
Knowledge base
1000 FAQs, 500 tutorials and explanatory videos. Here, there are only solutions!
This guide explains how to change the URL of a site where the Prestashop application is installed (manual installation on your end) but more generally, it also allows you to import a Prestashop site to Infomaniak if it was previously registered elsewhere with a different URL.
Preamble
- If you are using Prestashop installed via the Infomaniak Manager Apps, then you can change the address very easily.
- Intended for version 1.7 of Prestashop, this guide requires technical knowledge and any responsibility in case of an error on the site is disclaimed by Infomaniak.
Change the URL of an installed Prestashop
To do this:
- Put your Prestashop in maintenance (go to Store Settings then Maintenance).
- Go to Store Settings > Traffic and SEO.
- A little further down, modify the Store URL part:
- under Store Domain enter the new domain
- under SSL Domain enter the new domain
- the base path can be modified at your convenience but with caution
- Click on Save.
- Download to your computer all the data Web + MySQL from your old Prestashop.
- Re-import the downloaded MySQL data to a new database.
- Update the
parameters.phpfile (located inapp/config/) by indicating the information of the new database on the following lines:database_hostdatabase_namedatabase_userdatabase_password
- Re-import the Web data to the directory of your new site (new URL).
- Remove all the content of the cache folder except the
index.phpfile. - Remove the site from maintenance and test the entire site (links, images, cart, etc.).
Also refer to this other guide.
This guide helps you protect the reputation of your domain name, to maintain the trust of Internet users and service providers in your website or business, thereby facilitating the smooth operation of your email.
The web reputation
There are different types of reputation on the Internet, including personal reputation, corporate reputation, and domain reputation.
Domain reputation is essentially a score that determines how email systems decide what to let through to users' inboxes. Fundamentally, the reputation of your domain is a measure of the health and legitimacy of your domain. This reputation can be influenced by the security of your email and website.
For example, the reputation of a domain can decrease if…
- … the site visible at the domain address is hacked, leading to the mass sending of fraudulent emails,
- … the domain's email is exploited for the involuntary sending of spam.
If the reputation of your domain remains poor, your emails may be marked as spam and not reach their intended audience. This can harm email deliverability (see this other guide in English on this topic).
Improving domain reputation
By following these few tips, you can improve the reputation of your domain and, for example, boost all your email marketing efforts:
- Set up and verify SPF, DKIM, and DMARC records that help protect your domain from identity theft attacks.
- Check the reputation of your domain with tools such as Google Postmaster Tools, Sender Score, Microsoft SNDS, McAfee or Talos Intelligence and identify potential issues.
- Only send emails to users who have chosen to subscribe!
- Get trusted links or backlinks…
See this other guide about RBLs.
This guide details the creation of a GIT repository on your Web Hosting as well as on your Infomaniak Cloud Server.
Preamble
- GIT and GITHub are available by default on the two aforementioned supports.
- For additional help contact a partner or launch a free call for tenders — also discover the role of the host.
Creation of the GIT repository
Setup on the server:
- the GIT repository is on
/git_depot - the site is located in the folder
/web/[project](on your FTP server)
Commands to enter:
cd
mkdir git_depot
cd git_depot/
git init --bare [projet].git
cd [projet].git
git update-server-info
Sending the local repository to the server
To do on the local machine:
git init
git remote add origin ssh://user@[xxxxx].ftp.infomaniak.com:/home/clients/[123456789]/git_depot/[projet].git
git status
git add .
git commit -a -m "init"
git push --set-upstream origin master
git push
Cloning the site on the server directory
To do on the server:
cd
cd web
rm -r [projet]/
git clone /home/clients/[123465789]/git_depot/[projet].git [projet]/This guide explains how to replace, within an Infomaniak Web Hosting, the address of a site currently a subdomain (https://dev.domain.xyz) with the main domain (https://domain.xyz).
Preamble
- Operations in brief:
- We start with a site created and accessible via the main domain URL
dev.domain.xyz. - We add an alias
domain.xyzto it. - We reverse the 2 types (the main domain becomes an alias and the alias becomes the main domain).
- We remove the old name
dev.domain.xyz.
- We start with a site created and accessible via the main domain URL
- Note that the site's location remains in the original folder on the server; the name of this location may be of the form
/sites/dev.domain.xyzbut this has absolutely no impact on the production site. - Also refer to the last chapter of this other guide.
Reverse a linked domain
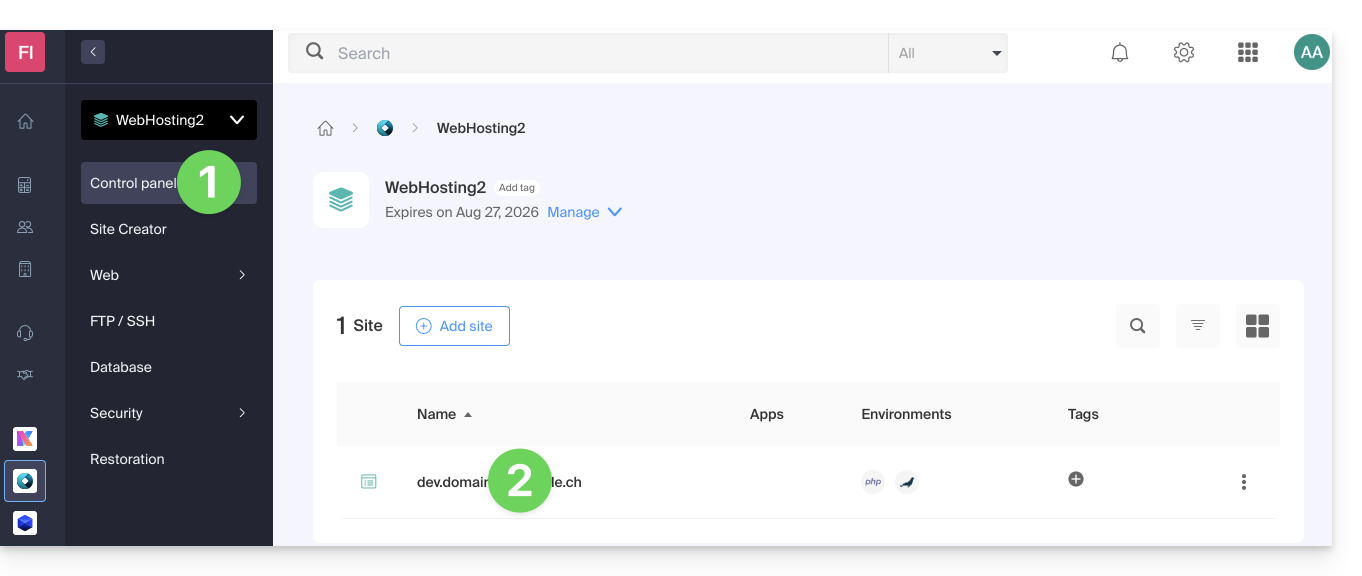
Here are the detailed operations to go from a site with a subdomain type address to a direct address (here dev.domaine-exemple.ch becomes domaine-exemple.ch):
- Click here to access the management of your site on the Infomaniak Manager (need help?).
- Click directly on the name assigned to the site concerned:
- Then click on the chevron to expand the Domains section of this site:
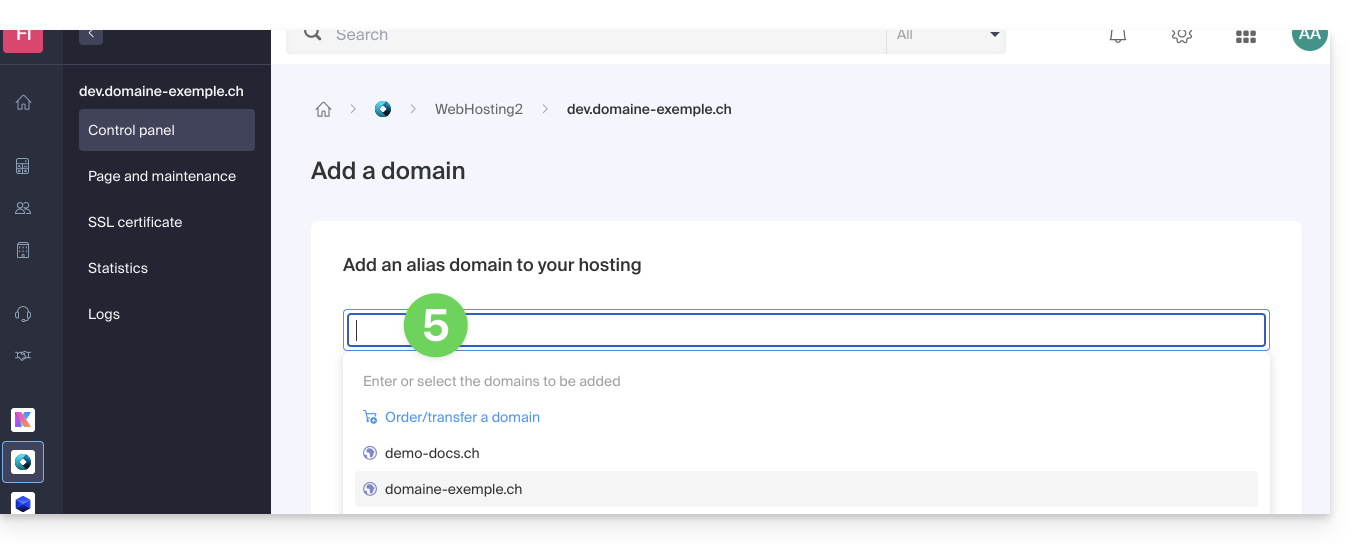
- Click on the Add a domain button:

- Add the desired new name (if the domain name to be added is under the same Organization, it will be suggested in the list, otherwise enter its spelling):
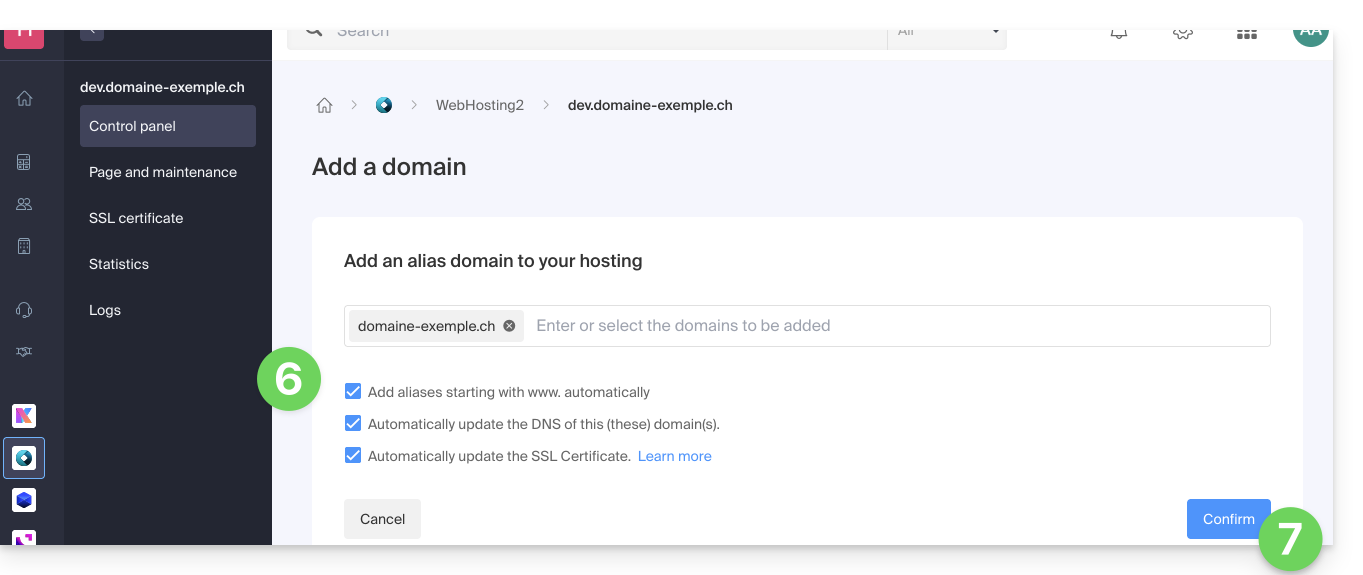
- Enable or disable the checkboxes:
- If the added domain is not in the form of a subdomain, it is possible to request to automatically add the
wwwversion of the domain. - Automatically update (if possible) the DNS records of the added domains.
- Automatically update the related SSL certificates (if possible).
- If the added domain is not in the form of a subdomain, it is possible to request to automatically add the
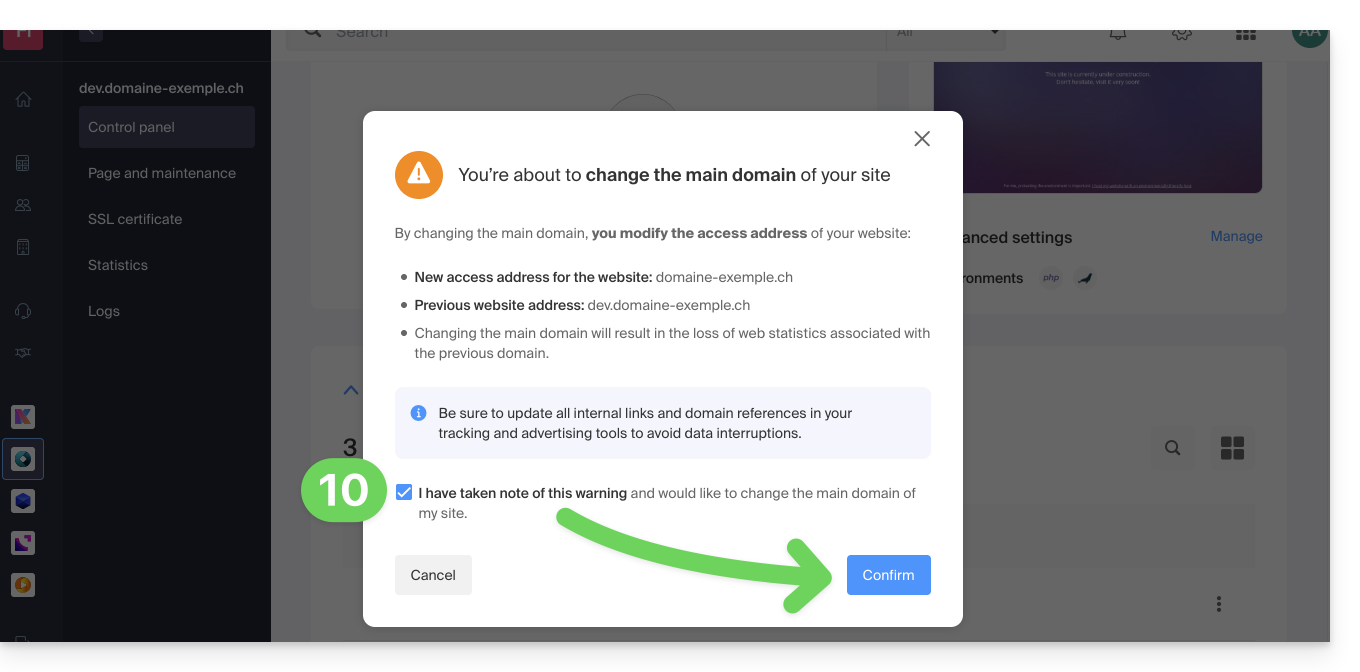
- Click the button to Confirm and wait:
- Once the addition is complete, click on the action menu ⋮ located to the right of the domain that has just been added and that you wish to set as the main domain:
- Choose to set the item as the main domain:
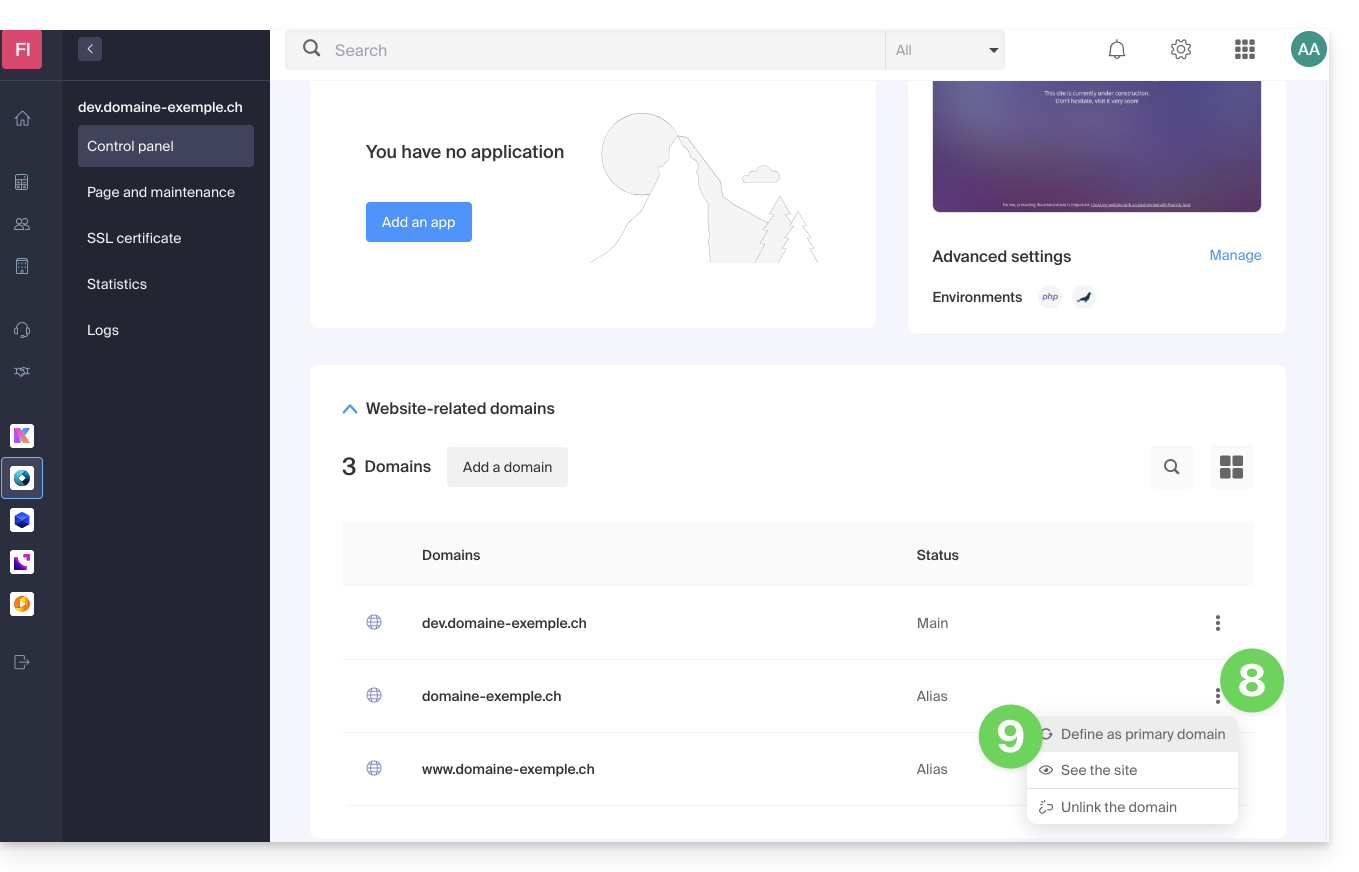
- Confirm the operation to proceed with the domain reversal:
This guide explains what spamtrap email addresses are.
Preamble
- A spamtrap, also known as a honeypot, is a tool used to detect and catch spammers.
- It is essentially an email address or a system that is created to attract unwanted messages, such as spam.
How a Spamtrap Address Works
A spamtrap address works by attracting spam and identifying the senders of unwanted mail. Here's how it can happen:
- An email address is specifically created to act as a spam trap; it is generally configured so as not to receive legitimate communication.
- The spamtrap address is hidden or obscured so that it is not visible to legitimate users, but only to spammers; this can be done by placing it on hidden web pages, in forums inaccessible to the public or by making it invisible to humans (for example by using white text on a white background).
- Spammers use automated techniques to extract email addresses from various sources, such as websites, forums, social networks, or stolen address lists; during this process, they may inadvertently or intentionally include spamtraps in their lists.
- When a spammer sends a message to a spamtrap address, it is captured and recorded; since the address is not used for legitimate communication, any mail received is considered unwanted.
- When a spamtrap receives a spam, it triggers an alert for email service providers like Infomaniak; they can then identify the sender of the spam by examining the message headers or the information related to the source IP address.
- Once a spammer is identified through a spamtrap, measures can be taken to block or filter their unwanted messages; Infomaniak can add the spammer's IP address to a blacklist, implement stricter anti-spam filters or take other steps to protect their users.
In terms of free software for handling multimedia files, FFmpeg is a powerful and flexible tool. It can be used to convert, edit, and stream videos and audio.
However, using FFmpeg on shared hosting presents certain issues and limitations for both users and hosts.
You should opt for the Cloud Server offer for using FFmpeg.
You can also opt for the Infomaniak VOD/AOD service.
This guide explains how to access the configuration of an Infomaniak Web site to display technical information such as the PHP, Apache version, or the activated PHP extensions and modules.
View the site's technical information
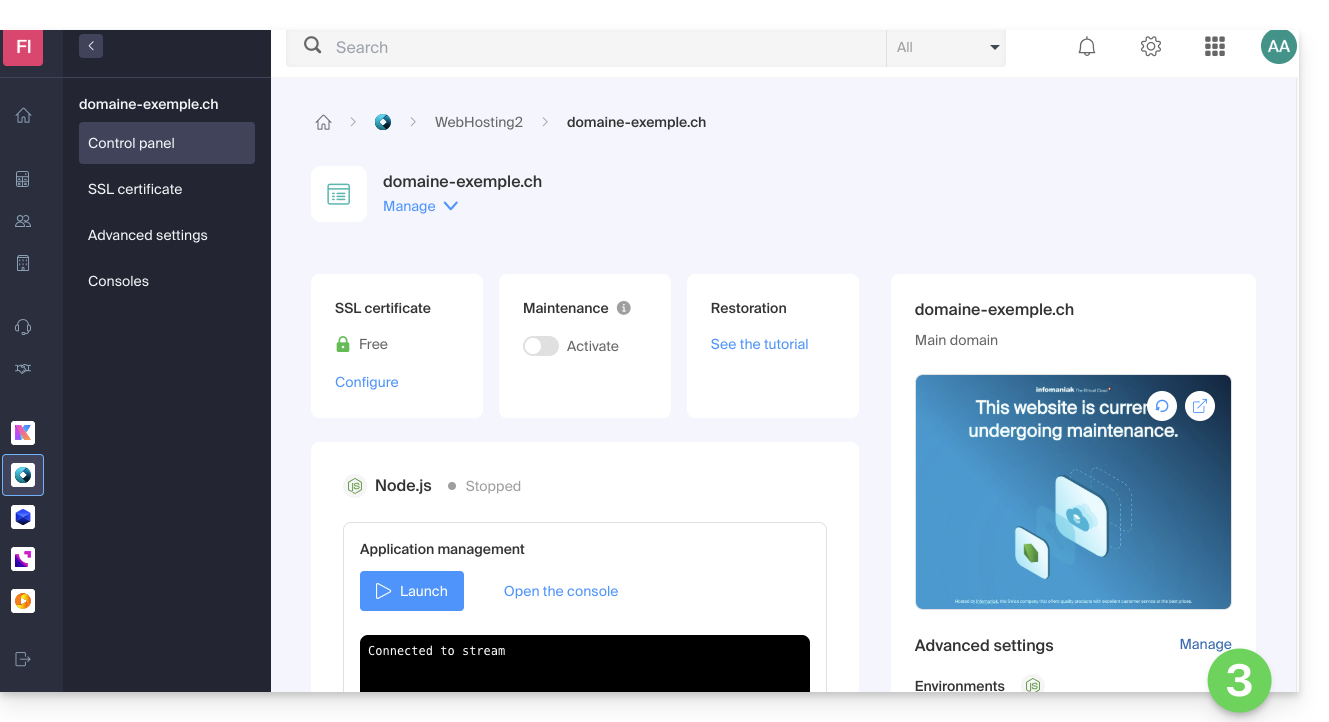
To access the Web site management:
- Click here to access the management of your product on the Infomaniak Manager (need help?).
- Click directly on the name assigned to the product concerned.
- Click on the Manage button under Advanced Settings:

- Take note of the Web site information under the General, PHP / Apache and PHP Extensions tabs:

- Click on the back arrow in the left sidebar.
- Click on Databases in the left sidebar to get the MySQL version of the Web hosting:

This guide presents the use of MySQL on Infomaniak hosting, particularly the operation of stored procedures.
Preamble
- “Stored procedures” and “stored routines” are not available on a shared web hosting.
Understanding stored procedures and routines
If stored procedures are essential to your project and you are currently using shared hosting, it is advisable to consider a VPS or a dedicated server, which offer more control and resources.
Stored procedures are an effective way to automate tasks and integrate business logic directly into the database. This results in more performant and easier-to-maintain applications.
On a Cloud Server, as soon as the user has administrator rights on the relevant MySQL database, they have the necessary permissions to execute SQL instructions, including the EXECUTE command, used to launch stored procedures already present in the database.
The user also has the required privileges to create new stored procedures. Creating a stored procedure is done via specific SQL syntax defining the instructions to execute, followed by its recording in the database.
Example
DELIMITER //
CREATE PROCEDURE GetUserCount()
BEGIN
    SELECT COUNT(*) AS total_users FROM users;
    -- Returns the total number of users in the table
END //
DELIMITER ;

-- Execute the stored procedure
CALL GetUserCount();This guide helps resolve an issue with the PrestaShop v9.x CMS regarding the generation of PDF invoices from the admin panel (Back Office), particularly when the French language is used.
The problem
When attempting to view or download a PDF invoice for an order in French, PrestaShop (version 9.x) returns a 500 Error. This malfunction is due to an incompatibility between the PDF generation library (TCPDF) using the default font (helvetica) and the hosting configurations.
Define a compatible font
The solution is to force the use of the freesans font, which is more compatible, via a custom configuration file.
It is strongly recommended to create a file named defines_custom.inc.php. This method is the safest as it ensures that the fix will not be lost during PrestaShop core updates.
To do this:
- Access your PrestaShop 9.x installation via FTP or the File Manager.
- Navigate to the
/config/directory. - Create a new file named
defines_custom.inc.php. Edit the file
defines_custom.inc.phpand add the following content:<?php /** * Eviter erreur PDF, forcer 'freesans'. */ define('PDF_FONT_NAME_MAIN', 'freesans');- Save the file and test the generation of a French invoice.
This guide will help you install n8n on Infomaniak, a powerful and extensible workflow automation solution.
Preamble
- Unlike tools like Zapier or Make, n8n, a “fair-code” workflow automation tool, can be self-hosted, allowing you to maintain full control over your data while connecting hundreds of services through an intuitive visual interface.
- For additional help, contact a partner or launch a free tender — also discover the role of the host.
Installing n8n
Prerequisites
- Have installed a blank Node.js site on Infomaniak Web Hosting or Cloud Server.
- Stop your Node.js application before proceeding with the installation!
To configure your hosting (via the Infomaniak Manager):
- Click here to access the management of your product on the Infomaniak Manager (need help?).
- Click directly on the name assigned to the product in question.
- Click on Manage under Advanced Settings:
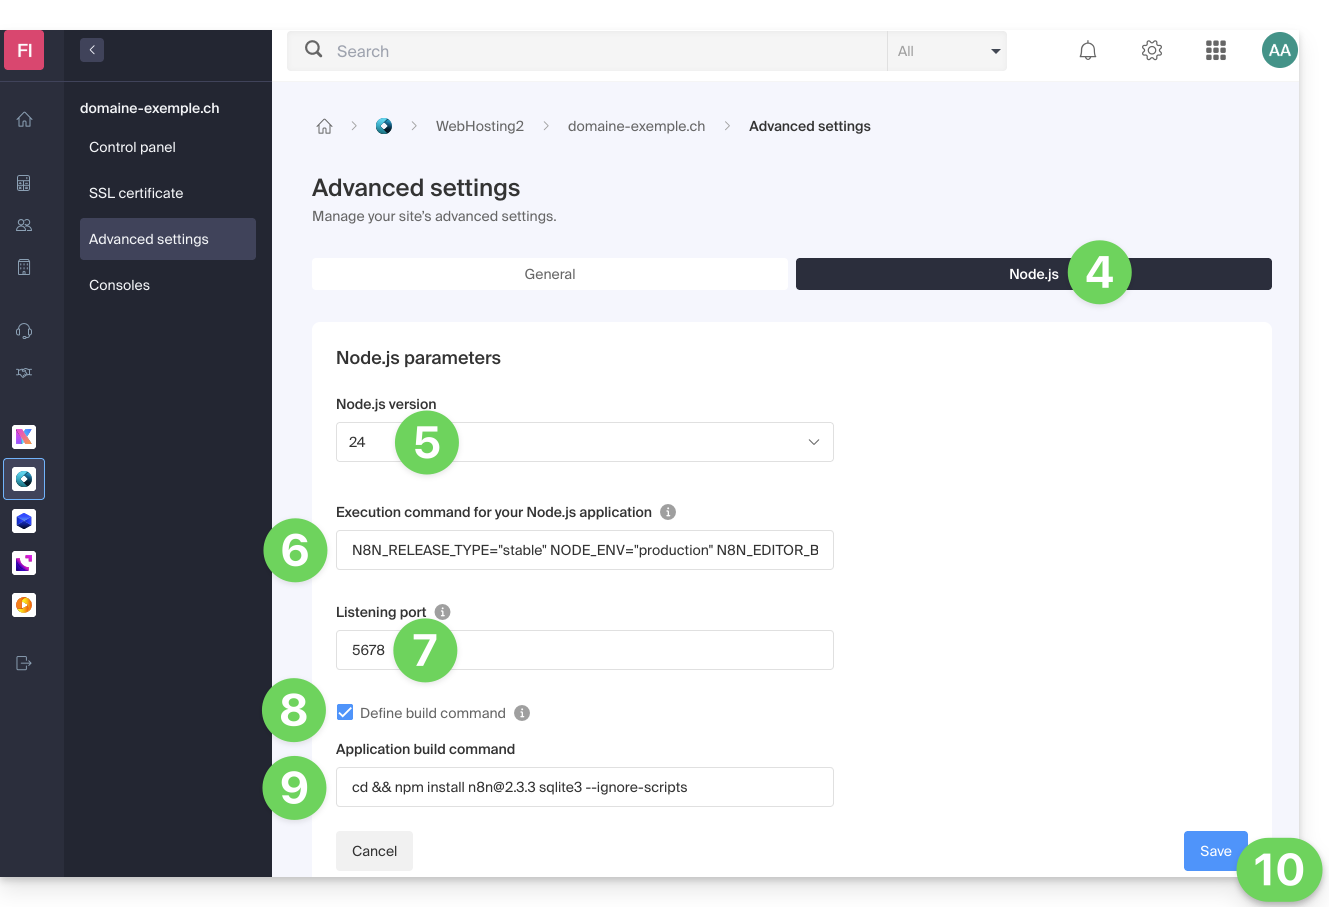
- Click on the Node.js tab to access the settings.
- Select a recent version (e.g., 24 or higher).
Enter the following command, replacing
https://domain.xyzwith your actual site address:N8N_RELEASE_TYPE="stable" NODE_ENV="production" N8N_EDITOR_BASE_URL="https://domaine.xyz" WEBHOOK_URL="https://domaine.xyz" GENERIC_TIMEZONE="Europe/Zurich" /srv/customer/node_modules/.bin/n8n start- Specify
5678for the listening port. - Check the box "Set the build command".
Enter the following command:
cd && npm install n8n@2.3.3 sqlite3 --ignore-scripts- Click on Save:
- On the main page of your site, click the Start (or Restart) button.
- Wait a few seconds, then go to the URL of your site (e.g.
https://domain.xyz). - On your first connection, n8n will ask you to create an owner account to secure your instance.
Your n8n instance is now operational! You can start creating your automations.
If you encounter an error indicating that the port is already in use when starting:
- Temporarily change the Node.js version in the settings (e.g. switch from v20 to v18) and save. This forces a complete stop of the processes.
- Set the desired version (v20) again and save.
- Restart the application.
The CGID module for Apache has been disabled on Infomaniak's shared web hosting offers.
If necessary, you should consider changing your plan to a Cloud Server if you are currently on a shared web hosting plan. This can be done transparently: refer to this other guide on the subject.
This guide explains how to protect your website and its visitors from the malicious exploitation of MIME-Type sniffing.
Preamble
- MIME-Type sniffing, or MIME type detection, is a technique used by web browsers to determine the content type of a resource when the MIME type provided by the server is ambiguous, missing, or incorrect.
- Although this can sometimes improve the user experience by making content accessible despite server configuration errors, this feature also introduces significant security vulnerabilities:
- When a browser performs MIME-Type sniffing, it can interpret a text file as an executable script, thus opening the door to cross-site scripting (XSS) attacks.
- For example, a file intended to be processed as plain text could be interpreted as JavaScript, allowing an attacker to execute malicious code on the user's browser.
- By disabling MIME-Type sniffing, you protect visitors from the unauthorized execution of malicious scripts and also strengthen the overall security of your website by reducing potential attack vectors.
Disable MIME-Type sniffing
To protect users and web applications from this type of vulnerability, it is possible to disable the automatic detection of resource types via the .htaccess file of your sites to instruct the browser to strictly adhere to the MIME type specified by the server without attempting to guess it.
By placing the code below in your .htaccess file, you ensure that MIME-Type sniffing is disabled as long as the mod_headers module (which allows adding the header below) is enabled on your Apache server:
- Open the .htaccess file of the site in question from the FTP Manager or an FTP software/client.
Add the following code:
<IfModule mod_headers.c> Header always set X-Content-Type-Options "nosniff" </IfModule>- Save the .htaccess file.
The SafeMode, or secure mode, is a protection mechanism that limits certain server functionalities to reduce the risks of malicious exploitation.
This mode was removed as of PHP 5.3.0 as it was deemed ineffective in enhancing security and likely to cause malfunctions with certain applications.
Infomaniak previously used the open_basedir directive on its old hosting offers, but this is no longer applied to current plans.
This guide covers data protection regulations in Switzerland and Europe, and the measures taken by Infomaniak to secure your customer data and data within Web Hosting and Mail Services.
Understanding the difference between data security and data confidentiality
Data security aims to prevent any unauthorized access to your information. It relies on measures such as encryption, firewalls, or VPNs. A security breach can have disastrous consequences: imagine a hacker stealing your entire customer database and demanding a ransom to recover it. This type of attack – ransomware – can paralyze a company overnight.
Data confidentiality concerns who can access your information and how it is used. Even if your data is secure against hacking, it can be collected, analyzed, and resold… legally.
Example: you carefully store your customers' information, but unbeknownst to you, a service you use shares – anonymously – this data with third parties. Result? Your competitors can obtain valuable analyses of your market and target your own customers without ever needing to hack.
LPD & GDPR
In Switzerland, the LPD (Federal Law on Data Protection) and nLPD (for the "new Law" in effect since September 2023) protect the confidentiality of residents by regulating the collection and processing of personal data by organizations.
On the other hand, the GDPR (General Data Protection Regulation) of the EU, in effect since May 2018, influences global companies processing the data of European residents, including in Switzerland. While the LPD applies to the data of Swiss residents, the GDPR concerns that of EU residents. Swiss companies managing European data must comply with the GDPR requirements, including the designation of a Data Protection Officer and the conduct of Impact Assessments in case of risky processing.
Your role as an Infomaniak Client
Regarding the hosted data that belongs to you — and especially if it contains personal data of your visitors, contacts, or customers — it is your responsibility to ensure its compliance.
When processing this personal data, it is essential to inform users about the purpose and methods of this processing. This is usually done through a privacy policy or a data processing agreement (DPA).
Agreement between data controller and processor
A DPA (Data Processing Agreement), known in German as AVV (Auftragsverarbeitungsvertrag), in Italian as ATD (Accordo di Trattamento dei Dati), and in Spanish as CTA (Contrato de Tratamiento de Datos), translates to Data Processing Agreement or Personal Data Processing Contract.
It is a mandatory contract provided by the GDPR between a data controller and a processor. It defines the purpose, duration, and nature of the processing, as well as the obligations and security measures. Its goal is to protect the personal data entrusted to a service provider.
This GDPR certificate (in PDF format) can be generated and downloaded from the Manager (accessible to organization users who are owners or administrators):
- Click here to access DPA management on the Infomaniak Manager (need help?).
- Click the Generate button to download the customized PDF document:

Here are some tips on this subject:
- Inform about all data processing, not just those related to the website.
- Ensure easy access to the privacy statement on the website, for example, in the footer of each page.
- Generally, it is not necessary to obtain the user's approval for privacy statements (e.g., for forms); it is sufficient to indicate where to find the statement (example Site Creator).
- Keep in mind that new, more in-depth information rules may require adjustments to existing privacy statements.
It is crucial to differentiate between the security of the infrastructures where your data is hosted and the management and implementation of your data on your side. As a host, Infomaniak acts as a subcontractor for your GDPR-related obligations. In this context, its privacy policies and cookie usage, as well as its terms and conditions, provide the necessary guarantees regarding its compliance as a subcontractor.
If necessary, you can find professionals or online guides to help you in the compliance process.
Infomaniak's role
Like companies that work with user data, Infomaniak must comply with the LPD and, because some of these users are European citizens, the GDPR as well:
- the data privacy policy details the data that Infomaniak retains to provide and execute its services
- the policy related to the protection of your personal data describes Infomaniak's commitments as a subcontractor that hosts all of your data, including personal data
These commitments, as outlined in the general terms and specific conditions, are as follows:
- to keep your data within data centers exclusively located in Switzerland and never to transfer your information outside of these infrastructures
- to apply rigorous security standards and to continually improve processes to ensure a high level of security across all services
- to promptly inform you in case of a data breach
- to ensure transparency with you when Infomaniak uses subcontractors who may process your data
- to strengthen and develop physical security measures to prevent any unauthorized access to the infrastructures where your data is stored
- to implement physical and/or logical isolation systems (depending on the services) to separate the hosting of different clients; additionally, Infomaniak conducts annual penetration tests to ensure data integrity between clients
- to demonstrate a high level of reactivity in updating the security of the systems under its responsibility
Manage the cookies on the infomaniak.com site
When you visit the page infomaniak.com a choice must be made for the acceptance of certain cookies. To modify this choice later, access your preferences from the bottom of the site's page: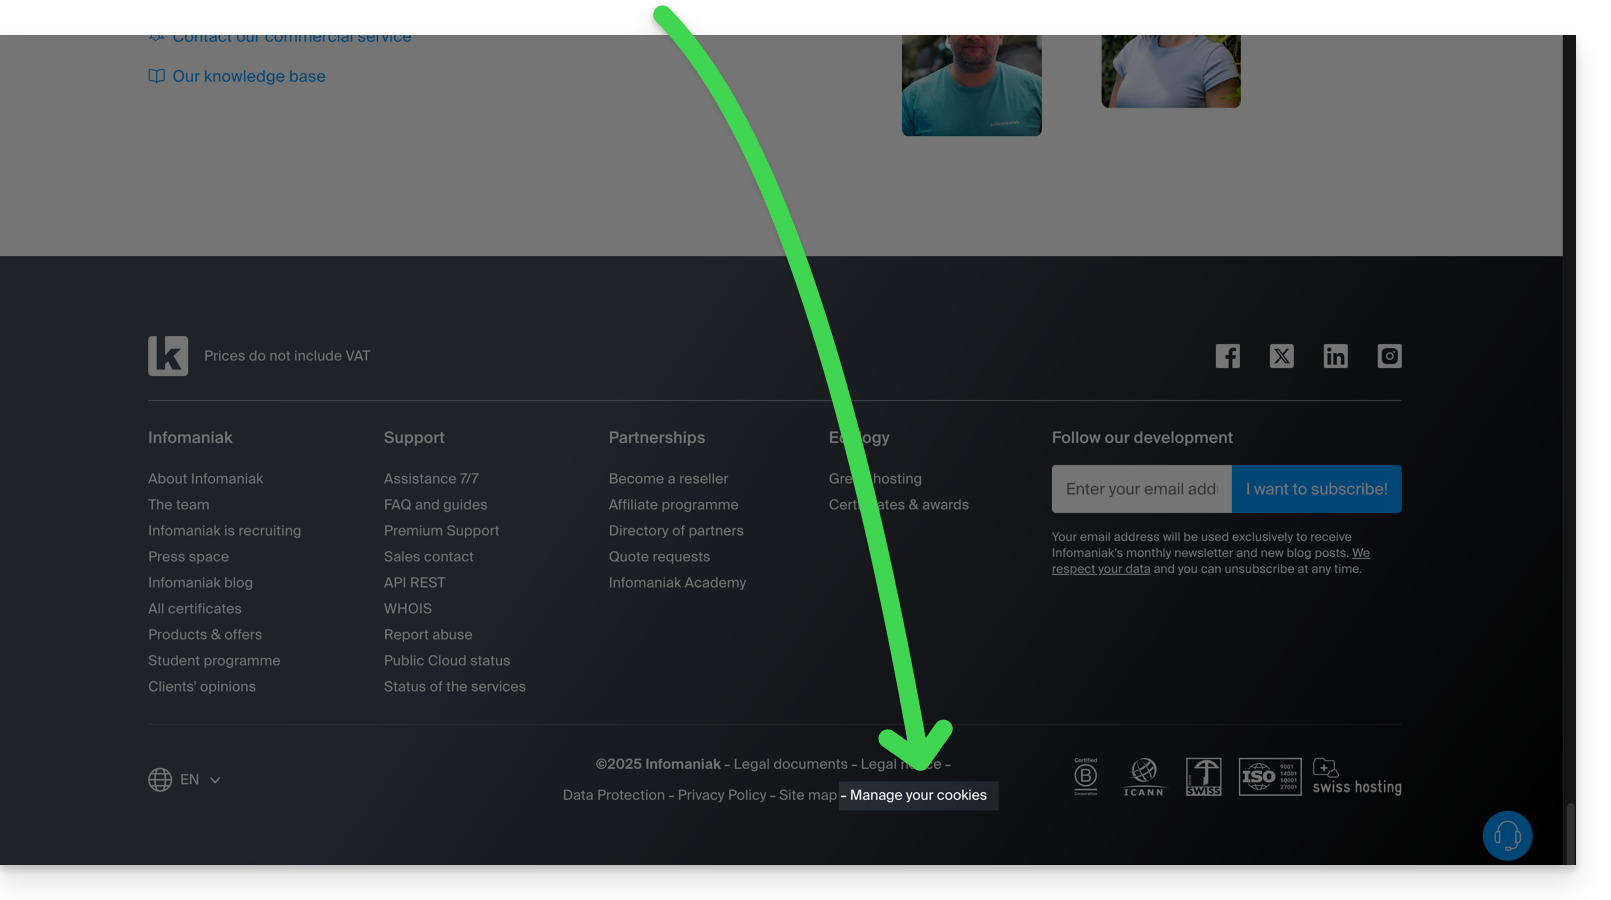
This guide covers the execution of the C# language and the .NET framework via the Mono implementation on Infomaniak hosting.
Technologies for software development
To use the C# language and the .NET framework with the Mono implementation, in order to develop software applications that can be deployed and executed on multiple platforms, outside the Windows environment, it is recommended to opt for solutions such as:
The flexibility and portability offered by these multi-platform environments mean that a shared web hosting does not allow the execution of projects based on C#, .NET or Mono.
This guide covers redirecting web traffic to a specific port, including when using a dedicated IP and a specific web application (such as Node or Varnish, for example).
Prerequisites
- Add a site to your hosting.
- Install
HAProxyon the Cloud Server.
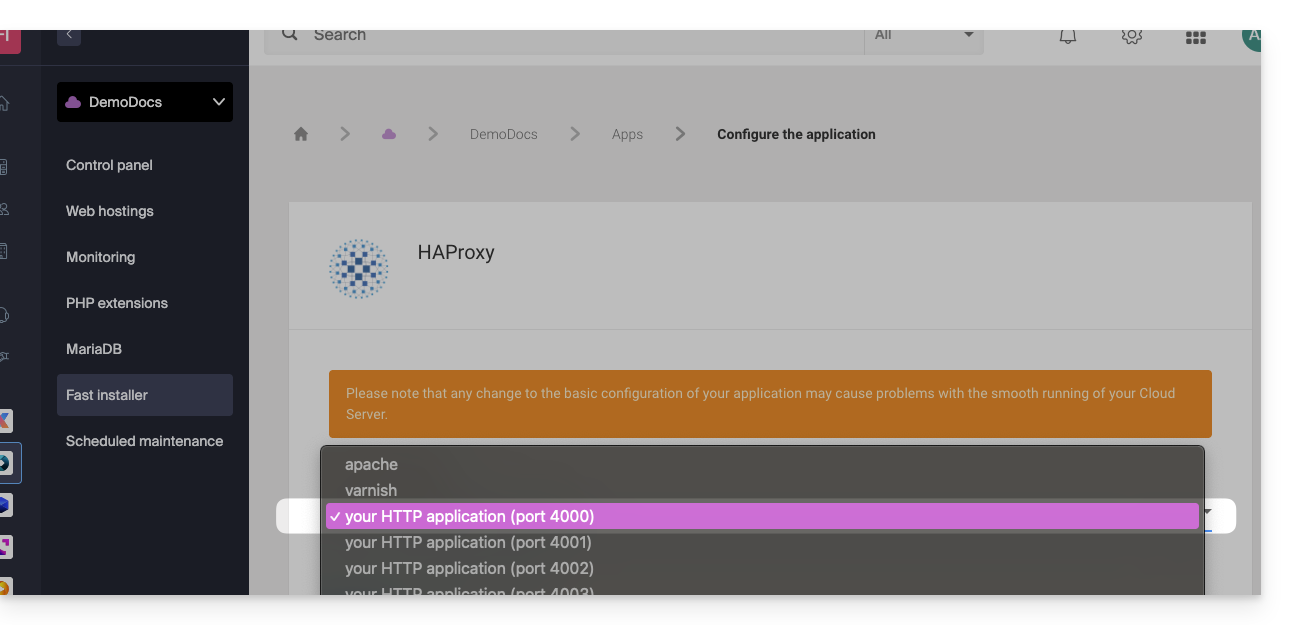
Redirect web traffic to a specific port
By default, on the Cloud Server, web traffic is sent to Apache. To send requests to a Node script or another service (provided it "listens" on a port between 4000 and 4009), you need to go through HAProxy.
This applies in particular to Express, Socket.IO, Meteor.js, Nuxt.js, Django, Flask, Ruby on Rails, even possibly Java (J2E), etc.
To do this, you need to ensure that the service is listening on a port between 4000 and 4009 (especially with server.listen(4000) for Express or a basic Node HTTP server, but depending on the type of project by other means, a configuration file, in the code or otherwise) and on all interfaces (0.0.0.0).
It will also be necessary to configure HAProxy as in the example below:
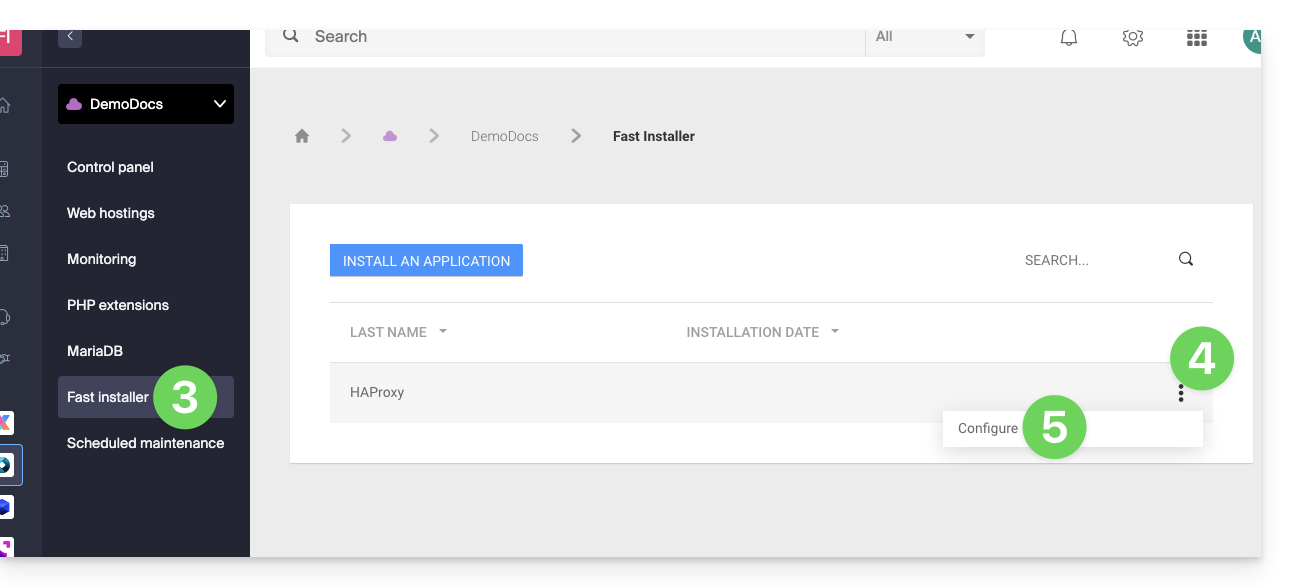
- Click here to access the management of your Cloud Server on the Infomaniak Manager (need help?).
- Click directly on the name assigned to the Cloud Server in question.
- Click on Fast installer in the left sidebar.
- Click on the action menu ⋮ located to the right of
HAProxy. - Click on Configure:
- Choose the desired information and save:
Retrieving the source IP of a request
When you redirect web traffic to your web application, the processing of requests changes and the request is first received by a reverse proxy (local to the server) which then forwards the request to the chosen port. Thus, due to the transfer of the request, the methods usually used to retrieve the visitor's IP will give the IP of the reverse proxy instead of that of the visitor.
Thus, to retrieve the real source IP of the visitor in these cases, you need to consult an HTTP header named X-Forwarded-For, which will contain the source IPs accumulated during each redirection. This header will therefore contain last the original IP address of the client, allowing the real visitor to be identified.
Warning: It is important to note that HTTP headers can be manipulated, which presents security risks. To minimize these risks, it is recommended to verify that the request comes from a trusted server before trusting the content of the header X-Forwarded-For. This verification may involve ensuring that the request was transmitted by a trusted intermediary server, identified by a predefined list of IP addresses. In the case where the site uses a dedicated IP, the trusted servers are:
- 83.166.133.15
- 83.166.133.17
- 83.166.133.16
- 84.16.92.5
- 84.16.92.43
- 10.2.32.255
- 10.2.34.164
This guide concerns the MySQL query cache which, when enabled, stores the results of already executed queries in memory.
Preamble
- MySQL Query Cache allows to speed up subsequent identical queries by avoiding to execute them again.
- This can improve the overall performance of the database server by reducing the load and decreasing the response time for frequent queries.
query_cache_type ON or OFF?
On Shared Web Hosting (i.e. excluding Cloud Server) MySQL Query Cache is neither enabled nor enableable.
On Cloud Server, enable MySQL Query Cache via Fast Installer.
Webalizer only displays the last 12 months of statistics. With the old Infomaniak hosting offers, you must enter a specific URL to access previous statistics.
View previous statistics
To do this:
- Enter your domain address followed by
/stats(for examplehttp://www.domain.xyz/stats)… - Enter your administrator FTP access…
- Add
/usage_AAAAMM.htmlafter the address (for examplehttp://www.domain.xyz/stats/usage_AAAAMM.html) with AAAA = year 2017 and MM = month 01 for examplehttp://www.domain.xyz/stats/usage_201701.html
This guide is about "browscap.ini", a configuration file used by the PHP library "browscap" that contains information about web browsers and their features, such as their name, version, compatible operating systems, browsing capabilities, etc.
File information
The file "browscap.ini" reflects the latest information about web browsers. It can be used with PHP scripts that require the "browscap" library.
phpinfo indicates where the file browscap.ini is located, namely:
/opt/php/lib/php/browscap.iniYou can retrieve the content of the file yourself via a PHP script, for example:
<?php
header("Content-type: text/plain");
print file_get_contents("/opt/php/lib/php/browscap.ini");
?>
Note that the "browscap" library is no longer widely used and that many developers prefer other solutions to detect browsers, such as the native PHP function "get_browser()".
This guide details the specific rules to follow when creating a user password with mysqli_connect() that contains the “dollar” character $ on Infomaniak platforms.
Preamble
- If, when using
mysqli_connect(), you get the error message "Access denied for user" and your database user password contains a$sign, the issue may be due to the functioning of strings in PHP. - The problem may also occur with messaging scripts.
Rules to follow
When the special character $ is used in a user password and is followed by any character other than a number, the variable name is not valid and the substitution does not occur correctly.
Here are solutions to fix this:
- Place the password in single quotes:
'$******' - Ensure a number directly follows the dollar:
"$2*****" - Use a backslash to "escape" the dollar in the password:
"\$****"