Knowledge base
1000 FAQs, 500 tutorials and instructional videos. Here, there are only solutions!
This guide presents the advantages of kSuite (Standard, Business, Enterprise), the suite of productivity and online collaboration tools developed in Switzerland by Infomaniak.
Preamble
- kSuite simplifies user management in a company and groups your products into a single invoice with a single due date.
- It also includes advanced user management for all the applications you need to collaborate online.
- You choose the domain name and kSuite is then set up according to your needs in terms of the number of users and storage space.
- kSuite is a bundled offer that can be upgraded to a higher offer at any time but it is not possible to change to a lower rate later, or to transfer kSuite to another Organization.
- The products included in kSuite cannot be moved or canceled independently of each other.
- To help you identify the kSuite offer that best suits your needs, refer to this other guide.
Choosing kSuite instead of individual apps
The question of choosing kDrive and/or Mail separately, standalone, rather than the suite kSuite may indeed arise.
kSuite is more economical, simplifies user management in a company and groups all your products into a single invoice with a single due date. The offer is recommended as soon as you own or wish to have a domain name that will be associated with it.
It also includes advanced and unified user and team management, as well as kChat which cannot be ordered separately.
Here are some other points:
- unlocked features
- 1 single invoice
- address book & dynamic calendar for the Organization
- more important disk storage (per user)
- Custom Brand offered with kSuite Enterprise
In summary, choosing this collection of Web tools rather than individual applications offers advantages in terms of integration, simplified management, real-time collaboration, multi-platform accessibility and flexibility. These advantages can improve your efficiency, productivity and overall user experience.
Products included in kSuite
On your interface ksuite.infomaniak.com you access to: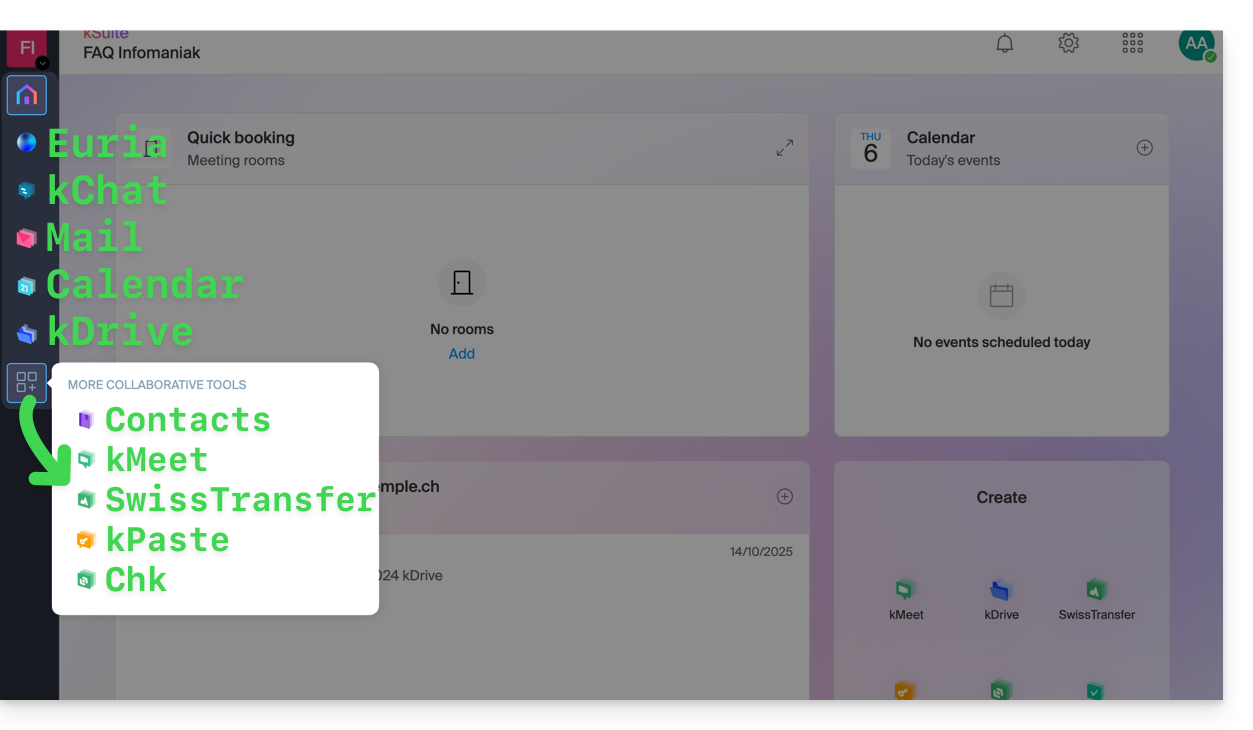
Create, communicate, plan, collaborate, share…
- Euria
- kChat
- A Mail Service (even if you already own a Mail Service)
- Calendar
- kDrive (even if you already own a kDrive)
Also:
Management
- The Manager interface with Custom Brand included or as an option depending on the offer
Are you a Partner or would you like to become one in order to resell kSuite?
Link to this FAQ:
Has this FAQ been helpful?
This guide explains how to change the first and last name that Infomaniak displays when you are logged into your Infomaniak account (= user account) within an Organization in the Manager, as well as the avatar of your account.
Edit the Infomaniak account details
To edit your personal details:
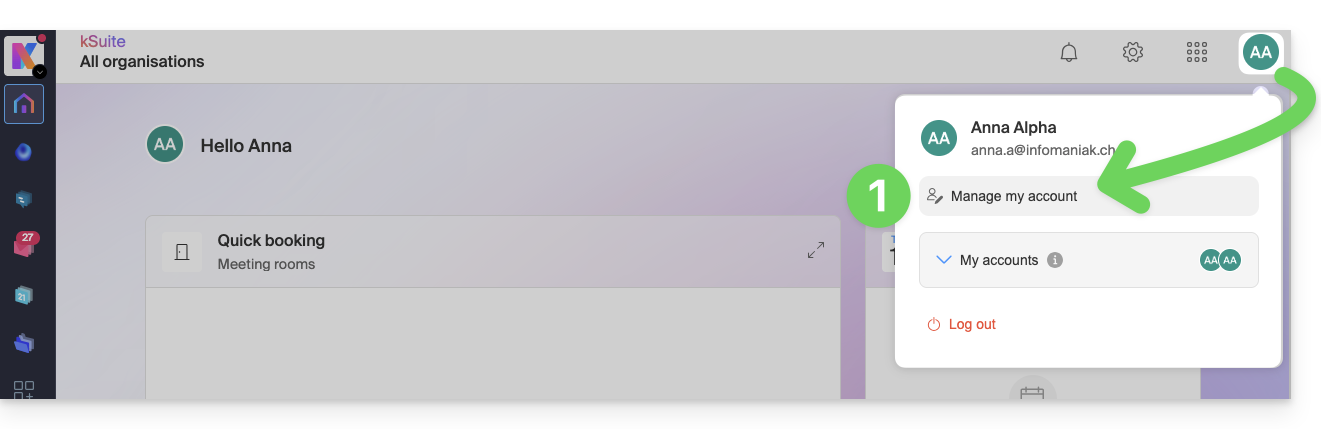
- Click here (or on the badge with your initials/avatar in the top right of the Infomaniak Manager) to "Manage my account":
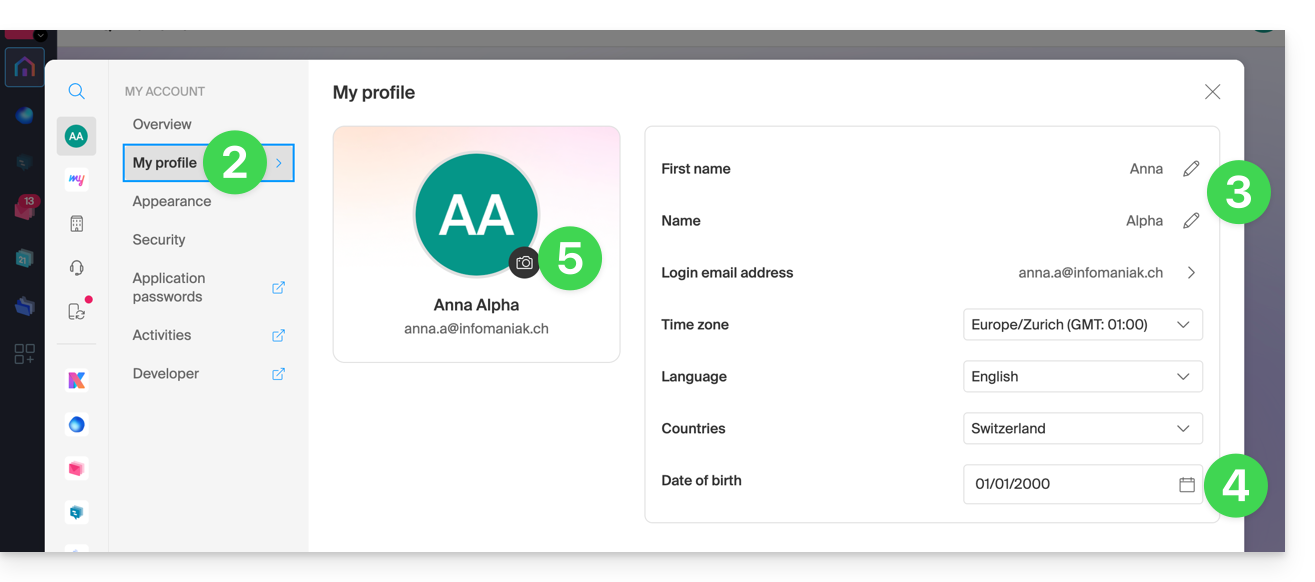
- Click on My profile in the left sidebar.
- Modify your first name and last name on the right side.
- You can also specify your date of birth.
- You can add a profile picture to your Infomaniak account that will replace your initials; it is recommended to import an image of at least 210 pixels on each side:
Learn more
Link to this FAQ:
Has this FAQ been helpful?
This guide explains how to display a calendar / agenda with the dates of public holidays from the canton or country of your choice on the Infomaniak Web app Calendar (online service ksuite.infomaniak.com/calendar).
Preamble
- These suggested calendars can be synchronized with your mobile and desktop devices.
- The birthday calendar (calendar that displays the birthdates of your contacts when the date is entered in their address book entry) is only visible through the Infomaniak Web app Calendar (online service ksuite.infomaniak.com/calendar) and cannot be synchronized with CalDAV tools.
Display additional official calendars
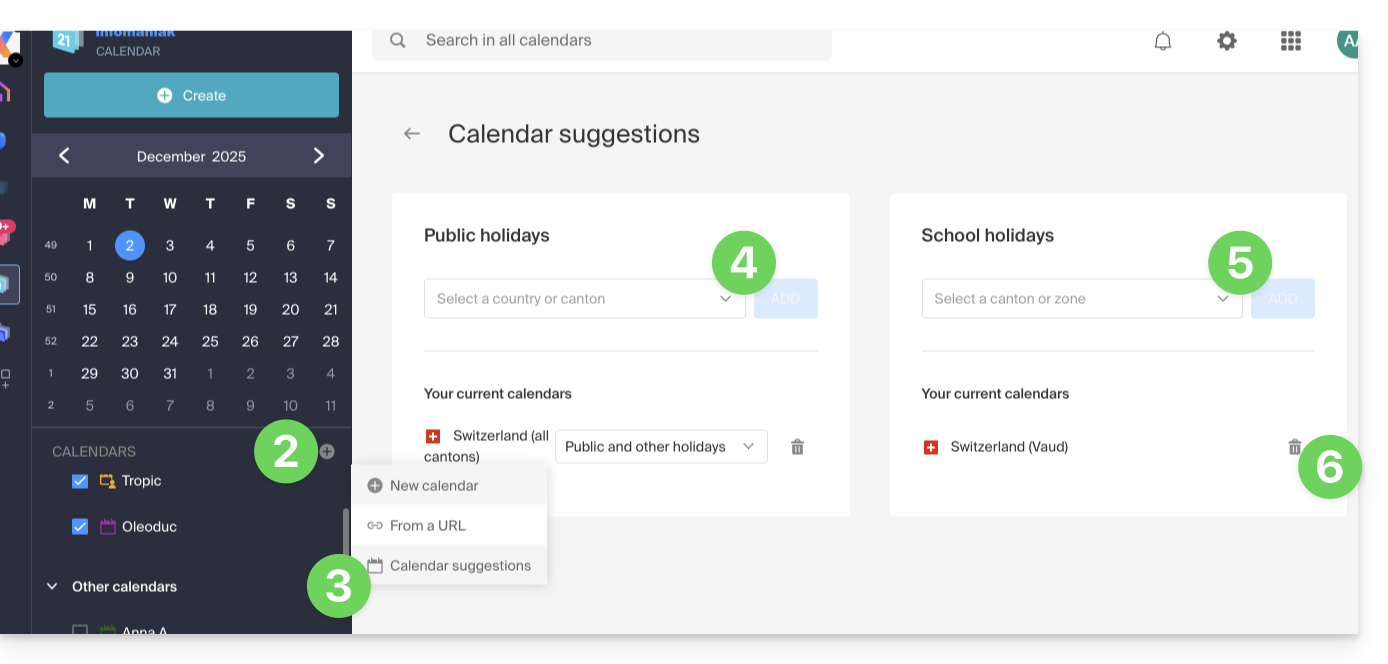
To add the public holiday or school holiday calendar:
- Click here to access the Infomaniak Web app Calendar (online service ksuite.infomaniak.com/calendar).
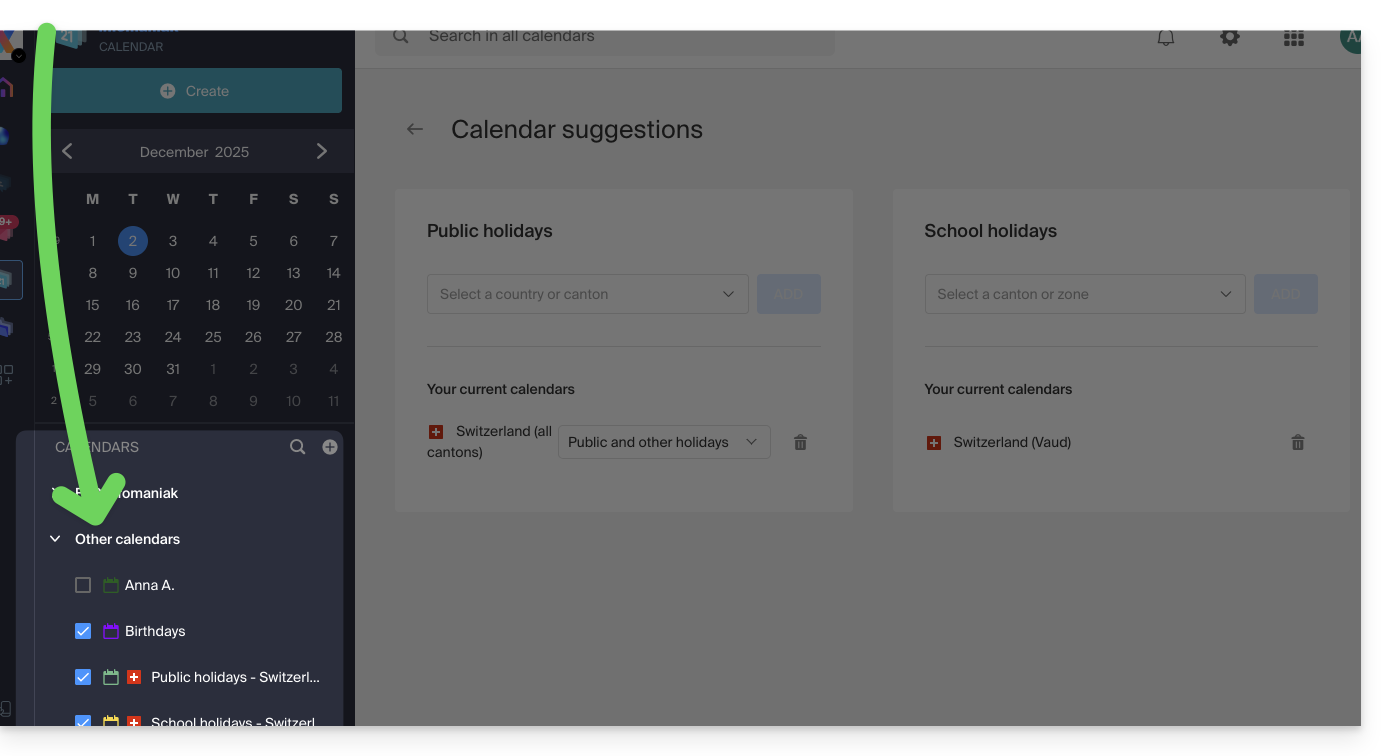
- Click on the button in the left sidebar.
- Click on Calendar suggestions.
- Choose from the national public holiday calendars (by canton or country).
- You can also add the official calendar of national school holidays (France, Switzerland, etc.).
- Once added, this is also where you can remove them:
Link to this FAQ:
Has this FAQ been helpful?
This guide explains how to connect the mobile app Microsoft Outlook (application for smartphone or tablet iOS / Android) to an email address hosted by Infomaniak.
Preamble
- The app Outlook Lite is not compatible with the IMAP protocol… Only install the version offered above.
- Instead of the manual configuration below, it is recommended to use the app Infomaniak Mail (iOS / Android).
- The various services offered by Infomaniak are all compatible with the corresponding standard protocols (IMAP/SMTP for email, for example), therefore if you encounter a problem with third-party software, contact its publisher or a Partner and consult the support policy as well as article 11.9 of the Infomaniak Terms of Service.
Add the email address to the application
Prerequisites
- Create the email address within my kSuite or a Mail Service / kSuite.
- Create a password for the email address for the device you are going to configure.
To configure the email application:
- Open the application.
- Click on Add an account:
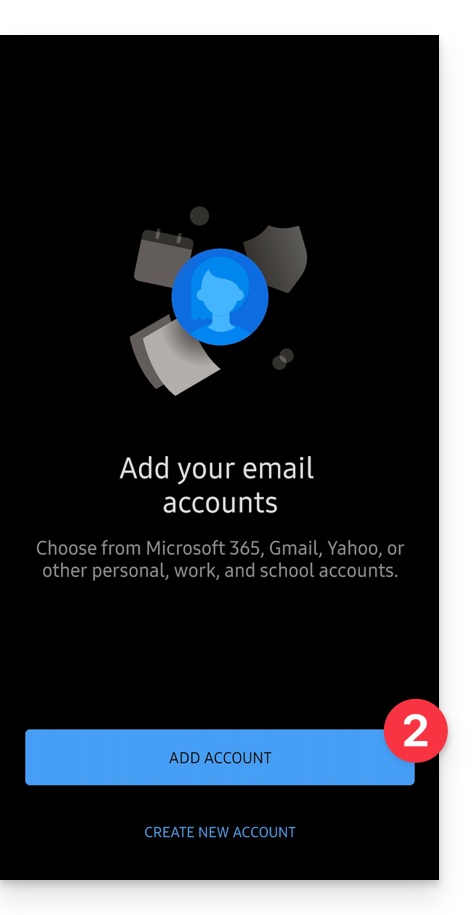
- Enter the email address to be linked.
- Click on Continue:

- Click on IMAP:

- Check and complete the missing information.
- Click on the icon ✓ at the top right.
- Click on the left to complete the configuration:

- That's it, your email address is now configured in the application:

Recommended settings
- Incoming IMAP server =
mail.infomaniak.com - IMAP port =
993(with SSL) - Outgoing SMTP server =
mail.infomaniak.com - SMTP port & encryption protocol and command/method to activate this protocol:
587+ STARTTLS - Username = full & complete email address ( ? )
- Password = the one generated for the email address you want to access
- Authentication required for sending emails:
- It is activated in the SMTP settings of your application.
- Check "use the same parameters as the incoming server" or, depending on the software/email clients, enter a username (= full & complete email address) and the generated password.
Refer to this other guide if you are looking for information about other compatible messaging ports and protocols (SSL / TLS for example).
In case of problem
Check that the Mail Service is configured optimally.
It is not necessary to contact Infomaniak Support if your email address works well outside the application. The most common error concerns the use of an incorrect password. The troubleshooting guides help you resolve any potential issues:
- Refer to the solutions given in this other guide regarding email in general.
- This other guide is more specifically about Outlook.
… and if your Outlook no longer works since a change of email password, refer to this other guide.
Link to this FAQ:
Has this FAQ been helpful?
This guide explains how to quickly create/get a password or reset or delete the passwords of an email address from the Infomaniak Web app Mail (online service ksuite.infomaniak.com/mail).
Prerequisites
- Have permission to manage the password: it is possible that the Mail Service manager has removed this right from their admin account.
Add a device
Determine what you want to do precisely and for what purpose:
- get a password to add the address to a device, an external application, etc.
- get a password so that a third-party user can add the address to their Infomaniak Web app Mail
- remove an address currently visible in the Infomaniak Web app Mail from a third-party user
Cases 1 & 2
To manage the password of an already associated email address:
- Click here to access the Infomaniak Web app Mail (online service ksuite.infomaniak.com/mail).
- Click on the action menu ⋮ to the right of the email address concerned.
- Click on Address settings:
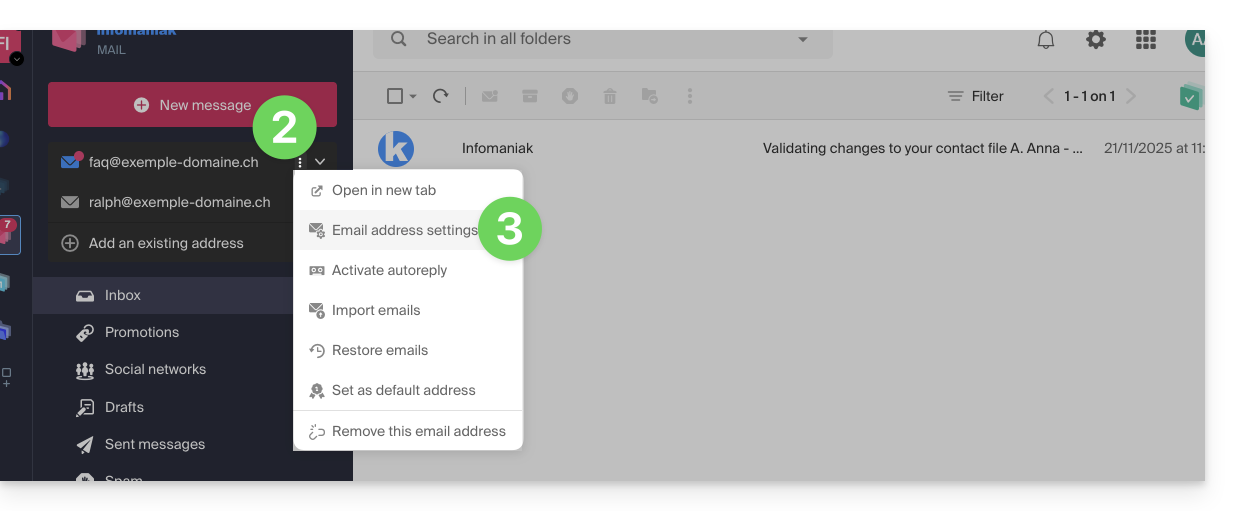
- Click on Manage the password:
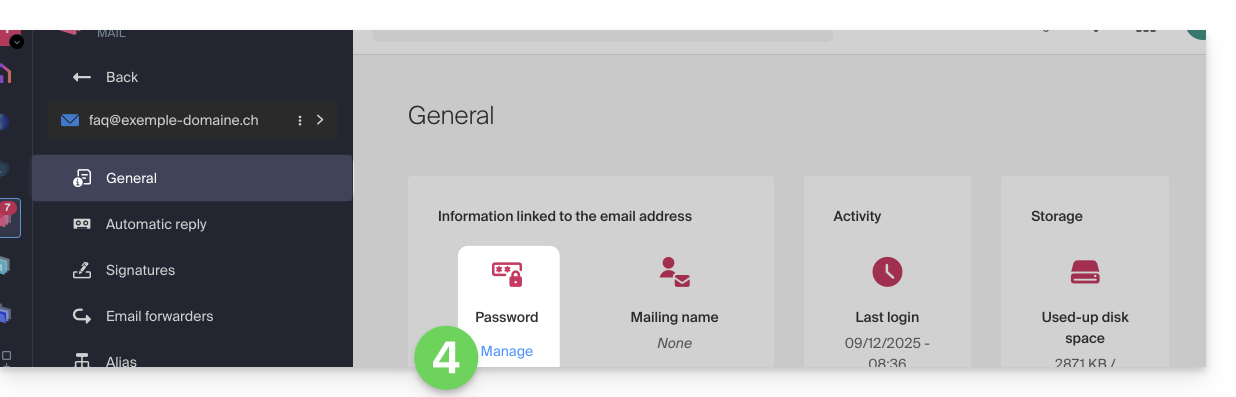
- Click on Add a device:
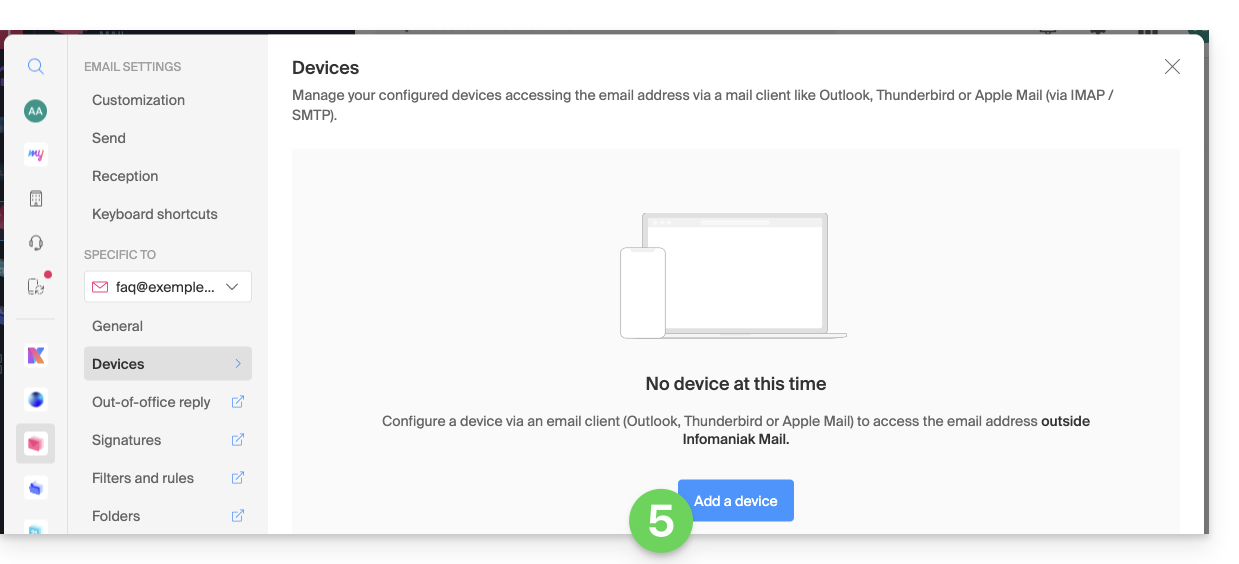
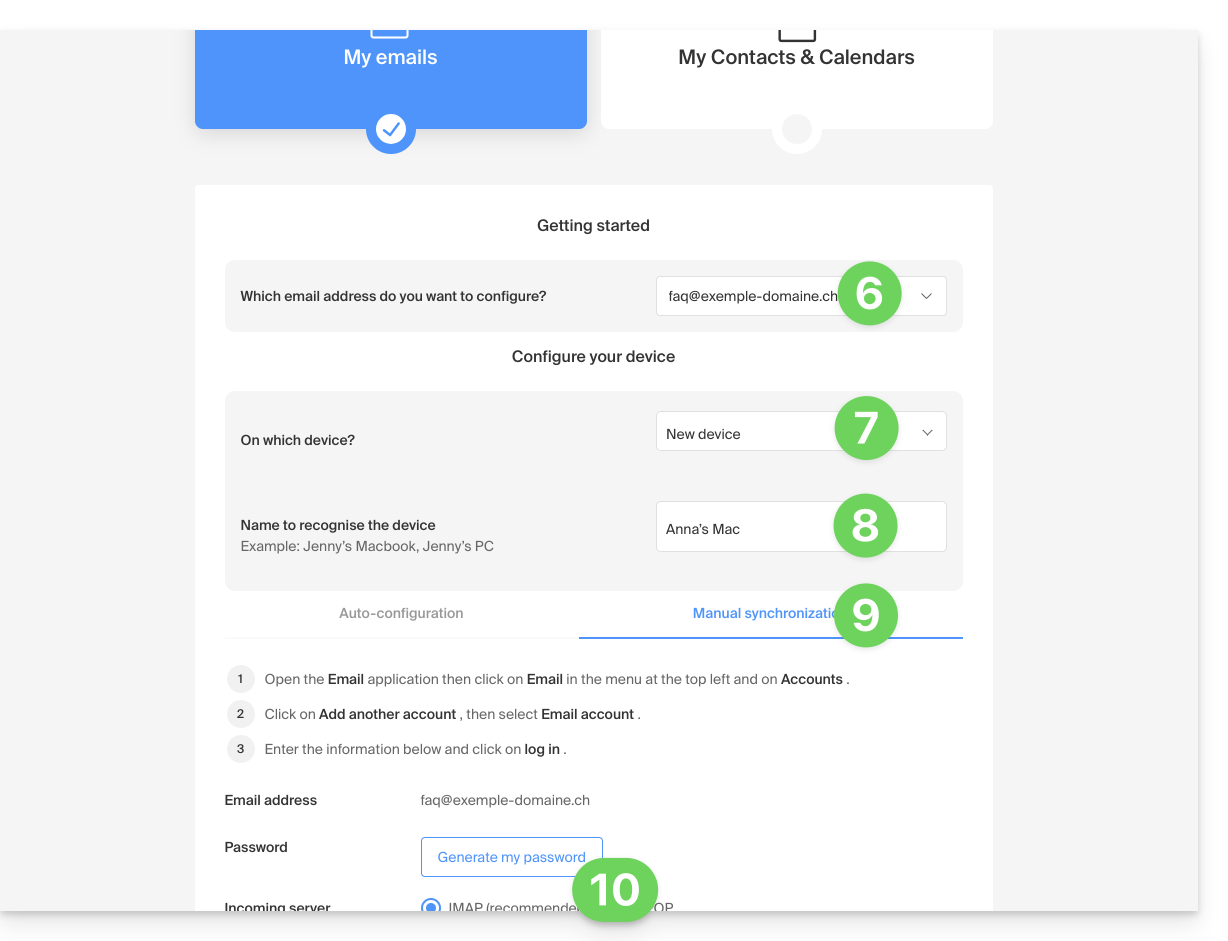
- The setup assistant opens on the MAIL section; check or select the email address concerned in the dropdown menu.
- Select “new device” from the dropdown menu.
- Give a description to the device.
- Click on the Manual configuration tab.
- Click the button to generate a password:
- Enter the password to log in to your Infomaniak account if prompted.
- The new created password is displayed, you can copy it and keep it safe (password manager for example); it will no longer be displayed afterwards.
Case 1 & 2 & 3
At any time, it is possible to manage the accesses created / used:
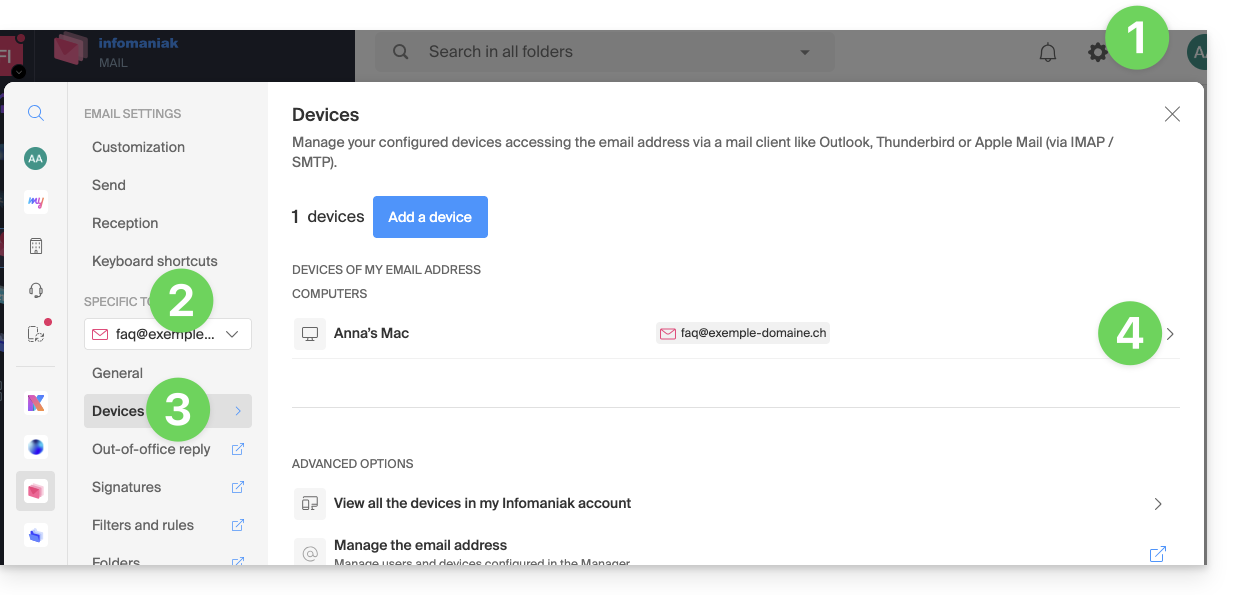
- Click on the Settings icon at the top right of the interface.
- Check or select the email address concerned in the drop-down menu of the left sidebar.
- Click on Devices in the left sidebar.
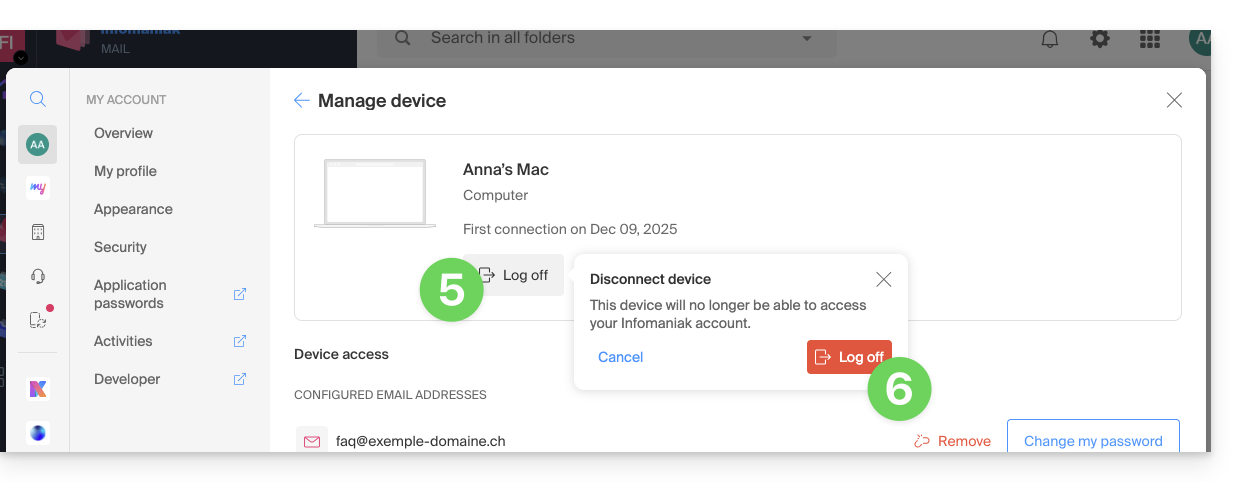
- Click on the device concerned:
- Click on the button to disconnect the device.
- Confirm the disconnection of the device concerned:
Link to this FAQ:
Has this FAQ been helpful?
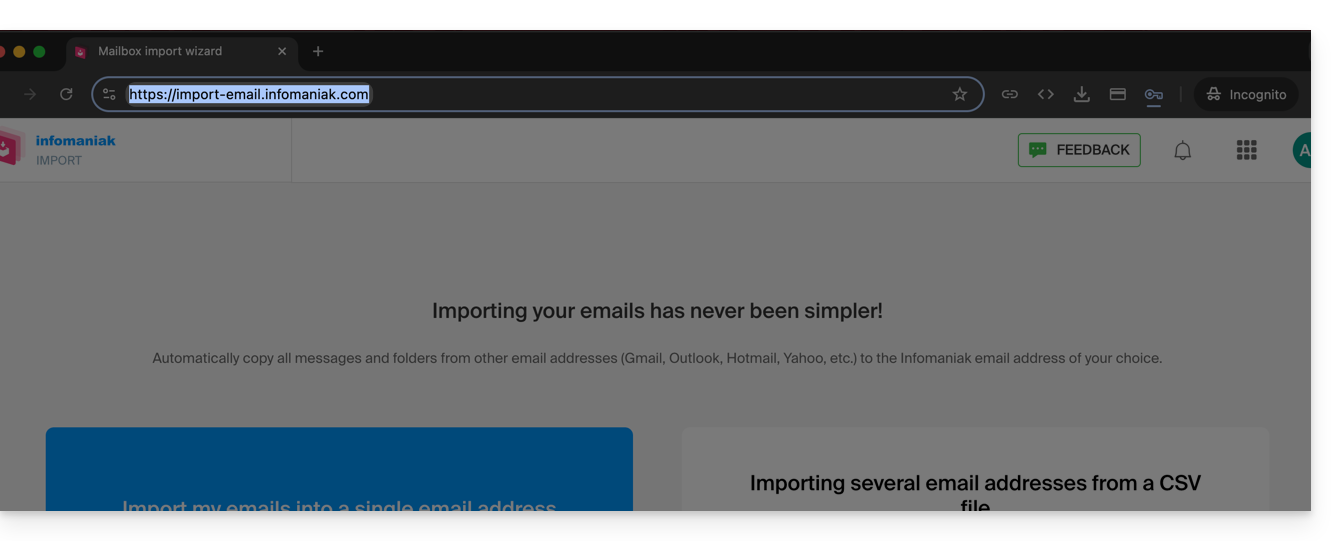
This guide explains how to copy the content of one or more email addresses from other providers to one or more email accounts managed by Infomaniak, using the Infomaniak import tool!
Preamble
- The entirety of the external mailbox will be imported.
- Once the import process has started, it is no longer possible to interrupt it.
- A confirmation email is sent once the copy is complete.
- Duplicate removal (in case of successive imports) is handled.
- It is also possible to copy the content of an email address already hosted by Infomaniak (e.g., @ik.me), including via the batch method.
Copy emails from another provider to Infomaniak
Prerequisites
- Order a Mail Service from Infomaniak.
- Create one or more addresses on this Mail Service.
- The email address whose content needs to be copied must have been used (or be compatible) with the IMAP protocol.
- The email address to which the content must be copied must be listed among the addresses associated with the Infomaniak Web App Mail (online service ksuite.infomaniak.com/mail); if it is not listed, the dropdown menu (see point 9 below) will not offer this address.
- This is not a prerequisite for batch import (detailed .csv file) described at the bottom of this guide.
Next, click on the link corresponding to the provider of the email to be imported:
- addresses @ Bluewin
- addresses @ Gmail (or @ custom domain Google address)
- addresses @ GMX
- addresses @ custom domain Microsoft 365
- addresses @ custom domain Swisscom
- addresses @ Yahoo
Guide for any other mail provider such as Gandi, Hotmail, Hostinger, Sunrise, etc:
- Click here to access the Infomaniak import tool (online service https://import-email.infomaniak.com).
- Log in if you haven't already to your Infomaniak account on the Organization of your choice (the import will be to an email address linked to the Infomaniak Mail interface of the account you are using).
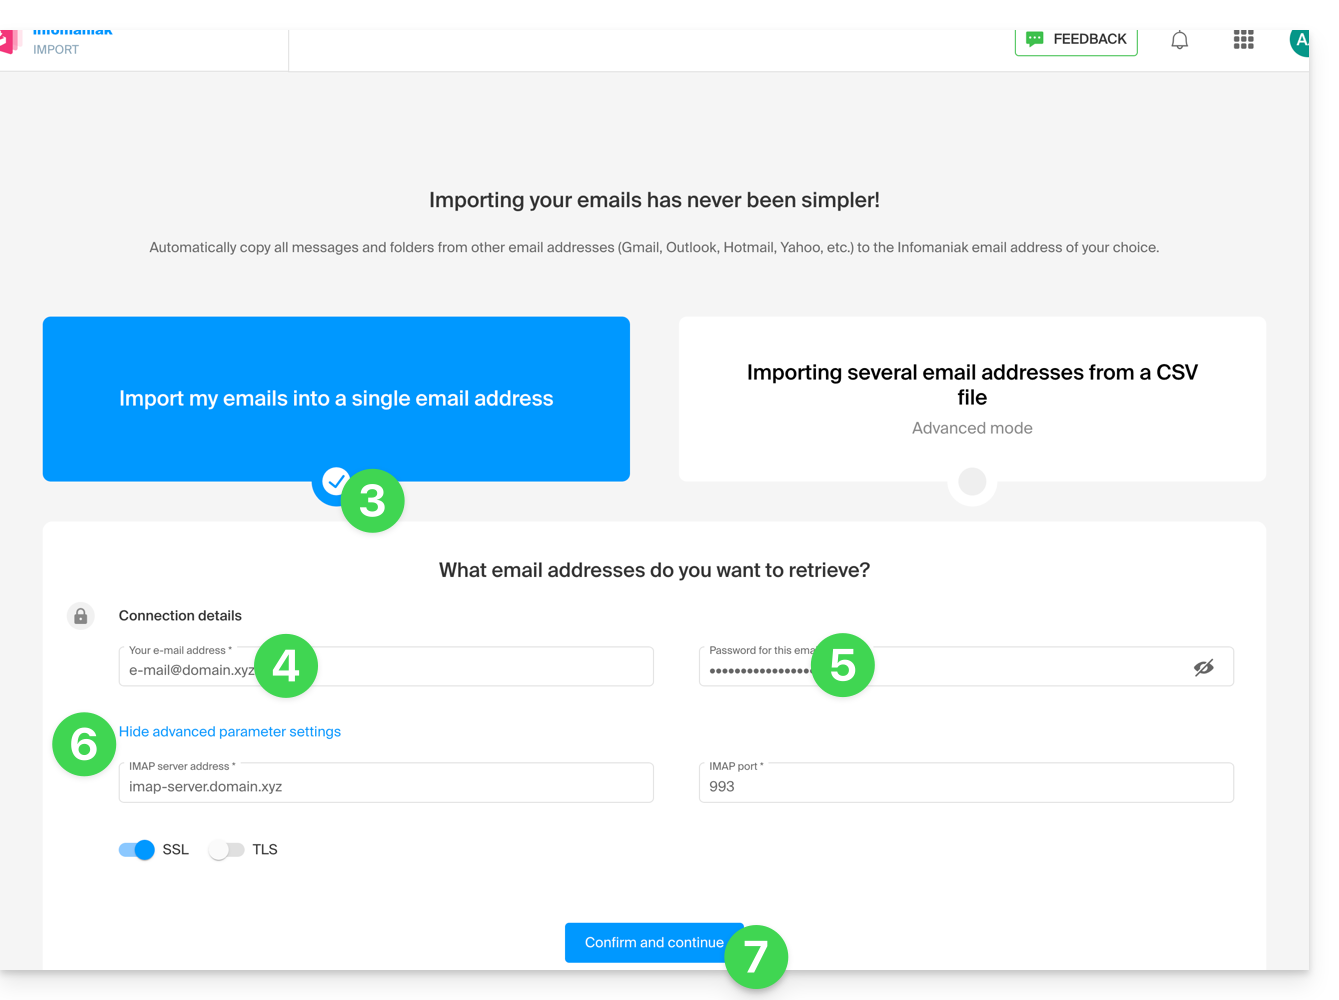
- Click on single import on the left.
- Fill in the left field with your starting email address (whose content is to be copied).
- Fill in the right field with the password of the same email address.
- Modify if necessary the Advanced settings to specify an IMAP server address.
- Click on Confirm:
- If necessary, enter a second email address to be imported at the same time.
- Choose which email address to import emails to; the drop-down menu lists the email addresses currently linked to your Infomaniak Mail interface of the Infomaniak account you are logged into (see prerequisites above)

- After selecting the desired destination address from the list, click the blue Import emails button.
- The copy starts and continues in the background; you can close the window that appears; a confirmation email will be automatically sent to all email addresses concerned by the operation once the import is complete, mentioning the number of messages copied.
Retrieve the content of multiple email addresses in batches
This method via CSV file will not work for Google or Microsoft addresses due to their authentication system.
To import the content of multiple email addresses (maximum 25 at a time):
- Click here to access the batch import tool (online service https://import-email.infomaniak.com).
- Select Import multiple email addresses from a CSV file (format
.csv). - Download the example
CSVtemplate to create one with the necessary information for copying. - Upload the file using the Select a CSV file button:
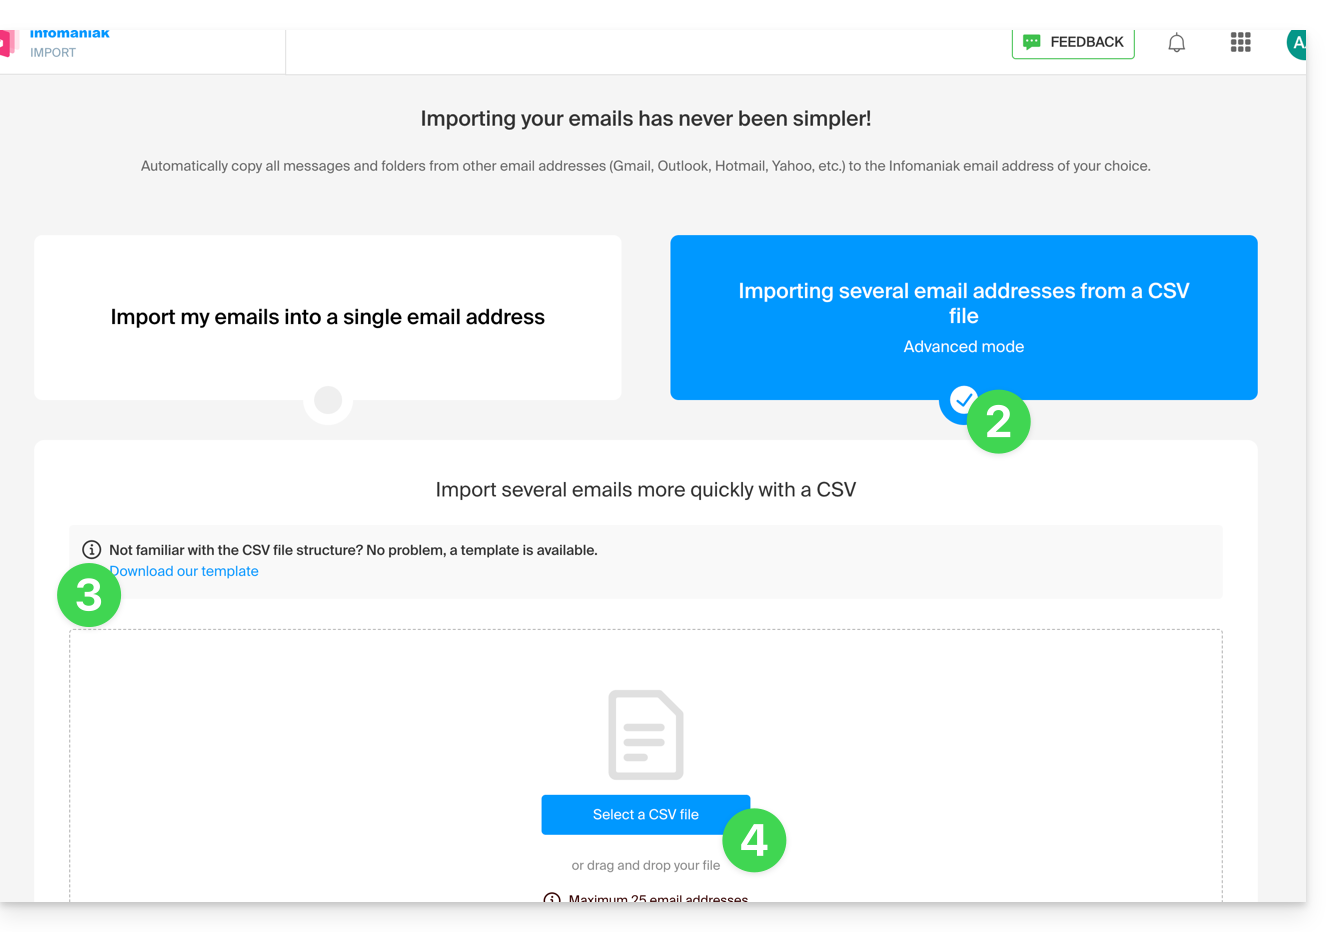
- Once the file is uploaded to the tool's page, select Import email address.
- Wait while the content of the addresses is copied (a confirmation email is sent once the copy is complete).
Link to this FAQ:
Has this FAQ been helpful?
This guide explains how to connect the desktop app Outlook 2007 (desktop application on Windows) to an email address hosted by Infomaniak.
Preamble
- The various services offered by Infomaniak are all compatible with the corresponding standard protocols (IMAP/SMTP for email, for example), therefore if you encounter a problem with third-party software, contact its publisher or a Partner and consult the support policy as well as article 11.9 of the Infomaniak Terms of Service.
Add the email address to the application
Prerequisites
- Create the email address in my kSuite or a Mail Service / kSuite.
- Create a password for the email address on the device you are going to configure.
To configure the email application:
- Open the application.
- Click on the Tools menu.
- Click on Options:
- Click on the Mail Configuration tab.
- Click on Email Accounts...:
- Click on New:
- Click on Configure manually.
- Click on Next:
- Click on the Internet E-mail button to connect to an IMAP server.
- Click on Next:
- Check and complete the missing information.
- Click on Additional settings:
- Click on the Outgoing server tab.
- Click on My outgoing server requires authentication.
- Click on the Advanced tab:
- Replace the port numbers with the correct information and enable SSL.
- Click on OK.
- Click on Next:
- Click on Finish:
- Click on Close:
- That's it, your email address is now configured in the application:
Recommended settings
- Incoming IMAP server =
mail.infomaniak.com - IMAP port =
993(with SSL) - Outgoing SMTP server =
mail.infomaniak.com - SMTP port & encryption protocol and command/method to activate this protocol:
587+ STARTTLS - Username = the complete & full email address ( ? )
- Password = the one generated for the email address you want to access
- Mandatory authentication for sending emails:
- It is activated in the SMTP settings of your application.
- Check "use the same settings as the incoming server" or, depending on the software/email clients, enter a username (= complete & full email address) and the generated password.
Refer to this other guide if you are looking for information about other mail ports and protocols compatible (SSL / TLS for example).
In case of a problem
Check that the Mail Service is configured optimally.
It is not necessary to contact Infomaniak Support if your email address works well outside the application. The most frequent error concerns the use of an incorrect password. The troubleshooting guides help you resolve any potential issues:
- Refer to the solutions given in this other guide regarding mail in general.
- This other guide is more specifically about Outlook.
… and if your Outlook no longer works since a change of mail password, refer to this other guide.
Link to this FAQ:
Has this FAQ been helpful?
This guide concerns kSuite and user management as well as their different types of access.
Preamble
- Each kSuite includes 1 first user offered upon subscription; compare the offers by clicking here.
- Each user is entitled to their email address on the domain name around which your kSuite is organized.
- The email address quota will depend on the offer and the number of users:
- Standard: 1 user = 2 email addresses (2 = 4, etc.)
- Business: 1 user = 5 email addresses (2 = 10, etc.)
- Enterprise: 1 user = 10 email addresses (2 = 20, etc.)
- You can assign a kSuite email address to a user who is not part of kSuite.
- To obtain more email addresses, you must modify the offer to increase the number of users. Example:
- You order a kSuite Business with 5 users, you benefit from a quota of 5x5=25 email addresses in total in your kSuite, which you can use (for any use - the creation of an email address within the kSuite Mail Service is identical to that of a Mail Service outside kSuite).
Add a user to kSuite
Prerequisites
- The quota of users that can be added to kSuite must be sufficient (in this example, you will need to modify the offer to adjust the number of users first):
Next:
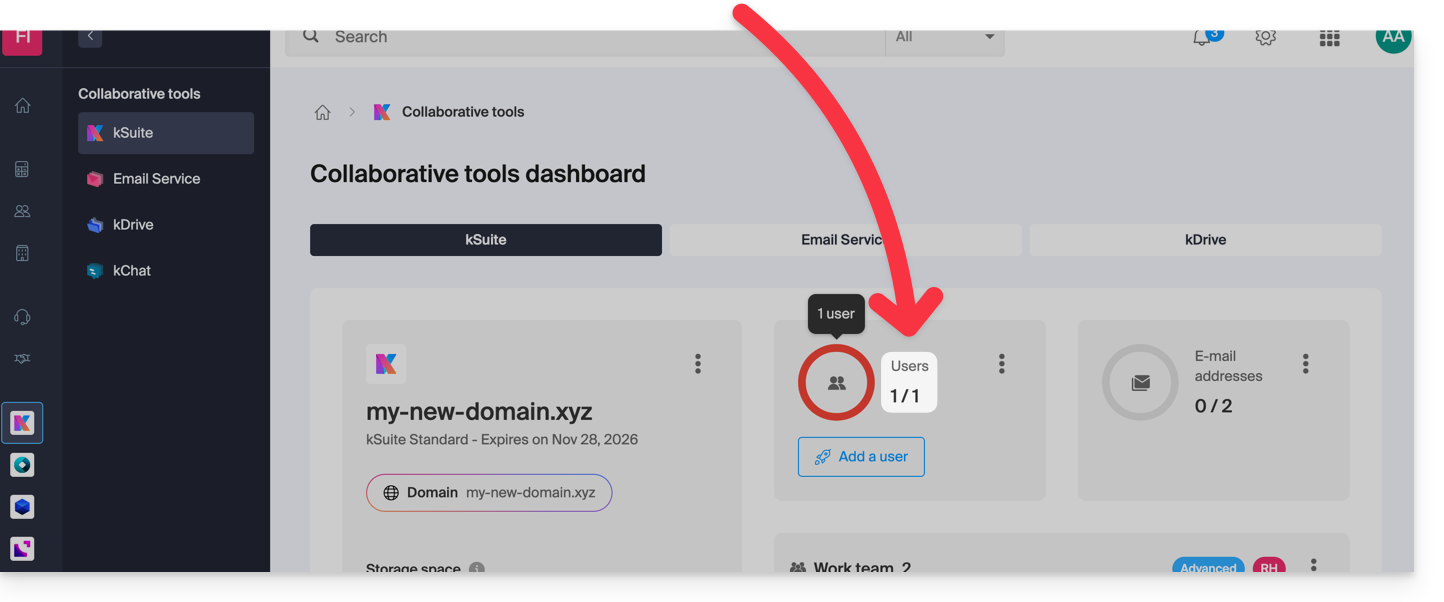
- Click here to access the management of your product on the Infomaniak Manager (need help?).
- Click on the action menu ⋮ in the Users section.
- Click on Add a user:

- Two possibilities are offered:
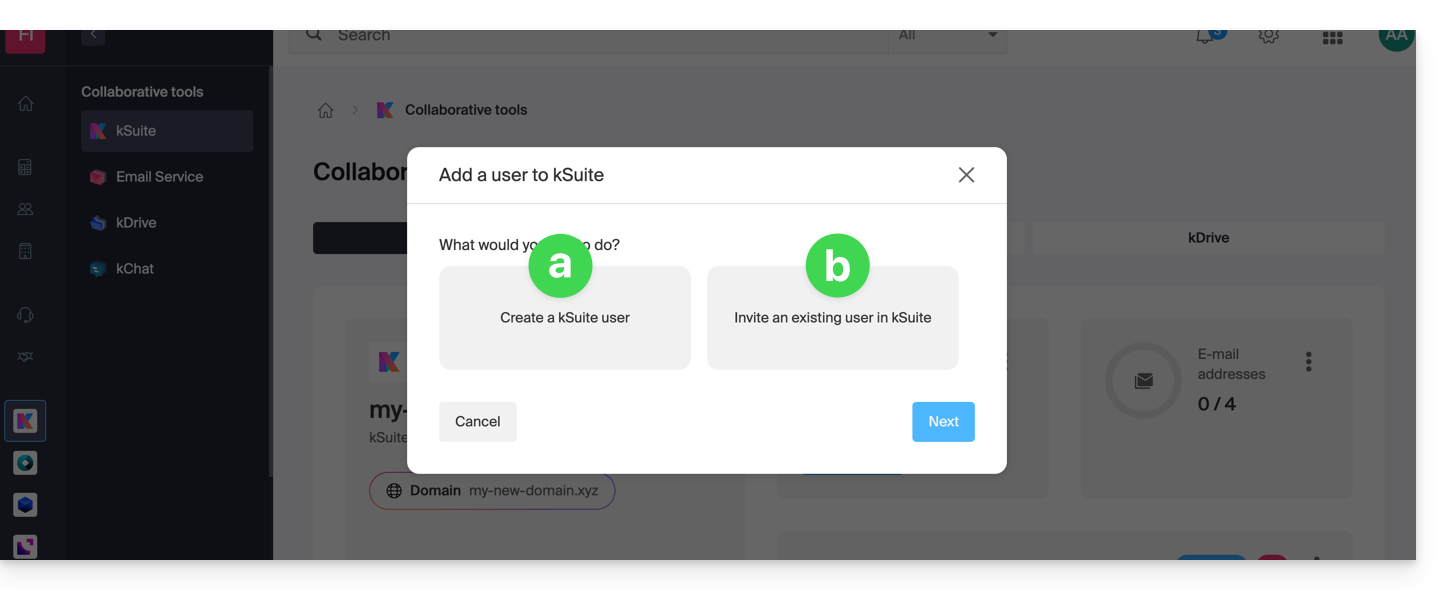
- Add a user who has no connection with the Organization on which kSuite is located: you will need to configure and generate an invitation by specifying whether the user will receive an email address and if so, whether they will need to log in with it, etc.
- Add a user who is already part of the Organization on which kSuite is located: it is the same process as going to the profile of the user concerned within your Organization and then adding them:
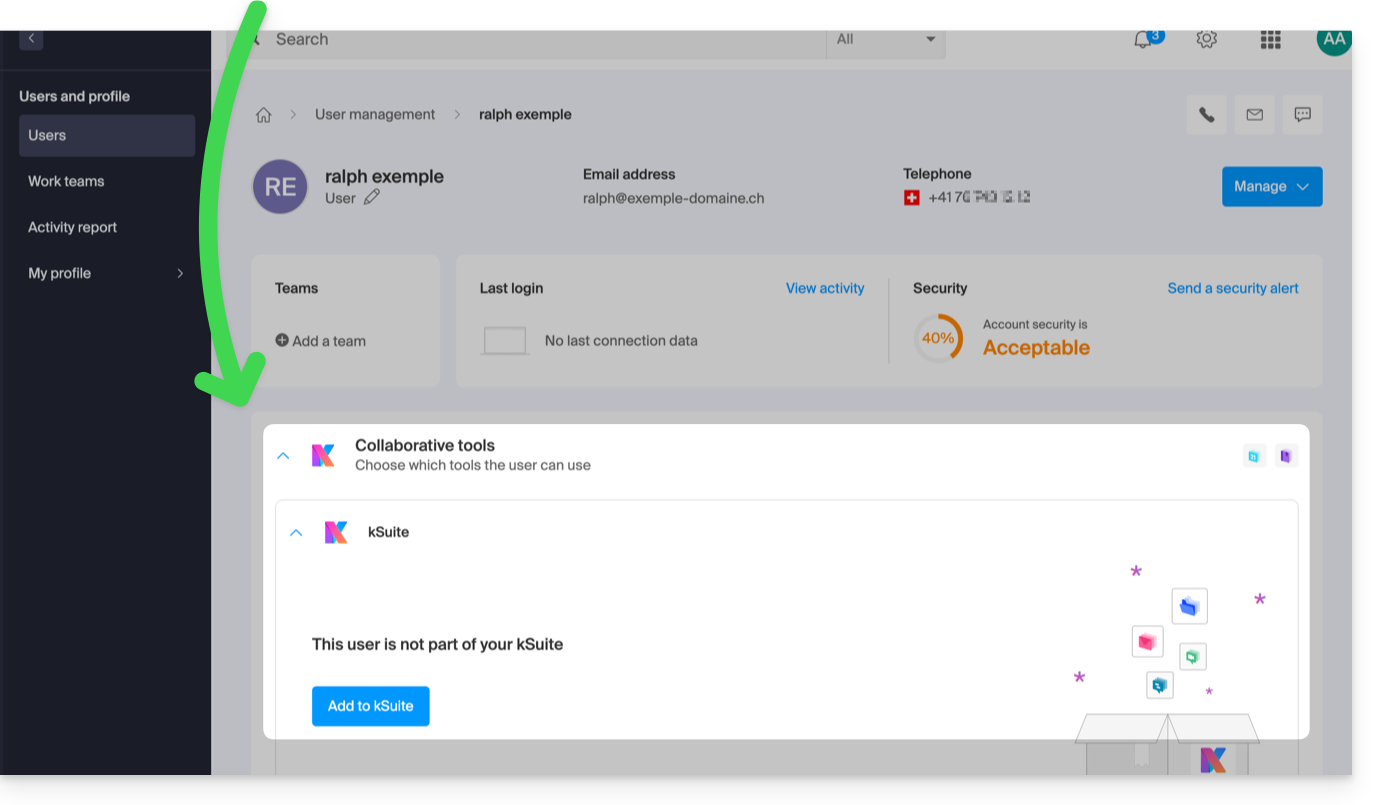
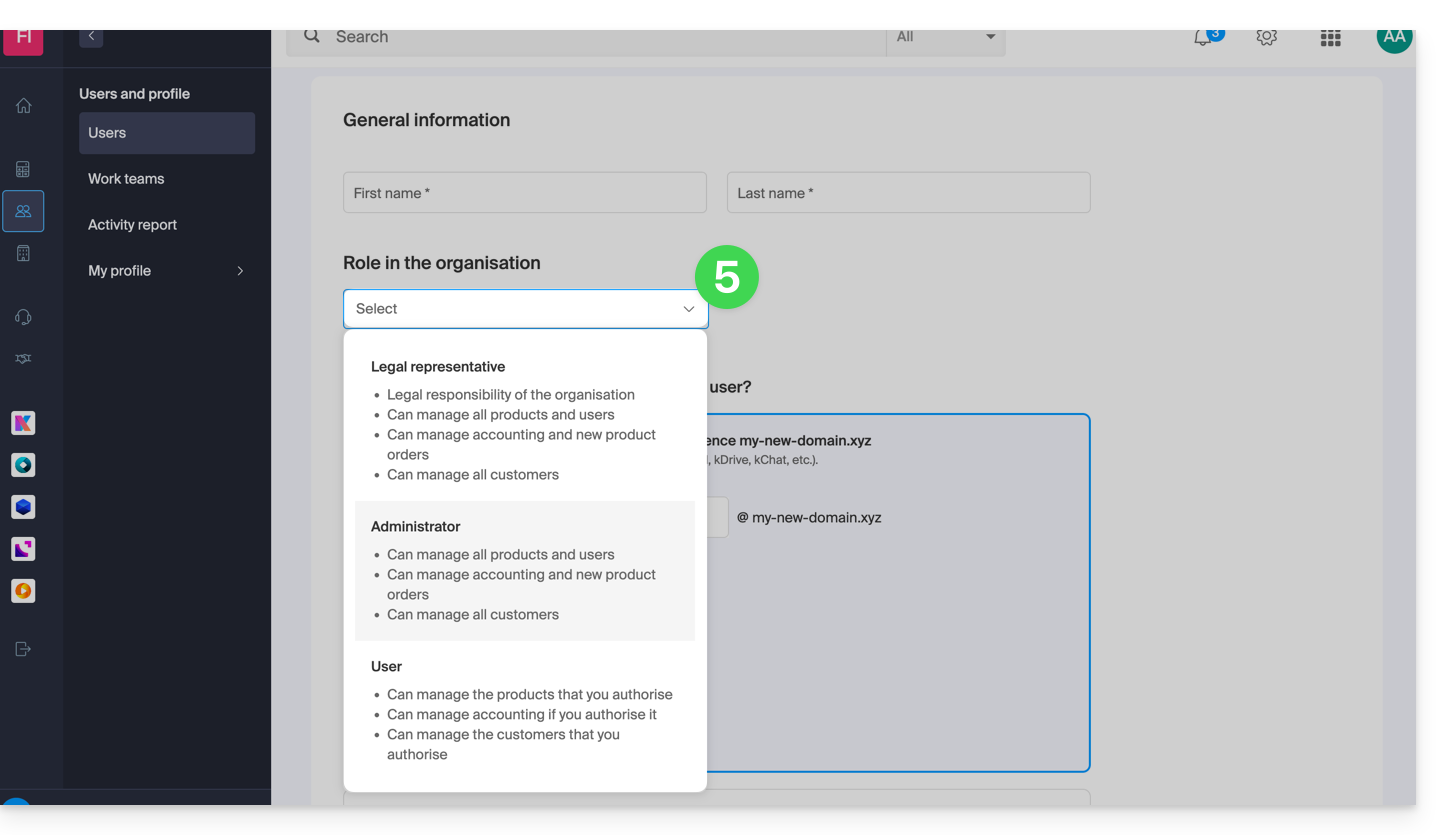
- In both cases, follow the assistant by carefully reading the instructions, especially the detailed characteristics of each role that can be assigned to the user:
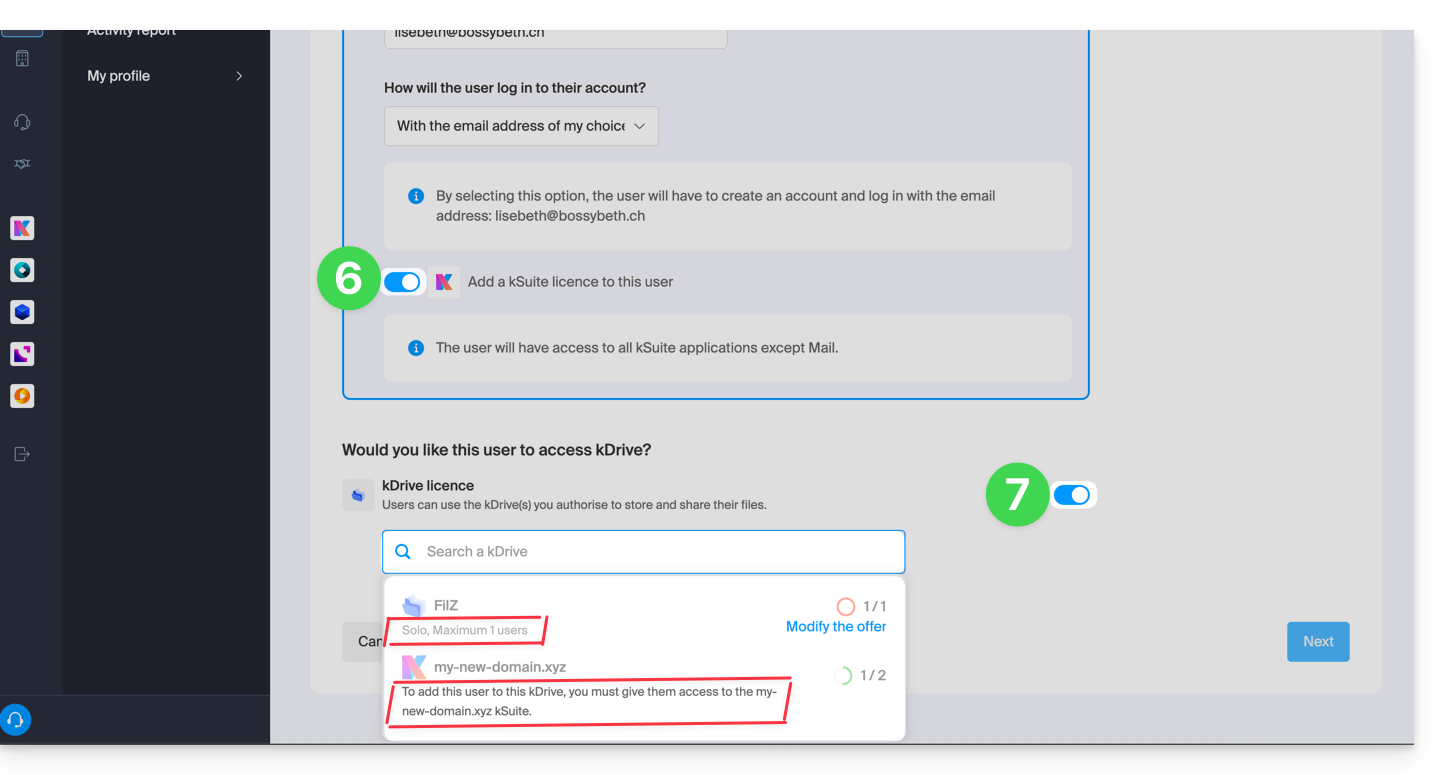
- Activate a kSuite license so that the new user can access kSuite.
- Activate access to kDrive if necessary (provided that kDrive is multi-user and belongs to the kSuite to which you are adding the user):
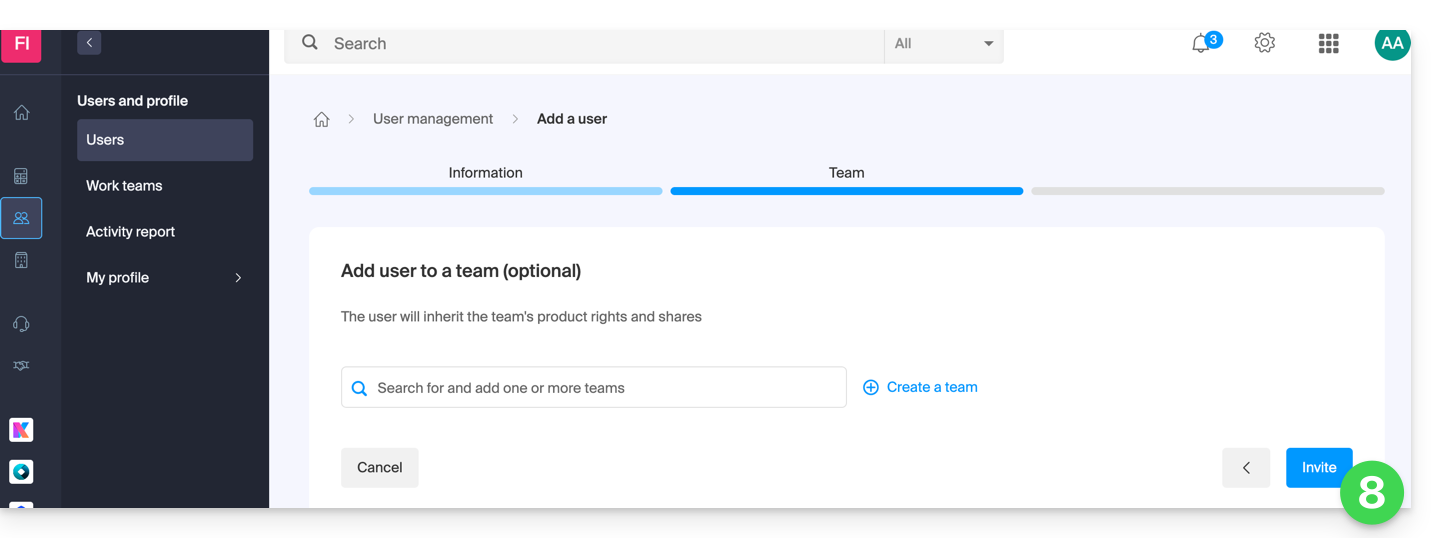
- The last step allows you to manage the Teams part if you wish; finish by clicking the button to generate the invitation:
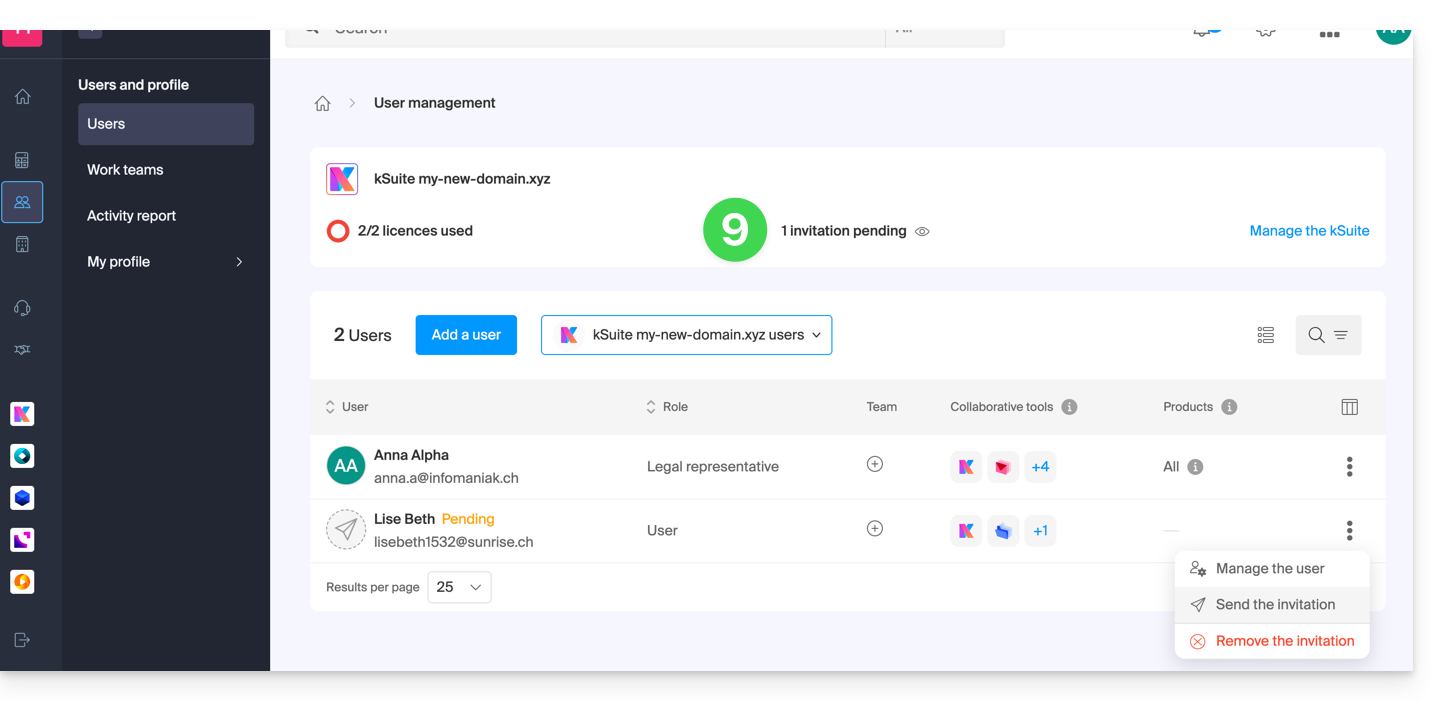
- The user is added if they were already part of the Organization, or receives an invitation to their email address inviting them to join the kSuite - in the meantime, they are listed as a pending user and you can resend the invitation to them at any time:
kChat and kDrive examples
- Refer to this other guide to add an external user to the Organization so that they can use kChat and kDrive without visibility of the products themselves in the Manager directly.
- Refer to this other guide for examples of adding a user to kDrive / kSuite.
It is not possible to add a user so that they only access kDrive or kChat separately. In this case, you would need to use, for example, the sharing functions so that third parties can join kDrive temporarily.
Link to this FAQ:
Has this FAQ been helpful?
This guide explains how to add a simple new unique event to a calendar / agenda of the Infomaniak Web app Calendar (online service ksuite.infomaniak.com/calendar).
Preamble
- To create a recurring event / regularly recurring event, refer to this other guide.
- To schedule/meet a meeting between multiple users and find the best time slot, refer to this other guide about the appointment scheduling assistant.
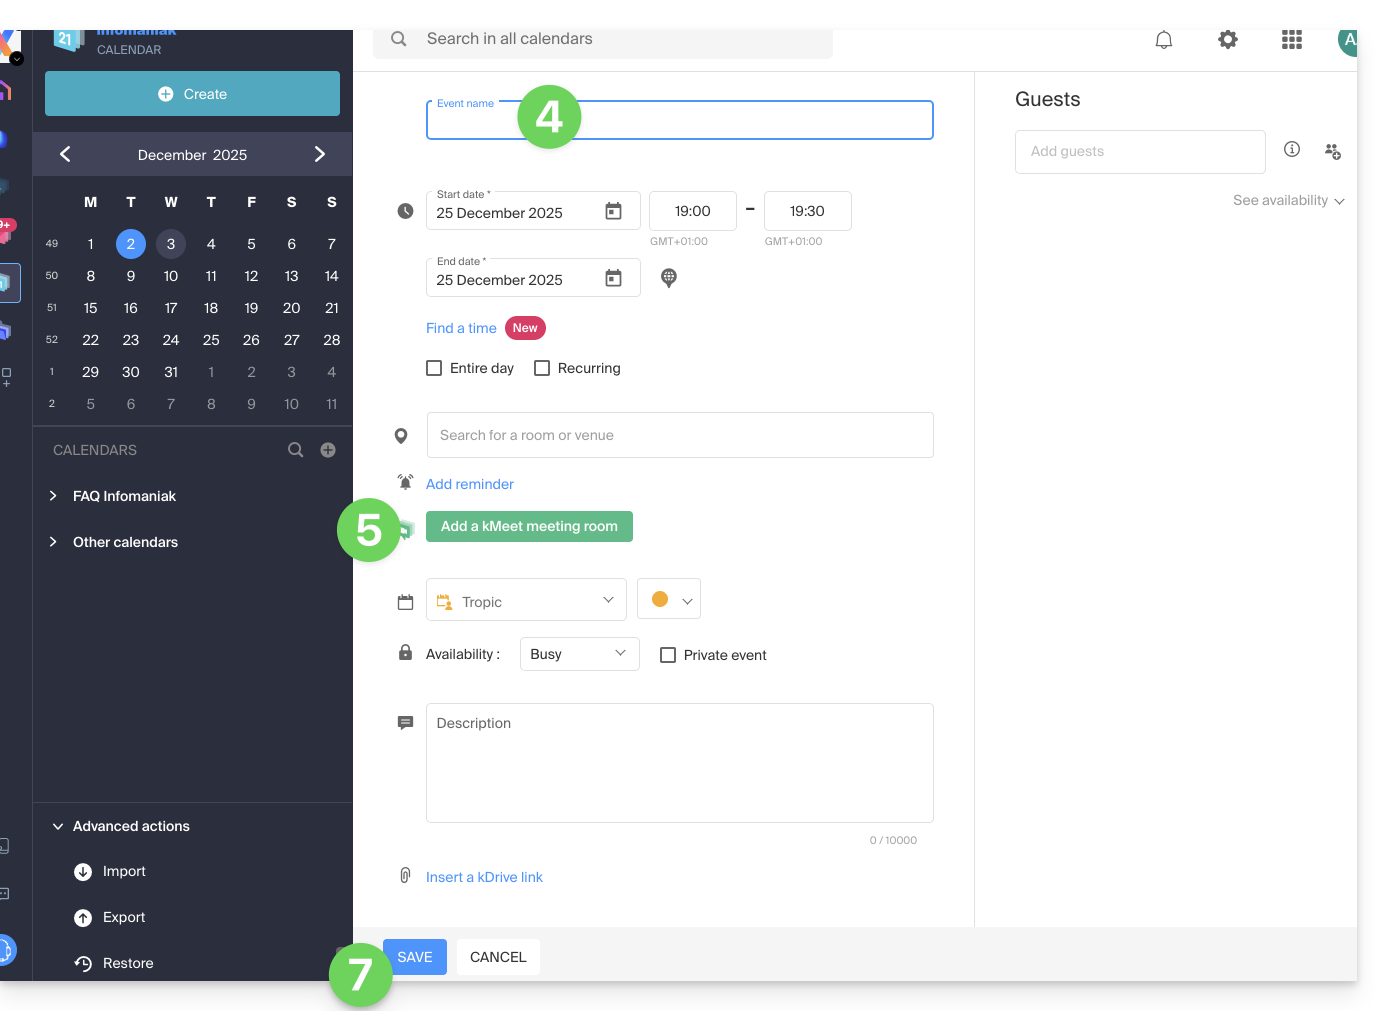
Add a new event
To schedule a unique event in a calendar managed by Infomaniak:
- Click here to access the Infomaniak Web app Calendar (online service ksuite.infomaniak.com/calendar).
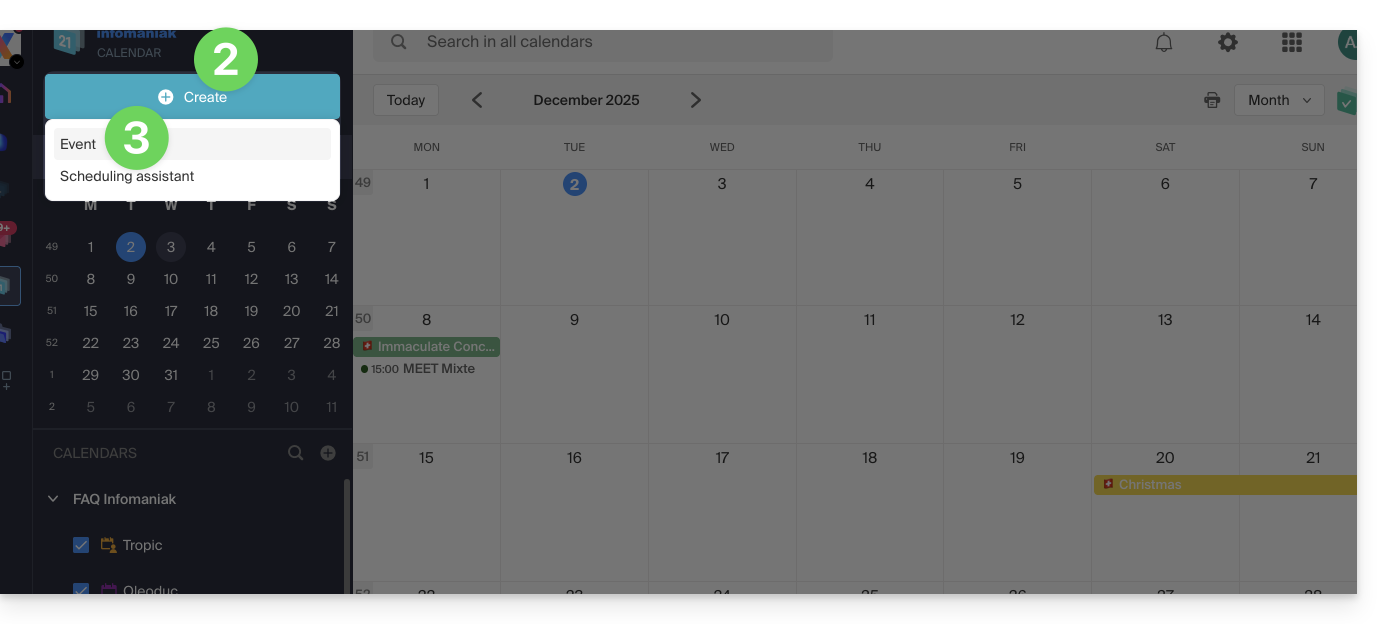
- Click the Create button at the top left.
- Click on Event:
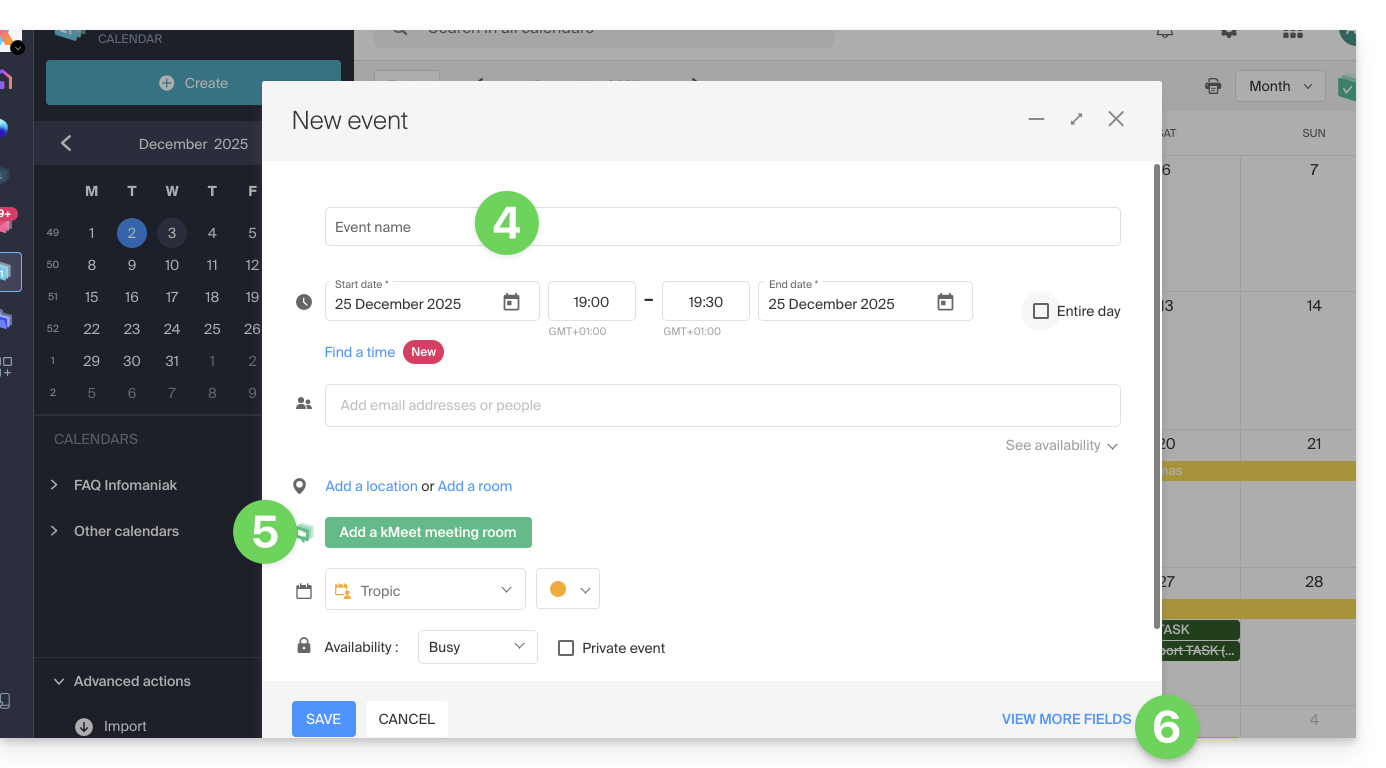
- Fill in the most important fields, such as the title (subject), date/time or duration, possible participants (see below), location, agenda concerned, event color...
- Click the green button to add a kMeet link if the event corresponds to a meeting between several people.
- Display additional fields by clicking on SHOW MORE FIELDS at the bottom right (and some of these fields may be automatically reused in case of follow-up):
- Click on SAVE to add the event to the selected calendar:
You can also click directly on the calendar to add a new event, by dragging the mouse pointer over a desired time period.
To add an attachment from kDrive to your events on Calendar, refer to this other guide.
To add reminders to your events on Calendar, refer to this other guide.
Add participants to the event
To invite users, add their name or email address when creating the event or later: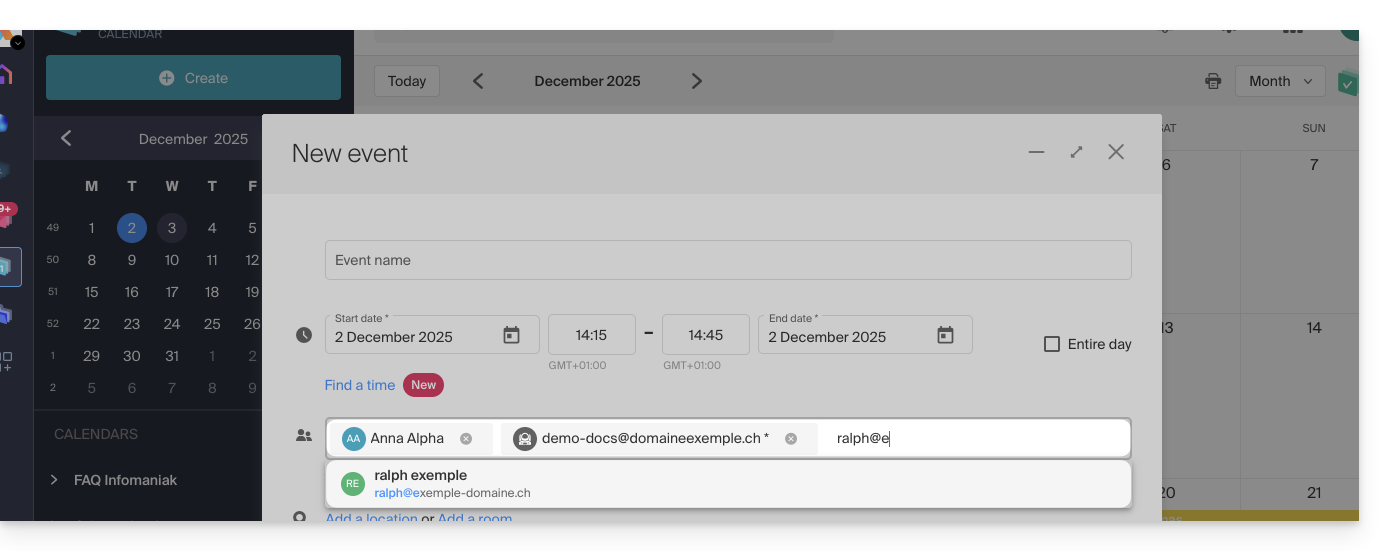
You will be informed of their presence or refusal if they follow the procedure sent to them by email when the event is created.
Any update to a scheduled event is also sent by email to all participants.
Automatically find the best time between participants
Before creating the event and therefore before sending invitations to participants, it is possible to determine the best time that suits everyone based on each person's availability (e.g., other appointments in their calendars) — this is based on the availability of the guests (not the organizer):
- Click here to access the Infomaniak Web app Calendar (online service ksuite.infomaniak.com/calendar).
- Click the Create button at the top left.
- Click on Event.
- Choose a date and time that would suit you for the event.
- Add the participants.
- Click on the dropdown menu below the participants to find the time immediately available for all participants closest to the initially desired time:
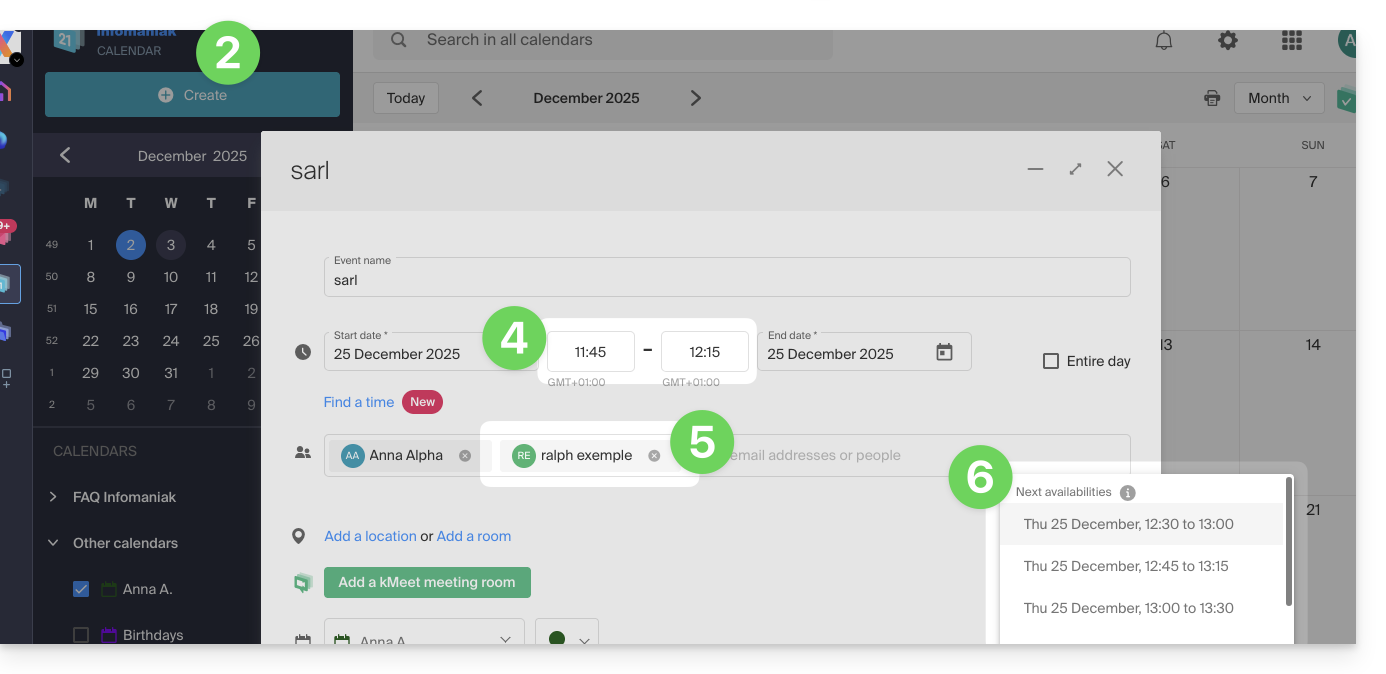
In the example above, 11:45 is not suitable for a one-hour meeting because Ralph already has a 30-minute appointment scheduled in his calendar at 12:00, so the system suggests 12:30, the closest time when all guests will be available.
An asterisk * next to a participant means that the user's availability is unknown because…
- … either the person invited by their email address is not an Infomaniak user: no user account exists with the specified email address…
- … or the invited person does not share their availability: they do not share their calendar at least in read-only mode with the meeting organizer or have not transferred their calendar to at least one of the organizer's Organizations…
Note, an all-day event (like a memo stating a day of teleworking, for example) will prevent the tool from correctly finding availability.
Meeting room
Refer to this other guide if you are looking for information about meeting rooms that can be preconfigured to link an event to a location of this type.
Link to this FAQ:
Has this FAQ been helpful?
This guide explains what the external mail notice, "External" means, which appears on the Web app Mail (online service ksuite.infomaniak.com/mail) and the mobile app Infomaniak Mail (application for iOS / Android smartphone or tablet) when reading certain messages: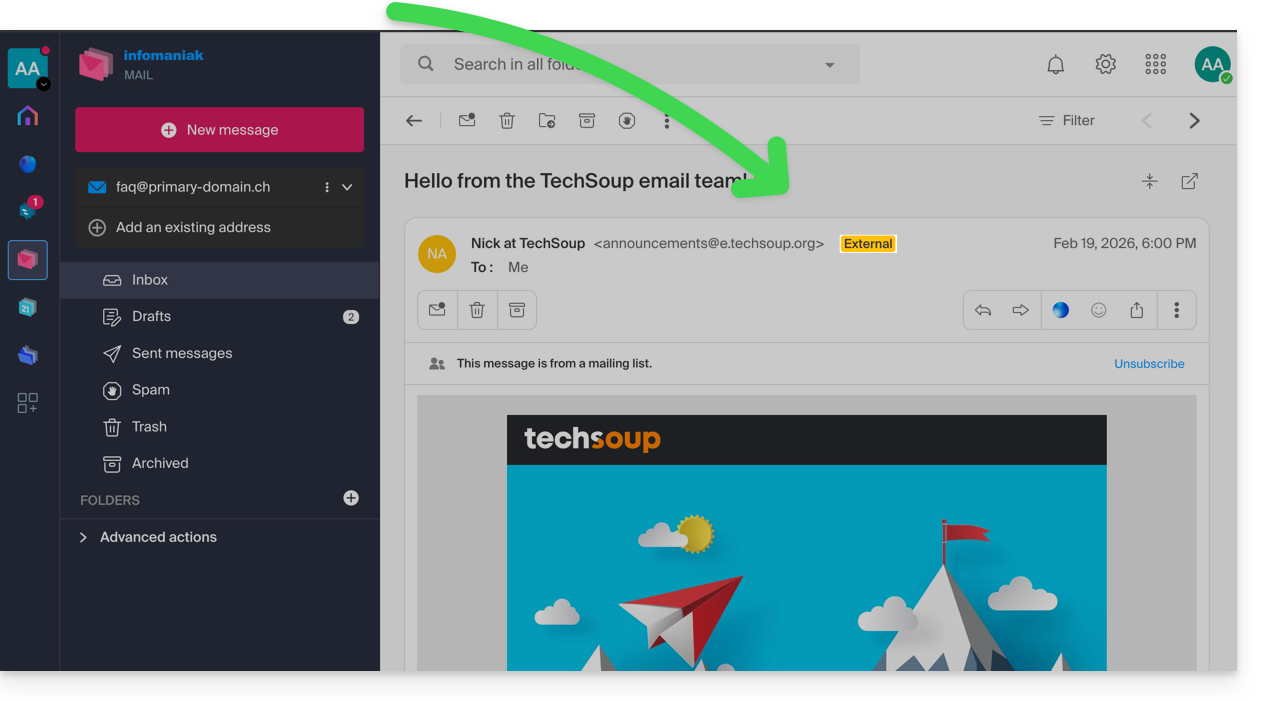
External mail notice
The external mail notice appears in the following cases:
- The sender's domain name (or alias) does not match the one configured in Mail.
- The sender is not part of the contacts (including suggested contacts).
- The email comes from an address hosted outside the Organization.
The notice will appear as unknowninstead of “ external” with some free offers like my kSuite.
Enable or disable the notice
You can enable or disable the notice, the effect is immediate for incoming emails and in the case of a response to an external email. To do this:
- Click here to access the management of your Mail Service on the Infomaniak Manager (need help?).
- Click directly on the name assigned to the Mail Service concerned:
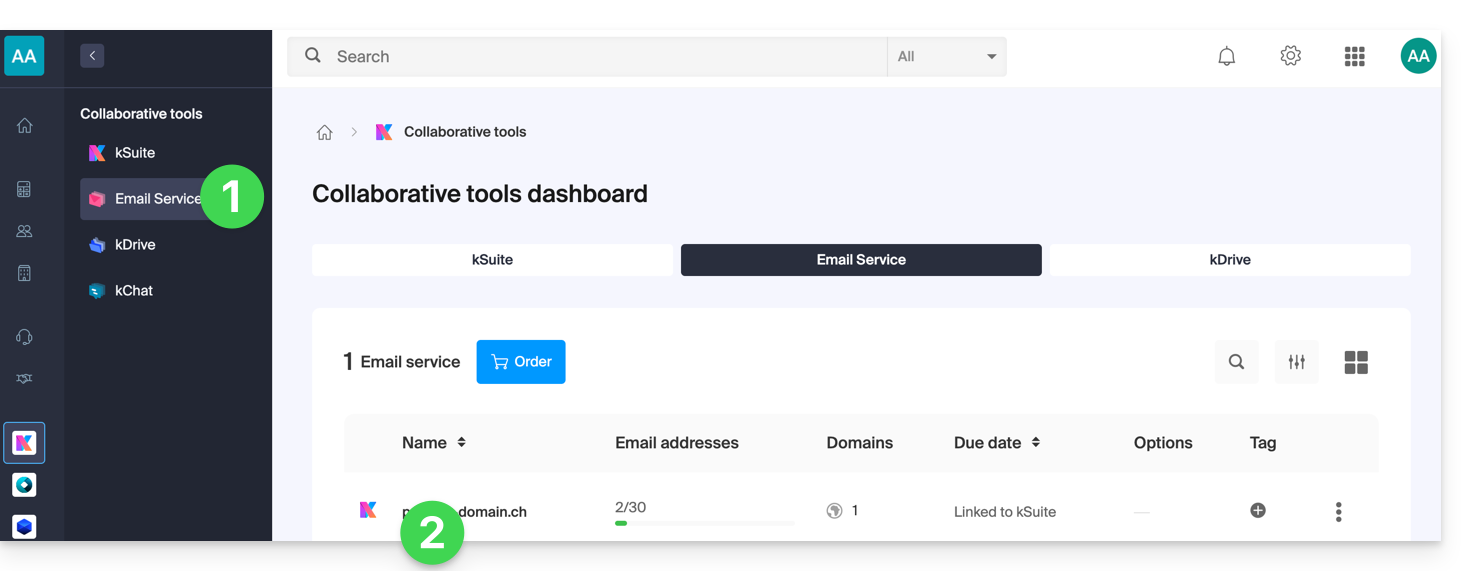
- Click on Global Configuration in the left sidebar:
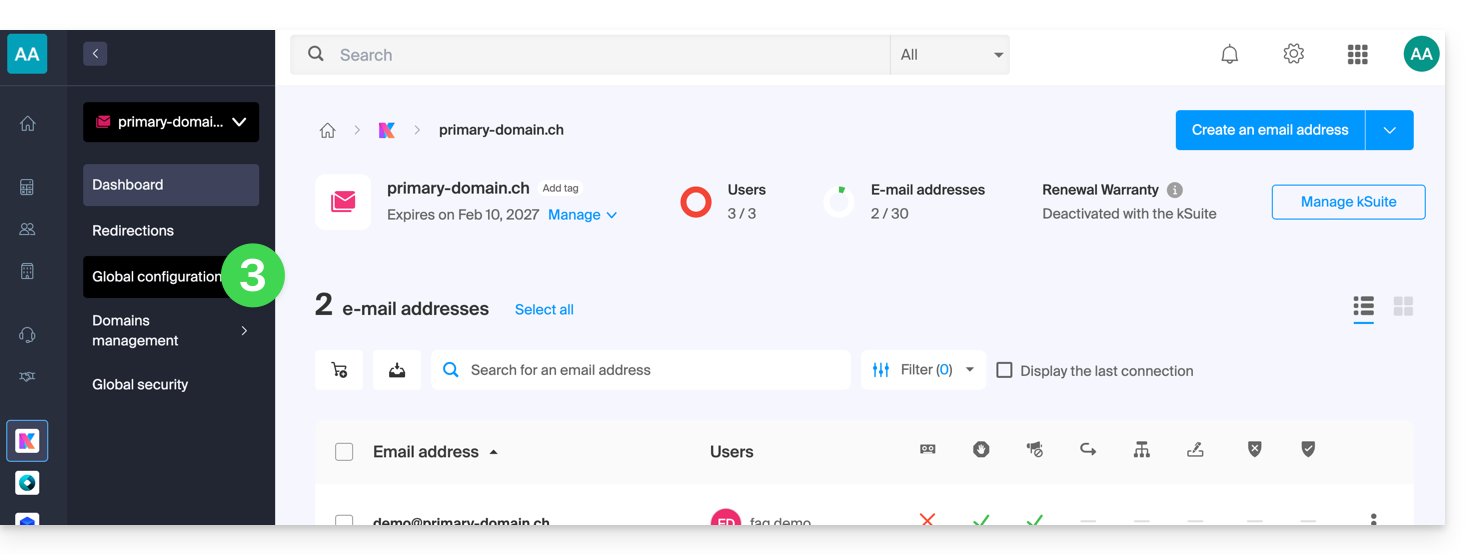
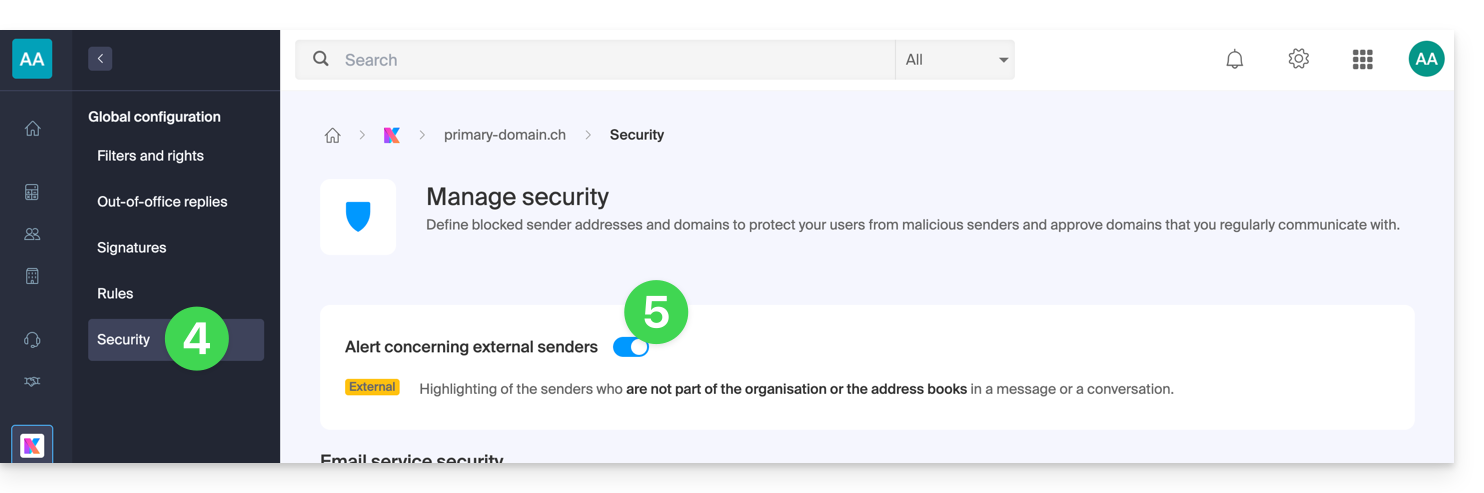
- Click on the Security tab.
- Enable or disable the toggle switch:
Link to this FAQ:
Has this FAQ been helpful?
This guide explains how to use the task manager available on the Infomaniak Web app Calendar (online service ksuite.infomaniak.com/calendar/tasks).
Manage your tasks to be done
To add a task to the task manager:
- Click here to access the Web app Tasks (online service ksuite.infomaniak.com/calendar/tasks)…
- … also accessible from your agenda by clicking on the Tasks icon in the right sidebar:
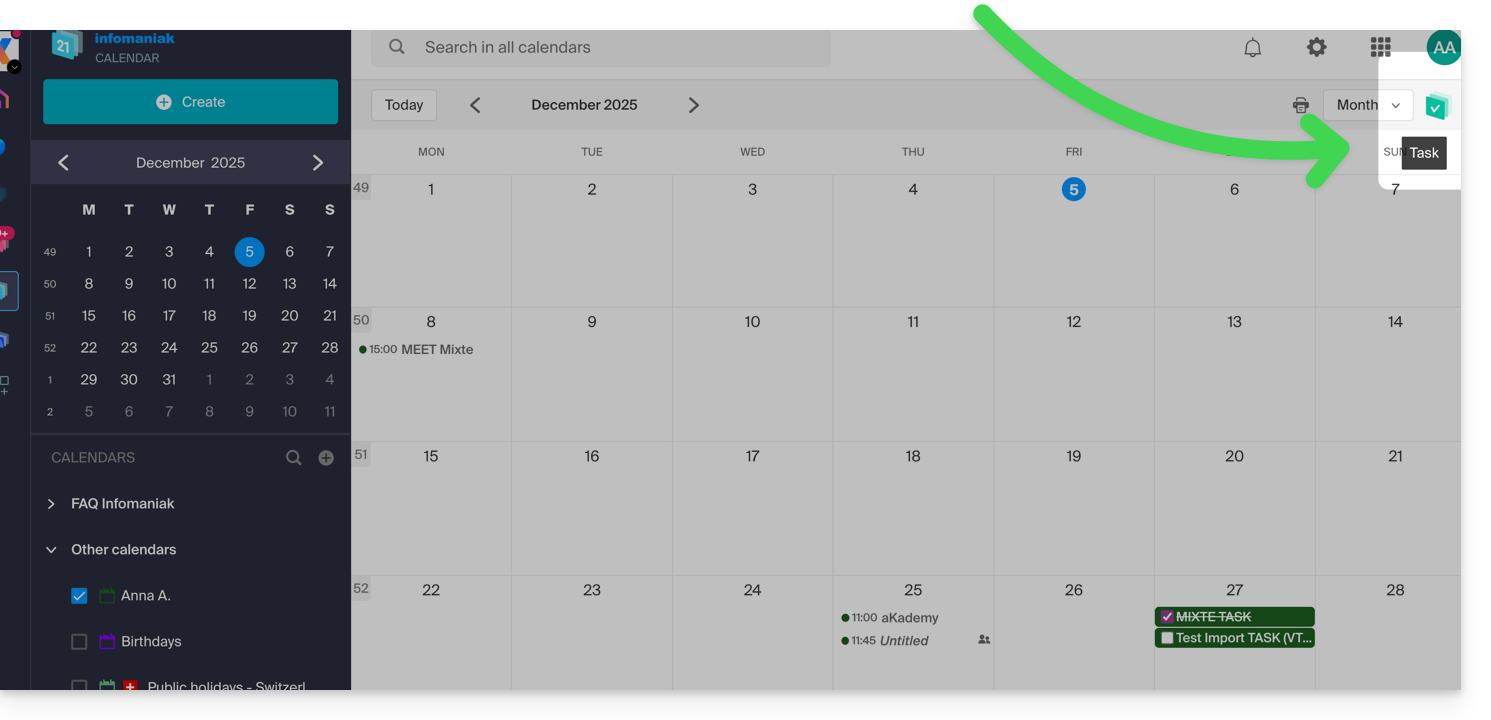
- … also accessible from your agenda by clicking on the Tasks icon in the right sidebar:
Once the manager is open, you can Create a task in the top left, linked to the calendar specified to the right of the button: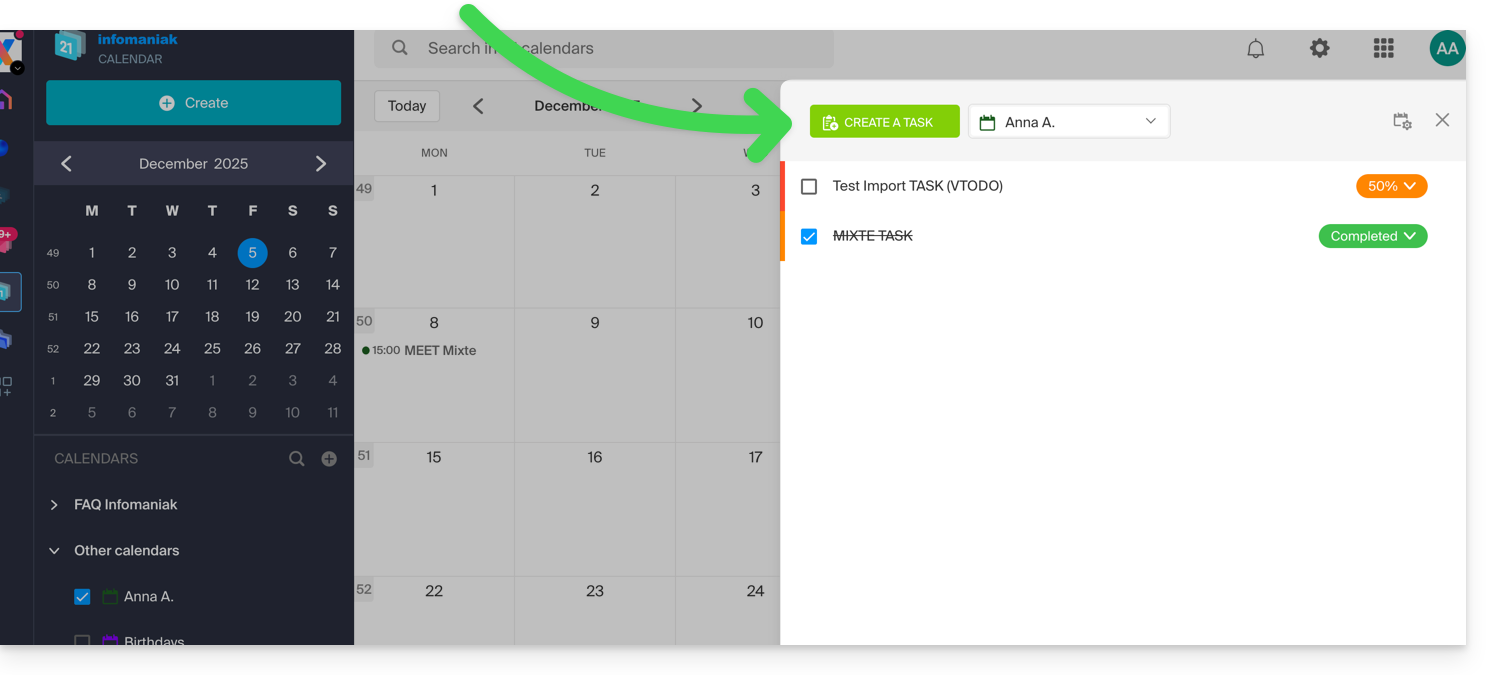
If you add a due date to your task, it will appear on the corresponding agenda: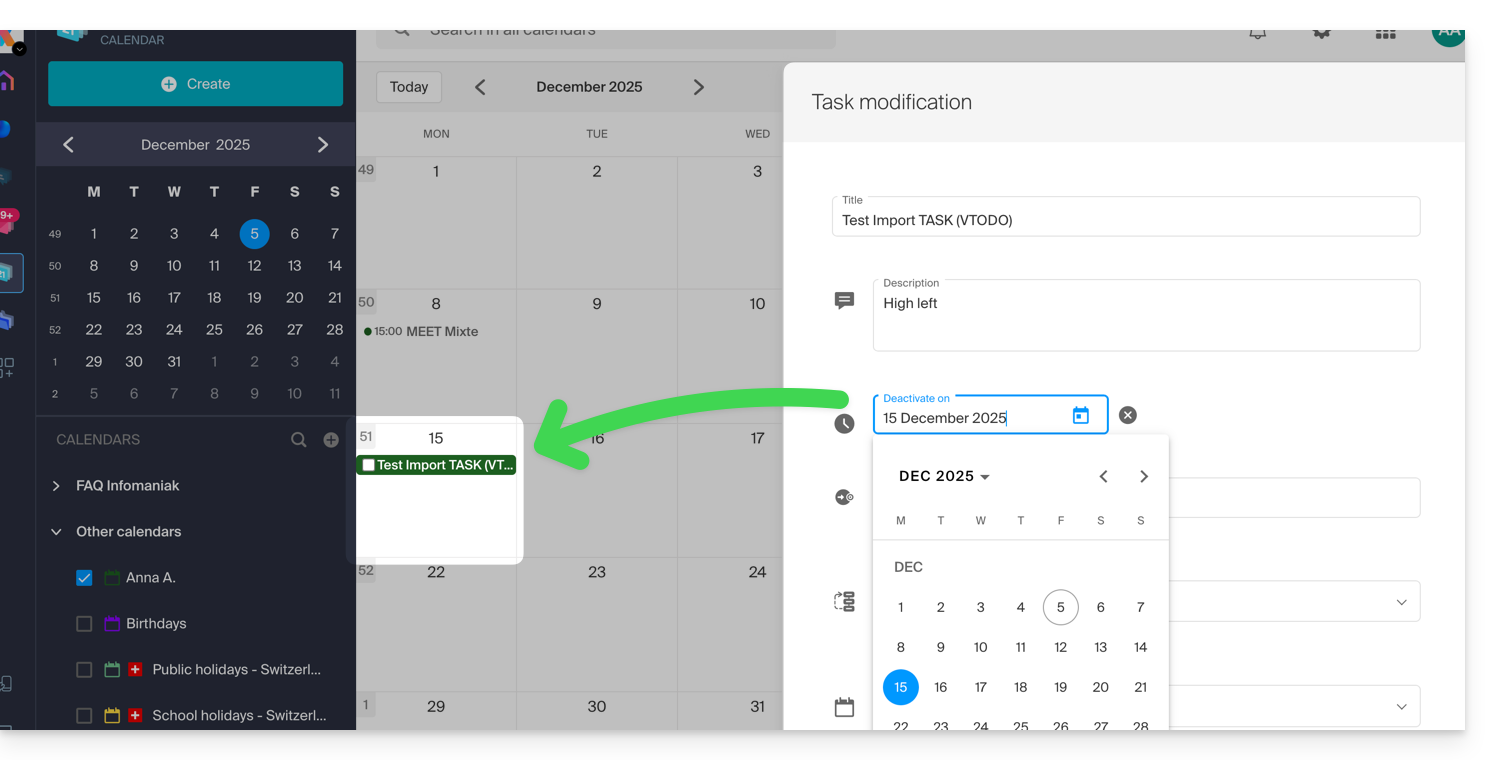
You can also filter and sort your displayed tasks using the button located at the top right of the manager, next to the cross that allows you to close it: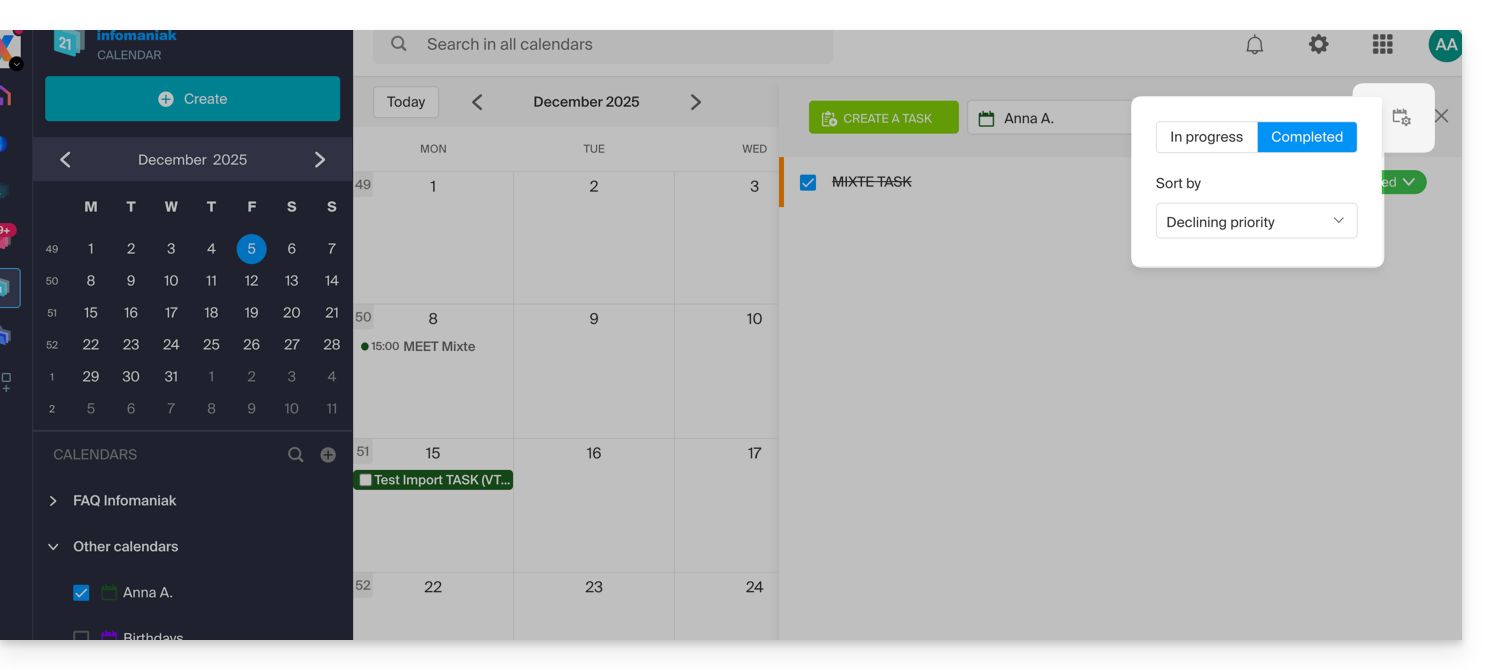
You can import tasks to your calendar.
To synchronize tasks with an Android device, refer to this other guide.
Link to this FAQ:
Has this FAQ been helpful?
This guide explains how to add or delete contacts in the address books of the Infomaniak Web app Contacts (online service ksuite.infomaniak.com/contacts).
Add a new contact
To add a new contact card to an address book:
- Click here to access the Infomaniak Web app Contacts (online service ksuite.infomaniak.com/contacts).
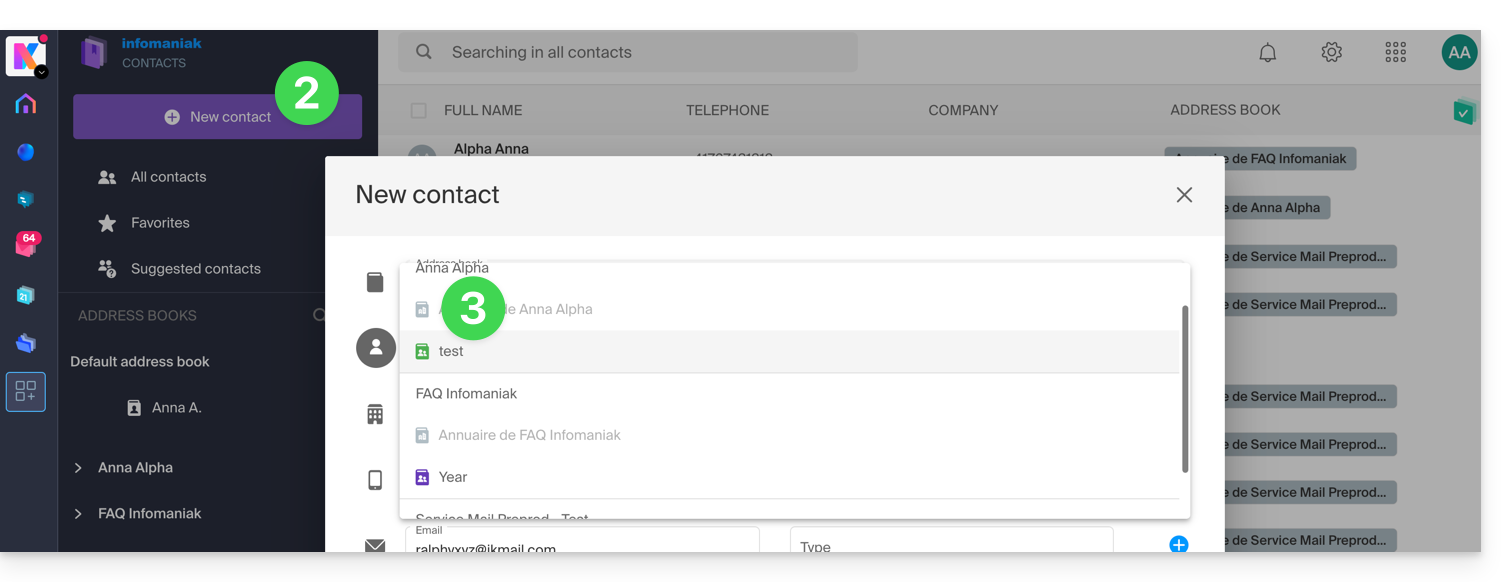
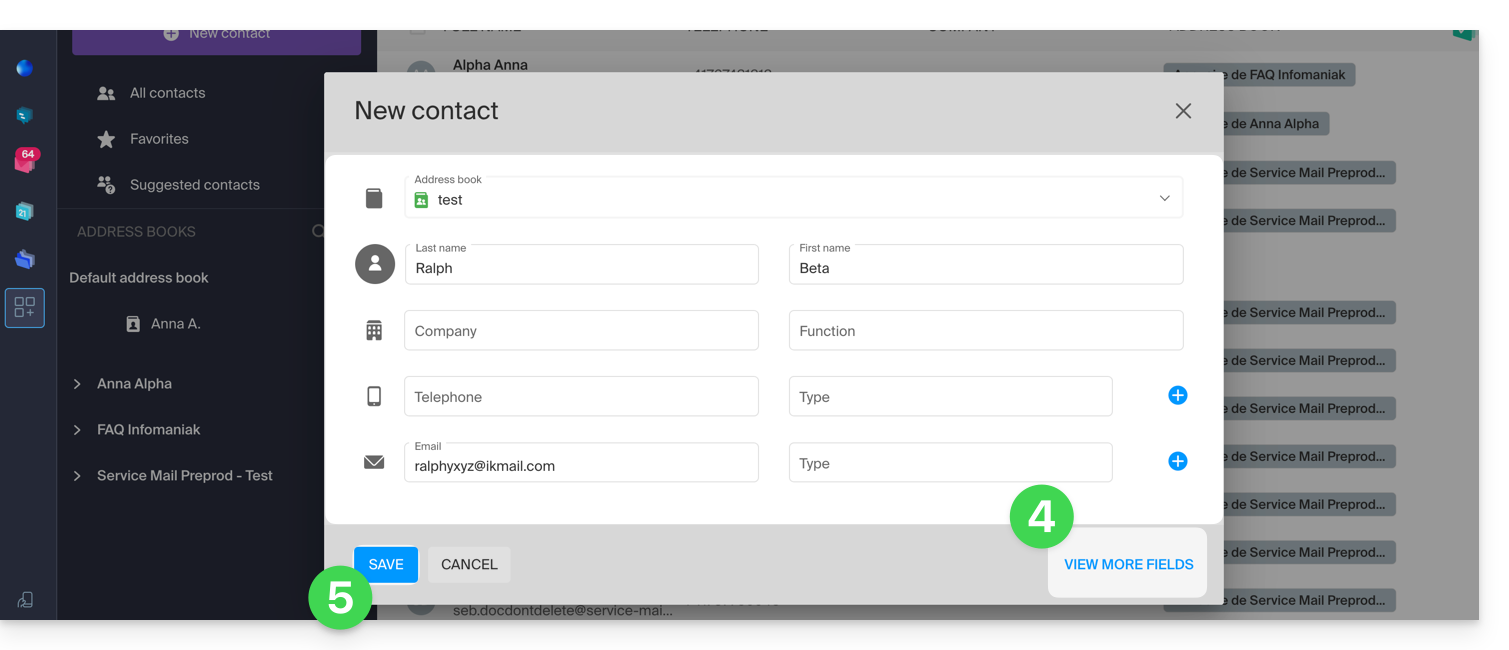
- Click on New contact at the top left.
- Choose the existing address book to which to add the contact:
- Fill in the main information (or additional information via the link at the bottom right).
- Validate with the Save button:
Add from frequently used contacts
You can complete an address book from the frequent contacts suggested by the app (based on your use of the Web Mail app). The first name/last name/email will be pre-filled if available:
- Click here to access the Infomaniak Web app Contacts (online service ksuite.infomaniak.com/contacts).
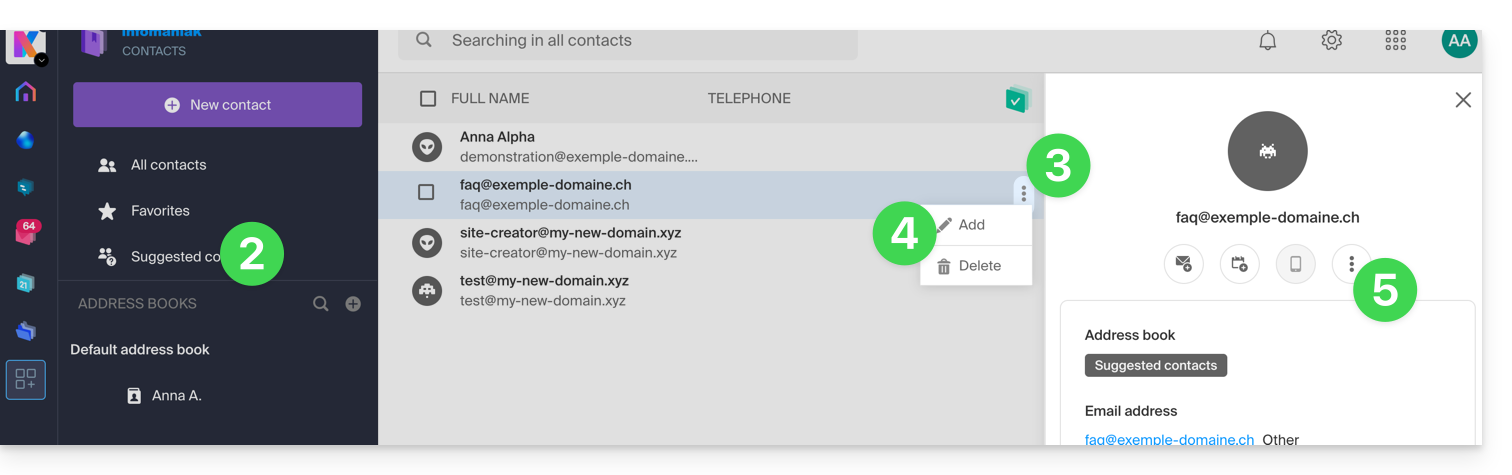
- Click on Suggested contacts in the left sidebar menu.
- Click on the action menu ⋮ to the right of the contact concerned.
- Click on Add to add the contact to an existing address book.
- You can also click on the action menu ⋮ in the right sidebar:
- Complete the contact information if necessary, then click on Save.
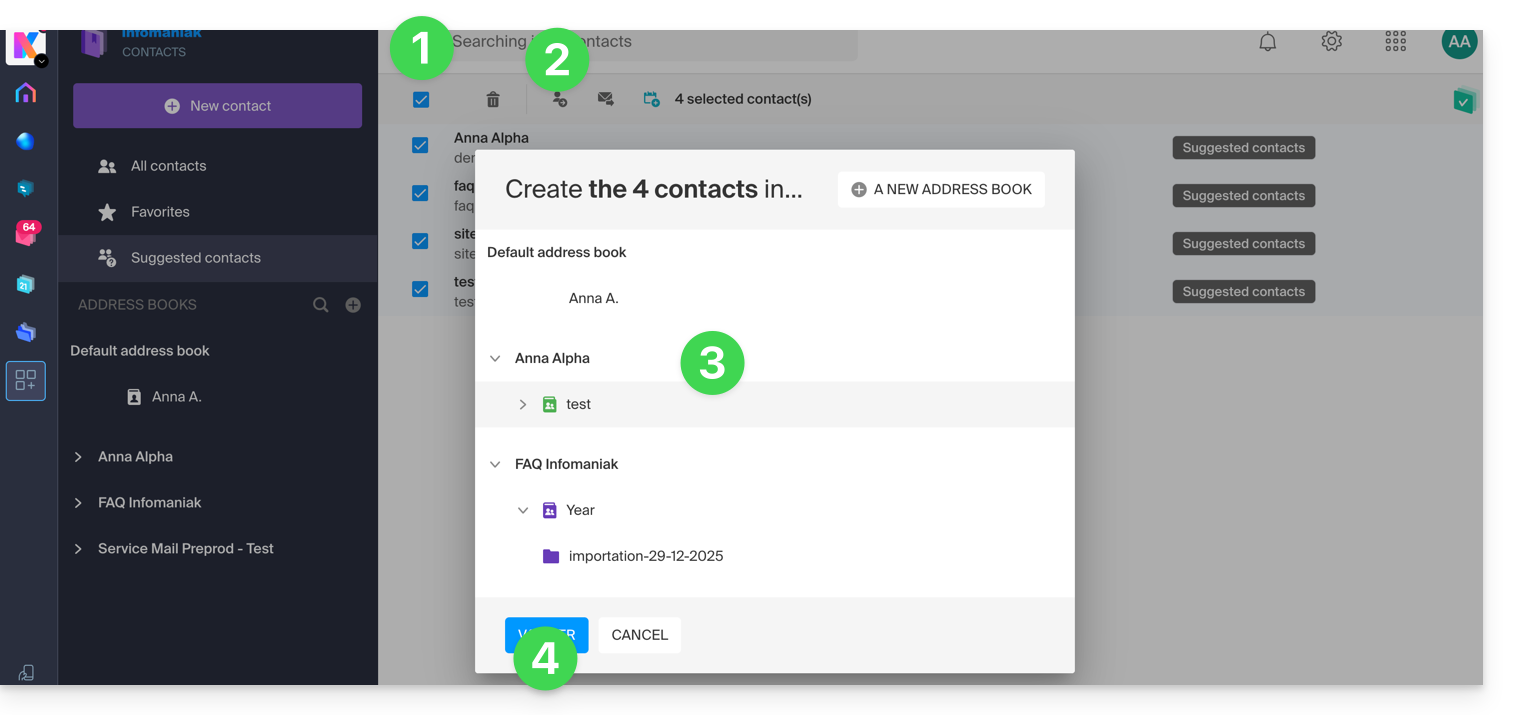
To add all suggested contacts at once:
- Click at the top of the column to select all contacts.
- Then click on the icon that appears at the top of the table.
- Choose the existing address book to which to add the contacts.
- Click on the button to save all selected contacts:
Delete one or more contacts
To remove a contact from your lists:
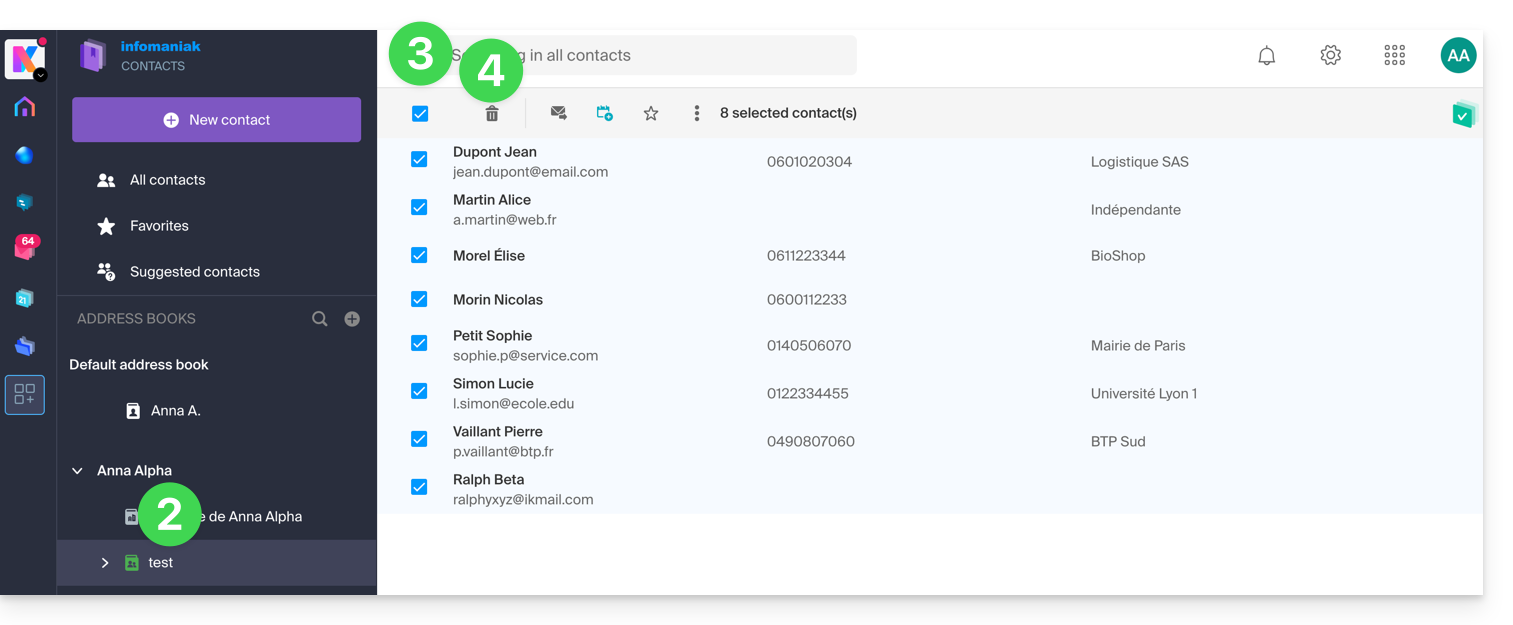
- Click here to access the Infomaniak Web app Contacts (online service ksuite.infomaniak.com/contacts).
- Select the address book from which to delete your contacts:
- Select the contact(s) to delete.
- The Trash icon appears at the top of the column, allowing you to delete the selected contacts:
Note that displaying all contacts does not always allow deletion, especially if some of them are contacts from Organizations of which you are not the administrator.
Link to this FAQ:
Has this FAQ been helpful?
This guide addresses issues that may arise when using Infomaniak applications (such as kChat, kDrive, kAuth, etc.) or tools (such as config.infomaniak.com, the Infomaniak Manager, etc.) with outdated hardware or software (OS, browser, devices, etc.) old / not up to date / obsolete.
Preamble
- For example, it will not be possible to comfortably access Infomaniak services with an iPhone 5s or 6 on iOS 12.
- It is therefore recommended to regularly update browsers and operating systems to benefit from the best possible experience with the Infomaniak infrastructure.
- Also, refer to this other guide which is more specifically focused on browsers and their components.
- And are you using the latest version of the Infomaniak app concerned?
Update the OS, browser, etc.
Old systems or browsers can cause slowness, errors, or incorrect display. It is therefore preferable to rely on regularly updated components as Infomaniak apps work optimally on up-to-date systems and recent hardware.
Example for kChat:
| kChat | Minimum requirement |
|---|---|
| Web app (browser) | Chrome 134+, Firefox 128+, Safari 17.4+, Edge 134+ |
| Mobile app (iOS) | iOS 15.1+ (iPhone 6s or newer) |
| Mobile app (Android) | Android 7.0+ with up-to-date Chrome |
| Desktop app (macOS) | macOS 12 (Monterey) or later version |
| Desktop app (Windows) | Windows 10 or later version |
| Desktop app (Linux) | Ubuntu 22.04 LTS or equivalent maintained distribution |
If you encounter any issues with an internet browser, try updating it or installing an alternative:
- Google Chrome
https://www.google.com/chrome/
(The site automatically detects the operating system and offers the latest version) - Mozilla Firefox
https://www.mozilla.org/firefox/new/
(Download and update page for Windows, macOS, and Linux) - Microsoft Edge
https://www.microsoft.com/edge
(The link offers automatic update or download depending on the system) - Safari (macOS only)
https://support.apple.com/en-us/HT204416
(Safari updates are handled through macOS system updates) - Opera
https://www.opera.com/download
(Allows you to download the latest version for your system) - Brave
https://brave.com/download/
(Download page with automatic operating system detection)
Technologies used by Infomaniak
Many of the web tools developed by Infomaniak use Angular. The need for up-to-date or recent hardware to run applications is not specific to Angular itself but rather a general requirement for running any modern web application. Here are a few reasons why up-to-date hardware is often necessary:
- Angular relies on advanced features of modern browsers, often missing or poorly handled in older versions.
- Recent browsers optimize JavaScript execution and graphical rendering, improving the fluidity of Angular applications.
- Updated versions fix known vulnerabilities, reducing the risk of compromise.
- Modern browsers are more compliant with the latest HTML, CSS, and JavaScript specifications, ensuring better compatibility.
- Modern APIs (camera, geolocation, notifications, etc.) are only accessible through recent browsers, essential for interactive experiences.
Link to this FAQ:
Has this FAQ been helpful?
This guide explains how to create an additional calendar on the Web app Calendar Infomaniak (online service ksuite.infomaniak.com/calendar) and then set it as default.
Preamble
- Setting a default calendar, for example, speeds up the creation of new events as you will no longer need to modify the calendar in which your next event will be recorded each time.
- You can only set calendars that you own directly as default.
Add a new calendar/schedule
To create an additional calendar:
- Click here to access the Web app Calendar Infomaniak (online service ksuite.infomaniak.com/calendar).
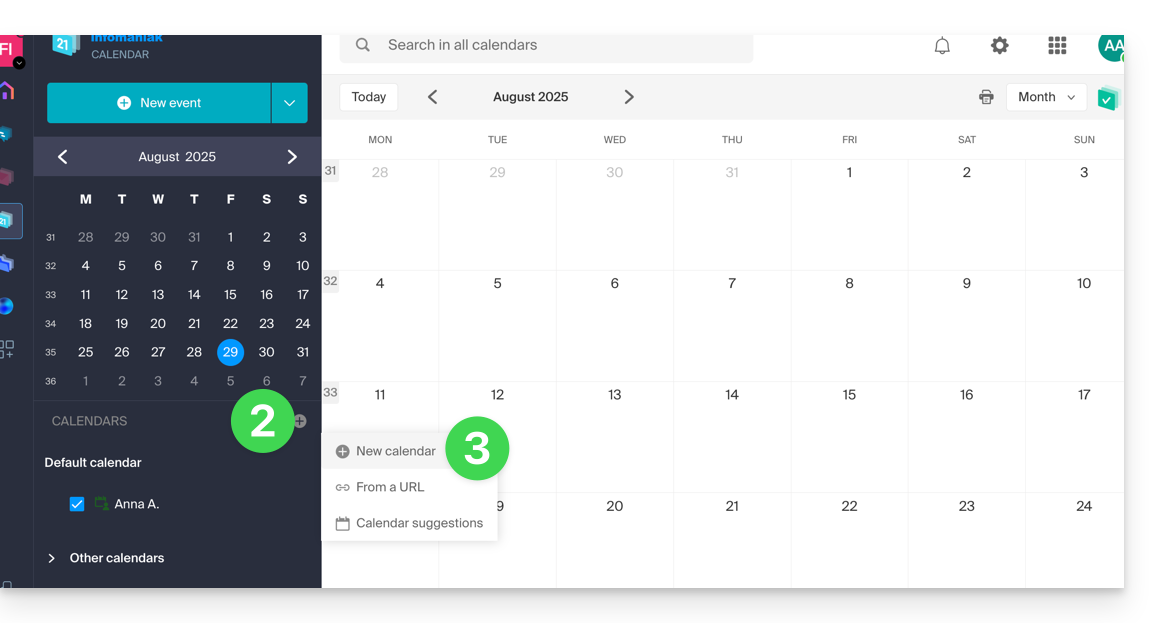
- Click on in the left sidebar menu.
- Click on New calendar:
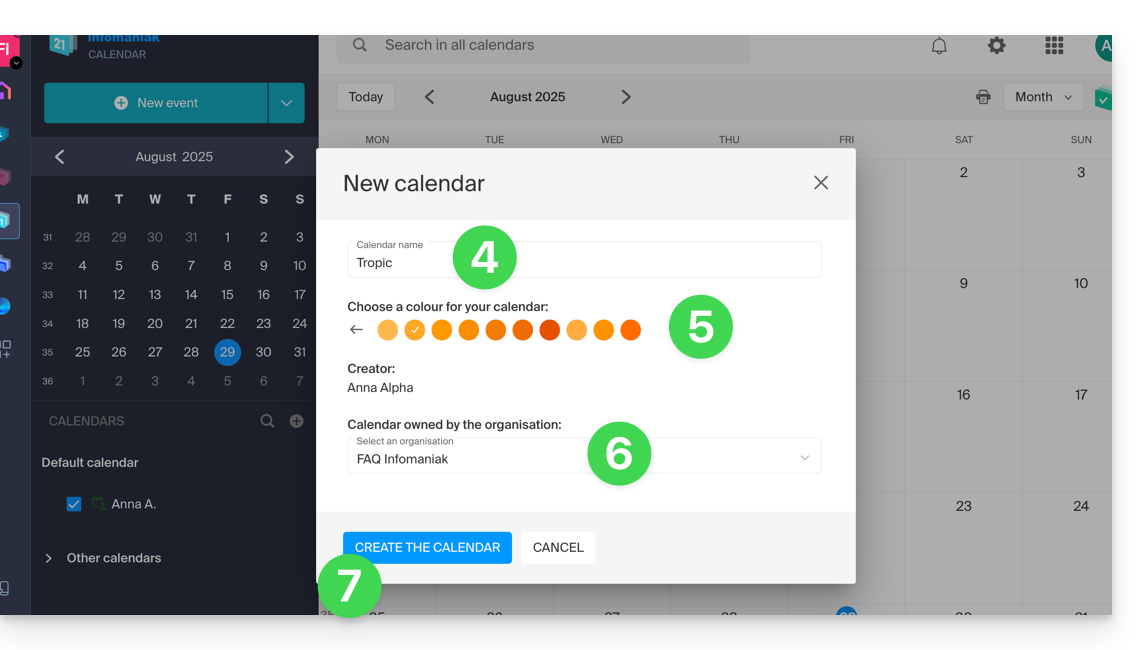
- Enter a name for the calendar.
- Choose a color.
- Choose one of your Organizations in which to create the calendar.
- Click the button to create the calendar:
Modify the default calendar
To set one of your calendars as default:
- Click here to access the Web app Calendar Infomaniak (online service ksuite.infomaniak.com/calendar).
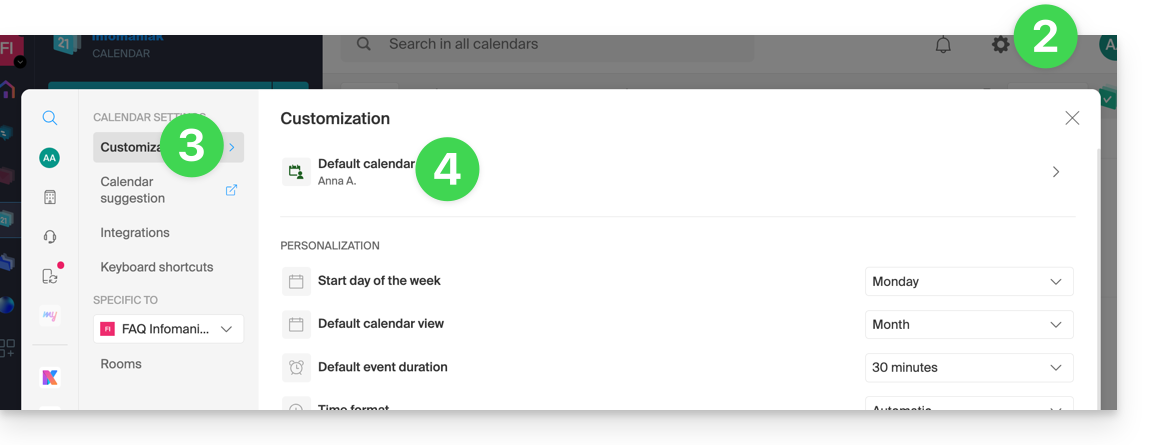
- Click on the Settings icon in the top right corner.
- Click on Customization in the left sidebar menu.
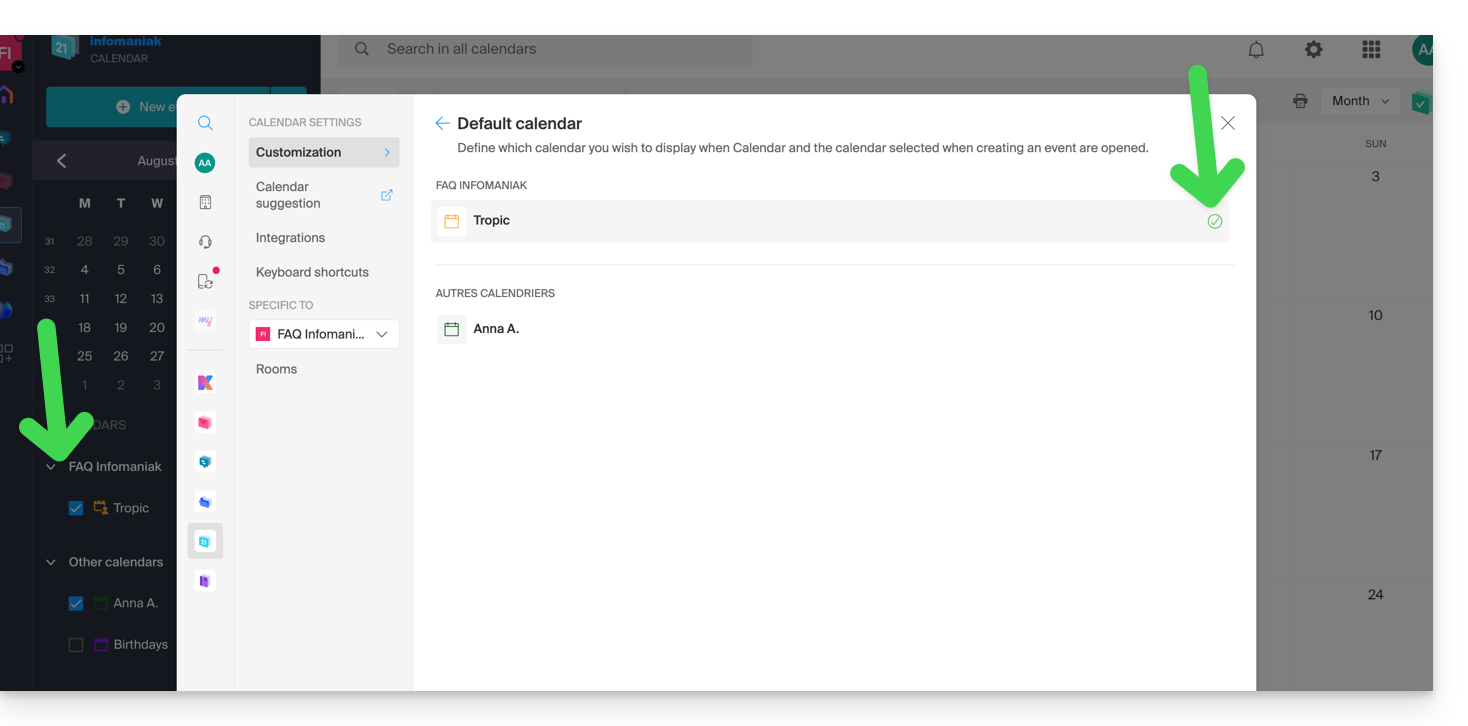
- Click on the default calendar to open the selection menu:
- Choose the desired calendar in the Default calendar field; it will be placed first in your calendar lists:
Link to this FAQ:
Has this FAQ been helpful?
This guide explains how to save and export a calendar / agenda from the Infomaniak Web app Calendar (online service ksuite.infomaniak.com/calendar) in .ics format.
Export a calendar
To export the agenda in .ics format:
- Click here to access the Infomaniak Web app Calendar (online service ksuite.infomaniak.com/calendar).
- Click on Advanced actions in the left sidebar.
- Click on Export in the left sidebar.
- Check the calendar(s) to export.
- Click on Export:
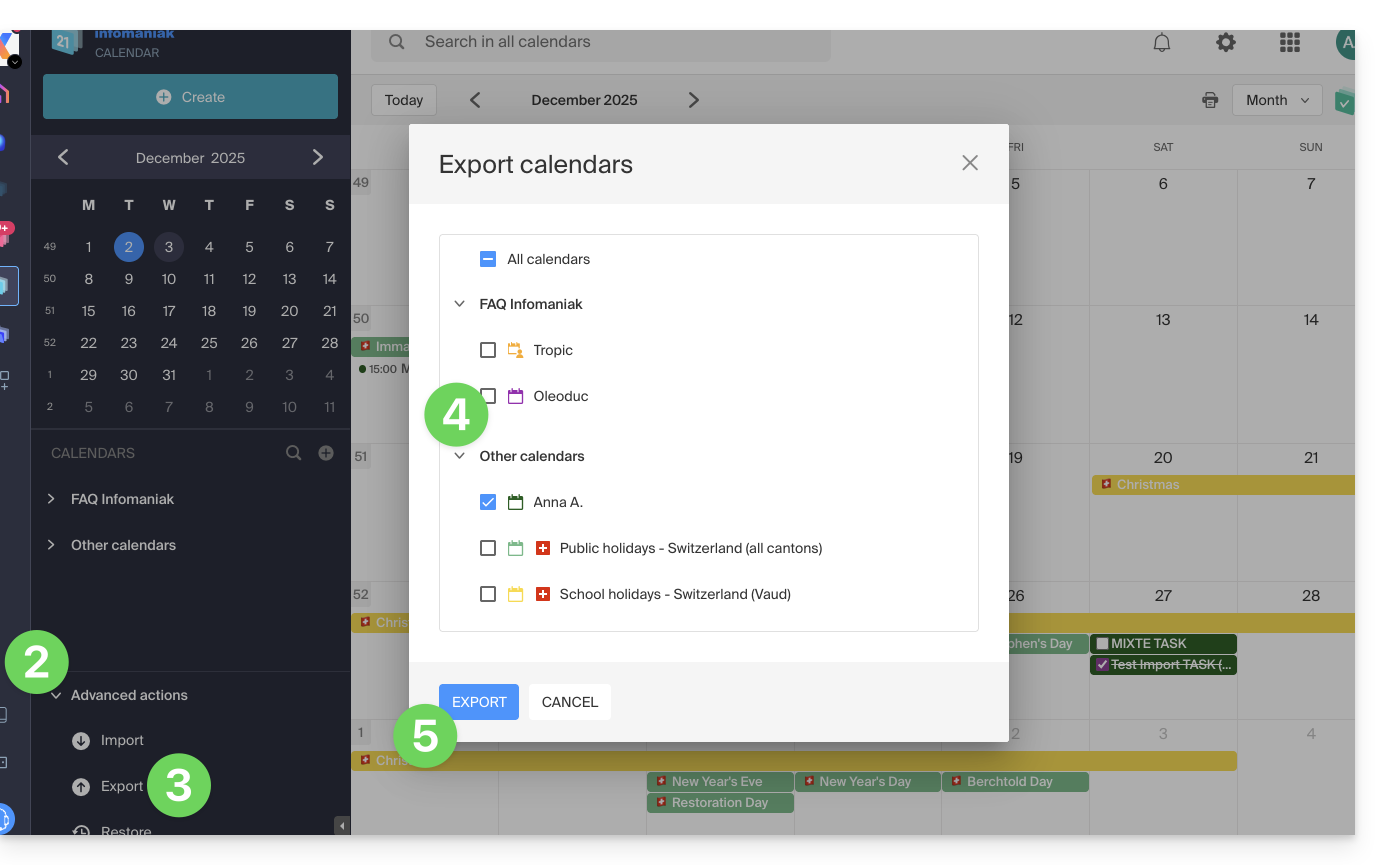
- Save the file on your computer.
Refer to this other guide if you are looking for information about importing events.
Link to this FAQ:
Has this FAQ been helpful?
This guide explains how to use the Gmail mobile app (app for iOS/Android smartphone or tablet) and the Gmail Web app (gmail.com online service) to access an email address hosted by Infomaniak.
Preamble
- It is recommended to use the app Infomaniak Mail (iOS / Android) to benefit from Infomaniak's security advantages.
- The various services offered by Infomaniak are all compatible with the corresponding standard protocols (IMAP/SMTP for email, for example), therefore if you encounter a problem with third-party software, contact its publisher or a Partner and consult the support policy as well as article 11.9 of the Infomaniak Terms of Service.
Using the Gmail mobile app for Infomaniak
Prerequisites
- Create the email address in my kSuite or a Mail Service / kSuite.
- Create a password for the email address on the device you are going to configure.
- Check that the Mail Service is configured optimally.
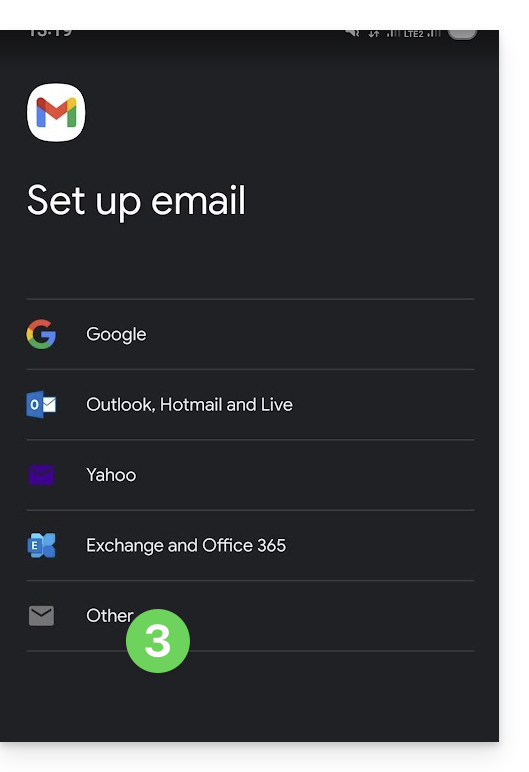
To add the email address managed by Infomaniak in IMAP to your Gmail mobile app (official guide):
- Go to Gmail Settings.
- Tap Add an account.
- Select Other:
- Enter the email address you wish to use.
- Select the account type IMAP.
- Enter the password for the email address:
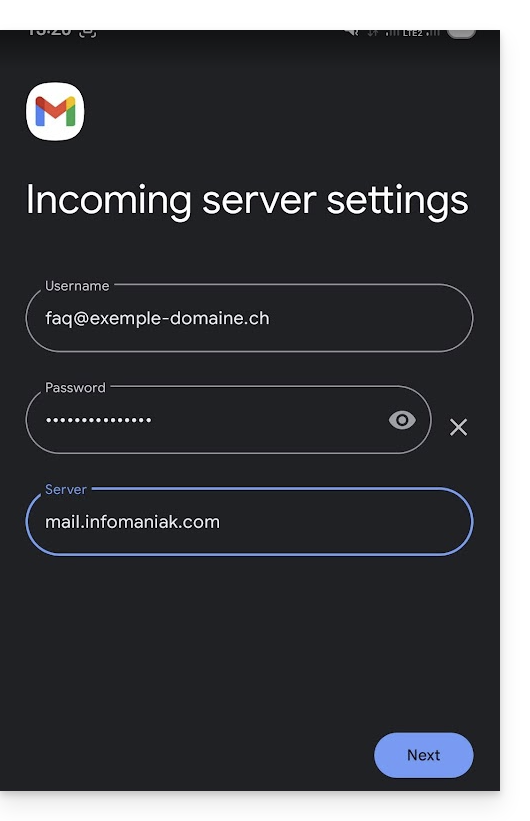
- Use the server name
mail.infomaniak.comfor:- Incoming IMAP server (reception)
- Outgoing SMTP server (sending)
- Complete the addition of the email address.
Link to this FAQ:
Has this FAQ been helpful?
This guide explains how to connect the desktop app Outlook 2010 (desktop application on Windows) to an email address hosted by Infomaniak.
Preamble
- The different services offered by Infomaniak are all compatible with the corresponding standard protocols (IMAP/SMTP for email, for example). Therefore, if you encounter a problem with third-party software, contact its publisher or a Partner and consult the support policy as well as article 11.9 of the Infomaniak Terms and Conditions.
Add the email address to the application
Prerequisites
- Create the email address in my kSuite or a Mail Service / kSuite.
- Create a password for the email address on the device you are going to configure.
To configure the messaging application:
- Open the application.
- Click on Next:
- Click on Yes to configure a messaging account.
- Click on Continue:
- Click on Configure manually.
- Click on Next:
- Click on the Internet E-mail button to connect to an IMAP server.
- Click on Next:
- Check and complete the missing information.
- Click on Additional settings:
- Click on the Outgoing server tab:
- Click on My outgoing server requires authentication.
- Click on the Advanced tab:
- Replace the port numbers with the correct information and enable SSL.
- Click on OK.
- Click on Next:
- Click on Close:
- Click on Finish:
- That's it, your email address is now configured in the application:
Recommended settings
- Incoming IMAP server =
mail.infomaniak.com - IMAP port =
993(with SSL) - Outgoing SMTP server =
mail.infomaniak.com - SMTP port & encryption protocol and command/method to activate this protocol:
587+ STARTTLS - Username = full & complete email address ( ? )
- Password = the one generated for the email address you want to access
- Mandatory authentication for sending emails:
- It is activated in the SMTP settings of your application.
- Check "use the same settings as the incoming server" or, depending on the software/email clients, re-enter a username (= full & complete email address) and the generated password.
Refer to this other guide if you are looking for information about other messaging ports and protocols compatible (SSL / TLS for example).
In case of problem
Check that the Mail Service is configured optimally.
It is not necessary to contact Infomaniak Support if your email address works well outside the application. The most common error concerns the use of an incorrect password. The troubleshooting guides help you resolve any potential issues:
- Be aware of the solutions provided in this other guide regarding email in general.
- This other guide is more specifically about Outlook.
… and if your Outlook no longer works since a change of email password, be aware of this other guide.
Link to this FAQ:
Has this FAQ been helpful?
This guide explains how to connect the desktop app Apple Mail (desktop application on macOS) to an email address hosted by Infomaniak.
Preamble
- Your macOS computer will be automatically configured via configuration profiles .mobileconfig compatible with Apple, unlike a manual configuration.
- It is possible to remove a configuration profile once installed (scroll down to the bottom of this page for the explanations).
- The various services offered by Infomaniak are all compatible with the corresponding standard protocols (IMAP/SMTP for email, for example), therefore if you encounter a problem with third-party software, contact its publisher or a Partner and consult the support policy as well as article 11.9 of the Infomaniak Terms of Service.
Install a configuration profile
Prerequisites
- Create the email address within my kSuite or a Mail Service / kSuite.
- Check that the Mail Service is configured optimally.
You can download the profile from the device concerned or send it from another device (if you already have a working email address, for example):
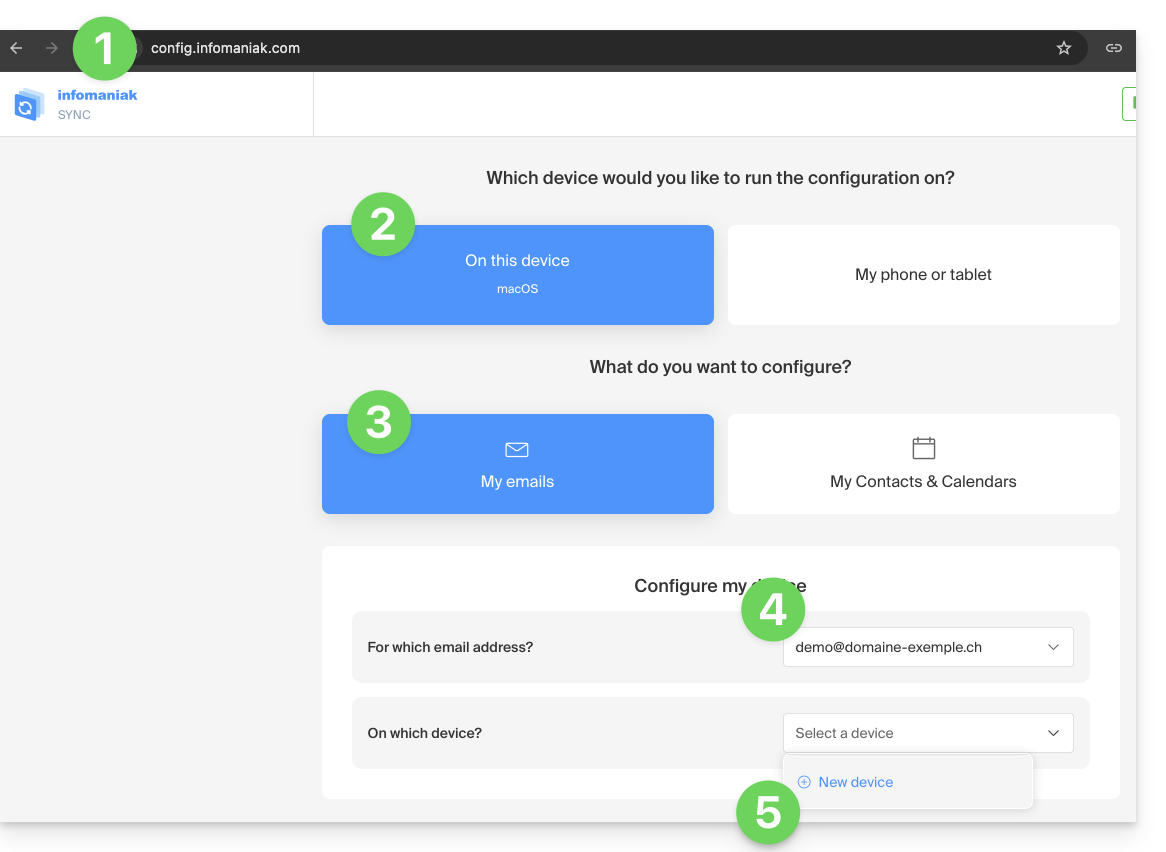
- Click here to access the Infomaniak configuration tool (online service https://config.infomaniak.com) — log in if necessary to your Infomaniak account on the Organization on which your email address is managed.
- Choose to install the profile on this device.
- Choose to synchronize emails.
- Choose the email address to configure on Apple Mail (from those you have access to).
- Create a new device:
- Enter a descriptive name for the new device.
- Click the button to Download the profile (you can also send it by email using the link on the right):
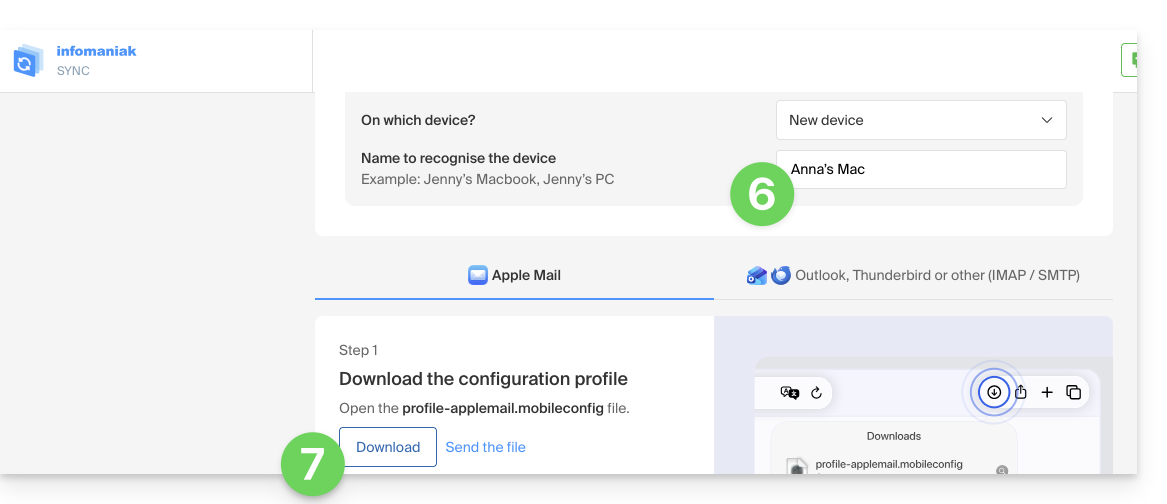
- Once the file
profile-applemail.mobileconfigis on your computer, double-click to open and run it. - Click OK:

- Open the System Settings of the computer.
- Click on Downloaded Profile in the sidebar, then double-click on the new profile to apply it:
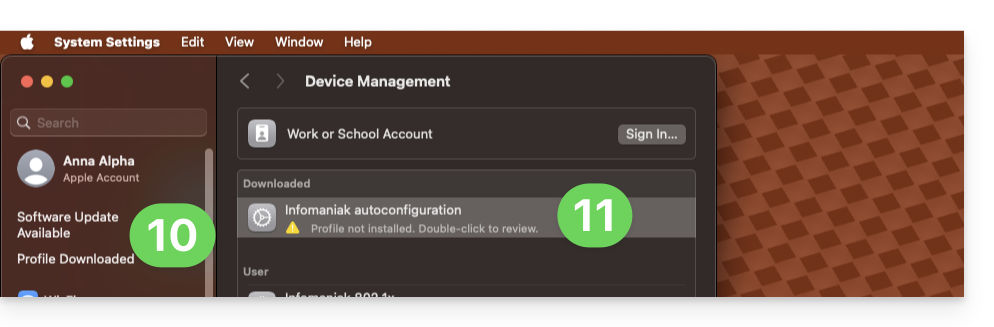
- If you have an older version of macOS or cannot find the profile, search for “profile” in the settings, or refer to the official documentation by changing the system version at the top of the page if necessary.
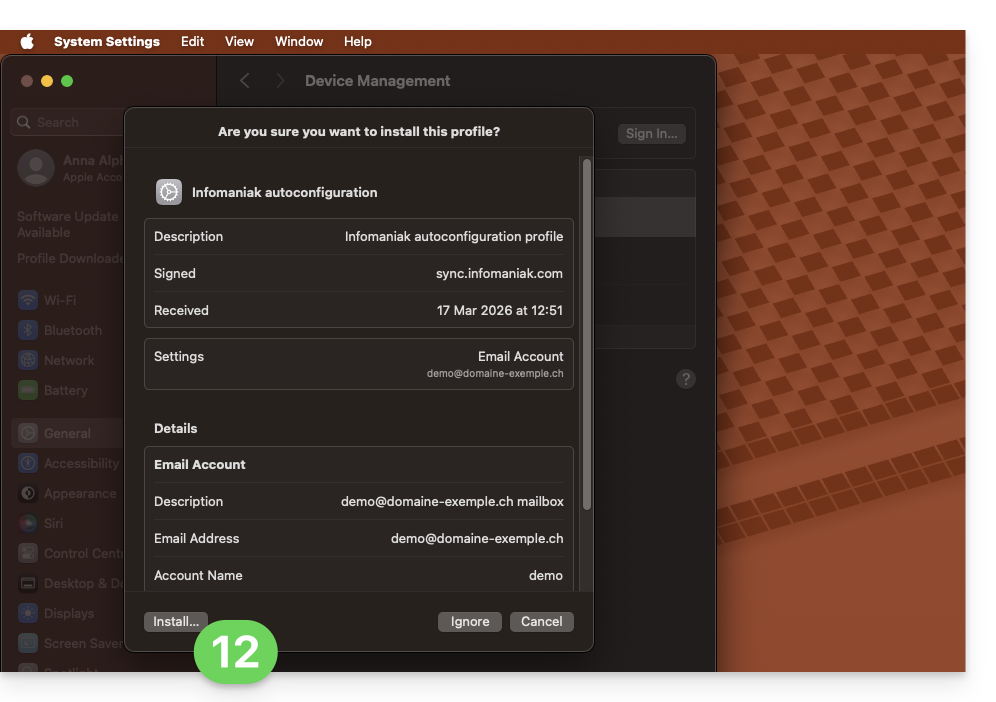
- Click on Install…:
- A password is then requested…
- either you know it because you have already created it in the Devices section of the Mail Service:
- or you can copy the new password found further down on the assistant page
config.infomaniak.comopened earlier: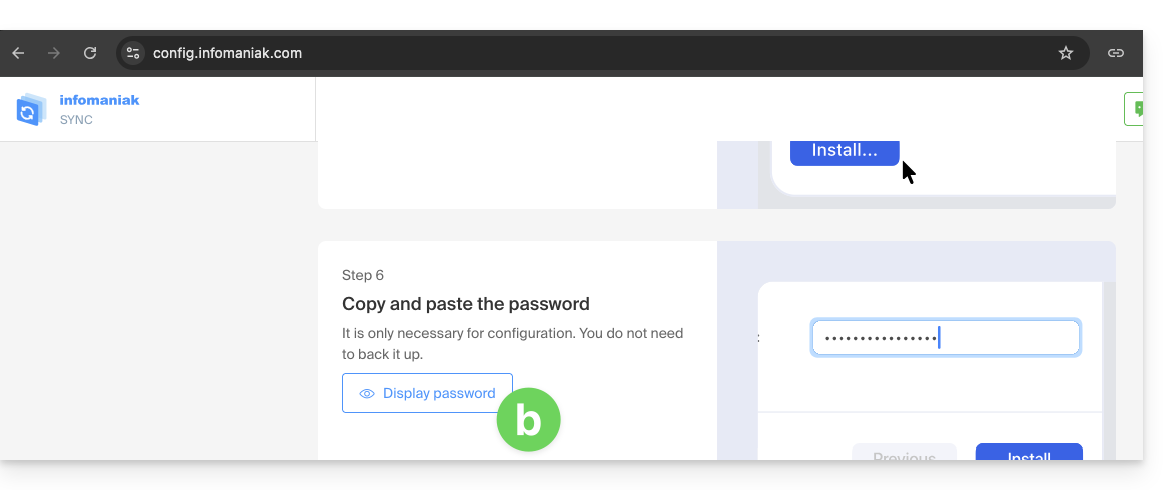
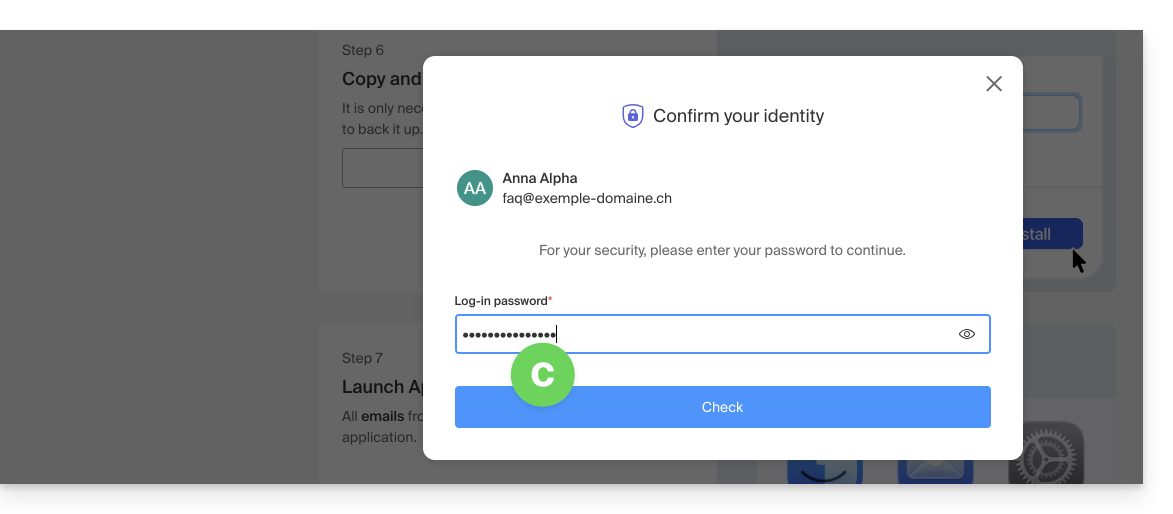
- Before the email password is displayed, your Infomaniak account password may be requested for security:
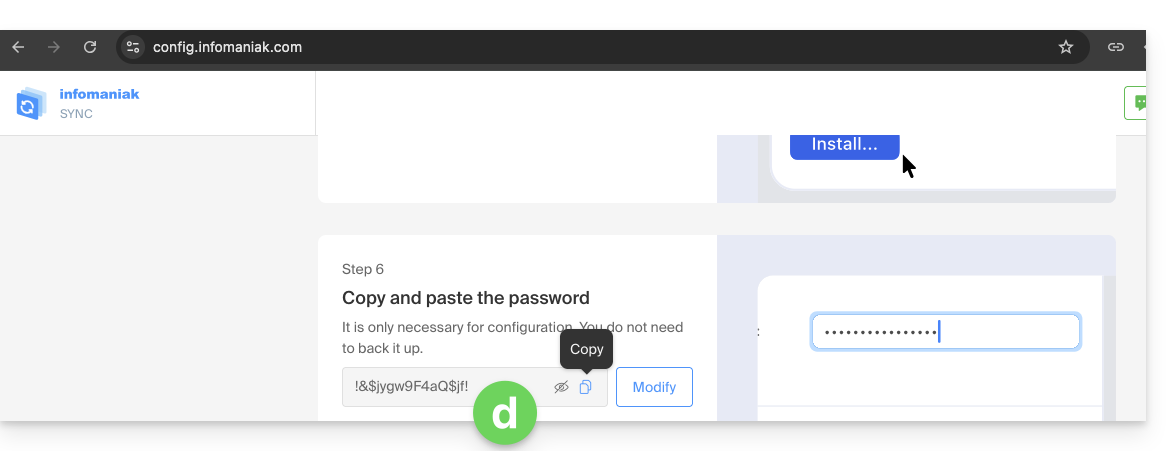
- Here it is, the randomly generated password is displayed, you just need to copy it:
- either you know it because you have already created it in the Devices section of the Mail Service:
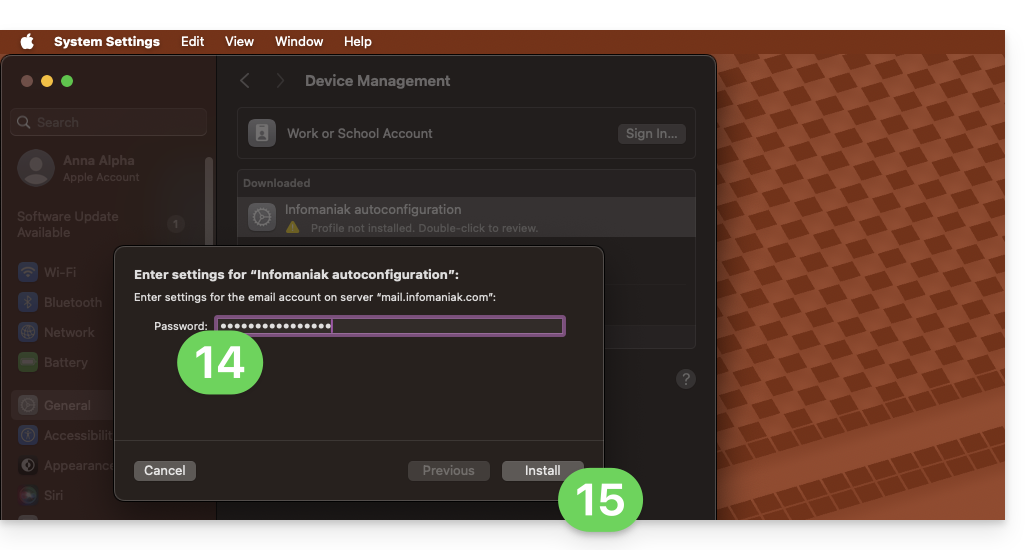
- Paste the password into the macOS window.
- Click on Install to start the profile installation:
- Your email address is now configured in the Apple Mail application, which you can open and check:

Delete an IMAP account
Refer to the chapter "Stop using an account" by changing the system version at the top of the page if necessary (note: do not delete a POP-configured account without saving your messages first).
Delete an Apple profile
Refer to the official documentation by changing the system version at the top of the page* if necessary.
*Why is it necessary to choose the guide version that exactly matches your macOS / iOS system version? Apple introduces changes, sometimes subtle, with each new system version, for example a path on iOS 15…
…becomes this on iOS 18…
Link to this FAQ:
Has this FAQ been helpful?
This guide explains how to connect the Apple Mail mobile app on iOS to an email address hosted by Infomaniak.
Preamble
- Your iOS device will be automatically configured via .mobileconfig configuration profiles compatible with Apple, unlike a manual configuration.
- It is possible to delete a configuration profile once installed (scroll down to the bottom of this page for the instructions).
- The various services offered by Infomaniak are all compatible with the corresponding standard protocols (IMAP/SMTP for email, for example), therefore if you encounter a problem with third-party software, contact its publisher or a Partner and consult the support policy as well as section 11.9 of the Infomaniak Terms of Service.
Install a configuration profile
Prerequisites
- Create the email address in my kSuite or a Mail Service / kSuite.
- Create a password for the email address on the device you are going to configure.
- Check that the Mail Service is configured optimally.
Download the profile from the relevant iOS device or send it from another device (if you already have a working email address, for example):
- Click here to access the Infomaniak configuration tool (online service https://config.infomaniak.com) — log in if necessary to your Infomaniak account on the Organization on which your email address is managed.
- Choose to install the profile on this device:
- Choose to synchronize emails:
- Choose to synchronize another application than the Infomaniak Mail application:
- Enter the password for the email address (attached to Mail Infomaniak (Webmail)) that you want to synchronize on iOS.
- Press the blue Verify button:
- Press to copy the validated password.
- Download the configuration profile and authorize its opening:
- Open the settings of the iOS device:
- Press the recently downloaded profile:
- Press Install:
- Unlock your iOS device:
- Press Install:
- Paste the password of the previously verified email address (point 7 above).
- Press Next:
- There you go, your email address is now configured in the Apple Mail application that you can open and control:
Delete an Apple profile
Refer to the official documentation by changing the version of your system at the top of the page* if necessary.
*Why is it necessary to choose the guide version that exactly matches your macOS / iOS system version? Apple introduces changes, sometimes subtle, with each new version of its system, for example a path on iOS 15…
… becomes this on iOS 18…
Link to this FAQ:
Has this FAQ been helpful?
This guide explains how to quickly create/obtain a password from an Infomaniak Mail Service when you need to access an Infomaniak email address on third-party software, such as Outlook or Thunderbird.
Preamble
- When creating an email address, no password is defined:
- An email address can be accessed on the Infomaniak Mail apps without a password other than the one that already allows you to access your Infomaniak account.
- You just need to authorize your account or invite a contact to be a user of the email address.
- You then simply create specific passwords for each device (Outlook, iPhone, CRM, etc.) as needed:
- You can create multiple passwords for the same email address without interrupting existing connections.
- Each password can be revoked individually, without affecting other users or devices linked to this address.
- A password is never displayed again after its creation; modify it or create a new one if necessary.
Generate an email address password
Prerequisites
- Order a Mail Service from Infomaniak.
- Create one or more addresses on this Mail Service.
- Be Administrator or Legal Representative within the Organization.
If you cannot complete these steps because you receive different information on the screen, you probably lack the necessary rights if you were not the original creator of the email address — refer to this other guide — an administrator can, for example, add the email address directly to your Web Mail app or send you a link allowing you to generate a password yourself.
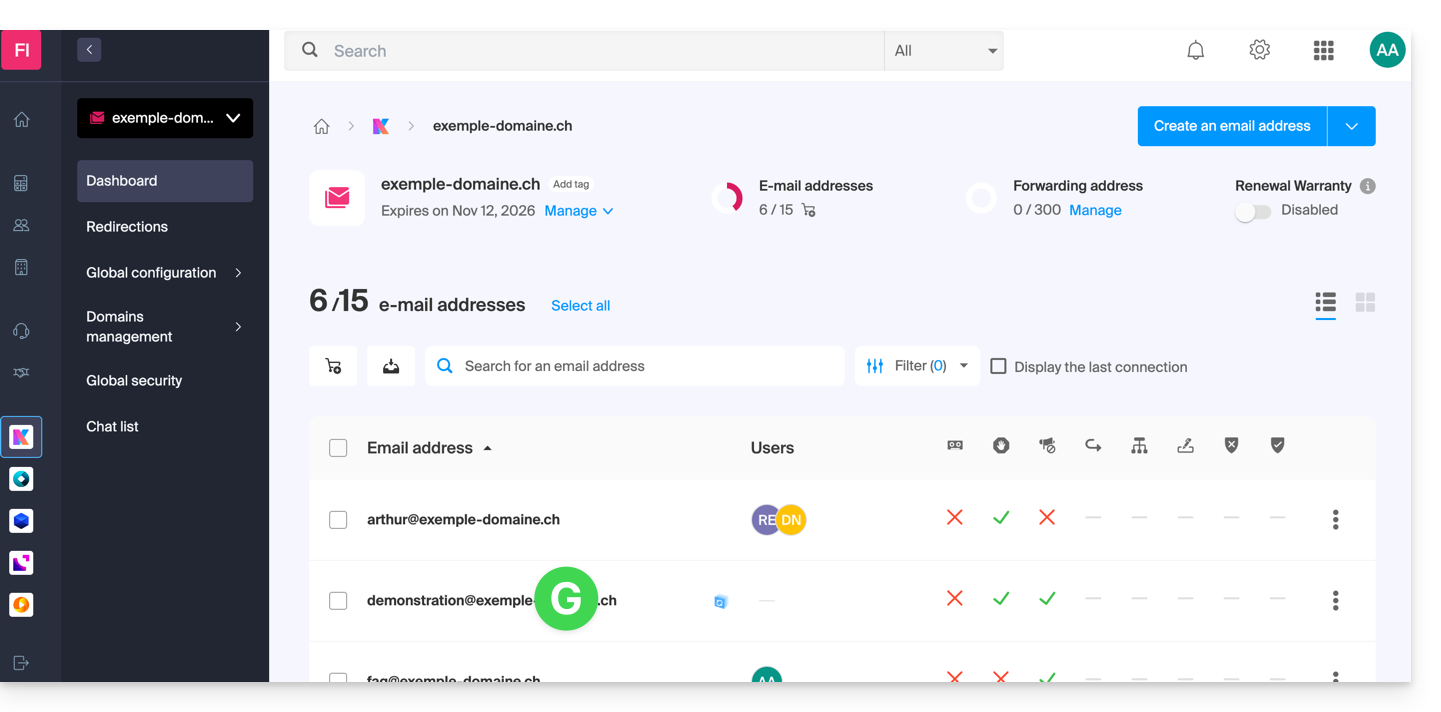
To add a password to the example address demonstration@exemple-domaine.ch:
- Enter your Infomaniak account login and password on the page https://manager.infomaniak.com/:
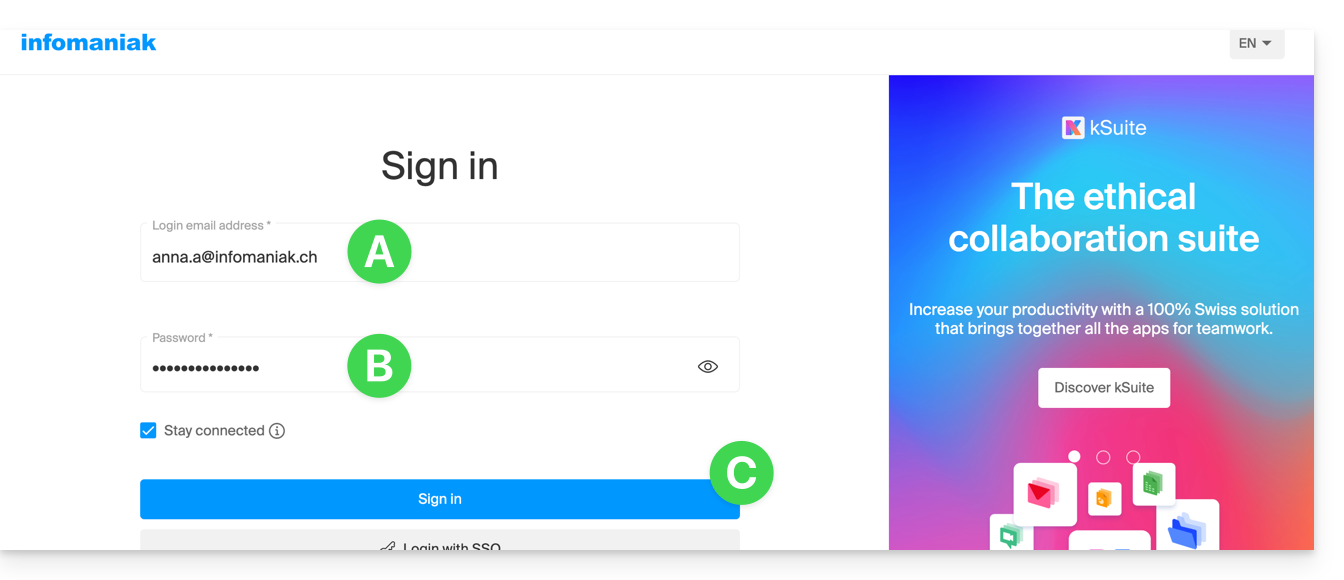
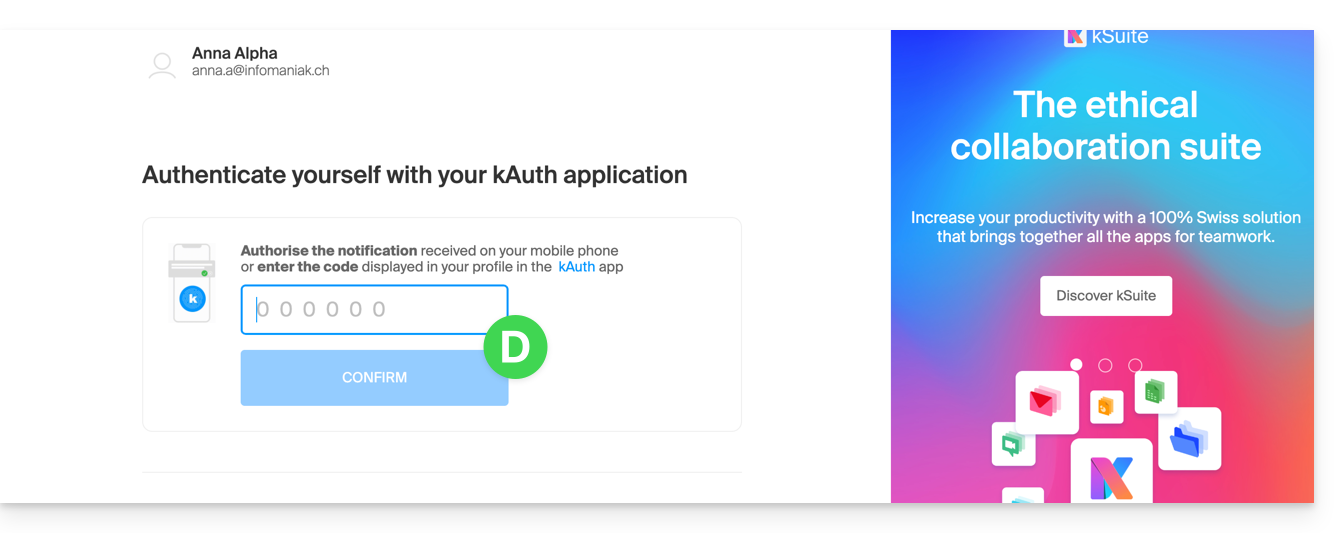
- Validate the entry on the Manager with the 2FA (two-factor authentication) method initially defined:
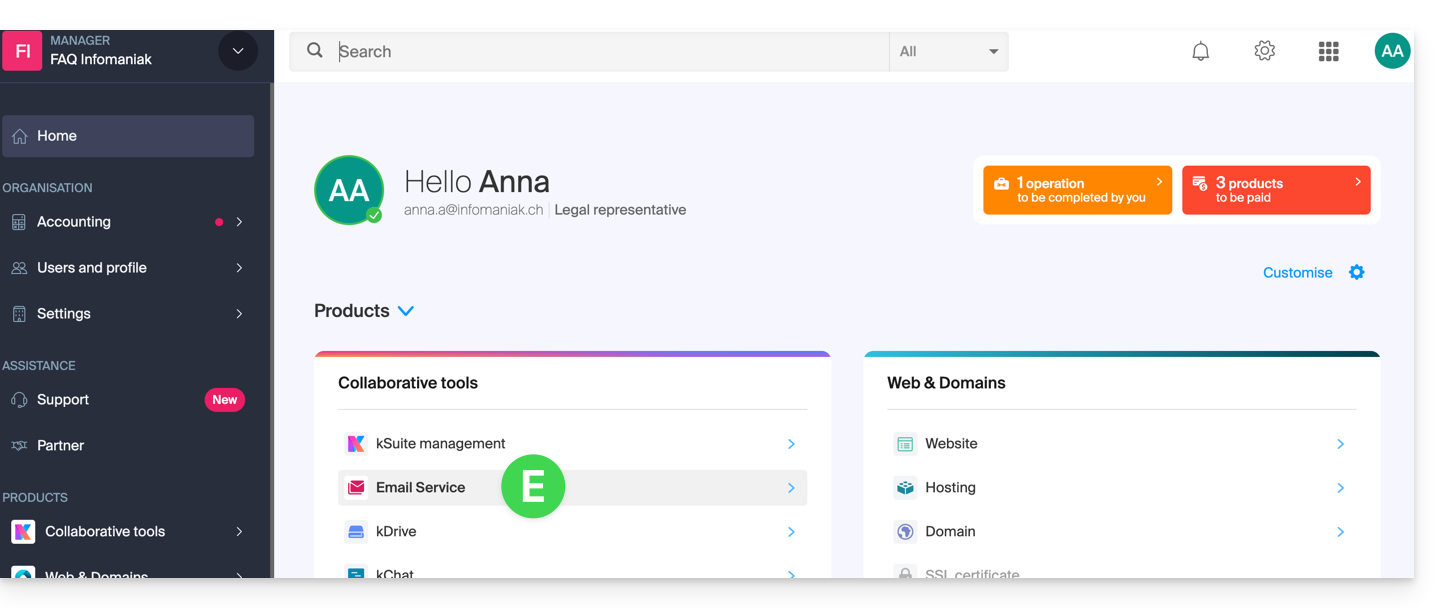
- Once on the dashboard, click on Mail Service:
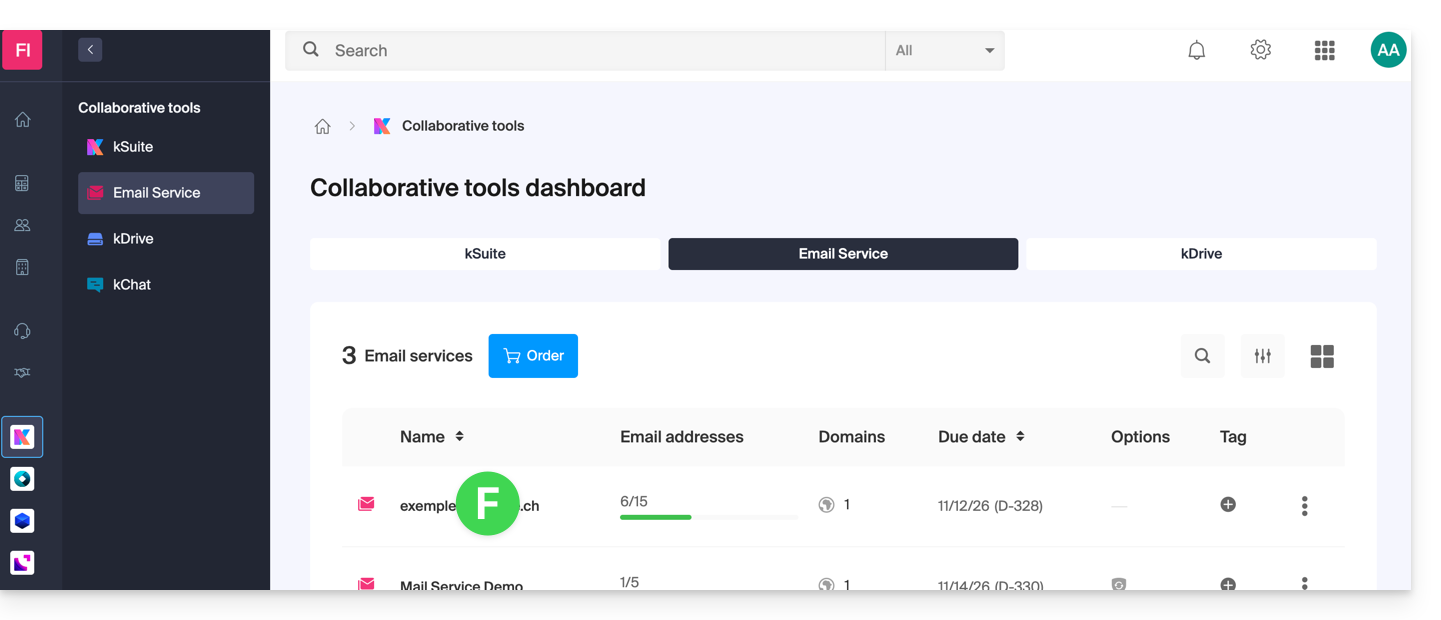
- Once on your Mail Services, click on the name / domain name to which the email address in question belongs:
- Once on the Mail Service to which the address belongs, click on the email address in question:
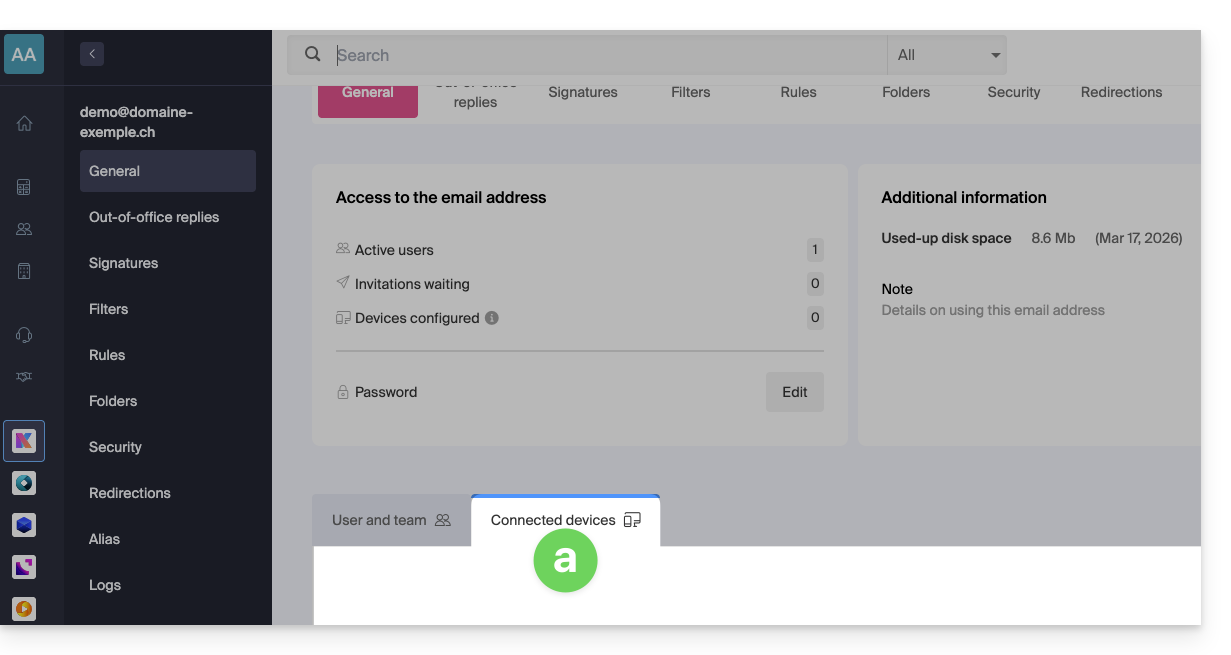
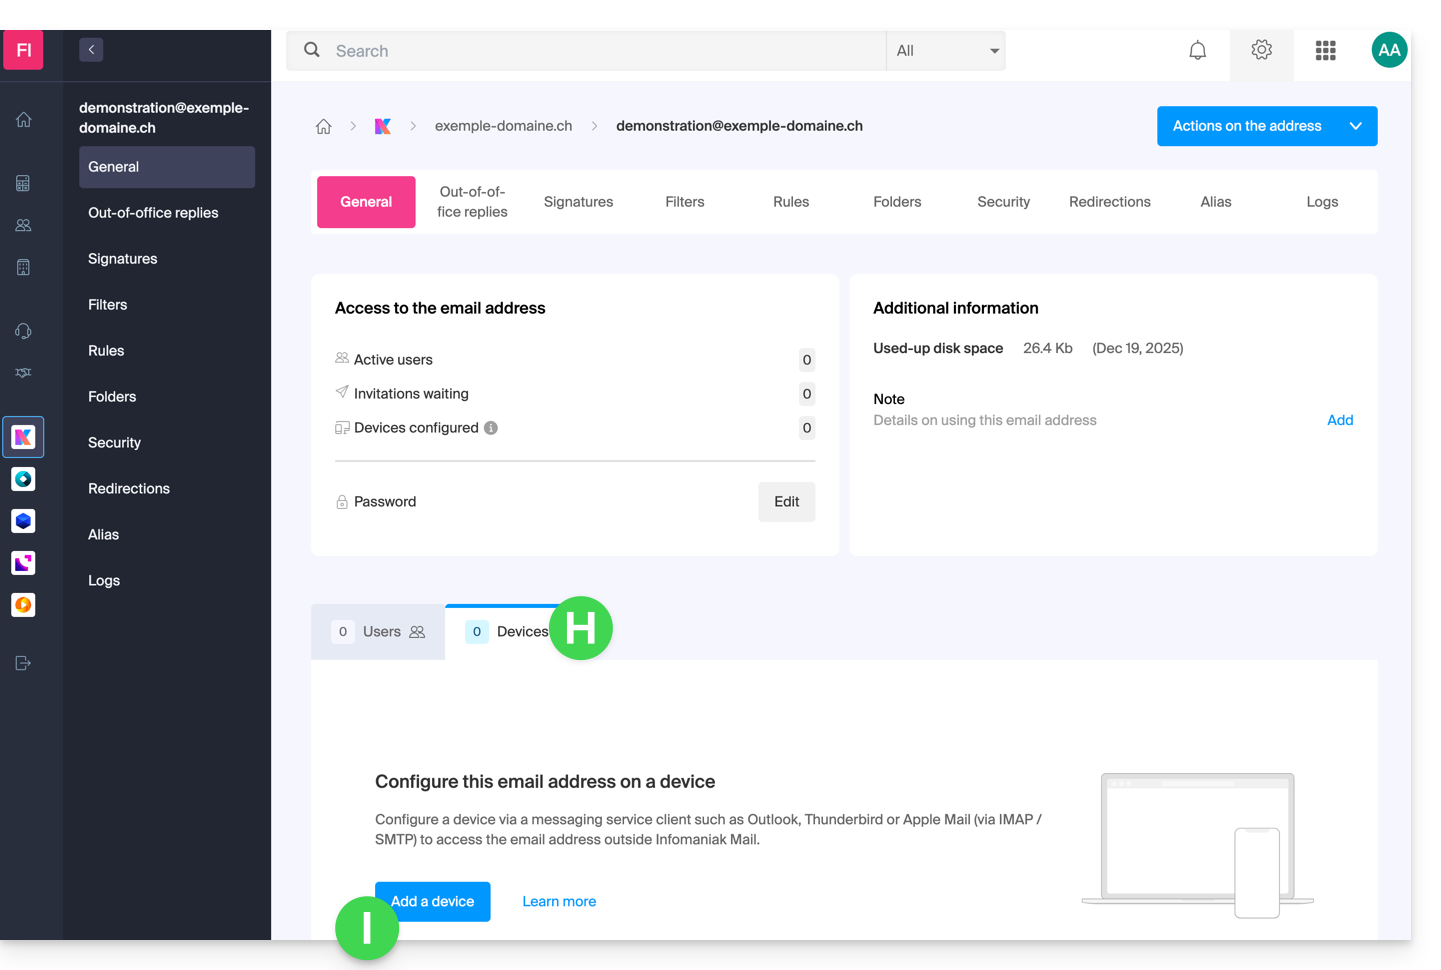
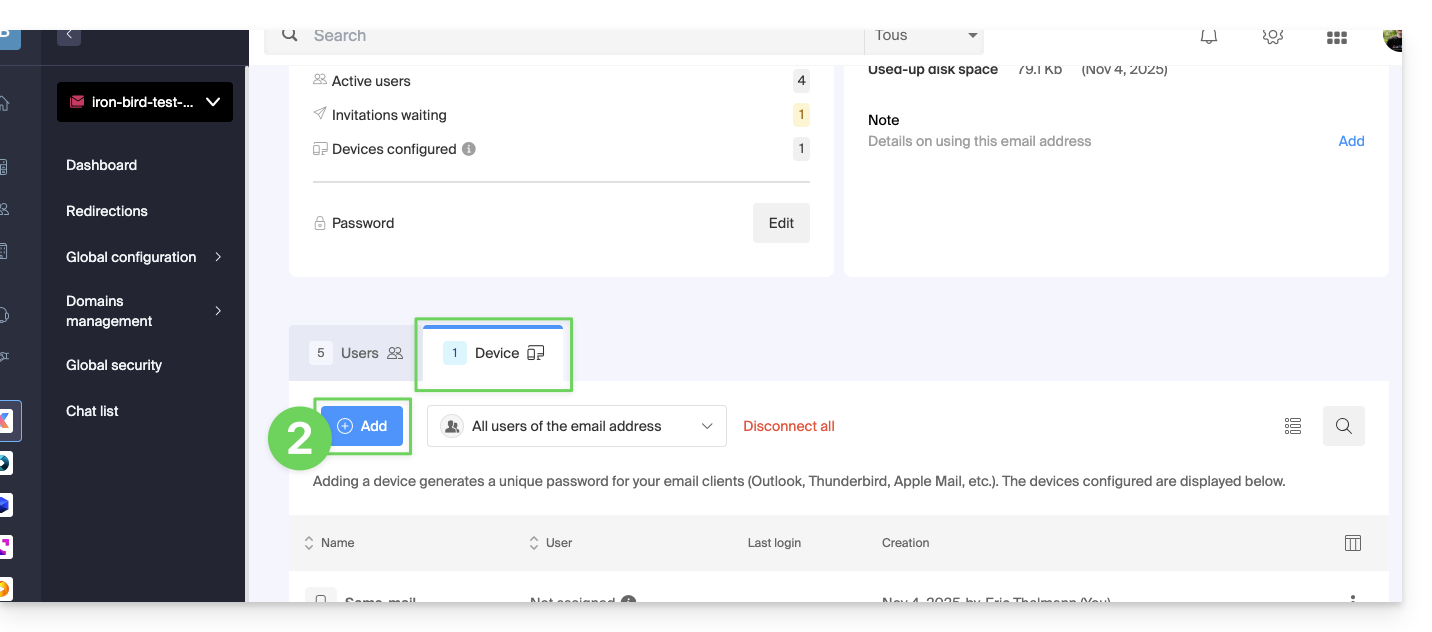
- Once on the email address in question, click on the Devices tab and then on Add a device:
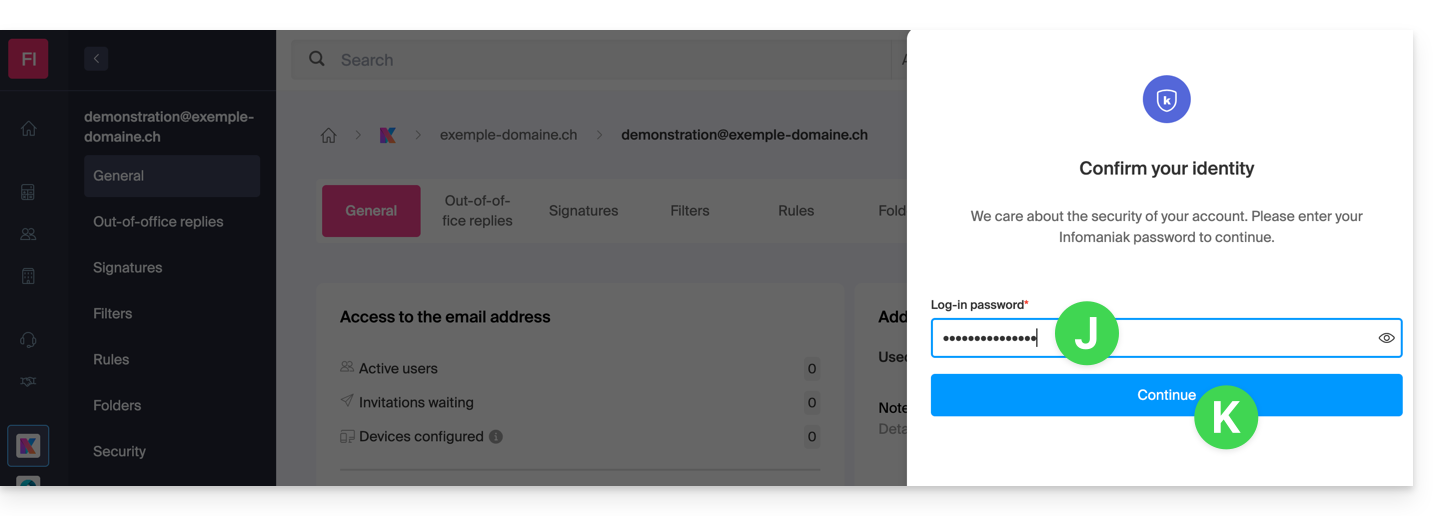
- You may need to re-enter the login password (the one at point B above) at this stage:
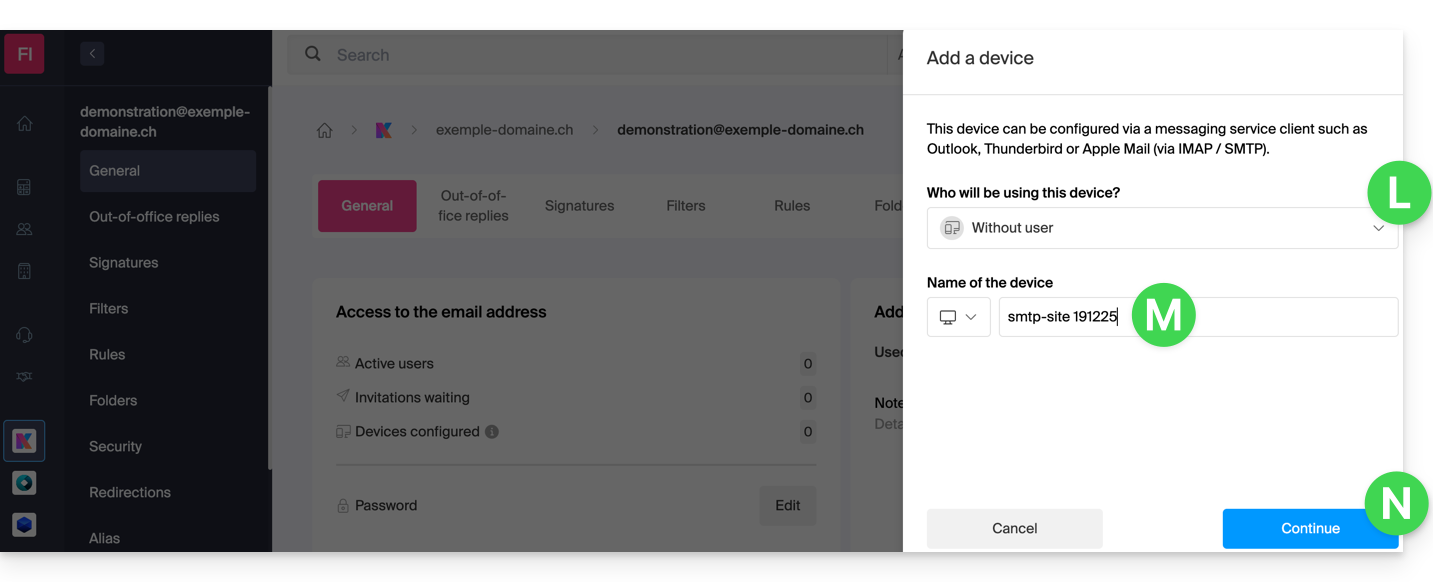
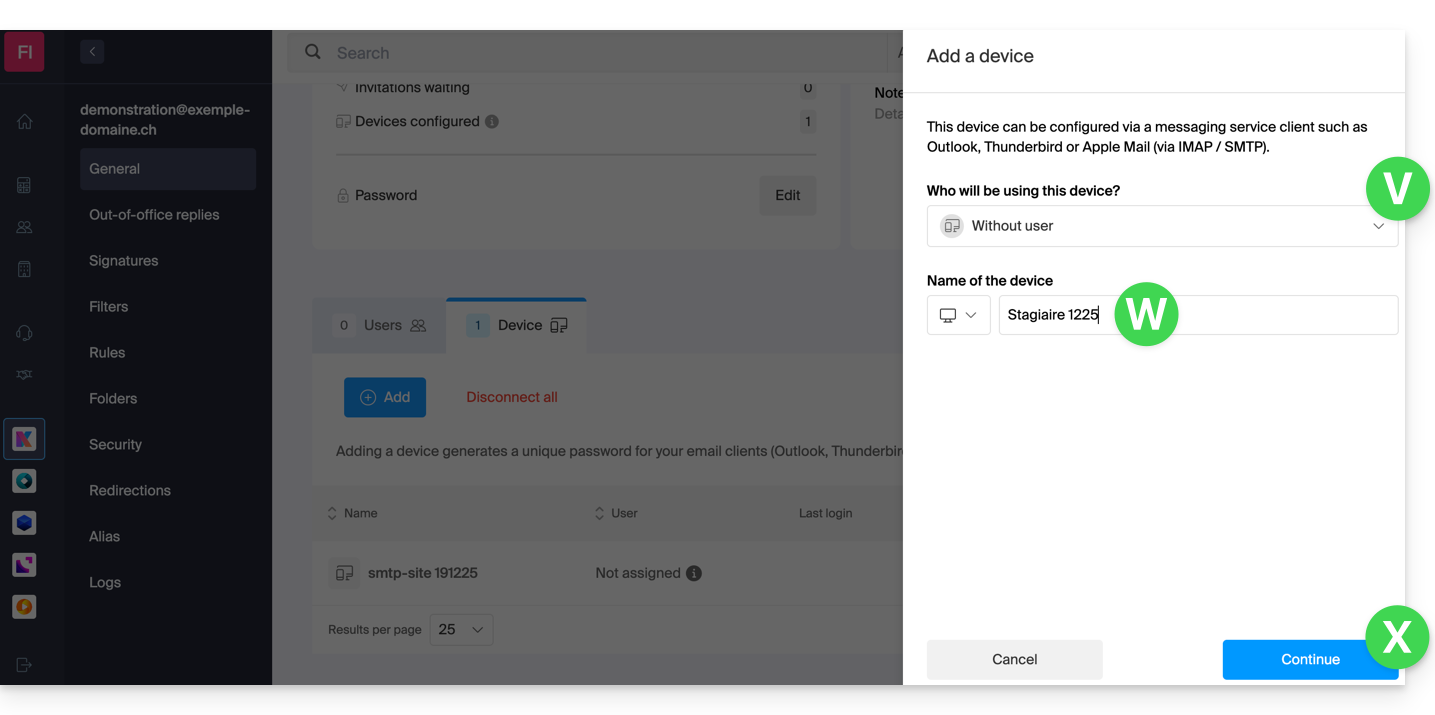
- Then choose to not specify a particular user ("Without user").
- Enter a descriptive name that allows you to identify the reason why you created this device (here the user needs a password to be able to send emails from a site, and adds as useful information today's date):
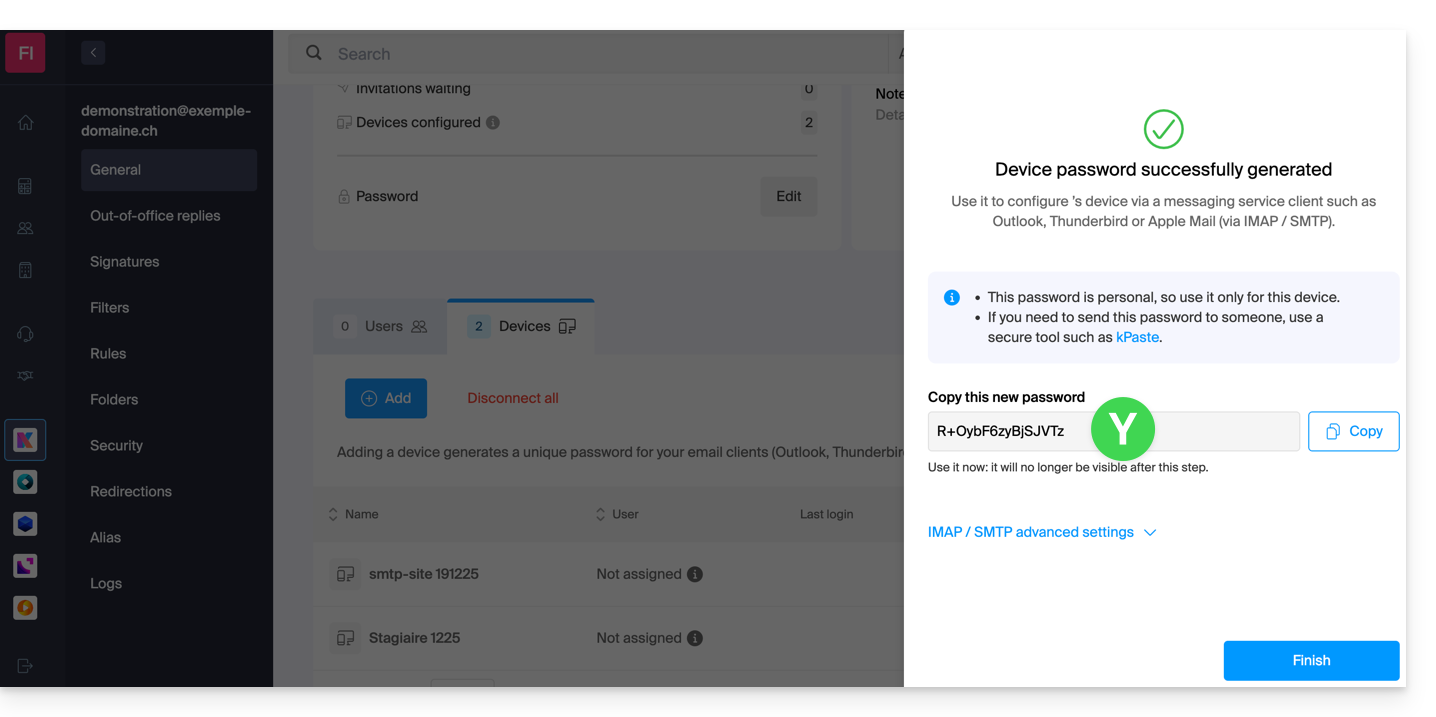
- There you go: the new password is displayed, you can change the characters (16 minimum) if necessary (be careful, it will not be possible to display it again later).
- Save it at the bottom of the page to use it as you wish:
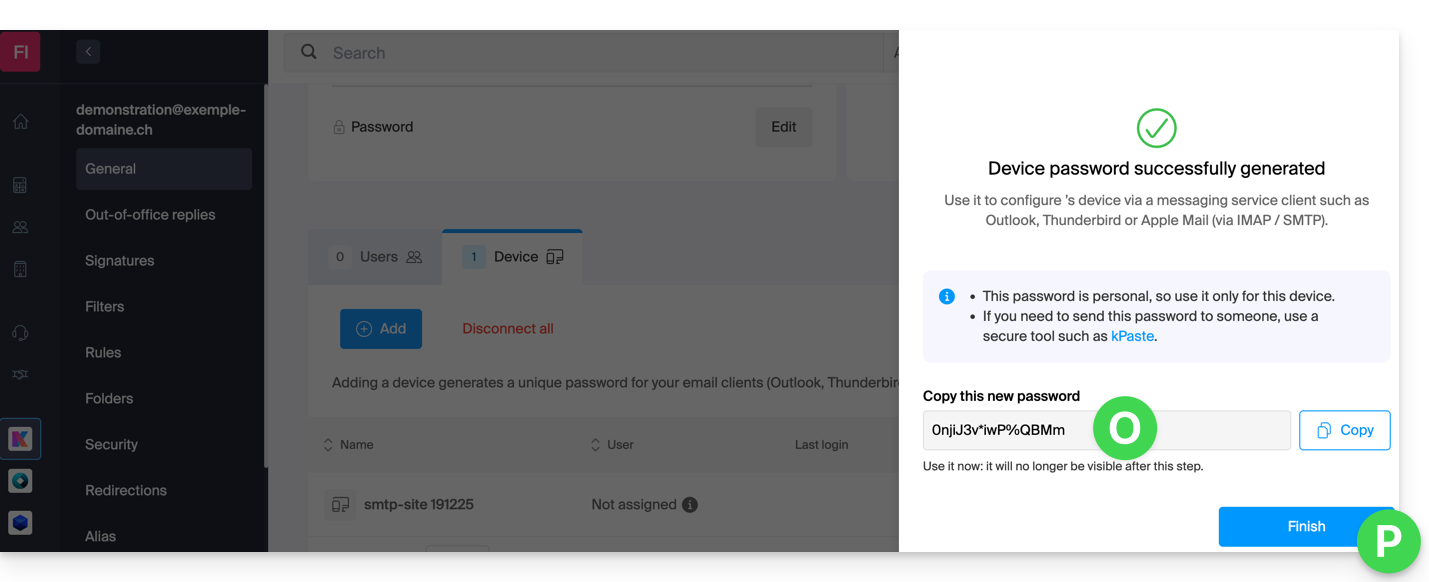
You clicked on the “Finish” button (above “P”) without noting the password? No problem, modify or generate a new one!
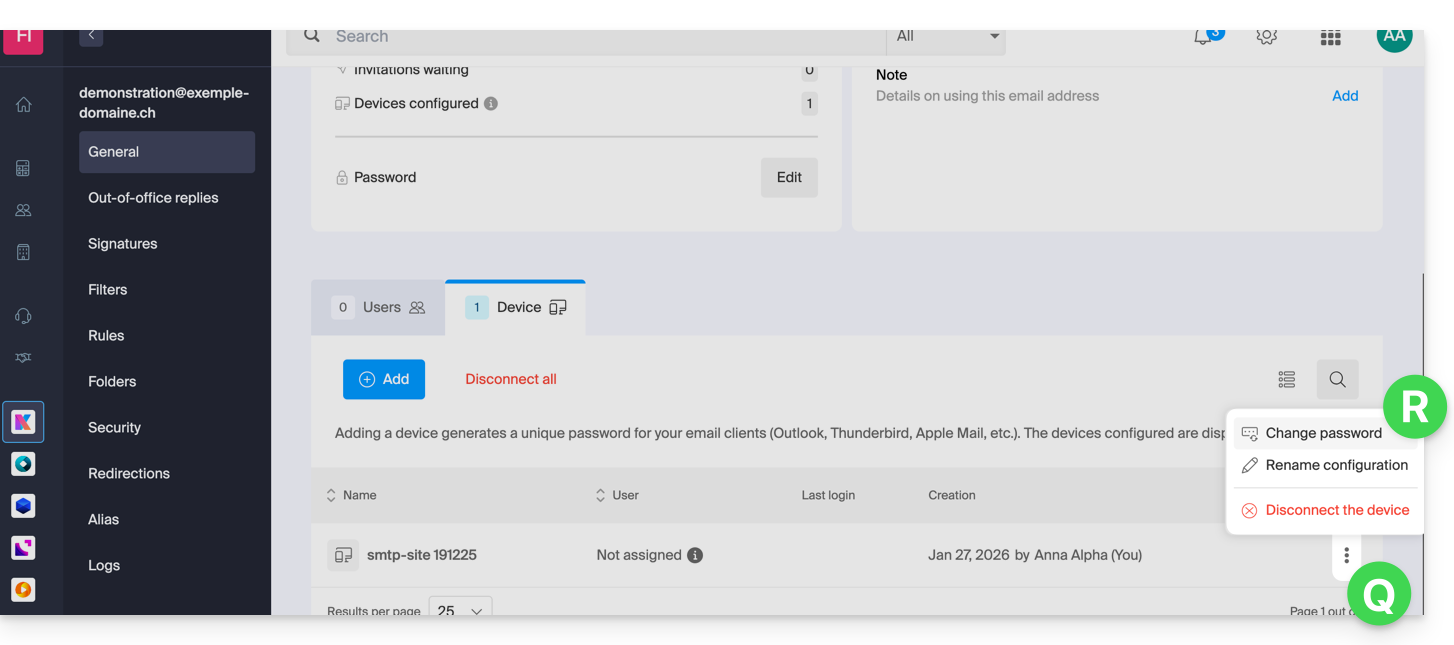
- Click on the action menu ⋮ located to the right of the device just created and click on Modify the password:
- Click on the button on the far right of the field to generate a new random password and/or enter the secure characters you want to use (16 minimum) for the new password, then click on the button to save the modification:
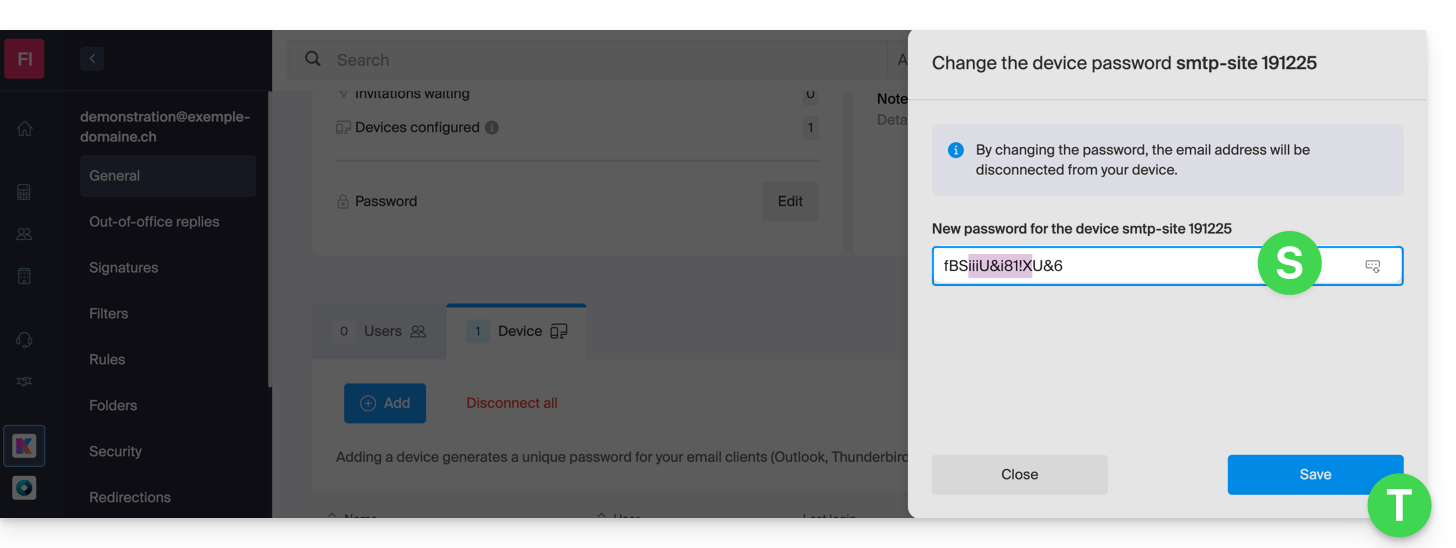
- There you go, the password that replaces the old one is displayed permanently, you can enter it on your device(s) in place of the previous one (be careful, it will not be possible to display it again later).
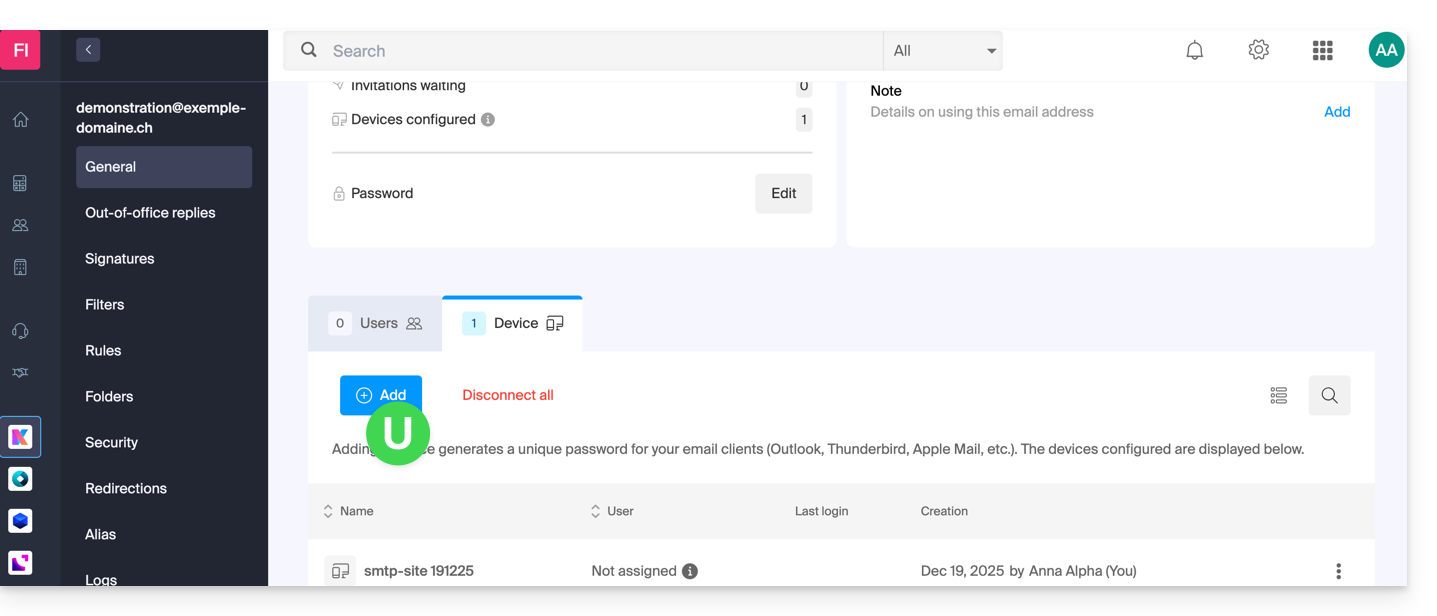
Do you need a password for a secondary and temporary user? No problem, generate a second one!
- Click on the button to Add an additional new device:
- Then choose to not specify a particular user, and enter a name that allows you to identify the reason why you created this device (here the user needs a password for an intern for a week):
- There you go, the password is displayed, you can use it for the purpose of your choice (be careful, it will not be possible to display it again later, however, as before, it will of course be possible to modify it or generate a new one):
Alternative: create a password for a user
Instead of creating a password yourself and having to communicate it to the user later, you can directly allow a user who does not have as many permissions as you to obtain the password for the device they need:
- Add the new user (existing in the Organization or not) as described in this other guide:

- Once the user is added, switch to the devices tab to add a new device:
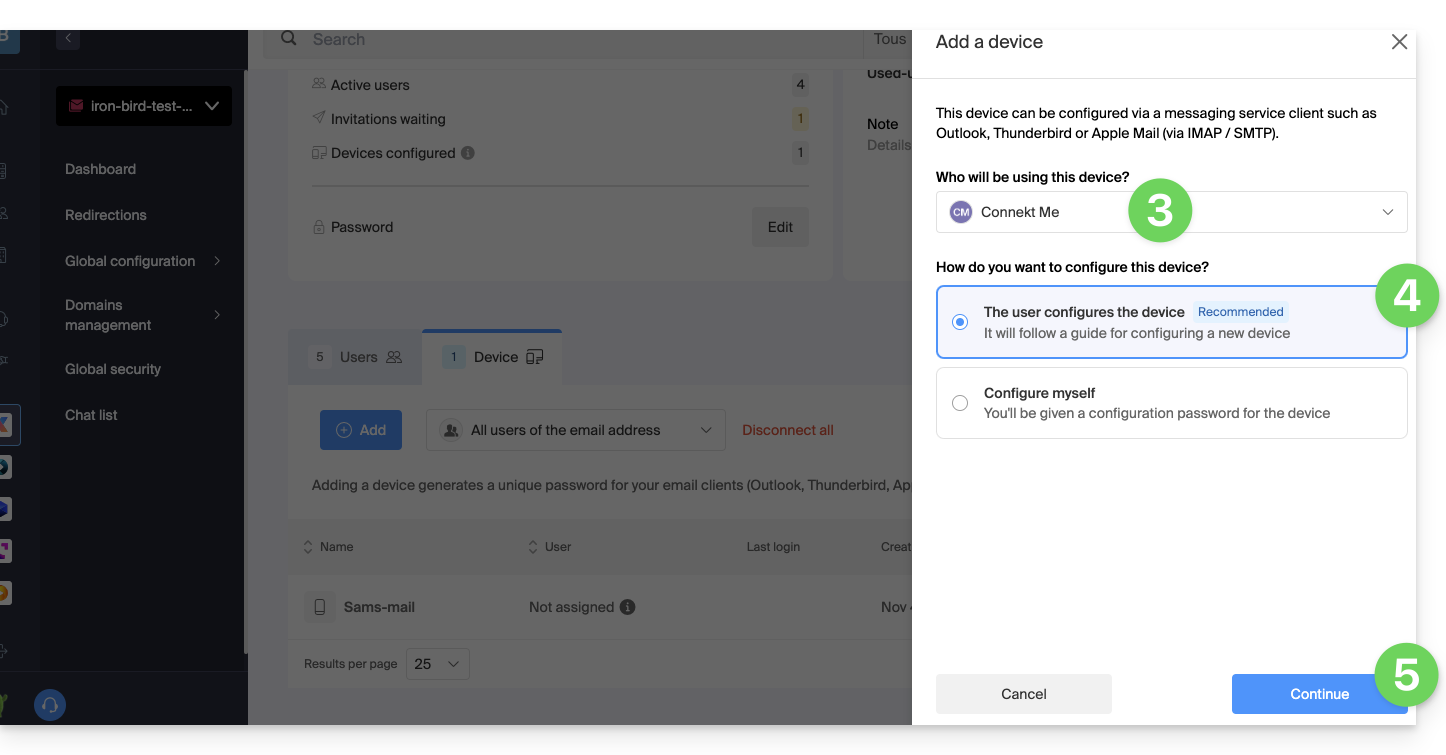
- If necessary, enter the login password to your Infomaniak account and then select the user created in step 1.
- Click on the first option to send a setup assistant for the user's device.
- Click on the Continue button:
- Copy the invitation link valid for 30 days to send to the user.
- If necessary, send the invitation to the user's email address:
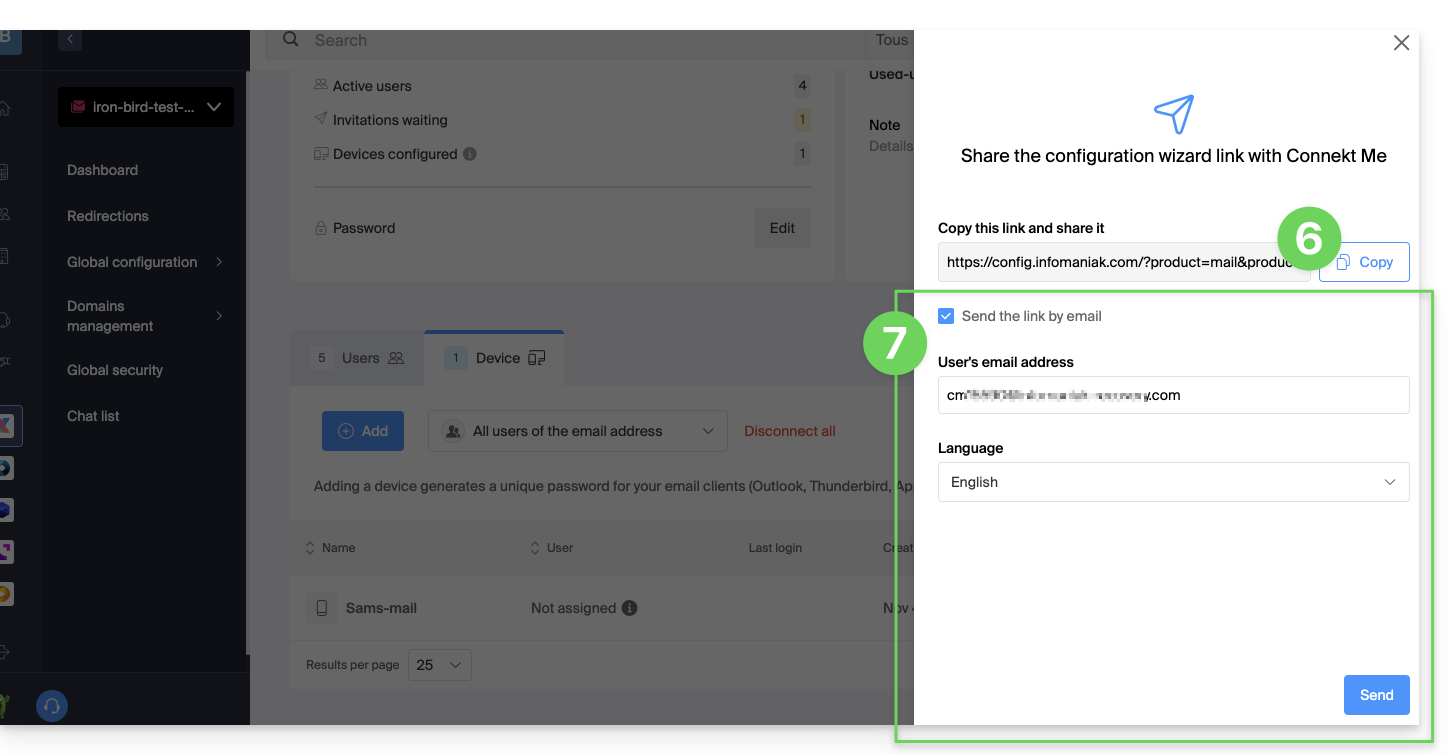
In point 4 above, you can also choose to generate a password:
- The created password will be displayed, you can modify it one last time, copy it, and keep it safe (password manager, for example); it will no longer be displayed afterward.
Modify or remove an existing password
When access is no longer needed, revoke only the password in question: other accesses to the email address remain active.
Link to this FAQ:
Has this FAQ been helpful?