Knowledge base
1000 FAQs, 500 tutorials and explanatory videos. Here, there are only solutions!
This guide explains how to display and interpret monitoring data (network statistics, CPU, RAM, etc.) of a Cloud Server.
Monitor the activity of a Managed Cloud Server
To access monitoring
- Click here to access the management of your product on the Infomaniak Manager (need help?).
- Click directly on the name assigned to the product concerned.
- Click on Monitoring in the left sidebar
Different data is available to monitor the activity of your Cloud Servers, including:
- incoming and outgoing traffic (network)
- the average system load (load average)
- the average CPU load
- the amount of RAM used
- disk space used
- the number of hits / sec.
- the average number of MySQL queries made
Interpreting the statistics
By interpreting the monitoring of the resources of a Cloud Server, you can estimate the resources (power) you need to run your websites and web applications.
Total system load

The total system load summarizes in percentage the level of use of the virtual processors. In this example, the server therefore uses less than 10% of its resources (0.10).
Processor (CPU) and memory (RAM)

These graphs show that less than 10% of the virtual processors are used and that less than 3 GB of RAM are actually used. In this example, the configuration of this server is therefore oversized compared to actual needs.
High cached memory
High cache memory on a server is not abnormal and is often beneficial in many cases. Here's why:
- Caching for improved performance: Modern operating systems, such as Linux, use free memory to cache data from the disk to improve performance. When you access files or applications, the system can quickly retrieve the data from the cache instead of reading it from slower storage devices, such as hard drives. This helps to reduce the overall response time of your server and can significantly improve performance.
- Efficient memory usage: High memory usage due to caching means that your server is efficiently using the available memory. Unused memory is wasted memory. Therefore, as long as the memory is being used for useful purposes like caching, it is a positive sign.
- Automatic memory management: Operating systems are designed to automatically adjust the size of the cache based on the needs of the running applications. If an application needs more memory, the cache can reduce its size to accommodate it. This dynamic memory management ensures a balance between caching and serving active applications.
- Monitoring perspective: From a monitoring perspective, seeing high memory usage due to caching can initially raise concerns, but it is essential to interpret the metrics in the context of your server's behavior. If you observe good performance and notice no signs of memory-related issues, such as swapping or application crashes, the high cache usage is likely expected and beneficial.

In summary, high cache memory on a server is normal and can contribute to improving the overall system performance. Do not worry if you observe significant cache memory usage, as long as your server is functioning correctly and without obvious memory-related issues. Caching is an essential tool for optimizing performance and making the most of available resources.
This guide explains how to access the bootloader of a Cloud VPS / Lite VPS from the Infomaniak Manager.
The bootloader (or bootloader) is the software that allows you to launch one or more operating systems (multi-boot) on your Cloud VPS / Lite VPS.
Display the bootloader of a Cloud VPS / Lite VPS
The following procedure allows you to display the bootloader of GRUB:
- Click here to access the management of your product on the Infomaniak Manager (need help?).
- Click directly on the name assigned to the product concerned.
- Click on Open VNC console.
- Click on Restart the server while keeping the new window with the VNC console displayed.
- Refresh the VNC console as soon as the server restarts to display the server's bootloader; GRUB then appears and you can leave it displayed by pressing a key on your keyboard:

This guide explains how to replace, within an Infomaniak Web hosting, the address of a site currently a subdomain (https://dev.domain.xyz for example) with the main domain (https://domain.xyz).

Preamble
- The operations in brief:
- We start with a site created and accessible via the URL of the main domain
dev.domain.xyz. - We add an alias
domain.xyz. - We swap the two types (the main domain becomes an alias and the alias becomes the main domain).
- We remove the old name
dev.domain.xyz.
- We start with a site created and accessible via the URL of the main domain
- Note that the site remains in the original folder on the server; the name of this location may be in the form
/sites/dev.domain.xyzbut this has absolutely no impact on the live site. - Also, familiarize yourself with the last chapter of this other guide.
The operations in detail
To switch from a site with a subdomain address "dev.domain.xyz" to a direct address "domain.xyz":
- Click here to access the management of your product on the Infomaniak Manager (need help?).
- Click directly on the name assigned to the product in question.
- Click on the chevron to expand the Domains section of this site:
- Click on the button Add a domain:

- Add the desired new name, check the corresponding boxes.
- Click on the button to Confirm:

- Once the addition is complete, click on the action menu ⋮ located to the right of the relevant item.
- Choose to set the item as the primary domain:

- Confirm the operation to proceed with the domain swap.
This guide explains how to modify the disk space of a hosting on Managed Cloud Server.
Preamble
- The databases are installed on the same Cloud Server, so the disk space for the databases is not limited to the size of the hosting but to the total disk space of the Cloud Server.
- To modify this total disk space, it is necessary to modify the configuration of the Cloud Server.
- To modify this total disk space, it is necessary to modify the configuration of the Cloud Server.
Modify the disk space of a Web hosting
To access the hosting on Cloud Server:
- Click here to access the management of your product on the Infomaniak Manager (need help?).
- Click directly on the name assigned to the product concerned.
- Click on the action menu ⋮ located to the right of the Web hosting concerned, in the Web Hostings section.
- Click on Modify the disk space of the hosting:
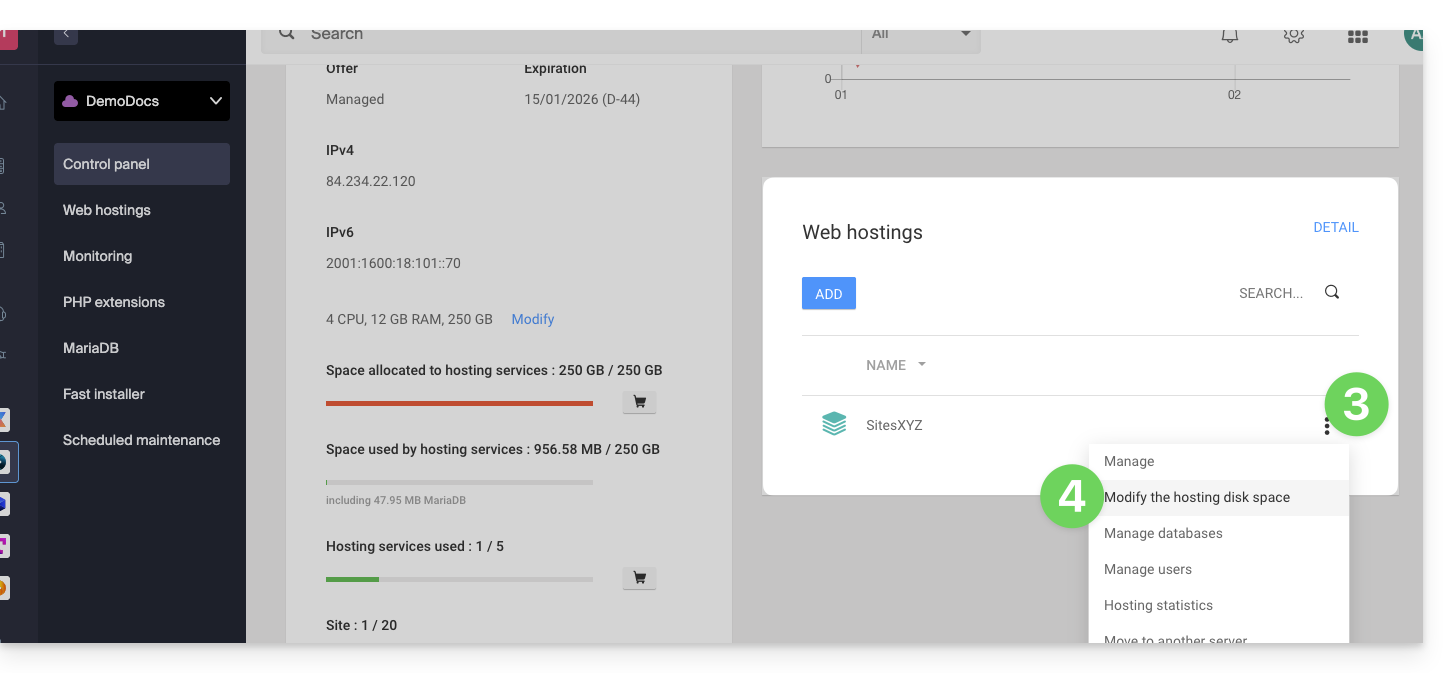
- Adjust the size according to the allocated and still available disk space.
- Click on the Confirm button to validate the modification.
This guide helps you resolve any issues with activating your Windows Server license.
Preamble
- Check for any ongoing issues on https://infomaniakstatus.com/.
- For Public Cloud specifically, the list of scheduled maintenance and ongoing issues is available at https://status.infomaniak.cloud/.
Modify the registered key
Open the Run utility (press Windows logo + R).
Remove the registered key
Run the following command:
cscript.exe c:\windows\system32\slmgr.vbs -upkAdd a new key
Reopen the Run utility and then run the following command:
cscript.exe c:\windows\system32\slmgr.vbs -ipk {CLE/KEY}Replace {CLE/KEY} with the key from your configuration below:
| Operating system | KMS key |
|---|---|
| Windows Server 2019 Datacenter | WMDGN-G9PQG-XVVXX-R3X43-63DFG |
| Windows Server 2019 Standard | N69G4-B89J2-4G8F4-WWYCC-J464C |
| Windows Server 2022 Datacenter | WX4NM-KYWYW-QJJR4-XV3QB-6VM33 |
| Windows Server 2022 Standard | VDYBN-27WPP-V4HQT-9VMD4-VMK7H |
| Windows Server 2025 Standard | TVRH6-WHNXV-R9WG3-9XRFY-MY832 |
| Windows Server 2025 Datacenter | D764K-2NDRG-47T6Q-P8T8W-YP6DF |
Activate Windows
Reopen the Run utility and then run the following command to associate the key with the Infomaniak activation robot:
cscript.exe c:\windows\system32\slmgr.vbs -skms kms.infomaniak.cloudReopen the Run utility and then finally run the following command to activate your Windows system:
cscript.exe c:\windows\system32\slmgr.vbs -atoIn terms of free software for handling multimedia files, FFmpeg is a powerful and flexible tool. It can be used to convert, edit, and stream videos and audio.
However, using FFmpeg on shared hosting presents certain issues and limitations for both users and hosts.
You should opt for the Cloud Server offer for using FFmpeg.
You can also opt for the Infomaniak VOD/AOD service.
This guide explains how to access the configuration of an Infomaniak Web site to display technical information such as the PHP, Apache version, or the activated PHP extensions and modules.
View the site's technical information
To access the Web site management:
- Click here to access the management of your product on the Infomaniak Manager (need help?).
- Click directly on the name assigned to the product concerned.
- Click on the Manage button under Advanced Settings:

- Take note of the Web site information under the General, PHP / Apache and PHP Extensions tabs:

- Click on the back arrow in the left sidebar.
- Click on Databases in the left sidebar to get the MySQL version of the Web hosting:

This guide explains how to restart an Infomaniak VPS Cloud / VPS Lite and what you can do in case you no longer have access to the server.
Reboot VPS Cloud / VPS Lite
The classic mode allows you to restart your server normally. To access the VPS Cloud / VPS Lite:
- Click here to access the management of your product on the Infomaniak Manager (need help?).
- Click directly on the name assigned to the product concerned.
- Click on the Manage button.
- Click on Restart (classic mode):

Enable/disable safe mode
If you have lost your SSH key, or made a configuration error, etc.
You have the possibility to restart in rescue mode. This consists of restarting from a base image from which you can mount the partitions of your cloud. In this way, you will be able to modify/repair your configuration.
Warning: depending on the operating system installed, the system volume may be named /dev/sda, /dev/sda1 or /dev/vda; the same for the data volume /dev/sdb, /dev/sdb2 or /dev/vdb! It is therefore necessary to replace these indications with those corresponding to your situation.
To activate rescue mode:
- Click here to access the management of your product on the Infomaniak Manager (need help?).
- Click directly on the name assigned to the product concerned.
- Click on the Manage button.
- Click on Restart (safe mode):

Warning: Your data disk is not accessible when your VPS Cloud / VPS Lite is in safe mode. Only the system disk is accessible.
Perform operations
Once safe mode is active, access your Cloud via SSH, either with your ssh key, or with the temporary password available in the interface.
Once connected, do:
sudo -ithen list the available partitions (replace ov-abcdby your hostname):
[root@ov-abcd ~]# lsblk
NAME MAJ:MIN RM SIZE RO TYPE MOUNTPOINT
vda 253:0 0 8G 0 disk
└─vda1 253:1 0 8G 0 part /
vdb 253:16 0 20G 0 disk
└─vdb1 253:17 0 20G 0 part
vdb corresponds to your cloud disk.
To access it in write mode, you must mount it:
[root@ov-abcd ~]# mount /dev/vdb1 /mnt/You can then modify the files:
[root@ov-abcd ~]# ls /mnt/
bin boot dev etc home initrd.img initrd.img.old lib lib64 lost+found media mnt opt proc root run sbin srv sys tmp usr var vmlinuz vmlinuz.old
Depending on the operating system of your cloud, you can also perform a chroot to reproduce your usual environment:
[root@ov-abcd ~]# chroot /mnt/
bash: ls: command not found
root@ov-abcd:/# export PATH="$PATH:/usr/sbin:/sbin:/bin"
root@ov-abcd:/# ls
bin boot dev etc home initrd.img initrd.img.old lib lib64 lost+found media mnt opt proc root run sbin srv sys tmp usr var vmlinuz vmlinuz.old
Once the necessary modifications have been made, disable safe mode to restart your cloud on the original disk.
This guide presents the use of MySQL on Infomaniak hosting, particularly the operation of stored procedures.
Preamble
- “Stored procedures” and “stored routines” are not available on a shared web hosting.
Understanding stored procedures and routines
If stored procedures are essential to your project and you are currently using shared hosting, it is advisable to consider a VPS or a dedicated server, which offer more control and resources.
Stored procedures are an effective way to automate tasks and integrate business logic directly into the database. This results in more performant and easier-to-maintain applications.
On a Cloud Server, as soon as the user has administrator rights on the relevant MySQL database, they have the necessary permissions to execute SQL instructions, including the EXECUTE command, used to launch stored procedures already present in the database.
The user also has the required privileges to create new stored procedures. Creating a stored procedure is done via specific SQL syntax defining the instructions to execute, followed by its recording in the database.
Example
DELIMITER //
CREATE PROCEDURE GetUserCount()
BEGIN
    SELECT COUNT(*) AS total_users FROM users;
    -- Returns the total number of users in the table
END //
DELIMITER ;

-- Execute the stored procedure
CALL GetUserCount();This guide explains how to customize the time slot(s) during which Infomaniak can perform maintenance to update your services (new features, fixes, etc.).
Preamble
- This feature is only available for:
- Cloud Servers
- Cloud VPS / VPS Lite
- Jelastic Cloud
- Without any indication from you, scheduled maintenance is generally performed by Infomaniak between 10 PM and 6 AM.
Modify the scheduled maintenance period
To do this:
- Click here to access the service for which you want to schedule maintenance on the Infomaniak Manager (need help?).
- Click directly on the name assigned to the product concerned.
- Click on Scheduled Maintenance in the left sidebar or on the central page depending on the service concerned (below Jelastic):
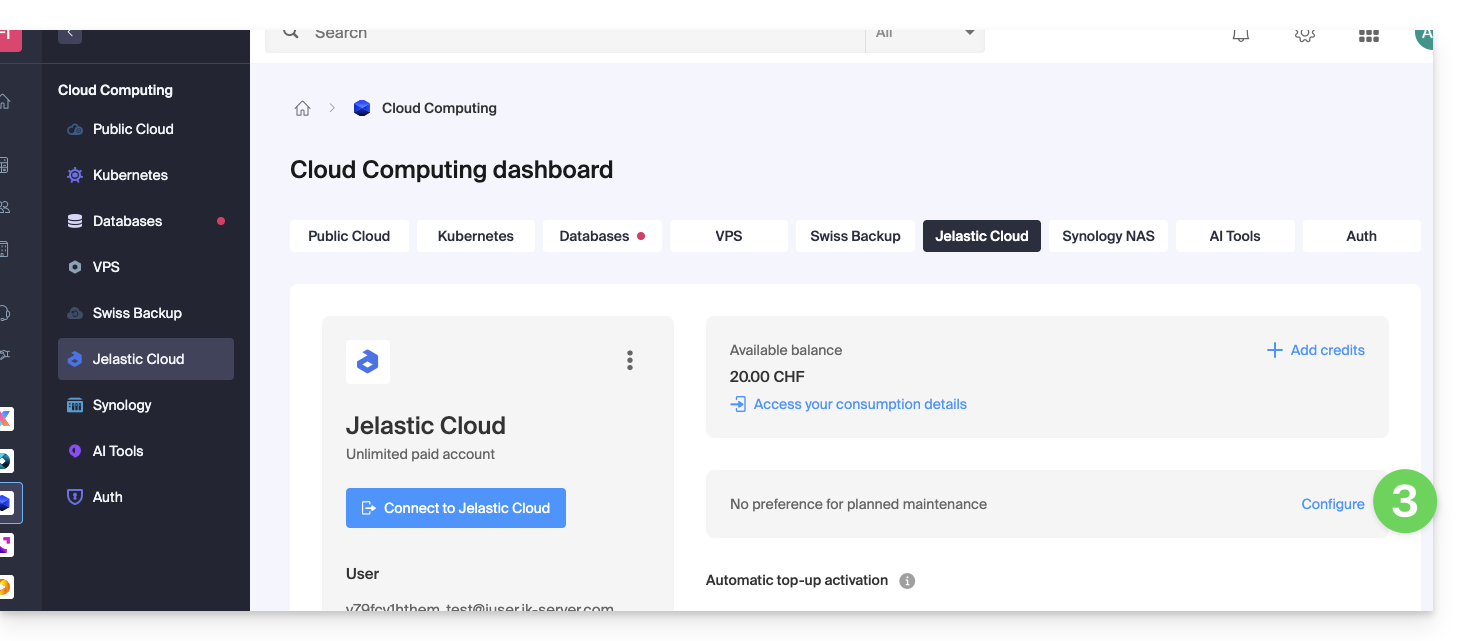
- Same principle for a VPS:
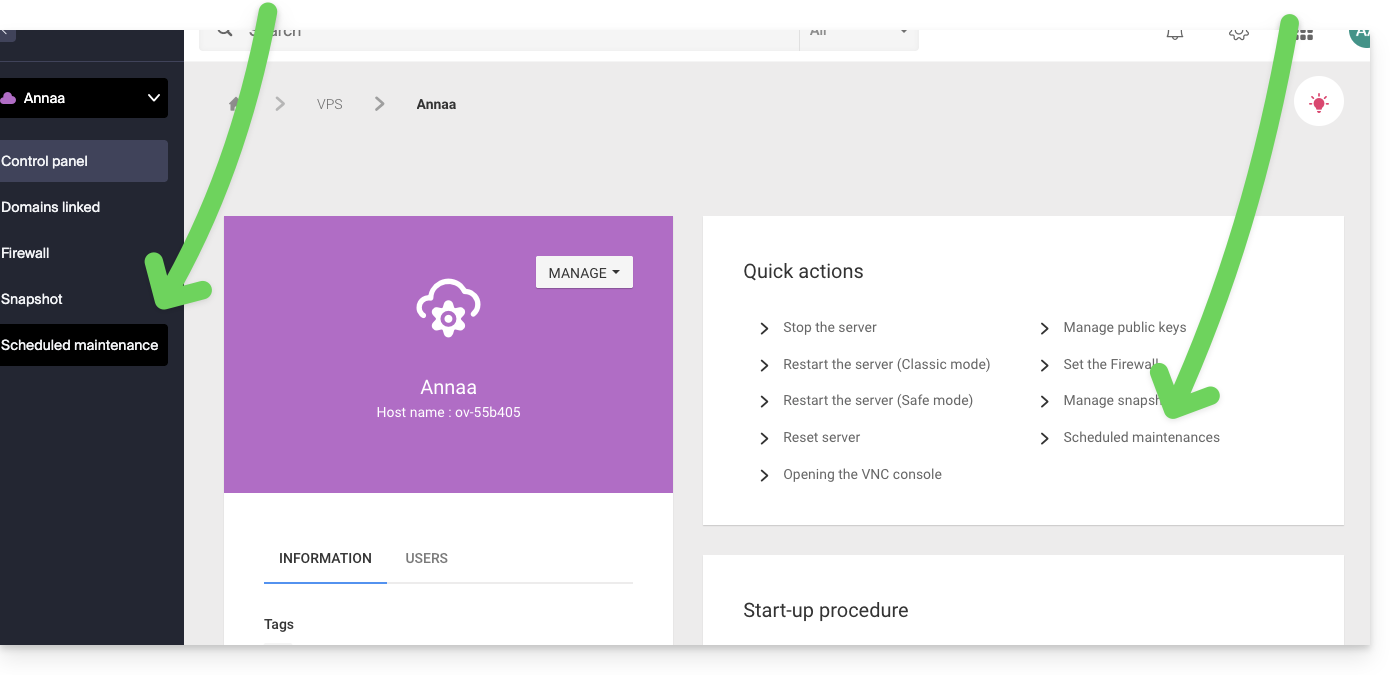
- Same principle for a VPS:
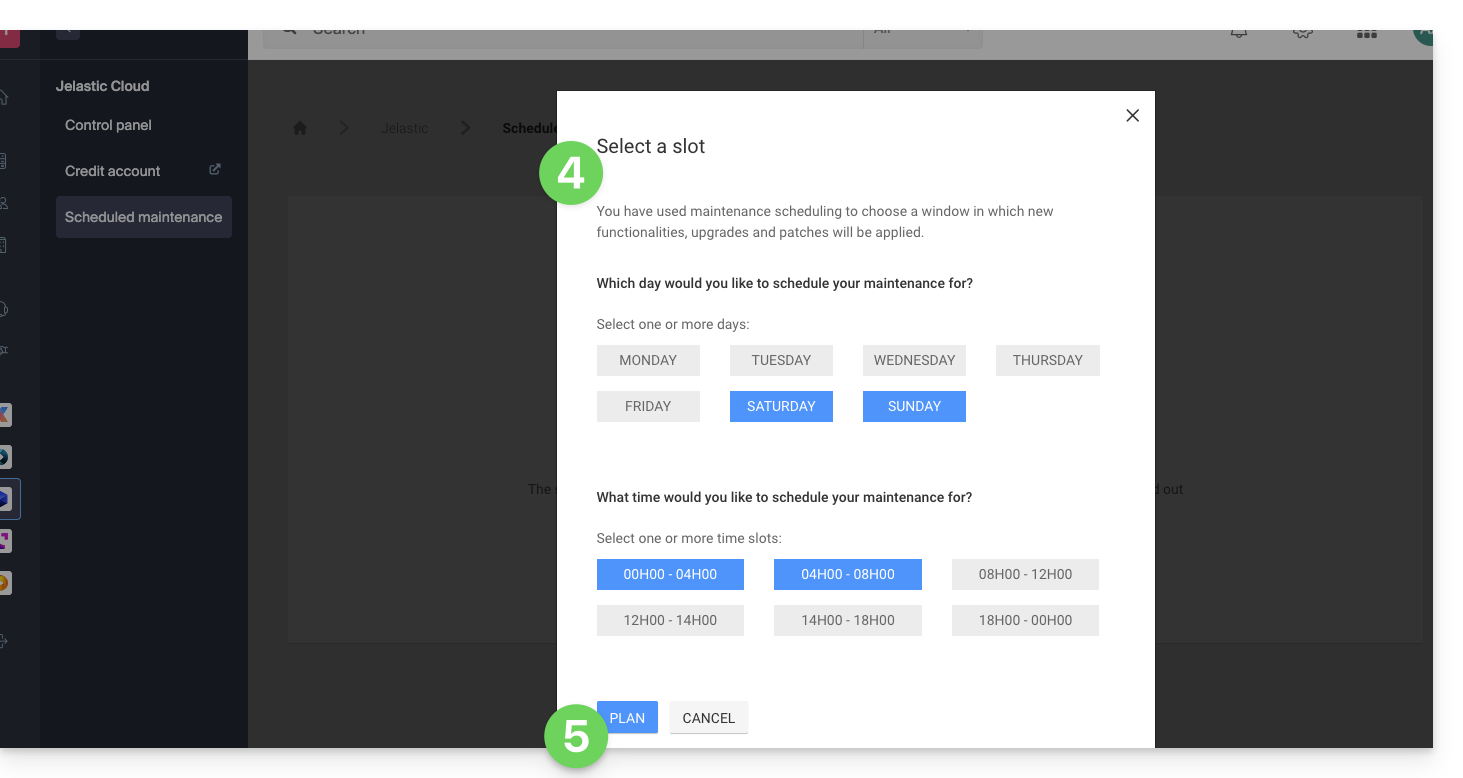
- Click on the buttons to define, in blue, a preferred intervention slot.
- Validate by clicking on the button at the bottom:
The CGID module for Apache has been disabled on Infomaniak's shared web hosting offers.
If necessary, you should consider changing your plan to a Cloud Server if you are currently on a shared web hosting plan. This can be done transparently: refer to this other guide on the subject.
This guide covers redirecting web traffic to a specific port, including when using a dedicated IP and a specific web application (such as Node or Varnish, for example).
Prerequisites
- Add a site to your hosting.
- Install
HAProxyon the Cloud Server.
Redirect web traffic to a specific port
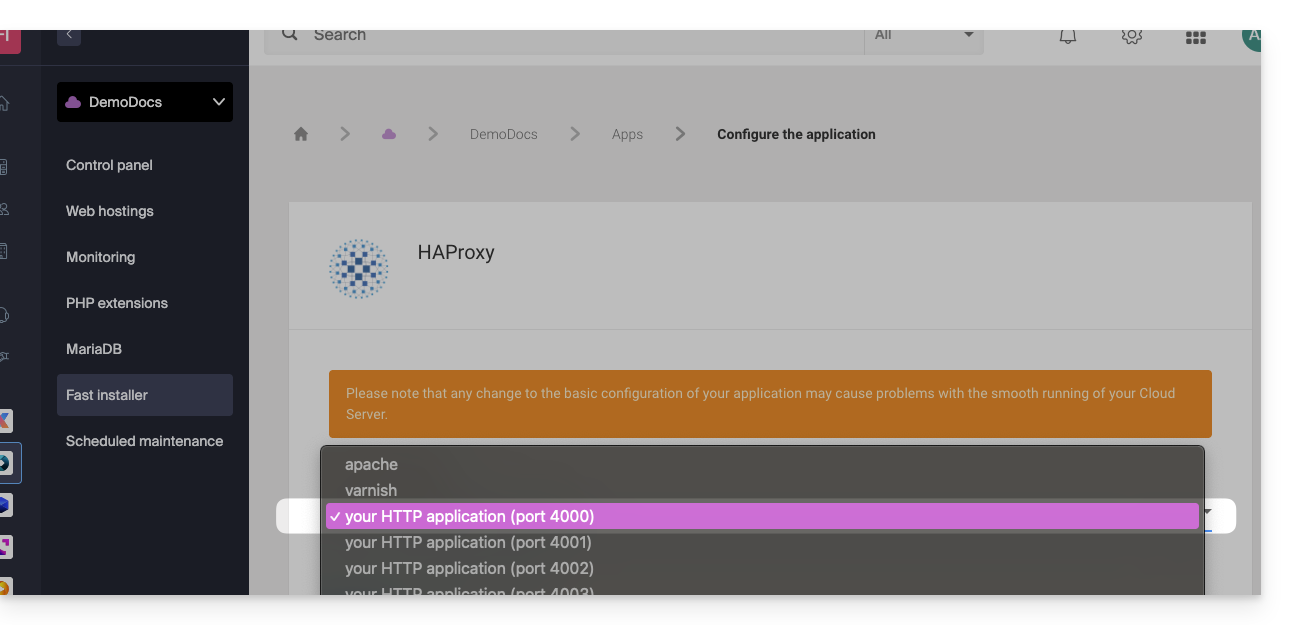
By default, on the Cloud Server, web traffic is sent to Apache. To send requests to a Node script or another service (provided it "listens" on a port between 4000 and 4009), you need to go through HAProxy.
This applies in particular to Express, Socket.IO, Meteor.js, Nuxt.js, Django, Flask, Ruby on Rails, even possibly Java (J2E), etc.
To do this, you need to ensure that the service is listening on a port between 4000 and 4009 (especially with server.listen(4000) for Express or a basic Node HTTP server, but depending on the type of project by other means, a configuration file, in the code or otherwise) and on all interfaces (0.0.0.0).
It will also be necessary to configure HAProxy as in the example below:
- Click here to access the management of your Cloud Server on the Infomaniak Manager (need help?).
- Click directly on the name assigned to the Cloud Server in question.
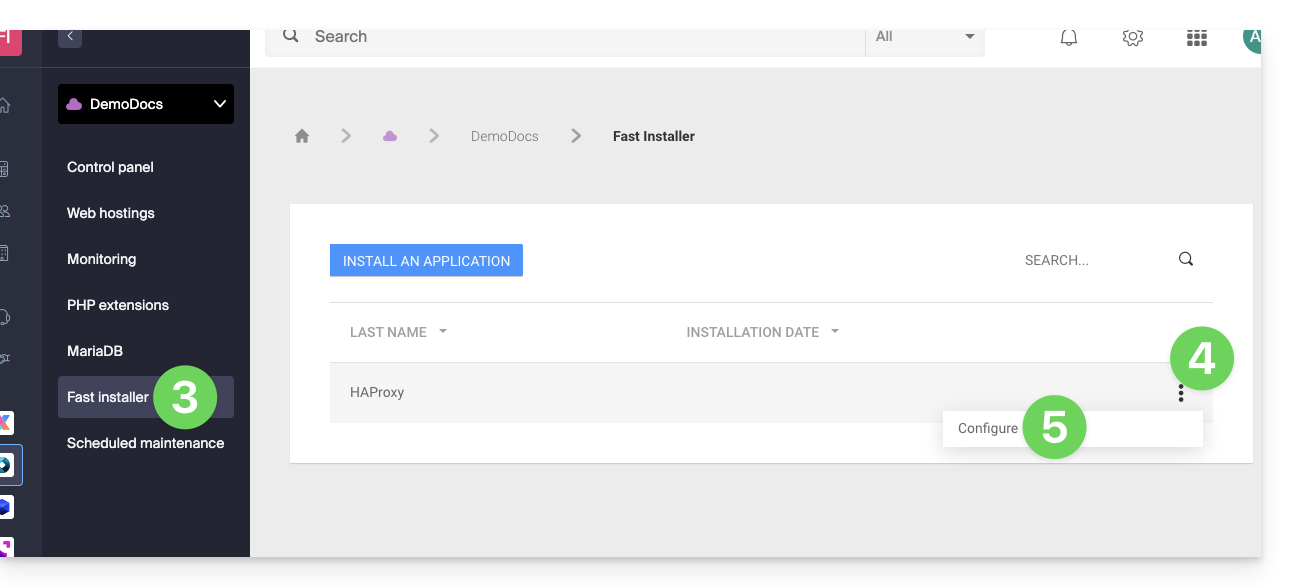
- Click on Fast installer in the left sidebar.
- Click on the action menu ⋮ located to the right of
HAProxy. - Click on Configure:
- Choose the desired information and save:
Retrieving the source IP of a request
When you redirect web traffic to your web application, the processing of requests changes and the request is first received by a reverse proxy (local to the server) which then forwards the request to the chosen port. Thus, due to the transfer of the request, the methods usually used to retrieve the visitor's IP will give the IP of the reverse proxy instead of that of the visitor.
Thus, to retrieve the real source IP of the visitor in these cases, you need to consult an HTTP header named X-Forwarded-For, which will contain the source IPs accumulated during each redirection. This header will therefore contain last the original IP address of the client, allowing the real visitor to be identified.
Warning: It is important to note that HTTP headers can be manipulated, which presents security risks. To minimize these risks, it is recommended to verify that the request comes from a trusted server before trusting the content of the header X-Forwarded-For. This verification may involve ensuring that the request was transmitted by a trusted intermediary server, identified by a predefined list of IP addresses. In the case where the site uses a dedicated IP, the trusted servers are:
- 83.166.133.15
- 83.166.133.17
- 83.166.133.16
- 84.16.92.5
- 84.16.92.43
- 10.2.32.255
- 10.2.34.164
This guide provides instructions to synchronize kDrive with a VPS (or vice versa) via the WebDAV protocol found in the rClone application.
⚠ Available with:
| kSuite | |
| Business | |
| Enterprise | |
| kDrive | Solo |
| Team | |
| Pro |
Prerequisites
- Have a VPS.
- Know your kDrive identifier (kDrive ID).
Synchronize kDrive and VPS via rClone
This operation allows you to retrieve in real-time the files and folders from kDrive and to read, create, or modify these files from your VPS while ensuring they are synchronized back to the kDrive server. An rClone mount point can be created with a folder on your VPS to manipulate these kDrive files.
Refer to the rClone documentation if you are looking for information about the available options:
- Example of an rClone command:
rclone mount kdrive:/My_kDrive_Folder_Path /home/ubuntu/Target_Folder_Path --vfs-cache-mode full --vfs-cache-max-age 24h --vfs-cache-max-size 10G --cache-dir /home/ubuntu/rclone/cache --daemon --allow-other --dir-cache-time 1h --log-file /home/ubuntu/rclone/rclone.log --log-level INFO- The
--daemonattribute of this command allows you to run the synchronization as a background task because without it, the sync stops at each VPS disconnection…
- Example of an rClone configuration file:
[kdrive] type = webdav url = https://***.connect.kdrive.infomaniak.com/*** vendor = other user = *** pass = ***- Server address:
https://IDkDrive.connect.kdrive.infomaniak.com(refer to the prerequisites above) - Username: email address used to log in to your Infomaniak account
- Password: create an application password for this specific use.
This guide explains how to install and configure systemd on a Cloud Server and presents the main commands that can be used.
⚠️ For additional help contact a partner or launch a free tender — also discover the role of the host.
Prerequisites
- Follow the installation guide for
systemdon Cloud Server. - Consult the official documentation to learn about all the possibilities offered by systemd
- The "unit" files must be placed in:
~/.config/systemd/user/ ( /home/clients/absolute-path-id/.config/systemd/user )(replacing absolute-path-id visible in your Manager) and the permissions must be set to 0644. - The
--userparameter must be specified in each command.
Main commands
Here is a non-exhaustive list of commands that can be used with systemd.
Force systemd to reload the unit files and take into account the modifications:
systemctl --user daemon-reloadActivate a service:
systemctl --user enable --now SERVICENAME.serviceCheck the status of a service:
systemctl --user status SERVICENAME.serviceConfiguration of Node as a service with systemd
It will be necessary to create a "Unit" file with the ".service" extension, which must be saved in the directory:
~/.config/systemd/user/It is possible to reuse the example below by replacing the values starting with {} :
[Unit]
Description={Le nom du service} # Spécifier ici un nom du service. Celui-ci est obligatoire mais n'a pas d'impact sur le fonctionnement

[Service]
Restart=always
Environment=NODE_VERSION={la version souhaitée} # Spécifier ici la version de Node à utiliser. S'assurer qu'elle soit installée au préalable avec "nvm install {la version souhaitée}"
WorkingDirectory=%h/{repertoire du projet Node} # %h correspond à la racine de l'hébergement
ExecStart=/bin/bash -c "exec $HOME/.nvm/nvm-exec {commande de lancement du script node}" # Cette commande dépend du projet. Par exemple, "npm run start", "npm run serve" ou encore "node server.js" sont courants

[Install]
WantedBy=default.target
Additional actions with a Unit file
systemctl --user daemon-reloadStart the service (if it is already active, nothing happens):
systemctl --user start [Nom du Unit]Stop the service (if it is not active, nothing happens):
systemctl --user stop [Nom du Unit]Restart the service (if it is not running, it is started):
systemctl --user restart [Nom du Unit]Get information about the service; in particular:
- 'Active' indicates whether the service is running and since when
- 'CGroup' shows the process group managed by the service, allowing you to see active processes, their arguments, and their ID
Below 'CGroup' are any logs (the standard output and error of the process):
systemctl --user status [Nom du Unit]Enable automatic service startup on server boot; NB: this does not start the service:
systemctl --user enable [Nom du Unit]Disable automatic service startup on server boot; NB: this does not stop the service:
systemctl --user disable [Nom du Unit]Configuration with user entries:
[Unit]
Description="nom service"

[Service]
Restart=always
Environment=NODE_VERSION=16.17
WorkingDirectory=%h/sites/"nom-repertoire-site"/
ExecStart=/bin/bash -c "exec $HOME/.nvm/nvm-exec npm run start"

[Install]
WantedBy=default.targetThis guide explains how to enable PHP-FPM status in order to, for example, debug a slow PHP site.
Preamble
PHP-FPM statusallows you to monitor in real-time the scripts that are executed as well as their execution time.- This operation is only possible on Managed Cloud Server.
Enable PHP-FPM status
To enable PHP-FPM on a site, contact Infomaniak support from an email address mentioned in your user account to authenticate your request.
In your request, please indicate the source IP address that needs to be authorized.
Once PHP-FPM status is enabled, the following URL links will allow you to display the necessary information:
- https://domain.xyz/fpm-status?json&full
- https://domain.xyz/fpm-status?html&full
- https://domain.xyz/fpm-status?xml&full
Warning: if your site contains rewrite rules (rewrite rules) including the path /fpm-status, you will likely need to make an exception.
This guide explains how to benefit from new versions of PHP, MySQL, and many other packages by migrating a Cloud Server to new Infomaniak infrastructure.
Migration procedure
By migrating your data to the new Cloud infrastructure, you increase the performance and reliability of your sites, which will have access to the latest technologies:
- Click here to access the management of your product on the Infomaniak Manager (need help?).
- Click directly on the name assigned to the product concerned.
- Click the blue button in the box "Upgrade your Cloud Server" (or Manage):
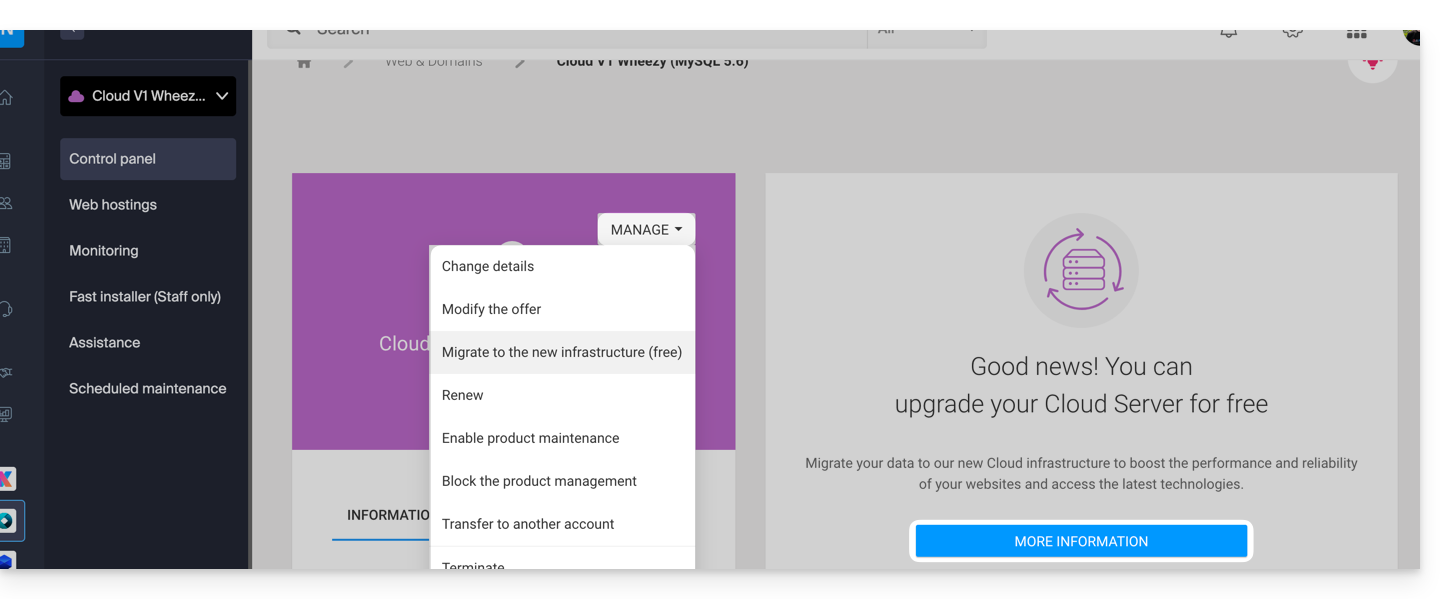
The migration is free and takes place in 3 steps:
- Infomaniak provides a state-of-the-art Cloud Server with the same characteristics as the current one, at the same price and same commitment period.
- You have one month to move your hosting to the new Cloud Server provided (see below).
- Once your hosting is moved to the new server, cancel the old Cloud Server.
Regarding step 2...
When moving hosting from one Cloud Server to another:
- FTP access and databases do not change.
- Only the supported versions of PHP and MariaDB, as well as the server's IPv4 and IPv6 addresses, change at the hosting level.
- Hostnames (hostnames) do not change and are automatically updated to point to the new IP addresses.
This guide explains how to reset a VPS Cloud / VPS Lite.
Preamble
- This procedure erases all the content of the volume dedicated to the operating system (
/dev/vda). - In the case of a VPS Cloud, the volume dedicated to data storage (
/dev/vdb) is not affected by the reset.
Warning: depending on the installed operating system, the system volume may be named /dev/sda, /dev/sda1 or /dev/vda… same for the data volume /dev/sdb, /dev/sdb2 or /dev/vdb … It is therefore necessary to replace these indications with those corresponding to your situation.
Reset of the VPS Cloud / VPS Lite OS
To access the VPS:
- Click here to access the management of your product on the Infomaniak Manager (need help?).
- Click directly on the name assigned to the product concerned.
- Click the Reset button.
- Follow the displayed instructions to complete the reset.
This guide explains how to restore a snapshot of VPS Cloud Infomaniak.
Warning: depending on the operating system installed, the system volume may be named /dev/sda, /dev/sda1 or /dev/vda; the same applies to the data volume /dev/sdb, /dev/sdb2 or /dev/vdb … It is therefore necessary to replace these indications with those corresponding to your situation.
Restore a snapshot
To do this:
- Click here to access the management of your product on the Infomaniak Manager (need help?).
- Click directly on the name assigned to the product concerned.
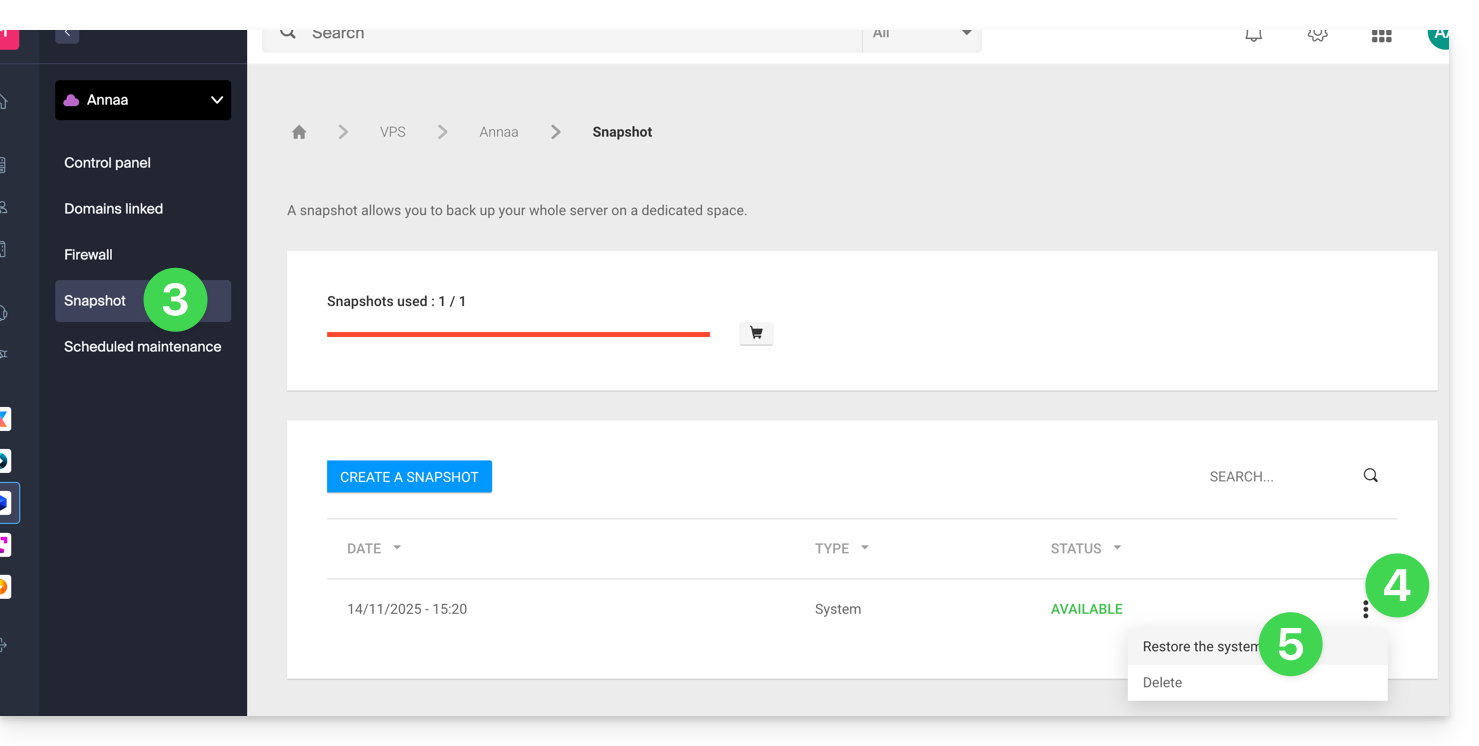
- Click on Snapshot in the left sidebar menu.
- Click on the action menu ⋮ to the right of the object concerned in the table that appears.
- Click on Restore:
- Click the blue button to start the snapshot restoration.
- An email is sent when the snapshot is restored.
Restore the operating system disk
Restoring the system volume as in the example above is an irreversible operation. The operating system disk will be replaced by the snapshot and the server will be in the exact state of the backup date.
The data stored on the data volume (vdb) is not affected by this operation.
Restore the data disk (vdb)
Two data restoration modes are possible:
1. “Read-only” mode
If the size of the snapshot differs from the size of the volume, only this read-only mode is available.
This option allows you to mount the snapshot data image, which allows read-only access to the backup data.
For information, here are useful commands to exploit your backup:
- To access the main data volume:
mount /dev/vdb /mnt/. - To mount the data volume in a specific folder "backup":
mount -o nouuid -o ro,norecovery /dev/vdc /backup.
To know which letter to use (/dev/vd?), use the command lsblk:
2. “Restore” mode
Restoring the data volume is an irreversible operation. The data disk (vdb) will be replaced by the snapshot. At the end of the restoration, it will be necessary to remount the data volume so that your operating system refreshes the content.
The following procedure and commands are provided for informational purposes only:
- Make sure your data volume is not mounted:
* umount /mnt(/mnt or the location you chose to access your data). - Remount the data volume:
* mount /dev/(vdb) /mnt
To know the name of the data volume attached to your server, use the command lsblk (see above).
Infomaniak does not provide root access on Cloud Server.
However, root access is possible on:
This guide covers the ODBC functions of PHP.
The ODBC functions of PHP are only supported on Managed Cloud Server.
Open Database Connectivity functions
These are the functions used to interact with databases via the ODBC (Open Database Connectivity) interface, a standard for accessing data sources uniformly. Here are a few examples of using the ODBC functions of PHP:
- Ability to read data from an external database and display it on your website
- Insert or modify data in an external database
- Perform complex queries on an external database


