
Knowledge base
1000 FAQs, 500 tutorials and explanatory videos. Here, there are only solutions!
Infomaniak does not perform any backups of the Cloud VPS / VPS Lite.
However, you can…
- … create a server snapshot (non-automated backup)
- … backup the server to Swiss Backup (automated backup)
This guide explains how to work without the PECL SSH2 client module, which is unavailable on Infomaniak Web Hosting and Cloud Servers, by using the phpseclib library instead. This library works with native PHP without requiring any specific extension.
Preamble
- The use of
PECL SSH2 clientresults in errors of typeNo compatible key exchange algorithms foundorUnable to exchange encryption keysin its latest available version. Phpsecliballows:- SSH authentication via password or private key.
- Remote command execution.
- Secure file transfer (SFTP).
- SSH key management.
Using phpseclib
To integrate an SSH connection into a PHP script, use phpseclib as follows:
use phpseclib3\Net\SSH2;
use phpseclib3\Crypt\PublicKeyLoader;

$ssh = new SSH2('domain.xyz');
$key = PublicKeyLoader::load(file_get_contents('/path/to/private_key'));

if (!$ssh->login('utilisateur', $key)) {
    exit('Authentication Failed');
}

echo $ssh->exec('ls -la');This guide covers the creation of private networks between different Infomaniak hosting offers such as VPS Cloud / VPS Lite, Public Cloud, Synology NAS, etc.
Create a VLAN between VPS
It is not possible to create a private network (VLAN) between VPS Cloud / VPS Lite and other products, such as Synology NAS, for example, as they are installed on separate networks.
However, it is possible to create a VLAN between a minimum of 10 VPS Cloud / VPS Lite that you own (contact Infomaniak support) however a dedicated private network will not be able to communicate with another.
It is recommended to migrate to the Public Cloud offer to create such private networks between VMs.
This guide concerns the installation of PHP extensions on Infomaniak Web Hosting.
Using Zend PHP extensions
- Zend Guard Loader is a PHP extension that allows you to run PHP scripts encrypted via Zend Guard.
- Zend Guard Loader is installed by default for PHP <= 5.6 on all web hosting and is not available for PHP versions >= 5.6.
- Since PHP 5.3.x, the Zend Optimizer module has been replaced by ZendGuardLoader
- The ZendOPCache extension requires a Cloud Server configured with PHP 5.5 minimum
This guide concerns Redis, a PHP module for Infomaniak Cloud Server.
Preamble
Redisis used with PHP to accelerate performance by serving as a cache for temporary data and to manage user sessions, thus improving the efficiency of web applications.Redisalso allows the implementation of queue systems and the temporary storage of data for asynchronous tasks or statistics.
Install Redis
Redis is installed from Fast Installer, applications available in a few clicks on Cloud Server:
- After installation,
Redisis accessible via the IP/portlocalhost:6379or127.0.0.1:6379 - The password for
Redismust be between 15 and 99 characters (inclusive).
This guide will help you if, for example, you want to deploy a package like pymysql and it requires a version of python higher than the one offered on your hosting.
Preamble
- Anaconda is a free and open-source distribution of the Python programming language. This distribution aims to simplify package management and deployment.
- It is recommended to use conda delivered with a recent version of python and which installs in the user space, so that there is no conflict with the python system (as in a virtual environment, which always requires a system installation of the desired version).
- Refer to the official documentation.
⚠️ For additional help contact a partner or launch a free call for tenders — also discover the role of the host.
Download the installer
uid165116@od-12345:~$ wget https://repo.anaconda.com/miniconda/Miniconda3-py37_4.10.3-Linux-x86_64.sh
--2021-07-28 18:21:10--  https://repo.anaconda.com/miniconda/Miniconda3-py37_4.10.3-Linux-x86_64.sh
Resolving repo.anaconda.com (repo.anaconda.com)... 2606:4700::6810:8303, 2606:4700::6810:8203, 104.16.131.3, ...
Connecting to repo.anaconda.com (repo.anaconda.com)|2606:4700::6810:8303|:443... connected.
HTTP request sent, awaiting response... 200 OK
Length: 89026327 (85M) [application/x-sh]
Saving to: ‘Miniconda3-py37_4.10.3-Linux-x86_64.sh’
Miniconda3-py37_4.10.3-Linux-x86_64.sh 100% [==============================================>] 84.90M 203MB/s in 0.4s 18:21:11 (100 MB/s) - ‘Miniconda3-py37_4.10.3-Linux-x86_64.sh’ saved [89026327/89026327]Check the hash
uid165116@od-12345:~$ test $(md5sum Miniconda3-py37_4.10.3-Linux-x86_64.sh | awk '{print $1}') == "9f186c1d86c266acc47dbc1603f0e2ed" && echo "OK"
OK
Start the installation
uid165116@od-12345:~$ bash Miniconda3-py37_4.10.3-Linux-x86_64.sh -b
PREFIX=/home/clients/fc84cbbf6dcbd6dd76b15d3e56c1789f/miniconda3
Unpacking payload ...
Collecting package metadata (current_repodata.json): done
Solving environment: done
## Package Plan ##environment location: /home/clients/fc84cbbf6dcbd6dd76b15d3e56c1789f/miniconda3added / updated specs:
- _libgcc_mutex==0.1=main
- _openmp_mutex==4.5=1_gnu
- brotlipy==0.7.0=py37h27cfd23_1003
- ca-certificates==2021.7.5=h06a4308_1
- certifi==2021.5.30=py37h06a4308_0
- cffi==1.14.6=py37h400218f_0
- chardet==4.0.0=py37h06a4308_1003
- conda-package-handling==1.7.3=py37h27cfd23_1
- conda==4.10.3=py37h06a4308_0
- cryptography==3.4.7=py37hd23ed53_0
- idna==2.10=pyhd3eb1b0_0
- ld_impl_linux-64==2.35.1=h7274673_9
- libffi==3.3=he6710b0_2
- libgcc-ng==9.3.0=h5101ec6_17
- libgomp==9.3.0=h5101ec6_17
- libstdcxx-ng==9.3.0=hd4cf53a_17
- ncurses==6.2=he6710b0_1
- openssl==1.1.1k=h27cfd23_0
- pip==21.1.3=py37h06a4308_0
- pycosat==0.6.3=py37h27cfd23_0
- pycparser==2.20=py_2
- pyopenssl==20.0.1=pyhd3eb1b0_1
- pysocks==1.7.1=py37_1
- python==3.7.10=h12debd9_4
- readline==8.1=h27cfd23_0
- requests==2.25.1=pyhd3eb1b0_0
- ruamel_yaml==0.15.100=py37h27cfd23_0
- setuptools==52.0.0=py37h06a4308_0
- six==1.16.0=pyhd3eb1b0_0
- sqlite==3.36.0=hc218d9a_0
- tk==8.6.10=hbc83047_0
- tqdm==4.61.2=pyhd3eb1b0_1
- urllib3==1.26.6=pyhd3eb1b0_1
- wheel==0.36.2=pyhd3eb1b0_0
- xz==5.2.5=h7b6447c_0
- yaml==0.2.5=h7b6447c_0
- zlib==1.2.11=h7b6447c_3The following NEW packages will be INSTALLED: _libgcc_mutex pkgs/main/linux-64::_libgcc_mutex-0.1-main
_openmp_mutex pkgs/main/linux-64::_openmp_mutex-4.5-1_gnu
brotlipy pkgs/main/linux-64::brotlipy-0.7.0-py37h27cfd23_1003
ca-certificates pkgs/main/linux-64::ca-certificates-2021.7.5-h06a4308_1
certifi pkgs/main/linux-64::certifi-2021.5.30-py37h06a4308_0
cffi pkgs/main/linux-64::cffi-1.14.6-py37h400218f_0
chardet pkgs/main/linux-64::chardet-4.0.0-py37h06a4308_1003
conda pkgs/main/linux-64::conda-4.10.3-py37h06a4308_0
conda-package-han~ pkgs/main/linux-64::conda-package-handling-1.7.3-py37h27cfd23_1
cryptography pkgs/main/linux-64::cryptography-3.4.7-py37hd23ed53_0
idna pkgs/main/noarch::idna-2.10-pyhd3eb1b0_0
ld_impl_linux-64 pkgs/main/linux-64::ld_impl_linux-64-2.35.1-h7274673_9
libffi pkgs/main/linux-64::libffi-3.3-he6710b0_2
libgcc-ng pkgs/main/linux-64::libgcc-ng-9.3.0-h5101ec6_17
libgomp pkgs/main/linux-64::libgomp-9.3.0-h5101ec6_17
libstdcxx-ng pkgs/main/linux-64::libstdcxx-ng-9.3.0-hd4cf53a_17
ncurses pkgs/main/linux-64::ncurses-6.2-he6710b0_1
openssl pkgs/main/linux-64::openssl-1.1.1k-h27cfd23_0
pip pkgs/main/linux-64::pip-21.1.3-py37h06a4308_0
pycosat pkgs/main/linux-64::pycosat-0.6.3-py37h27cfd23_0
pycparser pkgs/main/noarch::pycparser-2.20-py_2
pyopenssl pkgs/main/noarch::pyopenssl-20.0.1-pyhd3eb1b0_1
pysocks pkgs/main/linux-64::pysocks-1.7.1-py37_1
python pkgs/main/linux-64::python-3.7.10-h12debd9_4
readline pkgs/main/linux-64::readline-8.1-h27cfd23_0
requests pkgs/main/noarch::requests-2.25.1-pyhd3eb1b0_0
ruamel_yaml pkgs/main/linux-64::ruamel_yaml-0.15.100-py37h27cfd23_0
setuptools pkgs/main/linux-64::setuptools-52.0.0-py37h06a4308_0
six pkgs/main/noarch::six-1.16.0-pyhd3eb1b0_0
sqlite pkgs/main/linux-64::sqlite-3.36.0-hc218d9a_0
tk pkgs/main/linux-64::tk-8.6.10-hbc83047_0
tqdm pkgs/main/noarch::tqdm-4.61.2-pyhd3eb1b0_1
urllib3 pkgs/main/noarch::urllib3-1.26.6-pyhd3eb1b0_1
wheel pkgs/main/noarch::wheel-0.36.2-pyhd3eb1b0_0
xz pkgs/main/linux-64::xz-5.2.5-h7b6447c_0
yaml pkgs/main/linux-64::yaml-0.2.5-h7b6447c_0
zlib pkgs/main/linux-64::zlib-1.2.11-h7b6447c_3Preparing transaction: done
Executing transaction: done
installation finished.Launch conda
uid165116@od-12345:~$ source <(~/miniconda3/bin/conda shell.bash hook)Install pymysql (for example)
(base) uid165116@od-12345:~$ python3 -V
Python 3.7.10
(base) uid165116@od-12345:~$ pip3 install pymysql --user
Collecting pymysql
Downloading PyMySQL-1.0.2-py3-none-any.whl (43 kB)
|████████████████████████████████| 43 kB 892 kB/s
Installing collected packages: pymysql
Successfully installed pymysql-1.0.2This guide explains how to specify a file that will be loaded before the desired page or at the beginning of each PHP script executed on your server, included as if it had been called with the function require(), but more globally using the PHP directive auto_prepend_file.
Preamble
- For example, to declare the headers of a website, you can create a
headers.phpfile that contains PHPheader()functions and that is prepended at the beginning of each PHP file…- … via a
.user.inifile (specific to a folder), - … or via the site configuration in the Manager (global) as explained below.
- … via a
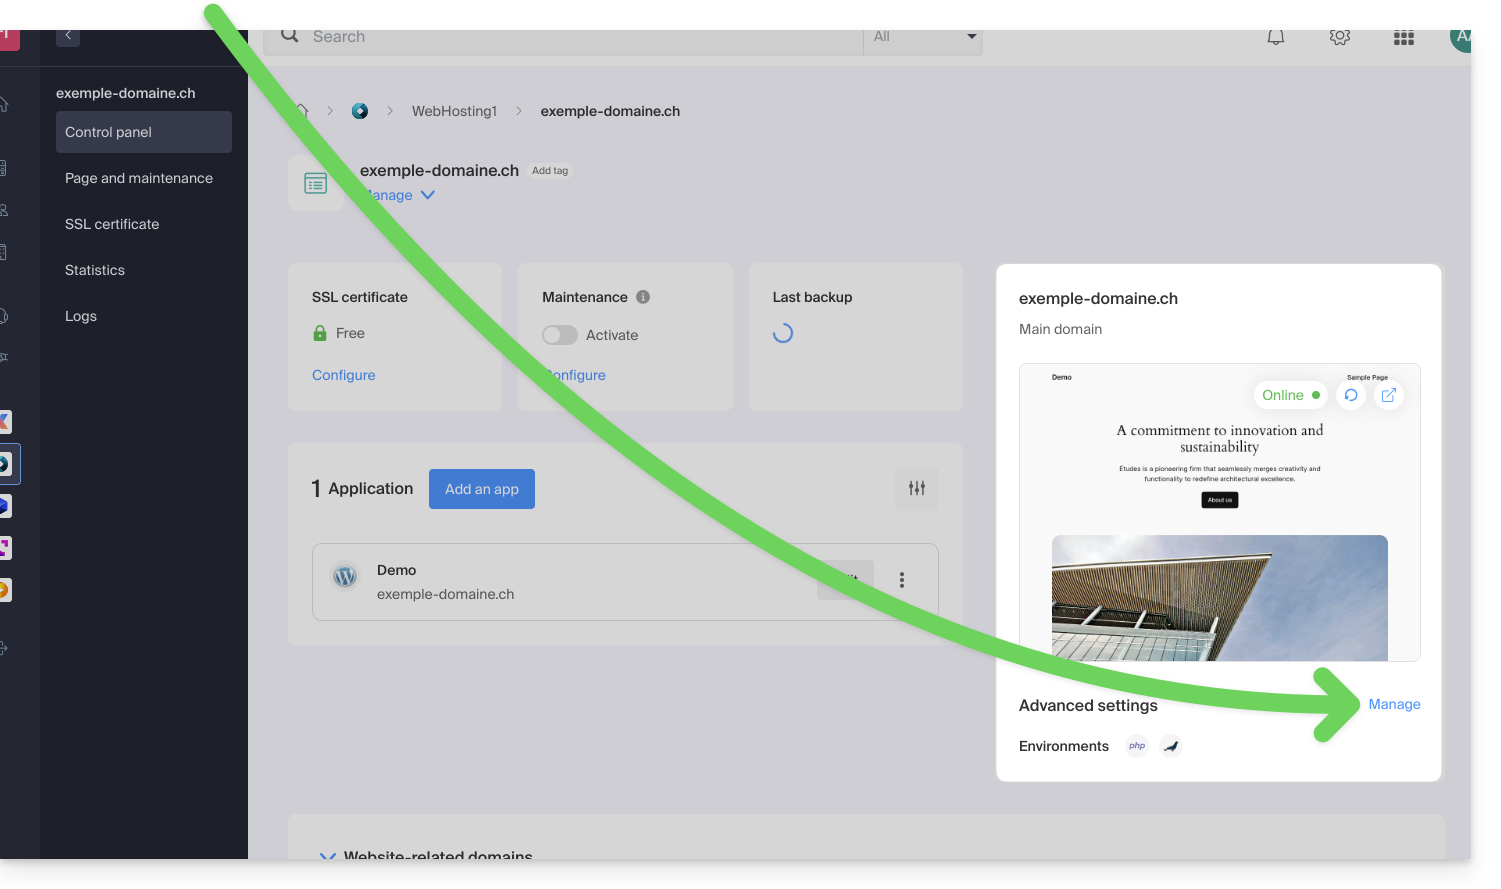
Include a file globally from the Manager
To access the website management:
- Click here to access the management of your product on the Infomaniak Manager (need help?).
- Click directly on the name assigned to the product concerned:
- Click on Manage under Advanced Settings:
- Click on the PHP / Apache tab.
- Complete the relevant line by entering the path of the file to include.
- Click the button to save:
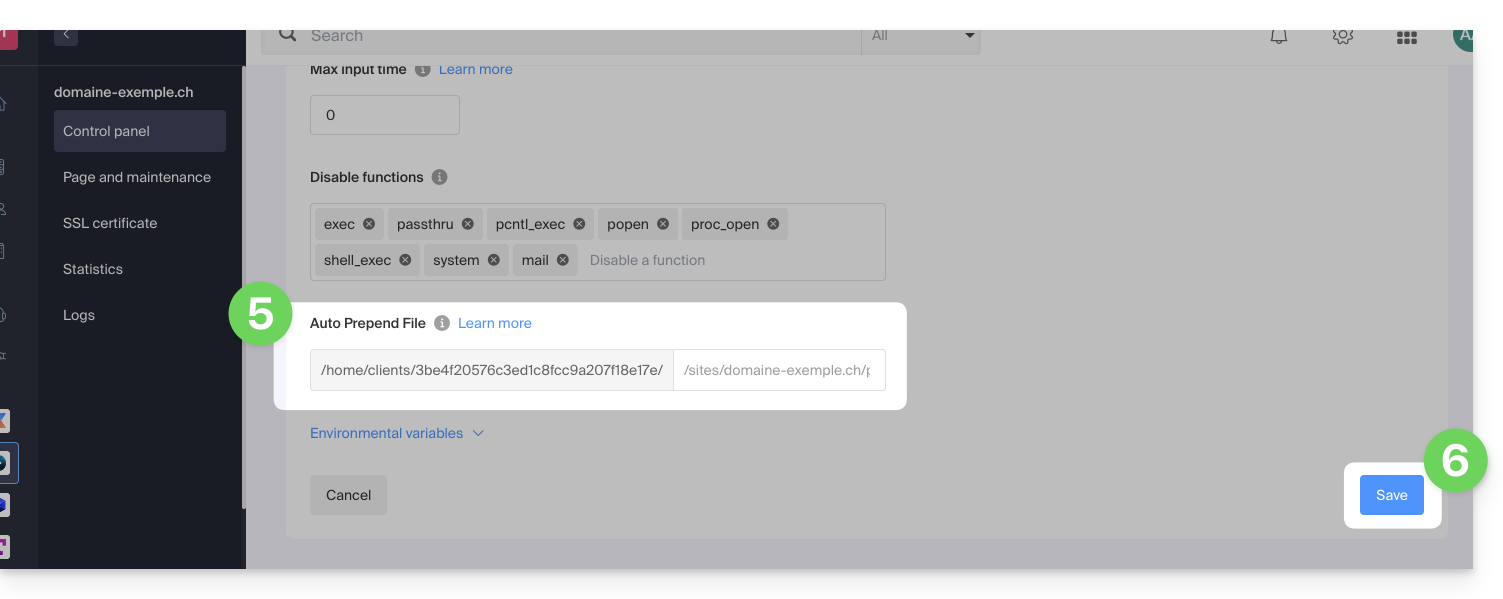
After defining this directive, all PHP pages on your server will automatically include the specified file before executing their own code.
The headers defined in a .htaccess file are only valid for non-PHP (i.e., static) content.
Infomaniak uses php-fpm which receives the different headers via apache fast_cgi. In the RFC of cgi_www the header Strict-Transport-Security is not part of the headers passed via CGI and the Apache documentation confirms this. See this other RFC.
⚠️ For additional help contact a partner or launch a free tender — also discover the role of the host.
The Infomaniak infrastructure does not transmit virtualization instructions to Cloud VPS / Lite VPS; it is therefore not possible to perform nested virtualization (virtualization that would run within an already virtualized environment) as this causes issues, particularly during live migrations.
This guide explains how to increase the max_children value on Cloud Server to increase the number of simultaneous PHP processes that can be used by your site. This will be very useful for resolving infinite page loading issues on your site.
Preamble
- By default on all hosting, the
max_childrenlimit is set to 20.- Although it is possible to increase this value from the Infomaniak Manager, the
max_childrenlimit is automatically adjusted based on the configuration of your Cloud Server. - To increase this limit on shared hosting, migrate to Cloud Server.
- Although it is possible to increase this value from the Infomaniak Manager, the
- To understand how to accurately calculate the necessary
max_children, refer to this article on the subject.
Increase the max_children value
Prerequisites
- Ensure that you have the necessary resources on the Cloud Server.
- Ensure that all resources of the Cloud Server are not being used; if it turns out that they are fully used, increasing the
max_childrenvalue will have no effect (Modify the resources of the Cloud Server). - Monitor the resources of your server, in case the resources of your server are reached, it will be necessary to check the optimization of the processes and your site before considering increasing the value
max_children. - Consult the PHP error reports from the
/ik-logsfolder (master process php logs - file name: php-fpm.log) to verify if the "max_children" limit has been exceeded... example of error:[05-Jul-2024 09:08:58] WARNING: [pool www.infomaniak.ch] server reached max_children setting (20), consider raising it
To access the management of PHP / Apache parameters of the site for which you need to increase the max_children value on Cloud Server, refer to this other guide.
You will be able to...
- … choose a new
max_childrenvalue: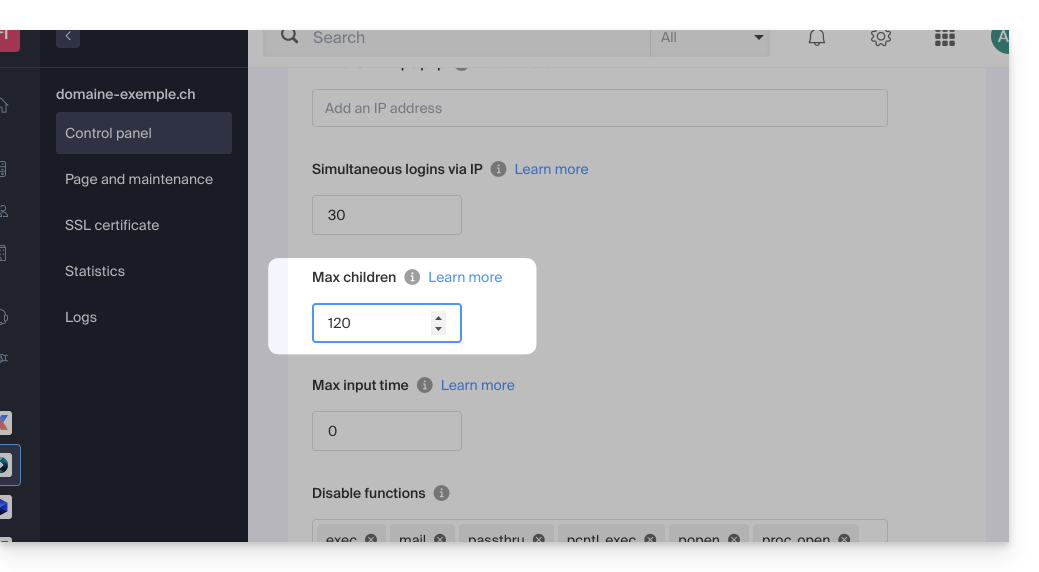
Do not forget to save the changes at the bottom of the page.
Limits depending on the server
Limit of max_children depending on the resources of the Cloud Server:
| Cloud Server Configuration | max_children |
|---|---|
| 2 CPU / 6 Go RAM | 20 |
| 4 CPU / 12 Go RAM | 40 |
| 6 CPU / 18 GB RAM | 60 |
| 8 CPU / 24 GB RAM | 80 |
| 12 CPU / 36 GB RAM | 120 |
| 16 CPU / 48 GB RAM | 160 |
| 24 CPU / 72 GB RAM | 240 |
| 32 CPU / 96 or 128 GB RAM | 320 |
This guide explains how to modify the variables of the PHP-CLI extension, which is available by default on Infomaniak Cloud Server.
Modify PHP_CLI variables
To access the PHP extensions of the Cloud Server:
- Click here to access the management of your Cloud Server on the Infomaniak Manager (need help?).
- Click directly on the name assigned to the concerned Cloud Server.
- Click on PHP Extensions in the left sidebar.
- Click on the action menu ⋮ to the right of PHP-CLI in the displayed table.
- Click on Configure:

- Modify the following variables:
allow_url_fopen,allow_url_include,memory_limit,max_execution_time,short_open_tag,allow_local_infile - Click on the blue Save button.
This guide explains how to change the value of the directive php_value include_path.
Change the include_path
Like any other PHP parameter, include_path is defined in the .user.ini file.
Here is an example of a path to use in the .user.ini file:
include_path = .:/home/clients/123456789a12345b12fc345d/web/www.domainetest.abc/public/abc/includeRefer to this other guide regarding phpinfo to verify that your new directive is taken into account.
This guide explains how to allow certain incoming and/or outgoing ports in the firewall of a VPS Cloud / VPS Lite server.
Access the management tool
To manage the VPS Cloud / VPS Lite firewall:
- Click here to access the management of your product on the Infomaniak Manager (need help?).
- Click directly on the name assigned to the relevant product.
- Click on Firewall in the left sidebar:

Rule to allow ping on VPS Cloud / VPS Lite
To add a rule to the firewall:
- Click the blue button to Add a rule.
- Click on Manual Selection.
- Select ICMP:

- Validate at the bottom of the page.
Open the outgoing port 25 globally
The outgoing port 25 (SMTP Mail port) is blocked by default.
It is recommended to use an authenticated mail sending solution.
To open this port, contact Infomaniak support and justify your request.
This guide explains how to modify the configuration of a VPS Cloud / VPS Lite.
Configuration changes (CPU/RAM) or storage make the service unavailable for approximately 20 minutes.
Modify storage size on VPS Cloud / VPS Lite
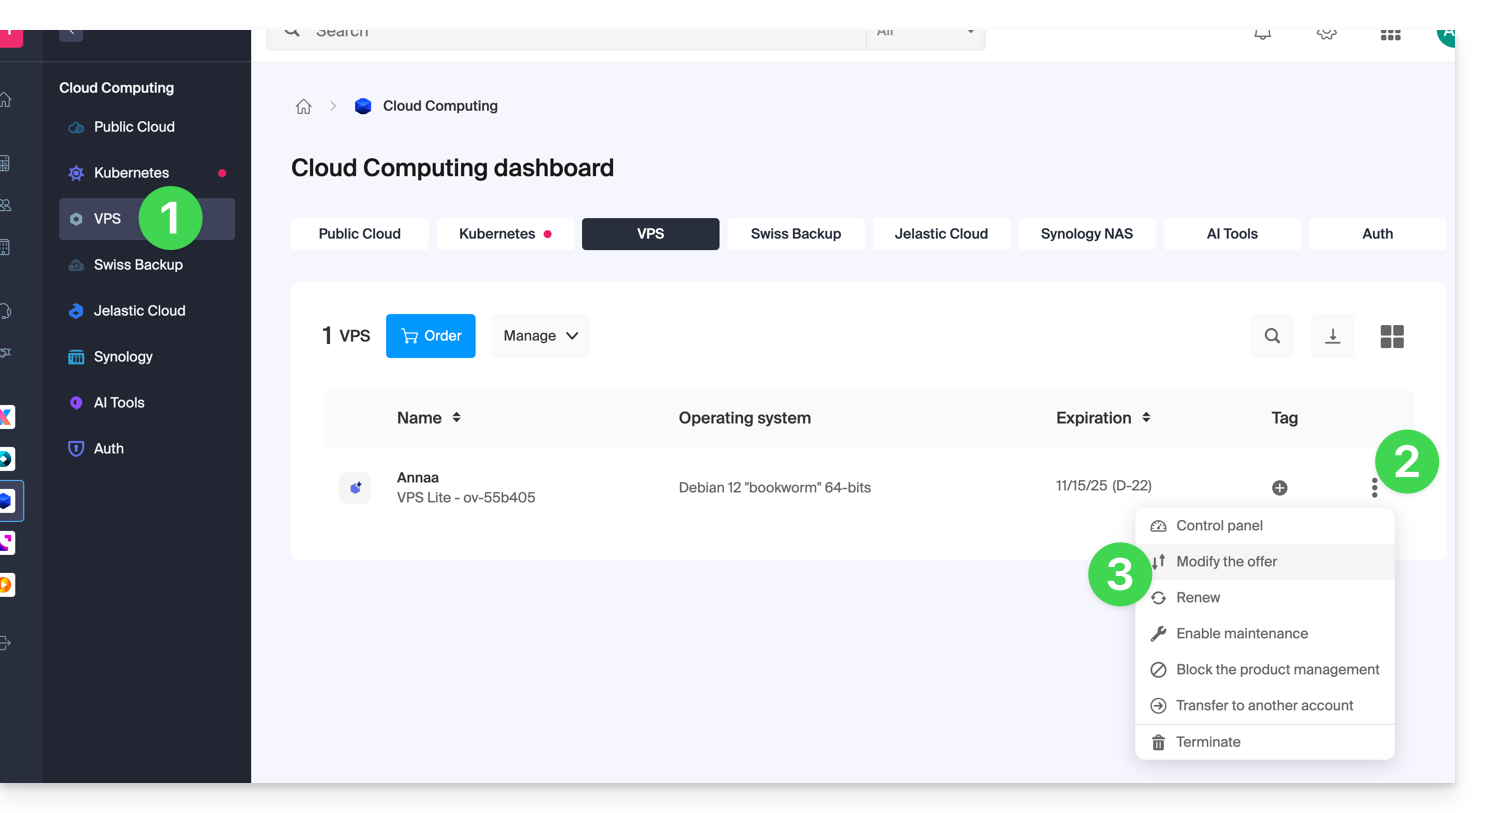
To access the VPS Cloud / VPS Lite:
- Click here to access the management of your product on the Infomaniak Manager (need help?).
- Click on the action menu ⋮ to the right of the object concerned in the table that appears.
- Click on Modify the offer:
- Make the desired adjustments from the shop's proposals and complete the procedure at the bottom:
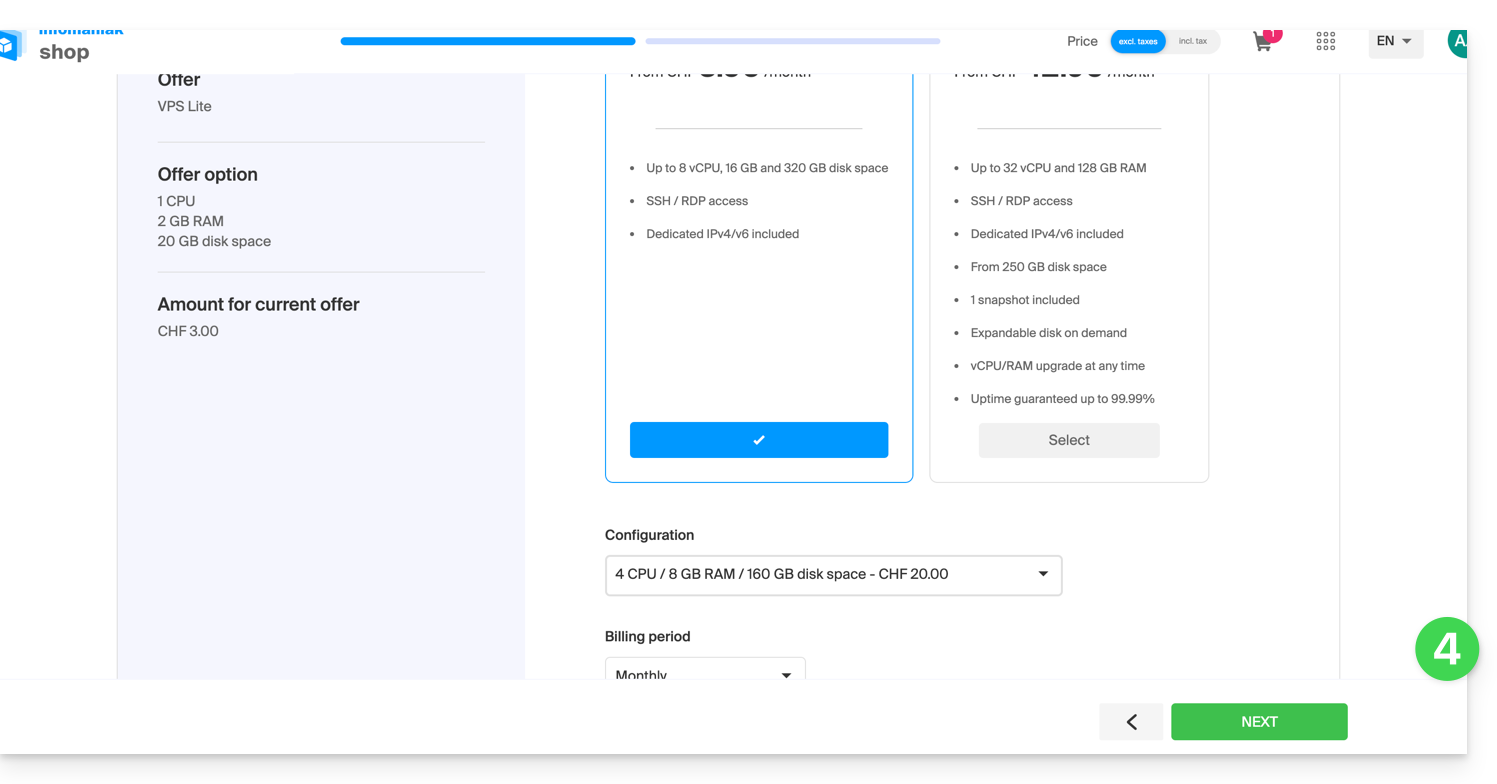
- It is necessary to extend the volume after an increase in storage volume.
Infomaniak does not offer virtual disk encryption on VPS Cloud / VPS Lite but provides a block device that you can format and encrypt if you wish.
This guide covers swap on Managed Cloud Server.
Swap and RAM memory
There can be swap even when RAM usage is low. Indeed, the system can use swap at any time if it deems it useful.
Swap is not a dedicated memory space to be used if there is no free RAM, although this is often its main use.
If you want to learn more, there is a parameter "swappiness" that allows you to define how the system will use the swap. The default value is 60 and it cannot be modified.
This guide explains how to connect to Elasticsearch after installing it on Magento from an Infomaniak Cloud Server.
Prerequisites
- Have an Infomaniak Cloud Server.
- Install Magento.
- Contact Infomaniak support for the installation of Elasticsearch.
Connection Information
Once connected to your Magento space, you will need to provide the following information to start Elasticsearch:
- Hostname :
localhostor127.0.0.1 - Port :
9200 - Prefix :
magento2
⚠️ For additional help contact a partner or launch a free tender — also discover the role of the host.
It is not possible to order and obtain more IP addresses on a VPS Cloud / VPS Lite.
The possible alternatives would be to use…
- … a Public Cloud hosting (it is possible to add as many IP addresses as desired),
- … the Newsletter tool according to your needs.
This guide presents several examples of using Varnish on Cloud Server Infomaniak.
⚠️ For additional help contact a partner or launch a free tender — also discover the role of the host.
Varnish Configuration
After installation, configuring Varnish includes important rules for caching and purging. Be careful not to accidentally allow unwanted IP addresses.
Here is what a basic configuration file might look like with a few common cases and different actions/rules in one example:
vcl 4.0;
# Configuration du backend par défaut
backend default {
    .host = "127.0.0.80";  # Adresse IP du backend
    .port = "80";           # Port du backend
}
# Définition d'une liste de contrôle d'accès (ACL) pour les IPs autorisées à purger le cache
acl purge {
    "localhost";            # IP locale
    "1.2.3.4";              # IP de votre domicile
    "42.42.42.0"/24;        # Plage d'IP publique de votre entreprise
    ! "42.42.42.7";         # Exclusion d'une IP spécifique (ex : un collègue gênant)
}
# Traitement des requêtes à leur réception par Varnish
sub vcl_recv {
    # Autoriser les requêtes de purge
    if (req.method == "PURGE") {
        # Vérification si l'IP du client est autorisée à purger
        if (!client.ip ~ purge) {  # 'purge' fait référence à l'ACL définie plus haut
            # Retourne une page d'erreur si l'IP n'est pas autorisée
            return (synth(405, "Cette IP n'est pas autorisée à envoyer des requêtes PURGE."));
        }
        # Si l'IP est autorisée, purger le cache pour cette requête
        return (purge);
    }
    # Autoriser la purge de toutes les images via une requête PURGEALL
    if (req.method == "PURGEALL" && req.url == "/images") {
        if (!client.ip ~ purge) {
            return (synth(405, "Cette IP n'est pas autorisée à envoyer des requêtes PURGE."));
        }
        # Invalider tous les objets en cache correspondant à des images
        ban("req.url ~ \.(jpg|png|gif|svg)$");
        return (synth(200, "Images purgées."));
    }
    # Ne pas mettre en cache les pages avec une autorisation (header Authorization)
    if (req.http.Authorization) {
        # Passer la requête directement au backend sans la mettre en cache
        return (pass);
    }
}
# Traitement de la réponse du backend avant de la renvoyer au client
sub vcl_backend_response {
    # Mise en cache des images pour une durée de 1 jour
    if (beresp.http.content-type ~ "image") {
        set beresp.ttl = 1d;
    }
    # Si le backend indique que la réponse ne doit pas être mise en cache, respecter cette consigne
    if (beresp.http.uncacheable) {
        set beresp.uncacheable = true;
    }
}
Purge from the CLI interface
From there, the rules stated in the configuration above apply to all requests, so if the configured site is "domain.xyz", you can simply use the CLI tool "curl" and do the following:
# Envoyer une requête PURGE pour purger la page d'accueil de "domain.xyz"
$ curl -X PURGE https://domain.xyz/
# Réponse renvoyée par le serveur Varnish
<!DOCTYPE html>
<html>
<head>
    <title>200 Purged</title>
</head>
<body>
    <h1>Erreur 200 : Purge effectuée</h1>
    <p>La page a été purgée avec succès.</p>
    <h3>Guru Meditation:</h3>
    <p>XID: 2</p>
    <hr>
    <p>Serveur de cache Varnish</p>
</body>
</html>
And there, the homepage has been purged. Or to purge another URL, simply point the request to the latter:
# Envoyer une requête PURGE pour purger un fichier spécifique à "domain.xyz"
$ curl -X PURGE https://domain.xyz/some_path/some_file.html
# Réponse renvoyée par le serveur Varnish
<!DOCTYPE html>
<html>
<head>
    <title>200 Purged</title>
</head>
<body>
    <h1>Erreur 200 : Purge effectuée</h1>
    <p>Le fichier a été purgé avec succès.</p>
    <h3>Guru Meditation:</h3>
    <p>XID: 4</p>
    <hr>
    <p>Serveur de cache Varnish</p>
</body>
</html>
Or, as indicated in the VCL configuration, purge all images:
# Envoyer une requête PURGEALL pour purger toutes les images dans "domain.xyz"
$ curl -X PURGEALL https://domain.xyz/images
# Réponse renvoyée par le serveur Varnish
<!DOCTYPE html>
<html>
<head>
    <title>200 Purged images</title>
</head>
<body>
    <h1>Erreur 200 : Images purgées</h1>
    <p>Toutes les images ont été purgées avec succès.</p>
    <h3>Guru Meditation:</h3>
    <p>XID: 32770</p>
    <hr>
    <p>Serveur de cache Varnish</p>
</body>
</html>
Purge from a CMS
It is a bit more difficult to illustrate this case because there are many ways to manage caching from a backend. In the configuration example above, a control on the header "Uncacheable" is added, which disables caching. With this option, any CMS could simply set this header on the response to disable caching for this request, for example.
From any PHP code and with the configuration above, you can simply send an HTTP request and use this snippet to perform a PURGE of the cache:
<?php
if ($curl = curl_init("http://127.0.0.1/some_url")) {
    curl_setopt_array($curl, [
        CURLOPT_RETURNTRANSFER => true,
        CURLOPT_CUSTOMREQUEST => "PURGE",
        CURLOPT_HTTPHEADER => [
            "Host: {$_SERVER['HTTP_HOST']}"
        ]
    ]);
    curl_exec($curl);
    if (curl_getinfo($curl, CURLINFO_HTTP_CODE) == 200) {
        echo "Cache purged!";
    }
    curl_close($curl);
}
?>
Learn more
Useful links regarding the Varnish configuration language (VCL) to control request processing, routing, caching and several other aspects: