
Knowledge base
1000 FAQs, 500 tutorials and explanatory videos. Here, there are only solutions!
This guide explains how to maintain control over your radio streaming flows, for example, to decide if a listener can listen to your radio by activating geolocation protection.
Protecting an Audio Stream with GeoIP
The principle is simple, and it suffices to go to the restriction settings:
- Log in to the Infomaniak Manager (manager.infomaniak.com) from a web browser like Brave or Edge
- Click on the icon at the top right of the interface (or navigate through the left sidebar menu, for example)
- Choose Radio Streaming (under Streaming)
- Click on the name of the relevant object in the displayed table
- Click on Restrictions in the left sidebar menu
- Click on the action menu ⋮ on the right of the concerned stream in the displayed table
- Click on Geolocation Restriction
Then configure the restrictions:
- Choose whether the listed countries will be allowed or denied
- Search for a country to add it to the list
- Activate advanced configuration if necessary
- Copy or paste a list of countries (useful for restricting other flows with a simple copy-paste)
- Click to remove all listed countries on the page
- Click on the blue button to save
Activating the restriction implies a change in the stream's configuration, which may take a few minutes to be replicated on the servers.
This guide is about the DMARC policy and the optional security reports sent by email that can be enabled or disabled upon request.
Optional DMARC Reports
DMARC reports provide the following information:
- Third-party senders or servers sending emails on behalf of your domain
- The percentage of messages from your domain that pass the DMARC verification process
- Servers or services sending emails failing DMARC checks
- DMARC actions performed by the receiving server for unauthenticated messages from your domain (none, quarantine, or reject)
When reports indicate that most emails pass DMARC checks successfully, it is recommended to strengthen your DMARC settings by enforcing stricter measures. This will enhance your domain's protection against spoofing.
The written report is sent via email to the address you specify in the configuration and will come from dmarc@infomaniak.com or other providers such as Microsoft, Google, Yahoo, etc. It is delivered as a zip archive containing the report in XML format.
It is also possible to receive copies of problematic emails.
Analyzing a DMARC Report
Infomaniak is neither able to analyze your potential DMARC reports and records, nor able to determine their validity or compliance, as this is entirely your responsibility.
It is recommended to use an external service to analyze a DMARC report, such as https://dmarcadvisor.com/dmarc-analyzer/.
Disabling a DMARC Report
from a Mail Service
To disable sending a DMARC report if you still have a Mail Service (otherwise, read below):
- Log in to the Infomaniak Manager (manager.infomaniak.com) from a web browser like Brave or Firefox
- Click on the icon in the top right corner of the interface (or navigate via the left side menu, for example)
- Select Mail Service (Web & Domain universe)
- Click on the name of the relevant object in the displayed table
- Click on Global Security in the left side menu
- Click on Edit (in the DMARC section)
- Remove the registered addresses and Apply the changes
from the DNS zone of a domain
If the Mail Service is no longer active but you continue to receive reports via email, you need to take action on the domain name directly and remove the dmarc record from its DNS zone:
This guide explains how to automatically start playing a video or audio stream when loading a web page.
Automatically starting media
The autostart option is enabled via your Manager (manager.infomaniak.com) in the player that broadcasts your media.
Important: this option is now limited by certain browsers and devices. These restrictions have been established by publishers and manufacturers to limit advertising abuse. Some of them allow automatic playing but disable the sound by default; users must then click on the icon to enable sound. Others simply block the media autostart feature. In this case, users must manually start your media.
It is possible to have the live radio stream start with a pre-recorded advert. This is what is termed a 'pre-roll' in-stream ad (post-roll and mid-roll are not possible for live streams).
Necessary steps
The first absolutely essential step is to sign a contract with https://adswizz.com/
AdsWizz will send you the necessary configuration parameters (identifiers, tags, URLs etc).
Contact Infomaniak to enable the AdsWizz option (specifying the stream in question)
Insert the parameters provided by AdsWizz into your control panel under Flash Player -> Advanced settings
Your audio stream will then have the advert inserted at the start.
We recommend using AAC+ over MP3: a 32 kbps AAC+ stream has a quality that is slightly lower than a 128 kbps MP3 stream and a far higher quality to a 62 kbps MP3 stream.
Some formats are more or less authorized with the <audio/> tag in HTML5, however they won't be readable by all browsers (including the more recent ones).
Please note that when playing on an iPhone / iPod / iPad, the Quicktime player will automatically take over from the Flash player so the listener can listen to the radio.
To upload metadata after configuring your encoder, you may:
- configure Edcast or other software (click here)
- provide the URL of a script that supplies the text to be displayed (for our Flash player only)
- upload information (where you or WinAmp, SamBroadcaster etc, know what you are broadcasting) to the server using the script below.
Actions to be carried out
Simply perform a GET request to the following URL:
https://statslive.infomaniak.ch/updatemetadata.php?radio=...&password=...&push=...
the "radio" parameter is the mount point, e.g. yourfmradio-64.mp3
The "password" parameter is the password supplied in "Webmediastats access link"
the "push" parameter is the metadata that you wish to have displayed
The URL is available from your management interface by going to Radio -> Configuration -> Additional Info .
More information
For developers coding their own player, there are various libraries available to fetch and display the uploaded information, as such data is sent as part of the stream data. The other option is to retrieve the stream info on the server itself.
This guide explains how to remove an audio stream from your radio streaming without deleting the entire product.
Delete a Radio
To access the Streaming service and delete one of the streams:
- Log in to the Infomaniak Manager (manager.infomaniak.com) from a web browser like Brave or Edge.
- Click on the icon at the top right of the interface (or navigate through the left side menu, for example).
- Choose Radio Streaming (Streaming universe).
- Click on the name of the relevant object in the displayed table.
- Click on the action menu ⋮ on the right of the relevant object in the displayed table.
- Click on Delete
- Enter your account password and confirm the deletion.
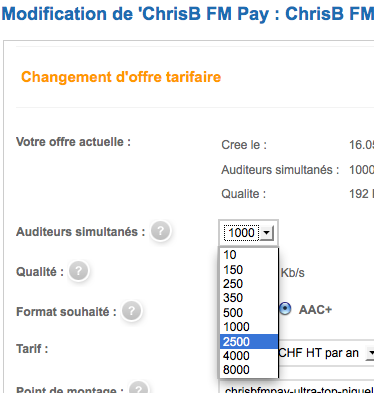
When you have already ordered an audio stream and go back to your Manager (manager.infomaniak.com) in the product ordering menu, you'll be able to change the streams of your existing radios.
Actions to be carried out
Your list of radios can be found under the radio ordering section.
To modify the stream of one of your radios, click on the PLUS on the left of the line to open the drop-down menu.
Then click on the icon to the right to modify the existing stream.

When you select new parameters (number of simultaneous listeners, format, throughput), the price of your offer will be updated automatically. You can choose to pay the difference straight away in order to benefit from the changes immediately. You may also choose to pay in accordance with the current contract's due date, in which case the changes will become effective as from that date only.
This guide explains how to configure an audio stream broadcast correctly.
Configuring a radio stream broadcast
- Open the admin console (https://manager.infomaniak.com)
- Go to Audio Streaming
- Click on the stream to be configured
- In the left-hand menu, click onConfiguration
- Check that the configuration of your encryption software matches the settings indicated on this page
