
Knowledge base
1000 FAQs, 500 tutorials and explanatory videos. Here, there are only solutions!
This guide details how to back up a Google Workspace space (Gmail, Google Drive, Google Calendar, …) using Acronis on Swiss Backup the backup solution in an independent Swiss cloud.
It is also possible to back up other types of data.
Prerequisites
- Have a Infomaniak Swiss Backup space with an available device quota (minimum 1) for a Google Workspace backup (1 license per Workspace user to be backed up):

- If necessary, increase the device quota according to your needs.
- Add the device to the Infomaniak Manager to receive the login credentials.
- Create a new project on Google Cloud Platform (console.cloud.google.com) as a super administrator:

- Familiarize yourself with the Acronis documentation on this topic:
- Plan for 20 to 30 minutes to complete the setup.
Make your life easier! If needed, **local partners referenced by Infomaniak can handle these procedures**. Launch a **free call for tenders**. They take care of everything, freeing you from the technical details.
Allow Acronis to access Google Cloud Platform
In the Google Cloud Platform console:
- Select your new project.
- In the navigation menu, select APIs and services > Enabled APIs and services:

- Disable each of the APIs enabled by default in this project:
- Scroll through the page Enabled APIs and services
- Click on the name of an activated API.
- On the API/Service details page that opens, click Disable and confirm:

- Go back to the previous page and do the same with the next API.
- From the navigation menu, select APIs and services > Library.
- In the API library, activate the following APIs one by one, using the search bar to find the required APIs:

- API Gmail
- API Google Drive
- SDK Admin
- API Google Calendar
- Google People API
- Click on its name then on Enable.
- To search for the next API, go back to step 5.
- From the Google Cloud Platform navigation menu, select APIs and services > OAuth consent screen.
- In the window that opens, select Internal for the user type, then click on Create:

- In the Application name field, enter a name for your application.
- In the User support email field, enter the super administrator's address.
- In the Developer contact information field, enter the super administrator's address.
- Leave all other fields empty, then click on Save and continue.
- On the Scopes page, click on Save and continue without making any changes.
- On the Summary page, check your settings then click on Go back to dashboard.
- In the Google Cloud Platform navigation menu, select Credentials > Service account.
- Click on Create a service account:

- Specify a name, a description and click on Create and continue:

- Do not make any changes to the steps Grant this service account access to the project and Grant users access to this service account.
- Click on Done; the Service Accounts page opens.
- Select the new service account, then under Actions, click on Manage keys.
- Under Keys, click on Add key > Create new key, then select the JSON key type:

- Click on Create; a JSON file containing the service account's private key is automatically downloaded to your machine: keep this file safe as you will need it to add your Google Workspace organization to the Cyber Protection service as described later in this guide.
- In the navigation menu of Google Cloud Platform, select Credentials > Service account.
- In the list, find the service account you created, then copy its client ID which is displayed in the OAuth 2.0 Client ID column (OAuth 2.0 Client ID):

- Click here to access the Google admin interface as a super administrator.
- In the navigation menu, select Security > Access and data control > API controls:

- Scroll down the API Controls page, then under Domain-wide delegation, click on Manage domain-wide delegation; the Domain-wide delegation page opens.
- On this page, click on Add:

- The Add new client ID window opens.
- In the Client ID field, enter the client ID of your service account.
- In the OAuth scopes field, add the following "scopes":
- https://mail.google.com
- https://www.googleapis.com/auth/contacts
- https://www.googleapis.com/auth/calendar
- https://www.googleapis.com/auth/admin.directory.user.readonly
- https://www.googleapis.com/auth/admin.directory.domain.readonly
- https://www.googleapis.com/auth/drive
- https://www.googleapis.com/auth/gmail.modify
- Click on Allow.
Your new Google Cloud project can therefore access the data in your Google Workspace account.
Creation of the backup space
To set up Google Workspace backup with Acronis:
- Click here to access the Acronis Console with the credentials obtained after adding the device (need help?).
- Click on the add device button to add a device of type Google Workspace:
- Enter the address of a super administrator of your Google Workspace account (it doesn't matter if two-step verification is activated for the super administrator's email account).
- Search for the JSON file that contains the private key of the service account you created in your Google Cloud project (or paste the content of the file as text).
- Click on Confirm:

Your Google Workspace organization then appears under the Devices tab of the service console:
This guide explains how the affiliate program works and how to use affiliate links.
Preamble
- Affiliation is an excellent way to create significant and sustainable passive income; it allows you to make money by naturally talking about Infomaniak products:
- Test a product offered by Infomaniak (it is possible to test the Web Hosting + Mail Service once for 3 months).
- Write an article (refer to this other guide if you are looking for advice) that presents the advantages of this product and the particularities of Infomaniak.
- Place a few links in the article that redirect your readers to the product's sales page.
- Then, for 365 days, earn a commission of up to 50% on all orders and renewals of new customers who have previously clicked on one of your links.
- Click here to join the active affiliates to whom Infomaniak pays thousands of francs or euros every month! There are as many reasons to create a site as to increase your revenue.
Manage affiliate links
To get the links with your own tag/ID:
- Click here to access the Infomaniak Manager.
- Click on Affiliation in the left sidebar.

- Click on Marketing tools in the left-hand menu.
- Click on Affiliate links in the left-hand menu.
- Use these links in your content.
You can create a link to any page on the Infomaniak site by adding your unique tag at the end. For example, to redirect your visitors to the page https://www.infomaniak.com/gtl/hosting.ssd your affiliate link will look like this: https://www.infomaniak.com/gtl/hosting.ssd?utm_term=xxyyyyyzzz (xxyyyyyzzz being your unique ID).
The list of orders made via your link remains anonymous. You will only see the order number and the associated commission.
Payment of earnings
Your earnings are paid out automatically at the beginning of each month as soon as the commission amount reaches CHF/EUR 50.-.
- The affiliate program is only valid for products ordered when creating a new customer account, and not for an existing customer account.
- You will continue to receive a commission for 1 year starting from the creation of the client account (on new products and renewals).
- For the earnings to be counted, the client must be new and have clicked on your affiliate link (the cache is kept for 30 days).
- Earnings remain pending validation for 30 days after the order is placed, due to the "Satisfied or refunded" guarantee.
- In case of a refund during this period, the affiliate will not receive a commission.
- If you receive a payment in a currency different from that of your affiliate account, the amount will be converted at the current exchange rate.
To set the payment method (Infomaniak prepaid account, PayPal, IBAN):
- Click here to access the Infomaniak Manager.
- Click on Affiliation in the left sidebar.
- Click on Earnings and payments in the left sidebar.
- Click on Payment preferences in the left sidebar:

Commission rates
As soon as you sign up for the affiliate program, you earn 25% commission on every order and renewal made by the new customers you have referred. Your commission rate automatically evolves based on the earnings you accumulate:
- 30% as soon as your cumulative earnings reach 50.–
- 35% from 1,000.– of accumulated earnings
- 50% once the threshold of 20,000.– in cumulative earnings is reached
In other words, the earlier you are active, the faster your efforts will be rewarded.
Solving an issue in case of an unaccounted commission
Here are the main reasons why a commission might not be taken into account:
- The customer forgot to click on the banner available on the affiliate's site.
- The new customer account was created by the person benefiting from the affiliate program (recognized IP).
- The new customer account is managed by an existing user.
- The new products were ordered from an existing customer account.
- The new products were ordered by the person benefiting from the affiliate program.
- The new products were ordered from the office/home of the person benefiting from the affiliate program.
- The new products were not ordered when the new customer account was created.
- The order was canceled within the first 30 days.
The goal of this program is to find new customers and not to place orders for existing customers.
- If you wish to "sell" Infomaniak products to existing customers, use the reseller (partner) program instead.
- ⚠ It is not possible to be a **Infomaniak Partner** and **Affiliate** at the same time!
Products covered by this program
The Infomaniak affiliate program covers almost all products, including…
- kSuite: the 100% Swiss alternative to Google Workspace and Microsoft 365
- VPS Lite / VPS Cloud : Linux/Windows server
- Public Cloud (and therefore Kubernetes Service): the sovereign alternative to AWS, GCP or Azure
- AI Tools : the best sovereign alternatives to ChatGPT (Llama, Mixtral, etc.)
- Jelastic
… with the exception of the following services:
- Renewal Guarantee" and "Domain Protection"
- Domain name
- Housing
- Very High Availability Hosting
This guide details how to get started with Swiss Backup, the backup solution in an independent Swiss cloud.
2 Swiss Backup variants
Infomaniak offers two backup modes depending on what you want to back up:
1. CLOUD Backups
Allows you to back up and sync files via the protocols:
- Swift (recommended)
- FTP / SFTP
- S3
- Synology NAS system
with the application of your choice
Cloud Backup Getting Started Guide
2. ACRONIS Backups
Ideal solution for backing up:
- workstations Windows / macOS
- mobiles iOS / Android (iPhone / Samsung, etc.)
- Windows/Linux servers
- websites
- virtual machines VMware, Hyper-V, Virtuozzo...
- Microsoft 365 / Google Workspace spaces...
using the software Acronis Cyber Protect Cloud which will perform automatic and customized backups
Click here to share a review or suggestion about an Infomaniak product.
This guide explains how to obtain a backup space Swiss Backup, the backup solution in an independent Swiss cloud.
Prerequisites
- Determine what type of device will be backed up on Swiss Backup:
CLOUD BACKUPS - allows you to back up and synchronize files via the protocols:
- Swift (recommended)
- FTP / SFTP
- S3 Compatible
- Synology NAS system
with the application of your choice…
ACRONIS BACKUPS - ideal solution for backing up:
- Windows / macOS workstations
- Android / iOS (iPhone) mobiles
- Windows / Linux servers
- websites
- VMware, Hyper-V, Virtuozzo virtual machines...
- Microsoft 365 / Google Workspace spaces…
using the software Acronis Cyber Protect Cloud which allows you to store backup data using Swift in the backend and create "protection plans" where you can choose between:
- full machine backup (all hard drives attached to the machine in SATA)
- file / folder backup (specifically of your choice)
- volume / disk backup (if you have external disks)
- backup scheduling
- backup retention duration
- backup restoration
- backup encryption
Get Swiss Backup
To order a Swiss Backup storage space:
- Click here to access your product management on the Infomaniak Manager (need help?).
- Click on Order:

or on the cart icon if a product is already active and you wish to order an additional Swiss Backup:
- Choose the maximum size of all the storage space needed for your project(s), regardless of the number and type of backups you will perform

Here is an example project to backup two things:
- important and large documents located on a NAS
- the photos/videos of an Android mobile device

- Complete the order and pay.
- The Swiss Backup product appears in your Manager with the disk space and quotas selected during the order:
- You can then add the desired devices to your Swiss Backup interface: refer to this other guide.
This guide explains how to respond to an email visible on the Web app Mail Infomaniak (online service mail.infomaniak.com) by sending the response directly in the Web app kChat (online service kchat.infomaniak.com) or the desktop app, in the form of a private message to the email sender.
Preamble
- This feature allows you to respond to an email directly in kChat, with a reminder of the original message to facilitate understanding.
- It aims to streamline collaboration by allowing you to respond quickly to an email without leaving the kSuite environment.
- It reduces the back-and-forth between traditional email and the collaborative workspace.
Sending a reply to an email via kChat
Prerequisites
- This feature is currently only available in one-to-one exchanges and not in group discussions.
- The email preview is not yet available on mobile, unless you are using the beta version of the kChat application.
When you have received an email from a colleague and you want to respond directly on kChat:
- Click here to access the Web app Mail Infomaniak (online service mail.infomaniak.com).
- Open the message to which you want to reply via kChat.
- Click on the kChat message icon in the email toolbar:

- Compose your kChat message, format it if necessary, and click the Send button at the bottom right:
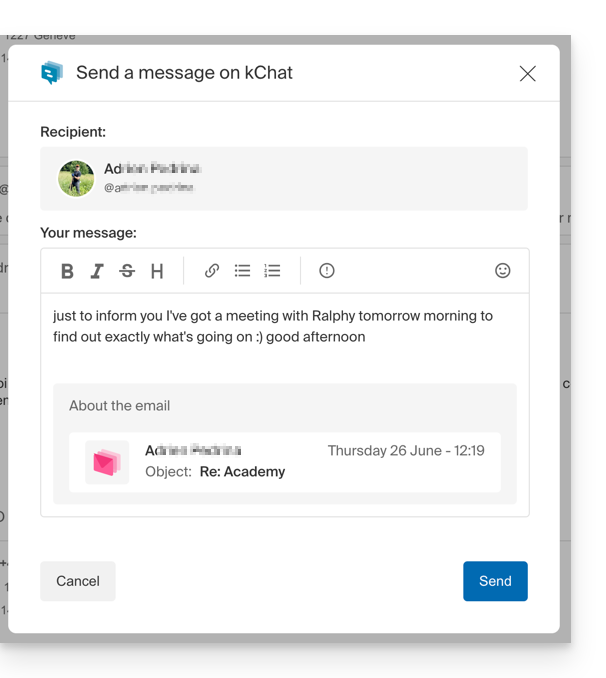
- Your contact receives the message on kChat with a box representing the original email (date & time, subject)…
You can access this message on kChat (in the thread of private messages exchanged with your correspondent) but also:
- in the send confirmation message:

- in an information banner on the email conversation:

This guide details how to import data from **Google Drive** using **rClone** on **kDrive** Infomaniak.
COMPATIBILITY my kSuite ✗ | my kSuite+ ✗ ✔= Compatible offer | ✗= Not available |
1. Set up rclone for drive access
Installing rclone on your computer
There is a version of rclone with a graphical interface (GUI) but it is quite possible to do this via command line (CLI):
- Install rclone from a terminal application on your device by entering the following command:
sudo -v ; curl https://rclone.org/install.sh | sudo bash - Enter the password for your session on your computer to start the installation:

- Refer to the official installation guide if necessary.
Configuration of the remote disk (Google Drive) on rclone
- Once rclone is installed, enter the command
rclone config.- Refer to the official configuration guide if necessary.
- Then choose to configure a new remote import by answering
nforNew remote. - Name the remote disk, for example
gdrive:
- Then choose the type of drive to import by responding with
drive, which corresponds to Google Drive among the options offered.
You then need to authorize the connection to Google Drive from a web browser.
By default, rclone uses a shared client ID among all users, which can result in request limitations imposed by Google. It is strongly recommended to use your own client ID to avoid these restrictions.
- Access the Google API Console with your Google account.
- Create or select a project.
- Enable the Google Drive API via the button/link "Enable APIs and services".
- Search for the keyword
Driveand click onGoogle Drive API:
- Click on the Enable button.
- Click on Credentials in the left sidebar (and not on a similar button).
- Click on Configure the OAuth consent screen (if not already done):
- Enter a name, for example
rclone. - Select "External" (or "Internal" if you are a Google Workspace user).
- Under “Data access”, add the necessary scopes ("application fields"):
https://www.googleapis.com/auth/docs,https://www.googleapis.com/auth/drive,https://www.googleapis.com/auth/drive.metadata.readonly
- Save.
- Add your email account as a test user under "Audience".
- Go back to the "Google Auth Platform" section.
- Enter a name, for example
- Create OAuth credentials :
- Click on "Create credentials / OAuth client ID".
- Choose "Desktop app" and leave the default name, then click the Create button.
- Keep the displayed
client IDandclient secret code.
- If "External" was chosen in step 7 above, go back to “Audience” in the left sidebar and click on “Publish the app.”
Due to the "enhanced security" recently introduced by Google, you are theoretically supposed to "submit your application for verification" and wait several weeks for their response.
In practice, you can directly use the client ID and client secret with rclone (read the rest of the guide). The only consequence will be a very intimidating confirmation screen when you log in via your browser to allow rclone to obtain its token-id. However, since this only happens during the initial setup of the remote storage, it is not a major issue.
It is also possible to leave the application in "Test" mode, but in this case, any authorization will expire after one week, which can be cumbersome to renew frequently. If a short validity period does not pose a problem for your use, then keeping the application in test mode may be sufficient.
Go back to rclone in the terminal:
- Provide rclone with the
client_idby copying and pasting theClient IDobtained in step 8 above, and do the same for the secret phrase. - Then choose the
scopenumber 1:
- Press the “
Enter” key to leave theservice_account_filequestion blank.. - Answer “No”
nto the question about “advanced configuration”. - Answer “Yes”
yto the question about connecting via web browser:
- A web page opens in your web browser allowing you to connect to Google and authorize the application you created in step 9 above.
- Once the permissions are granted, you should receive the following message:

- In the terminal, answer “No”
nto the question about “Shared Drive (Team Drive)”. - Answer “Yes”
yto the last question:
Configuration of the destination disk (kDrive) on rclone
It is possible to act directly on the configuration file of rclone by pasting your kDrive configuration in the following format, for example:
[kdrive]
type = webdav
url = https://kDrive_ID_HERE.connect.kdrive.infomaniak.com/
vendor = other
user = user@email.com
pass = PASSWORD_HERE_OR_APP_PASSWORD_IF_2FA
But here is how to proceed step by step, just like for the previous configuration:
- Still in the terminal, enter
nfor a new disk configuration and enter the namekDriveto recognize your destination disk:
- Then choose the type of disk to import by answering
webdav, which corresponds to a WebDAV configuration among the options offered. - Enter the following information:
url= direct access to kDrive (refer to this other guide regarding the kDrive ID for the connection URL)vendor= rclone (option #6)user= email address for logging into the Infomaniak user account
- Answer “Yes”
yfor the password question then enter the password:- application password in case double authentication is activated or the one of your Infomaniak user account if you haven't activated 2FA.
- Leave
bearer_tokenempty then answer “No”nto the question about “advanced configuration”. - Answer “Yes”
yto the last question and your 2 disks will be displayed:
2. Copy the data from Google Drive to kDrive
kDrive supports rclone streaming upload via WebDAV, up to 50 GB (extendable to 100 GB) to prevent abuse, with automatic error handling if the limit is exceeded without prior specification of the size via Content-Length.
Prerequisites
- Consult the options available in the official guide before starting an import, including these important commands:
--drive-skip-shortcutsto avoid infinite import loops--drive-shared-with-meto get what has been shared--drive-acknowledge-abuseto force the download of files blocked by Google
Example command to start copying your Google Drive to the root of your kDrive:
sudo rclone copy gdrive: kDrive:This will instantly start copying your folders, subfolders, and contents from Google Drive to the personal folder of your kDrive Infomaniak!
The Google documents of type Gdocs, Sheets, Slide, etc. are converted to Office formats like .docx, .xlsx, etc. readable directly on kDrive.