
Knowledge base
1000 FAQs, 500 tutorials and explanatory videos. Here, there are only solutions!
This guide explains how to enable or disable dark mode on your operating system (macOS / Windows) since the theme setting "automatic" of Infomaniak tools (animation below) is based on the Dark mode or Light mode setting of the OS:

Managing dark or light mode…
… on macOS
- Click on System Preferences…

- Click on Appearance and choose the dark mode on the right:

… on Windows
- Open the start menu
- Click on Settings:
- Click on Personalize then Colors:
- Click on Dark:
And on mobile?
The dark theme is enabled on mobile devices for Infomaniak login and account creation pages; it automatically adapts to the mobile system's preferences, thus providing a consistent visual experience between mobile apps and login and account creation pages.
This guide explains how to connect the eM Client email application to an email address hosted by Infomaniak.
⚠️ All the services offered by Infomaniak are compatible with the corresponding standard protocols (notably IMAP/SMTP for email, WebDAV for sharing, S3/Swift for storage, etc.). Therefore, if you encounter a problem with third-party software, contact its publisher or a Partner and consult the support policy as well as article 11.9 of the Infomaniak Terms and Conditions.
Prerequisites
- Create the address within my kSuite or on a Mail Service (Mail Service alone, or existing within a kSuite).
- Test the email password (do not confuse it with the one used to log in to the Infomaniak interface).
- Check on the Service Mail that the automatic diagnosis is correct.
Add the email address to the application
To configure the email application:
- Open the application and choose the desired mode, then click on Next:

- Enter the email address to attach and then click the Start button next to the field:

- Enter the email password and then click on Continue next to the field:

- Check the box and click on Yes:

- Check and complete the missing information:

- Choose the desired mode then click on Next:

- Check and complete the missing information:
- It is done, your email address is now configured in the application:

Recommended settings
- Incoming IMAP server = mail.infomaniak.com
- IMAP port = 993 (with SSL)
- Outgoing SMTP server = mail.infomaniak.com
- SMTP port = 465 (with SSL)
- Username = the full & complete email address ( ? )
- Password = the one assigned to the email address you want to access ( ? )
- Authentication required for sending emails:
- It is activated in the SMTP settings of your application.
- Check "use the same settings as the incoming server" or, depending on the software/email client, enter a username (= full & complete email address) and its password.
Some versions of eM Client incorrectly consider ports 993 and 465 as obsolete and you will then need to specify for IMAP tcp/143 STARTTLS or tcp/993 SSL/TLS and for SMTP tcp/587 STARTTLS.
In case of trouble
There is no need to contact Infomaniak Support if your email address works well outside of the application. The most common error involves using an incorrect password. Familiarize yourself with the solutions provided in this other guide regarding email in general.
This guide explains how to schedule the sending of an email so that your message is sent at a specific date/time in the future, this on the Web app Mail Infomaniak (online service mail.infomaniak.com), even if you are no longer connected at that time.
Scheduled sending is also possible on the mobile app Infomaniak Mail (app for iOS/Android smartphone or tablet).
COMPATIBILITY my kSuite ✔ (no customization option) | my kSuite+ ✔ ✔= Offer compatible | ✗= Not available |
Send an email at a later date and time
To do this:
- Click here to access the Mail Infomaniak web app (online service mail.infomaniak.com).
- Compose a new message as you usually do.
- Click on the dropdown arrow to the right of the Send button to access additional actions.
- Choose the time at which the message should be sent, from the suggestions or by customizing the schedule:

- You can then find your scheduled emails in a new dedicated section:

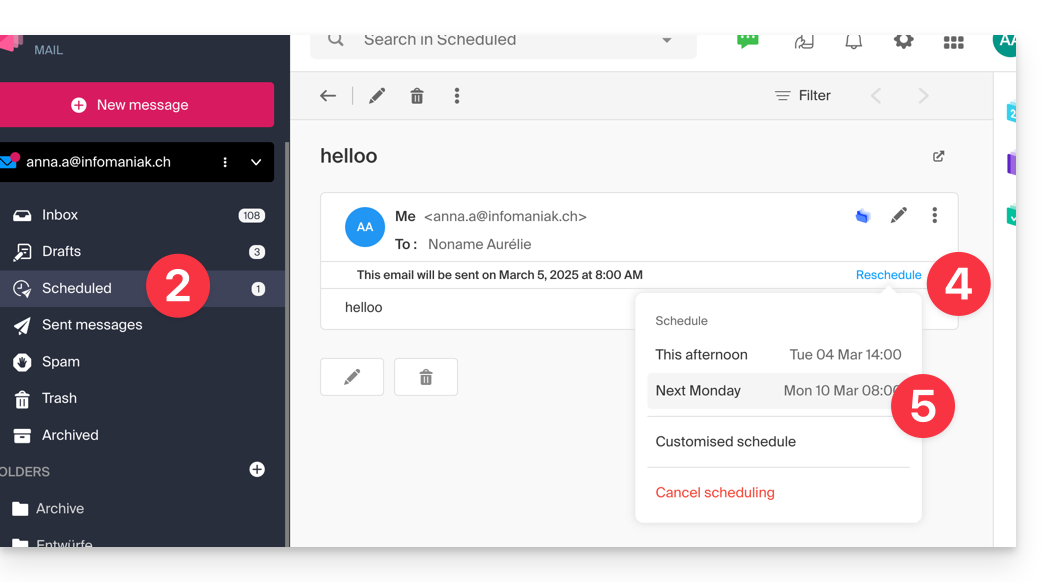
Reschedule a scheduled send
To change the send time of a message already scheduled to be sent later:
- Click here to access the Mail Infomaniak web app (online service mail.infomaniak.com).
- Click on Scheduled Sends in the left sidebar.
- Open the message for which you want to change the future send time.
- Click on Reschedule.
- Choose the time at which the message should be sent, from the suggestions or by customizing the schedule:
Cancel a scheduled send
To cancel the scheduled sending and move the message back to drafts:
- Click here to access the Mail Infomaniak web app (online service mail.infomaniak.com).
- Click on Scheduled Sends in the left sidebar.
- Open the message for which you want to change the future send time.
- Click on Reprogram.
- Click on Cancel scheduling:

- Confirm the cancellation to place the message in your drafts:

To permanently delete a message with no possibility of recovery:
- Click here to access the Mail Infomaniak web app (online service mail.infomaniak.com).
- Click on Scheduled Sends in the left sidebar.
- Hover over the message to delete and click on the trash can:

- Confirm the deletion to permanently destroy the draft.
This guide explains how to activate or deactivate the Infomaniak ad filter, which automatically sorts emails detected as Newsletters or activity notifications into specific folders.
Introduction
- The filter…
- … is automatically enabled when creating an email address within an Infomaniak Mail Service or when subscribing to a my kSuite / my kSuite+ offer.
- … allows you to focus on relevant and important emails, which improves your productivity by reducing distractions related to advertisements and spam.
- … helps keep your inbox cleaner and better organized by separating promotional emails, which makes managing important emails easier.
Activate the option from the Infomaniak Web Mail app
Prerequisites
- Having permission to manage filters: if you had been invited to the Web Mail app (online service mail.infomaniak.com) to manage your address, it is possible that the Service Mail manager has revoked this right from their admin account.
To access the settings of your Infomaniak mailbox:
- Click here to access the Web Mail app (online service mail.infomaniak.com).
- Click on the Settings icon at the top right.
- Check or select the relevant email address from the dropdown menu on the left sidebar.
- Click on Filters and rules:

- Activate the ad filter option, the effect is immediate:

- To disable the filter, simply click the toggle switch again; in this case, all future received messages will go to the inbox.
Enable the option from a Mail Service
To access the settings of your Infomaniak mailbox:
- Click here to access the management of your product on the Infomaniak Manager (need help?).
- Click directly on the name assigned to the relevant product.
- Click on the email address in question in the table that appears
- Click on Filters and rules in the left sidebar
- Enable the ad filter, the effect is immediate:

- To disable the filter, simply click the toggle switch again; in this case, all future received messages will go to the inbox.
Note that you can activate it in bulk for multiple addresses at once.
Customize the advertising filter
Email location
In the same place (point 5 in the images above), by clicking on Modify, you can choose the default location of the 2 folders where messages will be automatically placed (similar to special IMAP folders).
This guide explains how to sort emails currently in your Infomaniak inbox or in subfolders, in order to, for example, quickly delete specific messages with the same structure, classify messages based on their subject or sender, etc.
Sorting an email account quickly
Unlike the guide Sort incoming emails according to rules (Sieve filters) which details how to set up, from the Infomaniak interface, filters that will apply to all future incoming messages, it is possible with the free software Thunderbird to apply sorting rules to messages that have already arrived and are already present in an email account:
- Install and then open Thunderbird.
- Configure your Infomaniak mail within the application.
- Open the Tools menu and click on Filters:

- Check the selected address and click on New...

- Configure the filter according to your preferences (in this case, the rule is that all messages with the subject containing ER will be moved to the trash):

- Click on OK to return to the list of your filters, then click on Run now:

- The result is immediately visible as the messages are moved to the trash and disappear from the window.
This guide details the Signature section present in the emails you send from the Web app Mail Infomaniak (online service mail.infomaniak.com).
Preamble
- It is not possible to remove the automatic addition of the Infomaniak mention in the bottom part of your my kSuite emails.
- It is possible to delete the Infomaniak mention automatically inserted when drafting a new message.
- It is also possible to add your contact details or any information of your choice in the signature that is automatically inserted in each new message.
- If necessary, my kSuite+ offers more flexibility.
Manage the email signature
To add your name or any indication above the Infomaniak mention at the bottom of each of your messages:
- Click here to access the Web app Mail Infomaniak (online service mail.infomaniak.com).
- Click on New message, the composition window opens with a pre-written integrated signature that cannot be removed or modified without changing the offer (my kSuite+).
- Click on the dropdown arrow to the right of the signature selection menu.
- Click on Manage my signatures:

- Click on the action menu ⋮ located to the right of the signature in question.
- Click on Edit:

- Enter a name for your custom signature.
- Enter the name you want to display for your message when it reaches the inbox of your recipients.
- Enter the content of your signature (formatted text, image, etc.).
- Click the button to save:

There you go, every new message you write will include your new signature along with the mandatory Infomaniak mention:
This guide explains how to respond to an email visible on the Web app Mail Infomaniak (online service mail.infomaniak.com) by sending the response directly in the Web app kChat (online service kchat.infomaniak.com) as a private message to the email sender.
Preamble
- This feature allows you to respond to an email directly in kChat, with a reminder of the original message to facilitate understanding.
- It aims to streamline collaboration by allowing you to respond quickly to an email without leaving the kSuite environment.
- It reduces back-and-forth between traditional email and the collaborative workspace.
Sending an email reply via kChat
Prerequisites
- This feature is currently available only in one-to-one exchanges and not in group discussions.
- The email preview is not yet available on mobile, unless you are using the beta version of the kChat application.
When you have received an email from a colleague and you want to respond directly on kChat:
- Click here to access the Web app Mail Infomaniak (online service mail.infomaniak.com).
- Open the message to which you want to reply via kChat.
- Click on the kChat message icon in the email toolbar:

- Write your kChat message, format it if necessary, and click the Send button at the bottom right:
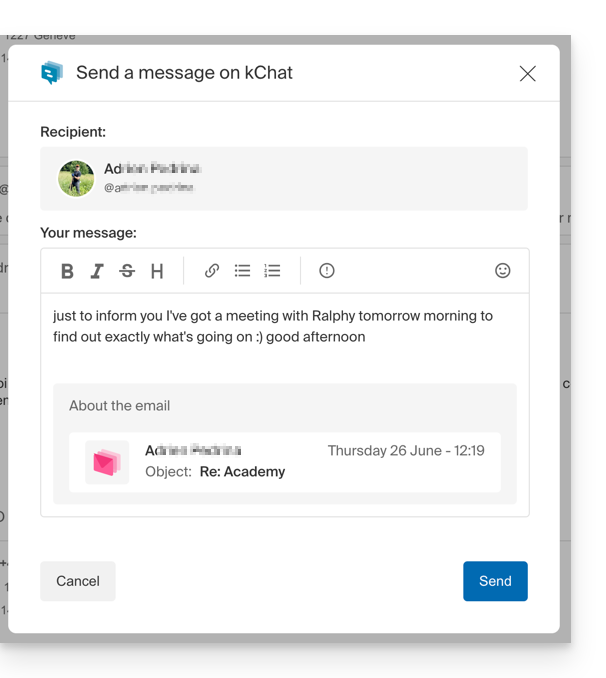
- Your contact receives the message on kChat with a box representing the original email (date & time, subject)…
You can access this message on kChat (in the thread of private messages with your correspondent) but also:
- in the send confirmation message:

- in an information banner on the email conversation:
