
Knowledge base
1000 FAQs, 500 tutorials and explanatory videos. Here, there are only solutions!
This guide explains how to modify product access rights for a user in your Organization on the Manager Infomaniak.
Preamble
- Since you opened your account with Infomaniak, you are part of at least one Organization.
- If you were alone and it was not an invitation, an Organization was created in your name and you automatically become the legal representative.
- Otherwise, you belong to the Organization that invited you (to join its kSuite, to manage a product, etc.).
- It is possible to modify a user's role within your Organization.
- You can define whether a user…
- … is part of your Organization and should become:
- Legal representative
- Administrator
- Collaborator
- … is external to your Organization (limited rights):
- External users are not included in the sharing of calendars and address books with the entire Organization.
- … is part of your Organization and should become:
Who can access what…
Prerequisites
- To be Administrator or Legal Representative within the Organization.
- To have added a user as a collaborator.
The guide below allows you to manage product access for collaborators and external users. Indeed, a legal representative or an Administrator already has access to all existing products within the Organization and visible on the Infomaniak Manager.
To modify a user's product access in the Organization:
- Click here to access user management on the Manager Infomaniak (need help?).
- Click on the action menu ⋮ located to the right of the user in question.
- Click on Edit product access:

- Expand the tabs/accordions by product if necessary.
- Click on the product category to which you want to grant access.
- Select the necessary product(s).
- If you have selected multiple products, decide whether a future additional product should automatically be visible to the user.
- Click on the Save button:

- Start again at step 5 if you need to grant access to multiple products.
Note, on your product table, it is important to distinguish product access (such as kDrive for example, within the kSuite) and product management access. It is possible to authorize a user to use kDrive (they will be able to create a PDF for example) without necessarily granting them management rights for the kDrive service (they will not be able to change the offer, invite a new user, cancel, etc.).
Easier access: Work Teams
To facilitate the addition of access rights to a product within your Organization, there are Work Teams. These allow you to create groups linked to Infomaniak products with the desired rights, very practical for giving a new collaborator in your Organization access to the products they will need in their daily activities.
This guide explains how to replace the main domain name associated with a kSuite.
Preamble
- Switching the domain linked to kSuite is useful if your activities change name.
- This affects:
- Custom Brand (thus the custom URLs leading to your tools like kDrive)
- Mail Service (so your email addresses)
Change the kSuite domain name
Prerequisites
- Own the new domain name (if necessary, create it in advance).
- Familiarize yourself with the instructions in this other guide by applying the instructions corresponding to your situation (this is so that the domain name works when it is attached to your kSuite).
- Add the domain name to kSuite.
Once the new domain name is ready to be used in place of the old one:
- Click here to access the management of your product on the Infomaniak Manager (need help?).
- Click on the action menu ⋮ located to the right of the relevant item.
- Click on Manage domains:

- Click on the action menu ⋮ located to the right of the domain intended to replace the current domain.
- Click on Set as primary domain:

- Click on the Continue button.
- Take note of the information on the screen and then confirm that you have read it.
- Click on the Continue button:

- Click on the button Confirm:
Impact on the Mail Service
By reversing the domain name of the kSuite above, the Mail Service is automatically updated. You go from:
… to this:
This guide explains how to create, save and edit an Office file (text, spreadsheet, presentation...) on the Web app kDrive (online service kdrive.infomaniak.com).
Preamble
- Refer to this other guide if you are looking for information on editing documents on the kDrive mobile app (application for iOS/Android smartphone or tablet).
- Your files are never analyzed and are exclusively stored in Switzerland.
Text files, spreadsheets, presentations...
... with the native editor
The Web app kDrive (online service kdrive.infomaniak.com) natively integrates the applications Docs, Grids and Points which allow you to create, edit and collaborate online on documents of type Word .docx, Excel .xlsx and PowerPoint .ppsx. You can thus work with:
- word processing document
- spreadsheet (worksheet)
- presentation
- notebook
- document draw.io for diagrams, schematics and wireframes
A feature allows you to add a unique bookmark, a sort of shortcut to a favorite passage in your document or the equivalent of a web page anchor, which you can easily share with your contacts. You can also easily notify a user in your Organization directly on the document.
Refer to this other guide for more information on this topic.
... with Microsoft Office Online
Another editing solution is available to you (depending on the kDrive / kSuite offer activated): the Microsoft Office Online editor (refer to this other guide for more information).
PDF Files
Refer to this other guide if you are looking for information on editing (including signing) documents in PDF format.
This guide explains how to add a new recurring event to a calendar / agenda in the Web app Calendar Infomaniak (online service calendar.infomaniak.com for managing your events and appointments).
Preamble
- To create a simple one-time event, refer to this other guide.
- To schedule a meeting with multiple users and find the best time slot, refer to this other guide about the appointment scheduling assistant.
Add a recurring event
To add an event that will be repeated in the future:
- Click here to access the Web app Calendar Infomaniak (online service calendar.infomaniak.com).
- Click on the More button at the top left of the interface to create a New event.
- Display additional fields:

- Enable recurrence:

You can move/delete the following occurrences of a recurring event (only if it does not have any guests).
This guide explains how to add a completely external user to kChat.
Preamble
- If you are the administrator of the Organization where kSuite (and therefore kChat) is located, with full rights granted for kChat, you can invite a completely external user to your Organization who will not be counted as a user.
- He will, however, be invited to create an Infomaniak account if he does not already have one.
- To add a kChat user and grant them more rights, refer to this other guide.
Invite a user to discuss in a private channel
To send an email invitation from kChat:
- Click here to access the kChat web app (online service kchat.infomaniak.com) or open the kChat desktop app (desktop application for macOS / Windows / Linux).
- Click the button to Invite members:

- Click on the link to invite a new user:

- Specify the email address(es) of the person(s) to invite.
- Specify the channel(s) to which these people will have access.
- Click on the blue button to send the invitation:

- The invited person receives an email with a link leading to the kChat interface and the channel shared with them:

- Obviously, there is a registration phase if the user does not already have an Infomaniak account and during this time, the invited user is listed on the kChat channel in question:

- Note that it will not be listed as pending within kSuite or elsewhere because it is a restricted and external user; and as long as it has not completed its registration, the quota remains at 0/100 external user:
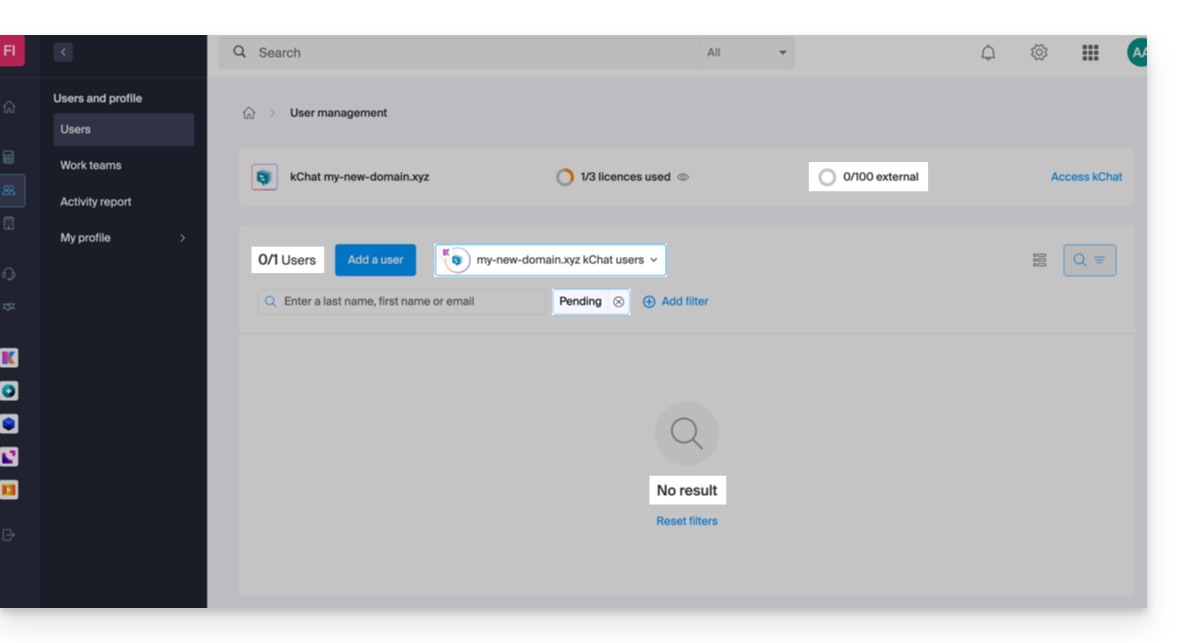
- Note that it will not be listed as pending within kSuite or elsewhere because it is a restricted and external user; and as long as it has not completed its registration, the quota remains at 0/100 external user:
- Once the registration is complete, the user can access kChat:

- From the administrator account, once the registration of the external user is complete, you will see a mention of 1 external user on your kSuite dashboard:

- And you will see the indication on kChat that the user is accessing your private channel:

- From the administrator account, once the registration of the external user is complete, you will see a mention of 1 external user on your kSuite dashboard:
Guest user permissions
Guests can…
- … pin messages to channels
- … use "slash commands" (except for restricted commands such as inviting members, renaming channels, modifying headers, etc.)
- … add a channel to favorites
- … mute a channel
- … update their profile
- … use different authentication methods from other users
Guests cannot…
- … discover public channels
- … join open teams
- … create direct messages or group messages with members who are not in the same channel
- … invite people
This guide details the management of the Organization Directory, i.e., a “special” address book present within the Web app Contacts Infomaniak (online service contacts.infomaniak.com).
Introduction
- The Organization Directory is "automatically compiled" by the various users who make up one of the Organizations to which your user is attached.
- This address book is automatically synchronized with all internal users of your Organization.
- It is not possible to export it.
Access the directory
If your login ID matches and belongs to multiple Organizations, you can access the different directories of your Organizations:
- Click here to access the Web app Contacts Infomaniak (online service contacts.infomaniak.com).
- Click on the chevron to the left of the name of the relevant Organization.
- Click on Directory of {Organization Name}:

- The Organization's contacts are displayed on the right.
Edit the details of a contact in the directory
You can do many things (copy, export the card, view email exchanges, favorite, etc.) by clicking on the card of a contact in the Organization Directory address book, but you will not be able to modify the coordinates on behalf of the person concerned:
To modify the main information, the person concerned (the one for whom a change needs to be made) must log in to their profile and modify it:

A. First & Last Name
To modify the first and last name visible in the directory, the concerned user (here user2@exemple-domaine.ch) must log in to their account and update their information:
B. Email address
To modify the email address visible in the directory, the user in question (here user2@exemple-domaine.ch) must log in to their account and update their details:
C. Phone number
To modify the phone number visible in the directory, the user in question (here user2@exemple-domaine.ch) must log in to their account and update their details: