
Knowledge base
1000 FAQs, 500 tutorials and explanatory videos. Here, there are only solutions!
This guide explains how to add a new recurring event to a calendar / agenda in the Infomaniak Web app Calendar (online service ksuite.infomaniak.com/calendar).
Preamble
- To create a simple one-time event, refer to this other guide.
- To schedule/meet with multiple users and find the best time slot, refer to this other guide about the appointment scheduling assistant.
- It is possible to modify (move/delete) a single occurrence of a recurring event in the Infomaniak agenda without affecting the entire series, thus allowing you to temporarily adjust the schedule, participants, location, or duration of a specific meeting while preserving the original configuration for all other occurrences.
Add a recurring event
To add an event that will be repeated in the future:
- Click here to access the Infomaniak Web app Calendar (online service ksuite.infomaniak.com/calendar).
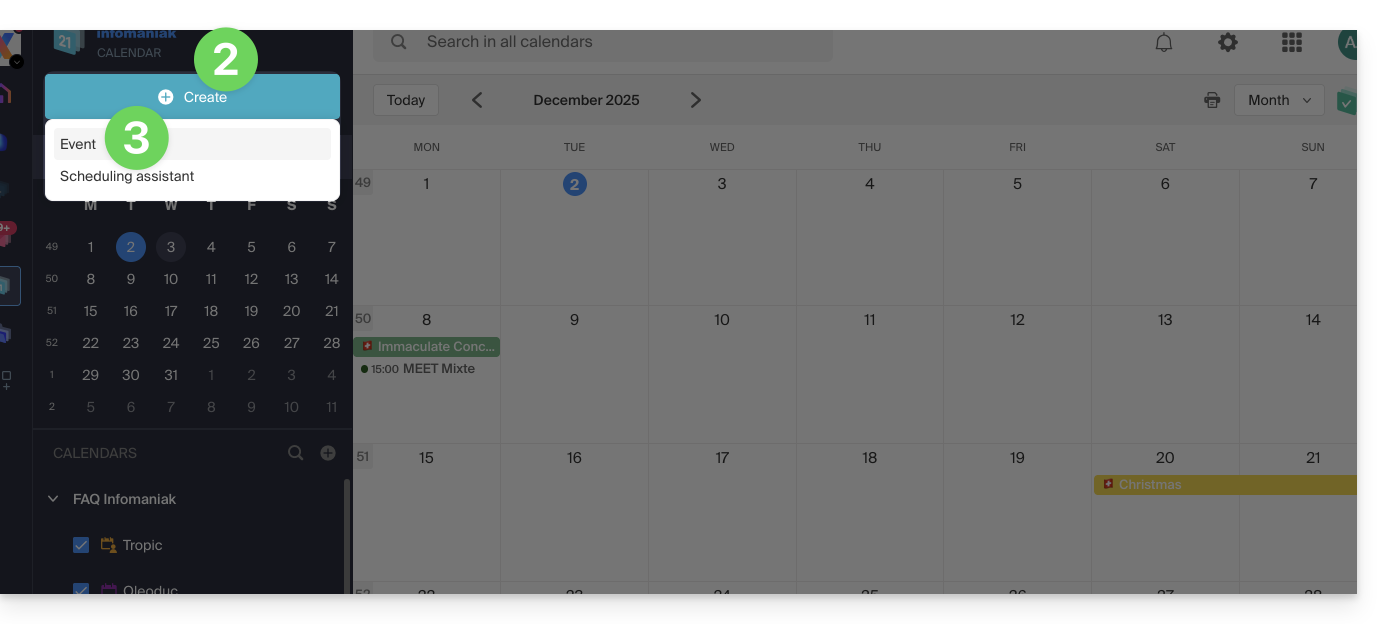
- Click the Create button in the top left corner.
- Click on Event:
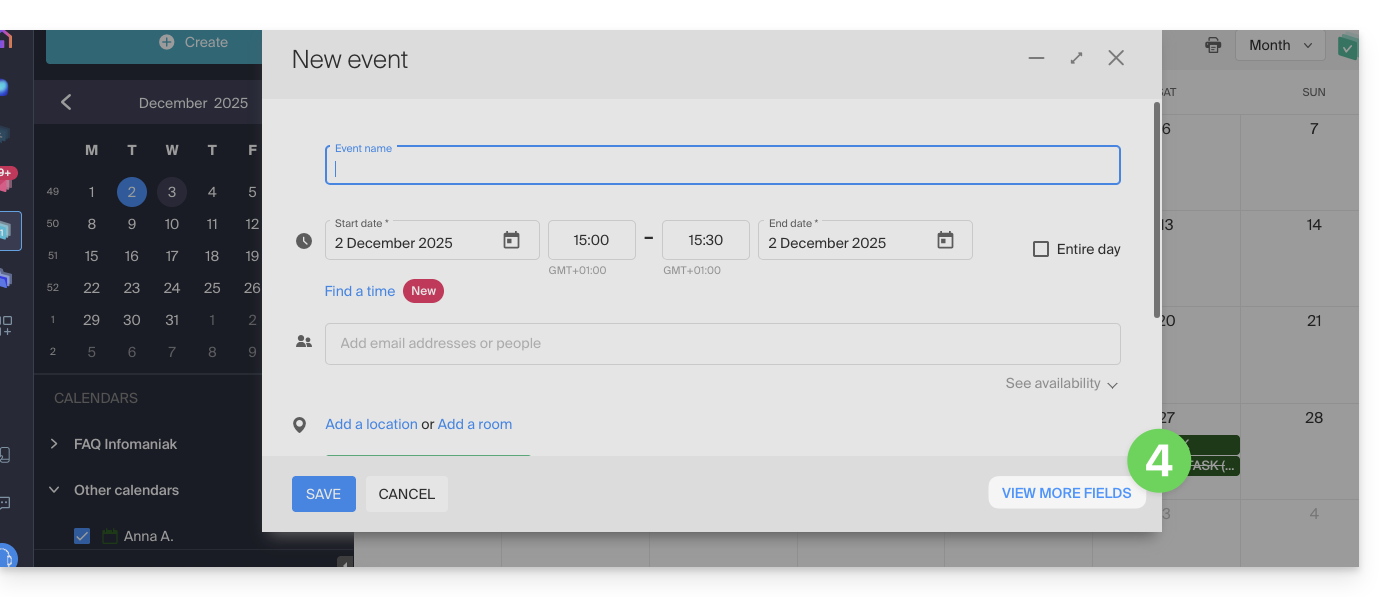
- Display the additional fields:
- Enable recurrence and customize it as needed:
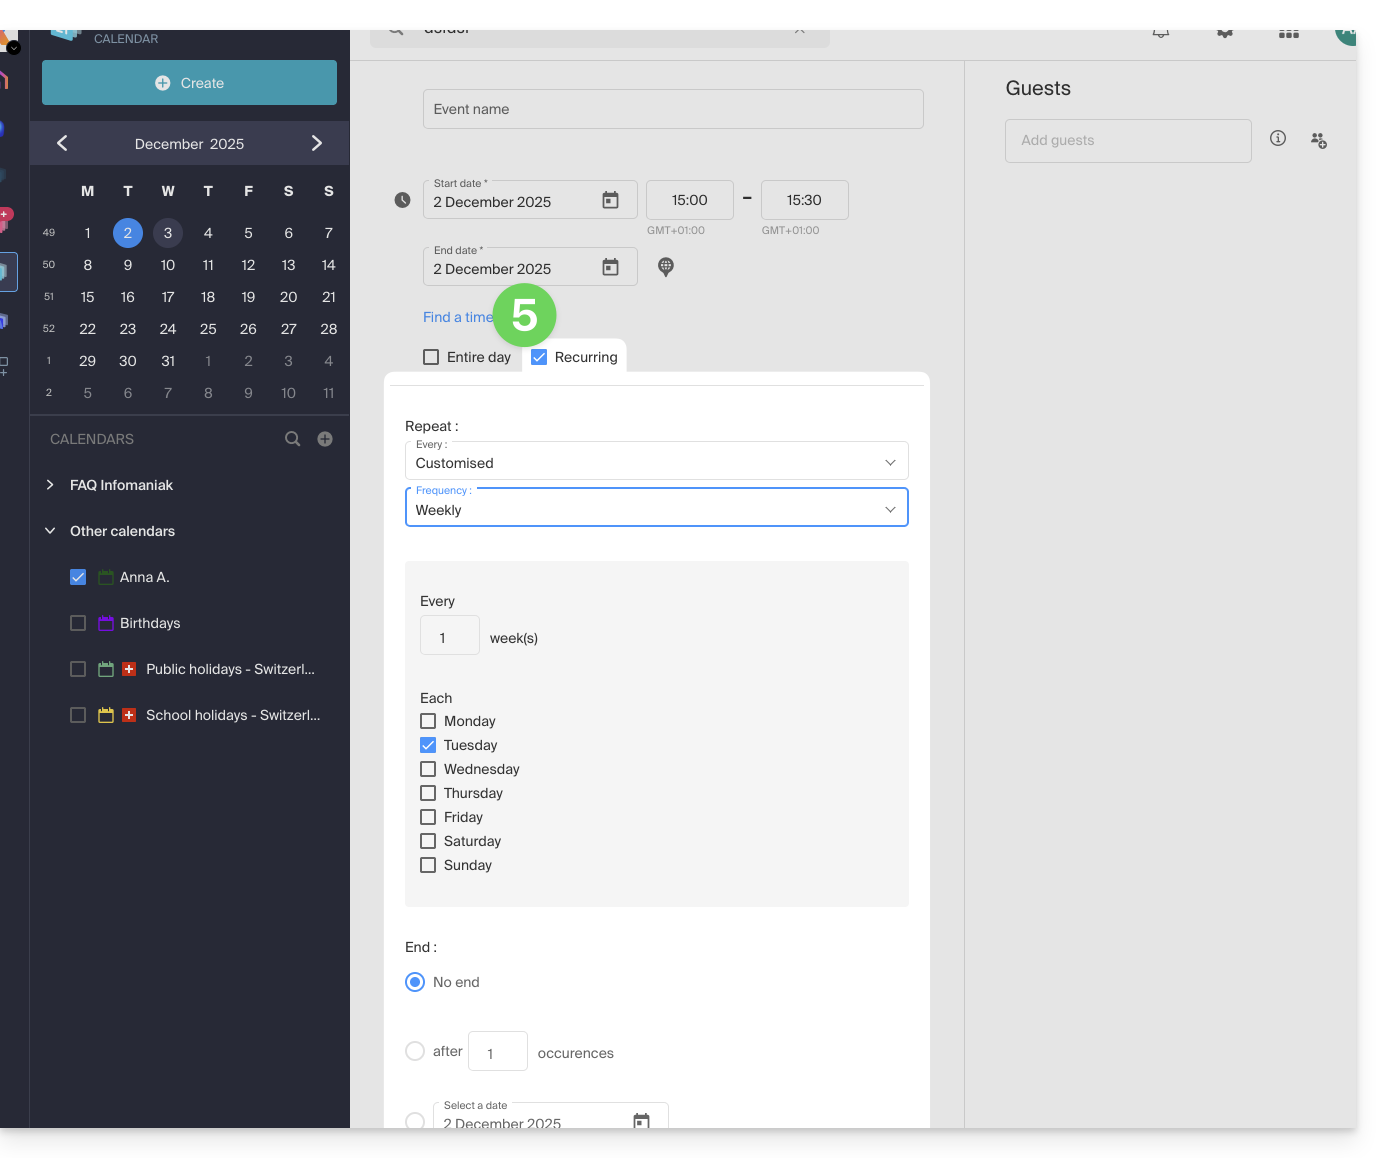
- Save the recurring event at the bottom of the page.
This guide explains how to respond to an email visible on the Mail Infomaniak web app (online service mail.infomaniak.com) by sending the response directly in the kChat web app (online service kchat.infomaniak.com) or the desktop app, in the form of a private message to the email sender.
Preamble
- This feature allows you to respond to an email directly in kChat, with a reminder of the original message to facilitate understanding.
- It aims to streamline collaboration by allowing you to react quickly to an email without leaving the kSuite environment.
- It reduces the back and forth between the classic messaging and the collaborative workspace.
Send a response to an email via kChat
Prerequisites
- The feature is currently available only in one-to-one exchanges and not in group discussions.
- The email preview is not yet accessible on mobile, unless you are using the beta version of the kChat app.
When you have received an email from a colleague and you want to respond to them directly on kChat:
- Click here to access the Mail Infomaniak web app (online service mail.infomaniak.com).
- Open the message to be replied to by kChat.
- Click on the kChat message icon in the email toolbar:

- Compose your kChat message, format it if necessary and click the Send button at the bottom right:
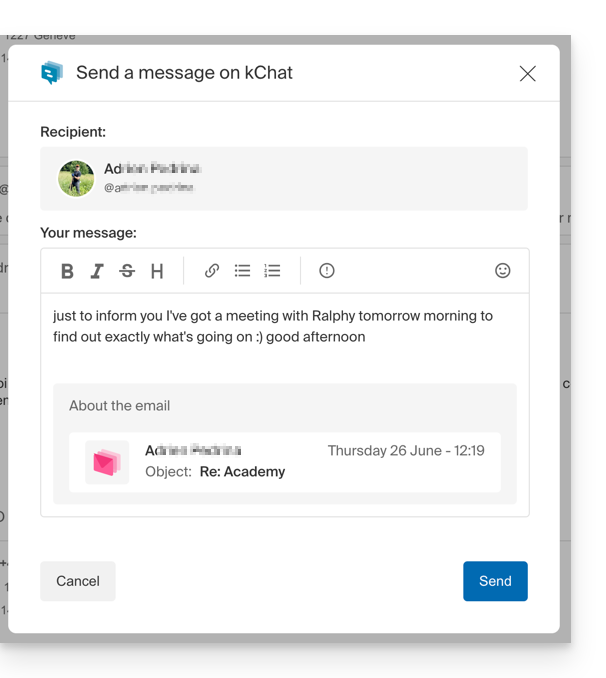
- Your correspondent receives the message on kChat accompanied by a box representing the original email (date & time, subject)...
You can access this message on kChat (in the thread of private messages exchanged with your correspondent) but also:
- in the send confirmation message:

- in an information banner on the email conversation:

This guide explains how to quickly schedule a meeting between multiple users from the Infomaniak Web app Mail (online service ksuite.infomaniak.com/mail).
Create an event from an email
To start the scheduling assistant:
- Click here to access the Infomaniak Web app Mail (online service ksuite.infomaniak.com/mail).
- Open the message from the sender (or the discussion between multiple participants) with whom you want to organize a meeting / a common event.
- Click on the icon ⋮ at the top right of the open message.
- Click on Organize an event:

- The assistant of the Infomaniak app Calendar appears on the right of the screen.
- The title of the meeting is automatically generated from the subject of the email, but it can be modified.
- The duration of the event (and its placement within the day) is automatically generated as close as possible to the present moment, but it can be modified, just as a possible room can be added below.
- Check or change the calendar used.
- The participants in the discussion are automatically added from their email address and can be managed in the second tab.
- Save the information to create the event and invitations:
Infomaniak offers to replace Skype with its own solutions, whether for individual calls, remote meetings, or team exchanges.
kMeet, video conferencing for individuals & businesses
Despite its initial success, the communication platform Skype has seen its use decrease in the face of the emergence of solutions better integrated with new collaborative uses.
One of the simplest ways to replace Skype is to adopt kMeet:
- Unlimited audio and video calls
- Access without registration
- Compatibility Web, mobile and desktop
- Integrated chat & reactions (emojis, sounds)
- Screen sharing with drawing tools, remote control
- Breakout rooms
- Integration with calendar (video link creation)
- Integration with kDrive for storing meeting recordings
- Integration with kChat for video calls
- Privacy respect (no ads, hosted in Switzerland)
- Security with AES-256 encryption
- Eco-friendly (renewable energy, CO2 compensation)
Replace Skype with kMeet
The alternative kMeet to replace Skype can be implemented in different ways:
1. Quick use without registration
To start a private communication between several people on the Internet, it is enough for one of them to go to kMeet and then communicate the meeting link to the others. Here is the step-by-step procedure:
- Enter kmeet.infomaniak.com on a browser like Chrome or Safari.
- Click on Start a new meeting:

- Enter a name for the meeting, which allows future participants to know the subject of the discussion they are joining.
- Click on the button to Continue:

- Grant the necessary rights to kMeet:

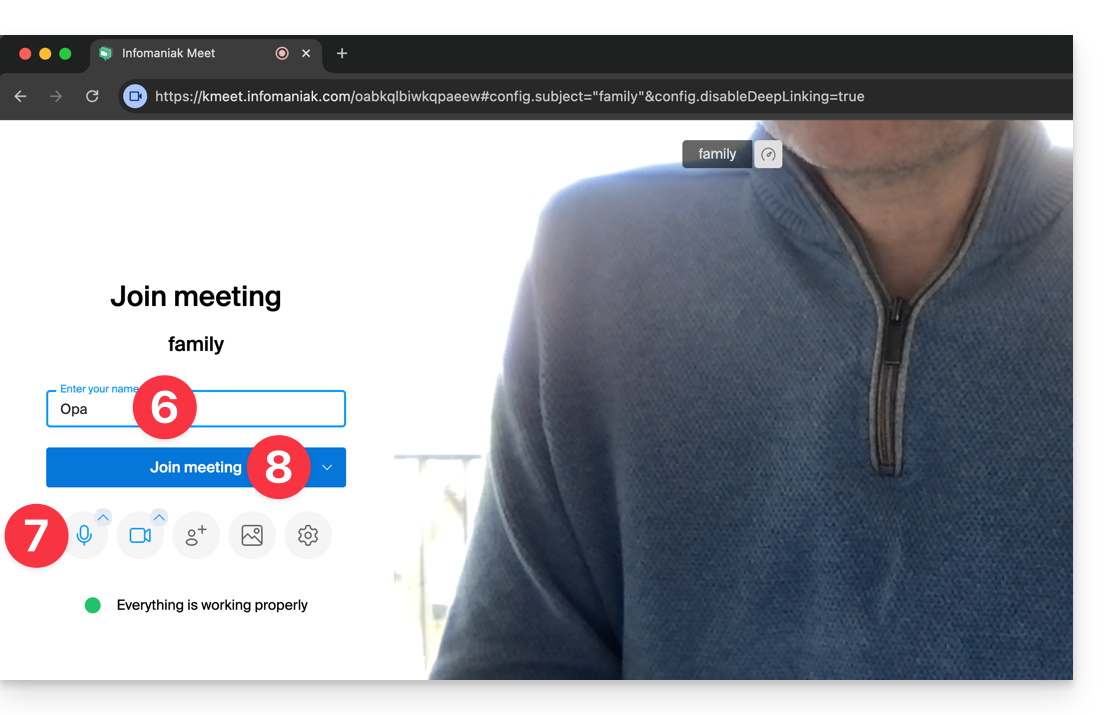
- Enter your name, the one that other participants will see.
- Enable or disable any communication means if these should not be used for the moment.
- Click on the button to join the virtual meeting room (as the first participant since no one has been invited except you for the moment):
- There you go, the room is created and you can now copy the information related to this session and send it to the correspondents so that they can join you (they will only have to execute the link you send them).
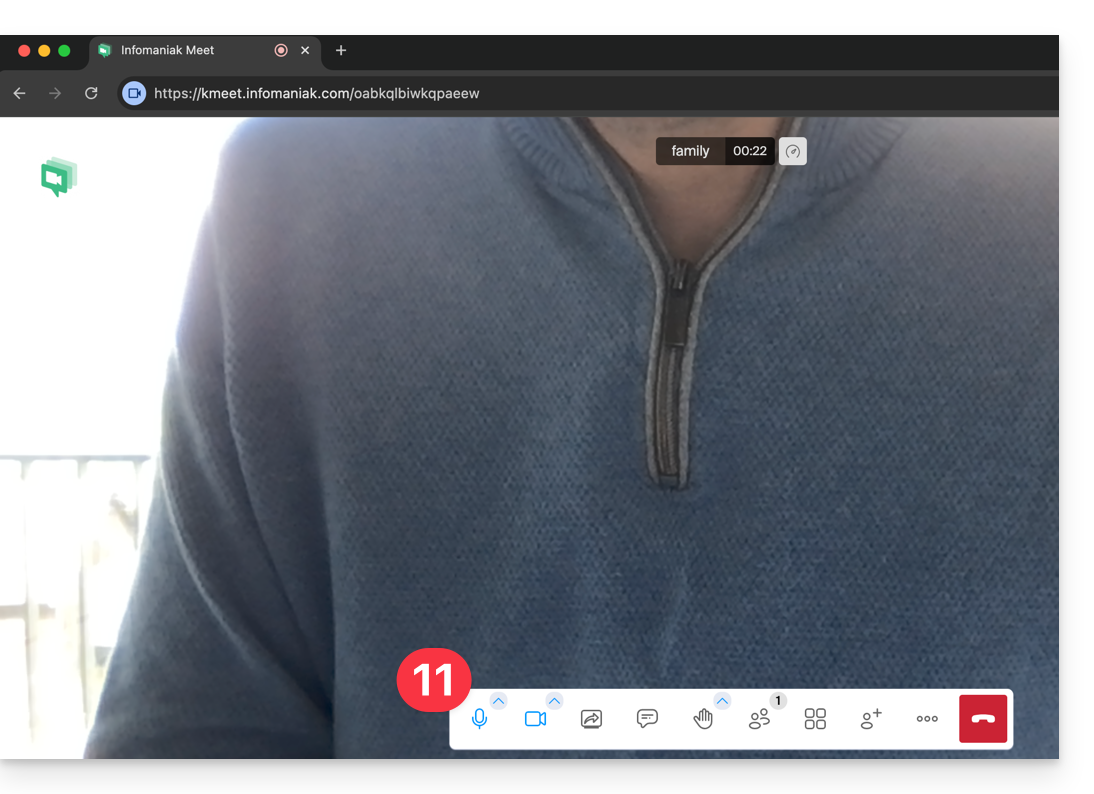
- Close the information window so that you can all chat together:

- The toolbar at the bottom of the screen allows you to enable or disable the microphone, the camera, etc.:
To discover all the possibilities that kMeet offers, refer to this other guide.
2. Planning and invitations with my kSuite
To work efficiently, kMeet can be directly connected to your professional calendar. This means that every time you create an event in your calendar…
- … a video conference link is automatically generated…
- … participants receive the invitation by email with all the information…
- … and on the day of the event, they can join the meeting in one click, without registration or software to install.
Benefit: you centralize the management of meetings, reduce forgetfulness and simplify organization, all from a single interface.
To set up this solution:
- Sign up for my kSuite to get an email address, for example
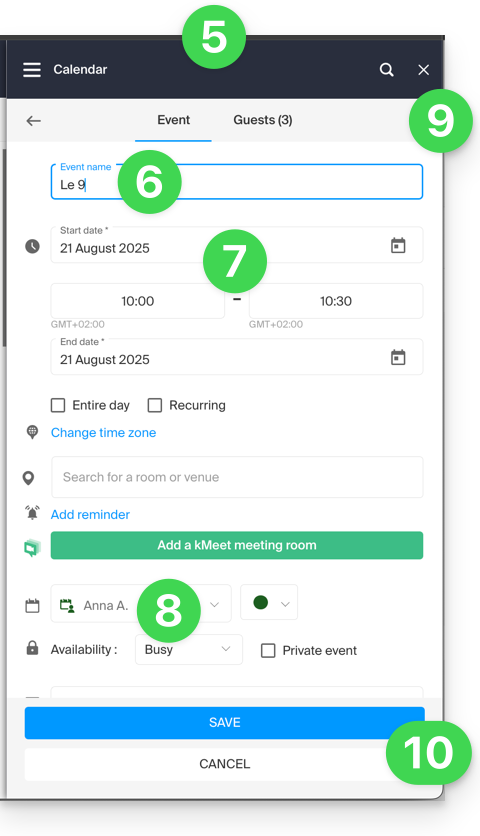
anna.alpha@ikmail.comand, above all, access to Infomaniak services. - Access the calendar ksuite.infomaniak.com/calendar and then create an event on the day of your choice.
- Add participants to the event, even if they are not Infomaniak customers.
- Click the green button to automatically add a kMeet link to the event.
- Click the button to save your event:

- Invitations will then be automatically sent by email to the participants, containing the clickable link to join the online discussion when the time comes:

- The kMeet meeting link is also visible on the event in the calendar directly:

3. Call your correspondent like Skype
To start a conversation at any time with a contact previously saved in your address book, you must both have kChat, available within the Infomaniak kSuite. To set up this solution, which can also be extended to an entire group of contacts:
- Sign up for kSuite to get access to the corresponding Infomaniak services.
- Configure the users (these can even be external) on the kSuite.
- Install the kChat app or go to the URL https://ksuite.infomaniak.com/kchat
- A user can then be called via kChat, which will ring the recipient's device:
- = Internet browser if the kChat URL is open, or computer/mobile device if the kChat app is installed.
- Refer to this other guide to learn more about video calls on kChat.
- Your correspondent can then choose to answer; the call will be made with the kMeet technology within kChat or on the kMeet app if it is installed.
This guide is for you if you wish to change your current email provider and host your emails with Infomaniak.
Preamble
- To help you identify the offer best suited to your needs, refer to this other guide.
Bring your email to Infomaniak
To avoid losing any messages and experiencing any interruptions:
- Follow the different links provided in order, they will open in a new tab of your browser, and return to this main guide after each completed step.
- If necessary, you can also migrate your:
You order a Mail Service only
Below are the different steps to migrate your mail service to Infomaniak securely.
Step 1: It is necessary to order the mail service by following this guide.
At the time of ordering, you can choose to transfer the domain name at the same time or to order the mail service alone.
You can then import the content of your old addresses to Infomaniak by following this guide.
Step 2: Once the addresses are configured and your old content imported, you will be able to link your external domain name to your Infomaniak Mail Service to start receiving emails with Infomaniak. You will need to follow the chapter "Link the external domain to your Mail Service" of this guide.
You will find here the MX / SPF to add in the DNS zone of your domain name:
SPF
Type: TXT
Host: Leave blank
Target: v=spf1 include:spf.infomaniak.ch -all
MX
Priority: 5
Host: Leave blank
Target: mta-gw.infomaniak.ch (for Gandi, it is necessary to add a dot at the end "mta-gw.infomaniak.ch." )
Step 3 (optional): When everything is working correctly and if it hasn't been done already, you can transfer your domain name by following this guide.
As soon as the transfer is initiated, you should have access to the DNS zone of your domain name on the Infomaniak Manager. You can therefore check…
1. … in the DNS diagnostic if there are any corrections to be made and if necessary add the DNS entries that would be necessary for other services used with your domain name (newsletter or other).
2. … in the global security tab of your mail service if DKIM is properly activated.
If emails arrived during the migration with your former provider, you can re-import the content of your old addresses with Infomaniak by following this guide (duplicates are managed).
You order a kSuite
Here are the different steps to migrate your external mail service to an Infomaniak kSuite securely.
Step 1: Order kSuite from this page.
Once the order is completed, access your kSuite and add your domain name to it.
You can then create your email addresses and even import the content of your old addresses by following this guide.
Step 2: Once the addresses are configured and your old content imported, you will be able to link your external domain name to your Infomaniak Mail Service to start receiving emails with Infomaniak. You will need to follow the chapter "Link the external domain to your Mail Service" of this guide.
You will find here the MX / SPF to add in the DNS zone of your domain name:
SPF
Type: TXT
Host: Leave blank
Target: v=spf1 include:spf.infomaniak.ch -all
MX
Priority: 5
Host: Leave blank
Target: mta-gw.infomaniak.ch (for Gandi, it is necessary to add a dot at the end "mta-gw.infomaniak.ch." )
Step 3 (optional): When everything is working correctly and if it hasn't been done already, you can transfer your domain name by following this guide.
As soon as the transfer is initiated, you should have access to the DNS zone of your domain name on the Infomaniak Manager. You can therefore check…
1. … in the DNS diagnostic if there are any corrections to be made and if necessary add the DNS entries that would be necessary for other services used with your domain name (newsletter or other).
2. … in the global security tab of your mail service if DKIM is properly activated.
If emails arrived during the migration with your former provider, you can re-import the content of your old addresses with Infomaniak by following this guide (duplicates are managed).
This guide explains how to remove the link between a domain name and my kSuite.
Preamble
- Once removed, the domain name is available again to link to one of your services.
Remove the linked domain
To unlink a domain name from my kSuite:
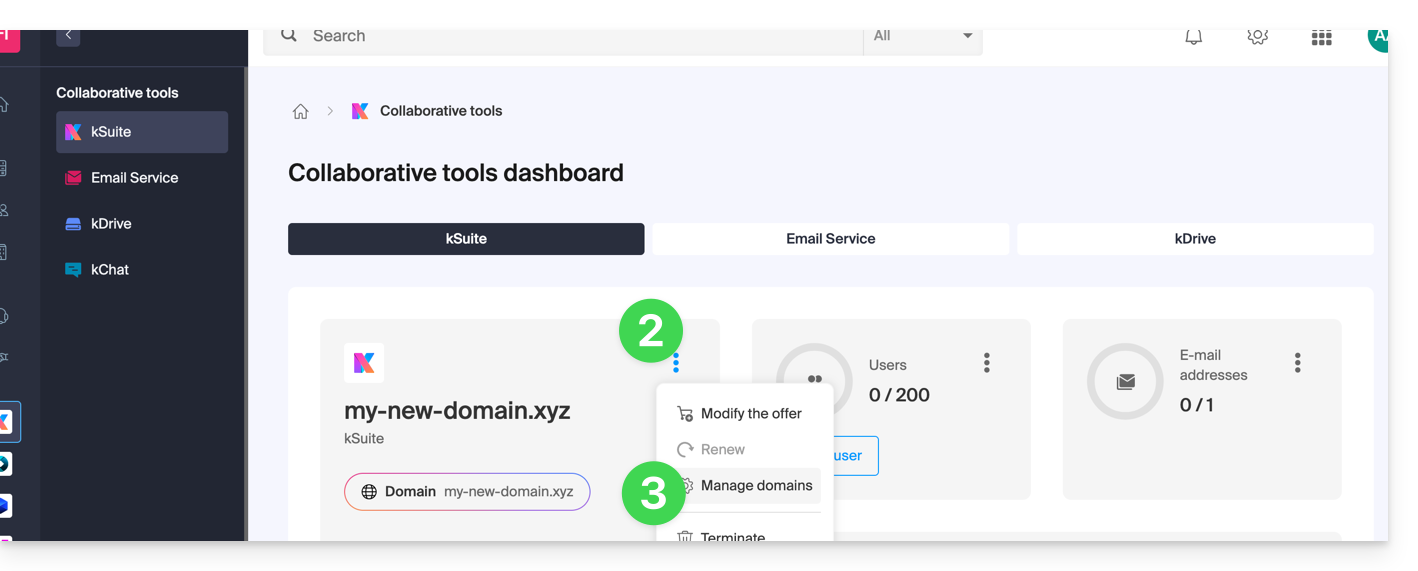
- Click here to access the management of your my kSuite on the Infomaniak Manager (need help?).
- Click on the action menu ⋮ to the right of the my kSuite name.
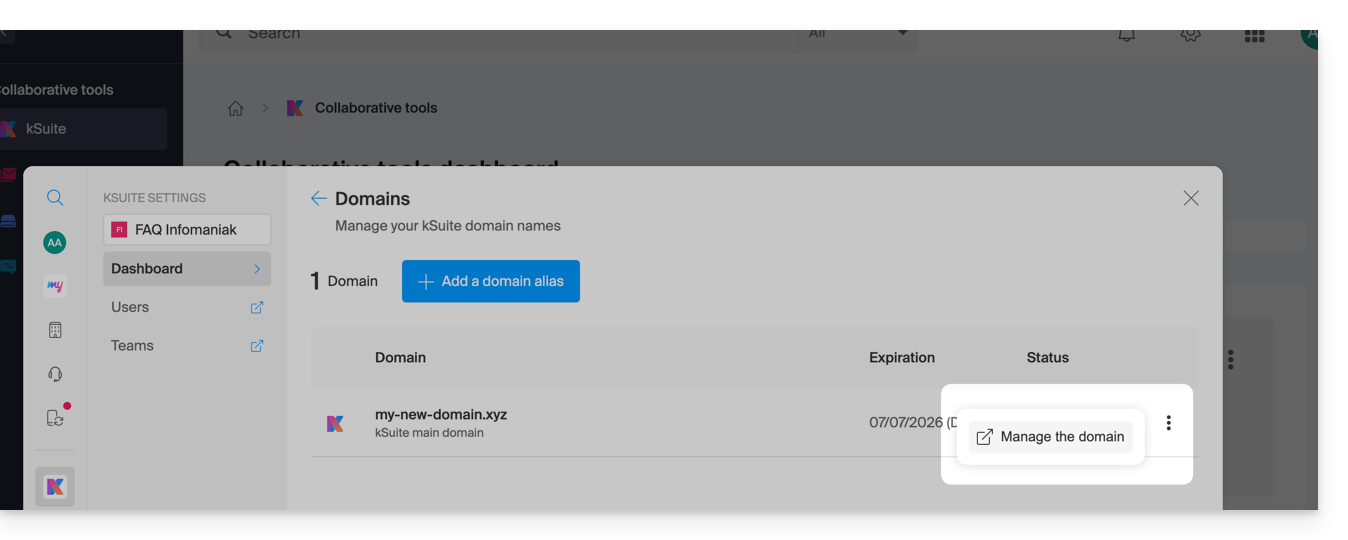
- Choose Manage domains:
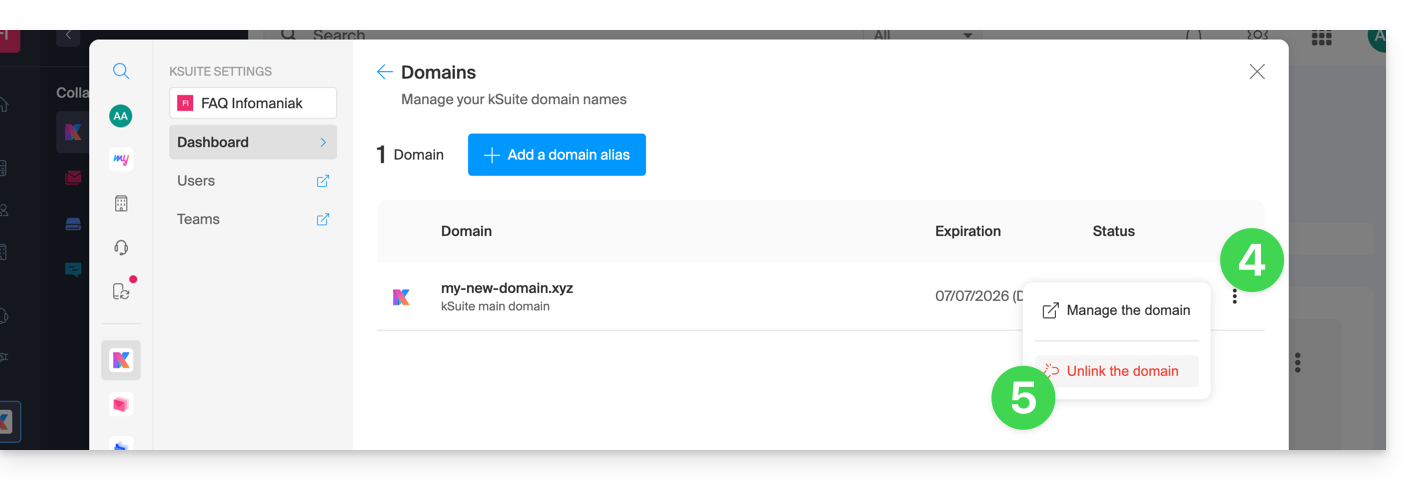
- Click on the icon ⋮ to the right of the domain name to unlink.
- Click on Unlink the domain:
- In the case of a my kSuite paid offer, you cannot unlink the domain name (terminate the paid offer first if necessary):
- In the case of a my kSuite paid offer, you cannot unlink the domain name (terminate the paid offer first if necessary):
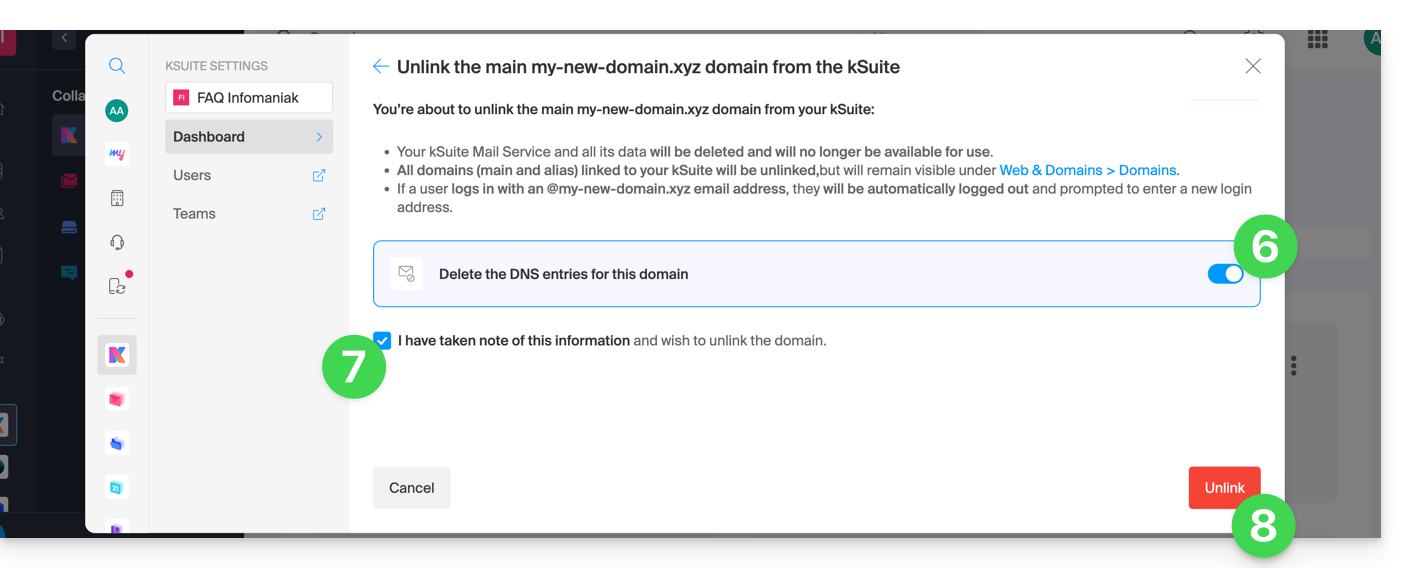
- Activate if necessary the deletion of the domain name DNS entries.
- Confirm the detachment.
- Click the button to validate:
This guide details the management of the Organization Directory, i.e., a “special” address book present in the Infomaniak Web app Contacts (online service ksuite.infomaniak.com/contacts).
Preamble
- The Organization Directory is "automatically created" by the various users who make up one of the Organizations to which your user is attached.
- This address book is automatically synchronized with all internal users of your Organization.
- It is not possible to export it.
- An administrator of the Organization can make certain entries in the directory private to hide them from users with fewer permissions.
Access the directory
If your login corresponds to and belongs to multiple Organizations, you can access the different directories of your Organizations:
- Click here to access the Infomaniak Web app Contacts (online service ksuite.infomaniak.com/contacts).
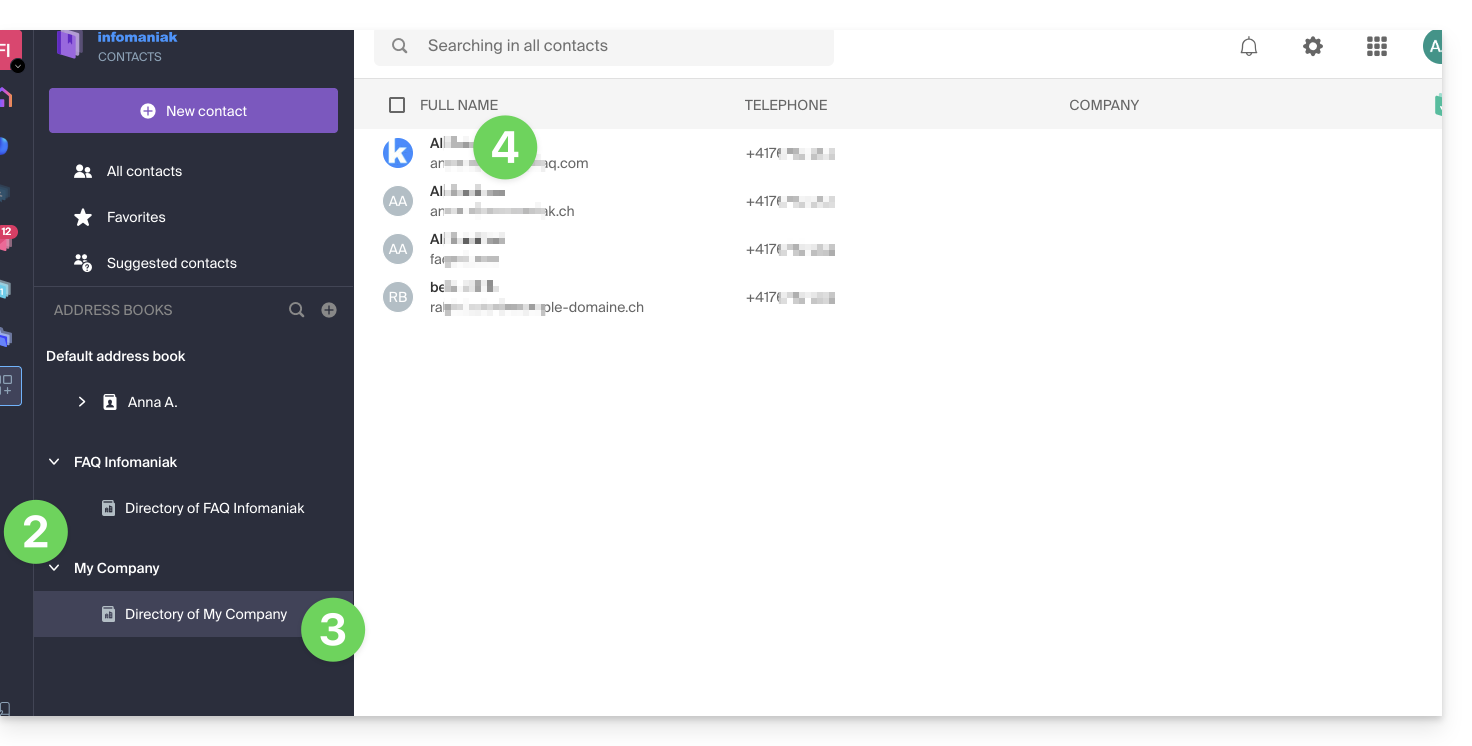
- Click on the chevron to the left of the name of the Organization concerned.
- Click on Directory of {Organization name}.
- The Organization's contacts are displayed on the right:
Modify the details of a directory contact
You can do many things (copy, export the card, view email exchanges or calendar events, add to favorites, call, etc.) by clicking on the card of a contact in the Organization Directory address book but you will not be able to modify the details on behalf of the person concerned: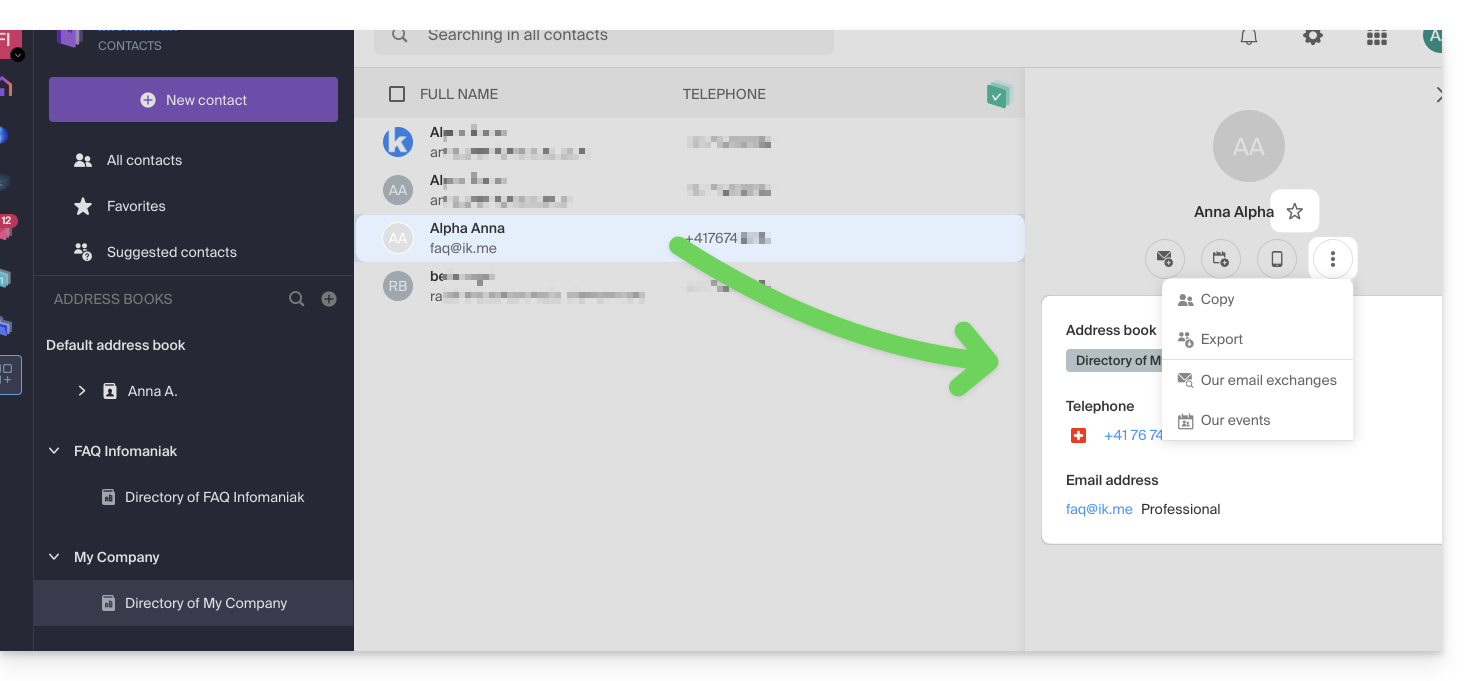
To modify the main information, the person concerned (for whom a change must be made) must log in to their profile and modify it (see below):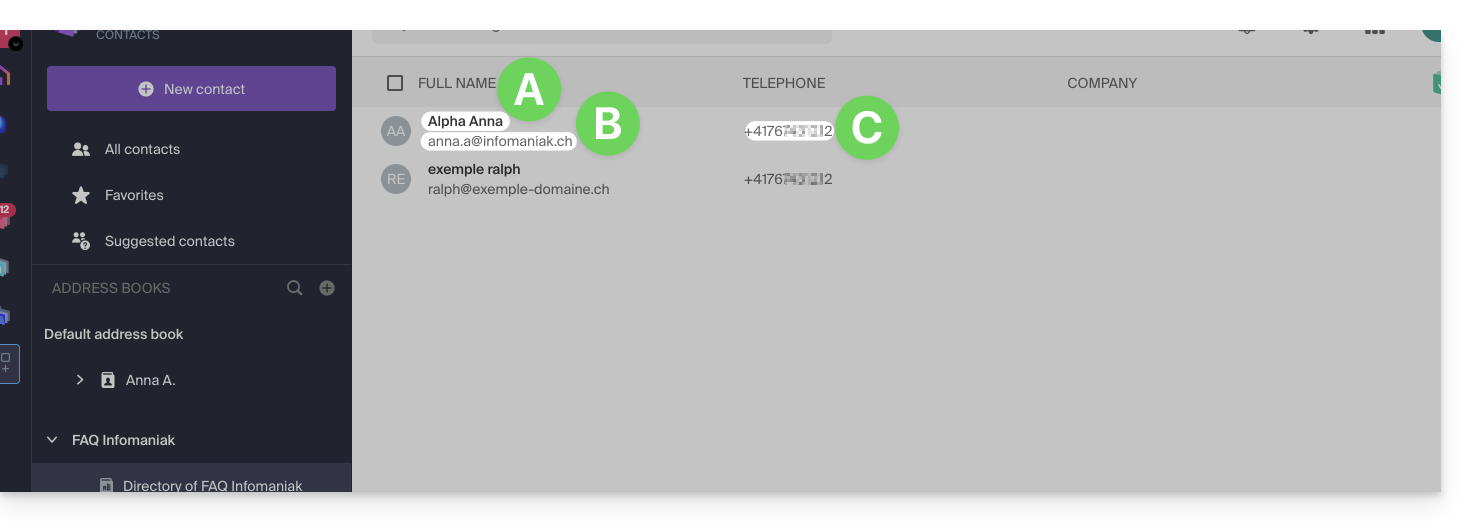
A. First and last name
To modify the first and last name visible in the directory, the user concerned (here anna.a@infomaniak.ch) must log in to their account and modify their details. Refer to this other guide on this subject.
B. Email address
To modify the email address visible in the directory, the user concerned (here user2@example-domain.ch) must log in to their account and modify their details. Refer to this other guide on this subject.
C. Phone number
To change the phone number visible in the directory, the user in question (here user2@exemple-domaine.ch) must log in to their account and update their contact details. Refer to this other guide on this topic.