
Knowledge base
1000 FAQs, 500 tutorials and explanatory videos. Here, there are only solutions!
This guide explains how to replace the main domain name associated with a kSuite.
Preamble
- Switching the domain linked to kSuite is useful if your activities change name.
- This affects:
- Custom Brand (i.e. the custom URLs leading to your tools such as kDrive or Euria)
- Mail Service (i.e. your email addresses)
Modify the kSuite domain name
Prerequisites
- Own the new domain name (if necessary, create it in advance).
- Be aware of the instructions in this other guide by applying the instructions corresponding to your situation (so that the domain name works when it is linked to your kSuite).
- Add the domain name to kSuite.
Once the new domain name is ready to be used in place of the old one:
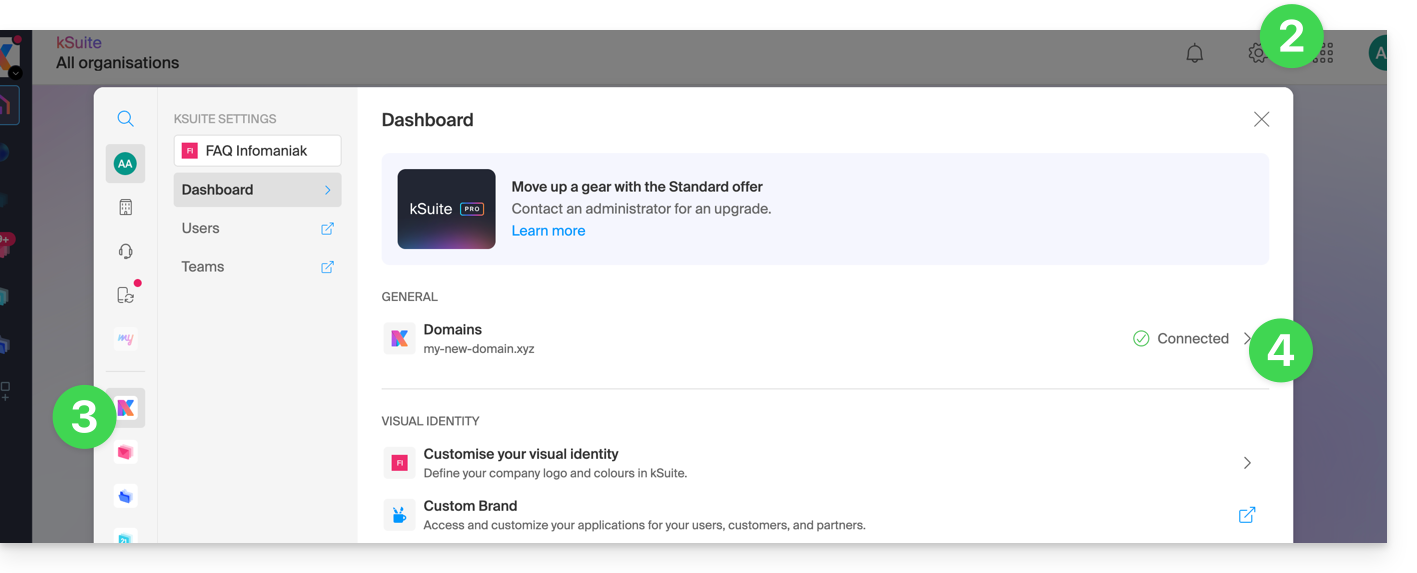
- Click here to access the management of your kSuite (need help?).
- Click on the Settings icon at the top right.
- Click on kSuite in the left sidebar menu.
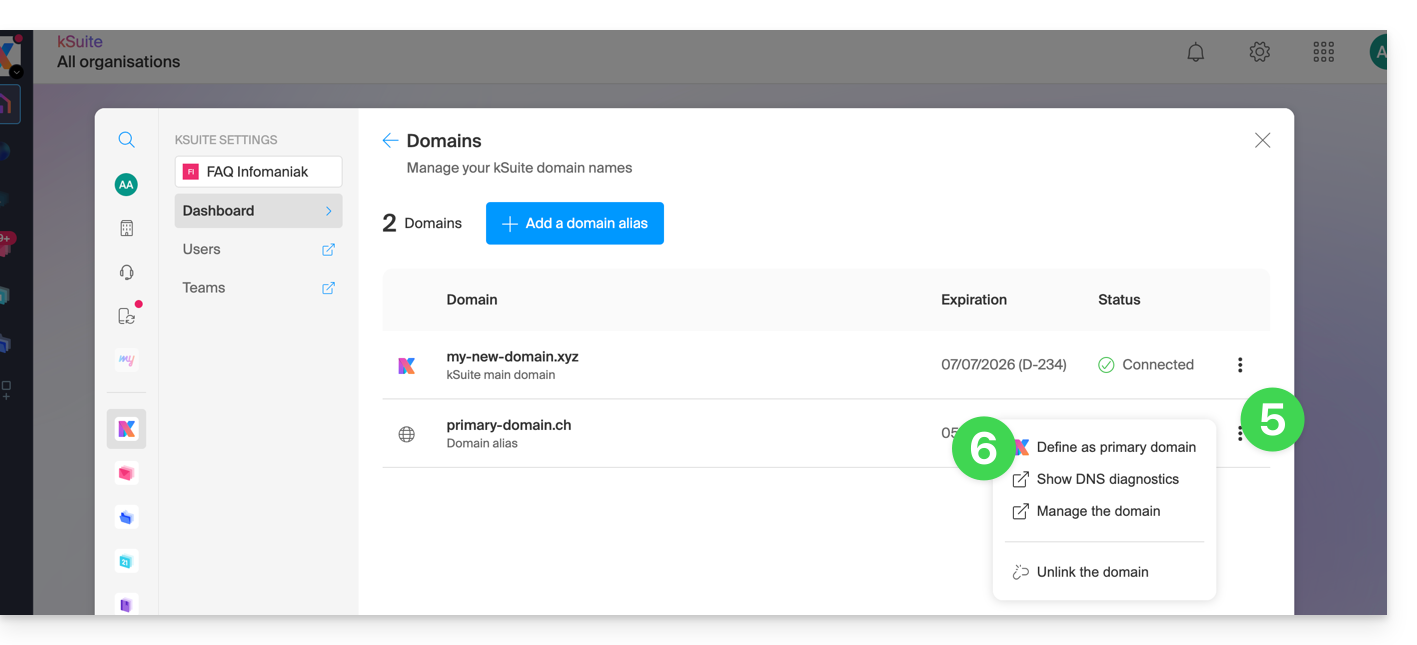
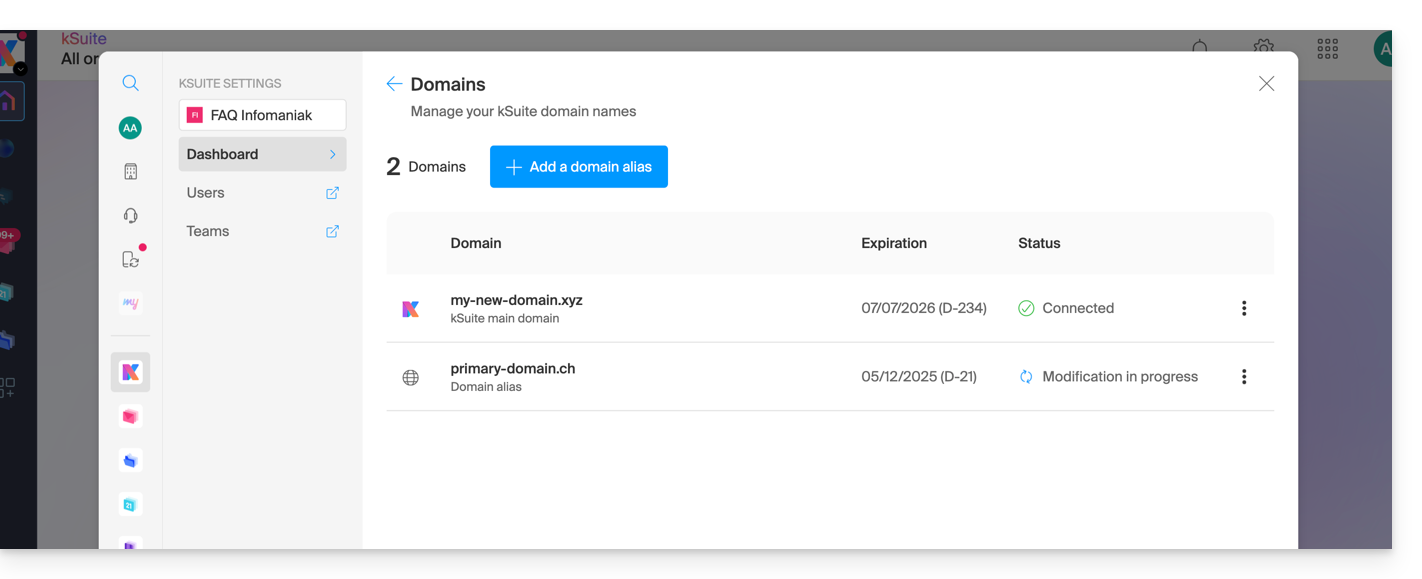
- Click on Domains:
- Click on the action menu ⋮ located to the right of the domain intended to replace the current domain.
- Click on Set as main domain:
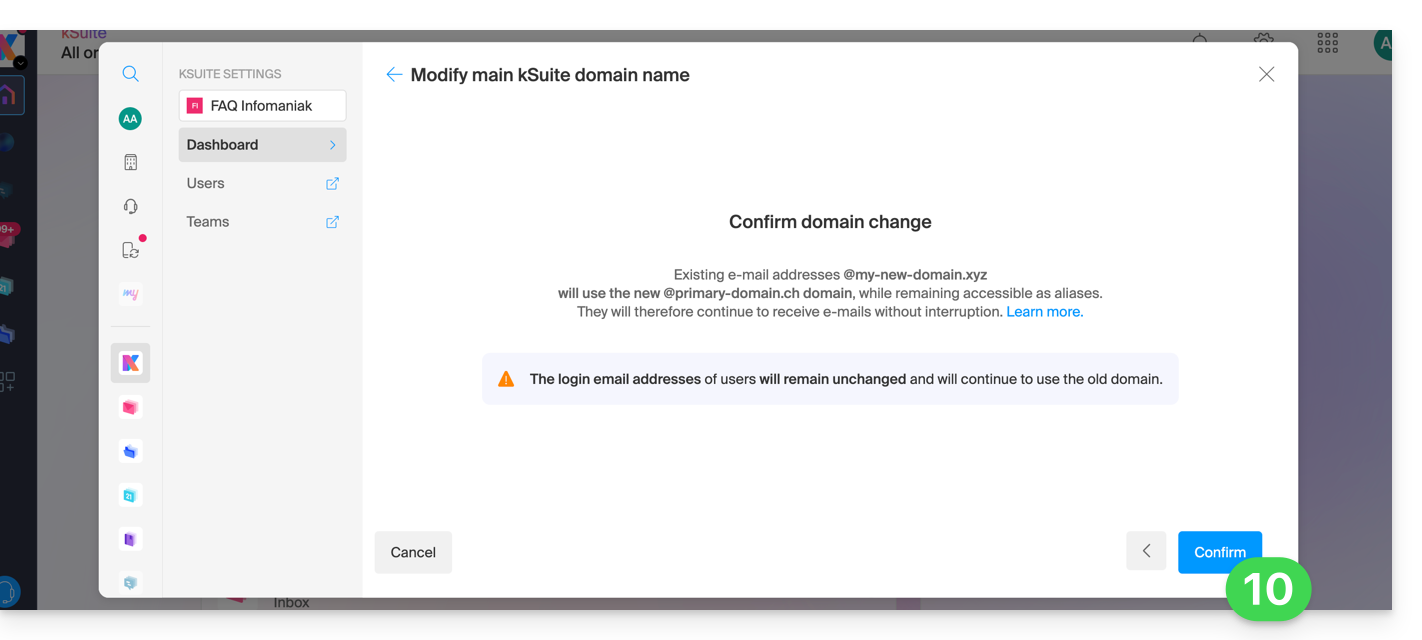
- Information is displayed, click on the Continue button.
- Be aware of the information on the screen and then confirm you have read it.
- Click on the Continue button:

- Click on the Confirm button:
Impact on the Mail Service
By reversing the domain name of the kSuite above, the Mail Service within kSuite is automatically updated. You switch from:
... to this:
This guide explains how to add or remove contacts from the address books of the Web app Contacts Infomaniak (online service ksuite.infomaniak.com/contacts).
Add a new contact
To add a new contact card to an address book:
- Click here to access the Web app Contacts Infomaniak (online service ksuite.infomaniak.com/contacts).
- Click on New contact at the top left.
- Choose the existing address book to which to add the contact.
- Fill in the main information (or additional information via the link at the bottom right).
- Validate with the Save button:

Add from frequently used contacts
You can complete an address book from the frequent contacts suggested by the app (based on your use of the Web Mail app). The name/surname/email will be pre-filled if available:
- Click here to access the Web app Contacts Infomaniak (online service ksuite.infomaniak.com/contacts).
- Click on Suggested contacts in the left sidebar menu.
- Click on the action menu ⋮ to the right of the contact concerned…
- … or on the action menu ⋮ in the right sidebar.
- Click on Add to add the contact to an existing address book:

- Complete the contact information if necessary, then click on Save.
To add all suggested contacts at once:
- Click at the top of the column to select all contacts.
- Click on the icon that appears at the top of the table.
- Choose the existing address book to which to add the contacts.
- Click on the button to save all selected contacts:

Delete one or more contacts
To remove a contact from your lists:
- Click here to access the Web app Contacts Infomaniak (online service ksuite.infomaniak.com/contacts).
- Select the address book from which to delete your contacts:

- Select the contact(s) to delete.
- The Trash icon appears at the top of the column, allowing you to delete the selected contacts:

- Note that displaying all contacts does not always allow deletion, especially if some of them are contacts from Organizations for which you are not an administrator.
This guide explains how to have multiple domain names linked to an existing kSuite by adding additional domain names to it.
Prerequisites
- Own the new domain name (if necessary you will need to create it in advance).
- Be aware of the instructions in this other guide by applying the instructions corresponding to your situation (so that the domain name works when it is linked to your kSuite).
Add a domain name to kSuite
Once the new domain name is ready to be used alongside the old one, you need to add it to kSuite:
- Click here to access the management of your kSuite (need help?).
- Click on the Settings icon at the top right.
- Click on kSuite in the left sidebar.
- Click on Domains:
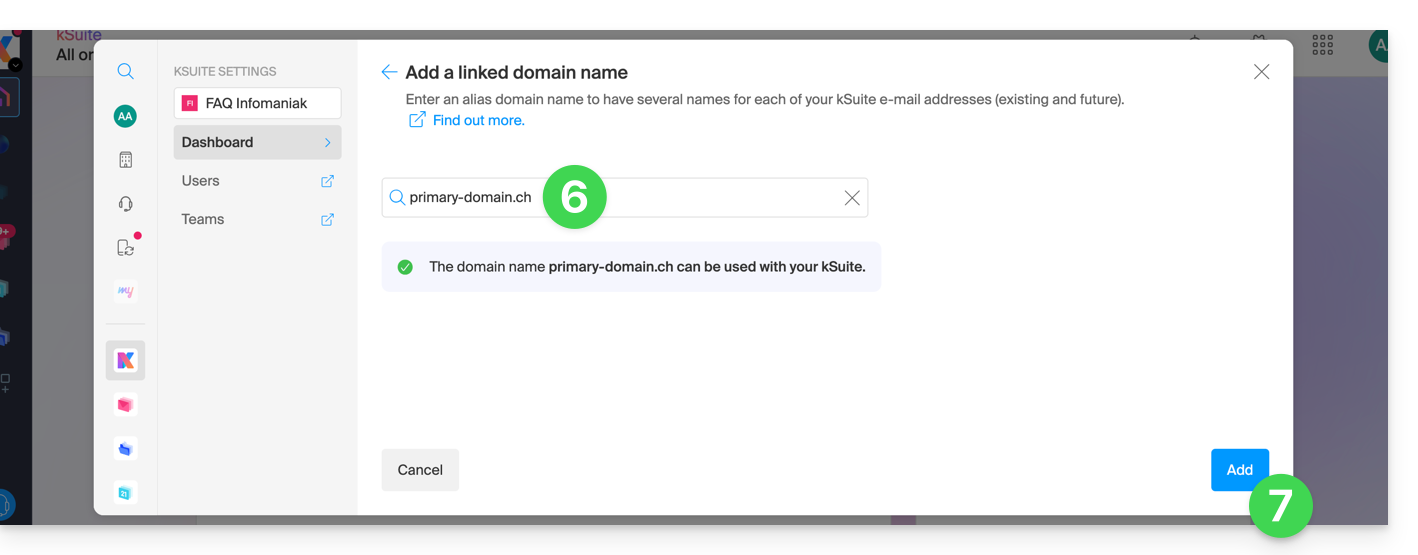
- Click the blue button Add a domain alias:

- Choose the domain to attach from those in your Organization (still available, i.e. not attached to any service) or enter an external domain name (read the prerequisites).
- Click the button to add the domain:
- The domain is properly attached:
You can also consider a reversal of the additional domain name linked to kSuite, with its main domain, in order to modify the domain name of your kSuite.
This guide explains how to print a calendar / agenda from the Infomaniak Web app Calendar (online service ksuite.infomaniak.com/calendar).
Print the content of a calendar / agenda
If you only use your browser's print function with Calendar, you will print the interface and not necessarily the content of the calendar. To print the list of your schedule (regardless of the display mode usually selected):
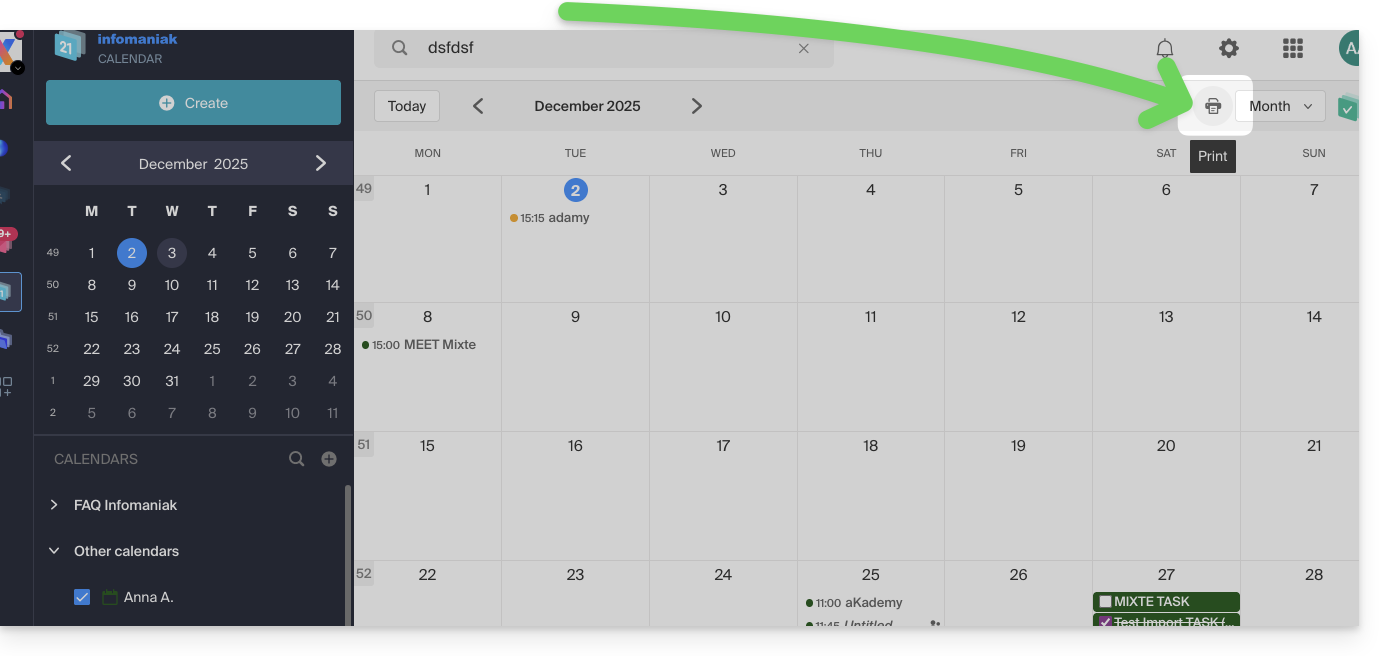
- Click here to access the Infomaniak Web app Calendar (online service ksuite.infomaniak.com/calendar).
- Click on the printer icon located at the top right:
This guide explains how to connect the Apple Mail desktop app (desktop application on macOS) to an email address hosted by Infomaniak.
Preamble
- Your macOS computer will be automatically configured via .mobileconfig configuration profiles compatible with Apple, unlike a manual configuration.
- It is possible to remove a configuration profile once installed (scroll to the bottom of this page for instructions).
- The various services offered by Infomaniak are all compatible with the corresponding standard protocols (IMAP/SMTP for email, for example). Therefore, if you encounter a problem with third-party software, contact the publisher directly or a Partner and consult the support policy as well as section 11.9 of the Infomaniak Terms of Service.
Install a configuration profile
Prerequisites
- Create the email address in my kSuite or a Mail Service / kSuite.
- Create a password for the email address on the device you are going to configure.
- Check that the Mail Service is configured optimally.
You can download the profile from the device in question or send it from another device (if you already have a working email address, for example):
- Click here to access the Infomaniak configuration tool (online service https://config.infomaniak.com) — log in if necessary to your Infomaniak account on the Organization on which your email address is managed.
- Choose to install the profile on this device.
- Choose to synchronize emails.
- Enter the password for the email address (attached to Mail Infomaniak (Webmail)) that you wish to synchronize.
- Click on the blue Verify button:

- Download the configuration profile:

- Open the System Settings of the computer.
- Click on General in the sidebar, then click on Device Management (for macOS Sequoia 15 version). If you have a lower version or cannot find the profile, refer to the official documentation by changing the version of your system at the top of the page if necessary:

- Click on +:

- Locate and then open the previously downloaded file:

- Click on Continue:

- Enter the email address password.
- Click on Install:

- There you go, your email address is now configured in the Apple Mail application that you can open and control.
Delete an IMAP account
Refer to the chapter "Stop using an account" by changing the system version at the top of the page if necessary (be careful: do not delete a POP3 account without saving your messages first).
Delete an Apple profile
Refer to the official documentation by changing the system version at the top of the page if necessary.
*Why is it necessary to choose the guide version that exactly matches your macOS / iOS system version? Apple sometimes introduces subtle changes with each new system version, for example a path on iOS 15…
…becomes this on iOS 18…
This guide explains how to save and export your contacts from the Infomaniak Web app Contacts address books (online service ksuite.infomaniak.com/contacts).
Preamble
- It is not possible to export an Organization Directory.
- Exporting generates a file of type vCard with the .vcf extension.
Export contacts
To select the contacts or address book to export:
- Click here to access the Infomaniak Web app Contacts (online service ksuite.infomaniak.com/contacts).
- Click on the chevron to expand the Advanced Actions section.
- Click on the Export menu.
- Click on the address book to export.
- Click on the Export button:
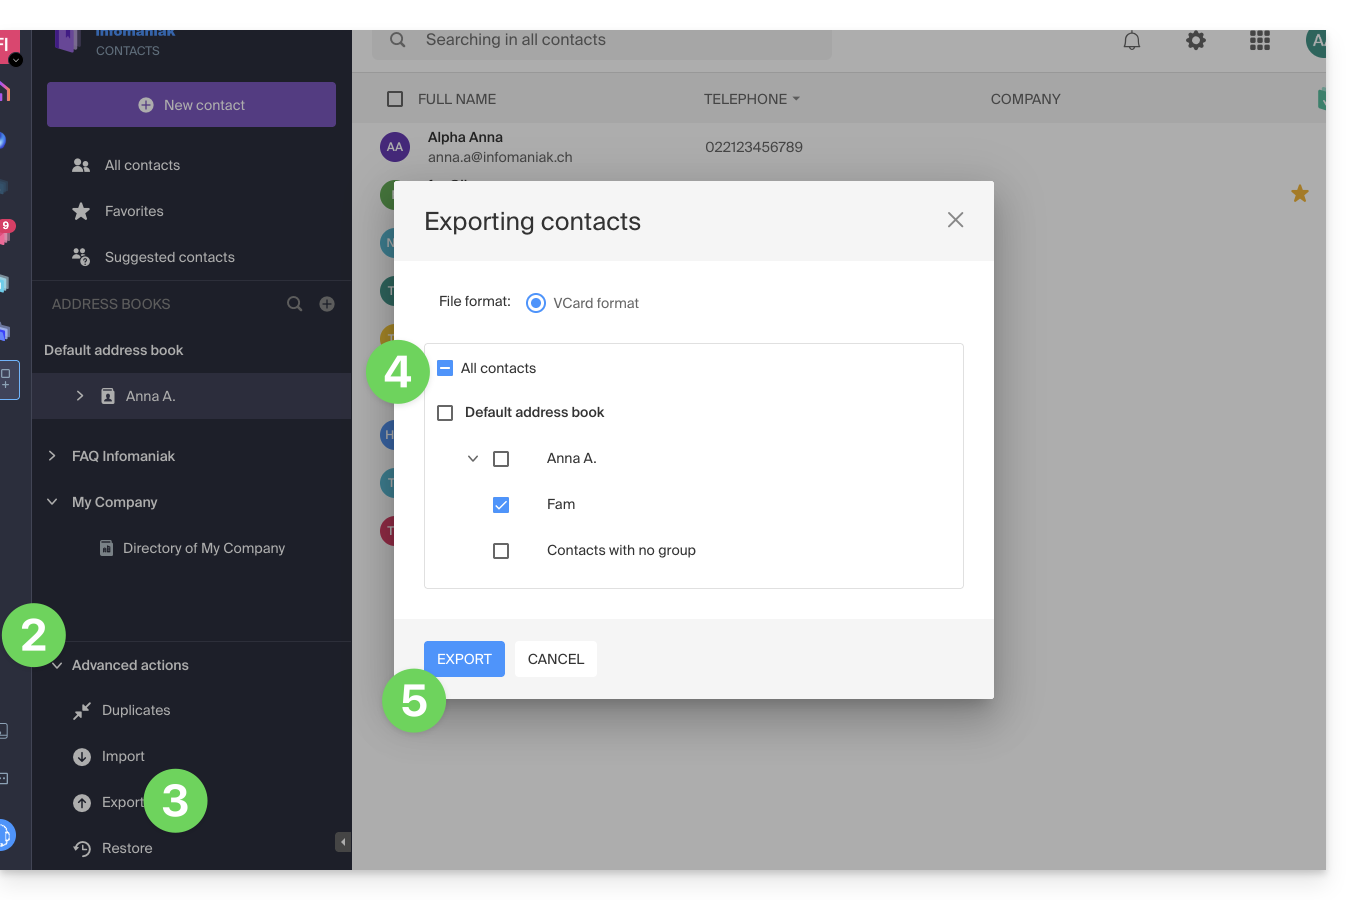
- Choose the location on your device where to save the vCard file with your contacts.
You can then open it in macOS Contacts or any compatible application.
This guide explains how to change your kDrive offer, the collaborative storage solution on a 100% Swiss Made cloud.
Preamble
- kDrive is the name given to the file storage/sharing service offered by Infomaniak in Switzerland.
- kDrive is accessible for free or by subscription depending on whether you are alone using it or if you want collaborators to also access it.
- kDrive exists as an independent product, or as a product among others within the kSuite & my kSuite / my kSuite+ suite.
- To help you identify the offer most suited to your needs, refer to this other guide.
If you have been invited to view/collaborate on a file from a kDrive, it is possible that you do not actually own the kDrive product; you only have access to the kDrive managed by someone else. You cannot therefore interact with the current offer.
Determine the current kDrive offer
From the kDrive Web App
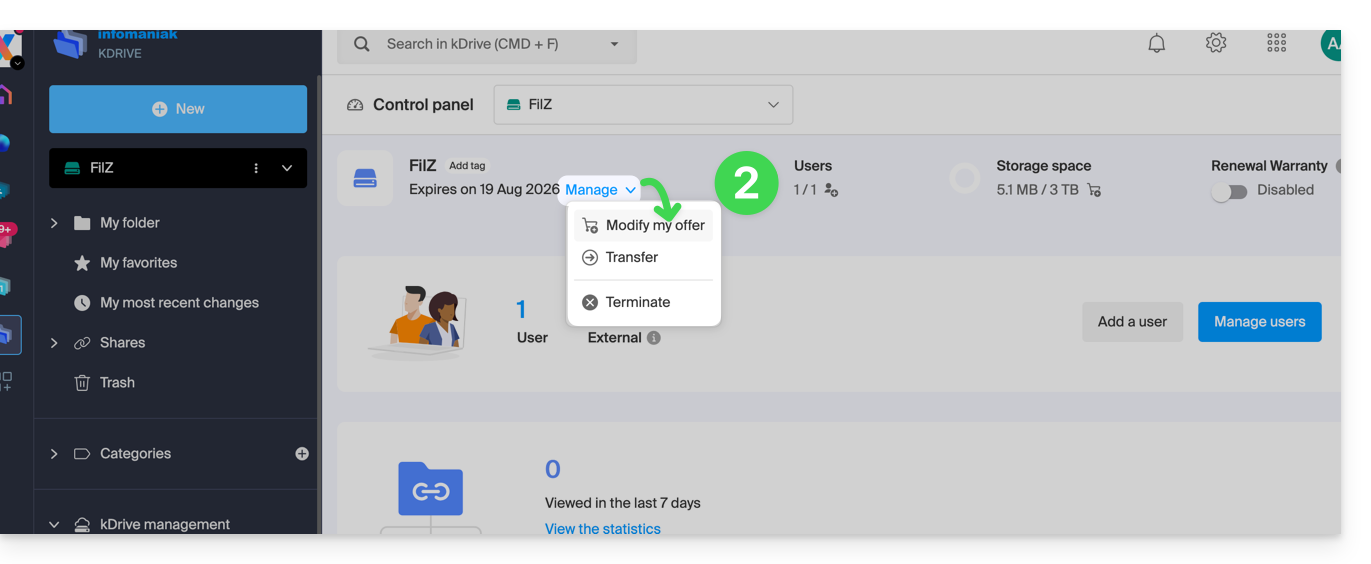
To find out which offer you currently have:
- Click here to access the Infomaniak kDrive Web App (online service ksuite.infomaniak.com/kdrive).
- Click on Manage to go to the offer change and view the current offer:
If no dashboard is accessible at the bottom left, you have limited features (e.g., my kSuite offer) that can be unlocked by upgrading to a higher offer: 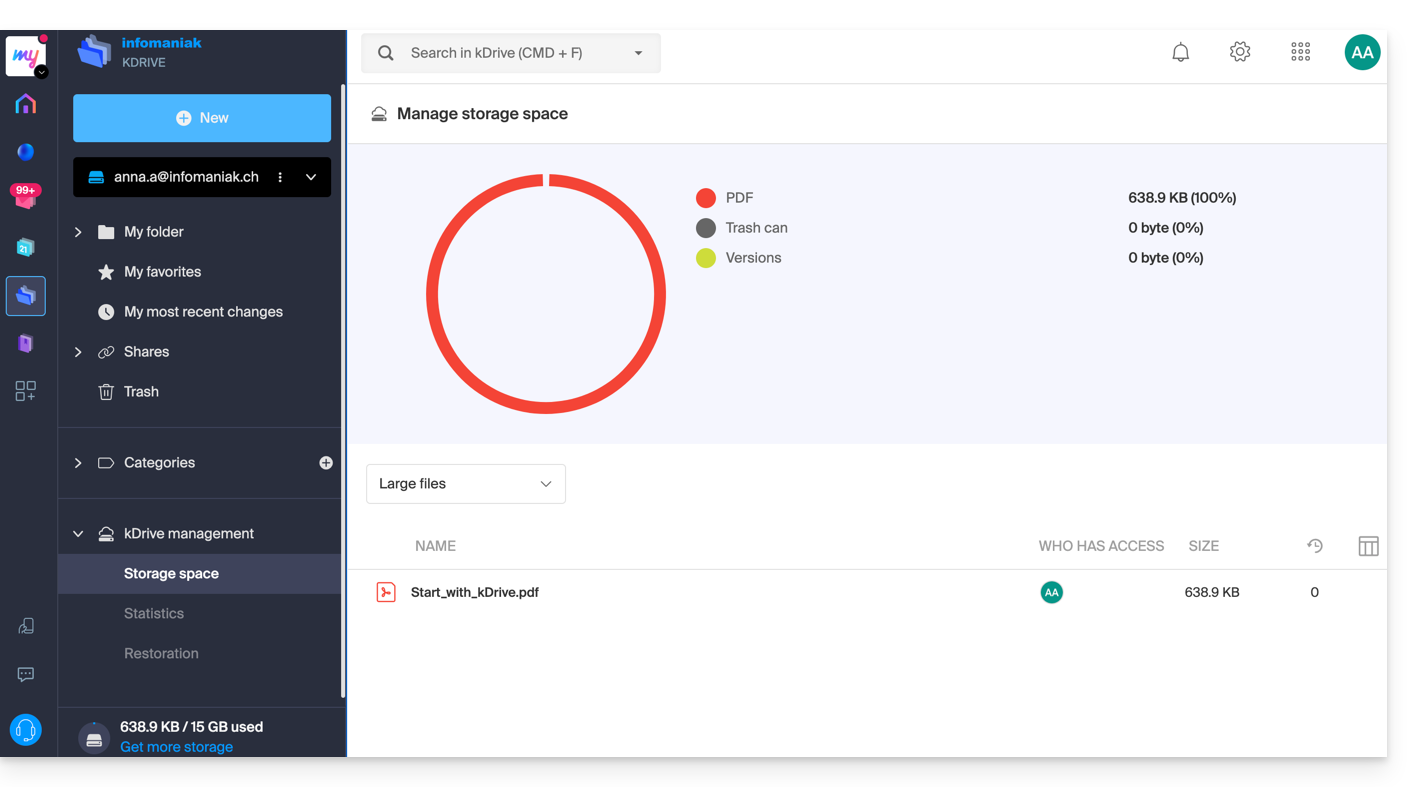
From the Infomaniak Manager
You can also find out about the current offer from the Manager, the dashboard of your products.
If no kDrive product is present in the Manager, the kDrive app is accessible only among the apps at the top right, because you have…
- either a my kSuite / my kSuite+ offer:
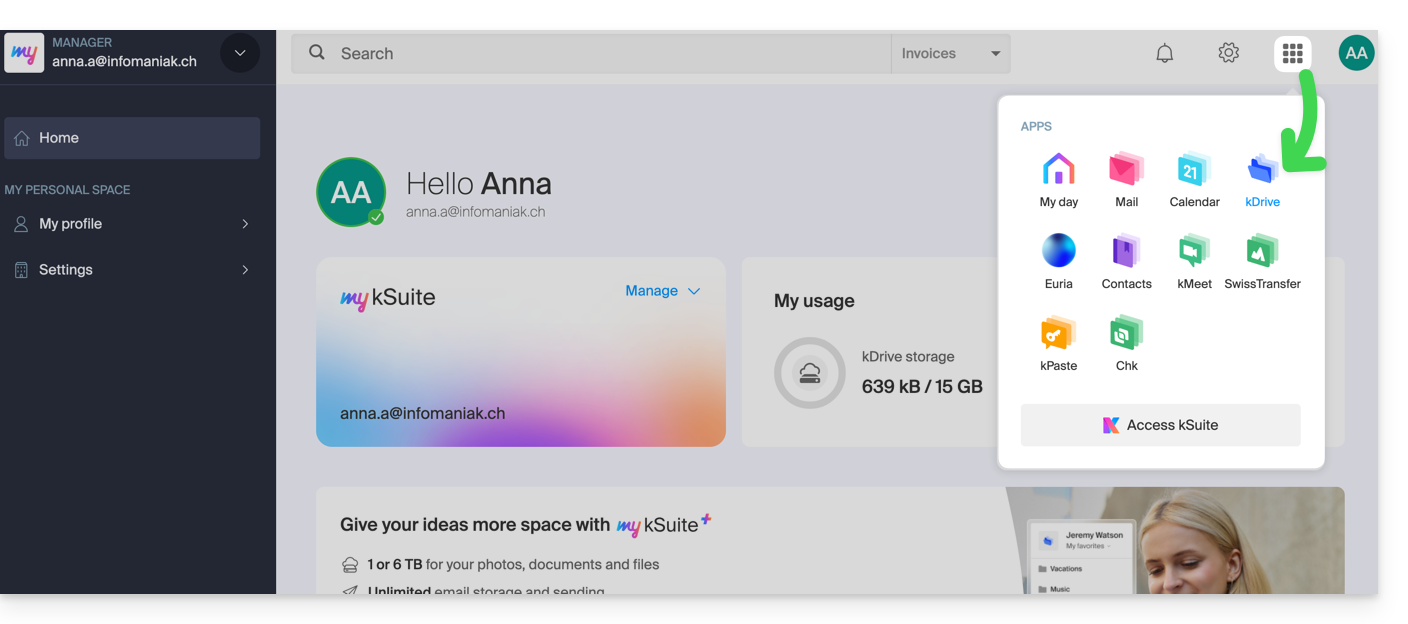
- or you have been invited during a document share (you are therefore an external user of kDrive):
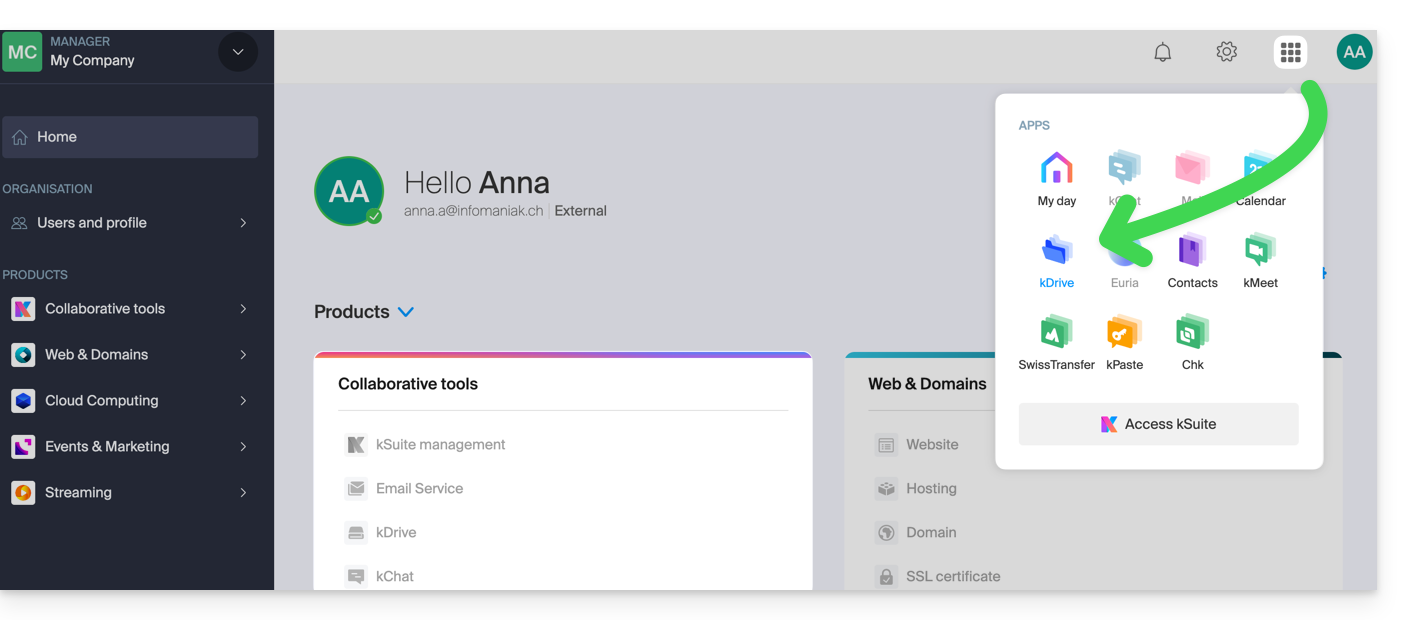
Otherwise, find your kDrive among your collaborative tools: 
Change the current kDrive plan
Your kDrive can evolve with you. When your needs expand — whether to welcome new collaborators, integrate a family member, or store a growing volume of data — easily increase its capacity to unlock its full potential.
Prerequisites
- Have sufficient permissions within the Organization.
To modify your current kDrive offer:
- Click here to access the Infomaniak kDrive Web App (online service ksuite.infomaniak.com/kdrive).
- Click on Manage to go to the offer change and view the current offer:
You can then switch to a higher offer from the Infomaniak Shop: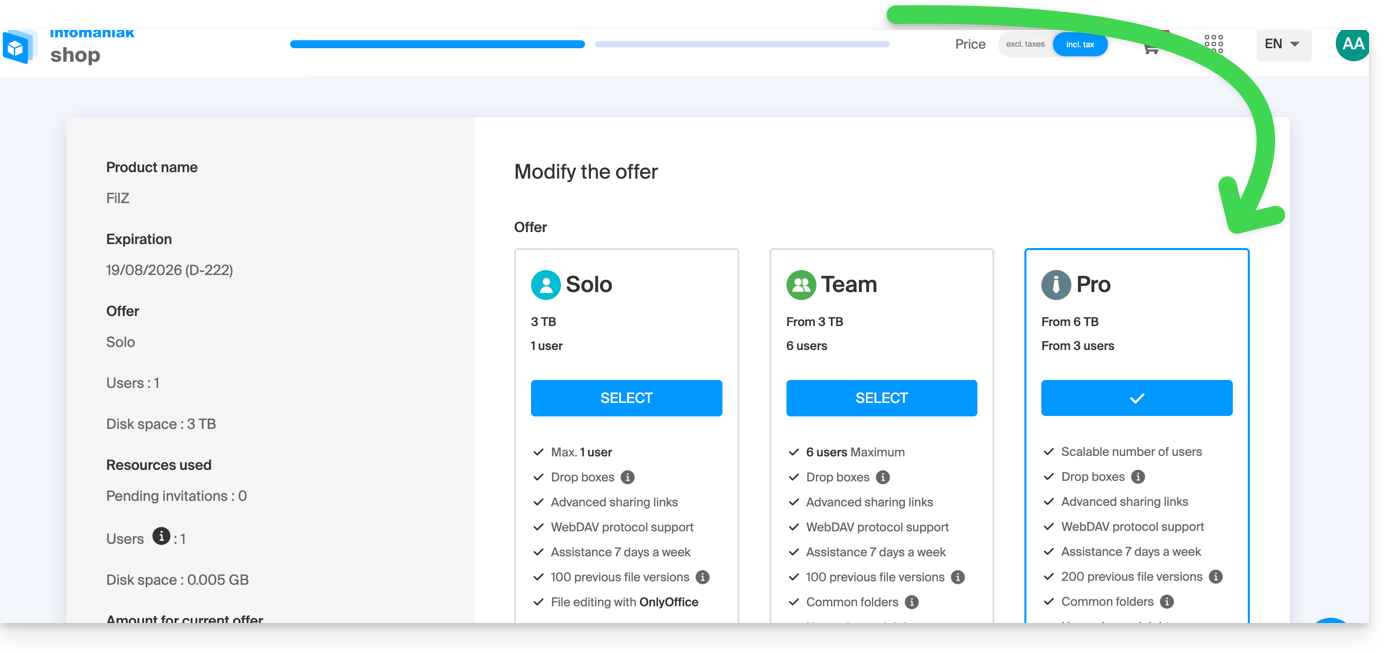
If, for example, by choosing a new offer, you increase the quota of users that can be added to your kDrive, refer to this other guide to invite them to join you.
This guide explains how to synchronize eM Client contacts & calendars with contacts & calendars hosted by Infomaniak.
Preamble
- Infomaniak contacts & calendars are linked to your Infomaniak account; when you log in to ksuite.infomaniak.com/contacts or /calendar you will likely have to perform two-factor authentication (2FA) when logging in.
- In this case, an application password is required to establish synchronization between your device and Infomaniak tools.
- But don't worry, creating such a password is offered to you by following the setup assistant.
- The various services offered by Infomaniak are all compatible with the corresponding standard protocols (CalDAV/CardDAV for contacts & calendars, for example), therefore if you encounter a problem with third-party software, contact its publisher or a Partner and consult the support policy as well as section 11.9 of the Infomaniak Terms of Service.
Synchronize contacts & calendars (eM Client 10 macOS)
Prerequisites
- Obtain your synchronization information provided by the Infomaniak synchronization assistant:
- account address:
https://sync.infomaniak.com - username: for example
AB12345 - application password if two-factor authentication is enabled or the one of your Infomaniak user account if you have not enabled 2FA
- account address:
Next:
- Open eM Client
- Click on the eM Client Menu
- Click on Accounts
- Click on Add an account
- Click on Calendar
- Click on CalDAV
- Click on Next

- Choose a title for the account name (e.g., Infomaniak agenda) and complete the procedure
You can start the Contacts part if you wish, but in any case, 1 CalDAV procedure configures CardDAV at the same time, and vice-versa.
This guide concerns kSuite and the possibility for users to set a status as well as manage the display of presence or absence.
Preamble
- Once defined, your custom status is visible to users of the Organization on various pages related to kSuite:
- home page ksuite.infomaniak.com

- Mail
- Agenda
- Contacts
- kDrive
- Euria
- Chk
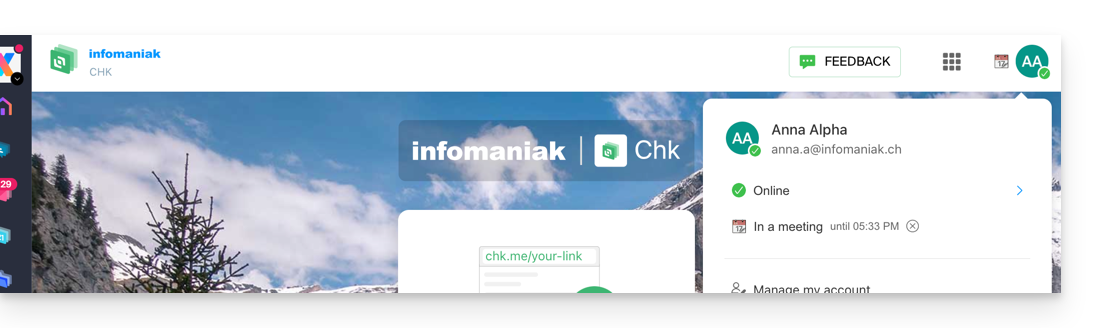
- kPaste
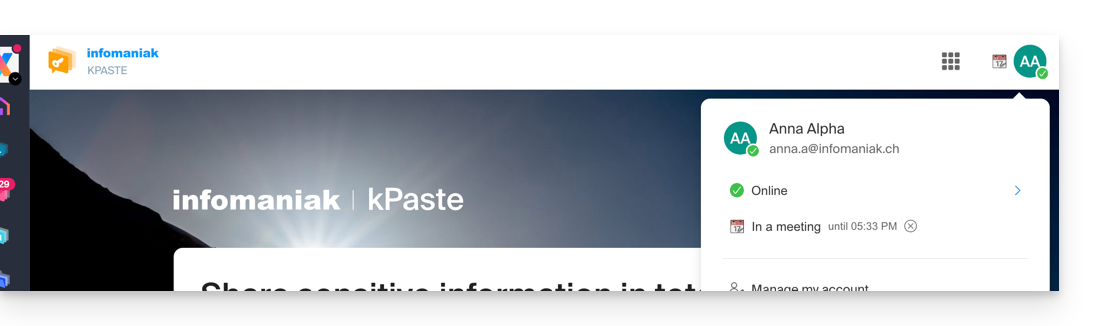
- kMeet
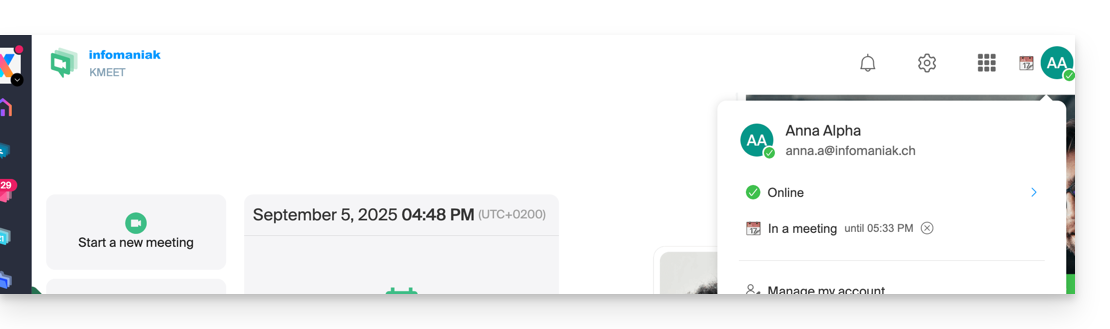
- home page ksuite.infomaniak.com
- A presence status different from the default status, such as "Do not disturb", can affect certain notifications.
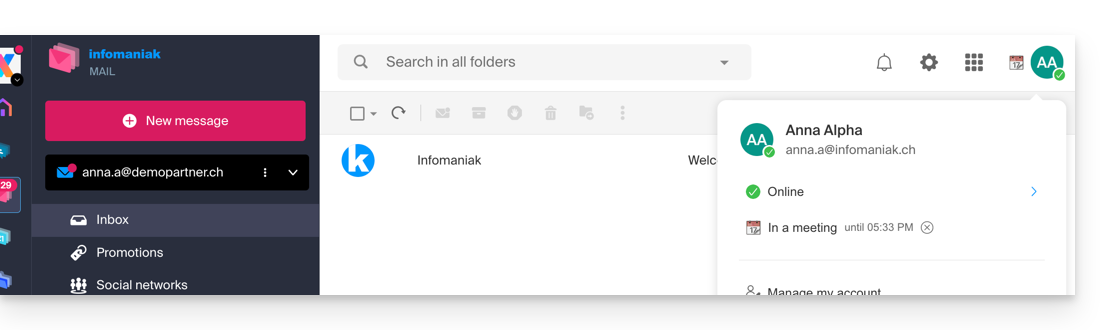
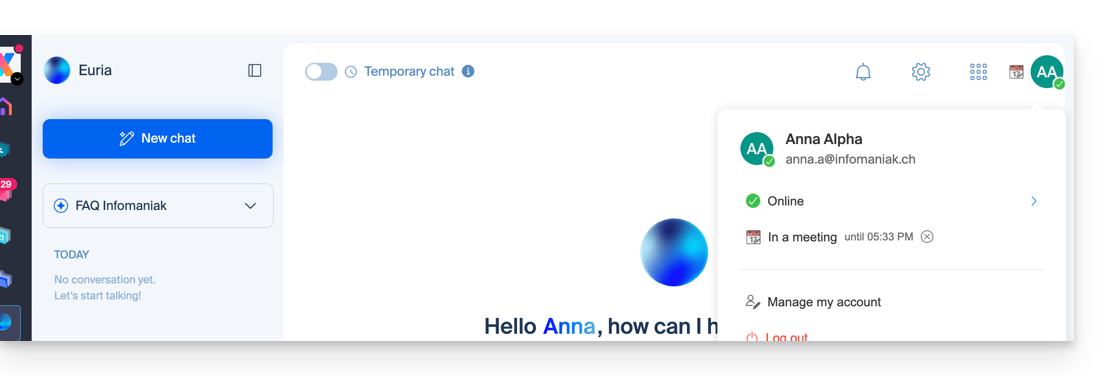
Update the kSuite profile status
To do this:
- Click here to access the kSuite interface.
- Click on the badge with your initials/avatar in the top right corner.
- Click on Online to choose another status if necessary (away or do not disturb)…
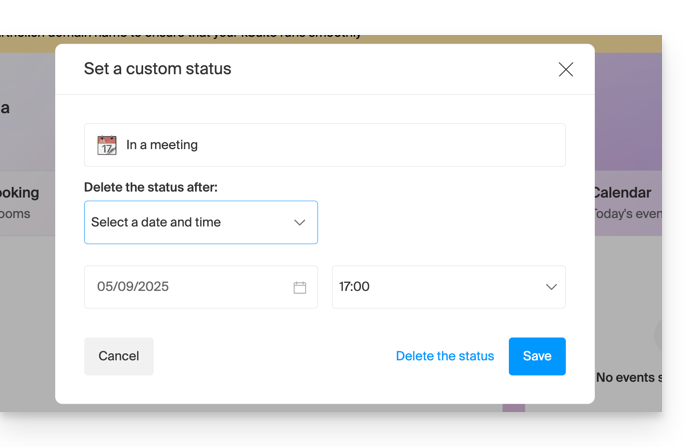
- … or click on Set a custom status to enter a custom status or choose one from the suggestions:
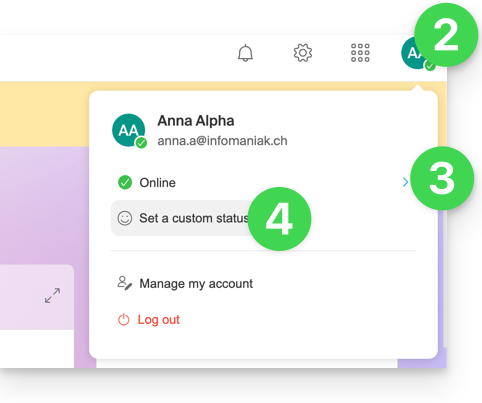
- Indicate an expiration date if necessary and save:
This guide explains how to obtain and install an application on a computer from certain Infomaniak interfaces such as kSuite or those that allow you to manage your calendars/agendas or your address books.
Install a progressive web app (PWA)
A Progressive Web App (PWA) is an application designed for the Web and offers an experience similar to that of a mobile application. PWAs are fast and offer many features available on mobile devices. For example, they can work offline and send notifications.
Download the Infomaniak Calendar app (PWA)
- Click here to access the Infomaniak Calendar Web app (online service ksuite.infomaniak.com/calendar).
Click on the icon specific to and dedicated to PWAs in the browser's address bar:
On some devices, you need to choose the option “Add to Home Screen” to be able to “create” the standalone application.
Delete the Infomaniak Calendar application
- Open the previously created application.
- Click on the action menu ⋮ .
Click on Uninstall:
This guide explains how to create, save, and edit an Office-type file (text, spreadsheet, presentation...) on the Web app kDrive (online service ksuite.infomaniak.com/kdrive) and on the mobile app kDrive (application for iOS / Android smartphone or tablet).
Note to LibreOffice file users: to avoid display or formatting bugs on kDrive, always convert your LibreOffice files (ODF: .ods, .odt, .odp) to their Microsoft Office XML equivalents (.xlsx, .docx, .pptx) before online editing.
Using the native editor
kDrive natively integrates the Docs, Grids and Points applications that allow you to create, modify, and collaborate online on Word-type documents .docx, Excel .xlsx and PowerPoint .ppsx. You will thus be able to work with:
- text document
- spreadsheet (worksheet)
- presentation
- notebook
- document draw.io for diagrams, schematics, and wireframes
A feature allows you to add a bookmark (shortcut to a favorite passage in your document or the equivalent of a web page anchor) that you can easily share with your contacts. You will also be able to easily notify a user in your Organization directly on the document.
Refer to the guide on this subject.
Using Microsoft Office Online
Another editing solution is available to you (kDrive Pro or kSuite Business / Enterprise required): the Microsoft Office Online editor.
Refer to the guide on this subject.
Setting the default editor
⚠ Available with:
| kSuite | |
| Business | |
| Enterprise | |
| kDrive | |
To specify in detail which editor to always use by default to open your collaborative Office files (text, spreadsheet, presentation...) among the 2 options presented above:
- Click here to access the Infomaniak kDrive Web app (online service ksuite.infomaniak.com/kdrive).
- Click on the Settings icon at the top right.
- Check or select the relevant kDrive in the dropdown menu of the left sidebar.
- Click on General in the left sidebar.
- Click on Default Editor:
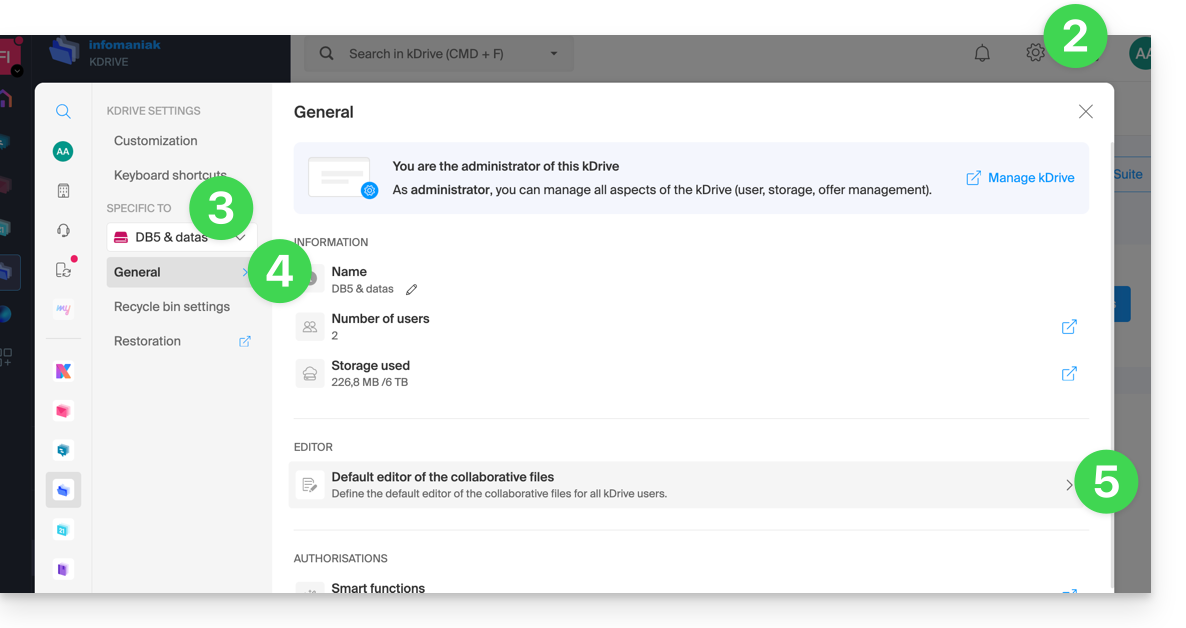
- Choose the default editor for the files:
.docx/.doc.xlsx/.xls.pptx/.ppt
This guide explains how to invite an external user to your Organization on kChat who will be counted as a kSuite user.
Preamble
- Refer to this other guide to grant access to one or more kChat channels to an external user who can then interact with your team without being counted as a kSuite user and without having any special rights in the Organization (of which they will not be a part).
- You can also invite a work team in full from kChat.
- Refer to this other guide if you wish to manage the channels to which new members will automatically belong.
Invite to use kSuite
Prerequisites
- Be an administrator of the Organization where kSuite is located with full rights granted for kChat.
Once invited, the user can confirm their membership and will access kChat with the limited permissions you have granted them:
- Click here to access the management of kChat on the Infomaniak Manager (need help?).
- Click on Add a user:

- Click on Create a kSuite user.
- Click on Next:

- Enter the user's first and last name, and define their role as a basic user:
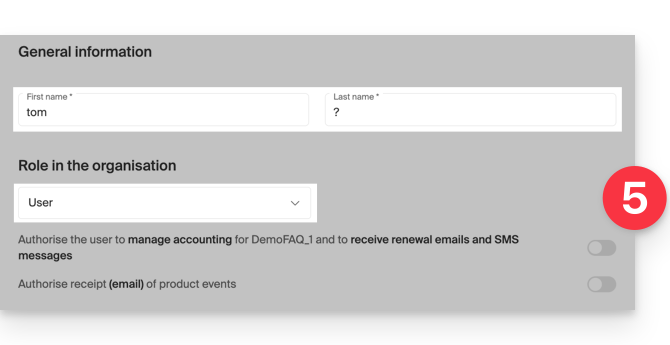
- Legal representative
- Legal responsibility of the organization
- Can manage all products and users
- Can manage accounting and orders for new products
- Administrator
- Can manage all products and users
- Can manage accounting and orders for new products
- User
- Can manage the products you authorize
- Can manage accounting if you authorize it
- Legal representative
- Do not create an email address for the user and indicate their existing email address to which to send the invitation:
- You can force this future user to log in with this email address or allow them to specify another email address (useful if they already have a user account with Infomaniak with another login identifier).
- Add the user to your kSuite with the toggle switch.
- Click on the Invite button:

The invitation is pending until the invited user's final registration (read more below). The Organization's user dashboard clearly indicates this status:
Accept the invitation
In order to access the Organization holding kChat:
- The invited user receives the invitation to their email address and clicks on the Accept the invitation:

- They specify their contact details as well as the email address / password they wish to use and complete the registration:

- Once the registration is complete, the newly registered user can log in to their Manager and access kChat to which they have been invited.
- Existing users are automatically notified of the arrival of the new participant and can now converse with them; as soon as they are added, the new user receives a message from kChat.bot welcoming them:

Access to kSuite, and not access to the management of kSuite!
It is important to differentiate the use of the kChat app (within kSuite) and the management of kSuite itself.
In the invitation example above, the new user has been invited to join kChat, they are counted as a kSuite user when an administrator accesses the management of their kSuite users:
However, this new user will not be able to directly manage the kSuite to which they have been invited since their role (defined in the first point 5 above) does not authorize them to do so.
This is why this user will not see any active link in the Collaborative Tools → kSuite section of their Infomaniak anager. They will need to switch to the Infomaniak applications using the menu at the top right:

Note that if necessary, this user can order their own kSuite without any link to the kSuite to which they have been invited.
This guide explains how to connect the desktop app eM Client (desktop application on macOS / Windows) to an email address hosted by Infomaniak.
Preamble
- The various services offered by Infomaniak are all compatible with the corresponding standard protocols (IMAP/SMTP for email, for example), therefore if you encounter a problem with third-party software, contact its publisher or a Partner and consult the support policy as well as article 11.9 of the Infomaniak TOS.
Add the email address to the application
Prerequisites
- Create the email address in my kSuite or a Mail Service / kSuite.
- Create a password for the email address for the device you are going to configure.
To configure the email application:
- Open the application and choose the desired mode, then click on Next:

- Enter the email address to be linked, then click on the Start button next to the field:

- Enter the email address password, then click on Continue next to the field:

- Check the box and click on Yes:

- Check and complete the missing information:

- Choose the desired mode, then click on Next:

- There you go, your email address is now configured in the application:

Recommended settings
- Incoming IMAP server =
mail.infomaniak.com - IMAP Port =
993(with SSL) - Outgoing SMTP Server =
mail.infomaniak.com - SMTP Port & encryption protocol and command/method to activate this protocol:
587+ STARTTLS - Username = full & complete email address ( ? )
- Password = the one generated for the email address you want to access
- Authentication required for sending emails:
- It is activated in the SMTP settings of your application.
- Check "use the same parameters as the incoming server" or, depending on the software/email clients, enter a username (= full & complete email address) and the generated password.
Refer to this other guide if you are looking for information about other compatible messaging ports and protocols (SSL / TLS for example).
In case of problem
Check that the Mail Service is configured optimally.
It is not necessary to contact Infomaniak Support if your email address works well outside the application. The most common error concerns the use of an incorrect password. Refer to the solutions given in this other guide regarding email in general.
This guide details the customization options for the Infomaniak Organization, including custom URLs (Custom Brand addresses) for the Manager and kSuite tools such as kDrive or Euria.
Custom Brand is a service already included with kSuite Enterprise.
Creating custom URLs
To obtain Custom Brand:
- Click here to access Custom Brand on the Infomaniak Manager (need help?).
- Click the blue Try for Free button (in the Custom Brand section)

- Enter the domain name to use in your custom web address:
- If you do not yet have a domain name, you will be able to order one at this step.
- If your domain name is already in use for another service, you will be able to choose another one, or use a subdomain (example:
my.domain.xyz).
- When choosing the domain name, the interface will present examples of custom web addresses (example: manager.domain.xyz).
- Click the blue “This web address suits me” button or select another domain name or subdomain until you find a custom web address that suits you.
- The preparation of custom web addresses may take a few minutes, a confirmation email will be sent to the email address of the account owner.
To disable access via custom URLs, click the blue Disable button at the top right of the Custom Brand section:
You can reactivate the addresses later via the same button.
Customizing the interface
In addition to customizing the web addresses of your Infomaniak products, you can add a logo. You will also be able to customize your login page via a slideshow of 3 images:
- Click here to access Custom Brand on the Infomaniak Manager (need help?).
- Click the blue Customize button (in the Custom Brand section).
- Upload an image or click Select an image to add it as a logo.
- Resize the image with the tool if it exceeds the maximum size of 270 x 70 pixels.
- The tool allows you to preview the rendering of your logo on a dark or light theme.
- Click on Validate.
- To customize your login page, click on the blue Next button all the way to the right.
- From the two color selection fields, choose the color of the text and login buttons.
- Drop or click on Select an image to create a slideshow of 3 images to the right of the login page (the images must be at least 865 x 1200 pixels).
- Click on Add then on Finish to save the changes.
Infomaniak tools, such as the Infomaniak Mail web app (online service ksuite.infomaniak.com/mail) or the Calendar, Contacts, kSuite interfaces... can be displayed in light mode or dark mode ("dark mode"), including based on the settings of your current operating system.
Enable manual mode
To manually choose a dark or light display, without relying on a possible different display on the operating system side:
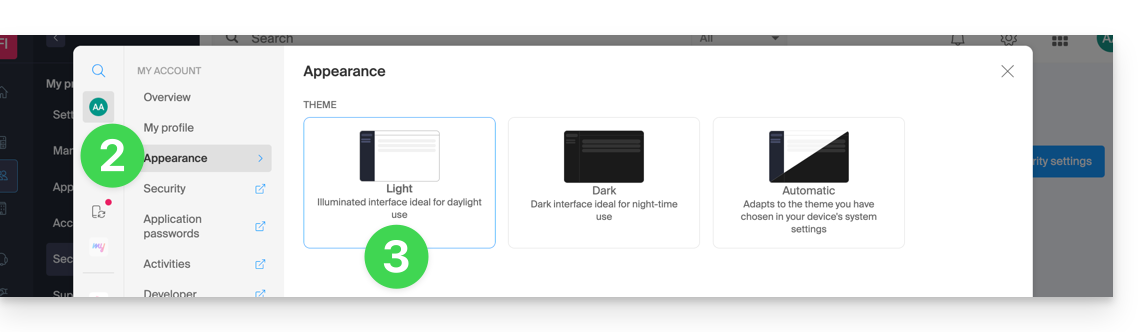
- Click here or on the badge with your initials / avatar in the top right of the Infomaniak Manager) to "Manage my account":
- Then click on Appearance in the left sidebar.
- Click on Light to apply the light mode:
- Click on Dark to enable the "dark mode".
Enable automatic mode
The automatic mode is based on the parameters of your operating system (macOS / Windows...):
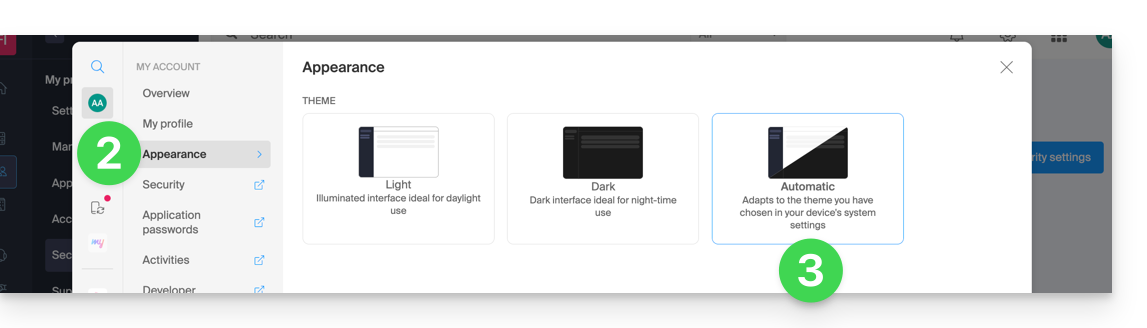
- Click here or on the badge with your initials / avatar in the top right of the Infomaniak Manager) to "Manage my account":
- Click on Appearance in the left sidebar.
- Click on the Automatic mode:
Then if you want to modify the light or dark theme of your computer, so that the Manager's automatic mode takes into account your preferences...
... on macOS
- Click on System Preferences...

- Click on Appearance and choose the dark mode on the right:

... on Windows
- Open the start menu
- Click on Settings:
- Click on Personalize then Colors:
- Click on Dark:
And on mobile?
The dark theme is enabled on mobile devices for Infomaniak login and account creation pages; it automatically adapts to the mobile system preferences, thus providing a consistent visual experience between mobile applications and login / account creation.
This guide explains how to start an audio or video conversation between one or more users kChat, with Infomaniak's ethical free video conferencing solution, kMeet.
Preamble
- The call function in kChat is available on all Web (browser), mobile (iOS / Android) and computer (macOS / Windows) versions.
Create a meeting between kChat users
To be able to discuss within a virtual room with the microphone and webcam of your device, simply press the Call button visible on any kChat conversation, private or public channel, via the application or directly on the browser: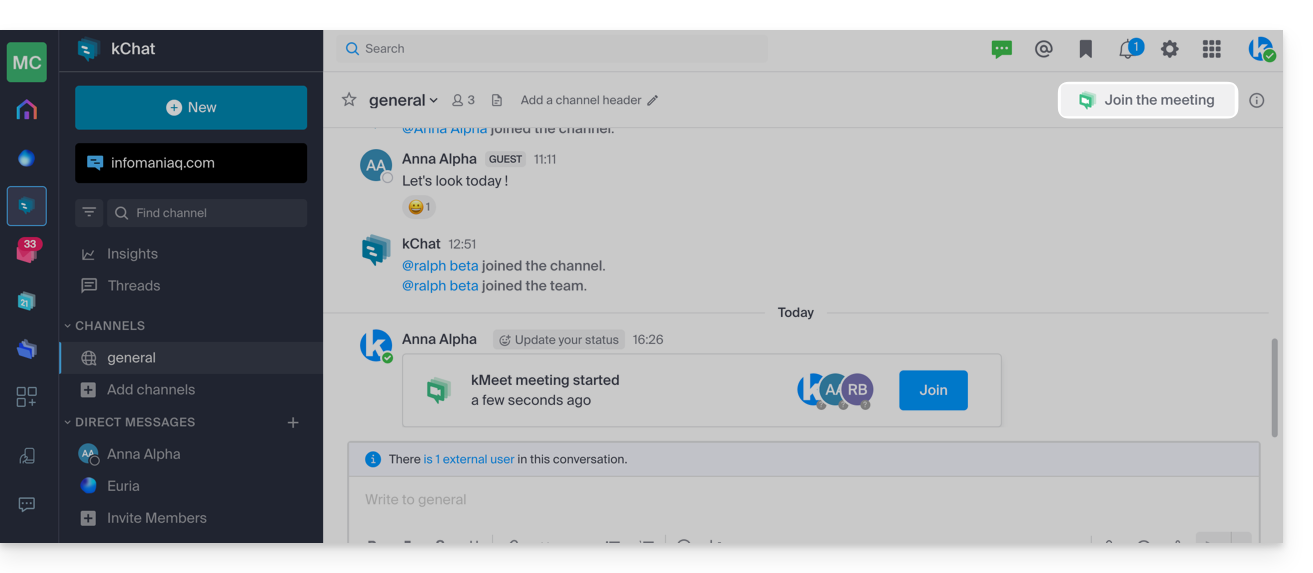
- Call a user directly if you are in a direct discussion with them, or trigger a call to all members of a channel if you start the meeting from the channel.
- Calling a user who is on “Do Not Disturb” will not trigger a ringtone or call modal for them, but they will see the message in the conversation.
- The microphone is enabled by default when the call is accepted, but not the camera.
- View the users of the meeting (who accepted, declined, or missed it) using the avatars in the kChat message.
- Once the call has started, an emoji will appear in your kChat status to indicate that you are busy with the conversation.
- A message sent from the video (kMeet) will also be visible in the kChat conversation (and vice versa).
- Indications related to the start and end of the meeting will automatically appear in the relevant kChat conversation thread.
Specifics for calls in channels
- The call will not ring for the recipients, but they will see a message in kChat as well as a notification.
- A message (warning) will appear if you want to start a call in a channel with more than 7 users.
Refer to this other guide if you are looking for information on kMeet.
This guide addresses issues that may arise when using Infomaniak applications (such as kChat, kDrive, kAuth, etc.) or tools (such as config.infomaniak.com, the Manager Infomaniak, etc.) with outdated hardware (OS, browser, devices, etc.) old / not up to date / obsolete.
Preamble
- For example, it will not be possible to comfortably access Infomaniak services with an iPhone 5s or 6 on iOS 12.
- It is therefore recommended to regularly update browsers and operating systems to benefit from the best possible experience with the Infomaniak infrastructure.
- Also, refer to this other guide which is more specifically focused on browsers and their components.
- And are you using the latest version of the Infomaniak app concerned?
Update the OS, browser, etc.
Old systems or browsers can cause slowness, errors, or incorrect display. It is therefore preferable to rely on regularly updated components because Infomaniak apps work optimally on up-to-date systems and recent hardware.
Example for kChat:
| kChat | Minimum requirement |
|---|---|
| Web App (browser) | Chrome 134+, Firefox 128+, Safari 17.4+, Edge 134+ |
| Mobile app (iOS) | iOS 15.1+ (iPhone 6s or newer) |
| Mobile app (Android) | Android 7.0+ with up-to-date Chrome |
| Desktop app (macOS) | macOS 12 (Monterey) or later |
| Desktop app (Windows) | Windows 10 or later |
| Desktop app (Linux) | Ubuntu 22.04 LTS or an equivalent maintained distribution |
If you encounter any issues with an internet browser, try updating it or installing an alternative:
- Google Chrome
https://www.google.com/chrome/
(The site automatically detects the operating system and offers the latest version) - Mozilla Firefox
https://www.mozilla.org/firefox/new/
(Download and update page for Windows, macOS and Linux) - Microsoft Edge
https://www.microsoft.com/edge
(The link offers automatic update or download depending on the system) - Safari (macOS only)
https://support.apple.com/fr-fr/HT204416
(Safari updates are handled through macOS system updates) - Opera
https://www.opera.com/fr/download
(Allows you to download the latest version for your system) - Brave
https://brave.com/download/
(Download page with automatic operating system detection)
Technologies used by Infomaniak
Many of the web tools developed by Infomaniak use Angular. The need for up-to-date or recent hardware to run applications is not specific to Angular itself but rather a general requirement for running any modern web application. Here are a few reasons why up-to-date hardware is often necessary:
- Angular relies on advanced features of modern browsers, which are often missing or poorly managed in older versions.
- Recent browsers optimize JavaScript execution and graphical rendering, which improves the fluidity of Angular applications.
- Up-to-date versions fix known vulnerabilities, reducing the risk of compromise.
- Modern browsers are more compliant with the latest HTML, CSS and JavaScript specifications, ensuring better compatibility.
- Modern APIs (camera, geolocation, notifications, etc.) are only accessible through recent browsers, which are essential for interactive experiences.
This guide allows you to quickly discover the essential functions of Euria, the artificial intelligence at your disposal within kSuite, particularly powerful as a conversational agent on the app kChat.
Preamble
- Euria can help you perform all kinds of calculations, translations, provide information on various subjects, and answer your questions.
- Refer to this other guide regarding the model used and the responsibilities of each party.
- As soon as a new user is added, they receive a welcome message from Euria.
- Refer to this other guide regarding the possibilities of AI summaries on kChat.
Add Euria to kChat contacts
The bots currently available on kChat are already part of your contacts.
If you don't see them yet, click in the left sidebar of kChat…
- … on the channel search (bots also appear as channels)
- … or on the + icon next to Direct Messages to search for the bot
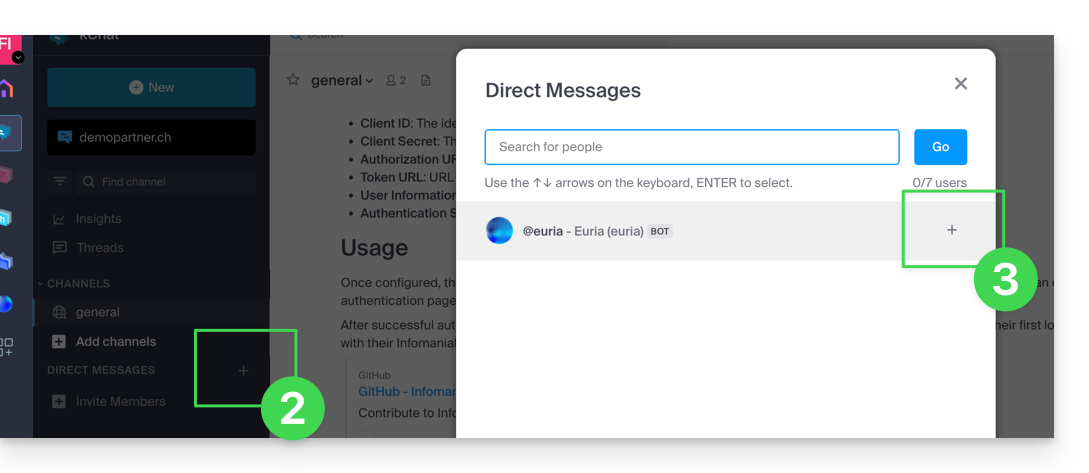
- Add the bots labeled as such with the tag [bot] or search for the term bot or chat.
Do not create a group conversation between the bots and yourself as it will not work. You need to create a private discussion channel between each bot individually and yourself.
Then simply write to them as if you were conversing with an acquaintance: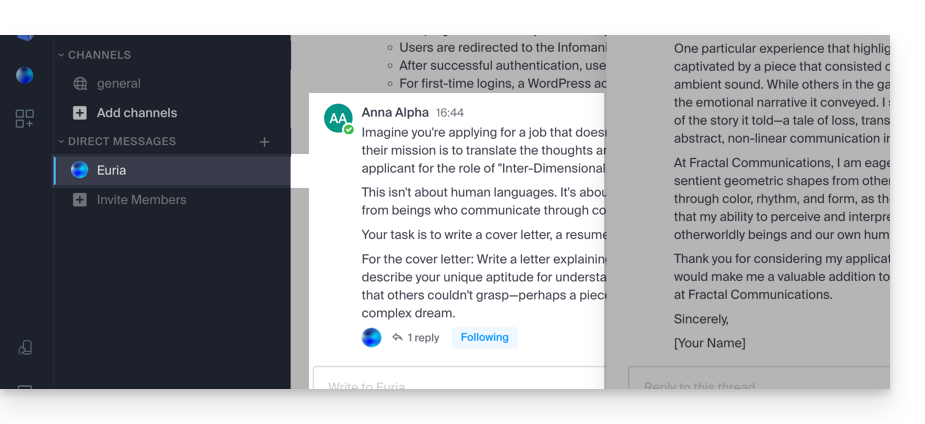
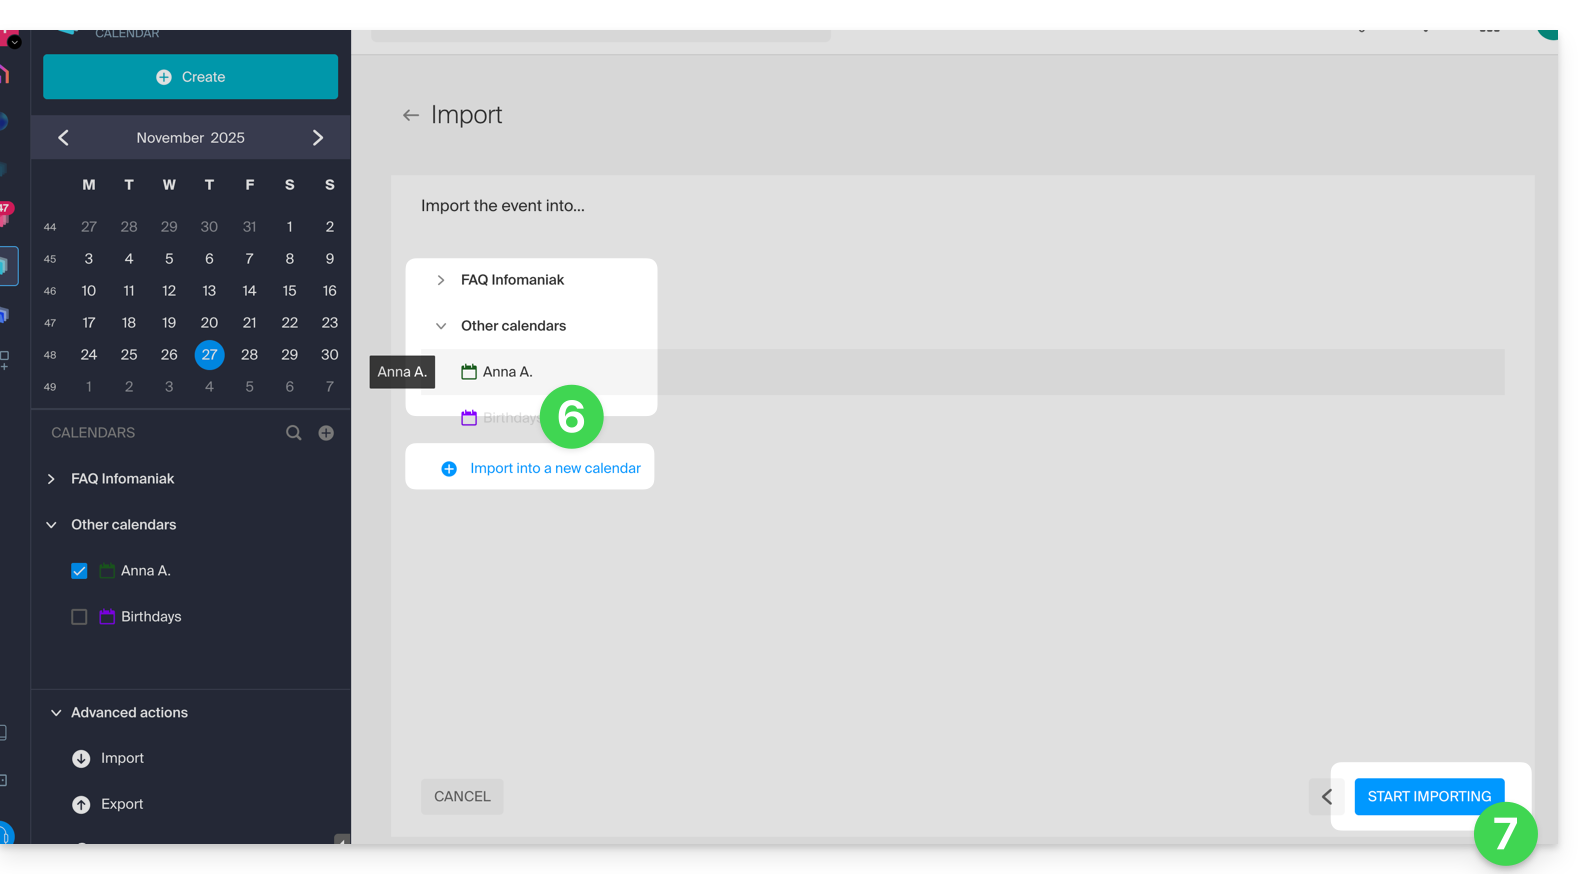
This guide explains how to import tasks in the dedicated section of the Infomaniak Web app Calendar (online service ksuite.infomaniak.com/all/calendar/tasks).
Preamble
- The
.icsfile is a standard container (RFC 5545) and inside this file, you will find “components”:VEVENT(Event): this is what you see on the calendar grid, with a notion of occupied time (Start timeDTSTARTand End timeDTENDor duration).VTODO(Task): this is an action to be performed, often with a due date (DUE), but not necessarily a duration, and a binary status (done or not done).
- Therefore, when importing a
.icsfile into the Infomaniak Calendar app, the system imports the data into the calendar and its “Tasks” section based on their type.
Import tasks
If you have a .ics file to import:
- Click here to access the Infomaniak Web app Calendar (online service ksuite.infomaniak.com/calendar).
- Click on the chevron to expand the Advanced Actions section.
- Click on Import.
- Click the button to select an ICS file (max 20 Mo):
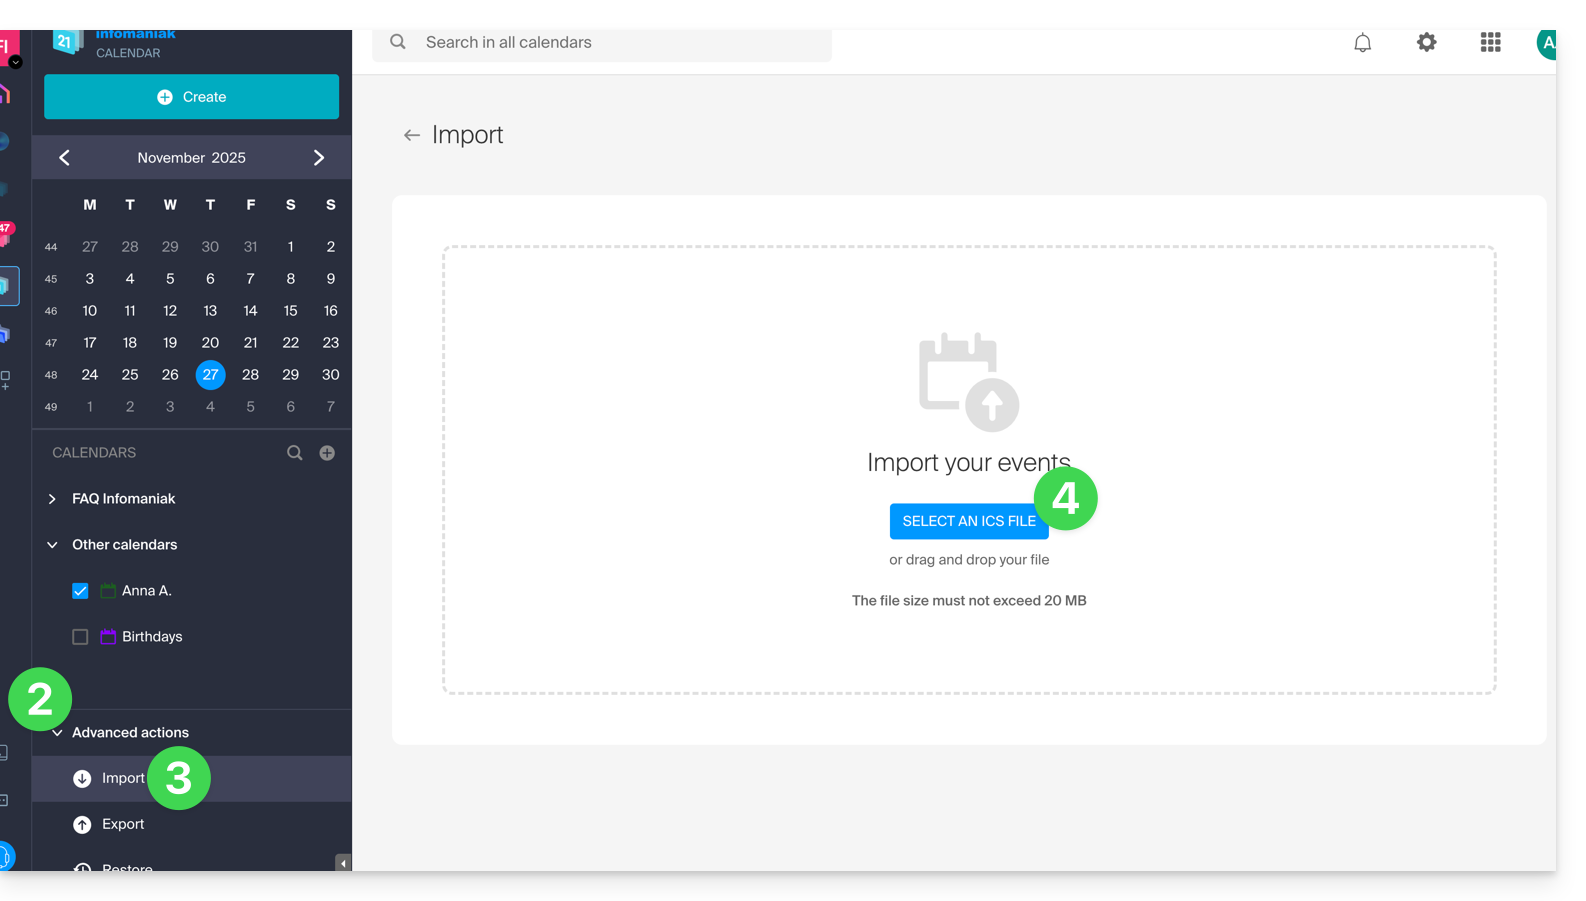
- Select the file containing the tasks (and/or events):
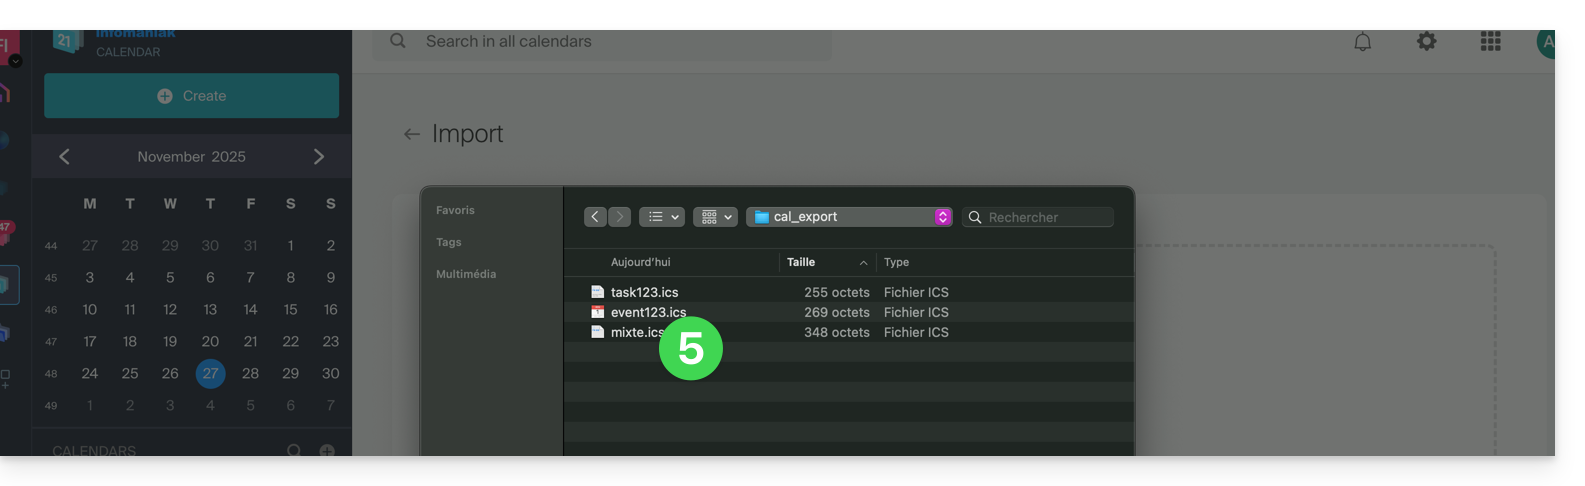
- Choose the calendar into which to import the data (or create a new calendar for the occasion).
- Click the button to start the import:
- If the
.icsfile contained tasks, you will find them in the Tasks section (and any events present in the file will be on the calendar):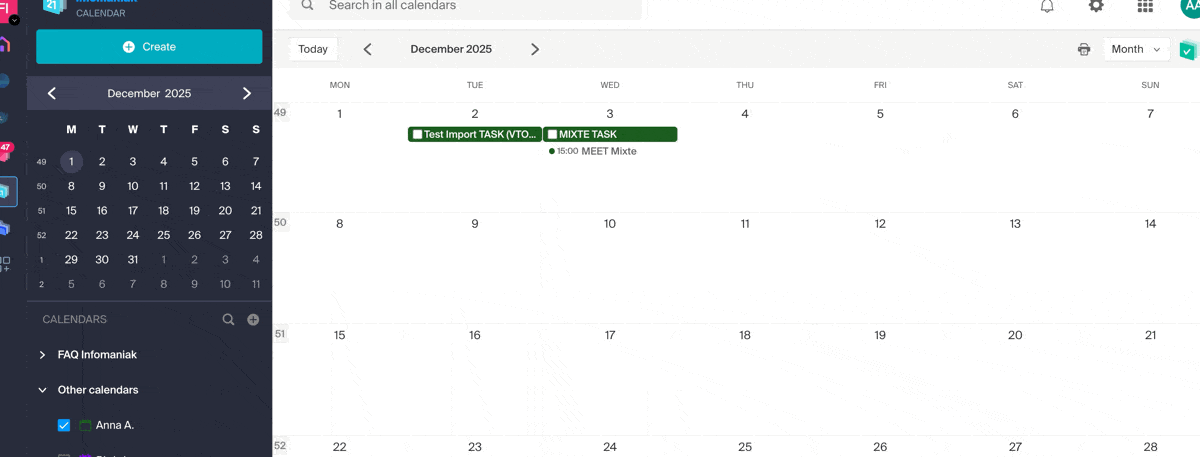
This guide explains how to add a completely external user to kChat.
Preamble
- If you are the administrator of the Organization on which my kSuite (and therefore kChat) is located with full rights granted for kChat, you can invite a completely external user to your Organization who will not be counted as a user.
- The latter will, however, be invited to create an Infomaniak account if they do not already have one.
- To add a kChat user and give them more rights, refer to this other guide.
Invite a user to chat in a private channel
To send an invitation by email from kChat:
- Click here to access the kChat Web app (online service ksuite.infomaniak.com/kchat) or open the kChat desktop app (desktop application on macOS / Windows / Linux).
- Click the button to Invite members:

- Click the link to invite a new user:

- Specify the email address(es) of the person(s) to invite.
- Specify the channel(s) to which these people will have access.
- Click the blue button to send the invitation:

- The invited person receives an email with a link leading to the kChat interface and the channel shared with them:

- Obviously, there is a registration phase if the user does not yet have an Infomaniak account and during this time, the invited user is indeed listed on the kChat channel in question:

- Note that it will not be listed as pending within my kSuite or elsewhere as it is a restricted and external user; and as long as it has not completed its registration, the quota remains at 0/100 external users:
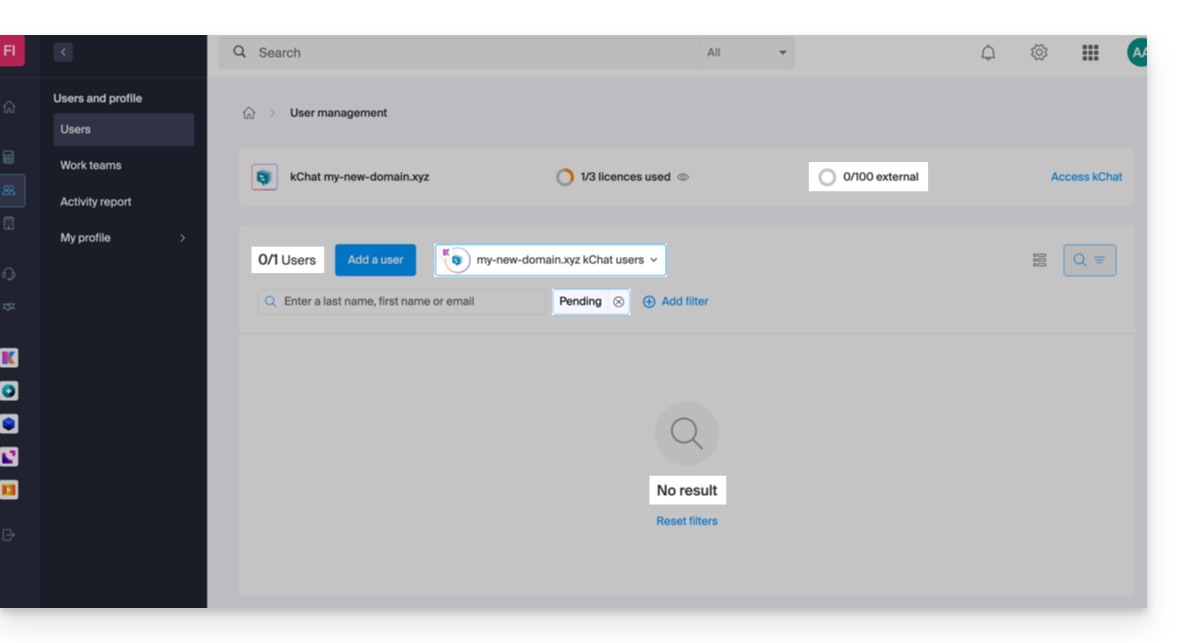
- Note that it will not be listed as pending within my kSuite or elsewhere as it is a restricted and external user; and as long as it has not completed its registration, the quota remains at 0/100 external users:
- Once registration is complete, the user can access kChat:

- From the administrator account, once the external user's registration is complete, you get the mention of 1 external user on your my kSuite dashboard:

- And you have the indication on kChat that the user is accessing your private channel:

- From the administrator account, once the external user's registration is complete, you get the mention of 1 external user on your my kSuite dashboard:
Permissions of the invited user
Guests can…
- … pin messages to channels
- … use "slash commands" (except for restricted commands such as inviting members, renaming channels, modifying headers, etc.)
- … add a channel to favorites
- … mute a channel
- … update their profile
- … use authentication methods different from those of other users
- … use the kChat app: the guest can open the app (Web, mobile, or desktop) whether they are already a member of a kChat or not; this operating principle is different with my kSuite+, for example.
Guests cannot…
- … discover public channels
- … join open teams
- … create direct messages or group messages with members who are not part of the same channel
- … invite people