
Knowledge base
1000 FAQs, 500 tutorials and explanatory videos. Here, there are only solutions!
This guide introduces the Global Security tool, which allows you to verify that the relationships between a domain name and an Infomaniak Mail Service are optimal in terms of security. This involves checking the SPF / DKIM / DMARC records, and the Global Security tool allows you to intervene in the configuration if necessary.
Any DNS addition/modification can take up to 48 hours to propagate.
Access the Global Security diagnostic tool
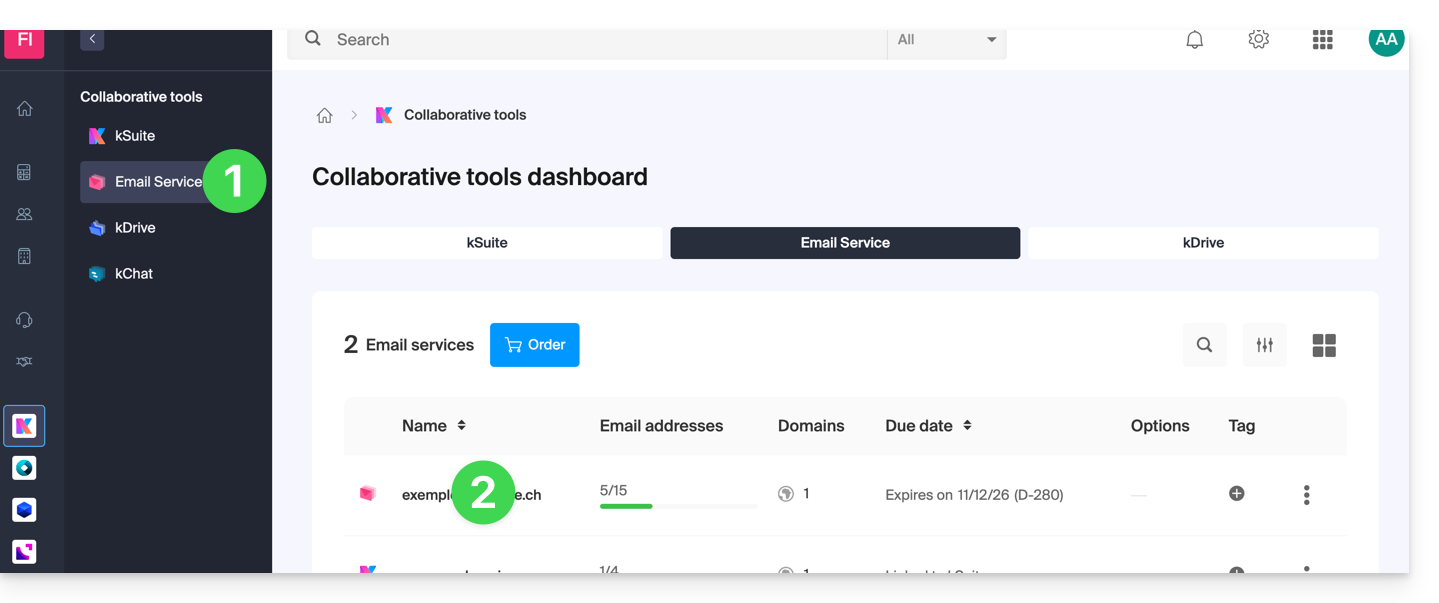
To access Global Security:
- Click here to access the management of your Mail Service on the Infomaniak Manager (need help?).
- Click directly on the name assigned to the relevant Mail Service:
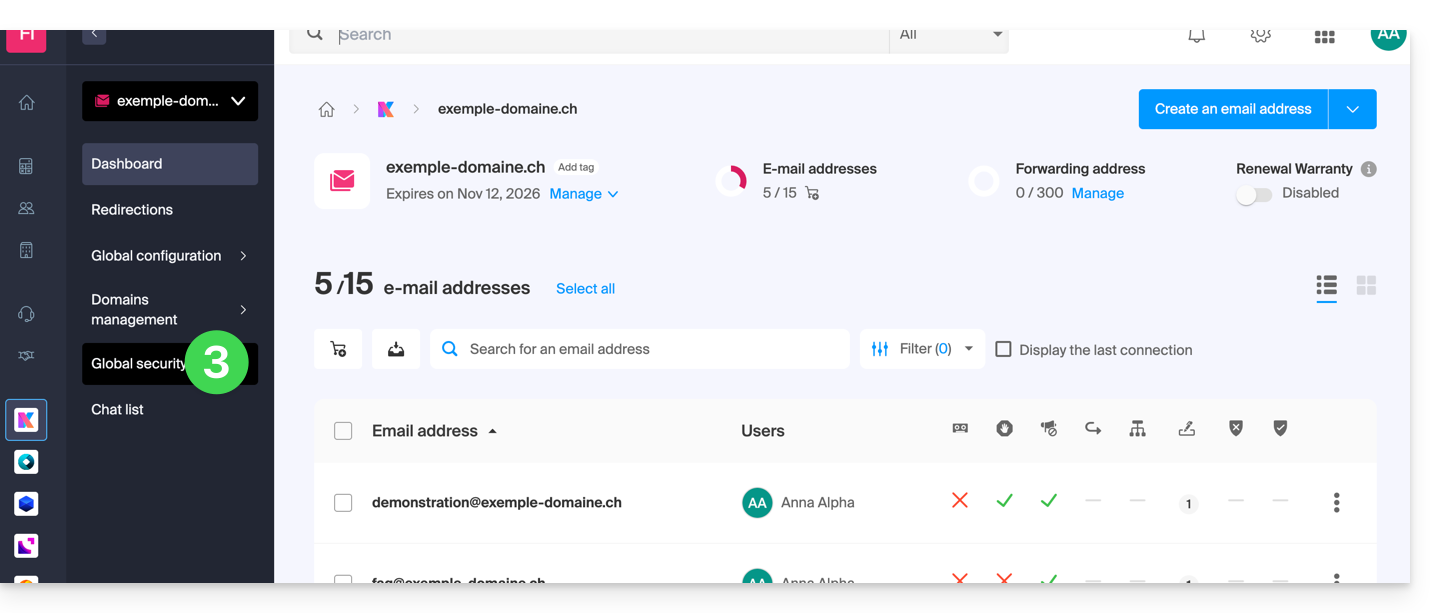
- Click on Global Security in the left sidebar:
Verify the optimal functioning of email
Once you have arrived at Global Security, familiarize yourself with and verify the three security mechanisms inherent to emails: SPF, DKIM, and DMARC policy. These indications should be displayed in green: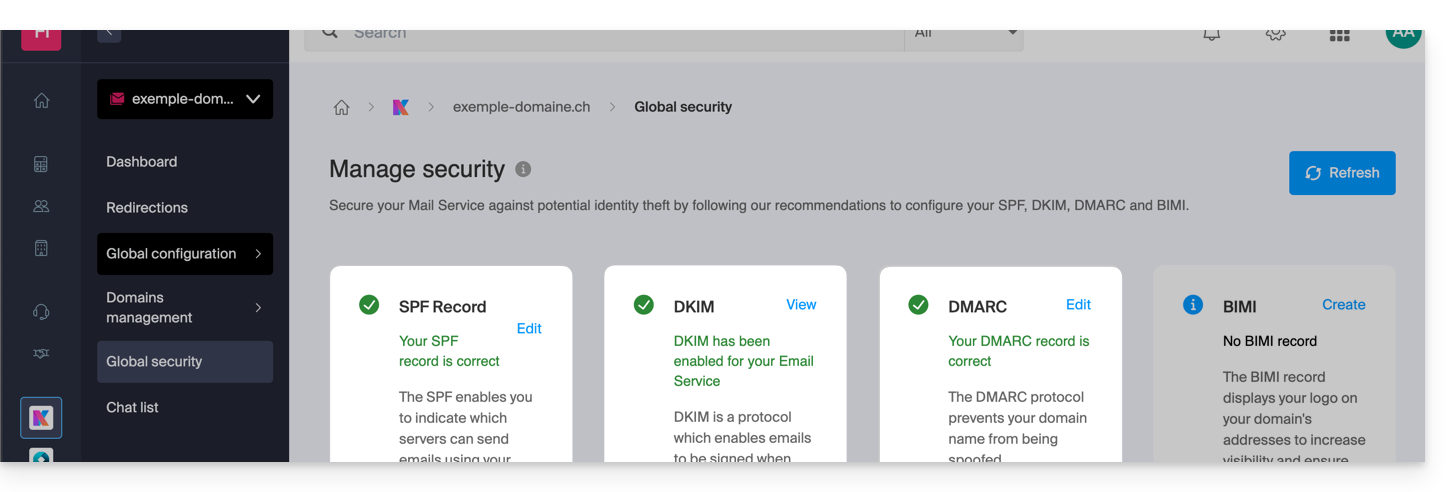
Otherwise, this may explain why an email that is not spam is treated as spam.
Click on Edit or Create to configure SPF, DKIM, and DMARC according to the recommendations below to secure your Mail Service against potential identity theft:
SPF (Sender Policy Framework)
SPF (click here to configure) allows the owner of a domain name to specify which servers are authorized to send emails on behalf of that domain. This helps to reduce the risk of spam and phishing, as the recipient's mail server can verify if the sender is authorized by consulting the sender domain's DNS records: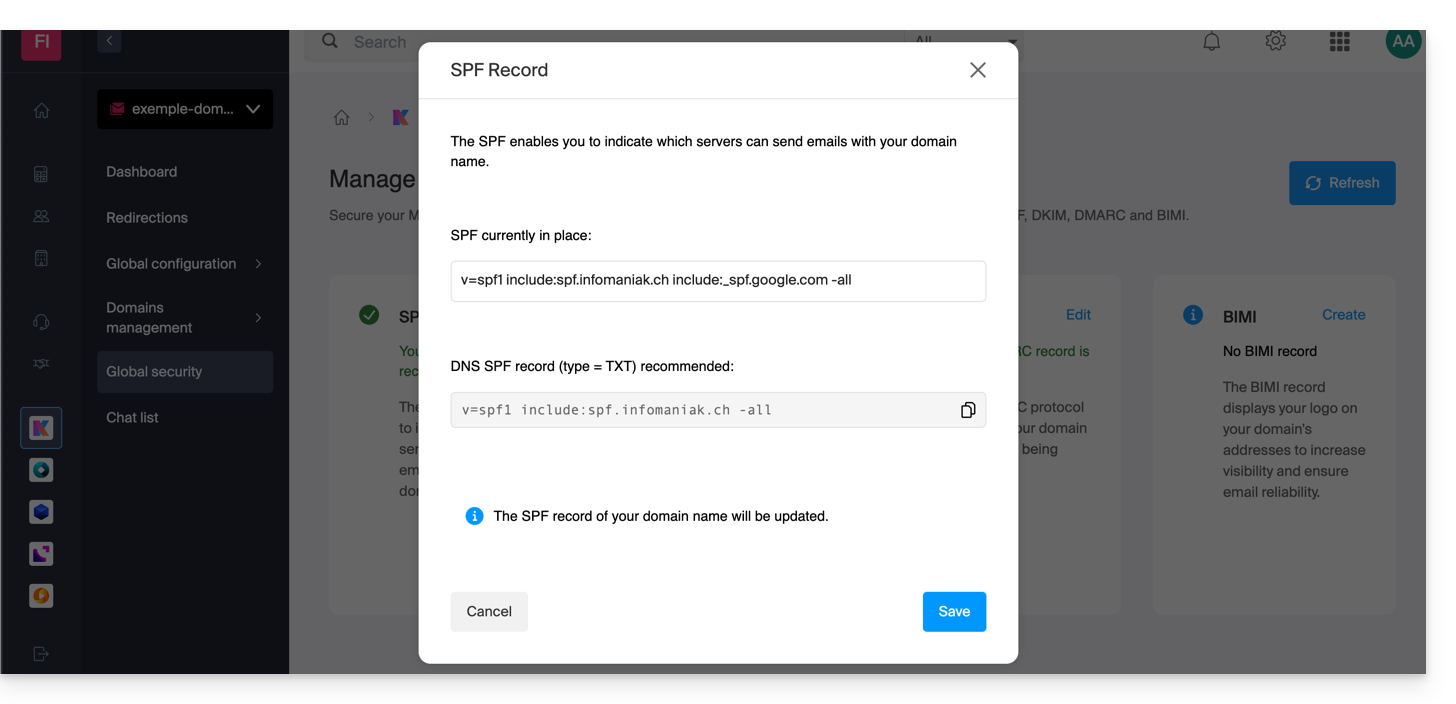
The analyses of the Global Security tool are only relevant if the domain name is with Infomaniak and is configured to direct mail traffic to Infomaniak.
Under these conditions and in case of a detected problem, you will find a Correct button that will allow you to automatically update your SPF.
If correcting one or the other of the mentioned issues is not possible, it is because it must be done on the configuration set up by the owner or technician of the sender's domain name.
If your domain name points to Wix or another provider, the SPF must be configured with the relevant provider.
DKIM (Domain Keys Identified Mail)
DKIM (click here to configure) is a protocol that allows emails to be signed when they are sent.
When your domain name (or its DNS zone) is managed elsewhere, you will find in this section Global Security > DKIM the DKIM record to add in the DNS zone: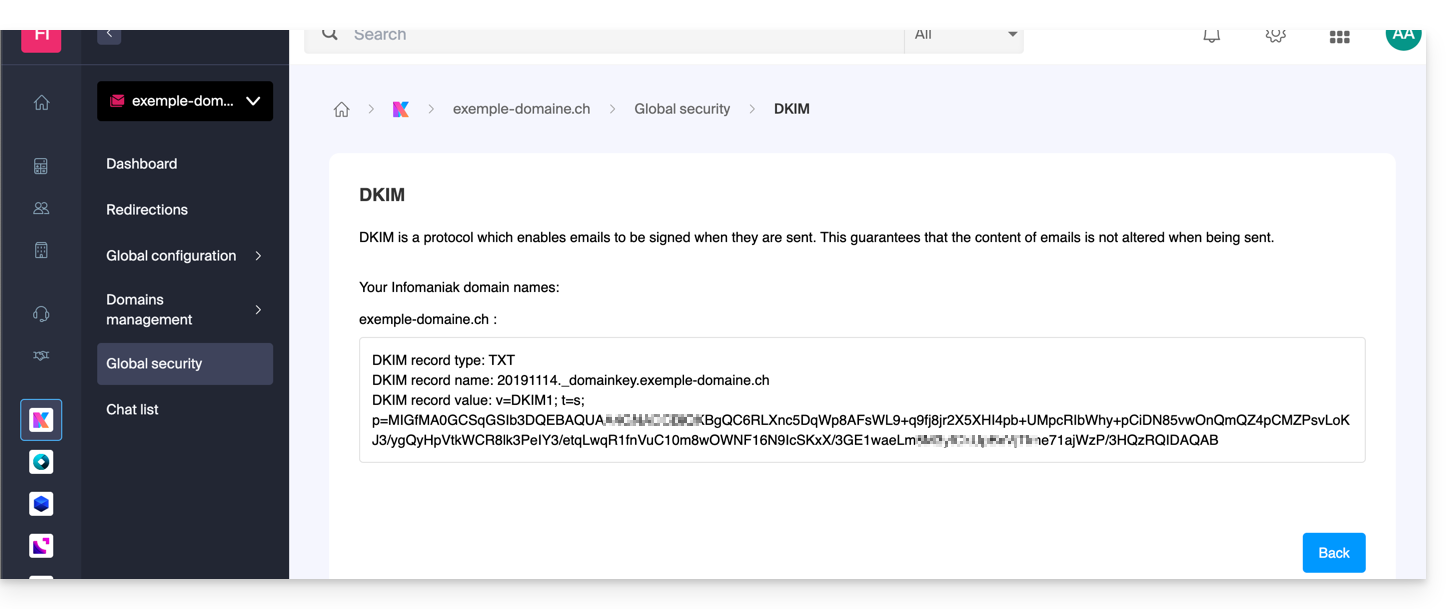
You can configure multiple DKIM records on your domain without a fixed limit, unlike DMARC or SPF, which is crucial if you use multiple third-party email providers for your daily communications.
DMARC (Domain-based Message Authentication, Reporting, and Conformance)
DMARC (click here to configure) allows you to indicate to other mail servers (the email providers of the contacts to whom you send an email) the policy to follow in case of receipt of a "suspicious" email (e.g., not authenticated) from your mail server (hosted by Infomaniak). Additionally, you can be notified of the "incident" by a summary message (called a "DMARC report") providing information on the recent activity of your email related to the domain name.
DMARC requires a valid SPF and DKIM. A wizard allows you to configure DMARC according to Infomaniak recommendations in simple mode or entirely as you wish in advanced mode (this expert mode allows you to enter the record of your choice):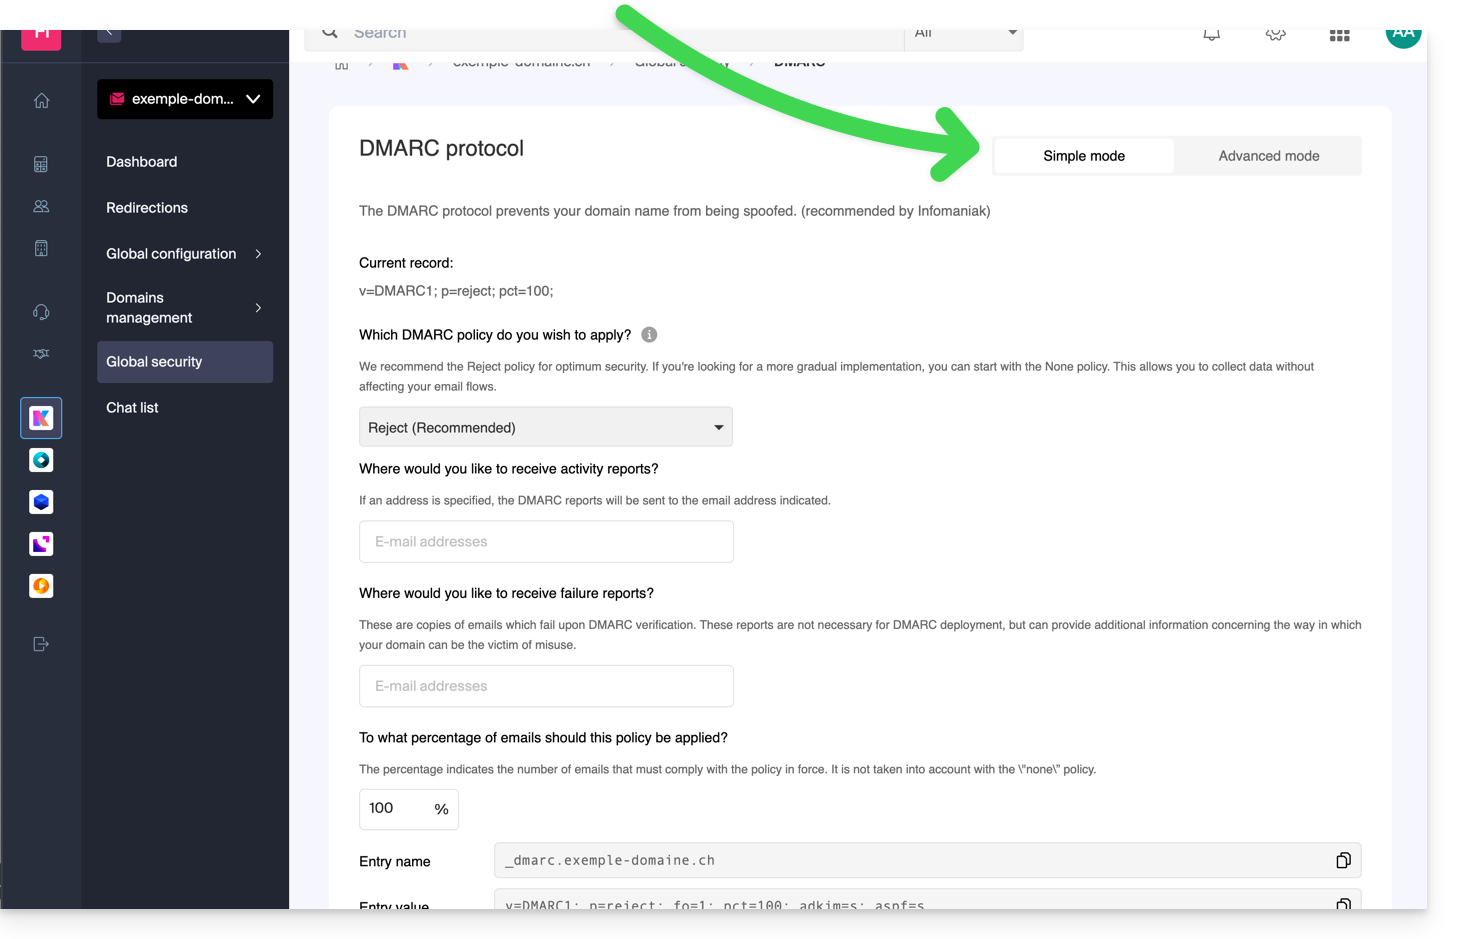 The corresponding necessary entries (type TXT) will then be automatically applied in the DNS zone of the concerned domain name (if administratively possible - domain managed in the same Organization, for example).
Infomaniak is neither able to analyze your potential DMARC reports and records, nor able to comment on the validity or compliance of these, as this is entirely your responsibility.
To verify the records within your DNS, you can also use an external and free service like the one mentioned at the bottom of this other guide.
Refer to this other guide if you are looking for information on the fourth point of the Overall Security page.
This guide explains how to connect the Apple Mail mobile app on iOS to an email address hosted by Infomaniak.
Preamble
- Your iOS device will be automatically configured via .mobileconfig configuration profiles compatible with Apple, unlike a manual configuration.
- It is possible to delete a configuration profile once installed (scroll down to the bottom of this page for the instructions).
- The various services offered by Infomaniak are all compatible with the corresponding standard protocols (IMAP/SMTP for email, for example), therefore if you encounter a problem with third-party software, contact its publisher or a Partner and consult the support policy as well as section 11.9 of the Infomaniak Terms of Service.
Install a configuration profile
Prerequisites
- Create the email address in my kSuite or a Mail Service / kSuite.
- Create a password for the email address on the device you are going to configure.
- Check that the Mail Service is configured optimally.
Download the profile from the relevant iOS device or send it from another device (if you already have a working email address, for example):
- Click here to access the Infomaniak configuration tool (online service https://config.infomaniak.com) — log in if necessary to your Infomaniak account on the Organization on which your email address is managed.
- Choose to install the profile on this device:
- Choose to synchronize emails:
- Choose to synchronize another application than the Infomaniak Mail application:
- Enter the password for the email address (attached to Mail Infomaniak (Webmail)) that you want to synchronize on iOS.
- Press the blue Verify button:
- Press to copy the validated password.
- Download the configuration profile and authorize its opening:
- Open the settings of the iOS device:
- Press the recently downloaded profile:
- Press Install:
- Unlock your iOS device:
- Press Install:
- Paste the password of the previously verified email address (point 7 above).
- Press Next:
- There you go, your email address is now configured in the Apple Mail application that you can open and control:
Delete an Apple profile
Refer to the official documentation by changing the version of your system at the top of the page* if necessary.
*Why is it necessary to choose the guide version that exactly matches your macOS / iOS system version? Apple introduces changes, sometimes subtle, with each new version of its system, for example a path on iOS 15…
… becomes this on iOS 18…
This guide explains how to create sorting rules (in Standard mode) to automatically classify your incoming emails on Infomaniak according to certain conditions.
Preamble
- These rules allow the following automatic actions, among others:
- Delete or move messages from email addresses you no longer wish to see.
- Forward to your spouse the emails from an email address so that you both receive them.
- Copy messages that contain a specific keyword to a folder.
- etc.
- Unlike the sorting rules offered within email software/clients (Microsoft Outlook, Mozilla Thunderbird, Apple Mail...), these rules will act directly on the server of your mailboxes before even the IMAP connection.
- You can make a template for all the addresses of your Mail Service.
- If you use an email software/client configured in POP, in parallel with Mail Infomaniak, messages classified in folders will no longer be downloaded by your application as the POP protocol only retrieves messages that are in your main inbox. To view the classified messages, it will be necessary to use the IMAP protocol or Mail only.
- Depending on the offer you have, there is an advanced mode to create sorting rules in a dedicated language.
Access the rules from the Infomaniak Web Mail app
Prerequisites
- Have permission to manage the rules: if you had been invited to the Infomaniak Web Mail app (online service ksuite.infomaniak.com/mail) to manage your address, it is possible that the Mail Service manager has revoked this right from their admin account.
To access the sorting filters for your Infomaniak mail:
- Click here to access the Infomaniak Web Mail app (online service ksuite.infomaniak.com/mail).
- Click on the Settings icon at the top right.
- Check or select the email address concerned in the dropdown menu.
- Click on Filters and rules:
Define a rule based on a received email
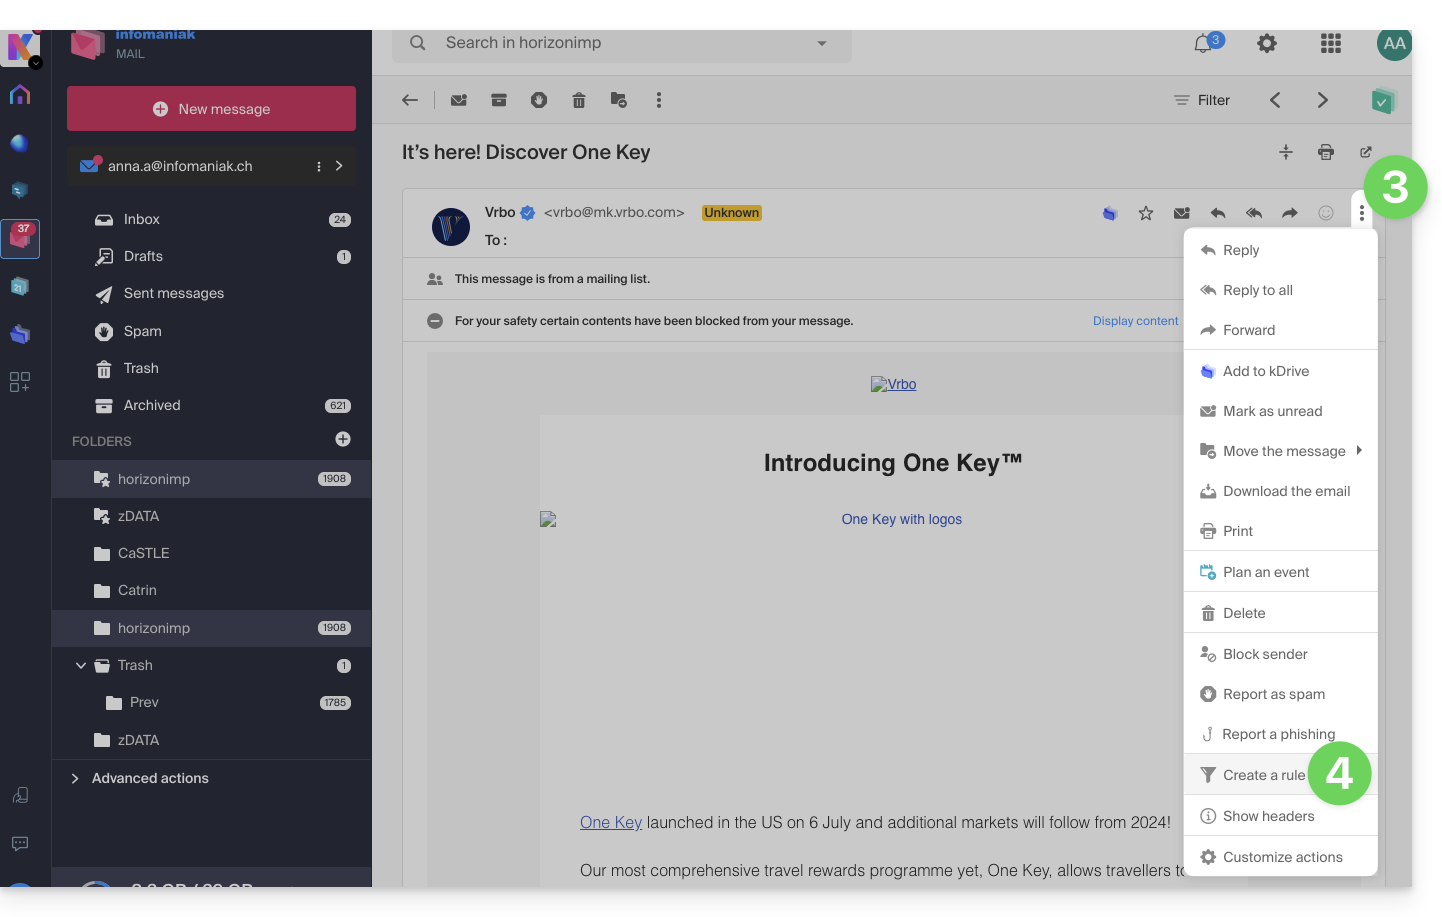
You can also create a rule directly from the received email:
- Click here to access the Infomaniak Web Mail app (online service ksuite.infomaniak.com/mail).
- Open the message from the sender in question.
- Click on the action menu ⋮ at the top right of the open message.
- Choose Create a rule to open the creation assistant that will be pre-filled with the elements of the message:
Access rules from a Mail Service
To access the sorting filters for your Infomaniak mail:
- Click here to access the management of your product on the Infomaniak Manager (need help?).
- Click directly on the name assigned to the product in question.
- Click on the email address concerned in the table that appears.
- Click on the tab Rules from the left sidebar (or top bar):

Create a new rule in Standard mode
- Click on the button Add a rule in Standard mode to create a new rule using a creation assistant/form:

- The different conditions available for sorting filters are presented in this other guide.
- Once a filter is created, click on Continue to activate it.
Add, duplicate, or modify a rule in Standard mode
If there are already sorting filters, the button to add is at the top right of the table:
These settings can be modified whenever you want by clicking on the pencil ✎ icon located to the right of the item in question.
It is also possible to duplicate an existing rule to rework it as a copy without affecting the first one: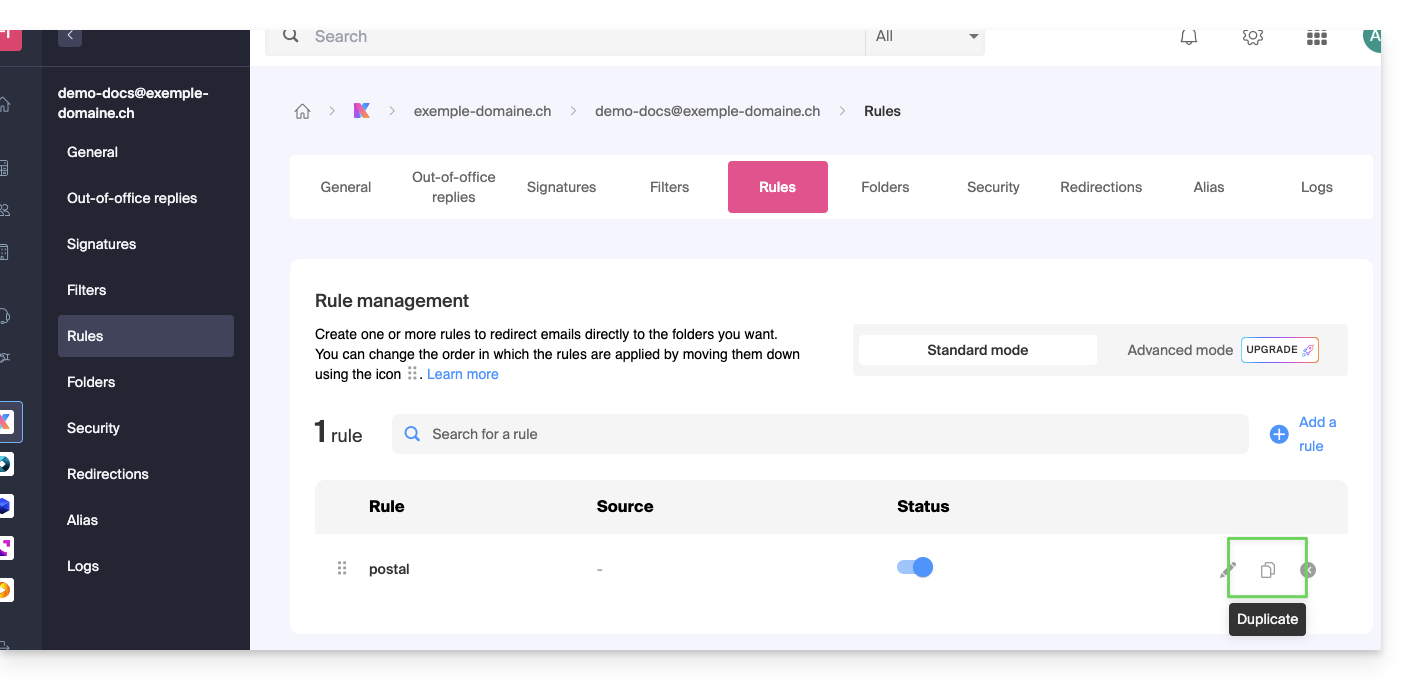
This guide explains why some attachments sent from Microsoft Outlook arrive in winmail.dat format on your email address hosted by Infomaniak, and how to permanently resolve the issue on the sender's side (where it originates).
Preamble
winmail.datis the container used by Outlook/Exchange when a message is sent in RTF / TNEF.- It encapsulates the formatting and attachments.
- Many non-Microsoft email clients do not know how to interpret TNEF:
- The formatting disappears and the attachments become a single
winmail.datfile.
- The formatting disappears and the attachments become a single
Important: the generation of a winmail.dat does not depend on Infomaniak; the issue arises with the sender (Outlook/Exchange) and must be corrected on their device or by their Microsoft 365 administrator.
Solving the problem (actions to request from the sender)
The most effective solution is to modify the Outlook configuration on the sender's side.
Disable RTF/TNEF and resend the message in HTML or plain text
- Classic Outlook for Windows (Microsoft 365/2021/2019, Win32 application)
Menu:File > Options > Mail
Composition:Compose messages in this format:choose HTML (or Plain Text).
Message format: inWhen sending messages in Rich Text format to Internet recipients, select Convert to HTML (or Convert to Plain Text).
Case by case (a single email): in the message window, tabText Format> choose HTML.
- New Outlook for Windows (Outlook on the Web-based application)
Menu:Settings (gear icon) > Mail > Compose and reply
Message format:Compose messages in:choose HTML (or Plain Text).
This client does not expose an RTF option; sending in HTML/text avoidswinmail.dat.
- Outlook on the Web (Exchange Online/Outlook.com)
Menu:Settings > Mail > Compose and reply > Message format> choose HTML (or Plain Text).
- Outlook for Mac
Menu:Outlook > Preferences > Composition> check/uncheck Compose messages in HTML by default.
For a single message: in the composition window, tab Options > switch to HTML or Plain Text.
Notes: if the sender has attached files, they will be readable by all recipients as long as the message is sent in HTML/text. Zipping the attachments (.zip) does not prevent Outlook from encapsulating the message if RTF/TNEF is still active.
Disable RTF for specific recipients (you, for example)
- Classic Outlook Windows: open the Contact card > double-click the email address > Outlook Properties > Internet Format: select Send as plain text only (or Let Outlook decide if the admin already forces the conversion).
- Clear the auto-completion (it may “remember” RTF for a recipient):
File > Options > Mail > Send messages > Empty the Auto-Complete List, then retype the address manually for the next send.
- Microsoft 365 administrators (at the sender's): in the Exchange Admin Center:
Mail flow > Remote domains > Default> Rich Text format: choose Never. In PowerShell:Set-RemoteDomain Default -TNEFEnabled $false.
Failing that: use another client to send (e.g., Thunderbird), or check that Calendar invitations are sent in iCalendar (File > Options > Calendar > enable Use iCalendar format for external recipients).
If you do not wish to recontact the sender
You can extract the content of winmail.dat with TNEF decoding tools (online or desktop applications). Search for “open winmail.dat” and choose a reputable tool for your system (Windows, macOS, Linux). This usually restores the attachments, but it is not a lasting fix. Moreover, privacy and security are in no way guaranteed during these operations.
This guide explains how to create a "catchall" type email address on a Service Mail.
⚠ Available with:
| kSuite | |
| Standard | |
| Business | |
| Enterprise | |
| Service Mail | |
| Premium 5 min. addresses |
Preamble
- A "catchall" type email address retrieves all emails sent to non-existent email addresses on the domain.
- This is ideal if you want to receive all messages for which there is no specific address on your domain.
- This type of address cannot be used to send emails.
- If you configure the "Automatic reply" (out of office message) function on a catchall@ address, no automatic reply will be sent to senders who contacted a non-existent address on your domain.
- This restriction notably avoids reply loops and the sending of unwanted messages.
- Also, take note of the important recommendations at the end of this guide.
Create a catchall address
Prerequisites
- Have a Service Mail on your Infomaniak Manager.
- Have a quota of available free addresses or adjust it in advance if necessary.
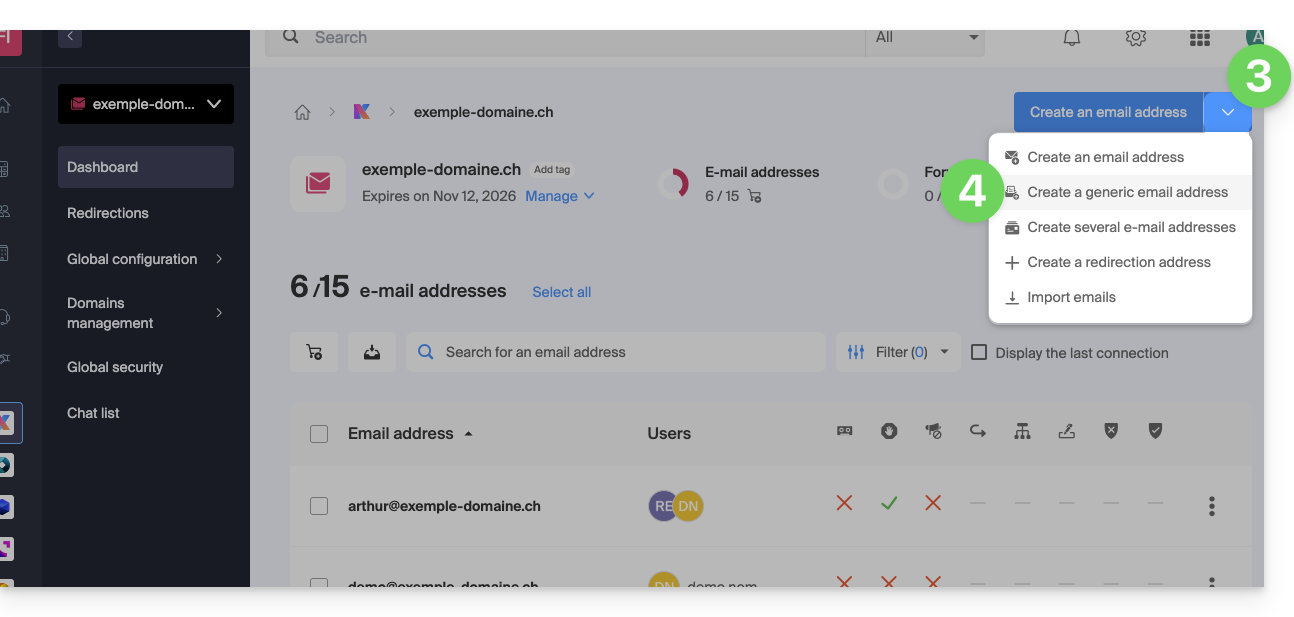
Then, the administrator of a Service Mail creates a new generic email address:
- Click here to access the management of your product on the Infomaniak Manager (need help?).
- Click directly on the name assigned to the product in question.
- Click on the chevron to the right of the blue button Create an email address.
- Click on Create a generic email address:
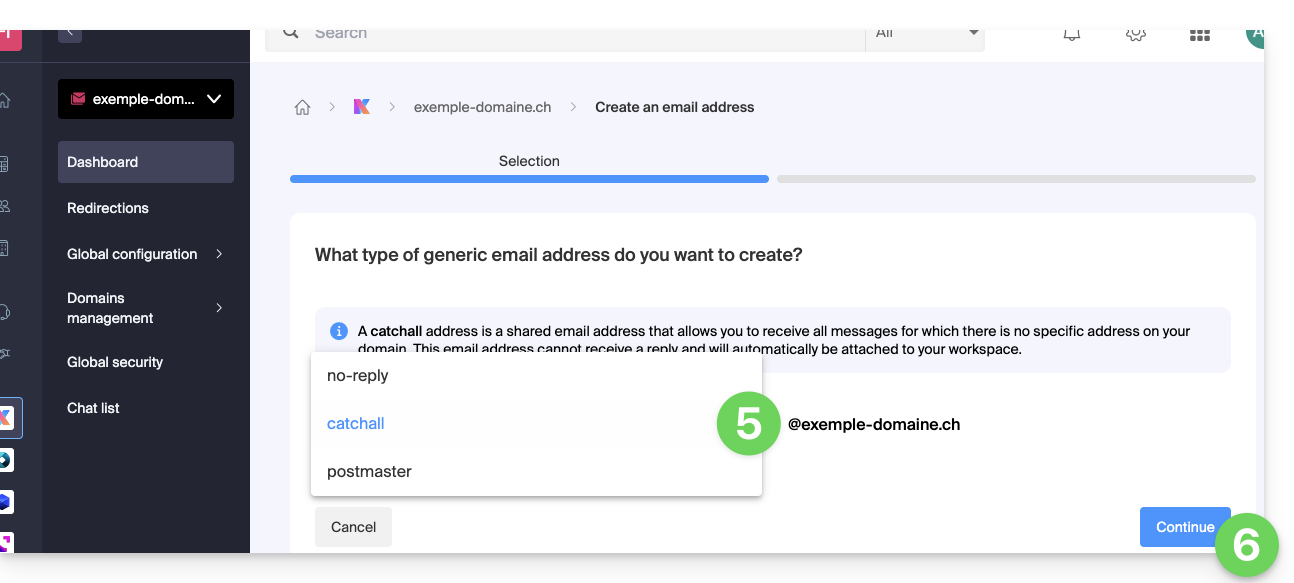
- Choose Catchall.
- Click on Continue:
Once the catchall address is created, it is automatically visible on your Infomaniak Mail Web app.
To use it elsewhere, you just need to add a password for your devices/users.
Example of use
Once the catchall address is created:
- You use the email address
jonnie.smith@domain.xyzwhich works and exists on the Mail Servicedomain.xyz.- You have also created an address
catchall@domain.xyzon the Mail Servicedomain.xyz.
- You have also created an address
- An email is sent to
smith.johnny@domain.xyzbecause the sender misspelled the recipient's address. - The email will still arrive in the
catchall@domain.xyzbox, which you just need to check in the Mail interface of your choice. - Same if you delete the address
jonnie.smith@domain.xyzone day; if you keep thecatchalladdress, then it is the latter that will receive everything that is still addressed to the non-existent address...
Important recommendations
Creating this type of account is not recommended:
- Catchall addresses receive all emails sent to any domain address; this means they are often flooded with spam, which can be difficult to manage and filter.
- Due to the high volume of spam, legitimate messages can be drowned out and lost in the mass, which can result in the loss of important communications.
- Catch-all addresses can potentially be used by attackers to target your domain with brute force attacks or other methods, as they provide an easy target for testing different address combinations.
In short, managing a catch-all address can become tedious and complicated, especially for large organizations with many employees and departments.
This guide presents commands that can be executed to test a connection or a network and thus specify the source of a potential error more precisely.
Perform a Telnet...
TELNET allows you to test the connection to a server without considering all the additional settings of a mail or FTP application in order to determine the origin of a problem. If the connection does not go through on an SMTP server, you will need to check, for example, if your firewall is not blocking port 587 or 465.
... on macOS
- Search for Network Utility.
- Go to the
Ping,Lookup, orTraceroutetab depending on what you want to test. - You can also use a
Terminaltype application (command line interface,CLI / Command Line Interface) on your device and, depending on what you want to test, enter:traceroute [server]nc [server] [port]
Replace[server]with the server name or its IP address, the same for[port]...
... on Windows
Enable Telnet if necessary.
- Use a
Terminaltype application (command line interface,CLI / Command Line Interface) on your device, for example by typing Run thencmd. - In the window that opens, depending on what you want to test, type:
tracert [server]telnet [server] [port]
Example:telnet mail.infomaniak.com 587(allows you to test the SMTP port if your software/email client does not allow sending emails)...
... on Android
- Use the application Simple Telnet Client which allows you to test very simply via 2 fields to fill in (for example
mail.infomaniak.comand port143or993)...
Perform a PING
PING allows you to know if a machine is accessible via the Internet. You can also check with this tool if you are indeed addressing the correct machine, for example during a DNS change, by looking at the IP address obtained. It is possible to perform a ping on a domain name, a hostname or an IP address.
PING is definitely blocked on shared hostings.
This guide details the various possibilities available to you in the incoming email filtering tool (based on sorting rules) of Mail Infomaniak.
Preamble
- Refer to this other guide if you are looking for information about setting up sorting filters on your Infomaniak mailbox.
Discover the possible conditions
The meaning of these different existing conditions and criteria is detailed below:
From
Allows you to filter messages based on the sender (and decide what to do with emails always coming from the same person or domain, for example).
A
Allows you to filter messages based on the recipient (if you receive an email that is always addressed to a specific main recipient, for example volunteers@domain.xyz).
Cc
Allows you to filter messages based on the recipient mentioned in the Cc field (and who therefore receives the email as a copy in addition to the main recipient).
Subject
Allows you to filter messages based on the subject of the message.
Reply to
Allows you to filter messages by looking at the content of the reply-to field (specific condition - example).
Size
Allows you to filter messages based on their size.
Message content
Allows you to filter messages based on certain words that would appear in the body of the incoming message.
Email type
Allows you to filter messages based on the x-infomaniak-type header whose value can be ham, spam, transactional and bounce.
In the case of using a condition "email type = advertising, social media", then the selected action will be performed before the advertising filtering if the latter was activated.
This guide explains how to connect the desktop app Outlook 2007 (desktop application on Windows) to an email address hosted by Infomaniak.
Preamble
- The various services offered by Infomaniak are all compatible with the corresponding standard protocols (IMAP/SMTP for email, for example), therefore if you encounter a problem with third-party software, contact its publisher or a Partner and consult the support policy as well as article 11.9 of the Infomaniak Terms of Service.
Add the email address to the application
Prerequisites
- Create the email address in my kSuite or a Mail Service / kSuite.
- Create a password for the email address on the device you are going to configure.
To configure the email application:
- Open the application.
- Click on the Tools menu.
- Click on Options:
- Click on the Email Configuration tab.
- Click on Email Accounts...:
- Click on New:
- Click on Configure manually.
- Click on Next:
- Click on the Internet E-mail button to connect to an IMAP server.
- Click on Next:
- Check and complete the missing information.
- Click on Additional settings:
- Click on the Outgoing server tab.
- Click on My outgoing server requires authentication.
- Click on the Advanced tab:
- Replace the port numbers with the correct information and enable SSL.
- Click on OK:
- Click on Next:
- Click on Finish:
- Click on Close:
- Your email address is now configured in the application:
Recommended settings
- Incoming IMAP server =
mail.infomaniak.com - IMAP port =
993(with SSL) - Outgoing SMTP server =
mail.infomaniak.com - SMTP port & encryption protocol and command/method to activate this protocol:
587+ STARTTLS - Username = full & complete email address ( ? )
- Password = the one generated for the email address you want to view
- Authentication required for sending emails:
- It is activated in the SMTP settings of your application.
- Check "use the same settings as the incoming server" or, depending on the software/email clients, enter a username (= full & complete email address) and the generated password.
Refer to this other guide if you are looking for information about other mail ports and protocols compatible (SSL / TLS for example).
In case of a problem
Check that the Mail Service is configured optimally.
It is not necessary to contact Infomaniak Support if your email address works well outside the application. The most common error concerns the use of an incorrect password. The troubleshooting guides help you resolve any potential issues:
- Refer to the solutions provided in this other guide regarding mail in general.
- This other guide is more specifically about Outlook.
… and if your Outlook no longer works since a change of mail password, refer to this other guide.
This guide details sending authenticated emails from a website / CMS hosted by Infomaniak.
Preamble
- Using an authenticated SMTP server to send emails from your applications has many advantages over the standard non-authenticated PHP mail() function:
- enhanced security,
- better delivery reliability,
- more accurate error handling,
- optimal compatibility with third-party mail servers,
- and complete traceability of shipments.
- Recommended settings:
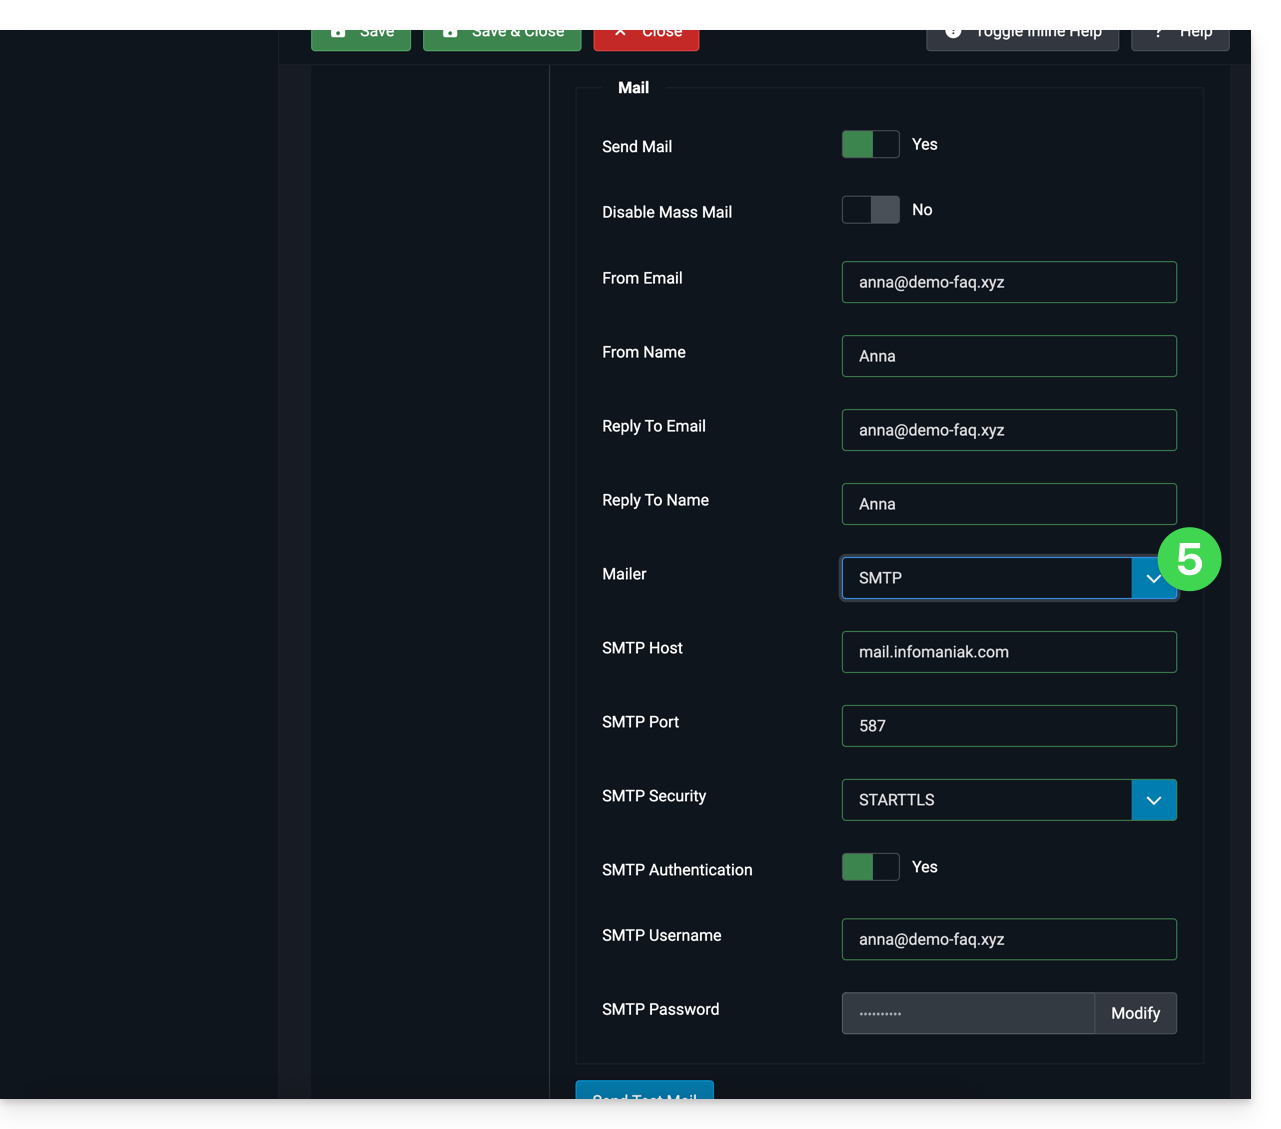
- Outgoing SMTP server =
mail.infomaniak.com - SMTP port & encryption protocol and command/method to activate this protocol:
587+ STARTTLS - Username = full & complete email address ( ? )
- Password = the one generated for the email address you want to access ( ? )
- Authentication required to send emails:
- It is activated in the SMTP settings of your CMS.
- Check "use the same parameters as the incoming server" or, depending on the CMS, enter a username (= full & complete email address) and the generated password.
- Outgoing SMTP server =
SMTP configuration examples...
Prerequisites
- Have a mail service.
- You can use the Mail Service offered by Infomaniak or any other mail service of your choice.
When you have an email address whose domain is attached to your website ( email@domain-site.xyz for example) enter its details to use it for sending from the web server via SMTP:
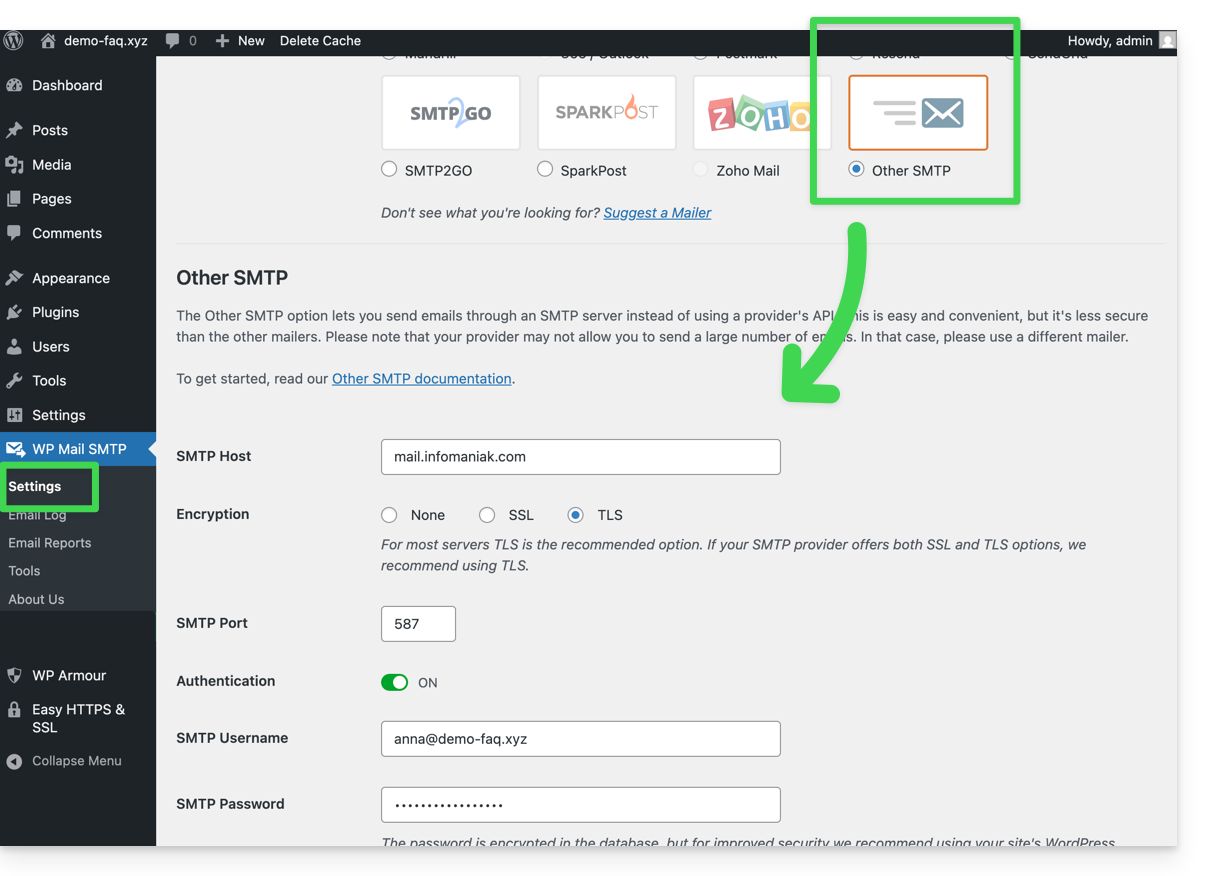
... on WordPress
- Log in to the WordPress admin panel.
- Install an SMTP extension (WP Mail SMTP works).
- Configure the extension, for example:
From then on, an email sent from a contact form present on the site (default form Divi for example) will be sent via an SMTP method.
To ensure this, simply look at the headers of a message received this way, in particular the x-mailer line which may mention for example WPMailSMTP/Mailer/smtp instead of PHPMailer.
Note: the x-mailer can be any indication not necessarily representative of the actual sending method!
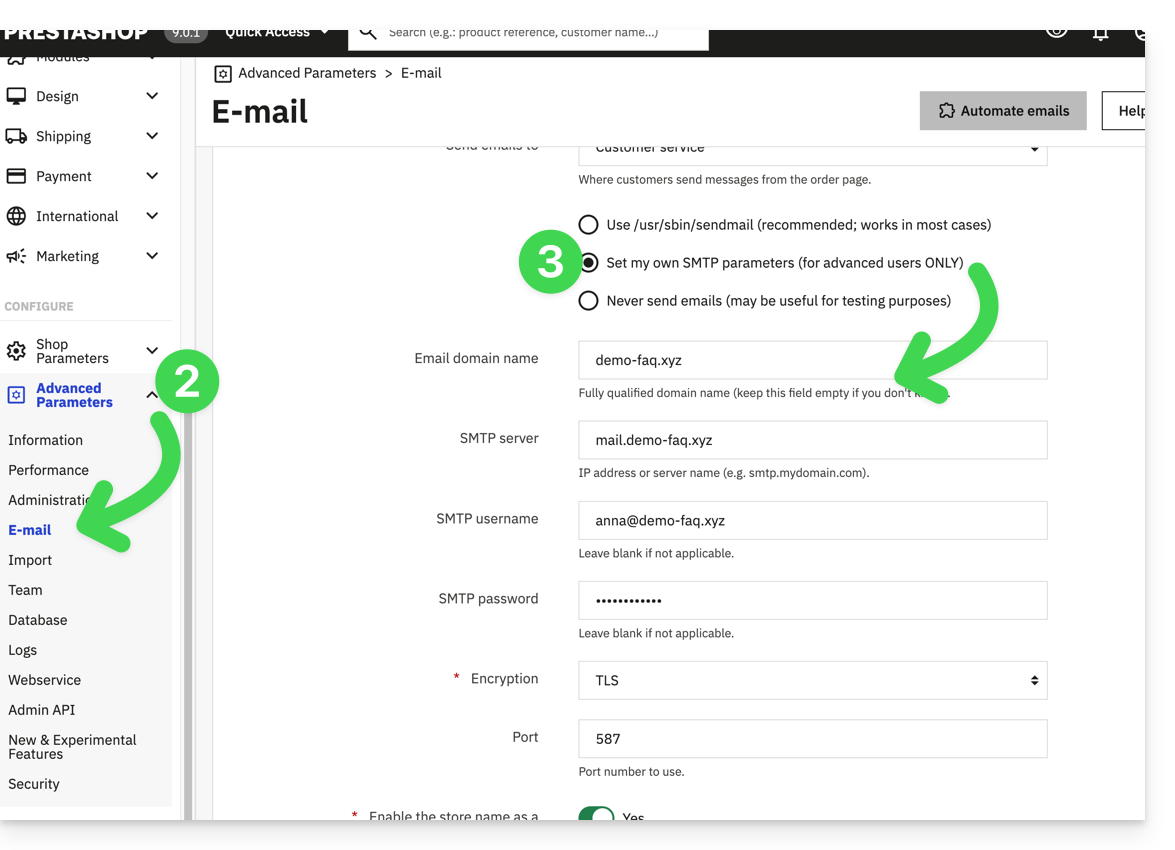
… on Prestashop
- Log in to the Prestashop admin panel.
- Go to Advanced Settings then Email.
- Configure sending via SMTP:
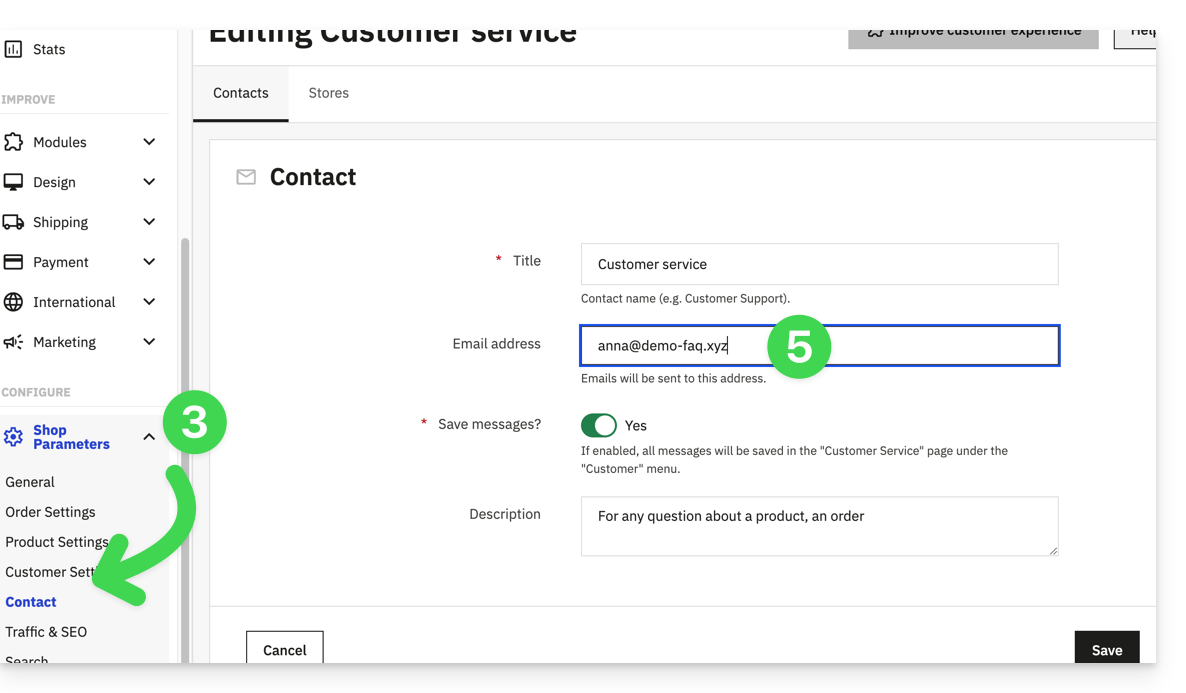
Then check (to avoid an error like Could not instantiate mail function or sender mismatch) that the address you have configured in these advanced settings matches the address that Prestashop uses when sending. To do this:
- Log in to the Prestashop admin panel.
- Go to Shop Settings.
- Click on Contact in the left sidebar menu.
- On the Contacts tab, check that the email address mentioned is the same as the one configured previously.
- Edit the email addresses if necessary:
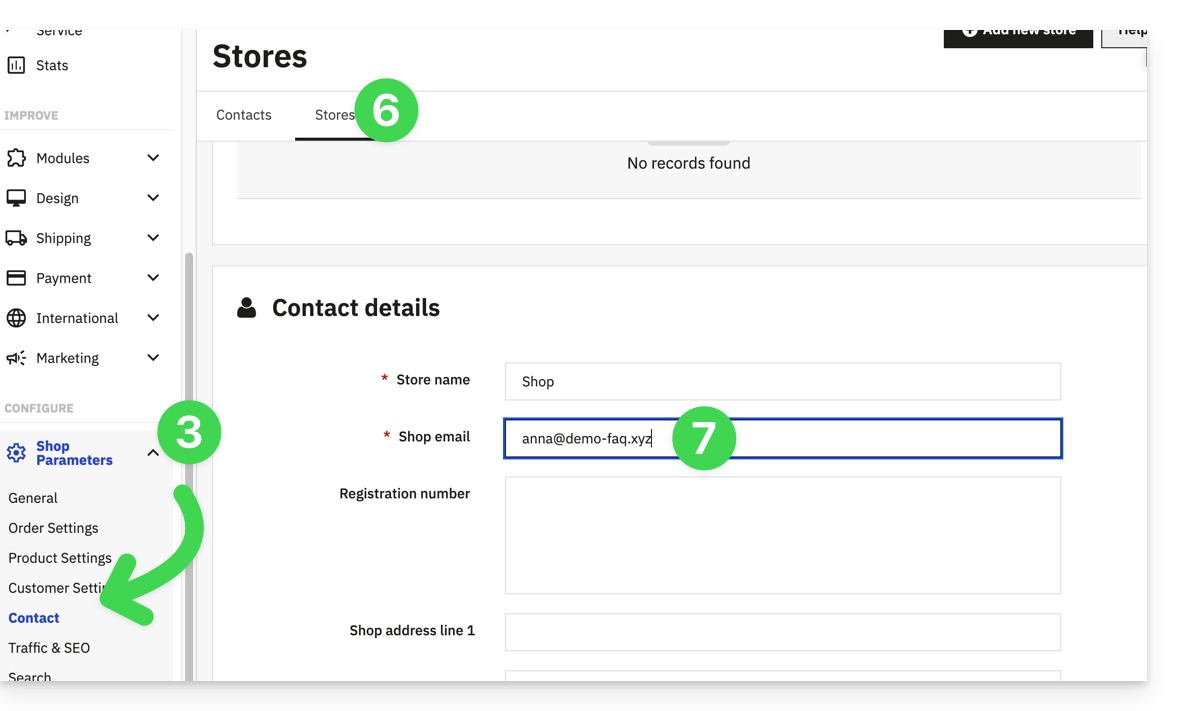
- Click on the Stores tab.
- Check (and correct if necessary) that the email address mentioned is the same as the one configured previously:
… on Joomla
- Log in to the Joomla admin panel.
- Click on System in the left sidebar menu.
- Click on Global Configuration.
- Click on the Server tab:
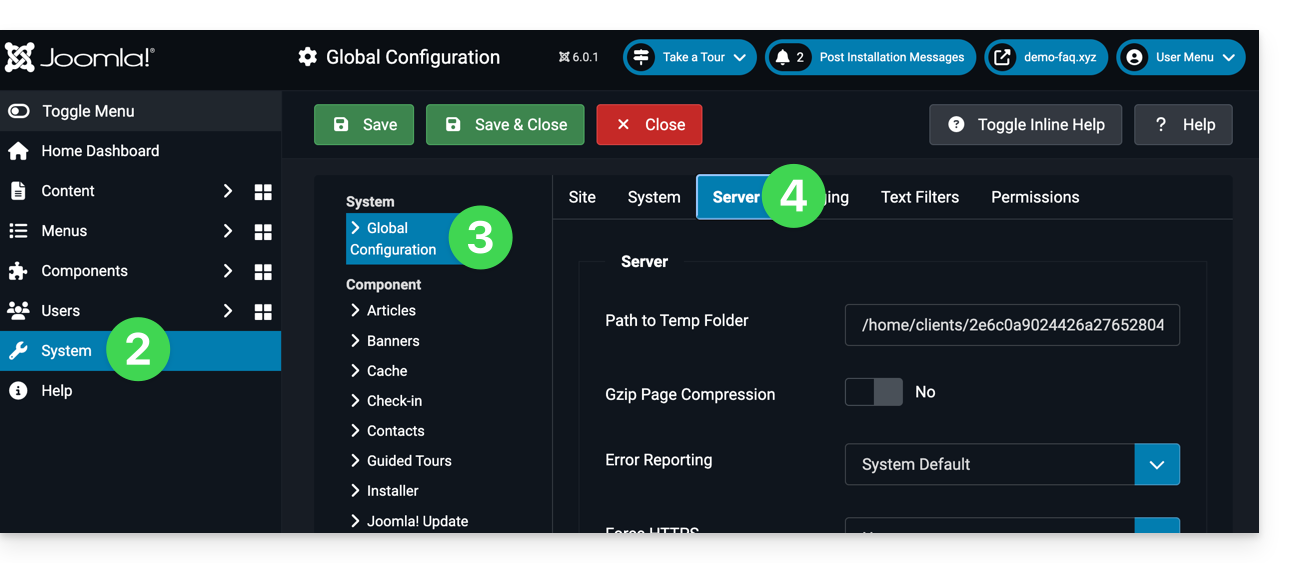
- Configure sending via the SMTP sending method:
This guide explains how to report a phishing attempt (Phishing, Fishing, Filoutage...) of which you may be a victim.
Preamble
- Phishing is an attempt at fraud and scam, aiming to obtain sensitive information fraudulently.
- Generally, the victim receives in their inbox a message seemingly from Infomaniak, their bank, or a trusted organization, indicating that a problem has occurred on their account or in their daily life:
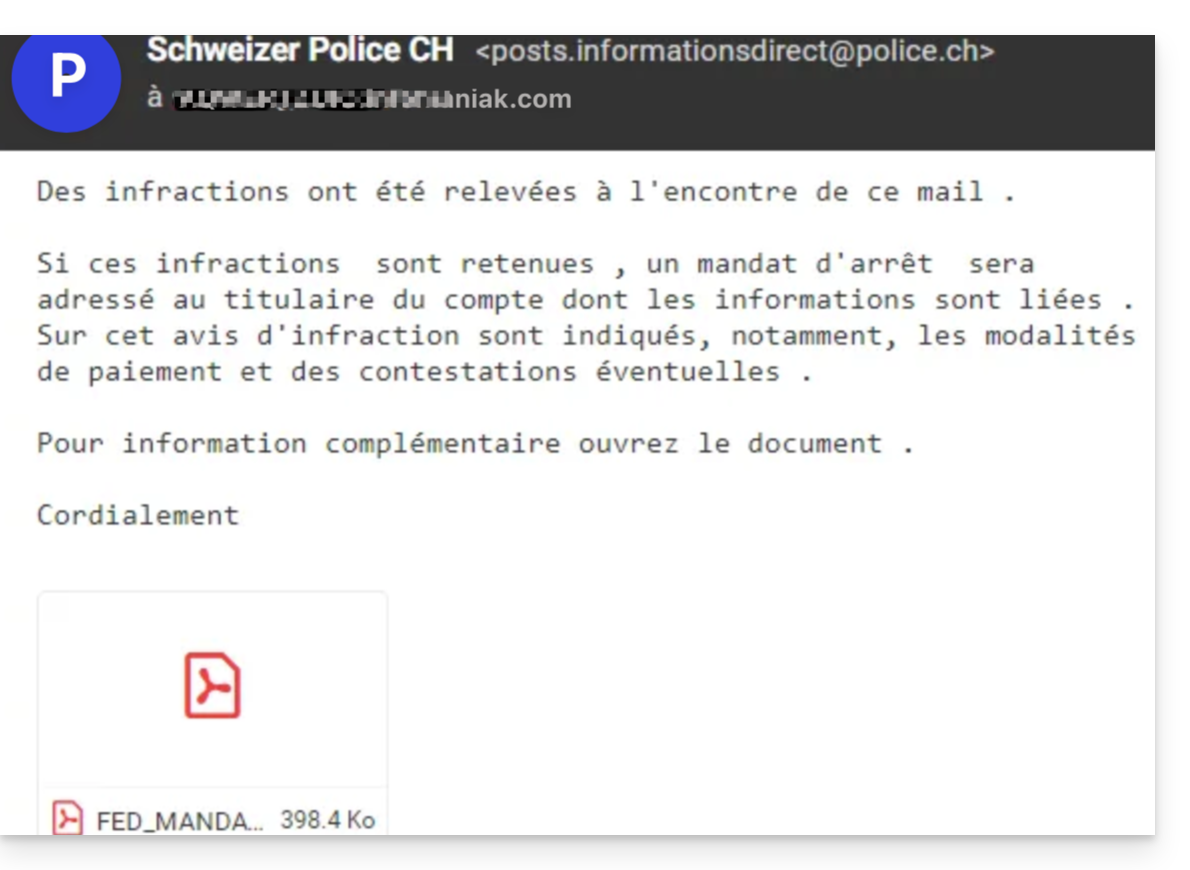
- The goal of this identity theft is generally for the user to voluntarily go to a page and share private information that will then be exploited for various purposes, mainly financial.
- If it is not a message “pretending to be something it is not”, but simply an unsolicited advertising message, it is better to report it as Spam.
Report a Phishing Email
Prerequisites
- Check that the spam filter is active.
- For added security, enable the external mail mention.
Then, if you find an email of this type in your inbox, you have the option to act so that these messages decrease and eventually disappear from the messaging systems:
- Click here to access the Infomaniak Mail Web app (online service ksuite.infomaniak.com/mail).
- Open the phishing message
- Click on the action menu ⋮ on the right.
- From the menu that appears, select
Report as phishing :
- Confirm sending for processing.
- Delete the email
Once you have clicked on Report as phishing, an email is automatically sent to Infomaniak with all the necessary information for processing the scam report.
In case of a more serious problem (when the message is directly addressed to you by an acquaintance or contact without it being a mass mailing) it is recommended to contact an organization such as report.ncsc.admin.ch.
This guide explains how to download an email from the Web app Mail Infomaniak (online service ksuite.infomaniak.com/mail) in order to obtain on your hard drive a file in .eml format compatible with all email software/clients.
It is not possible to reproduce this operation on the mobile app Infomaniak Mail (application for iOS / Android smartphone or tablet) but take note of the alternatives proposed at the end of this guide.
Download an email
To save an email from the Web app Mail Infomaniak (online service ksuite.infomaniak.com/mail):
- Click here to access the Web app Mail Infomaniak (online service ksuite.infomaniak.com/mail).
- Open the message to download.
- Click on the action menu ⋮ to the right of the open email.
- Select Download:
4 alternatives
- The Save as... function of an email software/client such as Thunderbird allows you to achieve the same result:
- Open the software Thunderbird.
- In the inbox, right-click on the message to save.
- Choose the location to save the file
.eml.
- It is also possible to print a message and choose
PDFfrom the available printers, in order to save the message in a simple and universal format. - To download the message to kDrive, refer to this other guide.
- To share it publicly using a simple shortcut to it, refer to this other guide.
This guide explains how to connect the desktop app Outlook 2010 (desktop application on Windows) to an email address hosted by Infomaniak.
Preamble
- The various services offered by Infomaniak are all compatible with the corresponding standard protocols (IMAP/SMTP for email, for example). Therefore, if you encounter a problem with third-party software, contact its publisher or a Partner and consult the support policy as well as article 11.9 of the Infomaniak Terms of Service.
Add the email address to the application
Prerequisites
- Create the email address in my kSuite or a Mail Service / kSuite.
- Create a password for the email address on the device you are going to configure.
To configure the email application:
- Open the application.
- Click on Next:
- Click on Yes to configure a mail account.
- Click on Continue:
- Click on Configure manually.
- Click on Next:
- Click on the Internet E-mail button to connect to an IMAP server.
- Click on Next:
- Check and complete the missing information.
- Click on Additional settings:
- Click on the Outgoing server tab:
- Click on My outgoing server requires authentication.
- Click on the Advanced tab:
- Replace the port numbers with the correct information and enable SSL.
- Click on OK:
- Click on Next:
- Click on Close:
- Click on Finish:
- That's it, your email address is now configured in the application:
Recommended settings
- Incoming IMAP server =
mail.infomaniak.com - IMAP port =
993(with SSL) - Outgoing SMTP server =
mail.infomaniak.com - SMTP port & encryption protocol and command/method to enable this protocol:
587+ STARTTLS - Username = the full & complete email address ( ? )
- Password = the one generated for the email address you want to access
- Authentication required for sending emails:
- It is activated in the SMTP settings of your application.
- Check "use the same settings as the incoming server" or, depending on the software/email clients, enter a username (= full & complete email address) and the generated password.
Refer to this other guide if you are looking for information about other messaging ports and protocols compatible (SSL / TLS for example).
In case of problem
Check that the Mail Service is configured optimally.
It is not necessary to contact Infomaniak Support if your email address works well outside the application. The most common error concerns the use of an incorrect password. The troubleshooting guides help you resolve any potential issues:
- Be aware of the solutions provided in this other guide regarding email in general.
- This other guide is more specifically about Outlook.
… and if your Outlook no longer works since a change of email password, be aware of this other guide.
This guide explains how to connect the desktop app Microsoft Outlook for Mac version 16.80 (desktop app on macOS) to an email address hosted by Infomaniak.
Preamble
- Instead of the manual configuration for Outlook below, it is recommended to use Apple Mail with the .mobileconfig configuration profiles offered by Apple.
- The various services offered by Infomaniak are all compatible with the corresponding standard protocols (IMAP/SMTP for email, for example), therefore if you encounter a problem with third-party software, contact its publisher or a Partner and consult the support policy as well as article 11.9 of the Infomaniak Terms of Service.
Add the email address to the application
Prerequisites
- Create the email address in my kSuite or a Mail Service / kSuite.
- Create a password for the email address on the device you are going to configure.
To configure the email application:
- Open the application.
- Click on Add an account:
- Enter the email address to be linked.
- Click on Continue:
- Click on IMAP:
- Click on Synchronize in IMAP (without Microsoft Cloud):
- Check and complete the missing information.
- Click on Add the account:
- Understand and go through the different Microsoft information windows:
- That's it, your email address is now configured in the application:
Recommended settings
- Incoming IMAP server =
mail.infomaniak.com - IMAP port =
993(with SSL) - Outgoing SMTP server =
mail.infomaniak.com - SMTP port & encryption protocol and command/method to activate this protocol:
587+ STARTTLS - Username = full & complete email address ( ? )
- Password = the one generated for the email address you want to access
- Authentication required to send emails:
- It is activated in the SMTP settings of your application.
- Check "use the same parameters as the incoming server" or, depending on the software/email clients, enter a username (= full & complete email address) and the generated password.
Refer to this other guide if you are looking for information about other compatible messaging ports and protocols (SSL / TLS for example).
In case of problem
Check that the Mail Service is configured optimally.
There is no need to contact Infomaniak Support if your email address works well outside the application. The most common error concerns the use of an incorrect password. The troubleshooting guides help you resolve any potential issues:
- Refer to the solutions given in this other guide regarding email in general.
- This other guide is more specifically about Outlook.
… and if your Outlook no longer works since a change of email password, refer to this other guide.
This guide explains how to add a user to an existing email address on Infomaniak without sharing a password.
If the email address in question is used as a login identifier for an Infomaniak account, it cannot be shared for security reasons.
Prerequisites
- Order a Mail Service from Infomaniak.
- Create one or more addresses on this Mail Service.
- Be an Administrator or Legal Representative within the Organization.
Add one or more users (new or existing) to an email address
The current email access management model allows each user to log in independently and securely to the same email address without sharing a global password. In the case of one or more existing users already in the Organization, the email address will be automatically added to their Infomaniak Mail interface.
Refer to this other detailed guide on this subject.
Managing and removing a user
If a user should no longer have access to an email address and its content, simply remove them from the same interface, but there are 2 possibilities:
- Click on the action menu ⋮ to the right of the user in question.
- Choose whether you want to disconnect all of the user's devices: they will no longer have access to the email address on email software/clients, but will still have access to the address on the Infomaniak app (Web, mobile…).
- You can choose to remove all of their access to the address, and they will never be able to view it again:
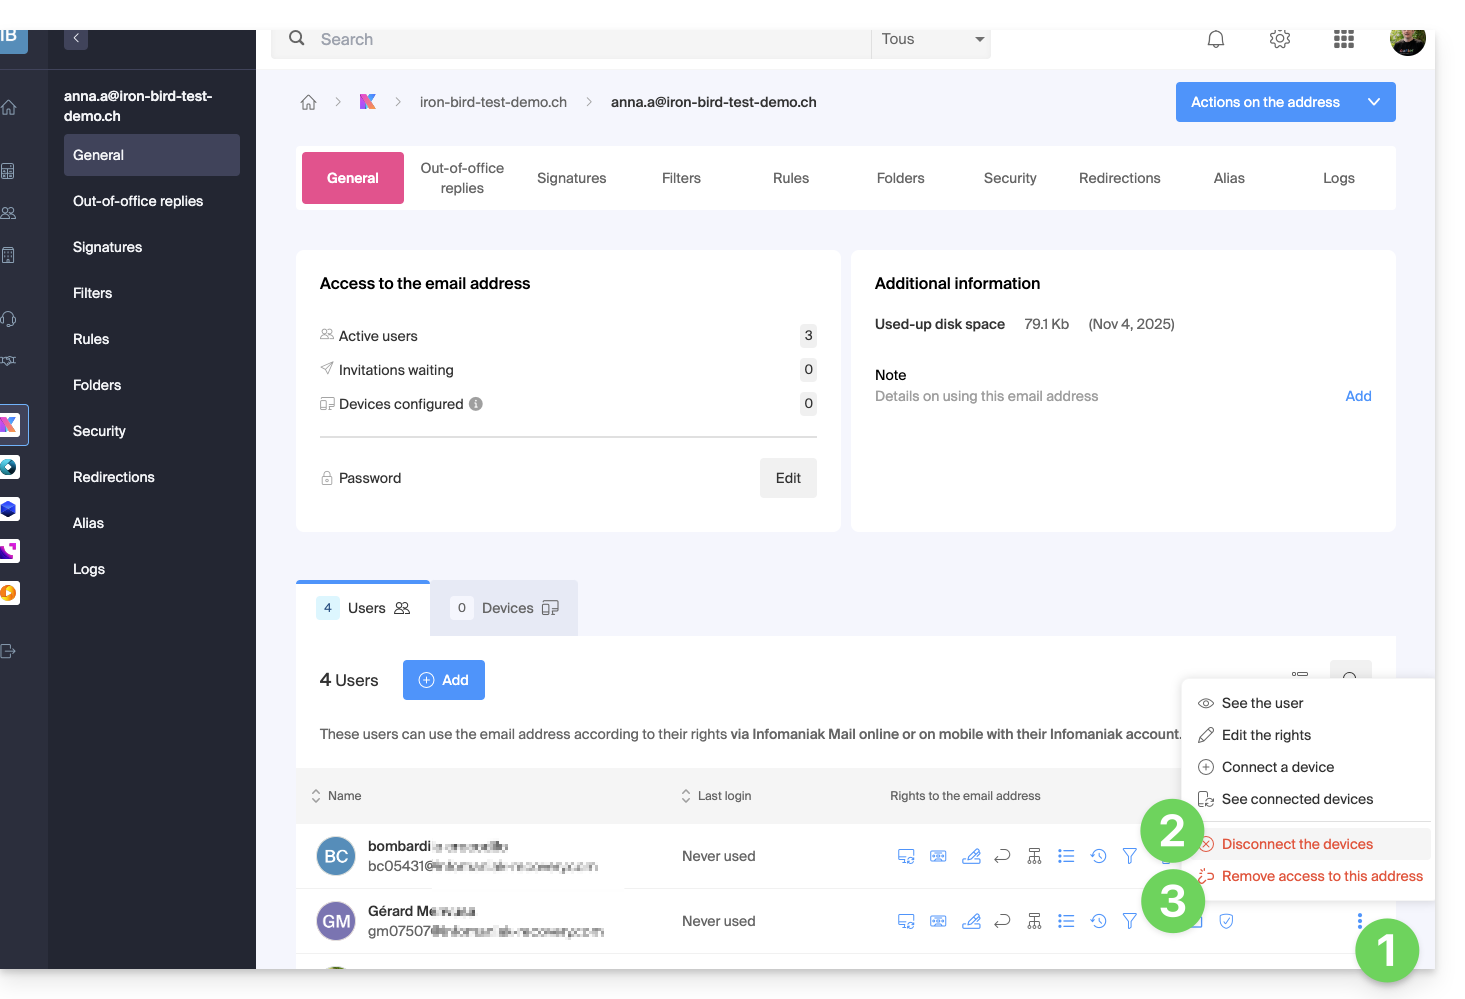
Their password is then immediately revoked, without affecting other users. You can then:
- … assign access to another person
- … retain full management of the address
- … create new accesses without service interruption
Also refer to this other guide if necessary to block a complete Mail Service to all users.
Management of individual accesses and passwords
Each added user has their own password, generated automatically when their access is configured. This password is unique to their account and device:
- The owner of the address no longer needs to communicate a main password.
- Each access is isolated and can be revoked without disrupting the others.
- A password is never visible after its creation; if necessary, a new access can be created.
Multiple accesses can coexist for the same address, allowing different devices or software to connect without interruption. Each password is entered once per application or device and remains independent: you can revoke a specific access (for example, in case of a lost or replaced device) without affecting the others.
Refer to this other guide on this subject.
On the Infomaniak Mail mobile app
When a user is added, the email address is automatically added to their Infomaniak Mail mobile application:
They can switch between their addresses at any time via the chevron located at the top left of the screen: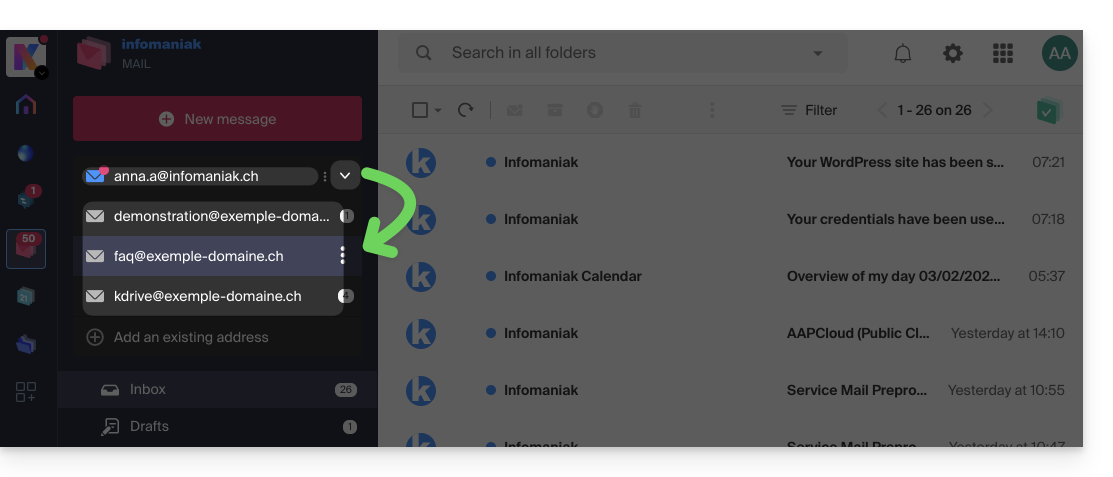
To do this, it is sometimes necessary to choose to display, from the top left section, all Organizations: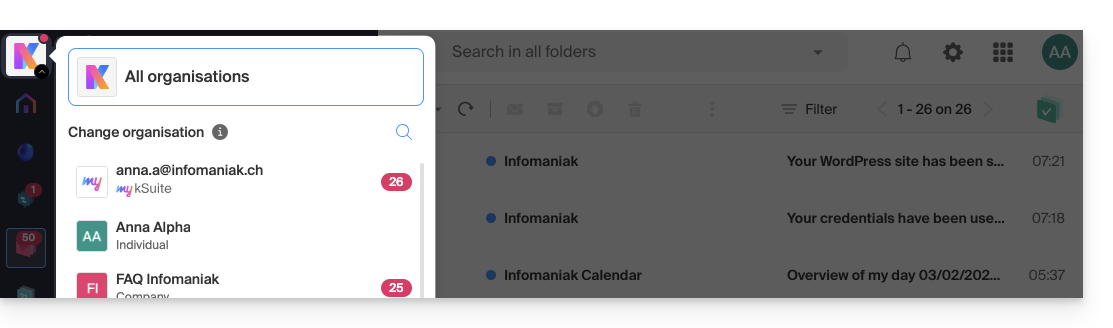
This guide explains how to add or modify one or more SPF records in a DNS zone (of a domain name) managed on the Infomaniak Manager.
Preamble
- If your domain name is registered with Infomaniak, your email is managed by Infomaniak, but your website is hosted with another provider (e.g., Wix), you are probably managing the DNS zone (and therefore the SPF) with this other provider: refer to this other guide on this topic.
Understanding SPF records
The SPF (Sender Policy Framework) record type is a standard for verifying the domain name of the sender of an email and aims to reduce SPAM. It is used to indicate which server is authorized or not to send emails for a domain. If the SPF fails for an email, it means that the email was not sent from a server/IP address authorized by the administrator of the sending domain. The email is then considered as spam.
Strict SPF -all: rejection of unauthorized emails
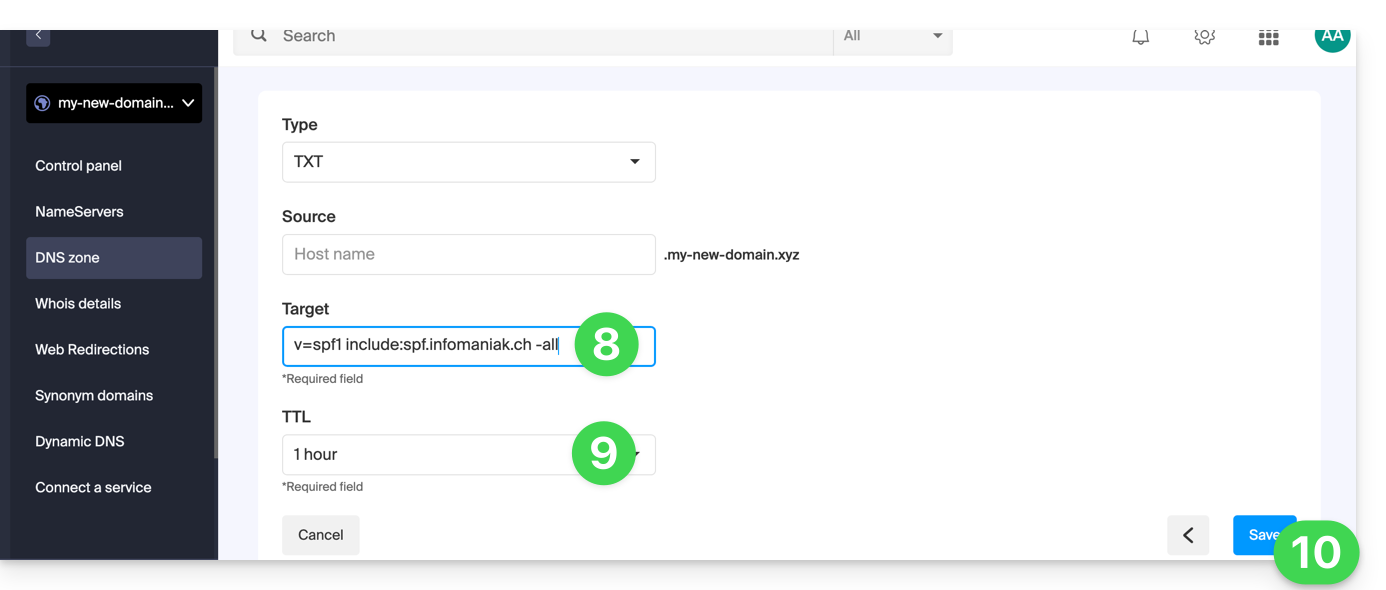
Infomaniak automatically installs this type of record when creating a Mail Service on your domain (strict SPF):
v=spf1 include:spf.infomaniak.ch -allThus, the recipient server of the email you send will evaluate that any email not coming from Infomaniak servers will be rejected. This prevents malicious individuals from impersonating email addresses from your domain.
Flexible SPF ?all: tolerance for certain emails
You can decide to modify the SPF for a more flexible model:
v=spf1 include:spf.infomaniak.ch ?allIn this case, the recipient server of the email you send will evaluate, according to its own rules, whether it accepts emails not coming from Infomaniak servers.
In summary:
?: the receiving server accepts the message even if the sender is not listed in the SPF~: the receiving server generally accepts the message if it is not listed in the SPF but identifies it as suspicious-: the receiving server rejects the message if it is not listed in the SPF (recommended)
Adding an SPF via a TXT record
There are 2 ways to manage SPFs.
If you have a Mail Service with Infomaniak, the simplest way is to go to the Global Security tool to manage SPFs: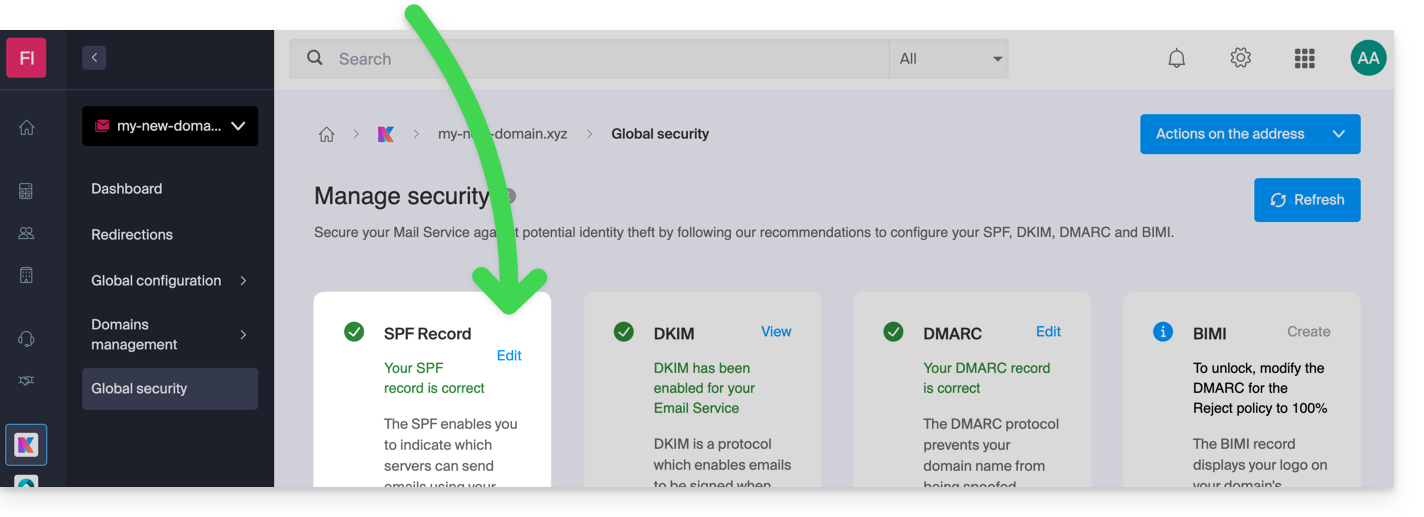
However, since the SPF record is a TXT type DNS record, you can also manage it from the DNS zone of the domain name:
- Click here to access the management of your domain on the Infomaniak Manager (need help?).
- Click directly on the name assigned to the domain in question.
- Click on DNS Zone in the left sidebar menu.
- Check in the table that there is not already a TXT record with a value mentioning SPF as here:
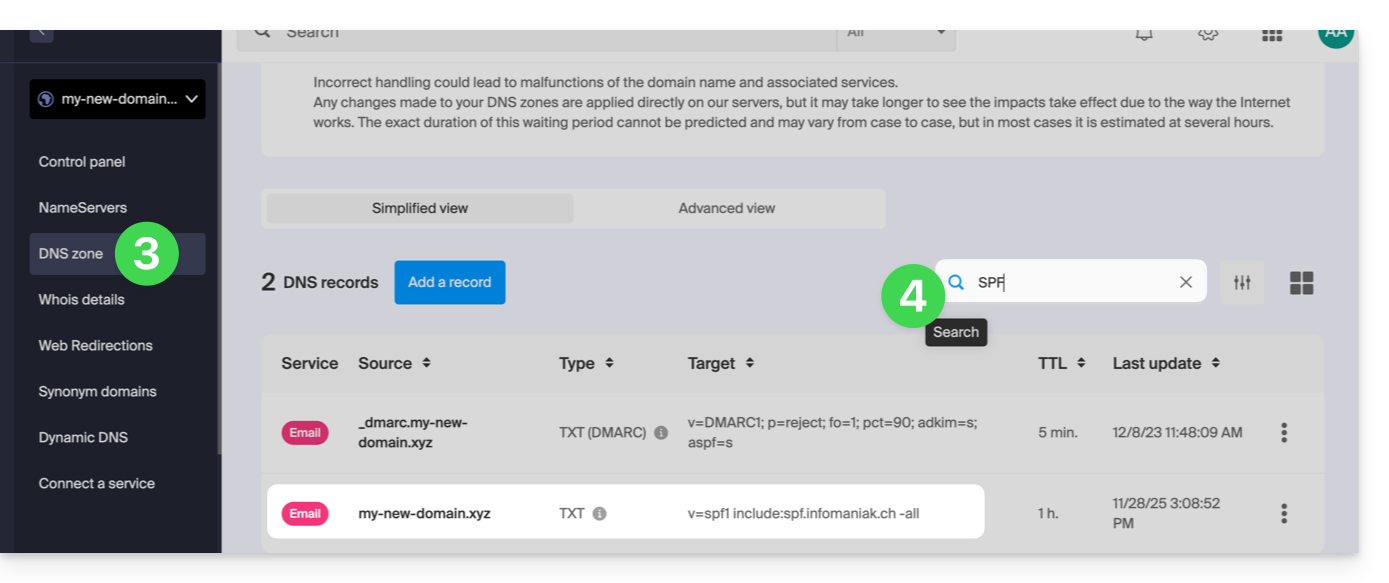
- Click the button to add a record (you will get an error if you try to add a TXT record with an SPF value when one already exists in the zone):
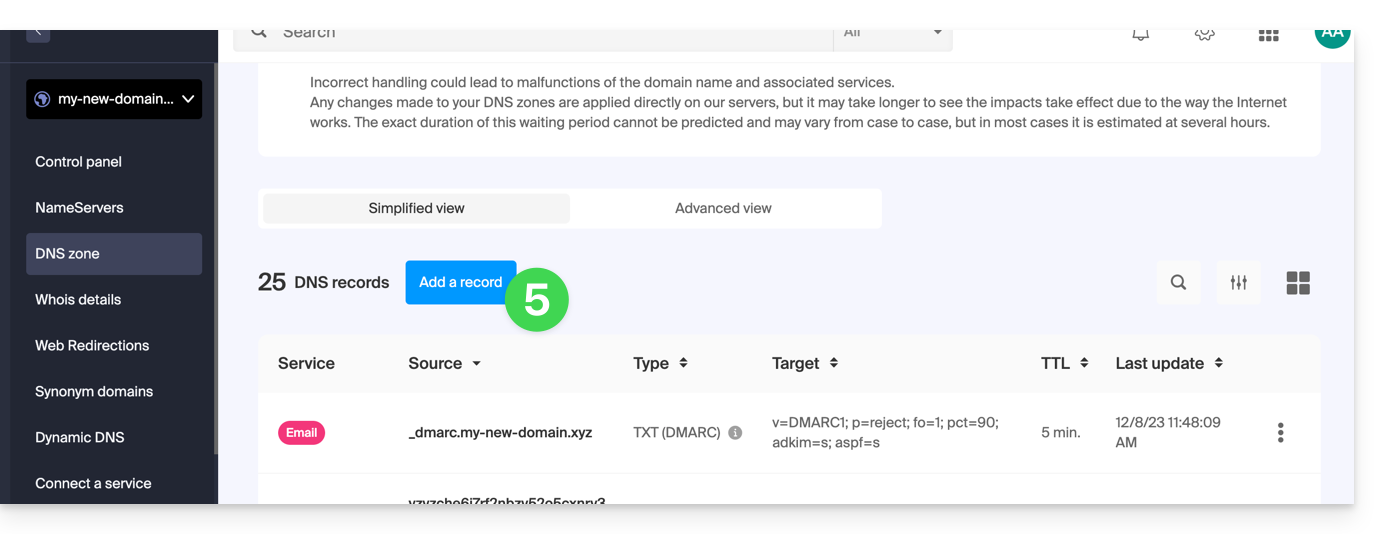
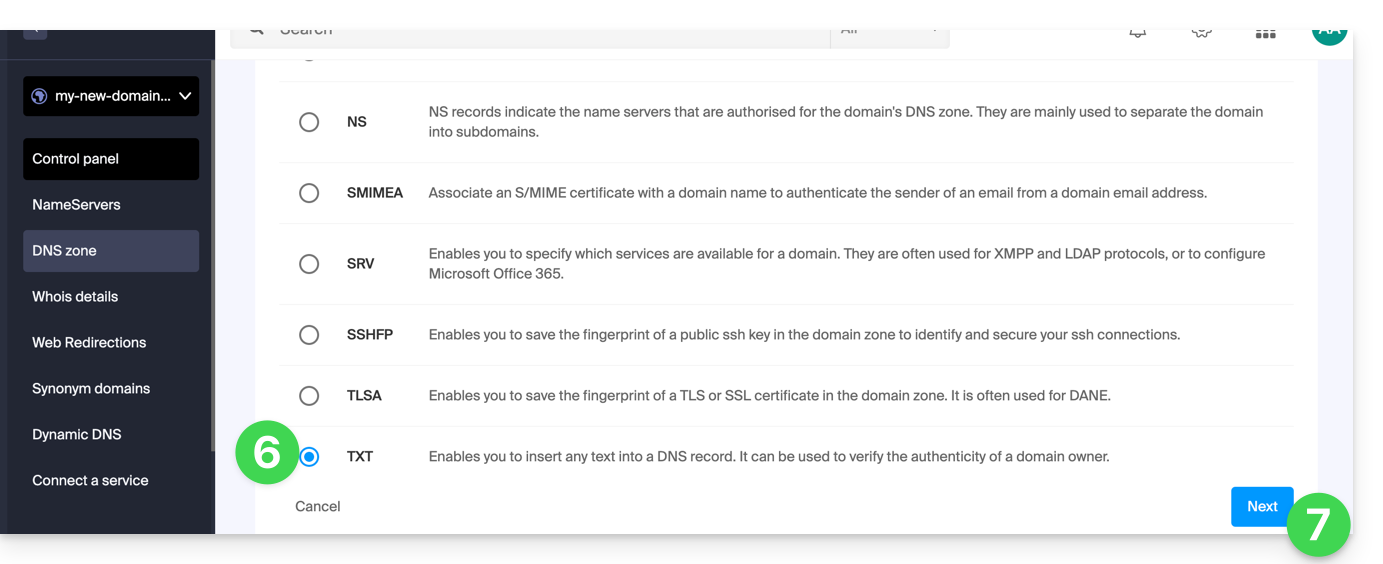
- Click the radio button TXT to add a record.
- Click the button Next:
- Enter the SPF value required for your DNS zone.
- Leave the default value for TTL.
- Click the button Save:
Add multiple SPFs
If you use other mail providers in addition to Infomaniak, you need to obtain their SPF and then merge it with Infomaniak's according to a specific syntax.
Having multiple distinct SPF records will cause errors. It is essential to group multiple SPFs into the same TXT!
Example of 3 SPFs to merge:
- That of Infomaniak:
v=spf1 include:spf.infomaniak.ch -all - Those of 2 secondary providers:
v=spf1 include:the-second-domain.xyz ?allv=spf1 include:the-other-domain.xyz ~all
...the final SPF to be inserted into your DNS zone should be in the form:
v=spf1 include:spf.infomaniak.ch include:the-second-domain.xyz include:the-other-domain.xyz -allDelete any other SPF entry from the DNS zone of your domain! Any DNS addition/modification can take up to 48 hours to propagate.
Limits on the number of SPFs
Multiple SPFs are limited to a maximum of 10 inclusions.
The Infomaniak SPF usually already includes 4 inclusions:
include:relay.mail.infomaniak.chinclude:app.mail.infomaniak.chinclude:newsletter.infomaniak.cominclude:amazonses.com
Check the SPF record(s)
The Global Security tool on the Infomaniak Manager allows you to easily check and correct any problematic records you may have.
If you encounter any issues, it is recommended to analyze your domain name on MxToolbox to check if your SPF contains syntax errors, too many inclusions, or any other issues that could lead to an error: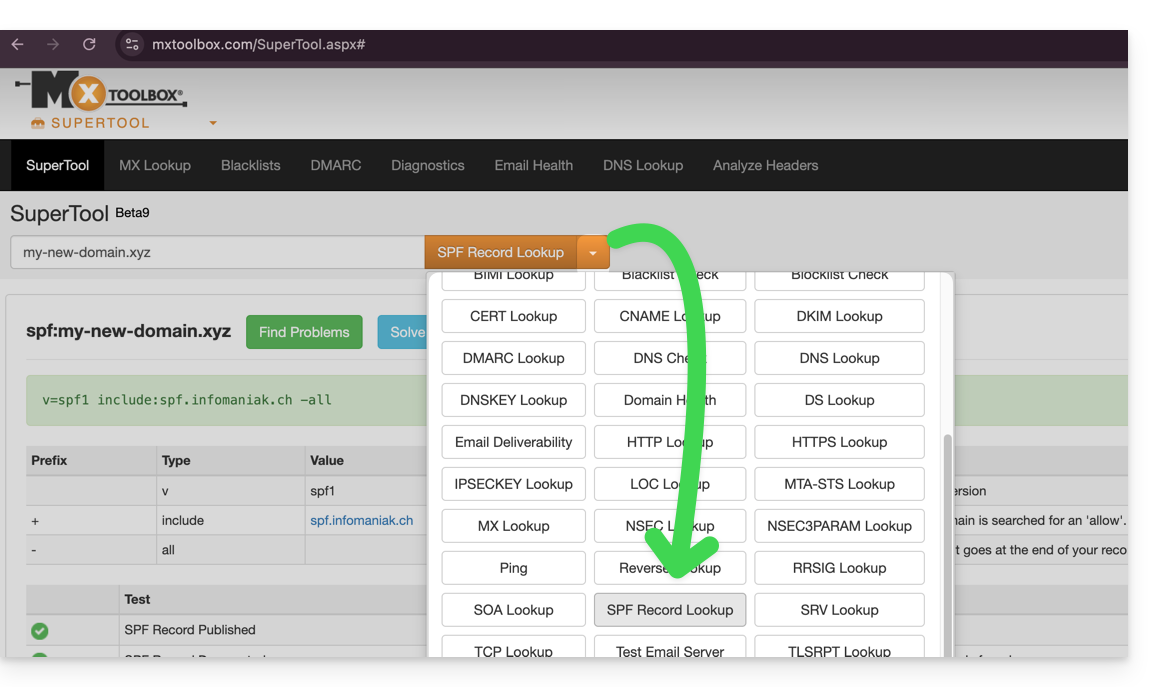
… or directly at the address https://mxtoolbox.com/spf.aspx.
This guide explains how to connect the desktop app Outlook 2019 (desktop application on Windows) to an email address hosted by Infomaniak.
Preamble
- The various services offered by Infomaniak are all compatible with the corresponding standard protocols (IMAP/SMTP for email, for example), therefore if you encounter a problem with third-party software, contact its publisher or a Partner and consult the support policy as well as article 11.9 of the Infomaniak TOS.
Add the email address to the application
Prerequisites
- Create the email address in my kSuite or a Mail Service / kSuite.
- Create a password for the email address on the device you are going to configure.
To configure the email application:
- Open the application.
- Click on the File menu:
- Click on Account Settings.
- Click on Add or remove accounts:
- Click on New:
- Enter the email address to connect.
- Click on Advanced options.
- Click on Manual configuration.
- Click on the blue Connect button:
- Click on IMAP:
- Enter the password of the email address to connect.
- Click on the blue Connect button:
- Uncheck the additional mobile device configuration box if necessary.
- Click on the blue Finish button:
- Click on Repair to correct some automatically added but incorrect information:
- Click on Advanced options.
- Click on Manual Repair.
- Click on the blue Repair button:
- Check and complete the missing information by scrolling down if necessary.
- Click on Outgoing Mail:
- Check and complete the missing information.
- Click on Next:
- Click on Finish:
- Click on Close:
- There you go, your email address is now correctly configured in the application:
Recommended settings
- Incoming IMAP server =
mail.infomaniak.com - IMAP port =
993(with SSL) - Outgoing SMTP server =
mail.infomaniak.com - SMTP port & encryption protocol and command/method to activate this protocol:
587+ STARTTLS - Username = the complete & full email address ( ? )
- Password = the one generated for the email address you want to access
- Authentication required for sending emails:
- It is activated in the SMTP settings of your application.
- Check "use the same parameters as the incoming server" or, depending on the software/email clients, enter a username (= complete & full email address) and the generated password.
Refer to this other guide if you are looking for information about other messaging ports and protocols compatible (SSL / TLS for example).
In case of a problem
Check that the Mail Service is configured optimally.
There is no need to contact Infomaniak Support if your email address works well outside the application. The most common error concerns the use of an incorrect password. The troubleshooting guides help you resolve any potential issues:
- Refer to the solutions provided in this other guide regarding email in general.
- This other guide is more specifically about Outlook.
… and if your Outlook no longer works since a change in your email password, refer to this other guide.
This guide explains how to connect the desktop app Microsoft 365 Outlook MSO (desktop application on Windows) to an email address hosted by Infomaniak.
Preamble
- The various services offered by Infomaniak are all compatible with the corresponding standard protocols (IMAP/SMTP for email, for example). Therefore, if you encounter a problem with third-party software, contact its publisher or a Partner and consult the support policy as well as section 11.9 of the Infomaniak Terms and Conditions.
Add the email address to the application
Prerequisites
- Create the email address in my kSuite or a Mail Service / kSuite.
- Create a password for the email address on the device you are going to configure.
To configure the email application:
- Open the application.
- Click on File.
- Click on Add an account.
- Enter the email address to be linked.
- Click on Connect.
- Select IMAP:
- Click on Next.
- Enter the password for your email address.
- Your email address is now configured in the application.
Recommended settings
- Incoming IMAP server =
mail.infomaniak.com - IMAP port =
993(with SSL) - Outgoing SMTP server =
mail.infomaniak.com - SMTP port & encryption protocol and command/method to activate this protocol:
587+ STARTTLS - Username = full & complete email address ( ? )
- Password = the one generated for the email address you want to access
- Authentication required to send emails:
- It is activated in the SMTP settings of your application.
- Check "use the same parameters as the incoming server" or, depending on the software/email clients, enter a username (= full & complete email address) and the generated password.
Refer to this other guide if you are looking for information about other messaging ports and protocols compatible (SSL / TLS for example).
If you encounter any issues
Check that the Mail Service is configured optimally.
There is no need to contact Infomaniak Support if your email address works well outside the application. The most common error concerns the use of an incorrect password. The troubleshooting guides help you resolve any potential issues:
- Refer to the solutions given in this other guide regarding email in general.
- This other guide is more specifically about Outlook.
… and if your Outlook no longer works since a change of email password, refer to this other guide.
This guide is about IP addresses, those…
- …assigned to sites/housing/servers, dynamic or static, shared or dedicated,
- …assigned by your Internet Service Provider (ISP) when establishing an Internet connection to your Infomaniak product.
Preamble
- A dedicated or static IP address for a website is a permanent IP address specifically assigned to it.
- Unlike a shared IP address, which is used by multiple websites, a dedicated IP address ensures that only this platform is associated with this address.
- Dedicated IP addresses for websites are often used in cases where stability, customization, and security are important, such as server hosting, firewall configuration, or activating SSL certificates (although it is possible to proceed without a dedicated IP address to install an SSL certificate).
- Here are the main advantages:
- Configuring a PTR entry or reverse DNS on dedicated IPs is useful, especially for installing a mail server, as some email providers check the PTR record before accepting emails sent from a server.
- Better connection stability.
- Reduced risk of a bad reputation linked to websites sharing the same IP address.
- Ease of configuring certain technical aspects.
- A dedicated IP can improve a website's referencing (although there are differing opinions among SEO specialists).
- Attention: Infomaniak does not allow access to websites via HTTP(S) by IPs (dedicated) on managed servers; you must use a domain name that points to the IP (or use the preview URL).
Add a dedicated IP to the website
To add a dedicated IP to your website, refer to this guide.
If you encounter issues directing web traffic to a defined port, refer to this other guide.
Blocking the IP address (Internet connection)
If you can no longer access…
- … all your email addresses that you own with Infomaniak (which usually work well) and this with a software/email client from the same Internet network (i.e., from the same IP address provided by your ISP)…
… or if you unfortunately performed this type of operation:
- repeated unsuccessful connection attempts via FTP, SSH, or access points such as the WordPress login…
- requests returning too many errors such as mass 403 errors…
… your access to Infomaniak servers may be blocked following the banning of the IP address (banip / ipban) of your Internet connection.
To unblock the situation, contact Infomaniak support by email and specify the domain concerned and especially your public IP address concerned.
Permanent Unblocking (IP on Whitelist)
With a Cloud Server, you can request to permanently authorize the IP address in question so that the blocking never happens again, regardless of the situation. To do this, you must:
- Have a dedicated IP associated with your Cloud Server.
- Be aware that Infomaniak will no longer block any potential attacks from this IP; attacks or malicious access attempts from this address will no longer be automatically blocked by the security systems.
- Confirm by email and from a contact address associated with the account (owner or administrator) that you understand and accept full responsibility in case of an attack from this IP.
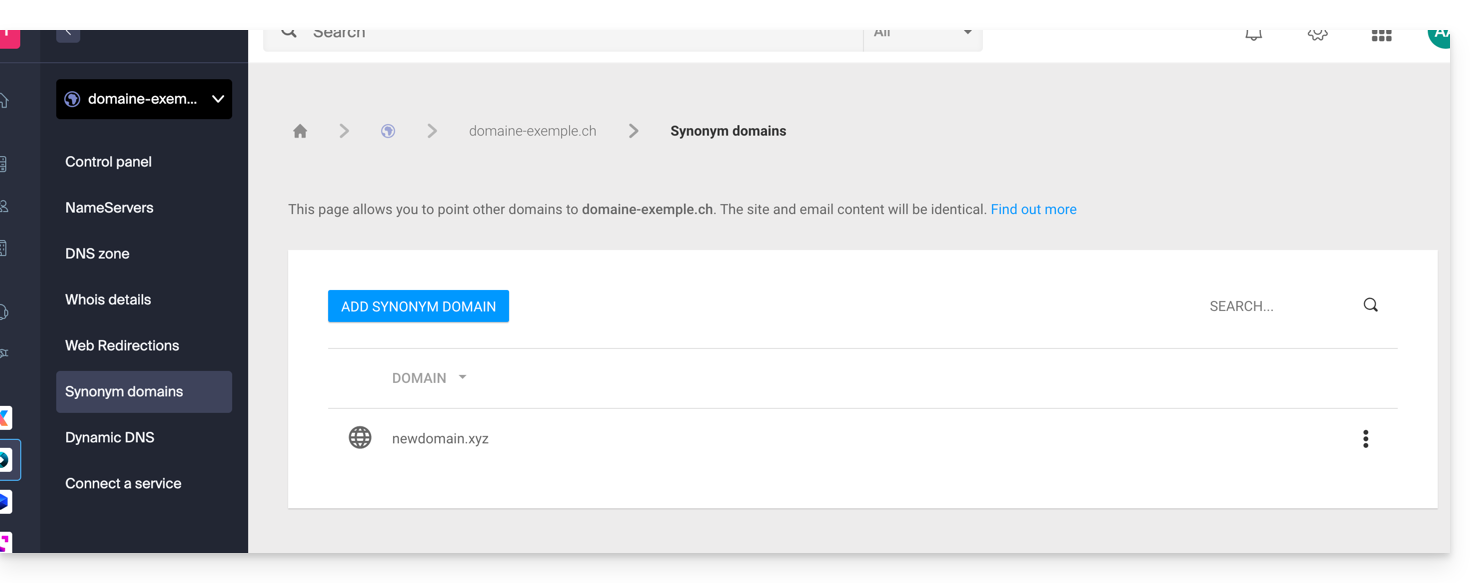
This guide explains how to add a synonym domain to a domain name.
Preamble
- A synonym domain is a domain name that can serve as a secondary name for another domain.
- When a synonym domain is added, it automatically inherits the content of the DNS zone of the main domain (including
MX,A, etc. records), as well as its Web and Mail hosting. - Alternatively, you can also add a (domain) alias to a website or add a (domain) alias to a Mail Service.
Add a synonym domain to a domain
Prerequisites
- The domain name of the future synonym or the management of its DNS zone…
- … must be reserved with Infomaniak,
- … must be configured with the Infomaniak DNS,
- … must not be linked to any product yet.
- The domain name on which the synonym will be placed…
- … must not be associated with the Infomaniak Newsletter product.
To access your domain names:
- Click here to access the management of your product on the Infomaniak Manager (need help?).
- Click directly on the name assigned to the product in question.
- Click on Synonym Domains in the left sidebar.
- Choose to add a synonym.
- Click on Next:
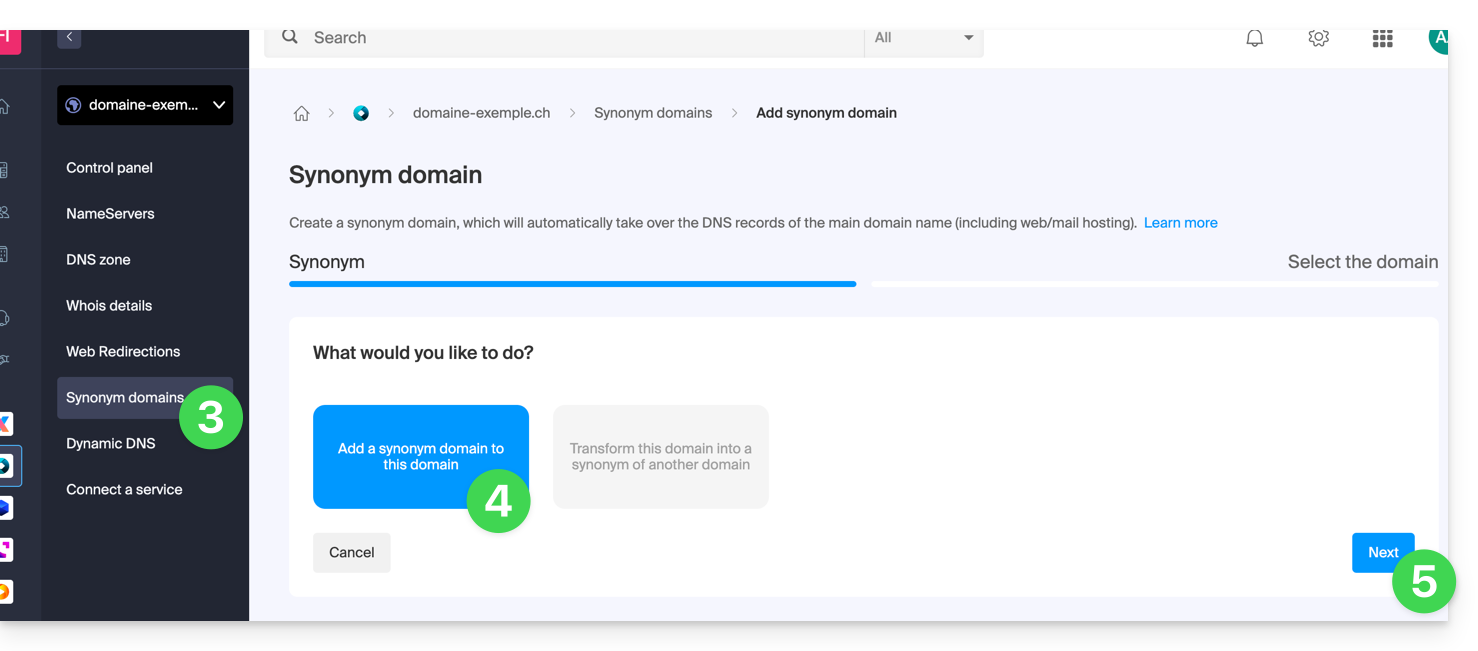
- Choose an existing domain in the current Organization, or order a new domain in advance.
- Click the button to Confirm:

- That's it:
Refer to this other guide if you are looking for information to dissociate a synonym domain name.
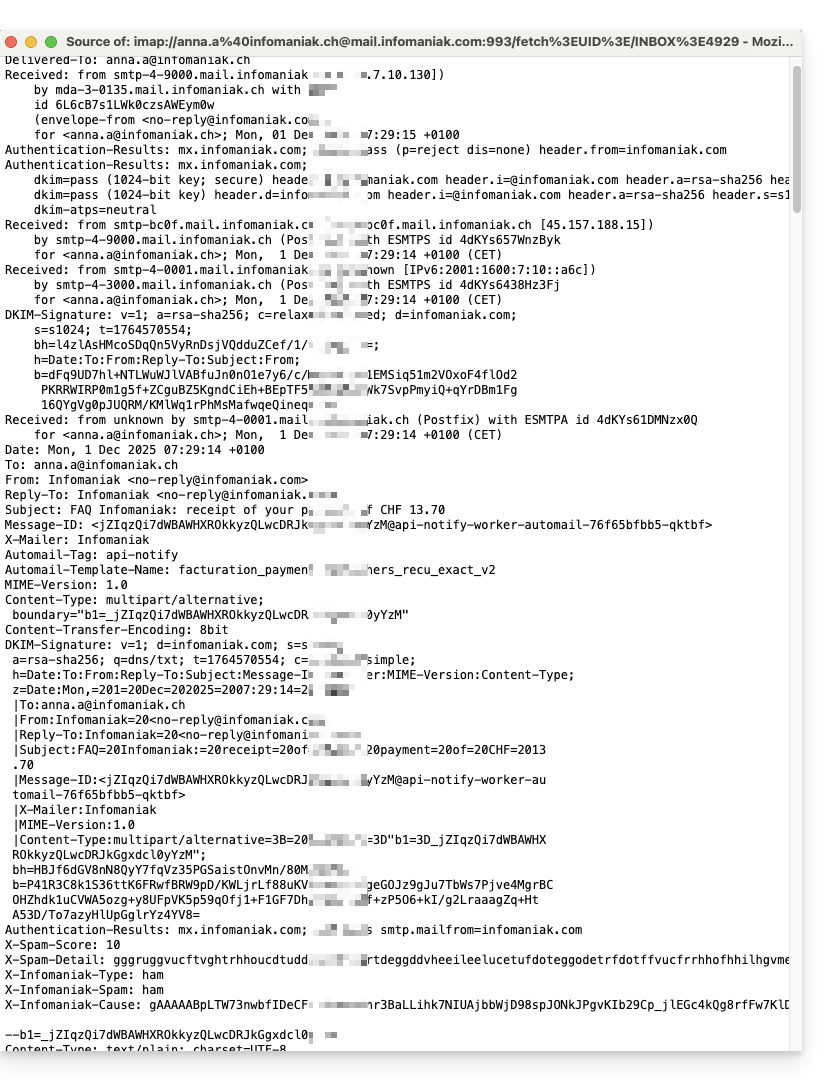
This guide explains how to display and forward the headers of an email.
Preamble
- An email consists of a header (
header) and the actual content of the message (body, body of the text). - Most email software/clients do not directly display the headers, but displaying or forwarding them allows Infomaniak support to identify the issues encountered.
- The headers (= source) of an email provide various information such as:
- the sender
- the recipient
- the date
- the subject
- the servers involved in the transmission between the sender and the recipient:
Display headers...
... on Mail Infomaniak
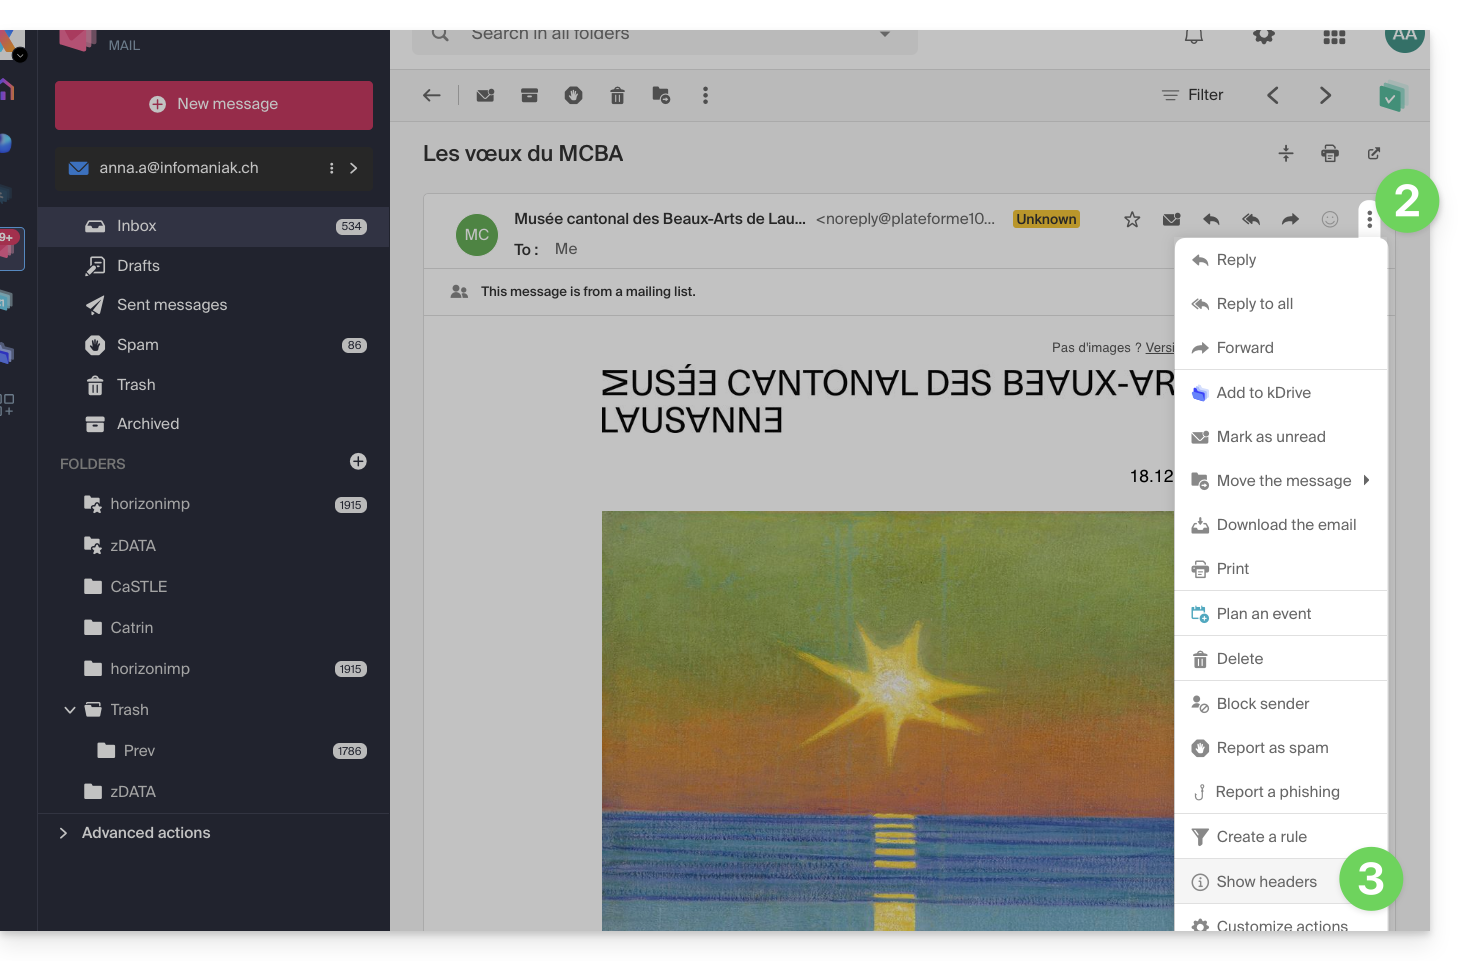
To display the headers of an email from the Mail Infomaniak interface:
- Click here to access the Web app Mail Infomaniak (online service ksuite.infomaniak.com/mail).
- Open the message in question and click on the action menu ⋮ on the right.
- From the menu that appears, select View headers:
- Repeat the operation to hide them:

To display the headers with external email software/client, refer to this other guide.
Forward the headers of an email
To forward the headers of an email, in response to a support request or to the recipient of your choice, either...
- ... copy-paste the displayed headers according to the method above.
- ... forward the email message.
However, for the headers to be present, it is essential to transfer the message not in the body of the message but as an attachment only. The email attachment will be in the .eml format and this file contains all the necessary headers.
A third method of complete email transmission is explained in this other guide.