
Knowledge base
1000 FAQs, 500 tutorials and explanatory videos. Here, there are only solutions!
This guide concerns domain names with the .se extension.
Preamble
- Domains in
.seare managed by Internetstiftelsen i Sverige (IIS), the official body that governs domain names in Sweden. - They were introduced in 1986 and it was during the 2000s that they gained popularity as their suffix could be used for words like "clo.se", "sen.se", etc.
- However, a Swedish court rejected the request of the artist Prince who claimed the domain prince.se and which was registered for local use (sale of jams, in relation to the Swedish word "prins", <h2>Change the owner of a <strong>.se</strong> domain</h2>).
To change the owner (or owner) of a .se domain, the procedure defined by the IIS involves filling out a specific form.
In the form, the IIS IDNO (ID Number) field is a key requirement:
- For Swedish citizens: indicate the social security number (Personnummer),
800101-1234for example,- For Swedish companies: use the company registration number (Organisationsnummer)
556123-4567for example,
- For Swedish companies: use the company registration number (Organisationsnummer)
For foreign citizens or non-Swedish companies: enter an identification number such as a passport number, an identity card, or an equivalent for your country.
- This is to authenticate the owner and prevent disputes or fraudulent use of the domain. The change can take a few days, depending on how quickly the documents are verified.
Cela sert à authentifier le propriétaire et à prévenir les litiges ou utilisations frauduleuses du domaine. Le changement peut prendre quelques jours, selon la rapidité avec laquelle les documents sont vérifiés.
This guide details the priority actions to take if you do not see any difference between your website after a change you have made to it, and its previous version. These tips are also valid if you encounter issues while using the Infomaniak product interface.
Preamble
- During your browsing, a web browser saves the data consulted in a reserved space, in order to avoid requesting the data already consulted from the server again, to save time and resources.
- Your cache may contain a lot of data and sometimes the browser gets confused. Sites may then display incorrectly or display an outdated version.
- Clearing the cache ensures that you have the very latest version of the page or folder consulted.
Clear the web browser cache …
… on Safari
Choose your macOS version to view the corresponding Apple help.
… on Google tools (Chrome, Android, etc.)
View the Google help.
… on Firefox
View the Mozilla help.
… on Edge / Internet Explorer
View the Microsoft help.
This guide explains how to restart the domain name transfer to Infomaniak in case of failure.
Manually restart a domain transfer
When a domain name transfer fails, you receive an email with the possible reason for the problem.
The message also contains a link to restart the transfer request without paying the transfer fees again.
In case of a problem:
- Click here to access the management of your product on the Infomaniak Manager (need help?).
- Click directly on the name assigned to the product in question.
- Follow the instructions displayed in red at the top of the page.
This guide explains how to set up a zone delegation for a subdomain.
Prerequisites
- Have a domain name with Infomaniak or at least a DNS zone.
- Understand:
- the operation of a domain and a DNS zone before modifying the latter.
- that the DNS zone presented here is valid and used only if the server names are those of Infomaniak.
- that any DNS addition/modification can take up to 48 hours to propagate.
Set up a zone delegation
To do this:
- Click here to access the management of your product on the Infomaniak Manager (need help?).
- Click directly on the name assigned to the product concerned.
- Click on DNS Zone in the left sidebar.
- Click on the Advanced View tab.
- Click on the + button:

- Enter the desired subdomain (e.g.
testto gettest.domain.xyz) - It is now possible to edit the DNS zone of the delegated subdomain.
This guide explains which DKIM to add to secure Infomaniak messaging if it revolves around a domain name whose DNS is that of Cloudflare.
Preamble
- If you manage your emails at Infomaniak, as well as the associated domain name, but the DNS management is with Cloudflare, then you need to add the DKIM on the Cloudflare interface.
Add a DKIM on Cloudflare
Prerequisites
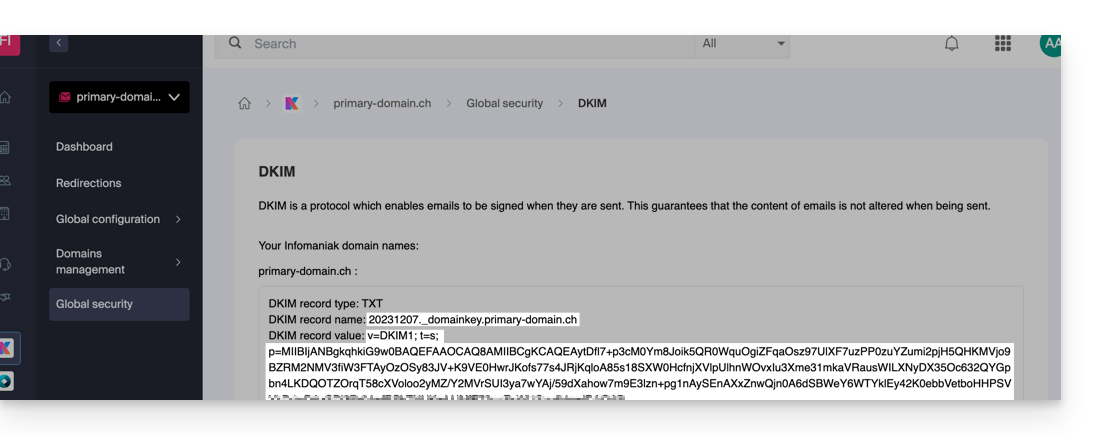
- Refer to this other guide to allow you to display the DKIM corresponding to your Infomaniak messaging.
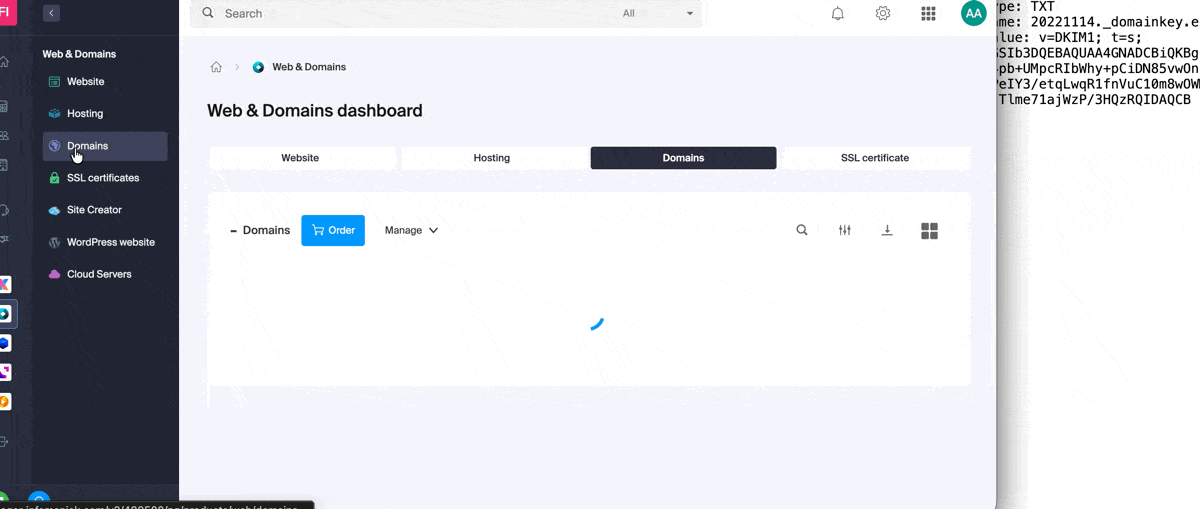
- Display the DKIM to be able to copy-paste it. Example:
Follow the procedure below to correctly activate DKIM, thereby improving the security and deliverability of emails for the domain in question:
- Click here to access your Cloudflare account.
- Select the domain in question.
- In the DNS section, search for and delete any NS records for "
_domainkey" pointing to Infomaniak. - Click the Add a record (
Add record) button to open the input form. - Fill in the fields using the data obtained from the Infomaniak Manager, respecting the standard configuration for a TXT type DKIM record:
| Cloudflare Field | Value to Enter | Important Notes |
|---|---|---|
| Type | TXT (text) | Choose the standard type for DKIM keys. |
| Name (Host) | The DKIM selector (e.g. 20240112) | Enter only the selector as Cloudflare automatically adds the domain name and the suffix ._domainkey for you. Refer to the Cloudflare documentation if necessary. |
| Content (Value) | The public key (the long string) | Paste the entire DKIM public key provided (what comes after p=) |
| TTL | Auto | Leave the default value for optimal management by Cloudflare. |
Make sure the Proxy Status (cloud) is set to DNS Only (grayed out) for email authentication records.
Save and Propagation
After carefully verifying the accuracy of the Selector and Public Key, click the Save button. This validates the addition of your DKIM record to the Cloudflare DNS zone.
Any DNS addition/modification can take up to 48 hours to propagate.
Once the waiting period has elapsed, you can use online verification tools to confirm that the DKIM record is published and valid. This validation ensures that your Infomaniak emails will be properly signed and their deliverability will be optimal.
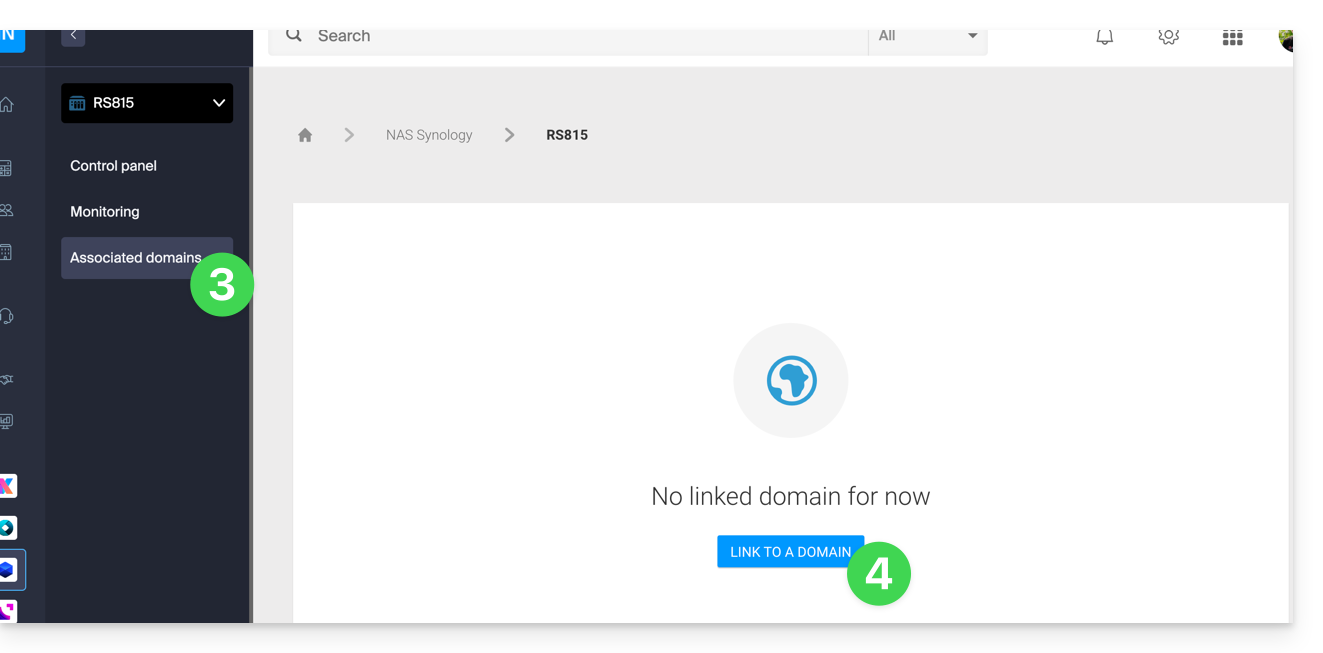
This guide explains how to link a domain name to the Synology NAS that you rent from Infomaniak.
Link an existing domain
To connect your existing domain name to Synology with Infomaniak:
- Click here to access the management of your product on the Infomaniak Manager (need help?).
- Click directly on the name assigned to the Synology concerned.
- Click on Linked Domains in the left sidebar menu.
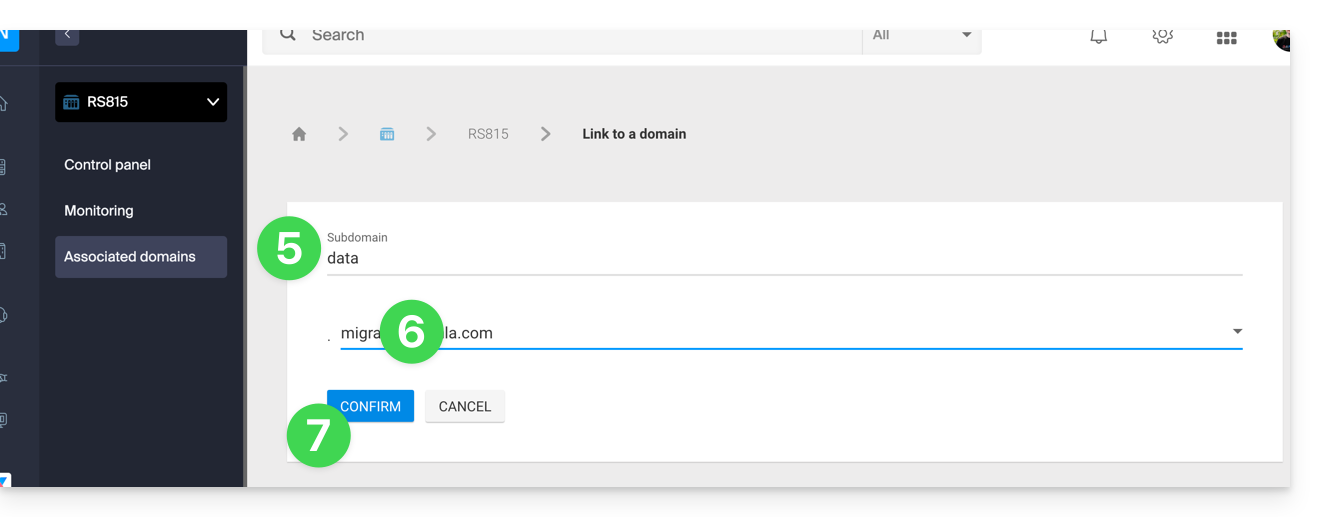
- Click on Link a domain name (in the Associated Domains section):
- Enter any subdomain.
- Choose one of the domain names registered with your Organization.
- Click the button to Confirm:
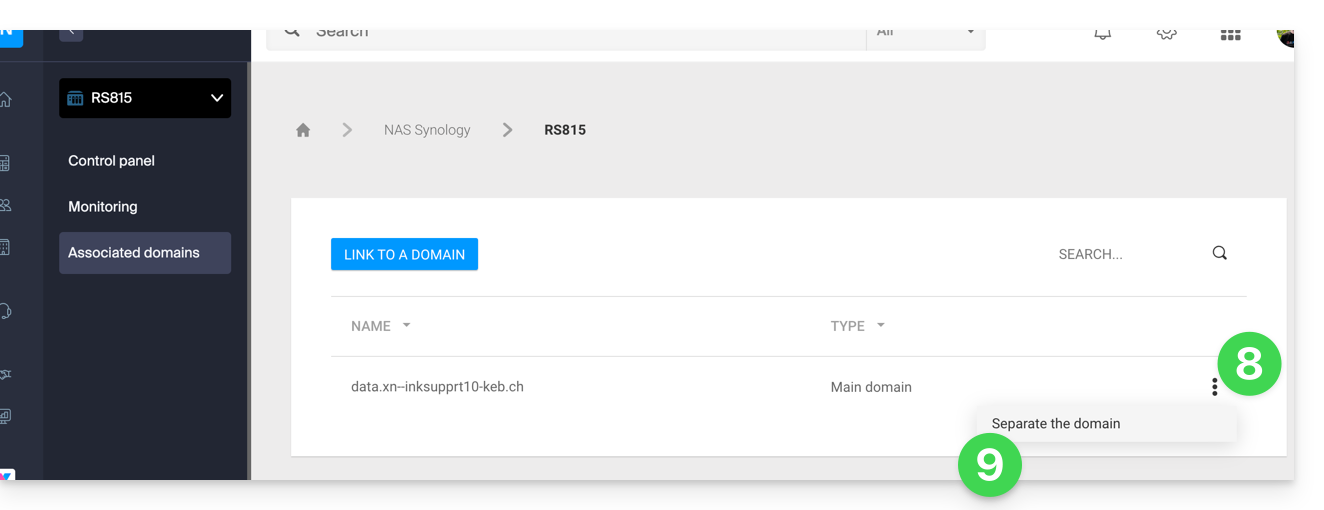
- The domain is linked to the device; to remove the link, click on the action menu ⋮ to the right of the item concerned in the displayed table.
- Click on Unlink the domain and confirm:
This guide concerns the possible messages you may receive mentioning terms such as WDPR (WHOIS Data Problem Report System) and WHOIS, which refer to notifications and policies associated with the management of domain names on the Web.
WDPR (WHOIS Data Problem Report System)
WDPR, or WHOIS Data Problem Report System, is a system established by the ICANN (Internet Corporation for Assigned Names and Numbers). This system allows users to report problems with WHOIS data. Here are the key points of this system:
- Reporting problems: users can report inaccuracies or incorrect data in the WHOIS information of a domain; common problems include outdated contact addresses, incorrect phone numbers, or fraudulent information
- Reporting process: to report a problem, users must fill out a form available on the ICANN website; this form requests details about the problem observed and the WHOIS information concerned
- Problem resolution: once a problem is reported, ICANN takes steps to investigate and resolve the inaccuracy; this may involve updating the WHOIS information by the concerned registrar
- WHOIS information: the information available via WHOIS includes the domain holder's name, contact address, phone number, and email address; this information is generally public and accessible to anyone performing a WHOIS search
- Confidentiality: although WHOIS information is public, many registrars like Infomaniak offer WHOIS privacy services; these services mask the personal information of the domain holder, displaying the contact details of the privacy service instead
- Updates: it is essential that domain holders keep their WHOIS information up to date; ICANN requires that the information be accurate and complete: incorrect information can result in the suspension or cancellation of the domain
Letters mentioning WDPR and WHOIS
Letters mentioning WDPR and WHOIS follow specific guidelines to inform domain holders of the next steps and necessary actions:
- WHOIS problem notification: an email informing that a problem with the WHOIS information has been reported; this email will contain instructions on how to verify and correct the inaccurate information
- Update reminder: an email reminding domain holders of the importance of keeping their WHOIS information up to date, often sent periodically to ensure continued compliance
- Resolution confirmation: an email confirming that the modifications or updates made to the WHOIS information have been successfully completed, following a problem report
These letters are essential to ensure that information related to domain names remains accurate and up to date, which is crucial for the security and effective management of domains. They also help protect domain holders from potential issues, such as missed notifications or legal actions due to inaccurate information.
By carefully following the instructions and reminders contained in these letters, domain holders can avoid service interruptions, domain loss, and other complications associated with the management of domain names on the Web.
Change the language of these letters
The French, English, German, etc. language applied to a WHOIS contact can be modified on the management page of its details related to domain names.
This guide explains how to add or modify a DKIM record in a DNS zone (domain name) managed on the Manager Infomaniak.
Preamble
- The DKIM (Domain Keys Identified Mail) record type is a protocol that allows you to sign emails when sending them and ensures the optimal operation of your Infomaniak mail service.
- This ensures that the content of the emails is not modified during their transmission and that they indeed come from the domain of the sender. This standard thus prevents spammers from impersonating legitimate entities.
- DKIM will fail if it detects that a message has been modified and unauthorized changes have been made to theFromof the message.
- The DKIM standard is enabled for all Infomaniak customers with a Mail Service whose domain name has its DNS zone managed by Infomaniak. All emails sent from Mail or the email software/client of your choice are therefore automatically signed.
- DKIM is not available for subdomains.
Check the DKIM record
The Global Security tool allows you to easily check and correct certain problematic records.
And when your domain name is managed elsewhere, you will find the DKIM record to add in the DNS zone: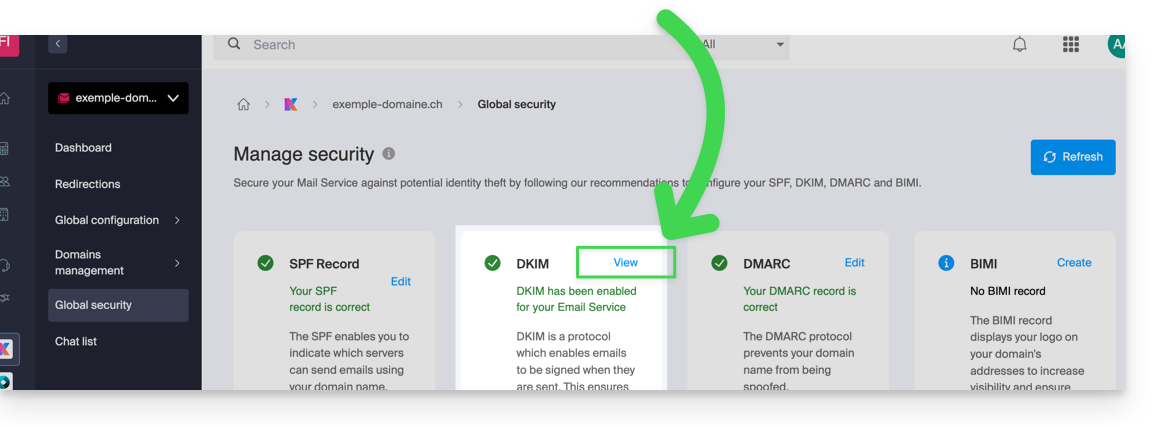
Manually modify the DNS zone (not recommended)
Refer to this other guide to manage this type of record in a DNS zone.
Add multiple DKIMs
You can have multiple DKIM records on your domain without limit, unlike DMARC or SPF, as long as your DNS host allows it.
If you use multiple third-party email providers, for example the ERP Odoo, it is necessary to add a DKIM for Odoo in addition to that of Infomaniak.
Use unique DKIM selectors to avoid conflicts with existing records.
This guide explains how to add or modify one or more TXT record entries in the DNS zone (of a domain name) managed on the Manager Infomaniak.
Preamble
- The
TXTrecord type allows you to insert readable text in the DNS zone of a domain name. - This is the method generally used to help prevent spam and to verify domain ownership (Google may ask you to do this before using some of their services: refer to this other guide for an example of adding a
TXTrecord to authenticate a domain).
Modify the DNS zone
Refer to this other guide to manage this type of record in a DNS zone.

This guide explains how to add or modify one or more CNAME and DNAME type records in the DNS zone (of a domain name) managed on the Manager Infomaniak.
Preamble
- The
CNAMErecord type allows a subdomain to point to a website address.- This is the method generally used to make the
wwwsubdomain work with your site, or to redirect a subdomain to a folder on the web server where your website is hosted.
- This is the method generally used to make the
- The
DNAMErecord type for "delegation name" is particularly useful when reorganizing domains or for smooth transitions of part of your infrastructure to another, while preserving the hierarchical structure of subdomains.- A
DNAMEcreates an alias for an entire domain and all its subdomains.
- A
- Unlike the
CNAMEwhich only applies to a single specific host name, theDNAMEautomatically redirects all subdomains. Example:- A
DNAMEforabc.site1.compointing tosite2.comwill automatically linkxyz.abc.site1.comtoxyz.site2.com,new.login.abc.site1.comtonew.login.site2.com, and so on.
- A
- ⚠ A
DNAMErecord cannot be used at the root zone level of a domain (likesite1.comdirectly). It is generally used on a subdomain. If you want to redirect the main domain itself, you will need to use other types of records such as anA,AAAAorCNAME(with some restrictions for the latter).
Modify the DNS zone
Refer to this other guide to manage this type of record in a DNS zone.
This guide explains how to add or modify one or more CAA type records in the DNS zone (of a domain name) managed on the Manager Infomaniak.
Introduction
- A CAA record allows you to specify a certification authority authorized to issue certificates for a domain.
Add a CAA
Refer to this other guide to manage this type of record in a DNS zone.
Adding CAA to validate an SSL certificate…
… Sectigo
In the case of a SSL certificate validation for Sectigo, follow the generic guide above but enter the following data specifically:
- Select "Issue for Certification Authority".
- Enter the flag:
0. - Specify
sectigo.com:
… Let's Encrypt
In the case of a SSL certificate validation for Let's Encrypt, follow the generic guide above but enter the following data specifically:
- Select "Issue for Certification Authority".
- Enter the flag:
0. - Specify
letsencrypt.org:
This guide explains how to display the IP address of a site on your Web Hosting.
Preamble
- The IPv4 address is generally the same for each of the sites on the hosting (unless you have acquired a dedicated IP).
Display the IP address of your site
The IP address is specified on the hosting management page (Starter or containing multiple sites):
- Click here to access the management of your site on the Infomaniak Manager (need help?).
- Click directly on the name assigned to the product concerned.
- Then click on the chevron to expand the Information section of this hosting.
- The IPv4 address is displayed on the page:

- The IPv6 address is also displayed in the case of paid hosting:

This guide explains how to add or modify an MX record in the DNS zone (of a domain name) managed on the Manager Infomaniak.
Preamble
- The “MX” record type allows you to specify which provider should manage the email (= the target).
- You should only modify this type of record if you have a specific configuration to implement (e.g., domain name with Infomaniak and email service with an external provider).
- There can be multiple MX records (so that a second email service can take over in case the first one fails) and in this case a number designates the priority of each of them (the smaller the number, the higher the priority).
MX for Infomaniak email
Infomaniak automatically provides the MX record needed to link your domain name and your email, if they are managed within the same organization at the Manager level.
If your configuration requires you to add an MX record yourself to direct mail traffic to Infomaniak, then specify the following MX record:
mta-gw.infomaniak.ch
with the priority 5.
On the interface of some providers like Gandi, it is necessary to add a dot at the end of the MX record:
mta-gw.infomaniak.ch.
An SPF record is also required for proper functioning of Infomaniak email.
Modify the DNS zone
Refer to this other guide to manage this type of record in a DNS zone.
Learn more
- Link a domain to an Infomaniak Mail Service
- Specify the Infomaniak MX with a third-party web provider
This guide explains how to implement a DMARC policy for your email hosted by Infomaniak, an essential element for preventing potential email delivery issues.
Preamble
- DMARC (Domain-based Message Authentication, Reporting, and Conformance) is a crucial tool for enhancing email security and protecting your domain against fraud by verifying the authenticity of outgoing emails (through authentication mechanisms such as SPF and DKIM) and allowing you to define policies for handling unauthenticated emails.
- DMARC specifies to other email providers what they should do when they reject an email due to incorrect or missing SPF or DKIM.
- To do this, domain owners can define DMARC policies, such as "reject", "quarantine" or "none", to specify how these "suspicious" emails should be handled. Example:
- An email is sent from anna@domain.xyz to victor@yahoogle.abc.
- The Mail Service of domain.xyz contains a DMARC configuration of type reject at 100%.
- The Mail Service of yahoogle.abc is well secured and proceeds with the SPF/DKIM/DMARC analysis of the email arriving from domain.xyz.
- If this analysis results in a failure of SPF or DKIM, then the Mail Service of yahoogle.abc will reject (i.e., delete) the message.
- It will send a report by email if a report address is specified in the DMARC of domain.xyz.
- These DMARC reports generated help you maintain and improve the security of your domain; you will be able to identify any authentication errors and phishing attempts using your domain.
DMARC Policy and Acceptance Percentage
For the instructions that can be given to recipient servers when a suspicious message is detected, 3 policies (p = policy) exist and can be refined with a percentage (pct):
none
With "p=none", no email is rejected or quarantined based on DMARC verification. However, the reception percentage can be used to collect data on unauthenticated emails, indicating how many of these emails should be subject to the DMARC policy. For example, "p=none; pct=10" means that 10% of unauthenticated emails will be subject to the DMARC policy, while the remaining 90% will be accepted.
quarantine
With "p=quarantine", unauthenticated emails can be quarantined, but the reception percentage determines the proportion actually subject to this policy. For example, "p=quarantine; pct=50" means that 50% of unauthenticated emails will be quarantined, while the remaining 50% will be accepted.
reject
With "p=reject", unauthenticated emails are rejected. The reception percentage determines the proportion of unauthenticated emails that will actually be rejected. For example, "p=reject; pct=20" means that 20% of unauthenticated emails will be rejected, while the remaining 80% will be accepted.
Create a DMARC Record
There are 2 ways to manage DMARC.
If you have a Mail Service with Infomaniak, the simplest way is to go to the Global Security tool to manage your DMARC security policy and reports:
However, since the DMARC record is a type of DNS record, generally of type TXT, you can also manage it from the DNS zone of the domain name:
- Click here to access the management of your product on the Infomaniak Manager (need help?).
- Click directly on the name assigned to the product concerned.
- Click on DNS Zone in the left sidebar.
- Click the button to add a record:

- Click on the radio button DMARC to add a record.
- Click on the button Next:

- Leave (or add if necessary) the value
_dmarcin the Source field. The Target field must contain the parameters you wish to use, separated by
;:Tag Name Purpose Example v Protocol version v=DMARC1pct Percentage of messages subject to filtering pct=20ruf URI report for forensic reports ruf=mailto:authfail@domain.xyzrua URI report for aggregated reports rua=mailto:aggrep@domain.xyzp Policy for the organizational domain p=quarantinesp Policy for subdomains of the organizational domain sp=rejectadkim DKIM alignment mode adkim=saspf SPF alignment mode aspf=rwhich can give for example
v=DMARC1;p=reject;pct=100;rua=mailto:postmaster@dmarcdomain.com(source)- Leave the default value for TTL.
- Click on the button Save:

Any DNS addition/modification can take up to 48 hours to propagate.
This guide explains how to access a Sunrise Internet Box connected to the Internet with a dynamic IP via a domain name.
Prerequisites
- Have a Box that allows configuring a custom dynamic DNS provider.
- A dynamic DNS must have been created on the domain in question.
Link a Sunrise Internet Box to a domain name
There are different models of Sunrise Internet Box. Here is an example:
- Log in to the Sunrise Box administration interface (
http://192.168.1.1for example). - Enable expert mode (top right button).
- Go to DynDNS (top left):

- Click on the DynDNS tab.
- Enable the Dynamic DNS client.
- Choose the “Custom” provider:

- Fill in the following fields:
- Username = the identifier defined in the Manager when adding the Dynamic DNS
- Password = the password defined in the Manager when adding the Dynamic DNS
- Hostname = the URL configured in the Manager when adding the Dynamic DNS
- Below, fill in the following fields:

- Server:
infomaniak.com - Port:
443 - Request (to copy-paste as is):
https://infomaniak.com/nic/update?hostname=[DOMAIN]&myip=[IP]&username=[USERNAME]&password=[PASSWORD] - Update interval (seconds):
300 - Retry interval (seconds):
30 - Max attempts:
3
- Server:
The interface may be presented in this form but the principle remains the same: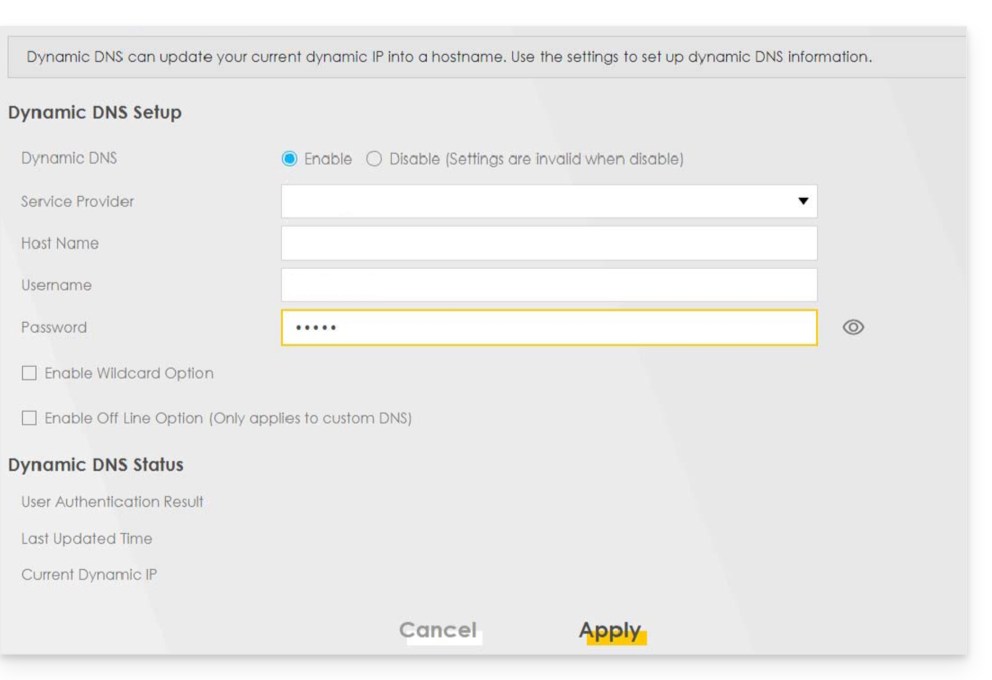
Other routers
It's the same principle for an Omada SDN solution from TP-Link; the Update-URL is https://infomaniak.com/nic/update?hostname=[DOMAIN]&myip=[IP]&username=[USERNAME]&password=[PASSWORD]:
And for other models (type Zyxel USG Flex or ax7501-B1 for example) fill in the fields using the data below:
- Enable DDNS Profile : enable
- DDNS Type :
User custom - HTTPS : enable
- Username : the identifier defined in the Infomaniak Manager when adding the Dynamic DNS (help)
- Password : the password defined in the Infomaniak Manager when adding the Dynamic DNS (help)
- Domain Name : host name with the domain
- Primary Binding Address > Interface : any
- Backup Binding Address > Interface : none
- DYNDNS Server : infomaniak.com
- URL (to copy-paste as is) : /nic/update?password=password(point 5 above)&username=username(point 4 above)&hostname=DomainName
- example
/nic/update?password=abcd1234&username=admin&hostname=abc.domain.xyz
- example
Make your life easier! If needed, local partners referenced by Infomaniak can handle these procedures. Launch a free call for tenders. They take care of everything, freeing you from technical details.
This guide details domain name monetization, generally done through domain parking while keeping the reseller's details hidden.
Domain parking
Domain parking is a technique that involves registering a domain name without using it immediately for a website.
Instead, the domain name is "parked" and usually displays a parking page with ads generated by an affiliate network.
The owner of the "parked" domain name can then earn money through these ads as a passive income source.
Infomaniak allows this practice provided that online advertising and trademark laws are respected.
And if you are the visitor?
Be vigilant: some domain parking pages may look similar to legitimate websites, which can cause confusion for users trying to access a specific website, and others may be infected with malware, which can be dangerous for users' cybersecurity.
This guide presents the Domain Status tool, which allows you to verify that the relationships between…
- DOMAIN NAME with Infomaniak
and
- WEB HOSTING with Infomaniak
… are correct, so that Web traffic is directed to the right place.
Preamble
- To verify, the tool checks the
A,CNAMErecords, etc. - You will thus be able to detect and correct certain Web issues, especially if they are related to DNS (technical information that, in short, determines where such and such Web traffic should be directed) by acting at the level of your domain.
- Automatic correction is only possible when the domain name is present in the same Organization as the product to which it must be attached.
- If this is not the case, then the correction must be done manually.
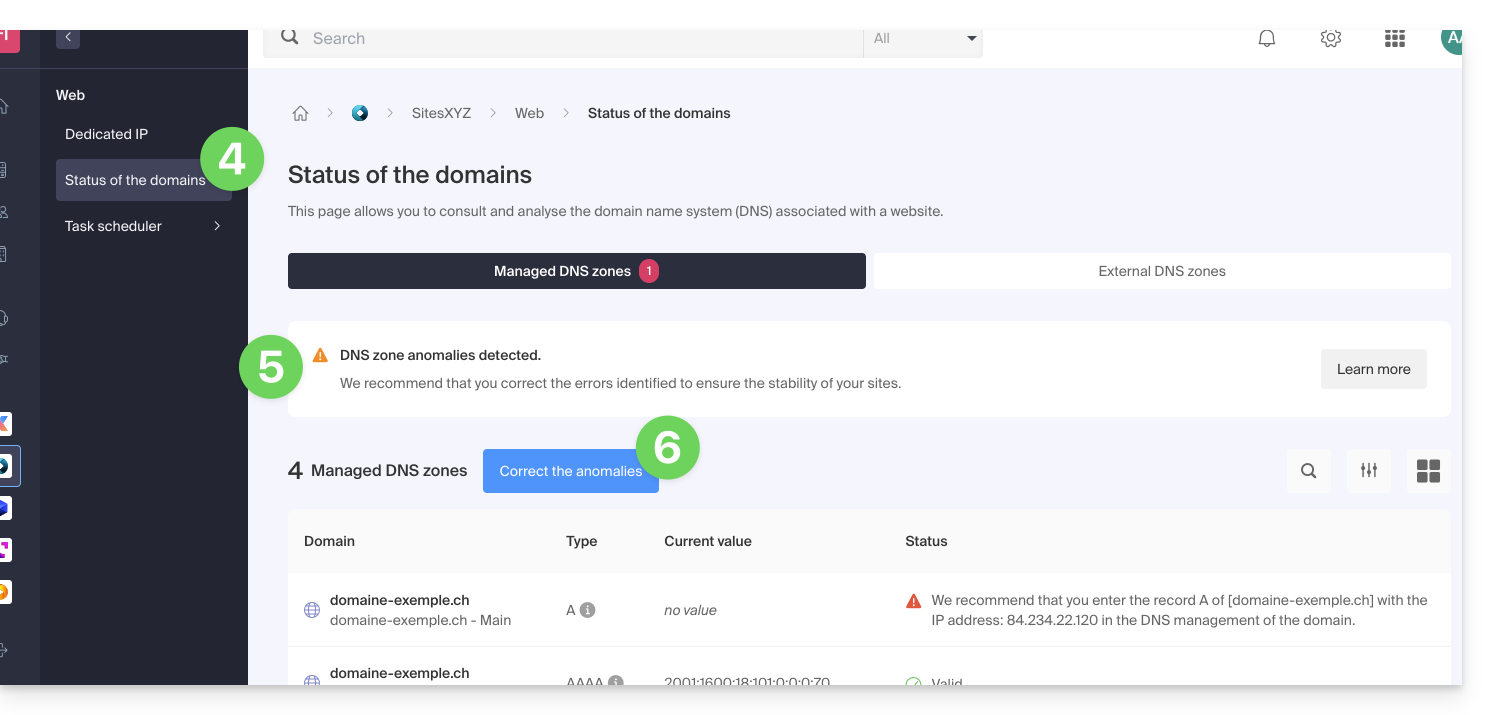
Diagnose a DNS problem
To access the DNS diagnosis of your domain name:
- Click here to access the management of your product on the Infomaniak Manager (need help?).
- Click directly on the name assigned to the product concerned.
- Click on Web in the left sidebar (or on the possible indication to go directly to point 6):
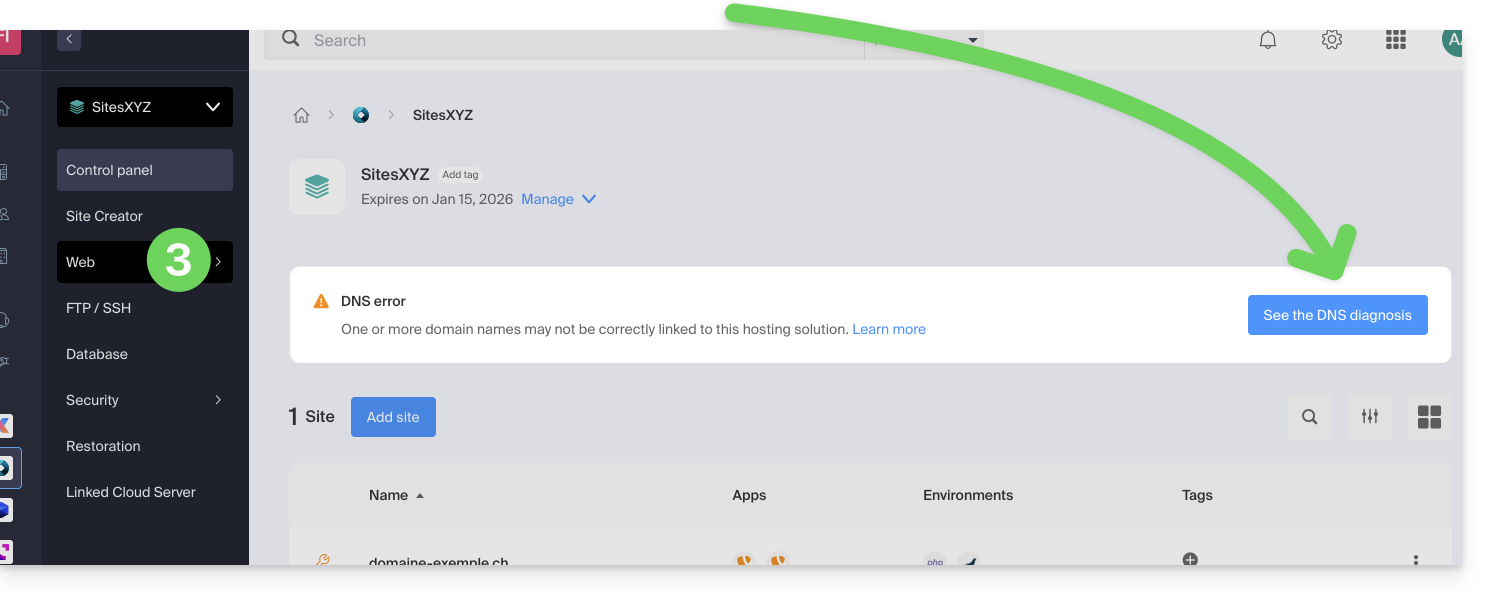
- Click on Domain Status in the left sidebar.
- If DNS issues are detected, a display on the dashboard indicates it.
- Correct all errors at once by clicking on the button:
Refer to this other guide regarding the same automatic verification process but for Mail Services.
This guide explains how to use the Infomaniak Newsletter tool with an external domain name (not managed at Infomaniak).
Prerequisites
- The domain name must belong to you.
- Synonym domains and their main domain cannot be used to send newsletters.
- It is possible to configure your synonyms as aliases.
Link an external domain
To access the management of Newsletter sending domains:
- Click here to access the management of your product on the Infomaniak Manager (need help?).
- If you already have a Newsletter, click on Add a domain:
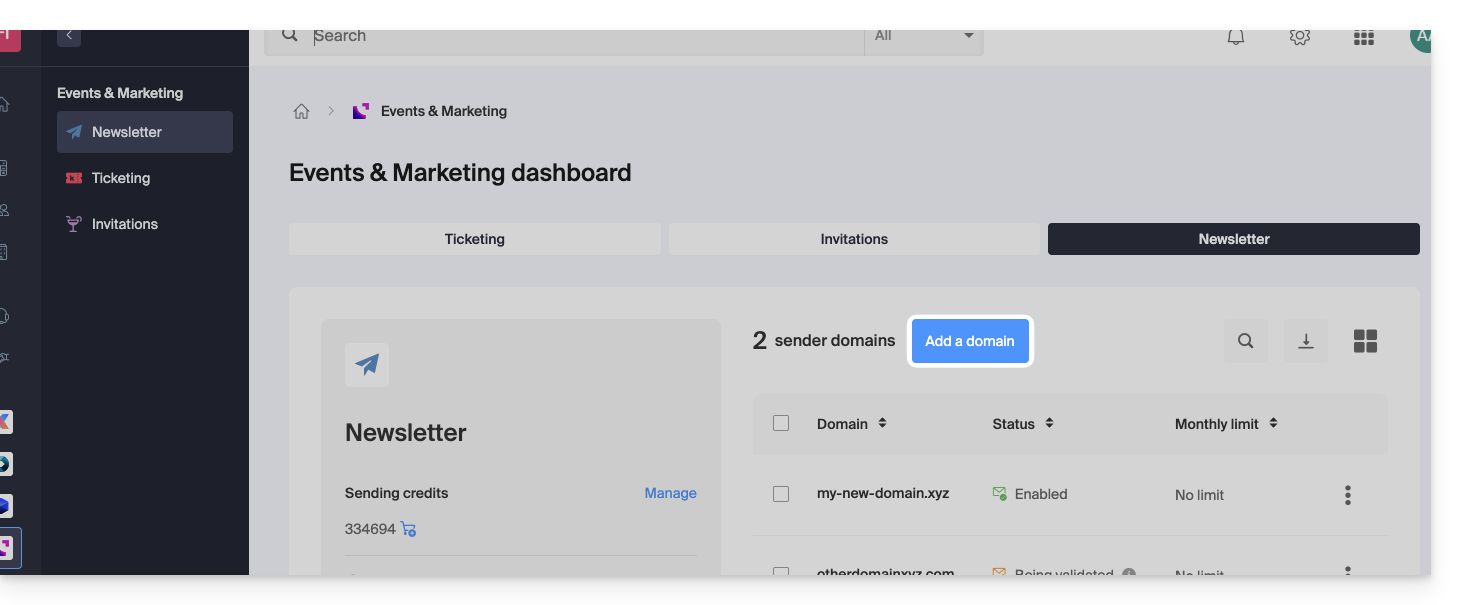
- Otherwise, click on Start for free:
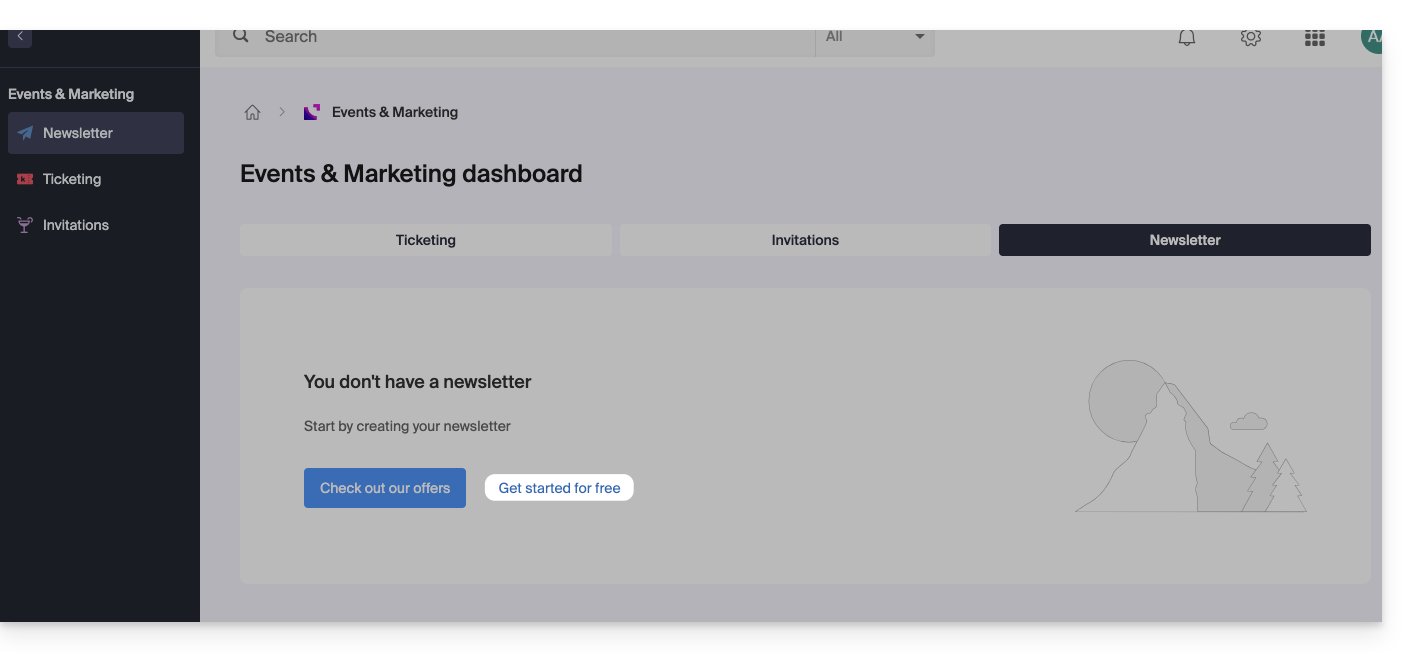
- Otherwise, click on Start for free:
- Select Other domain from the dropdown menu before entering (or enter directly) the domain name with which you want to send newsletters.
- Choose a possible monthly limit.
- Click the button to Continue:
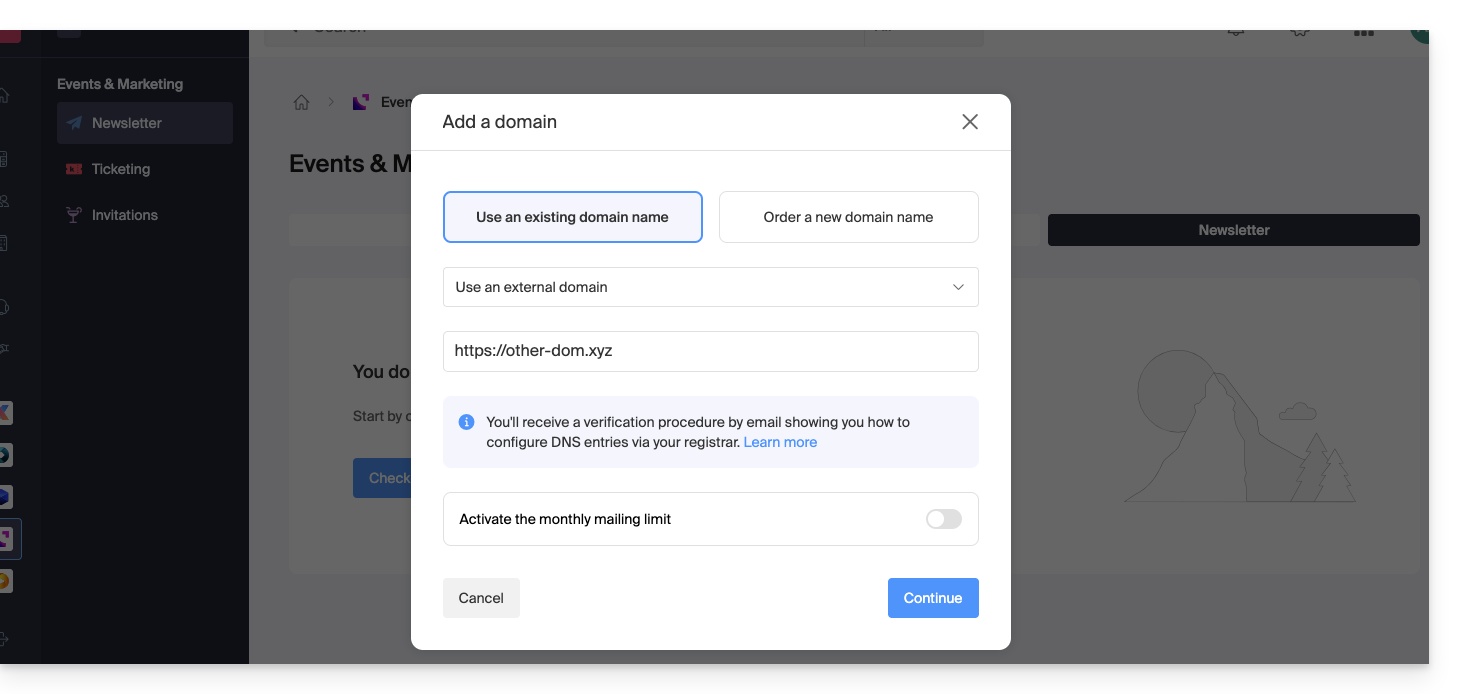
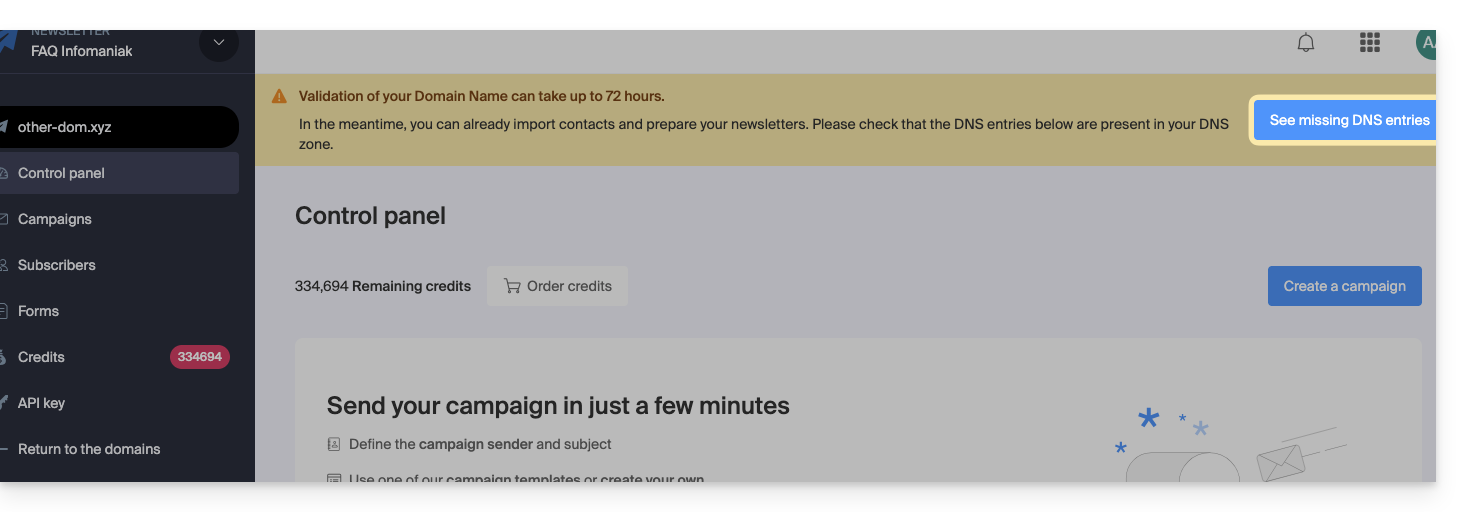
- Add the TXT / CNAME / DKIM records that you will receive by email and visible on the interface by clicking on the button:
This guide details the specifics related to the expiration dates of domain names when they are transferred from one registry to another.
Preamble
- The expiration dates of domain names refer to the period during which the owner of a domain name has paid for the registration of that name.
- It is crucial for domain name owners to carefully monitor the expiration dates and renew their registration on time to avoid any service interruption or having to pay additional recovery fees.
Transfer a domain to Infomaniak
When a domain is transferred to Infomaniak, the new expiration date(date until which the domain will be registered, valid, and functional) after transfer will be the date…
- … already existing before transfer + 365 days minimum.
Example:
- Domain name with expiration 01/12/2025 before transfer…
- Transfer occurs on 01/10/2025 for example (no importance or impact)…
- The expiration date becomes 01/12/2026 after transfer to Infomaniak (1 year is added after the transfer).
Exceptions based on domain extensions
Transfer policies and effects on expiration dates may vary depending on the domain extension. Each domain extension (such as .com, .net, .org, etc.) is managed by a specific regulatory entity, and these may have different rules regarding transfers and expiration dates.
The rule described in the previous chapter does not apply to certain extensions for which the new expiration date after transfer will be the date…
- … already existing before transfer, without incrementation or change:
.CH. - … of the transfer date + 365 days minimum:
.BEand.DE.
Domain ownership transfers can also affect expiration dates. When a domain name is transferred from one owner to another, the expiration date may sometimes be modified depending on the registrar's policies.
This guide explains how to convert a free Web Starter offer to a more comprehensive and enhanced paid offer, such as Shared Web Hosting or Web hosting on a Cloud Server.
Preamble
- By purchasing a domain name from Infomaniak, you get 1 free email address and a basic 10 MB web space.
- In a few clicks, it is possible to upgrade this offer to benefit from an enhanced experience.
Modify the Starter Offer - Basic Web Page
To upgrade this free offer:
- Click here to access the management of your product on the Infomaniak Manager (need help?).
- Click on the action menu ⋮ located to the right of the item concerned.
- Click on Modify the offer:
- Follow the wizard to choose the new type of hosting, pay to complete the offer change.