
Knowledge base
1000 FAQs, 500 tutorials and explanatory videos. Here, there are only solutions!
This guide explains how to view file activity on your Infomaniak hosting server.
FTP space activity logs
To know the activity of exchanges on your FTP space, contact Infomaniak support to request FTP logs by first authenticating with the credentials corresponding to the management of your web hosting.
The log is only updated if there has been FTP activity.
Help reading logs: http://www.castaglia.org/proftpd/doc/xferlog.html
The owner "site1xxx" (e.g. site1152, site1163, site1184…) appears when the FTP user account that created the folders/files in question has been removed from the list of FTP user accounts.
To access these files again in order to modify them, you need to log in with a different FTP account in the FTP File Manager and change the owner of the files with the "Properties" button.
This guide explains how to configure PHP settings for Web Hosting directly from the command line when you run PHP scripts using PHP CLI (Command Line Interface).
Preamble
- This type of configuration can be useful when you need to temporarily modify certain parameters for a specific script or for a PHP session.
- These modifications will only be valid for the execution of the current script and will not modify the global PHP configuration.
Modify PHP CLI settings
For example, to temporarily modify the settings for a specific script without having to modify the global PHP configuration of the server, follow the method below; with the PHP CLI environment, you can specify multiple PHP parameters at the same time by separating them with spaces.
Using the -d parameter
When you run PHP from the command line, you can use the -d parameter to specify PHP configurations. This allows you to modify the PHP parameters for this specific execution. For example, to set the maximum execution time to 90 seconds, the memory limit to 256 MB, and disable safe mode, you can do it as follows:
php -d max_execution_time=90 -d memory_limit=256M -d safe_mode=Off -f test.phpThis guide helps you find the public IP address of your device, which can be useful for certain support requests, among other things.
Display the public IP address on the connected device
Click here to obtain the public IP address of your device in IPv4 and IPv6 format.
Alternative methods
Visit ipinfo.io or ifconfig.me.
... on macOS
- From a terminal application (command line interface, CLI) on your device, run the command
curl ifconfig.meand press enter. - The displayed address is the public IP address of the computer.
Do not forget that this address can change periodically, especially if the router restarts or if the internet service provider uses dynamic IP address allocation.
To automate the search for the public IP address, use commands or scripts that query services such as api.ipify.org ...
This guide helps you protect against hotlinking on Infomaniak Web Hosting.
Preamble
- Hotlinking, also known as "leeching" or "bandwidth theft", occurs when a website directly integrates resources (such as images, videos, or audio files) hosted on another site without the latter's authorization.
- This means that the remote site is used to display content on the hotlinking site, which can result in unauthorized use of resources and bandwidth consumption for the remote site owner.
Preventing hotlinking
Content owners can implement measures to prevent hotlinking, such as rules in the .htaccess file at the root of the website to block requests from specific sites or to redirect to a replacement image:
RewriteEngine on
RewriteCond %{HTTP_REFERER} !^$
RewriteCond %{HTTP_REFERER} !^http(s)?://(www\.)?infomaniak.com [NC]
RewriteCond %{HTTP_REFERER} !^http(s)?://(www\.)?google.com [NC]
RewriteCond %{HTTP_REFERER} !^http(s)?://(www\.)?bing.com [NC]
RewriteCond %{HTTP_REFERER} !^http(s)?://(www\.)?yahoo.com [NC]
RewriteRule \.(jpg|jpeg|png|gif|svg)$ https://infomaniak.com/imagederemplacement.png [NC,R,L]
Replace "infomaniak.com" above with your site's address.
Remove the 3 lines google/bing/yahoo if you do not want these 3 sites to be allowed to display your images.
This guide explains how to add a dynamic trust seal to a secure site with a Sectigo SSL certificate.
Preamble
- Infomaniak, as a host, offers SSL certificates to secure its clients' websites
- Sectigo (formerly known as Comodo) is a recognized SSL certificate provider that offers different levels of security
- The "dynamic trust seal", or "Sectigo Trust Seal" / "Sectigo Trust Logo" is a visual that website owners can display on their pages to indicate to visitors that their connection is secure, a sign of trust that informs users that transactions and information exchanges made on the site are encrypted and protected by an SSL certificate issued by Sectigo.
- By using a Sectigo SSL certificate and displaying the dynamic trust seal, a website at Infomaniak therefore benefits not only from data exchange security, but also from increased user trust, essential for e-commerce and for the protection of personal information.
Adding a trust seal
Here's how a dynamic trust seal works:
- Validation: to obtain such a seal, the site owner must first obtain a valid SSL certificate from Sectigo, which requires a validation process; depending on the level of certificate chosen (Domain Validation - DV, Organization Validation - OV or Extended Validation - EV), this validation may be more or less in-depth
- Installation: once the SSL certificate is obtained and installed on the Infomaniak web server, the website is then able to establish secure HTTPS connections
- Displaying the seal: Sectigo provides an HTML code or script that the site owner can then integrate into their website; this code allows the Sectigo dynamic trust seal to be displayed
- Update: the seal is often updated in real time to reflect the current situation of the SSL certificate; if the certificate were to expire or be revoked, the seal would also reflect this, warning potential visitors that the site may no longer be secure
The trust seal consists of an image and an HTML code. The latter only works if a Sectigo certificate is installed on the site and in this case generates an interactive logo that displays the certificate data.
Save one of the images below
Right-click on the image to save, then click on Save image as...
- Small

- Medium

- Large

Upload the image to your site
Send the image to your web server (via FTP or your CMS) and note the URL to access this image for the next step (for example https://domain.xyz/wp-content/uploads/sectigo.png).
Get the code to integrate into your pages
Enter the full address of your image on the page https://www.trustlogo.com/install/index2.html to check if the image is accessible.
Click the Continue button on the same page to get the 2 codes to copy-paste into the header of your (or your) Web page(s):

Important:
- In the code,
CL1corresponds to aDVSSL certificate; replaceCL1withSC5for anEVtype SSL certificate.
This guide explains how to use PHP environment variables with Web Hosting that runs on php-fpm.
Preamble
- PHP environment variables are system variables used to store information about HTTP requests and redirects.
- They are generally used on web servers to store details about previous requests or redirects that have been performed.
- These variables can contain information such as previous URLs, HTTP methods, or other data related to the client's navigation on the web server.
Using environment variables
To use PHP environment variables:
- Define the PHP environment variables in a
.htaccessfile:SetEnv EXAMPLEVARIABLE hello
- In your PHP file, the name of the variable to call corresponds to the same variable name defined in the environment variable:
<?php getenv('EXAMPLEVARIABLE');
In this example, the displayed result will be hello.
Going further with environment variables
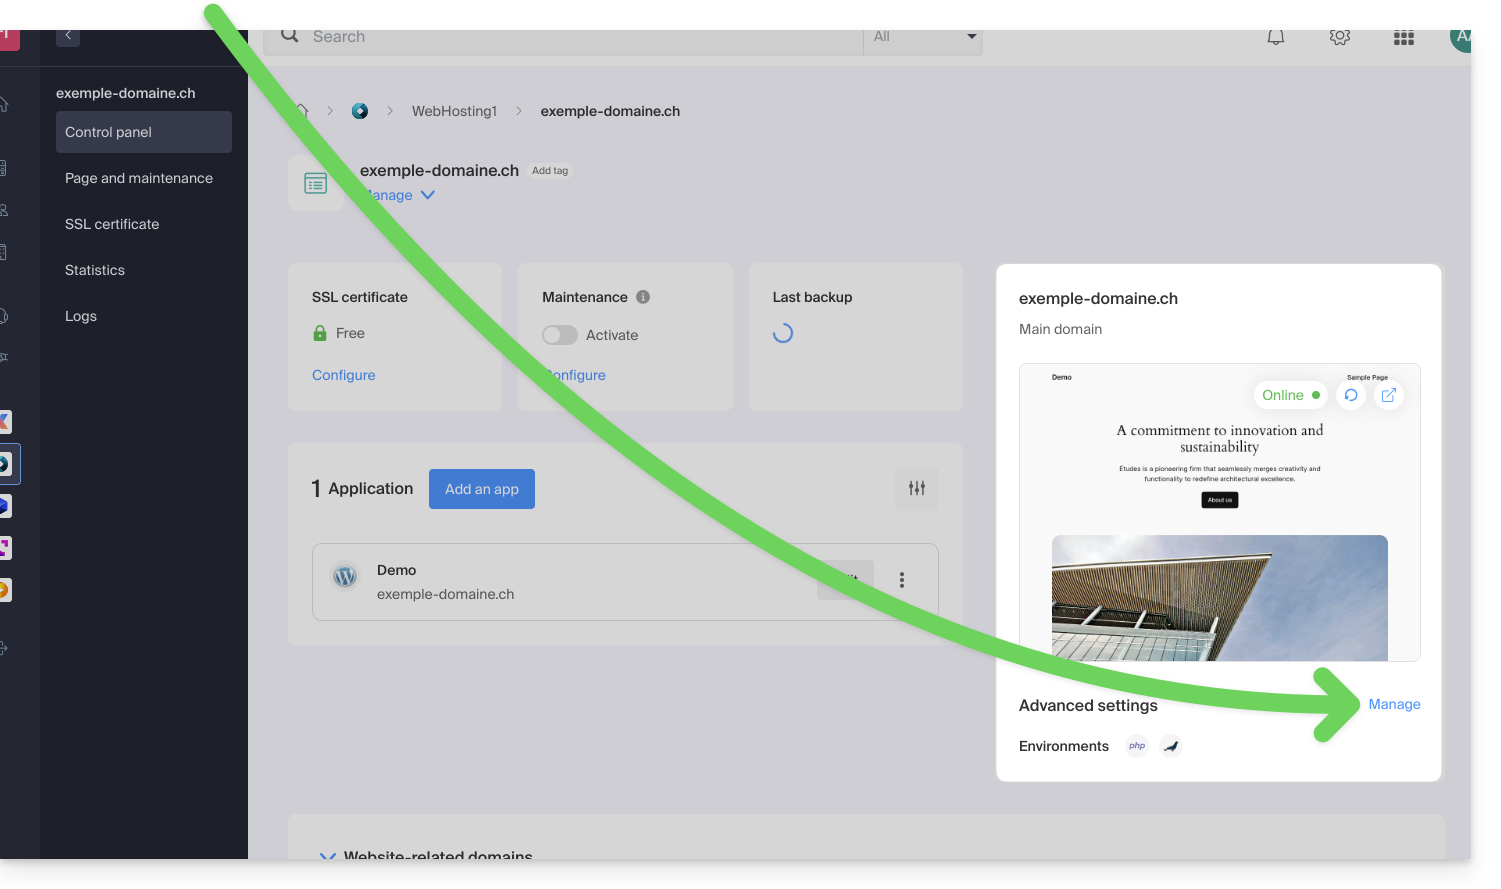
It is possible to configure environment variables directly from the Manager for your entire website:
- Click here to access the management of your product on the Infomaniak Manager (need help?).
- Click directly on the name assigned to the product concerned:
- Click on Manage under Advanced settings:
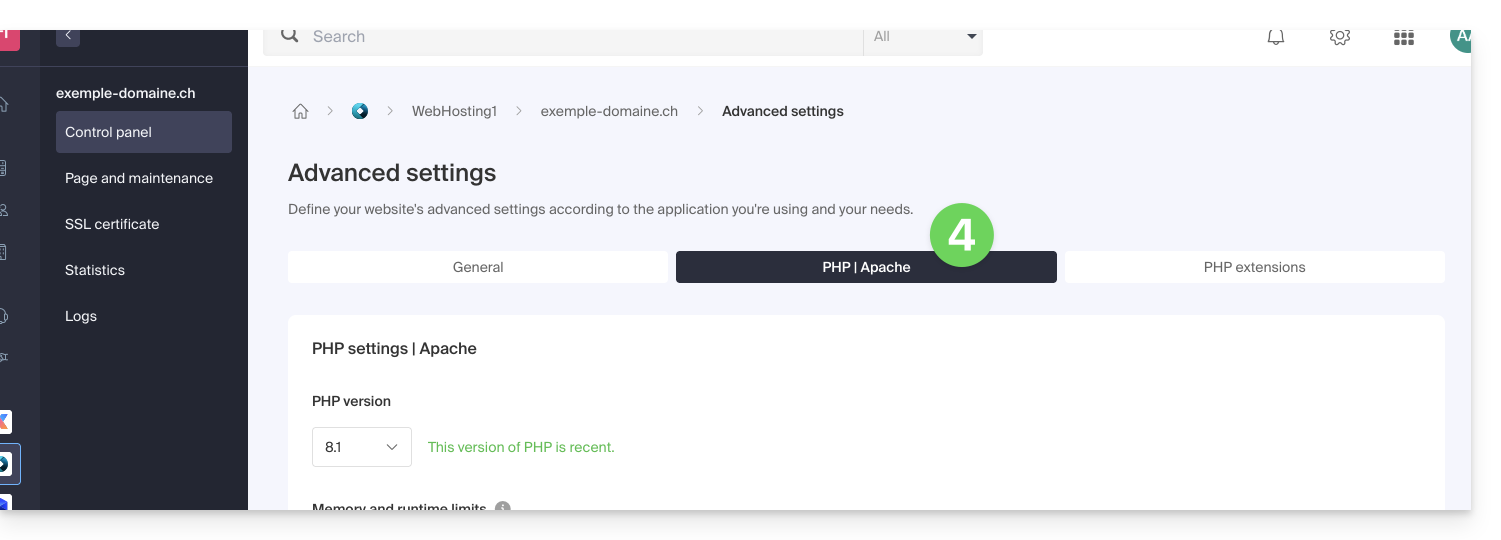
- Click on the PHP / Apache tab:
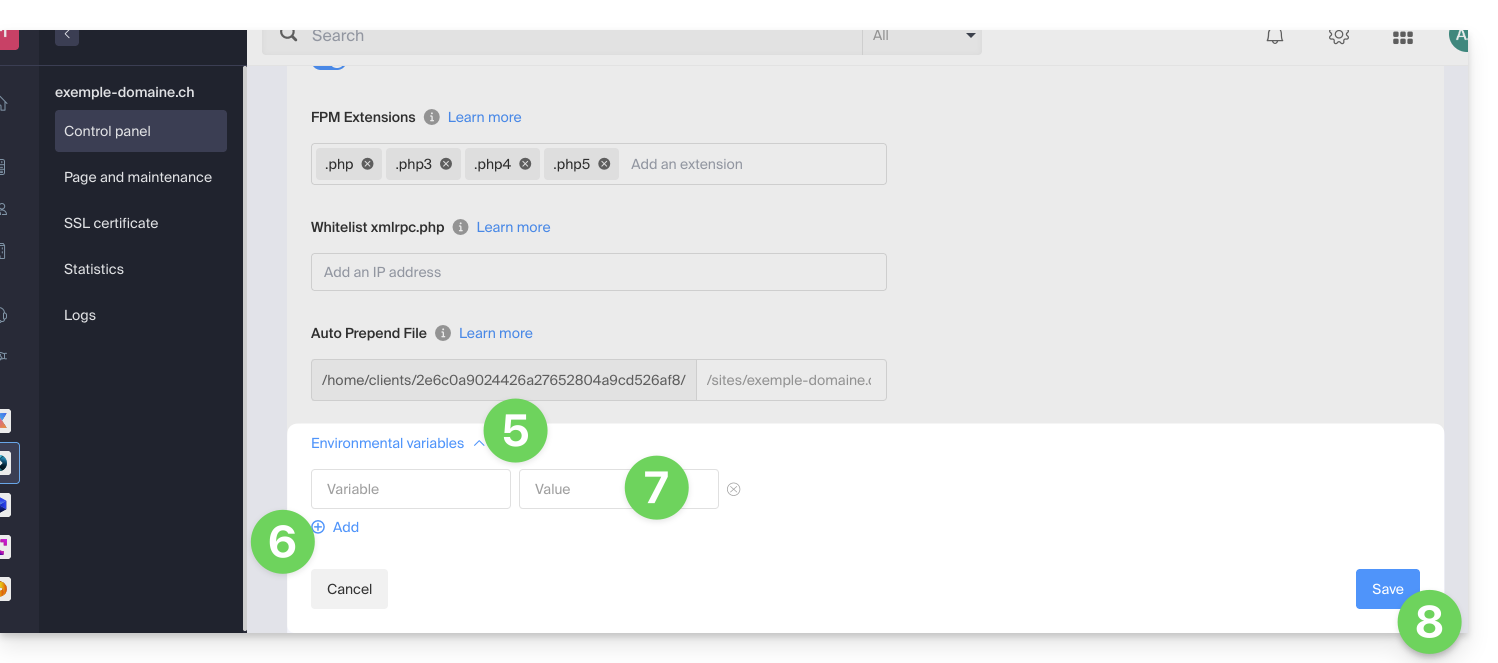
- Click on the chevron to expand the Environment Variables section.
- Click on the icon Add.
- Enter the variable and its value.
- Click the button to save:
This guide helps resolve issues with special characters (accents, emojis, etc.) that do not display correctly or appear as symbols like ??, often due to incorrect encoding when connecting to MySQL.
Preamble
- By default, MySQL uses
UTF-8. - Recent MySQL servers are generally configured to use
UTF-8orUTF-8MB4by default.- This is suitable for most cases, especially for international languages and emojis.
- Also, refer to this other guide to learn how to avoid encoding issues with non-European characters and emojis in your developments.
Set the default MySQL / MariaDB charset (Cloud Server)
With an Infomaniak Cloud Server, you can set the default charset (utf8 or utf8mb4):
- Click here to access the management of your product on the Infomaniak Manager (need help?).
- Click directly on the name assigned to the product concerned.
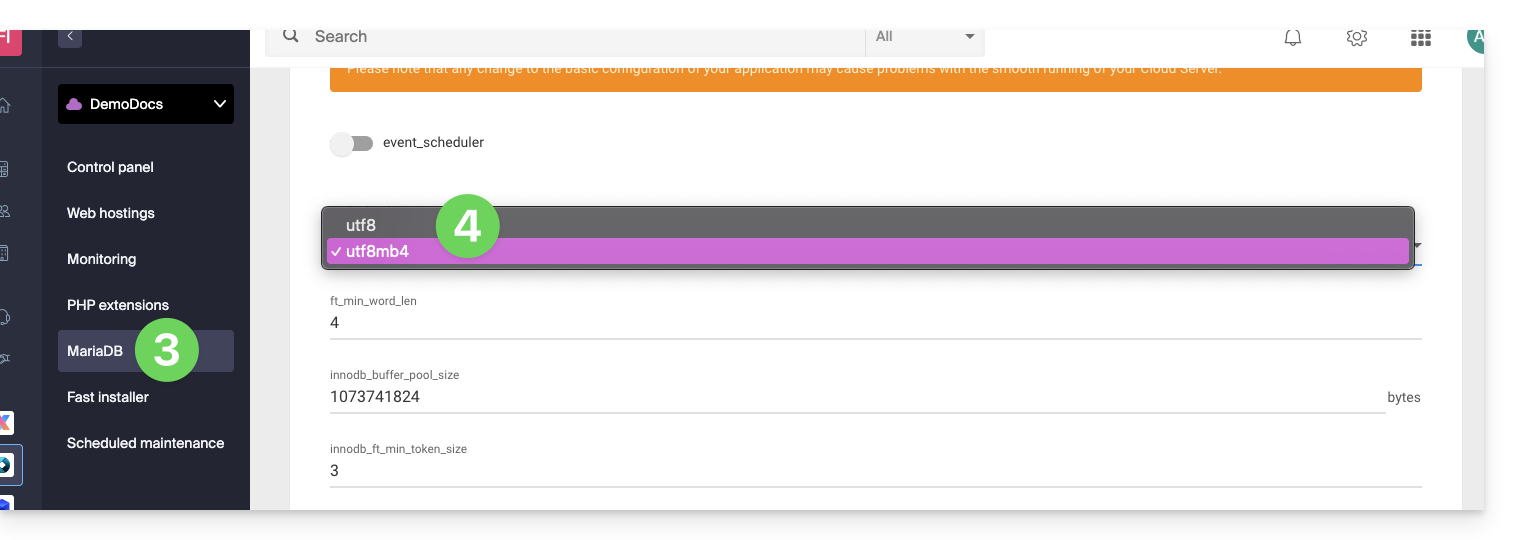
- Click on MariaDB in the left sidebar.
- Choose the default charset:
- If you have not yet migrated to MariaDB, the principle is the same.
- Save your changes at the bottom of the page.
Force a specific encoding (latin1 for example)
If you need to work with a database in latin1 (ISO-8859-1), you must explicitly align the encoding when connecting, depending on your environment.
On current offers, place the following code in a user.ini file located at the root of your hosting:
mysql.connect_charset = "latin1"
mysqli.connect_charset = "latin1"
pdo_mysql.connect_charset = "latin1"
or in PHP (MySQL API):
mysql_query("SET CHARACTER SET latin1");On older hosting plans, force the MySQL connection to latin1 via the .htaccess file located at the root of your hosting:
php_value mysql.connect_charset latin1
php_value mysqli.connect_charset latin1
php_value pdo_mysql.connect_charset latin1The possible indication information_schema does not concern you directly.
Please disregard this.
It is an internal database of MySQL that is a summary of the information from your own databases.
To help you identify the most suitable kSuite offer for your needs, refer to this other guide.
The kSuite offer provided by Infomaniak does not include a web hosting service for a page or a website on the Internet.
It is of course possible to subscribe to an Infomaniak Web Hosting from the same user account and/or the same Organization and to build your website with the tool of your choice such as WordPress or Site Creator.
To help you identify the most suitable hosting offer for your needs, refer to this other guide.
This guide explains how to manage interactions between your Infomaniak VOD/AOD space and any of your WordPress sites, using an extension developed by Infomaniak
Preamble
- This WordPress extension allows you to retrieve and manage all your videos present on an Infomaniak VOD/AOD space, with automatic updates when new videos are added.
- It manages the automatic retrieval of existing Players and playlist management.
- You will be able to search for your videos while writing an article or a page or import media directly from the CMS administration.
- Possible incompatibilities:
- The plugin is not compatible with Elementor.
- Test if the problem persists after installing another editor.
- The plugin is not compatible with WordPress Multisite.
- The plugin is not compatible with Really Simple Security (Really Simple SSL).
- Test if the problem persists by activating or deactivating this setting of the Really Simple Security extension:

- Test if the problem persists after using another similar module.
- If problems persist, refer to this other guide.
- Test if the problem persists by activating or deactivating this setting of the Really Simple Security extension:
- The plugin is not compatible with Elementor.
Get the Infomaniak VOD extension
Go to your VOD space to obtain the information necessary for the WordPress external module:
- Click here to access the management of your product on the Infomaniak Manager (need help?).
- Click directly on the name assigned to the product concerned:
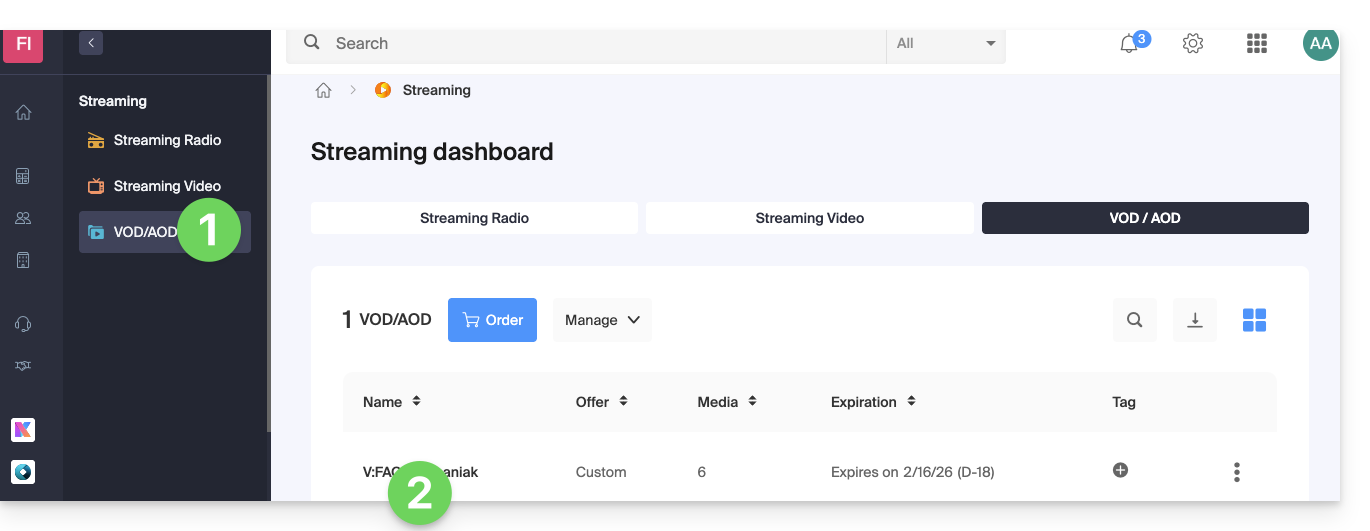
- Click on CMS/Extensions API in the left sidebar menu.
- Click on CMS Extensions in the left sidebar menu.
- Download the WordPress extension.
- Configure the extension using the provided instructions:

- It is recommended to create a new user in your Organization with only technical rights on the VOD/AOD product and then create the application password from this dedicated account.
You can also download the extension directly from the WordPress extension library: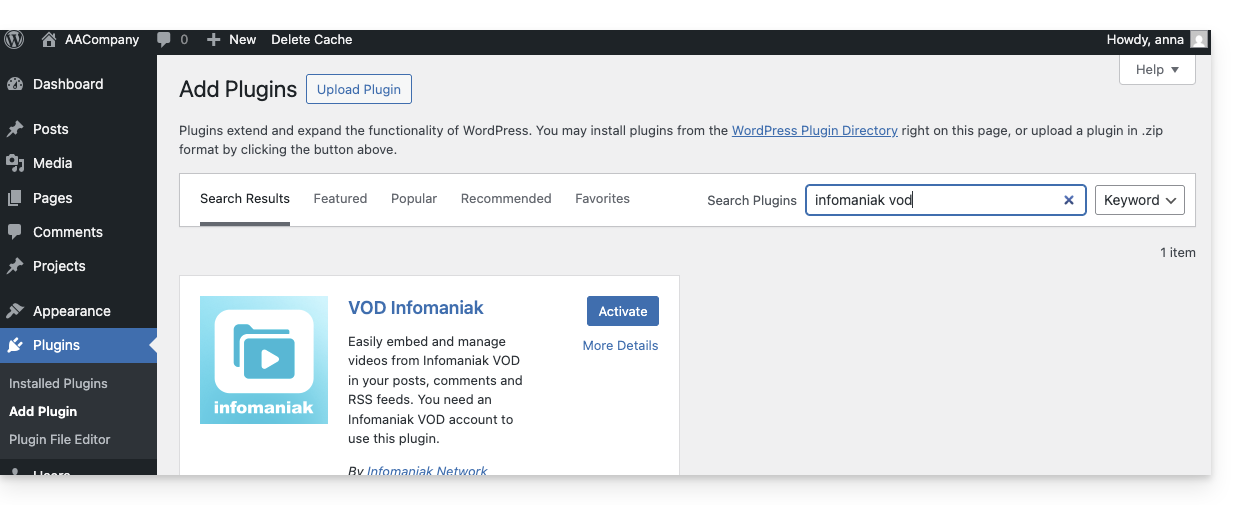
A similar feature exists for Typo3 with the dedicated extension that you can find and install from its extension library: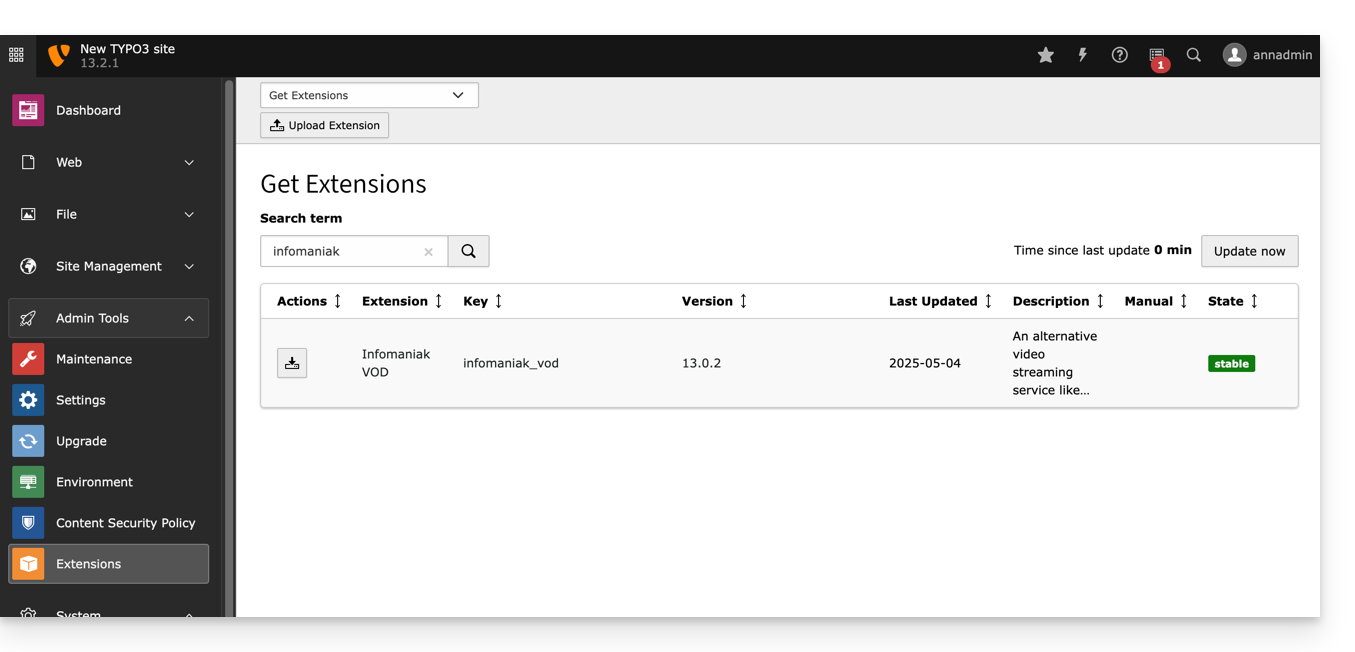
This guide explains how to find out the operating system version of the server for your Web Hosting.
Preamble
- Even if Debian or a package seems outdated, the displayed versions do not present any vulnerabilities:
- Infomaniak keeps them up to date via regular internal patches on all components and systems used.
- The versions are chosen for their stability and then strengthened by security measures that standard tests do not detect.
- If you or your clients identify a vulnerability in an Infomaniak product, please submit a POC. Although rare, these cases are handled quickly.
- Data security is the responsibility of the user: Infomaniak cannot be held responsible for poor management or use of access credentials.
What OS on my site?
To find out the version:
- Log in to the server via SSH (need help?).
Run the following command:
lsb_release -aYou will obtain information of this type:
Distributor ID: Debian
Description: Debian GNU/Linux 7.9 (wheezy)
Release: 7.9
Codename: wheezy
This guide details the specific rules to follow when using a password containing the "dollar" character $ to send an email via the SMTP Infomaniak in a script (PowerShell, Python, etc.).
Preamble
- If you encounter an authentication error (for example
auth failed,invalid login or password) when sending an email via SMTP, even though the password is correct and works in software like Outlook, the issue may be due to the handling of the character$in your script or configuration file. - To ensure reliable execution of your SMTP scripts, it is strongly advised to avoid any special character with syntactic meaning, particularly
$, in passwords used in scripts and configuration files. - The issue may also occur when connecting to databases.
Rules to follow
The character $ is a special symbol in many languages and environments. When it is used in a password in a script or configuration file, it can be mistakenly interpreted as a variable or control character.
Here are frequent cases where you should not use the character $ in a password:
- PowerShell:
$is used to declare variables. A password containing$can cause syntax errors or be truncated. - Bash / Shell (Linux):
$is also a variable prefix. It can trigger unexpected substitutions. - YAML files (for example Home Assistant, GitHub Actions, Docker Compose) :
$can be interpreted as an environment variable. - Files
.env,.ini, or other configuration files: the tools that read these files may attempt to interpret the variables. - Commands or URLs with authentication: a password containing
$may be improperly encoded or fail during parsing.
To correct or prevent this type of error:
- Avoid using the character
$in passwords intended for use in scripts or automated systems. - If you absolutely must use it, always enclose the password string correctly according to the language:
- In PowerShell: use single quotes
'password$Test'if possible. - In Python: ensure the string is well enclosed in single or double quotes, without interpretation.
- In Bash: escape the
$with a backslash\$.
- In PowerShell: use single quotes
This guide explains how to import external data (files, folders, etc.) into your kDrive using the WebDAV protocol.
Preamble
- Refer to this other guide if you are looking for information on how to copy specific data from one kDrive to another when your user has access to both kDrives in question.
- Refer to this other guide if you are looking for information about using your kDrive via the WebDAV protocol in the future.
Importing external data via WebDAV
Prerequisites
- Have a kDrive or kSuite subscription (WebDAV not required)
- Have sufficient permissions within kDrive or kSuite.
- Do not change your password until the import is complete!
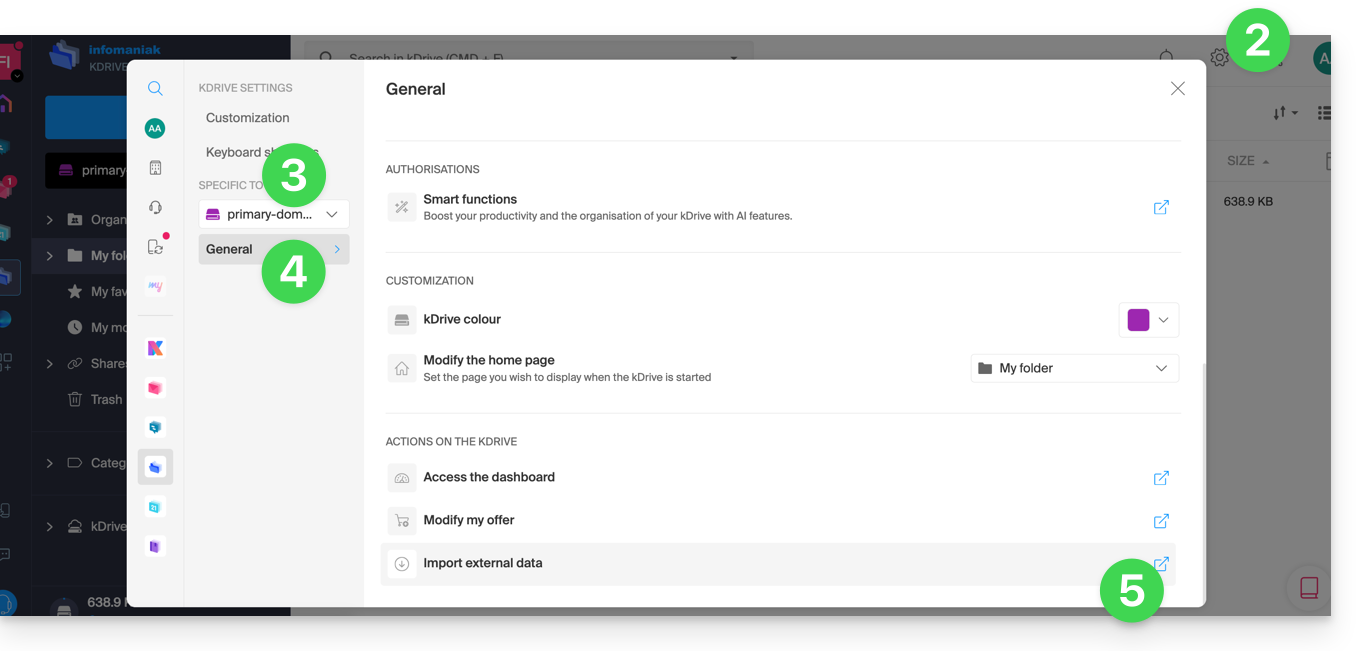
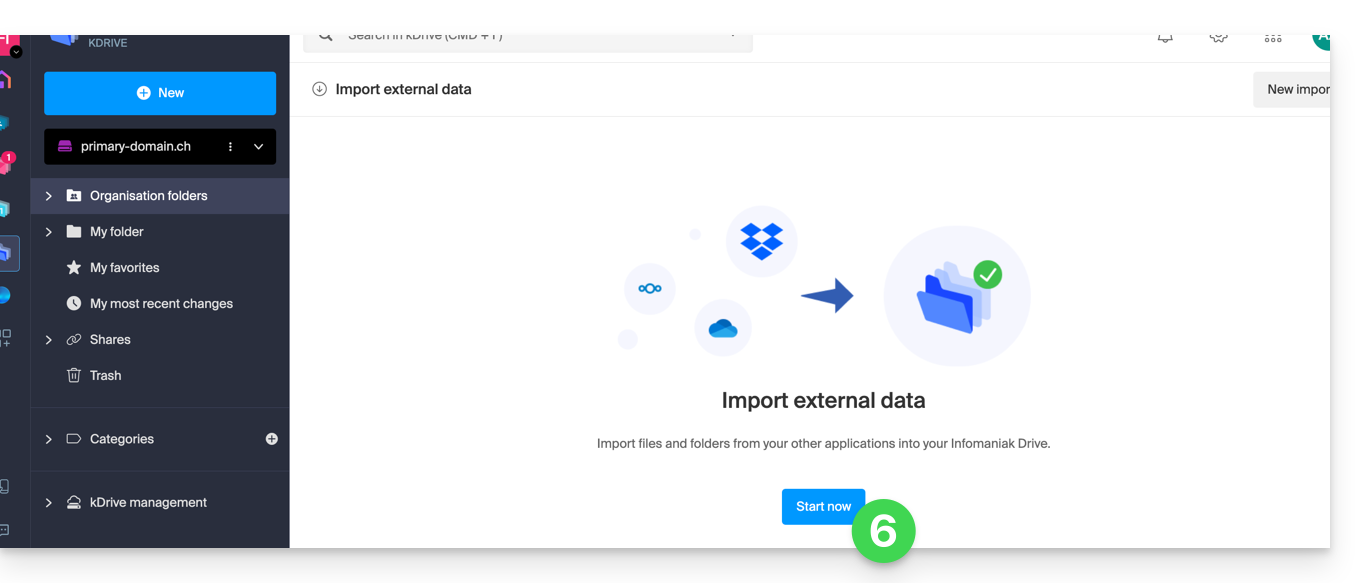
To access the import tool, where the data needs to be imported:
- Click here to access the Infomaniak kDrive web app (online service ksuite.infomaniak.com/kdrive).
- Click on the Settings icon in the top right corner.
- Check or select the relevant kDrive in the dropdown menu of the left sidebar.
- Click on General in the left sidebar.
- Click on Import external data:
- Click the blue Start button:
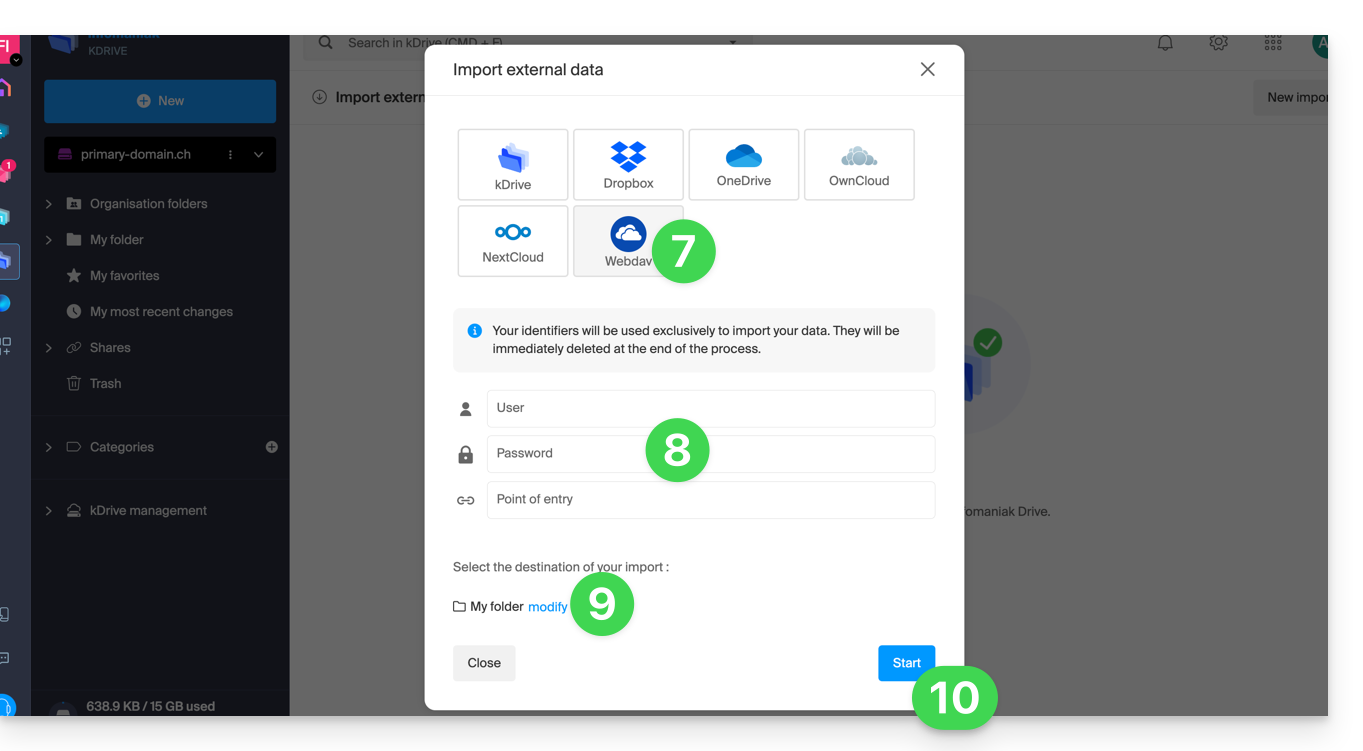
- Click on WebDAV.
- Complete the requested information based on the source (including the WebDAV address you have - obtained from the source).
- Choose the destination kDrive and the desired location to store the imported data.
- Click on Start:
Example: copying data from an external kDrive to the Organization
To import a kDrive that would be outside the Organization in which your destination kDrive is located, you need to enter the following information at point 9 above (your credentials will be used exclusively to import your data; they will be immediately deleted at the end of the process):
- Username: email address to log in to the Infomaniak account
- Password: create an application password for this specific use.
- Entry point: the WebDAV login URL with the source kDrive ID (starting disk) — refer to this other guide regarding the kDrive ID
- Example:
https://123456.connect.kdrive.infomaniak.comif the ID is “123456” to obtain the entire kDrive; but it is also possible to import only a part (see below).
- Example:
Specify the name of a specific subfolder
It is possible to choose a subfolder as a source folder, by combining the kDrive ID and the folder path.
Example for a folder in the shared space of the Organization Folders (= "Common documents"):
https://IDkDrive.connect.kdrive.infomaniak.com/Common documents/Nom du dossier
Example for a folder/subfolder that would be in the personal folders (therefore outside the Organization Folders):
https://IDkDrive.connect.kdrive.infomaniak.com/Nom du dossier/Nom du sous-dossier
This guide explains how to download or export an SSL certificate from the Infomaniak Manager.
Preamble
- The download of the certificate produces a file in
.zipformat. - The archive contains the
.keyand.crtfiles (as well as_windows.pfx&.protected.keydepending on the type of certificate):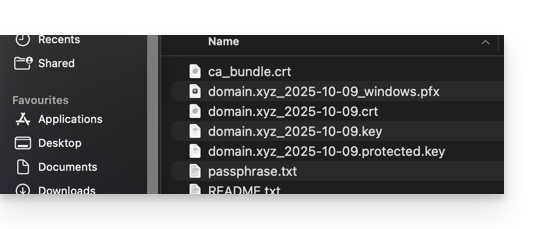
- It is recommended to store this certificate and its private key in a secure location, as the latter could allow access to your encrypted data.
Export or download an SSL certificate
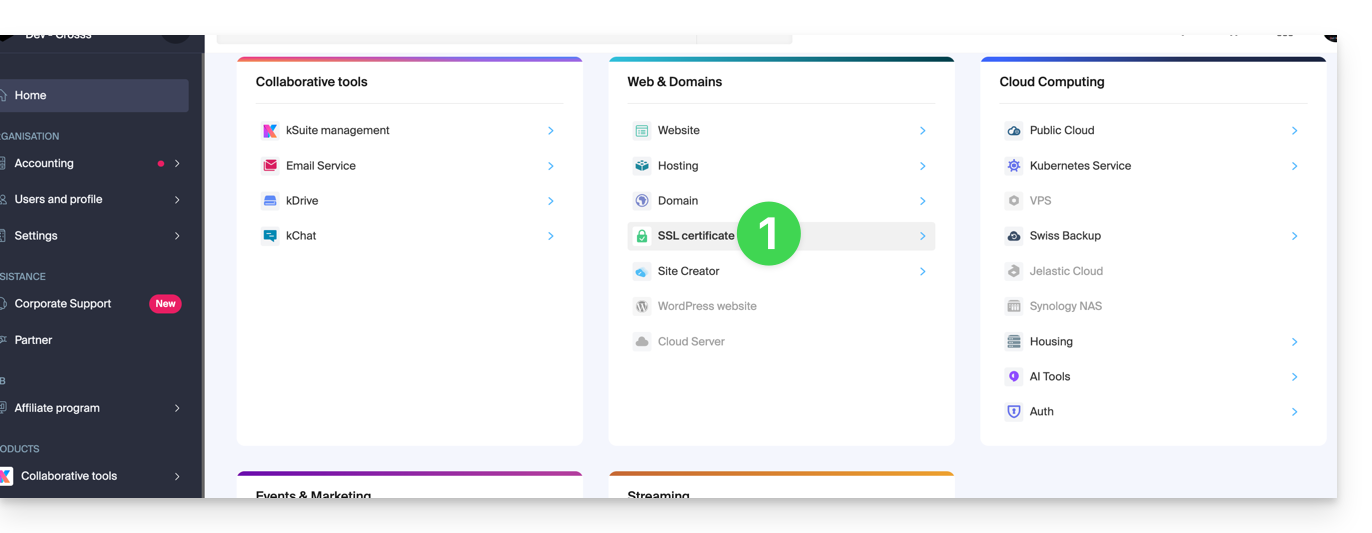
To access the management of your certificates:
- Click here to access the management of your product on the Infomaniak Manager (need help?):
- Filter your certificate types if necessary by clicking on the icon dedicated to this effect.
- Display the different types of certificates such as Let's Encrypt, Sectigo DV & EV...
- Add the certificates that need to be displayed.
- Apply the filters:
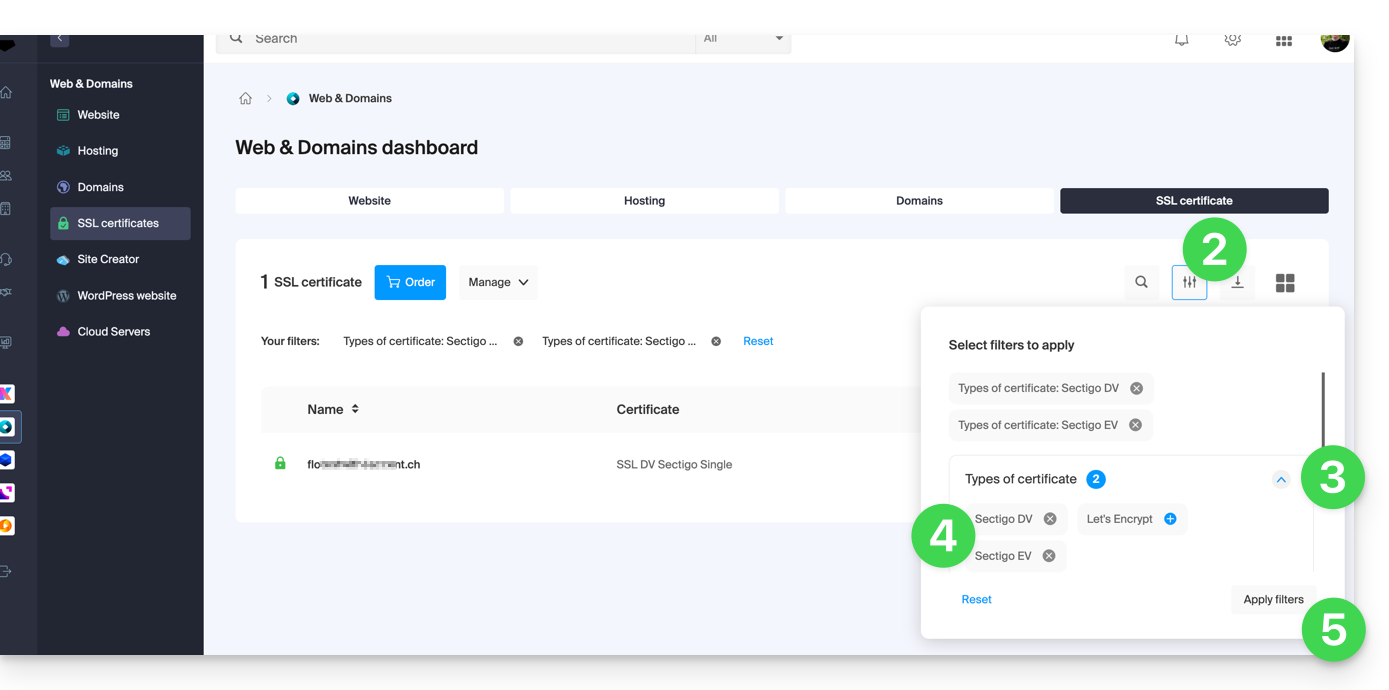
- The table now only displays the types of certificates you have selected.
Export a Let's Encrypt certificate
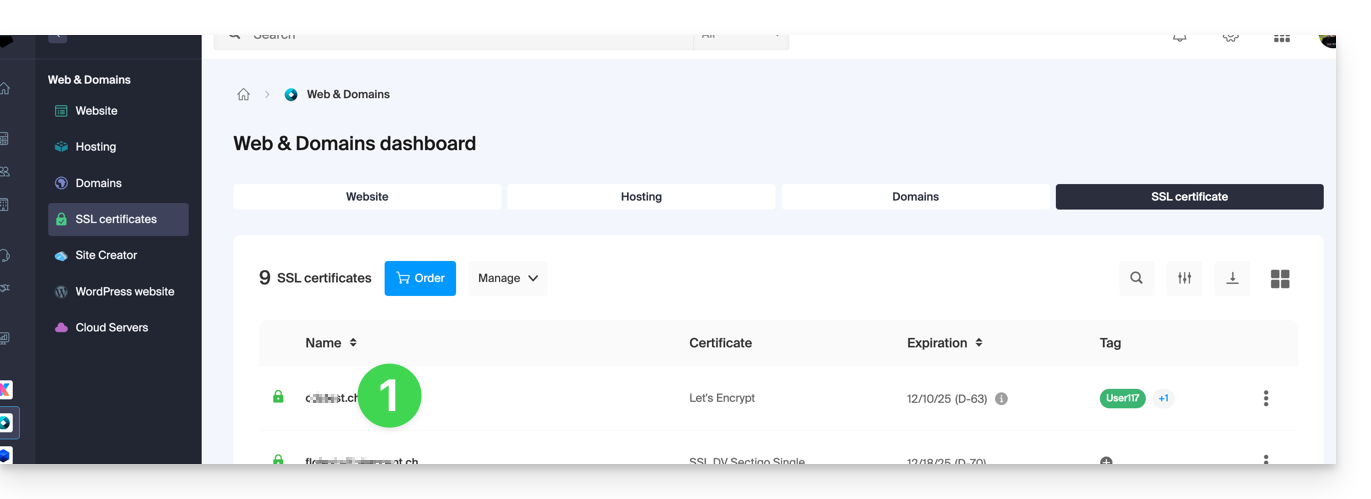
- Click directly on the name assigned to the certificate Let's Encrypt in the list:
- Click on the action menu ⋮ to the right of the object concerned in the table that appears.
- Choose Export the certificate and follow the instructions to download the archive to your device:

Export a Sectigo certificate
- Click directly on the name assigned to the certificate in the list of certificates.
- Click on the Manage button.
- Click on Download the certificate and follow the instructions to download the archive to your device:

Supervisor is not offered directly because systemd is recommended, better integrated with Debian, and available in Fast installer.
If you still need to install it, contact Infomaniak support in writing.
This guide details the possible actions to combat unwanted content that may appear on your WordPress site when it is not sufficiently protected.
Preamble
- When your WordPress site is not sufficiently protected or monitored, spam bots take advantage of the comment system to post thousands of messages (obviously containing links to their fraudulent activities).
- Any form (contact, voting, booking, etc.) can also be exploited for malicious activities if nothing is done in advance to protect against it.
- This will affect your site (no one will post a serious comment), the reputation of the domain name, your activities, and the server itself to the point of saturating it and impacting other sites on the same space.
- It is therefore essential to take care of the health of your site and ensure its proper functioning throughout its life.
Combating unwanted comments
First, carefully follow the solutions proposed by the WordPress codex. You will learn, for example, that disabling the comment system via the WordPress dashboard only affects future articles; it is important to follow one of the alternative methods proposed by WordPress for a more radical deactivation.
If you still want to collect comments, you can, for example, limit them to registered users (refer to the official help regarding the comments settings page) but you will then have to monitor the registrations.
Combating spam sending
Effective protection against automated comments and the exploitation of any form on your site consists of implementing a captcha, or its alternative the honeypot (honey pot). You will thus close the door to bots (robots programmed to browse the Web and exploit its vulnerabilities).
Akismet, developed by Automattic, the company behind WordPress, receives good reviews but becomes paid for commercial use.
By installing WordPress on your Infomaniak site via the automatic installation system, you will find the WP Armour – Honeypot Anti Spam extension already activated, to protect in its free version all types of forms, such as those of WP Comments, WP Registration, BBPress Forum, Contact Form 7, Gravity Forms, Elementor Forms, Divi Theme Contact Form, WooCommerce Reviews Pro, etc.
If you want an alternative dedicated solely to the Contact Form 7 contact form, add its protective Honeypot extension.
Another extension receives many favorable reviews: La Sentinelle antispam!
The role of the host
You can learn more about the mechanisms put in place by Infomaniak thanks to the article and the FAQ about the tools provided if you have a website.
This guide explains how to change the URL of your website from the Joomla app installed on your Web Hosting Infomaniak (only in the case where you have installed Joomla via the dedicated tools offered by Infomaniak).
This allows you to assign a different domain name to your Joomla site.
Prerequisites
- The domain name you wish to use must first be added as an alias to the main domain on the relevant site.
Change the domain name of Joomla
To change the address of the site created with Joomla to another domain name that is already in the same Organization:
- Click here to access your site management on the Infomaniak Manager (need help?).
- Click directly on the name assigned to the relevant product:

- Click on the action menu ⋮ located to the right of the relevant Web Application.
- Click on Settings for the application:

- Click on Edit to the right of the Joomla:

- Under Site URL, select the desired web address from the dropdown menu:
- If you have not followed the prerequisites above, the desired domain will not appear even if it is registered within the same Organization.
- If you have added the domain as an alias for the site, the desired domain will appear and you will be able to select it to replace the previous domain.
- Click on the Save button:

Domain “…preview.infomaniak.website”?
Among the URLs present in the dropdown menu, the preview URL allows you to access your Joomla site in case the site's domain name is not yet correctly configured to point to your app.
Change the address or location of Joomla
⚠️ These manipulations break the link between your Joomla and the Infomaniak Web Applications system; it will no longer be possible to benefit from the advantages of the latter. For additional help contact a partner or launch a free tender — also discover the role of the host.
Prerequisites
- Create an FTP account (need help?).
- Connect via FTP (need help?).
To modify the Joomla installation if it was done in a subfolder…
… and if the latter is visible in the site address each time it is consulted…
… here is how to proceed:
- On the FTP, move up to the root (in the target folder of the website) all the files of your Joomla currently installed in a subfolder (folder
/primaryin the example below):
- Delete the now-empty subfolder.
- Modify the
.htaccessfile located at the root of your Joomla directory. - Replace
RewriteBase /primarywithRewriteBase /:
- Save the changes.
- Do not uninstall the Joomla Web Application but simply stop using it and connect directly to the management interface of your Joomla via the URL
/administrator:
This guide explains how to view the disk space of an Infomaniak Web Hosting and display the size of directories.
Find large folders in a Web Hosting
To do this:
- Connect to the server via SSH (need help?).
Run the following SSH command:
ncdu- Navigate through the folder structure using the keyboard's directional arrows.
- Exit with the key combination
CTRL + C.
This guide explains how to securely transfer files between your machine and the web hosting server using the SCP (secure copy command) protocol.
Preamble
- To work, the
SCPcommand requires:- a source: a file/folder to transfer
- a destination: FTP server address to perform the transfer
- The data is automatically encrypted by
SCPat the time of transfer. - For additional help contact a partner or launch a free tender — also discover the role of the host.
Copy a local file to the server
Prerequisites
- To obtain the FTP server address:
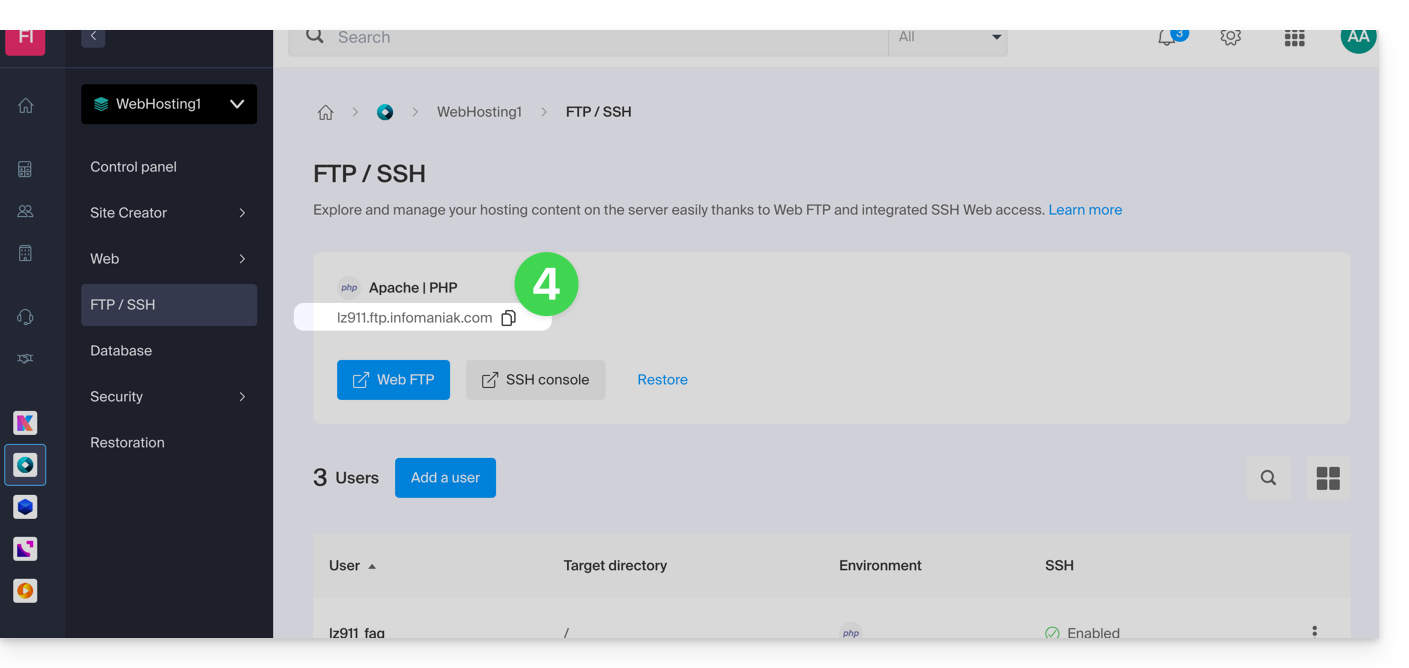
- Click here to access the management of your hosting on the Infomaniak Manager (need help?).
- Click directly on the name assigned to the hosting concerned.
- Click on FTP / SSH in the left sidebar:
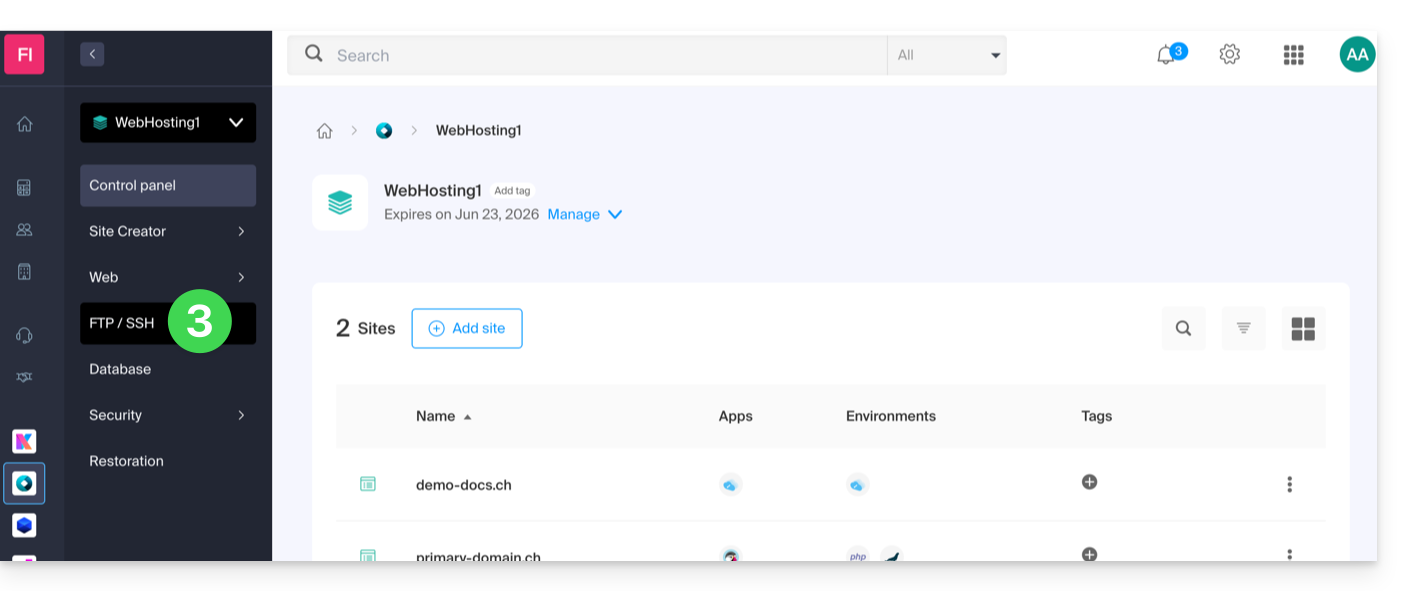
- The host server address is displayed at the top left and can be copied:
- To obtain the destination folder path:
- Click here to access the management of your hosting on the Infomaniak Manager (need help?).
- Click directly on the name assigned to the hosting concerned.
- Click on More information (in the Information section).
- Copy the absolute path:
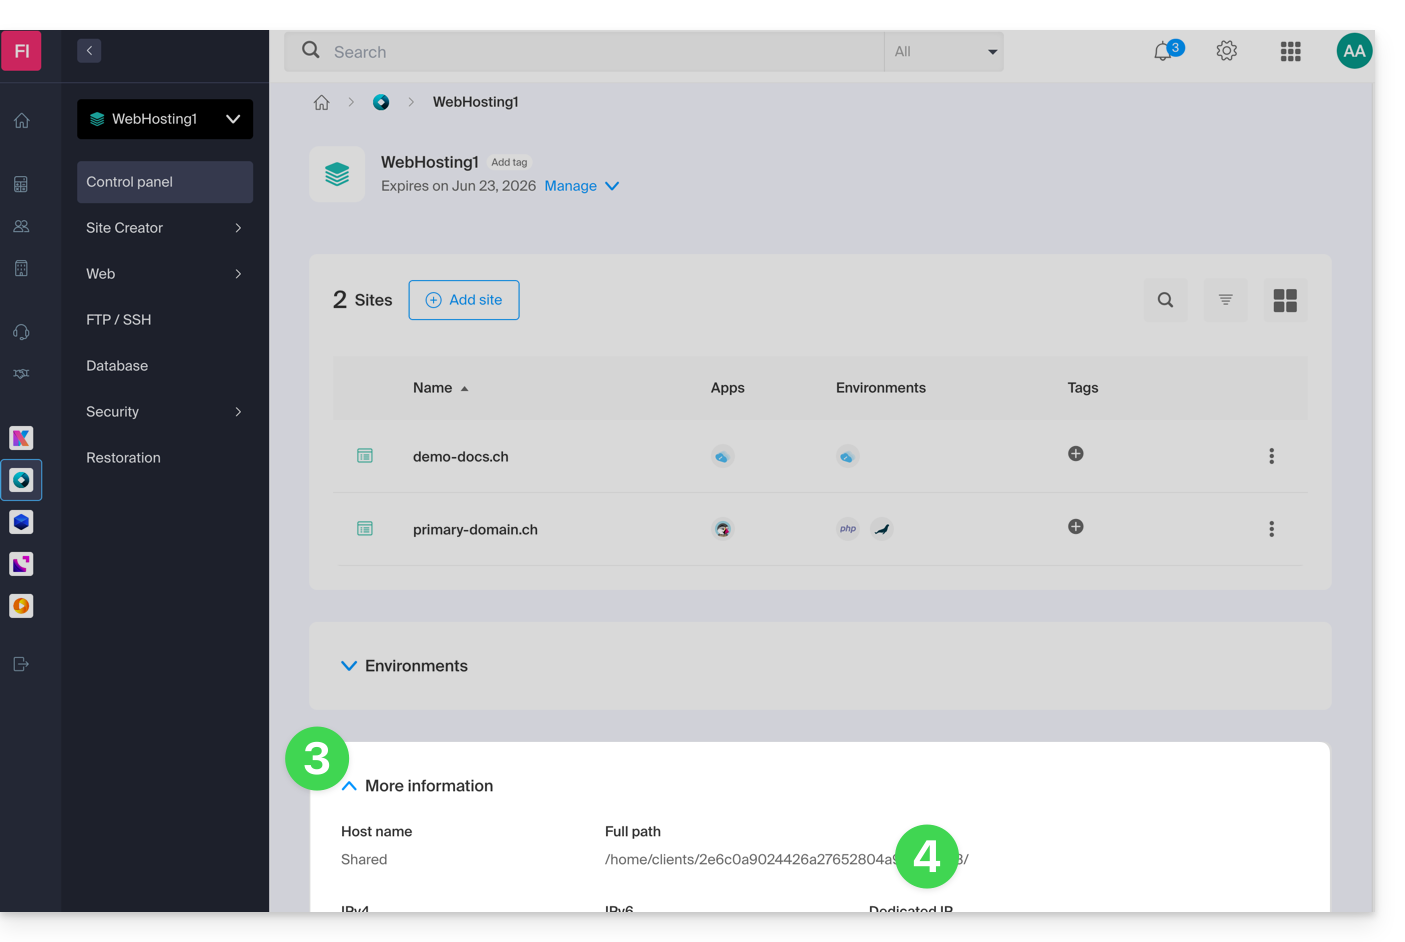
- Complete the absolute path with the desired destination folder.
Then, to copy a file from your machine, the command is as follows:
scp localmachine/path_to_the_file username@ftp_server_adress:/path_to_remote_directoryTo copy an entire directory from your machine, you need to adapt the command as follows:
scp -r localmachine/path_to_the_file username@ftp_server_adress:/path_to_remote_directoryThe entire folder will be transferred to your server.
To copy the contents of an entire directory from your machine, you need to adapt the command as follows:
scp -r localmachine/path_to_the_file/* username@ftp_server_adress:/path_to_remote_directory