Knowledge base
1000 FAQs, 500 tutorials and instructional videos. Here, there are only solutions!
This guide concerns the installation of PHP extensions on Infomaniak Web Hosting.
Using Zend PHP extensions
- Zend Guard Loader is a PHP extension that allows you to run PHP scripts encrypted via Zend Guard.
- Zend Guard Loader is installed by default for PHP <= 5.6 on all web hosting and is not available for PHP versions >= 5.6.
- Since PHP 5.3.x, the Zend Optimizer module has been replaced by ZendGuardLoader
- The ZendOPCache extension requires a Cloud Server configured with PHP 5.5 minimum
Link to this FAQ:
Has this FAQ been helpful?
This guide explains how to activate the following functions on Web Hosting (in italics, Cloud Server only):
proc_openpopenexec()shell_exec()set_time_limitpassthrusystem
These functions are disabled by default as they pose a significant security risk in case of a website hack. Only activate them if there is a real need (for a script or CMS ImageMagick, Typo3, CraftCMS, etc.).
Enable PHP functions
To access website management:
- Click here to access your site management on the Infomaniak Manager (need help?).
- Click directly on the name assigned to the site concerned:
- Click on Manage advanced settings:
- Click on the PHP / Apache tab:
- Click on the toggle switch On/Off buttons as desired:

- Click on the Save button at the bottom of the page to validate the changes.
Link to this FAQ:
Has this FAQ been helpful?
This guide explains how to restore backups of previous versions of your files and other web data from your Infomaniak hostings, and how to set up an effective backup policy if the automatically and freely provided backups no longer meet your availability or security needs.
Web Hostings (Starter, Shared, Cloud Server)
Refer to these guides to restore automatic backups:
- of an entire hosting (FTP + MySQL),
- of specific files on the hosting,
- of specific databases,
- of a Web Application (Wordpress & Apps),
- of Cloud Server SSH crons.
Refer to these guides to backup and restore:
- a hosting with Swiss Backup and Restic (advanced),
- WordPress with Swiss Backup,
- WordPress with an extension.
Also refer to https://faq.infomaniak.com/snapshot.
Messaging
- Restore messages from Infomaniak automatic backups.
- Restore contacts or calendar events.
- Backup the current content of an email account:
- by downloading the current content locally,
- by duplicating all current content to a backup box,
- by copying future emails as they arrive to a backup box.
Domains / DNS Zones
- Restore deleted DNS records from Infomaniak automatic backups.
- Restore an expired domain in redemption period.
Link to this FAQ:
Has this FAQ been helpful?
This guide helps you resolve any issues with activating your Windows Server license.
Preamble
- Check for any ongoing issues on https://infomaniakstatus.com/.
- For Public Cloud specifically, the list of scheduled maintenance and ongoing issues is available at https://status.infomaniak.cloud/.
Modify the registered key
Open the Run utility (key Windows logo + R).
Remove the registered key
Run the following command:
cscript.exe c:\windows\system32\slmgr.vbs -upk
Add a new key
Restart the Run utility, then run the following command:
cscript.exe c:\windows\system32\slmgr.vbs -ipk {CLE/KEY}Replace {CLE/KEY} with the key from your configuration below:
| Operating system | KMS key |
|---|---|
| Windows Server 2019 Datacenter | WMDGN-G9PQG-XVVXX-R3X43-63DFG |
| Windows Server 2019 Standard | N69G4-B89J2-4G8F4-WWYCC-J464C |
| Windows Server 2022 Datacenter | WX4NM-KYWYW-QJJR4-XV3QB-6VM33 |
| Windows Server 2022 Standard | VDYBN-27WPP-V4HQT-9VMD4-VMK7H |
| Windows Server 2025 Standard | TVRH6-WHNXV-R9WG3-9XRFY-MY832 |
| Windows Server 2025 Datacenter | D764K-2NDRG-47T6Q-P8T8W-YP6DF |
Activate Windows
Restart the Run utility, then run the following command to associate the key with the Infomaniak activation robot:
cscript.exe c:\windows\system32\slmgr.vbs -skms kms.infomaniak.cloudRestart the Run utility, then finally run the following command to activate your Windows system:
cscript.exe c:\windows\system32\slmgr.vbs -atoLink to this FAQ:
Has this FAQ been helpful?
This guide concerns IonCube Loader, a PHP module that allows decoding of PHP scripts that have been encoded with IonCube Encoder.
Preamble
- IonCube encoding is used to protect the source code of an application and prevent its modification or illegal distribution.
- By using IonCube Loader, website owners can ensure the security of their code and content while allowing secure and easy distribution of their applications.
Using ionCube Loader
With shared hosting it is no longer offered. You can check this from the dashboard:
- Click here to access the management of your site on the Infomaniak Manager (need help?).
- Click directly on the name assigned to the site concerned:
- Click on Manage advanced settings:
- Click on the PHP Extensions tab.
- Click on ionCube Loader (if present in the list) to see the details:

- Here, you will need to consider a Cloud Server.
Link to this FAQ:
Has this FAQ been helpful?
In terms of free software for handling multimedia files, FFmpeg is a powerful and flexible tool. It can be used to convert, edit, and stream videos and audio.
However, using FFmpeg on shared hosting presents certain issues and limitations for both users and hosts.
You should opt for the Cloud Server offer for using FFmpeg.
You can also opt for the Infomaniak VOD/AOD service.
Link to this FAQ:
Has this FAQ been helpful?
This guide explains how to securely and easily transfer files between Web Hosting and/or Cloud Server.
Preamble
- The FXP (File eXchange Protocol) is a method for transferring files directly between two FTP servers without the data passing through the local client.
- Using the FTP PORT and PASV commands, it allows establishing a connection between the two servers for faster and more efficient file transfer, thus saving bandwidth.
- However, this method can present security risks if the connections are not secured by FTPS, and it requires a more complex configuration compared to traditional FTP transfers.
Transferring data between servers
FXP is enabled by default on Cloud Servers and Web Hosting (excluding Starter).
For example, you can use CrossFTP, a multi-platform software that allows FXP (as well as FTP, SFTP, S3, OpenStack Swift…).
Link to this FAQ:
Has this FAQ been helpful?
This guide concerns the ODBC functions of PHP.
The ODBC functions of PHP are only supported on Managed Cloud Server.
Open Database Connectivity functions
These are the functions used to interact with databases via the ODBC (Open Database Connectivity) interface, a standard for accessing data sources uniformly. Here are some examples of using the ODBC functions of PHP:
- Being able to read data from an external database and display it on your website
- Insert or modify data in an external database
- Perform complex queries on an external database
Link to this FAQ:
Has this FAQ been helpful?
This guide covers ImageMagick, a powerful software suite for image manipulation, available on Infomaniak's Web Hosting and Cloud Servers.
Simplified Installation: To install ImageMagick or its extensions, it is recommended to use Fast Installer from your Manager.
ImageMagick and image manipulation solutions
Several tools are available to process your visuals (resizing, conversion, watermarks):
- ImageMagick (CLI): the main suite usable via command line (through SSH); the modern command is
magick, but the old syntaxconvertis still available. - PHP Extension
imagick: this is the most common solution for websites (WordPress, etc.); it allows you to use ImageMagick directly in your PHP scripts. - GD Library: a lighter alternative, often pre-installed, ideal for simple manipulations (thumbnails, text on image).
- PerlMagick: dedicated interface for Perl scripts to access ImageMagick features.
Paths and Commands
On Infomaniak infrastructures, ImageMagick is installed by default. The executables are located in the following directory:
/usr/bin/Here are the main available commands:
| Command | Main Usage |
|---|---|
magick (or convert) | Convert, resize, and transform images. |
identify | Retrieve the metadata of a file (format, size, etc.). |
mogrify | Apply a modification directly to the original file. |
composite | Overlay multiple images (e.g., adding a logo as a watermark). |
To test the presence of the Perl module Image::Magick, you can use the following command:
perl -e 'use Image::Magick; print "Installed\n"';Link to this FAQ:
Has this FAQ been helpful?
This guide details the use of Crontab (crons via SSH), available only on Managed Cloud Server, by default (there is also a task scheduler for all hosting).
Prerequisites
- The script files called by the cron must be executable (CHMOD).
Full path
Cron tasks do not know the absolute path. Calling PHP without specifying the full paths to the executable makes it impossible to execute the task. You must specify
/opt/phpX.X/bin/phpby replacing X.X with the desired PHP version (/opt/php8.1/bin/php for example).
Other operations
For example:
List the crons of the SSH user in question:
crontab -l -u UsernameEdit the crons:
crontab -e -u UsernameBe notified by email of the result of your cron tasks (to be added at the beginning of the file):
MAILTO=e-mail@domain.xyz
Restore a backup
Infomaniak backs up the crons of the last 7 days (once a day). In case of accidental deletion, contact Infomaniak support to request a restoration specifying the time and date of the deletion.
Link to this FAQ:
Has this FAQ been helpful?
This guide details the header X-Frame-Options, used to protect your site against clickjacking (click hijacking).
The value ALLOW-FROM is now obsolete. To allow a specific domain, it is recommended to use the header Content-Security-Policy (CSP) with the directive frame-ancestors.
Values for the X-Frame-Options header
This header tells the browser whether to allow or not the display of your page in a <frame> or <iframe> tag.
- "DENY" : Complete prohibition. The site cannot be loaded in any frame, even from your own site.
- "SAMEORIGIN" : Allows display in an iframe only if the parent site has the same domain as the content.
Implement the header
Via the .htaccess file (recommended for the entire site) :
Header set X-Frame-Options "SAMEORIGIN"Or via PHP (for a specific page) :
<?php
header('X-Frame-Options: SAMEORIGIN');
?>
The modern alternative: Content-Security-Policy (CSP)
If you need to allow a specific external site (e.g. domain.xyz) to embed your content, do not use X-Frame-Options but the following header in your .htaccess :
Header set Content-Security-Policy "frame-ancestors 'self' https://domain.xyz"This rule allows your own site ('self') as well as domain.xyz to display you in an iframe.
Link to this FAQ:
Has this FAQ been helpful?
This guide details the management of incoming and outgoing connections (incoming and outgoing connections) between your different hosting environments, specifically for remote access to databases.
Database connections between hostings
1. From a Web Hosting (Shared)
If you have a Web Hosting (except for the old offer "v1 - 60 Go"), you can establish a connection to databases located on:
- another Web Hosting (shared),
- a Cloud Server type hosting.
This flexibility allows you to share a database between multiple sites, establish remote connections, or configure cross-access between your services.
2. From a Cloud Server
With a Cloud Server, it is possible to connect to databases hosted on another Cloud Server in your fleet:
- Make sure that port
3306(protocolTCP) is open for incoming traffic in your firewall. - If you restrict access to certain addresses, check the rules for the
IPv4andIPv6protocols.
Important note: outgoing connections from a Cloud Server to the databases of a shared hosting are not allowed.
3. From an external provider
If you want to access your MySQL databases from a server or a tool located outside the Infomaniak infrastructure (third-party provider, local application, etc.), refer to this other guide.
Link to this FAQ:
Has this FAQ been helpful?
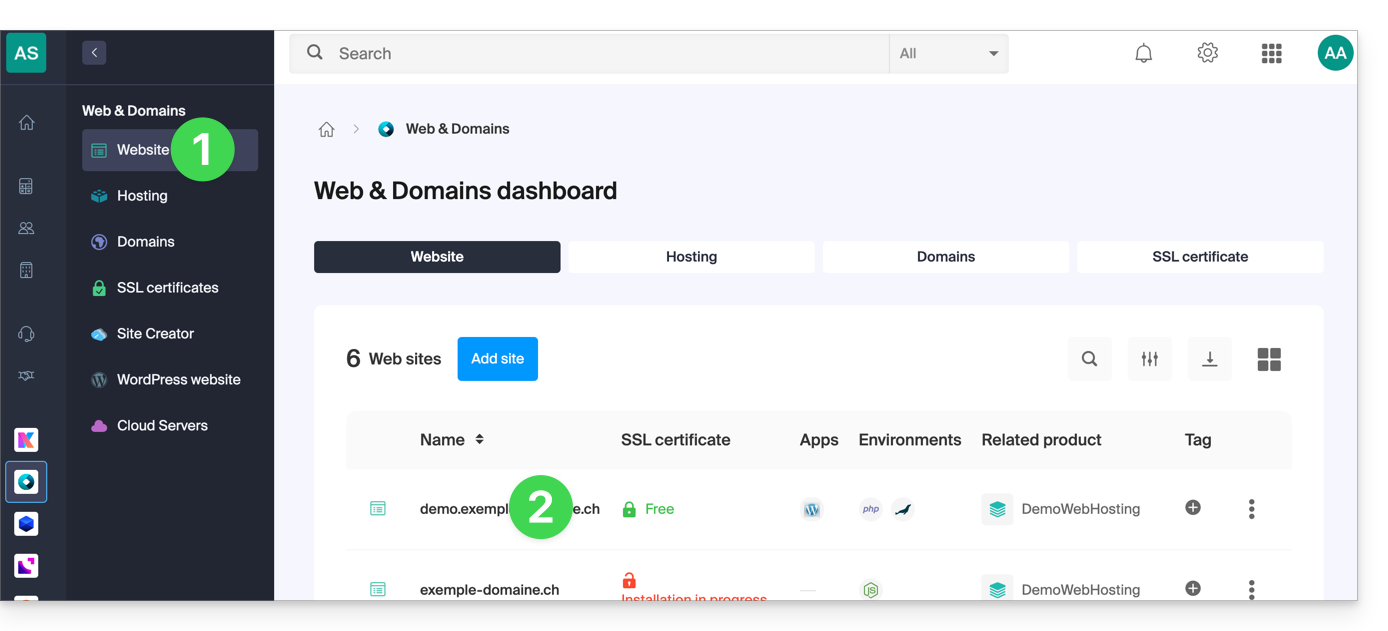
This guide explains how to enable or disable the PHP function set_time_limit for a Web Hosting.
Preamble
set_time_limitis a PHP function that sets the time limit for a script, in seconds; if this limit is reached, the script stops and returns a fatal error.set_time_limitcannot be used to set values beyond the script execution time limit (max_execution_time) defined in the Manager.
Enable or disable the PHP set_time_limit function
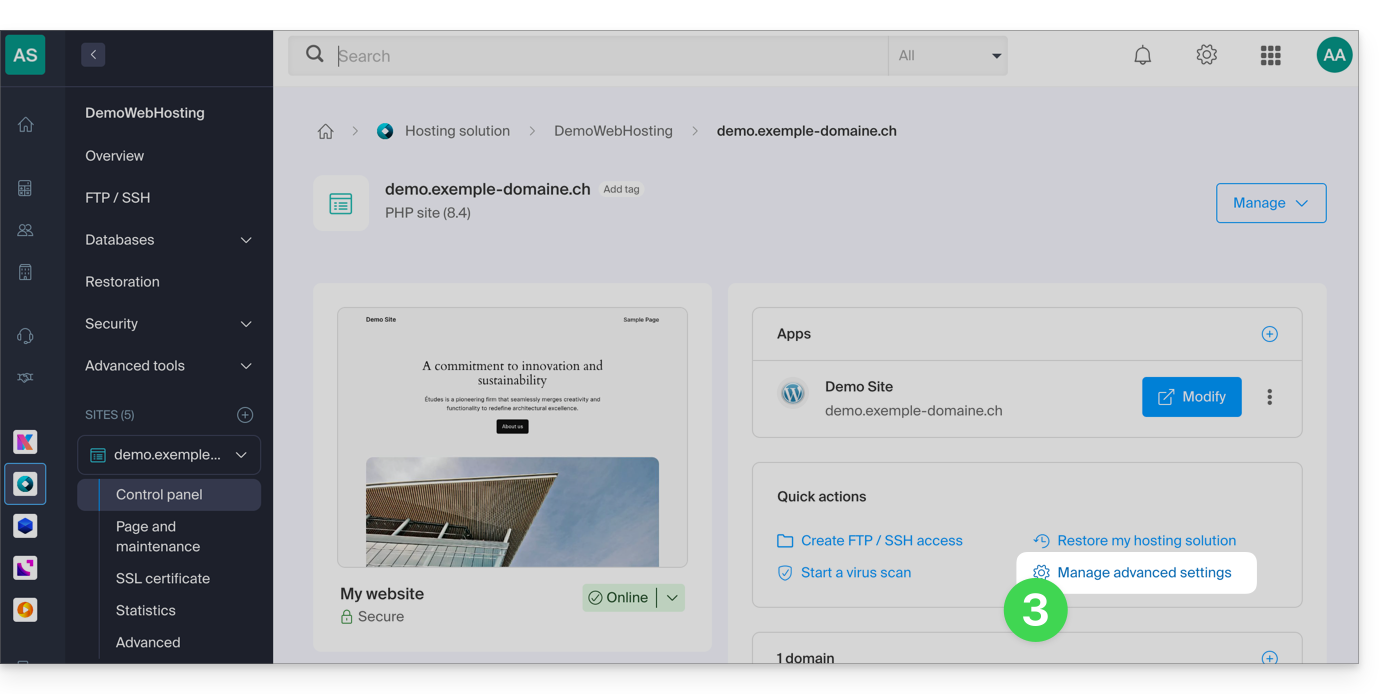
To access the website management:
- Click here to access the management of your site on the Infomaniak Manager (need help?).
- Click directly on the name assigned to the site concerned:
- Click on Manage advanced settings:
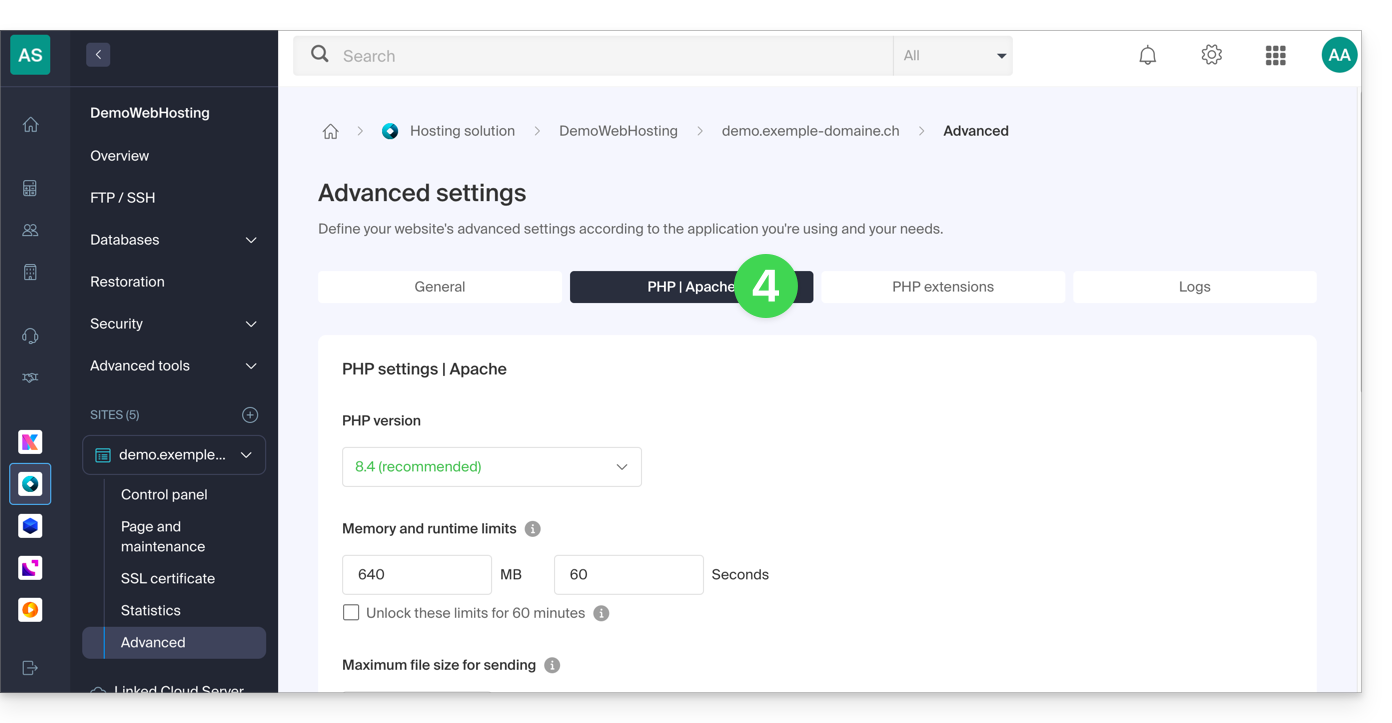
- Click on the tab PHP / Apache:
- Click on the toggle switch button On/Off as desired:
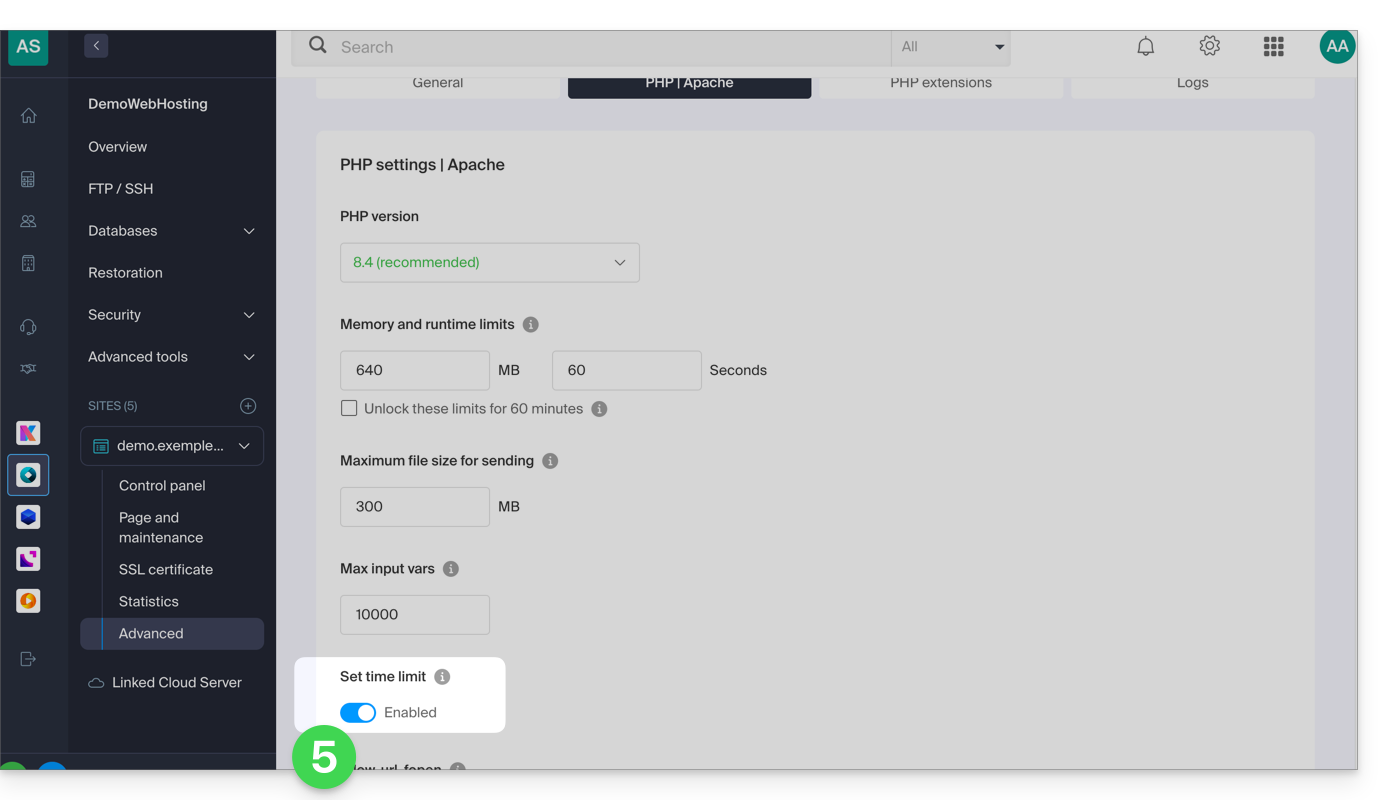
- Click on the Save button at the bottom of the page to validate the changes.
Link to this FAQ:
Has this FAQ been helpful?
This guide covers the database management features available with Infomaniak hosting.
Discover also the high availability managed database solution (DBaaS) hosted in Switzerland, allowing you to easily deploy performant and secure clusters (MySQL, MariaDB, PostgreSQL) without having to manage the underlying infrastructure.
MySQL, SQLite, MariaDB, PostgreSQL…
At the Database Management System, hosting supports…
- … MySQL databases via PHP MySQL access or via Perl DBI+DBD::mysql
- You can use MySQL as a database management system (DBMS) on Infomaniak servers.
- You can access it either via PHP using the built-in MySQL database functions, or via Perl using the DBI and DBD::mysql modules
- … MySQLI, the native MySQL access interface (PHP5)
- MySQLI is a PHP extension that allows access to a MySQL database.
- It is an improved and more recent version of the old MySQL extension of PHP, offering enhanced features and performance.
- … SQLite 3.x
- SQLite is a lightweight, standalone, and serverless SQL database engine.
- Infomaniak servers support SQLite version 3.x, which means you can use SQLite to store data on these servers.
- … MariaDB
- MariaDB is a fork of MySQL and is often used as an alternative to MySQL
- You can therefore use MariaDB as a database management system on Infomaniak servers
- … the PGSQL module
- PGSQL is a PHP module that allows you to connect to a PostgreSQL database
- This specific feature allows you to connect to a REMOTE PostgreSQL database via PHP; this requires opening the appropriate port to the specific IP of the PostgreSQL database from the Infomaniak manager.
Dba, dbm, db2, sqlite are not supported, SQL Server neither (it is a database server that requires a Microsoft architecture).
Link to this FAQ:
Has this FAQ been helpful?
This guide explains how to obtain information about the presence of a caching system on a website using the curl command.
Preamble
- In the world of programming and system administration, it is often necessary to determine if a website uses a caching system to improve its performance.
- Caching systems like Fastly are commonly used to temporarily store data to serve it faster to users.
- By following these steps, you will be able to determine if a website uses a caching system to improve its performance and understand the operation and optimization of websites.
Using the curl command
curl is a command-line tool for transferring data using URLs.
The -svo /dev/null option is used to perform a silent request (-s), display detailed information about the request (-v) and redirect the output data to /dev/null to ignore it (/dev/null is a special device on Unix/Linux systems that acts as a trash can). -H "Fastly-Debug: true" is an HTTP header added to the request to request specific Fastly debugging information.
Execute the command
Run the following command from a Terminal type application (command-line interface, CLI / Command Line Interface) on your device:
curl -svo /dev/null [url] -H “Fastly-Debug: true”and replace [url] with the address of the website you want to check.
If the site uses Fastly or another similar caching system, you will see specific debugging information in the command output. The details provided may include information about HTTP requests and responses, as well as information about the cache and performance.
Link to this FAQ:
Has this FAQ been helpful?
This guide explains how to modify the disk space of a hosting on Managed Cloud Server.
Preamble
- The databases are installed on the same Cloud Server, so the disk space for the databases is not limited to the size of the hosting but to the total disk space of the Cloud Server.
- To modify this total disk space, it is necessary to modify the configuration of the Cloud Server.
- To modify this total disk space, it is necessary to modify the configuration of the Cloud Server.
Modify the disk space of a Web hosting
To access the hosting on Cloud Server:
- Click here to access the management of your product on the Infomaniak Manager (need help?).
- Click directly on the name assigned to the product concerned.
- Click on the action menu ⋮ located to the right of the Web hosting concerned, in the Web Hostings section.
- Click on Modify the disk space of the hosting:
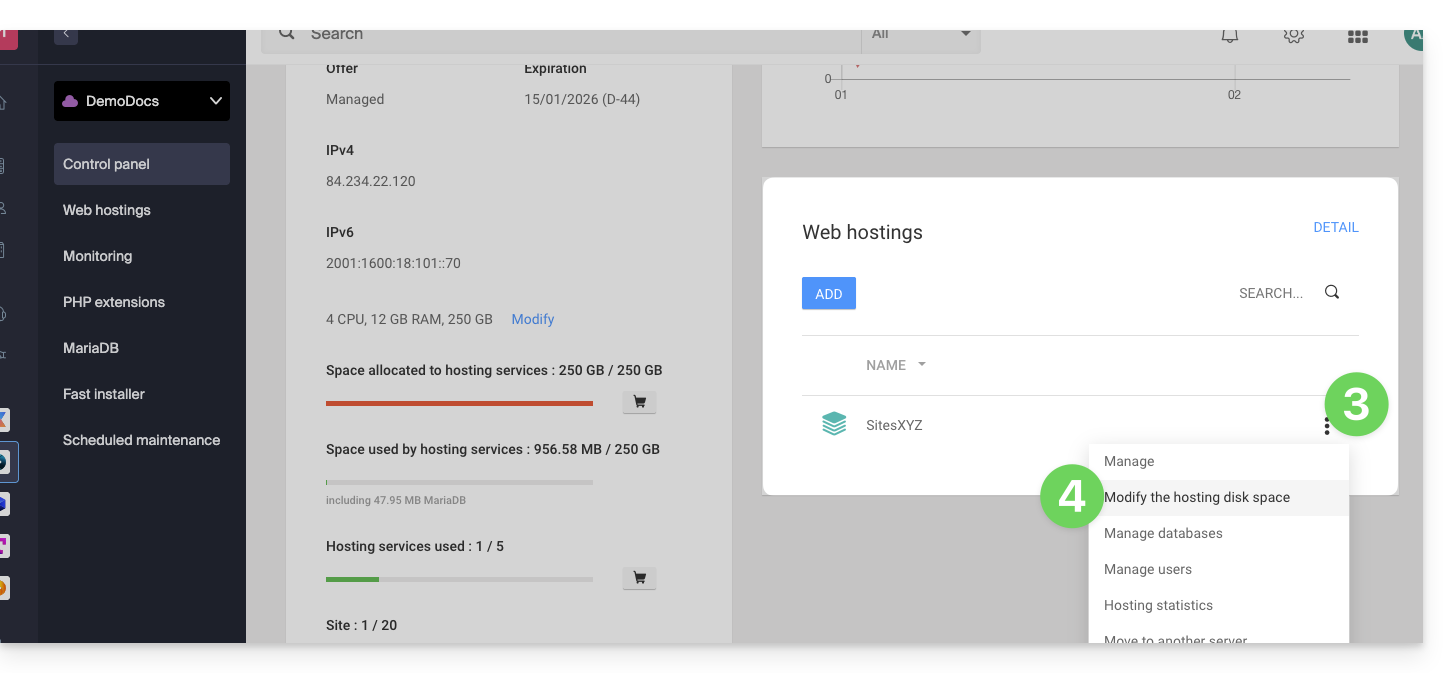
- Adjust the size according to the allocated and still available disk space.
- Click on the Confirm button to validate the modification.
Link to this FAQ:
Has this FAQ been helpful?
This guide helps resolve an error of type "Invalid query: MySQL server has gone away".
Preamble
- This type of error often originates from keeping a MySQL connection open without submitting requests for a period of time beyond which the connection is closed: http://dev.mysql.com/doc/refman/5.7/en/gone-away.html
- The variables
wait_timeoutandinteractive_timeoutthat control this disconnection are set to 30 seconds: http://dev.mysql.com/doc/refman/5.0/en/communication-errors.html
Solutions
To avoid the "MySQL server has gone away" error, here are several possible approaches:
Verification and automatic reconnection
Before executing a query, it is recommended to test if the MySQL connection is still active. If the connection has been closed, you can automatically re-establish it before proceeding with your query. Here is an example in PHP:
if (!mysqli_ping($connexion)) {
mysqli_close($connexion);
$connexion = mysqli_connect($host, $user, $password, $database);
}
The function mysqli_ping() checks if the connection is still valid. If it is not, the script closes the connection and opens a new one.
Regular "Ping" sending
Another method is to run a script that regularly sends a "ping" to the database to keep the connection active. For example, you could create a scheduled task (cron job) that sends a light query, such as SELECT 1; at regular intervals.
Adjusting MySQL parameters (Cloud Server)
With a Cloud Server, you can increase the values of the variables wait_timeout and interactive_timeout from the MySQL menu of your server to extend the duration of the connection before it is closed.
Link to this FAQ:
Has this FAQ been helpful?
This guide concerns Django, an open-source web development framework in Python.
Installing Django
It is possible to install Django on web offers such as VPS Cloud / VPS Lite: discover the different web hostings from Infomaniak.
Link to this FAQ:
Has this FAQ been helpful?
This guide helps you find the public IP address of your device, which can be useful for certain support requests, among other things.
Display the public IP address on the connected device
Click here to obtain the public IP address of your device in IPv4 and IPv6 format.
Alternative methods
Visit ipinfo.io or ifconfig.me.
... on macOS
- From a
Terminaltype application (command-line interface,CLI / Command Line Interface) on your device, run the commandcurl ifconfig.meand press enter. - The displayed address is the public IP address of the computer.
Remember that this address may change periodically, especially if the router restarts or if the internet service provider uses dynamic IP address assignment.
To automate the search for the public IP address, use commands or scripts that query services such as api.ipify.org ...
Link to this FAQ:
Has this FAQ been helpful?