Knowledge base
1000 FAQs, 500 tutorials and instructional videos. Here, there are only solutions!
This guide explains how to use zones in the pricing menu (as part of the Infomaniak ticketing system).
Preamble
- Each event can contain one or more zones, each with its own pricing.
- This allows you to group prices in each zone and manage each zone independently:
- Each zone can contain prices, each with its own ticket quantity.
- Each zone can be assigned or not to the seating plan.
- Each zone and each price can have its own online visibility.

Access the pricing menu
To do this:
- Click here to access the management of your product on the Infomaniak Manager (need help?).
- Click directly on the name assigned to the ticketing concerned by the event.
- Click on Programming in the left sidebar menu.
- Click on Events in the left sidebar menu.
- Click on the event concerned.
- Click on the Pricing tab.
- If the event has multiple dates, this section is replaced by “Dates” which opens a calendar.
- Click on the calendar date to join the pricing…
- Enable zone management. This option will be automatically activated if a seating plan is assigned to the event:

This menu is also offered to you when creating an event.
Adding a zone and a price, managing the parameters of each zone
Here are the important buttons to manage your zones and prices:
Link to this FAQ:
Has this FAQ been helpful?
This guide explains the procedure for creating free entries for your guests (as part of the Infomaniak ticketing system).
Preamble
- The simplest way to create free entries for your guests is to create a free rate, which is not available online, but only from the ticket office.
- This allows you to generate completely free tickets for your shows.
Setting up the invitation rate
In order to create invitations, you must first include an invitation rate in the areas where you want to be able to create this type of entry.
- Click here to access the management of your product on the Infomaniak Manager (need help?).
- Click directly on the name assigned to the ticketing concerned by the event.
- Click on Programming in the left sidebar.
- Click on Events in the left sidebar.
- Click on the event concerned.
- Click on the Pricing tab.
- If the event has multiple dates, this section is replaced by “Dates” which opens a calendar.
- Click on the calendar date to join the pricing…
- Click on Add a rate:

- Add a free rate with the desired name:

- Once the rate is created, click on the visibility option and choose Hidden from customer or Hidden from customer and reseller:

Create the invitation ticket
To create the invitation ticket, go to the ticket office and proceed as a normal sale with the invitation rate:
Link to this FAQ:
Has this FAQ been helpful?
Thank you for choosing my kSuite to manage your emails, save and share your data securely.
These guides help you set up your emails, use kDrive, change your plan, and more.
my kSuite & my kSuite+
- Compare the free and paid versions
- Differences between my kSuite and kSuite (Standard, Pro, Enterprise)
- Explanations about the interfaces available to you
Free email service
Getting started
- Redirect your emails to Infomaniak
- Sync your emails across all your devices
- Import your old emails
- Sync contacts and calendars
- Import your contacts
- Import your calendars
Advanced features
- Customize the Webmail interface
- Manage/Change passwords
- Add a signature
- Set up an automatic reply
- Use keyboard shortcuts
- Check sending limits
- Manage storage space
- Create an address with a custom domain
Free cloud storage
Getting started
Advanced features
Other services
- Organize a video conference with kMeet
- Share sensitive data with kPaste
- Send large files with SwissTransfer
- Consequences of deleting an account
A question or feedback?
- If you encounter any issues, please consult the knowledge base before contacting support.
- Click here to share feedback or a suggestion about an Infomaniak product.
Requests related to free services are processed with limited priority. To benefit from telephone support, opt for a Domains, Web Hosting, Backup, Storage, Marketing, Event or Multimedia offer.
Link to this FAQ:
Has this FAQ been helpful?
This guide explains how to modify certain language settings in the Manager and in my kSuite (Infomaniak Mail, Calendar, Contacts, etc.).
Change the language of your Infomaniak account
To do this:
- Click here (or on the pill with your initials / avatar in the top right of the Infomaniak Manager) to "Manage my account":
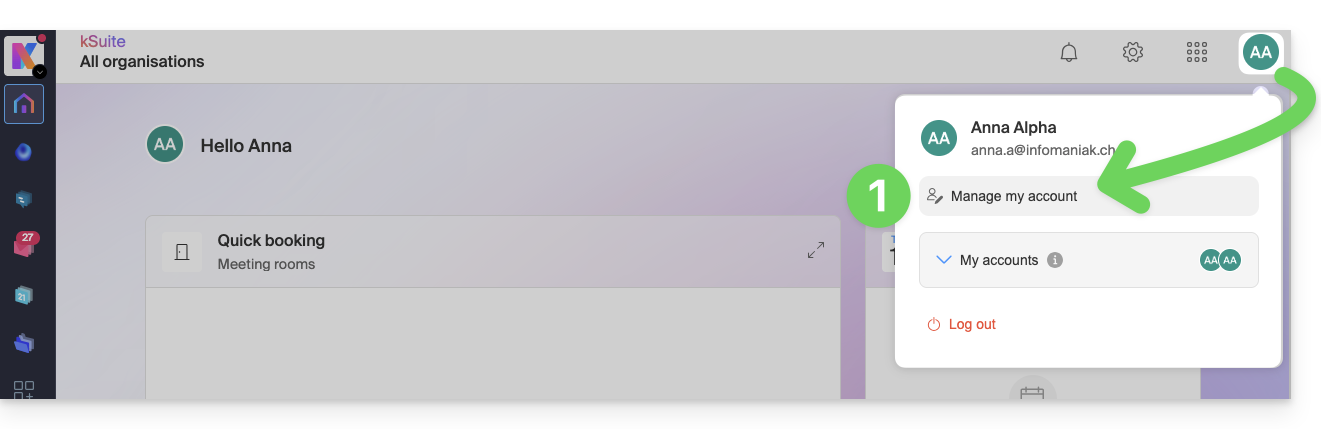
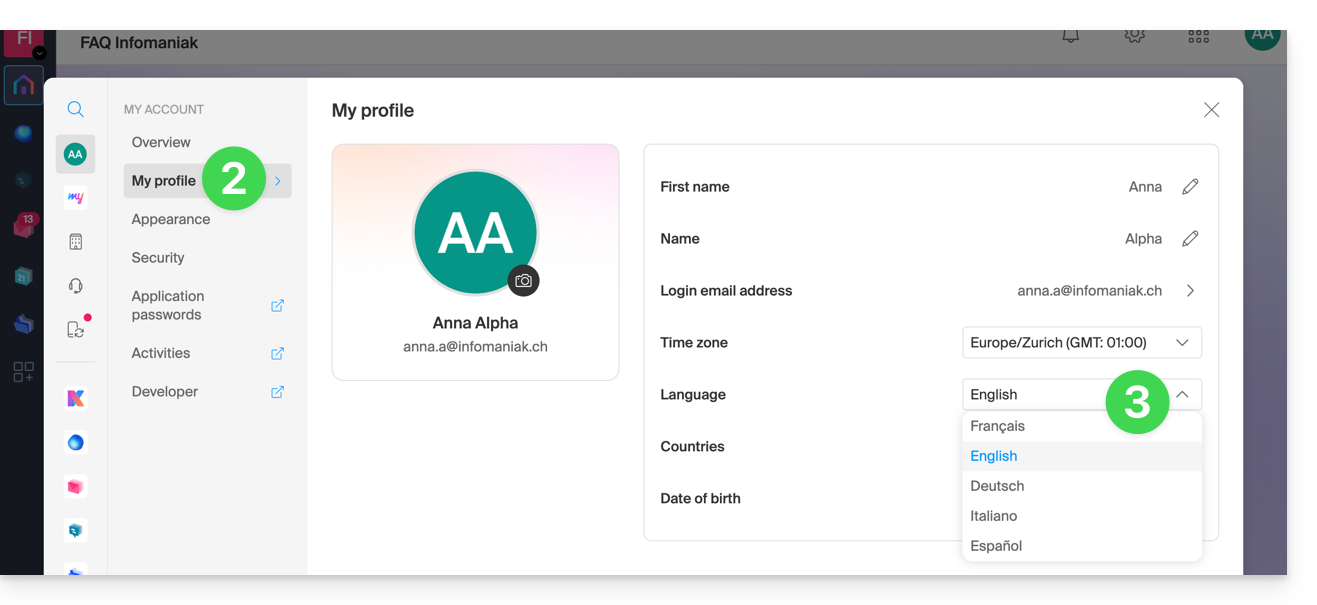
- Click on My profile in the left sidebar.
- Click on the language dropdown menu to choose between French, English, German, Italian, and Spanish:
Change the regional settings of your account
In the same place, you can set the time zone of your region / country: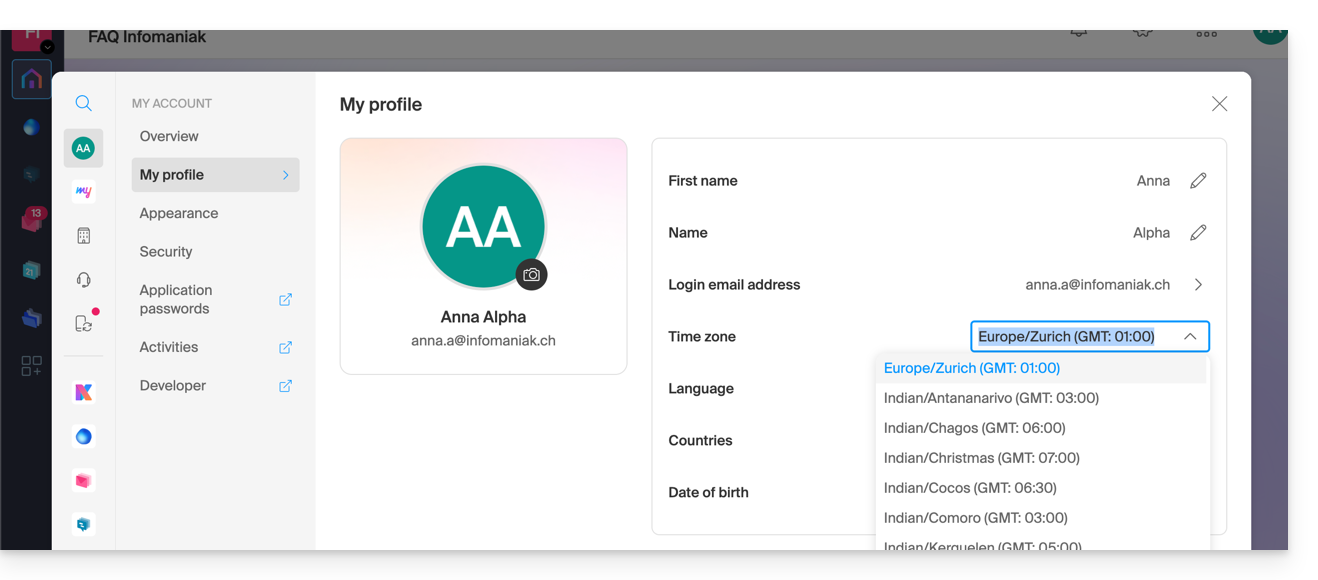
Link to this FAQ:
Has this FAQ been helpful?
This guide explains how to obtain one or more Infomaniak invoices before and after payment, view, download, and print all or part of the billing document history for your accounting.
Prerequisites
- Be Administrator or Legal Representative within the Organization…
- … or a simple user account but with the permission to manage accounting activated:
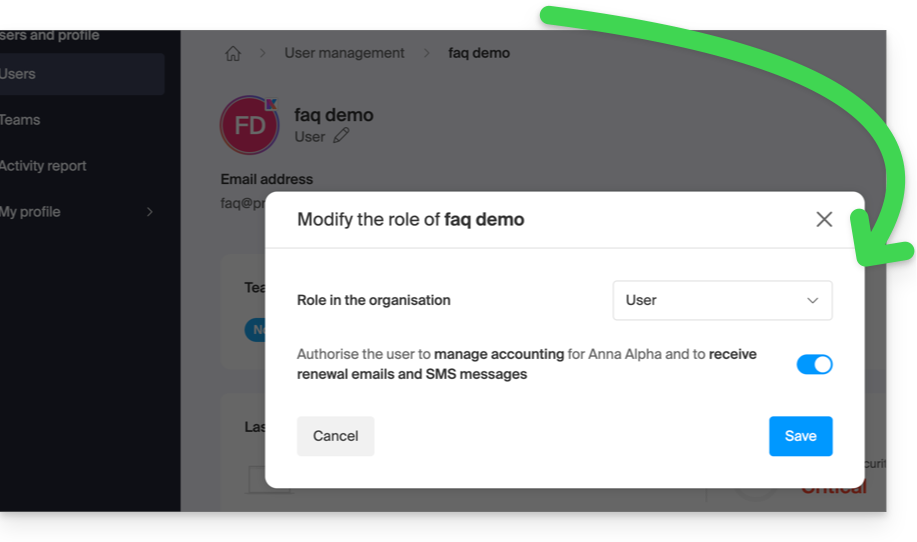
- … or a simple user account but with the permission to manage accounting activated:
Final invoices can only be printed after they have been paid.
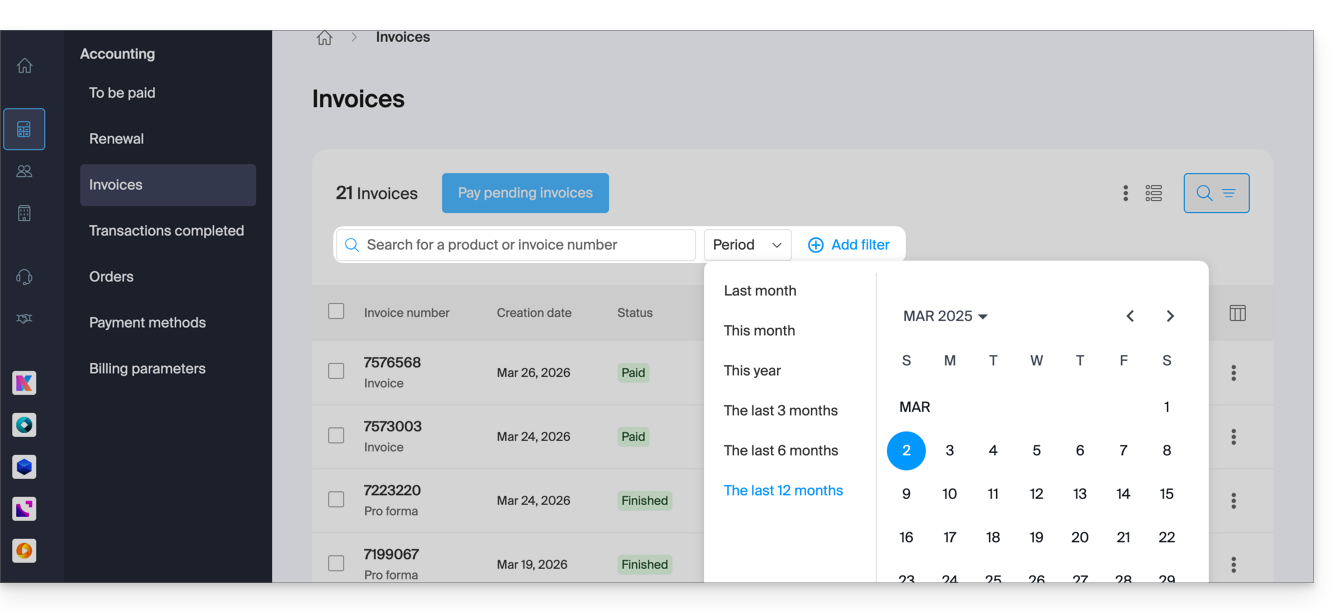
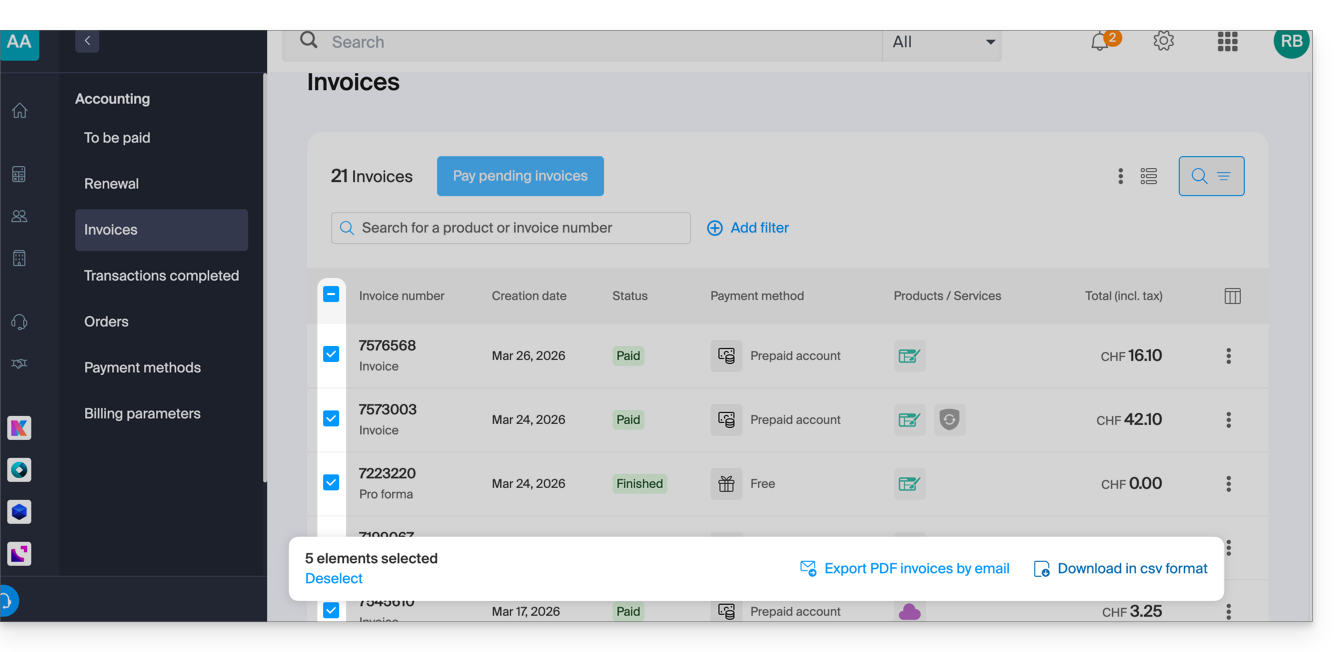
Access invoice history
To go to the billing documents page:
- Click here to access the invoice history on the Infomaniak Manager:
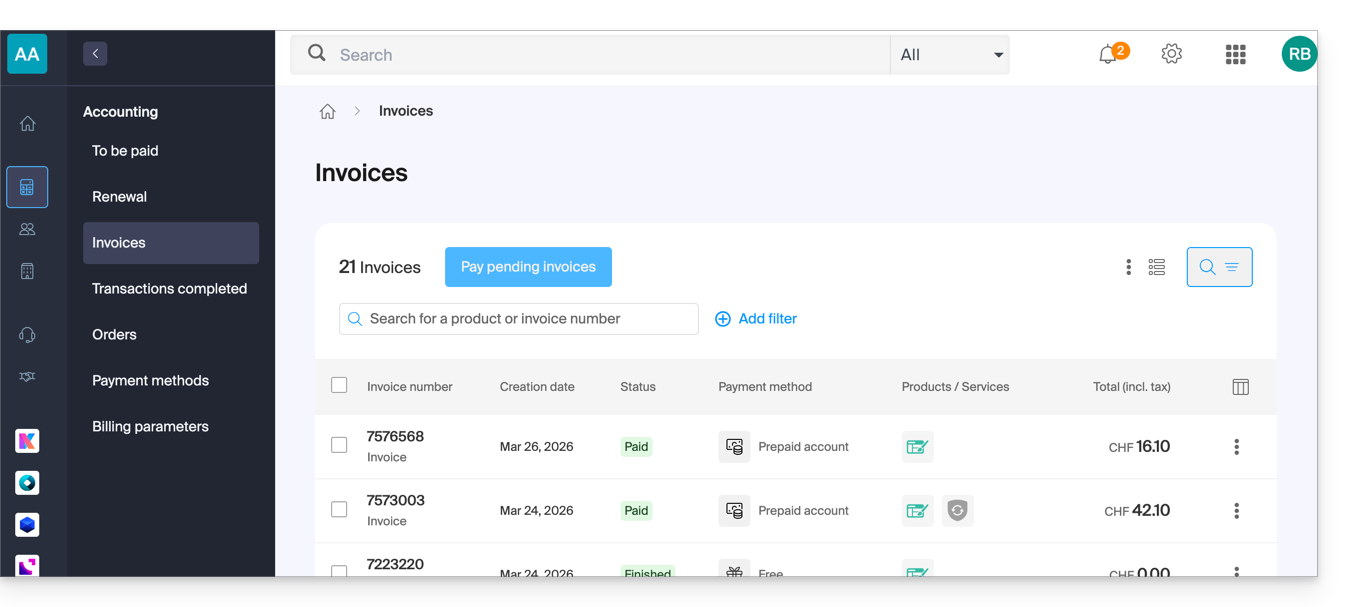
- The table automatically displays the most recent billing documents.
- The top section allows you to filter documents based on the status Paid, Refunded, etc. and based on the desired period (start and end calendar):
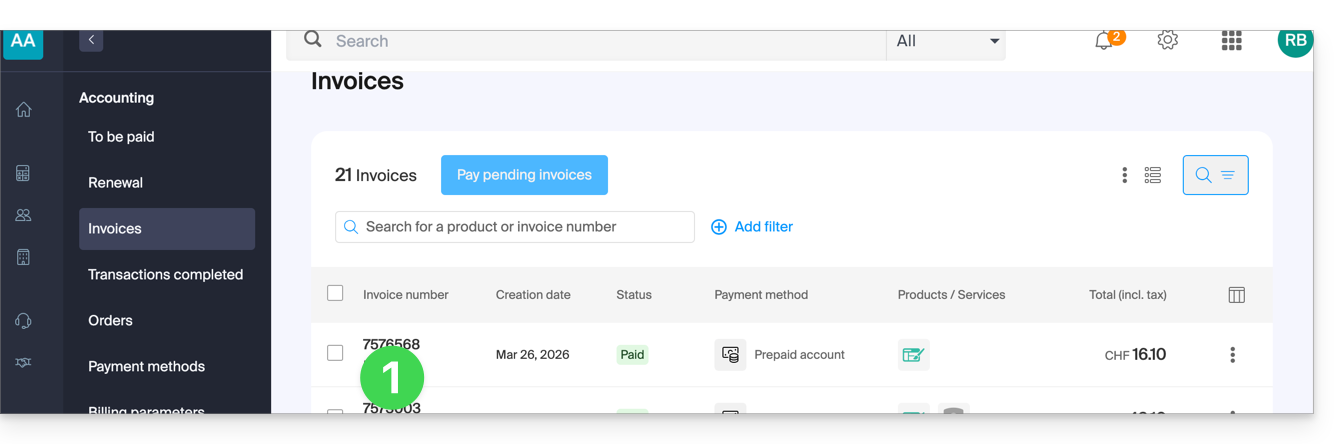
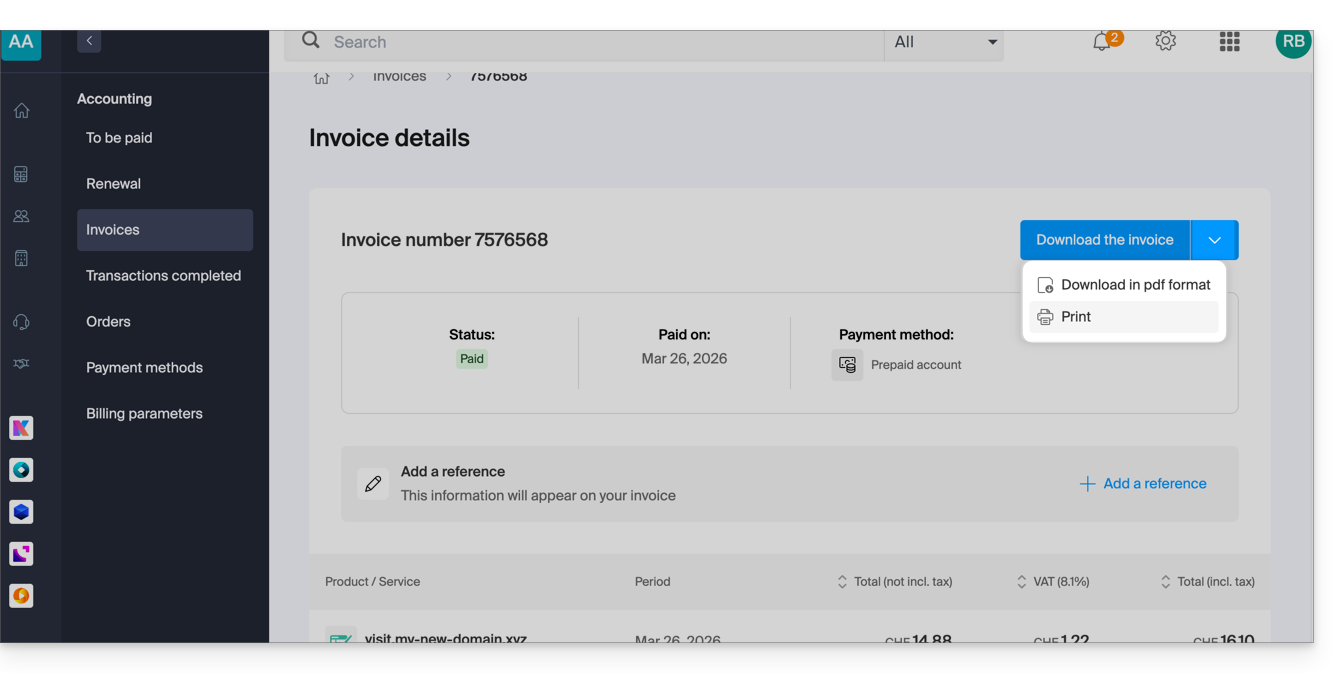
Export one of the billing documents
To view one of these documents in PDF format and then obtain it on your device:
- On the same page, click on the relevant invoice in the displayed table:
- Click on the Download button or the dropdown arrow for other options:
Export a set of billing documents
To download a set of documents in a CSV file in .csv format or receive them by email:
- On the same page, filter the documents based on the status Paid, Refunded, etc. and based on the period desired (start and end calendar).
- Click on the button at the bottom according to the desired type of export:
Receive the (next) PDF invoice by email
For the invoice to always be attached in PDF format with each renewal email:
- Click here to access the configuration / accounting page on the Infomaniak Manager (need help?).
- Access requires authentication with a user who has sufficient rights.
- On this page, enable or disable the addition of PDF invoices:

Your preferences are automatically saved as soon as a change is made on the page.
Print a Pro Forma invoice
Pro Forma invoices have no legal, judicial, tax or accounting value:
- Click here to access payment management on the Infomaniak Manager.
- Select the products concerned.
- Click on Generate a Pro Forma invoice at the bottom of the table
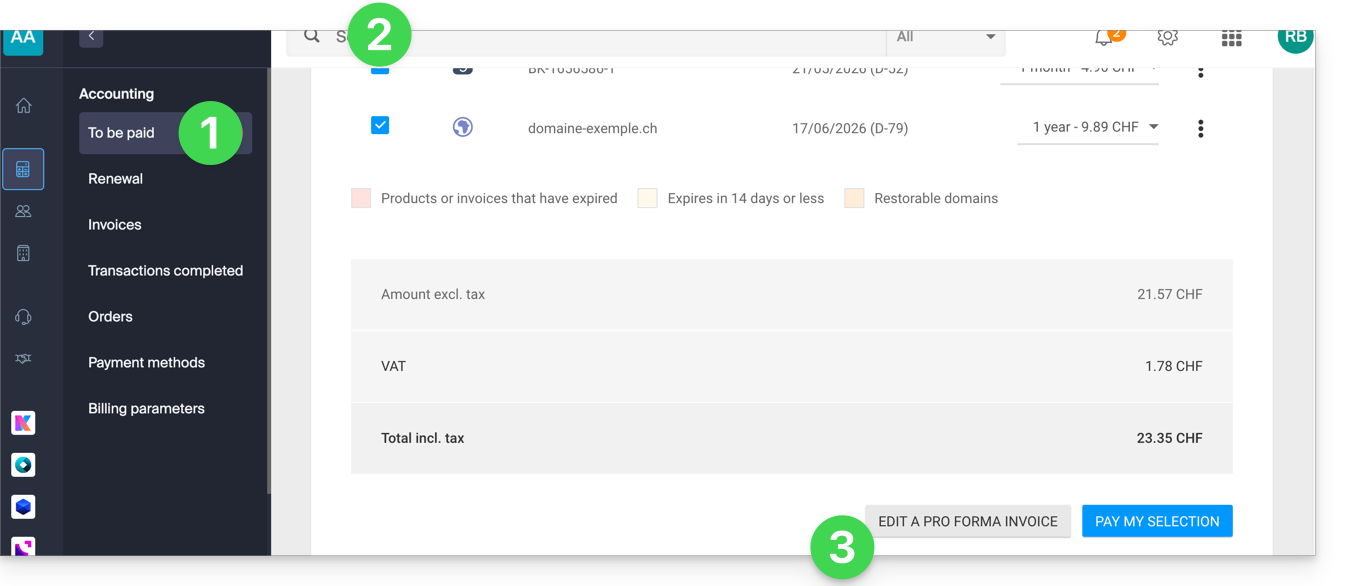
- Once displayed, it is then possible to download the Pro Forma invoice.
Link to this FAQ:
Has this FAQ been helpful?
This guide covers the "Applications" (or "modules", "extensions") available in Site Creator Infomaniak depending on the version you have, to create a showcase site, a blog, or an online store that is 100% customizable, without any technical knowledge.
Different Applications
In addition to the content blocks offering different preformatted layouts, you can also insert blocks in the form of modules, each with a specific function:
- Video
- Audio player
- Image slider / slideshow
- File download
- Location on map
- Poll
- Knowledge base
- Questions and answers
- Calendar
- Calendly
- Sub-page menu
- Site map (sitemap)
- Add to Google
- Custom HTML code
- Contact form
- Blog
- Shop
- RSS feed reader
- Restaurant menu
Insert a module on a page
To insert a module:
- Click here to access the management of your product on the Infomaniak Manager (need help?).
- Click directly on the name assigned to the Site Creator concerned.
- Click on the Edit my site button to start the editor:

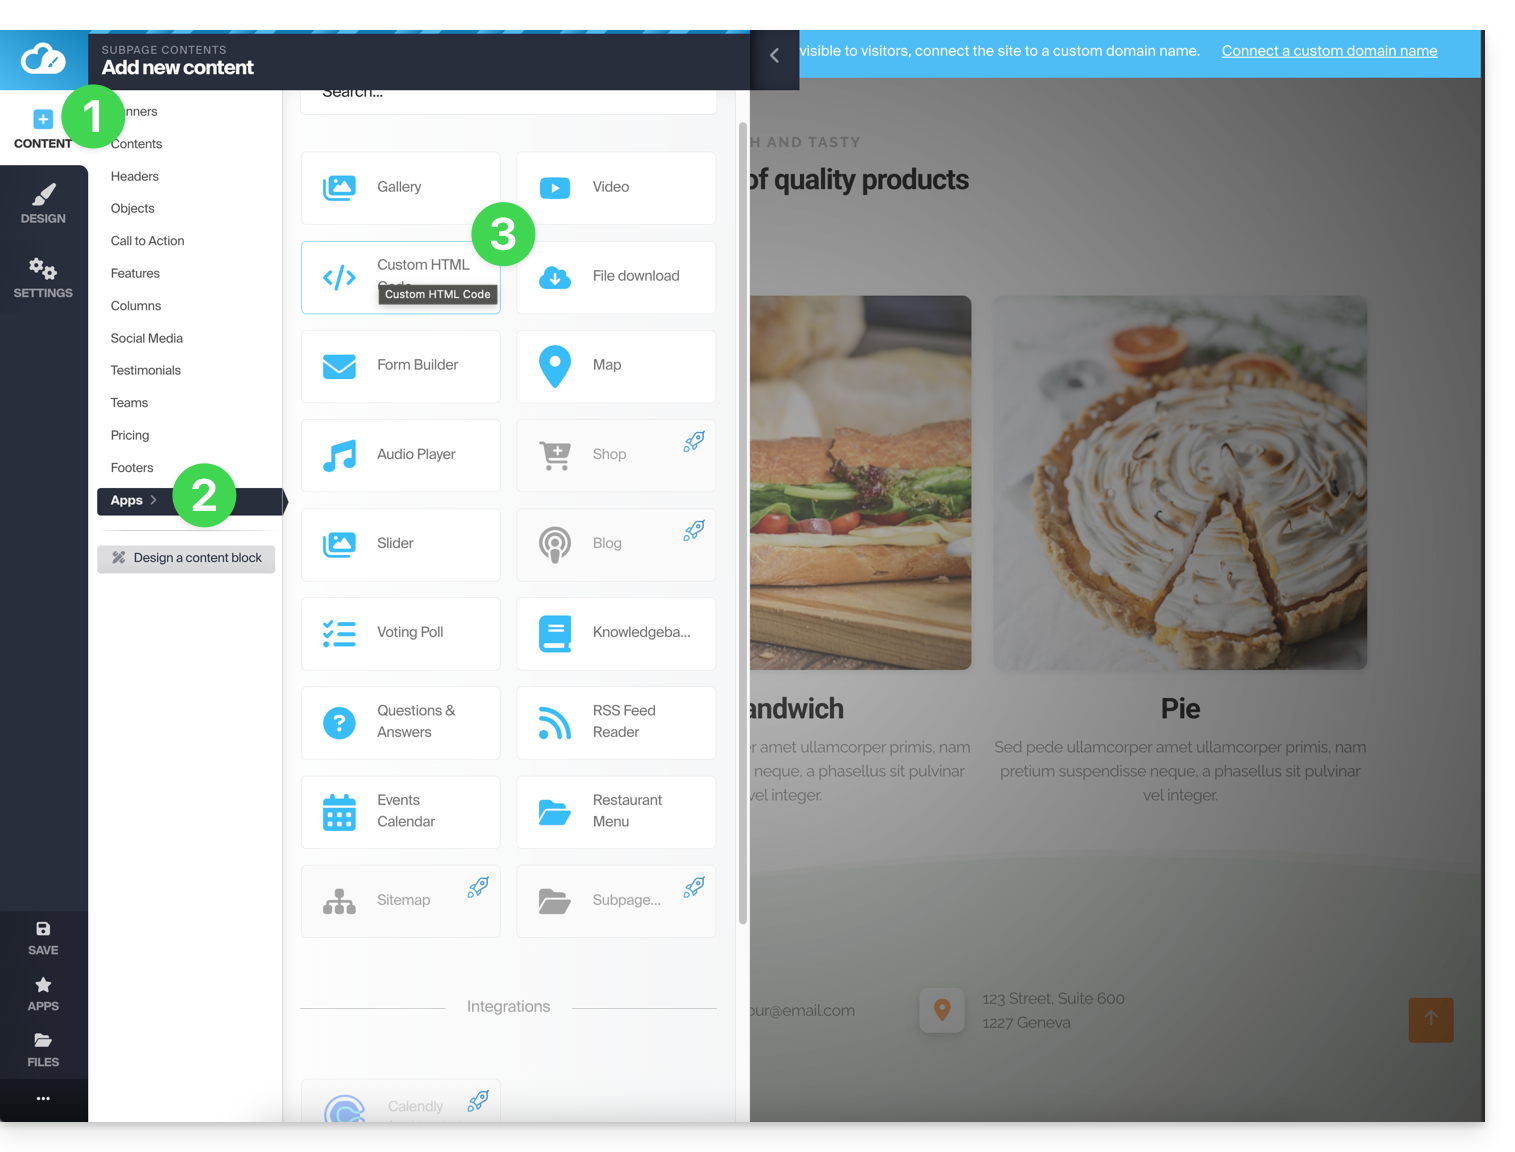
Once in Site Creator:
- Click on the Content button in the left sidebar.
- Click on Applications at the bottom and the content available is displayed on the right.
- Click on one of these applications to insert it into the page:
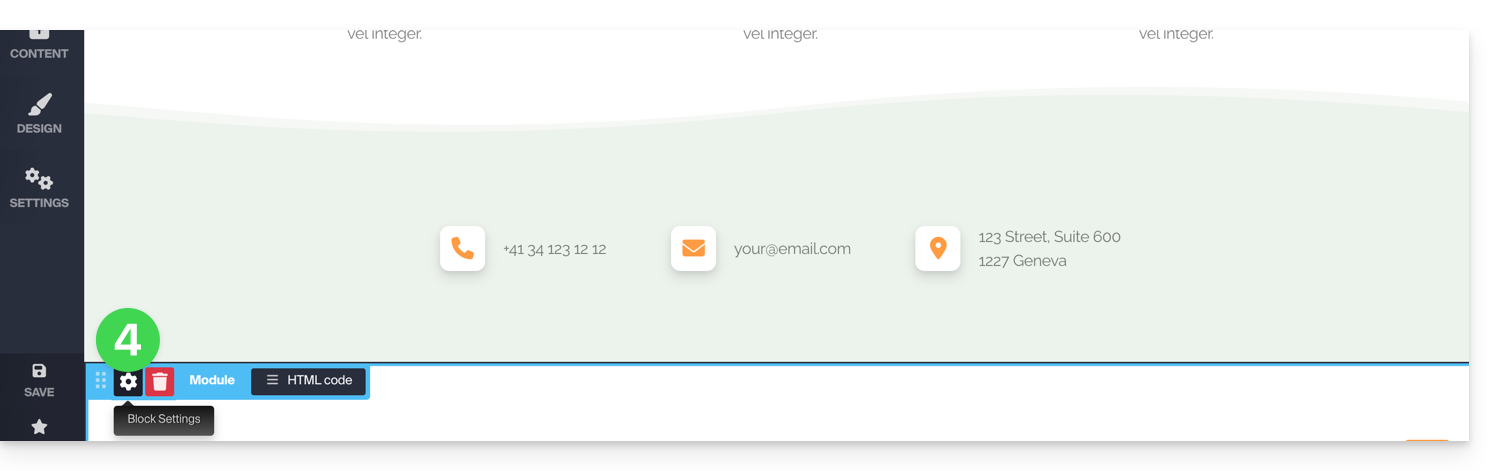
- Once inserted, hover over the module (or the block itself depending on the module) to access its settings:
Multiple module or missing module
If you delete one of your modules (such as the one for creating a survey) that is already configured and want to undo, press Undo immediately:
or
You can also reinsert the module, which should return with its previous settings.
You cannot insert multiple modules of the same type to customize them independently of each other.
Other integrations & widgets
Click on the APPLICATIONS button in the left sidebar of Site Creator: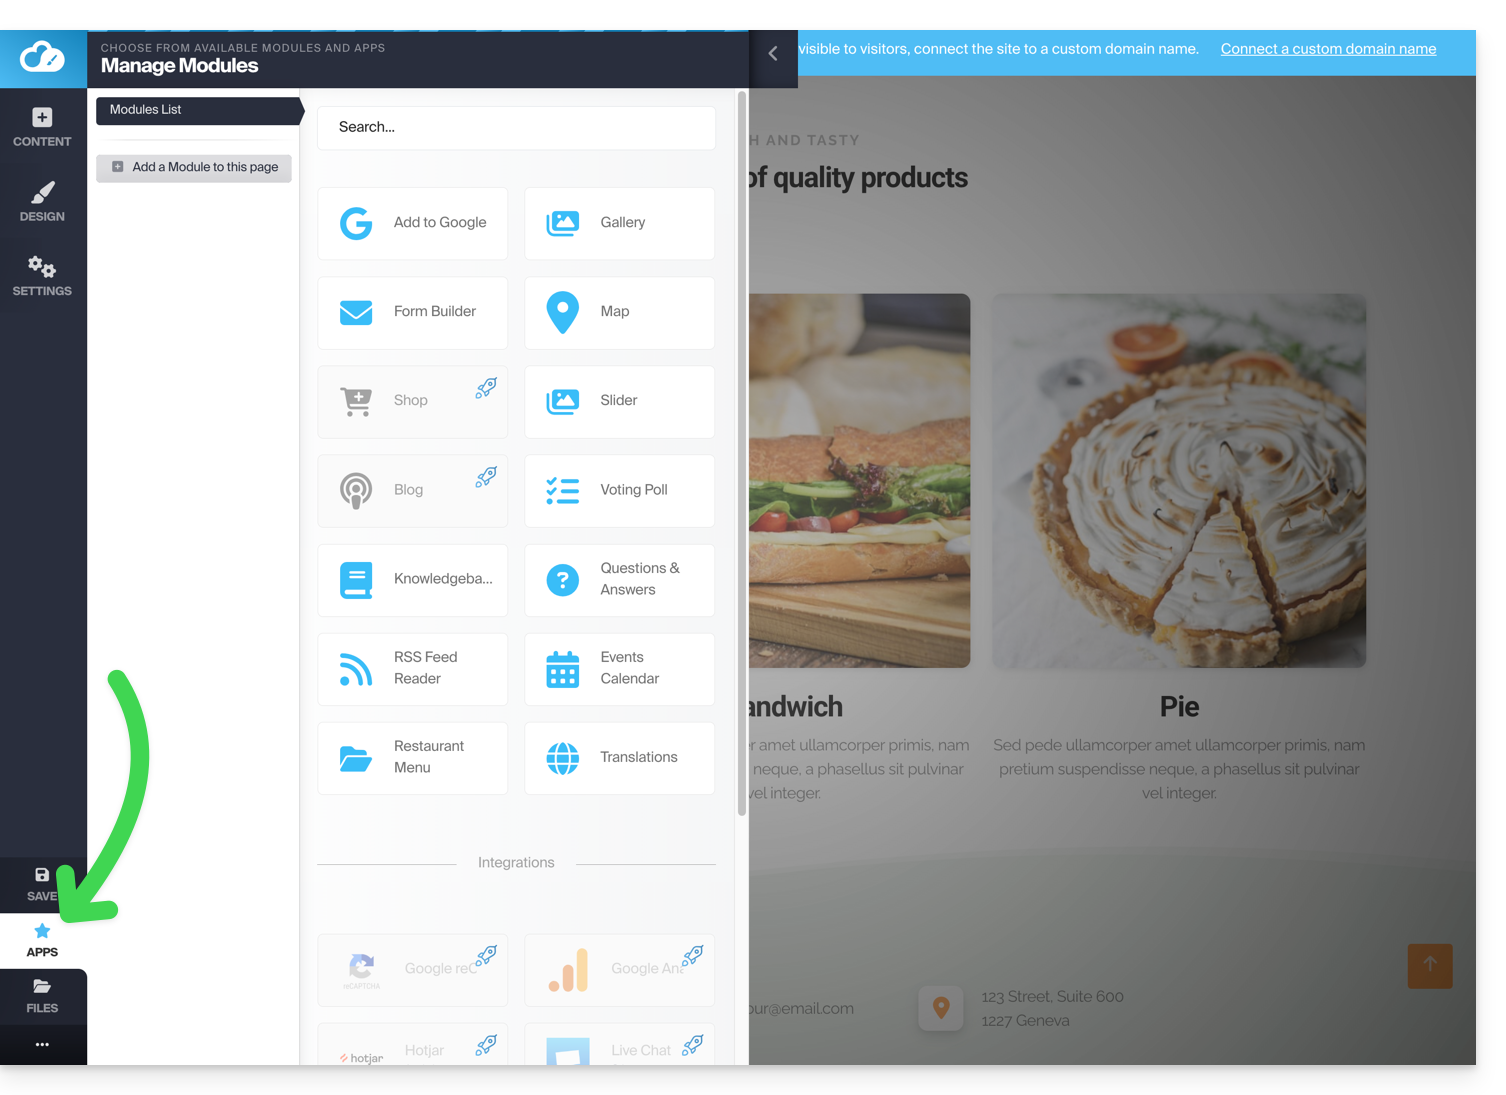
Example: insert a countdown
To add a counter that displays a countdown:
- In the left sidebar, click on the Content button.
- Click on Objects in the list and the available content is displayed on the right.
- Click on one of these objects to insert it on the page:
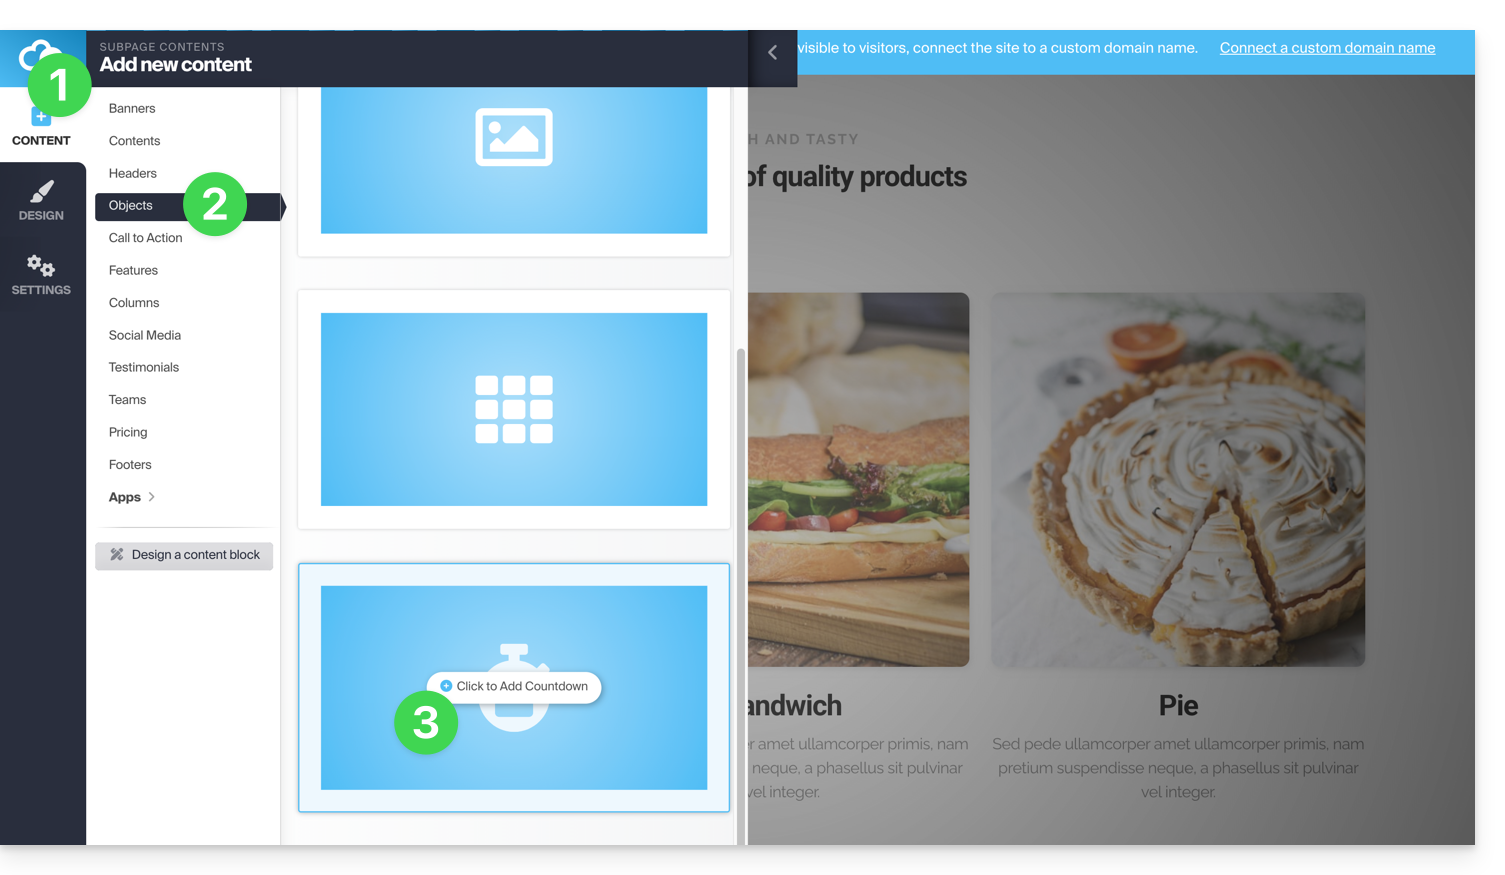
- Once inserted, hover over the module to access its settings:

Link to this FAQ:
Has this FAQ been helpful?
This guide explains how to create events with multiple performances (within the Infomaniak ticketing system).
Create a multi-date event
To do this:
- Click here to access the management of your product on the Infomaniak Manager (need help?).
- Click directly on the name of the ticket office concerned.
- Click on Programming in the left sidebar.
- Click on Events in the left sidebar.
- Click on the Add an event button.
- At the Date and Location step, you can choose the option Multiple performances:

- An interface with a calendar appears, choose the start date of the event.
- You can define whether the event lasts for several days, weeks, months, or if it is recurrent several times in the same day:

- Once the event is created and open for sale, you can track the progress of orders for each date using a List mode display:

Link to this FAQ:
Has this FAQ been helpful?
This guide presents the advantages of kSuite (Standard, Business, Enterprise), the suite of productivity and online collaboration tools developed in Switzerland by Infomaniak.
Preamble
- kSuite simplifies user management in a company and groups your products into a single invoice with a single due date.
- It also includes advanced management of users of all the applications you need to collaborate online.
- You choose the domain name and kSuite is then set up according to your needs in terms of number of users and storage space.
- kSuite is a bundled offer that can be upgraded to a higher offer at any time but it is not possible to change to a lower rate later, nor to transfer kSuite to another Organization.
- The products included in kSuite cannot be moved or canceled independently of each other.
- To help you identify the kSuite offer that best suits your needs, refer to this other guide.
Choosing kSuite over individual apps
The question of choosing kDrive and/or Mail separately, standalone, rather than the suite kSuite may indeed arise.
kSuite is more economical, simplifies user management in a company and groups all your products into a single invoice with a single due date. The offer is recommended from the moment you own or wish to have a domain name that will be associated with it.
It also includes advanced and unified management of users and teams, as well as kChat which cannot be ordered separately.
Here are some other points:
- unlocked features
- 1 single invoice
- address book & dynamic calendar for the Organization
- more important disk storage (per user)
- Custom Brand offered with kSuite Enterprise
In summary, choosing this collection of web tools over individual applications offers advantages in terms of integration, simplified management, real-time collaboration, multi-platform accessibility, and flexibility. These advantages can improve your efficiency, productivity, and overall user experience.
Products included in my kSuite
On your interface ksuite.infomaniak.com you access to: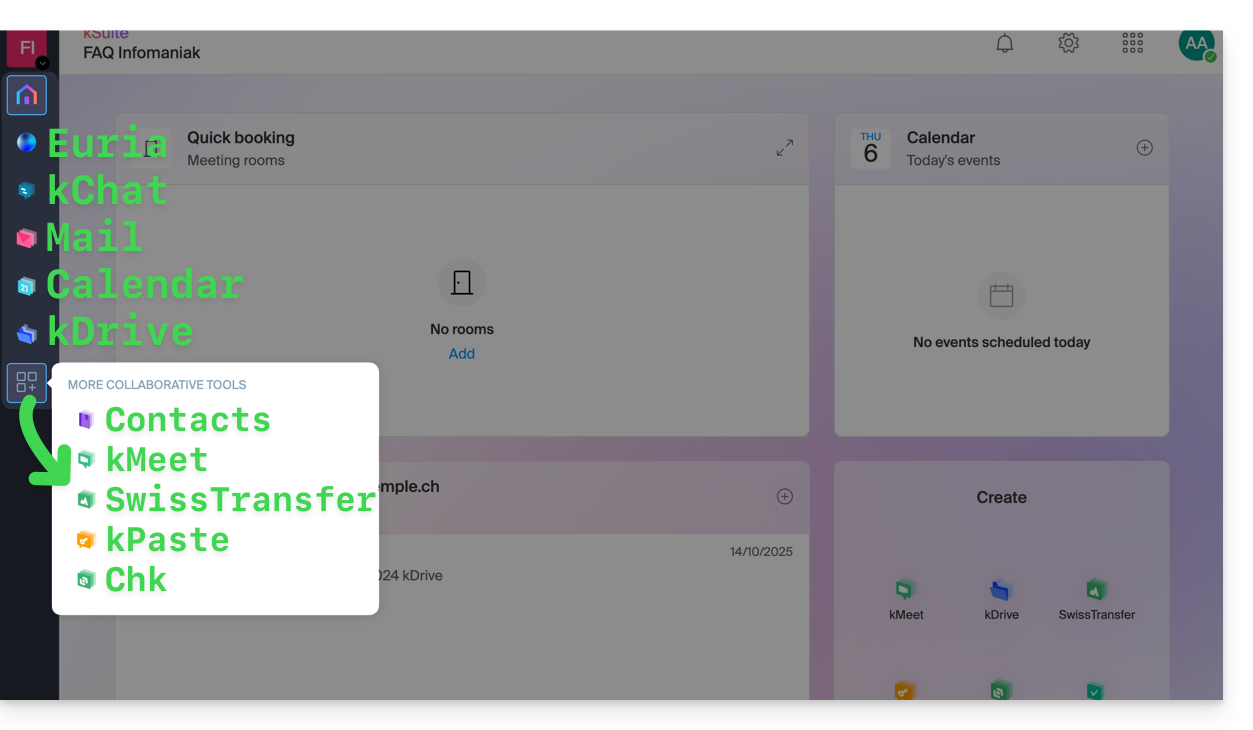
Create, communicate, plan, collaborate, share…
- Euria
- kChat
- A Mail Service (even if you already own a Mail Service)
- Calendar
- kDrive (even if you already own a kDrive)
Also:
Management
- The Manager interface with Custom Brand included or as an option depending on the offer
Are you a Partner or would you like to become one in order to resell my kSuite?
Link to this FAQ:
Has this FAQ been helpful?
This guide allows you to quickly discover the essential features of Euria, the artificial intelligence at your disposal within kSuite, particularly powerful with the Web app kDrive Infomaniak (online service ksuite.infomaniak.com/kdrive).
✘ UNAVAILABLE with
kSuite Free / kSuite Standard
my kSuite / my kSuite+ (ik.me, etik.com, ikmail.com)
kDrive offers (excluding kSuite)
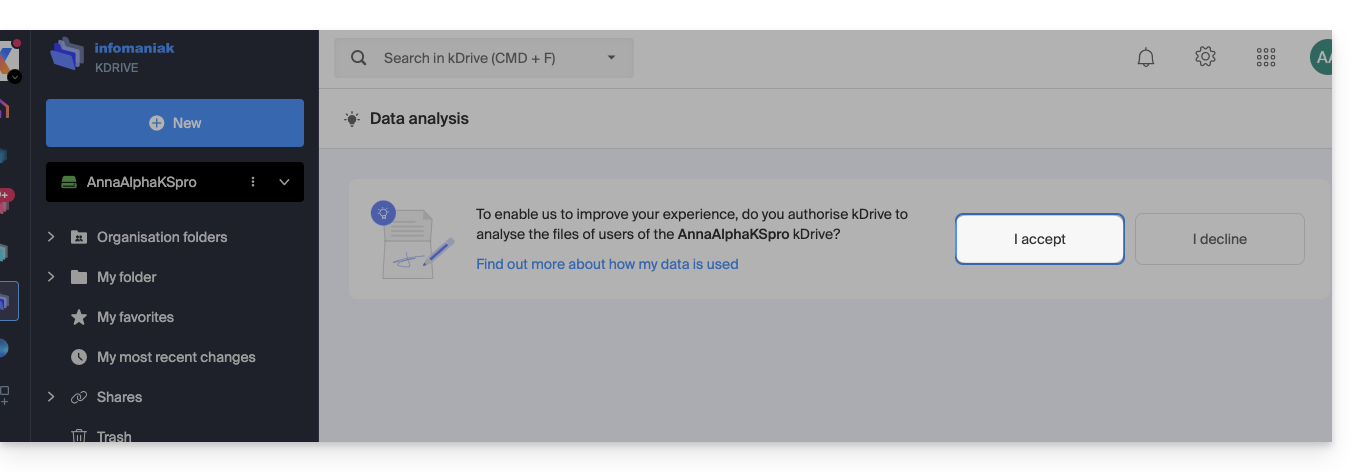
Use AI for your files on kDrive
Prerequisites
- Be Administrator or Legal Representative within the Organization that manages the kDrive.
- To activate Euria for all users of your concerned kDrive, follow the assistant that opens when you log in to kDrive.
- Read and understand this other guide about the model used and the responsibilities of each.
- You can also activate (or deactivate) Euria by going to the unified settings:
- You then need to accept (or revoke) the content search features on documents:
To access Euria on kDrive:
- Click here to access the Web app kDrive Infomaniak (online service ksuite.infomaniak.com/kdrive).
- Open a PDF document (Euria is also available with other text/code file types:
.md,.txt,.json,.php, etc.) or right-click on the file in question: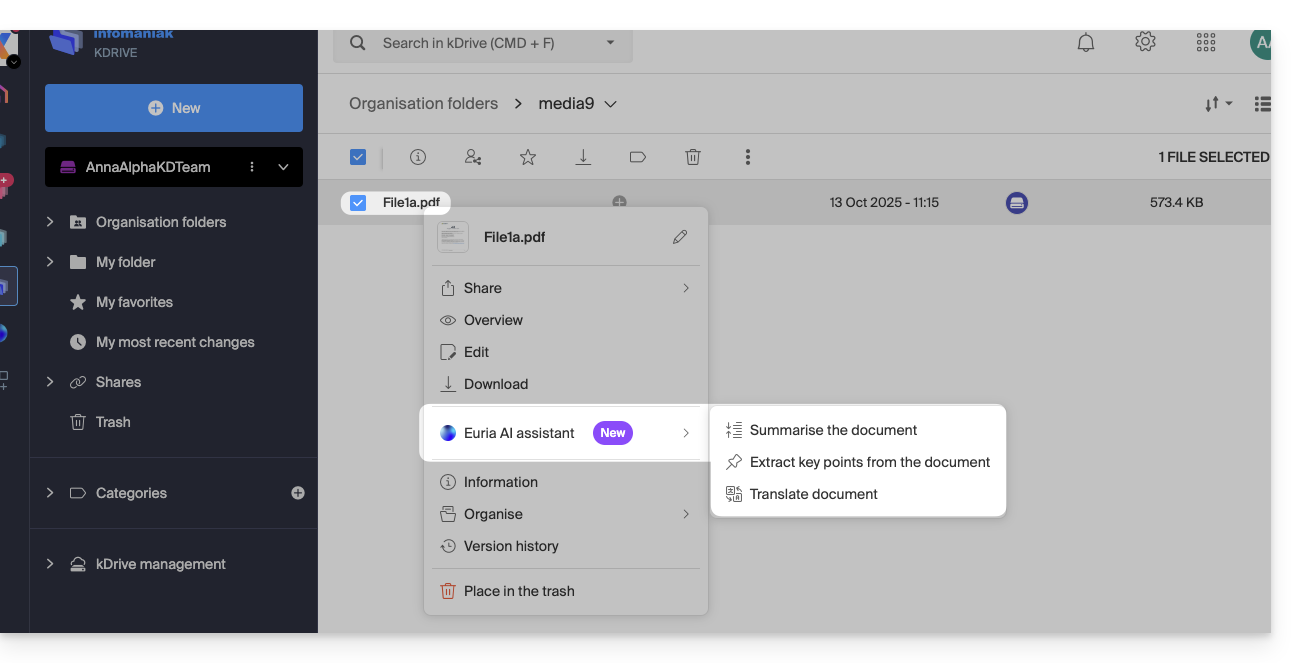
- Euria will open in a right-side panel; if you close it, Euria remains accessible via the round icon located at the top right:
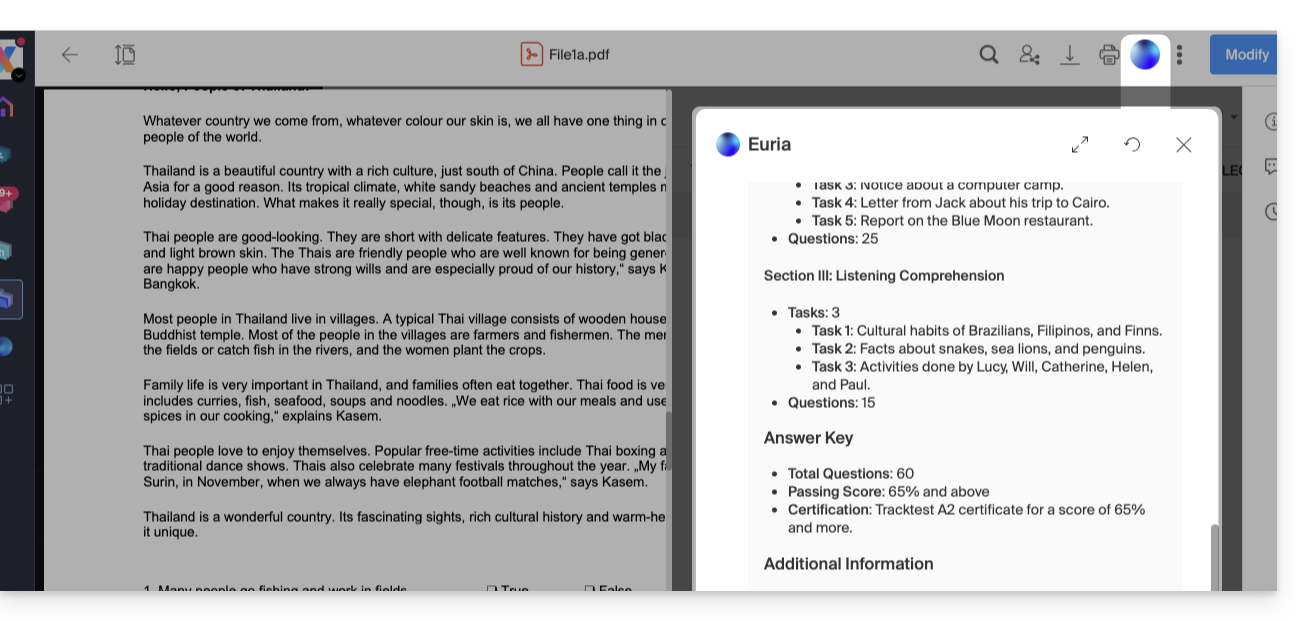
How can Euria help?
Euria helps you effectively use the document you have opened (and only that one); it can, in particular:
- answer your questions about its content (details, statistics, changes)
- summarize the key points (even simplify them and even more so if you specify “for a 10-year-old child”…)
- translate it
- provide metadata (size, creation or modification date)
- explain the terms or acronyms that appear in it
For example, if the document is a long company report on the past year, you can ask for the current size of the Development department, which projects are top priority, or the last date the document was modified…
Create an event for your agenda
With a document mentioning an appointment (medical, for example), you can ask Euria to create a piece of code that, once copied and pasted into an appropriate file, will allow you to add an event to your calendar. Example: “Create an ics format event using the details of this appointment”.
Euria can also extract events from a more complex document:
Euria will explain what it has done (a VCALENDAR code) and what you will need to do (create a new file with the .ics extension containing the code it has generated, and open it on your computer to import it into your usual calendar app or import it into your kSuite calendar):
Create a family tree of characters
With a book stored on your kDrive, you can ask Euria to create a precise and complete family tree to show the relationships between all the characters. You will thus obtain a list of names/first names with their relationships.
But you can take the experience further by then asking for a “Mermaid” diagram based on this list. You will just need to copy and paste the code proposed by Euria into a tool like mermaid.live:
Analyze a survey, write a blog article
From a survey/report-type document, you can ask Euria to write a new article in the tone you want and addressed to the desired target. Example: “From all this, write a blog article with a catchy title and a text of max 400 words, for a target audience of women aged 30 to 40”.
But you can also ask it to find “what are the biases of this survey” or “which elements would deserve to be deepened or verified”. Euria can thus help you adopt a critical stance towards a survey or report, by pointing out potential gaps, exaggerations, or biases.
It can also rephrase the conclusions of the survey for different audiences (professionals, teenagers, curious readers…), suggest alternative angles for a derived article, or generate titles, introductions, or summaries according to the desired level of complexity.
The goal is to extract as much editorial value as possible from the same source content, by diversifying the forms, tones, and viewpoints.
Link to this FAQ:
Has this FAQ been helpful?
This guide explains how to delete an Infomaniak account (i.e., user account), which means deleting your access to the Manager and/or the Infomaniak Web Mail app ksuite.infomaniak.com/mail.
Preamble
- This operation will immediately delete your calendars and address books.
- All access to the Manager with this identifier will be lost.
- This operation does not delete the email addresses accessed from the account in question (except for some free offers, but in this case, this is specified to you before the deletion operation).
- If the account you are using is the only existing account within an Organization, you must first delete the Organization or appoint someone else to be able to delete your account.
Delete an Infomaniak / Mail account
To access the user profile section:
- Click here to access the My profile menu on the Infomaniak Manager.
- Click on the trash can to the right of your name to delete the account and data:
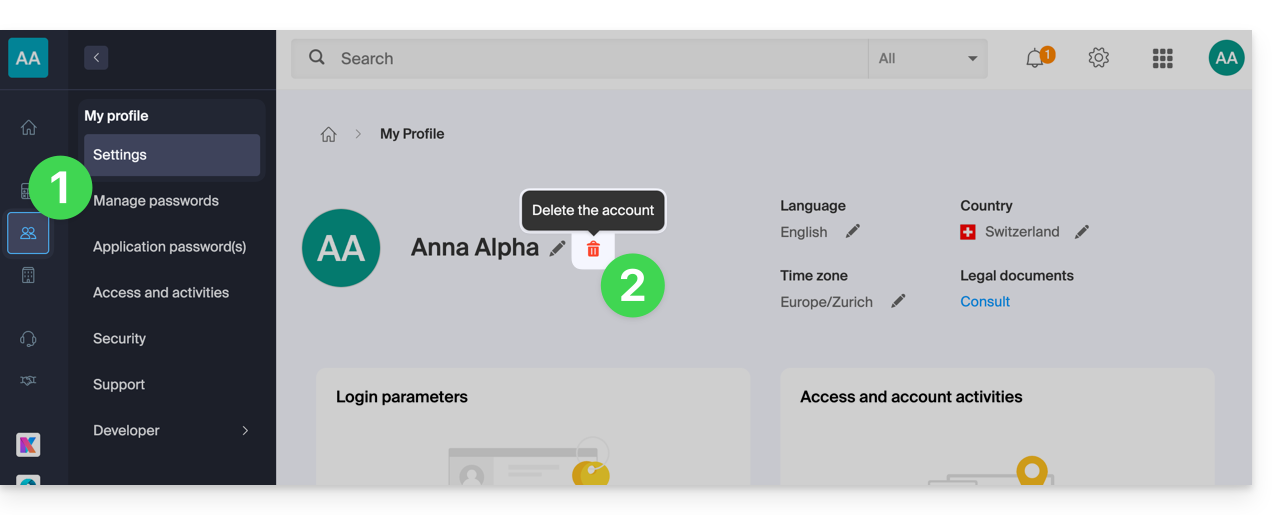
- Enter the login password one last time, then the Infomaniak account will be deleted.
Link to this FAQ:
Has this FAQ been helpful?
This guide details what can be searched on the Web app Mail Infomaniak (online service ksuite.infomaniak.com/mail) or other kSuite services. To search on kDrive refer to this other guide.
Search for an email
On ksuite.infomaniak.com/mail, type in the search bar at the top of the page the term to be found.
The search will be performed within the email address mentioned in the left sidebar (to search across multiple email addresses at once, use an IMAP email client/software to which you connect your different addresses):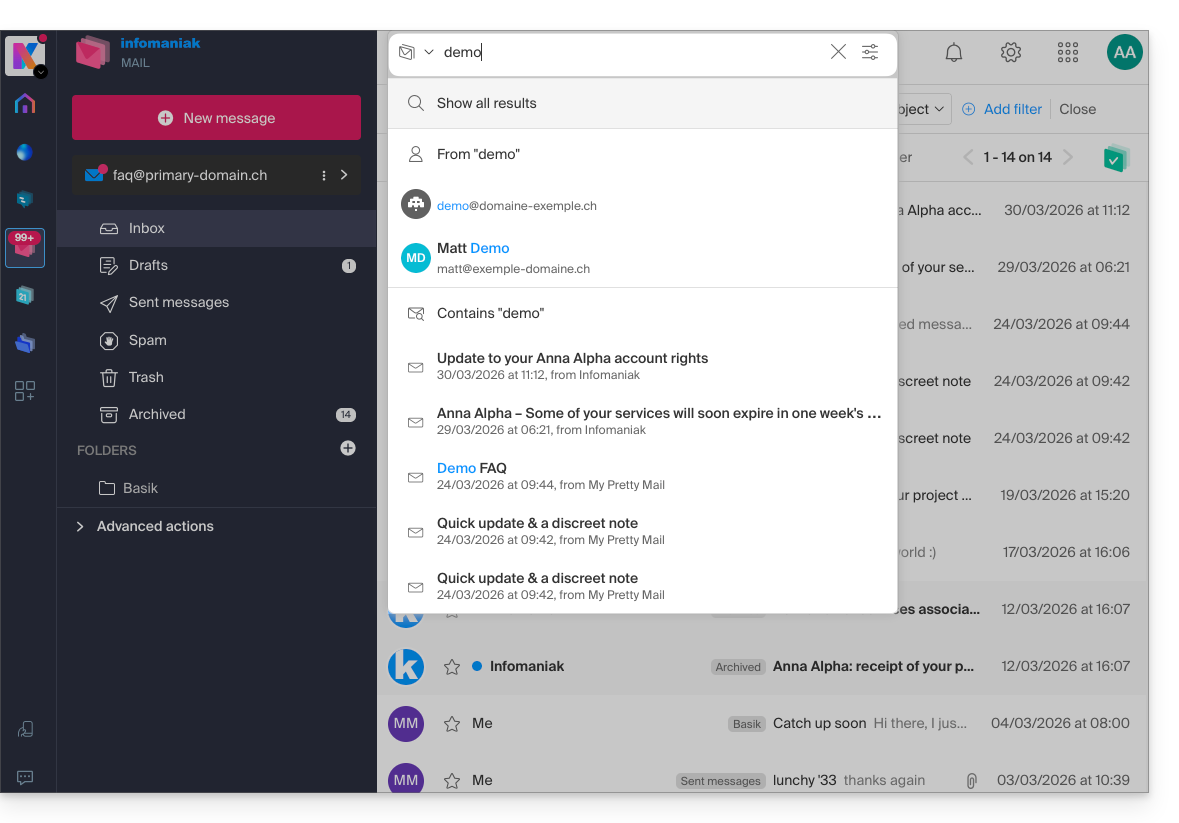
The advanced search is accessible to the right of the search field at the top of your Mail: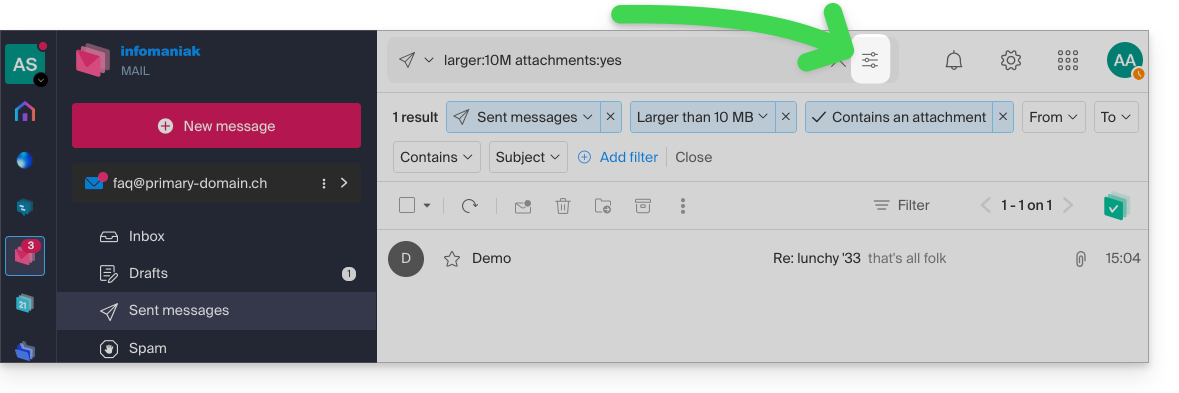
You can search for content…
- either in the body of the message,
- or in its subject,
- or among its senders/recipients…
You can also filter the search by message size and by presence of attachment or not.
Regarding the scope of searches:
- The content of encrypted emails is not indexed (except the subject of the email).
- The content of attachments, as well as their name, is not indexed: it is therefore not possible to find an email by searching for the name of the file that was attached to it.
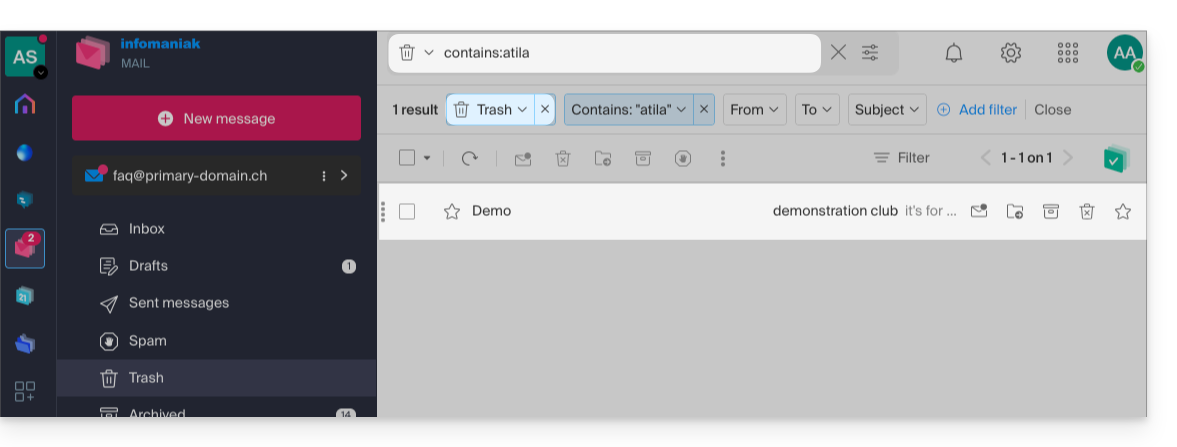
- The mention "Search all emails" does not include the Trash, nor the Spam folder:
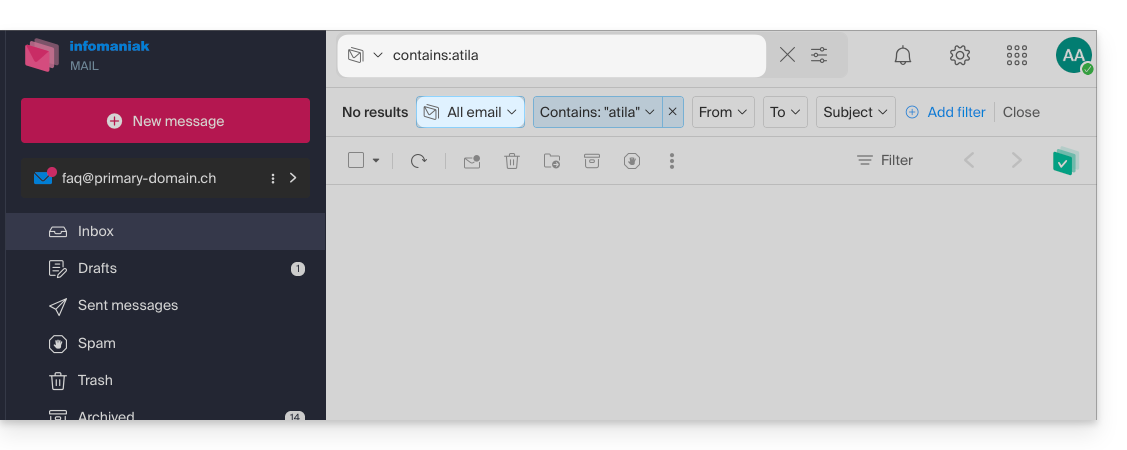
- If a global search yields no results, the email may be in one of these two folders.
- You will then need to go specifically to the Trash or Spam to perform the search there, or launch the search by selecting one of these 2 elements:
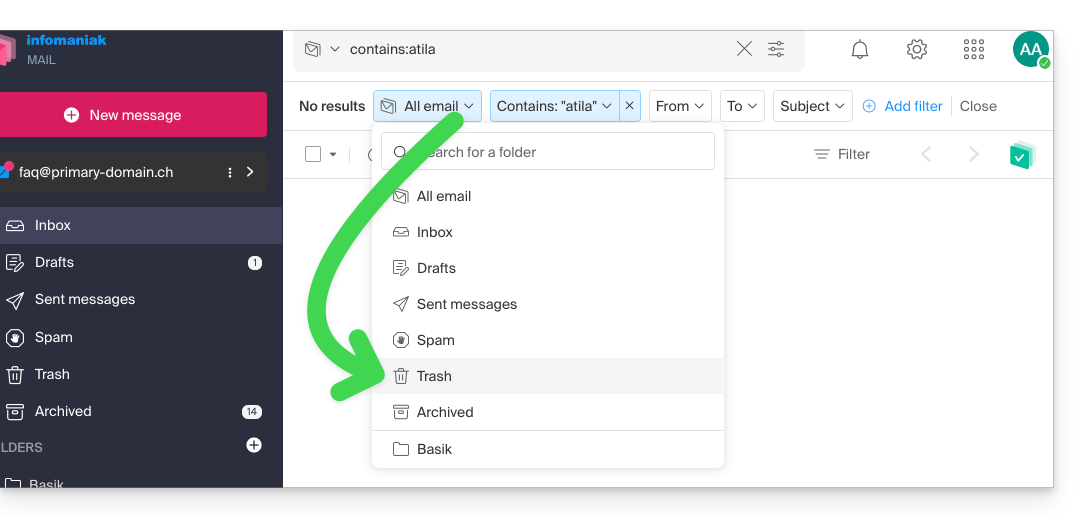
- Any found items will then be displayed:
- Same goes when you want to find a message in a specific directory, it is better to first go there from the left sidebar menu, then perform a search.
To search for the trace of an email or know its activity, you can also search in the logs of an email address.
Email search with a software/email client
To know how your specific messaging application performs searches, consult its documentation. For example, desktop apps (desktop application) Thunderbird and Outlook can synchronize messages locally and perform local searches, while other applications may prefer searching on the IMAP server and in this case, the software/email client sends a search command to the server, which then searches through all messages stored on the server and returns the results to the software/email client.
Search for a contact
The search for an item is performed automatically among all your address books, groups, teams, contacts, thanks to the search field at the top of the interface ksuite.infomaniak.com/contacts: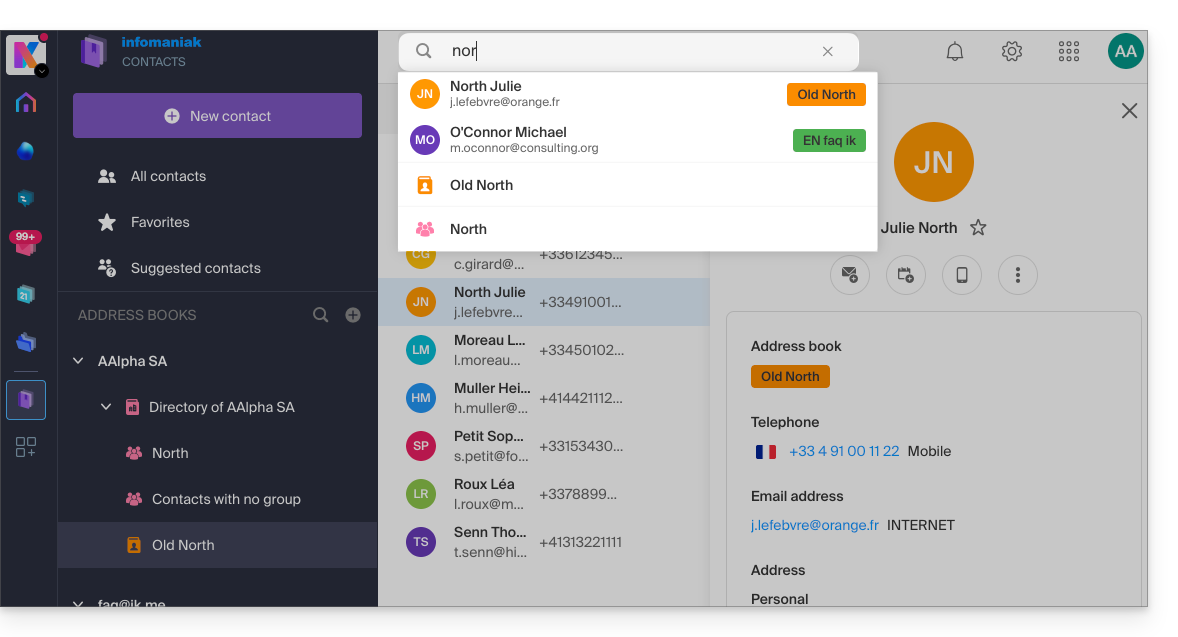
Search for an event
The search for an item on ksuite.infomaniak.com/calendar is performed automatically among all your calendars, events, rooms, including the description of these and the people associated with them (if you click on a contact, you get the events in common with this person):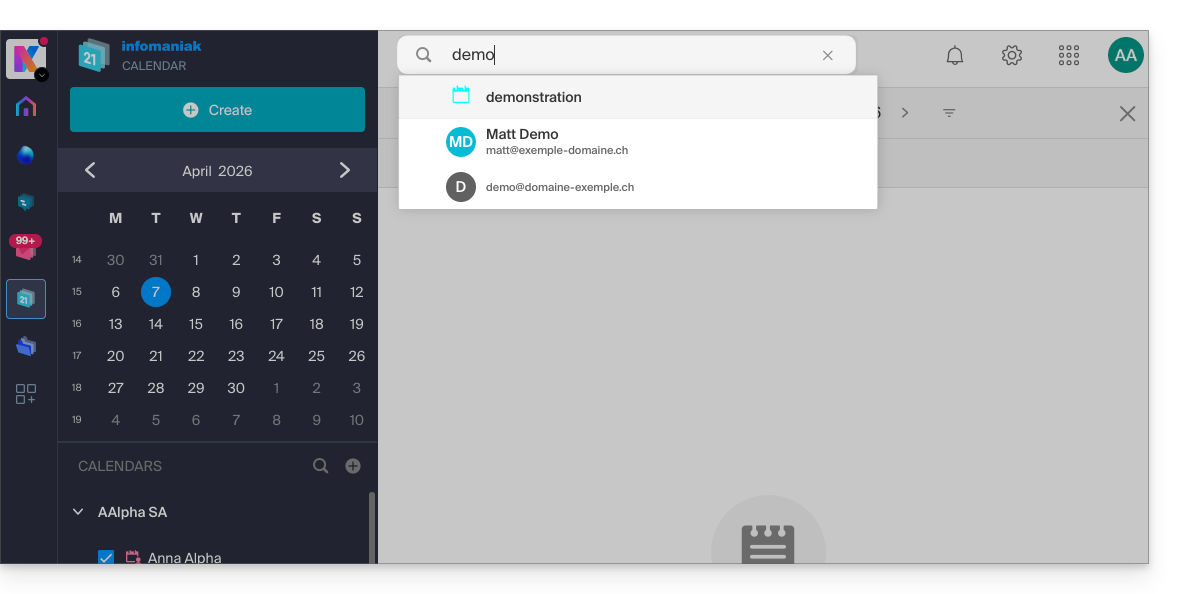
Link to this FAQ:
Has this FAQ been helpful?
This guide details the limitations specific to the my kSuite offer and the advantages of the my kSuite+ offer.
my kSuite limits only
The my kSuite offer imposes certain limits that my kSuite+ does not…
Mail, contacts & calendars
- Disk space limited to 20 GB of storage for emails.
- No advanced mode in message sorting rules.
- "my kSuite" signature imposed.
- No email sharing link.
- 1 address book, 1 calendar.
- Backup retention (30 days) of emails; retrievable by changing the offer.
kDrive
- 1 kDrive drop box.
- 25 kDrive sharing links (and without duration settings, password…).
- Retention of previous versions of your files: 30 versions over 30 days (60 over 120 days for my kSuite+, some of which are permanent).
- 30-day trash (60 for my kSuite+).
- No statistics.
- No editing/signing of PDF files.
Limitation of my kSuite & my kSuite+ offers
Click on the links below to find out the details:
- Offer limited to one address per account (linked to a European phone number).
- Obligation to indicate a valid mobile phone number to confirm registration.
- Limited number of daily email sends, email redirections and unique recipients per message.
- No possibility to create aliases for your email.
- No customizable email signature.
- Email hold and scheduled sending: restricted features (no customization) on my kSuite and customizable with my kSuite+.
- 15 GB of Cloud storage with my kSuite, 1/2/6/12 TB with my kSuite+.
- Registration only possible for individuals residing in OECD member countries (official list), including:
- Germany
- Australia
- Austria
- Belgium
- Canada
- Chile
- Colombia
- South Korea
- Costa Rica
- Denmark
- Spain
- Estonia
- United States
- Finland
- France
- Greece
- Guadeloupe
- French Guiana
- Hungary
- Ireland
- Iceland
- Israel
- Italy
- Japan
- Latvia
- Lithuania
- Luxembourg
- Martinique
- Mayotte
- Mexico
- Monaco
- New Caledonia
- New Zealand
- Norway
- Netherlands
- Poland
- French Polynesia
- Portugal
- Czech Republic
- Réunion
- United Kingdom
- Saint Barthélemy
- Saint Martin
- Saint Pierre and Miquelon
- Slovakia
- Slovenia
- Sweden
- Switzerland
- French Southern Territories
- Turkey
- Wallis and Futuna
my kSuite+ offer
The my kSuite+ offer allows you to send more messages per day to a larger number of unique recipients at once.
To help you identify the my kSuite / kSuite offer most suited to your needs, refer to this other guide.
For sending emails to a large number of recipients, there is a Newsletter tool.
Link to this FAQ:
Has this FAQ been helpful?
This guide details the necessary parameters to configure email sending (scan-to-mail / scan-to-email) from a printer, scanner, or any other device (Hewlett-Packard, Xerox, Canon, Epson, Brothers, etc.) connected via an Infomaniak mail account.
Preamble
- Your device must support SMTP authentication.
- Anonymous sending is not allowed.
- Manually configure your emails, contacts & calendars on your devices
SMTP configuration settings
Use the following settings in your device's configuration interface:
- Outgoing server (SMTP):
mail.infomaniak.com - Port and Security:
465(SSL/TLS) or587(STARTTLS) - Authentication: required /
yes - Username: the full email address (e.g.:
scan@domain.xyz) - Password: the password created for this email address
In case of problems
If the connection fails, check that port 465 or 587 is not blocked by the firewall of your local network.
Also test the connection by temporarily disabling encryption (port 25 or 587 without SSL), although this is strongly discouraged for security reasons.
Link to this FAQ:
Has this FAQ been helpful?
The easiest way to manage your contacts / address books is to use the Infomaniak Web app Contacts (online service ksuite.infomaniak.com/contacts).
This interface offers many advantages:
- No software to install or configure.
- Share address books with other users.
- Saved permanently.
- Synchronize your contacts across devices.
- Secure and respects your privacy, hosted in Switzerland by a neutral and independent company.
How to get started with Infomaniak Contacts?
Whether it's on kSuite or the Mail app, it is essential to log in with your Infomaniak account identifier and its password. This will not work by directly entering a hosted email address that is not an Infomaniak account. Understand the difference
- Click here to access the Infomaniak Web app Contacts (online service ksuite.infomaniak.com/contacts).
What do you want to do?
- Synchronize contacts & calendars on all your devices
- Manage contacts
- Manage duplicates
- Import contacts
- Export contacts
- Group contacts
- Copy or move contacts
- Restore contacts
- Search for contacts
- Share an address book
A question or feedback?
- Contact Infomaniak support
- Click here to share feedback or a suggestion on an Infomaniak product
Link to this FAQ:
Has this FAQ been helpful?
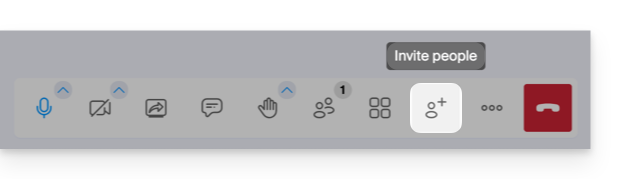
This guide explains how to start an online meeting with kMeet, Infomaniak's ethical free video conferencing solution.
Preamble
- There is no limit to the number of participants with paid my kSuite offers.
- Participants can write in a common chat, annotate a screen share and even control a remote device.
- To create a meeting room in advance and invite participants by creating an associated event in the Infomaniak calendar, refer to this other guide.
- It is also possible to share the video stream within a Video Streaming Broadcast (for example, to avoid depending on the connection to kMeet).
Create a virtual meeting room
To do this:
- Start kMeet via kmeet.infomaniak.com or from one of the applications for computers or mobile devices.
- Start a new meeting:
- Specify a name for your meeting room.
- Allow access to your webcam and microphone from your browser or from the application (click here if you encounter any issues).
- Enter a pseudonym or your first and last name.
- If necessary, enable participant control, a password or a custom encryption key.
- Click on Join the meeting.
- Share the room link to invite participants to join you:
Link to this FAQ:
Has this FAQ been helpful?
This guide explains how to restore backups of previous versions of your files and other web data from your Infomaniak hostings, and how to set up an effective backup policy if the automatically and freely provided backups no longer meet your availability or security needs.
Web Hostings (Starter, Shared, Cloud Server)
Refer to these guides to restore automatic backups:
- of an entire hosting (FTP + MySQL),
- of specific files on the hosting,
- of specific databases,
- of a Web Application (Wordpress & Apps),
- of Cloud Server SSH crons.
Refer to these guides to backup and restore:
- a hosting with Swiss Backup and Restic (advanced),
- WordPress with Swiss Backup,
- WordPress with an extension.
Also refer to https://faq.infomaniak.com/snapshot.
Messaging
- Restore messages from Infomaniak automatic backups.
- Restore contacts or calendar events.
- Backup the current content of an email account:
- by downloading the current content locally,
- by duplicating all current content to a backup box,
- by copying future emails as they arrive to a backup box.
Domains / DNS Zones
- Restore deleted DNS records from Infomaniak automatic backups.
- Restore an expired domain in redemption period.
Link to this FAQ:
Has this FAQ been helpful?
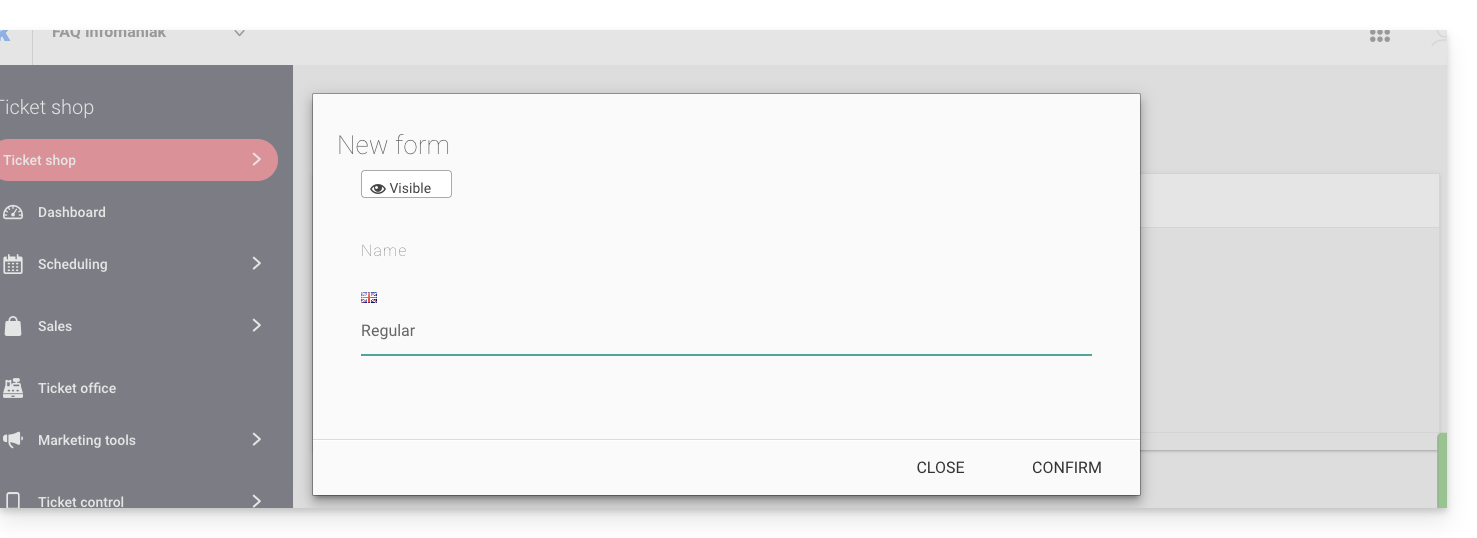
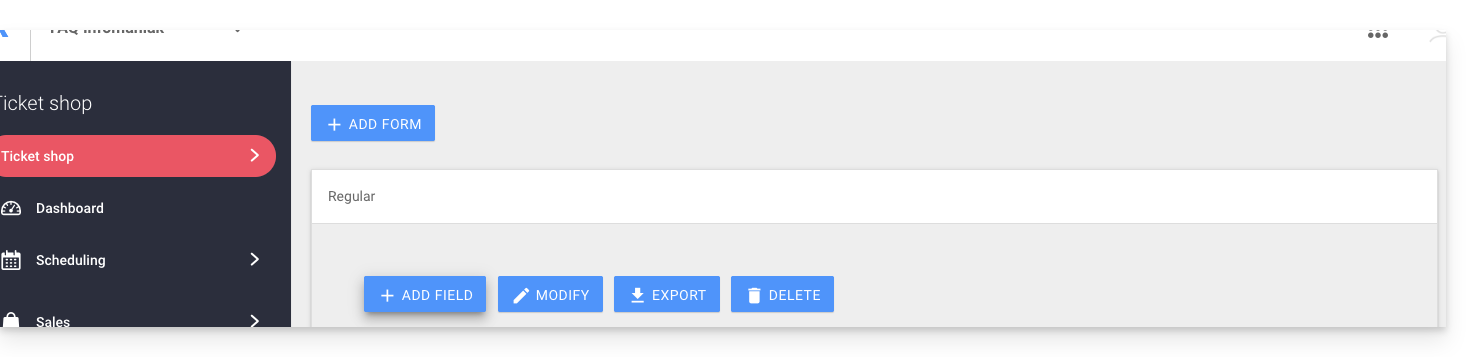
This guide explains how to create forms that will be linked to the different rates of an event (as part of the Infomaniak ticketing system). This allows you to create forms specific to each rate present at an event.
Create a form per rate
To do this:
- Click here to access the management of your product on the Infomaniak Manager (need help?).
- Click directly on the name assigned to the ticketing concerned by the event.
- Click on Settings in the left sidebar.
- Click on Form in the left sidebar.
- Click the Add a form button and give a name to the form:
Add fields
Add the elements to include in the form per rate:
- Click the Add button:
Choose the name and type of field:
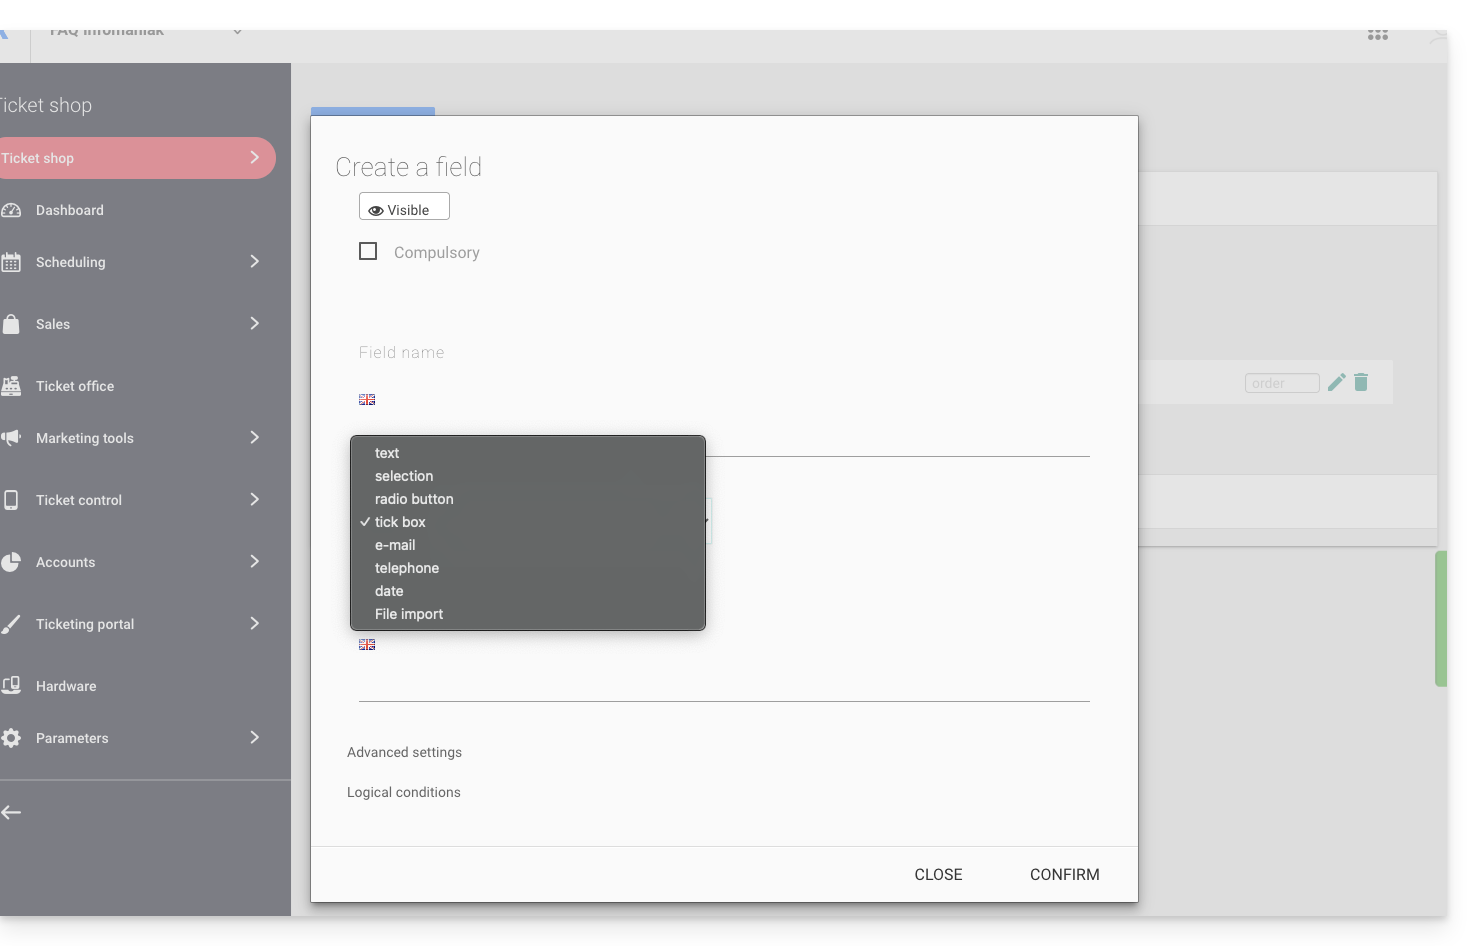
- Text: a free field to insert text
- Selection: dropdown menu allowing you to select an option from those proposed
- Radio button: radio buttons allowing you to select an option from those proposed
- Checkboxes: checkboxes that can be checked or left empty
Note: if the required option is selected, all boxes must be checked to continue. Example of use: “I have read and accept the terms of use”...
- Email: to provide an email address. Allows you to use a different email address than the one used by the person who placed the order.
- Phone: for a phone number
- Date: for a date
Advanced options and logical conditions
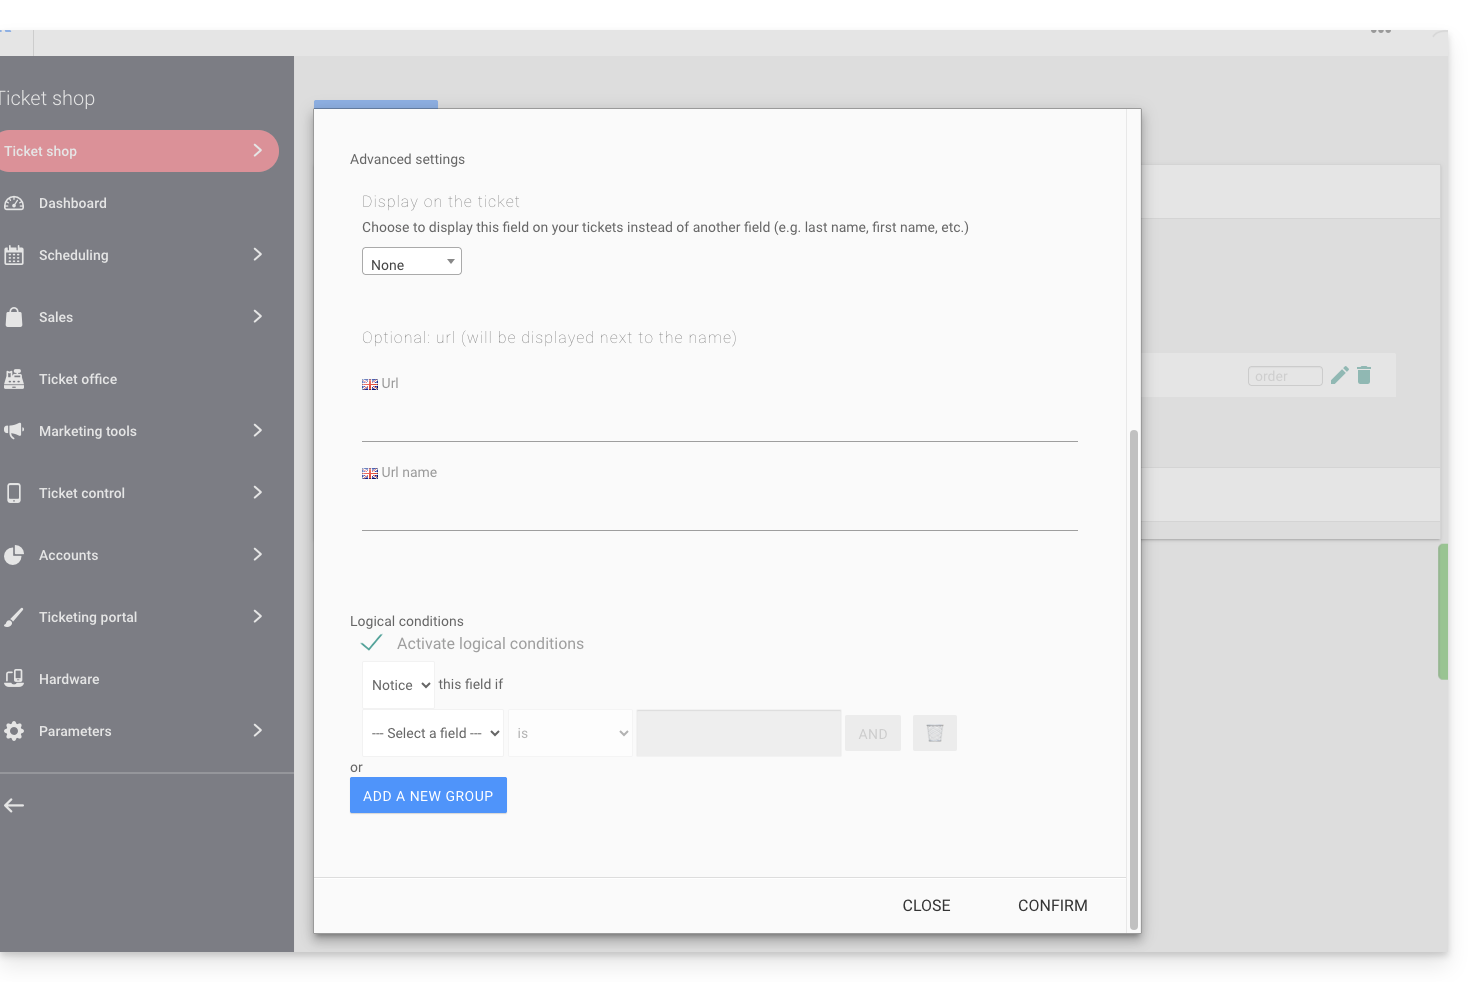
- Display on the ticket: allows you to replace the form information directly. For example, to have the ticket indicate the name of the person who will attend the event instead of the person who made the order…
- Add a URL: URL that will be displayed on the field, then above the field to let the visitor fill it in.
- Logical conditions are to be used when multiple fields have been created and you want to condition their display/visibility/presence.
Choose the order of the questions
Choose the order of the questions as they will appear on the ticketing: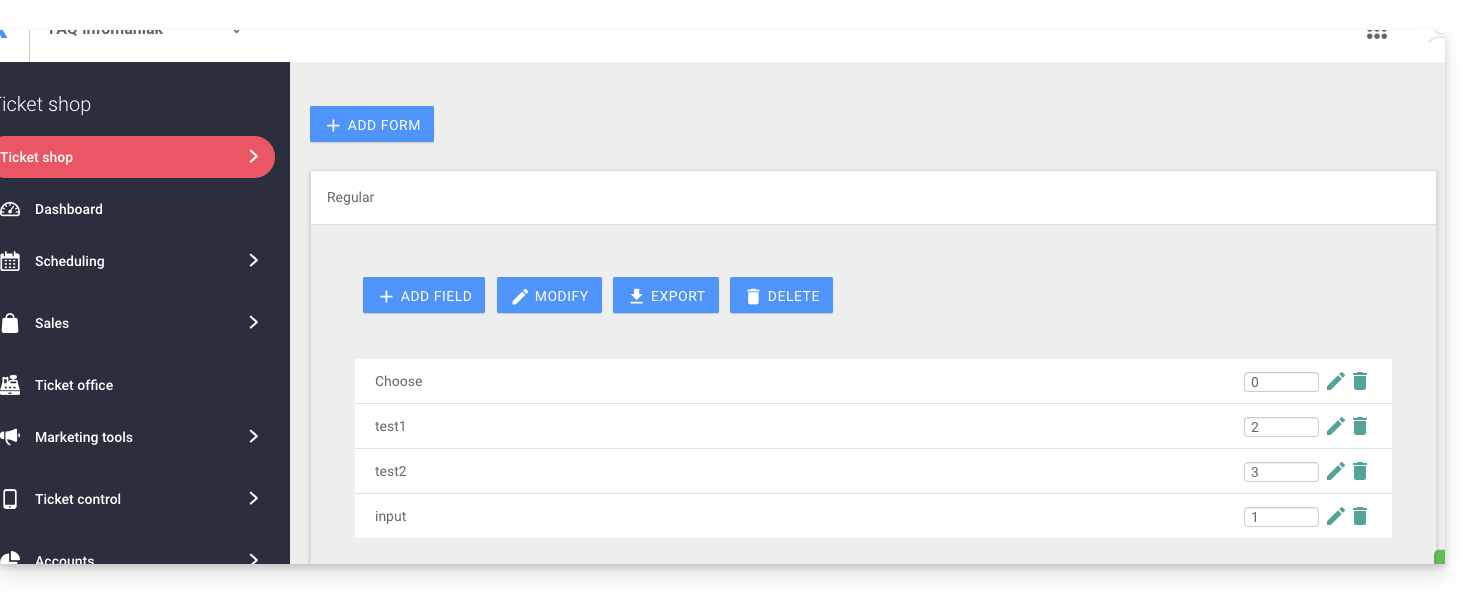
- The numbered positions will be in order of the numbers: 1, 2, 3, etc.
- Those without a defined order will follow (not recommended)
- Position 0 will appear at the very end
Link the form to a rate
To do this:
- Click here to access the management of your product on the Infomaniak Manager (need help?).
- Click directly on the name assigned to the ticketing concerned by the event.
- Click directly on the name assigned to the event (or if necessary Programming in the left sidebar menu then Events):
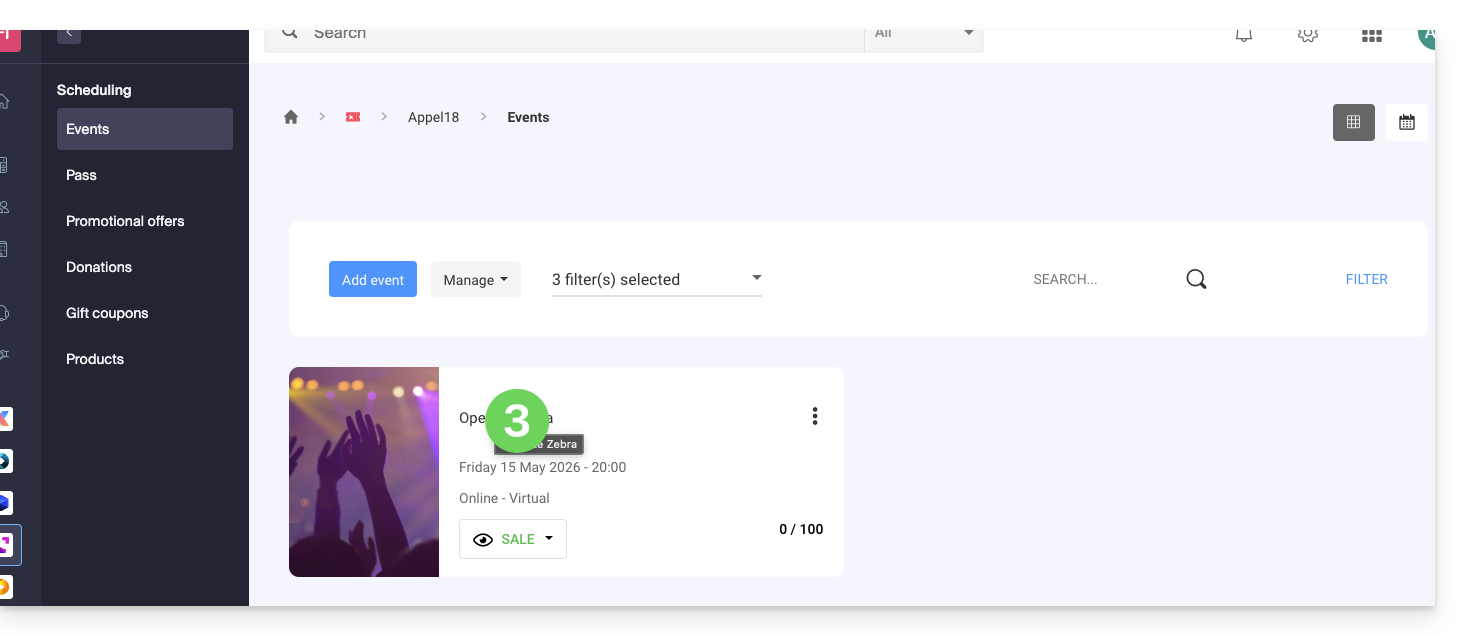
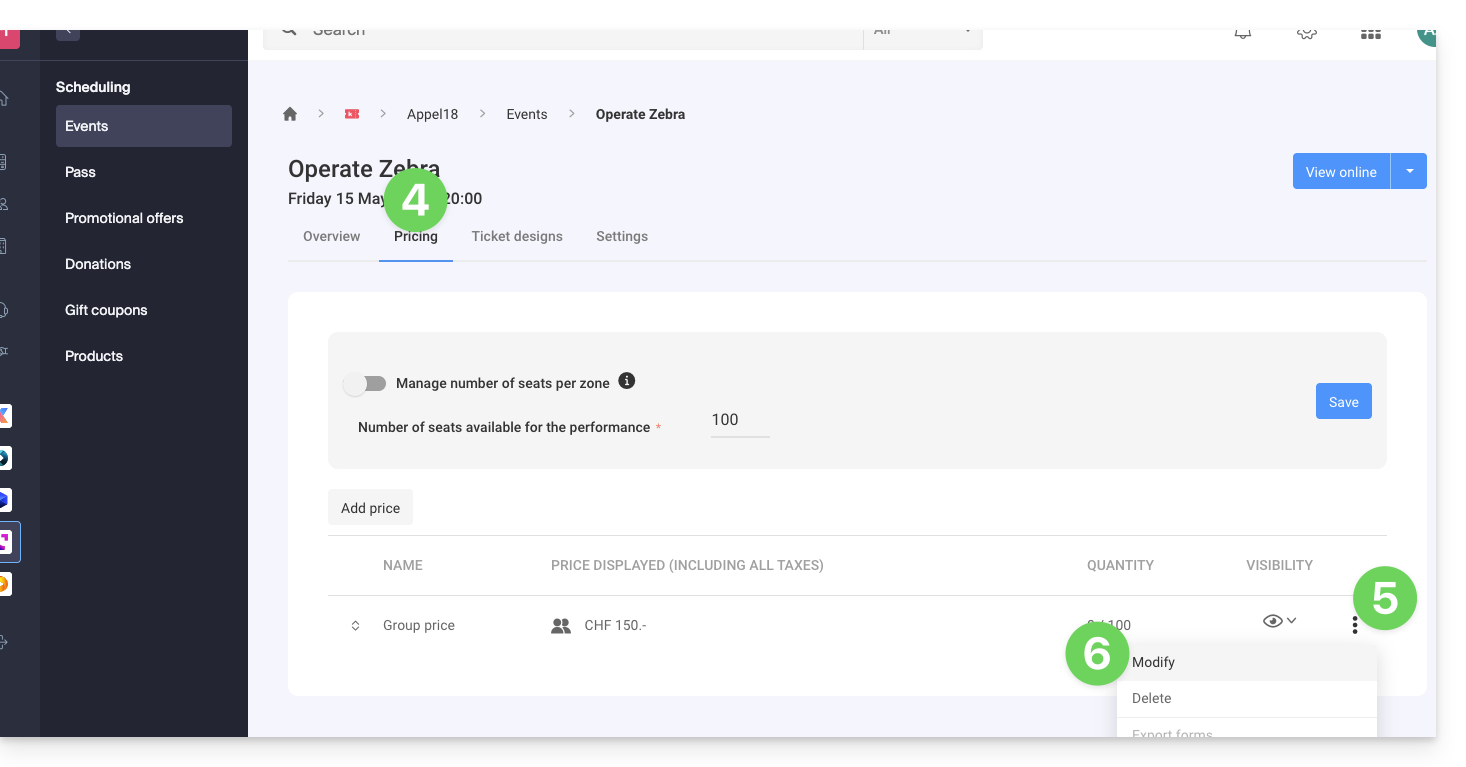
- Click on the Pricing tab.
- If the event has multiple dates, this section is replaced by “Dates” which opens a calendar.
- Click on the calendar date to join the pricing…
- Click on the action menu ⋮ located to the right of the rate to which the form is to be associated (by first expanding the Zone using the chevron if necessary).
- Click on Modify:
- Click on the chevron to expand the advanced parameters.
- Activate the option Link a form by rate.
- Choose the form to link.
- Click on the Confirm button:

To retrieve the information related to the forms, refer to this other guide.
Link to this FAQ:
Has this FAQ been helpful?
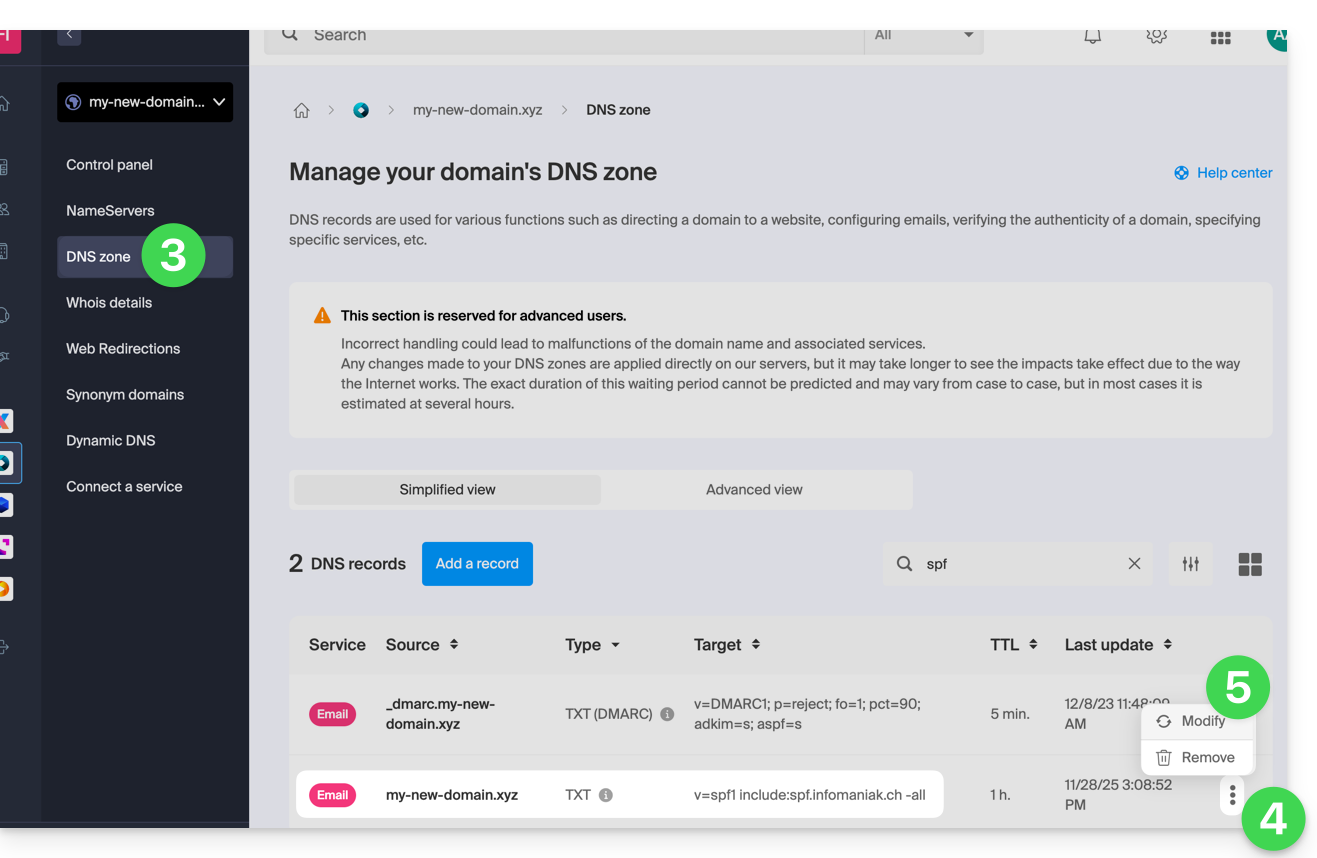
This guide is for owners of a domain name on the Infomaniak infrastructure who encounter a DMARC issue when using certain Google tools such as Meet or Calendar.
Resolve a DMARC error
To make your domain name configuration (with a DMARC policy of type reject) compatible with the use of certain Google services, it is necessary to add a corresponding SPF record:
- Before:
v=spf1 include:spf.infomaniak.ch -all - After:
v=spf1 include:spf.infomaniak.ch include:_spf.google.com -all
To edit the SPF currently configured in the DNS zone of your domain name:
- Click here to access the management of your product on the Infomaniak Manager (need help?).
- Click directly on the name assigned to the product concerned.
- Click on DNS Zone in the left sidebar.
- Click on the action menu ⋮ located to the right of the TXT type record containing the value of the SPF concerned.
- Click on Modify:
- Edit the field by adding on the same line
include:_spf.google.comafter the existing Infomaniak include, and this before the final-all. - Click on the Save button:
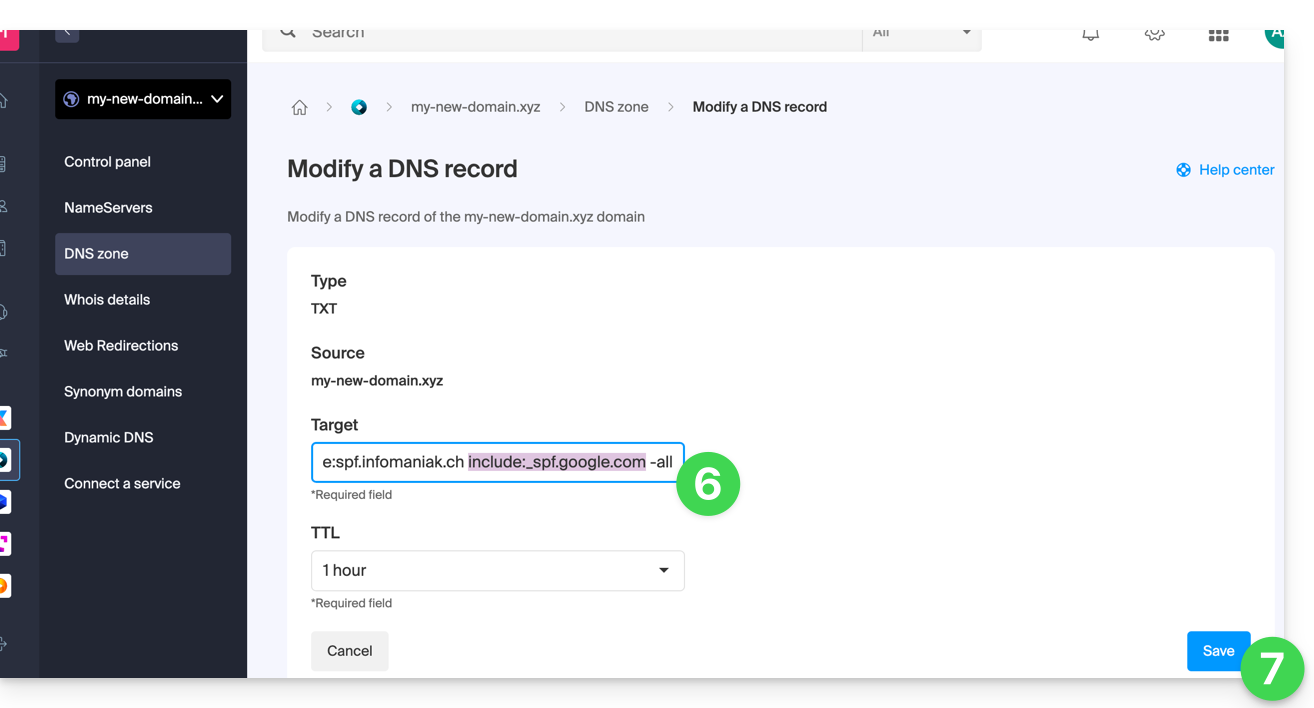
Any DNS addition/modification can take up to 48 hours to propagate.
Refer to this Google documentation if you are looking for information on configuring Google's SPF.
Link to this FAQ:
Has this FAQ been helpful?
This guide details how to back up an Apple iOS device (iPhone, iPad, etc.) using Acronis on Swiss Backup, the independent Swiss cloud backup solution.
Preamble
- What you can back up:
- Contacts & Calendars
- Photos (the original size and format of your photos are preserved)
- Videos
- It is also possible to back up other types of data.
- If necessary, local partners referenced by Infomaniak can handle these procedures: launch a free call for tenders; they handle everything, freeing you from technical details.
Configure the backup
Prerequisites
- Have a Swiss Backup Infomaniak space with available device quota (minimum 1) for Mobile:
- If necessary, increase the device quota according to your needs.
- Add the device to the Infomaniak Manager to receive the login credentials.
- Review the Acronis documentation on this subject.
To configure mobile backup on Android with Acronis:
- Download and install the Acronis Cyber Protect app (not Acronis Mobile) from the App Store.
- Open the app by logging in to the Acronis Agent with the credentials obtained after adding the device (need help?).
- Click on Back Up and select the data to back up.
- Click on Confirm to start the data backup.
Link to this FAQ:
Has this FAQ been helpful?
This guide details how to back up a Google Workspace space (Gmail, Google Drive, Google Calendar, …) using Acronis on Swiss Backup, the backup solution in an independent Swiss cloud.
It is also possible to back up other types of data.
Prerequisites
- Have a Swiss Backup space from Infomaniak with available device quota (minimum 1) for a Google Workspace backup (1 license per Workspace user to back up):
- If necessary, increase the device quota according to your needs.
- Add the device to the Infomaniak Manager to receive the login credentials.
- Create a new project on Google Cloud Platform (console.cloud.google.com) as a super administrator:

- Review the Acronis documentation on this topic:
- Allow 20 to 30 minutes to set everything up.
Authorize Acronis to access Google Cloud Platform
In the Google Cloud Platform console:
- Select your new project.
- In the navigation menu, select APIs and services > Enabled APIs and services:

- Disable one by one all the APIs enabled by default in this project:
- Scroll through the Enabled APIs and services page
- Click on the name of an enabled API.
- On the API/Service details page that opens, click on Disable and confirm:

- Go back to the previous page and do the same with the next API.
- From the navigation menu, select APIs and services > Library.
- In the API library, enable the following APIs, one by one, using the search bar to find the required APIs:

- Gmail API
- Google Drive API
- Admin SDK
- Google Calendar API
- Google People API
- Click on its name then on Activate.
- To search for the following API, go back to point 5.
- From the Google Cloud Platform navigation menu, select APIs and services > OAuth consent screen.
- In the window that opens, select Internal for the user type, then click on Create:

- In the Application name field, enter a name for your application.
- In the User support email field, enter the super administrator's address.
- In the Developer contact information field, enter the super administrator's address.
- Leave all other fields blank, then click on Save and continue.
- On the Scopes page, click on Save and continue without making any changes.
- On the Summary page, check your settings then click on Back to dashboard.
- In the Google Cloud Platform navigation menu, select Credentials > Service account.
- Click on Create a service account:

- Specify a name, a description and click on Create and continue:

- Do not modify anything in the Grant this service account access to the project and Grant users access to this service account steps.
- Click on Done; the Service accounts page opens.
- Select the new service account, then under Actions, click on Manage keys.
- Under Keys, click on Add key > Create new key, then select the JSON key type:

- Click on Create; a JSON file containing the service account's private key is automatically downloaded to your machine: keep this file safe as you will need it to add your Google Workspace organization to the Cyber Protection service as described later in this guide.
- In the Google Cloud Platform navigation menu, select Credentials > Service account.
- In the list, search for the service account you created, then copy its client ID which is displayed in the OAuth 2.0 Client ID column (OAuth 2.0 Client ID):

- Click here to access the Google administration interface as a super administrator.
- In the navigation menu, select Security > Access and data control > API controls:

- Scroll down the API controls page, then under Domain-wide delegation, click on Manage domain-wide delegation; the Domain-wide delegation page opens.
- On this page, click on Add:

- The Add a new client ID window opens.
- In the Client ID field, enter the client ID of your service account.
- In the OAuth scopes field, add the following "scopes":
- https://mail.google.com
- https://www.googleapis.com/auth/contacts
- https://www.googleapis.com/auth/calendar
- https://www.googleapis.com/auth/admin.directory.user.readonly
- https://www.googleapis.com/auth/admin.directory.domain.readonly
- https://www.googleapis.com/auth/drive
- https://www.googleapis.com/auth/gmail.modify
- Click on Authorize.
Your new Google Cloud project can therefore access the data of your Google Workspace account.
Creation of the backup space
To configure the backup of Google Workspace with Acronis:
- Click here to access the Acronis Console with the credentials obtained after adding the device (need help?).
- Click on the device addition button to add a Google Workspace type device:
- Enter the address of a super administrator of your Google Workspace account (it doesn't matter if two-step verification is activated for the super administrator's email account).
- Locate the JSON file that contains the private key of the service account you created in your Google Cloud project (or paste the content of the file as text).
- Click on Confirm:

Your Google Workspace organization then appears under the Devices tab of the service console:
Link to this FAQ:
Has this FAQ been helpful?