Knowledge base
1000 FAQs, 500 tutorials and instructional videos. Here, there are only solutions!
Infomaniak continuously improves its products and customer service by prioritizing your suggestions shared via support, social media, or the Web. These suggestions are then discussed during the meetings of the relevant service.
Provide feedback on…
INFOMANIAK SERVICE | [FR] | [EN] | [DE] | [IT] | [ES] |
|---|---|---|---|---|---|
| Euria [ ☍ ] | ✎__ | ✎__ | ✎__ | ✎__ | ✎__ |
| Domains [ ☍ ] | ✎__ | ✎__ | ✎__ | ✎__ | ✎__ |
| Hosting / Site Creator [ ☍ ] | ✎__ | ✎__ | ✎__ | ✎__ | ✎__ |
| Cloud Server [ ☍ ] | ✎__ | ✎__ | ✎__ | ✎__ | ✎__ |
| Public Cloud [ ☍ ] | ✎__ | ✎__ | ✎__ | ✎__ | ✎__ |
| Jelastic Cloud [ ☍ ] | ✎__ | ✎__ | ✎__ | ✎__ | ✎__ |
| Synology [ ☍ ] | ✎__ | ✎__ | ✎__ | ✎__ | ✎__ |
| Housing [ ☍ ] | ✎__ | ✎__ | ✎__ | ✎__ | ✎__ |
| Swiss Backup [ ☍ ] | ✎__ | ✎__ | ✎__ | ✎__ | ✎__ |
| kSuite / my kSuite [ ☍ ] | ✎__ | ✎__ | ✎__ | ✎__ | ✎__ |
| Mail [ ☍ ] | ✎__ | ✎__ | ✎__ | ✎__ | ✎__ |
| app Mail iOS [ ☍ ] | ✎__ | ✎__ | ✎__ | ✎__ | ✎__ |
| app Mail Android [ ☍ ] | ✎__ | ✎__ | ✎__ | ✎__ | ✎__ |
| kDrive [ ☍ ] | ✎__ | ✎__ | ✎__ | ✎__ | ✎__ |
| Calendar [ ☍ ] | ✎__ | ✎__ | ✎__ | ✎__ | ✎__ |
| Contacts [ ☍ ] | ✎__ | ✎__ | ✎__ | ✎__ | ✎__ |
| Newsletter [ ☍ ] | ✎__ | ✎__ | ✎__ | ✎__ | ✎__ |
| SwissTransfer [ ☍ ] | ✎__ | ✎__ | ✎__ | ✎__ | ✎__ |
| Streaming Radio [ ☍ ] | ✎__ | ✎__ | ✎__ | ✎__ | ✎__ |
| Streaming Video [ ☍ ] | ✎__ | ✎__ | ✎__ | ✎__ | ✎__ |
| VOD / AOD [ ☍ ] | ✎__ | ✎__ | ✎__ | ✎__ | ✎__ |
| Guest Manager [ ☍ ] | ✎__ | ✎__ | ✎__ | ✎__ | ✎__ |
| kChat [ ☍ ] | ✎__ | ||||
| kMeet [ ☍ ] | ✎__ | ||||
Infomaniak support is also at your disposal by email, chat or phone if needed.
Link to this FAQ:
Has this FAQ been helpful?
This guide explains how to add a new Organization to which you will have access with your current Infomaniak account and in which you can add and/or transfer products, link users, etc.
Preamble
- If you are my kSuite users, refer to this other guide.
Create a new Organization
You can add multiple Organizations (i.e., a space to manage your products) by accessing them with the same login credentials to separate your activities professional and personal for example, or when managing multiple clients:
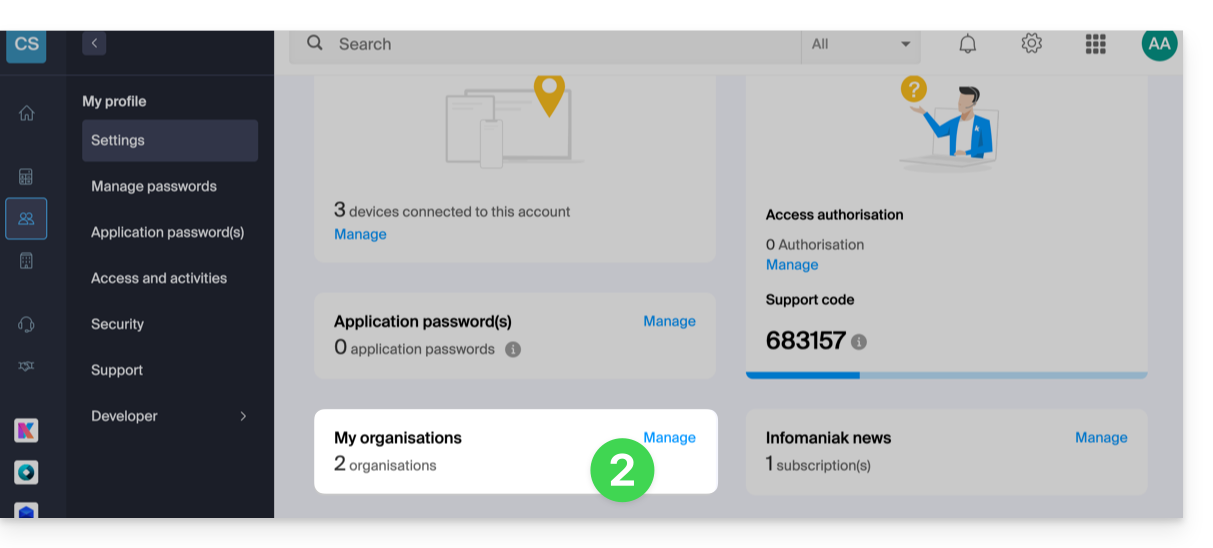
- Click here to access the management of your settings (Infomaniak Manager).
- Click on Manage from the My organizations box:
- Click on the Create a new organization button
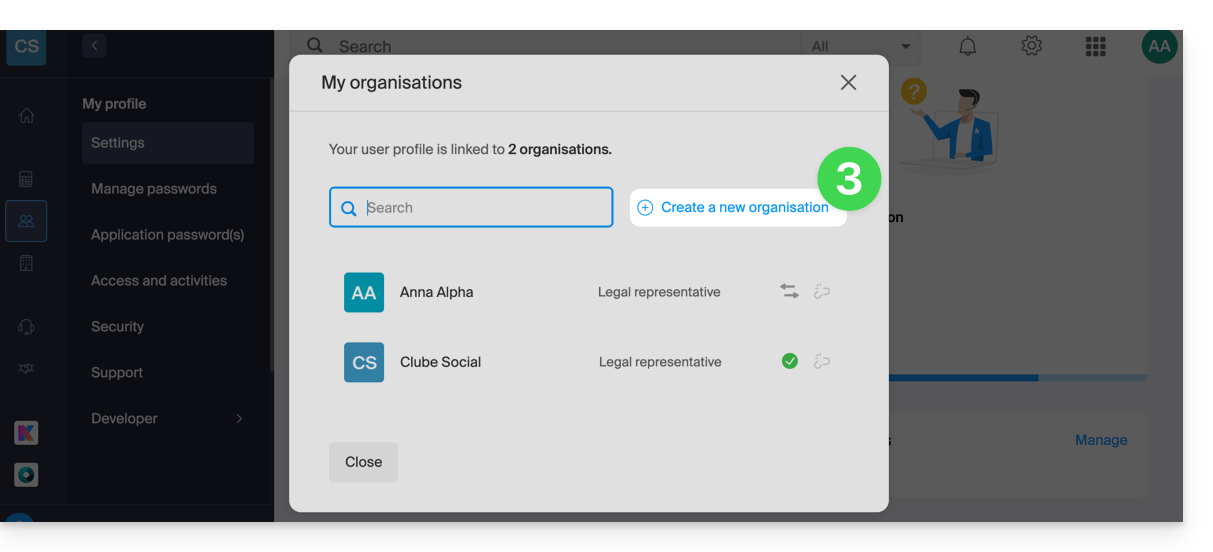
- Follow the procedure to create a new Organization.
You will thus be able to continue using your usual login credentials while being able to switch between your different Organizations (top left of the Manager).
Link to this FAQ:
Has this FAQ been helpful?
This guide explains how to delete an Infomaniak account (i.e., user account), which means deleting your access to the Manager and/or the Infomaniak Web Mail app ksuite.infomaniak.com/mail.
Preamble
- This operation will immediately delete your calendars and address books.
- All access to the Manager with this identifier will be lost.
- This operation does not delete the email addresses accessed from the account in question (except for some free offers, but in this case, this is specified to you before the deletion operation).
- If the account you are using is the only existing account within an Organization, you must first delete the Organization or appoint someone else to be able to delete your account.
Delete an Infomaniak / Mail account
To access the user profile section:
- Click here to access the My profile menu on the Infomaniak Manager.
- Click on the trash can to the right of your name to delete the account and data:
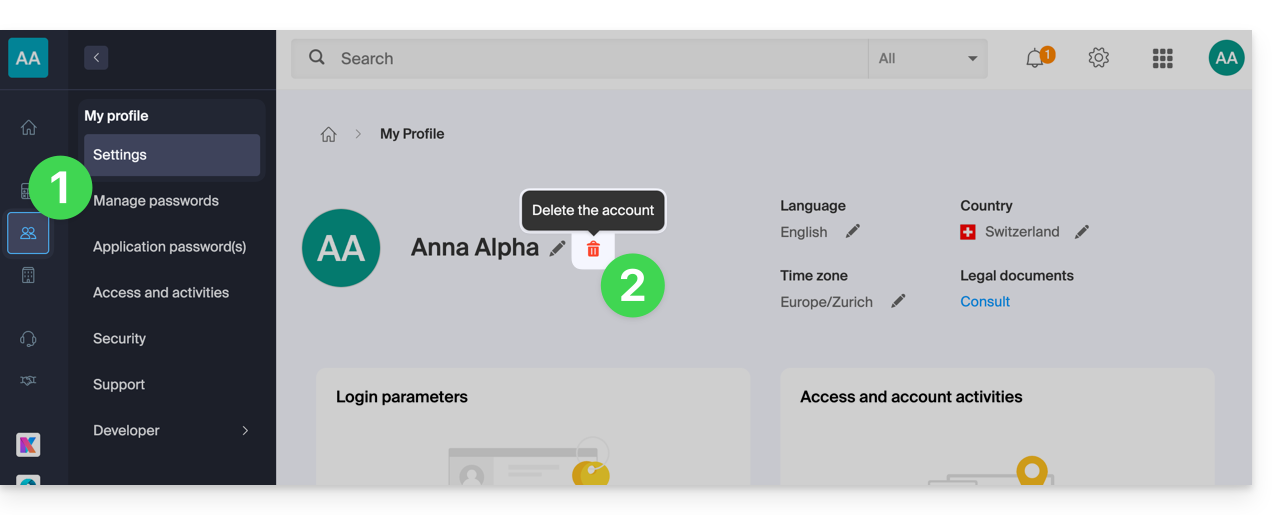
- Enter the login password one last time, then the Infomaniak account will be deleted.
Link to this FAQ:
Has this FAQ been helpful?
This guide explains how to obtain information about…
- … the connections made to the Infomaniak Manager using your Infomaniak account login credentials,
- … the activities performed within the Manager by your Infomaniak account.
The same type of logs, but concerning the entire Organization, is accessible to administrators: please refer to this other guide.
Obtain the connection log for your Infomaniak account
To view a connection log (active sessions) for connections made to the Infomaniak Manager using your Infomaniak account login credentials:
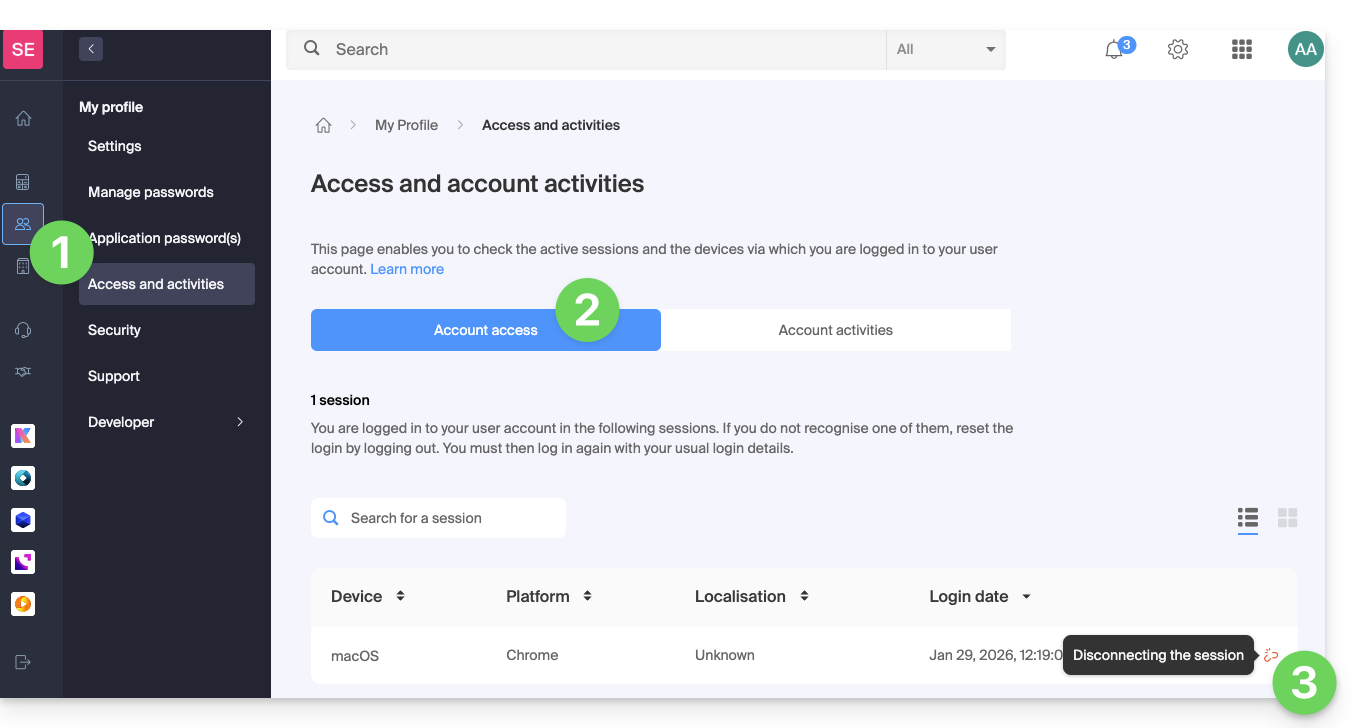
- Click here to access the summary of accesses to the Infomaniak Manager by your Infomaniak account.
- From the Account Access tab, view the list of devices connected to your Infomaniak account.
- You can end an open session by clicking on the icon at the far right of the name of the device connected to your account, which will disconnect it.:
Be notified of successful or unsuccessful logins
To be notified by email when someone logs in or attempts to log in to your Infomaniak account:
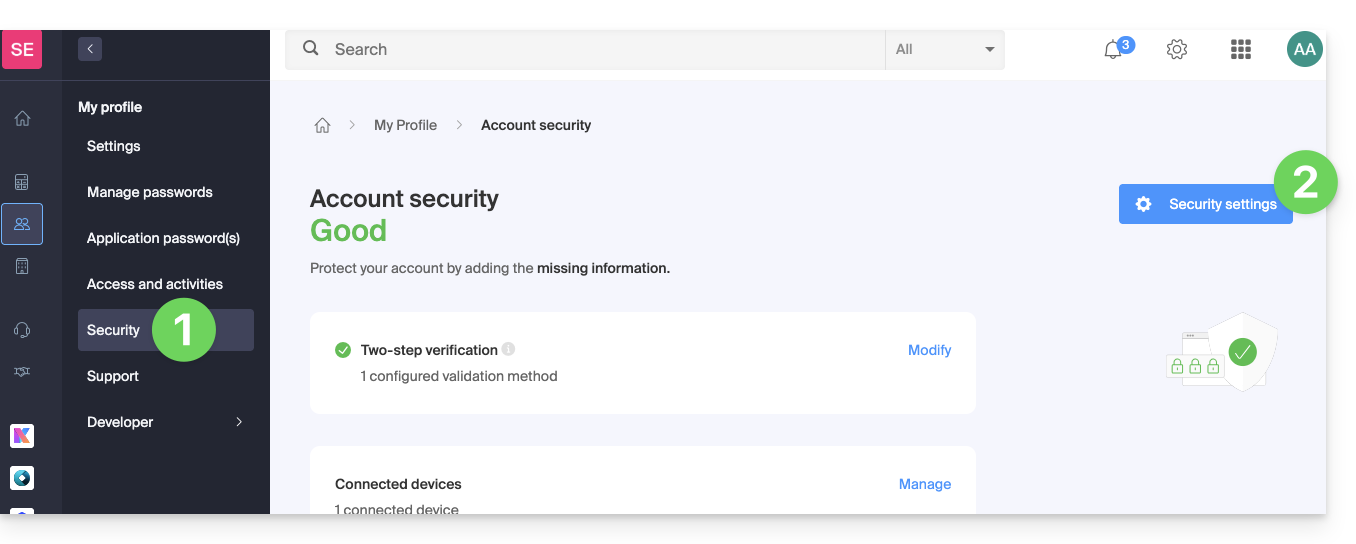
- Click here to access the security summary for your account in the Infomaniak Manager.
- Click on Security Settings:
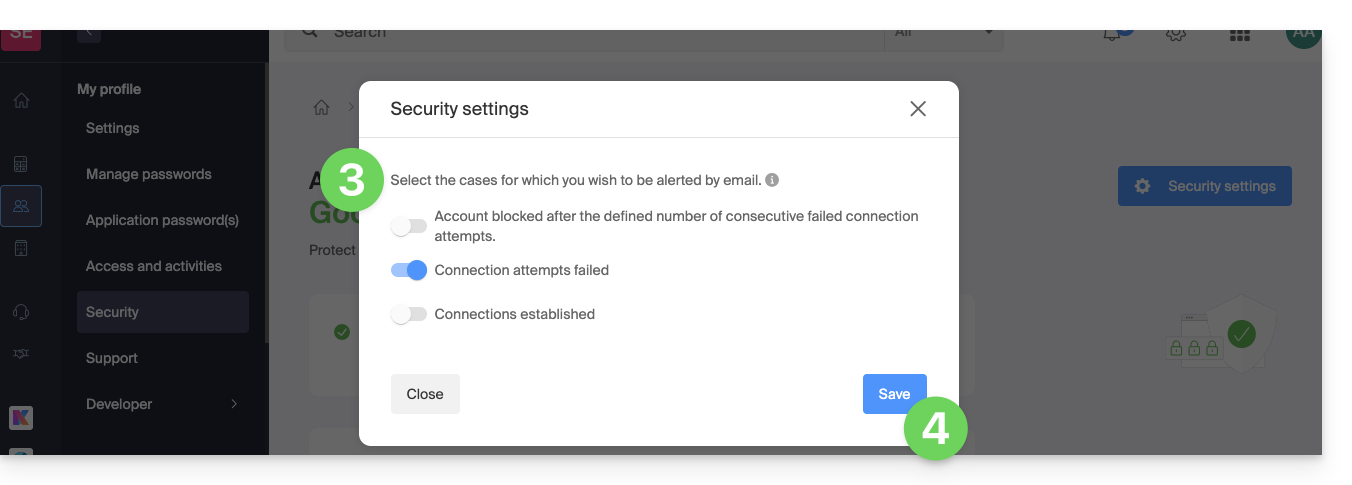
- Select the cases for which you want to receive email alerts (notification upon successful login, or only in case of failed login).
- Click Save to save your changes:
In the same section, you can choose the minimum number of unsuccessful attempts after which your Infomaniak account will be locked: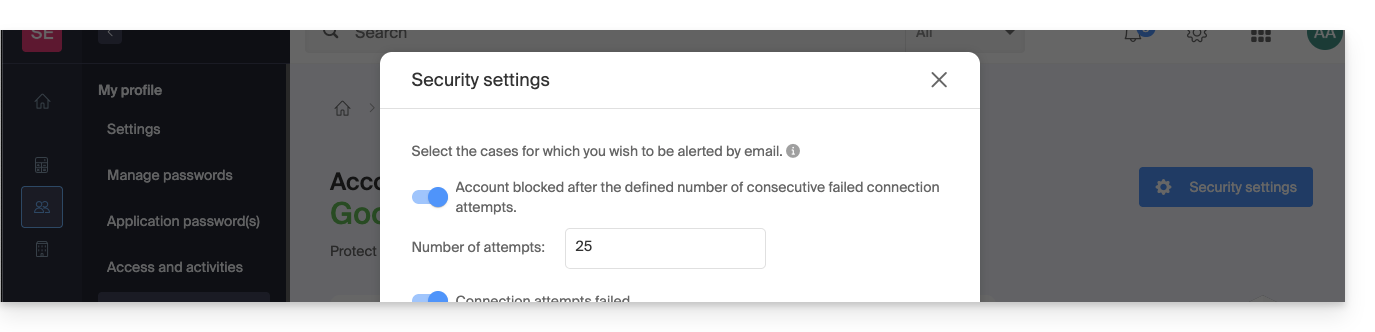
Once locked, the account can be unlocked by an Organization administrator or via a secure form.
Obtain the user account activity log
To view recent activities performed within the Manager by your Infomaniak account:
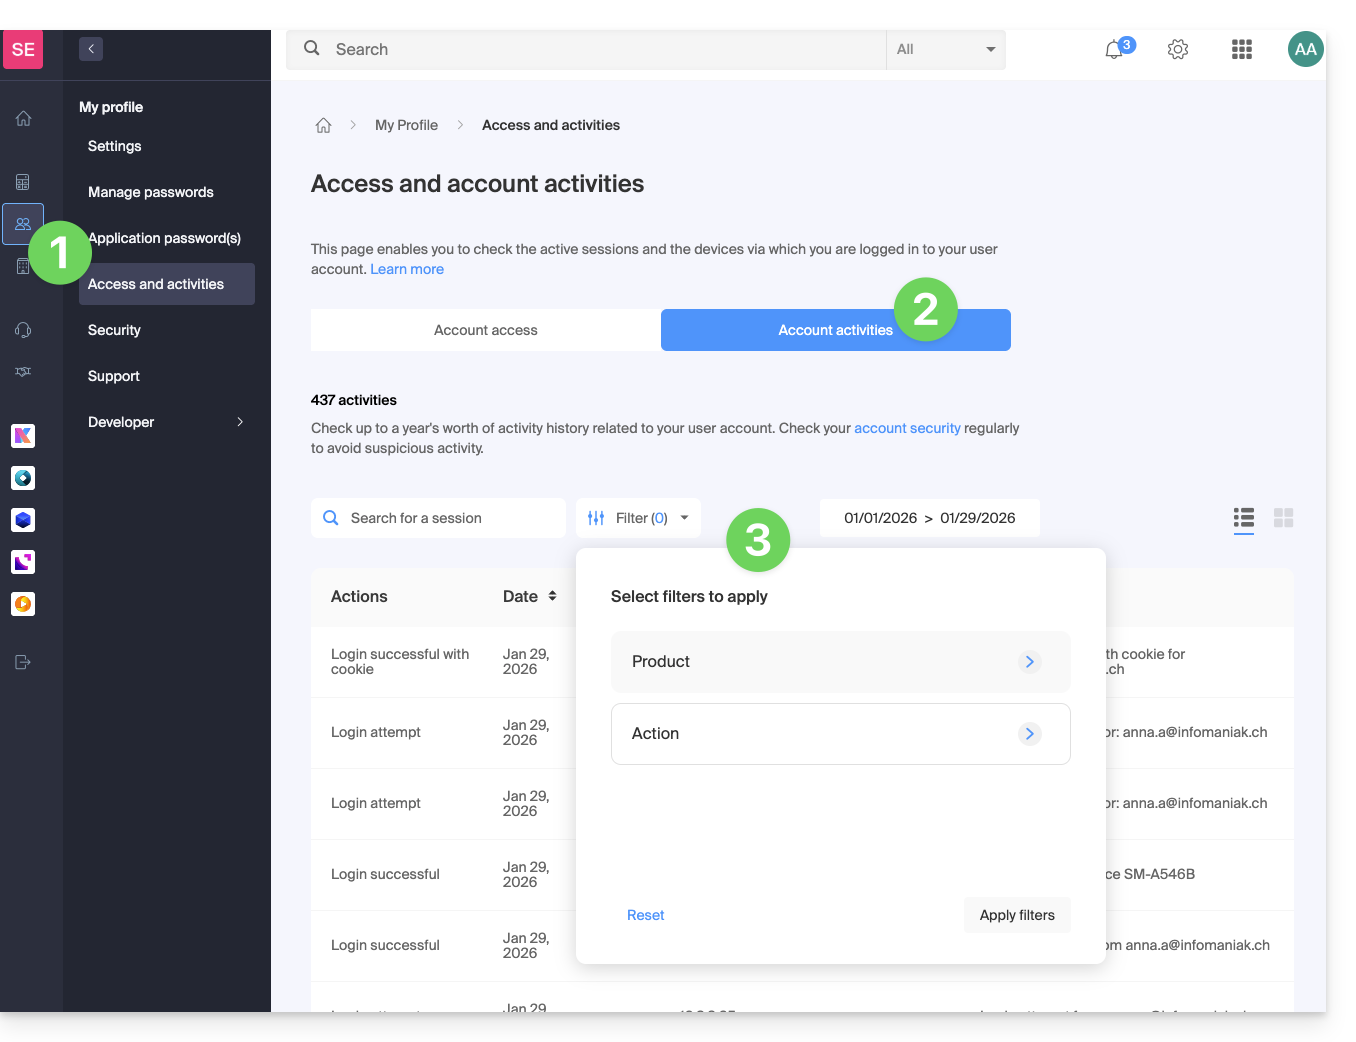
- Click here to access the summary of your account activity in the Infomaniak Manager.
- From the Account Activities tab, view the latest activities and actions of your Infomaniak account.
- Search and filter options for logs are available: date, product, or type of action:
Link to this FAQ:
Has this FAQ been helpful?
This guide details the procedure to modify the WHOIS details of the domain name holder, which you can apply to an entire batch of domains in your Organization with Infomaniak.
Change details in bulk
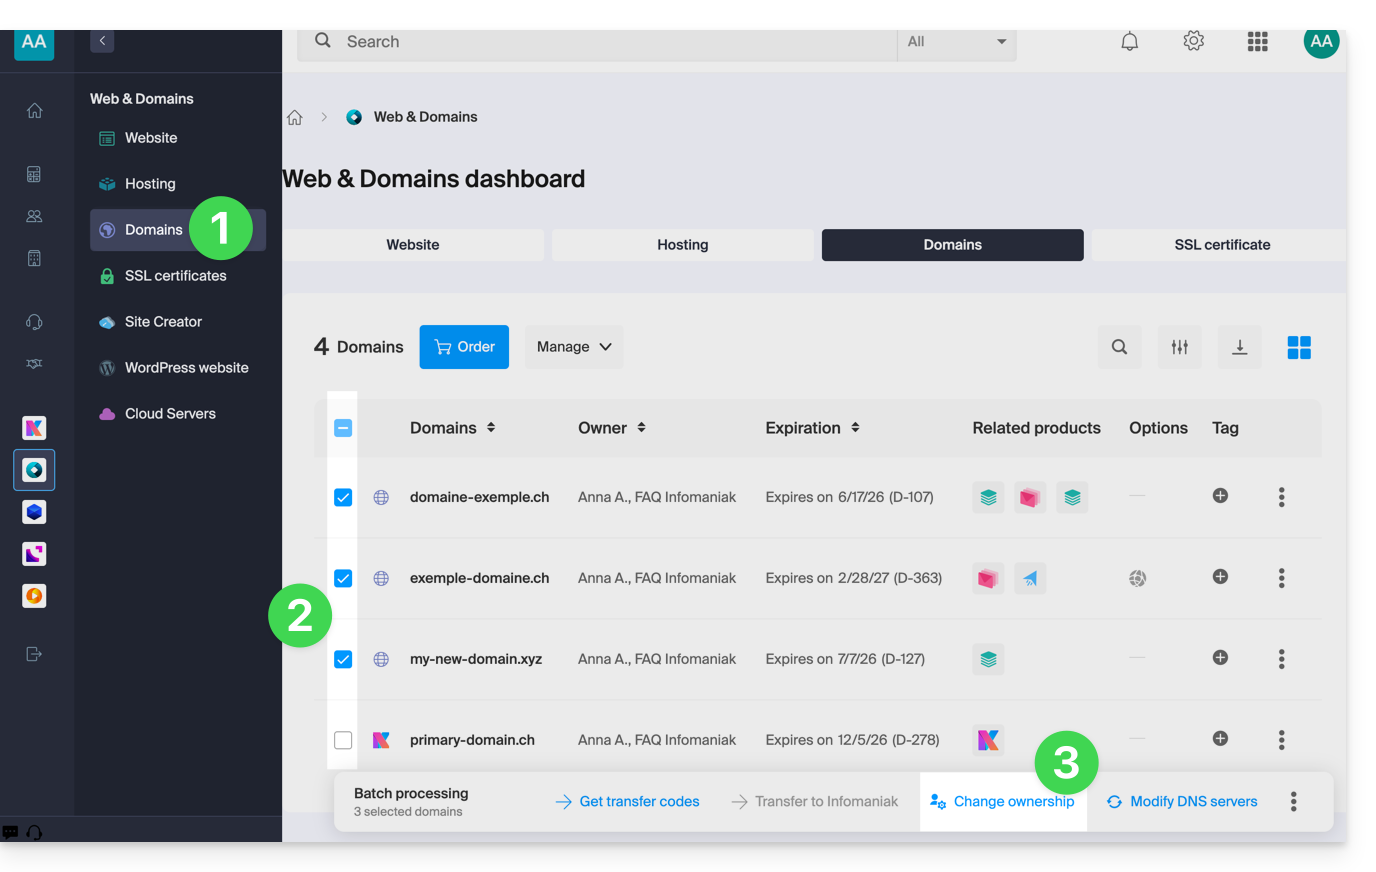
To modify the WHOIS details of multiple domain names at once:
- Click here to access the management of your domain on the Infomaniak Manager (need help?).
- Select the domains whose owner needs to be modified using the checkboxes.
- Click on Change owner at the bottom of the table:
- Choose an existing contact card…
- … or click on the Add button to create an entirely new contact card.
- Check your selection as well as any potential modification fees in the box:
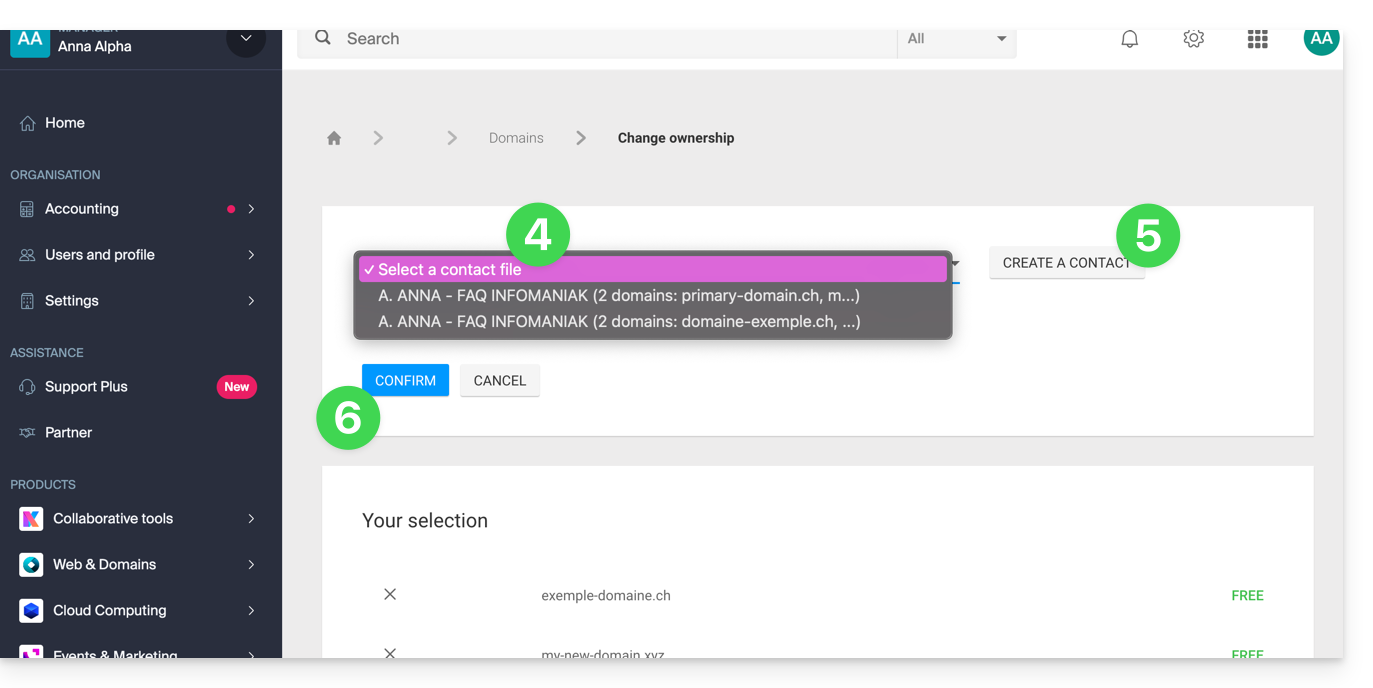
- Click on Confirm.
Link to this FAQ:
Has this FAQ been helpful?
If the order of an Infomaniak service is interrupted and cancelled before its end, while a bank transfer is in progress, the money will be deposited into your prepaid account.
You can then reorder and pay using the amount in the prepaid account.
Link to this FAQ:
Has this FAQ been helpful?
Infomaniak kAuth is a free mobile application that enhances and simplifies the security of Infomaniak accounts protected by two-factor authentication (or double authentication / 2FA). It is one of the methods that allows you to secure access to your Infomaniak user account.
Introduction
- Two-step verification protects your account and personal data when logging in to Infomaniak tools (manager.infomaniak.com and ksuite.infomaniak.com) by requiring:
- your password…
- then a second security method:

- The mobile app kAuth is one of these methods (learn more about 2FA):
Install the kAuth app
Prerequisites
- Have an Infomaniak account (know your login ID and password).
- Have an iOS or Android mobile device.
- From your iOS or Android mobile device, download the Infomaniak kAuth app here:


- Install and open the application.
Next, you have two options for linking your Infomaniak accounts to kAuth:
- Log in from this mobile device (recommended):
- Open the kAuth app on your mobile device.
- Click on Log in from this mobile device.
- Enter the credentials for the Infomaniak account you want to link and authenticate your connection if necessary (need help?).
- Click the Authorize button.
- Log in from a computer (if you choose this method, you will need a computer connected to the Internet):
- Open the kAuth app on a mobile device.
- Click on Log in from a computer.
- On your computer, open the page manager.infomaniak.com/2fa
- if two-factor authentication is not yet enabled: click on Enable and choose kAuth App.
- if two-factor authentication is already enabled: click on Add an option and then choose kAuth App.
- On your mobile, click on Continue.
- If necessary, allow kAuth to access your camera (only required to scan the identification QR code).
- On your computer, click on Next to display the QR code to scan.
- Scan the QR code displayed on the computer.
Save the backup codes
If you have just enabled two-factor authentication, the app will automatically display your 10 personal backup codes.
In any case, carefully note the backup codes offered for download after each configuration: download and keep a copy of these codes in a safe place, as they will be the only way to access your account if you lose your credentials or to access your account without access to your phone.
How the mobile app works
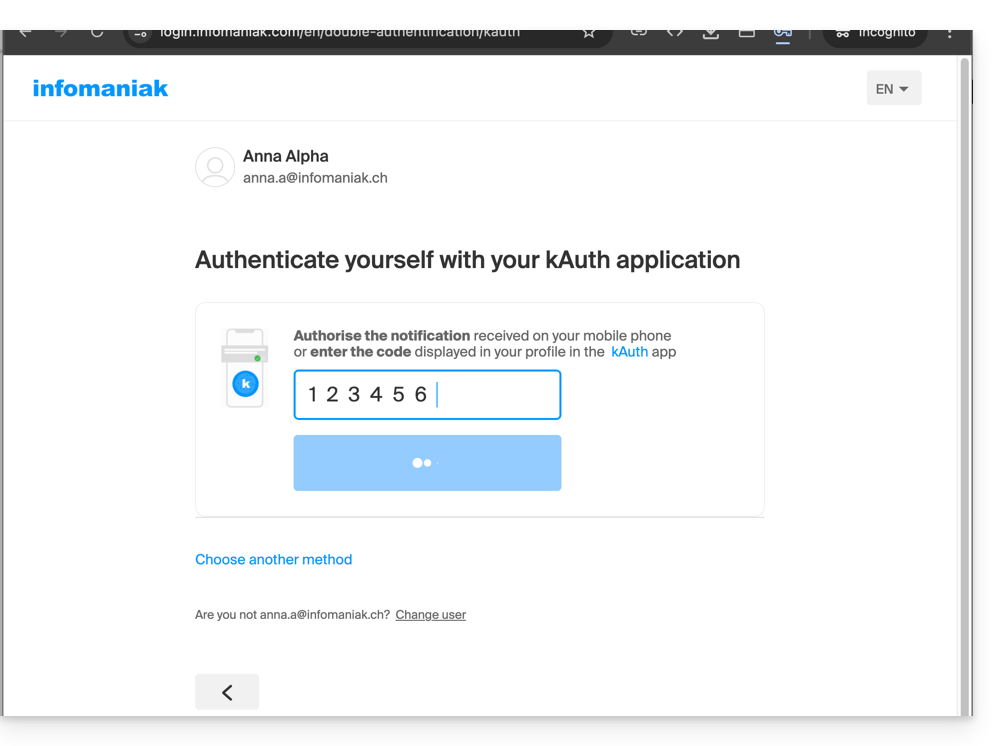
When you try to log in to your account and successfully enter your usual password, you receive a push notification on your mobile device asking you to authorize the login ("YES / NO") via a notification from the kAuth app:
or directly in the kAuth app: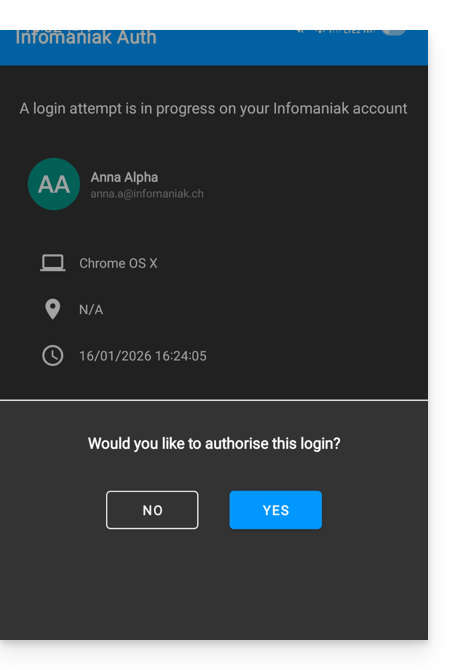
If the login is authorized, the initial page is automatically redirected to your Infomaniak account. You do not need to manually enter a one-time code as with a traditional OTP app or a code sent via SMS.
What if there is no internet connection?
Push notifications do not work without an internet connection, but kAuth also works without an internet connection and still allows you to display a one-time code in the same way as a traditional OTP app:
- Open kAuth from your mobile device.
- Click on the Infomaniak account in question.
- Copy the one-time code (each code is valid for 30 seconds) to the login page:
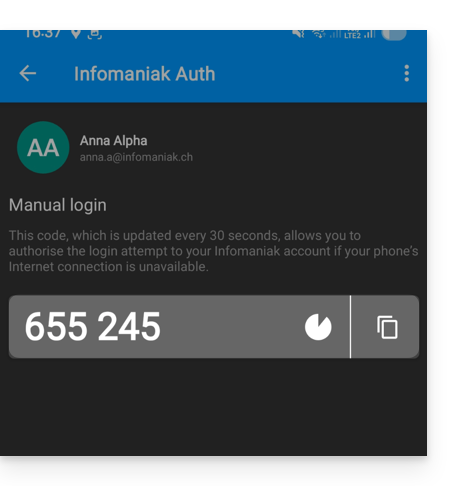
This way, you can always access your account while traveling or on vacation.
Add additional accounts
kAuth allows you to manage multiple Infomaniak accounts:
- Open kAuth from your mobile device.
- Click on the blue button :
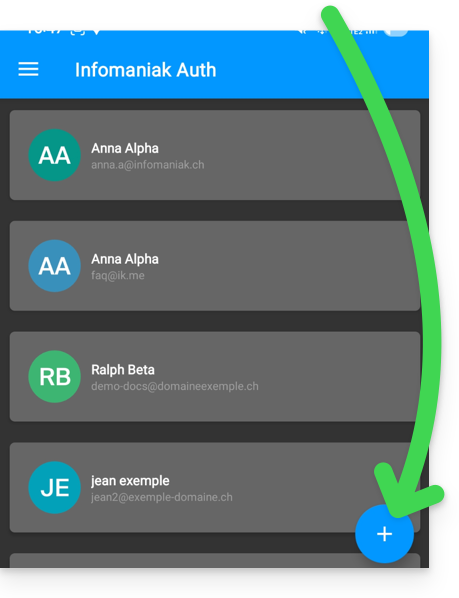
- Repeat the steps described above to link the account.
Delete a kAuth account
To delete your Infomaniak identity from the kAuth app, you must disable the kAuth security method from the 2FA section of the Infomaniak account manager.
Link to this FAQ:
Has this FAQ been helpful?
This guide explains how to change the password of your Infomaniak account (= user account) on the Manager, the administration interface of your Infomaniak products.
Preamble
- This password also allows you to log in to my kSuite and various iOS/Android applications such as kDrive, Infomaniak Mail, etc. (learn more) but it is not your email address password!
- If you cannot log in, you will not be able to change the password; refer to this other guide in this case.
Change the Infomaniak account password
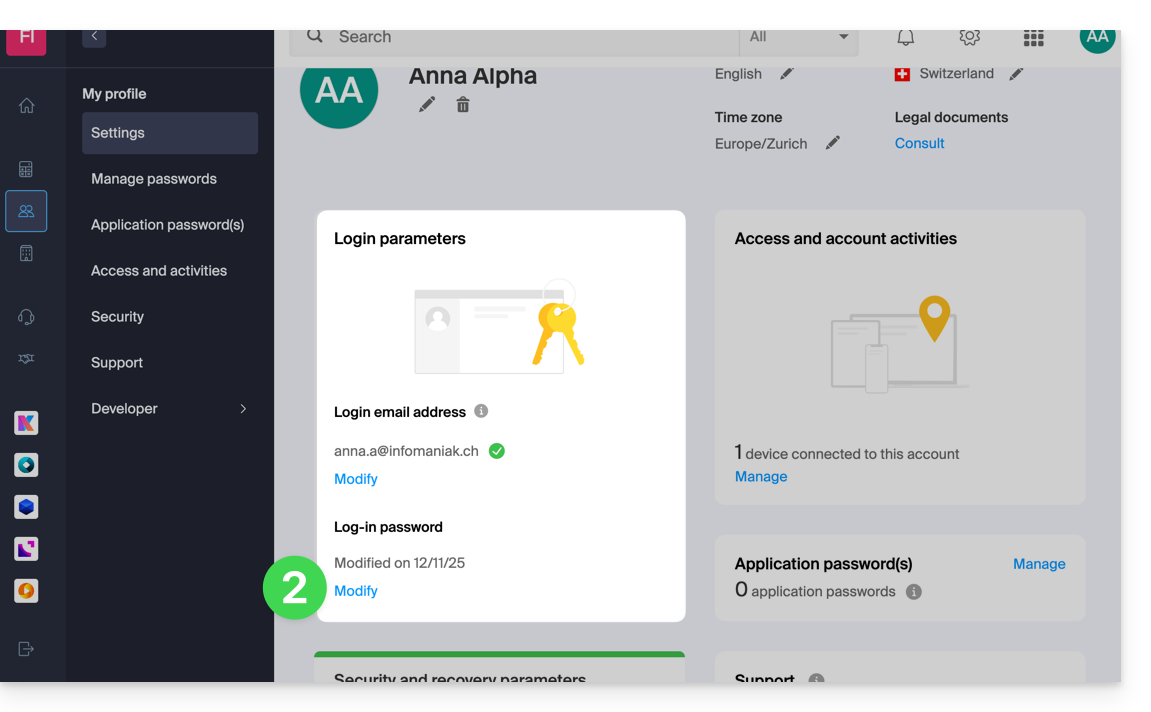
To change the password of your Infomaniak account:
- Click here to access the management of your settings (Infomaniak Manager).
- Click on Modify from the Connection settings box under connection password:
- Click on Modify:
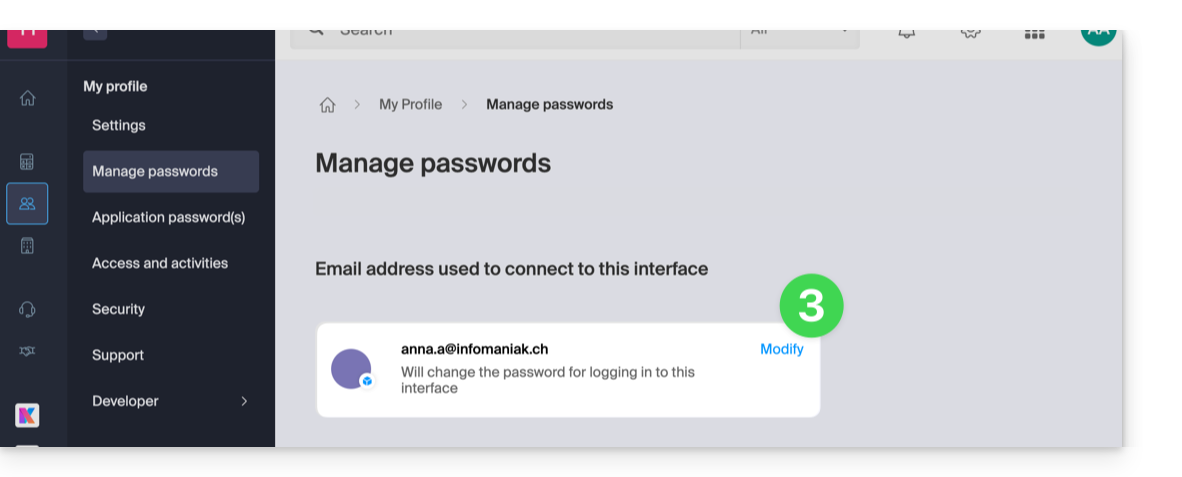
- Enter the current connection password as well as the desired new password.
- Click on Save.
Link to this FAQ:
Has this FAQ been helpful?
This guide explains how to remove an Infomaniak account configured in the Infomaniak mobile app kAuth (application for iOS / Android smartphones or tablets).
Removing an account from the kAuth mobile app
To delete one of the accounts, you must use a web browser, preferably on a computer:
- Click here to access the two-factor authentication management on the Infomaniak Manager.
- Click on the trash can icon in the box corresponding to the Infomaniak kAuth app:
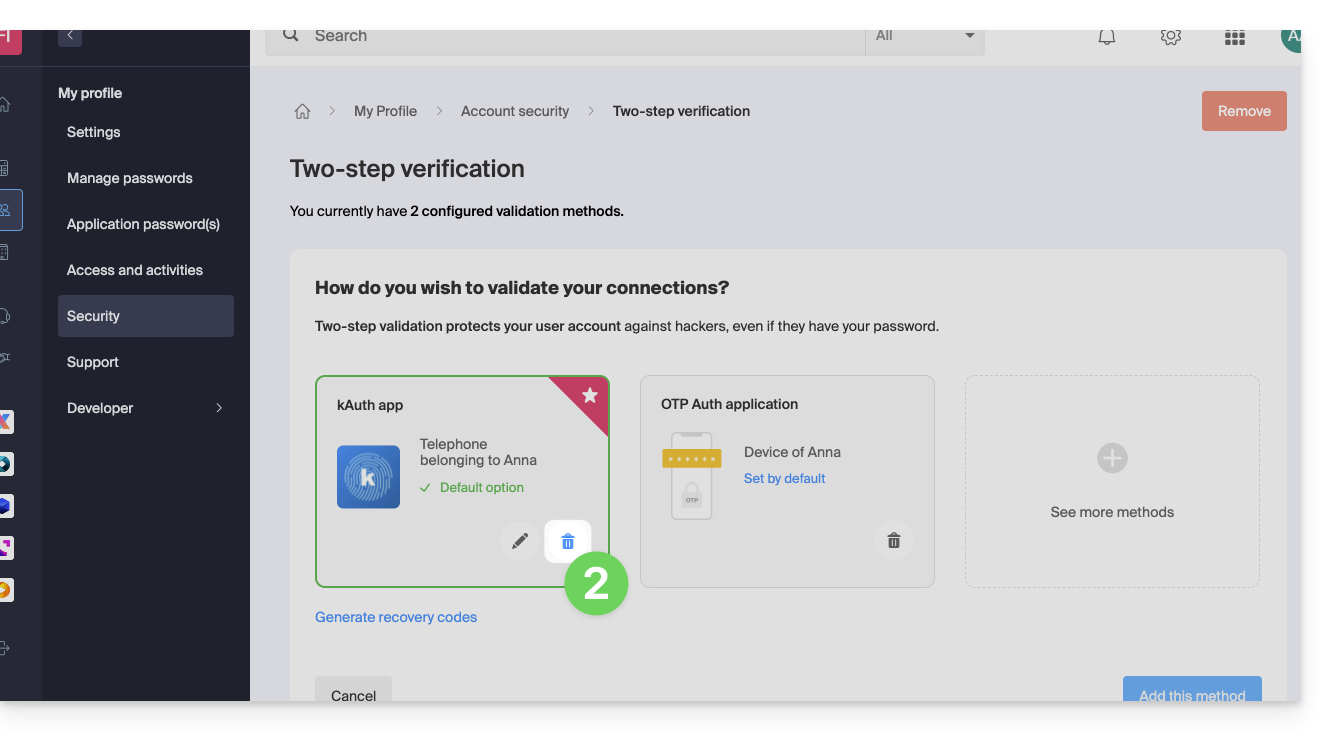
- Enter the password to log in to your Infomaniak account.
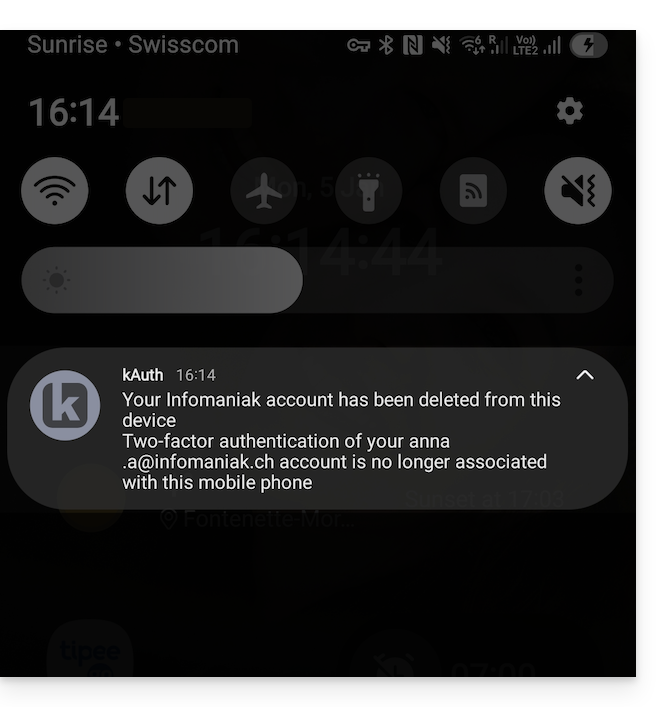
- A kAuth notification is sent to the mobile device on which the app is installed:
- The message is also displayed to the user directly within the kAuth app:
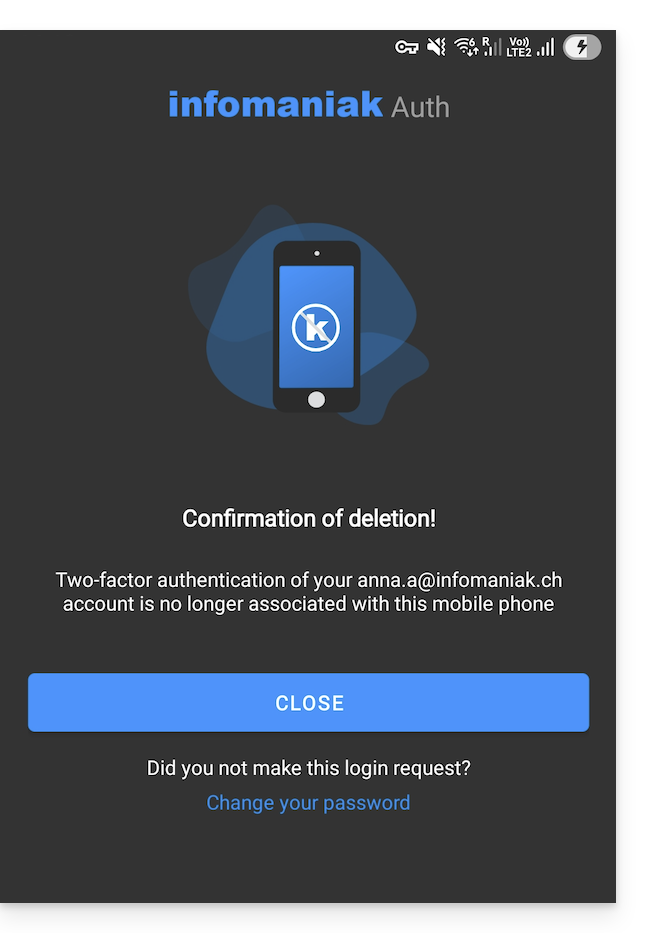
Warning: if no other method is configured to secure your account access (e.g., SMS), the two-factor authentication system is therefore deactivated; it is strongly recommended that you re-secure your account with two-factor authentication!
Link to this FAQ:
Has this FAQ been helpful?
This guide explains how to regain access to Infomaniak tools (manager.infomaniak.com and Mail / ksuite.infomaniak.com) in case you forget your password or Infomaniak account login ID.
Preamble
- To log in within an Organization that manages one or more Infomaniak products, go to manager.infomaniak.com and enter the following information:
- A login email address (ID for the Infomaniak account).
- The password chosen during your registration.
- A additional code if 2FA (two-factor authentication) is enabled.
- If the platform login works and you are missing a password for one of your email addresses, refer to this other guide.
- If you are experiencing a login form display issue, particularly with a mobile device, refer to this other guide on the subject.
You have forgotten...
... the Infomaniak account password
If you have forgotten this password, follow the reset procedure:
- Click here to reset your password.
- Enter the login email address of your Infomaniak account
- Choose the desired recovery option or follow the identity verification procedure by clicking on “You do not have access to any option”.
... the login email address for the Infomaniak account
During your registration, you had to provide a phone number; it is possible to retrieve the login email address for the Infomaniak account using your phone number:
- Click here to retrieve your login email address for the Infomaniak account.
- Enter your mobile number.
- Enter (if necessary) your recovery email address.
Two scenarios are then possible:
- The system manages to identify your account: choose how to receive your Infomaniak account login ID.
- In the opposite case: follow the on-screen assistant to manually verify your identity or via kCheck:
And if the email address no longer exists...
If you have an Infomaniak account for which the login ID is of the form toto123@yahoo.com, there is no problem if the email address toto123@yahoo.com is deleted or is no longer valid. You just need to log in one last time to the Infomaniak Manager with this ID toto123@yahoo.com and take note of this other guide to modify your Infomaniak account login email address.
On the other hand, if the email address used as an ID is hosted by Infomaniak (for example anna789@assoziation.ch) and an administrator deletes the email address in question or cancels the “assoziation.ch” Mail Service, the situation is different: you automatically receive an email on the secondary address and an SMS on the mobile phone number specified in your Infomaniak account: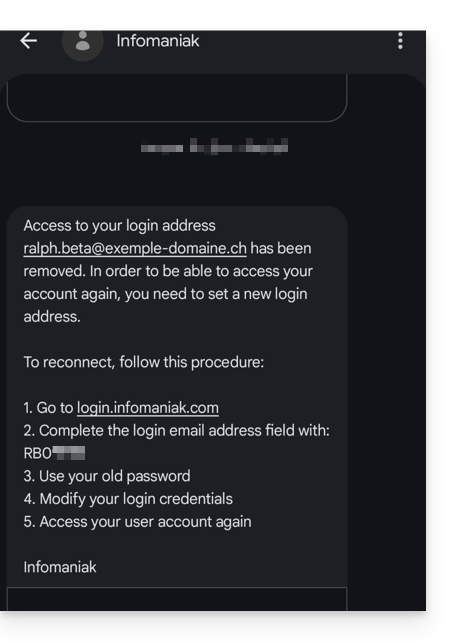
The situation can also occur in a specific case of mail service management.
To be able to access your Infomaniak account again now that access is no longer possible with the old email address, the Infomaniak account user must go to the address mentioned in the SMS:
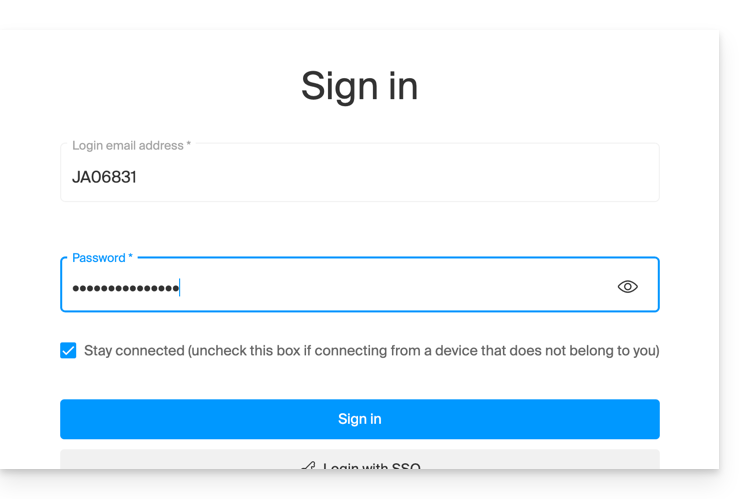
- Click here to access the login page.
- Enter the username specified in the SMS (usually the initials of your account and a sequence of numbers).
- Enter the usual password (it has not changed):
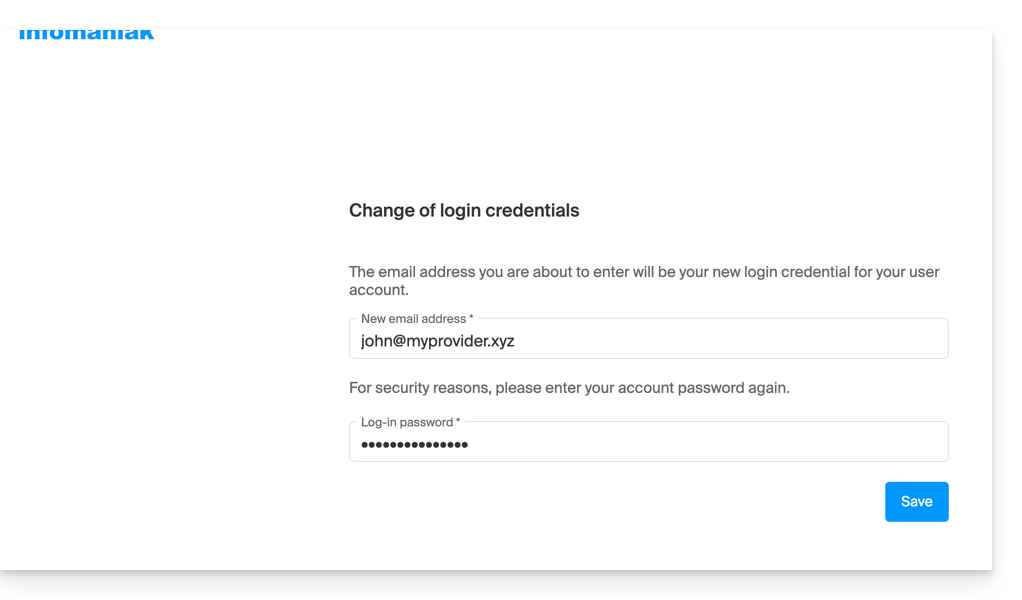
- Enter the new requested information:
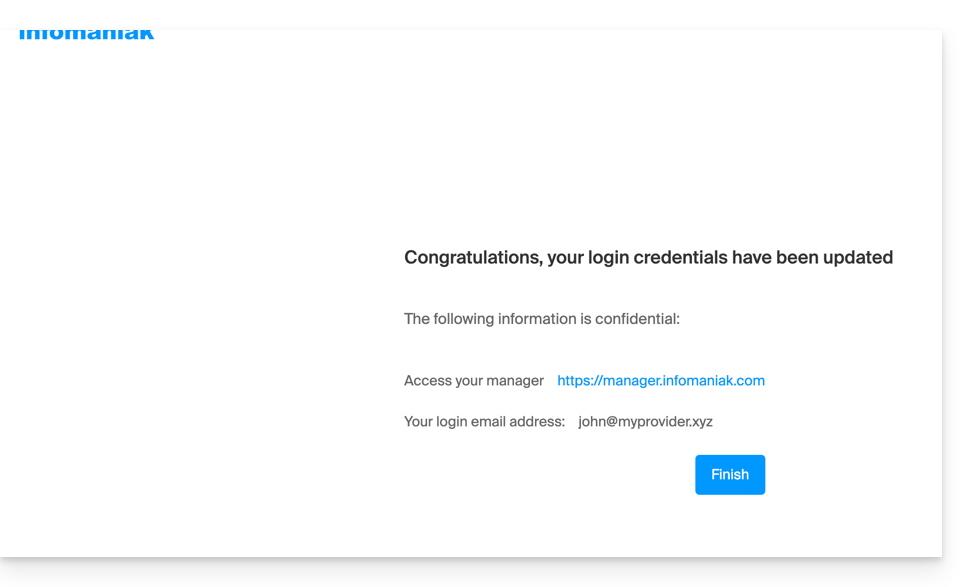
- You will be logged in to your account again:
Link to this FAQ:
Has this FAQ been helpful?
This guide concerns the mobile app kCheck (application for iOS/Android smartphone or tablet), created to simplify identity verification procedures and strengthen the security of your Infomaniak account.
Preamble
- For security reasons, to guarantee the identity of the person making a specific request to Infomaniak, an identity verification procedure may be triggered in the following cases (non-exhaustive list):
- forgetting an Infomaniak account password (user account)
- forgetting a login email address
- deactivation of double authentication (2FA)
- unlocking an Infomaniak account
- during the first transfer of revenue for the product Ticketing
- when ordering a product (suspicion of spam or fraud, brand name, etc.)
- This application allows you to securely transfer the requested items.
- Infomaniak respects your privacy: the information transmitted via the kCheck application will be kept until the complete processing of your file; it will in all cases be automatically deleted after 72 hours in case of non-processing of this request.
Start identity verification
Prerequisites
- A QR code or a link provided by Infomaniak.
- The mobile app kCheck installed on your device iOS (iPhone, etc.) or Android.
- An Internet connection on the mobile device.
You can then have your identity verified with kCheck:
- Launch the kCheck app on your mobile.
- Press Start.
- Press Scan a QR code.
- Point the QR code provided using the camera.
- Enter your mobile phone number.
- Enter the confirmation code received.
- Authorize geolocation (mandatory to continue the procedure).
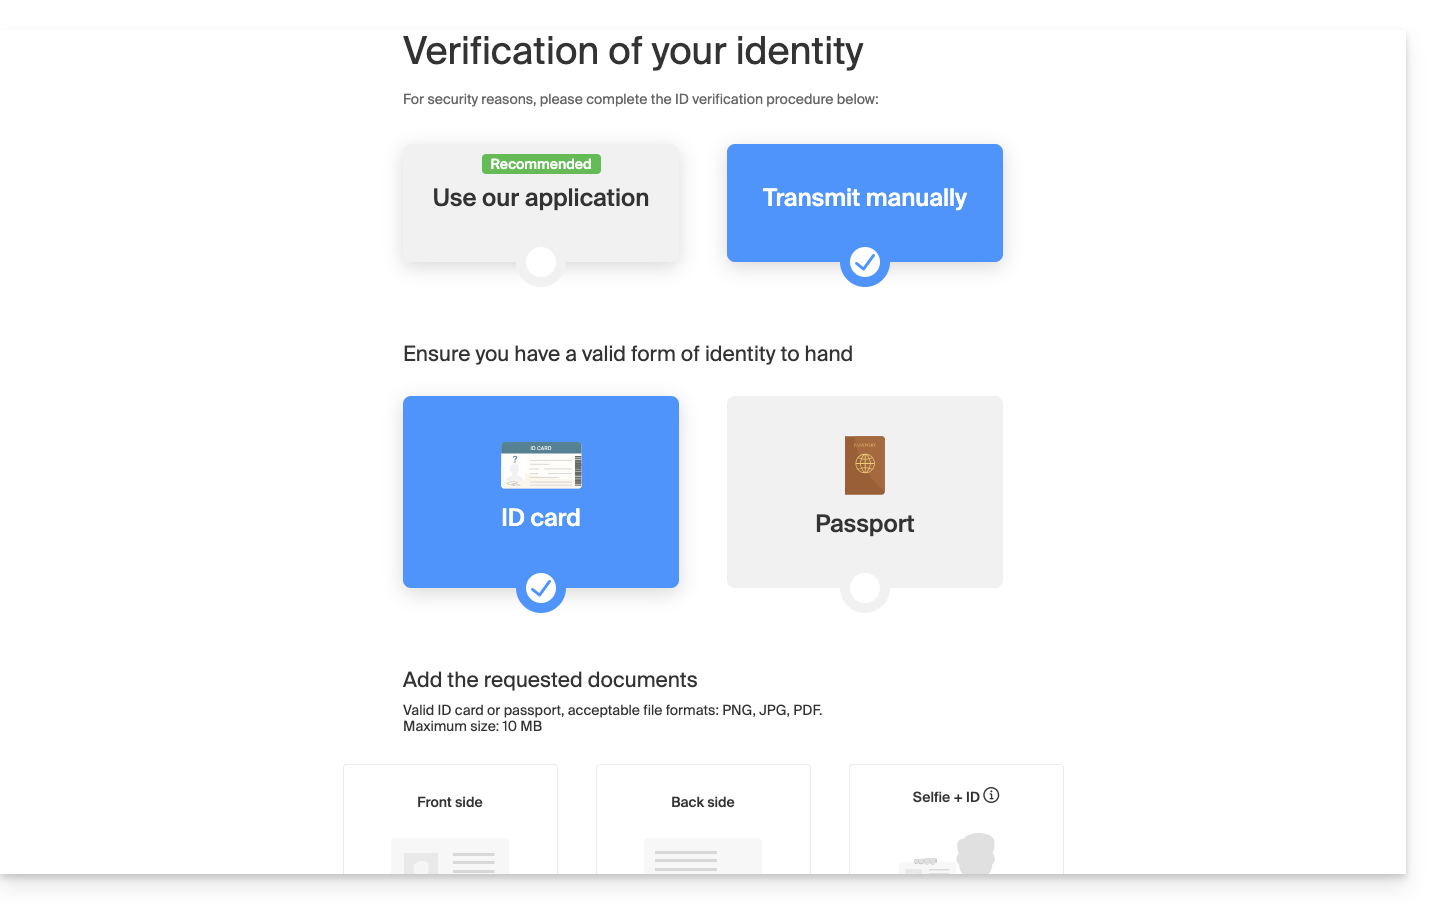
- Select the type of ID you have (ID card or passport).
- Follow the steps to photograph your ID.
- Take a selfie (of yourself) with your ID in your hand in front of you.
Your documents will then be securely transmitted to Infomaniak support. These requests are processed on a priority basis with an average response time of 2 hours during opening hours.
If your order is blocked...
For security reasons, some orders may be automatically blocked.
At the time of your order, an e-mail is sent to the email address connected to your Infomaniak Manager account. This email contains the procedure to unblock your order. If you do not find it, you can resend it from your Manager by clicking on Resend procedure from the red banner informing you of the blockage.
Prerequisites
- Open the email containing the unblocking procedure.
- The mobile app kCheck installed on your device iOS (iPhone, etc.) or Android.
- An Internet connection on the mobile device.
You can then start the unblocking procedure with kCheck:
- Launch the kCheck app on your mobile.
- Press Start.
- Press Scan a QR code.
- Scan the QR code present in the email.
- Follow the unblocking procedure to the end.
Special cases
- If there is no response from you within a 10-day period, the order is automatically canceled and the payment is fully refunded to the payment method used.
- In case you do not have a mobile device to follow this procedure, contact Infomaniak support.
Link to this FAQ:
Has this FAQ been helpful?
This guide covers the activation of cookies and JavaScript on the main web browsers.
Preamble
- Activating cookies allows websites to identify you and remember your preferences, such as your preferred language or items you have added to your cart.
- Activating JavaScript allows websites to be more interactive and dynamic, and offers features such as video playback or game creation.
- Some websites (including mobile apps) may not function correctly if cookies or JavaScript in the device's native browser are disabled.
- You can also choose to activate cookies and/or JavaScript only for certain websites.
Manage cookies and JavaScript
The exact location of the options to activate cookies and JavaScript may vary slightly from one browser version to another.
Click to see the corresponding guides:
| Browser | Enable or disable cookies | Enable or disable JavaScript |
|---|---|---|
Chrome | ||
Firefox | ||
Edge | ||
Safari |
Troubleshoot an app connection issue
If you encounter a login window like the one below, for example with the mobile app Infomaniak Mail (app for iOS smartphone or tablet) on iPhone:
- Open the advanced settings of Safari on your mobile device.
- Temporarily disable the toggle switch that blocks all cookies:

- It will then be possible to display the full login window and log in; you can always re-block cookies after logging in if you wish.
Link to this FAQ:
Has this FAQ been helpful?
This guide helps you understand the structure of your Infomaniak services, with the aim of familiarizing you with the terminology used and helping you easily manage your management interfaces, mainly when using my kSuite.
Preamble
- The Organization is the term that represents the grouping of Infomaniak services & users (you and potential collaborators, family members, etc.).
- To understand what an Organization really represents, this guide is structured around several possible situations currently:
- Any new registration for a free my ksuite address (ik.me / etik.com / ikmail.com).
- Any new registration for other Infomaniak services.
- Combined use of my kSuite and other services in the ecosystem:
- Sign up for my kSuite by specifying an existing Infomaniak account
- Purchase Infomaniak products with only a my kSuite account
1. my kSuite Registration (ik.me / etik.com / ikmail.com)
When registering on welcome.infomaniak.com/signup/myksuite, you chose the name of your email address, for example anna.a@ik.me and then entered a personal phone number: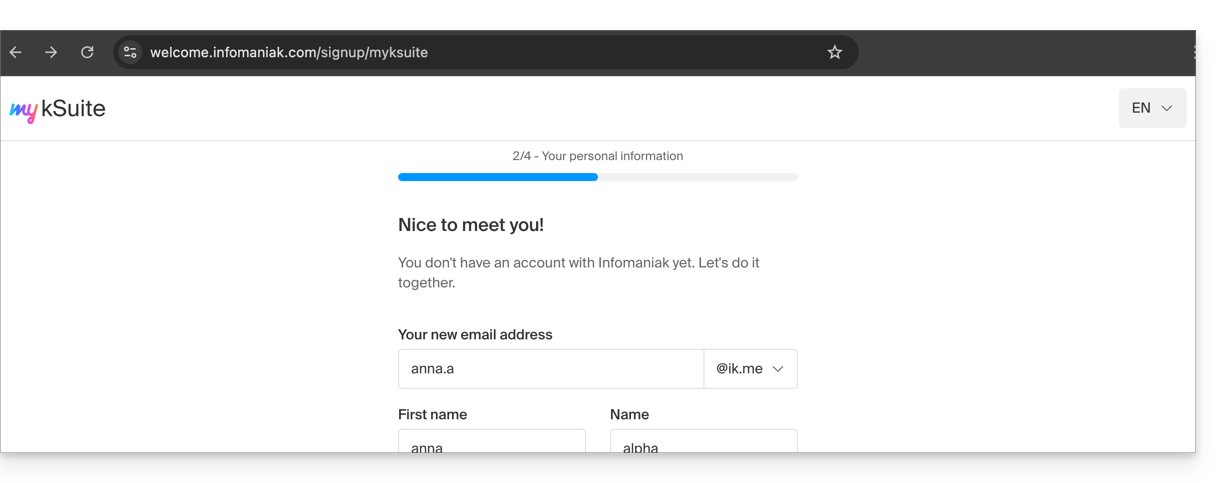
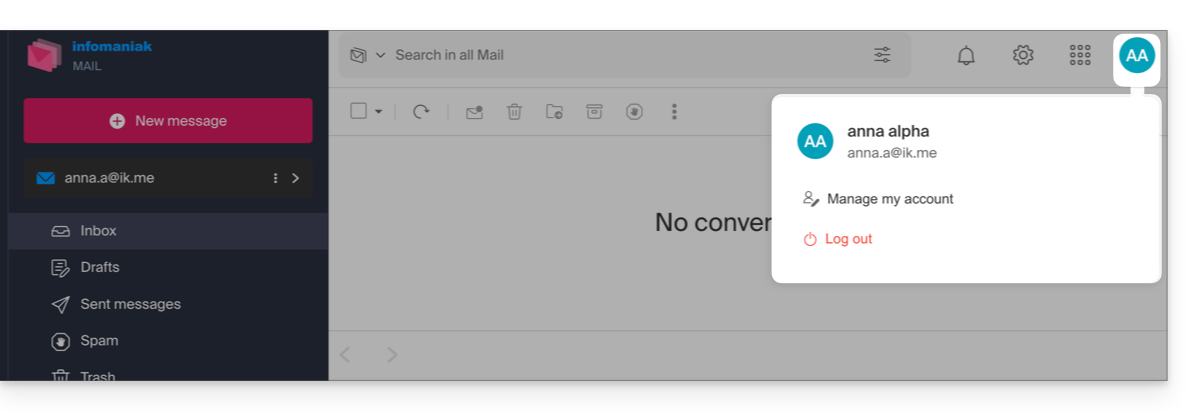
- Once the registration is validated, you access your email address anna.a@ik.me on the Web app Mail
ksuite.infomaniak.com/mail: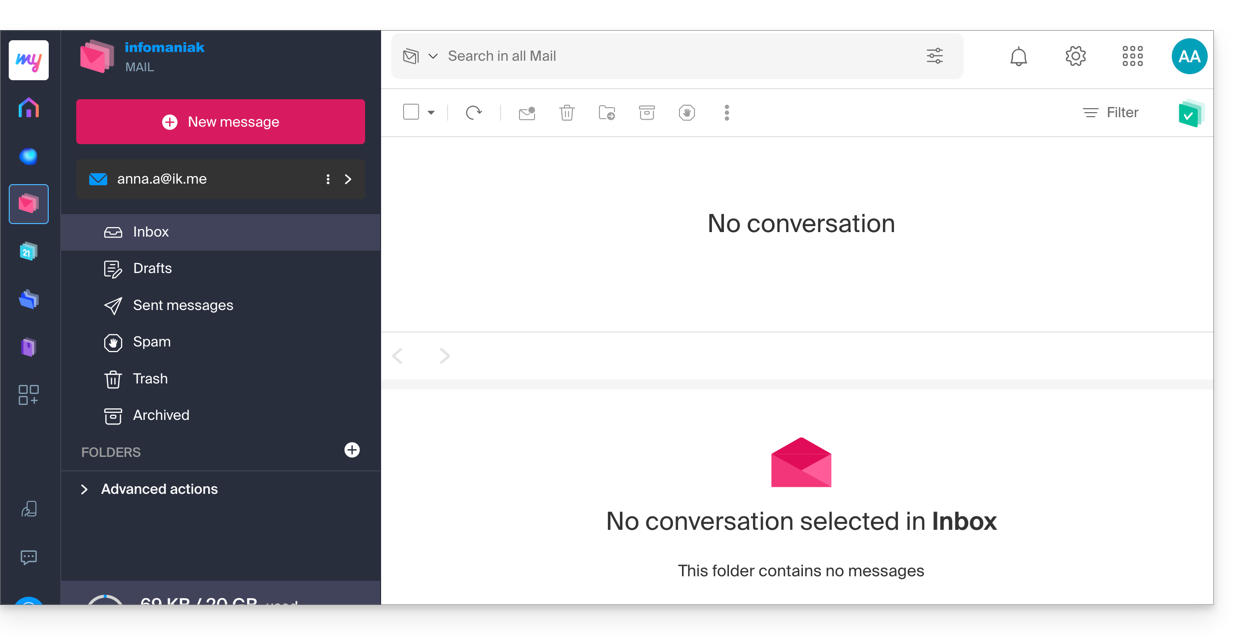
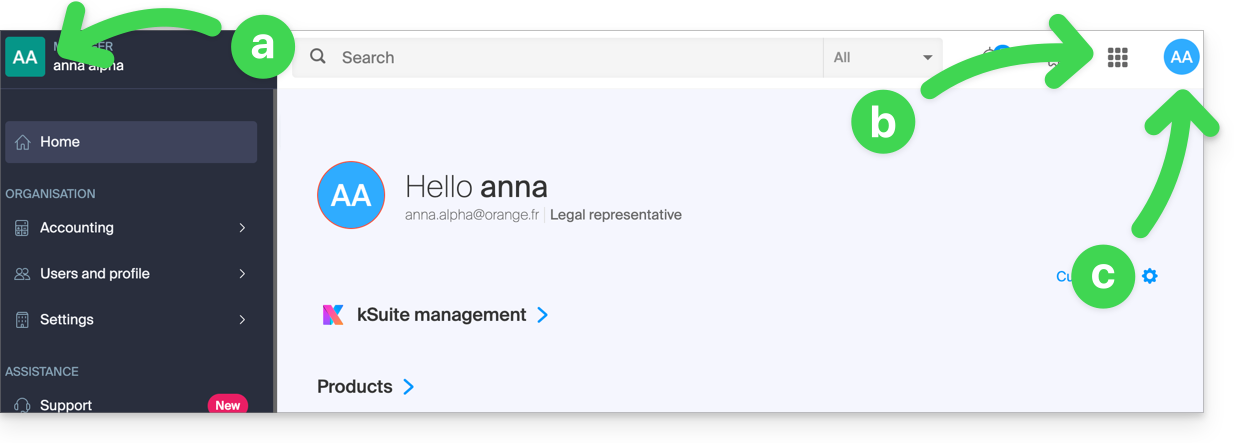
- You can distinguish:
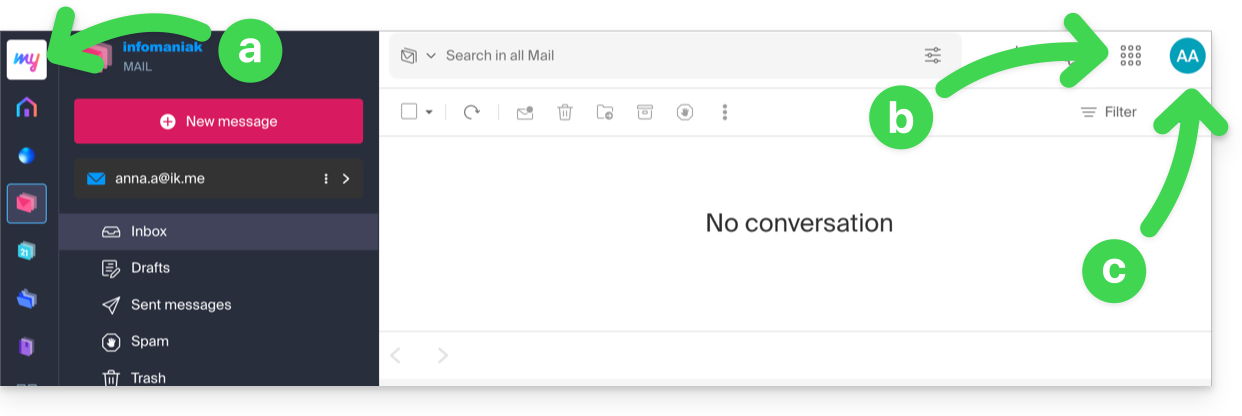
- The logo/type of your Organization, which in this case indicates that it is a my kSuite account.
- The button allows you to access the Manager
manager.infomaniak.comand other apps / other services related to my kSuite: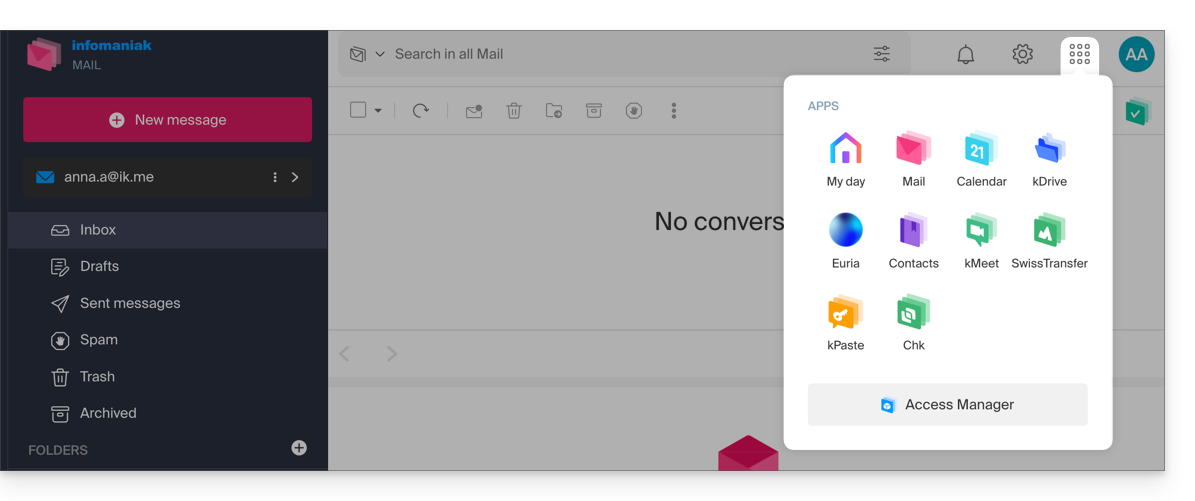
- The Manager in this case will contain nothing more than information about managing your my kSuite account:
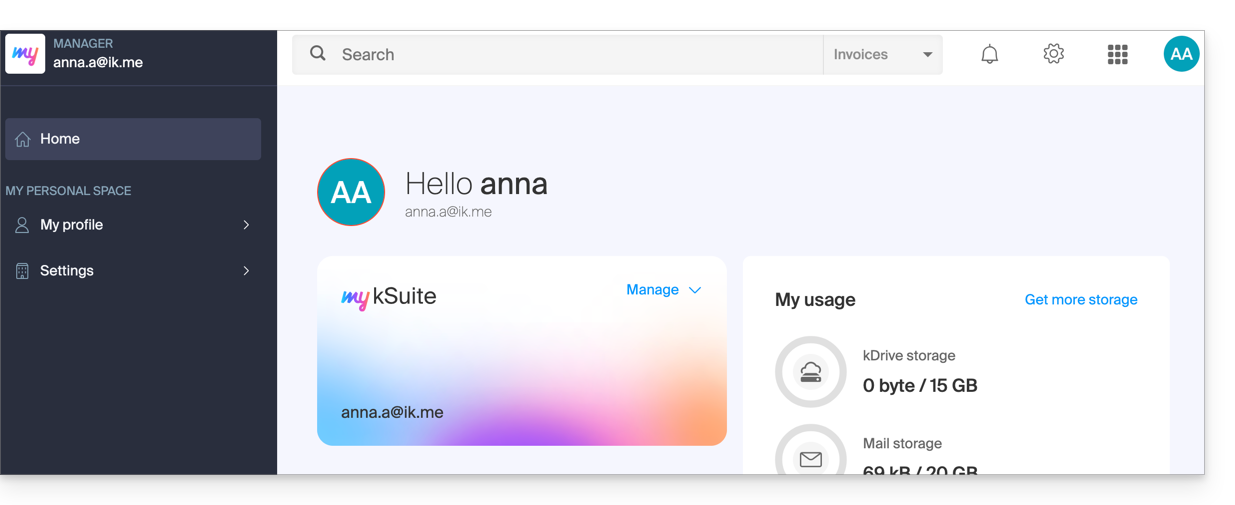
- The Manager in this case will contain nothing more than information about managing your my kSuite account:
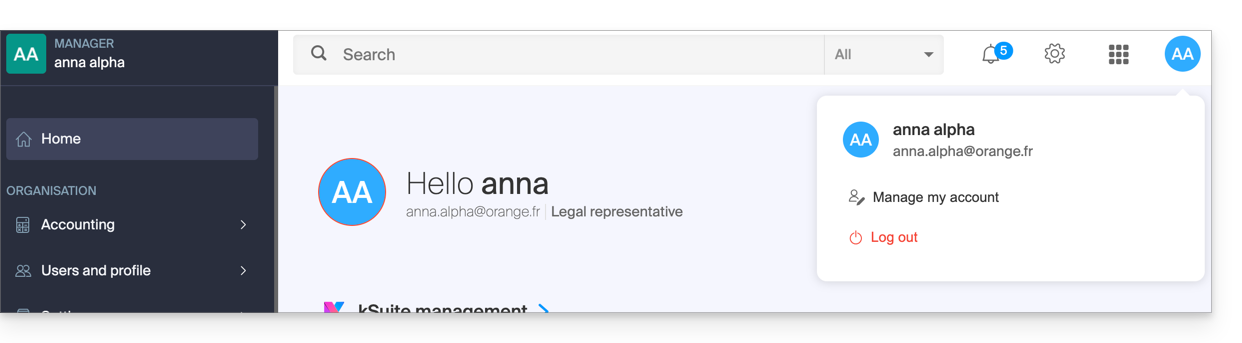
- The initials are those of your Infomaniak account (first name / last name entered during registration):
This account my kSuite will not be able to directly contain hosting products, or kSuite with a domain name, etc. The rest of this guide explains how to create a more comprehensive Organization if necessary.
Note that it is not possible to export your services my kSuite to another Organization.
To use your new my kSuite email address on the Web app Mail, refer to this other guide.
2. Registration and purchase of hosting, domain, etc.
When registering on welcome.infomaniak.com/signup/, you chose your login identifier, in the form of a personal email address, for example anna.alpha@orange.fr :
You then chose the type of Organization you wanted to create (personal, or for a company, association, etc.):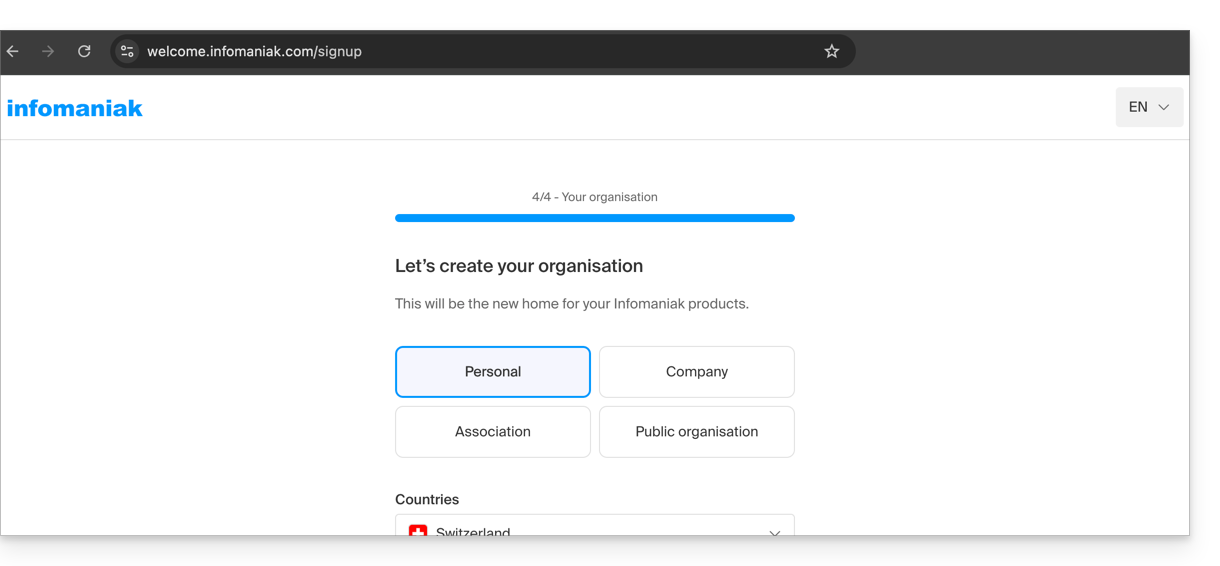
- Once registration is complete, you will access the Manager
manager.infomaniak.comand your Organization is still an “empty shell” of which you are currently the sole legal representative: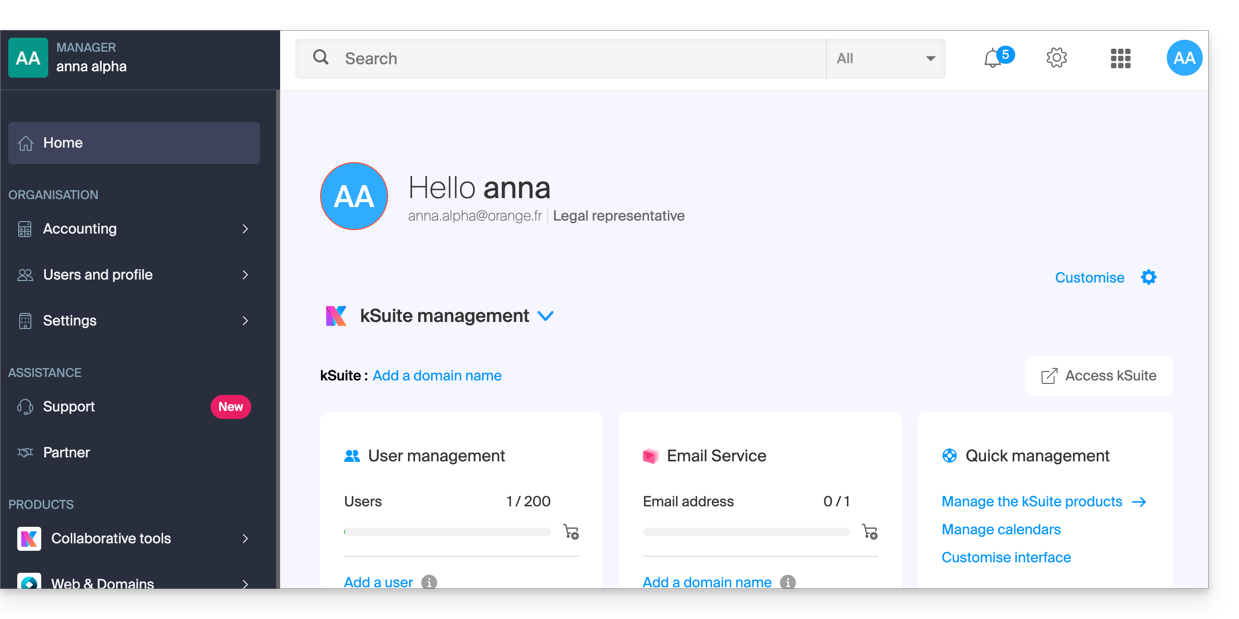
- You can distinguish:
- The logo/type of your Organization, which in this case indicates that it is a personal Organization (automatically named upon creation via the first name/last name of the creator); this can be customized.
- The button allows you to access kSuite
ksuite.infomaniak.comand other apps / other services related to the free kSuite added to your new Organization: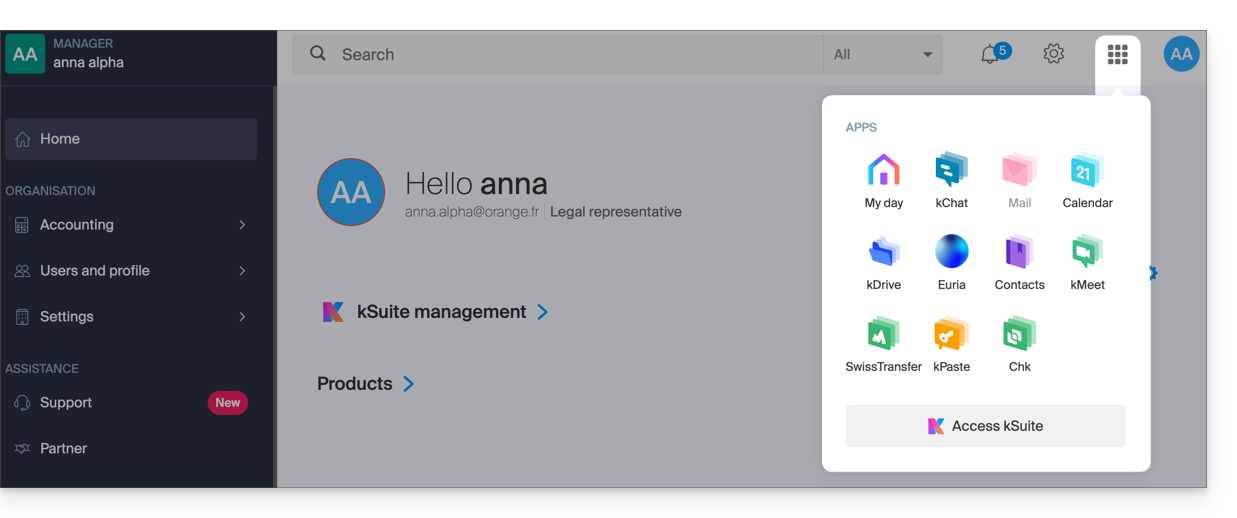
- The initials are those of your Infomaniak account (first name / last name provided during registration):
3. Combined use
What happens if you sign up for my kSuite by specifying an existing Infomaniak account that you already own for using hosting products?
Or how to proceed if you wish to acquire hosting products when you only have a my kSuite ?
Sign up for my kSuite by specifying an existing account
When signing up on welcome.infomaniak.com/signup/myksuite, you choose to log in with an existing account…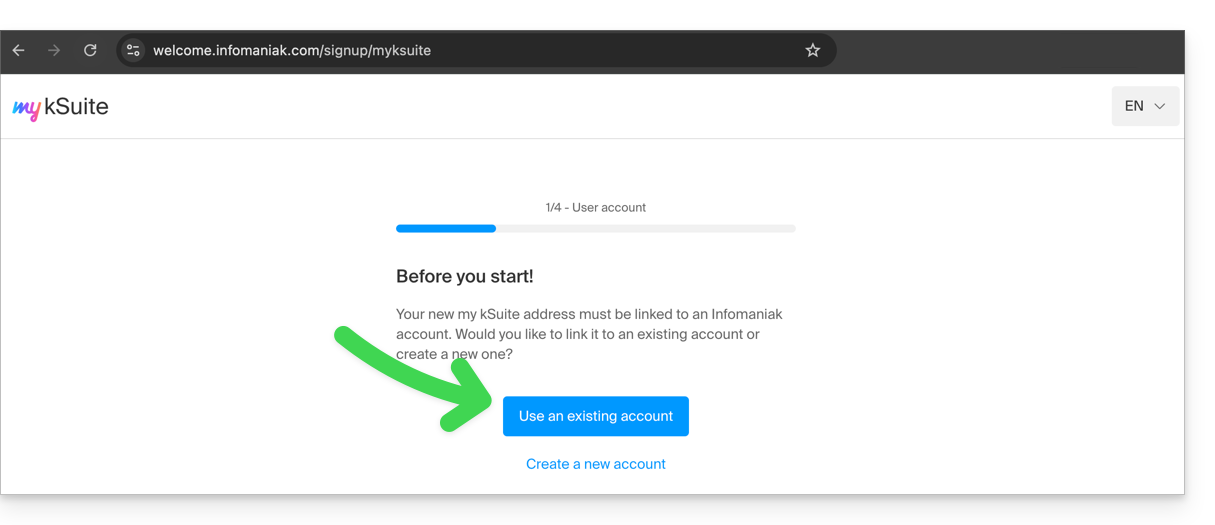
- Obviously, you should not specify a my kSuite account (
anna.a@ik.mefor example) as an existing account, as you cannot have multiple ik.me / etik.com / ikmail.com email addresses: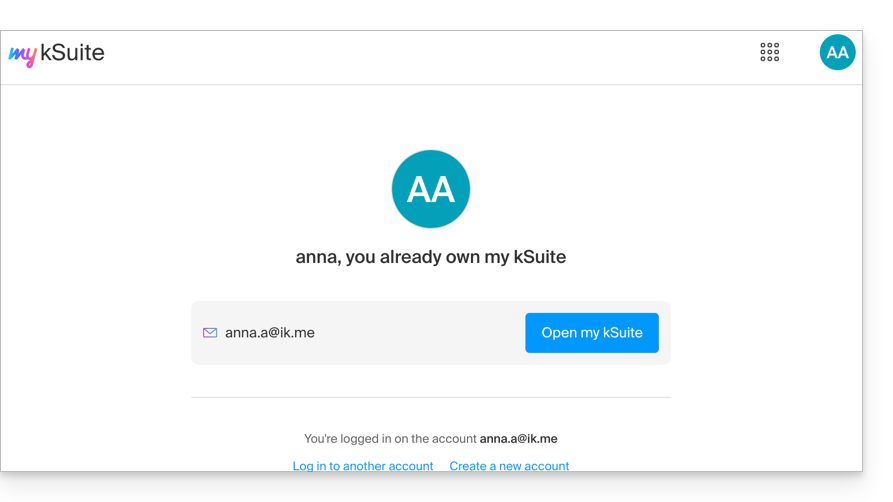
- Specify your existing Organization account,
anna.alpha@orange.fr: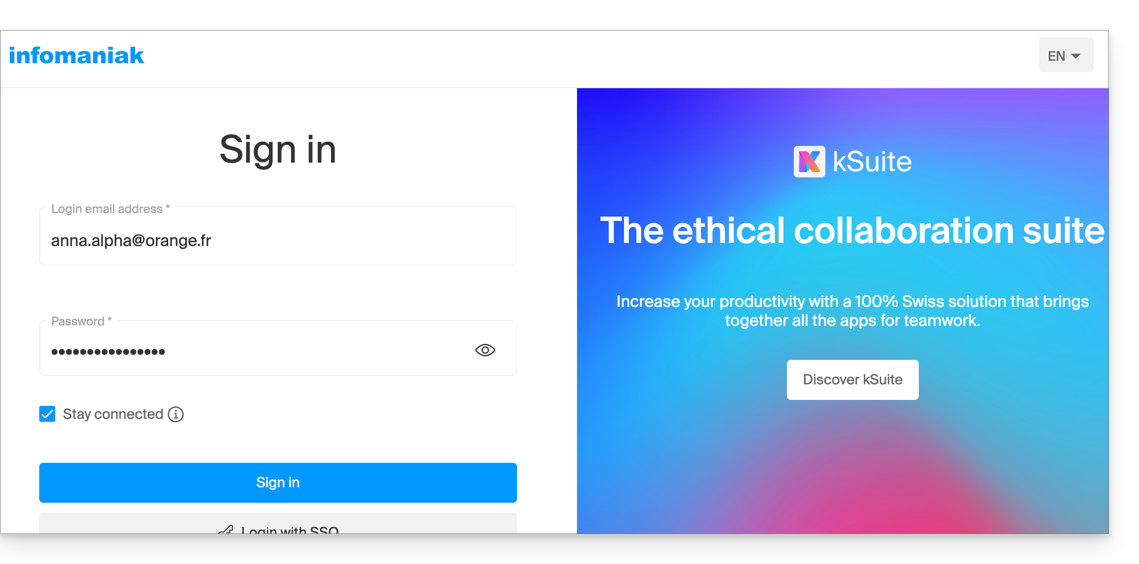
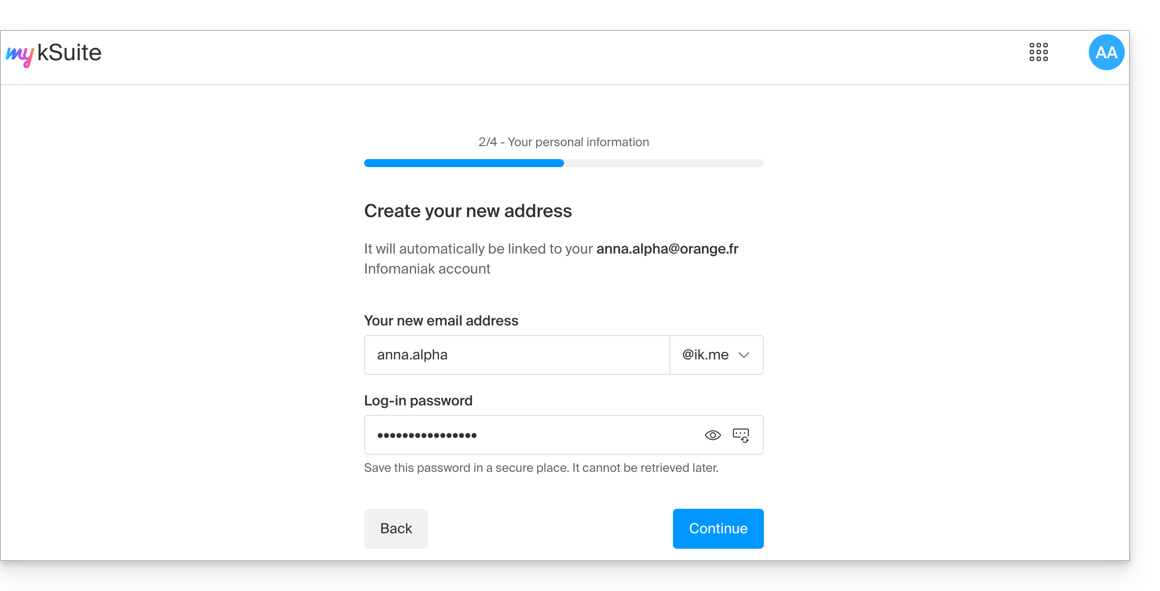
- Thus, the creation of a my kSuite account is proposed to you:
- Once registration is complete, you will access the Manager
manager.infomaniak.com:- your previous Organization is visible…
- separated from my kSuite currently selected:
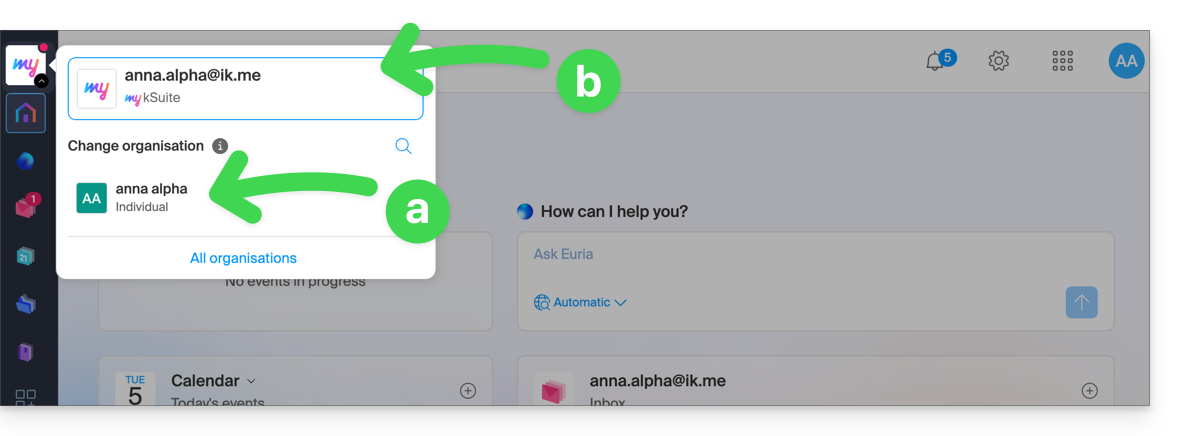
- Click on one or the other of the Organizations/my kSuite from this menu (always accessible permanently at the top left) to switch from one to the other.
Acquiring products with only one account my kSuite
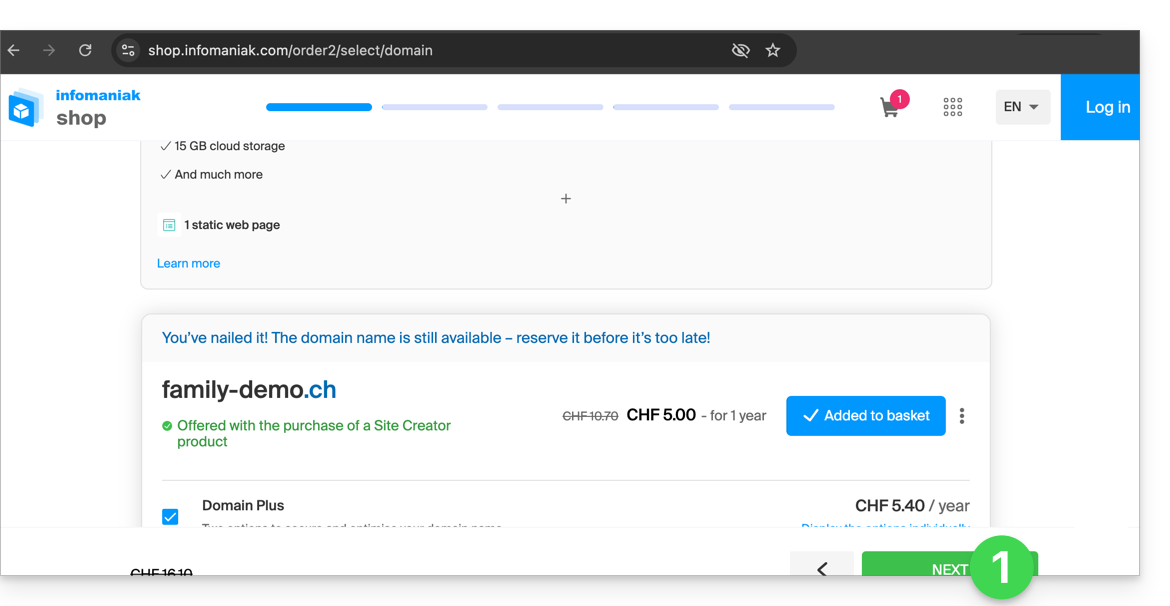
Another situation: you wish to acquire on www.infomaniak.com one of the services offered by Infomaniak, for example a domain name for your future site / email:
- You will be redirected to the Infomaniak Shop; proceed to the next step:
- At the step where you need to specify your existing Infomaniak identifier, if any, you enter your existing my kSuite account (
anna.alpha@ikmail.comin this example):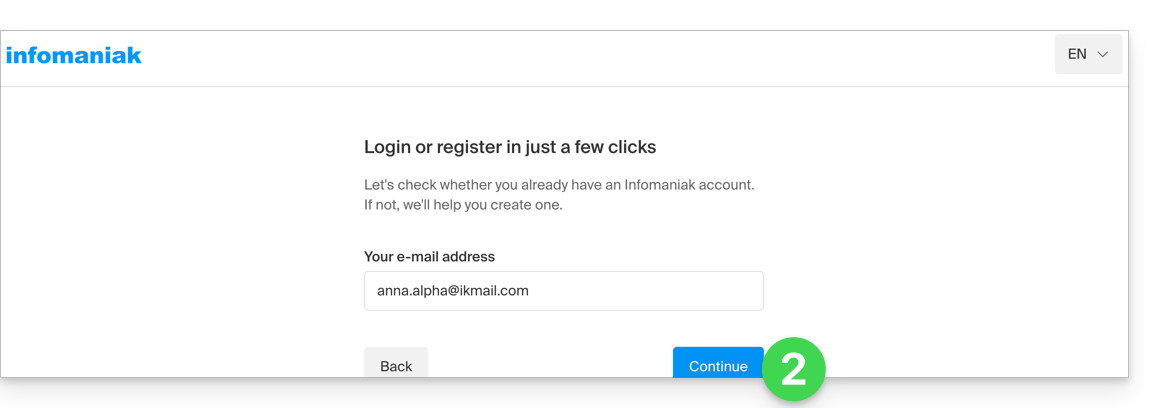
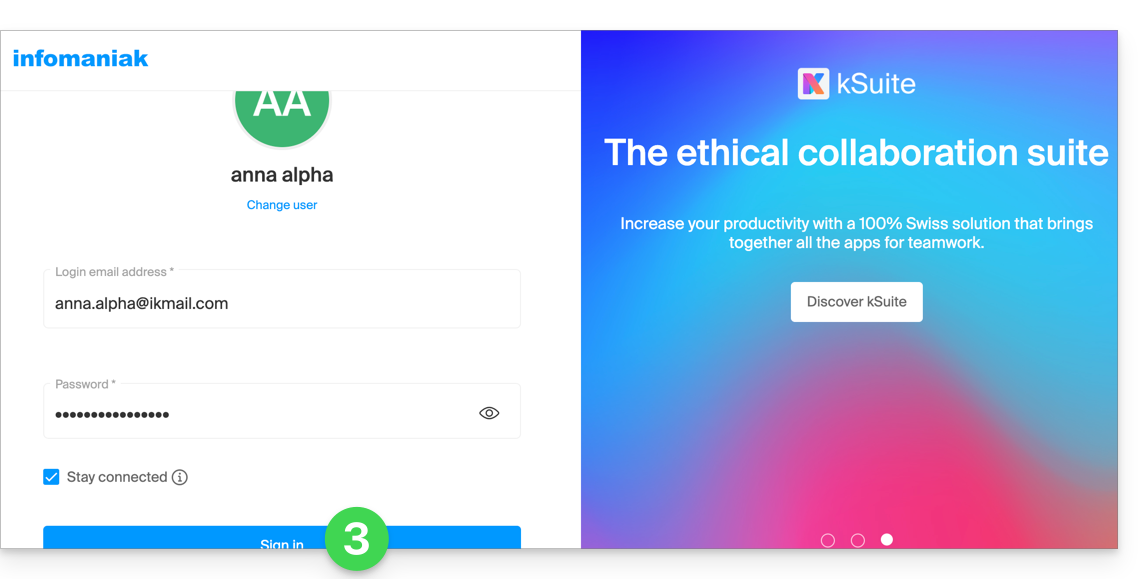
- Your existing identifier is recognized, you must authenticate:
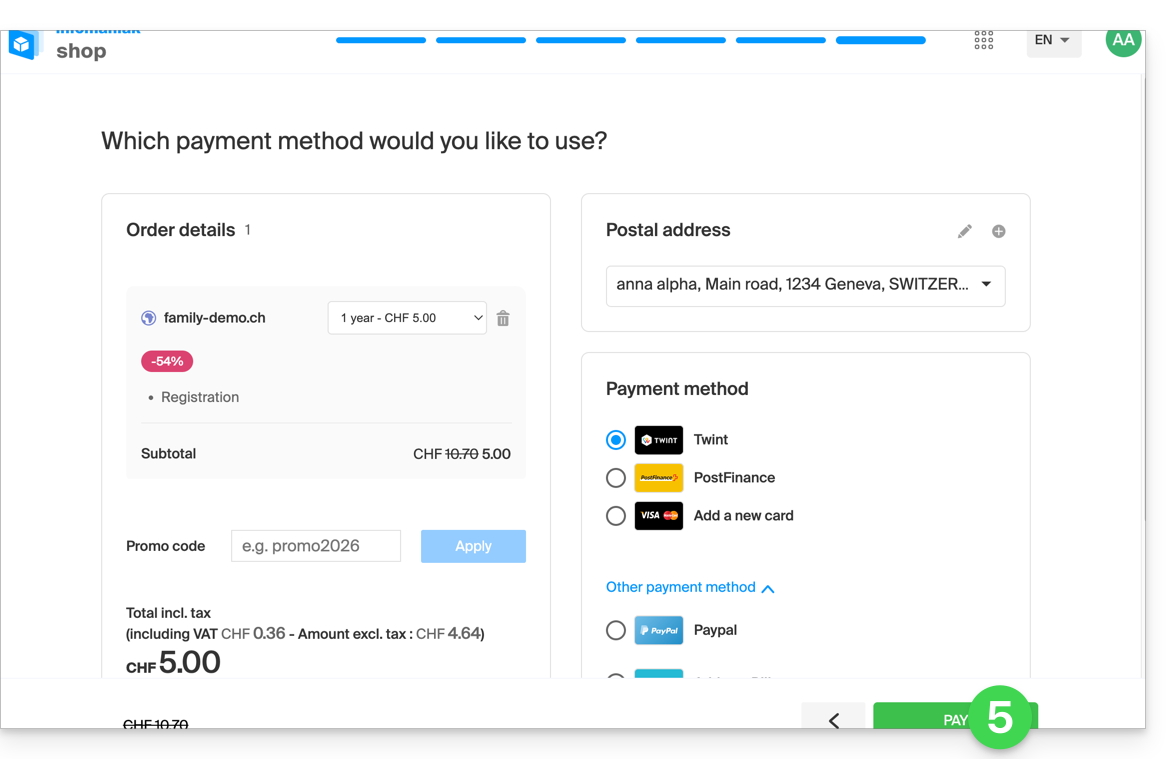
- Then you will necessarily go through the Organization creation step; choose the type of Organization you wish to create (personal, or for a company, association, etc.):

- To finalize the purchase, the details related to the Organization will be requested for billing (they are also used to generate a registrant for the ordered domain name); all you have to do is complete the order:
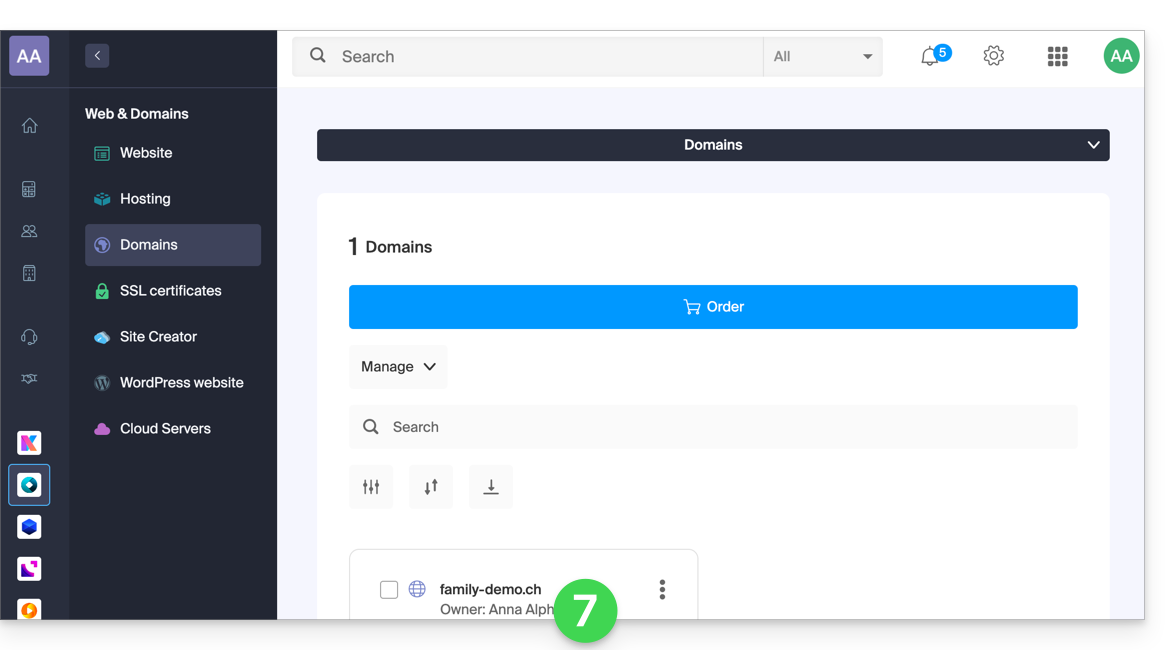
- Once the order is completed, you access the Manager
manager.infomaniak.com: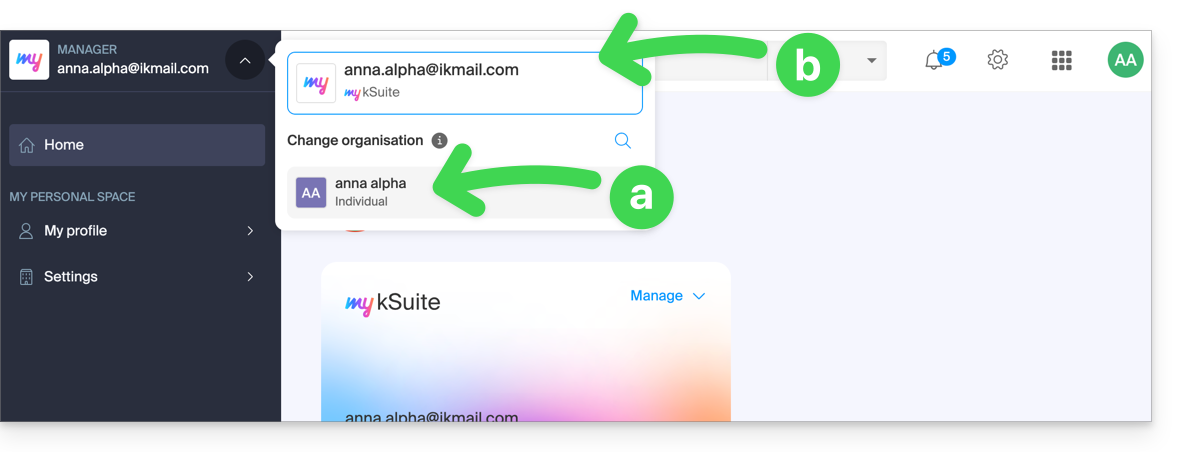
- your new Organization is visible…
- separated from my kSuite currently selected.
- Click on the new Organization to switch to it and manage your ordered products:
- To switch from one to the other of the Organizations/my kSuite click on this menu (always accessible permanently at the top left):
- A first time to arrive on the main page of the Manager,
- then on the chevron allowing the choice of the destination:
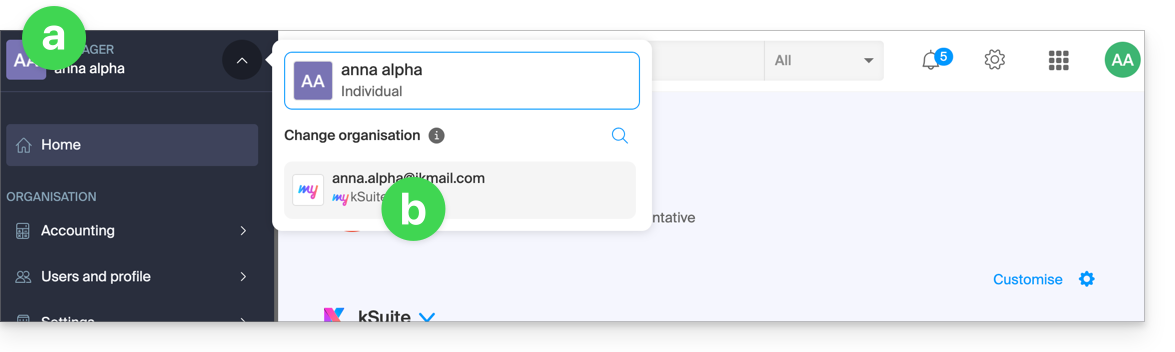
- You will find your email address my kSuite.
To understand the different "Suites" Infomaniak (kSuite, my kSuite...), refer to this other guide.
Link to this FAQ:
Has this FAQ been helpful?
Thank you for choosing Infomaniak for hosting your IT solutions and congratulations on optimizing your customer experience. You are taking it to the next level with the Premium Support offer.
Preamble
- Since the beginning of Infomaniak, the Support department has been working to resolve customer issues.
- Free and unlimited, it responds to all your requests in the shortest possible time, this 5/7 from 9 am to 6 pm by phone and 7/7 by email from 6 am to 11 pm.
- Infomaniak does not intervene directly on your machines or networks but may request access to Mail or kDrive on a case-by-case basis.
- Many technical guides answer common questions, and specialized partners offer personalized support beyond the role of the host.
- The Premium Support commitment is for a minimum of 6 months, with no possibility of canceling before the end of the term.
Infomaniak Premium Support
By choosing one of the 3 support options, you benefit from personalized advice, product optimization, and faster response times and extended hours compared to standard support. Here are the details of these 3 versions:
Support Plus
- The partners can benefit from this support.
- A first response is guaranteed within 4 hours (opening hours above).
Support Pro
- A response is guaranteed within 2 hours (opening hours above).
- Emergency calls can be made 24/7.
- You benefit from a designated account manager, 5/7 from 9 am to 6 pm.
Support Enterprise
- A response is guaranteed within 1 hour (opening hours above).
- Emergency calls can be made 24/7.
- Customized advice is provided 5/7 from 9 am to 6 pm.
- You benefit from two designated account managers (including one technical).
Frequently Asked Questions
- What is the VIP code and where to get it?
- What is the technical PDF document?
- Commitment period
- Premium Support limits
- Is it advantageous to pay annually?
- What does guaranteed response time mean?
The entire Infomaniak team is eager to provide you with superior service and help you get the most out of its offers.
Link to this FAQ:
Has this FAQ been helpful?
This guide concerns the WordPress module "Infomaniak Connect for OpenID" which allows users to log in to your WordPress site (whether hosted by Infomaniak or not) using their Infomaniak credentials.
Introduction
- Allowing login via an Infomaniak account on your WordPress site enables your visitors to comment, register for courses, or access any content reserved for members with a single click, without having to create a new account.
- This saves them time and provides a more secure method for you, as you don't have to manage additional passwords.
- The operation of this external module is identical to the "Log in with Google", "Log in with Facebook" or “Log in with Apple” options; it uses the standard OAuth2 and OpenID Connect protocols to enable single sign-on (SSO).
A. Create an application with Auth Infomaniak
To do this:
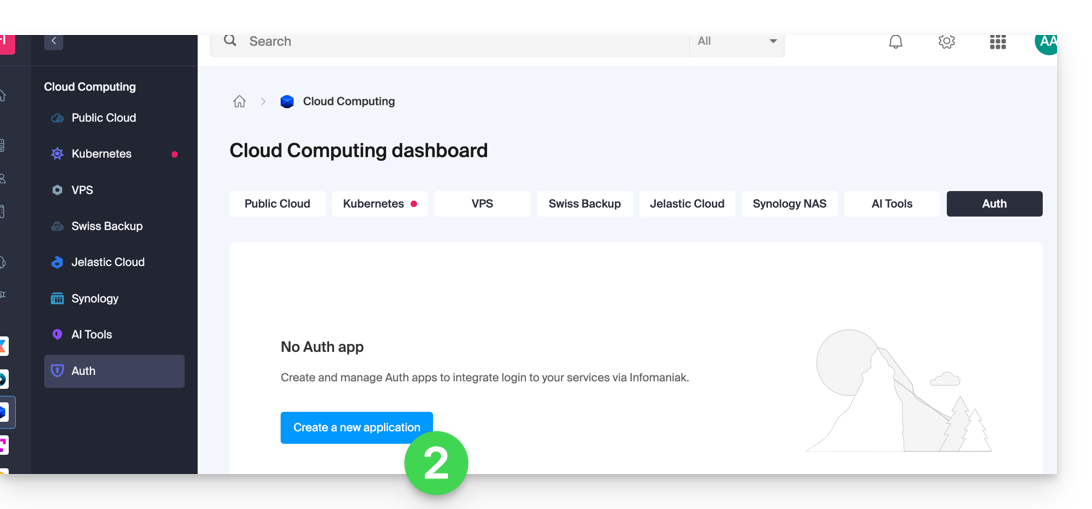
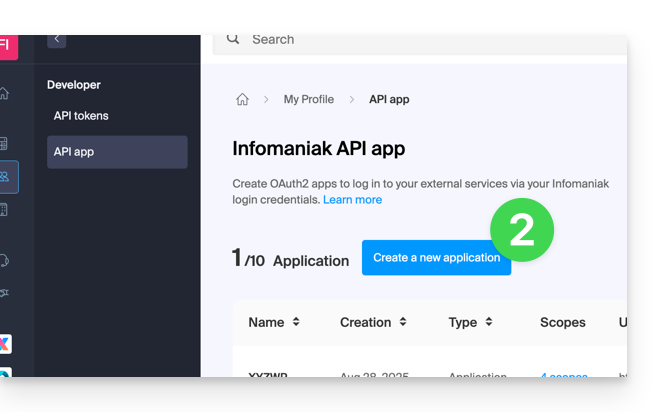
- Click here to access the management of your Auth product on the Infomaniak Manager (need help?).
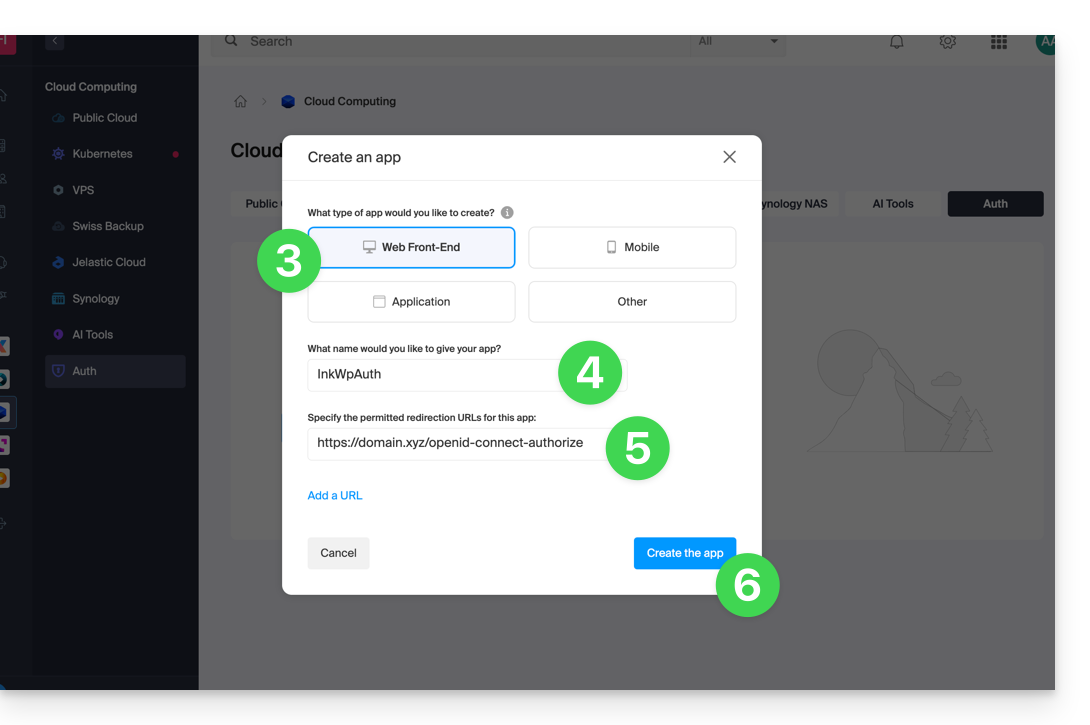
- Click the button to Create a new application:
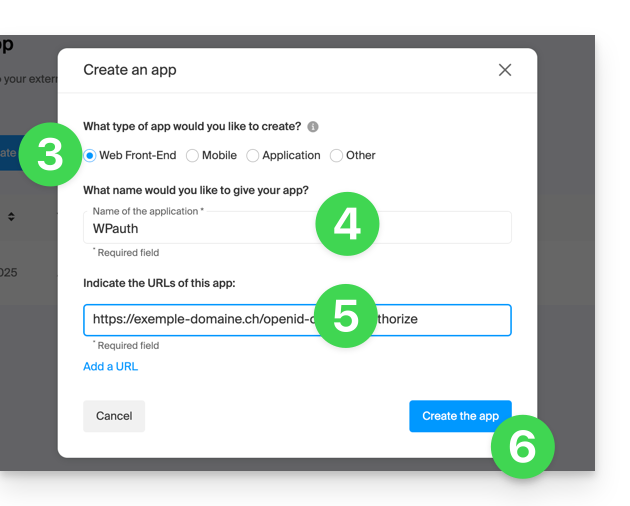
- Choose the type “Web Front-End”.
- Give your application a name.
- In the URL field, enter the domain name corresponding to your WordPress site, followed by
/openid-connect-authorize(refer to the GitHub documentation if needed). - Click the button to complete the app creation:
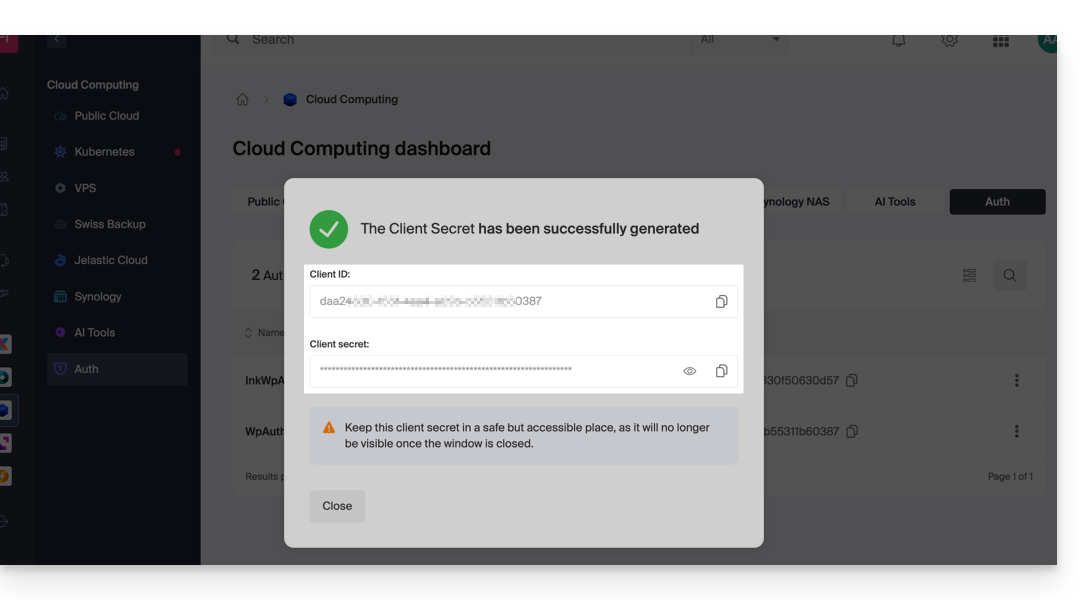
- Carefully note the 2 pieces of information obtained when finalizing your OAuth2 application:
B. Configure the WordPress extension
To do this:
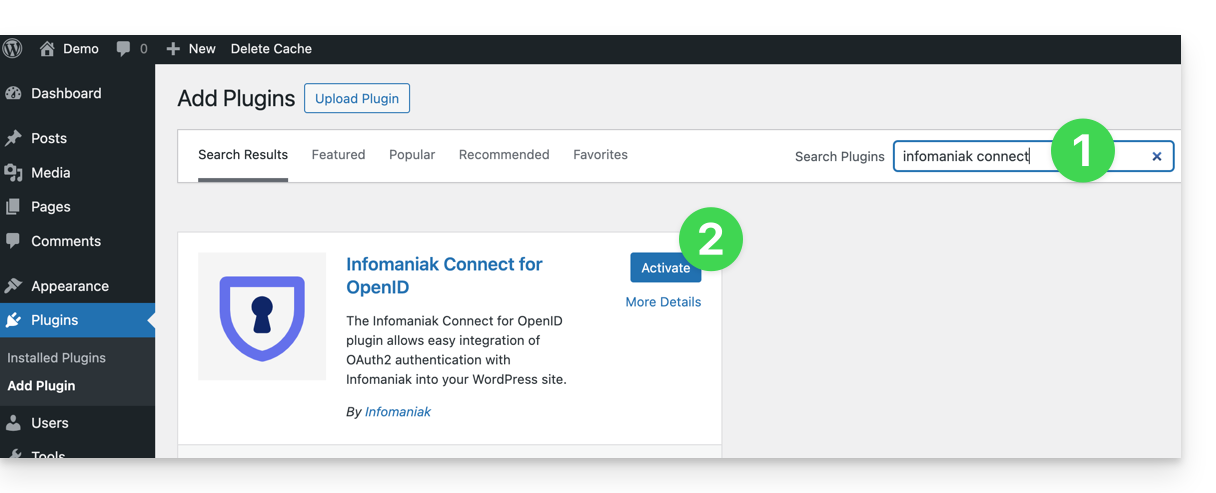
- Search for the
Infomaniak Connect for OpenIDextension on the WordPress extensions platform from your site. - Install and activate the extension:
- Configure the extension from the Settings menu:

- The only fields to fill in are Client ID and Client Secret Key, and these come from the information obtained in step A above:
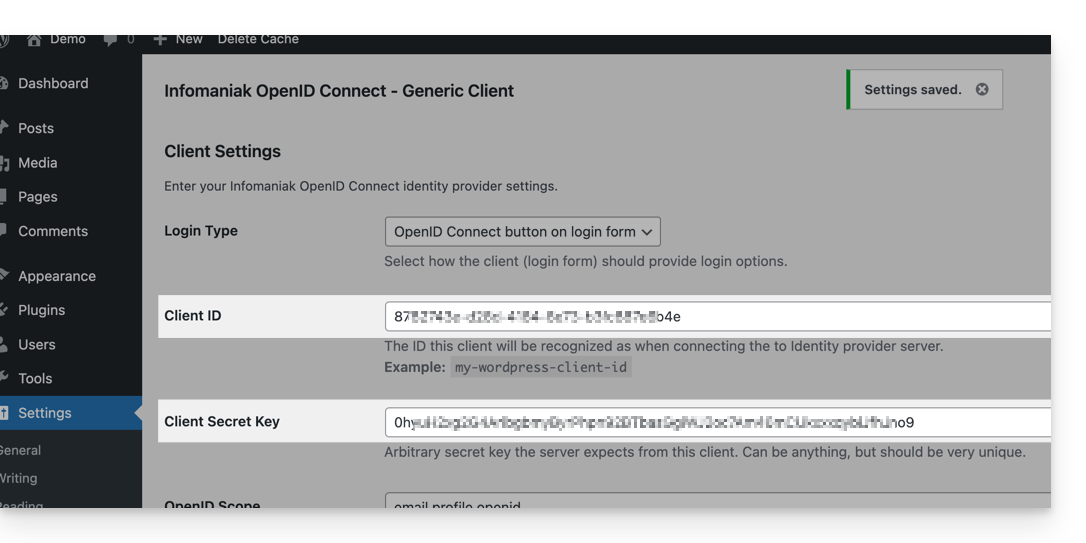
- Don't forget to save the changes made to the extension settings.
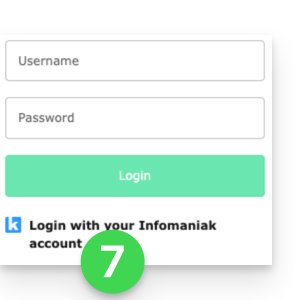
- An additional button for logging in with your Infomaniak credentials is now visible on your login page for
/wp-adminusers (/wp-login.php):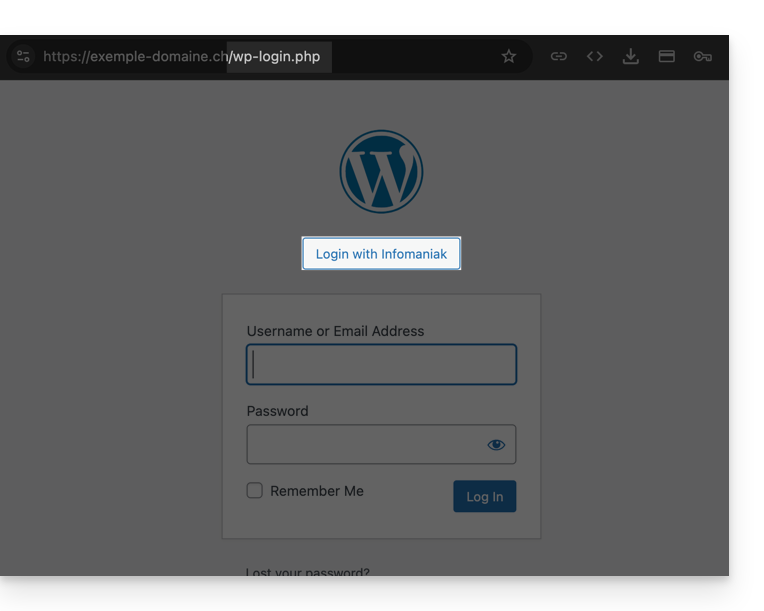
Link to this FAQ:
Has this FAQ been helpful?
This guide concerns the Typo3 module "t3ext-infomaniak-auth" which allows users to log in to your Typo3 site (whether hosted by Infomaniak or not) using their Infomaniak credentials.
Preamble
- Allowing login via an Infomaniak account on your Typo3 site enables your visitors to comment, register for courses, or access any member-only content with a single click, without having to create a new account.
- This saves them time and is a safer method for you, as you do not have to manage additional passwords.
- The operation of this external module is identical to the options "Sign in with Google", "Sign in with Facebook" or "Sign in with Apple"; it uses the standard protocols OAuth2 and OpenID Connect to enable single sign-on (SSO).
A. Create an application with Auth Infomaniak
To do this:
- Click here to access the management of your product Auth on the Infomaniak Manager (need help?).
- Click the button to Create a new application:
- Choose the type "Web Front-End".
- Give a name to your application.
- In the URL field, enter the domain name corresponding to your Typo3 site followed by
/openid-connect-authorize(refer to the GitHub documentation if necessary). - Click the button to complete the app creation:
- Carefully note the 2 pieces of information obtained during the finalization of your OAuth2 application:
B. Configure the Typo3 extension
In SSH, deploy Composer if necessary to retrieve the t3ext-infomaniak-auth extensions. To do this:
- The SSH command for installing the extension is here:
Then, in Typo3:
- Log in to your Typo3 administration interface.
- Check if necessary that the Infomaniak extension is activated:
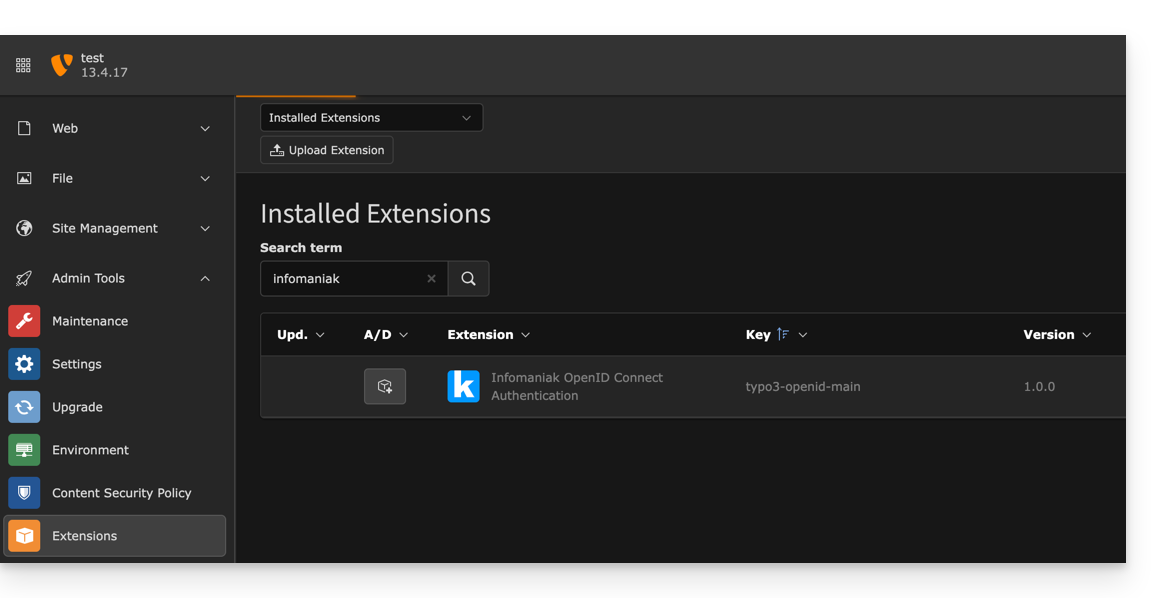
- Check if necessary that the Infomaniak extension is activated:
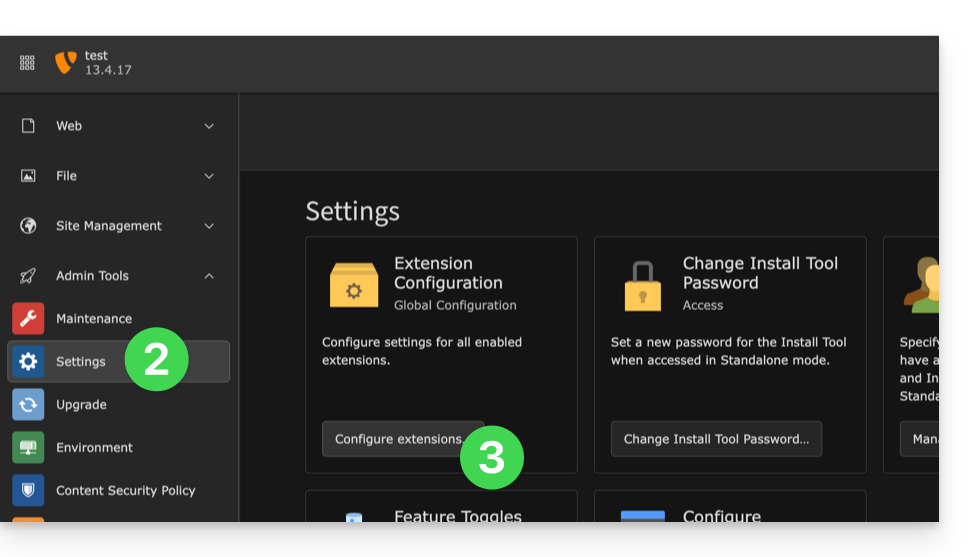
- Click on Settings in the left sidebar menu.
- Click on Configure extensions:
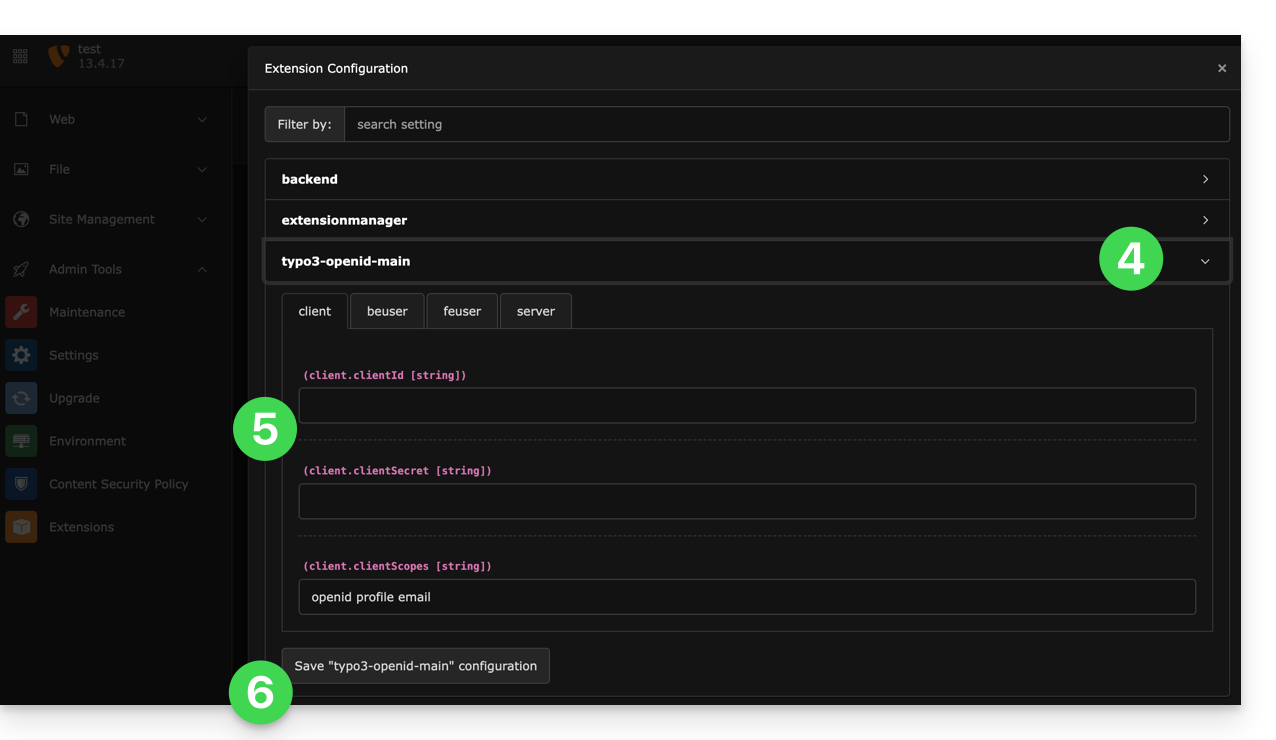
- Click on the chevron to the right of typo3-openid-main to expand the client tab.
- The only fields to fill in are clientID and clientSecret and come from the information obtained in point A above.
- Do not forget to save the changes made to the extension settings:
- An additional button for logging in with an Infomaniak identifier is now visible on your user login page:
Link to this FAQ:
Has this FAQ been helpful?
This guide concerns the Drupal module "Infomaniak_Connect" which allows users to log in to your Drupal site (whether hosted by Infomaniak or not) using their Infomaniak credentials.
Preamble
- Allowing login via an Infomaniak account on your Drupal site enables your visitors to comment, register for courses, or access any member-restricted content with a single click, without having to create a new account.
- This saves them time and is a safer method for you, as you do not have to manage additional passwords.
- The operation of this external module is identical to the options "Log in with Google", "Log in with Facebook" or "Log in with Apple"; it uses the standard protocols OAuth2 and OpenID Connect to enable single sign-on (SSO).
A. Create an application with Auth Infomaniak
To do this:
- Click here to access the management of your product Auth on the Infomaniak Manager (need help?).
- Click the button to Create a new application:
- Choose the type "Web Front-End".
- Give a name to your application.
- In the URL field, specify the domain name corresponding to your Drupal site followed by
/openid-connect-authorize(refer to the GitHub documentation if necessary). - Click the button to complete the app creation:
- Carefully note the 2 pieces of information obtained during the finalization of your OAuth2 application:
B. Configure the Drupal extension
Via SSH, deploy Composer if necessary to retrieve the openid_connect and infomaniak_connect extensions. To do this:
- You may need to edit the composer.json file as the version of
openid_connectis not yet considered stable. Add: "minimum-stability": "dev", "prefer-stable": true- The SSH commands for installing the 2 extensions are here:
Then, on Drupal:
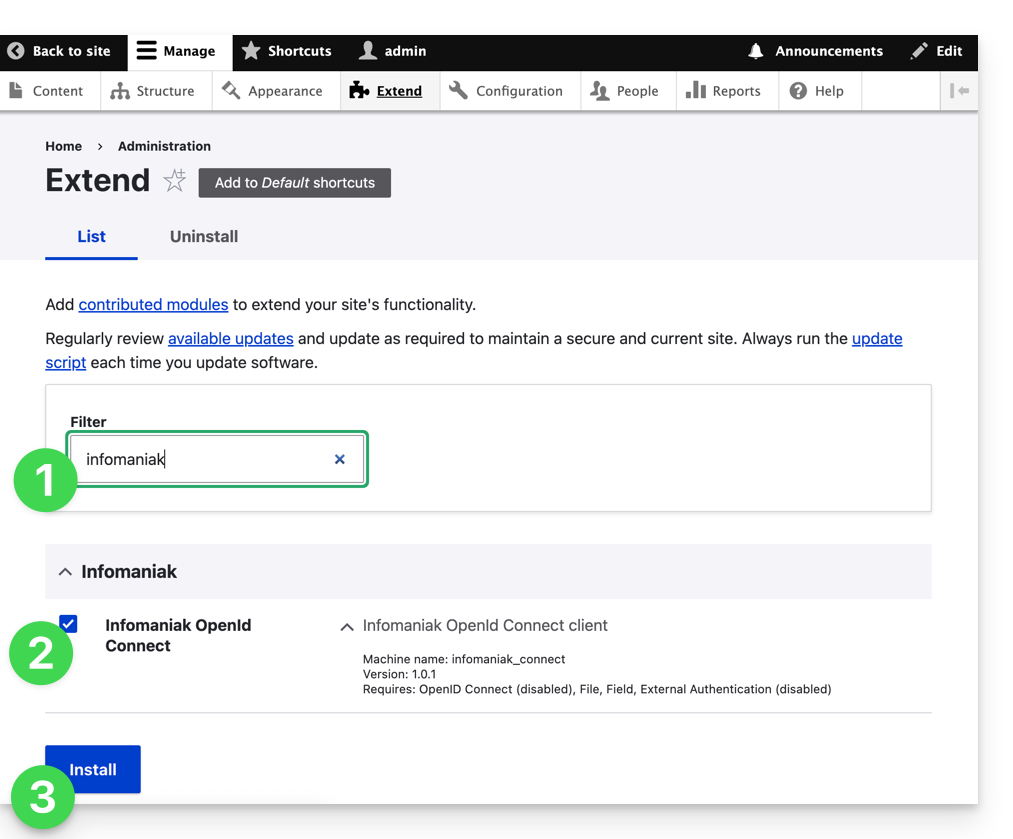
- Search for the Infomaniak module among your pre-installed modules.
- Select it.
- Click the Install button:
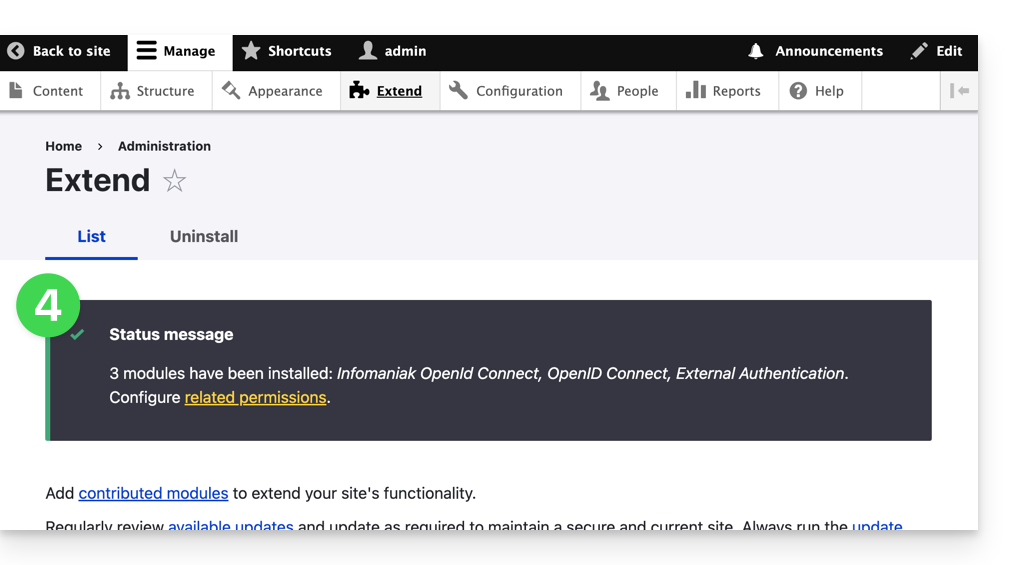
- The installation of dependencies will proceed:
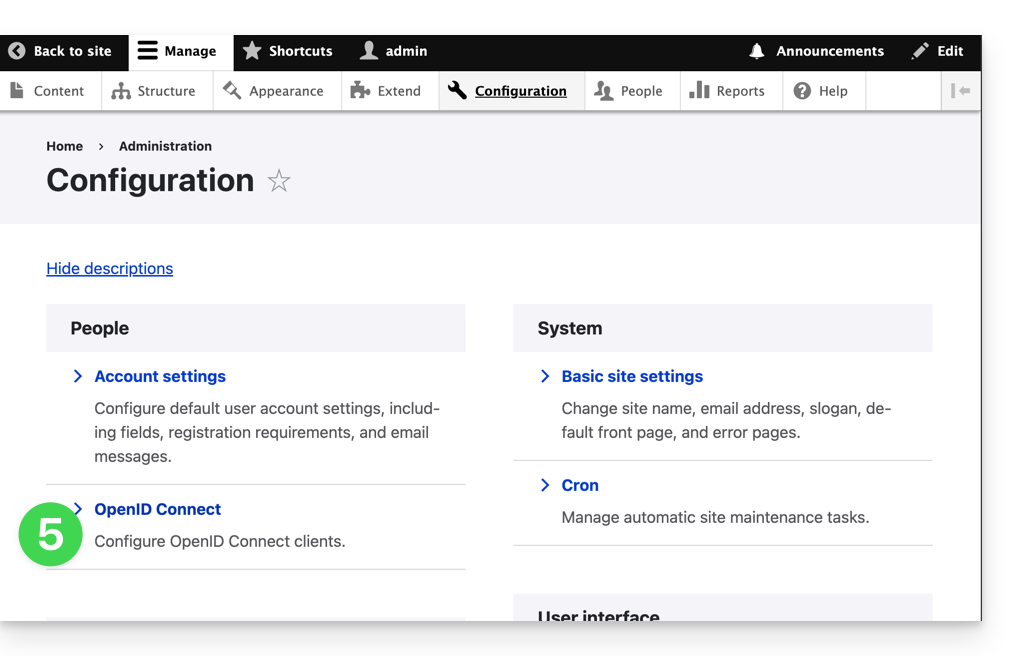
- Under Configuration, click to set up the OpenID connection:
- Click the edit button:
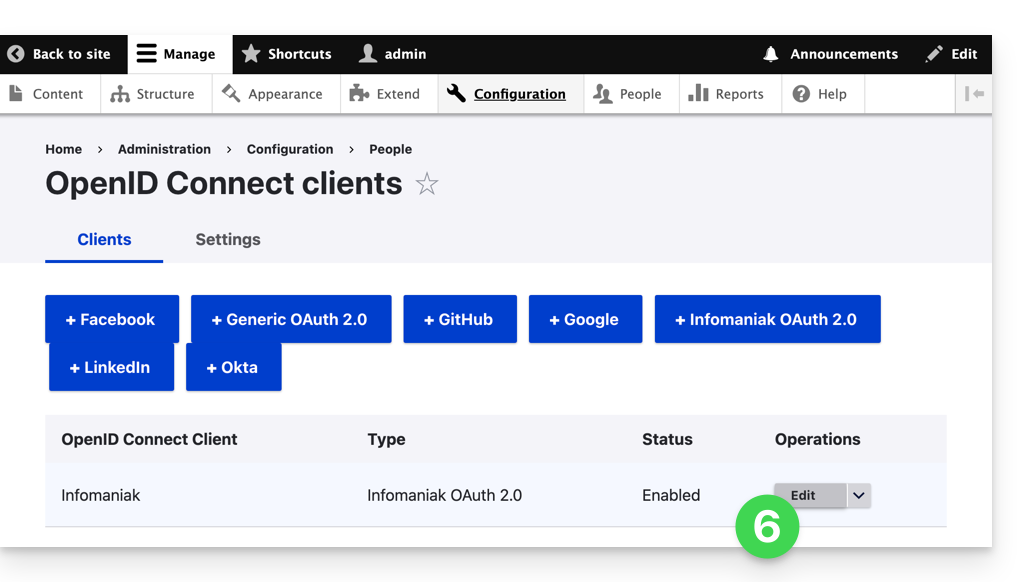
- The only fields to fill in are Client ID and Client Secret and come from the information obtained in point A above:
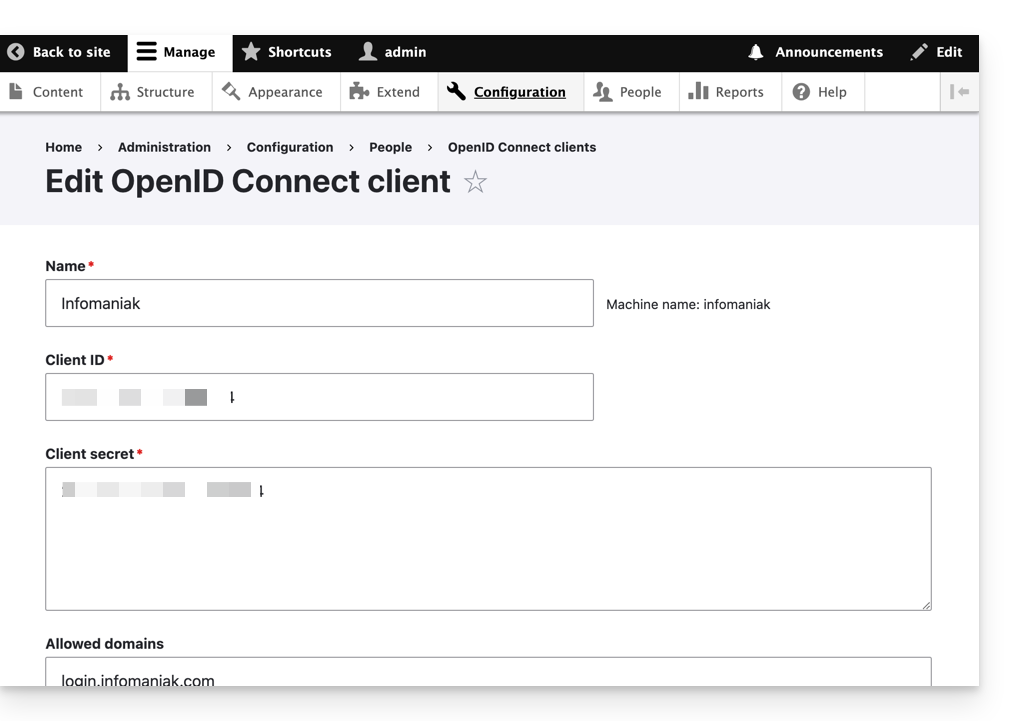
- Do not forget to save the changes made to the extension settings.
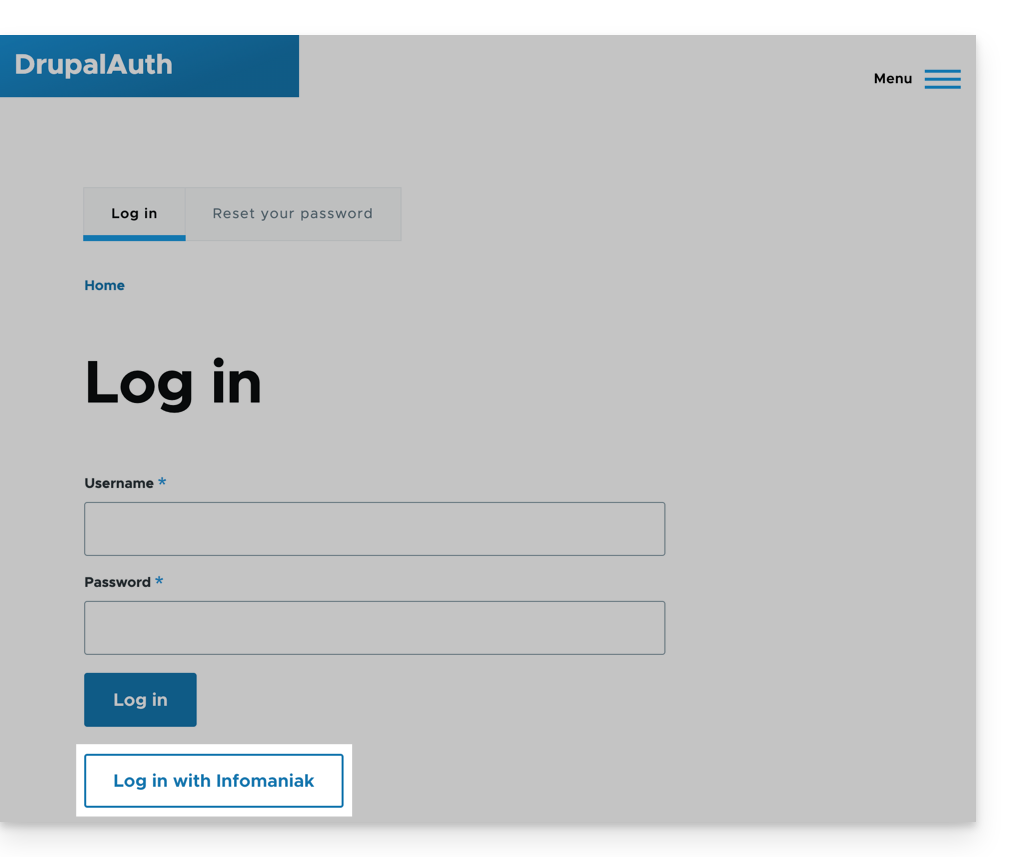
- In the Settings tab, you can choose the display type for your login page; do not forget to save:

- An additional button for logging in with an Infomaniak identifier is now visible on your login page for users:
Link to this FAQ:
Has this FAQ been helpful?
This guide details how to manage the Organization Directory, which is a special address book available within the Infomaniak Contacts web app (online service: ksuite.infomaniak.com/contacts).
Introduction
- The Organization Directory is "automatically created" by the various users that make up one of the Organizations to which your user is affiliated.
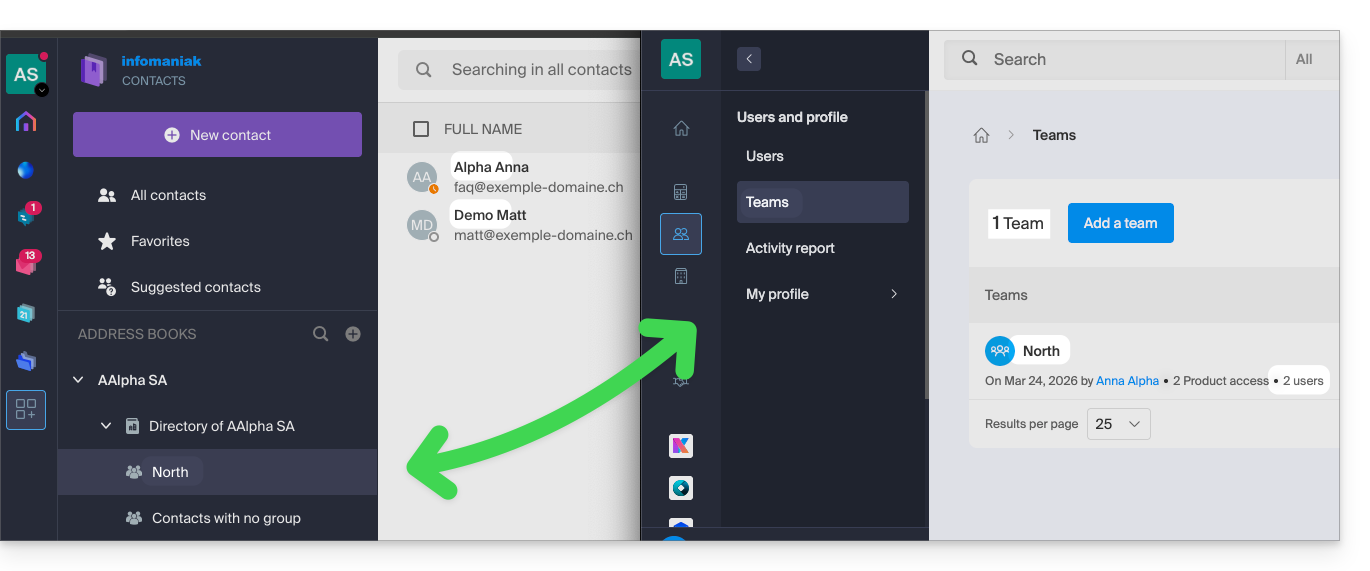
- If Groups are created within the Organization, they will be visible in the Organization Directory:
- This address book is automatically synchronized with all internal users of your Organization.
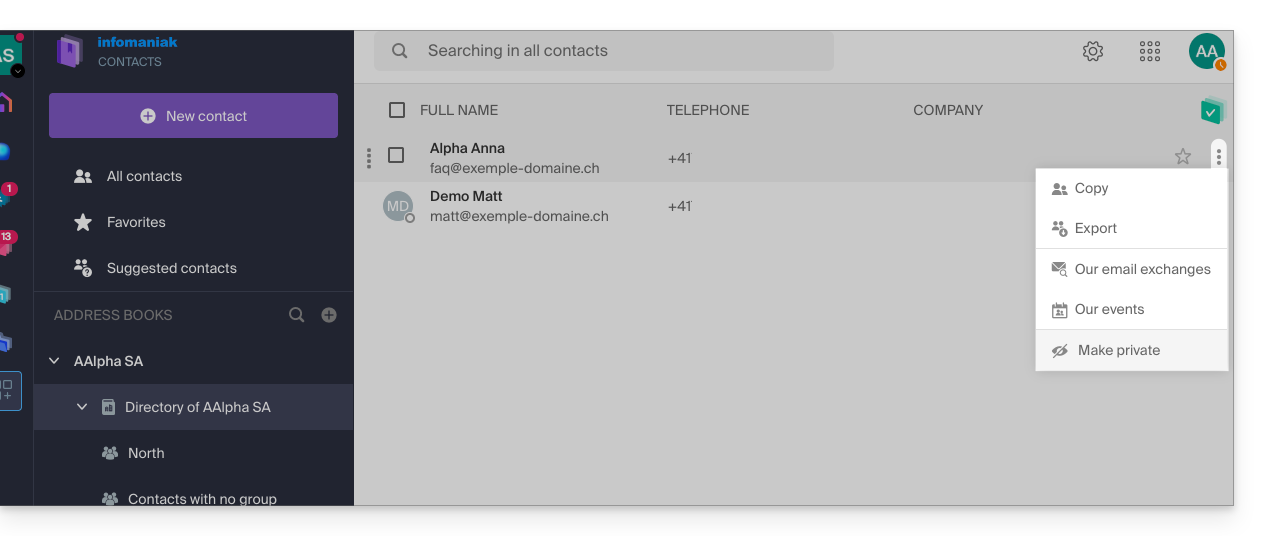
- An administrator of the Organization can make certain entries in the directory private, hiding them from users with fewer permissions:
- It is not possible to export or rename it.
- You can change its display color:
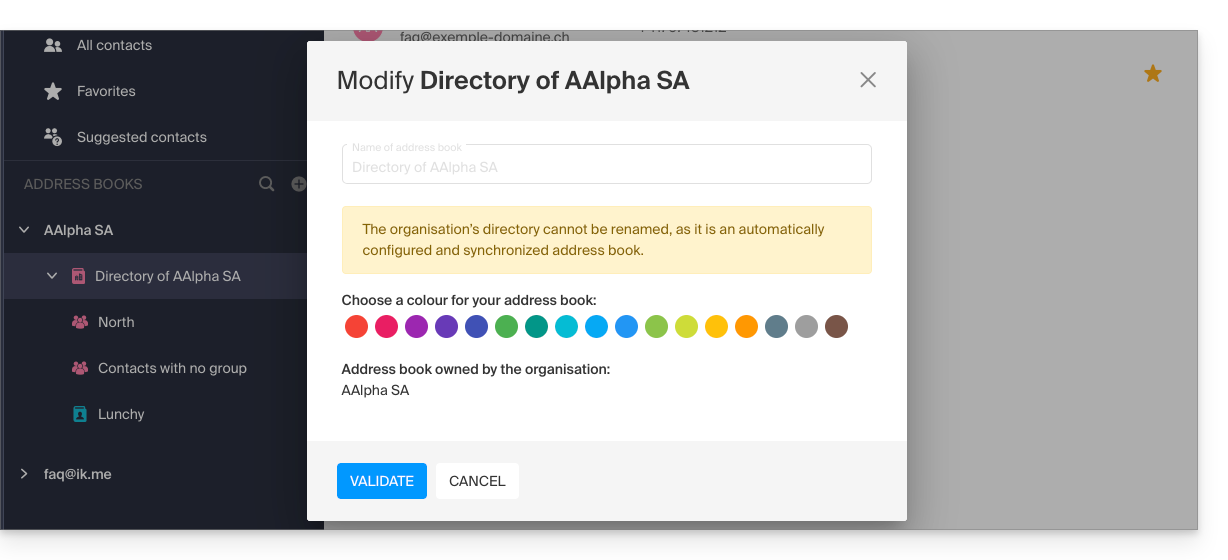
- You can change its display color:
Accessing the Directory
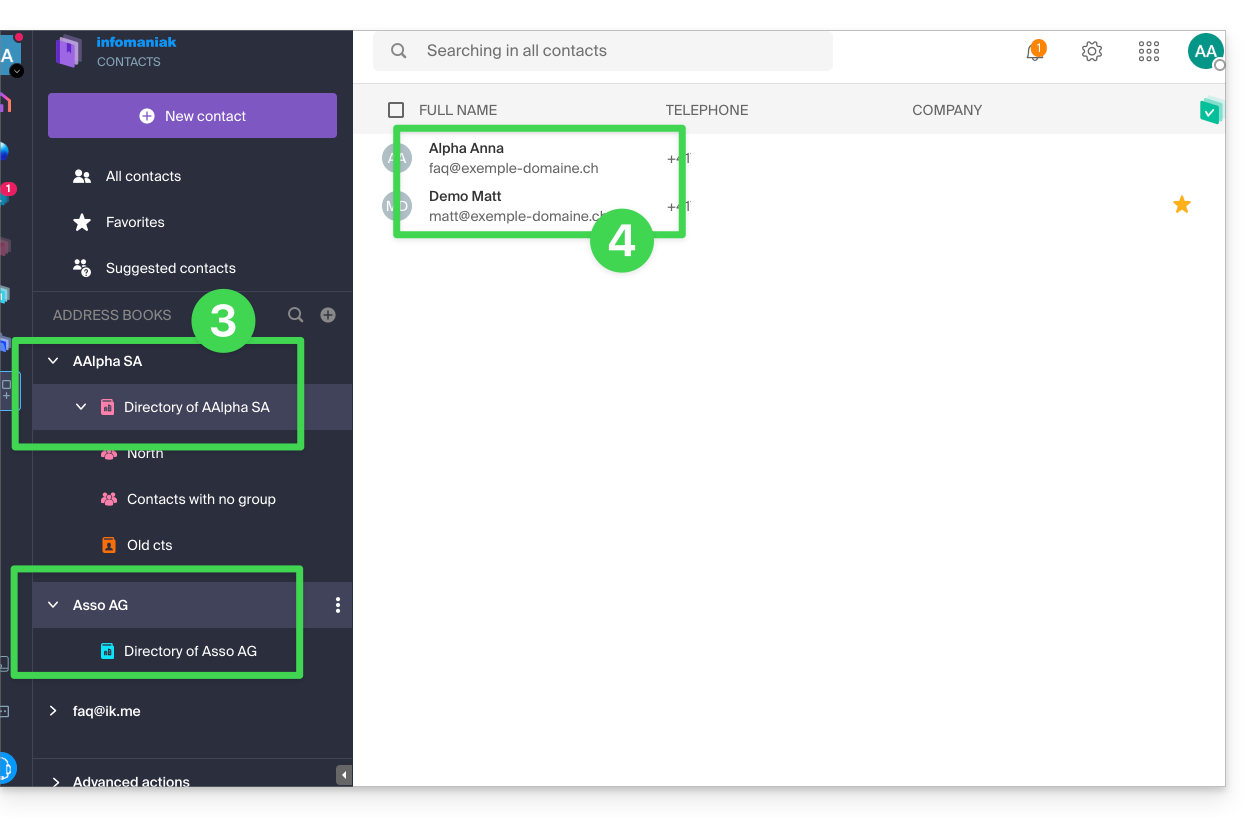
If your login ID corresponds to and belongs to one (or more) Organizations, you can access the different directories of these Organizations:
- Click here to access the Infomaniak Contacts web app (online service ksuite.infomaniak.com/contacts).
- Click on the chevron to the left of the name of the Organization in question.
- Click on {Organization name} Directory…
- The contacts of the selected Organization are displayed on the right:
Modify a contact's details in the directory
You can do many things (copy, export their profile, view email exchanges or calendar events, add to favorites, call, etc.) by clicking on a contact's profile in the Organization Directory address book, but you will not be able to modify the details on behalf of the person concerned: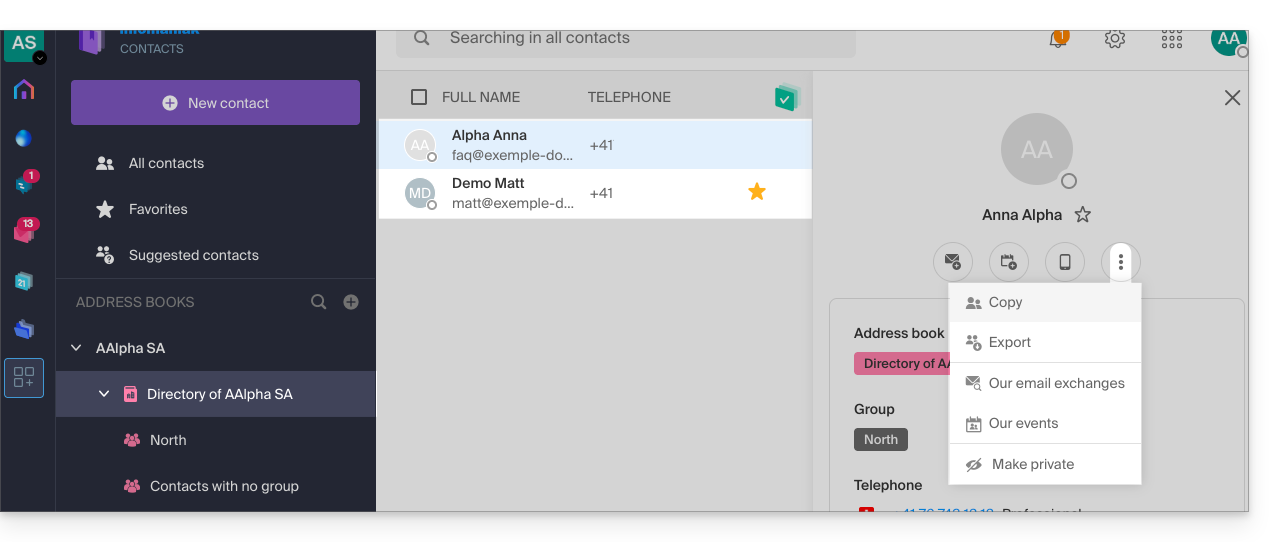
To modify the main information, the person concerned (the person for whom a change needs to be made) must log in to their profile and modify it (see below):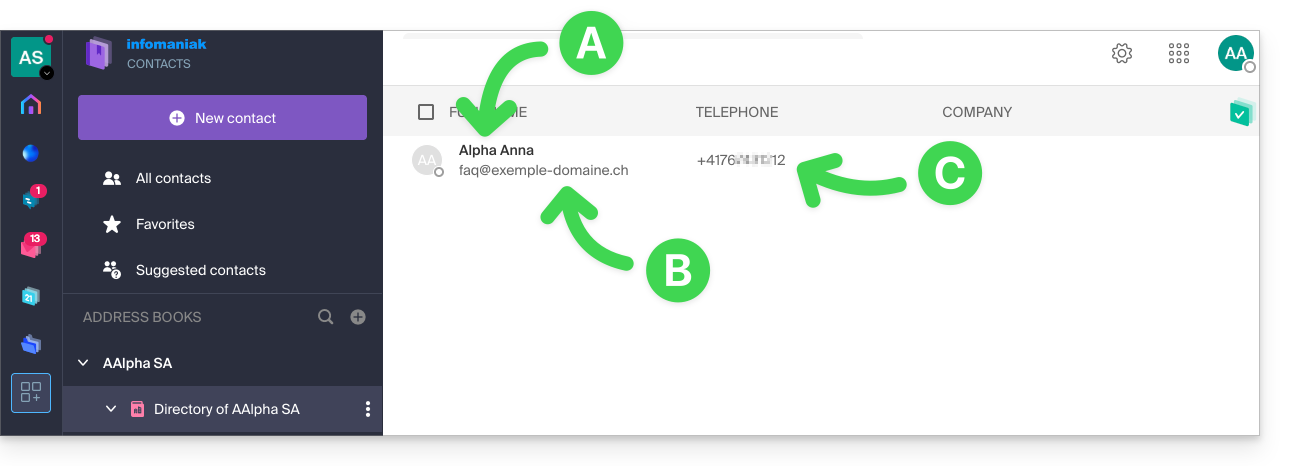
A. First name & last name
To change the first name and last name displayed in the directory, the user in question (here, faq@exemple-domaine.ch) must log in to their account and modify their contact information. Please refer to this other guide for more information.
B. Email address
To change the email address displayed in the directory, the user in question must log in to their account and modify their contact information. Please refer to this other guide for more information.
C. Phone number
To change the phone number displayed in the directory, the user in question must log in to their account and modify their contact information. Please refer to this other guide for more information.
Link to this FAQ:
Has this FAQ been helpful?
This guide concerns OAuth2 applications to connect to your external services via your Infomaniak login ID.
Manage Infomaniak OAuth2 apps
To do this:
- Click here to access the management of your product on the Infomaniak Manager (need help?).
- Click the blue button Create a new application:
- Choose the type suitable for your current need and project.
- Give a name to the application.
- Enter the URL of the application according to the technical information available to you.
- Click on the button to create the application:
- Copy the information (
Client ID,Client secret) to a safe place - they will no longer be accessible after that: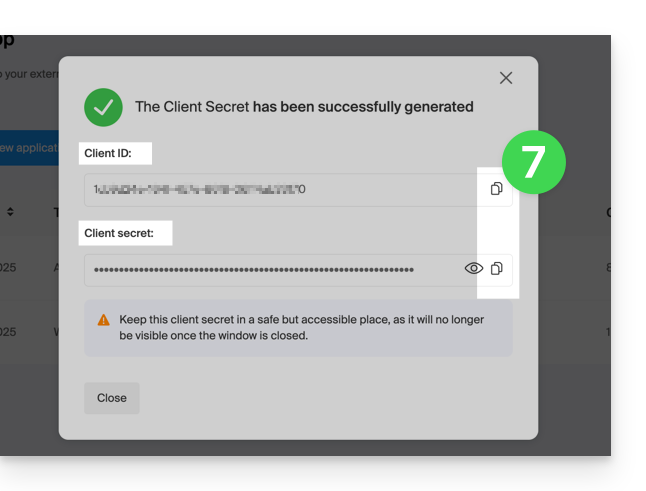
Link to this FAQ:
Has this FAQ been helpful?
This guide is intended for developers and advanced users and presents the possibilities offered by the Infomaniak API.
Preamble
- The Infomaniak API allows you to leverage the full potential of the Infomaniak ecosystem in your applications and using the language of your choice.
- The Infomaniak API is a REST API; the protocol used is HTTP, requests and responses are encoded in JSON format; authentication is performed via the OAuth 2 protocol.
- Access to and use of the Infomaniak API are completely free.
Infomaniak API Usage Protocol
Using the API, you will be able to automate a wide range of actions and tasks on Infomaniak products and services, without having to use the product interfaces. A few examples of use:
- Store data.
- Send direct mail campaigns.
- Broadcast video or radio streams.
- Order or manage products.
- ... and much more!
For example, for a Mail Service: managing mailboxes, managing aliases, managing automatic responses, managing folders, etc. For kChat, post a message on a channel…
Create your first requests with the Infomaniak API
Refer to the documentation in English only on the possibilities offered by the API.
Request format
The Infomaniak API is a REST API. The protocol used is HTTP, requests and responses are encoded in JSON. Authentication is performed via the OAuth 2 protocol.
To initiate a request, you must use the following syntax: /{version}/{command_path}. It is possible not to specify the version, but in this case, the latest version will be applied. Refer to the full list of available requests with the Infomaniak API.
API Response Codes
When using the Infomaniak API, you may encounter various response codes. These codes precisely indicate the status of your request. Refer to the complete list.
Limits & Restrictions
There is a limit of 60 requests per minute with the Infomaniak API. This limit cannot be increased. The use of the API is restricted to the products listed in the official documentation. Regular additions of products and services are made to it. If the product or service you are interested in is in the documentation, you will be able to use the following requests: GET ; POST ; PATCH ; PUT ; DELETE.
Learn more
Link to this FAQ:
Has this FAQ been helpful?