Knowledge base
1000 FAQs, 500 tutorials and instructional videos. Here, there are only solutions!
This guide explains how to create and manage an OAuth2/OpenID Connect (OIDC) application to allow a third-party application to use your Infomaniak login ID to authenticate users and, with their permission, access the resources provided by the granted authorizations (scopes).
Introduction
- An OAuth2 application is used, in particular, to implement a single sign-on (Single Sign-On) mechanism or to allow software to access certain data without having to transmit the account password.
Manage Infomaniak OAuth2 Applications
To create a new OAuth2 application:
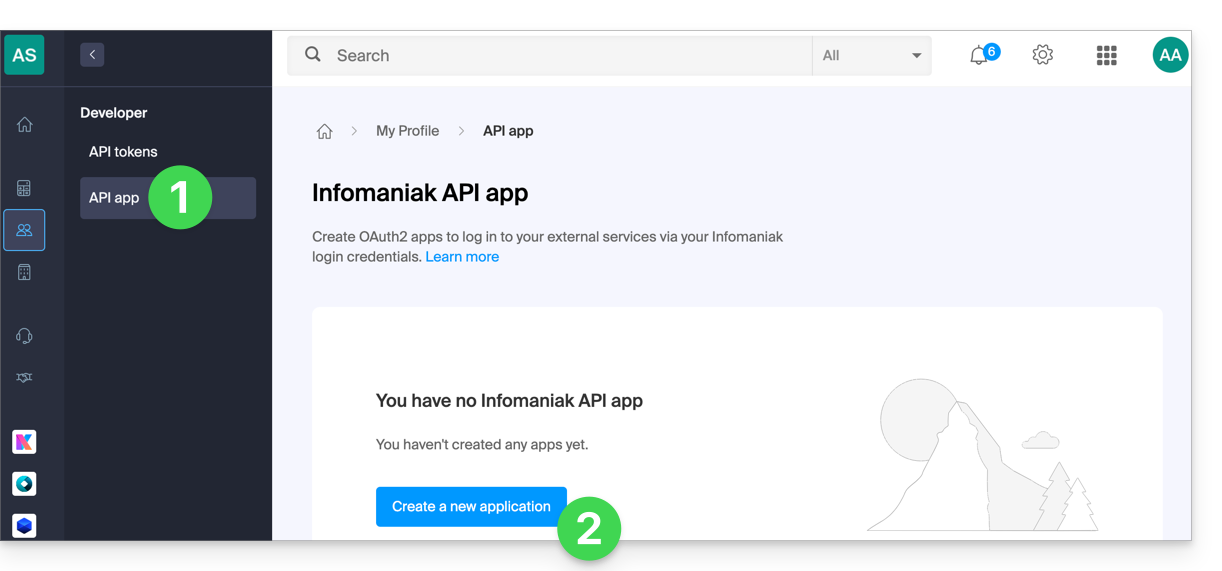
- Click here to access the management of your OAuth2 applications in the Infomaniak Manager (need help?).
- Click on the blue Create a new application button:
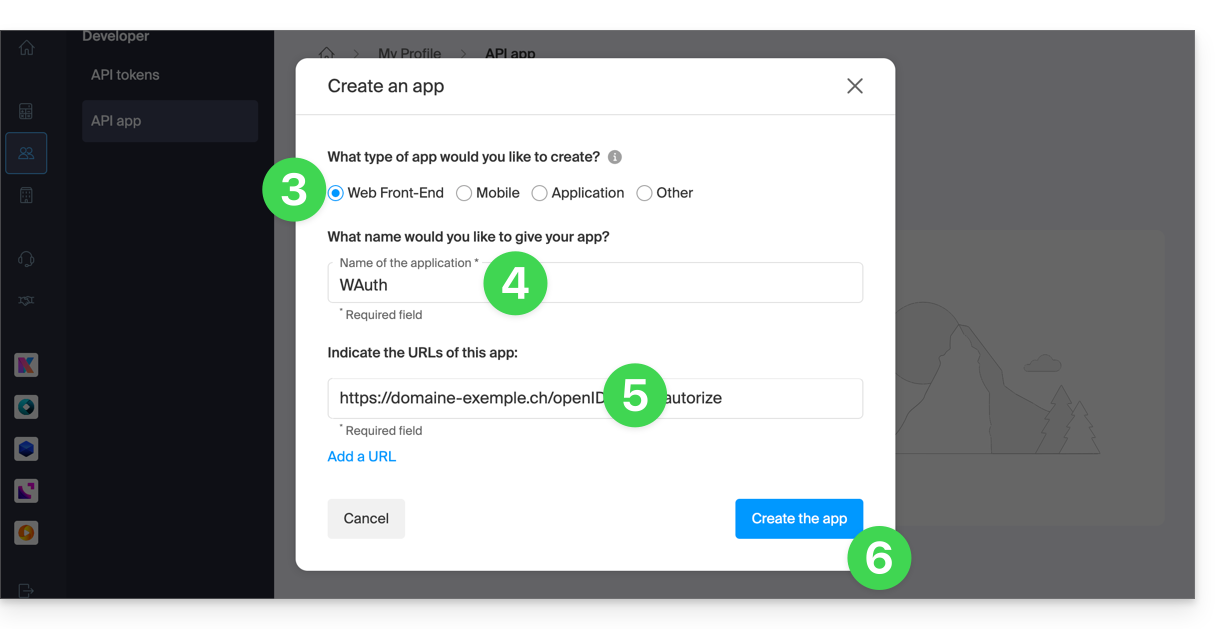
- Choose the application type that corresponds to your project. This choice determines, in particular, the OAuth2 authentication flow used.
- Give the application a name so you can easily identify it in the Manager.
- Enter the application's URL according to its technical configuration (e.g., its public URL or its redirect URL, depending on the type of application).
- Click on the button to create the application:
- Keep the
Client IDandClient secretin a safe place.- These credentials allow your application to authenticate with Infomaniak services.
- For security reasons, the
Client secretis only displayed once when it is created: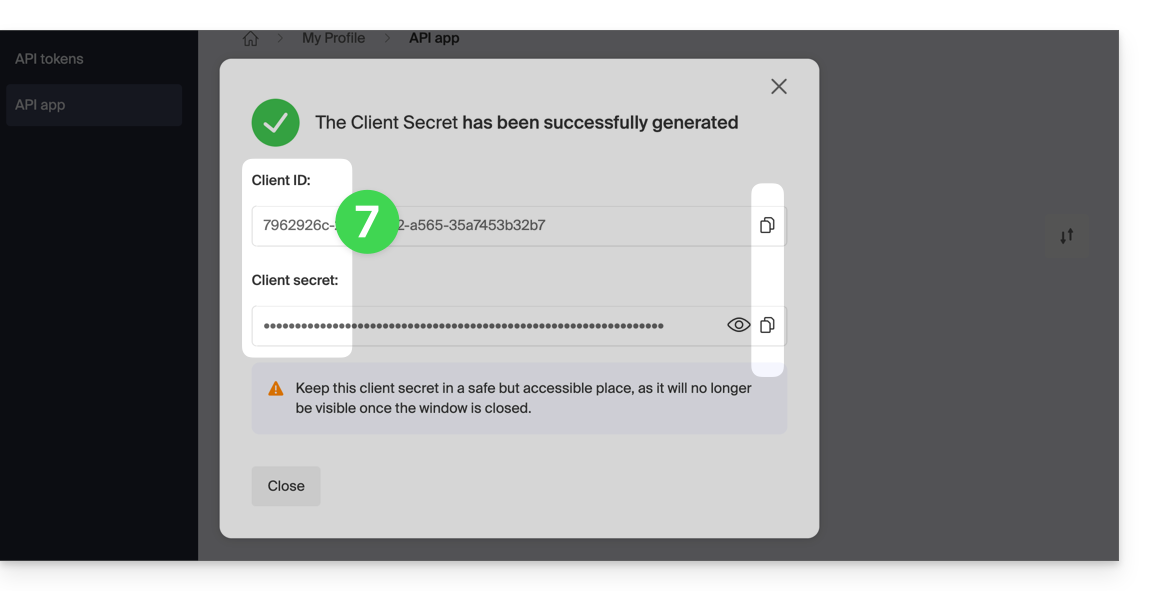
- However, you can renew the secret phrase from the main page.
Link to this FAQ: https://faq.infomaniak.com/2567
Has this FAQ been helpful?
This guide is intended for developers and advanced users and presents the possibilities offered by the Infomaniak API.
Introduction
- The Infomaniak API allows you to leverage the full potential of the Infomaniak ecosystem in your applications and using your preferred programming language.
- The Infomaniak API is a REST API; the protocol used is HTTP, requests and responses are encoded in JSON format; authentication is performed via the OAuth 2 protocol.
- Access to and use of the Infomaniak API is completely free.
Infomaniak API Usage Protocol
Using the API, you will be able to automate a wide range of actions and tasks on Infomaniak products and services, without having to use the product interfaces. Here are a few examples of how it can be used:
- Store data.
- Send email marketing campaigns.
- Broadcast video or audio streams.
- Order or manage products.
- … and much more!
For example, for a Mail Service: managing mailboxes, managing aliases, managing automatic replies, managing folders, etc. For kChat, post a message on a channel…
Create your first requests with the Infomaniak API
Consult the documentation available in English only to learn about the possibilities offered by the API.
Request format
The Infomaniak API is a REST API. The protocol used is HTTP, and requests and responses are encoded in JSON. Authentication is performed using the OAuth 2 protocol.
To initiate a request, use the following syntax: /{version}/{command_path}. You can omit the version, but in this case, the latest version will be applied. See all available requests with the Infomaniak API.
API response codes
When using the Infomaniak API, you may encounter various response codes. These codes indicate the status of your request. Refer to the complete list.
Limits & Restrictions
There is a limit of 60 requests per minute with the Infomaniak API. This limit cannot be increased. The use of the API is restricted to the products listed in the official documentation. Regular additions of products and services are made to this documentation. If the product or service you are interested in is in the documentation, you can use the following requests: GET; POST; PATCH; PUT; DELETE.
Learn more
Link to this FAQ: https://faq.infomaniak.com/2581
Has this FAQ been helpful?
This guide explains how to create and manage your authentication tokens to interact with the Infomaniak API securely.
Introduction
- Token features:
- Number: no limit to the number of tokens that can be created
- Validity: unlimited by default (customizable upon creation)
- Inactivity: a token is automatically deactivated if it is not used for one year
- Example of use:
Manage API tokens
When creating a token, you must define the application and the scope of access:
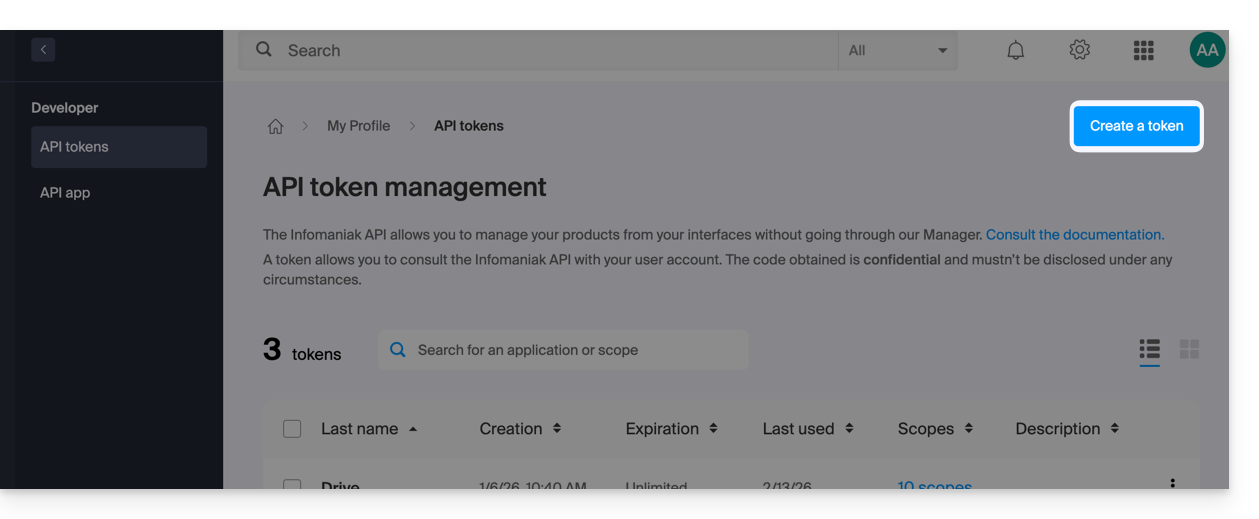
- Access the token management section in the Manager (need help?).
- Click on Create a token:
- Select the product/application and the validity period:
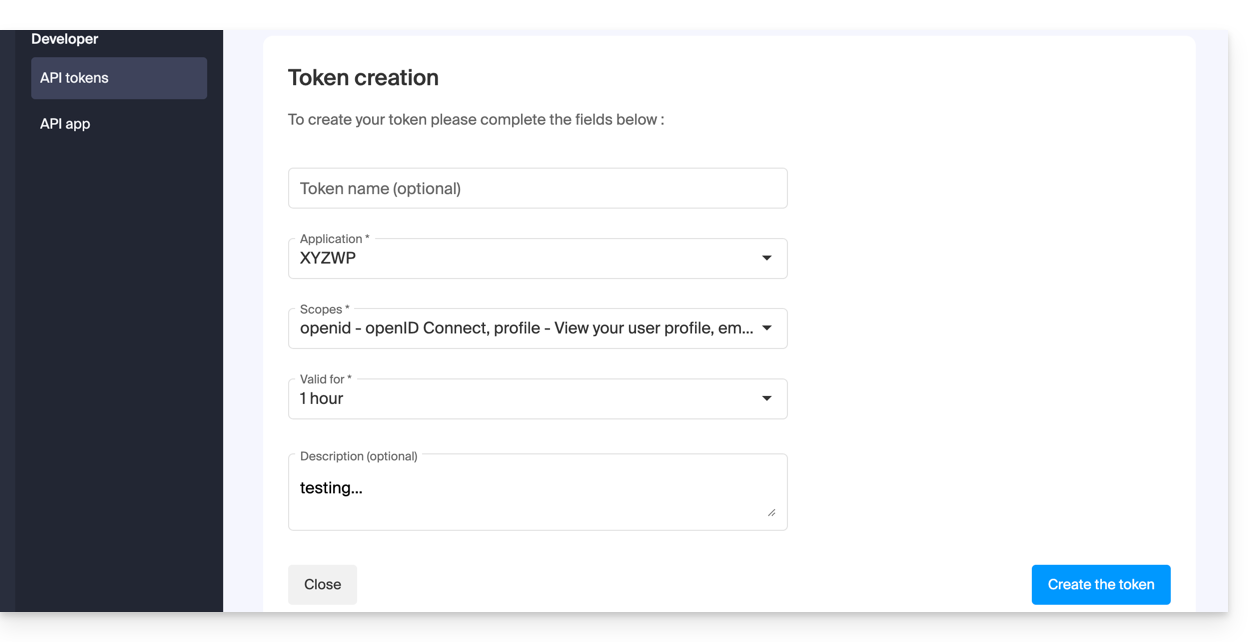
- Confirm the operation with your account password.
- Important: Copy the token and keep it in a safe place; it will no longer be displayed afterward.
To delete them, select them and click on the revocation button that appears: 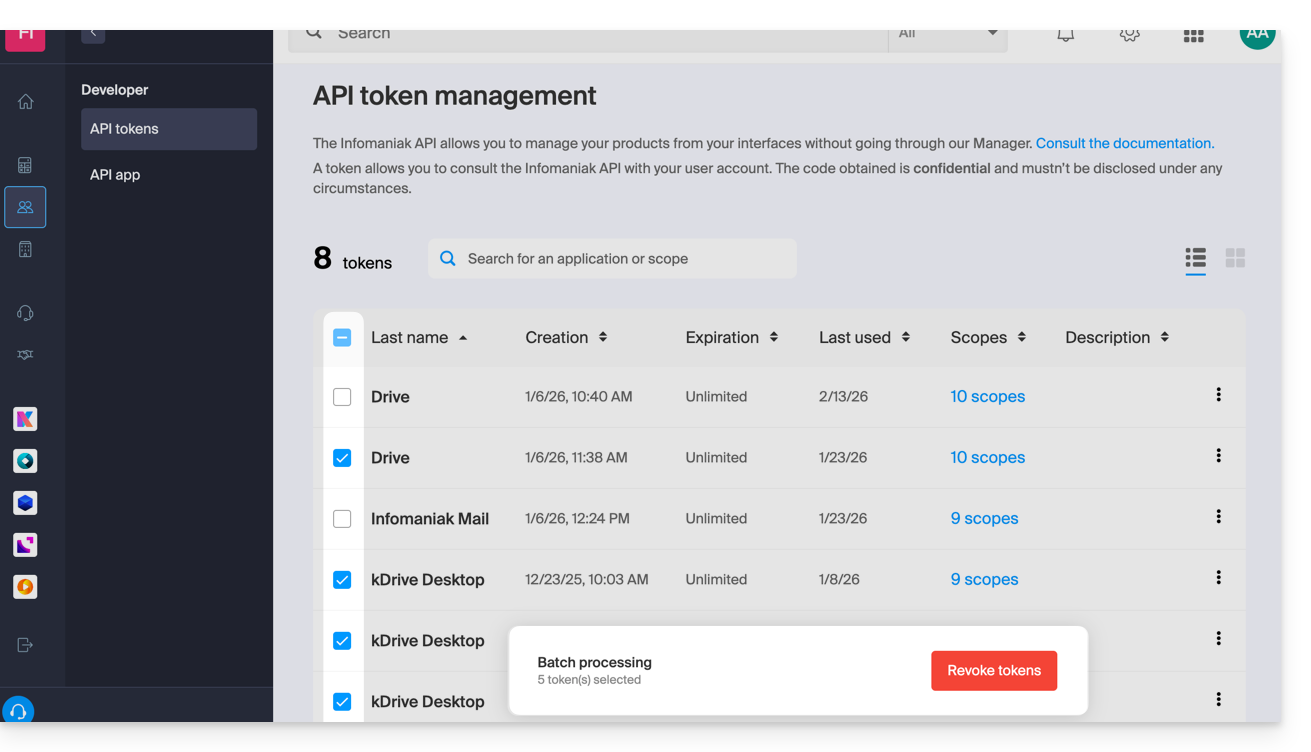
Link to this FAQ: https://faq.infomaniak.com/2582
Has this FAQ been helpful?
This guide introduces Groups, a user management system for your Organization, available on the Infomaniak Manager.
Preamble
- To facilitate access and the addition of a collaborator within the Infomaniak ecosystem, the Groups feature allows you to create teams of users and grant them access to the services they need with just a few clicks.
- Some examples:
- You create a Group for a new department: immediately associate its mailboxes, its kDrive organization folders, and its dedicated kChat discussion channels; each new collaborator added to the team will automatically receive all these accesses.
- You are a web agency and you want to give your webmaster teams access to all your web hostings: simply create a new group, choose all the hostings they will need access to, and invite them to join the Group.
- You own a kDrive: authorize access to a folder for a Group and adjust the access based on users added to or removed from the team over time.
- You use Streaming or Ticketing services and want to give your teams access: create a new Group that will have access to these two products or two separate Groups that will have access to the two products completely independently.
- It is entirely possible:
- to associate resources (Mail, kDrive, kChat) upon creation of the Group to automate onboarding,
- to adjust individual access levels: for kDrive, individual access takes precedence over Group access, while for Mail, access levels are cumulative.
- to add the same user to multiple Groups,
- to invite external users to your Organization to one of your Groups,
- to add one or more users to a Group at once,
- to designate a team leader to easily identify a project manager or the point of contact.
Manage your Groups
Group management now allows for complete centralization. No need to intervene in each tool separately: everything is controlled from the Infomaniak Manager for a smooth reorganization of your collaborators. Learn about the guides on this topic:
Link to this FAQ: https://faq.infomaniak.com/2585
Has this FAQ been helpful?
This guide explains how to create a Group (a work team) from the Infomaniak Manager.
Prerequisites
- Be Administrator or Legal Representative within the Organization.
Create and organize a Group
To do this:
- Click here to access Group management on the Infomaniak Manager (need help?).
- Click the blue Add a Group button:
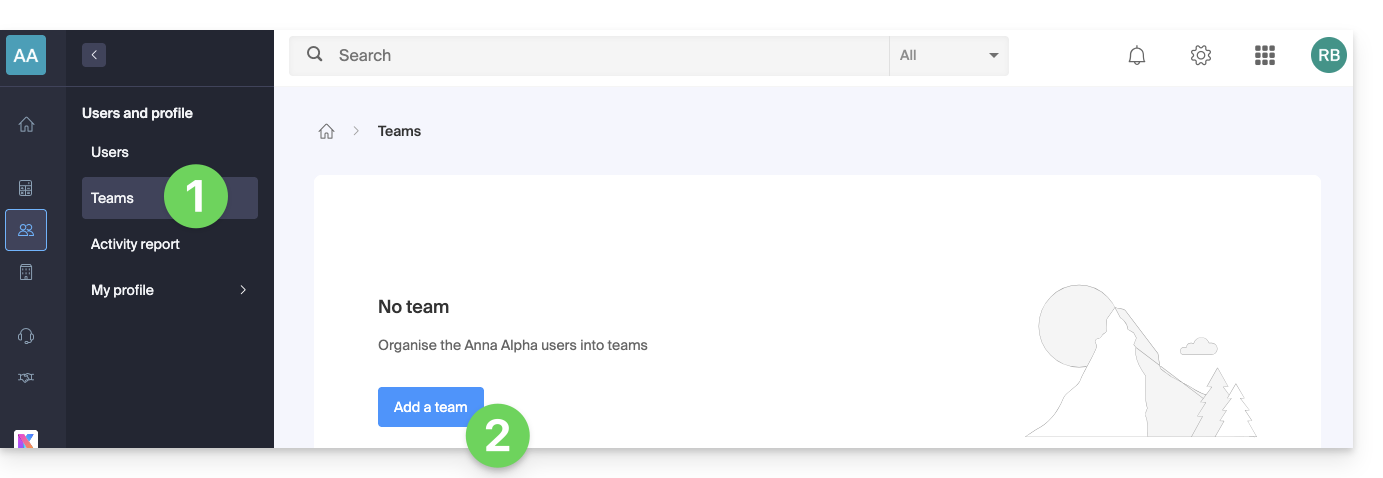
- Define a name, a color, and a description (optional) for the Group.
- Click the button to continue:
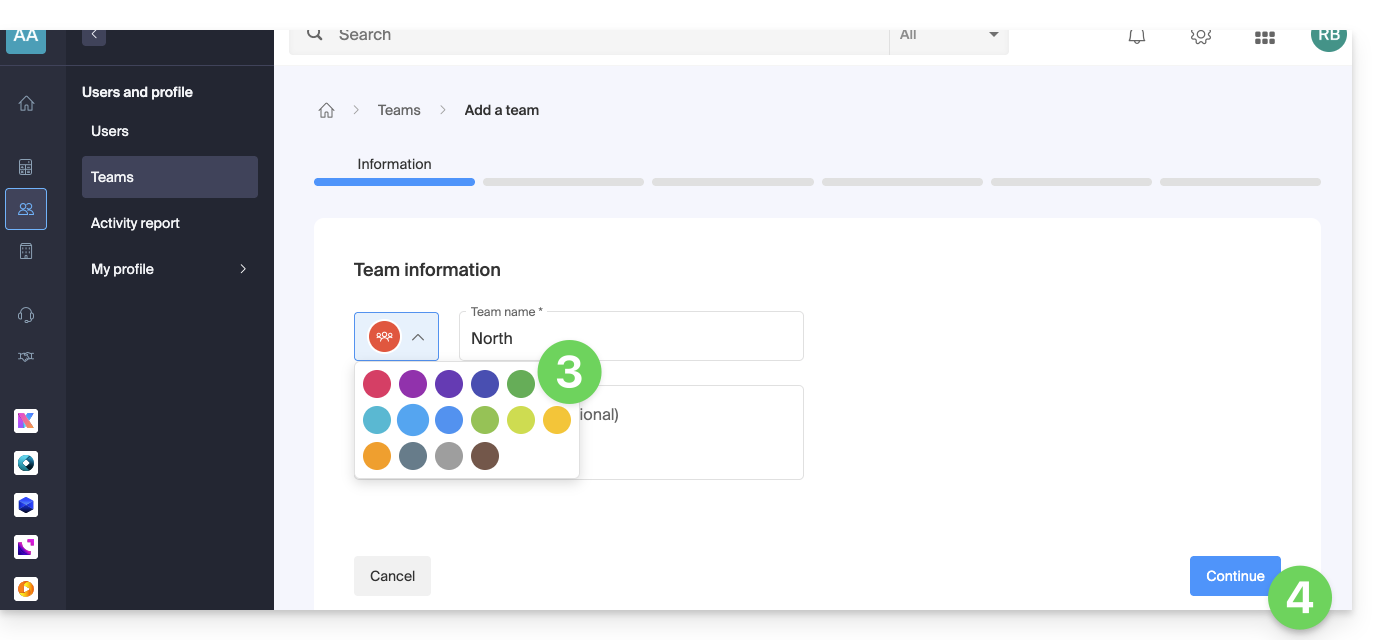
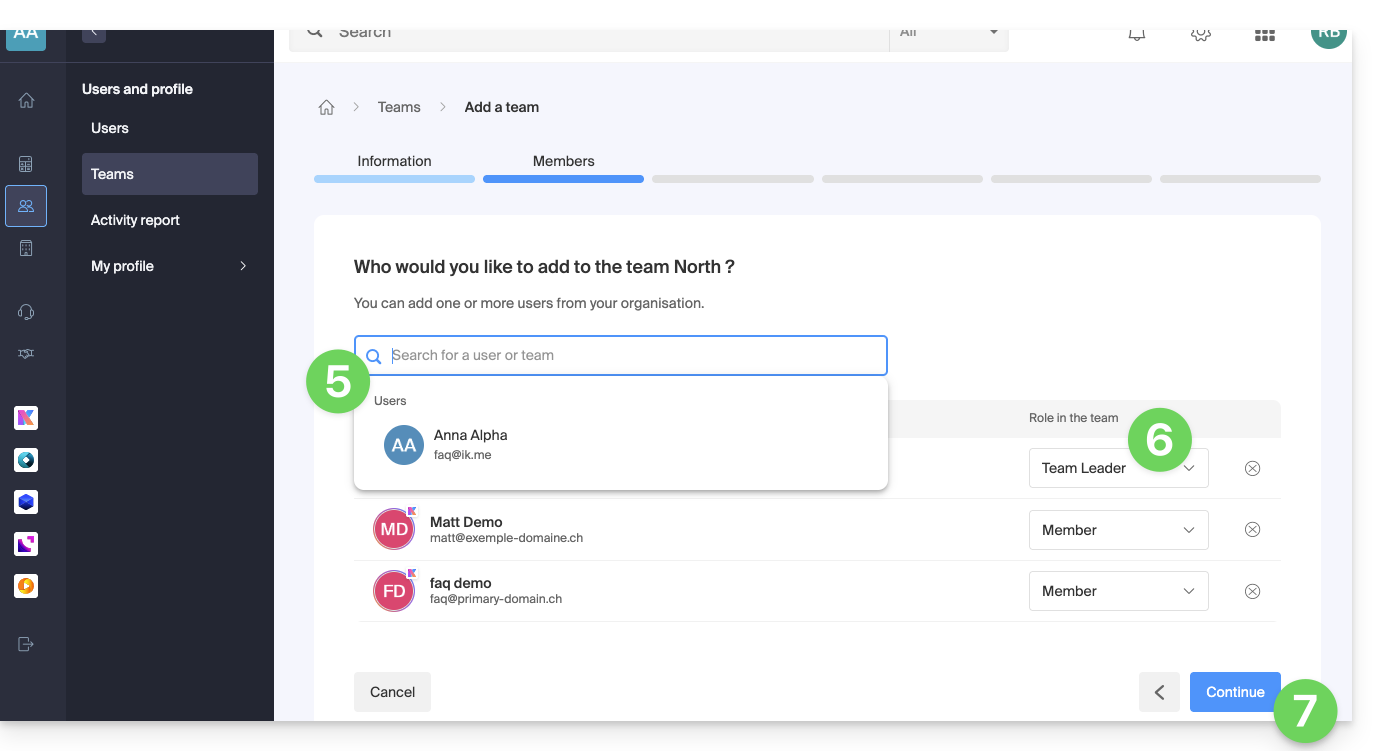
- Then choose the members who will make up the Group.
- Then choose their respective roles:
- group leader (1 only)
- member
- Click the button to continue:
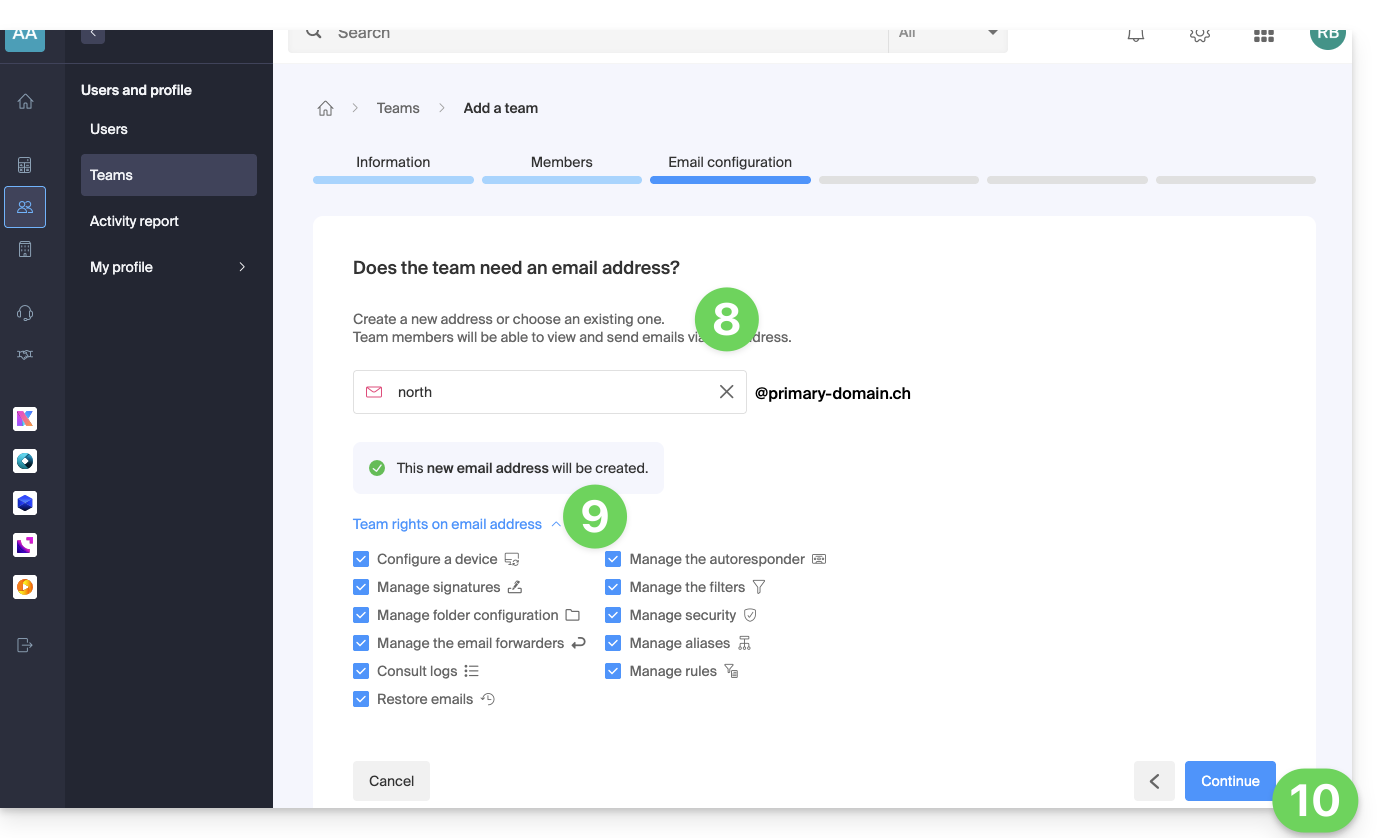
- Choose whether the Group should have access to an email address.
- If yes, choose from the existing addresses or create a new address, as well as the rights of the Group members for managing the address.
- Click the button to continue:
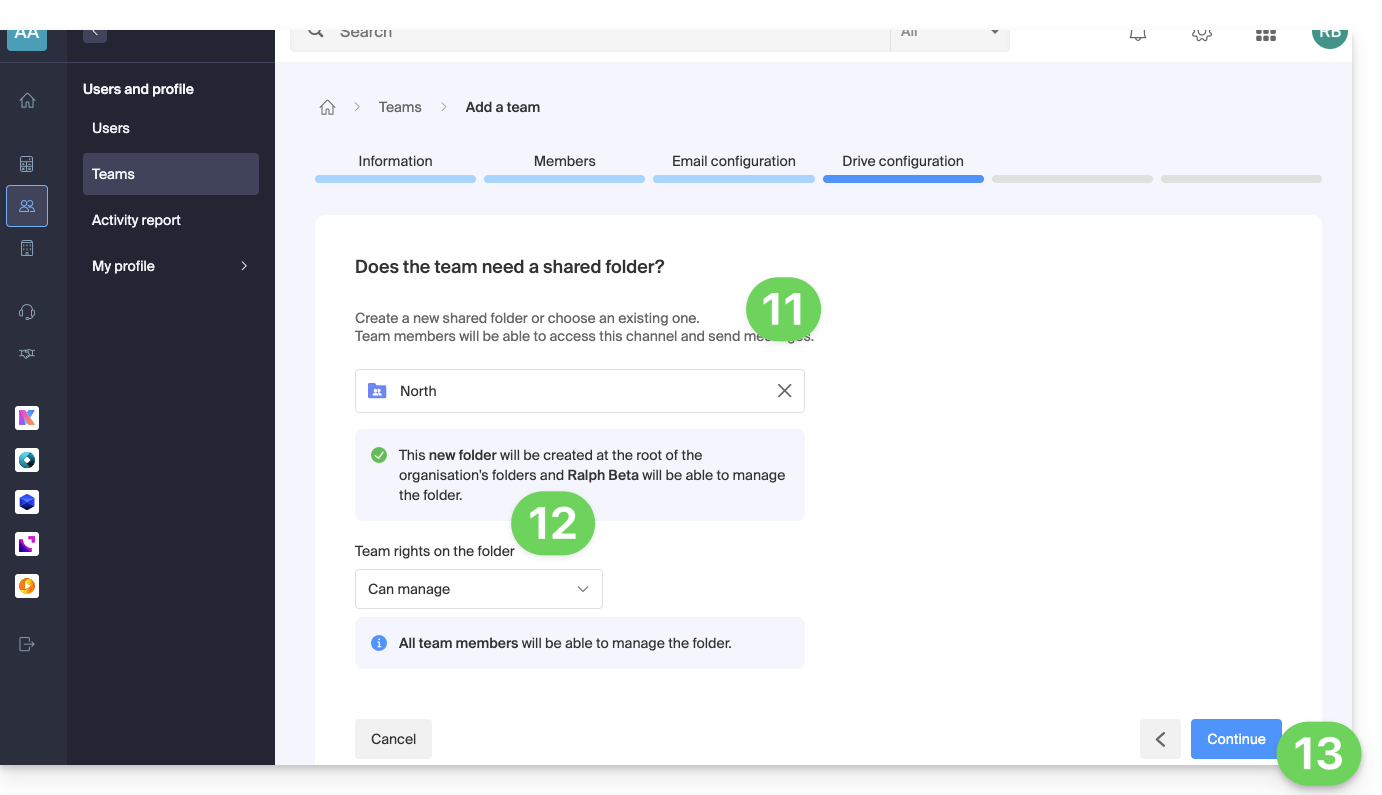
- Choose whether the Group should have access to a shared kDrive folder.
- If yes, choose from the existing folders or create a new folder, as well as the rights of the Group members for managing the folder.
- Click the button to continue:
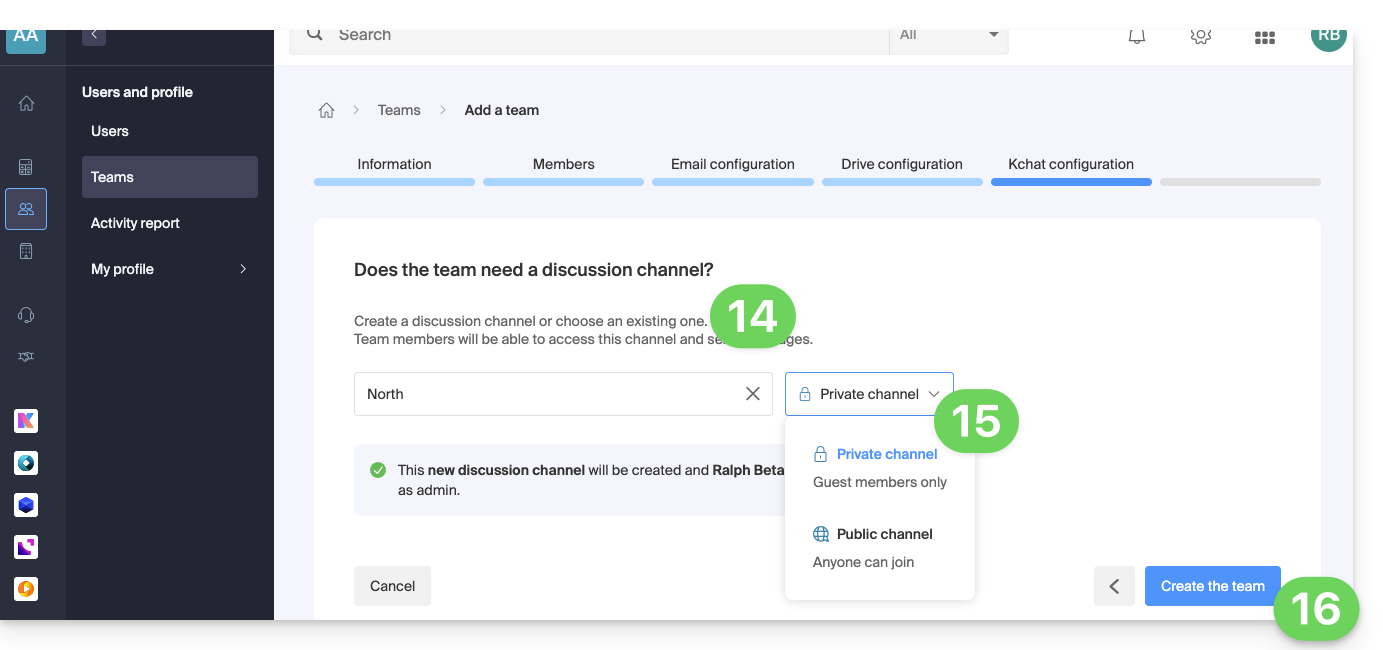
- Choose whether the Group should access a kChat channel in common.
- If yes, choose it from the existing channels or create a new channel, as well as the channel status (private or public, then visible to other kChat users in the Organization).
- Click the button to continue:
- Once the Group is created, you can add products that users in the Group will have access to at the management level:
- If you have multiple products of the same type (e.g., Web Hosting, Mail Service, Newsletters, etc.), you will have the option to grant access to multiple/all products or just one of them.
- For each product, you will need to choose the access rights to it:
User rights Details Technical rights The user can modify the product Statistical rights The user can view the product statistics Ticket control The user can control the tickets Sales control The user can control sales
It is possible to add new users to a Group at any time.
Learn more
Link to this FAQ: https://faq.infomaniak.com/2589
Has this FAQ been helpful?
This guide explains how to modify a Group (a work team) from the Infomaniak Manager.
Prerequisites
- Be Administrator or Legal Representative within the Organization.
- Have created one or more Groups.
Manage & modify a Group
To do this:
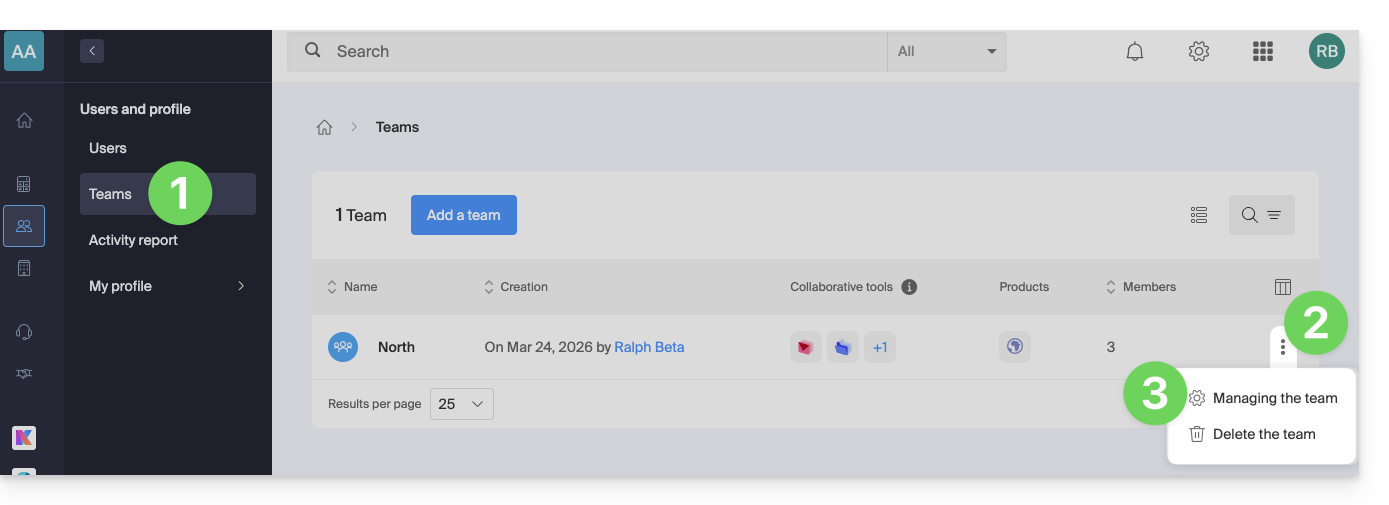
- Click here to access Group management on the Infomaniak Manager (need help?).
- Click on the action menu ⋮ located to the right of the item concerned.
- Select Manage the Group:.
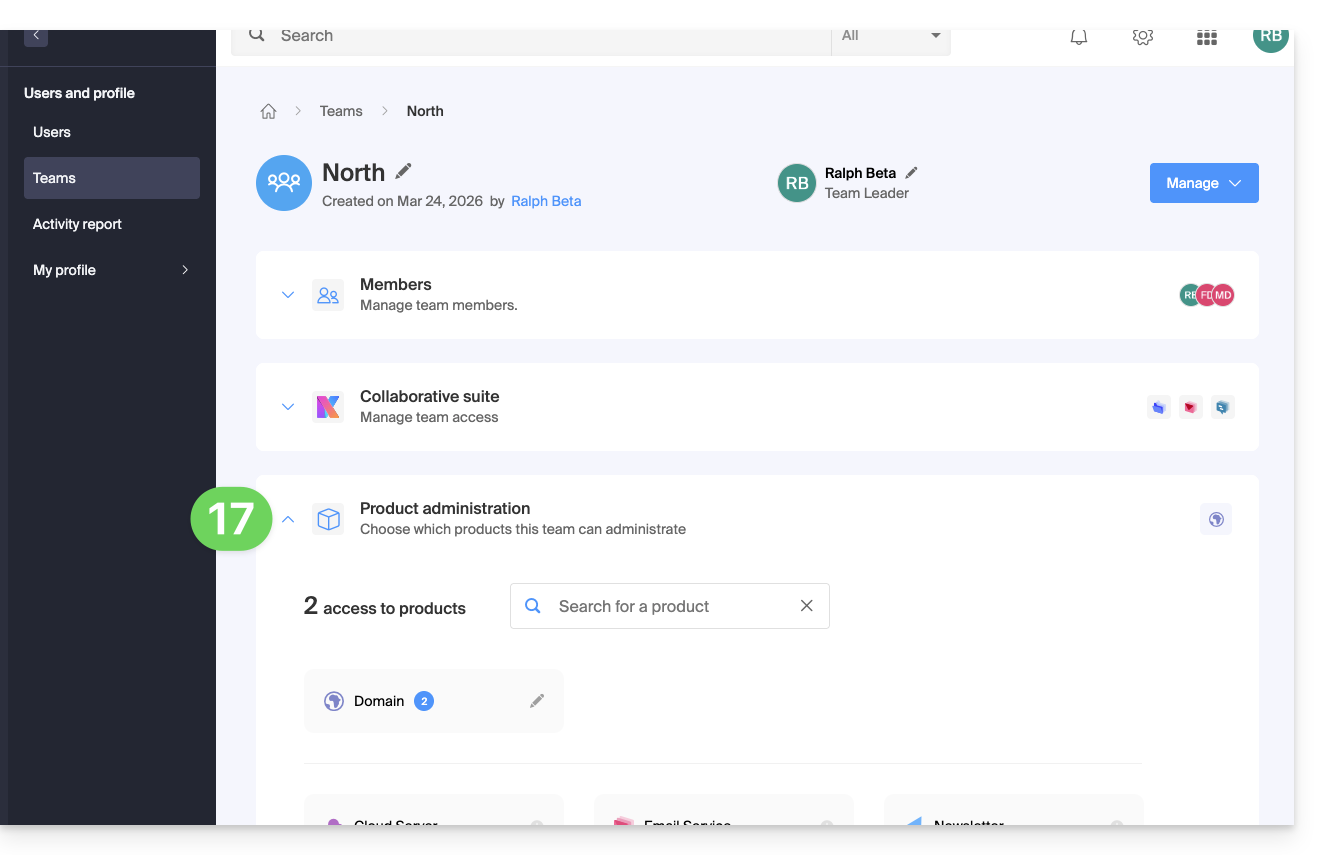
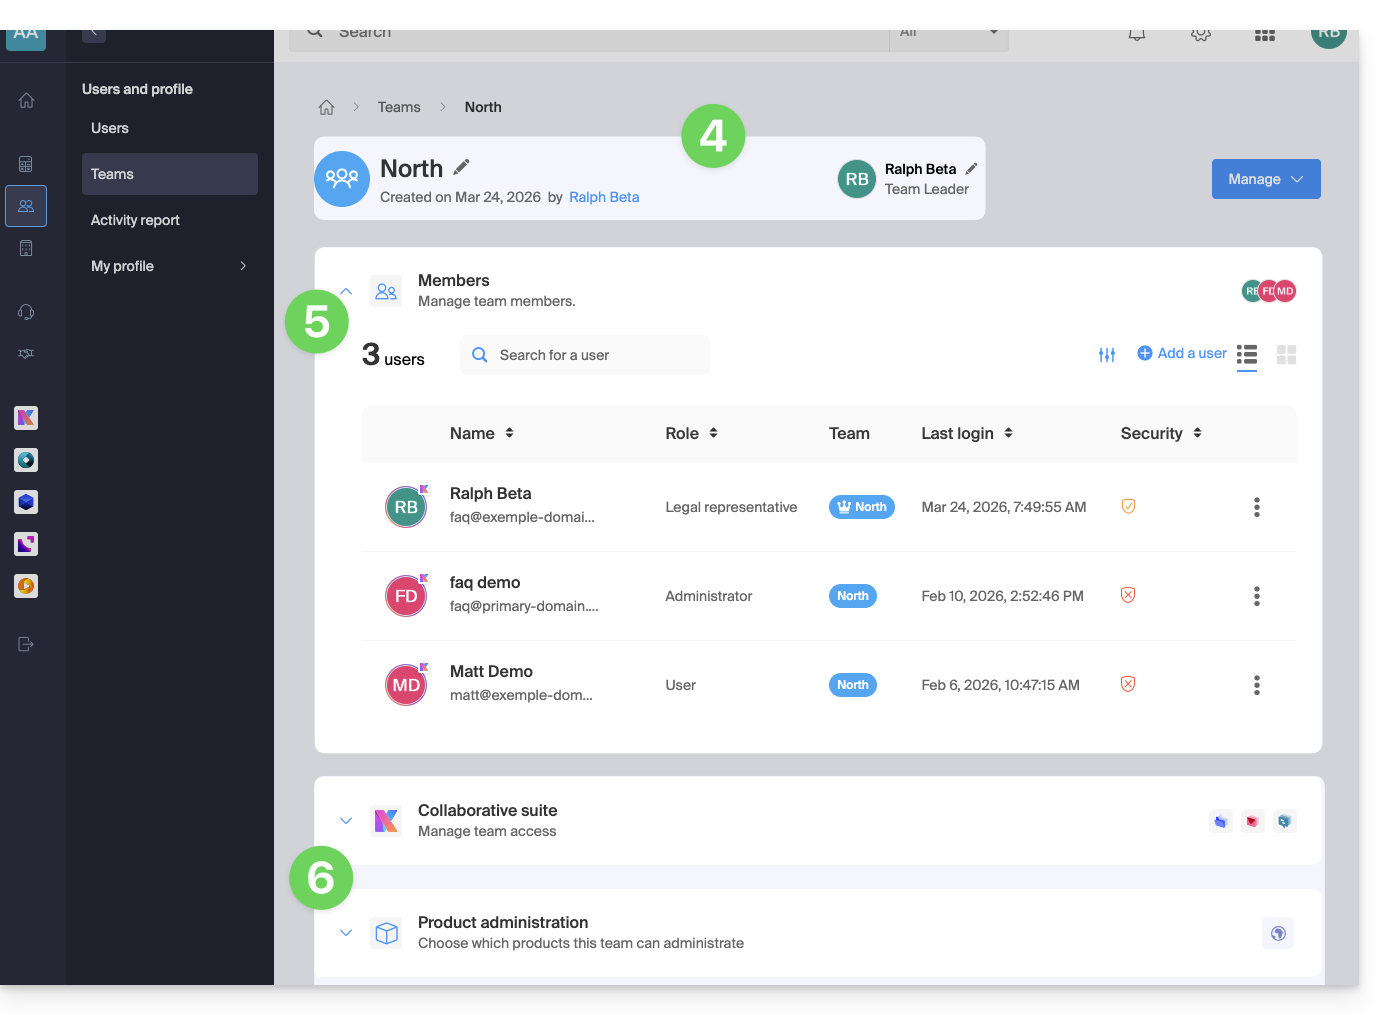
- At the top, you can manage the Group name and the manager (click on the pencil icon ✎).
- Click on the chevron to expand the table of users in the Group and click on the action menu ⋮ located to the right (the actions are described below); you can also add new members to the Group.
- Below, you can manage the services available to members (collaborative kSuite tools and/or product management on the Manager):
List of actions on Group users
| Actions on a user | Details |
|---|---|
| Allows you to access the user's profile | |
| Allows you to switch the user's rights between Administrator and Collaborator | |
| Allows adding the user to other Groups | |
| Allows removing or modifying access to products | |
| Allows viewing all actions performed by the user | |
| Allows removing the user from the Group |
Learn more
Link to this FAQ: https://faq.infomaniak.com/2590
Has this FAQ been helpful?
This guide explains how to delete a Group (a work team) from the Infomaniak Manager.
Prerequisites
- Be Administrator or Legal Representative within the Organization.
- Have created one or more Groups.
Delete a Group
Deleting the Group is irreversible and users will lose their rights and access to the various products of it; users, email address, kDrive folder, kChat channel, will not be deleted.
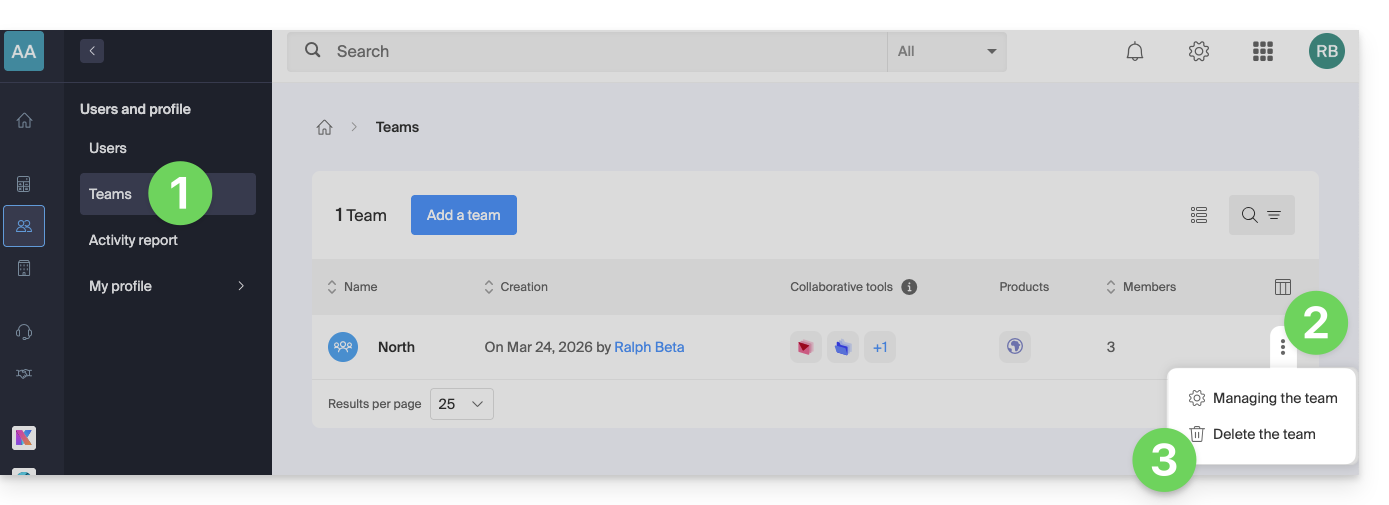
- Click here to access Group management on the Infomaniak Manager (need help?).
- Click on the action menu ⋮ located to the right of the item concerned.
- Choose Delete the Group:
- Click the button to delete the Group permanently.
Learn more
Link to this FAQ: https://faq.infomaniak.com/2591
Has this FAQ been helpful?
This guide is intended for Infomaniak customers with a registered business in a European Union (EU) country and details how to enter or modify their European VAT number to enable the application of the appropriate billing rules.
Introduction
- EU companies can benefit from the self-billing mechanism by providing a valid VAT identification number. In this case, Infomaniak does not collect the tax, and it is the company's responsibility to declare and pay the VAT in its country of residence.
- For a Swiss company, this number is not applicable:
- Switzerland has its own tax system, which is separate from that of the EU.
- Swiss companies are subject to Swiss VAT and are not affected by the self-billing mechanisms specific to intra-community transactions within the EU.
Add your VAT number
You can enter your VAT number when ordering your first Infomaniak product, when you are asked for your company details (corresponding to your Organization).
To add or modify the VAT number at any time:
- Click here to to access the management of your Organization's details in the Infomaniak Manager.
- Fill in the VAT number:
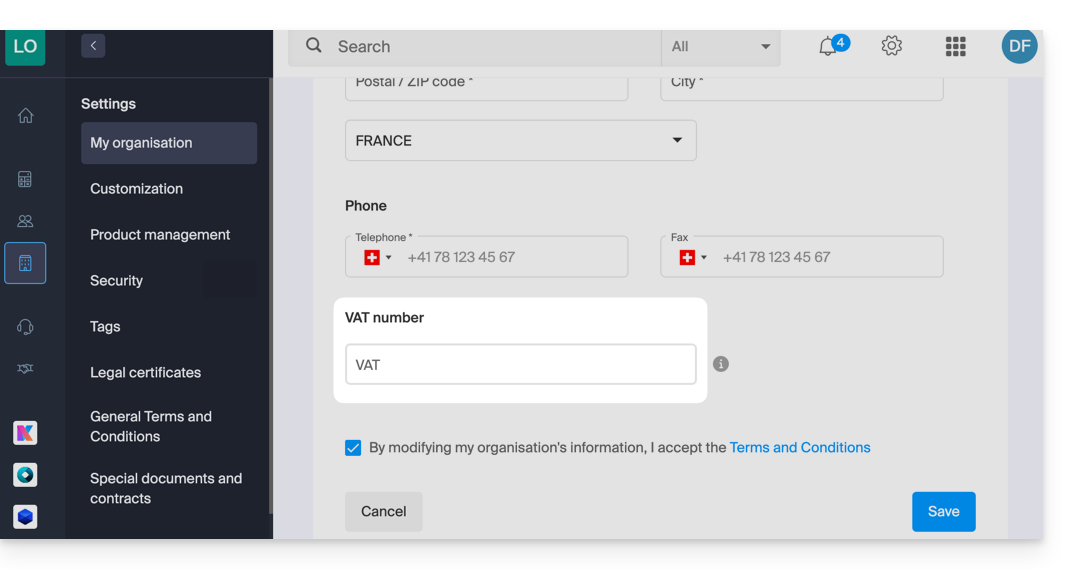
- Read and check the box for the terms and conditions, then click Save.
If necessary, refer to this other guide regarding other modifiable settings.
Link to this FAQ: https://faq.infomaniak.com/2599
Has this FAQ been helpful?
This guide explains how to enable or disable the Renewal Warranty option for Infomaniak products.
Introduction
- Renewal Warranty is an additional security measure to ensure the continuity of your products in case you are unable to renew them on time or if an automatic renewal fails; it ensures that you avoid any service interruption.
- Infomaniak will renew the products for you and issue an invoice that you will find in your account.
- This option is available when placing the order (except for the Synology NAS product) or after the purchase.
Activate the Renewal Warranty option
One product at a time
To activate Renewal Warranty on the product of your choice:
- Click here to access the management of payments in the Infomaniak Manager (need help?).
- Click on the action menu ⋮ located to the right of the item in question.
- Choose to enable the option:
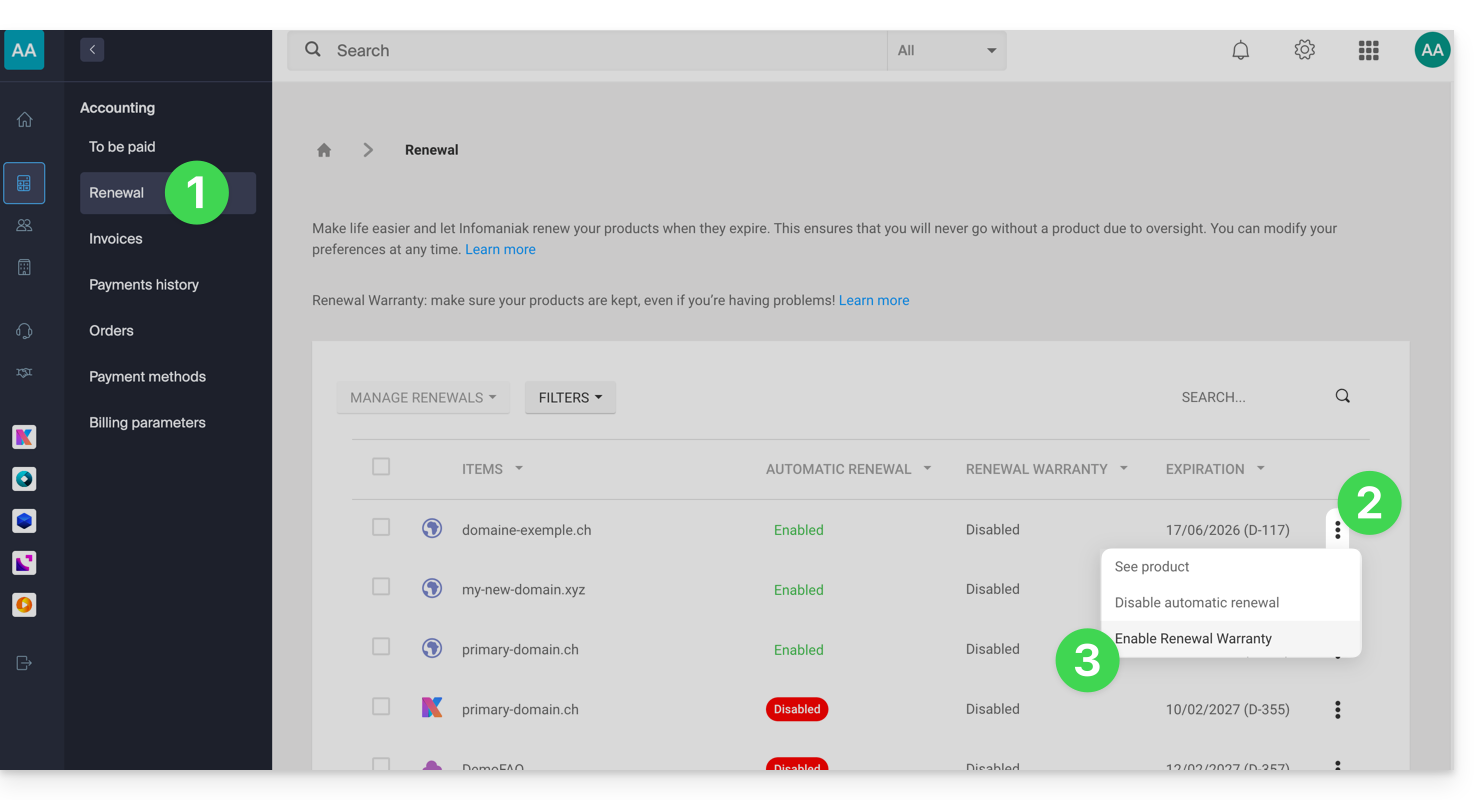
- Follow the instructions in the window that has opened.
All products at once
To activate Renewal Warranty on several of your products:
- Click here to access the management of renewals in the Infomaniak Manager (need help?).
- Click the box at the top of the column to select all your products with one click.
- Click on the Manage renewals button.
- Choose to enable the following option:
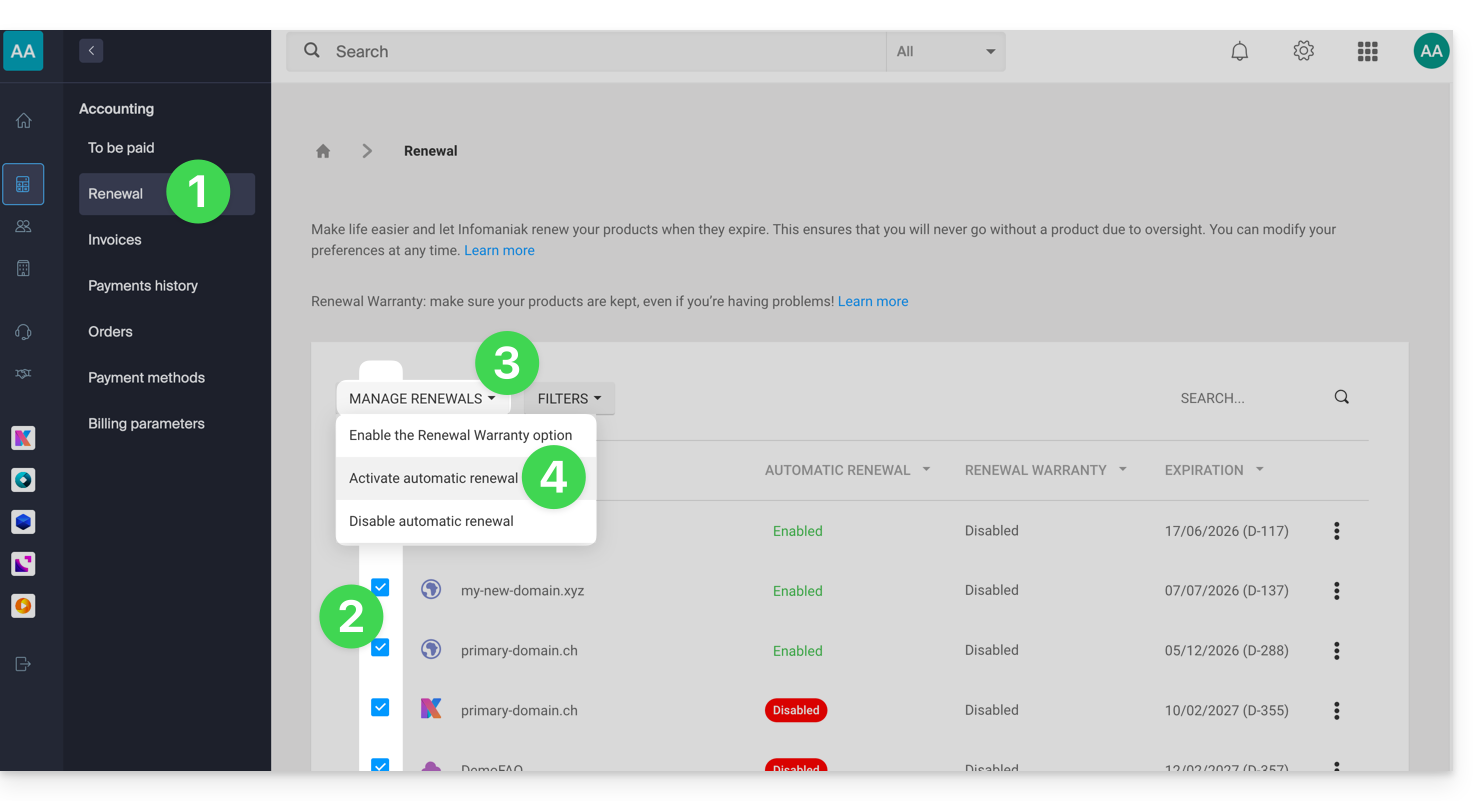
- Follow the instructions in the window that has opened.
Disable the Renewal Warranty option
One product at a time
To disable Renewal Warranty on the product of your choice:
- Click here to access the payment management section in the Infomaniak Manager (need help?).
- Click on the action menu ⋮ located to the right of the relevant item.
- Choose to disable the option:
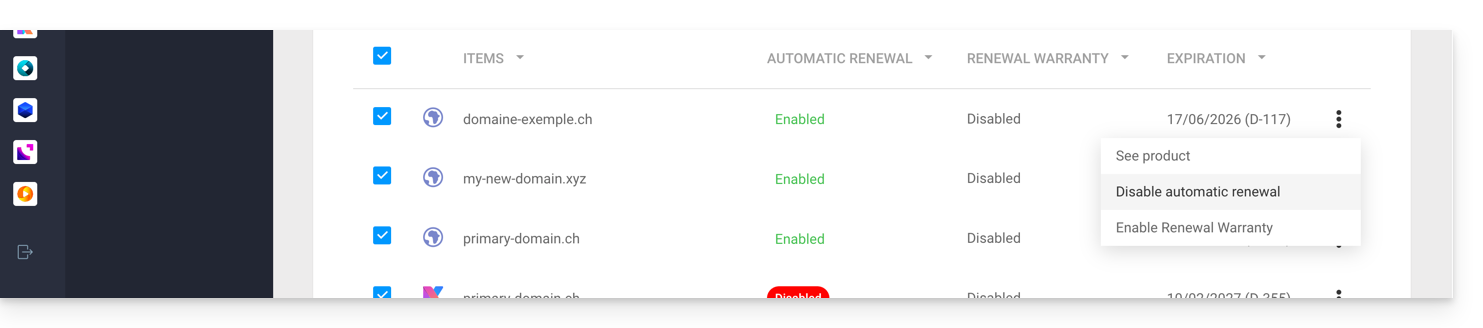
- Follow the instructions in the pop-up window.
All products at once
To disable Renewal Warranty on several of your products:
- Click here to access the management of renewals in the Infomaniak Manager (need help?).
- Click the box at the top of the column to select all your products with one click.
- Click on the Manage renewals button.
- Choose to disable the option:
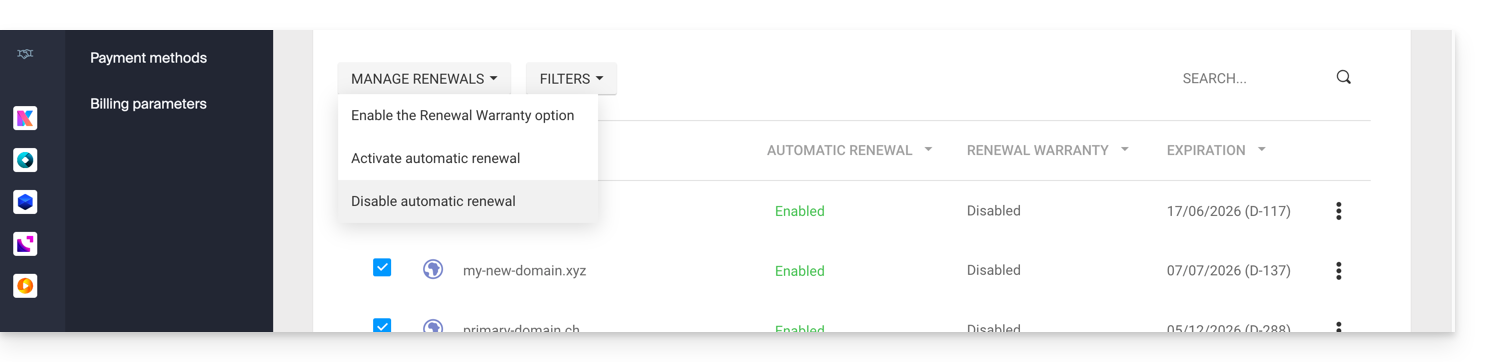
- Follow the instructions in the window that has opened.
Link to this FAQ: https://faq.infomaniak.com/2637
Has this FAQ been helpful?
Infomaniak places a high priority on securing data through a comprehensive and diverse approach to security. For whistleblowers, the company has implemented an internal system for reporting irregularities safely and anonymously, without fear of retaliation. This protection mechanism is known and accessible to all employees, thereby strengthening transparency and accountability within the organization.
Processing Times
Infomaniak demonstrates its commitment with concrete and effective measures to protect those who report anomalies. The company undertakes to process each report made via its abuse form within defined timeframes to ensure optimal responsiveness and maintain the trust of its users.
To guarantee efficient and transparent processing, Infomaniak has established a structured process with specific deadlines:
- It undertakes to acknowledge receipt of all reports within 24 hours of their submission, allowing those reporting to confirm that their request has been received by the relevant technical teams.
- Subsequently, the company carries out a preliminary assessment within 5 business days to determine the admissibility of the report and identify the resources needed to process it. This phase makes it possible to classify the level of priority and direct the case to the appropriate specialized teams.
- When an investigation is necessary, Infomaniak conducts a thorough analysis within a maximum period of 30 business days, depending on the nature and complexity of the reported case. This period allows the security teams to carry out the necessary technical checks, collect the required evidence, and assess the potential impact of the reported situation.
- Finally, the company undertakes to complete the analysis and implement appropriate corrective actions within a period of 60 business days when technically possible.
This final step includes the implementation of preventive measures, communication of the results to the parties concerned, and monitoring of the recommendations issued to prevent the recurrence of identified problems.
Infomaniak also undertakes to keep complainants informed of the progress of a complaint, provided that the complainant has completed the form and provided a contact email address.
You can also read the blog article on this topic.
Link to this FAQ: https://faq.infomaniak.com/2641
Has this FAQ been helpful?
This guide explains how to log out of an Infomaniak account (user account) from the Infomaniak Manager. Once logged out, it is easy to log back in to a different Infomaniak account and access a different Organization or a user with a different role within the same Organization.
Logging out and logging back in with Infomaniak credentials
To log out of an Infomaniak account and log in to another:
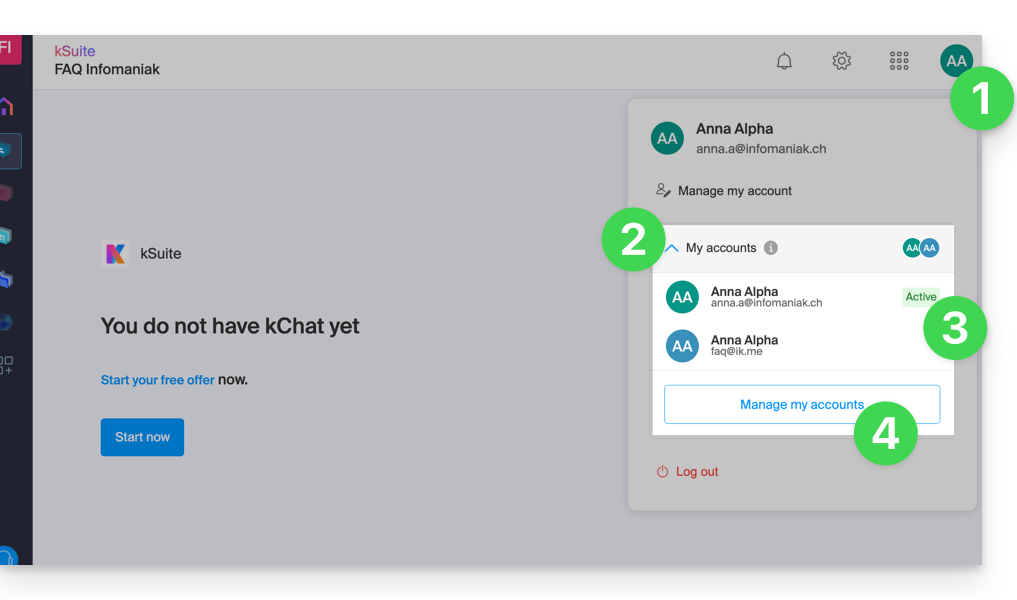
- Click on a badge with your initials / avatar in the top right corner of the Manager Infomaniak.
- Click on Log out:
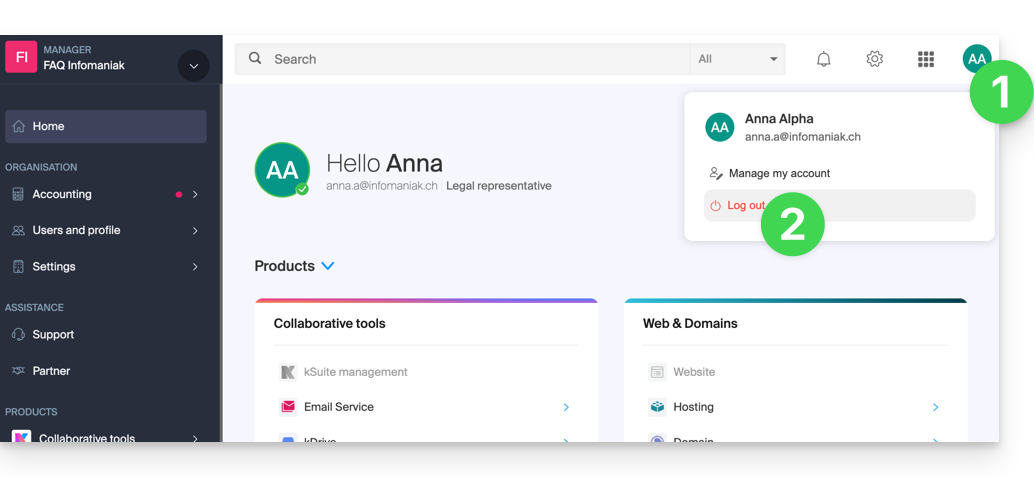
- Click on Switch user:
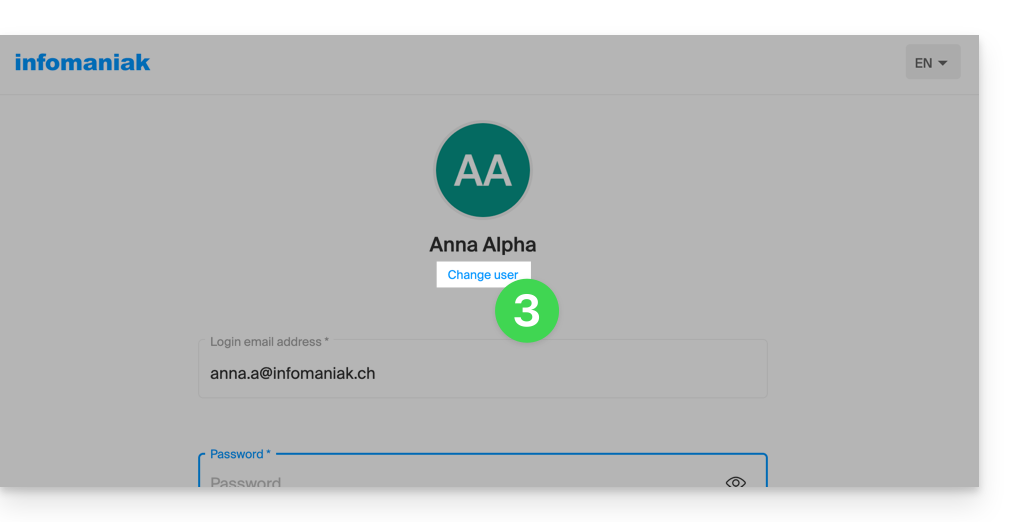
- Choose another pre-registered user…
- … or click the button to log in with new credentials…
- … or delete one of the users already saved:
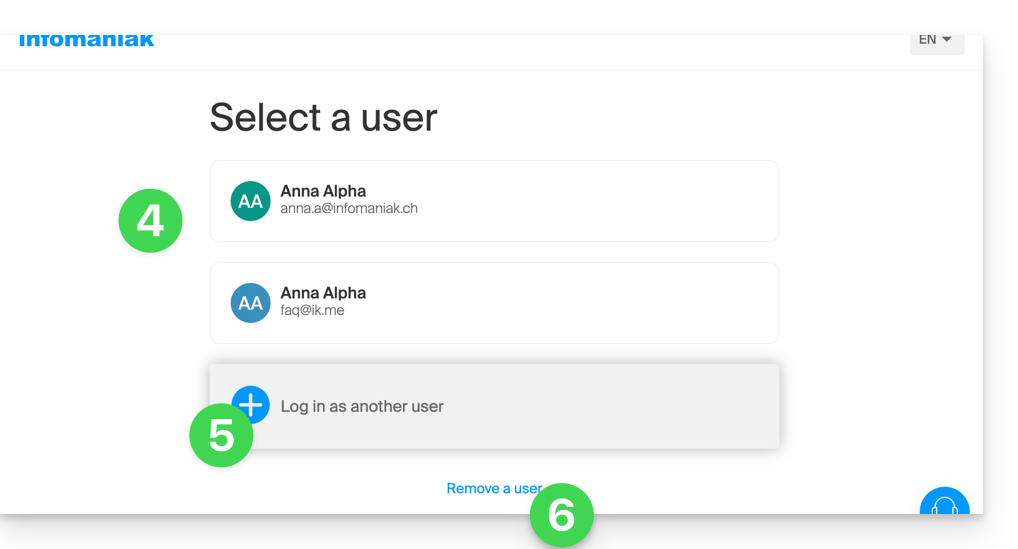
- Enter your login details and click the Login button.
Once you have logged in with several different users from the same device, you can find your different Infomaniak accounts and switch between them:
- Click on Pill with your initials / avatar in the top right corner of the Manager Infomaniak.
- Click on the chevron My accounts to expand the list of saved accounts.
- Click on an inactive account to switch to it.
- Click on the Manage accounts button to add or remove one of your accounts (see section 4 of the chapter above):
If your user is associated with multiple Organizations, they can simply switch between them without having to disconnect and reconnect.
Link to this FAQ: https://faq.infomaniak.com/2642
Has this FAQ been helpful?
This guide helps you understand what a Client is within the context of the Infomaniak Partner Program.
Definition
A Client is a natural or legal person who has chosen Infomaniak as their hosting provider in order to purchase and manage products. If you do not yet have any products with Infomaniak, you will be prompted to create an account during the ordering process.
The Client can add a Partner who is part of the Infomaniak Partner Program and grant them full or limited access rights to their account and products.
The Partner will be responsible for handling support requests for the products they manage.
As a Partner's Client, you should only contact the Partner for any support requests.
Link to this FAQ: https://faq.infomaniak.com/2666
Has this FAQ been helpful?
This guide explains how to add a Client within the Infomaniak Partner Program.
Prerequisites
- Only the legal representatives of the Partner Organization are authorized to add Clients.
Add a "managed" Client
To add a Client as part of your Partner activity:
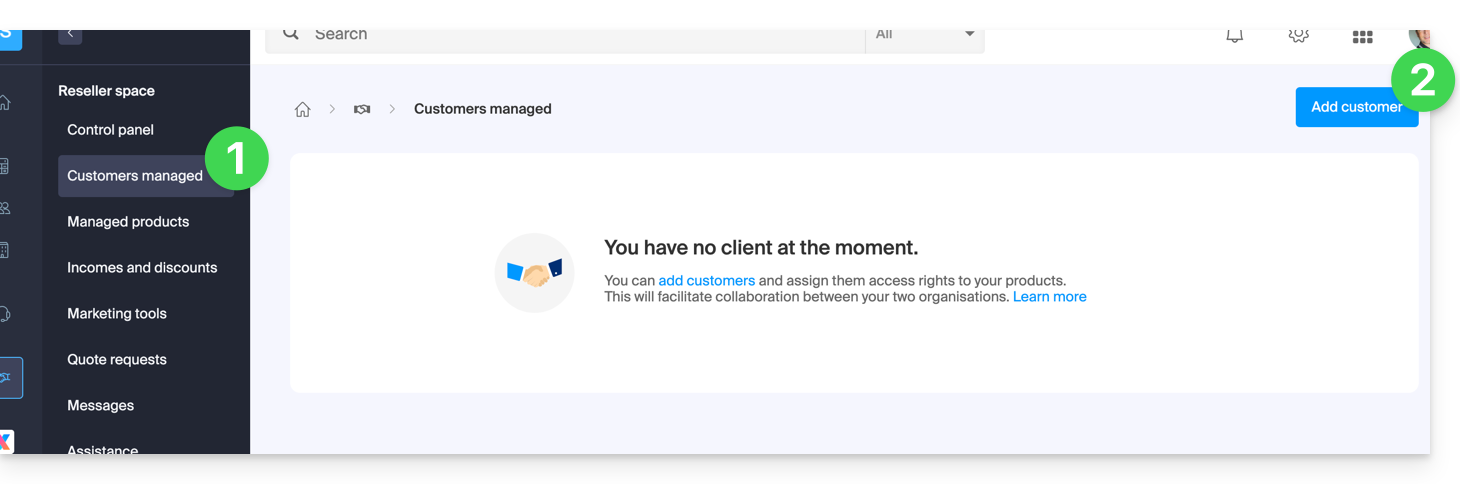
- Click here to access your Managed Clients in the Infomaniak Manager Reseller Area (need help?).
- Click on the blue “Add a client” button in the top right corner:
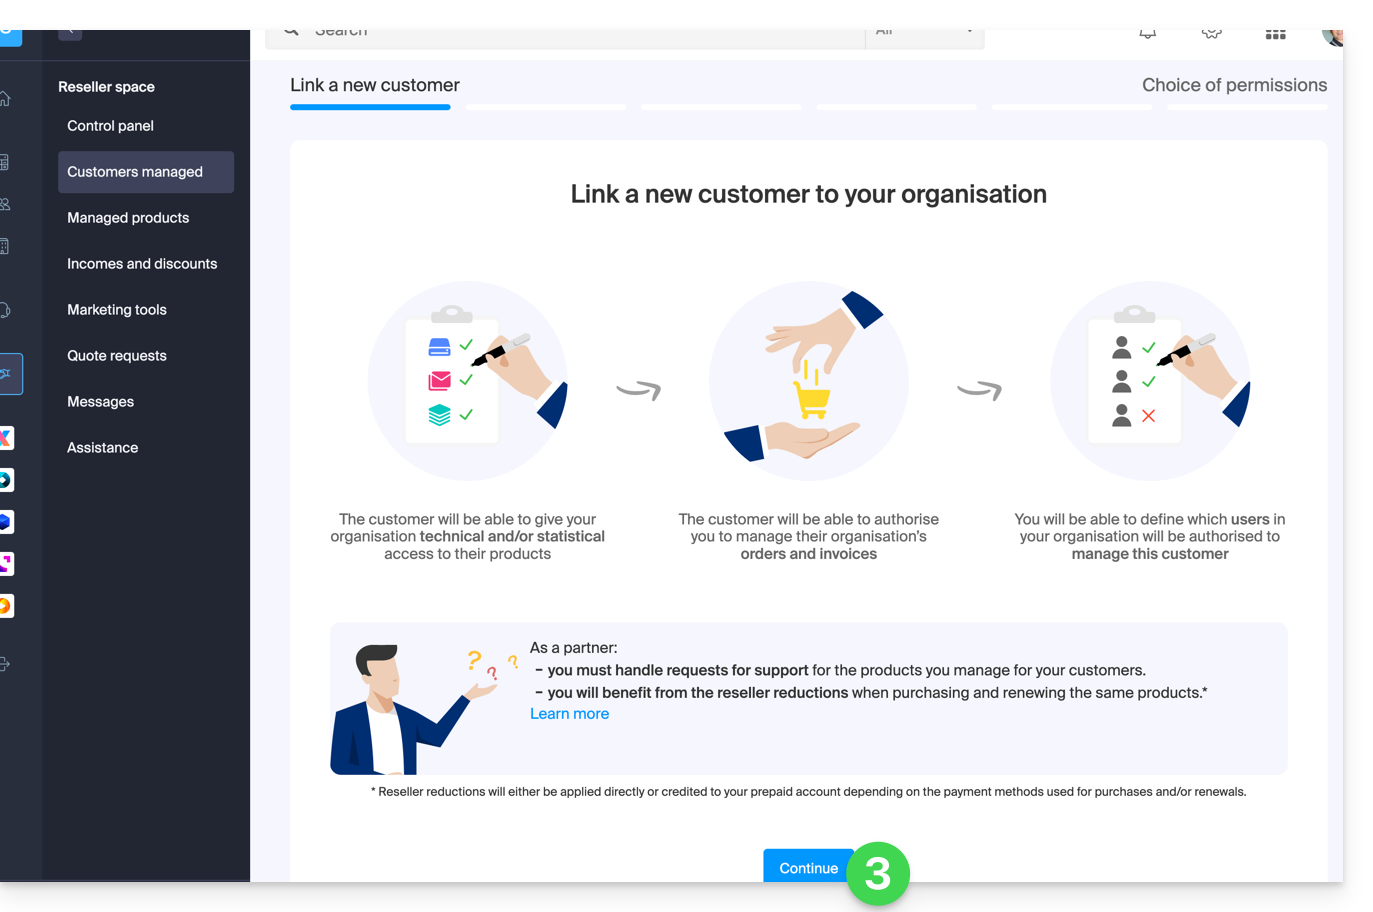
- Follow the procedure to complete:
- The pending request will be visible in your Manager:
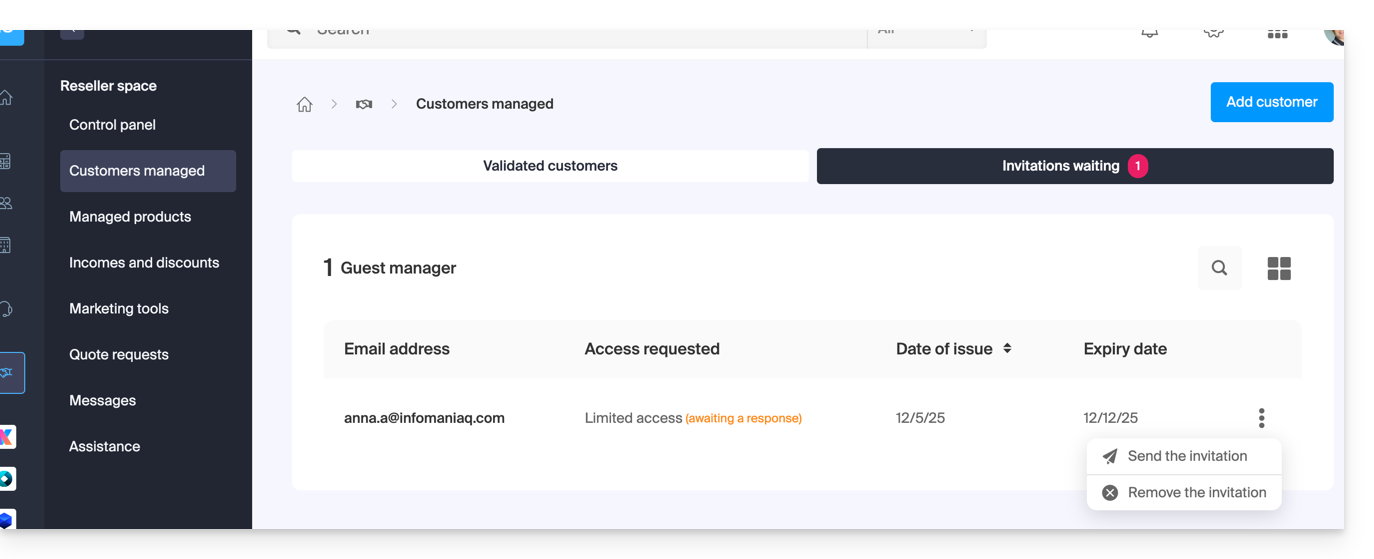
- The Client will receive an email with the request for the various access permissions and will have the option to grant different access rights than those requested by the Partner.
- Once an invitation has been accepted by a Client, check the access rights granted as well as the payment methods used (if applicable) in your Client's profile.
Accessing the Client's account and products…
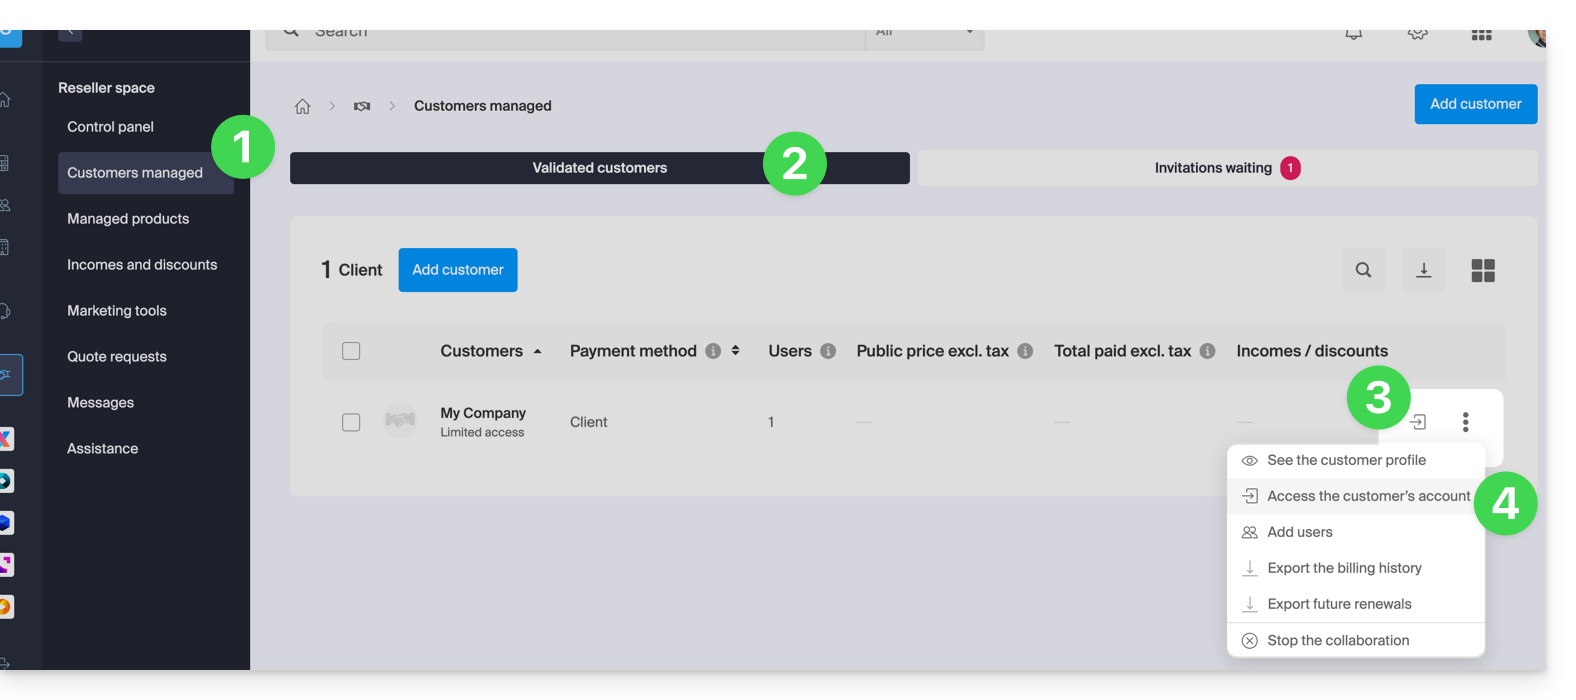
... as a legal representative or Partner administrator
- Click here to access your Managed Clients in the Infomaniak Manager Reseller Area (need help?).
- Click on the Verified Clients tab if necessary.
- Click on the icon to the right of the relevant client in the table that appears to access their Manager.
- Click on the action menu ⋮ to the right of the relevant client in the table to access more options (such as exporting data to a CSV file (format .csv) for example):
… as a collaborator of the Partner Organization
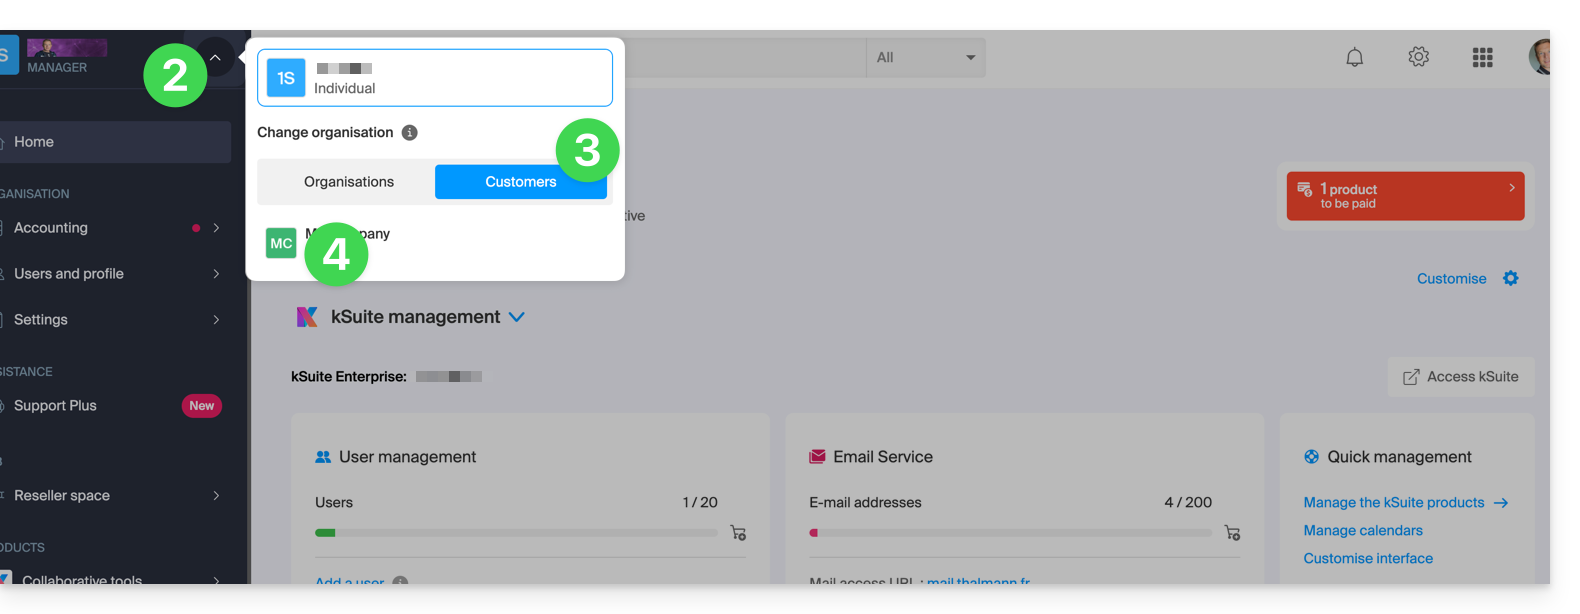
- Click here to access the Infomaniak Manager.
- Click on the chevron at the top left of your left-hand menu.
- Click on the Clients tab.
- Click on the relevant client in the menu that appears to access their Infomaniak Manager:
Link to this FAQ: https://faq.infomaniak.com/2668
Has this FAQ been helpful?
This guide explains how to grant a Partner (from the list of Partners recommended by Infomaniak) access to your Organization's products on the Infomaniak Manager, which is the administration interface for your products.
Introduction
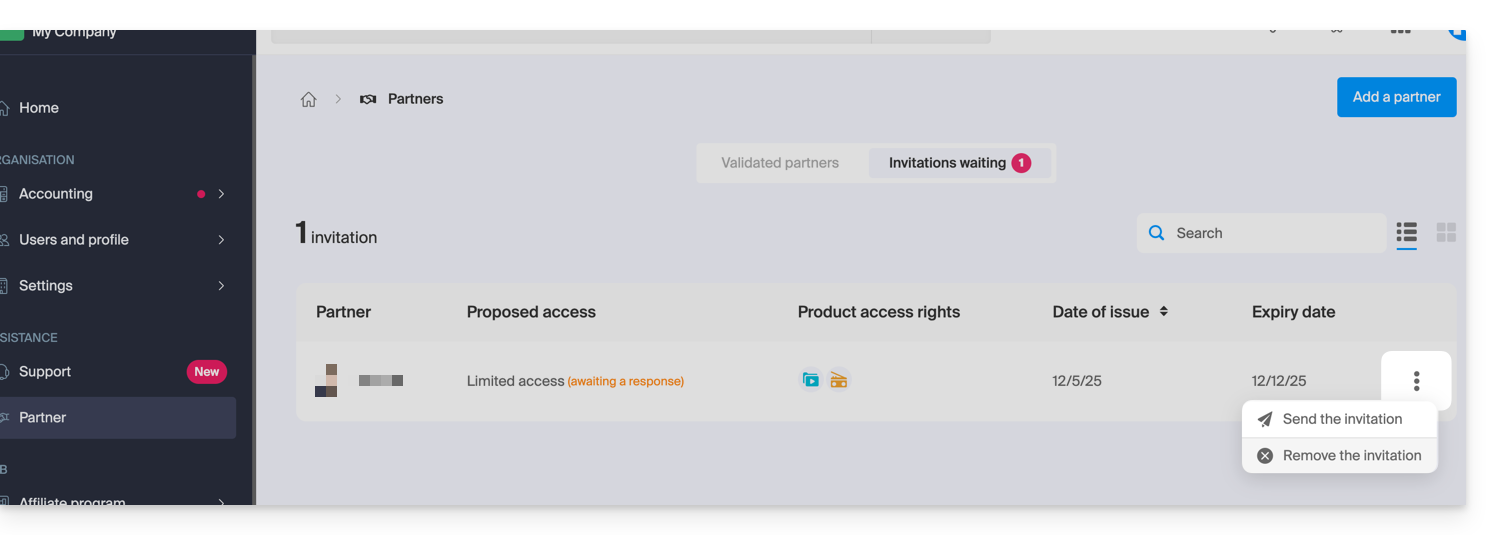
- If the Partner was already linked to the Client's organization before the invitation, for example as an external user, their status will be updated once the partnership begins.
- The current invitation can be resent or deleted before it is accepted.clicking on Partner in the left-hand menu in the Customer Manager:
- At any time, a partnership can be terminated.
As a Customer, add a known Partner
Prerequisites
- You must be the legal representative of the Organization.
To allow a Partner to access some of your products:
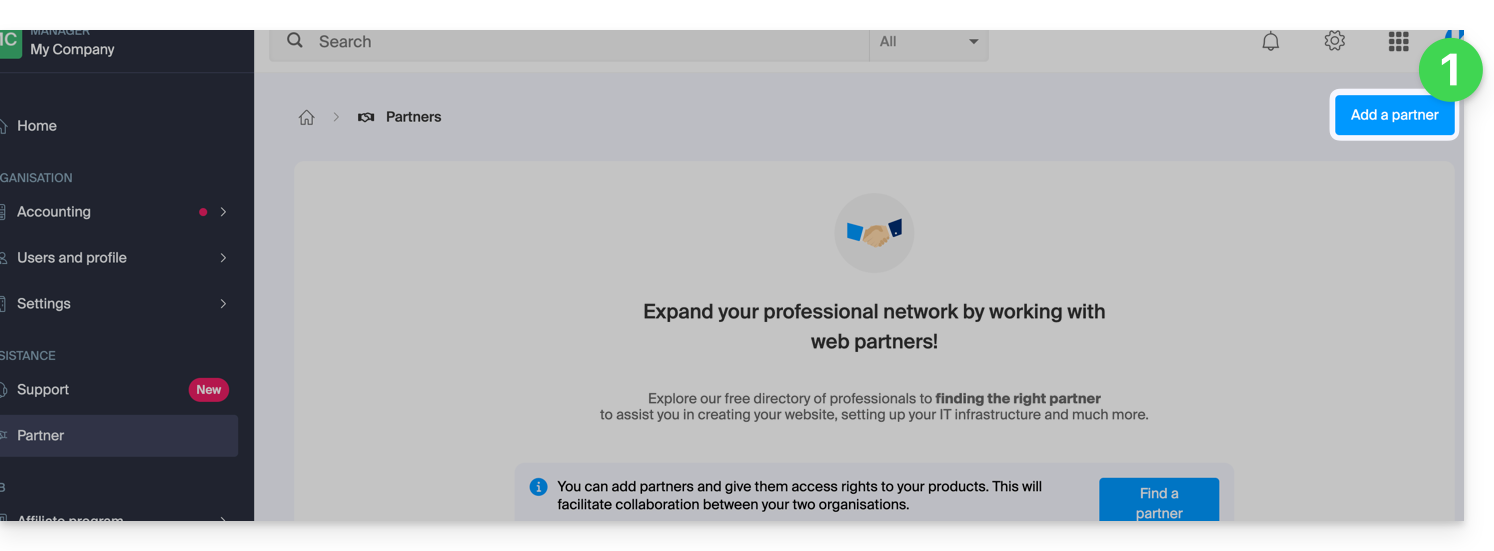
- Click here to access the Partner addition section in the Infomaniak Manager (need help?):
- Enter the name or email address of the Partner to whom you will grant access.
- Check the box to select the relevant Partner from the search results.
- Click the blue button to Continue:
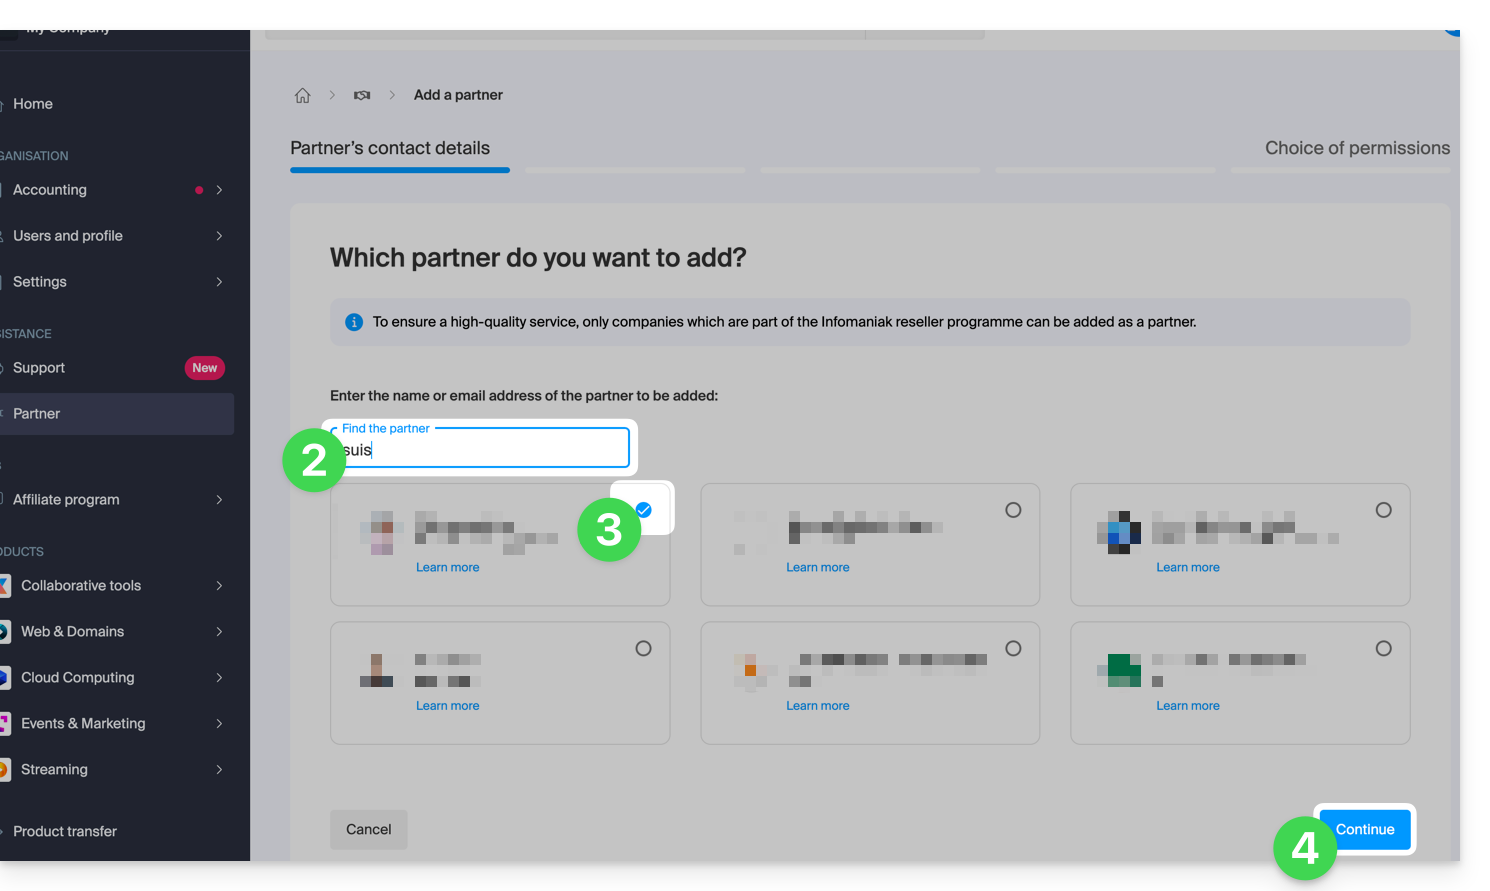
- The next step presents you with an important choice regarding the permissions granted to the Partner; the two options are detailed below…
Grant the Partner access...
... with limited permissions
- Click the button on the left to grant the Partner limited access:
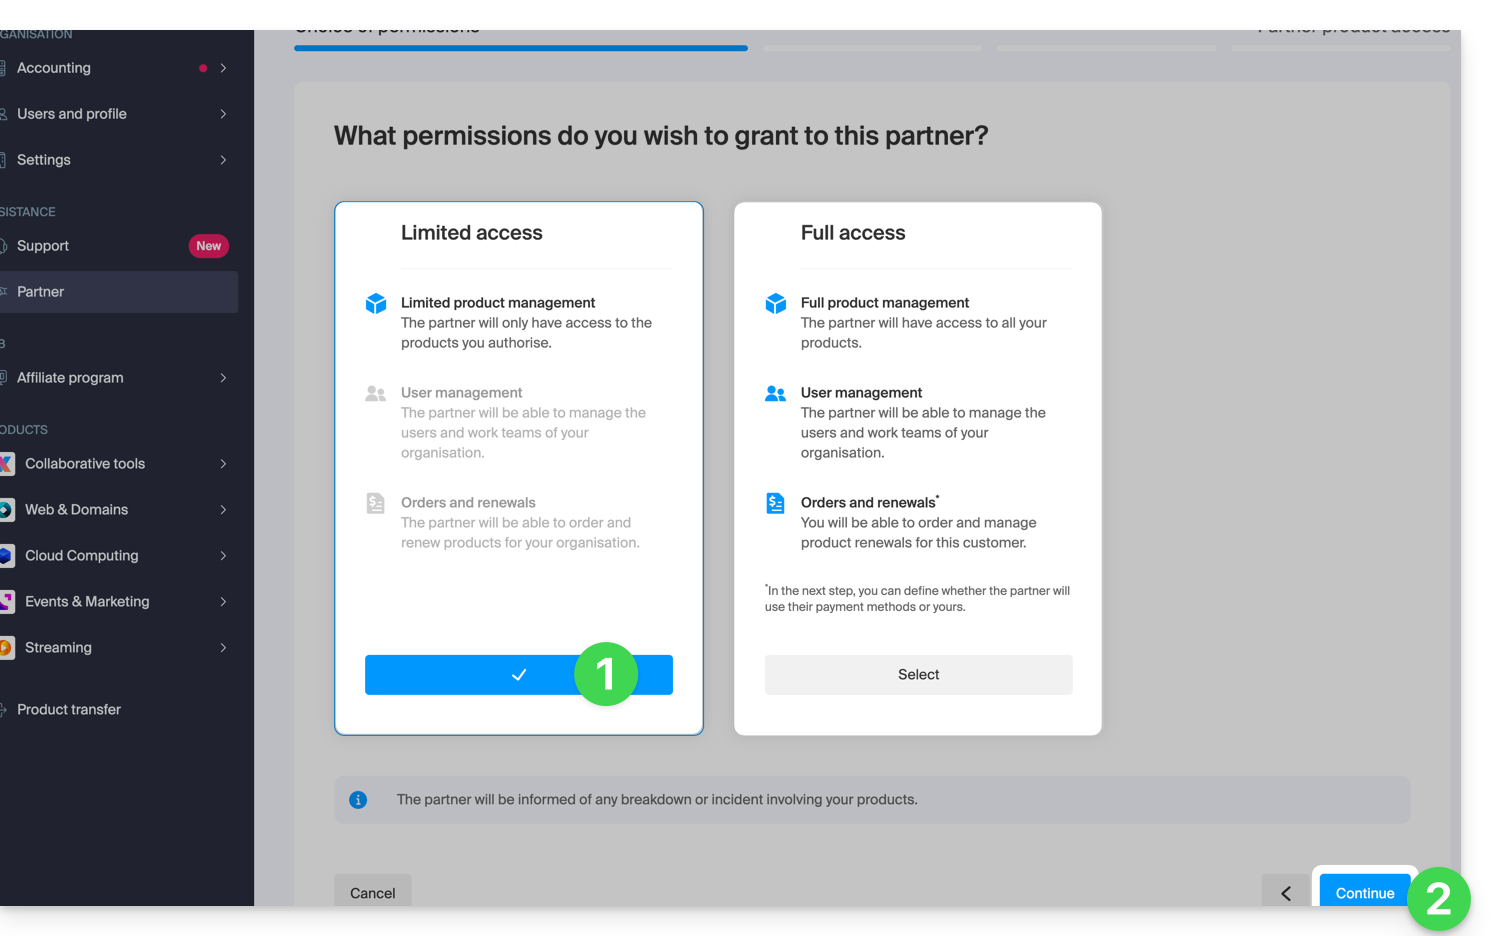
- Click the button to Continue.
- Click on the relevant product category, then in the panel that opens, click on the relevant product; repeat for all the different products you want to grant access to:
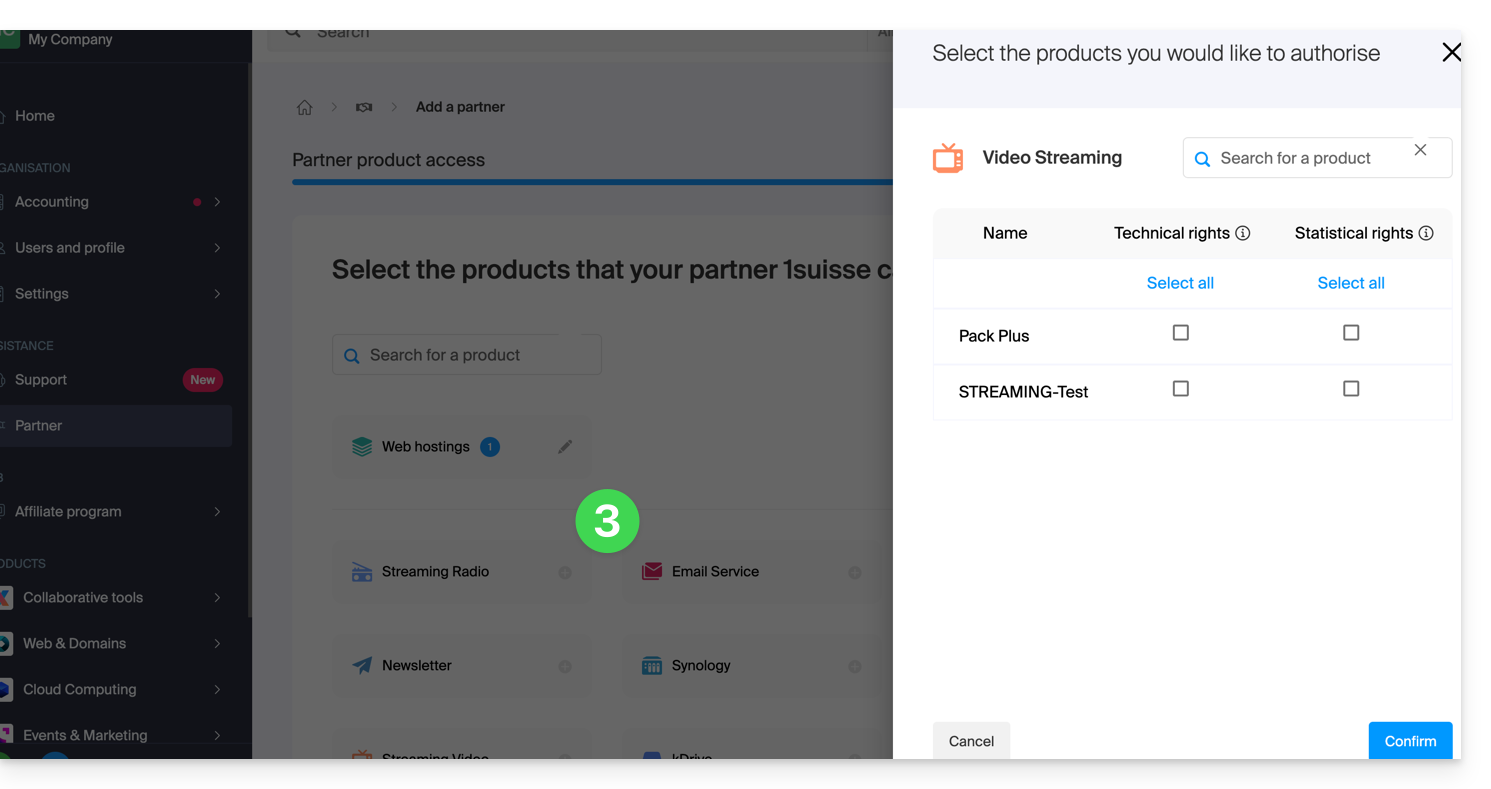
- Click on the blue button in the bottom right corner to Continue:
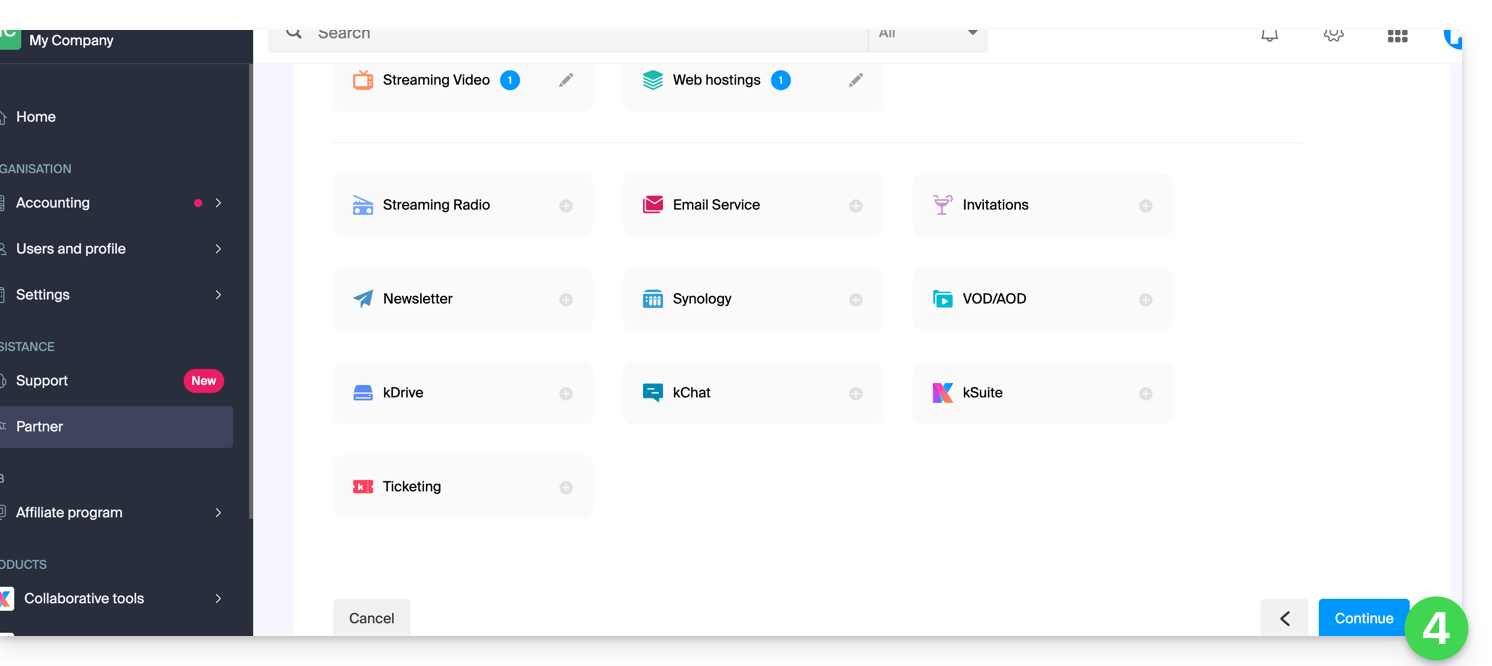
- An email is automatically sent to the invited Partner, which includes a link allowing them to accept (or reject) the management proposal:
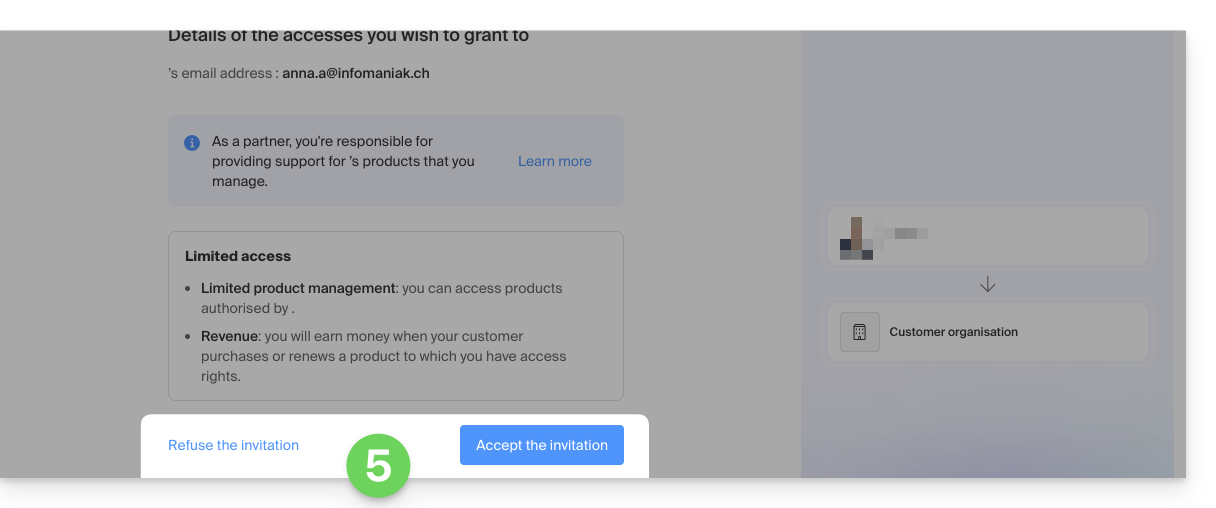
- Once the proposal is accepted, the Partner dashboard provides access to the Client's Organization and the products for which access rights have been granted.
... complete
- Click the right button to grant the Partner complete access.
- Click the blue button in the bottom right corner to Continue:
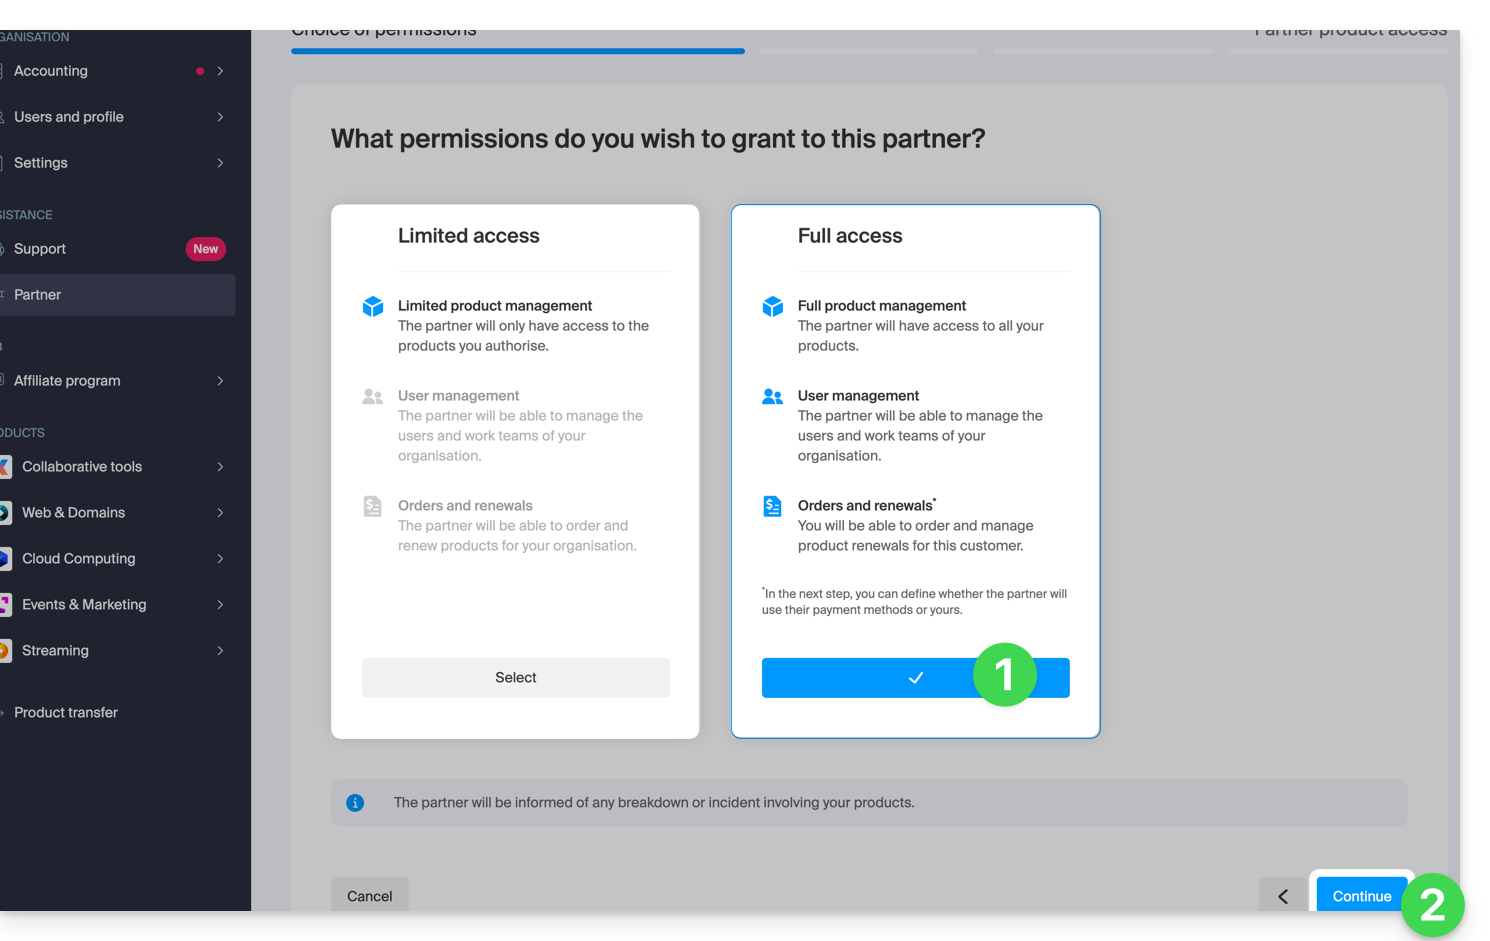
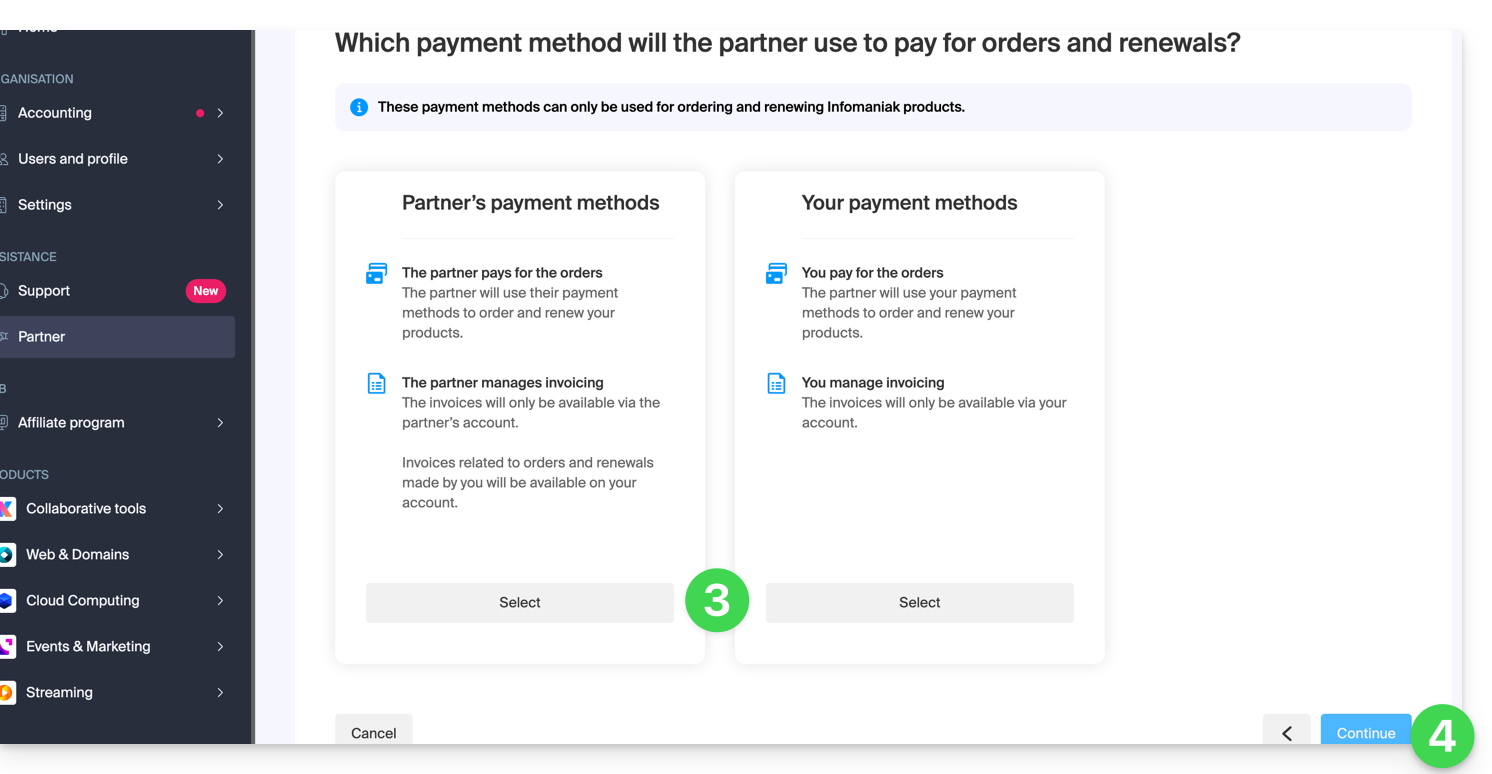
- The Customer must choose whether to also entrust their wallet to the Partner.
- Click the blue button in the bottom right corner to Continue:
- An email is automatically sent to the invited Partner, which includes a link allowing them to accept (or reject) the management proposal:
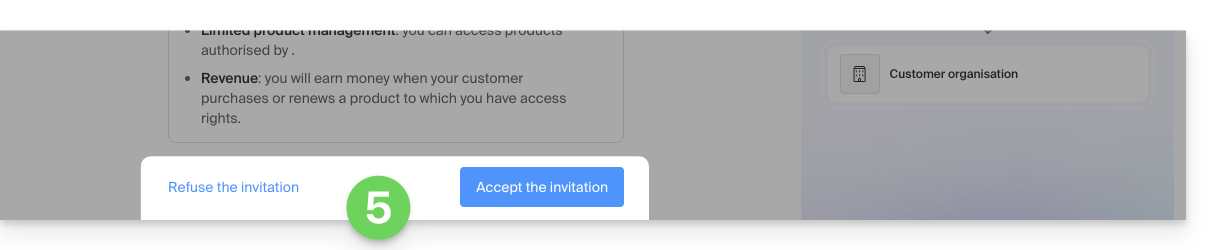
- Once the proposal is accepted, the Partner dashboard provides access to the Client's entire organization.
Link to this FAQ: https://faq.infomaniak.com/2669
Has this FAQ been helpful?
This guide explains the differences between the two types of access authorization available when the Partner wishes to start a partnership by choosing the Client they will manage.
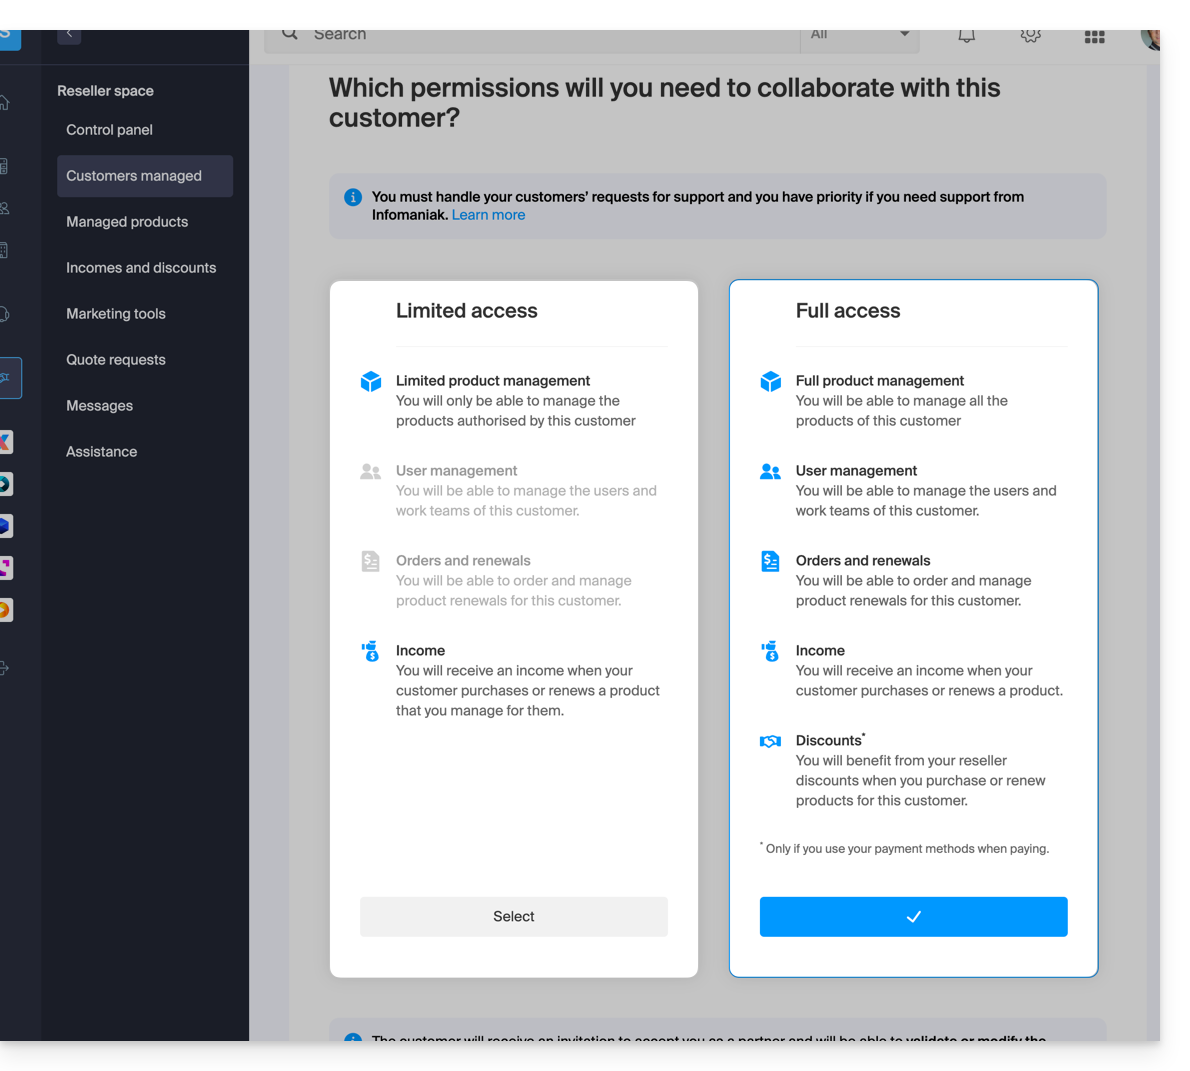
Limited Access
When making this choice:
- the Client
- grants their Partner access specifically to certain products
- may have multiple Partners with limited access to their Organization, provided they manage different products
- the Partner
- manages only the products that the Client has assigned to them (Limited product management)
- can manage the Client's users and Groups (User management)
- cannot order and renew products for their Client (Orders and renewals)
- receives revenue when the Client makes purchases or renews products for which the Partner has management rights (Revenue)
Full access
When making this choice:
- the Client
- grants their Partner access to all their products (Full product management)
- can only have one Partner with full access to their Organization
- the Partner
- can manage the Client's users and Groups (User Management)
- can order and renew products for their Client (Orders and Renewals)
- receives revenue for each product order or renewal (Revenue)
- benefits from reseller discounts when purchasing or renewing products for their Client, but only if they use their own payment methods (Discounts)
- the Client & the Partner can define which payment methods will be used for orders and renewals (Payment Methods)
The type of permission granted to the Partner can be modified at any time, and only by the Client.
Link to this FAQ: https://faq.infomaniak.com/2670
Has this FAQ been helpful?
This guide explains how a Client can adjust the access rights granted to an Infomaniak Partner so that the latter can access the products more broadly, or no longer access them at all.
Prerequisites
- Have authorized a Partner to access your products (and thus become the Client of a Partner).
- Understand the differences between the 2 types of permissions that can be defined from the Manager.
Modify the Partner's access to your products
To grant new access to the Partner as a Client:
- Click here to access the management of your partnerships on the Infomaniak Manager (need help?).
- Click on the action menu ⋮ to the right of the Partner concerned in the table that appears.
- Click on Modify access rights:

- Click on the type of access rights you wish to grant (
limited to a selection of productsorfull access):
- Click on the blue Continue button and follow the assistant to the end.
Remove the Partner's access to your products
To cut access to a product to a Partner:
- Click here to access the management of your partnerships on the Infomaniak Manager (need help?).
- Click on the action menu ⋮ to the right of the Partner concerned in the table that appears.
- Click on Modify access rights.
- Switch if necessary to the limited management of your products:

- Select or deselect the products concerned within the different product categories:

- Continue to confirm the removal of access.
You can also completely stop the collaboration with an Infomaniak Partner.
Link to this FAQ: https://faq.infomaniak.com/2671
Has this FAQ been helpful?
This guide helps you understand the concepts of recurring commission and cashback within the Infomaniak Partner Program.
Prerequisites
- Understand the differences between the 2 types of permissions that link a Client to a Partner, which can be defined from the Manager.
- Understand the differences between the 2 types of payment methods that link a Client to a Partner, which can be defined from the Manager.
Cashback
This is the amount equal to the difference between the list price and the preferential price that the Partner benefits from as an Infomaniak reseller.
This amount is credited as cashback to the Partner's prepaid accountin the following cases:
Full access partnership (Client's payment methods)
- When the Customer places an order or renews a product.
- When the Partner places an order or renews a product on behalf of their customer, using the customer's payment methods.
Full Access Partnership (Partner payment methods)
- When the Customer places an order or renews a product.
Limited Access Partnership
- The Customer places an order or renews a product that the Partner manages.
Discount
As an Infomaniak reseller, a Partner benefits from discounts on orders and renewals. The discount applies in the following case:
Full Access Partnership (Partner's payment methods)
- When the Partner places an order or renews a product on behalf of their client using their payment methods.
Cumulative Discount
The discount is applied in addition to the tiered pricing for Web/Mail hosting.
With 35 web hosting plans, you only pay CHF 208.32 / month per hosting plan instead of CHF 347.20, which represents a total discount of -40%.
Details of the calculation in CHF (excluding VAT):
- regular price for 35 web hosting plans: CHF 347.20
- with a 20% Partner discount: CHF 277.76
- final partner price with a 25% discount: CHF 208.32
Details of the calculation in euros (excluding VAT):
- standard price for 35 web hosting plans: €201.25
- with a 20% Partner discount: €161
- final partner price with a tiered discount of 25%: €120.75
The tiered discount (-25%) therefore applies to the remaining amount after the partner discount (-20%) has been applied.
Link to this FAQ: https://faq.infomaniak.com/2672
Has this FAQ been helpful?
This guide explains how to terminate a partnership between a Client and a Partner within the Infomaniak Partner Program.
Terminate the partnership…
... as a Customer
To do this:
- Click here to access the management of your partnerships in the Infomaniak Manager (need help?).
- Click on the action menu ⋮ to the right of the relevant Partner in the table that appears.
- Click on Stop collaboration:
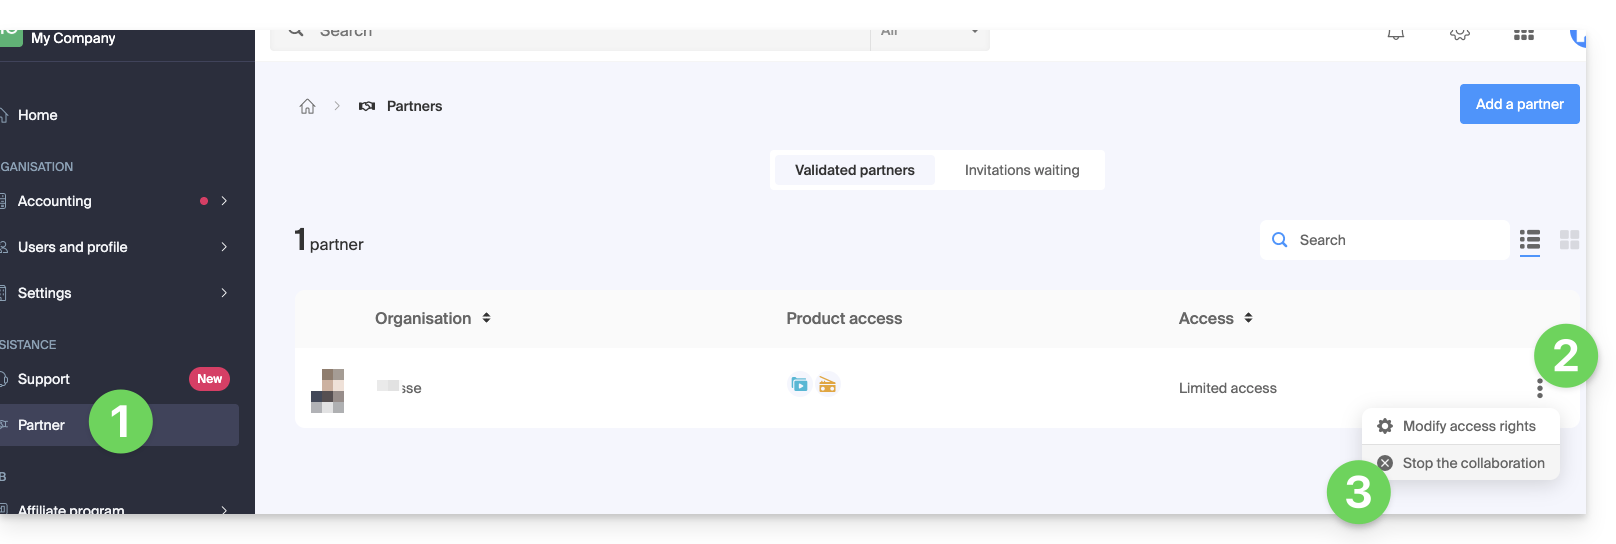
- Confirm the removal of the Partner for the first time.
- Confirm by entering your Infomaniak account password.
- The partnership has been successfully terminated.
... as a Partner
To do this:
- Click here to access your Managed Clients in the Infomaniak Manager Reseller Space (need help?).
- Click on the action menu ⋮ to the right of the relevant Client in the table that appears.
- Click on Stop collaboration:
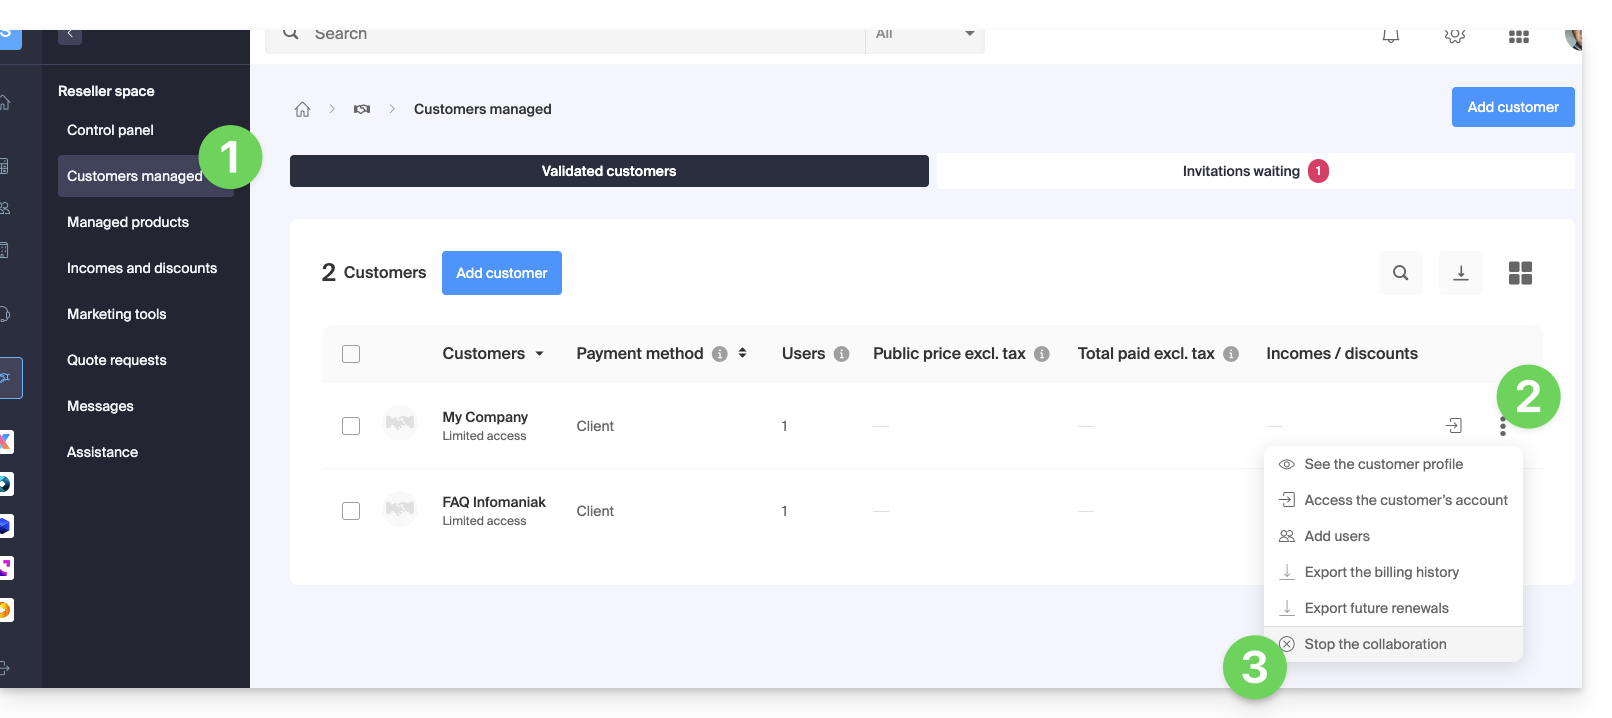
- Confirm the removal of the Client for the first time.
- Confirm by entering your Infomaniak account password.
- The partnership has been successfully terminated.
Link to this FAQ: https://faq.infomaniak.com/2673
Has this FAQ been helpful?
This guide explains the differences between the two types of payment modes possible within a partnership (with full access granted to the partner).
Indeed, in the context of adding a Partner for managing your products, if you grant all rights, you will need to decide whether to also entrust them with the entire billing part.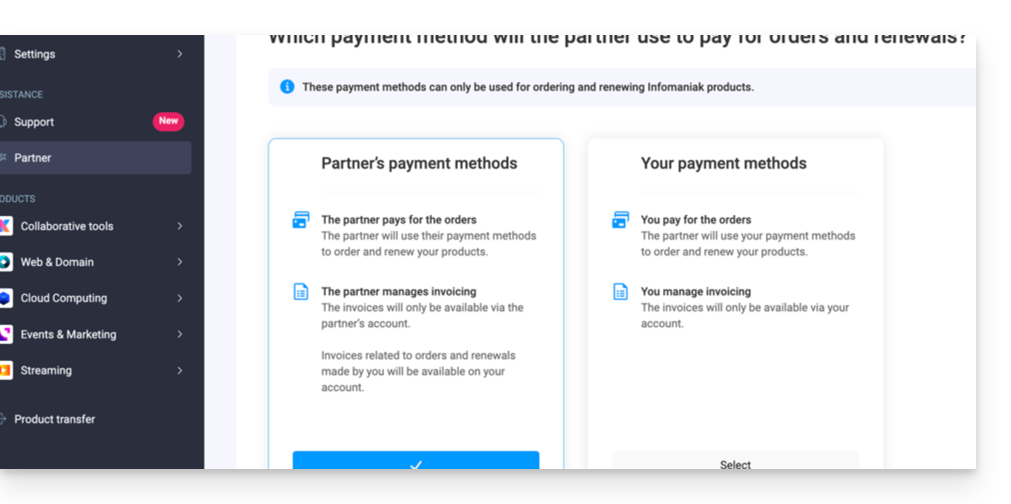
Payment modes ...
... of the Customer
In this case:
- The Customer manages billing and pays for orders and renewals made by the Partner.
- The Partner:
- Pays the public price and will receive income (cashback) in their account depending on the benefits they receive as an Infomaniak reseller
- Also receives income (refund) for any order and renewal made directly by their client.
- Invoices will only be accessible within the Customer's organization, and the Partner will not have access.
- The products will be installed directly within the Customer's Organization.
... of the Partner
In this case:
- The partner
- Manages billing and pays for orders and renewals made for their client
- Benefits directly from reseller discounts when ordering and renewing on behalf of their client
- Also receives income (refund) for any order and renewal made directly by their client.
- Invoices will only be available within the Partner's organization, and the Customer will not have access.
- The products will be installed directly within the client's organization.
Change the payment mode
When granting full access to an associate, the Customer can change the type of payment mode used in the partnership at any time:
- Log in to the Infomaniak Manager (manager.infomaniak.com).
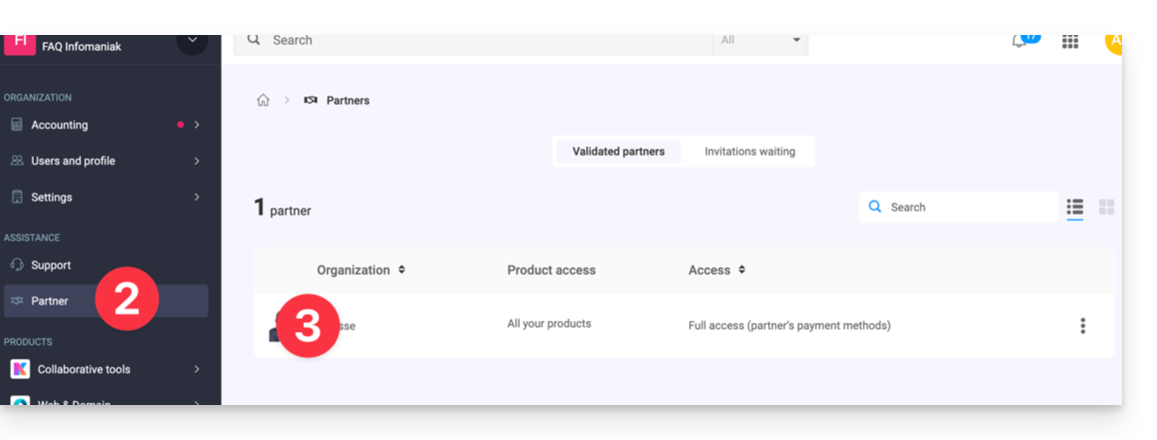
- Click on Partner in the left sidebar menu.
- Click on the name of the partner concerned:
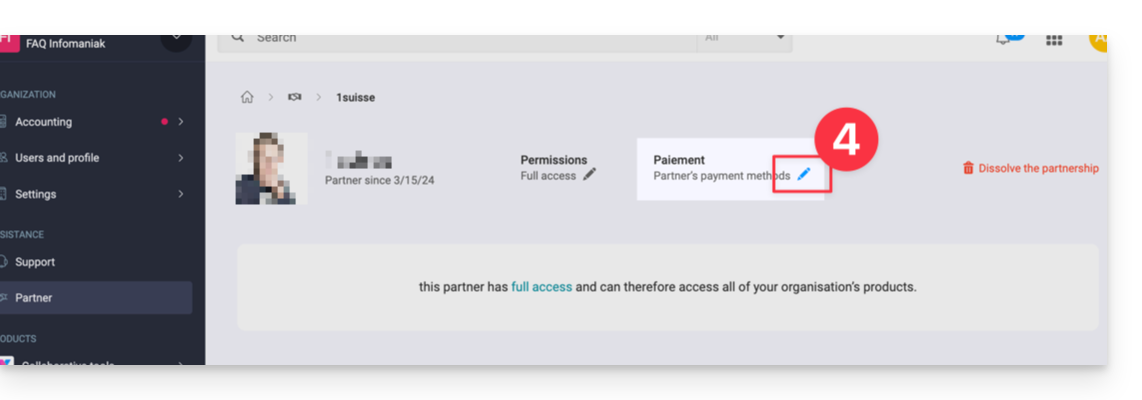
- Click on the pencil icon at the top of the page to the right of Payment:
- Modify and verify the desired information.
The Partner will receive a notification of the change by email.
Also refer to this other guide.
Link to this FAQ: https://faq.infomaniak.com/2679
Has this FAQ been helpful?
This guide helps you resolve login errors on Infomaniak mobile apps (kDrive, Euria, SwissTransfer, Mail) when the security message "your device is not recognized as safe" appears on Android.
"Your device is not recognized as safe" login issues
This blocking is related to Google's security protocols (Google Play Integrity API). Infomaniak uses these standards to ensure that data is not accessed on a device whose security may be compromised.
This generally occurs in the following cases:
- Using an unofficial operating system (Custom ROM / LineageOS).
- Device that is "rooted" or has an unlocked bootloader.
- Android version too old or not certified by Google.
- Certain smartphone models (e.g., Huawei without official Google services).
Immediate workaround
If your device is working correctly but the message persists, you can bypass the block by forcing a new manual authentication:
- On the app's login screen, click the down arrow/chevron icon next to your account or avatar.
- Select the "Log in with another account" option (even if it's the same account).
- Enter your credentials manually (Infomaniak email address and password).
This method allows you to ignore the previous login token and validate access via a new, secure session.
Link to this FAQ: https://faq.infomaniak.com/2685
Has this FAQ been helpful?