Knowledge base
1000 FAQs, 500 tutorials and instructional videos. Here, there are only solutions!
This guide explains how to synchronize your eM Client contacts & calendars with the contacts & calendars hosted by Infomaniak.
Introduction
- Infomaniak contacts & calendars are linked to your Infomaniak account; when you log in to ksuite.infomaniak.com/contacts or /calendar, you will likely need to perform two-factor authentication (2FA) during login.
- In this case, an application password is required to establish synchronization between your device and Infomaniak tools.
- But don't worry, creating such a password is offered as part of the configuration wizard.
Synchronize contacts & calendars (eM Client 10 macOS)
Prerequisites
- Obtain your synchronization information provided by the Infomaniak synchronization wizard:
- account address:
https://sync.infomaniak.com - username: for example
AB12345 - application password if two-factor authentication is enabled or the password for your Infomaniak user account if you have not enabled 2FA
- account address:
Then:
- Open eM Client.
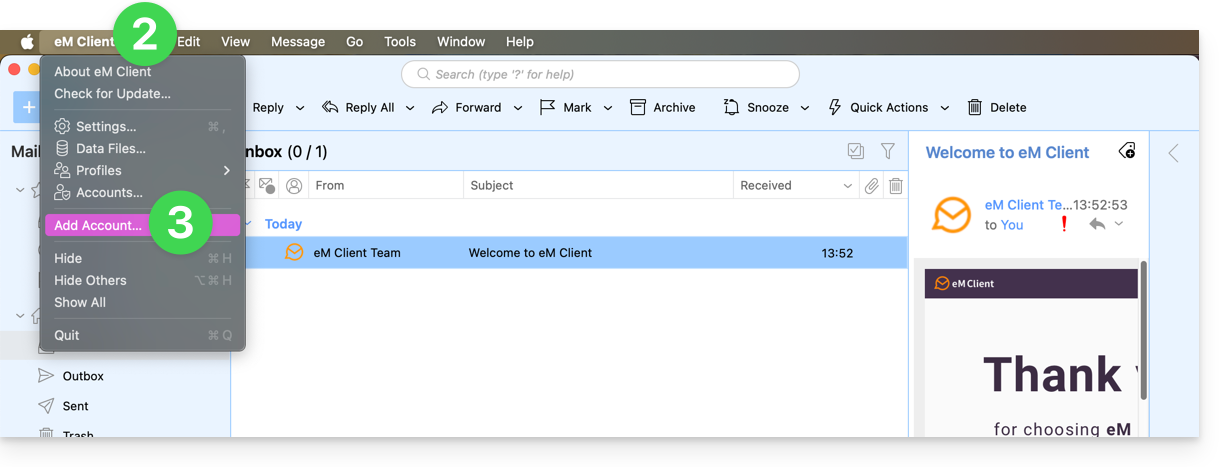
- Click on the eM Client Menu.
- Click on Add account:
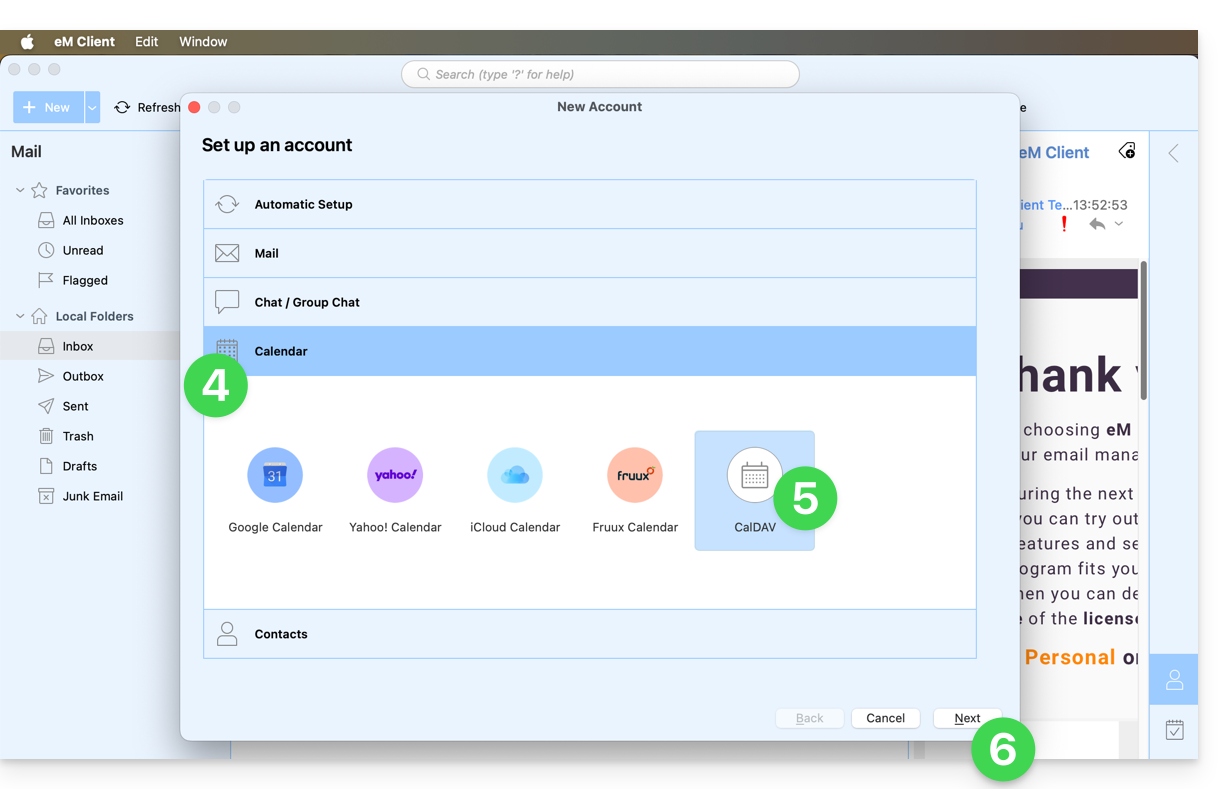
- Click on Calendar.
- Click on CalDAV.
- Click on Next:
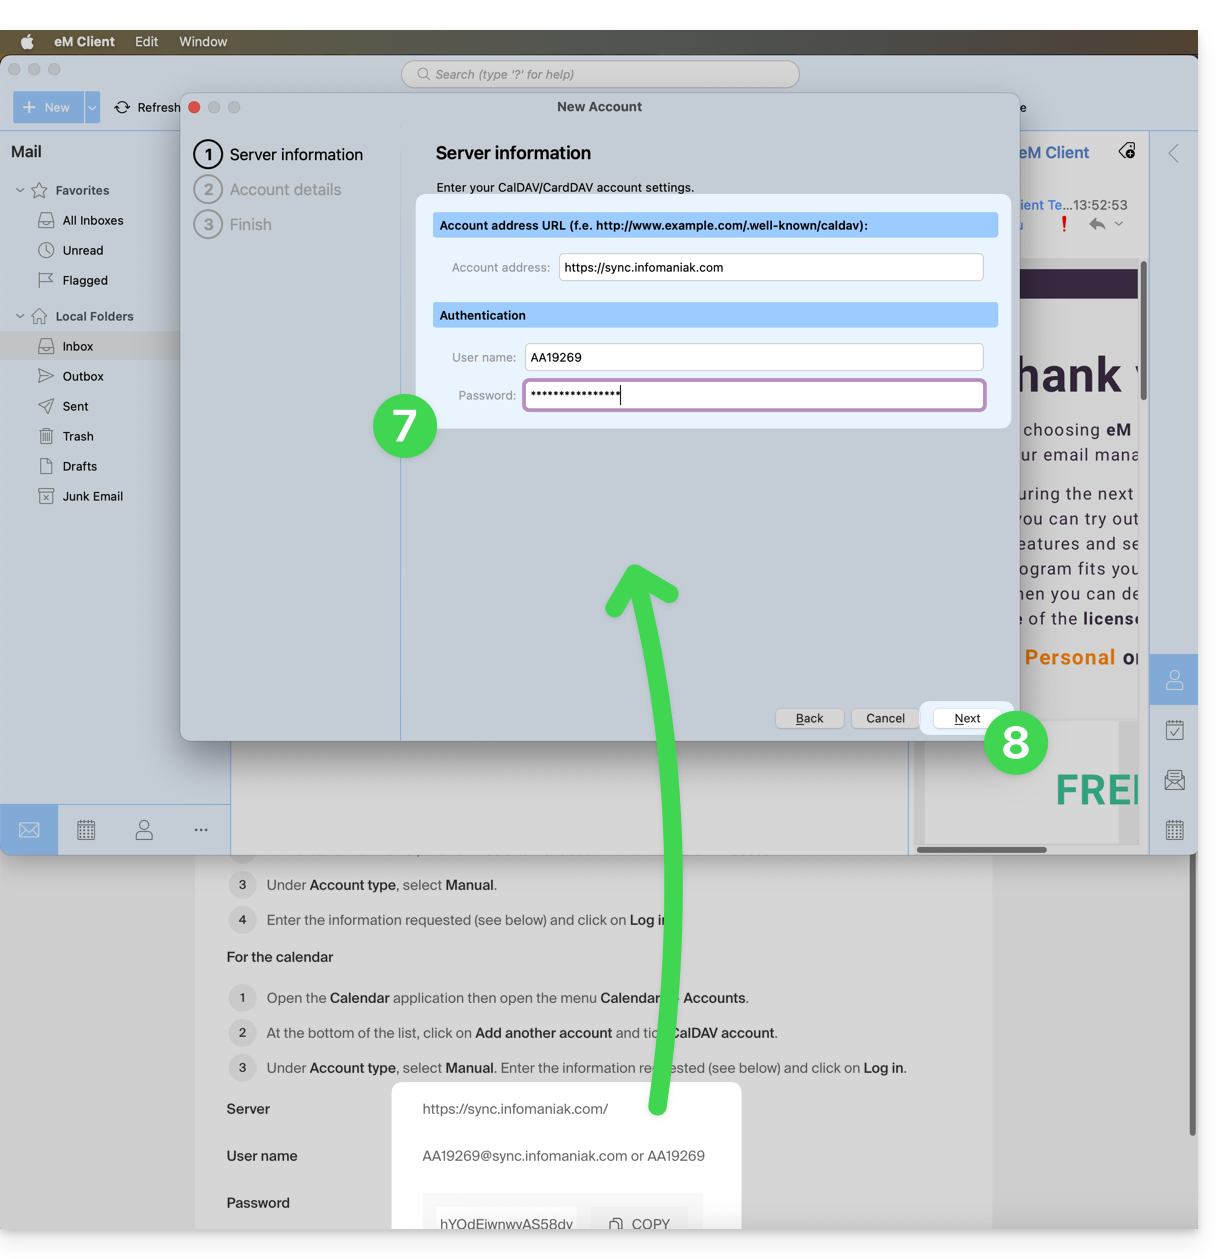
- Enter the information obtained from the configuration wizard (see prerequisites).
- Click on Next:
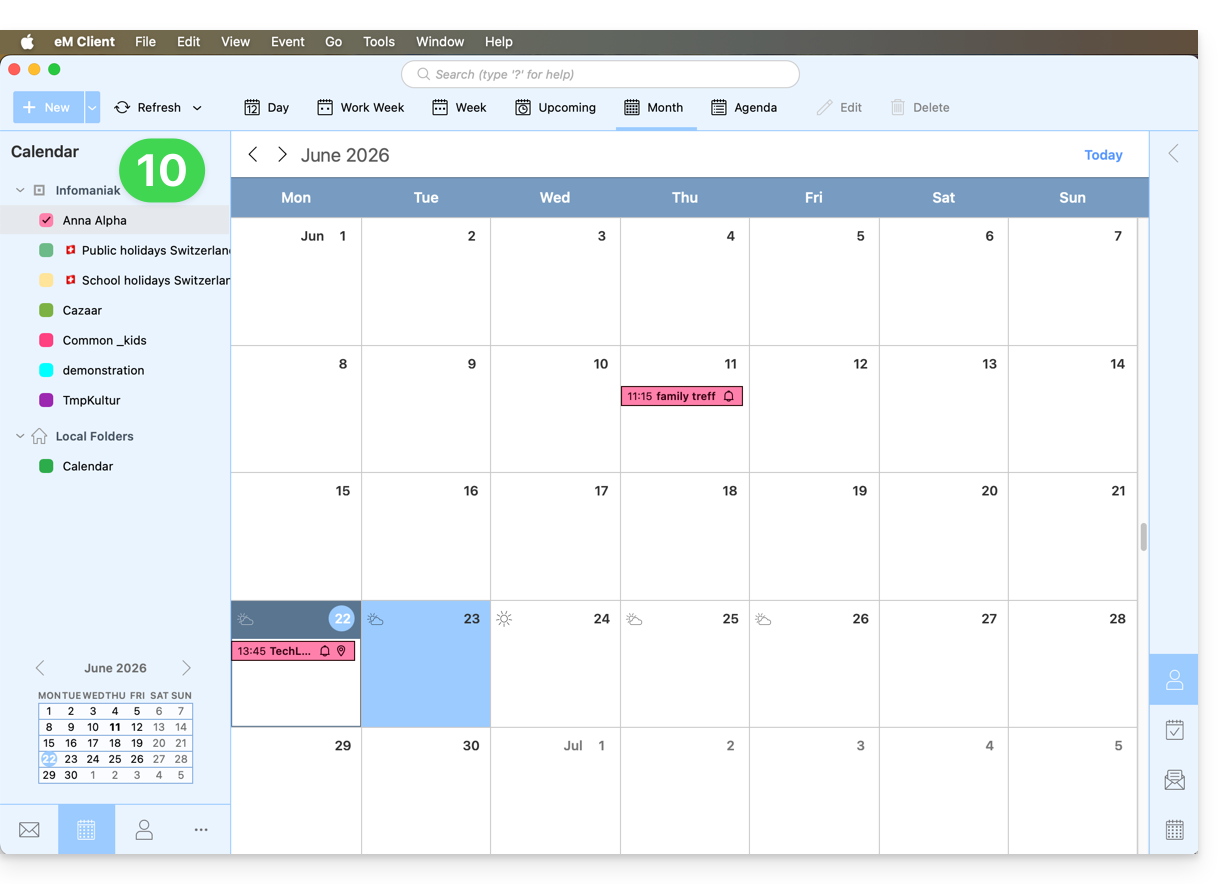
- Choose a name for the account (e.g., infomaniak) and complete the process.
- The information retrieved and synchronized with Infomaniak will be displayed in the Calendar section:
You can start with the Contacts section if you wish, but in any case, a CalDAV procedure also configures CardDAV, and vice versa: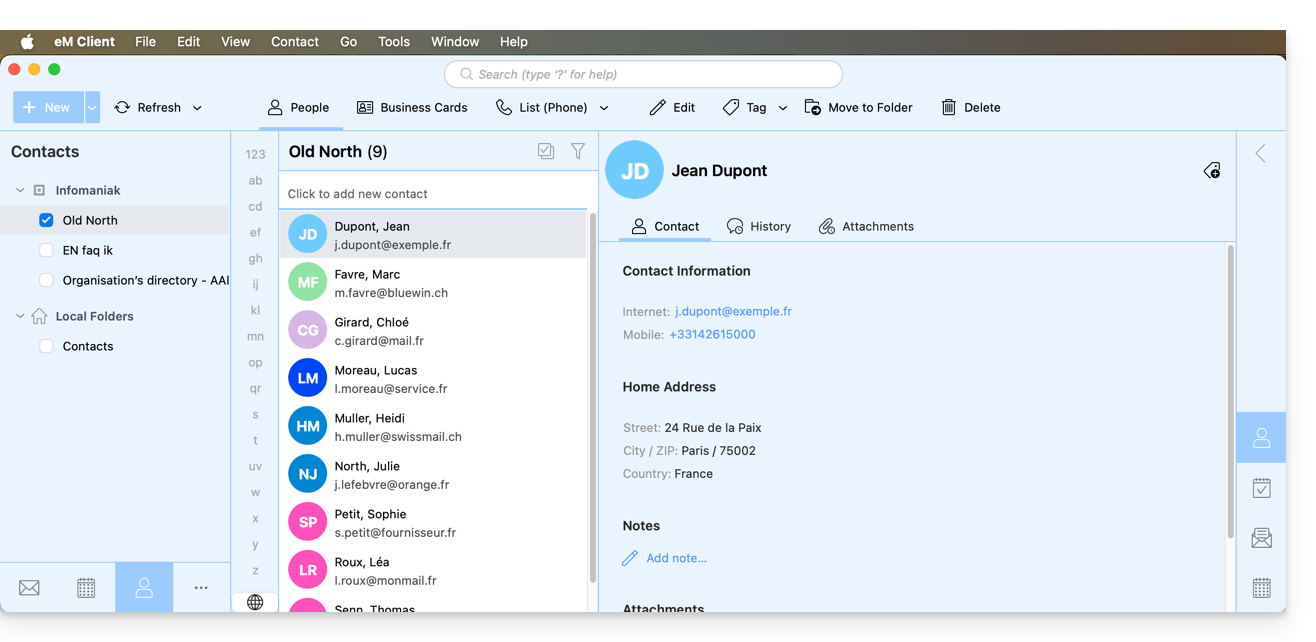
Link to this FAQ: https://faq.infomaniak.com/2047
Has this FAQ been helpful?
This guide explains how to restore backups of previous versions of your files and other web data from your Infomaniak web hosting, and how to set up an effective backup policy if the backups provided automatically and free of charge no longer meet your availability or security requirements.
Web Hosting (Starter, Shared, Cloud Server)
Consult these guides to restore automatic backups:
- of an entire hosting account (FTP + MySQL),
- of specific files on the hosting,
- of specific databases,
- a Web Application (WordPress & Apps),
- Cloud Server SSH crons.
Consult these guides for backing up and restoring:
- a hosting solution with Swiss Backup and Restic (advanced),
- WordPress with Swiss Backup,
- WordPress with an extension.
Please also refer to https://faq.infomaniak.com/snapshot.
Email / kSuite
- Restore messages from Infomaniak's automatic backups.
- Restore contacts or calendar events.
- Back up the current content of a mail account:
- by downloading the current content locally,
- by duplicating all the current content to a backup mailbox,
- by copying future emails as they arrive to a backup mailbox.
Domains / DNS Zones
- Restore deleted DNS records from Infomaniak's automatic backups.
- Restore an expired domain during the redemption period.
Link to this FAQ: https://faq.infomaniak.com/250
Has this FAQ been helpful?
This guide explains how to transfer data (Web, Mail, Domain, and even Cloud) currently hosted elsewhere to InfomaniakYou remain the owner of your data, with no loss or interruption!
Introduction
- By consolidating your domain names, websites, and email addresses with Infomaniak, you simplify the management of your invoices and services.
- Furthermore, your domains will be automatically linked to your website and email address.
- You will not need to manually configure the DNS settings for your domains with another registrar.
Guides for all hosting providers
To avoid interrupting your website and email services and prevent data loss by importing your existing data, migrate your services in the order indicated:
- Import Web data (any PHP, HTML, etc. website)
- For WordPress specifically, please refer to this other guide…
- Copy Mail data (addresses and mailbox content, etc.) to kSuite or a simple Mail Service (+ Contacts & Calendars)
- Transfer the domain name (domain management, DNS zone, etc.)
You can also move other types of data to Infomaniak's servers:
- Dropbox, Google Drive, etc. content: please refer to this other guide
- Data on Synology or QNAP NAS: please refer to this other guide
There is also a comprehensive guide for migrating Web, Mail, and domain name data, specifically for the hosting provider Swisscom.
Link to this FAQ: https://faq.infomaniak.com/2057
Has this FAQ been helpful?
The easiest way to manage your emails is to use the Infomaniak Mail web app (online service ksuite.infomaniak.com/mail).
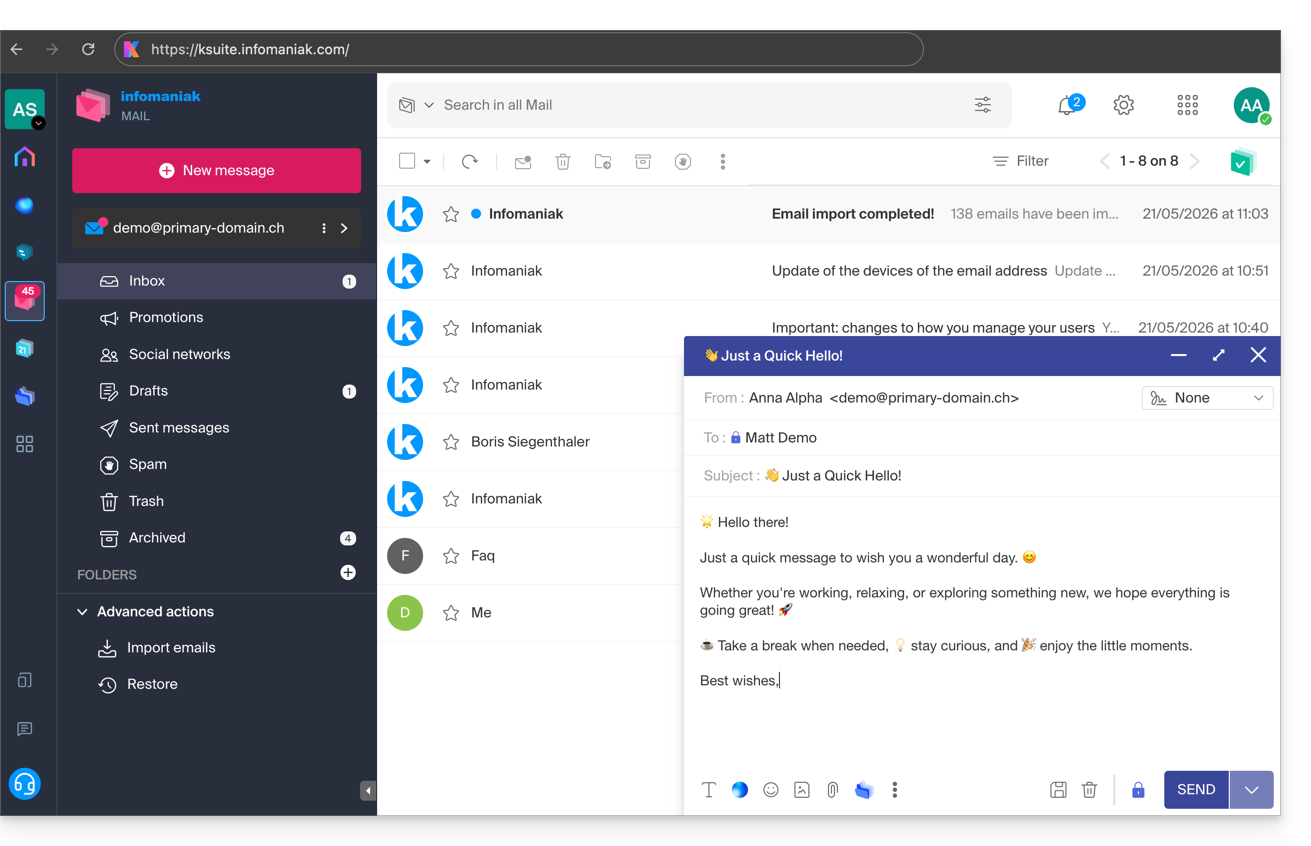
This interface offers many advantages:
- No software to install or configure.
- Share emails with other users, share kDrive.
- Unified management of all your Infomaniak email addresses.
- Professional inbound and outbound anti-spam and antivirus filter.
- Automatic sorting of incoming messages (filters).
- Sending large attachments.
- Continuously saved.
- Encryption.
- Secure and respects your privacy, hosted in Switzerland by a neutral and independent company.
A mobile app (Infomaniak Mail, application for iOS/Android smartphones or tablets) is available here.
How to get started with Infomaniak Mail?
Whether on ksuite.infomaniak.com/mail or in the Infomaniak Mail app, it is essential to Log in with your Infomaniak account ID and password. This will NOT work if you enter an email address and password directly. Understand the difference
- Click here to access your emails on your Infomaniak kSuite (❓: help).
- If necessary, associate the email addresses to be managed with Infomaniak Mail.
What would you like to do next?
- Access the app's settings
- Change the password for a mail address from Mail
- Restore deleted emails
- Add a signature
- Use an email template
- Manage the different users of an email address
- Modify a user's permissions
- Synchronize your devices (emails and/or contacts and calendars)
- Create an email address with Infomaniak
Link to this FAQ: https://faq.infomaniak.com/2008
Has this FAQ been helpful?
This guide details how to get started with Swiss Backup, the backup solution in a Swiss independent cloud.
Introduction
- Infomaniak offers two backup options, depending on what you want to back up:
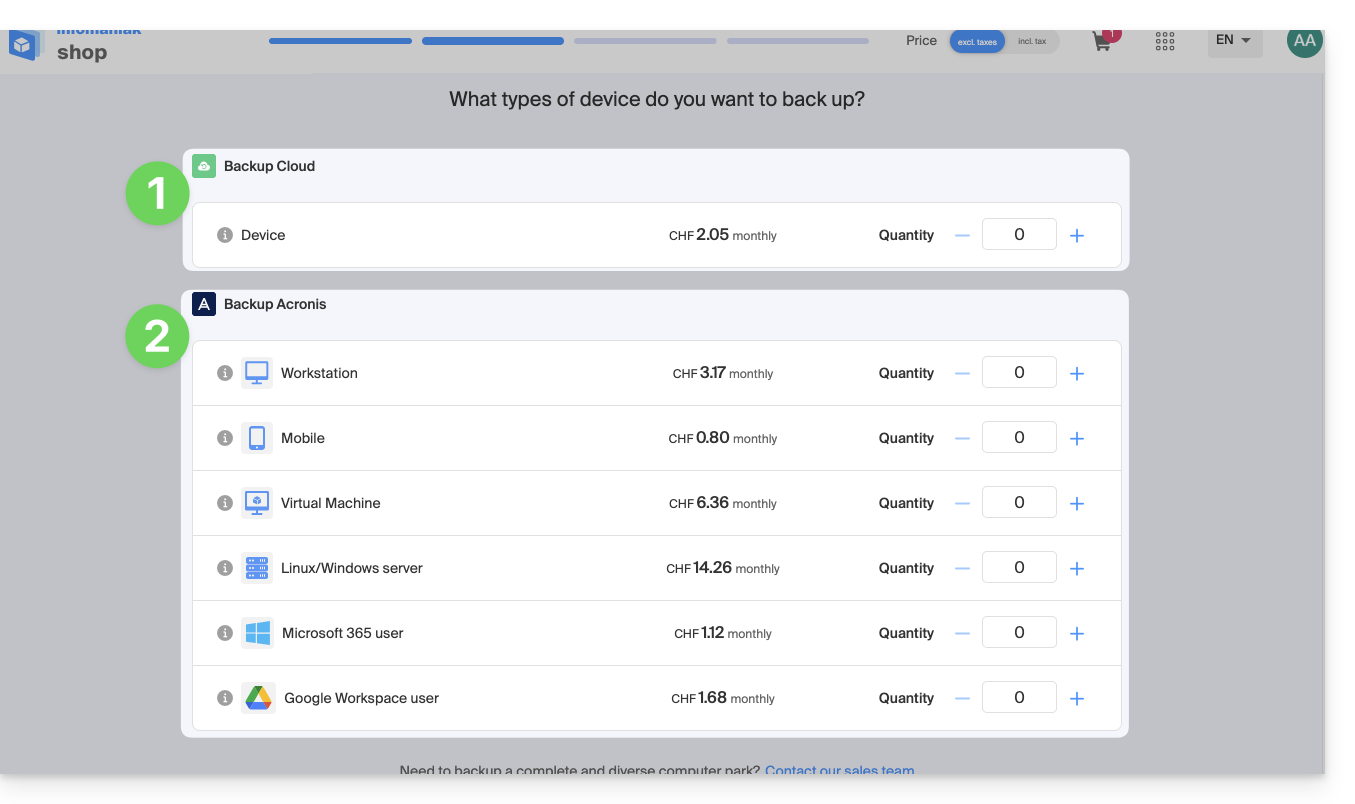
- You should have already made your choice when you ordered a Swiss Backup storage space, but it is possible to change the offer at any time.
1. CLOUD Backup Mode
Allows you to back up and synchronize files via the following protocols:
- Swift (recommended)
- FTP / SFTP
- S3
- Synology NAS system
with the application of your choice…
2. ACRONIS Backup Methods
Ideal solution for backing up:
- Windows / macOS workstations
- iOS / Android mobile devices (iPhone / Samsung, etc.)
- Windows / Linux servers
- VMware, Hyper-x, Virtuozzo virtual machines...
- Microsoft 365 / Google Workspace spaces...
using the Acronis Cyber Protect Cloud software, which will perform automatic and customized backups…
Link to this FAQ: https://faq.infomaniak.com/2284
Has this FAQ been helpful?
This guide details the limitations specific to the my kSuite (free) offering and the exclusive benefits of the my kSuite+ (paid) offering.
Introduction
- Compare what is included with my kSuite and my kSuite+ directly on the Infomaniak website (❓: help).
- To help you identify the my kSuite / kSuite offer that best suits your needs, consult this other guide (❓: help).
Features common to both offers
Neither offer requires you to have your own paid domain name (unlike the kSuite Pro plans), the email address is entirely based on the email domains provided by Infomaniak (ik.me, etik.com, ikmail.com):
- Offer limited to one address per account (linked to a phone number).
- You must provide a valid mobile phone number to confirmregistration (❓: help).
- Registration is only possible for people residing in OECD member countries (❓: official list), including: Germany, Australia, Austria, Belgium, Canada, Chile, Colombia, South Korea, Costa Rica, Denmark, Spain, Estonia, United States, Finland, France, Greece, Guadeloupe, French Guiana, Hungary, Ireland, Iceland, Israel, Italy, Japan, Latvia, Lithuania, Luxembourg, Martinique, Mayotte, Mexico, Monaco, New Caledonia, New Zealand, Norway, Netherlands, Poland, French Polynesia, Portugal, Czech Republic, Reunion, United Kingdom, Saint Barthélemy, Saint Martin, Saint Pierre and Miquelon, Slovakia, Slovenia, Sweden, Switzerland, French Southern Territories, Turkey, and Wallis and Futuna.
- For sending emails to a large number of recipients, there is a newsletter tool available (❓: help).
my kSuite (free)
Mail, contacts & calendars
- Disk space limited to 20 GB of storage for emails (❓: help).
- Limited number of daily email sends (❓: help), email redirects (❓: help), and unique recipients per message (❓: help).
- No advanced mode in message sorting rules (❓: help).
- No aliases can be created for your email account (❓: help).
- The "my kSuite" signature is mandatory (❓: help).
- No email sharing link (❓: help).
- Email scheduling (❓: help) and scheduled sending (❓: help): limited features (no customization).
- Only one address book, one calendar.
- Email backup retention (30 days) (recoverable by changing your plan).
kDrive
- 15 GB of Cloud storage (❓: help).
- 1 single kDrive upload folder (❓: help).
- 25 kDrive share links, without setting a duration or password (❓: help).
- Keep previous versions of your files: 30 versions over 30 days.
- 30-day trash bin.
- No statistics.
- No PDF file editing/signing (❓: help).
my kSuite+ (paid)
The my kSuite+ plan removes the limitations of the free version and provides access to advanced features:
- kDrive storage space: 1 TB (1000 GB) included, expandable up to 6 TB (❓: help).
- Email address: 1 full email address on a generic Infomaniak domain (
@ik.me,@etik.com,@ikmail.com) with a customizable signature. - Alias management: increased to a maximum of 2 aliases (❓: help).
- Email sending limits: limits increased to allow sending more messages per day and to a larger number of unique recipients at once (❓: help).
- Hold and scheduled sending: fully customizable features.
- AI Assistant: Euria included with unlimited access.
- Advanced kDrive: keeps 60 versions for 120 days, 60-day trash, customizable sharing links, statistics, and PDF file editing/signing (❓: help).
Link to this FAQ: https://faq.infomaniak.com/2485
Has this FAQ been helpful?
Infomaniak continuously improves its products and customer service by prioritizing your suggestions shared through support, social media, or the web. These suggestions are then discussed during meetings of the relevant department.
Introduction
- For languages not listed in the table, please use the English (EN) column.
- Infomaniak support is also available via email, chat, or phone if needed.
Provide feedback on…
INFOMANIAK SERVICE | [FR] | [EN] | [DE] | [IT] | [ES] |
|---|---|---|---|---|---|
| Euria [ ☍ ] | ✎__ | ✎__ | ✎__ | ✎__ | ✎__ |
| Domains [ ☍ ] | ✎__ | ✎__ | ✎__ | ✎__ | ✎__ |
| Hosting / Website Builder [ ☍ ] | ✎__ | ✎__ | ✎__ | ✎__ | ✎__ |
| Cloud Server [ ☍ ] | ✎__ | ✎__ | ✎__ | ✎__ | ✎__ |
| Public Cloud [ ☍ ] | ✎__ | ✎__ | ✎__ | ✎__ | ✎__ |
| Jelastic Cloud [ ☍ ] | ✎__ | ✎__ | ✎__ | ✎__ | ✎__ |
| Synology [ ☍ ] | ✎__ | ✎__ | ✎__ | ✎__ | ✎__ |
| Hosting [ ☍ ] | ✎__ | ✎__ | ✎__ | ✎__ | ✎__ |
| Swiss Backup [ ☍ ] | ✎__ | ✎__ | ✎__ | ✎__ | ✎__ |
| kSuite / my kSuite [ ☍ ] | ✎__ | ✎__ | ✎__ | ✎__ | ✎__ |
| Mail [ ☍ ] | ✎__ | ✎__ | ✎__ | ✎__ | ✎__ |
| app Mail iOS [ ☍ ] | ✎__ | ✎__ | ✎__ | ✎__ | ✎__ |
| Android Mail app [ ☍ ] | ✎__ | ✎__ | ✎__ | ✎__ | ✎__ |
| kDrive [ ☍ ] | ✎__ | ✎__ | ✎__ | ✎__ | ✎__ |
| Calendar [ ☍ ] | ✎__ | ✎__ | ✎__ | ✎__ | ✎__ |
| Contacts [ ☍ ] | ✎__ | ✎__ | ✎__ | ✎__ | ✎__ |
| Chk.me [ ☍ ] | ✎__ | ✎__ | ✎__ | ✎__ | ✎__ |
| Newsletter [ ☍ ] | ✎__ | ✎__ | ✎__ | ✎__ | ✎__ |
| SwissTransfer [ ☍ ] | ✎__ | ✎__ | ✎__ | ✎__ | ✎__ |
| Streaming Radio [ ☍ ] | ✎__ | ✎__ | ✎__ | ✎__ | ✎__ |
| Streaming Video [ ☍ ] | ✎__ | ✎__ | ✎__ | ✎__ | ✎__ |
| VOD / AOD [ ☍ ] | ✎__ | ✎__ | ✎__ | ✎__ | ✎__ |
| Guest Manager [ ☍ ] | ✎__ | ✎__ | ✎__ | ✎__ | ✎__ |
| kChat [ ☍ ] | ✎__ | ||||
| kMeet [ ☍ ] | ✎__ | ||||


Link to this FAQ: https://faq.infomaniak.com/2324
Has this FAQ been helpful?
This guide explains how to recover lost emails, especially after accidental deletion.
✘ NOT AVAILABLE with
kSuite Free
my kSuite (ik.me, etik.com, ikmail.com)
Mail Starter service
By upgrading one of these free plans, it will be possible to restore the backup for up to 30 days.
Introduction
- Infomaniak backs up each email address once a day (usually early in the morning).
- This allows you to restore your mailbox to its exact state at the time of the backup.
- RECOVERED ITEMS:
- ITEMS NOT RECOVERED:
- Emails moved (subfolders, trash): they still exist in your account and must be searched for (❓: help).
- The restoration does not include the calendar (❓: help) or the address book (❓: help).
- Messages that were not present at the time of the daily backup (see POP3 chapter); example:
- Restoration requested at 10 a.m. (5 a.m. backup) for an email that arrived at 8 a.m. and was deleted at 9:30 a.m.: it will not be recovered because it was not yet present during the 5 a.m. backup.
- UNALTERED ELEMENTS:
- Emails received, created, or stored between the backup date and the restoration execution remain in your inbox.
- Please refer to this other guide regarding the message retention limits.
Restore from the Infomaniak Web Mail app
Prerequisites
- Ensure that the deletion occurred less than 30 days ago (or within the timeframe included with your plan - see above).
- Have permission to manage backups: it is possible that the Mail Service administrator hasremoved this permission from their admin account
- Click here to access your emails on your Infomaniak kSuite (❓: help).
- Click on Settings in the top right corner.
- Check or select the relevant email address from the dropdown menu in the left sidebar.
- Click on General.
- Click on Restore:
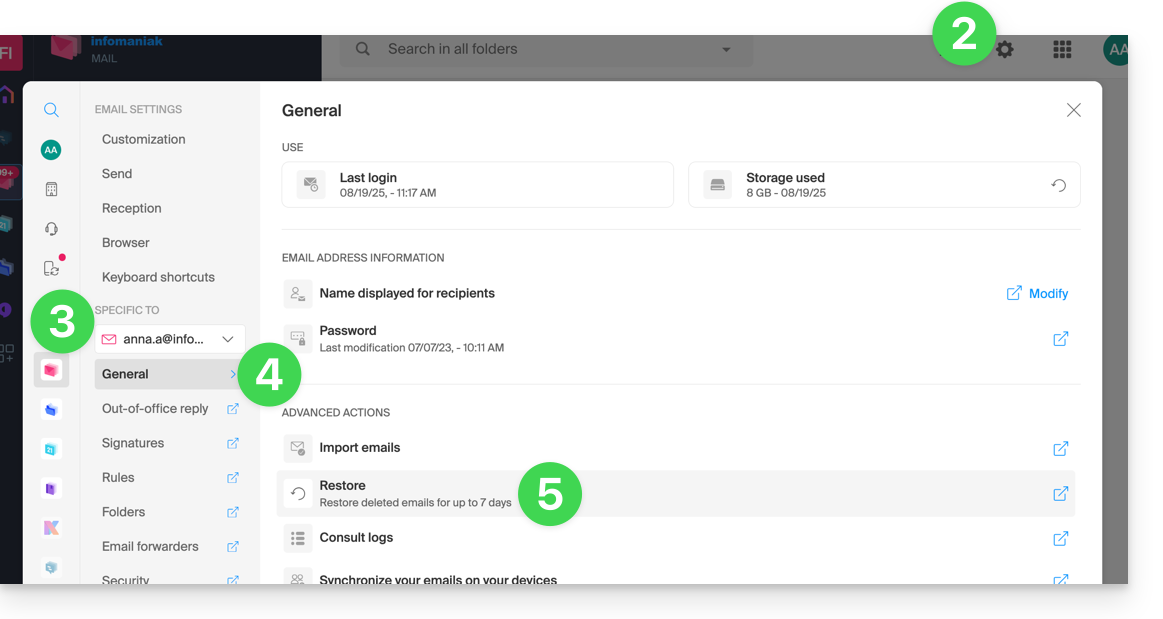
- Choose a Restore date.
- Click on Restore emails:
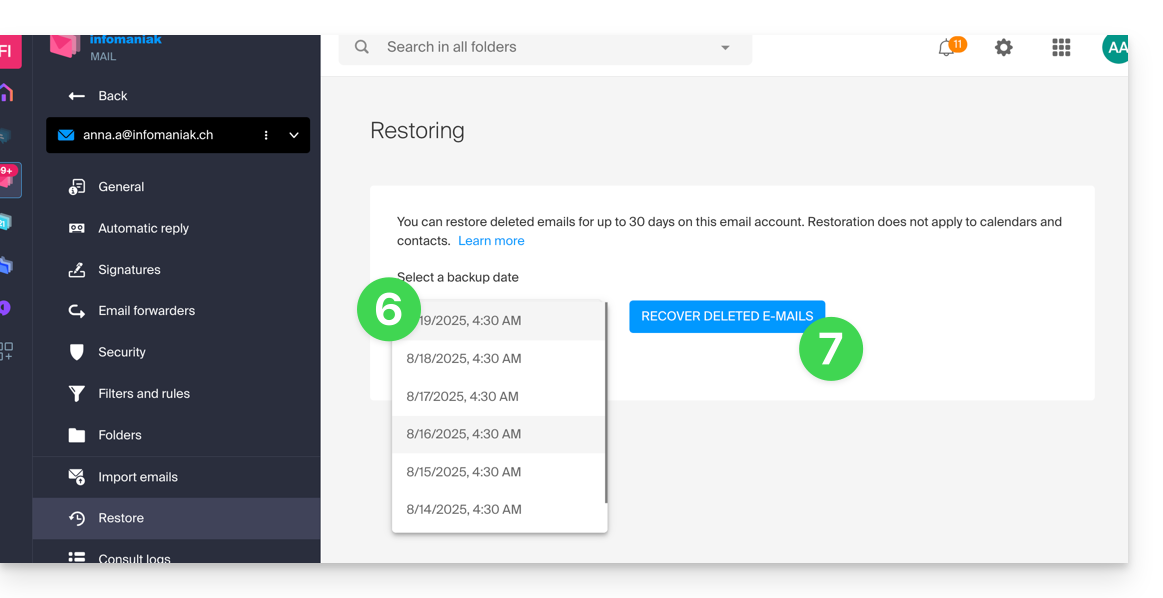
- Once the restoration is complete, an informational email is sent.
Restore from Mail Service
Prerequisites
- You must be at least an Administrator of the Organization (❓: help).
- Ensure that the deletion occurred less than 30 days ago (or within the timeframe included with your plan - see above).
To restore emails from a Mail Service:
- Click here to access the Mail Service management in your Infomaniak Manager (❓: help).
- Click on the name of the Mail Service in question.
- Click on the email address in question in the table that appears.
- Click on the Address actions button at the very top right.
- Click on Restore emails:
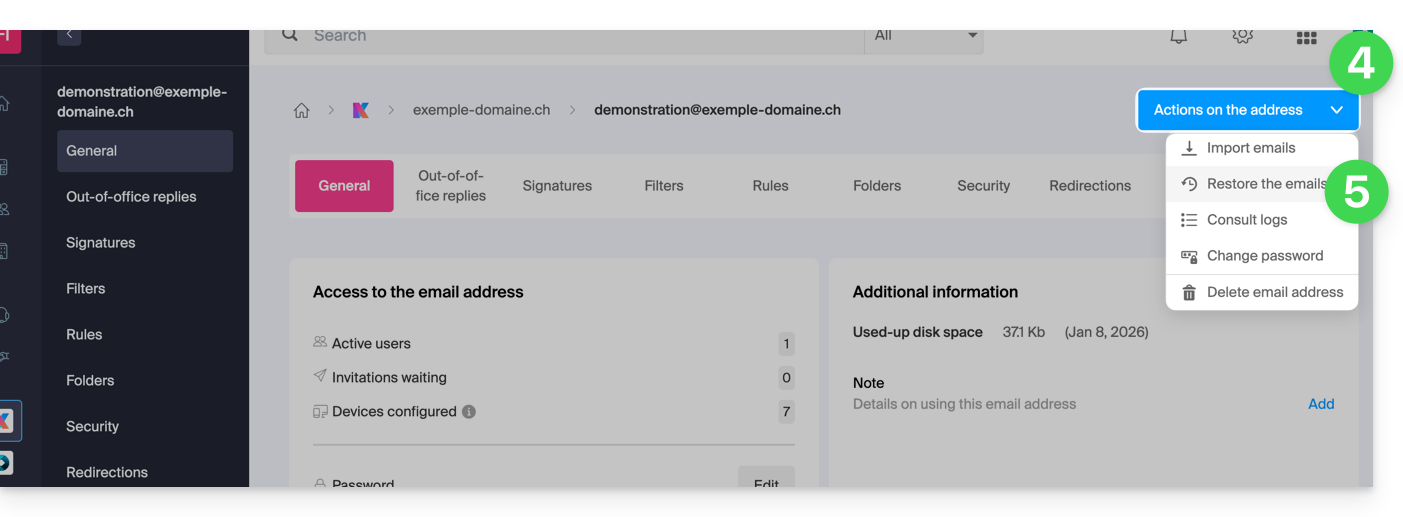
- Choose a Restore date.
- Click on Restore emails.
- Once the restoration is complete, you will receive a notification email.
Emails placed in the trash
Unless otherwise configured, a deleted email is moved to the trash folder, and it is only after a period of several days or weeks that the trash folder is automatically emptied (it can also be emptied with a click by the user). Therefore, during a restoration operation:
- Emails currently in the trash folder will remain as they are, regardless of the restoration date.
- Emails deleted from the trash will be restored to their original location, where they were located when they were deleted (whether in the inbox folders or in the trash).
Emails placed in non-standard folders
If you intentionally store your messages in folders with unusual names (for example, folders named Junk or Spam), please read the important information in this other guide.
Email client configured with POP3
If you usually check your email using an email client such as Outlook, and it is configured with the POP / POP3 protocol, you will not be able to restore everything, as the backup is performed once a day and only saves the messages that were in your Infomaniak inbox at the time of the backup; the same applies to your other folders (Sent Messages, for example) present in the POP3 application: these are not synchronized with Infomaniak and are therefore not backed up; in the future, you should therefore prefer the IMAP protocol in your email client (❓: help).
Link to this FAQ: https://faq.infomaniak.com/1203
Has this FAQ been helpful?
This guide explains how to import a calendar into the Infomaniak Calendar web app (online service ksuite.infomaniak.com/calendar).
Introduction
- Consult this other guide if you only want to display an Infomaniak calendar in read-only mode on Google Calendar (web & mobile app).
- Consult this other guide if you prefer to edit events in the calendar from both sides, but only on the mobile version of the Google Calendar app.
- You can also import tasks into the dedicated section of the calendar.
Import a calendar via a URL
You can display an existing calendar managed externally in Calendar. It will be automatically updated every hour via the URL you specify.
Please note that this is not a calendar synchronization, but a read-only, one-way display that is updated regularly.
To do this:
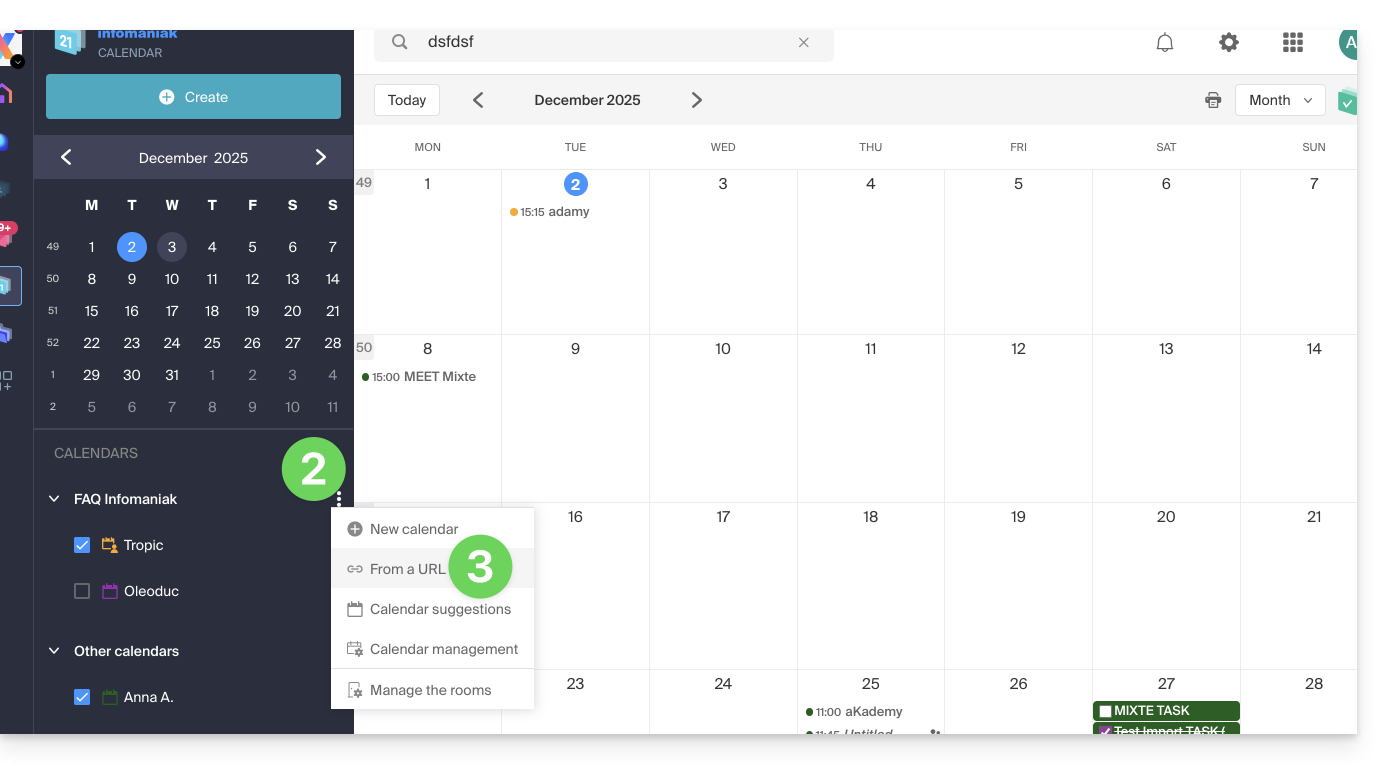
- Click here to access the Infomaniak Calendar web app (online service ksuite.infomaniak.com/calendar).
- Click on in the left-hand menu.
- Click on "From a URL":
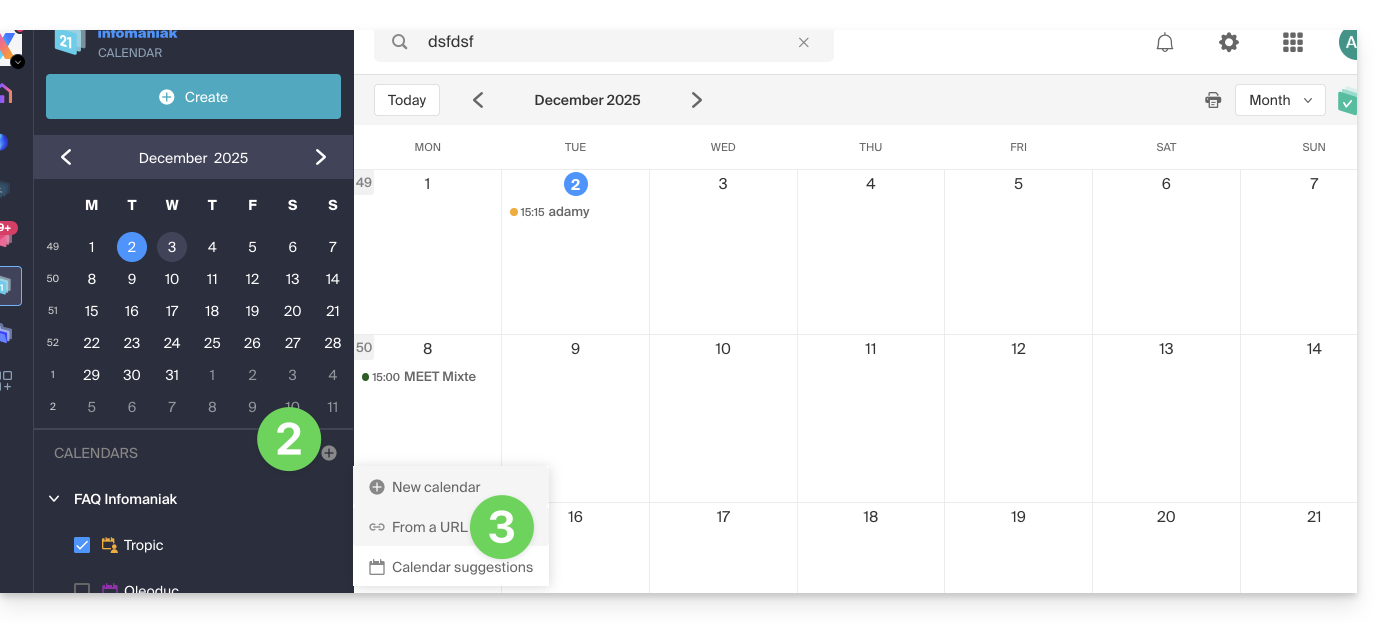
- Enter the URL of the calendar to import.
- Check the I want to subscribe to this calendar box.
- If necessary, select the Organization in which the calendar will be imported.
- Click on Import calendar:
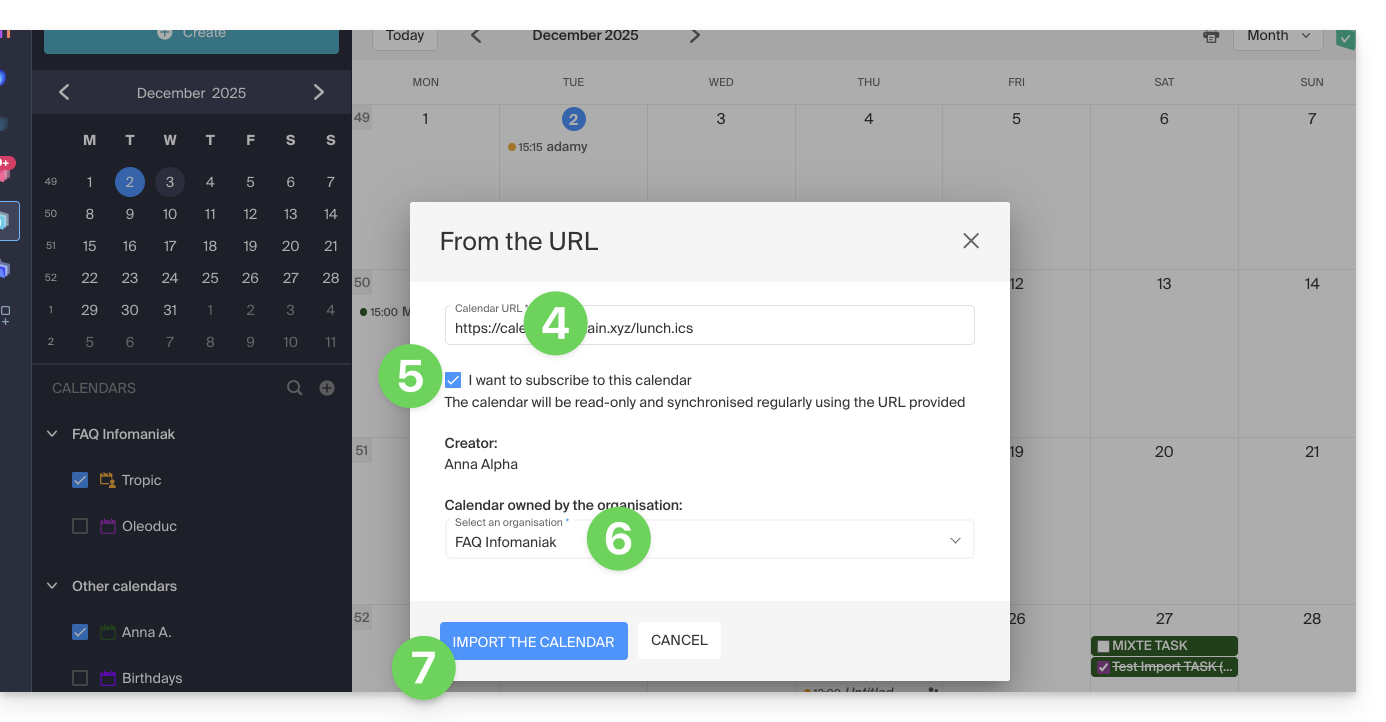
You can also go directly through one of the Organizations you belong to:
- Click here to access the Infomaniak Calendar web app (online service ksuite.infomaniak.com/calendar).
- Click on the action menu ⋮ to the right of the Organization in the table that appears.
- Click on "From a URL":
Link a Google calendar using its "secret" URL
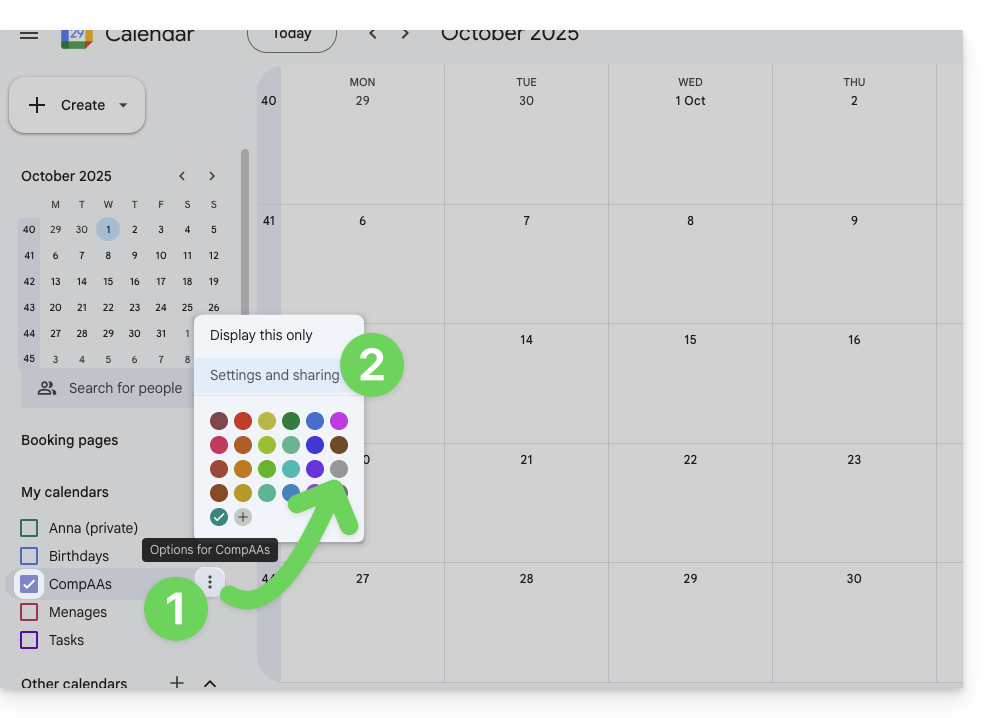
The "secret" URL of a Google calendar, which you can paste in step 3 above, can be found in the Google calendar settings:
- Click on the action menu ⋮ to the right of the Google Calendar in question.
- Click on Settings and sharing:
- Scroll down the page until you find the secret iCal URL and click on the icons to view and/or copy the URL:
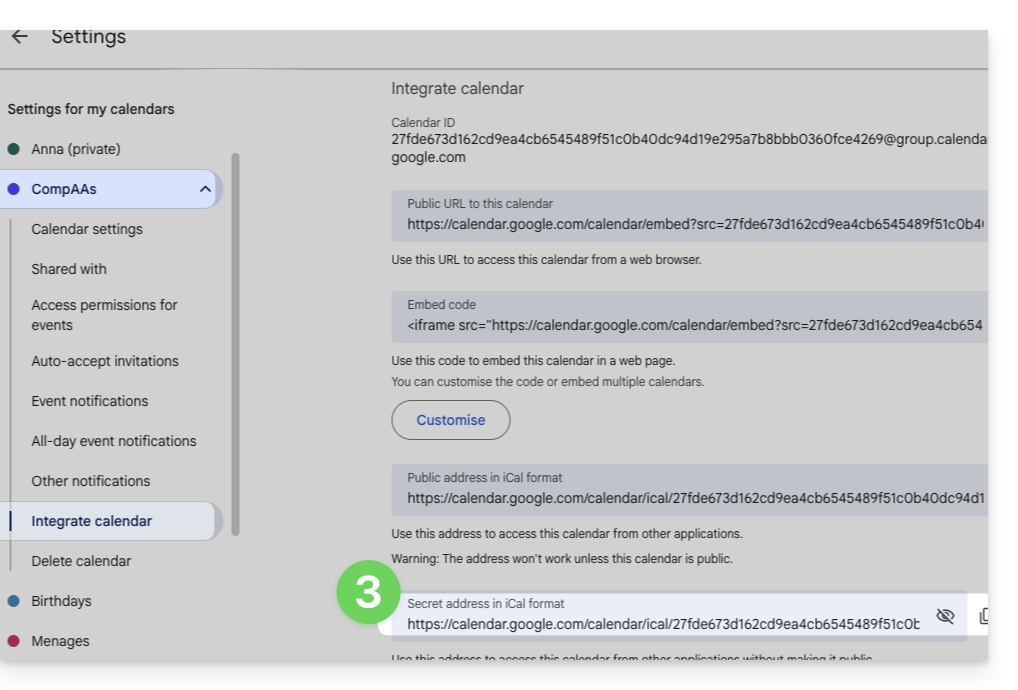
- Paste the URL according to the procedure in step 3 of the previous chapter above.
Please note that this is not a calendar synchronization, but rather a read-only, one-way feed that is updated regularly.
The calendar will be visible and will regularly display any updates made, but it will not be possible to edit it directly from the Infomaniak interface; this is a "one-way synchronization" with Google.
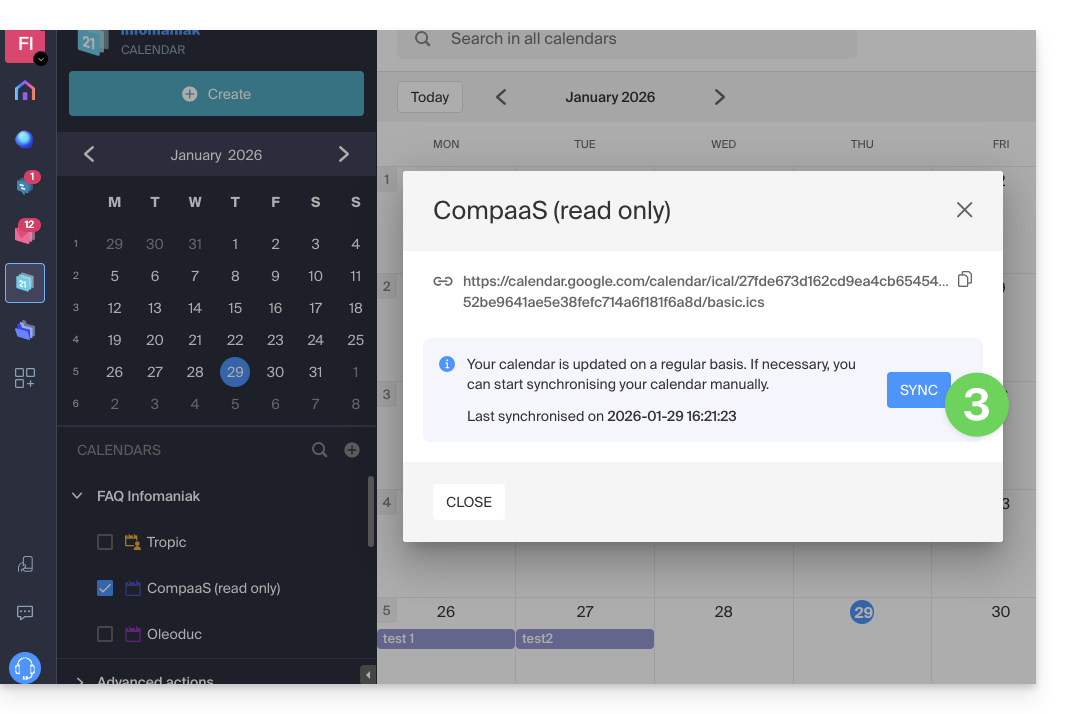
You can, however, force synchronization to immediately display any new events or changes:
- Click on the action menu ⋮ to the right of the imported calendar on Infomaniak.
- Click on Display information:
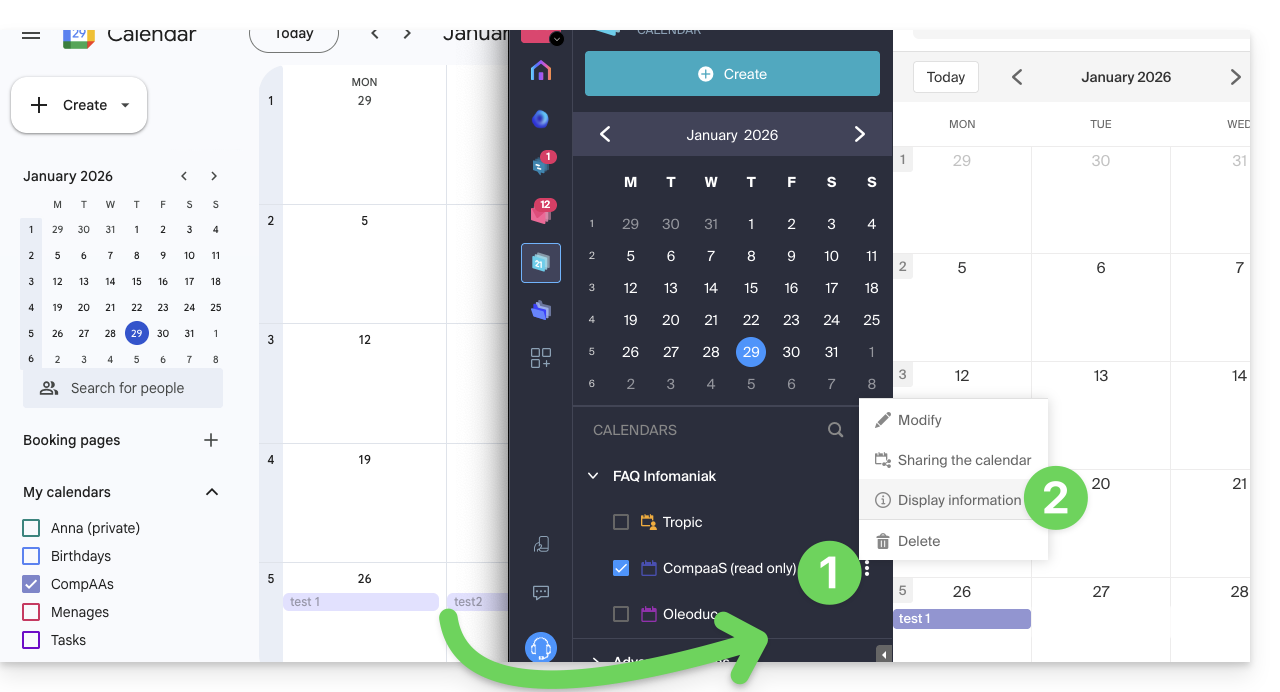
- Click on the SYNC button to synchronize the imported content, then wait a few seconds:
Import events via an .ics file
To access the Advanced actions for importing, exporting, and restoring calendars:
- Click here to access the Infomaniak Web app Calendar (online service ksuite.infomaniak.com/calendar).
- Click on Advanced actions in the left-hand menu.
- Click on Import.
- Upload the
.icsfile corresponding to the export performed from your previous provider: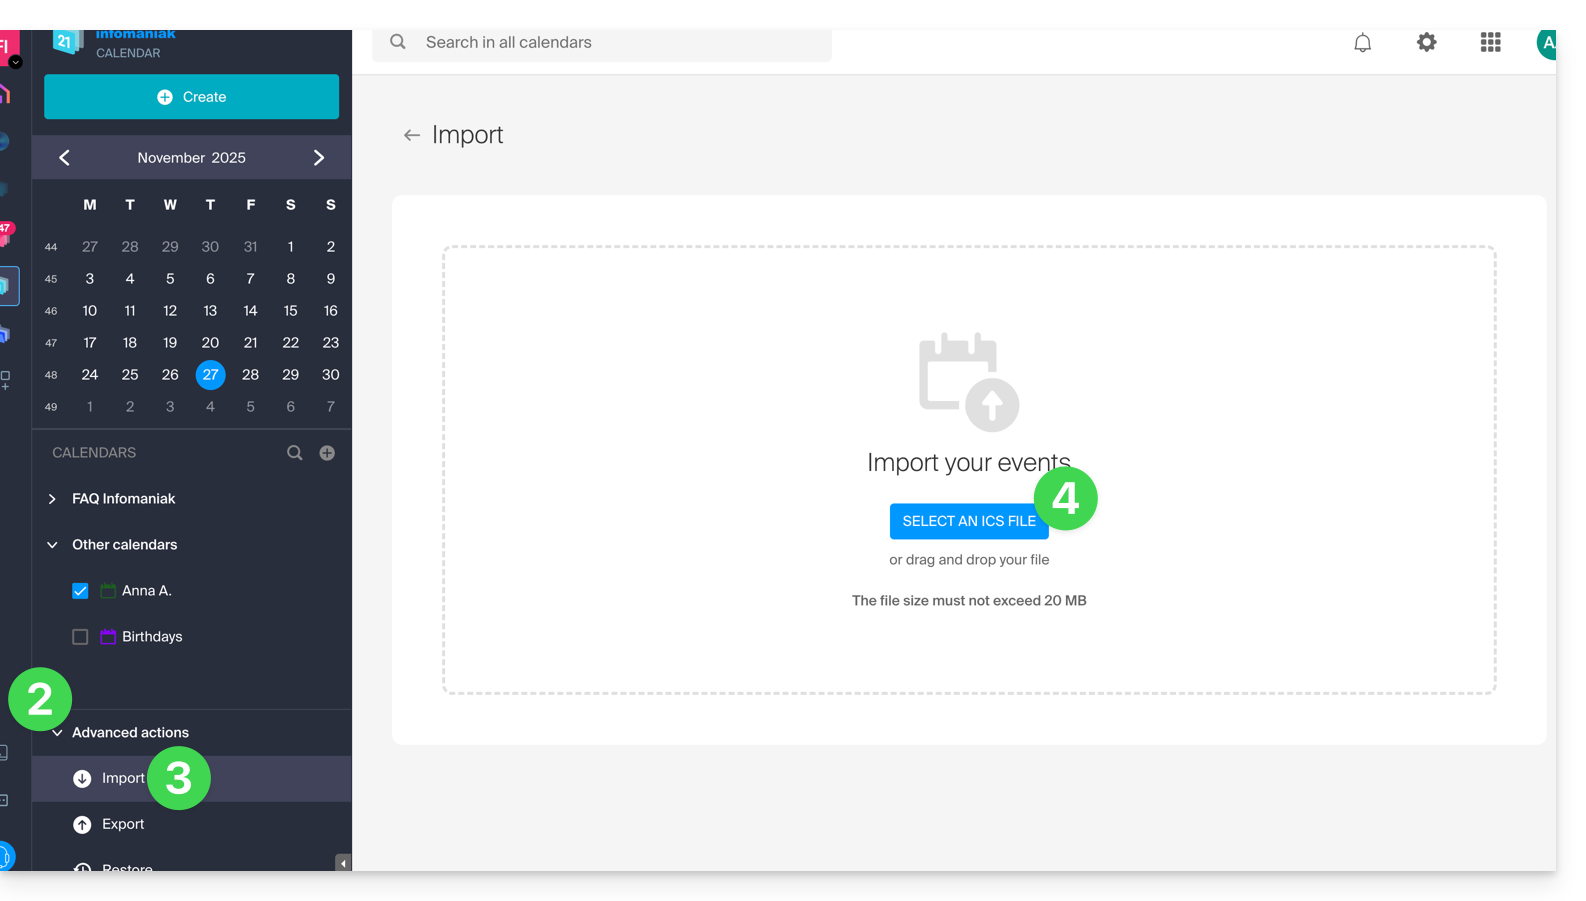
You can choose which existing calendar to import the events into, or create a new calendar (tasks are also imported if the .ics file contains them).
Please note that this is not a calendar synchronization, but a one-time, one-way import.
Export data from your previous provider
Here are some specific guides provided for reference to export the calendar from a third-party provider, which will allow you to re-import this data into Infomaniak:
- Apple Mail
- Gmail
- Outlook (section Publish > ICS link)
- Yahoo
- Proton
- Thunderbird
Refer to this other guide to import other data.
Link to this FAQ: https://faq.infomaniak.com/1943
Has this FAQ been helpful?
This guide explains how to force a synchronization of your Infomaniak contacts & calendars when they are synchronized using the kSync app on your Android device.
Introduction
- The kSync app only synchronizes the contacts & calendars that are selected in the application.
- If you add calendars/agendas later from Calendar or address books from Contacts, you will need to add them to the synchronization in the kSync application.
Add a calendar / address book to synchronization
To force synchronization if necessary:
- Open the kSync mobile app on your Android device and tap on the relevant synchronized account.
- Tap Refresh list to update the address books / calendars:
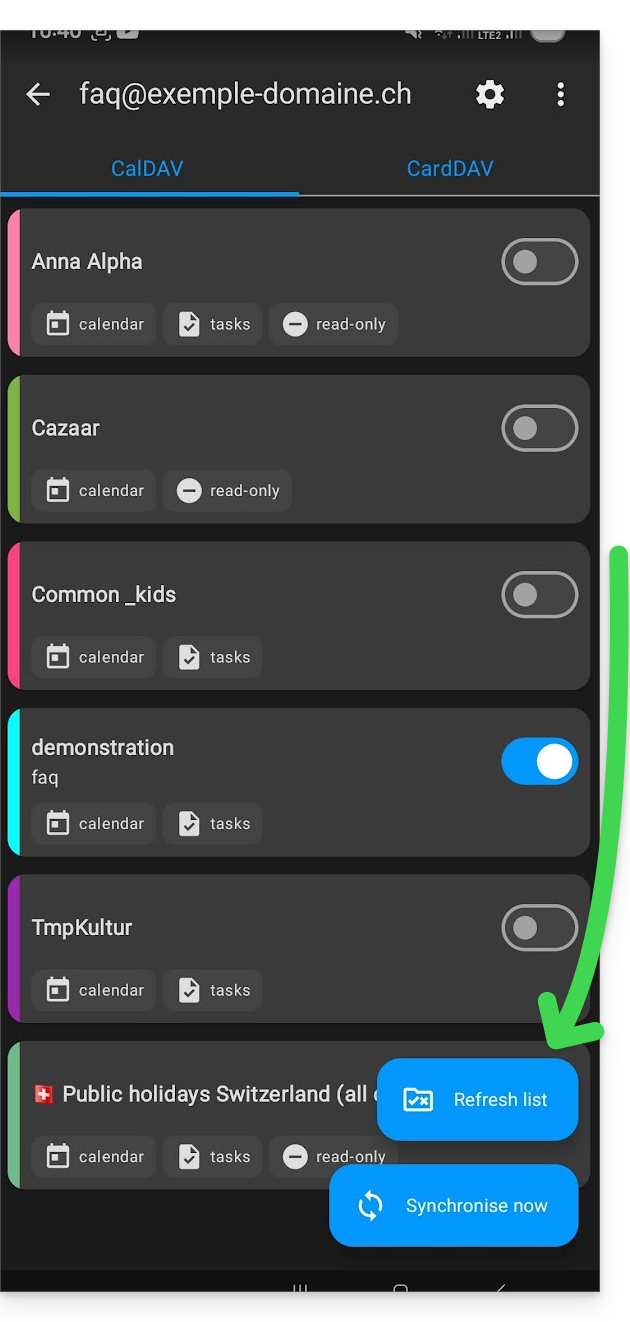
The new notebooks and calendars appear in the list. Configure the ones you want to synchronize.
Link to this FAQ: https://faq.infomaniak.com/2300
Has this FAQ been helpful?
This guide explains how to make one of your calendars public from the Infomaniak Calendar web app (online service ksuite.infomaniak.com/calendar).
Introduction
- You will obtain a specific URL for your calendar in the format
.icsthat Calendar (formerly iCal Apple), Calendrier (formerly iCalendar Microsoft), Thunderbird (formerly Lightning Mozilla), or even Google Calendar can recognize to display your calendar: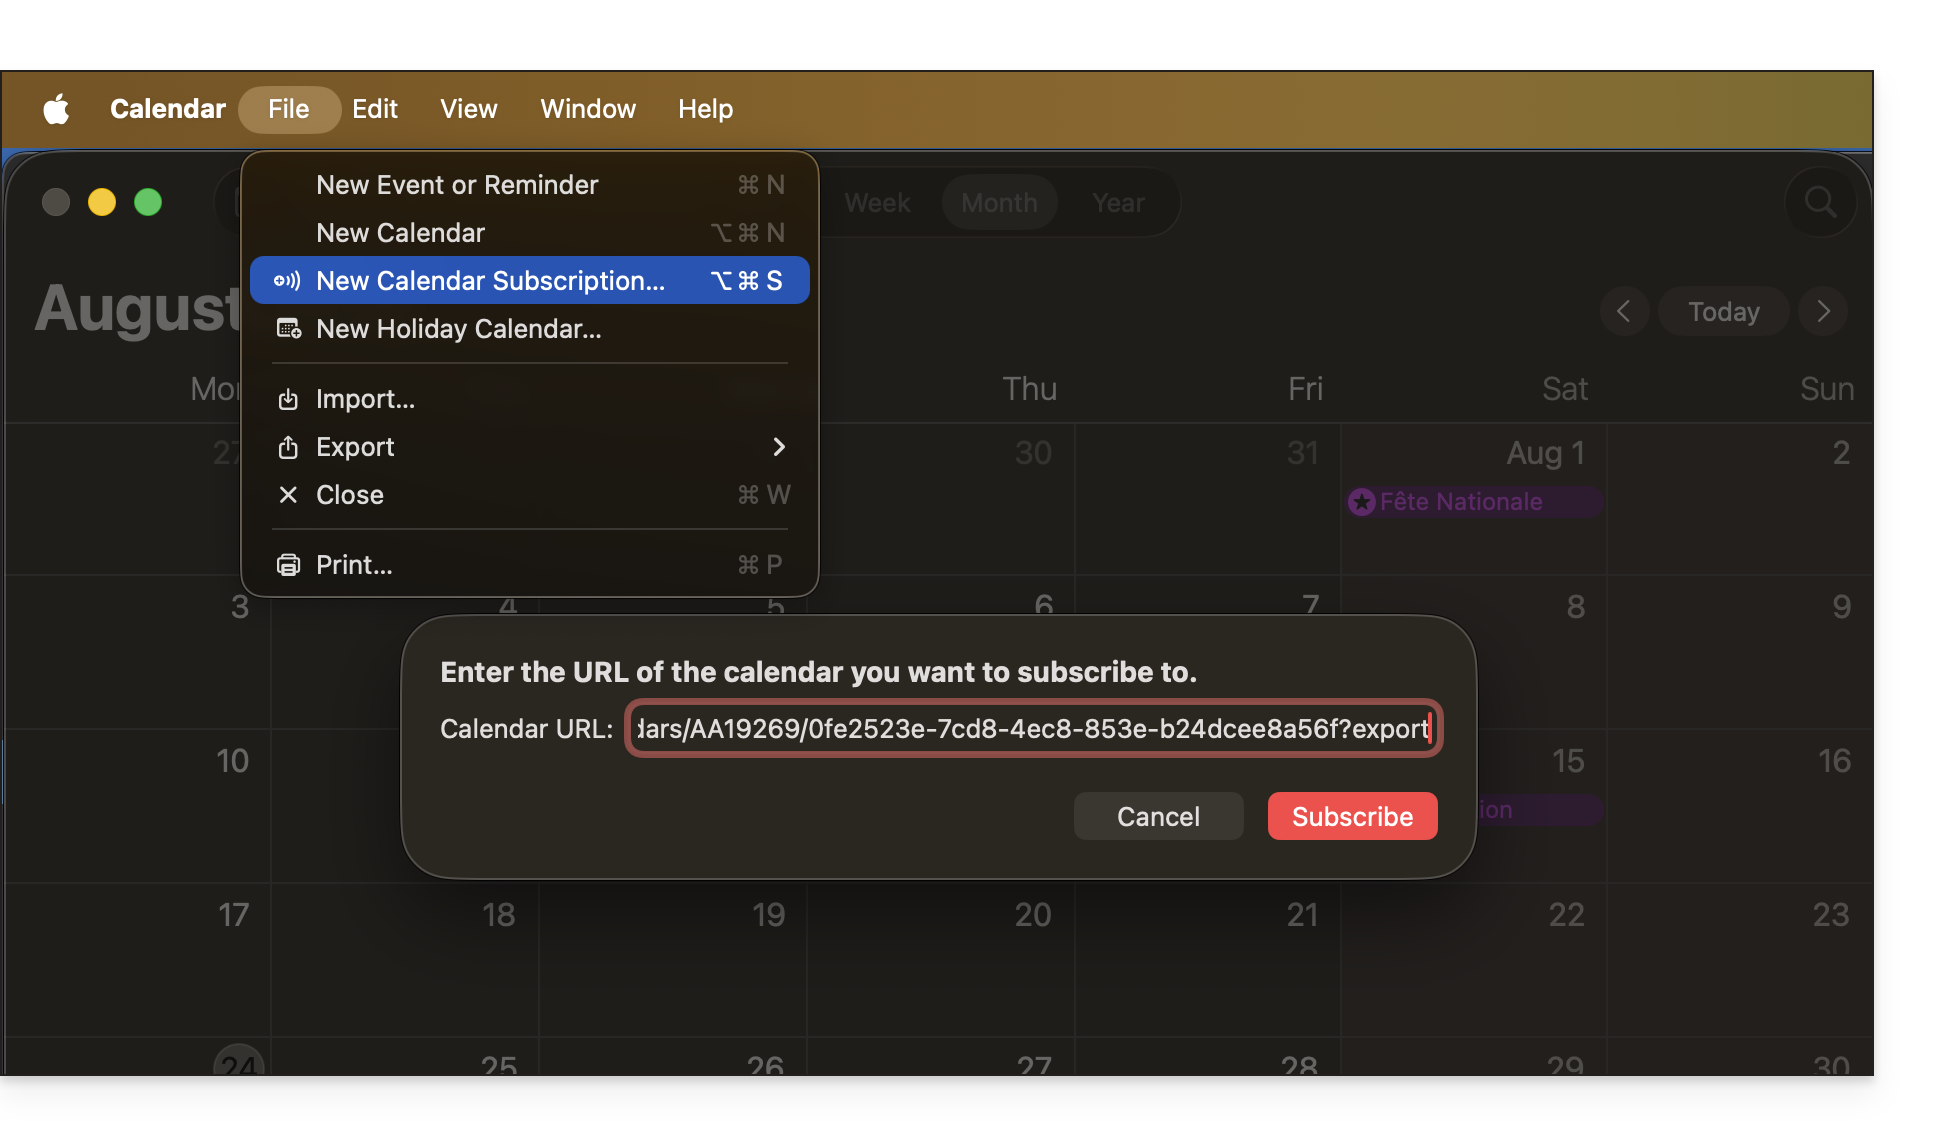
- The data contained in the shared calendar will no longer be private but will only be available in read-only mode to users who "subscribe" to it.
- The frequency of the incremental updates performed by the application that subscribes to your calendar's URL must be defined within that application.
- PHP scripts (not provided) can also be used to parse such files, allowing you, for example, to include events on a website.
- Refer to this other guide to configure the synchronization of your calendars, or this other guide to share a calendar with your colleagues with different permissions.
Enable public sharing of an Infomaniak calendar
To share a calendar publicly:
- Click here to access the Infomaniak Calendar web app (online service ksuite.infomaniak.com/calendar).
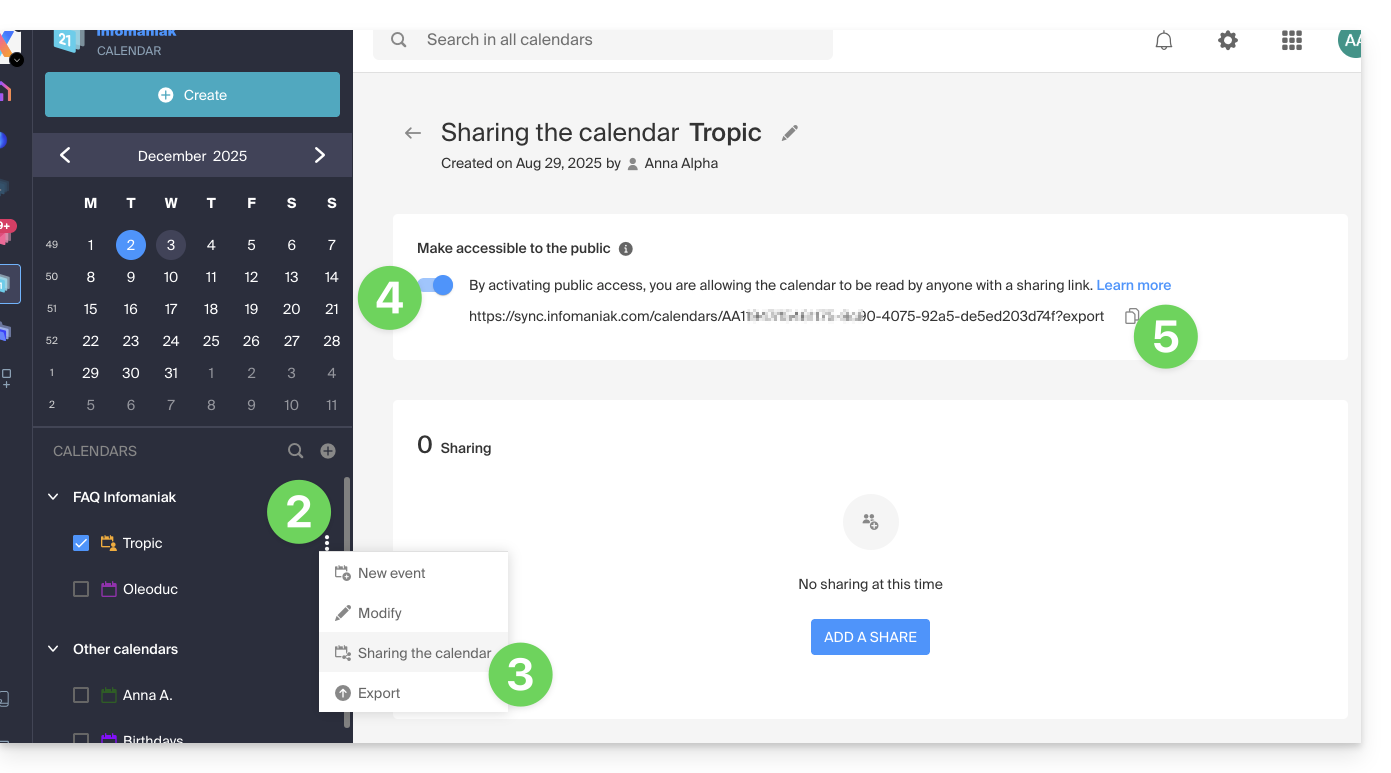
- Click on the action menu ⋮ to the right of a calendar.
- Click on Share calendar.
- Activate the toggle switch for public sharing.
- Click the icon to copy the address to the clipboard:
- You can always remove public access from this sharing page (see point 4 above):
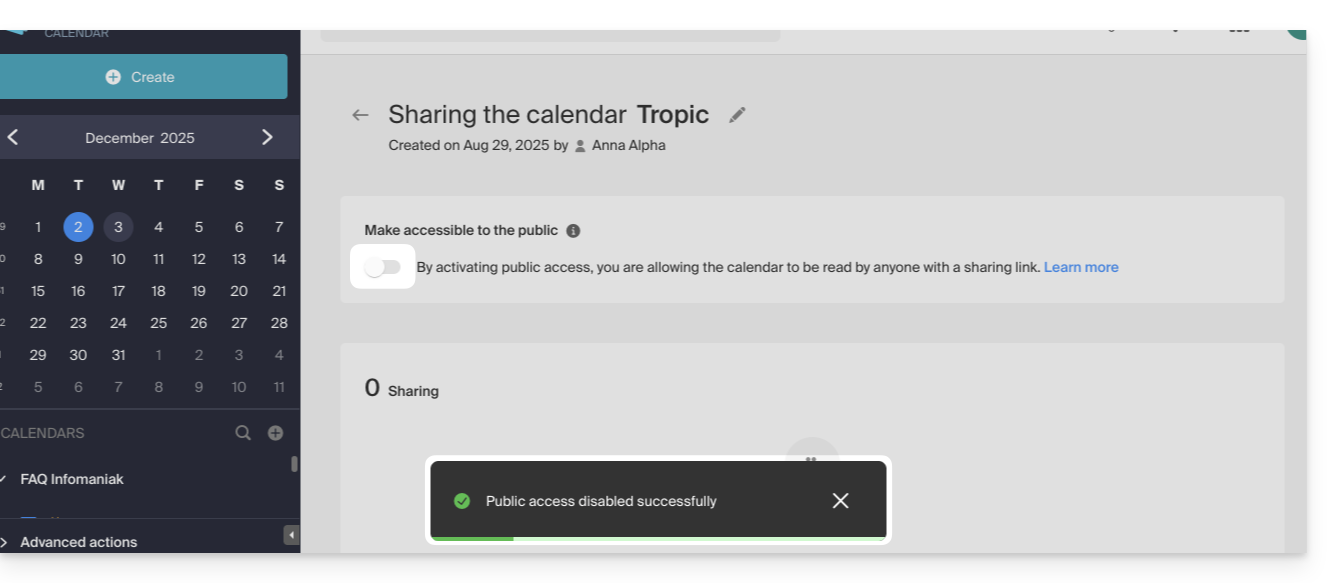
- You can always remove public access from this sharing page (see point 4 above):
Link to this FAQ: https://faq.infomaniak.com/1763
Has this FAQ been helpful?
This guide explains how to print a calendar from the Infomaniak web app Calendar (online service ksuite.infomaniak.com/calendar).
Printing the content of a calendar
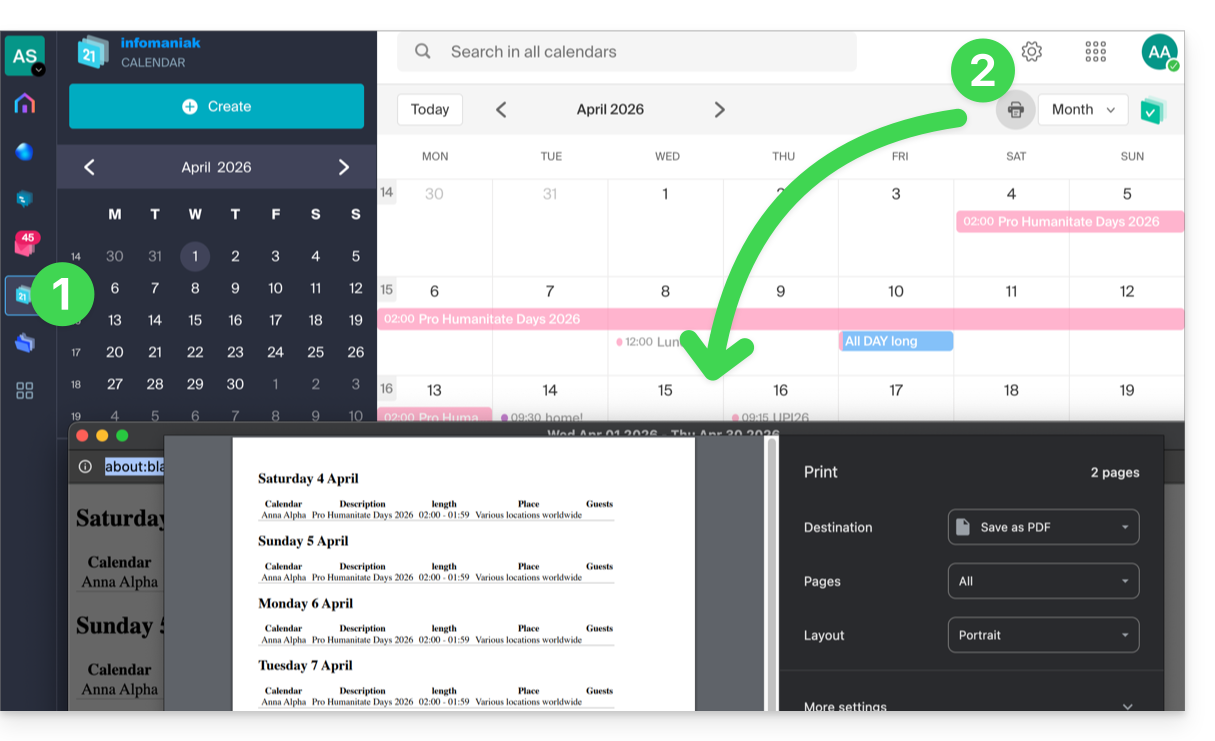
If you only use your browser's print function with Calendar, you will print the interface and not necessarily the calendar content. To print the list of your schedule (regardless of the display mode usually selected):
- Click here to access the Infomaniak Calendar web app (online service ksuite.infomaniak.com/calendar).
- Click on the printer icon located in the top right corner:
Link to this FAQ: https://faq.infomaniak.com/1949
Has this FAQ been helpful?
This guide explains how to save and export a calendar from the Infomaniak Web app Calendar (online service ksuite.infomaniak.com/calendar) in .ics format.
Exporting a calendar
To export the calendar in .ics format:
- Click here to access the Infomaniak Calendar web app (online service ksuite.infomaniak.com/calendar).
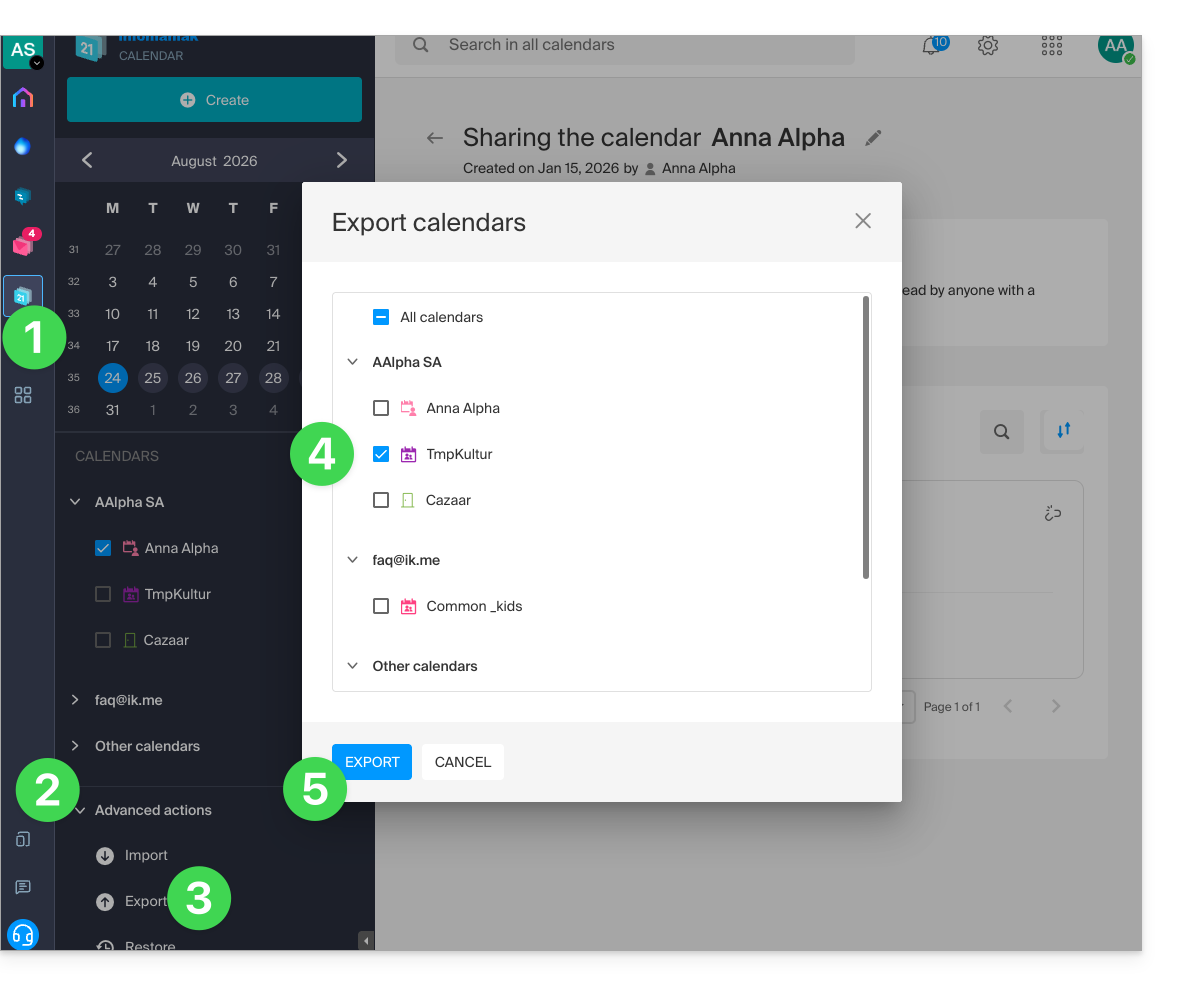
- Click on Advanced actions in the left-hand menu.
- Click on Export in the left-hand menu.
- Check the calendar(s) you want to export.
- Click on Export:
- Save the
.icsfile to your computer.
Refer to this other guide if you are looking for information about importing events.
Link to this FAQ: https://faq.infomaniak.com/1173
Has this FAQ been helpful?
This guide explains how to create an additional calendar in the Infomaniak Calendar web app (online service ksuite.infomaniak.com/calendar) and then set it as the default.
Introduction
- Defining a default calendar, for example, allows you to speed up the creation of new events because you will no longer need to change the calendar in which your next event will be saved each time.
- You can only set as default calendars that you directly own.
Add a new calendar
To create an additional calendar:
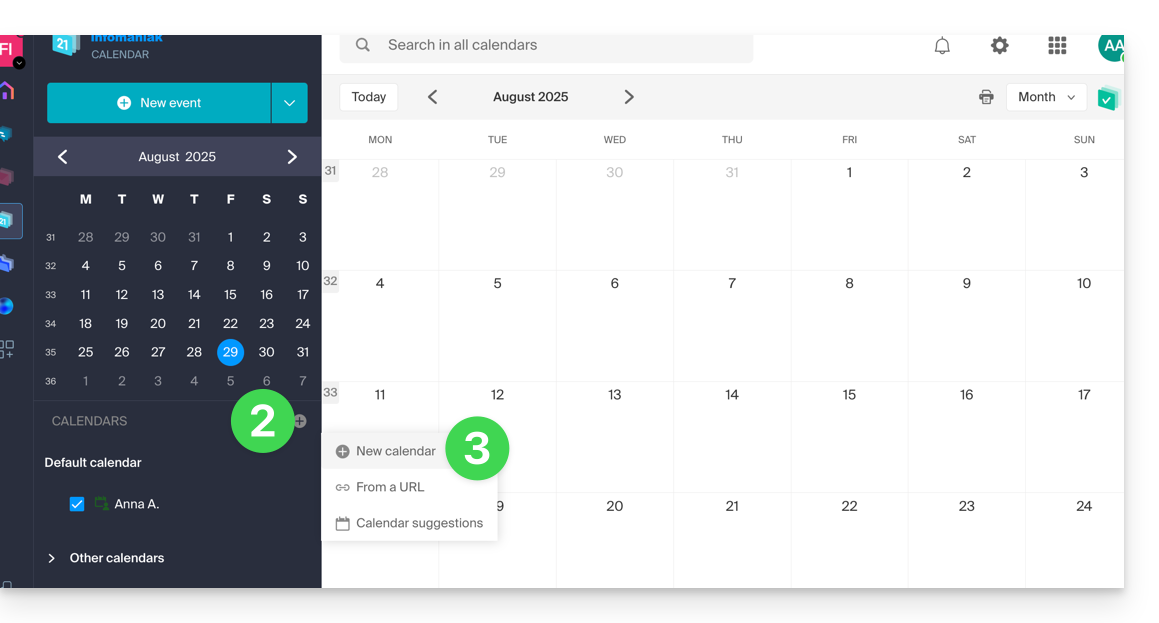
- Click here to access the Infomaniak Web app Calendar (online service ksuite.infomaniak.com/calendar).
- Click on in the left-hand menu.
- Click on New calendar:
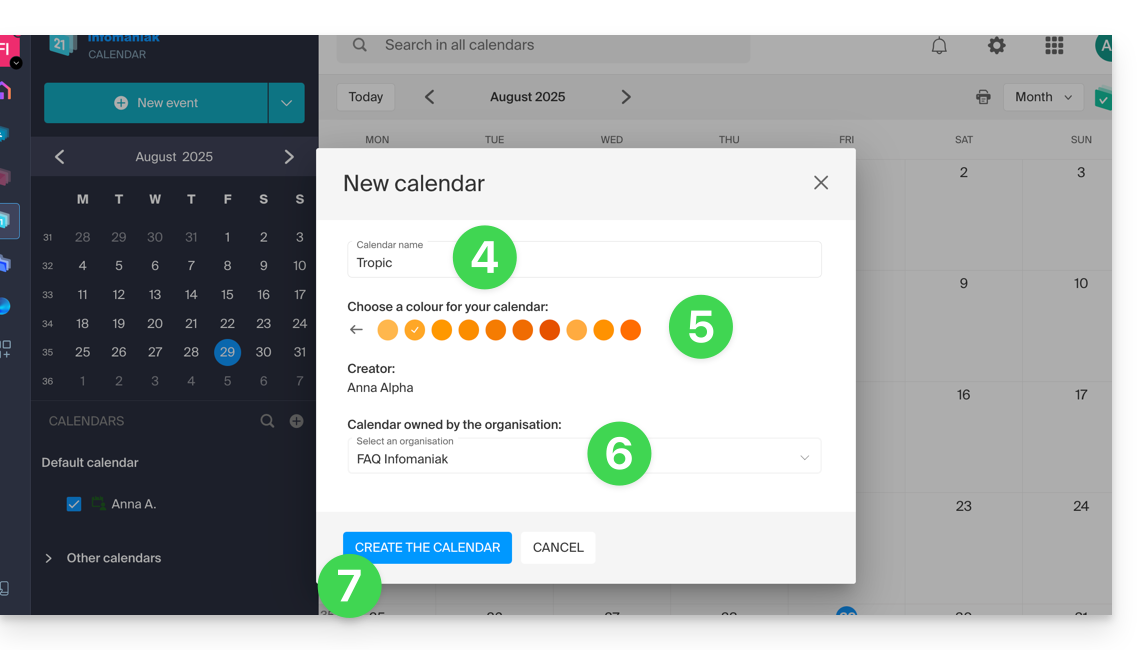
- Enter a name for the calendar.
- Choose a color.
- Choose one of your Organizations in which to create the calendar.
- Click the button to create the calendar:
Modify the default calendar
To set one of your calendars as the default:
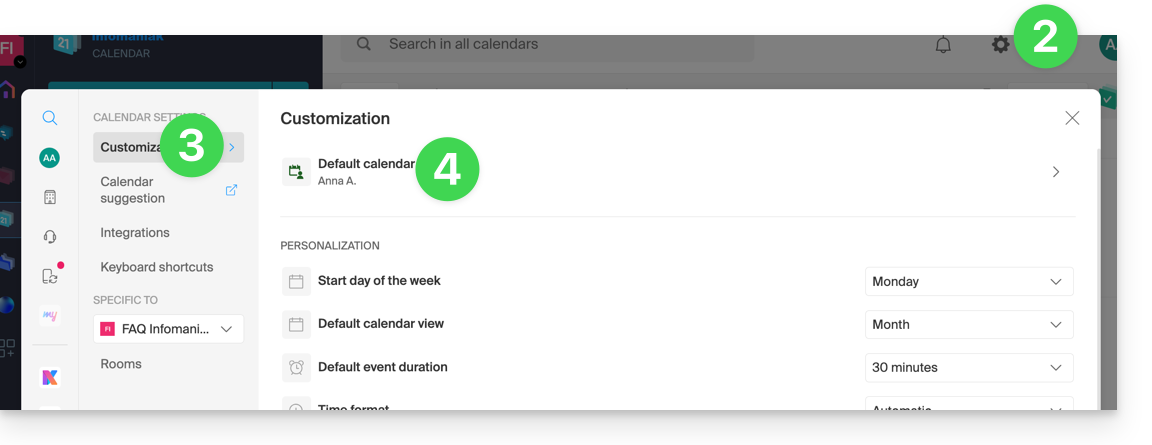
- Click here to access the Infomaniak Calendar web app (online service ksuite.infomaniak.com/calendar).
- Click on Settings in the top right corner.
- Click on Customization in the left-hand menu.
- Click on the default calendar to open the selection menu:
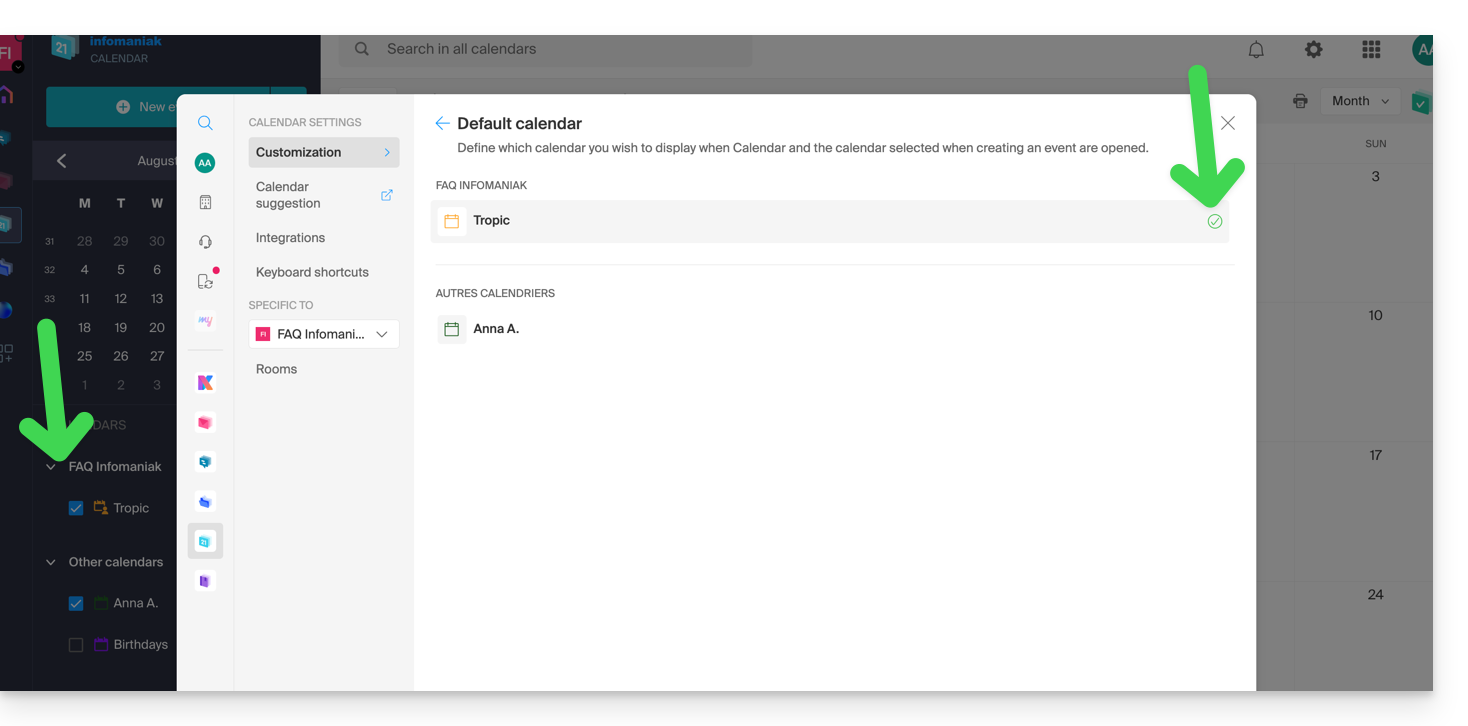
- Choose the desired calendar in the Default Calendar field; it will be placed in the first position in your calendar lists:
Link to this FAQ: https://faq.infomaniak.com/1078
Has this FAQ been helpful?
This guide explains how to synchronise tasks with kSync, the Infomaniak mobile app that connects your calendars and contacts stored with Infomaniak with the data on your Android devices.
Prerequisites
- Install and download the free jtx Board application.
Synchronize tasks
To synchronize data between Infomaniak Calendar tasks and your Android devices, jtx Board will use kSync to regularly synchronize tasks based on one or more Infomaniak calendars.
- Here is a task present in Infomaniak:

- After synchronization, it appears on jtx Board:

- Example of task validation when it is executed, then adding a second task from the application:

- Result on Infomaniak:

To go further, it may be necessary to purchase the Pro version of the jtx Board application.
Recommended settings
To improve the readability of your tasks in the application, it is recommended to disable these 2 settings in the jtx Board application settings…
… and then remove "local" from the list of locations, so that you only have the option to save to your synchronized account(s).
Link to this FAQ: https://faq.infomaniak.com/2301
Has this FAQ been helpful?
This guide explains how to completely uninstall the Acronis Backup Agent for Swiss Backup on Apple devices.
You can also consult the Acronis documentation on this topic.
Remove Backup Agent from macOS
To uninstall Cyber Protect:
- Click here to access the Acronis Console using the credentials obtained after adding the device (need help?).
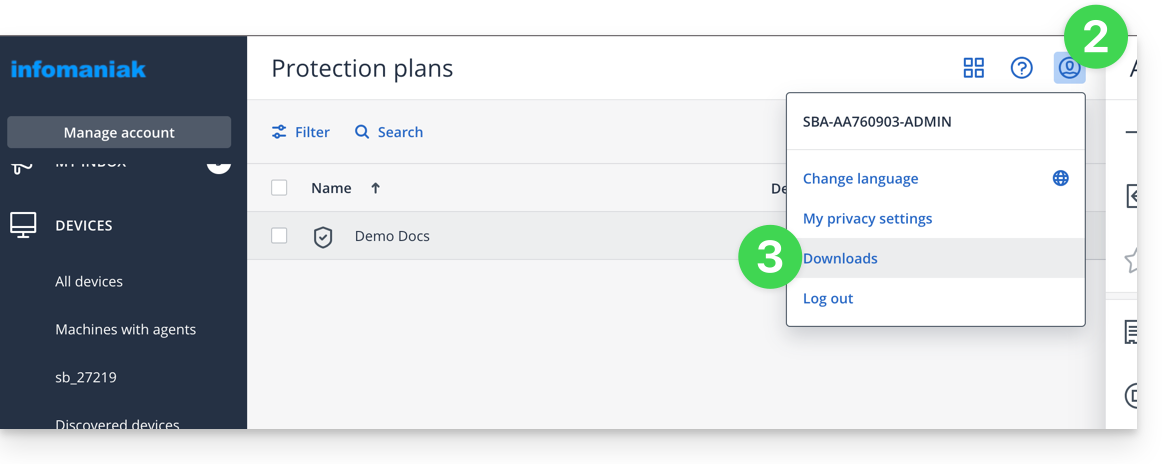
- Click on the user icon in the top right corner.
- Click on Downloads:
- Choose the client that is suitable for your device.
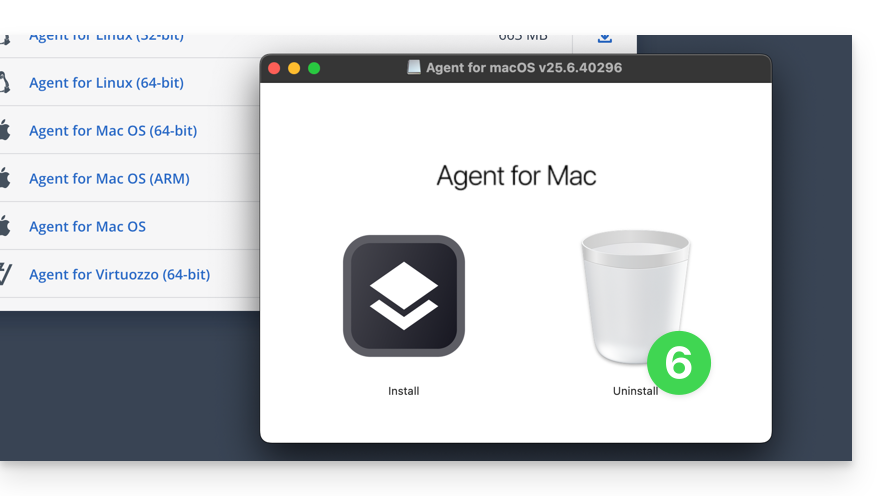
- Open the
.dmgfile once it has been downloaded. - Double-click on Uninstall:
- Confirm the application launch if necessary.
- Confirm the application uninstallation if necessary.
- Wait until the uninstallation is complete.
Link to this FAQ: https://faq.infomaniak.com/2311
Has this FAQ been helpful?
This guide helps you resolve some issues where you notice that data from kDrive is not being synchronized across your devices.
Certain folders are missing on your computer
If everything seems to be working correctly:
- kDrive app open in the background & functional,
- no interrupted synchronization,
- no error messages,
- you have the correct access rights when viewing them in their online version (ksuite.infomaniak.com/kdrive),
but you notice that:
- folders such as Organization Folders or other directories are not visible on your computer,
then check in the kDrive desktop app installed on your computer which folders you want to synchronize:
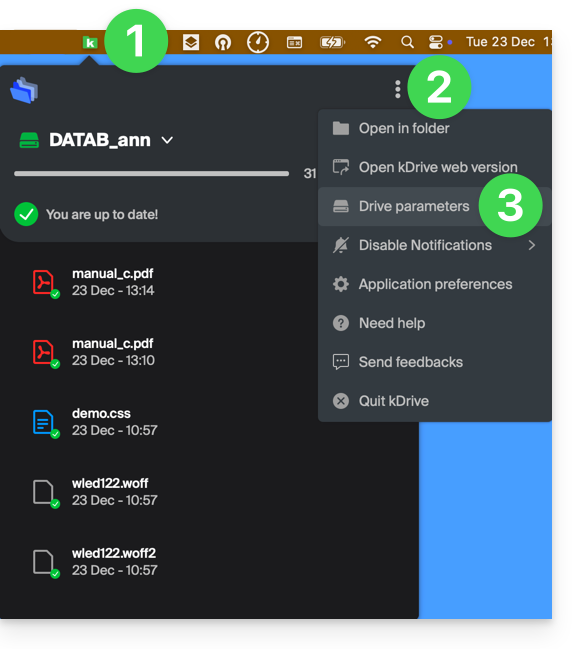
- Left-click on the desktop app icon in the notification area of your computer (top right on macOS, bottom right on Windows, and double-left-click in the taskbar on Linux).
- Click on the action menu ⋮ on the right of the window that appears.
- Click on kDrive Settings:
- Click on the chevron to the left of your synchronization name to display the list of folders.
- Expand the contents of the listed folders and check/uncheck the folders to be synchronized with your computer.
- Click on the blue Validate button:
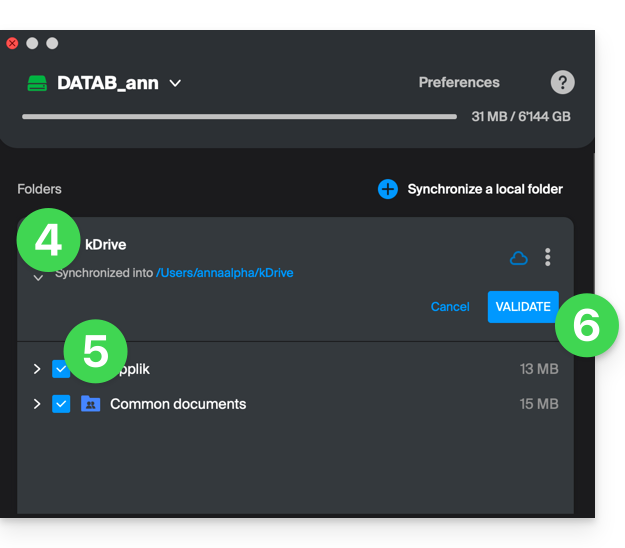
As a result, your local folder representing kDrive (named kDrive, or kDrive2, or something else) on your computer will finally display all the desired folders (after the time required for synchronization).
Synchronization in progress (0/10) then paused
Check that the Windows Search service is not stopped. To do this, use the Run window (Win + R):
- Enter
services.msc. - Click on OK:
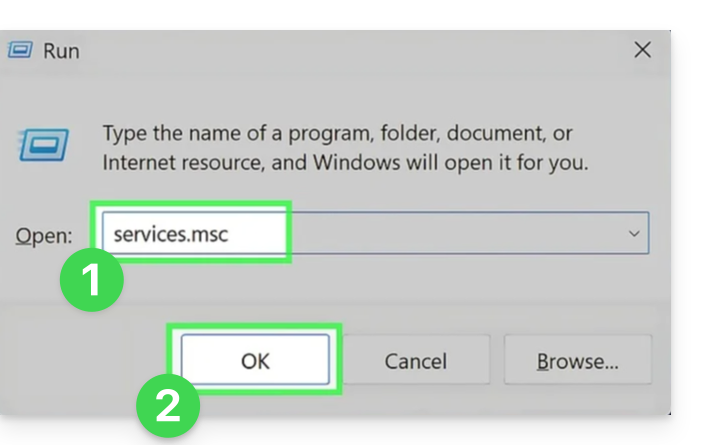
- Locate Windows Search in the list in the Services window and enable it if it is not already enabled:
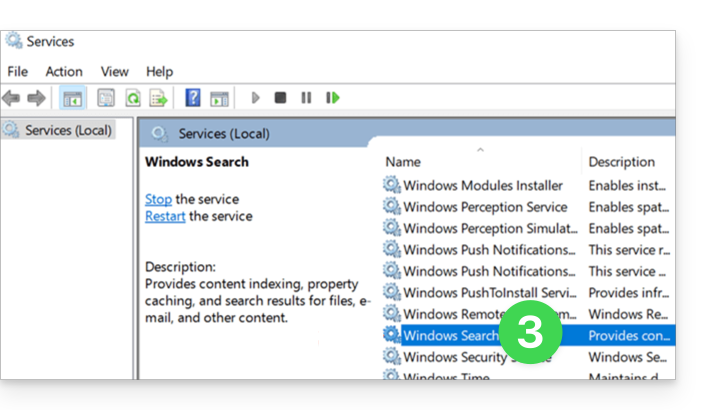
Continuous synchronization ( .eml files)
An issue related to Windows indexing may occur when synchronizing kDrive files with the .eml extension (a file type corresponding to email export/saving). Therefore, it is necessary to remove the eml type from the indexing options to resolve this issue:
- Open the Start menu and search for indexing options.
- Click on Indexing Options (Control Panel):
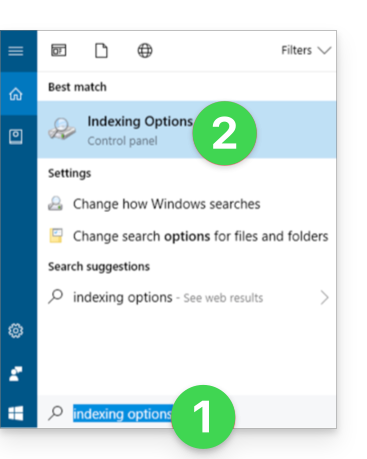
- Click on the Advanced button.
- Uncheck the box for the
emltype: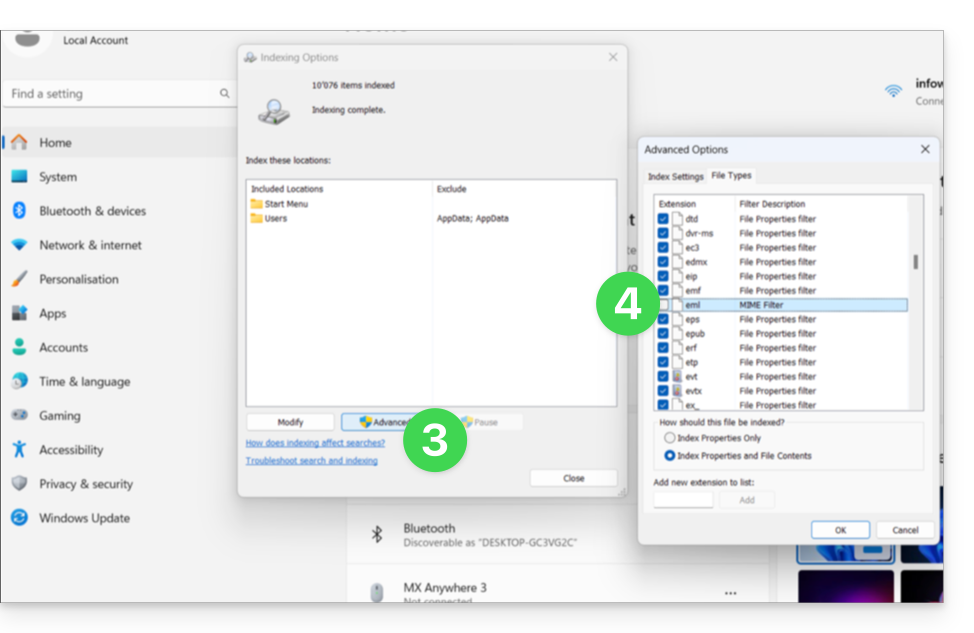
- Confirm and close the windows.
Adobe file synchronization
Applications like Adobe Illustrator, Photoshop, Lightroom, etc., or certain architecture/3D applications, encounter problems when saving files (error messages in the relevant software, file duplication, etc.) on kDrive. Therefore, it is best to avoid including such files in a synchronization.
Adobe explicitly states that it does not support synchronization with the cloud, external drives, and network drives.
Issues related to file names
Recommended structure
- Use only standard alphanumeric characters.
- Replace trailing spaces with underscores (_) or hyphens (-).
- Limit the total path length (folder name + file name) to less than 255 characters.
The following characters should be avoided as they are reserved by the Windows file system or cloud storage servers:
- < (less than)
- > (greater than)
- : (colon)
- " (quotation marks)
- / (slash)
- \ (backslash)
- | (vertical bar)
- ? (question mark)
- * (asterisk)
The location of the space is often more critical than the character itself for synchronization:
- Trailing space in the filename: a file named "
project .pdf" causes major synchronization errors on Windows. - Leading space in the filename: may make the file invisible or difficult to index.
- Trailing period: Folders ending with a period (e.g., "
Archives.") are rejected by Windows. - Unicode spaces (non-breaking): Invisible characters often generated on macOS that appear as spaces but are technically special characters not supported by Windows.
File names reserved by the system
The following terms should not be used as file names, as they are reserved for Windows internal communications:
- CON, PRN, AUX, NUL
- COM1, COM2, COM3, COM4, COM5, COM6, COM7, COM8, COM9
- LPT1, LPT2, LPT3, LPT4, LPT5, LPT6, LPT7, LPT8, LPT9
You should also consult this other guide.
Link to this FAQ: https://faq.infomaniak.com/2153
Has this FAQ been helpful?
This guide details the installation of the Infomaniak v4.x desktop application kDrive on a computer running the macOS operating system. This application allows you to automatically synchronize files from your computer with your online kDrive storage.
Prerequisites
- Have macOS version ≥ 10.15 (ARM is OK, and the APFS file system is recommended).
- Version ≥ 12.4 for kDrive version 4.x
Install kDrive 4.x on a recent macOS
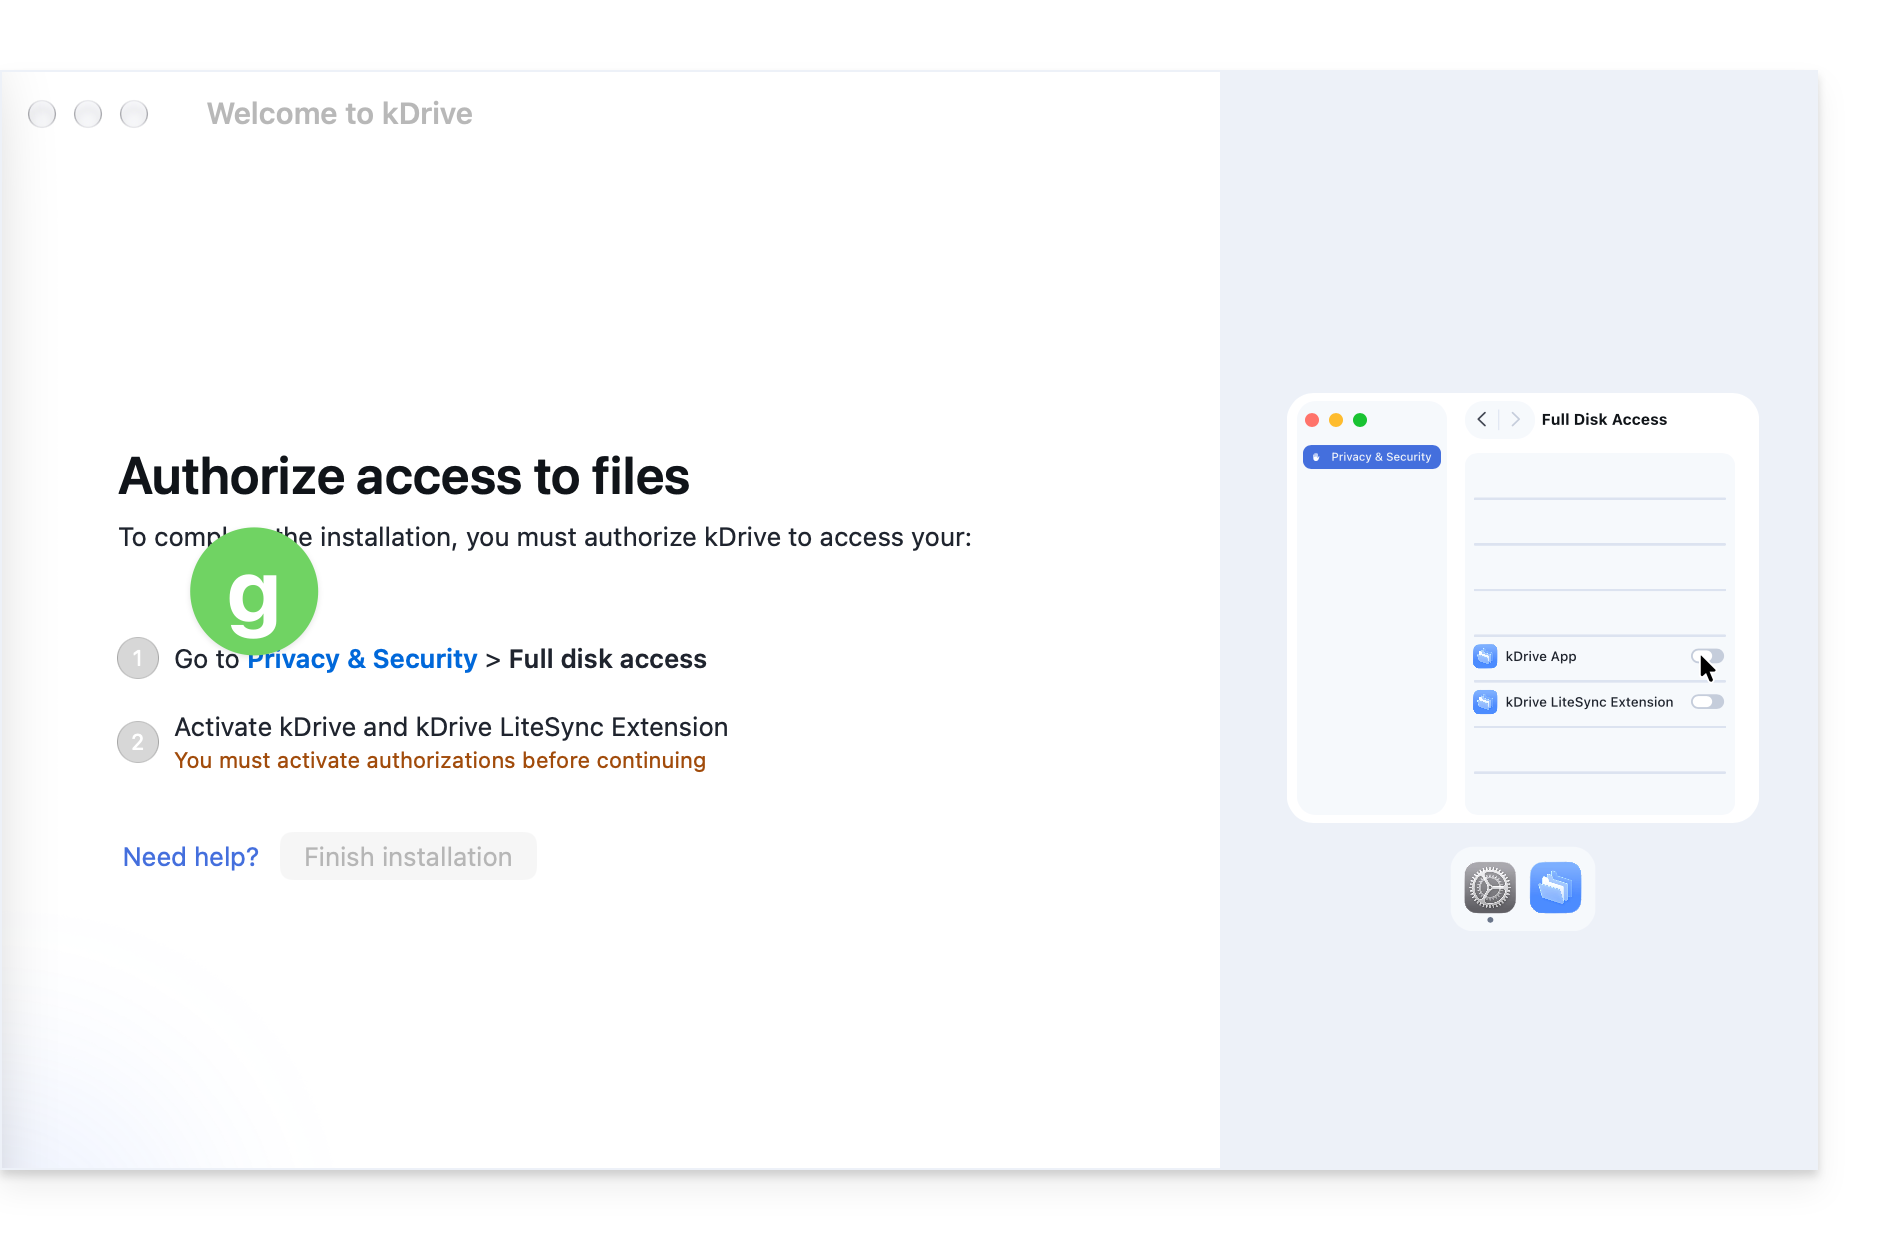
Installing kDrive requires grant certain permissions to the application's componentsto allow them to run on your Apple computer.
This guide outlines the steps to follow on recent versions of macOS; for older versions, please refer to the last chapter of the guide.
- Open the downloaded application (❓: help) and start the installation on your computer:
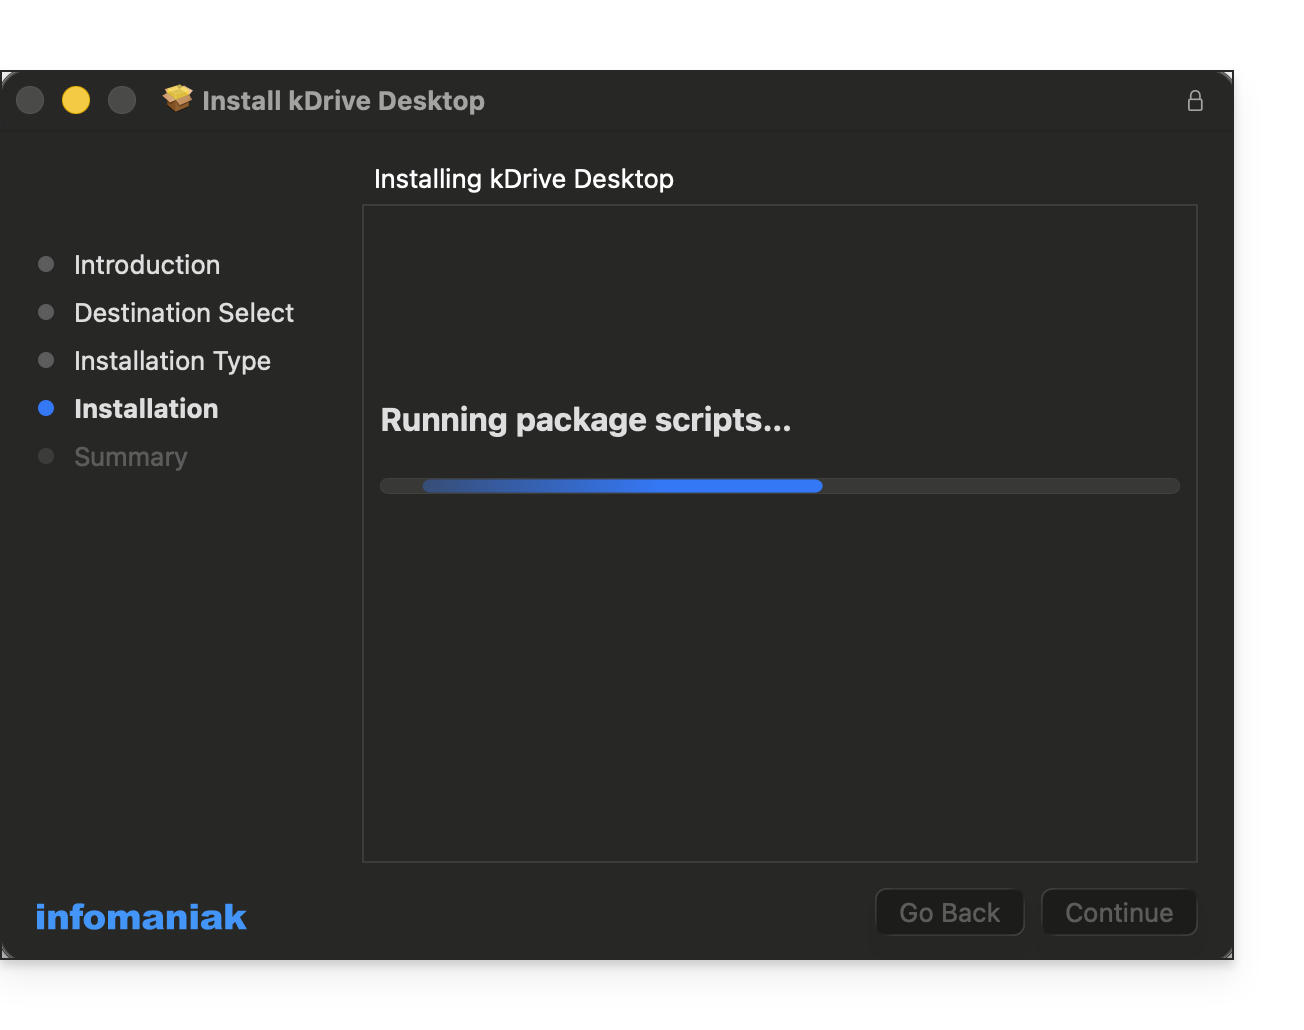
- Once the installation is complete:
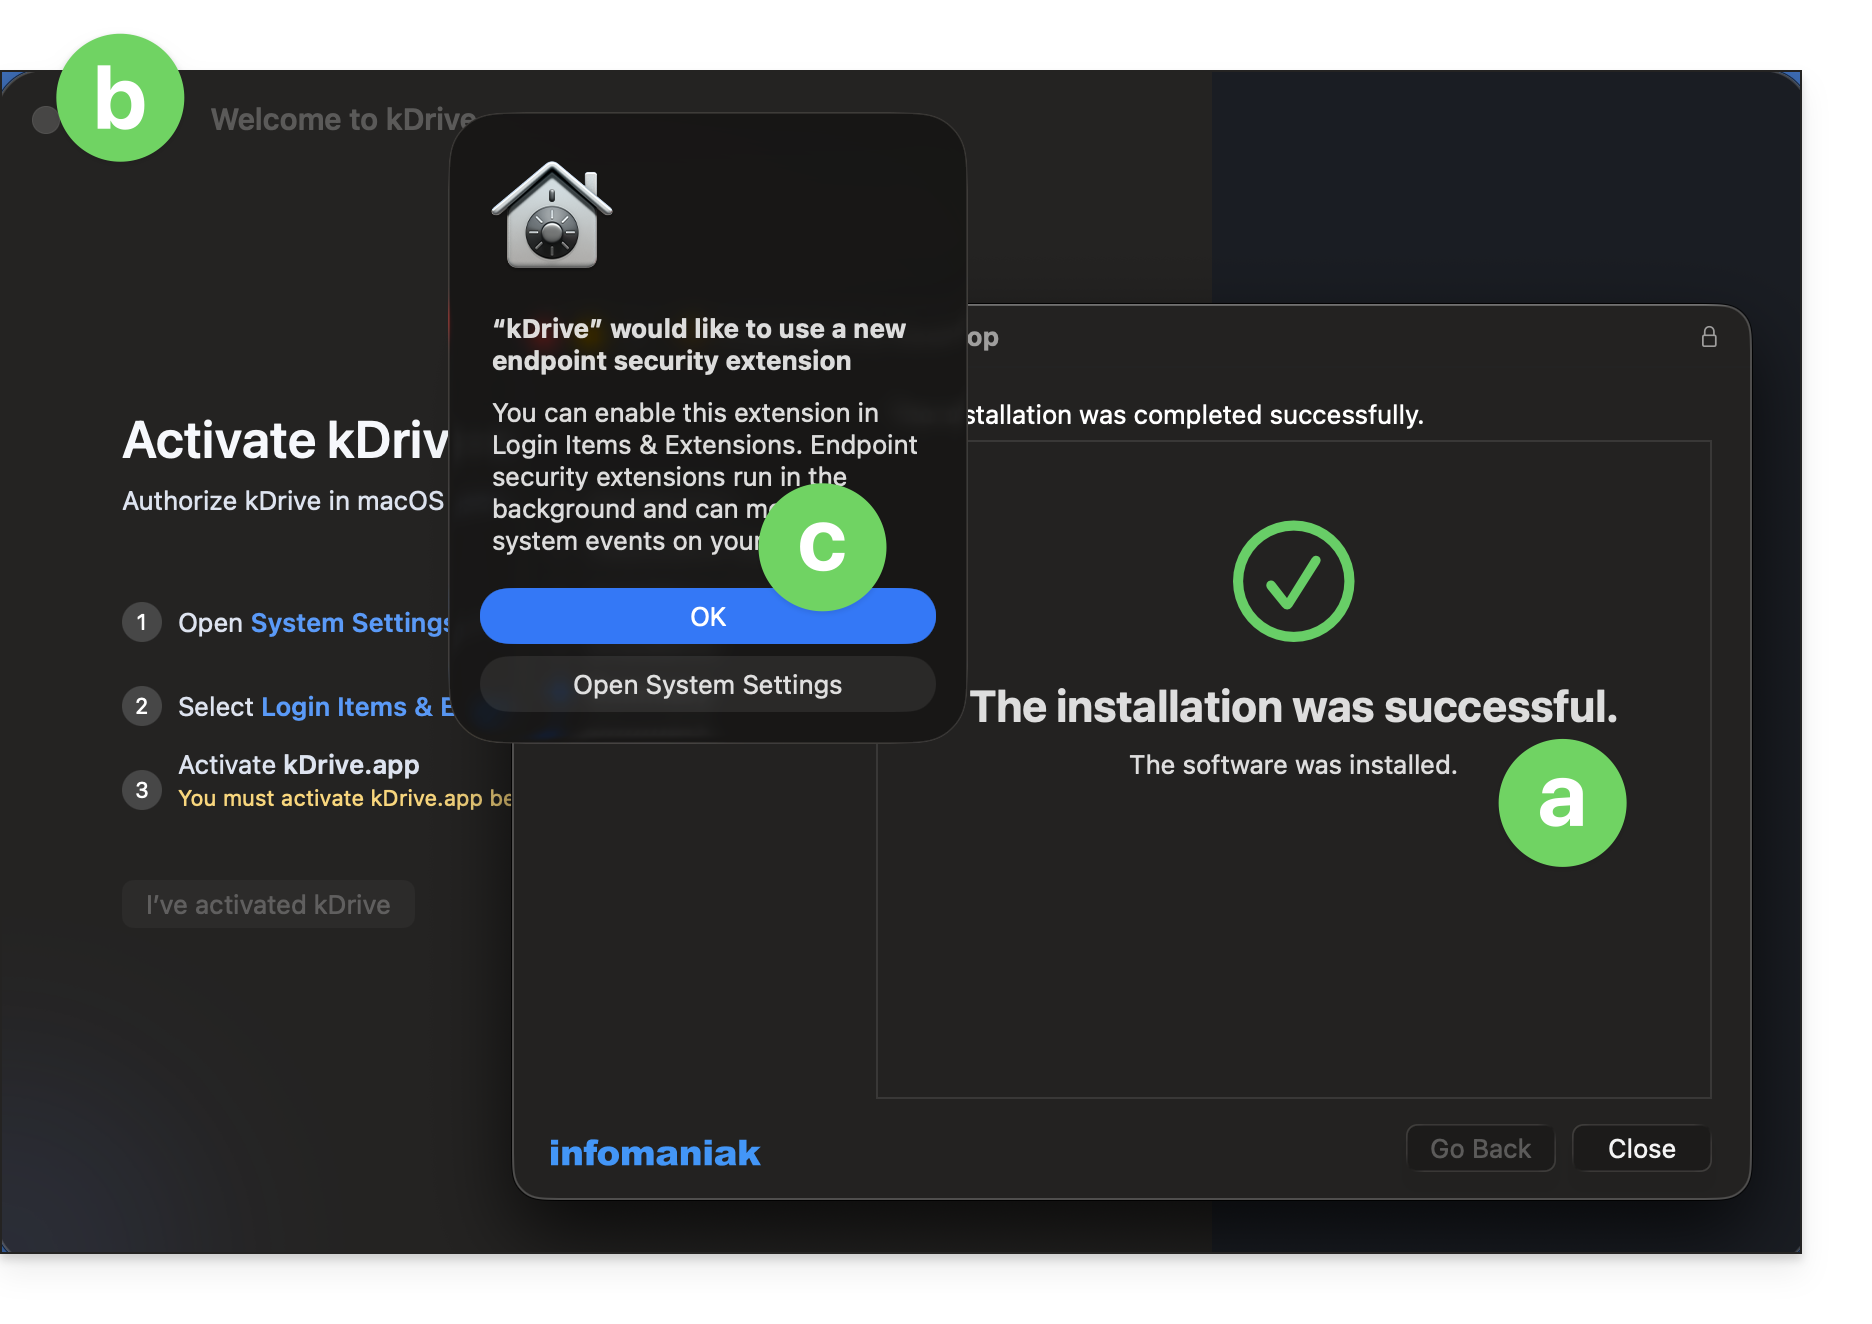
- The installer indicates that the operation was successful.
- The kDrive configuration window opens automatically.
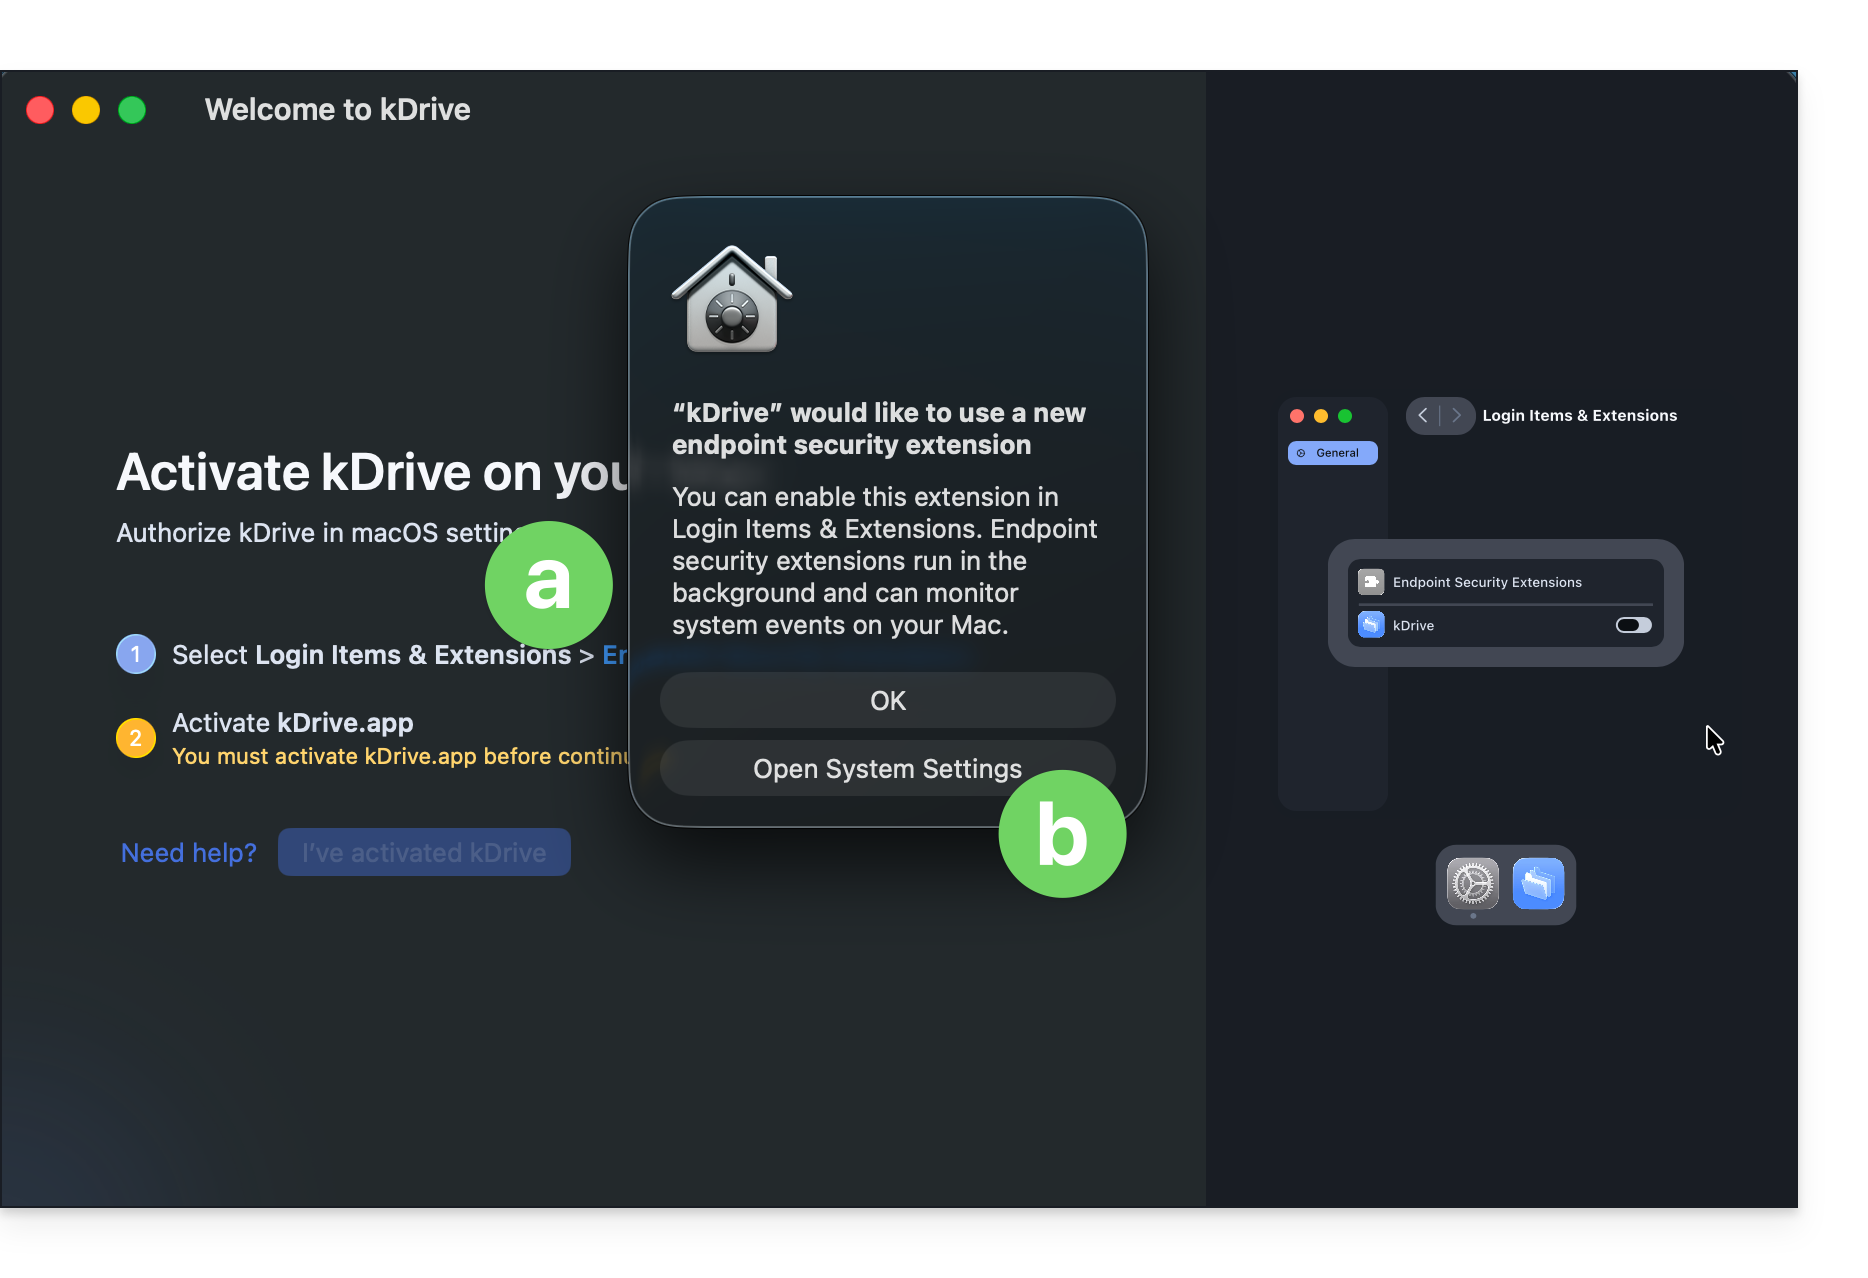
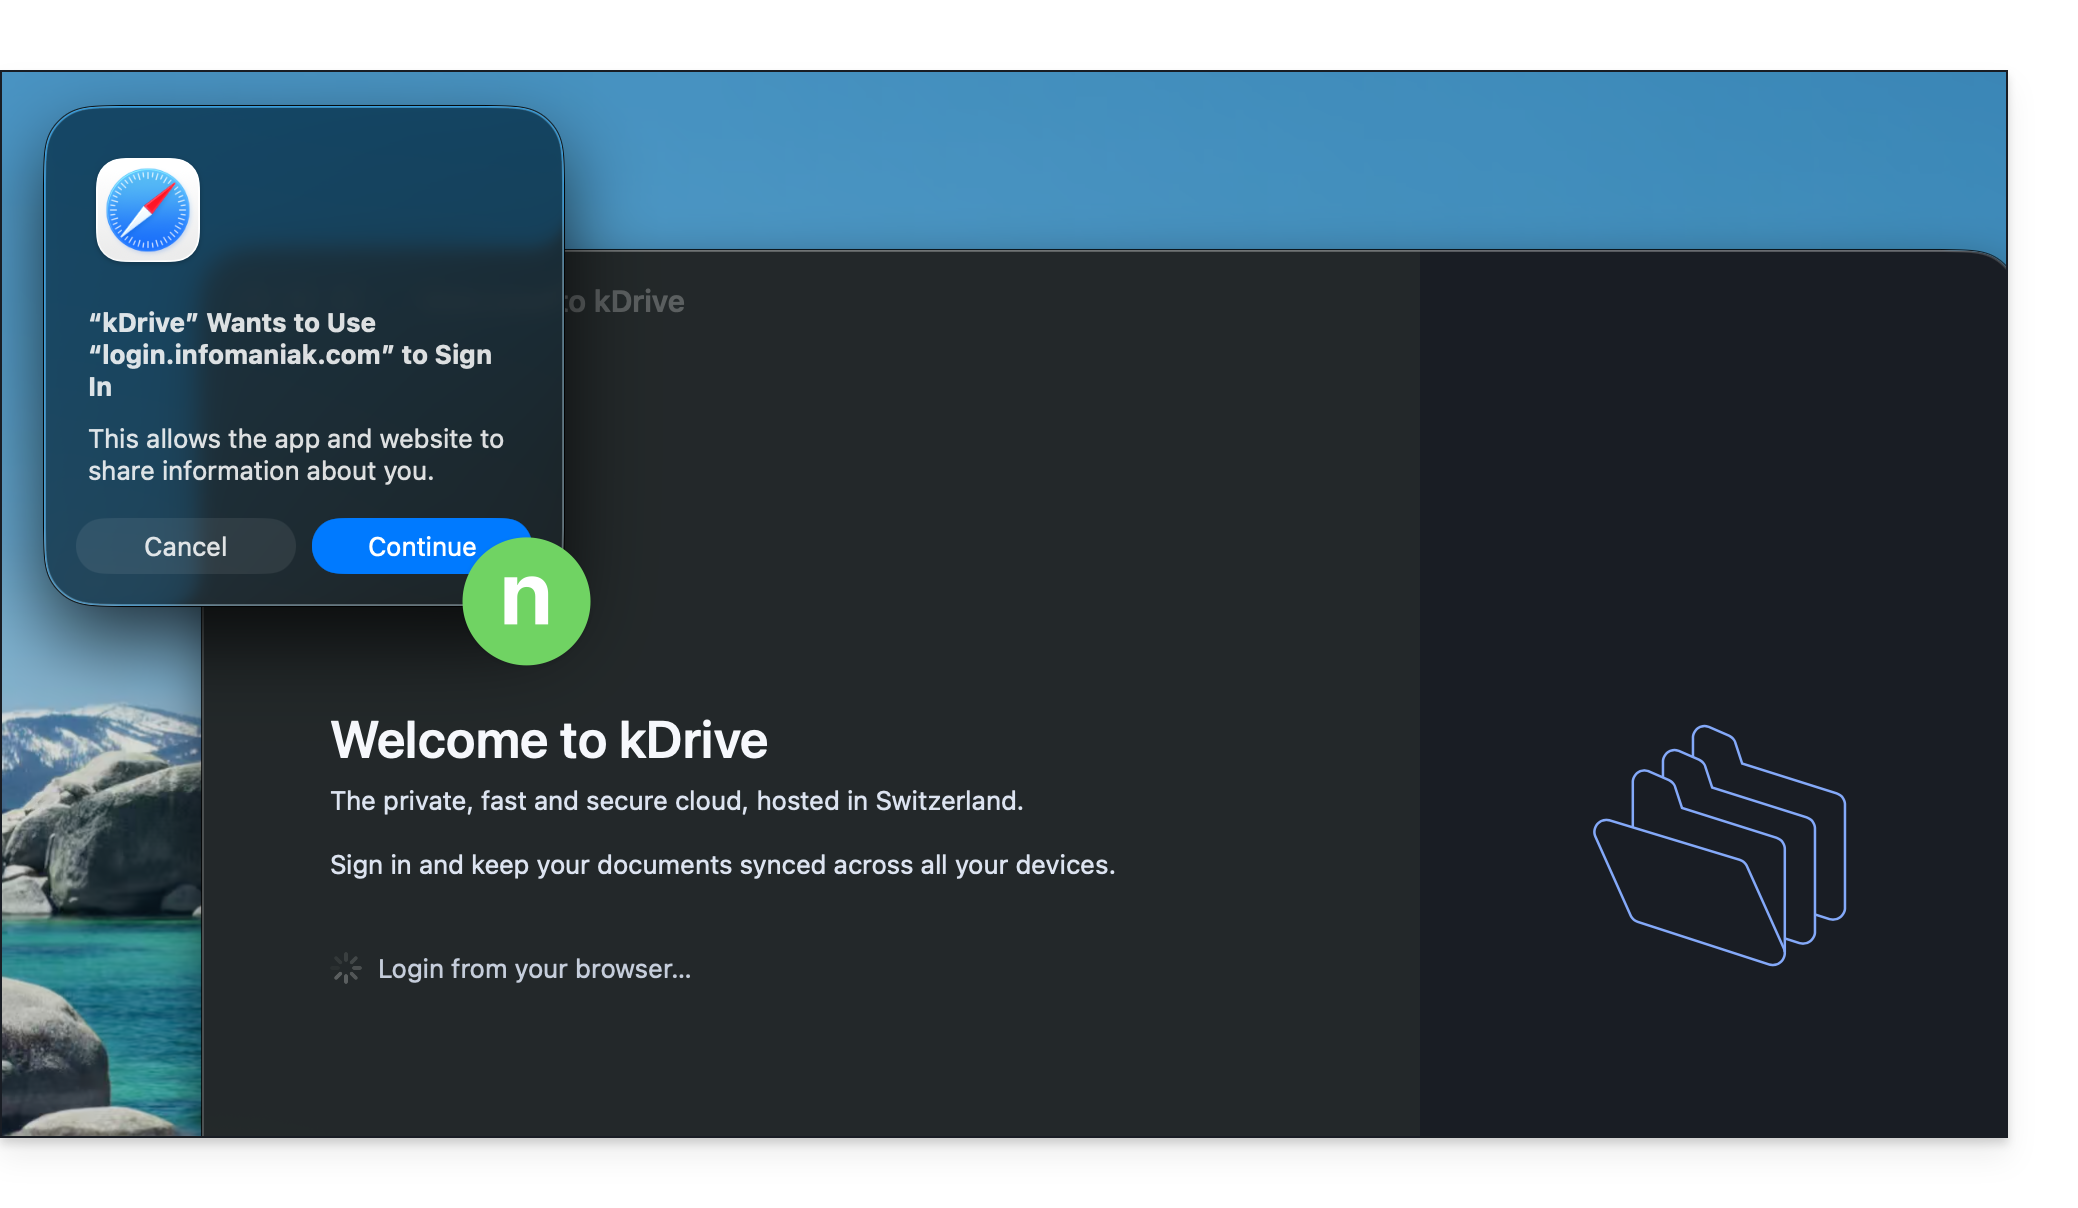
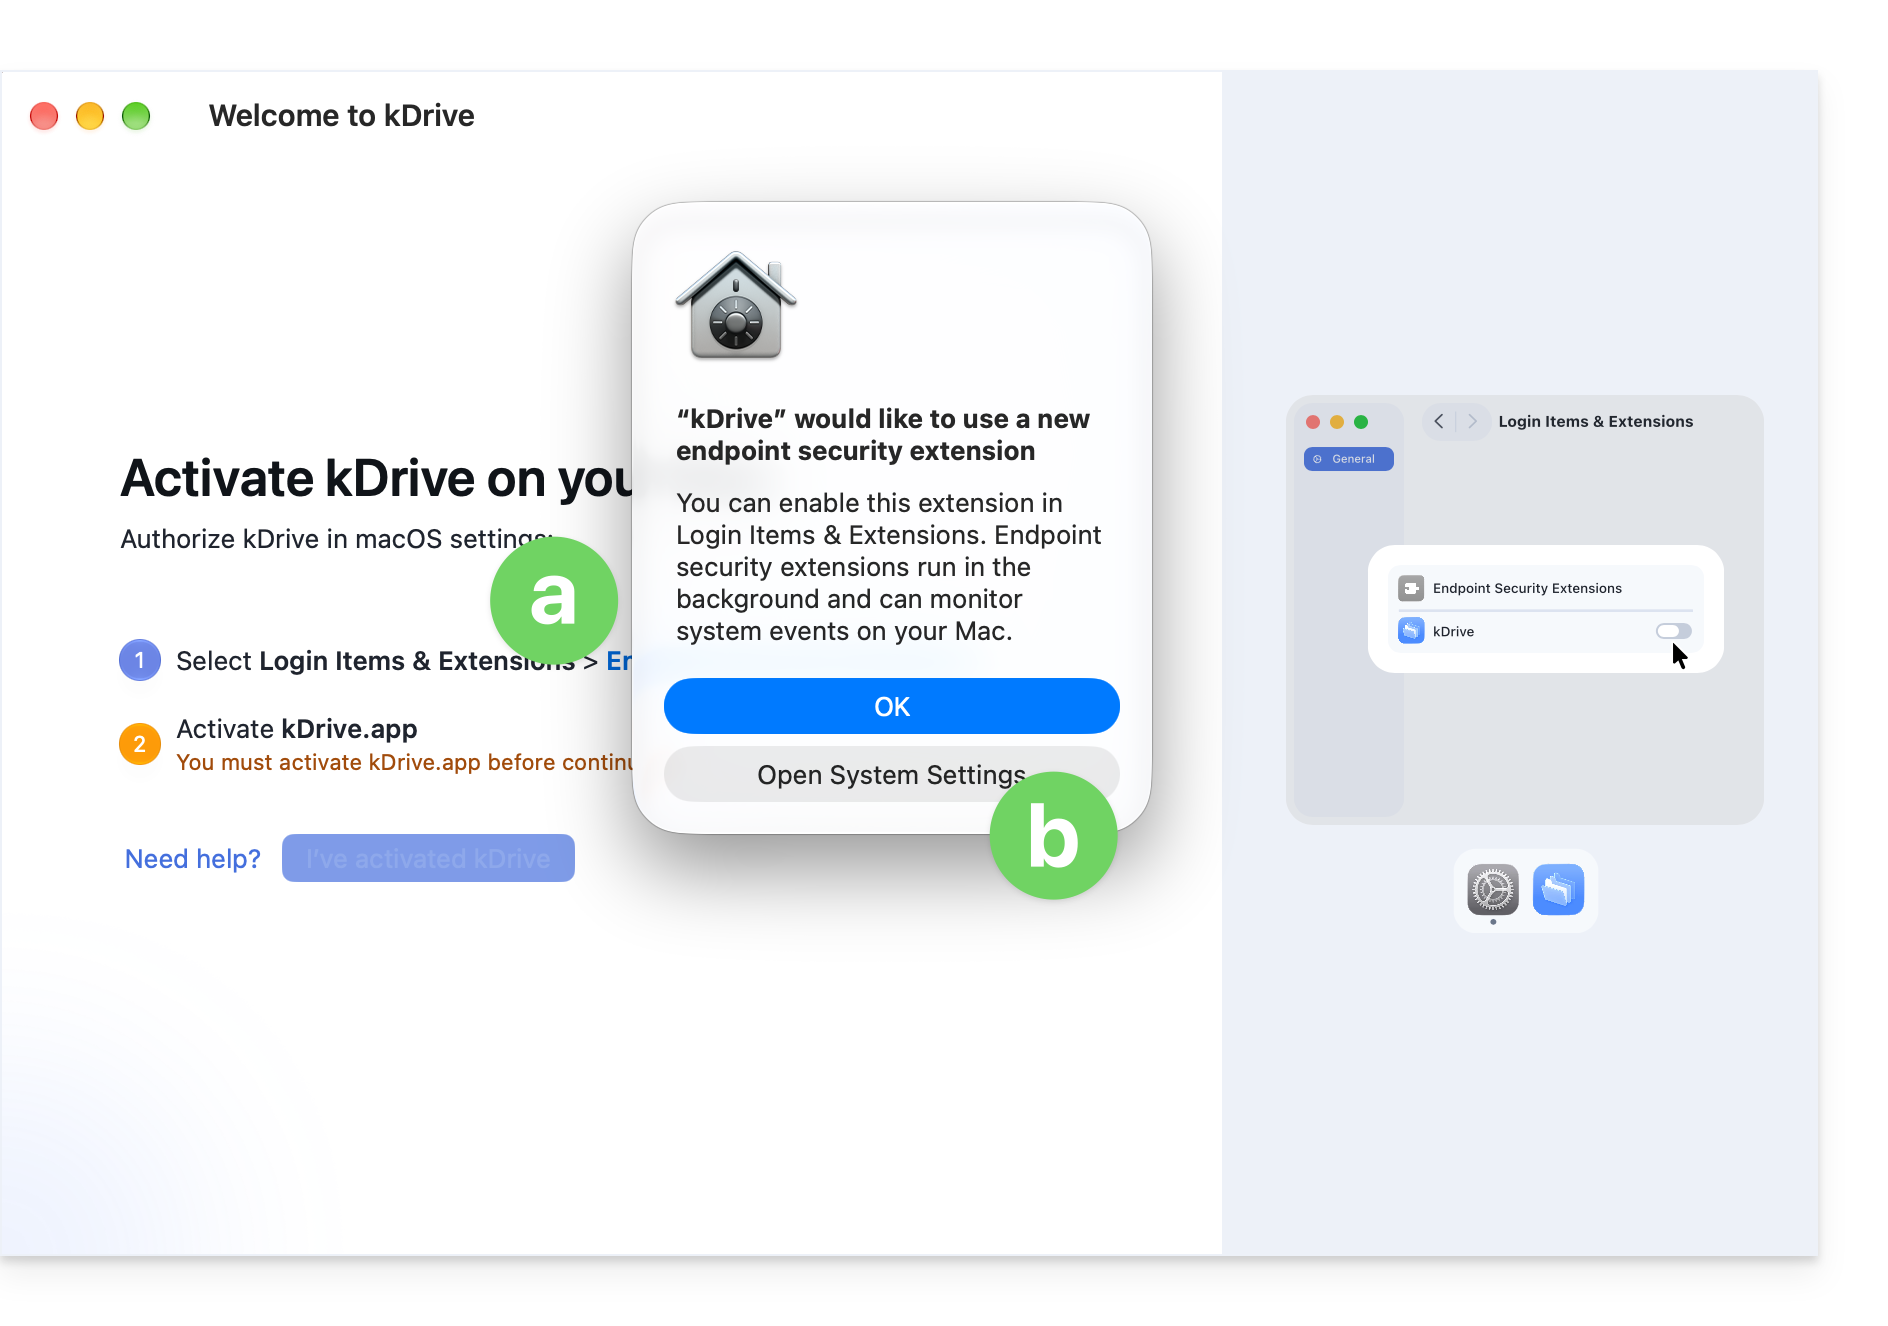
- A macOS permissions window also opens.
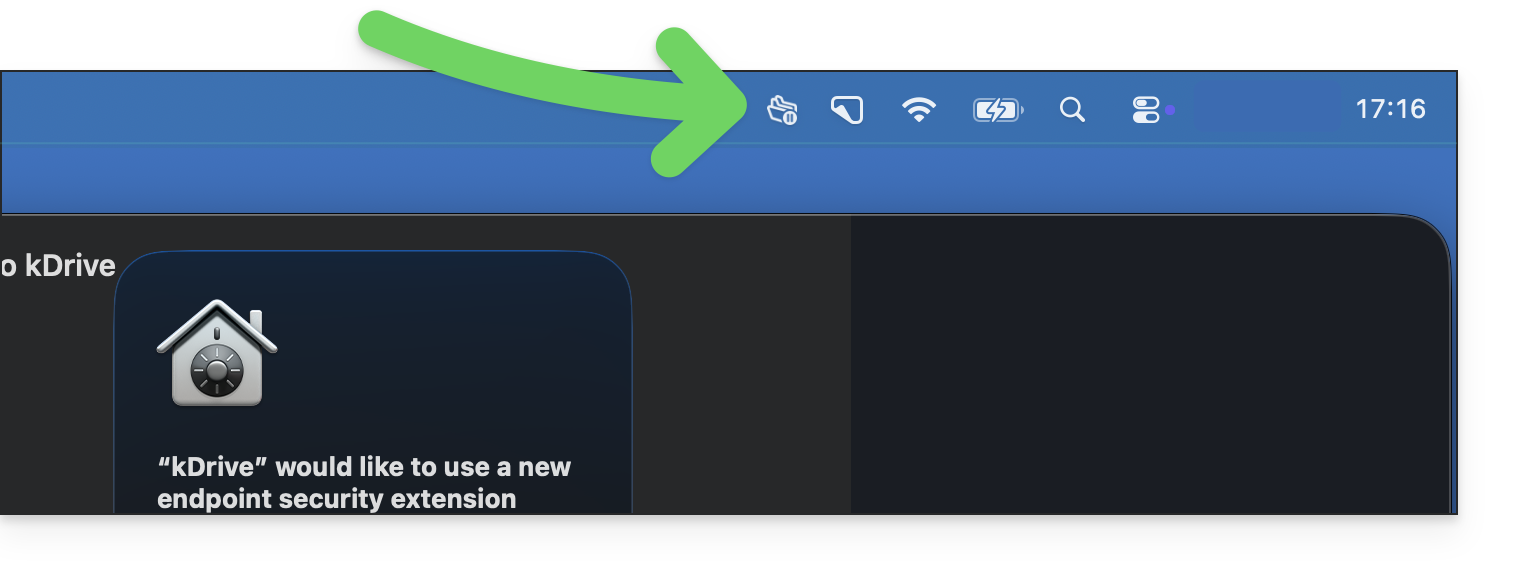
- and the app icon should be visible in the upper right corner on macOS:
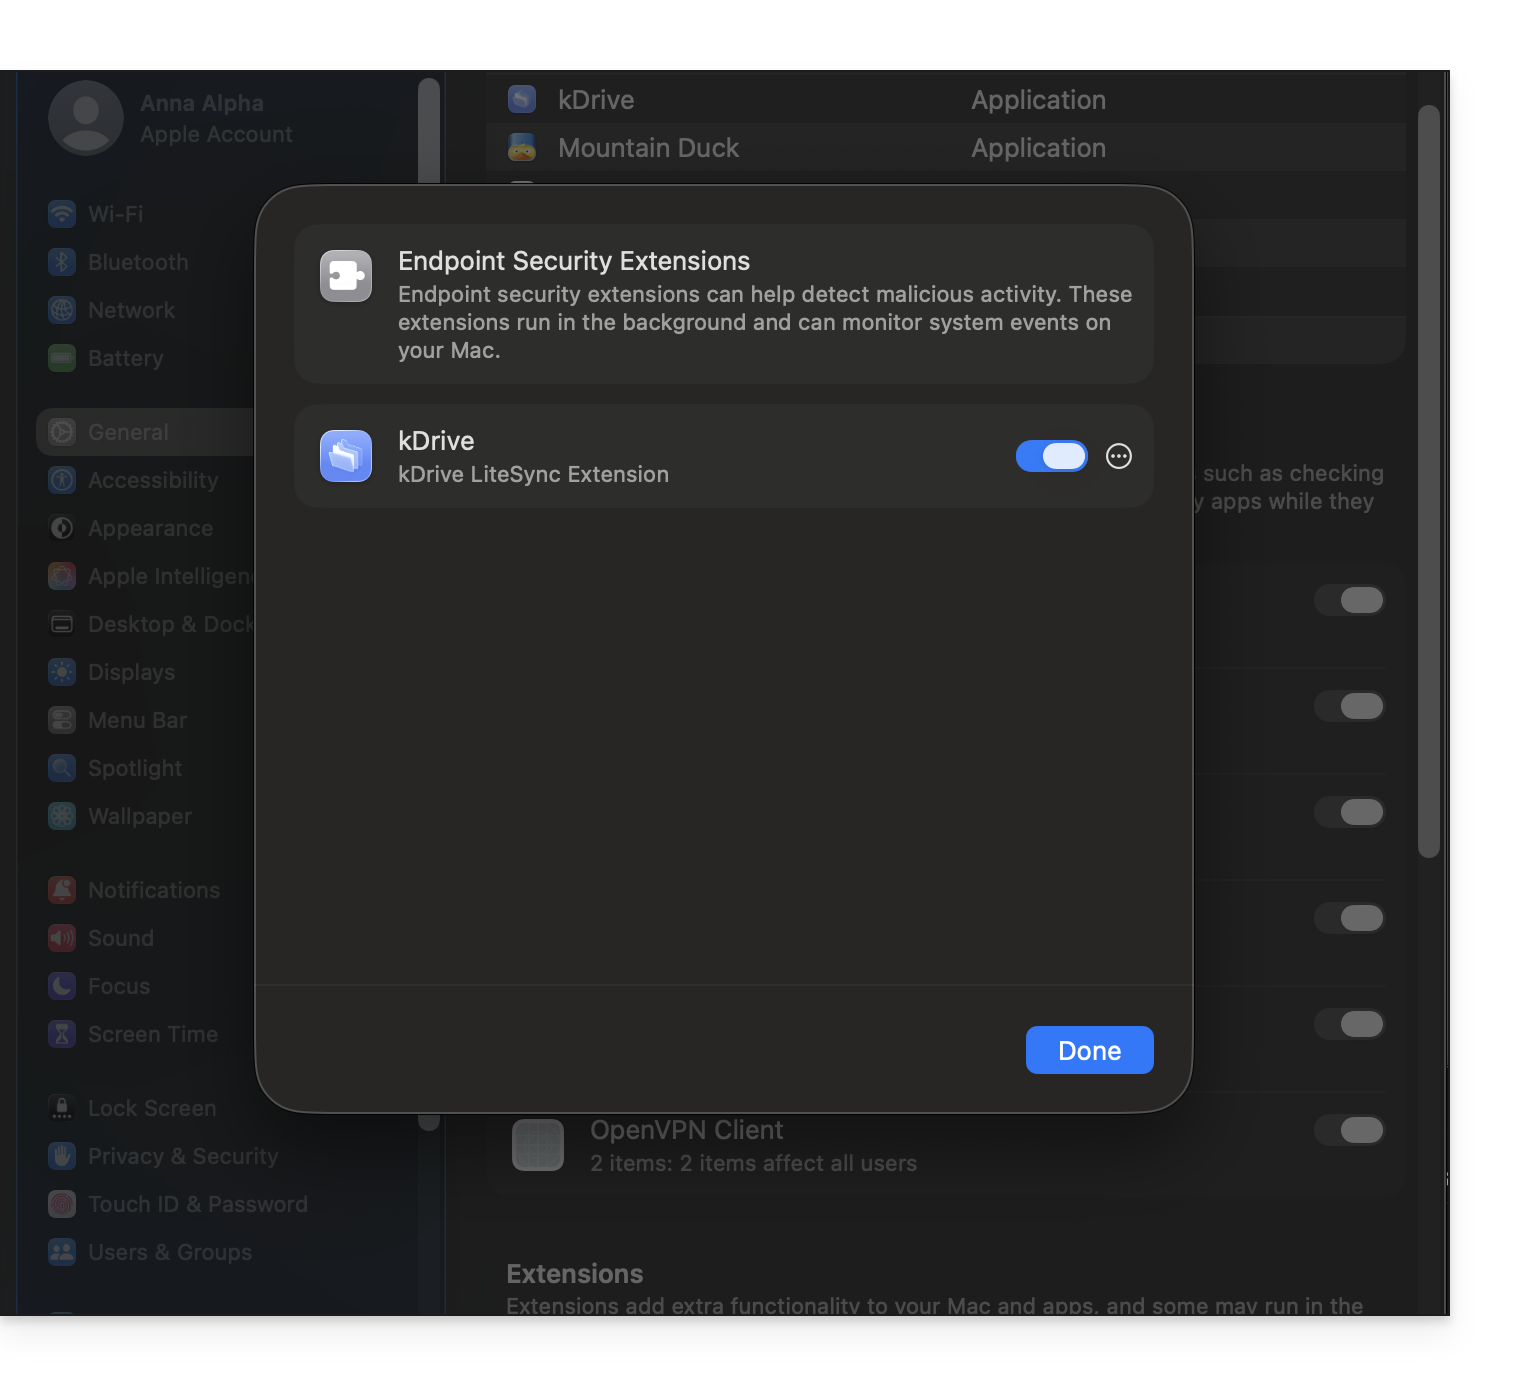
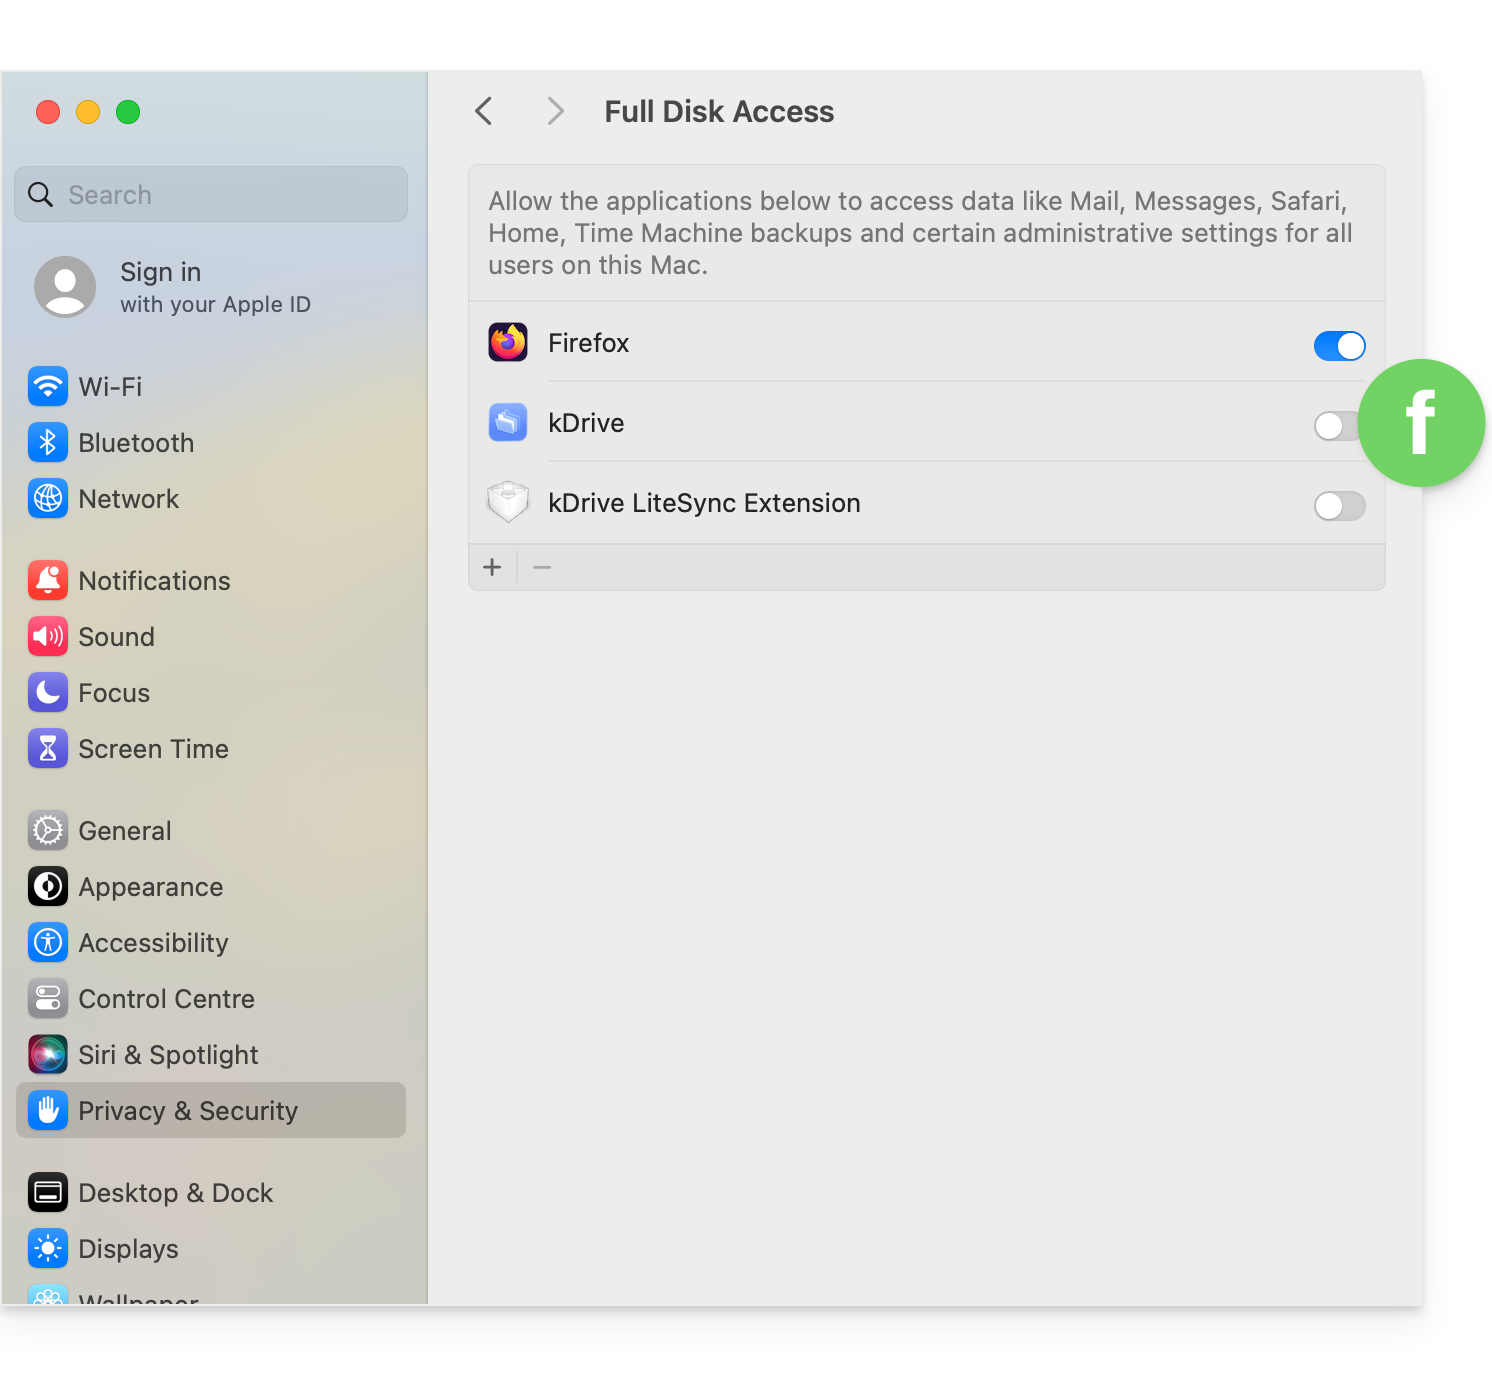
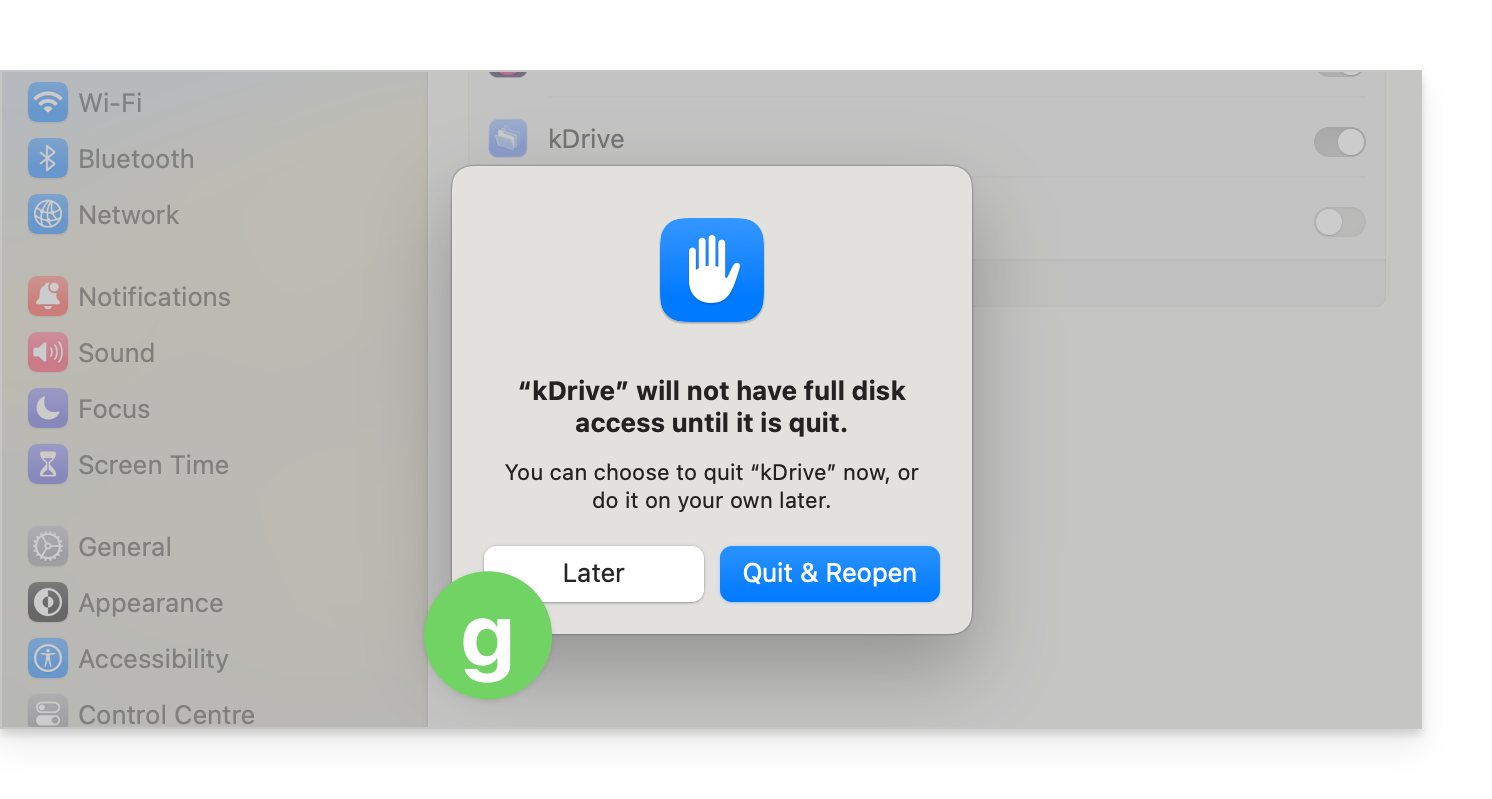
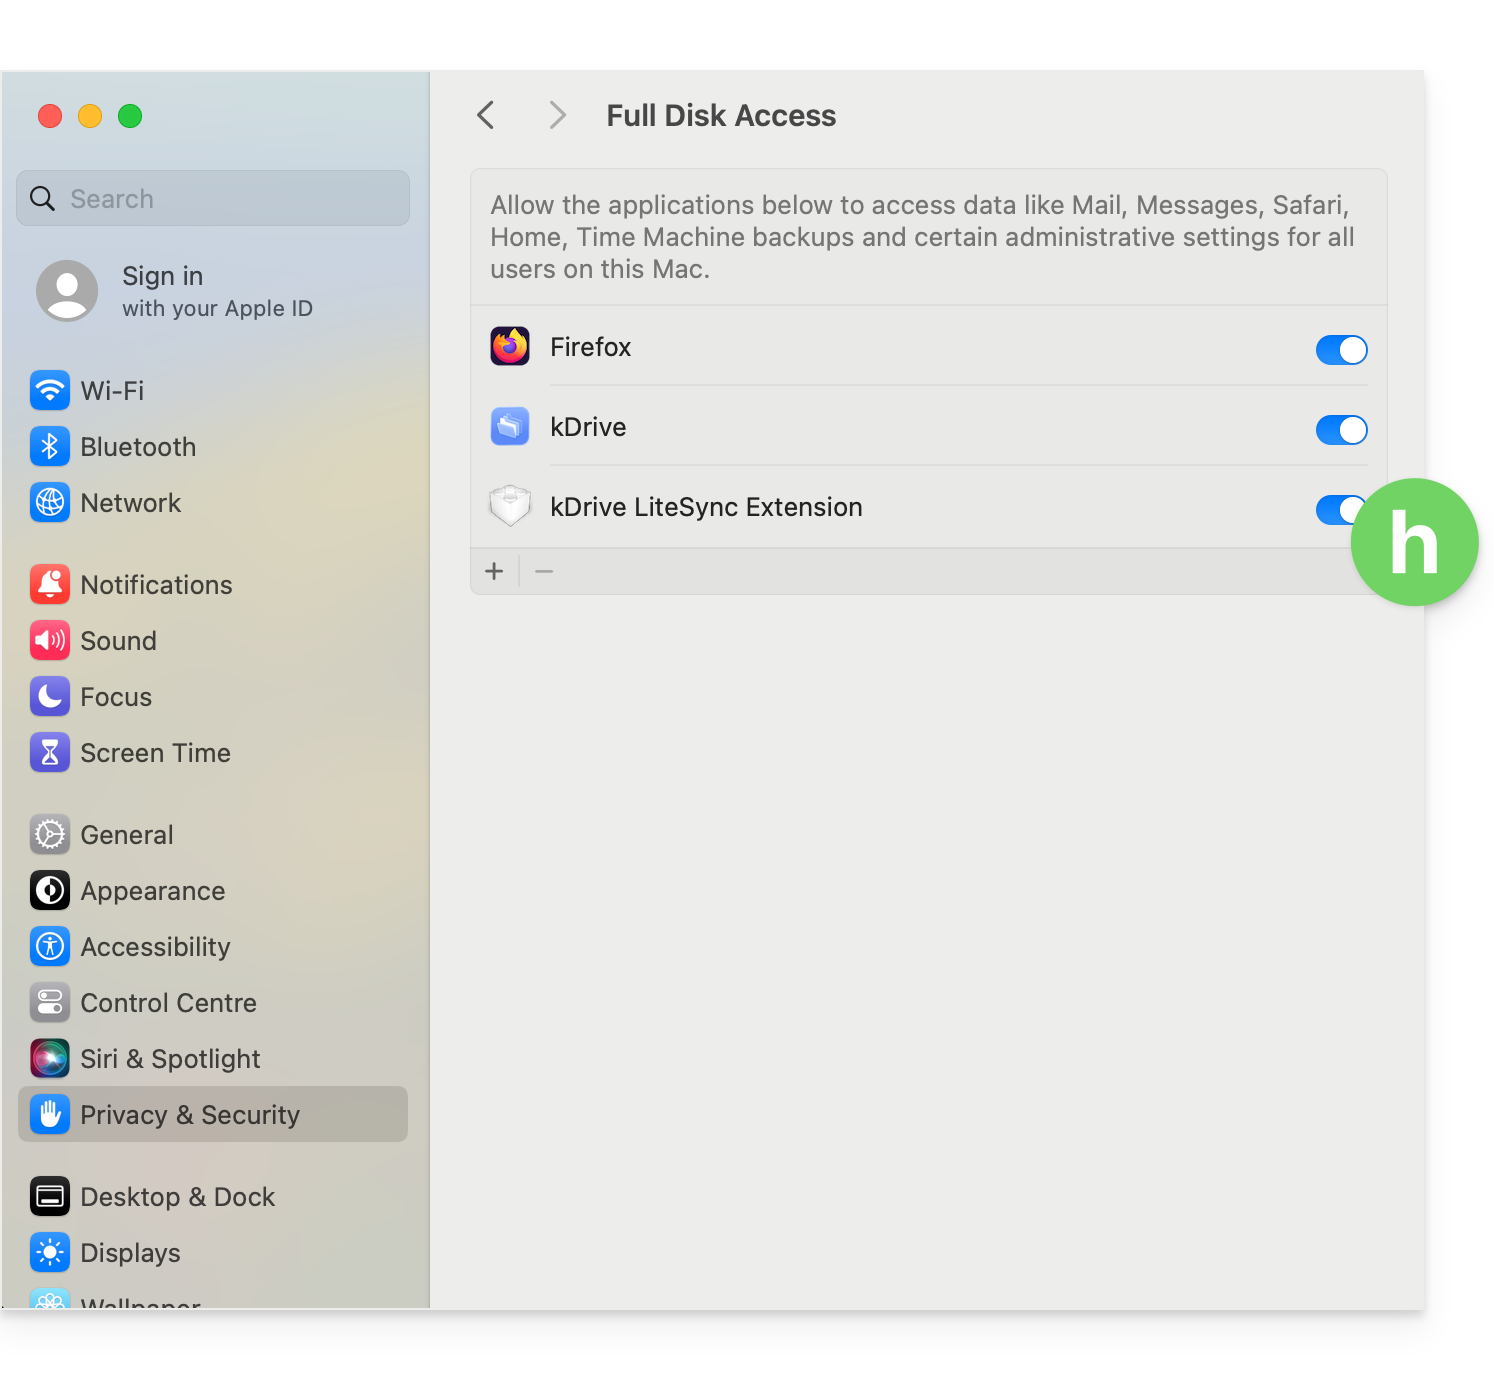
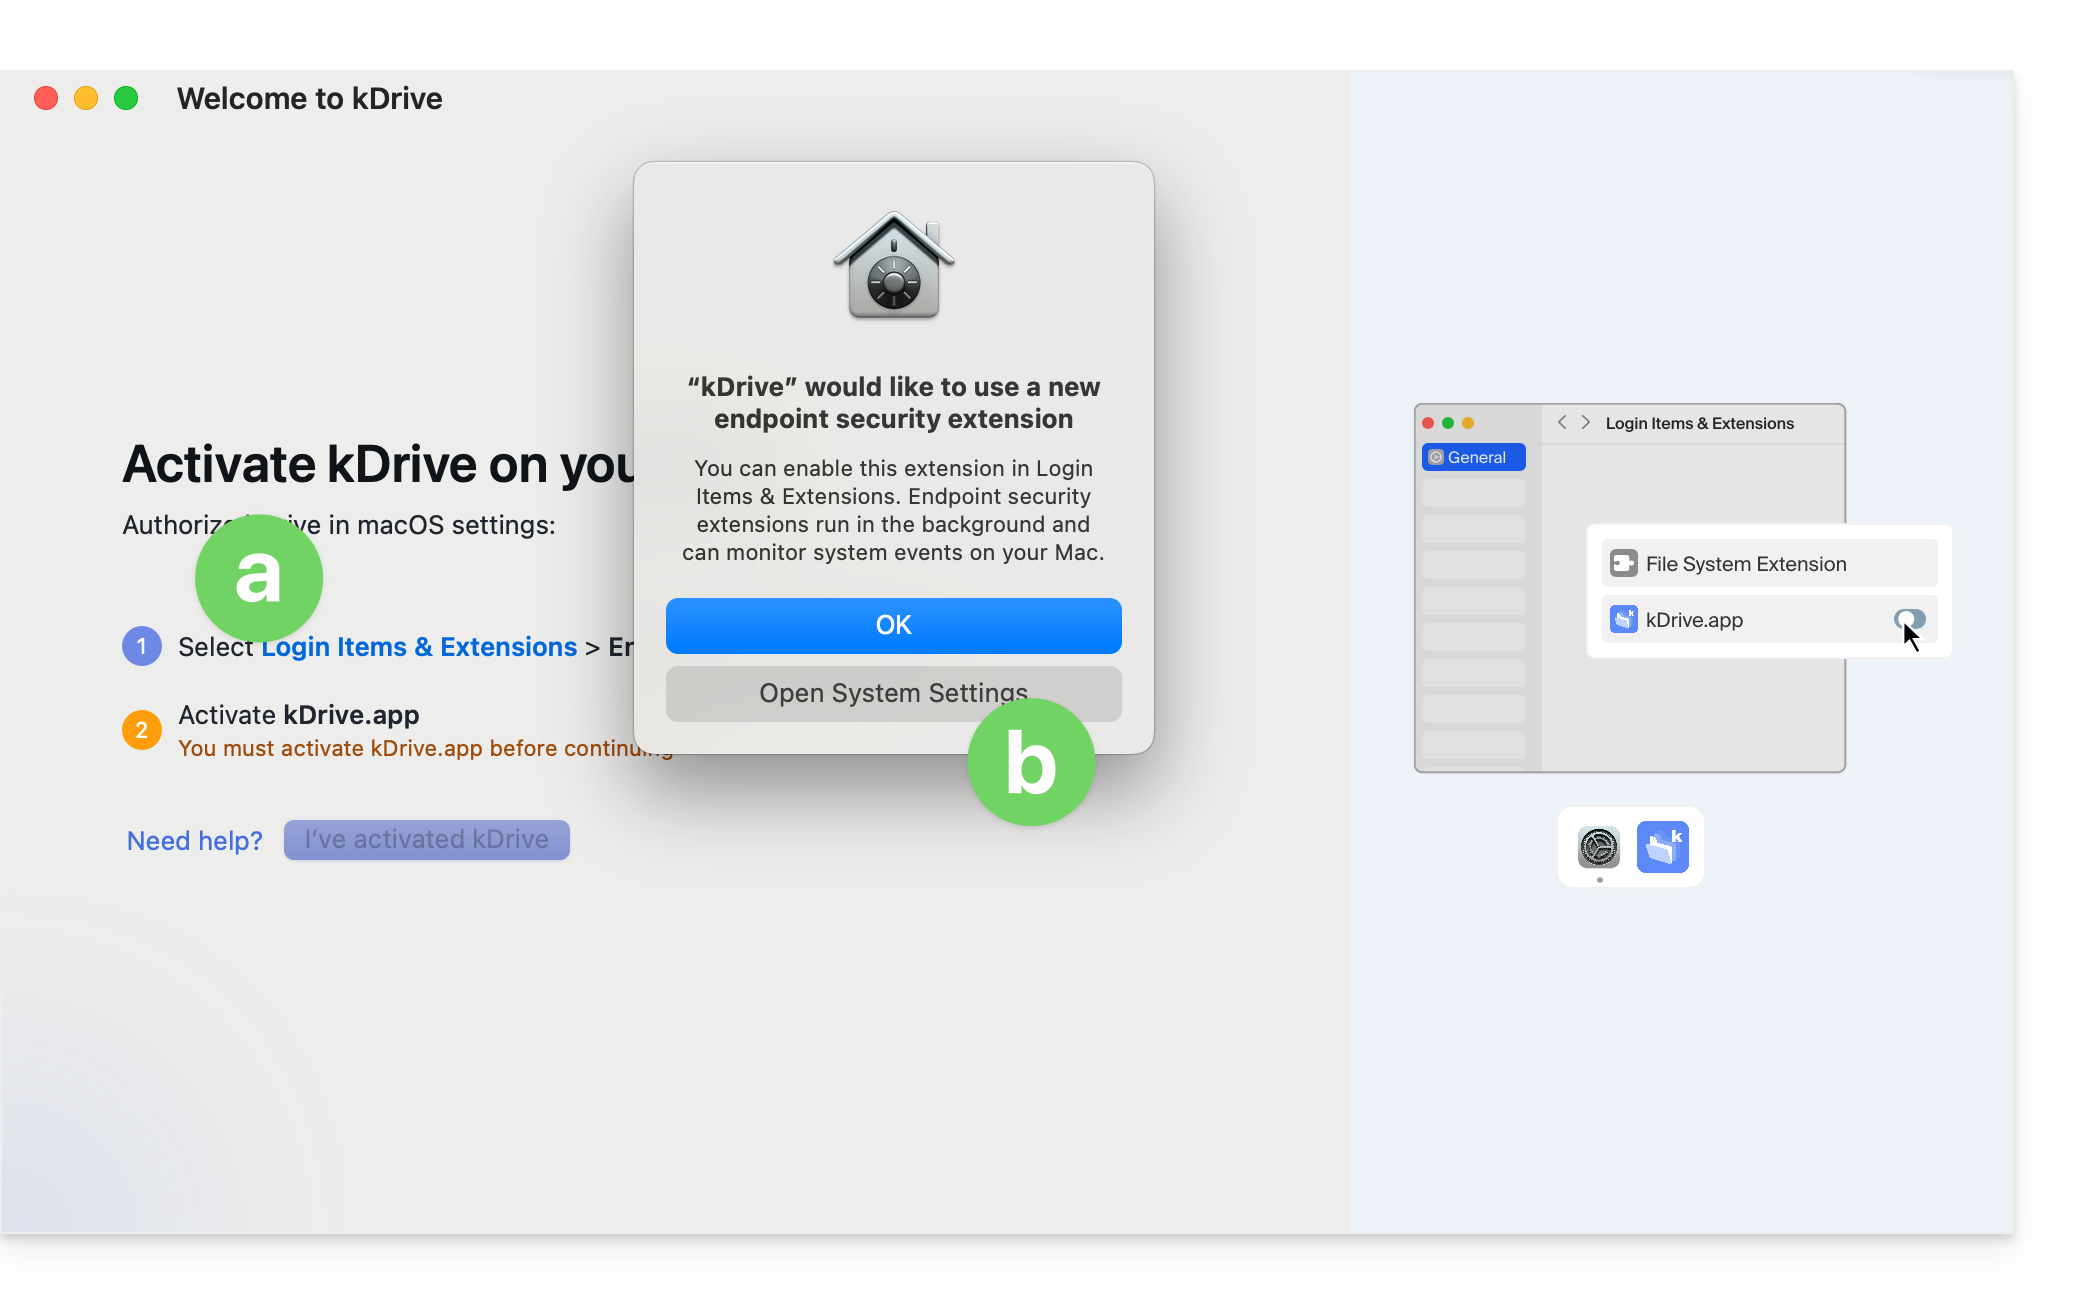
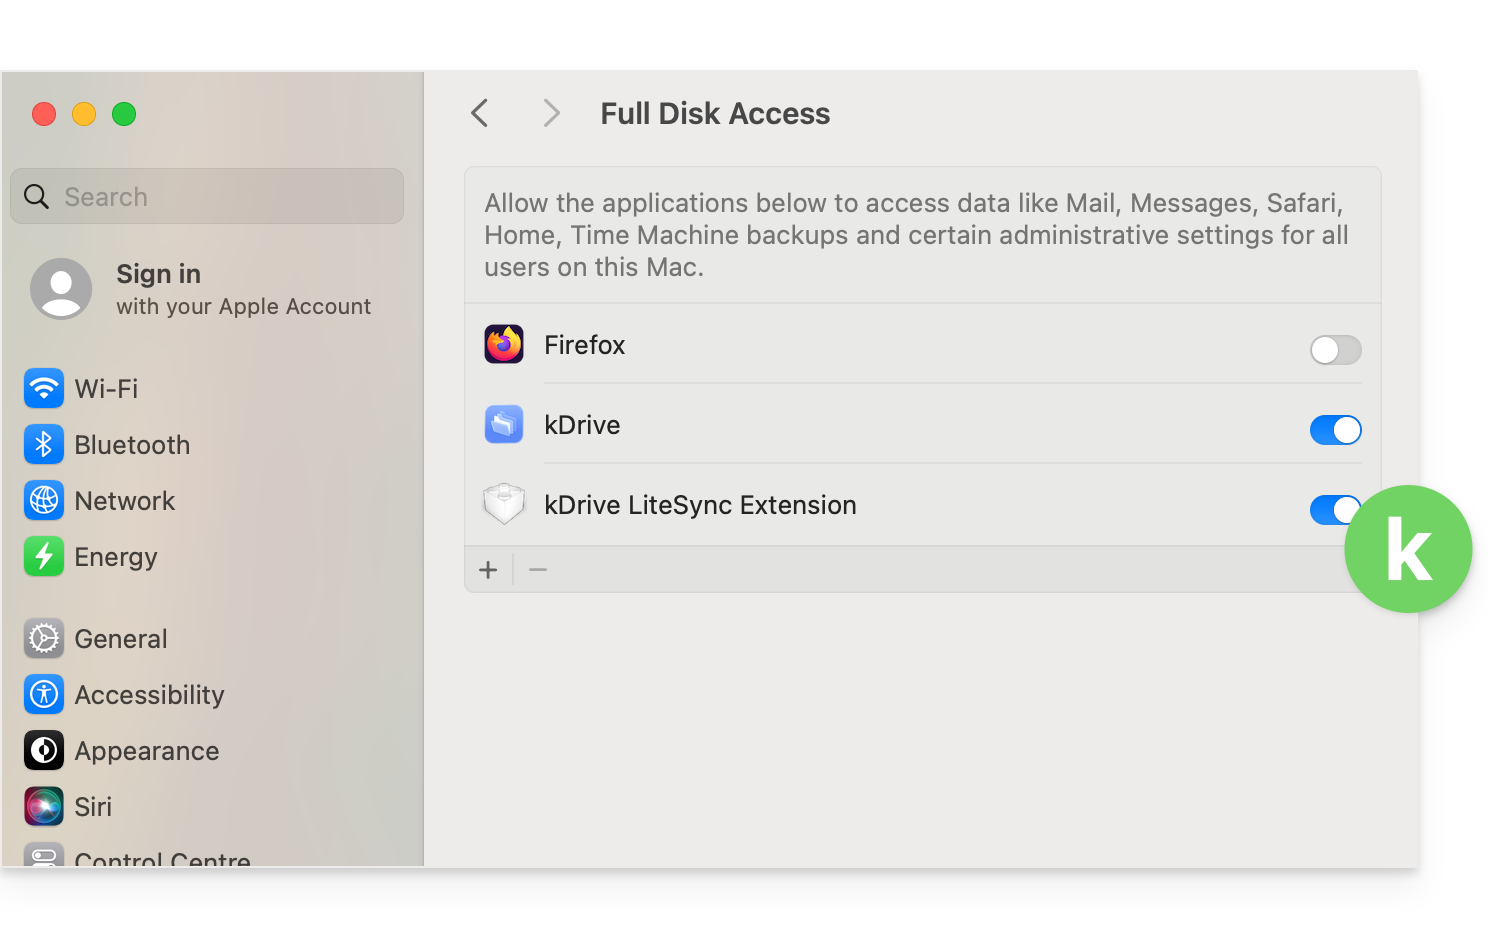
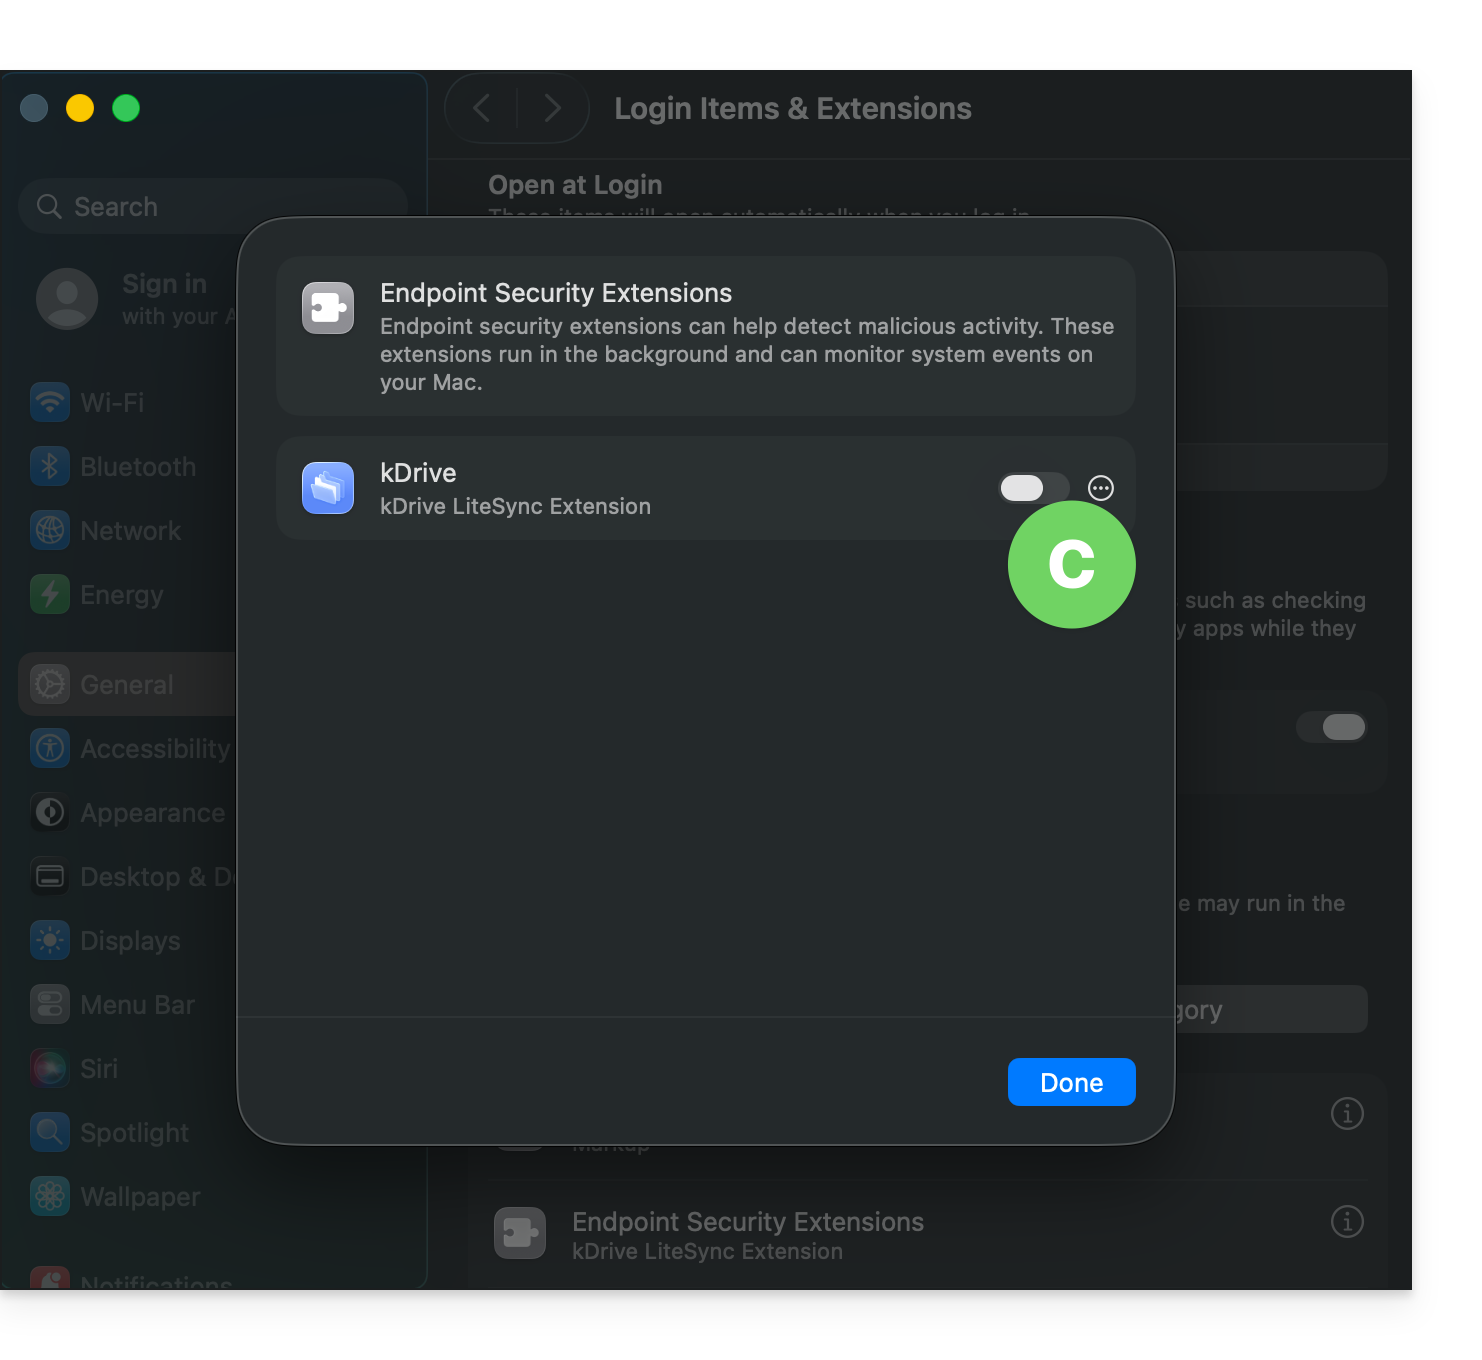
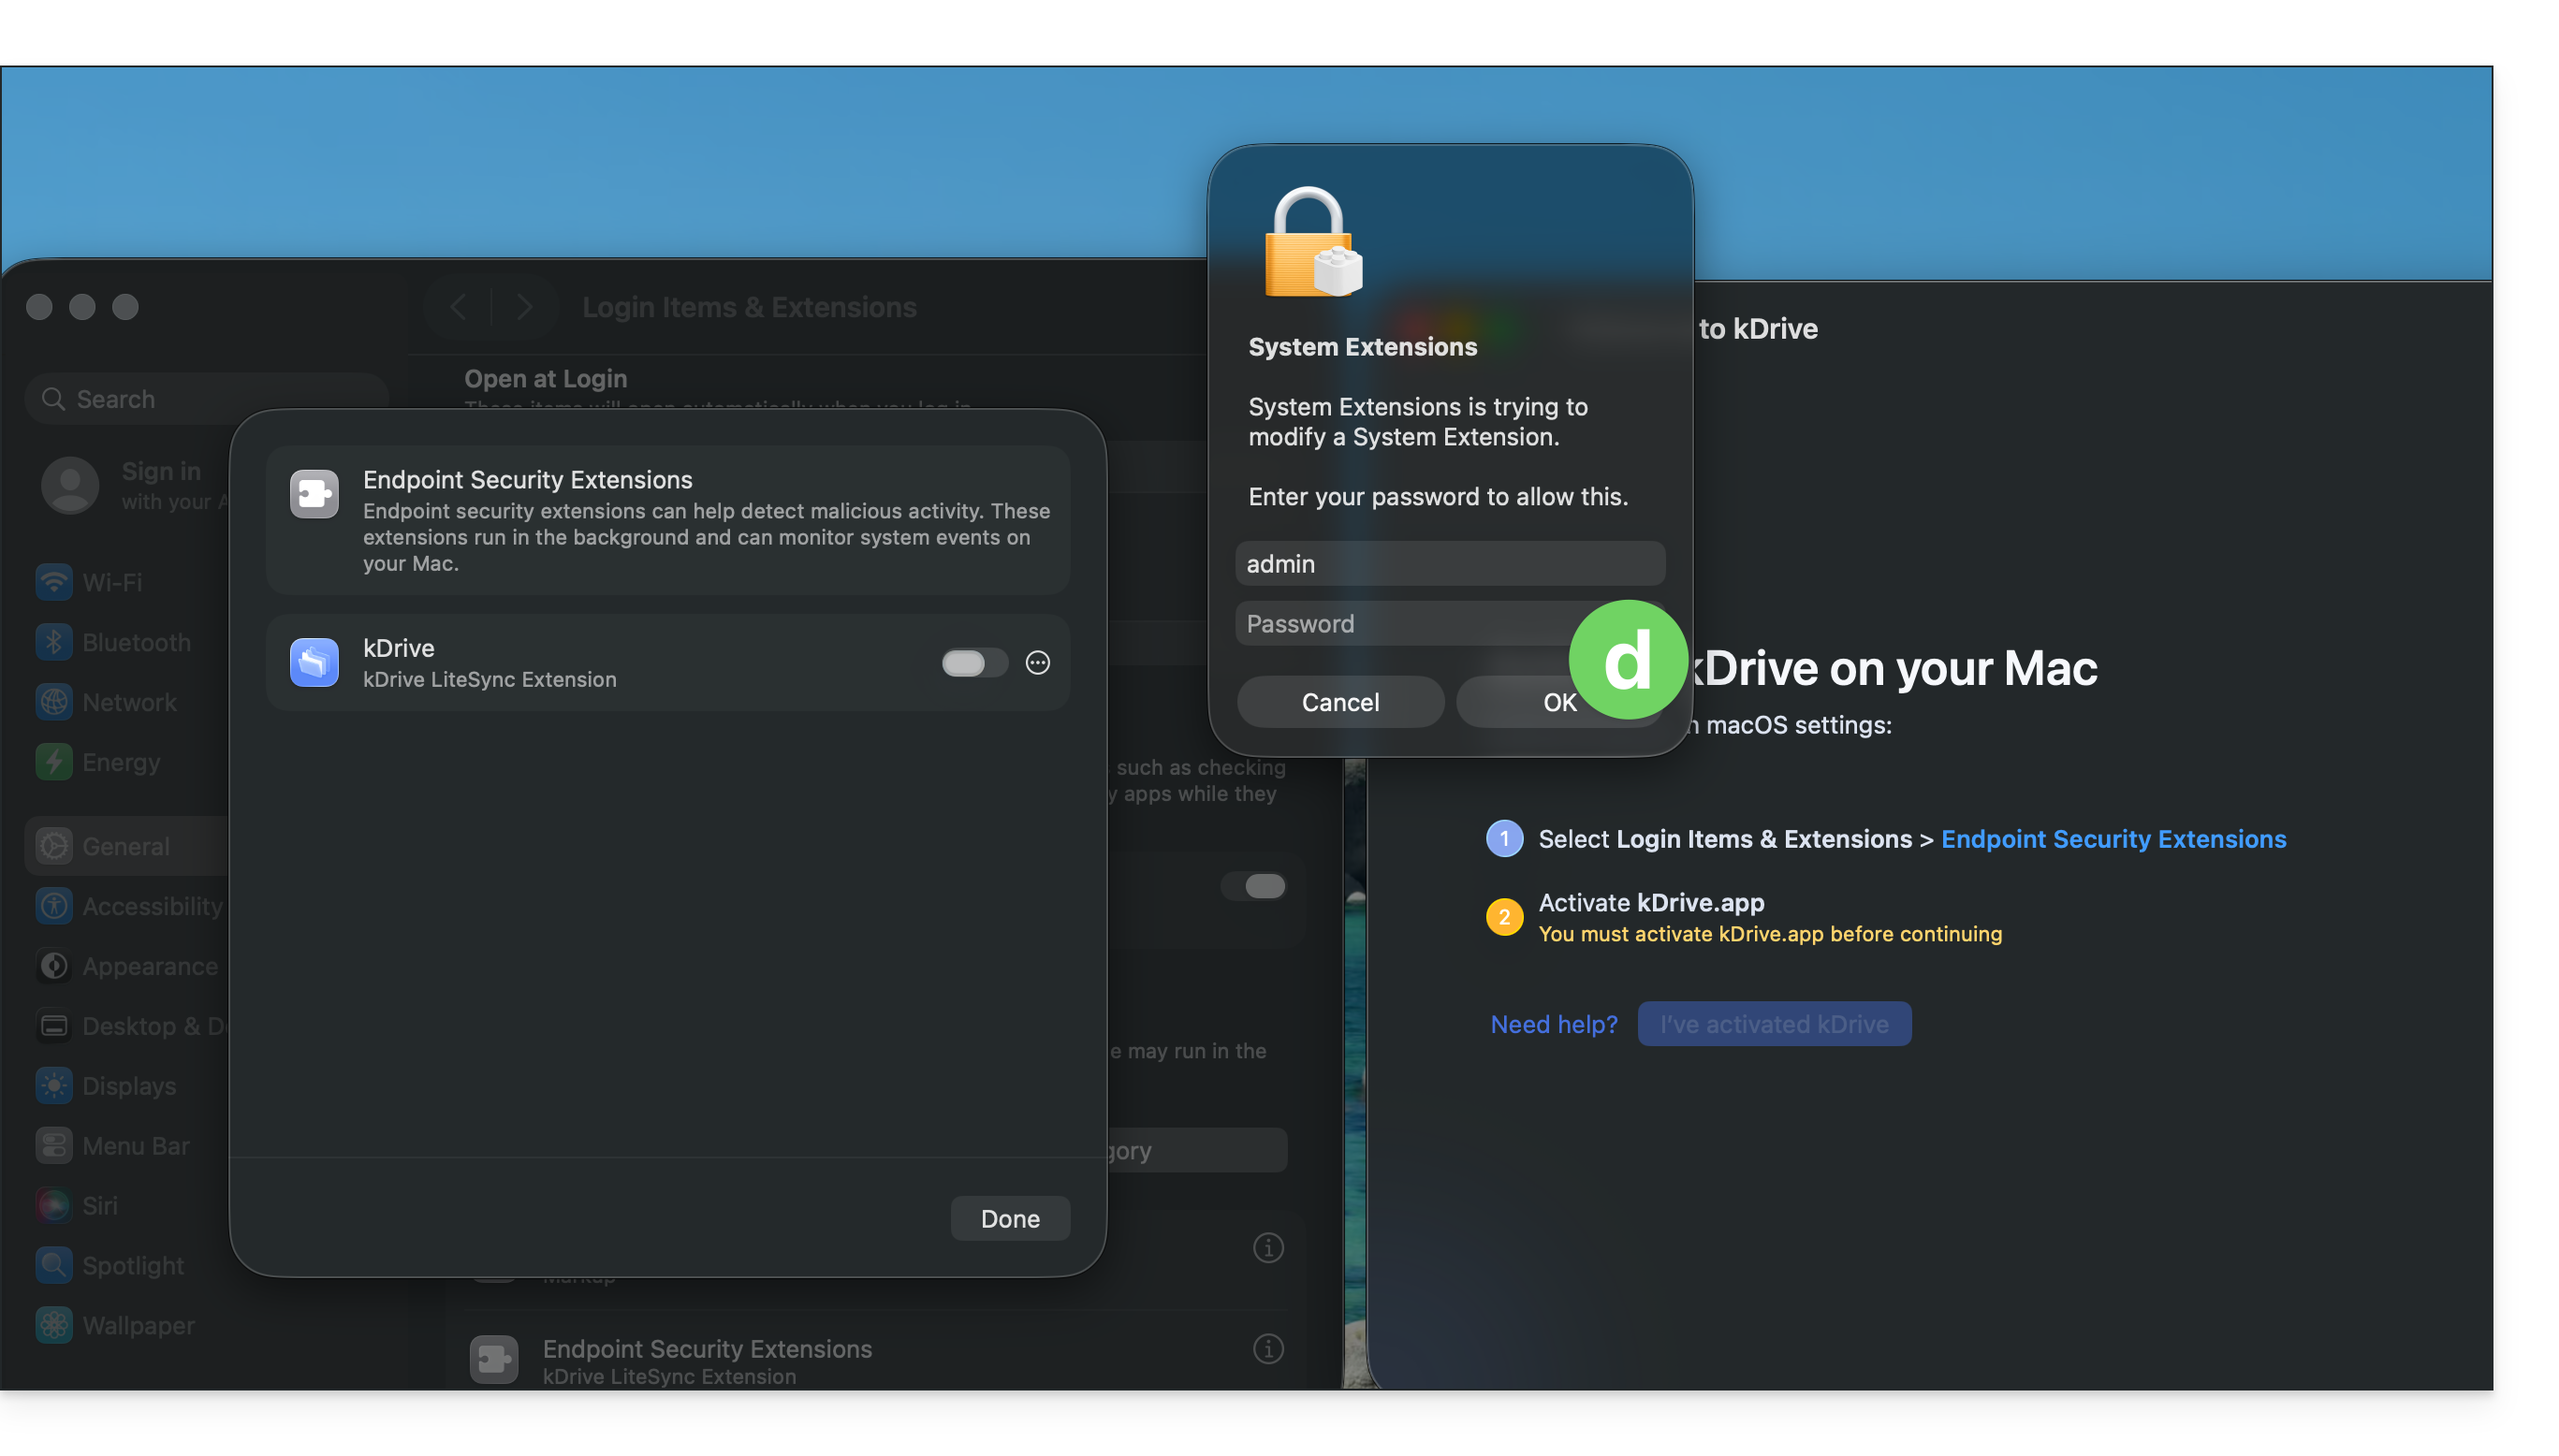
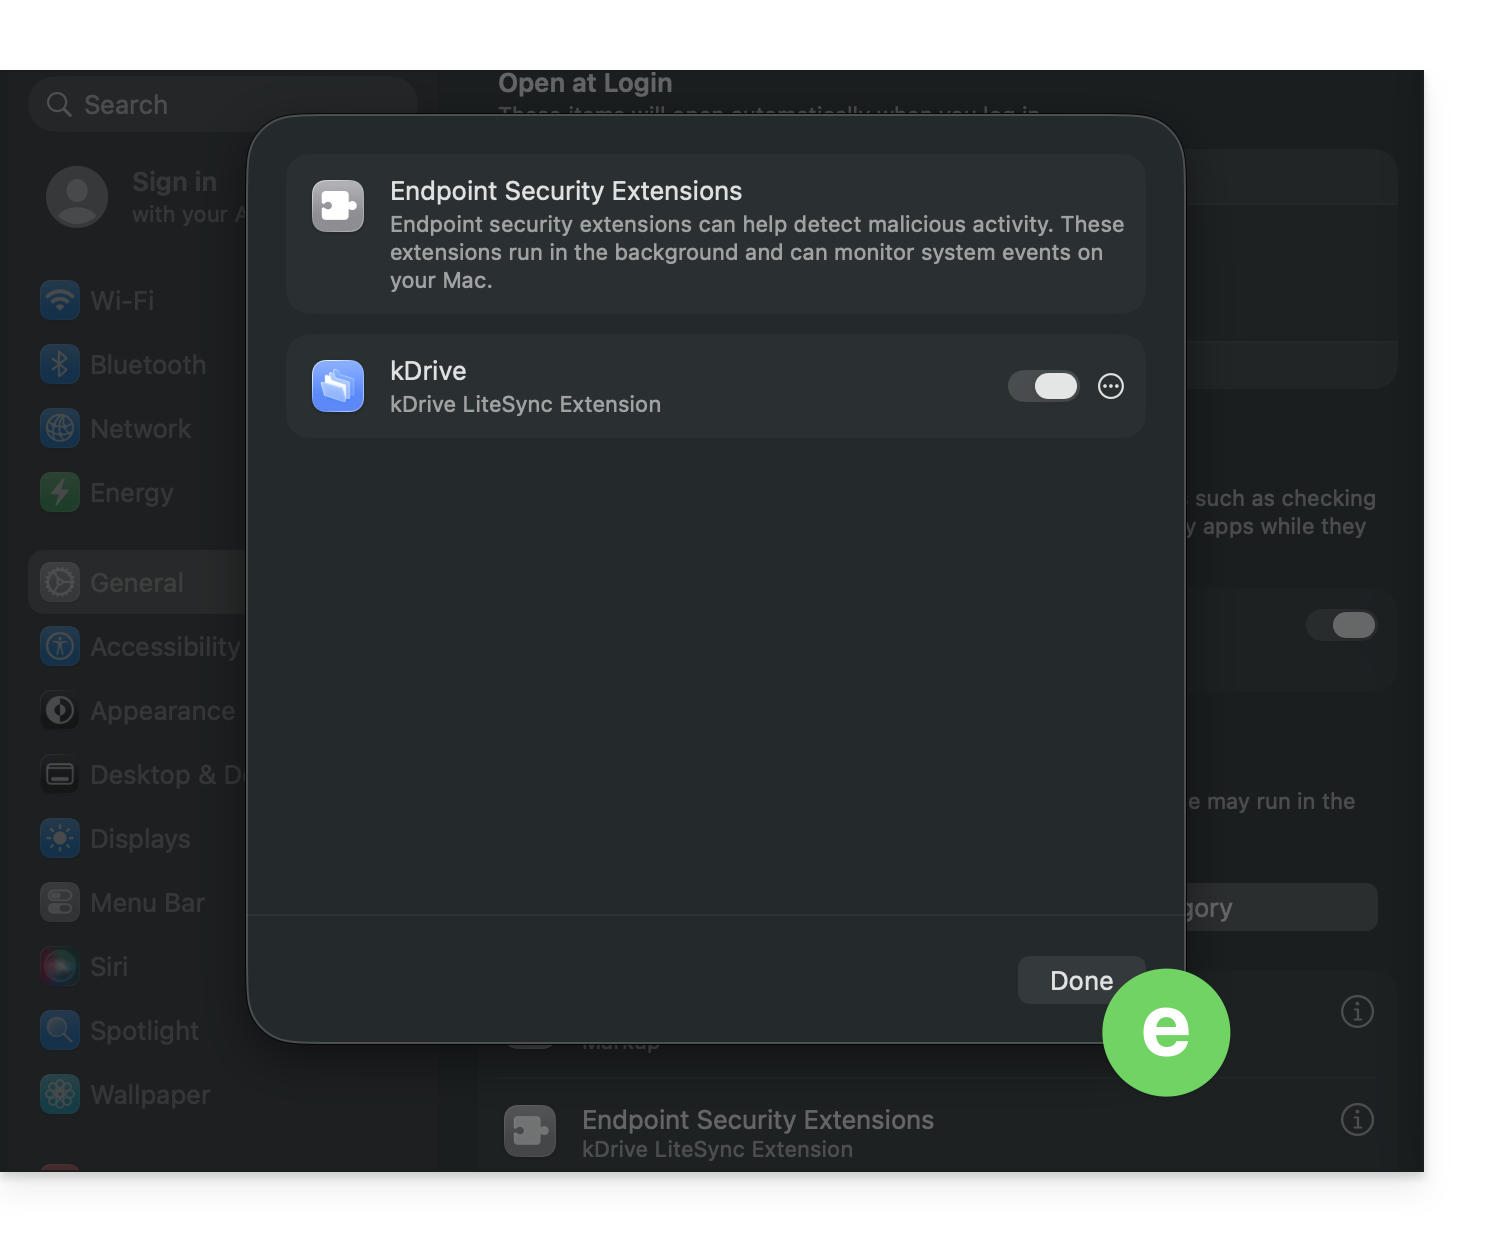
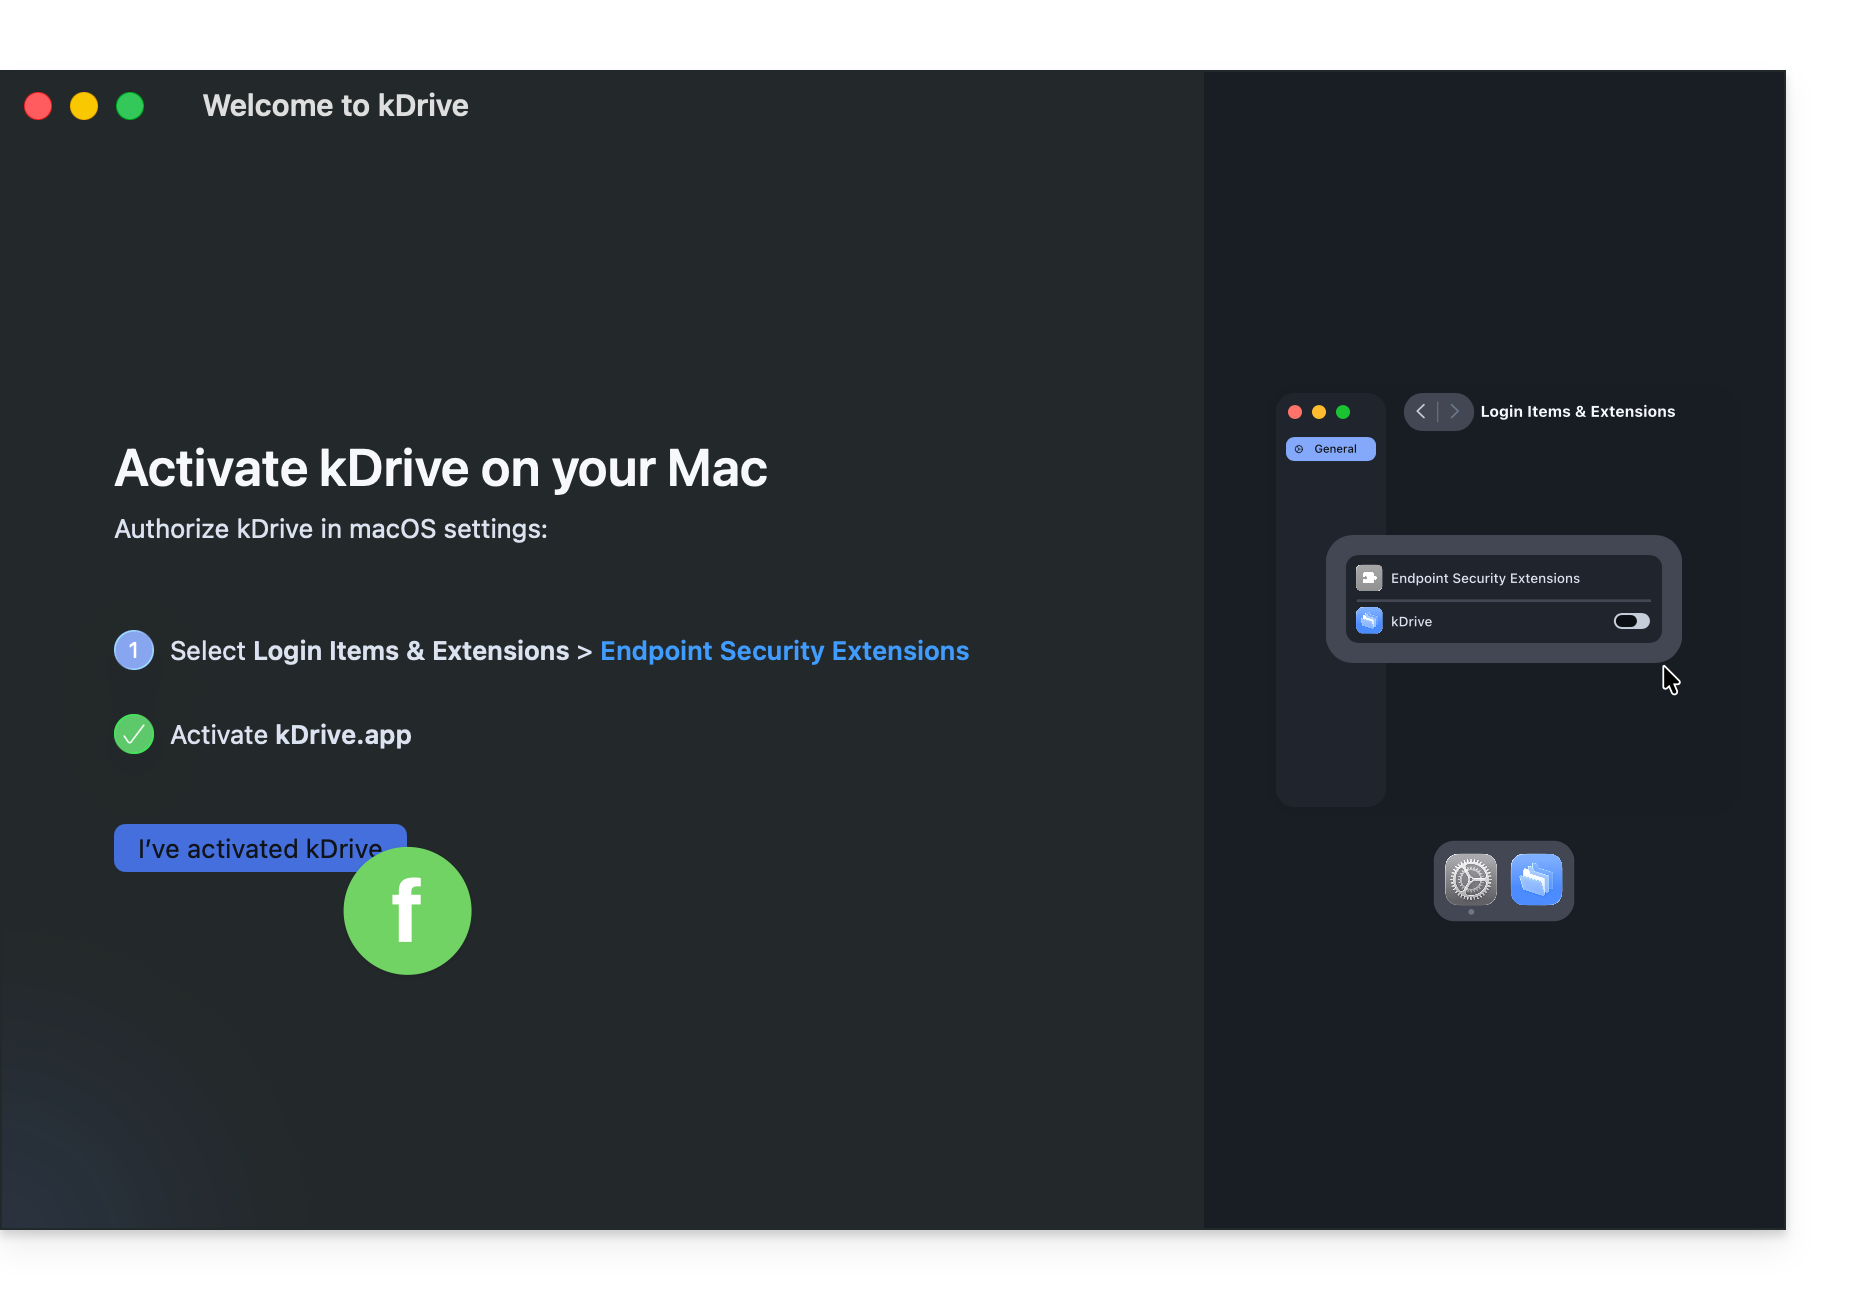
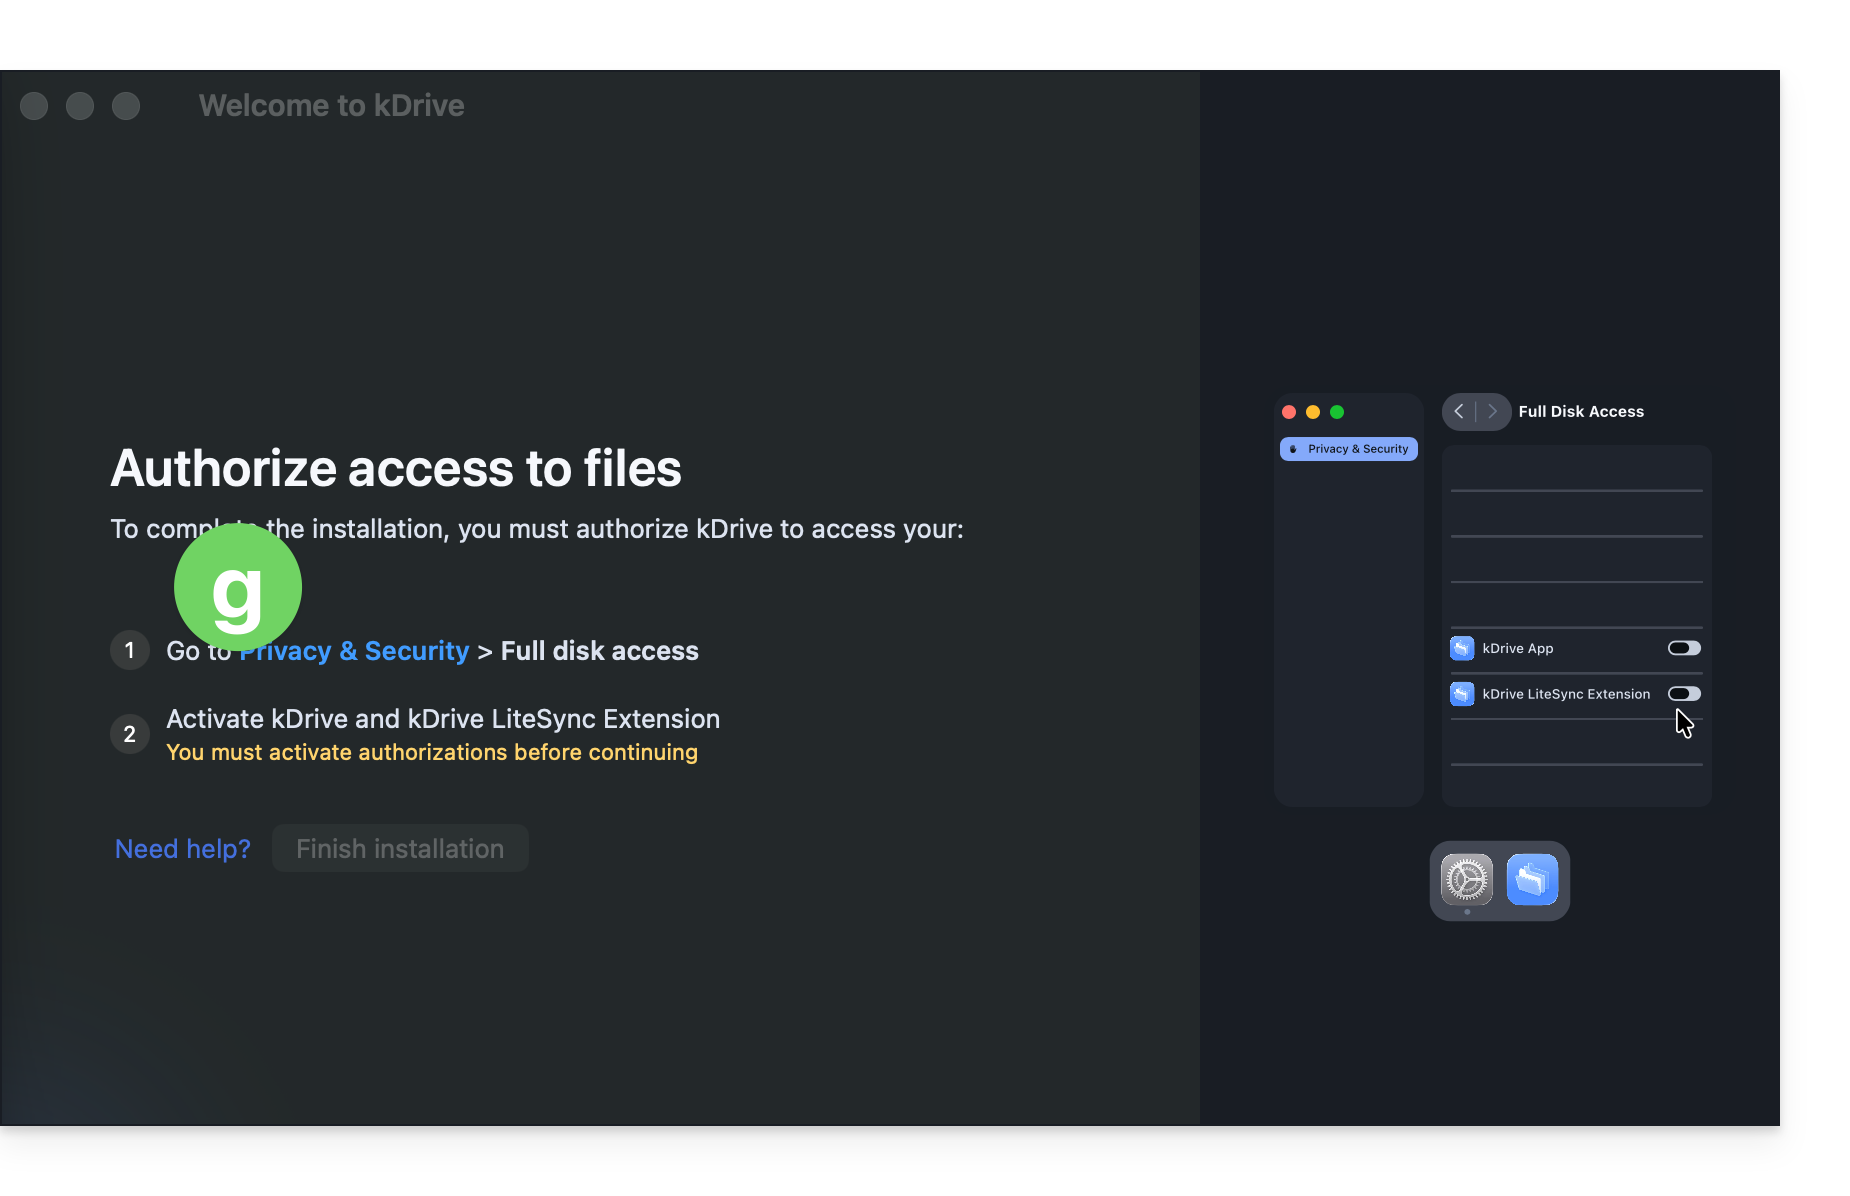
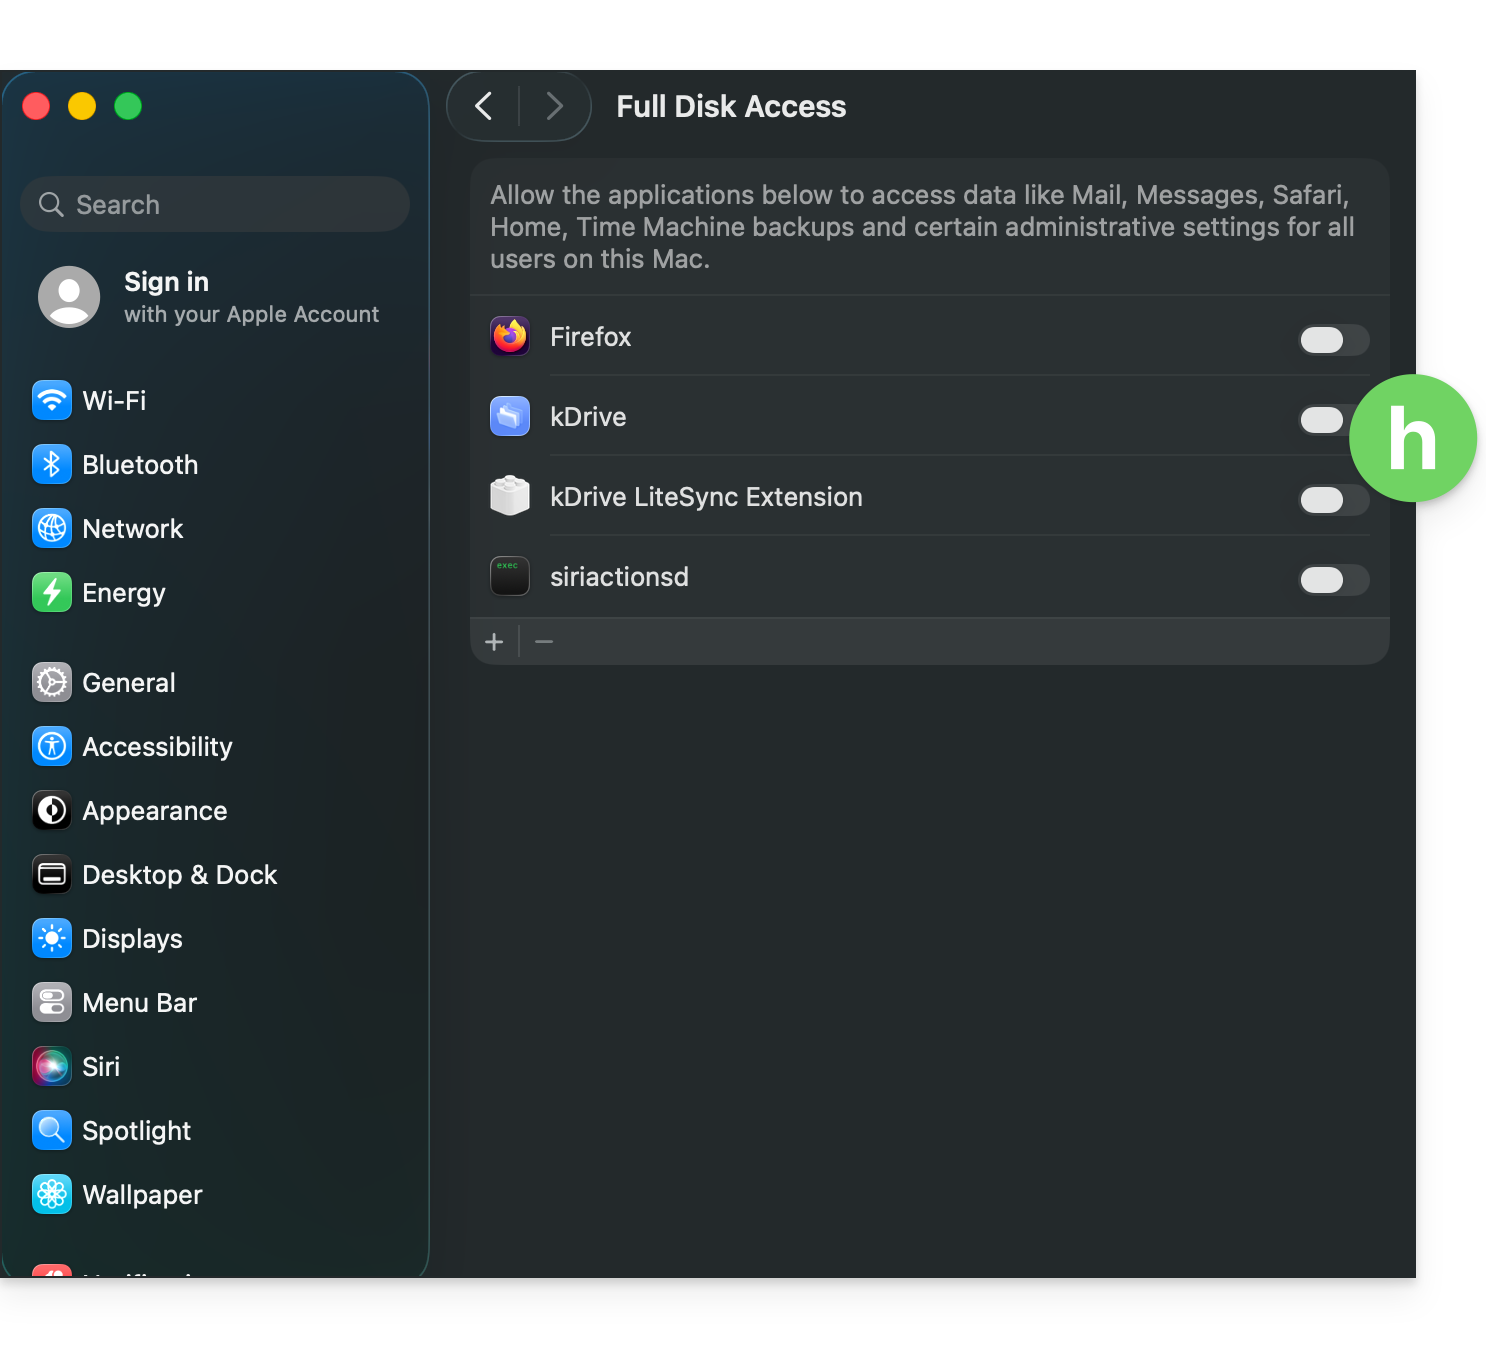
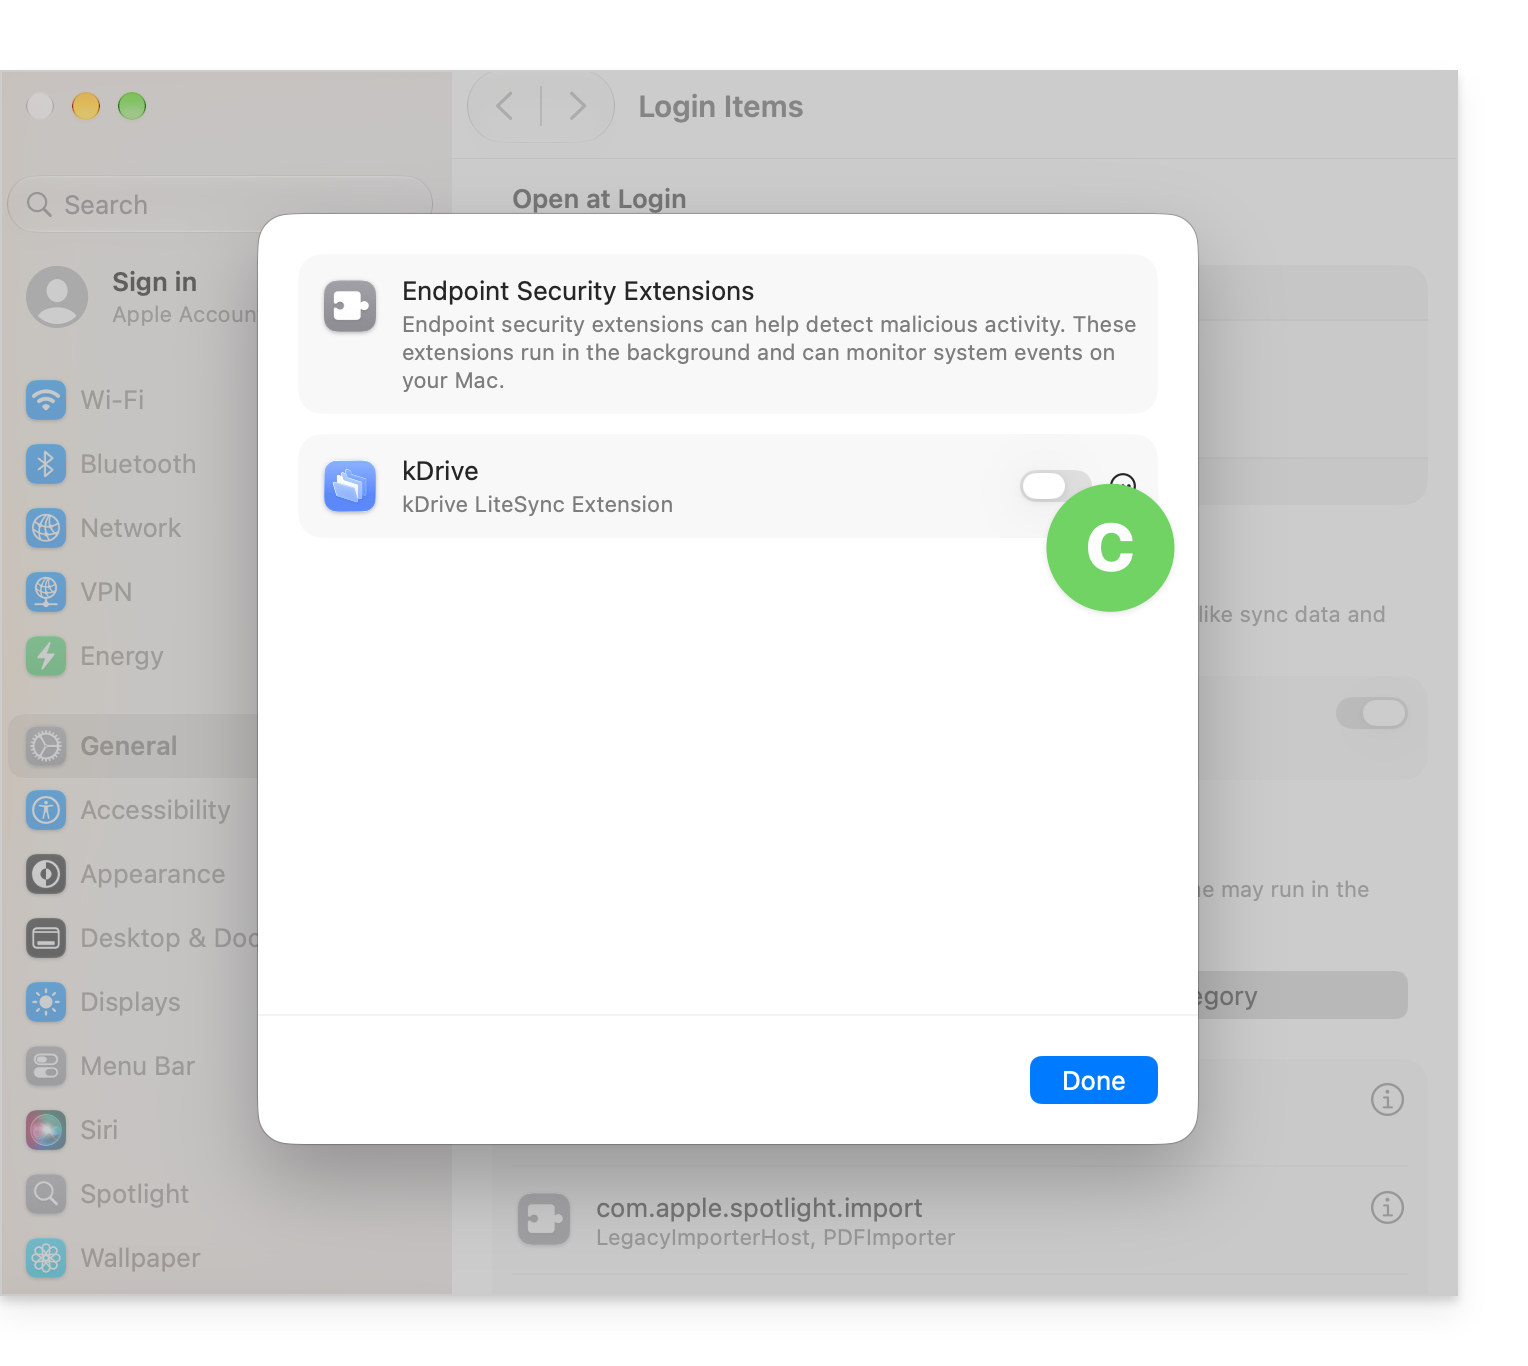
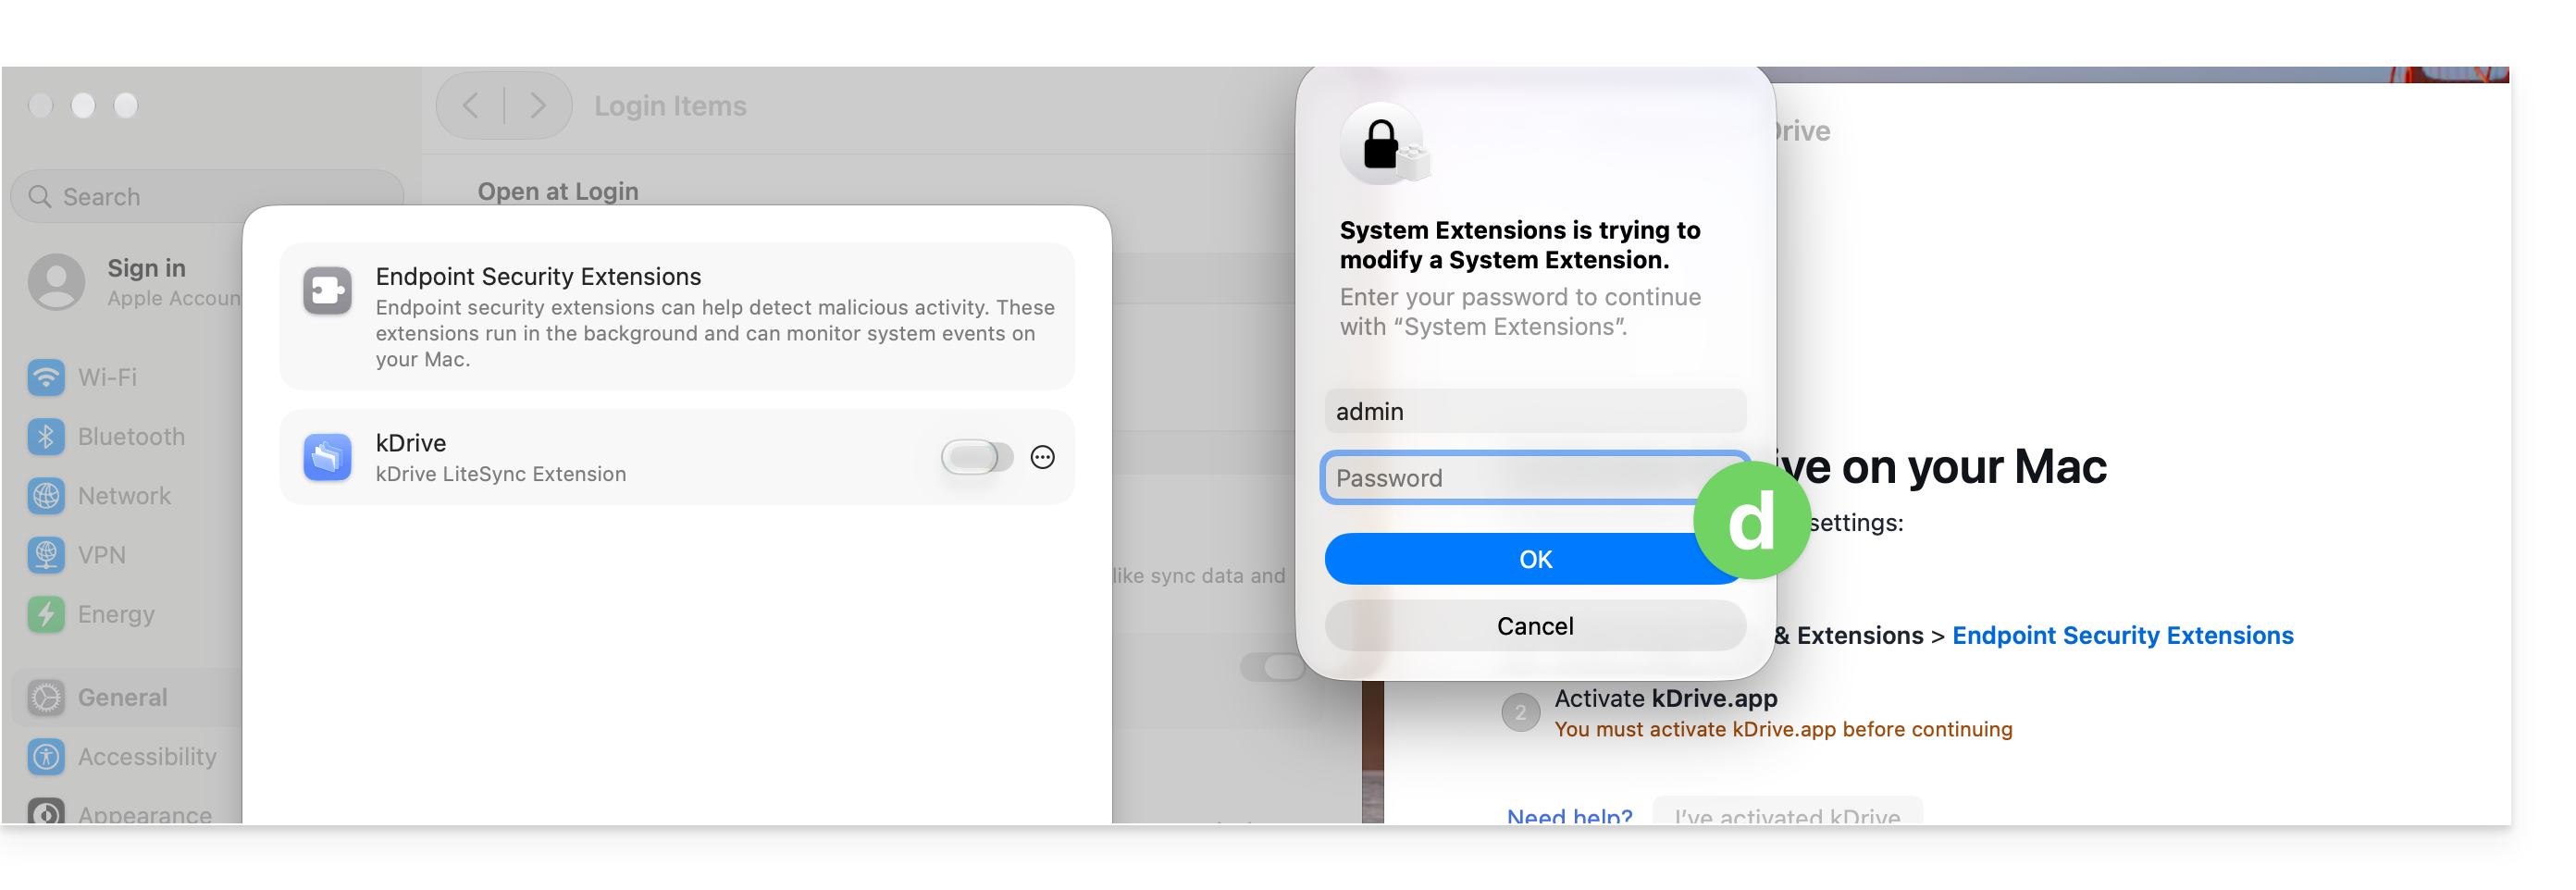
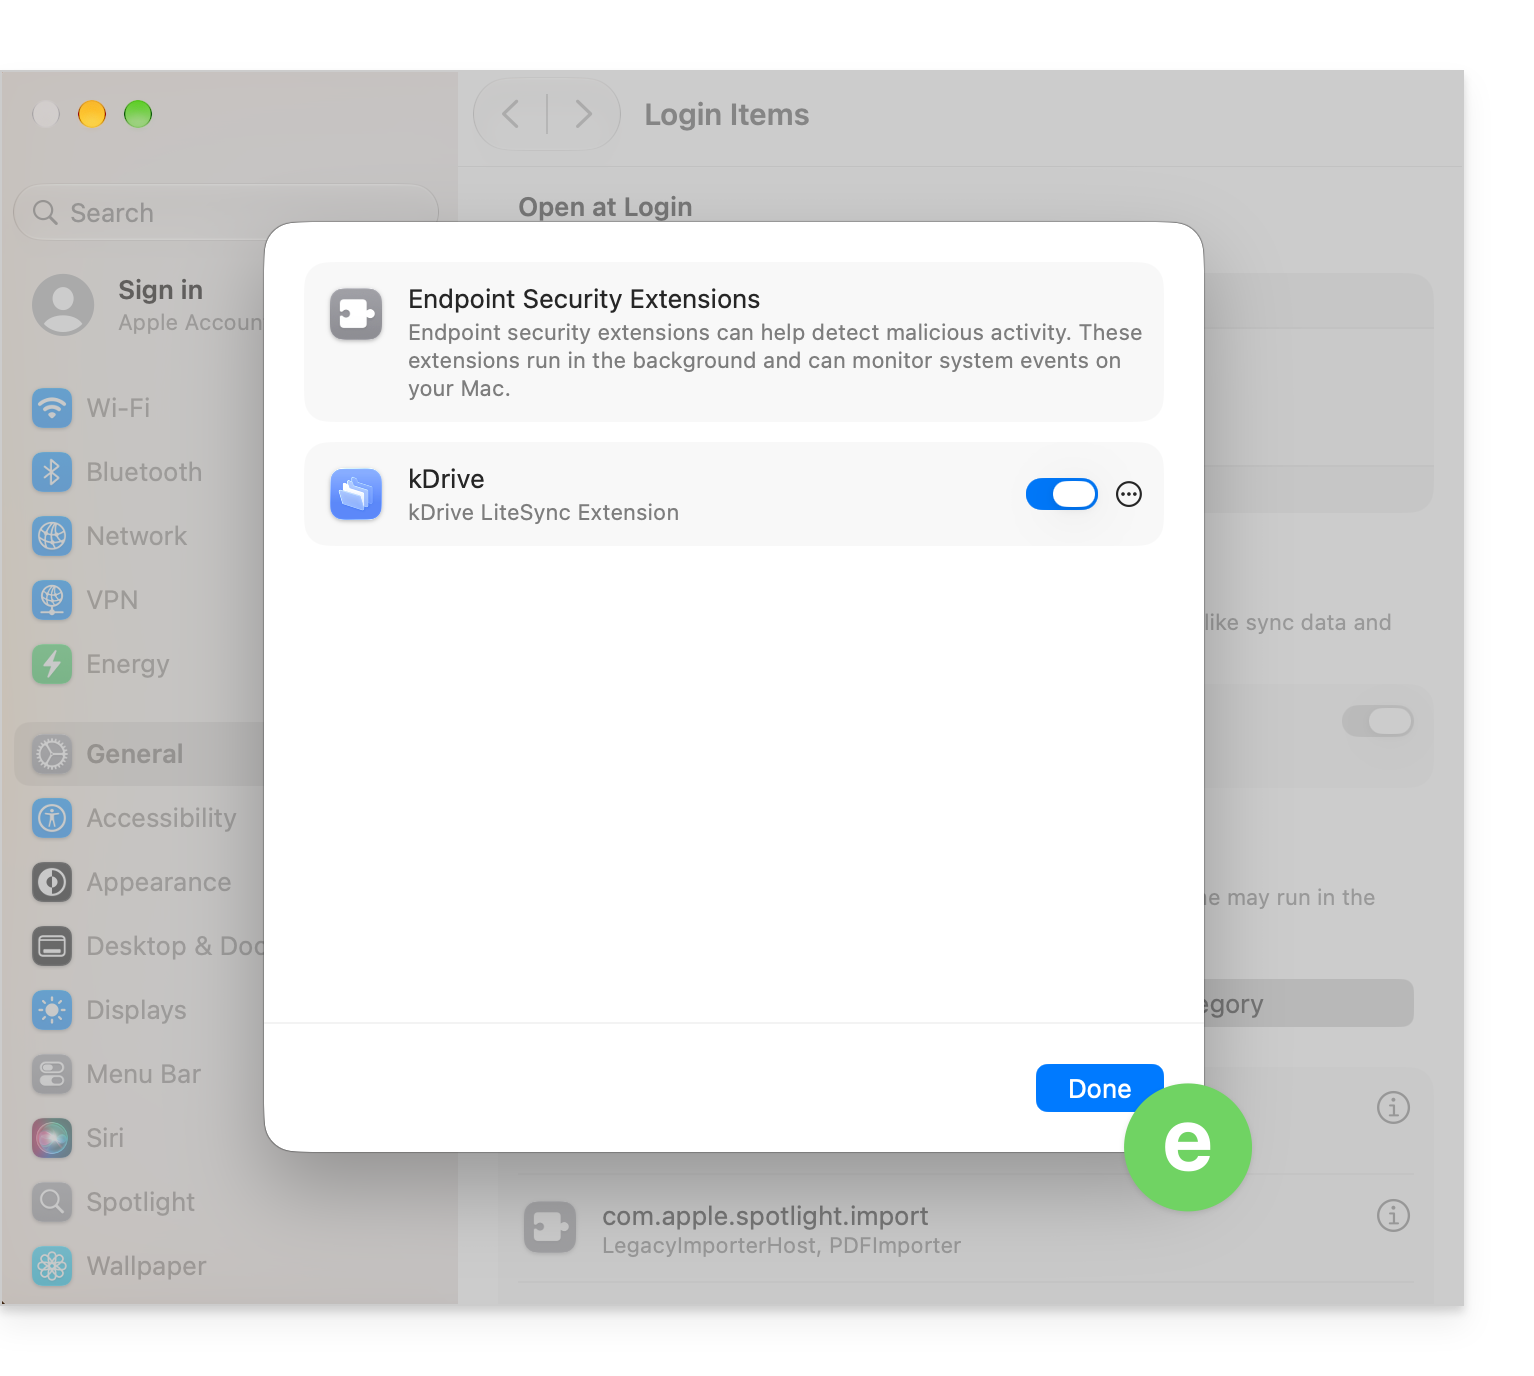
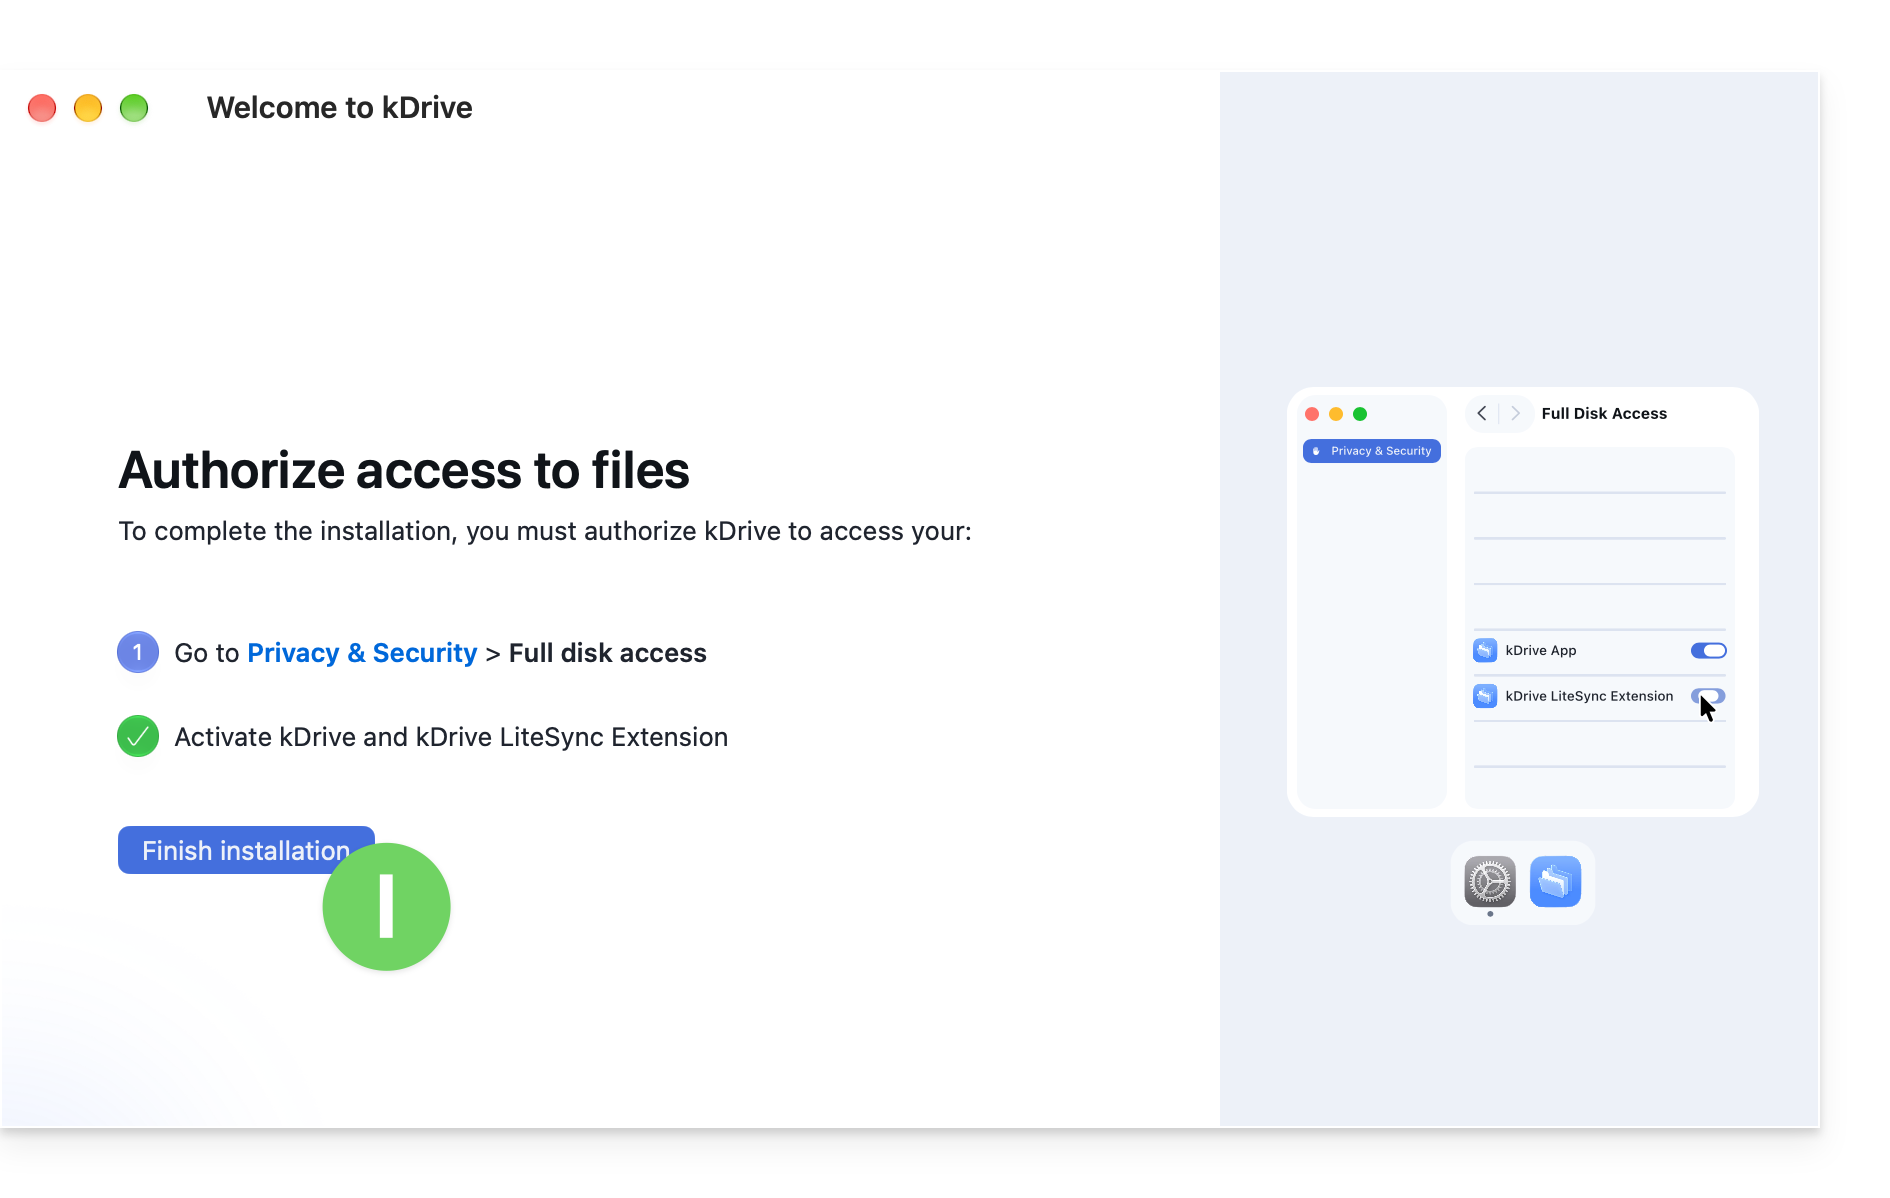
- It is essential to complete the requested authorization process. To do this, simply click the button to open the system settings and then activate the toggle switch for kDrive LiteSync Extension:
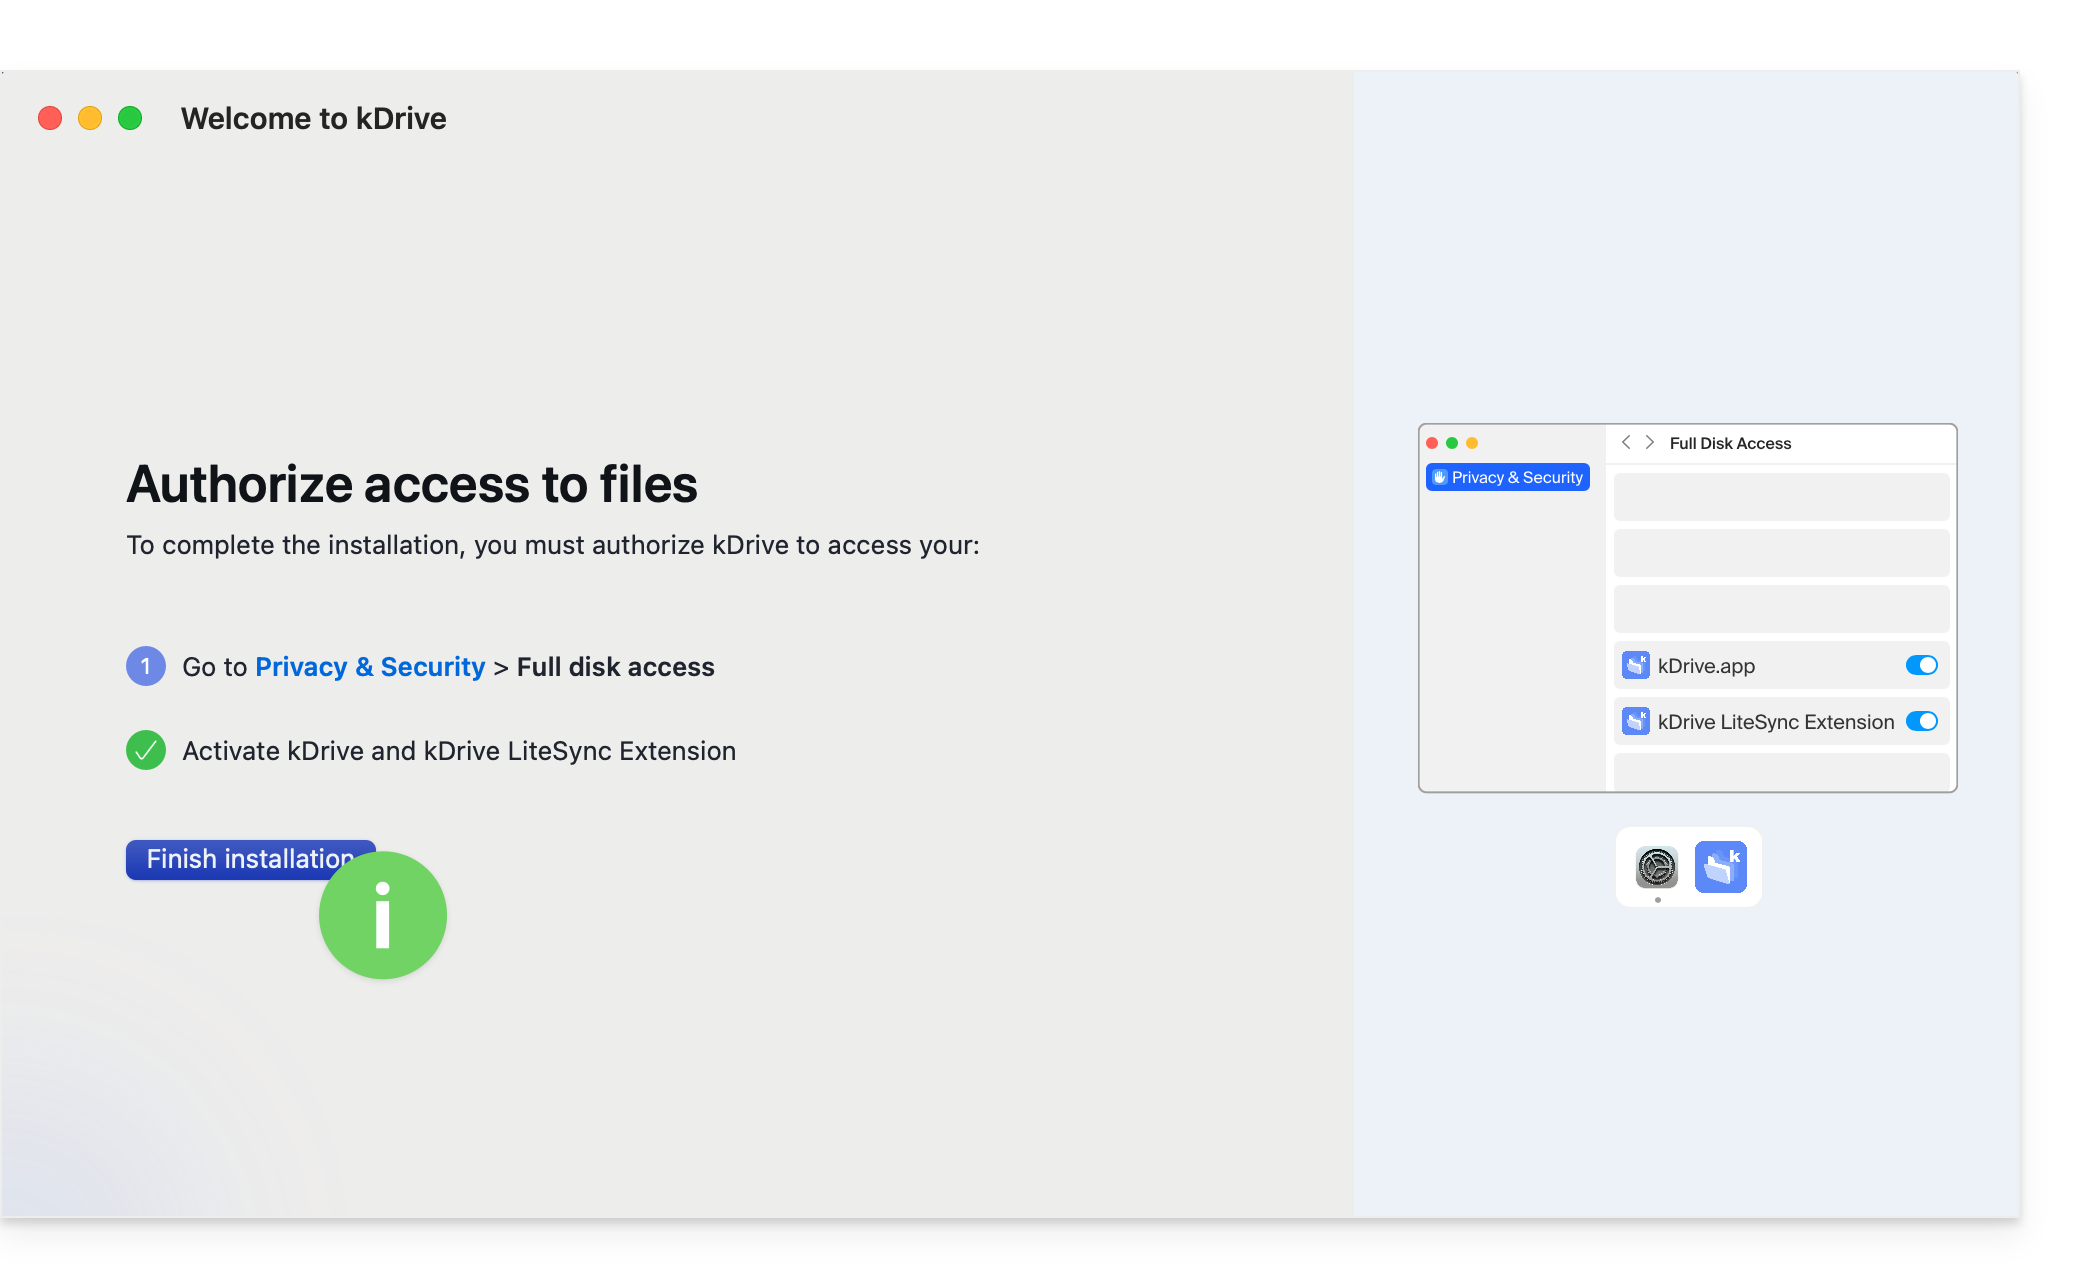
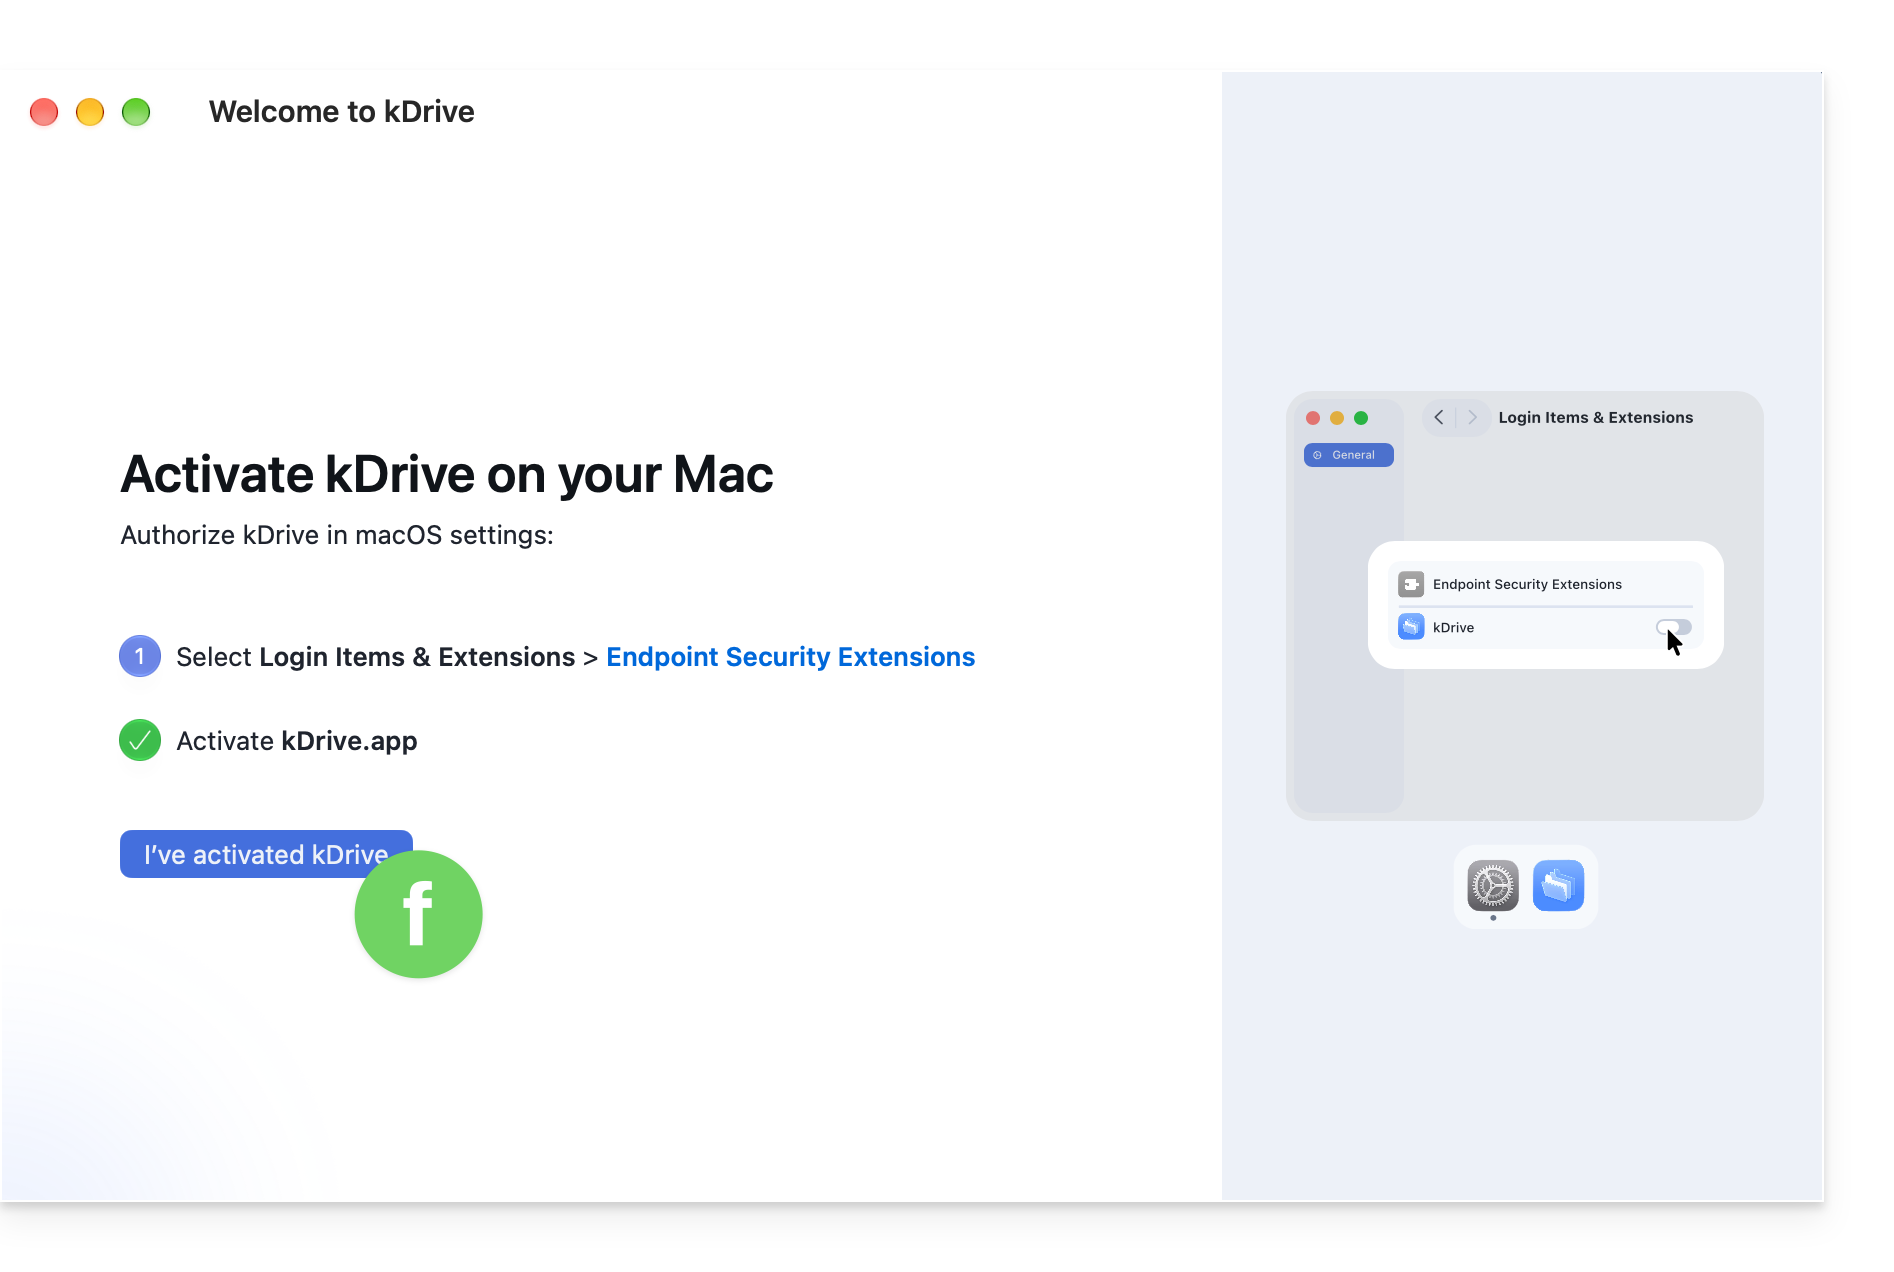
- Go back to the configuration window and click the button to confirm that you have made the requested change in the macOS system settings:
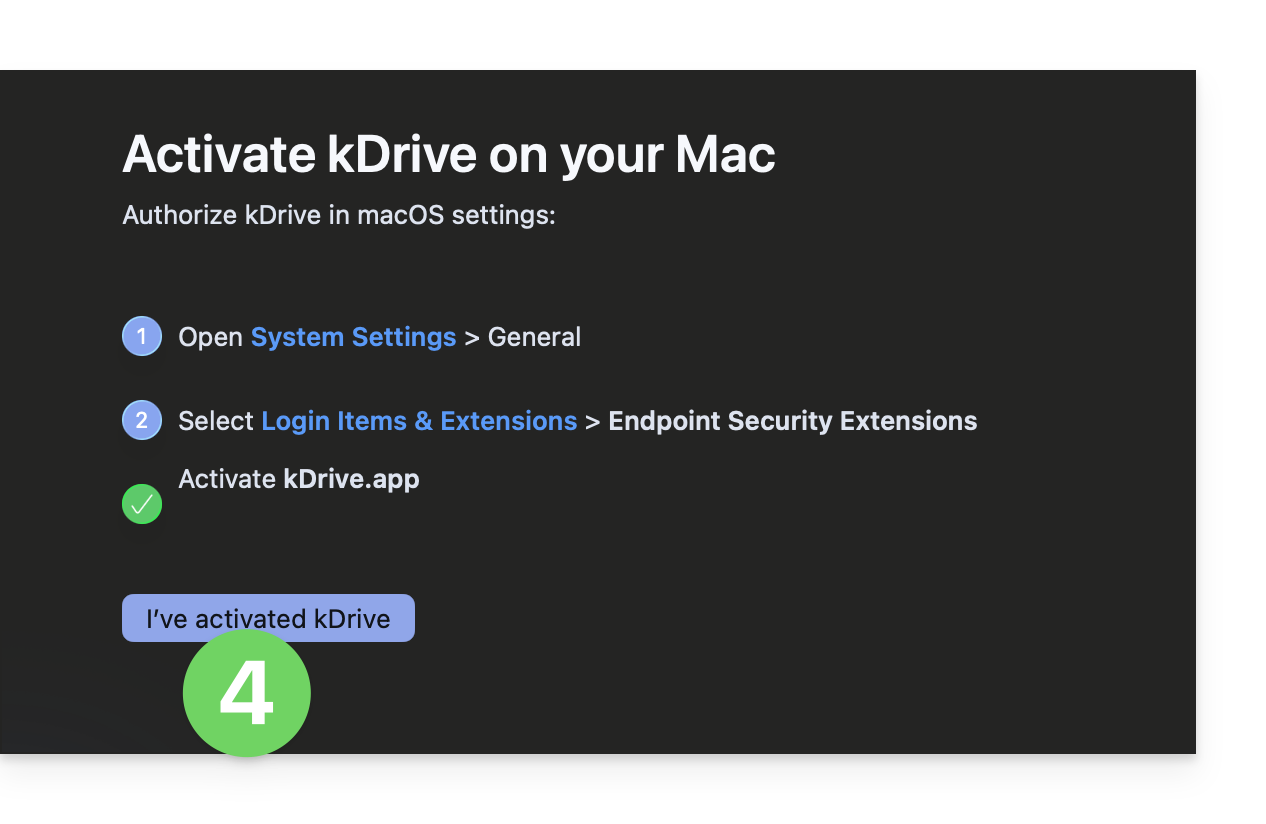
- If the button remains inactive, refer to the last chapter of the guide to compare your system configuration and ensure that you have enabled the correct settings.
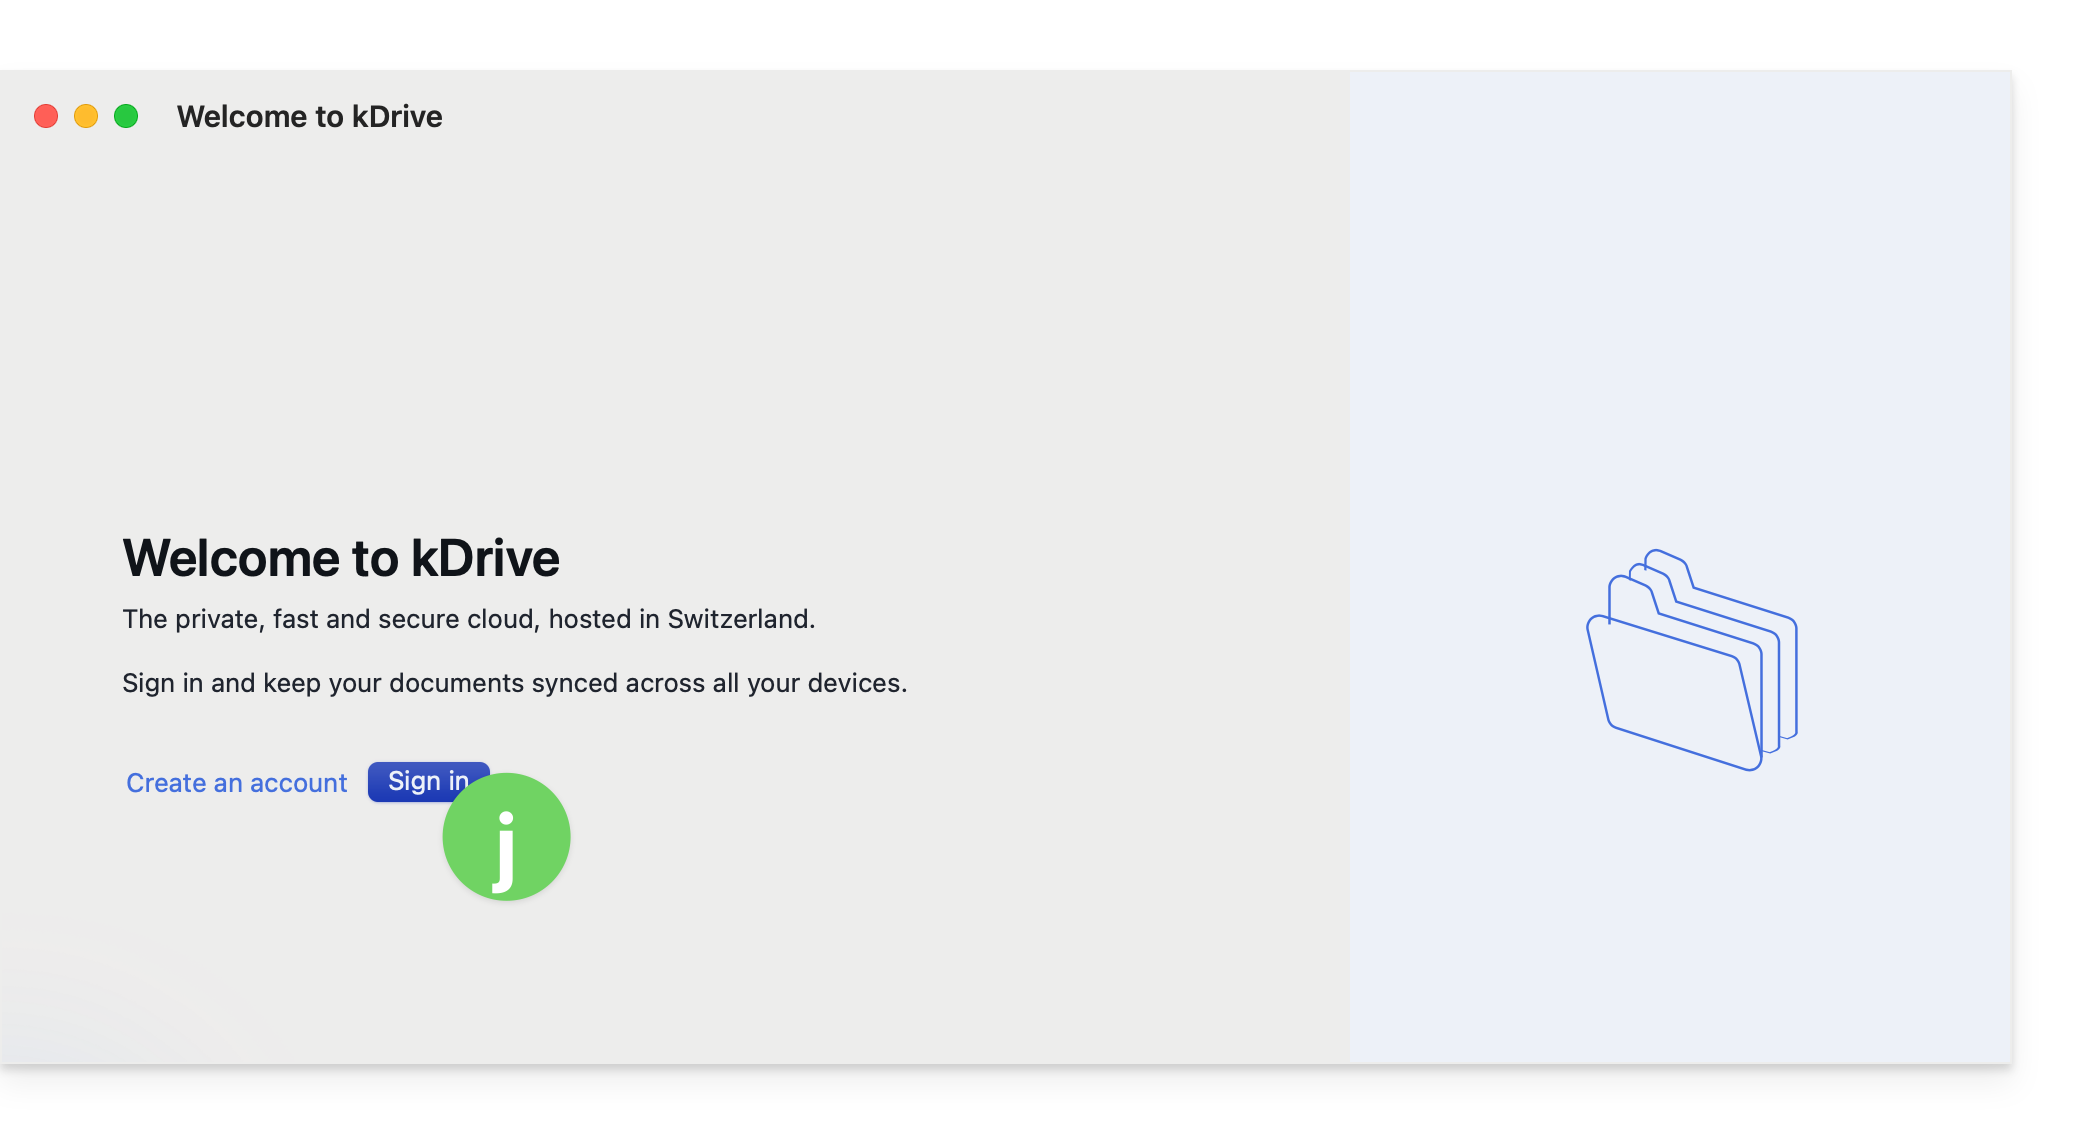
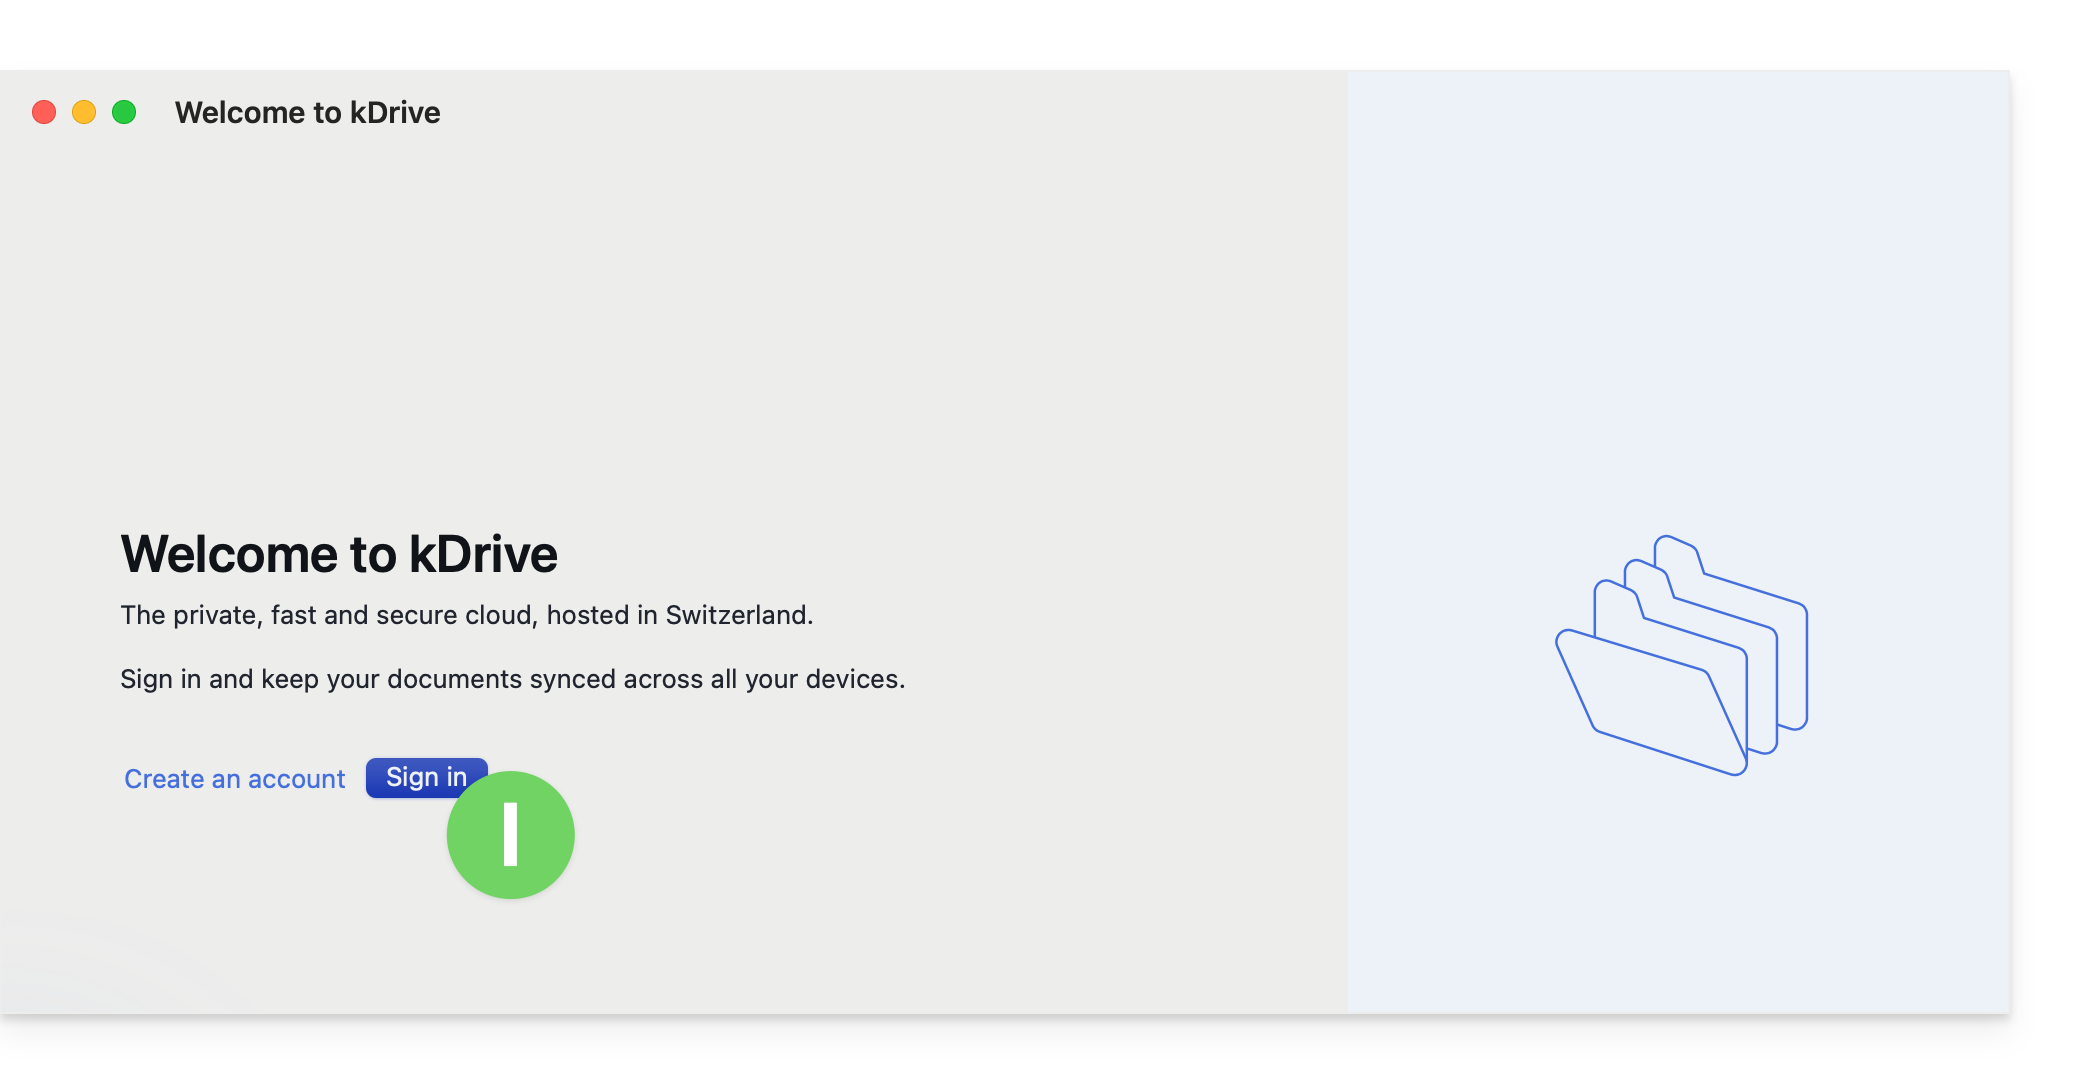
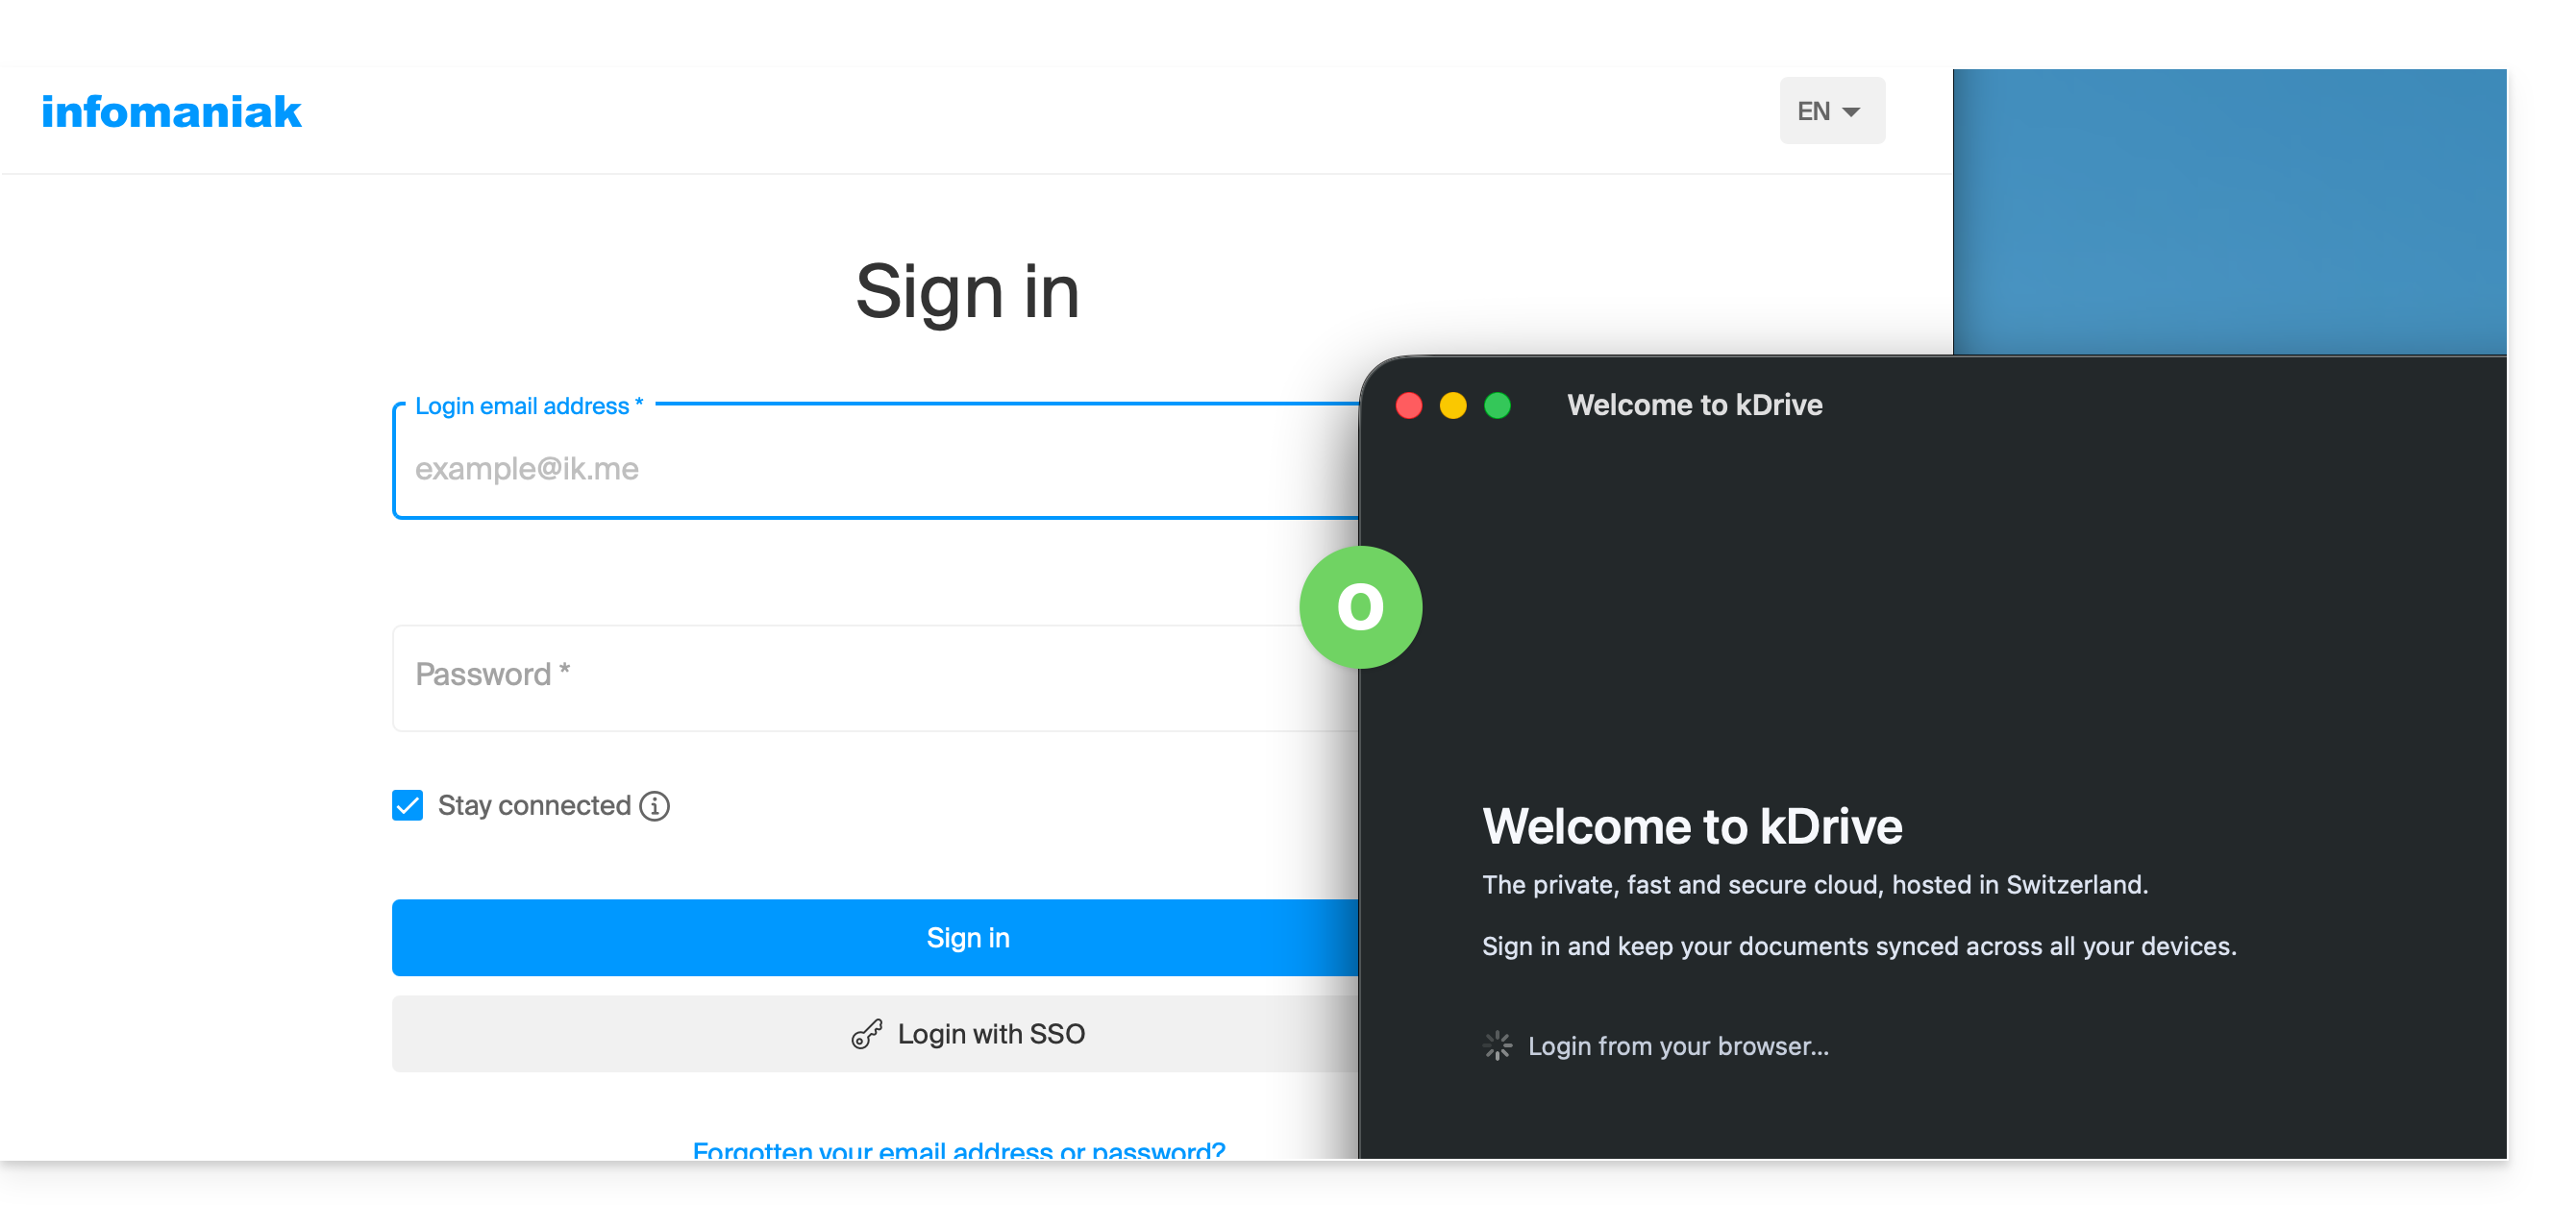
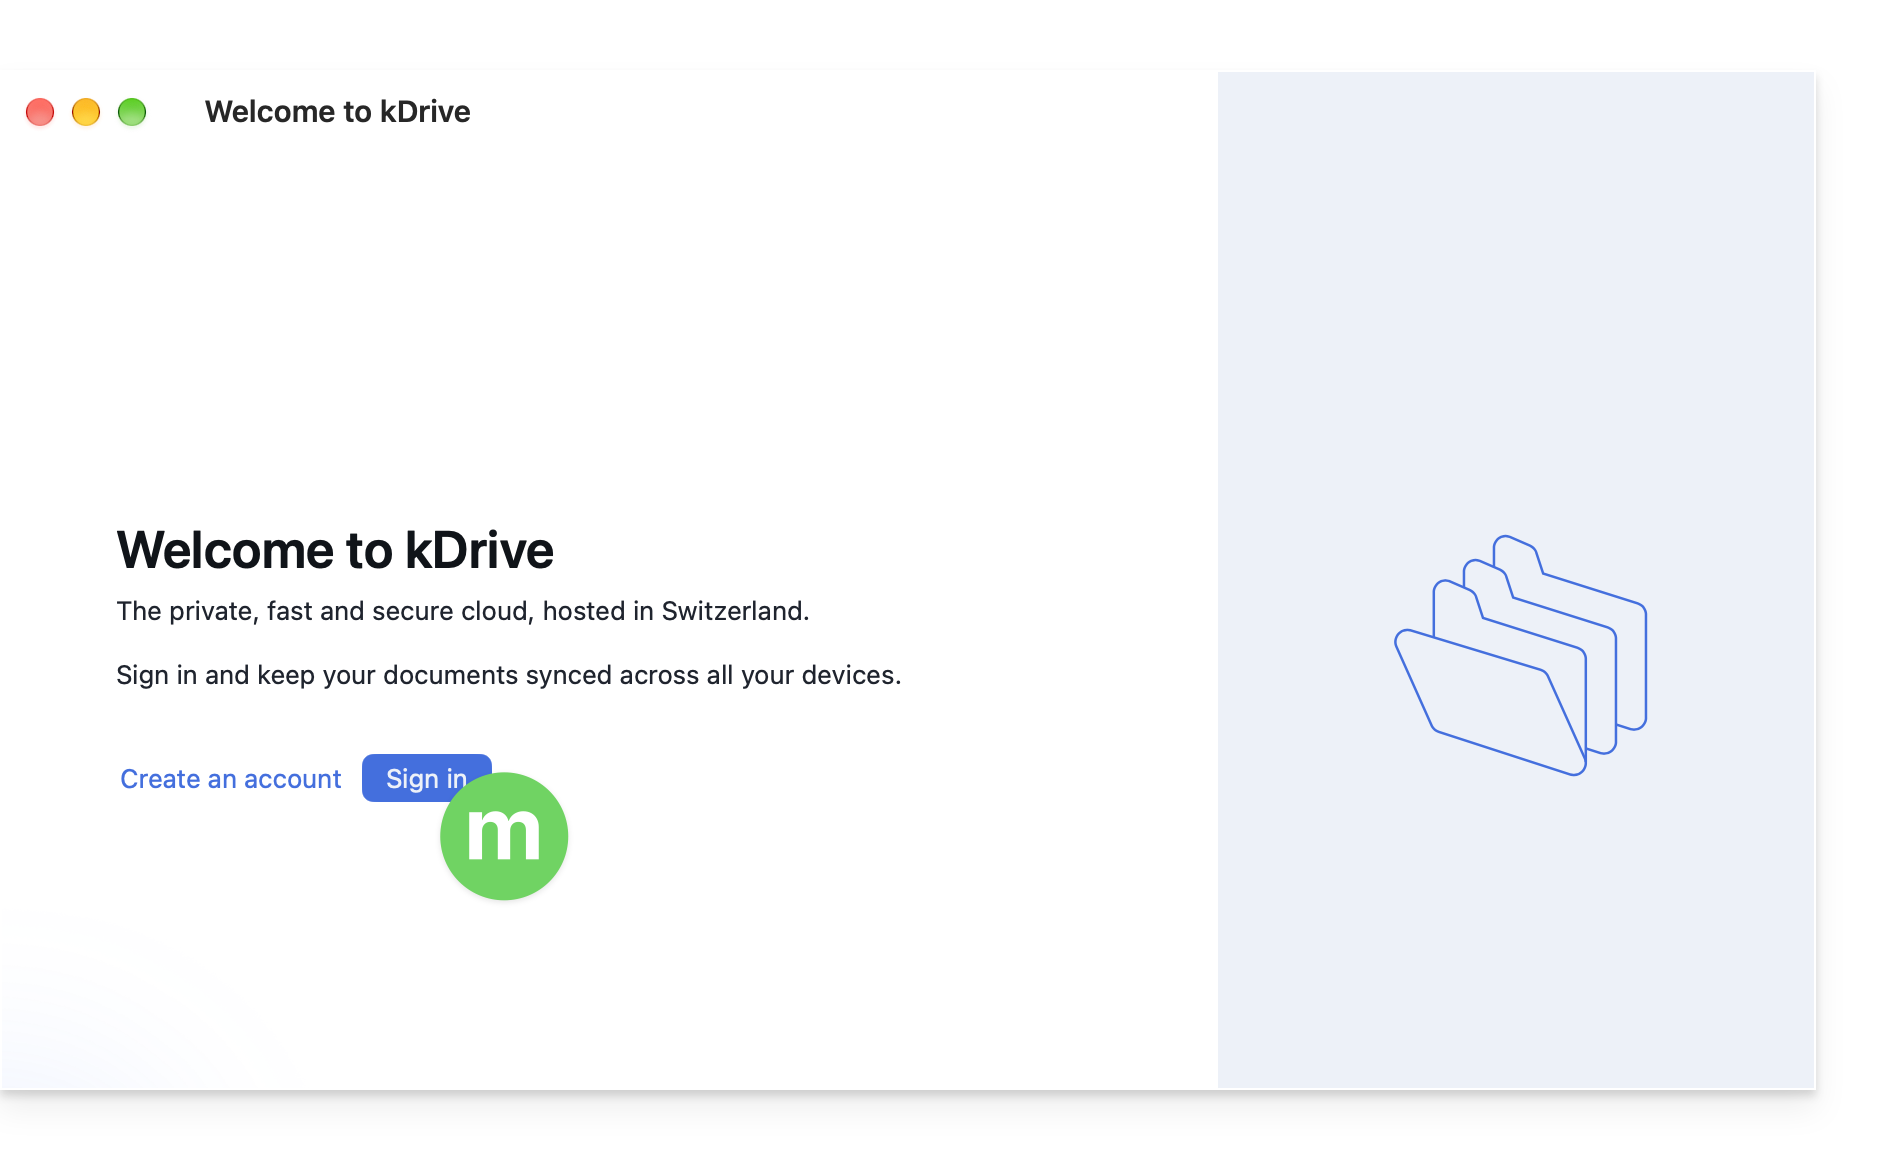
- Click the button to log in to your account:
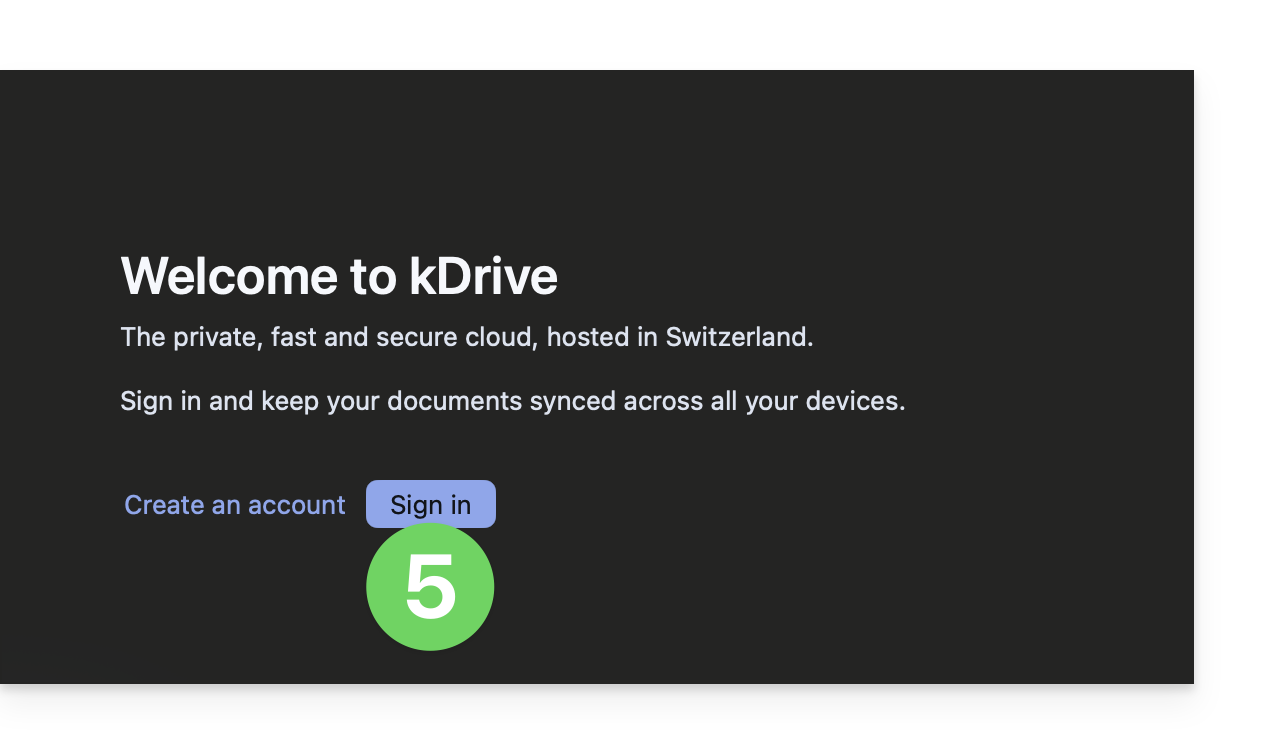
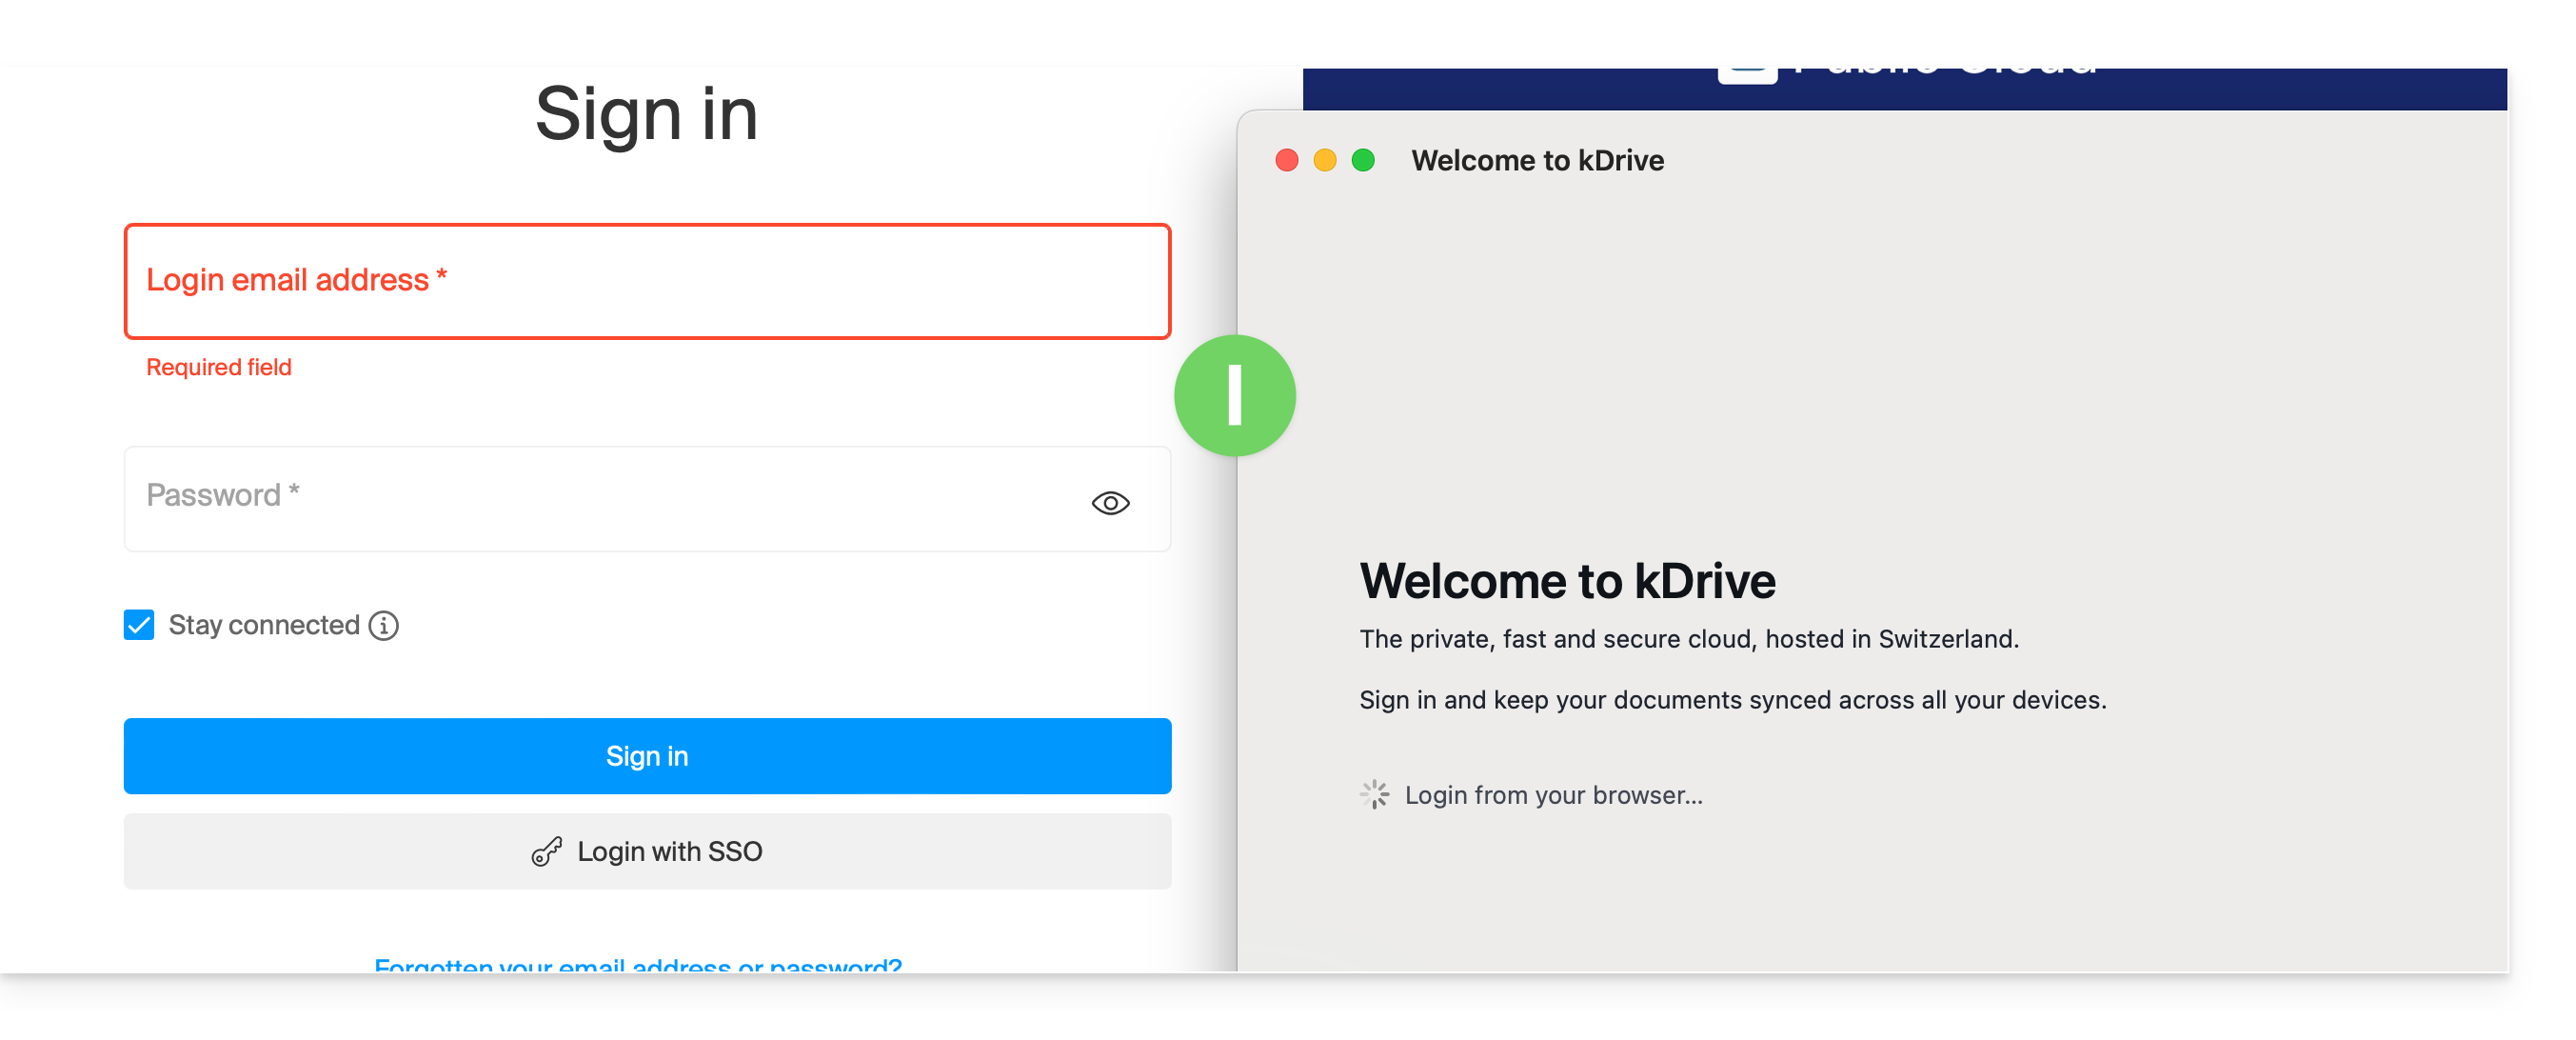
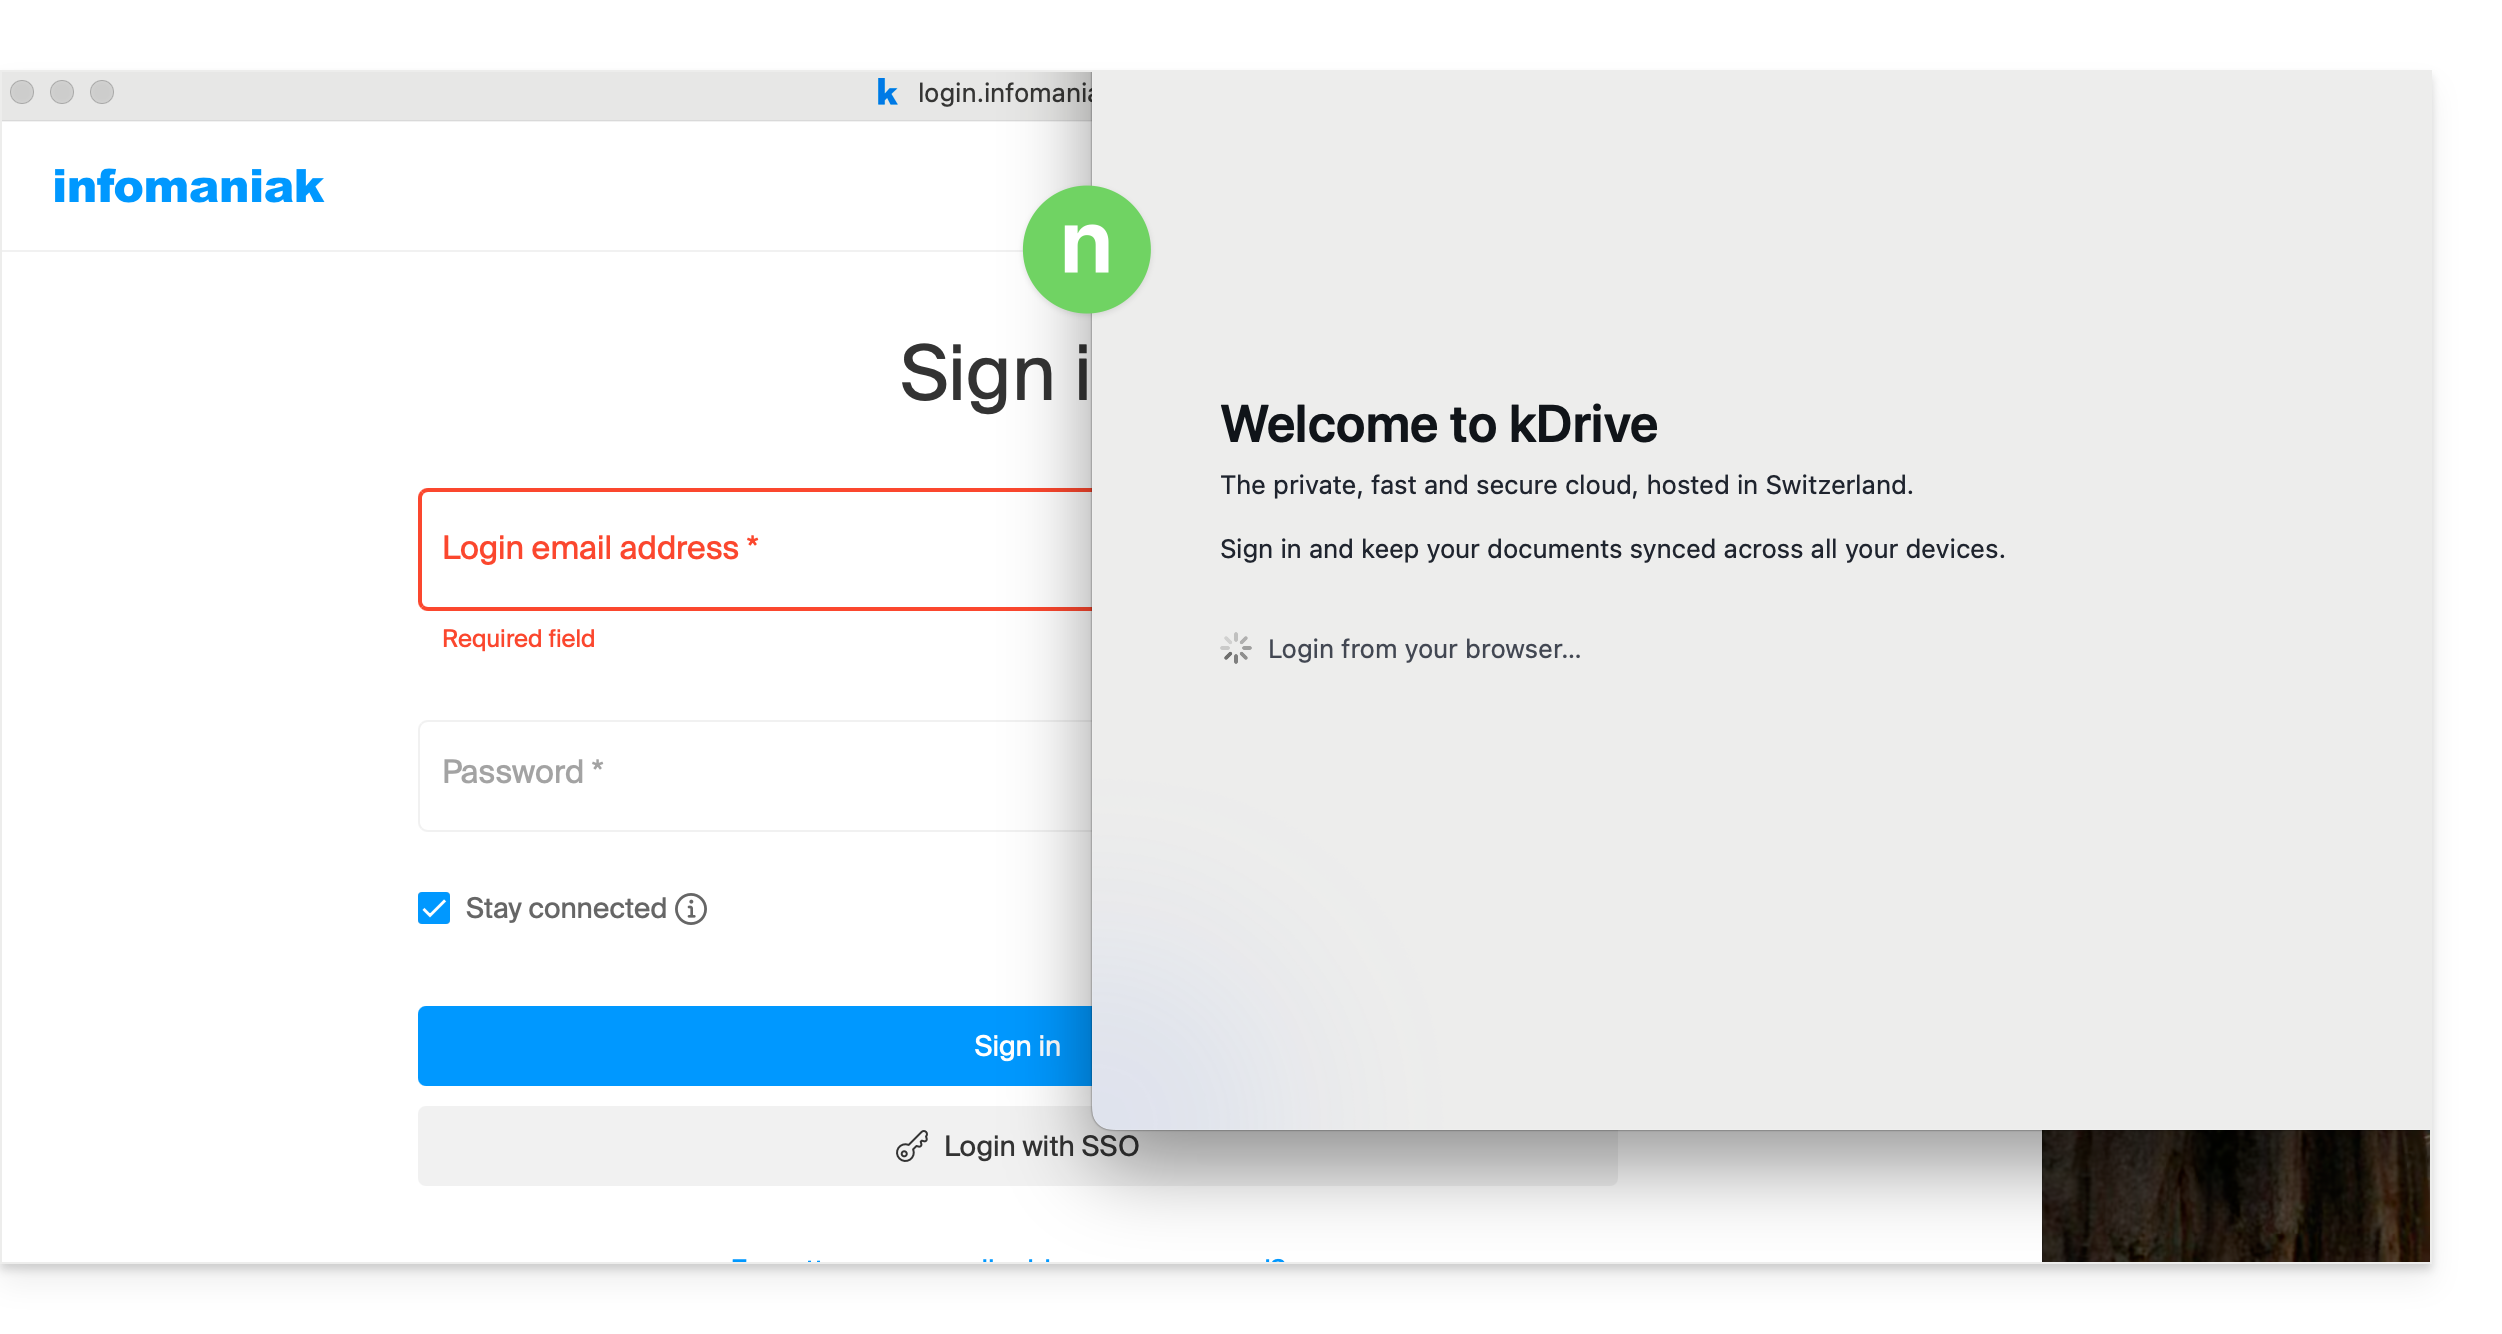
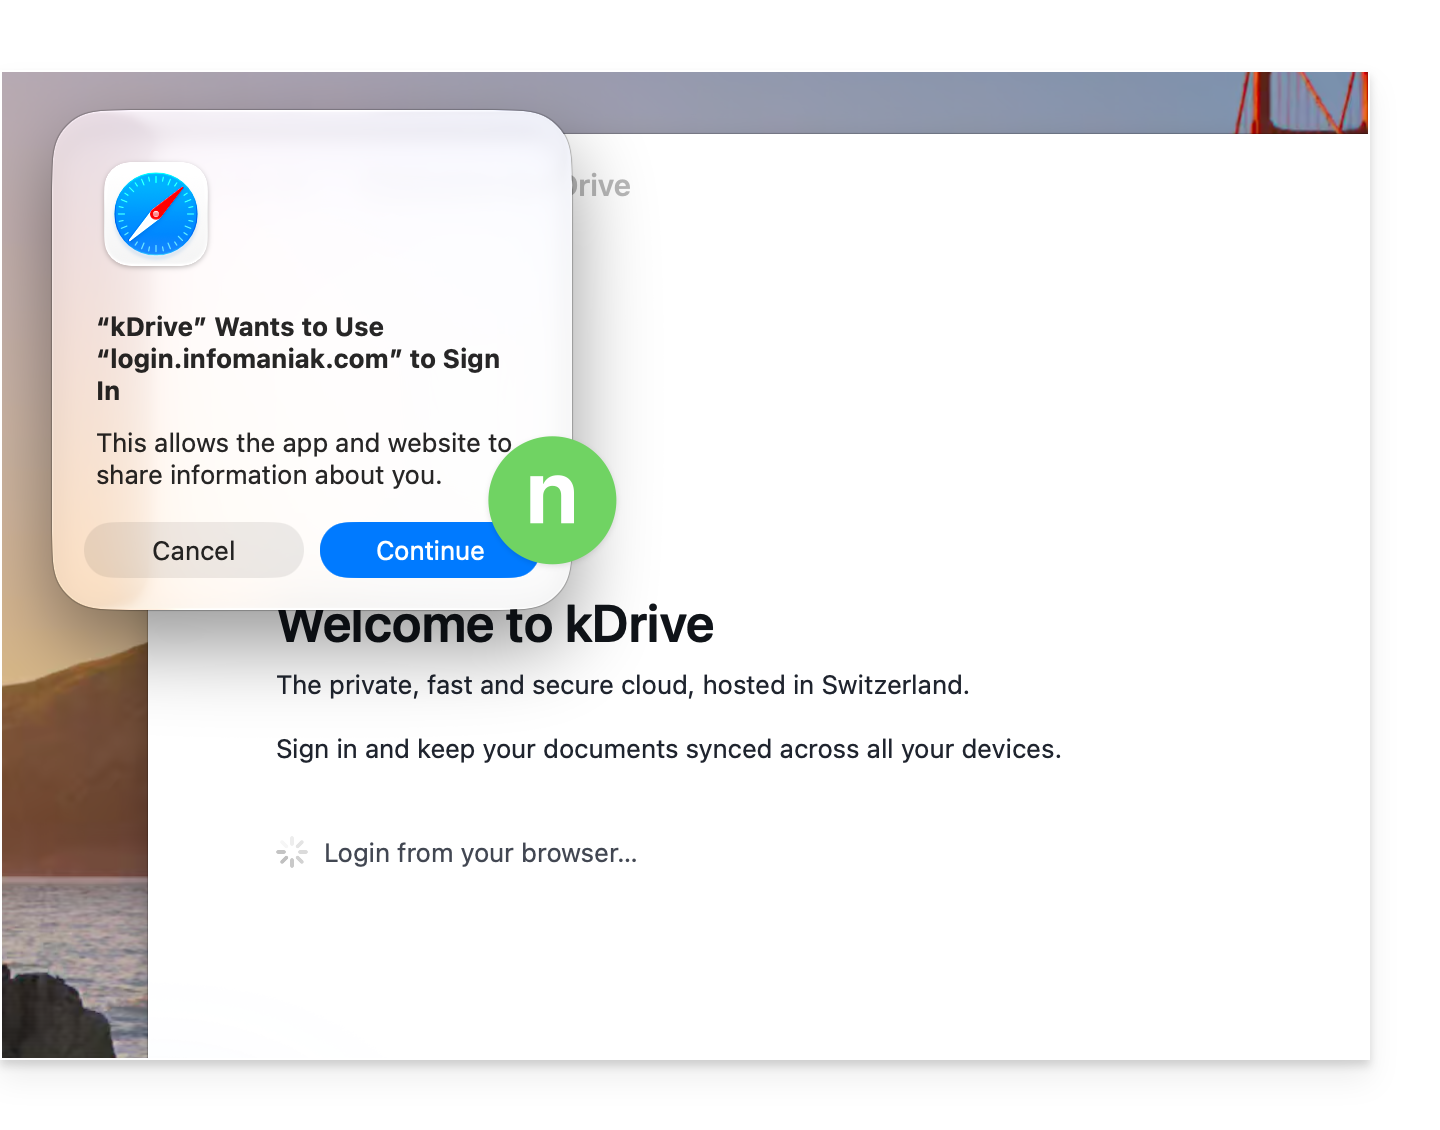
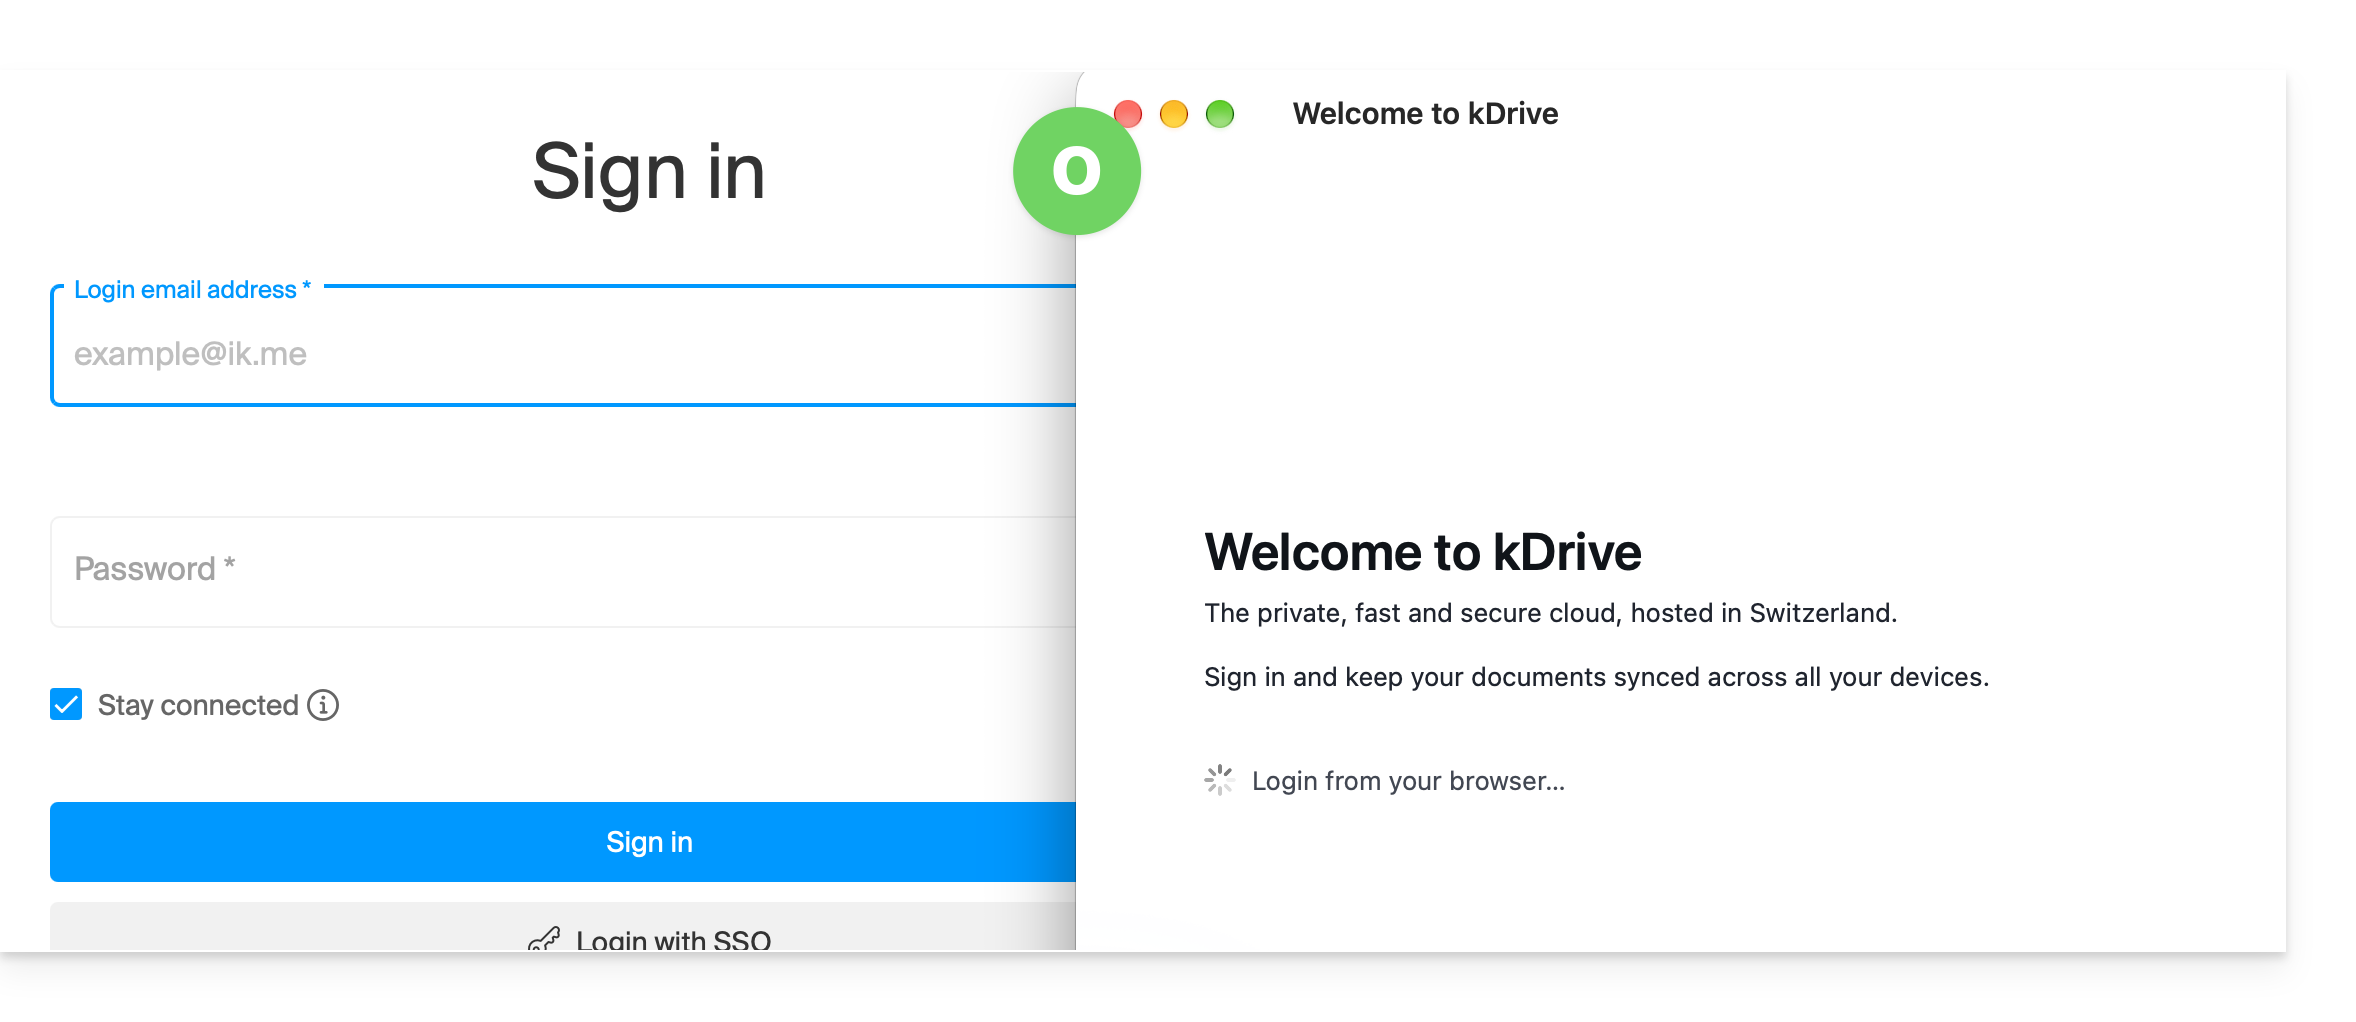
- The browser opens, allowing you to connect to your Infomaniak account, which will take you to the Organization(s) containing your kDrive.
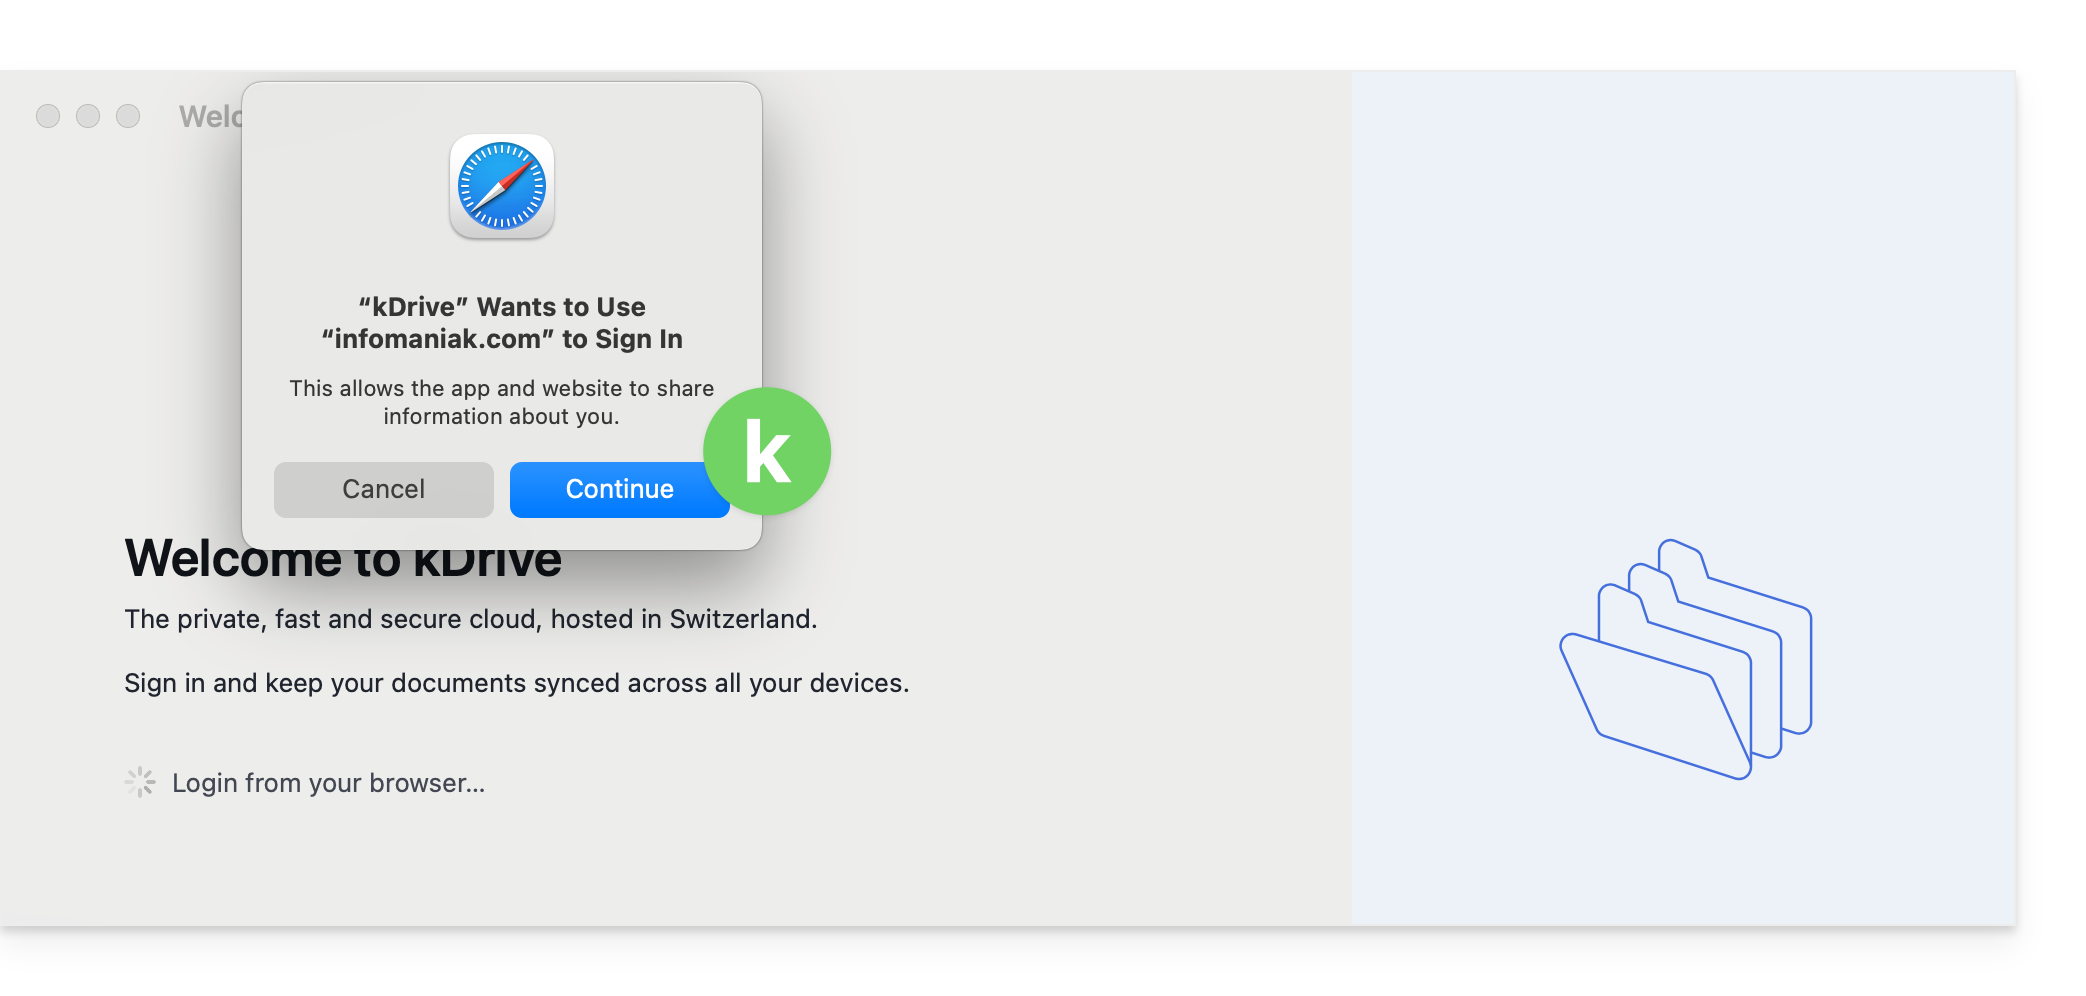
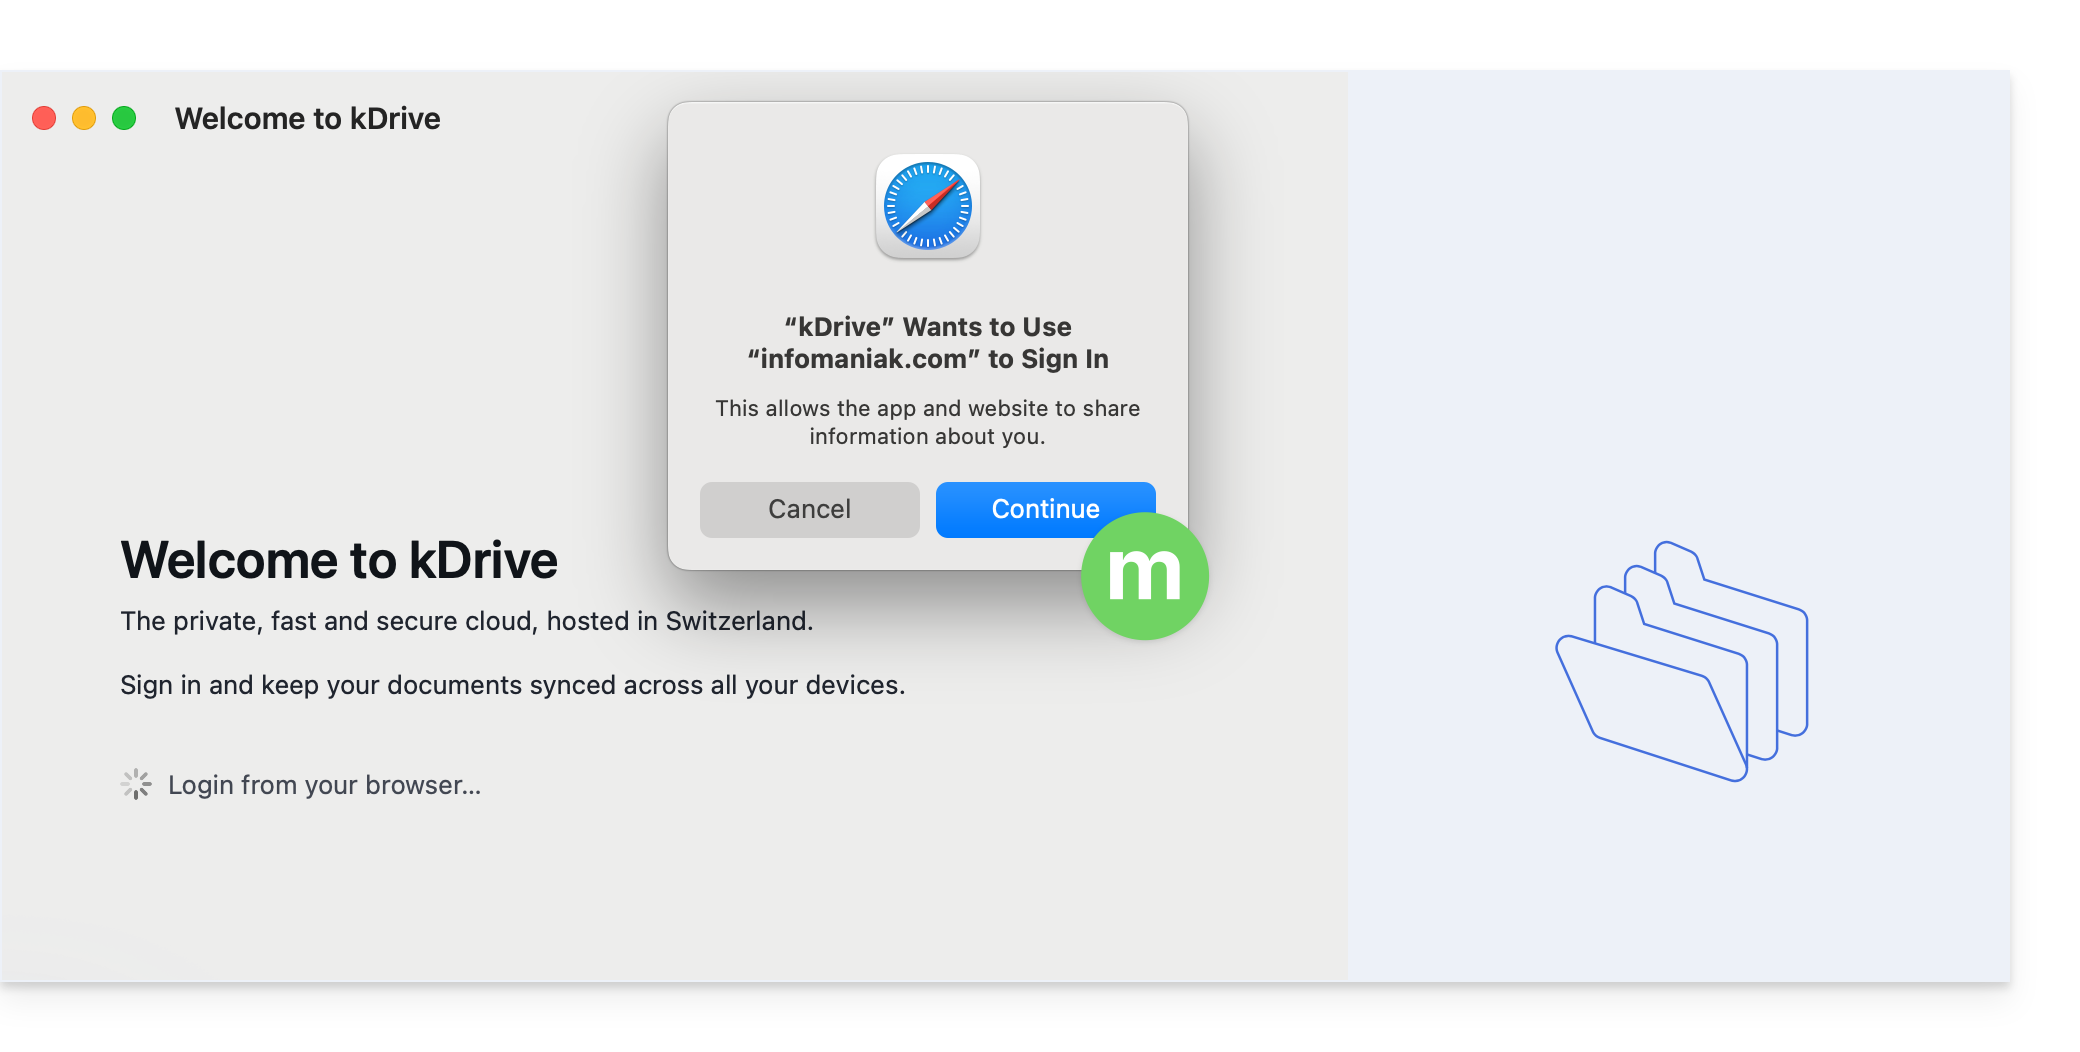
- The browser may ask for your permission to interact with the kDrive application to confirm the connection; click the Open button (if you cancel by mistake, click the link to request it again).
- You can close the browser; select the kDrive(s) that your user has access to and that you want to synchronize on this device, then click on Advanced Settings:
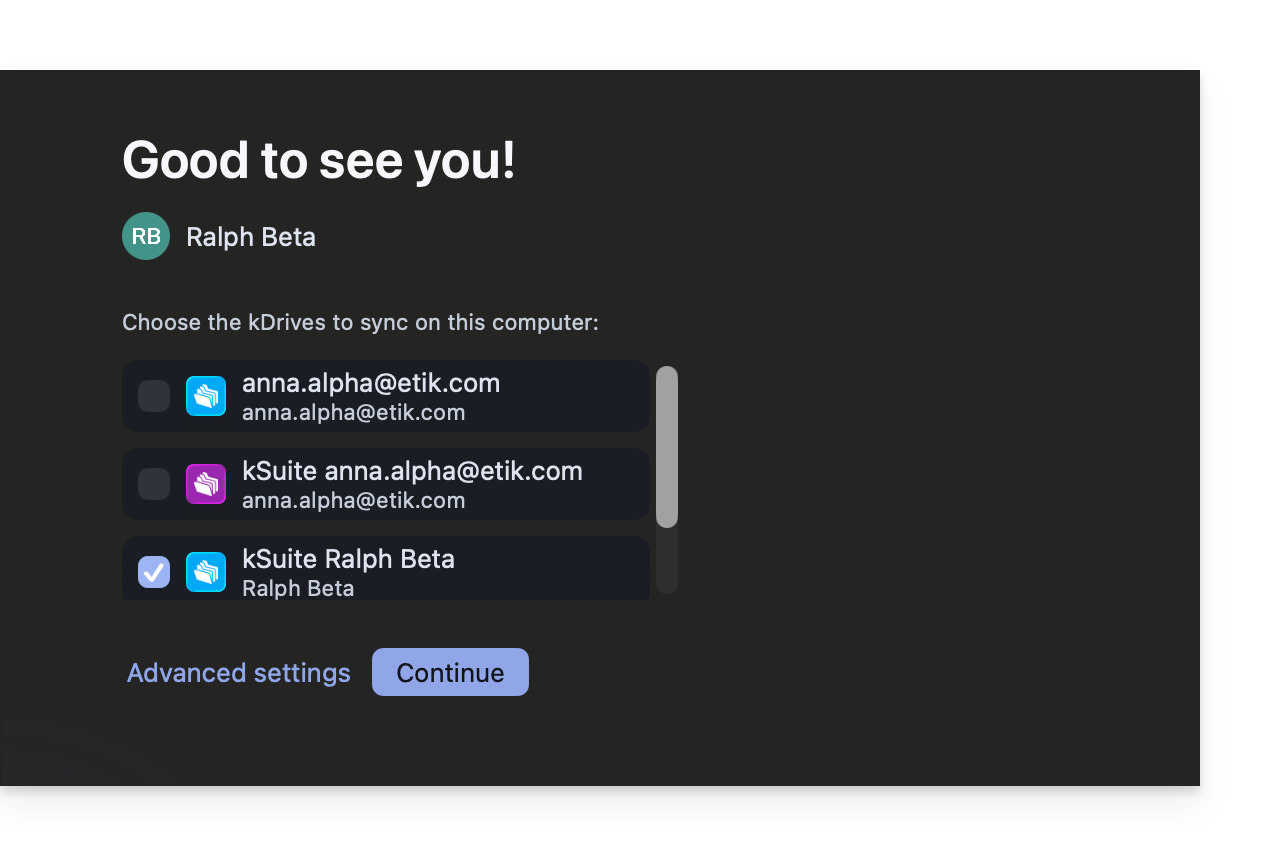
- The Advanced Settings allow you to choose:
- the location where the kDrive data will be stored (the folder must be empty),
- the existing folders on kDrive that should not be displayed on this device (❓: help),
- whether to store the kDrive files on the disk with their actual size, or whether they can be “virtually” listed while being stored on the remote servers (❓: help).
- Confirm at the top of the page:
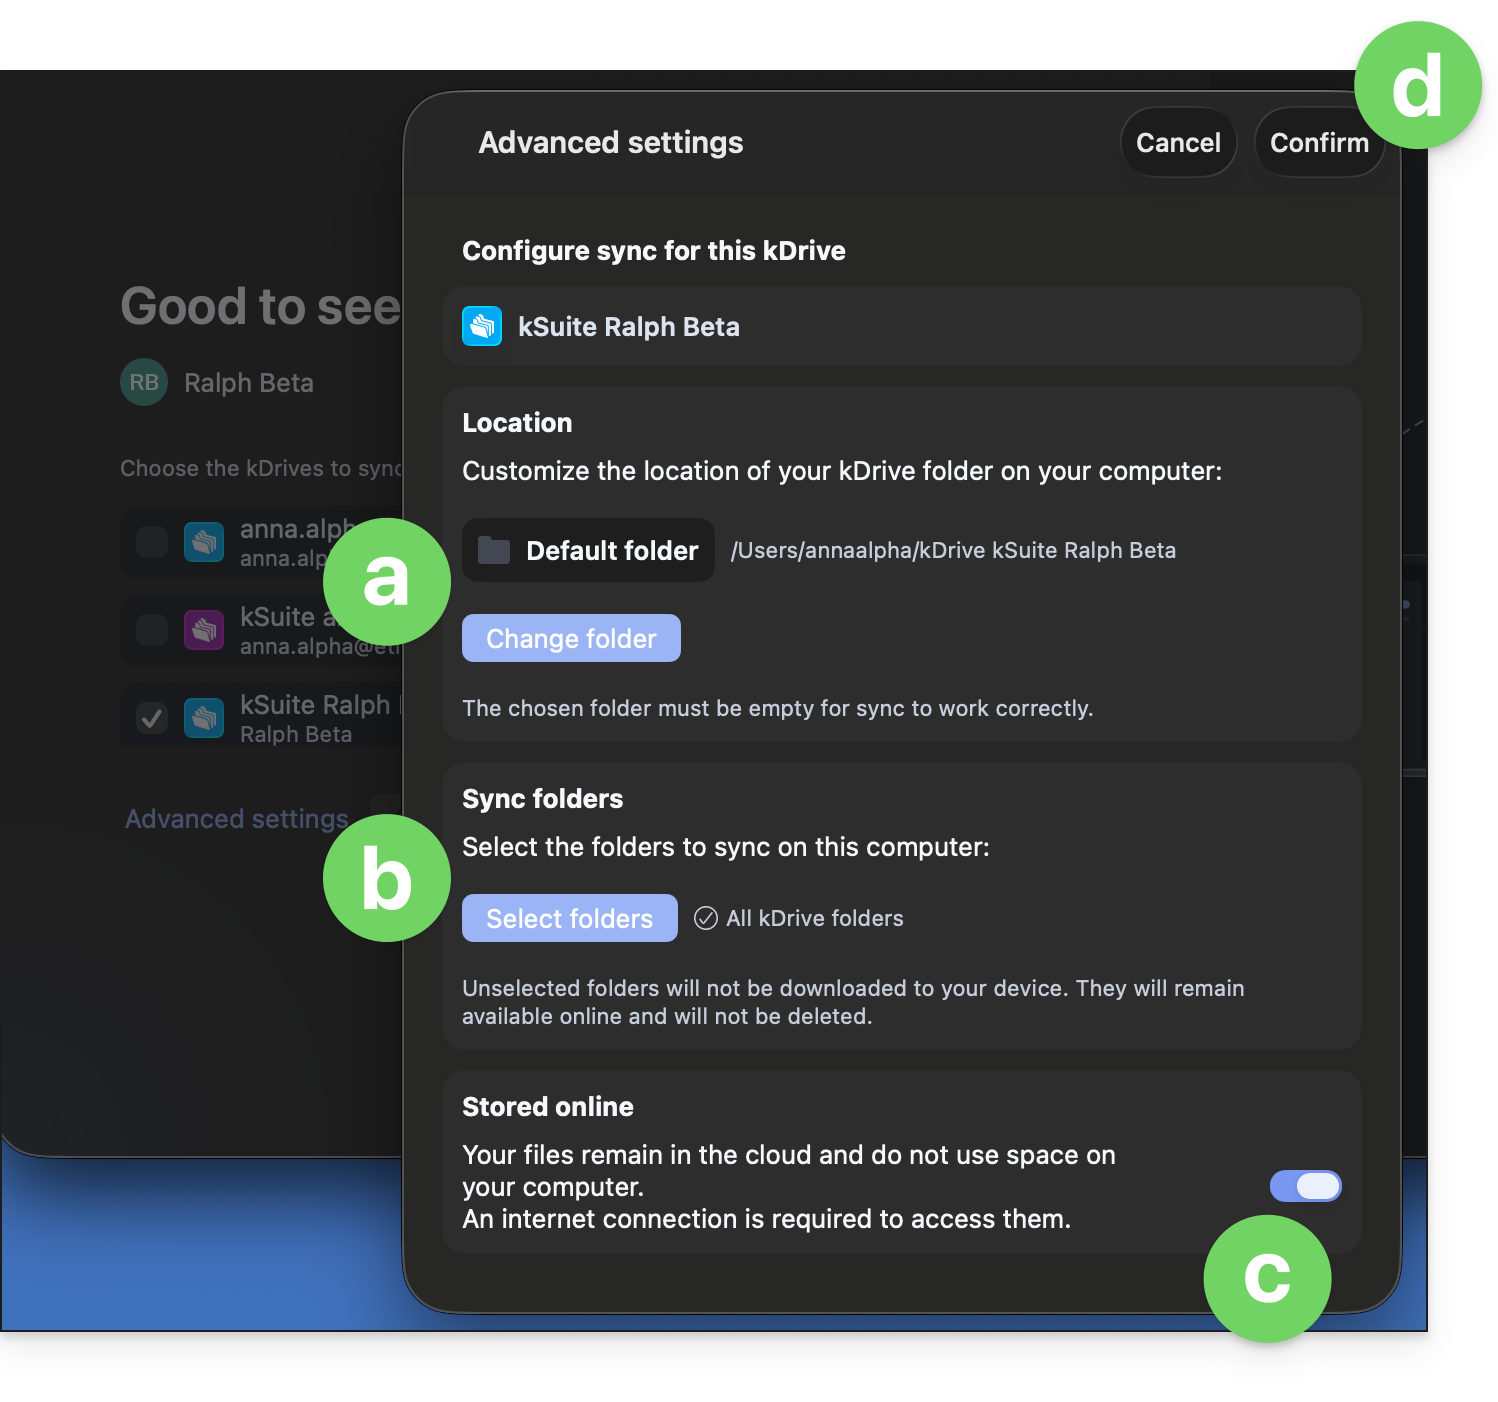
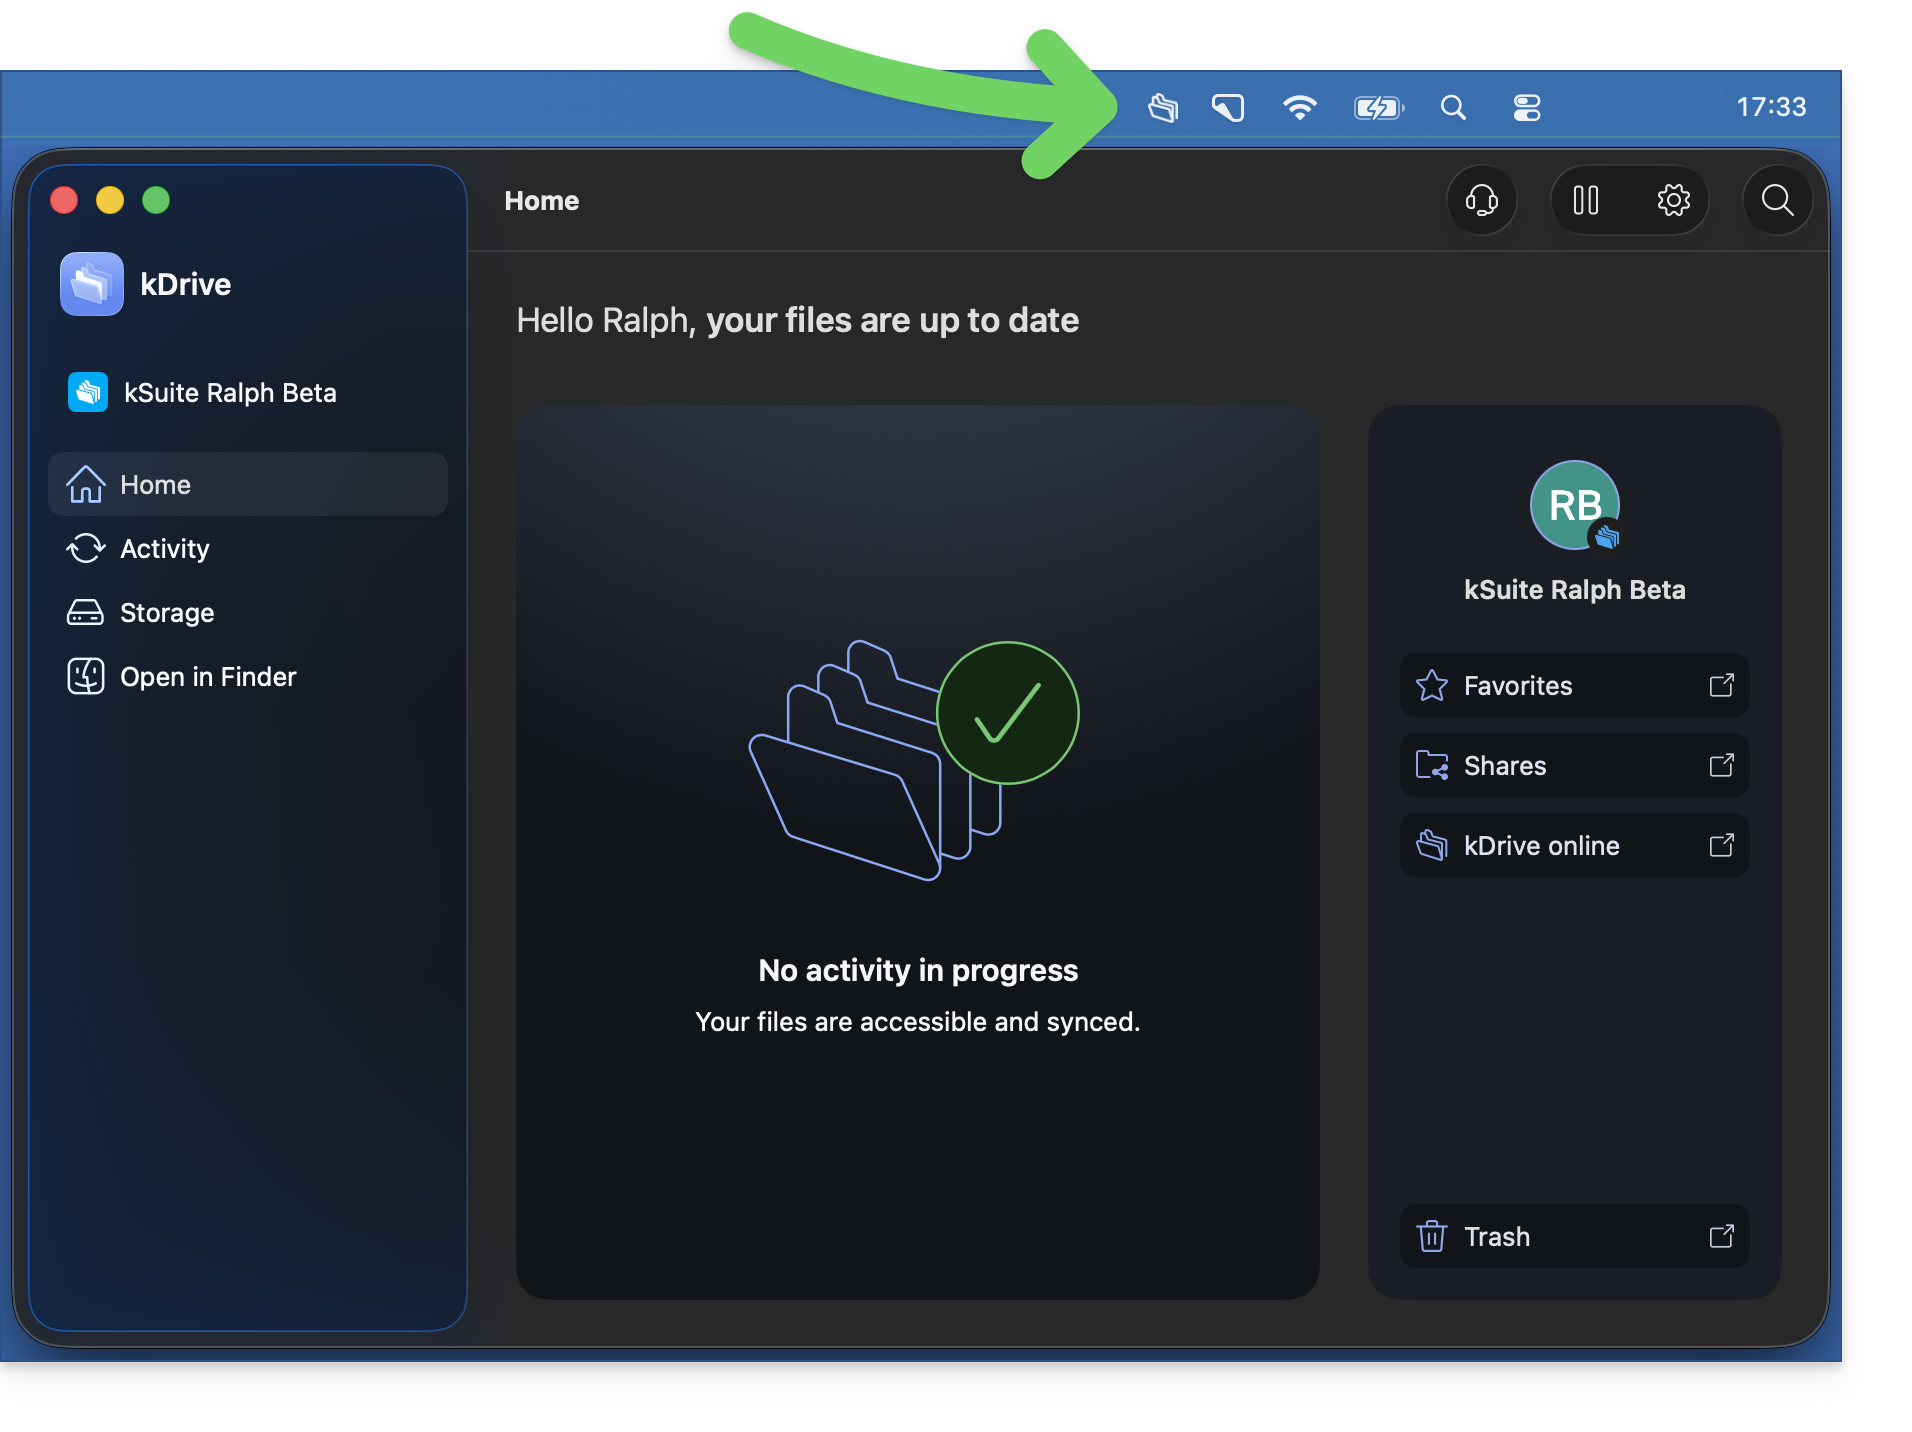
- Click the Continue button next to the advanced settings to complete the installation and open the interface. The app should run in the background, allowing for automatic synchronization. You should always see its icon (❓: help):
- Refer to other guides to continue exploring the kDrive application.
Uninstall kDrive on macOS
To do this:
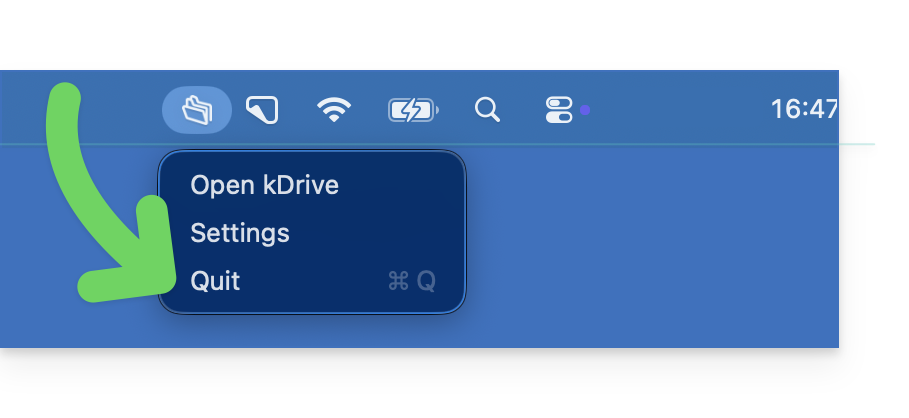
- Right-click on the icon and choose Quit if the app is still running in the background in the taskbar at the top right:
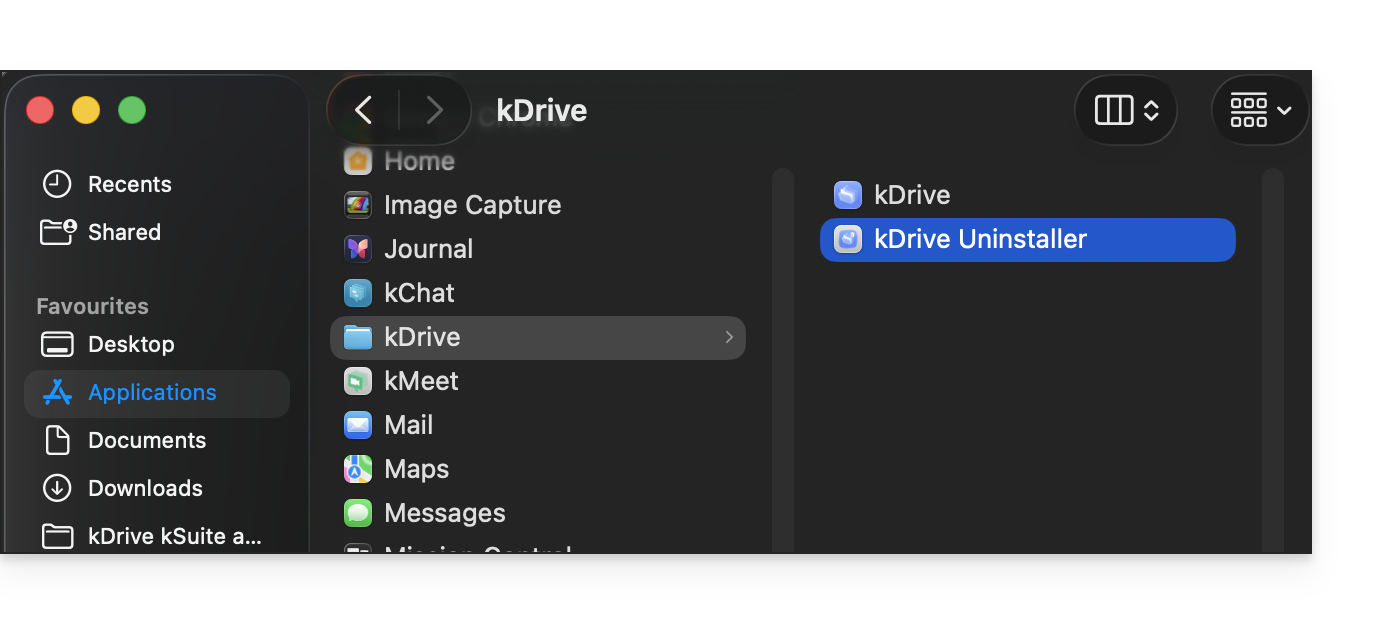
- Then, open the kDrive Uninstaller application from the kDrive folder in your macOS applications and confirm the deletion:
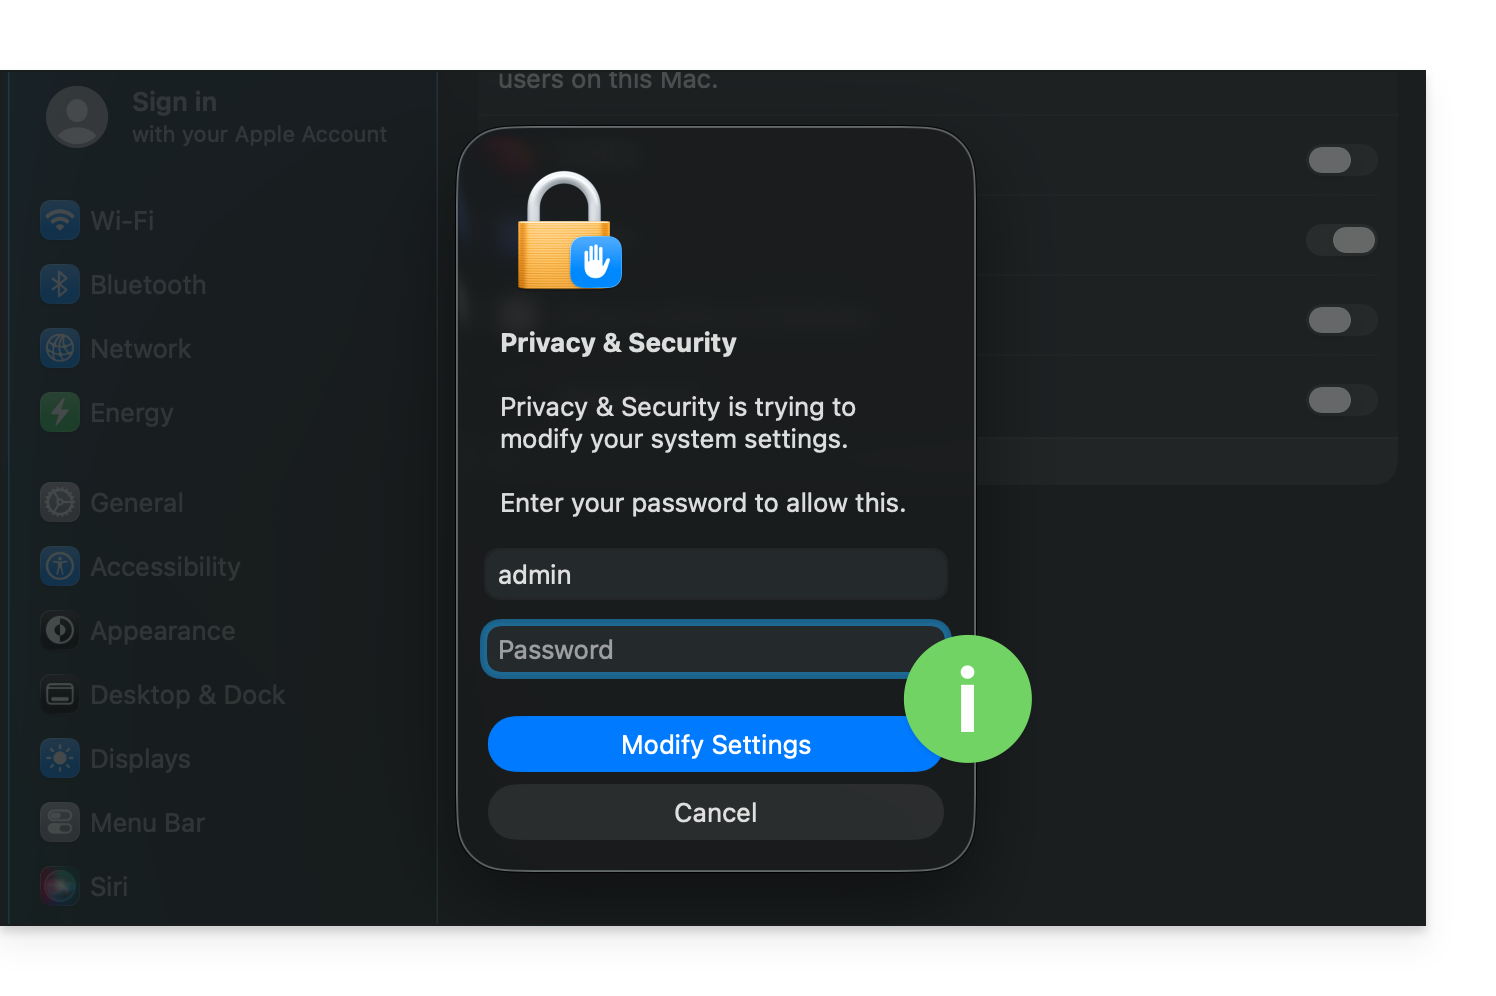
- You may need to enter your login credentials.
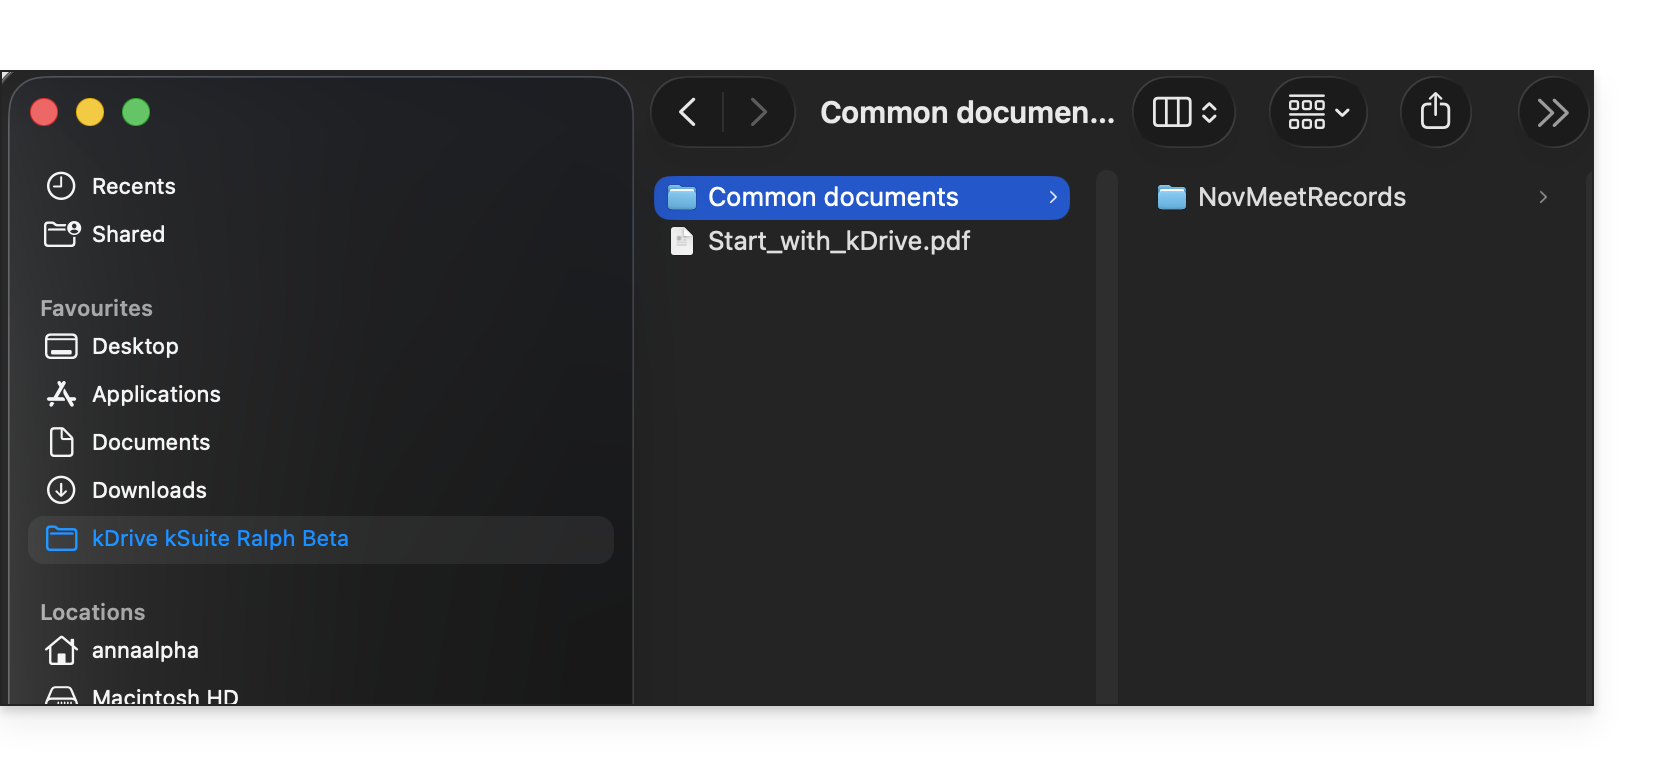
- Once the application has been deleted, you can delete the storage folder containing your files on your computer if necessary:
kDrive permissions for older versions of macOS
To allow the kDrive v4.x components to properly access your computer, follow the instructions shown in the screenshots corresponding to your version of macOS: 12 Monterey; 13 Ventura; 14 Sonoma; 15 Sequoia; 26 Tahoe; 27 Golden Gate
macOS 12
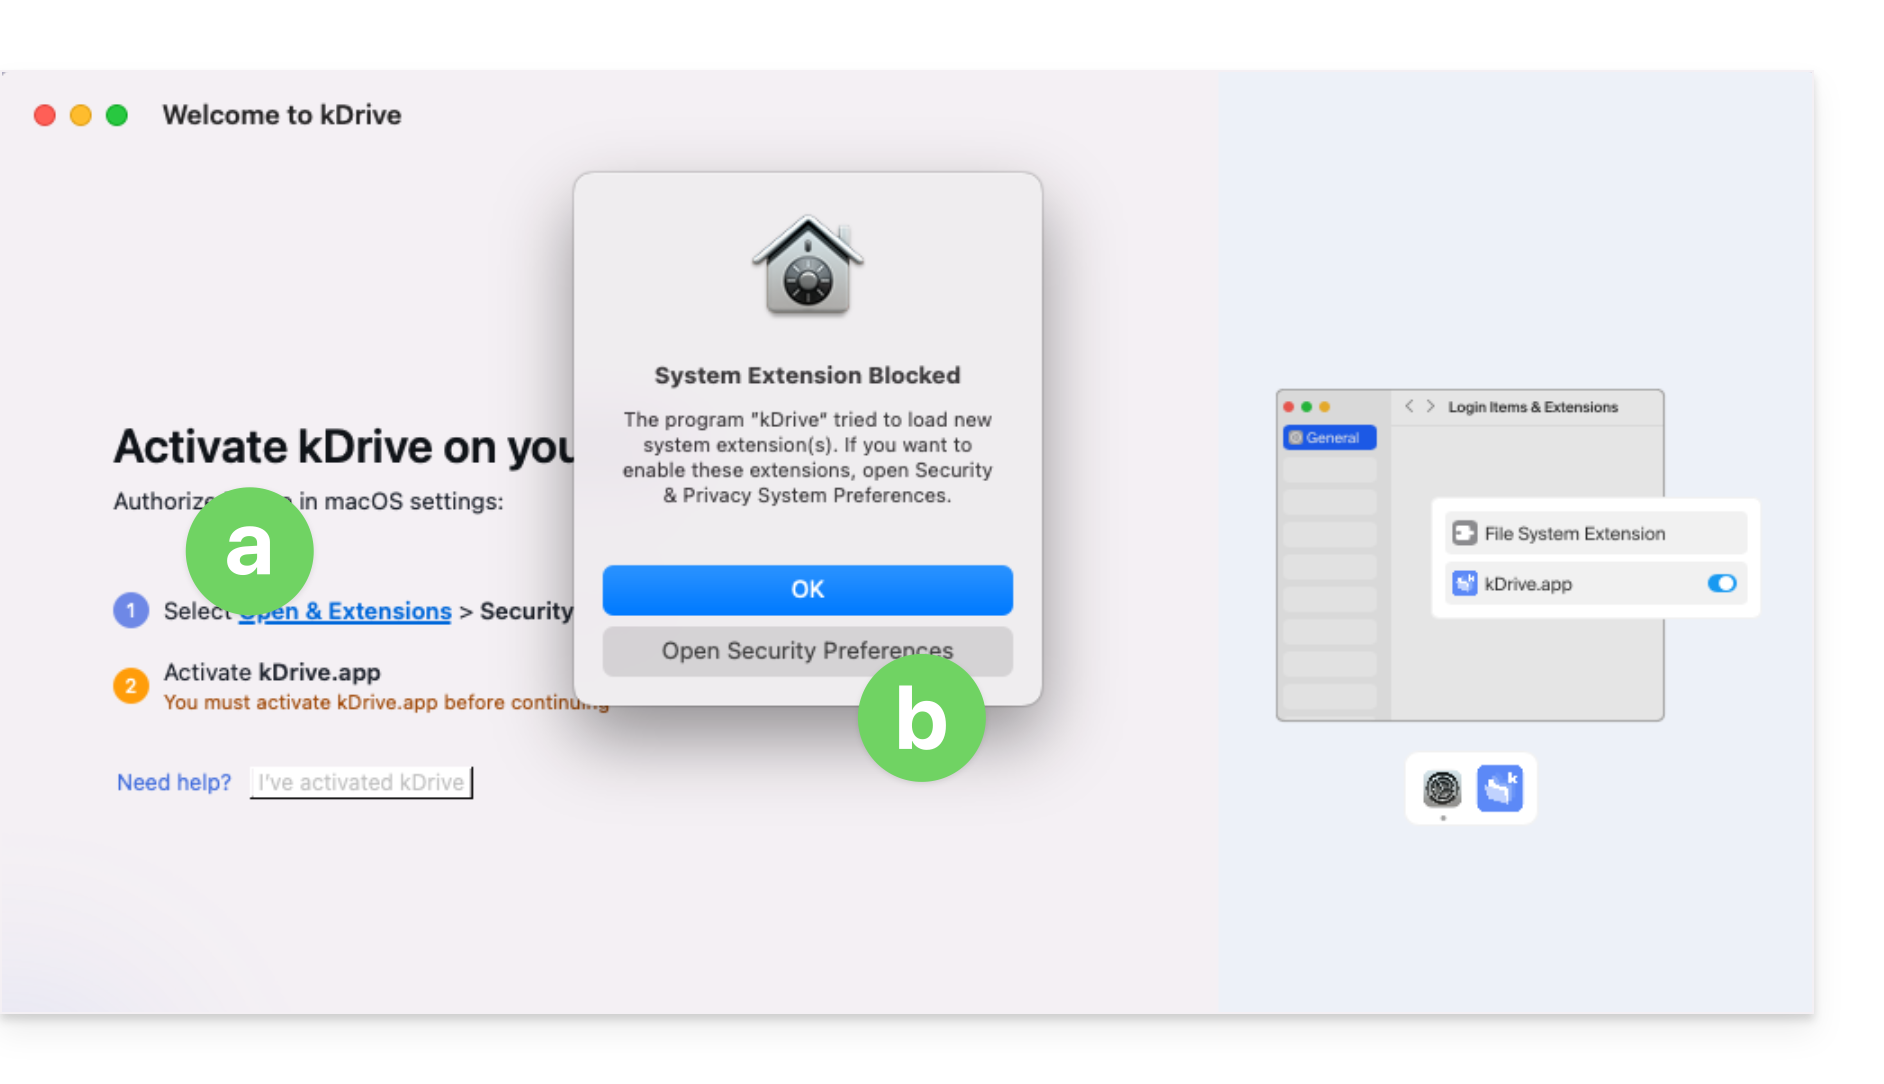
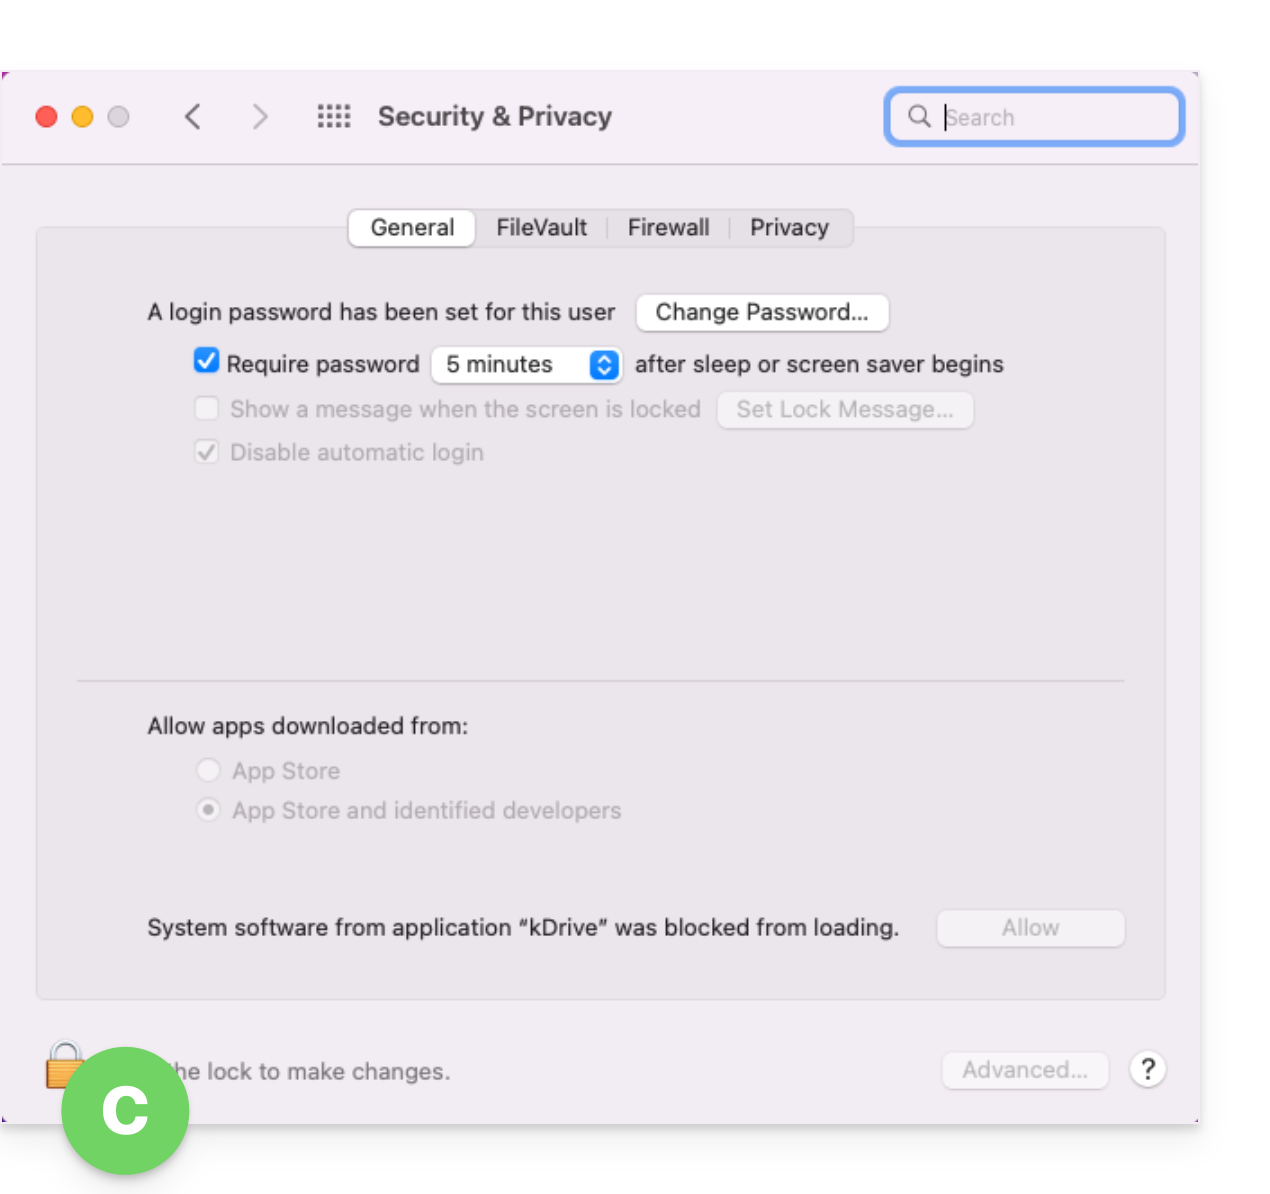
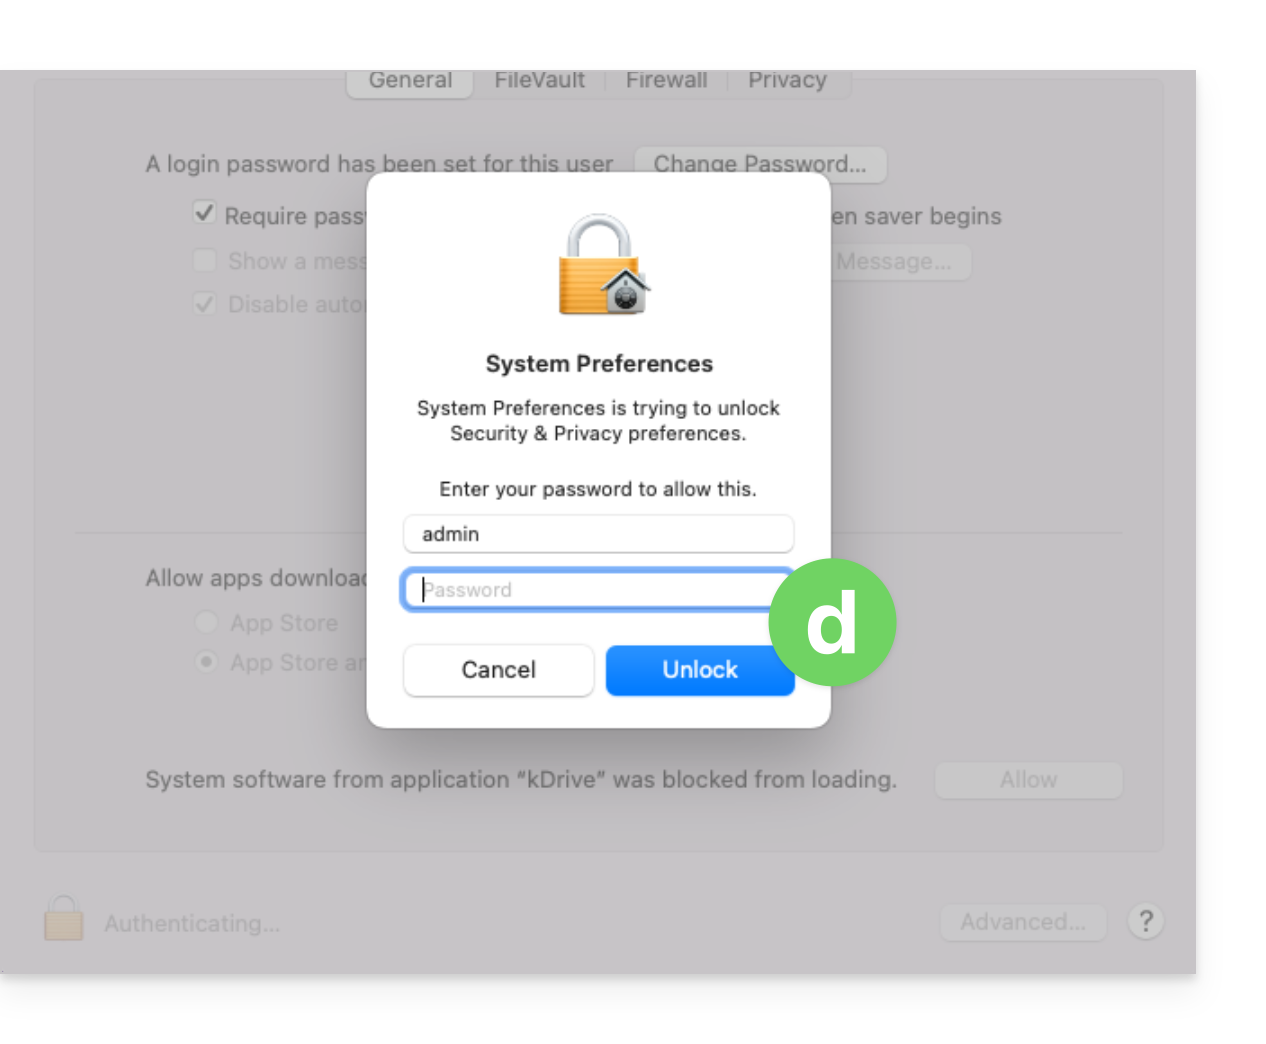
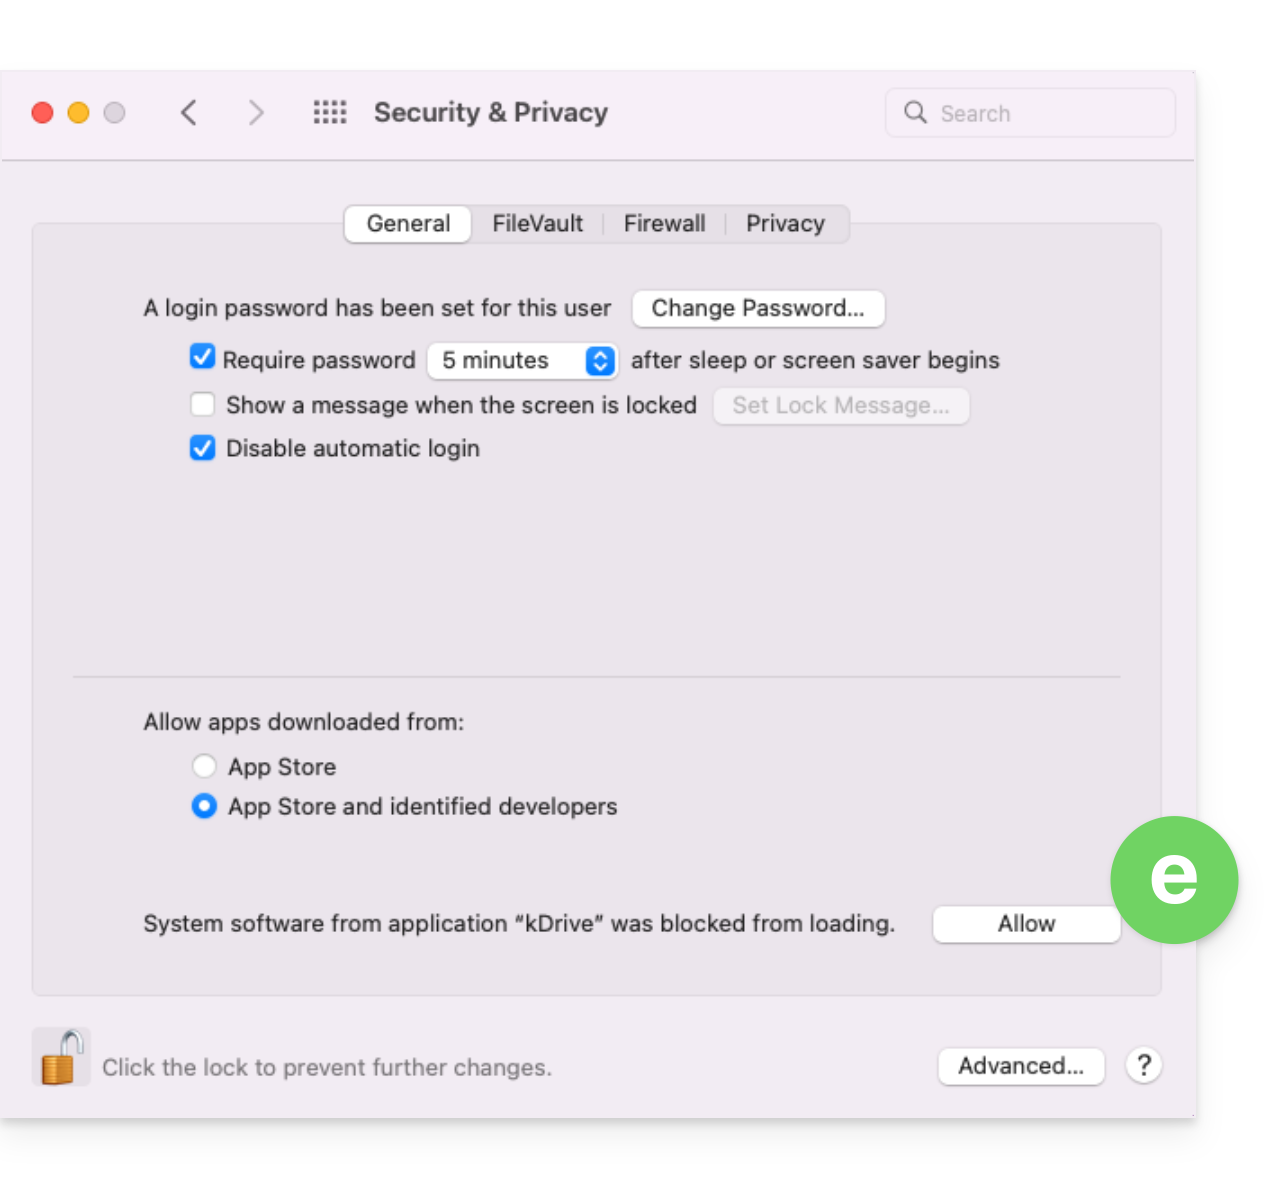
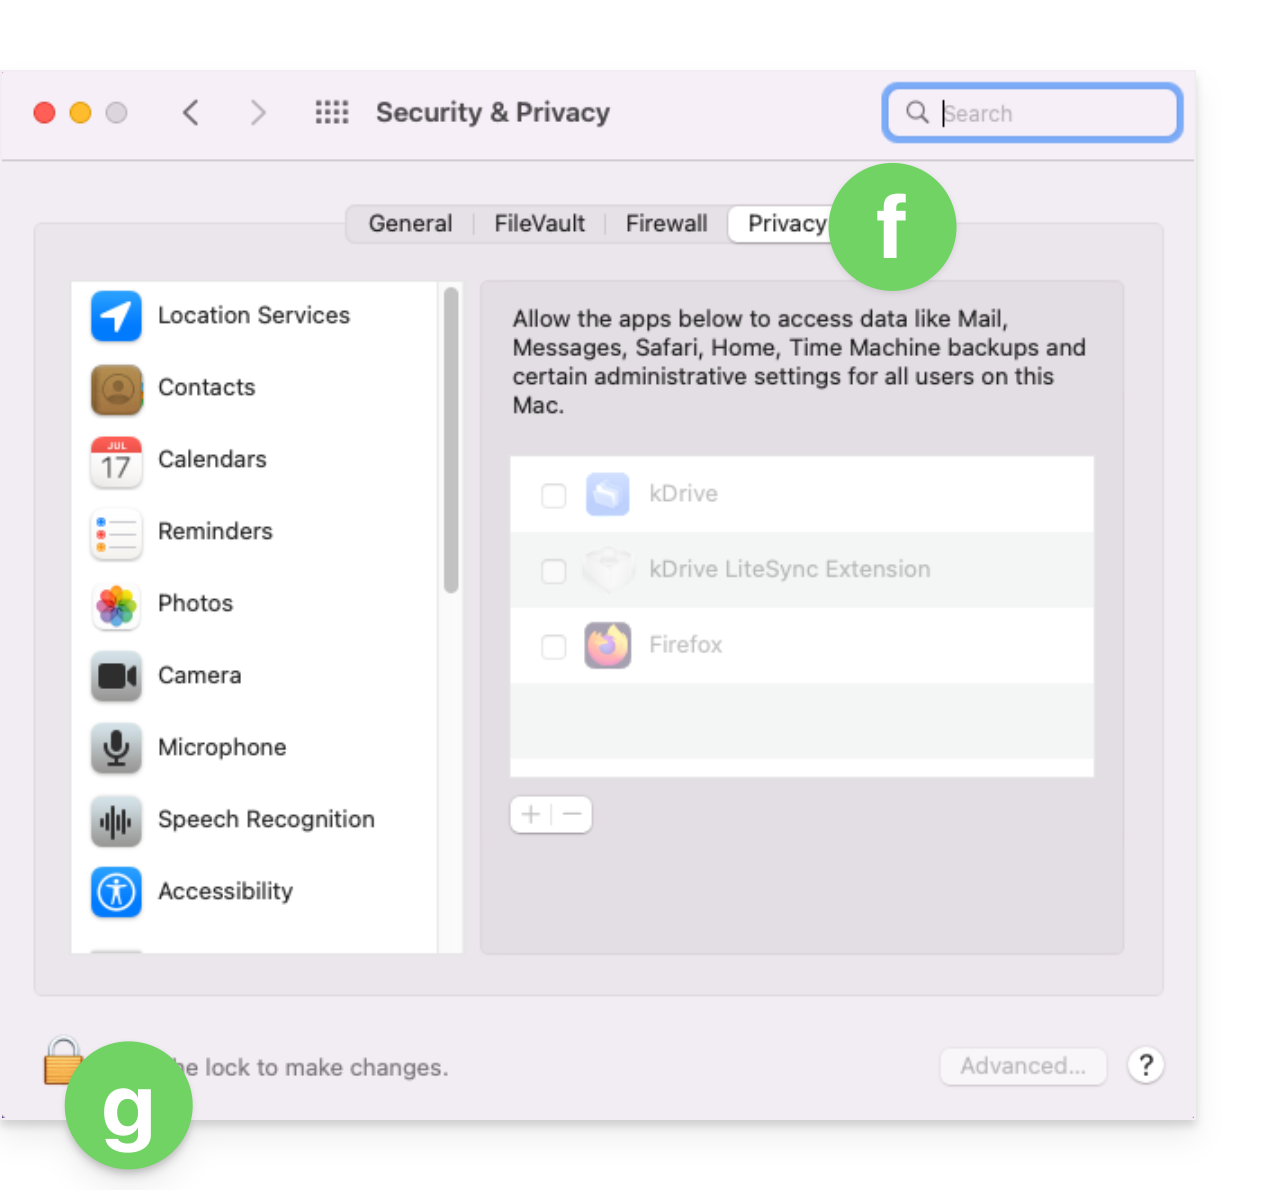
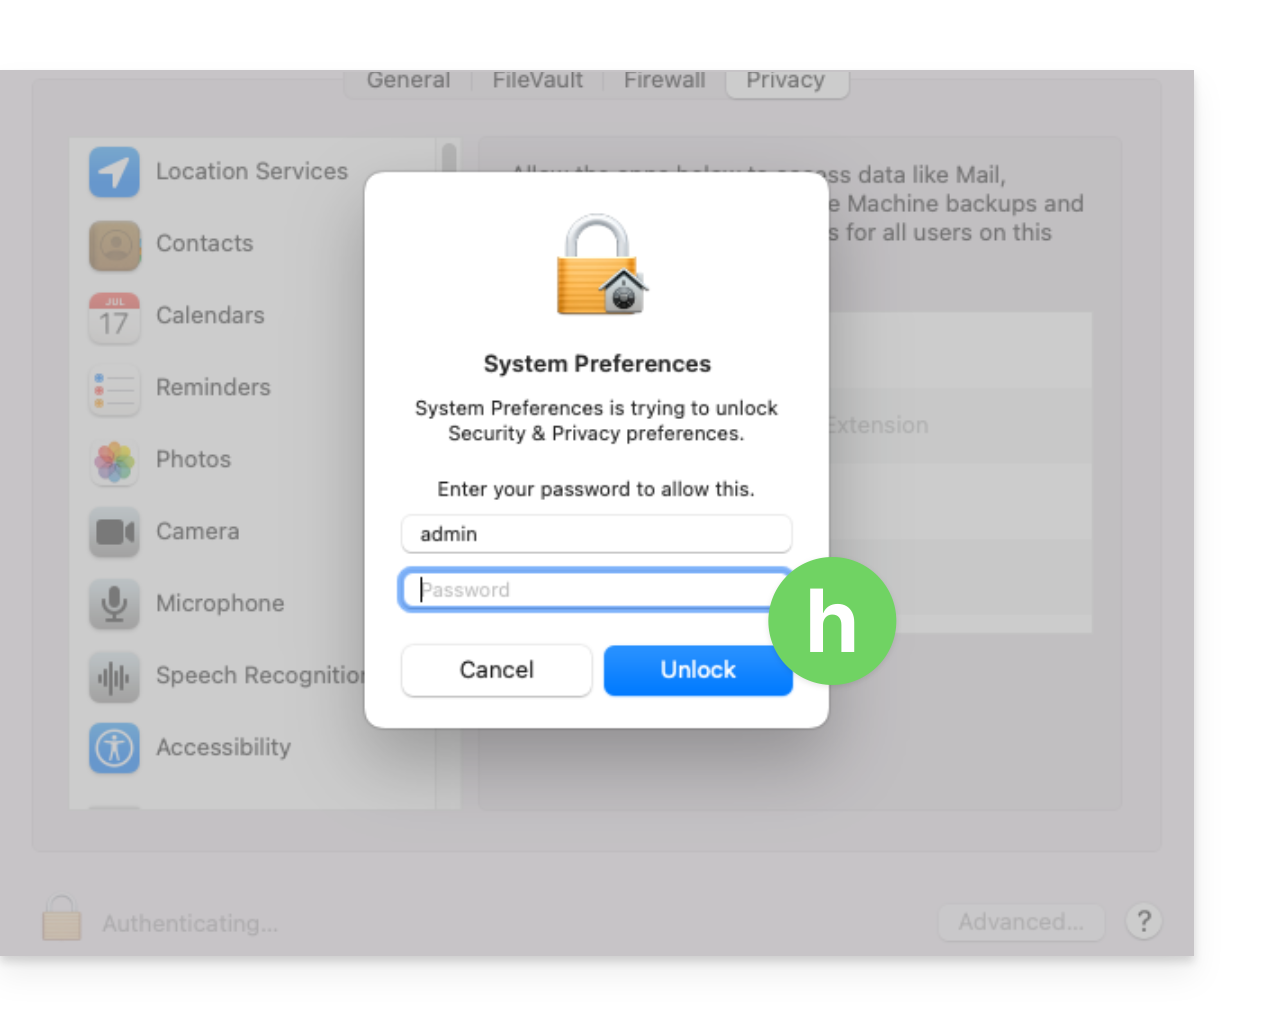
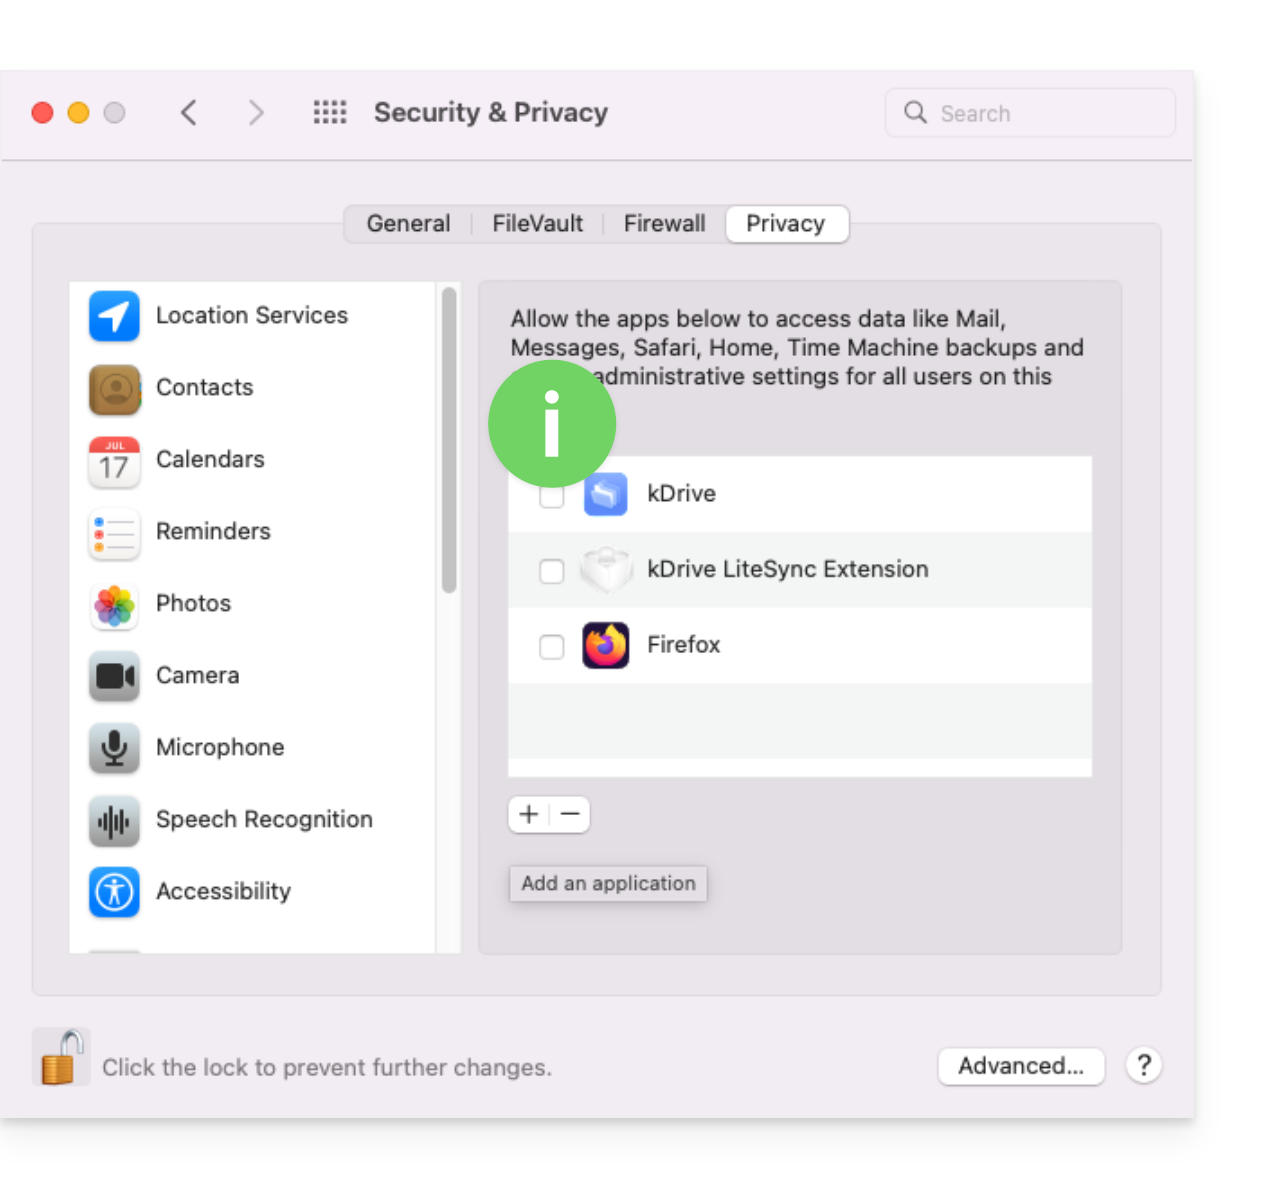
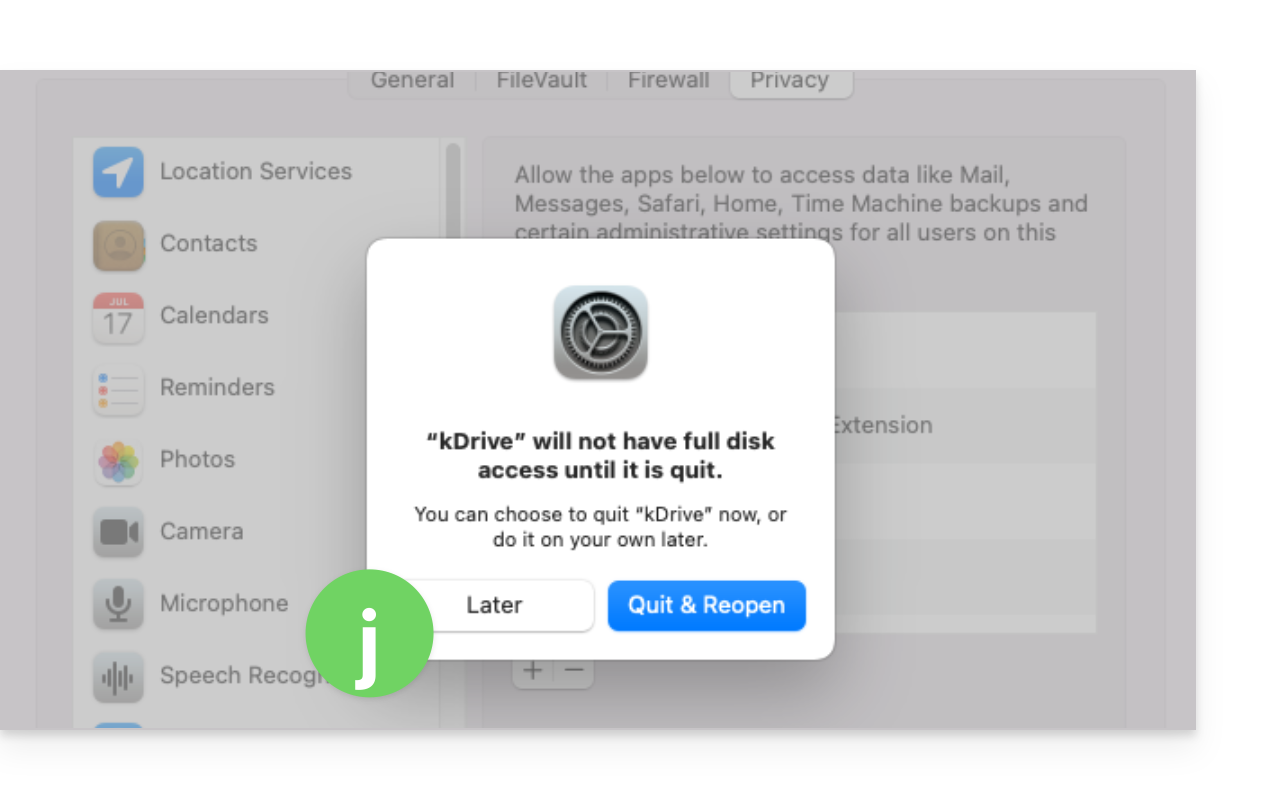
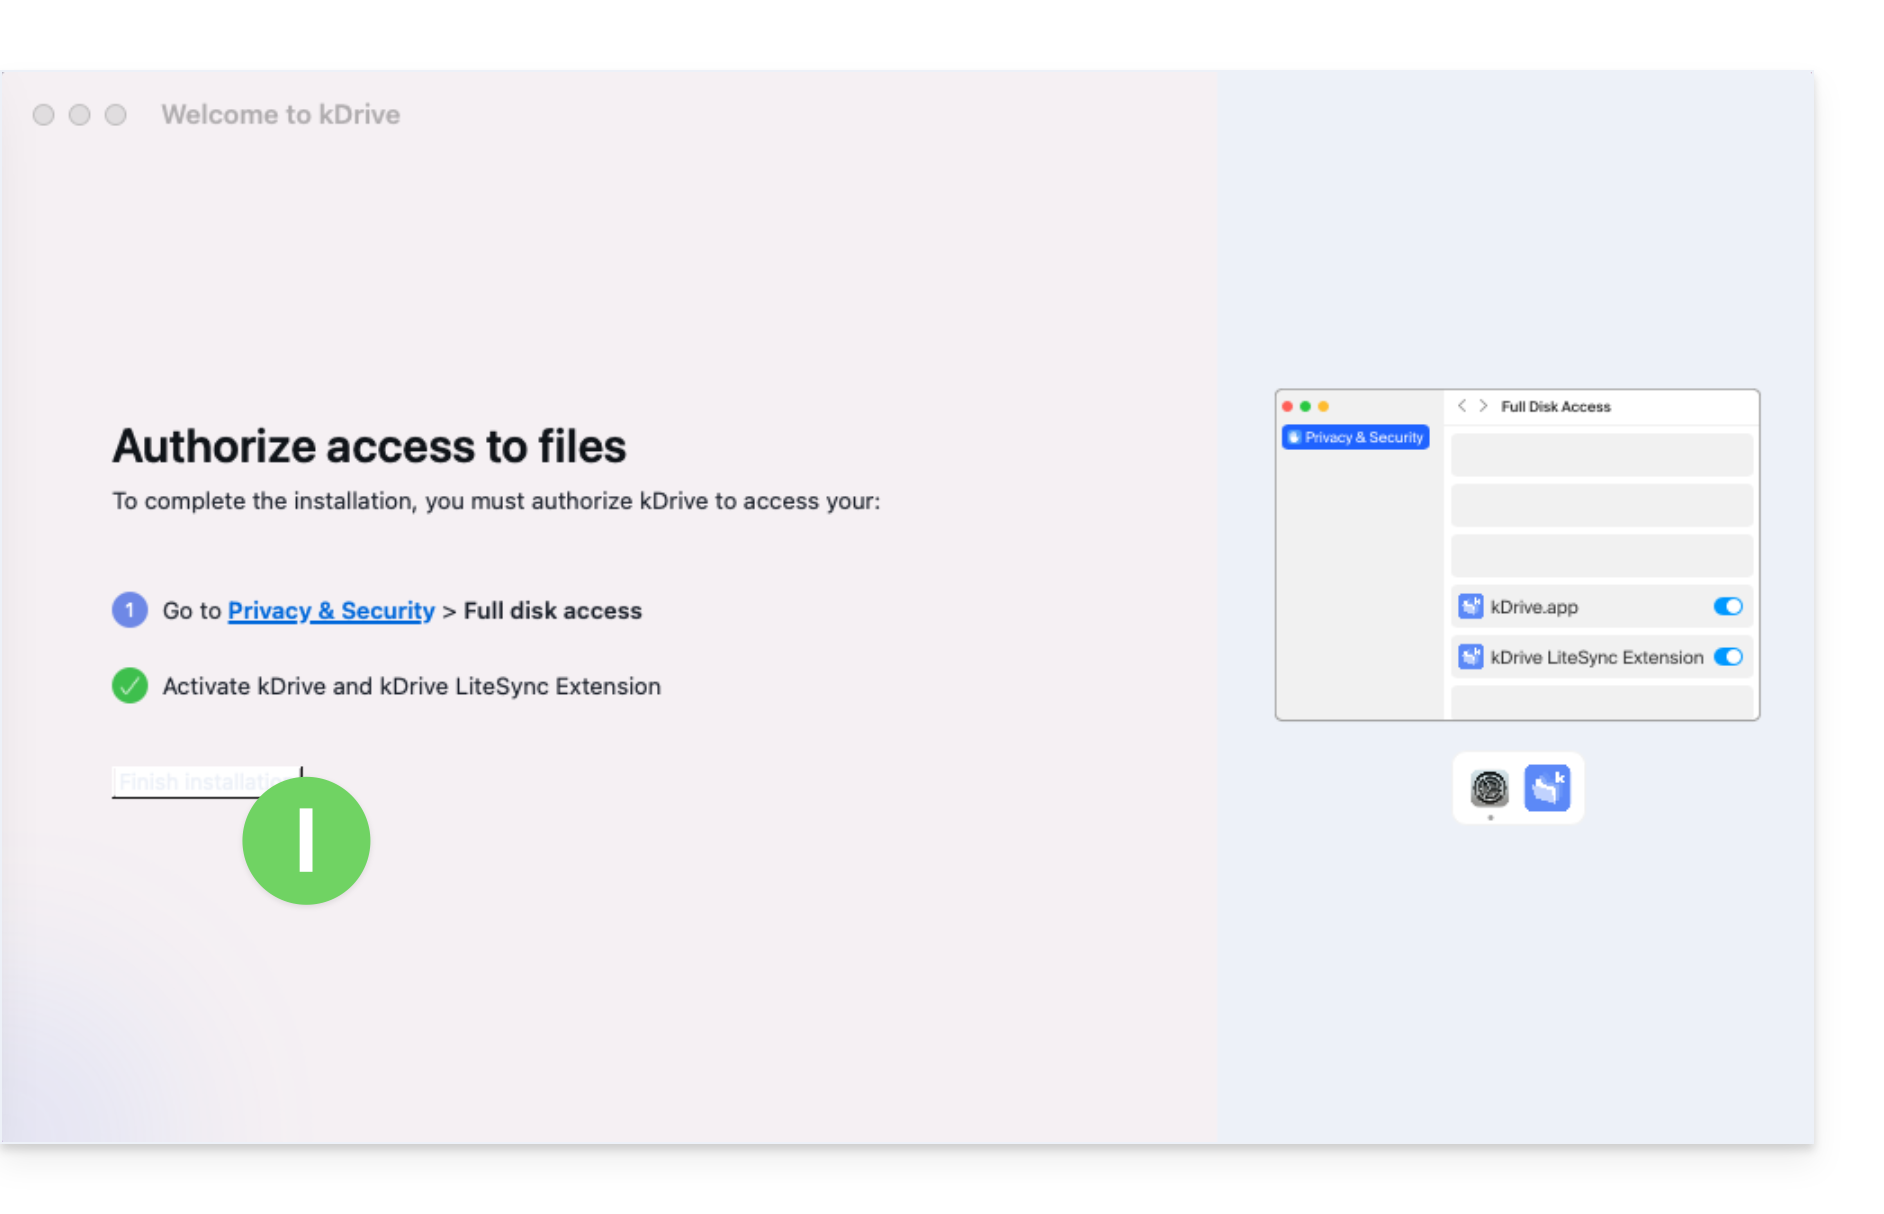
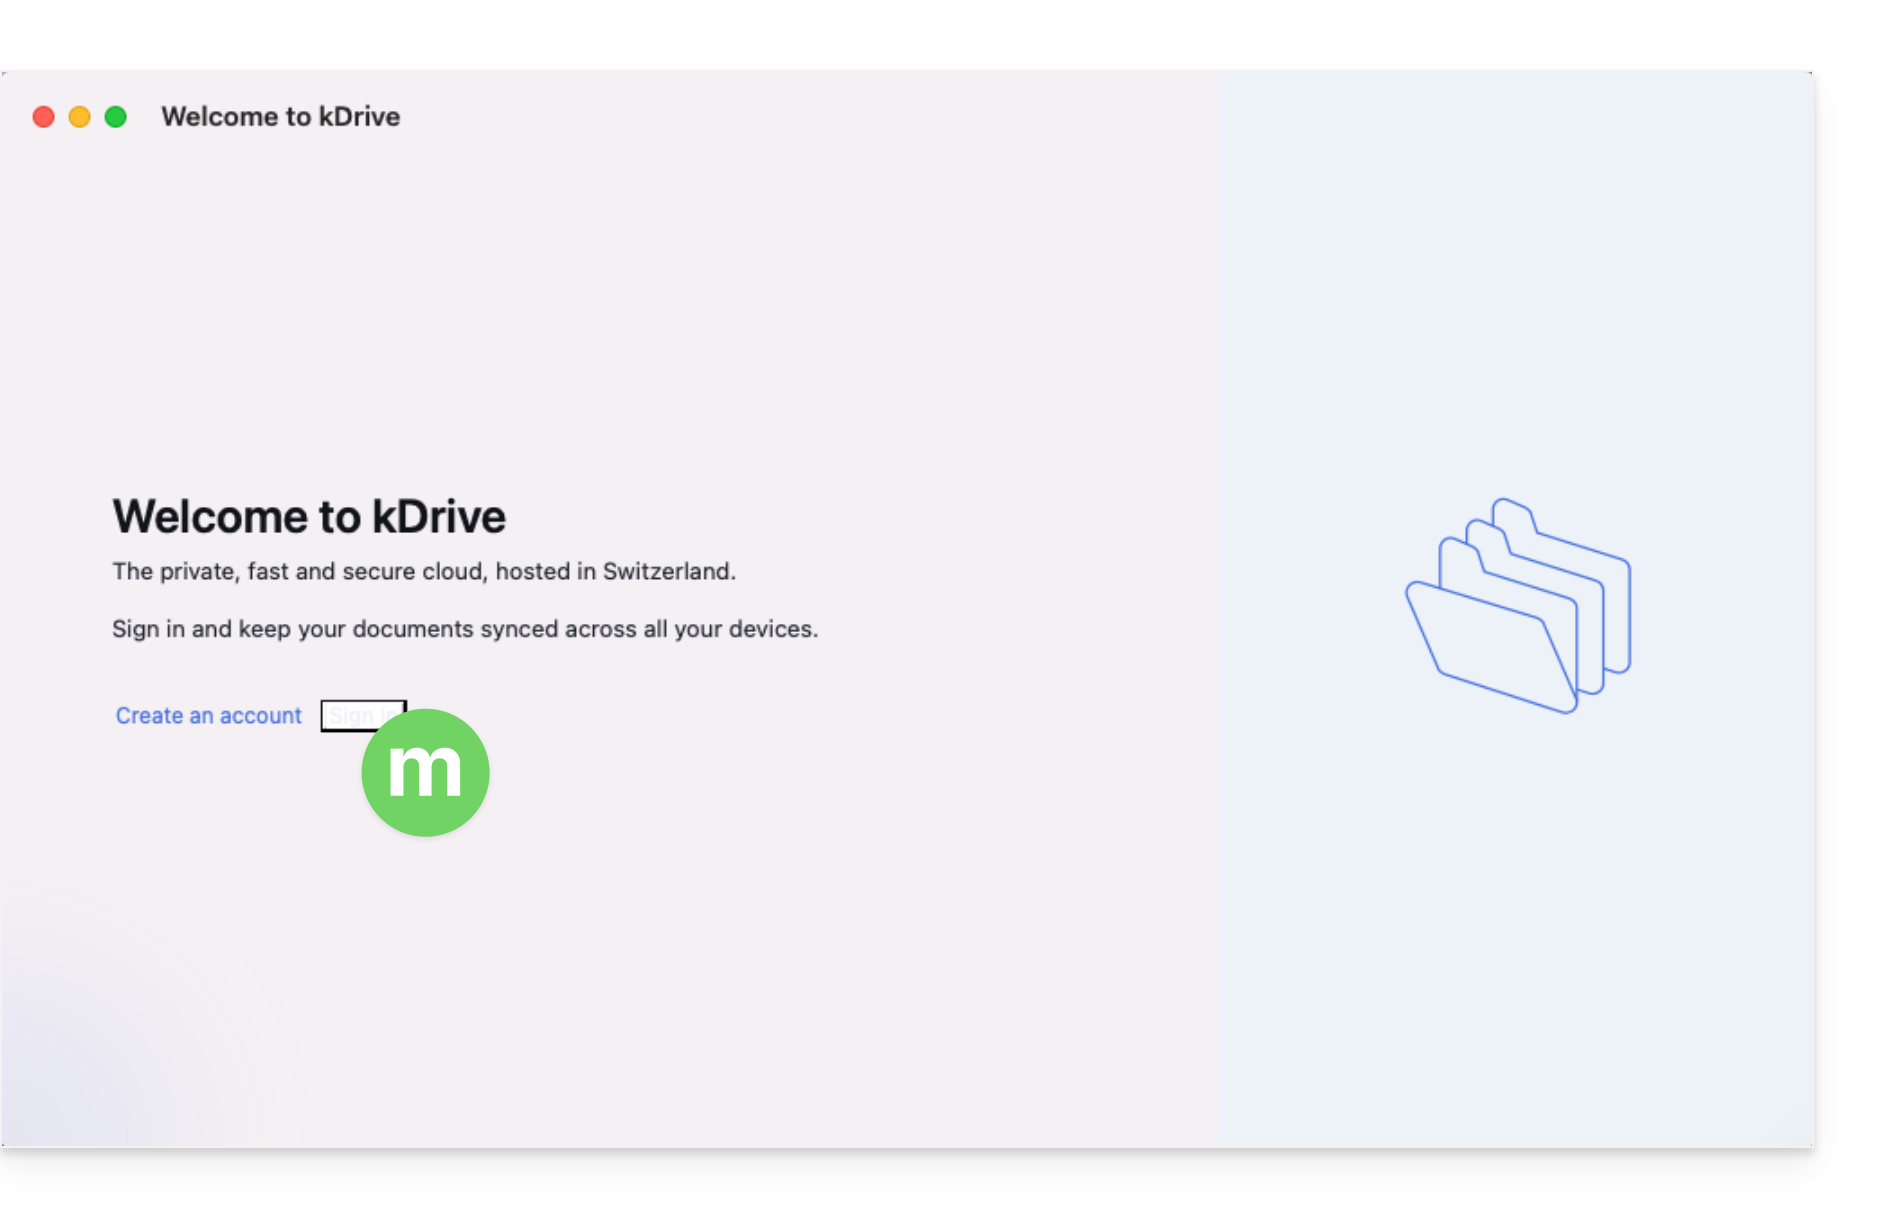
macOS 13
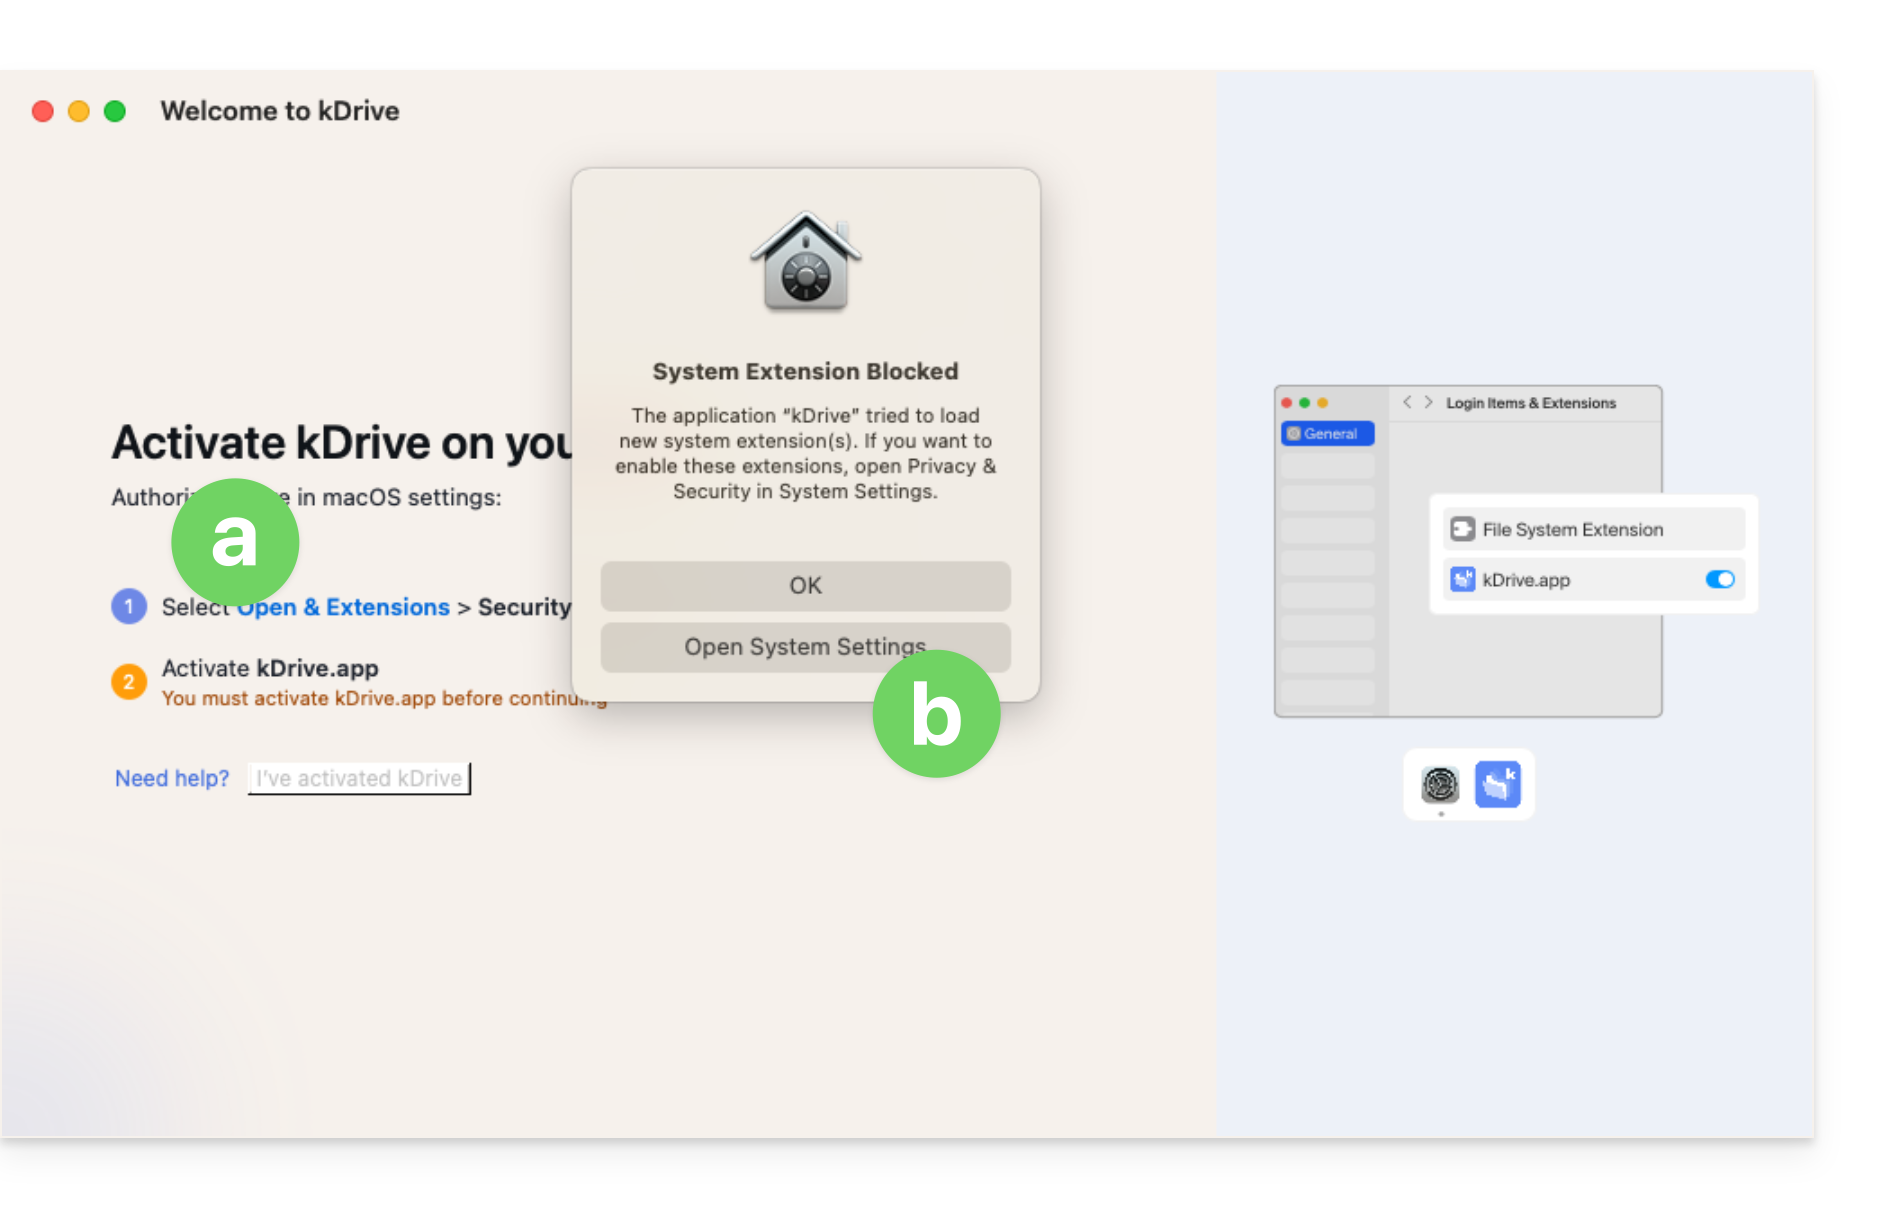
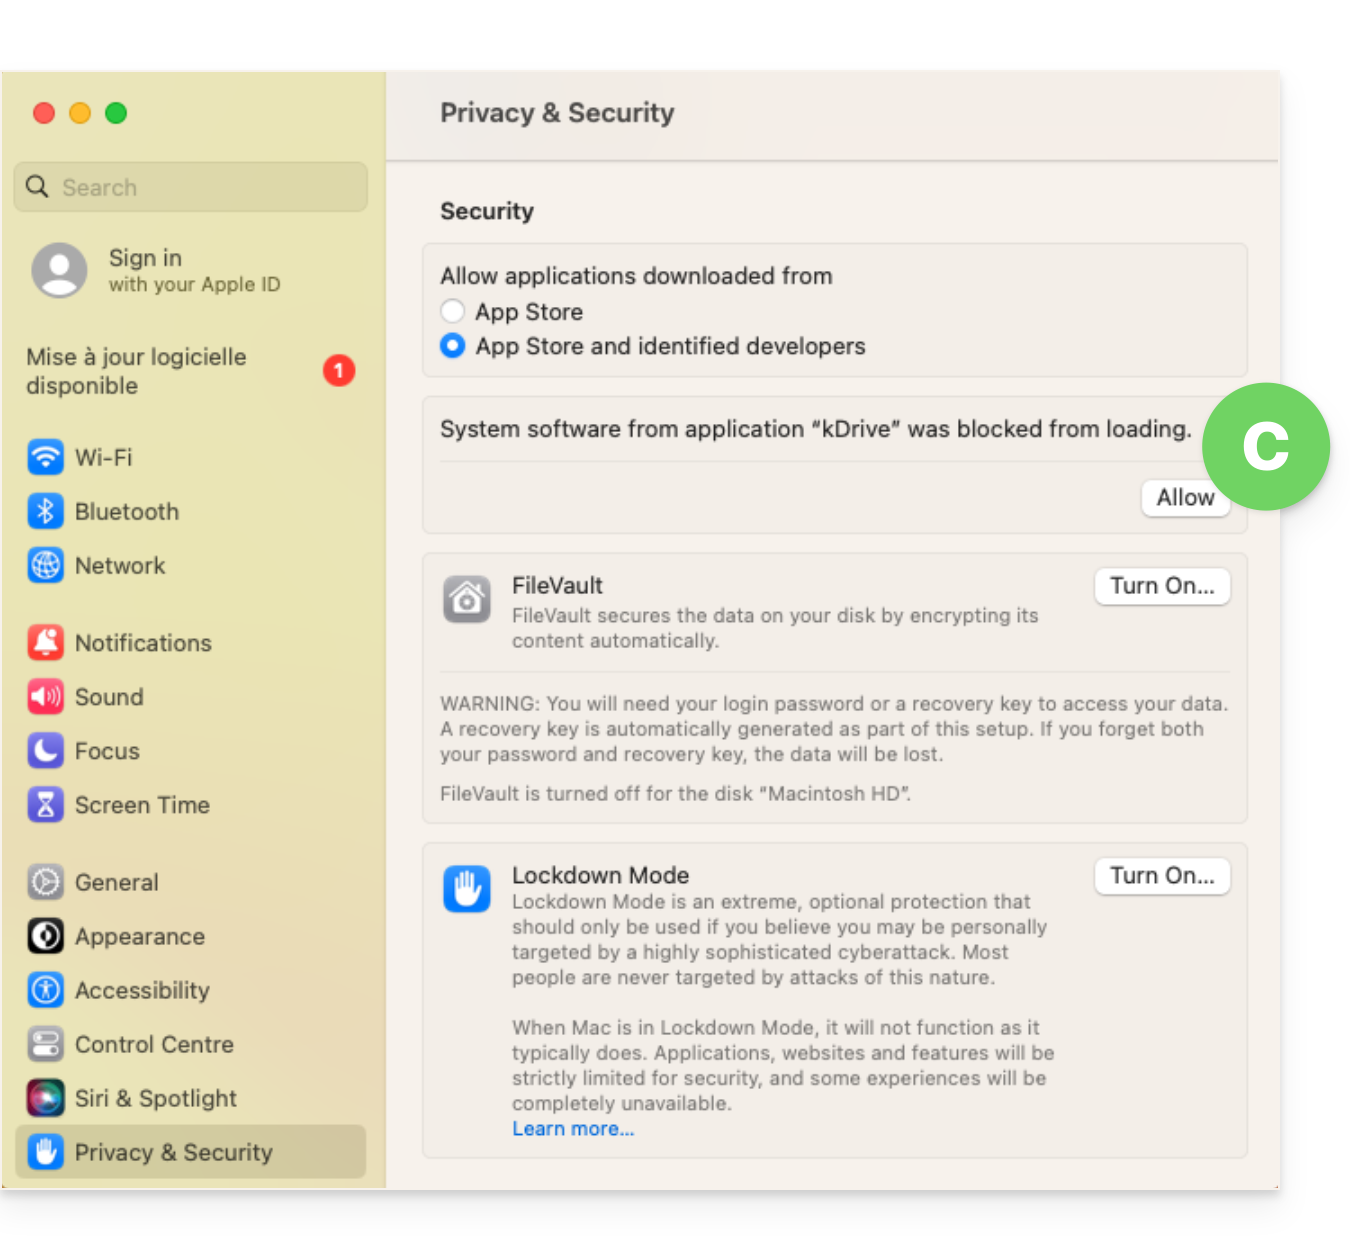
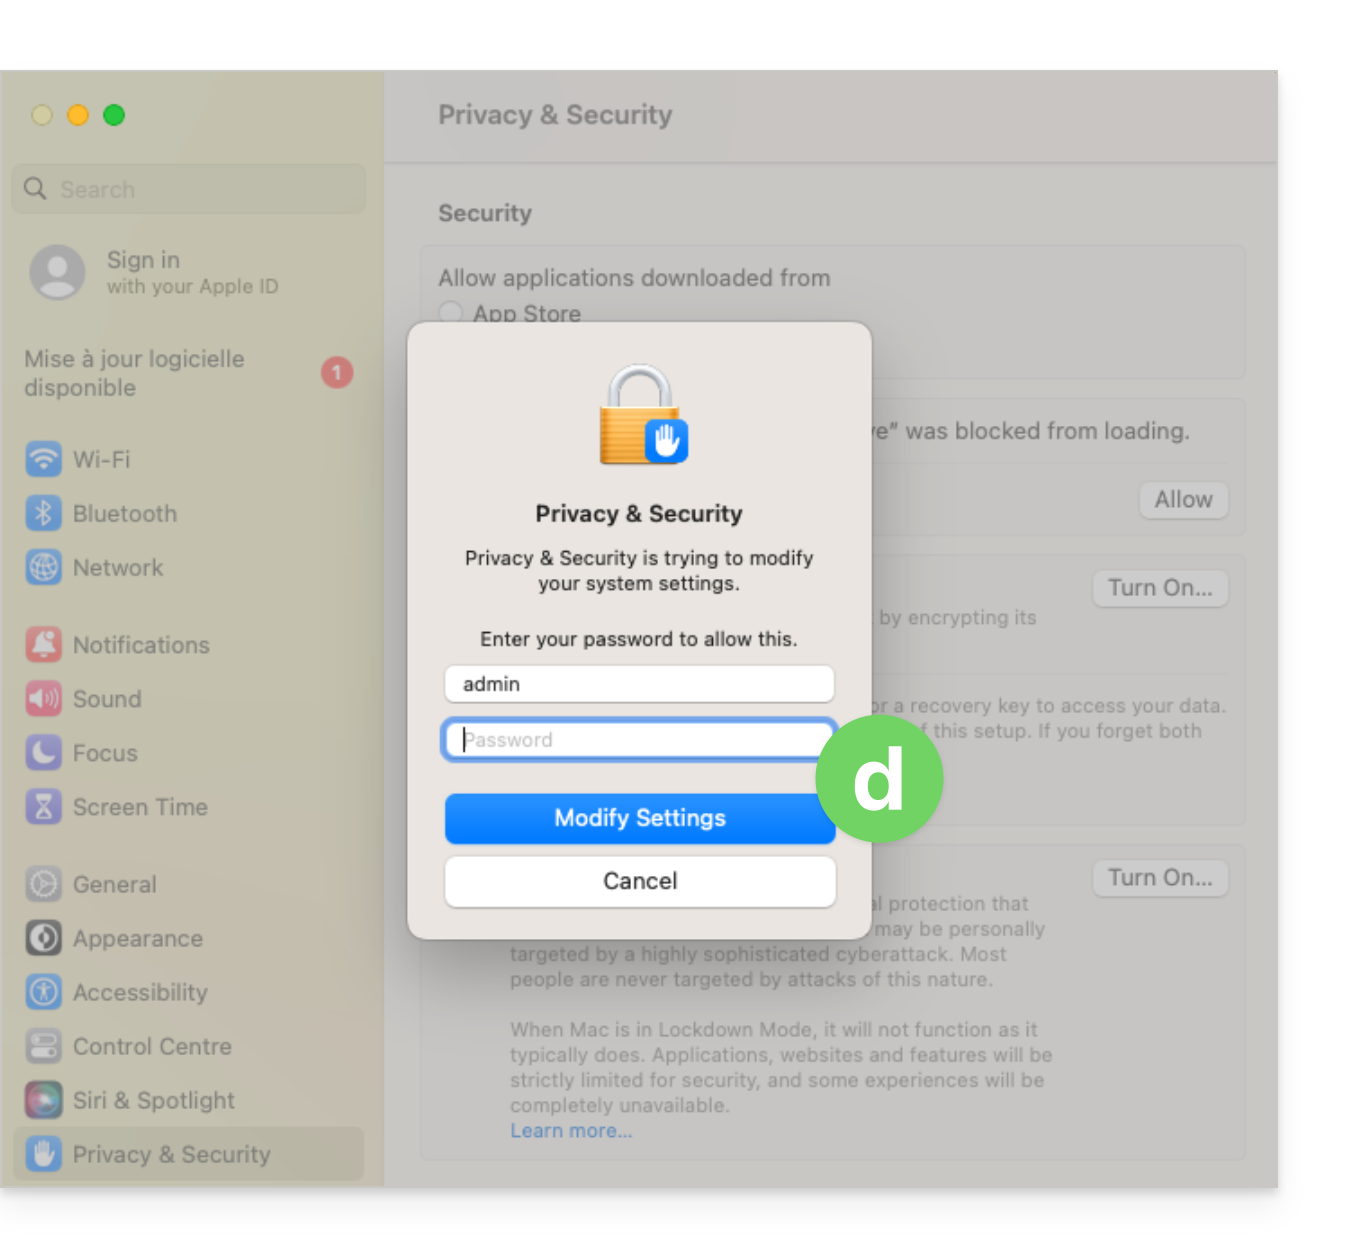
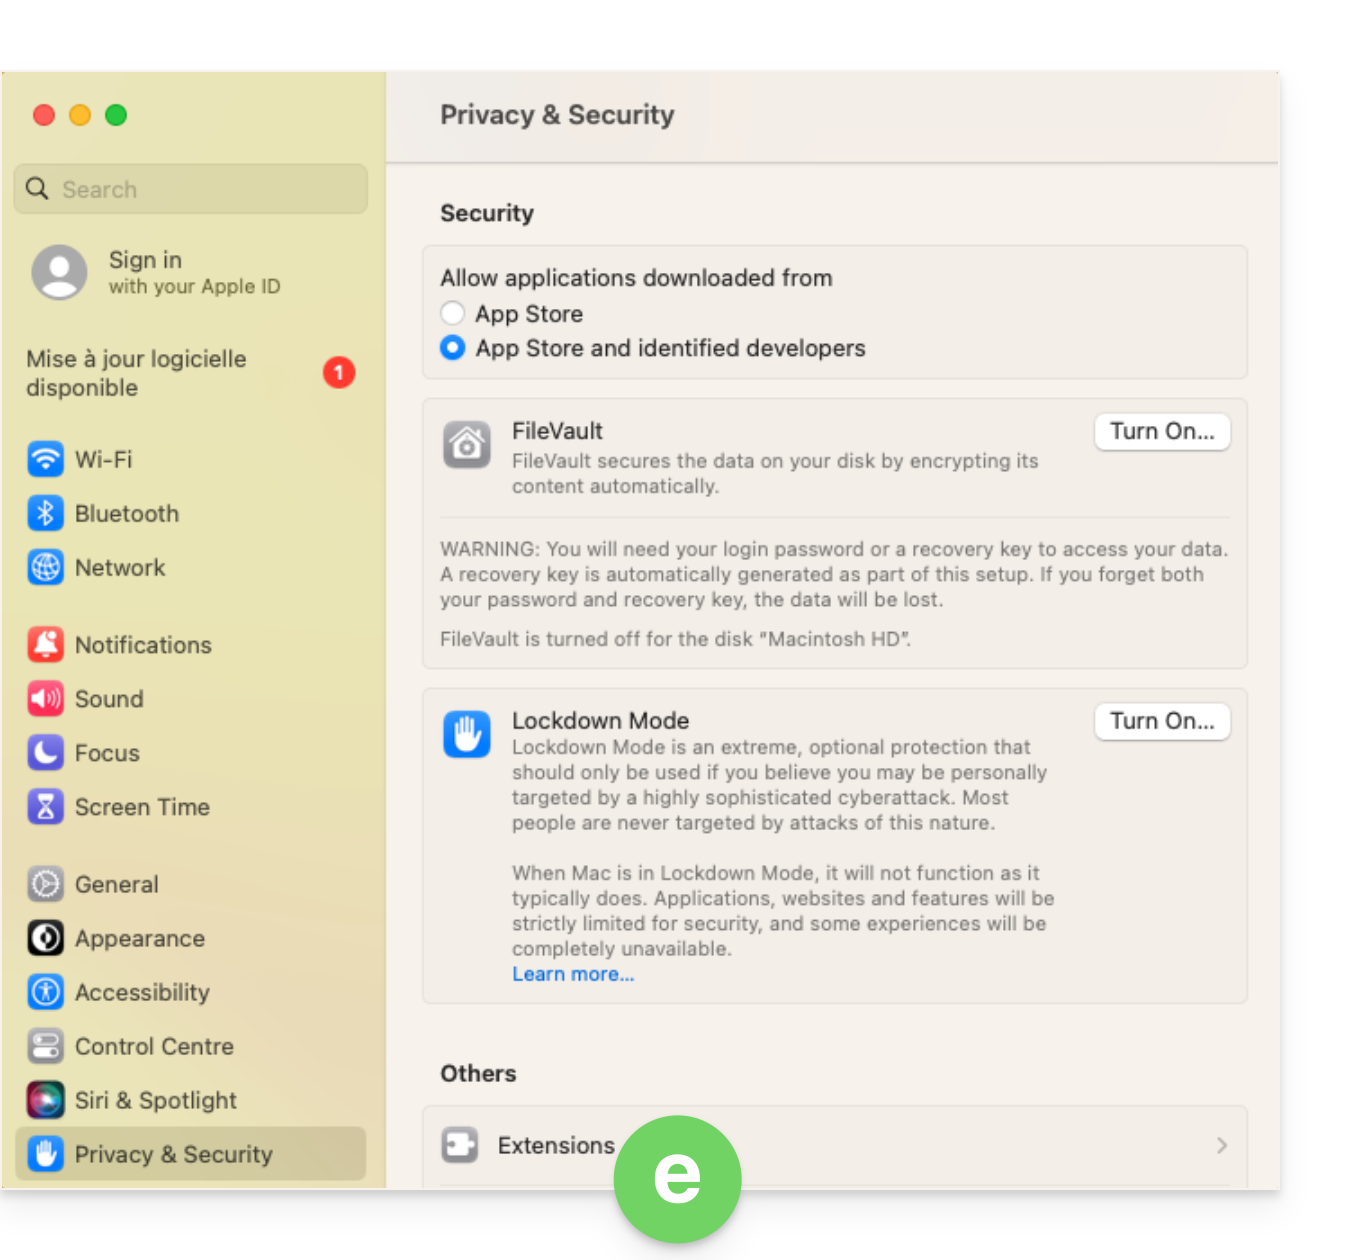
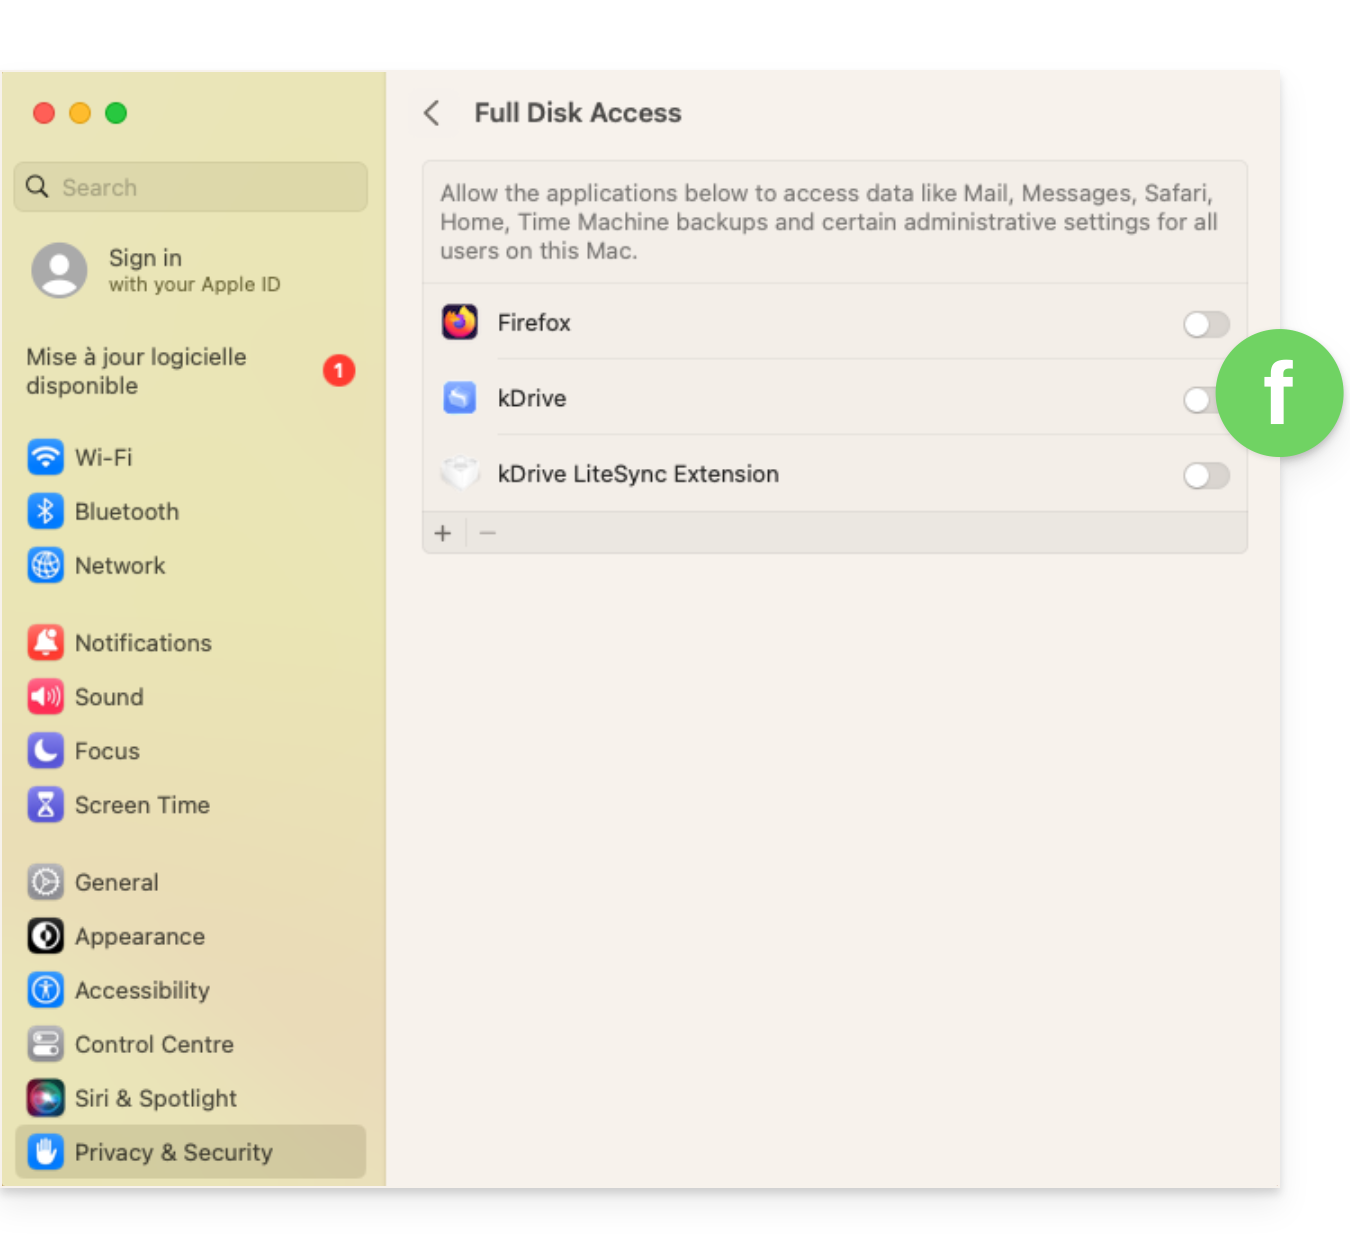
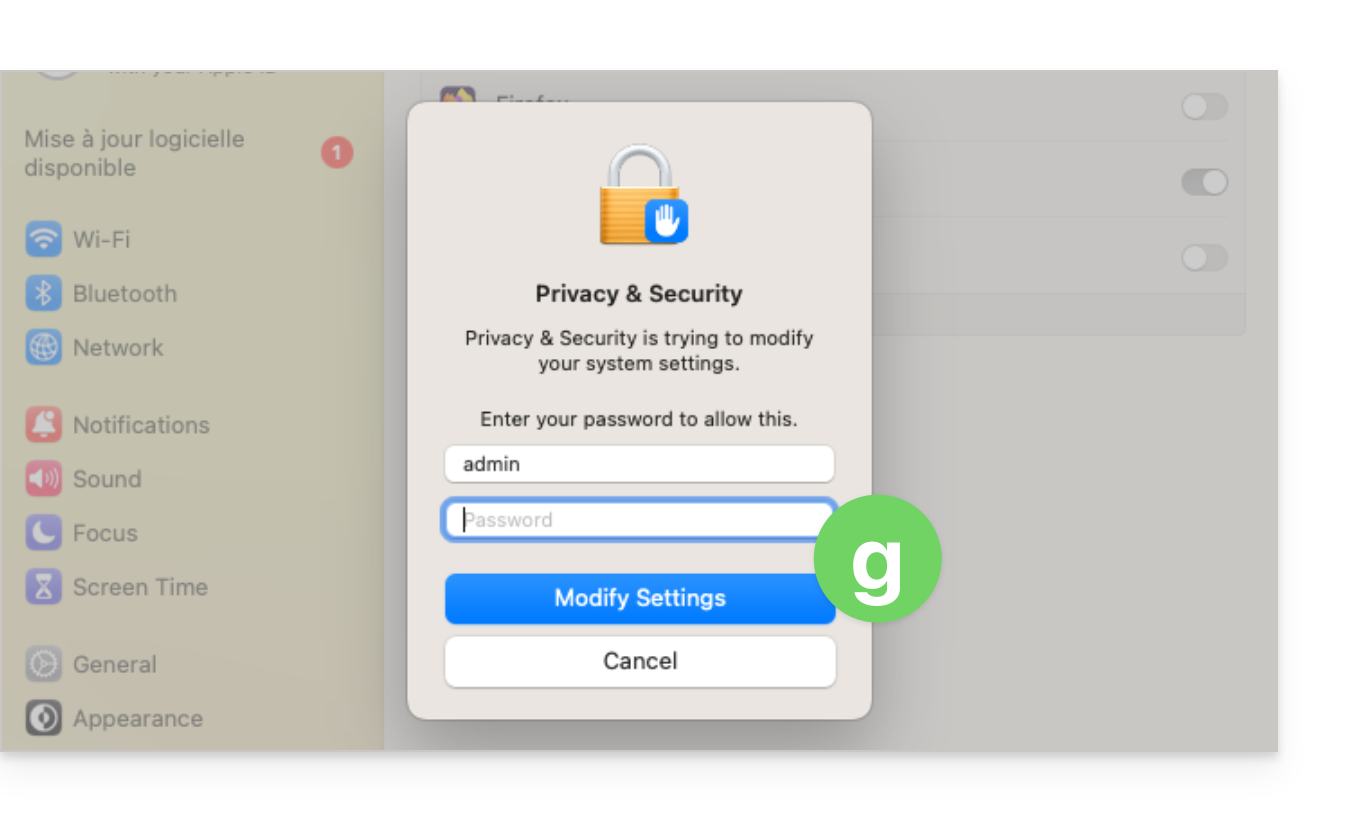
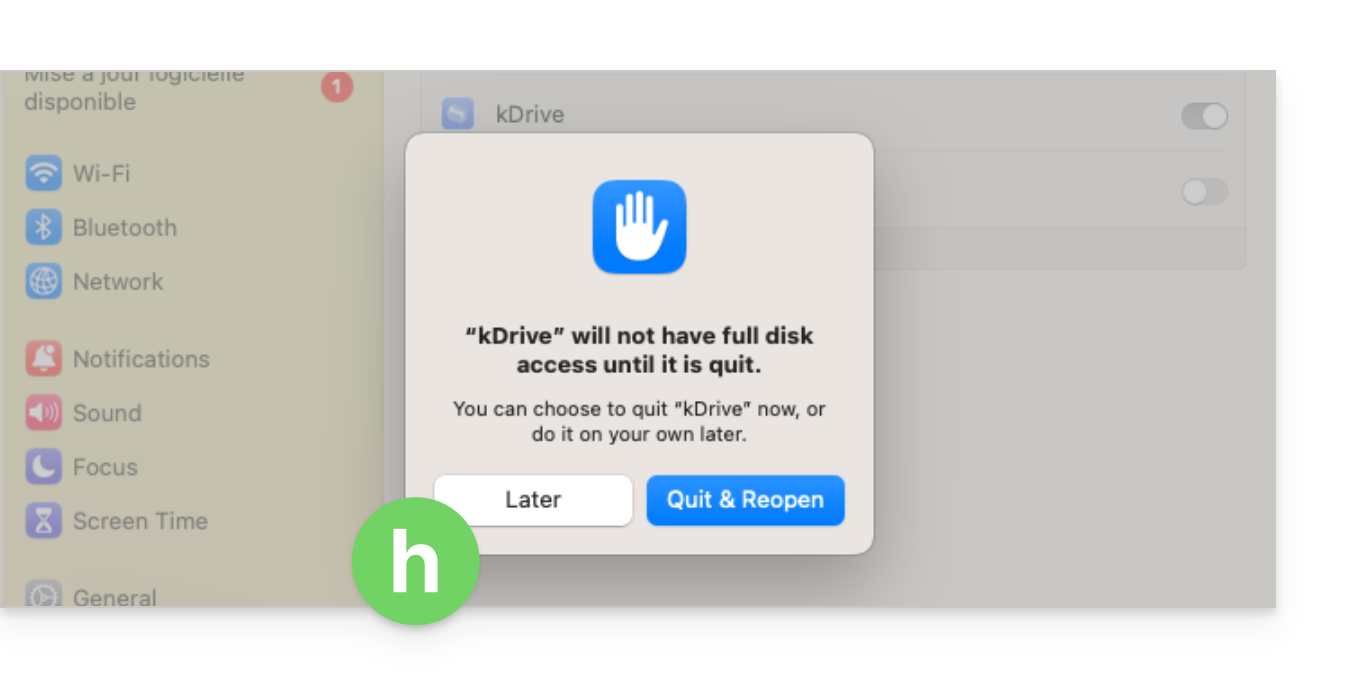
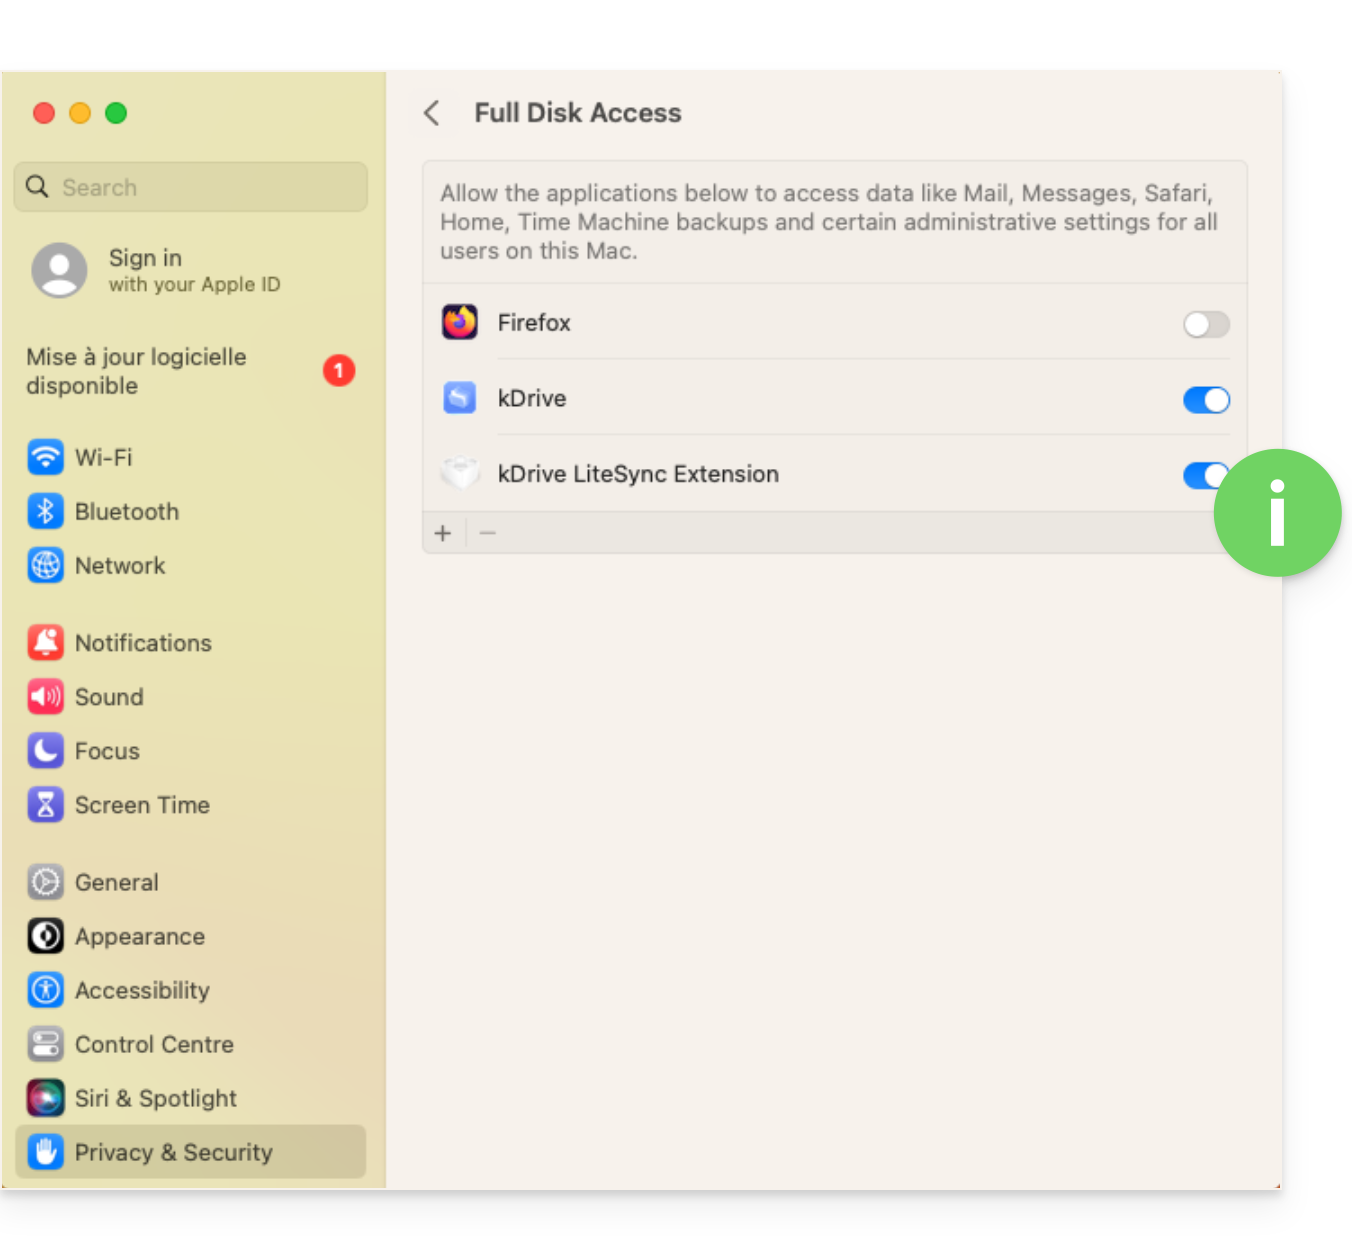
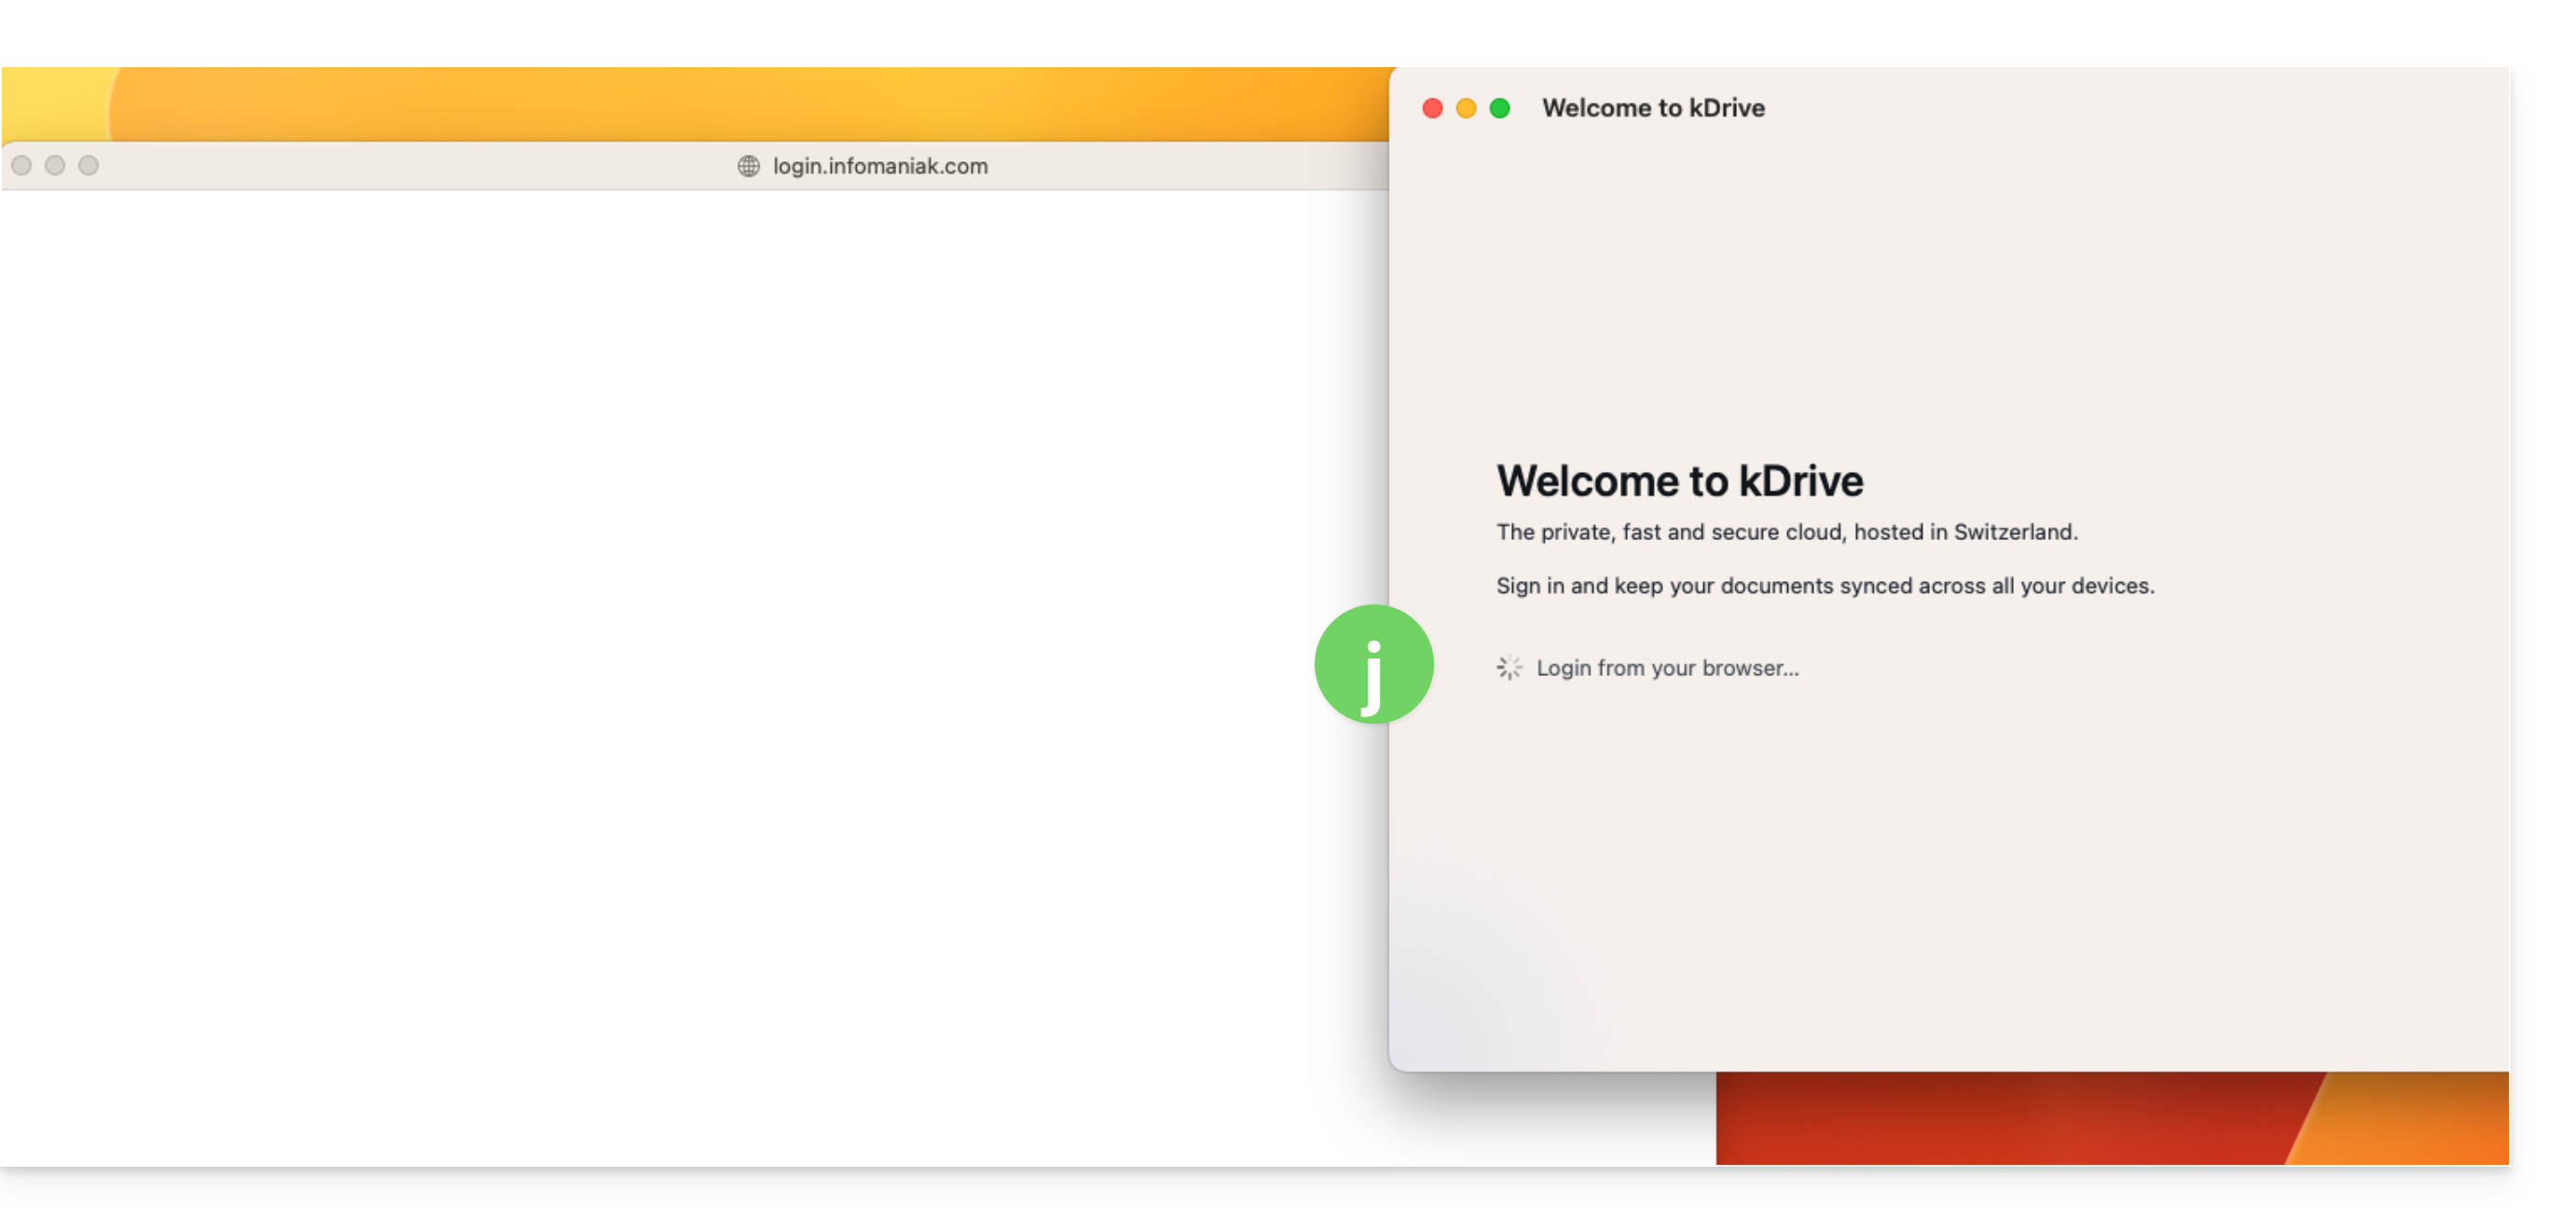
macOS 14
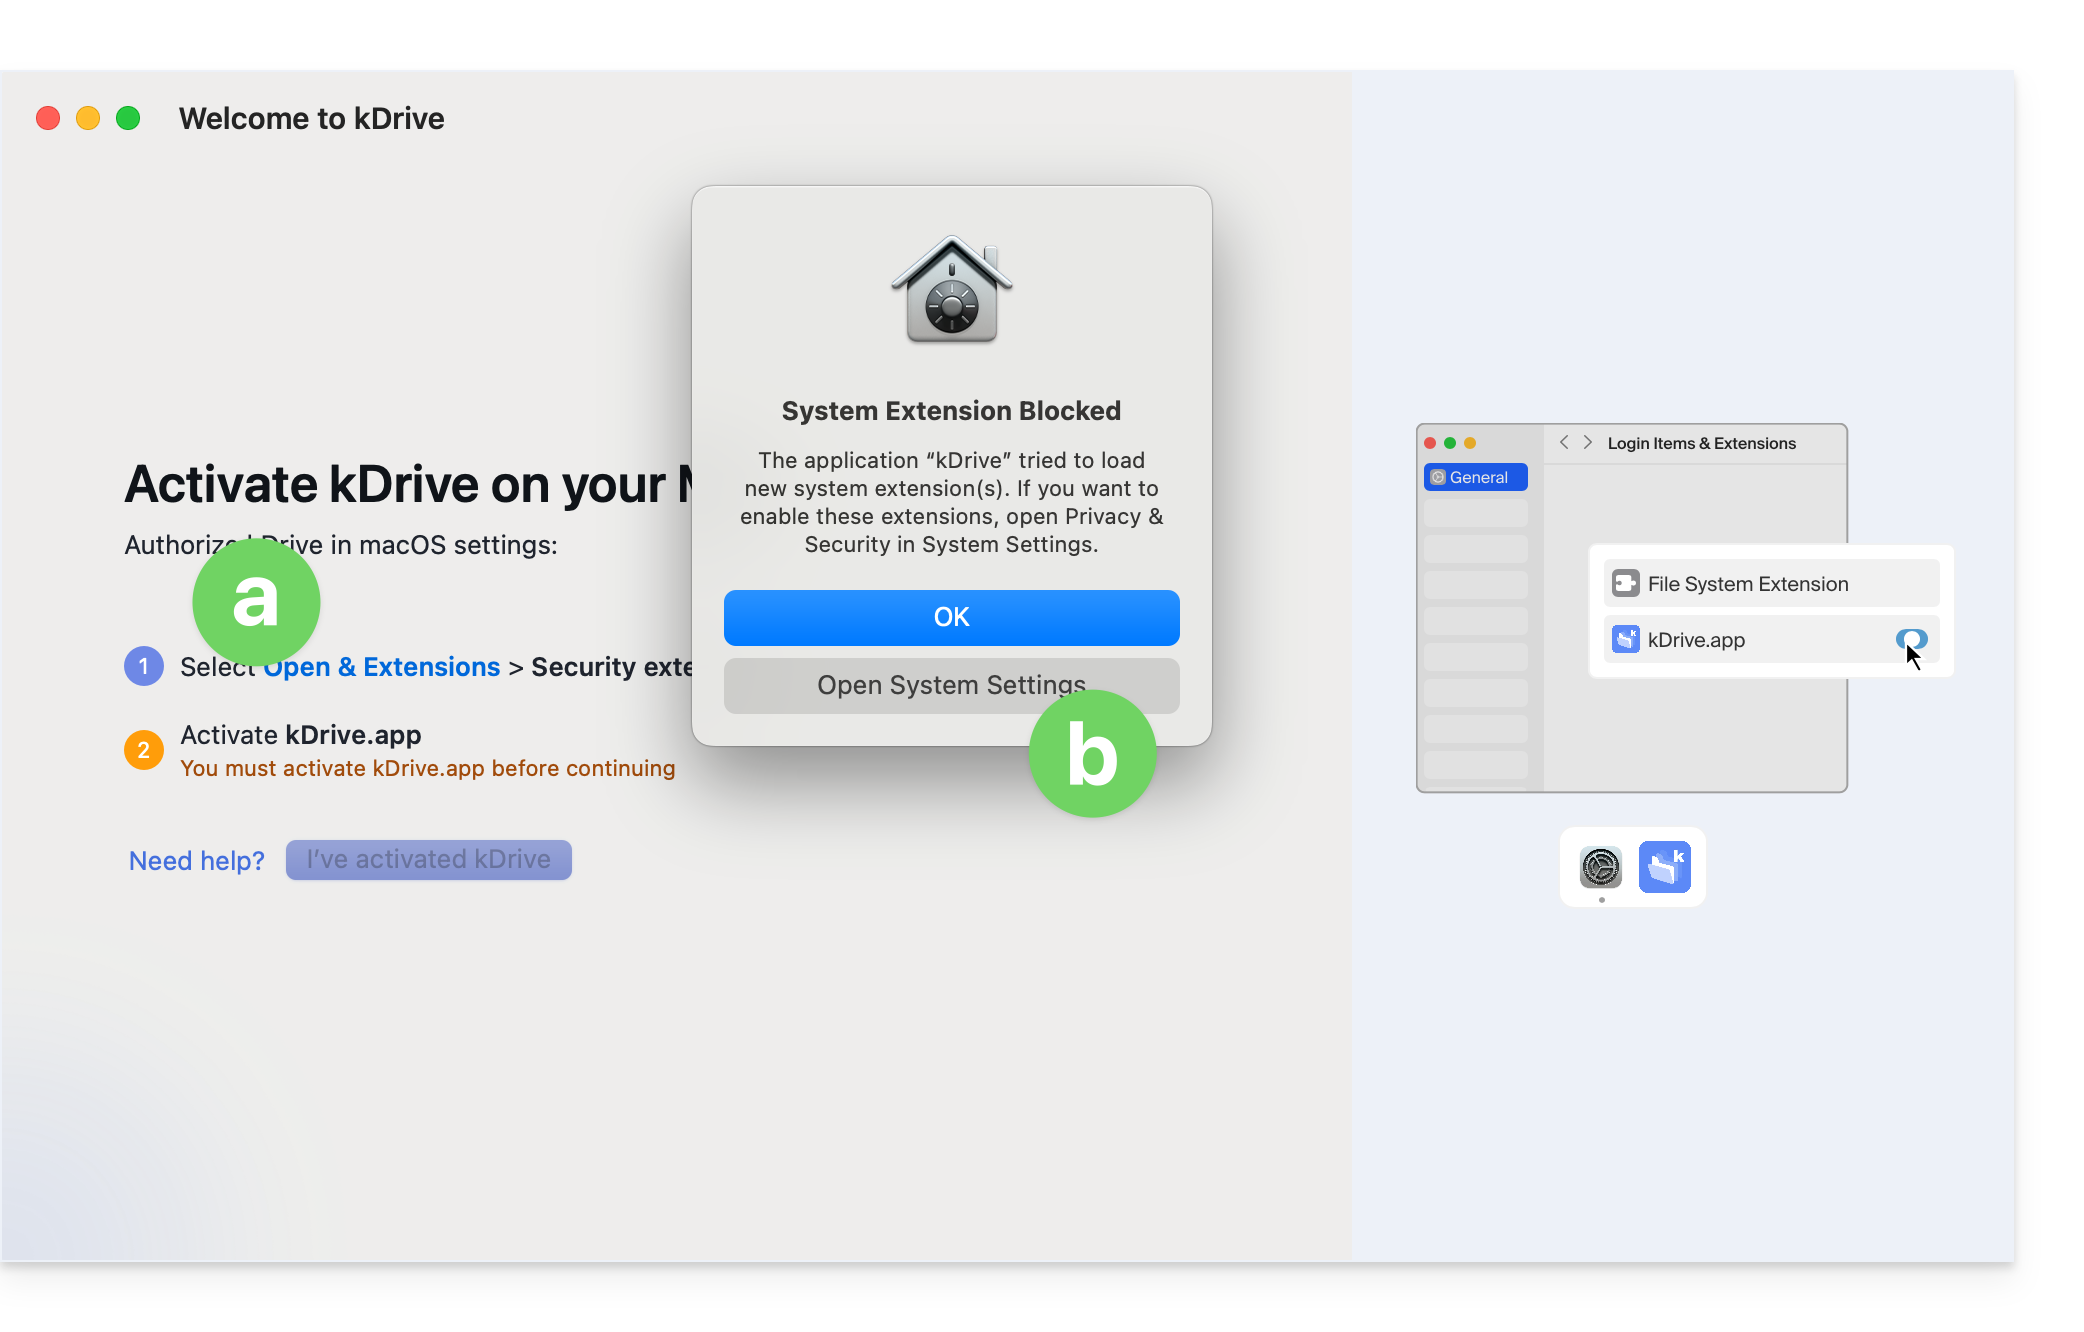
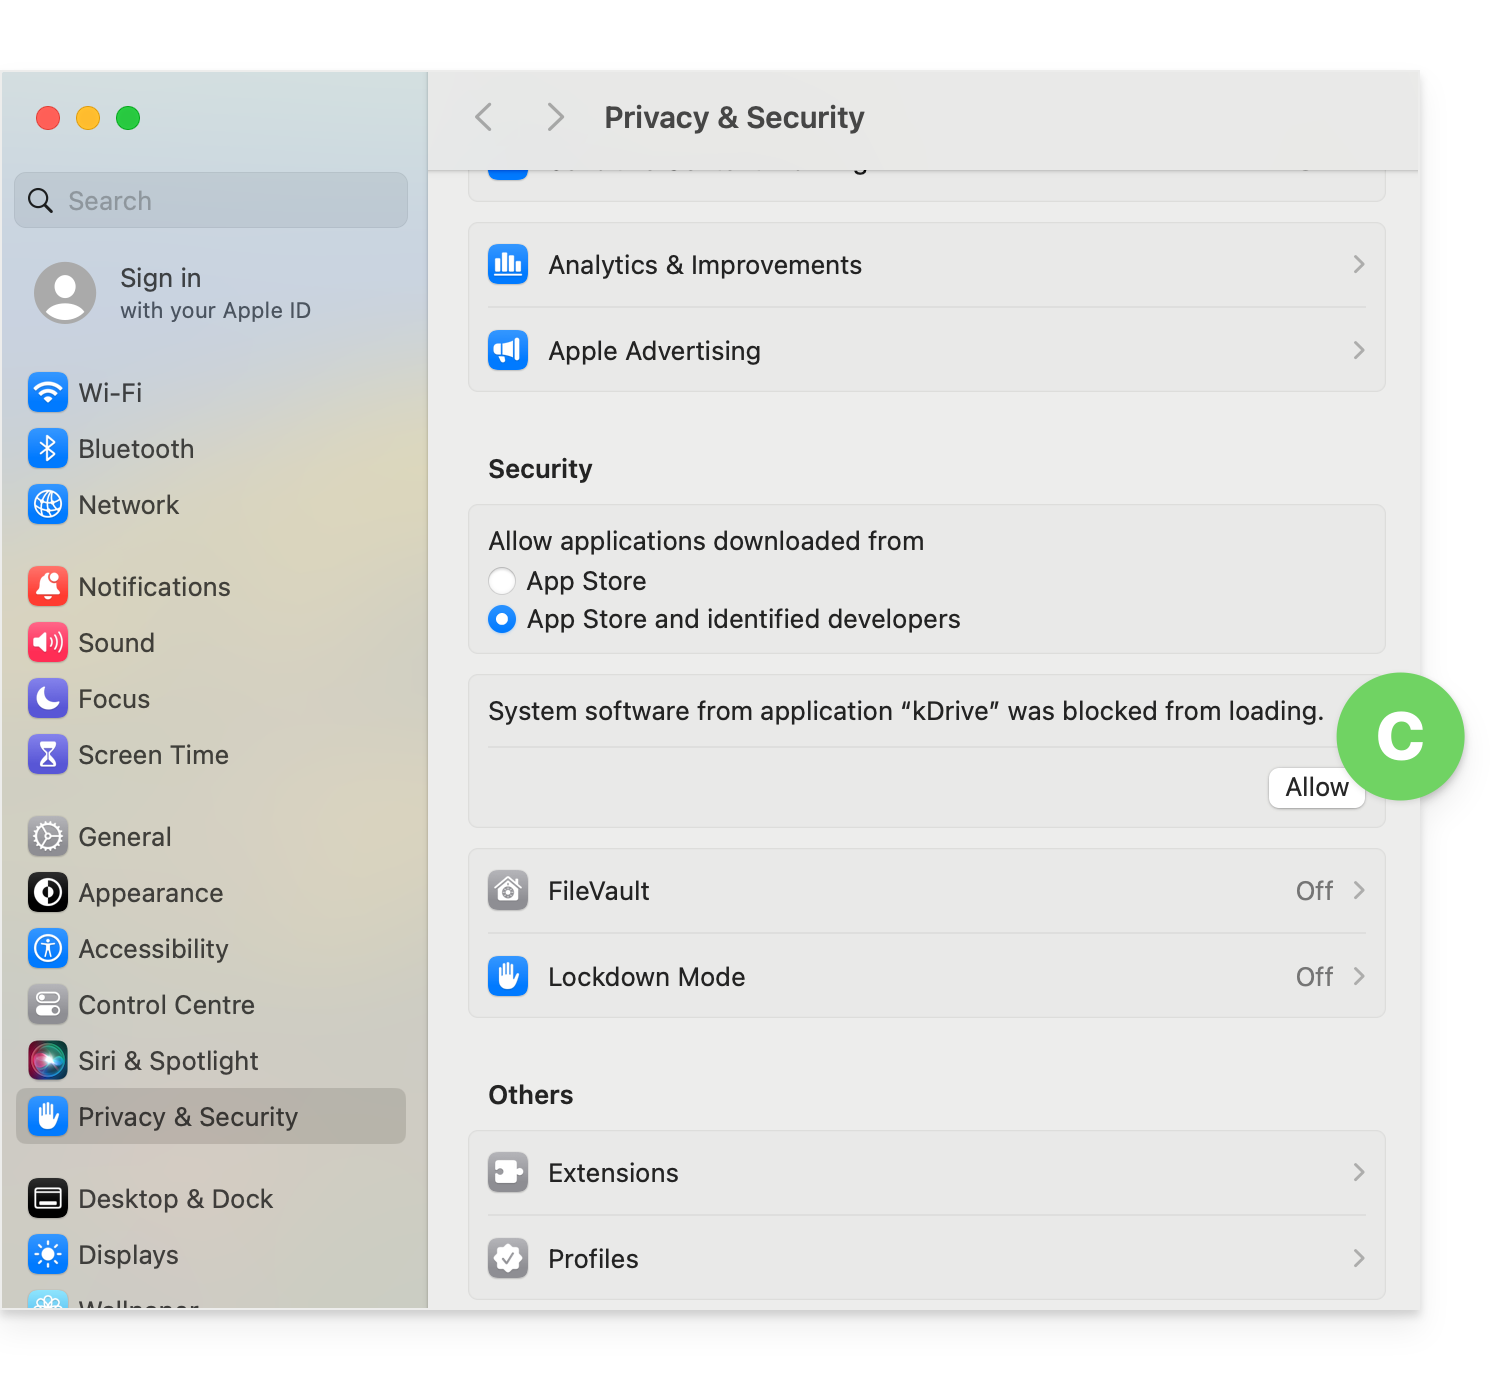
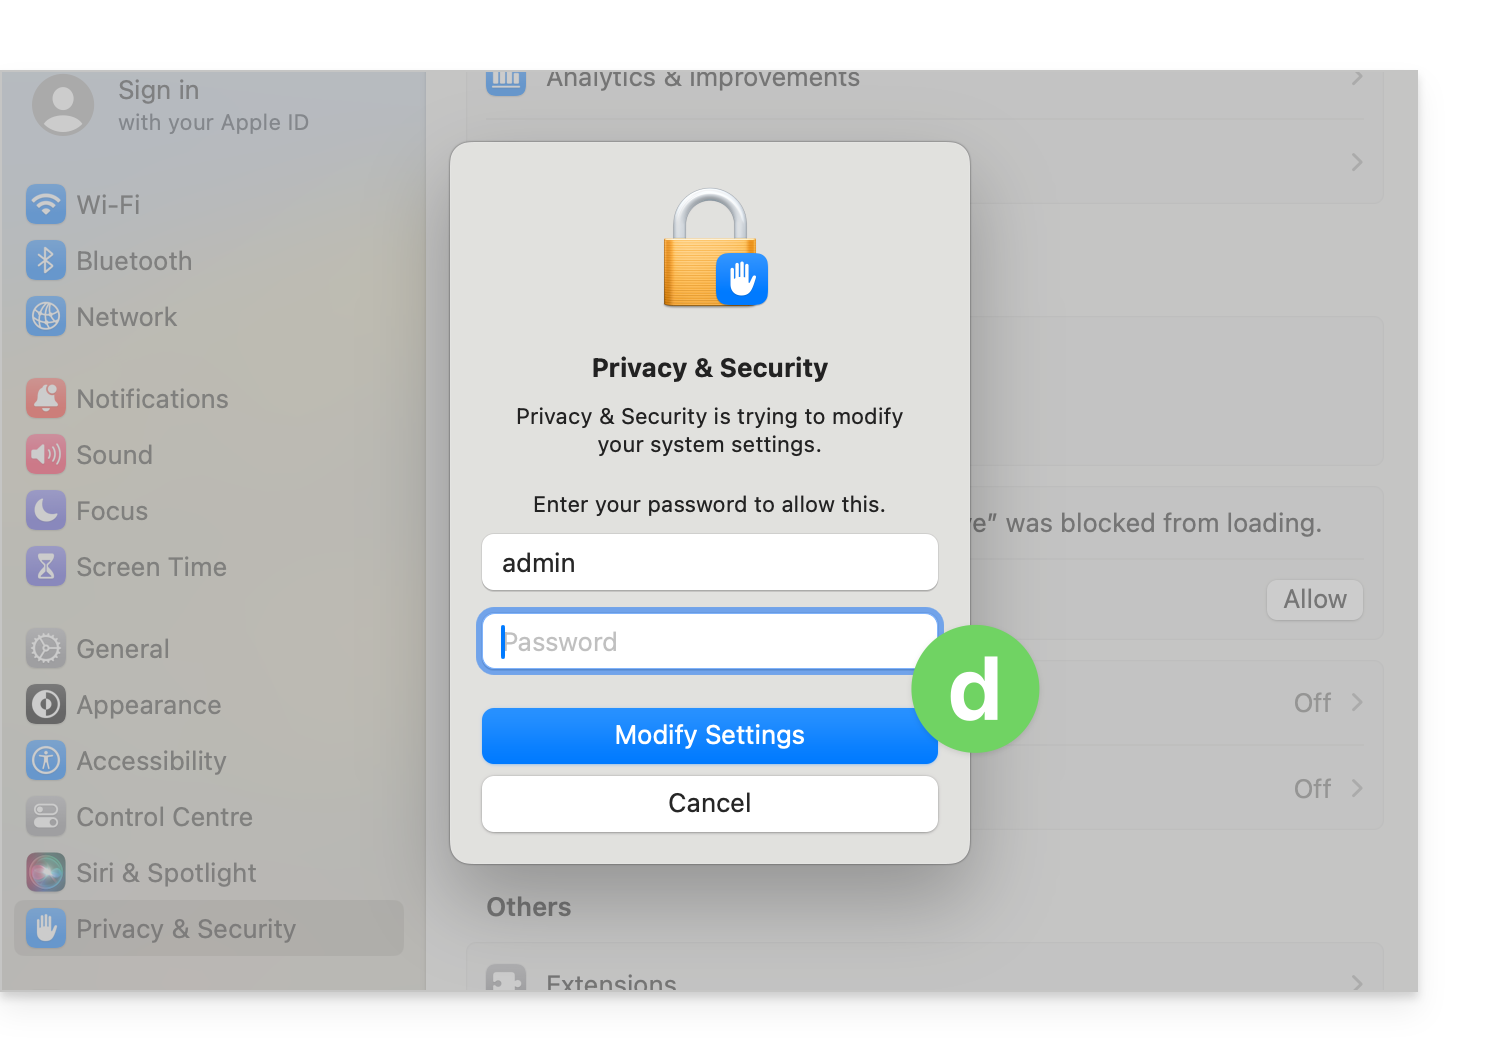
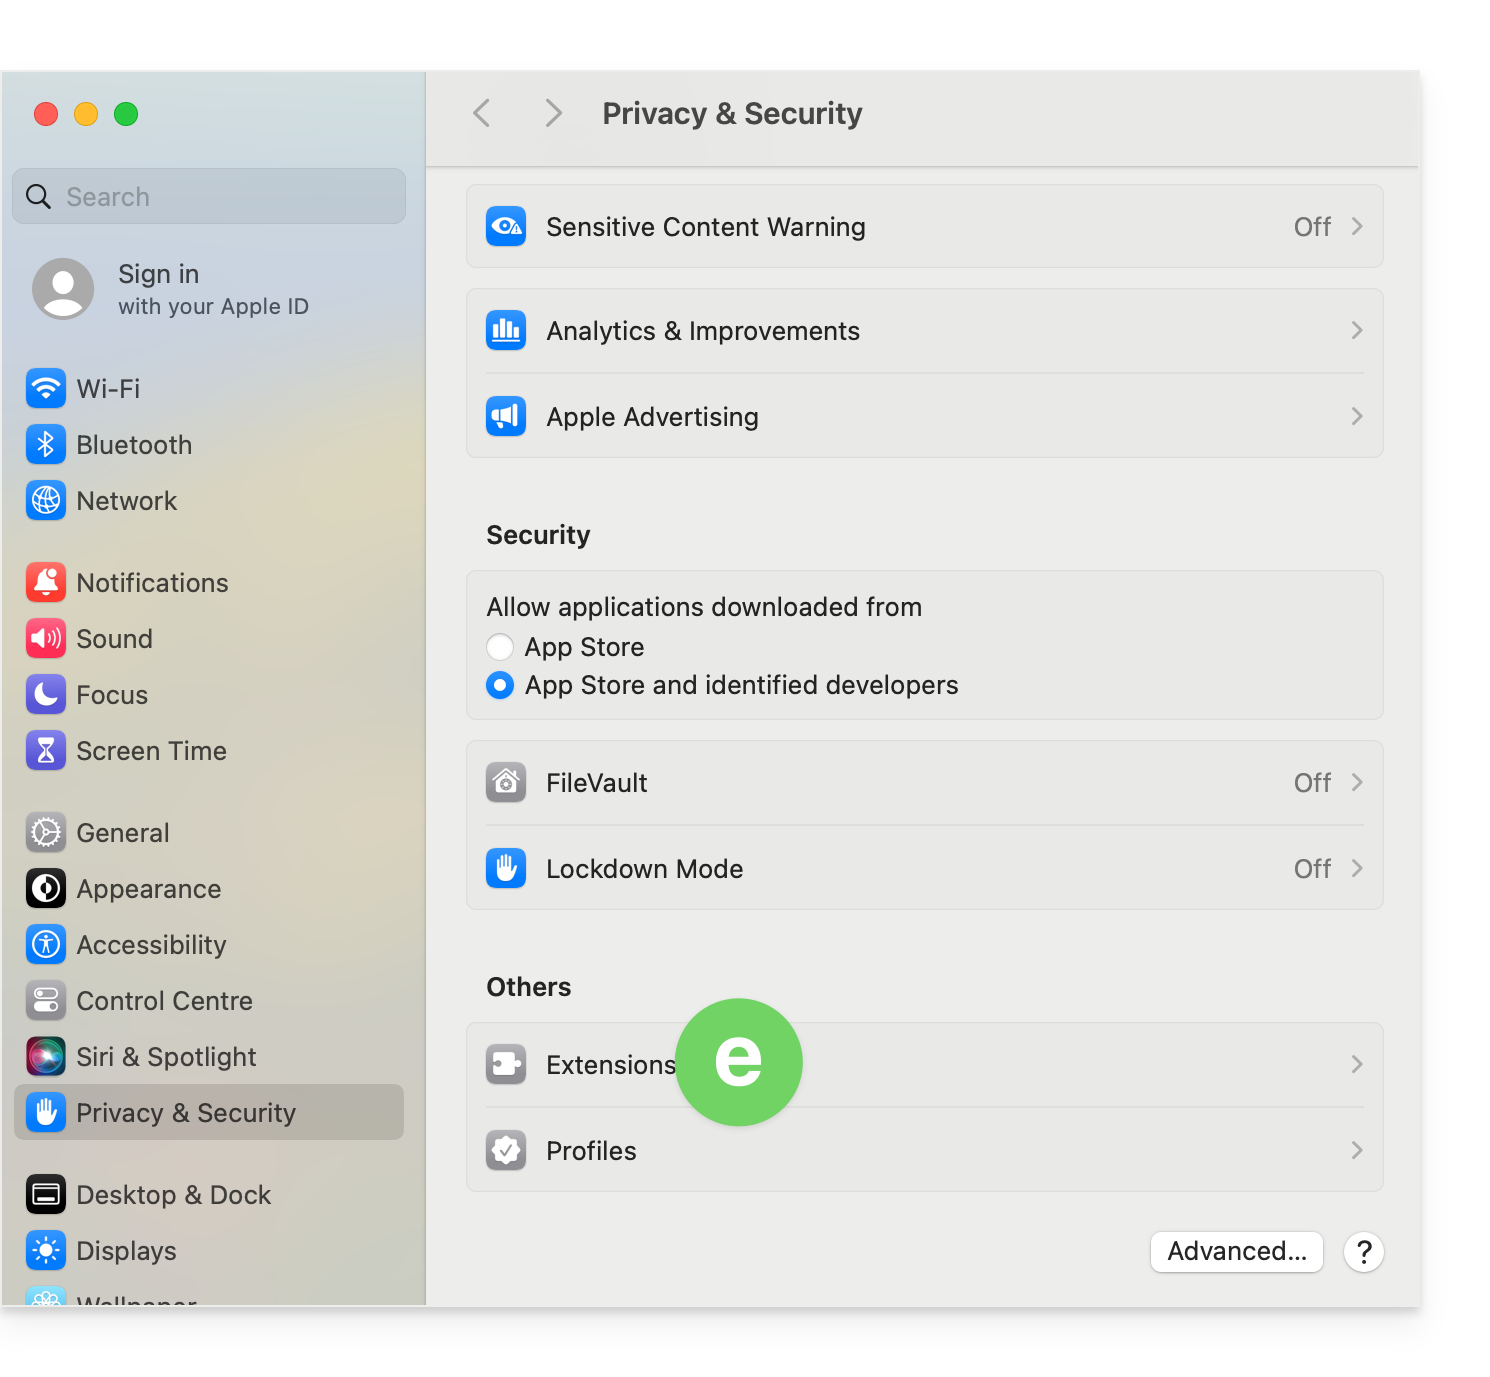
macOS 15
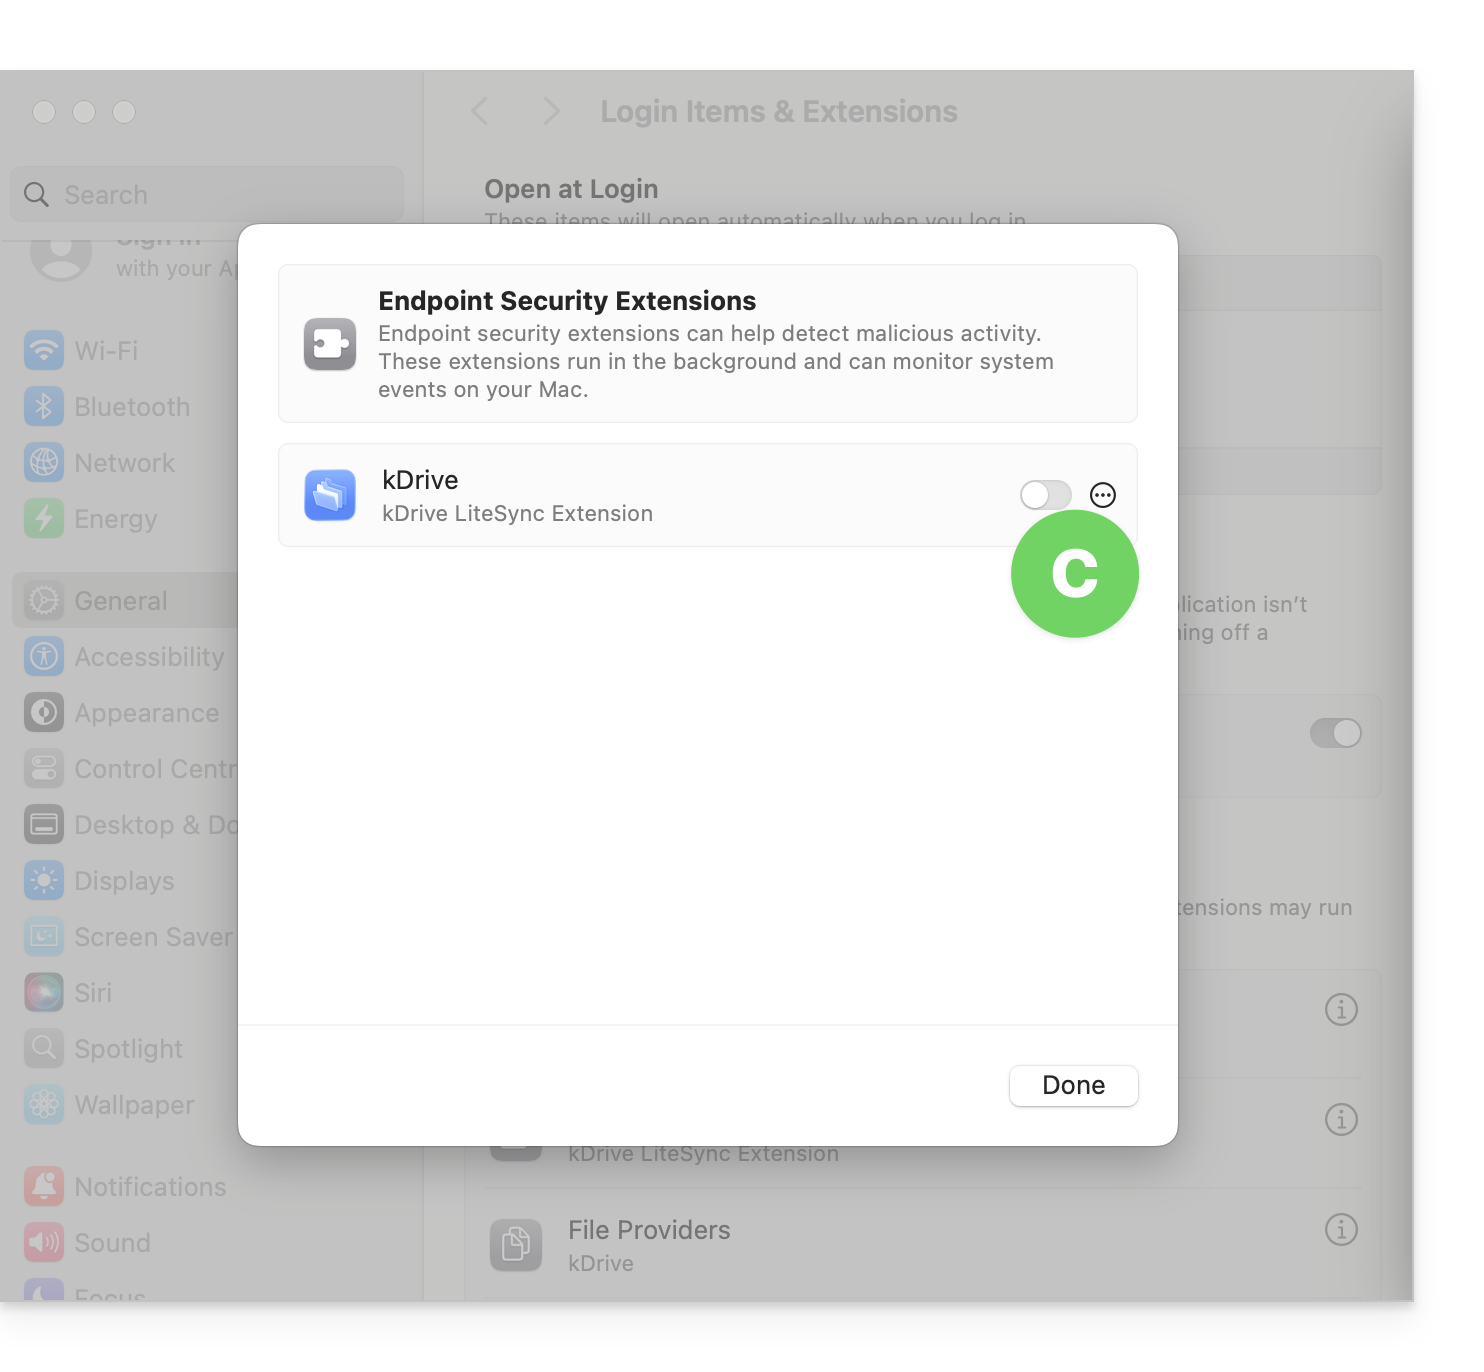
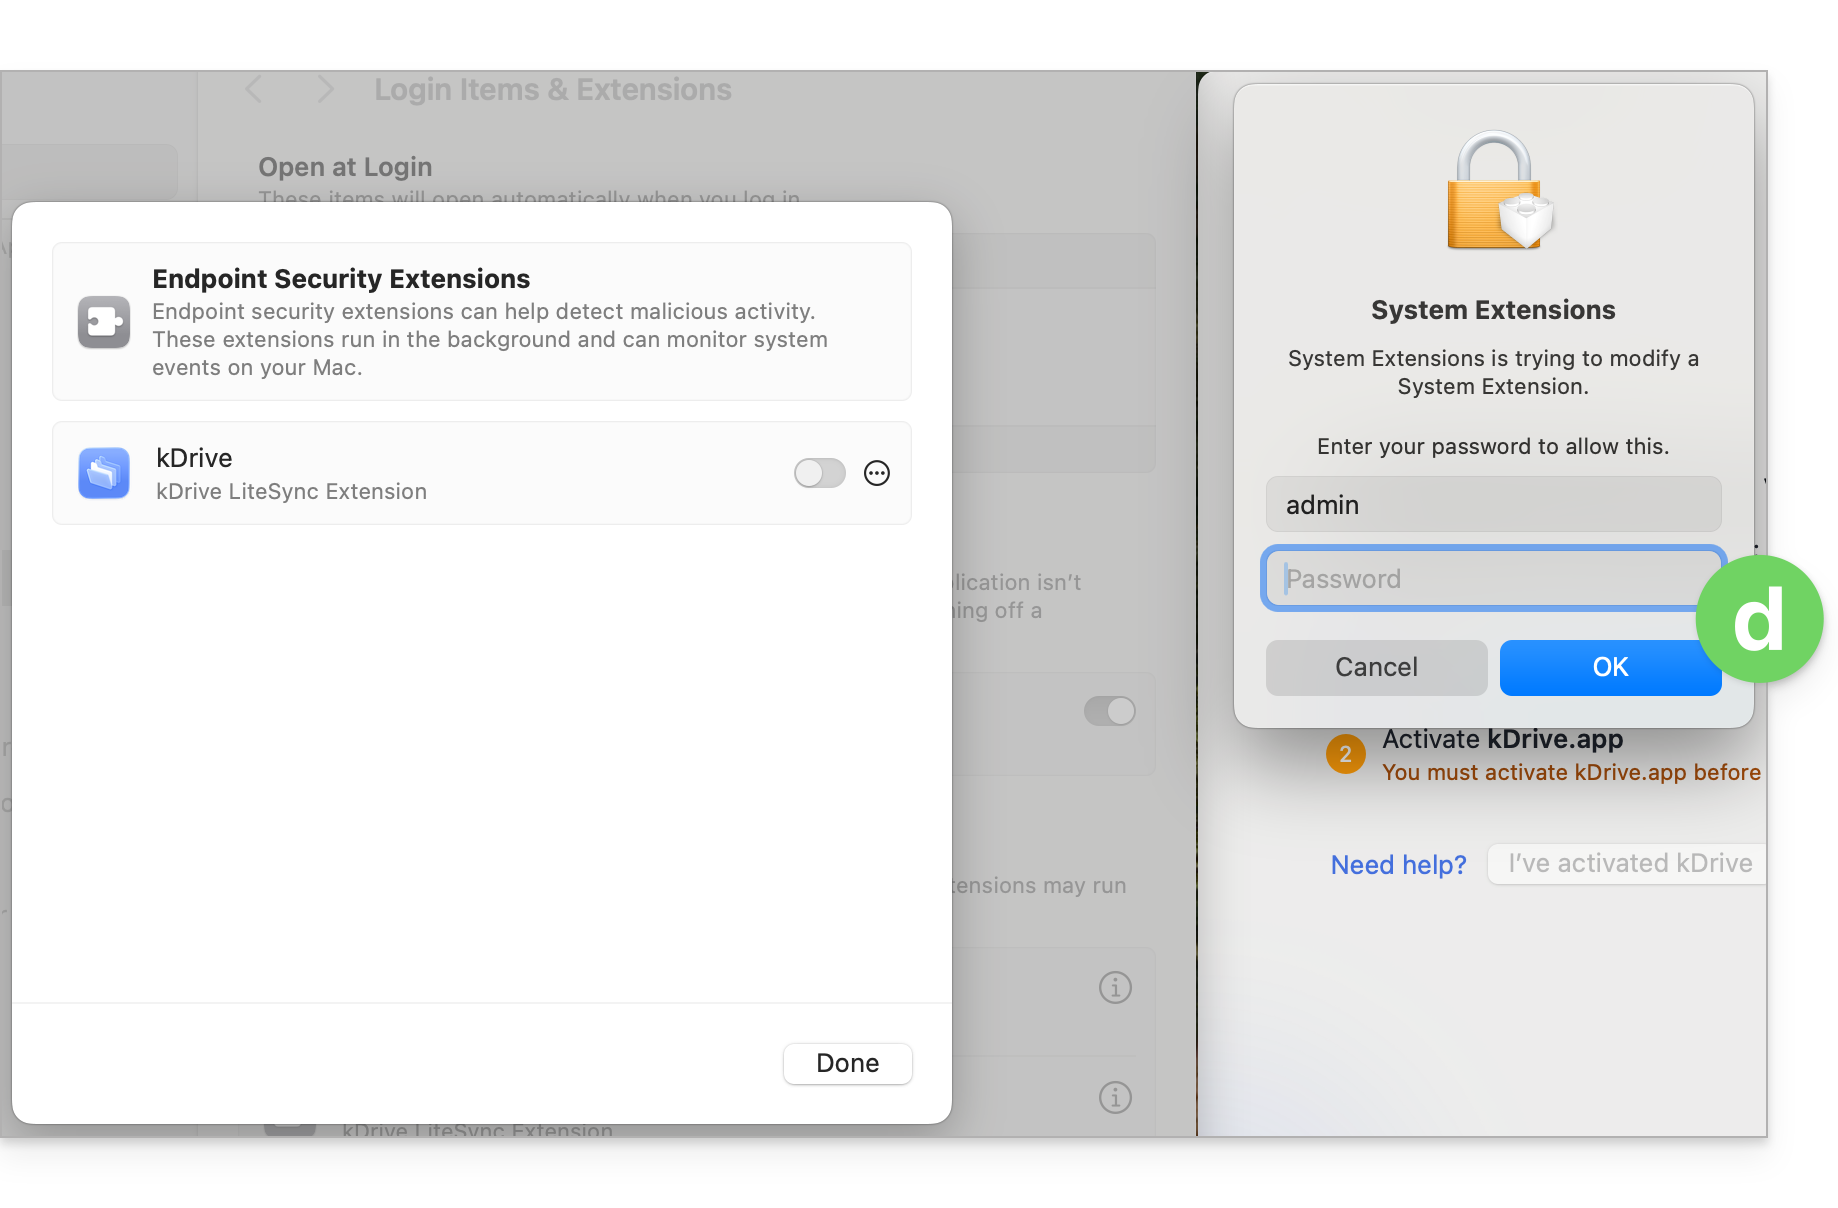
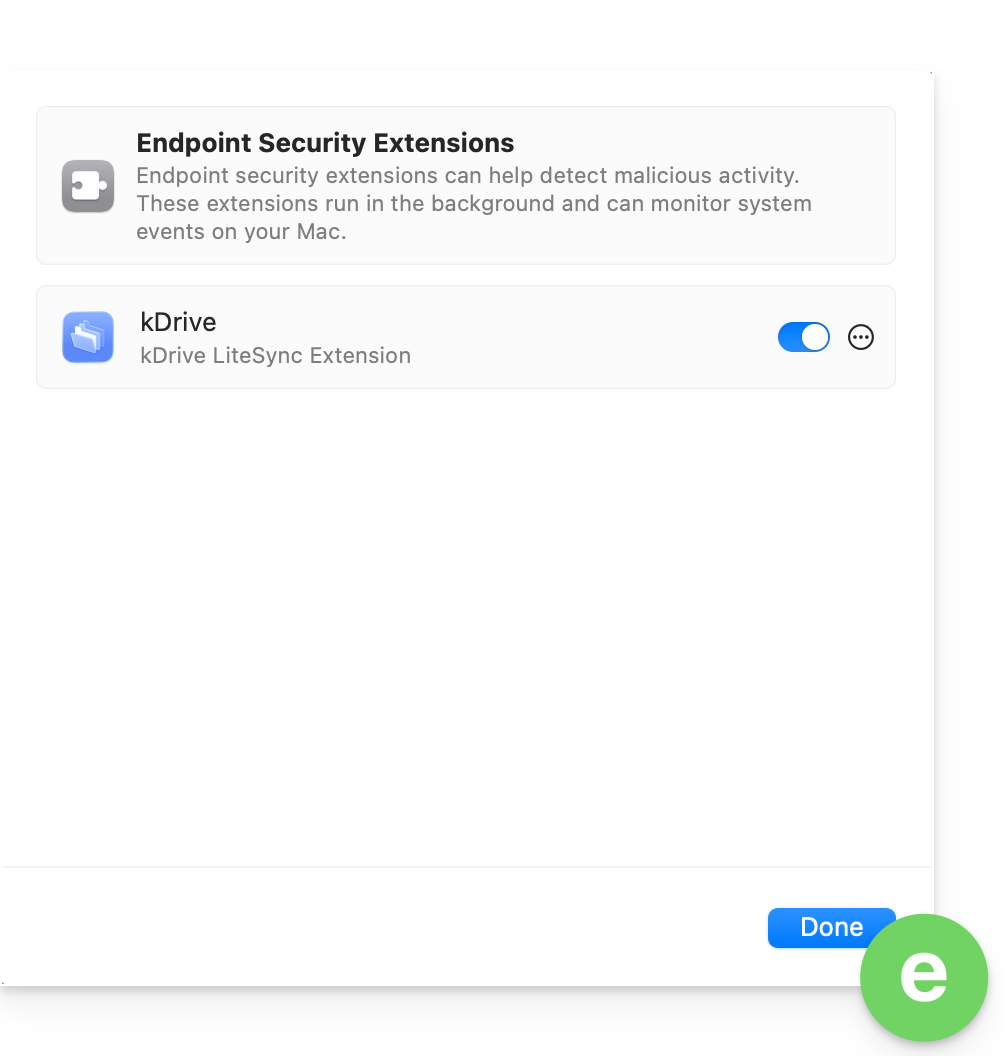
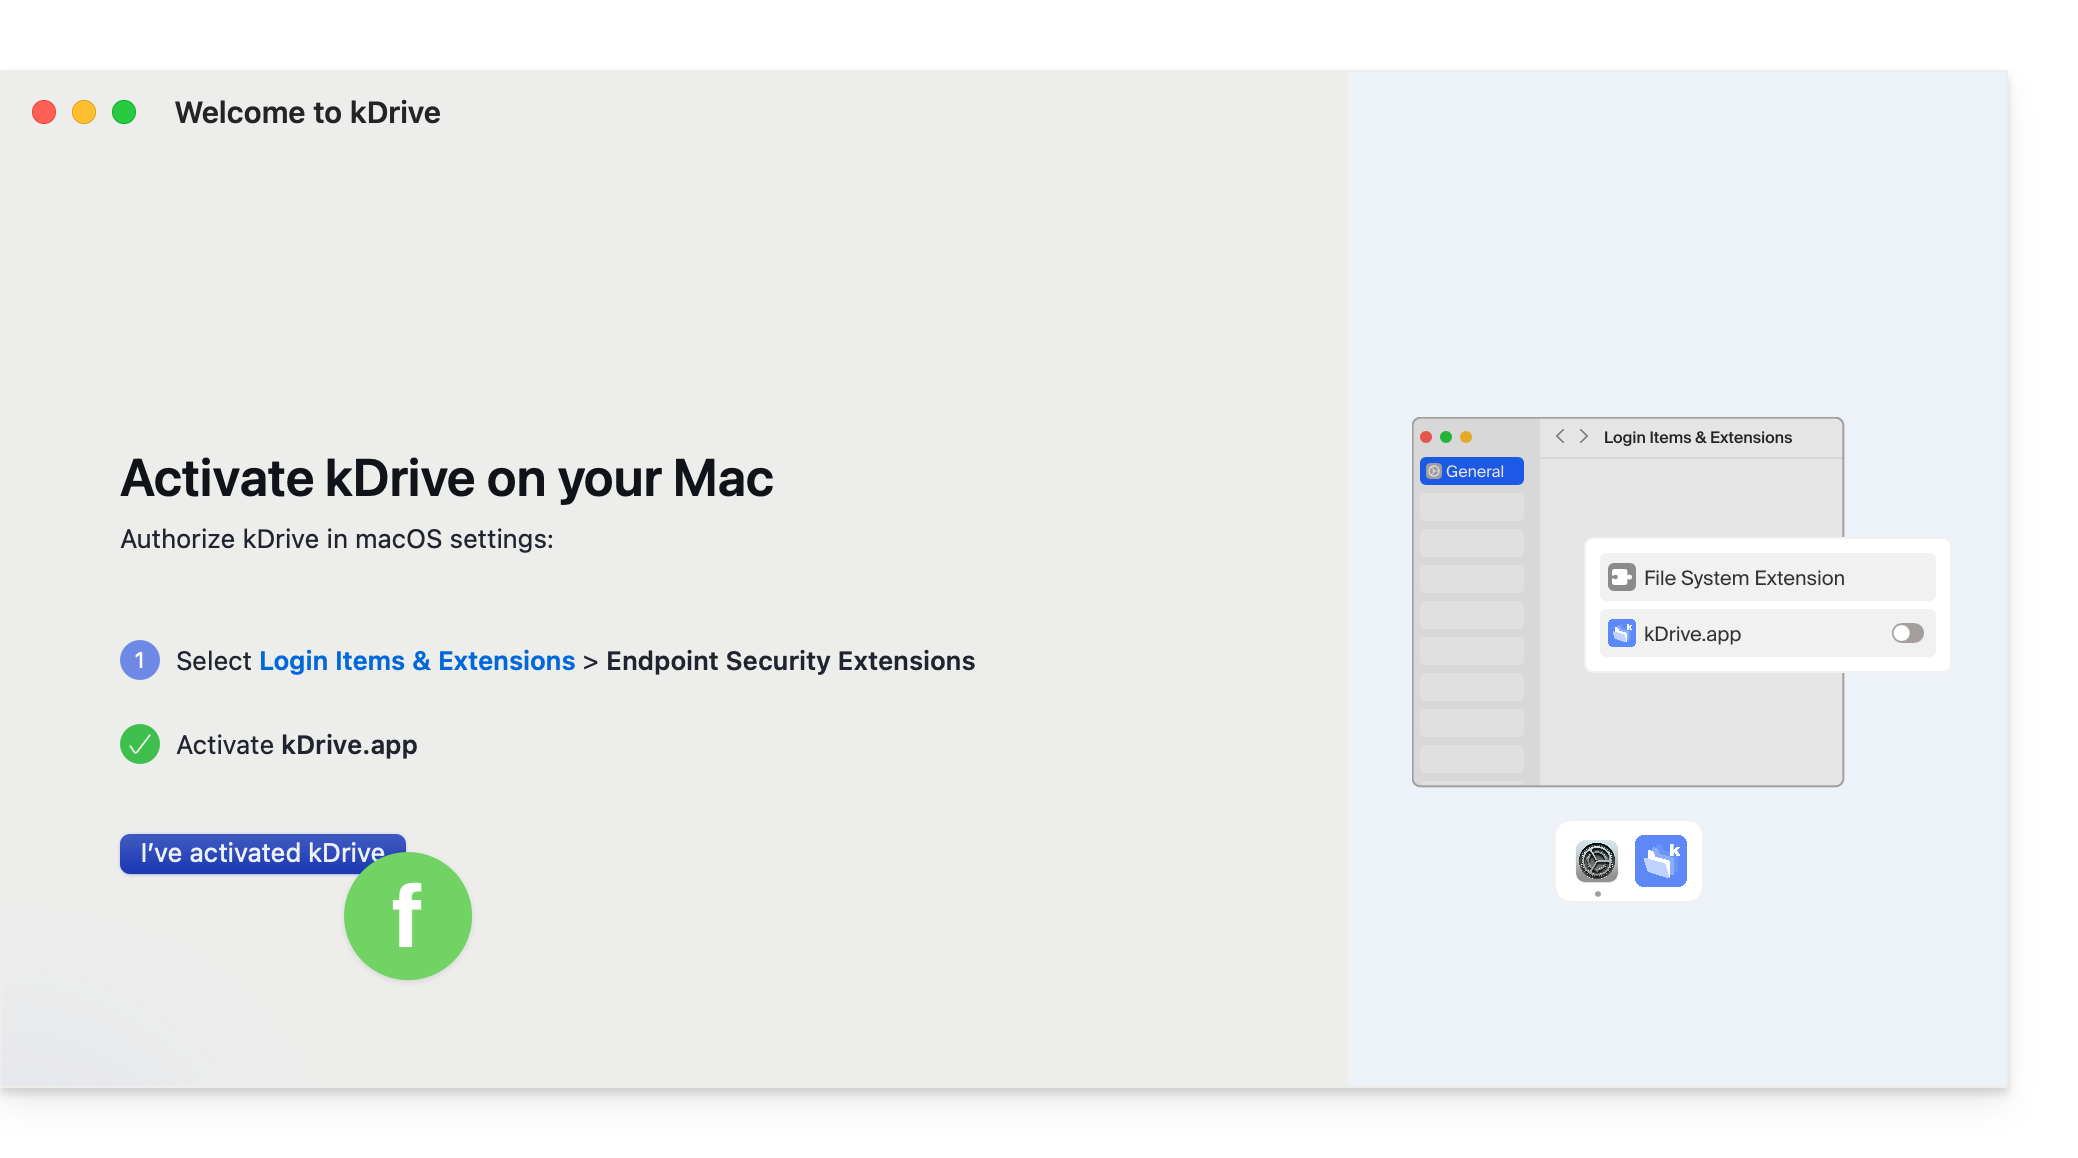
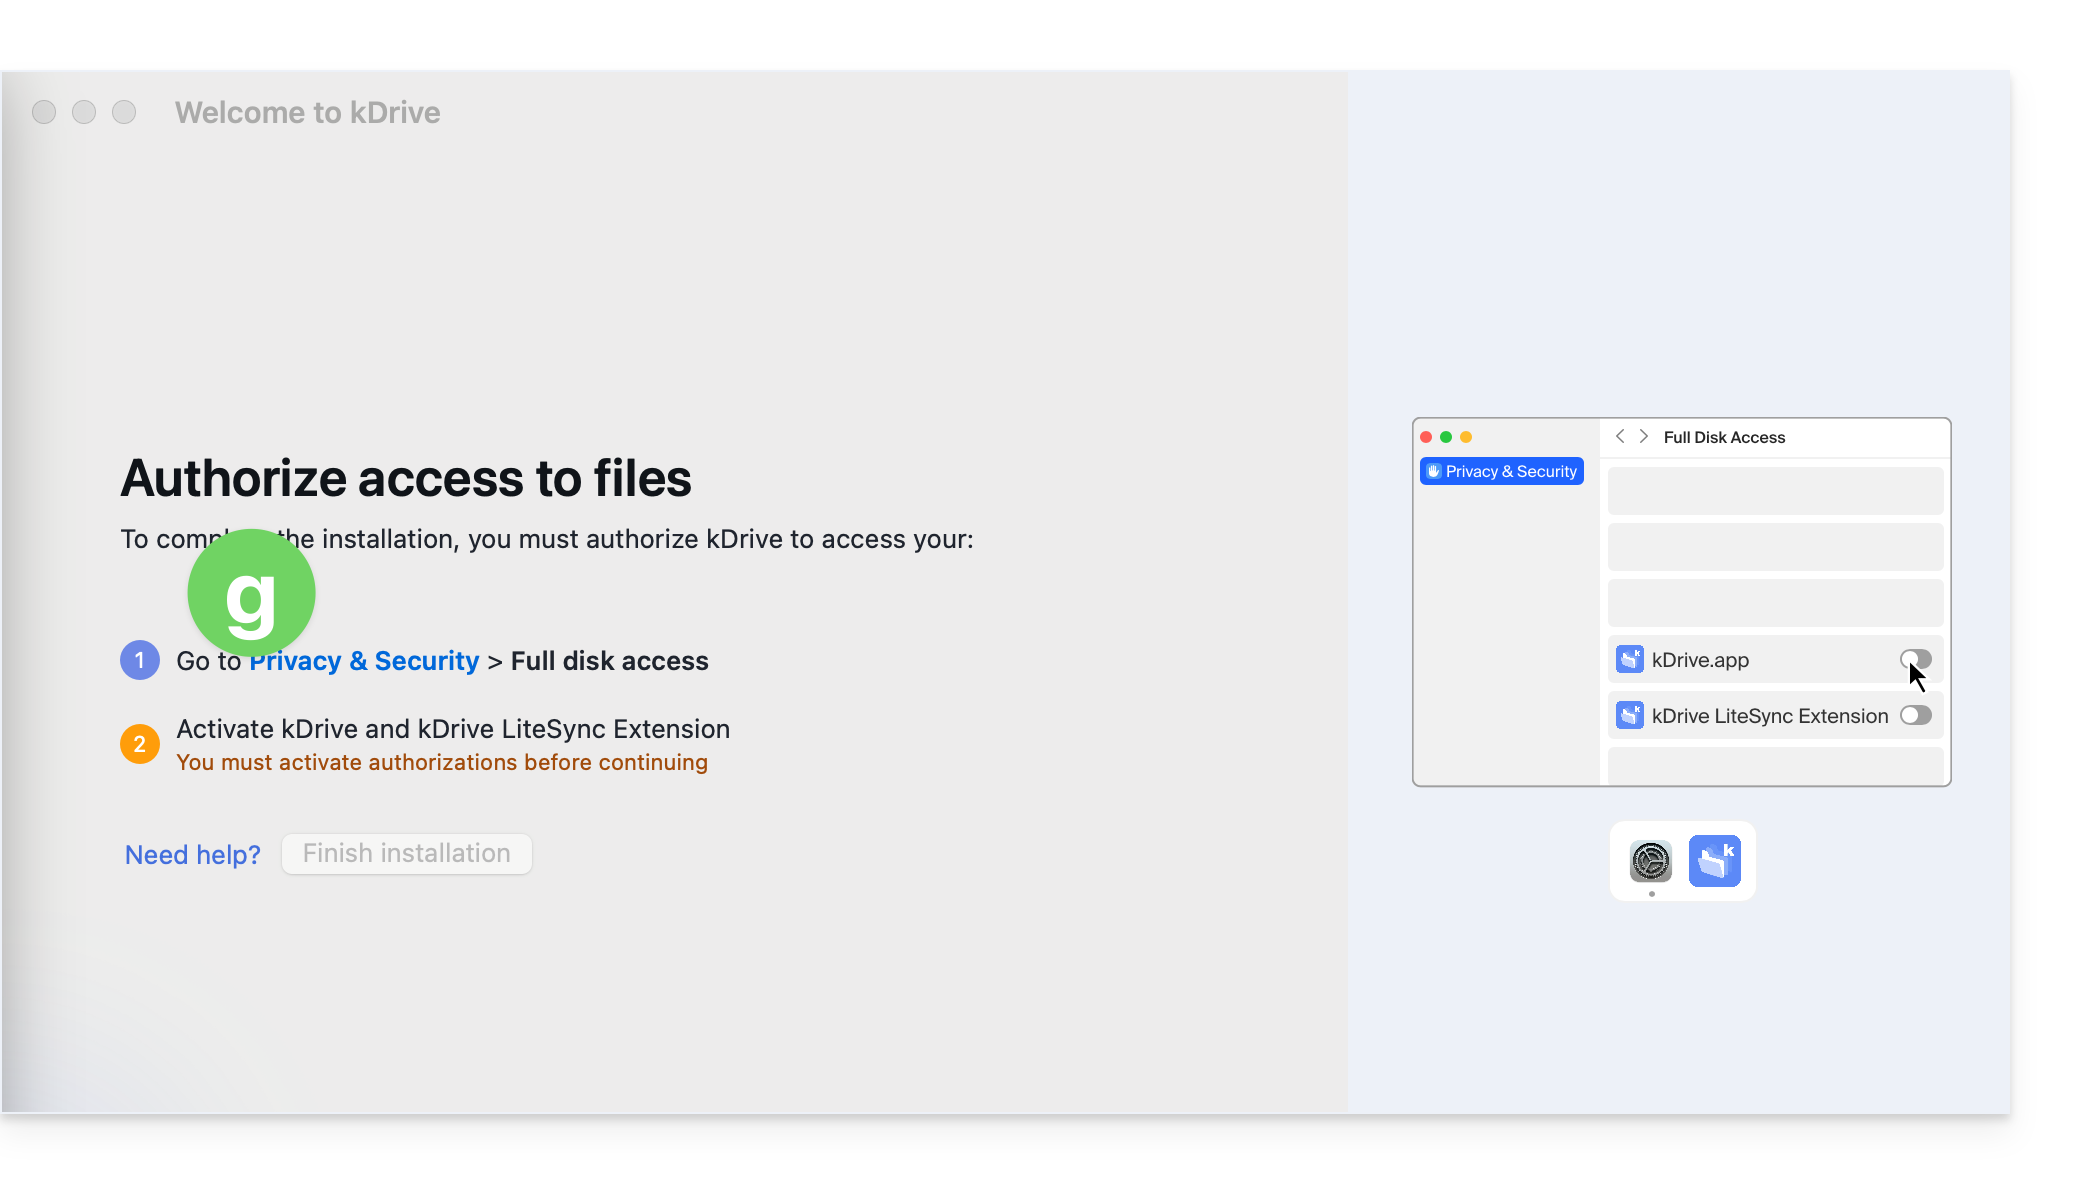
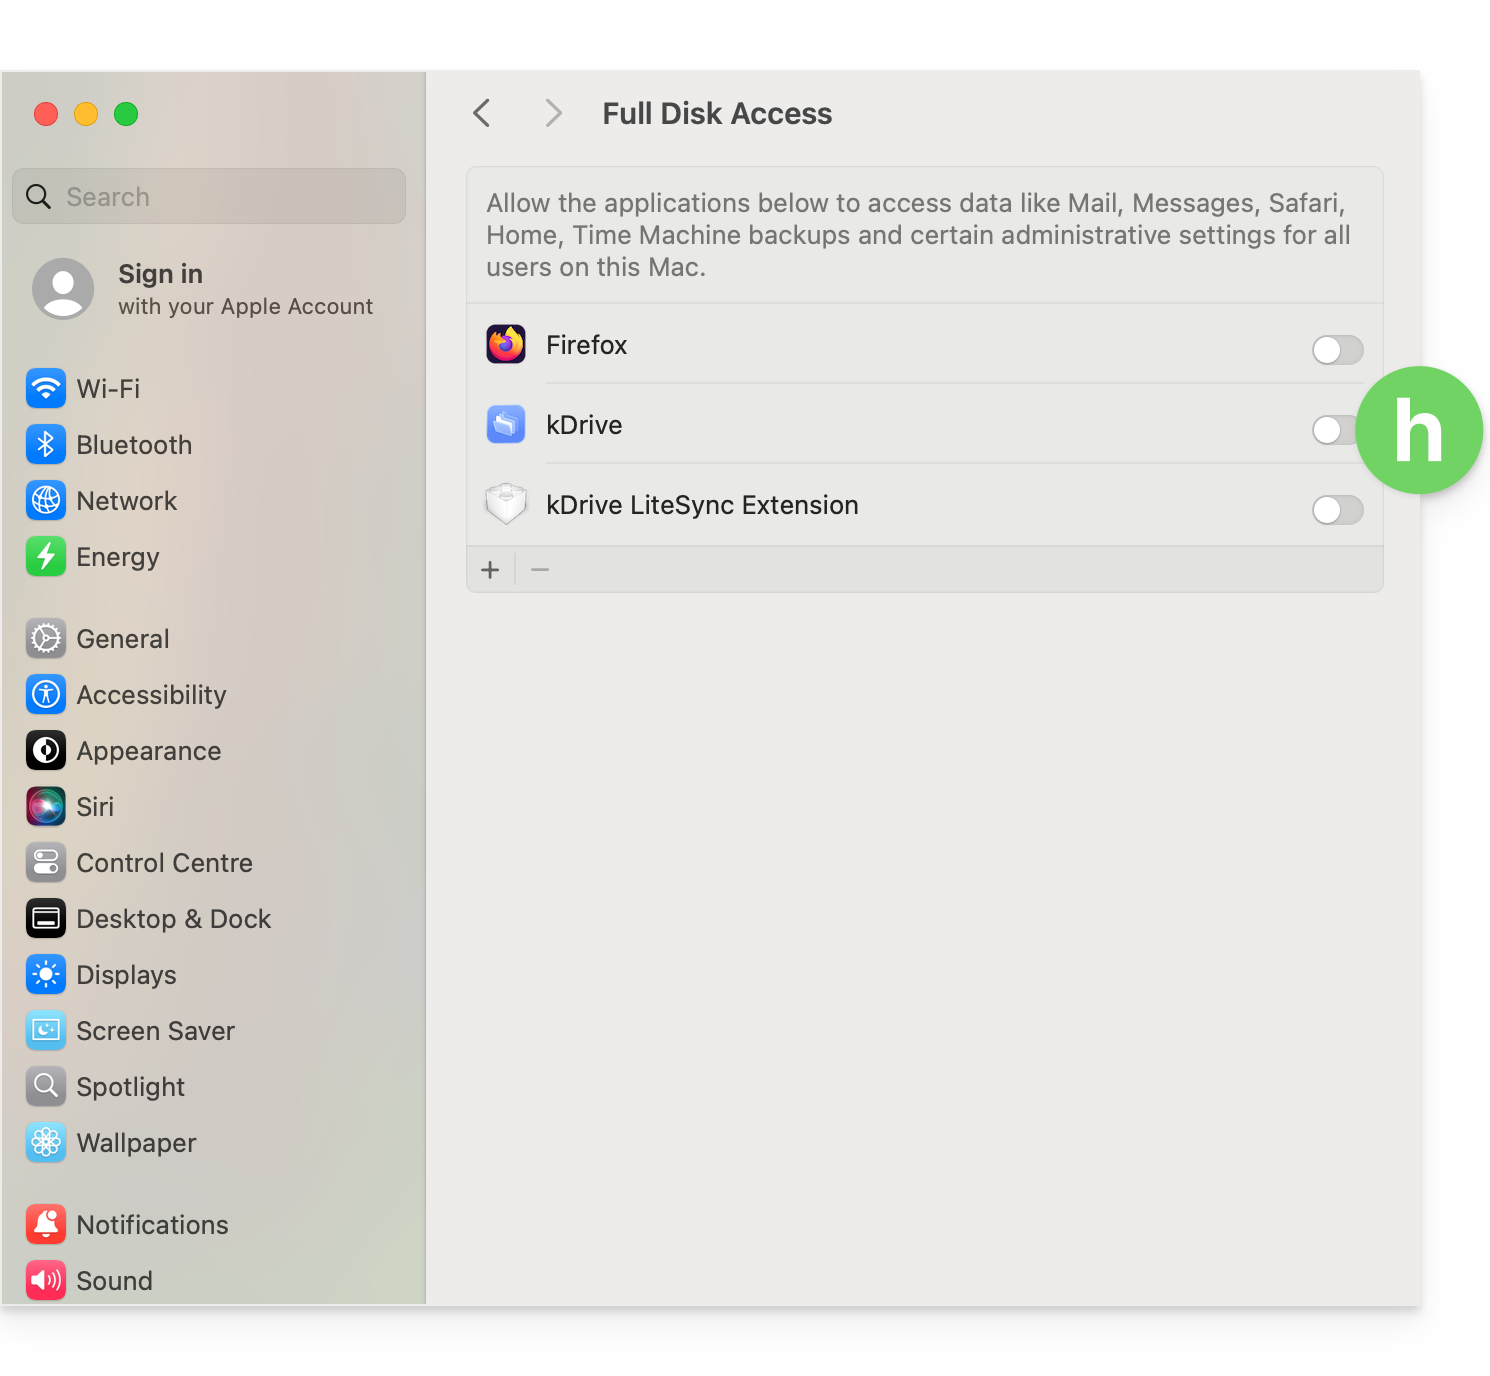
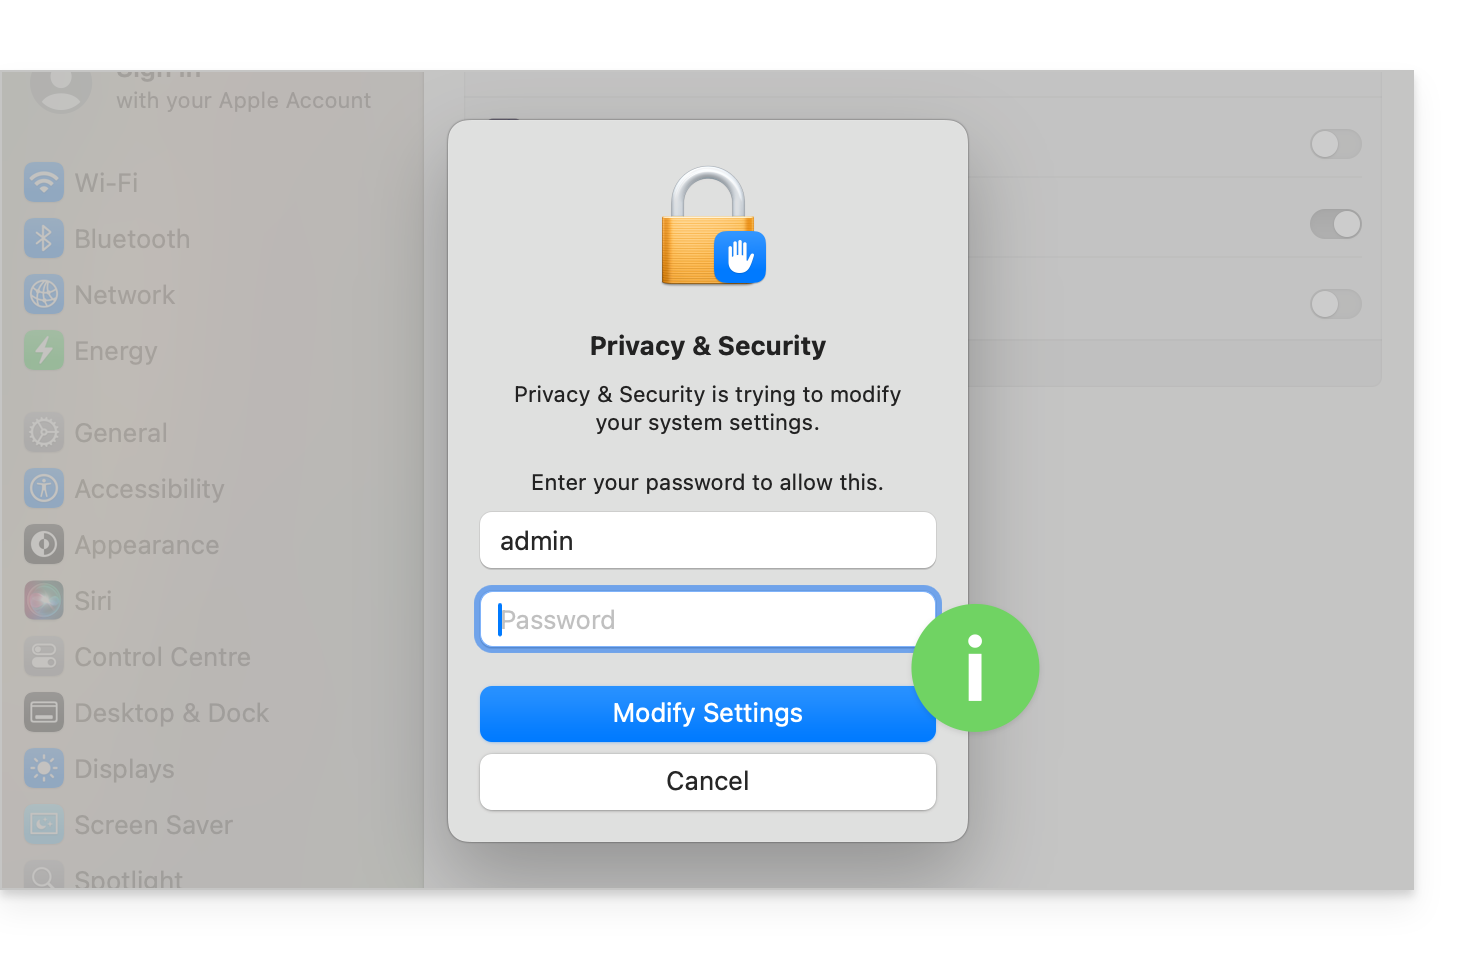
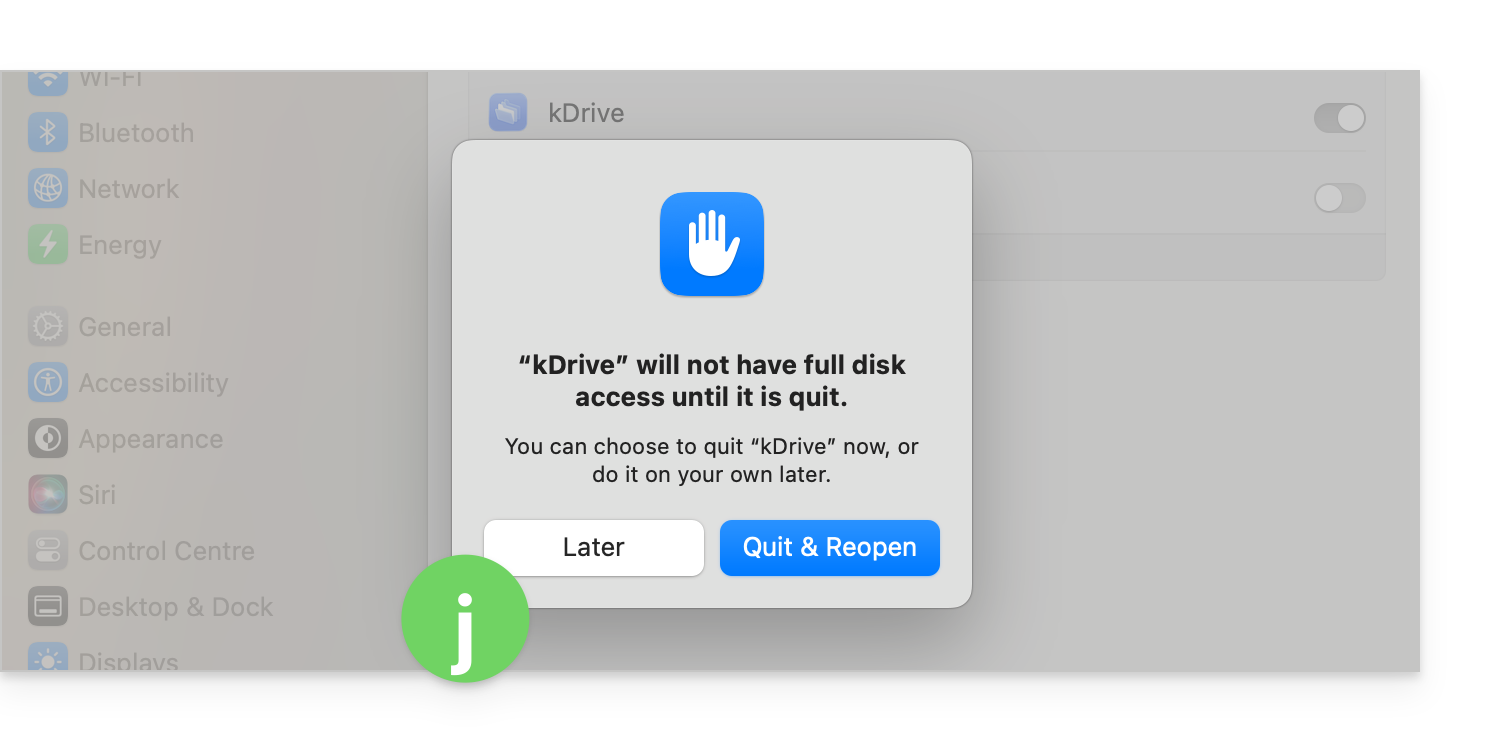
macOS 26
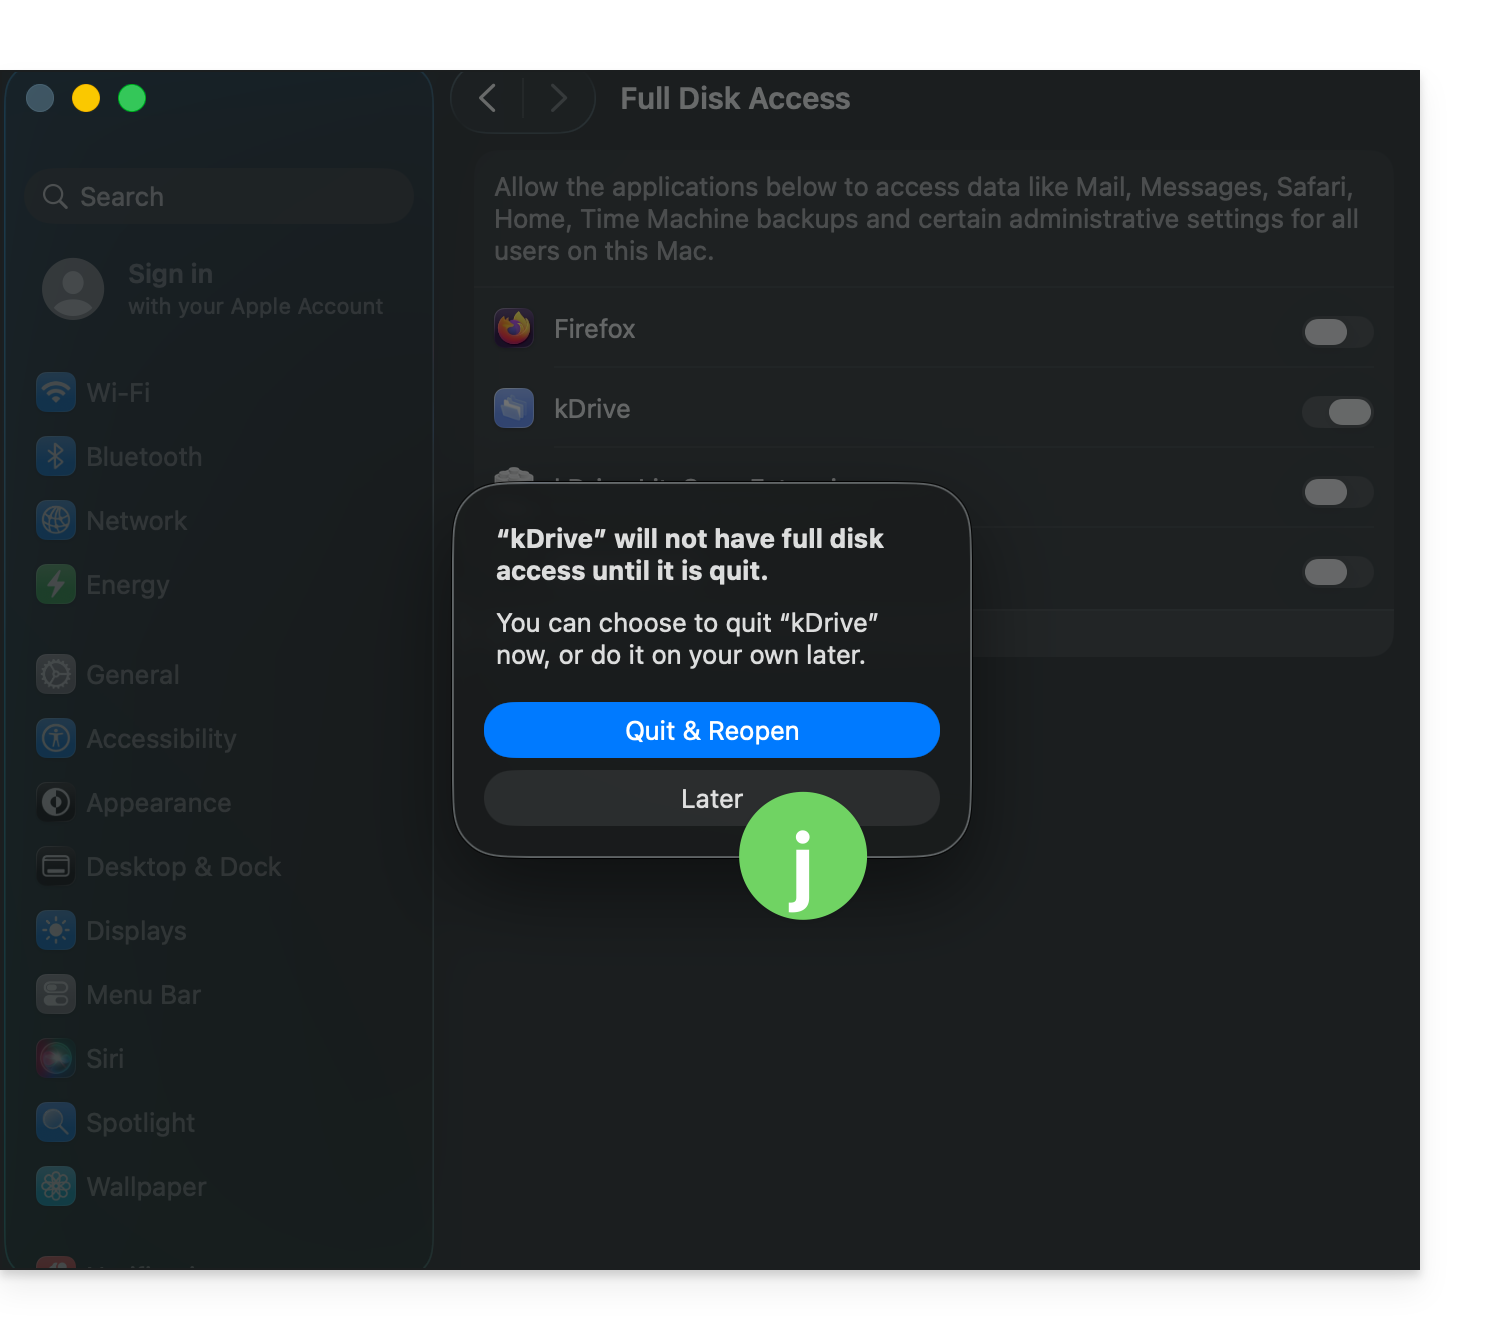
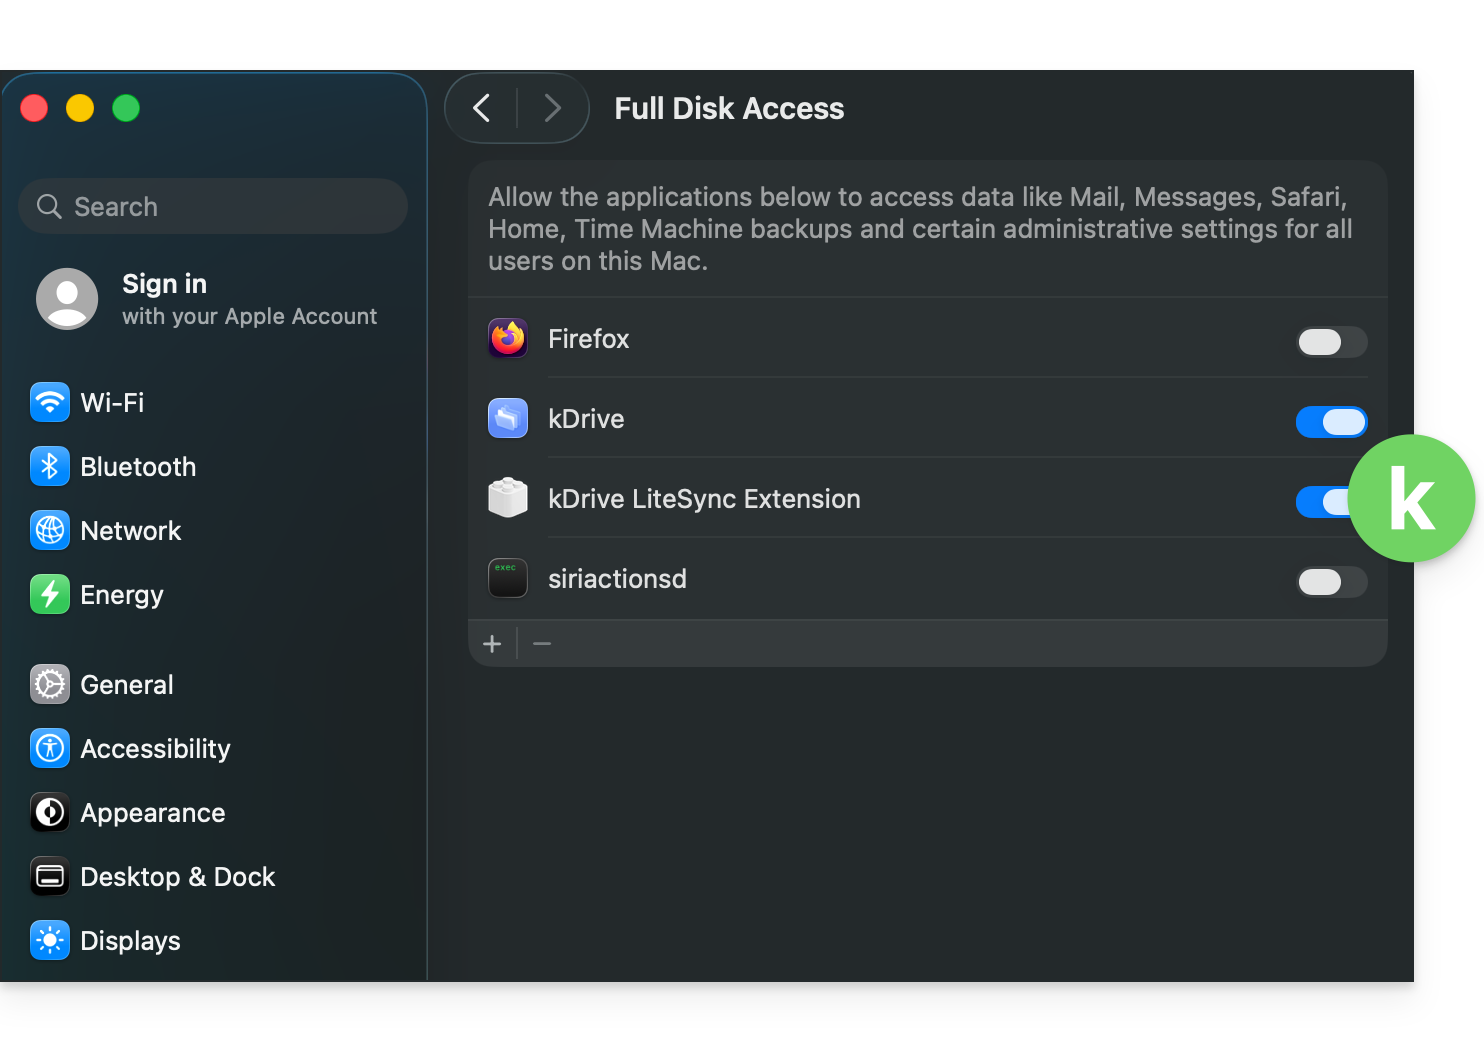
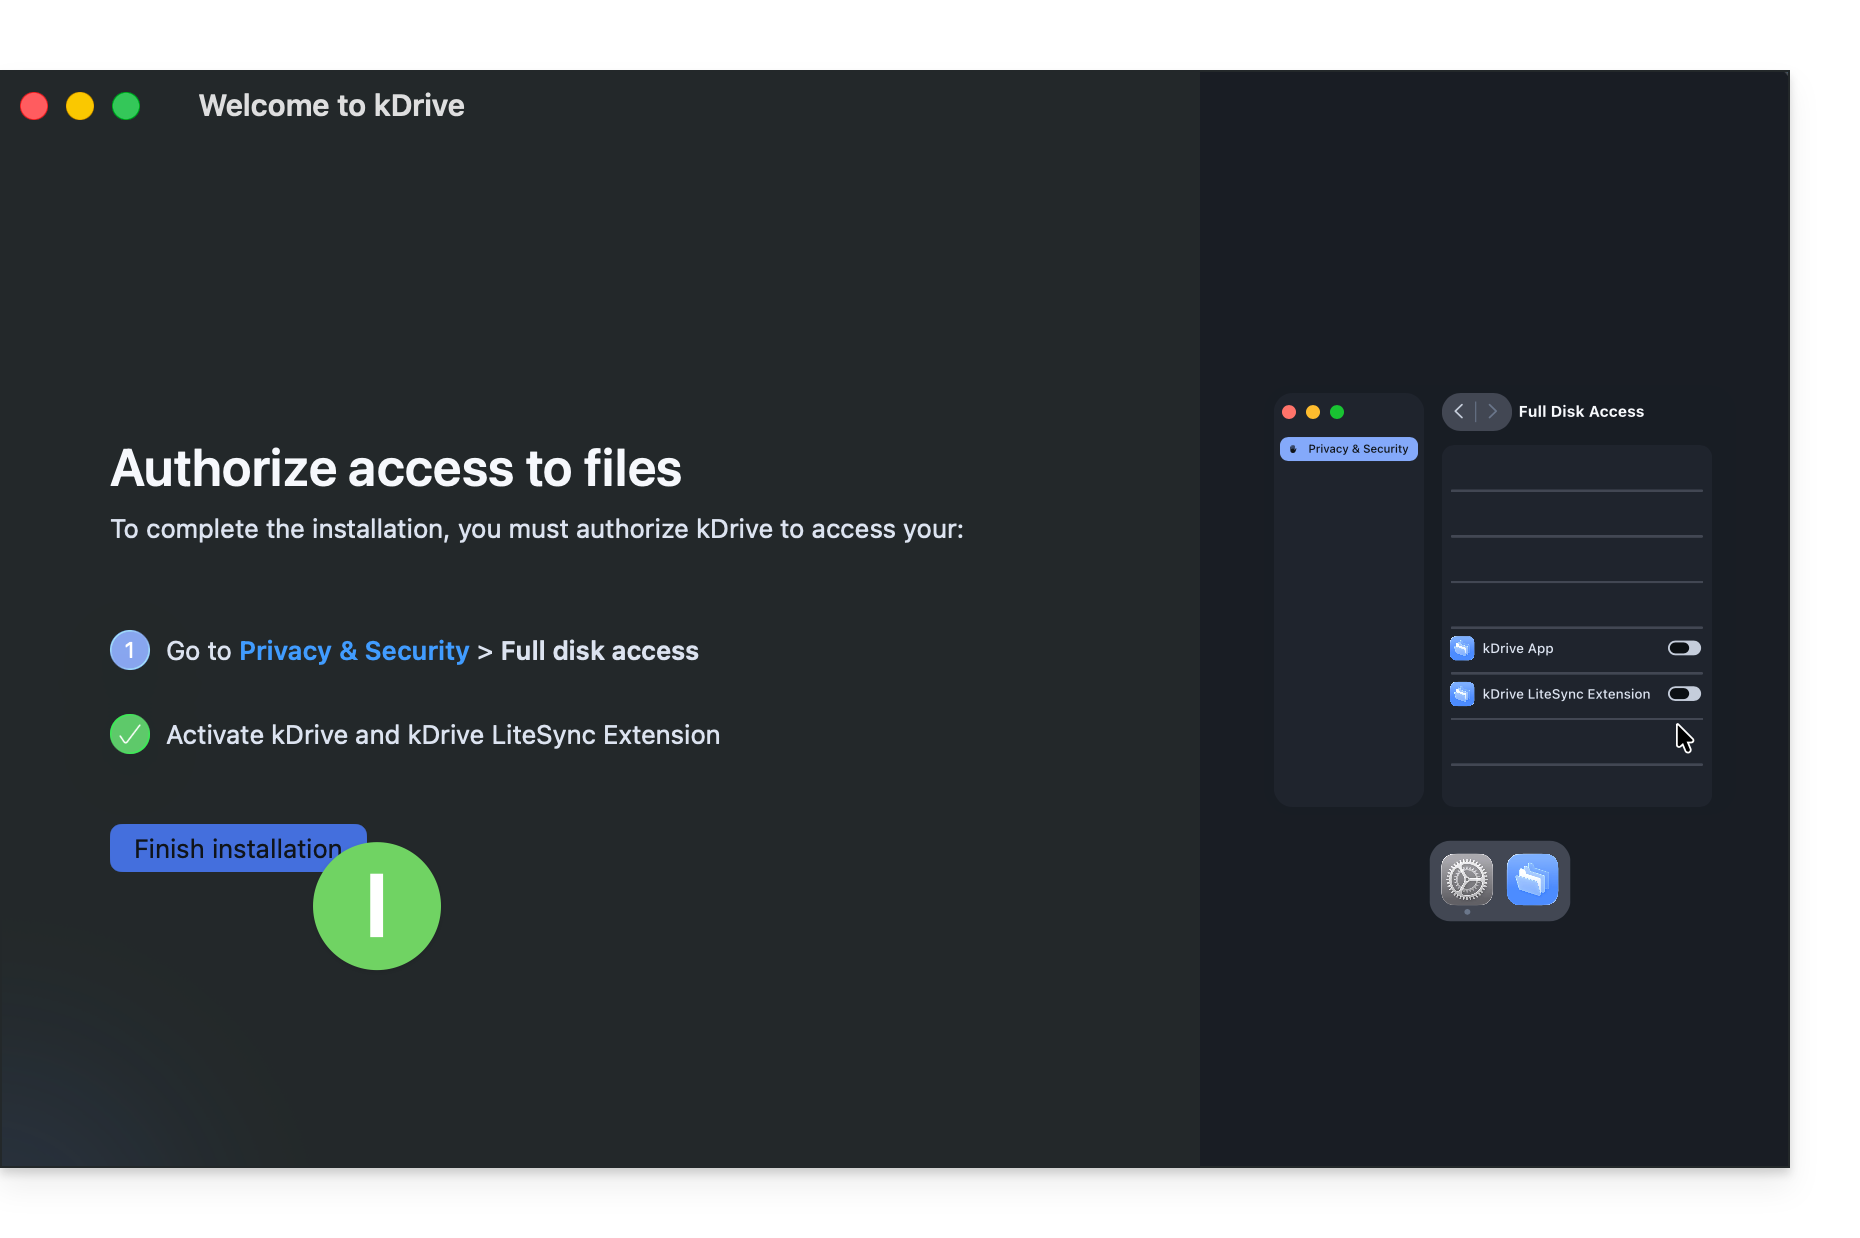
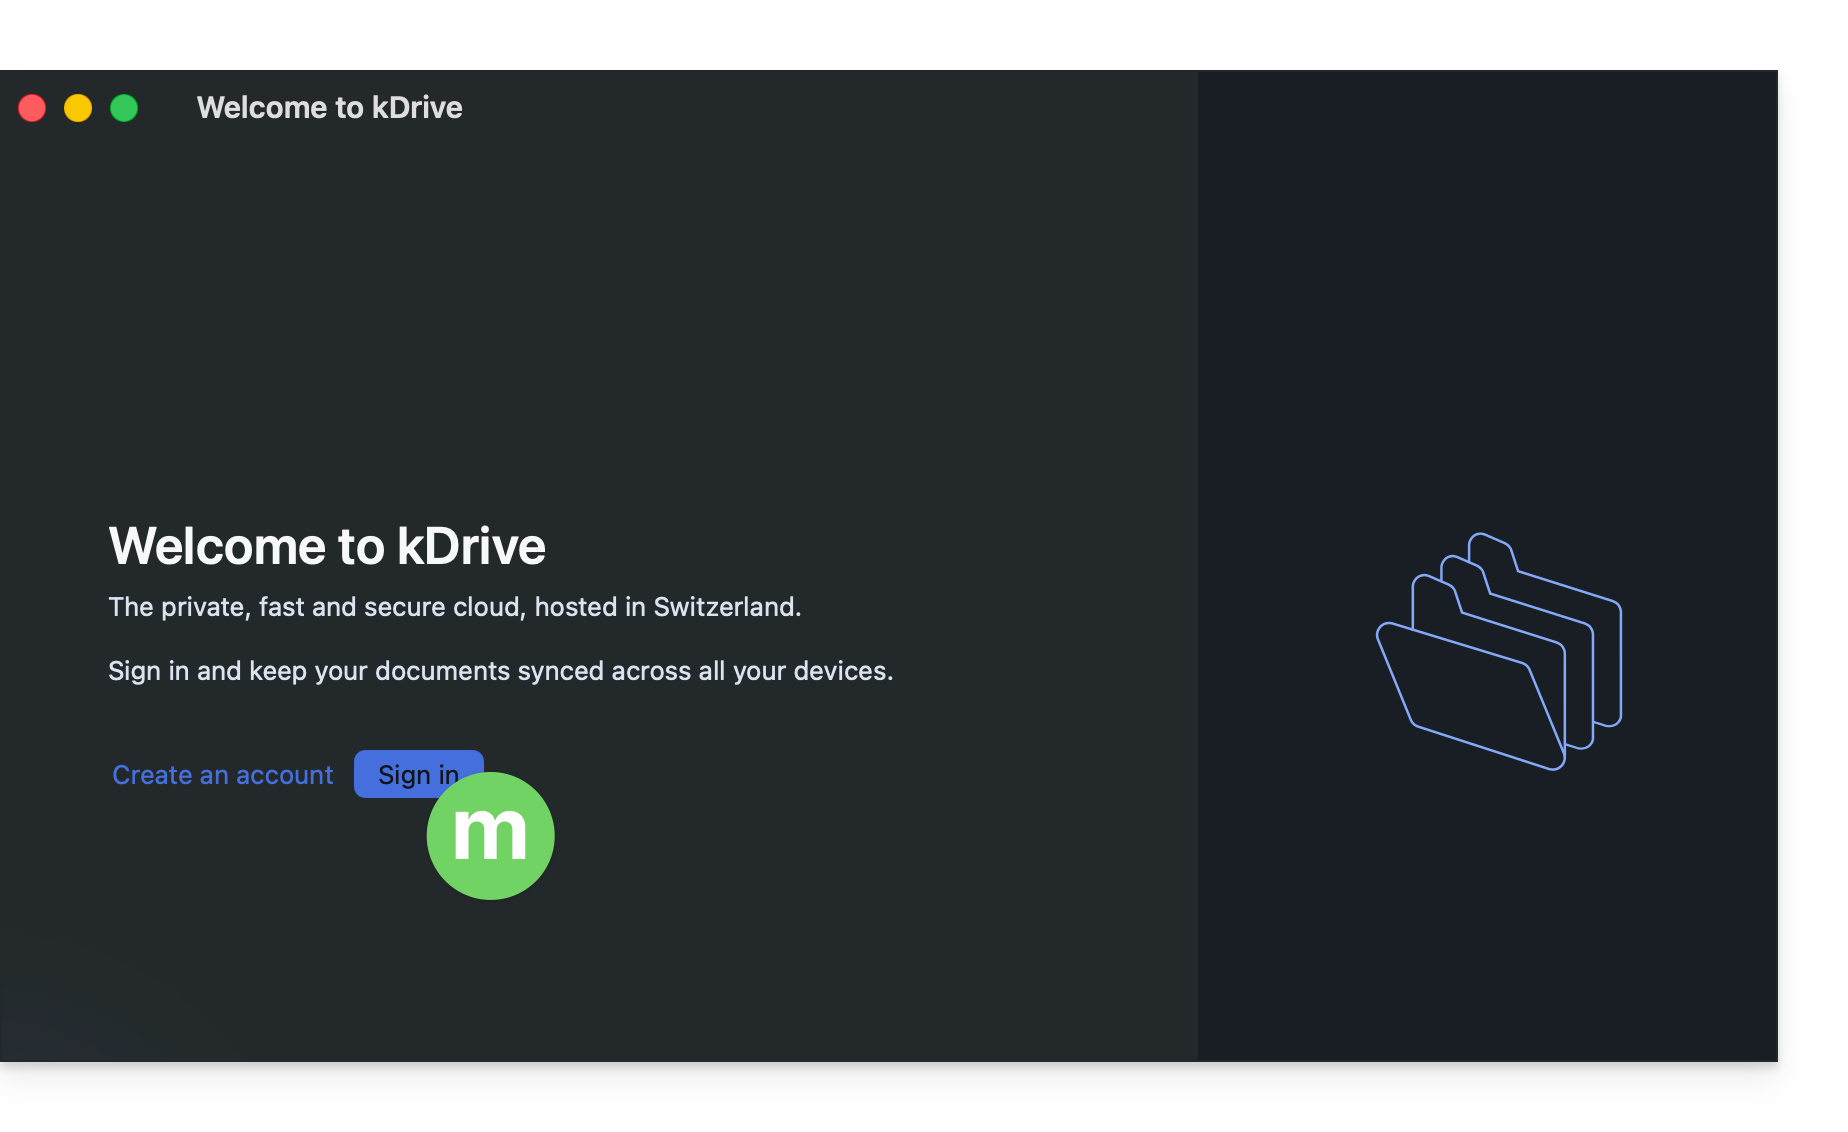
macOS 27
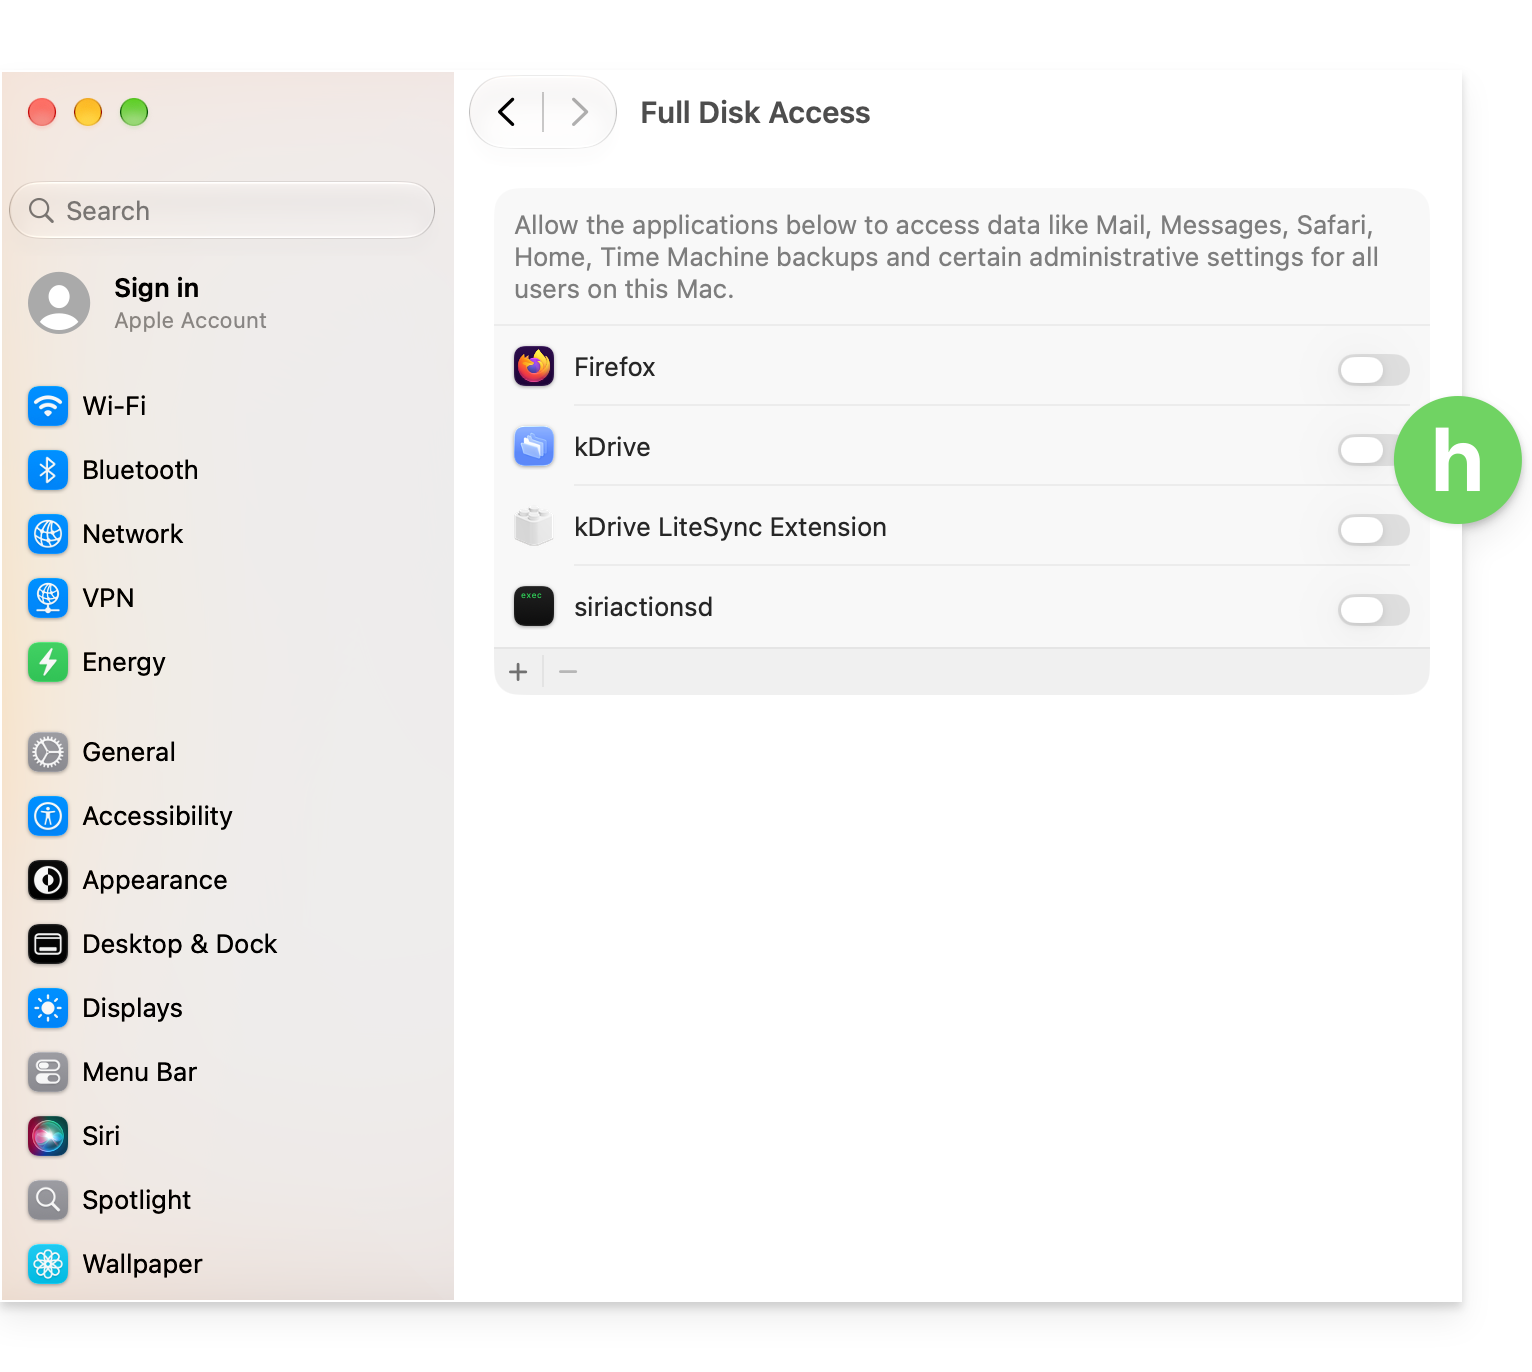
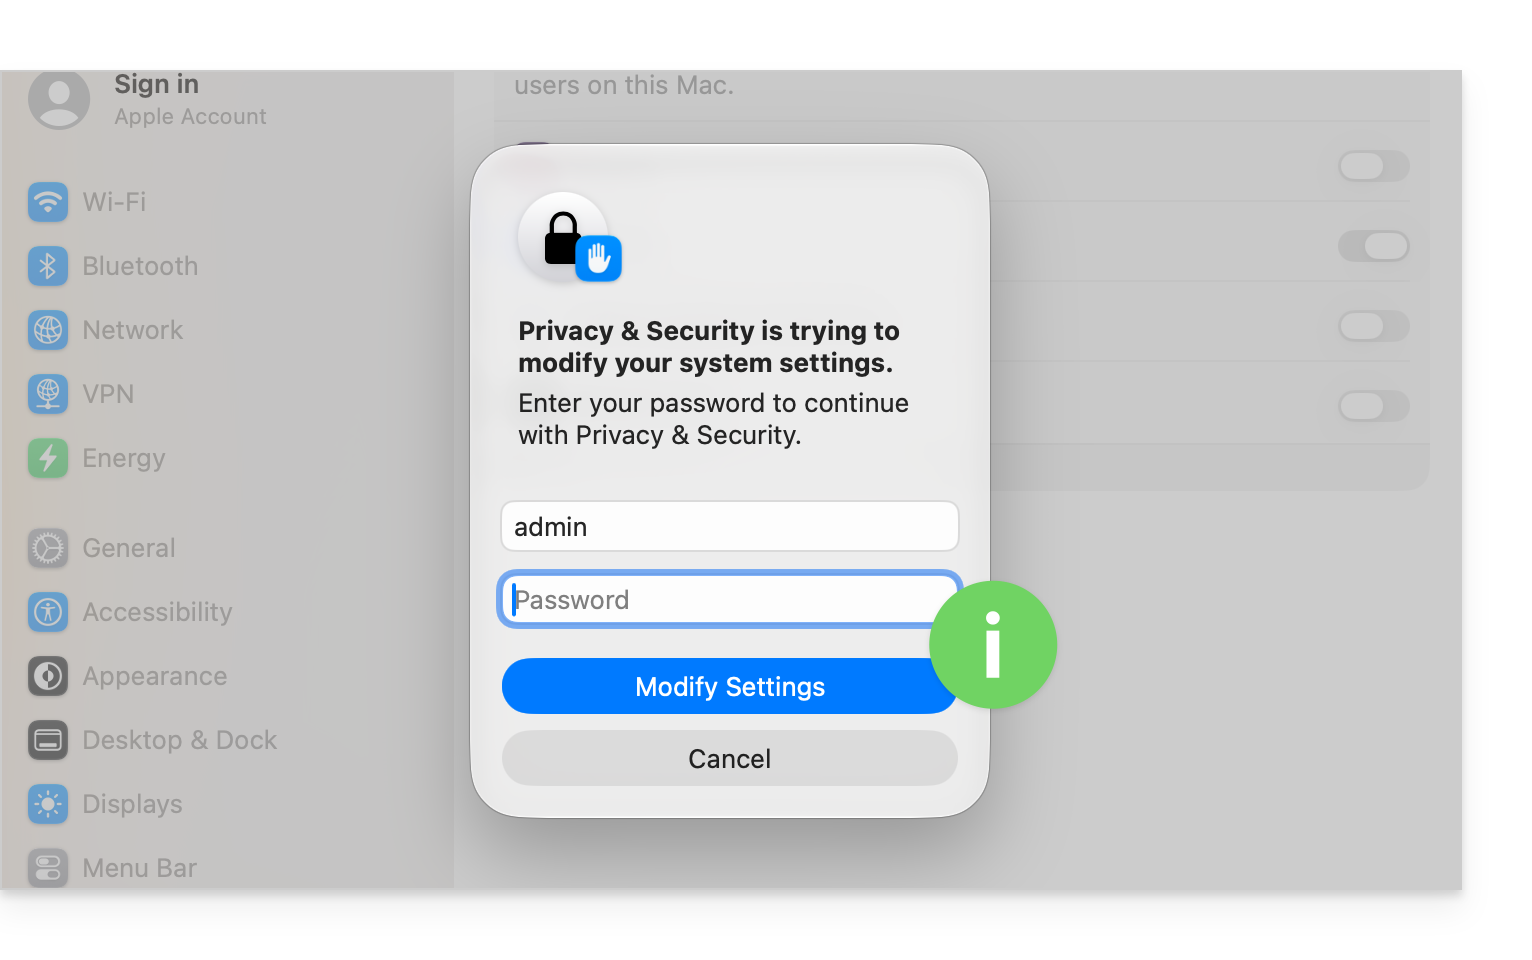
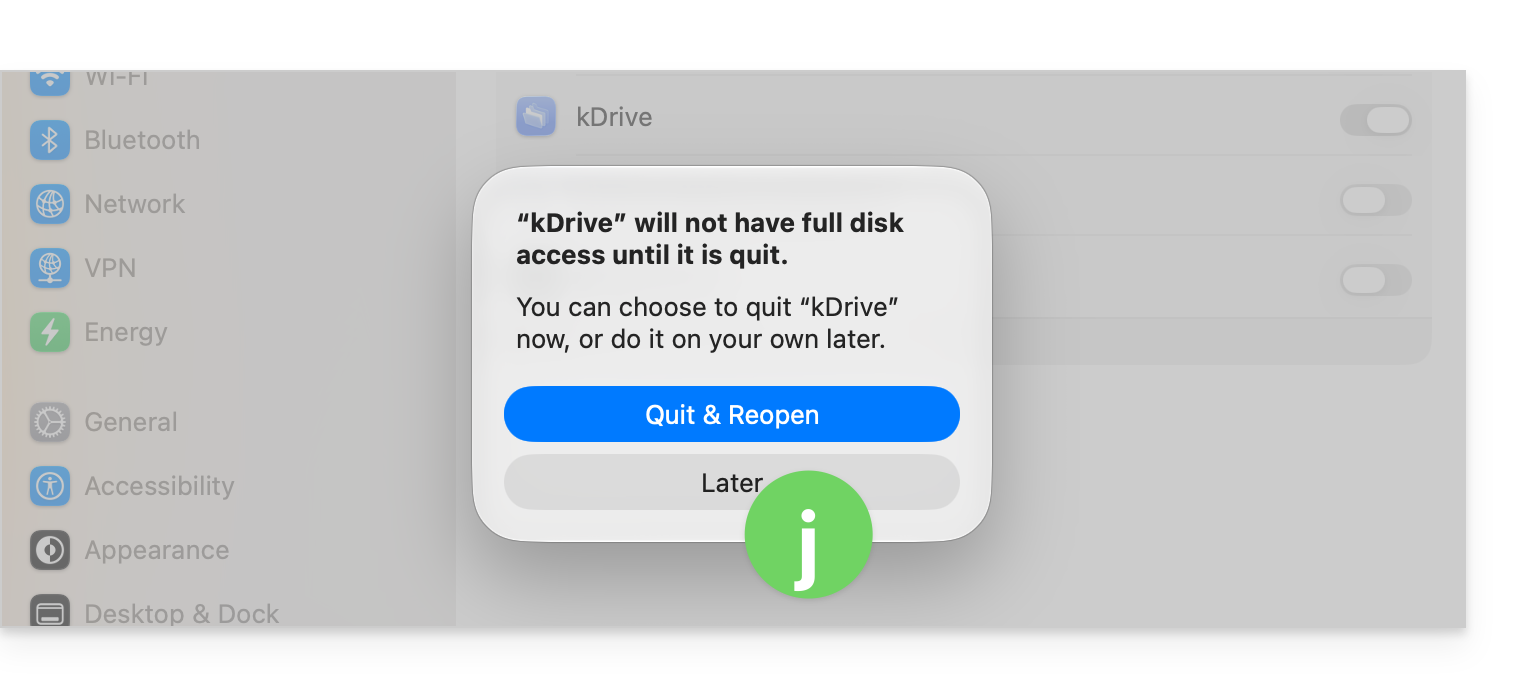
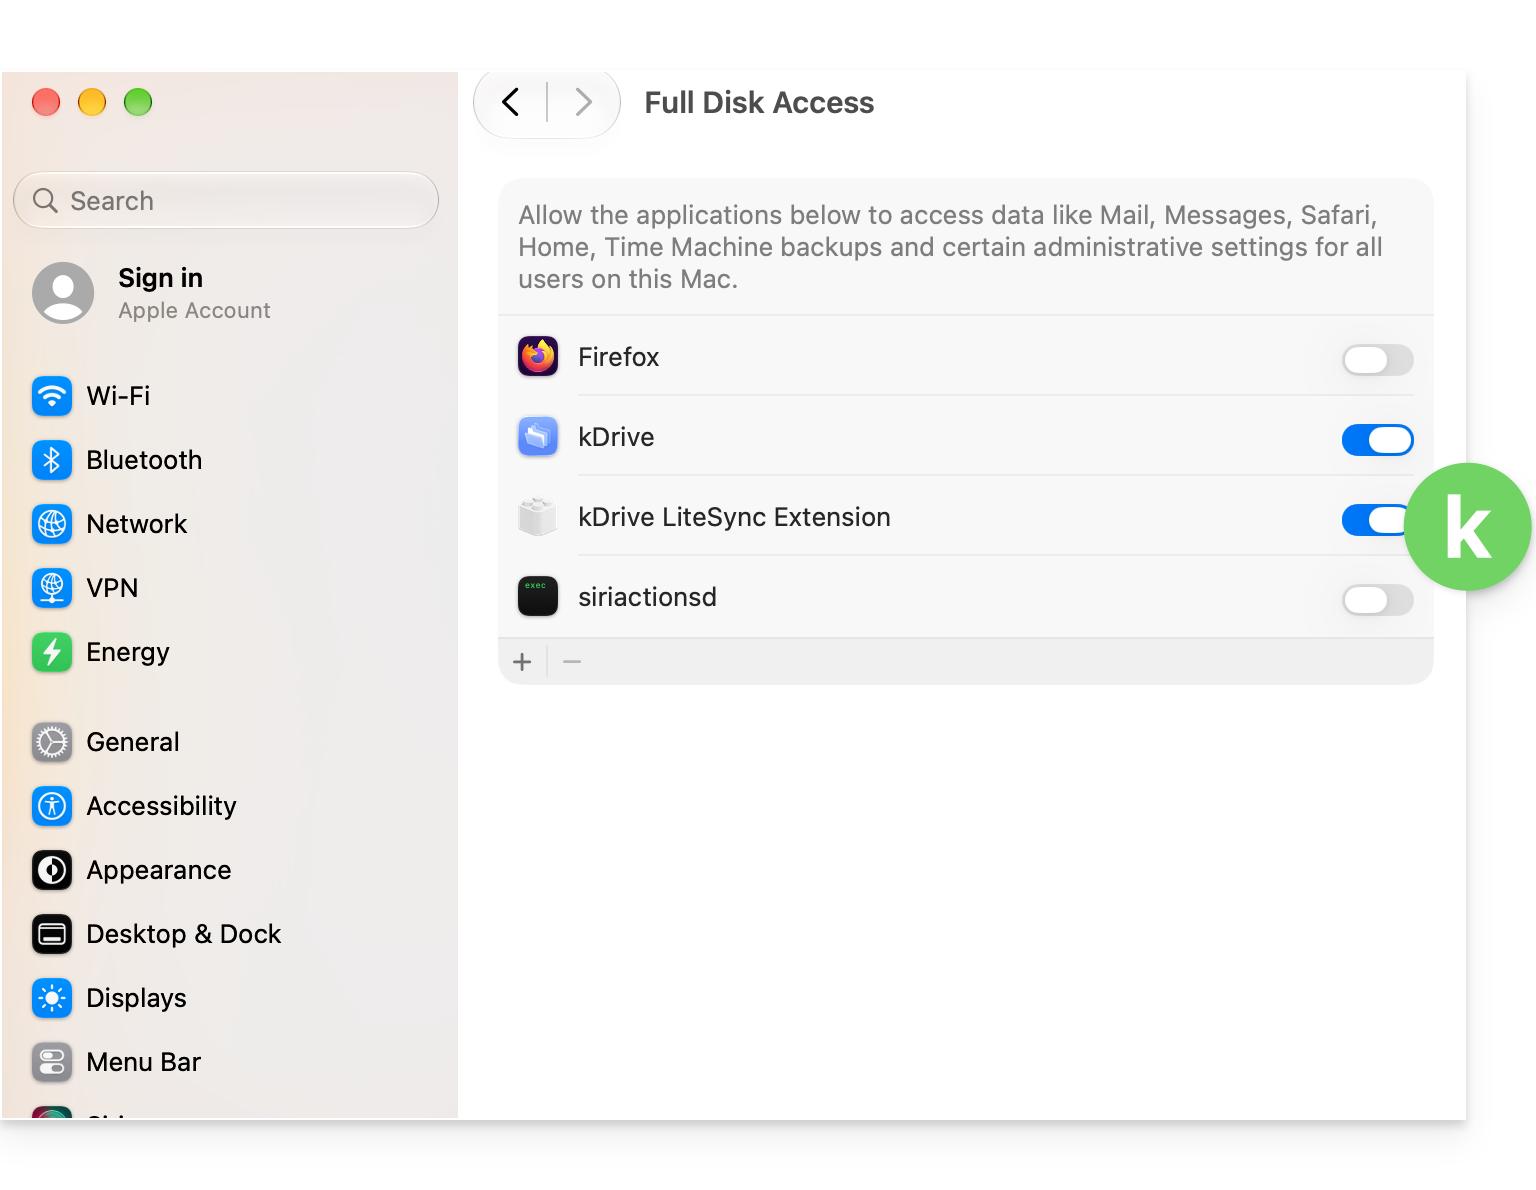
Link to this FAQ: https://faq.infomaniak.com/2935
Has this FAQ been helpful?
This guide explains how to connect the desktop app Microsoft Outlook for Mac version 16.80 (desktop application on macOS) to an email address hosted by Infomaniak.
Introduction
- Instead of the manual configuration for Outlook below, it is recommended to use the Infomaniak Mail macOS app or even Apple Mail with the .mobileconfig configuration profiles provided by Apple.
Add the email address to the application
Prerequisites
- Create the email address (❓: help my kSuite | Mail Service/kSuite).
- Create a device password (❓: help my kSuite | Mail/kSuite Service).
- Verify that the domain is configured correctly (❓: help).
To configure the email application:
- Open the application.
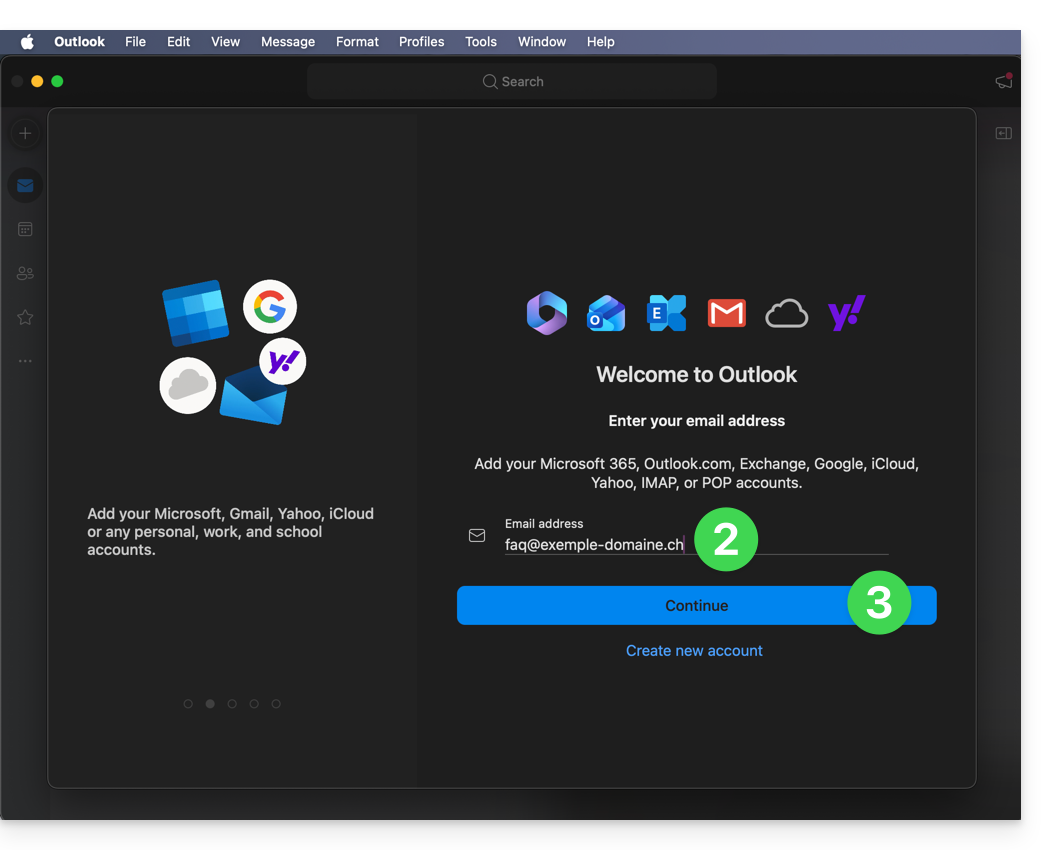
- Enter the email address to associate.
- Click on Continue:
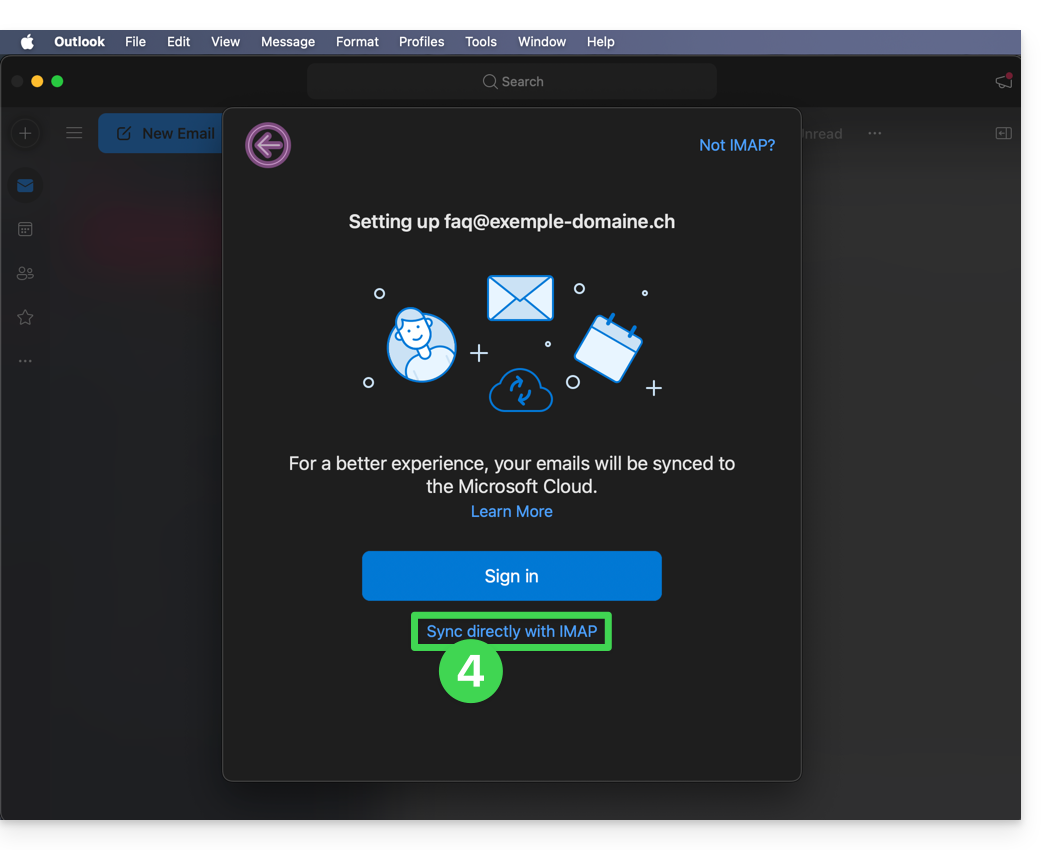
- Click on Synchronize via IMAP (without Microsoft Cloud):
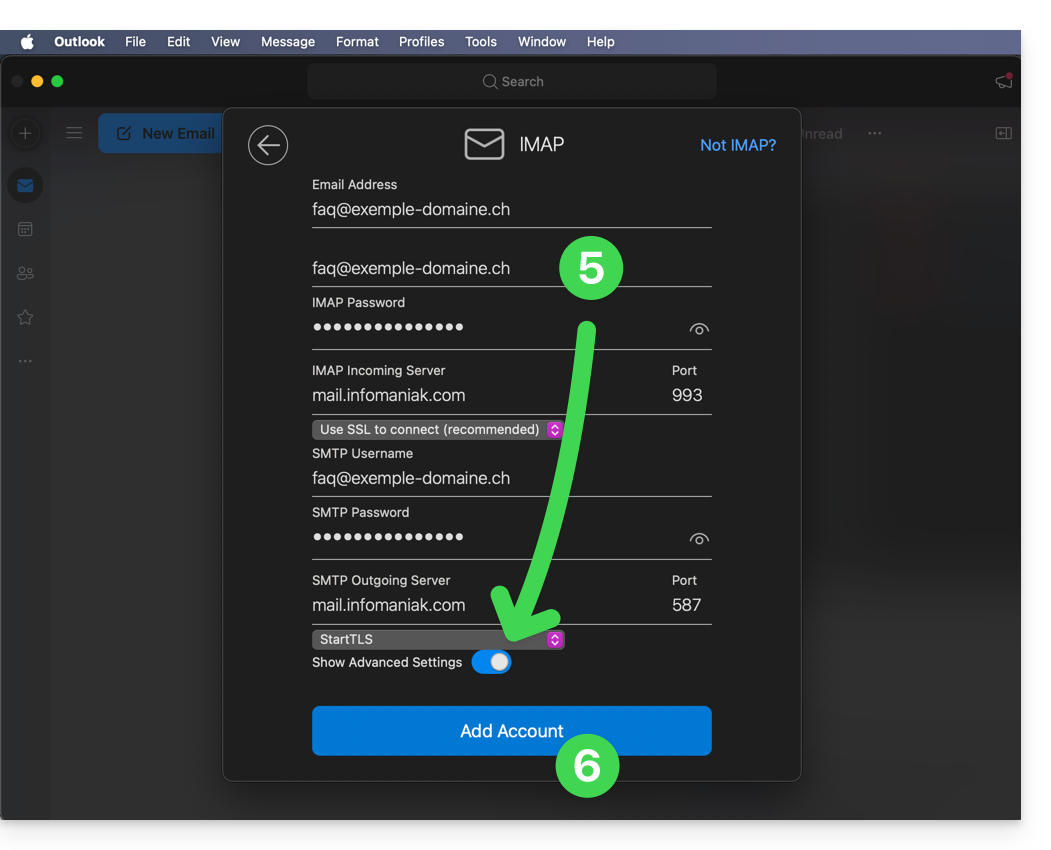
- Check and complete any missing information (❓: help).
- To do this, activate the toggle switch for displaying advanced settings.
- Click on Add account:
- Understand and proceed through the various Microsoft information windows:
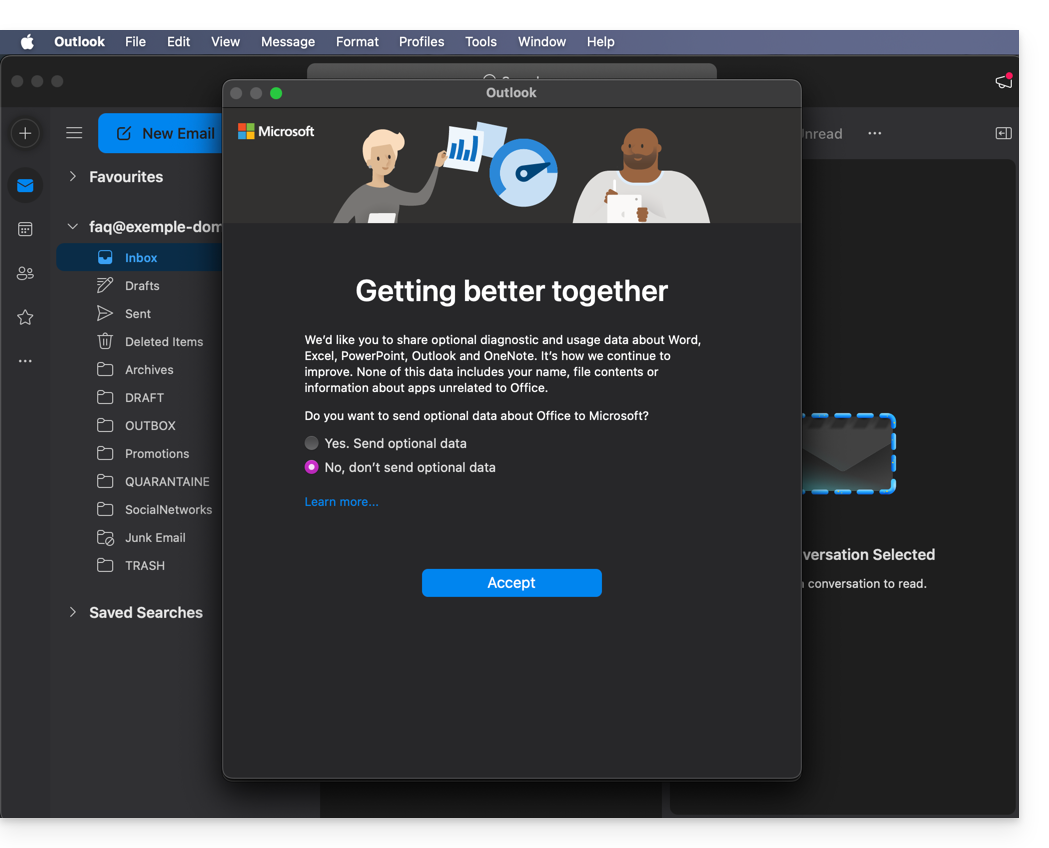
- Your email address is now configured in the application:
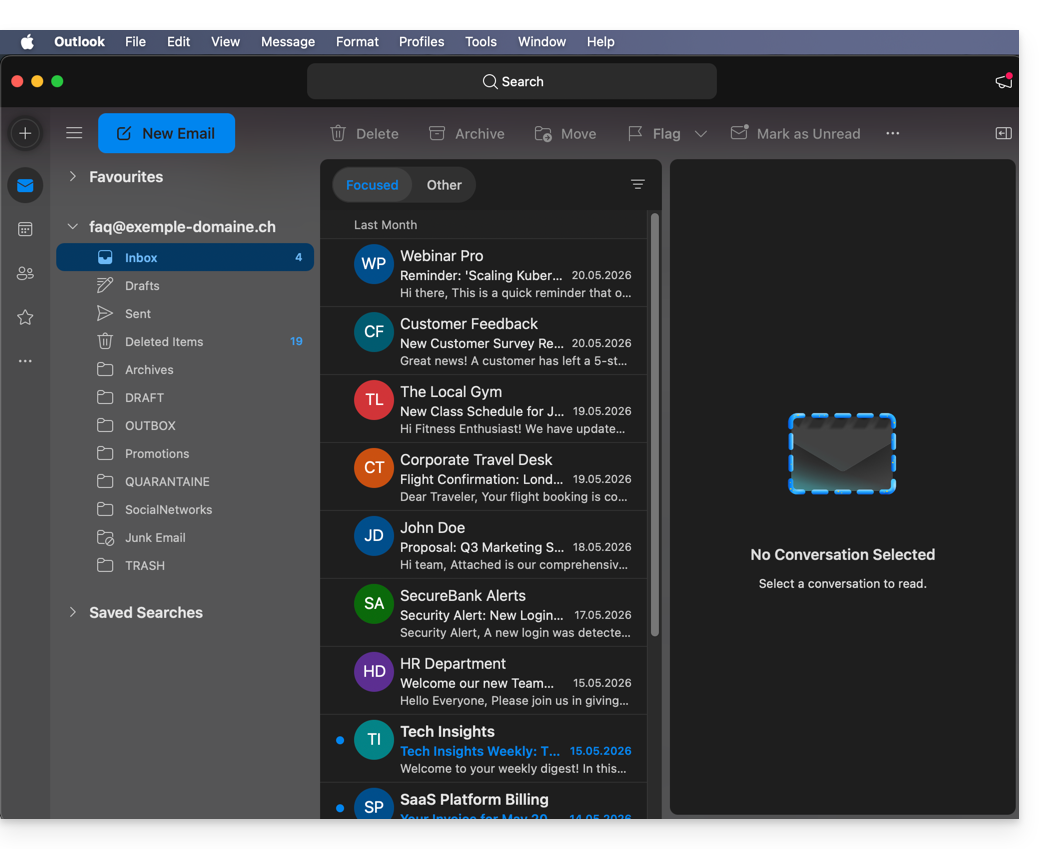
Recommended settings
- Incoming IMAP server =
mail.infomaniak.com - IMAP port =
993(with SSL) - Outgoing SMTP server =
mail.infomaniak.com - SMTP port & encryption protocol and command/method to activate this protocol:
587+ STARTTLS - Username = the complete email address (❓: help)
- Password = the password generated for the email address you want to access (❓: help my kSuite | Mail Service/kSuite).
- Mandatory authentication for sending emails:
- Activate it in the SMTP settings of your application.
- Check "use the same settings as the incoming server" or, depending on the software/email client, re-enter a username (= complete email address) and the generated password.
Refer to this other guide if you are looking for information about other compatible email ports and protocols (SSL / TLS for example).
In case of a problem
Make sure the Mail service is configured optimally (❓: help).
You do not need to contact Infomaniak Support if your email address works correctly outside the application. The most common error is using an incorrect password. The troubleshooting guides will help you resolve any potential issues:
- Refer to the solutions provided in this other guide regarding email in general.
- This other guide is specifically about Outlook.
… and if your Outlook is no longer working after a change of your email password, please refer to this other guide.
Link to this FAQ: https://faq.infomaniak.com/2174
Has this FAQ been helpful?
This guide explains how to connect the Contacts and Calendar iOS (iPhone, iPad…) apps with the contacts & calendars hosted by Infomaniak.
Introduction
- Rather than the manual configuration below, it is recommended to use the .mobileconfig configuration profiles offered by Apple.
- Infomaniak contacts & calendars are linked to your Infomaniak account; when you log in to ksuite.infomaniak.com/contacts or /calendar, you will likely need to perform two-factor authentication (2FA) during login.
- In this case, an application password is required to establish synchronization between your device and Infomaniak tools.
- But don't worry, creating such a password is offered as part of the configuration wizard.
Manual configuration (contacts & calendars)
Obtain your login information
To obtain the CardDAV/CalDAV synchronization username and password:
- Click here to access the Infomaniak configuration tool (online service https://config.infomaniak.com) — log in if necessary to your Infomaniak account for the Organization where your email address is managed.
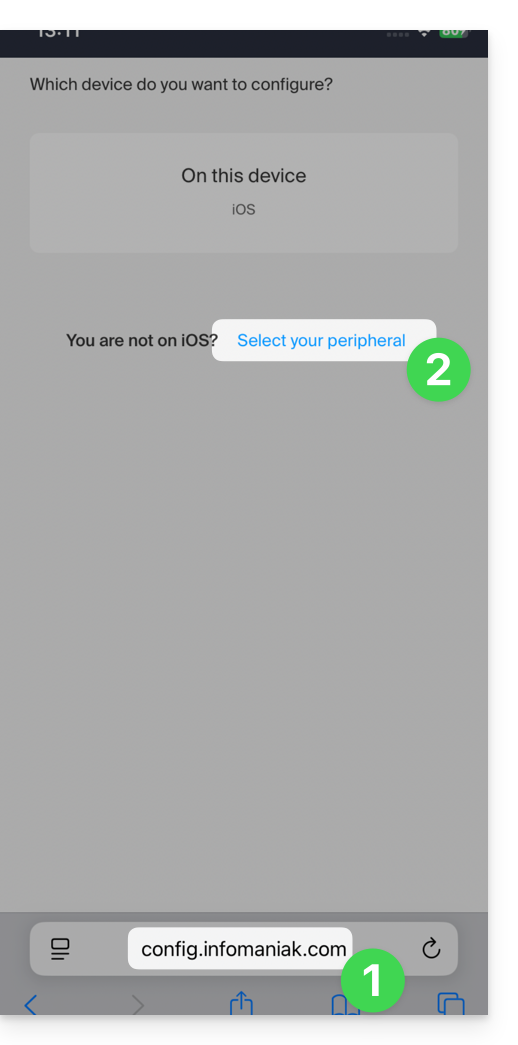
- Select a device other than iOS (this is to obtain your username):
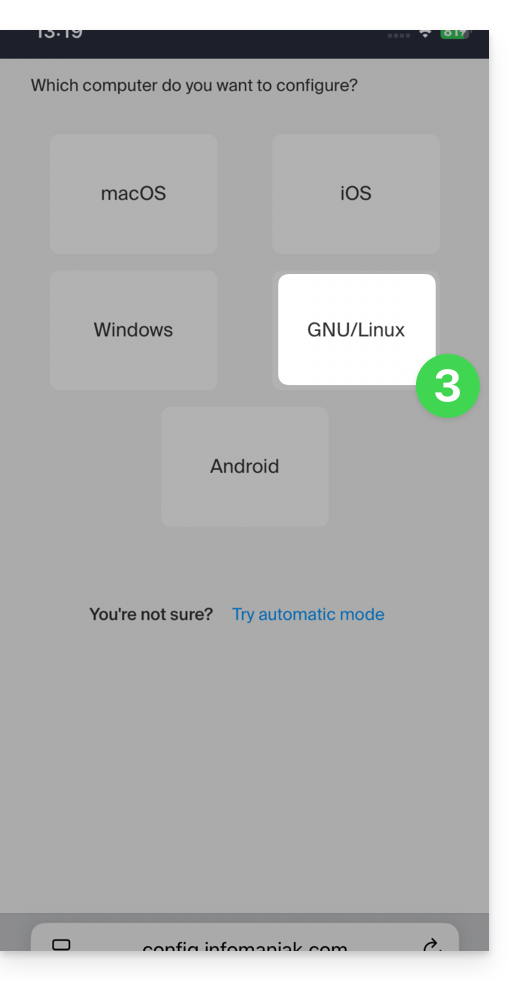
- Choose Linux:
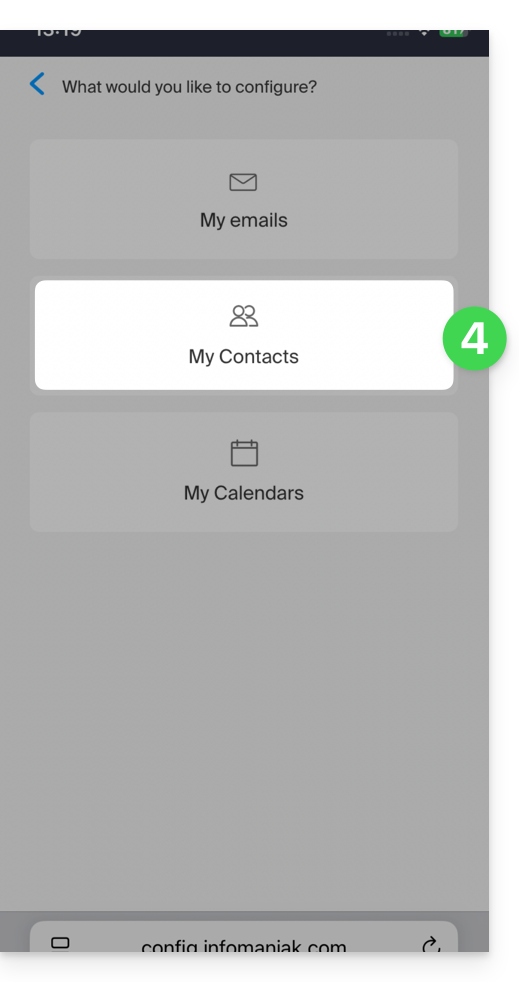
- Choose Contacts or Calendars:
- Choose the specific service that needs to be synchronized.
- Tap the right arrow several times, then tap the title of the manual synchronization tab:
- The information displayed below allows you to obtain:
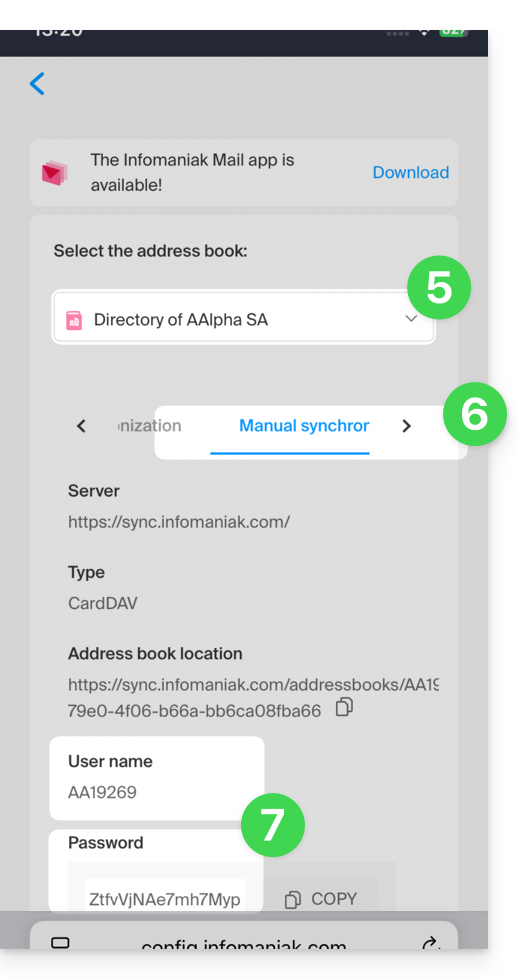
- your username (e.g.,
AB12345)… - application password if two-factor authentication is enabled or the password for your Infomaniak user account if you have not enabled 2FA.
- For the server address, use only
sync.infomaniak.com.
- your username (e.g.,
Using the login information
With this information, all you have to do is add your accounts according to Apple's instructions:
- Go to Settings > Contacts > Accounts > Add Account.
- Tap Other, then Add CardDAV Account and enter the account and server information.
Do the same for the Calendar app:
- Go to Settings > Calendar > Accounts > Add account.
- Tap Other, then Add CalDAV account and enter the account and server details.
Synchronization specifics
Refer to this other guide.
Link to this FAQ: https://faq.infomaniak.com/1544
Has this FAQ been helpful?