Knowledge base
1000 FAQs, 500 tutorials and instructional videos. Here, there are only solutions!
This guide details how, when activating a new WordPress theme, the formatting and content of articles and pages can be altered, this is if the new theme does not use the same shortcodes and/or the same page builder (page builder).
Layout issues
Here is an example of how your articles and pages may appear after changing your WordPress theme:

Unfortunately, there is no automatic solution to fix this issue: you will have to:
- either revert to the old theme you were using
- or manually adapt the content of your site with the tools provided by your new WordPress theme.
Of course, you can also uninstall and reinstall WordPress, the site content will be erased and you will start on a clean slate.
Reduce problems in the future
Here are some tips to avoid having to reformat all the content of your site in case of a theme change:
- Use as few theme-specific shortcodes as possible.
- Use a universal page builder that is compatible with all WordPress themes (for example Visual Composer or Thrive Content Builder).
- Take the time to test and evaluate the quality of a theme, by comparing it with 2-3 other similar themes, before using it and adapting all the content of your site.
Useful resources
- Automatically find and remove all unused shortcodes (article in English)...
Link to this FAQ:
Has this FAQ been helpful?
This guide provides basic instructions for creating and using a .htaccess and .user.ini file with an Infomaniak Web Hosting account.
Introduction
- A
.htaccessfile is placed in the root directory of a website and allows you to configure the Apache HTTP server.- As a decentralized configuration file, it offers significant flexibility to adjust the server's behavior according to the specific needs of the site.
- This file allows you to define URL rewrite rules, impose access restrictions, manage HTTP errors, and even customize security aspects such as disabling the display of files/folders.
- It also facilitates the implementation of redirects and aliases, providing precise control over the organization and accessibility of the site.
- A
.user.inifile allows you to customize the PHP directives for the folder (and its subfolders) in which it is located.- By acting at the PHP interpreter level, this file allows you to define specific configurations for a given folder and its subdirectories.
- Thanks to its clear syntax, it offers the possibility of modifying various parameters such as the memory limit, the script execution time, error handling, and other PHP-related directives.
- This granular approach allows developers to finely customize the behavior of PHP according to the specific requirements of each section of the site.
Create a file…
… .htaccess
- Connect to your hosting account via FTP or SSH.
- In the root directory of the website in question, create a new file and name it as follows:
.htaccess. - Enter the desired directives in the file; refer to this other guide, for example.
… .user.ini
- Connect to your hosting via FTP or SSH.
- In the desired location, create a new file and name it as follows:
.user.ini. - Enter the desired PHP configuration settings in the file.
Modifying the .user.ini file takes several minutes to take effect.
Link to this FAQ:
Has this FAQ been helpful?
This guide explains how to automatically restore an entire web hosting from backups made by Infomaniak.
Preamble
- Infomaniak performs a daily backup, and the last 7 are available to you in the Manager (or more if you use a Web Application).
- During the restoration, the sites will be automatically put in maintenance until the end of the process.
- Since automatic file backups and database backups are not performed simultaneously, it is recommended to check the proper functioning of the sites after restoration.
- Outside of these options, there is no other backup that you could obtain; it is therefore not necessary to contact Infomaniak for this purpose, but consider other backup methods for the future.
Restoring a web hosting
To access the web hosting:
- Click here to access the management of your product in the Infomaniak Manager (need help?).
- Click directly on the name assigned to the corresponding product.
- Click on Restore in the left sidebar.
- Choose the type of restoration desired:
- Restore one of the Web Applications that you have installed.
- Simple restoration to restore all sites and databases of the hosting.
- Advanced restoration allows you to choose the sites and databases to restore.
- Click on the Next button:
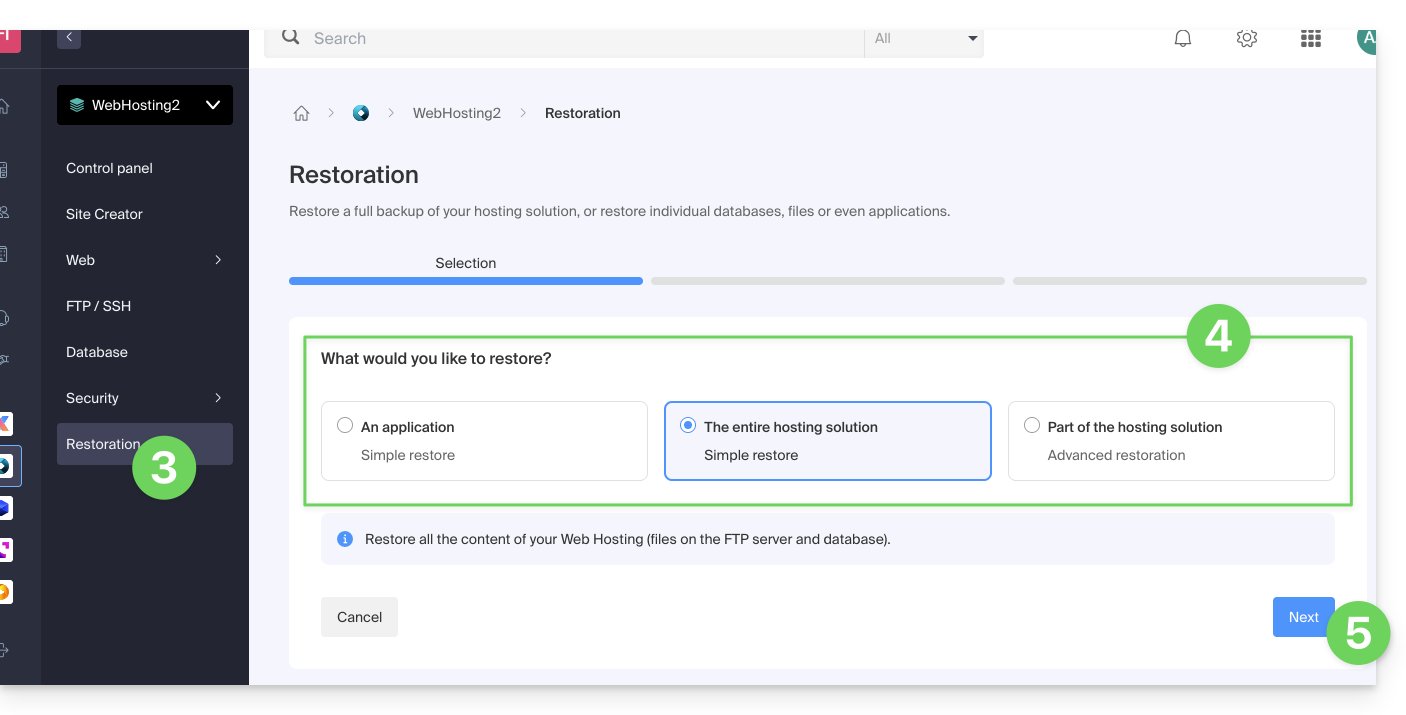
- Choose the desired restoration date and complete the procedure.
Link to this FAQ:
Has this FAQ been helpful?
This guide explains how to update Web Applications installed via Infomaniak tools.
Preamble
- If an application is manually updated via FTP, it is then impossible to update it via the Manager and benefit from automatic updates.
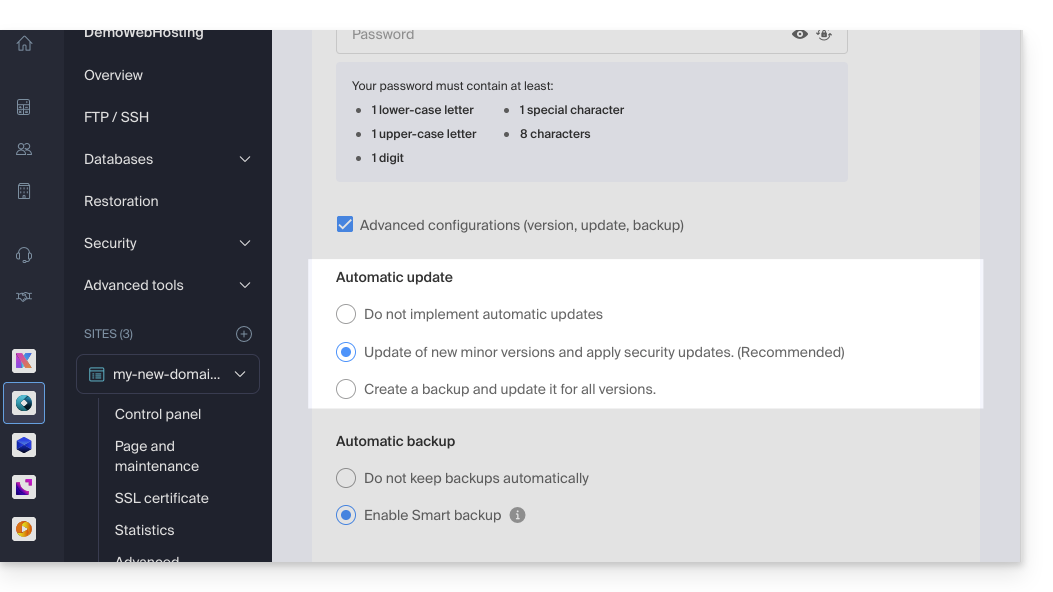
- When installing your Web Application, automatic updates (at least security ones) are usually enabled by default:
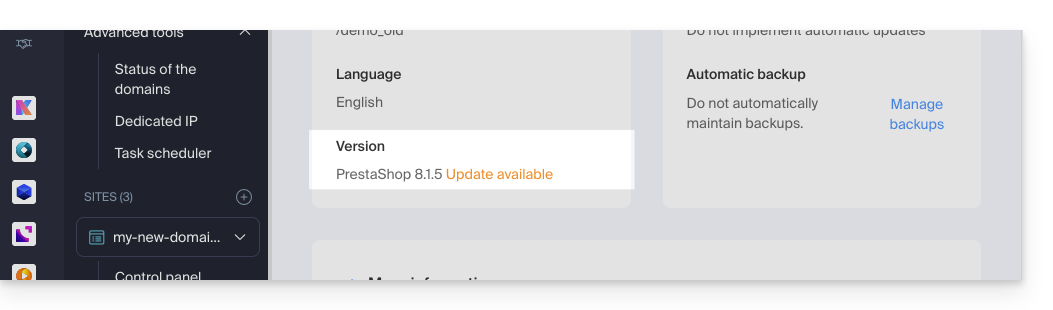
- If an app update is available, you are notified on the Manager:
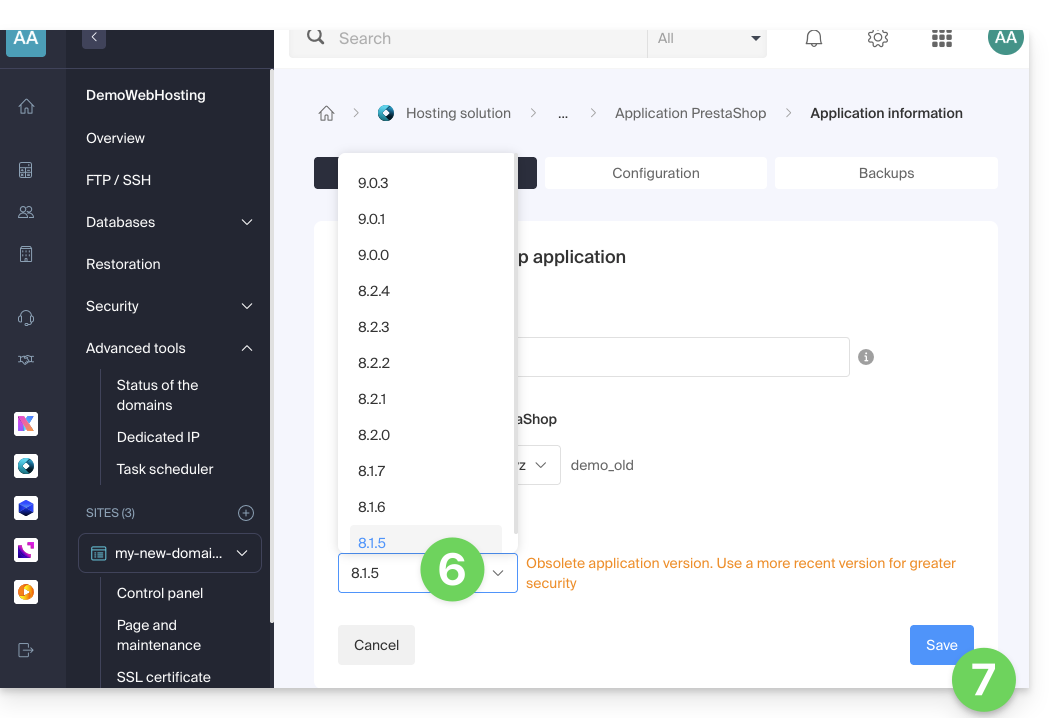
Update an application installed via Infomaniak
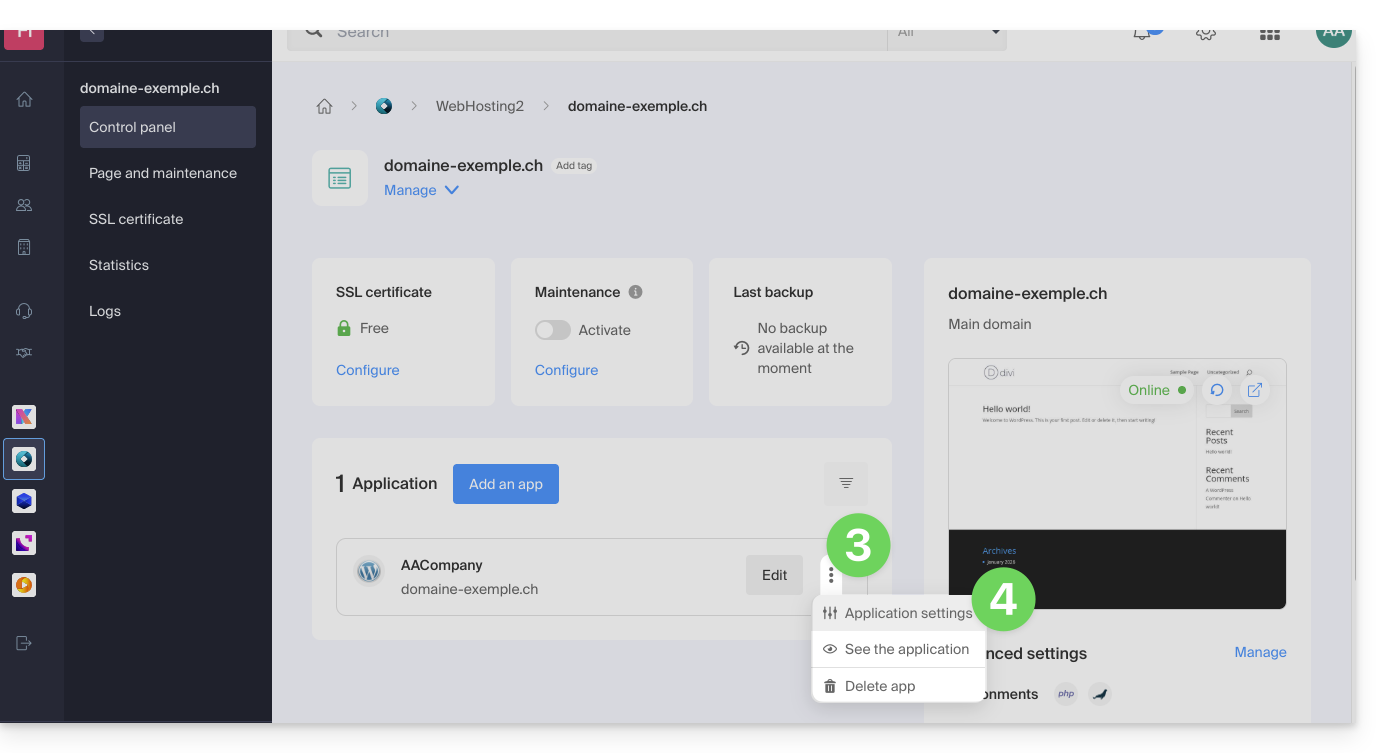
To access the Infomaniak Web Application and update it:
- Click here to access the management of your site on the Infomaniak Manager (need help?).
- Click directly on the name assigned to the site concerned.
- Click on the action menu ⋮ located to the right of the Web Application concerned.
- Click on Settings of the application:

- Click on Modify in the Information block:
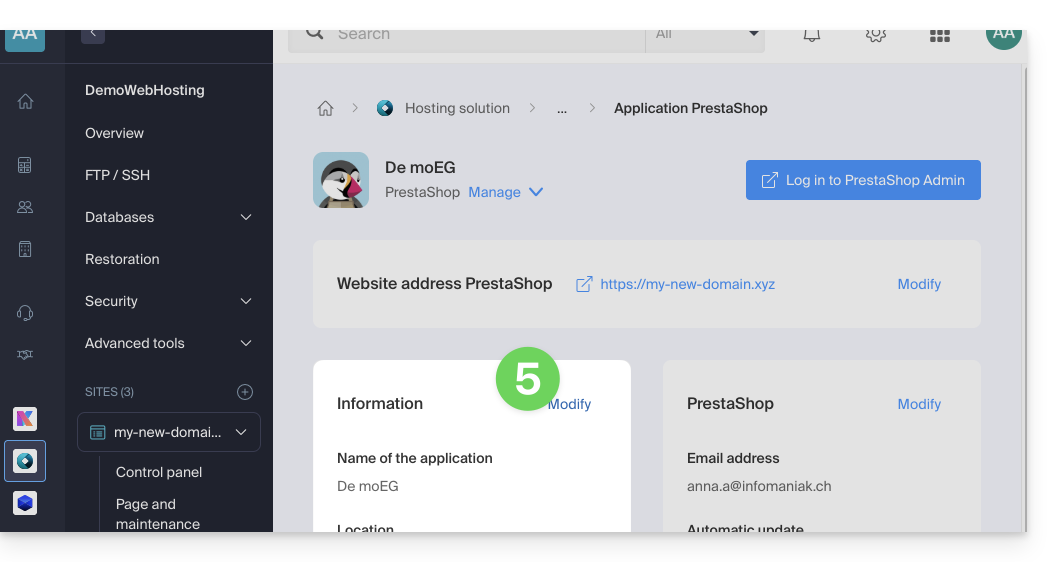
- Click on the drop-down menu to choose a more recent version.
- Click on the Save button:
Link to this FAQ:
Has this FAQ been helpful?
The Student Program from Infomaniak allows you to get 1 Web Hosting and 1 kSuite Standard for free to develop your digital skills during higher education.
Preamble
- A domain name is required for the proper functioning of the products and this one remains paid.
- Offer valid only in the following countries: Switzerland, France, Belgium, Germany, Italy, Austria, Spain, Canada.
- Offer reserved for new hosting orders (does not apply to orders already in progress or renewed orders).
- 1 web hosting (= storage of 20 websites on 250 GB of SSD space) and 1 standard kSuite offered per person.
- The student must be of legal age (or have parental authorization).
- The student must be able to justify their situation with a valid registration card and identity card:
- student card or school certificate: it must be up-to-date and show the school, the current school year as well as your first and last name
- identity card (front/back): it must be valid with a clear and legible photo
- your official student email address: it is provided by your school, for example firstname.lastname@your-school.com
- The duration of the offer depends on the validity period of the registration card and cannot exceed 4 years in total.
Get the free online hosting
To benefit from this offer, familiarize yourself with the offer page by preparing the required documents.
Requests are processed in the order they are received in the days following your message. You will receive a response by email in all cases.
Discover other free Infomaniak services!
Link to this FAQ:
Has this FAQ been helpful?
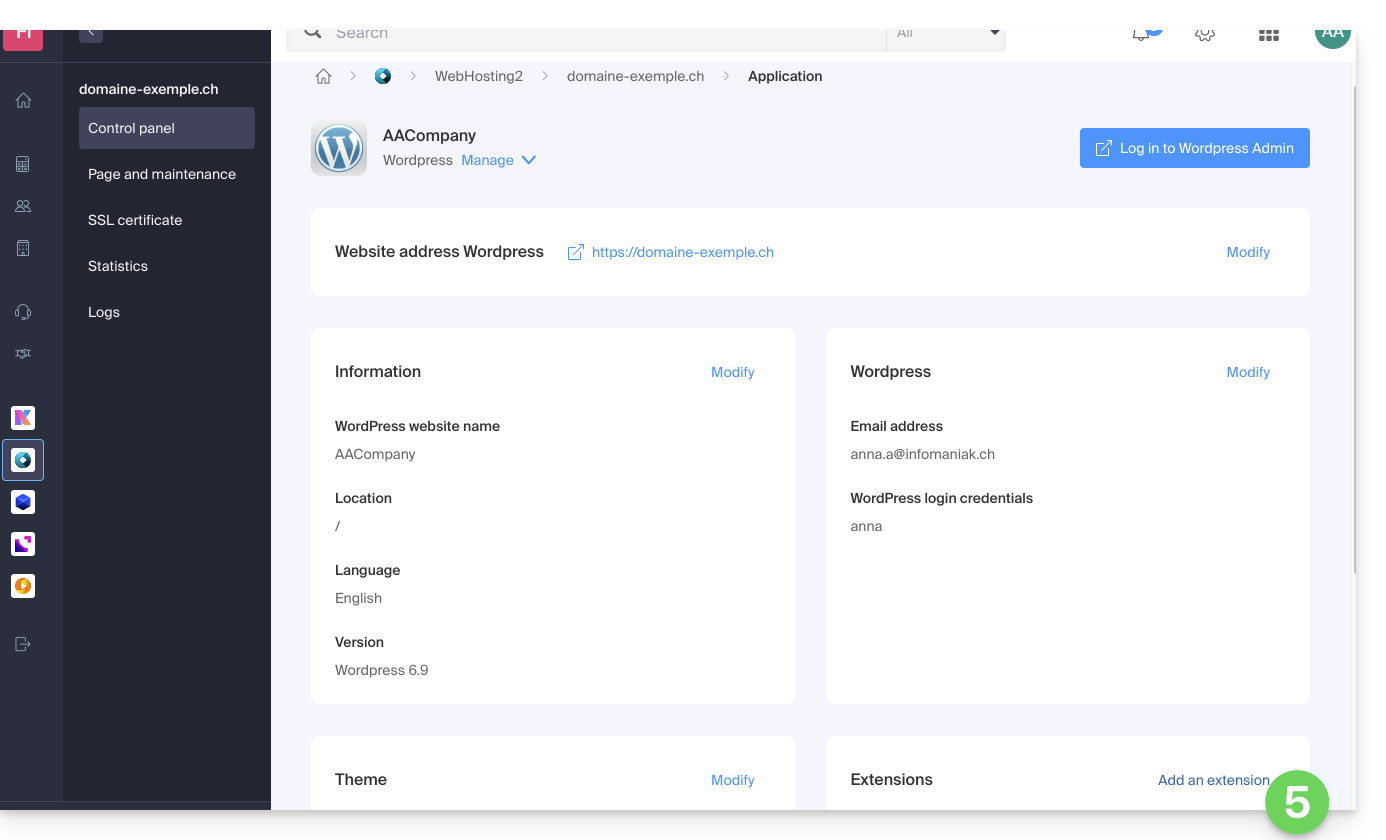
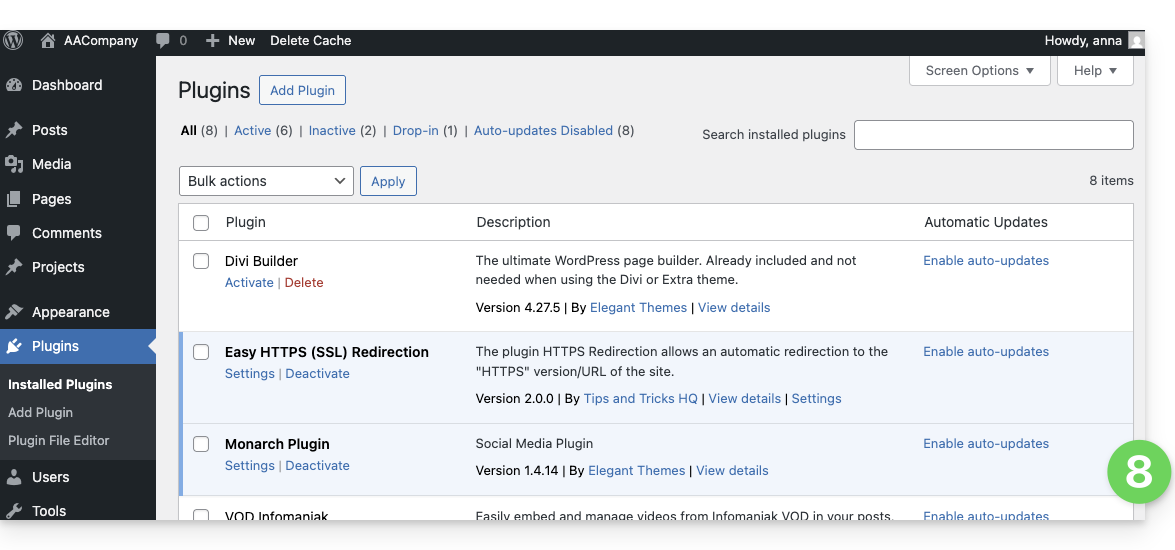
This guide explains how to add an Elegant Themes extension (Monarch, Divi Builder, Bloom, etc.) or a theme to a WordPress site that has already been installed via the Infomaniak installer, free of charge.
Prerequisites
- Your WordPress site must be installed using the Infomaniak WordPress tools in order to use these themes and extensions.
- Extensions can be added during installation (approximately step 16 of this other guide) or activated later.
- To benefit from Elegant Themes support (customer service), you must subscribe to an Elegant Themes plan.
Adding an Elegant Themes Plugin
To do this:
- Click here to access the management of your WordPress site in the Infomaniak Manager (need help?).
- If your site does not appear here, it means that it was not installed using the Infomaniak tools (see prerequisites).
- Click directly on the name assigned to the relevant product:

- Click on the action menu ⋮ located to the right of the relevant Web Application.
- Click on Settings in the application:
- Click on Add under Extensions:
- Enable the desired extensions.
- Click on the Save button:
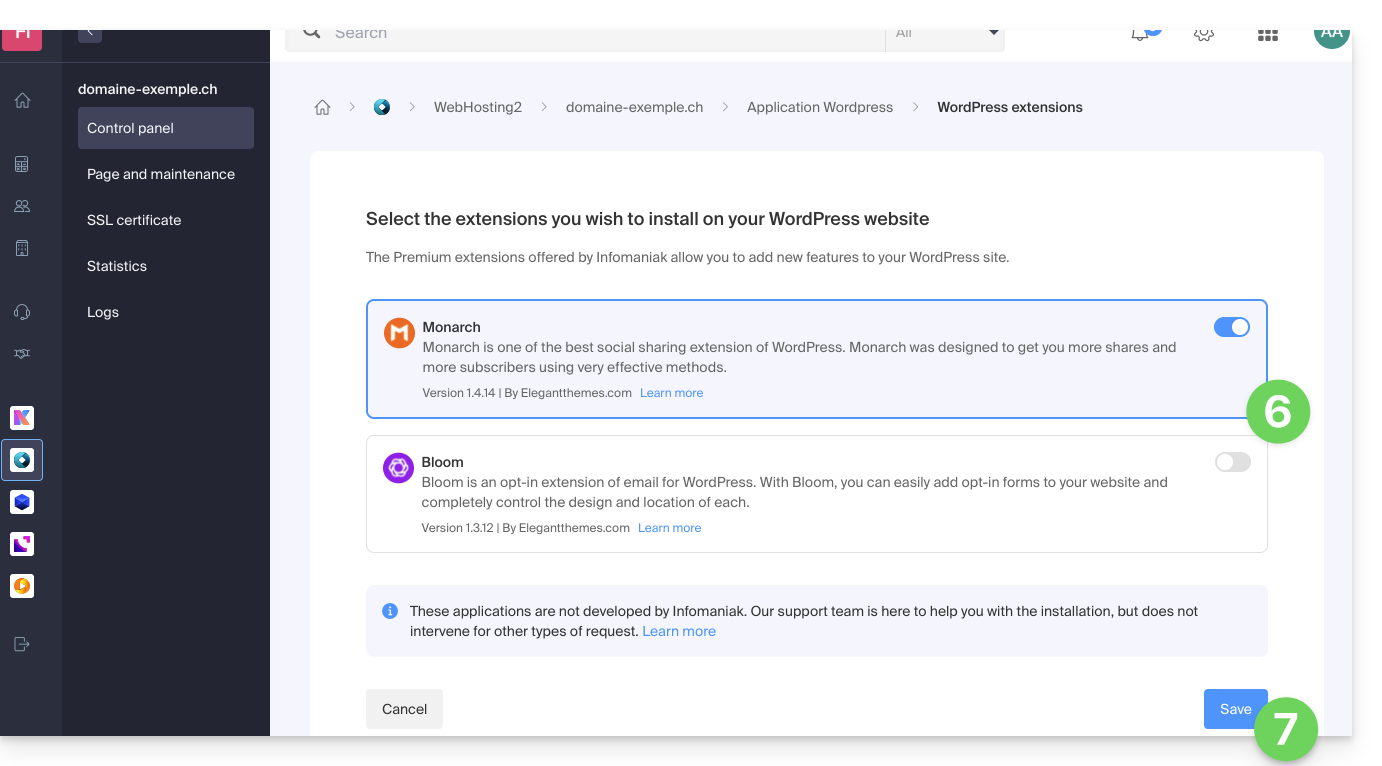
- The extensions are then available in your WordPress administration interface:
Using an Elegant Themes theme
Refer to this other guide to install an Elegant Themes theme with Infomaniak.
Link to this FAQ:
Has this FAQ been helpful?
This guide explains how to create an Infomaniak account, i.e., your user account (customer account) that will then allow you to use Infomaniak services such as the Mail app or kDrive, order additional services, and be attached to one or more Organizations to collaborate effectively in the Infomaniak ecosystem.
Create a new Infomaniak account
To be able to order and manage Infomaniak products (including in the case where a user wants to transfer existing products to you) within one or more Organizations, it is necessary to create a first Infomaniak account with a completely new login identifier:
- Click here to sign up; you will need to enter a valid email address to receive the mandatory verification request.
- Fill out the requested information and complete the registration.
To simply obtain a my kSuite / my kSuite+ account (ik.me, etik.com, ikmail.com) click here to sign up.
Link to this FAQ:
Has this FAQ been helpful?
This guide explains how to uninstall an SSL Certificate regardless of its type, initially installed from the Infomaniak Manager. If your certificate is of the paid type and you wish to cancel the current offer instead, refer to this other guide.
Remove an SSL certificate
To uninstall an Infomaniak certificate:
- Click here to access the management of your SSL certificate on the Infomaniak Manager (need help?).
- Click directly on the name assigned to the product concerned:
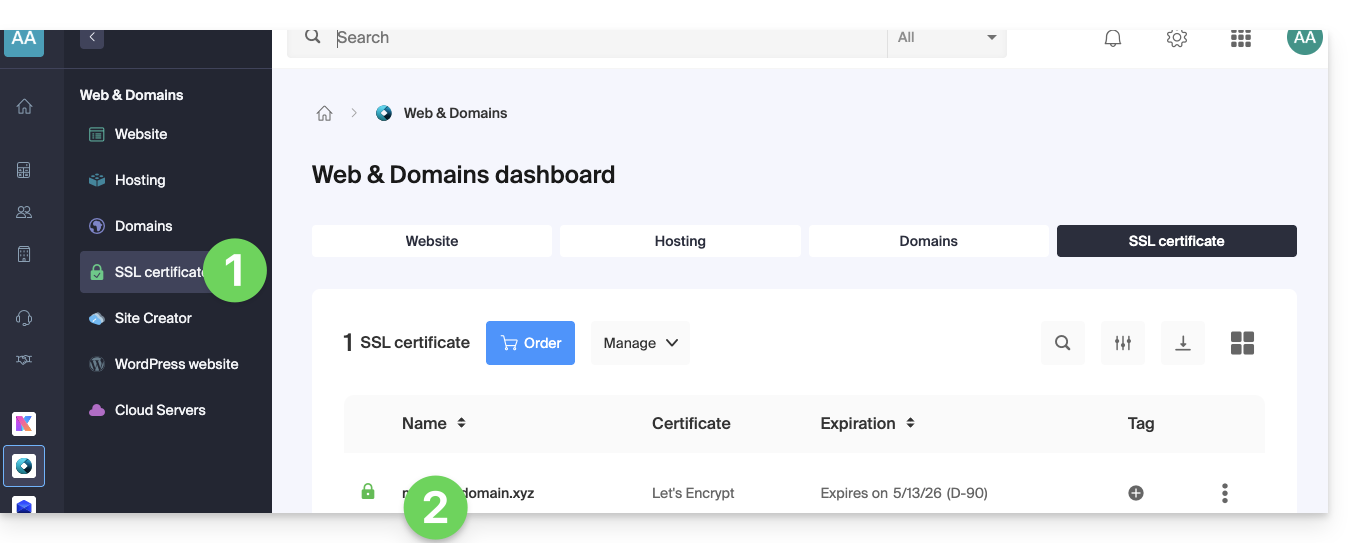
- Click on the action menu ⋮ located to the right of the item concerned.
- Click on Uninstall:
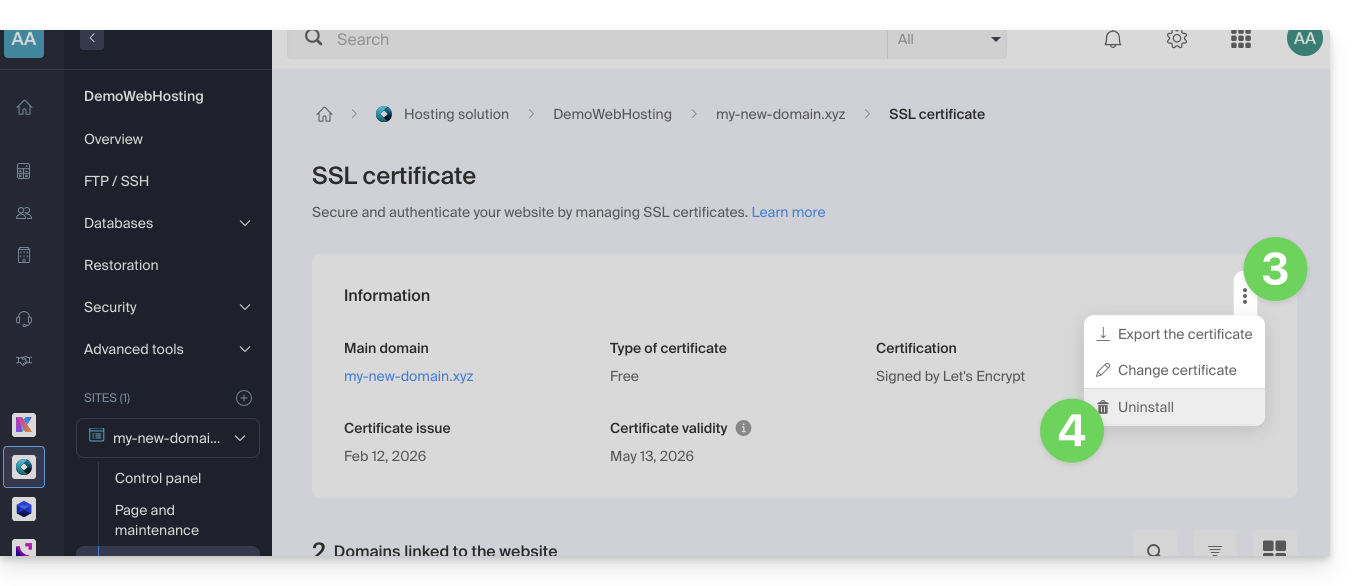
- Confirm the uninstallation of the certificate.
Link to this FAQ:
Has this FAQ been helpful?
This guide introduces the Domain Status tool, which allows you to verify that the relationships between…
- DOMAIN NAME at Infomaniak
and
- WEB HOSTING at Infomaniak
… are correct, so that Web traffic is directed to the right place.
Preamble
- To verify, the tool checks the
A,CNAME, etc. records. - You will thus be able to detect and correct certain Web issues, especially if they are related to DNS (technical information that, in short, determines where such and such Web traffic should be directed) by acting at the level of your domain.
- Automatic correction is only possible when the domain name is present in the same Organization as the product to which it must be attached.
- If this is not the case, then the correction must be done manually.
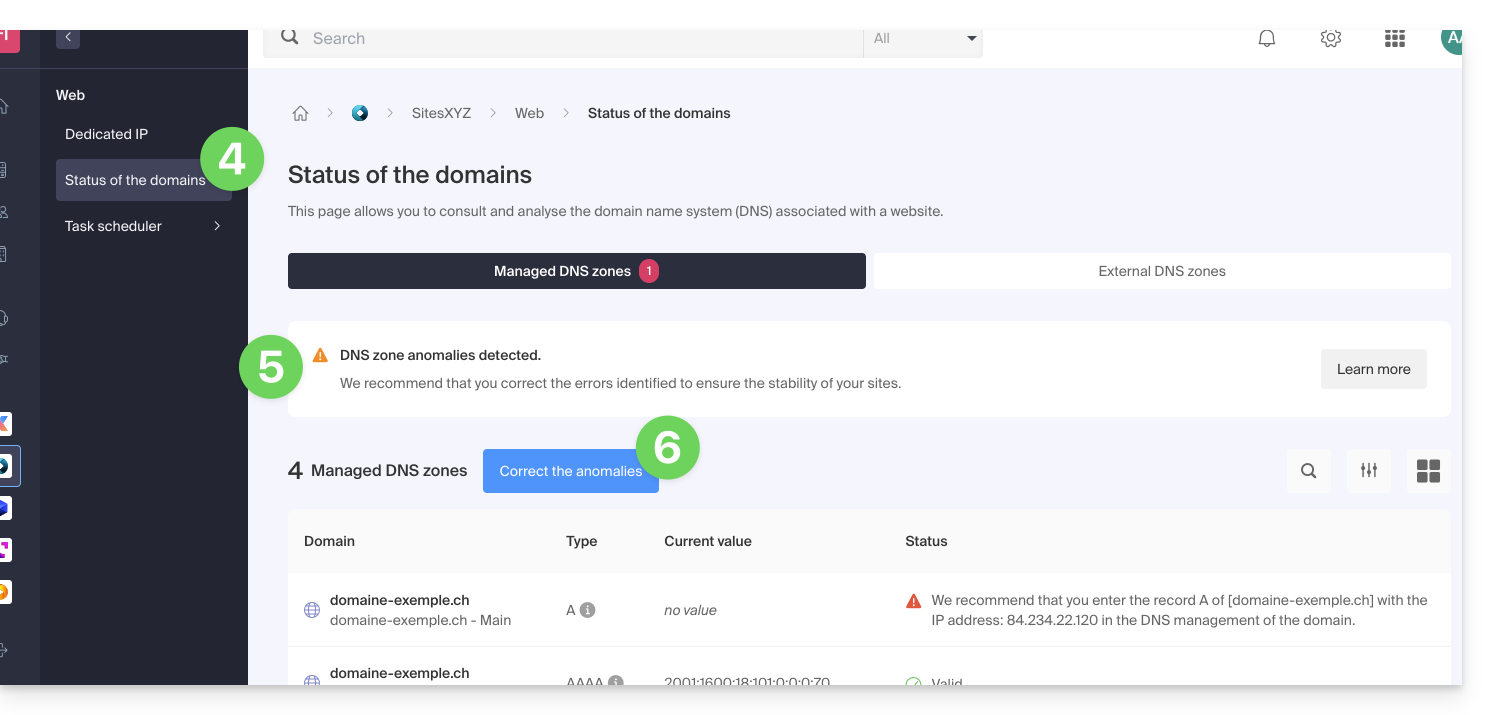
Diagnose a DNS problem
To access the DNS diagnosis of your domain name:
- Click here to access the management of your product on the Infomaniak Manager (need help?).
- Click directly on the name assigned to the product concerned.
- Click on Web in the left sidebar (or on the possible indication to go directly to point 6):
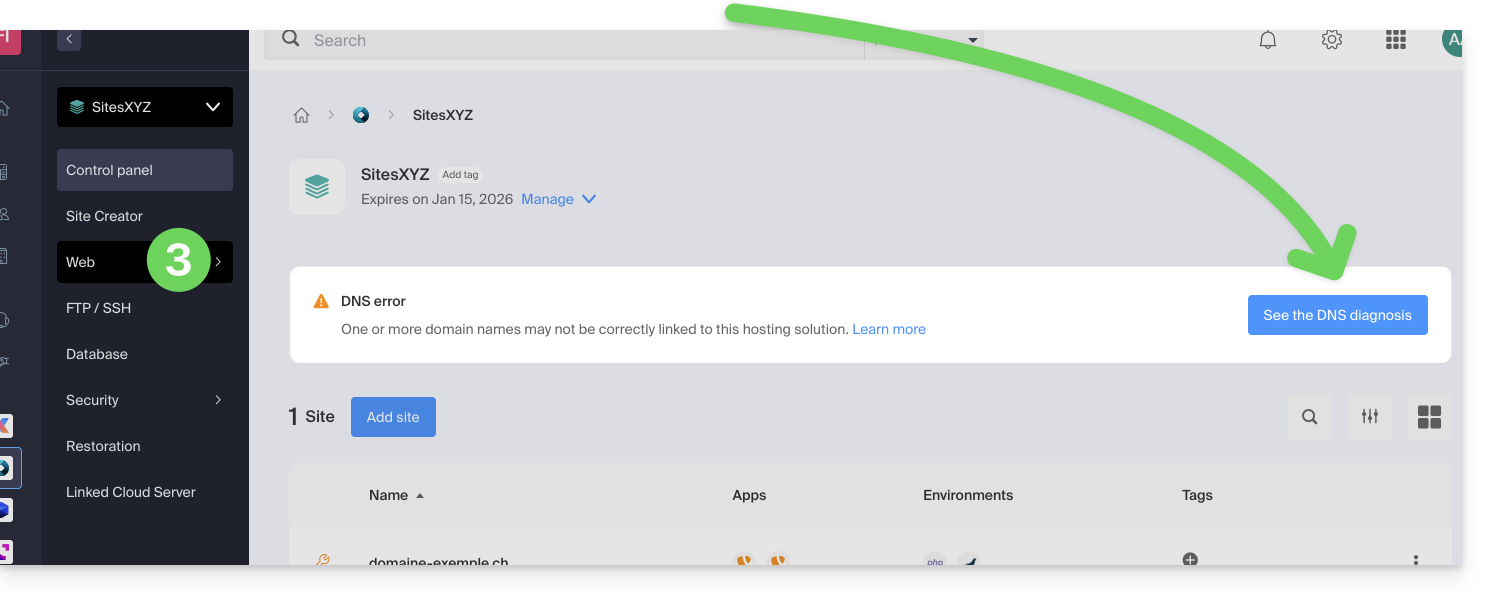
- Click on Domain Status in the left sidebar.
- If DNS issues are detected, the dashboard indicates it.
- Correct all errors at once by clicking on the button:
Refer to this other guide regarding the same automatic verification process but for Mail Services.
Link to this FAQ:
Has this FAQ been helpful?
This guide compares the different Infomaniak Cloud solutions to help you choose the infrastructure best suited to your needs. In all cases, you benefit from dedicated and scalable resources.
Jelastic Cloud (PaaS)
Jelastic Cloud is a platform that allows you to create development environments on the fly without managing system administration:
- Maximum flexibility: the platform automatically adjusts your resources according to real-time load.
- Advantage: ideal if your consumption (CPU, RAM) varies greatly depending on the time of year.
- Billing: you only pay for the resources actually consumed.
Managed Cloud Server
A Cloud Server allows you to manage websites and web applications via a simplified interface, while allowing the installation of specific software:
- Simplicity: as easy to use as shared hosting, but with the power of dedicated resources.
- Advantage: ideal if your resource consumption is stable and predictable.
- Management: Infomaniak handles the technical maintenance and security updates of the server.
Cloud VPS and VPS Lite
The Cloud VPS or VPS Lite offer full root access to a Linux distribution:
- Total control: you manage your entire server and software configurations.
- Required skills: solid technical expertise in system administration is essential.
- Usage: recommended for specific needs with stable resource consumption.
For large-scale infrastructure needs, learn about the Public Cloud offer.
Link to this FAQ:
Has this FAQ been helpful?
This guide provides two methods to access the administration interface of a WordPress site installed via Infomaniak tools, for example to update the content.
Prerequisites
- Know your login credentials…
Access the WordPress console…
1. … from the Manager
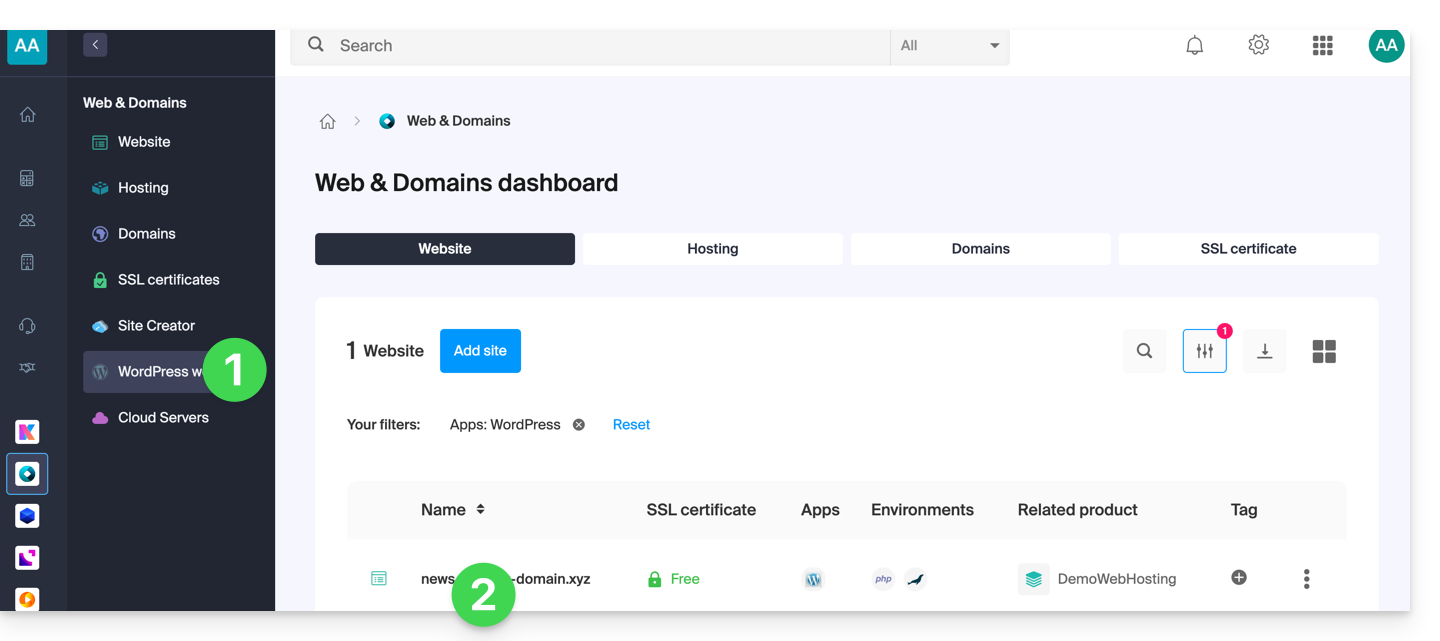
To access WordPress from the Manager:
- Click here to access the management of your WordPress site on the Infomaniak Manager (need help?).
- If your site does not appear here, it means it was not installed via Infomaniak tools… refer to the official documentation.
- Click directly on the name assigned to the product concerned:
- Click the Edit button to open the WordPress login page:
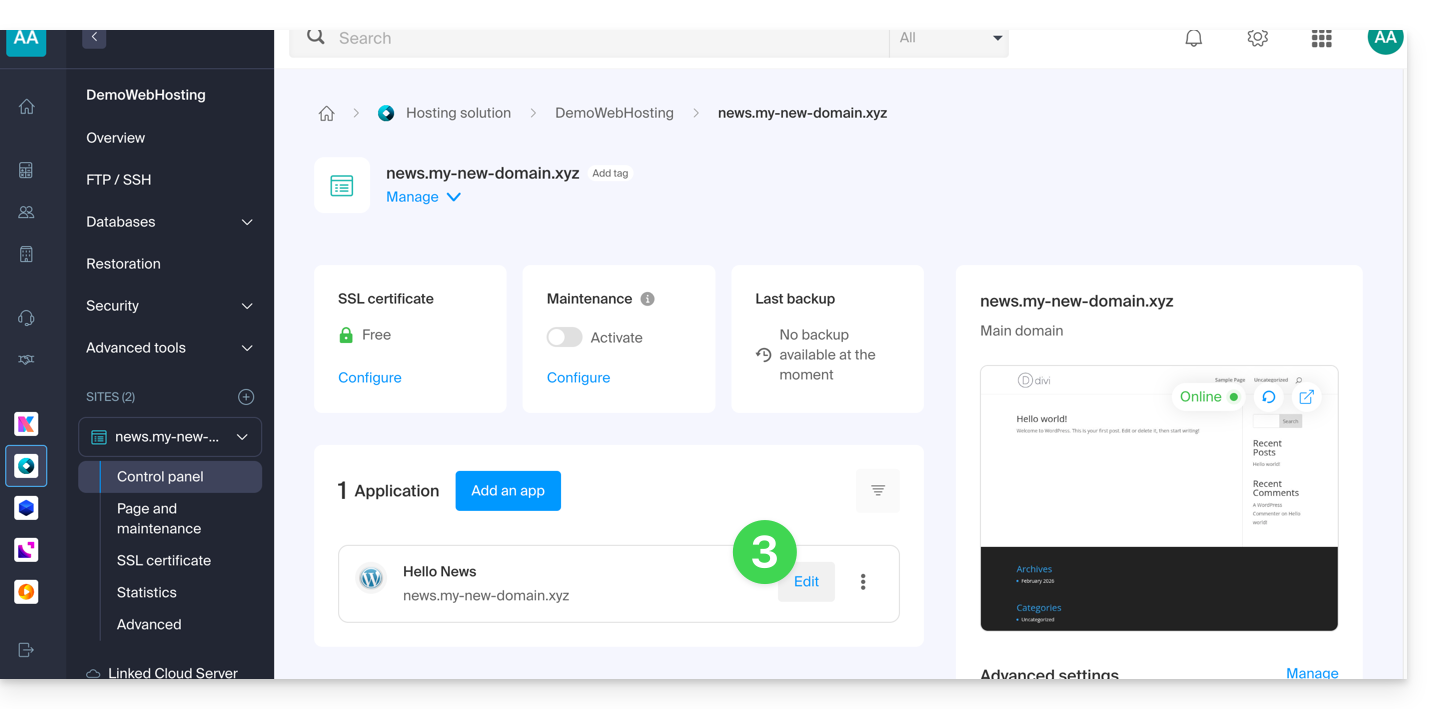
- Enter the username and password chosen during the WordPress installation:
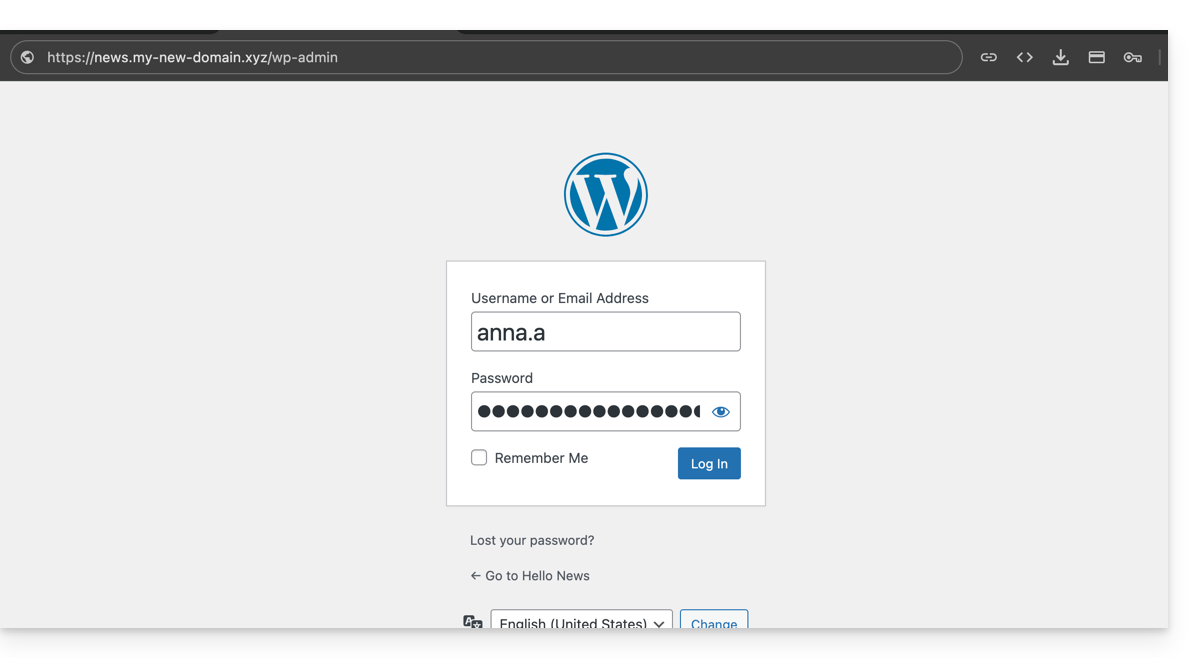
2. … via the URL /wp-admin
By default, simply add the terms /wp-admin to the end of your domain name's URL in your web browser's address bar to access the WordPress console login page directly (= point 4 above).
If your WordPress site address is for example https://domain.xyz, the address to access the WordPress administration interface will be https://domain.xyz/wp-admin.
What to do if the ./wp-admin shortcut does not work?
- If the
./wp-adminshortcut does not work, you may be using a security extension that modifies the URL of certain pages to limit attempts to hack your site (example of plugin)… - If you need to access the WordPress console and your domain name is not functional at the moment, you can switch the main domain name to the preview address.
Link to this FAQ:
Has this FAQ been helpful?
This guide provides important details regarding the launch and execution of command-line scripts (SSH) on various types of Infomaniak hosting.
Executing scripts via SSH and managing resources
Unlike scripts executed via a web browser, there is generally no strict time limit (timeout) for commands launched via SSH. Your script can therefore theoretically run as long as necessary.
Execution time and persistence
If your SSH session closes (loss of internet connection or terminal closure), the running script will be immediately interrupted.
To avoid this during long tasks, it is recommended to run your scripts in the background or, in the case of a VPS, use terminal multiplexing tools (such as screen, tmux, or the nohup utility). This allows the process to continue its work even after you disconnect.
Resource limits (RAM and CPU)
If time is not limited, hardware resources are.
The execution of your scripts remains subject to the capabilities of the machine and its configuration:
- Memory (RAM): if a process consumes more memory than the allowed limit (for example, the
memory_limitof PHP or the available physical RAM), it will be killed by the system to preserve the stability of the server. - Processor (CPU): excessive use of the processor over a long period can result in throttling or interruption of the process.
It is possible to adjust these resource limits on dedicated environments (such as a Cloud Server). However, on shared hosting, these limits are fixed and non-modifiable to ensure performance for all users hosted on the same server.
Link to this FAQ:
Has this FAQ been helpful?
This guide explains how to modify the URL of your site containing a Web Application (such as Prestashop or Joomla) previously installed on your paid Web Hosting offer.
Prerequisites
- The domain name you wish to use must first be added as an alias to the main domain on the site in question.
Specific guides
Refer to these guides if the application in question is:
Guides for any other Web Application
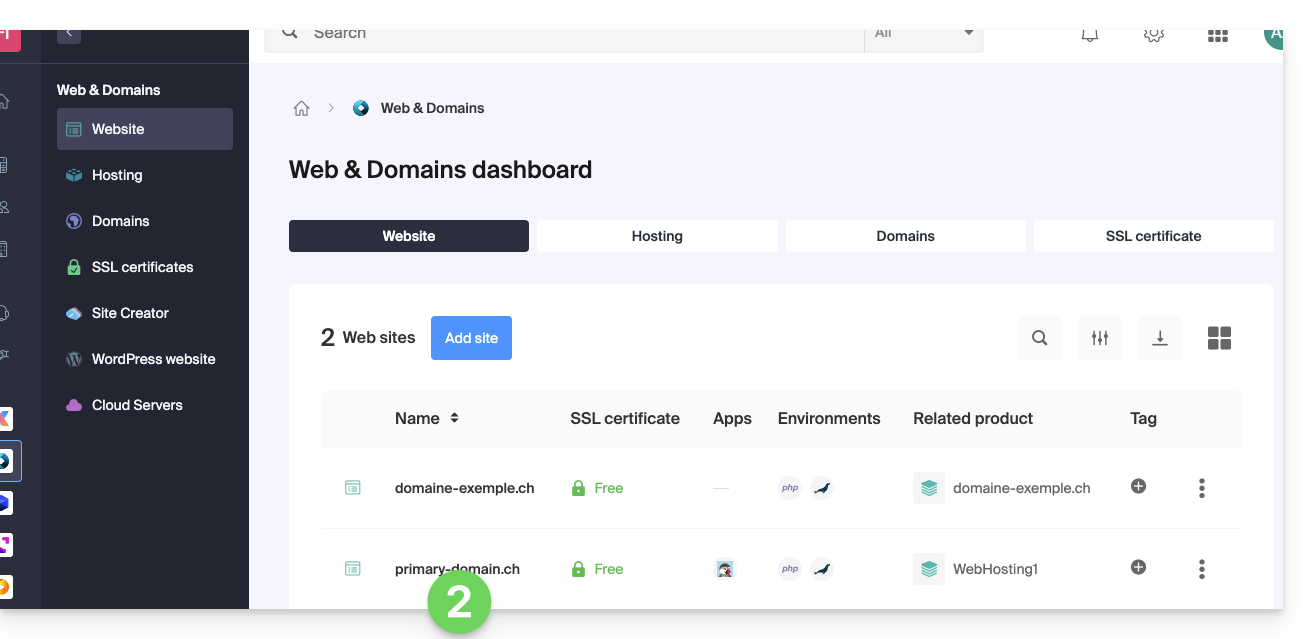
To change the address of the site created with an Infomaniak Web Application to another domain name that is already in the same Organization:
- Click here to access the management of your product on the Infomaniak Manager (need help?).
- Click directly on the name assigned to the product in question:
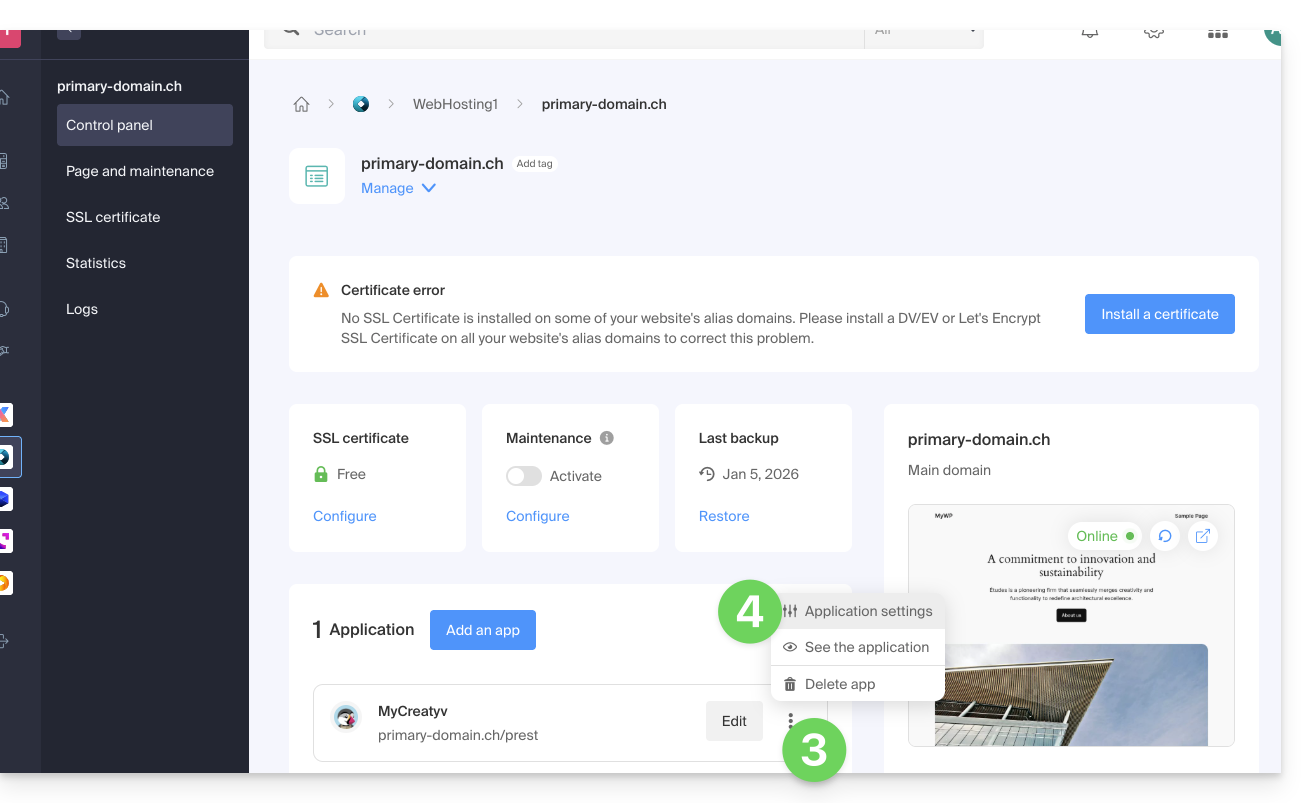
- Click on the action menu ⋮ located to the right of the Web Application in question.
- Click on Settings of the application:
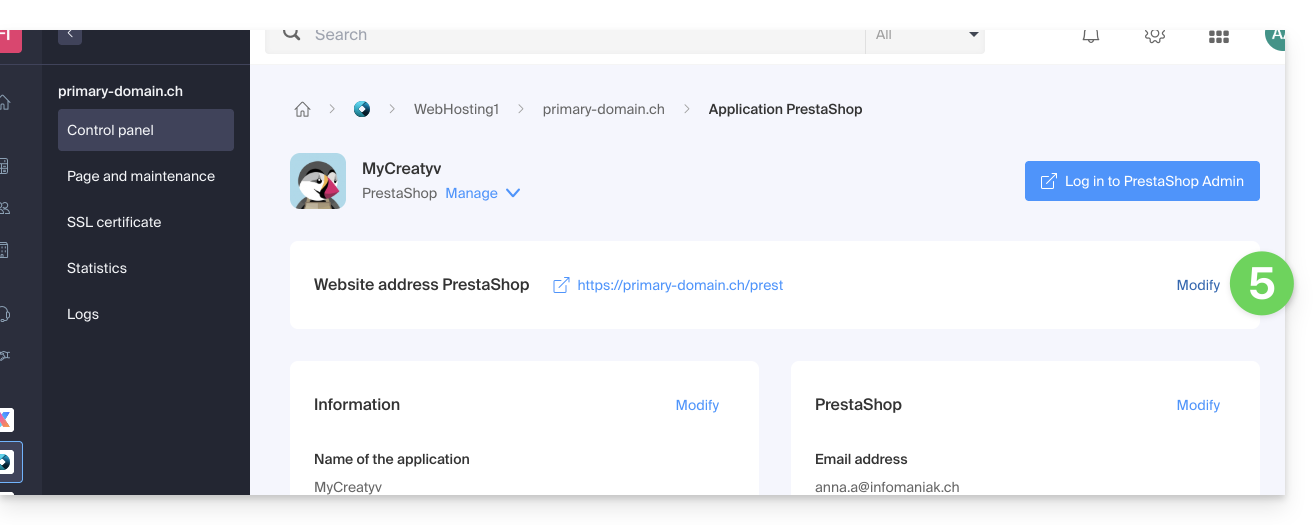
- Click on Modify to the right of the address of the Web Application in question:
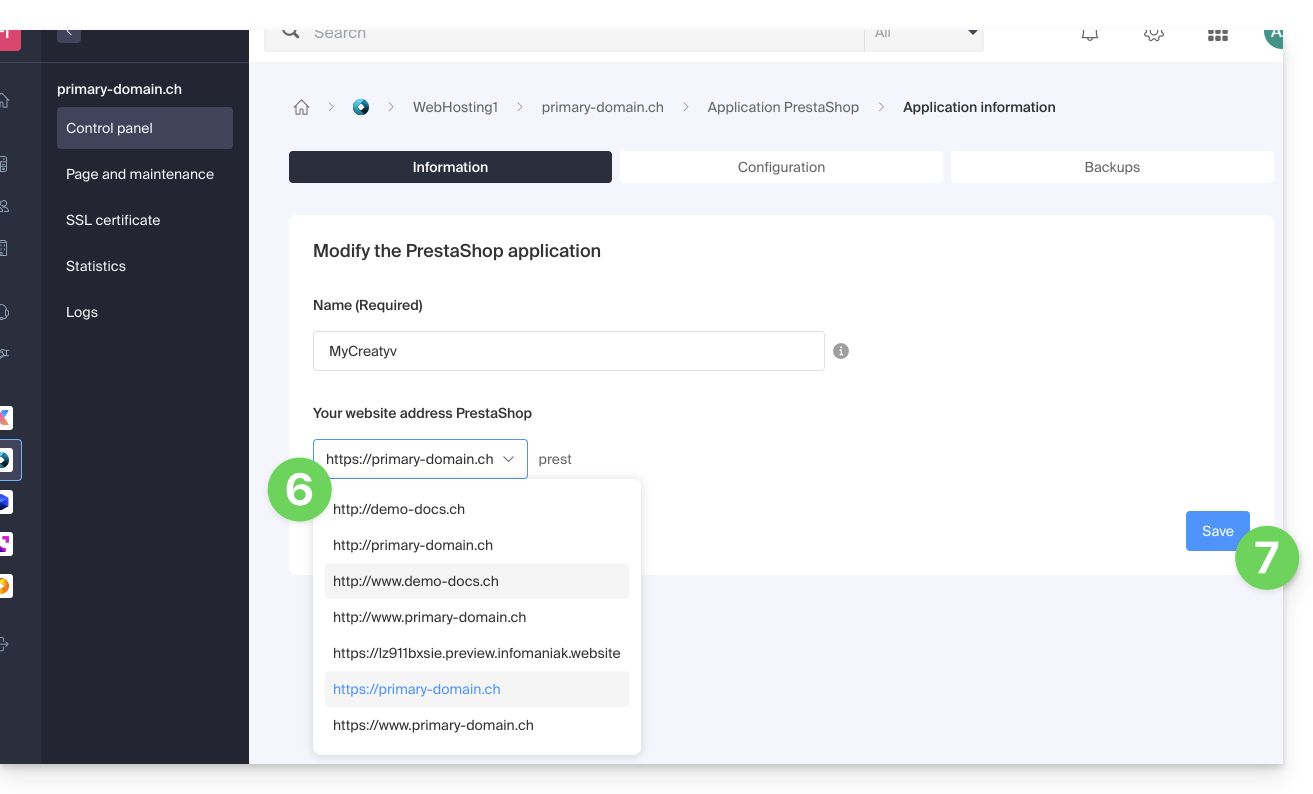
- Under Site URL, select the desired web address from the dropdown menu:
- If you have not followed the prerequisites above, the desired domain will not appear even if it is registered in the same Organization.
- If you have added the domain as an alias to the site, the desired domain will appear and you will be able to select it to replace the previous domain.
- Click on the Save button:
Domain ….preview.infomaniak.website?
Among the URLs present in the dropdown menu, the preview URL allows you to access your site in case the domain name of the site is not yet correctly configured to point to your Web Application: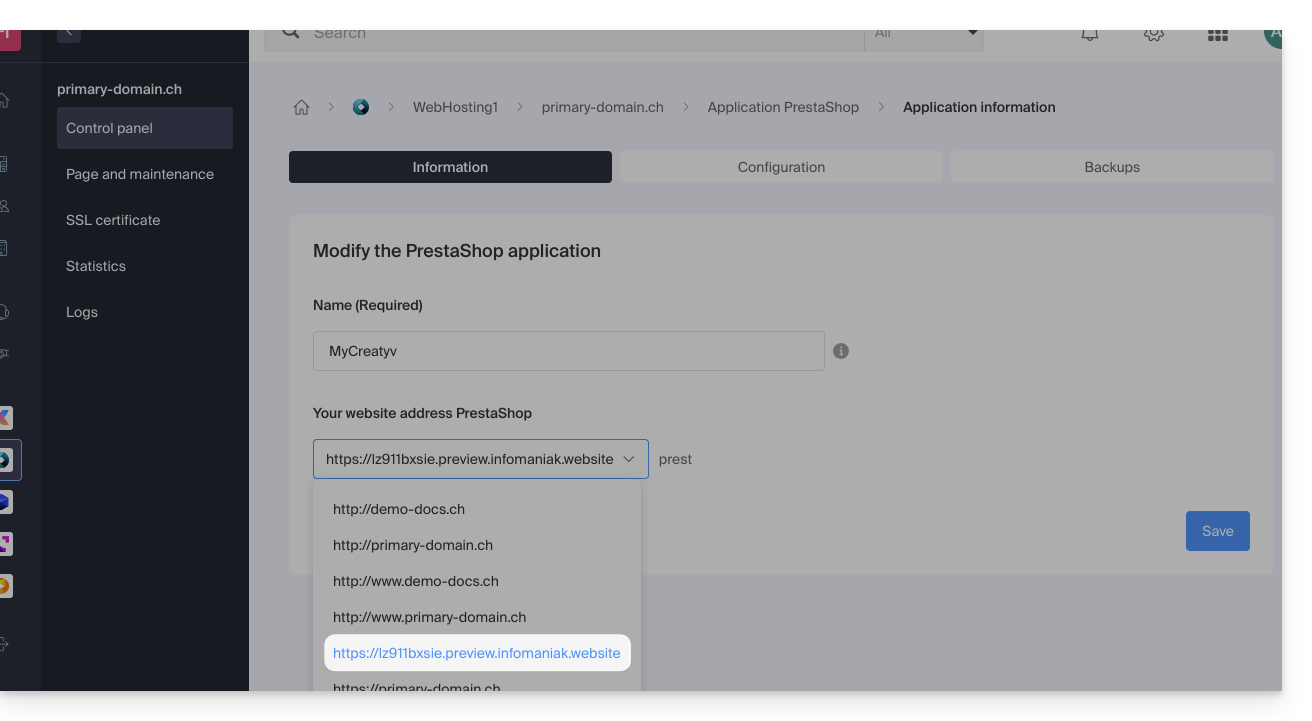
Learn more
Link to this FAQ:
Has this FAQ been helpful?
This guide explains how to move an existing website within an Infomaniak Web Hosting service to another Infomaniak Web Hosting service.
Introduction
- There are not many ready-made solutions for moving a website:
- In general, few hosting providers offer the export or import of an entire website with its databases.
- This is mainly due to the fact that there are many ways to build a website and just as many languages, which are often incompatible with each other.
- If the website to be transferred is built with WordPress, please refer to this other guide, which illustrates a simplified solution.
- It is also possible to move an entire Web Hosting service (see below).
Manual solution: example of website transfer
To do this manually, it is necessary to:
- retrieve the website data as well as the associated databases,
- republish this on a website created on the destination Web Hosting service,
- and if the associated domain name is the same, the first website must be deleted or renamed.
For the rest, here is an example of the steps to follow:
- Order the other Web Hosting / Cloud Server if you don't already have it.
- Create a "dummy website" on this new hosting (for example, dev.domain.xyz - see below).
- Manually copy your data via FTP and MySQL (export / import).
- Adapt your site if necessary (database address, etc.).
- Once you are satisfied with the "new site", delete the old one.
- Change the name of the new site to give it its actual name.
Alternatively, in step 2 above, you can work with the www. alias which you can detach beforehand from your current site. Indeed, the www alias (.domain.xyz) is often installed as an alias of your site, and you simply need to detach it, which allows you to create a site on the other hosting with the name www.domain.xyz (remember, in step 6, to add your alias of the type "domain.xyz" without the www to this new site).
Moving entire Web Hosting accounts
There is an automated way to move an Infomaniak Web Hosting account to:
- an Infomaniak Cloud Server (if the hosting is currently shared or if the hosting is already on a Cloud Server)
- another Infomaniak Organization
A Starter hosting account cannot be moved but it can be converted.
Link to this FAQ:
Has this FAQ been helpful?
DNS Fast Anycast replicates the DNS of your domain around the world to reduce latency and increase the availability of your websites.
Preamble
- Thanks to DNS Fast Anycast, the DNS of your domain are replicated within several Points of Presence (POP) around the world (list below).
- No matter where your visitors are, they are redirected to the nearest DNS server to them, which on average speeds up by 34% (DNS resolution) the access speed to your site.
- Moreover, if one of your DNS servers were to become unavailable, the nearest server naturally takes over and your visitors can continue to access your site.
- The replication of your domain's DNS is automatic and no modification of your code is required.
Manage DNS Fast Anycast
Prerequisites
- DNS Fast Anycast is compatible with all websites, regardless of your host.
- All you need is a domain name managed at Infomaniak.
- Transfer the management of your domain to Infomaniak if necessary
- Refer to this other guide to manage external domains.
To access the DNS Fast Anycast option:
- Click here to access the management of your product on the Infomaniak Manager (need help?).
- Click directly on the name assigned to the product concerned.
- Enable or disable the DNS Fast Anycast toggle switch on the dashboard:
POP - 'Point of Presence'
By activating DNS Fast Anycast on your domain, your DNS will be automatically replicated in the following points of presence:
Network 1
New York, USA (2x)
Paris, France (2x)
Varsovie , Pologne (2x)
Dublin, Irlande (2x)
Singapour (2x)
Johannesburg, Afrique du Sud
Stockholm, Suède
Vienne , Autriche (2x)
Francfort, Allemagne (2x)
Londres, Royaume-Uni
Dallas, USA
Los Angeles, USA (3x)
Amsterdam, Pays-Bas
Sydney, Australie
Sāo Paulo, Brésil
Miami, USA (2x)
Network 2
Hong Kong, Chine
San José, USA
Dallas, USA
Reston, USA
Chicago, USA
Seattle, USA
Londres, Royaume-Uni
Francfort, Allemagne
Amsterdam, Pays-Bas
Vienne, Autriche
Toronto, Canada
Sydney, Australie
Sāo Paulo, Brésil
Johannesburg, Afrique du Sud
Miami, USA
The points of presence are distributed across two networks that are randomly used when one of your visitors accesses your website.
Link to this FAQ:
Has this FAQ been helpful?
Infomaniak continuously improves its products and customer service by prioritizing your suggestions shared via support, social media, or the Web. These suggestions are then discussed during the meetings of the relevant service.
Provide feedback on…
INFOMANIAK SERVICE | [FR] | [EN] | [DE] | [IT] | [ES] |
|---|---|---|---|---|---|
| Euria [ ☍ ] | ✎__ | ✎__ | ✎__ | ✎__ | ✎__ |
| Domains [ ☍ ] | ✎__ | ✎__ | ✎__ | ✎__ | ✎__ |
| Hosting / Site Creator [ ☍ ] | ✎__ | ✎__ | ✎__ | ✎__ | ✎__ |
| Cloud Server [ ☍ ] | ✎__ | ✎__ | ✎__ | ✎__ | ✎__ |
| Public Cloud [ ☍ ] | ✎__ | ✎__ | ✎__ | ✎__ | ✎__ |
| Jelastic Cloud [ ☍ ] | ✎__ | ✎__ | ✎__ | ✎__ | ✎__ |
| Synology [ ☍ ] | ✎__ | ✎__ | ✎__ | ✎__ | ✎__ |
| Housing [ ☍ ] | ✎__ | ✎__ | ✎__ | ✎__ | ✎__ |
| Swiss Backup [ ☍ ] | ✎__ | ✎__ | ✎__ | ✎__ | ✎__ |
| kSuite / my kSuite [ ☍ ] | ✎__ | ✎__ | ✎__ | ✎__ | ✎__ |
| Mail [ ☍ ] | ✎__ | ✎__ | ✎__ | ✎__ | ✎__ |
| app Mail iOS [ ☍ ] | ✎__ | ✎__ | ✎__ | ✎__ | ✎__ |
| app Mail Android [ ☍ ] | ✎__ | ✎__ | ✎__ | ✎__ | ✎__ |
| kDrive [ ☍ ] | ✎__ | ✎__ | ✎__ | ✎__ | ✎__ |
| Calendar [ ☍ ] | ✎__ | ✎__ | ✎__ | ✎__ | ✎__ |
| Contacts [ ☍ ] | ✎__ | ✎__ | ✎__ | ✎__ | ✎__ |
| Newsletter [ ☍ ] | ✎__ | ✎__ | ✎__ | ✎__ | ✎__ |
| SwissTransfer [ ☍ ] | ✎__ | ✎__ | ✎__ | ✎__ | ✎__ |
| Streaming Radio [ ☍ ] | ✎__ | ✎__ | ✎__ | ✎__ | ✎__ |
| Streaming Video [ ☍ ] | ✎__ | ✎__ | ✎__ | ✎__ | ✎__ |
| VOD / AOD [ ☍ ] | ✎__ | ✎__ | ✎__ | ✎__ | ✎__ |
| Guest Manager [ ☍ ] | ✎__ | ✎__ | ✎__ | ✎__ | ✎__ |
| kChat [ ☍ ] | ✎__ | ||||
| kMeet [ ☍ ] | ✎__ | ||||
Infomaniak support is also at your disposal by email, chat or phone if needed.
Link to this FAQ:
Has this FAQ been helpful?
This guide presents the vulnerability detection tool for your Web Hosting.
Preamble
- There are thousands of cyber threats, and if your website were to be infected, your business could suffer, not only due to its unavailability, but also due to the loss of trust from your visitors and customers.
- The tool offered by Infomaniak is a free and complementary protection to the antivirus that protects all Infomaniak hostings against malware and security vulnerabilities.
- Infomaniak ensures the protection of hostings by analyzing exclusively the folders of the sites (webroot); outside of this, no synchronous scan is performed on the rest of the hosting.
Operation of this service
The tool works in the background to detect potential security issues. These vulnerabilities can allow malicious individuals to alter the content of your sites, which could harm your reputation with your customers and search engines.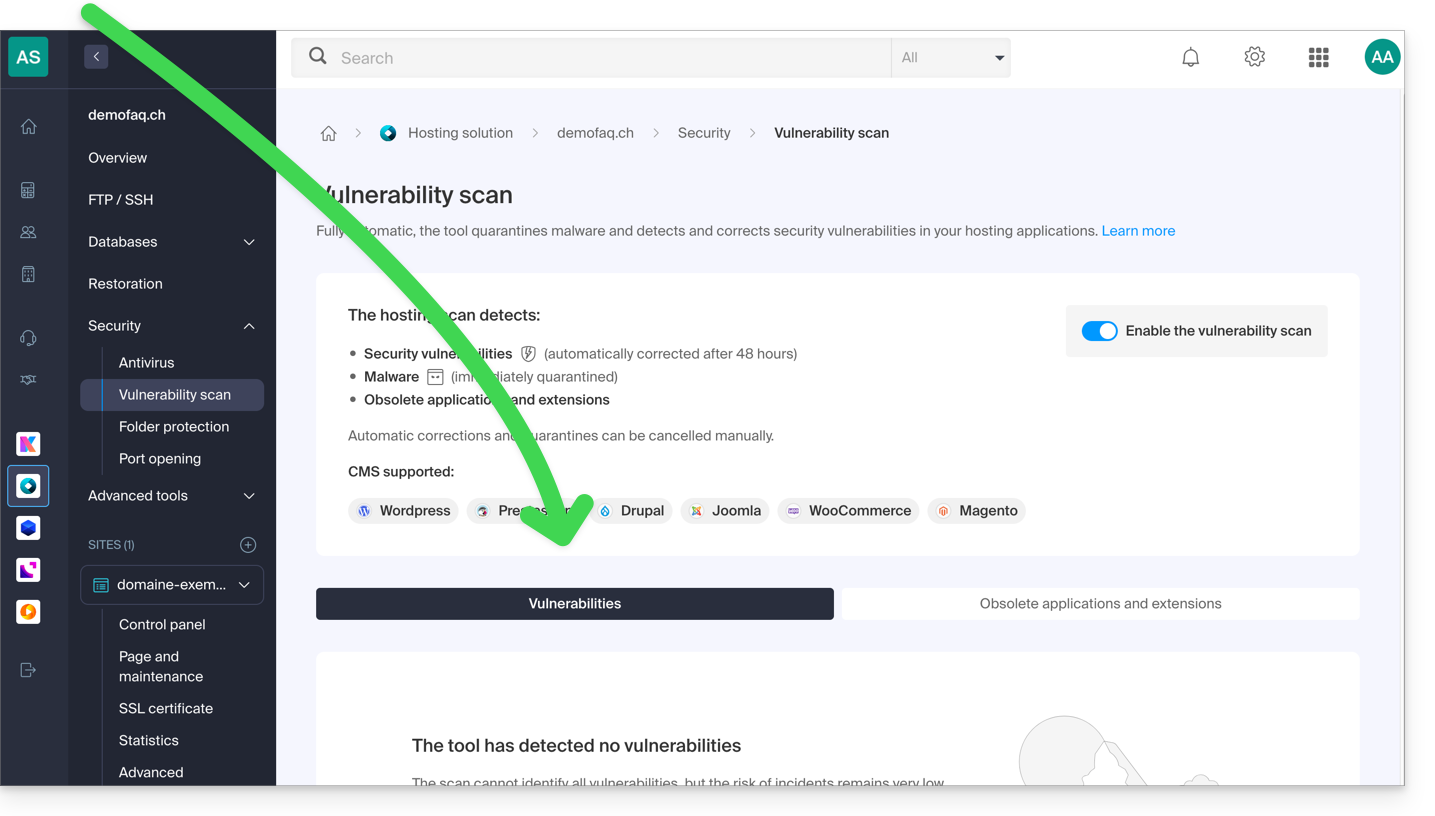
Without any action on your part within 48 hours following detection, the tool automatically corrects the security vulnerabilities of the majority of CMS and/or quarantines malicious software, without affecting the proper functioning of your sites.
If necessary, you can:
Following a detection, it is recommended to check your entire hosting, especially if you notice suspicious modifications that the protection would not have detected automatically.
A second tab allows you to analyze and display obsolete applications and extensions on your hosting:
Data confidentiality
Like Infomaniak, the tool is compliant with the General Data Protection Regulation (GDPR) of the European Union: the analyses are performed locally on Infomaniak's servers. The content or signatures of the scanned files are not transmitted outside the infrastructures.
In accordance with the privacy policy, the data processed is limited to the strict minimum and concerns the username, email address, path, and name of the files, primarily in order to communicate the detections to the customer.
Link to this FAQ:
Has this FAQ been helpful?
This guide explains how to add a new Organization to which you will have access with your current Infomaniak account and in which you can add and/or transfer products, link users, etc.
Preamble
- If you are my kSuite users, refer to this other guide.
Create a new Organization
You can add multiple Organizations (i.e., a space to manage your products) by accessing them with the same login credentials to separate your activities professional and personal for example, or when managing multiple clients:
- Click here to access the management of your settings (Infomaniak Manager).
- Click on Manage from the My organizations box:
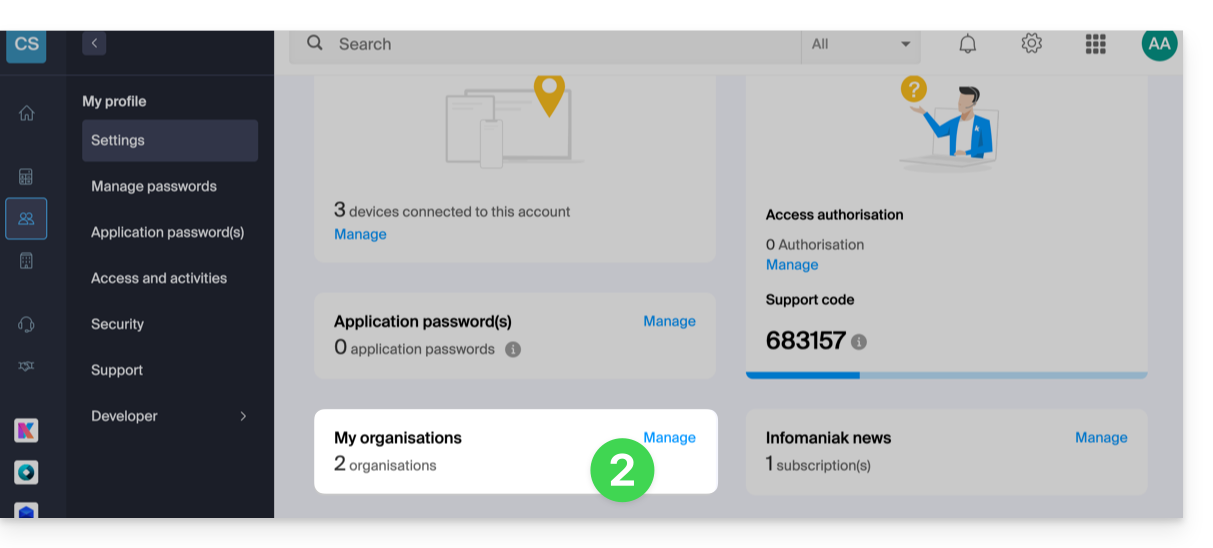
- Click on the Create a new organization button
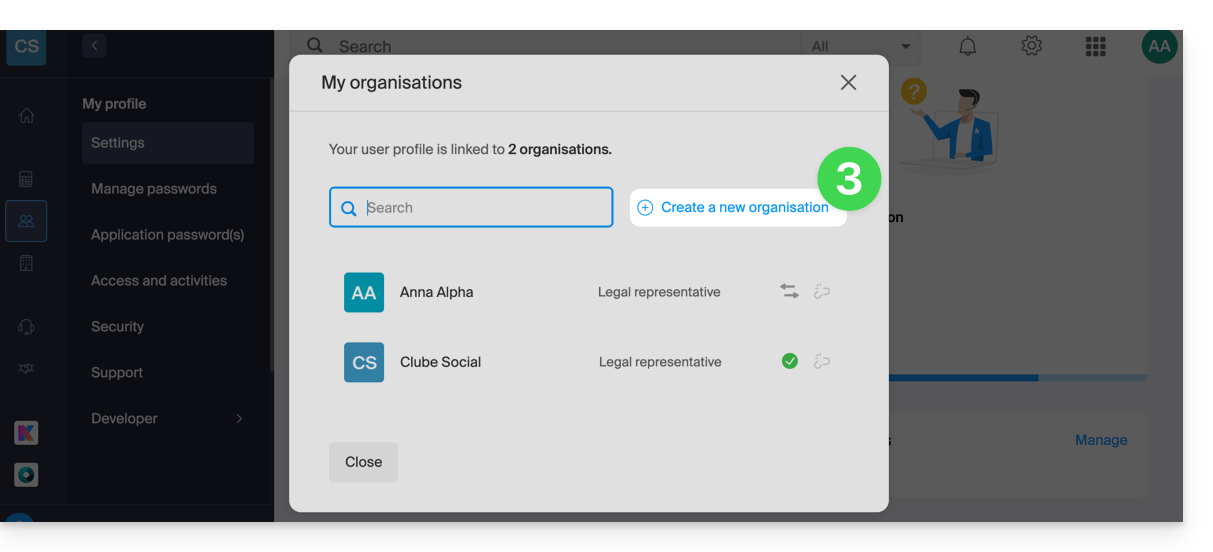
- Follow the procedure to create a new Organization.
You will thus be able to continue using your usual login credentials while being able to switch between your different Organizations (top left of the Manager).
Link to this FAQ:
Has this FAQ been helpful?
This guide explains how to add a dynamic trust seal to a secure site with a SSL certificate from Sectigo.
Preamble
- Infomaniak, as a host, offers SSL certificates to secure its clients' websites
- Sectigo (formerly known as Comodo) is a recognized SSL certificate provider that offers different levels of security
- The "dynamic trust seal", or "Sectigo Trust Seal" / "Sectigo Trust Logo" is a visual that website owners can display on their pages to indicate to visitors that their connection is secure, a sign of trust that informs users that transactions and information exchanges made on the site are encrypted and protected by an SSL certificate issued by Sectigo.
- By using a Sectigo SSL certificate and displaying the dynamic trust seal, a website at Infomaniak benefits not only from data exchange security but also from increased user trust, essential for e-commerce and personal information protection.
Adding a trust seal
Here's how a dynamic trust seal works:
- Validation: to obtain such a seal, the site owner must first obtain a valid SSL certificate from Sectigo, which requires a validation process; depending on the level of certificate chosen (Domain Validation - DV, Organization Validation - OV or Extended Validation - EV), this validation may be more or less in-depth
- Installation: once the SSL certificate is obtained and installed on the Infomaniak web server, the website is then able to establish secure HTTPS connections
- Displaying the seal: Sectigo provides an HTML code or script that the site owner can then integrate into their website; this code allows the Sectigo dynamic trust seal to be displayed
- Update: the seal is often updated in real-time to reflect the current status of the SSL certificate; if the certificate were to expire or be revoked, the seal would also reflect this, warning potential visitors that the site may no longer be secure
The trust seal consists of an image and an HTML code. The latter only works if a Sectigo certificate is installed on the site and in this case generates an interactive logo that displays the certificate data.
Save one of the images below
Right-click on the image to save, then click on Save image as...
- Small

- Medium

- Large

Upload the image to your site
Send the image to your web server (via FTP or your CMS) and note the URL to access this image for the next step (for example https://domain.xyz/wp-content/uploads/sectigo.png).
Get the code to integrate into your pages
Enter the full address of your image on the page https://www.trustlogo.com/install/index2.html to check if the image is accessible.
Click the Continue button on the same page to get the 2 codes to copy-paste into the header of your (or your) web page(s):

Important:
- In the code,
CL1corresponds to aDVSSL certificate; replaceCL1withSC5for anEVtype SSL certificate.
Link to this FAQ:
Has this FAQ been helpful?
This guide explains how to specify a file that will be loaded before the desired page or at the beginning of each PHP script executed on your server, included as if it had been called with the function require(), but more globally using the PHP directive auto_prepend_file.
Preamble
- For example, to declare the headers of a website, you can create a file
headers.phpthat contains PHPheader()functions and that is prepended at the beginning of each PHP file…- … via a
.user.inifile (specific to a folder), - … or via the site configuration in the Manager (global) as explained below.
- … via a
Include a file globally from the Manager
To access the website management:
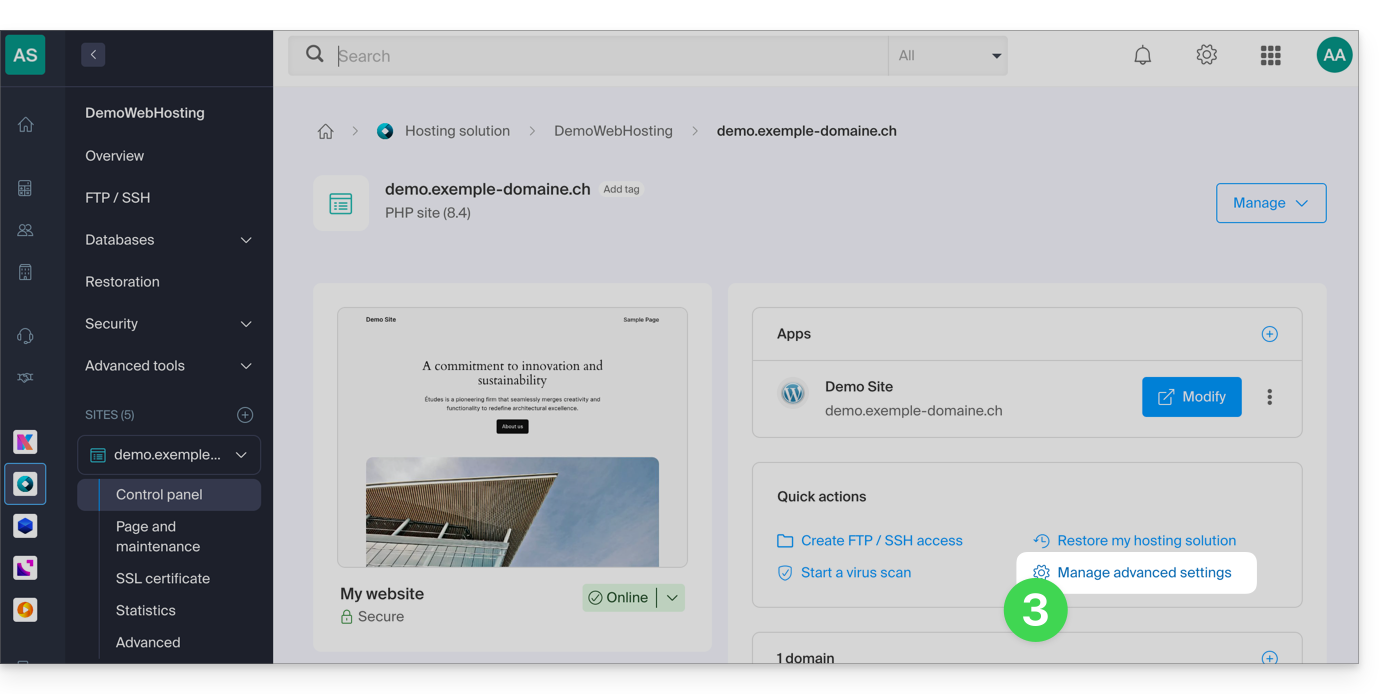
- Click here to access the management of your site on the Infomaniak Manager (need help?).
- Click directly on the name assigned to the site concerned:
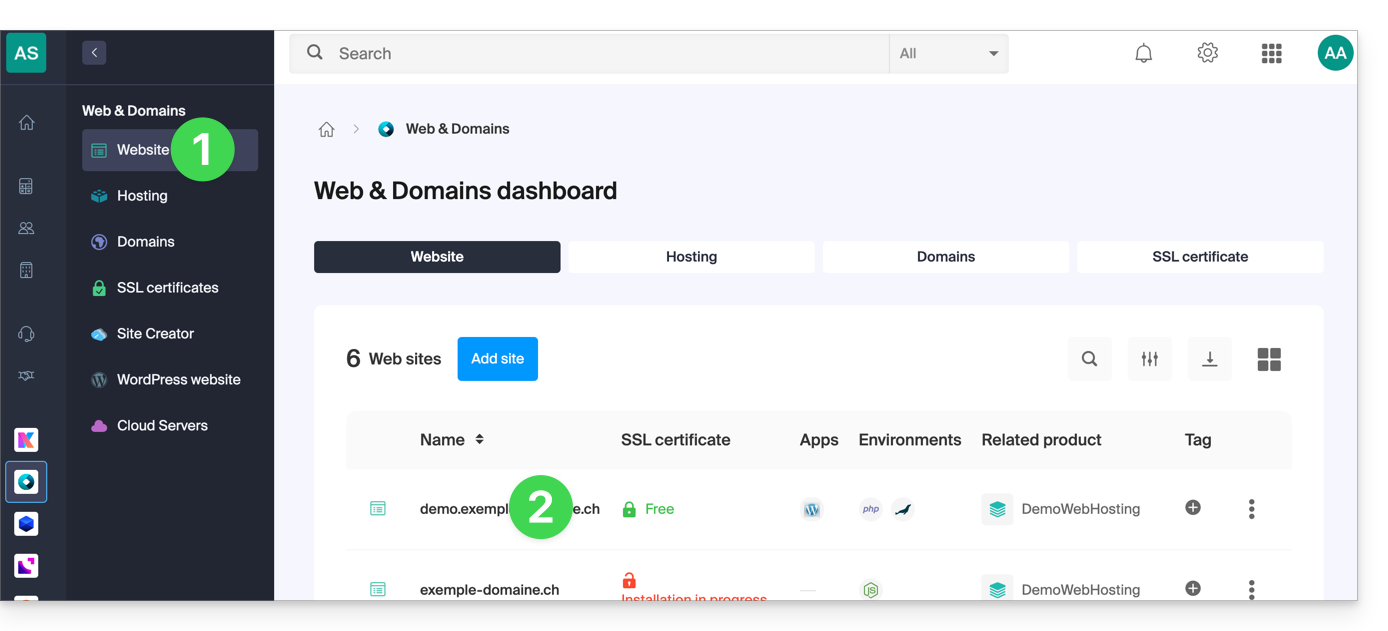
- Click on Manage advanced settings:
- Click on the PHP / Apache tab:
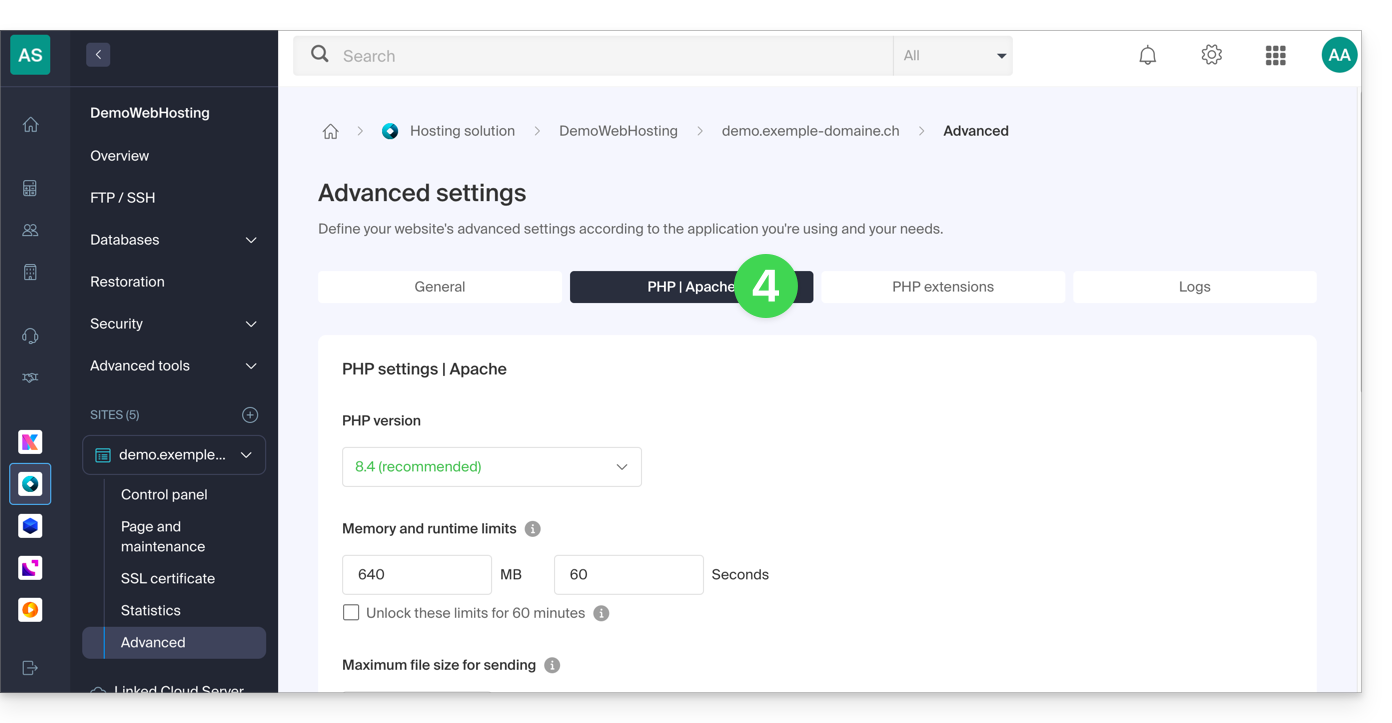
- Complete the relevant line by entering the path of the file to include.
- Click on the Save button at the bottom of the page:

After defining this directive, all PHP pages on your server will automatically include the specified file before executing their own code.
The headers defined in a .htaccess file are only valid for non-PHP (i.e., static) content.
Infomaniak uses php-fpm which receives the different headers via apache fast_cgi. In the RFC of cgi_www the header Strict-Transport-Security is not part of the headers passed via CGI and the Apache documentation confirms this. Refer to this other RFC.
Link to this FAQ:
Has this FAQ been helpful?