Knowledge base
1000 FAQs, 500 tutorials and instructional videos. Here, there are only solutions!
This guide explains how to change the URL of a website on which the Prestashop (1.7) application is installed (manual installation on your end), but more generally, it also allows you to import a Prestashop site to Infomaniak if it was previously registered elsewhere with a different URL.
Introduction
- If you are using Prestashop installed via the Apps in the Infomaniak Manager, you can change the address very easily.
Changing the URL of an Installed Prestashop
To do this:
- Put your Prestashop in maintenance mode (go to Shop Parameters then Maintenance).
- Go to Shop Parameters > Traffic & SEO.
- A little further down, modify the Shop URL section:
- Under Shop domain, enter the new domain
- Under SSL domain, enter the new domain
- The base URL can be modified as you wish but with caution
- Click on Save.
- Download the entire Web + MySQL data of your old Prestashop to your computer.
- Re-import the downloaded MySQL data to a new database.
- Update the
parameters.phpfile (located inapp/config/) by providing the information of the new database in the following lines:database_hostdatabase_namedatabase_userdatabase_password
- Re-import the website data into the directory of your new site (new URL).
- Remove the entire content of the cache folder, except for the
index.phpfile. - Disable the website maintenance mode and test the entire site (links, images, shopping cart, etc.).
Also, refer to this other guide.
Link to this FAQ:
Has this FAQ been helpful?
This guide explains how to configure an action on n8n to send a message to kChat when the conditions are met.
Prerequisites
- Install n8n on an Infomaniak hosting.
- Create a webhook on the Infomaniak kChat app.
Create the action on n8n
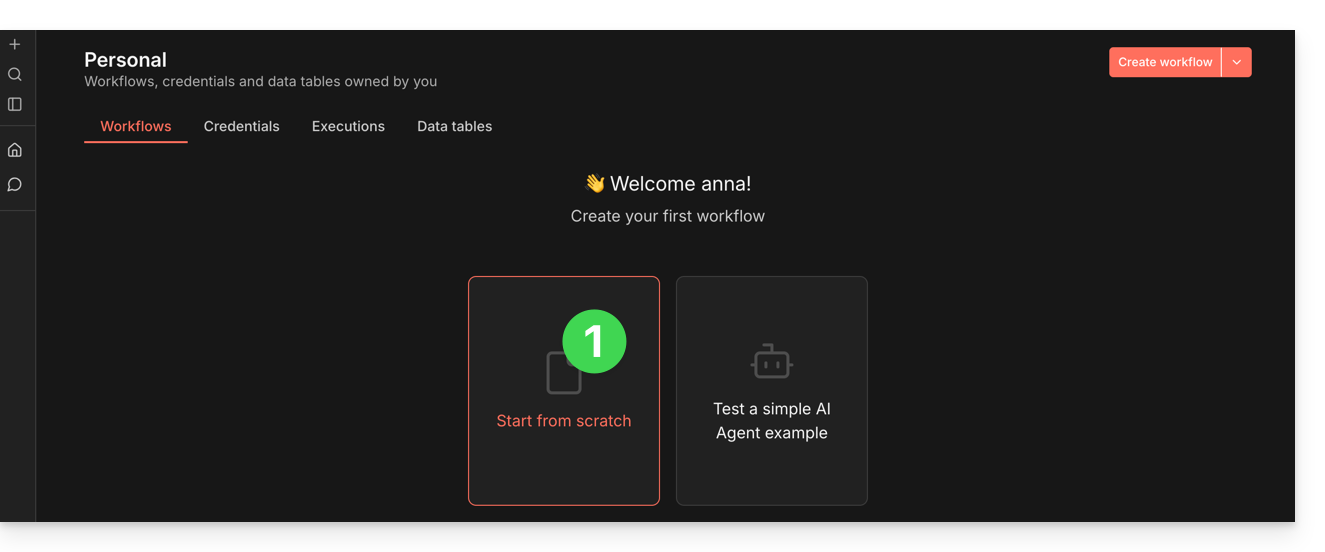
In your n8n session:
- Click to start from scratch:
- Click to add a first action.
- Choose a manual trigger:
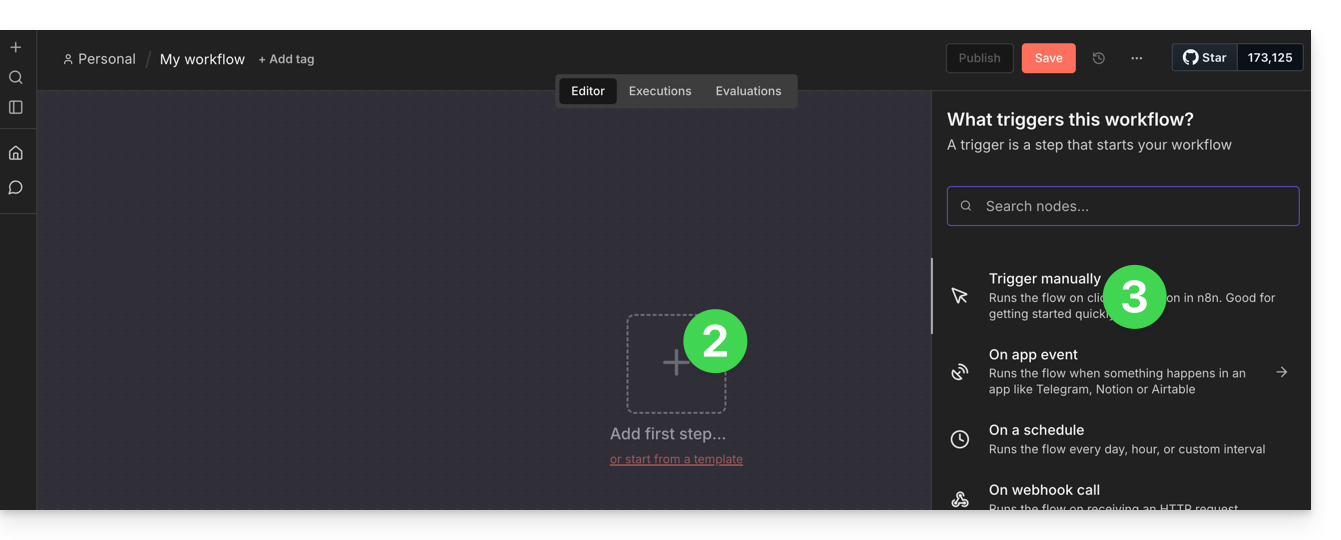
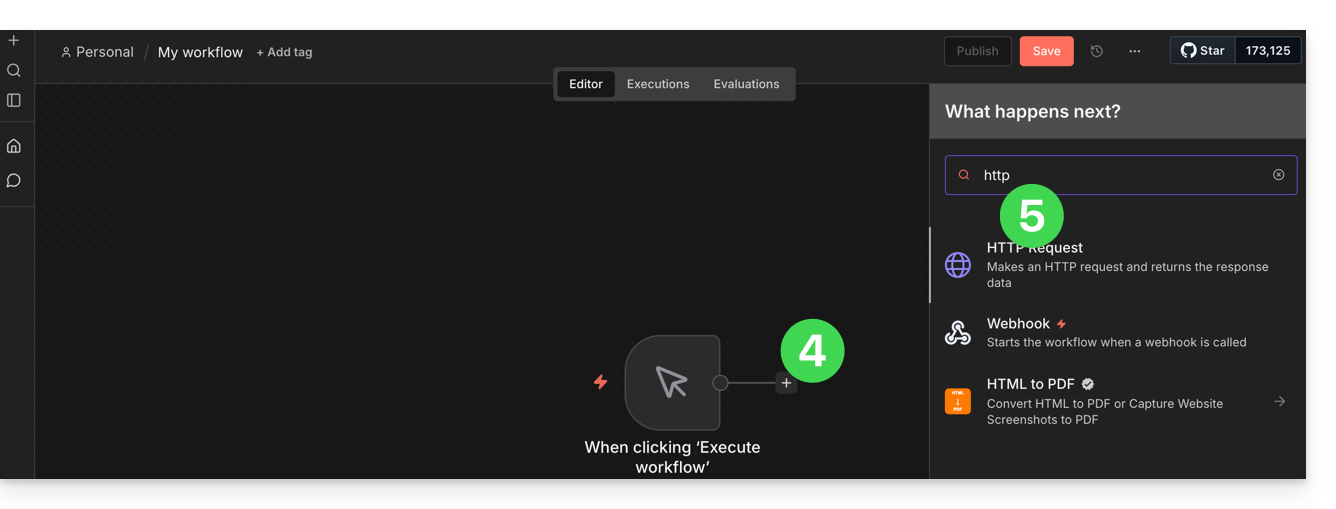
- Click to add an action to trigger.
- Search for and activate an action of type “HTTP Request”:
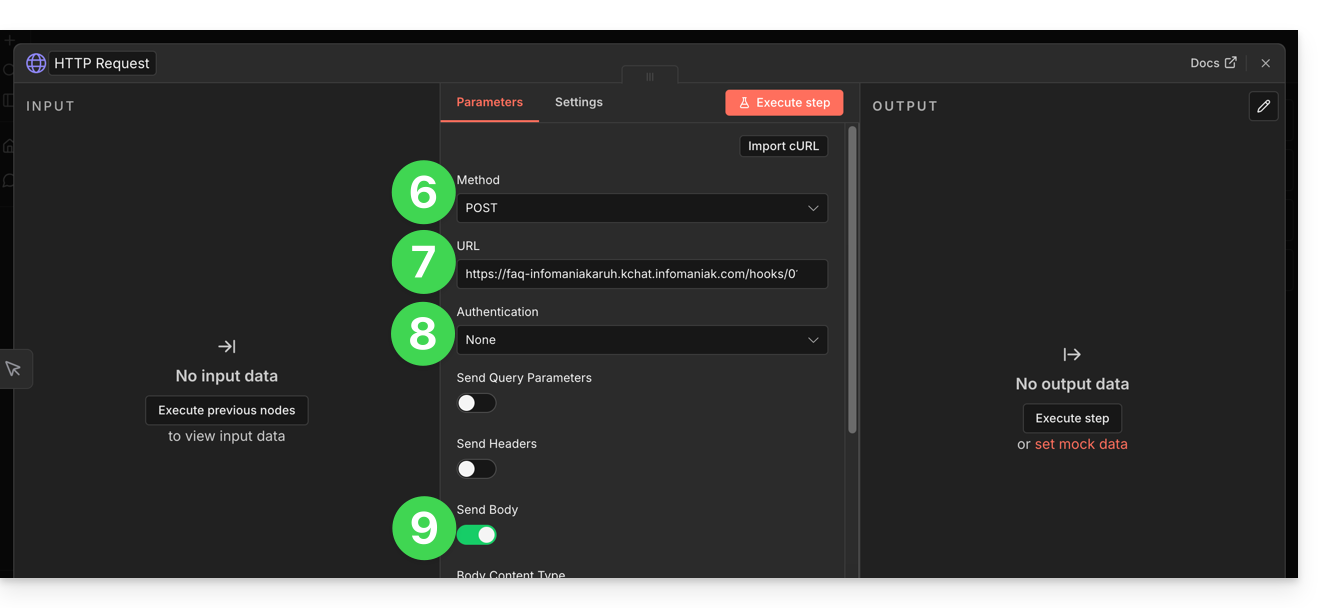
- Choose the POST method.
- Enter the URL of your kChat webhook.
- Authentication is not required (already applied in the URL).
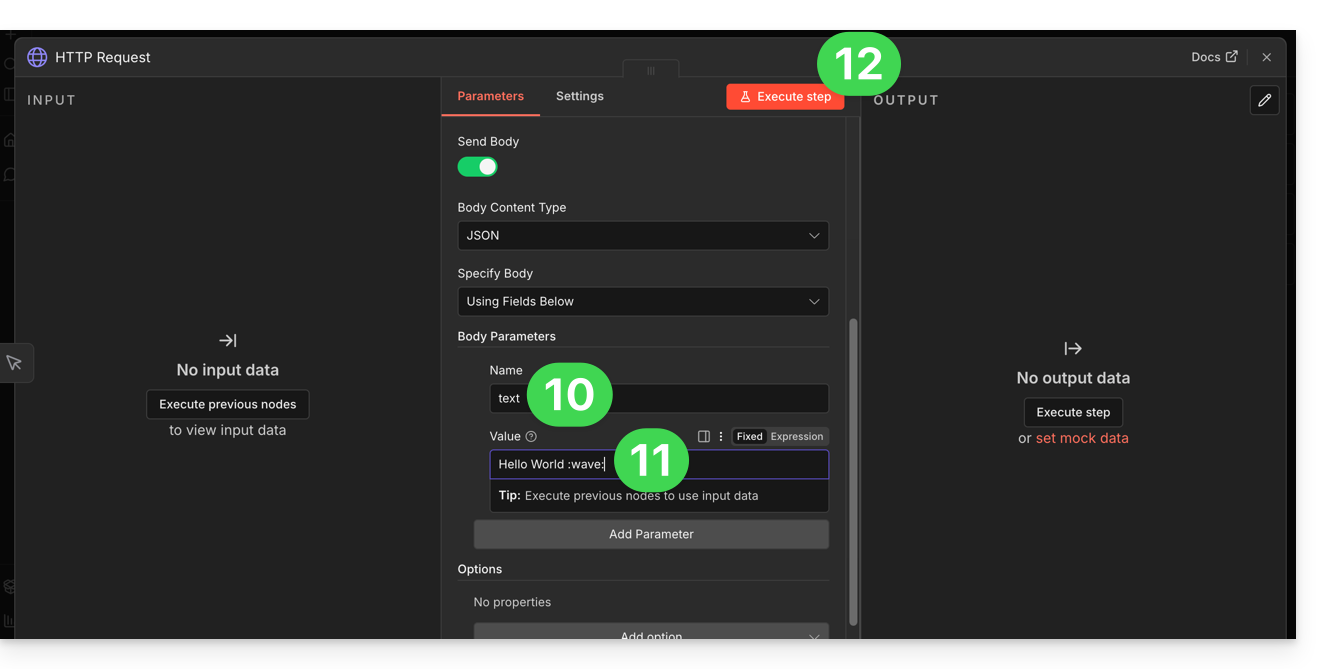
- Activate the “Send body” toggle switch to specify content:
- In the “Name” field, enter the exact term “text” as expected by kChat.
- In the “Value” field, enter the information you want to display on kChat.
- Click the button to test and apply your manual command:
- The message specified on n8n then appears on kChat:
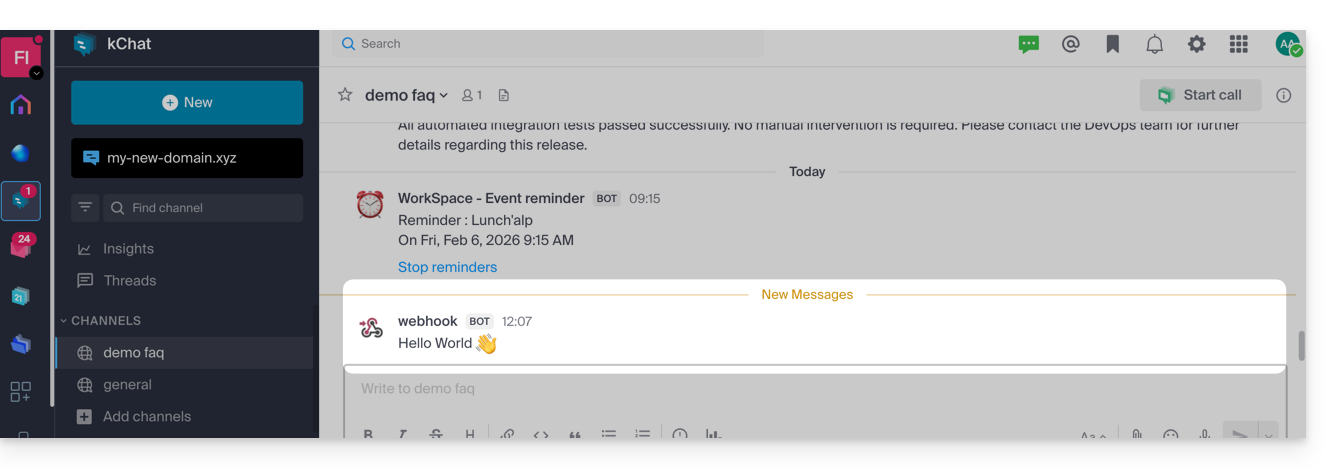
Now that this base works, you might imagine replacing the fixed text with data from elsewhere. For example, add an “Imap” or “RSS Feed” node before the HTTP Request node. Thus, instead of writing the text by hand, click on the small gear next to Value > Expression to say: “Send to kChat the title of the last received email”…
Link to this FAQ:
Has this FAQ been helpful?
This guide explains how to add or modify one or more TXT record entries in the DNS zone (of a domain name) managed on the Manager Infomaniak.
Preamble
- The
TXTrecord type allows you to insert readable text into the DNS zone of a domain name. - This is the method generally used to help prevent spam and to verify domain ownership (Google may ask you to do this before using some of their services: refer to this other guide for an example of adding a
TXTrecord to authenticate a domain).
Modify the DNS zone
To manage this type of record in a DNS zone:
- Click here to access your domain management on the Infomaniak Manager (need help?).
- Click directly on the name assigned to the domain in question.
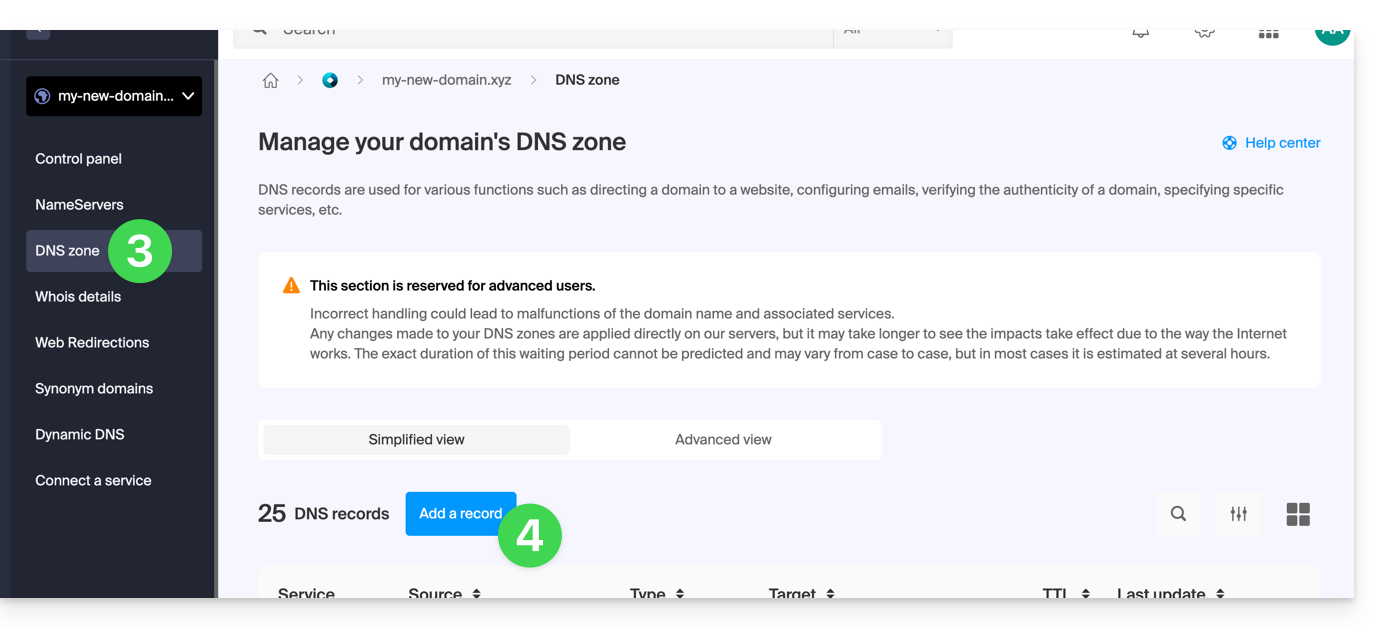
- Click on DNS zone in the left-hand menu.
- Click the button to add a record:
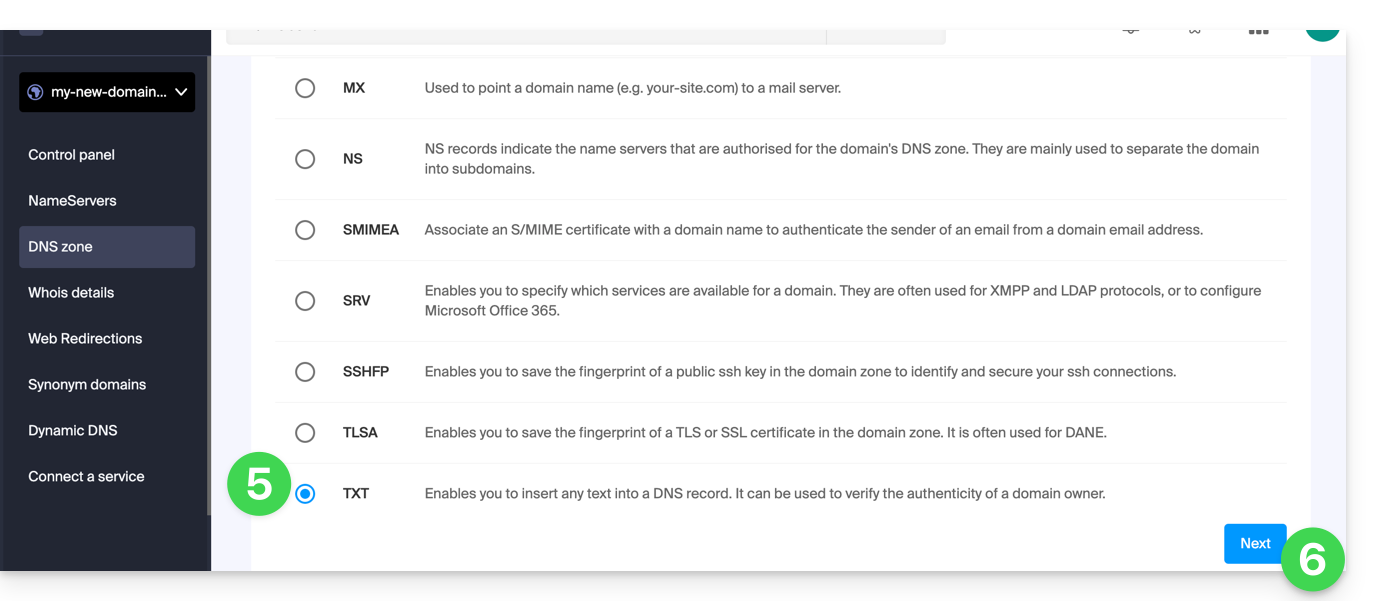
- Click on the radio button TXT to add a record.
- Click on the Next button:
- Enter the TXT values required for your DNS zone.
- Leave the default value for the TTL.
- Click on the Save button:

Link to this FAQ:
Has this FAQ been helpful?
This guide explains how to securely transfer files between your machine and the web hosting server using the SCP (secure copy command) protocol.
Preamble
- To work, the
SCPcommand requires:- a source: a file/folder to transfer
- a destination: FTP server address to perform the transfer
- The data is automatically encrypted by
SCPat the time of transfer.
Copy a local file to the server
Prerequisites
- To get the FTP server address:
- Click here to access the management of your hosting on the Infomaniak Manager (need help?).
- Click directly on the name assigned to the hosting concerned.
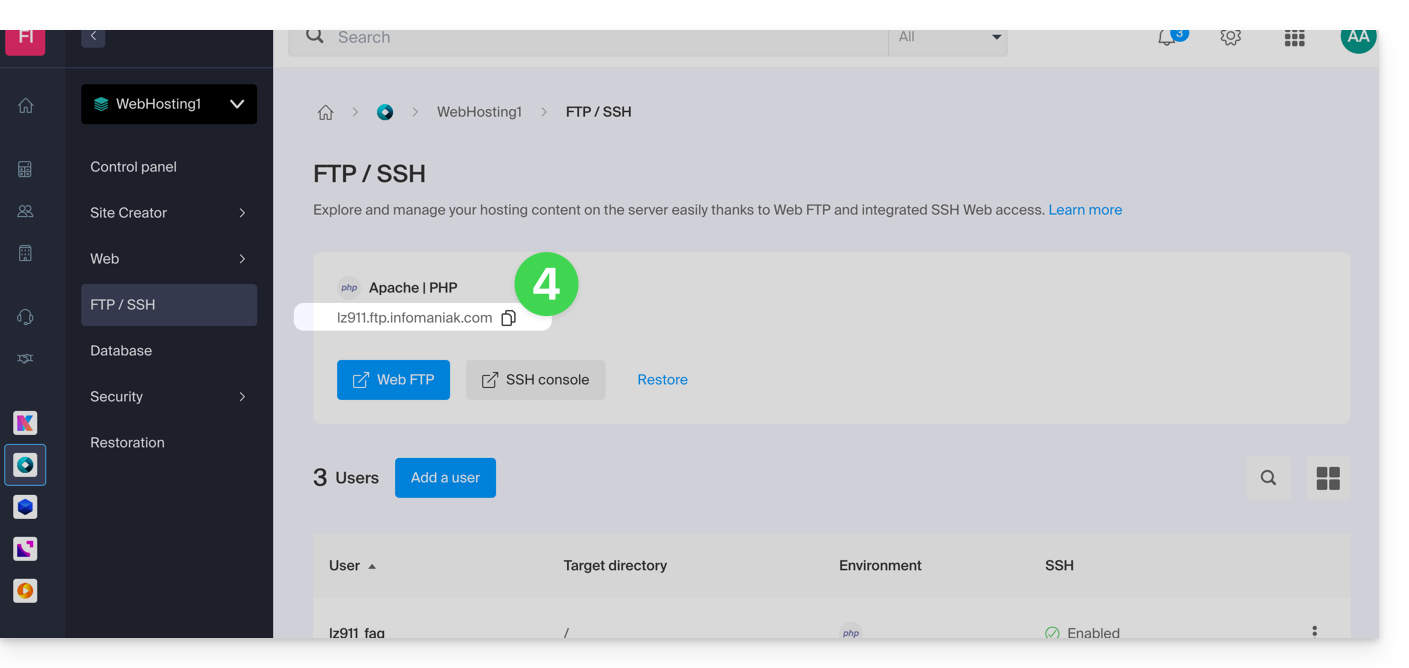
- Click on FTP / SSH in the left sidebar:
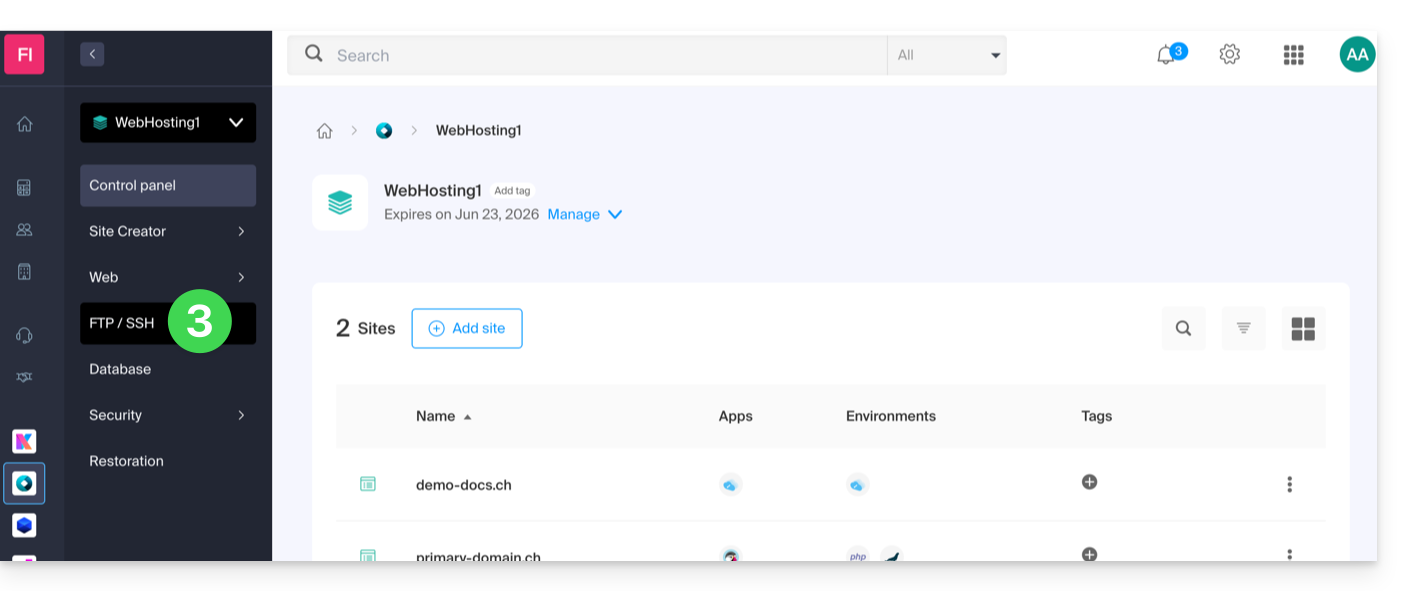
- The host server address is displayed at the top left and can be copied:
- To get the destination folder path:
- Click here to access the management of your hosting on the Infomaniak Manager (need help?).
- Click directly on the name assigned to the hosting concerned.
- Click on More information (in the Information section).
- Copy the absolute path:
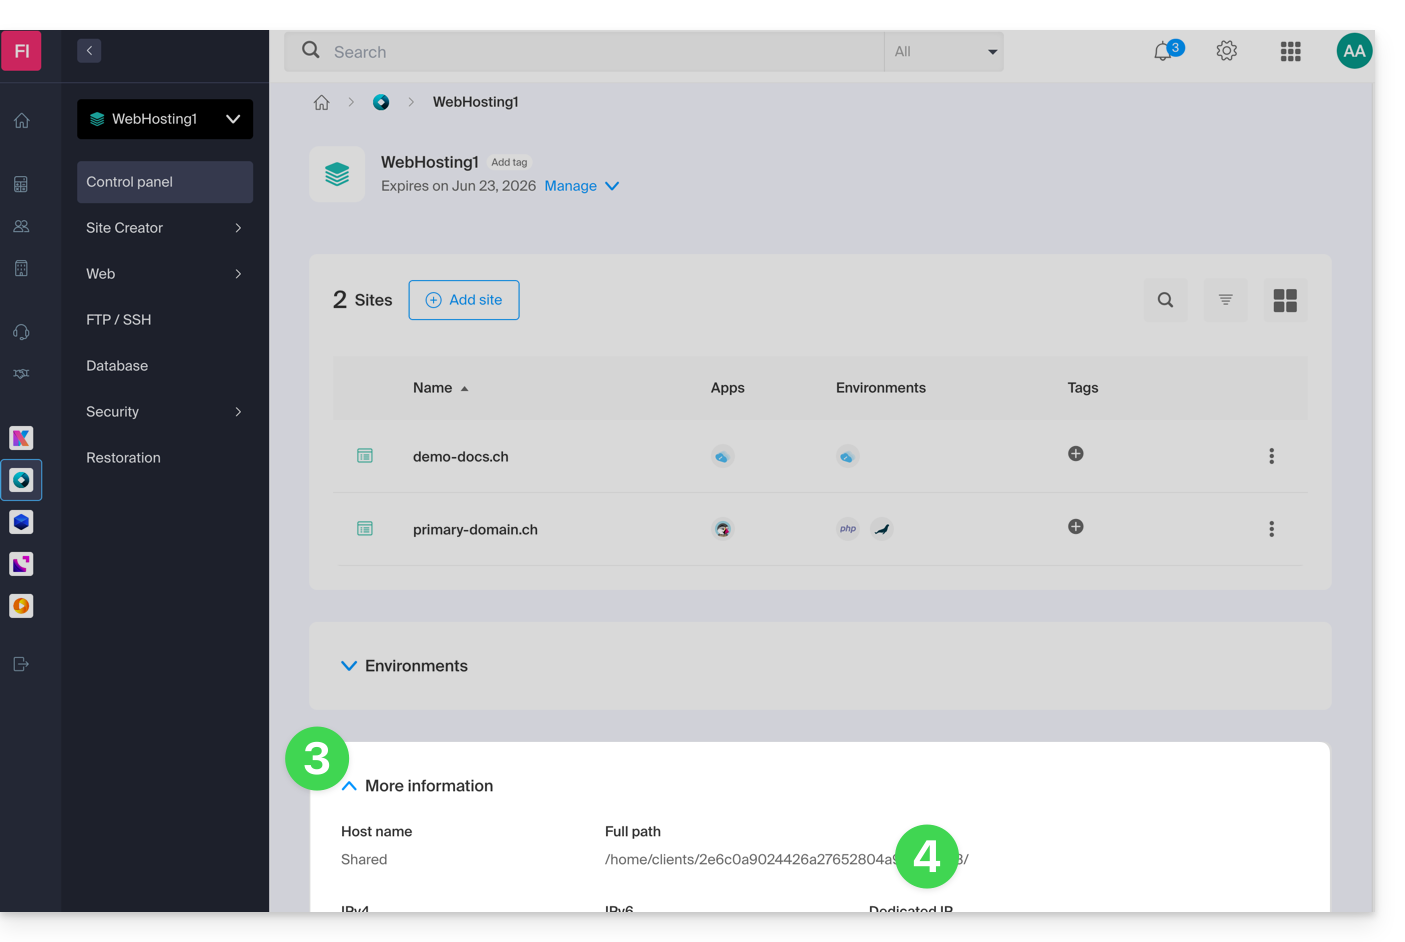
- Complete the absolute path with the desired destination folder.
Then, to copy a file from your machine, the command is as follows:
scp localmachine/path_to_the_file username@ftp_server_adress:/path_to_remote_directory
To copy an entire directory from your machine, you need to adapt the command as follows:
scp -r localmachine/path_to_the_file username@ftp_server_adress:/path_to_remote_directoryThe entire folder will be transferred to your server.
To copy the contents of an entire directory from your machine, you need to adapt the command as follows:
scp -r localmachine/path_to_the_file/* username@ftp_server_adress:/path_to_remote_directoryLink to this FAQ:
Has this FAQ been helpful?
This guide details how to create a GIT repository on both your Web Hosting and your Cloud Server with Infomaniak.
Introduction
- GIT and GitHub are available by default on both of the aforementioned platforms.
Creating the GIT repository
Setup on the server:
- The GIT repository is located at
/git_depot - The website is located in the
/web/[project]folder (on your FTP server)
Commands to enter:
cd
mkdir git_depot
cd git_depot/
git init --bare [projet].git
cd [projet].git
git update-server-info
Sending the local repository to the server
To be done on the local machine:
git init
git remote add origin ssh://user@[xxxxx].ftp.infomaniak.com:/home/clients/[123456789]/git_depot/[projet].git
git status
git add .
git commit -a -m "init"
git push --set-upstream origin master
git push
Cloning the website to the server directory
To be done on the server:
cd
cd web
rm -r [projet]/
git clone /home/clients/[123465789]/git_depot/[projet].git [projet]/
Link to this FAQ:
Has this FAQ been helpful?
This guide details the open ports available for Node.js sites (only) hosted by Infomaniak.
Outbound open ports
Web
- HTTP (tcp/80)
- Alternative HTTP (tcp/8080)
- HTTPS (tcp/443)
- FTP Data (tcp/20)
- FTP Control (tcp/21)
- POP3 (tcp/110)
- IMAP (tcp/143)
- SMTP submission (+ STARTTLS) (tcp/587)
- SMTPS (tcp/465)
- IMAPS (tcp/993)
- POP3S (tcp/995)
DB
- MySQL (tcp/3306)
- MongoDB (tcp/27017)
- PostgreSQL (tcp/5432)
- Redis (tcp/6379)
- Redis TLS (tcp/6380)
- ElasticSearch (tcp/9200)
Misc
- SSH (tcp/22)
- Git pack transfer (tcp/9418)
Inbound open ports
- HTTP (tcp/80)
- HTTPS (tcp/443)
- SSH (tcp/22)
Link to this FAQ:
Has this FAQ been helpful?
This guide explains how to resolve an SSL certificate (Let's Encrypt or Sectigo) installation issue if you are using Cloudflare with strict security rules, such as country or IP address filtering.
Adjust SSL / geoblocking settings
When an SSL certificate is requested via Infomaniak (free Let's Encrypt or Sectigo), the certification authority must verify that you are the owner of the domain. This verification can be done via HTTP (using special files placed on your site), DNS, or email:
- Let's Encrypt uses
/.well-known/acme-challenge/. - Sectigo usually uses
/.well-known/pki-validation/(or DNS / email depending on the option chosen).
If these verifications fail (for example, because Cloudflare blocks access), the certificate cannot be issued or renewed. However, Let's Encrypt no longer checks from a single location. For some time (and even more since March 2024), it performs its checks from multiple countries at the same time – including new ones like Sweden or Singapore. Result: if one of these countries is blocked by your Cloudflare settings, the certificate request may fail, even if everything else is correctly configured.
Worse still: even if you try to make an exception only for the challenge address (.well-known/acme-challenge), this does not always work with certain Cloudflare rules. Indeed, country or IP blocking rules are applied before any URL path-based exception.
Adjust SSL/TLS mode
In Cloudflare, use the Full or Full (strict) mode. These modes temporarily tolerate an expired or self-signed certificate, until the validation is complete:
Allow validation paths
Avoid blocking "IP Access Rules" and prefer "Custom Rules" that allow unrestricted paths:
/.well-known/acme-challenge/(Let's Encrypt)/.well-known/pki-validation/(Sectigo)
Temporarily disable geoblocking
If necessary, temporarily disable geographic or IP blocking for the duration of the validation, then reactivate your protections after the certificate is issued or renewed.
Link to this FAQ:
Has this FAQ been helpful?
Infomaniak offers various Site Creator plans, both free and paid, to meet different needs. It is essential to understand the terms associated with each type of plan before making your choice.
Understanding the Different Site Creator Plans
Site Creator is available…
- … either free with every existing paid web hosting plan (add one if necessary):
- In this case, only 1 Site Creator can be set up per Infomaniak web hosting plan.
- To manage multiple sites created with Site Creator within the same Organization, you must have multiple web hosting plans.
- … or as a standalone plan (standalone available in 3 versions), which does not require any other specific plan:
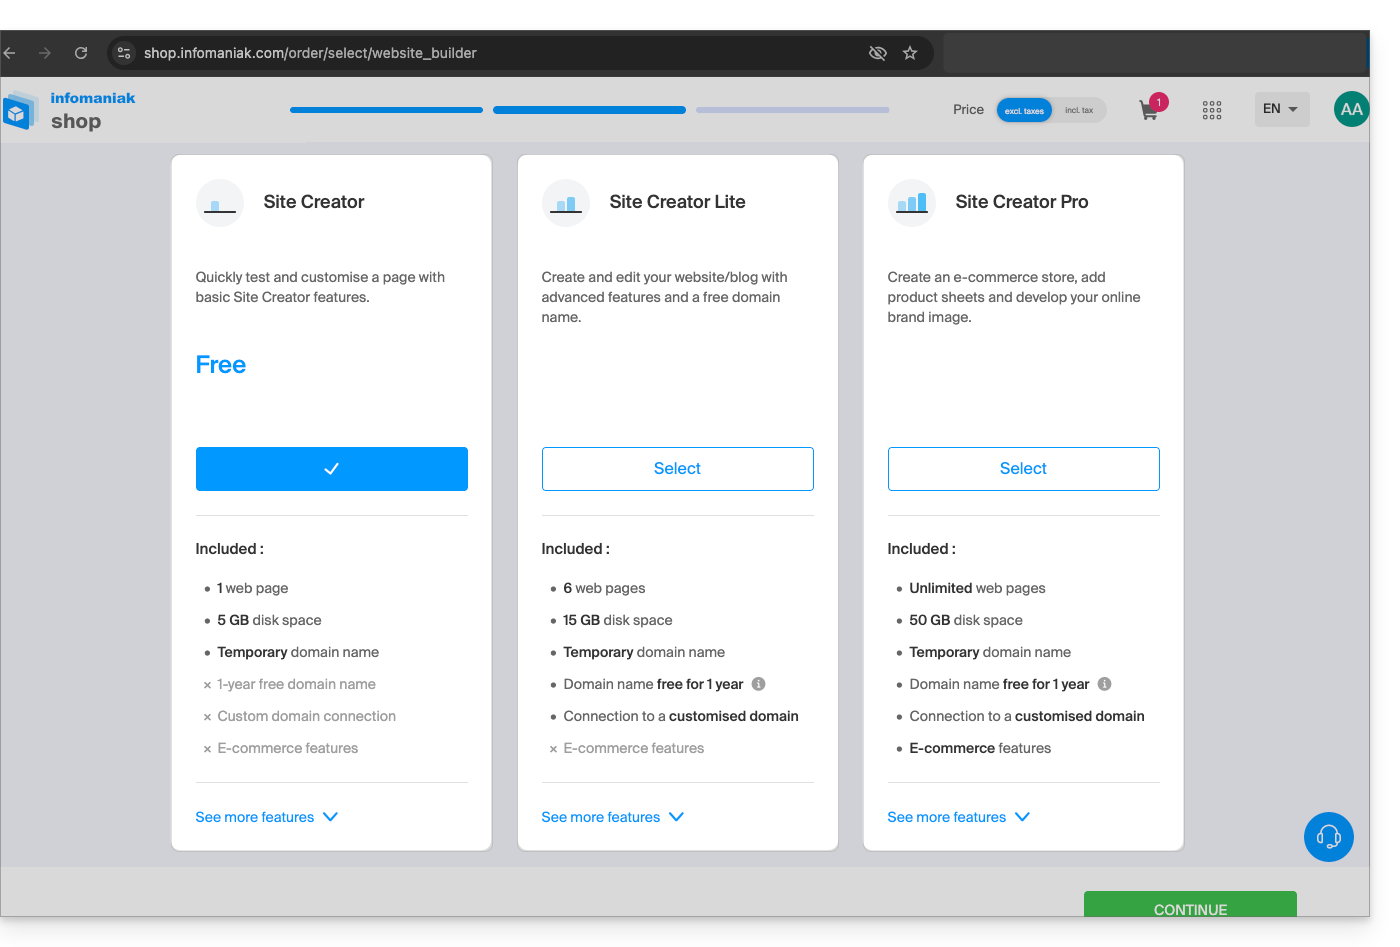
- Site Creator Free
- Site Creator Lite
- Site Creator Pro
1. Site Creator Free
This plan is designed as a testing and discovery solution and is completely free. It is intended for users who want to familiarize themselves with the tool or publish a very simple web page:
- It only allows one web page and offers limited disk space (5 GB).
- This offer does not allow connection to a custom domain name (it will be in the format
*.infomaniak.site) and includes the mandatory display of Infomaniak's advertising message. - Important growth modules, such as full blog management, the use of Artificial Intelligence for text generation, or the "Sitemap" function, are not included.
2. Site Creator Lite
The Lite plan is Infomaniak's entry-level paid offer. It is ideal for creating a simple showcase website or personal blog, as it eliminates the main limitations of the free version and unlocks the modules needed for a complete website:
- It allows you to create a more substantial website with a limit of 6 web pages and more comfortable disk space (15 GB).
- It includes a domain name for one year and, most importantly, removes all Infomaniak advertising from the site.
- Unlike the Free offer, the Lite plan unlocks access to important features for navigation and organization, including the Blog Creation and Management module and the Sitemap module.
3. Site Creator Pro
The Pro offer is the premium version of Site Creator. It is exclusively dedicated to the most ambitious projects, such as launching a complete online store, by removing all content restrictions and integrating advanced commerce and analysis tools:
- It removes all content limitations by offering unlimited web pages and a large disk space of 50 GB.
- This is the only plan that includes complete e-commerce management (orders, inventory, discounts) and allows integration of essential payment gateways (Stripe, PayPal, Mollie) for an online business.
- The Pro plan is the only one that provides access to crucial external analysis and performance tracking tools, such as Google Analytics, Hotjar, and tools like Google reCaptcha.
Commitment related to paid plans
Unlike other Infomaniak products, some Site Creator plans include a free domain name. These plans require a firm commitment for a minimum period of 12 months, with no possibility of a refund, even partial, even if:
- you decide to stop using Site Creator before the end of the first year,
- you cancel your products,
- you close your user account or your Organization.
Plan upgrades and keeping your site
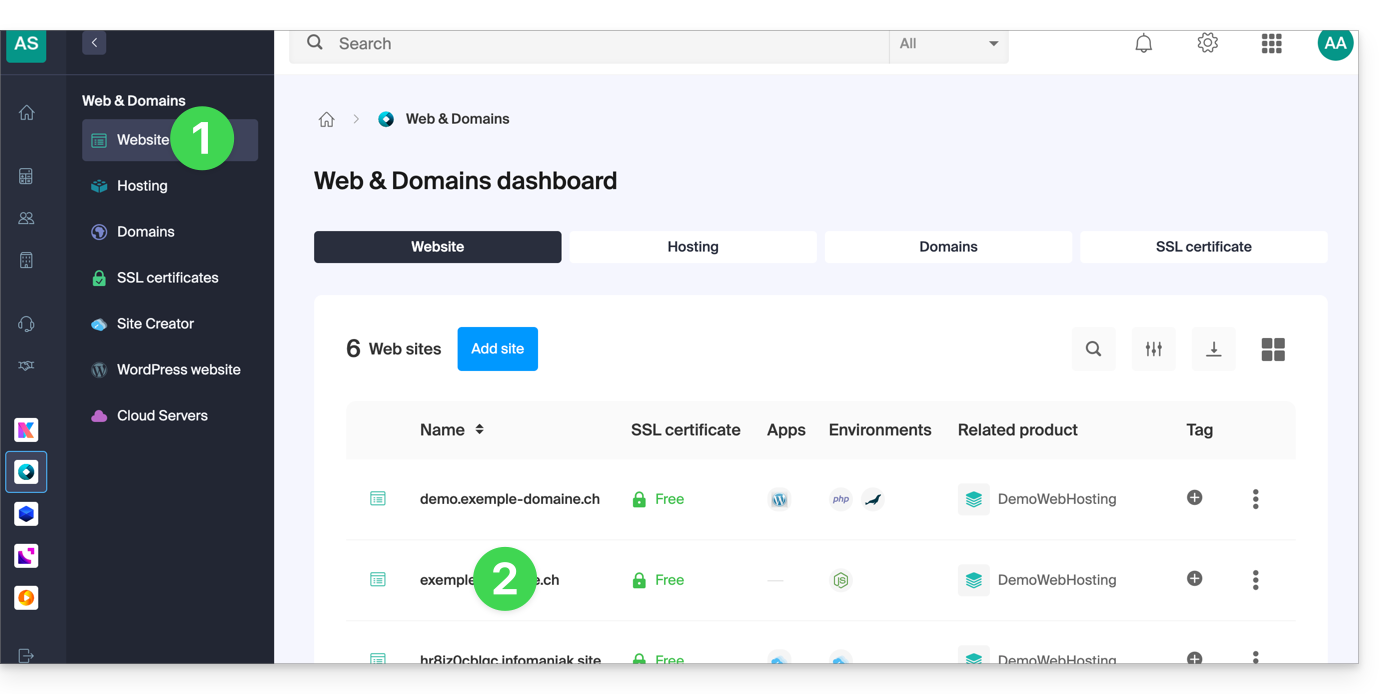
It is possible to upgrade from a free plan to a more comprehensive paid plan:
- Click here to access the management of your site on the Infomaniak Manager (need help?).
- Click on the action menu ⋮ to the right of the site in question in the table that appears.
- Click on Change plan:

It is also possible to upgrade to a higher plan (e.g., from Lite to Pro).
However, it is not possible to downgrade to a lower plan or revert to a free plan once a paid plan has been activated.
If you want to keep your site active, you must renew the same paid plan. It is not possible to switch to a free version of Site Creator, even if:
- you are not using any of the paid modules,
- your site only has one page.
What to do if you want to revert to the free plan?
In this case, you must:
- cancel your current site after manually copying all the information you want to keep,
- activate a new free Site Creator plan,
- recreate your site by pasting the content recovered from the old one.
Link to this FAQ:
Has this FAQ been helpful?
This guide details the installation and maintenance of Ghost on an Infomaniak Web Hosting, to obtain a platform optimized for blogging and editorial publishing, a powerful alternative to Substack or Medium.
Prerequisites
- A Node.js type site (v22 recommended).
- An active SSH access.
- A MySQL/MariaDB database.
- Stop the Node.js application from the dashboard of your Node.js site before any technical operation.
Installation of Ghost
To do this:
- Connect to your server via SSH (need help?).
Run the following commands to start the installer:
# Clone tools repo git clone https://github.com/Infomaniak/hosting-tools.git cd hosting-tools/h3-ghost # Run installation script bash ./install.sh- The script will now:
- ask you a few questions (site URL, database information, SMTP, etc.)…
- download and configure Ghost automatically…
- take a few minutes — be patient!
Answer the questions carefully using the details you have noted. Do not close the terminal until it has finished!
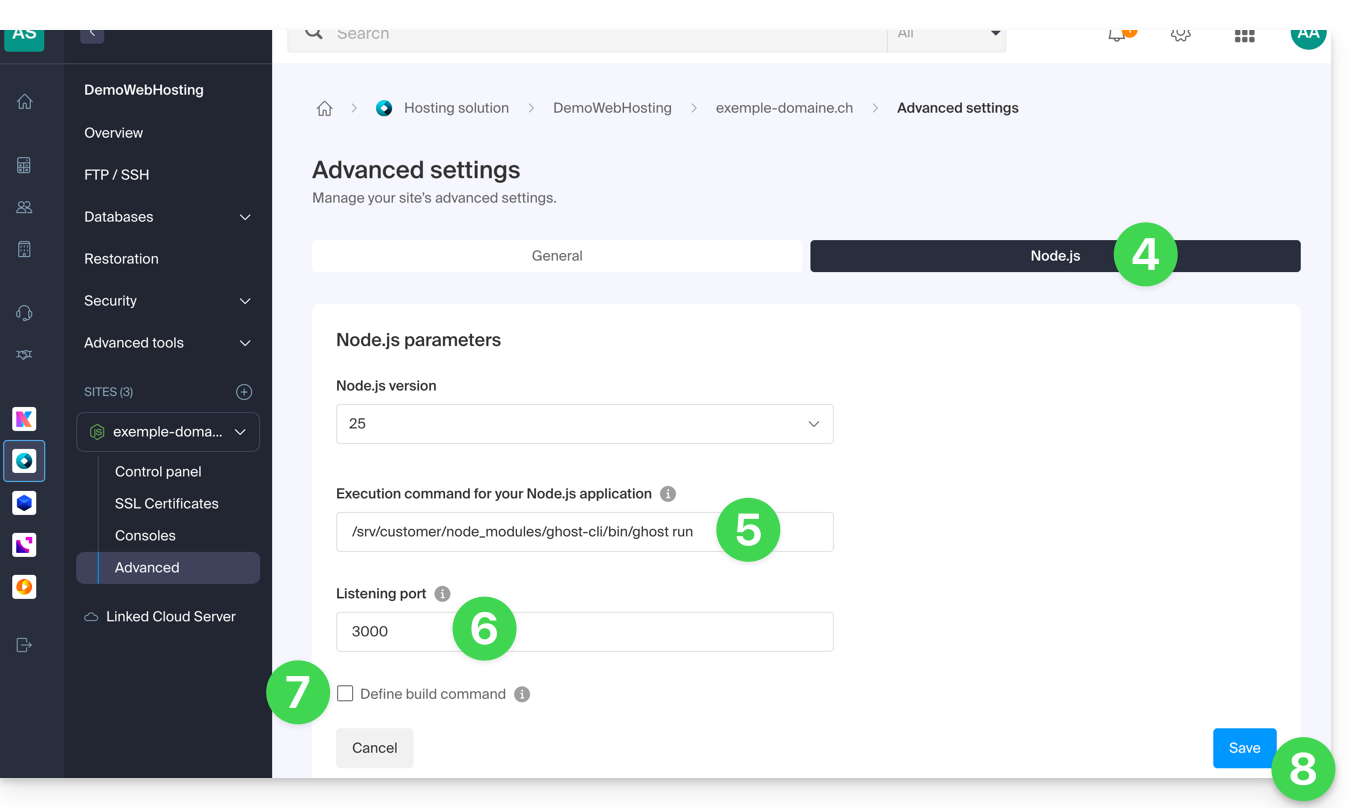
Configuration of the Manager (Node.js)
Once the script is complete, go to your Infomaniak Control Panel:
- Click here to access the management of your site on the Infomaniak Manager (need help?).
- Click directly on the name assigned to the site concerned:
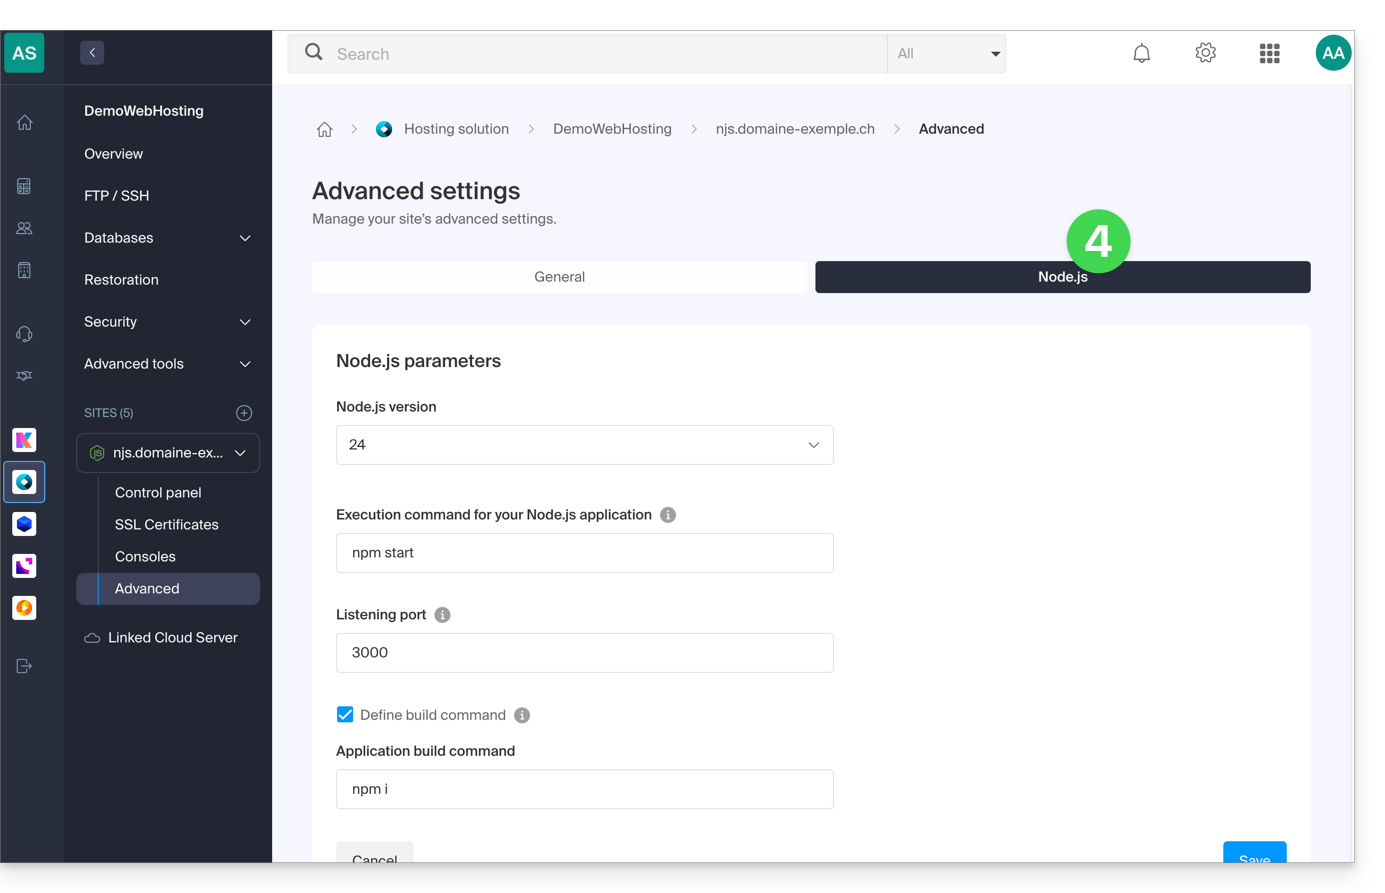
- Click on Manage advanced settings:

- Click on the Node.js tab to access the settings.
In the execution command field, enter:
/srv/customer/node_modules/ghost-cli/bin/ghost run- Check that the port number is
3000. - Command case build : disable it.
- Click on the Save button at the bottom of the page:
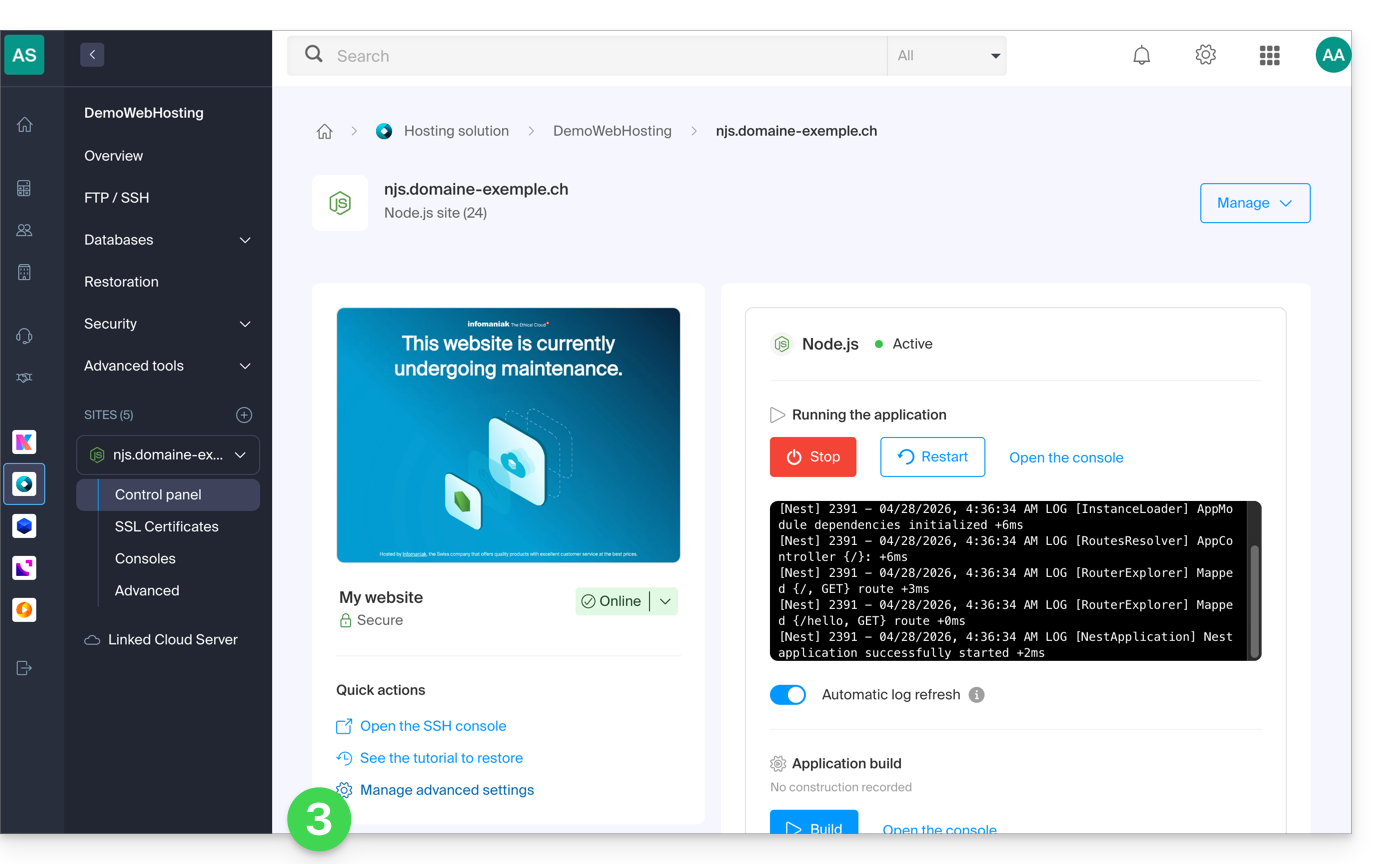
- On the main page, click on the Start button (or Restart if already running).
- Confirm the operation if necessary:
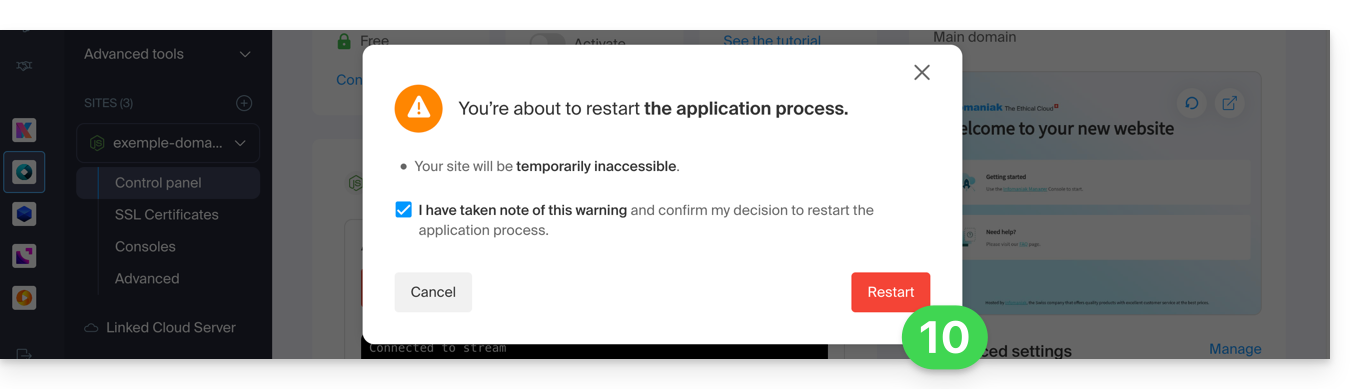
- Observe the logs showing the creation of the database and the startup of the application.
Updating Ghost
Before updating: do you want to back up your data? Refer to this other guide
To update Ghost CMS to the latest version or a specific version, follow these steps:
- Stop the Node.js application in the Infomaniak Manager.
Access the directory of your Ghost site
# Navigate to your Ghost site directory
cd ~/sites/ghost-site-name
Replace
ghost-site-namewith the actual name of your folder (e.g., blog, mysite, etc.).Ensure that the file permissions are correct (the operation may take several minutes):
# Ensure file permissions are correct
find ./ -type d -exec chmod -v 00775 {} \;
Check for available updates:
# Check available ghost updates
/srv/customer/node_modules/ghost-cli/bin/ghost check-update
For the latest version (the operation may take several minutes):
# Update to the latest version
/srv/customer/node_modules/ghost-cli/bin/ghost update
For a specific version such as v5 (the operation may take several minutes):
# Update to a specific version (e.g., v5) /srv/customer/node_modules/ghost-cli/bin/ghost update v5- Why go through v5? If you are using Ghost v4 and want to upgrade to v6, Ghost requires going through v5 as an intermediate step. This is essential for major version upgrades.
- Wait until the update is complete, then restart the application from the site dashboard to apply the update.
Done! Access your Ghost blog
Go to the URL of your site to get started:
- Open your browser and go to
https://domain.xyz/ghost(replacedomain.xyzwith your current domain). - The first time:
- You will create an administrator account (your login for the blog)…
- Then, you can start writing articles!
User / mail configuration
To create the first user, add /ghost to the URL of your site (for example https://ghost.domain.xyz/ghost) and follow the assistant.
You can also configure the "member portal support address": when new members want to register, the portal sends the double opt-in confirmation from a specific address.
By default, this is the “noreply” address of your domain. To update it, navigate to “Settings”, “Membership”, “Portal Settings”, “Customize”, and “Account Page”:
Resolve a technical incompatibility between Ghost and MariaDB
Some SQL queries cause HTTP 400 errors on MariaDB, resulting in this type of error:
[2025-01-01 12:54:28] ERROR "GET /ghost/api/admin/posts/6834625e35802b06f1496305/?formats=mobiledoc%2Clexical&include=tags%2Cauthors%2Cauthors.roles%2Cemail%2Ctiers%2Cnewsletter%2Ccount.conversions%2Ccount.clicks%2Csentiment%2Ccount.positive_feedback%2Ccount.negative_feedback" 400 27ms
Could not understand request.
Error ID:
8f2b0d90-3a30-11f0-a25f-fd9c83e1cf02
Error Code:
ER_BAD_FIELD_ERROR
----------------------------------------
Error: select `posts`.*,
...
If necessary, a patch exists to adapt Ghost's behavior.
To use this patch, enter this command:
# Enter the current version folder and apply the MariaDB patch
cd current
curl -L https://gist.githubusercontent.com/reneluria/8cbbfbc001e542c77d6d5887fbafe5d3/raw/65e0ce31753b4687d0eb67fc030734a35d3ffbad/ghost-post.patch | patch -p0
Link to this FAQ:
Has this FAQ been helpful?
This guide helps to solve a problem with the PrestaShop CMS and more specifically with its “Faceted Search” module, which allows the management of filters on product category pages.
The problem
This specific PrestaShop search module creates a cache in the database to speed up the search. However, the corresponding table is never cleaned, which poses a problem for the hosting infrastructure.
First solution
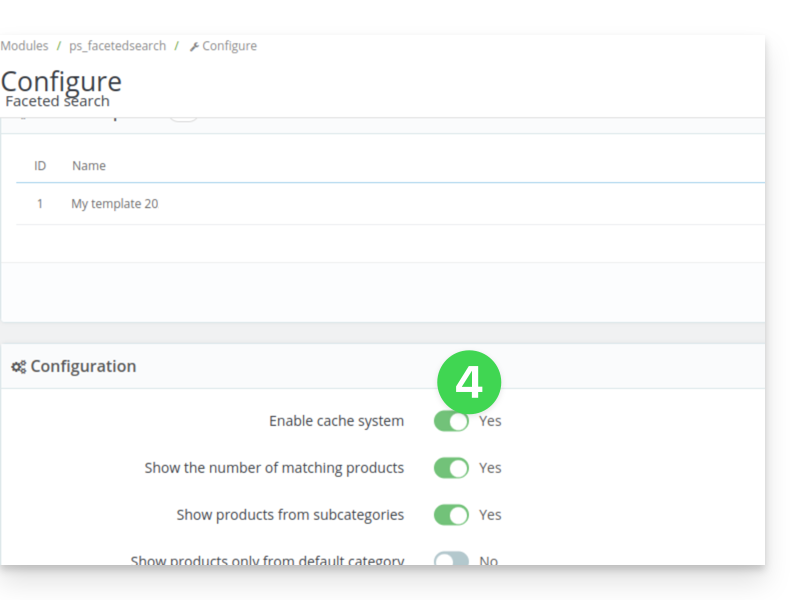
The first solution is to disable the proposed caching.
If you have a cache module, such as Ultimate Cache, there will be no negative impact.
To do this:
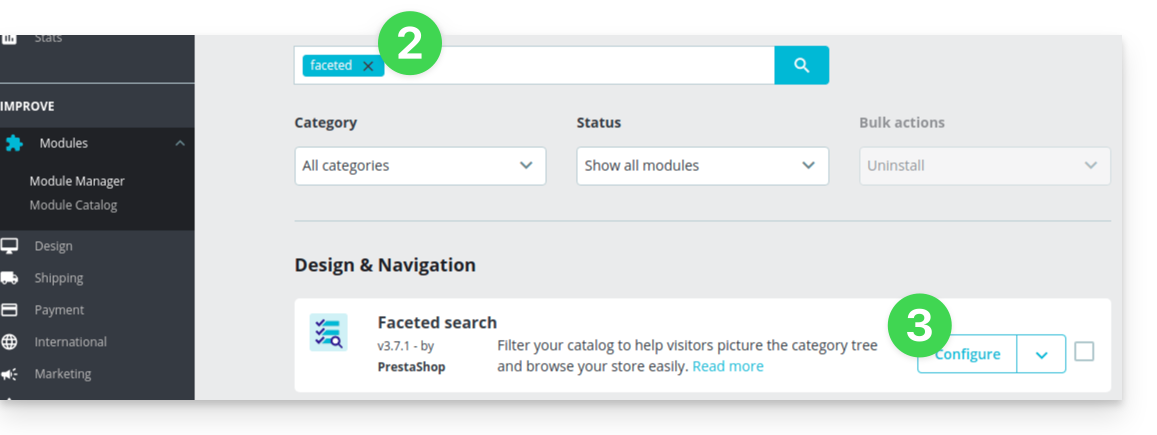
- In the PrestaShop administration panel, go to Modules → Module Manager.
- Select Modules and use the search field to find “facet”.
- Click on Configure next to the module obtained in the result:
- Disable the button for this:
Second solution
The second solution is to set up a cron job to clean the table, for example every night:
- From the module settings, copy the existing URL on the
Clear cachebutton:
Then, from the Infomaniak Manager, create a webcron (refer to this other guide on this subject) to execute the URL copied in point 1 above, for example once a day and once at night.
Link to this FAQ:
Has this FAQ been helpful?
This guide concerns the WordPress module "Infomaniak Connect for OpenID" which allows users to log in to your WordPress site (whether hosted by Infomaniak or not) using their Infomaniak credentials.
Introduction
- Allowing login via an Infomaniak account on your WordPress site enables your visitors to comment, register for courses, or access any content reserved for members with a single click, without having to create a new account.
- This saves them time and provides a more secure method for you, as you don't have to manage additional passwords.
- The operation of this external module is identical to the "Log in with Google", "Log in with Facebook" or “Log in with Apple” options; it uses the standard OAuth2 and OpenID Connect protocols to enable single sign-on (SSO).
A. Create an application with Auth Infomaniak
To do this:
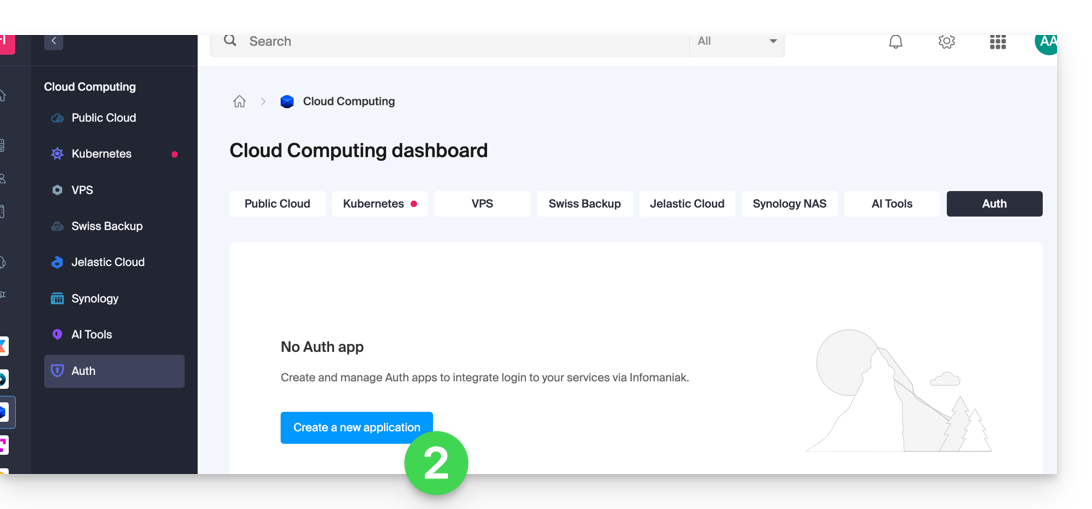
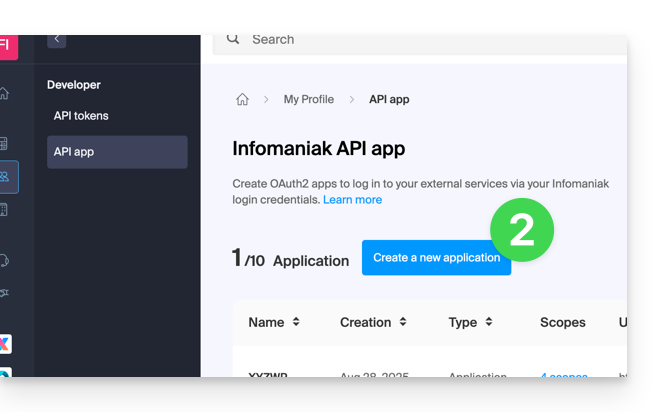
- Click here to access the management of your Auth product on the Infomaniak Manager (need help?).
- Click the button to Create a new application:
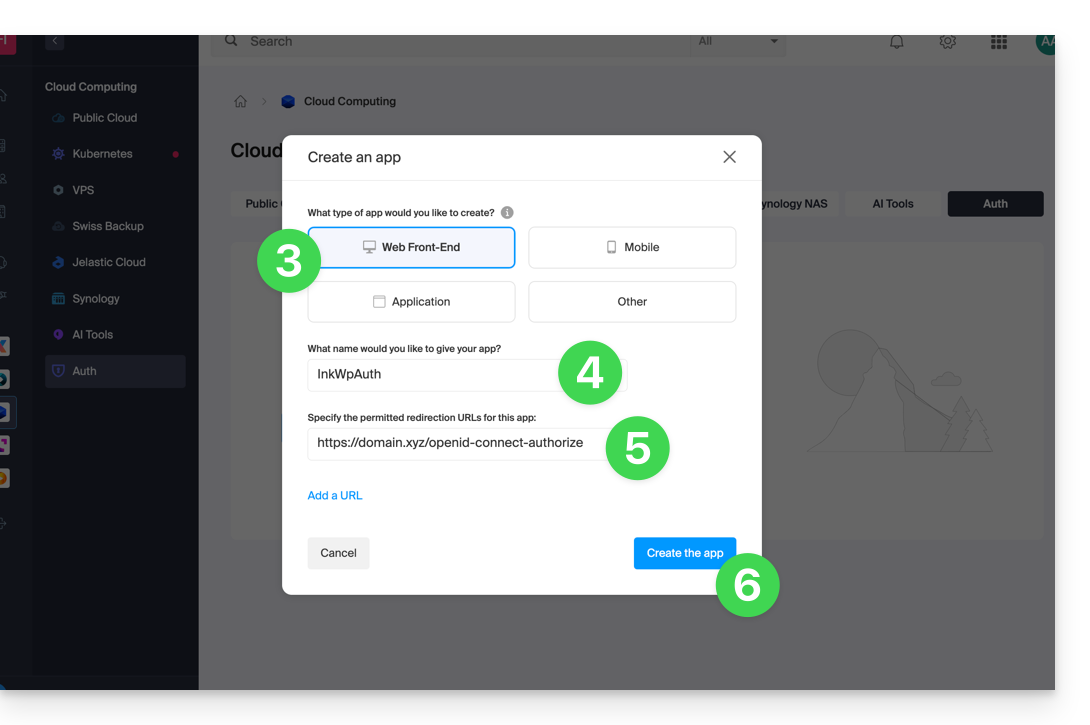
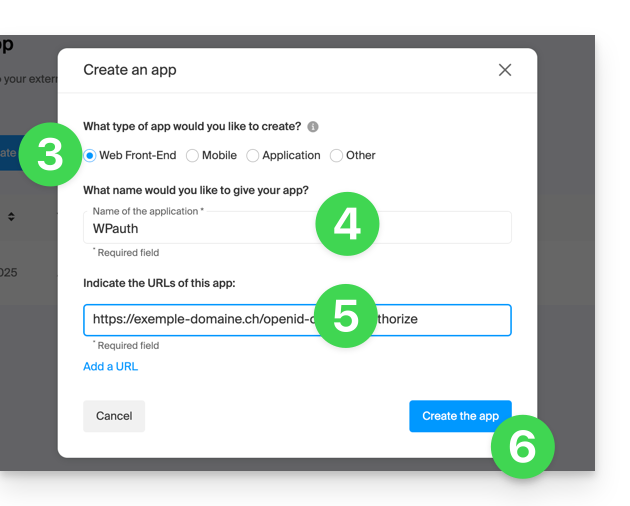
- Choose the type “Web Front-End”.
- Give your application a name.
- In the URL field, enter the domain name corresponding to your WordPress site, followed by
/openid-connect-authorize(refer to the GitHub documentation if needed). - Click the button to complete the app creation:
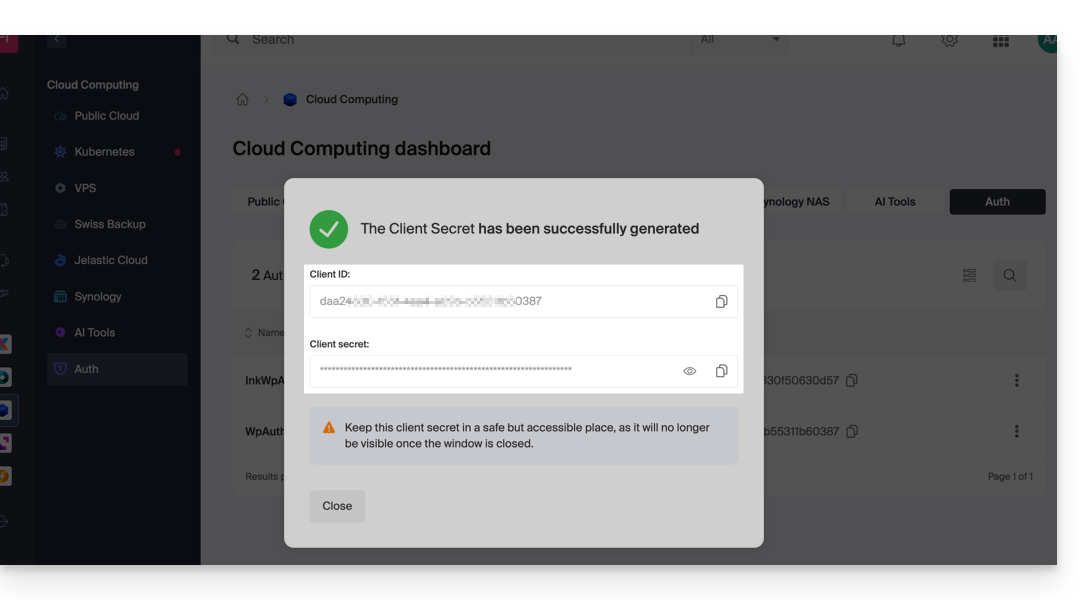
- Carefully note the 2 pieces of information obtained when finalizing your OAuth2 application:
B. Configure the WordPress extension
To do this:
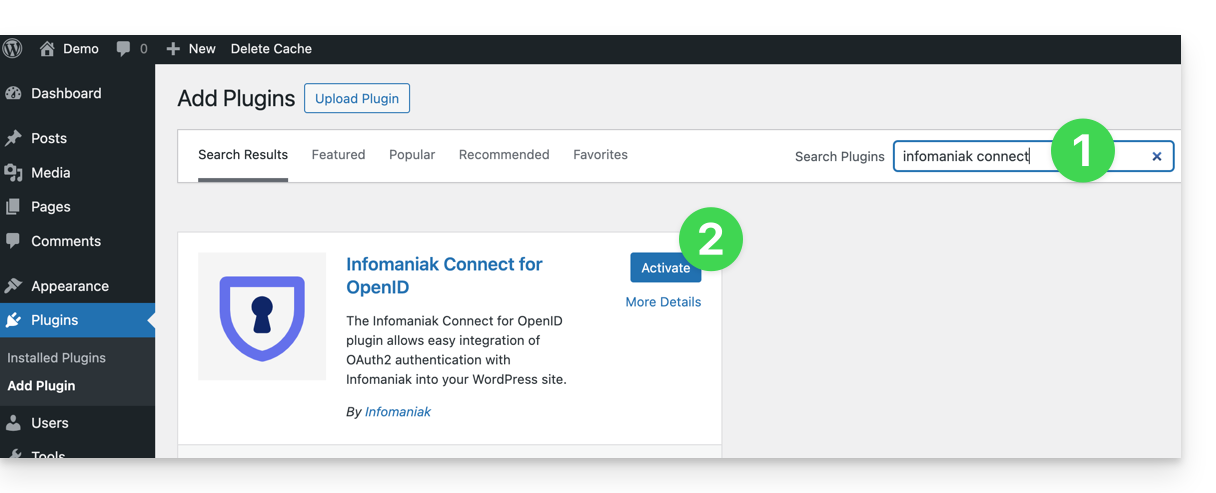
- Search for the
Infomaniak Connect for OpenIDextension on the WordPress extensions platform from your site. - Install and activate the extension:
- Configure the extension from the Settings menu:

- The only fields to fill in are Client ID and Client Secret Key, and these come from the information obtained in step A above:
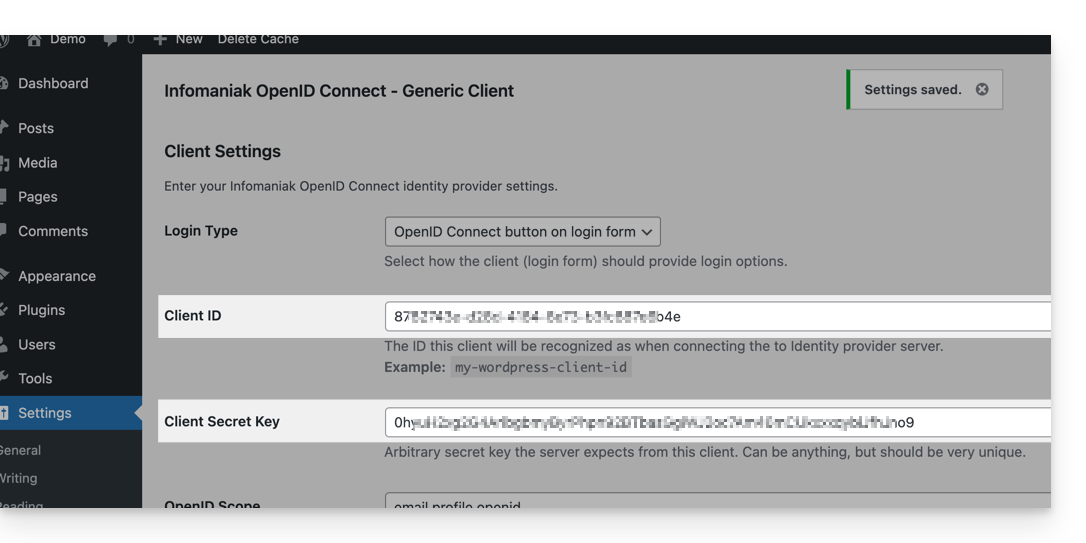
- Don't forget to save the changes made to the extension settings.
- An additional button for logging in with your Infomaniak credentials is now visible on your login page for
/wp-adminusers (/wp-login.php):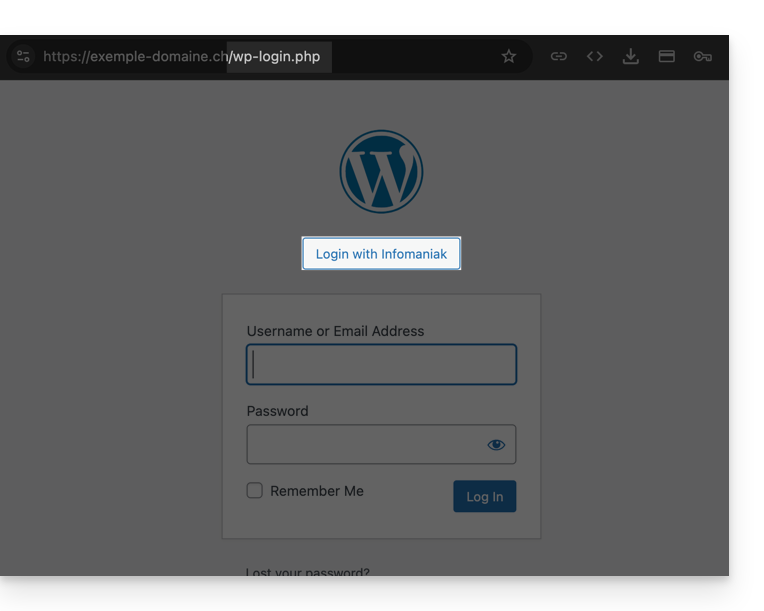
Link to this FAQ:
Has this FAQ been helpful?
This guide concerns the Typo3 module "t3ext-infomaniak-auth" which allows users to log in to your Typo3 site (whether hosted by Infomaniak or not) using their Infomaniak credentials.
Preamble
- Allowing login via an Infomaniak account on your Typo3 site enables your visitors to comment, register for courses, or access any member-only content with a single click, without having to create a new account.
- This saves them time and is a safer method for you, as you do not have to manage additional passwords.
- The operation of this external module is identical to the options "Sign in with Google", "Sign in with Facebook" or "Sign in with Apple"; it uses the standard protocols OAuth2 and OpenID Connect to enable single sign-on (SSO).
A. Create an application with Auth Infomaniak
To do this:
- Click here to access the management of your product Auth on the Infomaniak Manager (need help?).
- Click the button to Create a new application:
- Choose the type "Web Front-End".
- Give a name to your application.
- In the URL field, enter the domain name corresponding to your Typo3 site followed by
/openid-connect-authorize(refer to the GitHub documentation if necessary). - Click the button to complete the app creation:
- Carefully note the 2 pieces of information obtained during the finalization of your OAuth2 application:
B. Configure the Typo3 extension
In SSH, deploy Composer if necessary to retrieve the t3ext-infomaniak-auth extensions. To do this:
- The SSH command for installing the extension is here:
Then, in Typo3:
- Log in to your Typo3 administration interface.
- Check if necessary that the Infomaniak extension is activated:
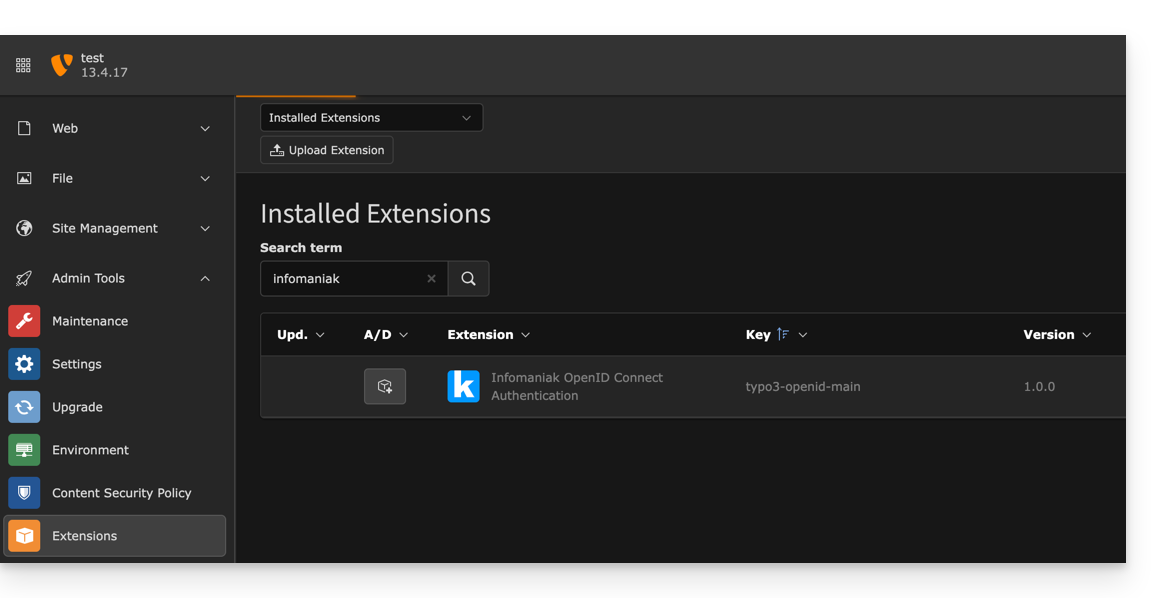
- Check if necessary that the Infomaniak extension is activated:
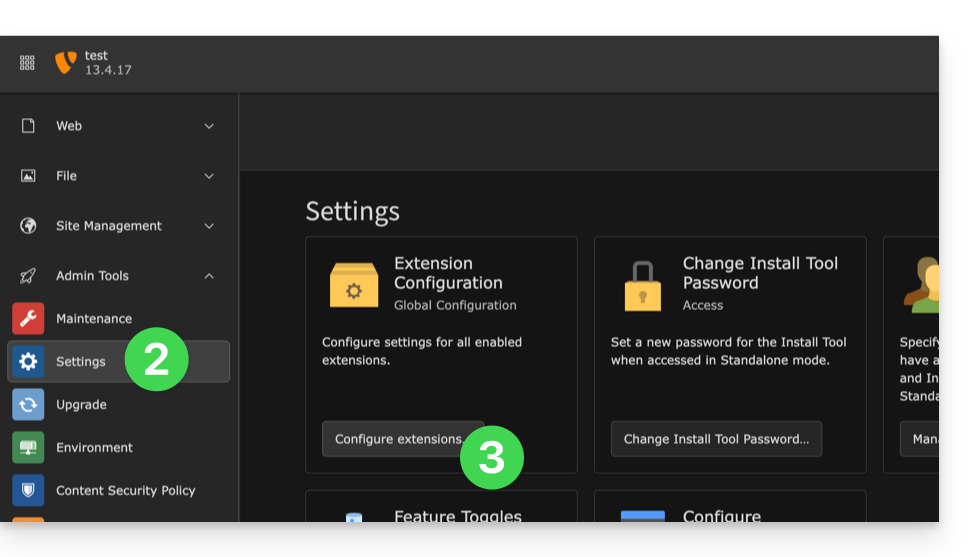
- Click on Settings in the left sidebar menu.
- Click on Configure extensions:
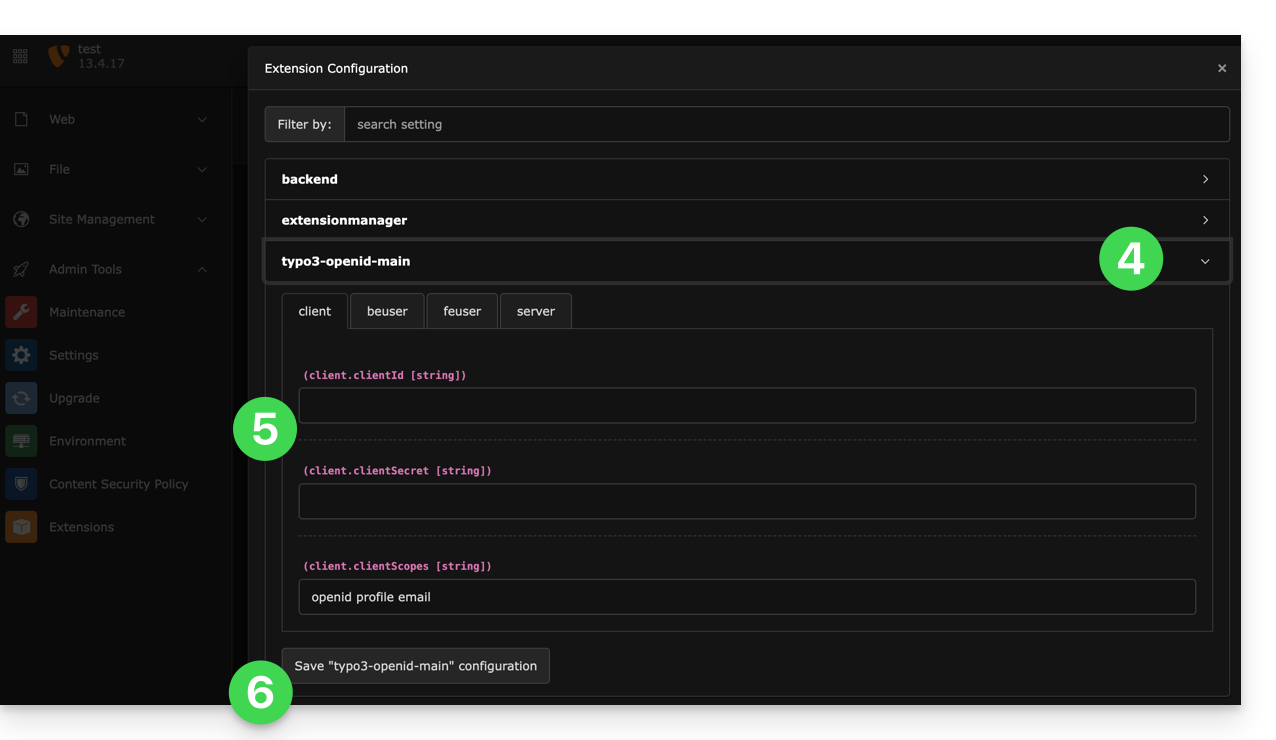
- Click on the chevron to the right of typo3-openid-main to expand the client tab.
- The only fields to fill in are clientID and clientSecret and come from the information obtained in point A above.
- Do not forget to save the changes made to the extension settings:
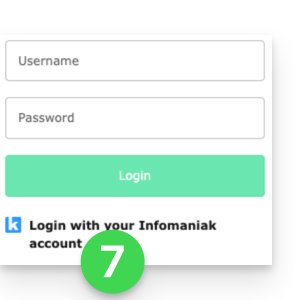
- An additional button for logging in with an Infomaniak identifier is now visible on your user login page:
Link to this FAQ:
Has this FAQ been helpful?
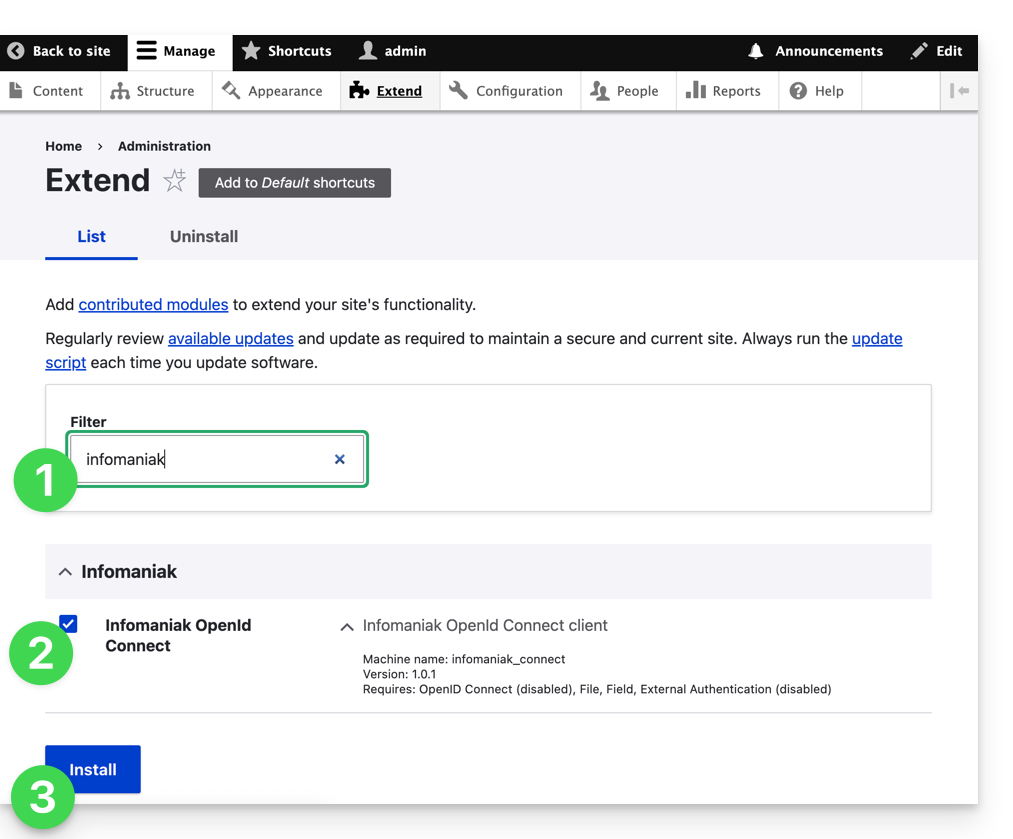
This guide concerns the Drupal module "Infomaniak_Connect" which allows users to log in to your Drupal site (whether hosted by Infomaniak or not) using their Infomaniak credentials.
Preamble
- Allowing login via an Infomaniak account on your Drupal site enables your visitors to comment, register for courses, or access any member-restricted content with a single click, without having to create a new account.
- This saves them time and is a safer method for you, as you do not have to manage additional passwords.
- The operation of this external module is identical to the options "Log in with Google", "Log in with Facebook" or "Log in with Apple"; it uses the standard protocols OAuth2 and OpenID Connect to enable single sign-on (SSO).
A. Create an application with Auth Infomaniak
To do this:
- Click here to access the management of your product Auth on the Infomaniak Manager (need help?).
- Click the button to Create a new application:
- Choose the type "Web Front-End".
- Give a name to your application.
- In the URL field, specify the domain name corresponding to your Drupal site followed by
/openid-connect-authorize(refer to the GitHub documentation if necessary). - Click the button to complete the app creation:
- Carefully note the 2 pieces of information obtained during the finalization of your OAuth2 application:
B. Configure the Drupal extension
Via SSH, deploy Composer if necessary to retrieve the openid_connect and infomaniak_connect extensions. To do this:
- You may need to edit the composer.json file as the version of
openid_connectis not yet considered stable. Add: "minimum-stability": "dev", "prefer-stable": true- The SSH commands for installing the 2 extensions are here:
Then, on Drupal:
- Search for the Infomaniak module among your pre-installed modules.
- Select it.
- Click the Install button:
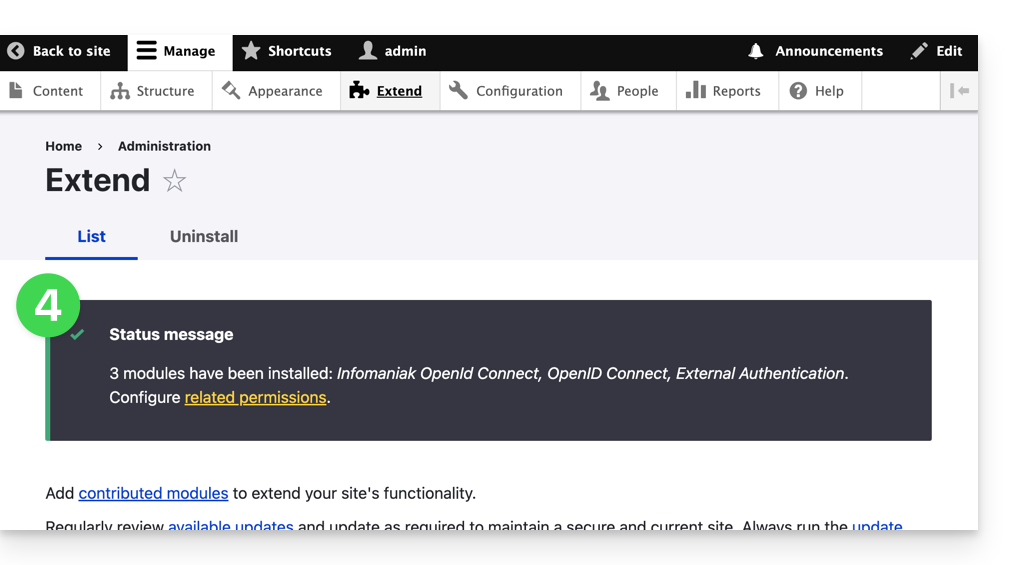
- The installation of dependencies will proceed:
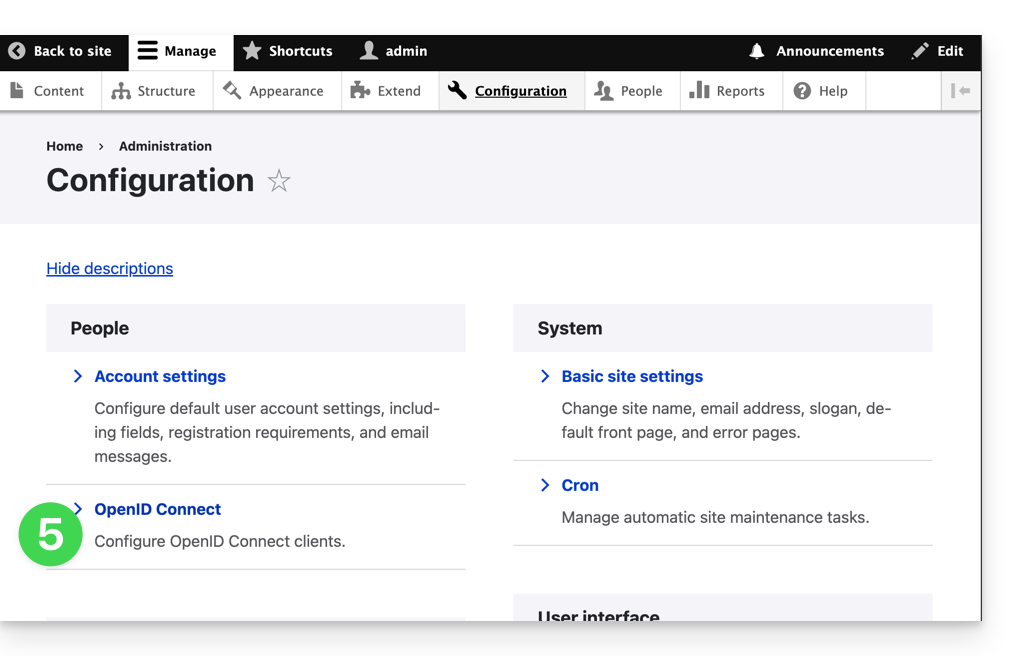
- Under Configuration, click to set up the OpenID connection:
- Click the edit button:
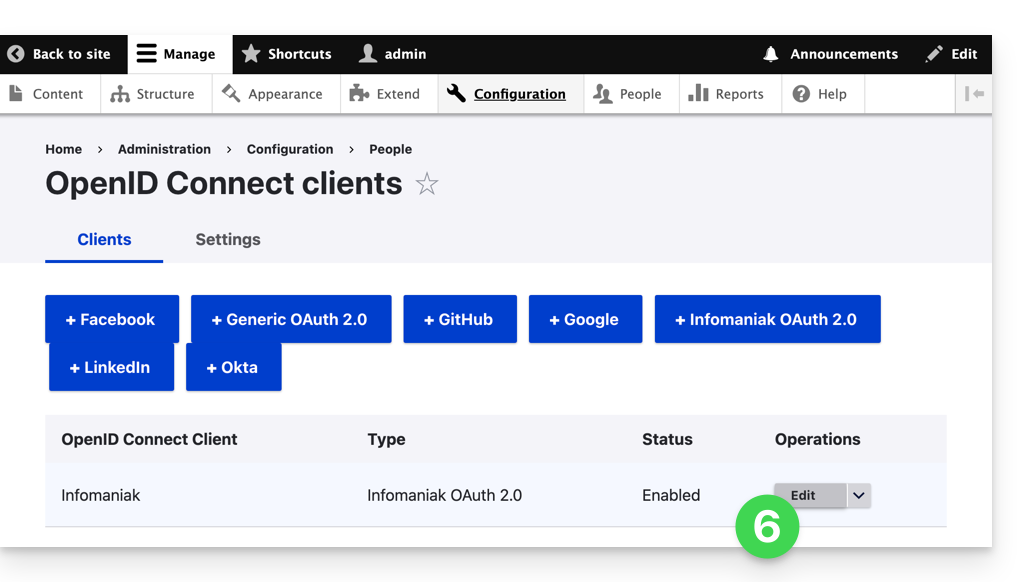
- The only fields to fill in are Client ID and Client Secret and come from the information obtained in point A above:
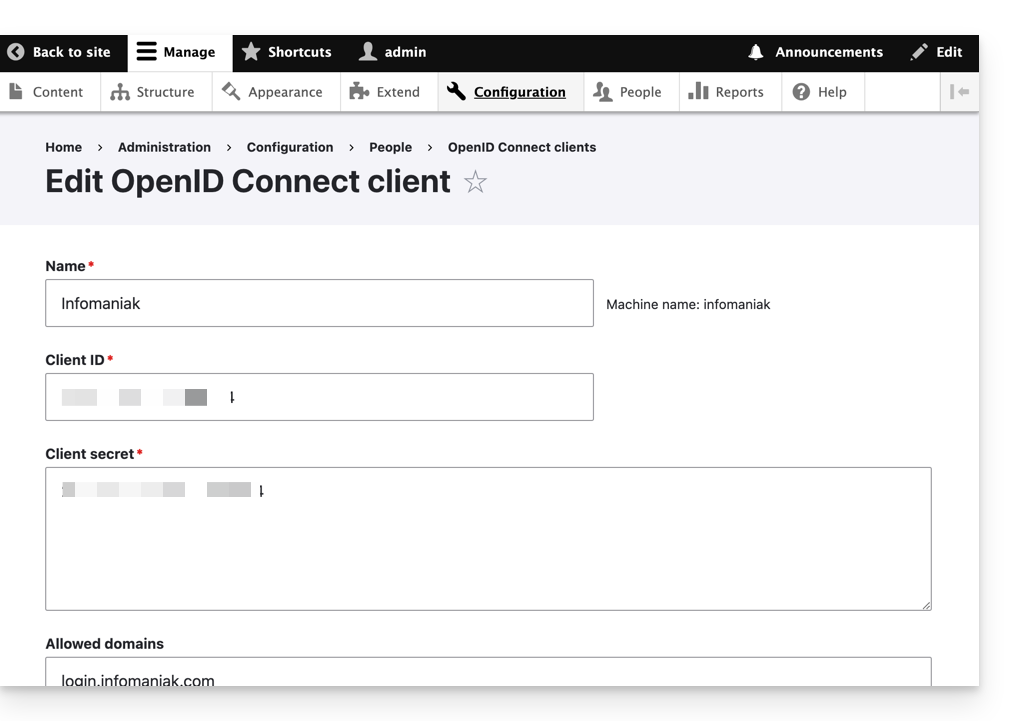
- Do not forget to save the changes made to the extension settings.
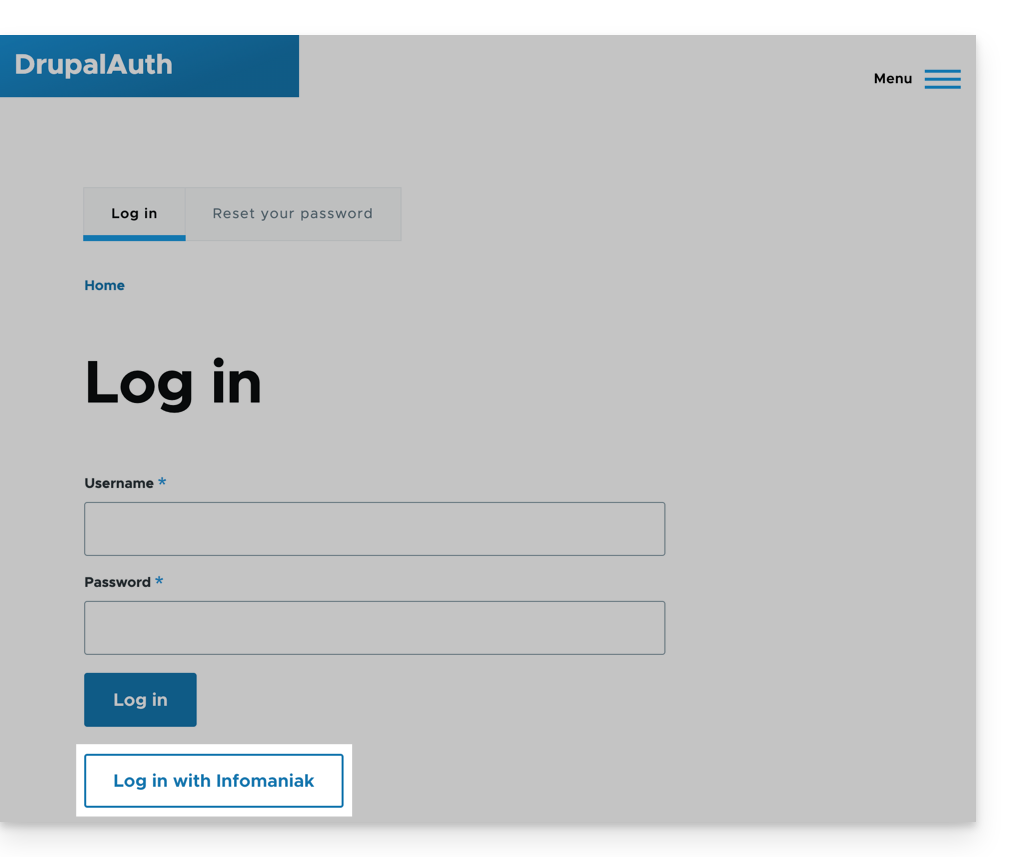
- In the Settings tab, you can choose the display type for your login page; do not forget to save:

- An additional button for logging in with an Infomaniak identifier is now visible on your login page for users:
Link to this FAQ:
Has this FAQ been helpful?
This guide explains how to adjust the configuration of a Node.js site hosted on the Infomaniak infrastructure. You will learn how to adapt the behavior of your application according to its evolution, its dependencies, or your technical preferences.
Prerequisites
- Install a Node.js site on your hosting.
- Test your changes locally before applying them to production.
- Check that your scripts (
start,build) are properly defined in yourpackage.jsonfile. - If you modify the structure of your project, remember to adjust the execution folder and the associated commands.
- Important: the listening port defined in the Manager must match the one used in the application code.
Access the configuration
Each site has a dedicated dashboard to control the application (start, stop, restart), view the execution logs, manage Node.js versions, and activate SSL certificates:
- Click here to access the management of your site on the Infomaniak Manager (need help?).
- Click directly on the name assigned to the site in question:
- Click on Manage advanced settings:
- Click on the Node.js tab to access the settings:
Commands and automation
Execution folder
The execution folder indicates the location on the server where the build and launch commands will be executed. It must point to the root directory of your application, where your package.json file is located.
./          // Root directory
./app       // Subfolder named app
./backend   // Subfolder named backend
Build command
If your application requires a preparation step (installing dependencies, compiling TypeScript, minification), specify the command to execute here. This is the recommended method for deploying your updates.
Unlike manual execution via SSH, this interface uses an environment with boosted performance to ensure fast building without impacting the resources of your production site. You can chain multiple tasks (such as a git pull followed by a build) and monitor the progress and logs of the process in real-time directly from the Manager.
# Example: install dependencies and build
npm install && npm run build

# Example: update code and build with yarn
git pull && yarn install && yarn build
Note: If your project is already compiled or requires no intermediate steps, this field can be left empty.
Start command
This instruction starts your server. It must be identical to the one used in your local development environment to launch the application's entry point.
# Option 1: Direct file launch
node index.js

# Option 2: Using npm script
npm start

# Option 3: Using yarn script
yarn start
Listening port
Your application must listen on the dynamic port assigned by the Manager. This port is passed to your code via the PORT environment variable.
// Use the port provided by the environment
const port = process.env.PORT || 8080;

app.listen(port, () => {
  console.log(`Application started on port ${port}`);
});
Node.js version
You can select the desired Node.js version in the settings. It is recommended to prioritize a stable version (LTS) to ensure the security and longevity of your project.
Apply and validate changes
Once your modifications are saved in the Manager, you must restart your application from the dashboard for the new parameters (new Node version, new port, or new build command) to take effect.
If you encounter startup issues, you can check the execution console or refer to this other guide for troubleshooting.
Link to this FAQ:
Has this FAQ been helpful?
Infomaniak's Node.js sites allow you to run Node.js applications in a flexible, ready-to-use environment without having to manage server infrastructure.
Preamble
- Offering the flexibility of a server without the complexity of its administration, this type of hosting is particularly suitable for REST API projects, deploying the CMS Ghost, n8n, Strapi or frameworks like Express.js, NestJS or socket.io, next.js, business tools or prototypes for:
- developers who want to deploy Node.js applications without managing infrastructure.
- webmasters looking to experiment or train with Node.js.
- agencies and freelancers working on multiple client projects.
- students, teachers and schools needing a simple environment to test code.
- The NPM and Yarn package managers are supported.
- If you install
Node.json a Web Hosting within a Cloud Server, your site will not work with the guaranteed resources of the managed Cloud Server.- Refer to this other guide to use Fast Installer and deploy NVM.
Node.js= official name of the language/environment;NodeJS= "technical" or simplified name in some contexts (often for practical reasons, no real technical difference).
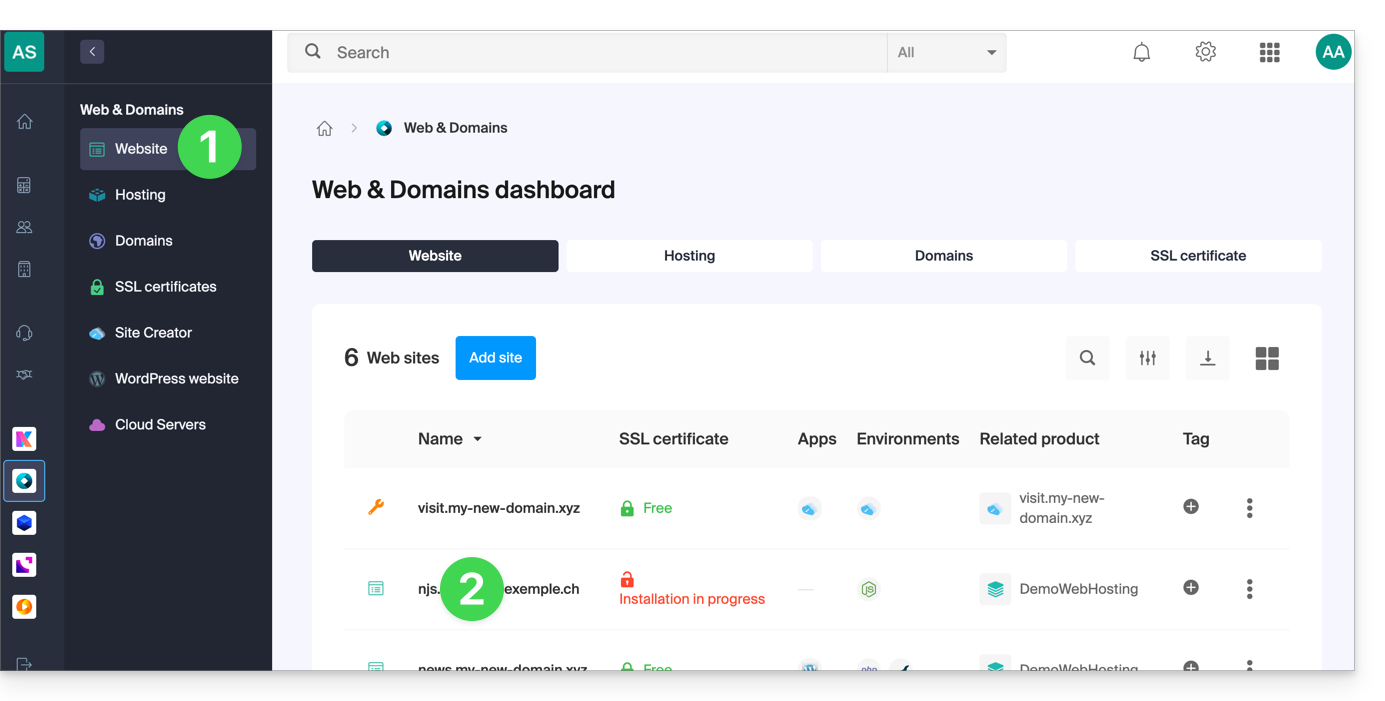
Create a Node.js site
To access a Web Hosting plan and add a Node.js site:
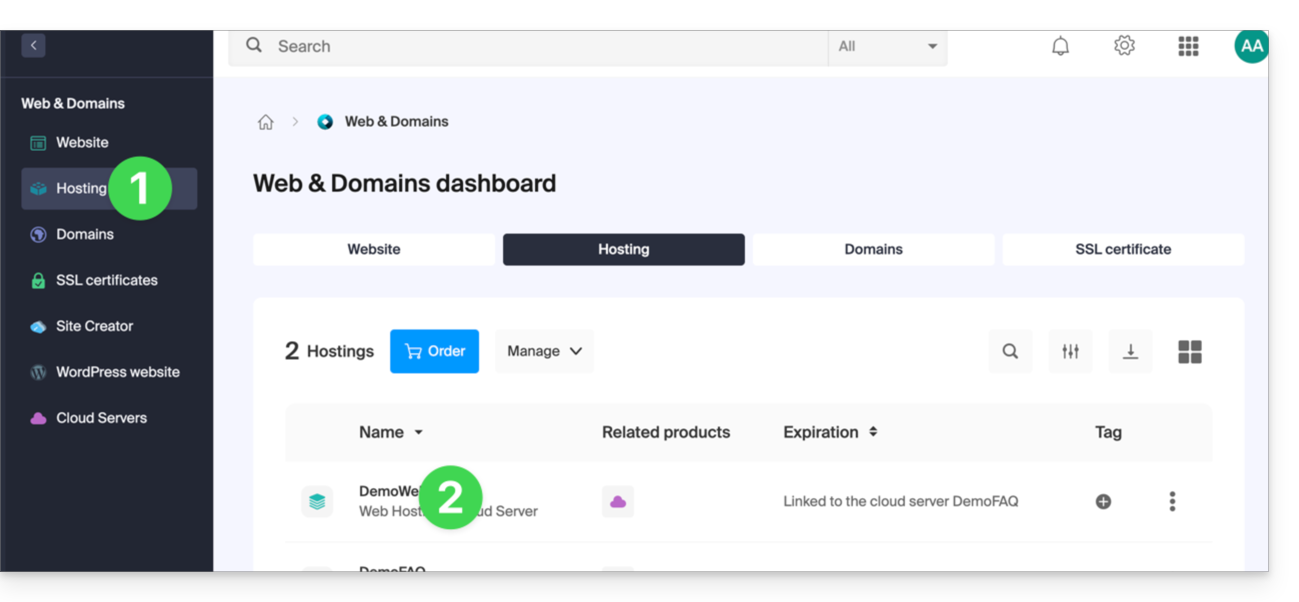
- Click here to access the management of your hostings in the Infomaniak Manager (need help?).
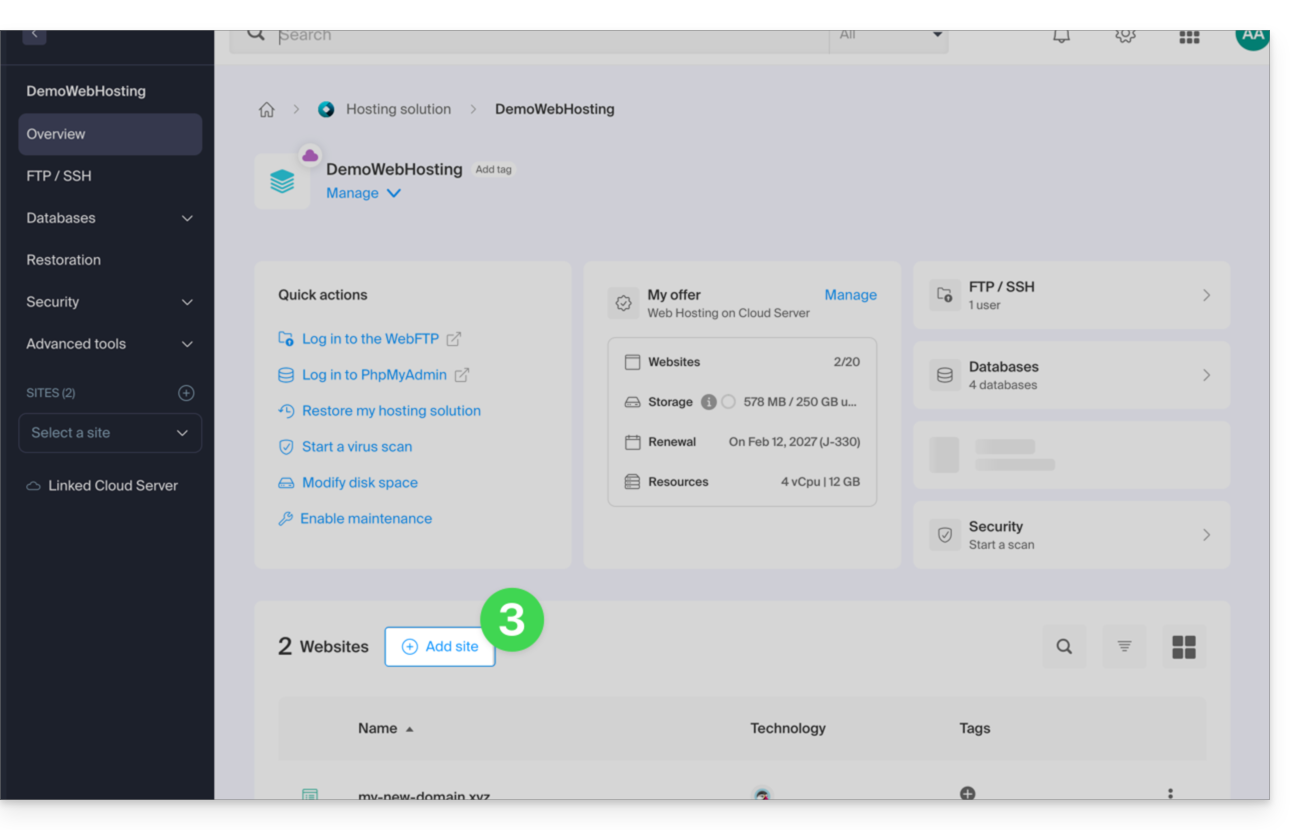
- Click directly on the name assigned to the hosting concerned:
- Click the blue Add button:
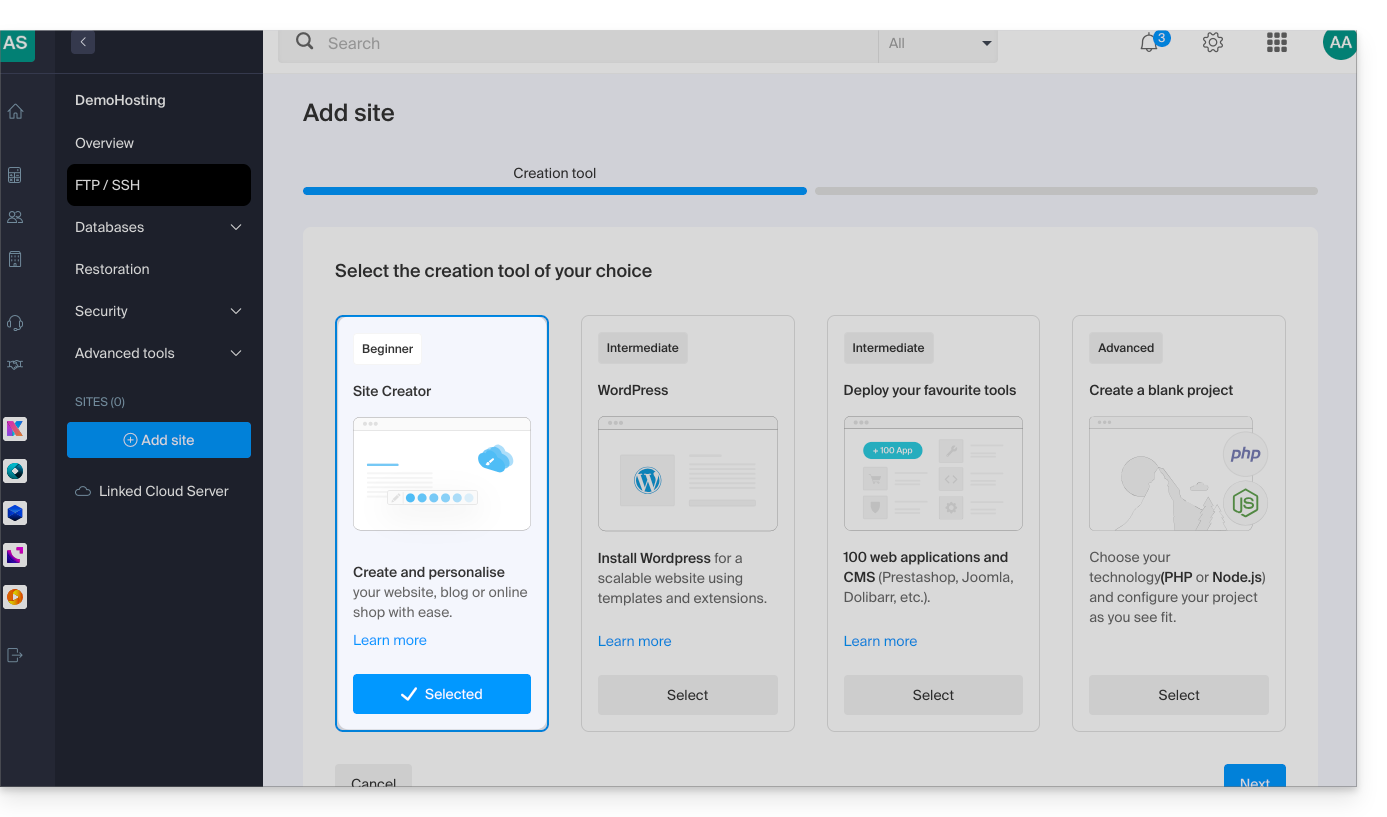
- Choose a project with advanced technologies.
- Click Next:
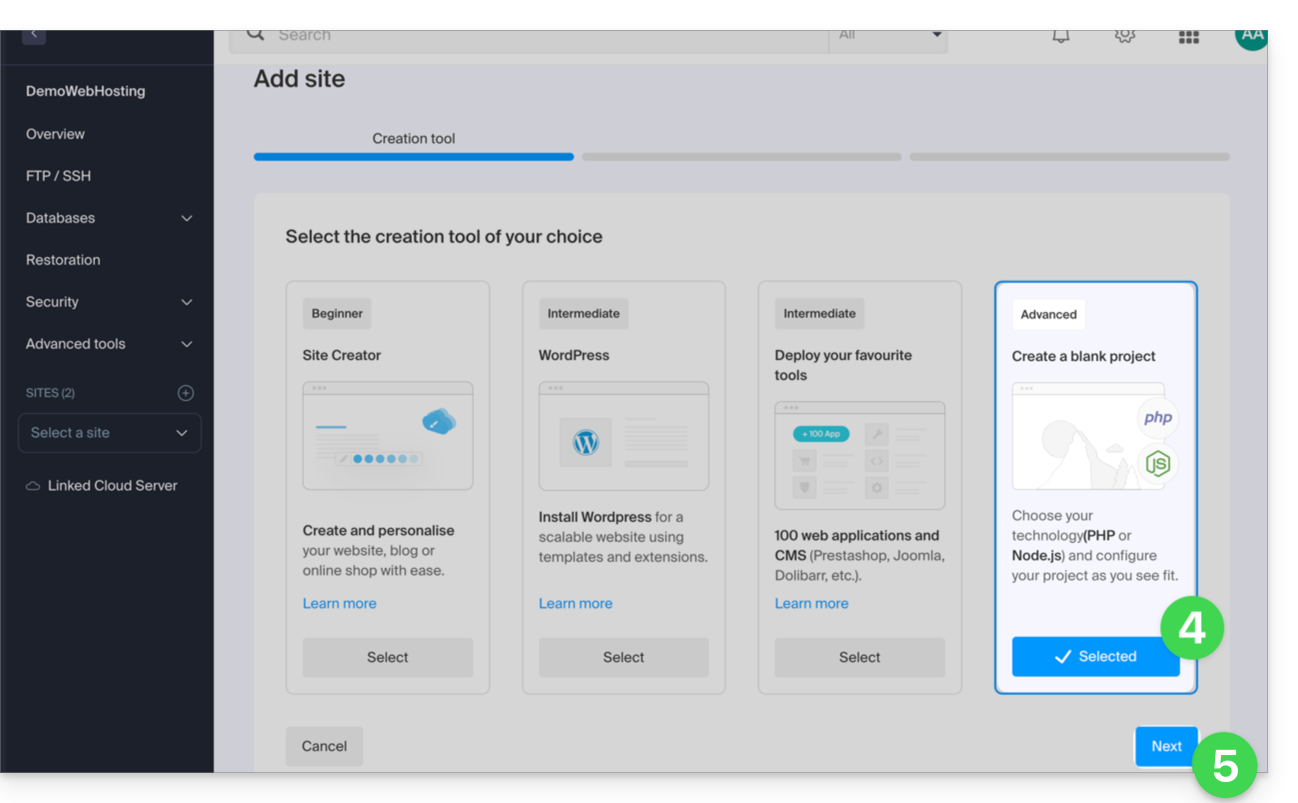
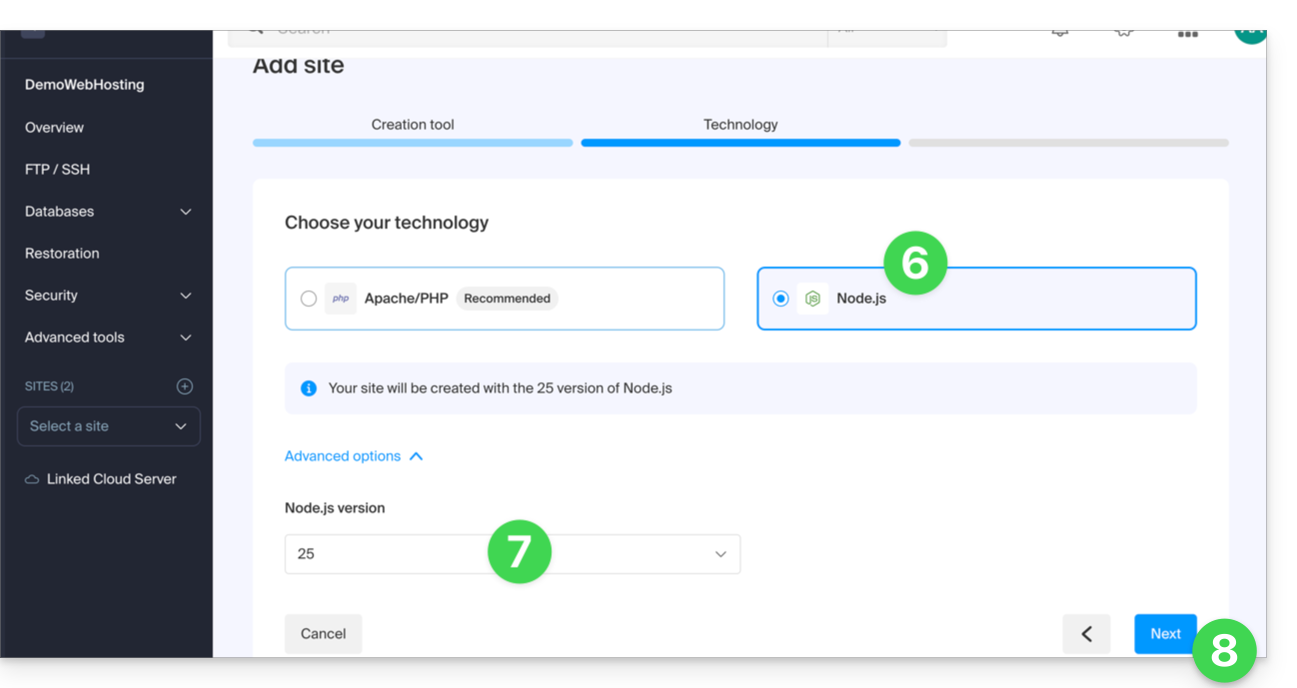
- Choose Node.js.
- Select another version if necessary.
- Click Next:
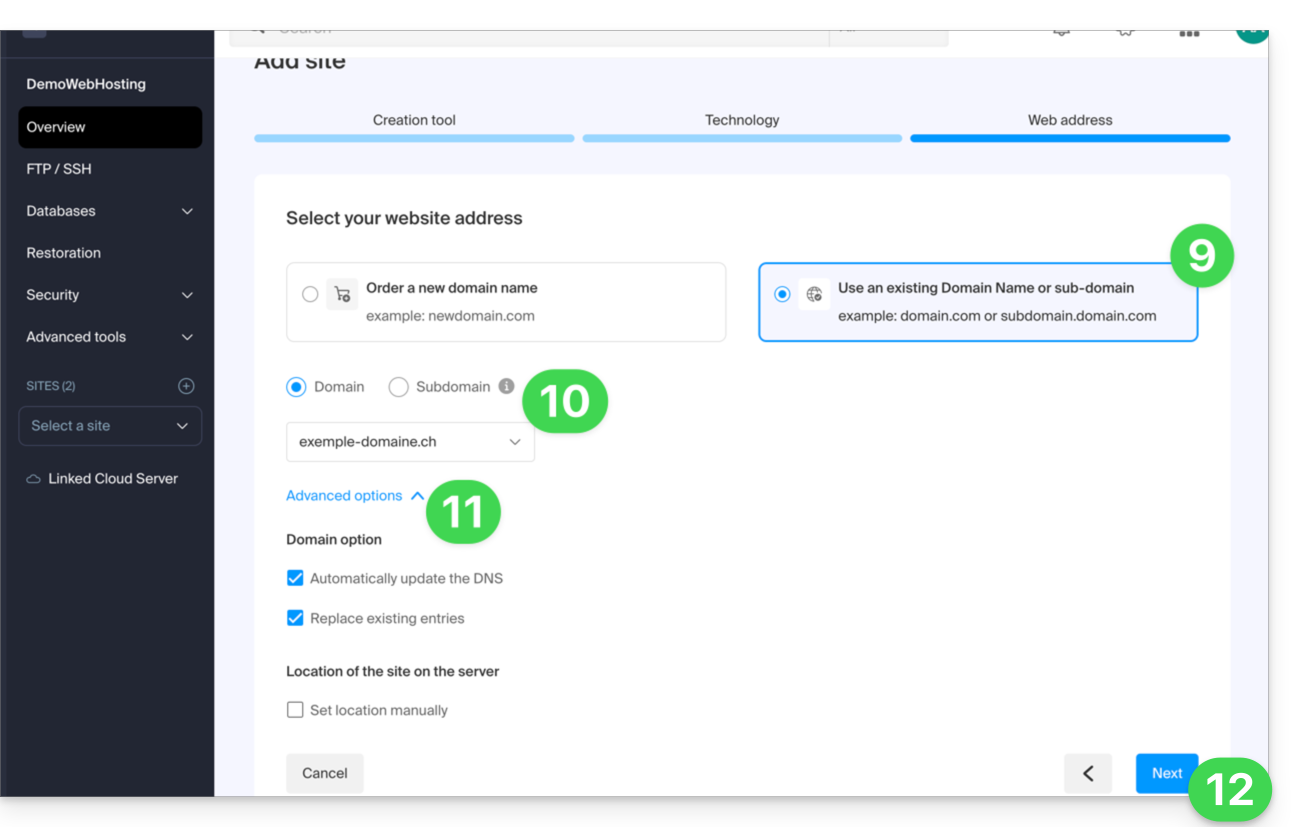
- Choose the type of domain to assign to this new site:
- an already acquired domain name
- a subdomain created from an already acquired domain name
- a domain name still available and to be ordered
- Enter the domain name or subdomain.
- Choose any advanced options.
- Click Next:
- Choose one of the two possible approaches:
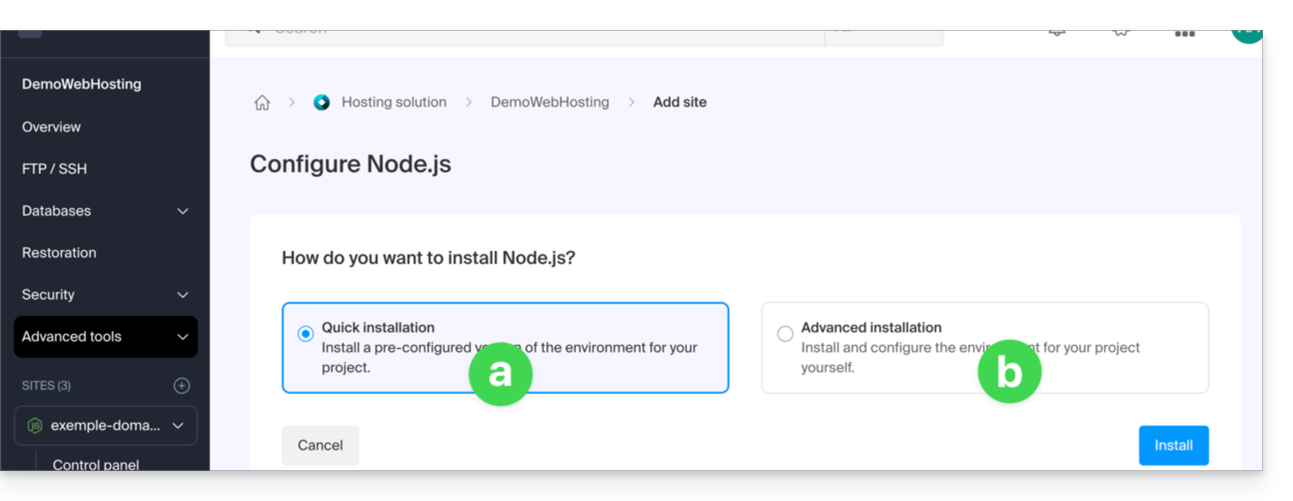
- Quick method:
- A preconfigured example project is automatically installed.
- This approach is ideal for discovering Node.js or quickly starting a functional base.
- Custom method:
- The source code can be imported via Git, ZIP archive, SSH, or SFTP.
- You define the scripts, entry points, listening port, and necessary build commands yourself.
- Quick method:
- It's done, the site is ready:
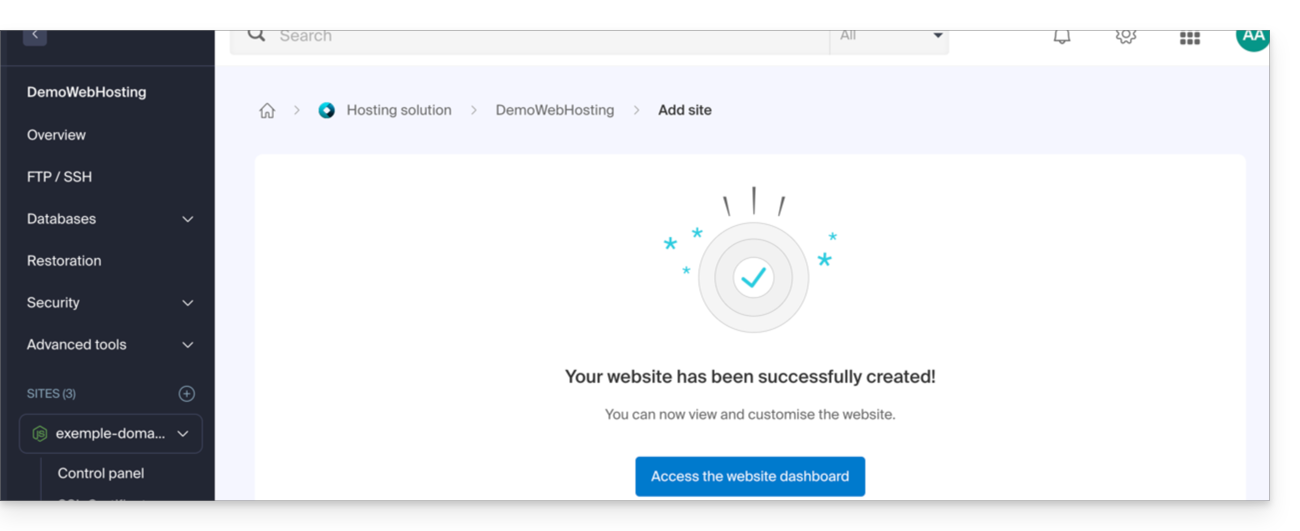
Each site has a dedicated dashboard to control the application (start, stop, restart), view the execution console, manage Node.js versions, configure domains, and activate SSL certificates: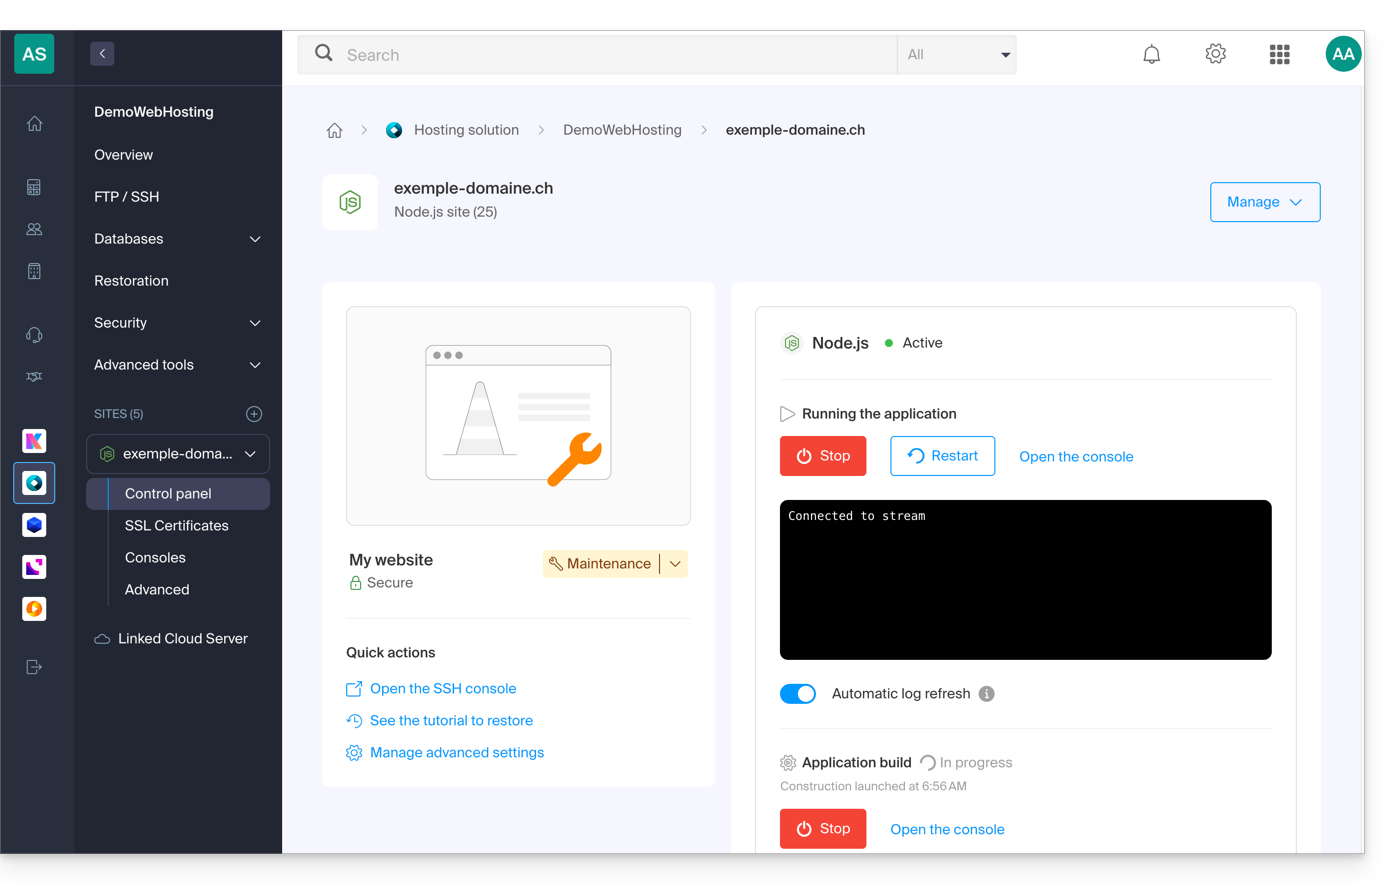
To go further in the configuration of your Node.js site, refer to this other guide.
Link to this FAQ:
Has this FAQ been helpful?
This guide explains how to import external data (files, folders, etc.) to your kDrive using the WebDAV protocol provided by your Cloud host.
Preamble
- Refer to this other guide if you are looking for information on how to copy specific data from one kDrive to another when your user has access to both kDrives concerned.
Import external data via WebDAV
Prerequisites
- Have a kDrive or kSuite offer
- Have sufficient permissions within kDrive or kSuite.
- Do not change your passwords until the import is complete!
To access the import tool, where the data needs to be imported:
- Click here to access the Infomaniak kDrive Web app (online service ksuite.infomaniak.com/kdrive).
- Click on the Settings icon in the top right corner.
- Check or select the kDrive concerned in the dropdown menu of the left sidebar.
- Click on General in the left sidebar.
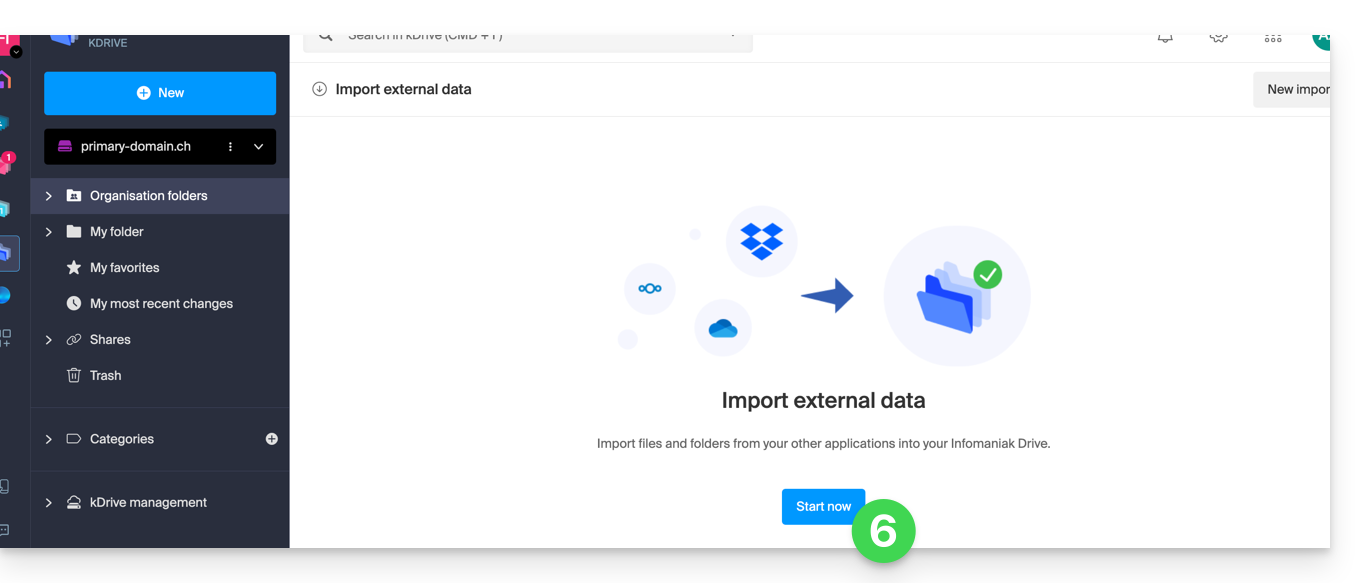
- Click on Import external data:
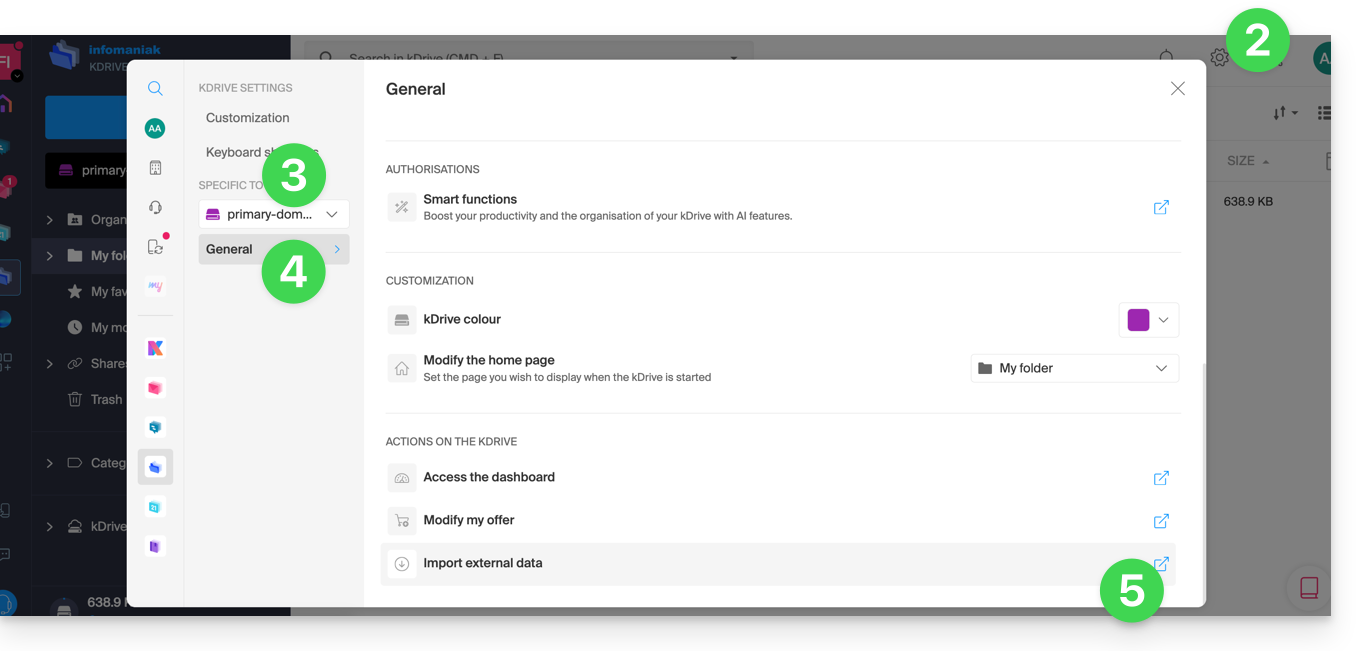
- Click the blue Start button:
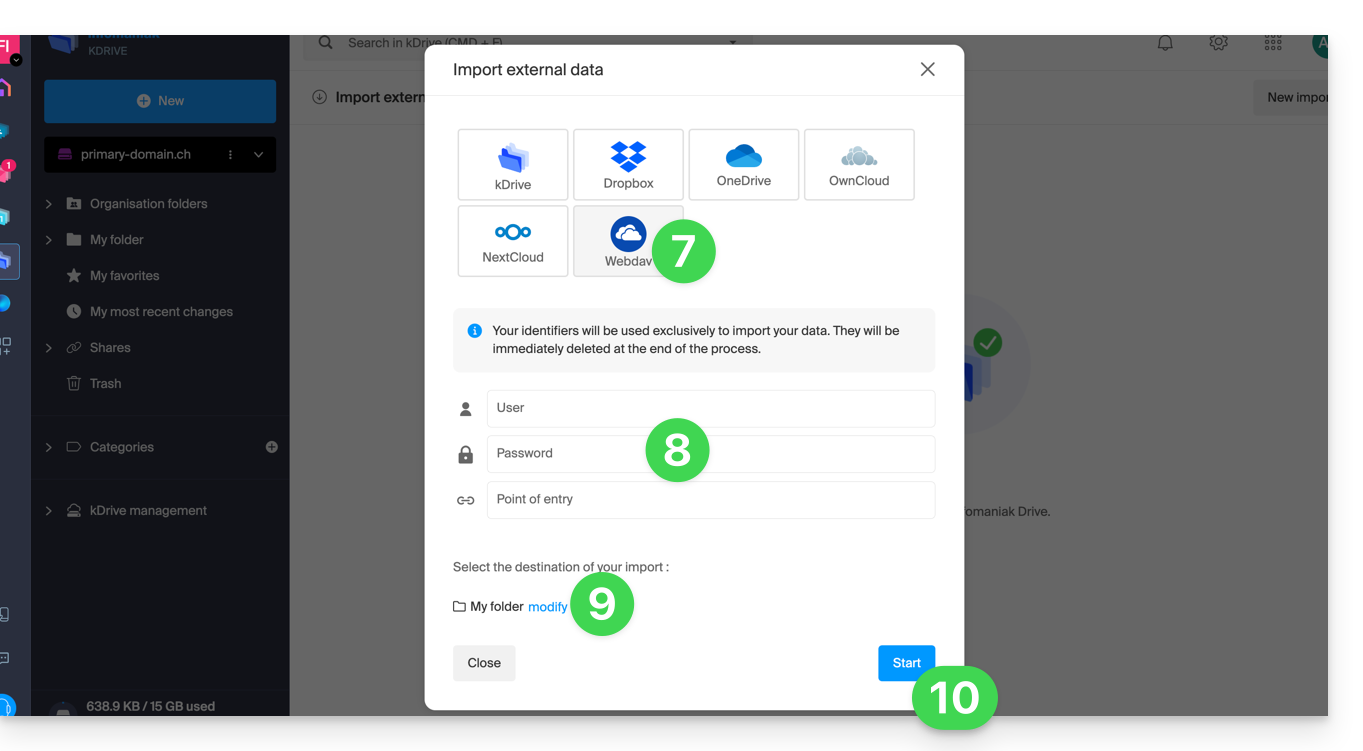
- Click on WebDAV.
- Complete the requested information based on the source (including the WebDAV address you have - obtained from the source).
- Choose the destination kDrive and the desired location to host the imported data.
- Click on Start:
Link to this FAQ:
Has this FAQ been helpful?
This guide details the specific rules to follow when creating a user password with mysqli_connect() that contains the “dollar” character $ on Infomaniak platforms.
Preamble
- If, when using
mysqli_connect(), you get the error message "Access denied for user" and your database user password contains a$sign, the problem may be due to the functioning of strings in PHP. - The problem can also occur with messaging scripts.
Rules to follow
When the special character $ is used in a user password and is followed by any character other than a number, the variable name is not valid and the substitution does not occur correctly.
Here are solutions to fix this:
- Place the password in single quotes:
'$******' - Ensure a number directly follows the dollar:
"$2*****" - Use a backslash to "escape" the dollar in the password:
"\$****"
Link to this FAQ:
Has this FAQ been helpful?
This guide explains the differences between a Domain (or main site), a Subdomain and an Alias.
Preamble
- Although they are related, these three elements (Domain, Subdomain, and Alias) have different functions and purposes.
- They can impact a Web Hosting via its domain name, or even the email service since it is quite possible to have email addresses on a subdomain, for example.
What is a Domain?
The domain or domain name is the main entrance to your website. It is from this that your users will access your content. It is this main domain that defines what will appear in the URL bar of your users' browsers.
Prerequisites
- Own a domain.
- Own an Infomaniak Web Hosting.
Refer to the guide Create a new site on your Web Hosting.
What is a Subdomain?
The Subdomain is symbolized by an additional word that is in front of your main domain name. This is very useful in several cases, for example:
- this can be used to display "exclusive" or targeted content, for example, by going to
faq.infomaniak.comyou arrive at the knowledge base where all the guides are located - this can also be used (temporarily or permanently) when creating a new site or redesigning an existing site, for example, by creating
new.domain.xyzwhen the main site was previouslydomain.xyz
Prerequisites
- Own at least one domain.
- Own an Infomaniak Web Hosting.
Refer to the guide Add a subdomain to your Web Hosting.
What is an Alias?
An Alias or Alias Domain is a second domain name that points directly to your main site; they share the same web pages. The alias is another entrance to your website. For example, the main site of the Swiss Confederation is www.ch.ch and www.suisse.ch is its alias.
Prerequisites
- Own multiple domain names.
- Own an Infomaniak Web Hosting.
Refer to the guide Add an alias to your Web Hosting.
The equivalent also exists for a Mail Service.
The benefit of an Alias is that it allows you to increase the visibility of your site with your target audience by offering them more entry points to access it.
Link to this FAQ:
Has this FAQ been helpful?
This guide details the ranges of public IP addresses used by Infomaniak; this notably facilitates the configuration of security systems (firewall, filtering, whitelisting).
Preamble
- The addresses are indicated in CIDR format (example:
192.0.2.0/24), which groups several consecutive addresses. - The format of the listing includes the IP ranges (ranges) used by the following products:
- kuite: all kSuite products
- vps: all VPS
- public-cloud: all Public Cloud
- all: covers all IP addresses in the Infomaniak network
IPv4 & IPv6 address ranges
The link to the JSON file listing the IPs is:
Link to this FAQ:
Has this FAQ been helpful?
This guide concerns OAuth2 applications to connect to your external services via your Infomaniak login ID.
Manage Infomaniak OAuth2 apps
To do this:
- Click here to access the management of your product on the Infomaniak Manager (need help?).
- Click the blue button Create a new application:
- Choose the type suitable for your current need and project.
- Give a name to the application.
- Enter the URL of the application according to the technical information available to you.
- Click on the button to create the application:
- Copy the information (
Client ID,Client secret) to a safe place - they will no longer be accessible after that: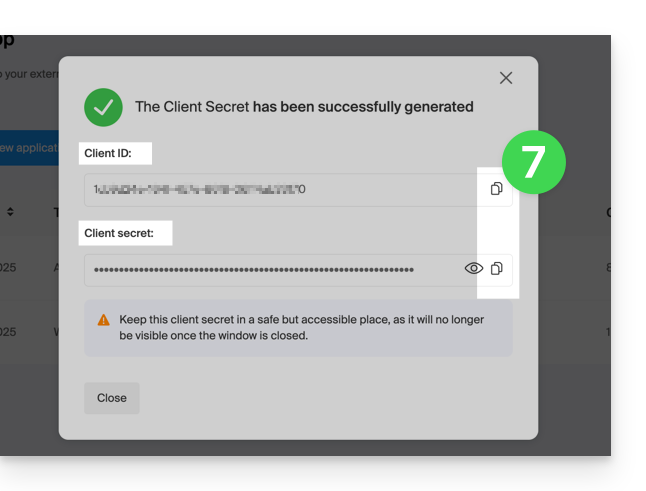
Link to this FAQ:
Has this FAQ been helpful?