Knowledge base
1000 FAQs, 500 tutorials and instructional videos. Here, there are only solutions!
This guide explains how to upgrade a free Mail Starter plan to a more comprehensive and enhanced plan, such as the free or paid kSuite.
Introduction
- When you purchase a domain name from Infomaniak, you get 1 free email address and 10 MB of basic web space: this is the Starter plan.
- With a few clicks, you can upgrade these plans to unlock the limits and enjoy an enhanced experience.
- To help you identify the Mail plan that best suits your needs, please refer to this other guide.
Upgrade the Starter plan - Free Mail service
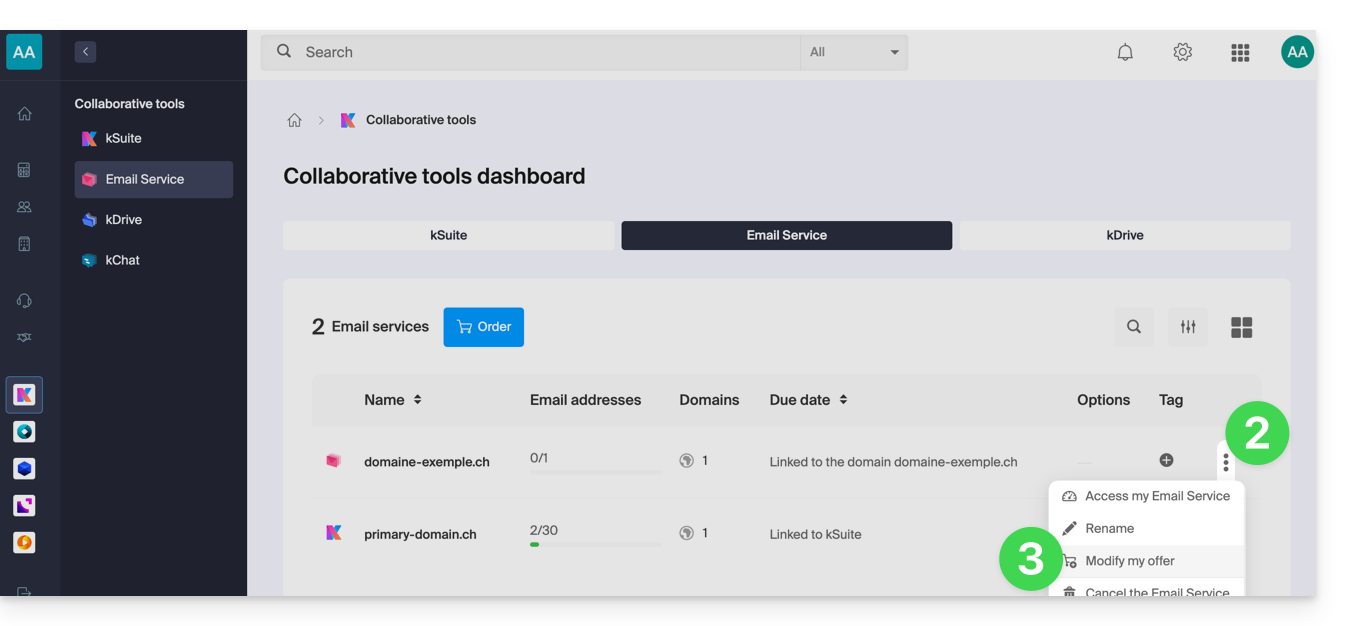
To upgrade the Starter plan:
- Click here to access the management of your product in the Infomaniak Manager (need help?).
- Click on the action menu ⋮ located to the right of the item in question.
- Click on Modify plan:
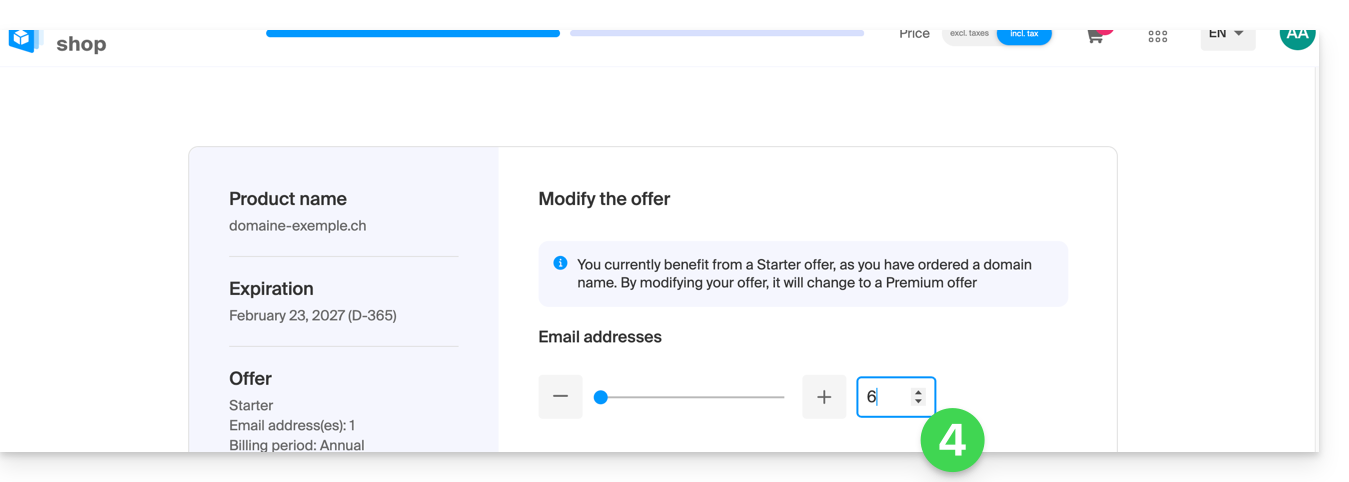
- Adjust, if necessary, the number of email addresses to add to the Mail service using the order wizard, which will guide you through the plan upgrade process:
Link to this FAQ:
Has this FAQ been helpful?
This guide introduces the DNS Diagnostic tool, which allows you to verify that the relationships between…
- DOMAIN NAME at Infomaniak
and
- MAIL SERVICE at Infomaniak
… are correct, so that the Mail traffic is directed to the right place.
Preamble
- To verify, the tool checks the MX, SPF records, etc.
- You will thus be able to detect and correct certain Mail issues, especially if they are related to DNS (technical information that, in short, determines where such and such Mail traffic should be directed) by acting at the level of your domain.
- Automatic correction is only possible when the domain name is present in the same Organization as the product to which it must be attached.
- If this is not the case, then the correction must be done manually.
Diagnose a DNS problem
To access the DNS diagnostic of your domain name:
- Click here to access the management of your Mail Service on the Infomaniak Manager (need help?).
- Click directly on the name assigned to the product concerned:
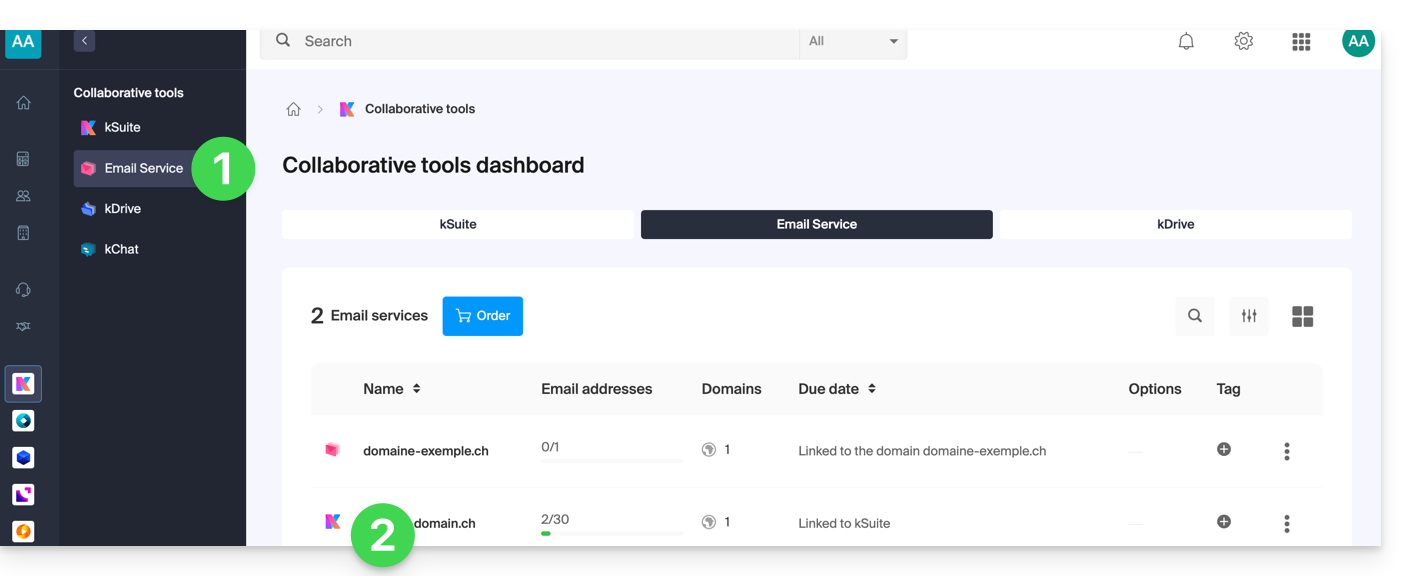
- Click on Domain Management in the left sidebar:
- Click on DNS Diagnostic in the left sidebar.
- Click the button if necessary to refresh the information that should be green.
- If DNS issues are detected, a red display on the dashboard indicates it:
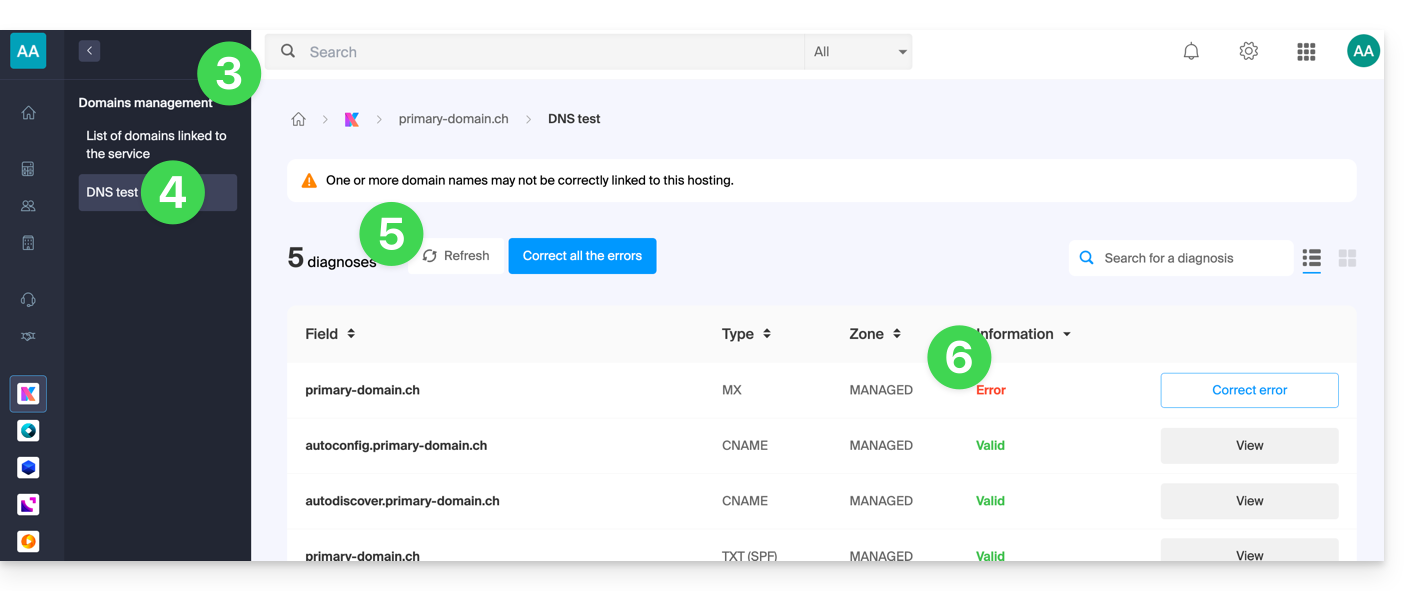
- Correct each error individually by clicking on the button located to the right of the item concerned…
- … or all errors at once with the button located above the dashboard
Refer to this other guide regarding the same automatic verification process but for Web Hosting.
And if necessary, refer to the messaging security diagnostic.
Link to this FAQ:
Has this FAQ been helpful?
This guide explains how to create an alias, i.e., a variation of your usual email address without having to add a new address to your existing Mail Service.
✘ UNAVAILABLE with
my kSuite / my kSuite+ (ik.me, etik.com, ikmail.com)
Number of aliases possible per email address:
| kSuite | free | 1 |
| Standard | 50 | |
| Business | 50 | |
| Enterprise | 50 | |
| Mail Service | Starter 1 address max. | 1 |
| Premium 5 addresses min. | 50 |
How an alias works
It is possible to create alternative versions of your email addresses by modifying what comes before the @ symbol.
For example:
john-peter.smith@domain.xyz is a long email address…
It can be shortened and used as follows:
jps@domain.xyz
In this example, you need to create an alias "jps" for the address "john-peter.smith".
Then, if someone writes to jps@domain.xyz:
- their message will arrive in the inbox of the main address (
john-peter.smith@domain.xyz).
If someone writes to john-peter.smith@domain.xyz AND jps@domain.xyz in the CC field:
- their message will arrive twice in the inbox of the main address (
john-peter.smith@domain.xyz).
An alternative feature is presented here. To modify what comes after the @ symbol instead, use domain aliases here.
Users of the email address on the Infomaniak Mail web app receive an email each time an alias is added or removed.
Add an alias from the Infomaniak Mail web app
Prerequisites
- You must have permission to manage aliases: it is possible that the Mail Service manager has removed this right from their admin account.
Then, to add an alias:
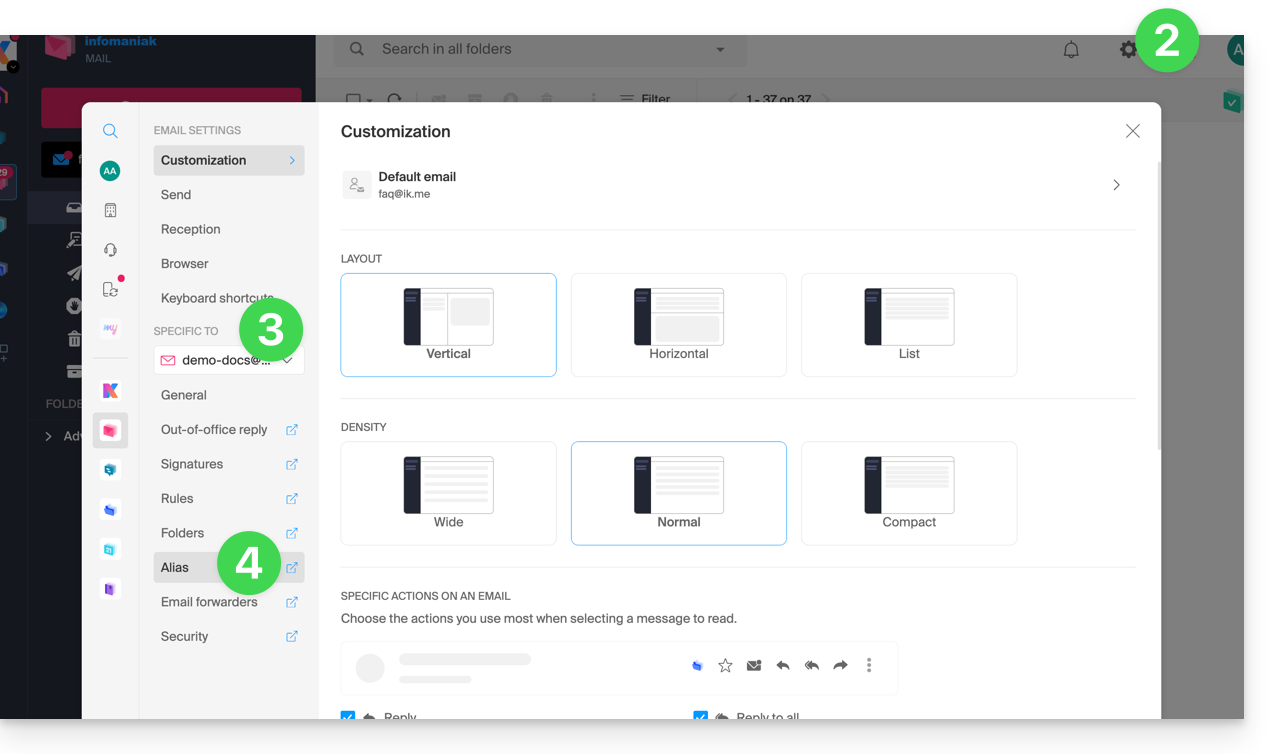
- Click here to access the Infomaniak Mail web app (online service ksuite.infomaniak.com/mail).
- Click on the Settings icon in the top right corner.
- Check or select the email address in question from the drop-down menu in the left-hand menu.
- Click on Aliases:
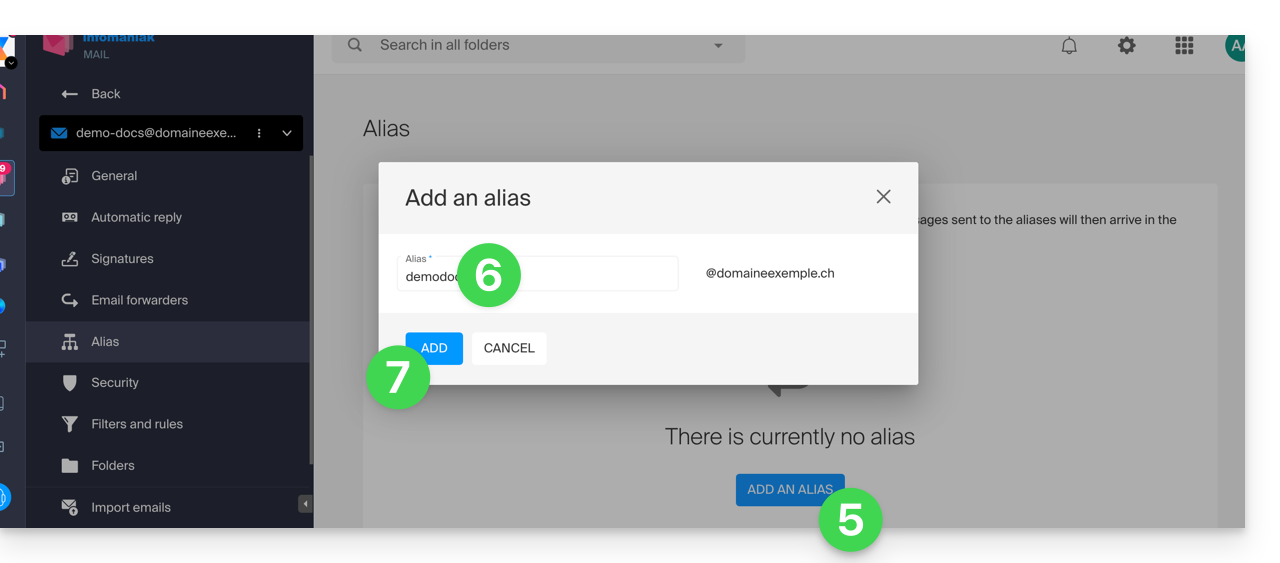
- Click on Add an alias to create a variation of your email address.
- Enter the desired alias (what comes before the @ symbol).
- Click on Add:
Add an alias from the Mail Service
To access the Mail Service:
- Click here to access the management of your product in the Infomaniak Manager (need help?).
- Click directly on the name assigned to the product in question.
- Click on the email address in the table that appears.
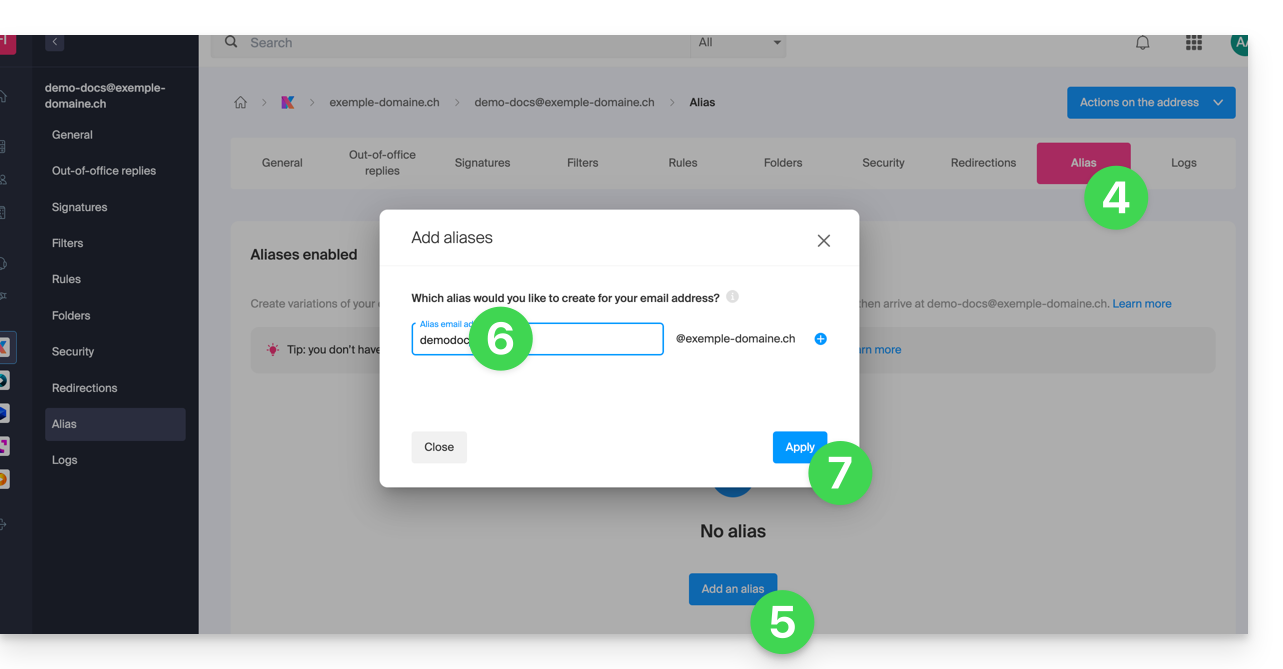
- Click on the Alias tab or, from the left-hand menu, click on Alias.
- Click on the blue Add an alias button.
- Enter the desired alias (the part that comes before the @ symbol):
- Click on Apply to save the changes:
Link to this FAQ:
Has this FAQ been helpful?
This guide is about IP addresses, those…
- …assigned to sites/hosting/servers, dynamic or static, shared or dedicated,
- …assigned by your Internet Service Provider (ISP) when establishing an Internet connection to your Infomaniak product.
Preamble
- A dedicated or static IP address for a website is a permanent IP address specifically assigned to it.
- Unlike a shared IP address, which is used by multiple websites, a dedicated IP address ensures that only this platform is associated with this address.
- Dedicated IP addresses for websites are often used in cases where stability, customization, and security are important, such as server hosting, firewall configuration, or activating SSL certificates (although it is possible to proceed without a dedicated IP address to install an SSL certificate).
- Here are the main advantages:
- Configuring a PTR entry or reverse DNS on dedicated IPs is useful, especially for installing a mail server, as some email providers check the PTR record before accepting emails sent from a server.
- Better connection stability.
- Reduced risk of a bad reputation due to websites sharing the same IP address.
- Easier configuration of certain technical aspects.
- A dedicated IP can improve a website's search engine ranking (although there are differing opinions among SEO specialists).
- Note: Infomaniak does not allow access to websites via HTTP(S) by IP (dedicated) on managed servers; you must use a domain name that points to the IP (or use the preview URL).
Add a dedicated IP to the website
To add a dedicated IP to your website, refer to this guide.
If you encounter issues directing web traffic to a defined port, refer to this other guide.
IP address blockage (Internet connection)
If you can no longer access…
- … all your email addresses that you own with Infomaniak (which usually work fine) and this with an email software/client from the same Internet network (i.e., from the same IP address provided by your ISP)…
… or if you unfortunately performed this type of operation:
- repeated unsuccessful connection attempts via FTP, SSH, or on access points such as the WordPress login…
- requests returning too many errors such as mass 403 errors…
… your access to Infomaniak servers may be blocked following the banning of the IP address (banip / ipban) of your internet connection.
To unblock the situation, contact Infomaniak support by email and specify the domain concerned and especially your public IP address concerned.
Permanent Unblocking (IP Whitelisting)
With a Managed Cloud Server, you can request to permanently authorize the IP address in question so that it is never blocked again, regardless of the situation. To do this, you must:
- Have a dedicated IP associated with your Managed Cloud Server.
- Be aware that Infomaniak will no longer block any potential attacks from this IP; attacks or malicious access attempts from this address will no longer be automatically blocked by the security systems.
- Confirm by email and from a contact address associated with the account (owner or administrator) that you understand and accept full responsibility in case of an attack from this IP.
Link to this FAQ:
Has this FAQ been helpful?
This guide explains how to…
- … enable filtering of incoming emails
- … automatically classify promotional messages
- … report certain fraudulent messages
… in order to reduce unwanted or too many messages on an email address managed by Infomaniak.
Solutions to exclude, sort, filter incoming emails
Automatic filtering methods
- Refer to this guide to use the <Spam> folder by activating the spam filter (it is possible to deactivate it).
- Refer to this other guide to use the <Promotions> and <Social Networks> folders by activating the advertising & social networks filter.
Manual methods
- Refer to this guide to report an incoming message not detected as spam (advertising / unsolicited contact).
- Refer to this guide to report an incoming message not detected as phishing (fraud / misleading fake email).
- Refer to this guide to block or allow specific email addresses or even entire domains.
- Refer to this guide to define your own sorting and classification filters ('Sieve language') for incoming emails…
- … which will allow you, among other things, to filter messages addressed to a temporary alias that you can create to protect yourself when registering on the Internet, for example.
If you are facing a wave of spam or unusual messages, refer to this other guide to perform some checks.
If your own emails are often incorrectly classified as spam, refer to this other guide to perform some checks.
To sort and clean an inbox that has been flooded with messages, refer to this other guide.
Link to this FAQ:
Has this FAQ been helpful?
This guide shows you how to export and save the contacts from the "Discussion List" tool into a CSV file (.csv) format.
The Discussion List tool is currently available only to users who have activated it in the past. Discover a simpler and more powerful emailing solution (Newsletter). You will be able to easily import your existing contacts.
Export contacts to a file
The discussion list tool is accessible within your Mail Service:
- Click here to access the management of your Mail Service on the Infomaniak Manager (need help?).
- Click directly on the domain name assigned to the product concerned.
- Click on Discussion List in the left sidebar.
- Click on the name of your list.
- Click on the Subscribers tab.
- Click on Download the list in CSV format:
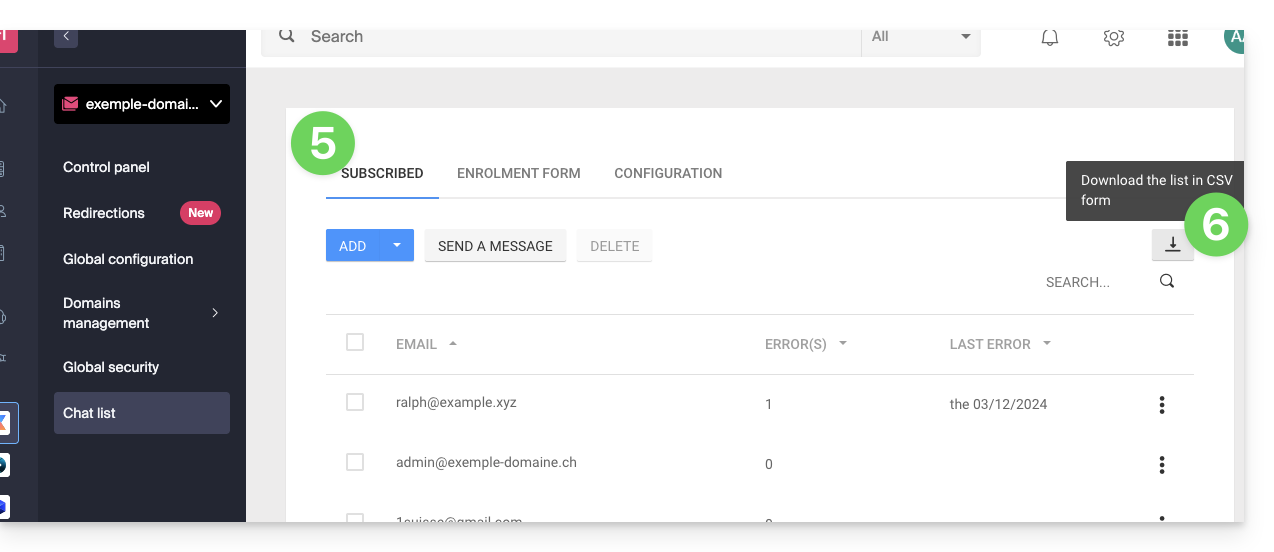
The CSV file will be downloaded to your computer's hard drive.
To import these contacts into the Newsletter tool:
- Change the possible
.txtfile extension to.csv. - Refer to this other guide.
Link to this FAQ:
Has this FAQ been helpful?
This guide explains how to connect the desktop app Outlook 2016 (desktop application on Windows) to an email address hosted by Infomaniak.
Add the email address to the application
Prerequisites
- Create the email address within my kSuite or a Mail Service / kSuite.
- Create a password for the email address on the device you are going to configure.
- Check that the Mail Service is configured optimally.
To configure the email application:
- Open the application.
- Click on the File menu:
- Click on Account Settings.
- Click on Add or Remove Accounts:
- Click on New:
- Enter the email address to connect.
- Click on Advanced Options.
- Click on Manual Configuration.
- Click on the blue Connect button:
- Click on IMAP:
- Enter the password for the email address to connect.
- Click on the blue Connect button:
- Uncheck the additional configuration box for mobile device if necessary.
- Click on the blue Finish button:
- Click on Repair to correct some automatically added but incorrect information:
- Click on Advanced Options.
- Click on Manual Repair.
- Click on the blue Repair button:
- Check and complete the missing or incorrect information.
- Click on Outgoing Server:
- Check and complete the missing.
- Click on Next.
- Click on Finish:
- Click on Close:
- There you go, your email address is now correctly configured in the application:
Recommended settings
- Incoming IMAP server =
mail.infomaniak.com - IMAP port =
993(with SSL) - Outgoing SMTP server =
mail.infomaniak.com - SMTP port & encryption protocol and command/method to activate this protocol:
587+ STARTTLS - Username = full & complete email address ( ? )
- Password = the one generated for the email address you want to access
- Authentication required for sending emails:
- It is activated in the SMTP settings of your application.
- Check "use the same parameters as the incoming server" or according to the software/email clients, enter a username (= full & complete email address) and the generated password.
Refer to this other guide if you are looking for information about other mail ports and protocols compatible (SSL / TLS for example).
In case of a problem
Check that the Mail Service is configured optimally.
It is not necessary to contact Infomaniak Support if your email address works well outside the application. The most common error concerns the use of an incorrect password. The troubleshooting guides help you resolve any potential issues:
- Refer to the solutions given in this other guide regarding mail in general.
- This other guide is more specifically about Outlook.
… and if your Outlook no longer works since a change of mail password, refer to this other guide.
Link to this FAQ:
Has this FAQ been helpful?
This guide explains how to connect the desktop app Microsoft Outlook for Mac version 16.80 (desktop application on macOS) to an email address hosted by Infomaniak.
Preamble
- Instead of the manual configuration for Outlook below, it is recommended to use Apple Mail with the .mobileconfig configuration profiles offered by Apple.
- The various services offered by Infomaniak are all compatible with the corresponding standard protocols (IMAP/SMTP for email, for example). Therefore, if you encounter a problem with third-party software, contact its publisher or a Partner and consult the support policy as well as article 11.9 of the Infomaniak Terms of Service.
Add the email address to the application
Prerequisites
- Create the email address in my kSuite or a Mail Service / kSuite.
- Create a password for the email address for the device you are going to configure.
- Check that the Mail Service is configured optimally.
To configure the email application:
- Open the application.
- Click on Add an account:
- Enter the email address to be linked.
- Click on Continue:
- Click on IMAP:
- Click on Synchronize via IMAP (without Microsoft Cloud):
- Check and complete the missing information.
- Click on Add the account.
- Understand and go through the different Microsoft information windows:
- Your email address is now configured in the application:
Recommended settings
- Incoming IMAP server =
mail.infomaniak.com - IMAP port =
993(with SSL) - Outgoing SMTP server =
mail.infomaniak.com - SMTP port & encryption protocol and command/method to activate this protocol:
587+ STARTTLS - Username = full & complete email address ( ? )
- Password = the one generated for the email address you want to access
- Authentication required for sending emails:
- It is activated in the SMTP settings of your application.
- Check "use the same parameters as the incoming server" or, depending on the software/email clients, enter a username (= full & complete email address) and the generated password.
Refer to this other guide if you are looking for information about other compatible messaging ports and protocols (SSL / TLS for example).
In case of a problem
Check that the Mail Service is configured optimally.
There is no need to contact Infomaniak Support if your email address works well outside the application. The most common error concerns the use of an incorrect password. The troubleshooting guides help you resolve any potential issues:
- Refer to the solutions given in this other guide regarding email in general.
- This other guide is more specifically about Outlook.
… and if your Outlook no longer works since a change in your email password, refer to this other guide.
Link to this FAQ:
Has this FAQ been helpful?
This guide explains how to add or modify one or more SPF records in a DNS zone (of a domain name) managed on the Infomaniak Manager.
Preamble
- If your domain name is registered with Infomaniak, your email is managed by Infomaniak, but your website is hosted with another provider (e.g., Wix), you are probably managing the DNS zone (and therefore the SPF) with this other provider: refer to this other guide on this topic.
Understanding SPF records
The SPF (Sender Policy Framework) record type is a standard for verifying the domain name of the sender of an email and aims to reduce SPAM. It is used to indicate which server is authorized or not to send emails for a domain. If the SPF fails for an email, it means that the email was not sent from a server/IP address authorized by the administrator of the sending domain. The email is then considered as spam.
Strict SPF -all: rejection of unauthorized emails
Infomaniak automatically installs this type of record when creating a Mail Service on your domain (strict SPF):
v=spf1 include:spf.infomaniak.ch -allThus, the recipient server of the email you send will evaluate that any email not coming from Infomaniak servers will be rejected. This prevents malicious individuals from impersonating email addresses from your domain.
Flexible SPF ?all: tolerance for certain emails
You can decide to modify the SPF for a more flexible model:
v=spf1 include:spf.infomaniak.ch ?allIn this case, the recipient server of the email you send will evaluate, according to its own rules, whether it accepts emails not coming from Infomaniak servers.
In summary:
?: the receiving server accepts the message even if the sender is not listed in the SPF~: the receiving server generally accepts the message if it is not listed in the SPF but identifies it as suspicious-: the receiving server rejects the message if it is not listed in the SPF (recommended)
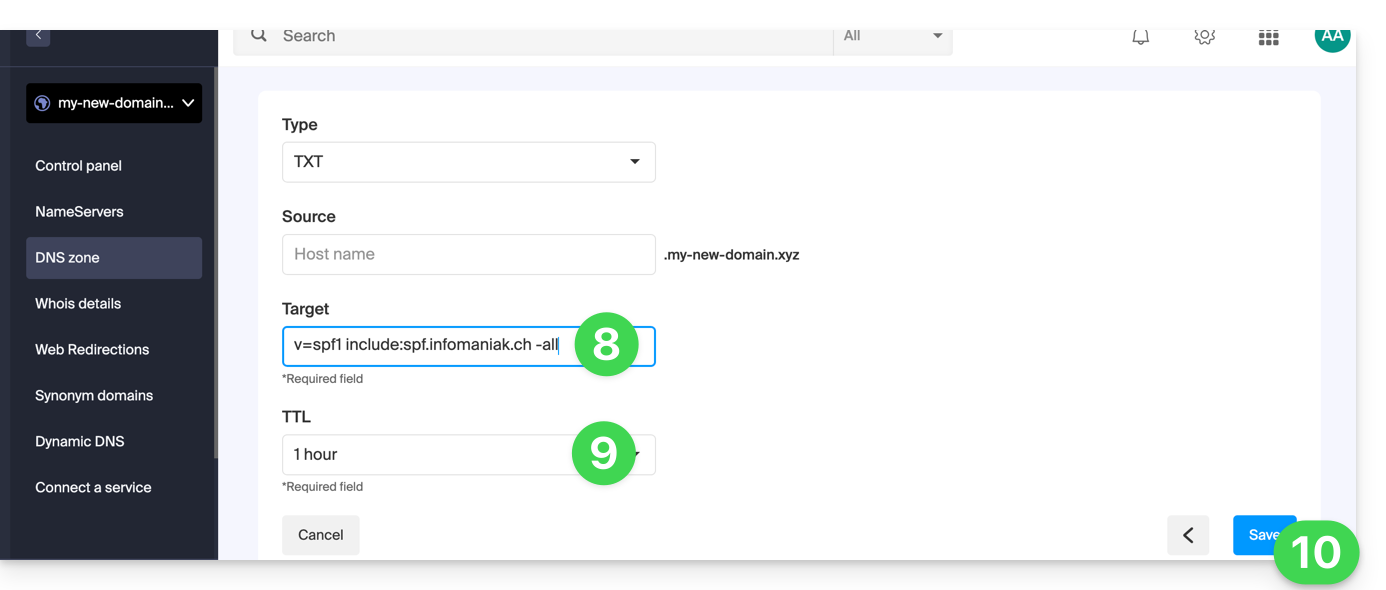
Adding an SPF via a TXT record
There are 2 ways to manage SPFs.
If you have a Mail Service with Infomaniak, the simplest way is to go to the Global Security tool to manage SPFs: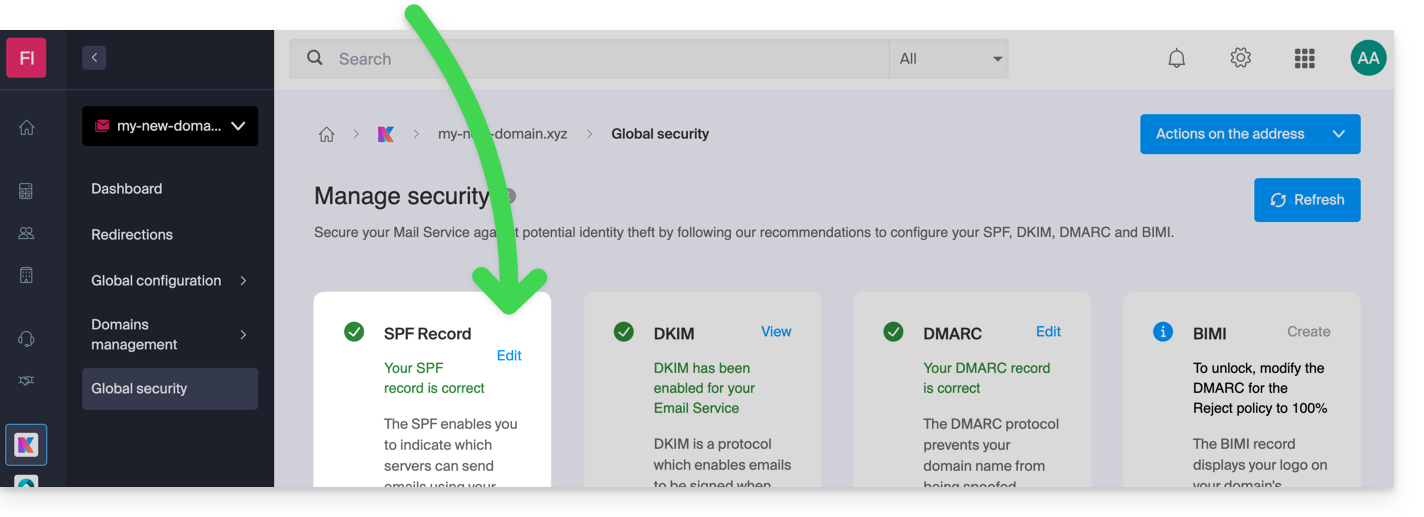
However, since the SPF record is a TXT type DNS record, you can also manage it from the DNS zone of the domain name:
- Click here to access the management of your domain on the Infomaniak Manager (need help?).
- Click directly on the name assigned to the domain in question.
- Click on DNS Zone in the left sidebar menu.
- Check in the table that there is not already a TXT record with a value mentioning SPF as here:
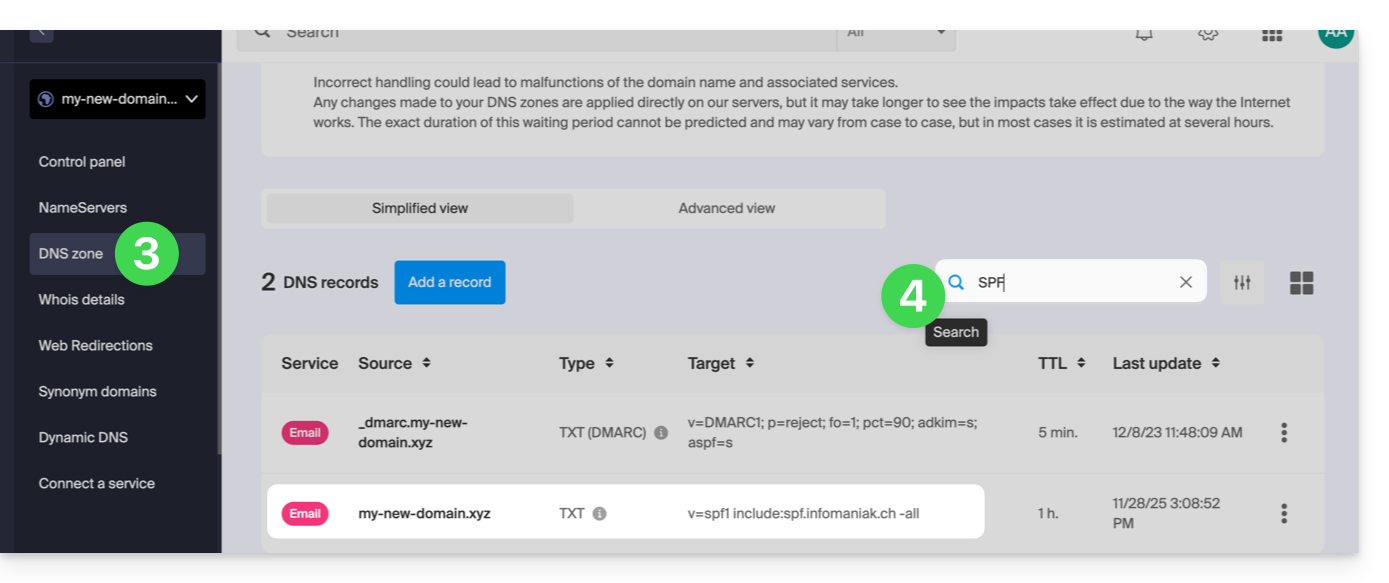
- Click the button to add a record (you will get an error if you try to add a TXT record with an SPF value when one already exists in the zone):
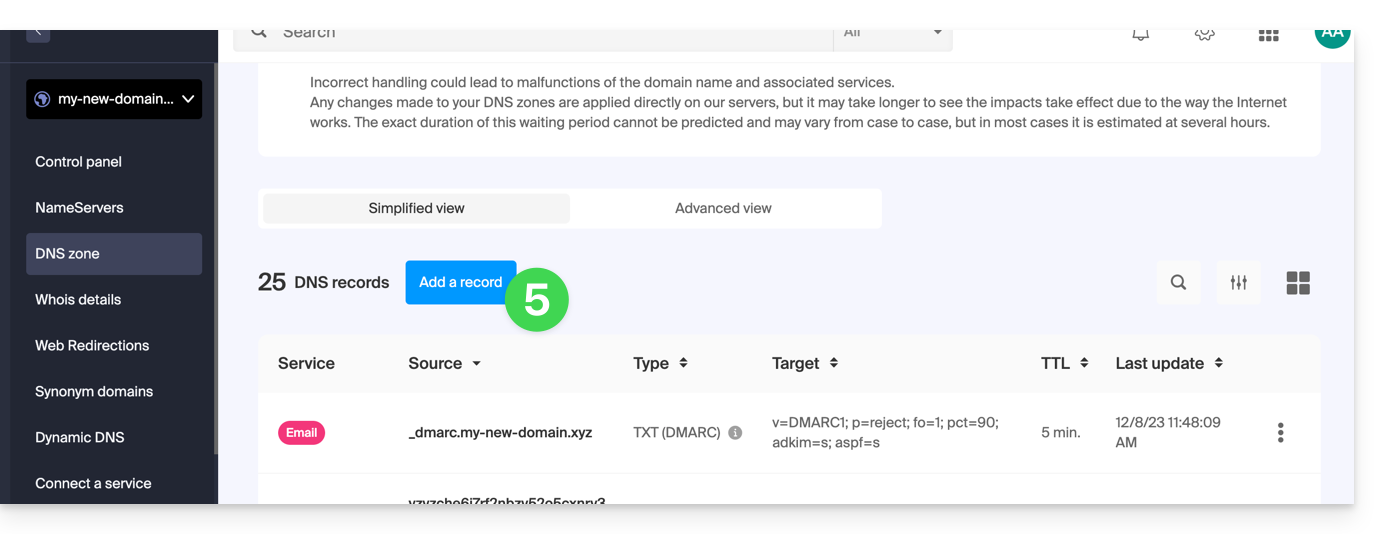
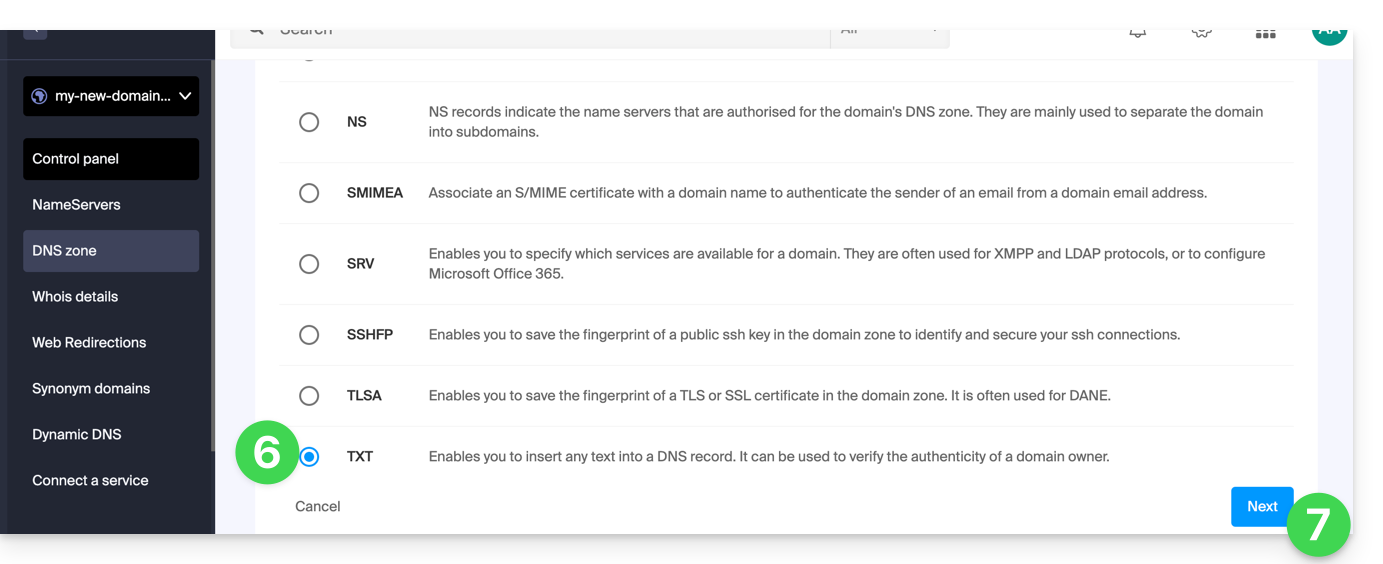
- Click the radio button TXT to add a record.
- Click the button Next:
- Enter the SPF value required for your DNS zone.
- Leave the default value for TTL.
- Click the button Save:
Add multiple SPFs
If you use other mail providers in addition to Infomaniak, you need to obtain their SPF and then merge it with Infomaniak's according to a specific syntax.
Having multiple distinct SPF records will cause errors. It is essential to group multiple SPFs into the same TXT!
Example of 3 SPFs to merge:
- That of Infomaniak:
v=spf1 include:spf.infomaniak.ch -all - Those of 2 secondary providers:
v=spf1 include:the-second-domain.xyz ?allv=spf1 include:the-other-domain.xyz ~all
...the final SPF to be inserted into your DNS zone should be in the form:
v=spf1 include:spf.infomaniak.ch include:the-second-domain.xyz include:the-other-domain.xyz -allDelete any other SPF entry from the DNS zone of your domain! Any DNS addition/modification can take up to 48 hours to propagate.
Limits on the number of SPFs
Multiple SPFs are limited to a maximum of 10 inclusions.
The Infomaniak SPF usually already includes 4 inclusions:
include:relay.mail.infomaniak.chinclude:app.mail.infomaniak.chinclude:newsletter.infomaniak.cominclude:amazonses.com
Check the SPF record(s)
The Global Security tool on the Infomaniak Manager allows you to easily check and correct any problematic records you may have.
If you encounter any issues, it is recommended to analyze your domain name on MxToolbox to check if your SPF contains syntax errors, too many inclusions, or any other issues that could lead to an error: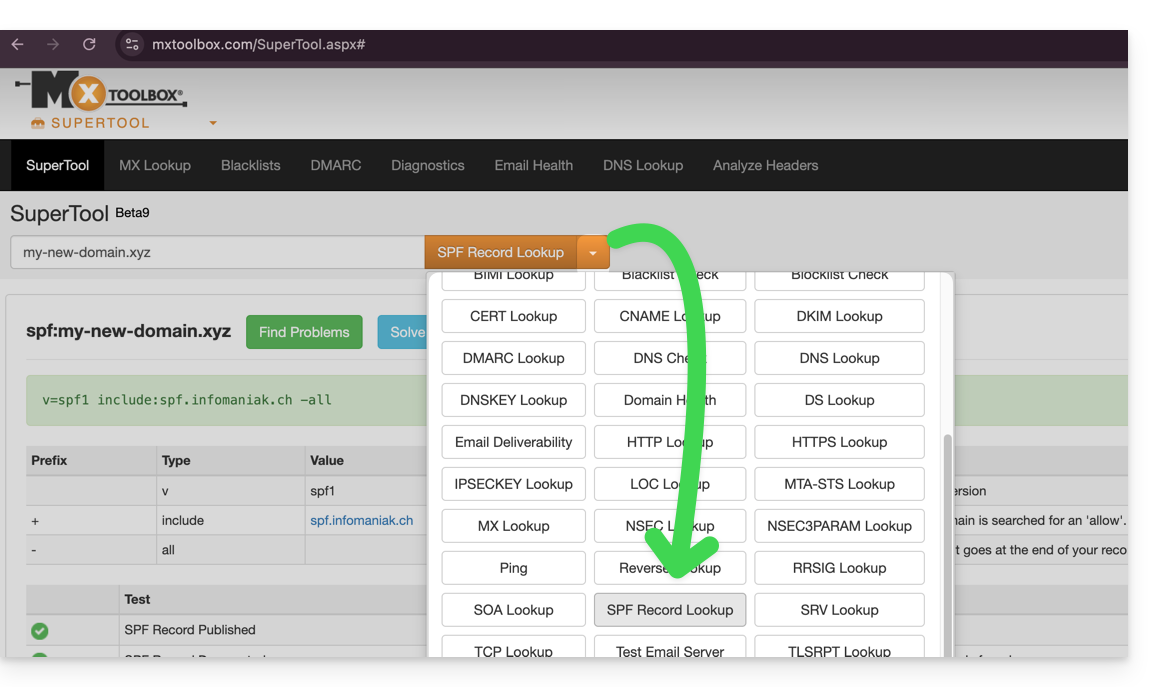
… or directly at the address https://mxtoolbox.com/spf.aspx.
Link to this FAQ:
Has this FAQ been helpful?
This guide helps you identify and correct errors encountered when attempting to use your software/email client such as Microsoft Outlook, Mozilla Thunderbird, Apple Mail, etc.
Refer to this other guide if you are looking for information regarding errors of type "mailer daemon" or "delivery failure" following an email send.
Always use...
- the unique server name:
mail.infomaniak.com(for receiving IMAP and sending SMTP servers), - the correct incoming/outgoing port numbers,
- the correct email address password which is different from the username used to log in to Infomaniak (if necessary, add/modify the password of your email address) - beware of the sign
$, - authentication in the settings when it is offered, and if necessary, enter the username (your full email address) and its password in the fields related to mandatory authentication,
- an existing email address that must have been actually created (or defined as an alias),
- one protocol at a time (never check an email box with devices configured in POP3 for some and in IMAP for others as these two protocols do not work well together).
Mandatory try to...
- compare recommended parameters for the email software/client used, especially if you have just modified the password on the Infomaniak side,
- retrieve your emails using another network (WiFi, connection sharing from 4G/5G, or any other Internet connection),
- temporarily disable your security applications (antivirus, firewall, VPN...); if you can then retrieve your emails normally, contact the publisher of the security application(s) you are using,
- type your password in plain text in a word processor; depending on the configuration of your keyboard the key A may refer to the letter Z and the key Q may refer to the letter A...,
- restart and retry a send/receive: some applications require validating several times the window containing the configuration parameters or ask to be restarted to take into account their new parameters,
- compose a new message after modifying your parameters: a message in the process of being written that would be saved in the Drafts folder risks not taking into account possible configuration changes.
Types of errors
0x800...- refer to this other guide- Certificate error (SSL or other): refer to this other guide
550 5.7.1 relaying deniedorProper authentication required- refer to this other guide535 5.7.0 authentication failed- refer to this other guide
also:
- "573 Antispam: Authenticated connection not possible. Please use port 587 instead of port 25."
or "An operation on the server timed out. The server may be down, overloaded, or there may be too much network traffic."
or "the time limit has been exceeded" with an error number that follows (421, or 573 for example).
Most ISPs (Internet Service Providers) have blocked the SMTP sending port n°25 for many years now. Therefore you should never specify port 25 as the SMTP port. To still be able to send emails, use the recommended ports.
Link to this FAQ:
Has this FAQ been helpful?
The Student Program from Infomaniak allows you to get 1 Web Hosting and 1 kSuite Standard for free to develop your digital skills during higher education.
Preamble
- A domain name is required for the proper functioning of the products and this one remains paid.
- Offer valid only in the following countries: Switzerland, France, Belgium, Germany, Italy, Austria, Spain, Canada.
- Offer reserved for new hosting orders (does not apply to orders already in progress or renewed orders).
- 1 web hosting (= storage of 20 websites on 250 GB of SSD space) and 1 standard kSuite offered per person.
- The student must be of legal age (or have parental authorization).
- The student must be able to justify their situation with a valid registration card and identity card:
- student card or school certificate: it must be up-to-date and show the school, the current school year as well as your first and last name
- identity card (front/back): it must be valid with a clear and legible photo
- your official student email address: it is provided by your school, for example firstname.lastname@your-school.com
- The duration of the offer depends on the validity period of the registration card and cannot exceed 4 years in total.
Get the free online hosting
To benefit from this offer, familiarize yourself with the offer page by preparing the required documents.
Requests are processed in the order they are received in the days following your message. You will receive a response by email in all cases.
Discover other free Infomaniak services!
Link to this FAQ:
Has this FAQ been helpful?
This guide explains how to modify an email address within a Mail Service in case you want to edit the spelling of the part coming before the at sign @ of your email address (= the prefix).
Preamble
- This can be useful for addresses “firstname.lastname” in case of a change of surname (marriage for example) or simply a spelling change.
- To rather modify the part of your email address coming after the at sign @, refer to this other guide.
Modify the prefix of an email address
To change from an email address of the form address1@domain.xyz …
… to a renamed address address2@domain.xyz…
… and given that it is not possible to simply modify the spelling of an email address, you need to:
… either create an email alias
- then in case of using a software/email client, reconfigure your email settings
- and possibly in Mail modify the sending address in the Signature section
… or create a second email address with the new formulation
- then move the messages from one address to the other
- and delete the first address if necessary.
Link to this FAQ:
Has this FAQ been helpful?
This guide explains how to easily sort your messages using Plus Addressing ("+ addressing" or "sub-addressing"), i.e., aliases of your email address that do not need to be actually created on an Infomaniak Mail Service.
Preamble
- This feature is free and allows you to have multiple versions of your existing email address (= alias), in order to, for example, separate your personal emails from the newsletters you are subscribed to.
- These "wildcard" type aliases mean that a message can be sent to an email address containing a
+(for exampleabc+def@domain.xyz) and it will still arrive in the existing mailboxabc@domain.xyzand have the possibility of being filtered and sorted automatically based on what comes after the "+" if you set this up. - Note that it is also possible to create real aliases without the
+character... - Infomaniak is fully compatible with the DEA system on which the feature presented here depends; in case of any issues, contact the organization on which it is used.
Using a “disposable” alias with an Infomaniak email address
The next time you sign up for a newsletter or a customer account that requires a username:
- Simply use a formulation of your email address that includes the "+" sign (example: anna+event@domain.xyz) instead of providing your actual email address:
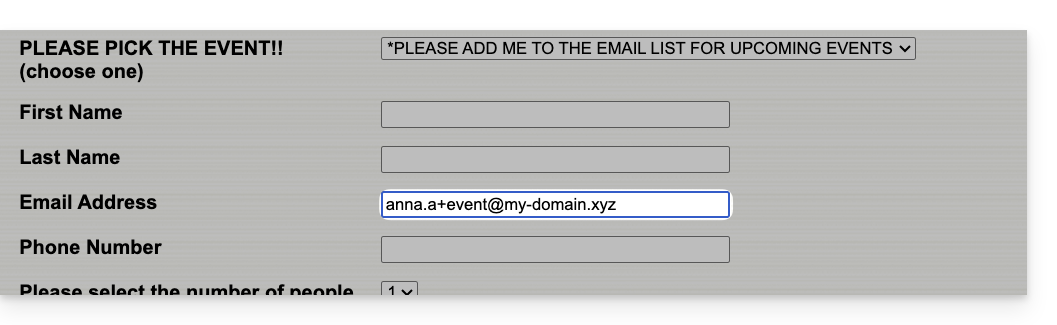
So if your usual email address is anna@domain.xyz, emails sent to anna+event@domain.xyz or anna+nospam@domain.xyz (in short, anna+"anything you want here"@domain.xyz ...) will arrive in the inbox of anna@domain.xyz.
Next, to automatically move incoming messages sent to your aliases into specific folders, refer to this other guide to create sorting filters based on the recipient of the received message.
You can also configure an email software/client so that sending from this type of email address works: refer to the second part of this other guide — this does not work for sending from the Infomaniak Mail web app (online service ksuite.infomaniak.com/mail).
Link to this FAQ:
Has this FAQ been helpful?
Infomaniak continuously improves its products and customer service by prioritizing your suggestions shared via support, social media, or the Web. These suggestions are then discussed during the meetings of the relevant service.
Provide feedback on…
INFOMANIAK SERVICE | [FR] | [EN] | [DE] | [IT] | [ES] |
|---|---|---|---|---|---|
| Euria [ ☍ ] | ✎__ | ✎__ | ✎__ | ✎__ | ✎__ |
| Domains [ ☍ ] | ✎__ | ✎__ | ✎__ | ✎__ | ✎__ |
| Hosting / Site Creator [ ☍ ] | ✎__ | ✎__ | ✎__ | ✎__ | ✎__ |
| Cloud Server [ ☍ ] | ✎__ | ✎__ | ✎__ | ✎__ | ✎__ |
| Public Cloud [ ☍ ] | ✎__ | ✎__ | ✎__ | ✎__ | ✎__ |
| Jelastic Cloud [ ☍ ] | ✎__ | ✎__ | ✎__ | ✎__ | ✎__ |
| Synology [ ☍ ] | ✎__ | ✎__ | ✎__ | ✎__ | ✎__ |
| Housing [ ☍ ] | ✎__ | ✎__ | ✎__ | ✎__ | ✎__ |
| Swiss Backup [ ☍ ] | ✎__ | ✎__ | ✎__ | ✎__ | ✎__ |
| kSuite / my kSuite [ ☍ ] | ✎__ | ✎__ | ✎__ | ✎__ | ✎__ |
| Mail [ ☍ ] | ✎__ | ✎__ | ✎__ | ✎__ | ✎__ |
| app Mail iOS [ ☍ ] | ✎__ | ✎__ | ✎__ | ✎__ | ✎__ |
| app Mail Android [ ☍ ] | ✎__ | ✎__ | ✎__ | ✎__ | ✎__ |
| kDrive [ ☍ ] | ✎__ | ✎__ | ✎__ | ✎__ | ✎__ |
| Calendar [ ☍ ] | ✎__ | ✎__ | ✎__ | ✎__ | ✎__ |
| Contacts [ ☍ ] | ✎__ | ✎__ | ✎__ | ✎__ | ✎__ |
| Newsletter [ ☍ ] | ✎__ | ✎__ | ✎__ | ✎__ | ✎__ |
| SwissTransfer [ ☍ ] | ✎__ | ✎__ | ✎__ | ✎__ | ✎__ |
| Streaming Radio [ ☍ ] | ✎__ | ✎__ | ✎__ | ✎__ | ✎__ |
| Streaming Video [ ☍ ] | ✎__ | ✎__ | ✎__ | ✎__ | ✎__ |
| VOD / AOD [ ☍ ] | ✎__ | ✎__ | ✎__ | ✎__ | ✎__ |
| Guest Manager [ ☍ ] | ✎__ | ✎__ | ✎__ | ✎__ | ✎__ |
| kChat [ ☍ ] | ✎__ | ||||
| kMeet [ ☍ ] | ✎__ | ||||
Infomaniak support is also at your disposal by email, chat or phone if needed.
Link to this FAQ:
Has this FAQ been helpful?
This guide details the size limits (message weight and disk space size) implemented as part of Infomaniak's messaging offers and guides you on how to check the storage used.
Mailbox size limit
⚠ Storage space in gigabytes (GB):
| kSuite | free | 20 |
| Standard | unlimited | |
| Business | unlimited | |
| Enterprise | unlimited | |
| my kSuite | 20 | |
| my kSuite+ | unlimited | |
| Mail Service | Starter 1 max. address | 20 |
| Premium 5 min. addresses | unlimited |
Email size and number limit
Regarding the messages themselves and their attachments:
- The maximum size of an email in sending and receiving is 210,763,776 bytes, or 201 MB exactly.
- This includes header and body (text, html, attachments, etc.) regardless of the means used to send it.
- Note that an attachment can be encoded in base64, so its size in the email is not necessarily the same as its size on disk.
- With the Infomaniak Mail web app (online service ksuite.infomaniak.com/mail) the attachment size limit is 25 MB.
- Beyond this and up to a limit of 3 GB, a SwissTransfer link is generated and integrated into your message: the data is stored in Switzerland in Infomaniak's Cloud and your recipients can use this link to easily download the attachments during a predefined period.
- Beyond 3 GB (and up to 50 GB), it is recommended to go directly through SwissTransfer for your sends.
- The number of messages in the respective storage space is not limited.
- However, it is not recommended to keep more than 4,000 to 5,000 messages per folder (slows down message indexing).
- It is therefore advisable to move your messages into subfolders, which also facilitates their consultation (you can do this manually or set up automatic sorting rules).
Email retention time limit
Retention period:
- There is no time limit for storing messages in the inbox or in subfolders, except for an email that would be deleted, marked as spam, or manually/automatically moved to the "Trash" or "Spam" folder (or any of its equivalent names such as "Deleted Items", "Deleted Messages", "Junk Mail", including spellings in other languages, "Junk" for example - non-exhaustive list)… In this case, the email is automatically deleted after 30 days without the possibility of recovery.
Therefore, never use a folder named, for example, Trash or Infected to store and keep important messages.
- Backups performed by Infomaniak have a retention period.
Display the total size from the Infomaniak Web Mail app
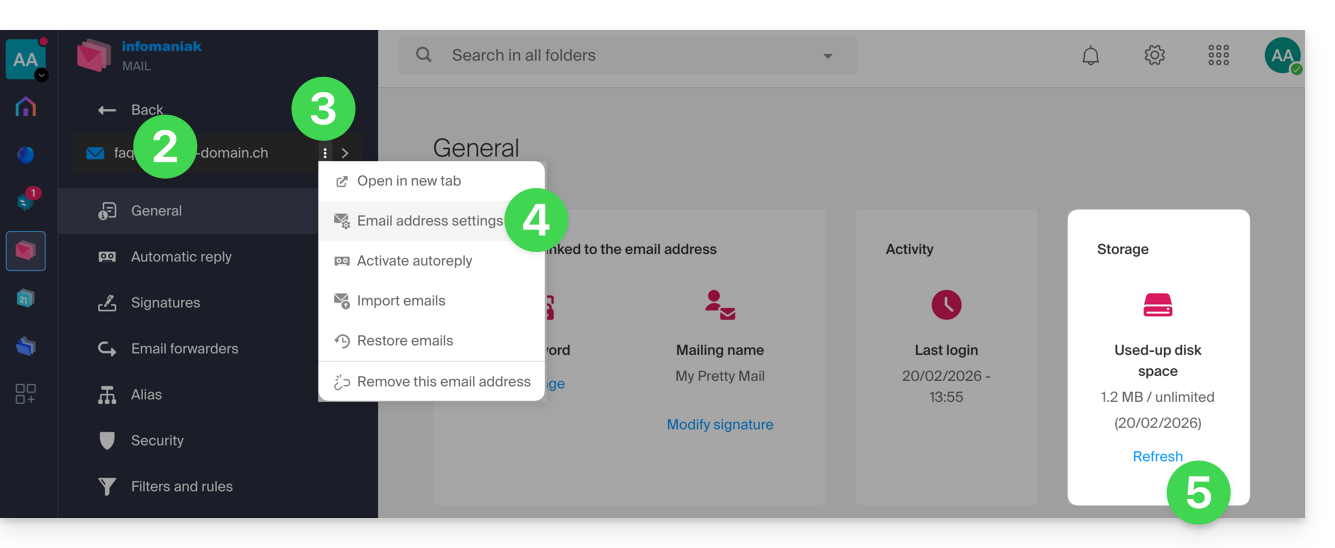
To do this:
- Click here to access the Infomaniak Web Mail app (online service ksuite.infomaniak.com/mail).
- Check or select the email address concerned in the dropdown menu of the left sidebar.
- Click on the action menu ⋮ to the right of the item concerned in the displayed table.
- Click on Email address settings.
- Click on Refresh in the Storage box to display the size of the mailbox:
Other email limits
Refer to the other guides on this subject:
Still having trouble?
If the email address of your recipient is not hosted by Infomaniak, you may receive an error message when sending the email. This can take various forms, such as Recipient address rejected: 5.2.2 Over quota 554 5.0.0 Service unavailable.
This may indicate that your recipient's mailbox is full and they can no longer receive emails, or that the email you are trying to send is too large.
In this case, you need to contact your correspondent to ask them to empty/lighten their mailbox or to ask them for the maximum size of messages you can send them.
Link to this FAQ:
Has this FAQ been helpful?
This guide explains how to connect the desktop app Outlook 2019 (desktop application on Windows) to an email address hosted by Infomaniak.
Preamble
- The various services offered by Infomaniak are all compatible with the corresponding standard protocols (IMAP/SMTP for email, for example), therefore if you encounter a problem with third-party software, contact its publisher or a Partner and consult the support policy as well as article 11.9 of the Infomaniak Terms of Service.
Add the email address to the application
Prerequisites
- Create the email address in my kSuite or a Mail Service / kSuite.
- Create a password for the email address on the device you are going to configure.
To configure the email application:
- Open the application.
- Click on the File menu:
- Click on Account Settings.
- Click on Add or Remove Accounts:
- Click on New:
- Enter the email address to connect.
- Click on Advanced Options.
- Click on Manual Configuration.
- Click on the blue Connect button:
- Click on IMAP:
- Enter the password of the email address to connect.
- Click on the blue Connect button:
- Uncheck the additional mobile device configuration box if necessary.
- Click on the blue Finish button:
- Click on Repair to correct some automatically added but incorrect information:
- Click on Advanced Options.
- Click on Manual Repair.
- Click on the blue Repair button:
- Check and complete the missing information by scrolling down if necessary.
- Click on Outgoing Mail:
- Check and complete the missing information.
- Click on Next.
- Click on Finish:
- Click on Close:
- There you go, your email address is now correctly configured in the application:
Recommended settings
- Incoming IMAP server =
mail.infomaniak.com - IMAP port =
993(with SSL) - Outgoing SMTP server =
mail.infomaniak.com - SMTP port & encryption protocol and command/method to activate this protocol:
587+ STARTTLS - Username = the complete & full email address ( ? )
- Password = the one generated for the email address you want to access
- Authentication required for sending emails:
- It is activated in the SMTP settings of your application.
- Check "use the same parameters as the incoming server" or, depending on the software/email clients, enter a username (= complete & full email address) and the generated password.
Refer to this other guide if you are looking for information about other mail ports and protocols compatible (SSL / TLS for example).
In case of a problem
Check that the Mail Service is configured optimally.
It is not necessary to contact Infomaniak Support if your email address works well outside the application. The most common error concerns the use of an incorrect password. The troubleshooting guides help you resolve any potential issues:
- Refer to the solutions provided in this other guide regarding email in general.
- This other guide is more specifically about Outlook.
… and if your Outlook no longer works since a change of email password, refer to this other guide.
Link to this FAQ:
Has this FAQ been helpful?
This guide details the various possibilities available to you in the incoming email filtering tool (based on sorting rules) of Mail Infomaniak.
Preamble
- Refer to this other guide if you are looking for information about setting up sorting filters on your Infomaniak mailbox.
Discover the possible conditions
The meaning of these different existing conditions and criteria is detailed below:
From
Allows you to filter messages based on the sender (and decide what to do with emails always coming from the same person or domain, for example).
A
Allows you to filter messages based on the recipient (if you receive an email that is always addressed to a specific main recipient, for example volunteers@domain.xyz).
Cc
Allows you to filter messages based on the recipient mentioned in the Cc field (and who therefore receives the email as a copy in addition to the main recipient).
Subject
Allows you to filter messages based on the subject of the message.
Reply to
Allows you to filter messages by looking at the content of the reply-to field (specific condition - example).
Size
Allows you to filter messages based on their size.
Message content
Allows you to filter messages based on certain words that would appear in the body of the incoming message.
Email type
Allows you to filter messages based on the x-infomaniak-type header whose value can be ham, spam, transactional and bounce.
In the case of using a condition "email type = advertising, social media", then the selected action will be performed before the advertising filtering if the latter was activated.
Link to this FAQ:
Has this FAQ been helpful?
This guide explains how to connect the Apple Mail mobile app (application for smartphone or iOS tablet) to an email address hosted by Infomaniak.
Introduction
- Rather than using the manual configuration below, it is recommended to use the .mobileconfig configuration profiles provided by Apple or the Infomaniak Mail (iOS) app to benefit from a Push-type update method.
Manually add the email address to the application
Prerequisites
- Create the email address within my kSuite or a Mail / kSuite Service.
- Create a password for the email address for the device you are going to configure.
- Verify that the Mail Service is configured optimally.
To configure the email application:
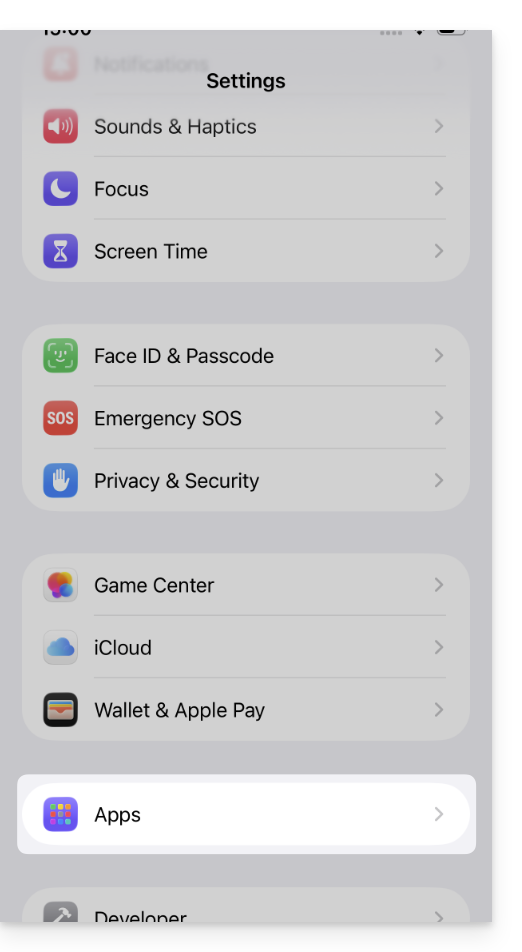
- Open the Settings of the iPhone and tap on Apps:
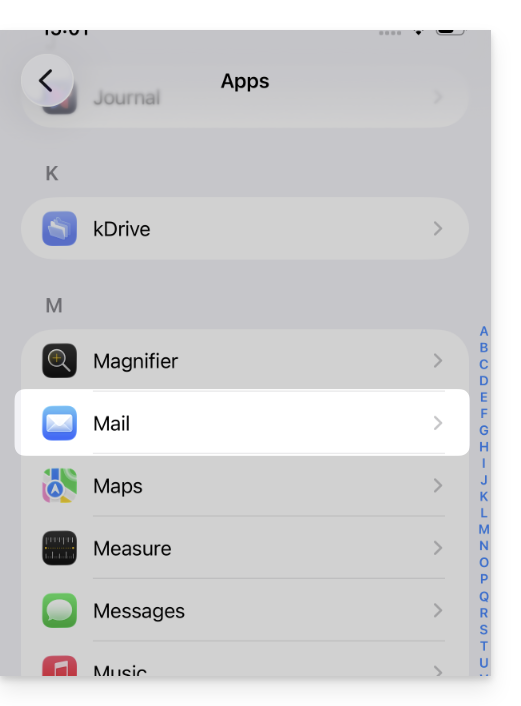
- In Apps, tap on Mail:
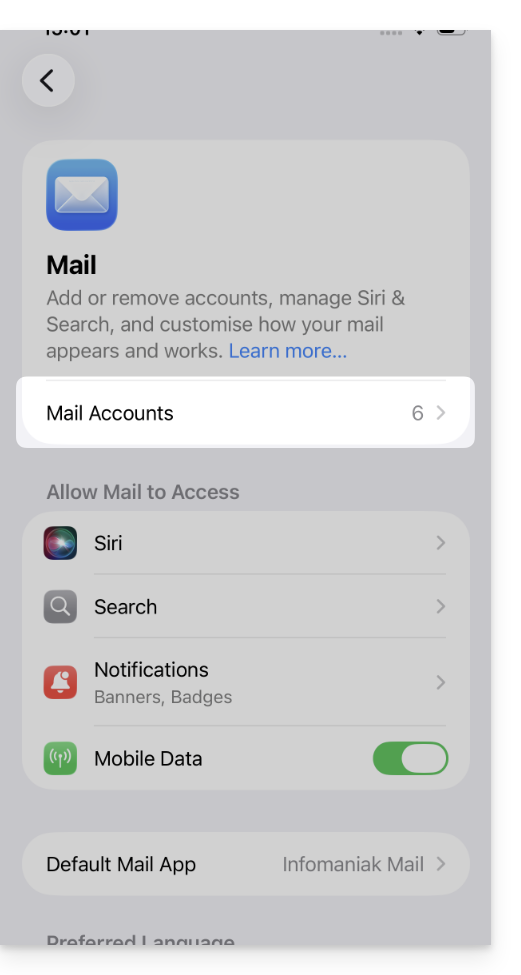
- Tap on Mail Accounts:
- Tap to add an account:
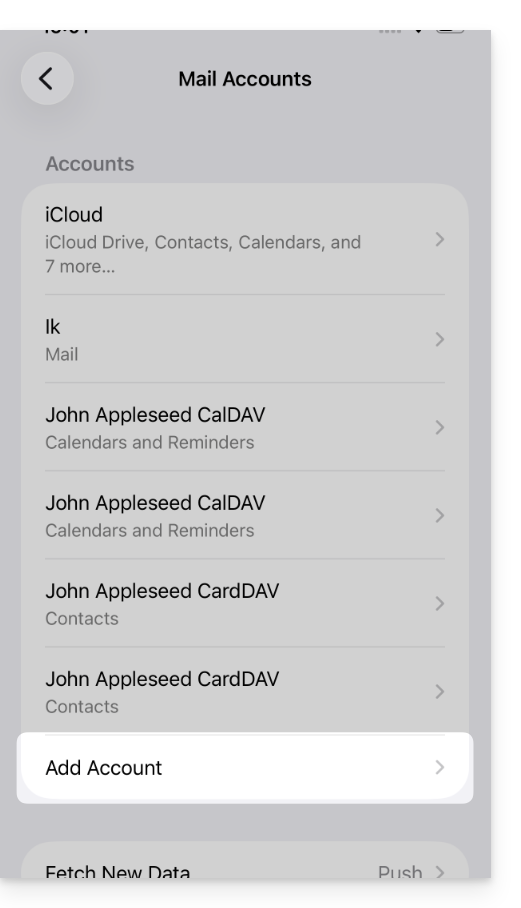
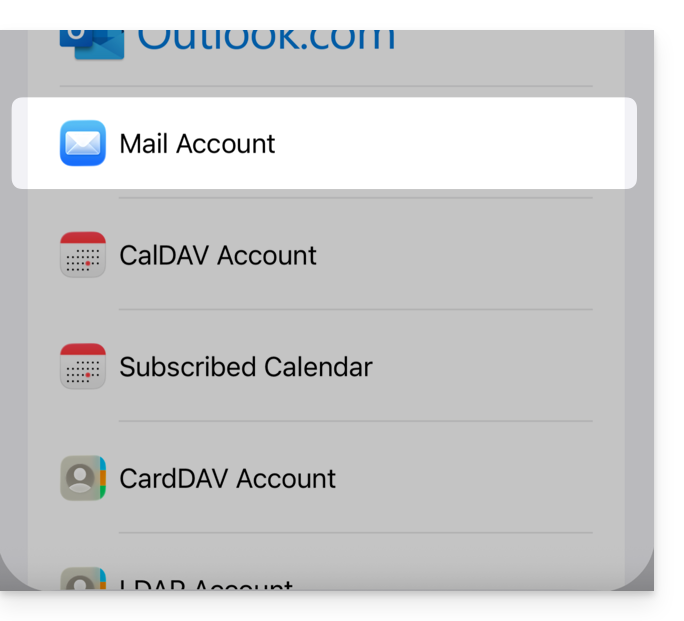
- Tap Other account:
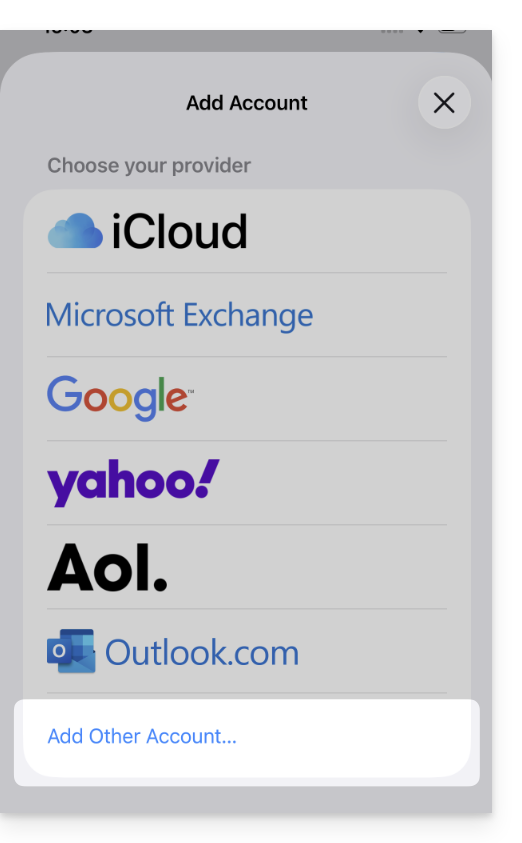
- Tap Mail account:
- Enter the email address to be added:
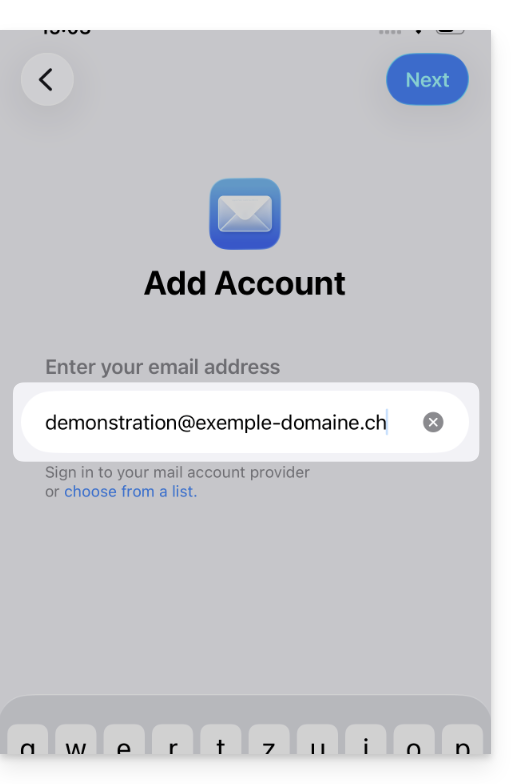
- Tap Next in the top right corner.
- The application indicates that some fields are optional but they are not at all:
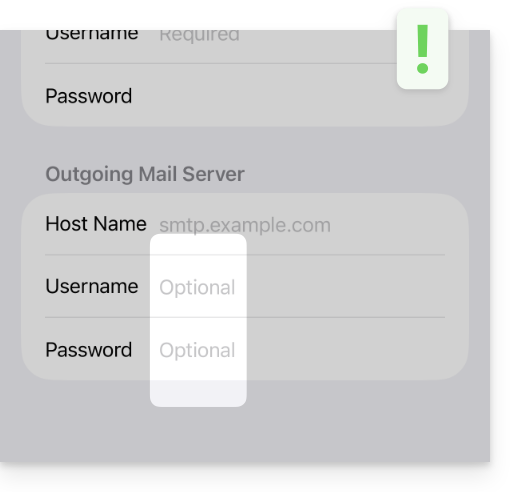
- Check and complete the missing information:
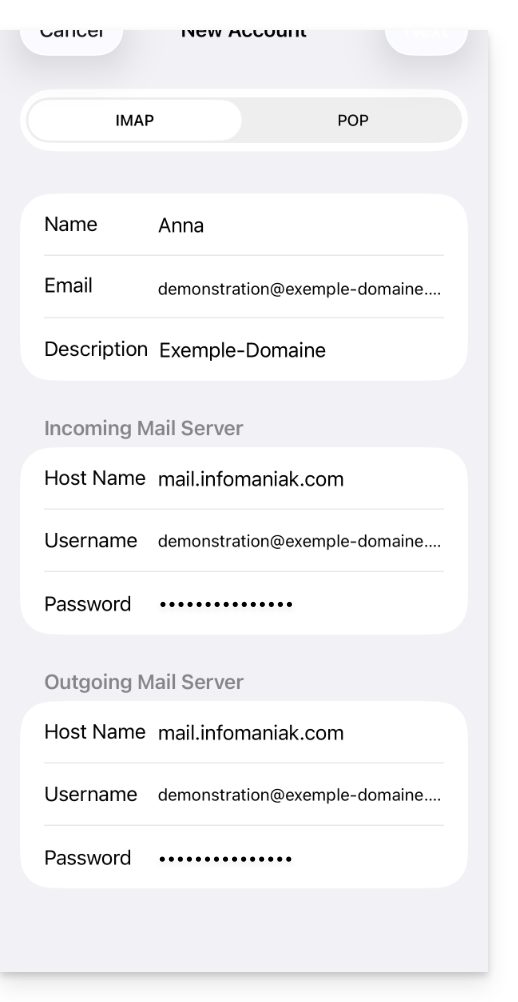
- Make sure you stay on the IMAP tab and tap Next in the top right corner.
- Enable emails and save the configuration in the top right corner:
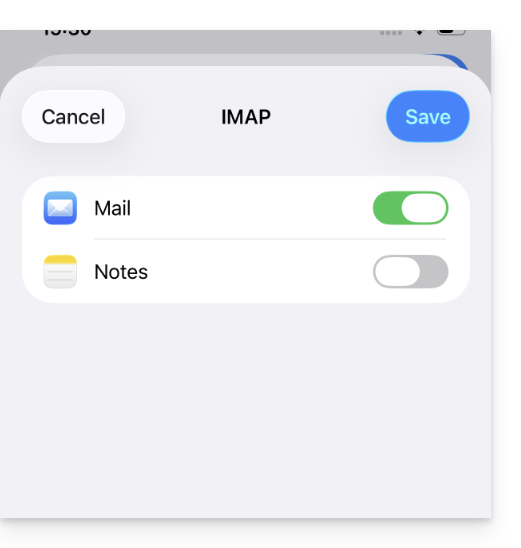
- That's it, your email address is now configured in the application.
Recommended settings
- Incoming IMAP server =
mail.infomaniak.com - IMAP port =
993(with SSL) - Outgoing SMTP server =
mail.infomaniak.com - SMTP port & encryption protocol and command/method to enable this protocol:
587+ STARTTLS - Username = the complete and full email address (need help?)
- Password = the one generated for the email address you want to access
- Mandatory authentication for sending emails:
- It is activated in the SMTP settings of your application.
- Check "use the same settings as the incoming server" or, depending on the software/email client, re-enter a username (= complete and full email address) and the generated password.
Refer to this other guide if you are looking for information about other compatible email ports and protocols (SSL / TLS for example).
In case of a problem
Check that the Mail Service is configured optimally.
It is not necessary to contact Infomaniak Support if your email address works fine outside the application. The most common error concerns the use of an incorrect password. The troubleshooting guides will help you resolve any potential issues:
- Refer to the solutions provided in this other guide regarding email in general.
- Delete any Apple configuration profiles related to your Infomaniak email before restarting the configuration.
If your Apple Mail no longer works for sending emails (e.g., the SMTP server is disconnected or missing) or after a change of your email password, please refer to this other guide.
Link to this FAQ:
Has this FAQ been helpful?
This guide explains how to access your emails hosted by Infomaniak.
Guides for Infomaniak Email
Click here to open the Infomaniak assistant to configure synchronization on macOS, Windows, Linux, Android, and iOS for common email software/clients (Outlook, Microsoft 365, Thunderbird, Apple Mail, eM Client, etc.). It will not only provide you with the recommended settings but also generate the IMAP/SMTP password required for your configuration.
Alternatively, use directly the email in a web browser via the Mail Infomaniak web app (online service ksuite.infomaniak.com/mail) and/or download the Infomaniak Mail mobile app (application for iOS/Android smartphones or tablets).
Here are also guides for specific manual procedures:
| OS | Application to synchronize |
|---|---|
| Outlook New / Microsoft 365 MSO / 2019 (Windows) | |
| Outlook Microsoft 365 MSO (macOS) | |
| Apple Mail (configuration profile macOS) | |
| Apple Mail (configuration profile iOS: iPhone, iPad, etc.) | |
| Mail (Android: Huawei, Samsung, Sony, etc.) | |
| Outlook (iOS + Android) | |
| Gmail (iOS + Android) | |
| Mozilla Thunderbird |
For synchronizing your contacts & calendars, please refer to this other guide.
Recommended IMAP settings
Username = the complete and full email address (need help?)
Password = the one created/generated for the email address you want to access
Incoming IMAP server = mail.infomaniak.com
IMAP port = 993 (with SSL)
Recommended SMTP settings
Username = the complete and full email address (need help?)
Password = the one created/generated for the email address you want to access
Outgoing SMTP server = mail.infomaniak.com
SMTP port & encryption protocol and command/method to enable this protocol:
- Prioritize port
587+ STARTTLS: this is the official technical standard and the most compatible method with the majority of modern systems for authenticated submission. - Tolerate port
465+ SSL/TLS only as a compatibility or alternative option, specifying that this is implicit encryption, but that 587 remains the recommended choice.
Authentication is mandatory for sending emails:
- It is activated in the SMTP settings of your application.
- Check "use the same settings as the incoming server" or, depending on the software/email clients, enter a username (= complete email address) and its password.
In case of problems
Check these points:
- Refer to this other guide if you encounter errors, in order to check the essential points!
- Refer to this other guide if you are looking for information about other compatible email ports and protocols.
- POP3 protocol not recommended (POP server = mail.infomaniak.com and POP port = 995 with SSL).
Change an email password
Email passwords can be multiple, are unrelated to your Infomaniak login password, and can no longer be retrieved after their initial display. Therefore, you need to (re)create them whenever you need them, specifying the device (computer, mobile, etc.) and/or the user concerned, so that you can manage them separately when you need to manage a specific connection.
Manage passwords:
- from the Manager in the Mail Service
- from the Infomaniak Mail Web app
Apply the new email password
If you have deleted an existing password to create a new one, you will need to update your applications & devices that used this password. Refer to these specific guides:
- Apple Mail (macOS / iOS)
- Android Mail / Gmail (different versions)
- Microsoft Outlook (different versions)
- Mozilla Thunderbird
Are you not yet managing your emails with Infomaniak?
Link to this FAQ:
Has this FAQ been helpful?
This guide explains how to connect the desktop app Outlook Microsoft 365 MSO (desktop application on Windows) to an email address hosted by Infomaniak.
Add the email address to the application
Prerequisites
- Create the email address in my kSuite or a Mail Service / kSuite.
- Create a password for the email address on the device you are going to configure.
- Check that the Mail Service is configured optimally.
To configure the email application:
- Open the application.
- Click on File.
- Click on Add an account.
- Enter the email address to be linked.
- Click on Connect.
- Choose IMAP:
- Check and complete the missing information.
- Click on Next.
- Enter the password for your email address.
- Your email address is now configured in the application.
Recommended settings
- Incoming IMAP server =
mail.infomaniak.com - IMAP port =
993(with SSL) - Outgoing SMTP server =
mail.infomaniak.com - SMTP port & encryption protocol and command/method to activate this protocol:
587+ STARTTLS - Username = the full email address & complete ( ? )
- Password = the one generated for the email address you want to access
- Authentication required for sending emails:
- It is activated in the SMTP settings of your application.
- Check "use the same parameters as the incoming server" or, depending on the software/email clients, enter a username (= full & complete email address) and the generated password.
Refer to this other guide if you are looking for information about other messaging ports and protocols compatible (SSL / TLS for example).
In case of problem
Check that the Mail Service is configured optimally.
It is not necessary to contact Infomaniak Support if your email address works well outside the application. The most common error concerns the use of an incorrect password. The troubleshooting guides help you resolve any potential issues:
- Refer to the solutions provided in this other guide regarding email in general.
- This other guide is more specifically about Outlook.
… and if your Outlook no longer works since a change of email password, refer to this other guide.
Link to this FAQ:
Has this FAQ been helpful?