Knowledge base
1000 FAQs, 500 tutorials and instructional videos. Here, there are only solutions!
This guide explains how to connect the eM Client desktop app (desktop application on macOS / Windows) to an email address hosted by Infomaniak.
Add the email address to the application
Prerequisites
- Create the email address within my kSuite or a Mail Service / kSuite.
- Create a password for the email address for the device you are going to configure.
- Verify that the Mail Service is configured optimally.
To configure the email application:
- Open the application and choose the desired mode, then click Next:

- Enter the email address to be added, then click the Start button next to the field:

- Enter the password for the email address, then click Continue next to the field:

- Check the box and click Yes:

- Verify and complete any missing information:

- Choose the desired mode and then click Next:

- That's it, your email address is now configured in the application:

Recommended settings
- Incoming IMAP server =
mail.infomaniak.com - IMAP port =
993(with SSL) - Outgoing SMTP server =
mail.infomaniak.com - SMTP port & encryption protocol and command/method to enable this protocol:
587+ STARTTLS - Username = the complete email address & entire email address (need help?)
- Password = the one generated for the email address you want to access
- Authentication is required for sending emails:
- It is activated in the SMTP settings of your application.
- Check "use the same settings as the incoming server" or, depending on the software/email client, enter a username (= complete email address) and the generated password.
Refer to this other guide if you are looking for information about other compatible email ports and protocols (SSL / TLS, for example).
In case of a problem
Check that the Mail Service is configured optimally.
It is not necessary to contact Infomaniak Support if your email address works correctly outside of the application. The most common error concerns the use of an incorrect password. Refer to the solutions provided in this other guide regarding email in general.
Link to this FAQ:
Has this FAQ been helpful?
This guide explains how to connect the Thunderbird desktop app (desktop application on macOS / Windows / Linux) to an email address hosted by Infomaniak.
Add the email address to the application
Prerequisites
- Create the email address within my kSuite or a Mail Service / kSuite.
- Create a password for the email address for the device you will be configuring.
- Verify that the Mail Service is configured optimally.
To configure the email application:
- Download the latest version of Thunderbird.
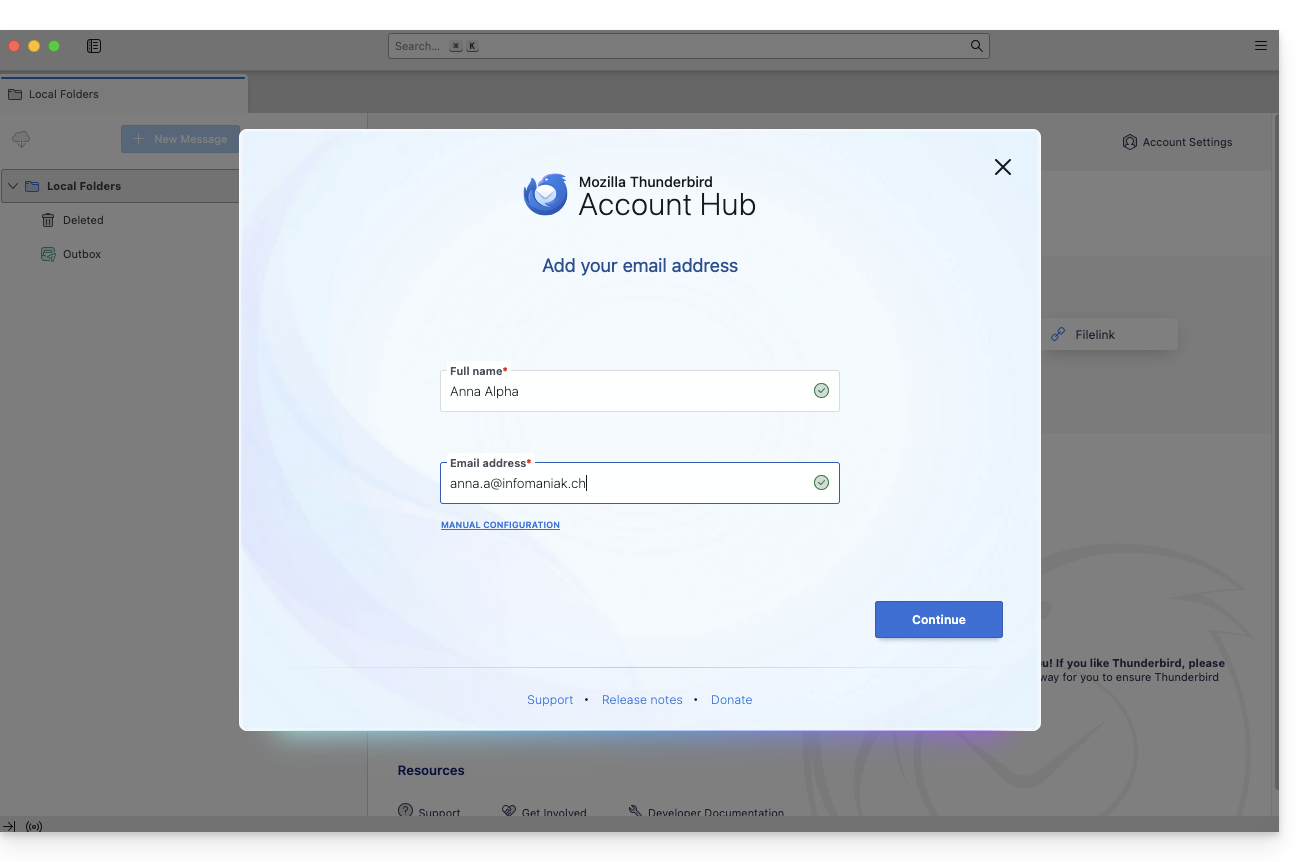
- Open the application.
- Enter your account information and click Continue:
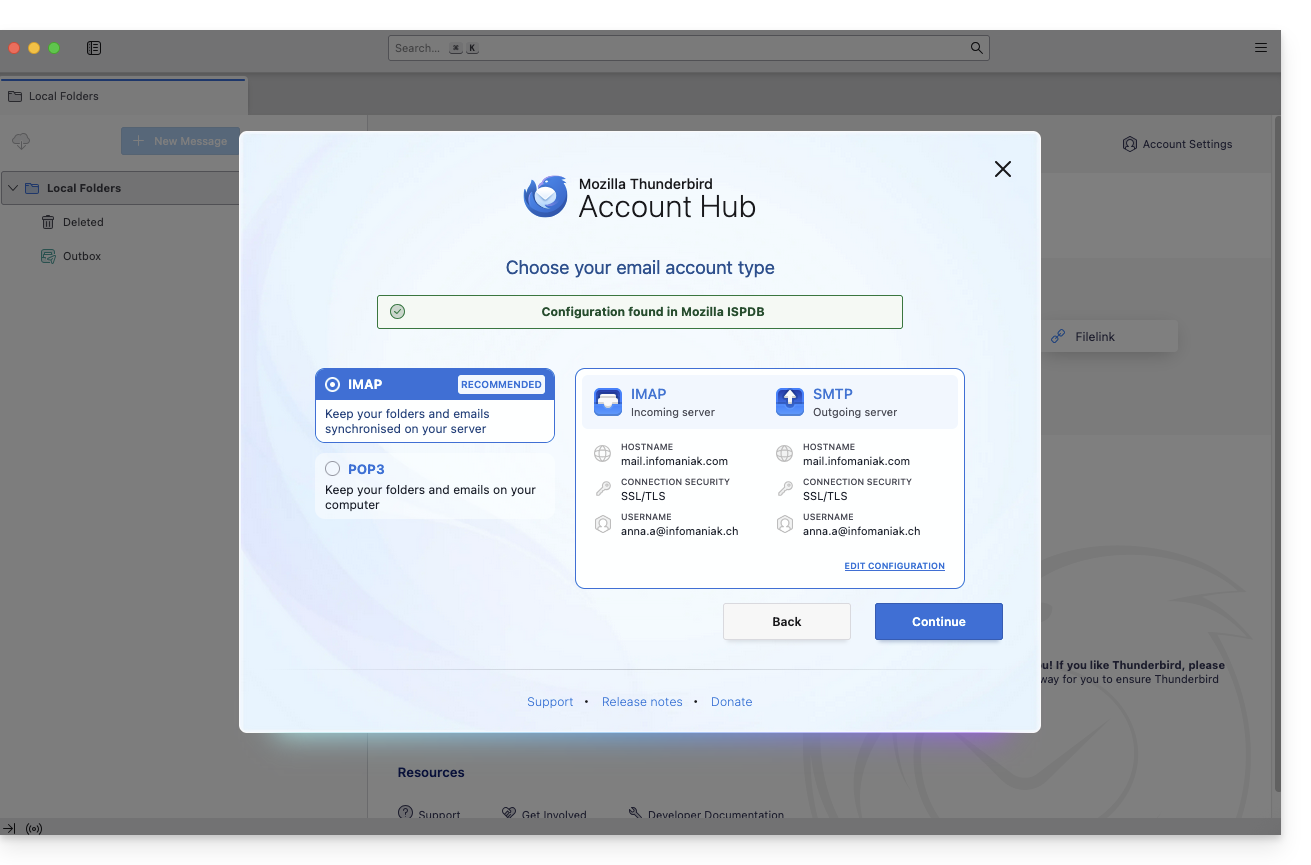
- Make sure you stay on IMAP and click Continue:
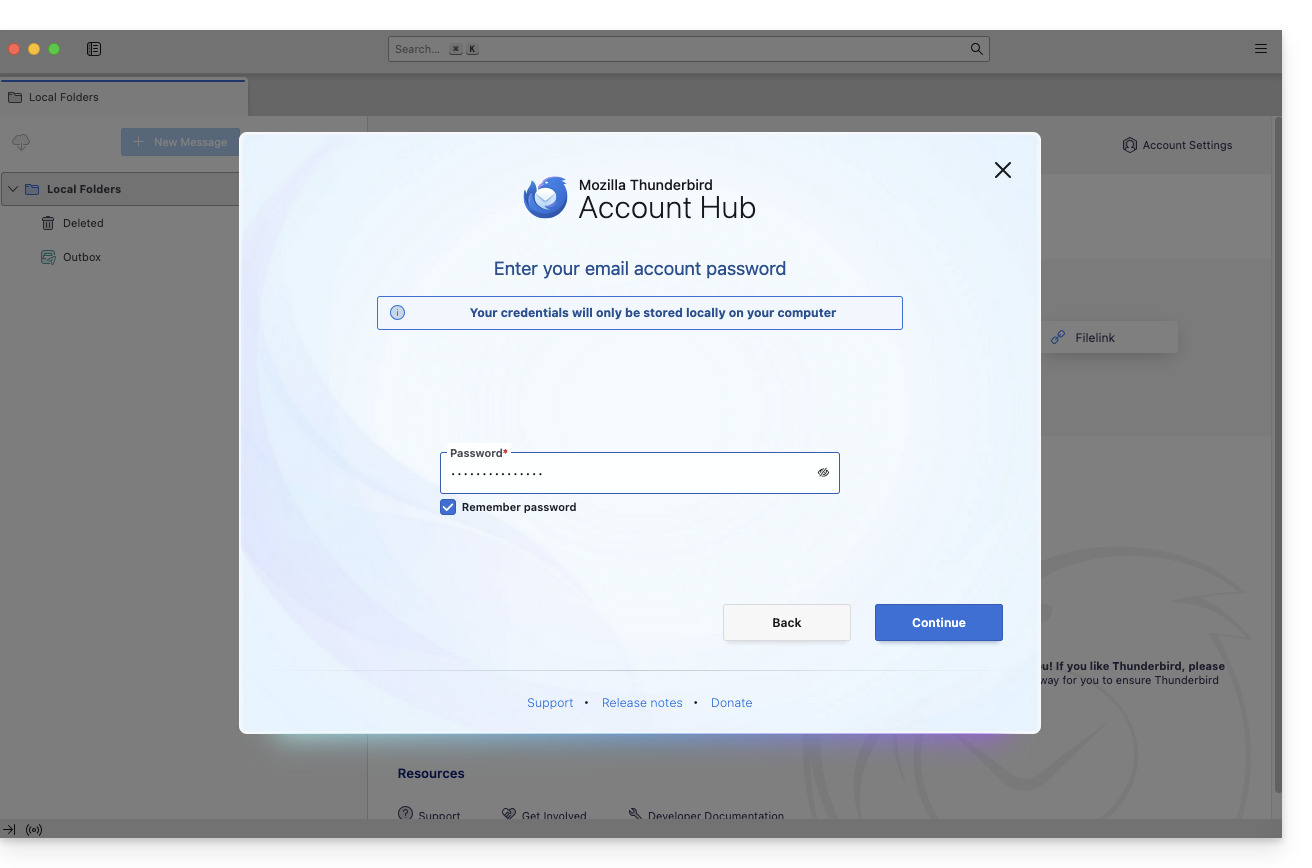
- Enter your password and click Continue:
- Click Continue:
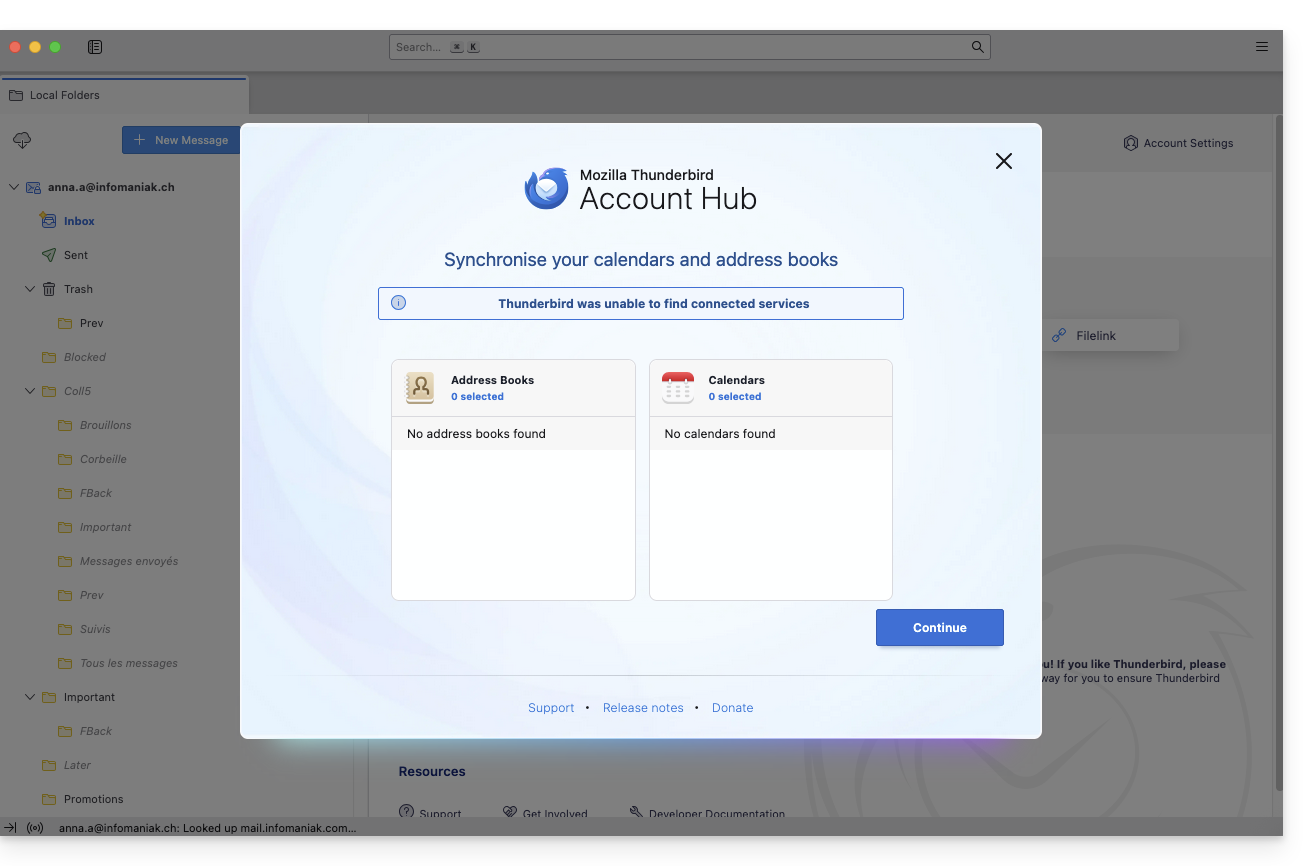
- Your registration summary is displayed; click Finish to add the address (or configure other services from there):
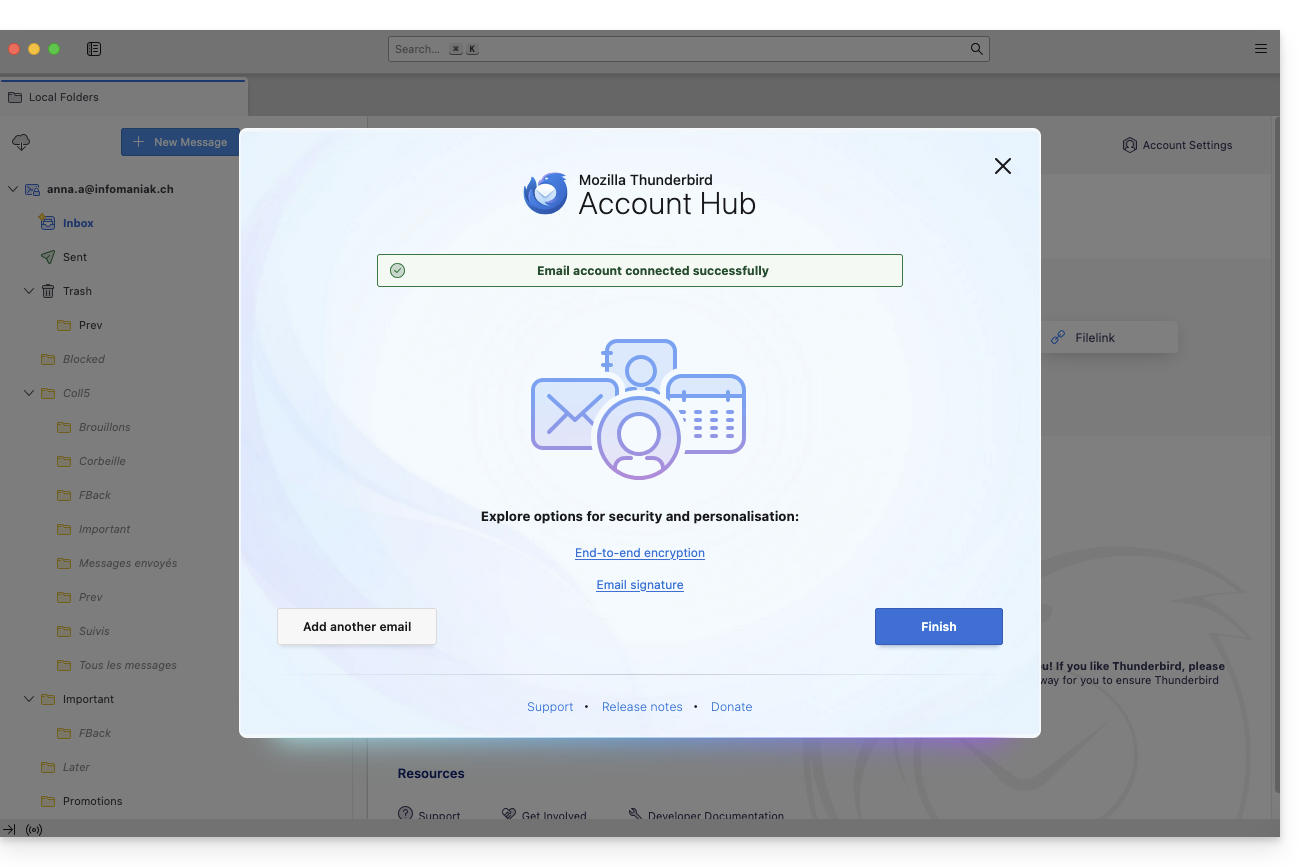
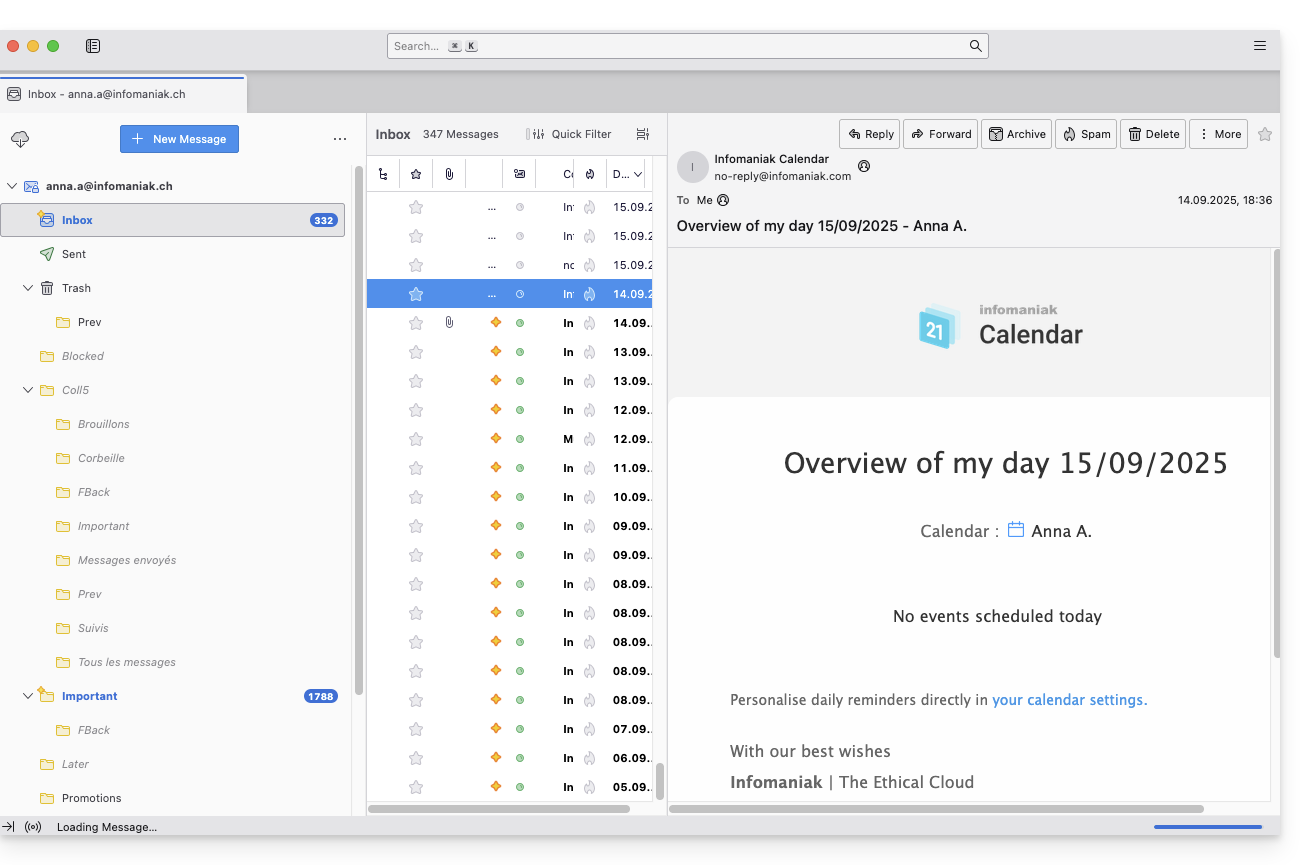
- That's it, your email address is now configured in the application:
Recommended settings
- Incoming IMAP server =
mail.infomaniak.com - IMAP port =
993(with SSL) - Outgoing SMTP server =
mail.infomaniak.com - SMTP port & encryption protocol and command/method to enable this protocol:
587+ STARTTLS - Username = the complete email address & entire address (need help?)
- Password = the one generated for the email address you want to access
- Authentication is required for sending emails:
- It is activated in the SMTP settings of your application.
- Check "use the same settings as the incoming server" or, depending on the software/email client, enter a username (= complete email address) and the generated password.
Refer to this other guide if you are looking for information about other compatible email ports and protocols (SSL / TLS, for example).
If you encounter a problem
Check that the Mail Service is configured optimally.
There is no need to contact Infomaniak Support if your email address works correctly outside the application. The most common error concerns the use of an incorrect password. The troubleshooting guides will help you resolve any potential issues:
- Refer to the solutions provided in this other guide regarding email in general.
- This other guide is specifically about Thunderbird.
… and if Thunderbird is no longer working after a change of email password, refer to this other guide.
Link to this FAQ:
Has this FAQ been helpful?
This guide explains how to connect the native Android messaging app to an email address hosted by Infomaniak.
Preamble
- Instead of the manual configuration below, it is recommended to use the app Infomaniak Mail (Android).
- The various services offered by Infomaniak are all compatible with the corresponding standard protocols (IMAP/SMTP for email, for example), therefore if you encounter a problem with third-party software, contact its publisher or a Partner and consult the support policy as well as article 11.9 of the Infomaniak Terms of Service.
Manually add the email address to the application
Prerequisites
- Create the email address in my kSuite or a Mail Service / kSuite.
- Create a password for the email address on the device you are going to configure.
- Check that the Mail Service is configured optimally.
To configure the messaging app:
- Open the native messaging app on your device.
- Click on Add an account.
- Select Other as the email type.
- Enter your email address.
- Select the Personal IMAP type.
- Check and complete the missing information.
- Complete the procedure.
- Your email address is now configured in the app on your device.
Recommended settings
- Incoming IMAP server =
mail.infomaniak.com - IMAP port =
993(with SSL) - Outgoing SMTP server =
mail.infomaniak.com - SMTP port & encryption protocol and command/method to activate this protocol:
587+ STARTTLS - Username = full & complete email address ( ? )
- Password = the one generated for the email address you want to access
- Authentication required for sending emails:
- It is activated in the SMTP settings of your application.
- Check "use the same parameters as the incoming server" or, depending on the software/email clients, enter a username (= full & complete email address) and the generated password.
Refer to this other guide if you are looking for information about other compatible messaging ports and protocols (SSL / TLS for example).
In case of a problem
Check that the Mail Service is configured optimally.
There is no need to contact Infomaniak Support if your email address works well outside the application. The most common error concerns the use of an incorrect password. The troubleshooting guides help you resolve any potential issues:
- Refer to the solutions provided in this other guide regarding email in general
- … and if your application no longer works at the sending level (disconnected or missing SMTP server, for example) or after changing your email password, refer to this other guide.
Link to this FAQ:
Has this FAQ been helpful?
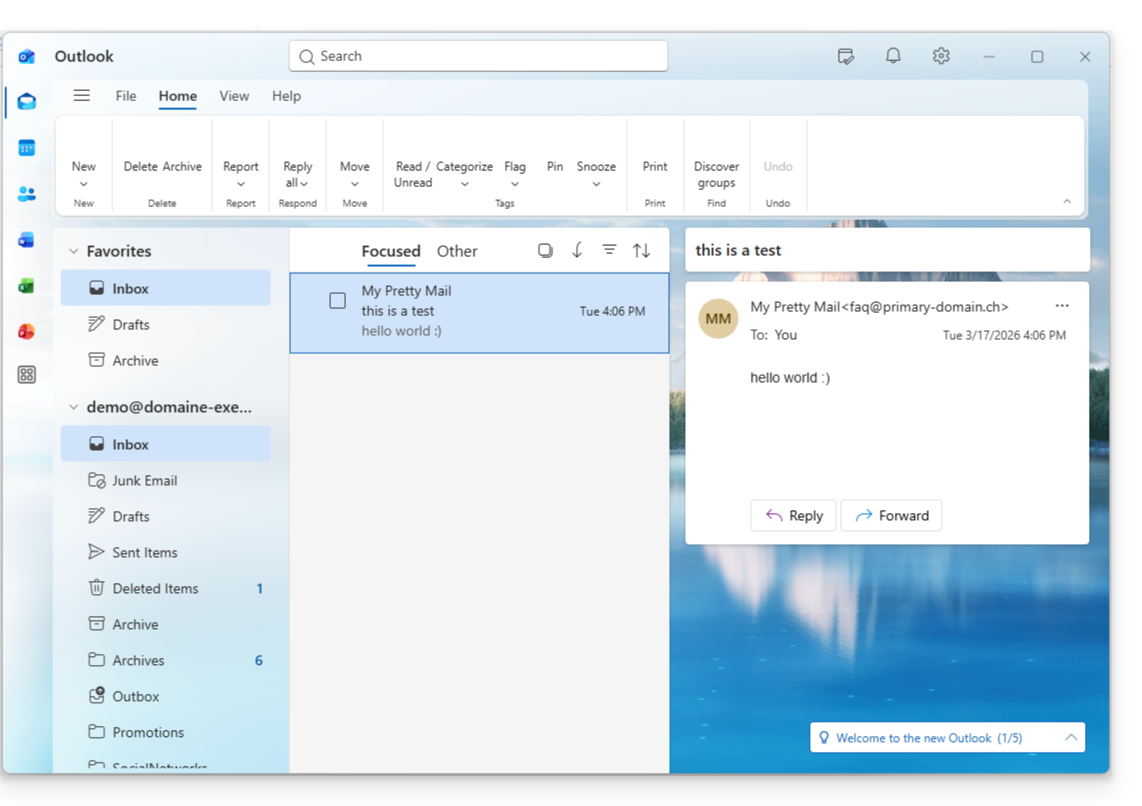
This guide explains how to connect the New Outlook desktop app (the desktop application for Windows, replacing Windows Mail) to an email address hosted by Infomaniak.
Introduction
- Although the emails themselves remain stored on the Infomaniak server, the experience in New Outlook is highly integrated with the Microsoft cloud:
- Some of your account information may be used by Microsoft for centralized management and a better synchronization experience.
- If you want to have complete and local control over your emails, consider using third-party email/client software (such as Thunderbird, for example) that allows for more direct storage.
Adding the email address to the application
Prerequisites
- Create the email address within my kSuite or a Mail Service / kSuite.
- Create a password for the email address for the device you are going to configure.
- Verify that the Mail Service is configured optimally.
The password created for the email address must meet the criteria detailed at the bottom of this guide.
To configure the email application:
- Open the application.
- If necessary, click on the gear icon in the upper right corner (otherwise, skip to step 4).
- Click on Add account:

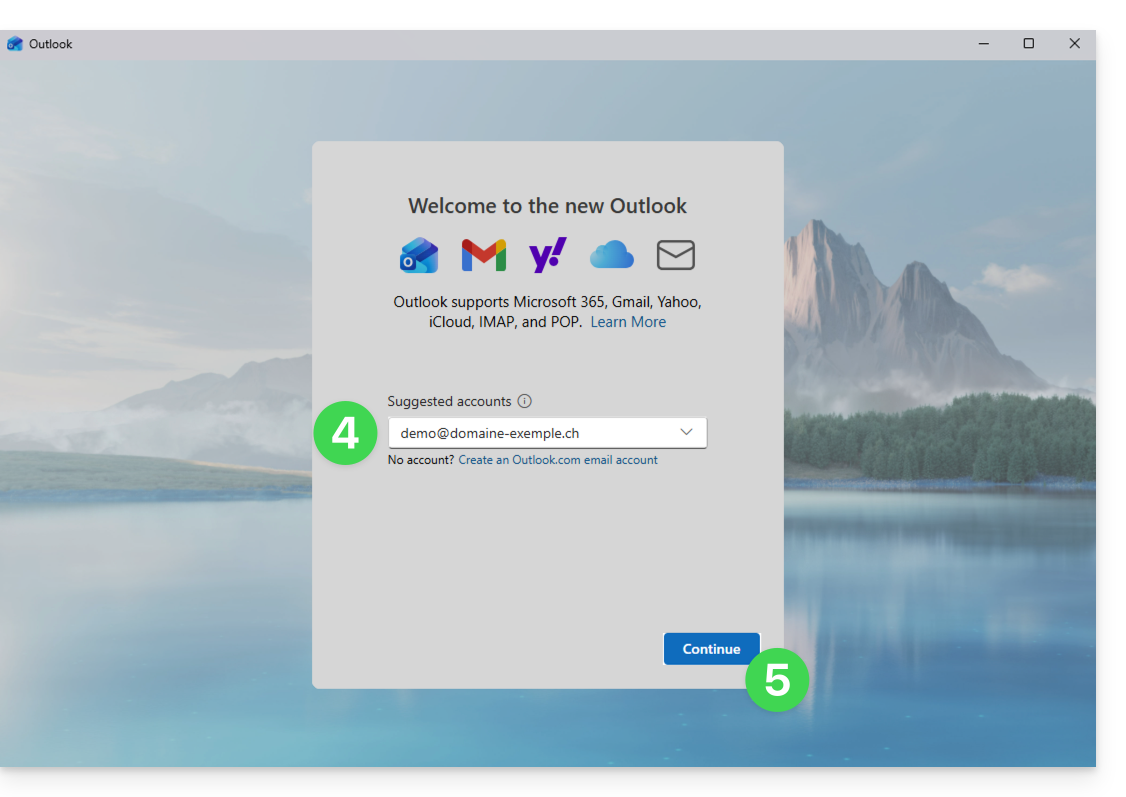
- Enter the email address to be added.
- Click on Continue:
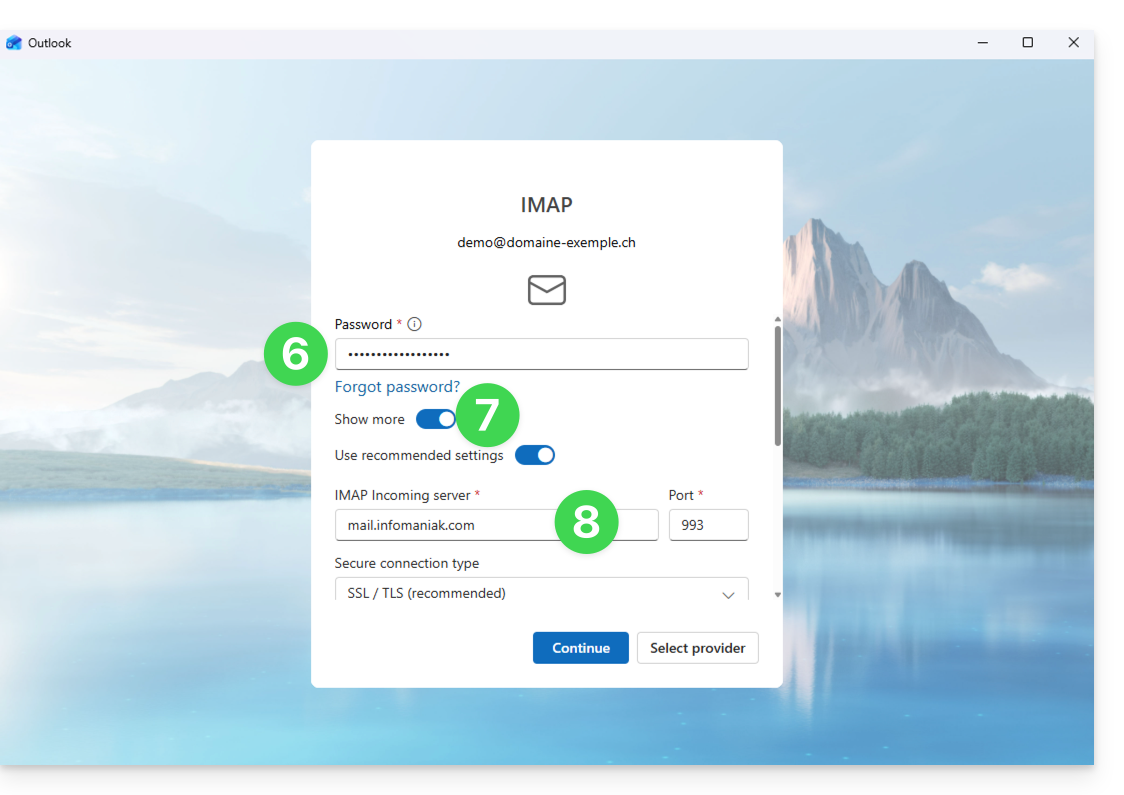
- Enter the password for the email address.
- Click on the See more button.
- Scroll down the page, then check and complete the missing information.
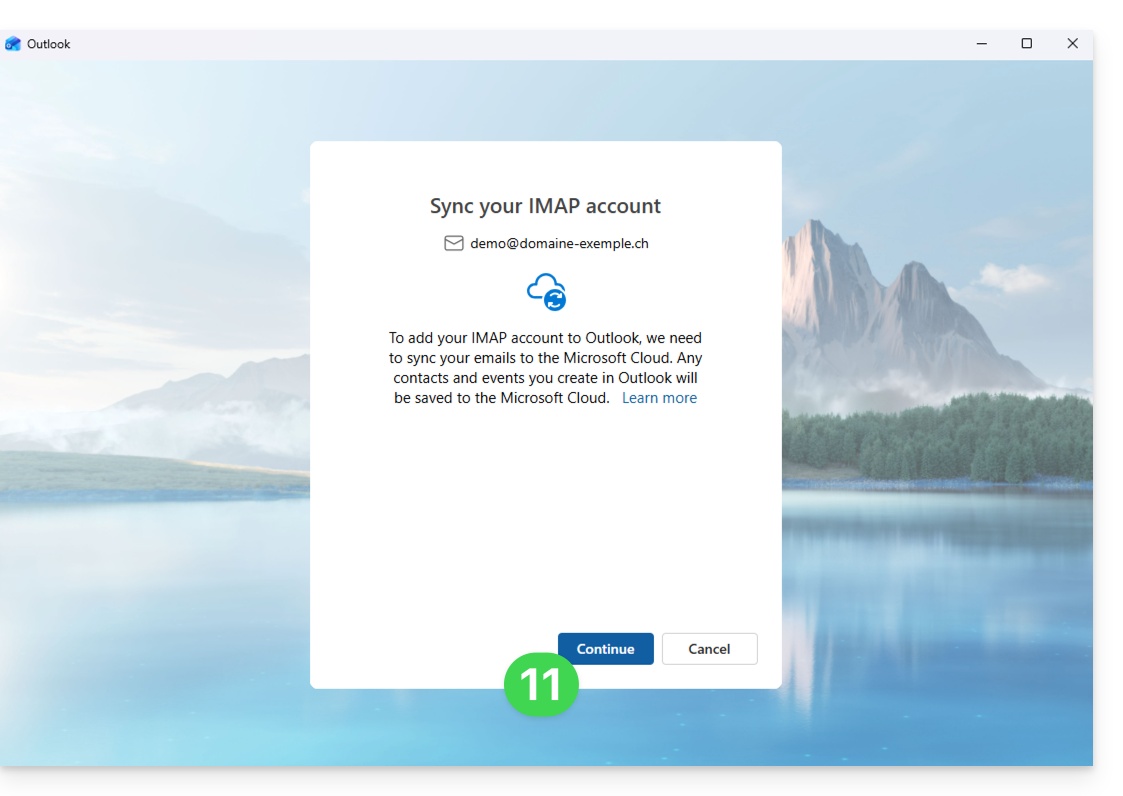
- Click on Continue:

- Read and go through the various Microsoft information windows:
- Your email address is now configured in the application:
Recommended settings
- Incoming IMAP server =
mail.infomaniak.com - IMAP port =
993(with SSL) - Outgoing SMTP server =
mail.infomaniak.com - SMTP port & encryption protocol and command/method to enable this protocol:
587+ STARTTLS - Username = the complete and full email address (need help?)
- Password = the one generated for the email address you want to access (it must meet the criteria detailed at the bottom of this guide)
- Mandatory authentication for sending emails:
- It is activated in the SMTP settings of your application.
- Check "use the same settings as the incoming server" or, depending on the software/email client, re-enter a username (= complete and full email address) and the generated password.
Refer to this other guide if you are looking for information about other compatible email ports and protocols (SSL / TLS for example).
In case of a problem
A solution that seems to work is the combination of these 2 situations:
- Be logged in to your Windows session with a Microsoft account (not just a local account).
- Have added the email address used to log in to Windows to this version of Outlook.
Also, create a new password by letting it be generated randomly, but also ensuring that it meets these criteria imposed by Microsoft:
| Allowed characters |
|
| Forbidden characters |
|
| Password length | MAXIMUM 16 characters |
Check that the Mail Service is configured optimally.
The troubleshooting guides will help you resolve any potential issues:
- Refer to the solutions provided in this other guide regarding email in general.
- This other guide is specifically about Outlook.
… and if your Outlook is no longer working after a change of email password, refer to this other guide.
Link to this FAQ:
Has this FAQ been helpful?
This guide presents the main features of an Infomaniak Mail Service. Discover the administration interface for your email addresses created and hosted with Infomaniak.
Access the Mail Service
To access the Mail Service:
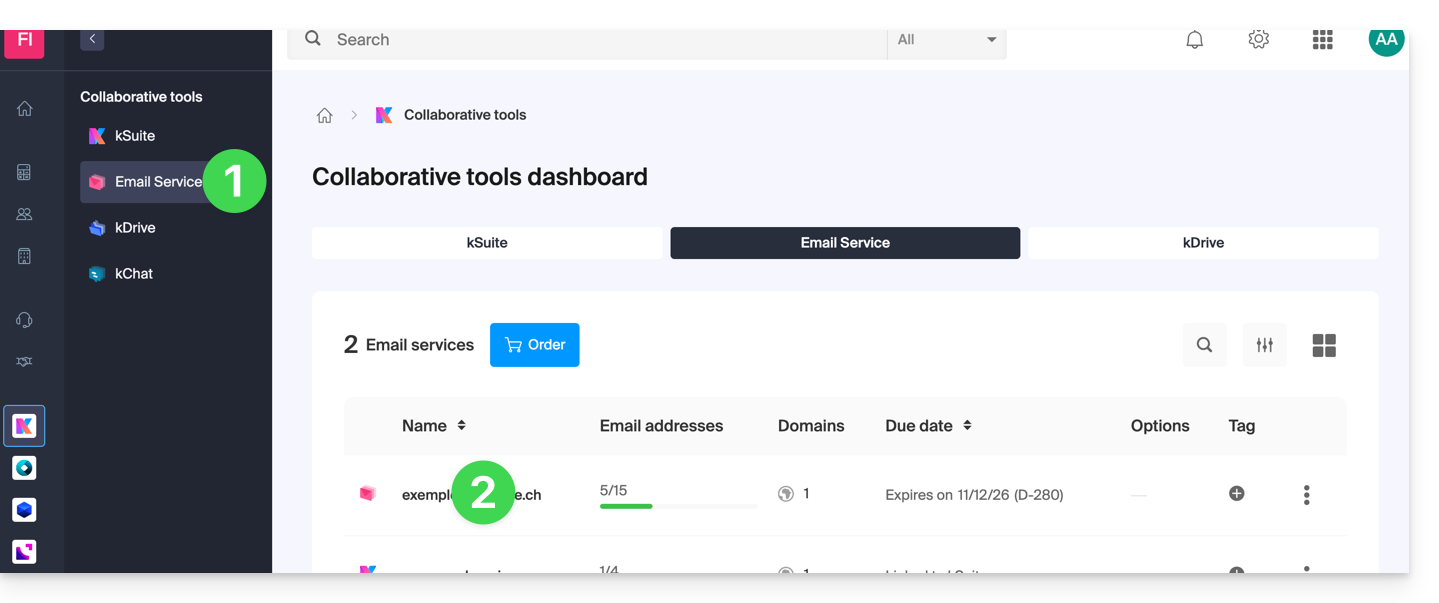
- Click here to access the management of your product on the Infomaniak Manager (need help?):
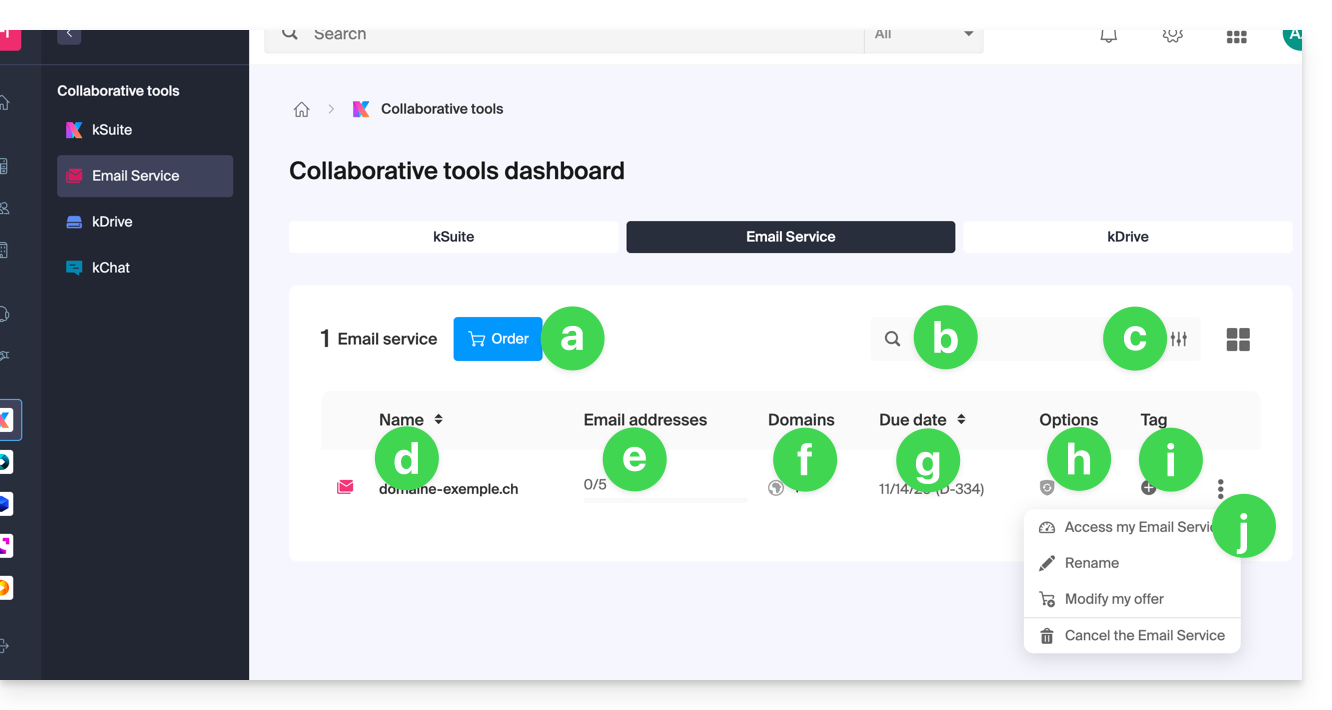
- Order a new Mail Service (to get email addresses on a new domain name, for example).
- Search among your Mail Service names.
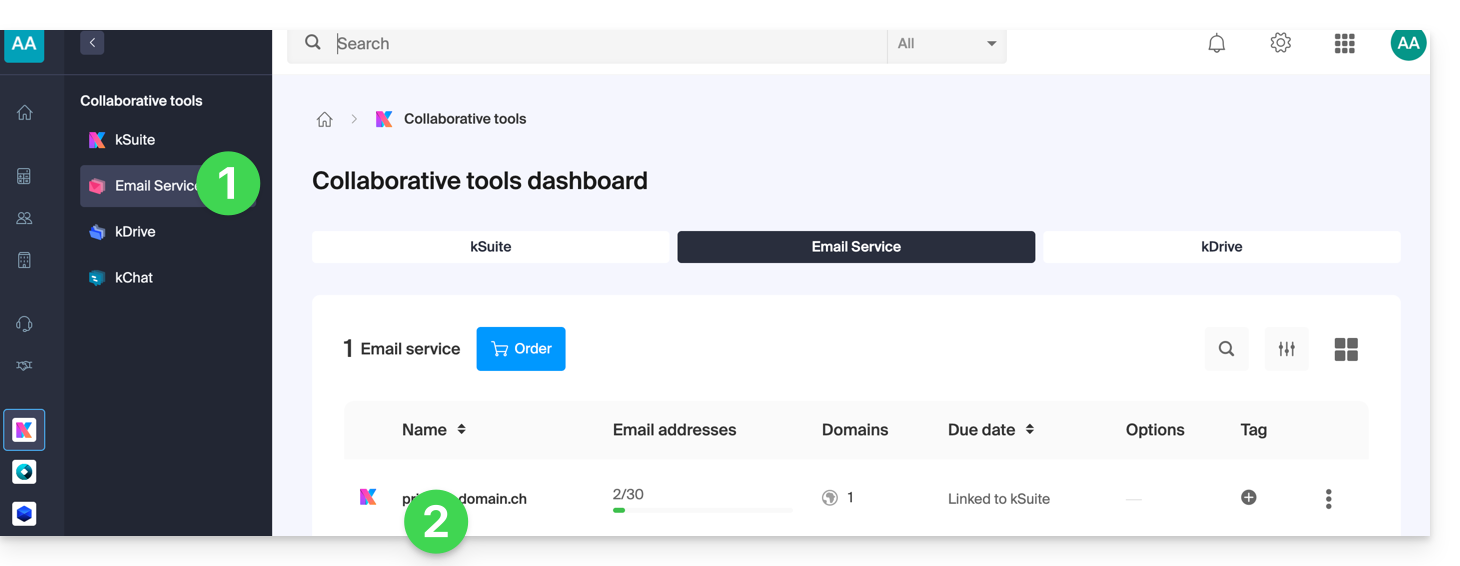
- Filtering/sorting and table presentation options.
- The name of your Mail Service (note that it can be renamed (see point j) to facilitate its organization, but the associated and visible domain on hover (see point f) will remain the same).
- The number of email addresses created and available (here the quota is 5, but no addresses have been created).
- The domain(s) associated with your Mail Service; refer to this other guide to change the domain name of your Mail Service.
- Service expiration date (may be linked to kSuite).
- Possible option(s) such as Renewal Warranty, for example.
- Possible label(s)/tag(s).
- Action menu allowing, among other things, to rename the Mail Service or to modify the offer.
Access email addresses
To access the email addresses contained in this Mail Service:
- Click directly on the name of the Mail Service concerned in the table (see illustration above).
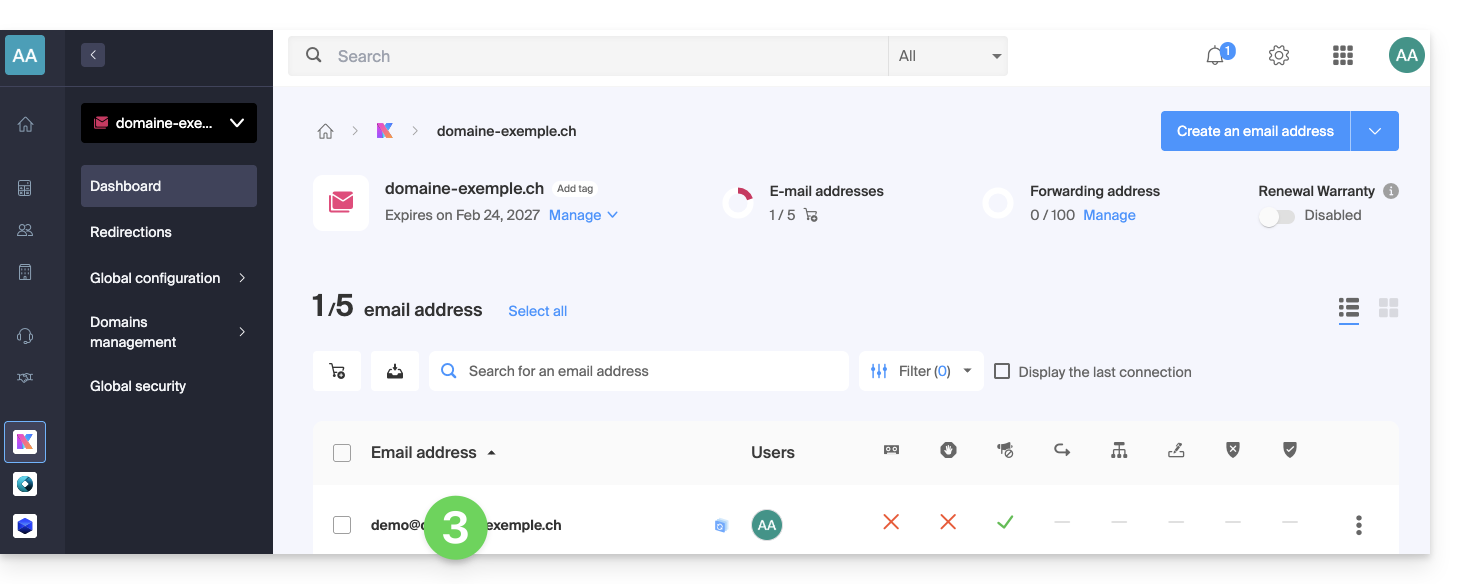
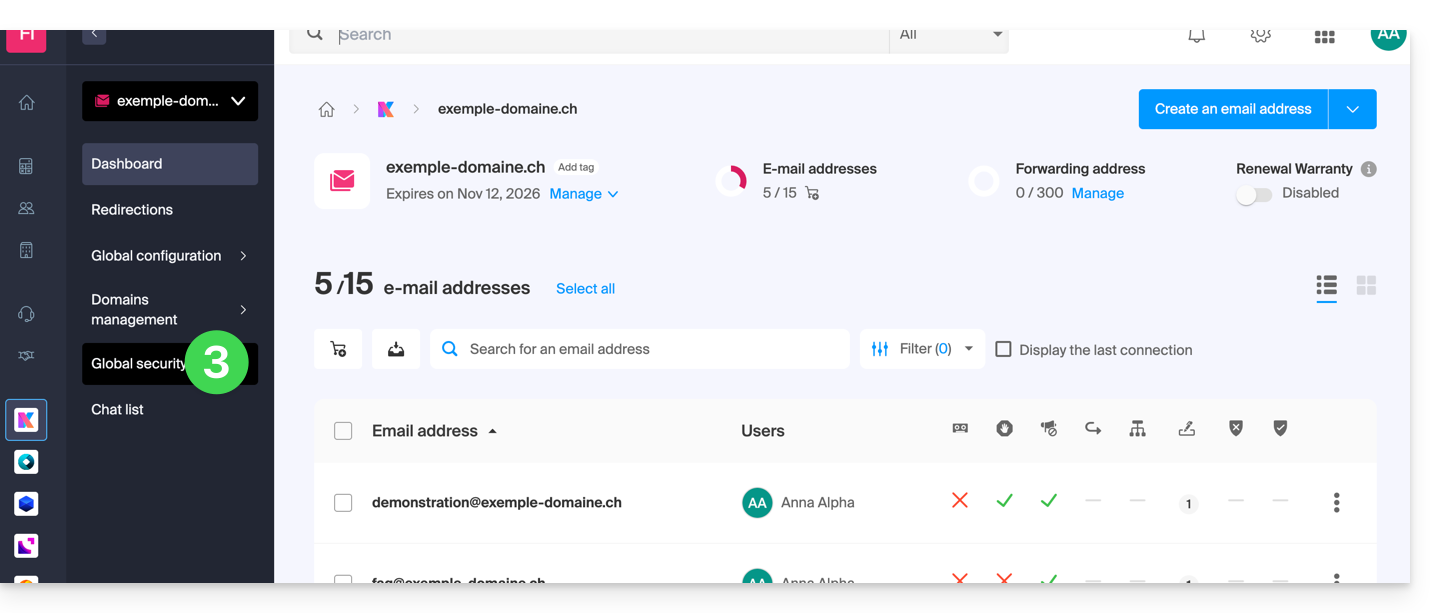
- You arrive on this type of page:
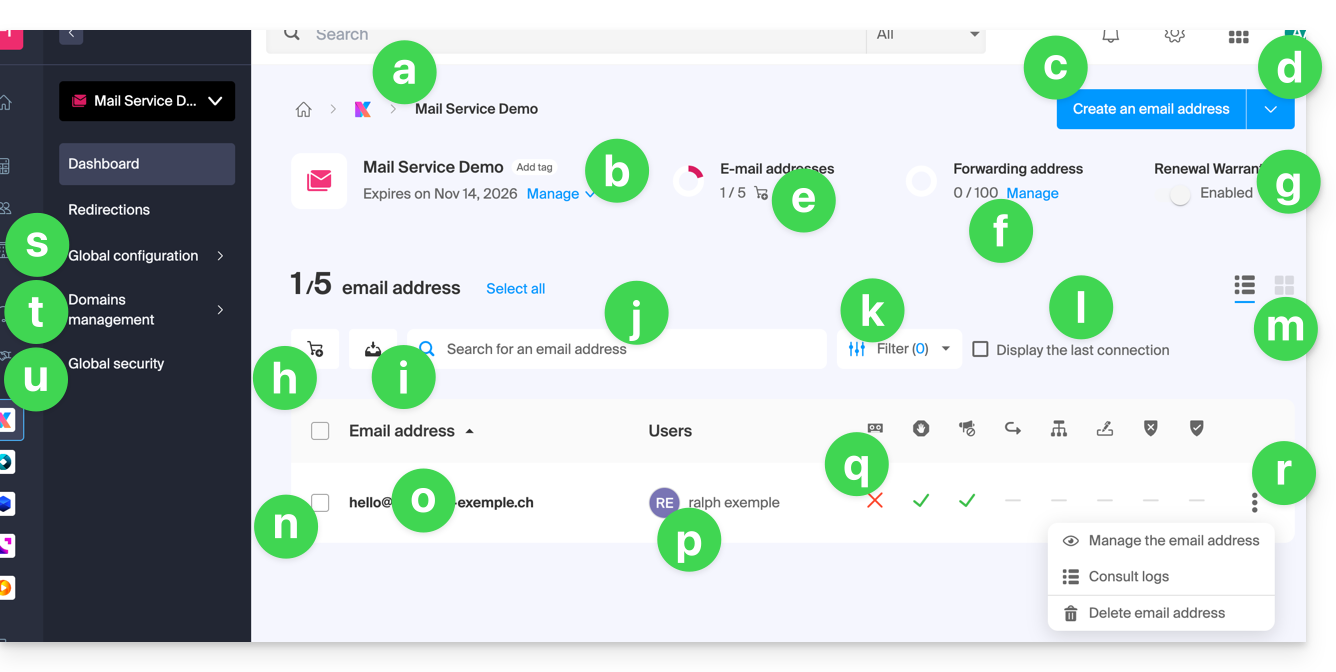
- Breadcrumb and denomination of the Mail Service (possibly renamed as in this example).
- Mail Service management menu, allows actions that point j of the previous table does not allow.
- Create additional email addresses (or order first if the quota is not sufficient) on the same domain.
- Additional menu to, among other things, create addresses in bulk or generic.
- Current quota (you can modify it).
- Create virtual addresses (redirection addresses).
- See point h of the previous table.
- Order additional email addresses.
- Download the list of addresses in a CSV file (format
.csv). - Search among the addresses of the Mail Service (unlike the search bar above which allows searching among all the products of the Organization).
- Filter the display according to different criteria, including the connection dates of the users.
- Display in the table the last connection of a user to the Infomaniak Mail interface to which the email address in question is attached.
- Table presentation options.
- In front of each email address is a small square that can be clicked and allows selecting multiple addresses at the same time to perform actions (offered at the bottom of the page as soon as the selection is made).
- Click directly on the denomination of the email address to configure it (see next table).
- The user(s) of the Infomaniak Mail interface who have attached the email address in question.
- By clicking on the boxes in the table, you can access the options; a sign indicates if the option in question is not activated.
- Actions on the email address.
- Global configuration (concerns the entire Mail Service in question) to apply, for example, a signature or anti-spam to the entire Mail Service.
- Actions on the domain(s) linked to the Mail Service.
- Global security to perform a technical diagnosis and, if possible, correct errors automatically.
Access details and settings of an email address
To access the settings and information related to the email address (storage, password, etc.) and the users of the Infomaniak Mail app (i.e., outside of IMAP use) who use the email address:
- Click directly on the email address concerned in the table.
- You arrive on this type of page:
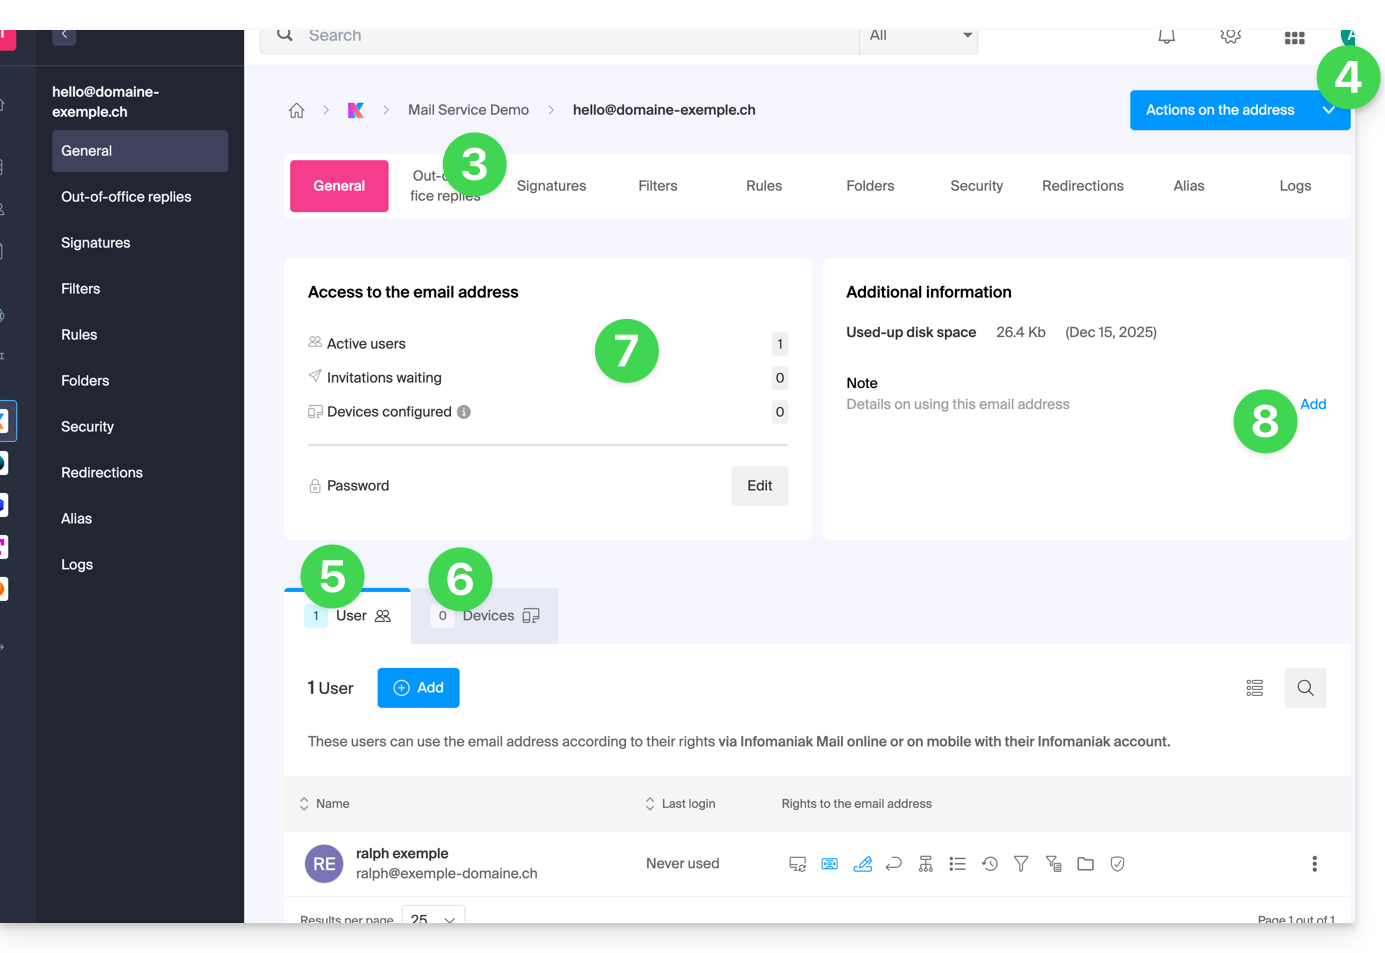
- Click on the different tabs at the top of the page (or in the left sidebar menu) to set the different settings for your email address.
- Additional actions such as restoration are accessible with the Actions button.
- Tab for users of the address (allows inviting and authorizing users to use the address).
- Tab for devices (allows adding a password to the address to use the address on a specific device).
- Summary of current accesses on the address (see points 5 & 6).
- Allows adding free text that will be displayed on the left.
Link to this FAQ:
Has this FAQ been helpful?
This guide explains how to connect the Apple Mail desktop app (desktop application on macOS) to an email address hosted by Infomaniak.
Introduction
- Rather than using the manual configuration below, it is recommended to use the .mobileconfig configuration profiles provided by Apple.
Manually add the email address to the application
Prerequisites
- Create the email address within my kSuite or a Mail Service / kSuite.
- Create a password for the email address for the device you are going to configure.
- Verify that the Mail Service is configured optimally.
To configure the email application:
- Open the application.
- If you have already configured an address, click on the Mail menu and then Add Account:
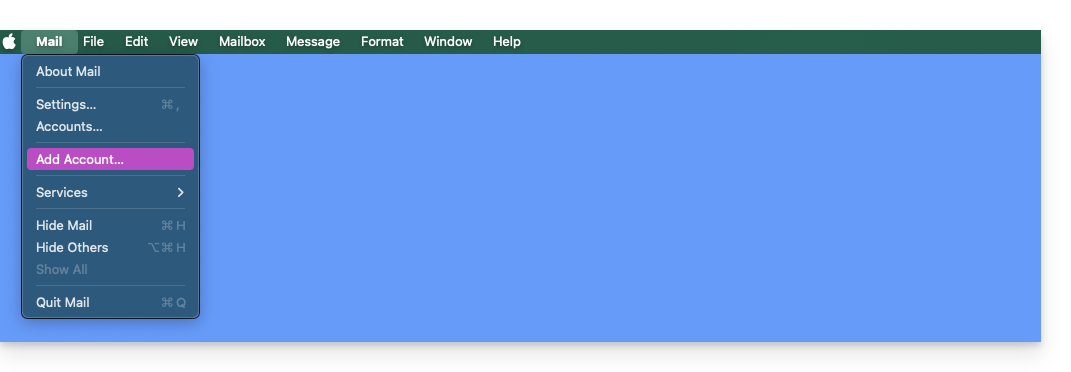
- If you have already configured an address, click on the Mail menu and then Add Account:
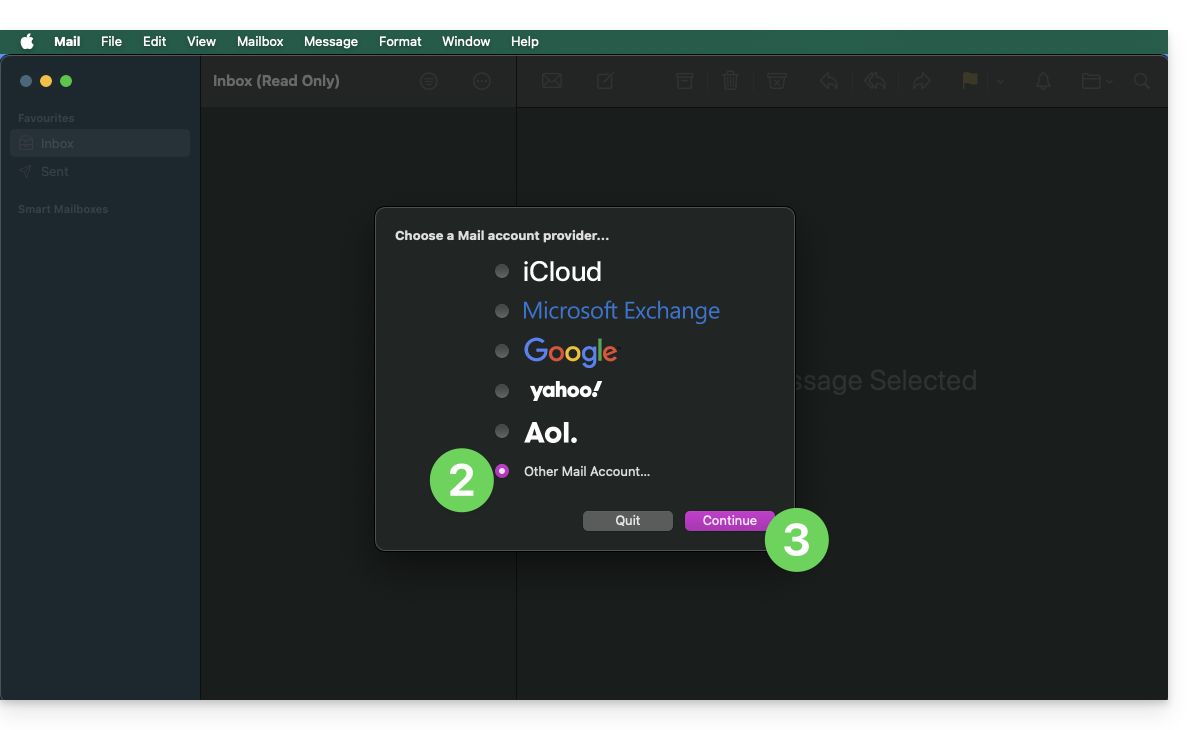
- Click on Other Account.
- Click on Continue:
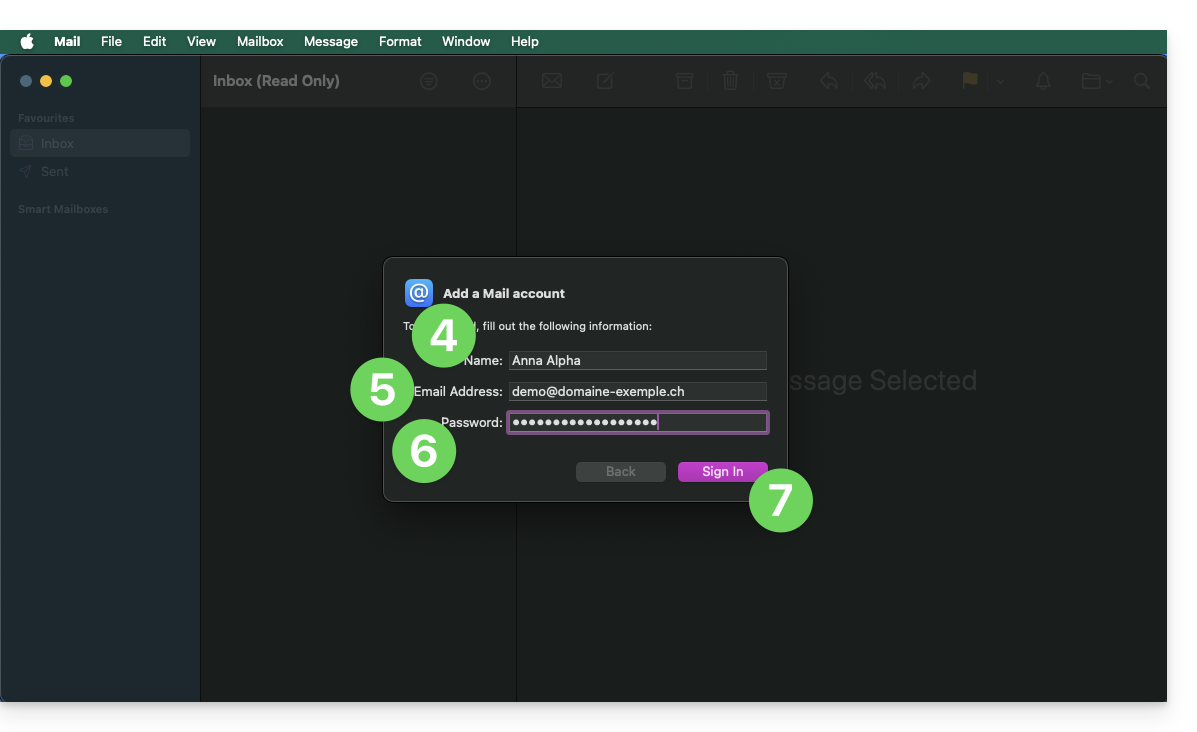
- Enter the account name.
- Enter the email address to be added.
- Paste the password for the email address generated in the Infomaniak Manager.
- Click the blue Sign In button:
- Check and complete the missing information.
- Click on Connect:
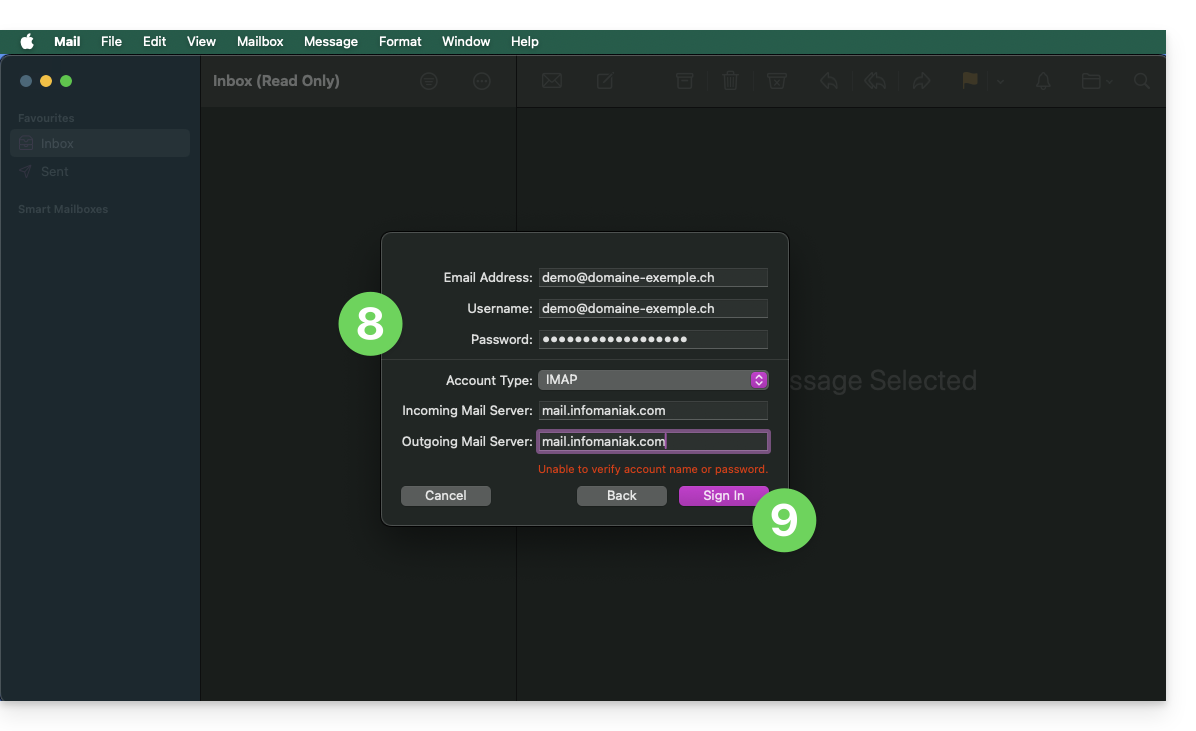
- Press the button to validate:
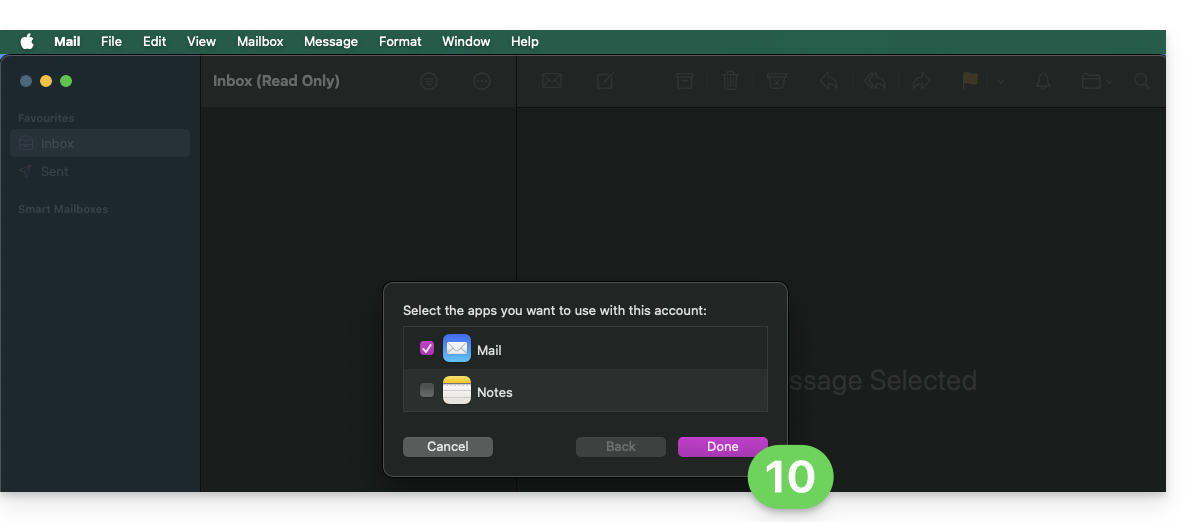
- That's it, your email address is now configured in the application:

Recommended settings
- Incoming IMAP server =
mail.infomaniak.com - IMAP port =
993(with SSL) - Outgoing SMTP server =
mail.infomaniak.com - SMTP port & encryption protocol and command/method to enable this protocol:
587+ STARTTLS - Username = the complete email address & entire email address (need help?)
- Password = the one generated for the email address you want to access
- Authentication is required for sending emails:
- It is activated in the SMTP settings of your application.
- Check "use the same settings as the incoming server" or, depending on the software/email client, enter a username (= complete email address) and the generated password.
Refer to this other guide if you are looking for information about other compatible email ports and protocols (SSL / TLS, for example).
In case of a problem
It is not necessary to contact Infomaniak Support if your email address works correctly outside the application. The most common error concerns the use of an incorrect password. The tool provided within Apple Mail can indicate this: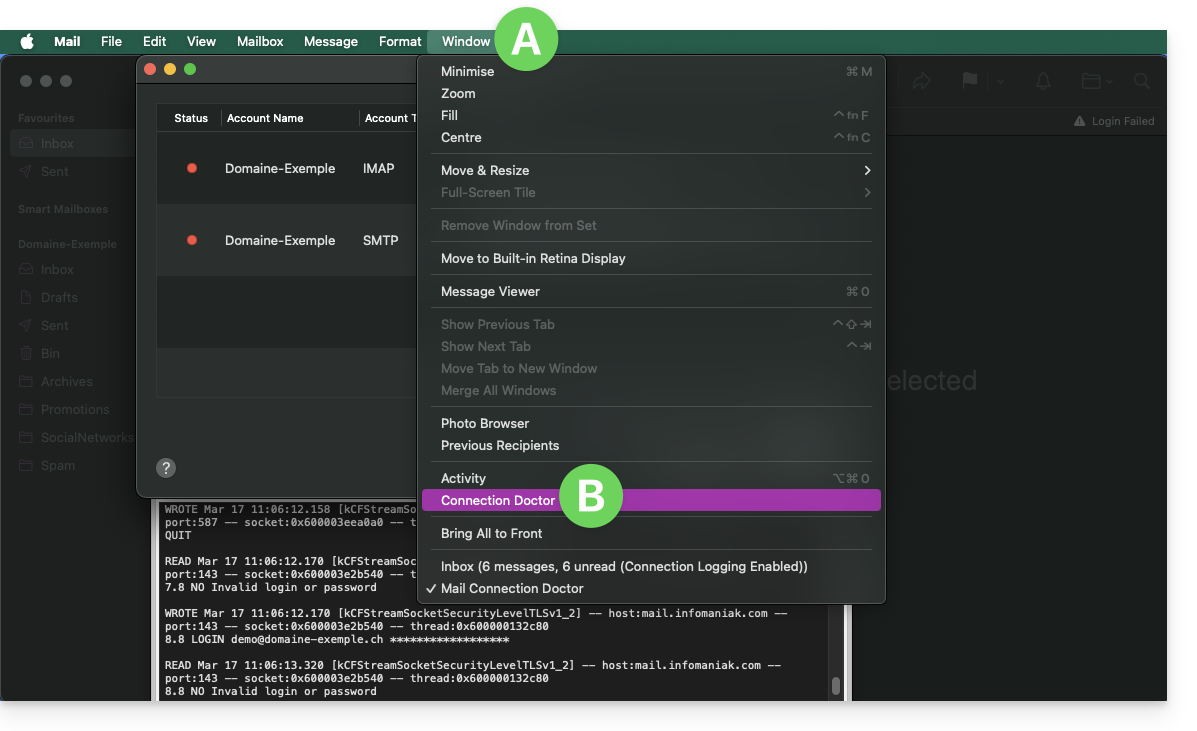
Create a new password from the Mail Service and restart the configuration of your account on the email application.
The troubleshooting guides help you resolve any potential issues:
- Refer to the solutions provided in this other guide regarding email in general.
- Delete any Apple configuration profiles related to your Infomaniak email before restarting the configuration.
And if your Apple Mail no longer works after a change of email password, refer to this other guide.
Link to this FAQ:
Has this FAQ been helpful?
This guide explains how to set up a sending and reply address different from the email address used on the Infomaniak platform.
✘ UNAVAILABLE with
my kSuite / my kSuite+ (ik.me, etik.com, ikmail.com)
Preamble
- This is useful for working with one of your email aliases (special aliases excluded) or synonymous domains.
- This will work with the Infomaniak Mail web app (online service ksuite.infomaniak.com/mail) but also with most email software/clients.
- However, note: there is no link between the settings entered in the Signature section of Infomaniak Mail and email software/clients.
- Each email software/client has its own settings and you can, for example, define a different reply address within each of the respective tools (read at the bottom of this guide).
Set up the sending address on the Infomaniak Web Mail app
Prerequisites
- The secondary email address that can be used must have been added as:
- … either email alias (example:
aa@instead ofanna.alpha@) but special aliases excluded: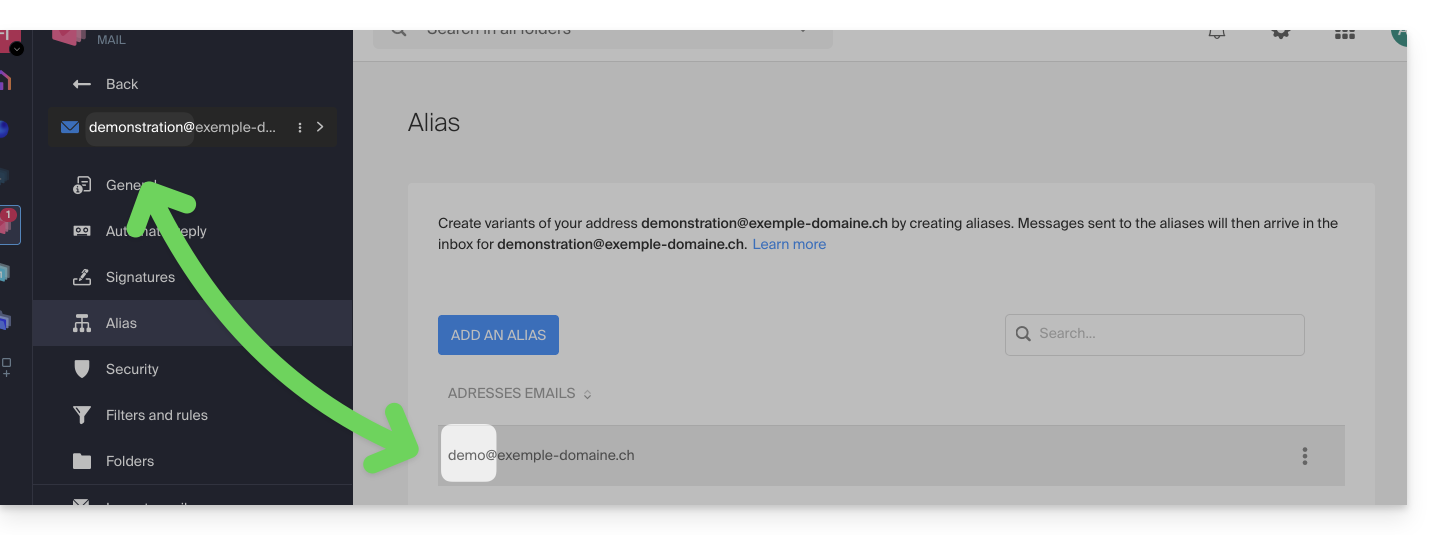
- … either synonymous domains (example:
@short-dom.xyzinstead of@my-super-long-domain.xyz).
- … either email alias (example:
To access the sending address options:
- Click here to access the Infomaniak Mail web app (online service ksuite.infomaniak.com/mail).
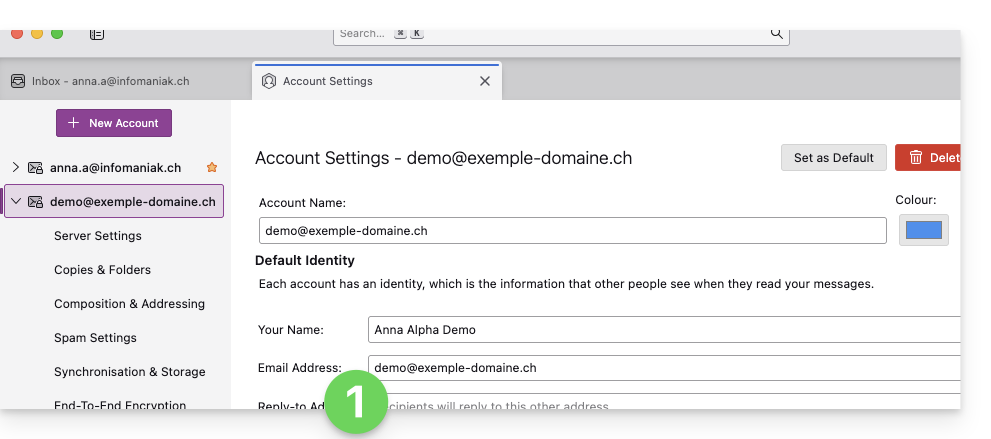
- Click on the Settings icon at the top right of the interface.
- Check or select the email address concerned in the dropdown menu of the left sidebar.
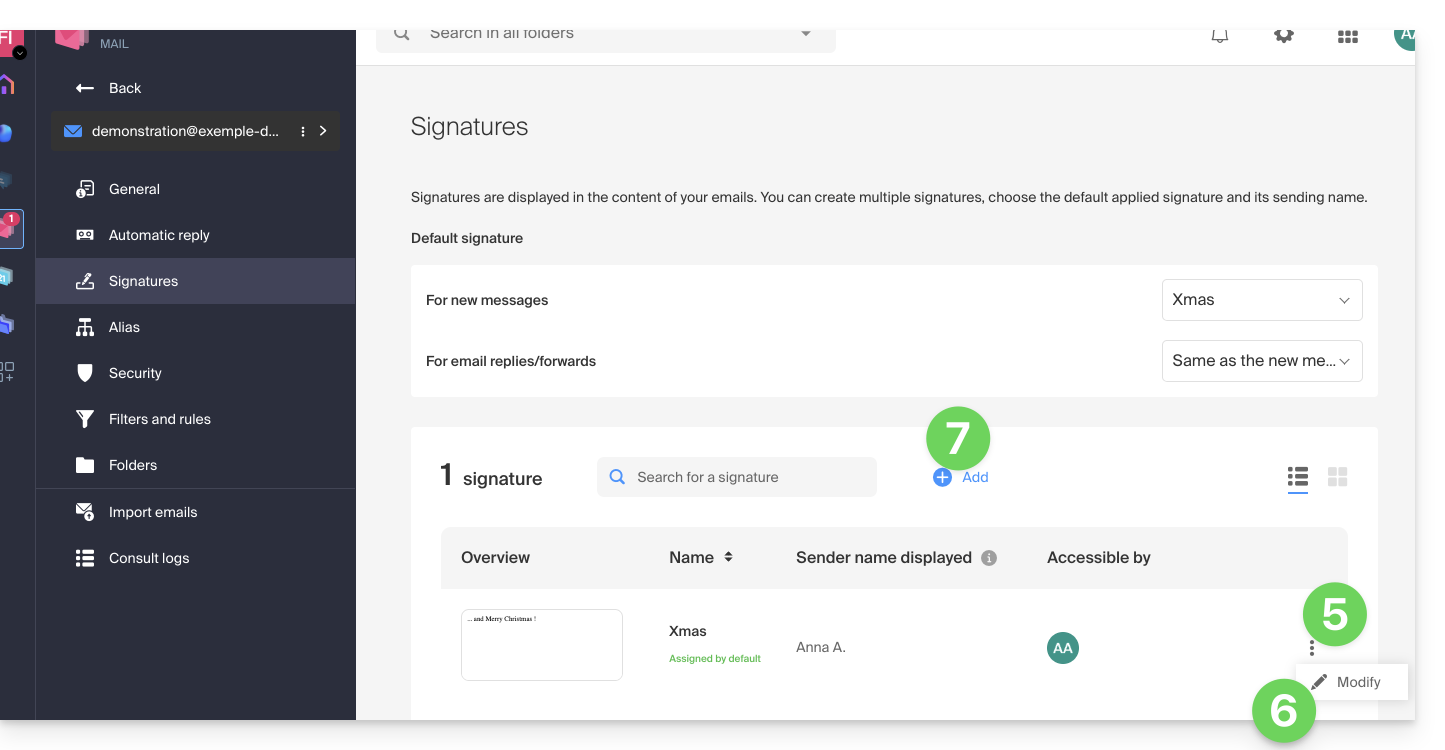
- Click on Signatures:
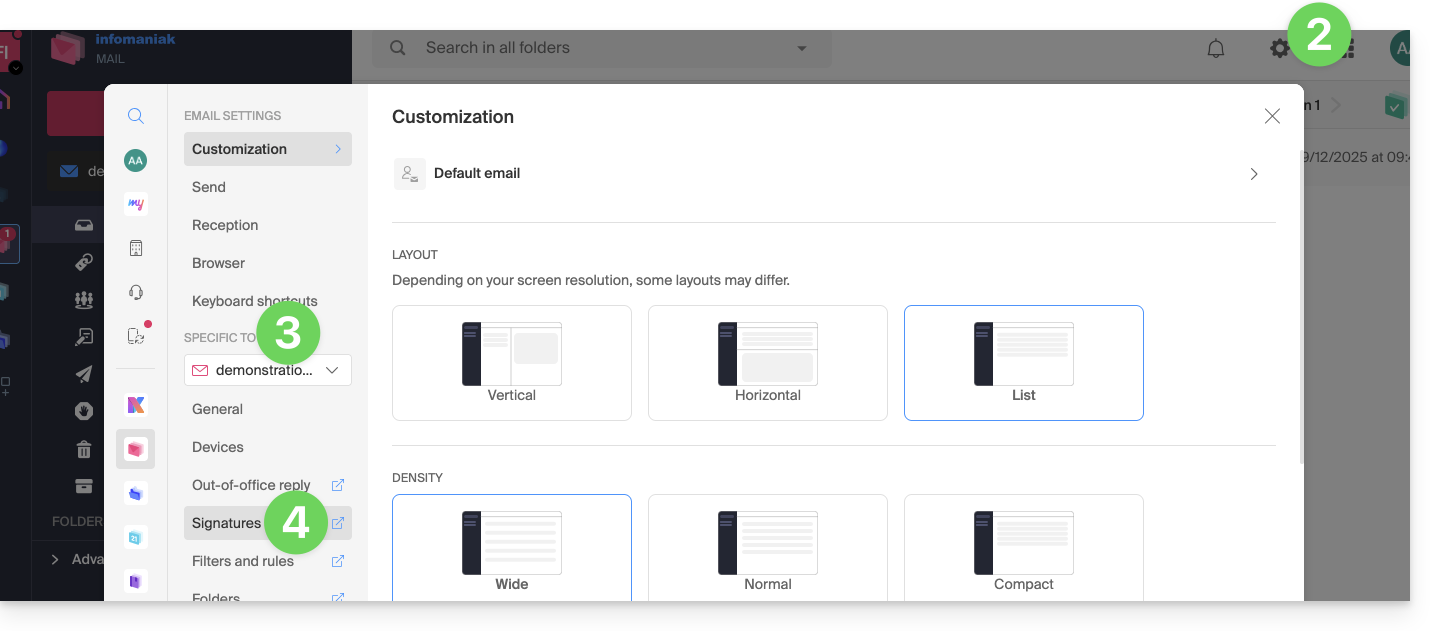
- Click on the action menu ⋮ to the right of the current signature.
- Click on the pencil icon ✎ to edit the current signature.
- OR ELSE create a new signature:
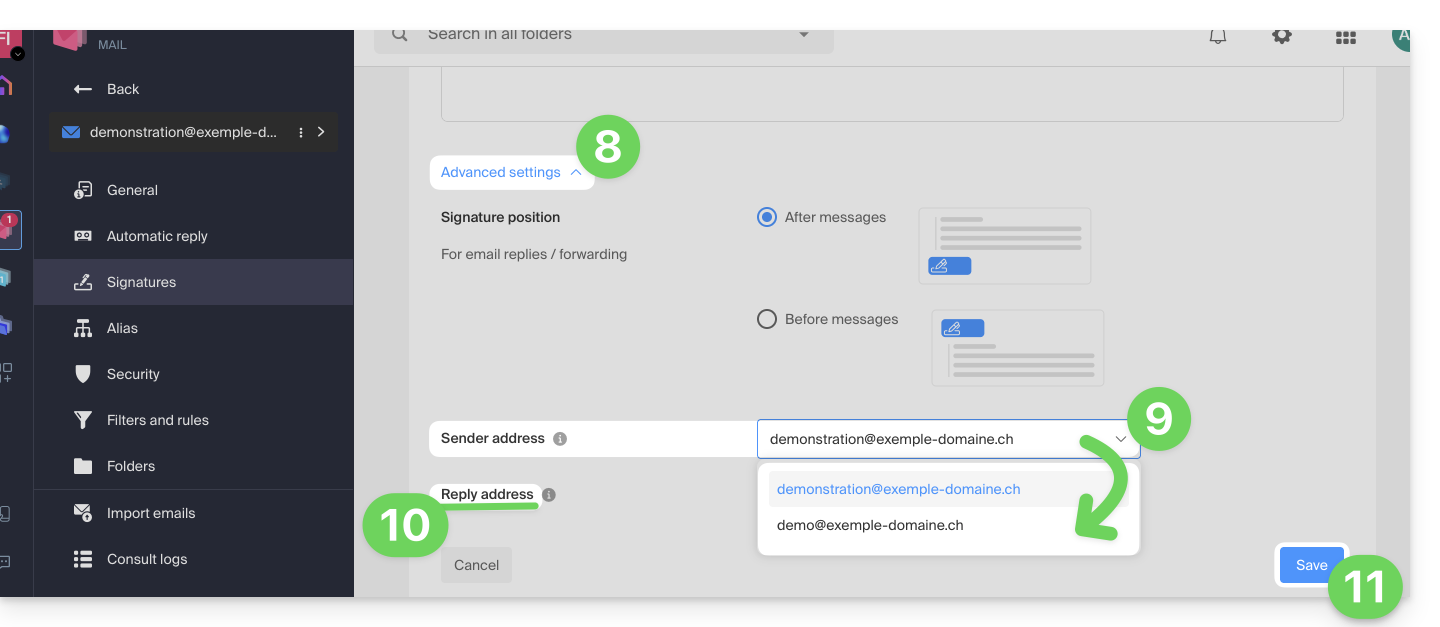
- Click on the chevron to expand the Advanced Settings section at the bottom of the page.
- The sending address allows, if proposed, to define the address that will be mentioned as the sender in the inbox of your recipients.
- The reply address allows you to receive future replies to your emails (return-path) to a different address (from the options specified in the prerequisites above)…
- …and if you write a message in response to a reply received on this alias, the signature allowing sending with this alternative identity will be applied instead of the default signature.
- Validate with the Save button (if this remains grayed out, make sure all fields are filled in, especially the full name field):
- Compose a new message by selecting the corresponding signature:
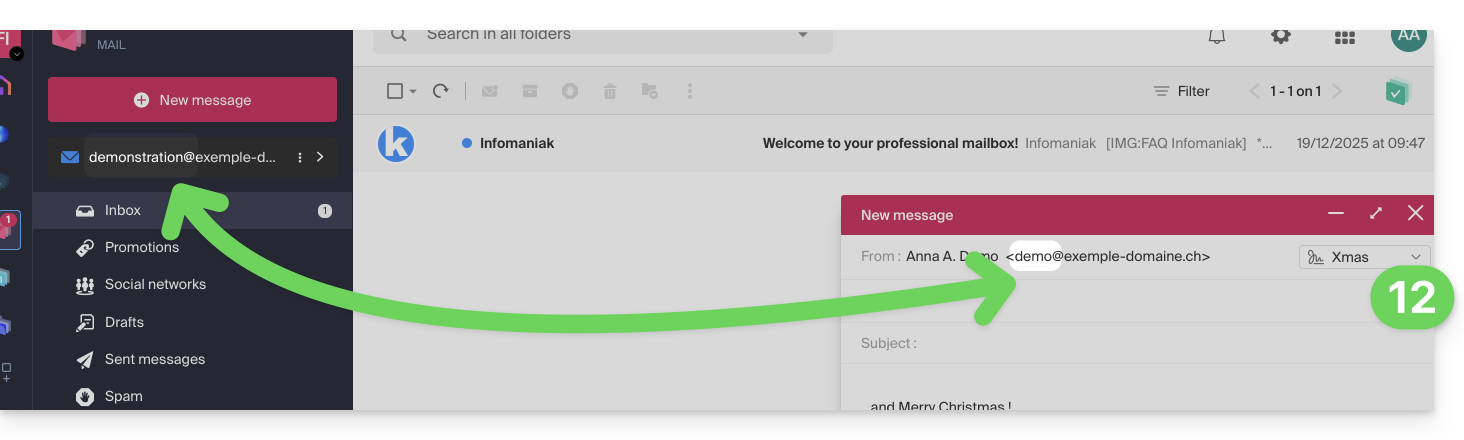
In the example above, the sending address was changed but not the reply address. This gives the expected result with the recipient (it is enough to look at the headers of the received message to prove it).
Now add the same secondary address in an email software/client, the effect will be the same.
Set up the sending address on an email software/client
Prerequisites
- The secondary email address that can be used must have been added as:
- … or email alias (example:
aa@instead ofanna.alpha@) including special aliases. - … either synonymous domains (example:
@short-dom.xyzinstead of@my-super-long-domain.xyz).
- … or email alias (example:
It is possible to configure an email software/client with any existing email address, even if it exists as an alias in your Mail Service. Sending will be done in the same way as with an address defined as "main" email.
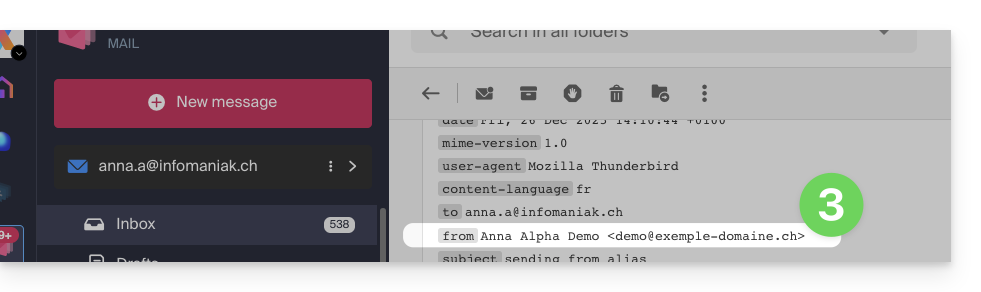
Example in the Thunderbird software:
- Add an account with the correct email parameters related to the alias:
- Compose a new message from the email software/client.
- Once received, the message is well described, even in its headers, as being sent from an address that you know is an alias:
Link to this FAQ:
Has this FAQ been helpful?
This guide provides the most common IMAP server addresses. These can be used to perform the copy of the content of your old email addresses to your Infomaniak email address.
Important note: For Gmail, Yahoo, Outlook, and iCloud, you generally need to generate an "App Password" in the security settings of your original account to authorize the copy.
If necessary, do not hesitate to contact your previous email provider to ask for the exact mail server to enter.
IMAP Server Addresses
| Provider | IMAP Hostname / Server |
|---|---|
| 1&1 (IONOS) | imap.ionos.fr |
| 9 Business | imap.9business.fr |
| 9 Telecom / Neuf | imap.neuf.fr |
| Alice | imap.aliceadsl.fr |
| Altern.org | imap.altern.org |
| AOL | imap.aol.com |
| Apple (iCloud / me.com) | imap.mail.me.com |
| Bouygues Telecom (Bbox) | imap4.bbox.fr |
| Caramail / GMX | imap.gmx.com |
| Cegetel | imap.cegetel.net |
| Club Internet | imap.club-internet.fr |
| Free | imap.free.fr |
| Freesurf | imap.freesurf.fr |
| Gmail (Google) | imap.gmail.com |
| Hotmail / Outlook / MSN | outlook.office365.com |
| La Poste | imap.laposte.net |
| Mailo (ex-NetCourrier) | imap.mailo.com |
| Noos | imap.noos.fr |
| Numericable | imap.numericable.fr |
| o2switch | nom-du-serveur.o2switch.net (consult your welcome email) |
| Online.net | imap.online.net |
| Orange / Wanadoo | imap.orange.fr |
| OVH (Shared) | ssl0.ovh.net |
| OVH (Pro / Exchange) | pro1.mail.ovh.net (or ex.mail.ovh.net) |
| Proton Mail | direct copy is not possible |
| SFR | imap.sfr.fr |
| Skynet (Belgacom / Proximus) | imap.proximus.be |
| Tele2 | imap.tele2.com |
| Telenet | imap.telenet.be |
| Videotron | imap.videotron.ca |
| Yahoo Mail | imap.mail.yahoo.com |
Link to this FAQ:
Has this FAQ been helpful?
This guide concerns the redirection email addresses feature, a function available on the Mail Services and used to create addresses intended solely for redirecting emails.
Preamble
- This feature allows you to create a "virtual" email address without affecting the available quota of email addresses on the paid Mail Service.
- It does not store any received messages, it is impossible to access and view them, nor to restore or view the logs of messages that have passed through.
- It is solely intended to redirect incoming emails to one or more (max. 10 users per redirection) other existing addresses.
- Recipients registered to receive redirected emails must first accept their addition for the redirection to them to work (see point 3 below).
- Emails considered as spam by Infomaniak will not be redirected (bounce to the sender — and refer to this other guide regarding possible Gmail to Gmail redirections).
- To manage the redirections of existing email addresses on your Mail Service, refer to this other guide.
Number of possible “virtual” redirections
⚠ Redirection addresses that can be created, per available address (depending on the Mail Service quota) :
| kSuite | Free | 1 |
| Standard | 20 | |
| Business | 20 | |
| Enterprise | 20 | |
| my kSuite | 0 | |
| my kSuite+ | 0 | |
| Mail Service | Starter 1 address max. | 1 |
| Premium 5 addresses min. | 20 |
For example: Mail Service paid for 10 addresses = 200 redirection addresses available
Create the address intended to redirect emails
1. Open the redirect address management page
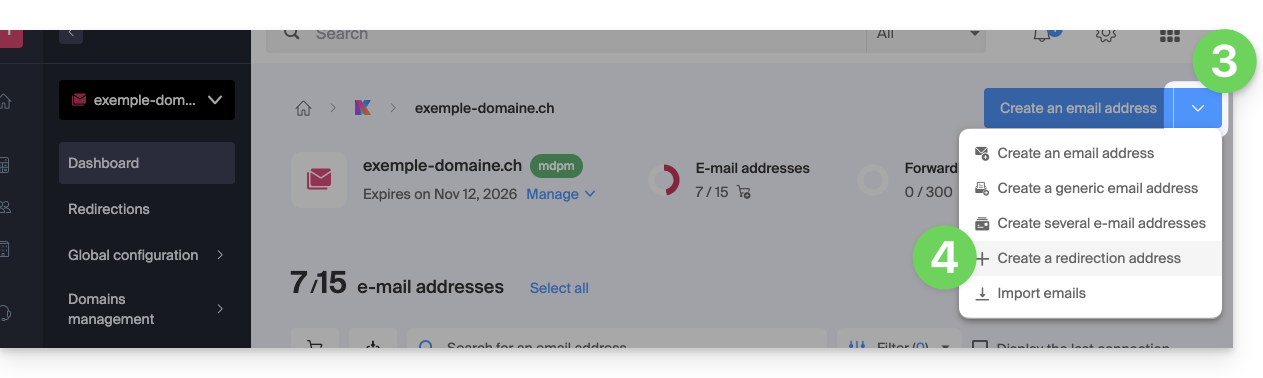
To access the feature:
- Click here to access your product management on the Infomaniak Manager (need help?).
- Click directly on the name assigned to the product concerned.
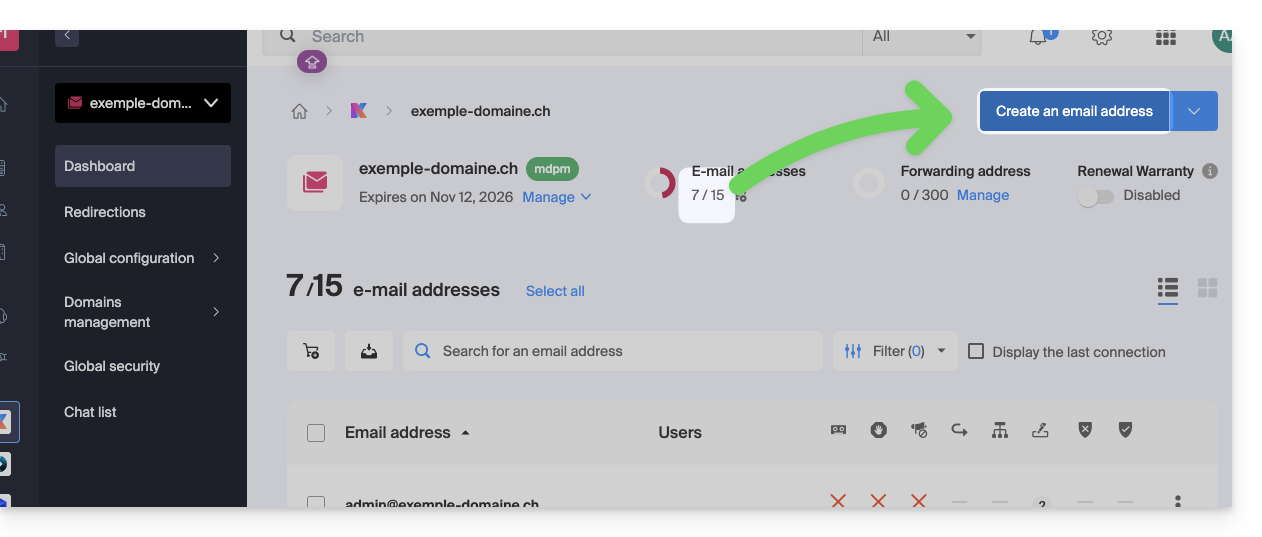
- Click on the chevron to the right of the blue button Create an email address.
- Choose to Create a redirect address:
- You can also click on Redirect Mail in the left sidebar:
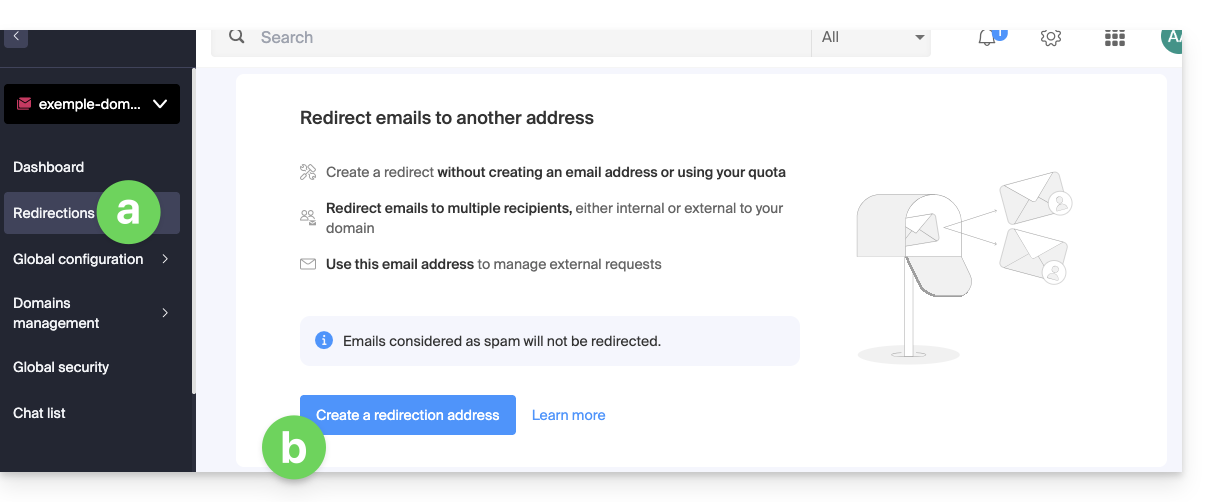
- You can also click on Redirect Mail in the left sidebar:
2. Add a new redirect address
Once on the redirections page:
- Click the button to Create a redirect address.
- Name the email address that will receive the redirected emails (it will be valid on the main domain and its linked domains).
- Specify an email address that will receive the emails.
- Click the button to add the valid email address to the table below.
- Delete, if necessary, an address added to the table by clicking on the trash icon.
- Click the Create button:

3. Confirm the addition as a redirect recipient
The receiving addresses entered in the table automatically receive an email requesting confirmation of addition.
As long as the addition is not confirmed by at least 1 mentioned user, the entire redirection will not work! As soon as 1 user has confirmed their addition, the redirection works (to the one or those who have confirmed the addition).
- The user must click on the link in the email to validate the addition.
- As long as the addition is not confirmed, the status Pending will remain displayed next to the destination address (visible if you modify the redirection address - read below).
Modify or delete the redirection
You cannot rename a redirection address after its creation. But to modify the list of redirection recipients, or resend a confirmation request, or delete the redirection email address:
- Once on the redirections page:
- Recipients who have not yet confirmed their addition are preceded by a gray icon.
- Click on the action menu ⋮ to the right of the redirection address concerned:
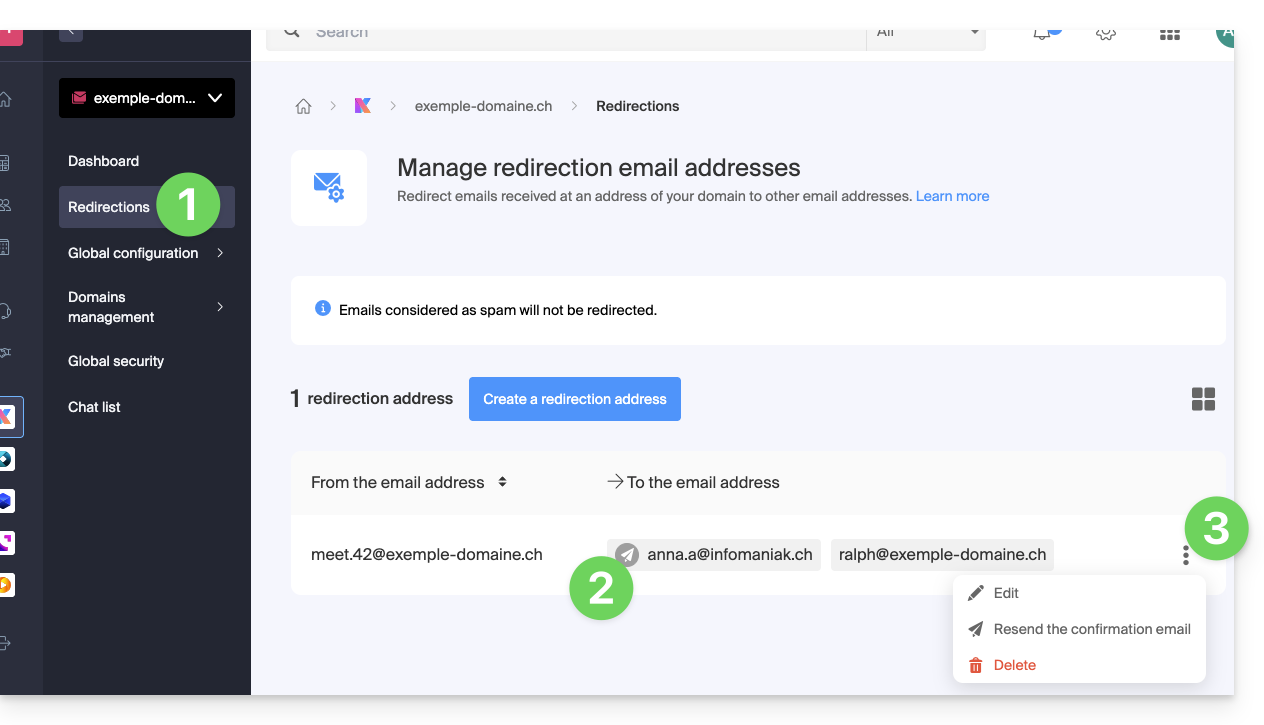
From this action menu ⋮ click on:
- Modify to add recipient email addresses:
- Click on the button to add the valid email address to the table below.
- Save the modification.
- Otherwise, click on the trash icon to remove a recipient email address from the list.
- The acceptance status details are displayed to the right of the recipient address.
- Resend to immediately request by email that the user accept their addition to the list (a second reminder will only be possible after 24 hours, otherwise the button remains grayed out).
- Delete to remove the entire address (click on the confirmation modal to execute the deletion):

Link to this FAQ:
Has this FAQ been helpful?
This guide explains how to modify an offer for Infomaniak Service Mail, the powerful and secure solution for hosting your email addresses, in order to increase or reduce the quota of email addresses available within it.
Preamble
- Refer to this other guide if you simply want to create or delete an email address on your existing Service Mail, without changing the number of email addresses available within it.
- If your Service Mail is not yet part of a kSuite, refer to this other guide to consider a possible change of offer along the way.
Modify the email address quota on a Service Mail
Prerequisites
- Have a Service Mail on your Infomaniak Manager.
To see the number of email addresses currently available on your Service Mail, and then order more if necessary (or remove some):
- Click here to access the management of your product on the Infomaniak Manager (need help?).
- Click directly on the name assigned to the product concerned.
- The number of email addresses created (A) and the total number of email addresses available (B) on the Service are displayed at the top of the page:
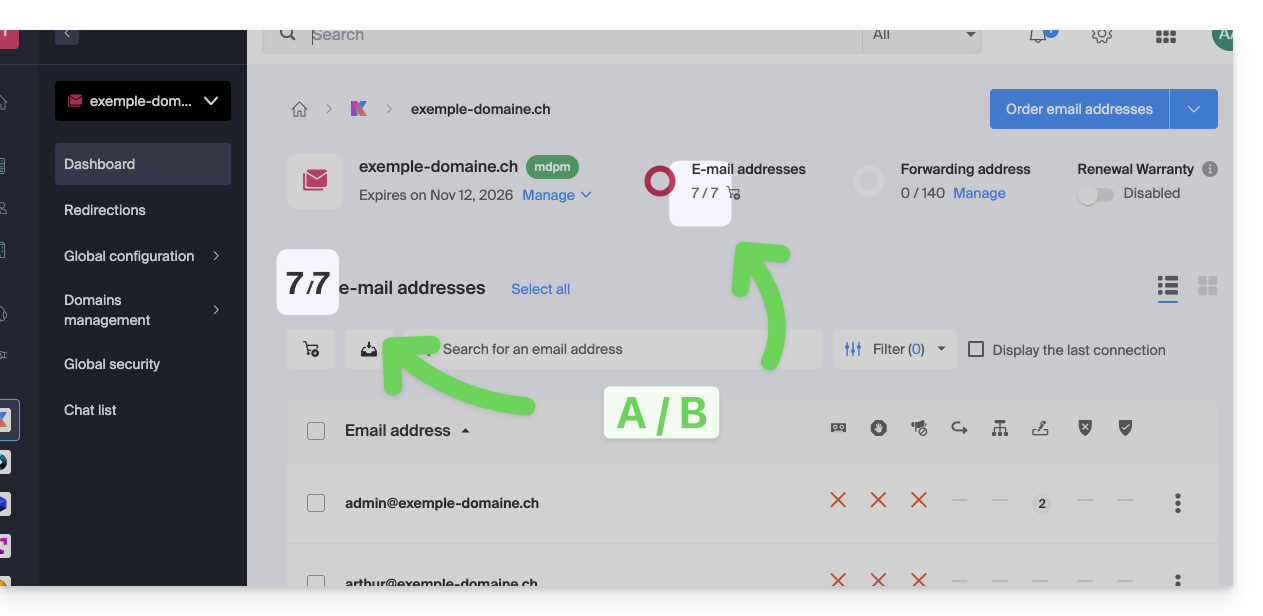
- Note that you can also view the quota directly at point 1, when you are on the page listing your Service Mail:
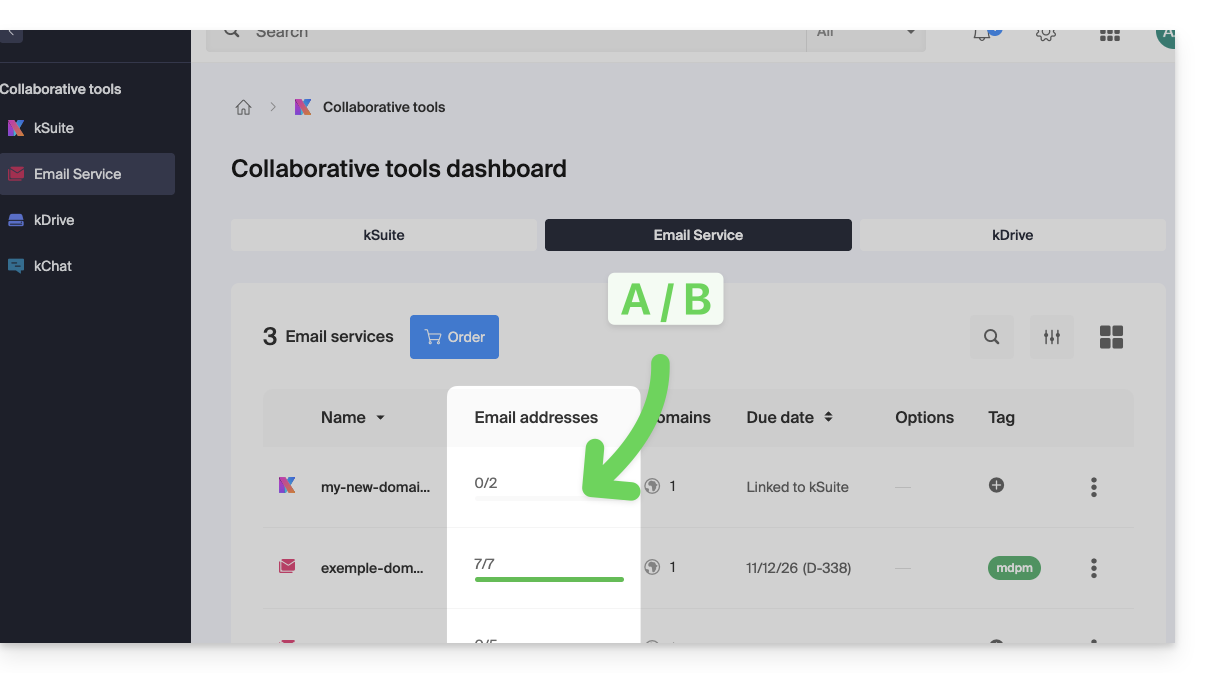
- Note that you can also view the quota directly at point 1, when you are on the page listing your Service Mail:
Increase the number of email addresses available
To increase the number of email addresses available to you on your Service Mail, thus allowing you to create new email addresses for yourself or your entourage:
- Click here to access the management of your product on the Infomaniak Manager (need help?).
- Click directly on the name assigned to the product concerned.
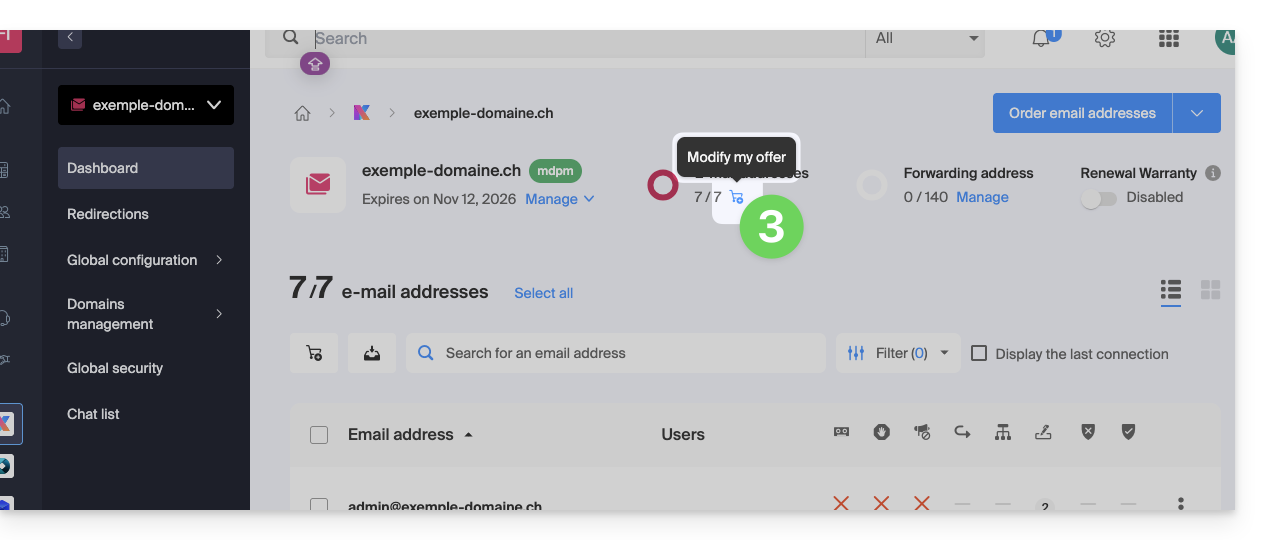
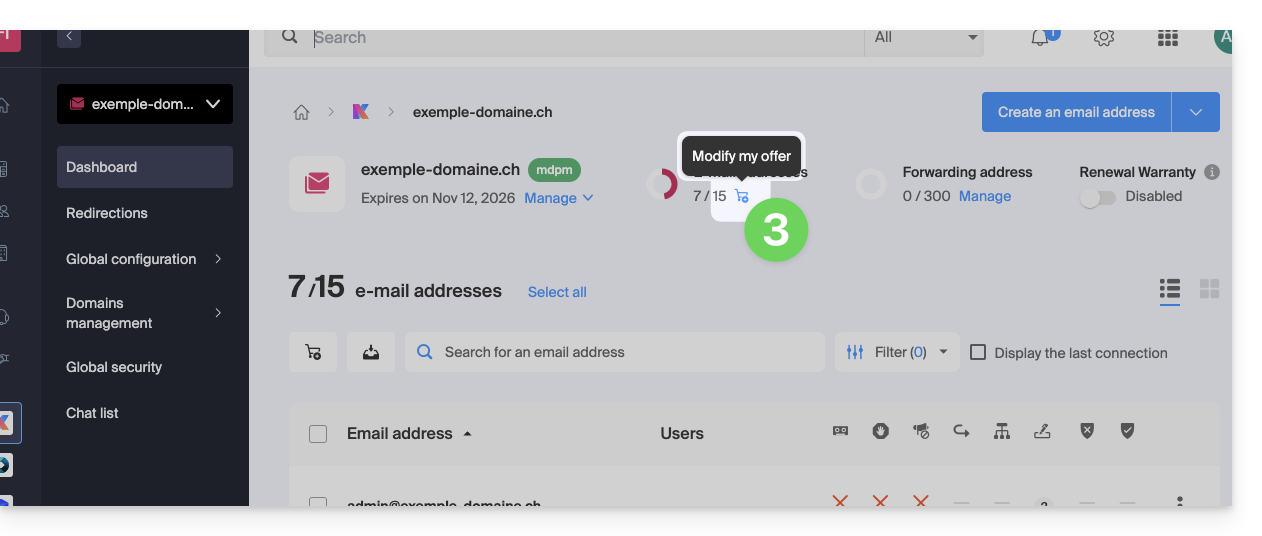
- Click at the top on the shopping cart icon:
- Adjust the desired quota and proceed with the order for the additional number of addresses on the Service Mail domain.
- Complete the payment procedure; you can now create your additional email addresses:
Reduce the number of email addresses available
To reduce the number of email addresses available to you on your Service Mail, thus allowing you to pay only for the number of addresses actually desired and used at the next renewal (minimum of 5 addresses for any Service Mail, excluding Service Mail Starter), you must, if necessary, have deleted the excess email addresses and then:
- Click here to access the management of your product on the Infomaniak Manager (need help?).
- Click directly on the name assigned to the product concerned.
- Click at the top on the shopping cart icon:
- Adjust the desired quota and complete the procedure by taking note of the important information displayed on the screen.
Link to this FAQ:
Has this FAQ been helpful?
This guide is for you if you want to change your current email provider and host your emails with Infomaniak.
Preamble
- To help you identify the offer best suited to your needs, refer to this other guide.
- To avoid losing any messages and experiencing any interruptions:
- Follow the different links provided in order; they will open in a new tab of your browser, and return to this main guide after each completed step.
- If necessary, you can also migrate your:
You order a Mail Service only
Below are the different steps to migrate your mail service to Infomaniak securely.
Step 1
It is necessary to order the mail service by following this guide.
At the time of ordering, you can choose to transfer the domain name at the same time or order the mail service alone.
You can then import the content of your old addresses to Infomaniak: refer to this other guide.
Step 2
Once the addresses are configured and your old content imported, you will be able to link your external domain name to your Infomaniak Mail Service to start receiving emails at Infomaniak. You will need to follow the chapter "Link the external domain to your Mail Service" of this guide.
You will find here the MX / SPF to add in the DNS zone of your domain name:
SPF
Type: TXT
Host: Leave blank
Target: v=spf1 include:spf.infomaniak.ch -all
MX
Priority: 5
Host: Leave blank
Target: mta-gw.infomaniak.ch (for Gandi, it is necessary to add a dot at the end "mta-gw.infomaniak.ch." )
Step 3 (optional)
Once everything is working correctly and if it hasn't been done already, you can transfer your domain name: refer to this other guide.
As soon as the transfer is initiated, you should have access to the DNS zone of your domain name on the Infomaniak Manager. You can therefore check…
1. … in the DNS diagnostic if there are any corrections to be made and if necessary add the DNS entries that might be necessary for other services used with your domain name (newsletter or other).
2. … in the global security tab of your mail service if DKIM is properly activated.
If emails arrived during the migration with your previous provider, you can import the content of your old addresses to Infomaniak again by following this guide (duplicates are managed).
You order a kSuite
Here are the different steps to migrate your external mail service to an Infomaniak kSuite securely.
Step 1
Order kSuite from this page.
Once the order is completed, access your kSuite and add your domain name to it.
You can then create your email addresses and even import the content of your old addresses: refer to this other guide.
Step 2
Once the addresses are configured and your old content imported, link your external domain name to your Infomaniak Mail Service to start receiving emails at Infomaniak. Refer to the chapter "Link the external domain to your Mail Service" of this other guide.
You will find here the MX / SPF to add in the DNS zone of your domain name:
SPF
Type: TXT
Host: Leave blank
Target: v=spf1 include:spf.infomaniak.ch -all
MX
Priority: 5
Host: Leave blank
Target: mta-gw.infomaniak.ch (for Gandi, it is necessary to add a dot at the end "mta-gw.infomaniak.ch." )
Step 3 (optional)
Once everything is working correctly and if it hasn't been done already, you can transfer your domain name: refer to this other guide.
As soon as the transfer is initiated, you should have access to the DNS zone of your domain name on the Infomaniak Manager. You can therefore check…
1. … in the DNS diagnostic if there are any corrections to be made and if necessary add the DNS entries that might be necessary for other services used with your domain name (newsletter or other).
2. … in the global security tab of your mail service if DKIM is properly activated.
If emails arrived during the migration with your previous provider, you can import the content of your old addresses to Infomaniak again by following this guide (duplicates are managed).
Link to this FAQ:
Has this FAQ been helpful?
This guide explains how to display the folders of your Infomaniak email account using an email client, via the IMAP protocol.
Introduction
- The various generic folders are created by Mail Infomaniak during the very first connection to the interface.
- Therefore, some email/IMAP clients may not display any folders if no connection has been made beforehand to Mail.
- And even if they are present in Mail, some folders may still not appear in your email client configured with IMAP.
Force the synchronization of IMAP folders…
… in Microsoft Outlook
In some cases, after configuring an Infomaniak address in the Outlook email client, some folders may not appear. In this case, it is necessary to check the synchronization with the subscribed folders in Outlook:
- Start the Outlook software on your computer.
- Under your Infomaniak email address, without selecting it first, right-click on the Inbox folder.
- Select IMAP Folders from the menu that appears:

- If the IMAP Folders item is not present, deselect the address beforehand.
- If the IMAP Folders item is not present, deselect the address beforehand.
- Disable the option
When viewing the hierarchy in Outlook, only show subscribed foldersby unchecking the box: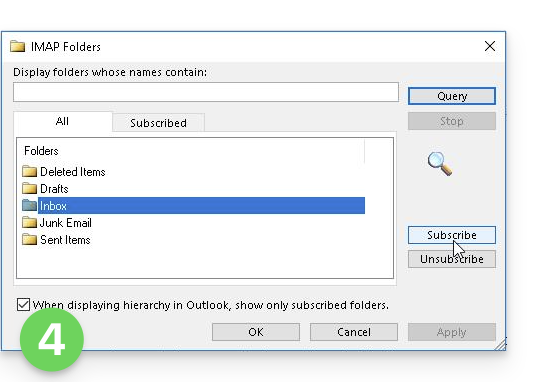
- Click on Apply.
Depending on the version, the menu can be found here: in some versions: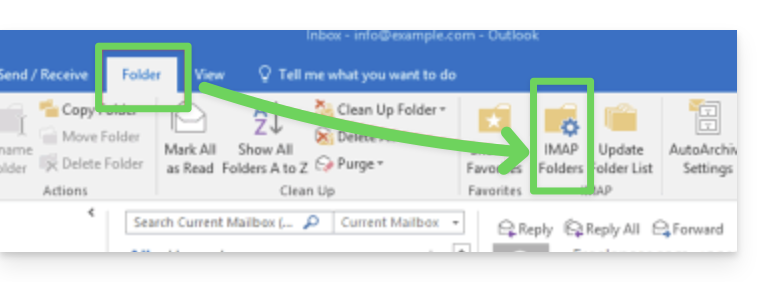
or here: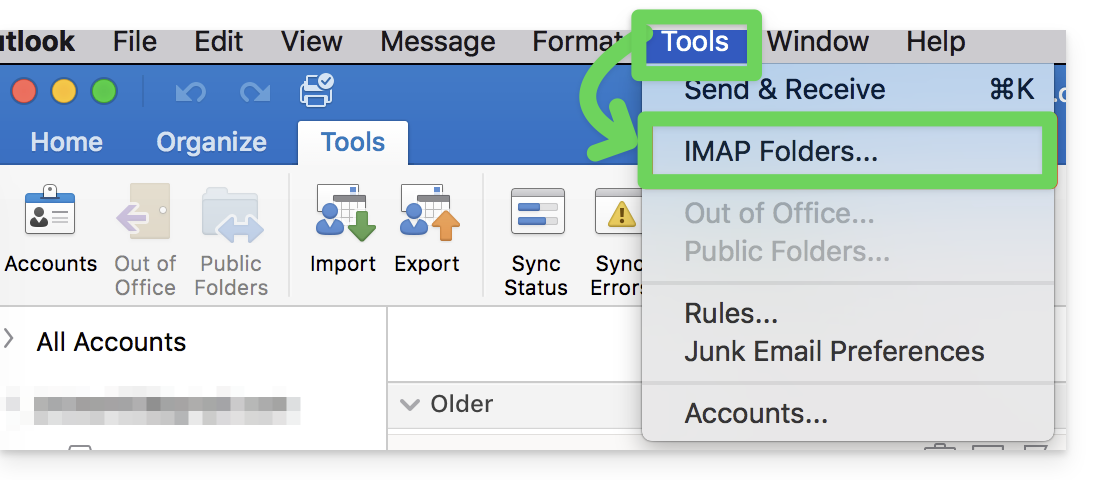
…in Thunderbird
In some cases, after configuring an Infomaniak address in the Thunderbird email client, some folders may not appear. In this case, you need to manually check these folders from the Thunderbird subscription menu:
- Start the Thunderbird software on your computer.
- Right-click on the Infomaniak address in question.
- Select the Subscribe menu:
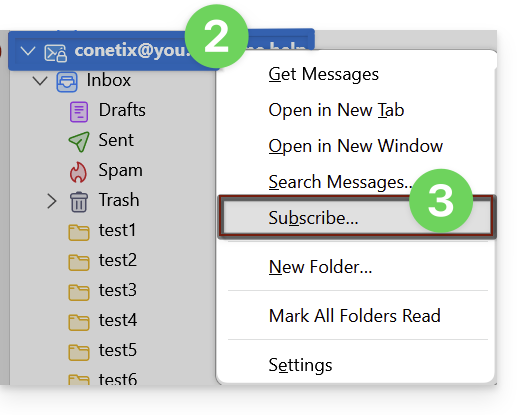
- Check the missing folders.
- Click OK to validate the selection.
… elsewhere
In your usual email client, find the term "IMAP folders" and/or "subscribe", "IMAP subscription", etc.
Modify the synchronized folders
Refer to this other guide to change the location of certain generic folders.
Link to this FAQ:
Has this FAQ been helpful?
This guide explains how to redirect emails from a Gmail, Bluewin, Outlook, Proton, Yahoo, etc. address to your Infomaniak-managed email address.
Preamble
- By setting up automatic redirection of all incoming emails on your previous messaging system, you can immediately use your new Infomaniak email address while ensuring you don't miss any messages.
- By responding to your emails from your new Infomaniak address, your contacts will automatically use it to write to you in the future.
- You can also import the content from another Mail provider directly to your Infomaniak address.
- For additional help, contact the service provider where you want to activate message redirection.
Specific guides
Refer to the official guides based on your previous provider:
- Gmail
- iCloud
- Microsoft (Outlook / Hotmail / Live)
- Orange
- Proton Mail (note, requires a paid plan)
- Sunrise:
- Click here to log in to Sunrise Mail.
- Click on Inbox.
- Click on Settings => Manage Inbox.
- Enter the corresponding email address under 'Transfer'.
- Yahoo (note, requires Yahoo Mail Pro)
Bluewin
- Bluewin (see also below):
- Click here to log in to Bluewin.
- Click on Settings then Automatic forwarding.
- Click on Set up automatic forwarding.
- Follow the procedure to set up automatic redirection.
- Bluewin (alternative method):
- Click here to log in to MySwisscom.
- Click on the "More" menu then “Settings”:

- Then click on “Manage transfers”:

GMX
Click on these elements in order to set up a redirection rule from GMX:
Link to this FAQ:
Has this FAQ been helpful?
This guide explains how to automatically transfer new messages from an existing email address, managed by Infomaniak, to the email account of your choice, even if it is completely external to Infomaniak, while keeping (or not) the messages.
Preamble
- The emails detected by Infomaniak as spam…
- … ARE REDIRECTED when all redirection addresses are hosted by Infomaniak.
- … ARE NOT REDIRECTED AT ALL from the moment one of the redirection addresses is not hosted by Infomaniak (even if all other redirection addresses are).
- Emails not considered spam ARE REDIRECTED, including to Gmail but beware in this case of this particular situation.
- Users of the email address on the Infomaniak Web App Mail receive an email each time a redirection is added/removed.
- It is also possible to create addresses intended solely for redirecting incoming emails (refer to this other guide on this subject).
⚠ Redirection addresses that can be added per email address :
| kSuite | free | 1 |
| Standard | 100 | |
| Business | 100 | |
| Enterprise | 100 | |
| my kSuite | 0 | |
| my kSuite+ | 100 | |
| Mail Service | Starter 1 address max. | 1 |
| Premium 5 addresses min. | 100 |
Add a redirection from the Infomaniak Web Mail app
Prerequisites
- Have permission to manage redirections: if you had been invited to the Infomaniak Web App Mail (online service ksuite.infomaniak.com/mail) to manage your address, it is possible that the Mail Service manager has removed this right from their admin account.
To access your Infomaniak mailbox:
- Click here to access the Infomaniak Mail Web app (online service ksuite.infomaniak.com/mail).
- Click on the Settings icon at the top right of the interface.
- Check or select the email address concerned in the dropdown menu of the left sidebar.
- Click on Redirections:
- Click on the blue Add a redirection button.
- Enter a destination email address per line.
- Click on Add.
Add a redirection from a Mail Service
To access the Mail Service:
- Click here to access the management of your Mail Service on the Infomaniak Manager (need help?).
- Click directly on the name assigned to the Mail Service concerned:
- Click on the email address concerned in the table that appears:
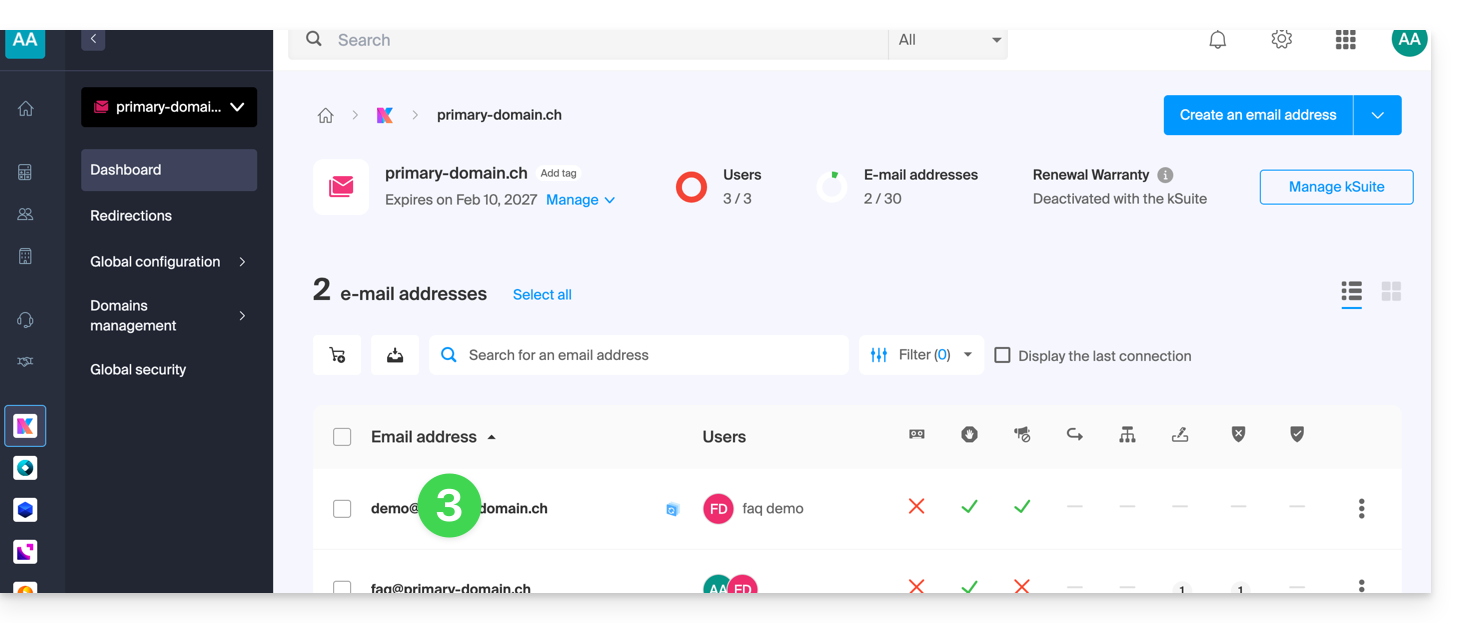
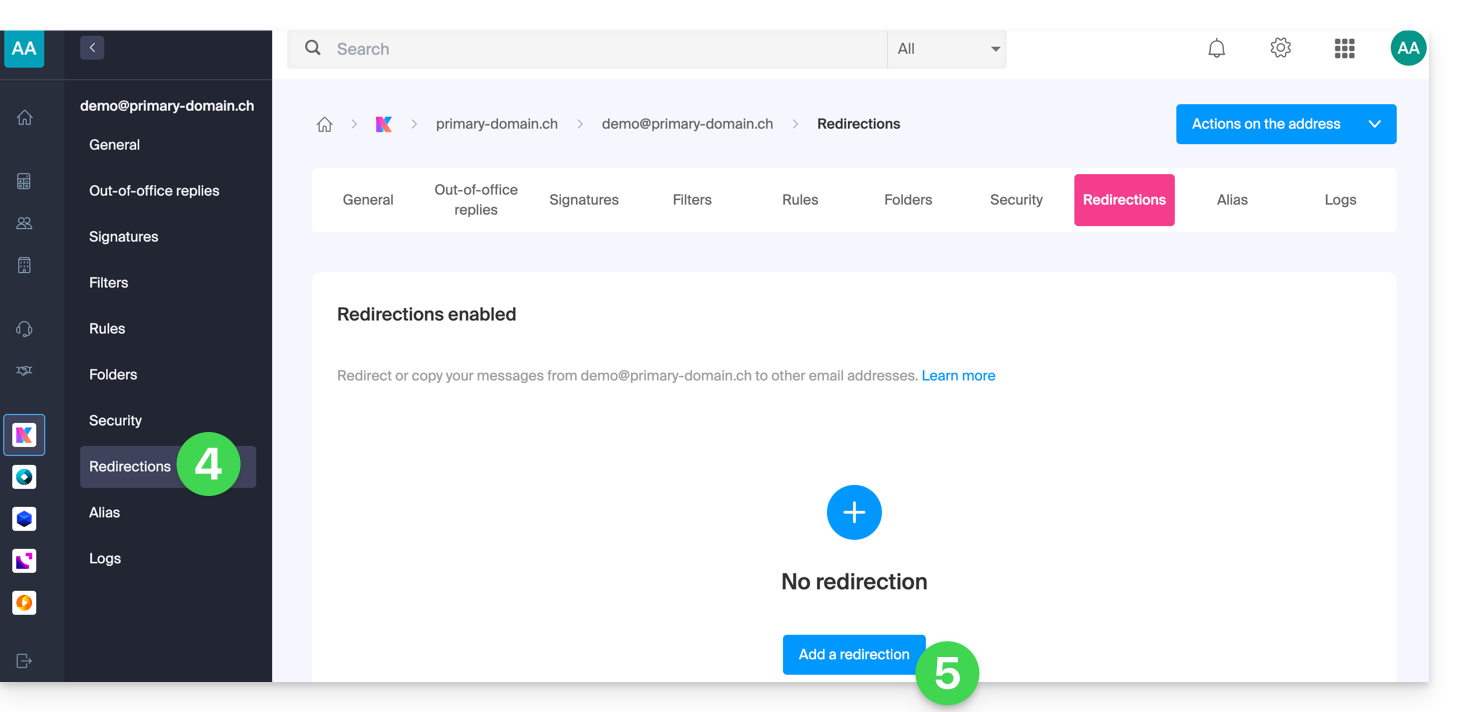
- Click on the left sidebar menu (or tab) Redirections.
- Click on the blue Add a redirection button (then, if necessary, enter your login password for security):
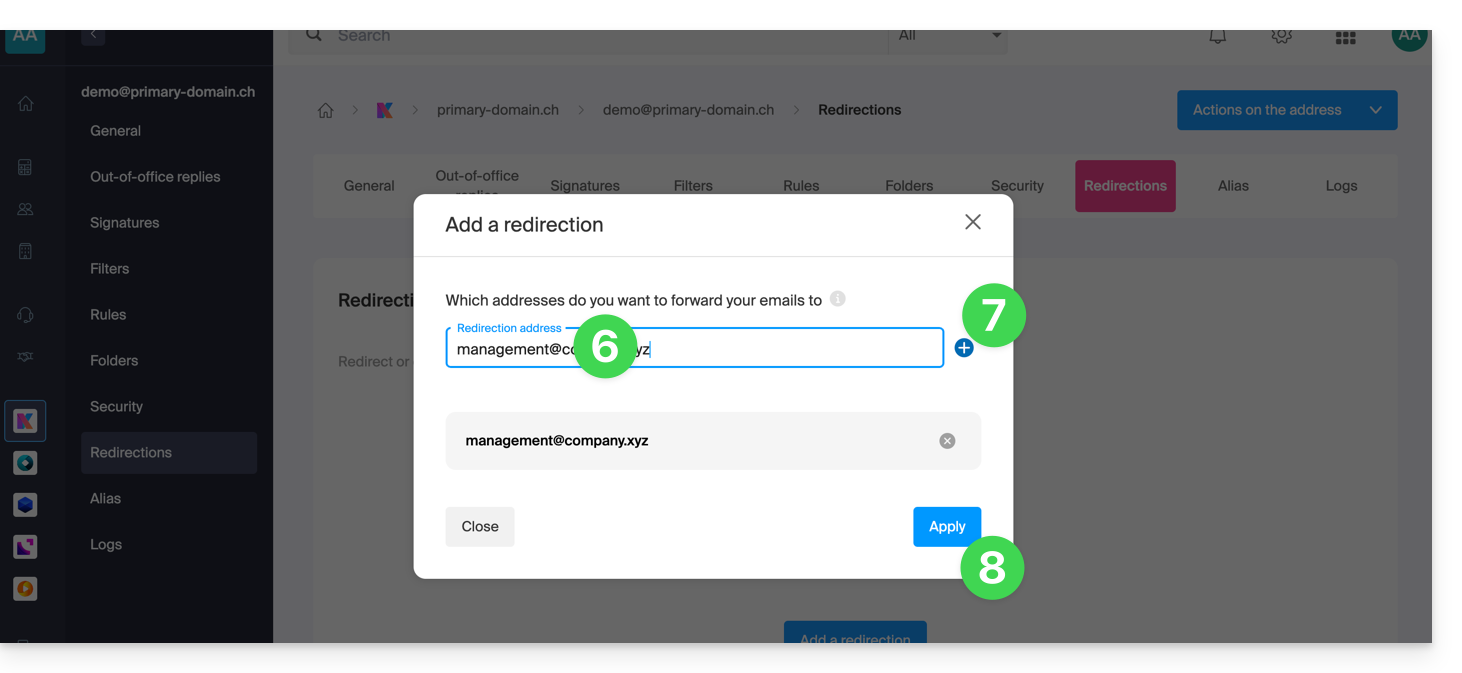
- Enter a destination email address.
- Click on the blue + button to add other email addresses.
- Click on Confirm to complete the addition:
- Click on the toggle switch button to Keep or not a copy of emails on the email address after redirection:
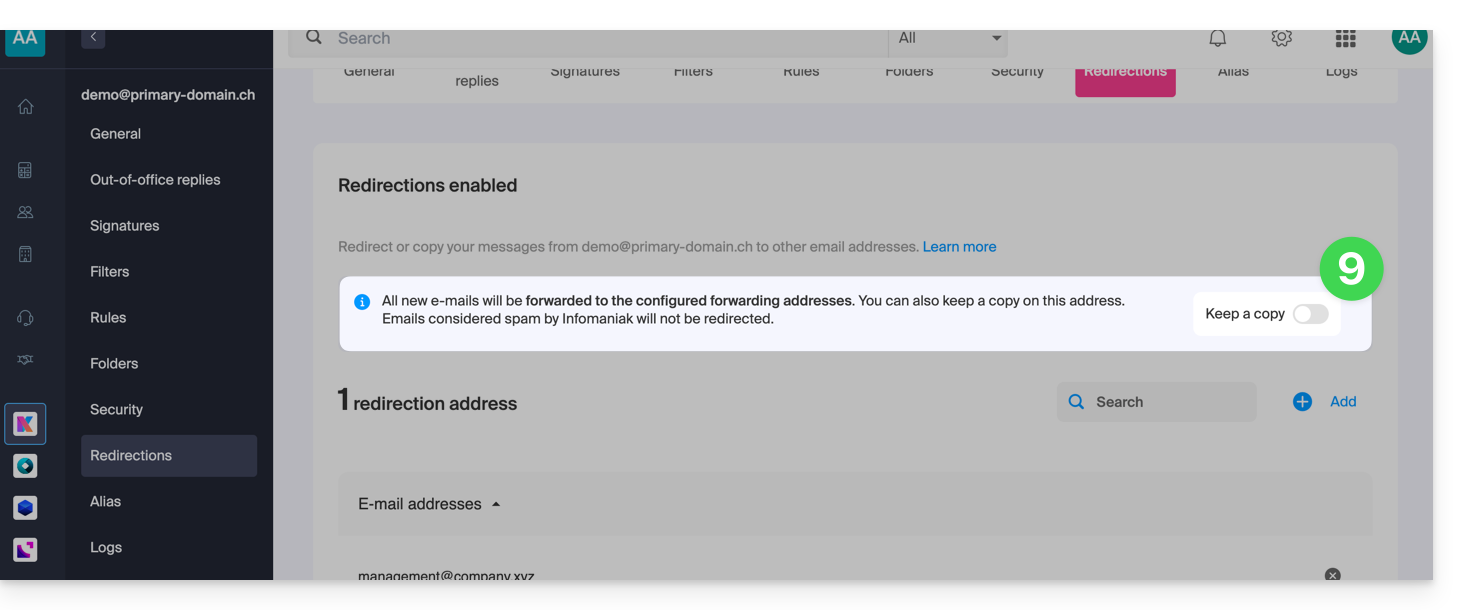
- Indeed, once an email redirection is added, it is possible to check the box to delete emails from the server after forwarding, the deviation then becomes a move and no longer a copy.
Delete email redirections
You cannot apply the redirection service to multiple email addresses of a domain in a single operation. However, the reverse is possible and you will therefore be able to select all the addresses of a Mail Service and remove their possible redirection: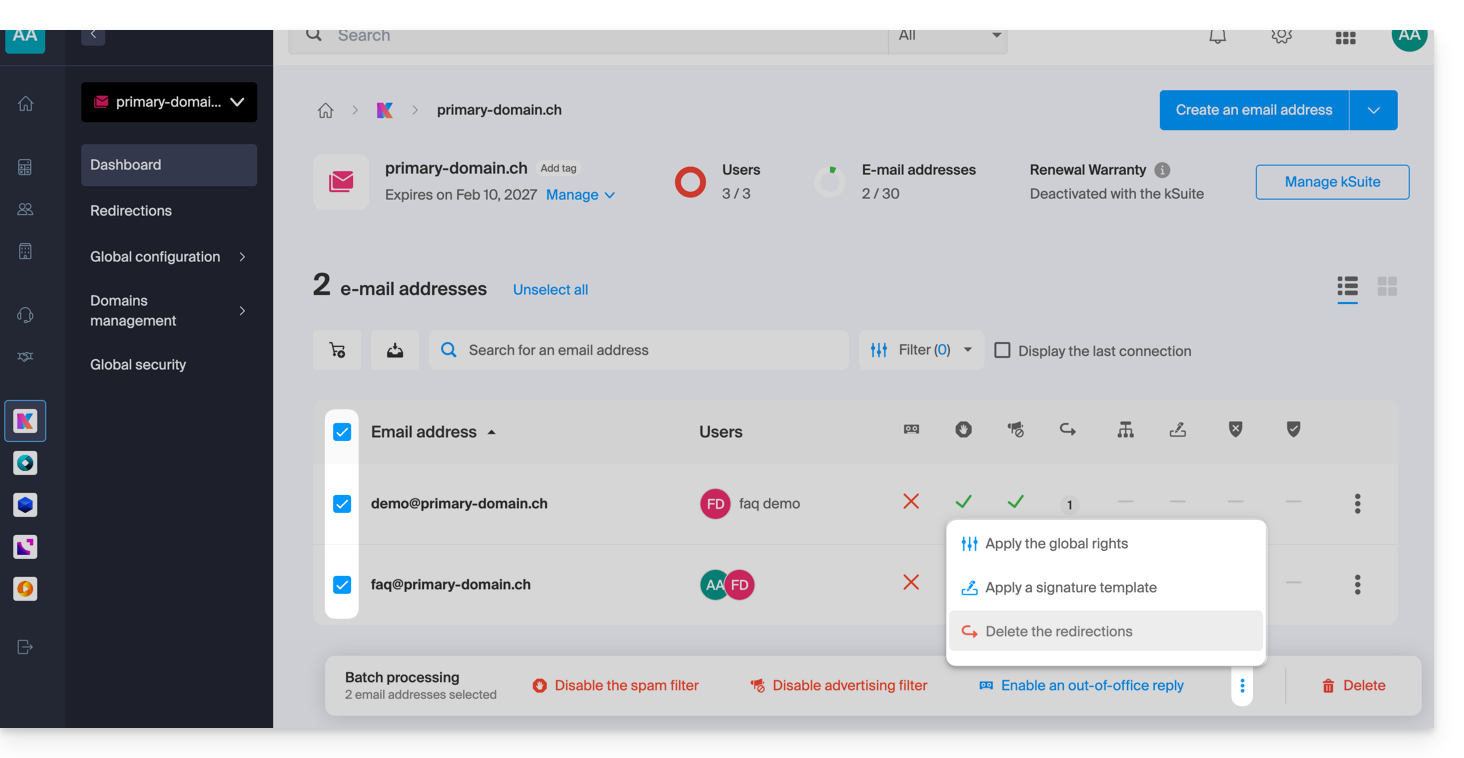
Link to this FAQ:
Has this FAQ been helpful?
This guide explains how to create a template for the sorting/filtering tool (conditions that allow you to automatically classify your emails based on certain criteria) for all your mailboxes on the Infomaniak Web app Mail (online service ksuite.infomaniak.com/mail).
Preamble
- A template allows you to create the neutral base of a tool that can then be used by multiple users of the same Infomaniak Mail Service, or even personalized according to the person who will use it.
- In the case of a rule template, the template creator chooses the condition(s) that will trigger the action, but it is up to the end user, from their Mail, to define the action to be performed (e.g., moving to a specific folder) when they add a rule based on the existing template.
- For privacy reasons, it is not possible to apply sorting rules to multiple email addresses at the same time.
- You can also hide a template so that it is no longer used.
Create a sorting rule template
To create a template:
- Click here to access the management of your Mail Service on the Infomaniak Manager (need help?).
- Click directly on the name assigned to the Mail Service concerned:
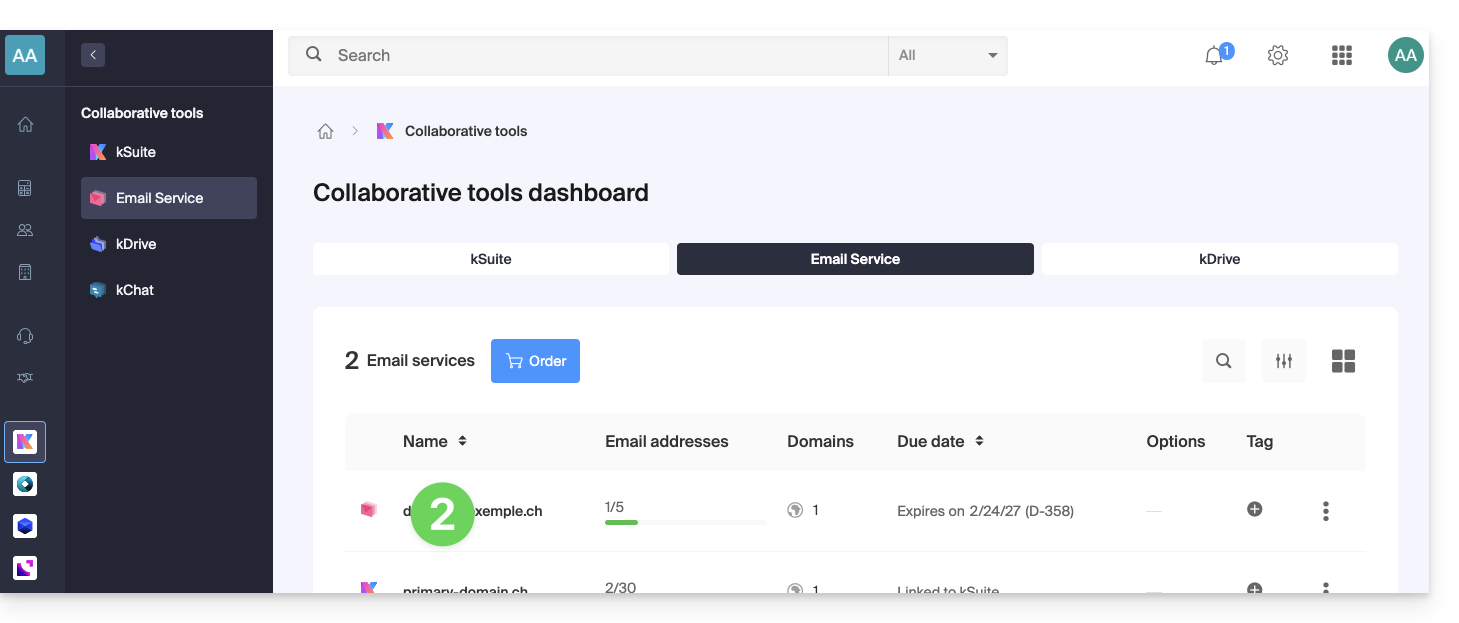
- Click on Global Configuration in the left sidebar.
- Click on the Rules tab.
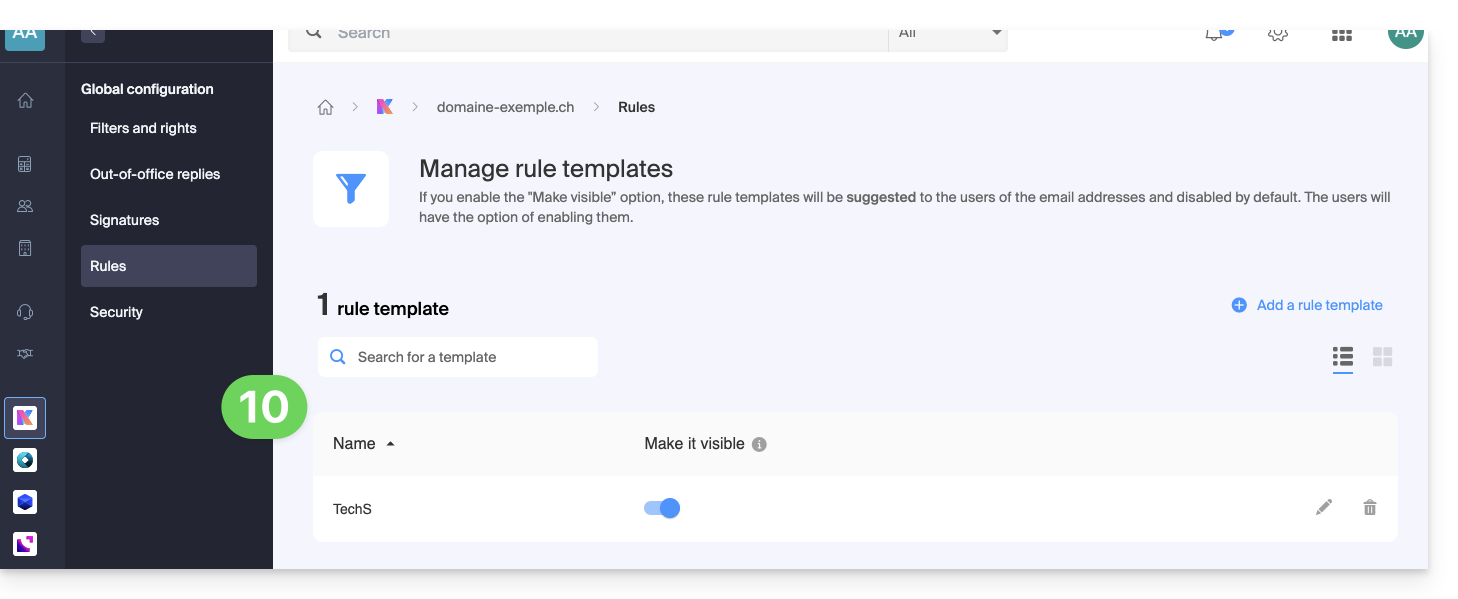
- Click on Add a rule template:
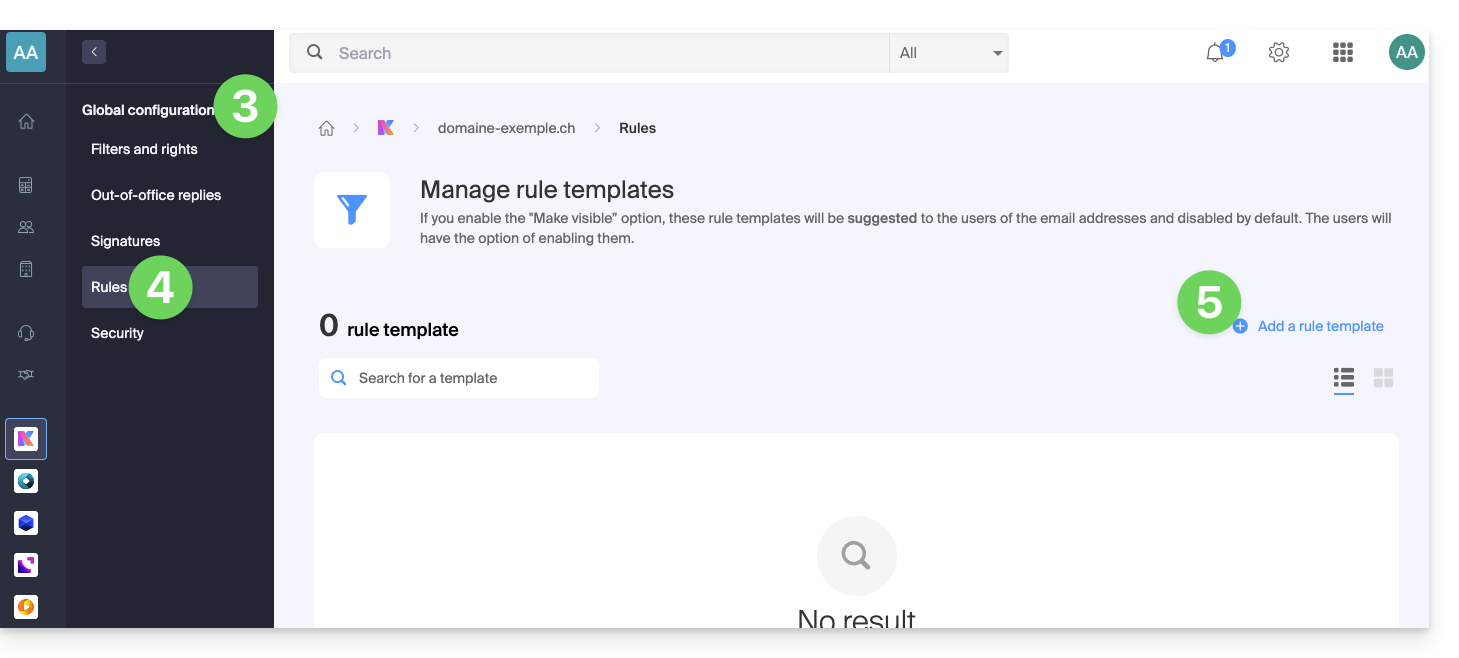
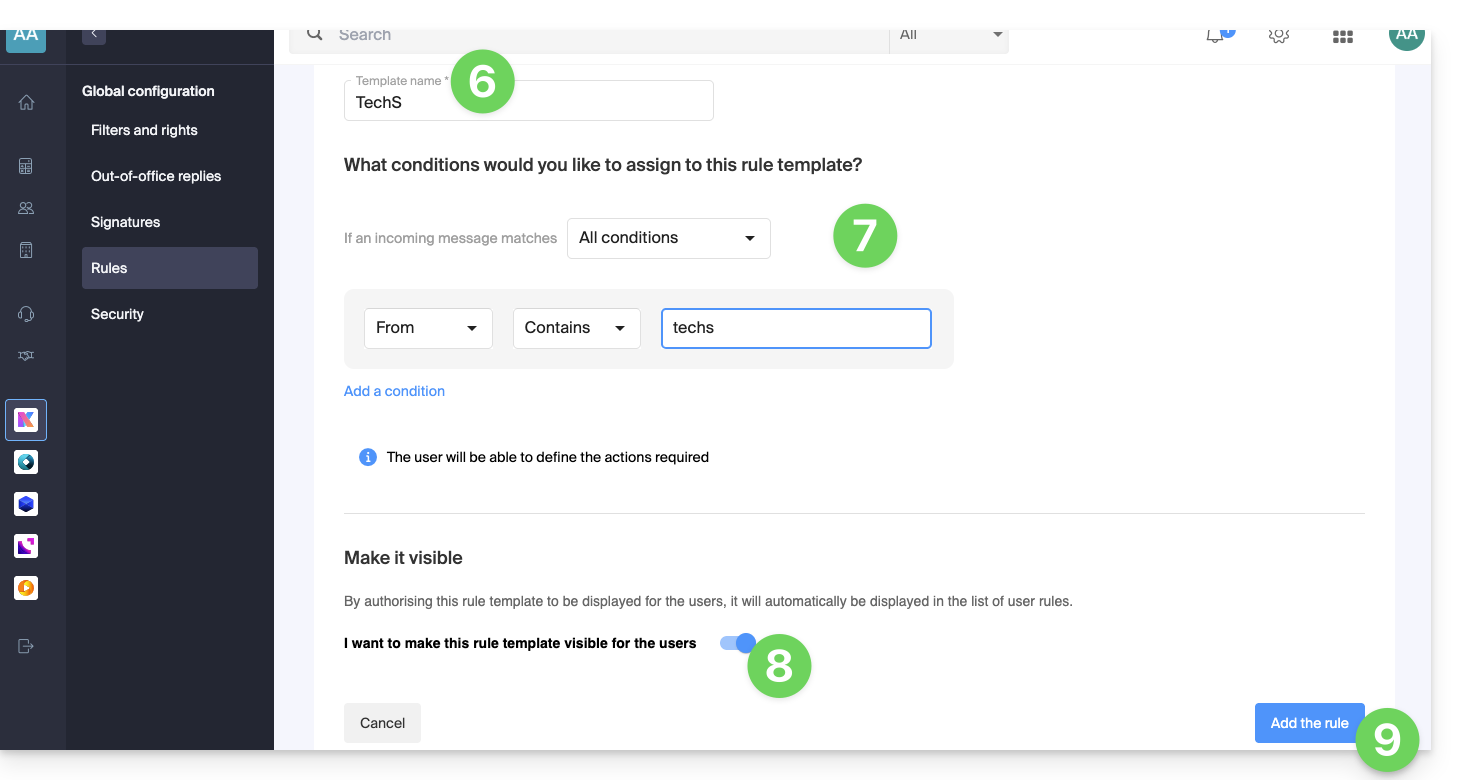
- Name the template.
- Define the condition for which the end user can choose the action to trigger.
- The different conditions available for sorting filters are presented in this other guide.
- If the Make visible option is enabled (during creation or also possible afterwards), the created rule templates will be suggested to users of email addresses who go to their FILTERS AND RULES section.
- Click on Add the template:
- The template is created:
- When the user of an email address from the Mail Service on which the rule template has been defined goes to the configuration of their sorting rules, they can use the template as a basis for work, which will save them from having to redo a potentially complex configuration, and simply choose the action to be performed:
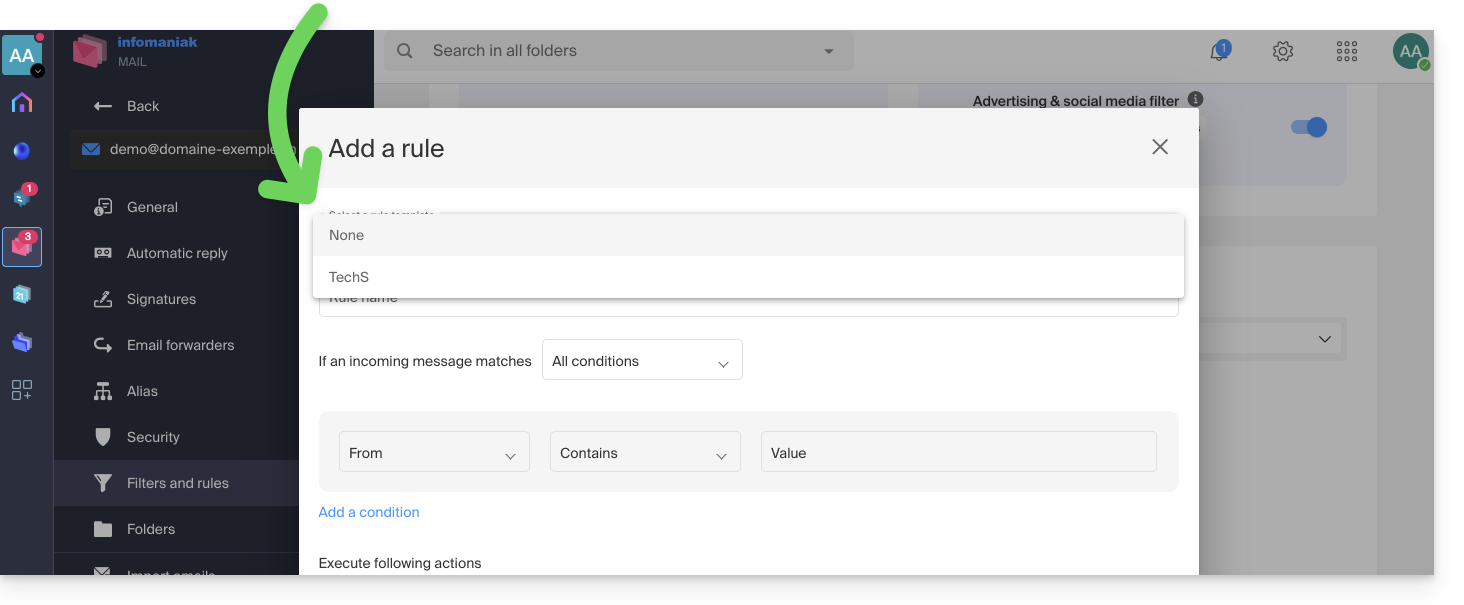
- When the user of an email address from the Mail Service on which the rule template has been defined goes to the configuration of their sorting rules, they can use the template as a basis for work, which will save them from having to redo a potentially complex configuration, and simply choose the action to be performed:
Link to this FAQ:
Has this FAQ been helpful?
This guide explains how to block email addresses or entire domains to stop receiving unwanted messages, or conversely allow addresses to bypass your Infomaniak email's anti-spam filter, thus always receiving their messages.
Preamble
- In addition to the Infomaniak anti-spam filter which eliminates the majority of unwanted emails as it evolves, Infomaniak offers two distinct lists that you can fill out as you wish:
- blocked senders:
- blocked emails and domains (blacklist) are then directly treated as spam…
- allowed senders:
- allowed senders and domains (whitelist) will no longer be filtered by the anti-spam filter…
- the list of allowed senders is only active on the original recipient of each message; if the message is addressed to abc@domain.xyz and then redirected to def@domain.xyz, the anti-spam filter and the list of allowed senders must be configured for the address abc.
- blocked senders:
- These lists are specific to the email address on which the operation is performed, but a Mail Service administrator can also apply these lists to the entire Mail Service via the Global Configuration of a Mail Service.
- These lists are also automatically filled based on your actions on emails at the anti-spam filter level.
Formats that can be used
Replace the example domain (the-spam-domain.xyz) with the one that is bothering you and that you want to send directly to the Spam folder:
Block a specific email address
john.example@the-spam-domain.xyz
Block all email addresses from a specific domain
*@the-spam-domain.xyz
Block certain email addresses from a specific domain
*example@the-spam-domain.xyz or john*@the-spam-domain.xyz
Block all incoming emails
*
Manage blocks or authorizations from the Infomaniak Web Mail app
Prerequisites
- Avoir la permission de gérer la sécurité: if you had been invited to the Infomaniak Web Mail app (online service ksuite.infomaniak.com/mail) to manage your address, it is possible that the Mail Service manager has removed this right from their admin account.
To block or allow senders:
- Click here to access the Infomaniak Web Mail app (online service ksuite.infomaniak.com/mail).
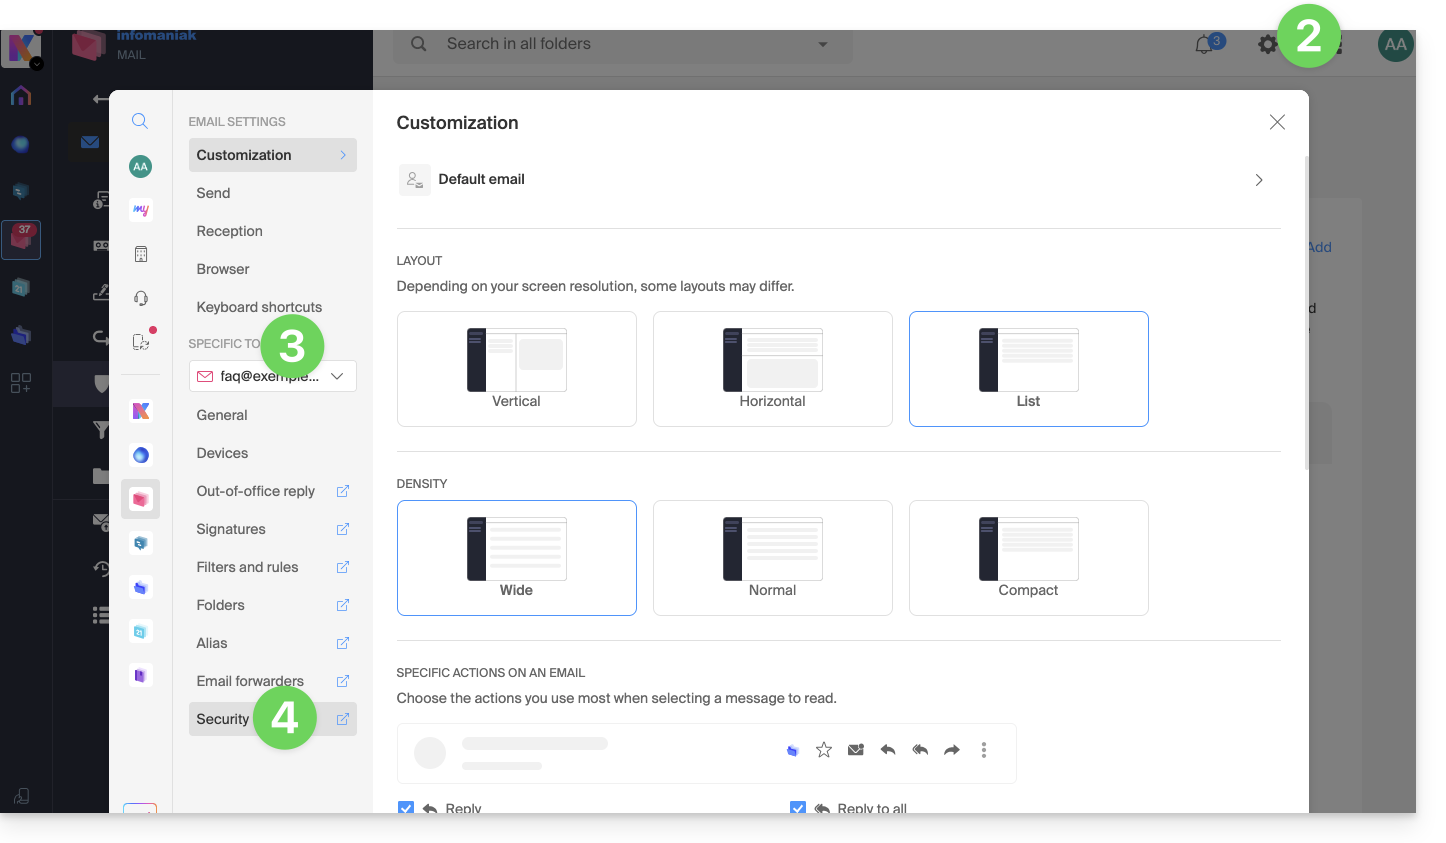
- Click on the Settings icon in the top right corner.
- Check or select the email address concerned in the dropdown menu of the left sidebar.
- Click on Security:
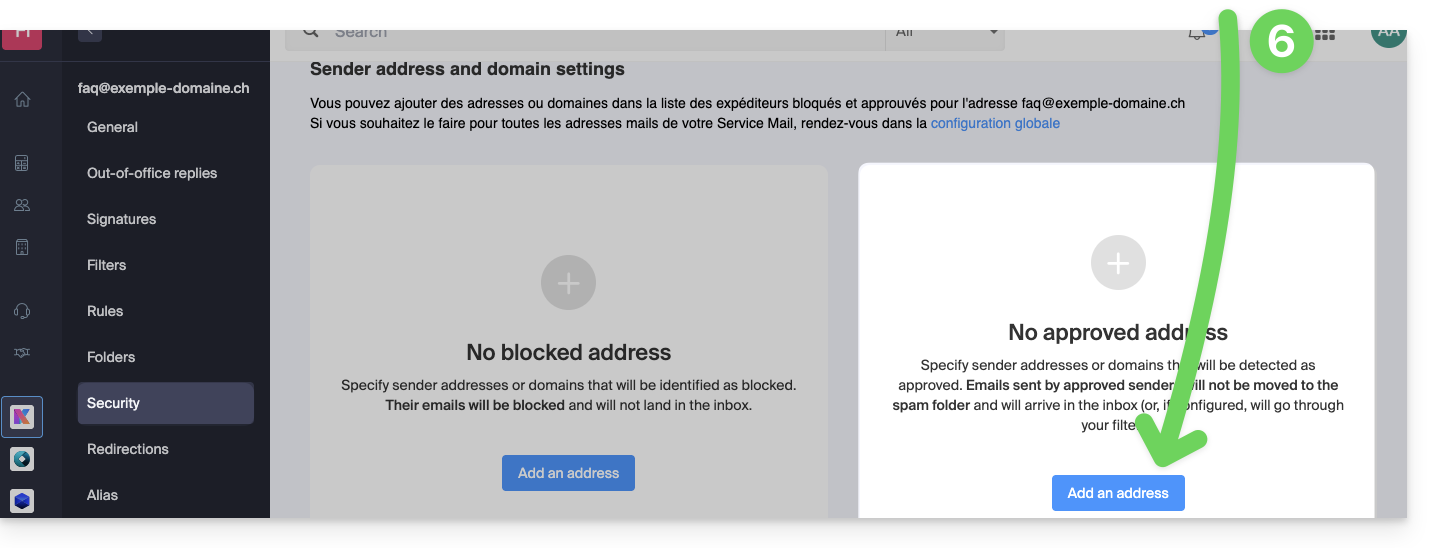
- To add a blocked sender (blacklisted), click on the Add an address button in the Blocked address box:
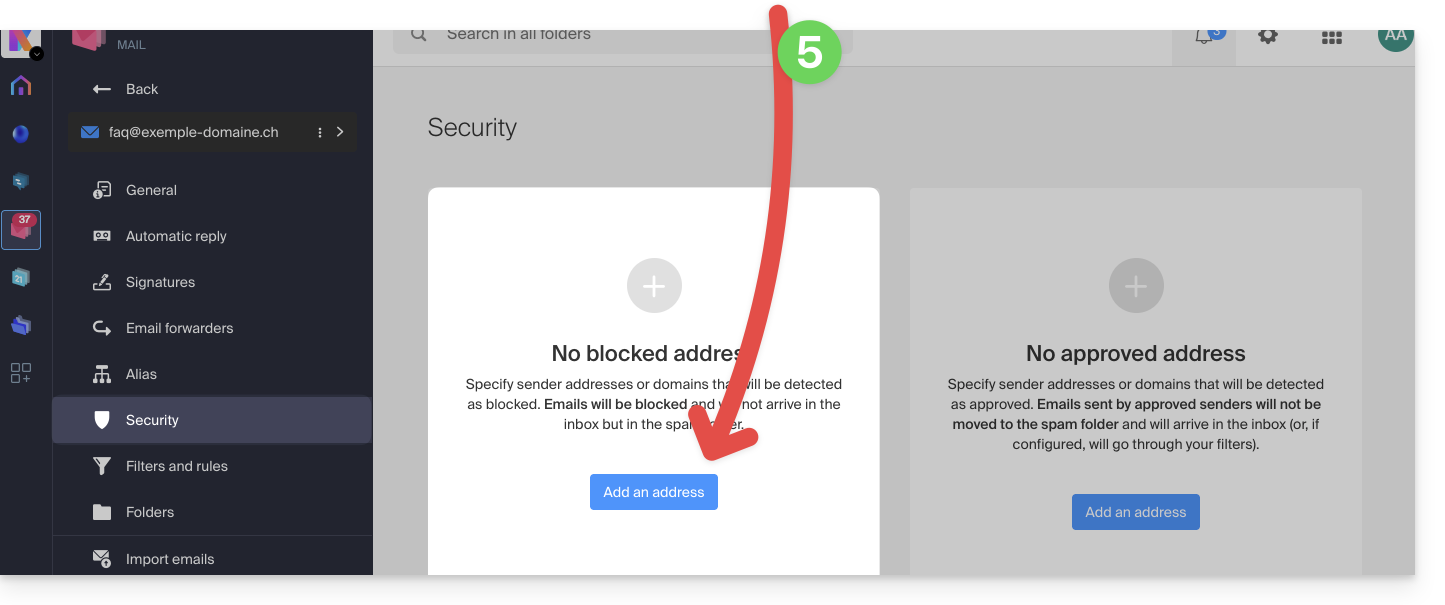
- To add an authorized sender (whitelisted), click on the Add an address button in the Approved address box:
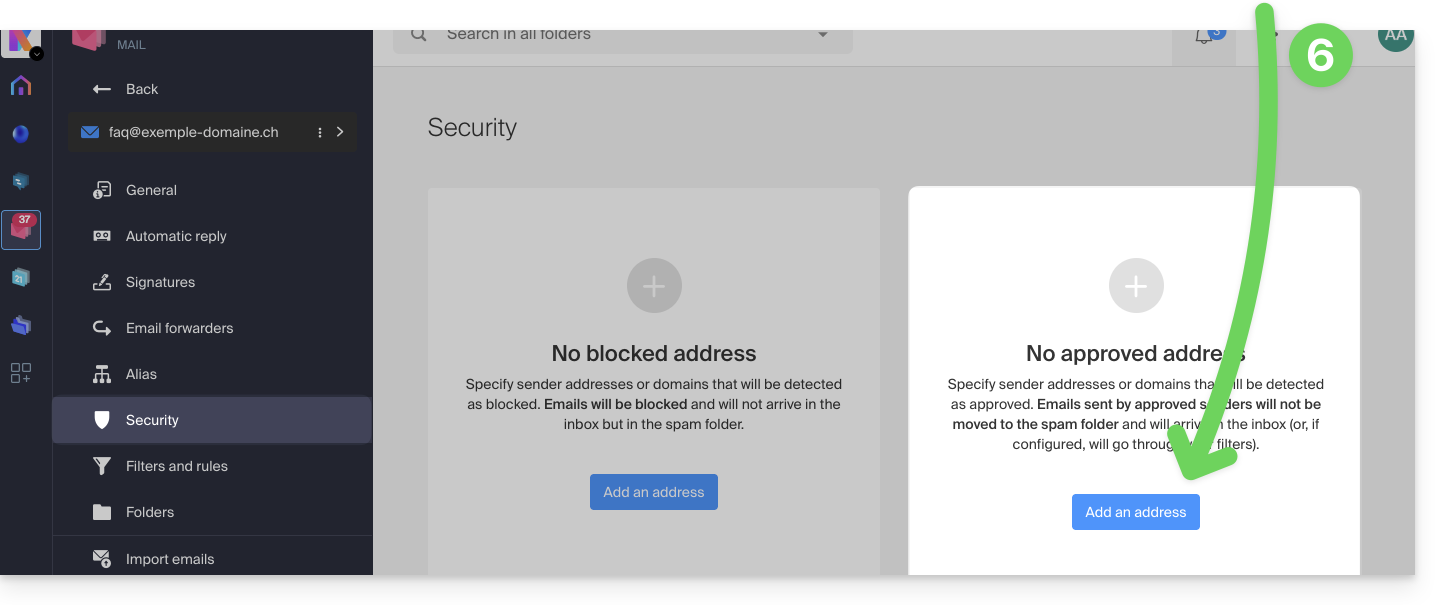
- Fill in the fields as desired and/or according to the formats indicated above.
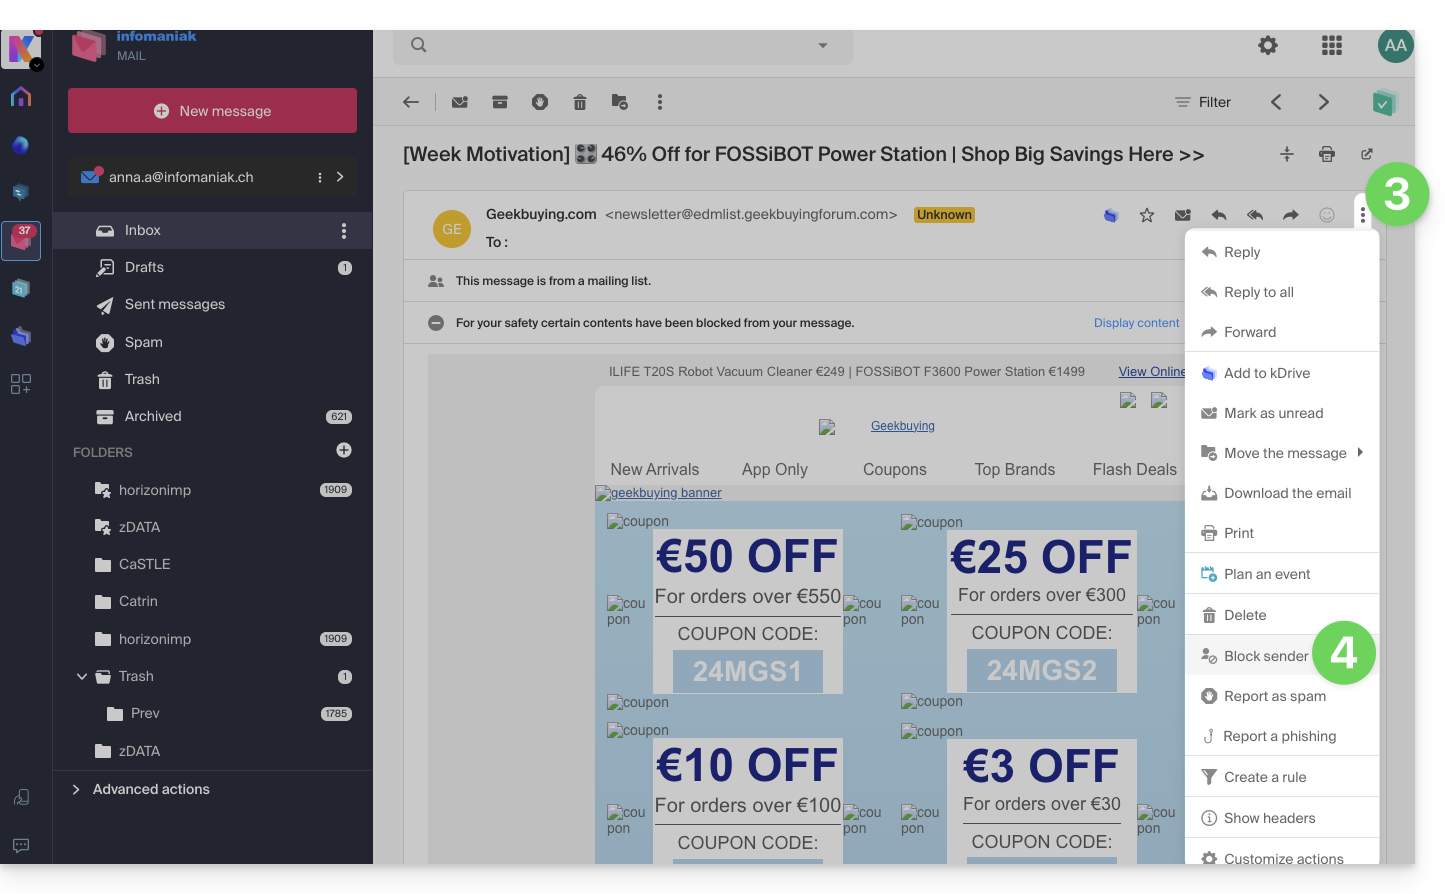
You can also block a sender directly from the received e-mail:
- Click here to access the Infomaniak Mail Web app (online service ksuite.infomaniak.com/mail).
- Open the message from the unwanted sender.
- Click on the ⋮ icon at the top right of the open message.
- Choose Block the sender to add it directly to the list of blocked addresses:
If necessary, remove the address by returning to the Security tab.
Manage blocks or authorizations from a Mail Service
To block or authorize senders from a Mail Service:
- Click here to access the management of your product on the Infomaniak Manager (need help?).
- Click directly on the name assigned to the product concerned.
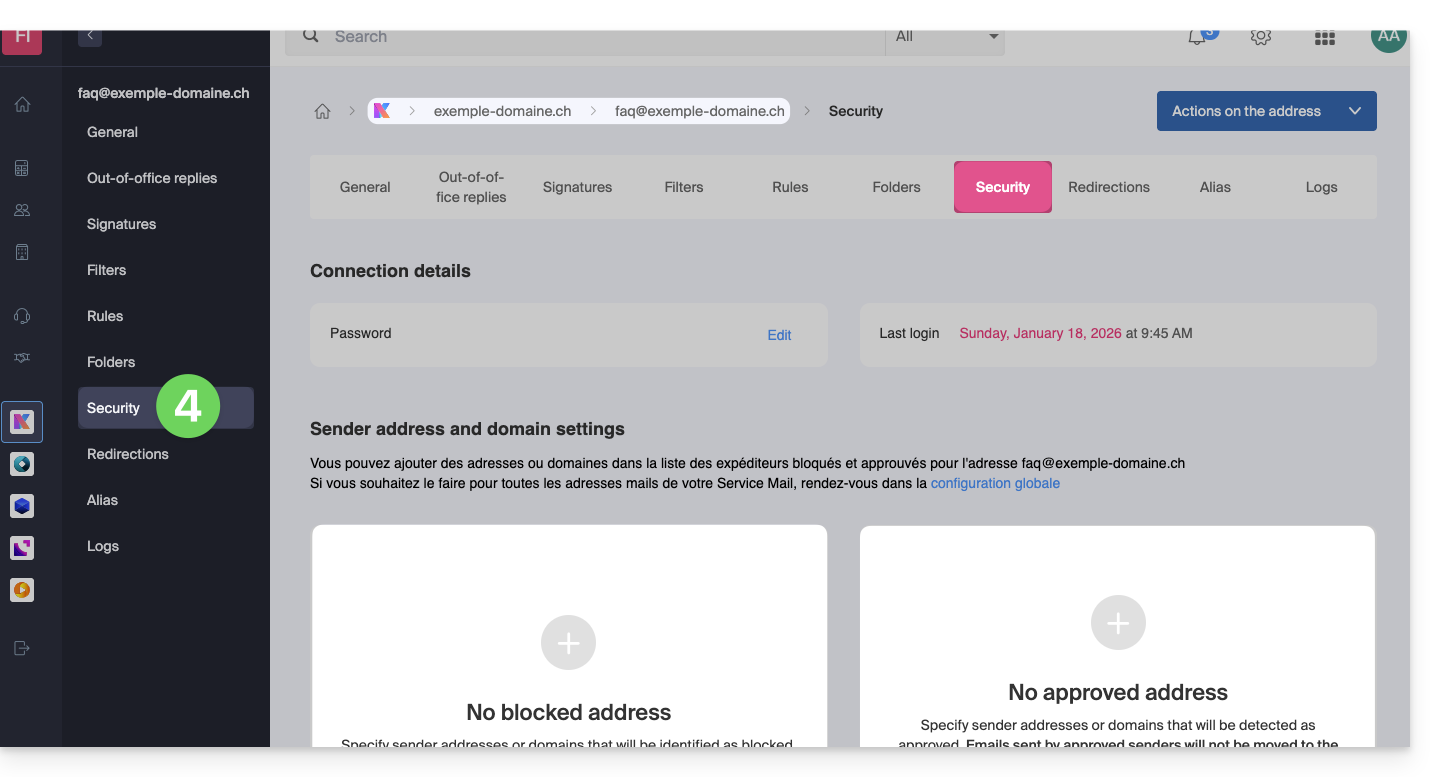
- Click on the email address concerned.
- Click on the Security tab or from the left sidebar on Security:
- To add a blocked sender, click on the Add an address button in the Blocked address box:
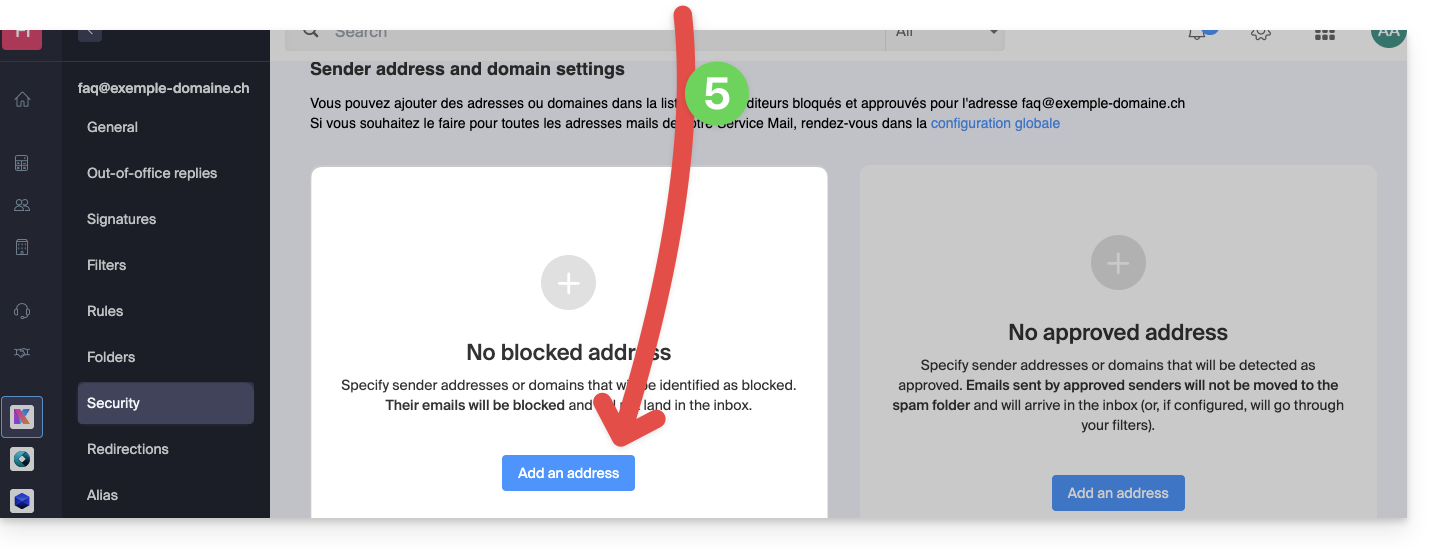
- To add an authorized sender, click on the Add an address button in the Approved address box:
- Fill in the fields as desired and/or according to the formats indicated above.
Alternative
To act on your incoming emails, you can also use mail filters. It is also possible to disable mail usage for an entire domain (messages will continue to arrive).
Link to this FAQ:
Has this FAQ been helpful?
This guide explains how to view the activity logs of email addresses contained within an Infomaniak Mail Service.
Preamble
- The logs of your email addresses are available free of charge for the last 19 days.
- Consulting logs over a longer period is payable:
View logs from the Infomaniak Web Mail app
Prerequisites
- Have a valid access to the Web Mail app Infomaniak (online service ksuite.infomaniak.com/mail) to which the email address is attached.
- Be Administrator or Legal Representative within the Organization that manages the Mail Service.
- Have permission to view the logs: it is possible that the Mail Service manager has removed this right from their admin account.
Then to access the logs from Infomaniak Mail:
- Click here to access the Web Mail app Infomaniak (online service ksuite.infomaniak.com/mail).
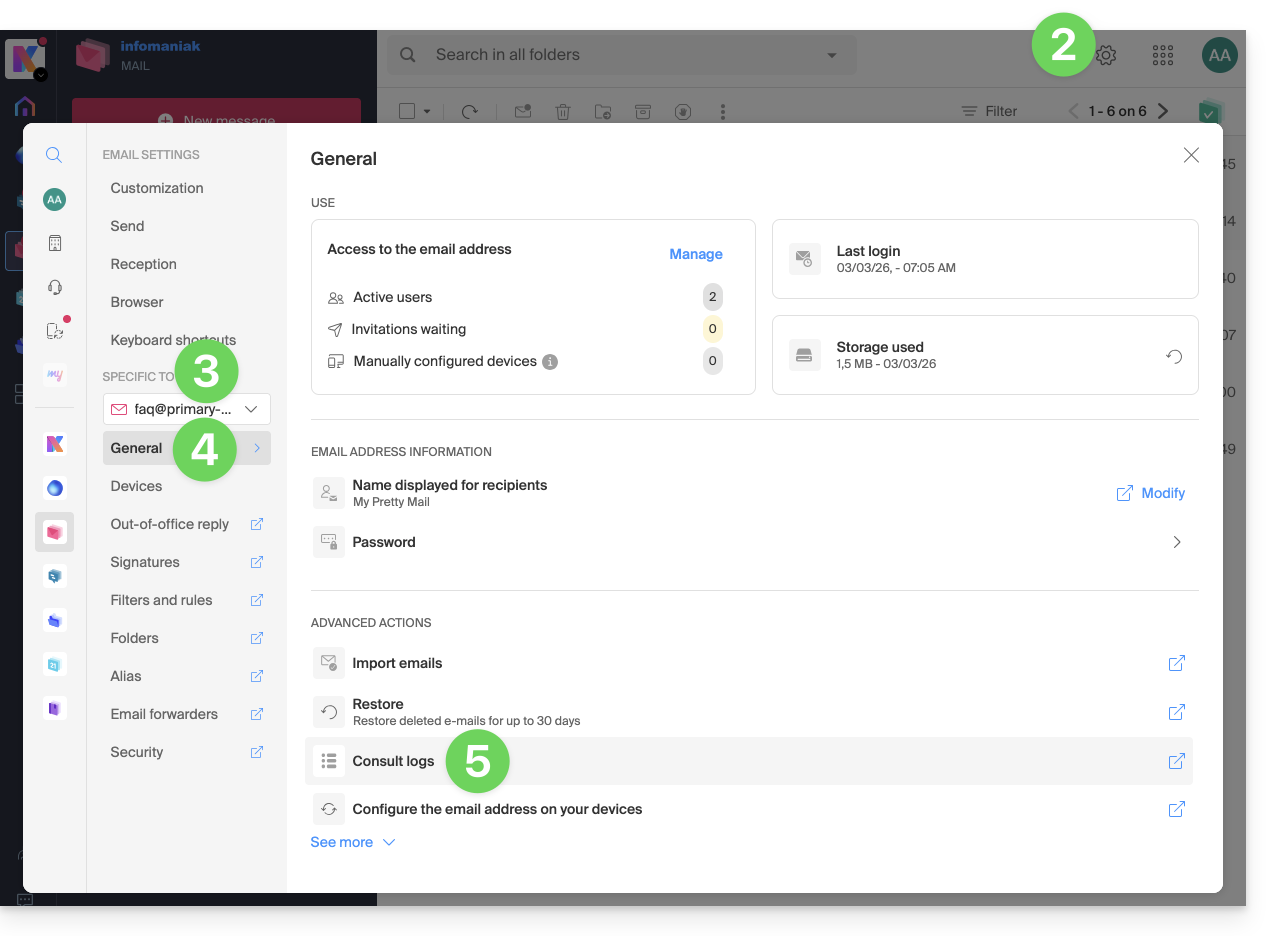
- Click on the Settings icon at the top right.
- Check or select the email address concerned in the dropdown menu of the left sidebar.
- Click on General below.
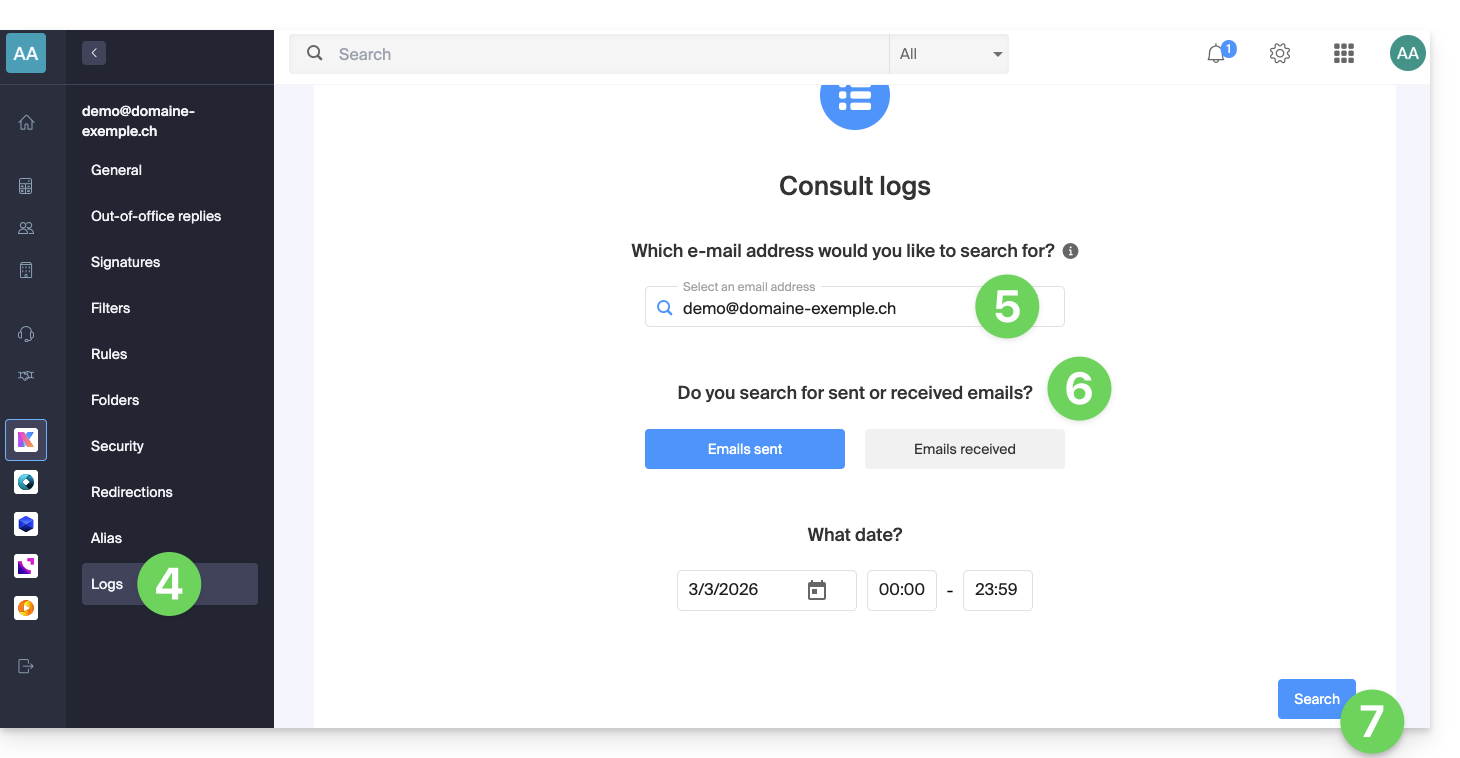
- Click on View logs:
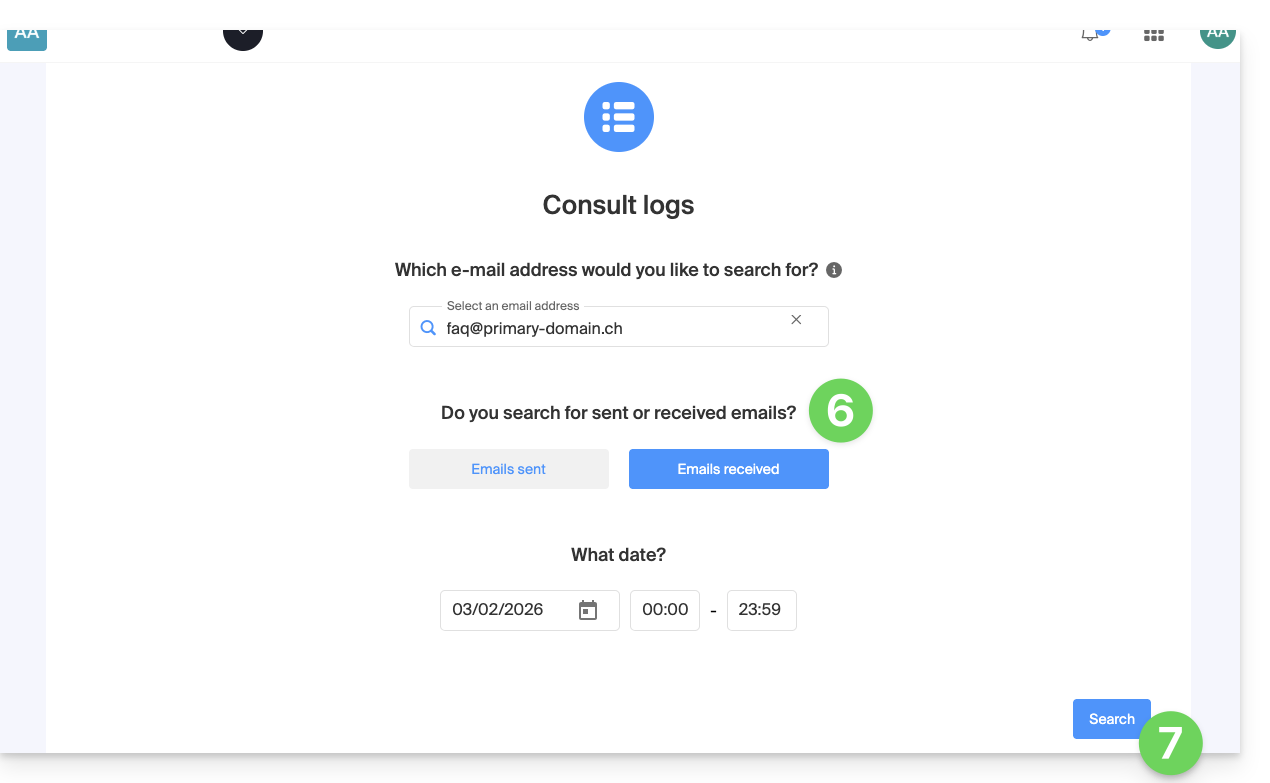
- Choose to view the logs of sent or received emails, and set the date and time.
- Click on Search:
View logs from Mail Service
To access the Mail Service:
- Click here to access the management of your Mail Service on the Infomaniak Manager (need help?).
- Click directly on the name assigned to the Mail Service concerned:

- Click on the email address concerned in the table that appears:
- Click on Logs in the left sidebar menu.
- If necessary, from the dropdown menu, select the email address concerned.
- Choose to view the logs of sent or received emails, and set the date and time.
- Click on Search:
Log results
The email sending and receiving logs will be presented in a table format.
Hover your mouse over the possible ⓘ icon in the Status column to display more information if necessary: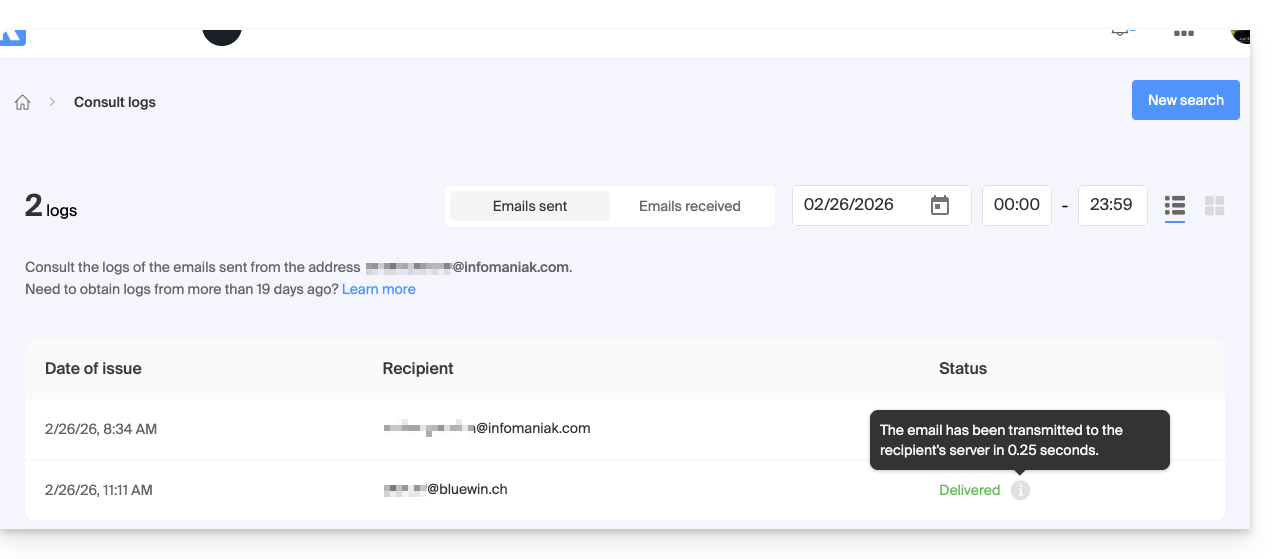
Link to this FAQ:
Has this FAQ been helpful?
This guide explains how to perform a bulk action (deletion, activation of the anti-spam filter, etc.) on multiple email addresses within a Service Mail.
Bulk actions
To perform these "batch" actions, in bulk:
- Click here to access the management of your product on the Infomaniak Manager (need help?).
- Click directly on the name assigned to the product concerned.
- Check the box to the left of Email address to select all addresses, or select the desired addresses one by one.
- The list of available actions will then appear at the bottom of the page, including in the action menu ⋮ :

The possible bulk actions are as follows:
- activate the anti-spam filter
- activate the advertising filters
- apply general rights
- activate an automatic reply
- apply an email signature template
- delete the redirections
- delete the email addresses
Link to this FAQ:
Has this FAQ been helpful?
This guide explains how to create a template for the automatic message tool when absent for all your mail on the Infomaniak Web app Mail (online service ksuite.infomaniak.com/mail).
Preamble
- A template allows you to create the neutral base of a tool that can subsequently be used by several users of the same Infomaniak Mail Service, or even personalized according to the person who will use it.
- In the case of an out-of-office template, the creator of the template chooses the text that must be sent when a new sender contacts an address to which the template has been applied.
- You can also hide a template so that it is no longer used.
Create an out-of-office template
To create a template:
- Click here to access the management of your Infomaniak Mail Service on the Manager Infomaniak (need help?).
- Click directly on the name assigned to the Infomaniak Mail Service concerned:

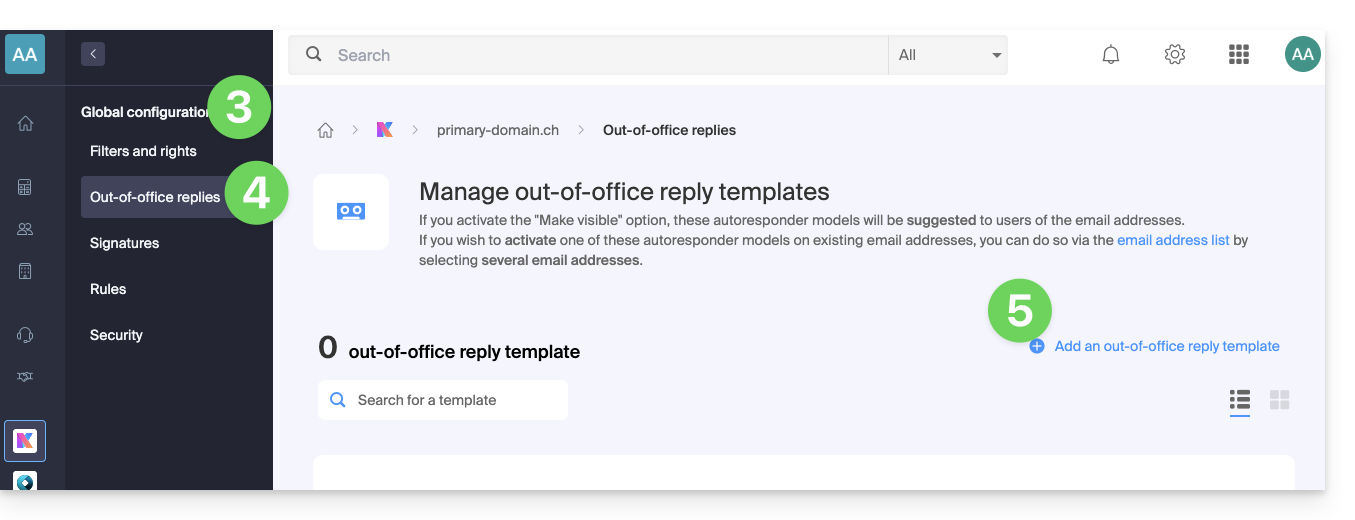
- Click on Global configuration in the left sidebar menu.
- Click on the Out-of-office menu.
- Click on Add an out-of-office template:
- Fill in the fields and click on Add the out-of-office template:
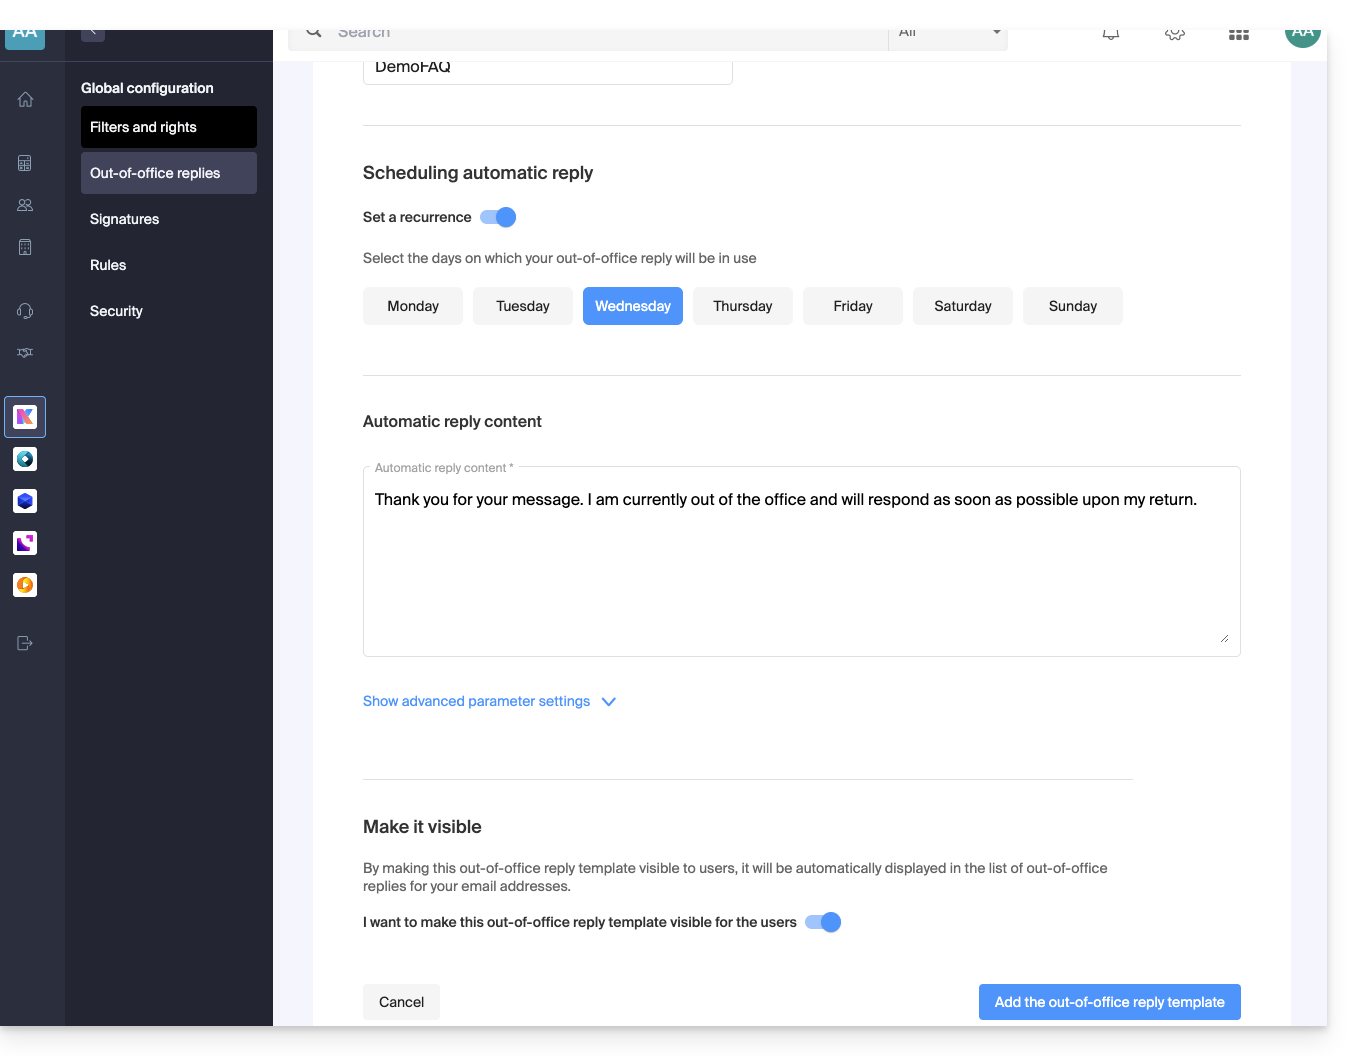
- If the Make visible option is enabled (during creation or possible choice afterwards), the out-of-office templates created will be suggested to users of mail addresses.
Activate a template on an existing mail address
It is necessary to have an existing template to activate it on one or more mail addresses:
- Click here to access the management of your Infomaniak Mail Service on the Manager Infomaniak (need help?).
- Click directly on the name assigned to the Infomaniak Mail Service concerned.
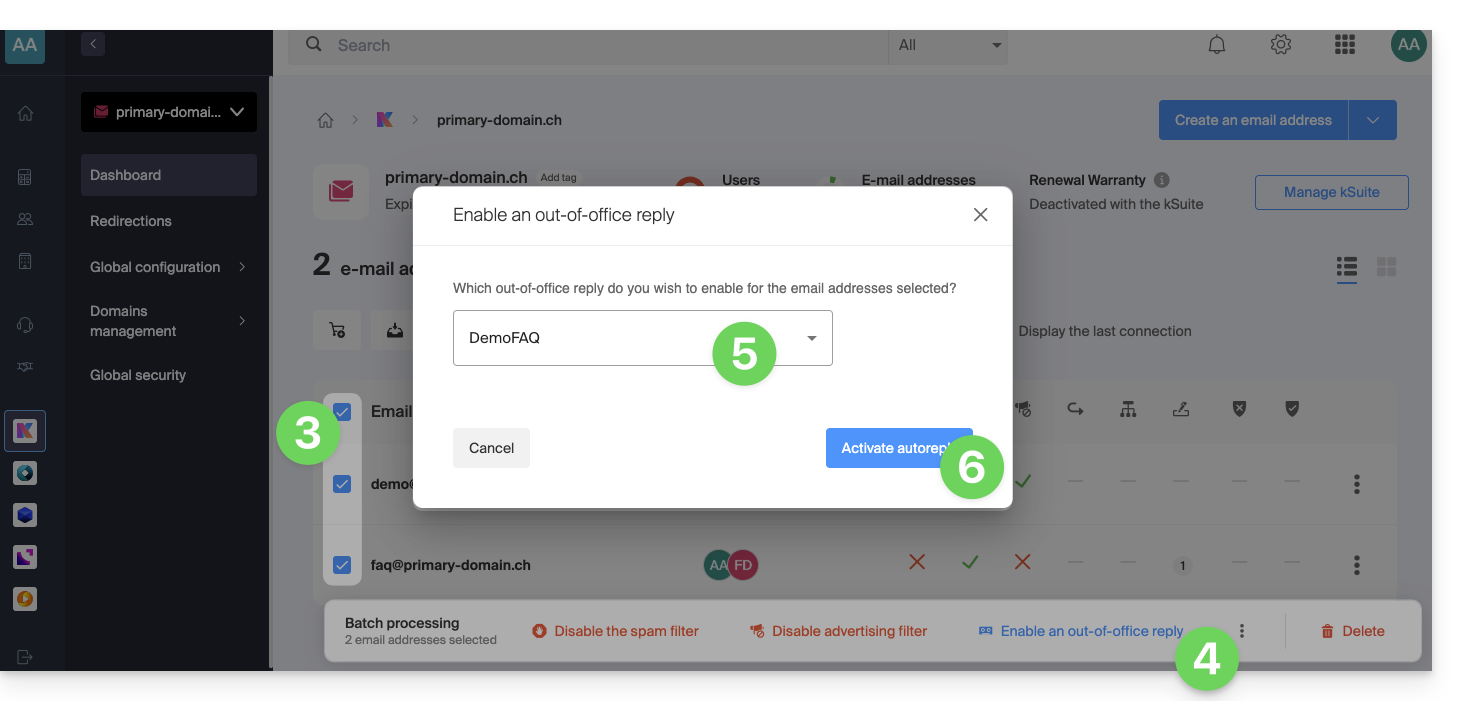
- Click on the boxes to select one or more mail addresses in the table that appears.
- Depending on the screen size, click first on the action menu ⋮ or directly on Apply an out-of-office template.
- Select the template of your choice.
- Only the visible templates are available when activating.
- Click the Activate button:
Link to this FAQ:
Has this FAQ been helpful?
This guide presents the Global Security tool, which allows you to verify that the relationships between a domain name and an Infomaniak Mail Service are optimal in terms of security. This involves checking SPF / DKIM / DMARC records, and the Global Security tool allows you to intervene in the configuration if necessary.
Any DNS addition/modification can take up to 48 hours to propagate.
Access the Global Security diagnostic tool
To access Global Security:
- Click here to access the management of your Mail Service on the Infomaniak Manager (need help?).
- Click directly on the name assigned to the Mail Service concerned:
- Click on Global Security in the left sidebar:
Verify optimal email functionality
Once you are on Global Security, familiarize yourself with and verify the three security mechanisms inherent to emails: SPF, DKIM, and DMARC policy. These indications should display in green: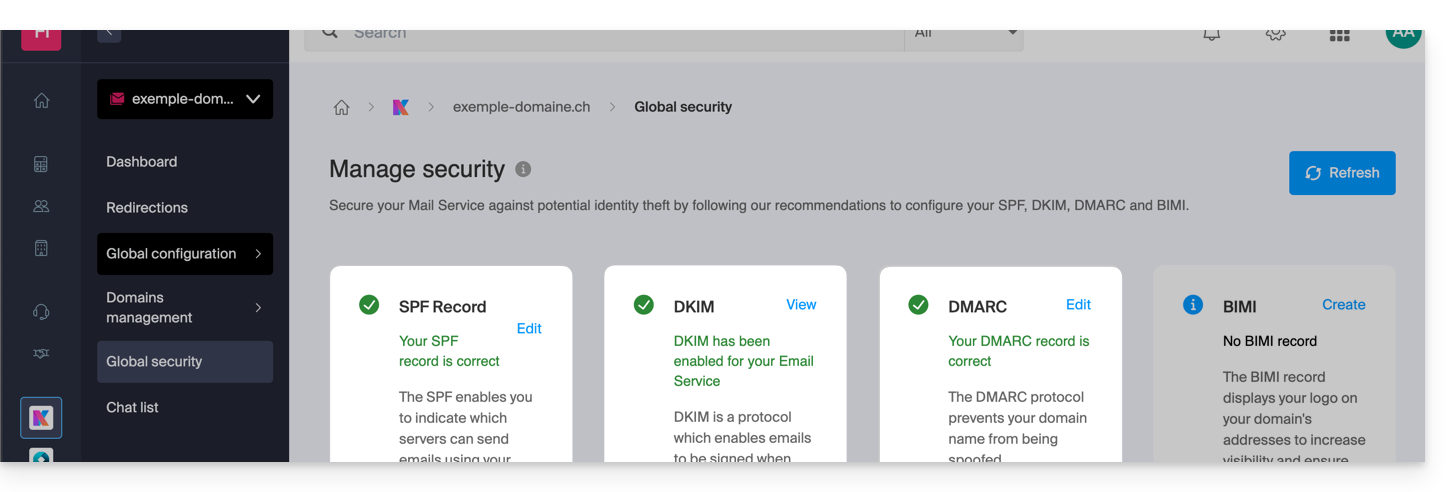
Otherwise, this may explain why an email that is not spam is treated as spam.
Click on Edit or Create to configure SPF, DKIM, and DMARC according to the recommendations below to secure your Mail Service against potential identity theft:
SPF (Sender Policy Framework)
SPF (click here to configure) allows the owner of a domain name to specify which servers are authorized to send emails on behalf of that domain. This helps reduce the risk of spam and phishing since the recipient's mail server can verify if the sender is authorized by consulting the sender domain's DNS records: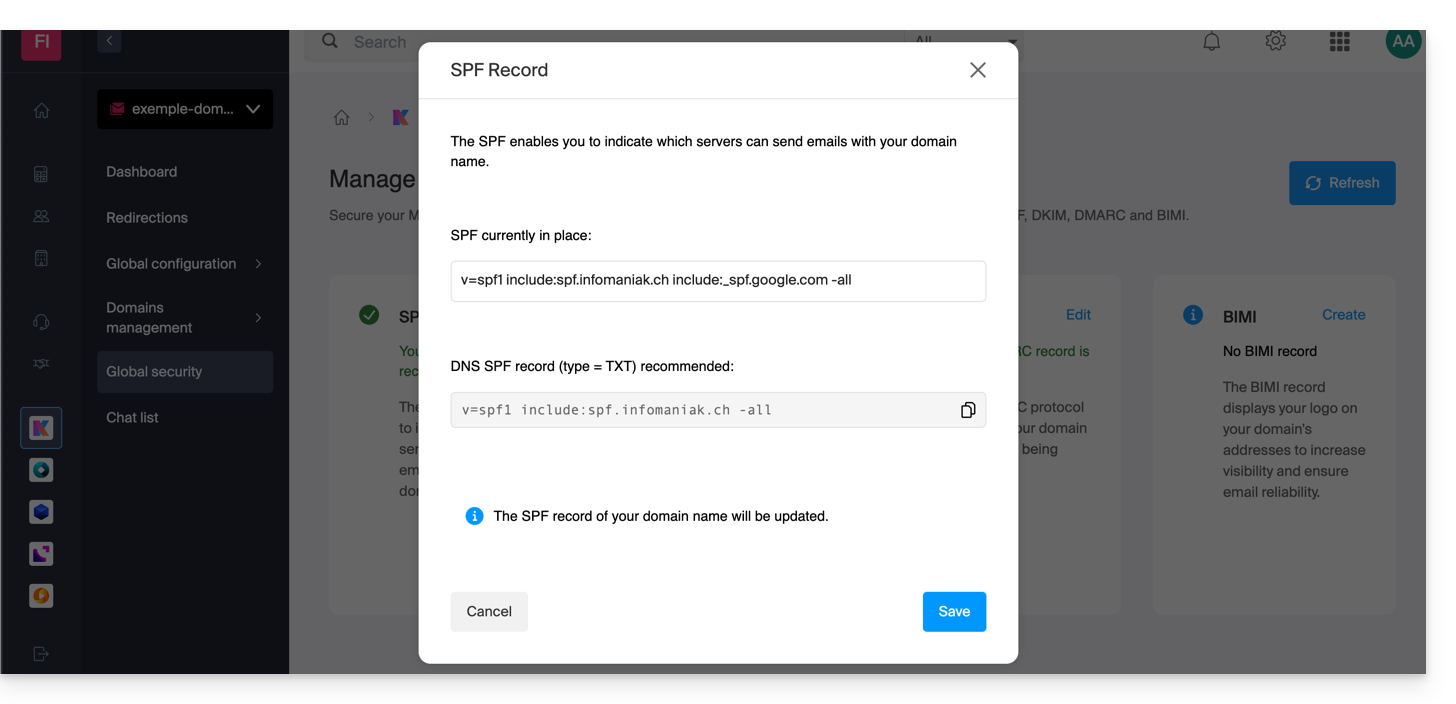
The analyses of the Global Security tool are only relevant if the domain name is with Infomaniak and configured to direct mail traffic to Infomaniak.
Under these conditions and in case of a detected problem, you will find a Correct button that will allow you to automatically update your SPF.
If correcting one or the other of the mentioned issues is not possible, it must be done on the configuration set up by the owner or technician of the sender's domain name.
If your domain name points to Wix or another provider, the SPF must be configured with the provider in question.
DKIM (Domain Keys Identified Mail)
DKIM (click here to configure) is a protocol that allows emails to be signed when they are sent.
When your domain name (or its DNS zone) is managed elsewhere, you will find in this section Global Security > DKIM the DKIM record to add in the DNS zone: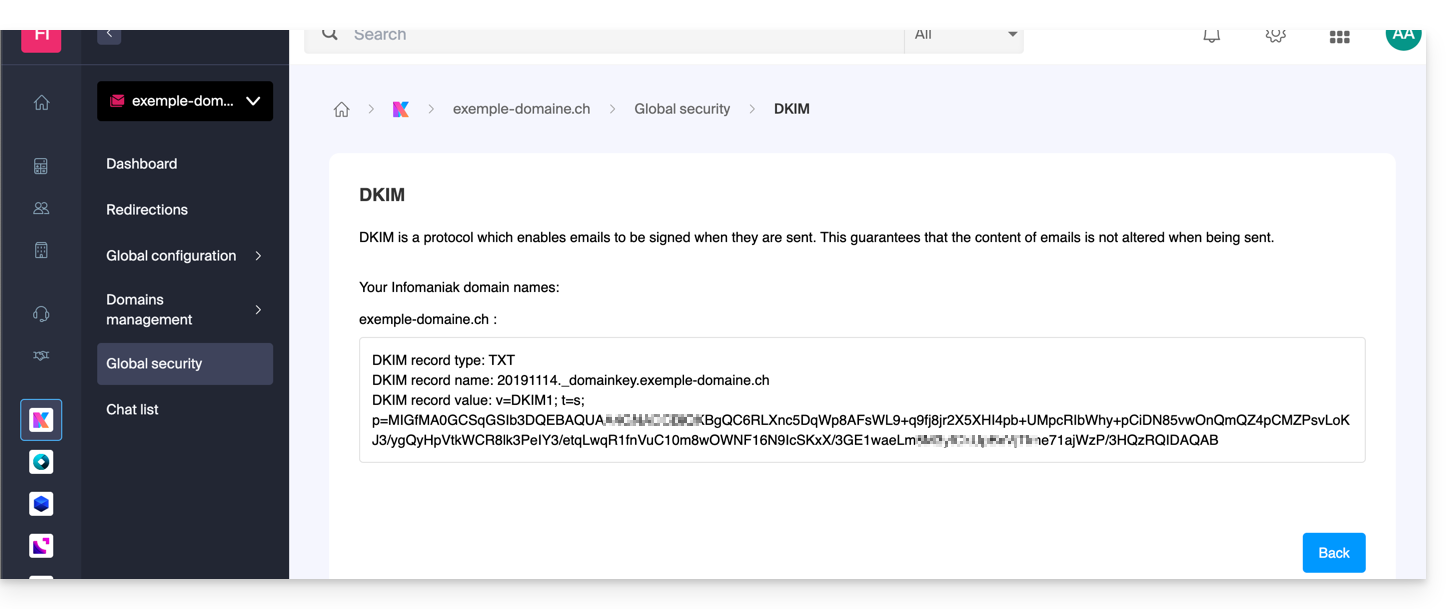
You can configure multiple DKIM records on your domain without a fixed limit, unlike DMARC or SPF. This is crucial if you use multiple third-party email providers for your daily communications.
DMARC (Domain-based Message Authentication, Reporting, and Conformance)
DMARC (click here to configure) allows you to indicate to other mail servers (the email providers of the contacts to whom you send an email) the policy to follow in case of receipt of a "suspicious" email (e.g., unauthenticated) from your mail server (hosted by Infomaniak). Additionally, you can be notified of the "incident" by a summary message (called a "DMARC report") providing information on recent activity related to your email and domain name.
DMARC requires a valid SPF and DKIM. A wizard allows you to configure DMARC according to Infomaniak's recommendations in simple mode or entirely as you wish in advanced mode (this expert mode allows you to enter the record of your choice):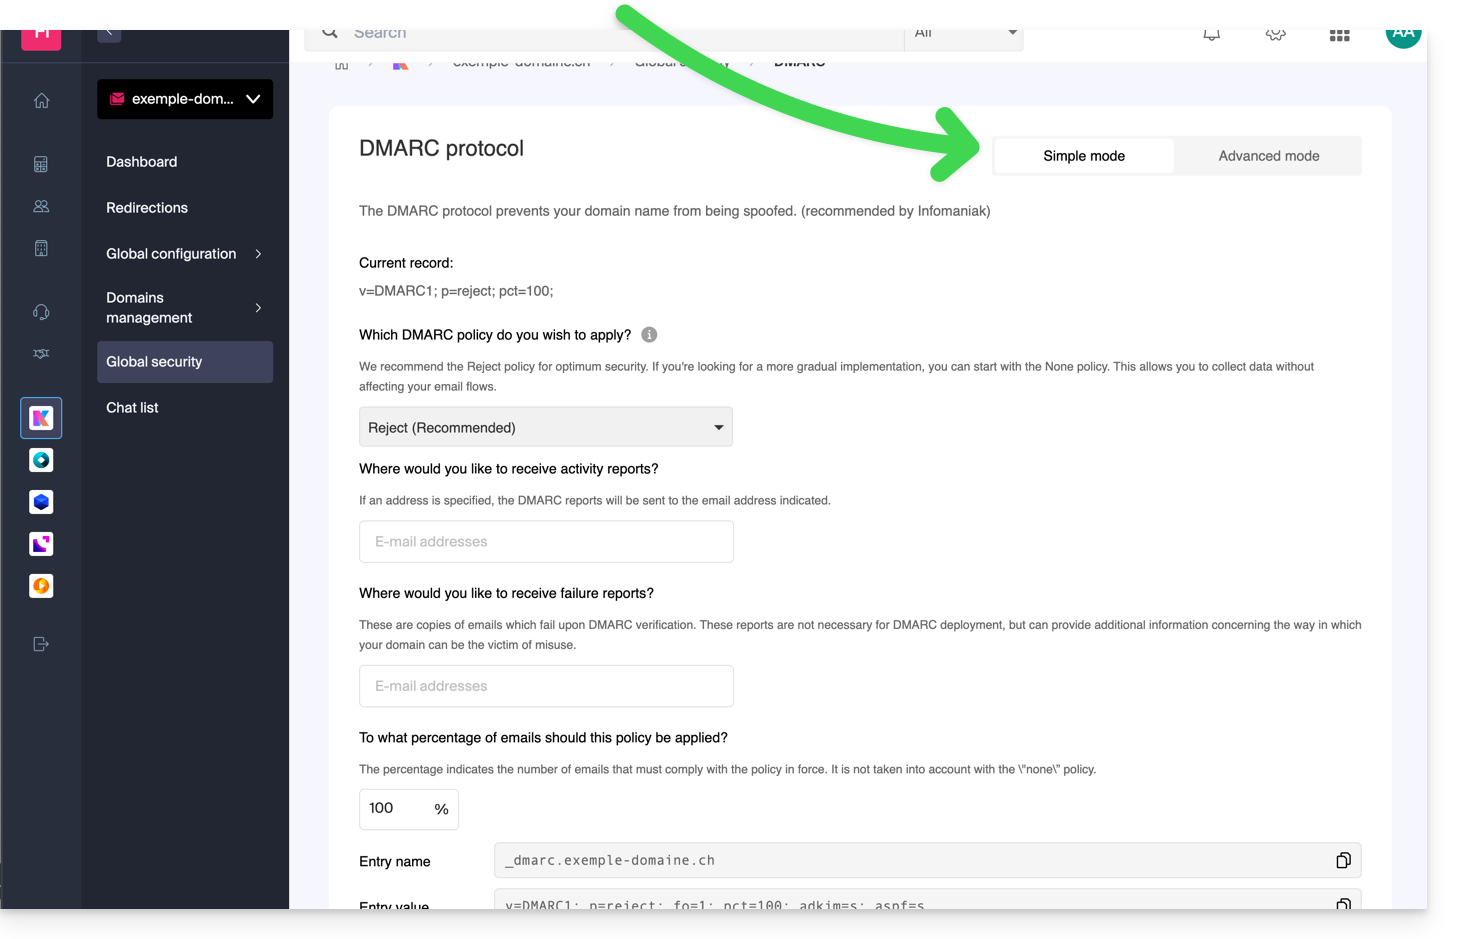 The corresponding necessary entries (type TXT) will then be automatically applied in the DNS zone of the concerned domain name (if administratively possible - domain managed in the same Organization, for example).
Infomaniak is neither able to analyze your potential DMARC reports and records, nor able to comment on the validity or compliance of these, as this is entirely your responsibility.
To verify the records within your DNS, you can also use a free external service like the one mentioned at the bottom of this other guide.
Refer to this other guide if you are looking for information on the fourth point of the Overall Security page.
Link to this FAQ:
Has this FAQ been helpful?