Knowledge base
1000 FAQs, 500 tutorials and instructional videos. Here, there are only solutions!
This guide concerns kSync which allows you to create a new calendar or a new address book directly from an Android device.
Create a calendar or address book from the app
To do this:
- Open the mobile app kSync on the Android device.
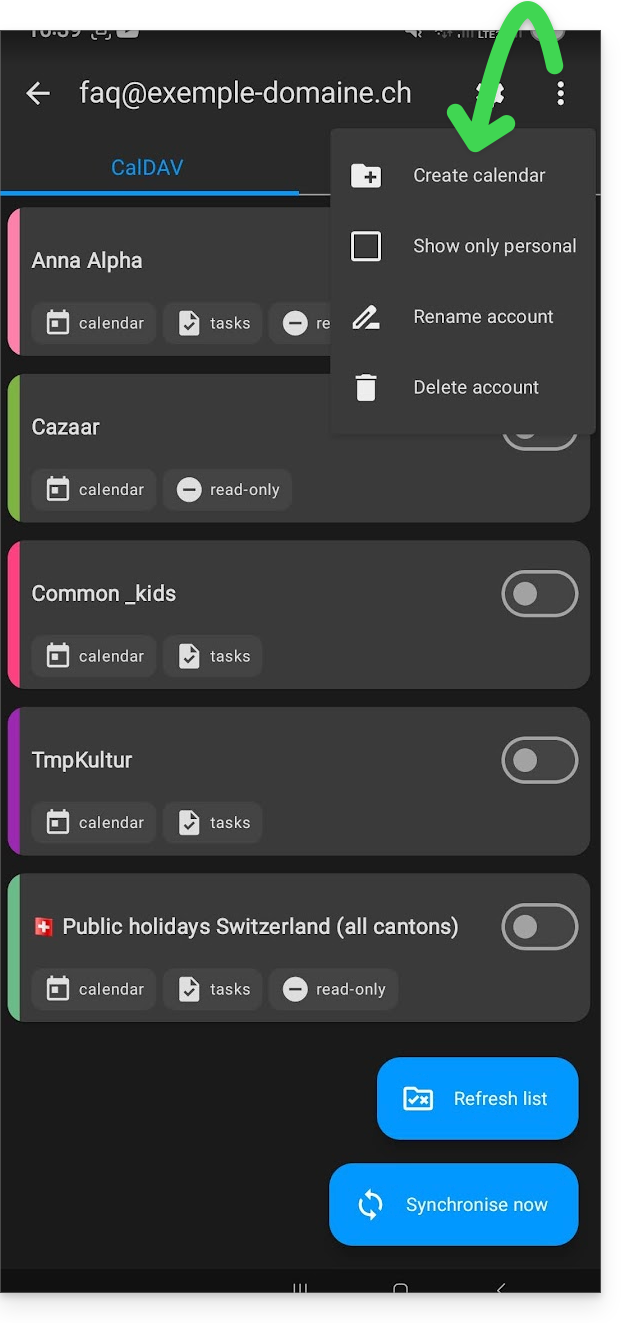
- Once logged in, click on the action menu ⋮ located at the top right.
- Press Create a new address book / Calendar:
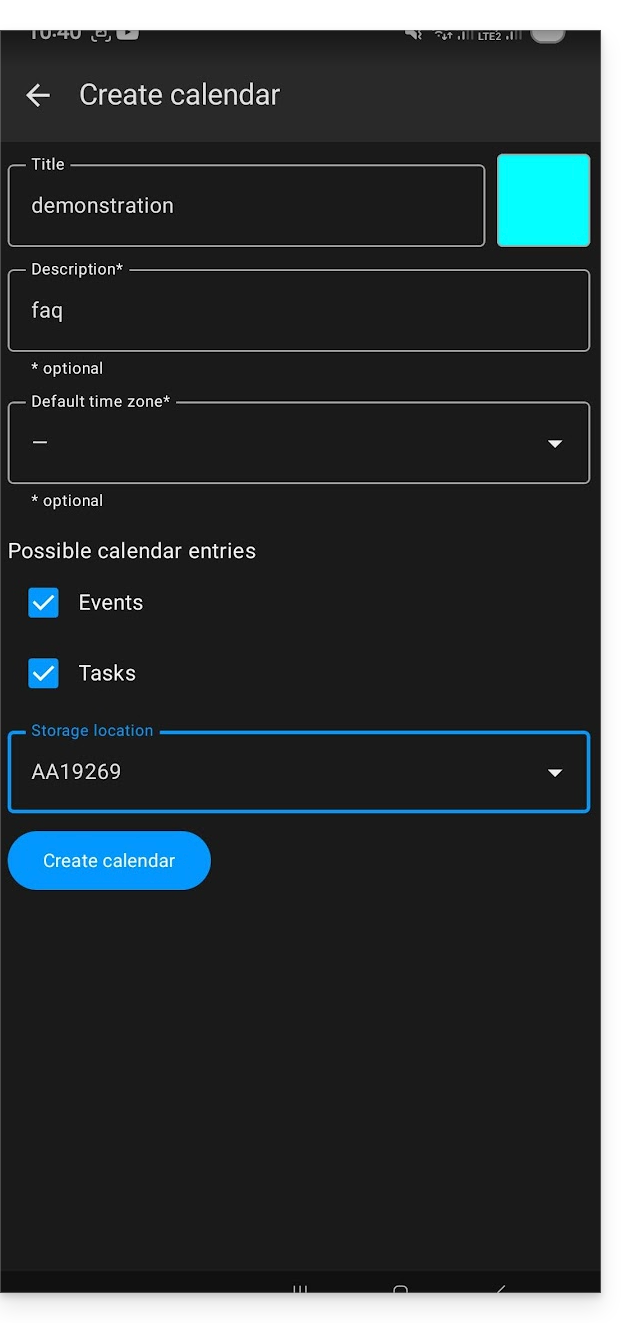
- Enter the name of the address book or calendar and a color.
- Click on Create:
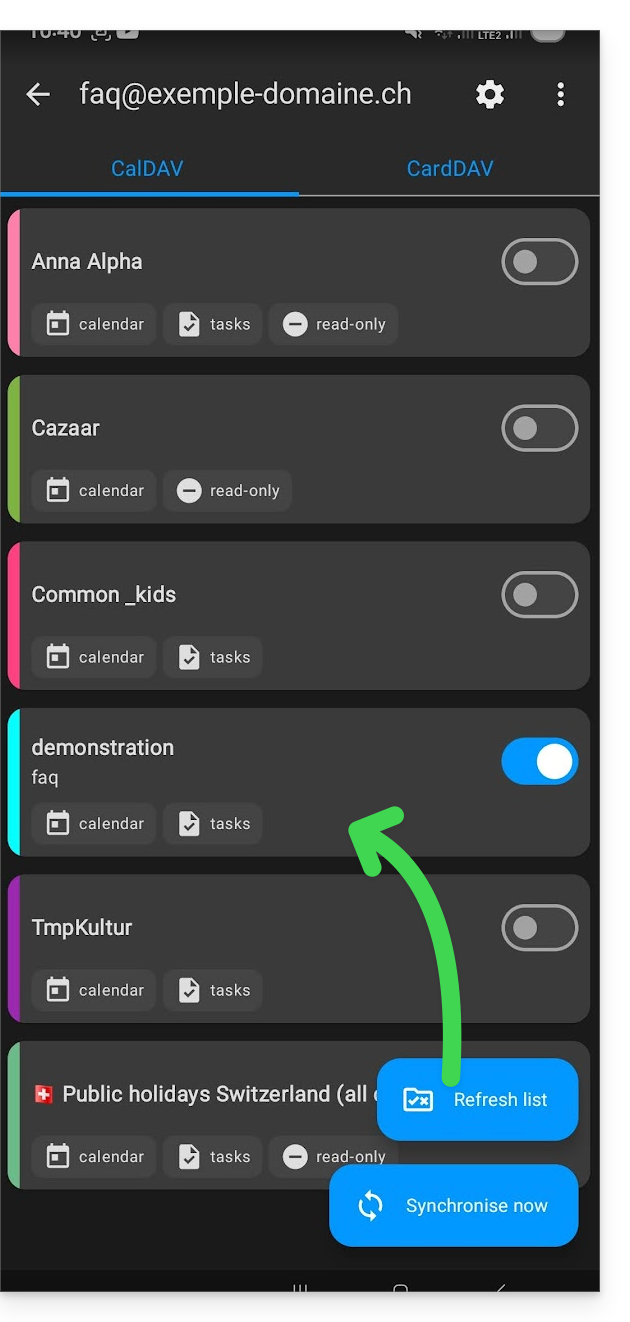
- If necessary, click on the icon to refresh the list, your new item appears in the list after a few seconds:
Your service will then be synchronized with the corresponding web app, here Calendar Infomaniak (online service ksuite.infomaniak.com/calendar):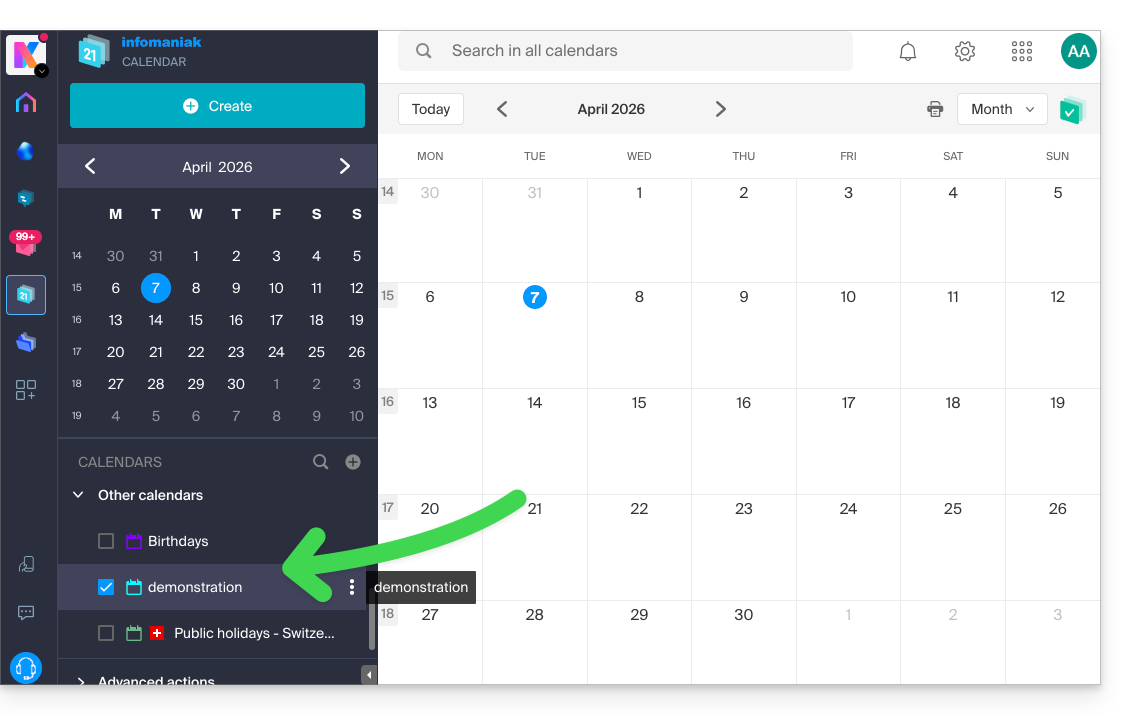
Link to this FAQ:
Has this FAQ been helpful?
This guide explains how to force synchronization of Infomaniak contacts & calendars when they are synchronized by the kSync app on an Android device.
Preamble
- The kSync app only synchronizes contacts & calendars that are selected in the application.
- If you subsequently add calendars/agendas from Calendar or address books from Contacts, it is therefore necessary to add them to the synchronization in the kSync application.
Add an agenda / address book to synchronization
To force synchronization if necessary:
- Open the mobile app kSync on your Android device and tap on the synchronized account concerned.
- Tap Refresh list to update the address books / agendas:
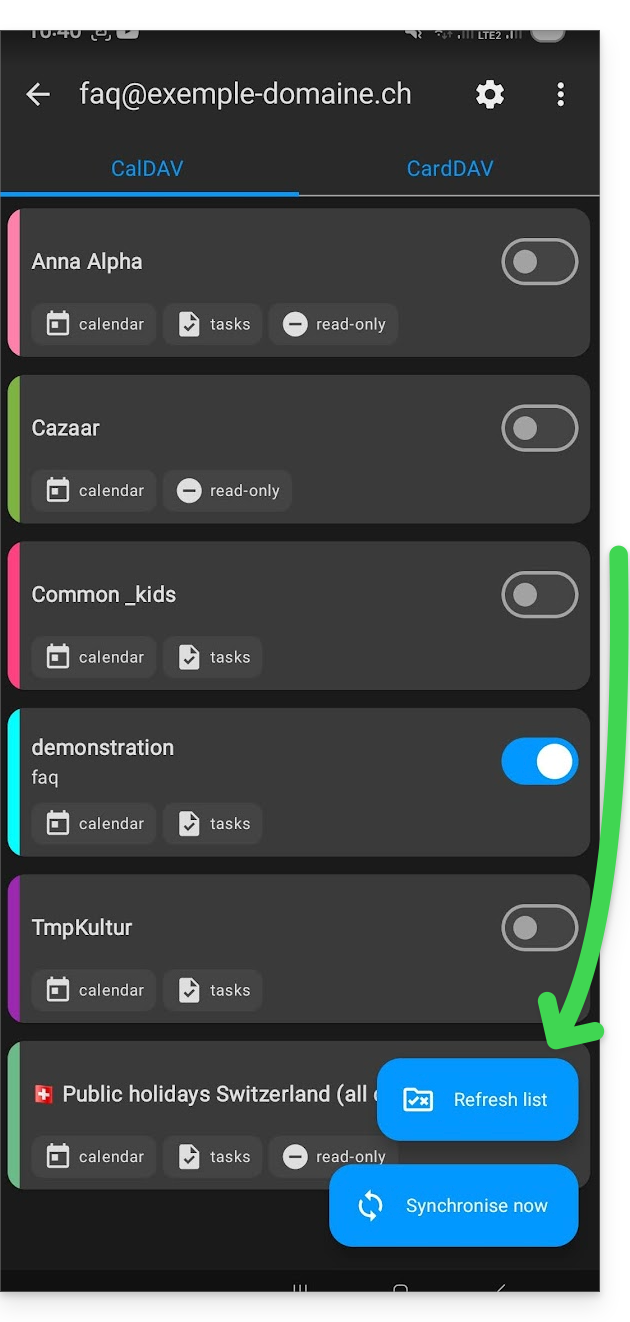
The new address books and agendas appear in the list. Configure those you want to synchronize.
Link to this FAQ:
Has this FAQ been helpful?
This guide explains how to synchronize tasks with kSync, the Infomaniak mobile app used to link your calendars & contacts stored at Infomaniak with the data on your Android devices.
Prerequisites
- Install and download the free application jtx Board.
Synchronize tasks
To synchronize data between the tasks of Infomaniak Calendar and your Android devices, jtx Board will, using kSync, synchronize the tasks based on one or more Infomaniak calendars at regular intervals.
- Here is a task present on Infomaniak:

- After synchronization, it appears on jtx Board:

- Example of task validation when it is executed, then adding a second task from the application:

- Result on Infomaniak:

To go further, it may be necessary to purchase the Pro version of the jtx Board application.
Recommended settings
It is recommended to improve the readability of your tasks in the application to disable these 2 parameters in the settings of the jtx Board application…
… then remove "local" from the list of locations to keep only the possibility of saving in your kDrive account(s).
Link to this FAQ:
Has this FAQ been helpful?
The Infomaniak kSync mobile app is a free solution offered by Infomaniak that allows you to synchronize contacts, calendars, and tasks from your Android mobile devices (Samsung, Huawei, Google Pixel, etc.) with the tools provided by Infomaniak:
- ksuite.infomaniak.com/contacts for managing contacts / address books
- ksuite.infomaniak.com/calendar for managing calendars
Introduction
- Configuring synchronization at the email level does not mean that contacts & calendars will also be synchronized!
- Email is synchronized via the IMAP protocol, while your contacts & calendars can be synchronized using the CardDAV and CalDAV protocols.
- To facilitate this synchronization on Android devices, it is recommended to install kSync.
- On iOS (iPhone, iPad, etc.), use an Apple profile, which can be downloaded from the configuration assistant.
- Microsoft has its own format that is not directly compatible with CardDAV and CalDAV; therefore, it is not possible on the Outlook mobile app to synchronize contacts and calendars with Infomaniak (PS: a paid and untested solution exists here).
- To synchronize Outlook on your computer, please refer to this other guide.
What would you like to do?
- Download and install kSync on your Android device
- Configure kSync
- Use kSync to synchronize Google Calendar
- Add a new address book or calendar from kSync
- Synchronize tasks between Mail Infomaniak and your Android devices
- Force kSync synchronization
- Generate a specific password if two-factor authentication is enabled
Link to this FAQ:
Has this FAQ been helpful?
Infomaniak continuously improves its products and customer service by prioritizing your suggestions shared via support, social media, or the Web. These suggestions are then discussed during the meetings of the relevant service.
Provide feedback on…
INFOMANIAK SERVICE | [FR] | [EN] | [DE] | [IT] | [ES] |
|---|---|---|---|---|---|
| Euria [ ☍ ] | ✎__ | ✎__ | ✎__ | ✎__ | ✎__ |
| Domains [ ☍ ] | ✎__ | ✎__ | ✎__ | ✎__ | ✎__ |
| Hosting / Site Creator [ ☍ ] | ✎__ | ✎__ | ✎__ | ✎__ | ✎__ |
| Cloud Server [ ☍ ] | ✎__ | ✎__ | ✎__ | ✎__ | ✎__ |
| Public Cloud [ ☍ ] | ✎__ | ✎__ | ✎__ | ✎__ | ✎__ |
| Jelastic Cloud [ ☍ ] | ✎__ | ✎__ | ✎__ | ✎__ | ✎__ |
| Synology [ ☍ ] | ✎__ | ✎__ | ✎__ | ✎__ | ✎__ |
| Housing [ ☍ ] | ✎__ | ✎__ | ✎__ | ✎__ | ✎__ |
| Swiss Backup [ ☍ ] | ✎__ | ✎__ | ✎__ | ✎__ | ✎__ |
| kSuite / my kSuite [ ☍ ] | ✎__ | ✎__ | ✎__ | ✎__ | ✎__ |
| Mail [ ☍ ] | ✎__ | ✎__ | ✎__ | ✎__ | ✎__ |
| app Mail iOS [ ☍ ] | ✎__ | ✎__ | ✎__ | ✎__ | ✎__ |
| app Mail Android [ ☍ ] | ✎__ | ✎__ | ✎__ | ✎__ | ✎__ |
| kDrive [ ☍ ] | ✎__ | ✎__ | ✎__ | ✎__ | ✎__ |
| Calendar [ ☍ ] | ✎__ | ✎__ | ✎__ | ✎__ | ✎__ |
| Contacts [ ☍ ] | ✎__ | ✎__ | ✎__ | ✎__ | ✎__ |
| Newsletter [ ☍ ] | ✎__ | ✎__ | ✎__ | ✎__ | ✎__ |
| SwissTransfer [ ☍ ] | ✎__ | ✎__ | ✎__ | ✎__ | ✎__ |
| Streaming Radio [ ☍ ] | ✎__ | ✎__ | ✎__ | ✎__ | ✎__ |
| Streaming Video [ ☍ ] | ✎__ | ✎__ | ✎__ | ✎__ | ✎__ |
| VOD / AOD [ ☍ ] | ✎__ | ✎__ | ✎__ | ✎__ | ✎__ |
| Guest Manager [ ☍ ] | ✎__ | ✎__ | ✎__ | ✎__ | ✎__ |
| kChat [ ☍ ] | ✎__ | ||||
| kMeet [ ☍ ] | ✎__ | ||||
Infomaniak support is also at your disposal by email, chat or phone if needed.
Link to this FAQ:
Has this FAQ been helpful?
This guide explains how to add a new Organization to which you will have access with your current Infomaniak account and in which you can add and/or transfer products, link users, etc.
Preamble
- If you are my kSuite users, refer to this other guide.
Create a new Organization
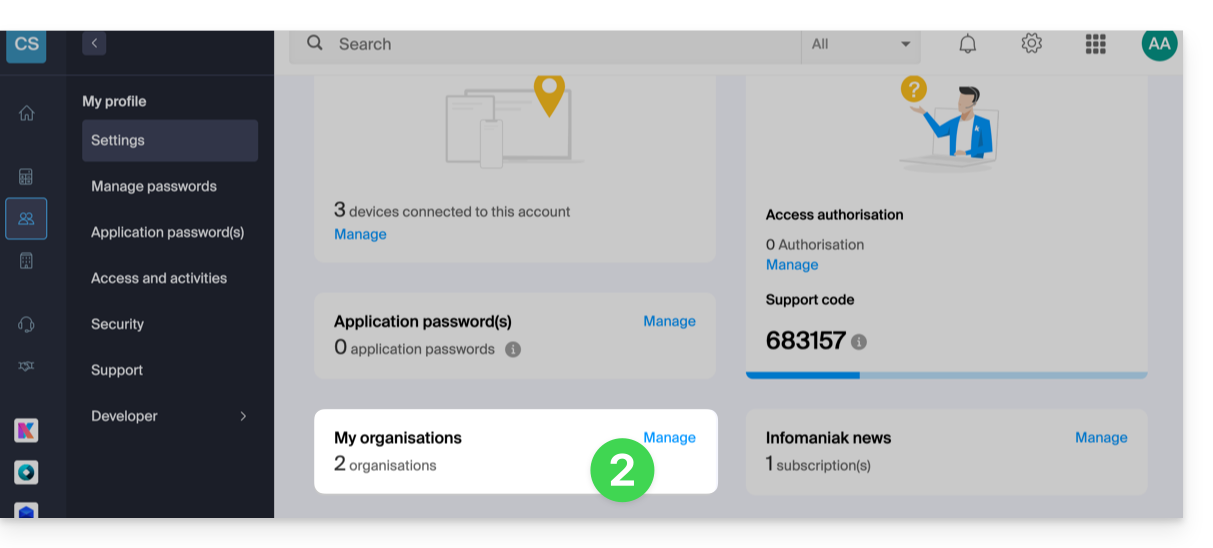
You can add multiple Organizations (i.e., a space to manage your products) by accessing them with the same login credentials to separate your activities professional and personal for example, or when managing multiple clients:
- Click here to access the management of your settings (Infomaniak Manager).
- Click on Manage from the My organizations box:
- Click on the Create a new organization button
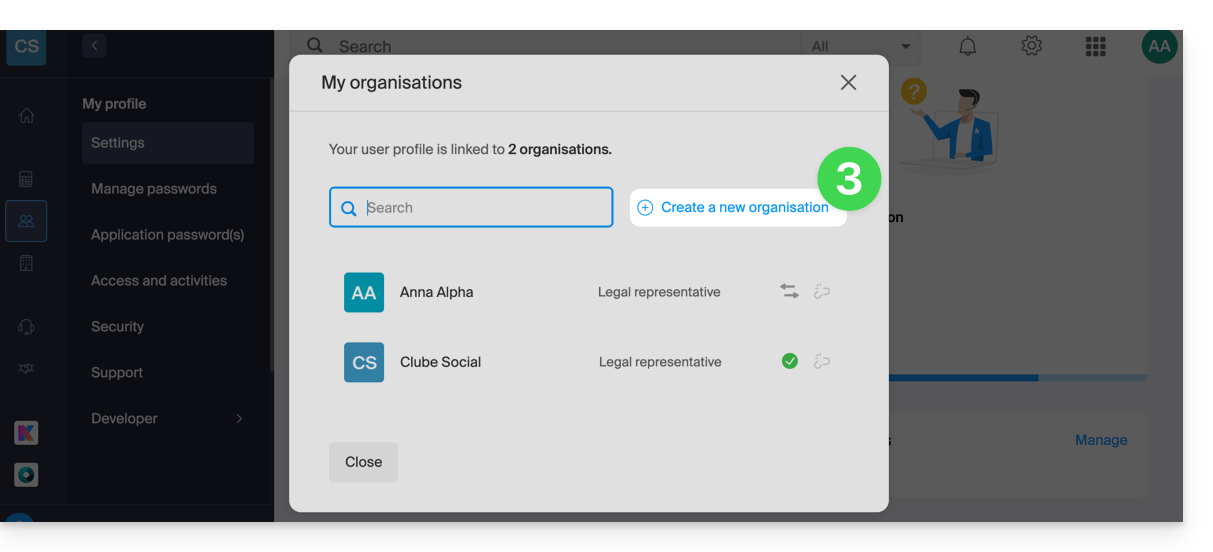
- Follow the procedure to create a new Organization.
You will thus be able to continue using your usual login credentials while being able to switch between your different Organizations (top left of the Manager).
Link to this FAQ:
Has this FAQ been helpful?
This guide helps you get started with kSuite by integrating an existing kDrive in your Organization.
Preamble
- The kDrive will be an integral part of the new kSuite.
- The minimum number of users in the chosen kSuite offer will be based on the number of users in the existing kDrive offer.
- kDrive users will become kSuite users.
- To help you identify the kSuite offer best suited to your needs, refer to this other guide.
Upgrade my kDrive to kSuite
Prerequisites
- Do not yet have a kSuite in the Organization.
- Have a paid kDrive offer and outside the trial period.
- Be the Legal Representative or Administrator of the Organization.
Create a new kSuite from your existing kDrive:
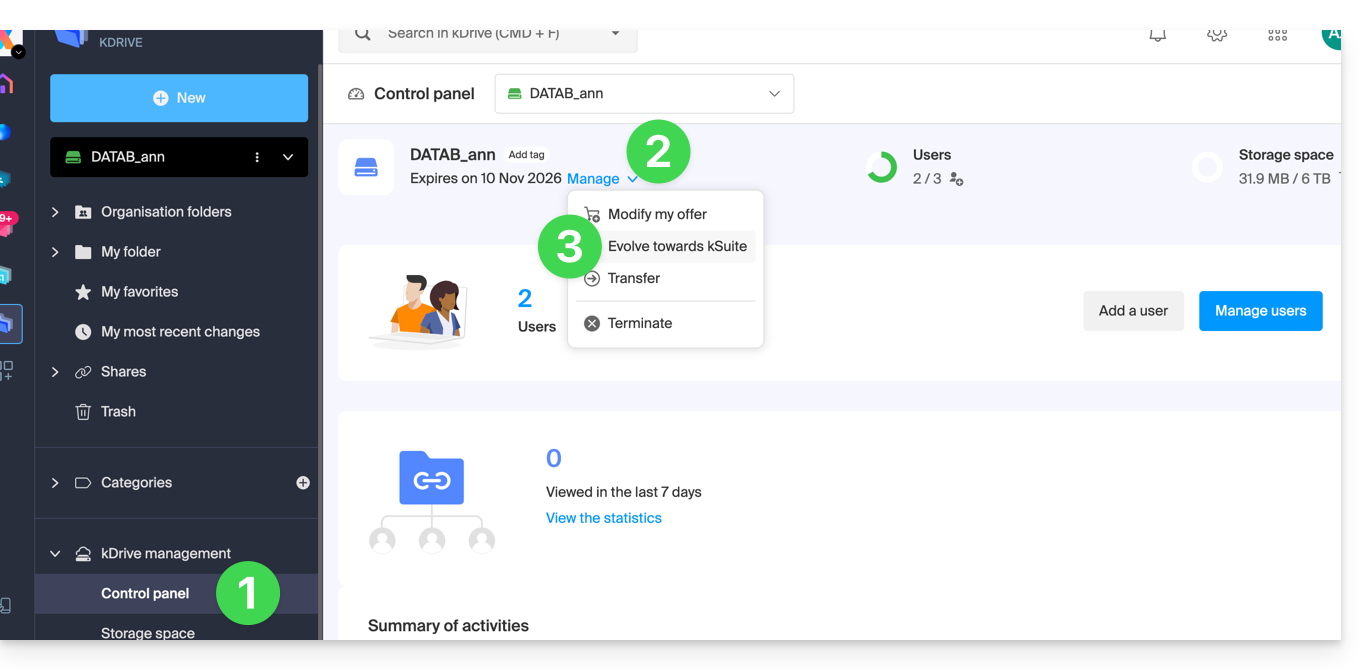
- Click here to access the Infomaniak kDrive Web app (online service ksuite.infomaniak.com/kdrive).
- Click on Manage.
- Click on Upgrade the offer.
You can also do this from an information banner visible on the homepage of your Manager interface:
You can also integrate your Mail Service if it is currently outside kSuite.
Link to this FAQ:
Has this FAQ been helpful?
This guide explains how to connect the desktop app Outlook 2019 (desktop application on Windows) to an email address hosted by Infomaniak.
Preamble
- The various services offered by Infomaniak are all compatible with the corresponding standard protocols (IMAP/SMTP for email, for example), therefore if you encounter a problem with third-party software, contact its publisher or a Partner and consult the support policy as well as article 11.9 of the Infomaniak Terms of Service.
Add the email address to the application
Prerequisites
- Create the email address in my kSuite or a Mail Service / kSuite.
- Create a password for the email address on the device you are going to configure.
To configure the email application:
- Open the application.
- Click on the File menu:
- Click on Account Settings.
- Click on Add or Remove Accounts:
- Click on New:
- Enter the email address to connect.
- Click on Advanced Options.
- Click on Manual Configuration.
- Click on the blue Connect button:
- Click on IMAP:
- Enter the password of the email address to connect.
- Click on the blue Connect button:
- Uncheck the additional mobile device configuration box if necessary.
- Click on the blue Finish button:
- Click on Repair to correct some automatically added but incorrect information:
- Click on Advanced Options.
- Click on Manual Repair.
- Click on the blue Repair button:
- Check and complete the missing information by scrolling down if necessary.
- Click on Outgoing Mail:
- Check and complete the missing information.
- Click on Next.
- Click on Finish:
- Click on Close:
- There you go, your email address is now correctly configured in the application:
Recommended settings
- Incoming IMAP server =
mail.infomaniak.com - IMAP port =
993(with SSL) - Outgoing SMTP server =
mail.infomaniak.com - SMTP port & encryption protocol and command/method to activate this protocol:
587+ STARTTLS - Username = the complete & full email address ( ? )
- Password = the one generated for the email address you want to access
- Authentication required for sending emails:
- It is activated in the SMTP settings of your application.
- Check "use the same parameters as the incoming server" or, depending on the software/email clients, enter a username (= complete & full email address) and the generated password.
Refer to this other guide if you are looking for information about other mail ports and protocols compatible (SSL / TLS for example).
In case of a problem
Check that the Mail Service is configured optimally.
It is not necessary to contact Infomaniak Support if your email address works well outside the application. The most common error concerns the use of an incorrect password. The troubleshooting guides help you resolve any potential issues:
- Refer to the solutions provided in this other guide regarding email in general.
- This other guide is more specifically about Outlook.
… and if your Outlook no longer works since a change of email password, refer to this other guide.
Link to this FAQ:
Has this FAQ been helpful?
This guide explains how to change the password of your Infomaniak account (= user account) on the Manager, the administration interface of your Infomaniak products.
Preamble
- This password also allows you to log in to my kSuite and various iOS/Android applications such as kDrive, Infomaniak Mail, etc. (learn more) but it is not your email address password!
- If you cannot log in, you will not be able to change the password; refer to this other guide in this case.
Change the Infomaniak account password
To change the password of your Infomaniak account:
- Click here to access the management of your settings (Infomaniak Manager).
- Click on Modify from the Connection settings box under connection password:
- Click on Modify:
- Enter the current connection password as well as the desired new password.
- Click on Save.
Link to this FAQ:
Has this FAQ been helpful?
This guide explains how to connect the Apple Mail iOS mobile app (iPhone, iPad, etc.) to an email address hosted by Infomaniak.
Introduction
- Rather than using the manual configuration below, it is recommended to use the .mobileconfig configuration profiles provided by Apple or the Infomaniak Mail (iOS) app to benefit from a Push-type update method.
Manually add the email address to the application
Prerequisites
- Create the email address within my kSuite or a Mail / kSuite Service.
- Create a password for the email address for the device you are going to configure.
- Verify that the Mail Service is configured optimally.
To configure the email application:
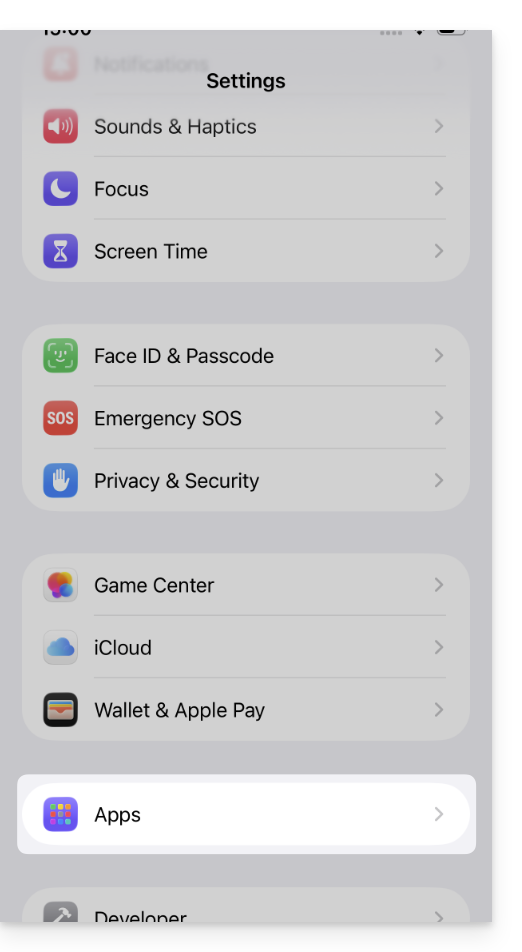
- Open the Settings of the iPhone and tap on Apps:
- In Apps, tap on Mail:
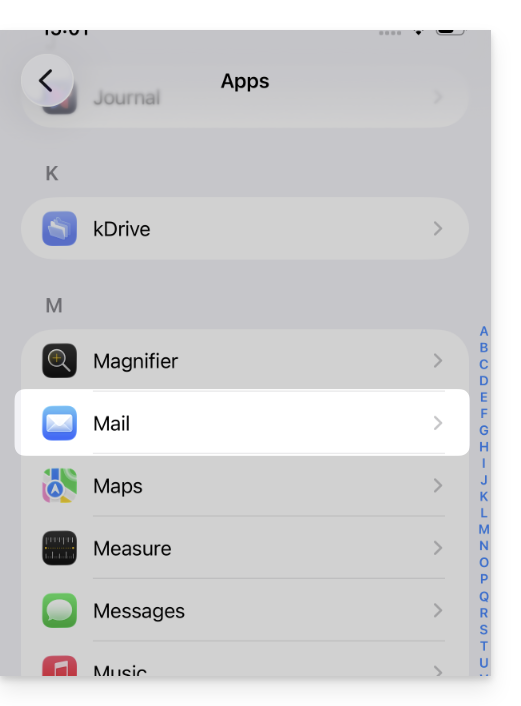
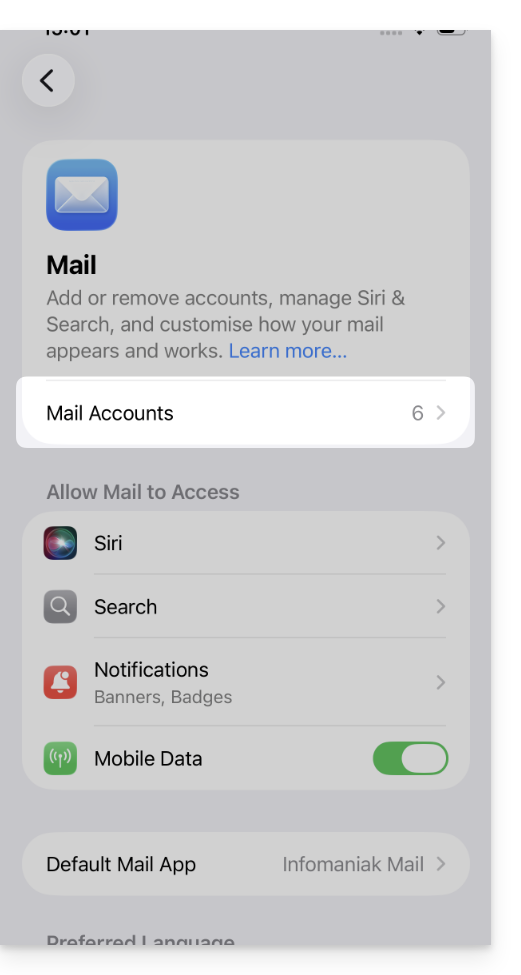
- Tap on Mail Accounts:
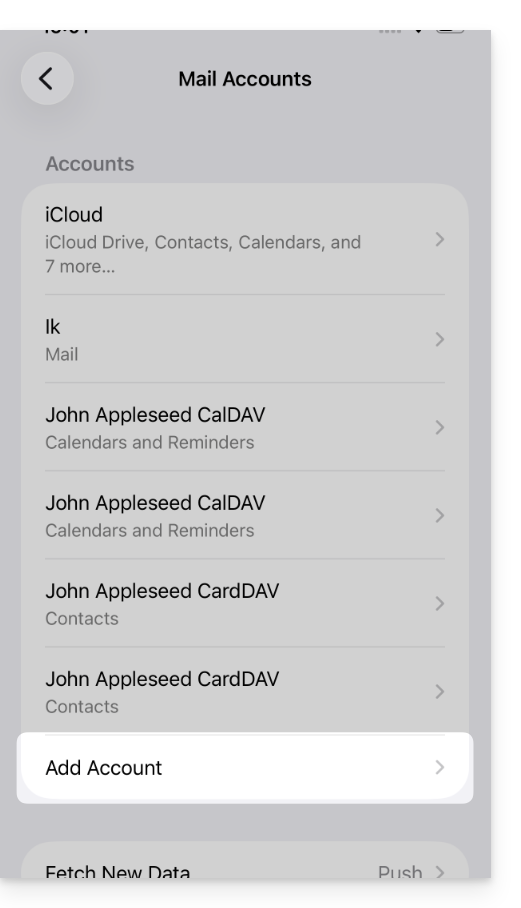
- Tap to add an account:
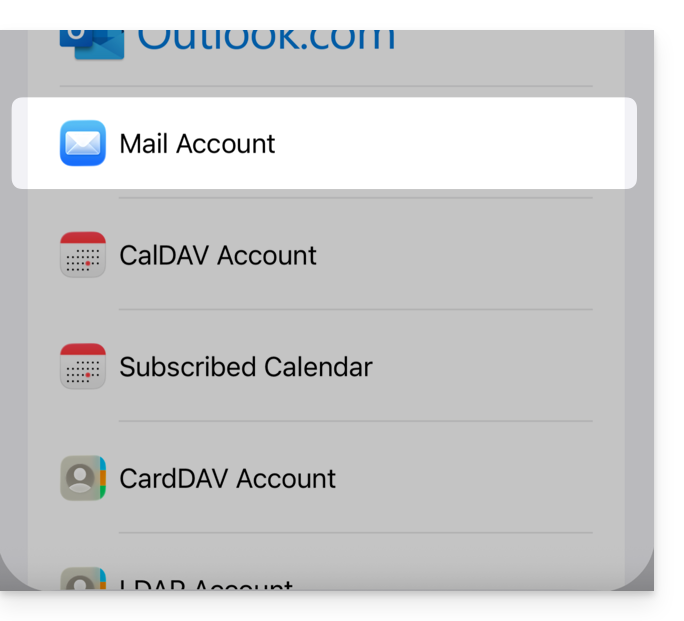
- Tap Other account:
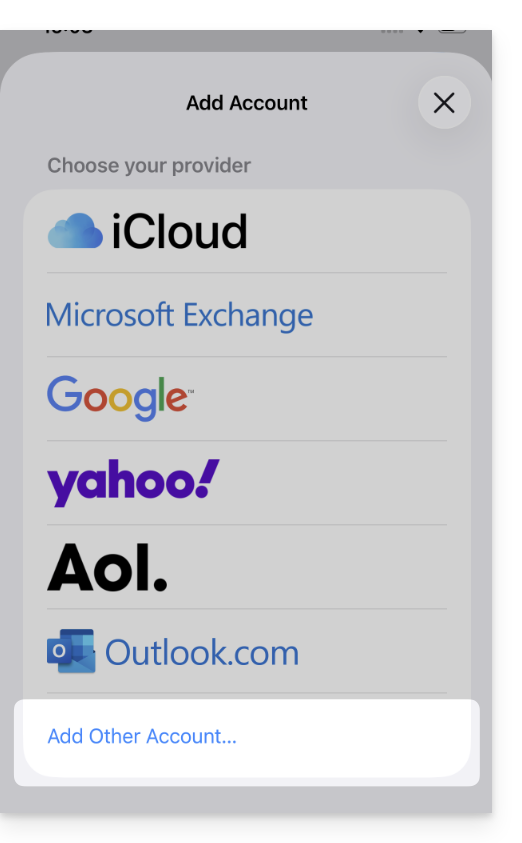
- Tap Mail account:
- Enter the email address to be added:
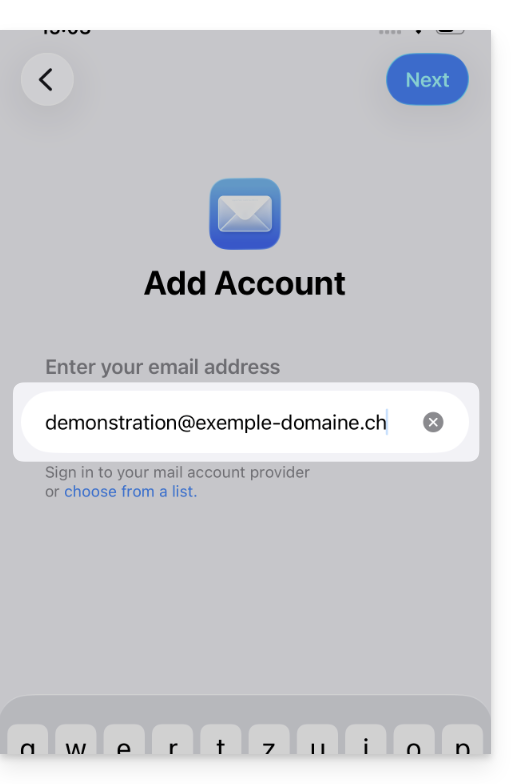
- Tap Next in the top right corner.
- The application indicates that some fields are optional but they are not at all:
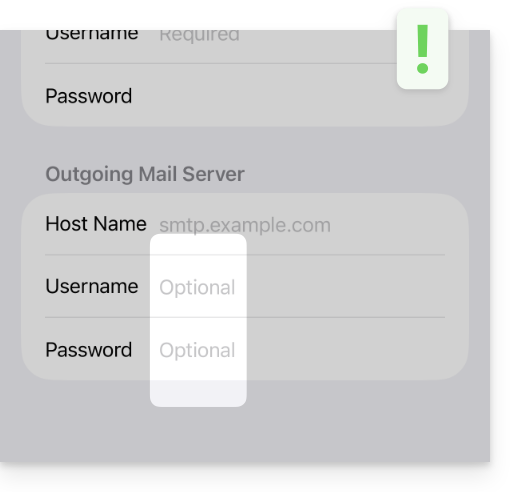
- Check and complete the missing information:
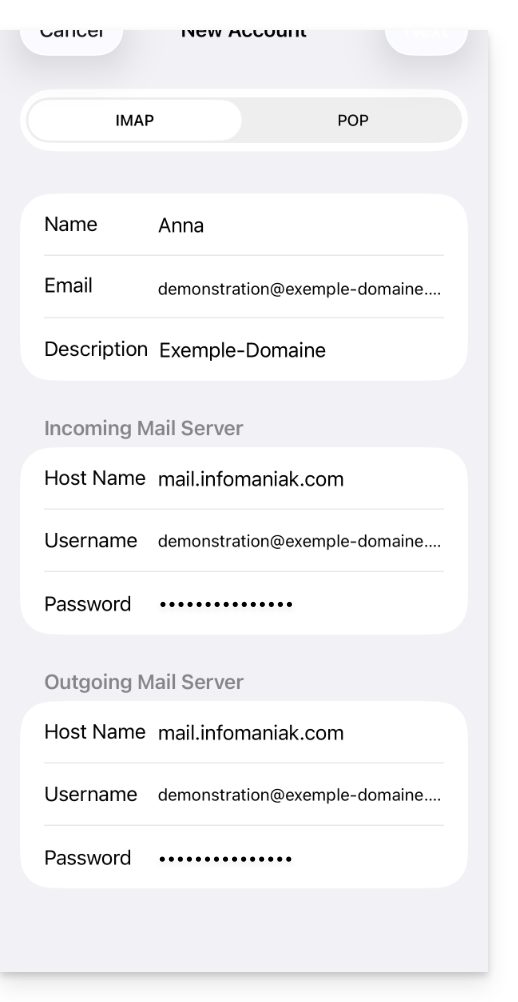
- Make sure you stay on the IMAP tab and tap Next in the top right corner.
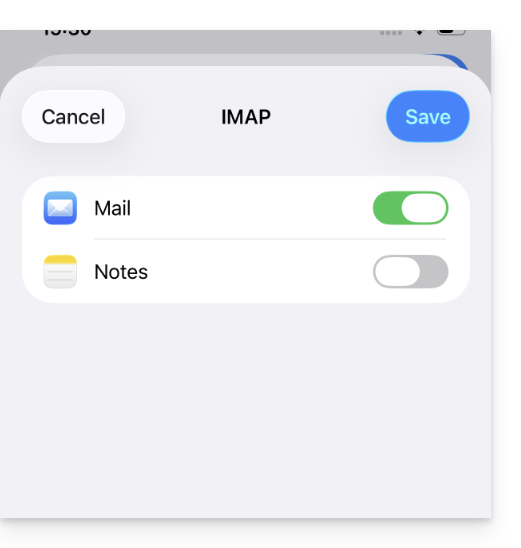
- Enable emails and save the configuration in the top right corner:
- That's it, your email address is now configured in the application.
Recommended settings
- Incoming IMAP server =
mail.infomaniak.com - IMAP port =
993(with SSL) - Outgoing SMTP server =
mail.infomaniak.com - SMTP port & encryption protocol and command/method to enable this protocol:
587+ STARTTLS - Username = the complete and full email address (need help?)
- Password = the one generated for the email address you want to access
- Mandatory authentication for sending emails:
- It is activated in the SMTP settings of your application.
- Check "use the same settings as the incoming server" or, depending on the software/email client, re-enter a username (= complete and full email address) and the generated password.
Refer to this other guide if you are looking for information about other compatible email ports and protocols (SSL / TLS, for example).
In case of a problem
Check that the Mail Service is configured optimally.
It is not necessary to contact Infomaniak Support if your email address works fine outside the application. The most common error concerns the use of an incorrect password. The troubleshooting guides will help you resolve any potential issues:
- Refer to the solutions provided in this other guide regarding email in general.
- Delete any Apple configuration profiles related to your Infomaniak email before restarting the configuration.
If your Apple Mail no longer works for sending emails (e.g., the SMTP server is disconnected or missing) or after a change of your email password, please refer to this other guide.
Link to this FAQ:
Has this FAQ been helpful?
This guide explains how to connect the Contacts and Calendar mobile apps to the contacts & calendars hosted by Infomaniak.
Introduction
- Your iOS device will be automatically configured using .mobileconfig configuration profiles compatible with Apple, unlike a manual configuration.
- It is possible to delete a configuration profile once it has been installed (scroll to the bottom of this page for instructions).
- Infomaniak contacts & calendars are linked to your Infomaniak account; when you log in to ksuite.infomaniak.com/contacts or /calendar, you will likely need to perform two-factor authentication (2FA) during login.
- In this case, an application password is required to establish synchronization between your device and Infomaniak tools.
- But don't worry, creating such a password is offered as part of the configuration wizard.
Install a configuration profile
To do this:
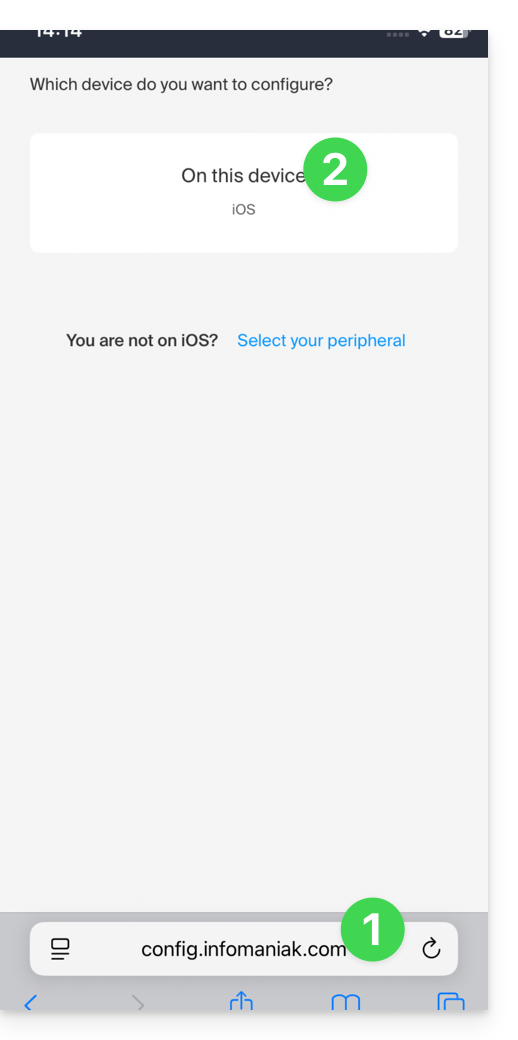
- Click here to access the Infomaniak configuration tool (online service https://config.infomaniak.com) — log in if necessary to your Infomaniak account for the Organization where your services are managed.
- Choose to install the profile on this iOS device:
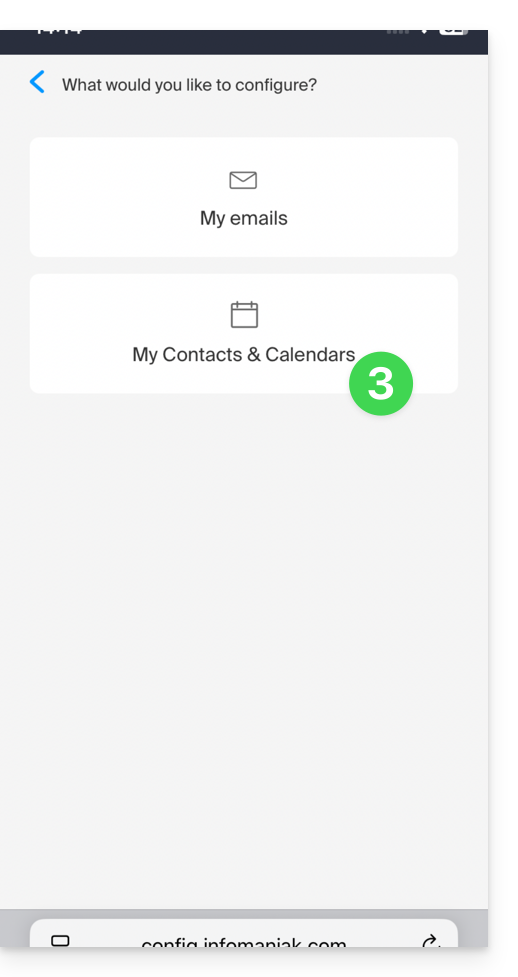
- Choose to synchronize contacts & calendars:
- Generate an application password dedicated to synchronization (in order to keep the usual 2FA login for your user account):
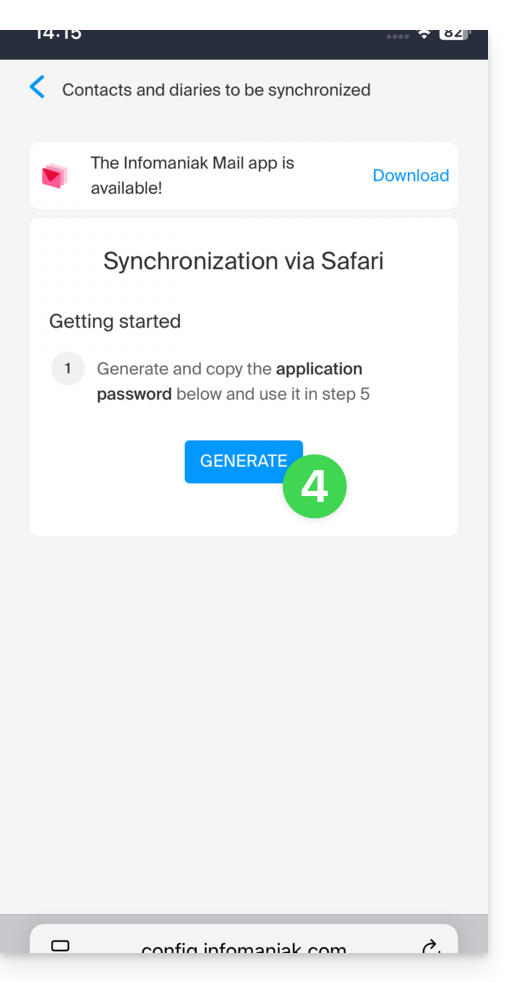
- Copy the generated application password (you will be asked for it when installing the Apple profile).
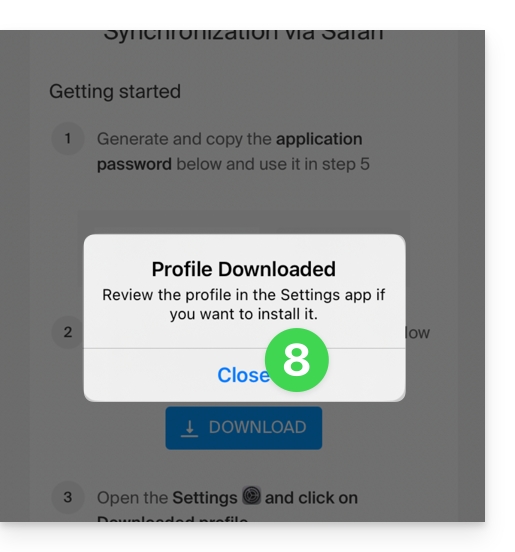
- Download the Apple profile:
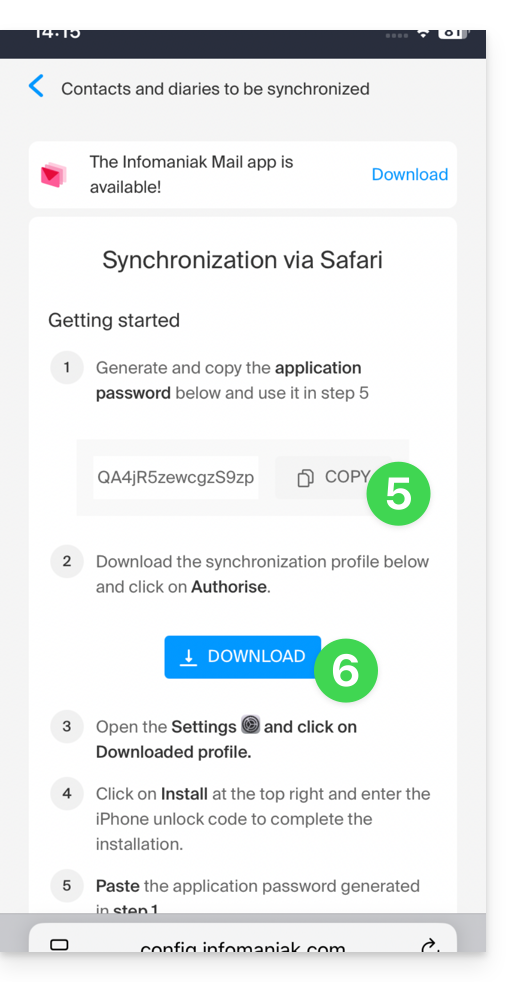
- Allow the download on the device:

- Tap to close the message:
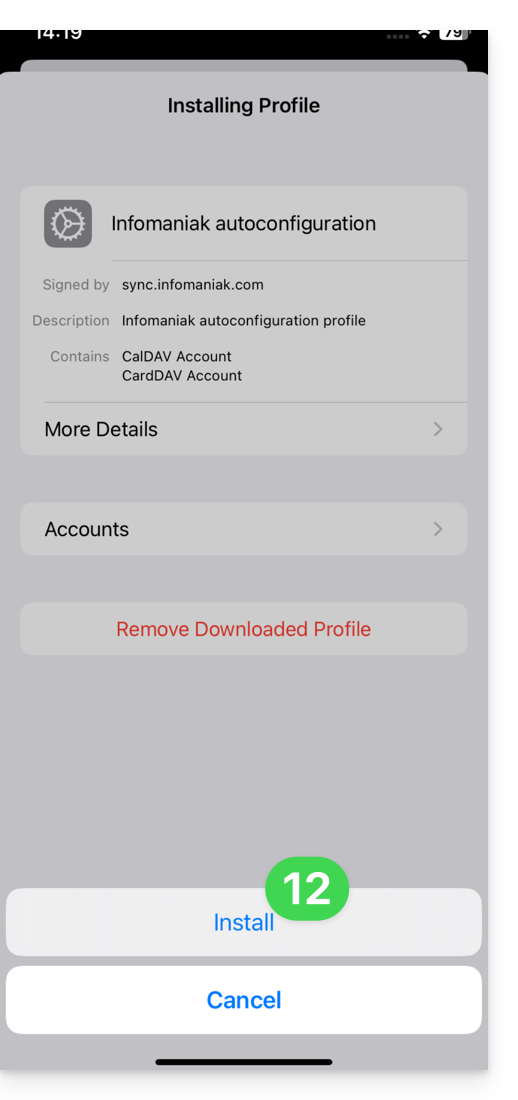
- Open the settings of the iOS device and tap on the banner at the top that informs you that a new profile has been downloaded:
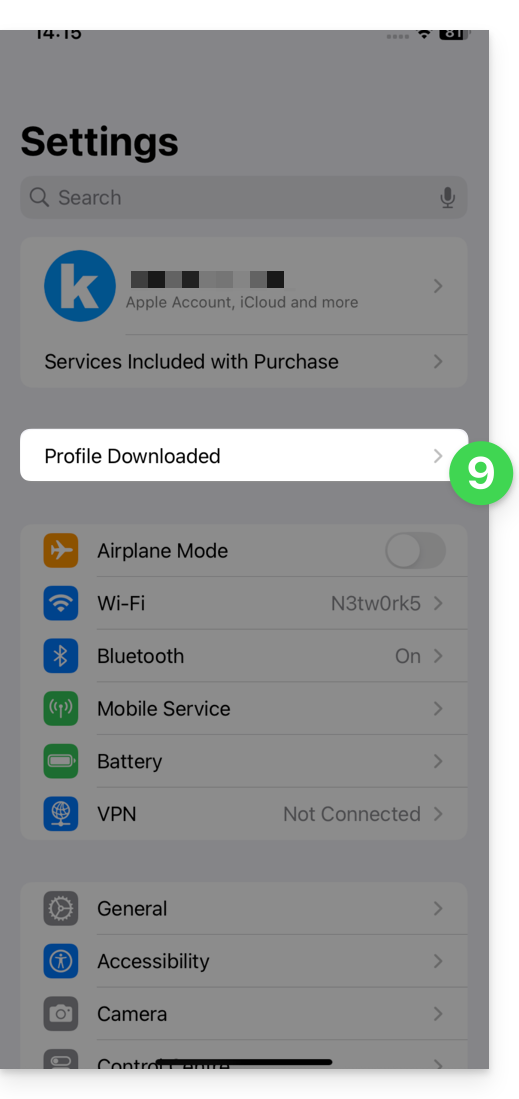
- Tap Install:
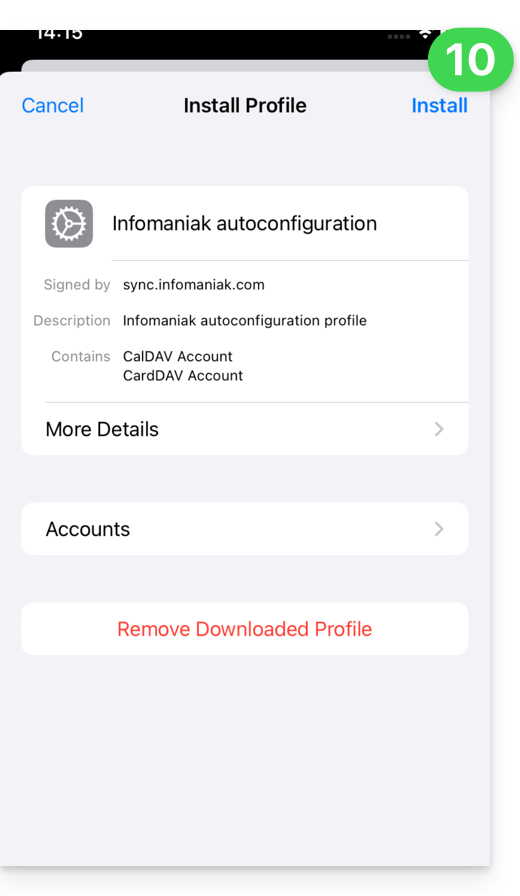
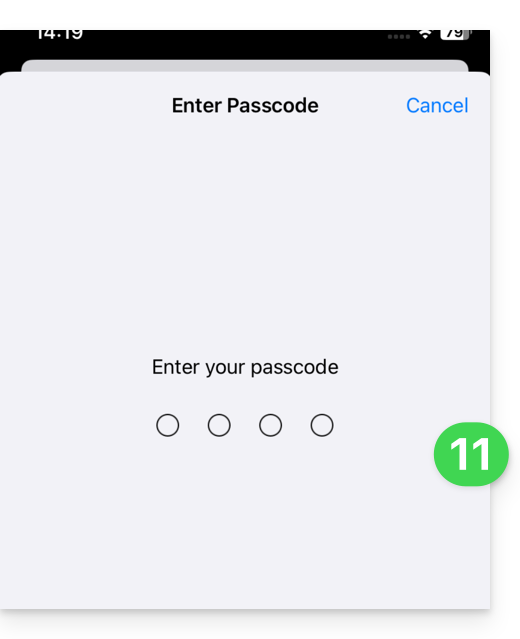
- Enter your iOS device code as if you were unlocking it:
- Tap Install:
- Enter (or paste) the application password copied in step 5 above:
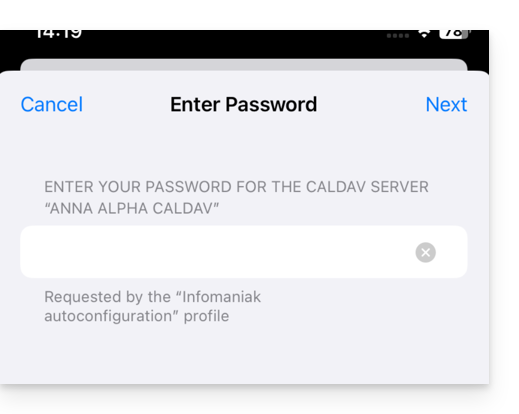
and do this twice in a row (contacts + calendars):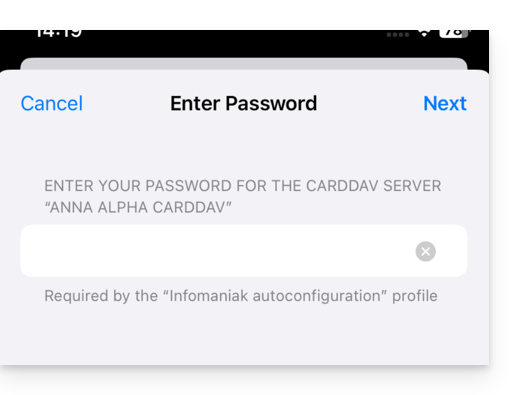
- When the notification appears at the top, it's done:
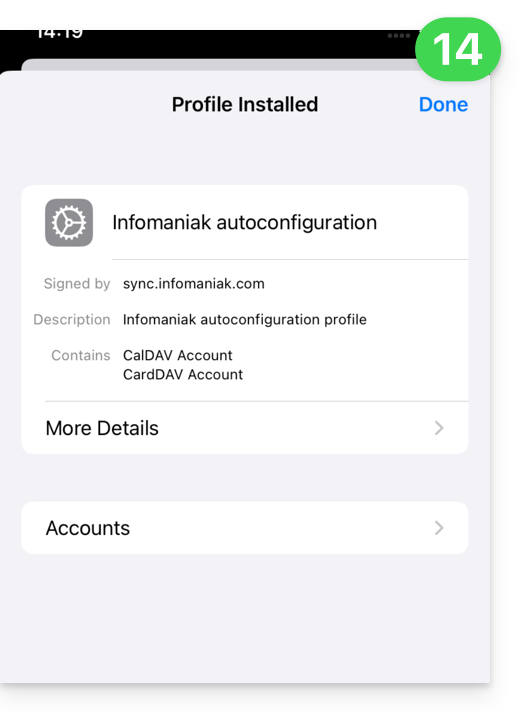
If your iOS Contacts and Calendar applications were already open, you need to restart them. You will then see the information added by the synchronization: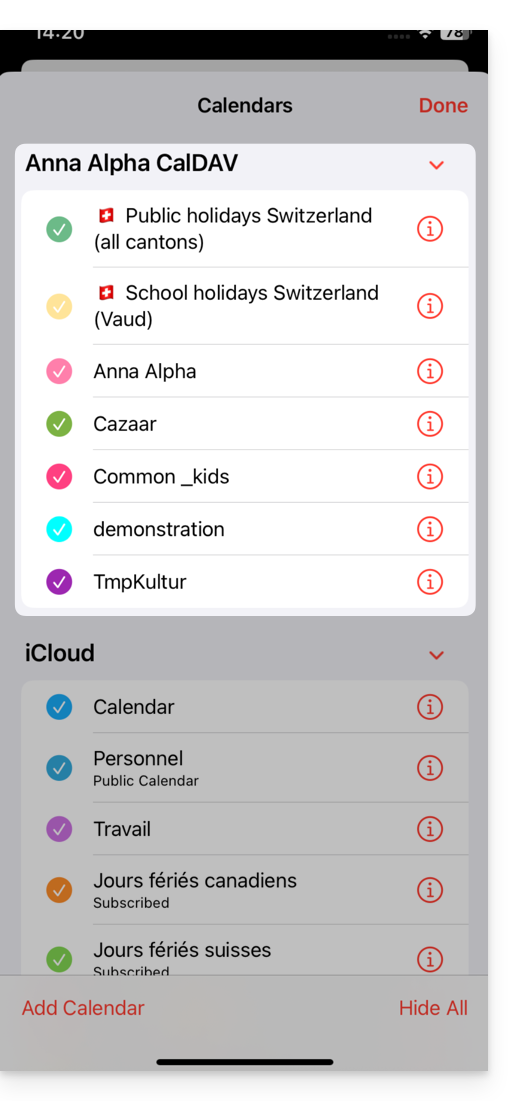
Synchronization Specifics
Please refer to this other guide.
Delete an Apple Profile
Please refer to the official documentation, changing the version of your system at the top of the page * if necessary.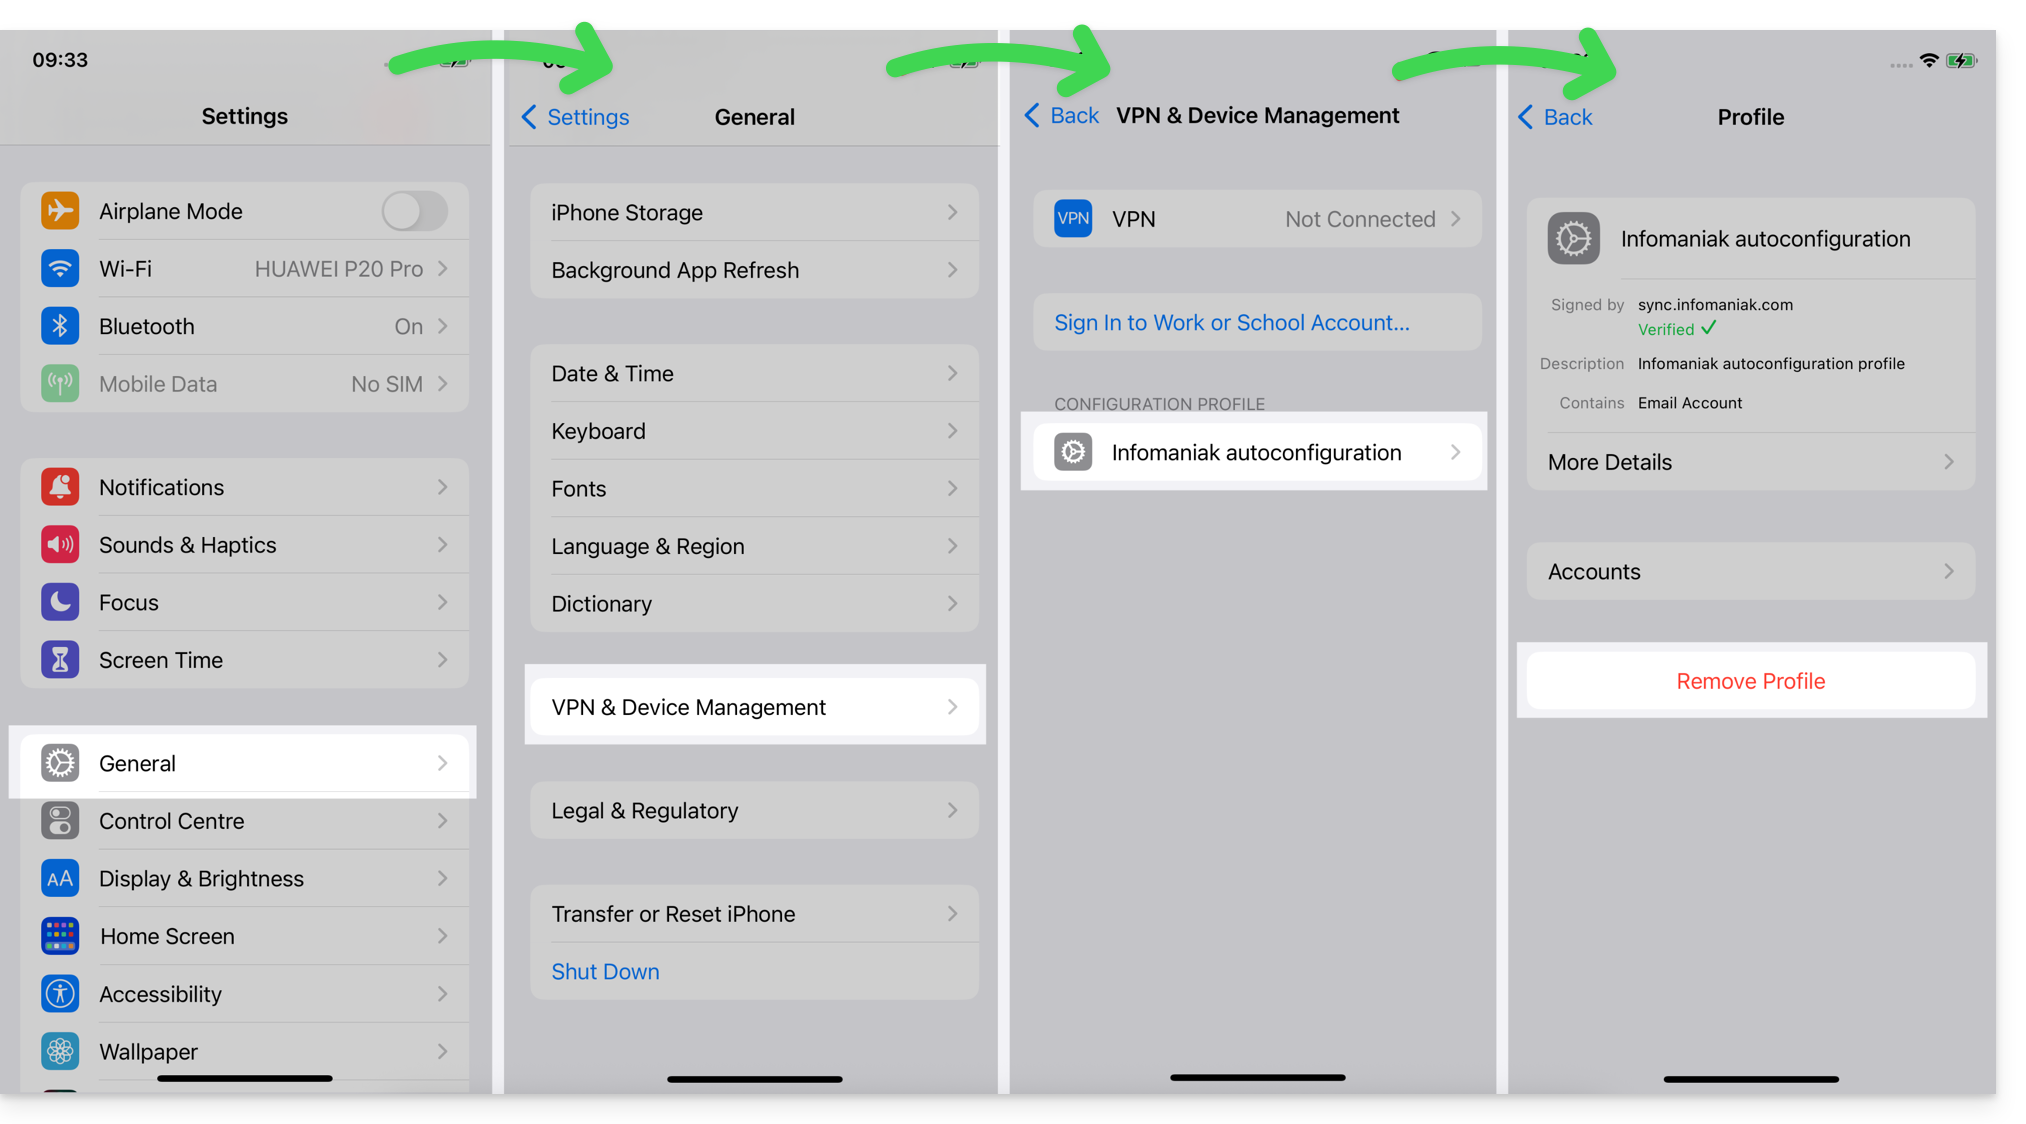
*Why is it necessary to choose the guide version that exactly matches your macOS/iOS system version? Apple introduces sometimes subtle changes with each new version of its system. For example, a path on iOS 15…
… becomes this on iOS 18…
Link to this FAQ:
Has this FAQ been helpful?
This guide explains how to regain access to Infomaniak tools (manager.infomaniak.com and Mail / ksuite.infomaniak.com) in case you forget your password or Infomaniak account login ID.
Preamble
- To log in within an Organization that manages one or more Infomaniak products, go to manager.infomaniak.com and enter the following information:
- A login email address (ID for the Infomaniak account).
- The password chosen during your registration.
- A additional code if 2FA (two-factor authentication) is enabled.
- If the platform login works and you are missing a password for one of your email addresses, refer to this other guide.
- If you are experiencing a login form display issue, particularly with a mobile device, refer to this other guide on the subject.
You have forgotten...
... the Infomaniak account password
If you have forgotten this password, follow the reset procedure:
- Click here to reset your password.
- Enter the login email address of your Infomaniak account
- Choose the desired recovery option or follow the identity verification procedure by clicking on “You do not have access to any option”.
... the login email address for the Infomaniak account
During your registration, you had to provide a phone number; it is possible to retrieve the login email address for the Infomaniak account using your phone number:
- Click here to retrieve your login email address for the Infomaniak account.
- Enter your mobile number.
- Enter (if necessary) your recovery email address.
Two scenarios are then possible:
- The system manages to identify your account: choose how to receive your Infomaniak account login ID.
- In the opposite case: follow the on-screen assistant to manually verify your identity or via kCheck:
And if the email address no longer exists...
If you have an Infomaniak account for which the login ID is of the form toto123@yahoo.com, there is no problem if the email address toto123@yahoo.com is deleted or is no longer valid. You just need to log in one last time to the Infomaniak Manager with this ID toto123@yahoo.com and take note of this other guide to modify your Infomaniak account login email address.
On the other hand, if the email address used as an ID is hosted by Infomaniak (for example anna789@assoziation.ch) and an administrator deletes the email address in question or cancels the “assoziation.ch” Mail Service, the situation is different: you automatically receive an email on the secondary address and an SMS on the mobile phone number specified in your Infomaniak account: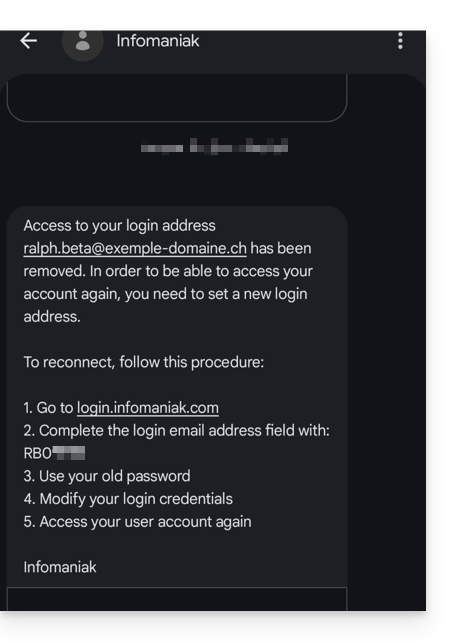
The situation can also occur in a specific case of mail service management.
To be able to access your Infomaniak account again now that access is no longer possible with the old email address, the Infomaniak account user must go to the address mentioned in the SMS:
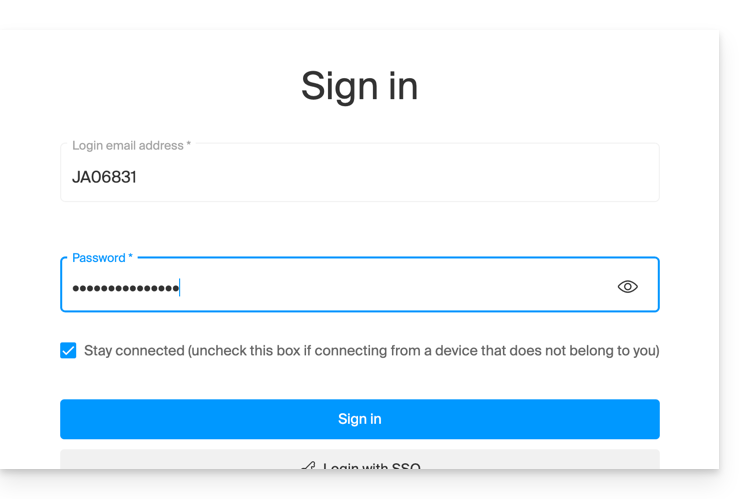
- Click here to access the login page.
- Enter the username specified in the SMS (usually the initials of your account and a sequence of numbers).
- Enter the usual password (it has not changed):
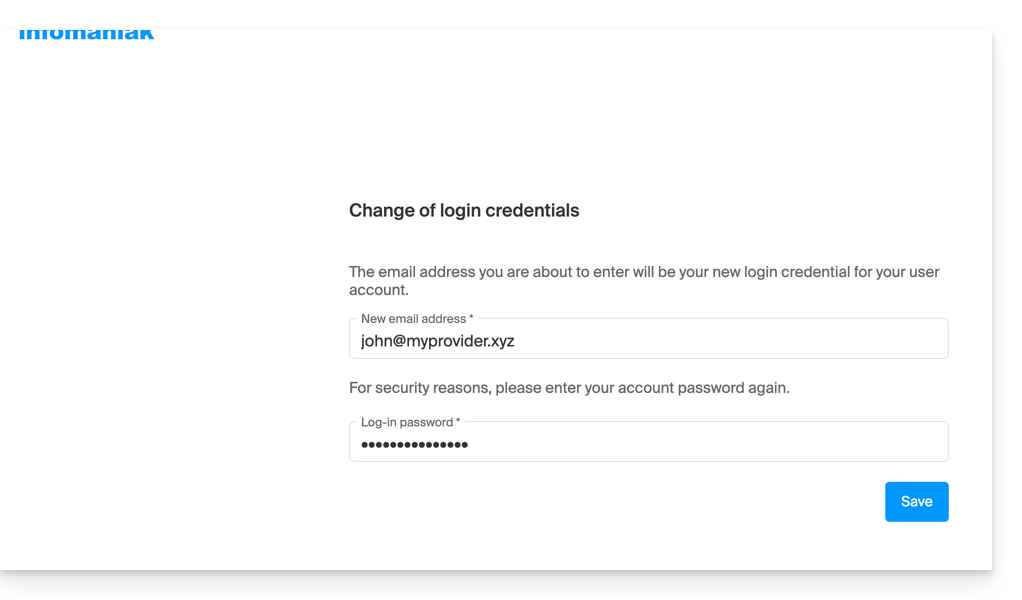
- Enter the new requested information:
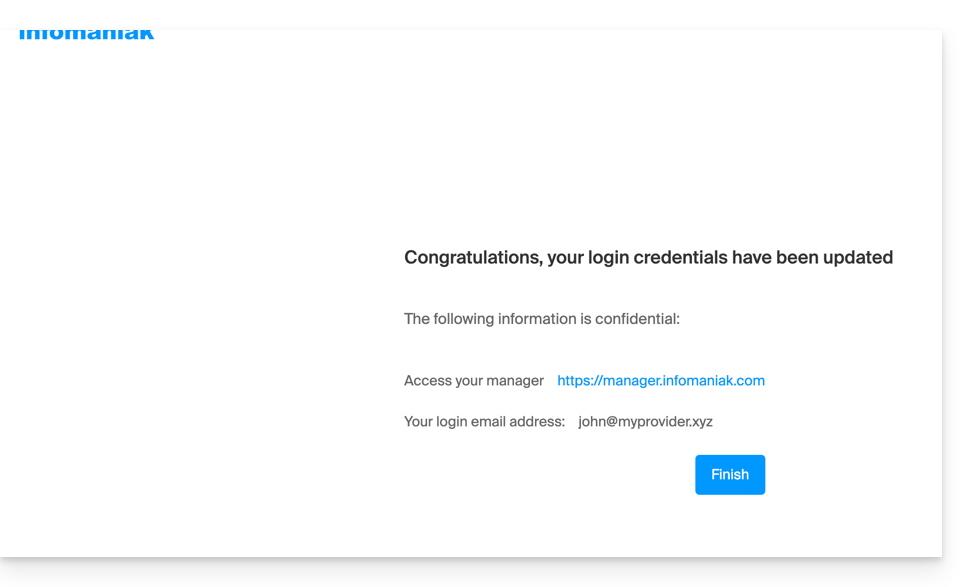
- You will be logged in to your account again:
Link to this FAQ:
Has this FAQ been helpful?
This guide concerns the mobile app kCheck (application for iOS/Android smartphone or tablet), created to simplify identity verification procedures and strengthen the security of your Infomaniak account.
Preamble
- For security reasons, to guarantee the identity of the person making a specific request to Infomaniak, an identity verification procedure may be triggered in the following cases (non-exhaustive list):
- forgetting an Infomaniak account password (user account)
- forgetting a login email address
- deactivation of double authentication (2FA)
- unlocking an Infomaniak account
- during the first transfer of revenue for the product Ticketing
- when ordering a product (suspicion of spam or fraud, brand name, etc.)
- This application allows you to securely transfer the requested items.
- Infomaniak respects your privacy: the information transmitted via the kCheck application will be kept until the complete processing of your file; it will in all cases be automatically deleted after 72 hours in case of non-processing of this request.
Start identity verification
Prerequisites
- A QR code or a link provided by Infomaniak.
- The mobile app kCheck installed on your device iOS (iPhone, etc.) or Android.
- An Internet connection on the mobile device.
You can then have your identity verified with kCheck:
- Launch the kCheck app on your mobile.
- Press Start.
- Press Scan a QR code.
- Point the QR code provided using the camera.
- Enter your mobile phone number.
- Enter the confirmation code received.
- Authorize geolocation (mandatory to continue the procedure).
- Select the type of ID you have (ID card or passport).
- Follow the steps to photograph your ID.
- Take a selfie (of yourself) with your ID in your hand in front of you.
Your documents will then be securely transmitted to Infomaniak support. These requests are processed on a priority basis with an average response time of 2 hours during opening hours.
If your order is blocked...
For security reasons, some orders may be automatically blocked.
At the time of your order, an e-mail is sent to the email address connected to your Infomaniak Manager account. This email contains the procedure to unblock your order. If you do not find it, you can resend it from your Manager by clicking on Resend procedure from the red banner informing you of the blockage.
Prerequisites
- Open the email containing the unblocking procedure.
- The mobile app kCheck installed on your device iOS (iPhone, etc.) or Android.
- An Internet connection on the mobile device.
You can then start the unblocking procedure with kCheck:
- Launch the kCheck app on your mobile.
- Press Start.
- Press Scan a QR code.
- Scan the QR code present in the email.
- Follow the unblocking procedure to the end.
Special cases
- If there is no response from you within a 10-day period, the order is automatically canceled and the payment is fully refunded to the payment method used.
- In case you do not have a mobile device to follow this procedure, contact Infomaniak support.
Link to this FAQ:
Has this FAQ been helpful?
This guide concerns kSuite, the suite of productivity and online collaboration tools developed in Switzerland by Infomaniak.
Preamble
- Only 1 kSuite is possible per Organization!
- Create multiple Organizations (while keeping your Infomaniak account and switching from one Organization to another) to manage multiple kSuite.
- Be aware that a kSuite cannot be transferred from one Organization to another!
Administer kSuite
- Link a domain name to kSuite
- Link an additional domain name to kSuite
- Convert existing products to kSuite (or dissociate them)
- Determine the user quota
- Understand the storage of data related to kSuite
- Obtain a website
- Modify an existing kSuite offer
Use kSuite
- Discover kSuite and its included products
- Discover the kSuite dashboard
- Manage status and presence on kSuite
Each product included in kSuite has its guides in the sections kChat, kMeet, kDrive, etc. that you will find on https://faq.infomaniak.com. You can also enter the name of the product you are looking for: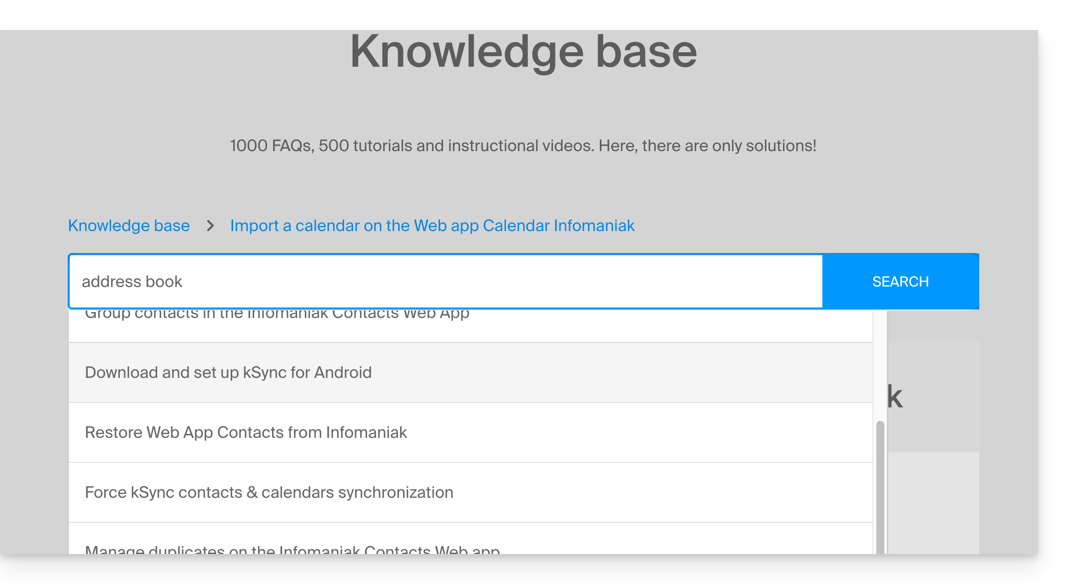
A question or feedback?
- To help you identify the my kSuite / kSuite offer most suited to your needs, refer to this other guide.
- In case of a problem, please consult the knowledge base before contacting support.
- Click here to share an opinion or suggestion on an Infomaniak product.
Link to this FAQ:
Has this FAQ been helpful?
This guide explains how to connect the desktop app Outlook Microsoft 365 MSO (desktop application on Windows) to an email address hosted by Infomaniak.
Add the email address to the application
Prerequisites
- Create the email address in my kSuite or a Mail Service / kSuite.
- Create a password for the email address on the device you are going to configure.
- Check that the Mail Service is configured optimally.
To configure the email application:
- Open the application.
- Click on File.
- Click on Add an account.
- Enter the email address to be linked.
- Click on Connect.
- Choose IMAP:
- Check and complete the missing information.
- Click on Next.
- Enter the password for your email address.
- Your email address is now configured in the application.
Recommended settings
- Incoming IMAP server =
mail.infomaniak.com - IMAP port =
993(with SSL) - Outgoing SMTP server =
mail.infomaniak.com - SMTP port & encryption protocol and command/method to activate this protocol:
587+ STARTTLS - Username = the full email address & complete ( ? )
- Password = the one generated for the email address you want to access
- Authentication required for sending emails:
- It is activated in the SMTP settings of your application.
- Check "use the same parameters as the incoming server" or, depending on the software/email clients, enter a username (= full & complete email address) and the generated password.
Refer to this other guide if you are looking for information about other messaging ports and protocols compatible (SSL / TLS for example).
In case of problem
Check that the Mail Service is configured optimally.
It is not necessary to contact Infomaniak Support if your email address works well outside the application. The most common error concerns the use of an incorrect password. The troubleshooting guides help you resolve any potential issues:
- Refer to the solutions provided in this other guide regarding email in general.
- This other guide is more specifically about Outlook.
… and if your Outlook no longer works since a change of email password, refer to this other guide.
Link to this FAQ:
Has this FAQ been helpful?
This guide explains how to connect the eM Client desktop app (desktop application on macOS / Windows) to an email address hosted by Infomaniak.
Add the email address to the application
Prerequisites
- Create the email address within my kSuite or a Mail Service / kSuite.
- Create a password for the email address for the device you are going to configure.
- Verify that the Mail Service is configured optimally.
To configure the email application:
- Open the application and choose the desired mode, then click Next:

- Enter the email address to be added, then click the Start button next to the field:

- Enter the password for the email address, then click Continue next to the field:

- Check the box and click Yes:

- Verify and complete any missing information:

- Choose the desired mode and then click Next:

- That's it, your email address is now configured in the application:

Recommended settings
- Incoming IMAP server =
mail.infomaniak.com - IMAP port =
993(with SSL) - Outgoing SMTP server =
mail.infomaniak.com - SMTP port & encryption protocol and command/method to enable this protocol:
587+ STARTTLS - Username = the complete email address & entire email address (need help?)
- Password = the one generated for the email address you want to access
- Authentication is required for sending emails:
- It is activated in the SMTP settings of your application.
- Check "use the same settings as the incoming server" or, depending on the software/email client, enter a username (= complete email address) and the generated password.
Refer to this other guide if you are looking for information about other compatible email ports and protocols (SSL / TLS, for example).
In case of a problem
Check that the Mail Service is configured optimally.
It is not necessary to contact Infomaniak Support if your email address works correctly outside of the application. The most common error concerns the use of an incorrect password. Refer to the solutions provided in this other guide regarding email in general.
Link to this FAQ:
Has this FAQ been helpful?
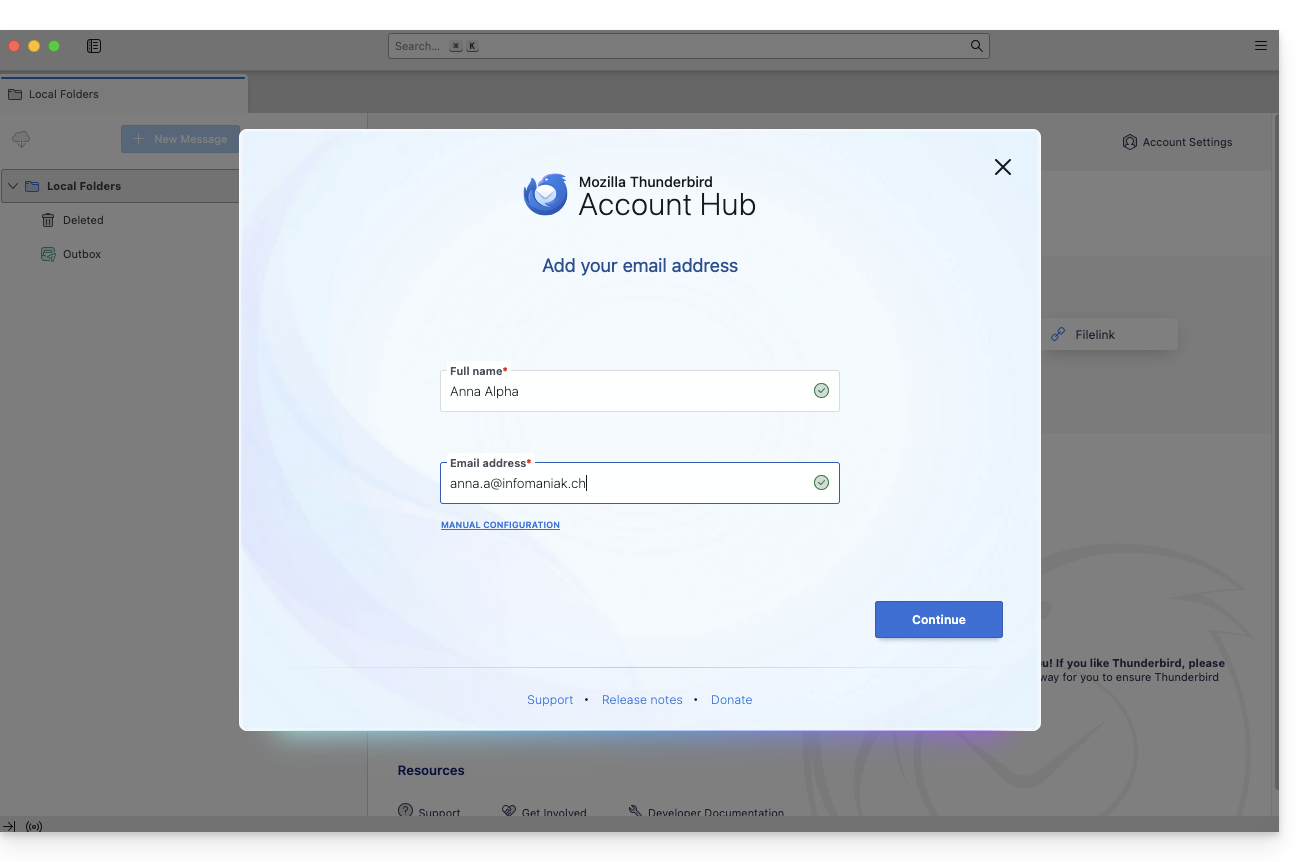
This guide explains how to connect the Thunderbird desktop app (desktop application on macOS / Windows / Linux) to an email address hosted by Infomaniak.
Add the email address to the application
Prerequisites
- Create the email address within my kSuite or a Mail Service / kSuite.
- Create a password for the email address for the device you will be configuring.
- Verify that the Mail Service is configured optimally.
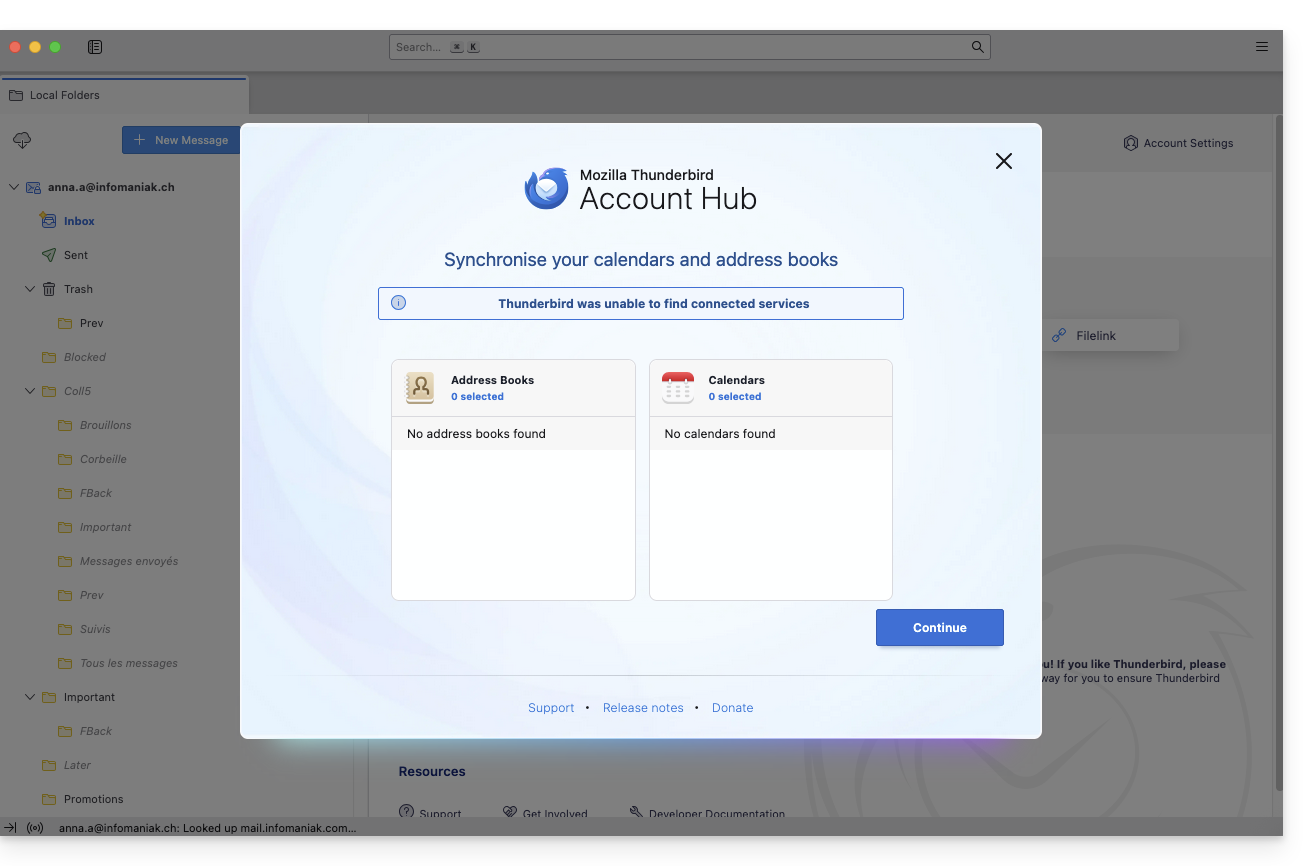
To configure the email application:
- Download the latest version of Thunderbird.
- Open the application.
- Enter your account information and click Continue:
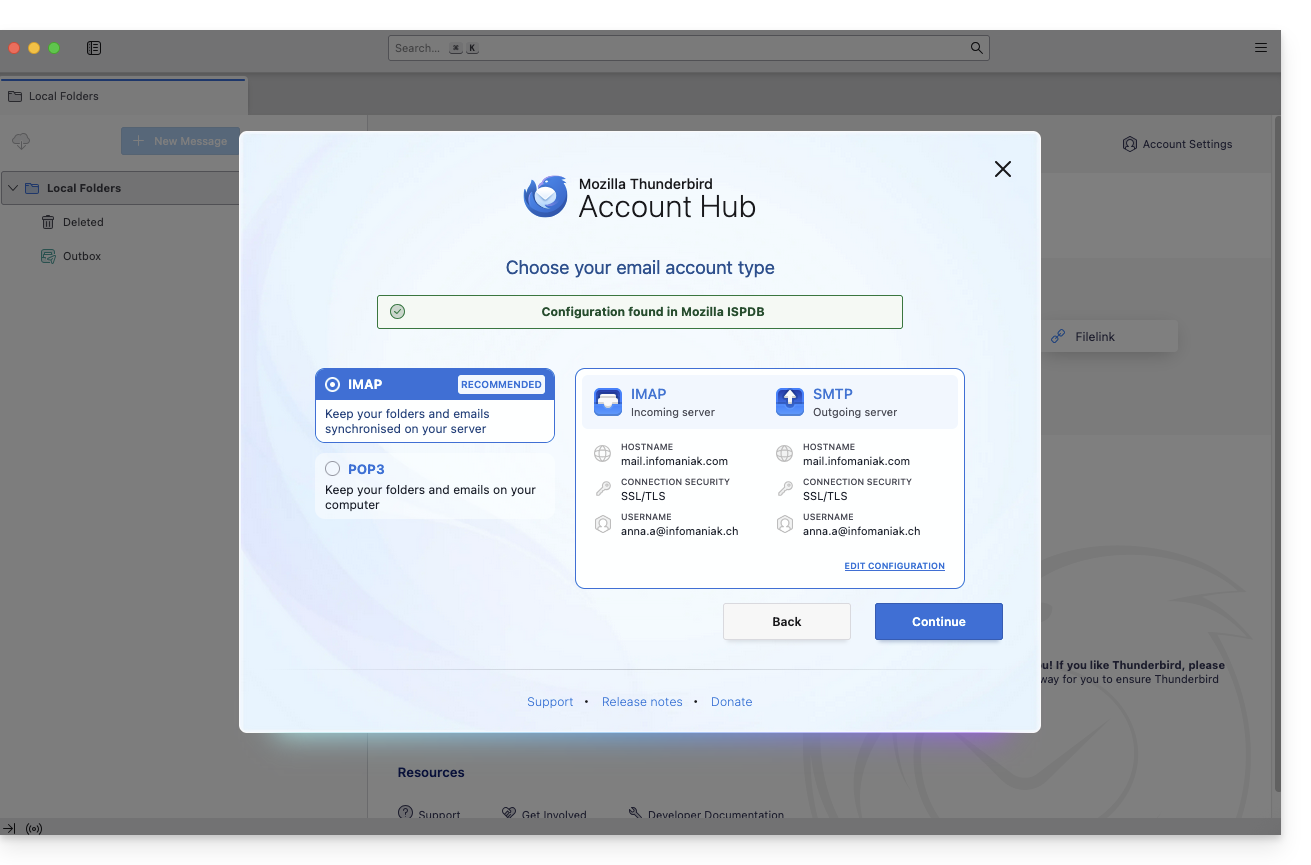
- Make sure you stay on IMAP and click Continue:
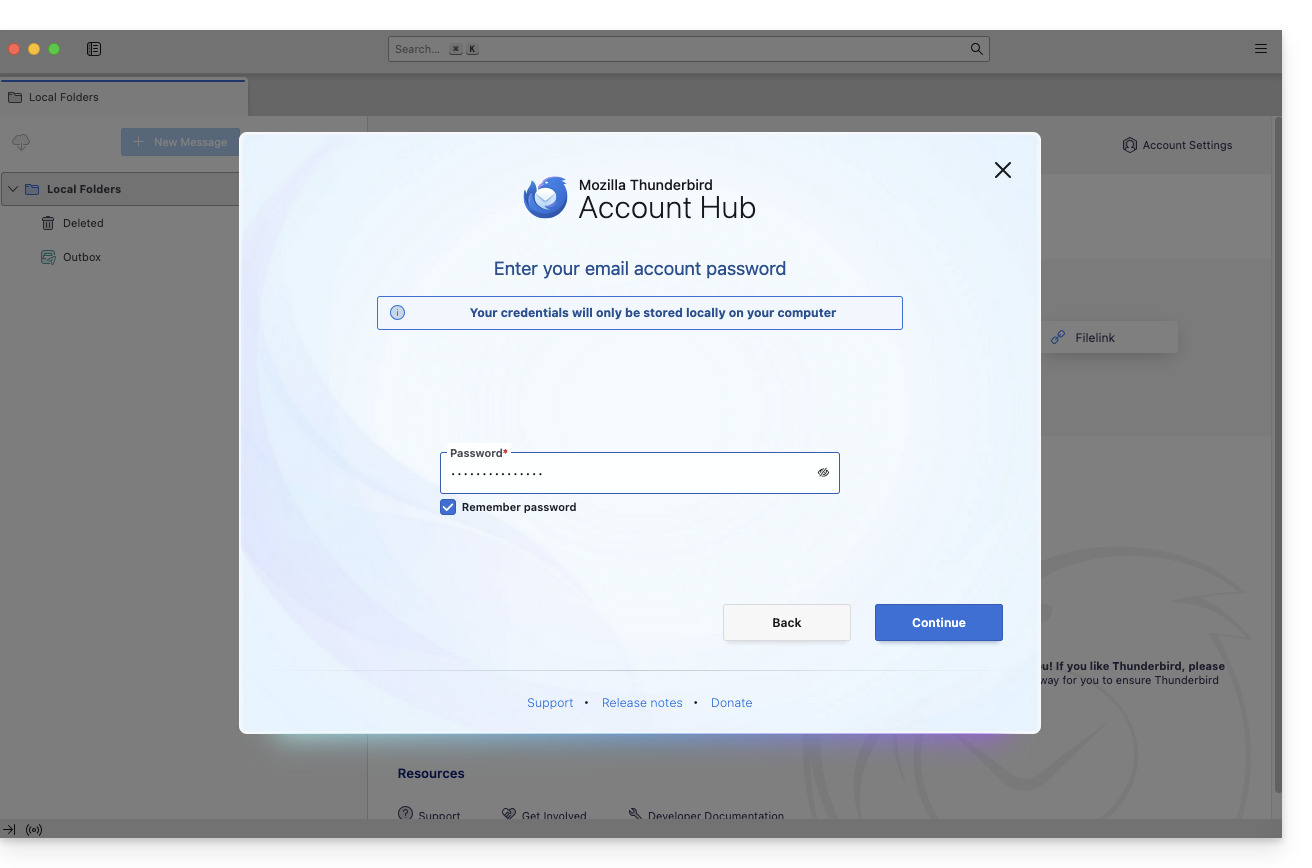
- Enter your password and click Continue:
- Click Continue:
- Your registration summary is displayed; click Finish to add the address (or configure other services from there):
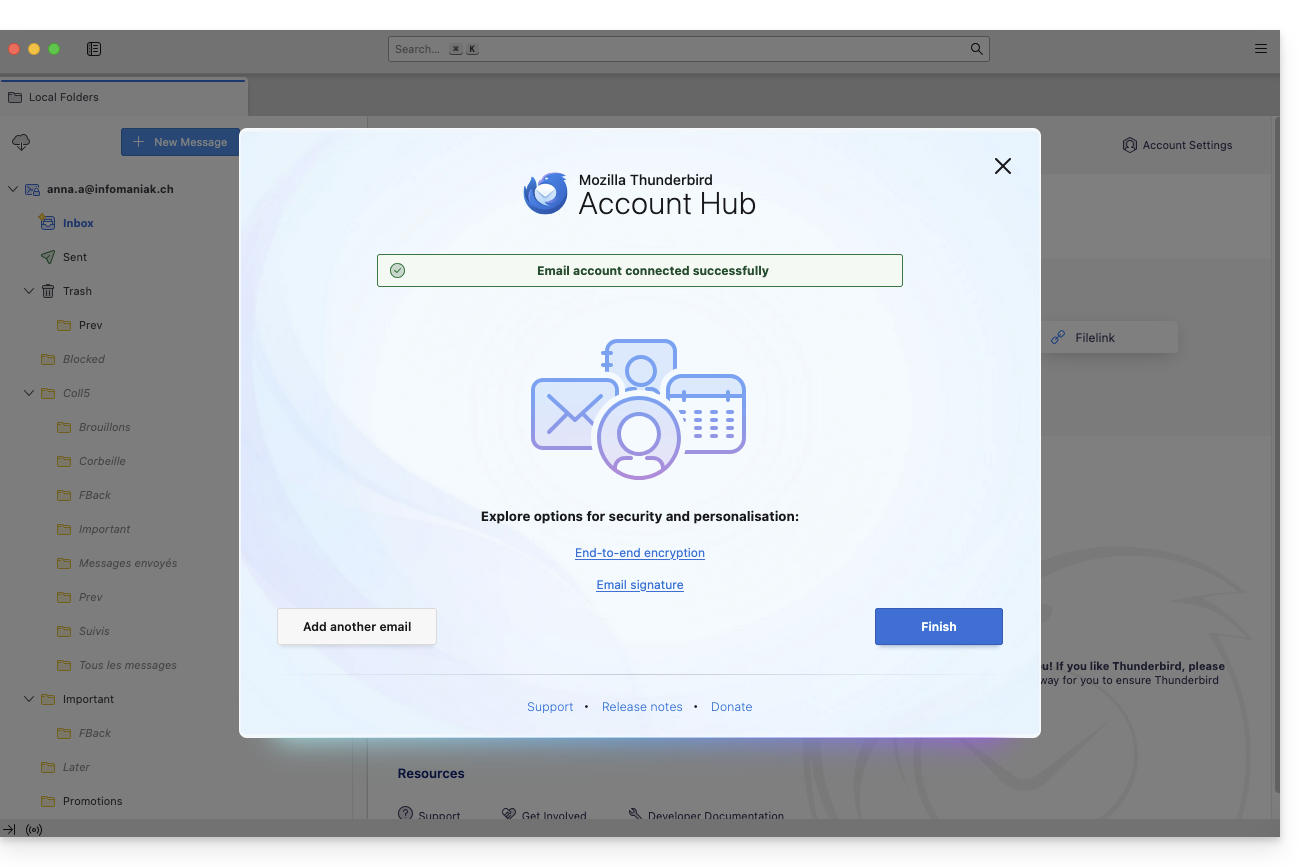
- That's it, your email address is now configured in the application:
Recommended settings
- Incoming IMAP server =
mail.infomaniak.com - IMAP port =
993(with SSL) - Outgoing SMTP server =
mail.infomaniak.com - SMTP port & encryption protocol and command/method to enable this protocol:
587+ STARTTLS - Username = the complete email address & entire address (need help?)
- Password = the one generated for the email address you want to access
- Authentication is required for sending emails:
- It is activated in the SMTP settings of your application.
- Check "use the same settings as the incoming server" or, depending on the software/email client, enter a username (= complete email address) and the generated password.
Refer to this other guide if you are looking for information about other compatible email ports and protocols (SSL / TLS, for example).
If you encounter a problem
Check that the Mail Service is configured optimally.
There is no need to contact Infomaniak Support if your email address works correctly outside the application. The most common error concerns the use of an incorrect password. The troubleshooting guides will help you resolve any potential issues:
- Refer to the solutions provided in this other guide regarding email in general.
- This other guide is specifically about Thunderbird.
… and if Thunderbird is no longer working after a change of email password, refer to this other guide.
Link to this FAQ:
Has this FAQ been helpful?
This guide explains how to access your Infomaniak address books and Infomaniak calendars from your devices.
Refer to this other guide if you are looking for information on synchronizing your emails.
Introduction
- The web app Contacts (management of your Infomaniak address books for all your professional and personal contacts) and the web app Calendar (management of your Infomaniak calendars for all your events and appointments) can be synchronized so that their content (hosted on Infomaniak servers) appears on your personal devices.
- If your current contacts & calendars are not yet managed within these Infomaniak applications, you will need to import your data first so that synchronization can work afterwards.
- The suggested calendars can also be synchronized with your mobile and desktop devices.
- The birthday calendar (calendar that displays the birthdays of your contacts when the date is entered in their address book entry) is only visible through the web app and cannot be synchronized with CalDAV tools.
Synchronize contacts & calendars (CardDAV/CalDAV)
Click here to open the Infomaniak wizard, which allows you to configure the synchronization of your devices (macOS, Windows, Linux, Android, iOS) and common software (Outlook, Microsoft 365, Thunderbird, Apple Mail, eM Client, etc.).
Specific guides
| OS | Application to synchronize |
| Outlook via CalDav Synchronizer (Windows) | |
| Contacts & Calendars (macOS) | |
| Contacts & Calendars (iOS: iPhone, iPad, etc.) | |
| Contacts & Calendars via kSync (Android: Huawei, Samsung, Sony, etc.) | |
| Google Calendar via kSync | |
| Mozilla Thunderbird |
You can also turn the Calendar or Contacts Infomaniak web app into an application to use on your device.
Link to this FAQ:
Has this FAQ been helpful?
This guide explains how to connect the native Android messaging app to an email address hosted by Infomaniak.
Introduction
- Rather than using the manual configuration below, it is recommended to use the Infomaniak Mail app (iOS / Android) to benefit from Infomaniak's security features.
Manually add the email address to the app
Prerequisites
- Create the email address within my kSuite or a Mail Service / kSuite.
- Create a password for the email address for the device you are going to configure.
- Verify that the Mail Service is configured optimally.
To configure the messaging app:
- Open the native messaging app on your device.
- Click on Add account.
- Select Other as the address type.
- Enter your email address.
- Select the Manual IMAP type.
- Check and complete the missing information.
- Complete the process.
- That's it, your email address is now configured in the app on your device.
Recommended settings
- Incoming IMAP server =
mail.infomaniak.com - IMAP port =
993(with SSL) - Outgoing SMTP server =
mail.infomaniak.com - SMTP port & encryption protocol and command/method to activate this protocol:
587+ STARTTLS - Username = the complete email address & (need help?)
- Password = the one generated for the email address you want to access
- Authentication is mandatory for sending emails:
- It is activated in the SMTP settings of your application.
- Check "use the same settings as the incoming server" or, depending on the software/email clients, enter a username (= complete email address) and the generated password.
Refer to this other guide if you are looking for information about other compatible email ports and protocols (SSL / TLS for example).
In case of a problem
Check that the Mail Service is configured optimally.
It is not necessary to contact Infomaniak Support if your email address works fine outside the application. The most common error concerns the use of an incorrect password. The troubleshooting guides will help you resolve any potential problem:
- Refer to the solutions provided in this other guide regarding email in general
- … and if your application no longer works for sending (SMTP server disconnected or missing, for example) or after a change of email password, refer to this other guide.
Link to this FAQ:
Has this FAQ been helpful?
This guide explains how to connect the New Outlook desktop app (the desktop application for Windows, replacing Windows Mail) to an email address hosted by Infomaniak.
Introduction
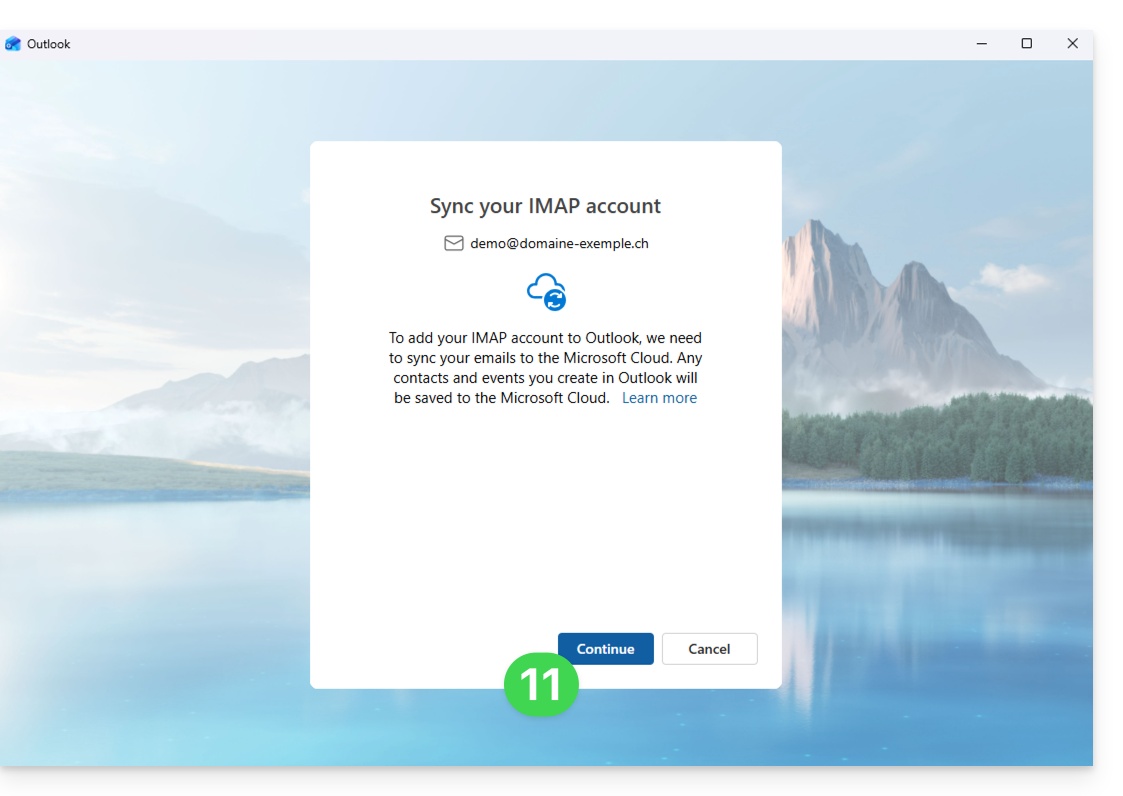
- Although the emails themselves remain stored on the Infomaniak server, the experience in New Outlook is highly integrated with the Microsoft cloud:
- Some of your account information may be used by Microsoft for centralized management and a better synchronization experience.
- If you want to have complete and local control over your emails, consider using third-party email/client software (such as Thunderbird, for example) that allows for more direct storage.
Adding the email address to the application
Prerequisites
- Create the email address within my kSuite or a Mail Service / kSuite.
- Create a password for the email address for the device you are going to configure.
- Verify that the Mail Service is configured optimally.
The password created for the email address must meet the criteria detailed at the bottom of this guide.
To configure the email application:
- Open the application.
- If necessary, click on the gear icon in the upper right corner (otherwise, skip to step 4).
- Click on Add account:

- Enter the email address to be added.
- Click on Continue:
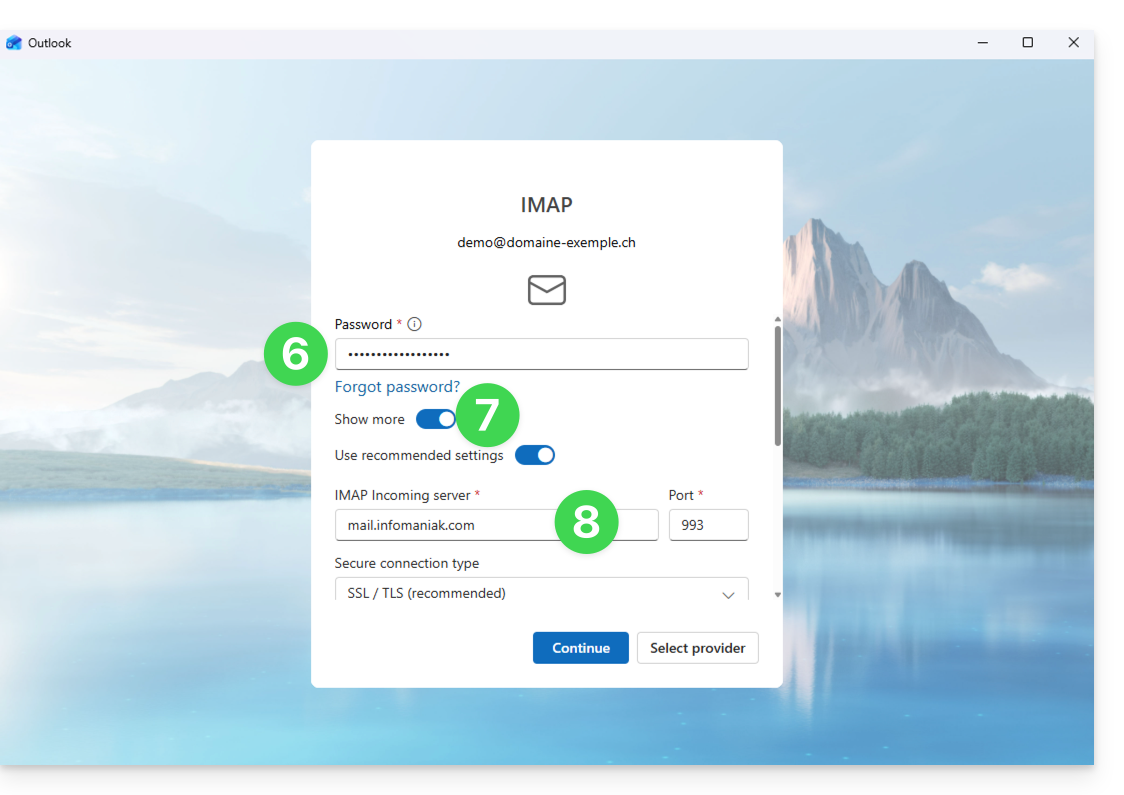
- Enter the password for the email address.
- Click on the See more button.
- Scroll down the page, then check and complete the missing information.
- Click on Continue:

- Read and go through the various Microsoft information windows:
- Your email address is now configured in the application:
Recommended settings
- Incoming IMAP server =
mail.infomaniak.com - IMAP port =
993(with SSL) - Outgoing SMTP server =
mail.infomaniak.com - SMTP port & encryption protocol and command/method to enable this protocol:
587+ STARTTLS - Username = the complete and full email address (need help?)
- Password = the one generated for the email address you want to access (it must meet the criteria detailed at the bottom of this guide)
- Mandatory authentication for sending emails:
- It is activated in the SMTP settings of your application.
- Check "use the same settings as the incoming server" or, depending on the software/email client, re-enter a username (= complete and full email address) and the generated password.
Refer to this other guide if you are looking for information about other compatible email ports and protocols (SSL / TLS for example).
In case of a problem
A solution that seems to work is the combination of these 2 situations:
- Be logged in to your Windows session with a Microsoft account (not just a local account).
- Have added the email address used to log in to Windows to this version of Outlook.
Also, create a new password by letting it be generated randomly, but also ensuring that it meets these criteria imposed by Microsoft:
| Allowed characters |
|
| Forbidden characters |
|
| Password length | MAXIMUM 16 characters |
Check that the Mail Service is configured optimally.
The troubleshooting guides will help you resolve any potential issues:
- Refer to the solutions provided in this other guide regarding email in general.
- This other guide is specifically about Outlook.
… and if your Outlook is no longer working after a change of email password, refer to this other guide.
Link to this FAQ:
Has this FAQ been helpful?