Knowledge base
1000 FAQs, 500 tutorials and instructional videos. Here, there are only solutions!
This guide explains how to connect the Apple Mail desktop app on macOS (MacBook Pro, Neo, etc.) to an email address hosted by Infomaniak.
Introduction
- Rather than using the manual configuration below, it is recommended to use the .mobileconfig configuration profiles provided by Apple.
Manually add the email address to the application
Prerequisites
- Create the email address within my kSuite or a Mail Service / kSuite.
- Create a password for the email address for the device you are going to configure.
- Verify that the Mail Service is configured optimally.
To configure the email application:
- Open the application.
- If you have already configured an address, click on the Mail menu and then Add Account:
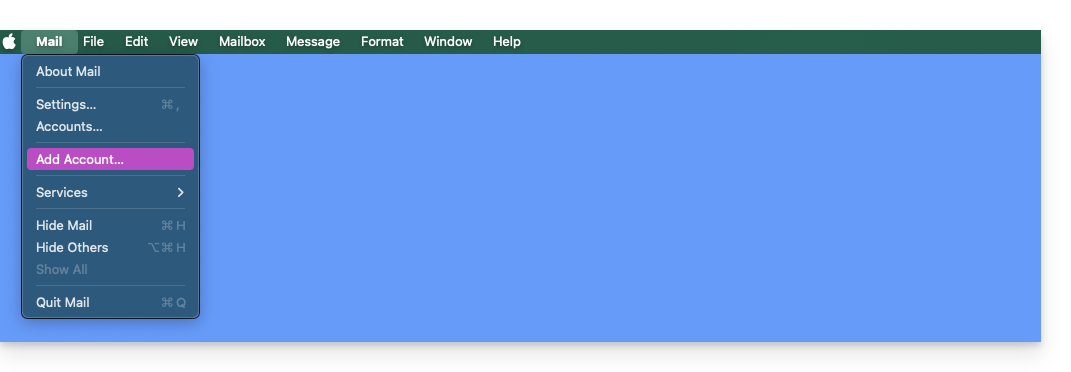
- If you have already configured an address, click on the Mail menu and then Add Account:
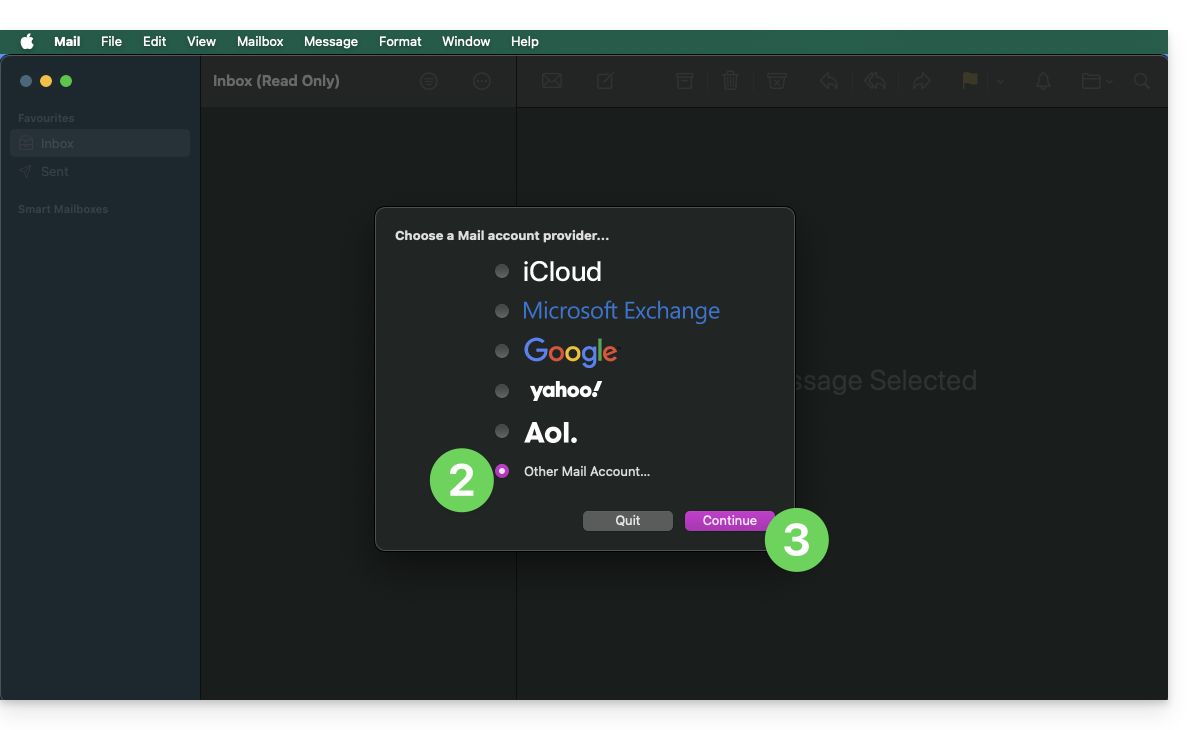
- Click on Other Account.
- Click on Continue:
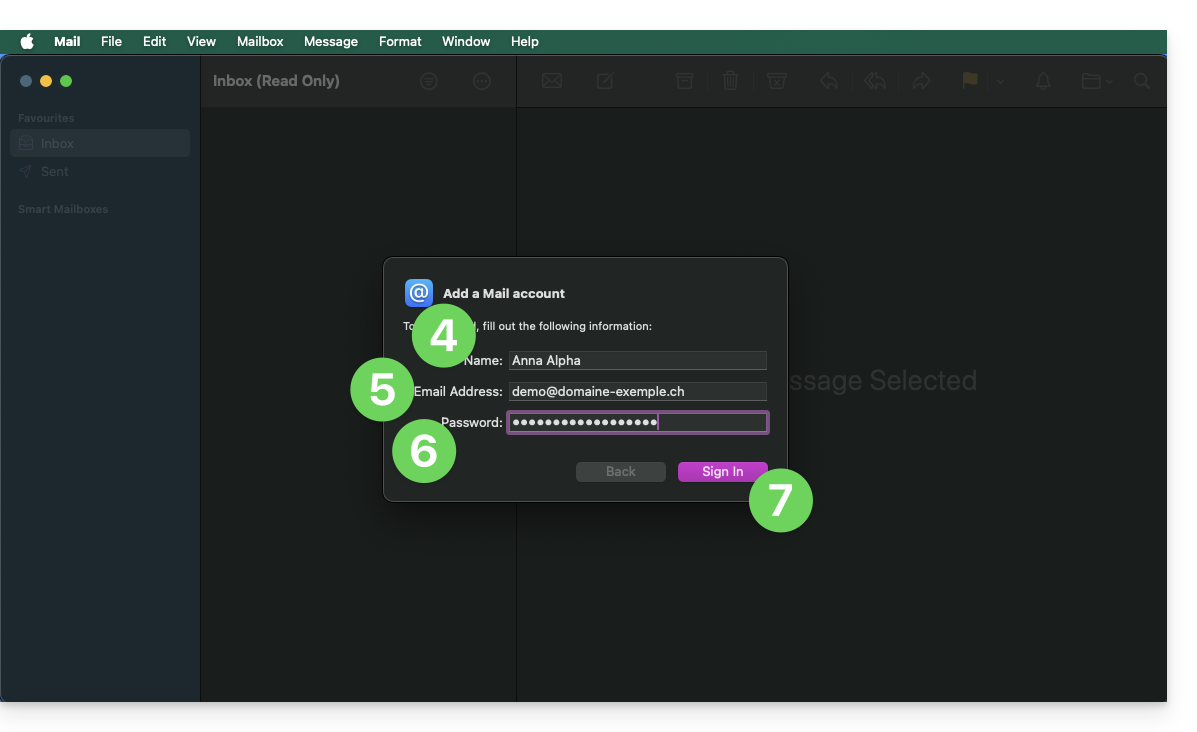
- Enter the account name.
- Enter the email address to be added.
- Paste the password for the email address generated in the Infomaniak Manager.
- Click the blue Sign In button:
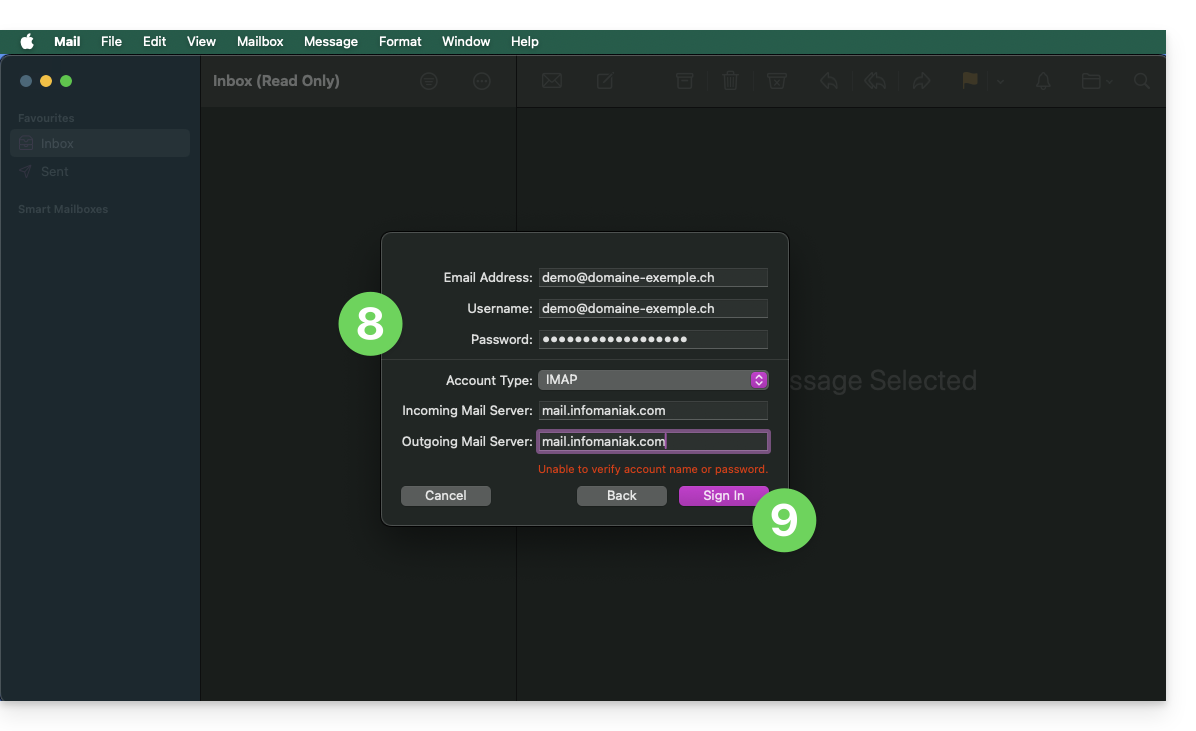
- Check and complete the missing information.
- Click on Sign in:
- Press the button to validate:
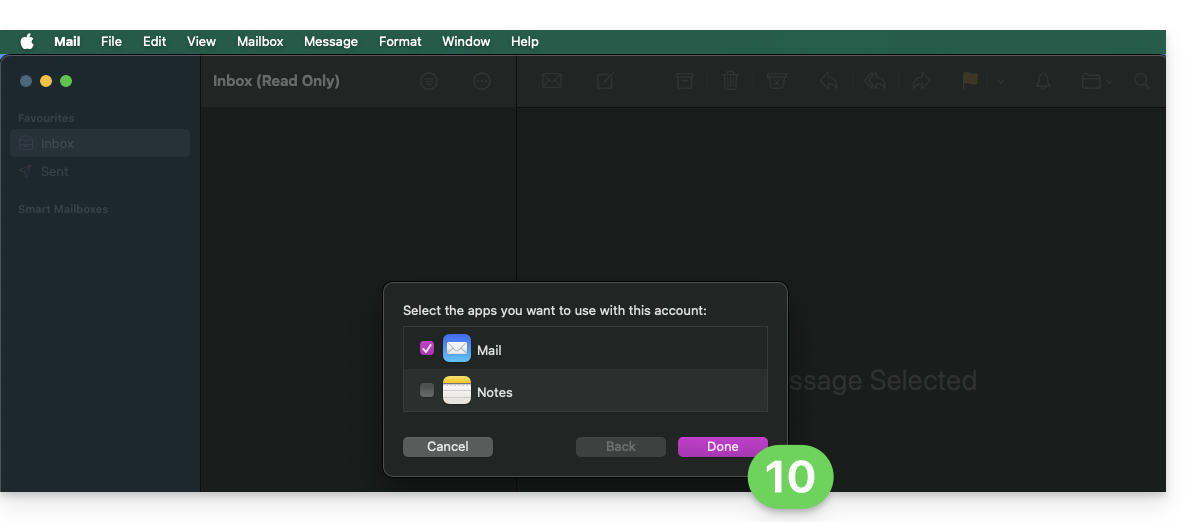
- That's it, your email address is now configured in the application:

Recommended settings
- Incoming IMAP server =
mail.infomaniak.com - IMAP port =
993(with SSL) - Outgoing SMTP server =
mail.infomaniak.com - SMTP port & encryption protocol and command/method to activate this protocol:
587+ STARTTLS - Username = the complete and full email address (need help?)
- Password = the one generated for the email address you want to access
- Authentication required for sending emails:
- It is activated in the SMTP settings of your application.
- Check "use the same settings as the incoming server" or, depending on the software/email client, enter a username (= complete and full email address) and the generated password.
Refer to this other guide if you are looking for information about other compatible email ports and protocols (SSL / TLS, for example).
In case of a problem
It is not necessary to contact Infomaniak Support if your email address works correctly outside the application. The most common error concerns the use of an incorrect password. The tool provided within Apple Mail can indicate this: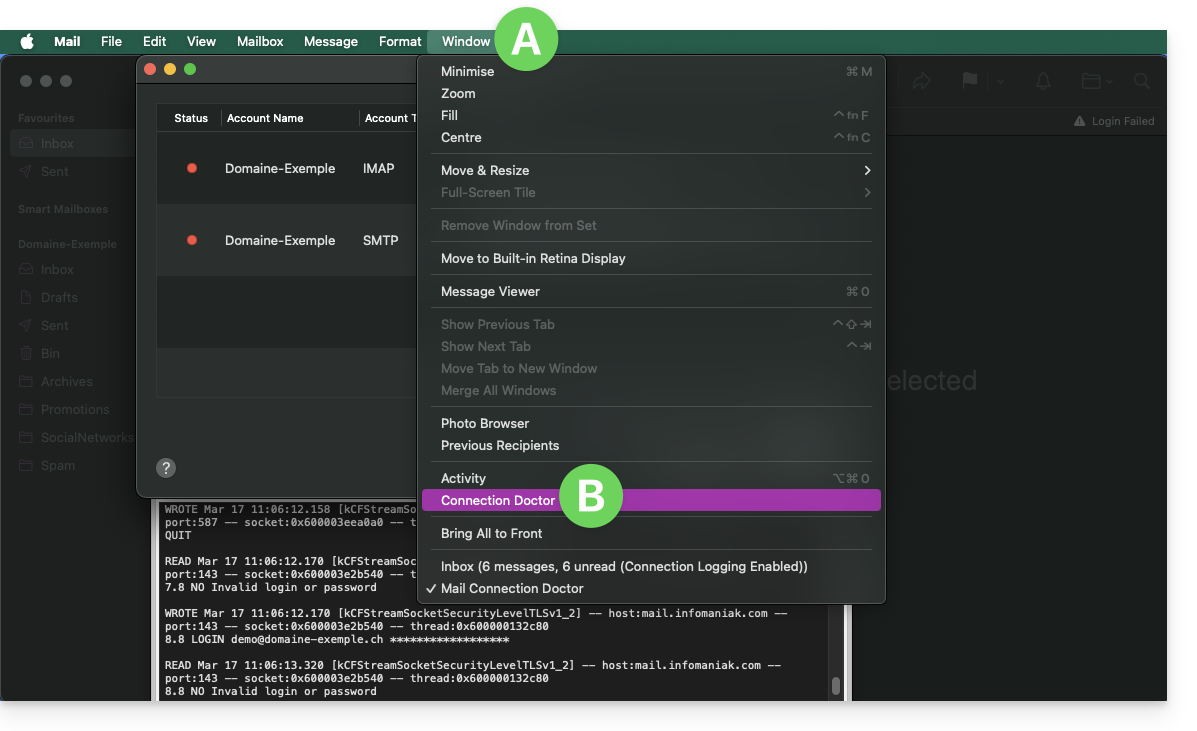
Create a new password from the Mail Service and restart the configuration of your account on the email application.
The troubleshooting guides help you resolve any potential issues:
- Refer to the solutions provided in this other guide regarding email in general.
- Delete any Apple configuration profiles related to your Infomaniak email before restarting the configuration.
And if your Apple Mail is no longer working after a change of email password, refer to this other guide.
Link to this FAQ:
Has this FAQ been helpful?
This guide explains how to access kDrive files locally on your hard drive using the desktop app kDrive (desktop application for macOS / Windows / Linux), as well as the files in the kDrive Web app (online service ksuite.infomaniak.com/kdrive).
Prerequisites
- Install the kDrive desktop app on your device.
- Be logged in with the same Infomaniak account on both the desktop and web versions; otherwise, step 3 below will lead to an error.
View kDrive Files
Once the kDrive application is installed and launched:
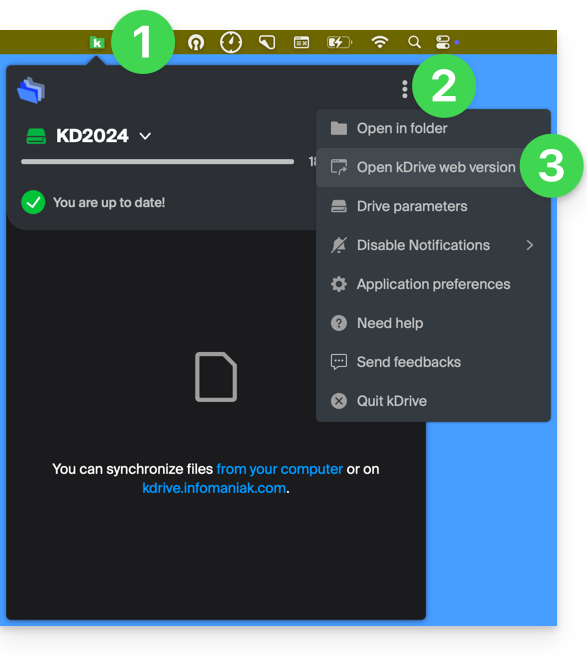
- Left-click on the app icon in your computer's notification area (top right on macOS, bottom right on Windows, and double left-click in the taskbar on Linux).
- Click on the ⋮ action menu in the top right corner.
- Click on Open kDrive Web to access the files stored on the kDrive server:
- The version in the browser may not be displayed.
- Click on the item above to open the disk folder on your computer containing your kDrive files, either physically present or virtually present (depending on whether Lite Sync is enabled).
If your files are not all present / synchronized, please refer to this other guide.
Link to this FAQ:
Has this FAQ been helpful?
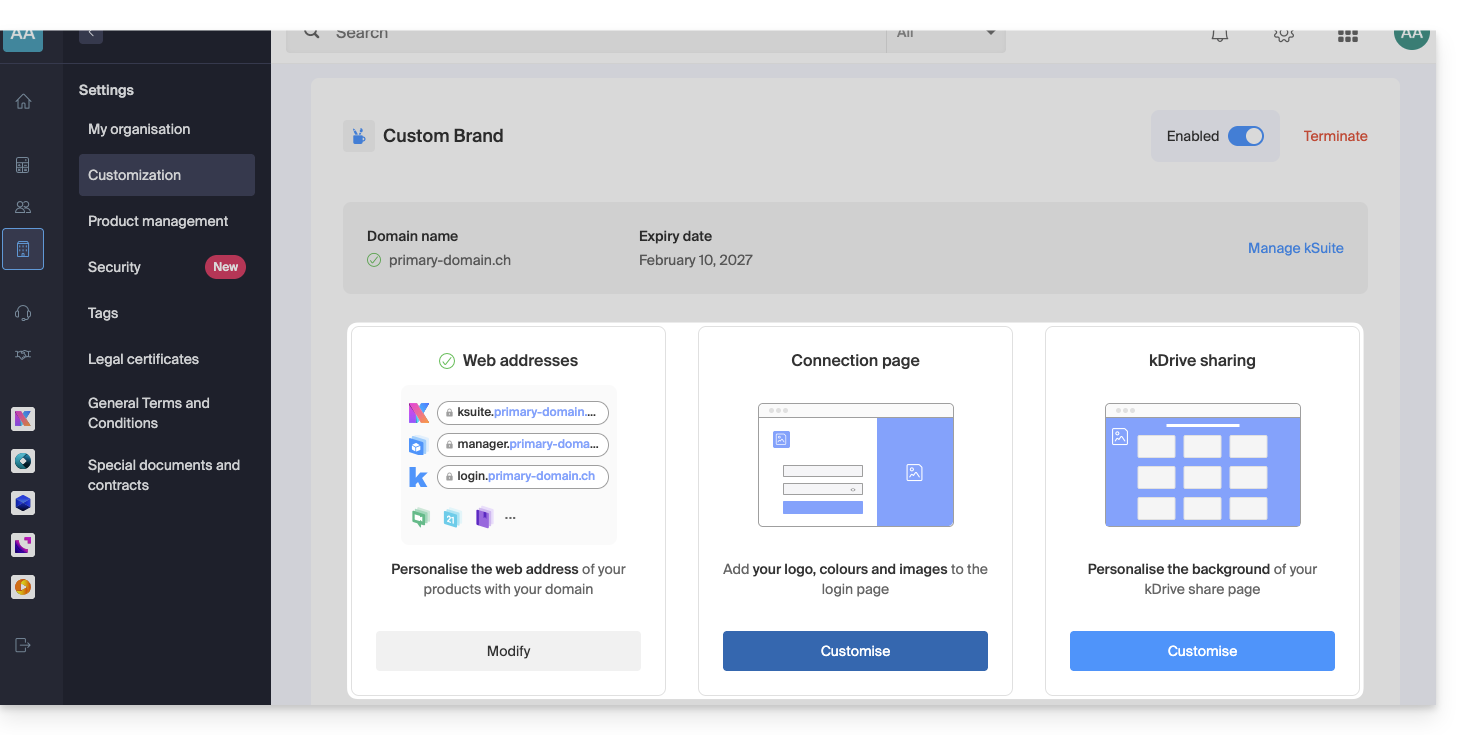
Thank you for choosing to customize your account with Custom Brand!
Preamble
- As an option with any Infomaniak offer or already included withkSuite Enterprise, discover this customization tool to make your web addresses unique, add a logo or an image slideshow to your login page for your Infomaniak Organization.
- The Web Redirection tool will no longer be usable on your domain after activating Custom Brand on it.
Custom Brand customization guides
Prerequisites
- Have a domain name with Infomaniak (transfer it if necessary).
- Its extension must be among those supported by Custom Brand.
- Note that this also works with a subdomain.
- Configure the domain to use Infomaniak's DNS servers.
Then, to use Custom Brand: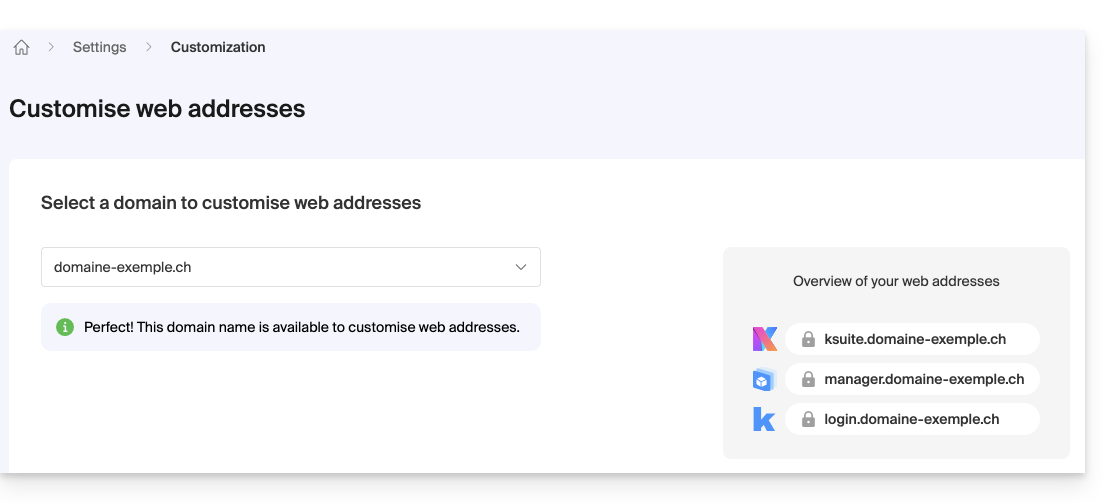
- Get started with Custom Brand: customize the URLs & interface
- Troubleshoot an issue:
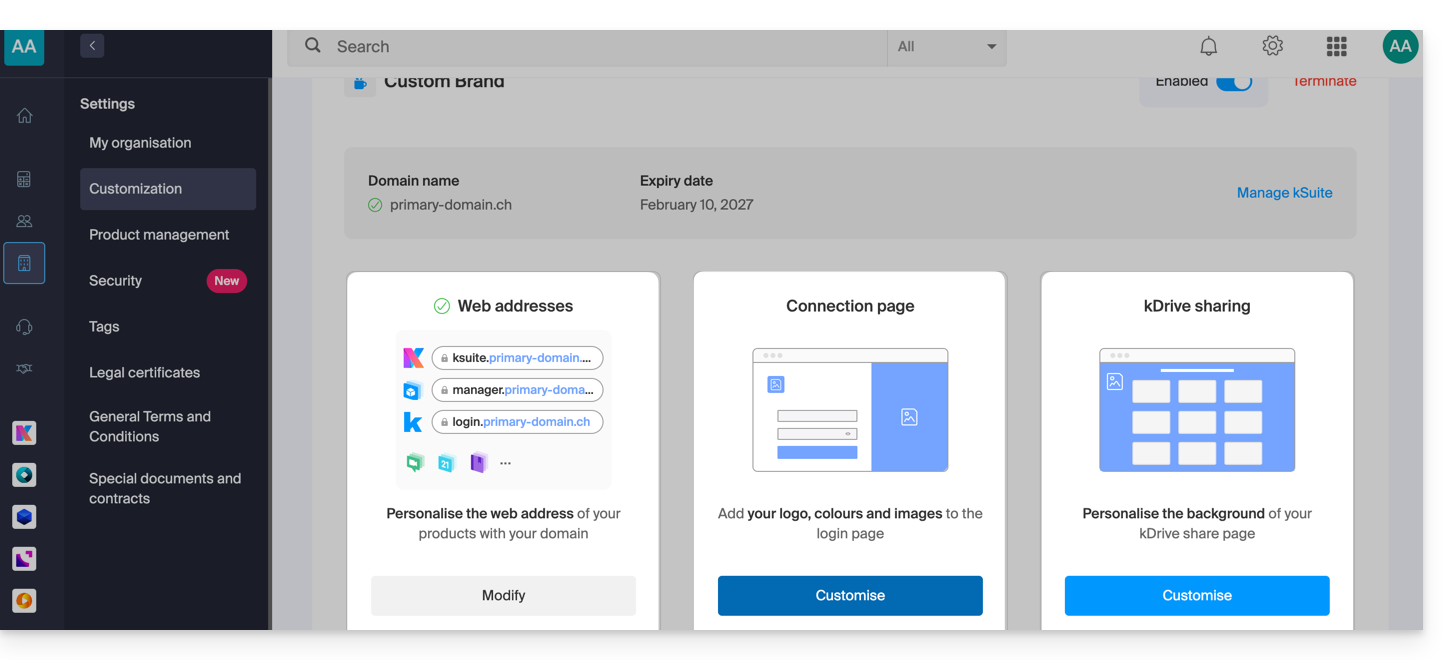
Customize your web addresses with your domain
| Access to … | without Custom Brand | with Custom Brand |
|---|---|---|
| kSuite | ksuite.infomaniak.com | ksuite.domain.xyz |
| Manager | manager.infomaniak.com | manager.domain.xyz |
| emails ( Mail) | mail.infomaniak.com | mail.domain.xyz |
| calendars / agendas | calendar.infomaniak.com | calendar.domain.xyz |
| contacts | contacts.infomaniak.com | contacts.domain.xyz |
| kDrive | kdrive.infomaniak.com | kdrive.domain.xyz |
| video conferences kMeet | kmeet.infomaniak.com | kmeet.domain.xyz |
| Euria | euria.infomaniak.com | euria.domain.xyz |
Customize your Organization's interface
The following interface options are modifiable from the my kSuite settings:
- Add your logo to your Organization's interface.
- Add a panorama of 3 images on the login page.
- Modify the text and button color of the login page.
- Customize kDrive shares (see this other guide).
Link to this FAQ:
Has this FAQ been helpful?
This guide details the customization options for the Infomaniak Organization, including custom URLs (Custom Brand addresses) for the Manager and kSuite tools such as kDrive or Euria.
Custom Brand is a service already included with kSuite Enterprise.
Creating custom URLs
To obtain Custom Brand:
- Click here to access Custom Brand on the Infomaniak Manager (need help?).
- Click the blue Try for Free button (in the Custom Brand section)
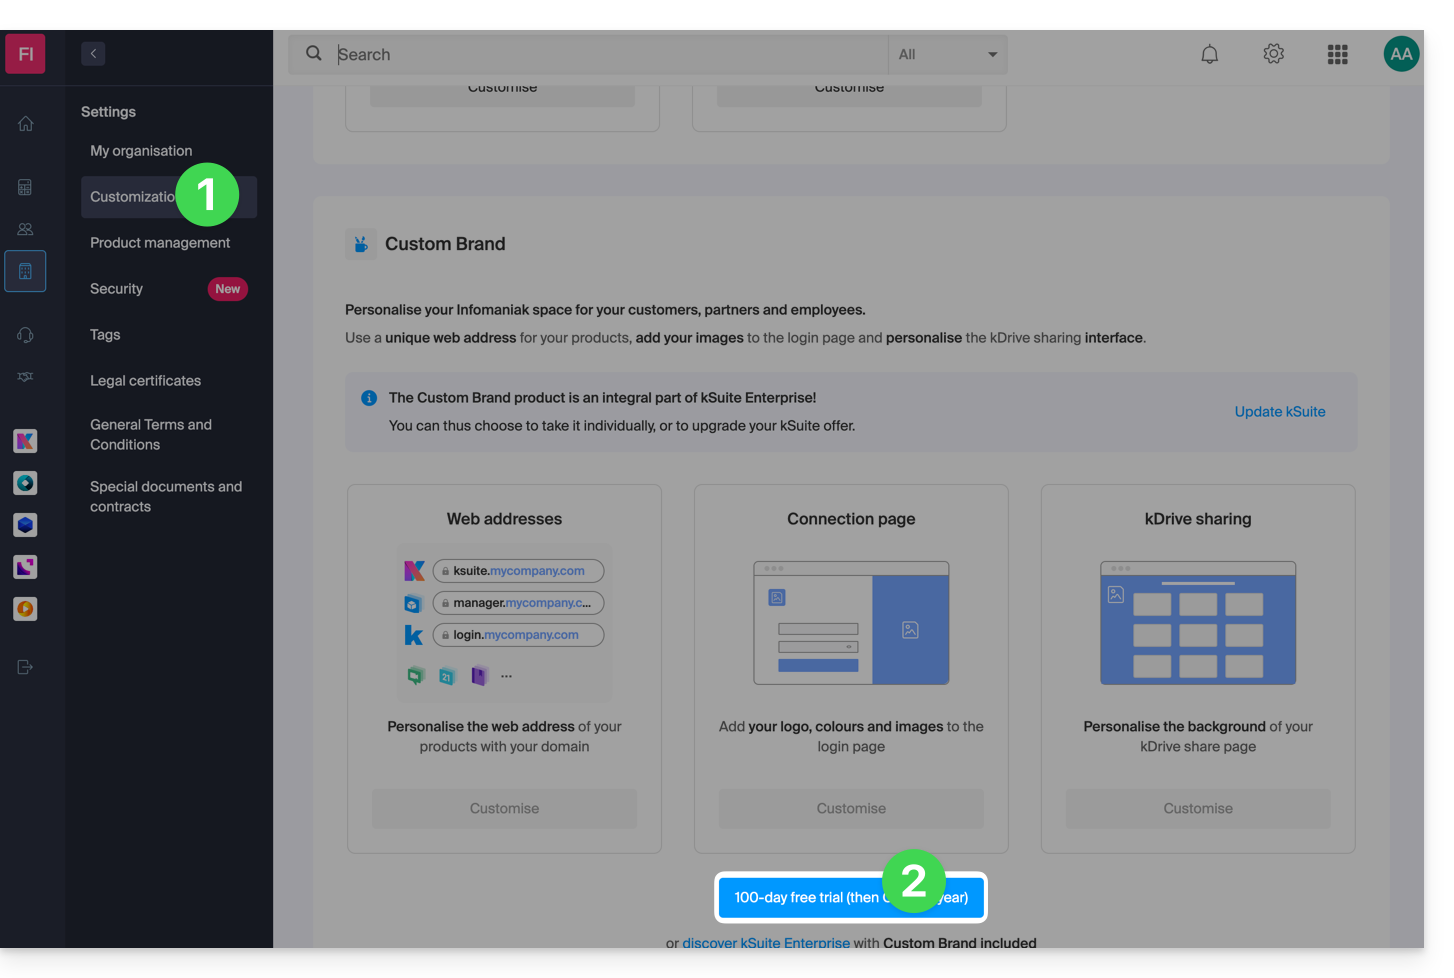
- Enter the domain name to use in your custom web address:
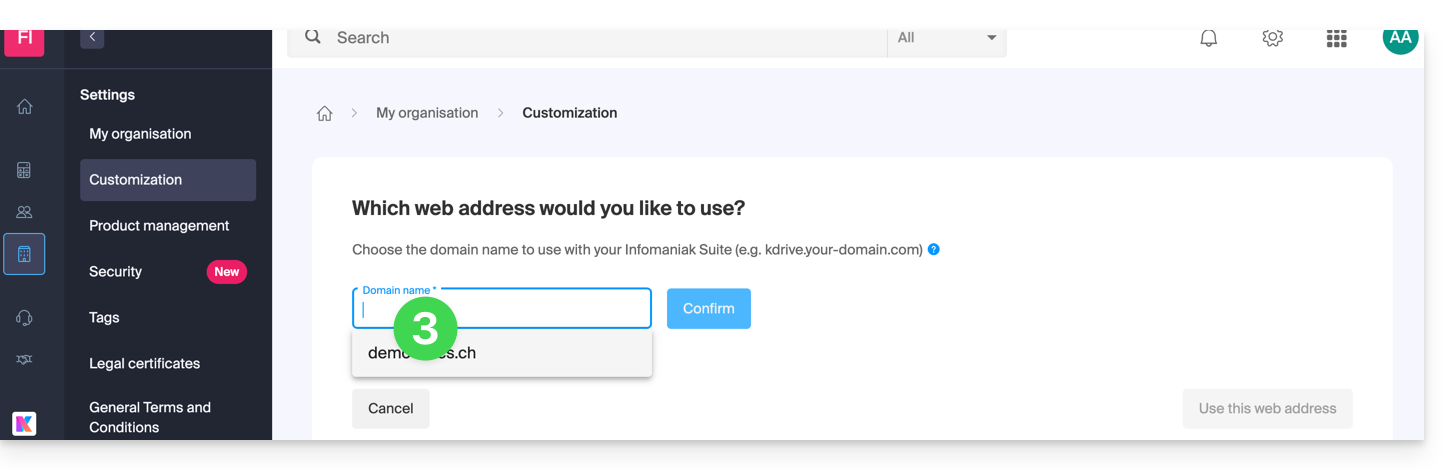
- If you do not yet have a domain name, you will be able to order one at this step.
- If your domain name is already used for another service, you will be able to choose another one, or use a subdomain (example:
my.domain.xyz).
- When choosing the domain name, the interface will present examples of custom web addresses (example: manager.domain.xyz).
- Click the blue “This web address suits me” button or select another domain name or subdomain until you find a custom web address that suits you.
- Preparing custom web addresses may take a few minutes; a confirmation email will be sent to the account owner's email address.
To disable access via custom URLs:
- Click the blue Disable button at the top right of the Custom Brand section:
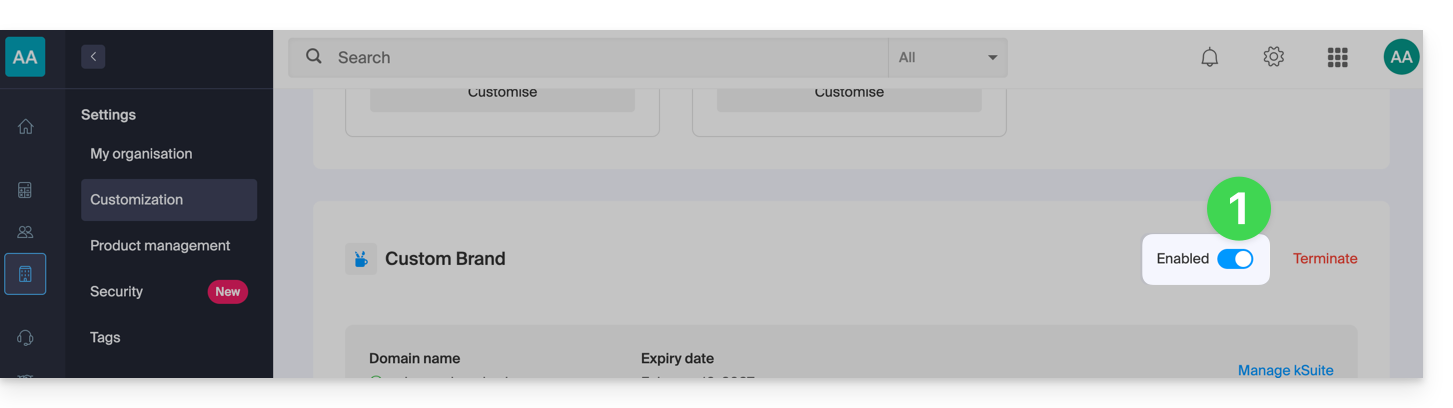
- You can reactivate the addresses later using the same button.
- You can also remove this service completely.
Customizing the interface
In addition to customizing the web addresses of your Infomaniak products, you can add a logo. You can also customize your login page via a slideshow of 3 images:
- Click here to access Custom Brand on the Infomaniak Manager (need help?).
- Click the blue Customize button (in the Custom Brand section):
- Upload an image or click Select an image to add it as a logo.
- Resize the image with the tool if it exceeds the maximum size of 270 x 70 pixels.
- The tool allows you to preview how your logo will look on a dark or light theme.
- Click on Validate.
- To customize your login page, click on the blue Next button on the far right.
- From the two color selection fields, choose the color of the text and login buttons.
- Drag and drop or click on Select an image to create a slideshow of 3 images to the right of the login page (images must be at least 865 x 1200 pixels).
- Click on Add then on Finish to save the changes.
Link to this FAQ:
Has this FAQ been helpful?
This guide explains how to start an online meeting with kMeet, Infomaniak's ethical free video conferencing solution.
Preamble
- There is no limit to the number of participants with paid my kSuite offers.
- Participants can write in a common chat, annotate a screen share and even control a remote device.
- To create a meeting room in advance and invite participants by creating an associated event in the Infomaniak calendar, refer to this other guide.
- It is also possible to share the video stream within a Video Streaming Broadcast (for example, to avoid depending on the connection to kMeet).
Create a virtual meeting room
To do this:
- Start kMeet via kmeet.infomaniak.com or from one of the applications for computers or mobile devices.
- Start a new meeting:
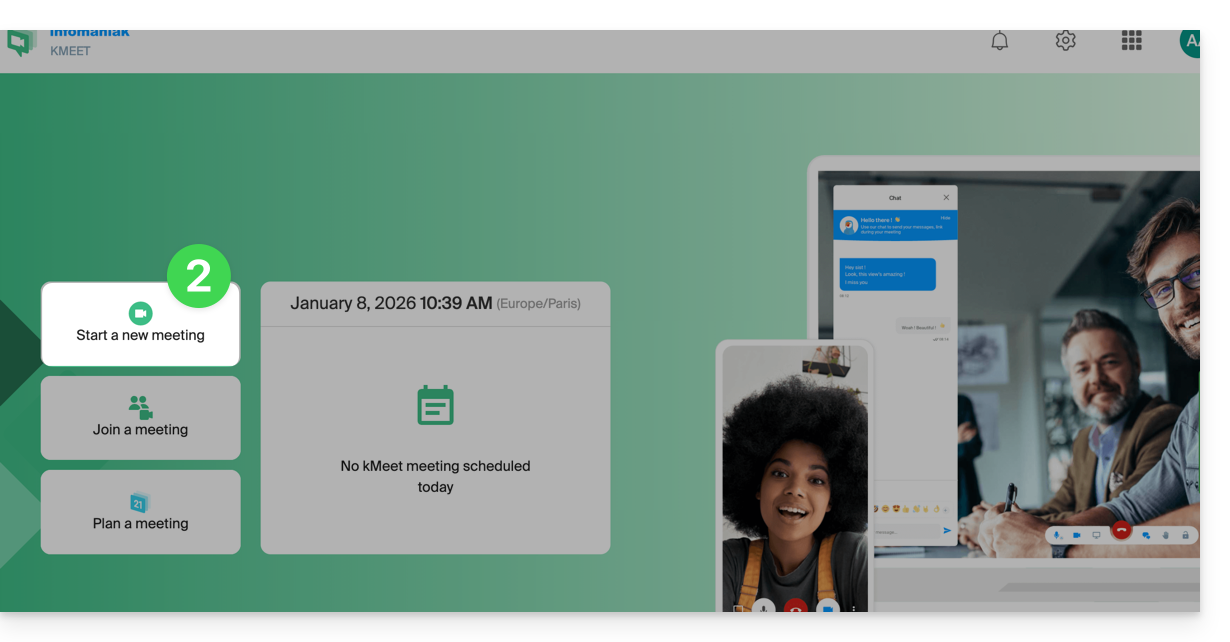
- Specify a name for your meeting room.
- Allow access to your webcam and microphone from your browser or from the application (click here if you encounter any issues).
- Enter a pseudonym or your first and last name.
- If necessary, enable participant control, a password or a custom encryption key.
- Click on Join the meeting.
- Share the room link to invite participants to join you:
Link to this FAQ:
Has this FAQ been helpful?
This guide will quickly introduce you to the essential functions of Euria, the artificial intelligence available within kSuite, which is particularly effective for summarizing discussions on the kChat app.
Introduction
- Euria can help you perform all kinds of calculations, translations, provide information on various topics, and answer your questions.
- Please read this other guide about the model used and the responsibilities of each party.
- When a new user is added, they receive a welcome message from Euria.
- Please read this other guide about the possibilities for discussing with the AI in kChat.
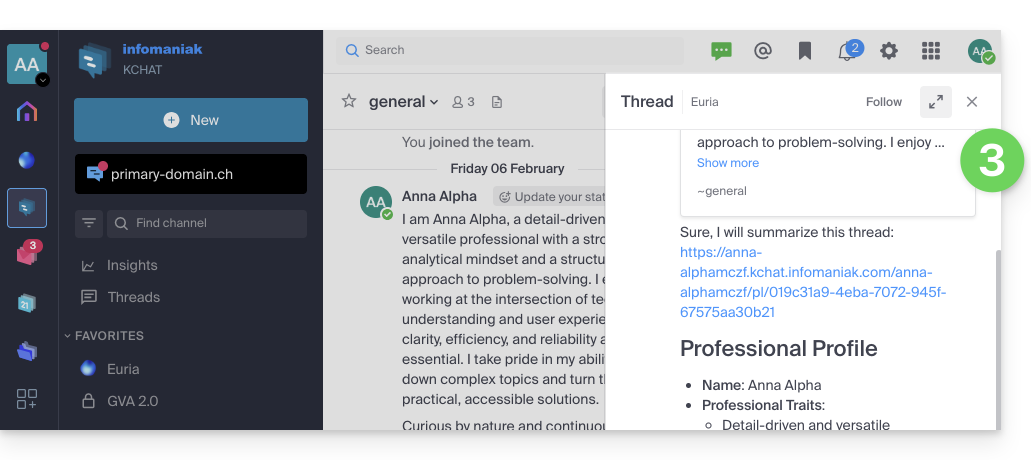
Automatically summarize a kChat message
To obtain a summary of a kChat message:
- Hover over the message and select the Euria actions icon in the upper right corner.
- Click on Summarize the conversation:
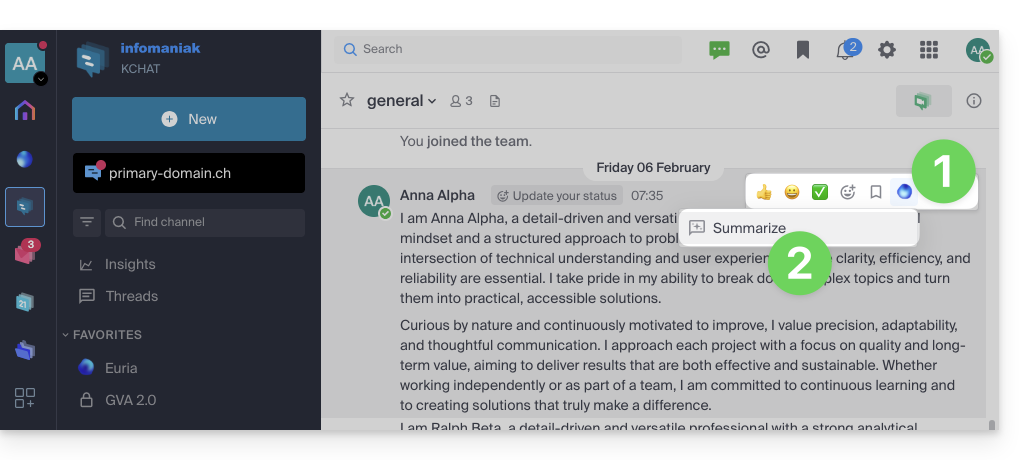
- Get the summary, generated by Euria in the right sidebar:
Link to this FAQ:
Has this FAQ been helpful?
This guide details the limitations specific to the my kSuite offer and the advantages of the my kSuite+ offer.
Limitations specific to my kSuite
The my kSuite offer imposes certain limitations that my kSuite+ does not…
Mail, contacts & calendars
- Disk space limited to 20 GB of storage for emails.
- No advanced mode in the message sorting rules.
- No aliases.
- "my kSuite" signature enforced.
- No email sharing link.
- 1 address book, 1 calendar.
- Email backup retention (30 days); recoverable by upgrading to a different offer.
kDrive
- 1 kDrive upload folder.
- 25 kDrive sharing links (without the ability to set a duration or password).
- Previous file version retention: 30 versions over 30 days (60 over 120 days for my kSuite+, including some versions that are kept indefinitely).
- Trash retention: 30 days (60 for my kSuite+).
- No statistics.
- No PDF file editing/signing.
Limitations of the my kSuite & my kSuite+ offers
Click on the links below for details:
- Offer limited to one address per account (linked to a European phone number).
- You must provide a valid mobile phone number to confirm registration.
- Limited number of daily email sends, mail redirects, and unique recipients per message.
- No creation of aliases is possible for your email.
- No customizable email signature.
- Email scheduling and scheduled sending: limited features (without customization) on my kSuite and customizable with my kSuite+.
- 15 GB of Cloud storage with my kSuite, 1/2/6/12 TB with my kSuite+.
- Registration is only possible for individuals residing in OECD member countries (official list), including:
- Germany
- Australia
- Austria
- Belgium
- Canada
- Chile
- Colombia
- South Korea
- Costa Rica
- Denmark
- Spain
- Estonia
- United States
- Finland
- France
- Greece
- Guadeloupe
- French Guiana
- Hungary
- Ireland
- Iceland
- Israel
- Italy
- Japan
- Latvia
- Lithuania
- Luxembourg
- Martinique
- Mayotte
- Mexico
- Monaco
- New Caledonia
- New Zealand
- Norway
- Netherlands
- Poland
- French Polynesia
- Portugal
- Czech Republic
- Réunion
- United Kingdom
- Saint Barthélemy
- Saint Martin
- Saint Pierre and Miquelon
- Slovakia
- Slovenia
- Sweden
- Switzerland
- French Southern and Antarctic Lands
- Turkey
- Wallis and Futuna
my kSuite+ offer
The my kSuite+ offer allows you to send more messages per day to a larger number of unique recipients at once.
To help you identify the my kSuite / kSuite offer that best suits your needs, please refer to this other guide.
For sending emails to a large number of recipients, there is a Newsletter tool.
Link to this FAQ:
Has this FAQ been helpful?
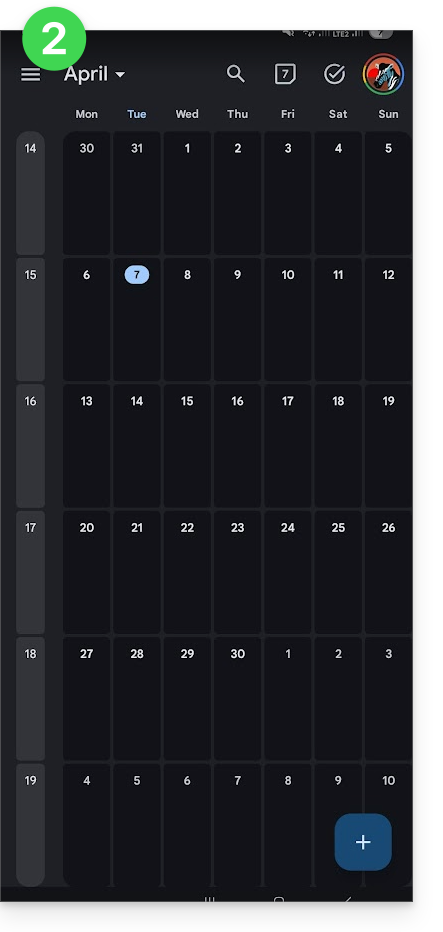
This guide explains how to manage a calendar and its events within the Google Calendar mobile app (application for iOS/Android smartphones or tablets) and/or the Infomaniak Calendar web app (online service ksuite.infomaniak.com/calendar), while keeping all data fully synchronized thanks to the Infomaniak mobile app kSync (application for Android smartphones or tablets).
Introduction
- Refer to this other guide if you only want to display an Infomaniak calendar in read-only mode on Google Calendar (web and mobile app).
- The reverse is also possible if you only want to display a Google calendar in read-only mode on the Infomaniak Calendar web app (online service ksuite.infomaniak.com/calendar).
- The procedure below allows you to edit calendar events on both sides, but only on the mobile version of the Google Calendar app.
Synchronize the Infomaniak calendar and the mobile device
Prerequisites
- Download the Google Calendar mobile app for Android.
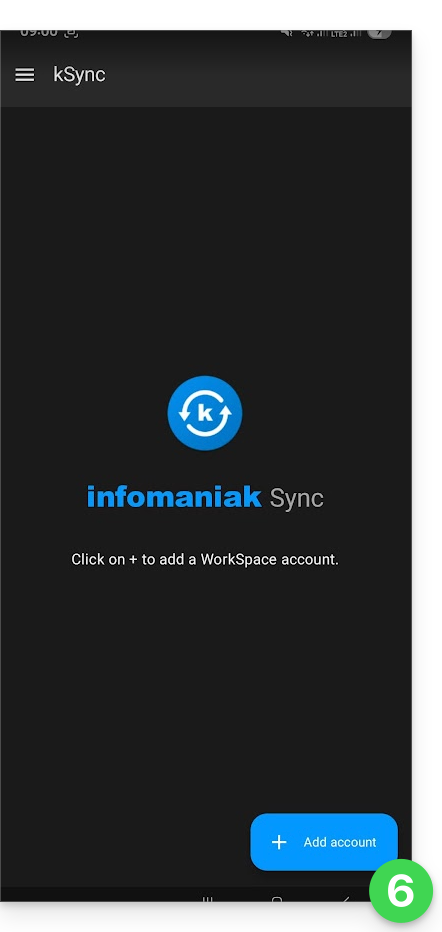
- Download the Infomaniak kSync mobile app (application for Android smartphones or tablets) here:

- The kSync app is also available on F-droid.
- Install kSync.
Next, launch the kSync app on your Android device. A step-by-step wizard will help you configure the app according to your needs:
- Decide if you want to synchronize tasks.
- Allow kSync to access the required items on the device, primarily the calendar.
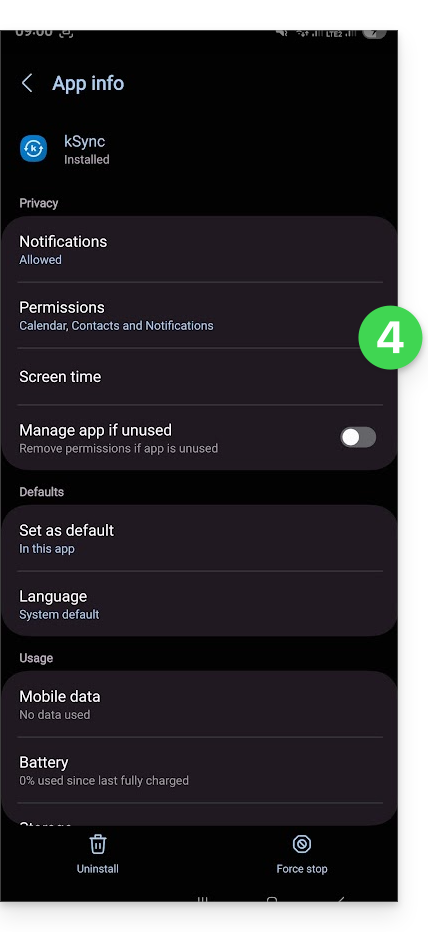
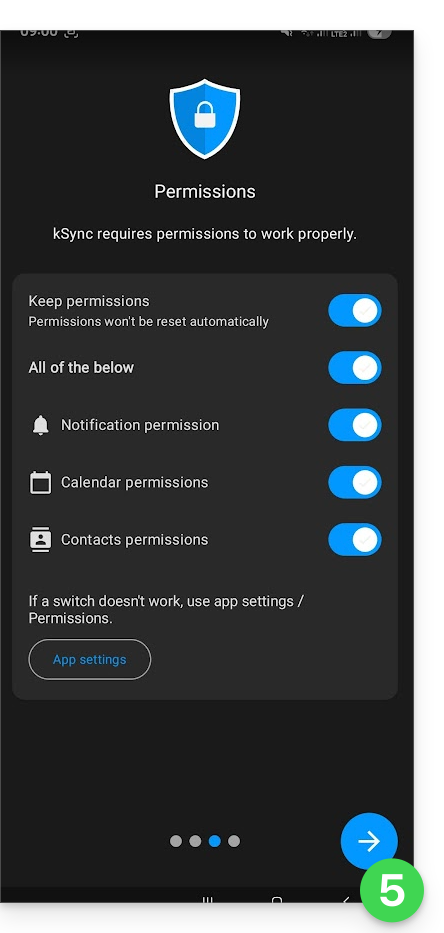
- Allow the app to run in the background for better synchronization (uses more battery); settings can also be adjusted within the app itself:
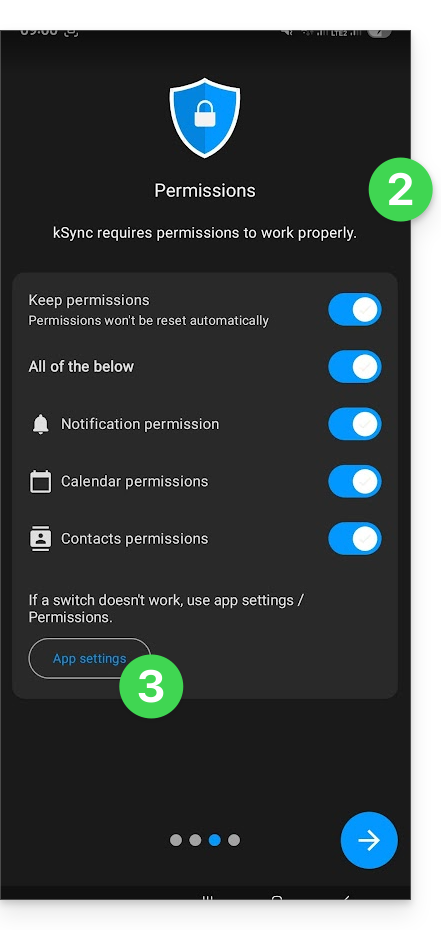
- The key is to grant access rights to the services you need to synchronize:
- Go back to the kSync app and continue the configuration:
- Tap to add an Infomaniak user account (the one you use to log in to your Infomaniak services):
- For example, in the Calendar web app, the user menu in the top right corner shows the login email address.
- You can then access the calendars of the Organization to which the current user belongs:
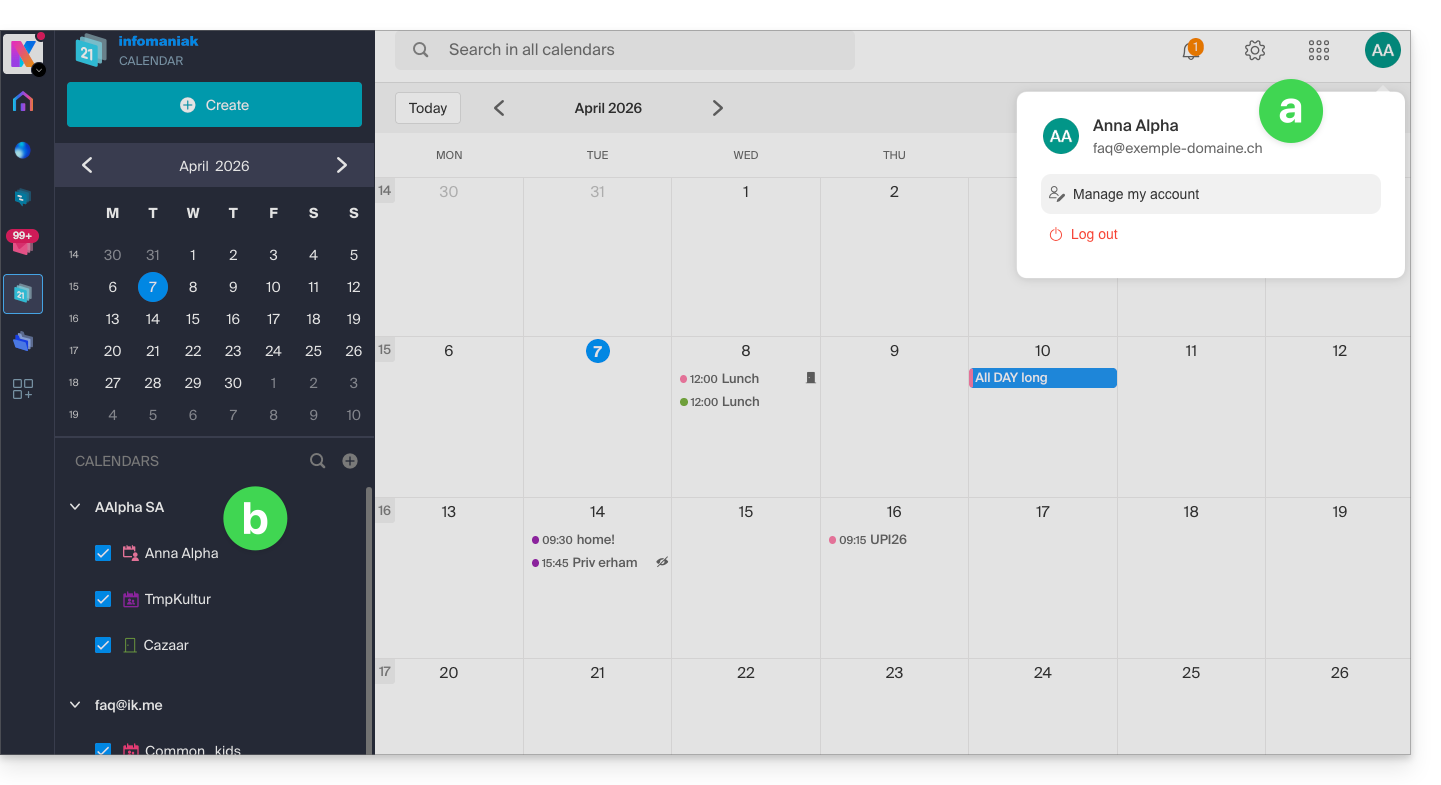
- This is the data that will be synchronized to your device when you log in to the same Infomaniak account on kSync…
- Enter your Infomaniak login credentials (see point a above).
- Tap the button to log in:
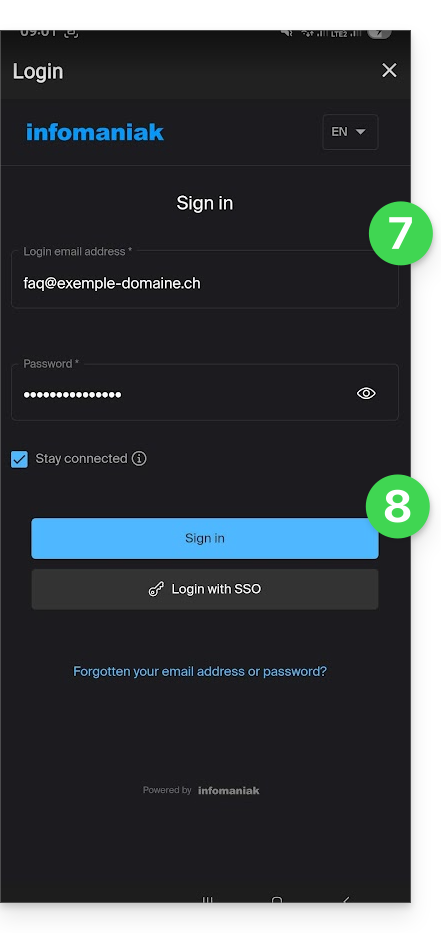
- Complete the two-factor authentication steps as you normally would.
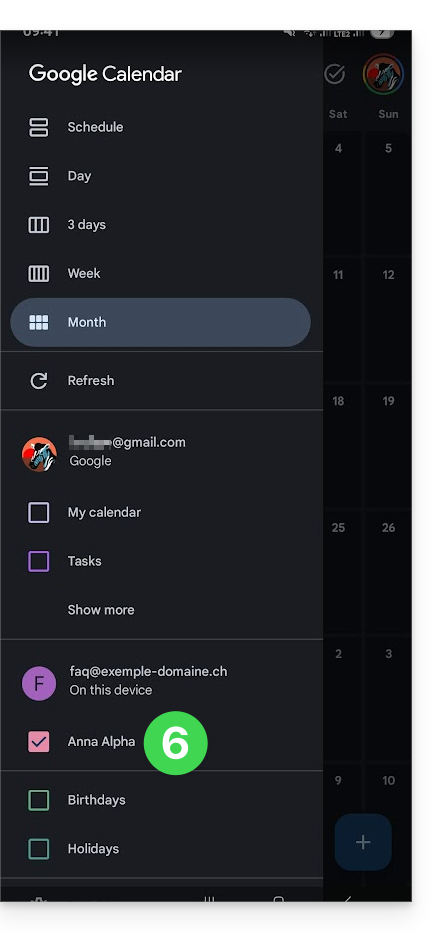
- Once logged in to kSync, activate the calendars (from those displayed, which are linked to your Infomaniak account) to be synchronized from the CALDAV tab:
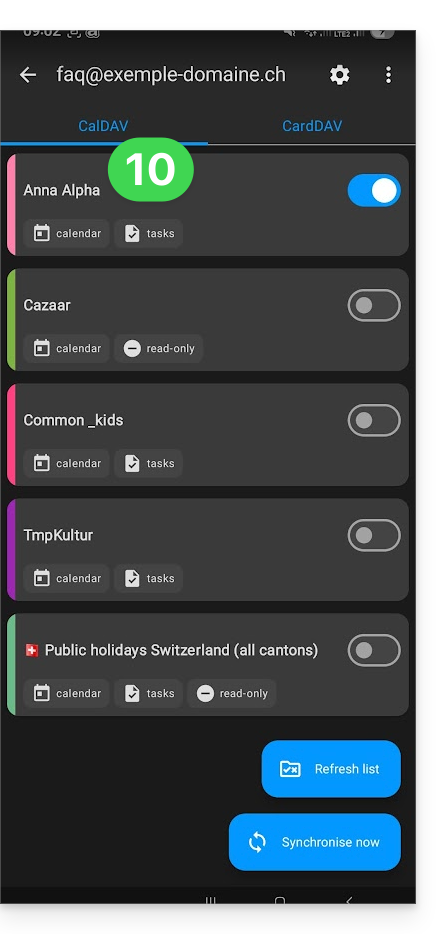
- Start the synchronization using the button at the bottom right.
Automatic synchronization of the native calendar
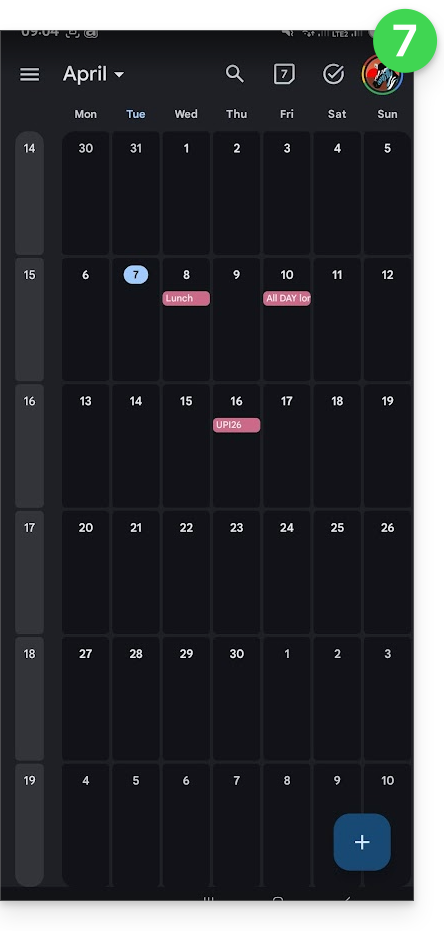
- At this stage, the native application on your Android device (Samsung Calendar, for example, on Samsung devices) will be synchronized and display the events from your Infomaniak calendar (you may need to activate the account in the application):

- An event added and/or modified on one of the interfaces will be automatically synchronized everywhere:

Enable the calendar in Google Calendar
To find your Infomaniak calendar in Google Calendar and be able to edit its events:
- Open Google Calendar on your Android device.
- Tap the menu button with three horizontal lines ☰ at the top left of the interface:
- Tap Settings at the bottom of the menu:
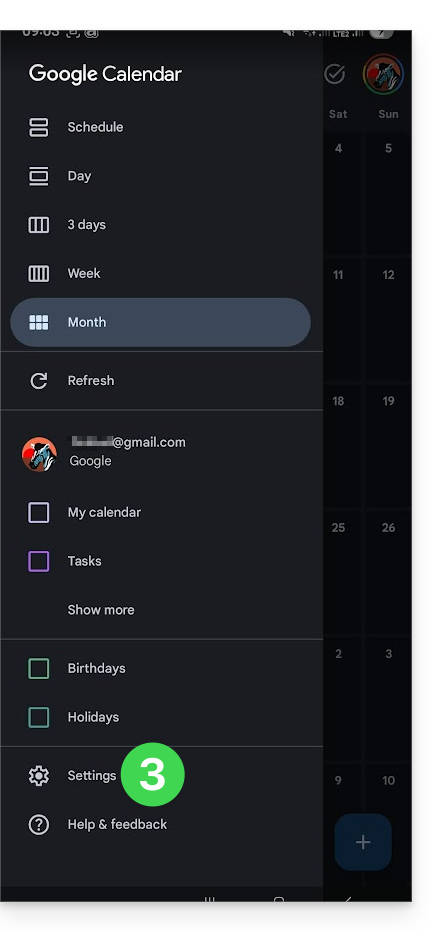
- Tap Manage accounts:
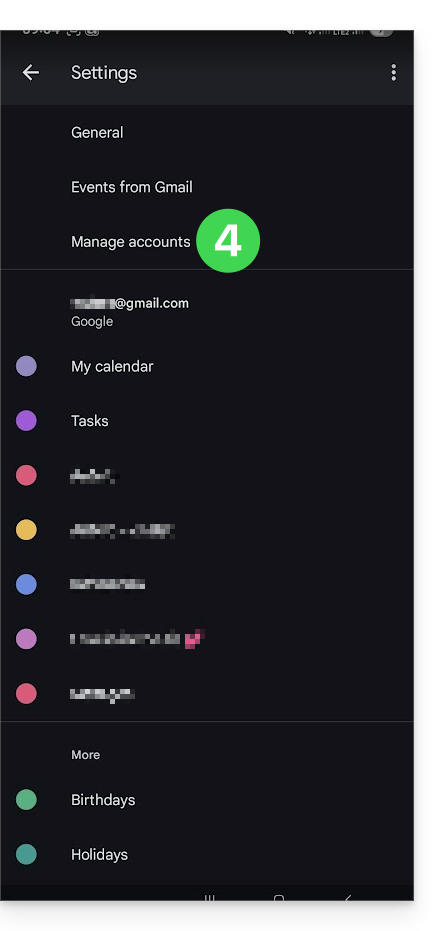
- Enable the account corresponding to your Infomaniak calendar:
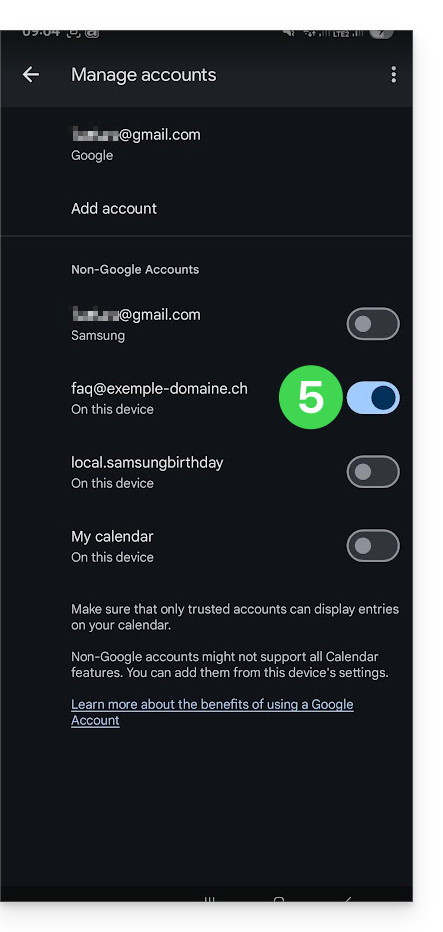
- Go back to the previous page and make sure the Infomaniak calendar appears among the accounts, and change the color if necessary:
- That's it, Google Calendar is synchronized with the Infomaniak calendar. Any event added and/or modified in either interface will be automatically synchronized everywhere:
Link to this FAQ:
Has this FAQ been helpful?
This guide helps you understand the structure of your Infomaniak services, with the aim of familiarizing you with the terminology used and helping you easily manage your management interfaces, mainly when using my kSuite.
Preamble
- The Organization is the term that represents the grouping of Infomaniak services & users (you and potential collaborators, family members, etc.).
- To understand what an Organization really represents, this guide is structured around several possible situations currently:
- Any new registration for a free my ksuite address (ik.me / etik.com / ikmail.com).
- Any new registration for other Infomaniak services.
- Combined use of my kSuite and other services in the ecosystem:
- Sign up for my kSuite by specifying an existing Infomaniak account
- Purchase Infomaniak products with only a my kSuite account
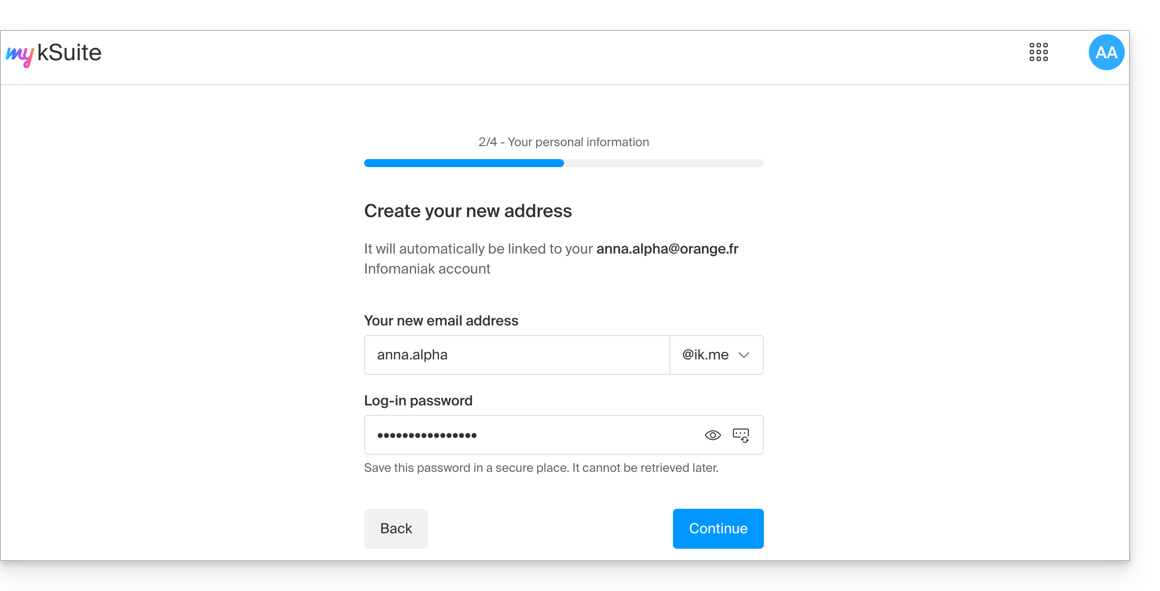
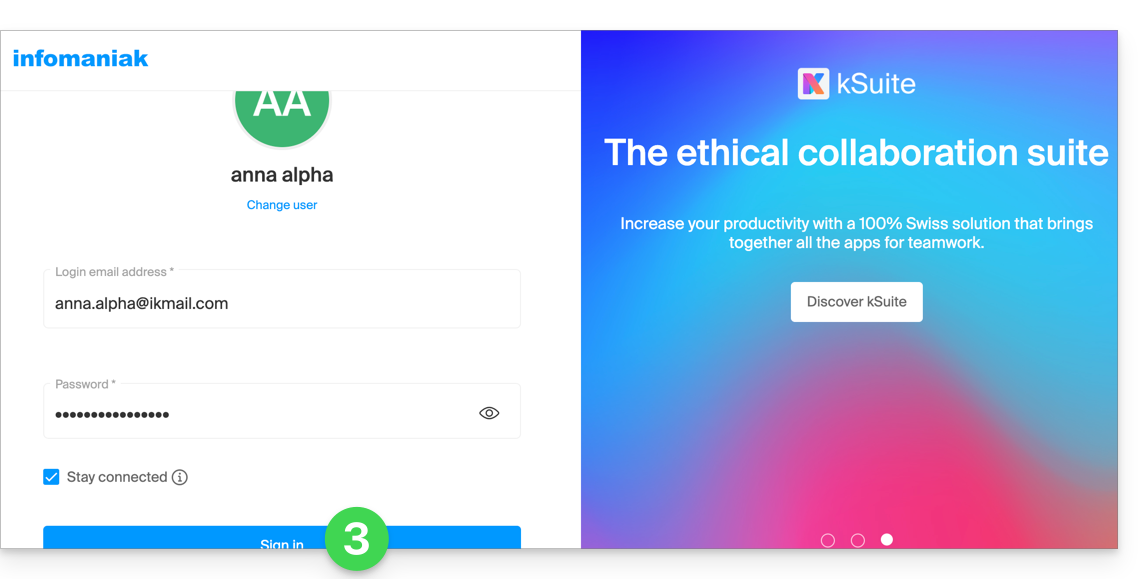
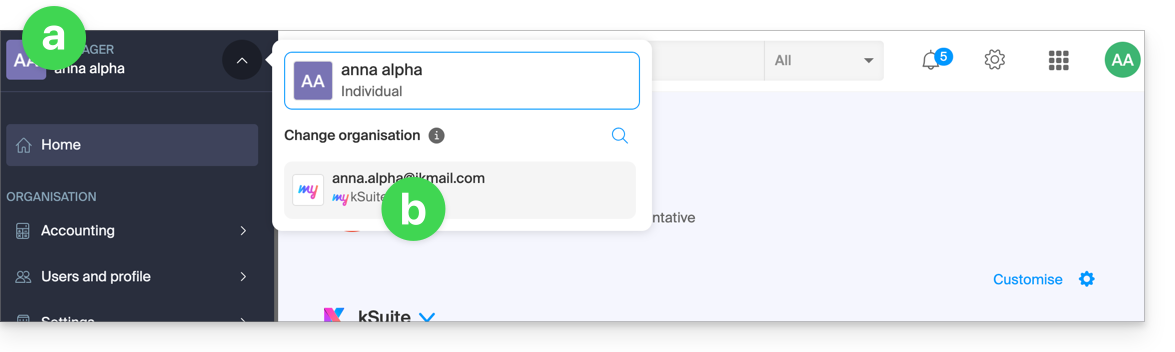
1. my kSuite Registration (ik.me / etik.com / ikmail.com)
When registering on welcome.infomaniak.com/signup/myksuite, you chose the name of your email address, for example anna.a@ik.me and then entered a personal phone number: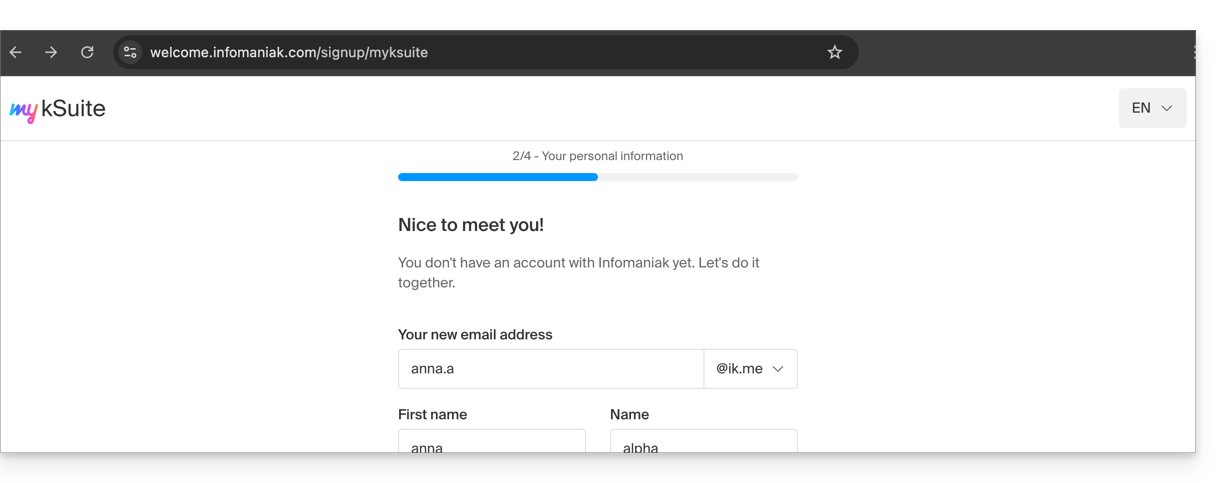
- Once the registration is validated, you access your email address anna.a@ik.me on the Web app Mail
ksuite.infomaniak.com/mail: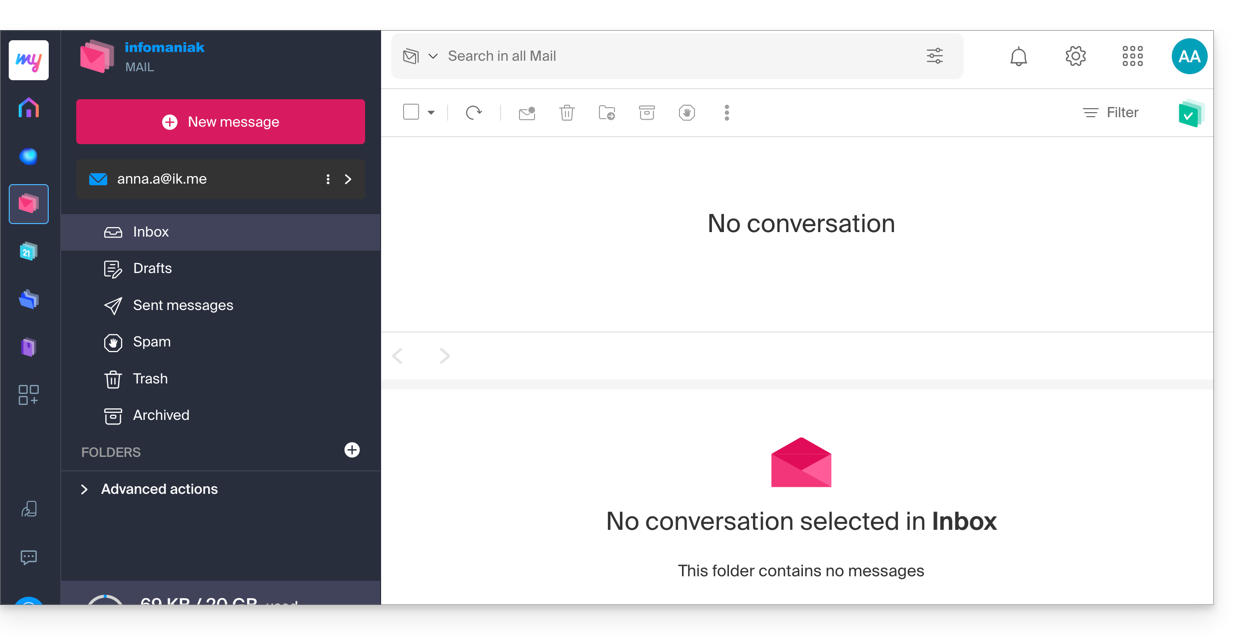
- You can distinguish:
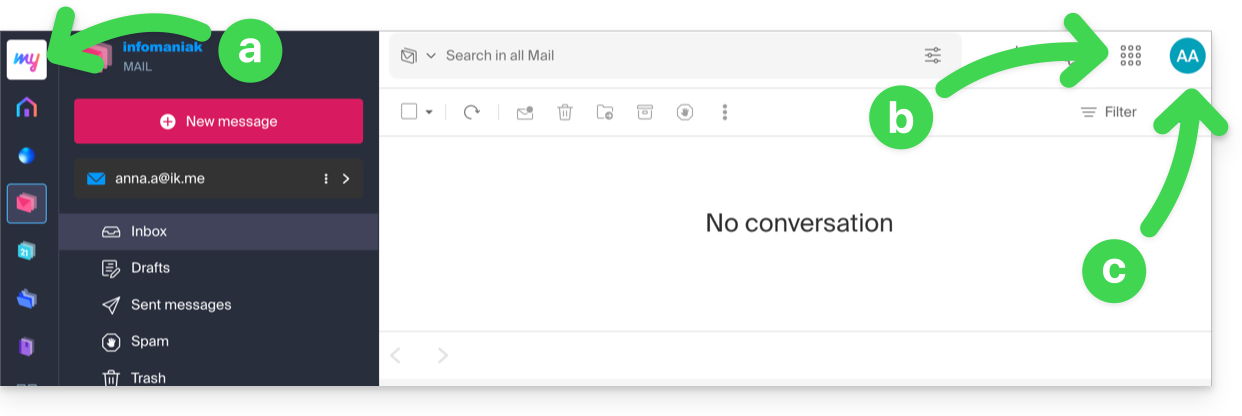
- The logo/type of your Organization, which in this case indicates that it is a my kSuite account.
- The button allows you to access the Manager
manager.infomaniak.comand other apps / other services related to my kSuite: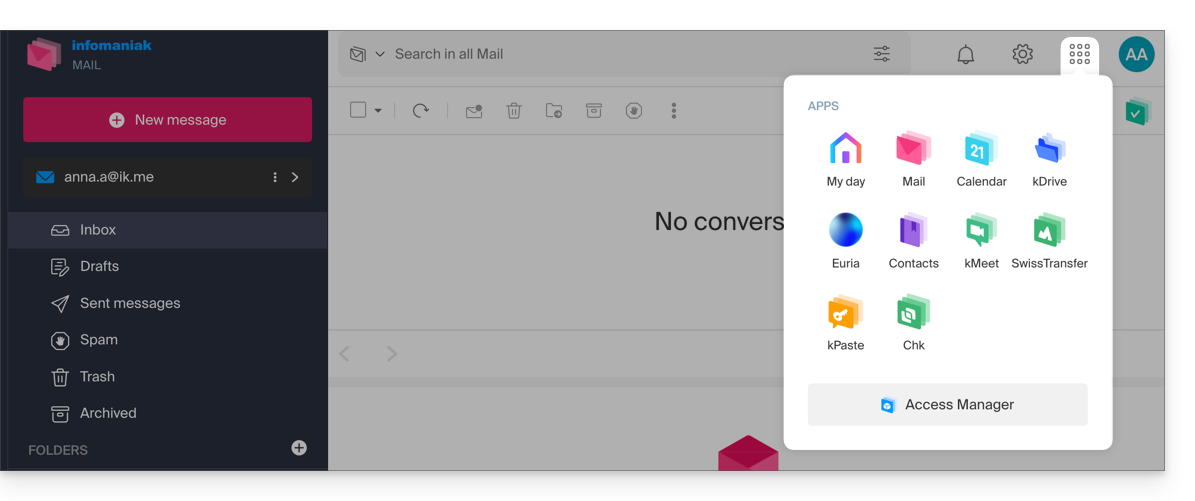
- The Manager in this case will contain nothing more than information about managing your my kSuite account:
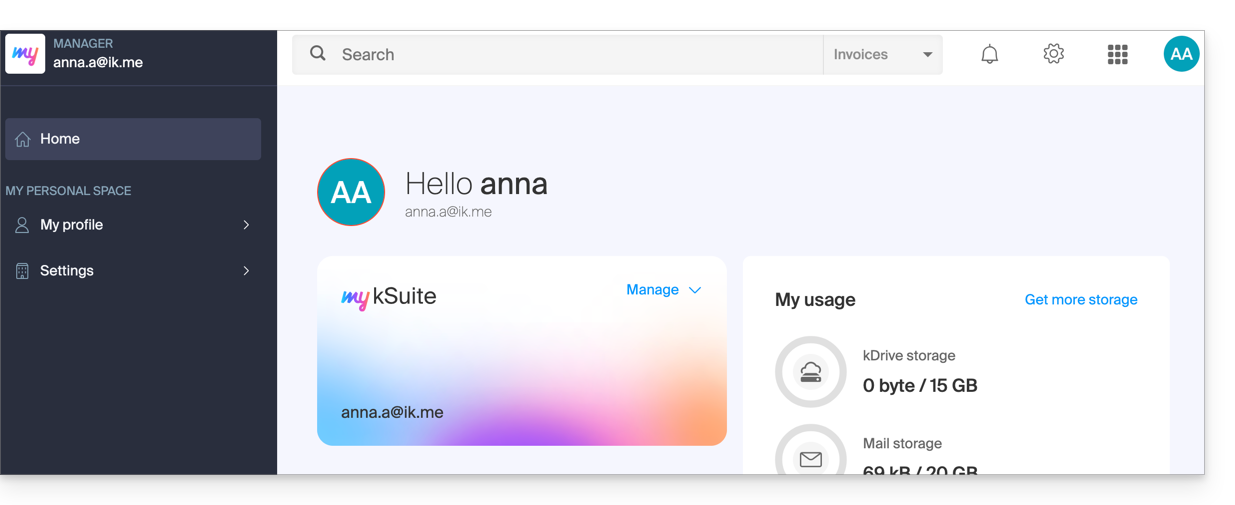
- The Manager in this case will contain nothing more than information about managing your my kSuite account:
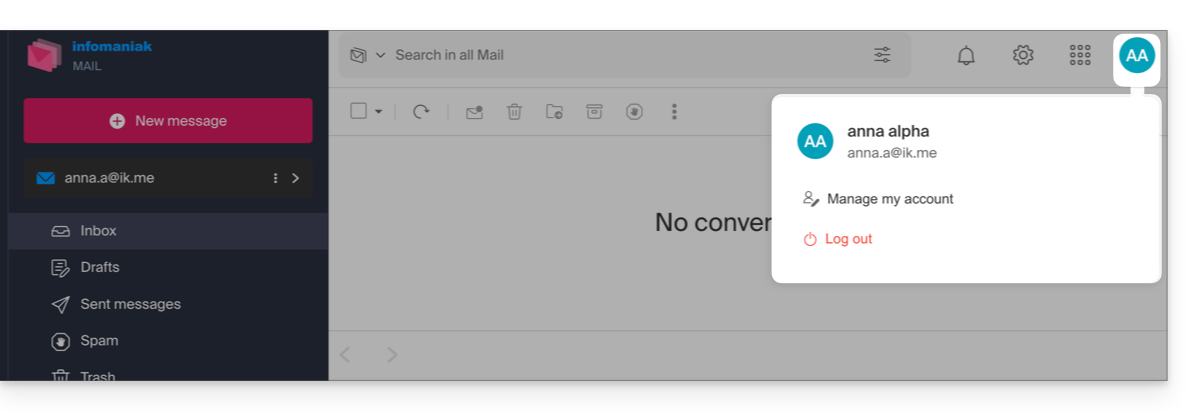
- The initials are those of your Infomaniak account (first name / last name entered during registration):
This account my kSuite will not be able to directly contain hosting products, or kSuite with a domain name, etc. The rest of this guide explains how to create a more comprehensive Organization if necessary.
Note that it is not possible to export your services my kSuite to another Organization.
To use your new my kSuite email address on the Web app Mail, refer to this other guide.
2. Registration and purchase of hosting, domain, etc.
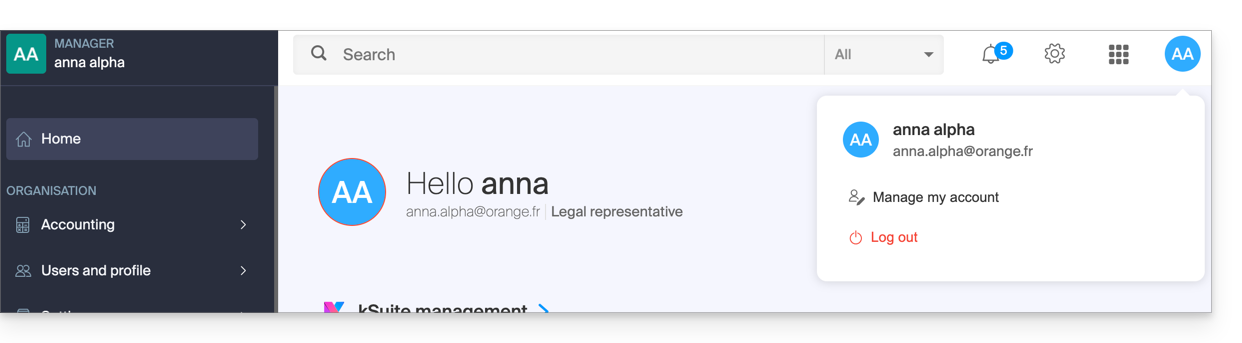
When registering on welcome.infomaniak.com/signup/, you chose your login identifier, in the form of a personal email address, for example anna.alpha@orange.fr :
You then chose the type of Organization you wanted to create (personal, or for a company, association, etc.):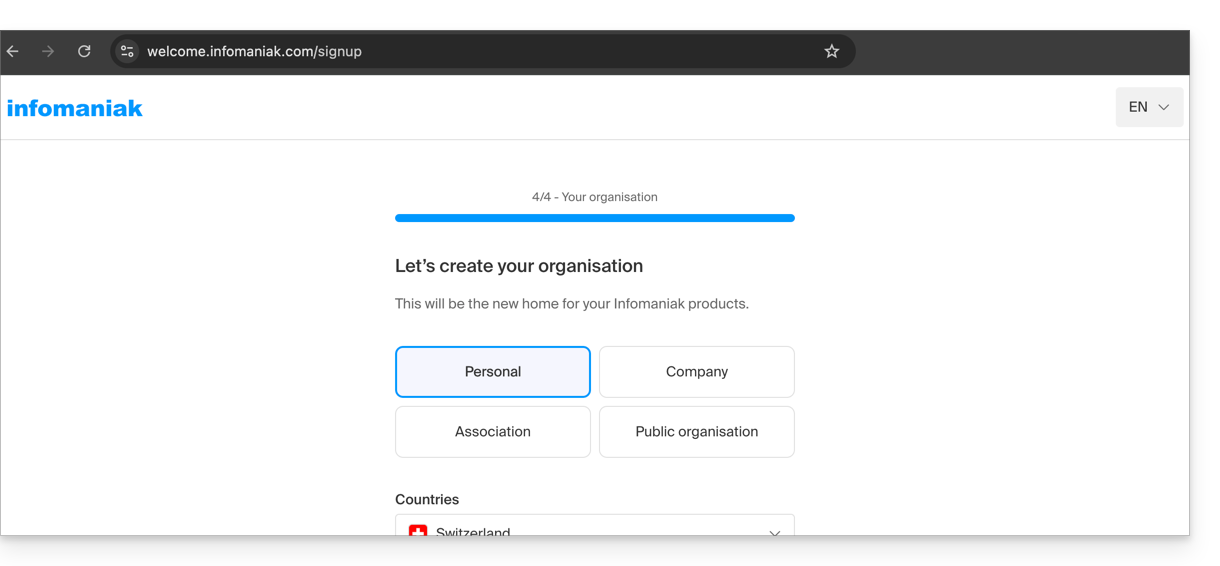
- Once registration is complete, you will access the Manager
manager.infomaniak.comand your Organization is still an “empty shell” of which you are currently the sole legal representative: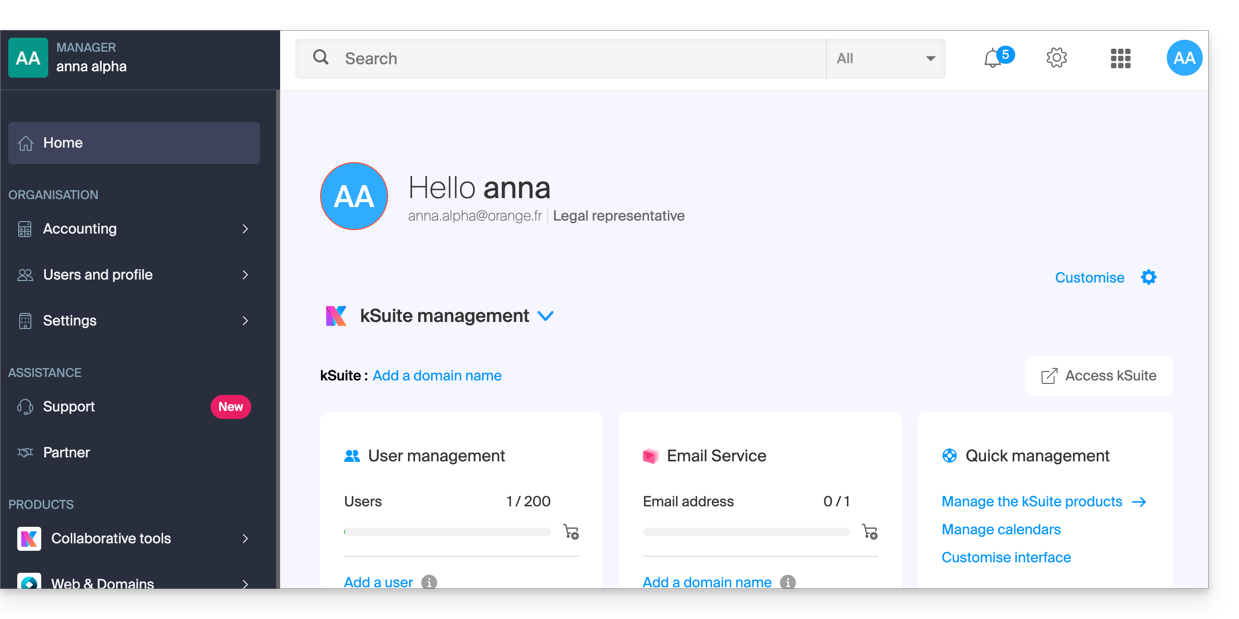
- You can distinguish:
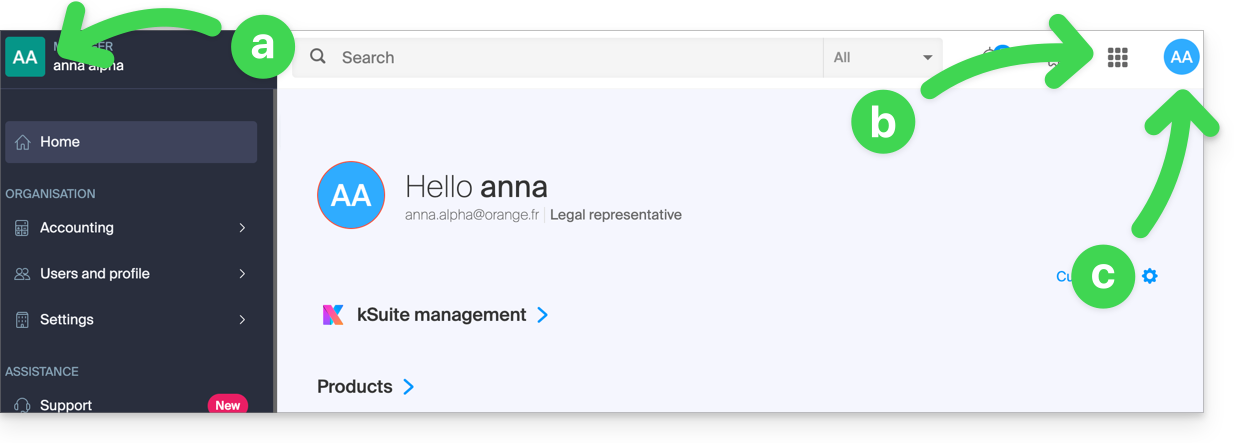
- The logo/type of your Organization, which in this case indicates that it is a personal Organization (automatically named upon creation via the first name/last name of the creator); this can be customized.
- The button allows you to access kSuite
ksuite.infomaniak.comand other apps / other services related to the free kSuite added to your new Organization: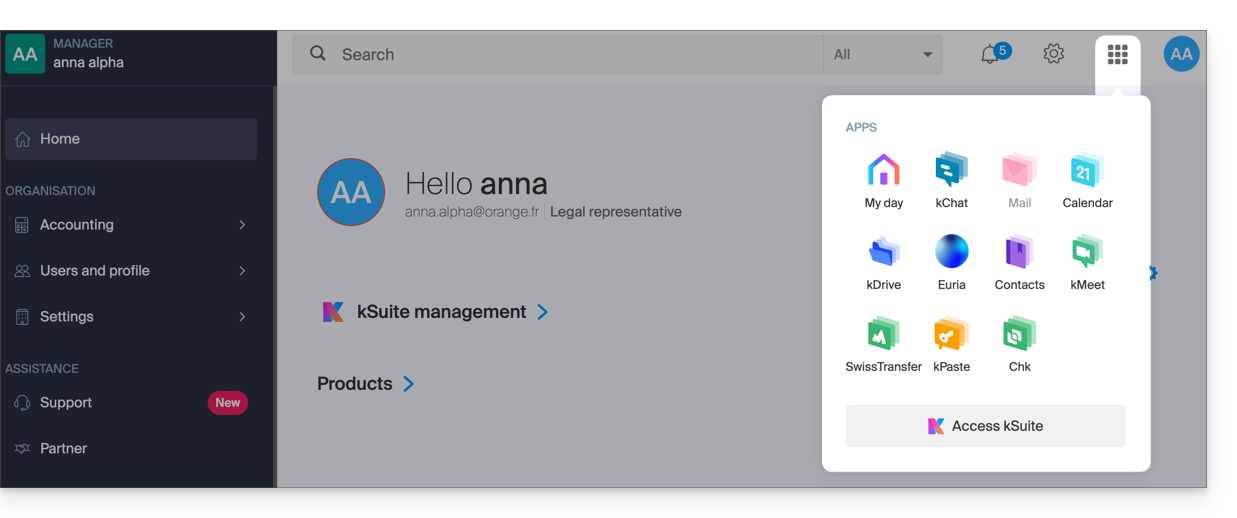
- The initials are those of your Infomaniak account (first name / last name provided during registration):
3. Combined use
What happens if you sign up for my kSuite by specifying an existing Infomaniak account that you already own for using hosting products?
Or how to proceed if you wish to acquire hosting products when you only have a my kSuite ?
Sign up for my kSuite by specifying an existing account
When signing up on welcome.infomaniak.com/signup/myksuite, you choose to log in with an existing account…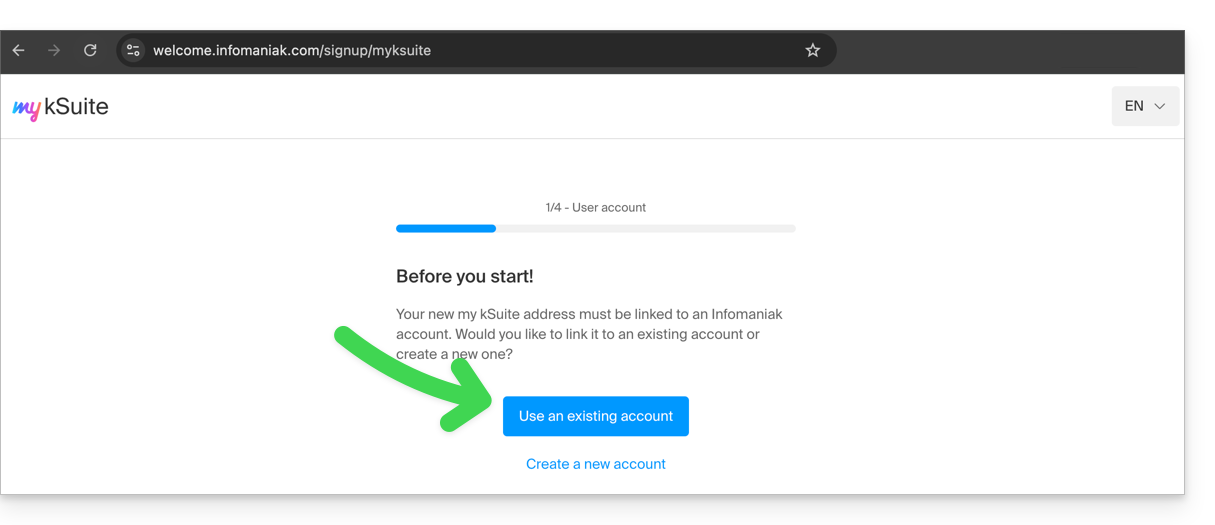
- Obviously, you should not specify a my kSuite account (
anna.a@ik.mefor example) as an existing account, as you cannot have multiple ik.me / etik.com / ikmail.com email addresses: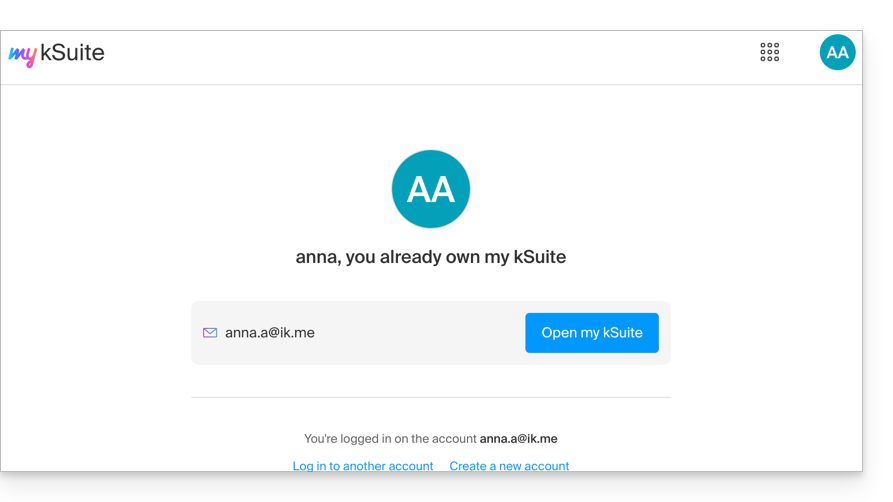
- Specify your existing Organization account,
anna.alpha@orange.fr: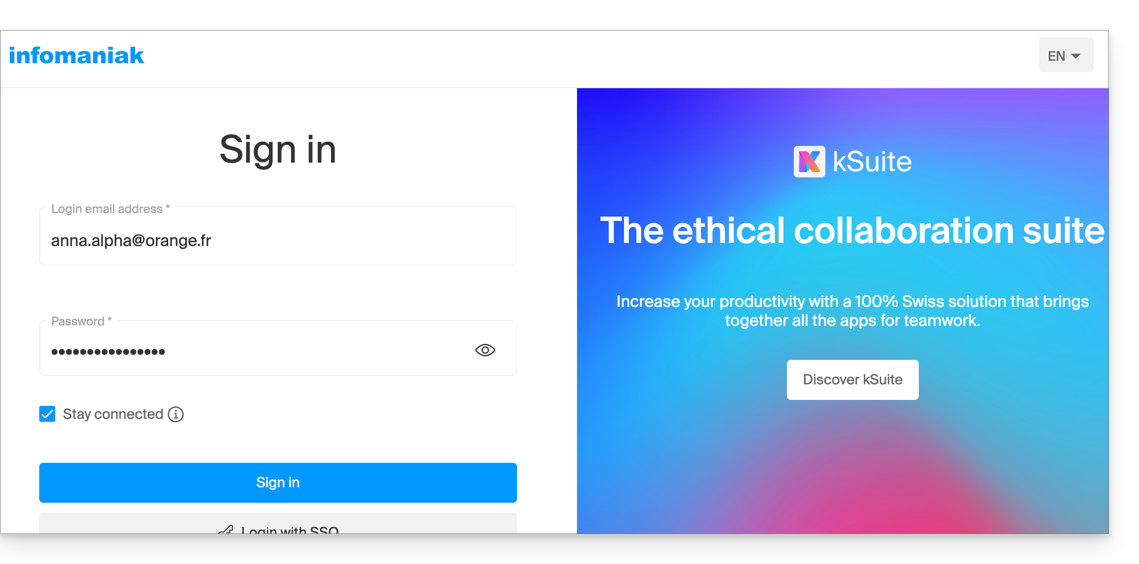
- Thus, the creation of a my kSuite account is proposed to you:
- Once registration is complete, you will access the Manager
manager.infomaniak.com:- your previous Organization is visible…
- separated from my kSuite currently selected:
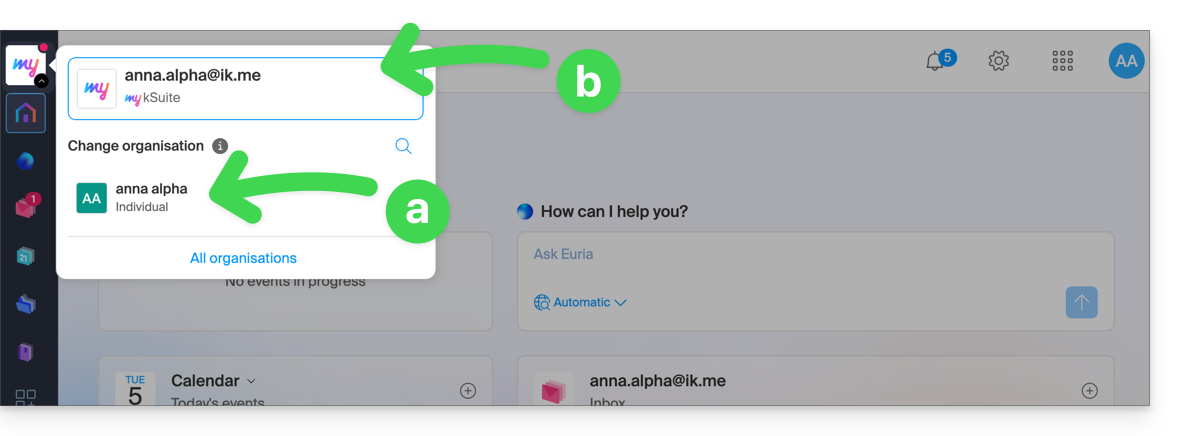
- Click on one or the other of the Organizations/my kSuite from this menu (always accessible permanently at the top left) to switch from one to the other.
Acquiring products with only one account my kSuite
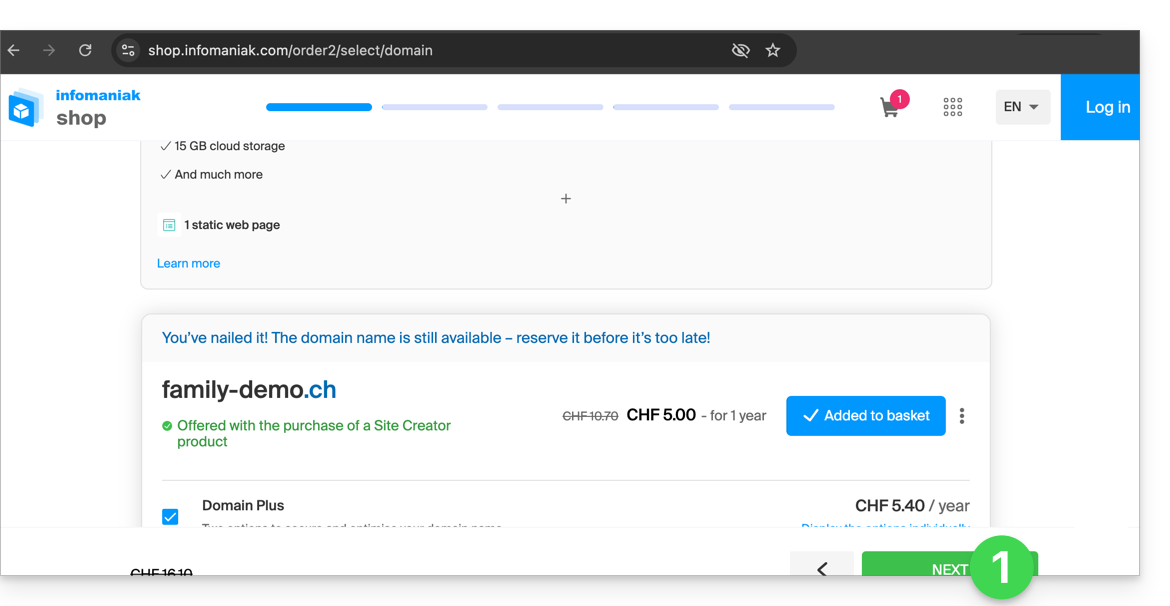
Another situation: you wish to acquire on www.infomaniak.com one of the services offered by Infomaniak, for example a domain name for your future site / email:
- You will be redirected to the Infomaniak Shop; proceed to the next step:
- At the step where you need to specify your existing Infomaniak identifier, if any, you enter your existing my kSuite account (
anna.alpha@ikmail.comin this example):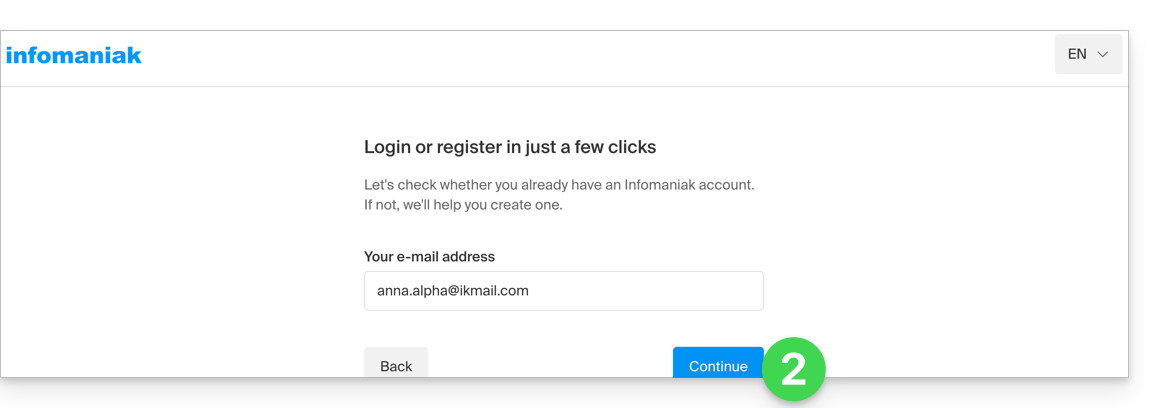
- Your existing identifier is recognized, you must authenticate:
- Then you will necessarily go through the Organization creation step; choose the type of Organization you wish to create (personal, or for a company, association, etc.):

- To finalize the purchase, the details related to the Organization will be requested for billing (they are also used to generate a registrant for the ordered domain name); all you have to do is complete the order:
- Once the order is completed, you access the Manager
manager.infomaniak.com: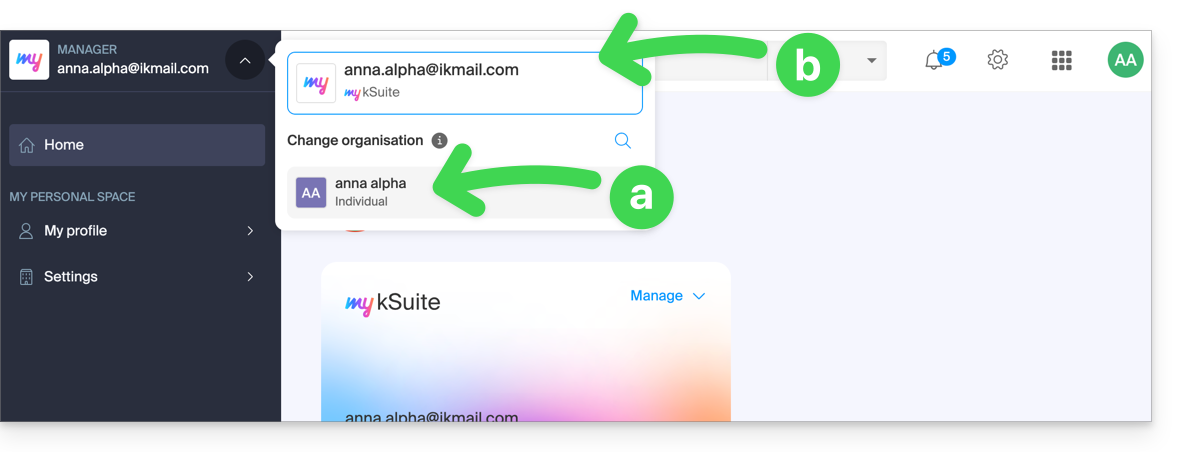
- your new Organization is visible…
- separated from my kSuite currently selected.
- Click on the new Organization to switch to it and manage your ordered products:
- To switch from one to the other of the Organizations/my kSuite click on this menu (always accessible permanently at the top left):
- A first time to arrive on the main page of the Manager,
- then on the chevron allowing the choice of the destination:
- You will find your email address my kSuite.
To understand the different "Suites" Infomaniak (kSuite, my kSuite...), refer to this other guide.
Link to this FAQ:
Has this FAQ been helpful?
The kSuite offer from Infomaniak simplifies the creation and use of various Infomaniak products (kDrive, Mail Service, kChat...) centered around a domain name.
Migrate to kSuite
If you subscribe to kSuite, you will receive products separate from your existing products.
However, if you already own a kDrive or a Mail Service, you can upgrade your products to kSuite:
- Refer to this guide to upgrade a kDrive to a kSuite…
- Refer to this other guide to upgrade a Mail Service to a kSuite…
To help you identify the most suitable kSuite offer for your needs, refer to this other guide.
What about the reverse?
You cannot separate kSuite products into distinct products from the offer.
If you wish to cancel a product from your kSuite, you must cancel kSuite in its entirety, having previously saved the information to keep, and then reorder the products corresponding to this information.
Link to this FAQ:
Has this FAQ been helpful?
This guide explains how to upgrade your my kSuite offer and switch to a paid offer my kSuite+ to, for example, increase your maximum storage size. You will keep the email address created when you subscribed to the free offer.
Preamble
- To help you identify the most suitable my kSuite / kSuite offer for your needs, refer to this other guide.
- Refer to this other guide regarding the limitations specific to the my kSuite offer and the advantages of the my kSuite+ offer.
- You are not required to switch to my kSuite+ to add services: refer to this other guide regarding Organizations.
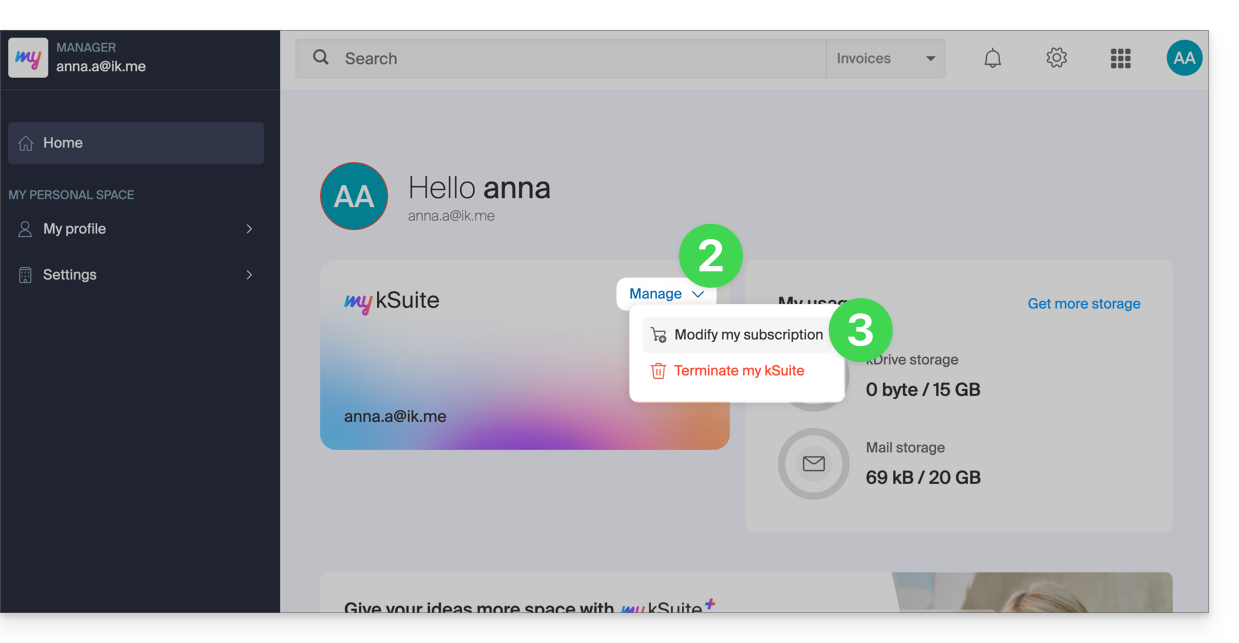
Switch to my kSuite+
To access your current my kSuite offer and switch to a higher offer:
- Click here to access the Manager of your my kSuite offer.
- Click on the chevron to the right of Manage.
- Choose Modify my offer to convert the free offer to a paid and more comprehensive offer:
Order a new kDrive
There is no limit to the number of kDrive (paid) you can add to your Infomaniak account. Order a new kDrive if necessary.
Link to this FAQ:
Has this FAQ been helpful?
This guide is for you if you are looking for a comprehensive email and collaborative data storage solution. Its purpose is to help you better understand the different Infomaniak product suites when you are unsure which one to choose…
If you are looking to host a website, please refer to this other guide.
The different offers in summary
Here is a summary of the different plans (excluding web hosting offers):
| Free (or domain name to be paid for) | Paid |
|---|---|
my kSuite
| my kSuite+
|
Service Mail Starter
| Service Mail Premium
|
kSuite Free
| kSuite Standard / kSuite Business / kSuite Enterprise
|
Free or paid suites
Infomaniak offers several email solutions, with or without additional collaboration tools:
- A Mail Service is the name given to the email service created by Infomaniak in Switzerland. You can order a Mail Service independently of kSuite.
- kSuite is a collection of Infomaniak services that includes a Mail Service and is based around a personal domain name.
- my kSuite and my kSuite+ are limited versions of kSuite that do not require a domain name and can also meet your email needs. In the Infomaniak Manager, these offers will be “separated” from the rest.
Cost of simple email offers
This email service can be…
- … free if you are satisfied with an address with a generic domain name (what comes after the at symbol
@), created by Infomaniak (etik.com,ik.me,ikmail.com) by choosing my kSuite (my kSuite+ unlocks some of the limitations of my kSuite). - … very affordable if you are satisfied with one or two free email addresses on a domain name that you pay for (there are domain names for less than 5 CHF/€ per year, which will be your only expense and allows you to customize your email addresses) by ordering:
- either the Starter offer (1 email address)
- or the kSuite offer
Need a large number of email addresses?
If you need multiple email addresses on the same domain, you can order a Mail Service only (minimum of 5 email addresses) or kSuite, which is available in 3 different versions:
- Standard
- Business
- Enterprise
A common feature of all Mail offers is that you must have an Infomaniak user account (a login ID in the form of an email address, as well as a password) which will take you to your Organization, where your email will be located.
Additional tools (kDrive…)
If you choose a Suite (kSuite or my kSuite / my kSuite+), this user account will take you to your Organization, where the suite of tools will be located, including your email, kDrive, kChat, etc.
Click on the links to access the comparison tables detailing all the features available depending on the plan:
- kDrive can be obtained by creating a my kSuite or my kSuite+ account.
- kDrive can be obtained independently in 3 different versions:
- Solo
- Team
- Pro
- kDrive is available if you subscribe to kSuite (either for free or with a paid subscription). kSuite is available in 3 different versions:
- Standard
- Business
- Enterprise
Would you like to join Infomaniak?
Please refer to this other guide.
Link to this FAQ:
Has this FAQ been helpful?
This guide provides the most common IMAP server addresses.
Introduction
- These addresses are provided for informational purposes and can be used to perform a content copy from your old email addresses to your Infomaniak email address.
- Not all of them have been individually verified and are subject to change without notice.
- For Gmail, Yahoo, Outlook, and iCloud, you generally need to generate an "App Password" in the security settings of your original account to allow the copy.
- If necessary, do not hesitate to contact your previous email provider to ask them for the exact email server to enter.
IMAP Server Addresses
| Provider | IMAP Hostname / Server |
|---|---|
| 1&1 (IONOS) | imap.ionos.fr |
| 9 Business | imap.9business.fr |
| 9 Telecom / Neuf | imap.neuf.fr |
| Alice | imap.aliceadsl.fr |
| Altern.org | imap.altern.org |
| AOL | AOL |
imap.aol.com | Apple (iCloud / me.com) |
| Bouygues Telecom (Bbox) | imap.mail.me.com |
| bbox | imap4.bbox.fr |
| Caramail / GMX | imap.gmx.com |
| Cegetel | imap.cegetel.net |
| Club Internet | imap.club-internet.fr |
| Free | imap.free.fr |
| Freesurf | imap.freesurf.fr |
| Gmail (Google) | imap.gmail.com |
| Hotmail / Outlook / MSN | mail.infomaniak.com |
| La Poste | imap.laposte.net |
| Mailo (formerly NetCourrier) | imap.mailo.com |
| Noos | imap.noos.fr |
| Numericable | imap.numericable.fr |
| o2switch | server-name.o2switch.net(check your welcome email) |
| Online.net | imap.online.net |
| Orange / Wanadoo | imap.orange.fr |
| OVH (Shared) | ssl0.ovh.net |
| OVH (Pro / Exchange) | pro1.mail.ovh.net (or ex.mail.ovh.net) |
| Proton Mail | Direct copy is not possible |
| SFR | imap.sfr.fr |
| Skynet (Belgacom / Proximus) | imap.proximus.be |
| Tele2 | imap.tele2.com |
| Telenet | imap.telenet.be |
| Videotron | imap.videotron.ca |
| Yahoo Mail | imap.mail.yahoo.com |
Link to this FAQ:
Has this FAQ been helpful?
This guide explains how to respond to an email visible on the Web app Mail Infomaniak (online service ksuite.infomaniak.com/mail) by sending the response directly in the Web app kChat (online service ksuite.infomaniak.com/kchat) or the desktop app, in the form of a private message to the email sender.
Preamble
- This feature allows you to respond to an email directly in kChat, with a reminder of the original message to facilitate understanding.
- It aims to streamline collaboration by allowing you to react quickly to an email without leaving the kSuite environment.
- It reduces the back and forth between classic messaging and the collaborative workspace.
Send a response to an email via kChat
Prerequisites
- The button providing access to the feature will only appear in the case of an email received from a sender attached to the kSuite, and this within the same Organization as the user who wishes to respond.
- To display a shortcut to this feature as in the first point 3 below, refer to this other guide.
When you have received an email from a colleague and you want to respond to them directly on kChat:
- Click here to access the Web app Mail Infomaniak (online service ksuite.infomaniak.com/mail).
- Open the message to be replied to by kChat.
- Click on the kChat icon in the email toolbar:
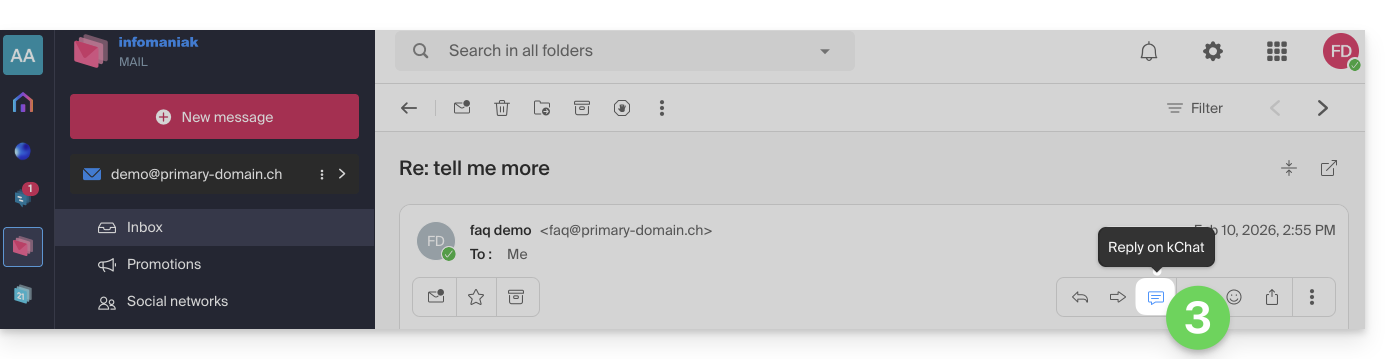
- It is also possible to click on a button below the message:
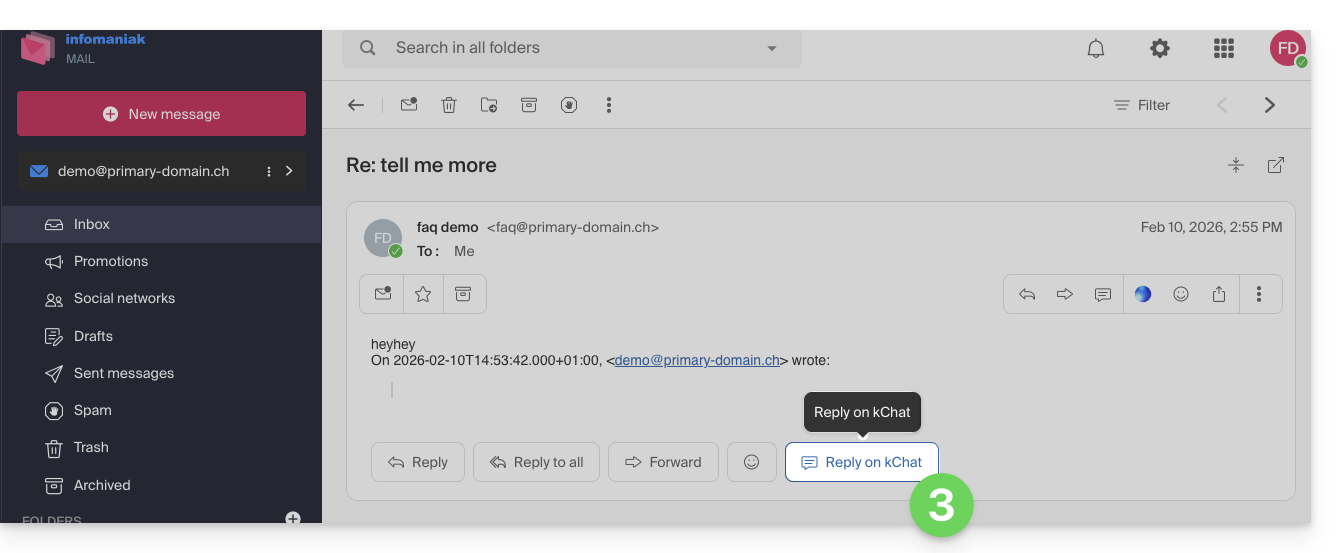
- It is also possible to click on a button below the message:
- Write your kChat message, format it if necessary and click on the Send button at the bottom right:
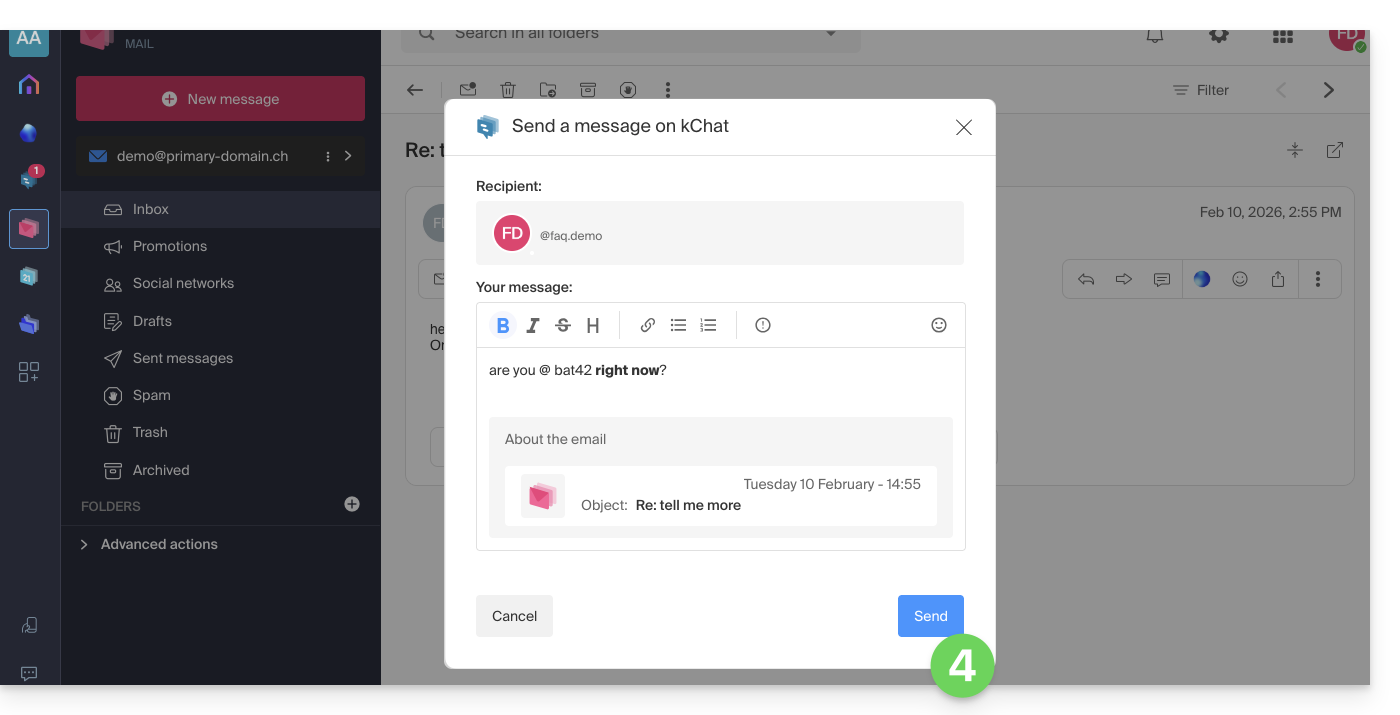
- Your correspondent receives the message on kChat accompanied by a box representing the original email (date & time, subject):
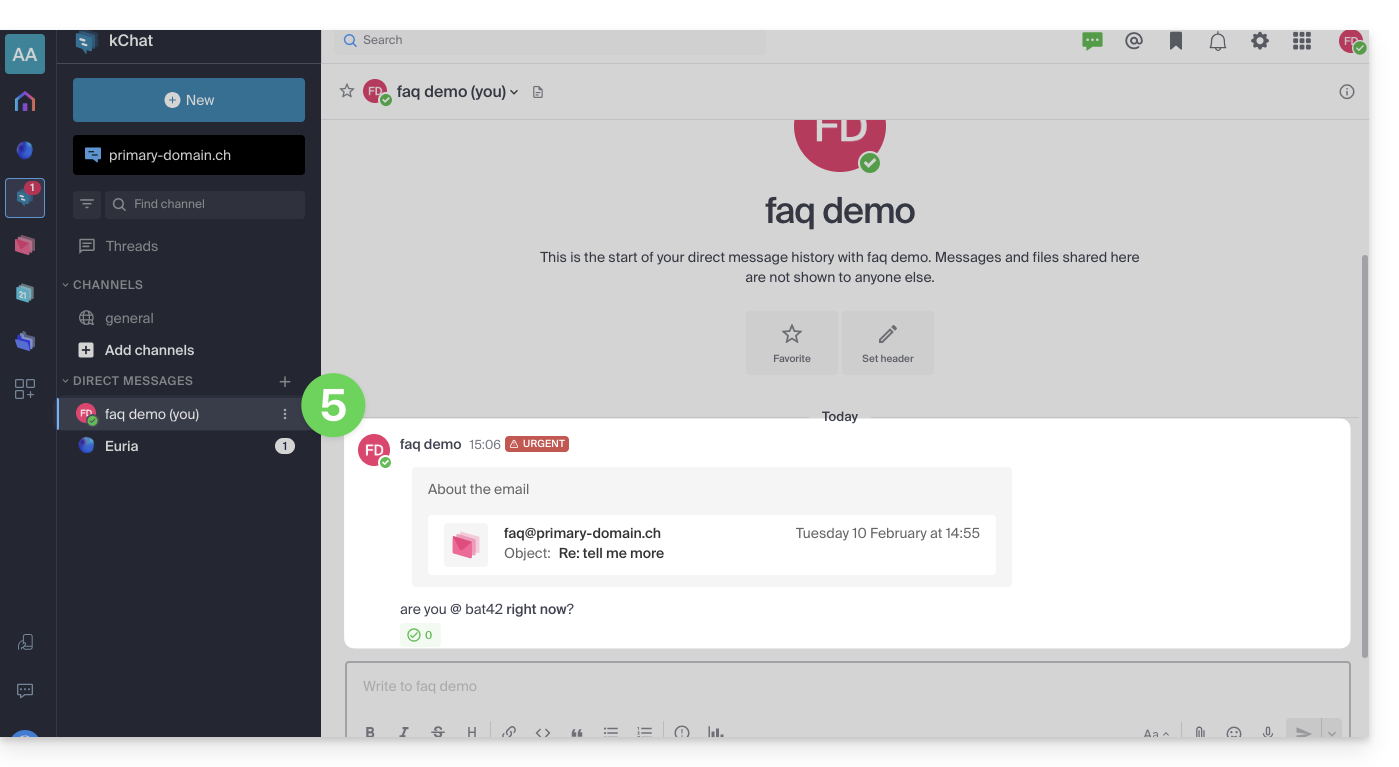
You can access this message on kChat (in the thread of private messages exchanged with your correspondent as above) but also:
- in an information banner on the email conversation,
- in the send confirmation message:

Link to this FAQ:
Has this FAQ been helpful?
This guide explains how to create, save, and edit an Office file (text, spreadsheet, presentation...) on the Web app kDrive (online service ksuite.infomaniak.com/kdrive) and on the mobile app kDrive (application for iOS / Android smartphone or tablet).
Note to LibreOffice file users: to avoid display or formatting bugs on kDrive, always convert your LibreOffice files (ODF: .ods, .odt, .odp) to their Microsoft Office XML equivalents (.xlsx, .docx, .pptx) before online editing.
Use the native editor
kDrive natively integrates the Docs, Grids and Points applications which allow you to create, modify and collaborate online on documents of type Word .docx, Excel .xlsx and PowerPoint .ppsx. You will thus be able to work with:
- text document
- spreadsheet (worksheet)
- presentation
- notebook
- document draw.io for diagrams, schematics and wireframes
A feature allows you to add a bookmark (shortcut to a favorite passage in your document or the equivalent of a web page anchor) that you can easily share with your contacts. You will also be able to easily notify a user of your Organization directly on the document.
Refer to the guide on this subject.
Use Microsoft Office Online
Another editing solution is available to you (kDrive Pro or kSuite Business / Enterprise required): the Microsoft Office Online editor.
Refer to the guide on this subject.
Set the default editor
✘ UNAVAILABLE with
Free kSuite / kSuite Standard
my kSuite / my kSuite+ (ik.me, etik.com, ikmail.com)
kDrive Solo / kDrive Team / kDrive Pro
To specify in detail which editor to always use by default to open your collaborative Office files (text, spreadsheet, presentation...) among the 2 options presented above:
- Click here to access the Infomaniak Web app kDrive (online service ksuite.infomaniak.com/kdrive).
- Click on the Settings icon at the top right.
- Check or select the relevant kDrive from the dropdown menu in the left sidebar.
- Click on General in the left sidebar.
- Click on Default editor:
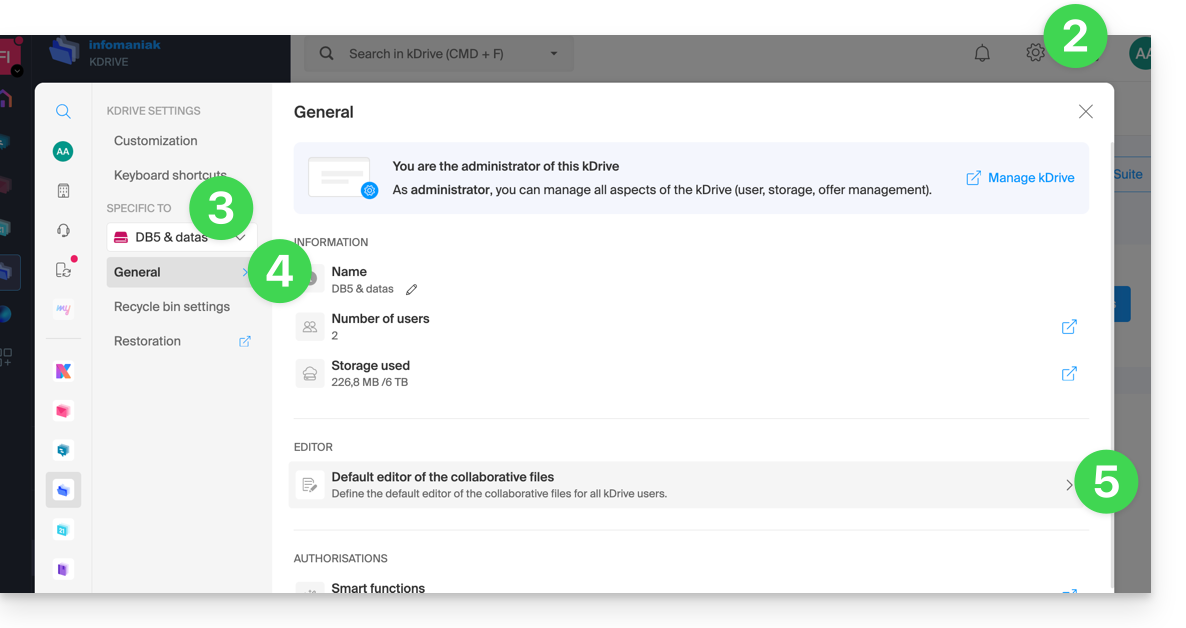
- Choose the default editor for files:
.docx/.doc.xlsx/.xls.pptx/.ppt
Link to this FAQ:
Has this FAQ been helpful?
This guide explains how to modify an offer for Infomaniak Service Mail, the powerful and secure solution for hosting your email addresses, in order to increase or reduce the quota of email addresses available within it.
Preamble
- Refer to this other guide if you simply want to create or delete an email address on your existing Service Mail, without changing the number of email addresses available within it.
- If your Service Mail is not yet part of a kSuite, refer to this other guide to consider a possible change of offer along the way.
Modify the email address quota on a Service Mail
Prerequisites
- Have a Service Mail on your Infomaniak Manager.
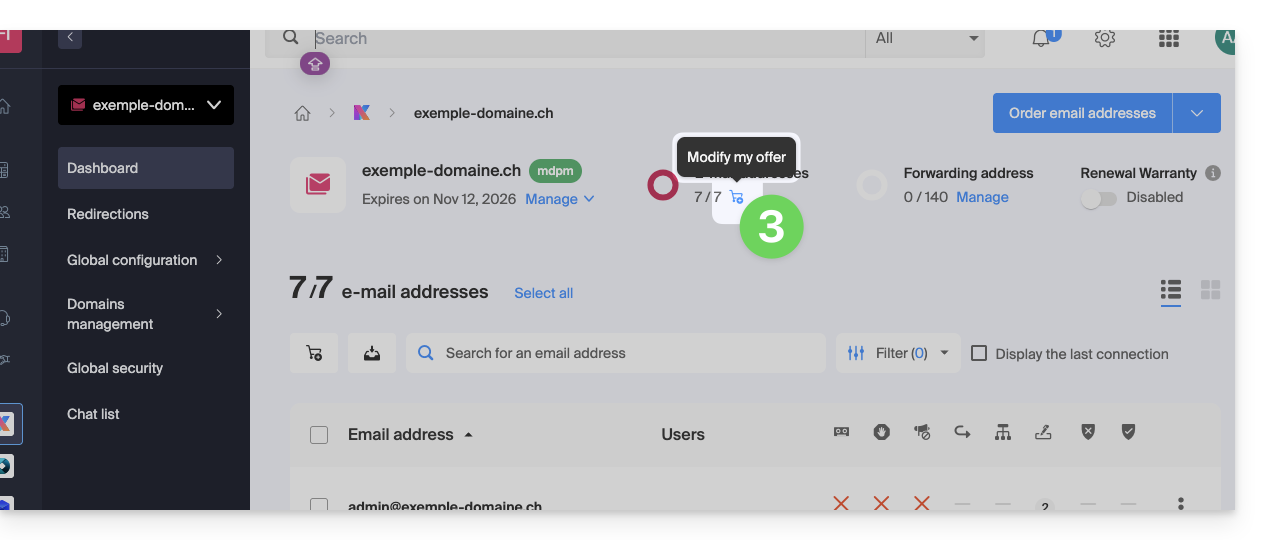
To see the number of email addresses currently available on your Service Mail, and then order more if necessary (or remove some):
- Click here to access the management of your product on the Infomaniak Manager (need help?).
- Click directly on the name assigned to the product concerned.
- The number of email addresses created (A) and the total number of email addresses available (B) on the Service are displayed at the top of the page:
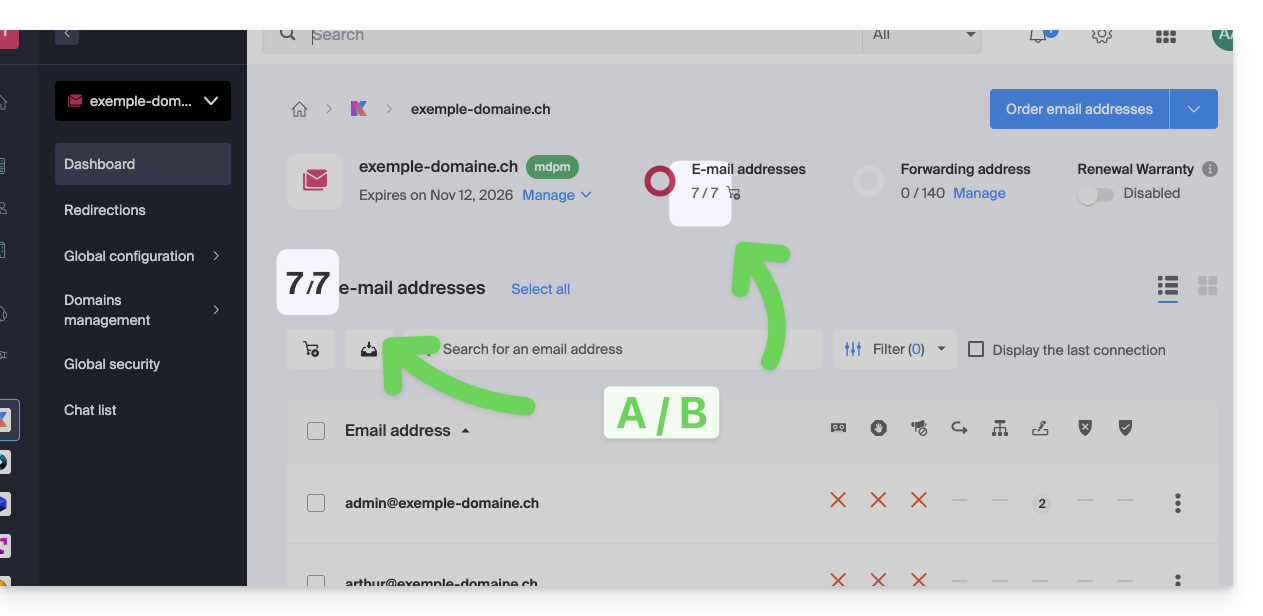
- Note that you can also view the quota directly at point 1, when you are on the page listing your Service Mail:
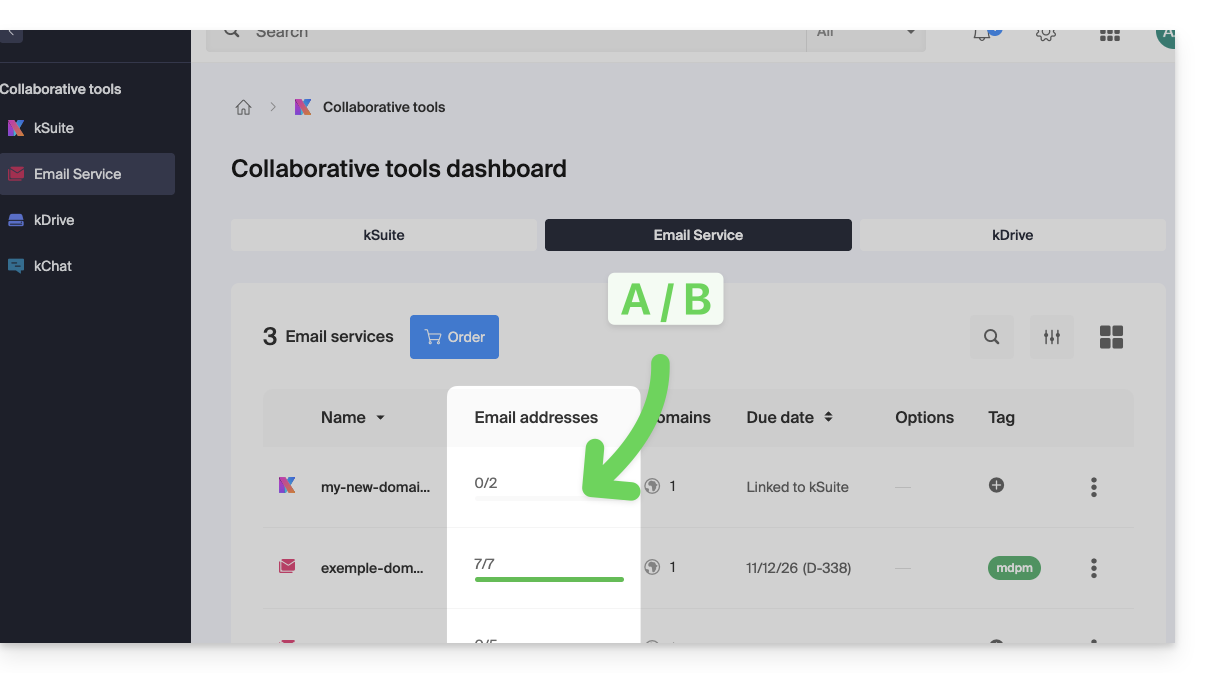
- Note that you can also view the quota directly at point 1, when you are on the page listing your Service Mail:
Increase the number of email addresses available
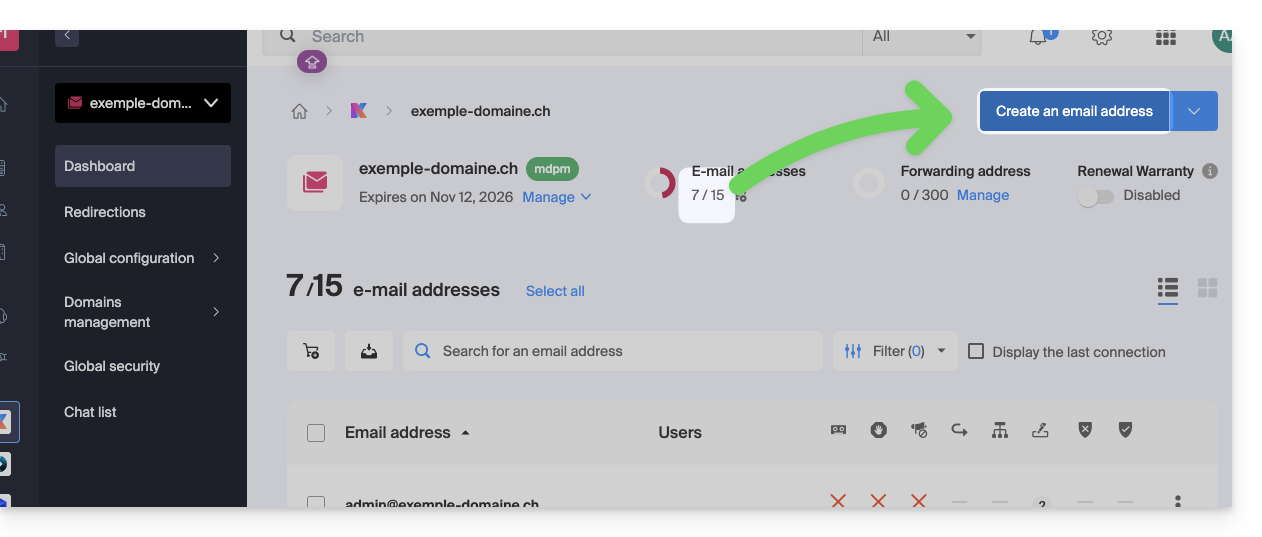
To increase the number of email addresses available to you on your Service Mail, thus allowing you to create new email addresses for yourself or your entourage:
- Click here to access the management of your product on the Infomaniak Manager (need help?).
- Click directly on the name assigned to the product concerned.
- Click at the top on the shopping cart icon:
- Adjust the desired quota and proceed with the order for the additional number of addresses on the Service Mail domain.
- Complete the payment procedure; you can now create your additional email addresses:
Reduce the number of email addresses available
To reduce the number of email addresses available to you on your Service Mail, thus allowing you to pay only for the number of addresses actually desired and used at the next renewal (minimum of 5 addresses for any Service Mail, excluding Service Mail Starter), you must, if necessary, have deleted the excess email addresses and then:
- Click here to access the management of your product on the Infomaniak Manager (need help?).
- Click directly on the name assigned to the product concerned.
- Click at the top on the shopping cart icon:
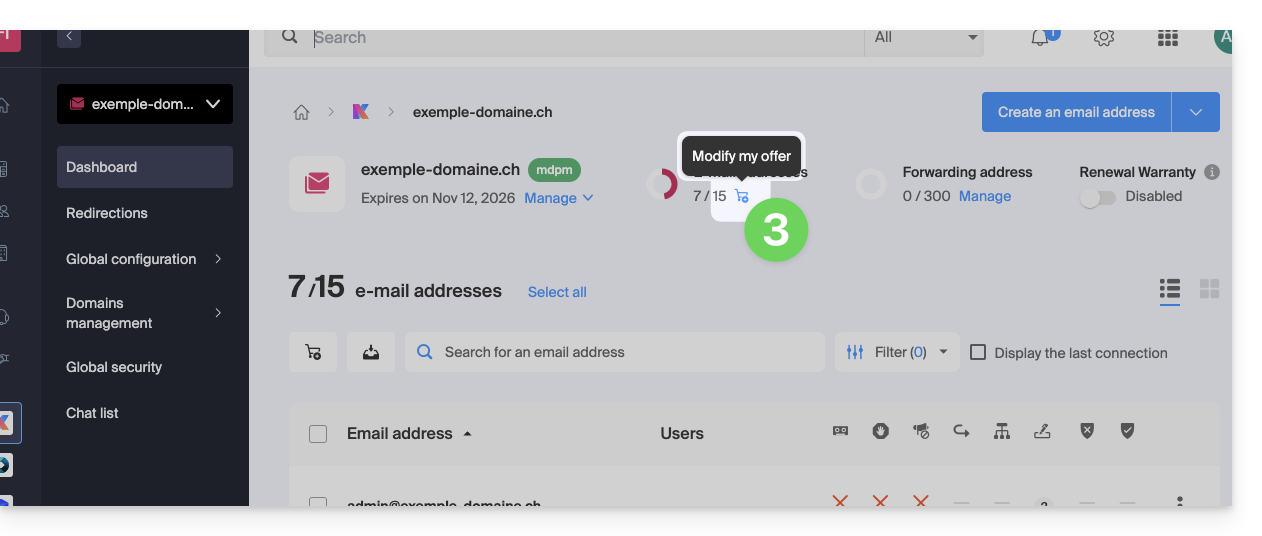
- Adjust the desired quota and complete the procedure by taking note of the important information displayed on the screen.
Link to this FAQ:
Has this FAQ been helpful?
This guide details how to manage the Organization Directory, which is a special address book available within the Infomaniak Contacts web app (online service: ksuite.infomaniak.com/contacts).
Introduction
- The Organization Directory is "automatically created" by the various users that make up one of the Organizations to which your user is affiliated.
- If Groups are created within the Organization, they will be visible in the Organization Directory:
- This address book is automatically synchronized with all internal users of your Organization.
- An administrator of the Organization can make certain entries in the directory private, hiding them from users with fewer permissions:
- It is not possible to export or rename it.
- You can change its display color:
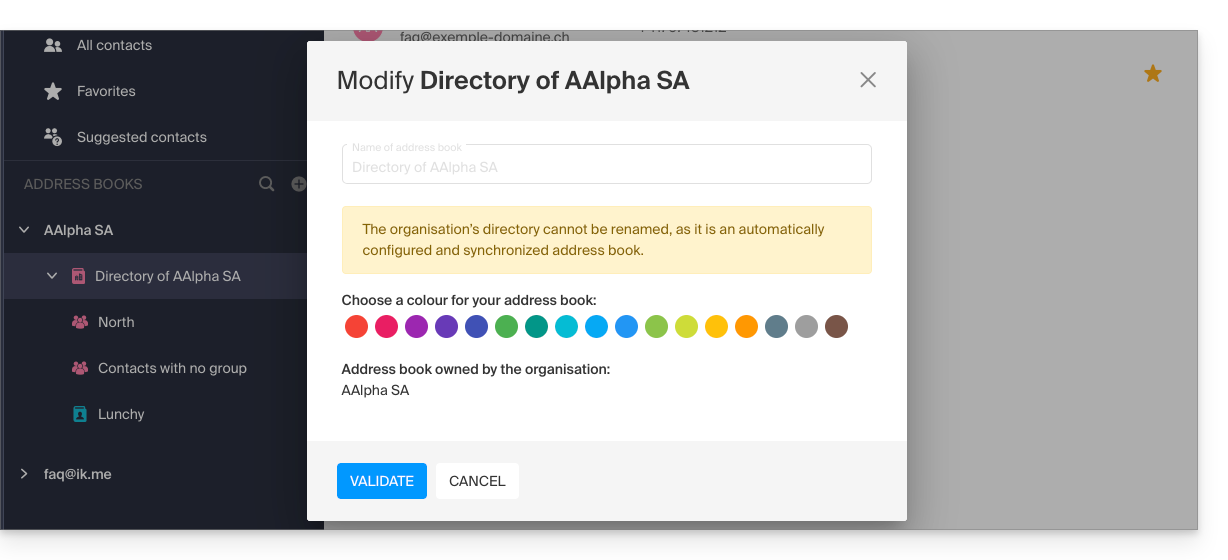
- You can change its display color:
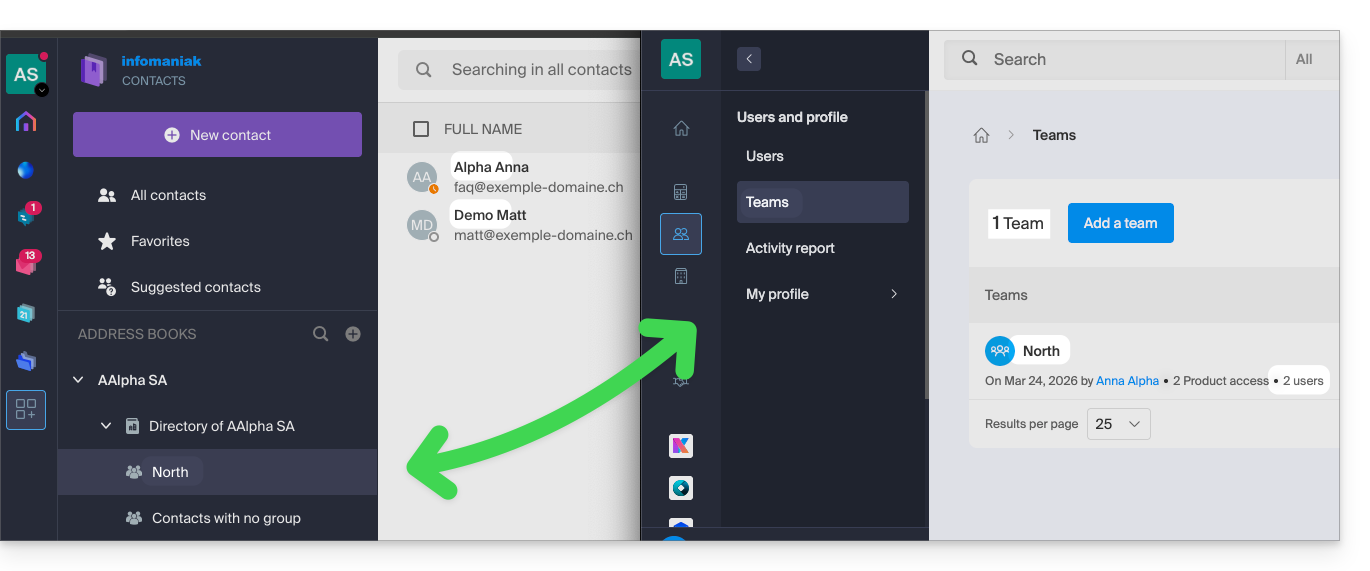
Accessing the Directory
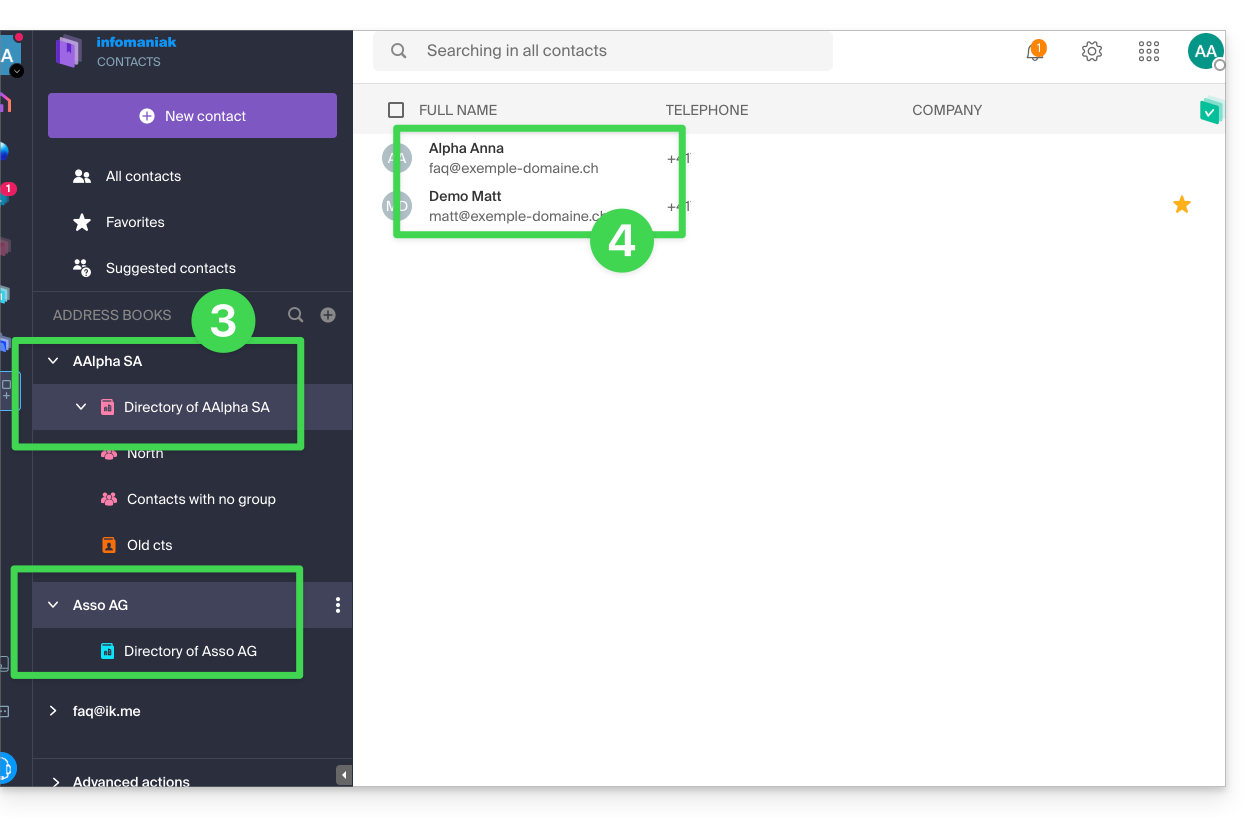
If your login ID corresponds to and belongs to one (or more) Organizations, you can access the different directories of these Organizations:
- Click here to access the Infomaniak Contacts web app (online service ksuite.infomaniak.com/contacts).
- Click on the chevron to the left of the name of the Organization in question.
- Click on {Organization name} Directory…
- The contacts of the selected Organization are displayed on the right:
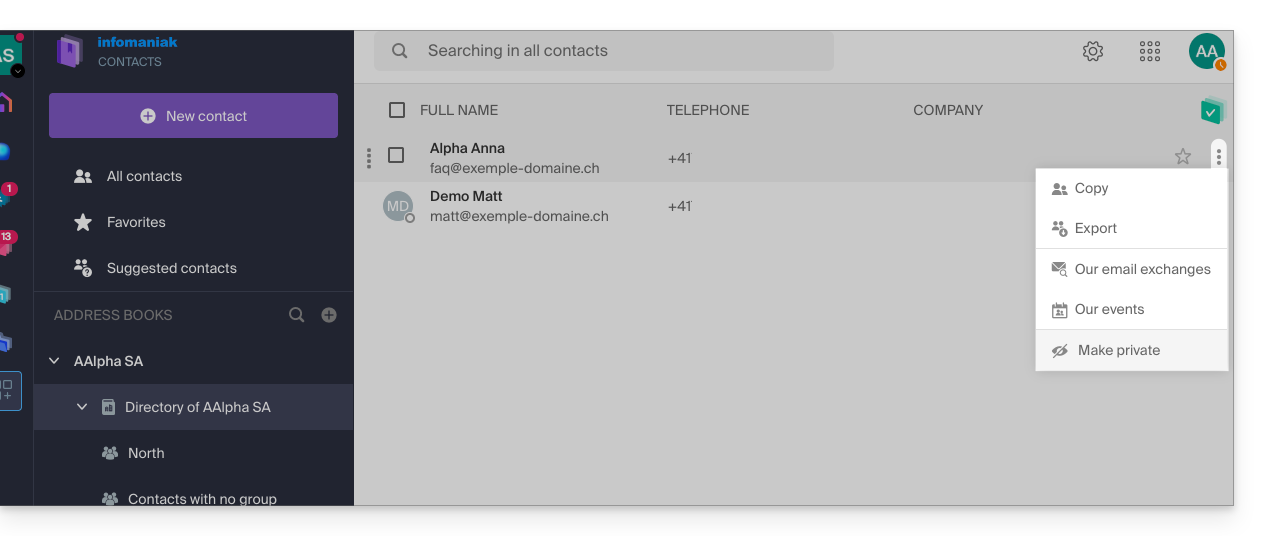
Modify a contact's details in the directory
You can do many things (copy, export their profile, view email exchanges or calendar events, add to favorites, call, etc.) by clicking on a contact's profile in the Organization Directory address book, but you will not be able to modify the details on behalf of the person concerned: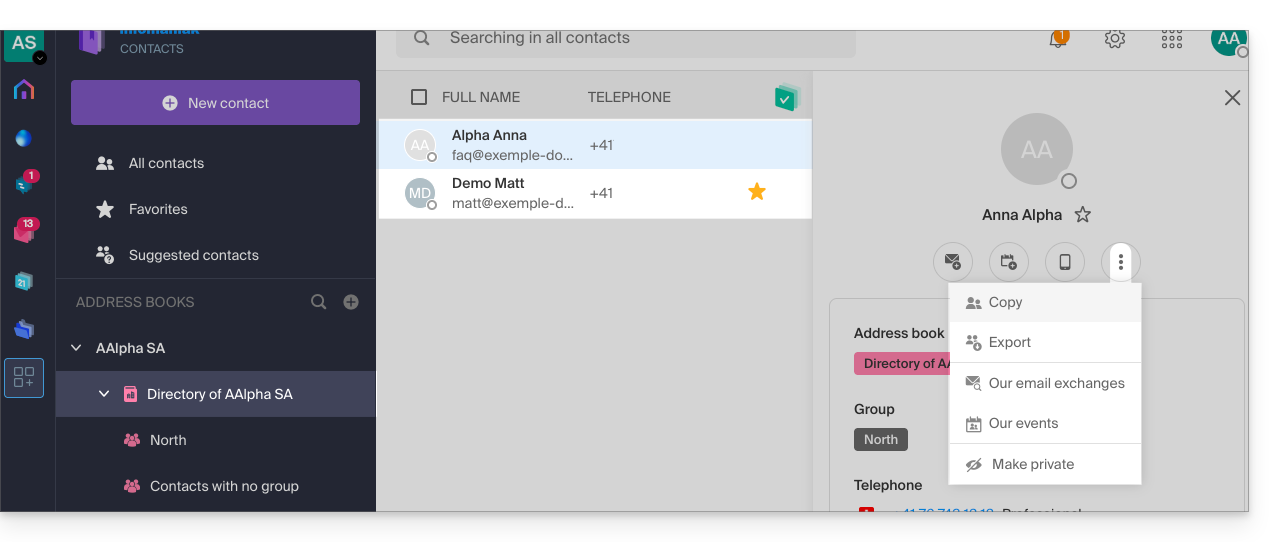
To modify the main information, the person concerned (the person for whom a change needs to be made) must log in to their profile and modify it (see below):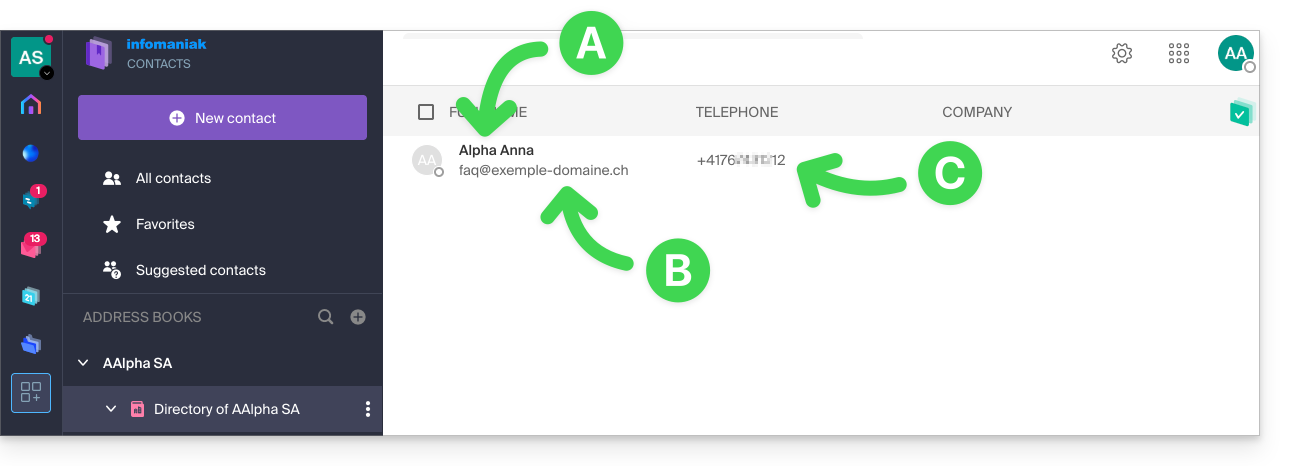
A. First name & last name
To change the first name and last name displayed in the directory, the user in question (here, faq@exemple-domaine.ch) must log in to their account and modify their contact information. Please refer to this other guide for more information.
B. Email address
To change the email address displayed in the directory, the user in question must log in to their account and modify their contact information. Please refer to this other guide for more information.
C. Phone number
To change the phone number displayed in the directory, the user in question must log in to their account and modify their contact information. Please refer to this other guide for more information.
Link to this FAQ:
Has this FAQ been helpful?
This guide will quickly introduce you to the essential features of Euria, the artificial intelligence available within kSuite. It performs particularly well with the kDrive Infomaniak web app (online service ksuite.infomaniak.com/kdrive).
✘ UNAVAILABLE with
kSuite Free / kSuite Standard
my kSuite / my kSuite+ (ik.me, etik.com, ikmail.com)
kDrive Solo / kDrive Team / kDrive Pro
Use AI for your files on kDrive
Prerequisites
- You must be Administrator or Legal Representative within the Organization that manages the kDrive.
- To activate Euria for all users of your kDrive, follow the wizard that appears when you log in to kDrive.
- Read and understand this other guide about the model used and the responsibilities of each user.
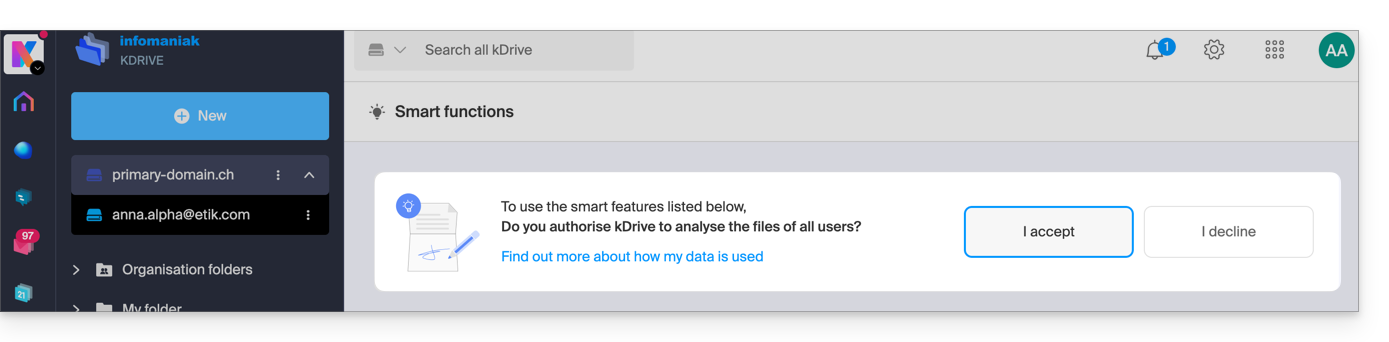
- You can also activate (or deactivate) Euria by going to the unified settings:
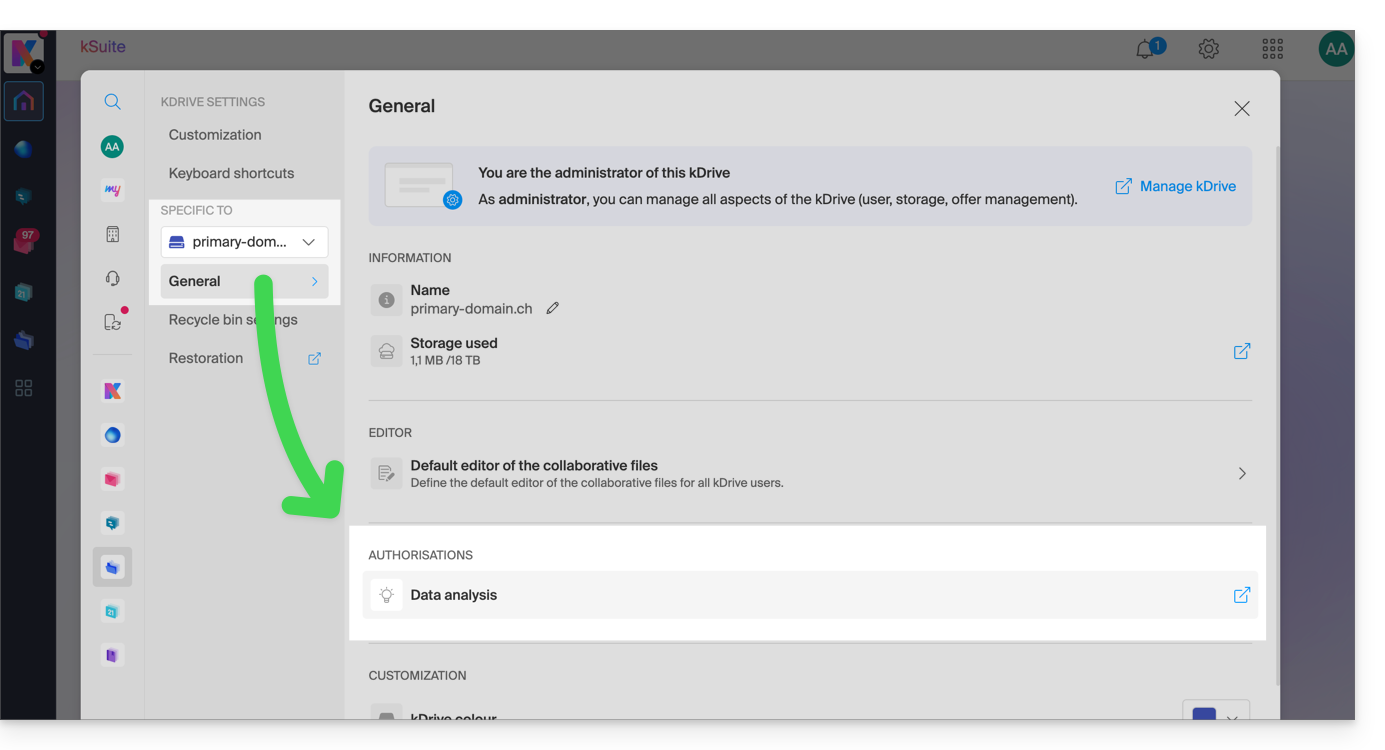
- You will then need to accept (or revoke) the content search features for documents:
To access Euria on kDrive:
- Click here to access the Infomaniak kDrive web app (online service ksuite.infomaniak.com/kdrive).
- Open a PDF document (Euria is also available with other text/code file types:
.md,.txt,.json,.php, etc.) or right-click on the file in question: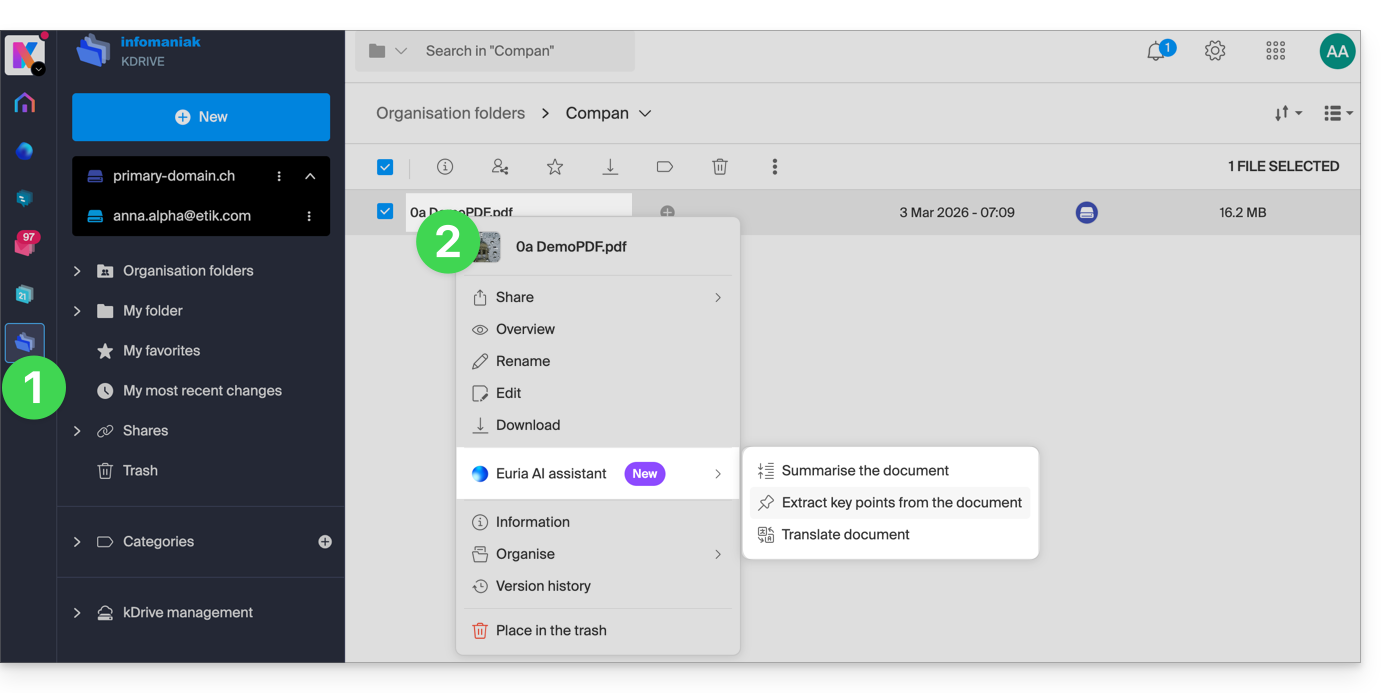
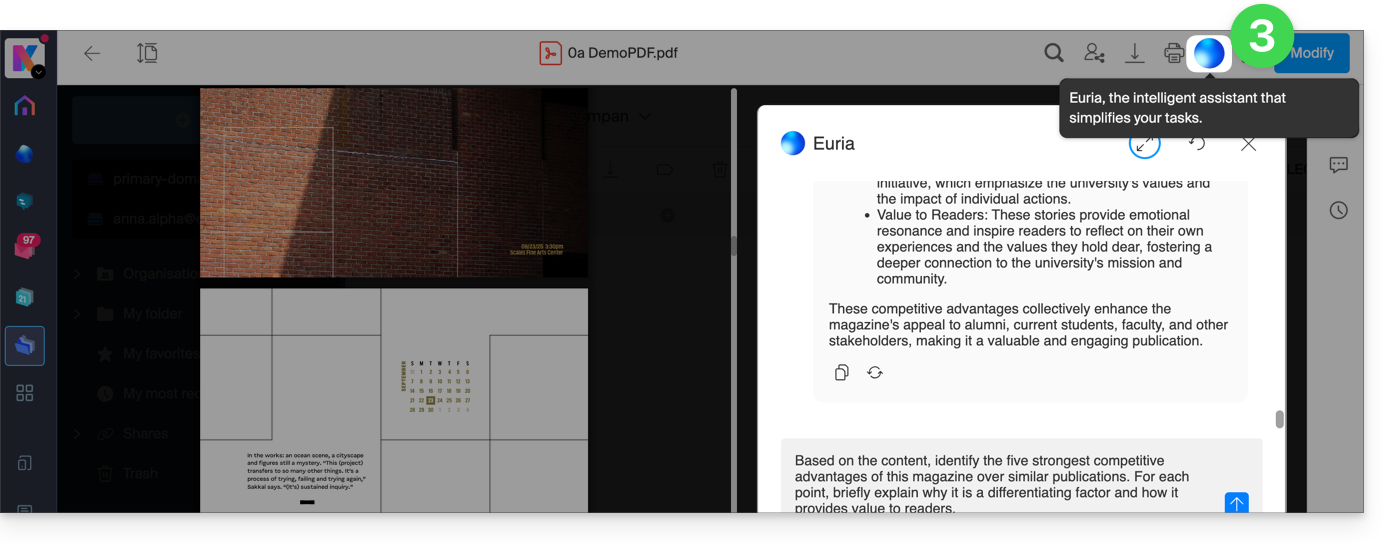
- Euria will open in a side panel on the right; if you close it, Euria remains accessible via the round icon at the top right:
How can Euria help?
Euria helps you to effectively leverage the document you have opened (and only that one); it can, in particular:
- answer your questions about its content (details, statistics, changes)
- summarize the key points (or even simplify them, and even more so if you specify “for a 10-year-old child”…)
- translate it
- provide metadata (size, creation or modification date)
- explain the terms or acronyms used
For example, if the document is a long company report on the past year, you can ask for the current size of the Development department, what the top priority projects are, or the last date the document was modified…
Create an event for your calendar
With a document mentioning an appointment (e.g., a medical appointment), you can ask Euria to create a snippet of code that, once copied and pasted into an appropriate file, will allow you to add an event to your calendar. Example phrasing: “Create an event in ics format, taking the details from this appointment”.
Euria can also extract events from a more complex document: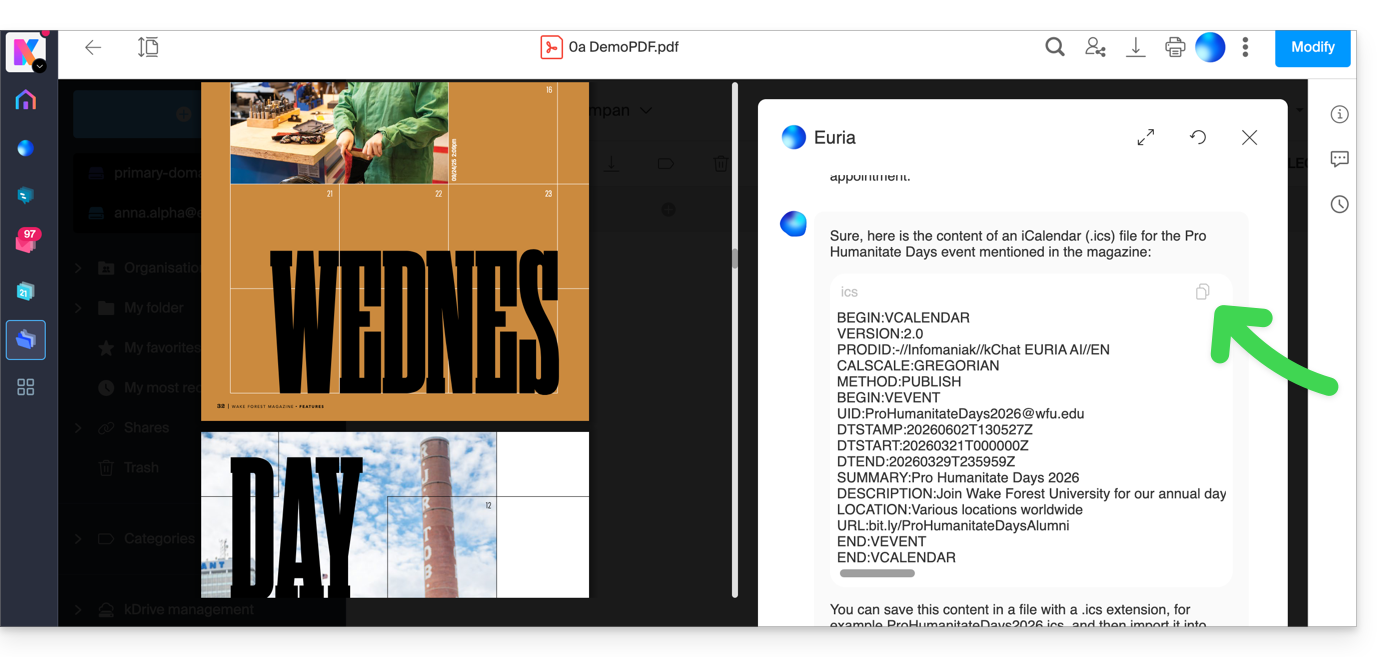
Euria will explain what it has done (a VCALENDAR code) and what you need to do (create a new file with the .ics extension containing the code it generated, and open it on your computer to import it into your usual calendar app or import it into your kSuite calendar):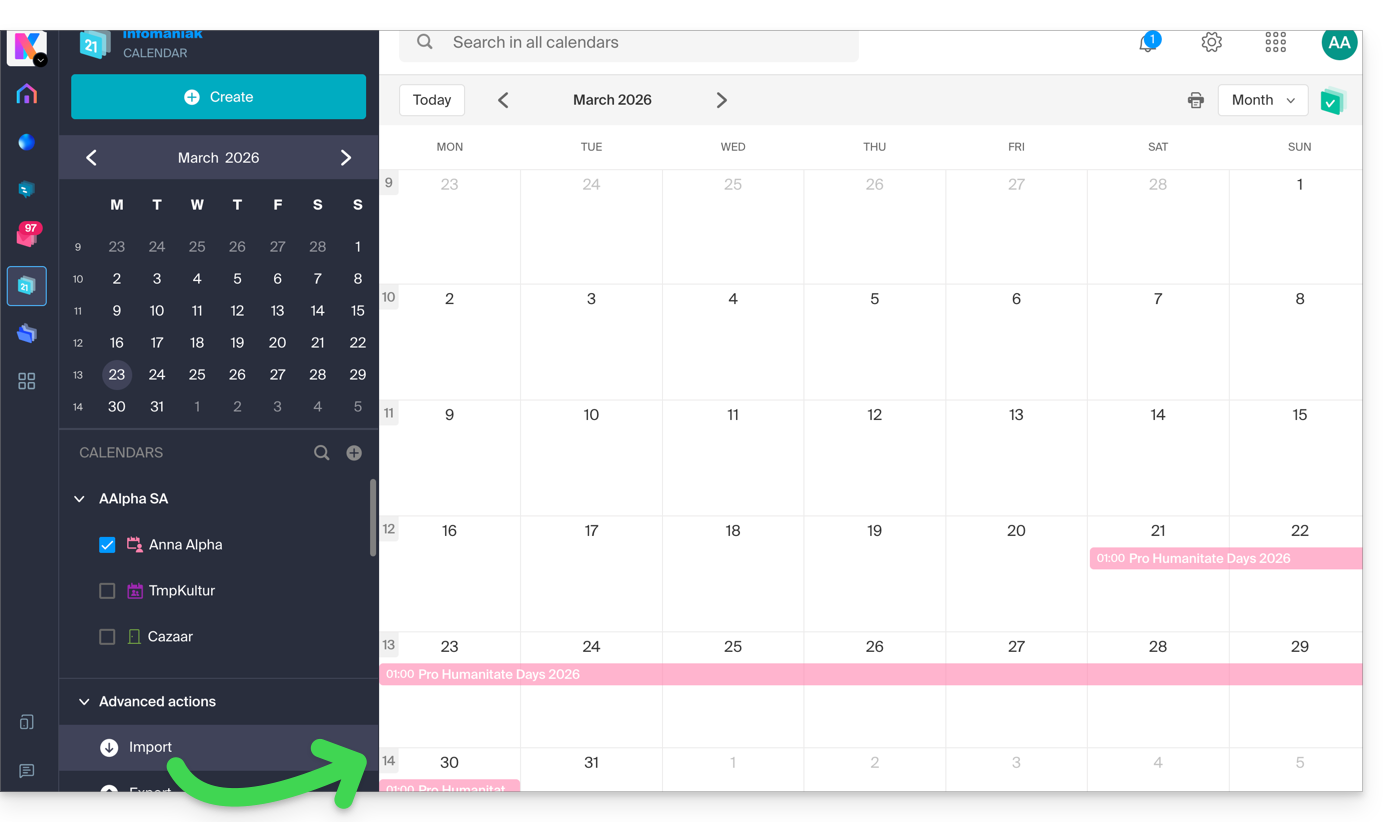
Create a genealogical tree of the characters
With a book stored on your kDrive, you can ask Euria to create a precise and complete genealogical tree to show the relationships between all the characters. You will thus obtain a list of names with their relationships.
But you can take the experience further by then requesting a “Mermaid” diagram based on this list. Simply copy and paste the code provided by Euria into a tool like mermaid.live:
Analyze a survey, write a blog post
Based on a survey/report document, you can ask Euria to write a new article in the tone you want and addressed to the desired target audience. Example: “Based on all of this, write a blog post with an engaging title and text of no more than 400 words, for a target audience of women aged 30 to 40”.
But you can also ask it to find “what are the biases in this survey” or "what elements would deserve to be explored or verified further". Euria can thus help you adopt a critical stance towards a survey or report, by pointing out any potential shortcomings, exaggerations, or biases.
It can also rephrase the conclusions of the survey for different audiences (professionals, teenagers, curious readers, etc.), suggest alternative angles for a related article, or even generate titles, introductions, or summaries according to the desired level of complexity.
The goal is to extract maximum editorial value from a single source of content, by diversifying the formats, tones, and points of view.
Link to this FAQ:
Has this FAQ been helpful?
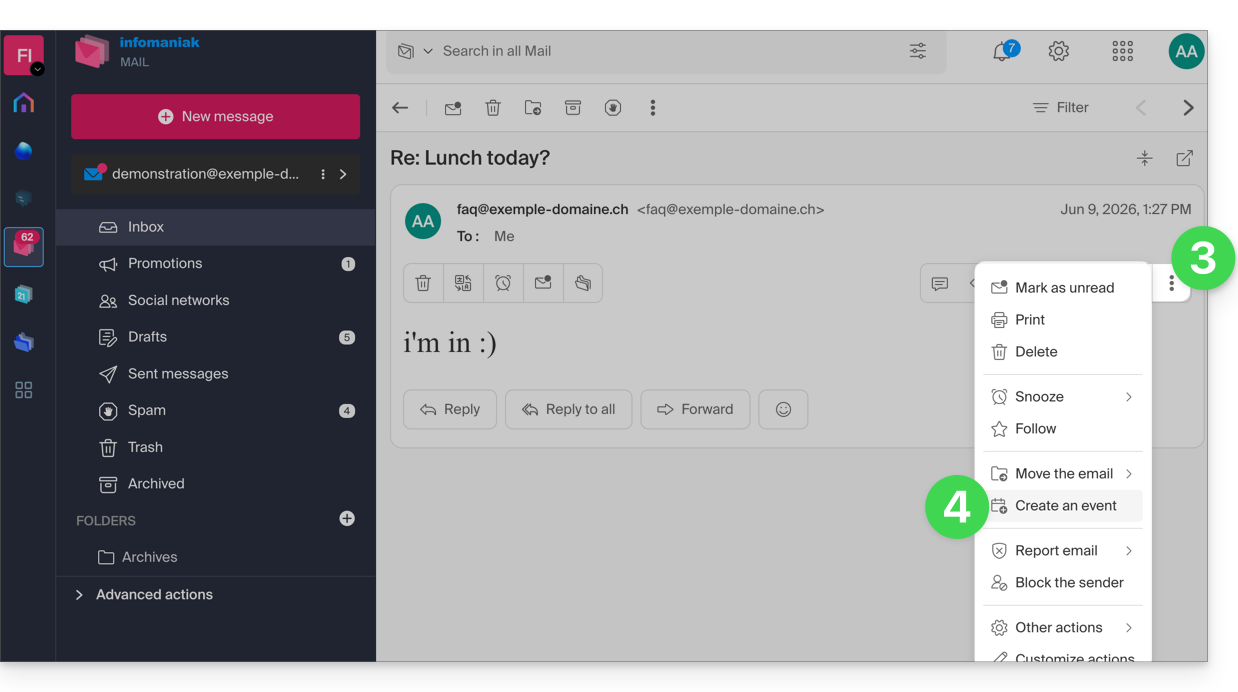
This guide explains how to quickly schedule a meeting between multiple users from the Infomaniak Mail web app (online service ksuite.infomaniak.com/mail).
Create an event from an email
To start the scheduling assistant:
- Click here to access the Infomaniak Mail web app (online service ksuite.infomaniak.com/mail).
- Open the message from the sender (or the conversation between multiple participants) with whom you want to organize a meeting/event.
- Click on the ⋮ icon in the upper right corner of the open message.
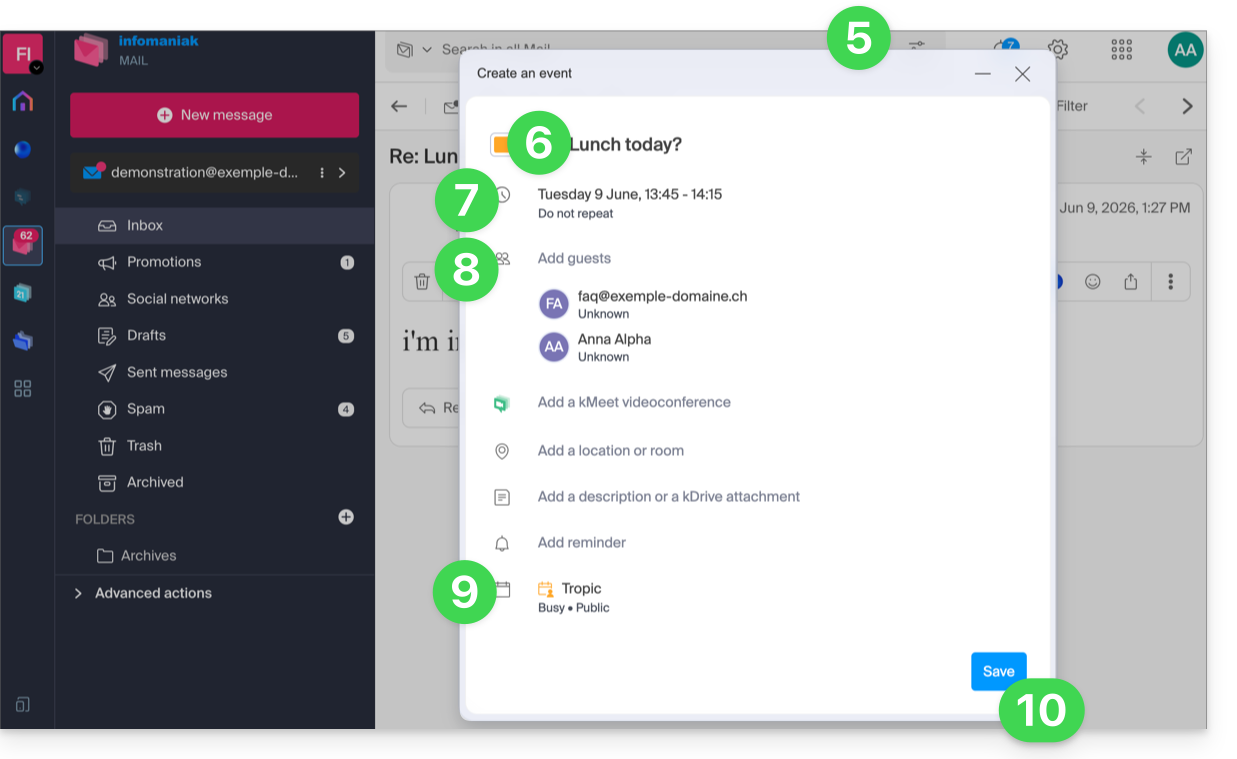
- Click on Create an event:
- The assistant for the Infomaniak Calendar app is displayed.
- The meeting title is automatically generated from the email subject, but it can be modified.
- The event duration (and its position within the day) is automatically generated as close as possible to the present time, but it can be modified, as can a possible room, which can be added below.
- The participants in the conversation are automatically added using their email addresses.
- Check or change the calendar used.
- Save the information to create the event and send the invitations:
Link to this FAQ:
Has this FAQ been helpful?
This guide is for you if you want to change your current email provider and host your emails with Infomaniak.
Preamble
- To help you identify the offer best suited to your needs, refer to this other guide.
- To avoid losing any messages and experiencing any interruptions:
- Follow the different links provided in order; they will open in a new tab of your browser, and return to this main guide after each completed step.
- If necessary, you can also migrate your:
You order a Mail Service only
Below are the different steps to migrate your mail service to Infomaniak securely.
Step 1
It is necessary to order the mail service by following this guide.
At the time of ordering, you can choose to transfer the domain name at the same time or order the mail service alone.
You can then import the content of your old addresses to Infomaniak: refer to this other guide.
Step 2
Once the addresses are configured and your old content imported, you will be able to link your external domain name to your Infomaniak Mail Service to start receiving emails at Infomaniak. You will need to follow the chapter "Link the external domain to your Mail Service" of this guide.
You will find here the MX / SPF to add in the DNS zone of your domain name:
SPF
Type: TXT
Host: Leave blank
Target: v=spf1 include:spf.infomaniak.ch -all
MX
Priority: 5
Host: Leave blank
Target: mta-gw.infomaniak.ch (for Gandi, it is necessary to add a dot at the end "mta-gw.infomaniak.ch." )
Step 3 (optional)
Once everything is working correctly and if it hasn't been done already, you can transfer your domain name: refer to this other guide.
As soon as the transfer is initiated, you should have access to the DNS zone of your domain name on the Infomaniak Manager. You can therefore check…
1. … in the DNS diagnostic if there are any corrections to be made and if necessary add the DNS entries that might be necessary for other services used with your domain name (newsletter or other).
2. … in the global security tab of your mail service if DKIM is properly activated.
If emails arrived during the migration with your previous provider, you can import the content of your old addresses to Infomaniak again by following this guide (duplicates are managed).
You order a kSuite
Here are the different steps to migrate your external mail service to an Infomaniak kSuite securely.
Step 1
Order kSuite from this page.
Once the order is completed, access your kSuite and add your domain name to it.
You can then create your email addresses and even import the content of your old addresses: refer to this other guide.
Step 2
Once the addresses are configured and your old content imported, link your external domain name to your Infomaniak Mail Service to start receiving emails at Infomaniak. Refer to the chapter "Link the external domain to your Mail Service" of this other guide.
You will find here the MX / SPF to add in the DNS zone of your domain name:
SPF
Type: TXT
Host: Leave blank
Target: v=spf1 include:spf.infomaniak.ch -all
MX
Priority: 5
Host: Leave blank
Target: mta-gw.infomaniak.ch (for Gandi, it is necessary to add a dot at the end "mta-gw.infomaniak.ch." )
Step 3 (optional)
Once everything is working correctly and if it hasn't been done already, you can transfer your domain name: refer to this other guide.
As soon as the transfer is initiated, you should have access to the DNS zone of your domain name on the Infomaniak Manager. You can therefore check…
1. … in the DNS diagnostic if there are any corrections to be made and if necessary add the DNS entries that might be necessary for other services used with your domain name (newsletter or other).
2. … in the global security tab of your mail service if DKIM is properly activated.
If emails arrived during the migration with your previous provider, you can import the content of your old addresses to Infomaniak again by following this guide (duplicates are managed).
Link to this FAQ:
Has this FAQ been helpful?