Knowledge base
1000 FAQs, 500 tutorials and instructional videos. Here, there are only solutions!
This guide explains the differences between Infomaniak's web hosting offers to help you choose the best solution according to your IT needs.
If you are looking to host your email, refer to this other guide.
Web Hosting Starter
Free web hosting
The Web Starter hosting is offered for free with each domain name registered with Infomaniak. It provides 10 MB of disk space to create a site (basic pages in HTML language only - no PHP, no database) even without particular knowledge thanks to the Welcome Page tool.
- Register or transfer a domain name with Infomaniak
- Learn more about the benefits included with a domain name
Shared Web Hosting
The flagship offer to create your sites
These web hostings are shared offers (the websites will be hosted on servers whose resources are shared with other customers). To ensure the reliability of these shared services, Infomaniak servers use on average only 40% of the CPU power and are equipped with professional last-generation SSD disks.
Web hosting offers a minimum of 250 GB of disk space and allows you to manage multiple websites with multiple domain names. This offer includes all the technologies usually used to create professional sites: PHP, MySQL, FTP and SSH access, SSL certificates and easy installation of WordPress or common CMS, etc. It is also possible to add a Node.js site and/or Site Creator.
Note that without any hosting, it is also possible to obtain and then use Site Creator “autonomous / standalone”. Refer to this other guide.
Cloud Server
Professional web hosting
With a Cloud Server, the resources allocated to you are not shared with other customers and you can customize the hardware and software configuration of your server according to your needs. A Cloud Server also allows you to use components that are not available on shared web hostings (Node.js, mongoDB, Sol, FFMPEG, etc.).
- A Cloud Server allows you to easily manage your server via the same administration interface as web hostings - you manage the sites in the same way.
- A VPS allows you to manage your server 100% autonomously with the version of Windows or the Linux distribution of your choice (
Debian,Ubuntu,openSUSE, ...) - solid technical skills are required to use a VPS, including VPS Lite.
Public Cloud (and Kubernetes Service)
Open, proven and secure IaaS solution
For Infomaniak, it is the infrastructure that powers kDrive, Swiss Backup and the Webmail, services used by several million users. But Public Cloud is accessible to everyone and provides the resources you need to develop your projects.
With the help of personalized and tailored offers, you will have no trouble managing your development budget. No setup fees. No minimum amount. Cancelable at any time. You only pay for the resources actually used with Public Cloud at the end of each month, the same goes for Kubernetes Service.
Jelastic Cloud
Custom web hosting with the technologies of your choice
Jelastic Cloud allows you to create custom development environments with the technologies of your choice (PHP, Java, Docker, Ruby, etc.). It is a flexible cloud offer:
- Horizontal and vertical scaling of resources.
- Payment based on actual resource consumption.
- Easy customization of your infrastructure (redundancy, IP, SSL, load balancing, etc.).
Link to this FAQ:
Has this FAQ been helpful?
This guide details sending authenticated emails from a website/CMS hosted by Infomaniak.
Introduction
- Using an authenticated SMTP server to send emails from your applications offers numerous advantages over the standard, unauthenticated PHP mail() function:
- enhanced security,
- improved delivery reliability,
- more precise error management,
- optimal compatibility with third-party email servers,
- and complete tracking of sent emails.
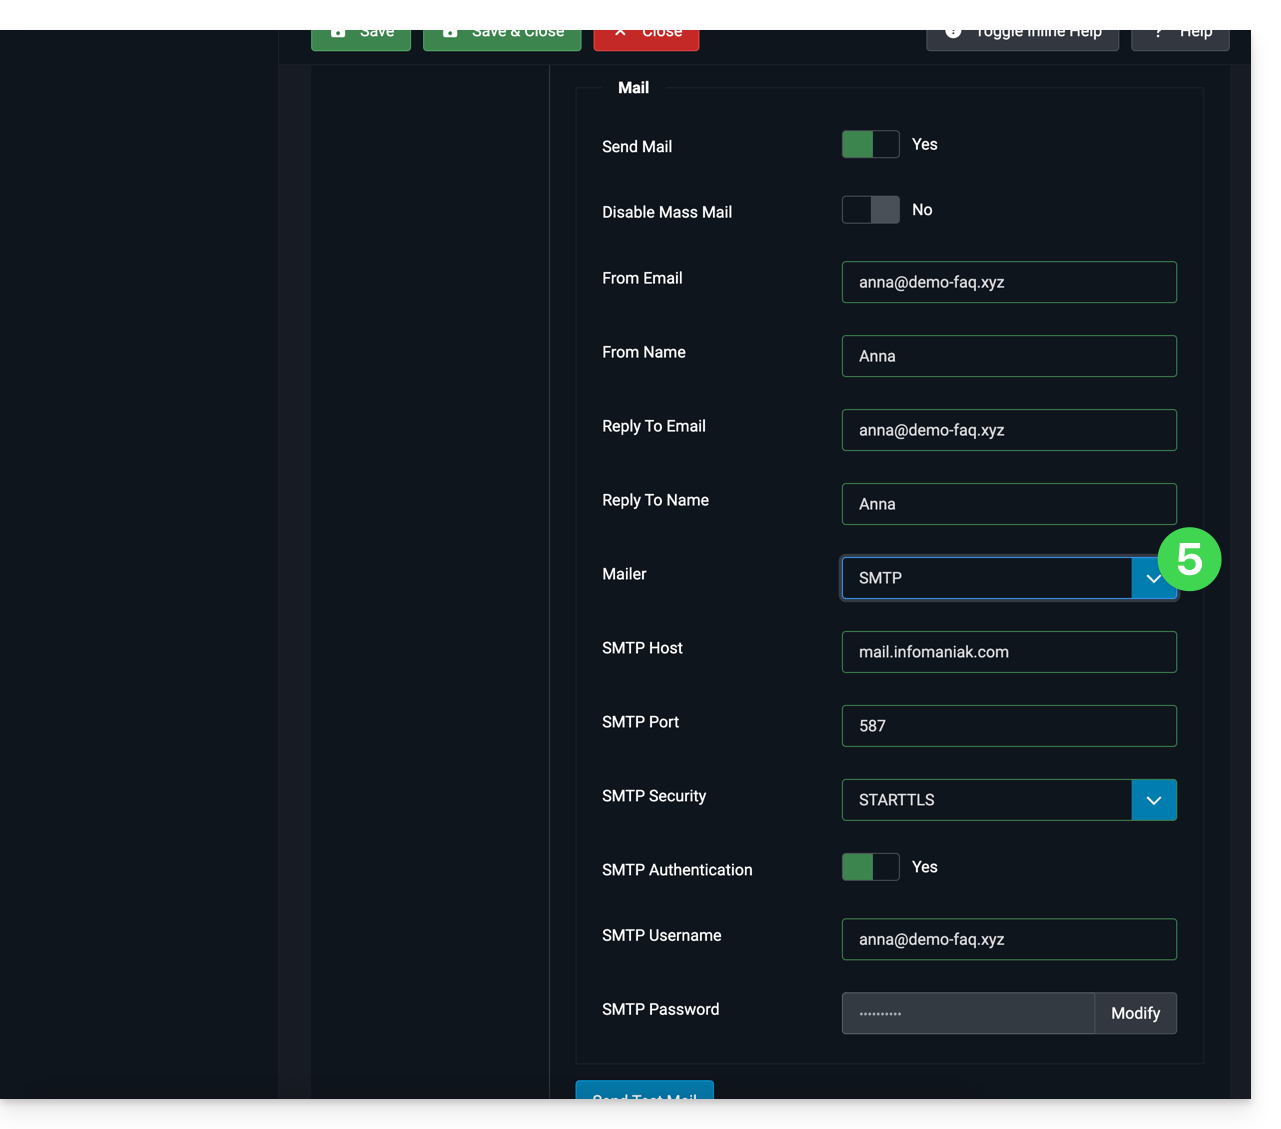
- Recommended settings:
- Outgoing SMTP server =
mail.infomaniak.com - SMTP port & encryption protocol and command/method to activate this protocol:
587+ STARTTLS - Username = the complete email address (& entire address) (need help?)
- Password = the one generated for the email address you want to use (need help?)
- Authentication is mandatory for sending emails:
- It is activated in the SMTP settings of your CMS.
- Check "use the same settings as the incoming server" or, depending on the CMS, enter a username (= complete email address & entire address) and the generated password.
- Outgoing SMTP server =
Examples of SMTP configuration…
Prerequisites
- You must have an email service.
- You can use the Mail Service offered by Infomaniak or any other email service of your choice.
If you have an email address whose domain is linked to your website (email@domain-site.xyz for example), enter its details so that you can use it for sending emails from your web server via SMTP:
… on WordPress
- Log in to the WordPress administration panel.
- Install an SMTP plugin ( WP Mail SMTP works).
- Configure the plugin, for example:
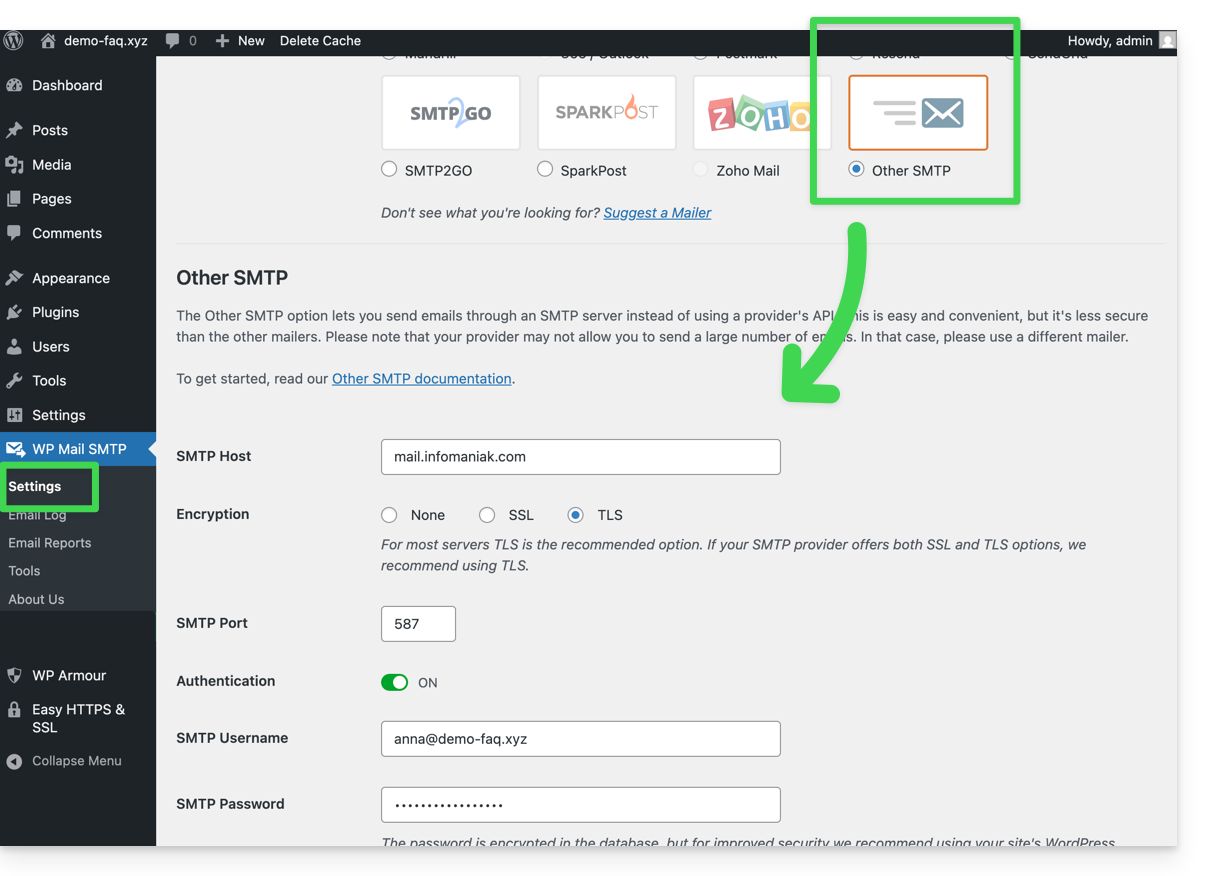
From then on, an email sent from a contact form on the site (e.g., the default Divi form) will be sent using the SMTP method.
To verify this, simply check the headers of a message received in this way, in particular the x-mailer line, which may mention, for example, WPMailSMTP/Mailer/smtp instead of PHPMailer.
Note: the x-mailer can be any indication and may not necessarily reflect the actual sending method!
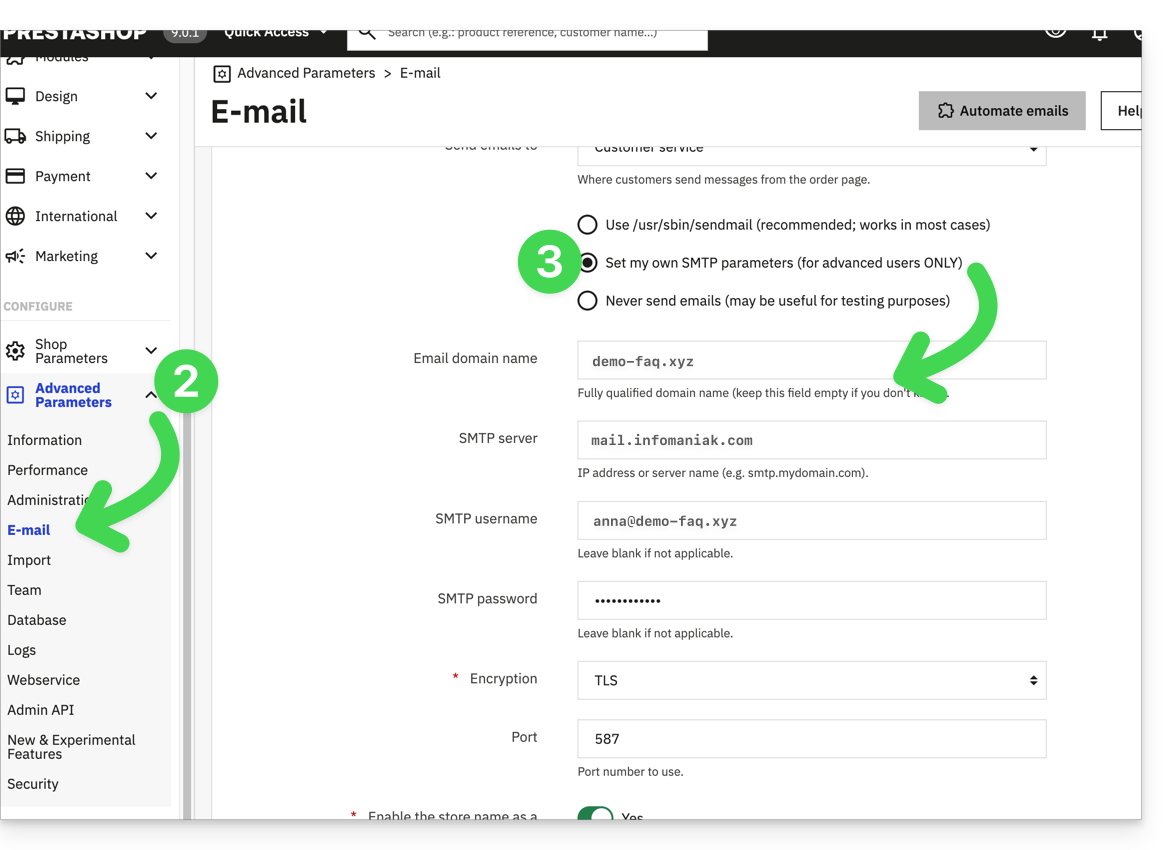
… on Prestashop
- Log in to the Prestashop administration panel.
- Go to Advanced Parameters then Email.
- Configure sending via SMTP:
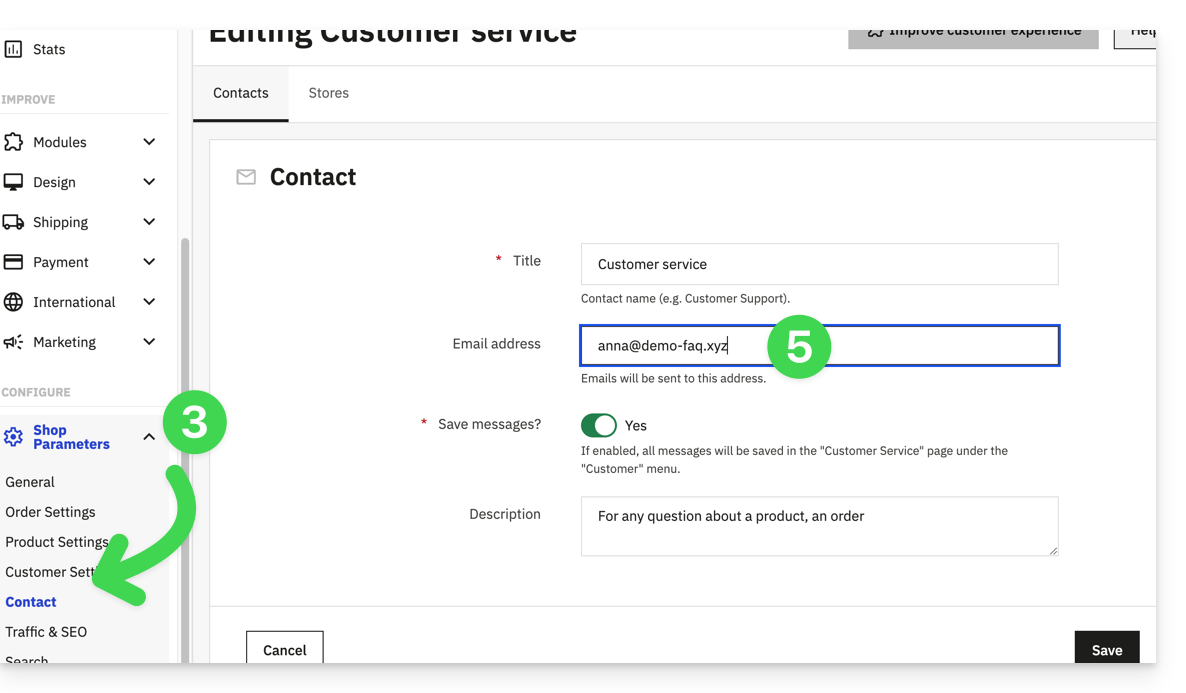
Then, check (to avoid an error such as Could not instantiate mail function or sender mismatch) that the address you have configured in these advanced parameters corresponds to the address used by Prestashop when sending emails. To do this:
- Log in to the Prestashop administration panel.
- Go to Shop Parameters.
- Click on Contact in the left-hand menu.
- On the Contacts tab, check that the email address mentioned is the same as the one configured previously.
- Edit the email addresses if necessary:
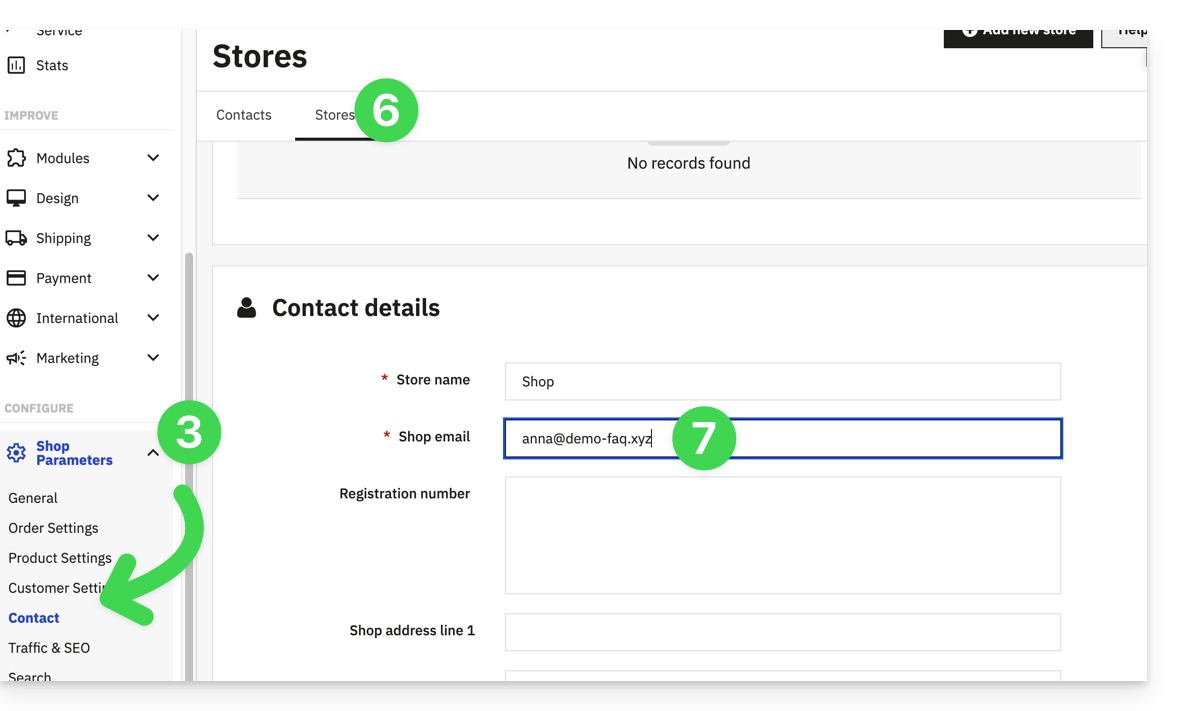
- Click on the Shops tab.
- Check (and correct if necessary) that the email address mentioned is the same as the one configured previously:
… on Joomla
- Log in to the Joomla administration panel.
- Click on System in the left-hand menu.
- Click on Global Configuration.
- Click on the Server tab:
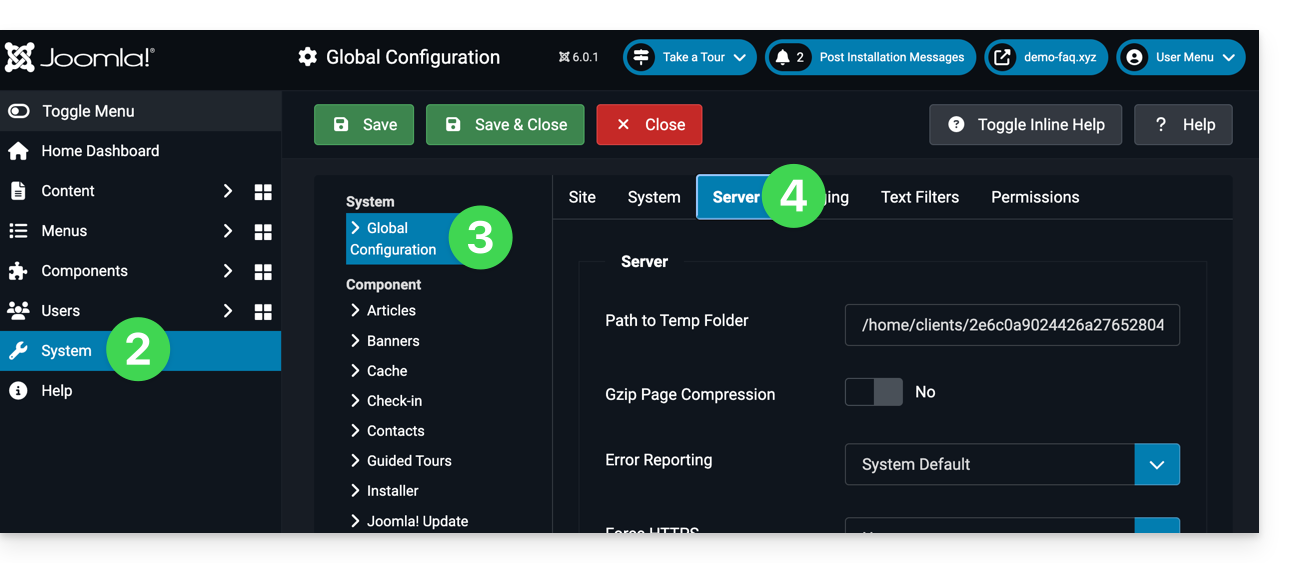
- Configure sending via the SMTP sending method:
Link to this FAQ:
Has this FAQ been helpful?
This guide explains how to transfer an Infomaniak product from one Organization to another.
Preamble
- You can move almost all products subscribed with Infomaniak to a different Infomaniak Manager interface than the one on which the product is currently located; this is therefore an internal transfer, from Organization to Organization.
- my kSuite cannot be transferred.
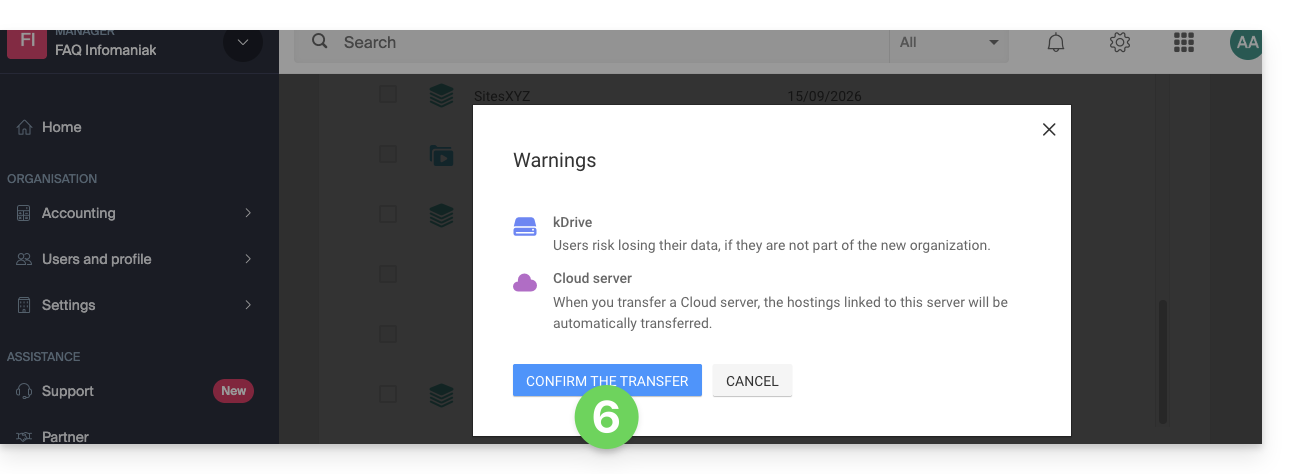
- The users who currently have access to the selected products will not be transferred (and therefore may no longer have access to the products).
- Regarding kDrive: users who currently have access to kDrive will be integrated into the new Organization.
- They will retain their access, their kDrive permissions, but any management rights they may have over the product itself will be lost.
- Groups (formerly "work teams") are not moved either, rights managed via Groups are also lost.
- If your user has access to multiple Organizations it is even easier to send to one of them the product of your choice.
- The invoices of the selected products will not be transferred.
- This operation does not cause any interruption.
Generate a transfer link
Prerequisites
- Be Administrator or Legal Representative within the Organization.
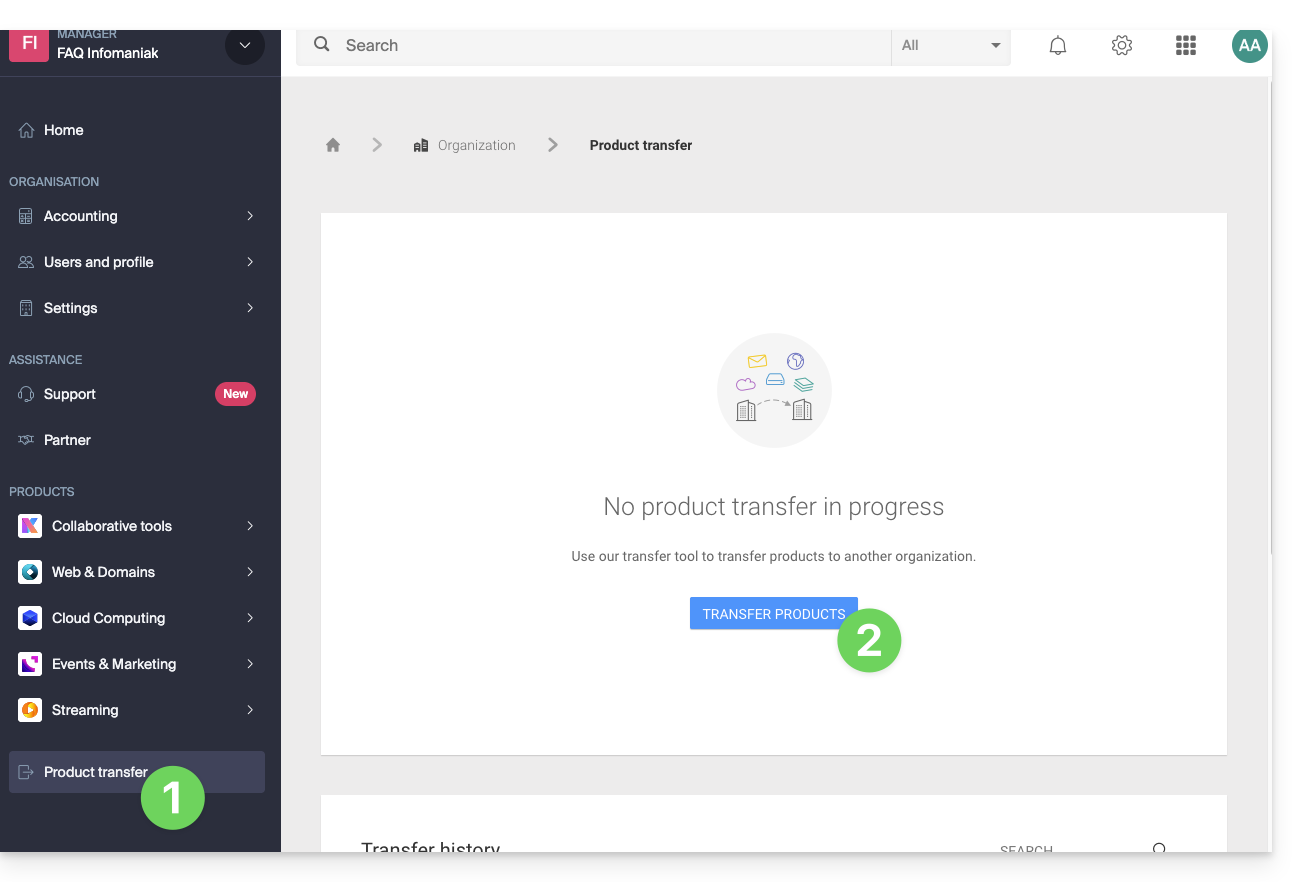
To transfer a product:
- Click here to access product transfers management on the Infomaniak Manager (need help?).
- Click on the Transfer products button:
- Check the product(s) to be moved:
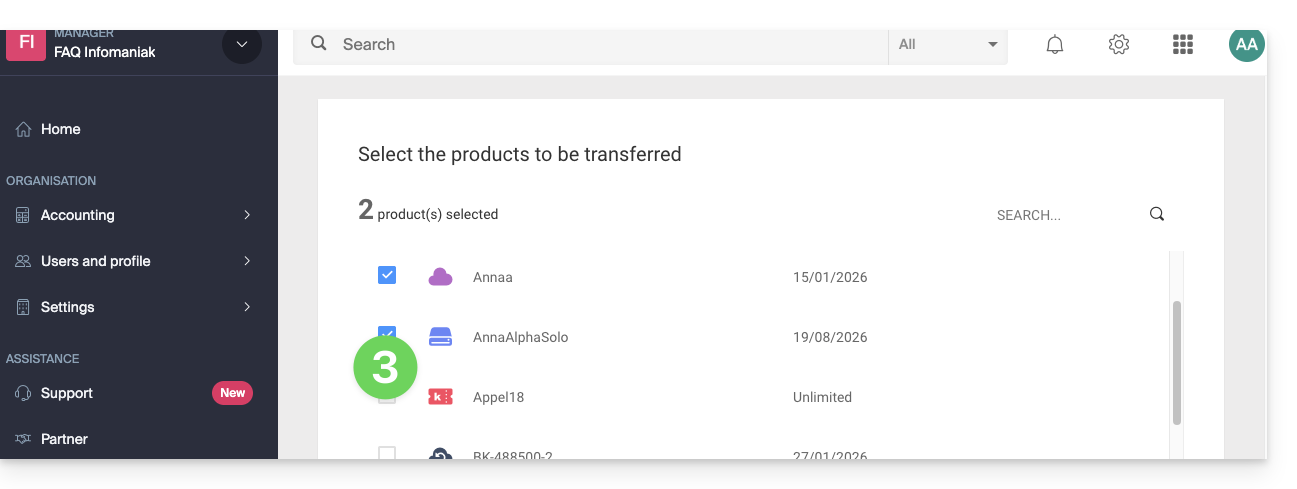
- Read and accept the general conditions.
- Click on the Transfer button:
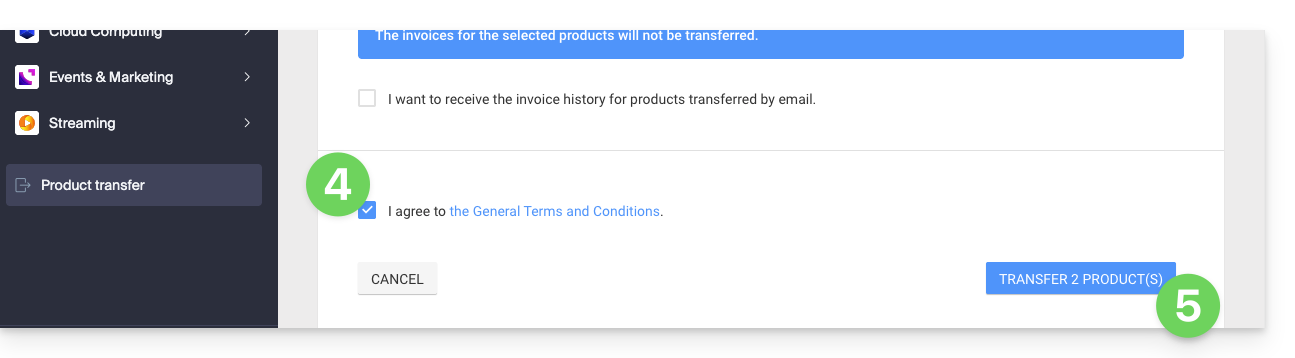
- Read and validate any warnings:
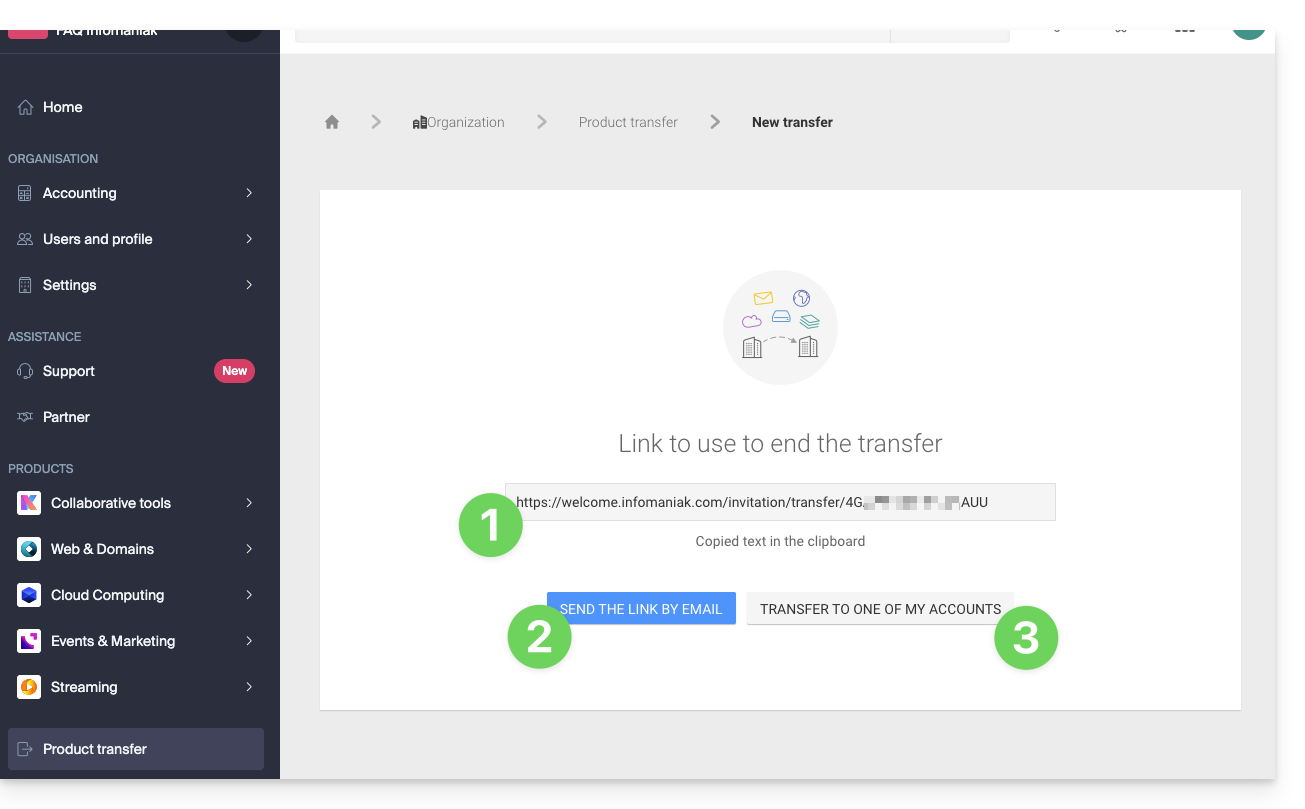
The transfer has started. Now, at your choice, you can:
- Copy the transfer link…
- or send it to the email address of your choice…
- or select directly one of the Organizations to which your user is attached, and the selected product will be transferred there:
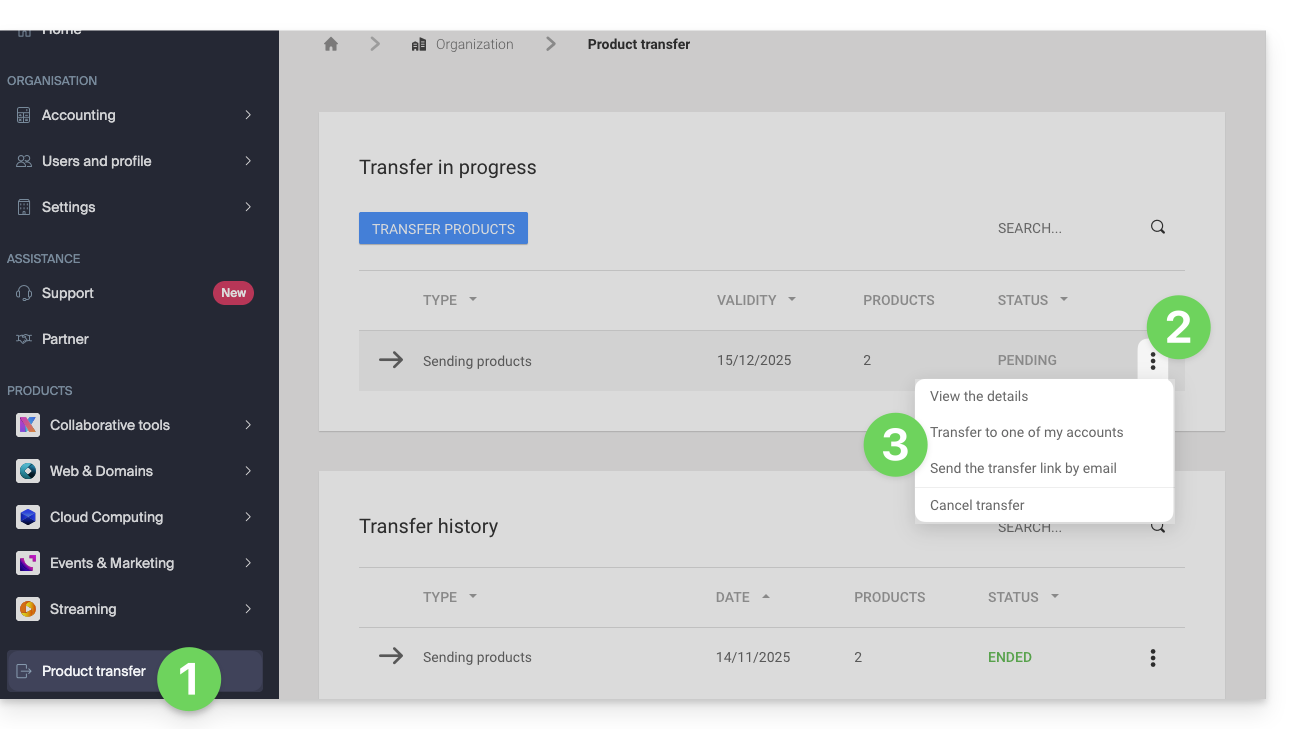
At any time you can return to the product transfer page to find the possibilities listed above:
Alternative method
In the case of one-off transfer, you can also go directly to the dashboard of the product concerned and click on Manage (example in the image below) however, since this menu is not always present, it is better to prioritize the first method above, which also allows bulk transfer: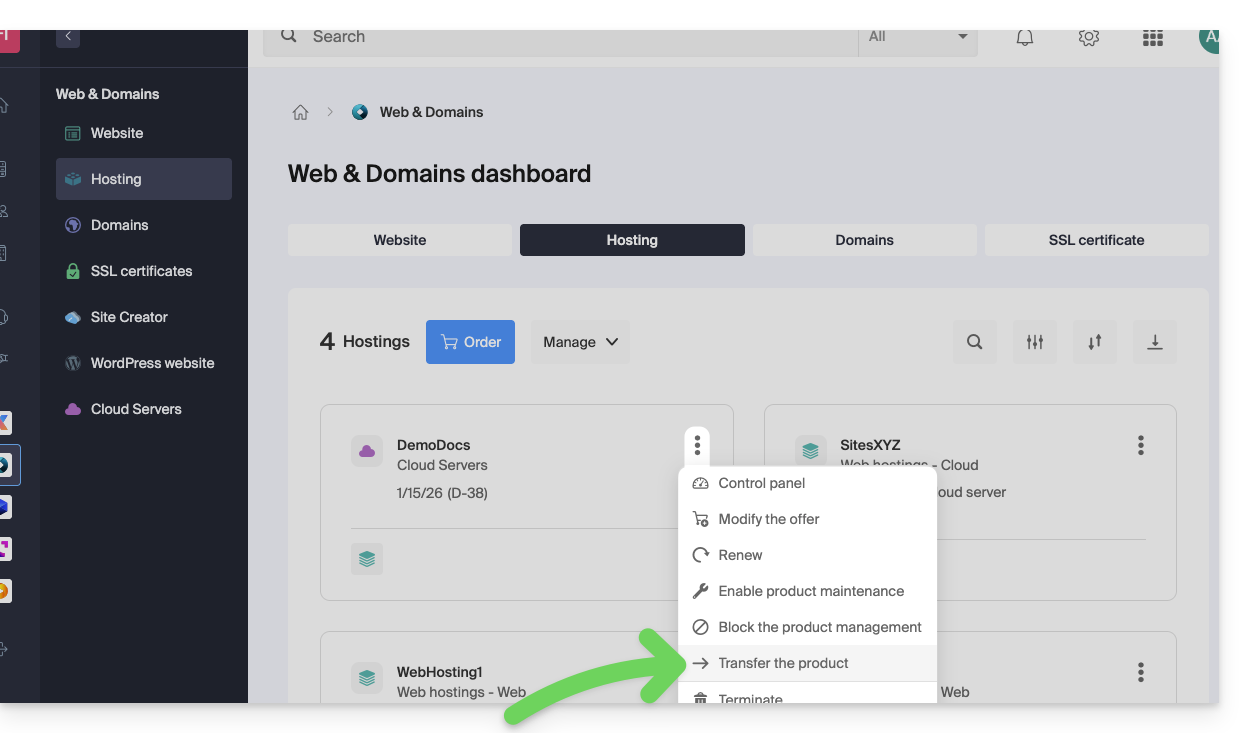
Refer to this other guide regarding Jelastic Cloud.
Receive the product
Once a product transfer has been started by a user…
1. Be on the Organization that must receive the product
- Click here to log in to the Manager on the Organization that must receive the product(s).
- The user specified when logging in to the Infomaniak account must have administrative rights.
- If necessary, you can create a new Organization to receive products.
2. Execute the obtained link
- Click on the link obtained in the first step above.
- You can also simply paste it into a browser while being logged in to the appropriate Infomaniak account.

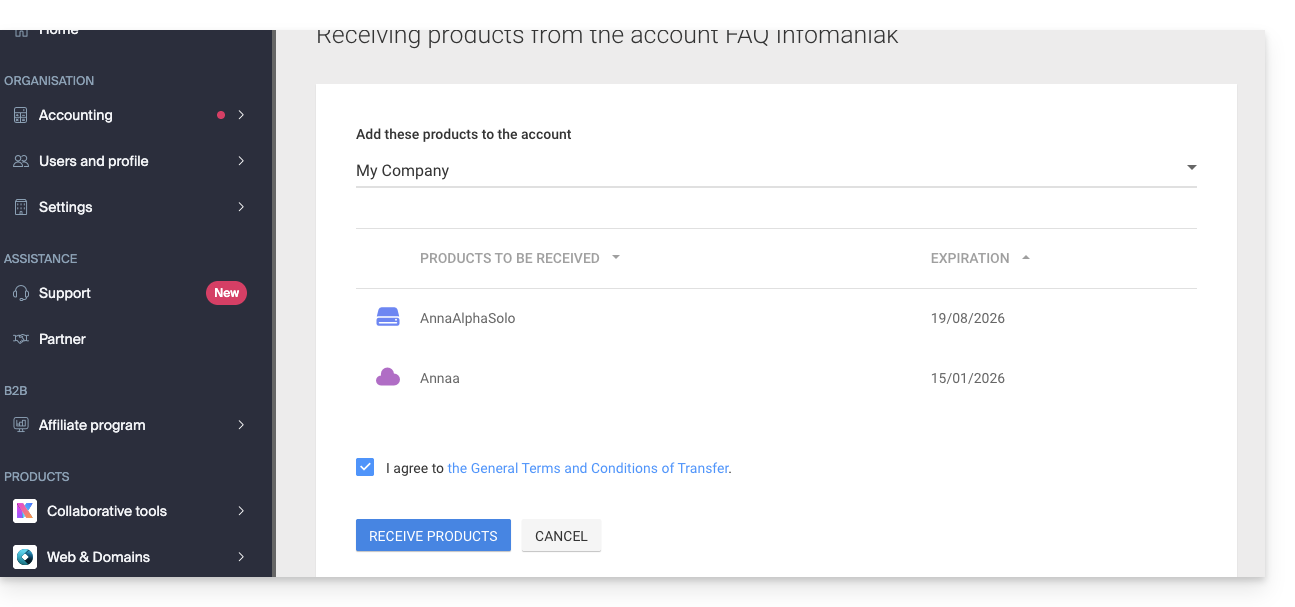
3. Validate the product transfer
- If necessary, choose the destination Organization using the drop-down menu.
- Read and accept the general conditions.
- Click the Receive the product button (if the button is not clickable, make sure you have selected the Organization):
Find transfers in progress or completed from the bottom icon on the left sidebar of the Infomaniak Manager: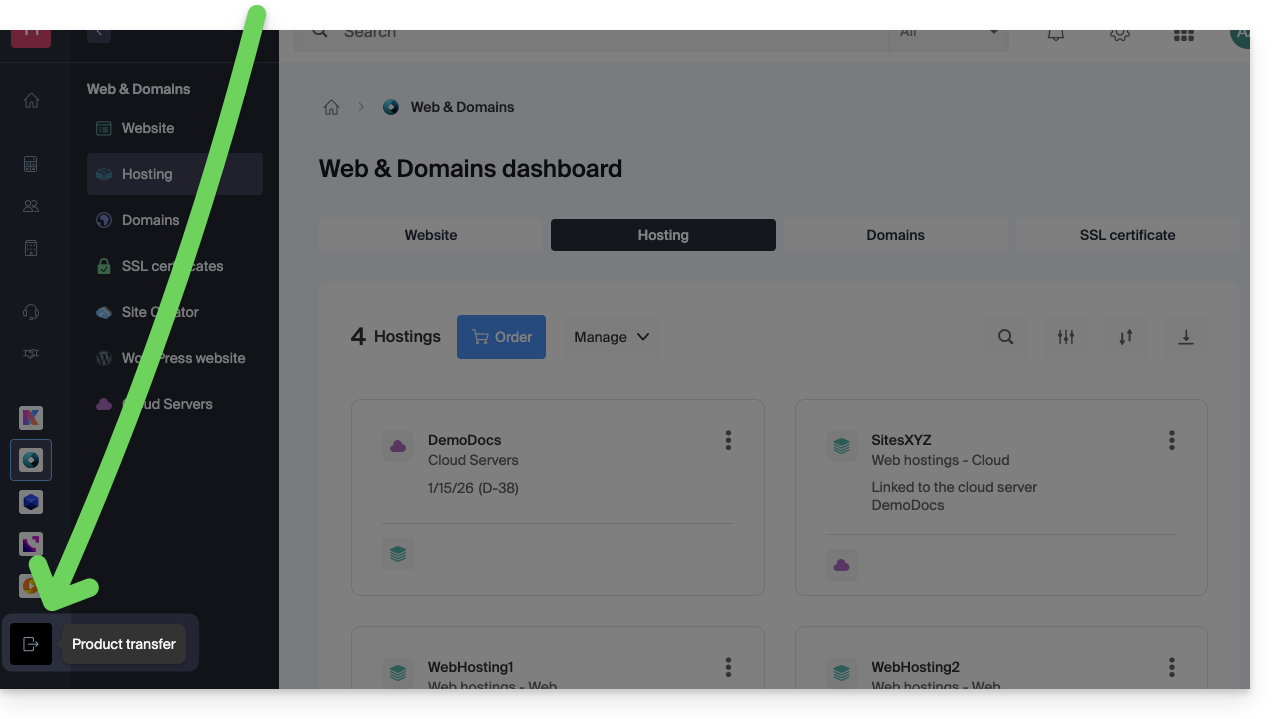
Link to this FAQ:
Has this FAQ been helpful?
This guide explains how to link a domain name to an Infomaniak Web Hosting service.
Where is your domain name located?…
… At Infomaniak, same Organization
If your domain name is registered with Infomaniak and is in the same user account or organization as your email, then there is nothing to do.
- Refer to this other guide to check and correct any configuration errors.
… At Infomaniak, different Organization
If your domain name is registered with Infomaniak but in a different user account or Organization, then:
- Edit its DNS zone by specifying the website's IP address as an A record.
- Any DNS addition/modification may take up to 48 hours to propagate.
OU
- Move it within the same Organization.
… At Infomaniak with external DNS
If your domain name has DNS that is not Infomaniak's, then:
- Edit the current DNS zone where it is located (if necessary, consult the help documentation of the relevant provider) and specify the website's IP address in the form of an A record.
- Any DNS addition/modification may take up to 48 hours to propagate.
OU
- Change the current DNS settings and select the option to use Infomaniak's DNS servers.
- Any DNS addition/modification may take up to 48 hours to propagate.
- Refer to this other guide to check for and correct any configuration errors.
… Elsewhere with external DNS
If your domain name uses DNS servers other than Infomaniak's:
- Edit the current DNS zone where it is located (if necessary, consult the help documentation of the relevant provider) and specify the website's IP address in the form of an A record.
- Any DNS addition/modification may take up to 48 hours to propagate.
OU
- Change your current DNS settings (if necessary, consult the documentation provided by your registrar) and specify Infomaniak's DNS servers (this requires you to have a DNS zone with Infomaniak).
- Any DNS addition or modification may take up to 48 hours to propagate.
- This DNS zone with Infomaniak will be configured correctly, but please refer to this other guide to check for and correct any configuration errors.
… Elsewhere, but you are transferring it
If your domain name is registered with another registrar and you want to transfer it to the same location as your Infomaniak website, then:
- Transfer the domain name to Infomaniak (it will be configured correctly, but please refer to this other guide to check for and correct any configuration errors).
- If the domain name is intended to be an alias for your main website, you need to add the alias to your website.
Link to this FAQ:
Has this FAQ been helpful?
This guide explains how…
- … generate a
CSRand private key to request a third-party certificate from a certification authority (CA), - … import this certificate for your Infomaniak site, using the
CRTobtained from theCA.
Preamble
- Although Infomaniak offers all the SSL certificates you might need…
- free Let's Encrypt certs for personal sites (only possible with sites hosted by Infomaniak),
- DV certs from Sectigo for professional/personal sites that are not registered in the trade register,
- EV certs from Sectigo for companies registered in the trade register,
- … it is also possible to install an SSL certificate obtained elsewhere (intermediate certificate from a certification body of your choice), custom or self-signed certificates.
1. Generate a CSR (Certificate Signing Request)
A CSR (Certificate Signing Request or Certificate Signing Request) is an encoded file containing the information necessary to request an SSL/TLS certificate.
It must be generated on your side to ensure that the private key remains under your control, using OpenSSL, for example.
Adapt and run the following command from a Terminal type application (command line interface, CLI / Command Line Interface) on your device:
openssl req -utf8 -nodes -sha256 -newkey rsa:2048 -keyout domain.xyz.key -out domain.xyz.csr -addext "subjectAltName = DNS:domain.xyz, DNS:www.domain.xyz"
Explanations
newkey rsa:2048: Generates a new 2048-bit RSA key.keyout domain.xyz.key: Specifies the file where the private key will be saved.out domain.xyz.csr: Specifies the file where the CSR will be recorded.addext “subjectAltName = ...”: Adds additional domains via theSAN (Subject Alternative Name)extension, necessary to include all desired domains in the certificate (main domain domain.xyz + any other associated domain or subdomain, such as www.domain.xyz).
After generation, you can check the contents of the CSR with the following command:
openssl req -in domain.xyz.csr -noout -textThis allows you to verify that all domains listed in subjectAltName are correctly included.
Once the CSR is generated, you can send it to the certification authority (CA) to obtain your SSL/TLS certificate.
2. Import the external certificate
Once validated, the CA issues a certificate (domain.xyz.crt) and sometimes an intermediate certificate (ca_bundle.crt).
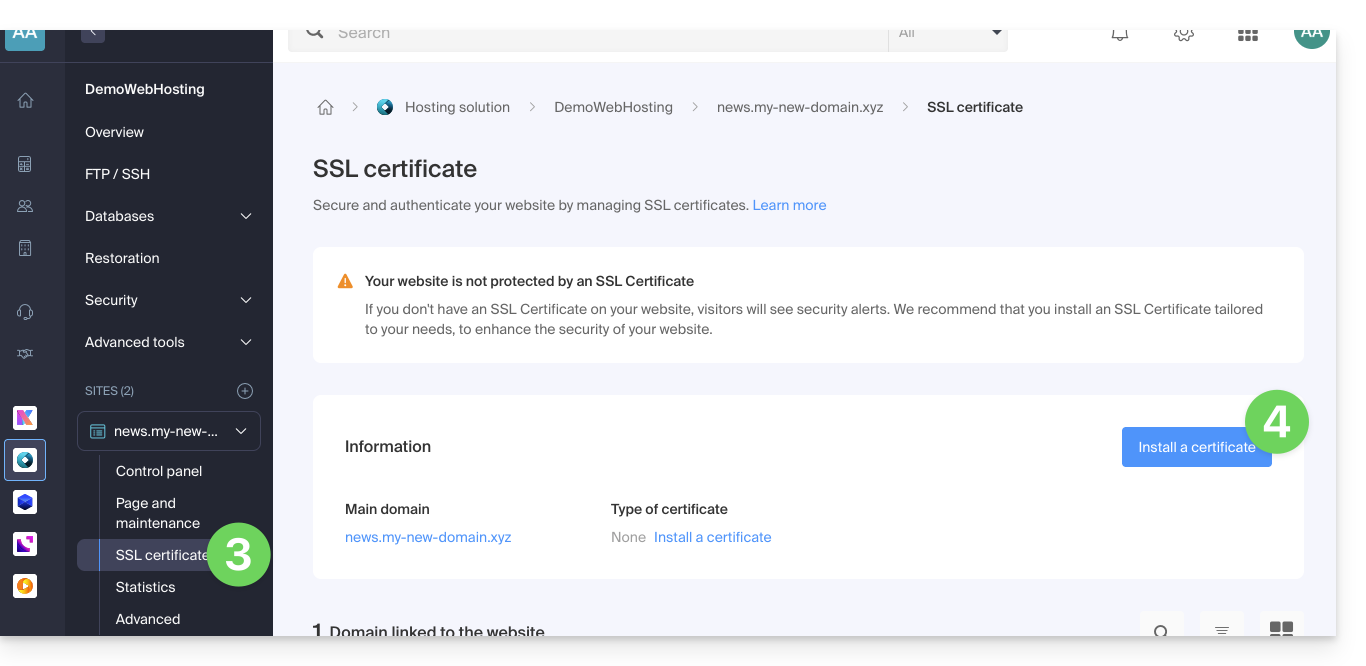
To access SSL certificate management:
- Click here to access your site management on the Infomaniak Manager (need help?).
- Click directly on the name assigned to the site concerned:
- Click on SSL Certificates in the left sidebar menu.
- Click the blue button Install a certificate:
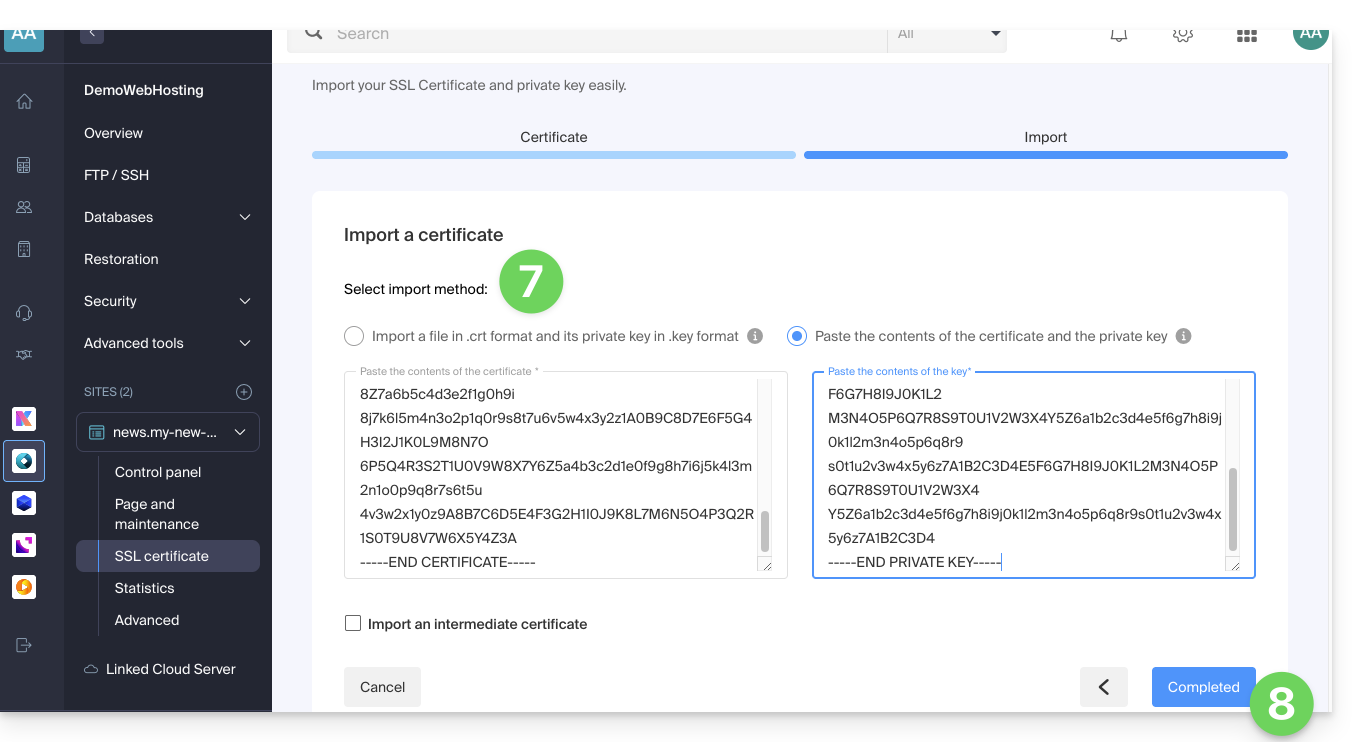
- Choose the custom certificate.
- Click the Next button:

- Import your certificate and private key, either by importing the
.crtand.keyfiles or by copy-pasting. - Click Complete:
Alternative command to generate a self-signed certificate (optional)
If you want a local certificate only for testing or without going through a CA (not recommended for production), you can use this command:
openssl req -x509 -nodes -days 365 -newkey rsa:2048 -keyout domain.xyz.key -out domain.xyz.crt -addext “subjectAltName = DNS:domain.xyz, DNS:www.domain.xyz”This generates both a self-signed certificate (domain.xyz.crt) and a private key (domain.xyz.key). However, self-signed certificates are not recognized as valid by public browsers or systems. They are only suitable for internal or development environments.
Import an intermediate certificate
When adding a custom SSL certificate, it is possible to import the intermediate certificate (by importing the .crt file or copy-pasting the data provided by the certification authority):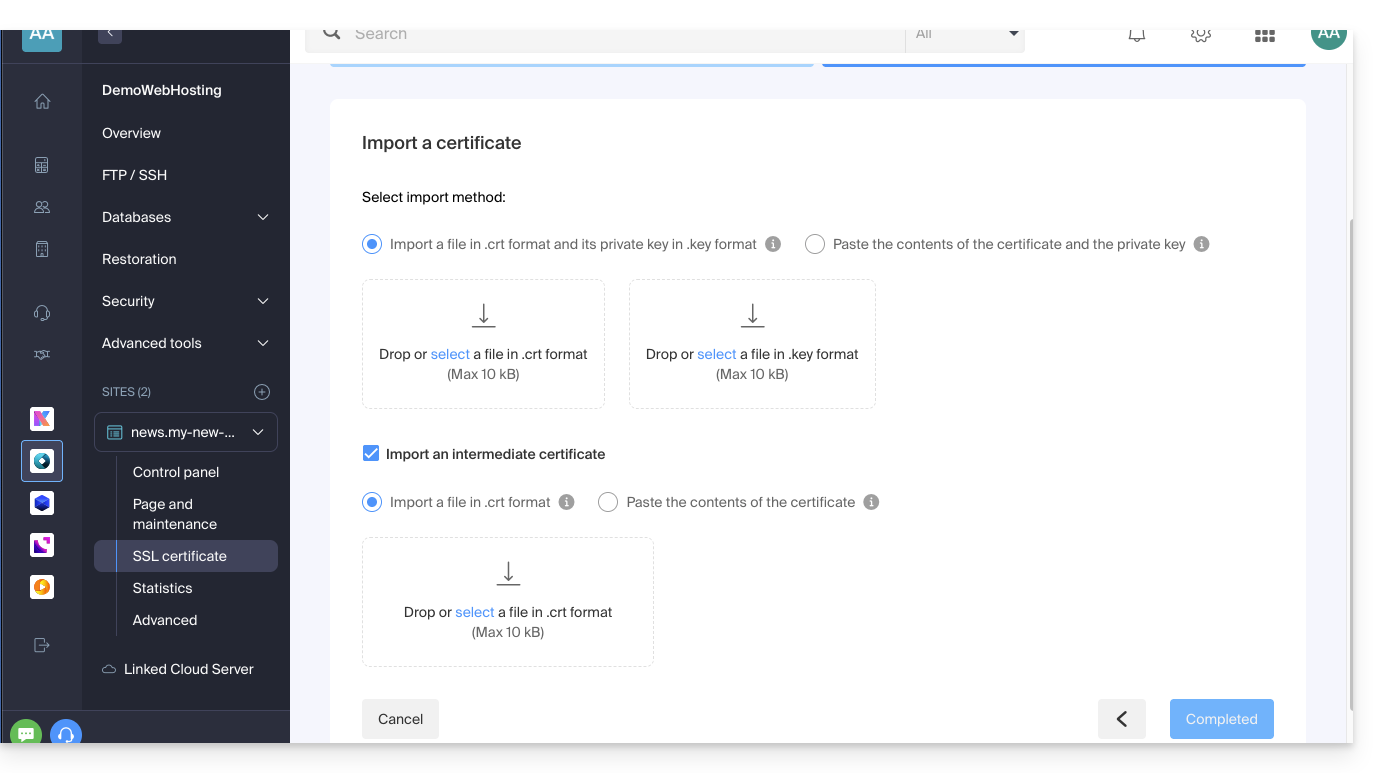
Link to this FAQ:
Has this FAQ been helpful?
This guide explains how to delete a folder or file via SSH, which can be particularly useful when it is impossible to delete a file using an FTP software/client or the Web FTP in the Manager.
SSH command to delete a folder/file
To delete a file or directory, you need to use the rm command.
To delete the Data.php and Data.txt files, for example, you need to run the following command:
rm Data.php Data.txtTo delete a directory, you must first delete its contents and then use the following command:
rmdir Folder/To delete all files in HTML format, run the following command:
rm *.htmlLink to this FAQ:
Has this FAQ been helpful?
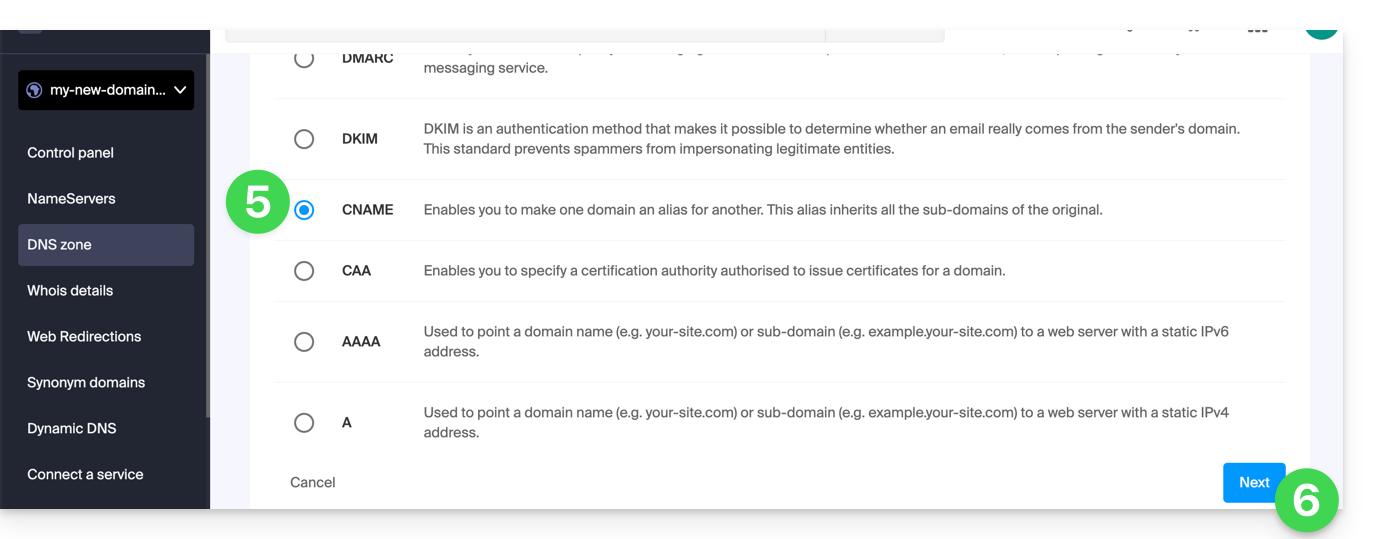
This guide explains how to add or modify one or more CNAME and DNAME type records in the DNS zone (of a domain name) managed on the Manager Infomaniak.
Preamble
- The
CNAMErecord type allows a subdomain to point to a website address.- This is the method generally used to make the
wwwsubdomain work with your site, or to redirect a subdomain to a folder on the web server where your website is hosted.
- This is the method generally used to make the
- The
DNAMErecord type for "delegation name" is particularly useful when reorganizing domains or for smooth transitions of part of your infrastructure to another, while preserving the hierarchical structure of subdomains.- A
DNAMEcreates an alias for an entire domain and all its subdomains.
- A
- Unlike the
CNAMEwhich only applies to a single specific host name, theDNAMEautomatically redirects all subdomains. Example:- A
DNAMEforabc.site1.compointing tosite2.comwill automatically linkxyz.abc.site1.comtoxyz.site2.com,new.login.abc.site1.comtonew.login.site2.com, and so on.
- A
- ⚠ A
DNAMErecord cannot be used at the root zone level of a domain (likesite1.comdirectly). It is generally used on a subdomain. If you want to redirect the main domain itself, you will need to use other types of records such as anA,AAAAorCNAME(with some restrictions for the latter).
Modify the DNS zone
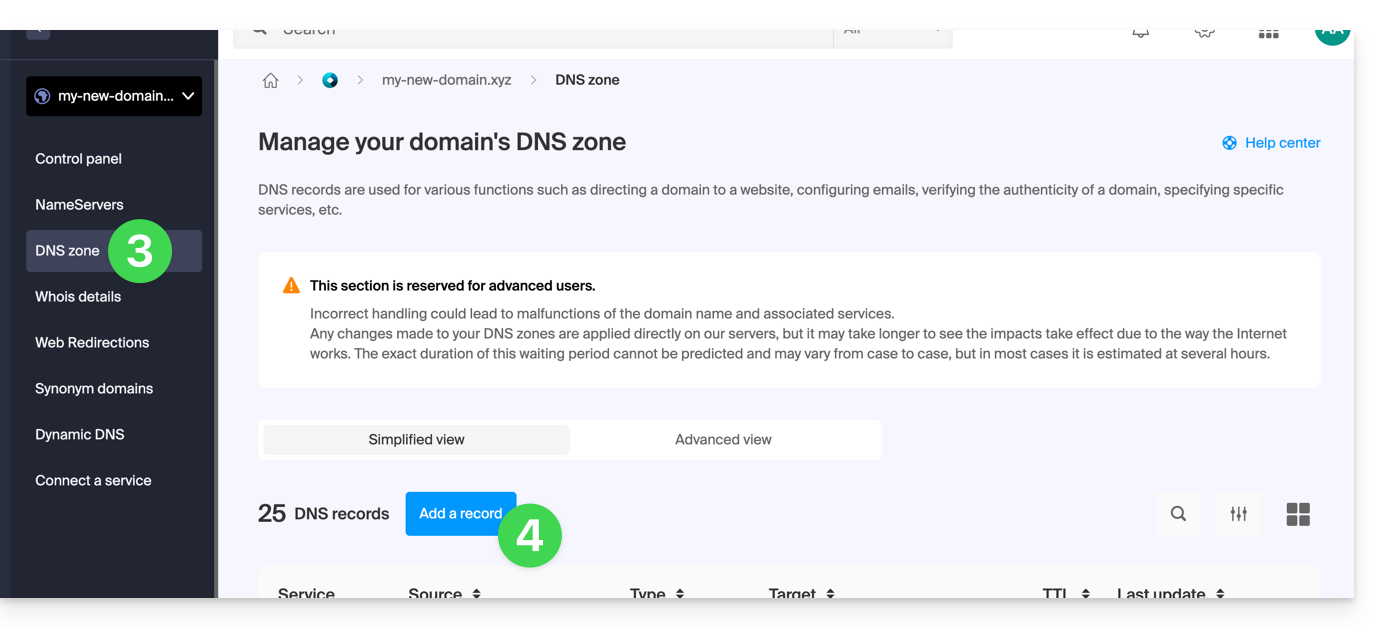
To manage this type of record in a DNS zone:
- Click here to access the management of your domain on the Infomaniak Manager (need help?).
- Click directly on the name assigned to the domain in question.
- Click on DNS zone in the left sidebar.
- Click the button to add a record:
- Click the radio button corresponding to add a record.
- Click the Next button:
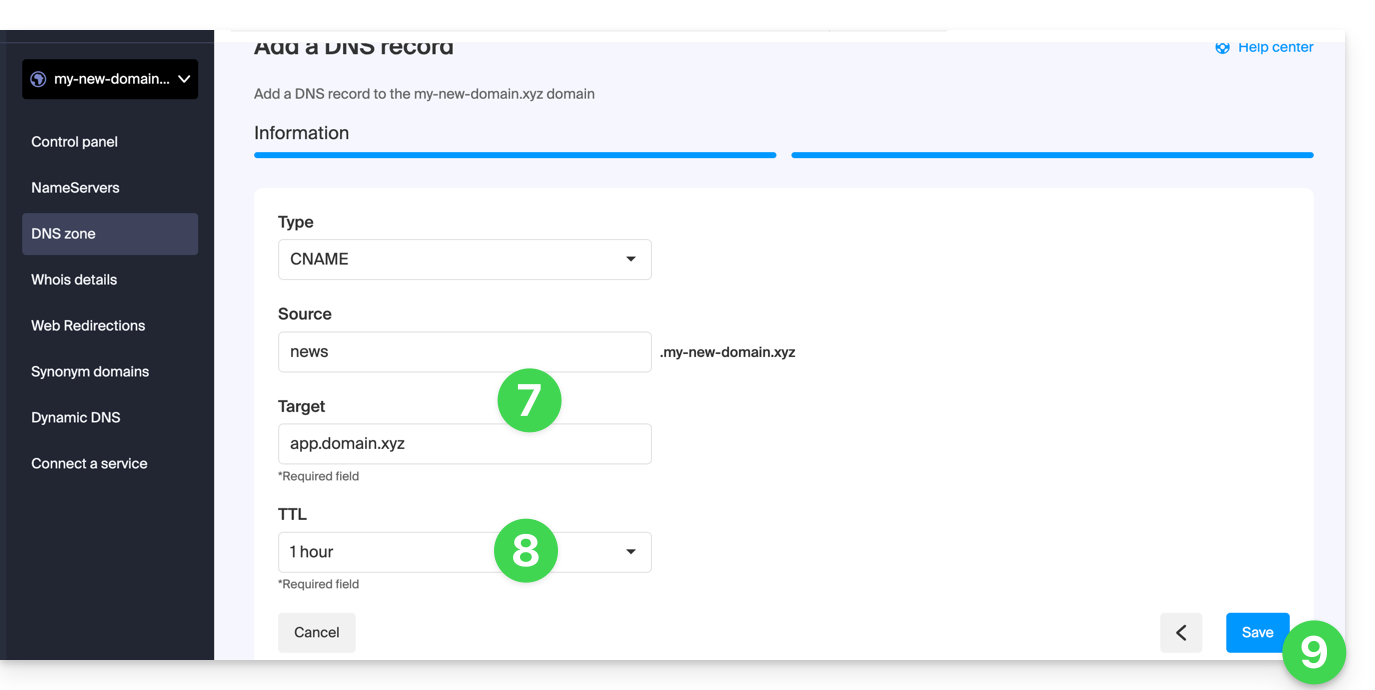
- Enter the values necessary for your DNS zone.
- Leave the default value for TTL.
- Click the Save button:
Link to this FAQ:
Has this FAQ been helpful?
This guide explains how to create subdomains on an existing Infomaniak hosting using a .htaccess file.
Introduction
- The hosting can be on an offer of Shared Web Hosting or on Infomaniak Cloud Server but this function is impossible with a Starter hosting.
- Subdomains can be added very easily to your current hosting since you have in the basic offer 20 sites per hosting (sites = subdomains).
- If you do not want to use this site volume available to you, you can follow the method below.
Create a subdomain as a shortcut
The subdomains thus created make it easier to organize a hosting. For example the address vlog.domain.xyz will be the shortcut of the address domain.xyz/vlog. In other words, the address vlog.domain.xyz will redirect to the vlog folder which must be located at the root of the website domain.xyz. In this example, vlog is the subdomain of domain.xyz.
1. Add the subdomain as an alias of your website
To do this:
- Follow the procedure for adding an alias but please read the points 2 and 3 below.
- In the field to add the related domain, enter the full address of the subdomain (for example
vlog.domain.xyz). - If your domain or its DNS zone is managed at Infomaniak, activate the following two options: Update DNS entries for this domain and Replace existing entries ; if this is not the case, create a A record with your registrar with the following information:
- field: the full URL of the subdomain (for example
vlog.domain.xyz) - target: the IPv4 address (A record) of your site (refer to this other guide to find the A record of your site)
- field: the full URL of the subdomain (for example
2. Modify the .htaccess file of your website
Important: the following instructions are given for informational purposes only. You may need to adapt the code to work in your situation.
Using your FTP software/client or Web FTP on the Manager, add and adapt the following code in the .htaccess file located at the root of your website:
RewriteCond %{HTTP_HOST} ^(.*)\.domain\.xyz [NC]
RewriteCond %{DOCUMENT_ROOT}/%1/ -d
RewriteCond %1::%{REQUEST_URI} !^(.*?)::/\1/?
RewriteRule "^(.*)$" "%{DOCUMENT_ROOT}/%1/$1" [L]
Explanation for the third line: https://stackoverflow.com/a/15981056
Replace on the first line:
domainwith your domain namexyzwith your domain extension (ch, fr, etc.)
Now, the address vlog.domain.xyz should display the content of the vlog folder located at the root of your website. If this is not the case, check that the vlog folder exists at the root of your website.
Link to this FAQ:
Has this FAQ been helpful?
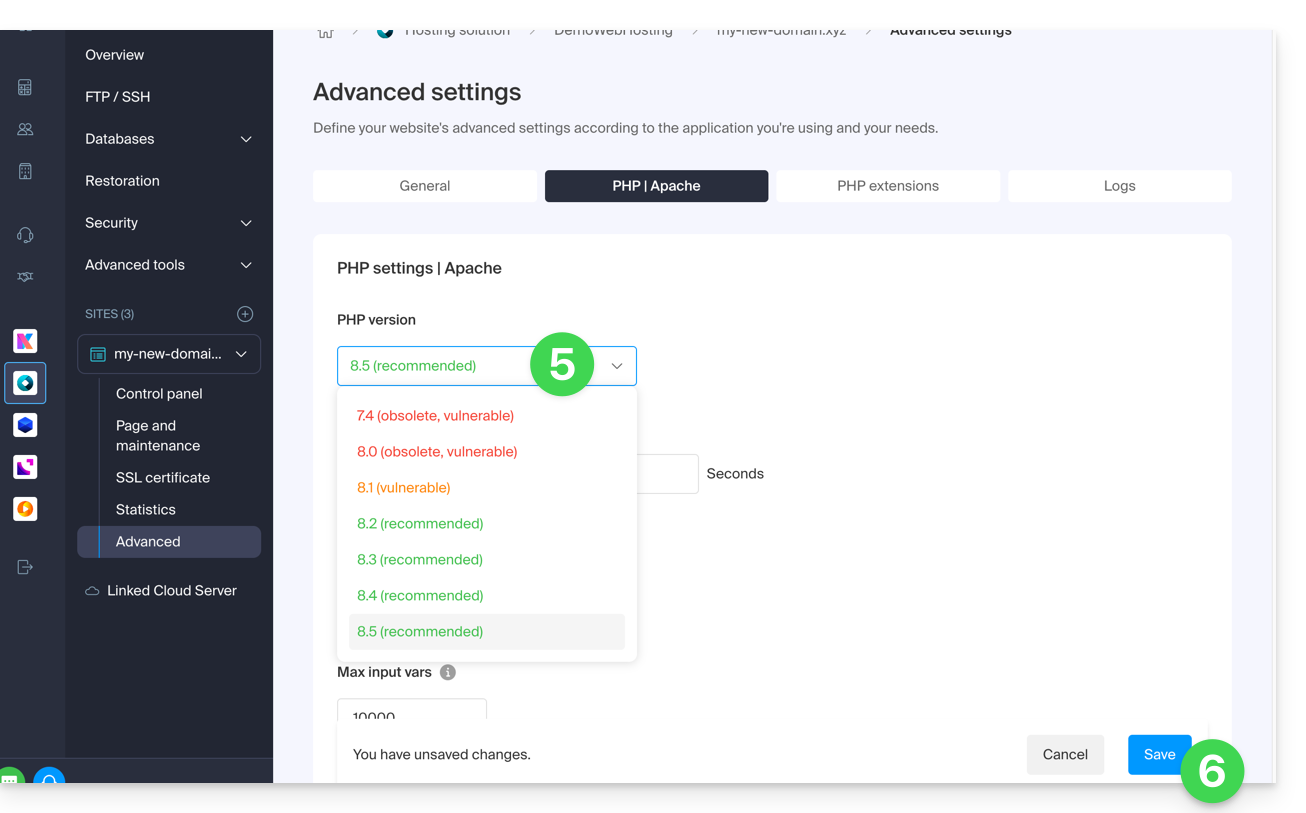
This guide explains how to change the PHP version available for your Infomaniak Web Hosting sites.
Preamble
- It is possible to switch from an old and potentially vulnerable PHP version to a recent one, but you will no longer be able to revert to this vulnerable version for security reasons.
- The change is effective immediately and permanently.
- Refer to this other guide if you are looking for information about configuring the PHP version used in SSH.
- It may be necessary to update your hosting in advance to access the very latest PHP versions offered by Infomaniak.
Change the PHP version used for a website
It is possible to easily change the PHP version used on an entire website:
- Click here to access your site management on the Infomaniak Manager (need help?).
- Click directly on the name assigned to the site in question.
- Click on More information.
- Click on Modify:
- Choose the desired PHP version.
- Click on Save at the bottom of the page to save the modification:
Link to this FAQ:
Has this FAQ been helpful?
This guide explains how to connect to your Web Hosting using an SSH key.
✘ UNAVAILABLE with
Node.js type site
Starter hostings
Prerequisites
- Create an FTP + SSH account from the Infomaniak Manager.
- Create an SSH key with a secure algorithm, for example
ed25519:ssh-keygen -t ed25519because with an rsa key (
ssh-keygenorssh-keygen -t rsa), the connection will be refused and the following error will be returned in verbose mode:debug1: send_pubkey_test: no mutual signature algorithm
Upload the SSH key
To do this:
- Connect to the server via SSH (need help?).
Go to the root of your hosting:
cd ~Create the directory «
.ssh»:mkdir .ssh- Change the permissions of the
.sshdirectory to CHMOD 700. - Create the
authorized_keysfile and paste your public SSH key on a single line (important). - Change the permissions of the
authorized_keysfile to CHMOD 600.
Link to this FAQ:
Has this FAQ been helpful?
This guide explains how to add an Elegant Themes (Divi) theme for free to a WordPress site that has already been installed via the Infomaniak installer.
Prerequisites
- Your WordPress site must be installed using the Infomaniak WordPress tools to use these themes and extensions.
- The theme can be added during installation (approximately step 14 of this other guide) or activated later.
- To benefit from Elegant Themes support (customer service), you must subscribe to an Elegant Themes plan.
Adding an Elegant Themes Theme
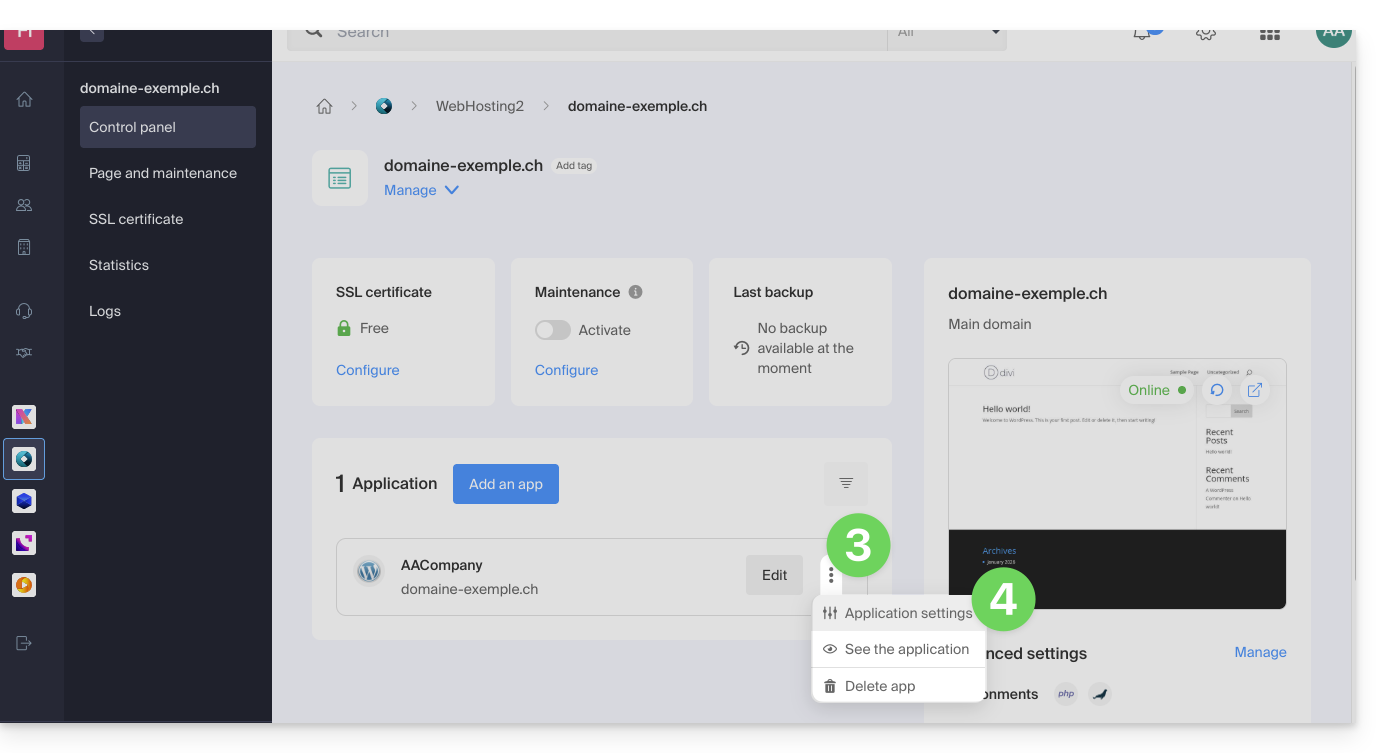
To do this:
- Click here to access the management of your WordPress site in the Infomaniak Manager (need help?).
- If your site does not appear here, it has not been installed using the Infomaniak tools (see prerequisites).
- Click directly on the name assigned to the relevant product:

- Click on the action menu ⋮ located to the right of the relevant Web Application.
- Click on Settings for the application:
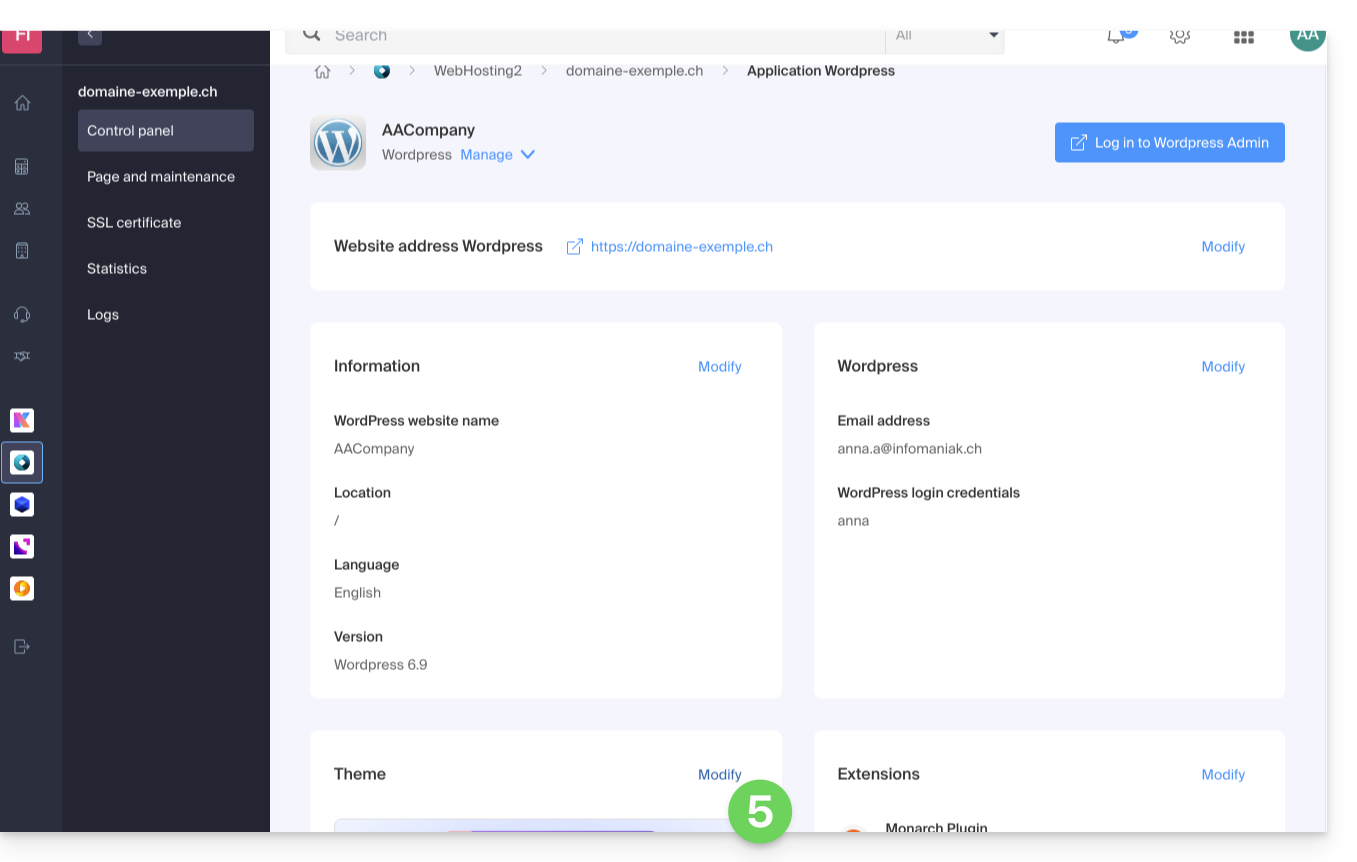
- Click on Edit under Theme:
- Select the desired theme.
- Click on the Save button:
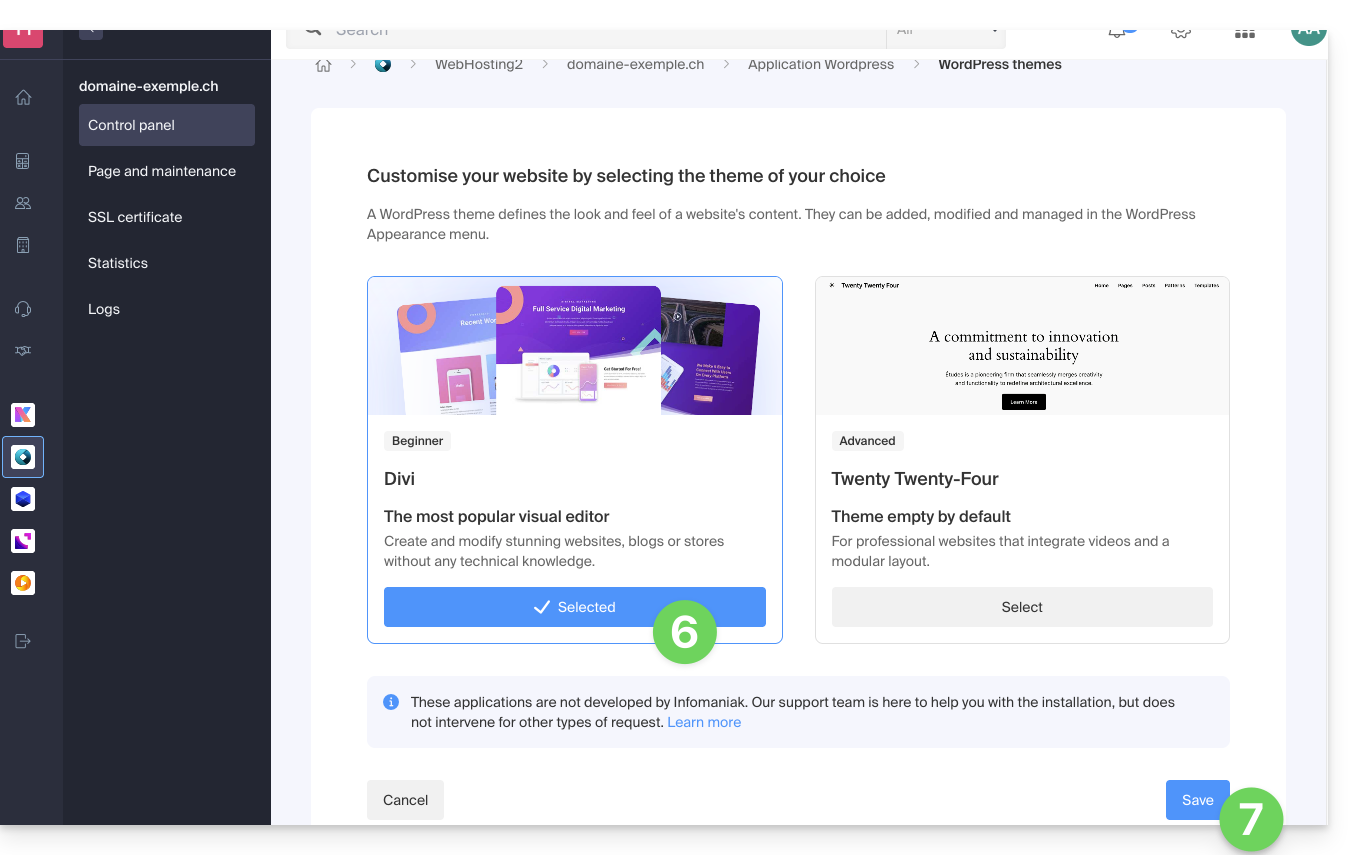
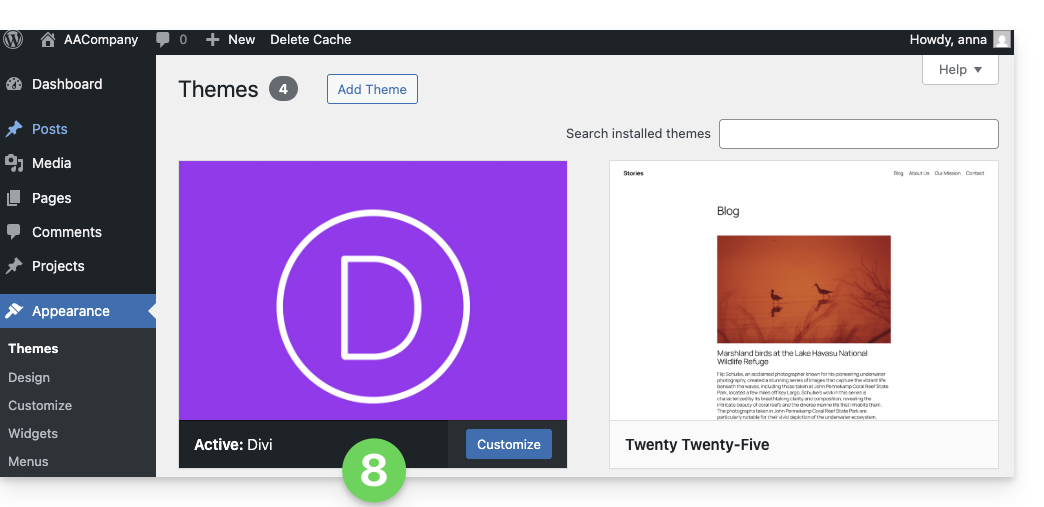
- The theme is applied and available for configuration in your WordPress administration interface:
Using an Elegant Themes extension
Refer to this other guide to install an Elegant Themes extension with Infomaniak.
Link to this FAQ:
Has this FAQ been helpful?
This guide explains how to transfer data (Web, Mail, Domain, and even Cloud) currently hosted elsewhere to Infomaniak. You will, of course, remain the owner of your data, without any loss or interruption!
Introduction
- By consolidating your domain names, websites, and email addresses with Infomaniak, you simplify the management of your invoices and services.
- Furthermore, the link between your domains will be automatically established with your website and email address.
- This means you won't need to manually configure the DNS settings for your domains with another registrar.
Specific Guides
Click on the link corresponding to your current hosting provider:
- Swisscom: complete guide for migrating Web, Mail, and domain name data
Guides for Any Other Hosting Provider
To avoid interrupting your website and emails and prevent data loss when importing your existing data, migrate your services in the order indicated:
Import Web data (any PHP, HTML, etc. website)
- For WordPress specifically, please refer to this other guide…
- For WordPress specifically, please refer to this other guide…
Copy Mail data (addresses and content of mailboxes, etc.) to kSuite or a simple Mail Service
Transfer the domain name (domain management, DNS zone, etc.)
You can also transfer other types of data to Infomaniak servers:
- Dropbox, Google Drive, etc. content: refer to this other guide
- Data on Synology or QNAP NAS: refer to this other guide
Link to this FAQ:
Has this FAQ been helpful?
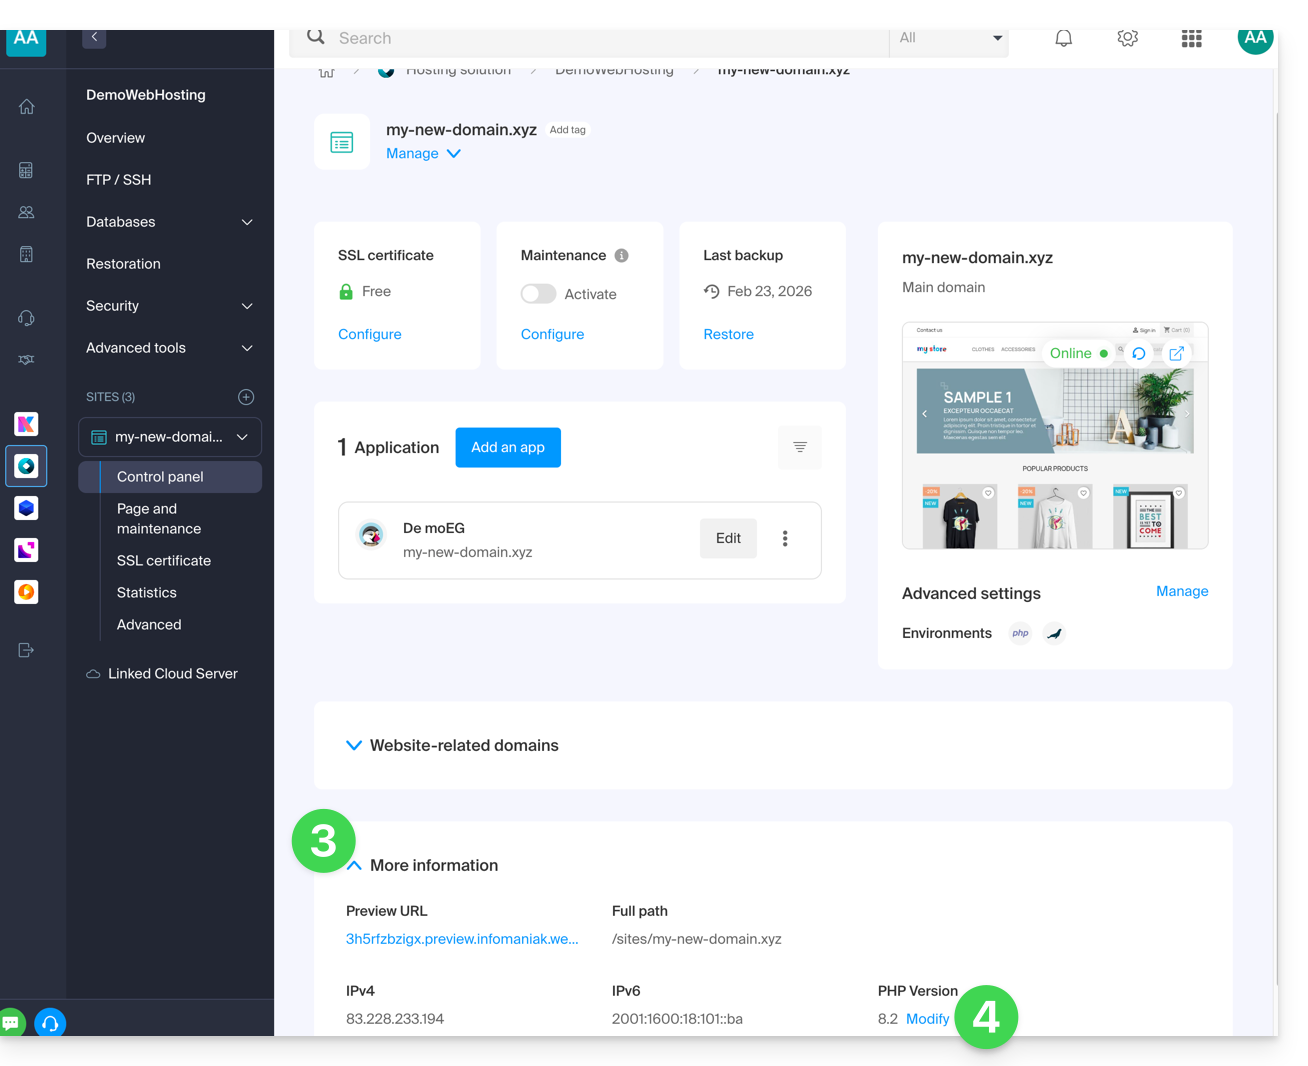
This guide explains how to view a website hosted by Infomaniak even if no domain name / URL is currently configured correctly to direct the visitor to this site.
Preamble
- Thanks to the preview URL of your website, you can get the current version of your content in a browser, regardless of whether the corresponding future domain name is not yet configured correctly.
- This site preview can be done using a preview URL and allows you to test a site before pointing a domain name that, for example, currently points elsewhere.
- This temporary URL provided by Infomaniak may change at any time and is only available with paid offers.
Get the preview URL of your site
To do this:
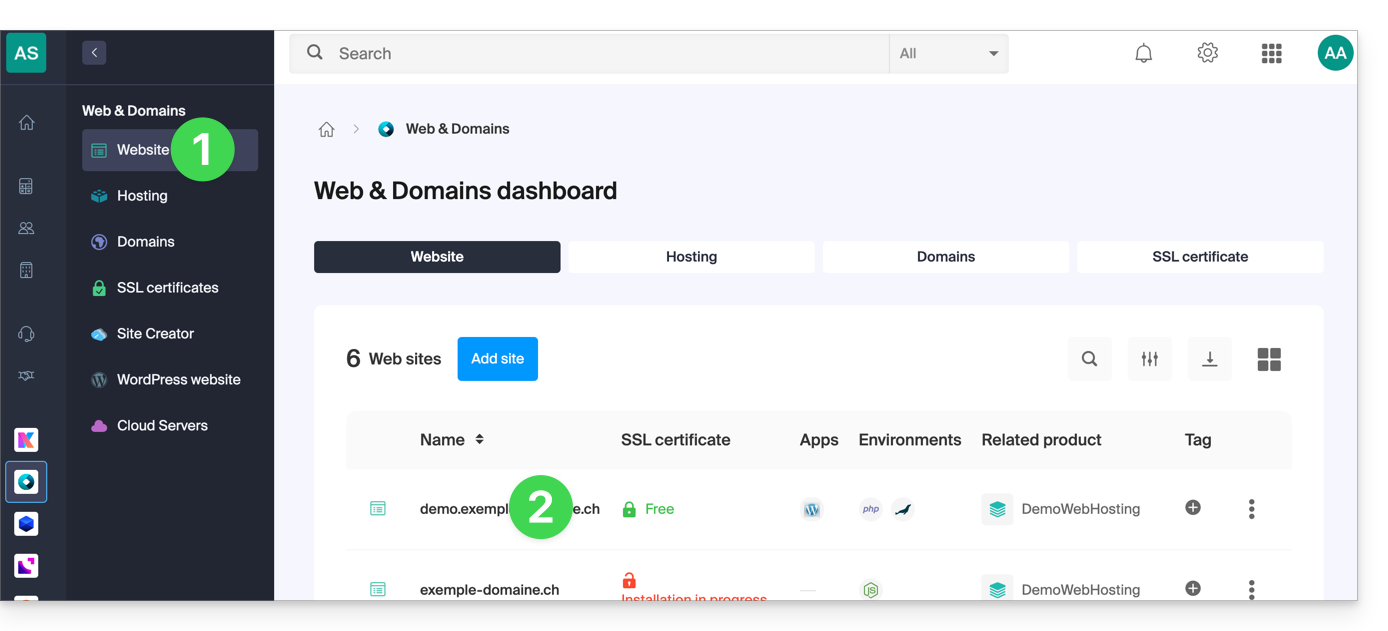
- Click here to access the management of your product on the Infomaniak Manager (need help?).
- Click directly on the name assigned to the product concerned.
- Click on More information.
- The preview address is indicated under Preview URL (e.g.:
XXX.preview.infomaniak.website):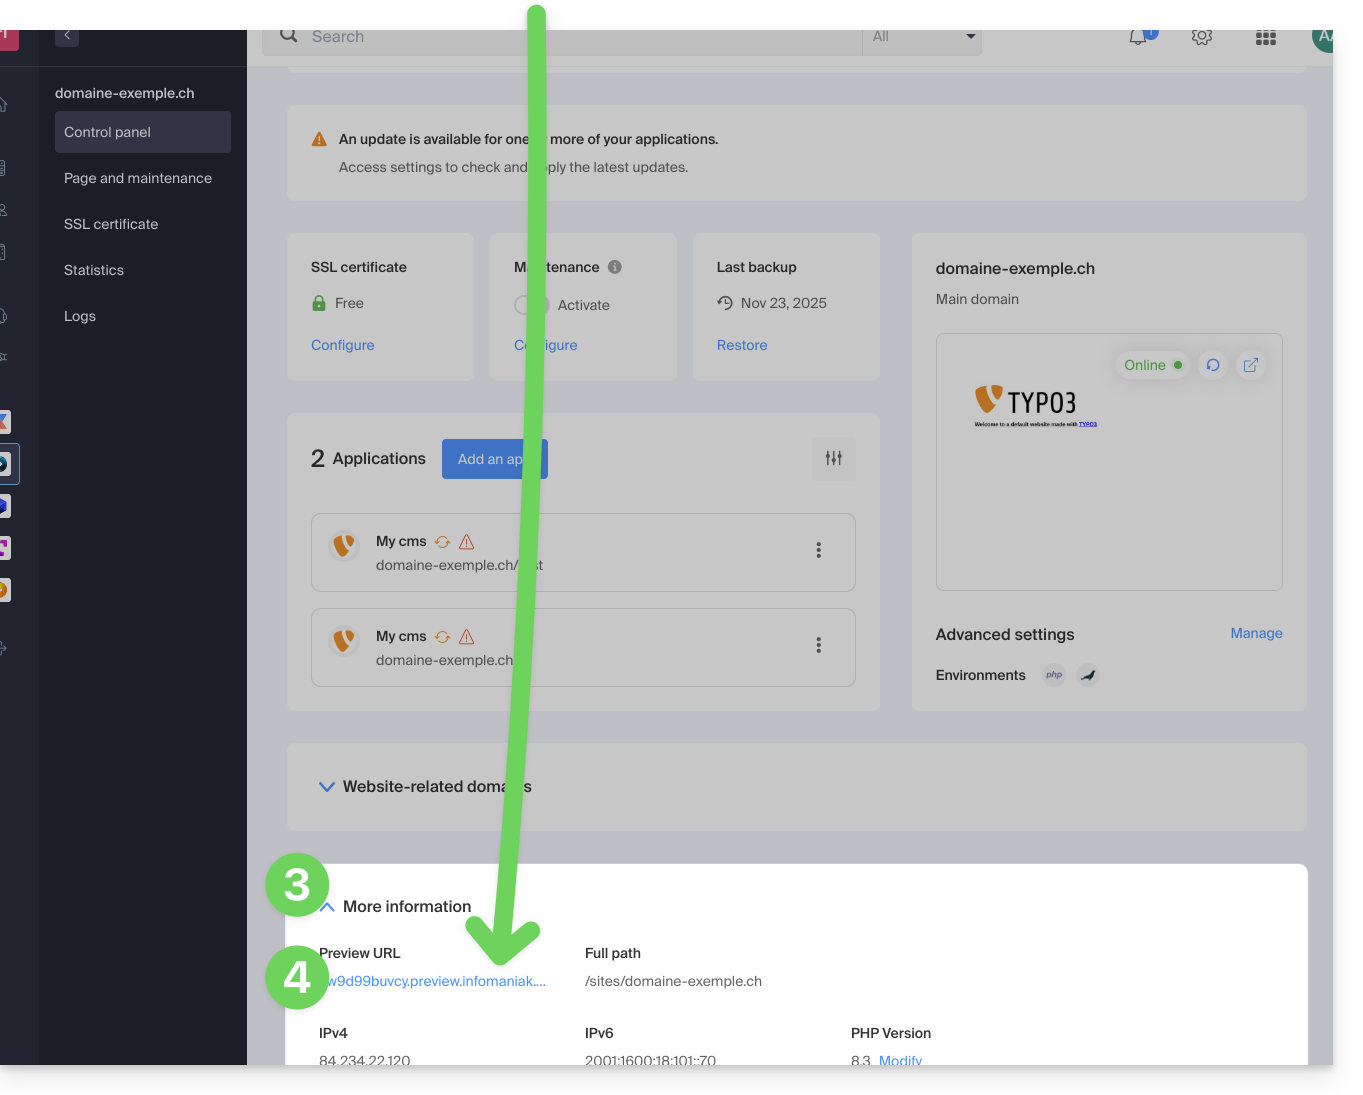
In case of problem…
If when visiting your preview address, the URL immediately changes to another one, it may be a .htaccess file that you have modified to include rewrite rules. You need to deactivate it and then test again.
… on WordPress
If the preview URL always displays even though you have done what is necessary regarding the domain name, you need to assign it the final address as the main address in the options of your website.
Alternatives to preview your site
If you wish to proceed differently than with the preview address provided by Infomaniak (see above), you can modify the hosts file of your computer (including with browser extensions like this one for Firefox). You will need the IP address of your site for this.
When your tests are completed or the DNS of the domain name are up to date, do not forget to delete your possible modifications otherwise it will be impossible to display your site if the IP address of the server is modified or the site is migrated to another web hosting.
Link to this FAQ:
Has this FAQ been helpful?
This guide explains how to enable or disable maintenance mode on a website hosted with Infomaniak Hosting.
Preamble
- Maintenance mode allows you to display a custom message to your visitors, for example while resolving a technical issue.
- It is also possible to specify IP addresses that can bypass this page.
- An email is sent to the Organization's users.
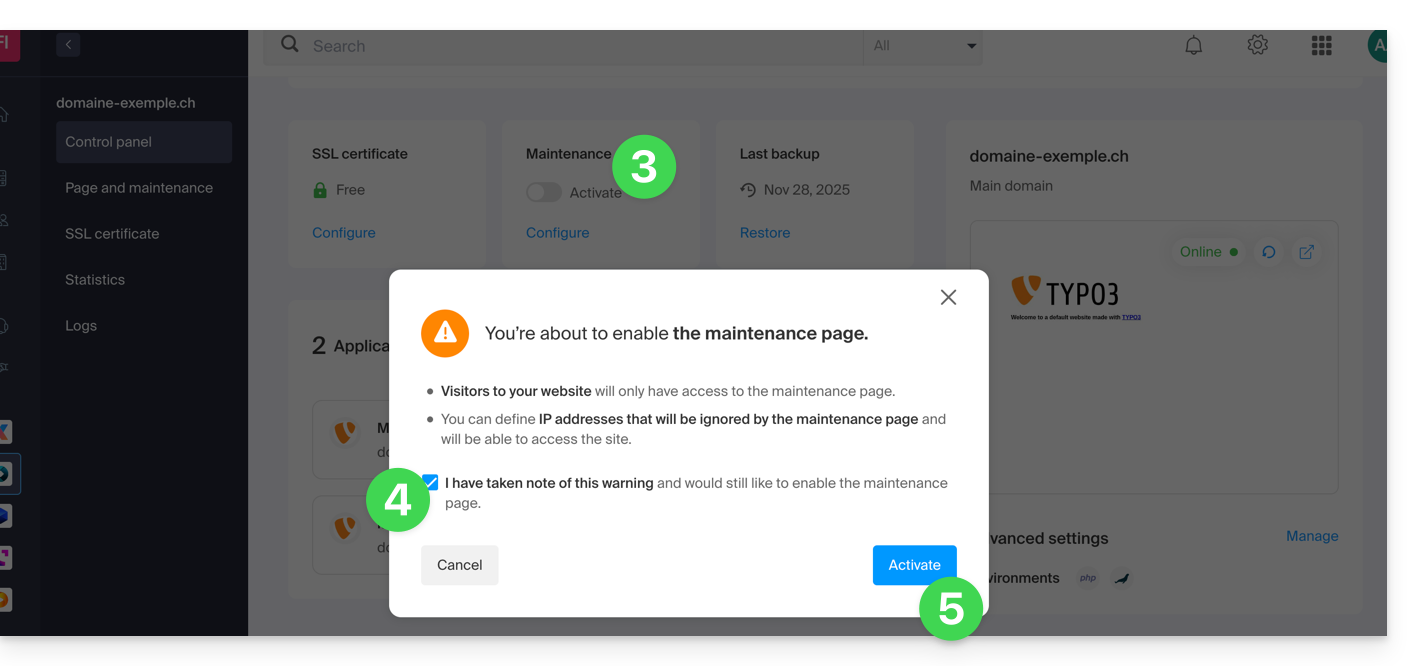
Enable maintenance mode
To activate a page that temporarily replaces your usual homepage:
- Click here to access the management of your product on the Infomaniak Manager (need help?).
- Click directly on the name assigned to the product in question.
- Click the toggle switch to enable the maintenance page.
- Confirm the warning.
- Click the button to enable:
Customize the maintenance page
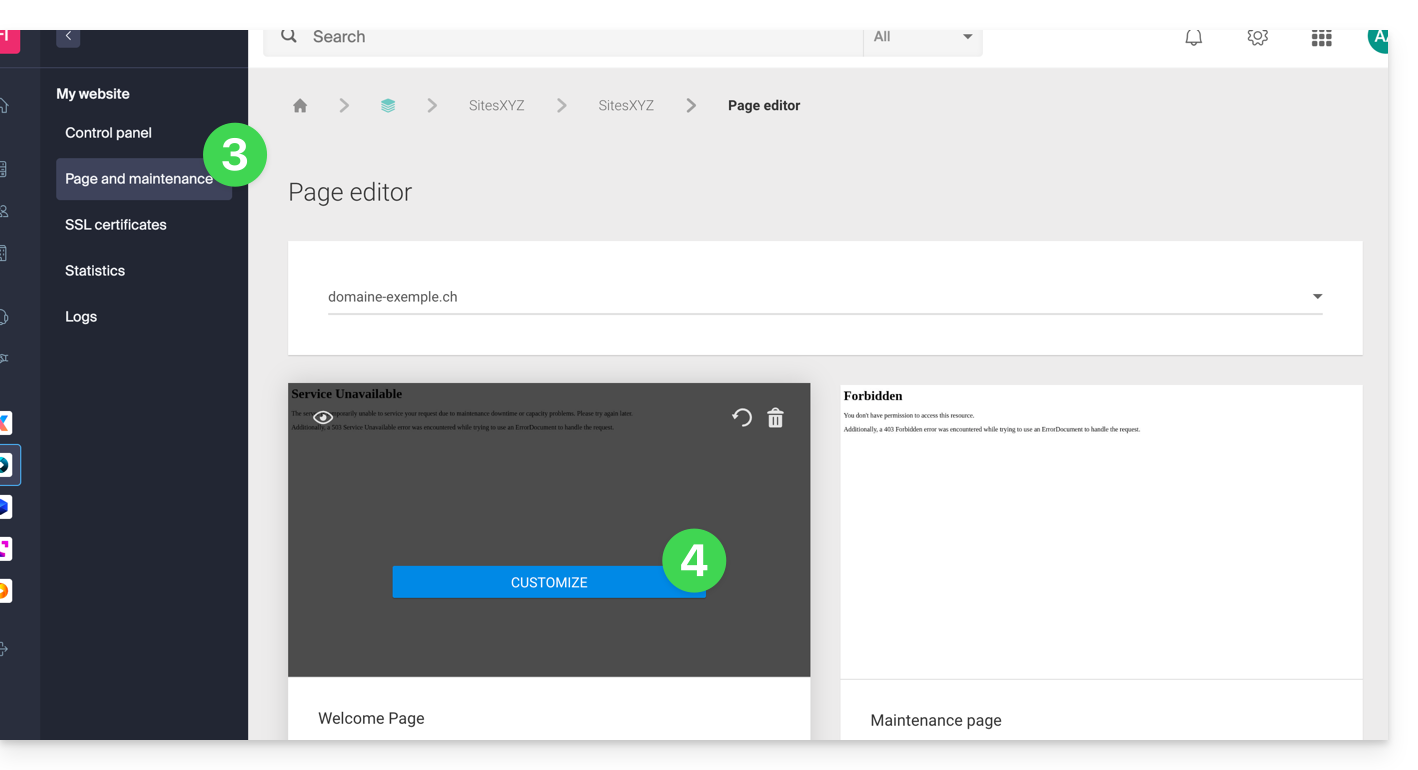
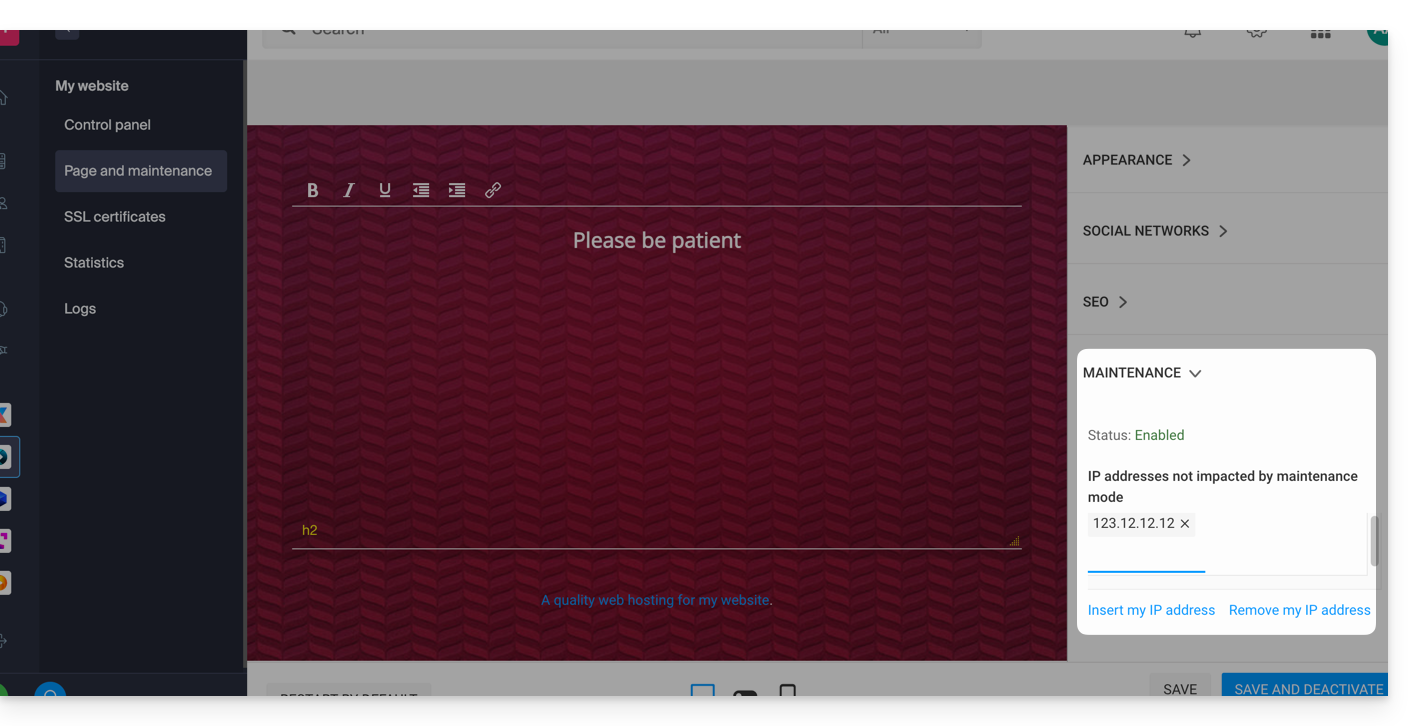
To set up a page with your desired message:
- Click here to access the management of your product on the Infomaniak Manager (need help?).
- Click directly on the name assigned to the product in question.
- Click on Page and Maintenance in the left sidebar menu.
- Click on Create a page or the Customize button if it already exists:
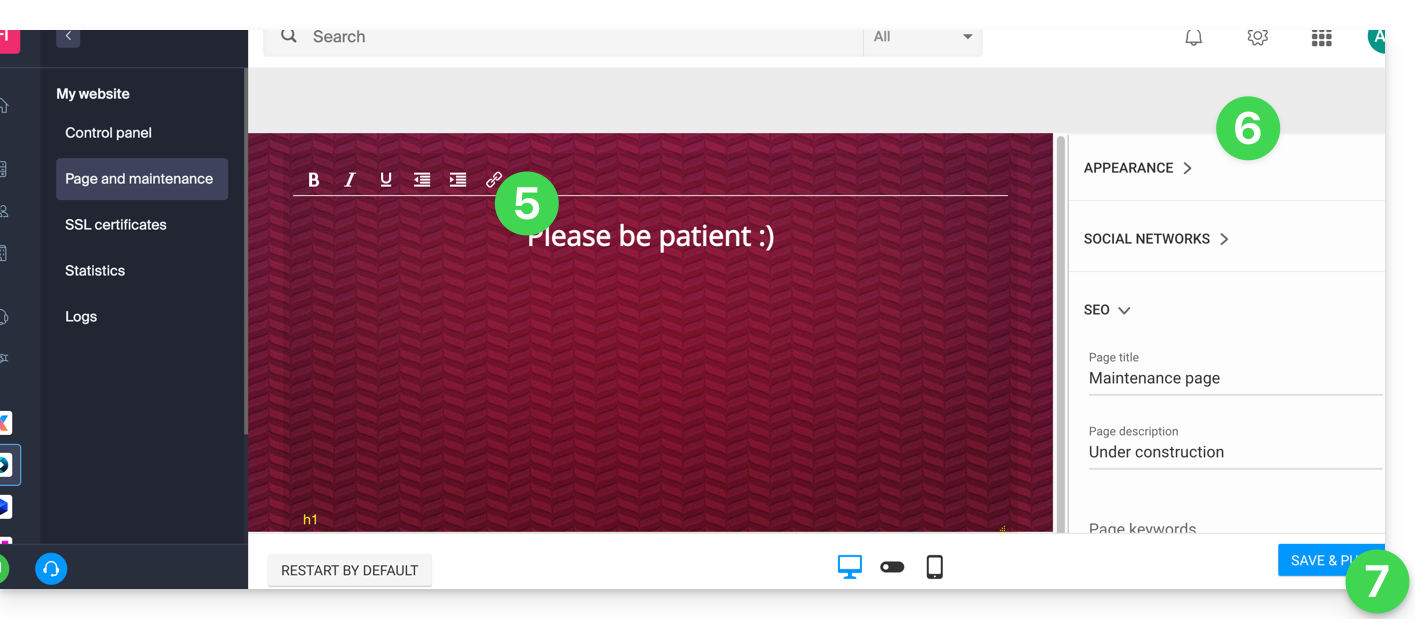
- Format the text of your choice.
- Configure the display using the elements on the right.
- Click on Save & Activate to publish the page:
Allow IP addresses to bypass the suspension
It is possible to display the actual site even with maintenance mode activated. To do this, it is necessary to enter the IP addresses of the computers that need to be able to bypass maintenance mode:
- Activate maintenance mode according to the procedure above.
- Go back to the maintenance page configuration page (see procedure above).
- Under Maintenance on the right, click on Insert my IP address to allow your computer to display the site without maintenance mode:
- It is also possible to manually enter the IP addresses to authorize.
- Click on Save and publish.
If the IP addresses of the added computers change, it will be necessary to repeat these steps.
Disable maintenance mode
To disable the message that appears on your site during maintenance:
- Click here to access the management of your product on the Infomaniak Manager (need help?).
- Click directly on the name assigned to the product in question.
- Click either on the Disable button or on the toggle switch to disable the maintenance page:
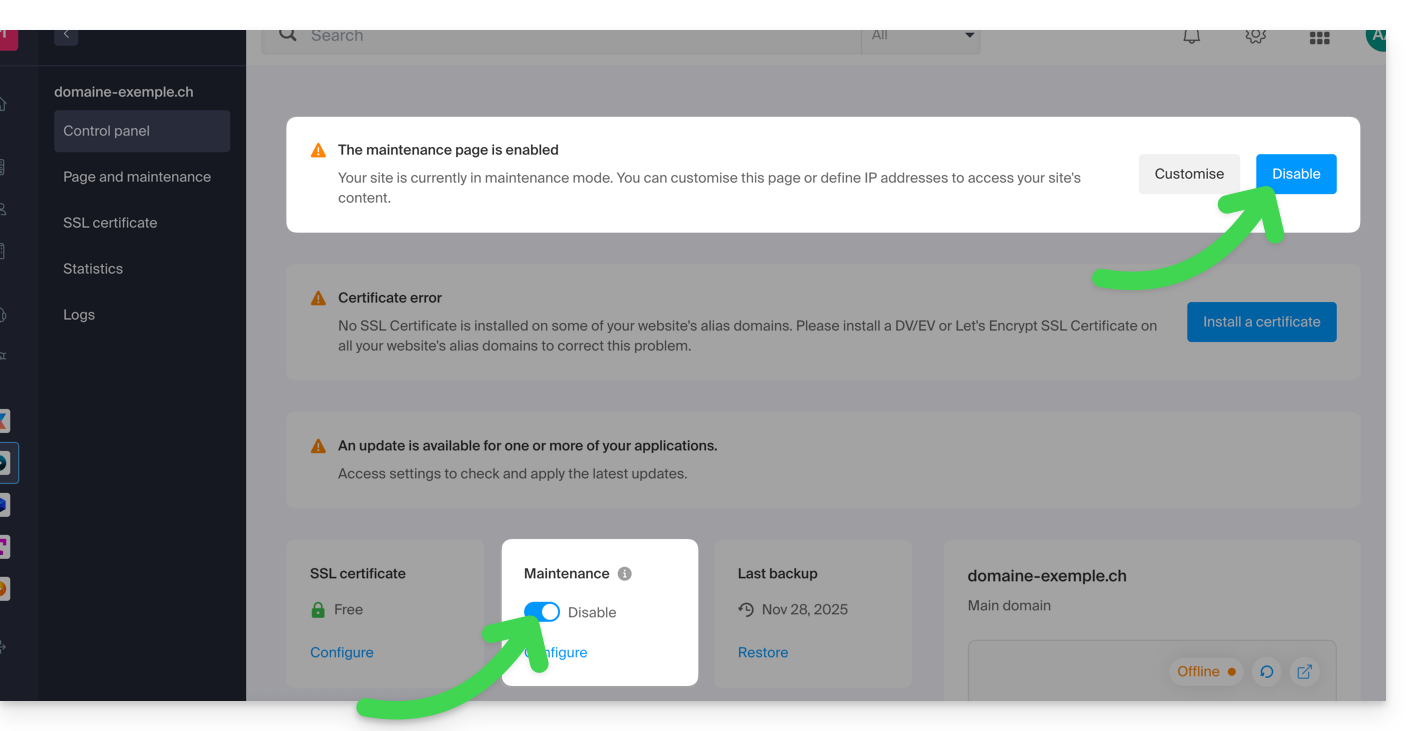
- Confirm the deactivation of maintenance.
Alternative method for WordPress
It is not recommended to activate the Infomaniak maintenance page above to then work in WordPress.
It is recommended to install a WordPress extension (there are dozens available) dedicated to maintenance within the CMS itself.
Otherwise, you can add the code <?php $upgrading = time(); ?> in a new empty file named .maintenance (the dot before the file name is important) placed on the server at the root of your site, which will disable all your pages except the WordPress homepage.
Link to this FAQ:
Has this FAQ been helpful?
This guide details the security measures implemented as part of Infomaniak's email offers to detect abusive and abnormal use of an email address.
Introduction
- For sending emails to a large number of recipients, the Newsletter tool is the most suitable.
- Upon written request, which must be justified and authenticated, it is possible to modify these security rules for a specific paid email address.
- These measures protect you from malicious use of your computer or account.
- Quota calculation (sliding window): the limits (below) are not reset at midnight but are calculated in real time over a 24-hour window; each message sent "occupies" a slot in your quota and is automatically freed up 24 hours after it is sent.
- If you send messages throughout the morning until you reach your limit at 11 a.m., your sending rights will gradually become available the next morning as each message reaches its 24-hour age.
- 1 message sent to 2, 42, or 99 people in CC/BCC counts as 2, 42, and 99 messages, respectively.
Sending limits per 24 hours
⚠ Number of outgoing emails possible per 24 hours:
| kSuite | Free | 200 |
| Standard | 500 | |
| Business | 500 | |
| Enterprise | 500 | |
| my kSuite | 200 | |
| my kSuite+ | 500 | |
| Mail Service | Starter: 1 address max. | 200 |
| Premium: 5 addresses min. | 500 | |
| Web Hosting | sending unauthenticated emails (PHP Mail()) | 50 |
| sending authenticated emails | * |
* The maximum number depends on the email plan to which the address belongs.
Other email limits
Link to this FAQ:
Has this FAQ been helpful?
This guide explains how to replace the main domain name associated with a Website (excluding Starter hosting) hosted on Infomaniak, in case you want to change your business name or modify the spelling, for example.
Introduction
- It is not possible to simply modify the spelling of the domain name in question.
- You must own the new domain name and install it in place of the current one by performing a switch (see below).
- After making changes to the domain name, it may be necessary to adapt the website content.
- You can also rename your Web Hosting product in the Infomaniak Manager, but changing the name of a hosting account has absolutely no impact on the URLs of the websites.
- During this operation, the statistics are reset.
Changing the website's domain name
Prerequisites
- Prepare the new domain name (if necessary, you must purchase it).
- Install a valid SSL certificate; otherwise, the switch will not be offered.
- If the desired change is more of a "subdomain" to "main domain" type (
dev.domain.xyz→domain.xyz, for example), then refer to this other guide.
Next, to replace the domain name assigned to the website with another domain name:
- Click here to access your website management in the Infomaniak Manager (need help?).
- Click directly on the name assigned to the website in question:
- Then, click on the down arrow to expand the Domains section of this website:
- Review this other guide (especially its Prerequisites) to link the new domain name to your website:
- This new linked domain will replace the current primary domain name after the switch you will perform below.
- Once the new domain name is linked to your website, click on the action menu ⋮ to the right of it.
- Choose Set as primary domain:
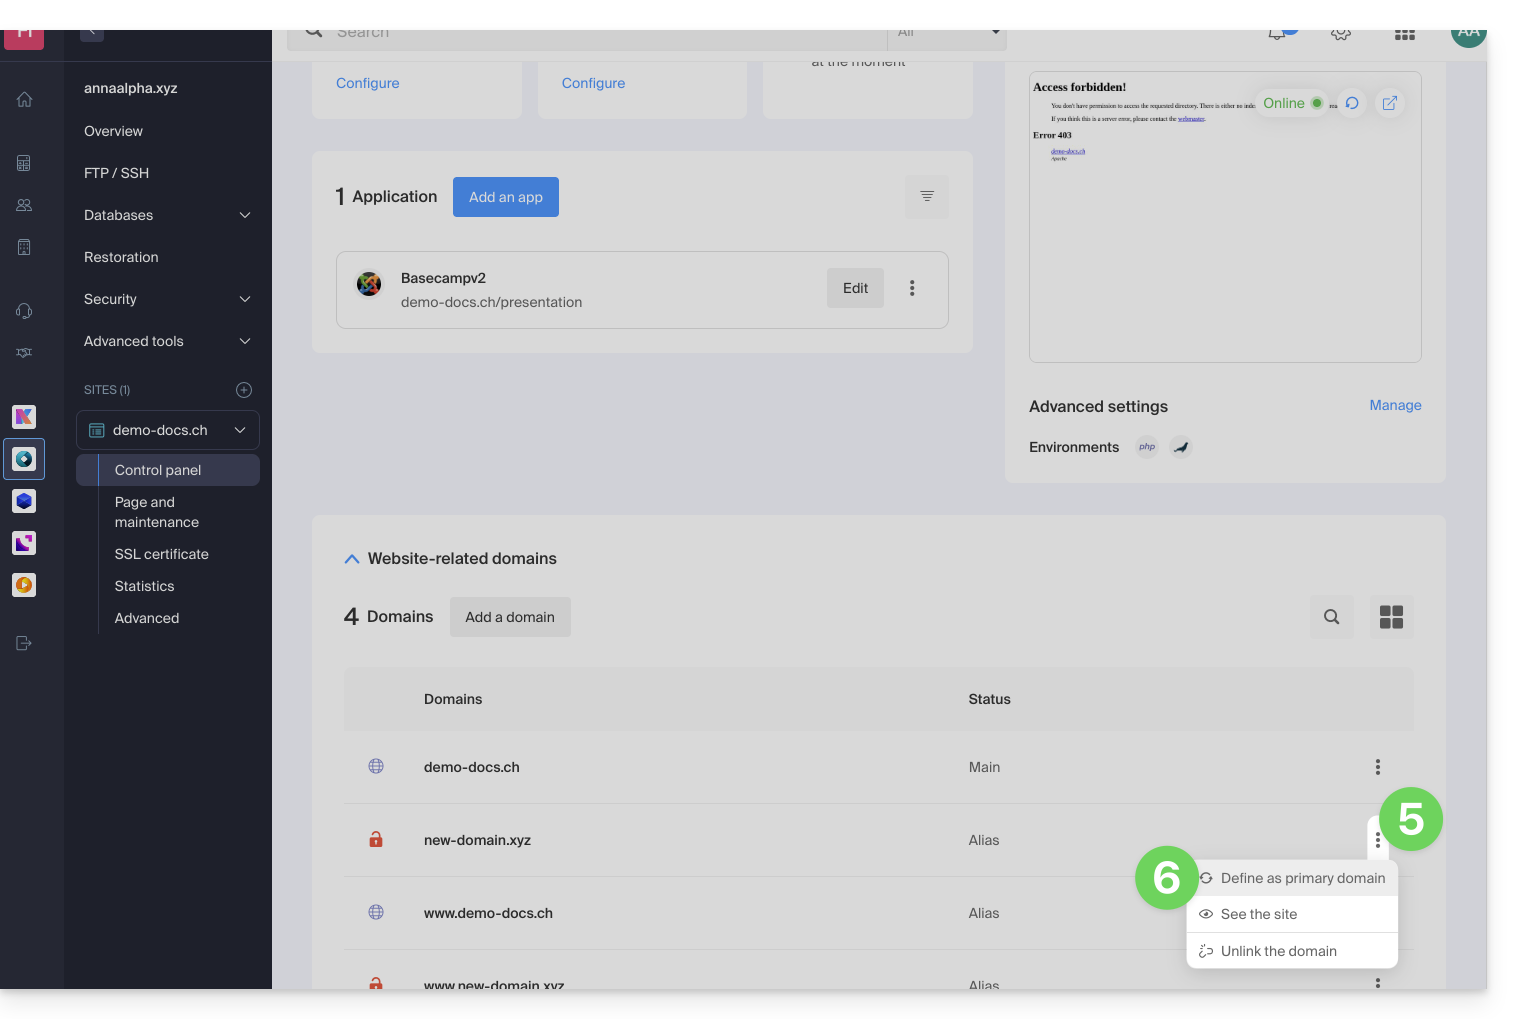
- If necessary, delete the old domain name and its variants that have become alias domains (and are no longer primary domains).
If you are using an SSL certificate, you will need to update it so that it includes the added aliases.
If you are using the dedicated IP option, you must uninstall it and then reinstall it after performing the domain switch.
Adapt the website content to the new domain name
In some cases, the web application used to develop the site may need some adjustments to function with the new domain name. Click on the link corresponding to your site's development to adapt the content:
Link to this FAQ:
Has this FAQ been helpful?
This guide is for users making changes around a hosting environment where WordPress is installed.
Preamble
- Following a change in your web hosting plan (migration from the old v1 60 Go hosting plan to the current plans), it is possible that you will need to update the connection between the MySQL/MariaDB database and your WordPress site (to avoid errors such as "
error establishing a database connection" for example) and thus restore the link between WordPress and the MySQL/MariaDB database.
Modify important elements
Here are the details to update in the wp-config.php file so that your WordPress site works (in general, a prefix has simply been added before the existing database name and the username):
- the MySQL database name (bddname before, abcd_bddname after for example)
- the MySQL database host server (mysql.domain.xyz before, abcd.myd.infomaniak.com after for example)
- the username accessing the MySQL database (userbdd before, abcd_userbdd after for example)
Modify the WordPress wp-config.php file
To do this:
- Find and keep your current MySQL information according to the list above.
- Create an FTP account.
- Connect via FTP.
- Edit the
wp-config.phpfile located in the root folder of your WordPress site. - Find the relevant paragraph and update the 3 pieces of information (according to the list above).
- Save the file and that's it, your WordPress will now connect to the correct database!
Link to this FAQ:
Has this FAQ been helpful?
This guide explains how to use PHP environment variables with Web Hosting that runs on php-fpm.
Preamble
- PHP environment variables are system variables used to store information about HTTP requests and redirects.
- They are generally used on web servers to store details about previous requests or redirects that have been performed.
- These variables can contain information such as previous URLs, HTTP methods, or other data related to the client's navigation on the web server.
Using environment variables
To use PHP environment variables:
- Define the PHP environment variables in a
.htaccessfile:SetEnv EXAMPLEVARIABLE hello
- In your PHP file, the name of the variable to call corresponds to the same variable name defined in the environment variable:
<?php getenv('EXAMPLEVARIABLE');
In this example, the displayed result will be hello.
Going further with environment variables
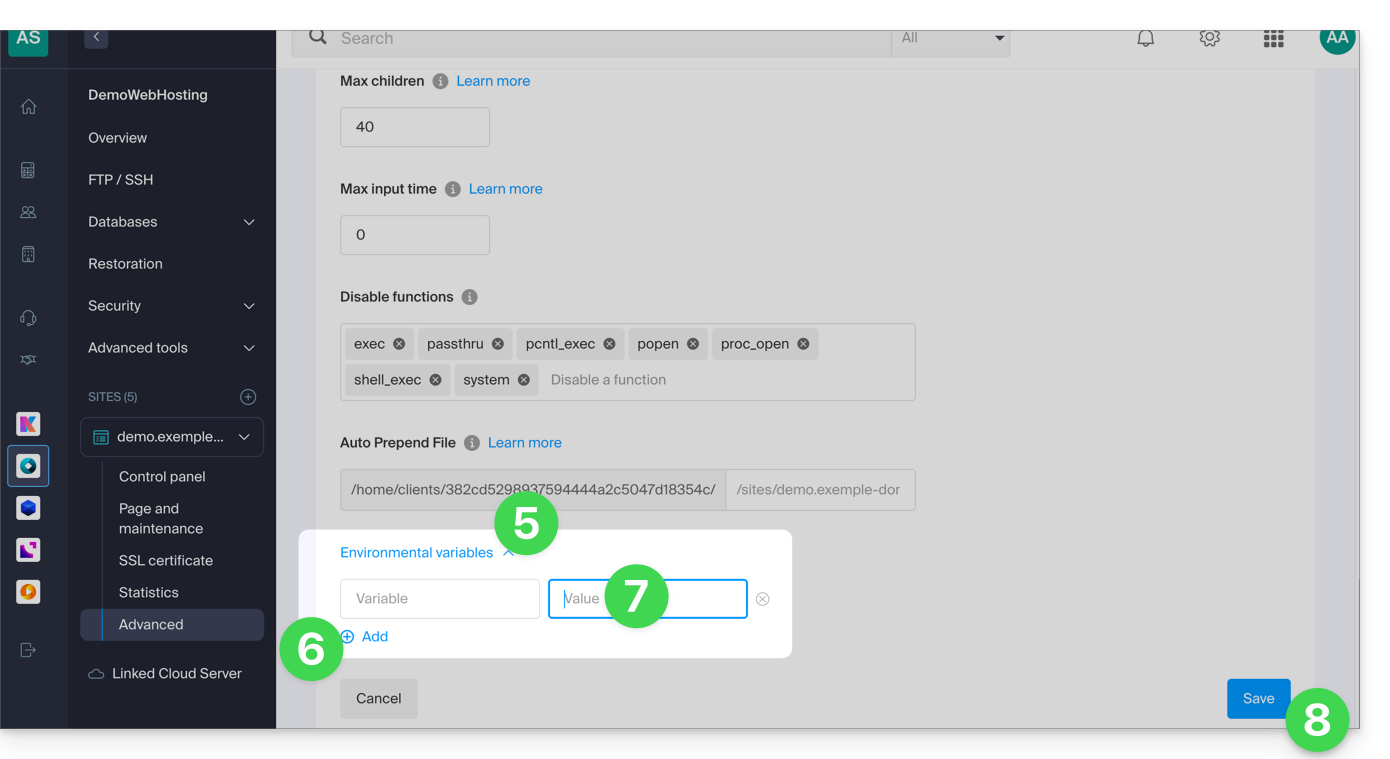
It is possible to configure environment variables directly from the Manager for your entire website:
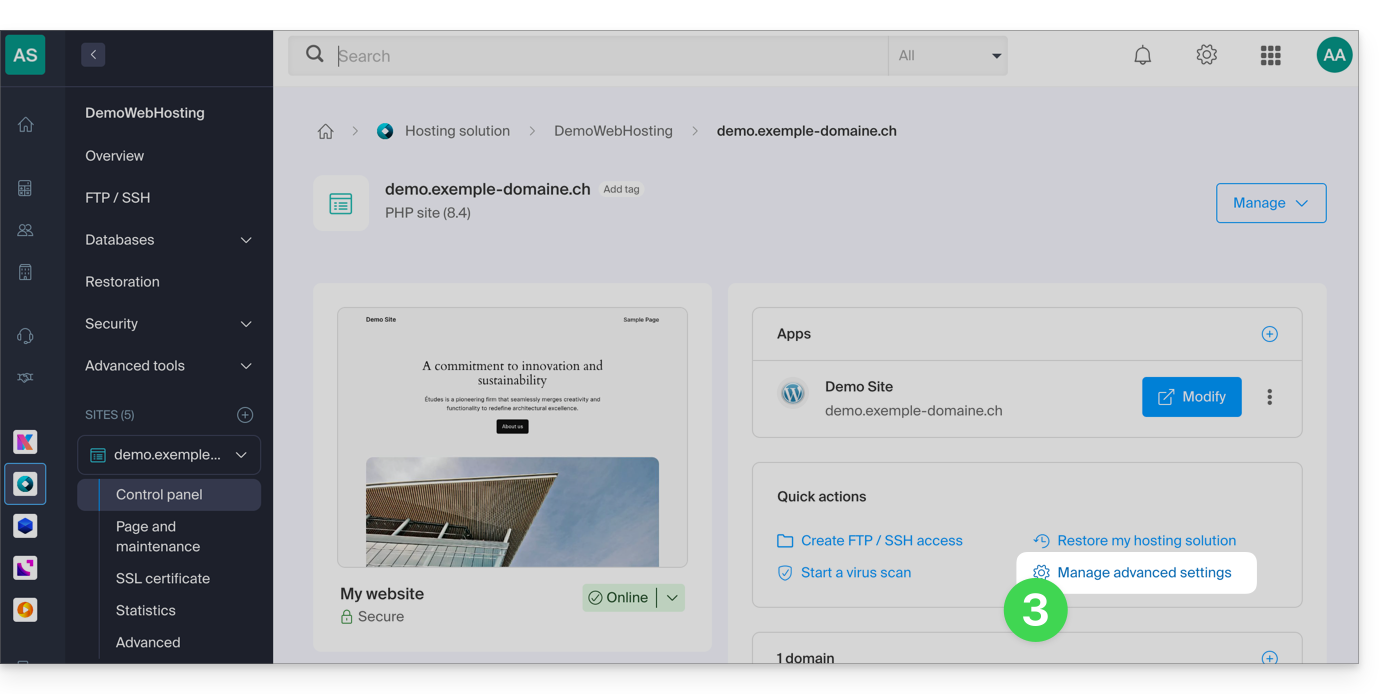
- Click here to access the management of your site on the Infomaniak Manager (need help?).
- Click directly on the name assigned to the site concerned:
- Click on Manage advanced settings:
- Click on the PHP / Apache tab:
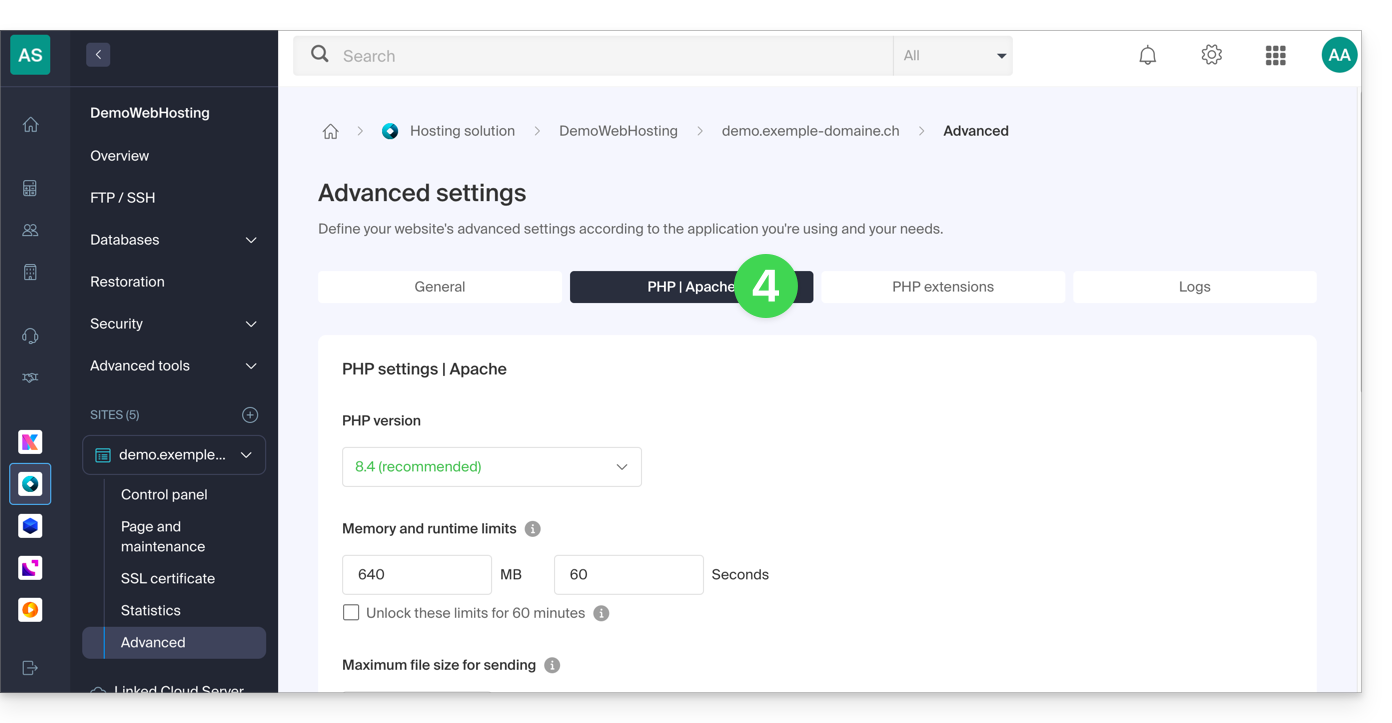
- Further down on the page, click on the chevron to expand the Environment Variables section.
- Click on the icon Add.
- Enter the variable and its value.
- Click the button to save:
Link to this FAQ:
Has this FAQ been helpful?
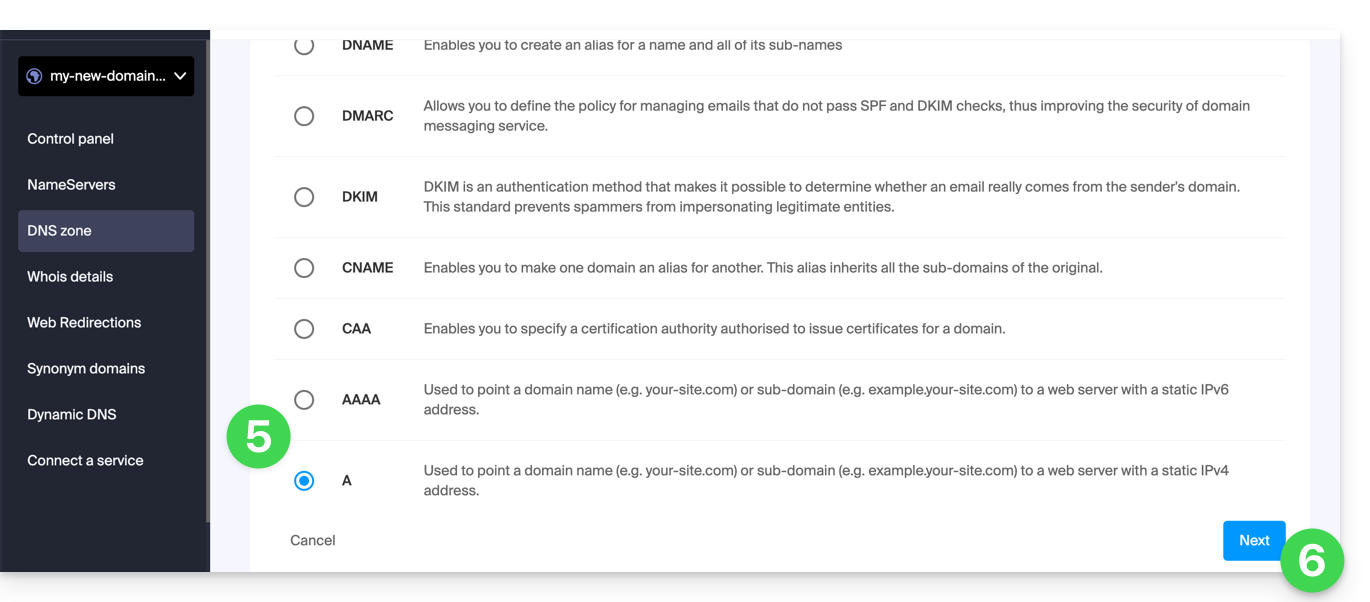
This guide explains how to add or modify one or more A and AAAA type records in the DNS zone (of a domain name) managed on the Manager Infomaniak.
Preamble
- This type of record allows a domain name to point to a static IP address (usually a server), type A for an IPv4 and AAAA for IPv6.
- This is the method generally used to redirect your domain name to the IP address of the web server on which your website is hosted. Moreover, this type of pointing is used automatically to link your domain name with your website if they are in the same place and in the same Infomaniak Organization.
- You should only modify this type of record if you have a particular configuration to set up (e.g., pointing a subdomain to an external application).
Modify the DNS zone
To manage this type of record in a DNS zone:
- Click here to access the management of your domain on the Infomaniak Manager (need help?).
- Click directly on the name assigned to the domain in question.
- Click on DNS Zone in the left sidebar.
- Click the button to add a record:
- Click the A or AAAA radio button to add a record.
- Click the Next button:
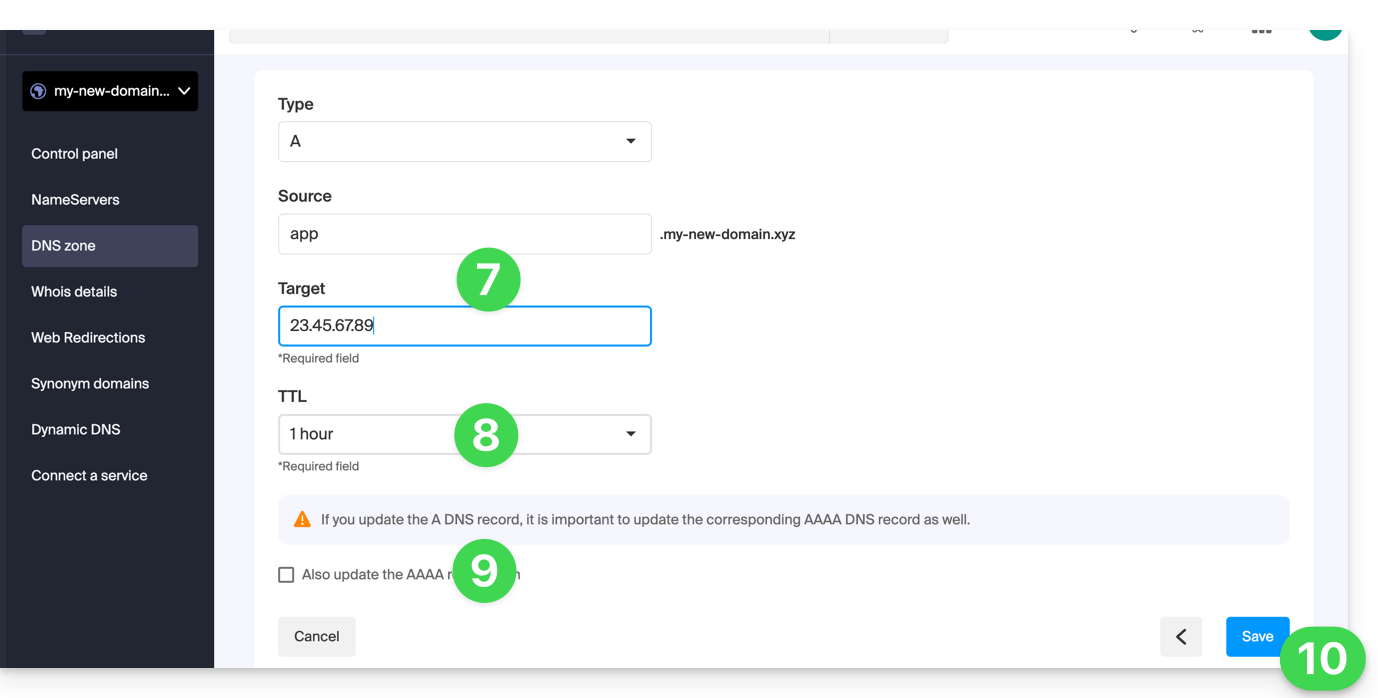
- Enter the values necessary for your DNS zone.
- Leave the default value for the TTL.
- If necessary, you can request the adjustment of the AAAA record by checking the box, which will allow you to indicate an IPv6 at the same time.
- Click the Save button:
Link to this FAQ:
Has this FAQ been helpful?
This guide provides tips to perform operations related to a WordPress site, which allows, among other things, to…
- … copy and migrate a WordPress site from a competing host to Infomaniak,
- … change the domain name of a WordPress site,
- … backup an entire WordPress site…
Preamble
- Depending on the context, instead of performing a WordPress transfer, you can simply…
- … change the site address (the associated domain name) very easily if you have installed WordPress via the Infomaniak installer,
- … duplicate a WordPress site to work in parallel in a development environment…
Transfer a WordPress site…
… with the All-in-One WP Migration extension
- Requires installing a new clean WordPress (for example via the Infomaniak automatic installer) to import the old site onto it.
- Refer to this guide.
… with the Duplicator extension
- Requires connecting to the hosting via FTP to send a
.ziparchive and a PHP file to reinstall the old site.- Refer to this guide.
Link to this FAQ:
Has this FAQ been helpful?