Knowledge base
1000 FAQs, 500 tutorials and instructional videos. Here, there are only solutions!
This guide provides instructions on how to obtain one or more Infomaniak invoices before and after payment, view, download, and print all or part of the billing document history for your accounting purposes.
Introduction
- Final invoices can only be printed after they have been paid.
- If necessary, a personalized message can be easily added to your billing documents: refer to this other guide.
Accessing the Invoice History
Prerequisites
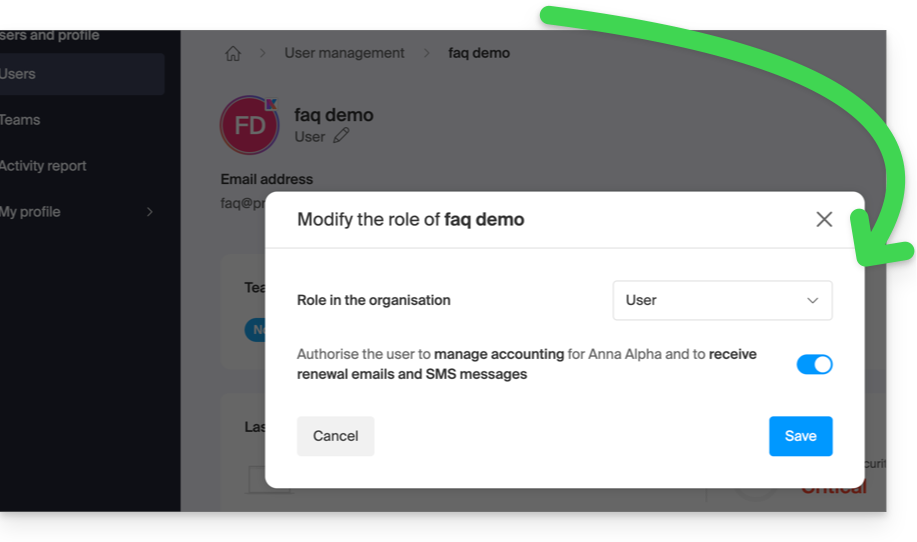
You must be an Administrator or Legal Representative within the Organization…
- …or a standard user account but with the permission to manage accounting enabled:
To access the billing document page:
- Click here to access the invoice history in the Infomaniak Manager:
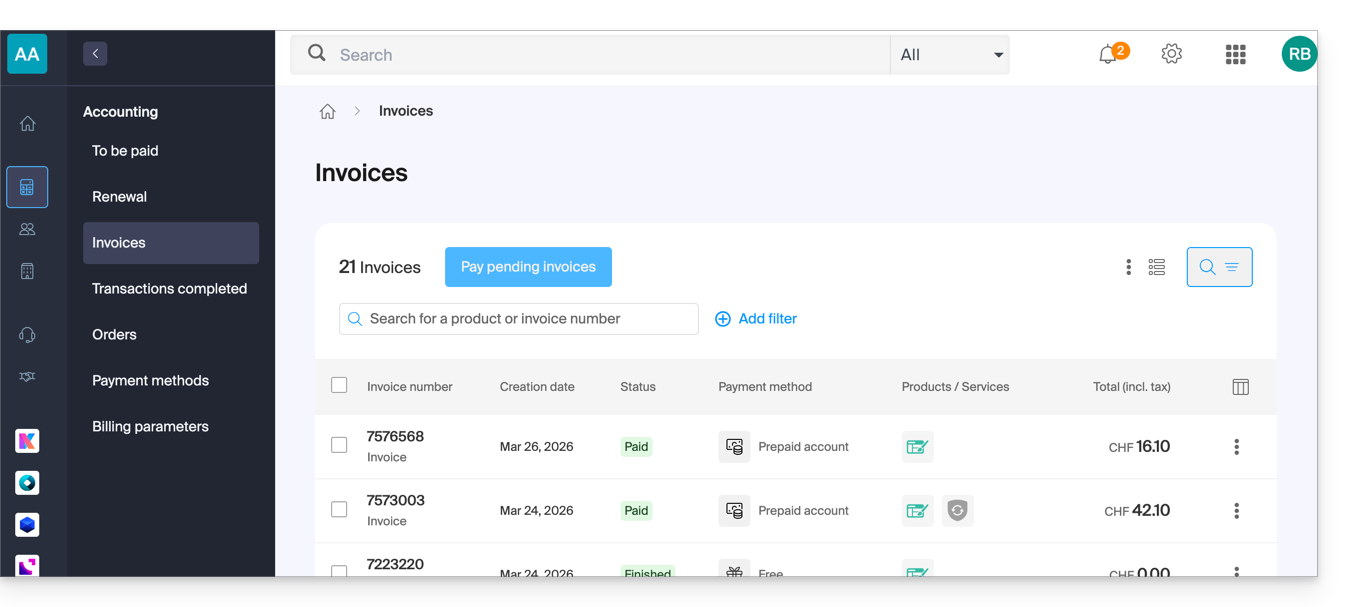
- The table automatically displays the most recent billing documents.
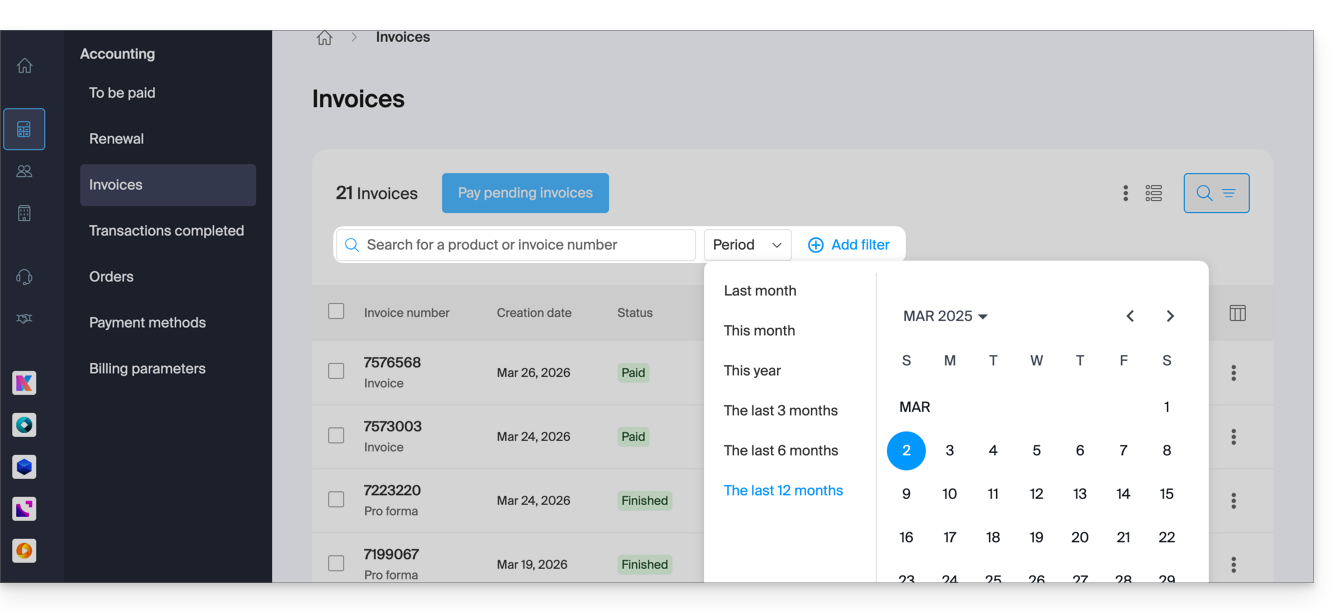
- The top section allows you to filter the documents based on the Paid, Reimbursed, etc. status and based on the desired period (start and end calendar):
Printing/Exporting a Billing Document
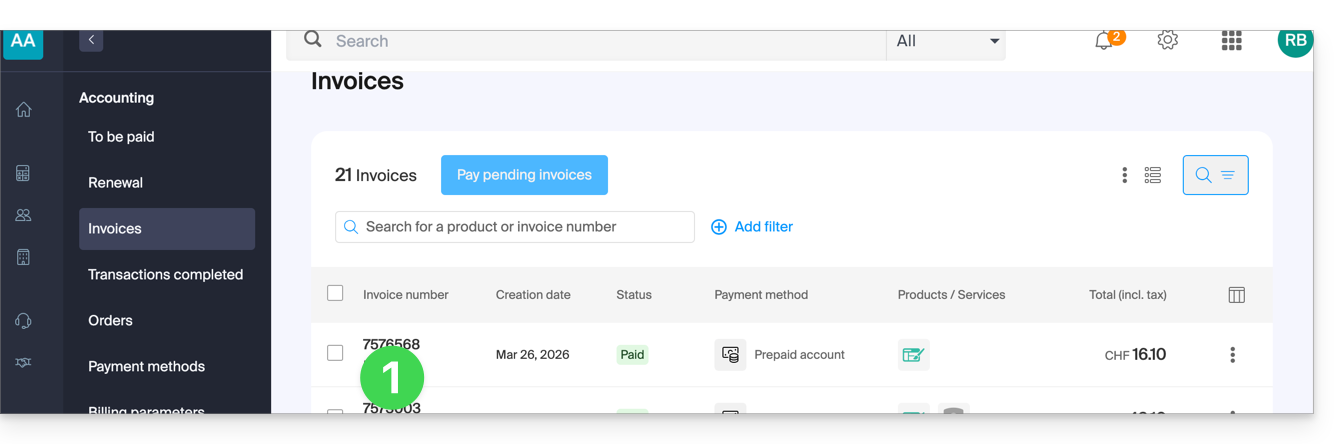
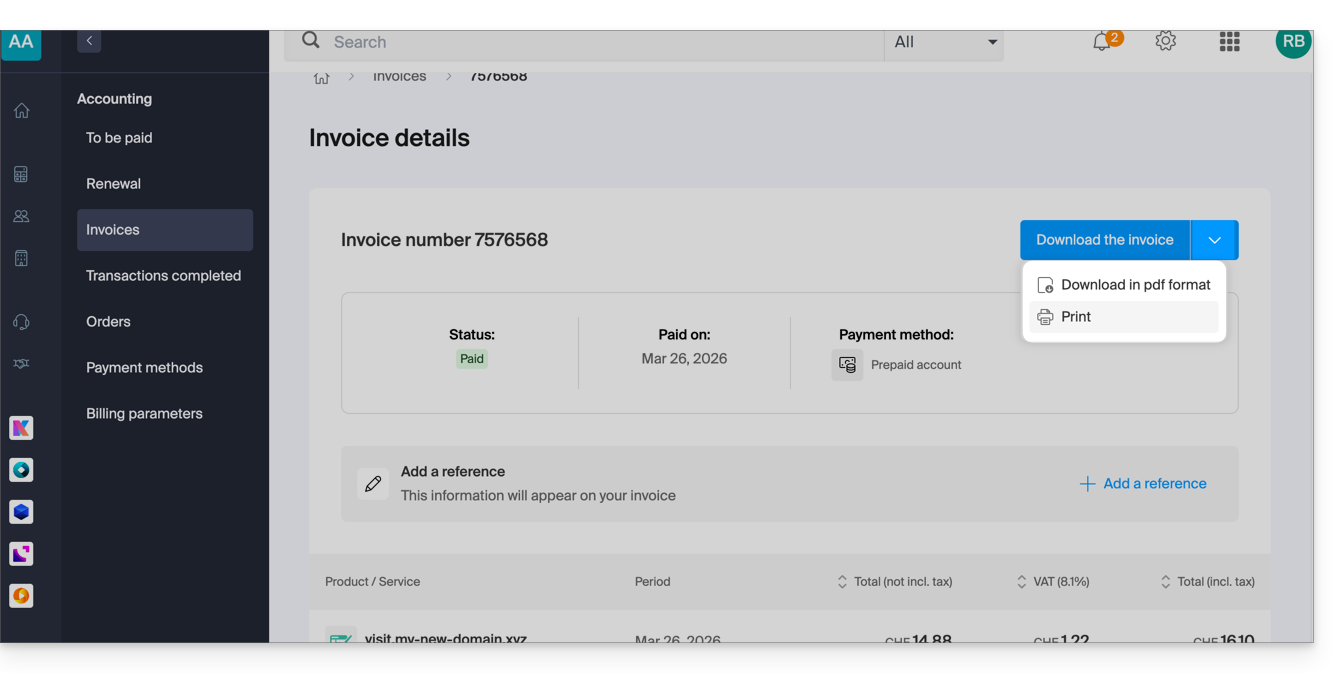
To view one of these documents in PDF format and then save it to your device or print it with your printer:
- On the same page, click on the invoice in question in the table that is displayed:
- Click on the Download button or on the chevron for other options:
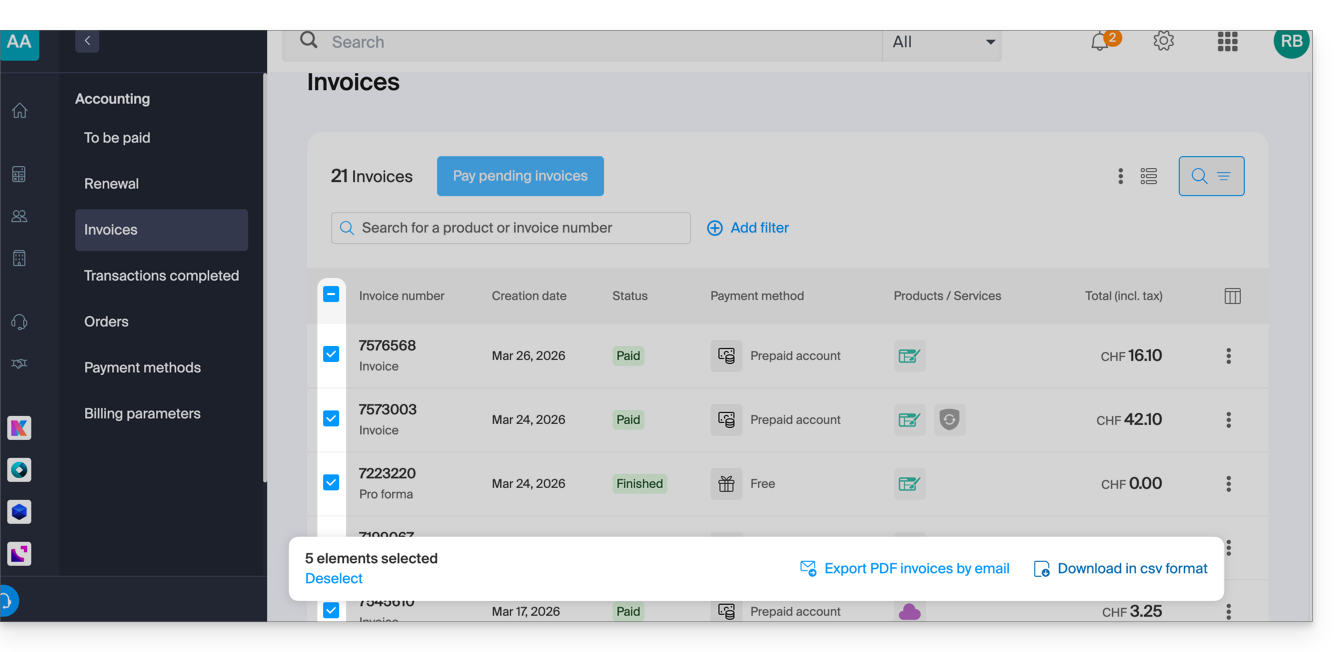
Export a set of billing documents
To download a set of documents in a CSV file in .csv format or receive them by email:
- On the same page, filter the documents according to the Paid, Reimbursed, etc. status and according to the desired period (start and end calendar).
- Click on the button at the bottom according to the desired export type:
Receive the (next) PDF invoice by email
To ensure that the invoice is always attached in PDF format with each renewal email:
- Click here to access the configuration / accounting page in the Infomaniak Manager (need help?).
- Access requires authentication with a user who has sufficient rights.
- On this page, enable or disable the addition of PDF invoices:

Your preferences are automatically saved as soon as a change is made on the page.
Print a Pro Forma Invoice
Pro Forma invoices do not have any legal, judicial, tax, or accounting value:
- Click here to access payment management in the Infomaniak Manager.
- Select the products concerned.
- Click on Generate a Pro Forma Invoice at the bottom of the table
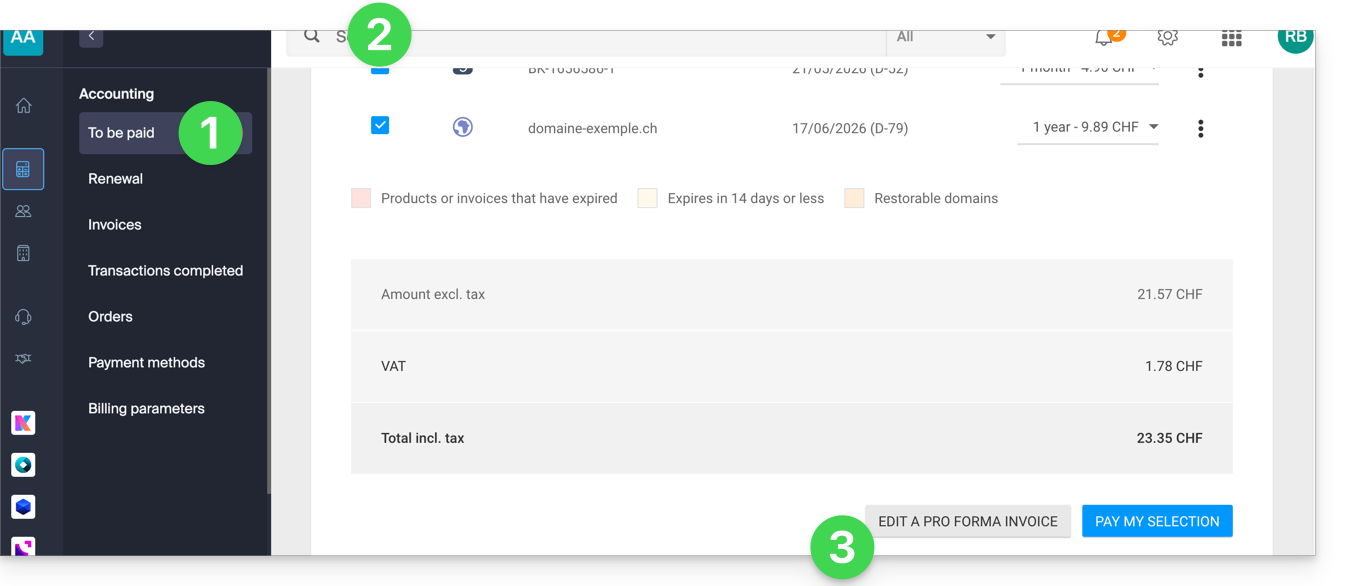
- Once displayed, you can then download the Pro Forma invoice.
Link to this FAQ:
Has this FAQ been helpful?
This guide explains how to easily set up a redirection of your domain name managed by Infomaniak.
Preamble
- A Web redirection allows you to redirect a domain name or subdomain to the Internet address of your choice.
- This procedure is only valid if the DNS of the domain is managed by Infomaniak and if Custom Brand is not activated.
- Any addition/modification may take up to 48 hours to propagate.
- If necessary, create a redirection of your domain with and without the www (
domain.xyzandwww.domain.xyz).
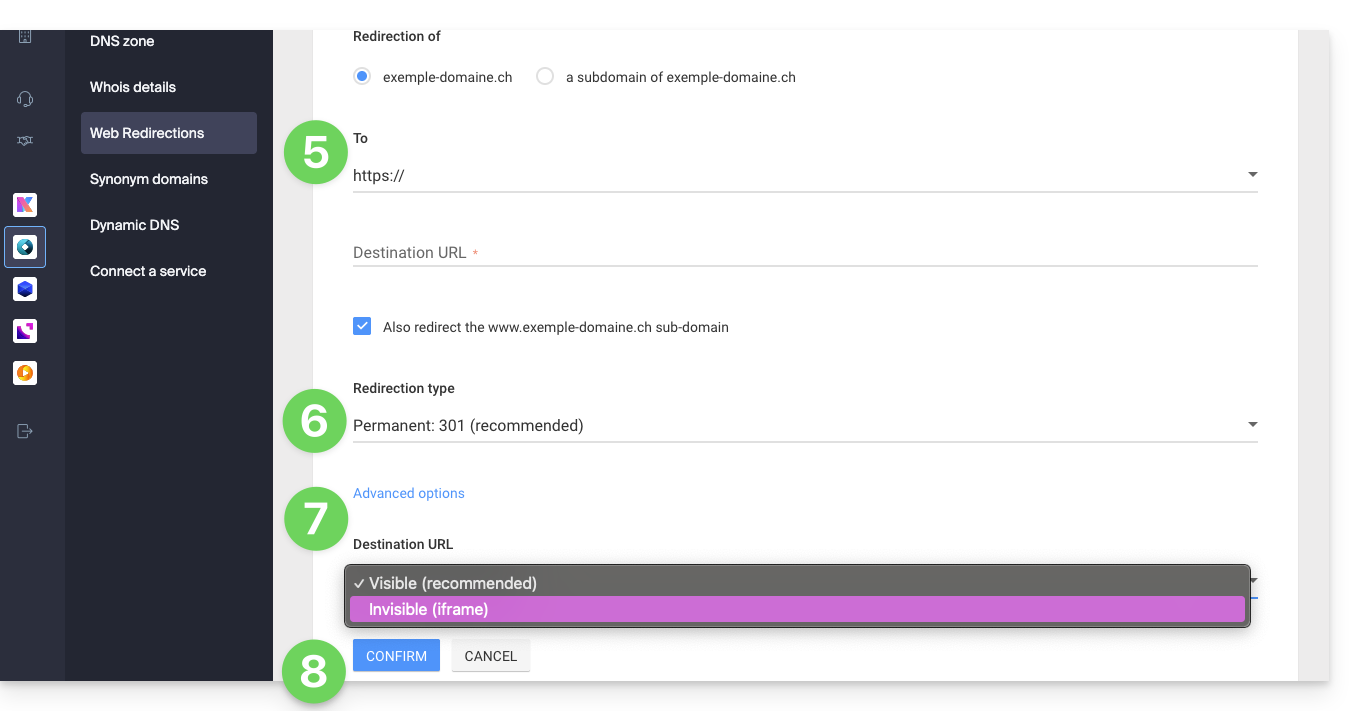
Redirect a domain to the URL of your choice
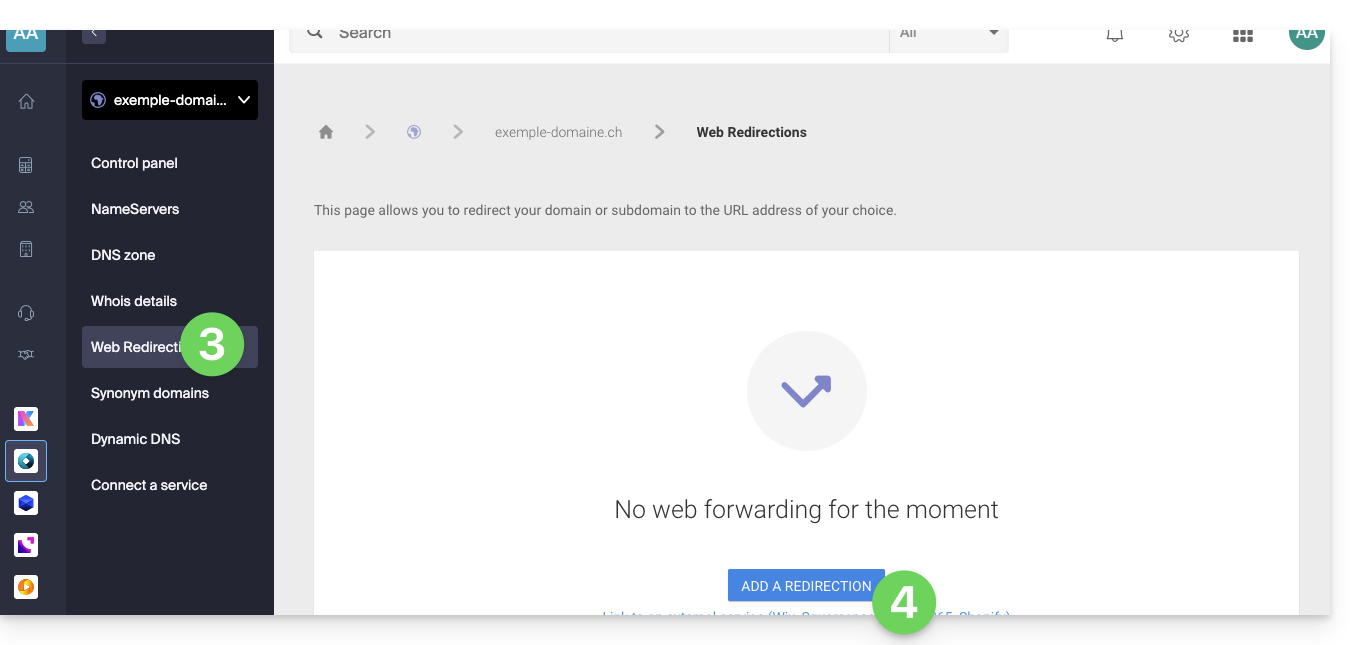
To do this:
- Click here to access the management of your product on the Infomaniak Manager (need help?).
- Click directly on the name assigned to the product concerned.
- Click on Web Redirections in the left sidebar.
- Click on the Add a redirection button:
- Enter the destination address (under To).
- Choose between a 301 or 302 type redirection.
- The advanced options allow you to specify a redirection in the form of an iframe (invisible, but not recommended).
- Click on the button to Confirm:
Link to this FAQ:
Has this FAQ been helpful?
This guide explains how to display the absolute paths for certain web applications that need to know them.
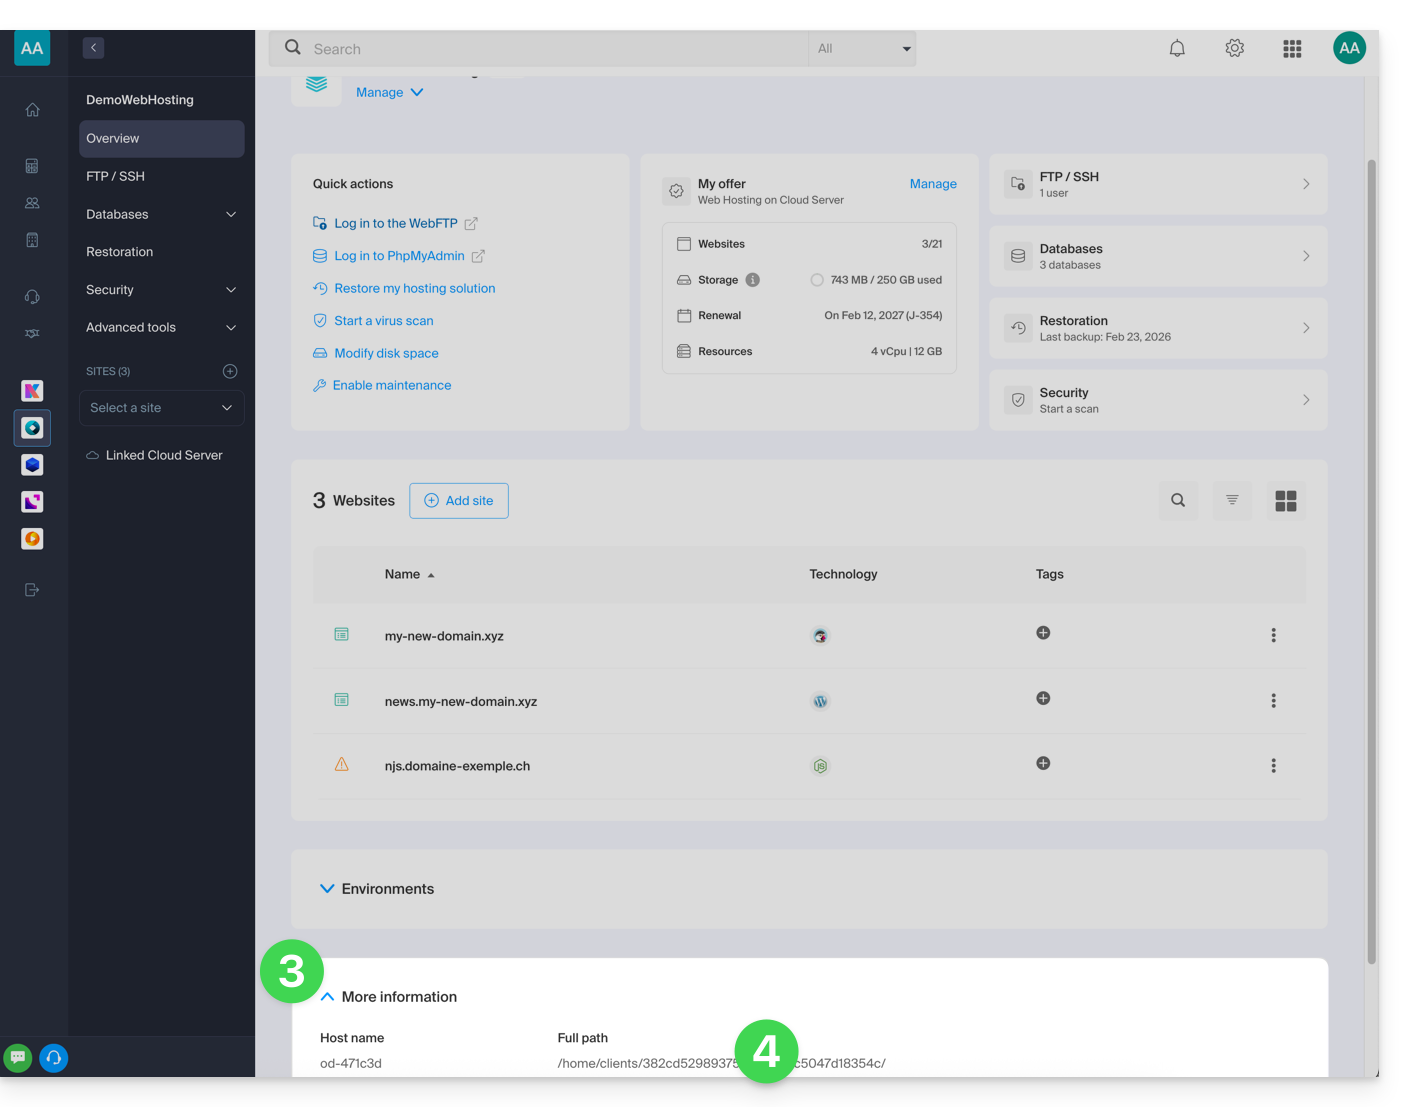
Get the absolute path…
… of a web hosting
To do this:
- Click here to access the management of your hosting on the Infomaniak Manager (need help?).
- Click directly on the name assigned to the hosting in question.
- Then click on the chevron to expand the Information section of this hosting.
- The highlighted indication below is the location of the example site:
… of a website
To do this:
- Click here to access the management of your site on the Infomaniak Manager (need help?).
- Click directly on the name assigned to the site in question.
- Then click on the chevron to expand the Information section of this site.
- The highlighted indication below is the location of the example site:

Link to this FAQ:
Has this FAQ been helpful?
To help you identify the kSuite offer that best suits your needs, refer to this other guide.
The kSuite offer provided by Infomaniak does not include a web hosting service for a page or a website on the Internet.
It is of course possible to subscribe to an Infomaniak Web Hosting from the same user account and/or the same Organization and to build your website with the tool of your choice such as WordPress or Site Creator.
To help you identify the hosting offer that best suits your needs, refer to this other guide.
Link to this FAQ:
Has this FAQ been helpful?
This guide explains how to generate a certificate signing request (CSR) for a domain name and all its subdomains with a Web Hosting (excluding free hosting of type Starter), thus allowing you to encrypt the connection to your domain name and all its subdomains via a single SSL certificate.
Preamble
- The configuration allows for a "named site" and a "backup site"; to ensure this works without conflict, make sure that the wildcard and your specific subdomains do not overlap on the same web hosting:
- DNS Level the priority is natural: if a specific subdomain exists (e.g.,
private.domain.xyz), it is the one that is requested; otherwise, the request is redirected to the wildcard (*.domain.xyz). - Server Level it is necessary to be vigilant: if the wildcard and the specific subdomain are on the same server, it is the software implementation (Apache) that decides; Apache processes requests according to the evaluation order of the configuration files.
- The risk: if the wildcard is evaluated first, it "captures" all the traffic, making your specific subdomain inaccessible, even if it exists elsewhere.
- Therefore, do not place the wildcard on the same hosting as a more specific overlapping subdomain.
- DNS Level the priority is natural: if a specific subdomain exists (e.g.,
Setting up a Wildcard Certificate
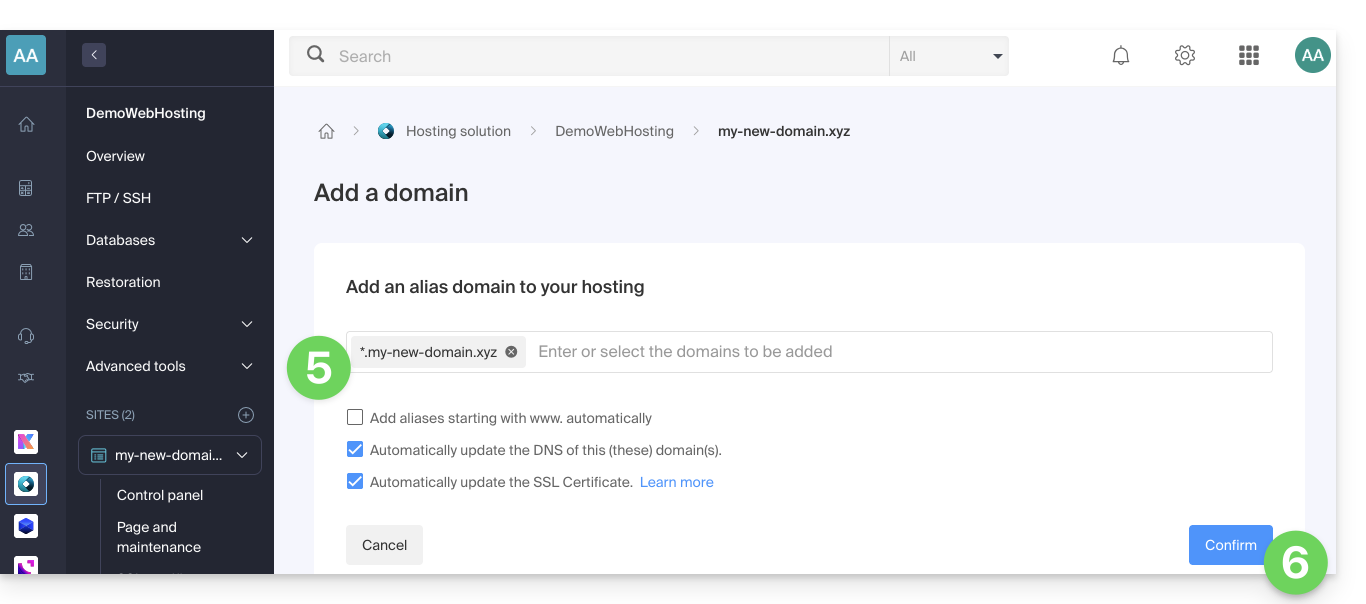
1. Add an alias domain with an asterisk *
To add an alias of type * to your website:
- Click here to access the management of your site on the Infomaniak Manager (need help?).
- Click directly on the name assigned to the site concerned:

- Click on the chevron to expand the Domains section of this site.
- Click on the Add a Domain button:
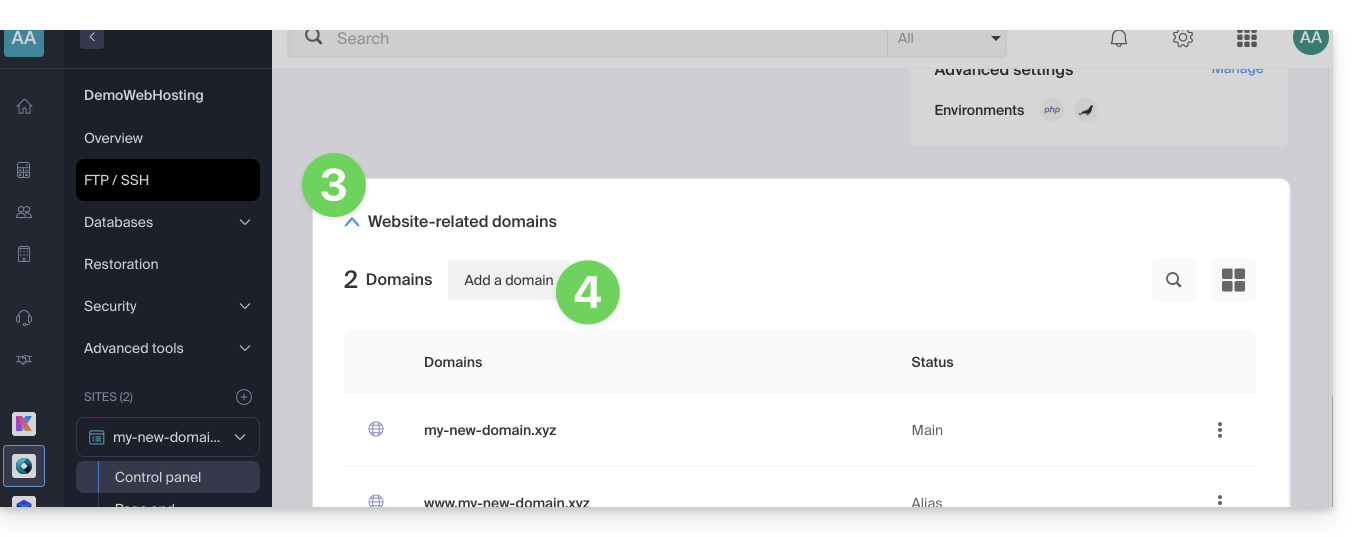
- Enter the domain name to be added in this form:
*.domain.xyz(the asterisk is mandatory, followed by a dot, then the domain name of the website which is domain.xyz in this example)
- Click on the Confirm button to complete the procedure:
2. Install or update an SSL certificate
Example of updating the existing certificate to include the * wildcard subdomain:
- Click here to access the management of your site on the Infomaniak Manager (need help?).
- Click directly on the name assigned to the site concerned.
- Click on SSL Certificate in the left sidebar menu.
- Click on the action menu ⋮ located on the right.
- Click on Update the certificate:

- Make sure the recently added subdomain is selected.
- Click on the Install button at the bottom:

- Wait for the creation or update to complete.
Link to this FAQ:
Has this FAQ been helpful?
This guide explains how ModSecurity works, how to configure it, and how to manage it on Infomaniak servers.
Introduction
- ModSecurity (
mod_secure) is available and enabled by default on Infomaniak servers:- All HTTP requests will be subject to the security rules defined by ModSecurity.
- The PHP extension
uploadprogressis not available on Infomaniak servers, as PHP is used in its FPM version.
- It is not possible to disable ModSecurity on Infomaniak servers:
- The setting is global to the server where your site is hosted, which means that all defined security rules will be applied to your site.
In case of a problem
Language error in the browser (code 403)
If the error message ModSecurity: Access denied with code 403 (phase 2). Operator EQ matched 0 at REQUEST_HEADERS. (...) appears regarding ModSecurity, you should check that a default language is properly configured in your web browser. This error can sometimes be caused by incorrectly configured language settings in the browser.
Warning "Request body larger than configured limit"
If you see messages regarding the error or warning Request body larger than configured limit, please note that this is only a warning — the request still goes through and is not blocked. This configuration is specific to certain older hosting generations (of the jessie type) and allows all requests to pass through to the server without any impact on your visitors.
Link to this FAQ:
Has this FAQ been helpful?
Thank you for trusting Infomaniak with the hosting of your WordPress site.
Preamble
- As a reminder, the WordPress site creation tool can be:
- hosted by the WordPress.com infrastructure (paid) and in this case Infomaniak is not involved in the hosting
- installed freely but manually by the user thanks to the archive offered by WordPress.org, Infomaniak is then the web host but does not manage any updates and does not list the application in the Web Applications section of the Infomaniak Manager; you will be in this case if you migrate an external WordPress to Infomaniak
- installed automatically by the tool available on the Manager and in this case WordPress is maintained (in terms of security) largely by Infomaniak
- This third and final point is developed in this guide.
- The Infomaniak installer automates the installation and security updates of WordPress ...
- If you encounter a problem with third-party software, contact its publisher or a Partner and consult the support policy as well as article 11.9 of the Infomaniak Terms of Service.
Install WordPress & Apps
Infomaniak simplifies the installation of the WordPress application (and other applications as well):
Use WordPress
Although WordPress is one of the easiest CMS to use, it is necessary to get used to it. To help you with this process, here are external resources in several different languages to get started with WordPress:
- Essential basics to know to get started with WordPress
- WordPress francophone community help forum
- FAQ about backups/restorations
- Use an ElegantThemes theme or extension
- Free WordPress training provided by the site progresser-en-informatique.com. If you want to get to the essentials, focus on the following modules:
Link to this FAQ:
Has this FAQ been helpful?
This guide explains what a Web host like Infomaniak is, and specifies its role, its scope of action, and the limits of its technical support.
Infomaniak, web host since 1996
According to Wikipedia, a Web host is a company that provides Internet hosting for computer systems to individuals or entities who do not wish to do so themselves.
Infomaniak, that’s also:
- … decades of experience in hosting and high-performance online solutions.
- … more than a million users in Switzerland and Europe trusting the management of their critical data.
- … a company certified ISO 27001, 9001, 14001, 50001 and committed to sustainable digital technology.
- … 100% of "Swiss made" technological expertise with data hosted in Switzerland in its own data centers.
- … a rich knowledge base and customer support available to guide you.
Responsibilities and limits of intervention
As a host, Infomaniak installs, secures, and keeps the server infrastructure up to date, evolves its management interfaces (Manager) and assists its customers in the optimal use of the tools provided. Infomaniak strives to offer solutions accessible to all; however, human support for free products is inherently limited to ensure the sustainability of these services.
For security and confidentiality reasons, no assistance will be provided without formal identification of the interlocutor.
Support is exclusively for Organization administrators. End customers or users benefiting from a contract via a Reseller Partner must contact their administrator or dedicated service provider first.
Scope of technical support
Technical assistance does not intervene for:
- Development and programming: debugging sites, correcting source code, personal scripts (PHP, JS, etc.)
- The use and integration of APIs.
- Application maintenance and webmastering: troubleshooting, updating, or managing content for third-party applications (e.g., CMS like WordPress, email clients like Outlook, etc.).
- Local and custom interventions: remote control, configuration of your own hardware, complex manual installations or migrations.
But support will be happy to assist you for:
- The infrastructure and the Manager: resolution of incidents related to the network, hardware, or Infomaniak management interfaces.
- The use of Infomaniak services: clarification of configuration processes and assistance in getting started with our native features.
- Documentation guidance: guiding you to the appropriate technical resources and guides to make you self-sufficient.
A Premium assistance and a migration service are available for more specific needs.
Find external help
For help with the content of your site, its programming, or the advanced organization of your mailboxes, use the Infomaniak tender platform which lists over 1000 verified professionals, or consult the directory.
Link to this FAQ:
Has this FAQ been helpful?
This guide explains how to modify the PHP version used in the command line (PHP CLI) on an Infomaniak Web Hosting.
Preamble
- Useful for configuring a specific script or PHP command line (CLI) session.
- To modify the PHP version of the Web server (FPM/Apache) via the Manager, refer to this other guide.
Default PHP CLI version
The php command uses the default server version. Check the active version with this command:
# Check current PHP version
php -v
For the stability of your scripts, use an explicit path (e.g., php8.2) or modify your PATH variable.
Modify the PHP version in CLI
You can configure the PHP version automatically loaded in your SSH session via two main files.
1. Using .bashrc (Recommended)
The ~/.bashrc file is read when opening an interactive shell.
Open the file (or create it if it does not exist):
touch ~/.bashrc
nano ~/.bashrc
Add this line to define the desired version (example with PHP 8.3):
export PATH="/opt/php8.3/bin:$PATH"Refresh the configuration:
source ~/.bashrcCheck the change:
php -v
which php
2. Using .profile (Alternative)
The ~/.profile file is read upon SSH connection (login mode).
Modify the file:
nano ~/.profileAdd the export line:
export PATH="/opt/php8.3/bin:$PATH"
3. Load .bashrc systematically
To apply the configuration to all types of sessions, add this code to your ~/.bash_profile or ~/.profile files:
# Load .bashrc if it exists
if [ -f ~/.bashrc ]; then . ~/.bashrc; fi
Run a specific version temporarily
To run a script with a specific version without changing your global environment, call the binary directly:
# Execute with a specific version
/opt/php8.2/bin/php my_script.php
/opt/php8.3/bin/php -v
Once these steps are completed, your SSH sessions and CLI scripts will use the selected PHP version by default.
Link to this FAQ:
Has this FAQ been helpful?
This guide explains how to convert a free Web Starter offer to a more comprehensive and enhanced paid offer, such as Shared Web Hosting or Web Hosting on a Cloud Server.
Preamble
- By purchasing a domain name from Infomaniak, you can add 1 free email address and a basic 10 MB Web space.
- In a few clicks, it is possible to upgrade this offer to benefit from an enhanced experience.
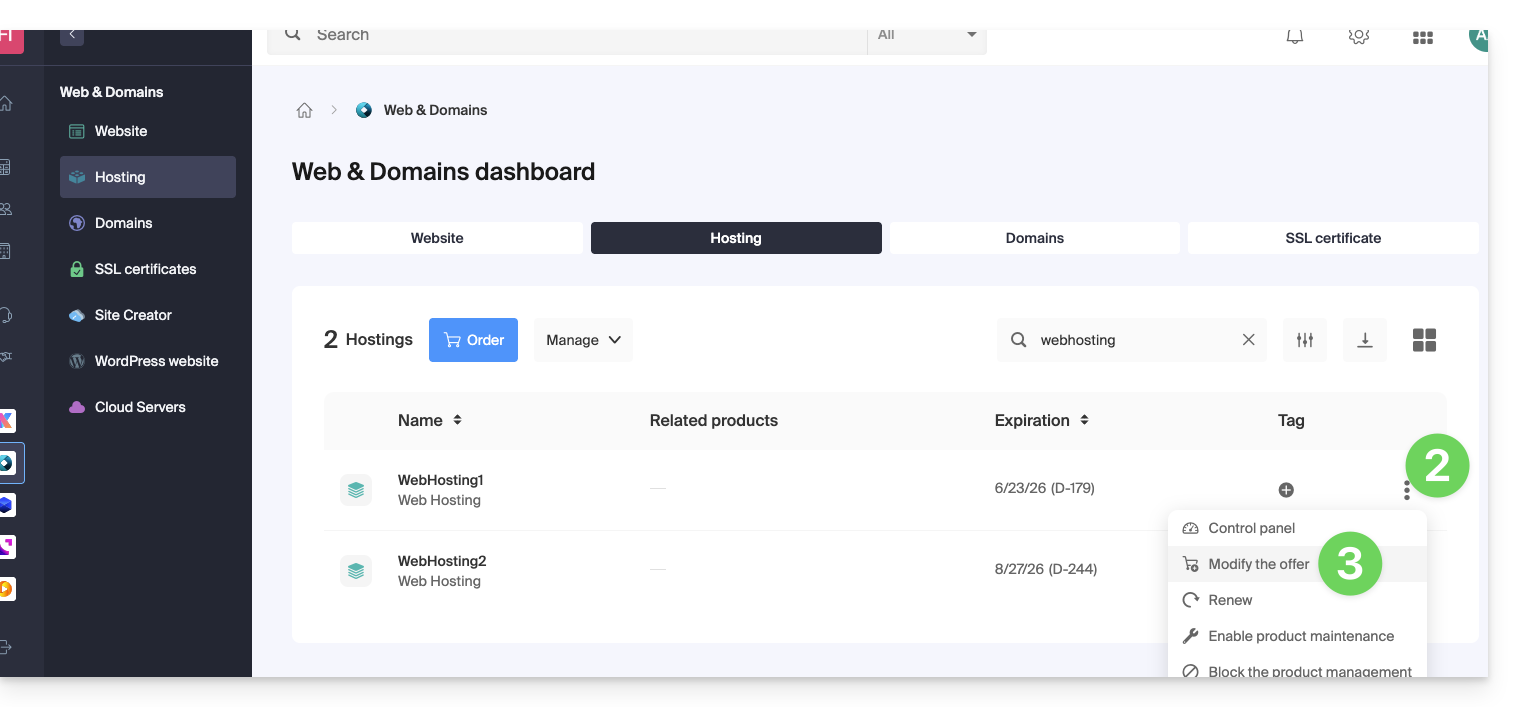
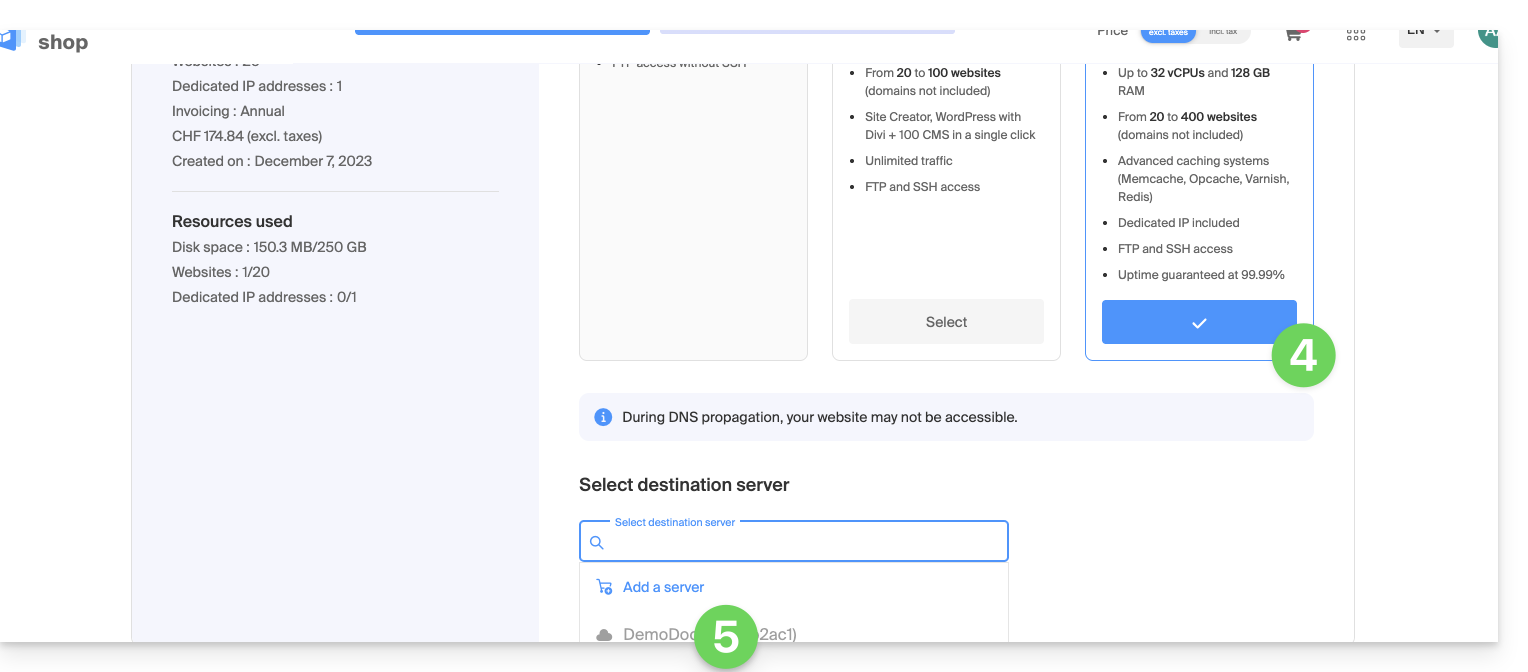
Modify the Starter Offer - Basic Web Page
To upgrade this free offer:
- Click here to access the management of your hosting on the Infomaniak Manager (need help?).
- Click on the action menu ⋮ located to the right of the item concerned.
- Click on Modify the Offer:
- Follow the wizard to choose the new type of hosting, pay to complete the offer change.
Link to this FAQ:
Has this FAQ been helpful?
This guide explains how to create a homepage on your Infomaniak website using the welcome page creation tool, a simplified aid for quickly and easily creating content. To create a more comprehensive site, there is Site Creator.
Prerequisites
- Have a website on Infomaniak hosting (even a simple Starter, the basic web page to activate if necessary).
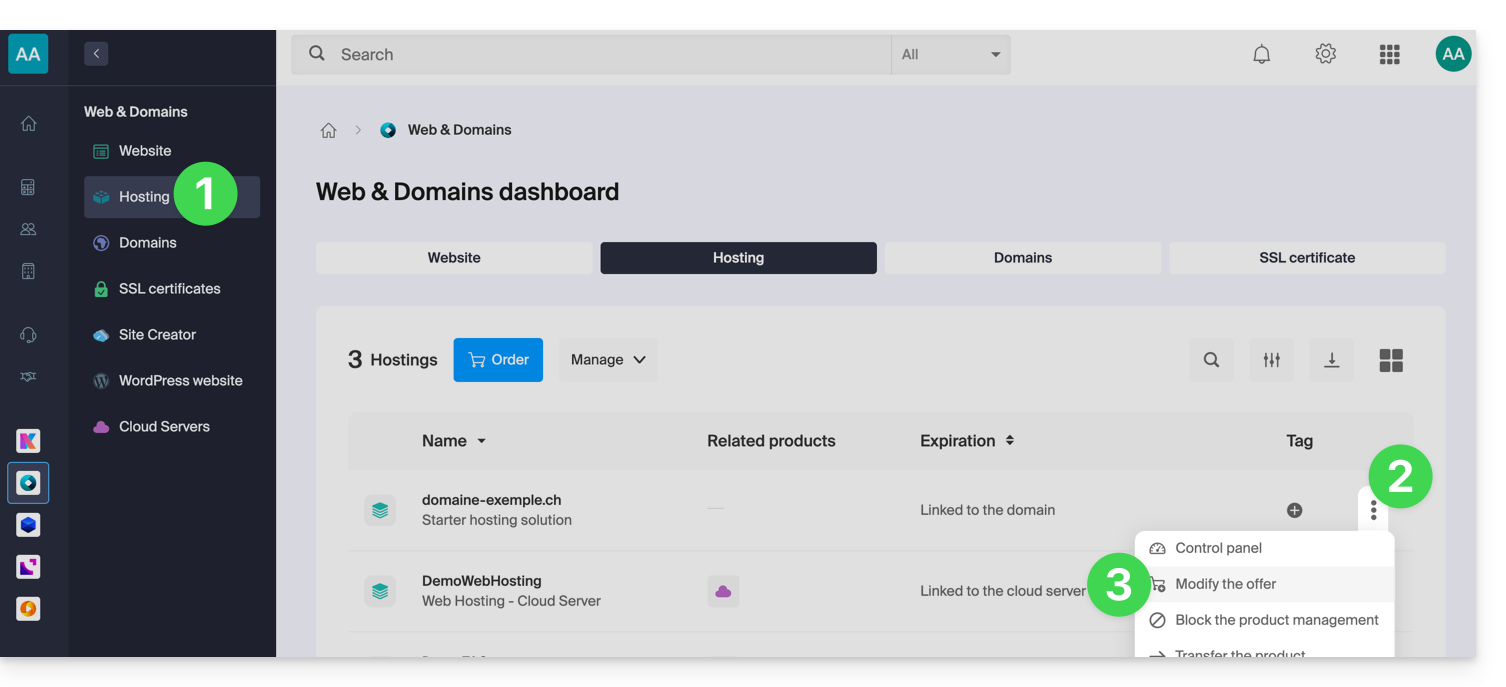
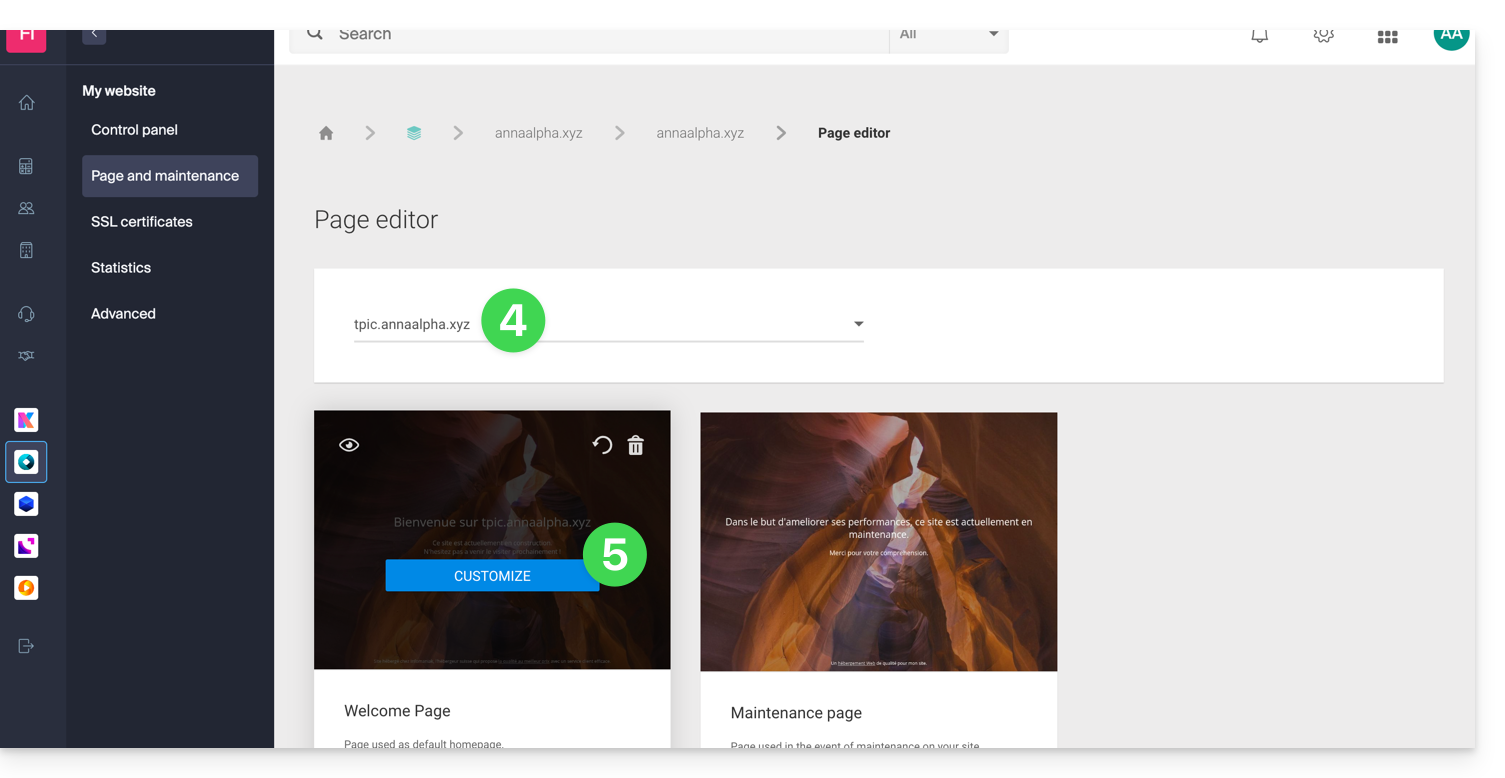
Create a welcome page on an Infomaniak site
To access the simple creation tool:
- Click here to access the management of your site on the Infomaniak Manager (need help?).
- Click directly on the name assigned to the site in question.
- Click on Page and Maintenance in the left sidebar:
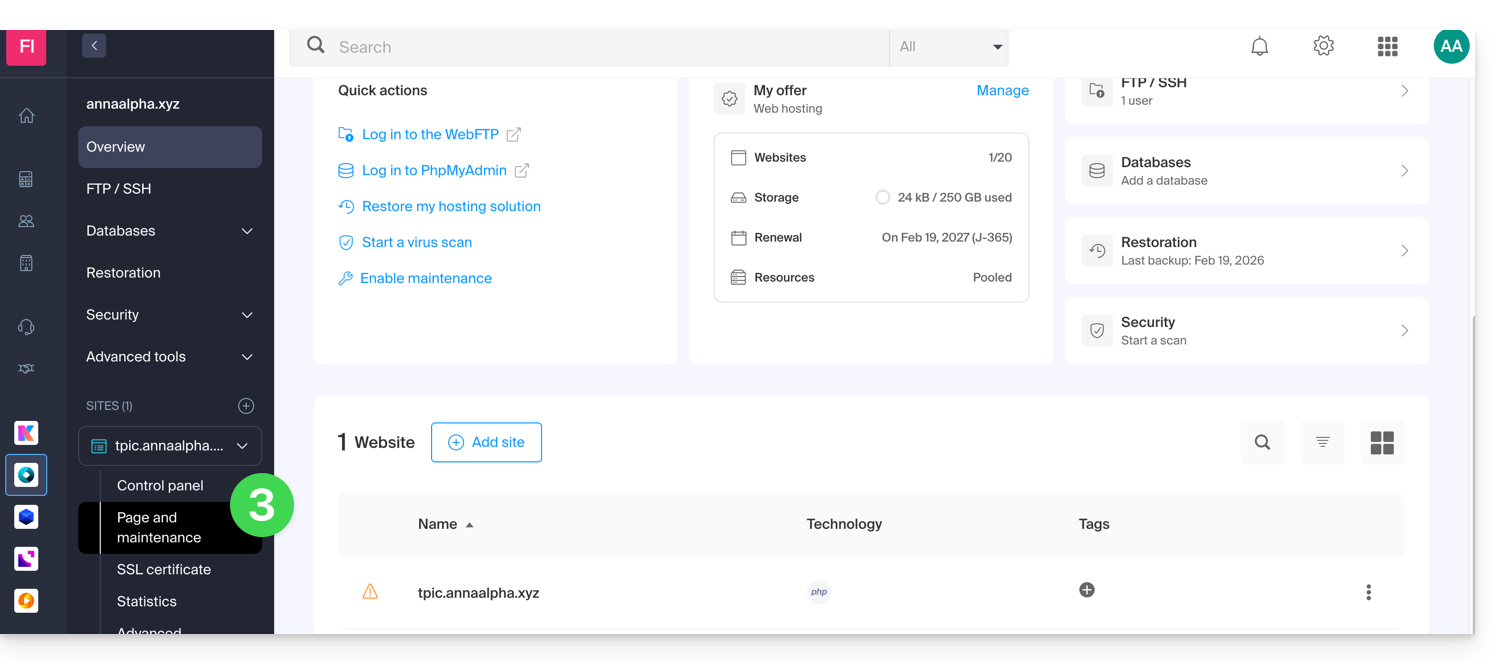
- Check or select the domain name of the site on which you want to install the web page.
- Click on Create a homepage or Customize:
You can then choose a theme, define the text visible to your visitors, insert an image into the body of the page, manage the SEO content of your page, add a background image, specify social network usernames if necessary, etc. and all of this can be modified at any time.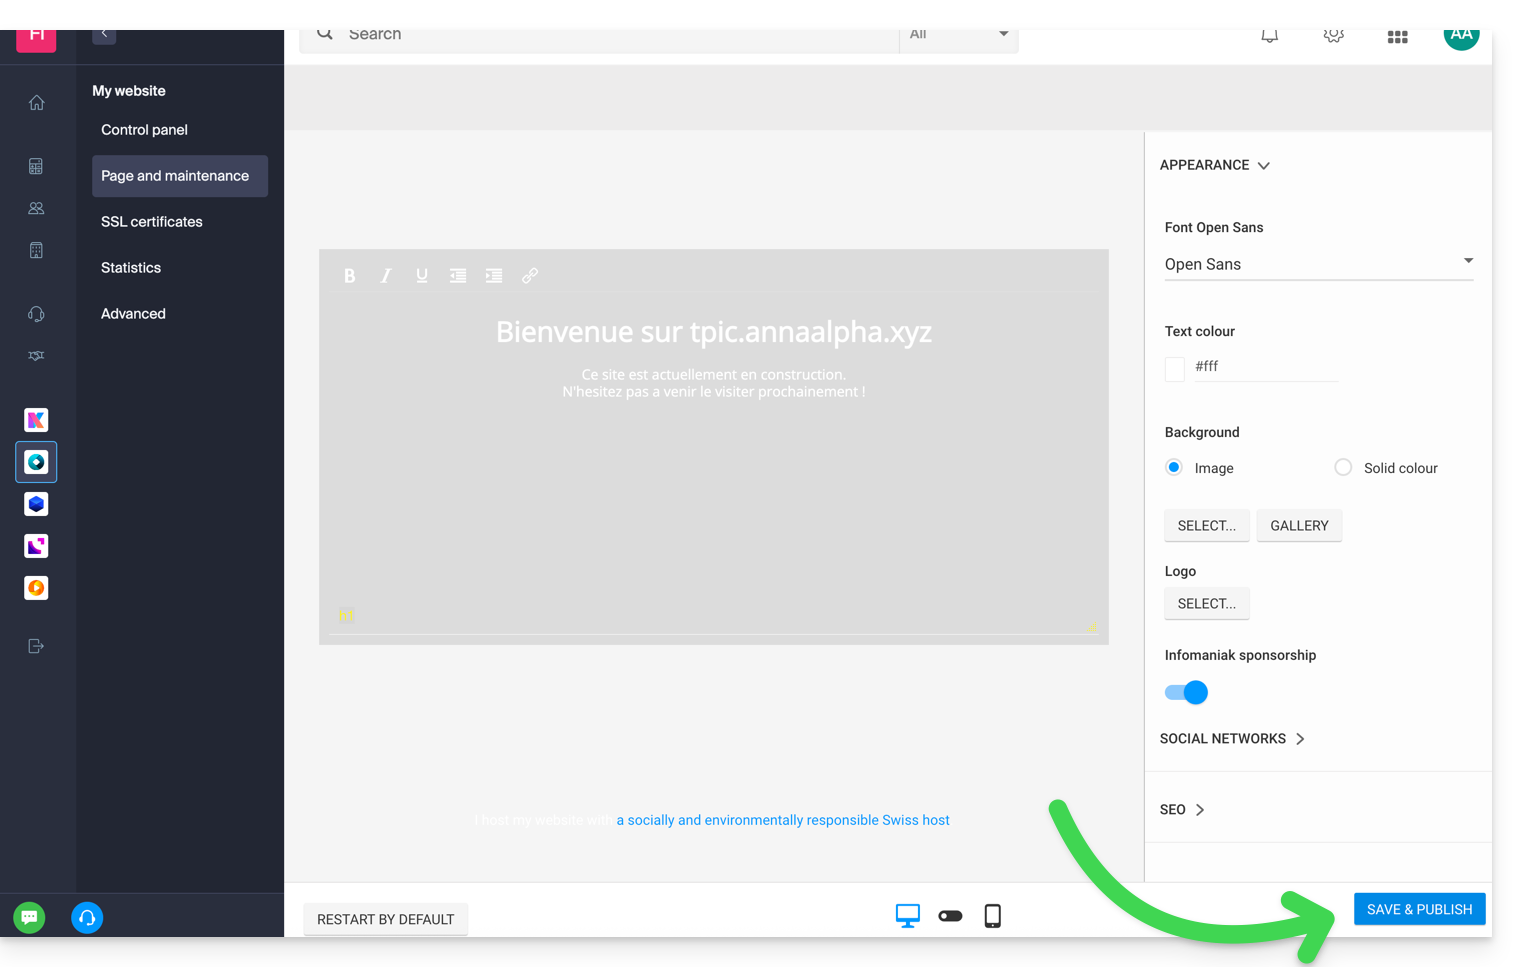
Click on the blue button at the bottom of the page to save and publish your changes.
Note that the tool can be used in conjunction with FTP management of your web hosting if necessary.
Disable and delete the welcome page
To delete the homepage that has been automatically placed at the root of your website's directory:
- Click here to access the management of your product on the Infomaniak Manager (need help?).
- Click directly on the name assigned to the product in question.
- Click on Page and Maintenance in the left sidebar.
You can delete the welcome page using the trash can icon; this will permanently delete the content of the welcome page!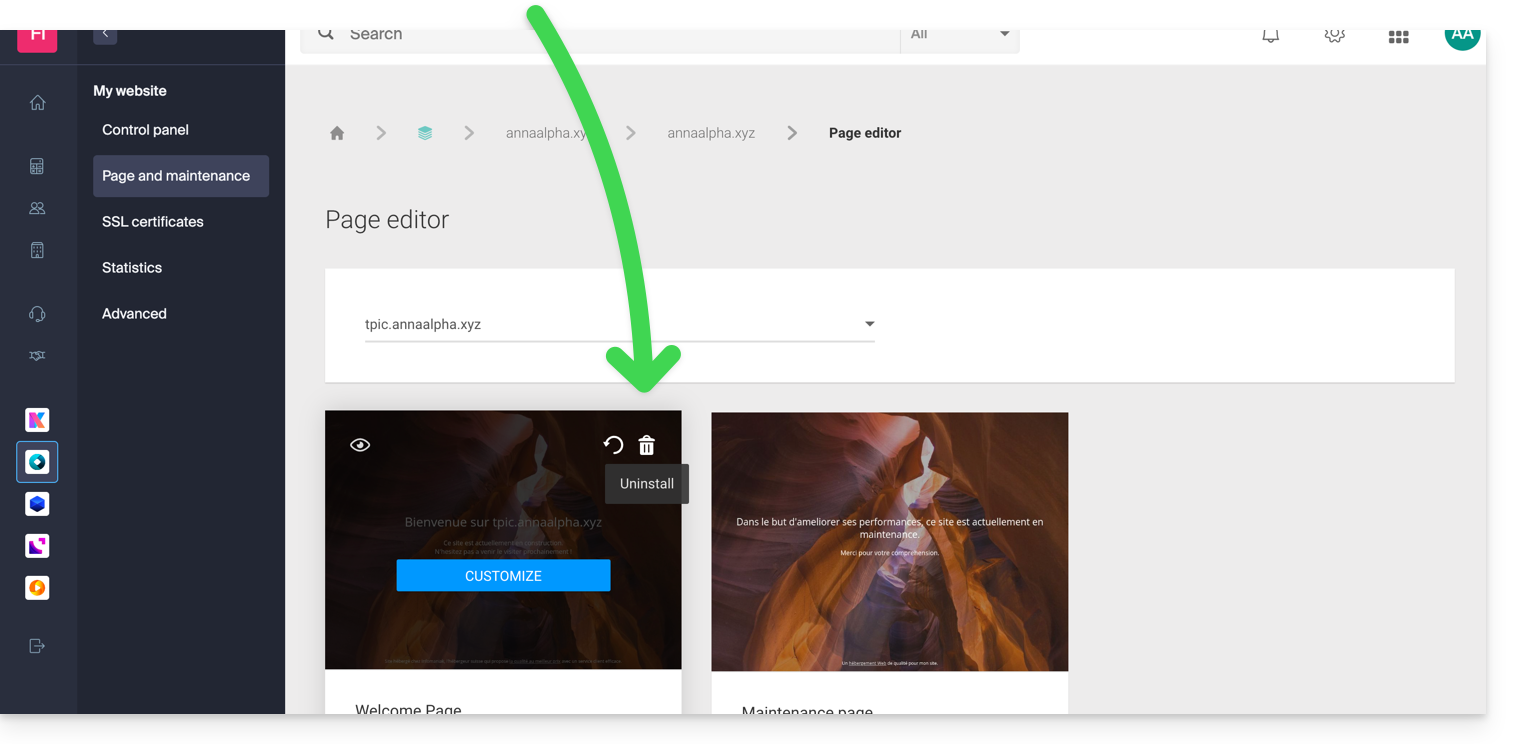
Link to this FAQ:
Has this FAQ been helpful?
This guide explains how to access the configuration of an Infomaniak website to display technical information such as the PHP, Apache version, or the activated PHP extensions and modules.
View the website's technical information
To access the website management:
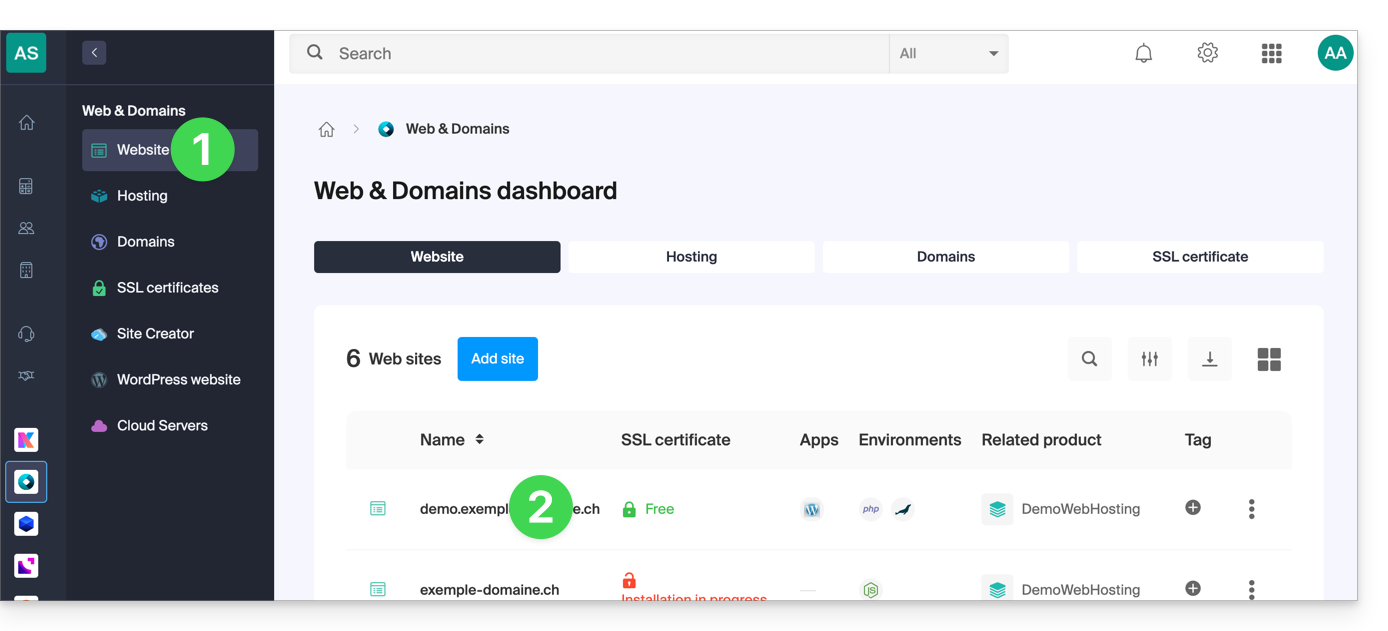
- Click here to access the management of your site on the Infomaniak Manager (need help?).
- Click directly on the name assigned to the site concerned:
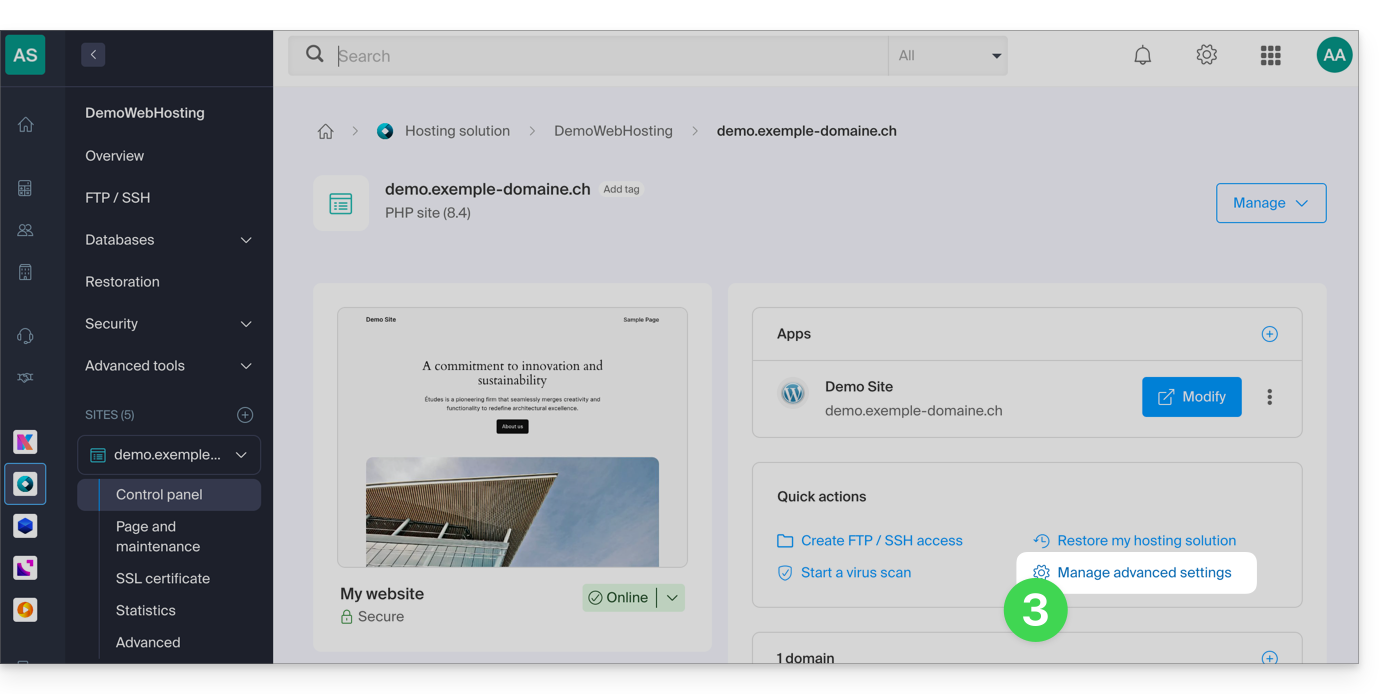
- Click on Manage advanced settings:
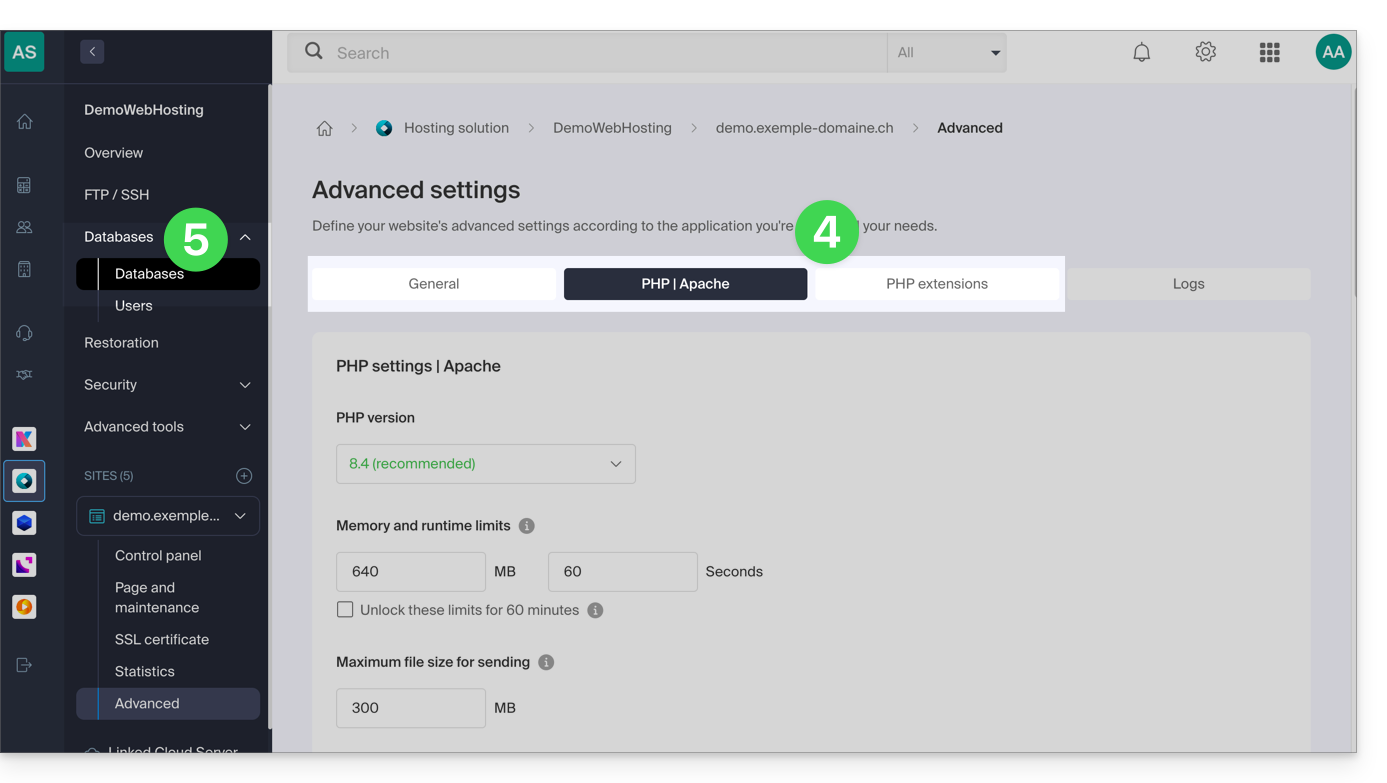
- Take note of the website information under the General, PHP / Apache and PHP Extensions tabs.
- Click on Databases in the left sidebar to get the MySQL version of the web hosting:
Link to this FAQ:
Has this FAQ been helpful?
This guide explains how to run the open source dependency manager Composer 2 using an SSH command.
Preamble
- Composer is an open source dependency manager for PHP that allows you to define, install, and update the libraries required for a PHP project.
- Composer 1 has been obsolete since 2021 and will no longer allow the installation of new packages or updates as of 2025.
- Only version 2 of Composer is now supported and available on all PHP versions from 7.2 to 8.3.
Run Composer 2
Composer 2 is already pre-installed and accessible via SSH. Therefore, it is not necessary to install it manually.
Simple usage
Log in to your hosting via SSH, then use the following command:
composerThis command will automatically run version 2 of Composer compatible with the PHP version currently in use in your session.
Check the active version
You can check the available version of Composer with:
composer --versionExample output: Composer version 2.5.0 2022-12-20 10:44:08
Force a specific PHP version
If you want to run Composer with a specific version of PHP, aliases are available. For example:
composer_php8.1 --versionor:
composer_php7.4These aliases allow you to run Composer 2 with the specified PHP interpreter, useful for testing or deploying a project on a target PHP version.
Link to this FAQ:
Has this FAQ been helpful?
This guide concerns Laravel, an open-source web framework written in PHP following the model-view-controller (MVC) principle. Also refer to their documentation.
Prerequisites
- Have a Shared Web Hosting or Cloud Server with the latest MySQL/MariaDB.
- Site under PHP 8.2.
- Create an SSH access.
- Create a database.
Installation of Laravel 11
To do this:
- Log in to the server via SSH (need help?).
- Navigate to the site directory by running the command “cd path-to-site” (for example
cd sites/laravel.domain.xyz). - Create a new project by running the command
composer create-project laravel/laravel example-app. - Modify the
.envfile at the root of the hosting to update the connection parameters to the new database:- DB_CONNECTION=mysql
- DB_HOST=xxxx.myd.infomaniak.com
- DB_PORT=3306
- DB_DATABASE= the name of the MySQL database (xxxx_newbdd)
- DB_USERNAME= the MySQL user with rights to this database
- DB_PASSWORD= its password
- Navigate to the project directory and publish via SSH:
cd example-appphp artisan migrate - Modify the target directory to point to the “public” subdirectory of the project, here
/sites/laravel.domain.xyz/example-app/public.
Link to this FAQ:
Has this FAQ been helpful?
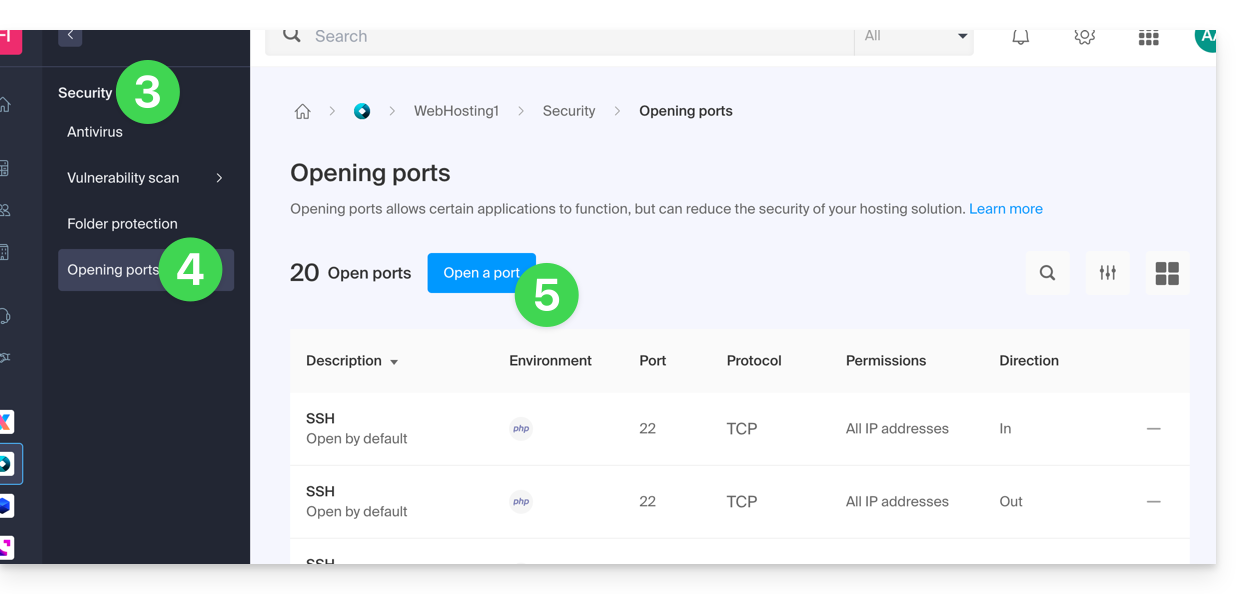
This guide explains how to allow certain incoming and/or outgoing ports in the firewall (firewall) of a Web hosting or a Cloud Server.
Preamble
- On a shared Web hosting, it is only possible to open outgoing ports.
- On a Cloud Server, it is possible to open incoming and outgoing ports.
- Opening ports allows certain applications to function properly but can reduce the security of your hosting.
Access the tool and add a rule
To manage port opening from the Manager:
- Click here to access the management of your hosting on the Infomaniak Manager (need help?).
- Click directly on the name assigned to the hosting concerned.
- Click on Security in the left sidebar.
- Click on Port Opening in the left sidebar.
- Click the Open a port button:
Open a port
It is only possible to set one port per rule, and only one IP / host per field: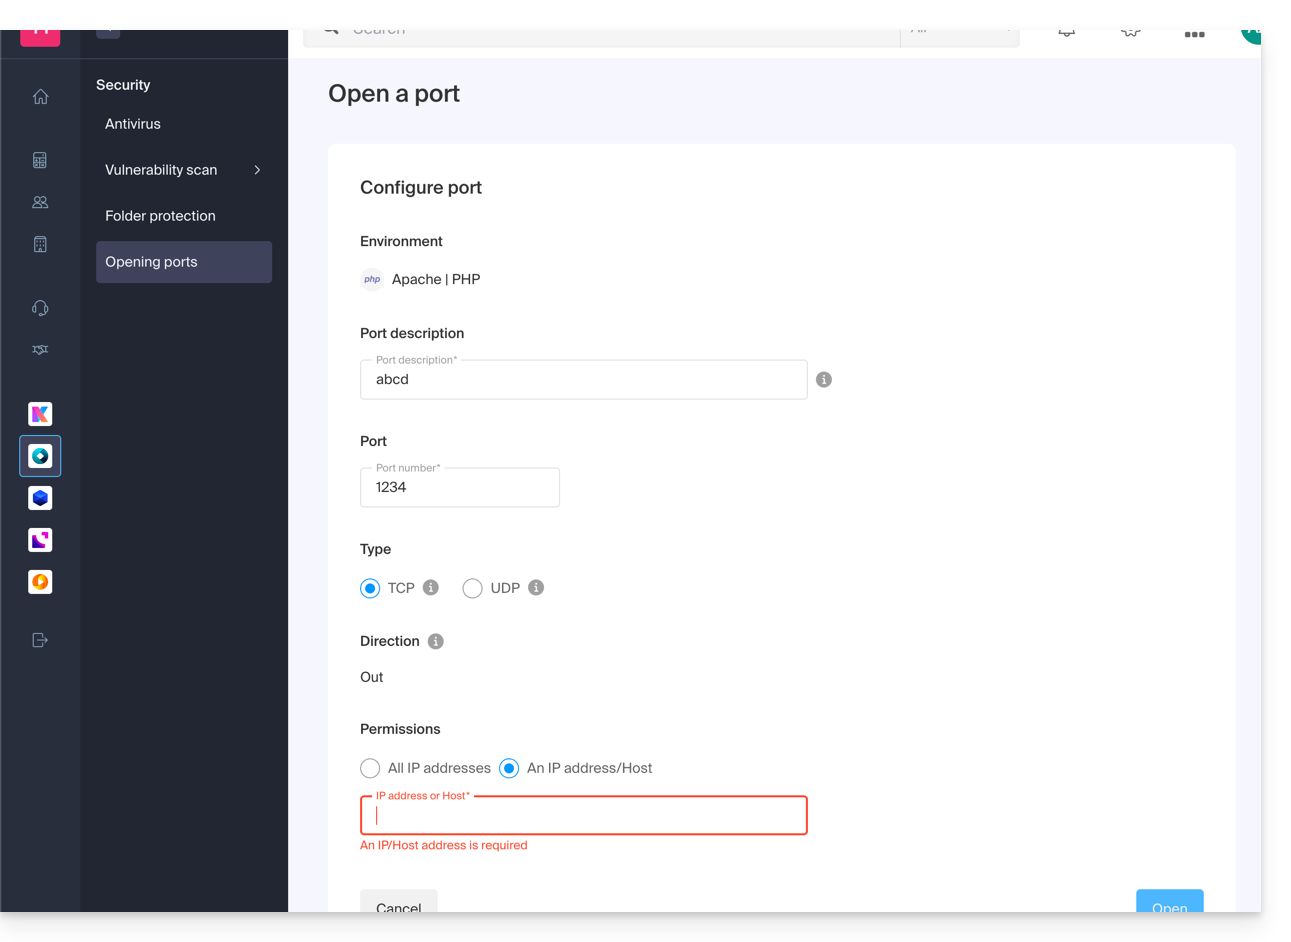
By specifying an IP or a host, the connection will only be allowed in these cases:
Incoming rule: if the connection comes from this IP or the specified hostOutgoing rule: if the connection is made to this IP or this host
Same for the "Type" of connection, if the protocol used for the connection is not the one specified in the rule, the connection is not allowed.
Open the outgoing port 25 globally
You can open the outgoing port 25 from the manager if a destination host is specified.
With a Cloud Server, to open this port to the world, contact Infomaniak support and justify your request.
Default open ports
Once you have accessed the port opening tool, you will find the list of default open ports on the page.
With a Cloud Server, to exceptionally close some of the listed ports, contact Infomaniak support and justify your request.
The display may sometimes be spread over several pages: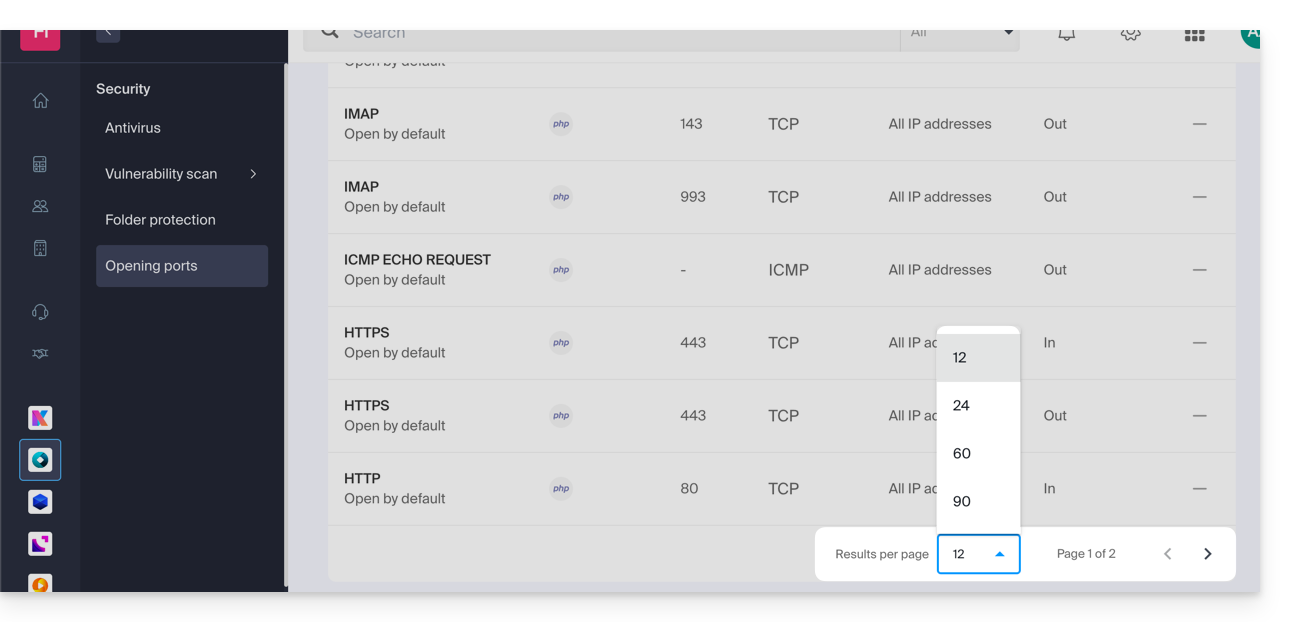
MySQL ports
Regarding database ports, refer to these guides:
Check the activity of a port (Cloud Server)
On Cloud Server, to check if an application is listening on a particular port (1234 in the example below) and to know the name of the application in question, run in SSH:
netstat -anpe | grep "1234" | grep "LISTEN"Link to this FAQ:
Has this FAQ been helpful?
This guide explains how to migrate a shared web hosting account to a Cloud Server while recovering all its data, websites, databases, etc.
Introduction
- Note:
- Database names and database user accounts are preserved.
- FTP accounts are preserved with the same names, but the host server changes to an address of the type
xxxx.ftp.infomaniak.com. - The IP addresses of the websites will change, except for dedicated IP addresses.
- During this operation, statistics are reset.
- If you already have a Cloud Server, go directly to step 2 of this guide.
- To migrate a web hosting account from a Cloud Server to another Cloud Server, please refer to this other guide.
- To migrate a web hosting account from a Cloud Server to a shared web hosting account, please refer to this other guide; please note that this is an operation that you will need to perform manually.
1. Order a Cloud Server
To do this:
- Click here to access the Cloud Server management section in the Infomaniak Manager (need help?).
- Click on Order, choose a Managed Cloud Server, and follow the wizard to complete the order:
2. Migrate your hosting to the Cloud Server
Once the Cloud Server is up and running:
- Click here to access the management of your product on the Infomaniak Manager (need help?).
- Click on the action menu ⋮ located to the right of the item in question.
- Click on Modify offer:
- Select the free transfer offer.
- Select the Cloud Server to which you want to migrate your hosting:
- Click on the Next button at the bottom of the page and complete the procedure.
- Wait for the hosting migration to complete; there will be a service interruption during the process.
Link to this FAQ:
Has this FAQ been helpful?
This guide explains how to backup or export a MySQL/MariaDB database via the Infomaniak Manager or via SSH.
Export a database via the Manager
To export an Infomaniak database:
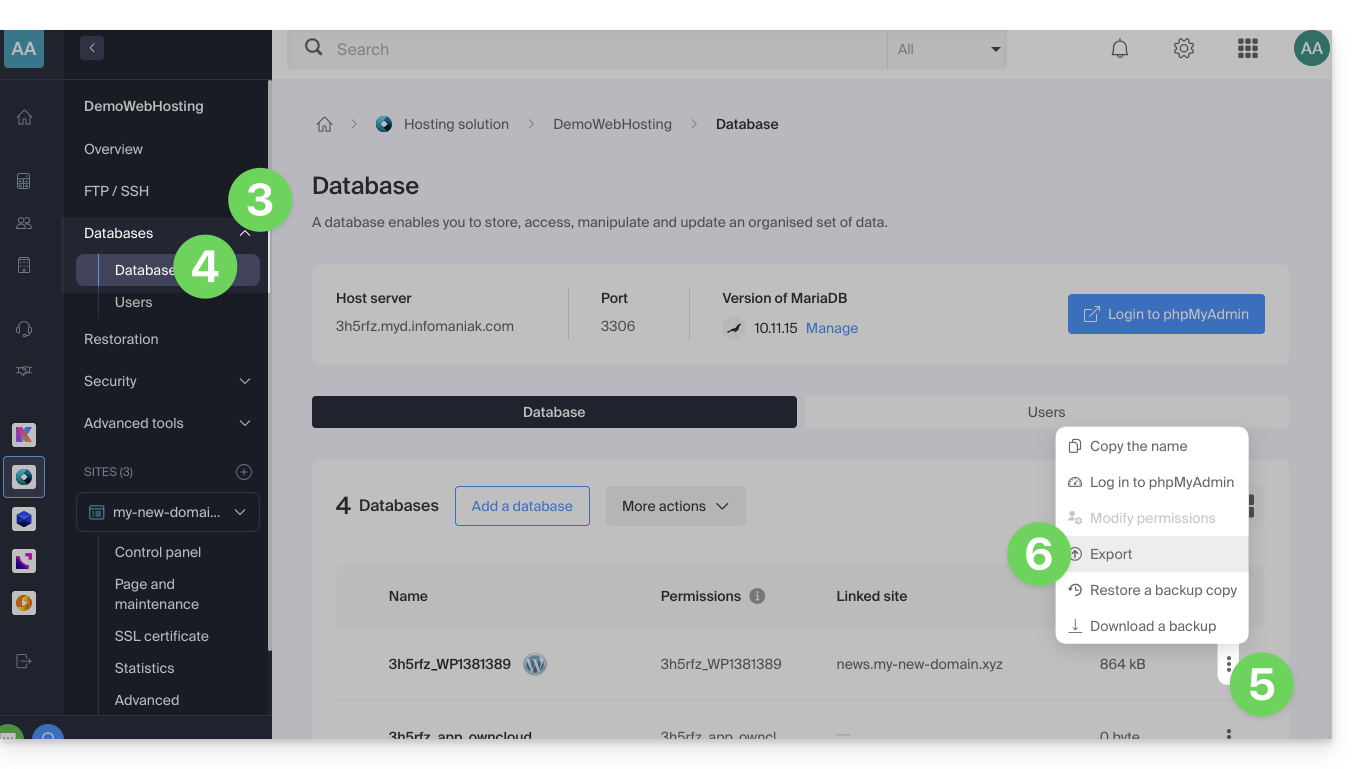
- Click here to access your site management on the Infomaniak Manager (need help?).
- Click directly on the name assigned to the site concerned:
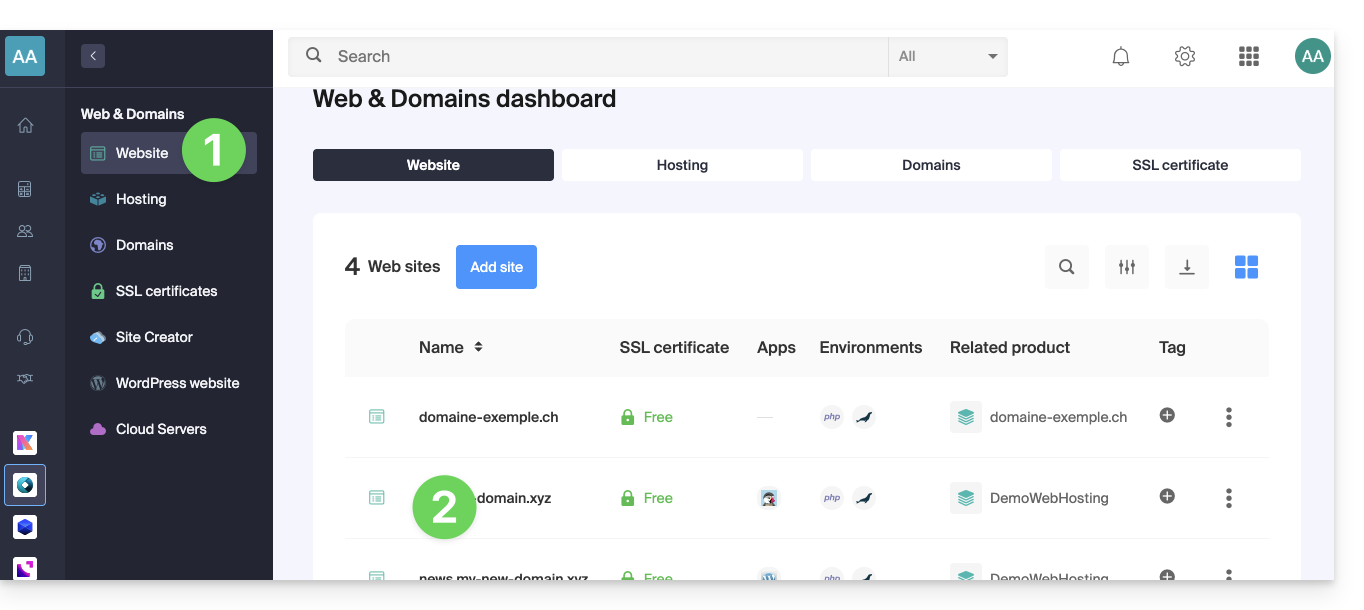
- Click on the chevron to the right of Databases in the left sidebar menu.
- Click on Databases in the left sidebar menu.
- Click on the action menu ⋮ to the right of the object concerned in the table that appears.
- Click on Export (or on Download a backup):
- Click on the export method and choose the database to download from the dropdown menu.
- Click on the Next button:
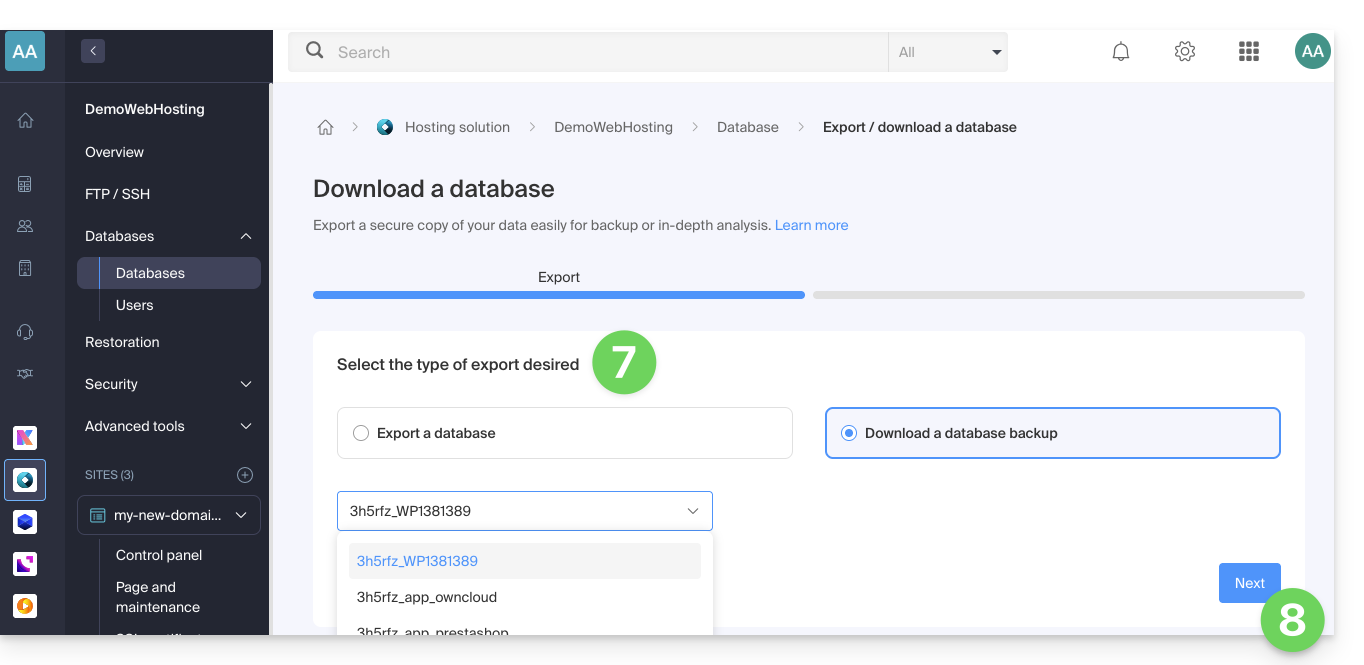
- Click on any desired instructions:
- Compression
Gzip Drop TableCreate Table if not existsInsert ignore into
- Compression
- Click on the Export button.
Export a database via SSH
If you cannot export the database via the console or if the database is large:
- If necessary, create an FTP SSH account.
- Connect to the server via SSH (need help?).
Customize and run the following SSH command:
# Usage: mysqldump --host=[hostname] -u [username] --password=[password] [database_name] --no-tablespaces > [output_file.sql] mysqldump --host=db_host -u db_user --password=db_password db_name --no-tablespaces > backup.sql- Wait for the SSH command to run (the terminal may freeze for a few seconds).
- Connect to the server via an FTP software/client.
- Download the generated SQL file.
Additional help
Example of command to execute at step 3 of the second procedure:
# Example with standard credentials mysqldump --host=abcd.xyz.infomaniak.com -u abcd_test --password=your_secret_password abcd_test --no-tablespaces > backup.sql- Refer to this other guide if you are looking for information related to the MySQL server, database username and password.
Link to this FAQ:
Has this FAQ been helpful?
This guide explains how to install a free SSL certificate from Let's Encrypt on a website hosted by Infomaniak.
Preamble
- Once the certificate is installed, your website will be accessible in
httpandhttps… - If you wish to include an alias domain name recently added to your site that already had a certificate, you need to update it.
- For multiple subdomains, refer to this other guide.
- Let's Encrypt limits the installation of certificates to:
- 100 subdomains
- 20 certificates for 7 days per registered domain
- 5 unsuccessful requests per account per hostname per hour
Install a free SSL certificate on a website
Prerequisites
- For the installation to be possible, the DNS of the domain name must be correctly configured to point to the site in question.
- If a change has just been made at this level, some operations may not be functional immediately.
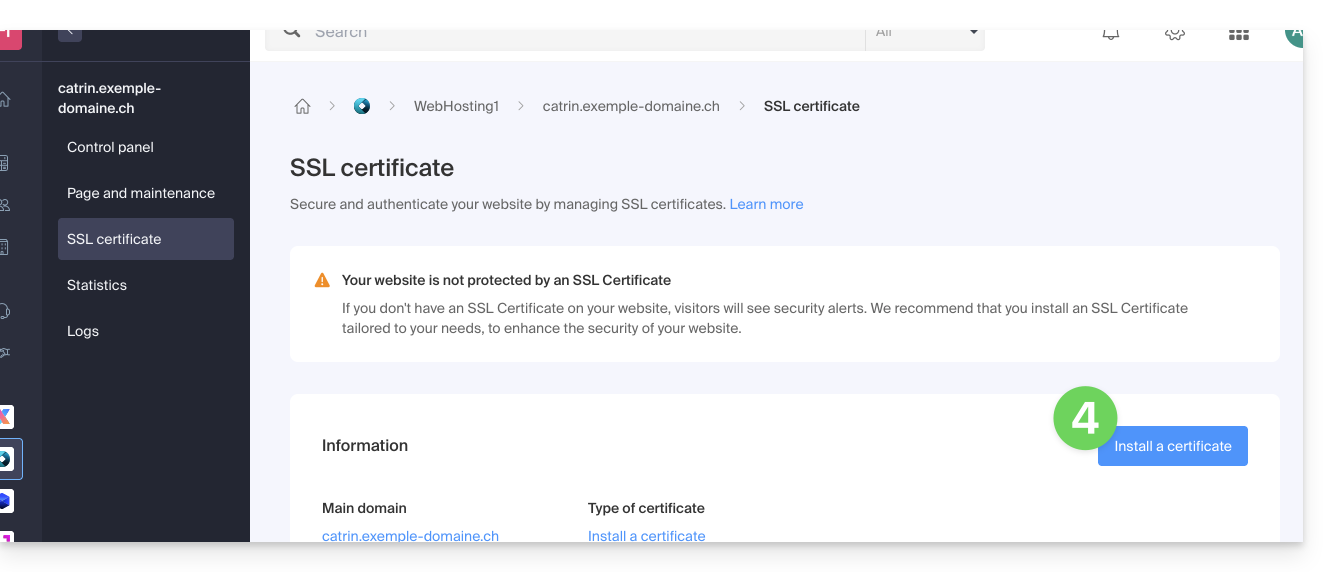
To access the websites to install an SSL certificate on them:
- Click here to access the management of your product on the Infomaniak Manager (need help?).
- Click directly on the name assigned to the product in question:

- Click on Configure under SSL Certificate:

- Click on the Install a certificate button:
- Choose the free certificate.
- Click on the Next button:

- Check or select the domains concerned.
- Click on the Install button:
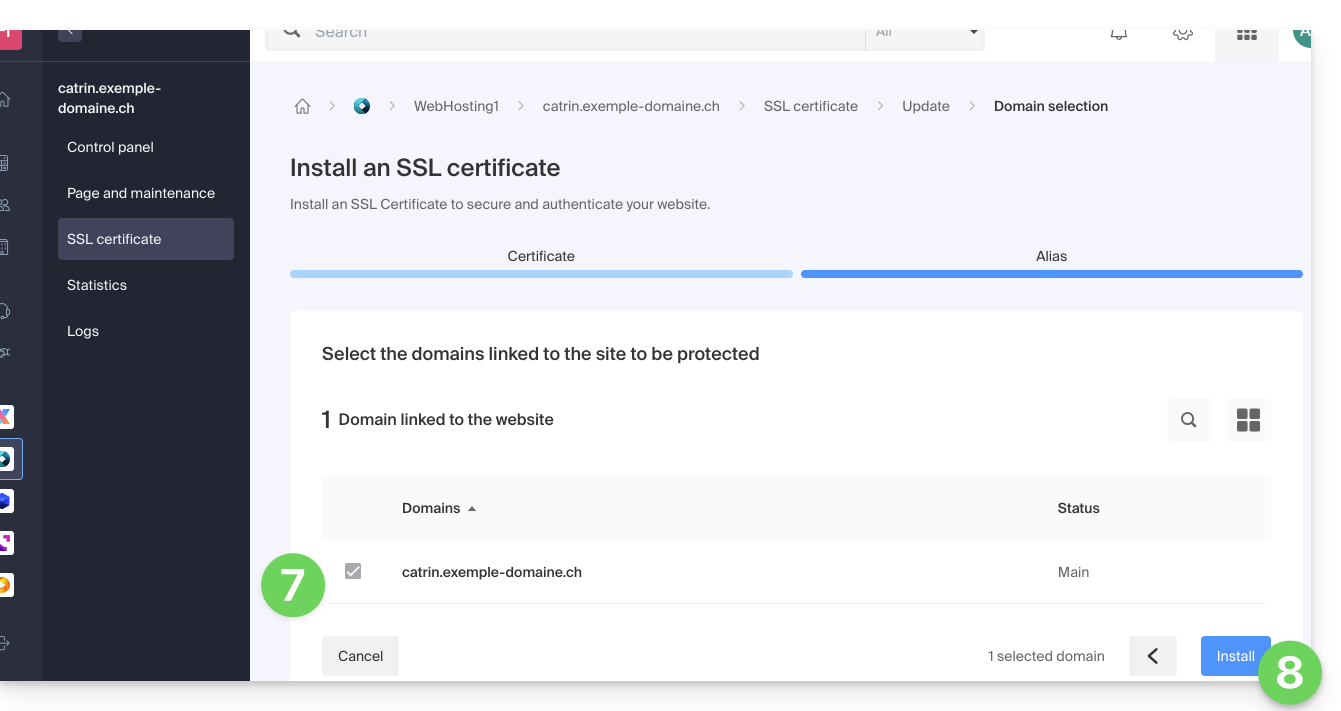
- Wait a few minutes until the certificate is obtained on the site.
Refer to this other guide if you encounter SSL errors and to this other guide specifically if you are using Cloudflare.
Link to this FAQ:
Has this FAQ been helpful?
This guide suggests solutions to resolve common issues and frequent errors that may occur when you try to display your website in https after activating an SSL certificate.
The web browser automatically displays the http version of the site when you try to access it in https
It is recommended to perform the following actions:
- Clear the cache of your applications or your site.
- Check that the pages and scripts of the site do not contain redirects to the
httpversion of the site. - Check that the site's
.htaccessfile does not contain redirects to thehttpversion of the site. - Set the site's
httpsaddress as the default one:
The website is displayed incorrectly (missing images, unsupported stylesheets, etc.) or displays a warning in the address bar
It is recommended to perform the following actions:
- Clear the cache of your applications or your site.
- Check that the pages and scripts do not point to external resources in
http; the site whynopadlock.com can help you identify the unsecured elements of your site. - Also refer to this other guide on this subject.
"This web page presents a redirection loop", "ERR_TOO_MANY_REDIRECTS"
If your web browser displays this error, it is recommended to perform the following actions:
- If the site works with a web application like WordPress or Joomla, disable the extensions one by one to identify the problematic one.
- Check that the pages and scripts of the site do not contain redirects to the http version of the site.
- Try to disable HSTS.
- If Prestashop is used, SSL must be activated on all pages:
- Add your SSL domain:
- Go to Preferences > SEO & URLs.
- In the "Store URL" section, enter your site's address in the "SSL Domain" field (without the
https://, justwww.domain.xyz).
- Activate SSL:
- Go to Preferences > General settings.
- At the top of the page, click on "Click here to use the HTTPS protocol before activating SSL mode."
- A new page will open with your site in the secure HTTPS version.
- Force the use of SSL on the entire site:
- Go back to Preferences > General settings.
- Set the "Enable SSL" option to YES.
- Also set "Force the use of SSL for all pages" to YES.
- Add your SSL domain:
An old SSL certificate is displayed - clear the SSL cache
Web browsers cache SSL certificates to speed up navigation. Normally, this is not a problem. However, when you develop pages for your website or install a new certificate, the browser's SSL state can hinder you. For example, you might not see the padlock icon in the browser's address bar after installing a new SSL certificate.
The first thing to do in this case is to make sure that the domain points to the server's IP address (A and AAAA records) and if it is still the wrong SSL certificate that is returned, clear the SSL cache:
- Chrome: go to Settings and click on Settings. Click on Show advanced settings. Under Network, click on Change proxy settings. The Internet Properties dialog box appears. Click on the Content tab. Click on Clear SSL state, then click OK. Refer to other leads in this other guide.
- Firefox: go to History. Click on Clear Recent History then select Active Connections and click on Clear Now.
Loss of CSS formatting
If the website displays without CSS style, analyze page loading with the browser Console. There may be mixed content errors (mixed content) related to your styles .css, which you will need to resolve for them to be loaded correctly again.
Cloudflare
If you are using Cloudflare, refer to this other guide on the subject.
Link to this FAQ:
Has this FAQ been helpful?
This guide explains how to disable or configure HSTS for a website.
Preamble
- When HSTS is enabled for a website, the server tells the site visitor (if their web browser is compatible) to replace all non-secure links with secure links.
- Example:
http://www.domain.xyz.com/one/page/is automatically replaced byhttps://www.domain.xyz/one/page/. - After activating an SSL certificate on a website, HSTS is configured as follows:
max-age=16000000.
Disable HSTS…
… with a CMS (WordPress, Joomla, etc.)
Include the following line in all pages generated by the CMS:
header( 'Strict-Transport-Security: max-age=0;' );For WordPress, for example, it is possible to add this directive in the functions.php file of your theme:
add_action( 'send_headers', 'add_header_xua' );
function add_header_xua() {
header( 'Strict-Transport-Security: max-age=0;' );
}
More details on WordPress
… with a PHP site
Include the following line in all php pages:
header( 'Strict-Transport-Security: max-age=0;' );To do this without having to modify each php page of a site, it is possible to use the auto_prepend_file directive in the .user.ini file of the site concerned:
auto_prepend_file=/home/clients/xxxx/web/hsts_disable.php... with the following hsts_disable.php file:
header( 'Strict-Transport-Security: max-age=0;' );
… with a static content site (non-PHP)
Include this header in a .htaccess file:
# BEGIN DISABLE HSTS
<IfModule mod_headers.c>
Header always set Strict-Transport-Security "max-age=0; includeSubDomains;"
</IfModule>
# END DISABLE HSTS
Customize HSTS
The default value can be modified in your website's php files with the following directive:
header( 'Strict-Transport-Security: max-age=X; includeSubdomains; preload' );(X being the desired number of seconds).
Enable HSTS for all hosted subdomains
includeSubDomains; is enabled by default and as its name indicates it will include the subdomains in the "Strict Transport Security".
When the visitor goes to an unsecured subdomain, the browser will automatically redirect to HTTPS and cause a security error.
If this behavior is not desired, you need to remove this header.
Clear the browser's HSTS cache…
… on Chrome
- In Chrome, type
chrome://net-internals/#hsts. - Enter the domain name in the text field of the 'Delete domain security policies' section.
- Click the Delete button.
- Enter the domain name in the text field of the 'Query HSTS' section.
- Click the Query button.
- The response must be '
Not found' (not found).
… on Safari
- With Safari, start by closing the browser.
- Delete the file
~/Library/Cookies/HSTS.plist. - Reopen Safari.
… on Firefox
- With Firefox, close all tabs.
- Open the Firefox menu and click on History / View History.
- Search for the page whose HSTS preferences you want to delete.
- Right-click on one of the corresponding entries.
- Choose Forget this site.
Link to this FAQ:
Has this FAQ been helpful?