Knowledge base
1000 FAQs, 500 tutorials and instructional videos. Here, there are only solutions!
This guide details how to back up an Android device (Samsung, Huawei, OnePlus, etc.) using Acronis on Swiss Backup Infomaniak, the independent Swiss cloud backup solution.
Preamble
- What you can back up:
- Contacts & Calendars
- Photos (the size and original format of your photos are preserved)
- Videos
- It is also possible to back up other types of data.
- If necessary, local partners referenced by Infomaniak can handle these procedures: launch a free call for tenders; they handle everything, freeing you from technical details.
Configure the backup
Prerequisites
- Have a Swiss Backup Infomaniak space with an available device quota (minimum 1) for Mobile:
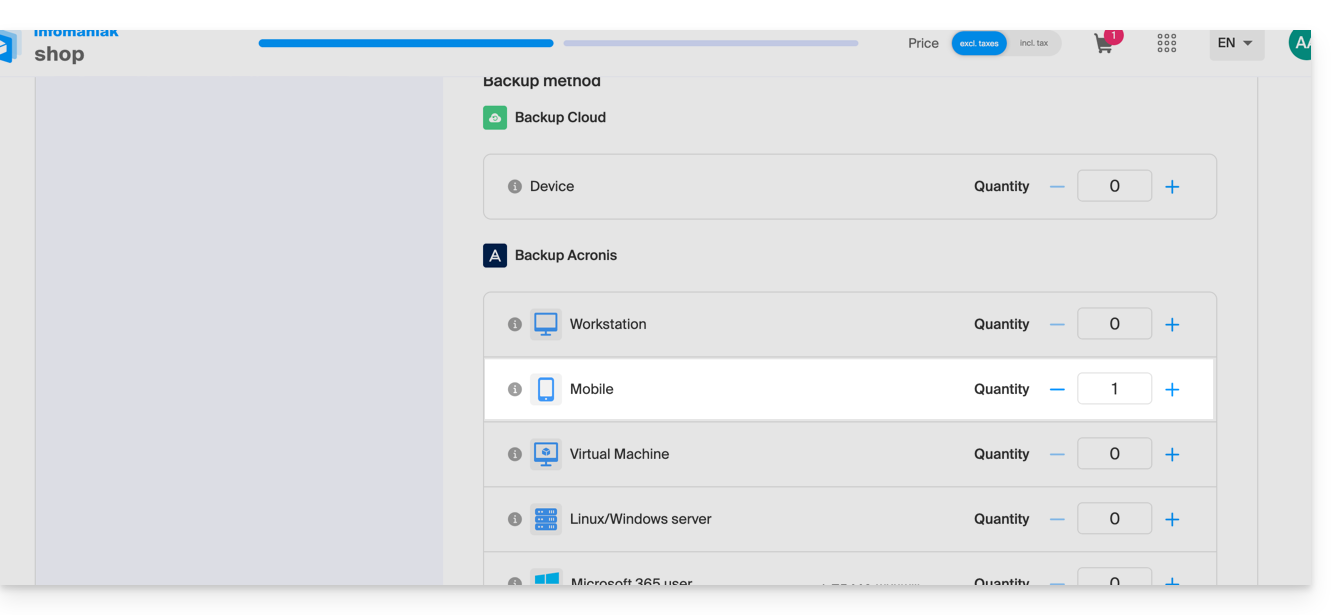
- If necessary, increase the device quota according to your needs.
- Add the device to the Infomaniak Manager to receive the login credentials.
- Refer to the Acronis documentation on this subject.
To configure mobile backup on Android with Acronis:
- Download and install the Acronis Cyber Protect app from the Google Play Store.
- Open the Cyber Protect mobile app by logging in to the Acronis Agent with the credentials obtained after adding the device (need help?).
- Click on Back Up and choose the data to back up.
- Click on Confirm to start the data backup.
Link to this FAQ:
Has this FAQ been helpful?
This guide details the Auto DJ feature of Infomaniak's Streaming Radio service, allowing you to generate a 24/7 live radio station from your own audio content (music, shows, podcasts, jingles, etc.) previously uploaded to your storage space.
Preamble
- Auto DJ relies on the files stored in your Infomaniak AOD (Audio on Demand) space to create a linear stream.
- You can use this same space for your on-demand file storage needs.
- You organize your media, create your playlists, and schedule their broadcast via an intuitive calendar interface.
- This allows for continuous broadcasting without the need for an active encoder at all times.
Activate Auto DJ
To start Auto DJ:
- Click here to access the management of your product on the Infomaniak Manager (need help?).
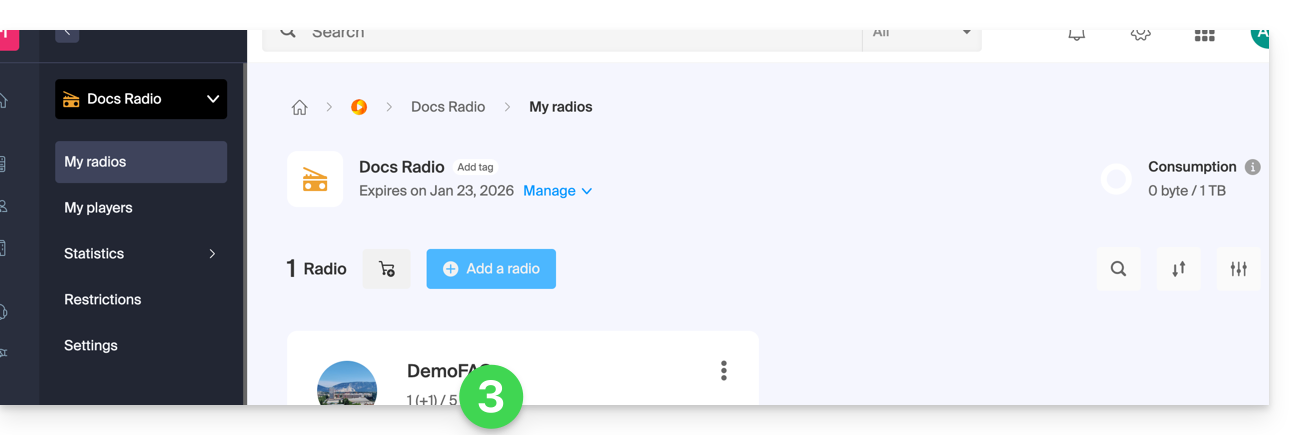
- Click directly on the name assigned to the product concerned.
- Click on the name of the audio stream concerned:
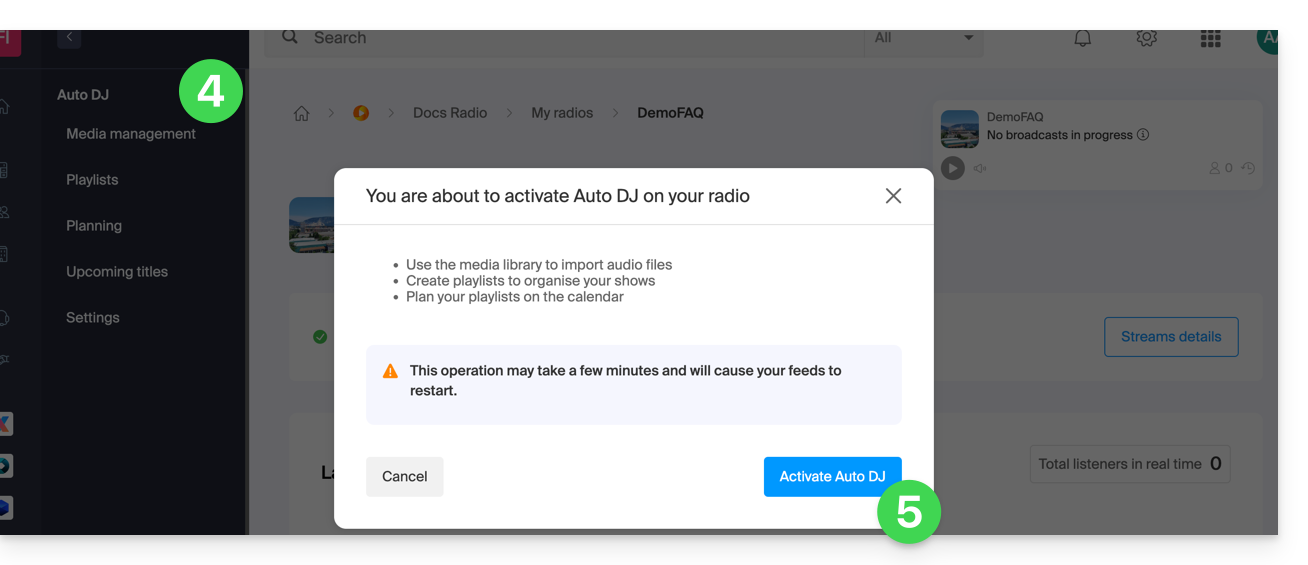
- Click on Auto DJ in the left sidebar menu.
- Read the warnings and click the button to Activate Auto DJ when you are ready:
- Select the AOD space to use if you already have one.
- Apply your choice by clicking at the bottom right:
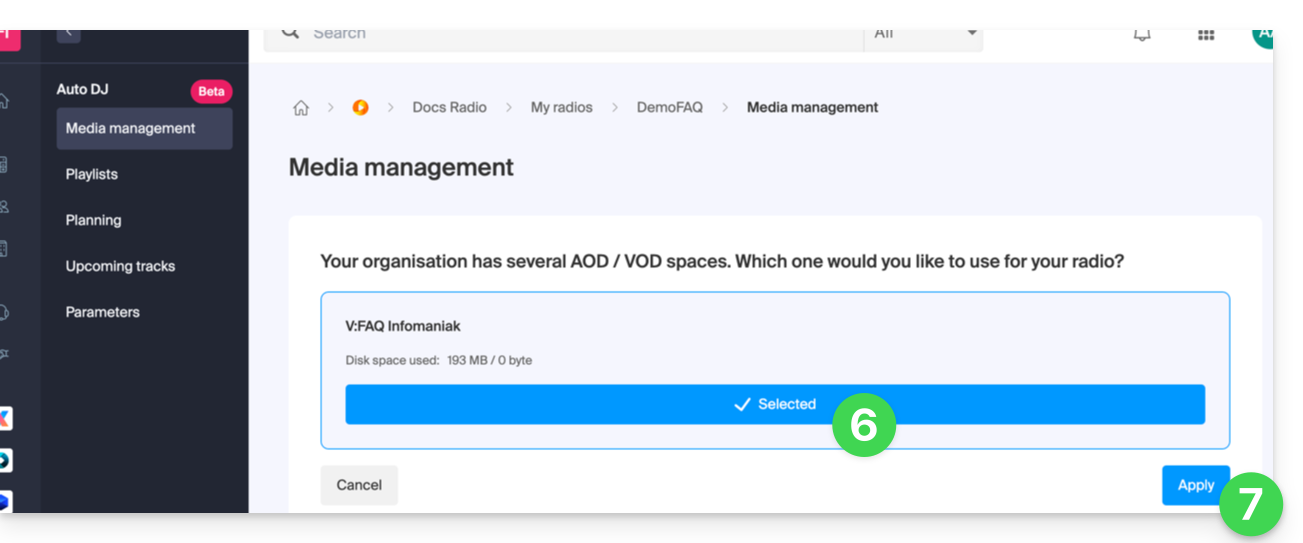
- There you go, the AOD space for your audio files to broadcast is at your disposal:
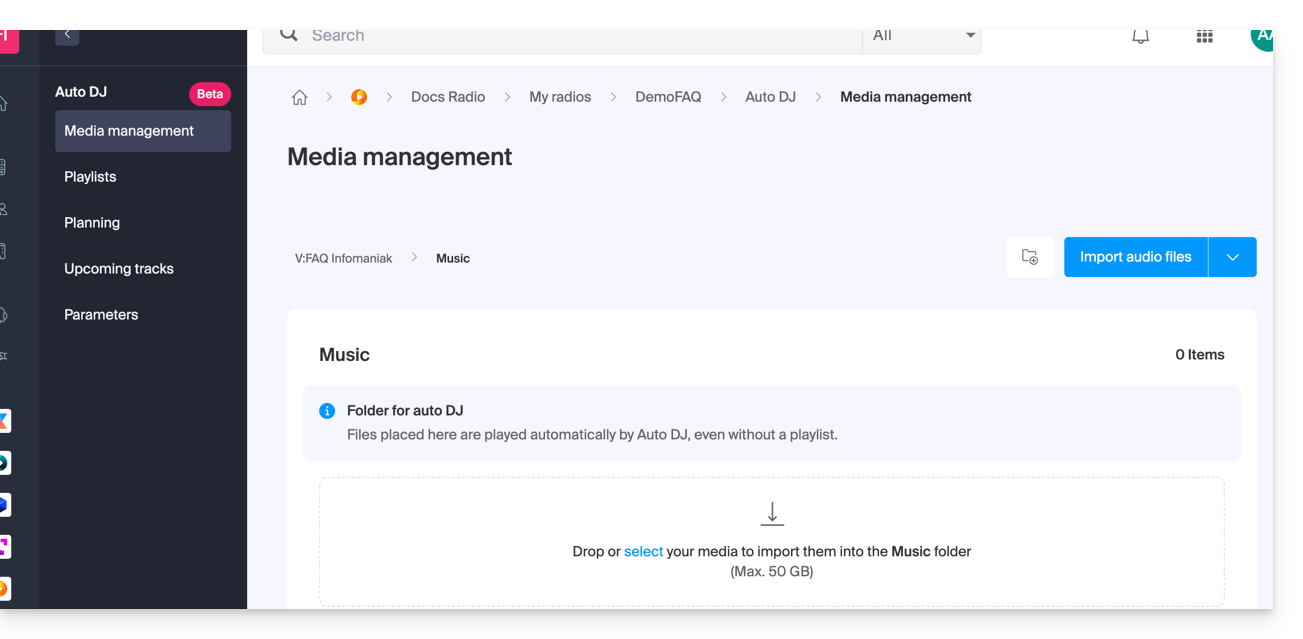
Organize, import your audio files
The first step is to prepare your content. The tool currently accepts files in .mp3 and .aac formats. You can import an entire folder containing your audio files: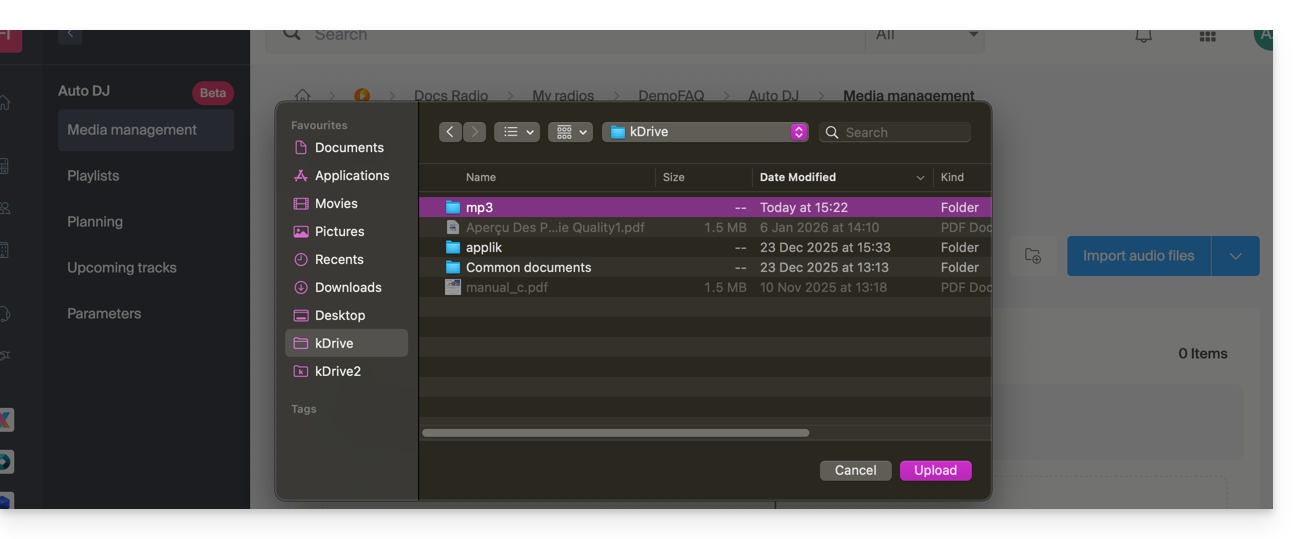
Once imported, you can organize your files into dedicated folders within your storage space to facilitate the management of your library: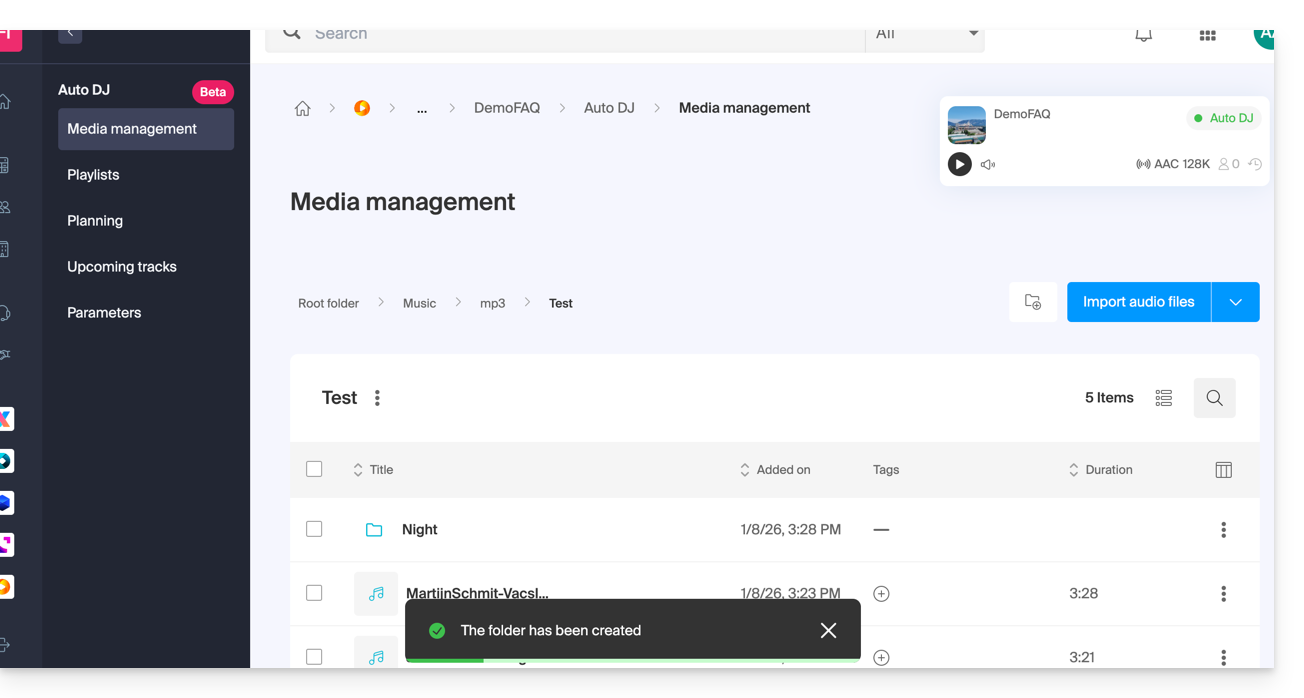
Metadata management
It is possible to modify the ID3 tags (title, artist, album, cover) directly from the interface so that this information is displayed correctly on your players: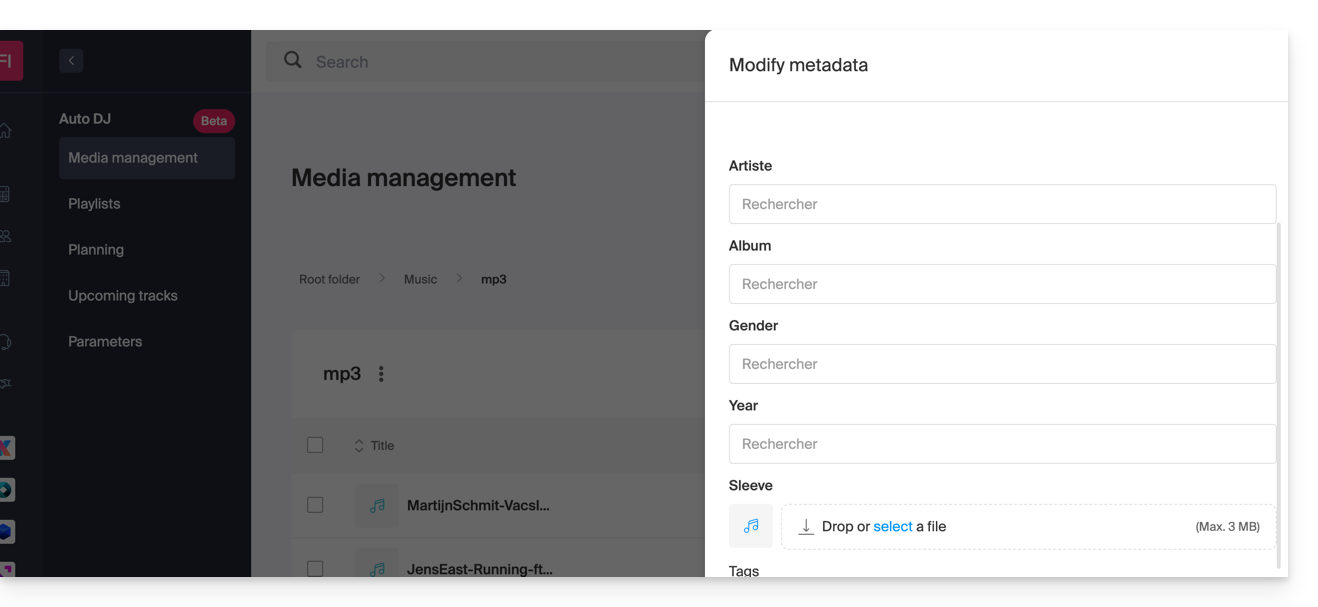
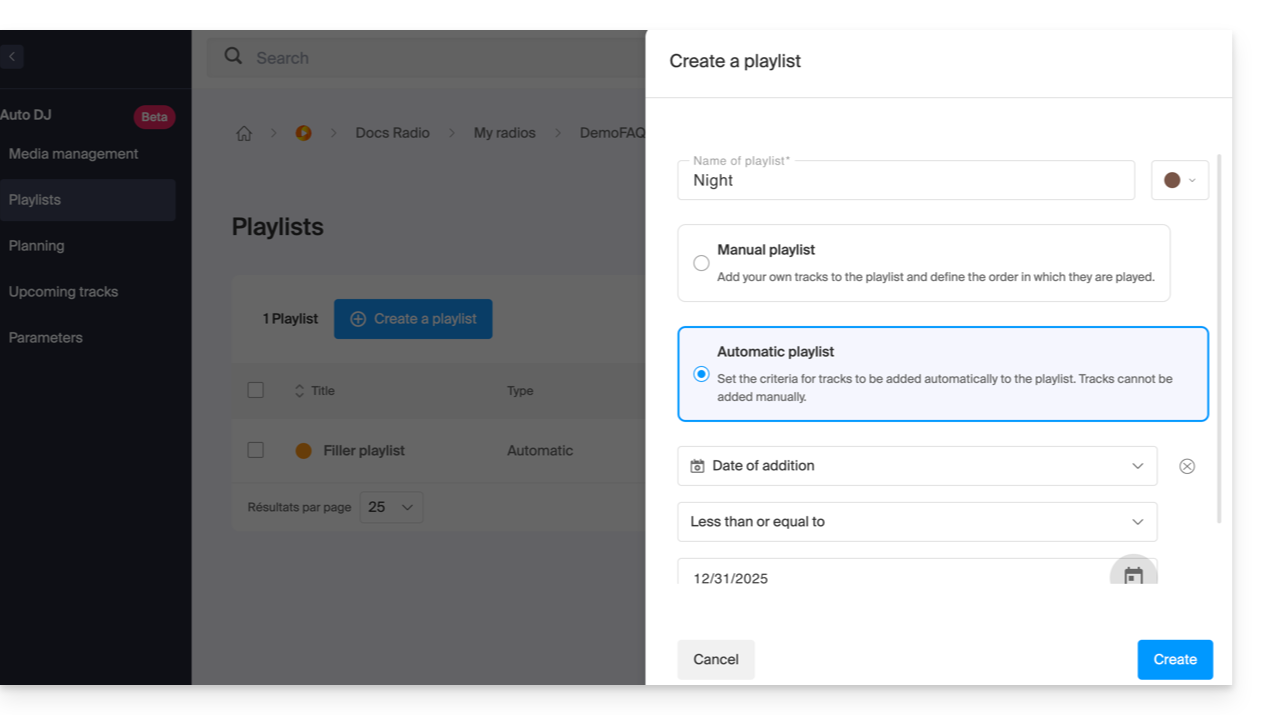
Create playlists
Once your files are imported, you can group them into playlists:
- Manual playlists: precisely select the tracks and their order.
- Automatic playlists: set smart criteria (by tags, styles, or artists) to let the system dynamically generate the playlist:
Schedule broadcasting (Planning)
The scheduling tool allows you to manage your program grid in a very detailed way:
- Slot programming: arrange your broadcasts by playlist or by folder on a weekly calendar:
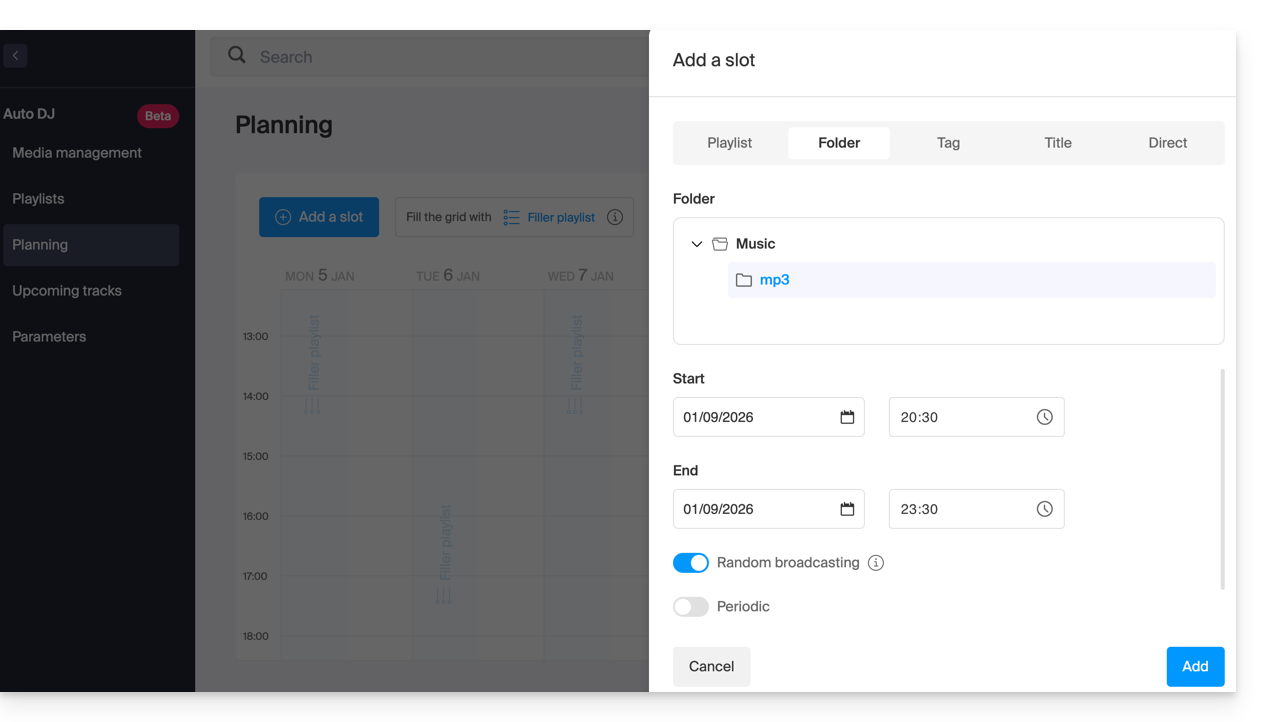
- Filler playlist: configure a backup playlist that will be broadcast automatically when no specific program is scheduled, ensuring an uninterrupted stream.
- Live / AutoDJ transition: you can schedule time slots or automate the resumption of the Auto DJ stream as soon as an encoder (external source) stops pushing its stream.
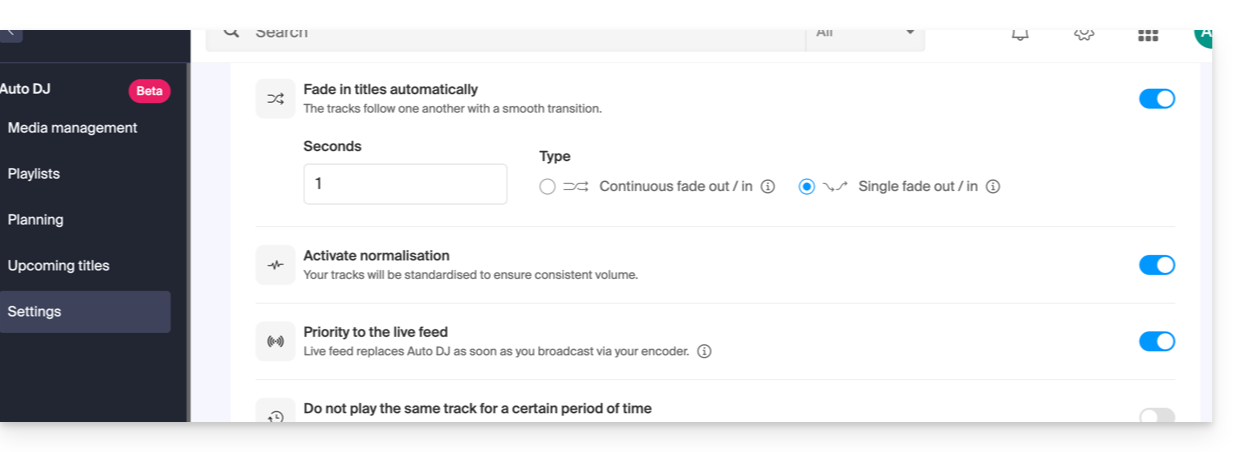
Advanced audio settings
To ensure professional listening quality, several processing options are available:
- Audio normalization: standardizes the volume level of all your files to avoid volume differences between two tracks.
- Transitions: set crossfades and overlaps between tracks:
Integration and statistics
The stream generated by the Auto DJ is a standard streaming stream that benefits from all the tools of the Infomaniak ecosystem:
- Infomaniak Player: Automatic display of the current title and broadcast history.
- Multi-format broadcasting: Support for HLS and stream transcoding.
- Advanced statistics: Precise tracking of your audience in real-time and detailed reports.
Link to this FAQ:
Has this FAQ been helpful?
This guide explains how to configure the floor plan when it has been activated for an event (as part of the Infomaniak ticketing system).
Prerequisites
- Own and have activated a floor plan for the event in question.
- Have activated and created at least one pricing zone.
Apply zones to the floor plan
To access event pricing from the ticketing system:
- Click here to access your product management on the Infomaniak Manager (need help?).
- Click directly on the name assigned to the ticketing system concerned by the event.
- Click on Programming in the left sidebar.
- Click on Events in the left sidebar.
- Click on the event in question.
- Click on the Pricing tab.
- If the event has multiple dates, this section is replaced by “Dates” which opens a calendar.
- Click on the calendar date to join the pricing…
Once in this menu, it is necessary to have at least one zone activated:
- Click on the action menu ⋮ located to the right of the zone in question.
- Make sure the box “Zone with numbered seats” is activated:

- A seat symbol must be next to the zone name in the pricing list.
- Then click on the “Manage floor plan” button above the zones to open the floor plan management menu:

The logic here is to assign a zone to each seat, row, or section according to the needs of the event.
For example, below, a green zone and a red zone are distinguished. To assign seats to a zone:
- Select the seats by hovering over all the seats, or to select the entire row, click on its number.
- Click on each seat to configure, a black circle surrounds them indicating that they are selected.
- It is possible to click on the name of each row (A, B, C) to select all the seats in the row, and even to click on the name of the section (here, right, left, middle) to select all the seats in the section.
- Then click on the area to link to the selected seats.
- In the Zones menu that appears in the lower half of the page, click on the zone to assign.
- The background of the selected seats will change to the color of the zone.
- Repeat the operation for each remaining zone to assign.
Block online sales for a seat/row/section
By default, all seats are available for online sale.
To block the online sale of certain seats, configure the restrictions directly in the seating plan:
- To block the sales of certain particular seats, open the seating plan management menu as explained above, and select (black circle) the seats/rows/sections.
- Instead of selecting the zones in the bottom menu, choose the type of Access:
- No restriction = default state, customers can purchase the seat
- Reserved for organizers = Only people with Admin status on the organization can purchase the ticket from the ticket office
- Reserved for resellers = Resellers can make the purchase from the ticket office (normal users/collaborators on the organizer with sales rights)
The section visible at the bottom named “Reserve” is no longer used and can be ignored.
Once the plan is configured, the seats can be put on sale. Make sure to assign a price to each zone.
See who a specific seat is assigned to
To obtain information related to seat assignments and identify the people who have reserved or occupied each seat according to the seating plan, you can use the seating plan management menu which displays purchased seats with an orange fill.
If you click on the seat, the order information is displayed, and a link to the customer record is provided: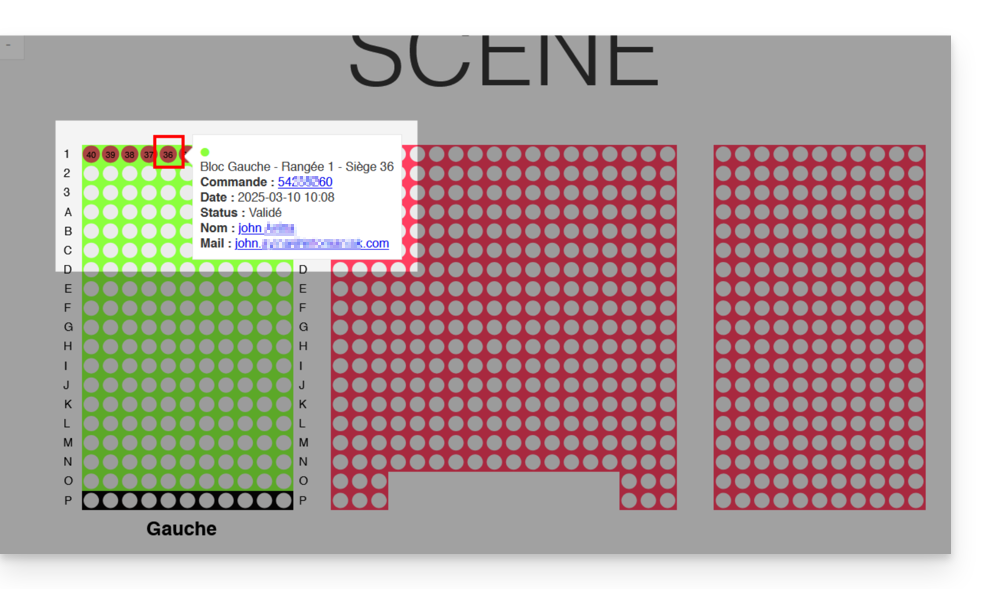
Link to this FAQ:
Has this FAQ been helpful?
This guide explains how to remove one of the users from your Organization on the Manager Infomaniak.
Prerequisites
- Switch to the desired Organization first if you do not find the expected list of users.
- Be Administrator or Legal Representative within the Organization.
- Warning, it is impossible to remove a Legal Representative if there is no other legal representative.
Remove a user from your Organization
If the user had access to kDrive or was invited to view a third-party email address, several intermediate steps will ask you to take actions with their data and inform you, if necessary, about what happens to calendars and address books. To remove one of the users from the Organization
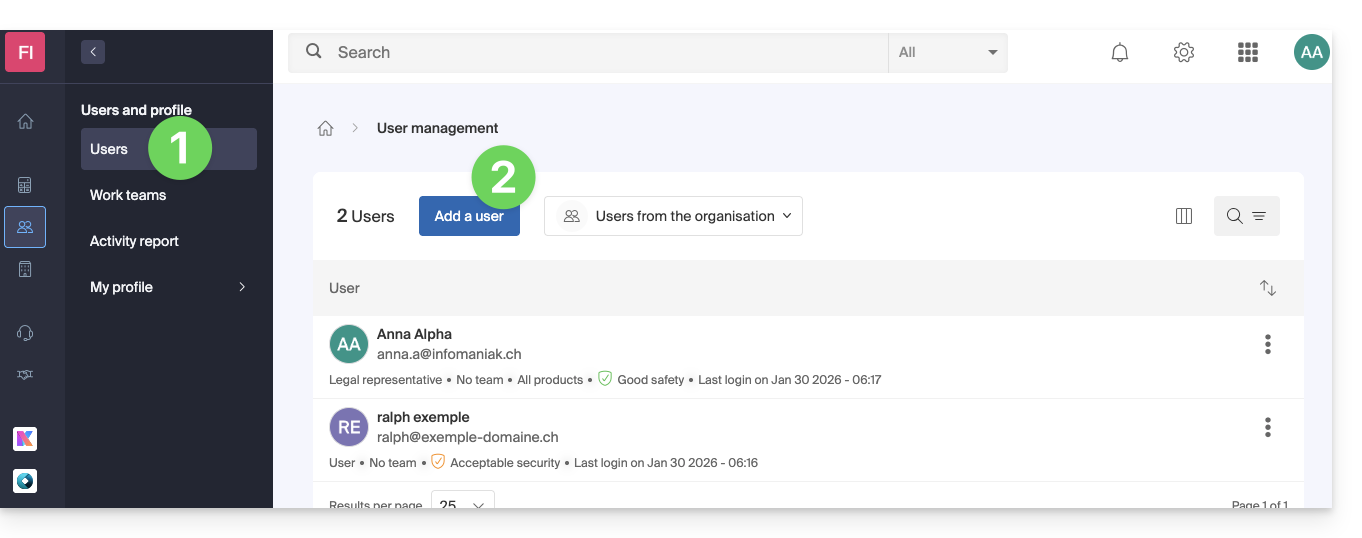
- Click here to access user management for the Organization on the Infomaniak Manager (need help?).
- Click on the action menu ⋮ to the right of the user concerned.
- Click on Remove from Organization:

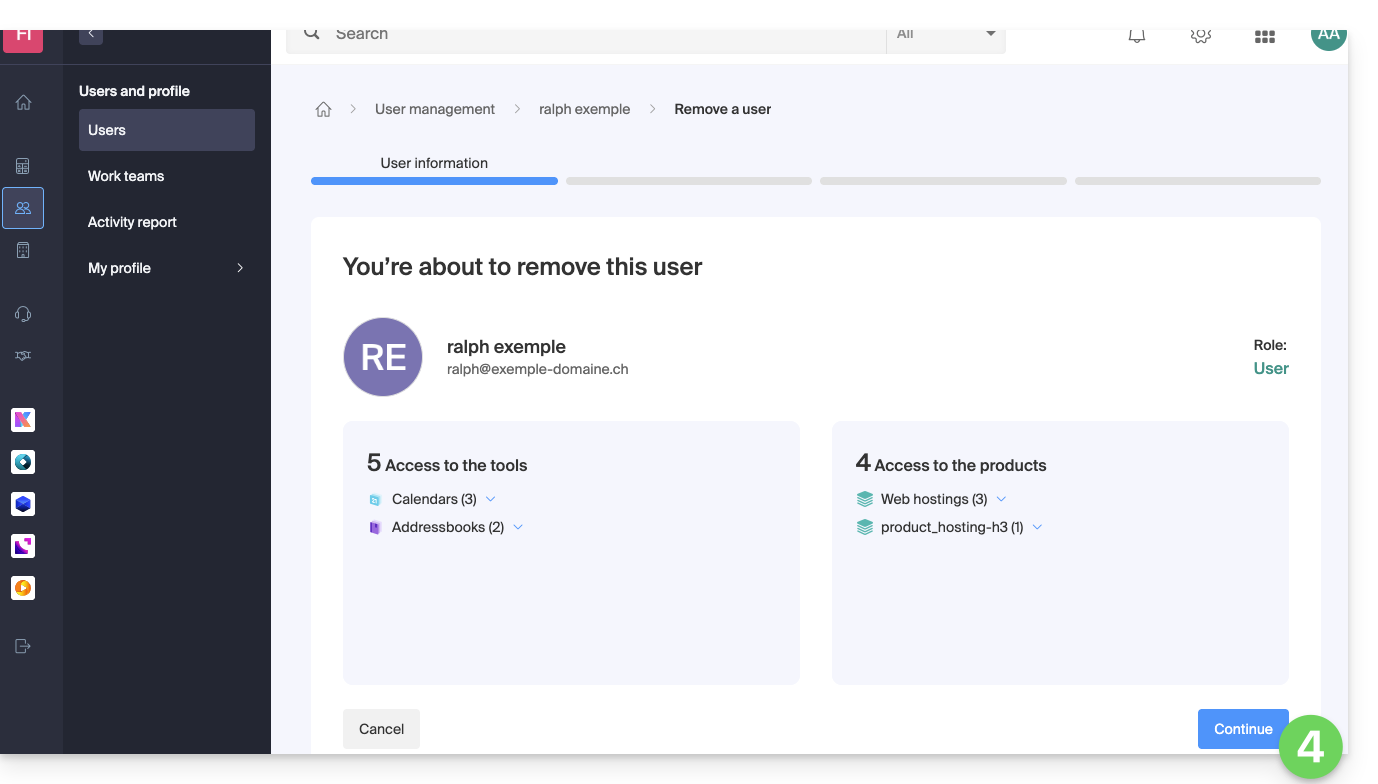
- Review the information (click if necessary on the chevrons to get the details of the deletions) then click on the blue button Continue:
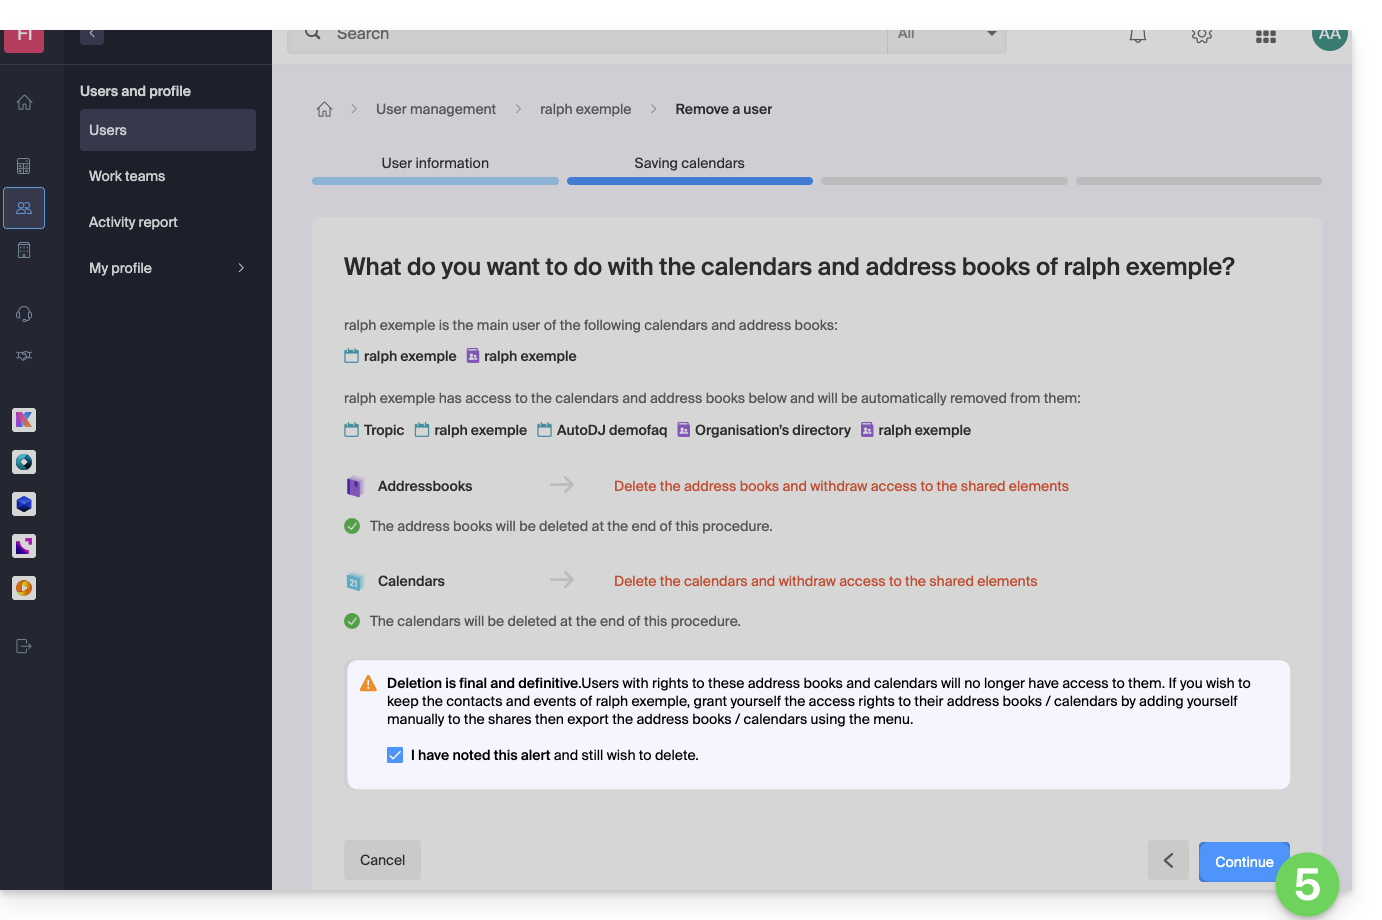
- Review the information, confirm the deletion by checking the checkbox, then click on the blue button Continue:
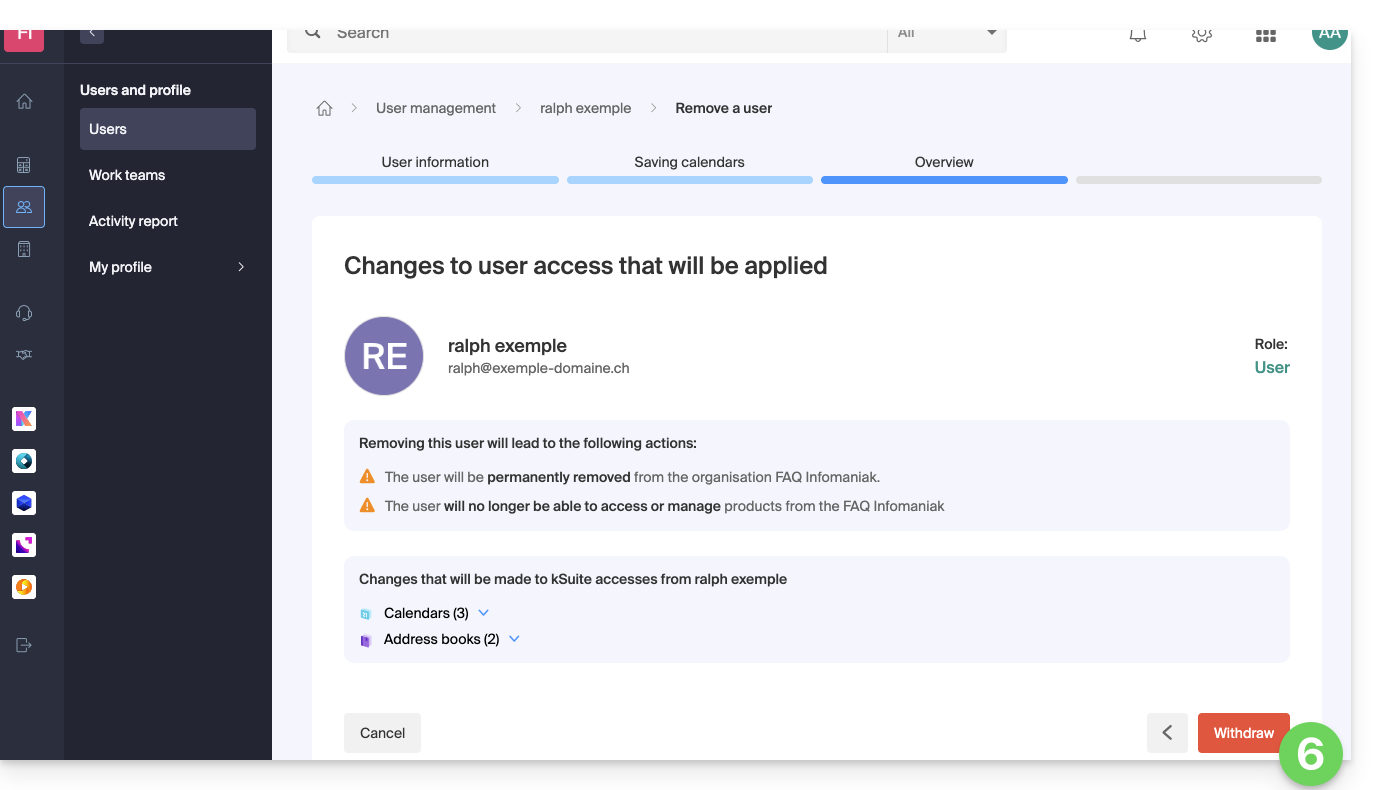
- Review the information (click if necessary on the chevrons to get the details of the deletions) then click on the red button Remove:
- Enter your email address (login identifier for the Manager), check the confirmation box, then click on the red button Remove this user to permanently remove the user without the possibility of undoing it.
Link to this FAQ:
Has this FAQ been helpful?
The easiest way to manage your emails is to use the Infomaniak Web app Mail (online service ksuite.infomaniak.com/mail).
A mobile app (Infomaniak Mail, application for iOS / Android smartphone or tablet) is available here!
This interface offers many advantages:
- No software to install or configure.
- Share mail with other users.
- Unified management of all your Infomaniak email addresses.
- Professional anti-spam and antivirus filter on incoming and outgoing mail.
- Automatic sorting of incoming messages (filters).
- Sending large attachments.
- Permanently saved.
- kDrive sharing.
- Secure and respects your privacy, hosted in Switzerland by a neutral and independent company.
How to start Mail Infomaniak?
Whether on ksuite.infomaniak.com/mail or the Infomaniak Mail app, it is essential to log in with your Infomaniak account identifier and its password. This will not work by entering an email address and its password directly. Understand the difference
- Click here to access the Infomaniak Web app Mail (online service ksuite.infomaniak.com/mail).
- If necessary, attach the email addresses to be managed with Mail Infomaniak.
What do you want to do next?
Link to this FAQ:
Has this FAQ been helpful?
Thank you for choosing kMeet Infomaniak as your video conferencing solution for individuals & businesses:
- Unlimited audio and video calls
- Access without registration
- Compatibility Web, mobile and desktop
- Integrated chat & reactions (emojis, sounds)
- Screen sharing with drawing, remote control
- Breakout rooms
- Integration with calendar (create video link)
- Integration with kDrive for storing meeting recordings
- Integration with kChat for video calls
- Privacy respect (no ads, hosted in Switzerland)
- Security with AES-256 encryption
- Eco-friendly (renewable energy, CO2 compensation)
What would you like to do?
- Create an online meeting
- Join a meeting
- Download the kMeet app on your macOS, Windows, Linux, iOS (iPhone/iPad) and Android devices.
- Control participants (moderation)
- Create a kMeet breakout room
- Protect meeting access with a password and/or an encryption key
- Record and share a video conference
- Share your screen with participants
- Remotely control a device with kMeet
- Start the chat during an online meeting
- Broadcast the kMeet stream via Video Streaming
- Draw on kMeet
- Replace Skype with kMeet
A question, problem or feedback?
- Solve a problem audio, video, device access permission…
- In case of a problem, please consult the knowledge base before contacting support.
- Click here to share feedback or a suggestion on an Infomaniak product.
Link to this FAQ:
Has this FAQ been helpful?
This guide explains why some attachments sent from Microsoft Outlook arrive in winmail.dat format on your e-mail address hosted by Infomaniak, and how to permanently resolve the issue on the sender's side (where it originates).
Preamble
winmail.datis the container used by Outlook/Exchange when a message is sent in RTF / TNEF.- It encapsulates the formatting and attachments.
- Many non-Microsoft e-mail clients do not know how to interpret TNEF:
- The formatting disappears and the attachments become a single
winmail.datfile.
- The formatting disappears and the attachments become a single
Important: the generation of a winmail.dat does not depend on Infomaniak; the issue arises with the sender (Outlook/Exchange) and must be corrected on their device or by their Microsoft 365 administrator.
Resolving the issue (actions to request from the sender)
The most effective solution is to modify the Outlook configuration on the sender's side.
Disable RTF/TNEF and resend the message in HTML or plain text
- Classic Outlook for Windows (Microsoft 365/2021/2019, Win32 application)
Menu:File > Options > Mail
Composition:Compose messages in this format:select HTML (or Plain text).
Message format: inWhen sending messages in Rich Text format to Internet recipients, select Convert to HTML (or Convert to plain text).
Case by case (single e-mail): in the message window, tabText format> select HTML.
- New Outlook for Windows (Outlook on the Web-based application)
Menu:Settings (gear icon) > Mail > Compose and reply
Message format:Compose messages in:select HTML (or Plain text).
This client does not expose an RTF option; sending in HTML/text avoidswinmail.dat.
- Outlook on the Web (Exchange Online/Outlook.com)
Menu:Settings > Mail > Compose and reply > Message format> select HTML (or Plain text).
- Outlook for Mac
Menu:Outlook > Preferences > Composition> check/uncheck Compose messages in HTML by default.
For a single message: in the composition window, tab Options > toggle HTML or Plain text.
Notes: if the sender has attached files, they will be readable by all recipients as long as the message is sent in HTML/text. Zipping the attachments (.zip) does not prevent Outlook from encapsulating the message if RTF/TNEF is still active.
Disable RTF for specific recipients (you, for example)
- Classic Outlook Windows: open the Contact card > double-click the e-mail address > Outlook Properties > Internet Format: select Send as plain text only (or Let Outlook decide if the admin already forces the conversion).
- Clear the auto-complete (it may “remember” RTF for a recipient):
File > Options > Mail > Send messages > Empty the Auto-Complete List, then retype the address manually for the next send.
- Microsoft 365 administrators (on the sender's side): in the Exchange Admin Center:
Mail flow > Remote domains > Default> Rich Text format: select Never. In PowerShell:Set-RemoteDomain Default -TNEFEnabled $false.
Failing that: use another client to send (e.g., Thunderbird), or check that Calendar invitations are sent in iCalendar (File > Options > Calendar > enable Use iCalendar format for external recipients).
If you do not wish to recontact the sender
You can extract the content of winmail.dat with TNEF decoding tools (online or desktop applications). Search for “open winmail.dat” and choose a reputable tool for your system (Windows, macOS, Linux). This usually restores the attachments, but it is not a lasting fix. Moreover, privacy and security are not guaranteed during these operations.
Link to this FAQ:
Has this FAQ been helpful?
This guide explains how to add a user to an Organization present in the Manager Infomaniak. You will thus be able to authorize this user to access certain of your Infomaniak products according to your needs.
Preamble
- Since you opened your account with Infomaniak, you are part of at least one Organization.
- If you were alone and it was not an invitation, an Organization was created in your name and you automatically become the legal manager.
- Otherwise, you belong to the Organization that invited you (to join its kSuite, to manage a product, etc.).
- You can define whether a user…
- … is part of your Organization and whether they should become:
- Legal manager
- Administrator
- Collaborator
- … is external to your Organization (limited rights):
- External users are not included in the sharing of calendars and address books for the entire Organization.
- … is part of your Organization and whether they should become:
Invite the new user
Prerequisites
- Switch beforehand to the desired Organization if you do not find the expected list of users.
- Be Administrator or Legal manager within the Organization.
- Be aware of the different permissions (access rights to products for example) and administrative contact preferences of a user within an Organization.
To add, and if necessary, create the new user of your Organization:
- Click here to access user management on the Infomaniak Manager (need help?).
- Click on the Add a user button:
- Follow the assistant to complete the procedure:
- If the added user does not yet have a user account with Infomaniak, they will be invited to create one.
- If the added user already has an Infomaniak account, they will be invited and then they will be able to switch from their original Organization to the new one.
Link to this FAQ:
Has this FAQ been helpful?
This guide explains how to modify the role and permissions of a user so that the latter has only a restricted legal role or access to only certain features of your Organization present in the Manager Infomaniak.
Preamble
- Since you opened your account with Infomaniak, you are part of at least one Organization.
- If you were alone and it was not an invitation, an Organization was created in your name and you automatically become the legal representative.
- Otherwise, you belong to the Organization that invited you (to join its kSuite, to manage a product, etc.).
- You can define if a user…
- … is part of your Organization and if they must have the role of:
- Legal representative
- Administrator
- Collaborator
- … is external to your Organization (limited rights):
- External users are not included in the sharing of calendars and address books for the entire Organization.
- … is part of your Organization and if they must have the role of:
Modify the rights/permissions of a user
Prerequisites
- Switch beforehand to the desired Organization if you do not find the expected list of users.
- Be Administrator or Legal representative within the Organization.
- Be aware of the different permissions (access rights to products for example) and administrative contact preferences of a user within an Organization.
- Be careful, it is impossible to remove a legal representative if there is no other legal representative.
To modify the role of a user:
- Click here to access user management on the Infomaniak Manager (need help?).
- Click on the action menu ⋮ located to the right of the user concerned.
- Click on Modify the role:
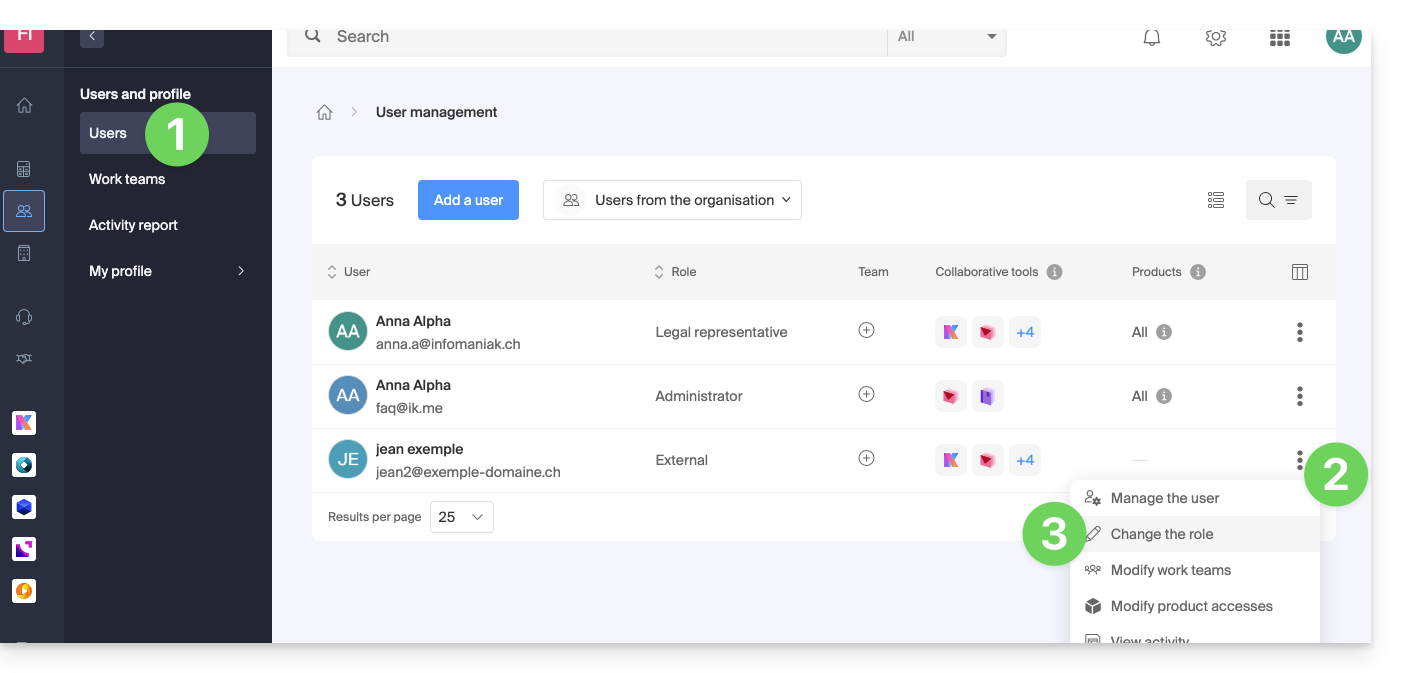
- Modify the desired role:
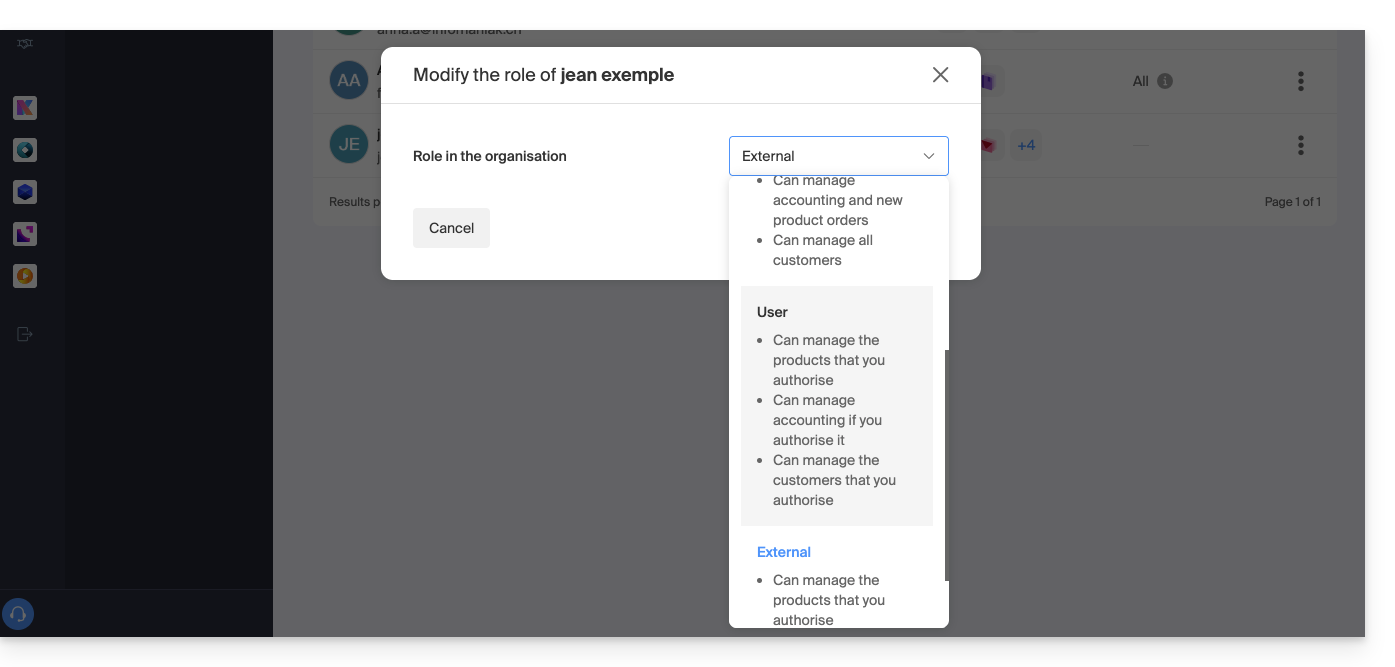
- Click on the Save button.
A summary email is sent to the user whose role is modified.
If you assign the user the role of a simple collaborator…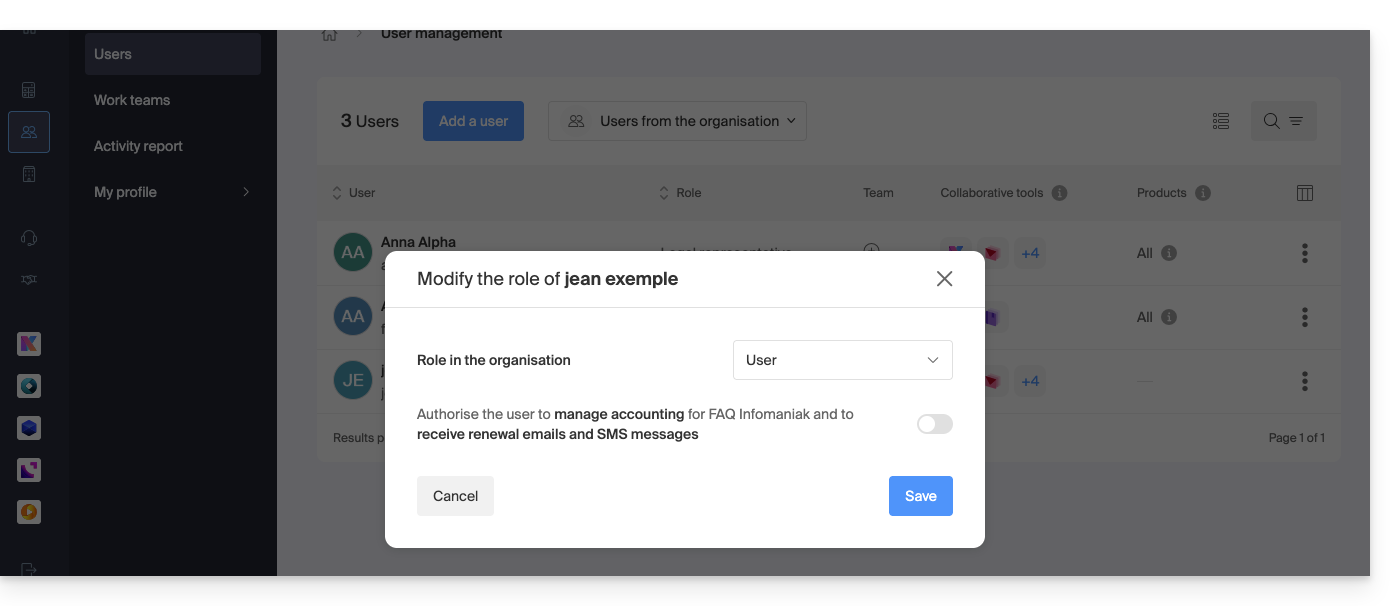
… you will be able to modify the services to which they can access; refer to this other guide: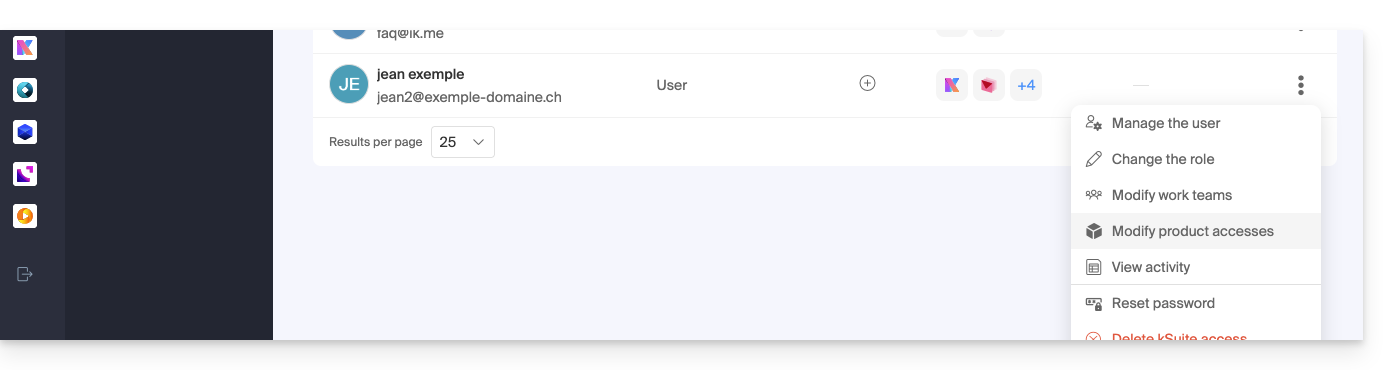
Link to this FAQ:
Has this FAQ been helpful?
Thank you for choosing to customize your account with Custom Brand!
Preamble
- As an option with any Infomaniak offer or already included withkSuite Enterprise, discover this customization tool to make your web addresses unique, add a logo or an image slideshow to your login page for your Infomaniak Organization.
- The Web Redirection tool will no longer be usable on your domain after activating Custom Brand on it.
Custom Brand customization guides
Prerequisites
- Have a domain name with Infomaniak (transfer it if necessary).
- Its extension must be among those supported by Custom Brand.
- Note that this also works with a subdomain.
- Configure the domain to use Infomaniak's DNS servers.
Then, to use Custom Brand: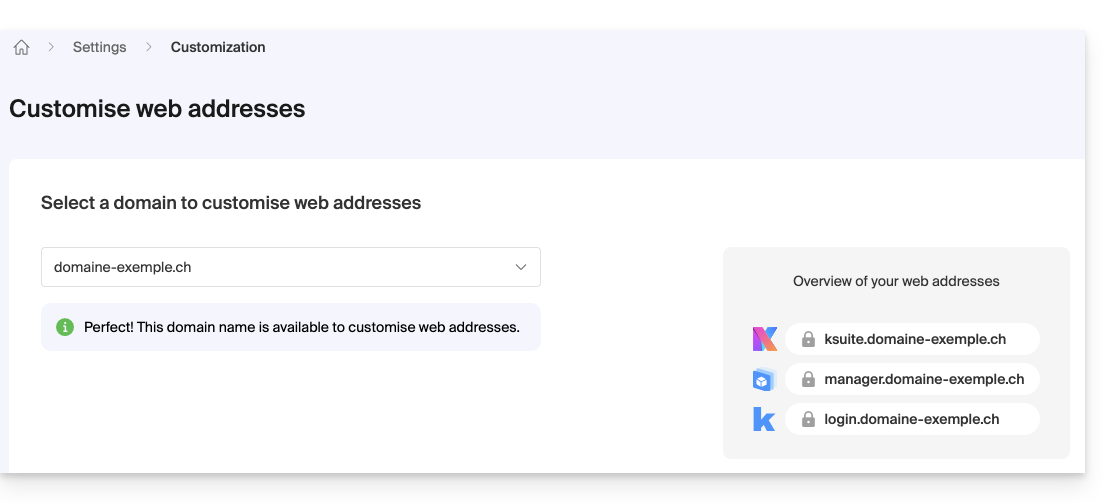
- Get started with Custom Brand: customize the URLs & interface
- Troubleshoot an issue:
Customize your web addresses with your domain
| Access to … | without Custom Brand | with Custom Brand |
|---|---|---|
| kSuite | ksuite.infomaniak.com | ksuite.domain.xyz |
| Manager | manager.infomaniak.com | manager.domain.xyz |
| emails ( Mail) | mail.infomaniak.com | mail.domain.xyz |
| calendars / agendas | calendar.infomaniak.com | calendar.domain.xyz |
| contacts | contacts.infomaniak.com | contacts.domain.xyz |
| kDrive | kdrive.infomaniak.com | kdrive.domain.xyz |
| video conferences kMeet | kmeet.infomaniak.com | kmeet.domain.xyz |
| Euria | euria.infomaniak.com | euria.domain.xyz |
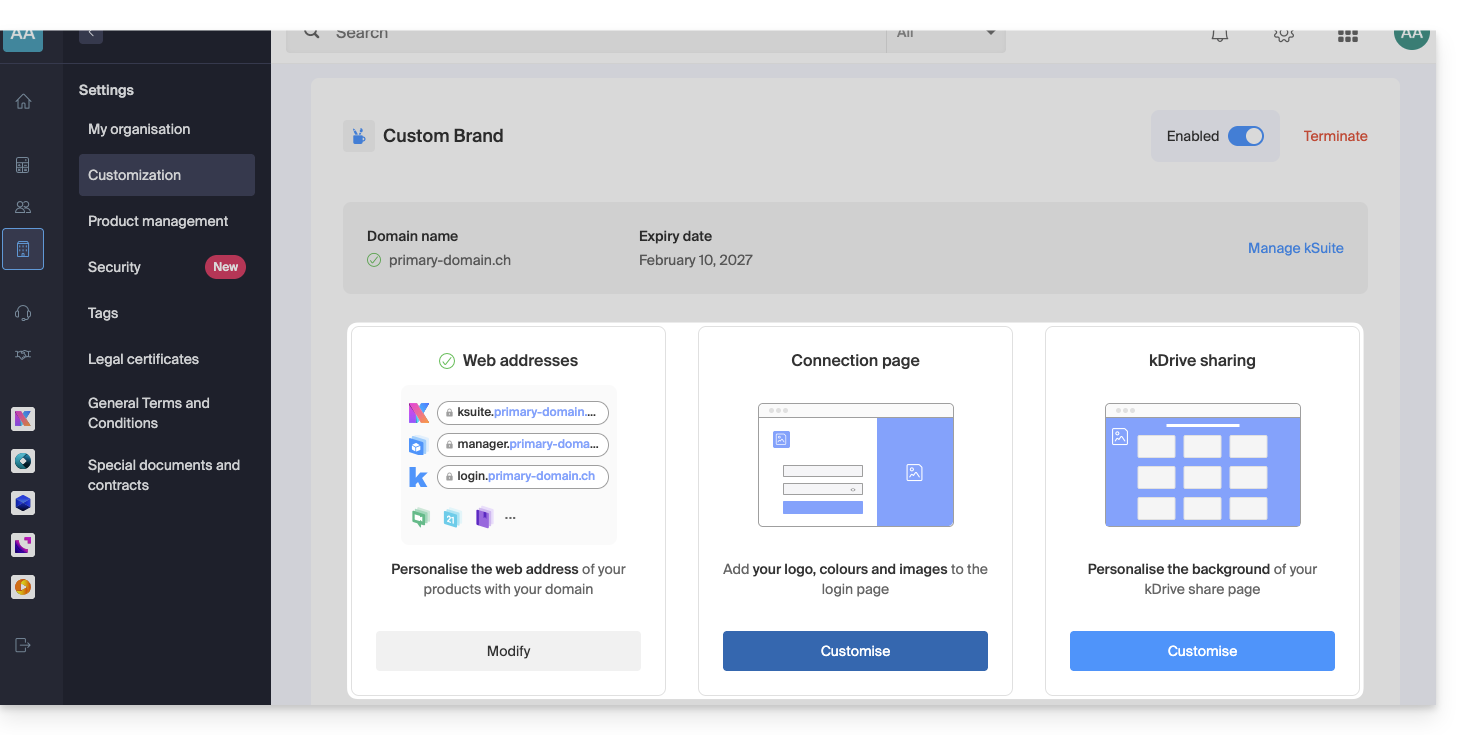
Customize your Organization's interface
The following interface options are modifiable from the my kSuite settings:
- Add your logo to your Organization's interface.
- Add a panorama of 3 images on the login page.
- Modify the text and button color of the login page.
- Customize kDrive shares (see this other guide).
Link to this FAQ:
Has this FAQ been helpful?
This guide explains how to configure the questions asked to visitors when ordering a pass/subscription (as part of the Infomaniak ticketing system). These settings will be available once step 1 is completed:
- Define the type when creating (subscription, ticket pack, etc.) as well as the basic information and parameters
- Associate events with passes
- Configure the visual and information related to the pass
- Define and collect information from subscribers that will be linked to the passes (below)
Configure the information related to the passes
This information will be linked to the passes and is therefore independent from the form linked to the order.
To do this:
- Click here to access the management of your product on the Infomaniak Manager (need help?).
- Click directly on the name assigned to the ticketing concerned by the event.
- Click on Programming in the left sidebar menu.
- Click on Passes in the left sidebar menu.
- Click on the name of the pass concerned.
- Click on the Settings tab:

- Enable the desired options:
- Title: dropdown menu giving the choice between Mr. and Mrs.
- Name: text field to indicate the name
- First name: text field to indicate the first name
- Organizer, Company: text field to indicate the company
- Email: text field to indicate the email address
- Address : 5 text fields including the number and street, city and country
- Postal code : add a field between the number and street for the postal code
- Mobile phone : field for the phone number
- Date of birth : add a calendar to indicate the date of birth
- Photo : allows you to upload a photo that can be displayed on the pass
- Free field : text field for free information
Link to this FAQ:
Has this FAQ been helpful?
Infomaniak tools, such as the Web app Mail Infomaniak (online service ksuite.infomaniak.com/mail) or the interfaces Calendar, Contacts, kSuite… can be displayed in light mode or dark mode ("dark mode"), including based on the settings of your current operating system:
Enable manual mode
To manually choose a dark or light display, without relying on a possible different display on the operating system side:
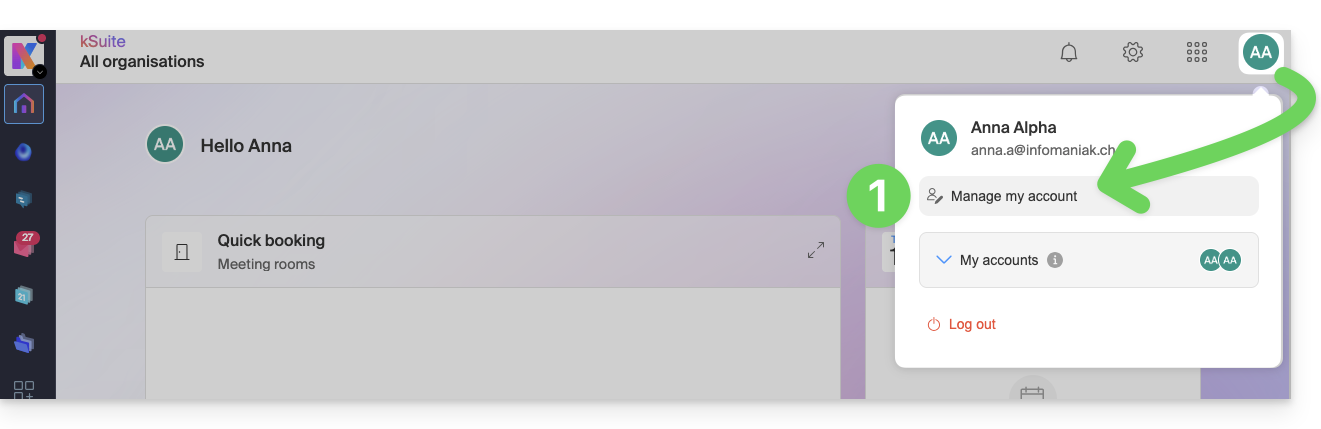
- Click here (or on the badge with your initials/avatar in the top right of the Infomaniak Manager) to "Manage my account":
- Then click on Appearance in the left sidebar.
- Click on Light to apply the light mode:
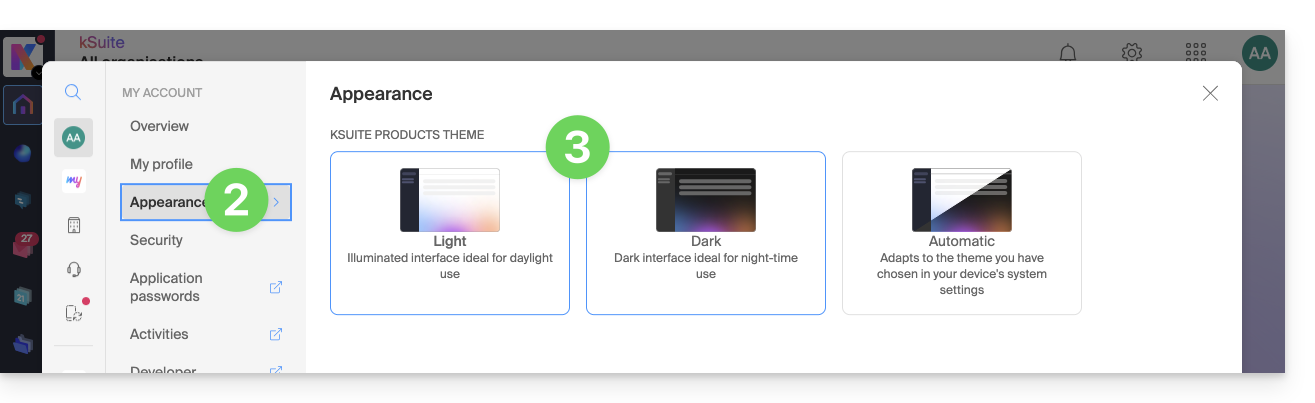
- Click on Dark to enable the "dark mode".
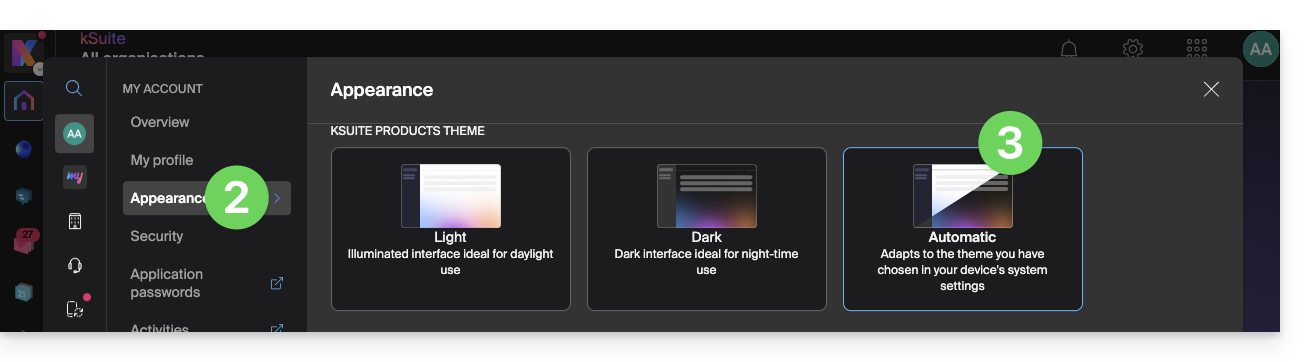
Enable automatic mode
The automatic mode is based on the parameters of your operating system (macOS / Windows...):
- Click here or on the badge with your initiales/avatar in the top right of the Infomaniak Manager) to "Manage my account":
- Click on Appearance in the left sidebar.
- Click on the Automatic mode:
Then if you wish to modify the light or dark theme of your computer, so that the Manager's automatic mode takes into account your preferences...
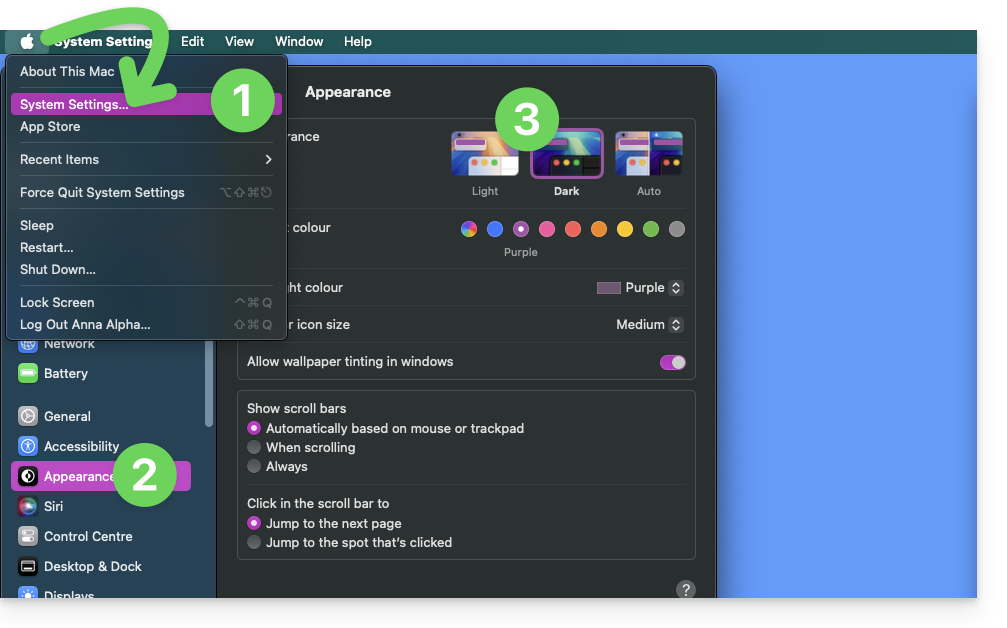
... on macOS
- Click on System Preferences...
- Click on Appearance.
- Choose the desired mode on the right:
... on Windows
- In the Start menu, open Settings > Personalization.
- Select Colors, then Choose your mode:
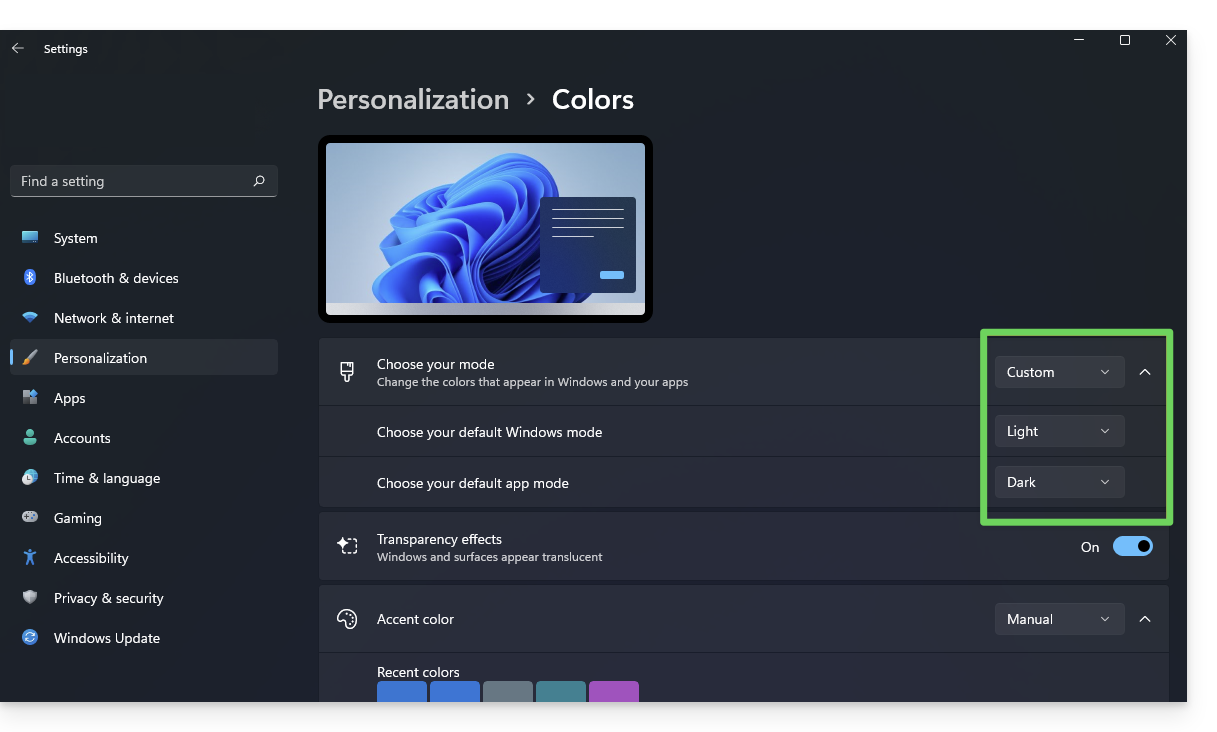
- You can choose between Light, Dark or Custom.
- If you select Custom, you will have the option to choose a default Windows mode and a different default application mode.
And on mobile?
The dark theme is enabled on mobile devices for Infomaniak login and account creation pages; it automatically adapts to the mobile system preferences, thus providing a consistent visual experience between mobile apps and login / account creation.
Link to this FAQ:
Has this FAQ been helpful?
This guide explains how to obtain your email address(es) from the Swiss host Infomaniak.
Preamble
- With the exception of certain free offers, an email address at Infomaniak is always created within an Email Service, and this Email Service revolves around a custom domain name that must exist and be configured for the email to work.
- Example: you want the address
jean.dupont@domain.xyzthen you need:- To own the domain name “
domain.xyz”. - To obtain an Email Service “
domain.xyz”. - To create the email address “
jean.dupont”.
- To own the domain name “
- All of this is offered and requested in the ordering process on infomaniak.com (see below), preceded by the mandatory creation of a user account (for which you will need to provide your personal email address, or an address that already exists in any case).
- If the corresponding domain name is already registered with an external registrar, you may need to enter the correct MX record in the DNS zone.
Order email addresses from Infomaniak
Before or after your registration:
- Click here to choose the offer that suits you and follow the process to start using the email services.
- Once the Email Service is ordered, you will be able to create email addresses and associated passwords.
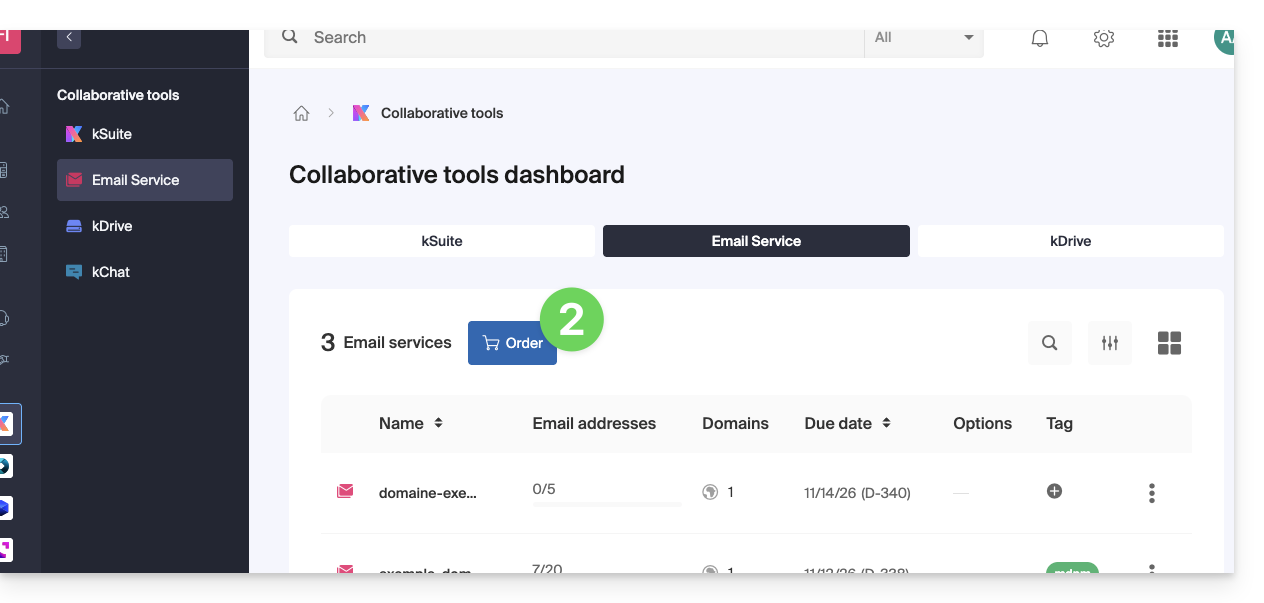
Add an additional Email Service
To add a new Email Service (to obtain new addresses on another domain):
- Click here to access the management of your product on the Infomaniak Manager (need help?).
- Click on the cart icon above the displayed table:
Increase the number of available email addresses on an existing Email Service
To increase the quota of available addresses if necessary, refer to this other guide.
Once the Email Service is activated
• Create your email addresses.
• Configure your emails on your computer and devices.
• Synchronize your contacts & calendars on your devices.
• Restore the content (including that present with another provider).
Link to this FAQ:
Has this FAQ been helpful?
Infomaniak continuously improves its products and customer service by prioritizing your suggestions shared via support, social media, or the Web. These suggestions are then discussed during the meetings of the relevant service.
Provide feedback on…
INFOMANIAK SERVICE | [FR] | [EN] | [DE] | [IT] | [ES] |
|---|---|---|---|---|---|
| Euria [ ☍ ] | ✎__ | ✎__ | ✎__ | ✎__ | ✎__ |
| Domains [ ☍ ] | ✎__ | ✎__ | ✎__ | ✎__ | ✎__ |
| Hosting / Site Creator [ ☍ ] | ✎__ | ✎__ | ✎__ | ✎__ | ✎__ |
| Cloud Server [ ☍ ] | ✎__ | ✎__ | ✎__ | ✎__ | ✎__ |
| Public Cloud [ ☍ ] | ✎__ | ✎__ | ✎__ | ✎__ | ✎__ |
| Jelastic Cloud [ ☍ ] | ✎__ | ✎__ | ✎__ | ✎__ | ✎__ |
| Synology [ ☍ ] | ✎__ | ✎__ | ✎__ | ✎__ | ✎__ |
| Housing [ ☍ ] | ✎__ | ✎__ | ✎__ | ✎__ | ✎__ |
| Swiss Backup [ ☍ ] | ✎__ | ✎__ | ✎__ | ✎__ | ✎__ |
| kSuite / my kSuite [ ☍ ] | ✎__ | ✎__ | ✎__ | ✎__ | ✎__ |
| Mail [ ☍ ] | ✎__ | ✎__ | ✎__ | ✎__ | ✎__ |
| app Mail iOS [ ☍ ] | ✎__ | ✎__ | ✎__ | ✎__ | ✎__ |
| app Mail Android [ ☍ ] | ✎__ | ✎__ | ✎__ | ✎__ | ✎__ |
| kDrive [ ☍ ] | ✎__ | ✎__ | ✎__ | ✎__ | ✎__ |
| Calendar [ ☍ ] | ✎__ | ✎__ | ✎__ | ✎__ | ✎__ |
| Contacts [ ☍ ] | ✎__ | ✎__ | ✎__ | ✎__ | ✎__ |
| Newsletter [ ☍ ] | ✎__ | ✎__ | ✎__ | ✎__ | ✎__ |
| SwissTransfer [ ☍ ] | ✎__ | ✎__ | ✎__ | ✎__ | ✎__ |
| Streaming Radio [ ☍ ] | ✎__ | ✎__ | ✎__ | ✎__ | ✎__ |
| Streaming Video [ ☍ ] | ✎__ | ✎__ | ✎__ | ✎__ | ✎__ |
| VOD / AOD [ ☍ ] | ✎__ | ✎__ | ✎__ | ✎__ | ✎__ |
| Guest Manager [ ☍ ] | ✎__ | ✎__ | ✎__ | ✎__ | ✎__ |
| kChat [ ☍ ] | ✎__ | ||||
| kMeet [ ☍ ] | ✎__ | ||||
Infomaniak support is also at your disposal by email, chat or phone if needed.
Link to this FAQ:
Has this FAQ been helpful?
This guide explains how to set up a dynamic DNS record (Dynamic DNS, DDNS) for a domain name whose DNS zone is managed at Infomaniak. This free alternative to Dyn and DynHost is very useful if you want to access devices connected to the Internet from the outside whose IP address is dynamic (e.g., a NAS, a surveillance camera, an Internet router/box/home automation, etc.).
Prerequisites
- The DNS zone of the domain name must be managed at Infomaniak.
- If necessary, transfer your domains to Infomaniak.
- Your device or application must support dynamic DNS records.
Specific guides
The following guides allow you to link a domain name with:
- … a Synology NAS
- … a Qnap NAS
- … Zyxel / Sunrise Internet Box / TP-Link solutions
- … a UniFI device
- … Swisscom Internet Box
- … Fritzbox
- … Jeedom
- … Linux via ddclient
- … potentially anything thanks to the API…
The various services offered by Infomaniak are all compatible with the corresponding standard protocols (CalDAV/CardDAV for contacts & calendars for example), therefore if you encounter a problem with third-party software, contact its publisher or a Partner and consult the support policy as well as article 11.9 of the Infomaniak Terms of Service.
Guides for any other use
To create a dynamic DNS on your domain:
- Click here to access the management of your domain on the Infomaniak Manager (need help?).
- Click directly on the name assigned to the domain concerned.
- Click on Dynamic DNS in the left sidebar menu.
- Click on the blue button Add a Dynamic DNS.
- Enter the necessary information:
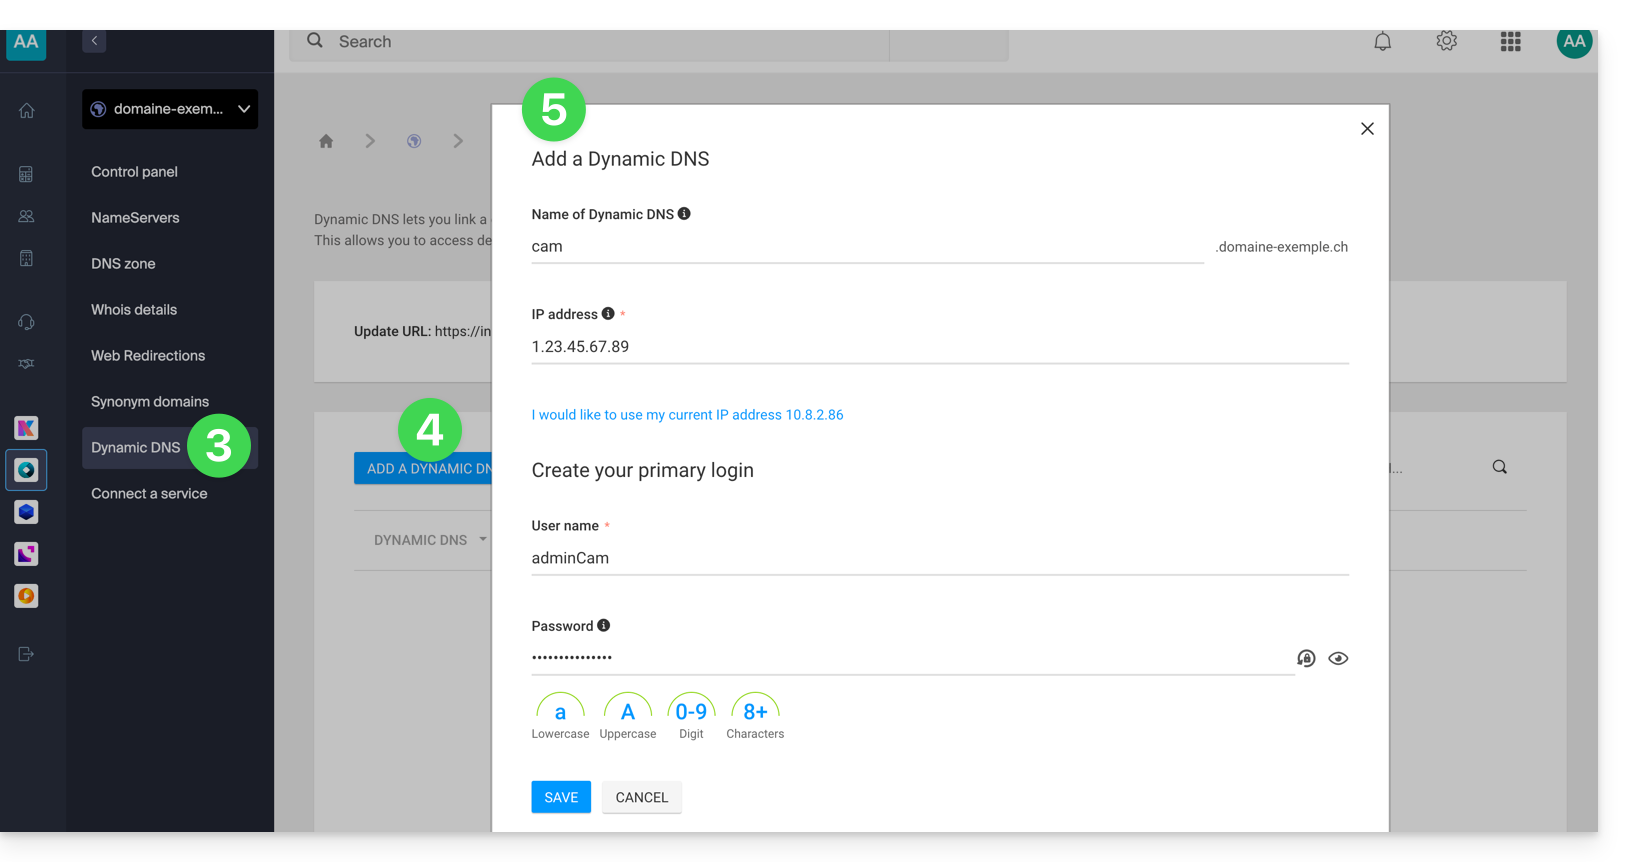
- Choose the desired subdomain or leave the Dynamic DNS Name field empty to use the main domain.
- Provide an IP address; this will then be dynamically updated by your device/app.
- Set up a username / password pair (uppercase, lowercase + numbers, no special characters); the latter will need to be entered in the configuration of your device/app.
Link to this FAQ:
Has this FAQ been helpful?
This guide explains how to register a domain name with Infomaniak.
Preamble
- With a new domain name or additional domain name, many possibilities open up to you, including access to free services, such as:
- You will also be able to:
- use your existing Mail Service or Website but with different spelling,
- host a website here or with a third-party host,
- etc.
Order a first domain name
To do this:
- If necessary, create an Infomaniak account.
- Click here to access domain management on the Infomaniak Manager.
- Click to open the Shop:
- If the case arises, select the Organization in which to order your domain:
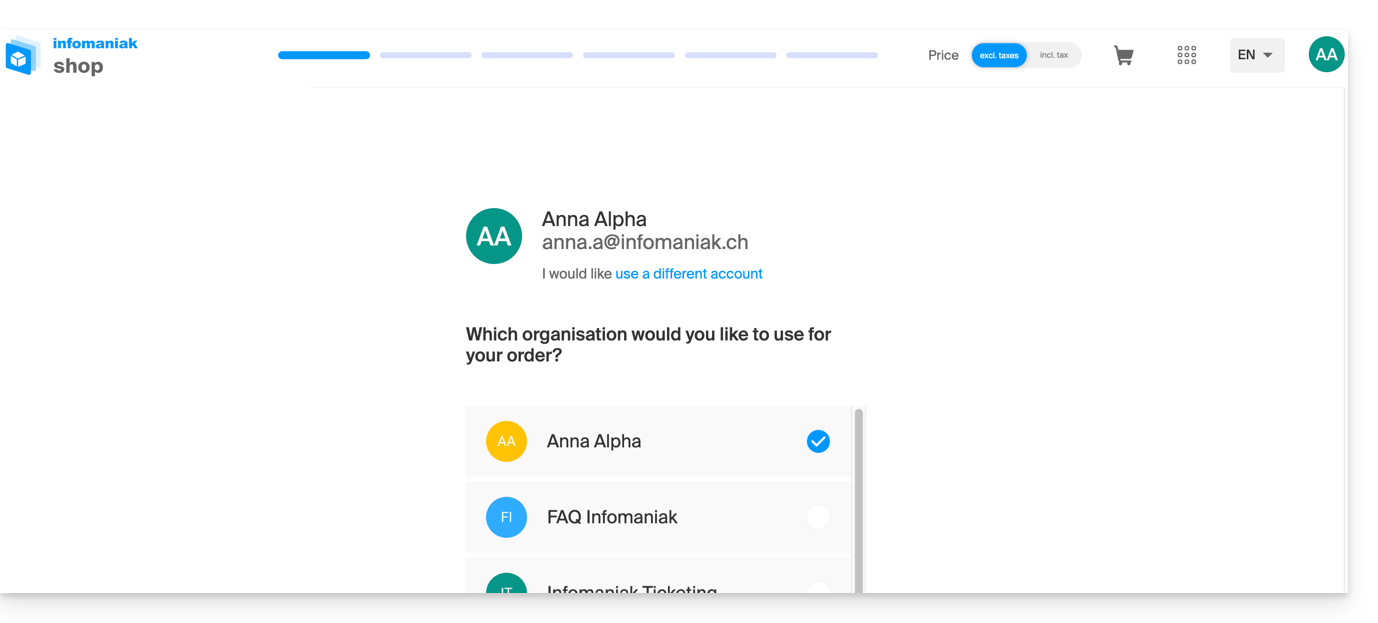
- If the case arises, select the Organization in which to order your domain:
- Once in the Shop, enter the domain name to be registered and search for it:
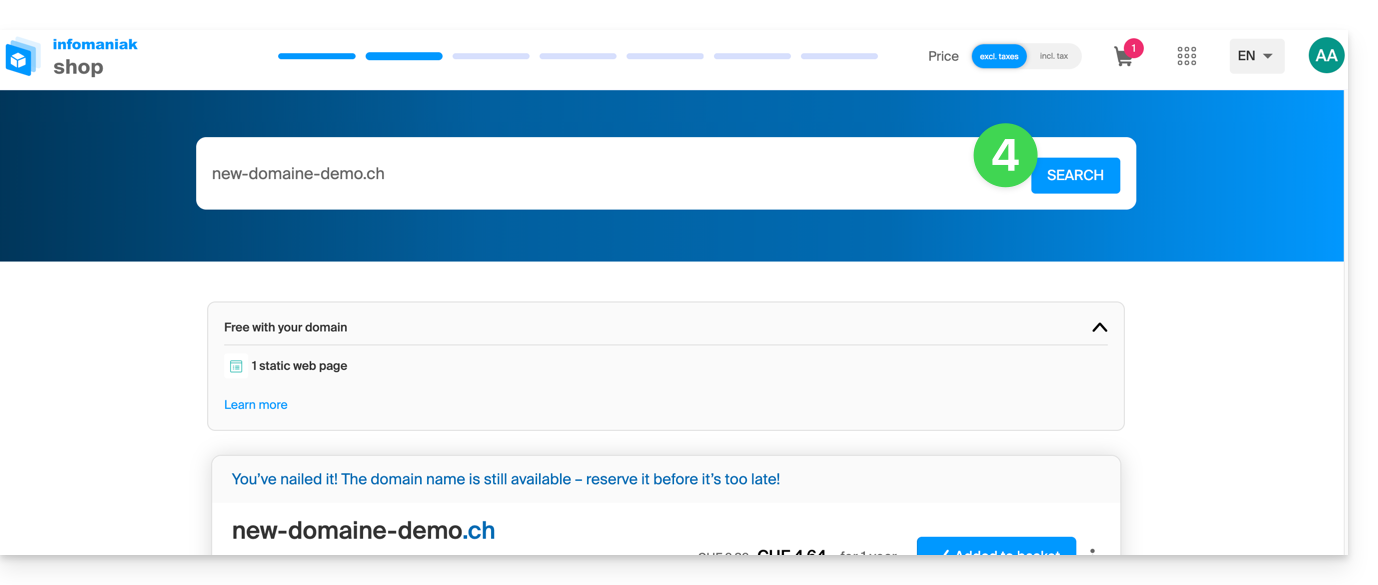
- Check or uncheck the additional options and extensions offered and click on Next to proceed.
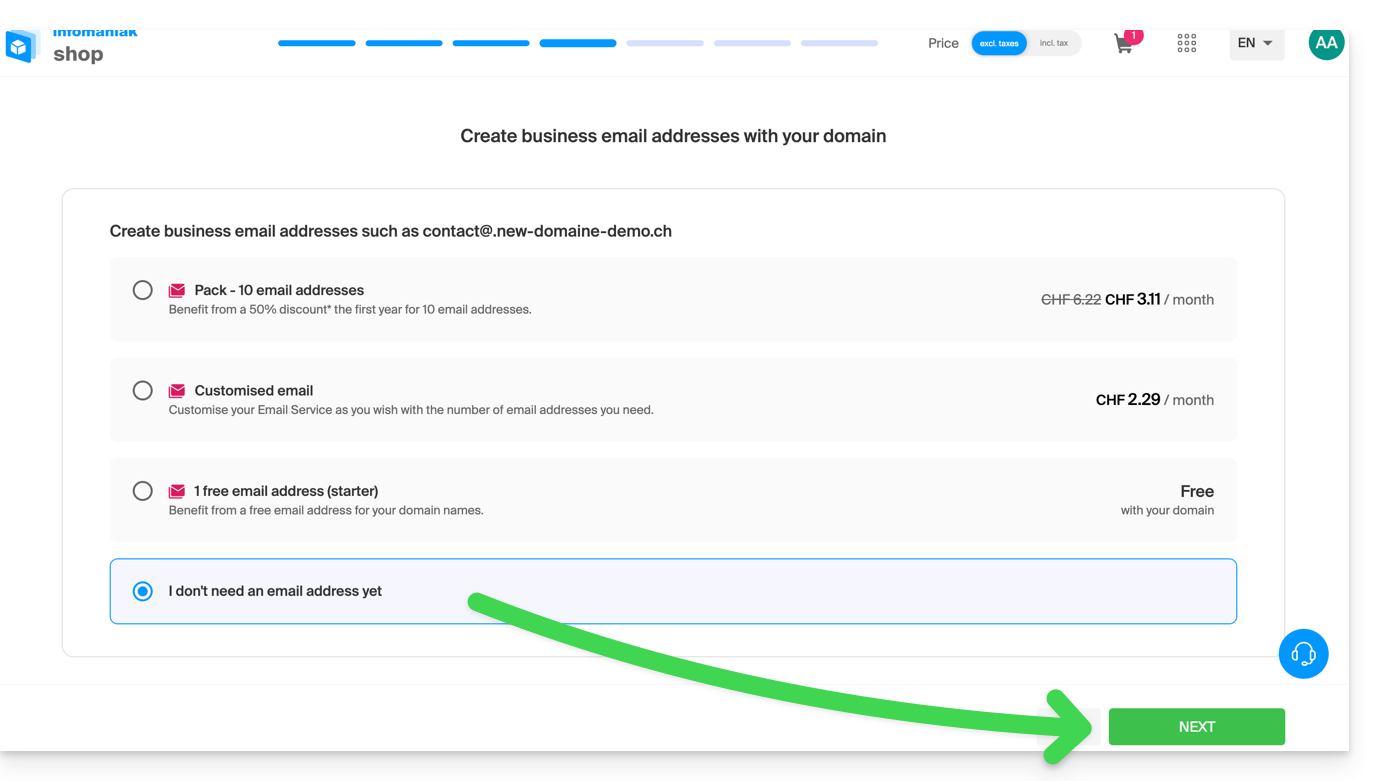
- Choose the desired options as you go through the pages, such as the possible Mail Service associated with the domain name:
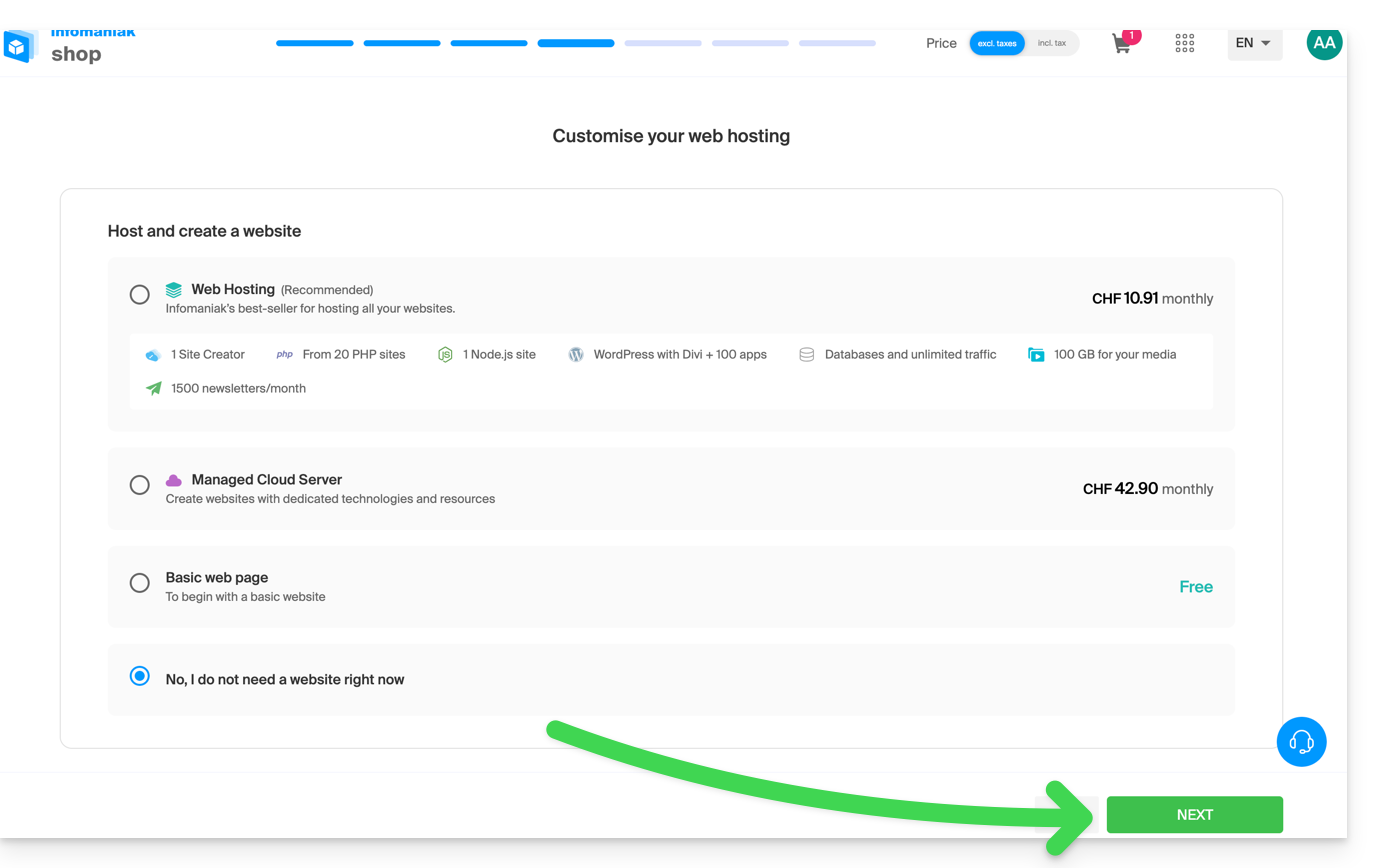
- Choose the desired options as you go through the pages, such as the possible Web hosting associated with the domain name:
- Enter the details related to the domain name.
- Complete the purchase without forgetting to read and accept the Terms (the box may require scrolling down the page first):
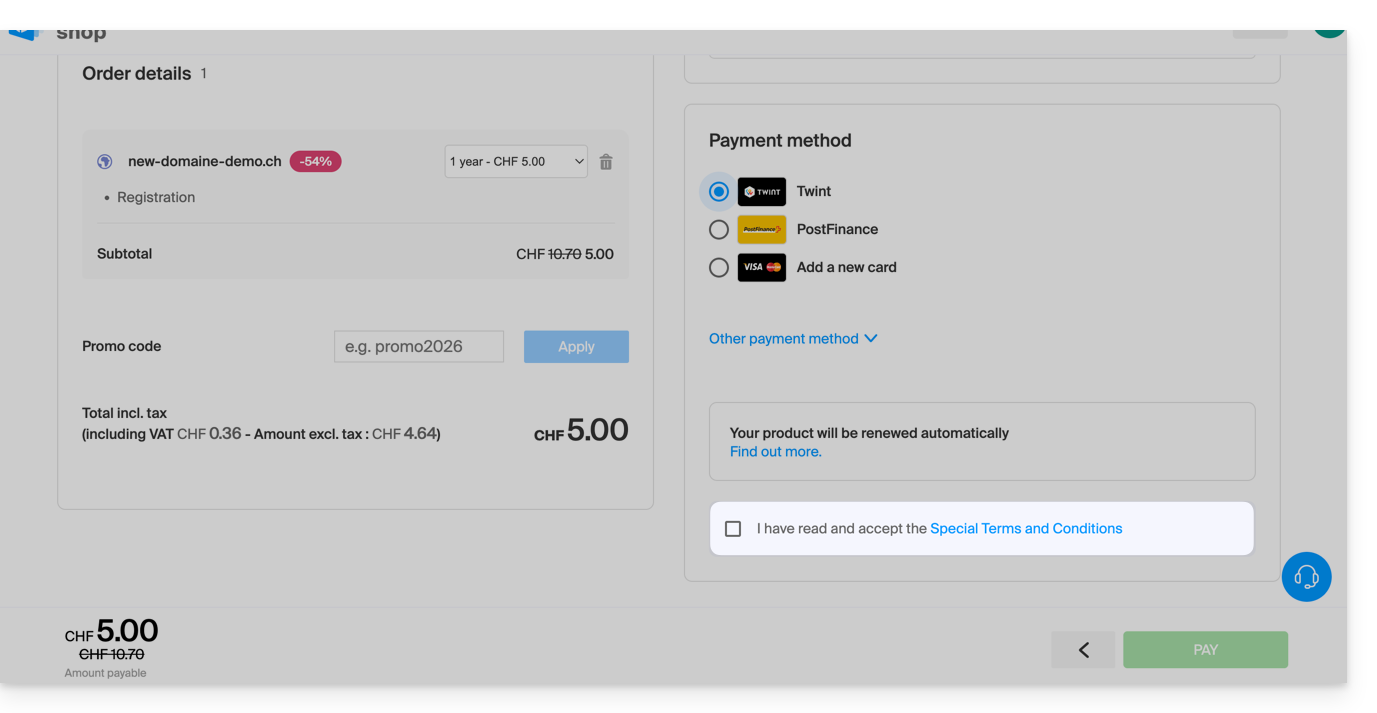
Once ordered, wait a few hours for the setup (and schematically the propagation of your domain name with Internet Service Providers (ISPs) around the world).
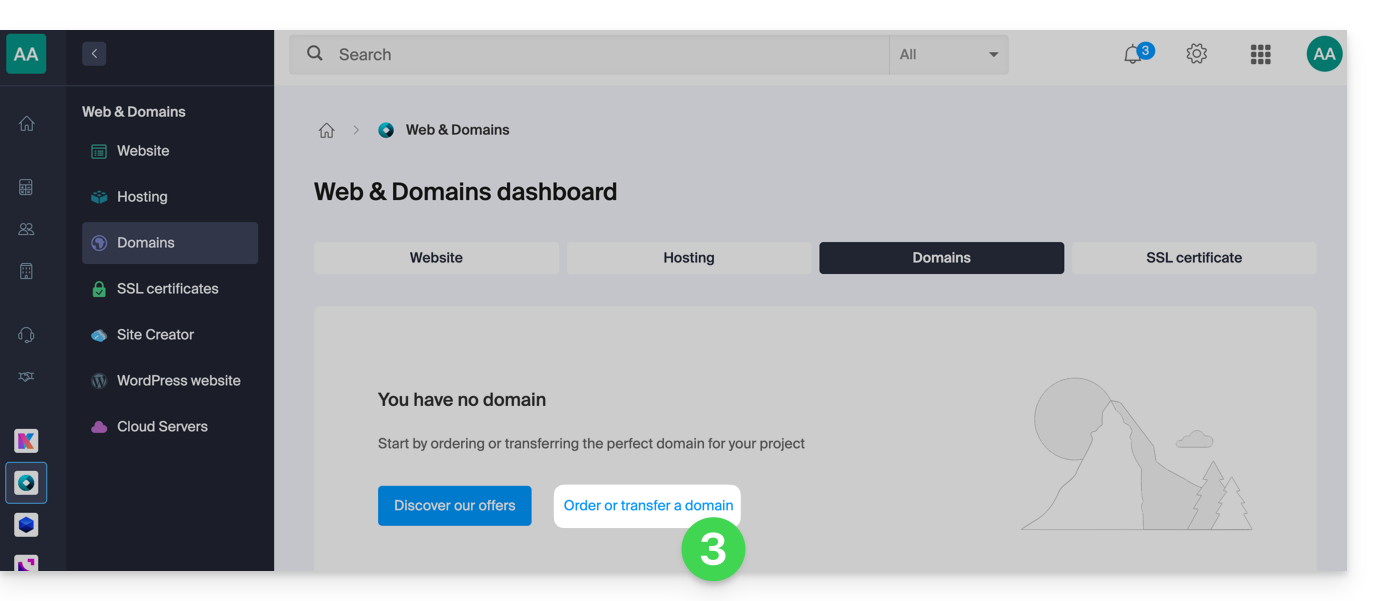
Order an additional domain name
To do this:
- Click here to access the management of your product on the Infomaniak Manager (need help?).
- Click on the button to Order an additional domain:
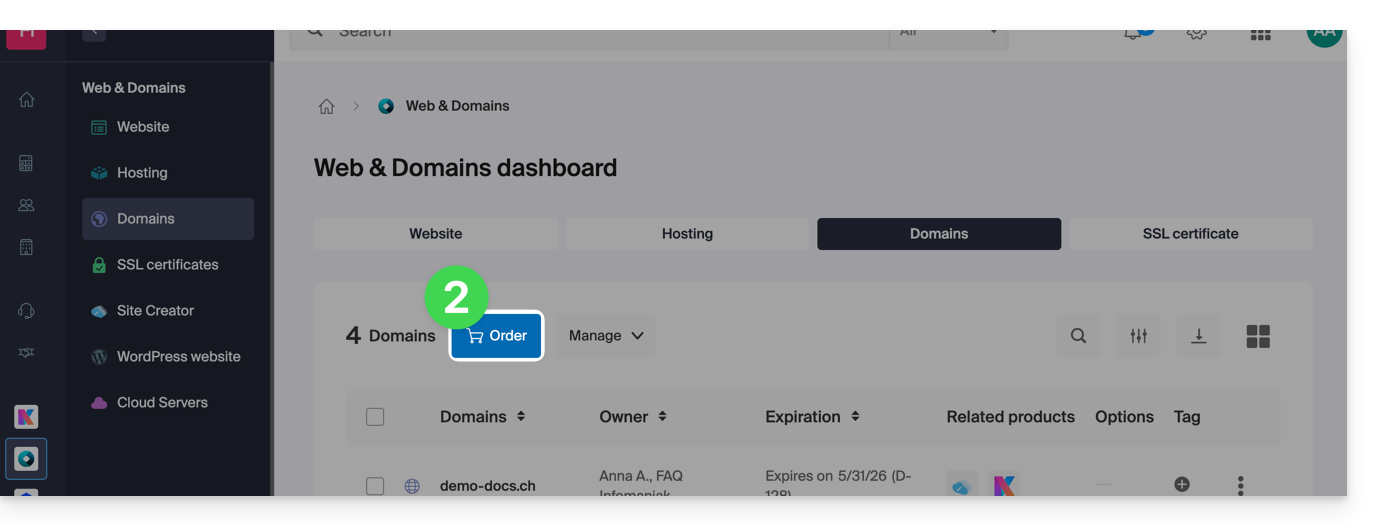
- Follow the first guide above starting from step 4.
Check the availability of a domain name
Refer to this other page which allows you to quickly check if a domain is available for registration or not.
There are at least 3 main indications:
- Available — in this case, it's good, you can reserve it.
- Transferable — you must own it with another provider to transfer it to Infomaniak.
- Unavailable — it will unfortunately not be possible to order it as long as it is not abandoned by its current owner.
Link to this FAQ:
Has this FAQ been helpful?
This guide details the management of the Organization Directory, i.e., a “special” address book present in the Infomaniak Web app Contacts (online service ksuite.infomaniak.com/contacts).
Preamble
- The Organization Directory is "automatically created" by the various users who make up one of the Organizations to which your user is attached.
- If work teams are created within the Organization, then these form groups visible in the Organization Directory:
- This address book is automatically synchronized with all internal users of your Organization.
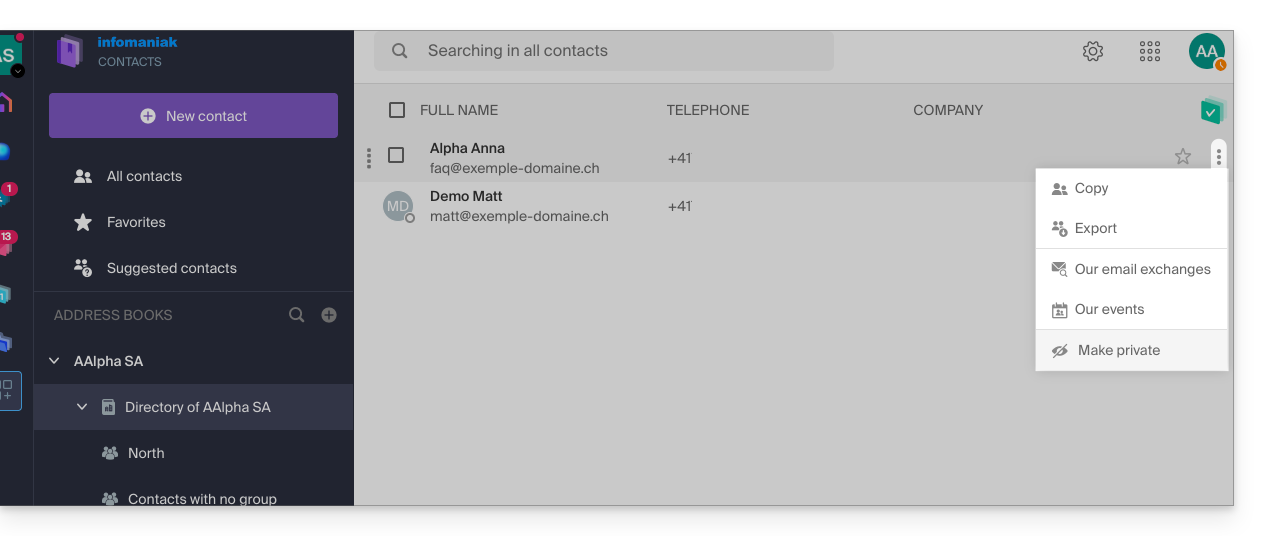
- An administrator of the Organization can make certain entries in the directory private to hide them from users with fewer permissions:
- It is not possible to export it or rename it.
- You can change its display color:
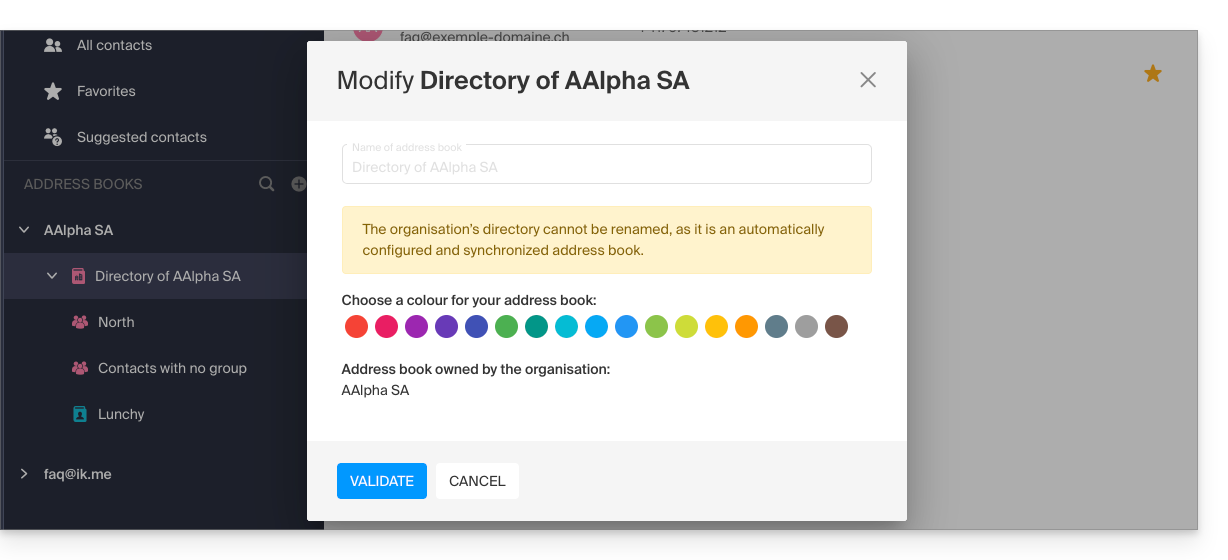
- You can change its display color:
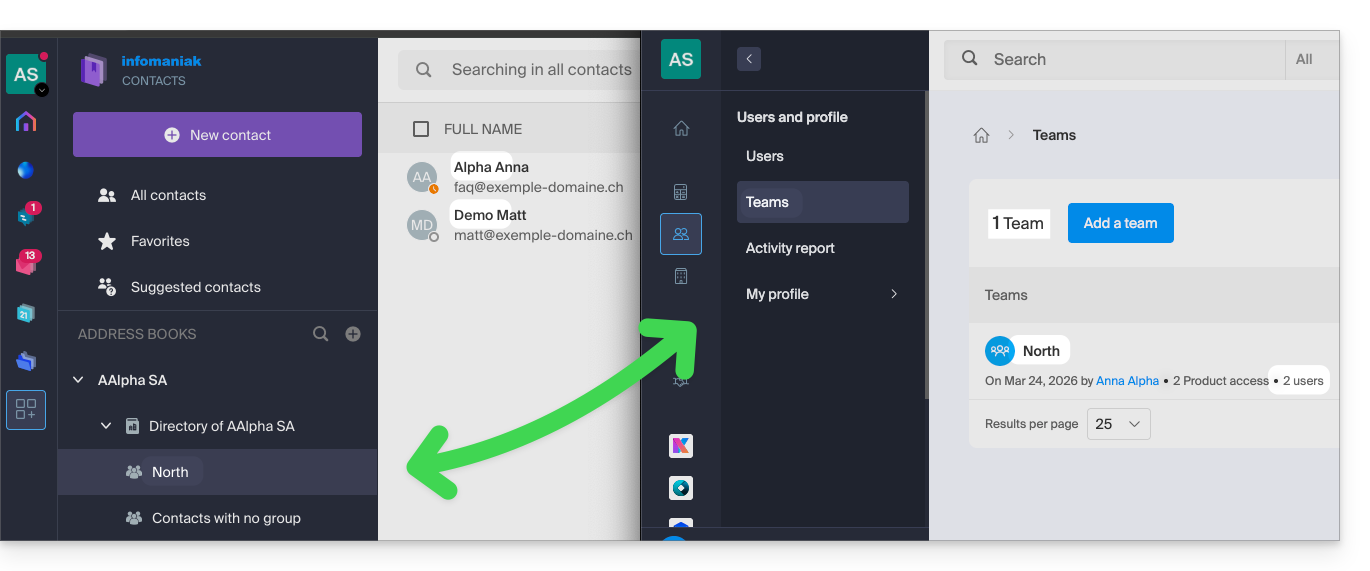
Access the directory
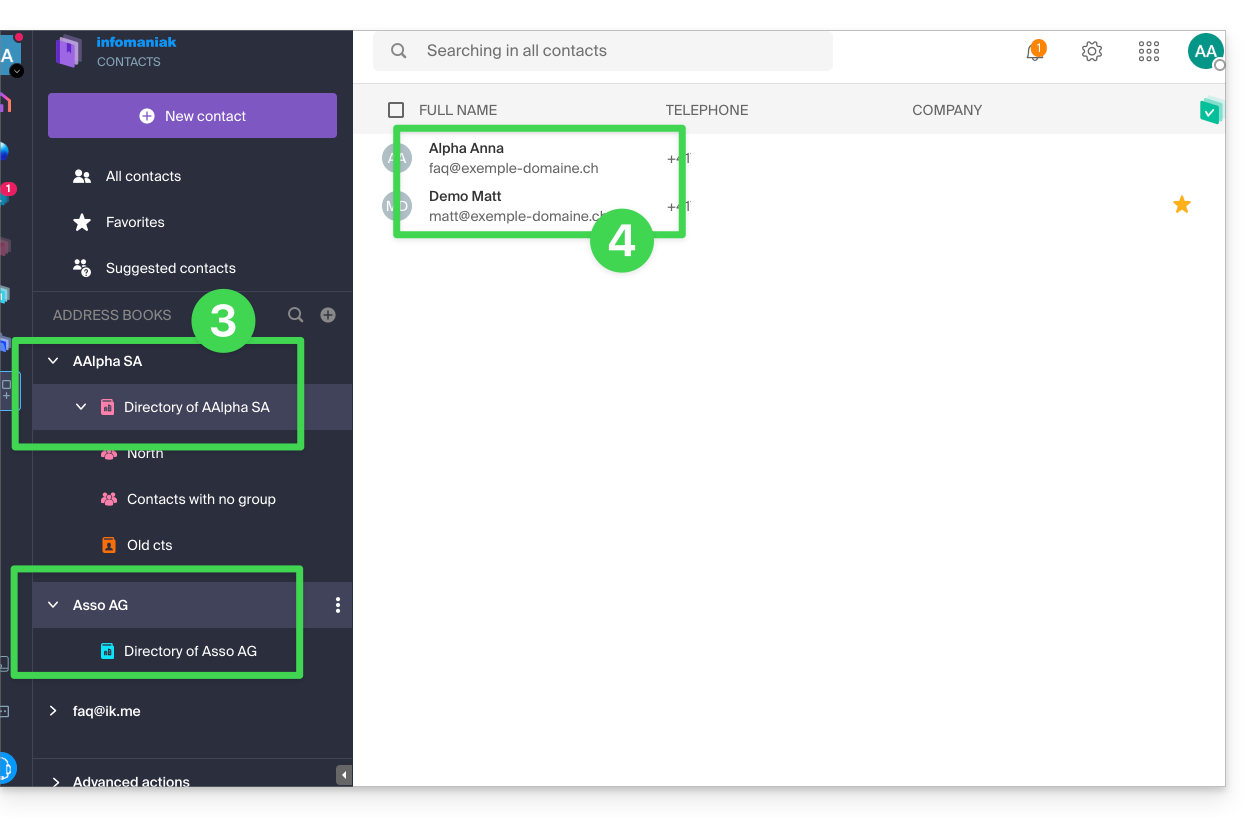
If your login matches and belongs to one (or more) Organizations, it is possible to access the various directories of these Organizations:
- Click here to access the Infomaniak Web app Contacts (online service ksuite.infomaniak.com/contacts).
- Click on the chevron to the left of the name of the Organization concerned.
- Click on Directory of {Organization name}…
- The contacts of the selected Organization are displayed on the right:
Modify the details of a directory contact
You can do many things (copy, export the card, view email exchanges or calendar events, add to favorites, call, etc.) by clicking on the card of a contact in the Organization Directory address book but you will not be able to modify the details on behalf of the person concerned: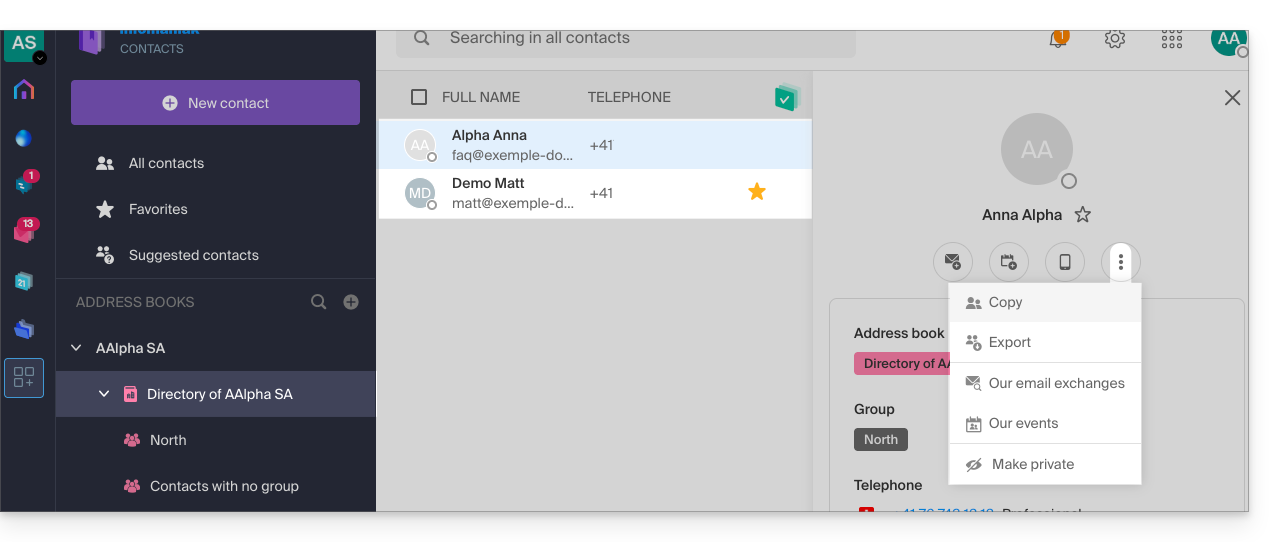
To modify the main information, the person concerned (the one for whom a change must be made) must log in to their profile and modify it (see below):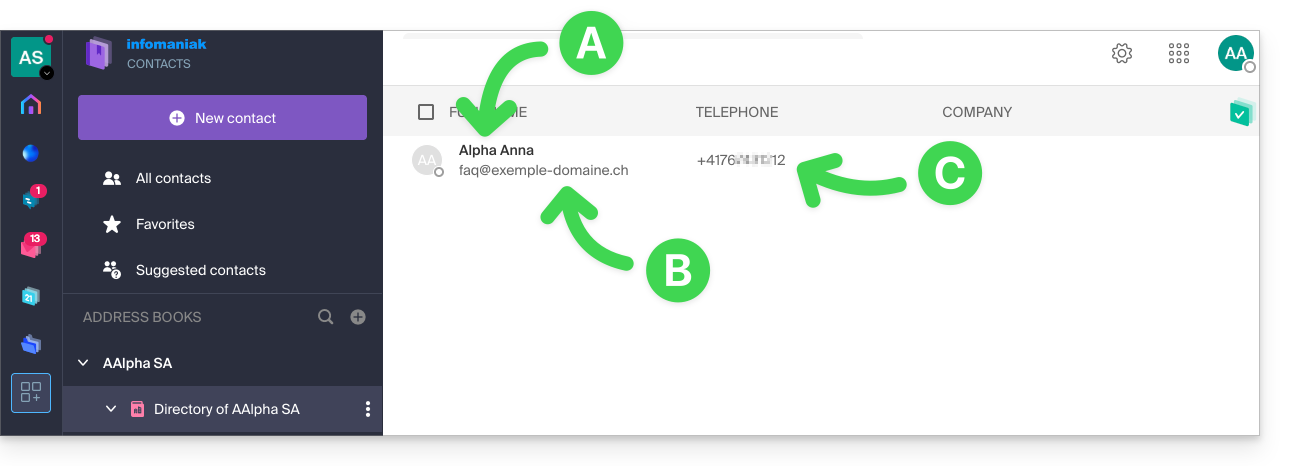
A. First & last name
To modify the first name and last name visible in the directory, the user concerned (here faq@exemple-domaine.ch) must log in to their account and modify their details. Refer to this other guide on this subject.
B. Email address
To modify the email address visible in the directory, the user concerned must log in to their account and modify their details. Refer to this other guide on this subject.
C. Phone number
To modify the phone number visible in the directory, the user concerned must log in to their account and modify their contact details. Refer to this other guide on this subject.
Link to this FAQ:
Has this FAQ been helpful?
This guide details the two main types of identifiers. They are distinct, even if the address format may be identical.
Infomaniak Account vs Email Address
Here is a summary of these 2 types of identifiers:
| Type of Identifier | Usage | Where to Use It | Associated Password |
|---|---|---|---|
| Infomaniak Account (login identifier) | Access all of your Infomaniak services. | Login to: | Password set when creating the user account. ⚠️ Different from the password of your email addresses. |
| Email Address Hosted with Infomaniak | Send and receive emails. | SMTP/IMAP Connection…
| Password specific to each email address (there can be several). ⚠️ Different from the Infomaniak account password. |
What to do in case of connection issues?
It is not necessary to contact Infomaniak Support (who does not have any of your passwords)…
- Issue with the Infomaniak account? Reset the account password.
- Issue with an email address? Reset the email password.
Explanations
- Like many other online services, you registered with Infomaniak using a personal email address.
- This personal email address serves as your login identifier when you want to access Infomaniak services.
- This login identifier has its own password (set when creating your Infomaniak user account – your personal email address, see above).
There is no link between…
- … this identifier/password pair described in points 1/2/3 above…
- … and the email addresses you created or obtained later with Infomaniak.
A link might exist if the address is the same (for example, you signed up with the email address toto@abc.xyz and you also manage this same email address at Infomaniak) but even in this case, the password will very likely be different — once for the login identifier toto@abc.xyz and once for the email address toto@abc.xyz.
Other identifiers?
Acquiring other Infomaniak products involves obtaining other identifiers, such as those required for FTP, MySQL, SSH connections, etc., but these identifiers are completely independent of the two types described above.
Link to this FAQ:
Has this FAQ been helpful?
This guide explains how to manually allow or refuse participants in a kMeet meeting.
Preamble
- To approve participants, you must have the status of moderator.
- To be a moderator, you must either be the first connected or designated later.
- Generally, a person generates a kMeet and will therefore be the moderator throughout the meeting.
- However, if a meeting is created from the Infomaniak calendar, a kMeet link can be added, which will be accessible to all event participants; it is therefore recommended that the event initiator connect a little before the participants to configure their meeting (add a waiting room or a password, etc.).
Approve or refuse participants
To be a moderator:
- Start kMeet via kmeet.infomaniak.com or from one of the apps for computers or mobile devices.
- Click the button to start a new meeting:
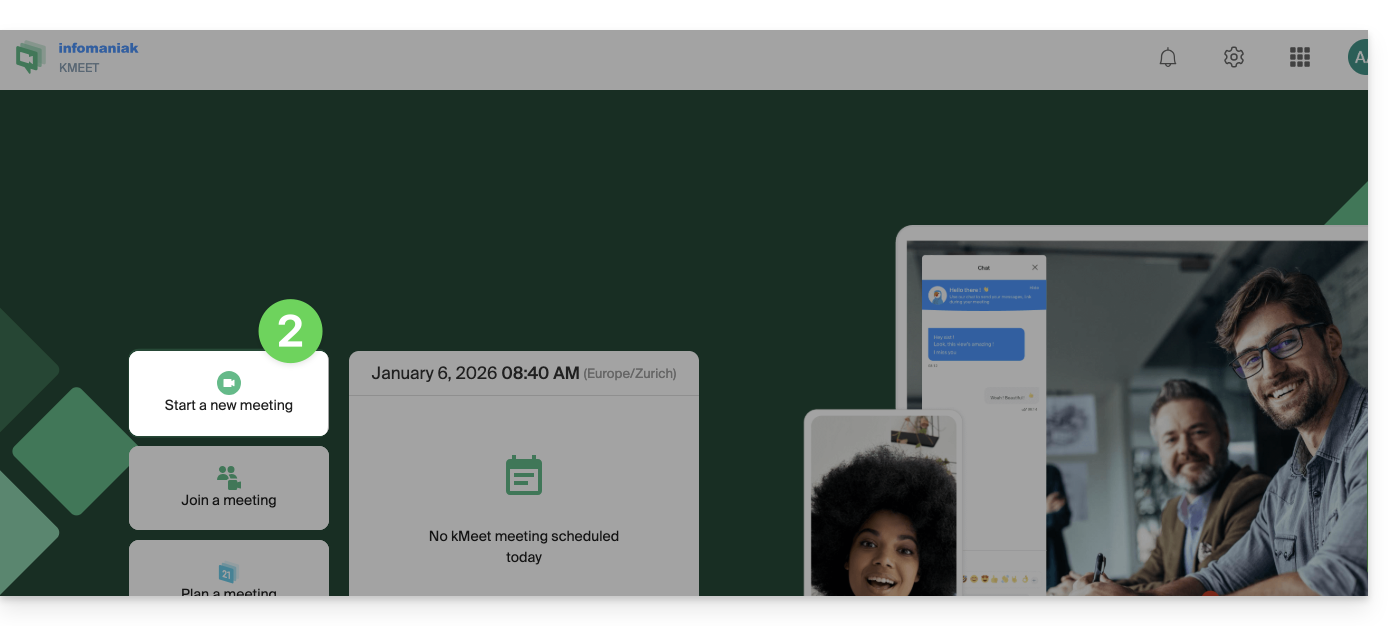
- Click the chevron below the meeting name to expand the advanced options.
- Enable participant control:
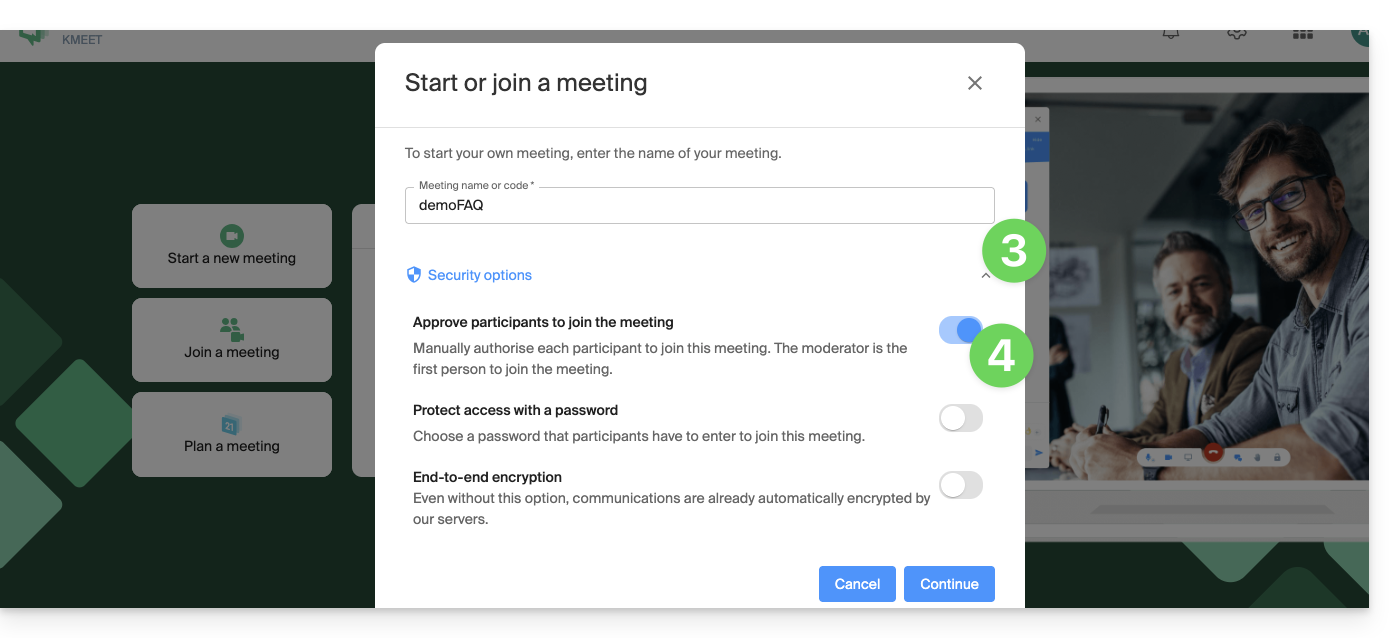
- Start the meeting.
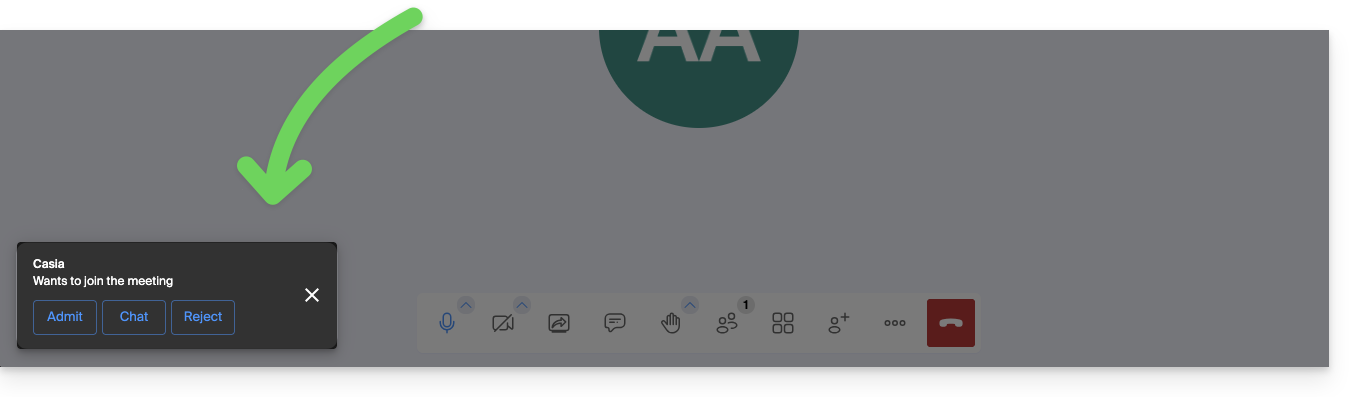
- Share the meeting link or code and if necessary the password and or the encryption key with your participants.
- When your participants try to join the meeting, an audio notification invites you to authorize or not authorize them to join the room:
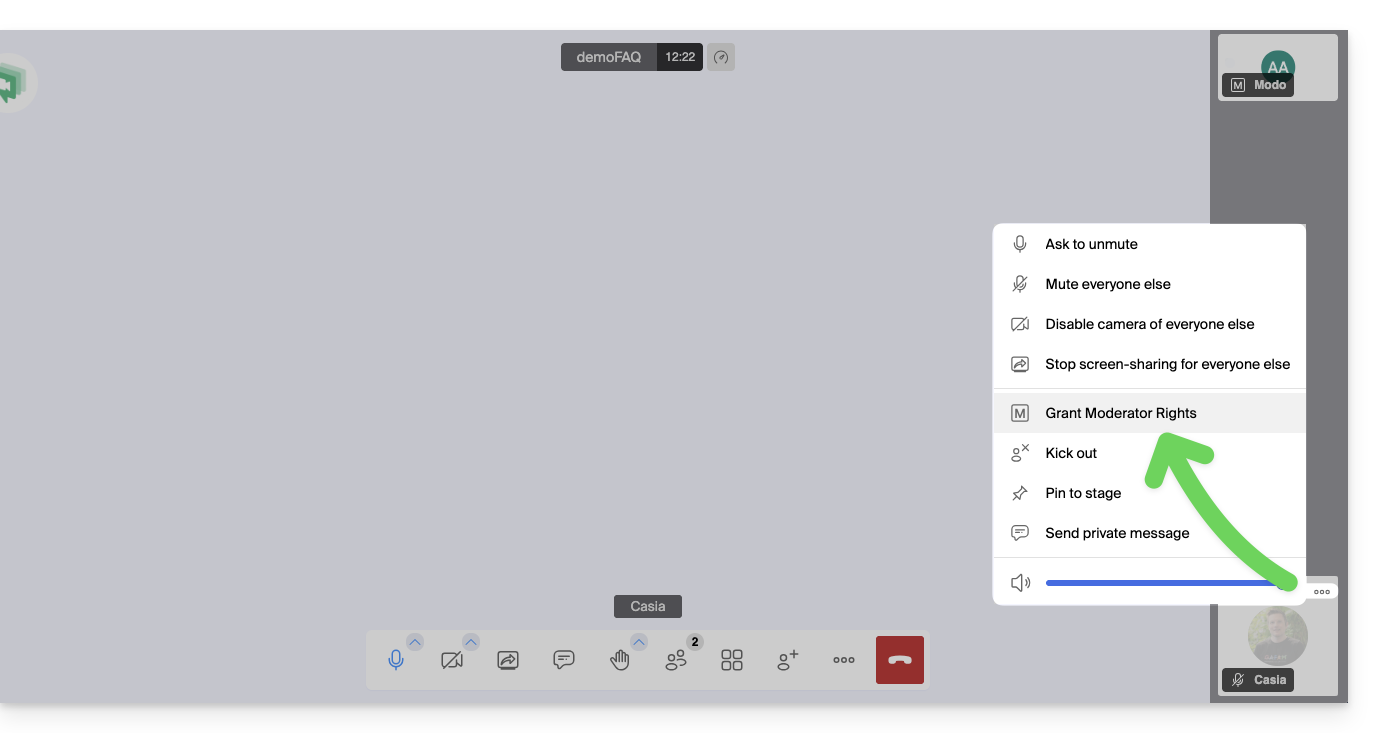
- You can also set a participant as a new moderator during the meeting, or just below, exclude them from the meeting:
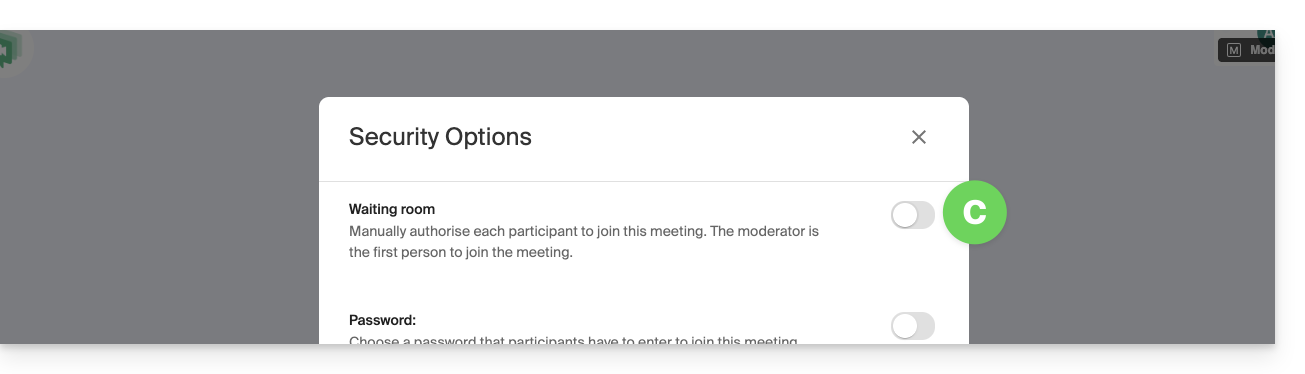
- The moderator can also disable the "waiting room" enabled in point 4 above once the meeting has started:
- Click on the icon ○○○ in the toolbar.
- Click on Security options:
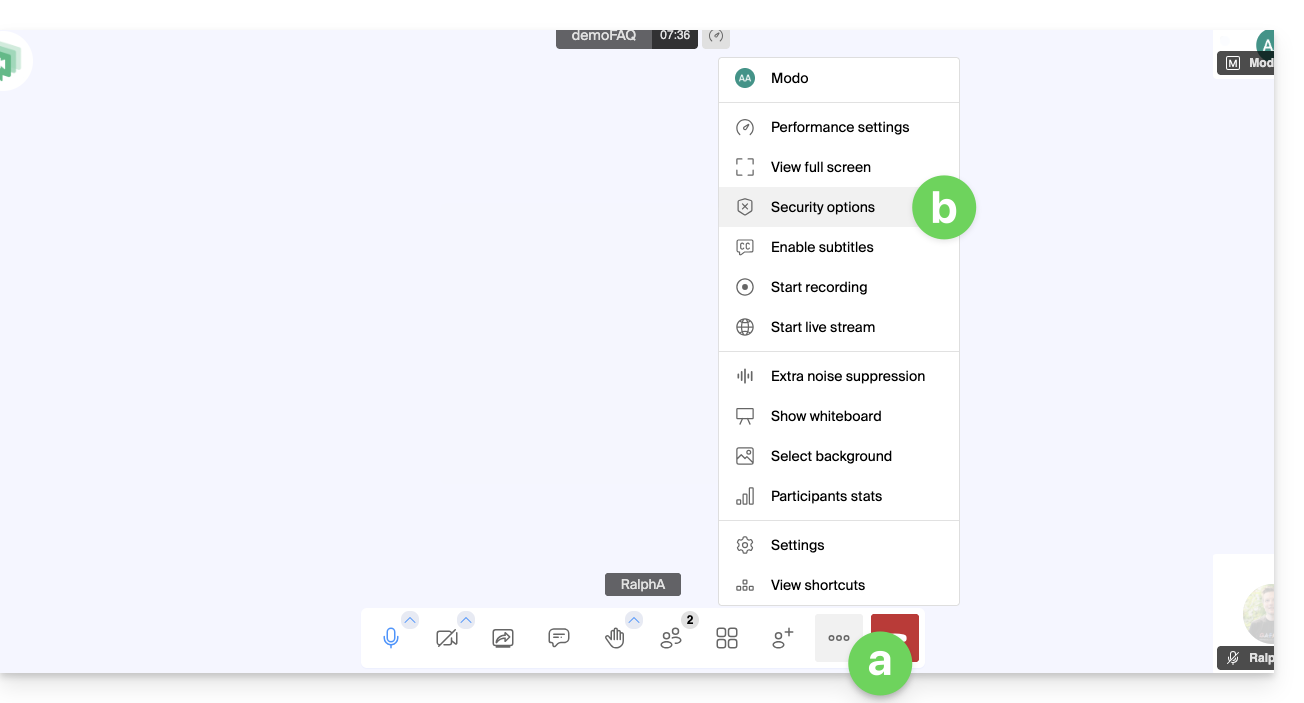
- Disable the option to no longer have to manage new arrivals in the meeting:
Moderation options
Other moderation options are available:
- Click on the icon ○○○ in the toolbar.
- Click on Settings:
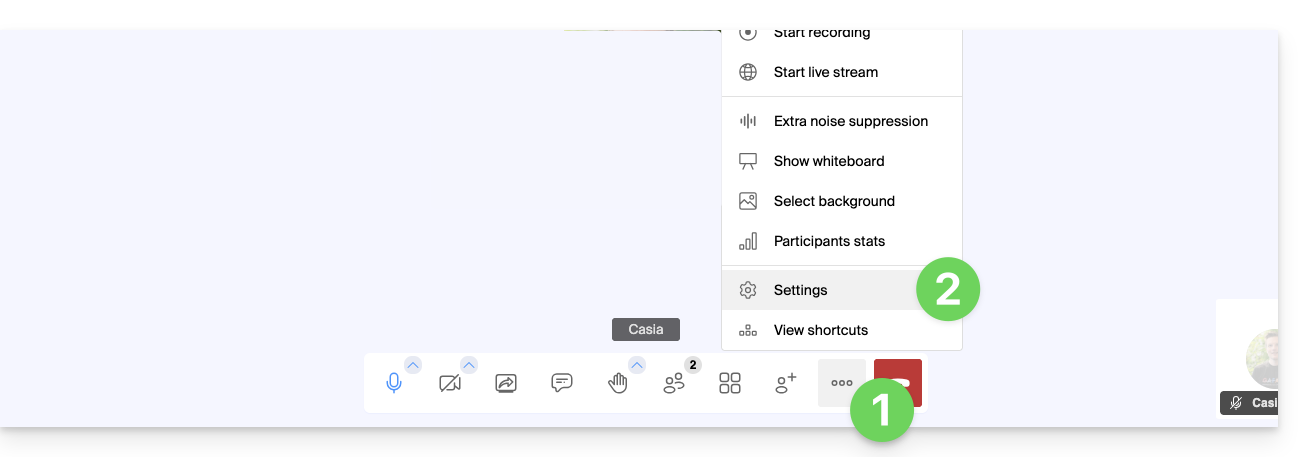
- Click on Moderation.
- The options allow you to manage the expected behavior when new participants connect:
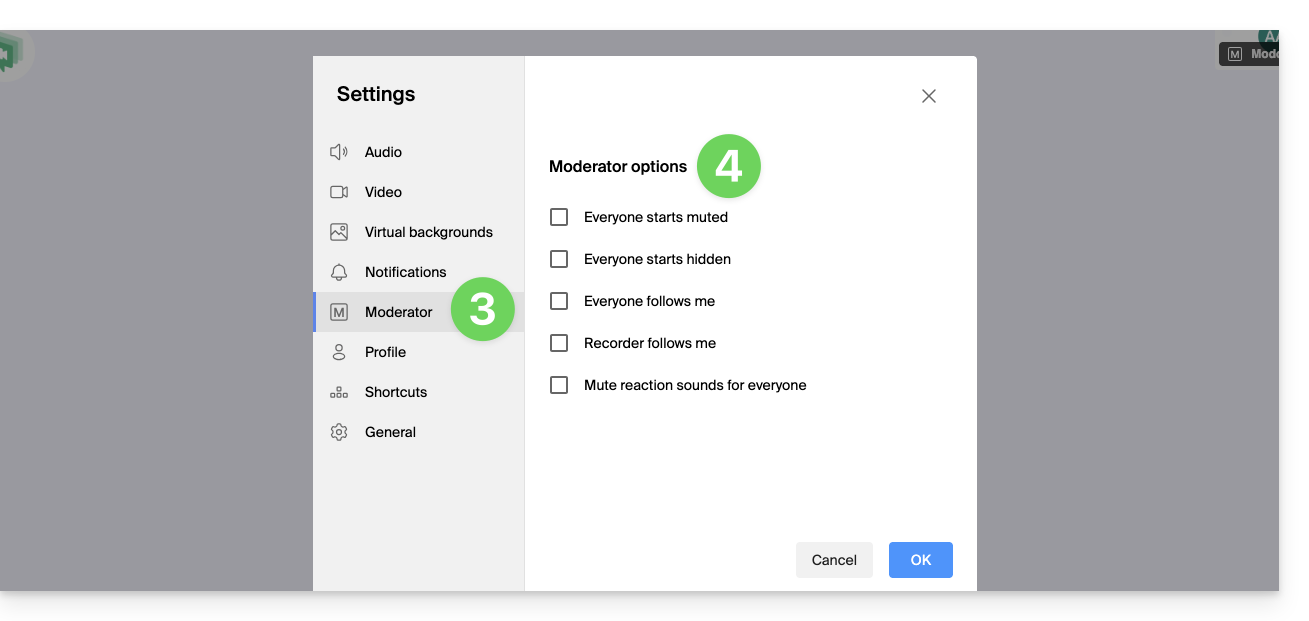
- all participants start with the microphone muted
- all participants start with the camera off
- all participants have the same interface display as the moderator (display of such participant in large on the layout, etc.), modifiable at any time by the users but the moderator can update at any time to enforce compliance
- recording will use the same interface display as the moderator (display of such participant in large on the layout, etc.)
- reaction emojis do not produce any sound
Link to this FAQ:
Has this FAQ been helpful?
Thank you for choosing kDrive, the independent and privacy-respecting solution for collaborating, sharing, and accessing your data from all your devices. Your data is encrypted, continuously backed up, and exclusively hosted in Switzerland.
Collaborative storage on a 100% Swiss Made cloud
- Discover kDrive in video (the interface has evolved since)
Getting Started
- Synchronize kDrive across different devices
- Manage kDrive Lite Sync option (macOS)
- Manage kDrive Lite Sync option (Windows)
- Install kDrive on Linux
- kDrive folders (personal, common, shared)
- Choose the kDrive folders to synchronize
- Edit an Office file type on kDrive (Word, Excel, PowerPoint) or plain text
- Working on kDrive: basic operations
- Manage kDrive storage space
- Search for data on kDrive
Share your data
- Manage kDrive drop boxes
- Customize kDrive shares and drops
- Share data from kDrive (web interface)
- Example of internal/external shares
- Share data by email from kDrive (web interface)
Fill your kDrive
- Import external data to kDrive
- Import data to kDrive (iOS) or just the iPhone photos automatically
- Import photos to kDrive (Android)
- Import data to kDrive without the kDrive app
- Access kDrive files locally and online
- Scan documents with kDrive (iOS/Android)
With multiple users
- Manage a kDrive user's rights
- Manage folder and subfolder access permissions
- Manage kDrive users
- Manage multiple kDrive (iOS/Android)
- Manage multiple kDrive (macOS / Windows)
- Copy certain data between kDrive you have access to
Go further with kDrive
- Modify an existing kDrive offer
- Manage kDrive categories to classify data
- Save a kMeet meeting on kDrive
- Export email attachments from Mail
- Export an email to kDrive
- Add an attachment to an event in Calendar
For advanced users
In case of a problem
- Resolve a kDrive blockage (antivirus, firewall, etc.)
- Resolve a kDrive sync conflict
- Resolve a kDrive synchronization problem
- Resolve a kDrive issue on Android device (don't kill my app)
- Resolve a Lite Sync plugin error on macOS
- Clear the browser cache
- Clear the mobile app kDrive cache
- kDrive application version (macOS / Windows / Linux)
- Restore a kDrive file to its previous version
- Restore a deleted kDrive file
- Force kDrive to synchronize certain special files
- Authorize access to your products / Complete a support request
- Display kDrive debugging information
Learn more about kDrive
A question or feedback?
- Contact Infomaniak support
- Click here to share feedback or a suggestion on an Infomaniak product
Link to this FAQ:
Has this FAQ been helpful?