Knowledge base
1000 FAQs, 500 tutorials and instructional videos. Here, there are only solutions!
This guide helps you troubleshoot situations where you notice that some kDrive data is not being synchronized across your devices.
Certain folders are missing on your computer
If everything seems to be working correctly:
- the kDrive app is running in the background and functioning,
- no synchronization is interrupted,
- no error messages are displayed,
- you have the correct access rights when viewing the files in their online version (ksuite.infomaniak.com/kdrive),
but you notice that:
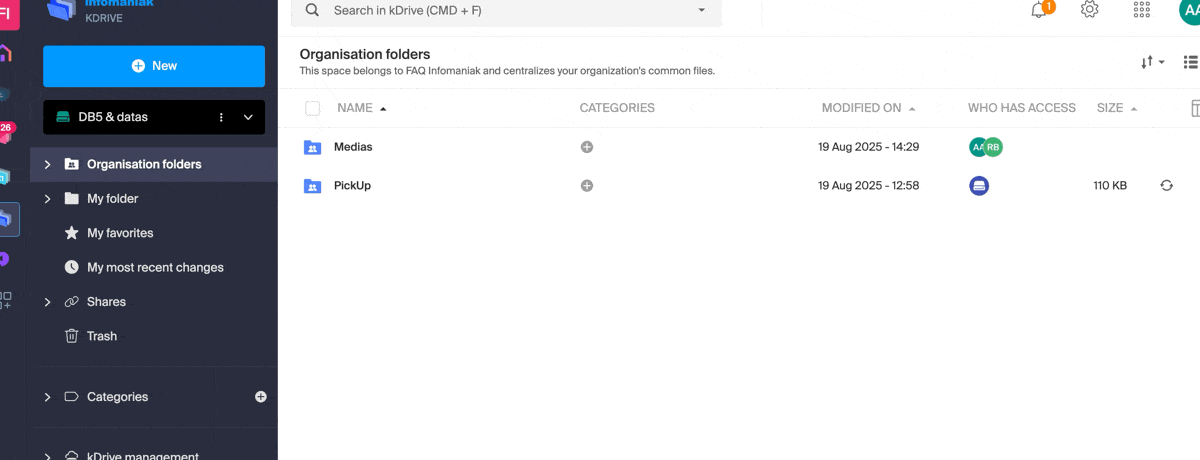
- folders such as Organization Folders or other directories are not visible on your computer,
then check in the desktop kDrive app installed on your computer which folders you want to synchronize:
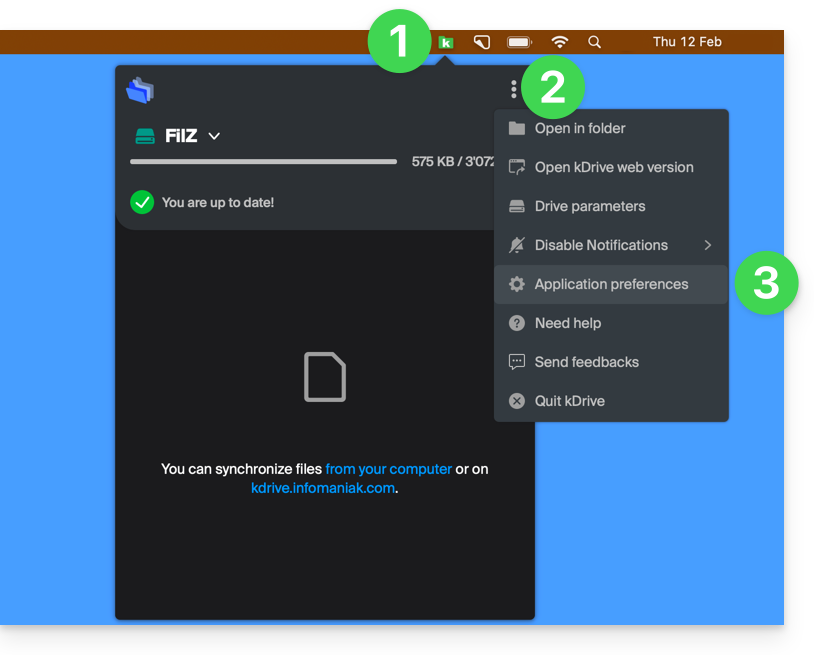
- Left-click on the app icon in the notification area of your computer (top right on macOS, bottom right on Windows, and double-left-click in the taskbar on Linux).
- Click on the action menu ⋮ on the right of the window that appears.
- Click on kDrive Settings:
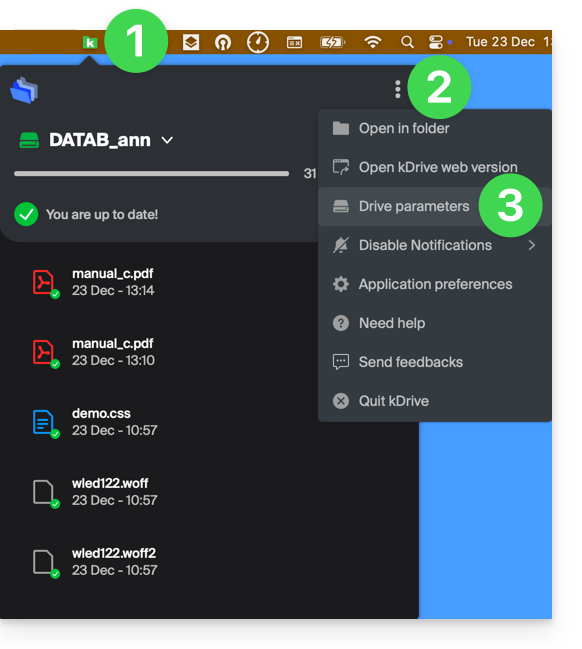
- Click on the chevron to the left of your synchronization name to display the list of folders.
- If necessary, expand the contents of the listed folders and check/uncheck the folders to be synchronized with your computer.
- Click on the blue Confirm button:
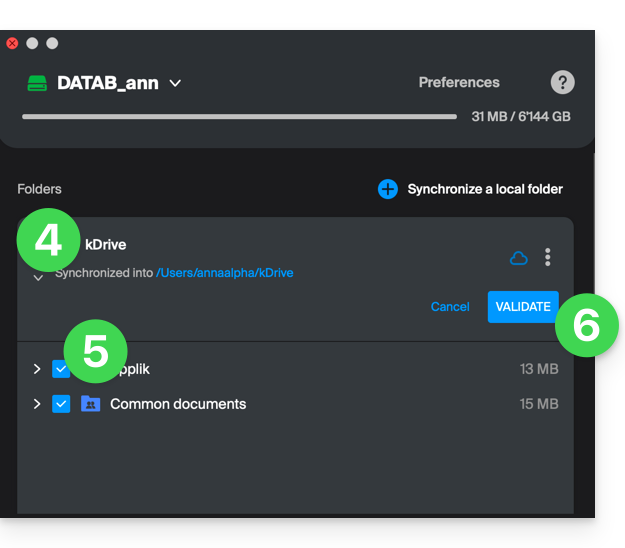
As a result, your local folder representing kDrive (named kDrive, or kDrive2, or another name) on your computer will finally display all the desired folders (after the time required for synchronization).
Synchronization in progress (0/10) then paused
Make sure that the Windows Search service is not stopped. Proceed via the Run window (Win + R):
- Enter
services.msc. - Click on OK:

- Locate Windows Search in the list in the Services window and activate it if it is not already:

Continuous synchronization (files .eml)
An issue related to Windows indexing may occur when synchronizing kDrive files with the .eml extension (a file type corresponding to email export/saving). It is therefore necessary to remove the eml type from the indexing options to resolve this issue:
- Open the Start menu and search for indexing options.
- Click on Indexing Options (Control Panel):

- Click on the Advanced button.
- Uncheck the box for the
emltype:
- Confirm and close the windows.
Adobe File Synchronization
Applications like Illustrator, Photoshop, Lightroom, etc., or certain architecture/3D applications, may encounter issues when saving files (error messages in the relevant software, file duplication, etc.) on kDrive. Therefore, it is best to avoid including such files in a synchronization.
Adobe explicitly states that it does not support synchronization with the cloud, external drives, and network drives.
Issues Related to File Names
Recommended Structure
- Use only standard alphanumeric characters.
- Replace trailing spaces with underscores (_) or hyphens (-).
- Limit the total length of the path (folder name + file name) to less than 255 characters.
The following characters should be avoided as they are reserved by the Windows file system or cloud storage servers:
- < (less than)
- > (greater than)
- : (colon)
- " (quotation marks)
- / (slash)
- \ (backslash)
- | (vertical bar)
- ? (question mark)
- * (asterisk)
The location of the space is often more critical than the character itself for synchronization:
- Space at the end of the name: a file named "
project .pdf" causes major synchronization errors on Windows. - Space at the beginning of the name: may make the file invisible or difficult to index.
- Trailing period: Windows rejects folders ending with a period (e.g., "
Archives."). - Unicode spaces (non-breaking): invisible characters often generated on macOS that appear as spaces but are technically special characters not supported by Windows.
File names reserved by the system
The following terms should not be used as file names, as they are reserved for Windows' internal communications:
- CON, PRN, AUX, NUL
- COM1, COM2, COM3, COM4, COM5, COM6, COM7, COM8, COM9
- LPT1, LPT2, LPT3, LPT4, LPT5, LPT6, LPT7, LPT8, LPT9
Also, please refer to this other guide.
Link to this FAQ:
Has this FAQ been helpful?
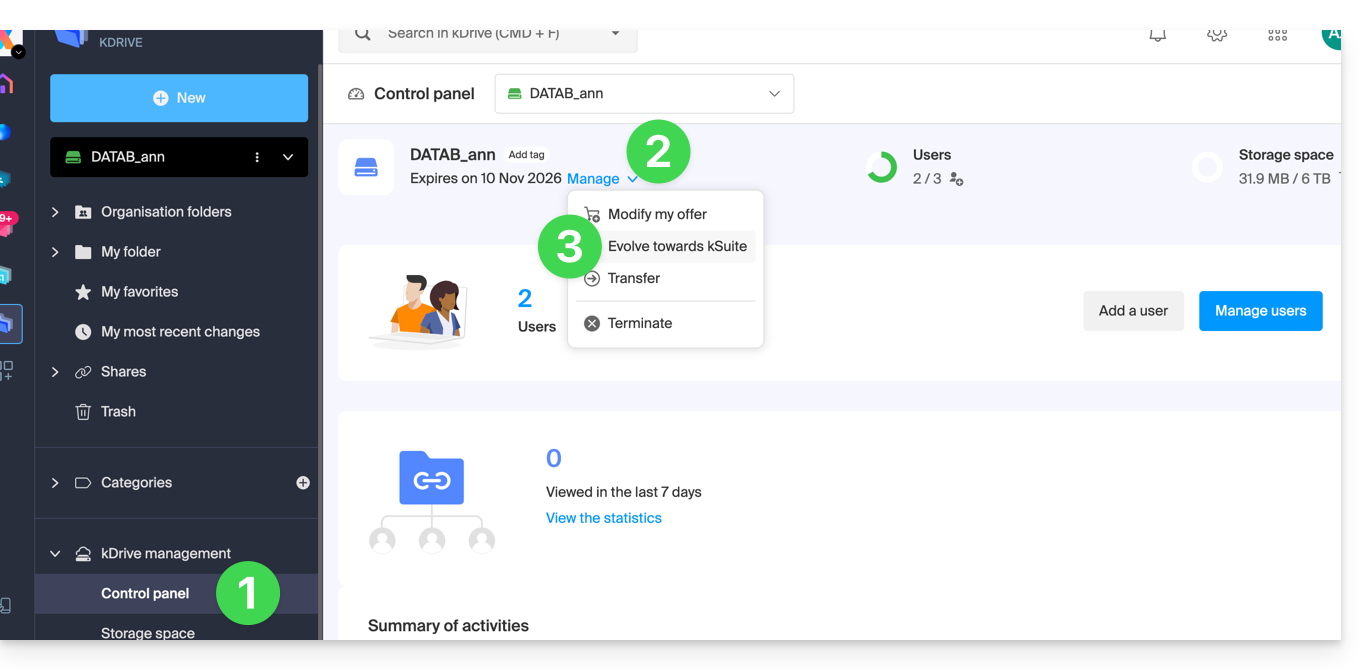
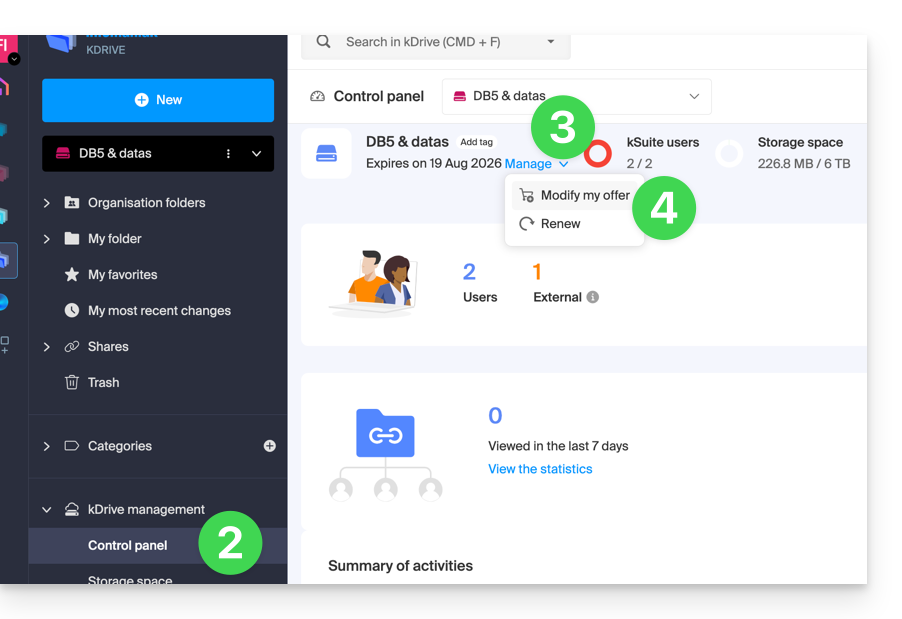
This guide explains how to modify the information for the kDrive product. Please note that there may be a delay before the applications (desktop, mobile, etc.) are synchronized with the new information.
Renaming a kDrive…
… from the Infomaniak Manager
- Click here to access the management of your product in the Infomaniak Manager (need help?).
- Click on the action menu ⋮ located to the right of the item in question.
- Click on Rename the product.
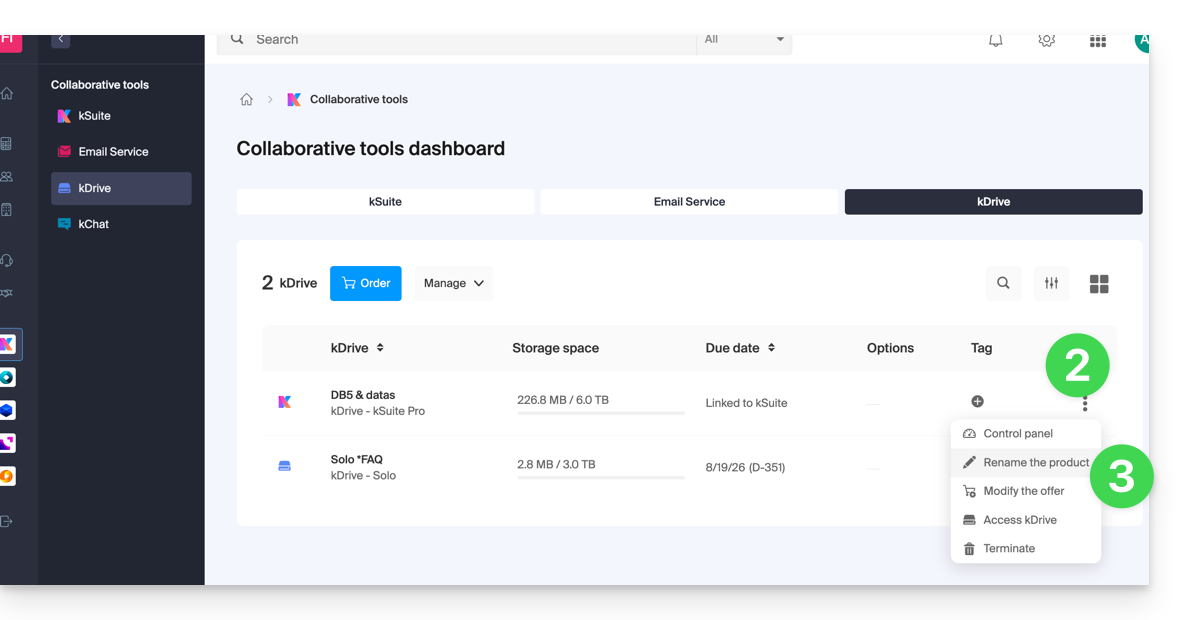
- Rename your kDrive.
- Click on the Save button.
… from the unified settings of the apps
- Click here to access the Infomaniak Web app kDrive (online service ksuite.infomaniak.com/kdrive).
- Click on the Settings icon at the top right of the interface.
- Check or select the kDrive in question from the drop-down menu in the left-hand sidebar.
- Click on General.
- Click on the pencil icon ✎ to edit the name of the kDrive as you wish:

Link to this FAQ:
Has this FAQ been helpful?
This guide explains how to save email attachments from the Infomaniak Web Mail app (online service ksuite.infomaniak.com/mail).
Preamble
- You can thus save all files attached to a message in one click, in a
.ziparchive on your computer, or in your kDrive etc. - Other guides detail how to:
Save the attachment from the Web Mail app
To export files received by email:
- Click here to access the Infomaniak Web Mail app (online service ksuite.infomaniak.com/mail).
- Go to the email message containing the attachments you want to save.
- Click on the paperclip icon to access the save and preview options for the content:
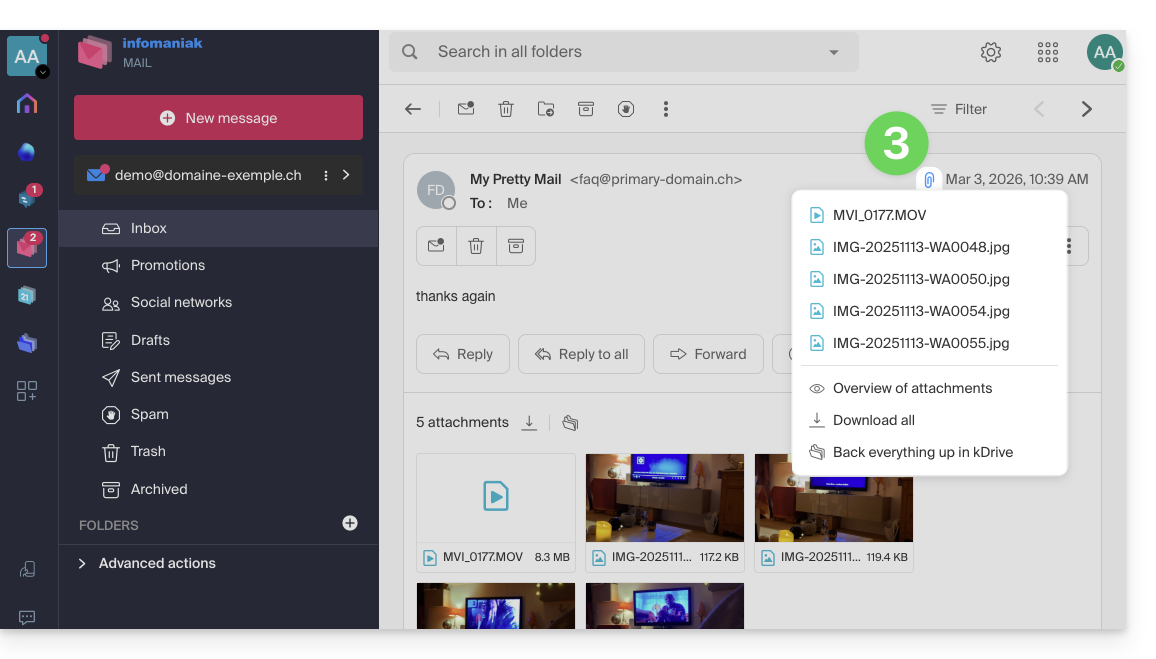
- … or directly above the attached files to start the download or save to kDrive:
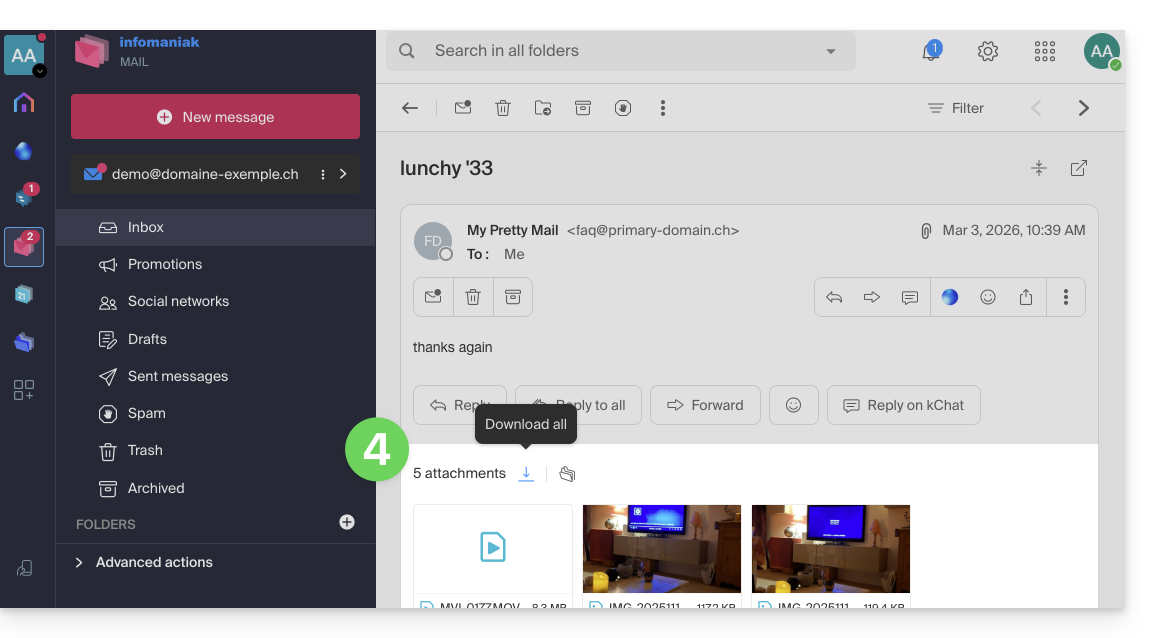
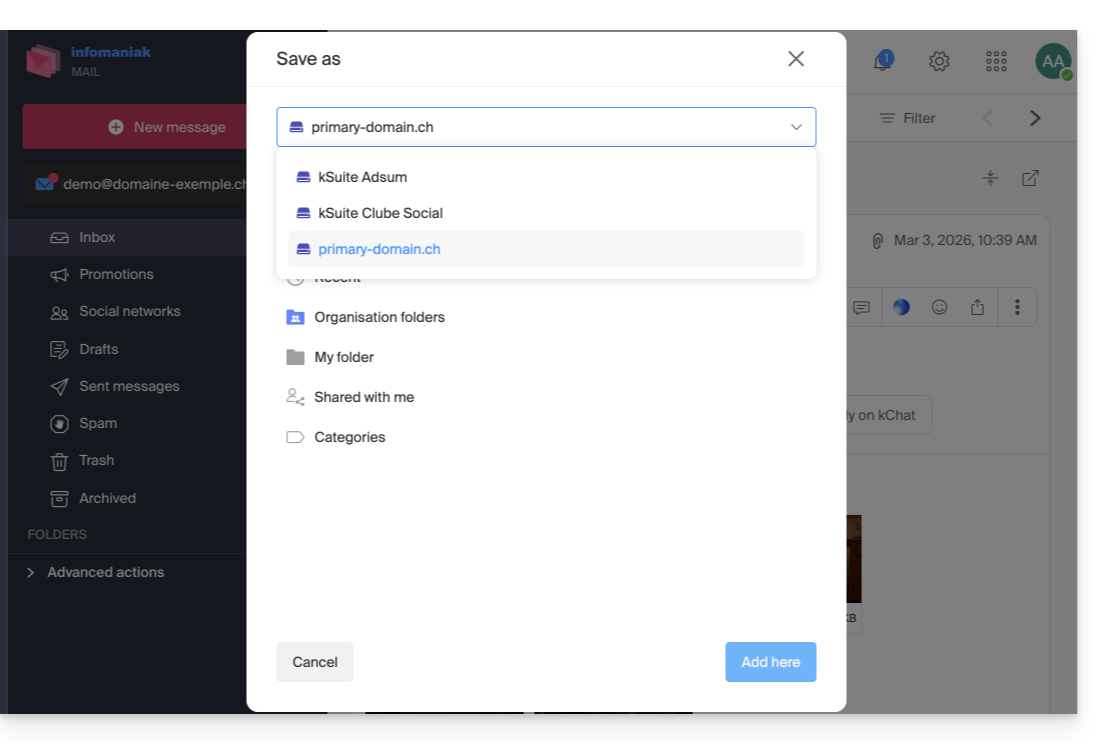
- Download all allows you to create a
zipformat archive to download to your device. - Save all in kDrive allows you to choose the kDrive (from those you are attached to by your Organization) and the desired location on it to save the files:
- Download all allows you to create a
Link to this FAQ:
Has this FAQ been helpful?
This guide concerns the search for information within the data stored on kDrive Infomaniak among the files and folders accessible to the connected user.
✘ UNAVAILABLE with
kSuite Free / kSuite Standard
my kSuite / my kSuite+ (ik.me, etik.com, ikmail.com)
kDrive Solo / kDrive Team
Enable search in hosted content
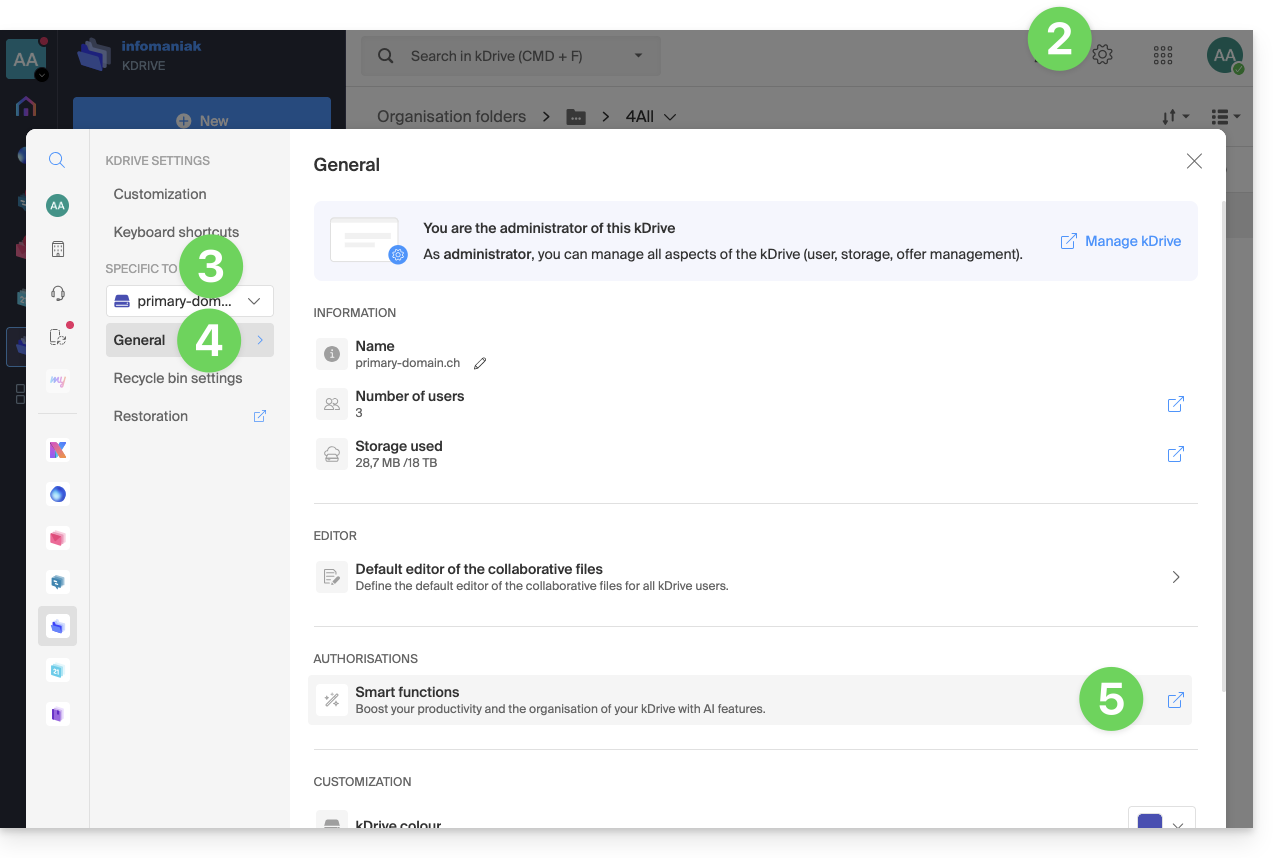
To enable this intelligent content search feature within PDF files or spreadsheet/text documents:
- Click here to access the kDrive Infomaniak Web app (online service ksuite.infomaniak.com/kdrive).
- Click on the Settings icon at the top right.
- Check or select the relevant kDrive in the dropdown menu of the left sidebar.
- Click on General in the left sidebar.
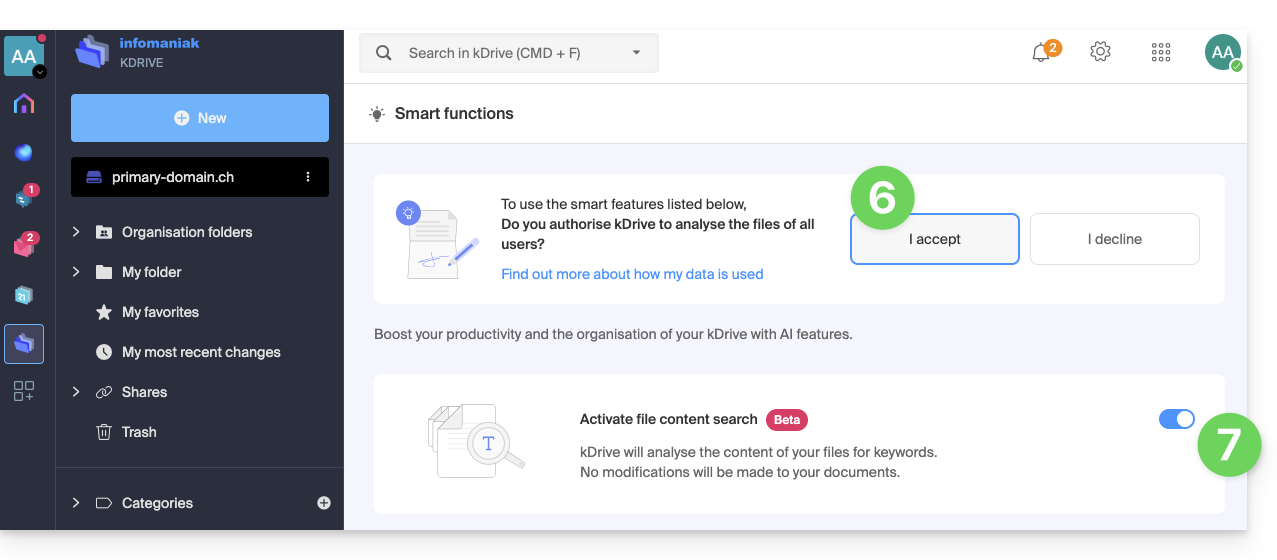
- Click on Intelligent Features:
- Click the button to accept the automatic analysis of files.
- Click the toggle switch to enable content search:
Search for an item…
… on the kDrive Web app (online service ksuite.infomaniak.com/kdrive)
The search bar is always at the top of the screen. The keyboard shortcut CMD-F or CTRL-F allows you to place the focus in the field to enter the text to find more quickly. The results are displayed as you search. Example of a simple search: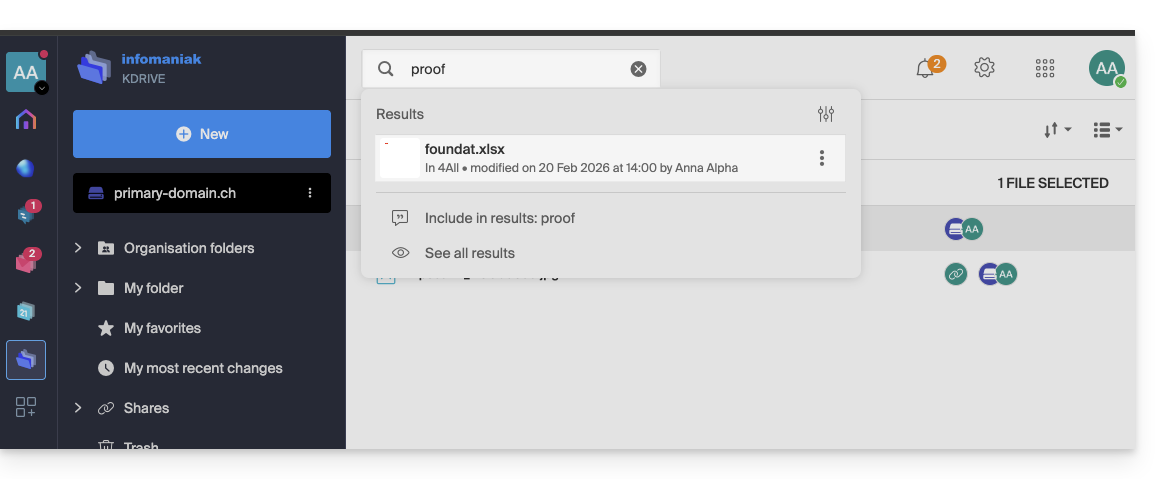
You can also search for files by their type: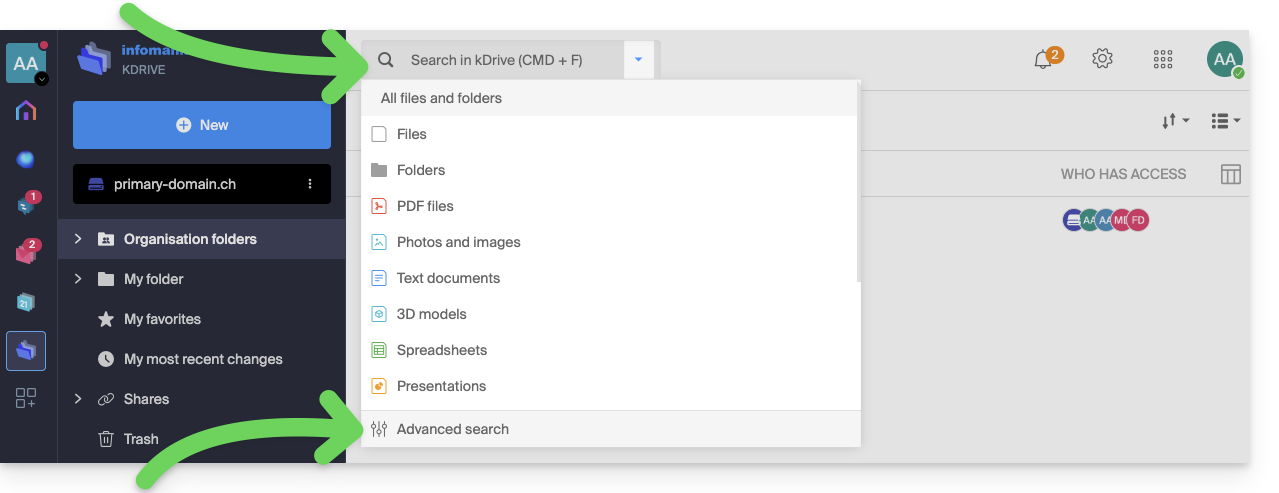
Click on the advanced search icon at the bottom of the search bar dropdown menu to filter by the following criteria:
- location
- document type
- modification date
- created by {kDrive user}
- text visible in the file or folder name
- text in the file content itself
- category
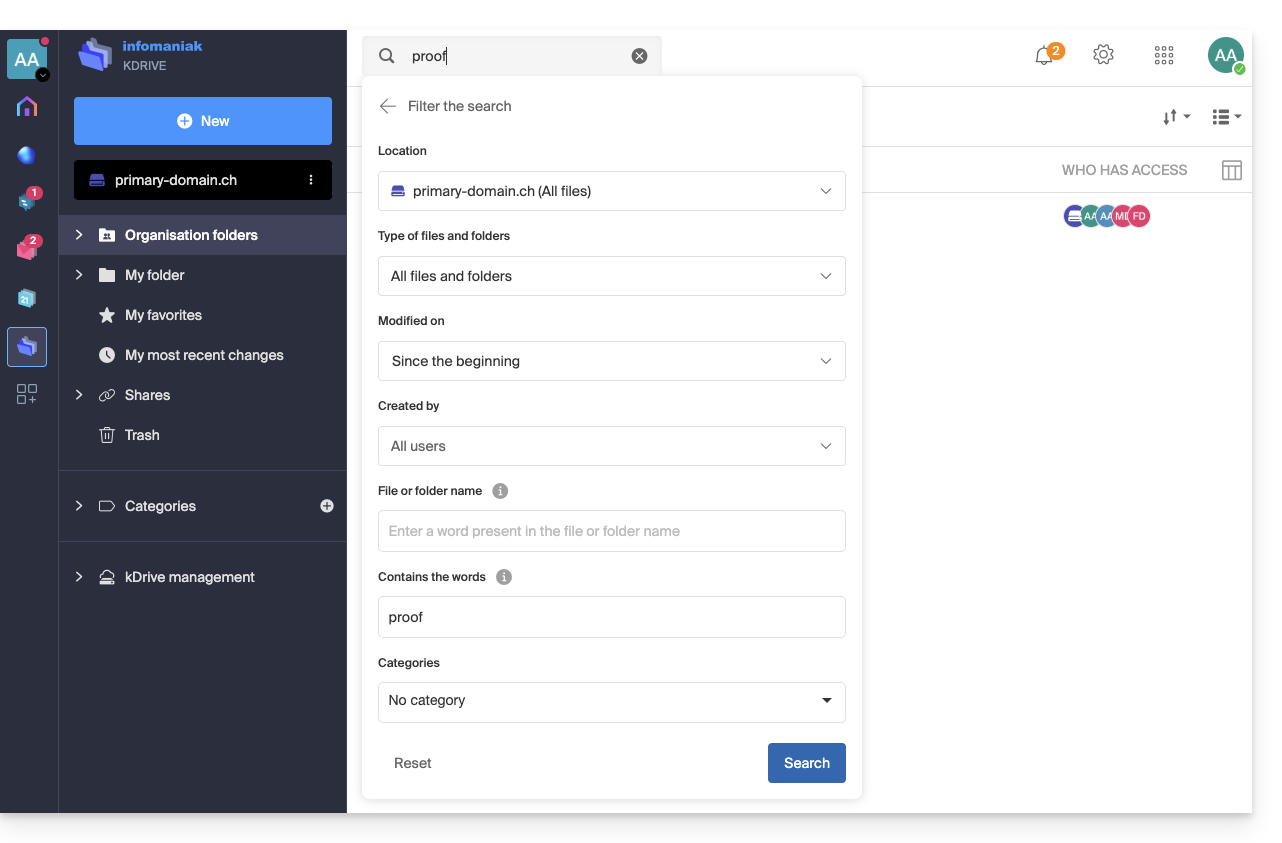
Once you have set your search criteria for the keyword to find, start the search using the Search button.
… on the kDrive mobile app (application for iOS / Android smartphone or tablet)
Search is accessible via the magnifying glass visible at the top right of the screen: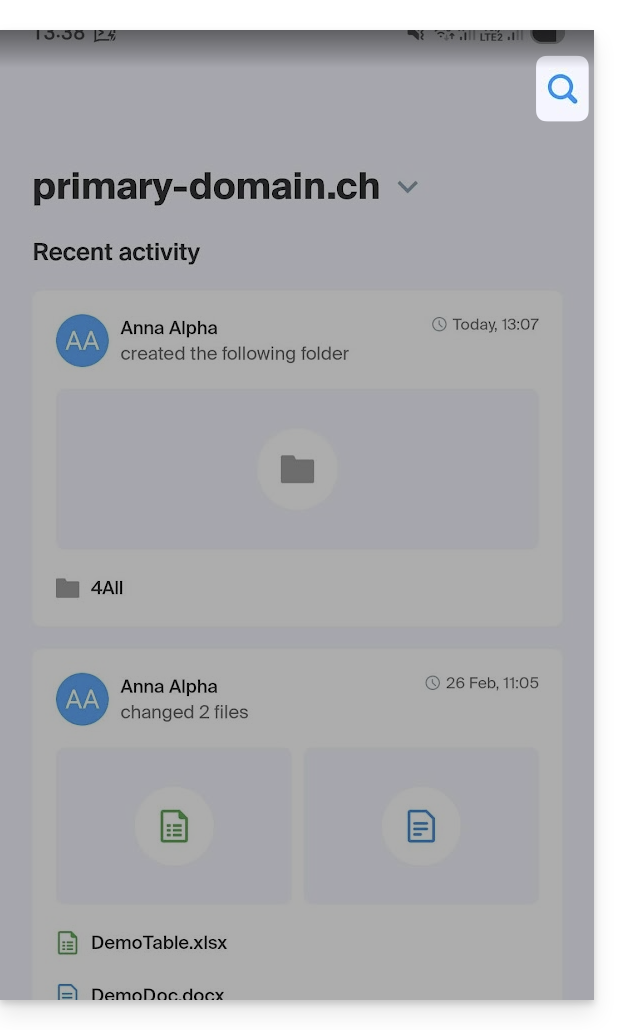
The search works the same way as on the Web app and the results are displayed below: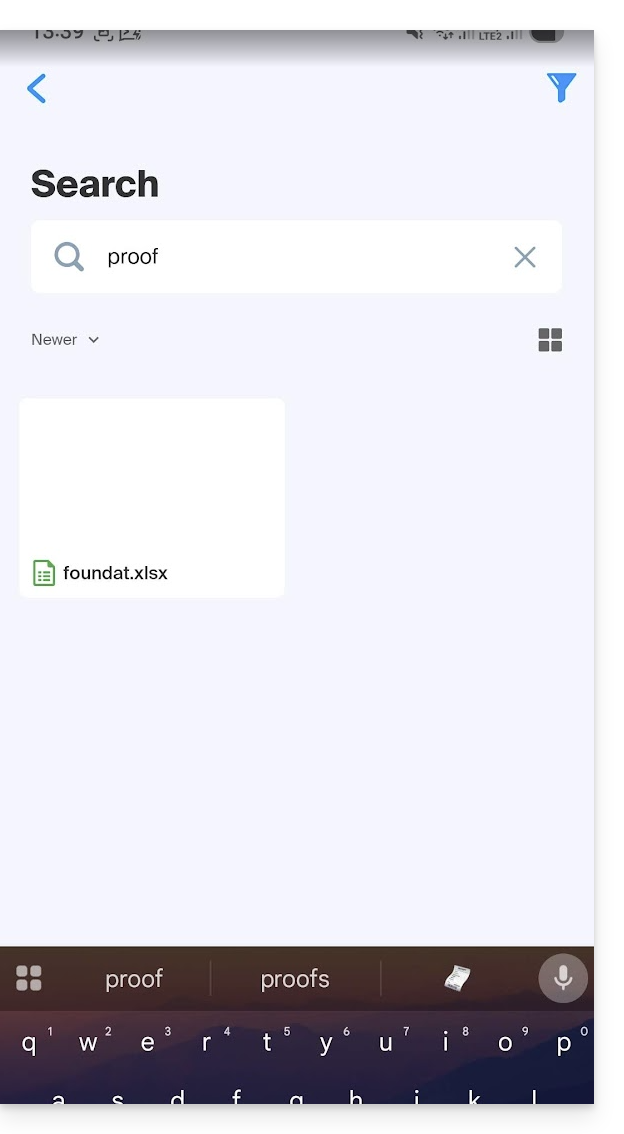
Link to this FAQ:
Has this FAQ been helpful?
This guide helps you get started with kSuite by integrating an existing kDrive in your Organization.
Preamble
- The kDrive will be an integral part of the new kSuite.
- The minimum number of users in the chosen kSuite offer will be based on the number of users in the existing kDrive offer.
- kDrive users will become kSuite users.
- To help you identify the kSuite offer best suited to your needs, refer to this other guide.
Upgrade my kDrive to kSuite
Prerequisites
- Do not yet have a kSuite in the Organization.
- Have a paid kDrive offer and outside the trial period.
- Be the Legal Representative or Administrator of the Organization.
Create a new kSuite from your existing kDrive:
- Click here to access the Infomaniak kDrive Web app (online service ksuite.infomaniak.com/kdrive).
- Click on Manage.
- Click on Upgrade the offer.
You can also do this from an information banner visible on the homepage of your Manager interface:
You can also integrate your Mail Service if it is currently outside kSuite.
Link to this FAQ:
Has this FAQ been helpful?
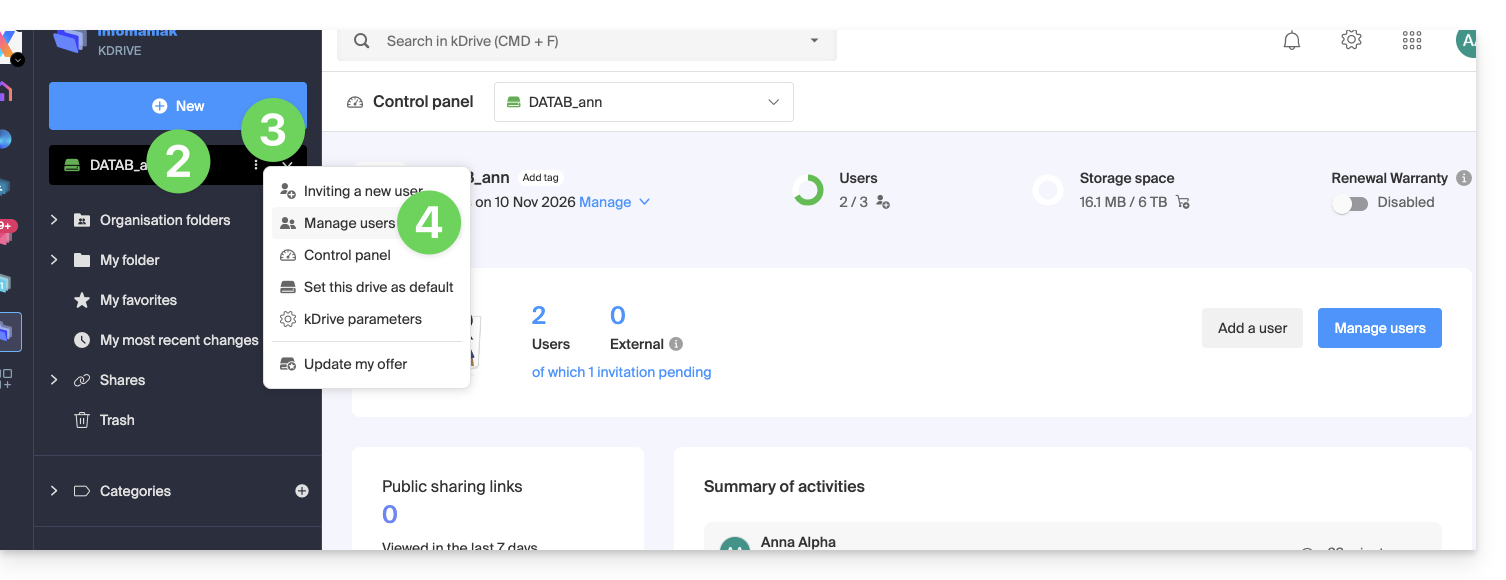
This guide explains how to add, block, replace, or remove a user from a kDrive. To learn more about managing user rights, please refer to this other guide.
Prerequisites
- The user must create (or already have) an Infomaniak account to accept the invitation and join the kDrive.
- You must have a kDrive plan with a sufficient number of available user slots (need help?).
Adding a user
To do this:
- Click here to access the Infomaniak kDrive web app (online service ksuite.infomaniak.com/kdrive).
- Check or select the relevant kDrive in the dropdown menu on the left-hand sidebar.
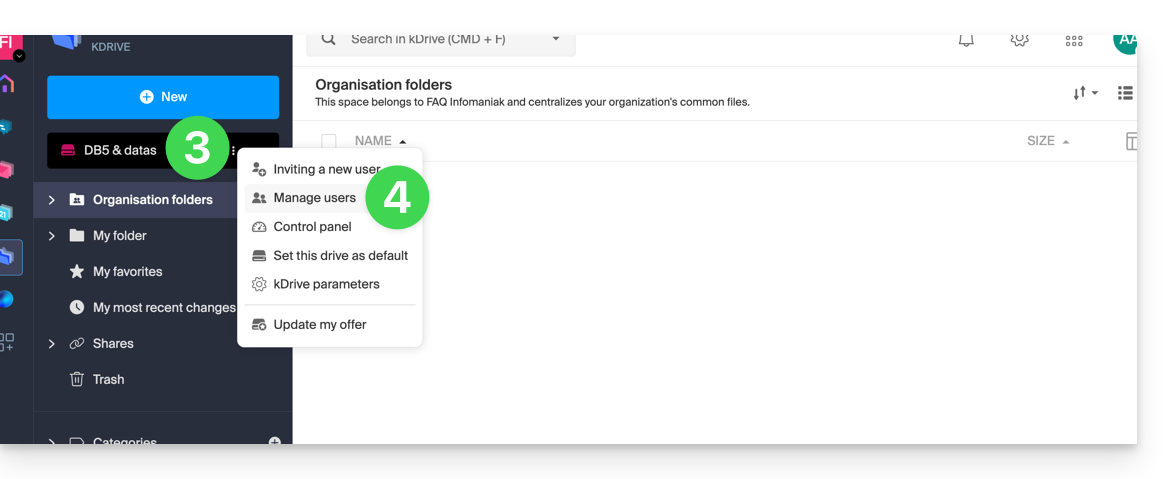
- Click on the action menu ⋮ located to the right of the item in question.
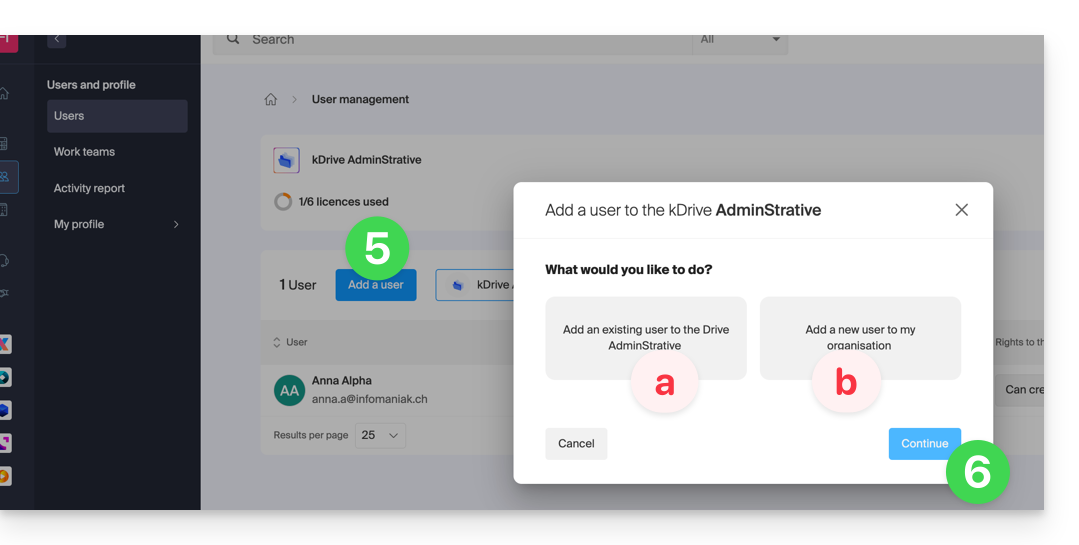
- Click on Invite a new user:
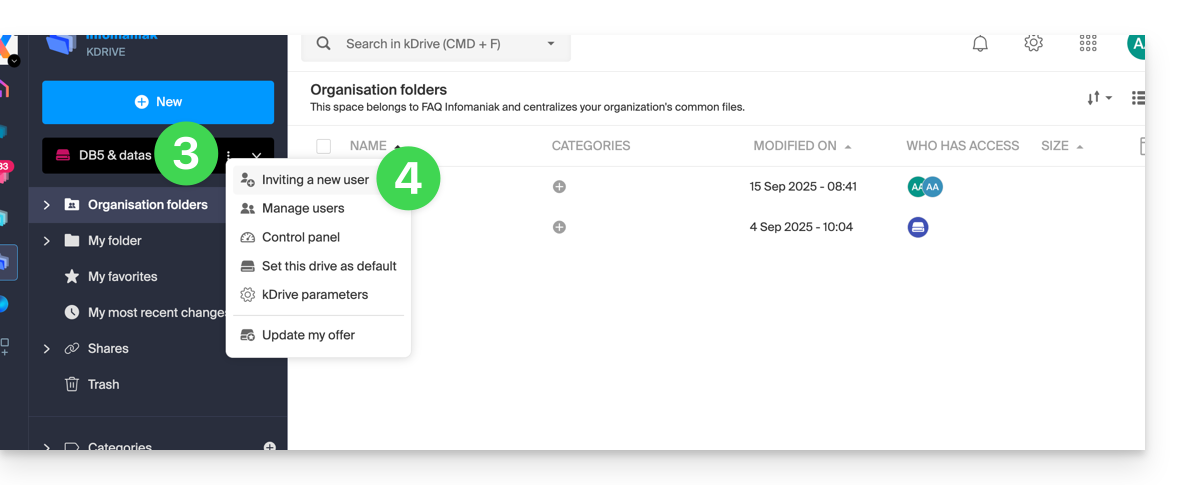
If necessary, click the button again to invite a new user, then click on:
- Add a user to Drive to choose a user who is already present in your Organization,
- Add a user to my Organization to invite an external user.
With kSuite, it's essentially the same:- Create a (new) kSuite user,
- Invite an existing user to kSuite.
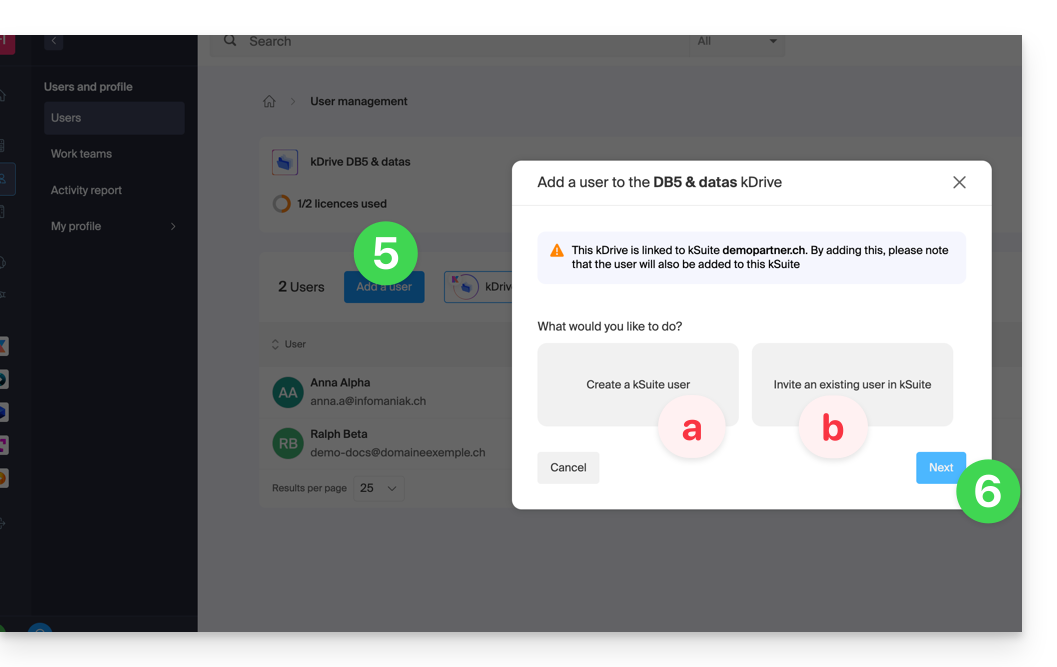
- Press the button to continue.
- Depending on your choice, enter the contact details or simply the email address of the user to invite, and specify their permissions.
- Click on Invite.
The user will then receive an email that will allow them to accept the invitation (valid for 1 month). They will be displayed as an invited user awaiting confirmation in the kDrive user management section.
Block a user
This feature allows you to prevent a user from accessing files from the kDrive web interface and from the application on a device:
- Click here to access the Infomaniak kDrive web app (online service ksuite.infomaniak.com/kdrive).
- Check or select the kDrive in question from the drop-down menu in the left-hand menu.
- Click on the action menu ⋮ located to the right of the item in question.
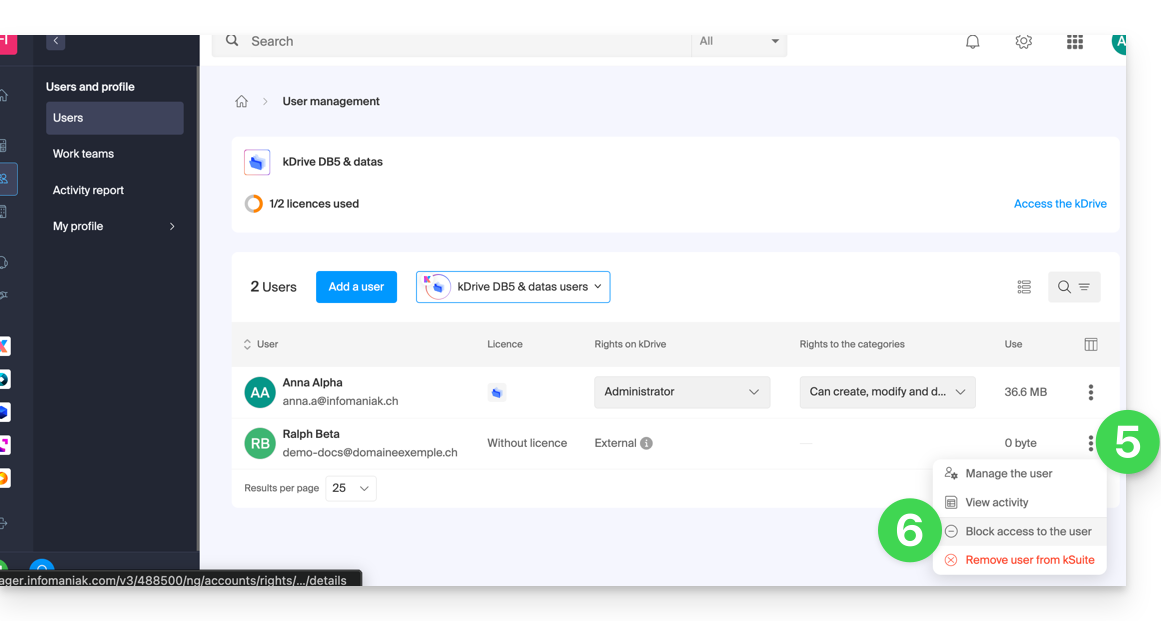
- Click on Manage Users:
- Click on the action menu ⋮ to the right of the user in question in the table that appears.
- Click on Block User and confirm the action:
To unblock a user, simply follow the same procedure.
How to delete a user
If a user leaves your company or team, you have several options as an administrator. You can choose to…
- … block the user for a certain period of time (see above).
- … completely delete the user and their files.
- … delete the user and keep their files for 6 months.
- … delete the user and transfer their files to another user.
To delete a user:
- Click here to access the Infomaniak kDrive web app (online service ksuite.infomaniak.com/kdrive).
- Check or select the relevant kDrive in the drop-down menu in the left-hand menu.
- Click on the action menu ⋮ located to the right of the item in question.
- Click on Manage Users:
- Click on the action menu ⋮ to the right of the user in question in the table that appears.
- Click on Remove User.
- Choose whether or not to keep the user's data:
- Keep the user's files for 6 months or transfer them to another user.
- Delete the user's files immediately and permanently.
- Click on Remove access rights.
Remove an external user from kDrive
External users are those with whom you have only shared one or more files/folders without giving them access to the entire kDrive:
To remove an external user:
- Click here to access the Infomaniak kDrive web app (online service ksuite.infomaniak.com/kdrive).
- Check or select the kDrive in question from the drop-down menu in the left-hand menu.
- Click on the action menu ⋮ located to the right of the item in question.
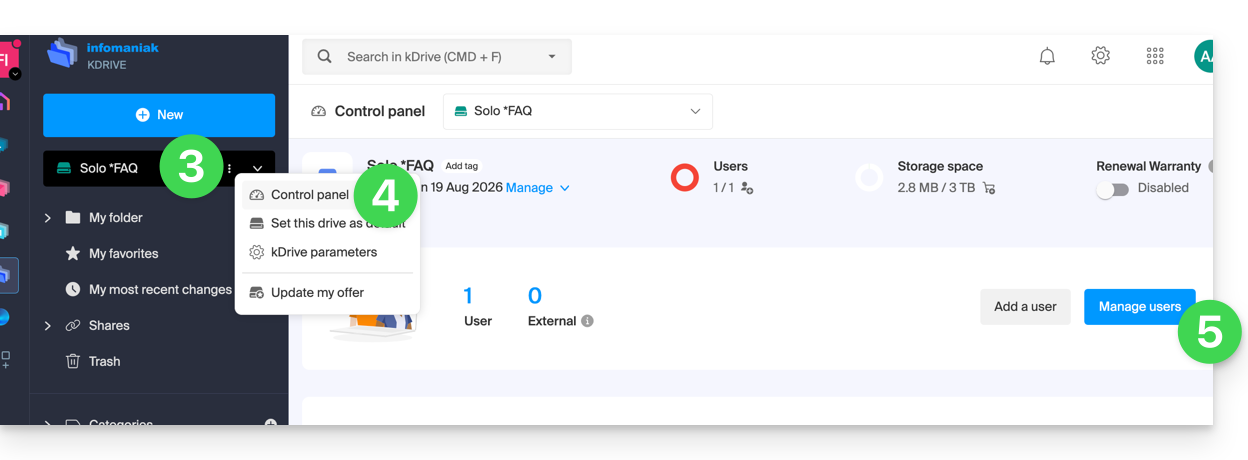
- Click on Manage users.
- Click on the action menu ⋮ to the right of the external user in question in the table that appears.
- Click on Remove access to kDrive:
You can also go to the location of the shared file and click on the sharing column to remove access for the user in question: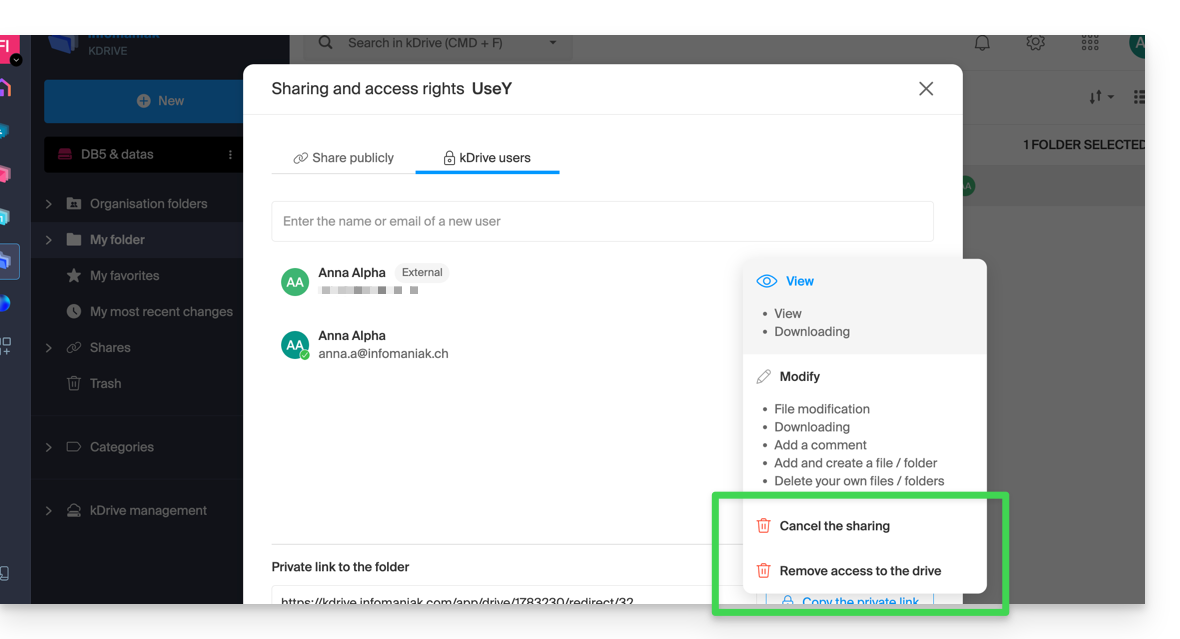
You can:
- stop sharing the file with them (they will still be able to see other files if you have shared others).
- revoke their access to all the files you have shared with them from this kDrive.
Please note that the external user can also, from their limited kDrive, remove themselves by cutting off access to the shared file if they no longer wish to access that file: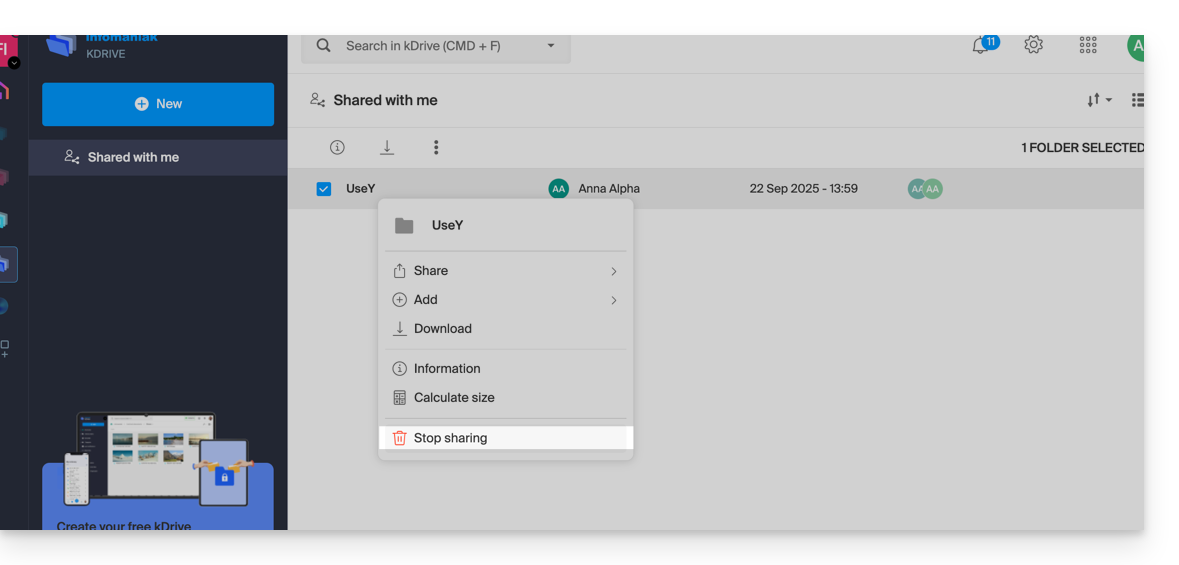
They will no longer appear in the list of external users.
Replace a kDrive user
✘ UNAVAILABLE with
kSuite
my kSuite / my kSuite+ (ik.me, etik.com, ikmail.com)
If a kDrive administrator wishes to remove themselves (only this type of account can do so) and assign the kDrive usage rights to a third-party user (who is already among the users of the Organization to which the kDrive in question belongs):
- Click here to access the Infomaniak kDrive web app (online service ksuite.infomaniak.com/kdrive).
- Check or select the kDrive in question from the drop-down menu in the left-hand menu.
- Click on the action menu ⋮ located to the right of the item in question.
- Click on Dashboard.
- Click on Manage users:
- Click on the action menu ⋮ located to the right of the current user.
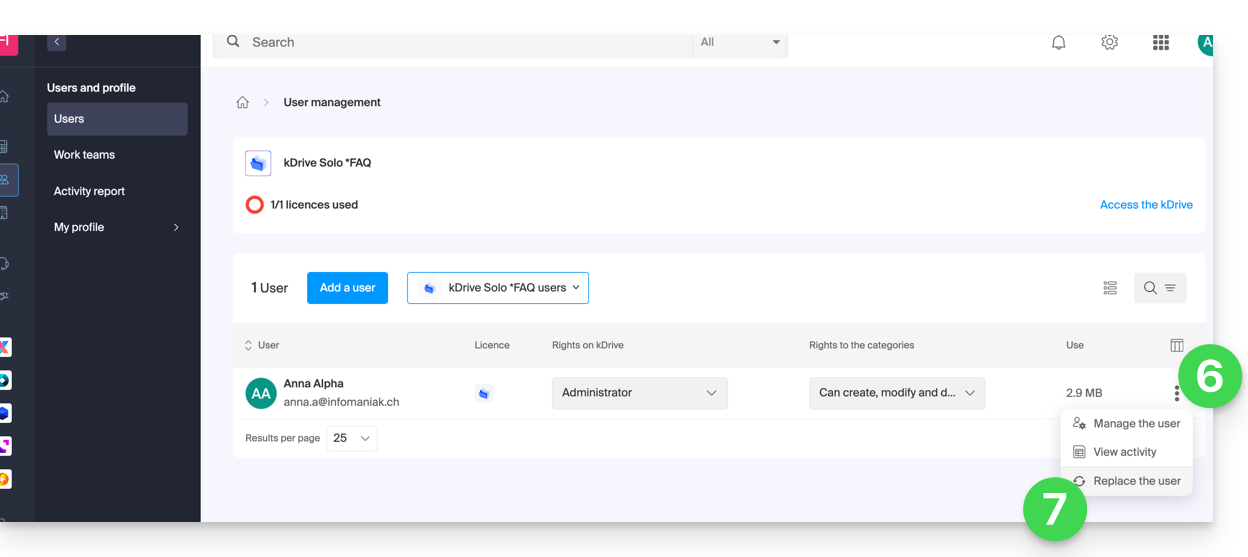
- Click on Replace User:
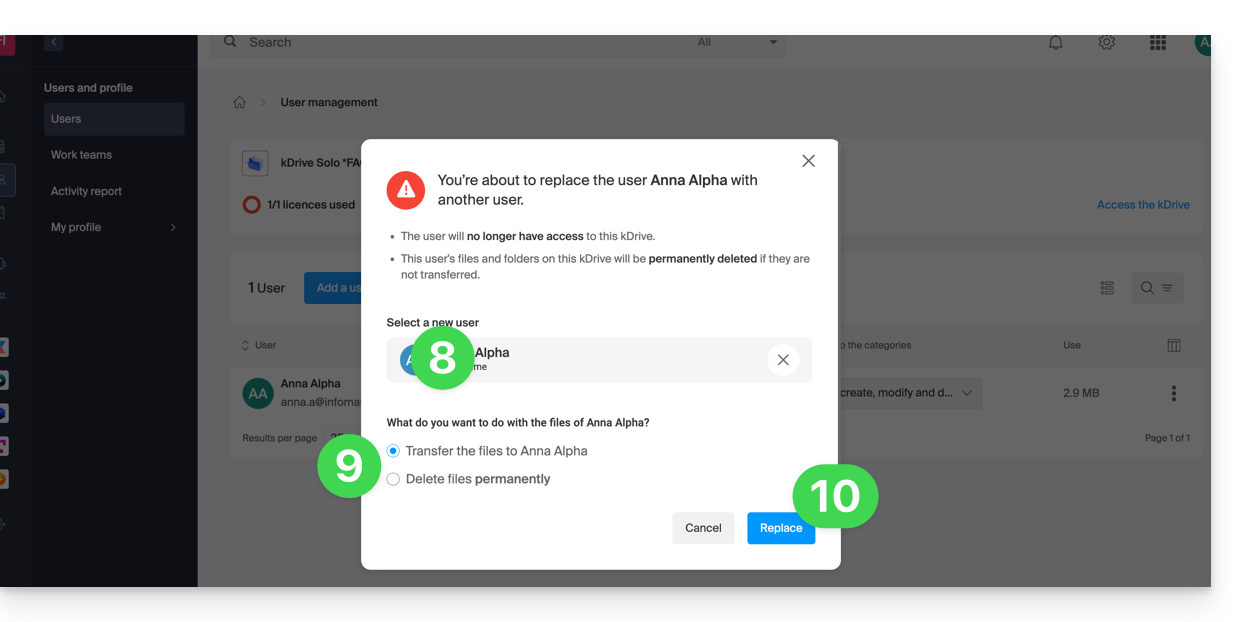
- Enter the user (from those already associated with the Organization) who should be the main user of the kDrive, replacing the current administrator.
- Choose whether the existing data on kDrive should be kept and transferred to the user, or whether it should be deleted completely and permanently.
- Click on the Replace button:
Video: What does a newly added user have access to?
Imagine a kDrive Pro within a kSuite, with only 1 out of 3 users, data in the shared folder "Organization Folders" and in the personal folder "My Folder".
If a new user without an Infomaniak account is invited to the kSuite as a collaborator, what will they be able to access by default in the Manager and on kDrive?
The new user is invited to the Organization as a collaborator, therefore by default they will have no management rights over the products in the Manager:
The invitee opens the link in a browser and creates their Infomaniak account:
and at the end of the registration process, they access the Manager, which, as expected, is completely empty in terms of product management…
However, they are prompted to use the kDrive web app (online service ksuite.infomaniak.com/kdrive), accessible via the icon in the top right corner, under Applications:
and they can access the organization's folders, which are already populated by other users!
Link to this FAQ:
Has this FAQ been helpful?
This guide explains how user permissions work on kDrive and how you can modify these access permissions.
How kDrive user permissions work
You can add a new user to kDrive (kDrive Pro, for example, therefore outside kSuite), and define 2 levels of permissions, via folder sharing…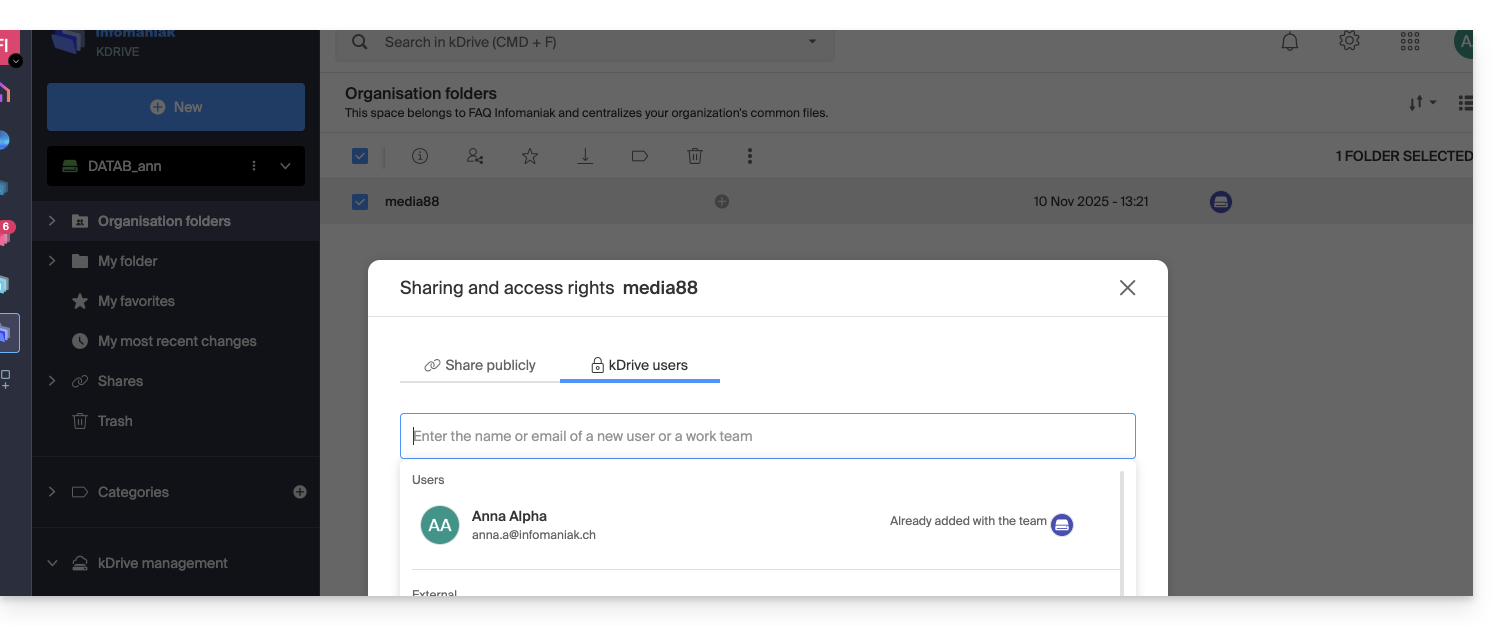
… or via kDrive user management: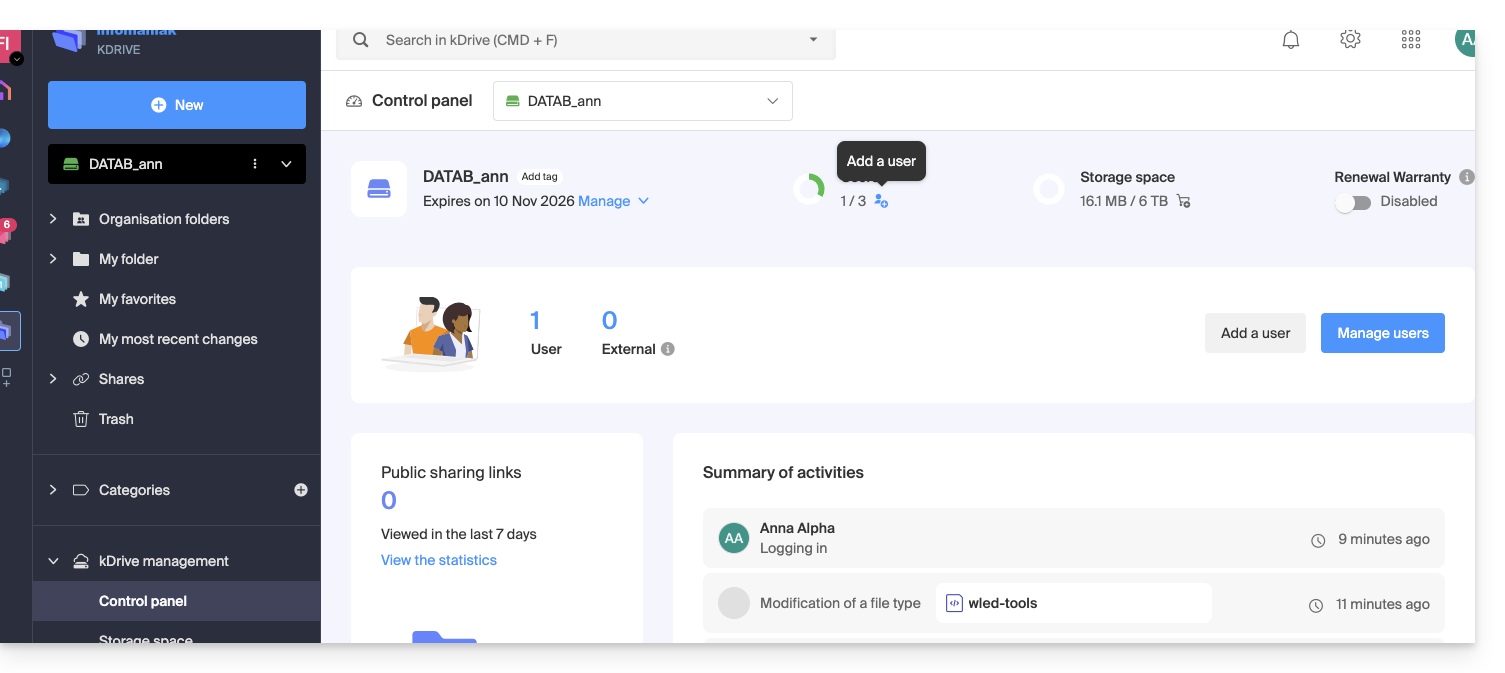
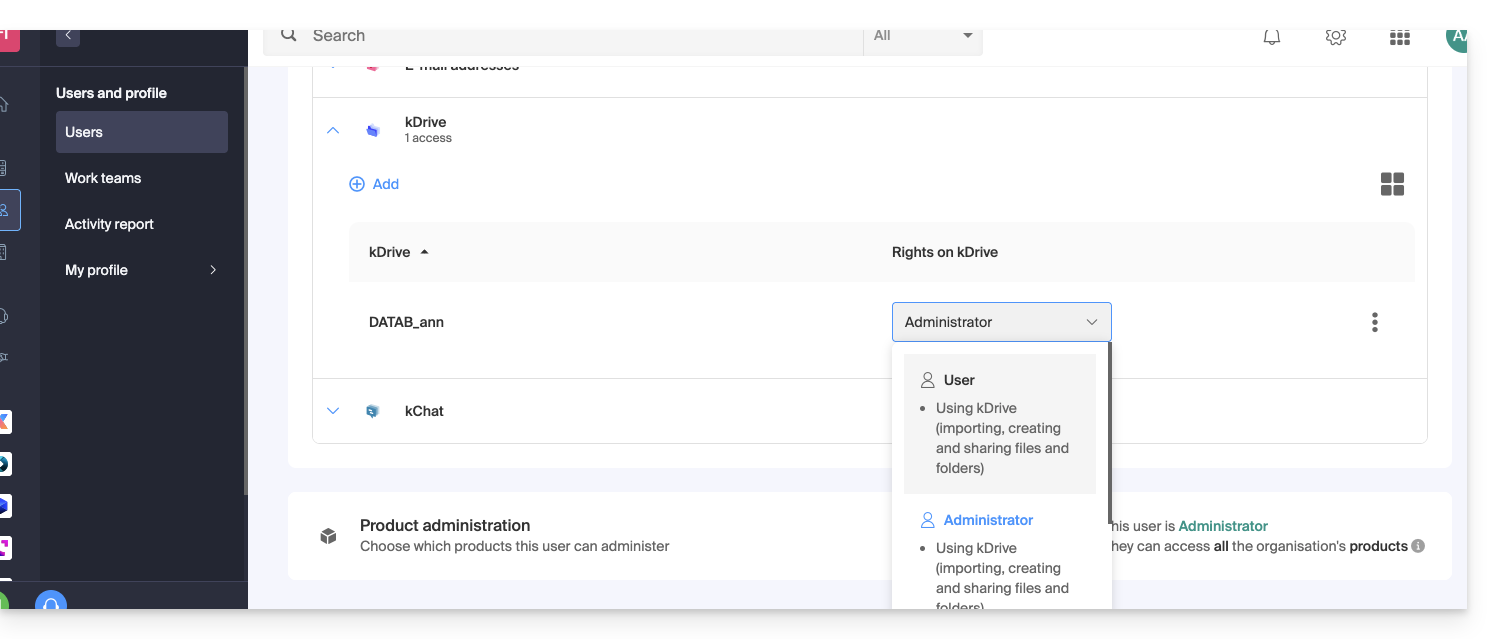
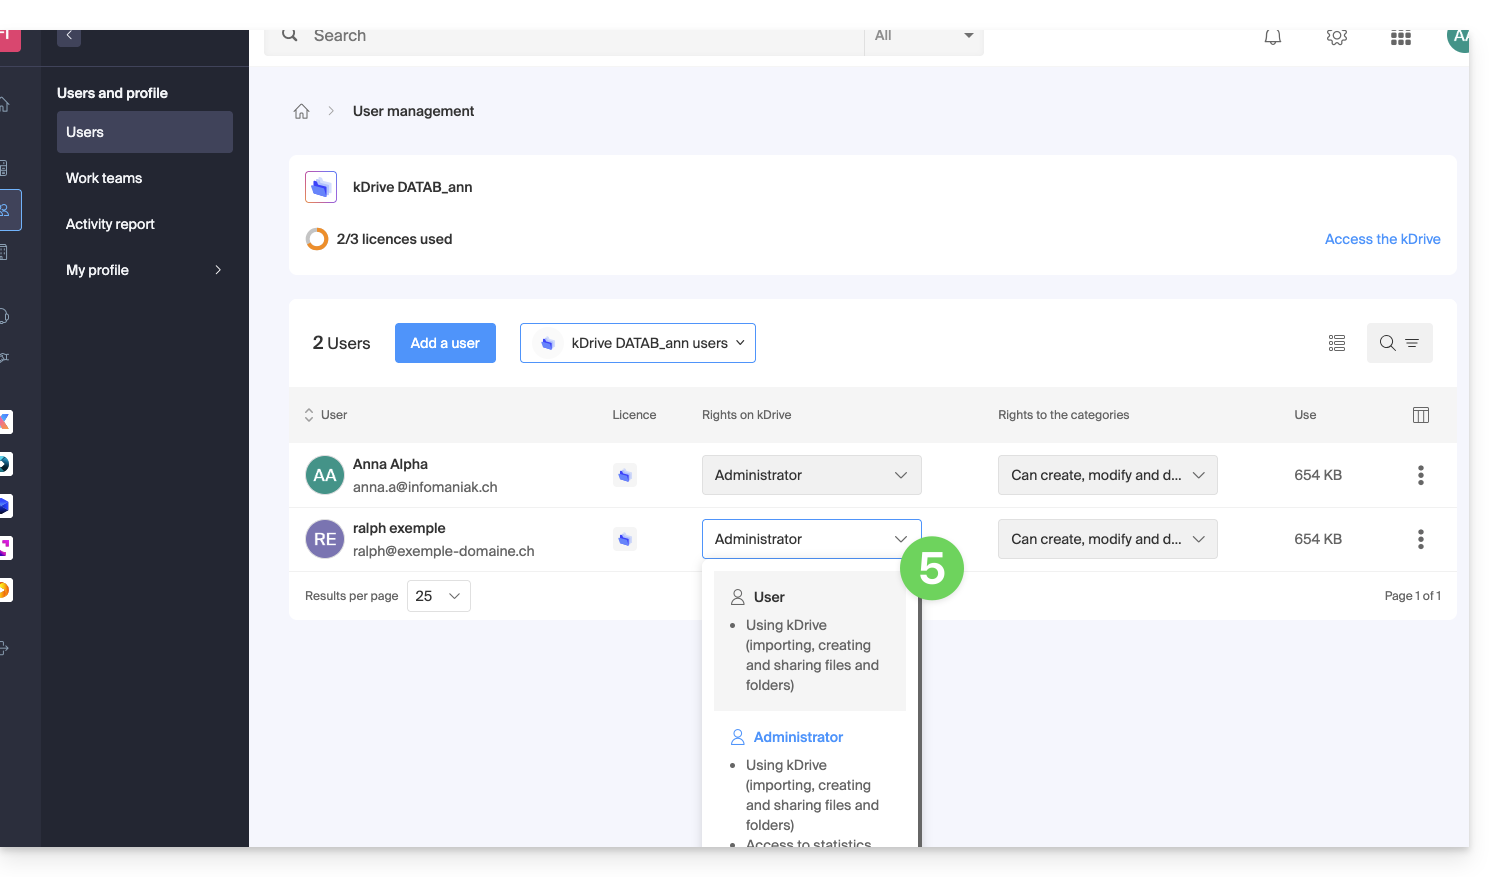
In both cases, 2 levels of permissions are offered:
- Administrator gives users the same rights as the kDrive owner:
- Sharing, statistics, activity reports, restoring and deleting folders, importing external data, etc. and accessing files and folders…
- User allows access to folders located at the root of the kDrive as well as managing and freely sharing their content:
- Access to shared files and folders, personal directory and file creation/sharing…
- However, users will not be able to access the administrative management of the product (manage users, view statistics, create or delete folders at the root of the kDrive, import data from an external service, etc.)…
In all cases:
- The content of the Organization Folders directory is common and visible to other kDrive users, but sharing can be restricted.
- Contents shared by other users from their private part of the kDrive are not listed in the Shares menu of other users.
- Any folder or file can be shared with other kDrive users and your chosen contacts.
Modify kDrive user permissions
To access kDrive and manage user rights:
- Click here to access the Infomaniak kDrive Web app (online service ksuite.infomaniak.com/kdrive).
- Check or select the relevant kDrive in the dropdown menu of the left sidebar.
- Click on the action menu ⋮ located to the right of the relevant item.
- Click on Manage users:
- Manage the rights of the desired user, choose the desired access level:
In case of a problem
If a modification is not possible: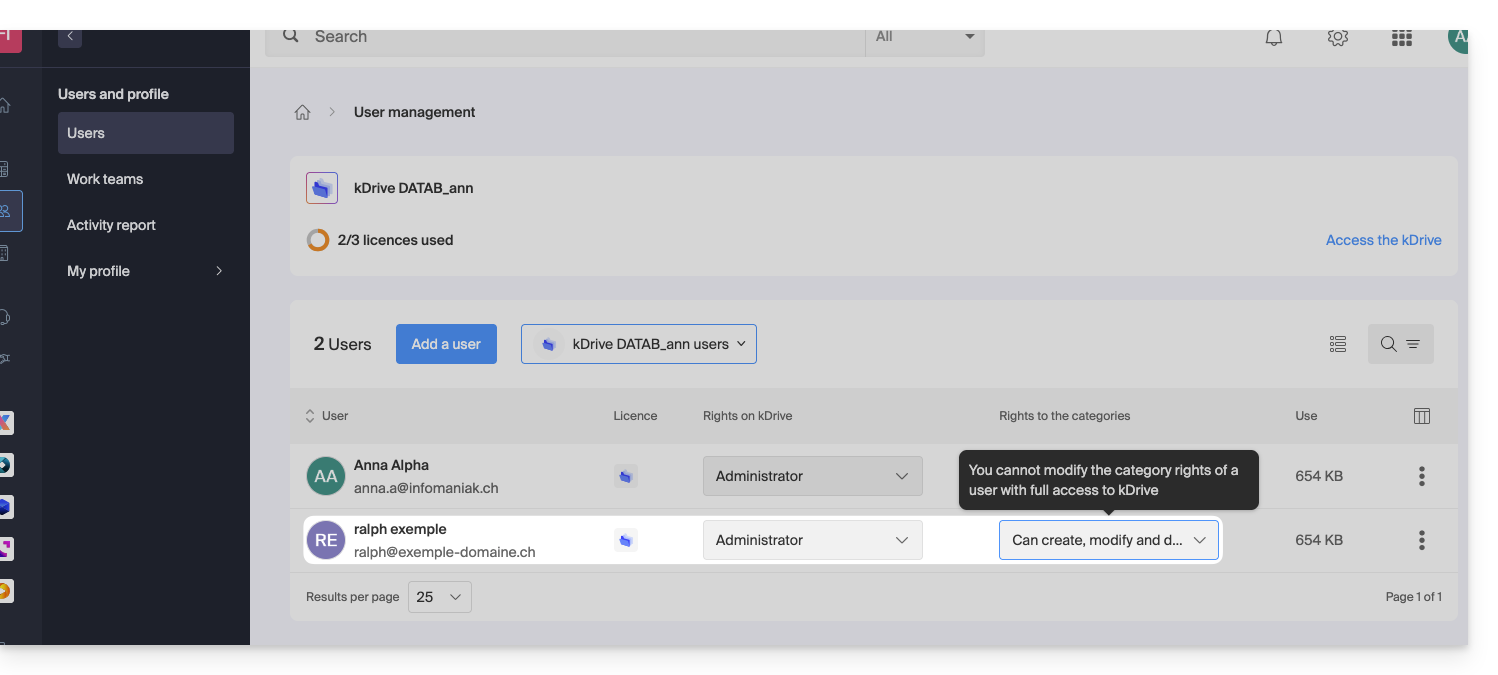
… then you need to act on the user's rights at the Organization level itself: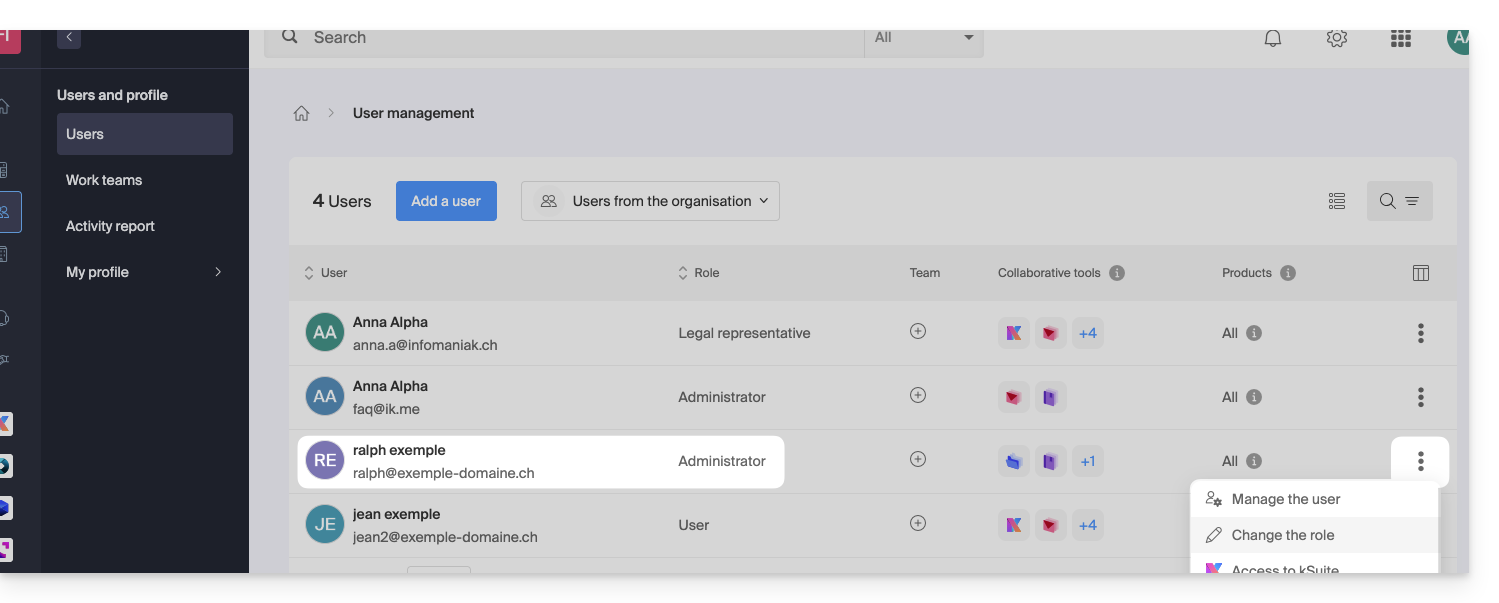
… and reduce their role as administrator by giving them a role as user: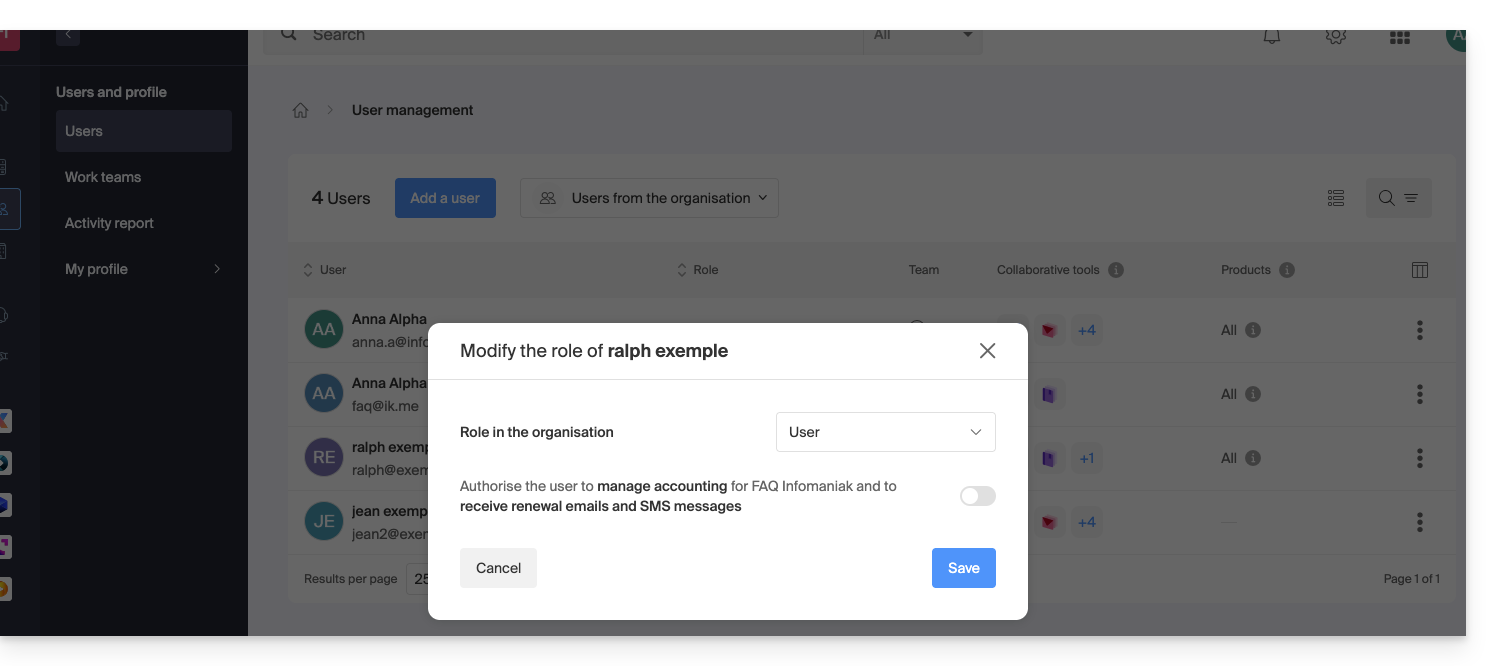
Thus, the modification proposed in point 5 above will now be accessible: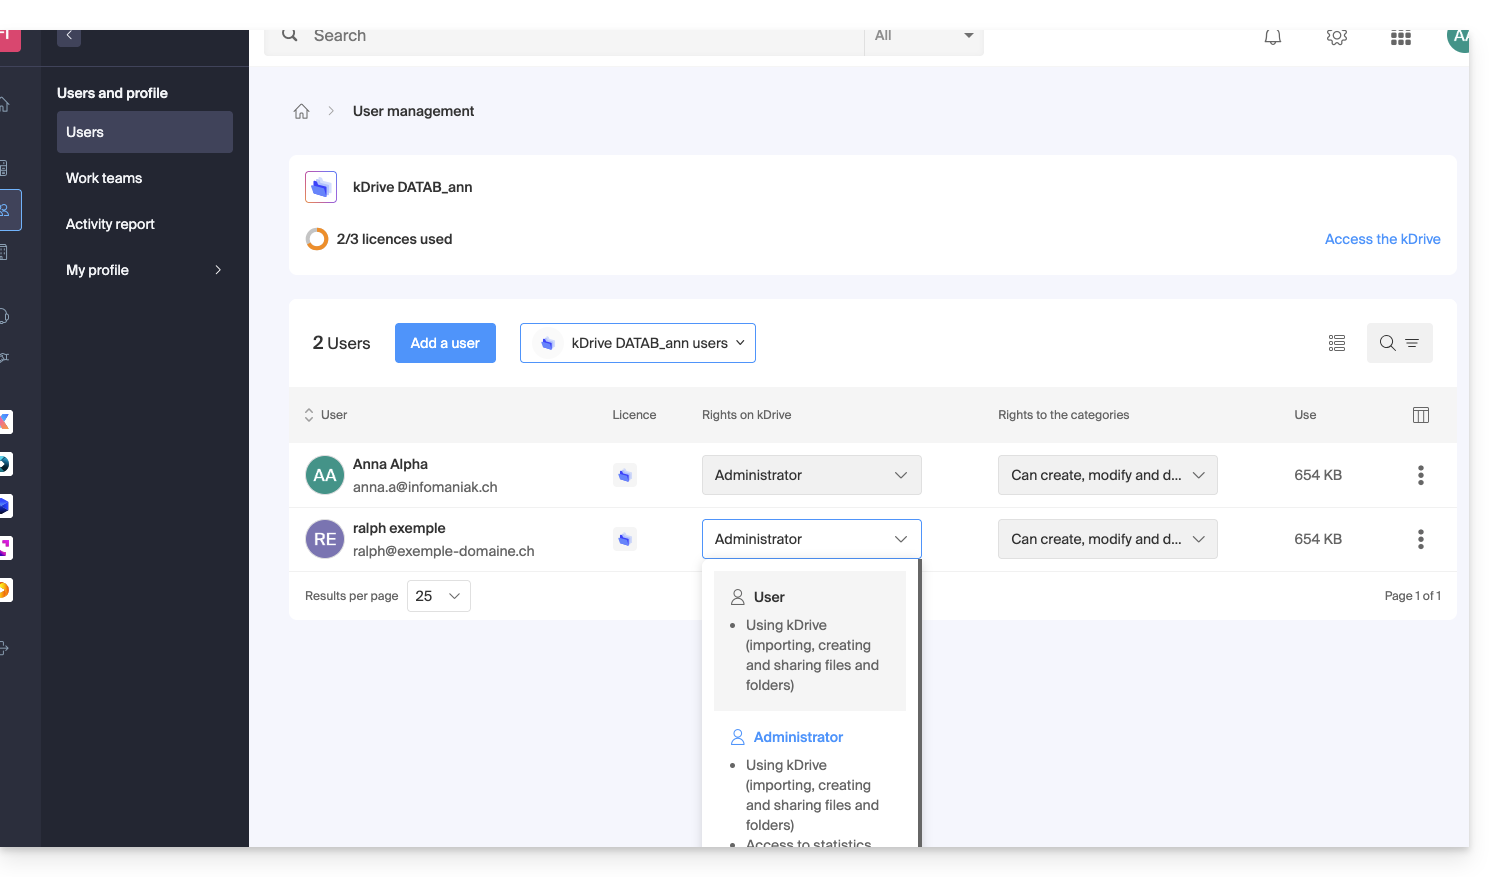
Other actions on the user
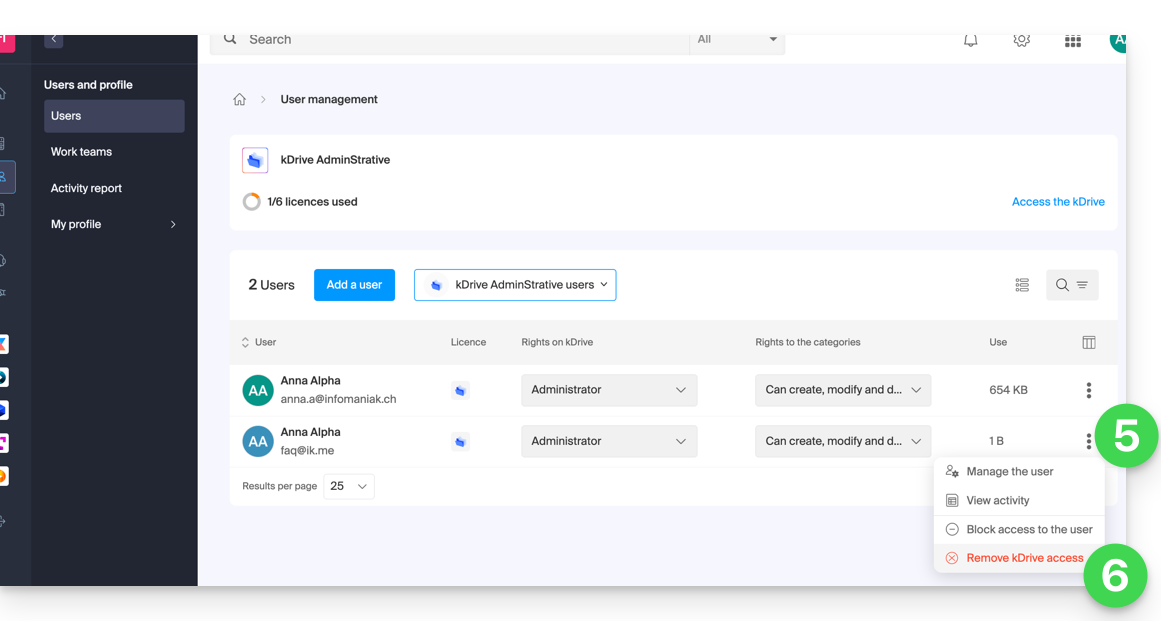
If necessary, open the action menu ⋮ of the desired user for advanced actions: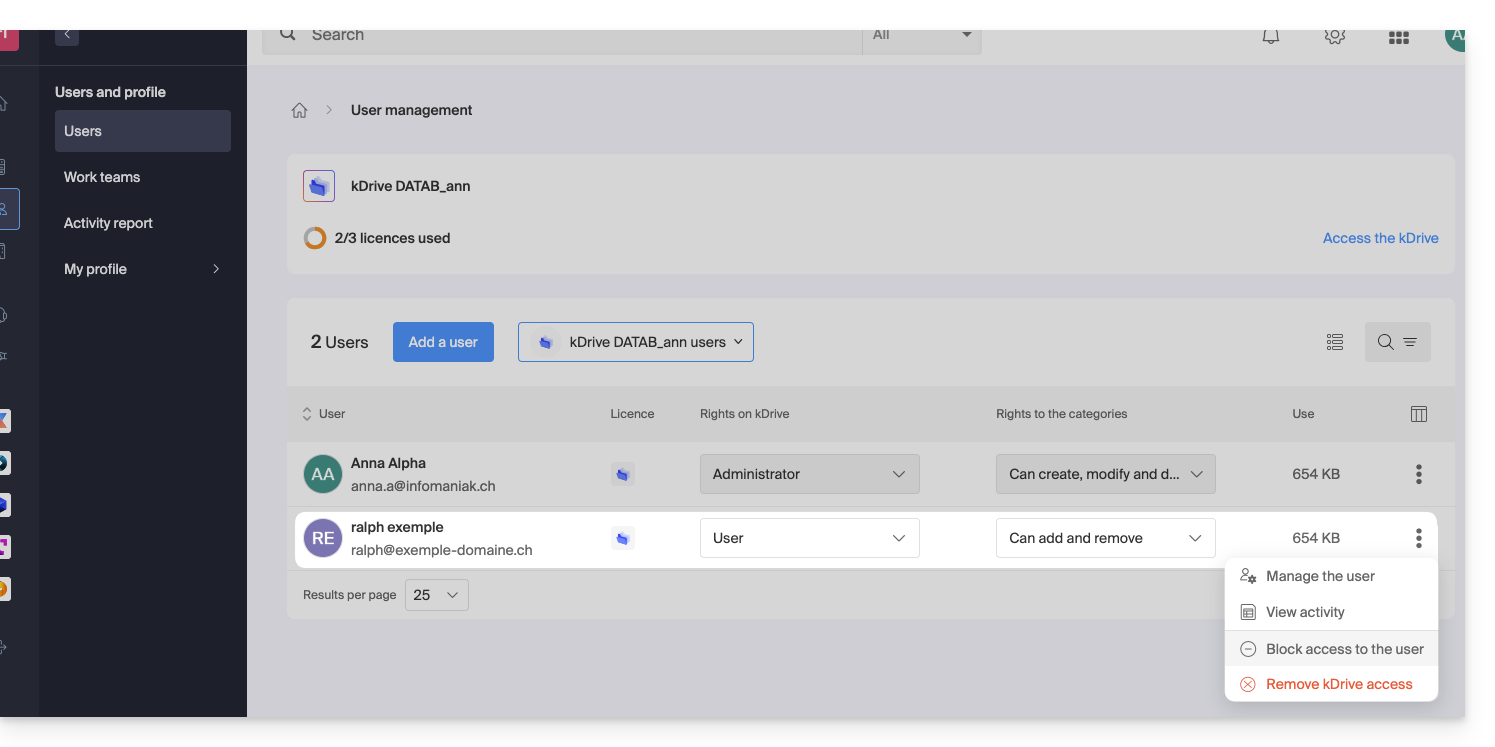
You can manage the user, view their activity, block their access, and completely remove them from kDrive.
If necessary, also manage the permissions related to actions on categories:
Rights in the Organization / Rights on kDrive
As seen above, do not confuse or mix:
- the rights granted for managing the kDrive service on the Manager,
- and the rights granted to the user within kDrive.
Indeed, a user may have restricted or no rights on the kDrive product in the Manager (they will therefore not be able to manage the kDrive product themselves or have technical details - see below) but may have been defined as administrator in kDrive and thus have access to all stored data.
Rights in the Organization: product management
In this example, you can manage the kDrive management rights of the user ralph from the product accesses: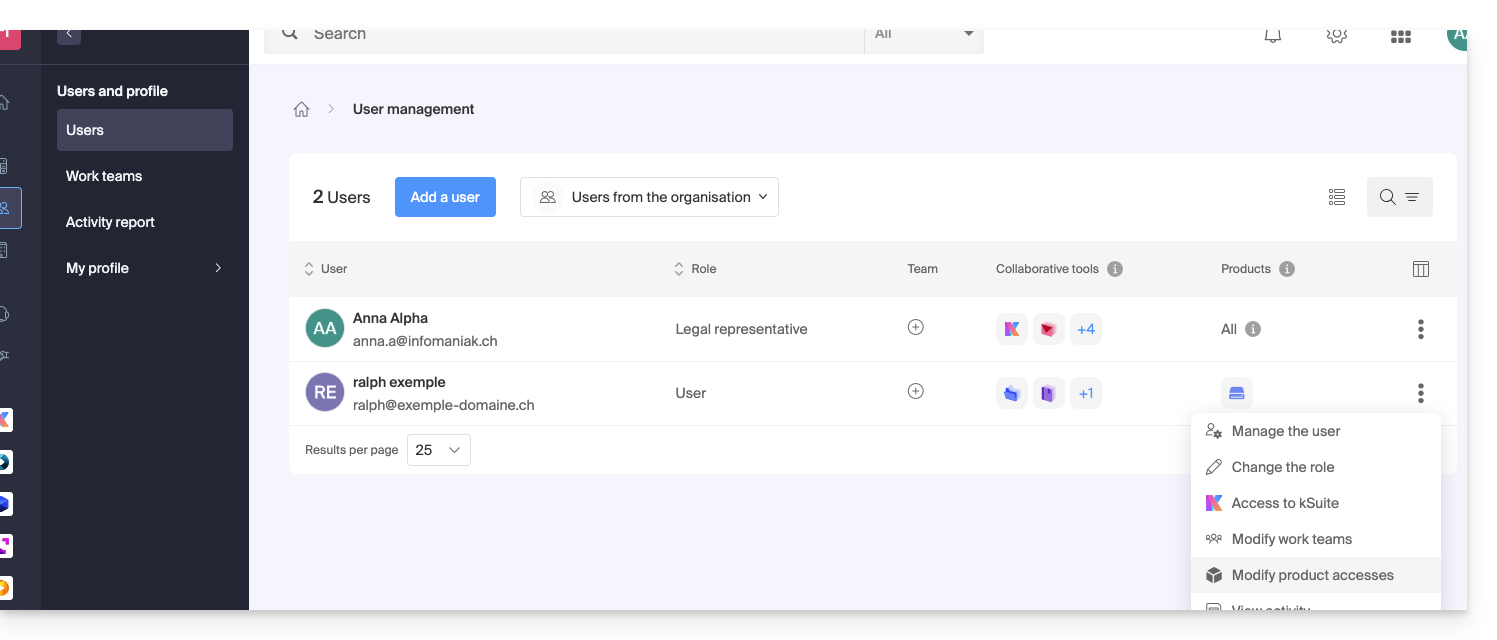
If necessary, specify which kDrive is concerned and especially which permissions (technical / statistics) they should have: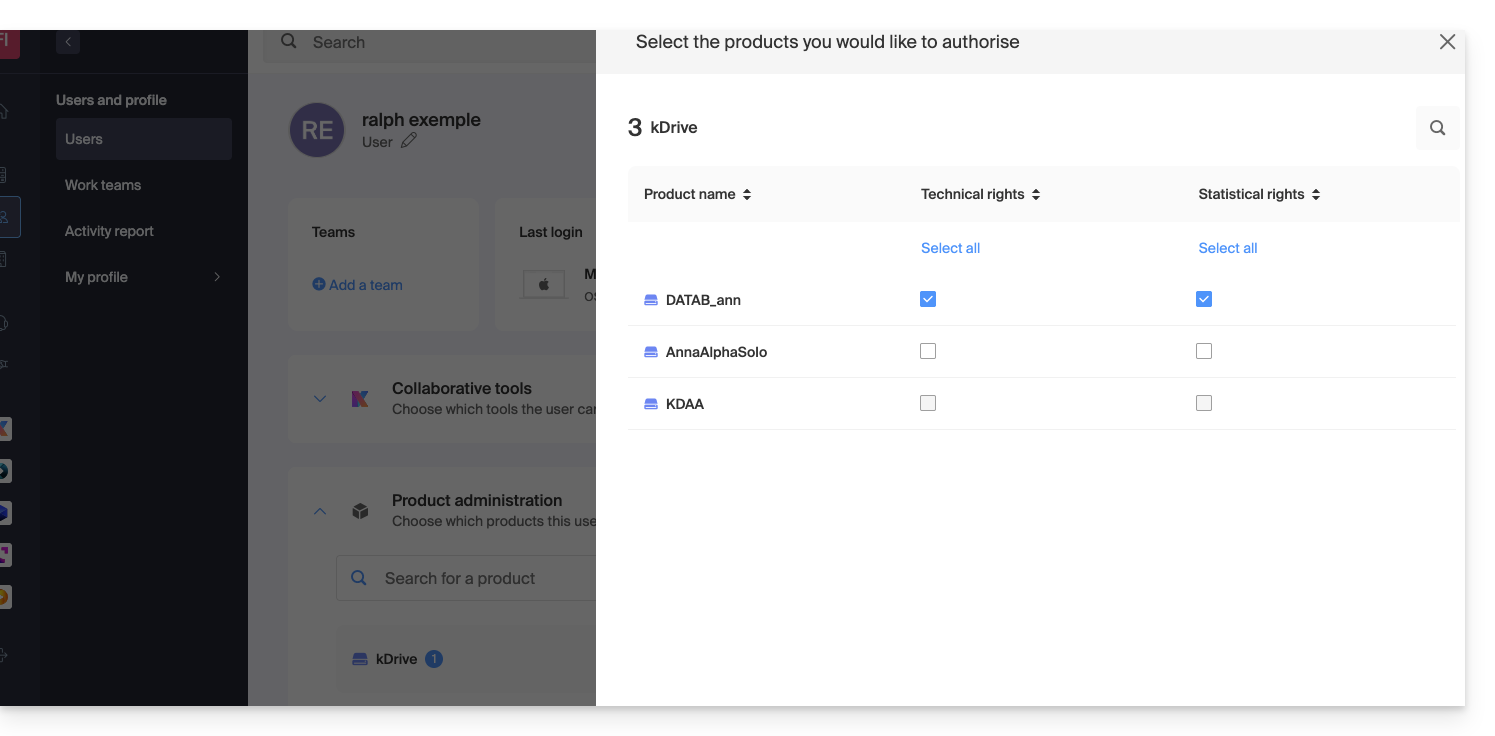
With only Technical rights, they will not see the Statistics element in the sidebar: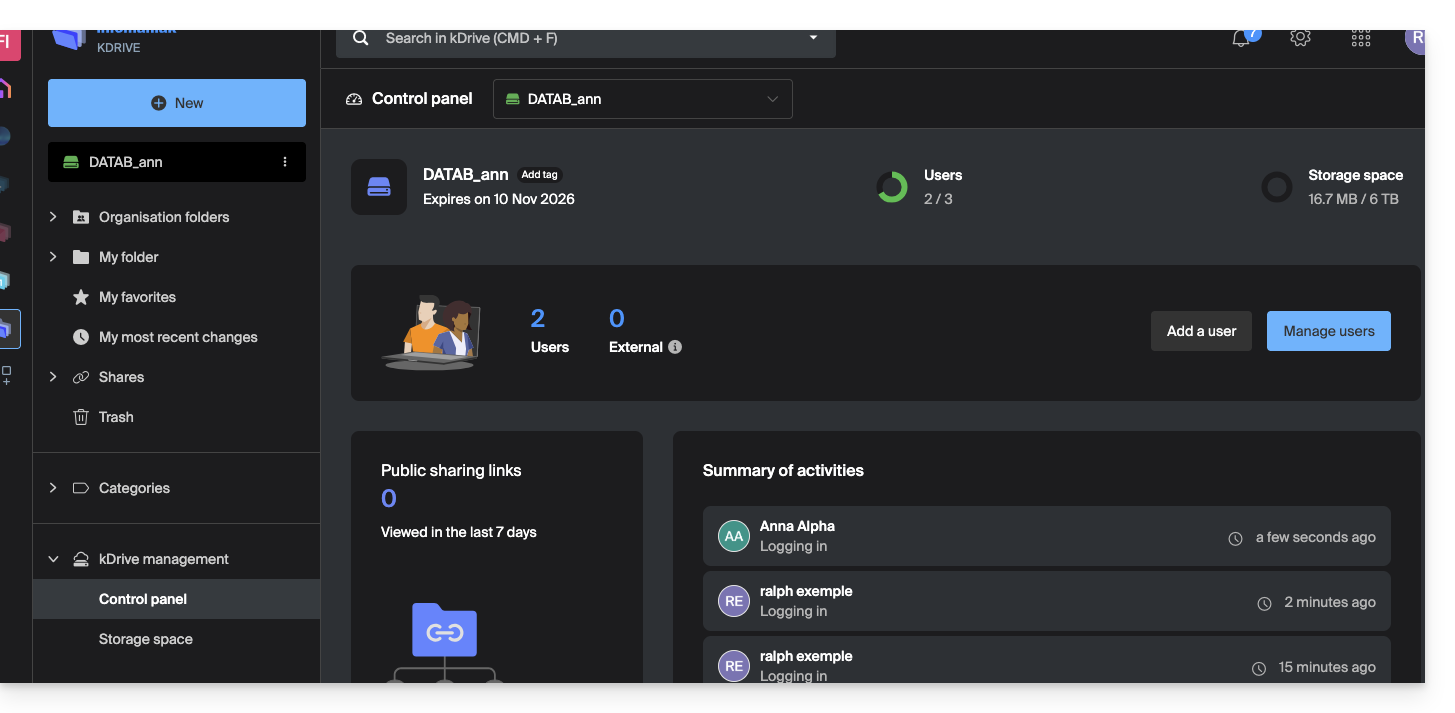
If, conversely, only the Statistics box is activated, then they will not access the dashboard: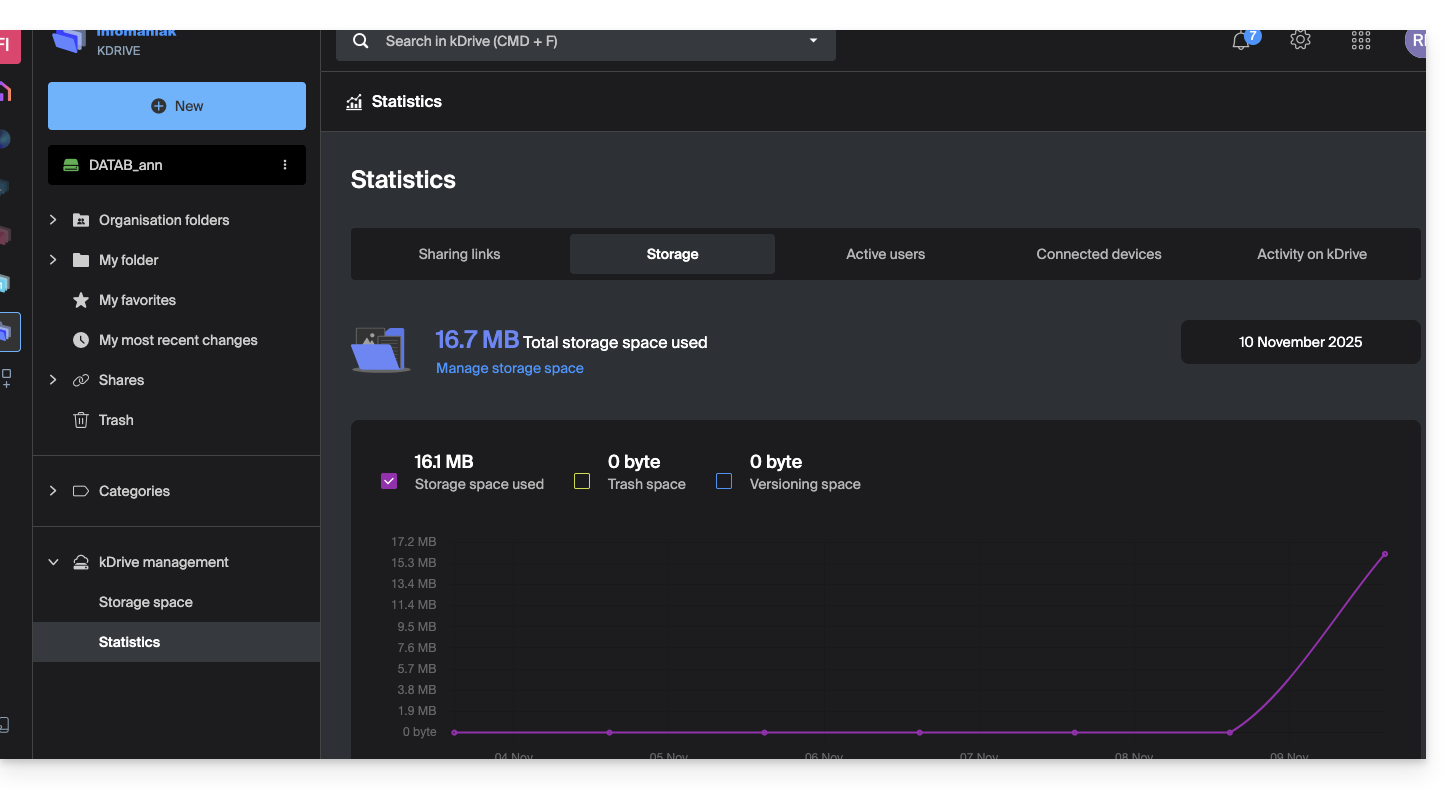
And if the administrator deactivates both Technical and Statistics boxes, only storage information is accessible from the sidebar: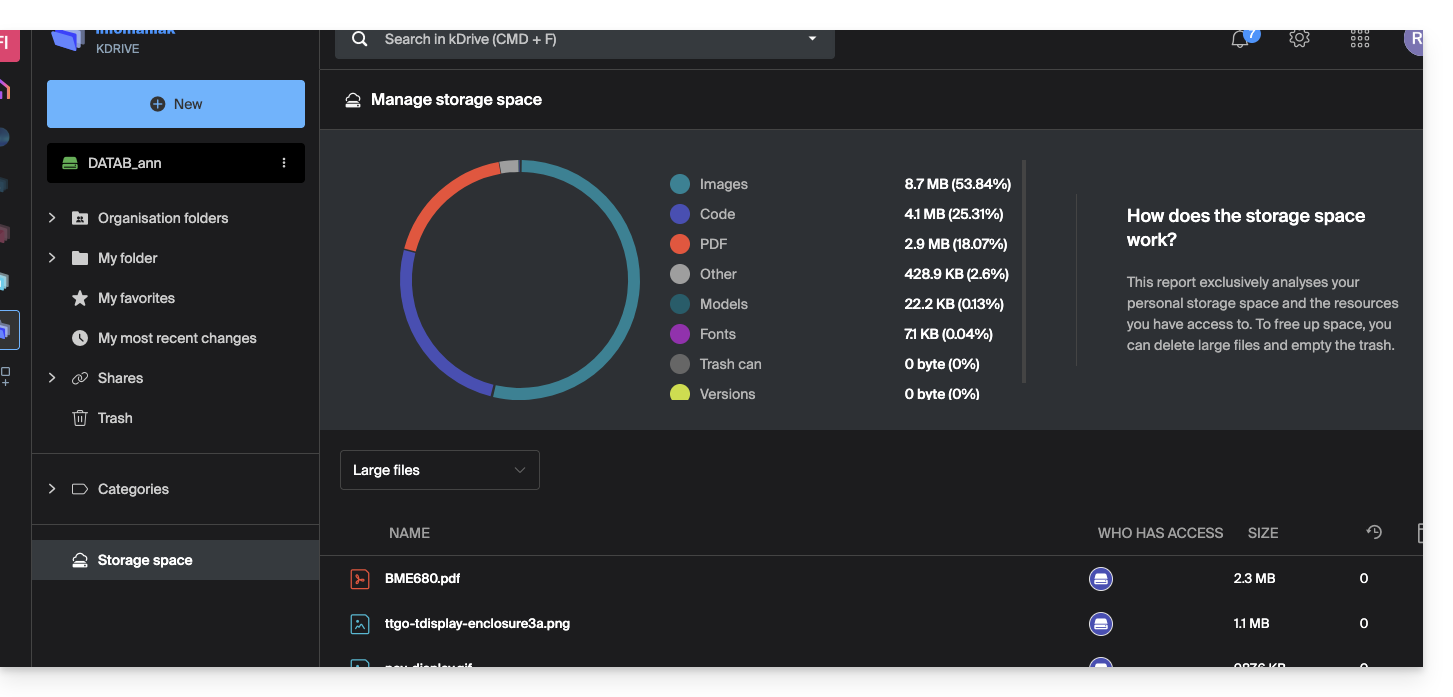
User rights on kDrive
Even with both boxes (Technical and Statistics) activated, a user who only has User rights at the level of kDrive user management will not be able to, among other things, create a new folder at the root of the Organization Folders:
The user will need an Administrator role (see point 5 above) to access this window for creating a new Organization Folder at the root:
Link to this FAQ:
Has this FAQ been helpful?
Thank you for choosing kDrive, the independent and privacy-respecting solution for collaborating, sharing, and accessing your data from all your devices. Your data is encrypted, continuously backed up, and exclusively hosted in Switzerland.
Collaborative storage on a 100% Swiss Made cloud
- Discover kDrive in video (the interface has evolved since)
Getting Started
- Synchronize kDrive across different devices
- Manage kDrive Lite Sync option (macOS)
- Manage kDrive Lite Sync option (Windows)
- Install kDrive on Linux
- kDrive folders (personal, common, shared)
- Choose the kDrive folders to synchronize
- Edit an Office file type on kDrive (Word, Excel, PowerPoint) or plain text
- Working on kDrive: basic operations
- Manage kDrive storage space
- Search for data on kDrive
Share your data
- Manage kDrive drop boxes
- Customize kDrive shares and drops
- Share data from kDrive (web interface)
- Example of internal/external shares
- Share data by email from kDrive (web interface)
Fill your kDrive
- Import external data to kDrive
- Import data to kDrive (iOS) or just the iPhone photos automatically
- Import photos to kDrive (Android)
- Import data to kDrive without the kDrive app
- Access kDrive files locally and online
- Scan documents with kDrive (iOS/Android)
With multiple users
- Manage a kDrive user's rights
- Manage folder and subfolder access permissions
- Manage kDrive users
- Manage multiple kDrive (iOS/Android)
- Manage multiple kDrive (macOS / Windows)
- Copy certain data between kDrive you have access to
Go further with kDrive
- Modify an existing kDrive offer
- Manage kDrive categories to classify data
- Save a kMeet meeting on kDrive
- Export email attachments from Mail
- Export an email to kDrive
- Add an attachment to an event in Calendar
For advanced users
In case of a problem
- Resolve a kDrive blockage (antivirus, firewall, etc.)
- Resolve a kDrive sync conflict
- Resolve a kDrive synchronization problem
- Resolve a kDrive issue on Android device (don't kill my app)
- Resolve a Lite Sync plugin error on macOS
- Clear the browser cache
- Clear the mobile app kDrive cache
- kDrive application version (macOS / Windows / Linux)
- Restore a kDrive file to its previous version
- Restore a deleted kDrive file
- Force kDrive to synchronize certain special files
- Authorize access to your products / Complete a support request
- Display kDrive debugging information
Learn more about kDrive
A question or feedback?
- Contact Infomaniak support
- Click here to share feedback or a suggestion on an Infomaniak product
Link to this FAQ:
Has this FAQ been helpful?
This guide explains how to install and use the kDrive app to synchronize files stored in kDrive and easily access them on all your macOS, Windows, Linux, iOS, and Android devices.
Introduction
- For any changes made to your files and folders on your workstation (Finder / Explorer) to be automatically synchronized…
- to the kDrive web app (Infomaniak online service ksuite.infomaniak.com/kdrive),
- to the kDrive mobile app (application for iOS / Android smartphones or tablets),
- across all collaborators who access the data,
- and in both directions,
- … you need to install the kDrive desktop app (desktop application on macOS / Windows / Linux).
- You can customize the kDrive folders that should be synchronized on your computer.
- You can also automatically back up photos from your mobile:
- Refer to this other guide for iOS and for Android.
- Please note that there is no automatic synchronization between the rest of the content on your mobile device and kDrive; this is the same as with competing apps that do not offer this feature, as the restrictions of mobile operating systems make it too difficult to implement.
Download the kDrive desktop app
Open the kDrive download page to download kDrive (other versions and apps can be downloaded from the unified kSuite settings, including an iOS version optimized for iPad, adapted to the screens of these tablets).
| OS | Minimum required and supported version |
|---|---|
| Windows 10 (v10 1709 to benefit from Lite Sync) | |
| macOS 10.15, ARM OK | |
| Ubuntu 22.04 LTS, ARM OK no Lite Sync or right-click context menu on Linux Desktop environments: GNOME or KDE | |
| iOS 16.4 | |
| Android 8.1 |
Install the kDrive app
To do this:
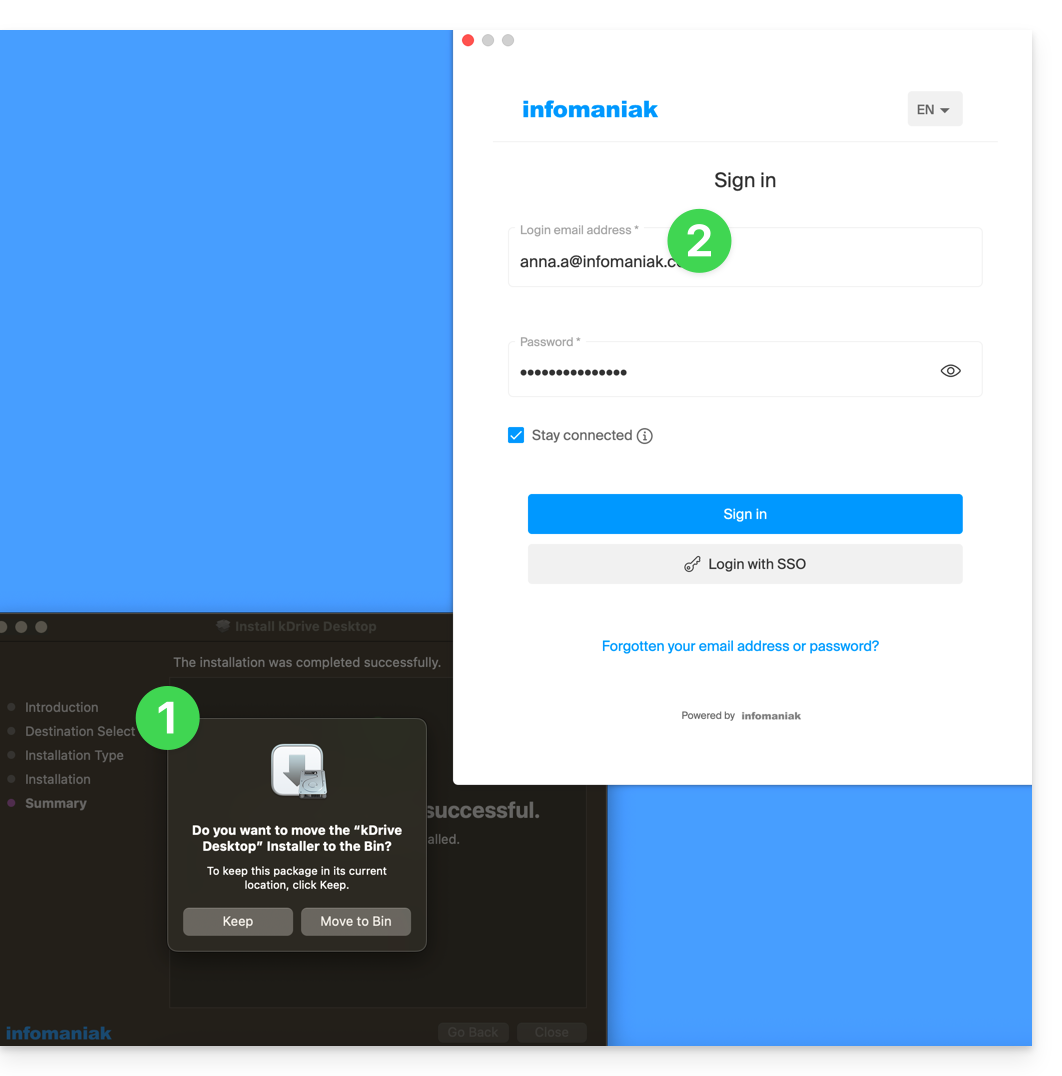
- Open the downloaded application to start the installation on your device.
- At the end of the installation, the application should open, and a form will ask you to log in to your Infomaniak account (need help?):
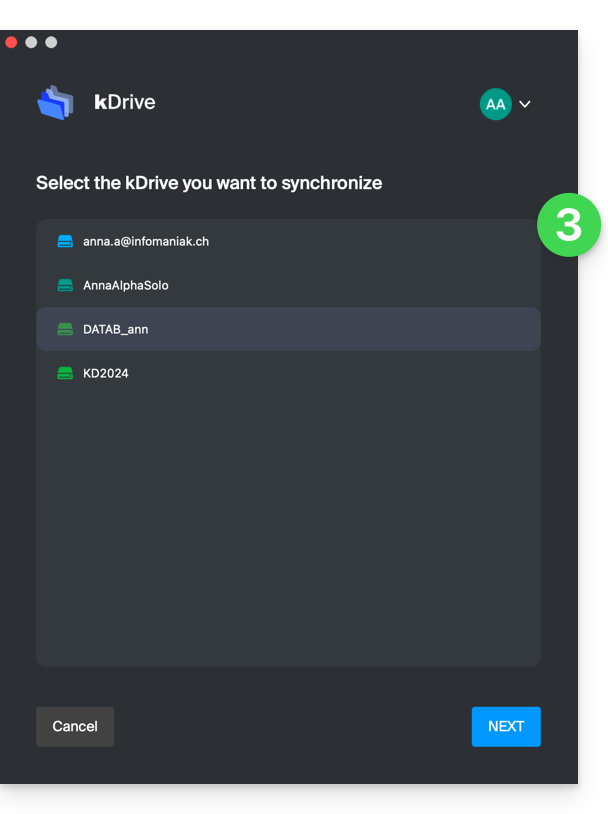
- Then, choose from the list the kDrive you want to synchronize (if your account allows access to multiple kDrives — you can link others later if necessary):
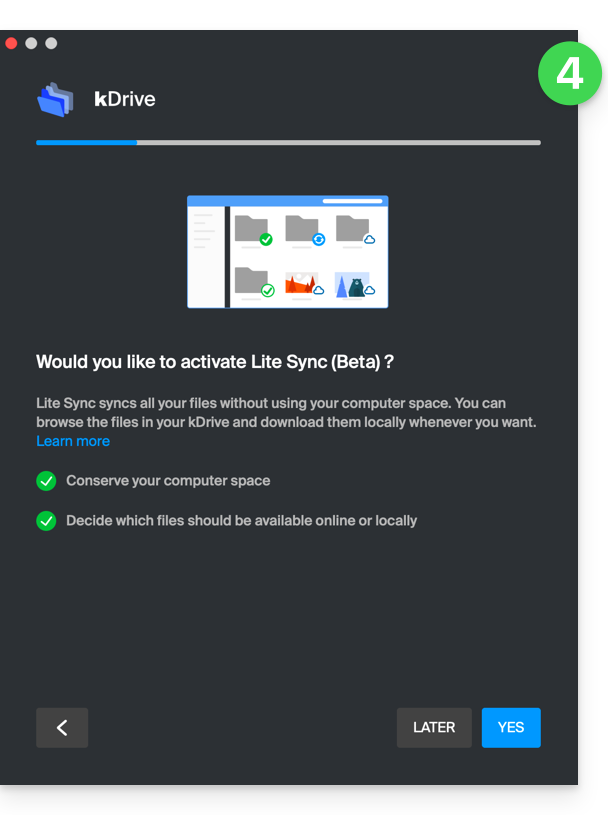
- Enable or disable the Lite Sync option (feature of the Windows and macOS app that saves space by virtually storing your kDrive files on your computer, only downloading them when needed):
- A kDrive folder is created on your hard drive at the specified location (it is recommended not to change this location, but if necessary, you can do so by clicking on the pencil icon ✎):
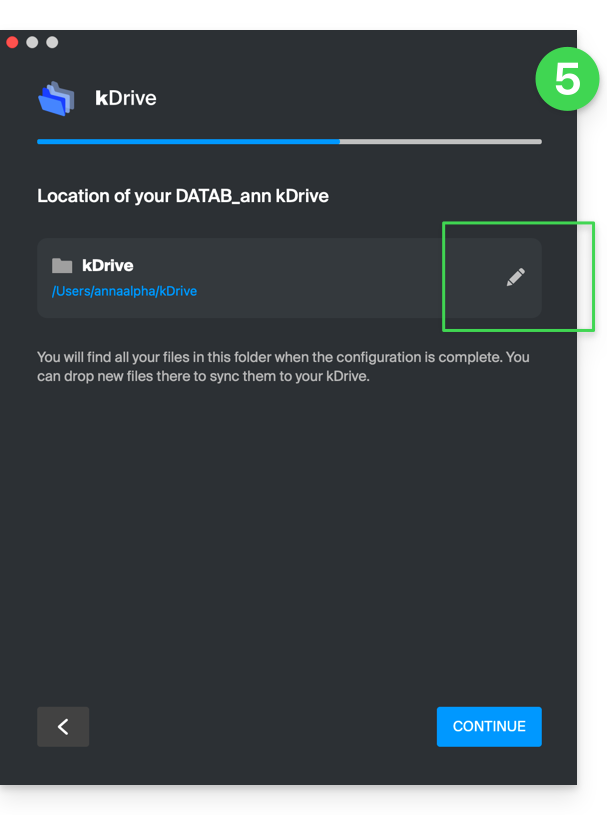
- It will contain any files that already exist on your kDrive (some folders may be ignored - see below) and will upload any files you place in it to the kDrive server in the future.
- During installation, pay attention to the permissions that may be requested (especially on macOS) and which must be granted for the application to function properly:
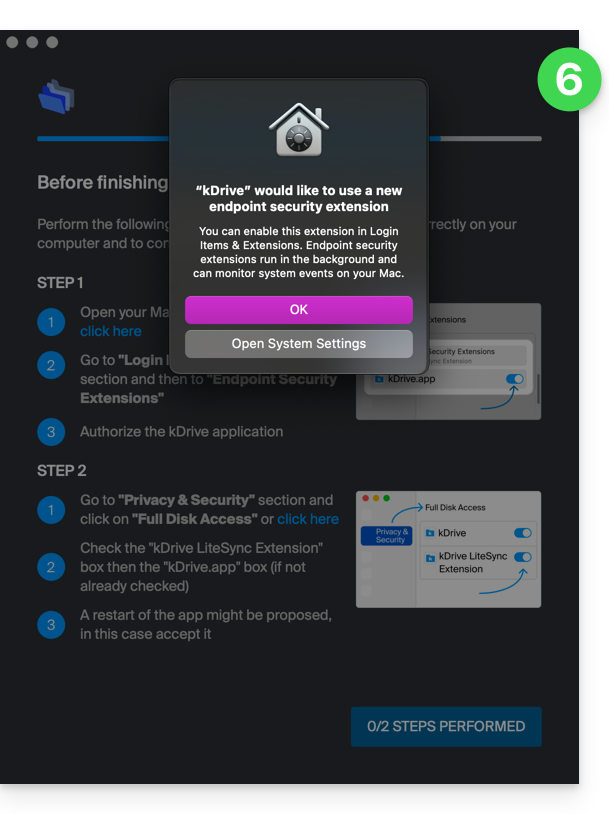
- In particular, you must enable this on macOS:
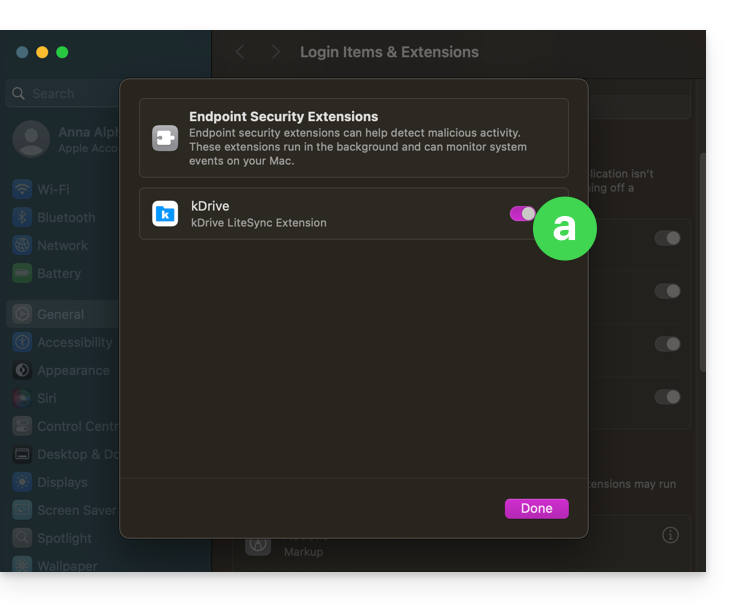
- but also this:
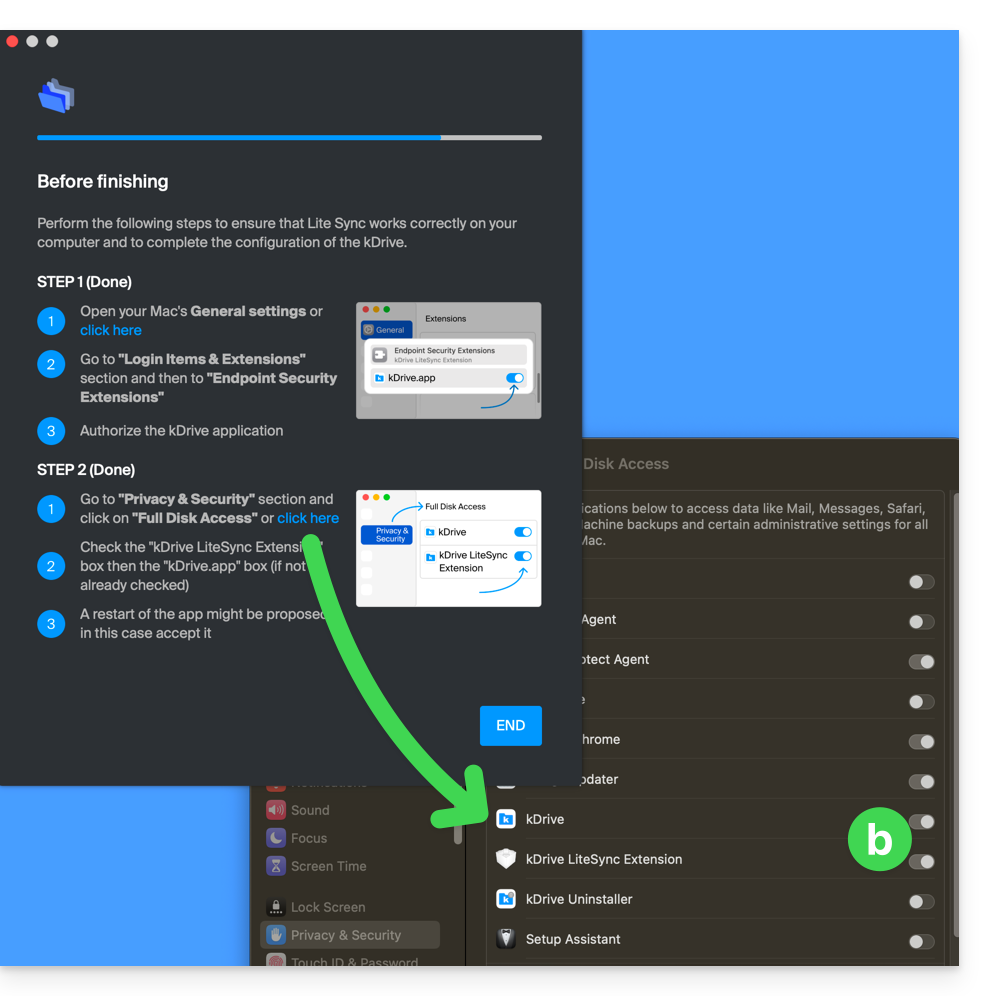
- In particular, you must enable this on macOS:
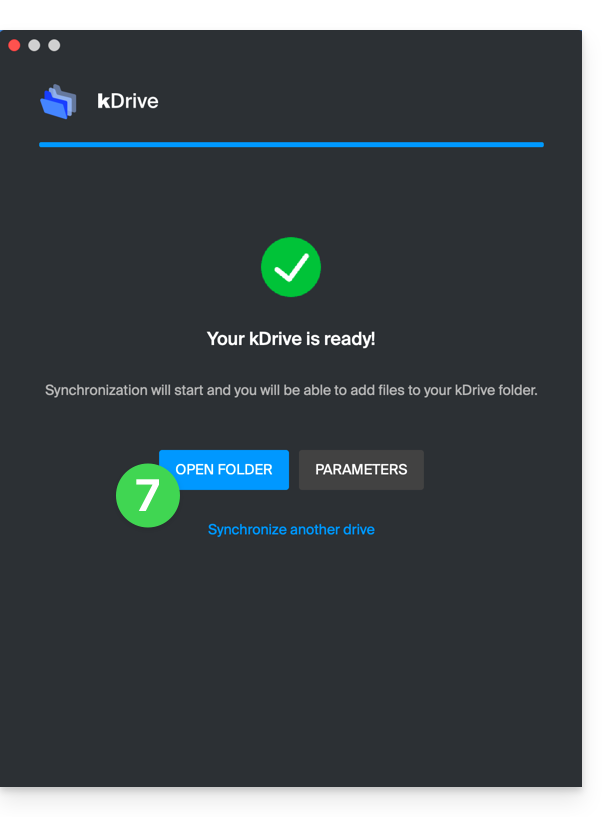
- Once the installation is complete, you can choose to open the location of the kDrive files on your hard drive:
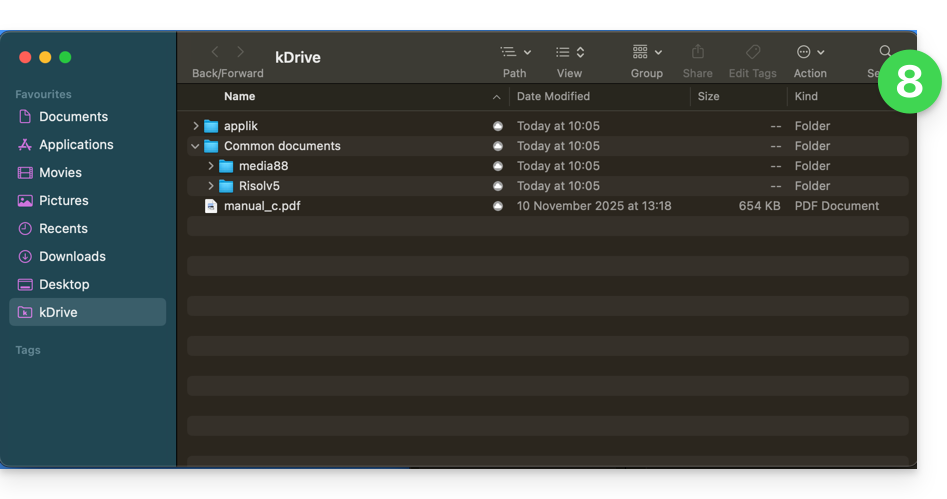
- For example, on a macOS device, it looks like this:
- And you can compare the data on your hard drive with the data in the kDrive web app (Infomaniak online service ksuite.infomaniak.com/kdrive):
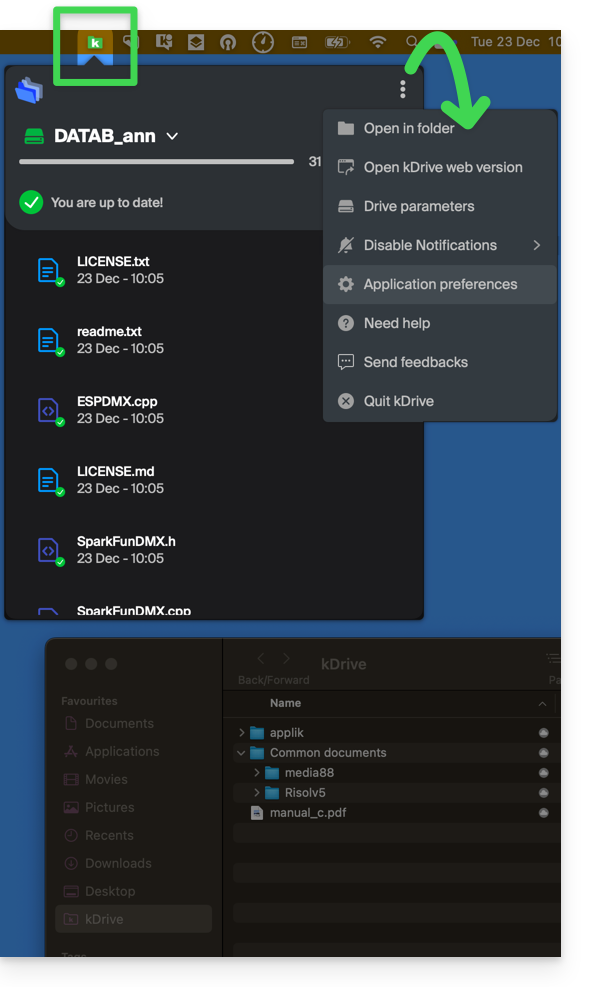
- Click on the action menu ⋮ on the right side of the kDrive window.
- Click to open the web version:
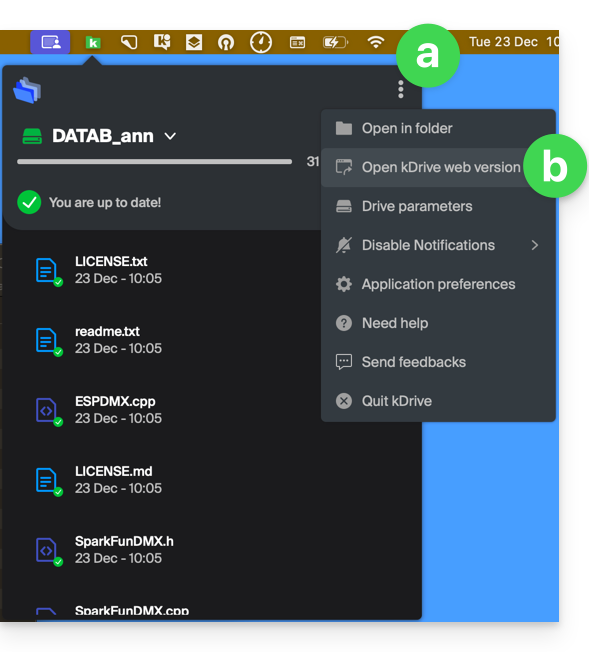
- The data appears, and you can compare it with point 8 above:
Sync files with kDrive
Once the application is installed and you are connected to your account, you have the kDrive application on your device:
- On a computer, the app icon appears in the notification area of your computer (top right on macOS, bottom right on Windows, and a double left-click in the taskbar on Linux).
- Take this opportunity to browse the application preferences and the Drive preferences from the action menu ⋮ on the right side of the kDrive window.
Refer to other guides to continue exploring the kDrive application.
Link to this FAQ:
Has this FAQ been helpful?
This guide explains how to manually upload data (upload files, folders, etc.) from your computer to your kDrive without installing the Infomaniak kDrive app (app for smartphone or tablet iOS / Android or desktop app on macOS / Windows / Linux).
Import to kDrive from the browser
To access kDrive:
- Click here to access the Infomaniak kDrive Web app (online service ksuite.infomaniak.com/kdrive).
- Check or select the relevant kDrive in the dropdown menu of the left sidebar.
Then as desired:
Drag & Drop
- Drag and drop the items to be sent to kDrive, from a window of your computer, to the window of your browser where the kDrive site is open:

New button
- Use the New button at the top left of your kDrive interface, then choose the desired import (either file or folder):
- The operating system (macOS for example) may ask for confirmation when uploading a folder.
Right-click
- Right-click where to import new content, then choose the desired import (either file or folder):

- The operating system (macOS for example) may ask for confirmation when uploading a folder.
Import external data
- Import specific content using the Import external data menu:
- Refer to this other guide if you are looking for information about importing data from the outside.
Regardless of the method used, wait during the data transfer (the duration depends on the speed of your Internet connection).
File types
You can send any type of file, such as .pdf, .txt or other extensions, including in the field of 3D.
kDrive also allows you to open and convert iWork files designed from a Mac to edit them from any device. These files from the Apple Suite still have a few peculiarities with their extensions; example with the Numbers application:
- The
.numberscan be files or folders depending on the registration chosen (and the behavior during upload is not the same when it is a folder). - If there is already a file for example
calcul.numberson kDrive and if it is saved as a “package” on the desktop, then at the time of upload the file will be considered as a folder and kDrive will try to upload files inside it, which is not possible so the upload will not be authorized.- To solve the problem, simply change the save format in the Apple Numbers application on macOS to “Single File”:

- To solve the problem, simply change the save format in the Apple Numbers application on macOS to “Single File”:
Link to this FAQ:
Has this FAQ been helpful?
This guide details how to share files and folders in kDrive with anyone you want, without installing the kDrive desktop app (desktop application on macOS / Windows / Linux), and even if the recipient does not have an Infomaniak account or is not yet using kDrive.
Introduction
- The kDrive web app allows you to share content in several ways, including by right-clicking on items or by attaching to an email to quickly offer the option to view or edit a file.
- A drop box can also be shared.
- The appearance of the sharing windows can be customized.
- To quickly access the various features/operations, right-click on your files.
⚠ Number of allowed external sharing links:
| kSuite | Free | 100 |
| Standard | 1000 | |
| Business | 2500 | |
| Enterprise | 5000 | |
| my kSuite | 25 | |
| my kSuite+ | 1000 | |
| kDrive | Solo | 1000 |
| Team | 1000 | |
| Pro | 1000 |
⚠ Number of clicks possible per hour on a public link:
| kSuite | Free | 150 |
| Standard | unlimited | |
| Business | unlimited | |
| Enterprise | unlimited | |
| my kSuite | 150 | |
| my kSuite+ | unlimited | |
| kDrive | Solo | unlimited |
| Team | unlimited | |
| Pro | unlimited |
The activity limits mentioned above (e.g., 150/hour) apply to all your sharing links and count a maximum of one action per user (IP) per minute, regardless of the number of files viewed or downloaded during that time. You can track this usage in your activity statistics: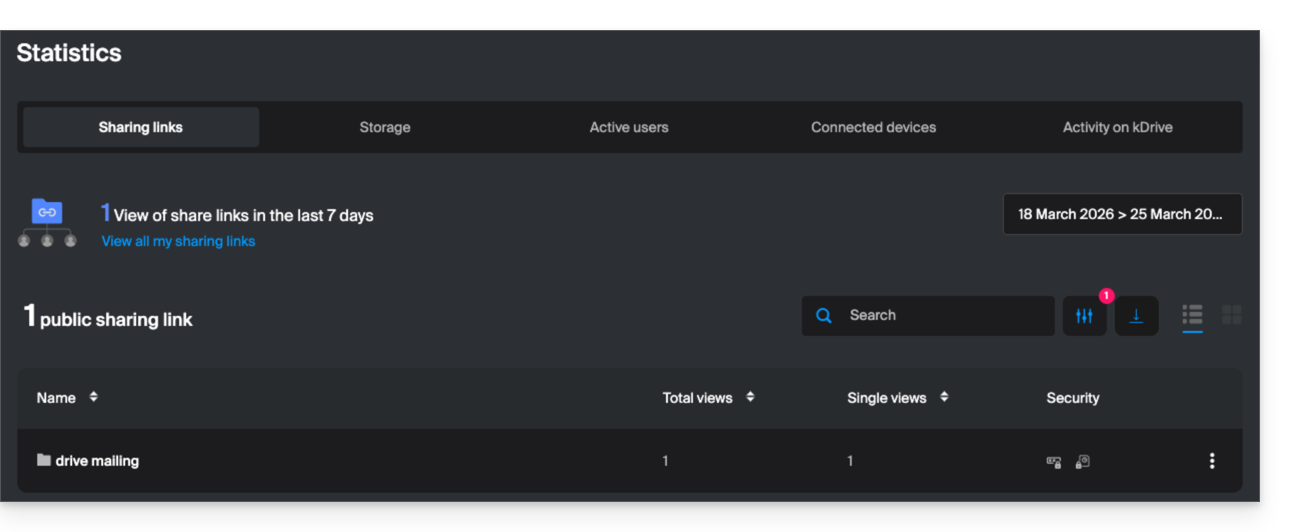
To optimize this quota, it is recommended that recipients download entire folders in one go rather than individual files.
Other types of limits are detailed in this other guide.
Share a file/folder on kDrive
For users to be able to view, edit, download your content, you must specify who to share a file/folder from kDrive with:
- Click here to access the Infomaniak kDrive web app (online service ksuite.infomaniak.com/kdrive).
- Right-click on the file/folder in question.
- Click on Share... at the top of the drop-down menu:
From there, you can…
- … either activate a public sharing link with various possible options:
- allow modification of the document if it is one of the collaborative formats
- expiration date
- password
- allow download
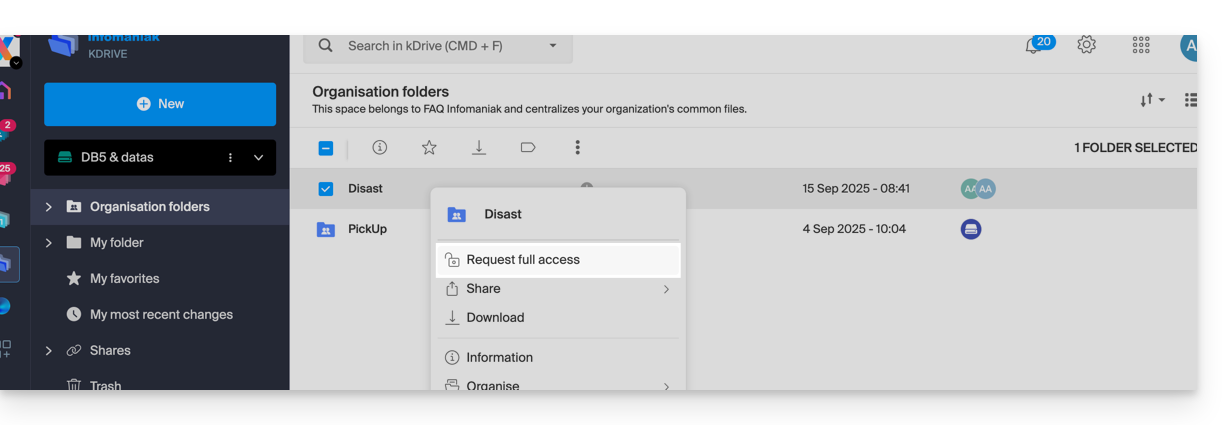
- allow access so that the user with access to the sharing link can request full access - see the dedicated chapter below
so that anyone with the link displayed in this modal can access the shared file: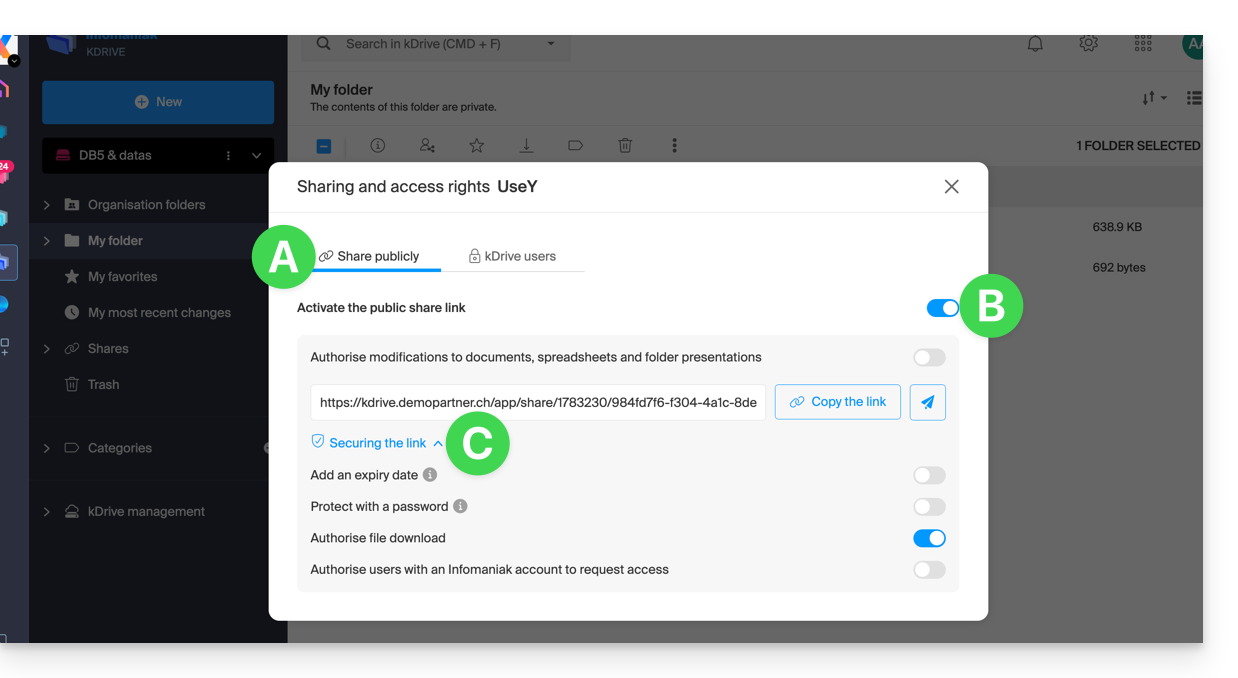
Note: simply deactivating/reactivating the public sharing link changes the URL and makes the previous one invalid!
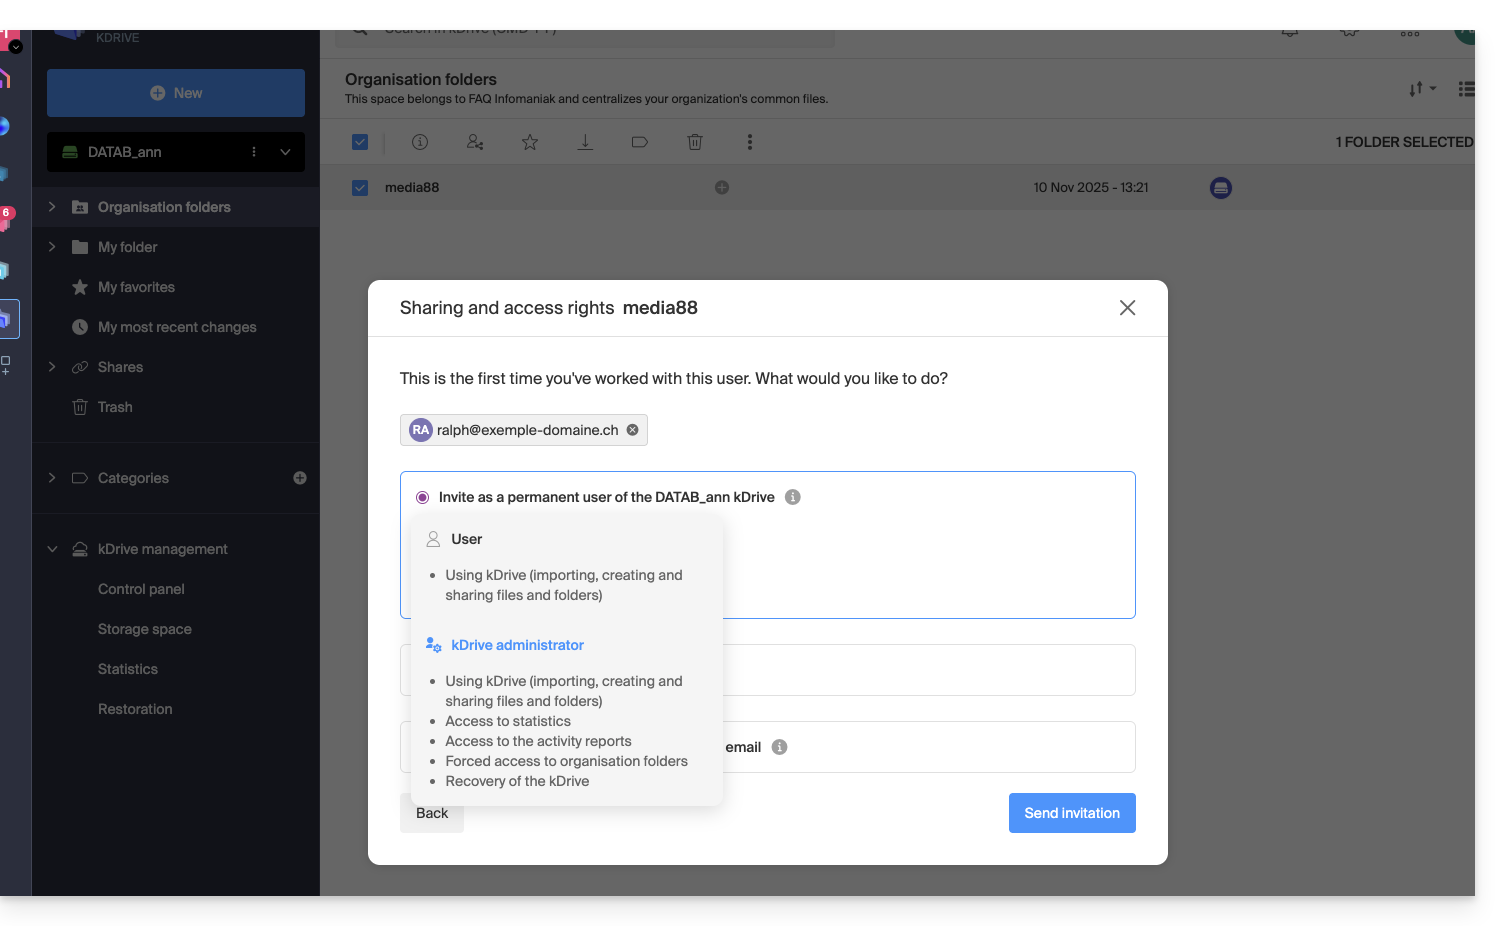
- … or enter a kDrive user, a contact from your address book, the email address of a new contact (or a Group if the sharing is done within the "shared folders"):
An assistant allows you to define the permissions for each person you add: “view” / “edit” / “manage” (refer to this other guide if you need information about access permissions for files, folders, and subfolders in kDrive):
- The person whose email address you provide will receive an email with the necessary information to access your shared content.
- If they do not have an Infomaniak account, they can create one for free to access the shared items and edit them.
- In the meantime, you will see the pending invitation and can revoke it at any time from the same location.
- The private link is displayed each time you go to the sharing menu in the sidebar, allowing you to easily copy and resend the link to authorized users.
With a Solo plan or a free kDrive account, it is only possible to specify this type of external user when you want to share a file/folder.
Click on the close button in the top right corner of the modal if you are finished.
Create a public and editable sharing link
When you activate a sharing link for a Word, Excel, or PowerPoint file, you can allow online editing of the file:
Anyone with access to this sharing link can then immediately edit the file without having an Infomaniak account (simply test the URL obtained in a private browsing session to verify the result).
You can also obtain a specific sharing link from the document.
Request access from the shared file page
The user who shares a folder can activate a button in the advanced sharing settings:
This “Add files” button will be displayed on the sharing page (A) so that the user accessing the sharing link can request to become an external user (if they have an Infomaniak account or if they create one (B):
The request will then be sent by email to the user who initiated the sharing, and they can decide whether to accept or not.
Shared folders
Refer to this other guide to fully understand the differences between the various sections of kDrive.
These shared folders are available with certain paid plans and allow you to share your data with all kDrive users. Any new folder created inside with a maximum sharing option will be indicated as such on the right in the folder list.
However, a folder can also be created with restricted sharing (this is offered when creating a new folder or when you return to the sharing of said folder), and in this case, only authorized people will be able to see its content directly; the users who have access are visible on the right in the folder list: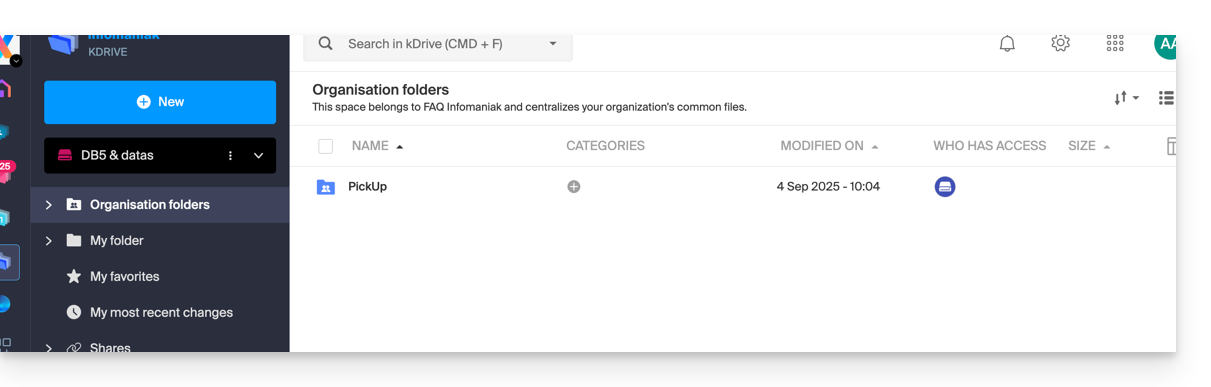
Other users with access to shared folders can also gain "forced" access to a subfolder by clicking on it and accepting the warning message, or by using the action menu on the right side of the directory and choosing "Force Access"; this will notify other users by email about the access attempt:
Please refer to this other guide if you are looking for information on sharing and shared folders.
Link to this FAQ:
Has this FAQ been helpful?
This guide explains how to manage the behavior of deleted files and the trash bin in kDrive.
Introduction
- When a file is deleted from one of the tools synchronized with kDrive, the kDrive web app (online service ksuite.infomaniak.com/kdrive) places the file in its trash bin.
- If this kDrive trash bin is emptied, it is impossible to recover its contents.
- If the operating system's trash bin on the computer where kDrive is installed is emptied, this does not empty the trash bin of the kDrive web app.
- The file remains for at least 30 days after it is moved to the kDrive trash bin, but some offers may define a retention period of up to 365 days:
⚠ Maximum duration that can be chosen for file retention in the kDrive trash bin:
| kSuite | Free | 30 |
| Standard | 60 | |
| Business | 180 | |
| Enterprise | 365 | |
| my kSuite | 30 | |
| my kSuite+ | 60 | |
| kDrive | Solo | 365 |
| Team | 365 | |
| Pro | 365 |
Deleting a file…
… in the kDrive web app
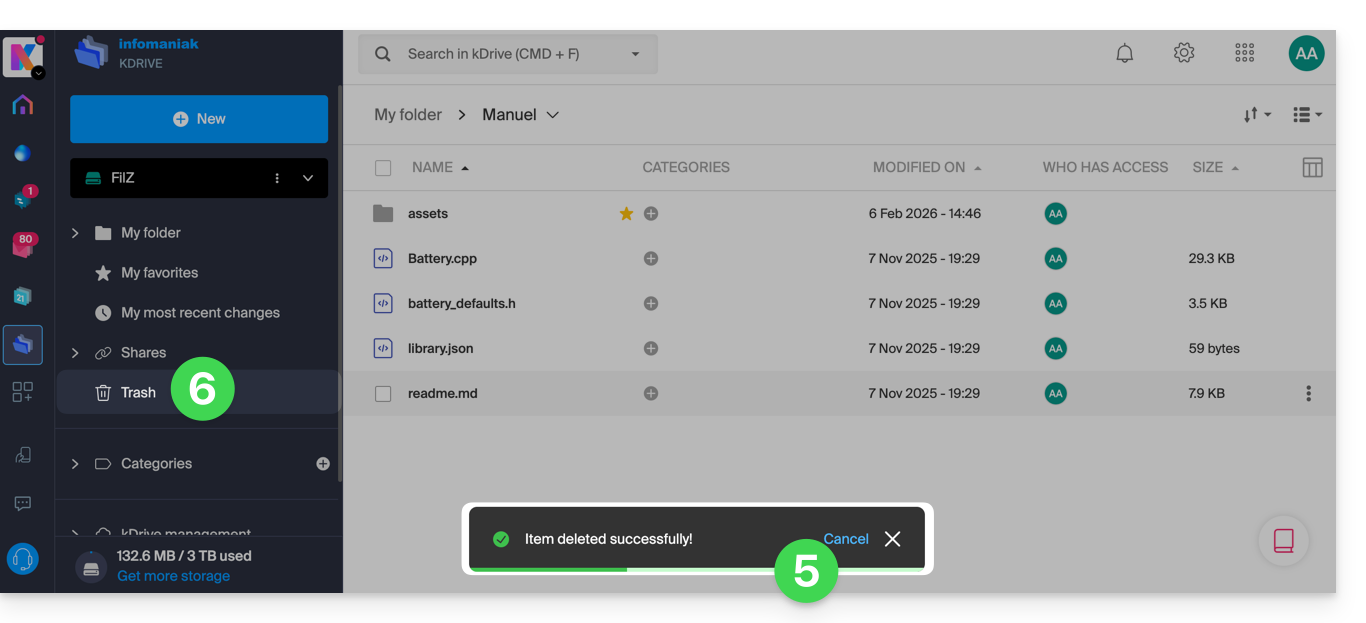
To delete a file and track its path to the trash bin:
- Click here to access the kDrive web app (online service ksuite.infomaniak.com/kdrive).
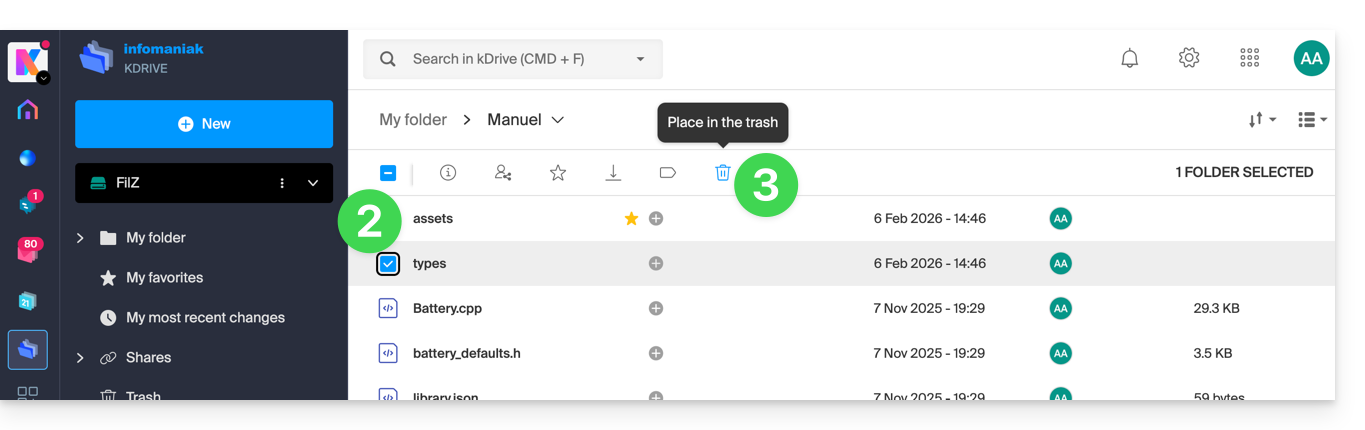
- Select the file(s) you want to delete.
- Click on the trash can icon in the top bar:
- Confirm the deletion:
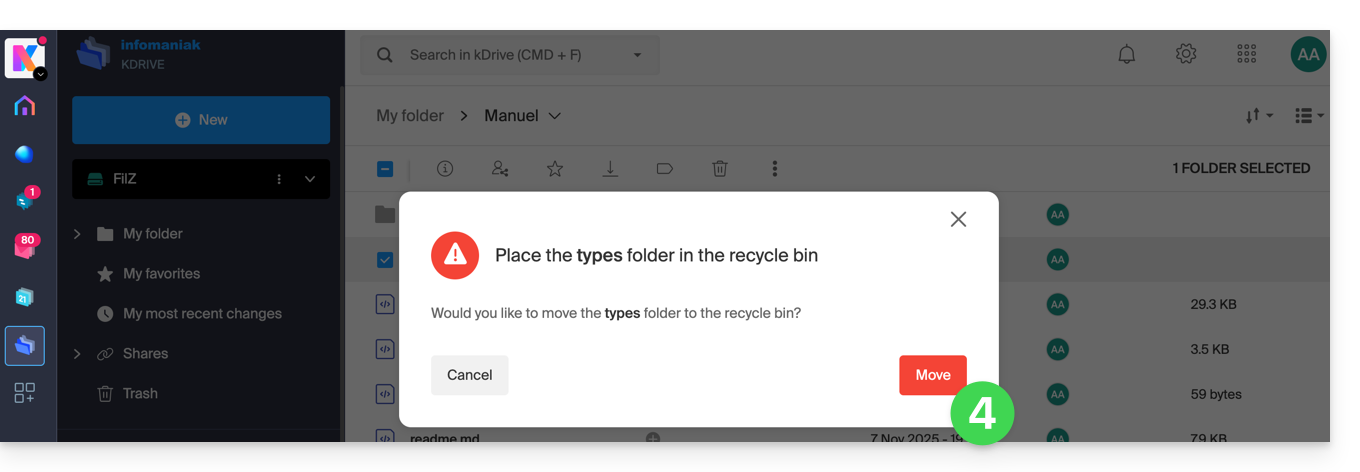
- A confirmation message will appear at the bottom of the screen, allowing you to cancel the deletion if needed.
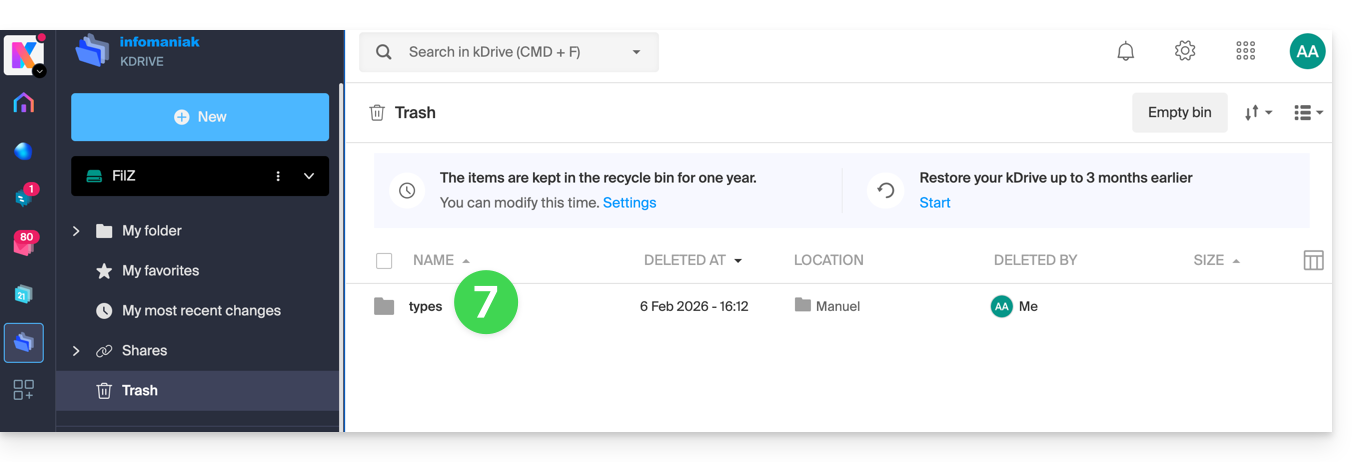
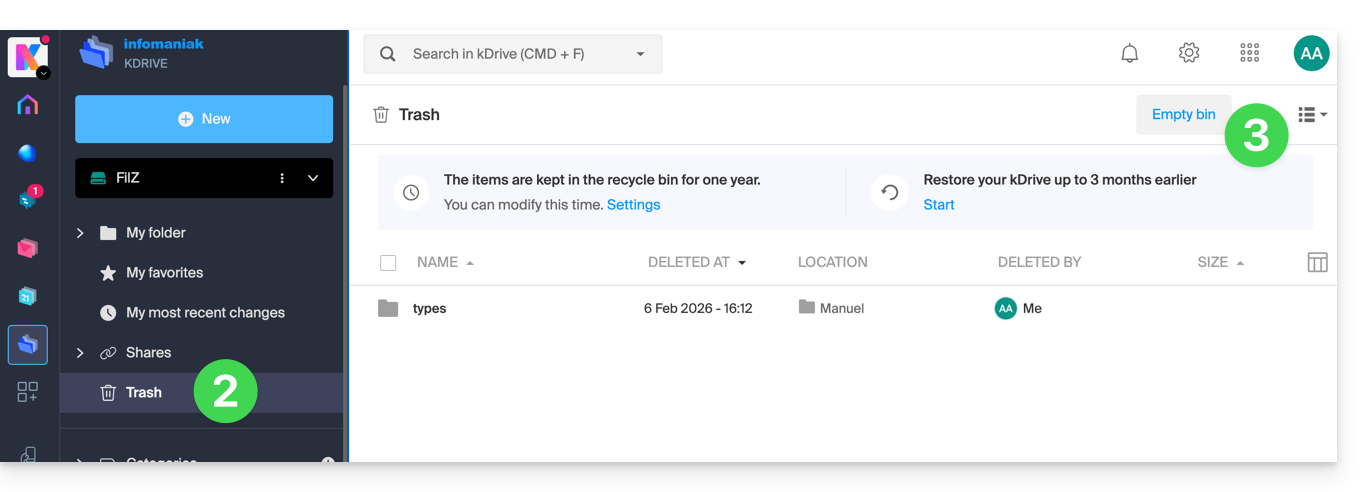
- Click on the Trash menu:
- Recently deleted items are displayed here:
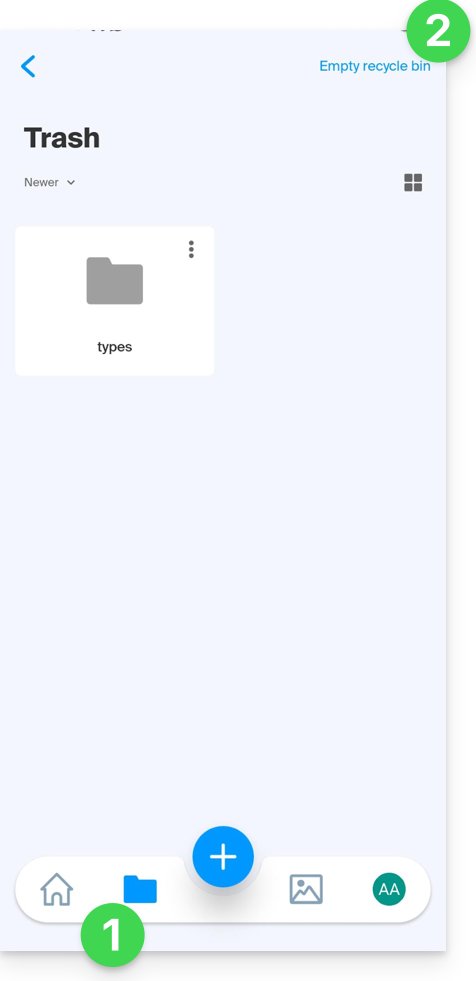
Deletion is synchronized with the various solutions connected to the same kDrive, for example, the kDrive mobile app (application for iOS/Android smartphones or tablets):
- The Trash menu is located under the Folders icon at the bottom.
- You can empty the trash from this page, but please read the information below in this guide:
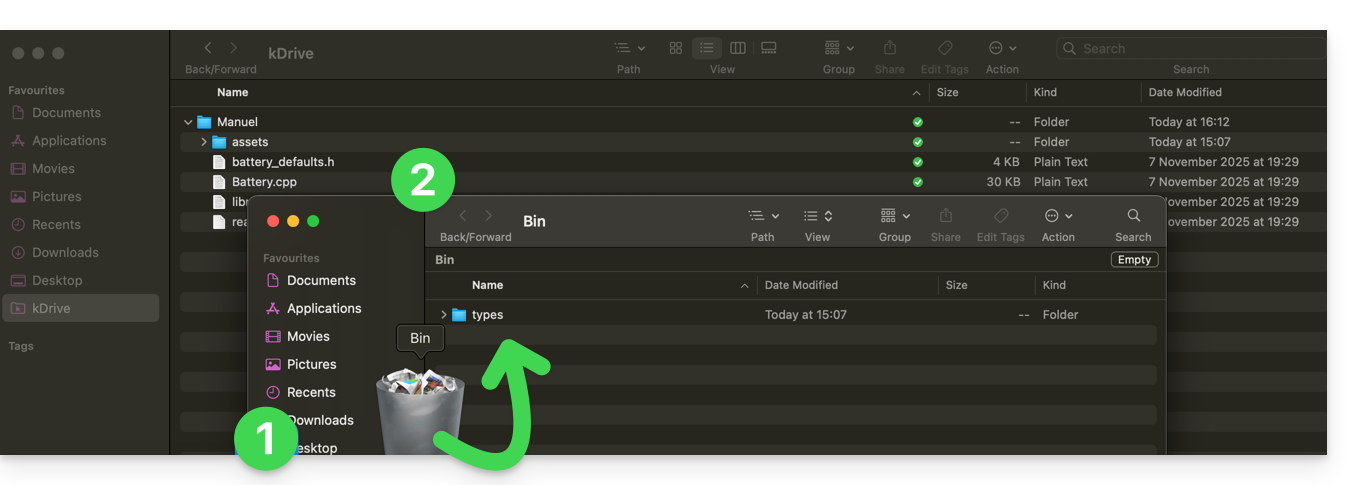
Deletion is also synchronized (if this option is not disabled – see below in this guide) with the kDrive desktop app (desktop application on macOS/Windows/Linux), which will send the command to move any data deleted from the web app to the computer's trash (and vice versa):
- Open the computer's trash.
- Deleted data is in the trash, and no longer in the main kDrive file structure:
Empty the trash manually…
… on the kDrive web app
To empty the kDrive trash manually (not recommended because it is better to wait for the scheduled time until automatic deletion):
- Click here to access the kDrive web app (online service ksuite.infomaniak.com/kdrive).
- Click on the Trash menu in the left sidebar.
- Click on Empty Trash:
- Confirm the operation:
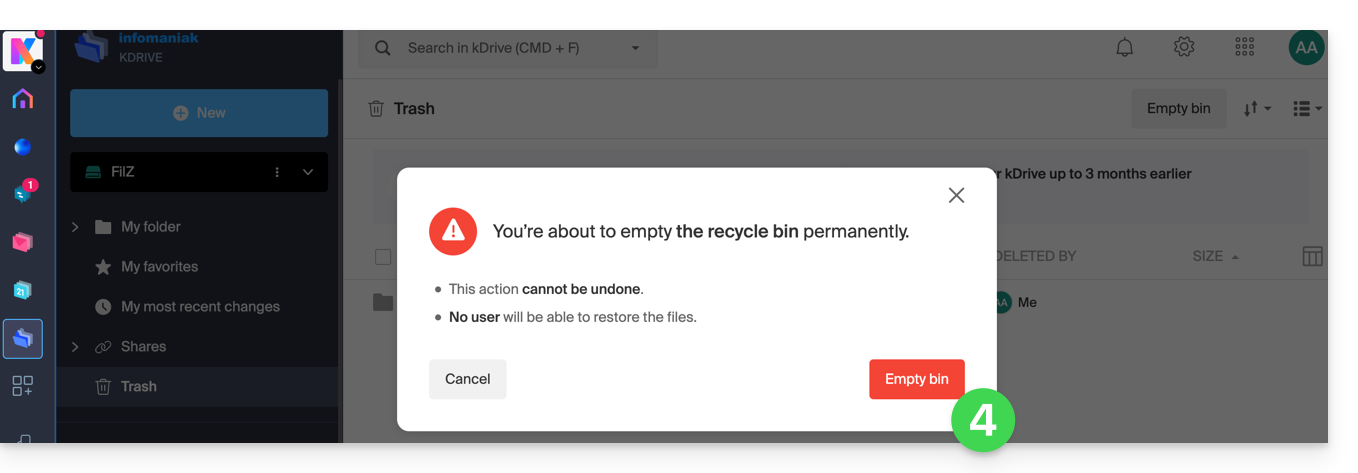
- The data is deleted permanently, only on the kDrive web app; the files remain in the computer's trash.
… on the synchronized computer
- If the computer's trash is emptied (Empty button in the example below)…
- and the deletion is confirmed…
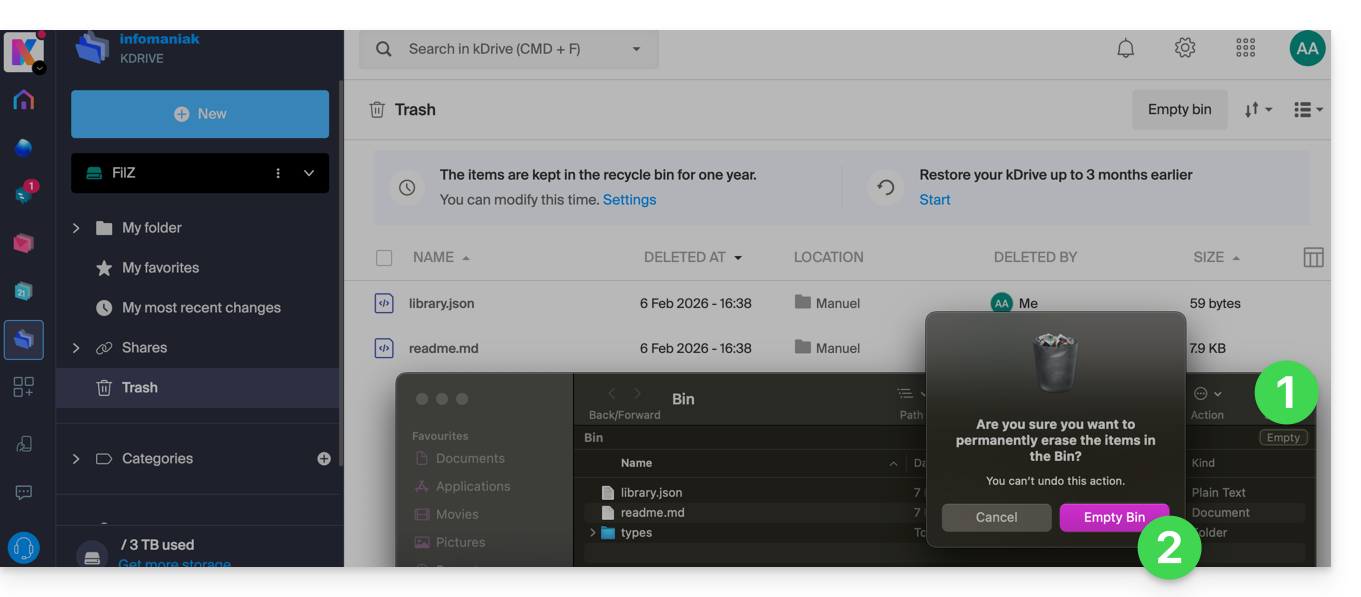
- … the trash in the kDrive web app is not affected, and the deleted files will still be there, until this kDrive trash is emptied, either manually or automatically after a certain time.
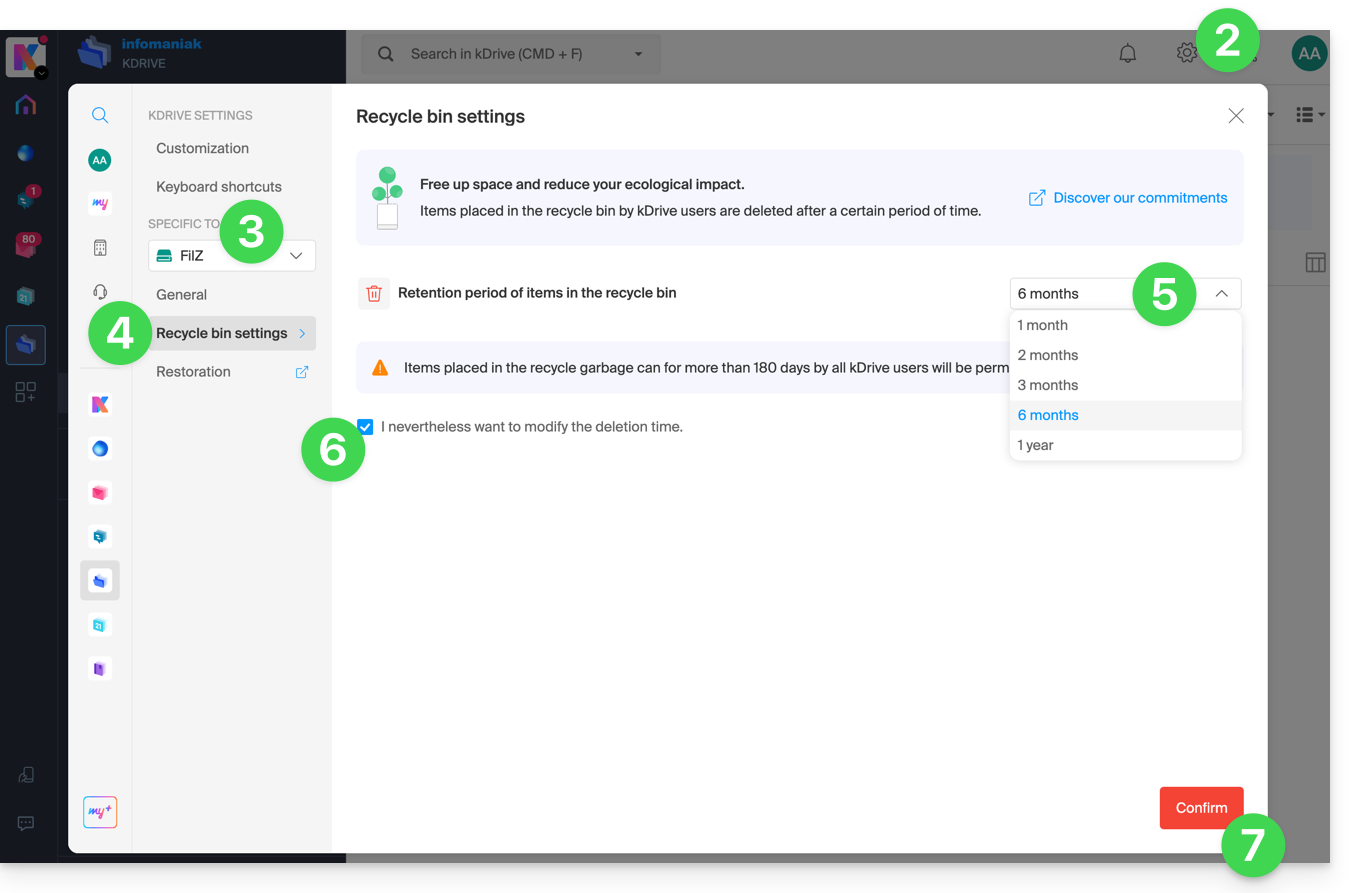
Manage the kDrive trash retention period
To access the files in the trash:
- Click here to access the kDrive web app (online service at ksuite.infomaniak.com/kdrive).
- Click on the Settings icon in the top right corner.
- Check or select the relevant kDrive from the drop-down menu in the left-hand sidebar.
- Click on Trash Settings.
- Choose the desired duration from the drop-down menu (between 1 month and 1 year depending on your plan – see at the top of this guide).
- Read the information regarding the possible permanent deletion of files moved to the trash before the new period you wish to apply, and confirm your choice.
- Click the button to Confirm:
Disable deletion synchronization on the desktop app
To choose whether deleting a file on the web app or mobile app should move the file synchronized with the desktop app to the computer's trash:
- Left-click on the desktop app icon in your computer's notification area (top right on macOS, bottom right on Windows, and double left-click in the taskbar on Linux).
- Click on the ⋮ action menu on the right in the window that appears.
- Click on Application Preferences:
- Activate or deactivate the toggle switch to decide whether or not to send the synchronized version to the computer's recycle bin:

Troubleshooting Recycle Bin Issues on Your Computer
In rare cases, even if you have configured the app to move files to the recycle bin (point 4 above), the desktop app may permanently delete the file from your computer when it is deleted from:
- … the web app (online service ksuite.infomaniak.com/kdrive)…
- … the mobile app (application for smartphone or iOS/Android tablet)…
- … another synchronized computer…
instead of placing it in the recycle bin, because:
- Insufficient space: the recycle bin has reached its maximum configured size.
- No recycle bin: on some file systems, such as network drives or removable drives (e.g., USB drive), there may be no recycle bin.
This list is not exhaustive but covers the majority of cases that will not be reported to the user. Other issues, such as those related to the use of read-only mounted disks, will be taken into account and reported to the user.
If in doubt, also make sure that your computer does not instantly delete items that are too large when they are placed in the recycle bin, due to the size of the Windows recycle bin, for example:
Restoring a File from the Recycle Bin…
To restore a file to its original location when the recycle bin has not yet been emptied in the kDrive web app:
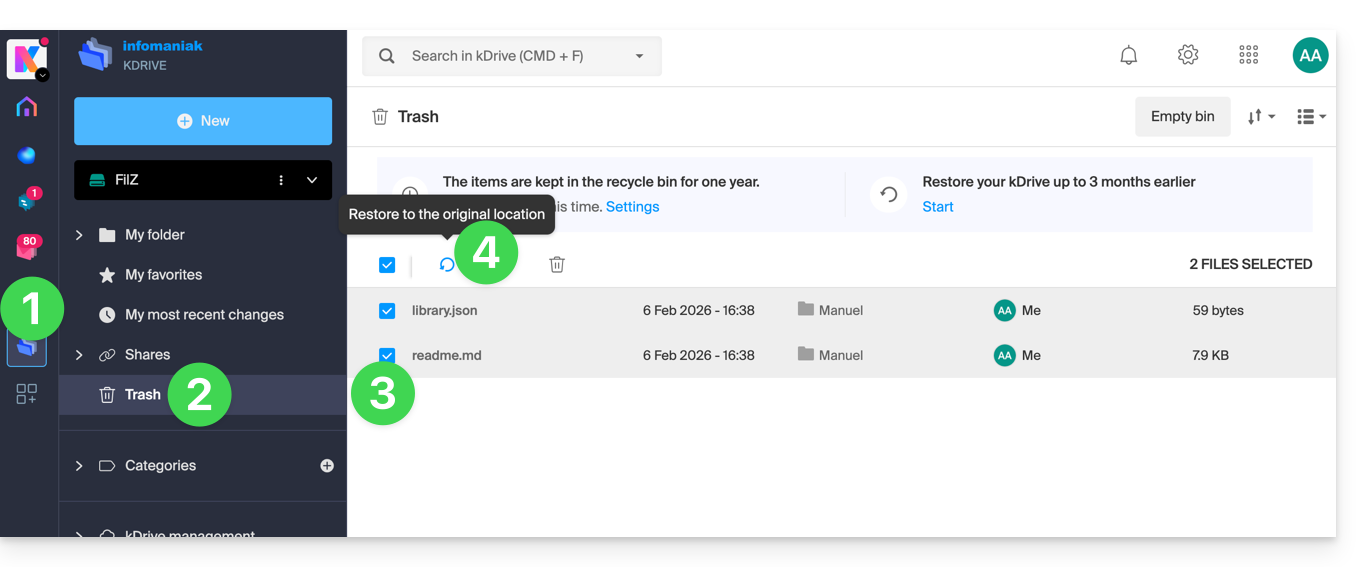
- Click here to access the kDrive web app (online service ksuite.infomaniak.com/kdrive).
- Click on Trash in the left-hand menu.
- Select the items to restore.
- Click on Restore:
To restore an entire kDrive to its state before file movements or reorganizations, please refer to this other guide.
To restore a previous version of an existing file, please refer to this other guide.
Link to this FAQ:
Has this FAQ been helpful?
This guide explains how to use the file history or versioning on kDrive.
Preamble
- This feature is very useful for recovering information that has been deleted or modified by a third party within a collaborative file.
- Infomaniak keeps in the version history a backup of all changes made to files on kDrive.
- You can choose to keep certain versions indefinitely.
⚠ Number of versions / Number of days :
| kSuite | free | 30 / 30 |
| Standard | 100 / 120 | |
| Business | 200 / 180 | |
| Enterprise | 200 / 365 | |
| my kSuite | 30 / 30 | |
| my kSuite+ | 60 / 120 | |
| kDrive | Solo | 100 / 60 |
| Team | 100 / 60 | |
| Pro | 200 / 120 |
Manage previous file versions
To access kDrive:
- Click here to access the kDrive Infomaniak Web app (online service ksuite.infomaniak.com/kdrive).
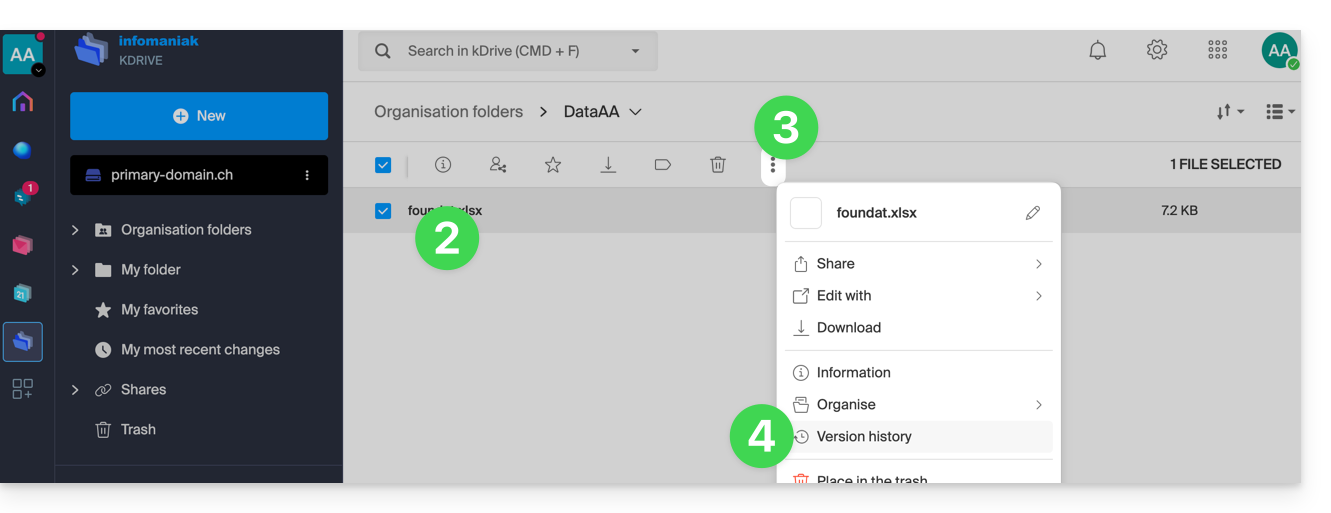
- Select the file to edit (or right-click on the file and in this case go to step 4).
- Click on the action menu ⋮ in the toolbar.
- Click on Version history:
The different versions of the file are listed in reverse chronological order.
You can delete all versions of this file using the button: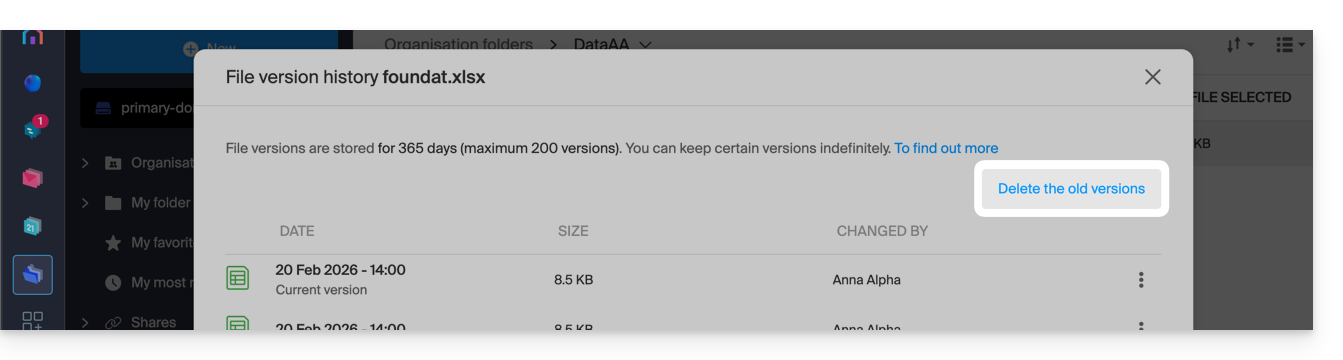
Otherwise, a menu on the right of each version allows you to:
- ... download the file in its state at the date/time of the selected version,
- ... keep it indefinitely: the version will be kept after the standard retention period,
- ... create a new file on kDrive from this version,
- ... delete the version: allows you to erase this version only.
You can also access all versions of all your files:
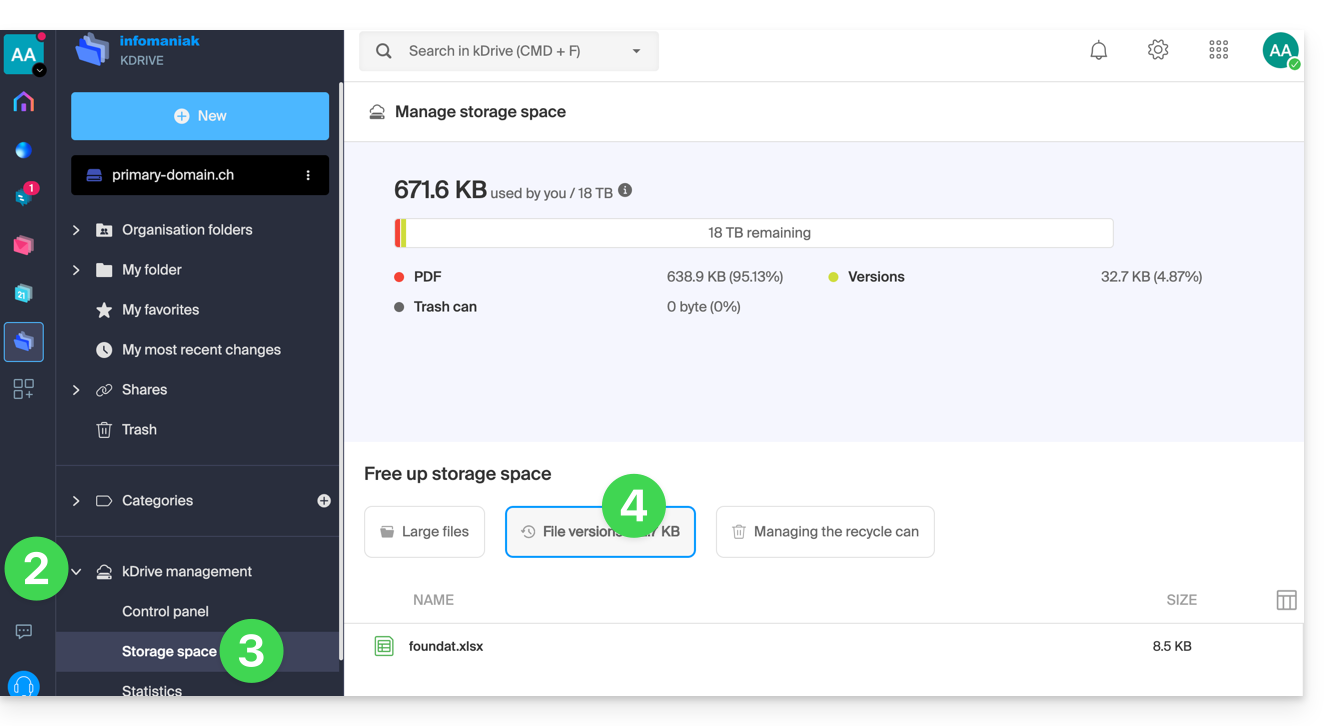
- Click here to access the kDrive Infomaniak Web app (online service ksuite.infomaniak.com/kdrive).
- Click on kDrive Management in the left sidebar.
- Click on Manage storage space
- Click to select File versions:
It is also possible to restore a previous version of the entire organization of your files on the kDrive.
Link to this FAQ:
Has this FAQ been helpful?
This guide explains how to create a (or multiple, depending on the kDrive offer you have) drop box with kDrive to invite contacts to deposit content (files or folders) there. The content uploaded by your contacts is thus directly sent and sorted to the right place on your kDrive.
Create a drop box
To access kDrive and create a drop box:
- Click here to access the Infomaniak kDrive Web app (online service ksuite.infomaniak.com/kdrive).
- Navigate through the kDrive directory that appears in the left sidebar and go to the folder that will host the data collected in the drop box:
- Stay in the personal folder (My Folder) if the data is private and specific to your user.
- Go to the shared folder (Organization Folders) if you want other users of your kDrive to be able to directly view the data from the drop box.
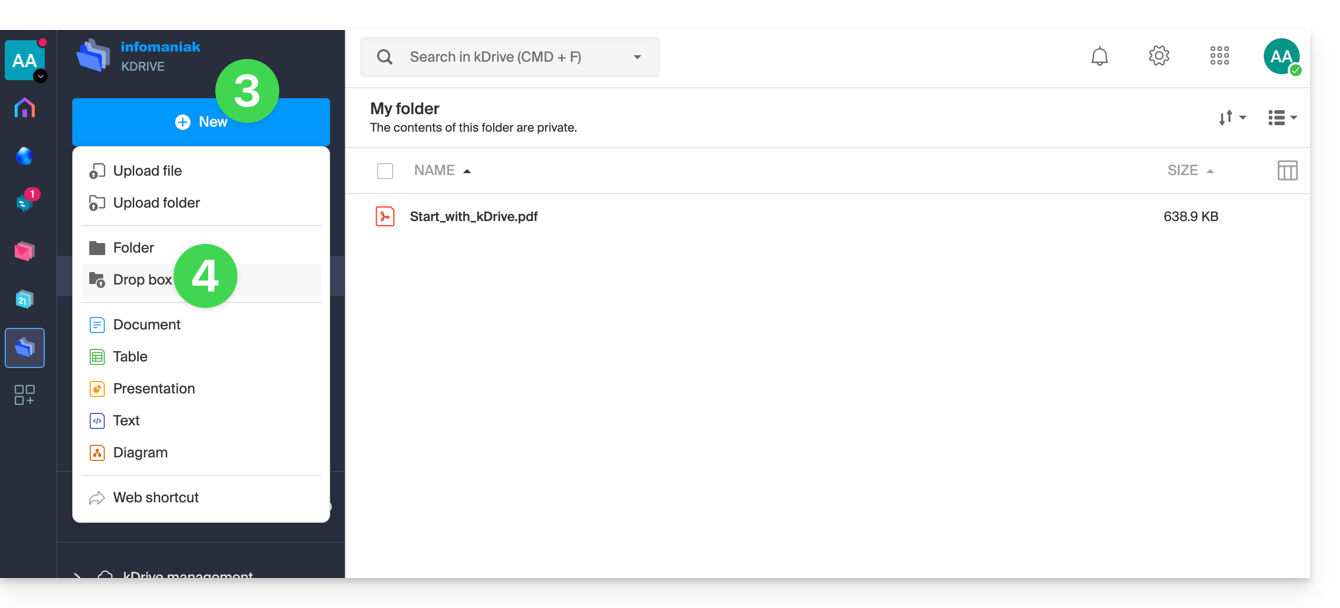
- Click the blue New button when you are in the directory of your choice (the one that will host the data collected using the drop box).
- Click on Drop box:
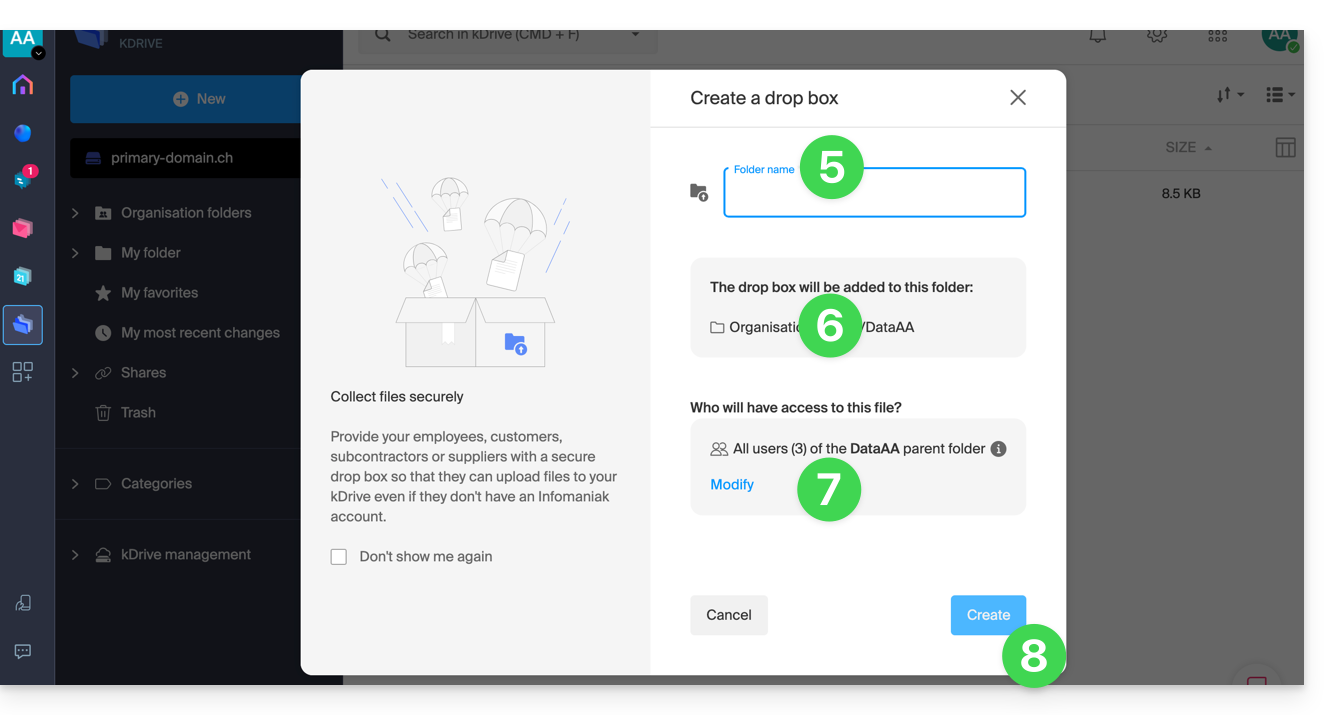
- Enter the name of the drop box.
- The full path (internal to your kDrive) to the location of this drop box is specified for your information.
- Depending on the kDrive offer and the choice in point 2 above, you can still decide whether, despite a location in an Organization Folder (shared folder), you want to restrict access to your user only.
- Click the blue Create button:
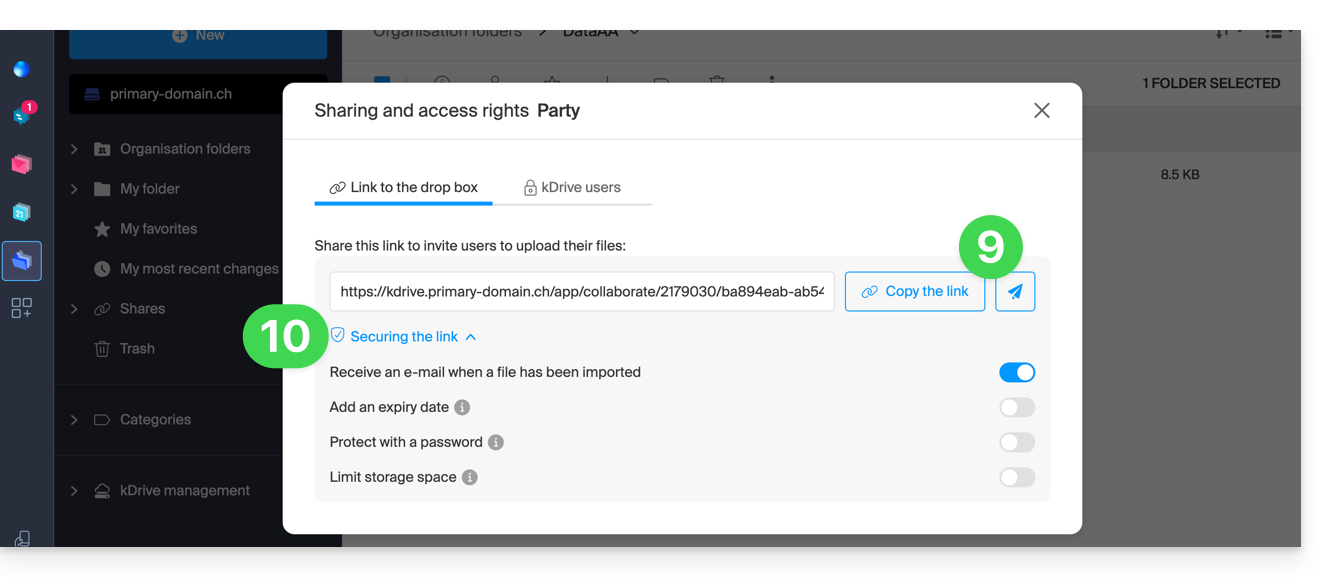
- Share the link to the drop box or click on Send by email to share it with your contacts.
- Advanced options allow you to receive an email notification when a file is deposited, protect the folder with a password, add an expiration date, and limit the storage space of the drop box:
- You can also customize the appearance.
⚠ Number of authorized drop boxes:
| my kSuite | free | 1 |
| Standard | 10 | |
| Business | 100 | |
| Enterprise | 1000 | |
| my kSuite | 1 | |
| my kSuite+ | unlimited | |
| kDrive | Solo | 100 |
| Team | 1000 | |
| Pro | 1000 |
The file size limits are those of kDrive.
Disable or modify a drop box
To access the drop boxes:
- Click here to access the Infomaniak kDrive Web app (online service ksuite.infomaniak.com/kdrive).
- Click on Shares in the left sidebar.
- Click on Drop boxes.
- Right-click or click on the action menu ⋮ to the right of the object concerned in the table that appears.
- Click on Disable to cancel the share link without deleting the already shared data (the box will become a simple folder).
or on Settings higher up in the dropdown menu to modify the advanced options (point 10 above):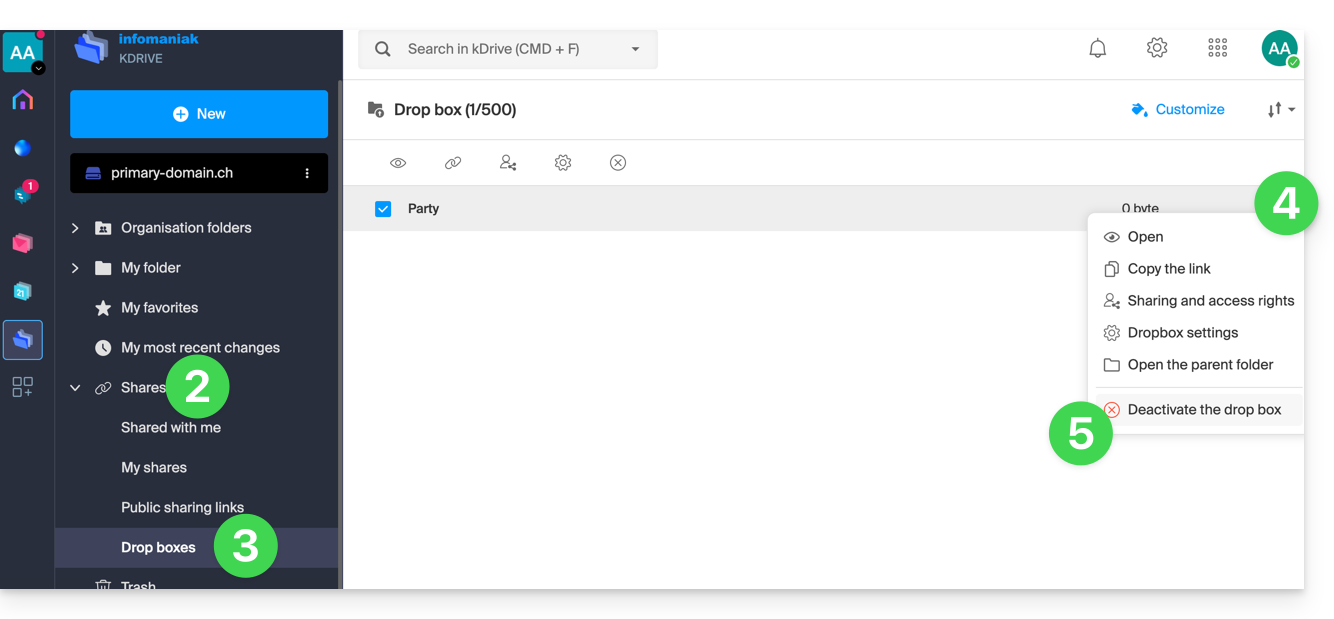
Link to this FAQ:
Has this FAQ been helpful?
This guide explains how to see how the storage space of your kDrive is used and how to increase its capacity if needed.
Preamble
- The maximum number of files per kDrive is not a fixed limit, but if it is exceeded, the stability of the storage system and the kDrive application cannot be guaranteed by Infomaniak.
- Only the particular conditions Backup and storage that you can find on your Manager are binding.
- Refer to this other guide for details specific to drop boxes.
Current limits
Other types of limits are detailed in this other guide.
⚠ Max. number of files / subfolders:
| per kDrive | per folder | |
| All offers | 300000 / 1000 | 50000 |
⚠ Bandwidth (in GB) allowed per day and per user (these limits, provided for informational and preventive purposes, may apply if excessive use degrades the service, in order to guarantee its stability and availability for all users):
| kSuite | free | 200 |
| Standard | 1000 | |
| Business | 1000 | |
| Enterprise | 1000 | |
| my kSuite | 200 | |
| my kSuite+ | 200 | |
| kDrive | Solo | 1000 |
| Team | 1000 | |
| Pro | 1000 |
⚠ Max. number of daily downloads of a file per user:
| kSuite | free | 50000 |
| Standard | 100000 | |
| Business | 100000 | |
| Enterprise | 100000 | |
| my kSuite | 50000 | |
| my kSuite+ | 50000 | |
| kDrive | Solo | 50000 |
| Team | 50000 | |
| Pro | 50000 |
⚠ Max. size of a file (in GB) sent via:
| Desktop app | Web app | API | |
| All offers | 50 | 50 | 50 |
View kDrive storage space
To access kDrive:
- Click here to access the Infomaniak kDrive web app (online service ksuite.infomaniak.com/kdrive).
- Click on the chevron to expand the kDrive Management section in the left sidebar.
- Click on Storage Space in the left sidebar:
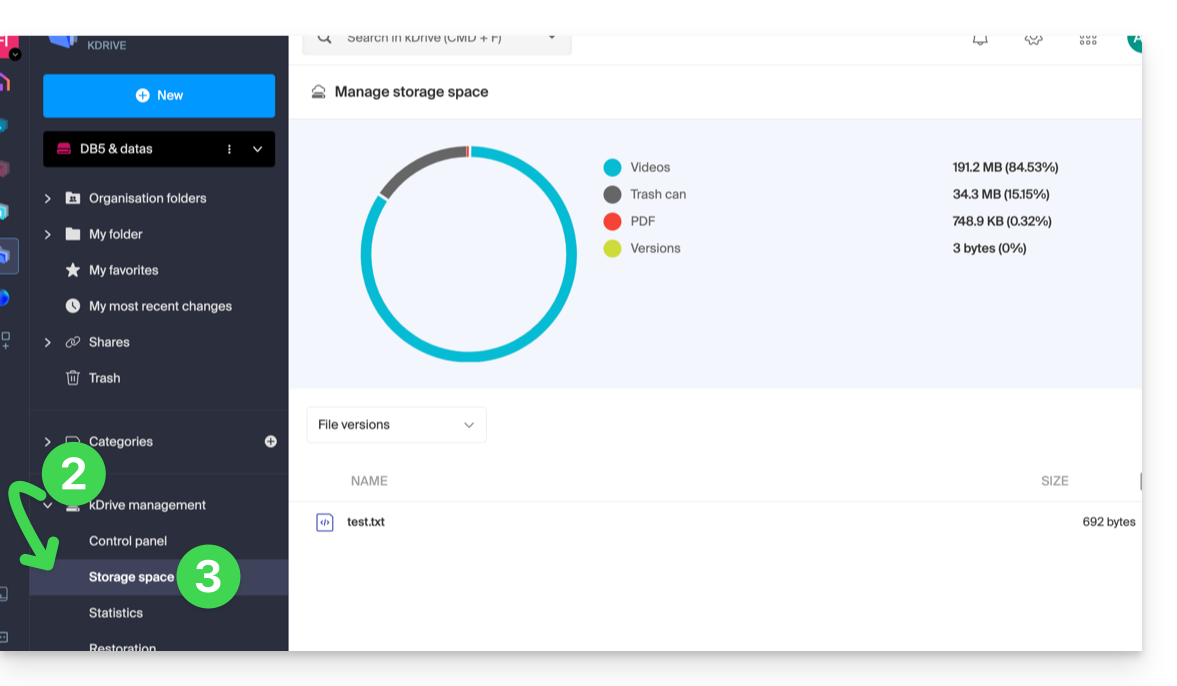
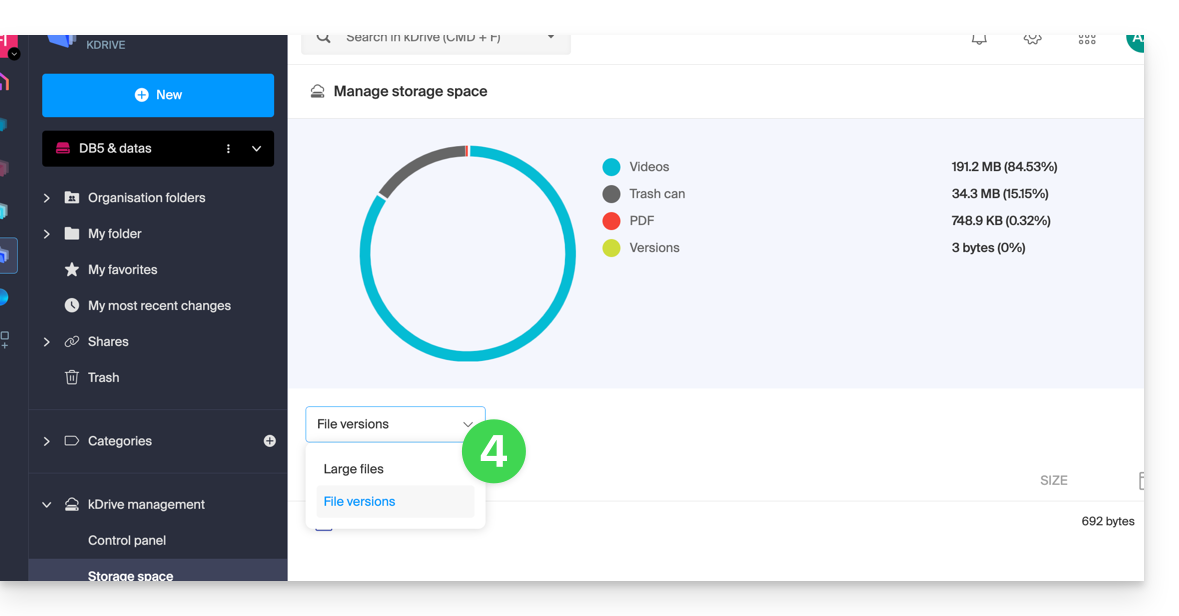
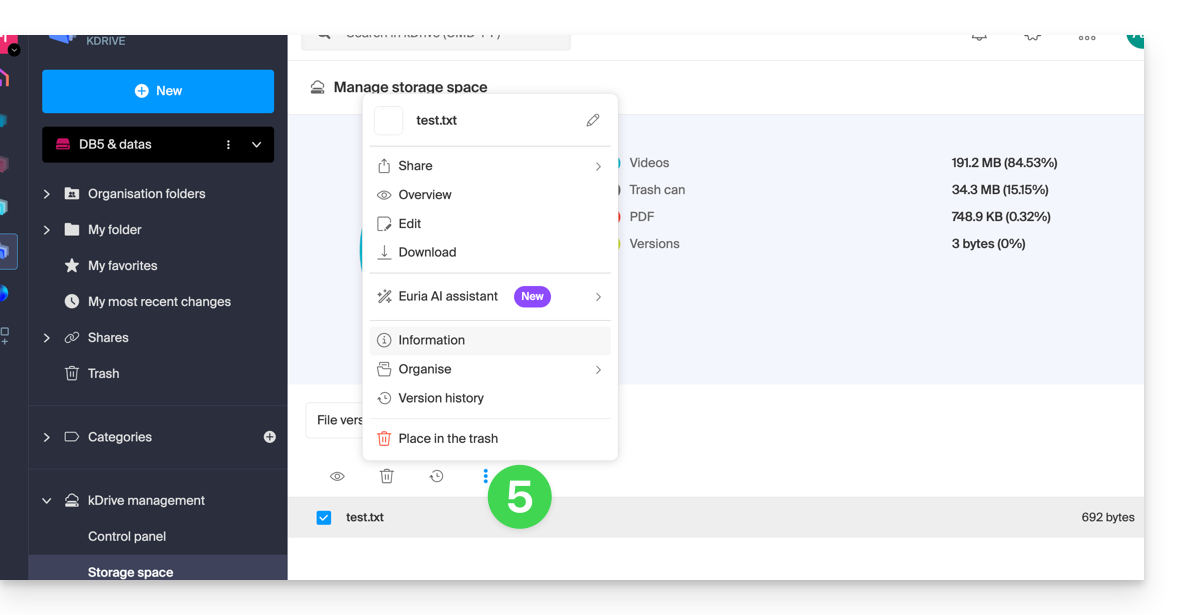
- Select large files (or file versions that are also counted in the storage space) using the dropdown menu:
- Click on the action menu ⋮ located above your selection to perform an action (e.g., deletion):
Increase kDrive Storage Space
Prerequisites
- Have sufficient permissions within the Organization.
To modify kDrive storage space:
- Click here to access the Infomaniak kDrive web app (online service ksuite.infomaniak.com/kdrive).
- Click on Dashboard in the left sidebar under kDrive Management.
- Click on Manage.
- Click on Change Offer:
- You will be offered the choice to change the offer or modify the maximum storage space of your kDrive.
- Once the offer is modified, click on Next and proceed with the payment.
Get information about a folder and its contents
Simply right-click on any folder in the kDrive web app to get the size and content information:
Link to this FAQ:
Has this FAQ been helpful?
This guide explains how to create, save, and edit a plain text file with no particular formatting (notepad, raw code) on the Web app kDrive (online service ksuite.infomaniak.com/kdrive) using the native editor.
Create a plain text file
To create a file in .txt format:
- Click here to access the Web app kDrive (online service ksuite.infomaniak.com/kdrive).
- Open the folder where you want to create a .txt document if necessary.
- Click the New button at the top left.
- Choose the type Text to create a blank document:
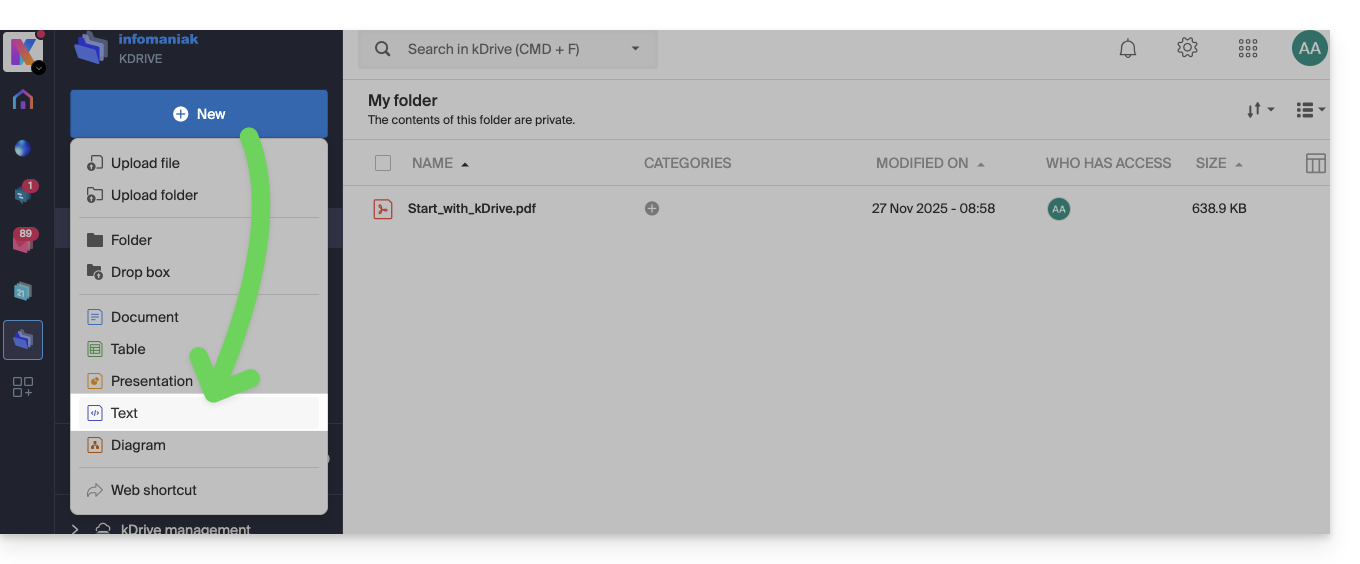
- Enter a file name:

- The blank file opens automatically and you can enter raw text:
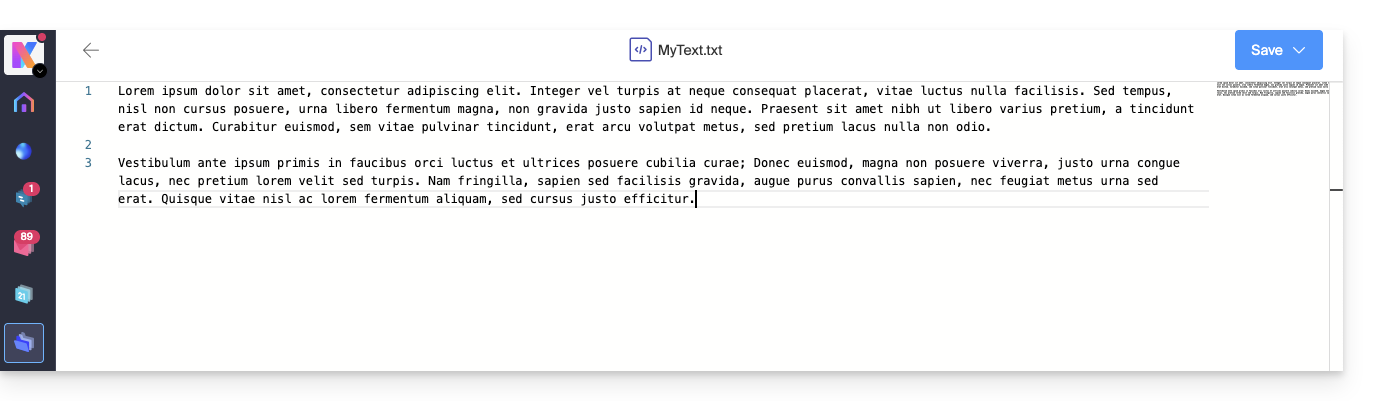
- There is no possibility to format it, edit the text style, alignment, etc. (prefer Office-type files for this).
- If you paste rich content on the page, it will be converted to unformatted raw text.
- A page outline appears on the right to facilitate quick navigation in long documents.
- Saving is automatic but save your changes manually at the top right if necessary.
Find / Replace function
To search and replace all instances of a text in a few clicks, once the document is created:
- Select the term to replace throughout the text.
- Right-click on the selection and choose the menu item “Edit all instances”:
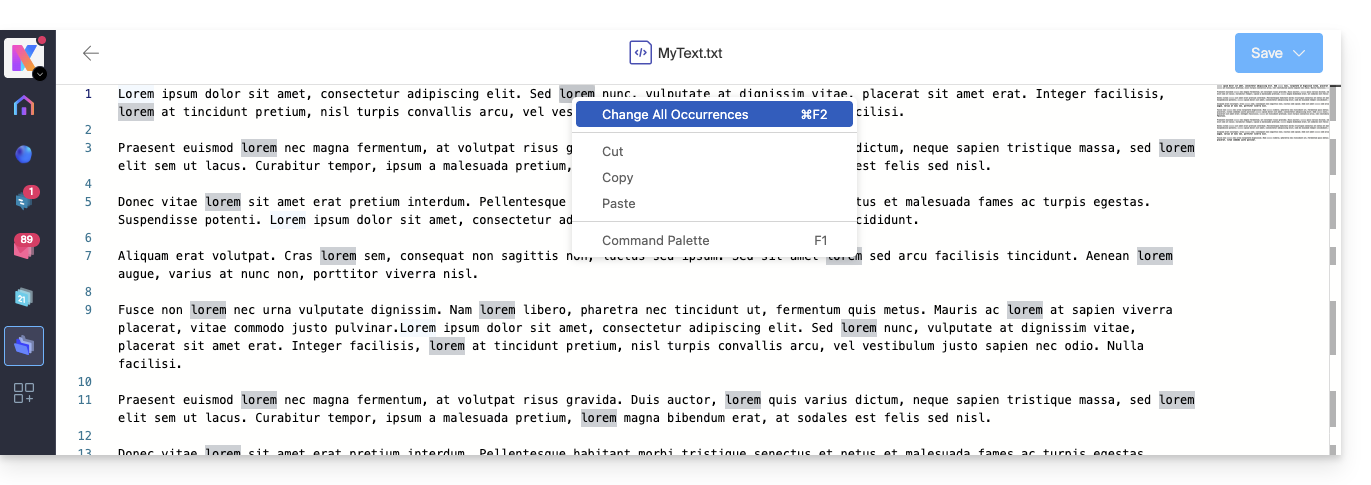
- Enter the text that should replace the selection; the text replaces all identical instances:
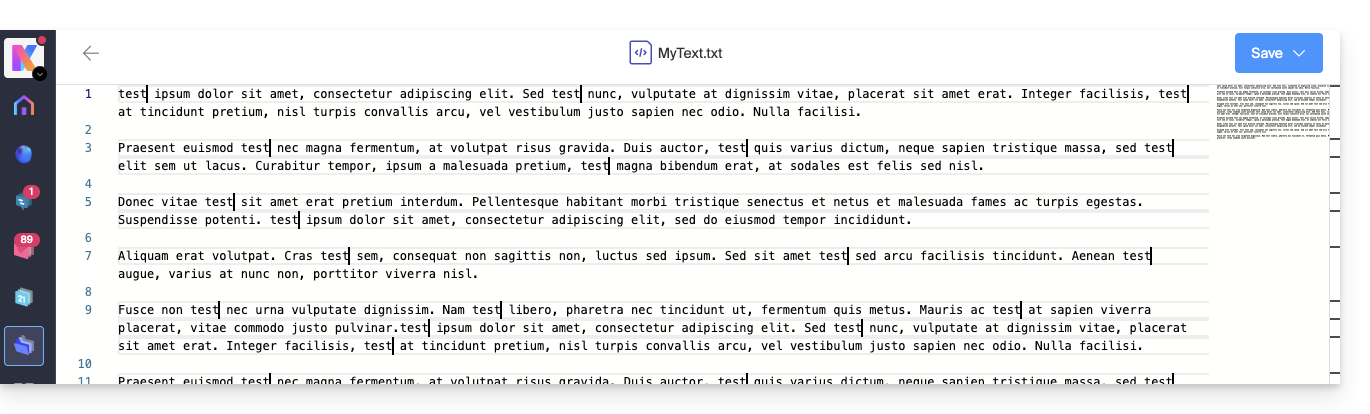
- Saving is automatic but save your changes manually at the top right if necessary.
Link to this FAQ:
Has this FAQ been helpful?
This guide explains how to automatically transfer photos from your mobile device (iOS) to kDrive Infomaniak.
Preamble
- Once this feature is enabled, photos from the mobile device will be saved in the kDrive folder of your choice.
- Foreground mode:
- The synchronization works optimally when the kDrive app is active and in the foreground.
- Background mode
- iOS limits the operation of closed applications.
- kDrive will, however, be able to send files in short sessions (every 15 minutes or so) or during the night if the device is charging and connected to Wi-Fi.
- File naming: automatic backup may rename your files to avoid collision errors or duplicates (see below).
Enable sending to kDrive on iOS (iPhone, iPad)
Prerequisites
To configure automatic backup:
- Open the mobile app kDrive.
- Tap on your initials or avatar (bottom right).
- Go to Settings:
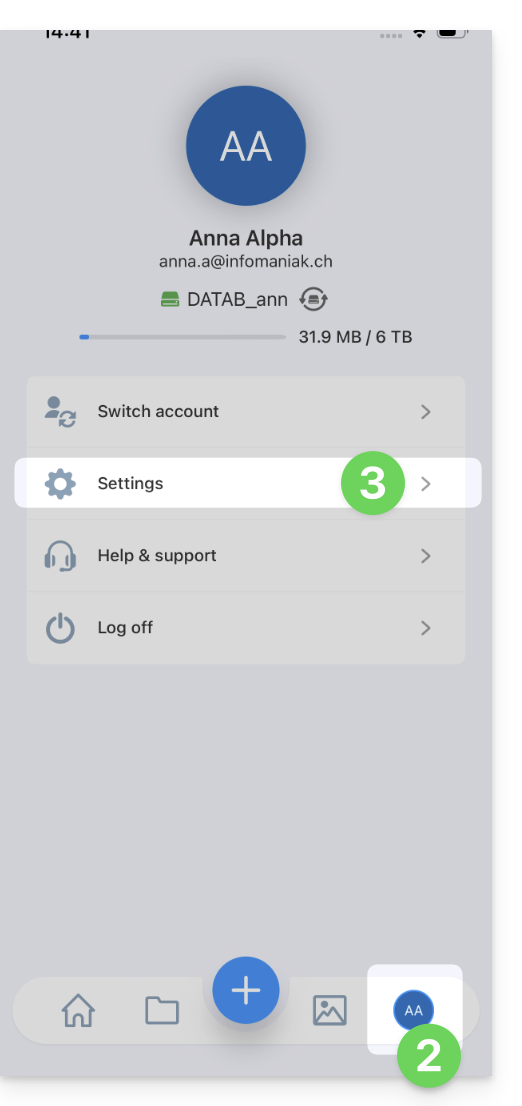
- Select Photo backup:
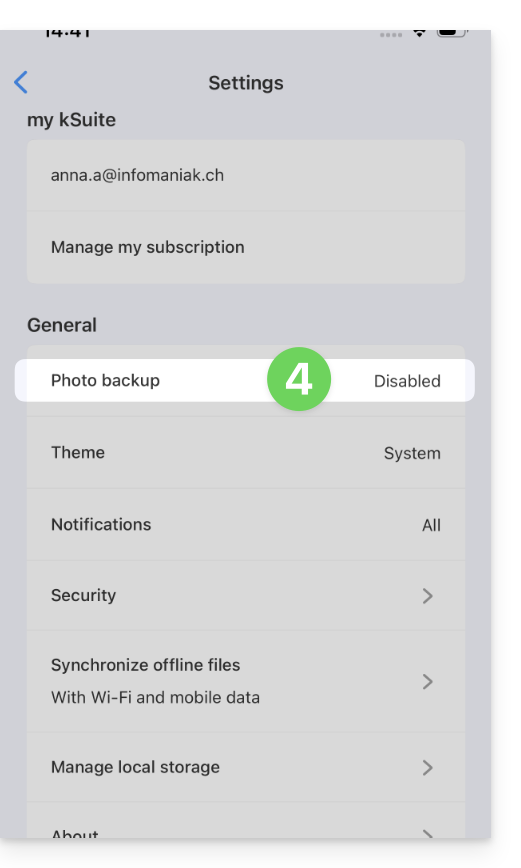
- Enable Automatic backup.
- Authorize access to your photos according to the options proposed by iOS.
- Choose the destination kDrive and the target folder.
- Adjust your preferences (videos, screenshots, deletion after sending, etc.) then tap Save.
Keep the original name of the photos
By default, automatic backup renames your files (e.g. 20260101_101000_1234.jpg) to avoid collision errors or duplicates.
If you want your photos to keep their original name (e.g. IMG_3006.jpg) instead of being renamed by date, you must use the iOS sharing function instead of automatic backup:
- Open the iOS Photos app.
- Select the desired photo(s).
- Tap the Share icon (square with an upward arrow).
- Select kDrive from the list of apps.
- Choose the location and send.
Manual export via the Share button is not recommended for mass transfers of thousands of photos, but it ensures the integrity of the original file name.
Link to this FAQ:
Has this FAQ been helpful?
This guide explains how to scan or digitize documents (multi-page) with the mobile app kDrive (application for iOS / Android smartphone or tablet).
Prerequisites
- Have a kDrive or kSuite offer.
- Install the mobile app kDrive (application for iOS / Android smartphone or tablet).
Scan documents
To quickly digitize paper documents and store them on your kDrive:
- Launch the mobile app kDrive on your iOS or Android device.
- Press the icon at the bottom:
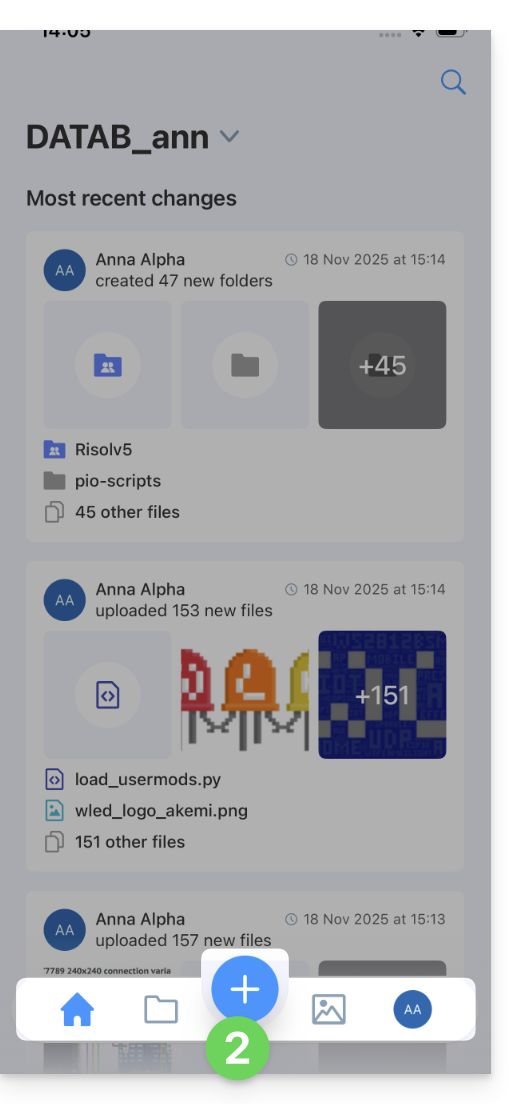
- Press Scan a document:

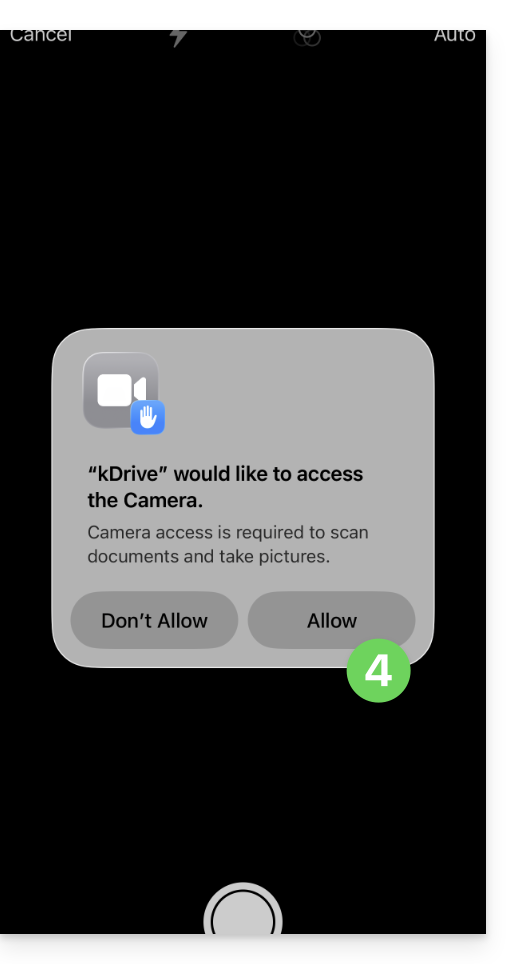
- If necessary, authorize the accesses requested by the app:
- Document search and detection is performed automatically as soon as the image is stable:
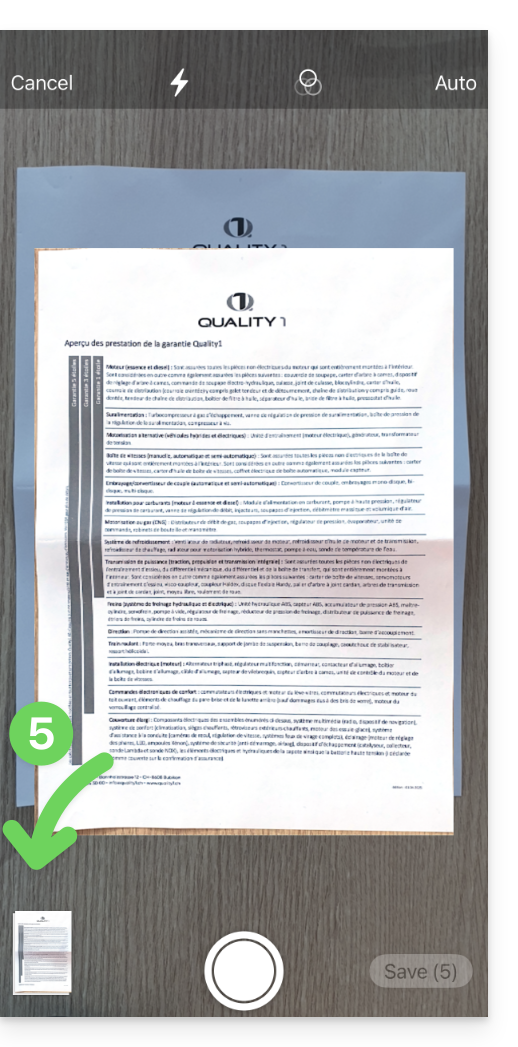
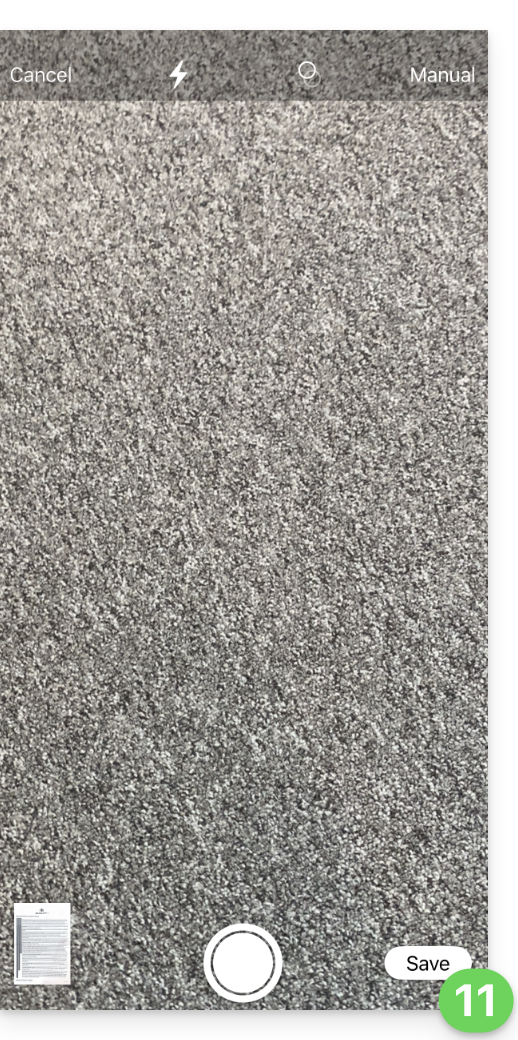
- You can switch to Manual mode at the top right and trigger the photo yourself when you are ready:

- If necessary, crop the document after manually taking the photo:
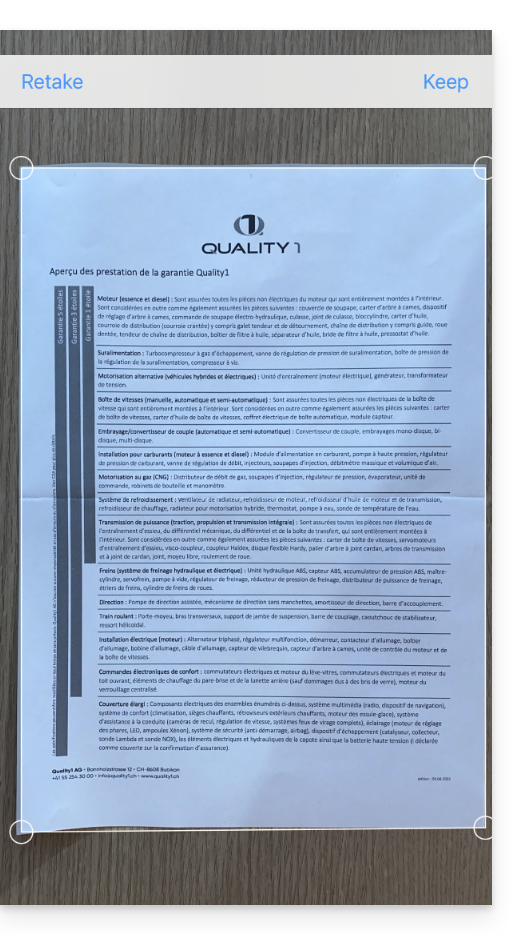
- Press KEEP at the top right.
- Press the thumbnail at the bottom left to access advanced editing (rotation, black and white...) or to delete a specific page.
- Press Finish at the top left.
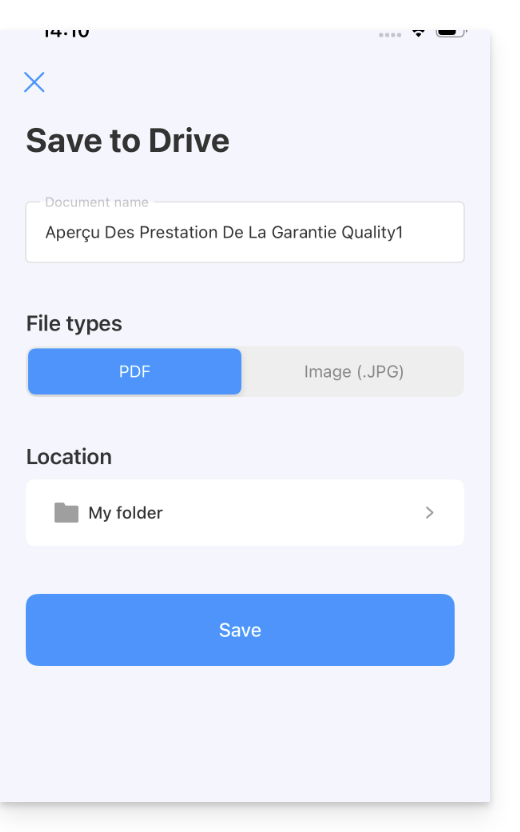
- Repeat the steps to scan other pages or press Save at the bottom right:
- If your scan contains multiple pages, it will be grouped into a PDF to be saved in the location of your choice on the kDrive. If there is only one image, you can choose to save it in .JPG format:
- The document is sent to the kDrive:
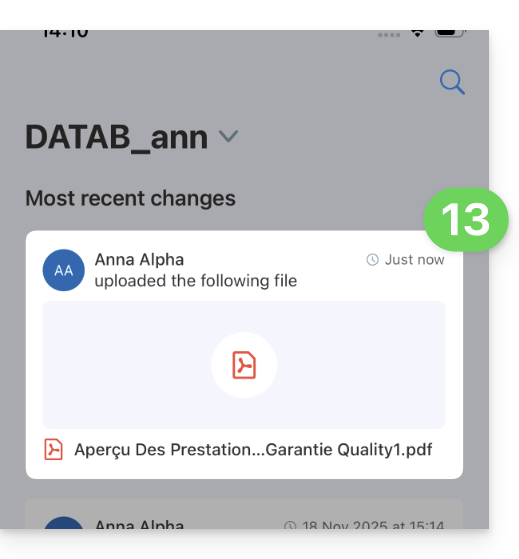
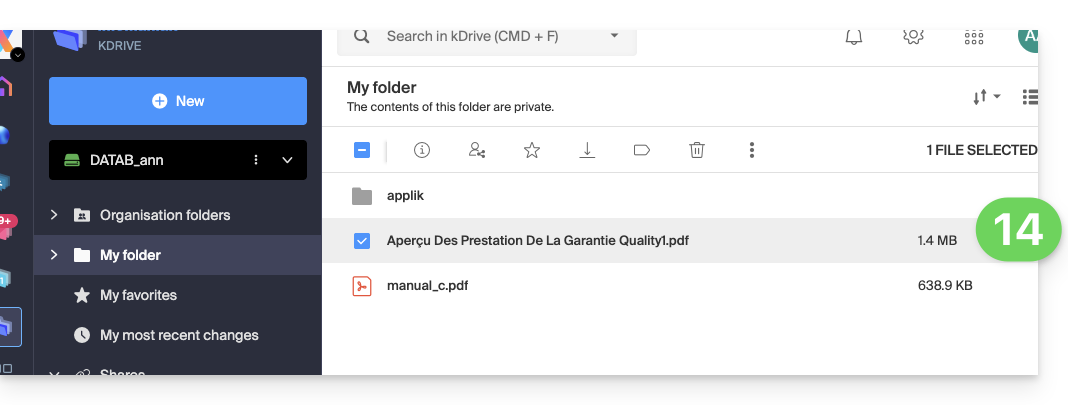
- You will find it on all your connected devices:
Link to this FAQ:
Has this FAQ been helpful?
This guide explains how to connect and manage multiple kDrive on the mobile app kDrive (app for iOS/Android smartphone or tablet). This feature allows you, for example, to access files from a personal kDrive and a professional kDrive.
Prerequisites
- Have a kDrive or kSuite offer.
- Install the mobile app kDrive (app for iOS/Android smartphone or tablet).
Access different kDrives from the mobile app
A user can access multiple kDrives if they already work with multiple kDrives outside the app, if they have been added to other kDrives, etc. They will all be accessible as soon as the user is logged in with the login ID corresponding to these kDrives.
This is the case on the Web app…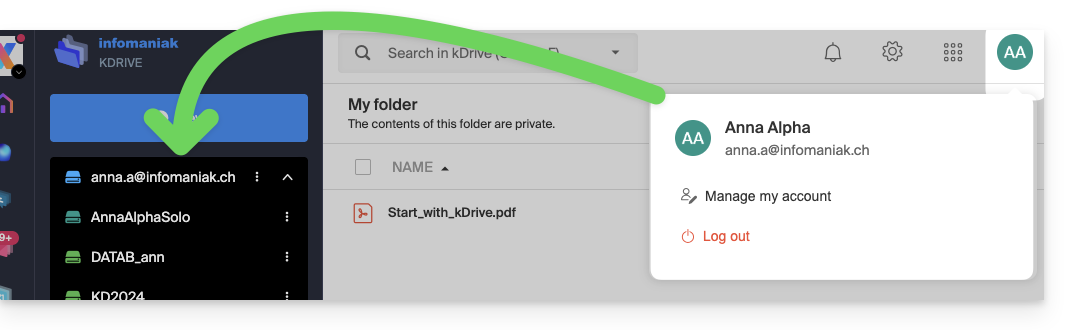 … as on the mobile app:
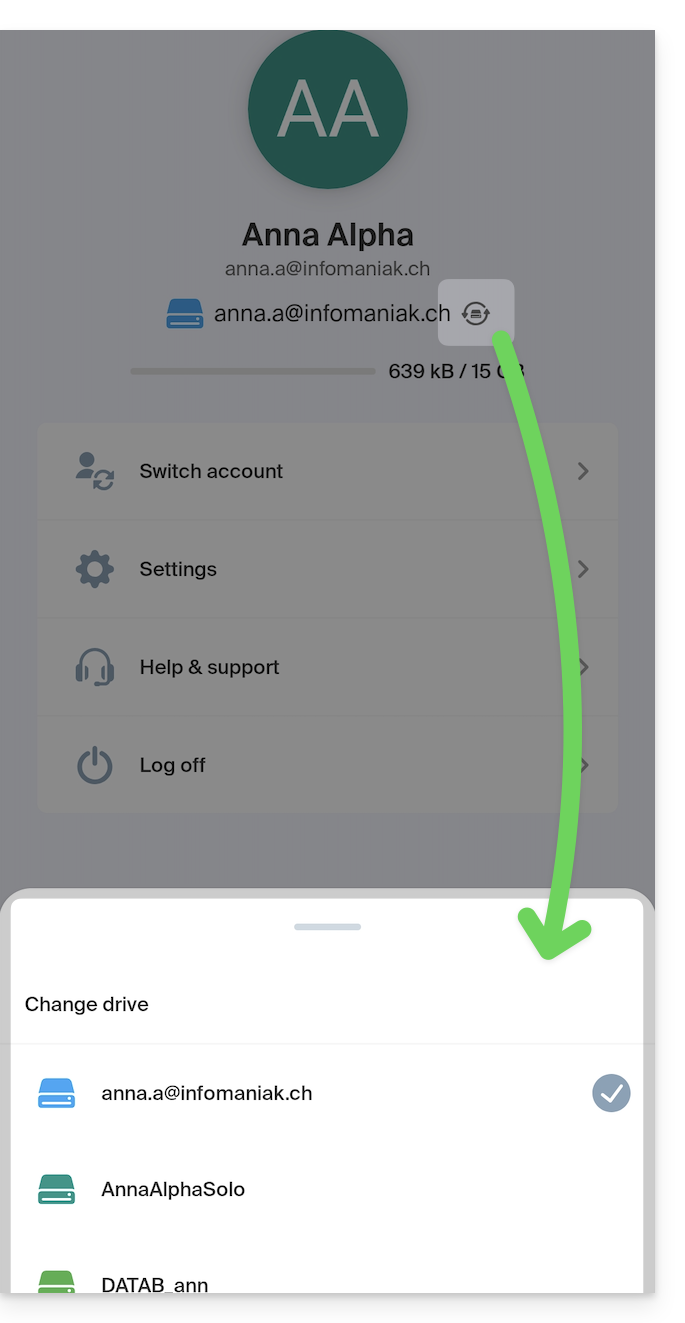
Once you are logged into your Infomaniak account on the mobile app kDrive, the easiest way to access the different kDrives for which your Infomaniak account has access:
- Click on the home icon to be on the home page,
- Click on the chevron to the right of the current kDrive name:
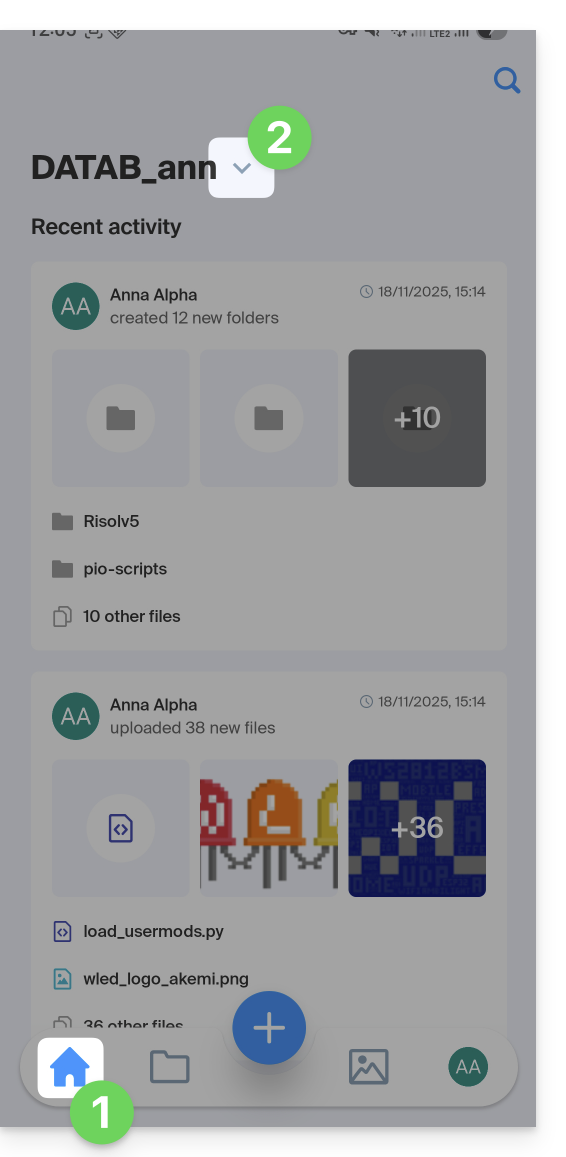
- On the sliding lower panel, click on the name of the desired kDrive:
- You will be switched to the data of the selected kDrive.
Access and manage other kDrive accounts
To log in with a different Infomaniak account and thus access other kDrives:
- Open the mobile app kDrive.
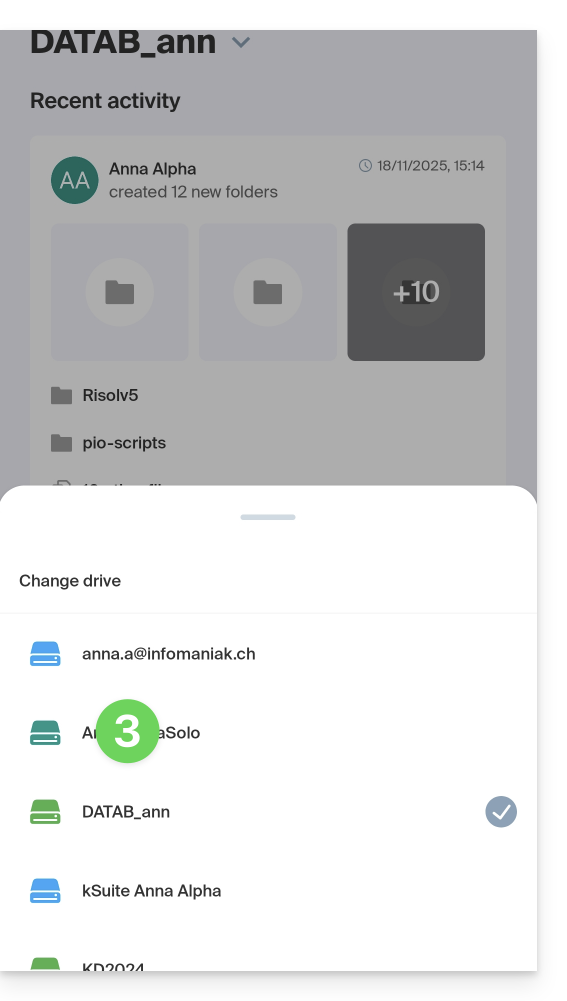
- Press the badge with your initials or avatar at the bottom right.
- Press the icon to the right of the kDrive name (just to check the kDrives you already have access to).
- Press Switch user:
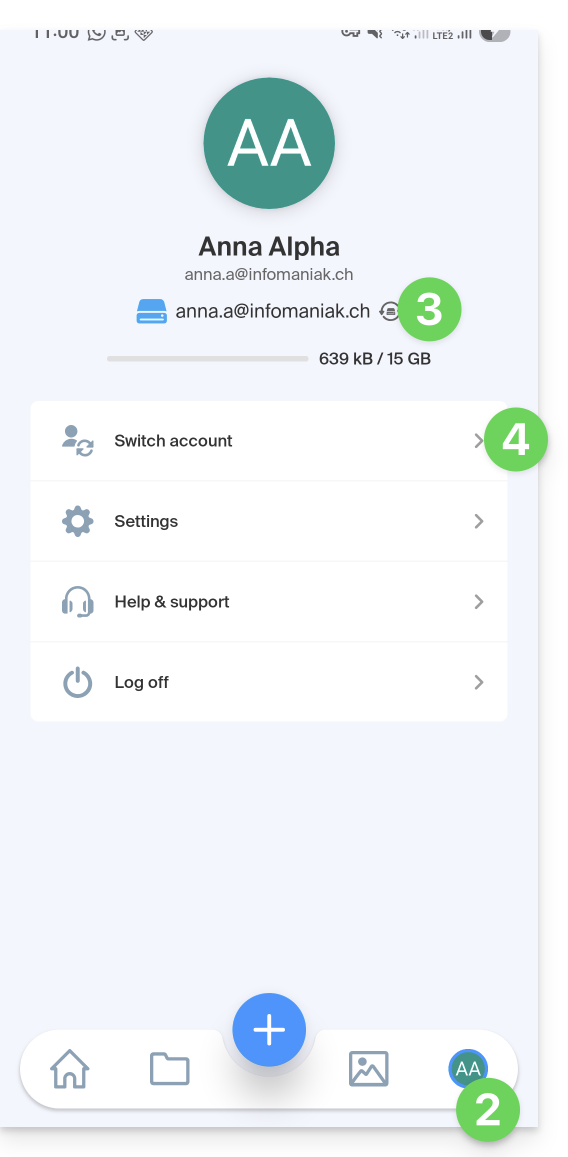
- Press Add a user:
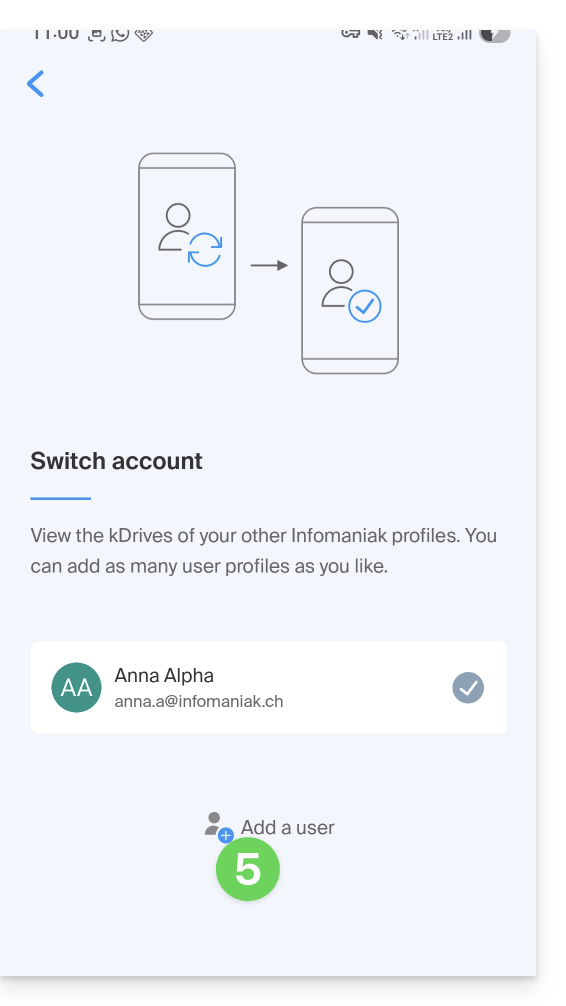
- Enter your Infomaniak account credentials — refer to this other guide if needed.
- Choose the kDrive to add.
- It is now possible to switch from one kDrive to another from the menu User > Switch user, the credentials of the different accounts are preserved.
Link to this FAQ:
Has this FAQ been helpful?
This guide details the possible solutions when the desktop app icon kDrive (desktop application on macOS / Windows / Linux) turns orange, which means there has been a synchronization conflict.
Preamble
- kDrive does not indicate if a file is open or being modified on another local device (no alert is displayed in this case):
- It is therefore quite possible to view (read) a file while it is being modified on another device without causing a conflict.
- The conflict only appears in case of simultaneous modification.
kDrive synchronization conflict cases
When do files conflict ?
- When you modify a file locally while it is also being modified on kDrive Web (the two versions become different).
- When you create or move a file while a similar operation is taking place simultaneously on kDrive Web.
- When you modify a file whose parent folder has been deleted on kDrive Web.
- When a file move cannot be synchronized correctly.
In all these cases
- The kDrive Web version is kept as is.
- Your local version is saved as "[file name]_conflict".
- The conflicting file is not synchronized with kDrive Web.
What to do with these files conflict ?
- Either keep both versions (but only the original file will synchronize).
- Or delete the
_conflictfile if it is the least recent version. - Or delete the original version (not
_conflict) if it is obsolete, then rename the_conflictto synchronize it. - Or manually merge the two versions before deleting the
_conflict.
During a reinstallation of the kDrive application
These conflicts can also occur if you uninstall and then reinstall the application without deleting the configuration, while changes have been made on kDrive Web. To avoid this, it is recommended to:
- Either do not keep the configuration during uninstallation.
- Or fully synchronize before any uninstallation.
- Refer to the best practices further down in this guide.
Managing synchronization conflicts
When simultaneous modifications are made to the same file (locally and on kDrive Web, or while the application is closed), kDrive automatically manages these conflicts according to specific rules.
For versions of the kDrive app prior to 3.6.11
- In case of simultaneous creation, concurrent modification, or conflicting move, the kDrive Web version is always prioritized. The local version is renamed with “
_conflict”. - For conflicts involving deletion on the kDrive Web side, the local file is usually kept and resynchronized.
- Conflicting moves are canceled and recalculated based on the state of kDrive Web.
Starting from version 3.6.11
For the files placeholder (files dehydrated via Lite Sync):
- They are automatically deleted locally.
- If the file still exists on kDrive Web, it is correctly resynchronized.
For other cases:
- The kDrive Web version remains prioritized in most situations.
- The conflicting local files are renamed with “
_conflict”. - Important exception: when a locally modified file should be deleted according to the state of kDrive Web…
- … it is moved to a folder named “
kDrive Rescue Folder” (instead of being deleted); this protects your local modifications from accidental deletion.
- … it is moved to a folder named “
Special cases:
- If a parent folder is deleted, locally modified files are kept.
- Move cycles (mutually moved folders) are resolved in favor of the kDrive Web state.
- Rename conflicts prioritize the kDrive Web version.
How to display conflicts?
To display conflicting files:
- Perform a left-click on the desktop app icon kDrive in the notification area of your computer (top right on macOS, bottom right on Windows and a double left click in the taskbar on Linux).
- Click on the information button at the top.
- Click on the listed event to view its details:

- Conflicts and errors are displayed in 2 distinct tabs allowing you to become aware of unsynchronized data:
- The first tab allows you to resolve conflicts:

- You will then need to choose how to resolve the conflict by deciding to send the local version
- to the server (= synchronize)
- or to the computer's recycle bin

Avoid synchronization conflicts
Recommendations:
- Do not work on the same file with multiple people (unless you are working online on a Word, Excel, or PowerPoint document).
- Synchronize your modifications offline before modifying the same files online.
- Avoid creating folders that have the same name as folders you do not synchronize on a device.
If necessary, to manually resolve certain synchronization conflicts that have not been resolved automatically:
- Open both files.
- Compare the differences.
- Retrieve the information from the conflict file (the one with the exclamation mark) in the base file.
- Delete the conflict file that is not synchronized (the one with the exclamation mark and the note
conflicted copy):
Don't see the conflict files on all your devices? That's normal; the conflict file (the one with the exclamation mark and the note conflicted copy in its name) is not synchronized. The idea is that you, the author of the changes, are the best person to resolve the conflict.
Refer to this other guide if you encounter a problem even though the kDrive desktop app icon is green.
Link to this FAQ:
Has this FAQ been helpful?