Knowledge base
1000 FAQs, 500 tutorials and instructional videos. Here, there are only solutions!
This guide explains how to import (one single time) to kDrive data (files, folders, etc.) from an external Cloud, such as your previous provider's, for example Dropbox or Microsoft.
Prerequisites
- Have a kDrive or my kSuite offer
- Have sufficient permissions within kDrive or my kSuite.
- Do not change your passwords until the import is complete!
Specific guides
Click on the link corresponding to your current host:
- Google Photos: complete guide to migrate photos from Google Photos to Infomaniak
- Google Drive
- Apple iCloud
- Any other Cloud provider offering the WebDAV protocol: refer to this other guide
Guide for any other external Cloud provider
For example:
- Dropbox
- OneDrive
- OwnCloud
- NextCloud
- Another kDrive to which your user account has access (except for "external" type access)
Data not imported
- Data that has been shared with you is not imported.
- Only data that truly belongs to you will be imported.
- Google documents such as Gdocs, Sheets, Slides, etc. …
- … are not imported during a Dropbox import.
- … are converted by Google when these files are downloaded from Google Drive on macOS/Windows.
- … are not converted when they are copied from the local Google Drive directory to the local kDrive directory. Therefore, it is imperative to download the files from the Web version of Google Drive.
- Dropbox Paper documents.
- Dropbox share links visible here.
- Individually shared Dropbox files, visible here (however, shared folders and common documents will be imported).
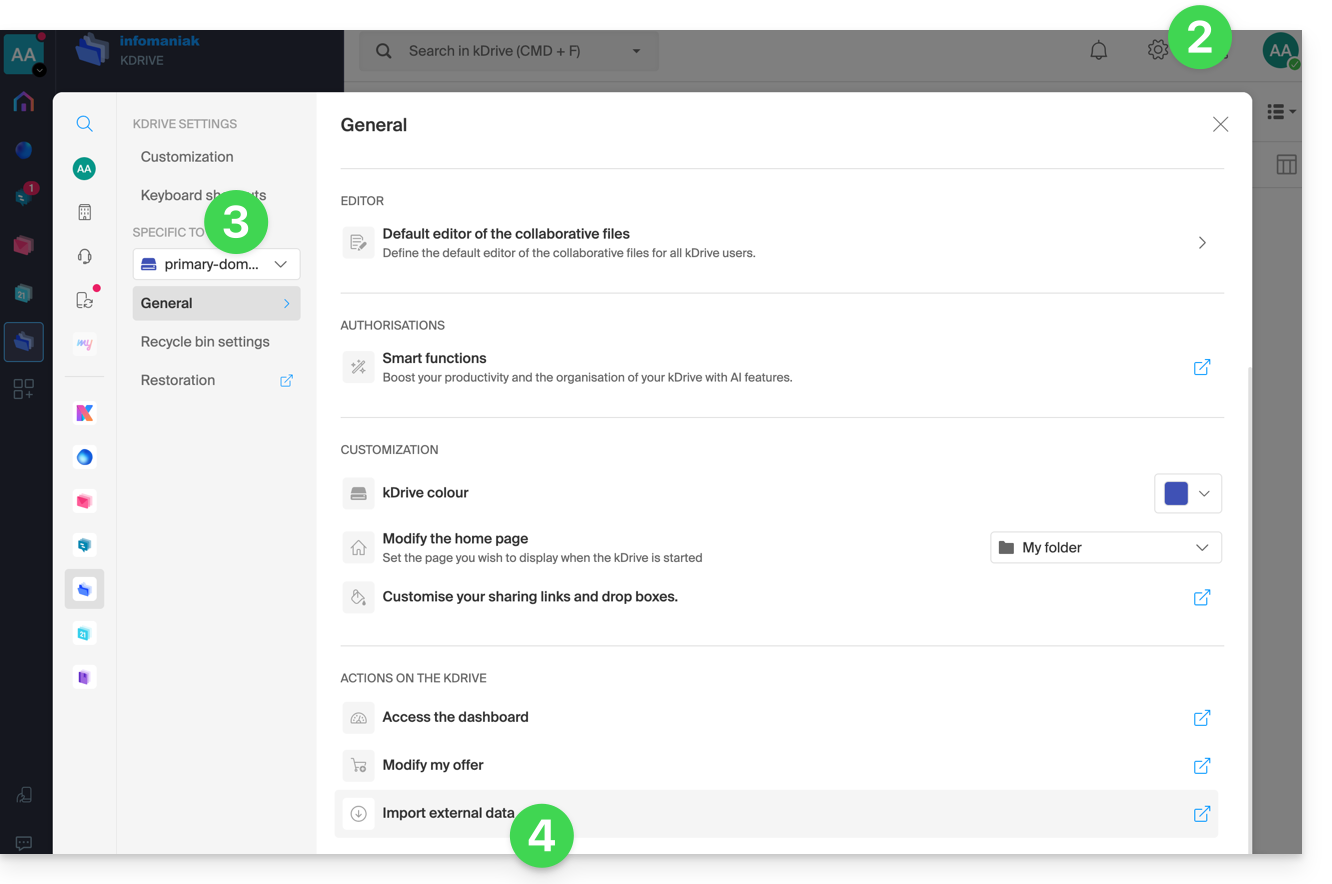
To proceed with the data import:
- Click here to access the Infomaniak kDrive Web app (online service ksuite.infomaniak.com/kdrive).
- Click on the Settings icon in the top right corner.
- Check or select the relevant kDrive in the dropdown menu of the left sidebar.
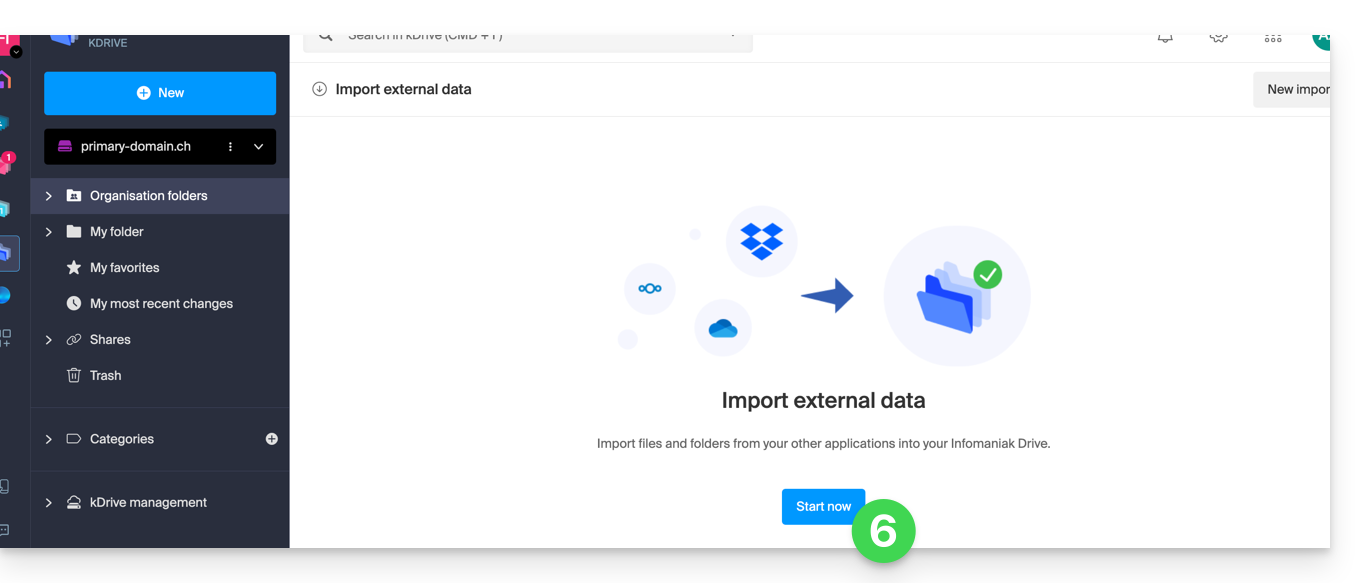
- Click on Import external data under General:
- Click on Start or New import at the top:
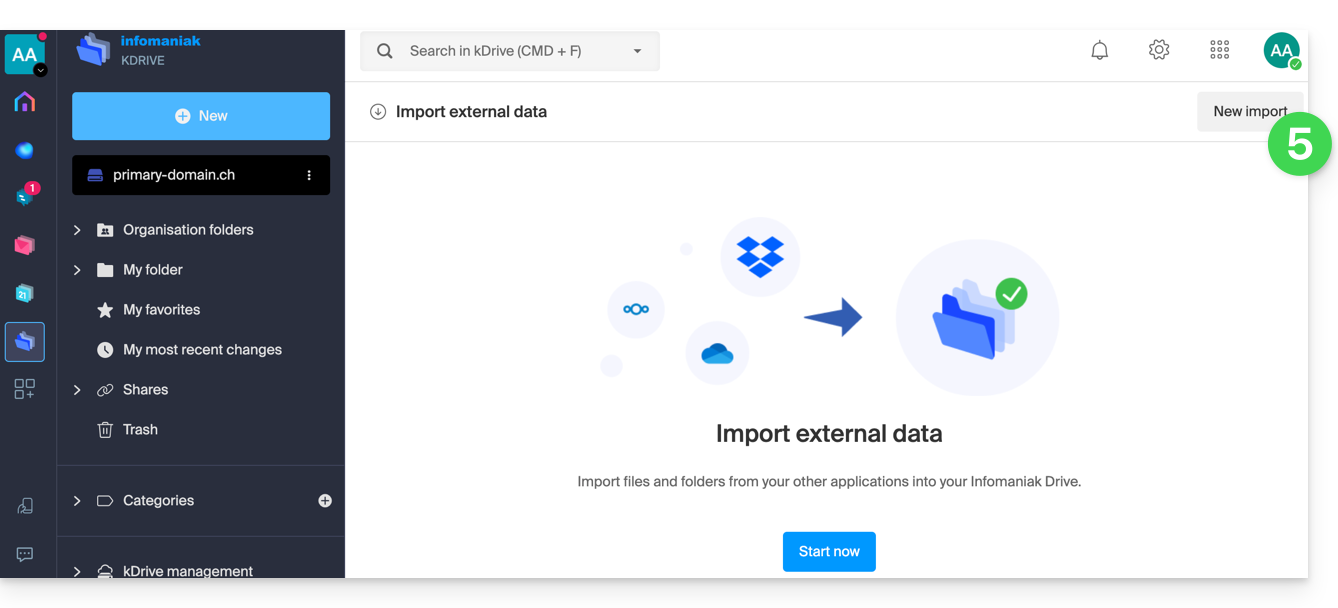
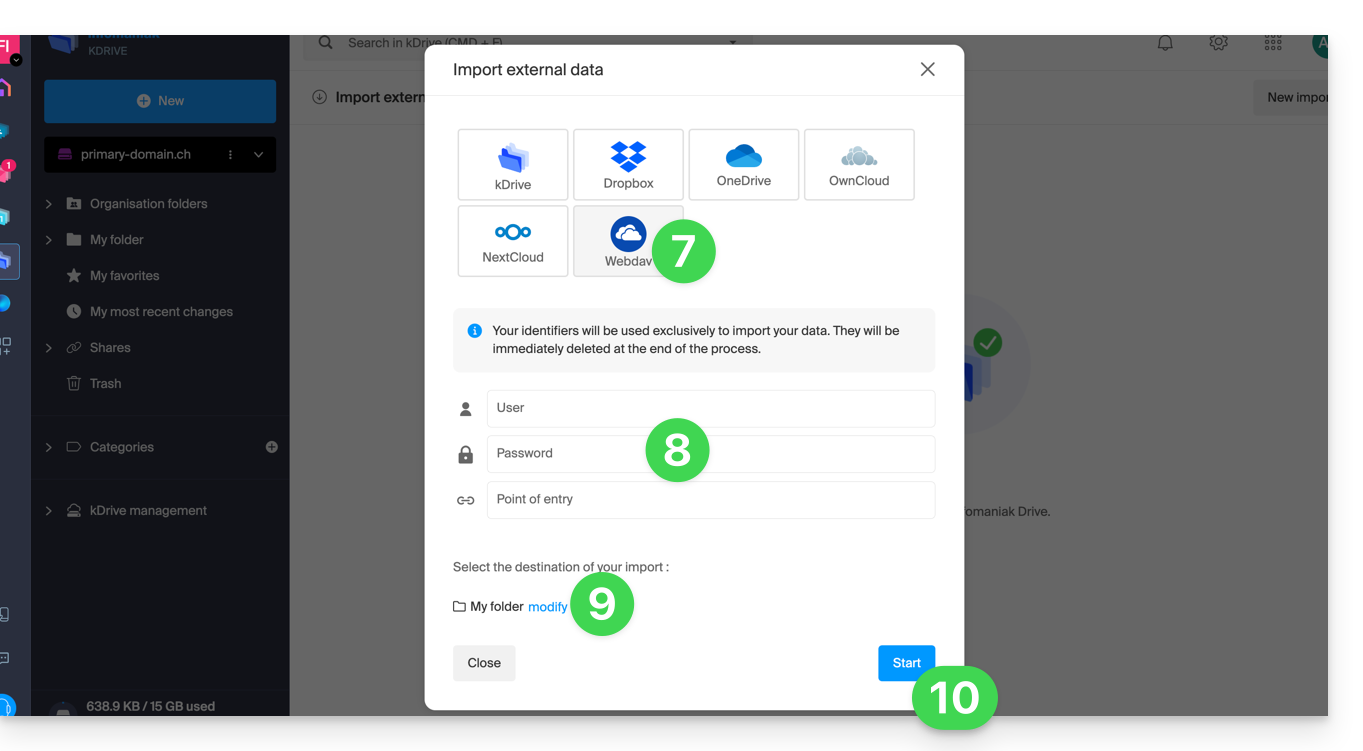
- Choose the relevant service.
- Choose the location where the imported files will be stored.
- Enter any required information if prompted and click the blue Start button:

- Enter any required information if prompted and click the blue Continue button.
- Complete the wizard.
- Wait while the data is being imported.
Manage the ongoing import
To monitor ongoing imports, return at any time to the page mentioned in point 5 above.
To stop an ongoing import, click on the action menu to the right of the import listed on the page and choose to cancel (in case of voluntary interruption, a report is sent by email to the administrator).
A second consecutive import would re-import all the data (to another kDrive directory), it is not differential synchronization and there is no duplicate management.
Check your imported data immediately after the operation.
Link to this FAQ:
Has this FAQ been helpful?
This guide provides instructions for connecting to kDrive using the WebDAV connection protocol.
Use the WebDAV protocol on kDrive for specific and occasional use cases: if you want to work on your files and share them, kDrive is the ideal tool. However, to secure your data against loss or corruption and ensure business continuity, Swiss Backup is the essential and appropriate solution.
✘ UNAVAILABLE with
kSuite free / kSuite Standard
my kSuite / my kSuite+ (ik.me, etik.com, ikmail.com)
Obtain the ID (kDrive ID)
To find your kDrive ID:
- Click here to access the Infomaniak kDrive web app (online service ksuite.infomaniak.com/kdrive).
- The kDrive file structure is displayed in the left-hand menu.
- The URL
https://ksuite.infomaniak.com/34567/kdrive/app/drive/123456/files/56789orhttps://ksuite.infomaniak.com/all/kdrive/app/drive/123456/displayed at the top of your browser contains a number: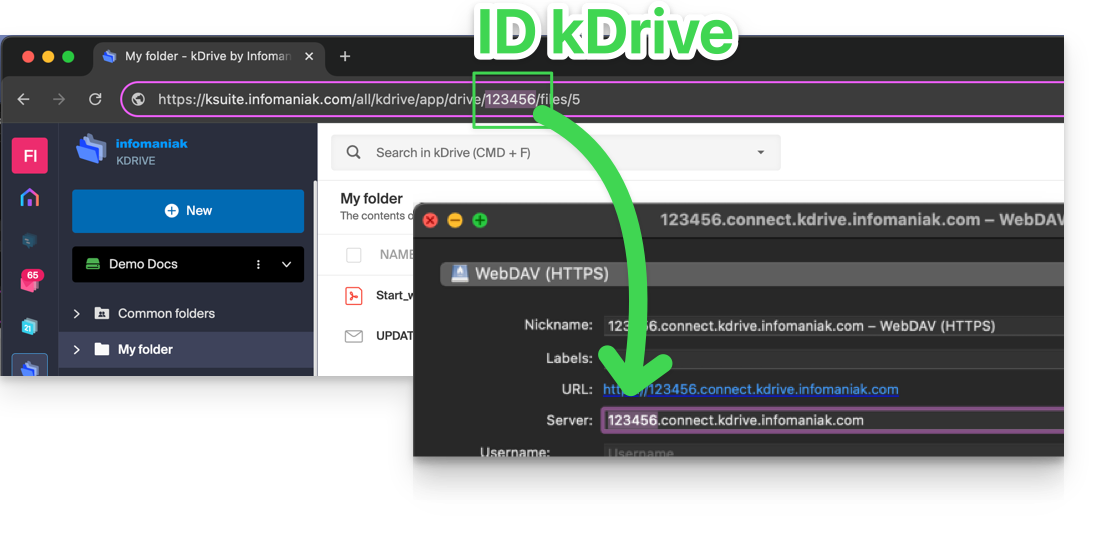
- In some cases, particularly when the Organization ID is mentioned in the URL, there may be several sets of numbers, but the principle remains the same: you need to take the number displayed after the term "/drive/":
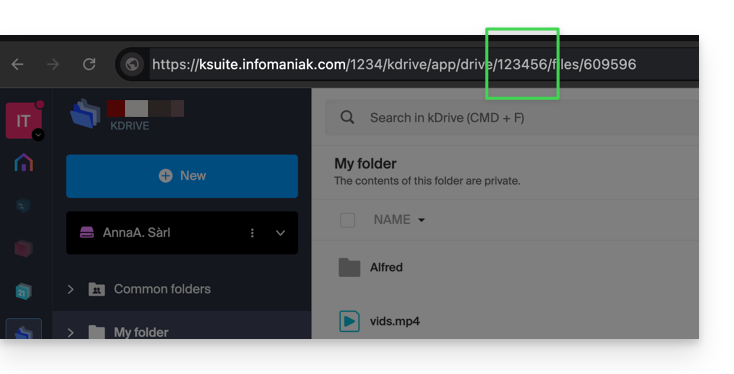
This number (in the example 123456) is your kDrive ID (IDkDrive).
You will therefore need to enter https://IDkDrive.connect.kdrive.infomaniak.com whenever necessary (e.g., https://123456.connect.kdrive.infomaniak.com as the WebDAV address).
Specific WebDAV Guides
Examples of synchronization via WebDAV:
WebDAV connection URL directly to a specific folder
To facilitate a direct connection via WebDAV to a specific folder, you can use the following URL (replacing 123456 as above):
https://12345.connect.kdrive.infomaniak.com/Common documents/folder-nameThis simple method allows you to quickly access the desired folder without manually navigating the directory structure. Simply replace "folder-name" with the exact name of the target folder to establish a direct and secure connection via WebDAV.
Link to this FAQ:
Has this FAQ been helpful?
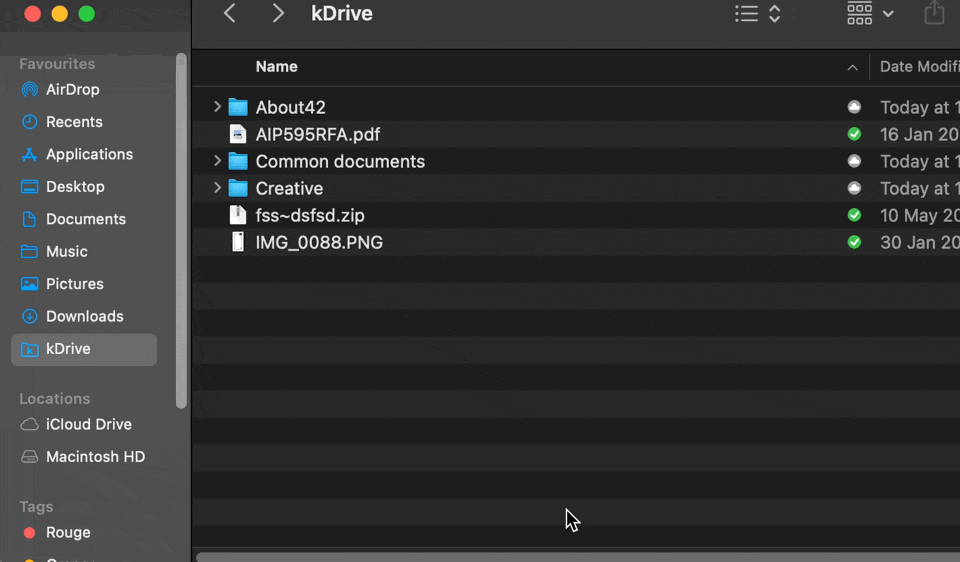
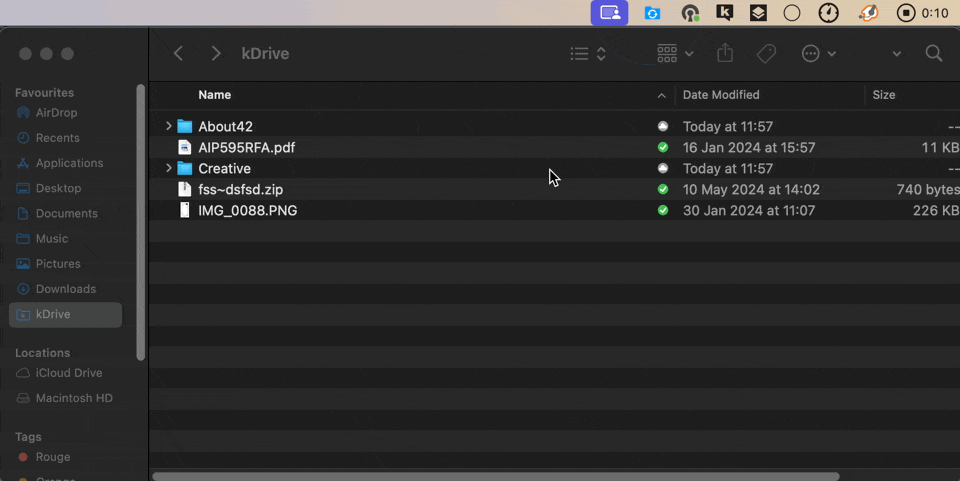
This guide details the structure of kDrive Infomaniak: online interface, menus to manage and find your shares, usefulness and meaning of default folders, etc.
Preamble
- This guide applies to the Web app kDrive (online service ksuite.infomaniak.com/kdrive).
- The desktop app kDrive (desktop application on macOS / Windows / Linux) is not directly concerned (and will not display certain elements).
- The mobile app (application for iOS / Android smartphone or tablet) is, however, similar in terms of menu organization (with a few singularities such as offline files, for example).
- The Shared folders and the Shares menu are only visible with certain multi-user offers.
- Do not rename and/or move the default-created folders either on the Web version and even less locally, as this causes synchronization issues.
- To quickly access the different functionalities/operations, right-click on your files.
3 main elements
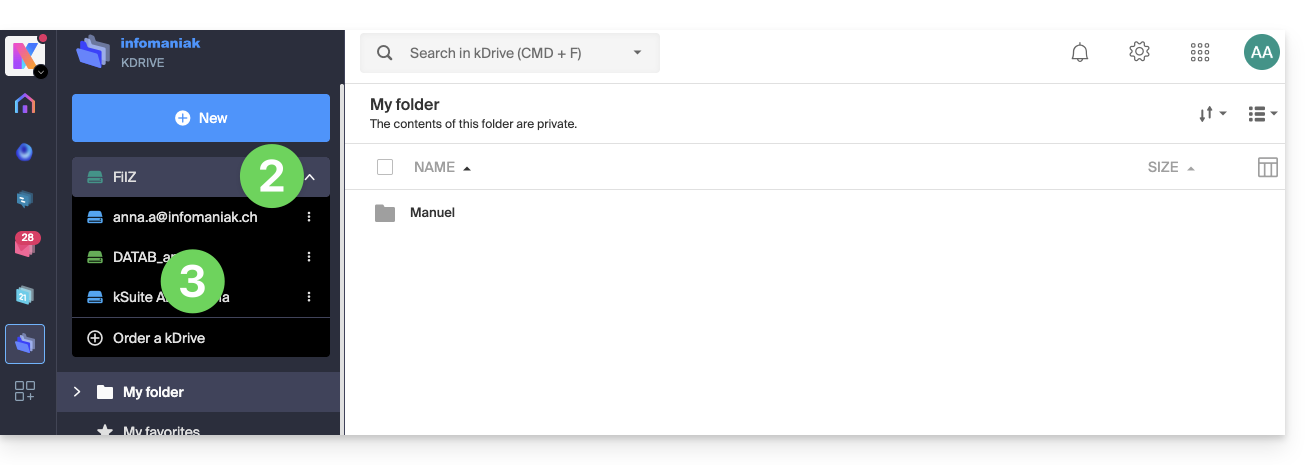
The kDrive interface offers a left-side menu that leads you to the kDrive data, including these 3 main elements:
1. Organization folders: common to the collaborators of your Organization
This folder displays the folder tree of shared folders automatically to some or all users of the same kDrive; if they contain documents, they will be displayed in the center of the interface: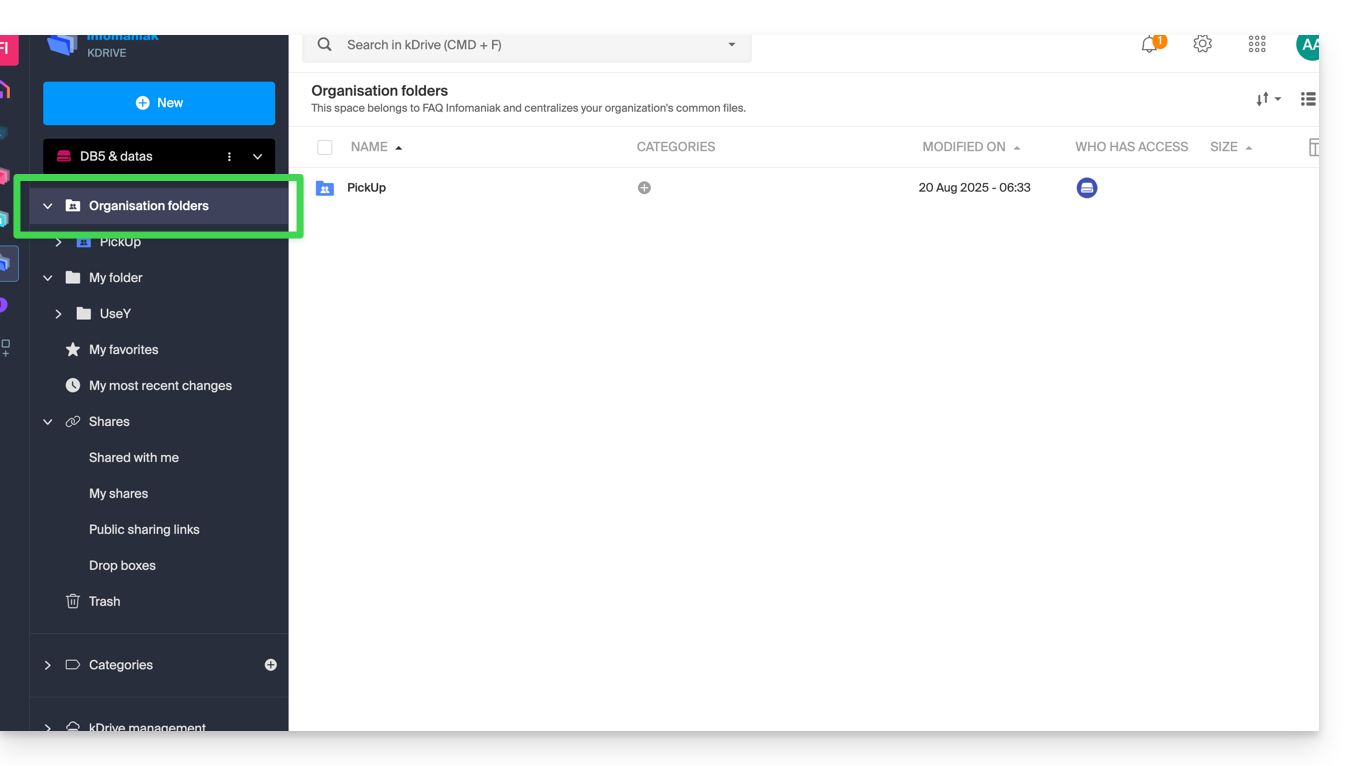
If you create a new folder here, you can choose to share it with the entire Organization (all kDrive users) or only a few users / Groups who will then have to request access if necessary:
2. My folder: default personal & private folder
This folder displays the folder tree specific to the user themselves: indeed, each kDrive user has their own personal space that will not be automatically shared with other users of the same kDrive: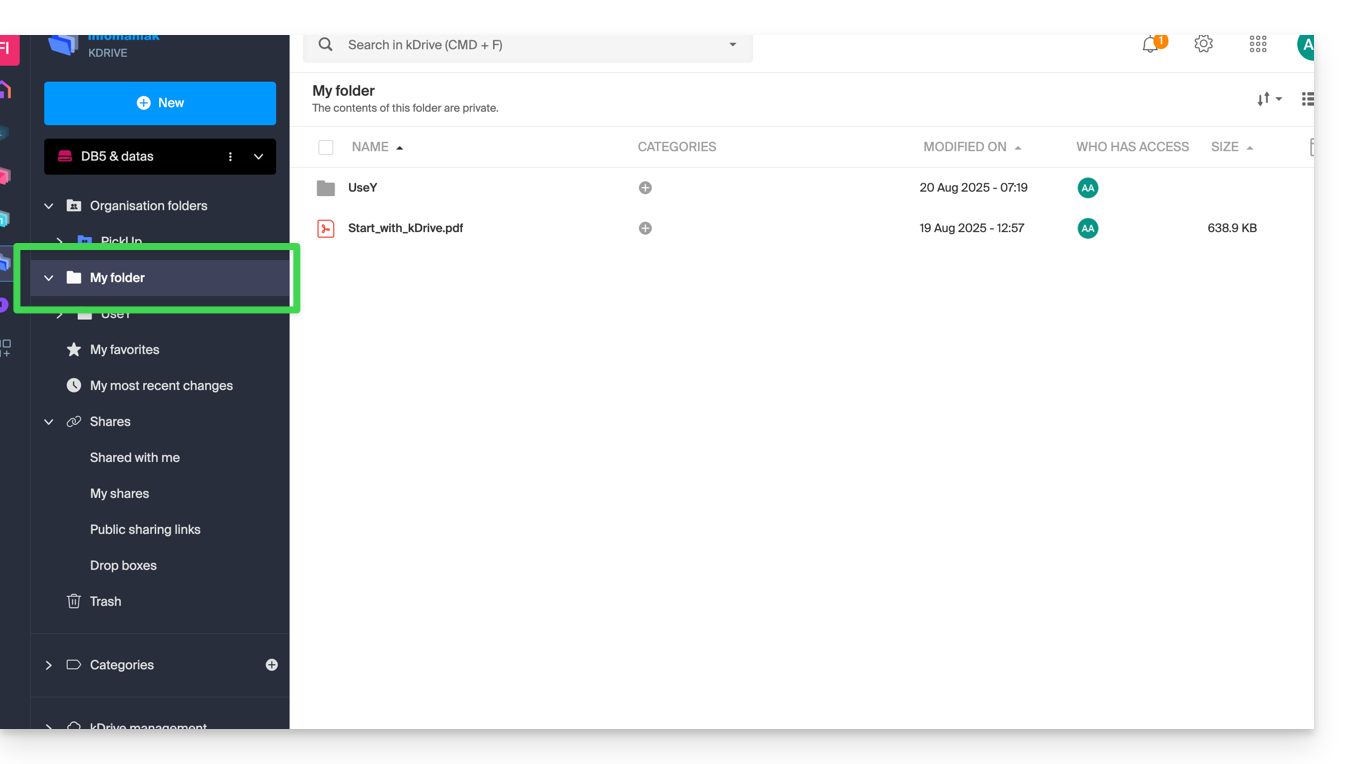
Any documents will be displayed in the center of the interface.
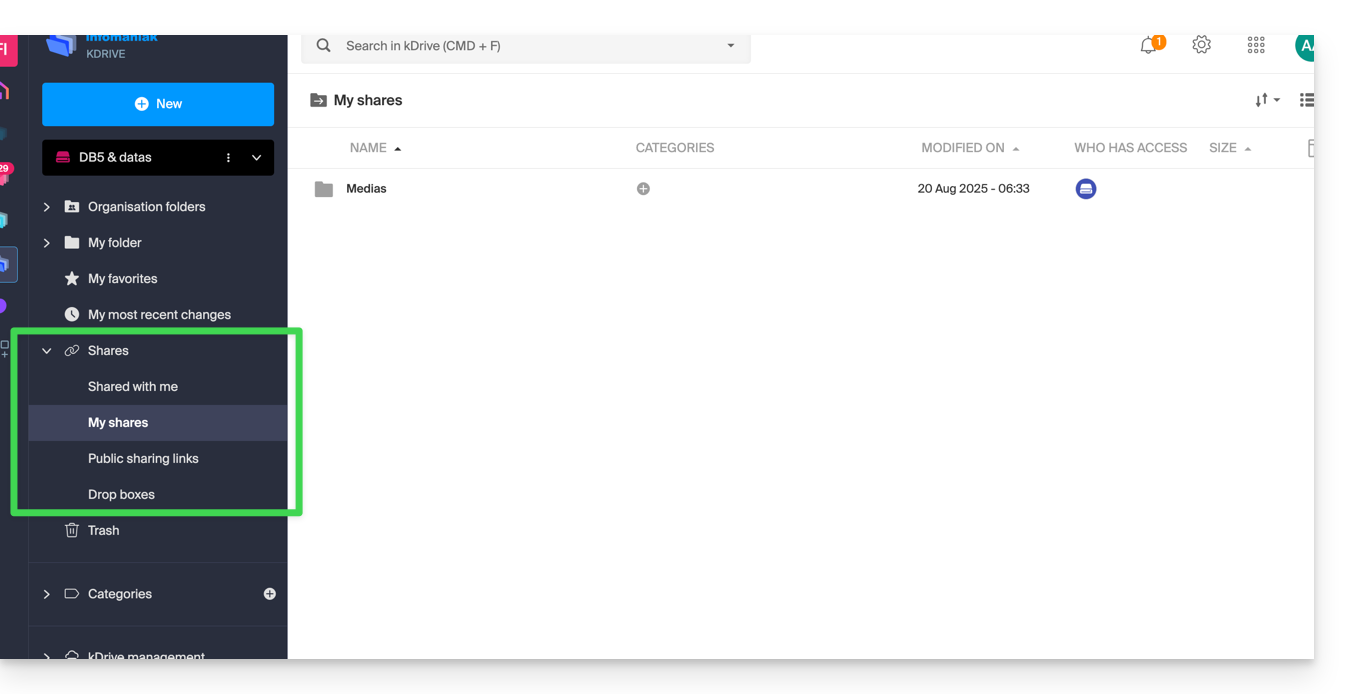
3. Shares
The Shares menu leads to 4 sub-menus displayed in the left-side menu:
- The elements shared with you by other kDrive users, among the kDrives you have access to with your login credentials
- The elements you share with other users
- The elements you have shared by creating a public share link
- Les dépôts
Les éléments éventuels s'afficheront au centre de l'interface et pourront être modifiés / supprimés.
Consultez ce guide concernant le comportement de ces dossiers de partage sur l'application Desktop.
Éléments secondaires
Mes favoris
Ce menu regroupe vos fichiers et dossiers définis comme favoris sur kDrive, que vous retrouvez alors sur l'application Web…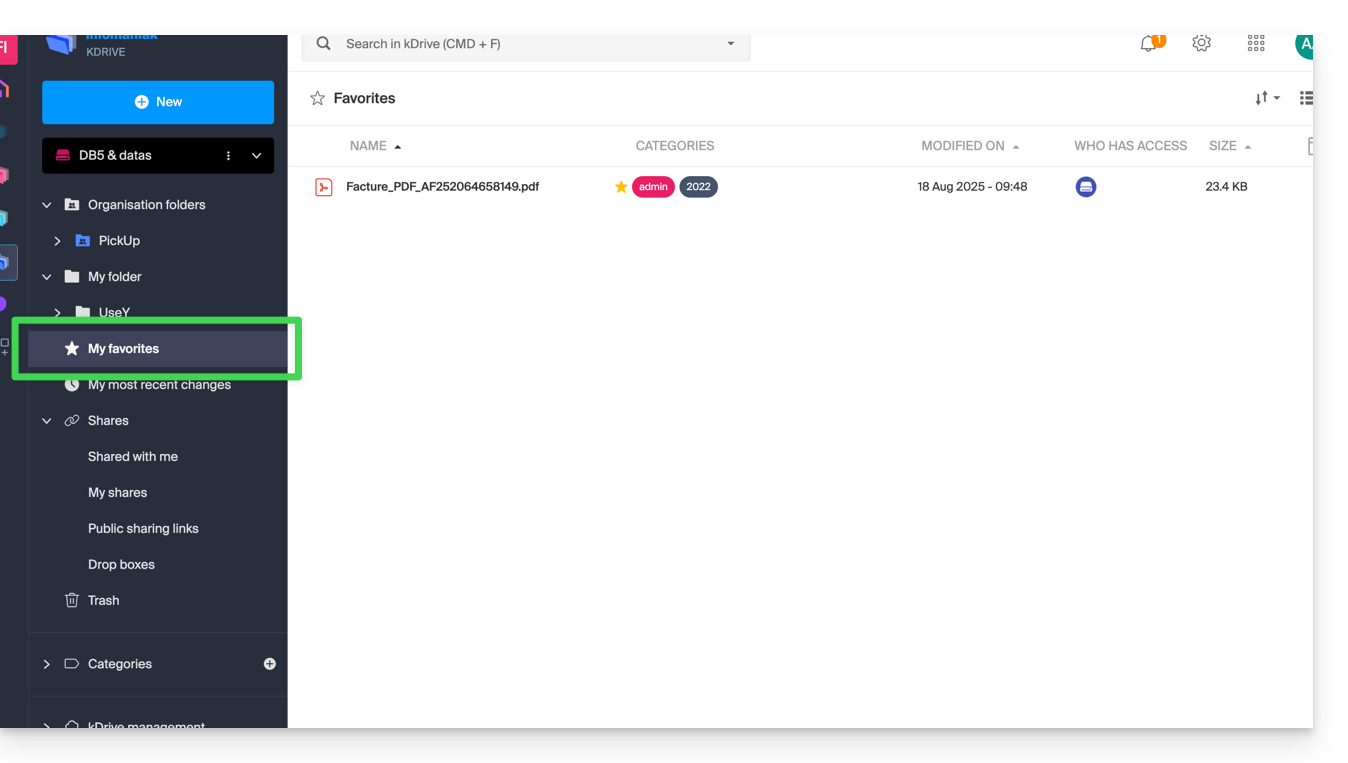
… et l'application mobile:
Mes dernières modifications
Ce menu affiche les dernières opérations effectuées par votre utilisateur: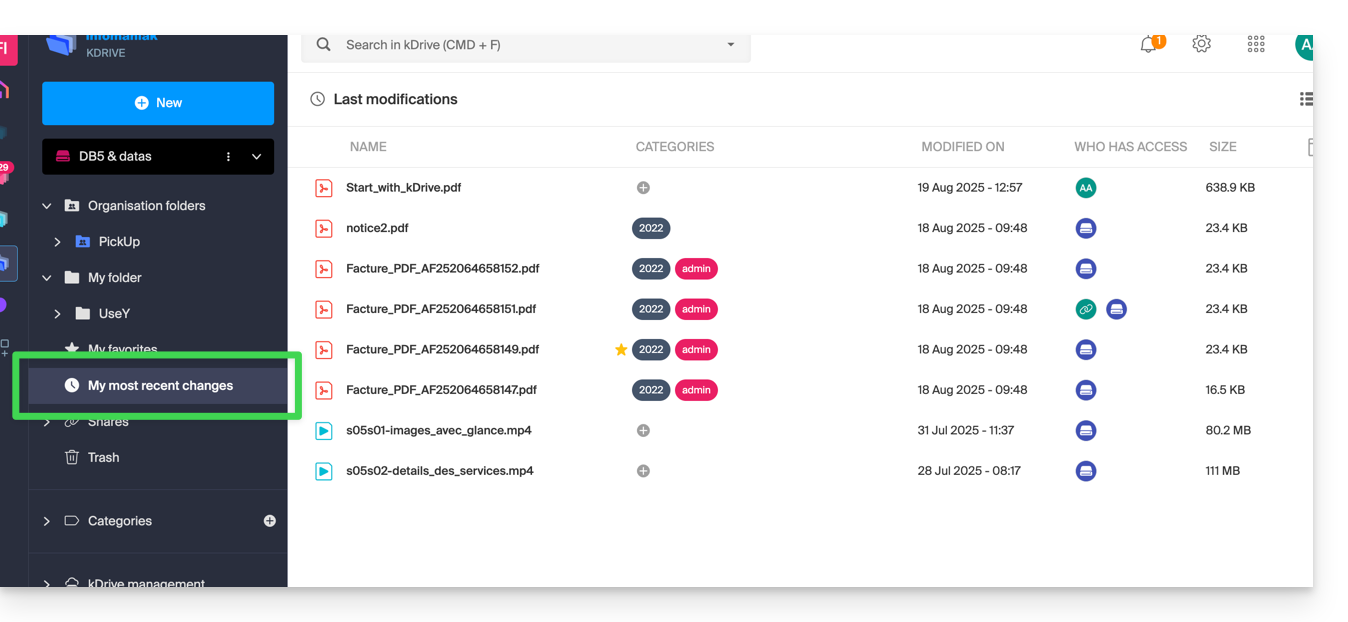
Vous pouvez ainsi rapidement revenir à des fichiers récemment modifiés même si leur emplacement est éparpillé dans différents sous-dossiers de votre kDrive. Vous pouvez aussi sélectionner ces fichiers pour les déplacer ou les supprimer en bloc.
Corbeille
Ce menu conduit vers vos données supprimées et qui peuvent encore être restaurées: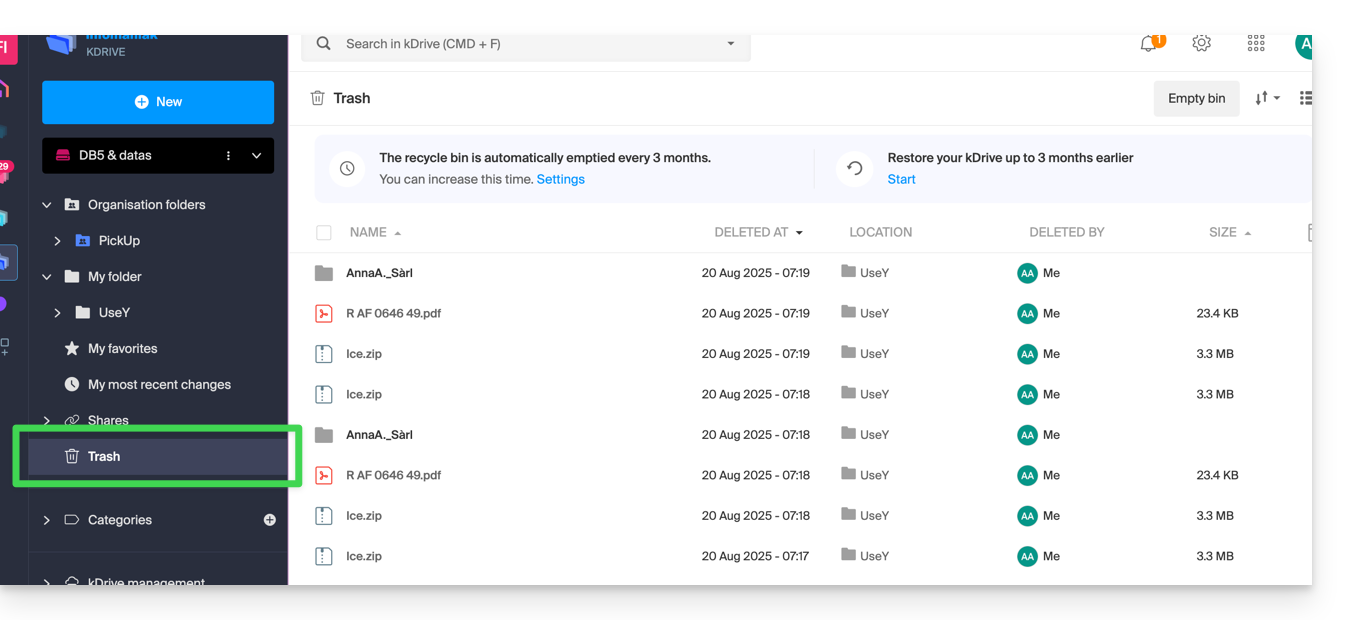
Catégories
Vous pouvez également accéder rapidement à vos fichiers si ceux-ci sont catégorisés grâce au menu Catégories en cliquant sur les différentes catégories qui y sont regroupées: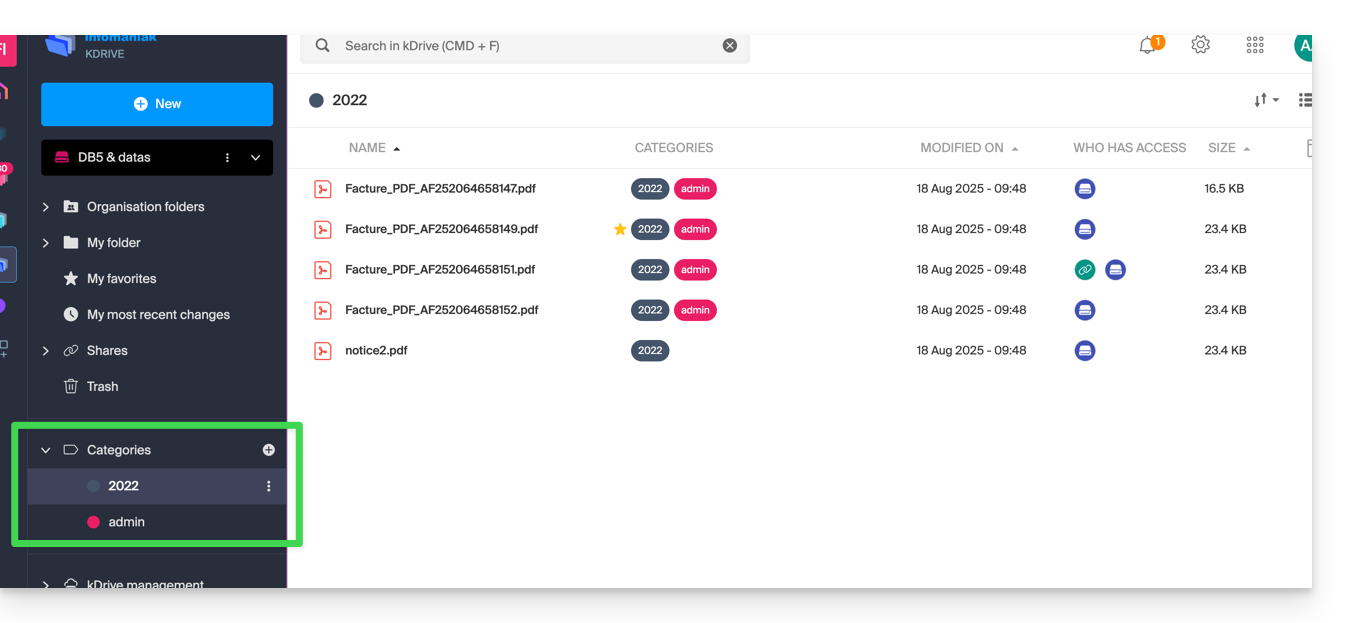
Définir l'affichage par défaut lors du démarrage
Vous pouvez choisir avec quelle page d'accueil démarrer la navigation au sein du kDrive en ligne, parmi les 3 propositions suivantes:
- votre dossier personnel
- le dossier des documents communs
- les favoris (qui regroupe les documents ajoutés en favori par votre utilisateur)
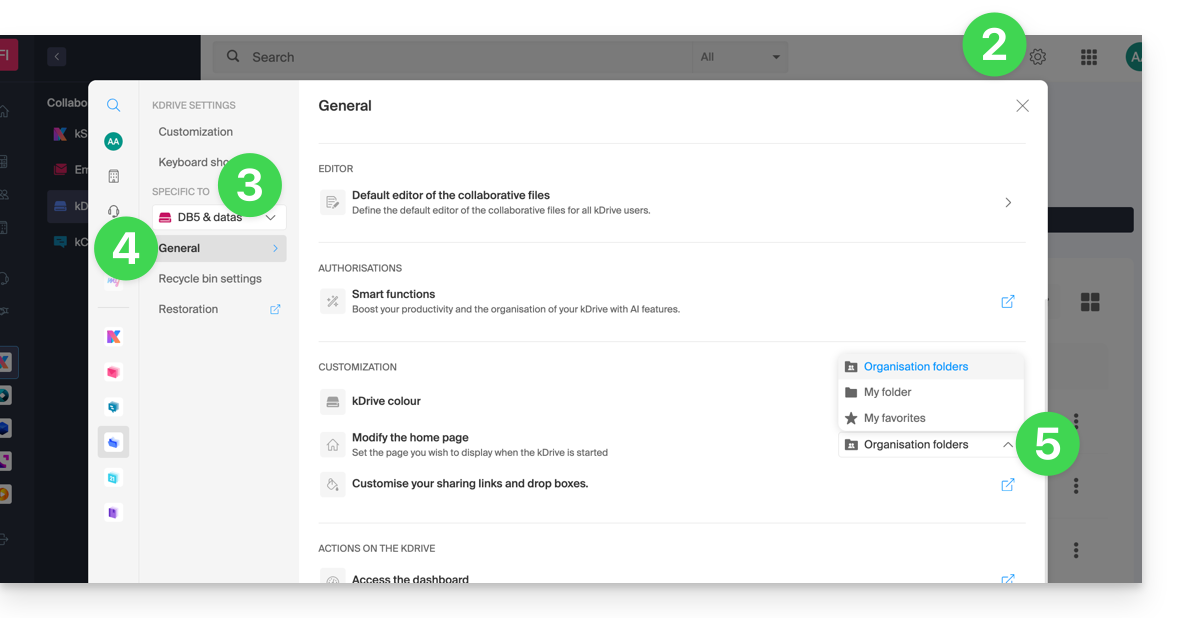
Pour accéder à kDrive et modifier la page d'accueil :
- Click here to access your product management on the Infomaniak Manager (need help?).
- Click on the Settings icon at the top right.
- Check or select the relevant kDrive from the dropdown menu in the left sidebar.
- Click on General in the left sidebar.
- Choose the page that should be displayed by default when arriving at the homepage:
Restore the shared folder (synchronized on a computer)
If you accidentally delete the folder corresponding to the data you share with all kDrive users ("Organization Folders"), don't panic: it will come back automatically. This is a special folder that cannot be moved, even on a computer:
If it does not come back immediately, wait for the background tasks already in progress to complete:
Link to this FAQ:
Has this FAQ been helpful?
This guide explains how to select the folders that need to be synchronized between the kDrive desktop app (desktop application on macOS / Windows / Linux) and kDrive Infomaniak.
Prerequisites
- Have a kDrive / kSuite offer.
- Have the kDrive application on the device to be synchronized.
- Check the parameter regarding limiting the synchronization of large folders.
Choose the kDrive folders to synchronize
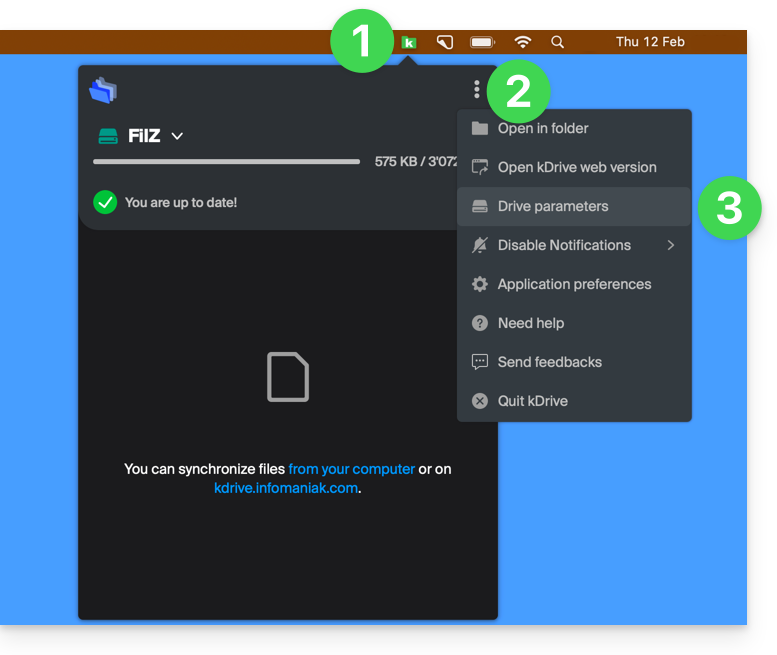
To access the settings of the kDrive application on your computer:
- Left-click on the desktop app icon in the notification area of your computer (top right on macOS, bottom right on Windows and double left-click in the taskbar on Linux).
- Click on the action menu ⋮ on the right of the window that appears.
- Click on kDrive Settings:
- Click on the chevron to the left of your synchronization name to expand the list of folders.
- Expand the contents of the listed folders if necessary and check/uncheck the folders to synchronize with your computer.
- Click on the blue Validate button:

Warning
- When deselecting a folder from the list, a message next to the button (point 6 above) warns you that this folder will be moved to your computer's recycle bin.
- This is the folder that was in your kDrive hierarchy on your computer.
- The kDrive folders on the online version accessible via web browser will not be affected but you must ensure, before the operation, that the folder in question was indeed synchronized and fully present on this online version (especially if you had just placed it within your synchronized directory).
- In case of doubt, also make sure that your computer does not instantly delete items that are too large when they are placed in the recycle bin, due to the size of the Windows recycle bin for example:

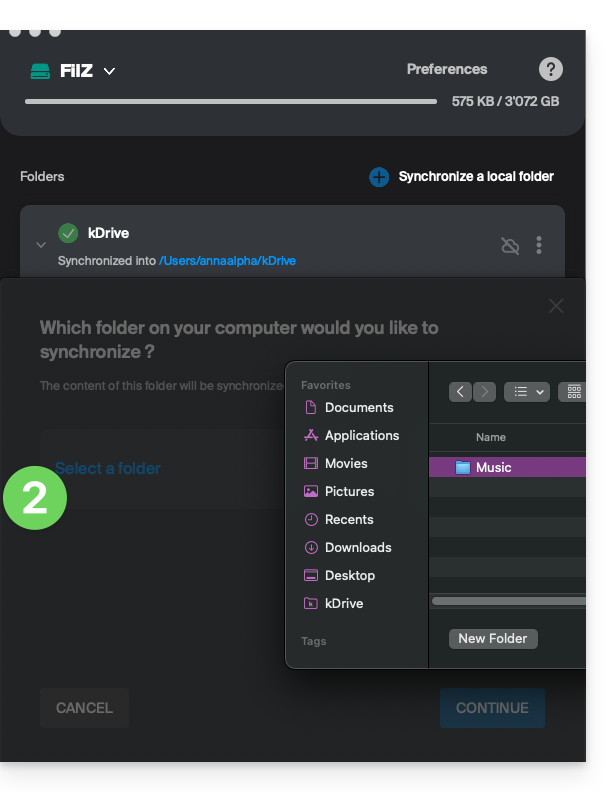
Add a local folder for advanced synchronization
To do this:
- In the same place accessible according to the procedure above, click on Synchronize a local folder :
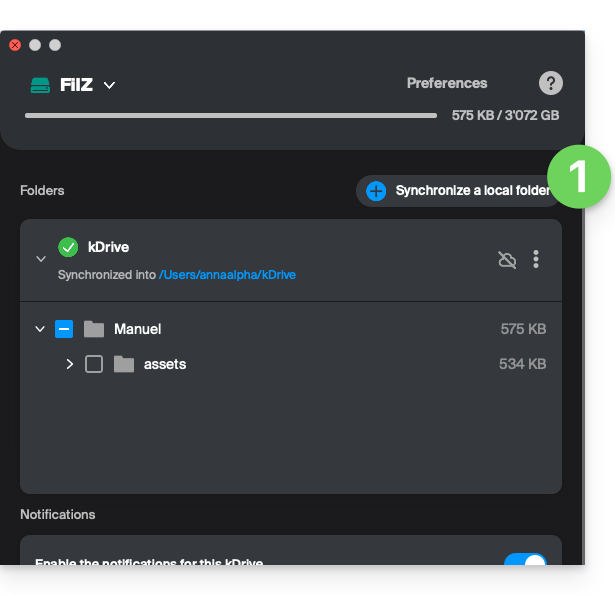
- … which will allow you to synchronize one or more new folder(s) from your hard drive with the location of your choice on kDrive:
Stop and remove a synchronization
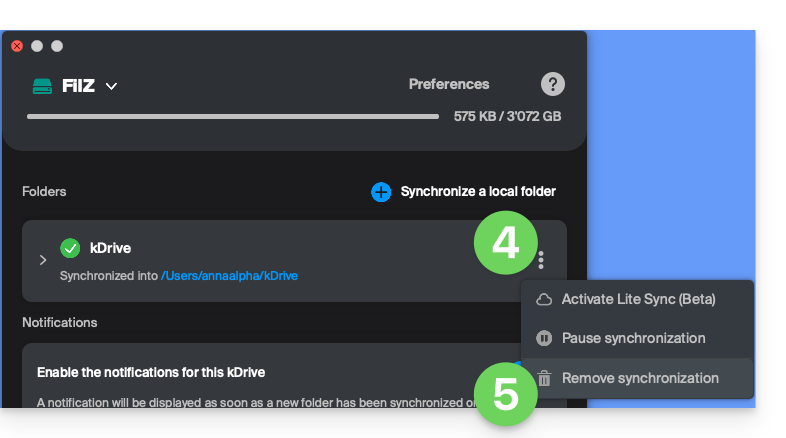
To do this:
- In the same place accessible according to the procedure above, click on the icon ⋮ all the way to the right:
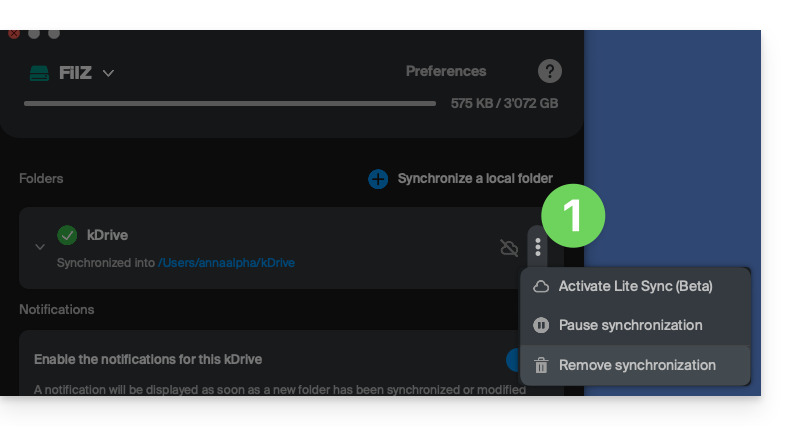
- … which will allow you to:
- Activate Lite Sync
- Pause the synchronization
- Delete the synchronization (only from your device, without affecting your kDrive) - refer to this other guide.
Link to this FAQ:
Has this FAQ been helpful?
This guide explains how to access kDrive files locally on your hard drive via the desktop app kDrive (desktop application on macOS / Windows / Linux), as well as files from the kDrive Web app (online service ksuite.infomaniak.com/kdrive).
Prerequisites
- Install the kDrive desktop app on your device.
View kDrive files
Once the kDrive application is installed and launched:
- Perform a left-click on the app icon in the notification area of your computer (top right on macOS, bottom right on Windows and a double left-click in the taskbar on Linux).
- Click on the action menu ⋮ at the top right.
- Click on Open kDrive Web to access the files stored on the kDrive server:
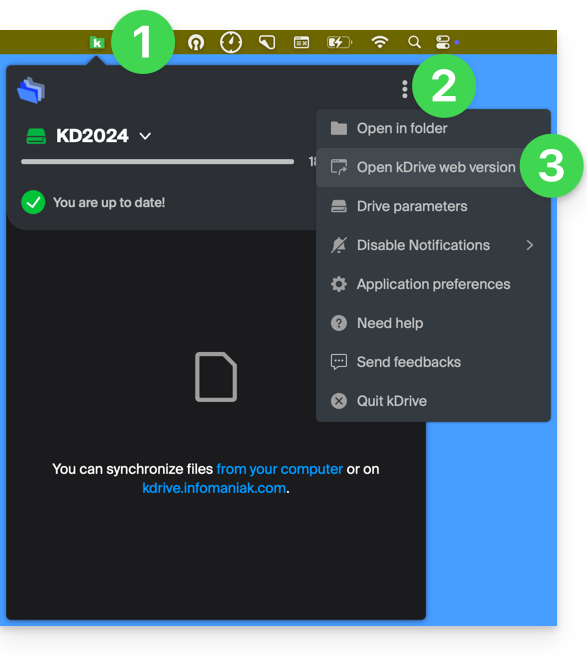
- Click on the item above to open the folder on your computer containing your kDrive files, physically present or virtually present (depending on whether Lite Sync is enabled).
If your files are not all present / synchronized, refer to this other guide.
Link to this FAQ:
Has this FAQ been helpful?
This guide explains how to connect to and manage multiple kDrive accounts on your computer (macOS / Windows). This feature allows you, for example, to access files from a personal kDrive and a professional kDrive.
Prerequisites
- You must have a kDrive or kSuite subscription.
- You must have the kDrive desktop app installed (desktop application for macOS / Windows / Linux).
Accessing different kDrive accounts from your computer
A user logged into the kDrive application on their computer can already access multiple kDrive accounts if they are already working with multiple kDrive accounts outside of the app, if they have been added to other kDrive accounts, etc. All of these are accessible as long as the user is logged in with the credentials corresponding to these kDrive accounts.
Accessing and managing other kDrive accounts…
To connect with a different account and therefore access other kDrive accounts:
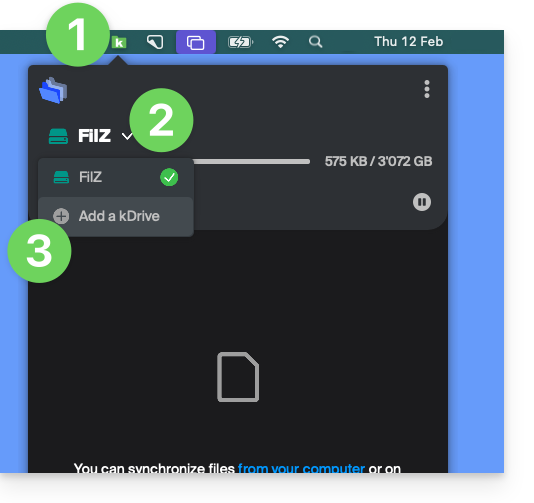
…from the kDrive desktop app (desktop application for macOS / Windows / Linux)
- Left-click on the desktop app icon in your computer's notification area (top right on macOS, bottom right on Windows, and double left-click in the taskbar on Linux).
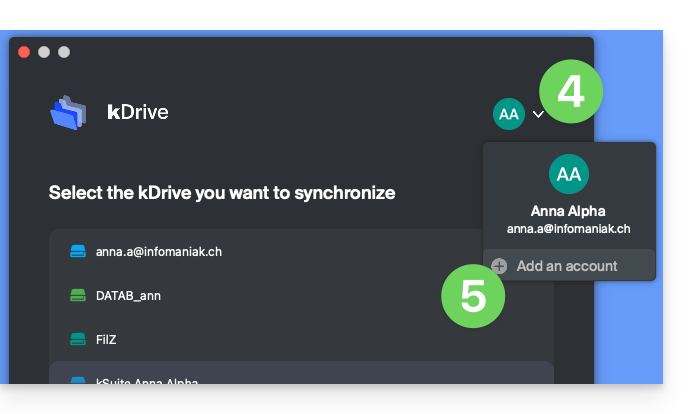
- Click on the chevron to the right of the kDrive name (the kDrive accounts you already have access to with your user account will be displayed).
- Click on Add a kDrive:
- Click on the badge with your initials or your avatar in the top right corner.
- Click on Add an account:
- Enter your Infomaniak account credentials – refer to this other guide if needed.
- Choose and configure the kDrive to add (Lite Sync, directory to be used on the computer, etc.):
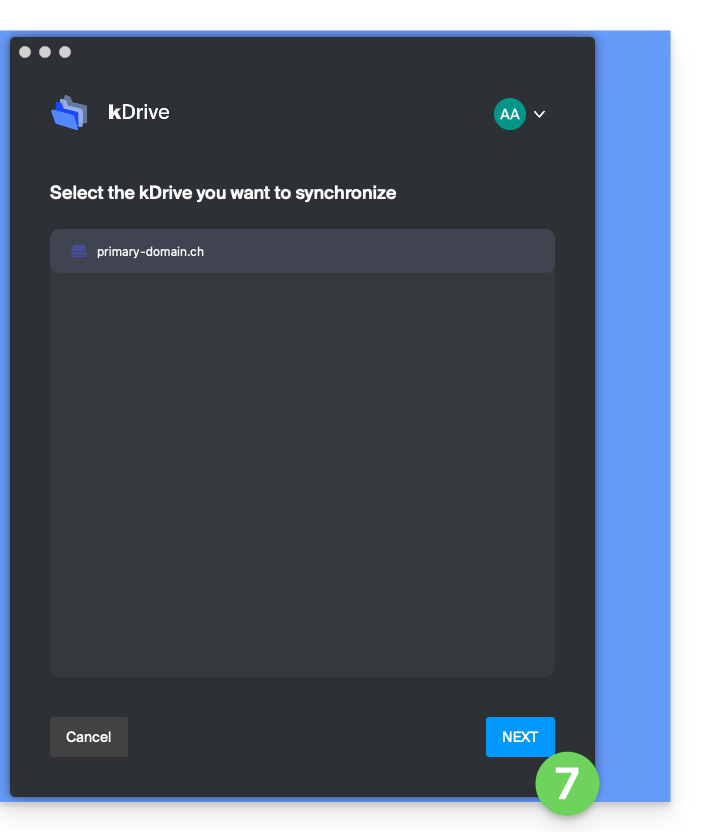
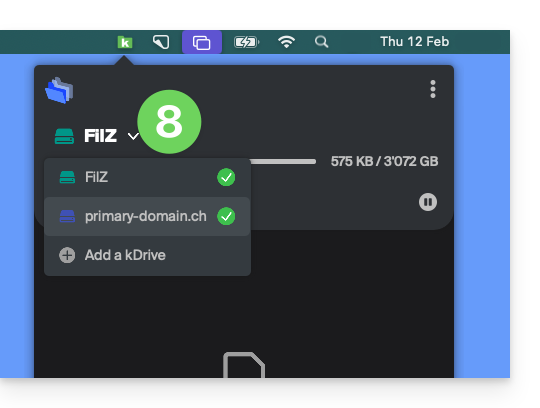
- You can now switch between kDrives by clicking on the kDrive icon and then on the down arrow in the window that opens:
… from the kDrive web app (online ksuite.infomaniak.com/kdrive service)
- Click here to access the Infomaniak kDrive web app (online service ksuite.infomaniak.com/kdrive).
- Click on the down arrow to expand the list at the top left of the kDrive interface.
- Click on the kDrive you want to use
Disconnect a kDrive from the desktop app
To access the kDrive application settings on your device:
- Left-click on the desktop app icon in the notification area of your computer (top right on macOS, bottom right on Windows, and double-left-click in the taskbar on Linux).
- Click on the ⋮ icon on the right in the application.
- Click on kDrive Settings:

- Click on the ⋮ icon to the right of the synchronized kDrive, under Folders.
- Choose Remove synchronization (only from your device, without affecting kDrive):
Link to this FAQ:
Has this FAQ been helpful?
This guide details the measures implemented by Infomaniak to secure all your data in kDrive, whether personal (medical data, identification or login information) or even sensitive (financial information, trade secrets, intellectual property information, research and development, etc.).
Data security and confidentiality
The kDrive infrastructure consists of several services and servers based on different technologies. The content and structure of each client's content are systematically encrypted and permanently saved in at least 3 locations in several datacenters controlled by Infomaniak. Data is stored and processed exclusively in datacenters located in Switzerland. Tier III+ data centers guarantee high availability and N+1 redundancy for its critical components.
Storage is performed via Swift, a distributed and highly available cloud data storage technology.
kDrive integrates several levels of protection to safeguard files:
- To protect data in transit, the use of the SSL/TLS encryption protocol.
- To protect saved data, AES 128-bit encryption (AES-128-CBC) with an individual and unique key per kDrive space.
Infomaniak regularly tests kDrive applications and infrastructure to identify potential security vulnerabilities they may have, thereby enhancing security and ensuring protection against attacks.
But also…
- kDrive offers a data access log and an action history that can be viewed directly from the Manager; it is possible to access an activity report to monitor the action history of all users of your kDrive; you can also track your data and changes made to each document, spreadsheet, or presentation.
- Only individuals with a link to public files can view them.
- Two-step verification provides an additional layer of security during login; if you use two-step verification, you can choose, for example, authentication via the kAuth app.
- Refer to this other guide if you are looking for information on data analysis.
Link to this FAQ:
Has this FAQ been helpful?
This guide explains how to start recording an online meeting organized with kMeet, the ethical free videoconferencing solution by Infomaniak, to obtain a video of the presentation stored on kDrive Infomaniak (this only when a user stops the recording).
Preamble
- Recording the video
- is done on the server side
- does not generate any load for the participant's computer that started it
- is in the video format
.mp4 - has a maximum duration of 3 hours.
- The video will not be available if everyone leaves the videoconference without someone stopping the recording.
- In other words, steps 5 and following below are mandatory for the recording to work!
Record a kMeet meeting on kDrive as a video
Prerequisites
- Have a kDrive (standalone/independent or as part of an offer kSuite, my kSuite, etc.).
- Be the moderator of the videoconference to be recorded.
- Do not create a videoconference encrypted with a custom key.
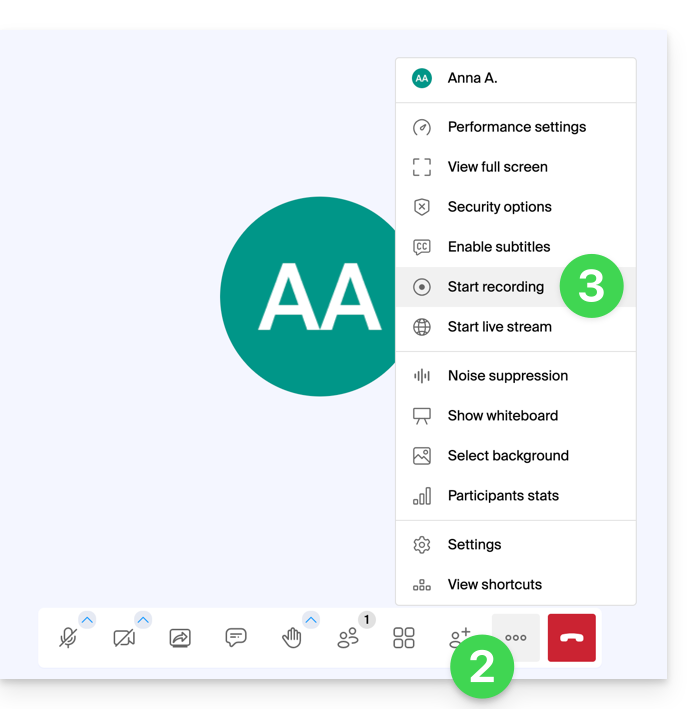
To record the meeting on kDrive, from the moment someone clicks on Start to begin, but also clicks on Stop to finalize the recording and make it available:
- Start kMeet via kmeet.infomaniak.com or from one of the apps for computers and mobile devices.
- Once in the meeting, click on the action menu ○○○ in the kMeet toolbar.
- Click on the icon ◉ Start Recording:
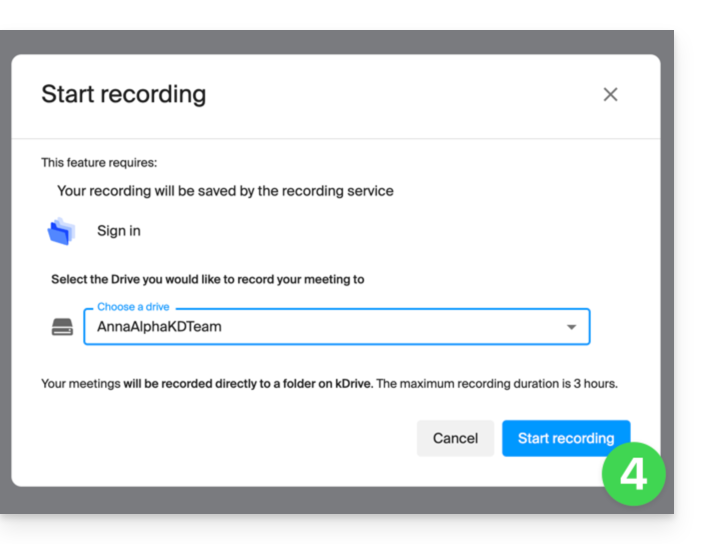
- Confirm the operation and if necessary, log in to your Infomaniak account, then select a kDrive to record the videoconference on; then click the button to start the video:
- To stop recording the video (mandatory step to obtain the video), click on the toolbar again, then choose Stop Recording:
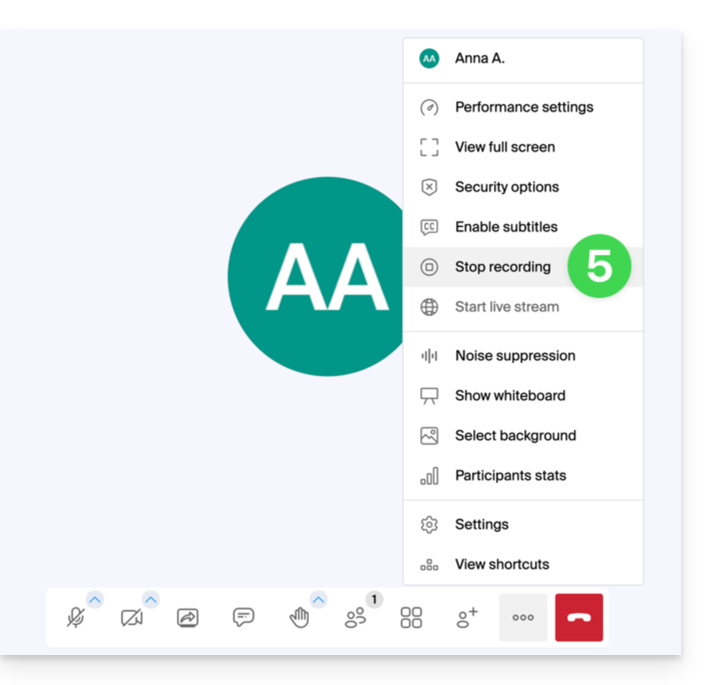
- Confirm, then choose if you want to go to the recording location on kDrive.
- The recording is available at the root of the selected kDrive as soon as the virtual fair is closed in which the meeting took place (i.e., as soon as all participants have left the video conference).
Link to this FAQ:
Has this FAQ been helpful?
This guide explains how to control the storage space used on your free cloud offer and how to free up space.
Preamble
- The free cloud offer my kSuite includes a maximum storage of 15 GB.
Check the free storage space
To access the offer my kSuitecurrent and check the storage space used:
- Click here to access the Infomaniak kDrive web app (online service ksuite.infomaniak.com/kdrive).
- The storage space used is displayed at the bottom of the left sidebar menu.
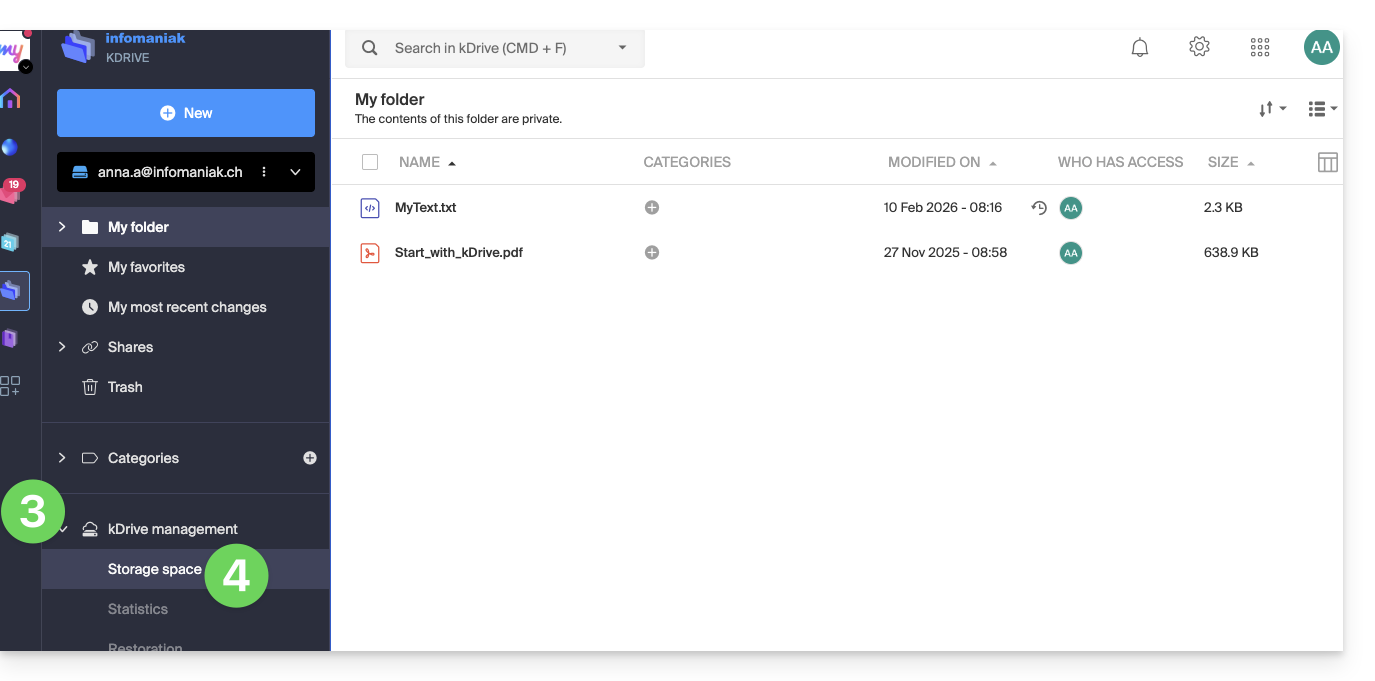
- Click on the chevron to expand the kDrive Management section in the left sidebar menu.
- Click on Storage Space in the left sidebar menu for a more detailed overview:
Free up storage space
To free up space on your free kDrive, simply deleting large files (videos...) is not enough because files still take up space once they are in the trash. They remain there for a certain time.
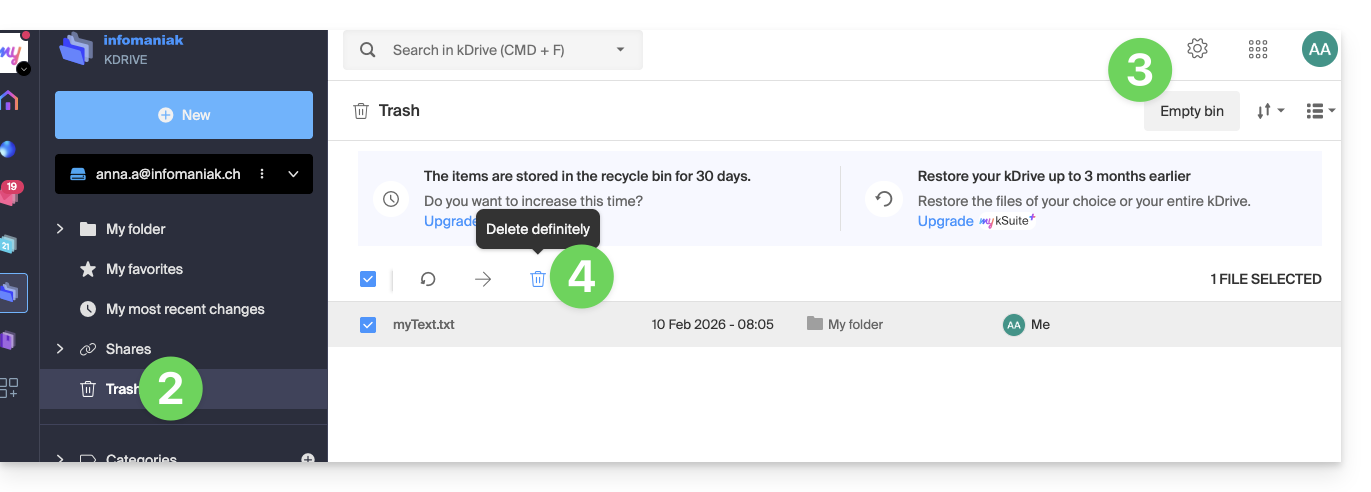
Empty the kDrive trash
You need to manually empty the trash to permanently delete the files in it:
- Click here to access the Infomaniak kDrive web app (online service ksuite.infomaniak.com/kdrive).
- Click on the trash in the left sidebar menu.
- Click on the Empty Trash button to delete all files from the trash…
- … or select files one by one and then click on the trash icon above the table:
Note also: once a modification is made to one of your files, kDrive (my kSuite) saves up to 30 versions for 30 days. This allows you to navigate between multiple versions of a file and restore an older version if needed.
It is possible to delete all versions of the document by clicking on the button Delete all versions or to delete versions one by one, by clicking on the icon ⋮ then clicking on Delete, but this does not particularly free up space because this versioning is not counted in your kDrive storage space: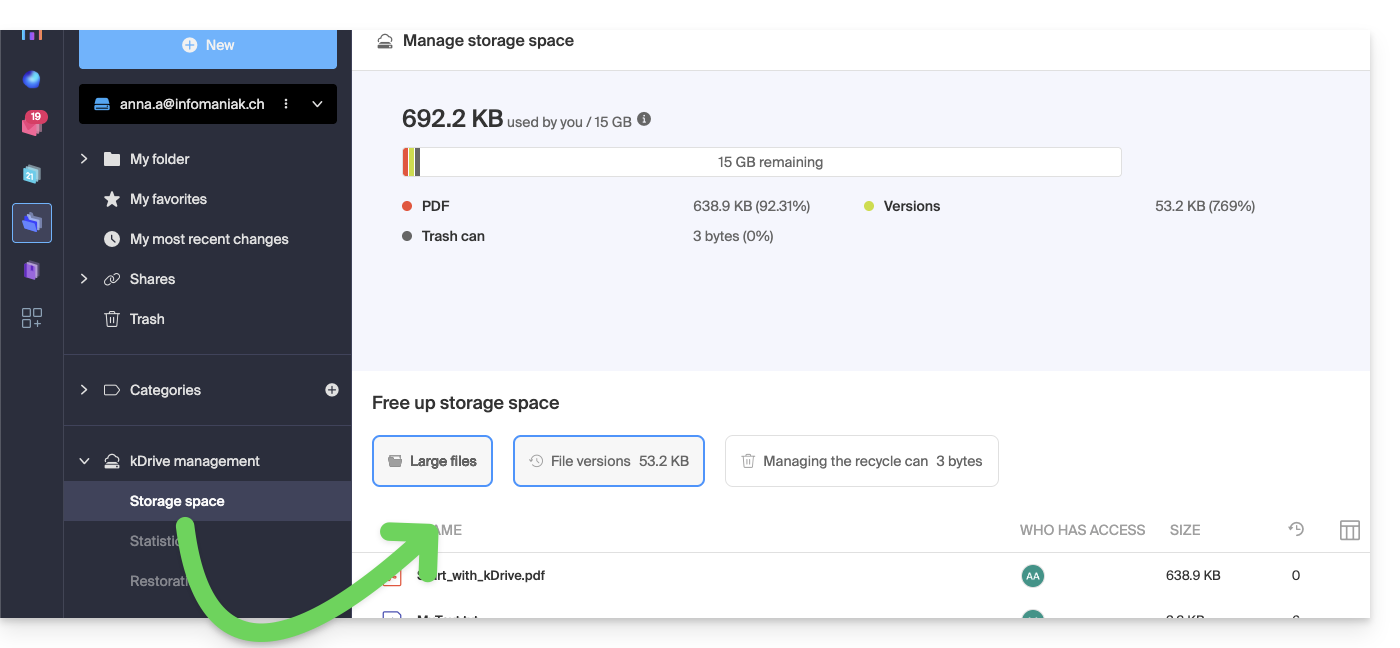
Link to this FAQ:
Has this FAQ been helpful?
This guide explains how to retrieve and transmit debugging information (logs, reports, and error logs) from the kDrive application in case of a problem on macOS, Windows, or Linux.
✘ UNAVAILABLE with
my kSuite / my kSuite+ (ik.me, etik.com, ikmail.com)
Preamble
- For various reasons (a file type or a name length exceeding commonly accepted limits, etc.), it may happen that the synchronization by the kDrive app no longer progresses.
- Logs allow Infomaniak Support to better track any issues that may arise between your device and the kDrive application.
- The extended logs “record” kDrive activity from the moment you activate them; they are the ones that allow Infomaniak to trace the problem best.
- Refer to these other guides to try to resolve the issue without sending the logs: conflicts and known issues.
Save and share the logs with Support
When requested by Infomaniak Support:
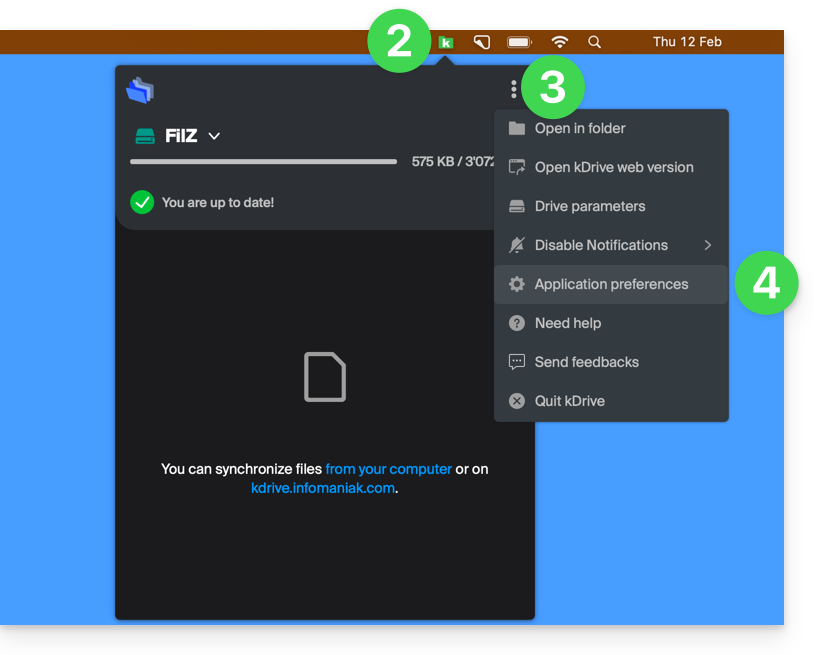
- Open the kDrive application on your computer, the app icon must be visible in the notification area.
- Perform a left-click on the app icon in the notification area of your computer (top right on macOS, bottom right on Windows, and a double left-click in the taskbar on Linux).
- Click on the action menu ⋮ to the right of the application window.
- Select Application Preferences:
- Scroll down to the Advanced section and click on the arrow to the right of debugging information:

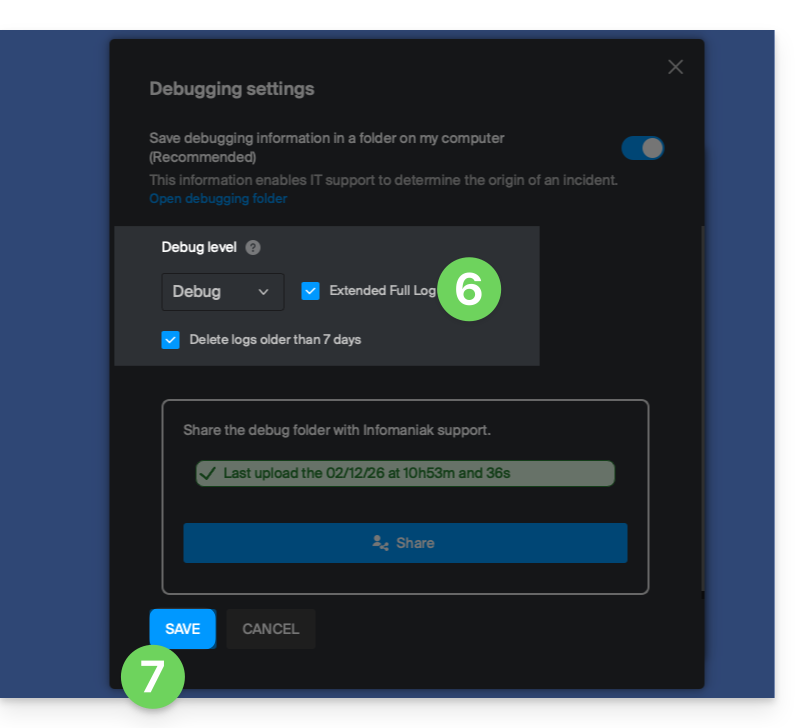
- Check the box for extended logs as shown in the image below.
- Click the SAVE button and let the application run for at least 10 minutes:
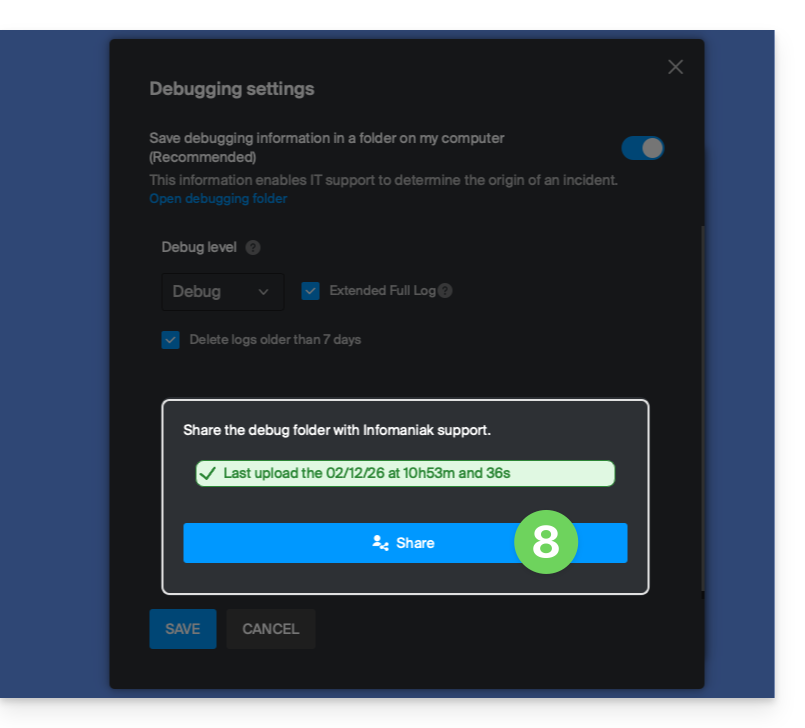
- Return to the same place 10 minutes later (points 1-6 above) and then click the blue button to share your debugging information with Infomaniak Support:
- Inform Infomaniak Support of this action within the ongoing exchange.
Alternative method
If you encounter a problem with the method above:
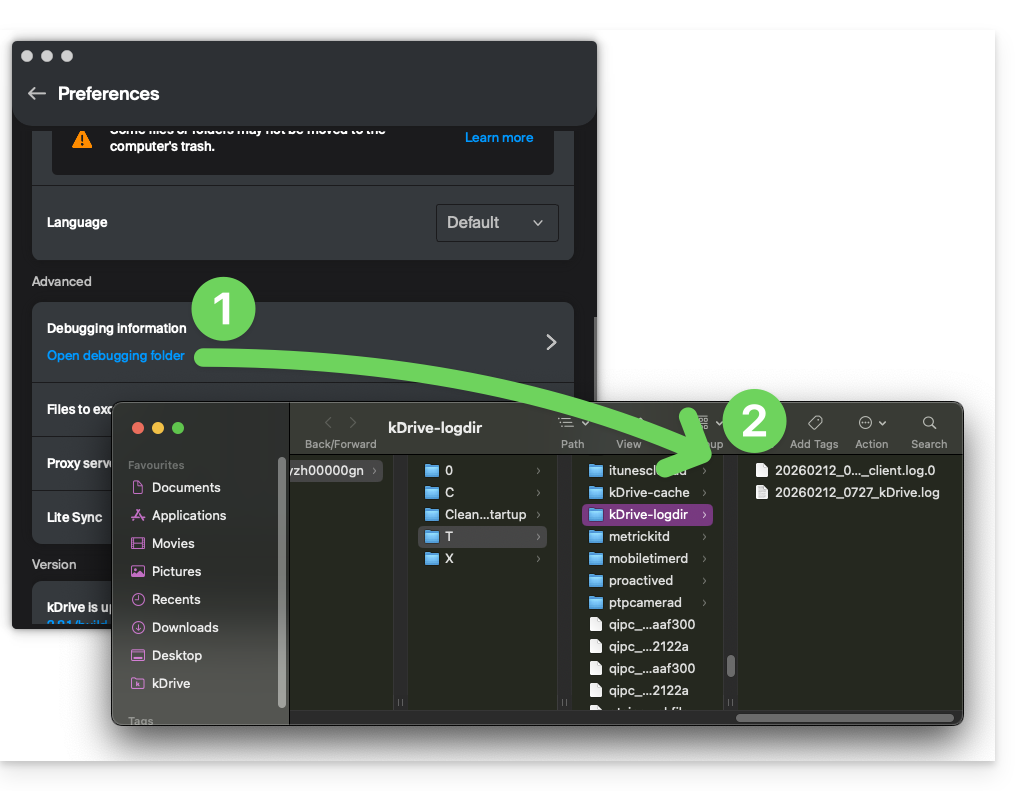
- Click on the blue link on the left to Open the debug folder.
- From this folder you will have access to all the bug reports of the kDrive application on your device:
If the application does not open, you can also access the logs through these paths:
- macOS:
/private/var/folders/h_/5c_k9rr564q0kzqv8rz8_dn80000gn/T/kDrive-logdir(note"h_/5c_k9rr564q0kzqv8rz8_dn80000gn"will be different on your computer)
- Windows (copy-paste into the file explorer):
C:\Users\%USERNAME%\AppData\Local\Temp\kDrive-logdir(if necessary, activate hidden files and folders in Windows Explorer)
- Linux:
/tmp/kDrive-logdir/
To manually send the collected files:
- If the files are not large, send them directly to Infomaniak Support within the ongoing exchange.
- If the files are large, compress them in .zip format and send them to Infomaniak Support within the ongoing exchange.
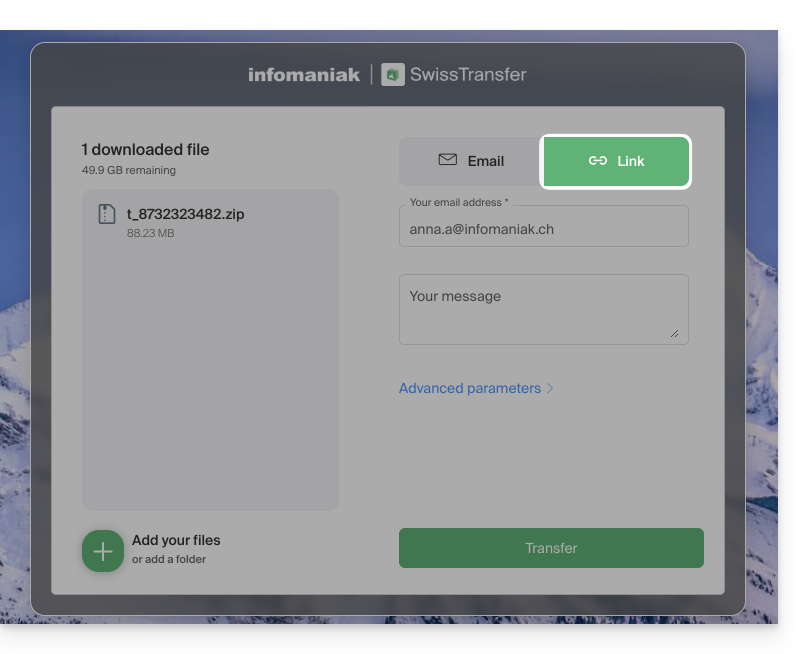
- If they are still too large to be sent by email, send the .zip archive to swisstransfer.com to obtain a share link that you will need to communicate to Infomaniak Support within the ongoing exchange:
Link to this FAQ:
Has this FAQ been helpful?
This guide is for you if you are looking for a comprehensive email and collaborative data storage solution. Its purpose is to help you better understand the different Infomaniak product suites when you are unsure which one to choose…
If you are looking to host a website, please refer to this other guide.
The different offers in summary
Here is a summary of the different plans (excluding web hosting offers):
| Free (or domain name to be paid for) | Paid |
|---|---|
my kSuite
| my kSuite+
|
Service Mail Starter
| Service Mail Premium
|
kSuite Free
| kSuite Standard / kSuite Business / kSuite Enterprise
|
Free or paid suites
Infomaniak offers several email solutions, with or without additional collaboration tools:
- A Mail Service is the name given to the email service created by Infomaniak in Switzerland. You can order a Mail Service independently of kSuite.
- kSuite is a collection of Infomaniak services that includes a Mail Service and is based around a personal domain name.
- my kSuite and my kSuite+ are limited versions of kSuite that do not require a domain name and can also meet your email needs. In the Infomaniak Manager, these offers will be “separated” from the rest.
Cost of simple email offers
This email service can be…
- … free if you are satisfied with an address with a generic domain name (what comes after the at symbol
@), created by Infomaniak (etik.com,ik.me,ikmail.com) by choosing my kSuite (my kSuite+ unlocks some of the limitations of my kSuite). - … very affordable if you are satisfied with one or two free email addresses on a domain name that you pay for (there are domain names for less than 5 CHF/€ per year, which will be your only expense and allows you to customize your email addresses) by ordering:
- either the Starter offer (1 email address)
- or the kSuite offer
Need a large number of email addresses?
If you need multiple email addresses on the same domain, you can order a Mail Service only (minimum of 5 email addresses) or kSuite, which is available in 3 different versions:
- Standard
- Business
- Enterprise
A common feature of all Mail offers is that you must have an Infomaniak user account (a login ID in the form of an email address, as well as a password) which will take you to your Organization, where your email will be located.
Additional tools (kDrive…)
If you choose a Suite (kSuite or my kSuite / my kSuite+), this user account will take you to your Organization, where the suite of tools will be located, including your email, kDrive, kChat, etc.
Click on the links to access the comparison tables detailing all the features available depending on the plan:
- kDrive can be obtained by creating a my kSuite or my kSuite+ account.
- kDrive can be obtained independently in 3 different versions:
- Solo
- Team
- Pro
- kDrive is available if you subscribe to kSuite (either for free or with a paid subscription). kSuite is available in 3 different versions:
- Standard
- Business
- Enterprise
Would you like to join Infomaniak?
Please refer to this other guide.
Link to this FAQ:
Has this FAQ been helpful?
This guide details the different assignments and access permissions for files/folders in kDrive Infomaniak, including restoring the inheritance of rights over the contents of folders and subfolders.
Preamble
- Refer to this other guide if you are looking for general information about data sharing on kDrive.
- Refer to this other guide for more specific information about sharing the common folder.
- Refer to this other guide regarding the more general permissions of users within the Organization if they are part of it.
Types of access rights
A share (of document, directory...) on kDrive can be restricted: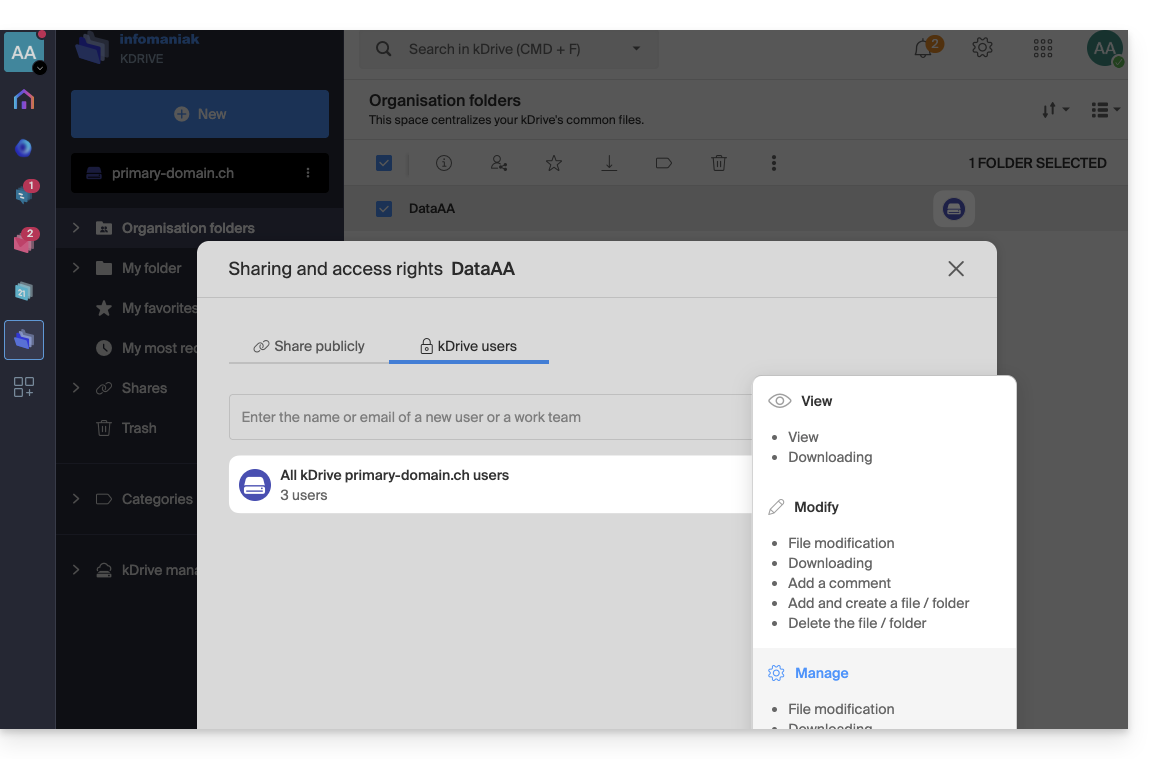
Choose if the user...
- ... can view:
- View only
- Download
- Add comment (if file is not of Office type)
- ... can modify:
- Modify the file
- Download
- Add comment
- Add and create file/folder
- Delete file/folder
- ... can manage (only if the share is within the common folder and not in a personal folder):
- Modify the file
- Download
- Add comment
- Add and create file/folder
- Delete the file
- Share with other users
- Manage user rights
The permissions granted as well as the information on the beneficiaries of the shares are visible on kDrive in the column “Who has access”: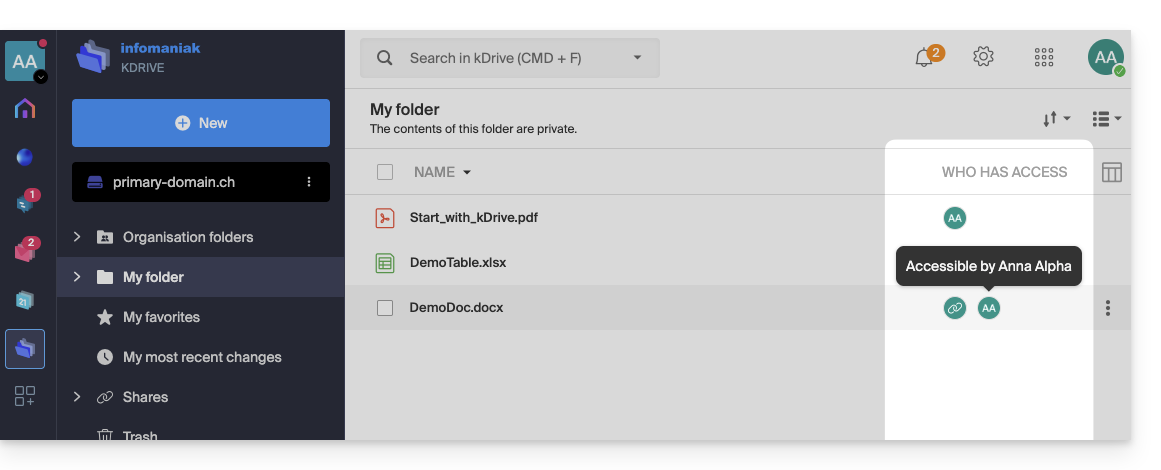
A possible activated public link on a file is indicated by a chain icon in this column: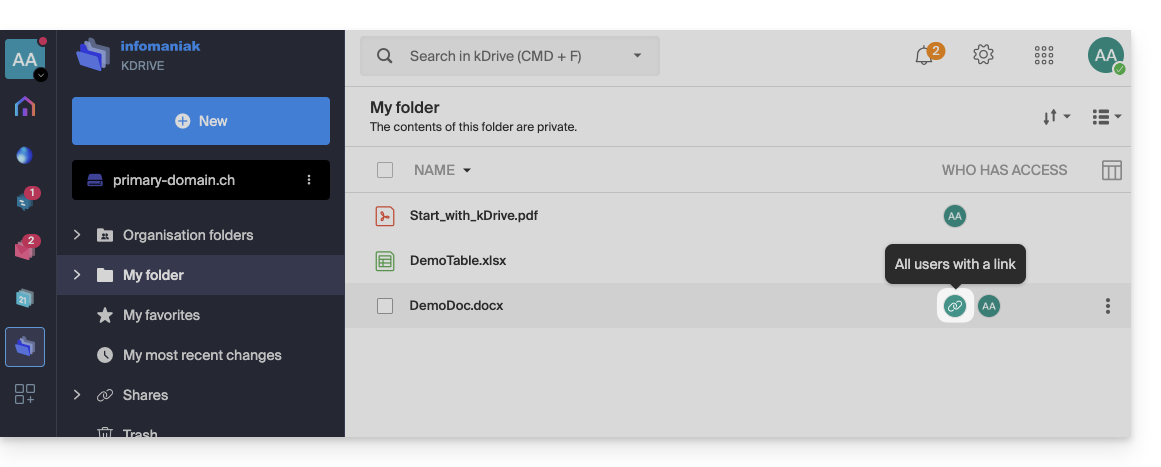
Assignment of rights and inheritance (Organization folders)
The fact that a folder is in the "Organization Folders" does not necessarily mean that all kDrive users have access to it.
Sharing can be restricted to sub-levels: only part of the hierarchy can be shared with certain collaborators, while other folders remain private or limited.
Understanding inheritance break
By default, a "child" folder inherits the rights of the "parent" folder. However, if you manually modify the accesses on a subfolder (by removing a user, for example), the inheritance is broken.
From then on, any subsequent modification made to the parent folder will no longer be reflected in this specific subfolder.
Concrete example with your folders:
- Multiple users have access to the parent folder DataAA. By inheritance, they all see the subfolder 4All.
- If you manually remove a user from the sharing on the child folder 4All, the inheritance stops for this folder.
- Later, you add a new collaborator to the parent folder DataAA.
- Problem: this new user will see the content of DataAA, but will not see the folder 4All (as inheritance was broken in point 2).
How to restore inheritance of rights?
kDrive detects these desynchronizations of rights. When you open the sharing settings of the child folder (4All), a blue information banner appears: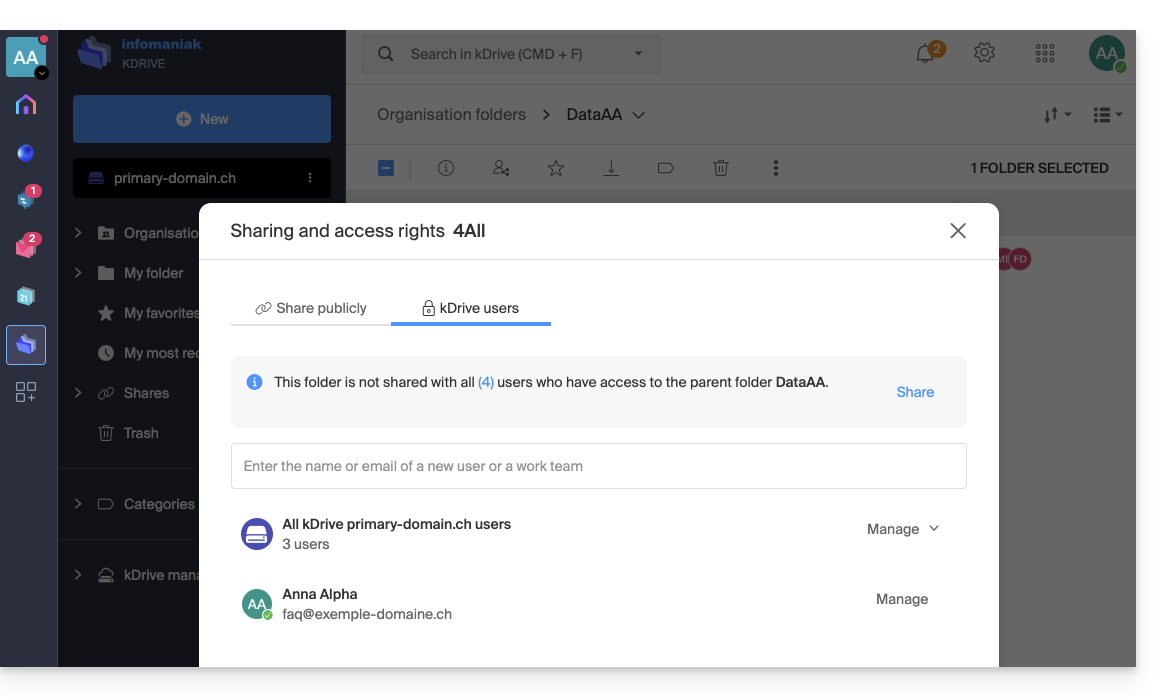
To resolve the issue:
- Click on the Share link in this blue banner.
- A confirmation window appears to inform you that "all future modifications made to the user accesses of the parent folder DataAA will automatically apply to the folder 4All".
- Click on the blue Share button to validate:
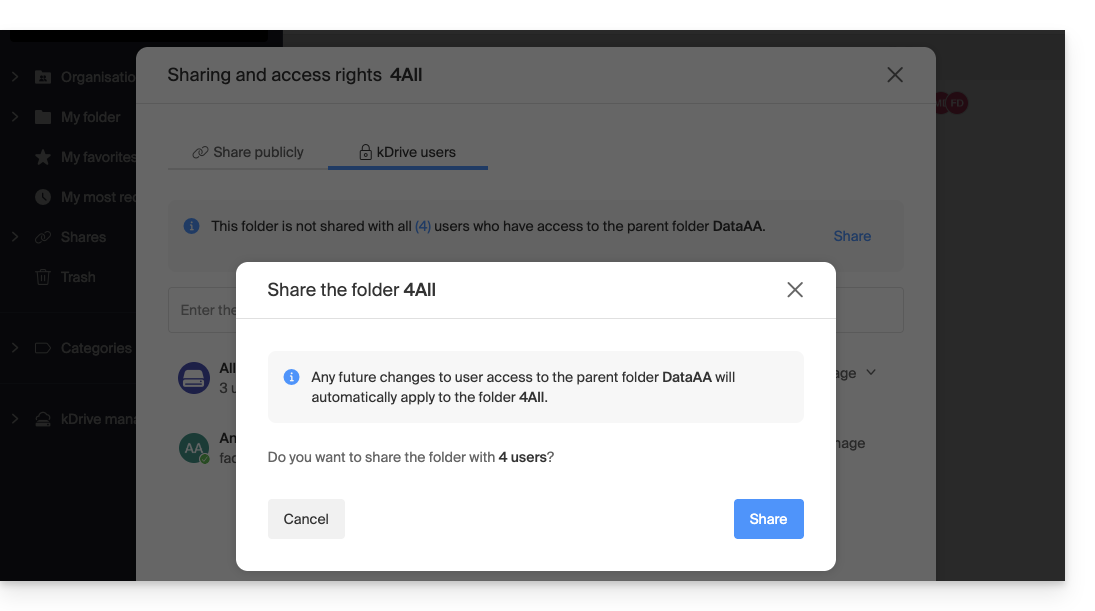
Inheritance is now restored: all current and future users of the parent folder will automatically regain access to the subfolder.
Link to this FAQ:
Has this FAQ been helpful?
This guide explains how to view 3D files on the Web app kDrive (online service ksuite.infomaniak.com/kdrive) and interact with them.
Preamble
- The 3D file object can be viewed on a light or dark background as desired.
- It is possible to zoom in and out, and the 3D view can be recentred with a click.
- The camera can be in orthographic or perspective mode.
- Recognised extensions and theoretically supported by online preview:
3dm3ds3mfamfbimbrepdaefbxfcstdglbifcigesobjoffplystepstpstlwrl
- Only recognised extensions:
blendusdusdausdcusdzgltf
- Formats that depend on other files cannot be previewed.
- Files with a thumbnail (such as
obj,stl, etc.) are generally supported by the preview.
Preview 3D files
To access kDrive and interact with 3D images:
- Click here to access the Infomaniak Web app kDrive (online service ksuite.infomaniak.com/kdrive).
- Open the relevant image file.
- Manipulate the object directly with the cursor.
- Use the toolbar available below the image:

Link to this FAQ:
Has this FAQ been helpful?
This guide explains how to automatically transfer photos from your mobile device (Android) to kDrive Infomaniak.
Preamble
- Once this feature is activated, the photos from the mobile device will be saved in the kDrive folder of your choice.
- Foreground mode:
- The synchronization works optimally when the kDrive app is active and in the foreground.
- Background mode
- Android may limit the operation of background applications to save battery.
- For smooth synchronization, make sure that the kDrive app is not subject to strict "battery optimizations" in your phone's settings.
- File naming: unlike iOS, automatic backup on Android generally keeps the original name of the files (e.g. IMG_001.jpg) but take note of the information at the bottom of this guide.
Enable sending to kDrive on Android
Prerequisites
To configure automatic backup:
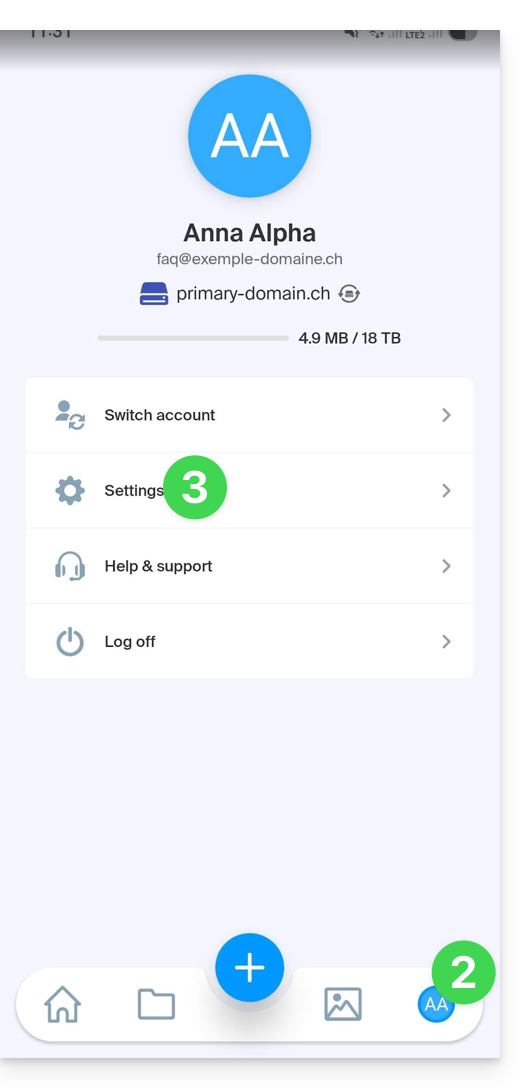
- Open the mobile app kDrive.
- Tap on your initials or avatar (bottom right).
- Tap on Settings:
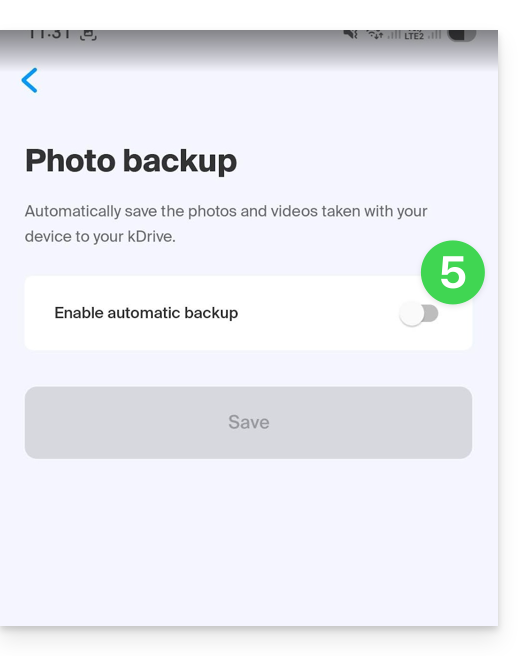
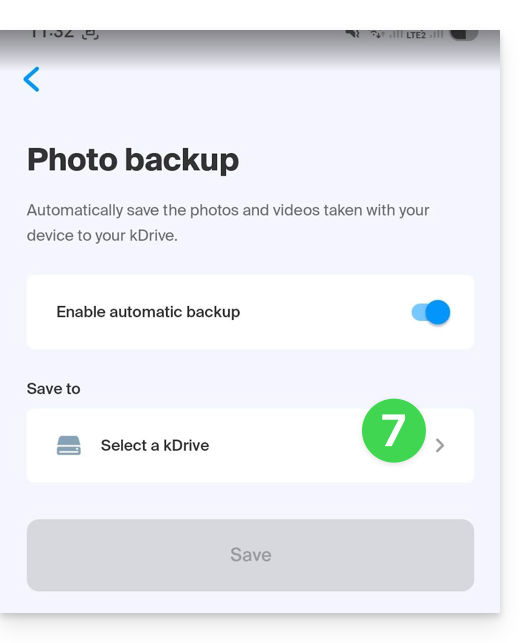
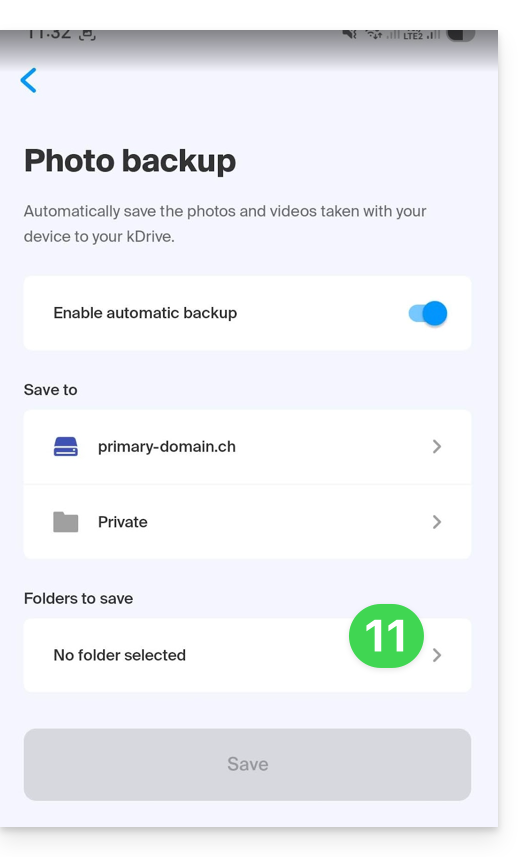
- Tap on Photo backup:

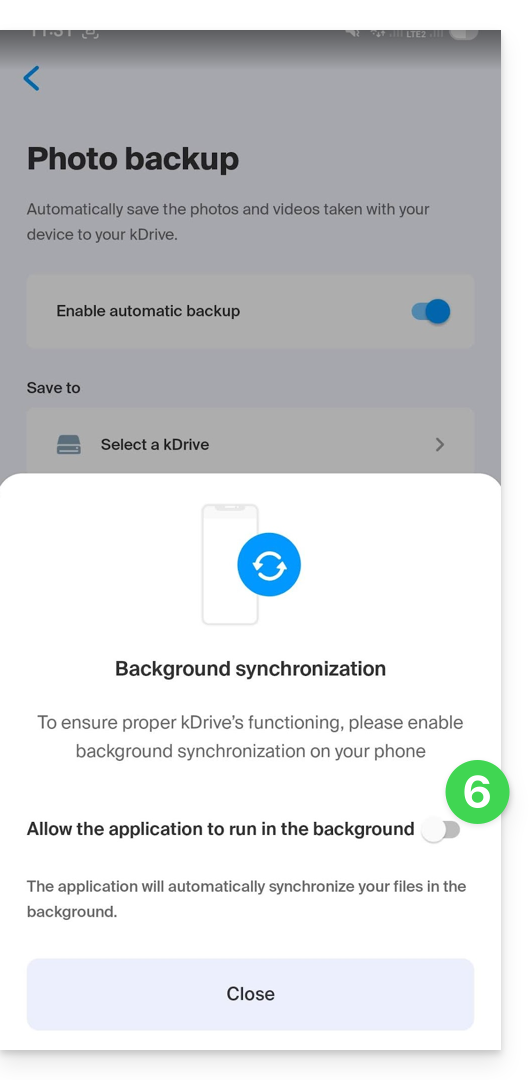
- Enable Automatic backup:
- If necessary, accept the Android request for permission to access all your media and background synchronization:
- Tap on Select a kDrive:
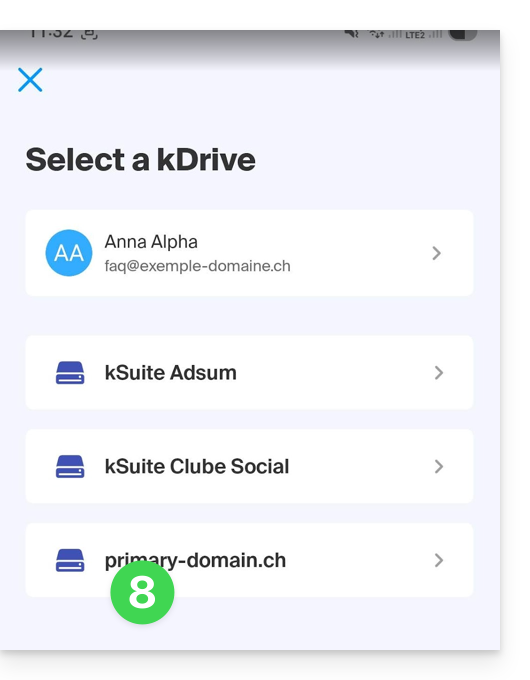
- Choose the Infomaniak account and the destination kDrive:
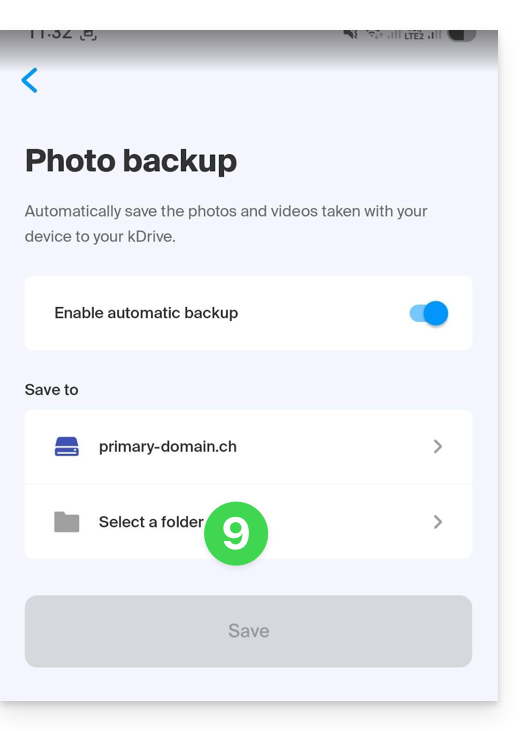
- Tap on the kDrive folder selection:
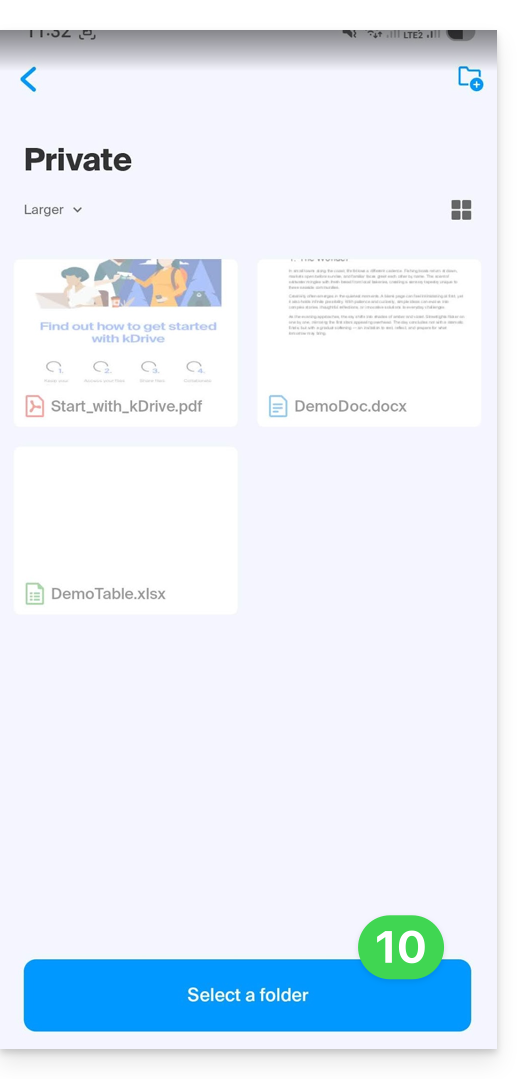
- Once in the target folder on kDrive, press Select:
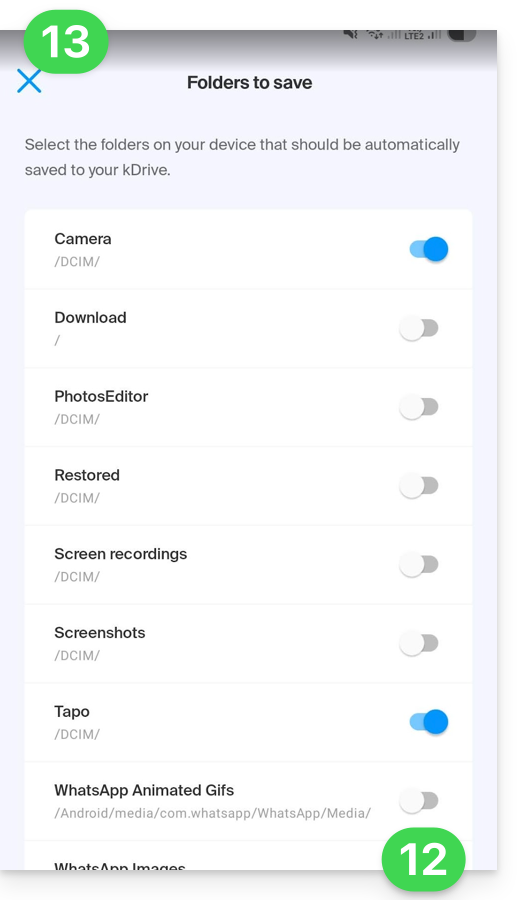
- Press the folders that need to be saved:
- Activate the folder(s) on your device to synchronize (e.g. DCIM, WhatsApp, etc.).
- Close the folder selection window:
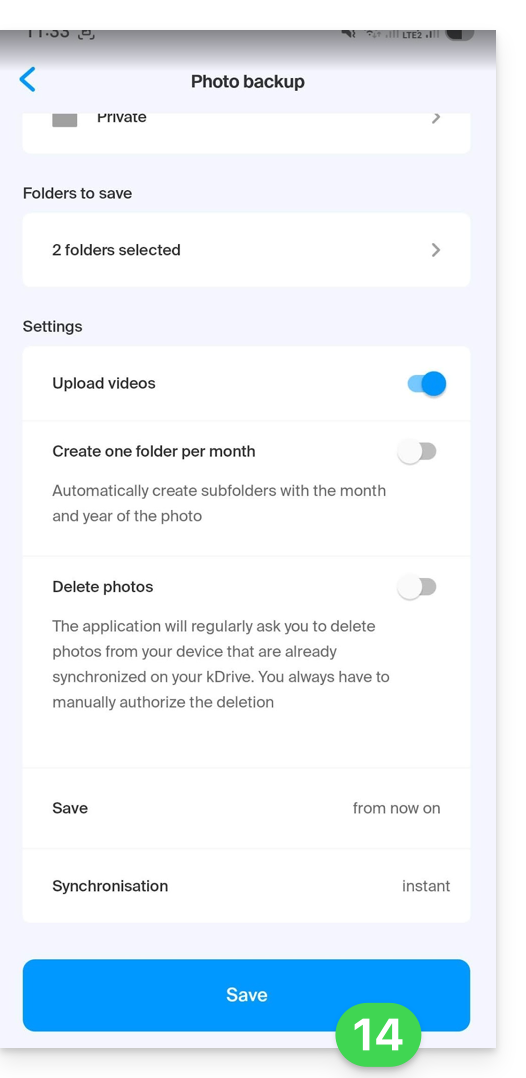
- Adjust your preferences (videos, monthly sorting, deletion after sending, etc.) then press Save:
Warning: Risk of collision and data loss
The Android application retains the original name set by your device. On some models (like Sony Xperia), the photo numbering is sequential (e.g. DSC_0001.jpg).
If you enable the option to delete content on the mobile device after sending, the device may reset its numbering. During the next synchronization, a new photo named DSC_0001.jpg could then overwrite the previous one on your kDrive.
To avoid any data loss, it is recommended to configure your "Camera" app to use a naming convention based on the date and time (e.g. 20260219_150109.jpg) rather than a simple numerical sequence.
Link to this FAQ:
Has this FAQ been helpful?
This guide explains how to create, save, and edit an Office file (text, spreadsheet, presentation...) on the Web app kDrive (online service ksuite.infomaniak.com/kdrive) and on the mobile app kDrive (application for iOS / Android smartphone or tablet).
Note to LibreOffice file users: to avoid display or formatting bugs on kDrive, always convert your LibreOffice files (ODF: .ods, .odt, .odp) to their Microsoft Office XML equivalents (.xlsx, .docx, .pptx) before online editing.
Use the native editor
kDrive natively integrates the Docs, Grids and Points applications which allow you to create, modify and collaborate online on documents of type Word .docx, Excel .xlsx and PowerPoint .ppsx. You will thus be able to work with:
- text document
- spreadsheet (worksheet)
- presentation
- notebook
- document draw.io for diagrams, schematics and wireframes
A feature allows you to add a bookmark (shortcut to a favorite passage in your document or the equivalent of a web page anchor) that you can easily share with your contacts. You will also be able to easily notify a user of your Organization directly on the document.
Refer to the guide on this subject.
Use Microsoft Office Online
Another editing solution is available to you (kDrive Pro or kSuite Business / Enterprise required): the Microsoft Office Online editor.
Refer to the guide on this subject.
Set the default editor
✘ UNAVAILABLE with
Free kSuite / kSuite Standard
my kSuite / my kSuite+ (ik.me, etik.com, ikmail.com)
kDrive Solo / kDrive Team / kDrive Pro
To specify in detail which editor to always use by default to open your collaborative Office files (text, spreadsheet, presentation...) among the 2 options presented above:
- Click here to access the Infomaniak Web app kDrive (online service ksuite.infomaniak.com/kdrive).
- Click on the Settings icon at the top right.
- Check or select the relevant kDrive from the dropdown menu in the left sidebar.
- Click on General in the left sidebar.
- Click on Default editor:
- Choose the default editor for files:
.docx/.doc.xlsx/.xls.pptx/.ppt
Link to this FAQ:
Has this FAQ been helpful?
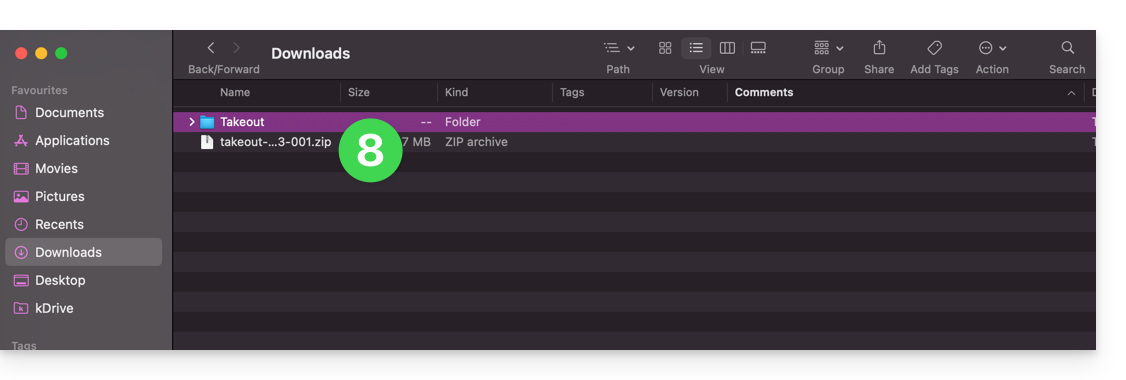
This guide details how to import your photos from Google Photos (https://photos.google.com/) to kDrive Infomaniak.
1. Export your Google photos
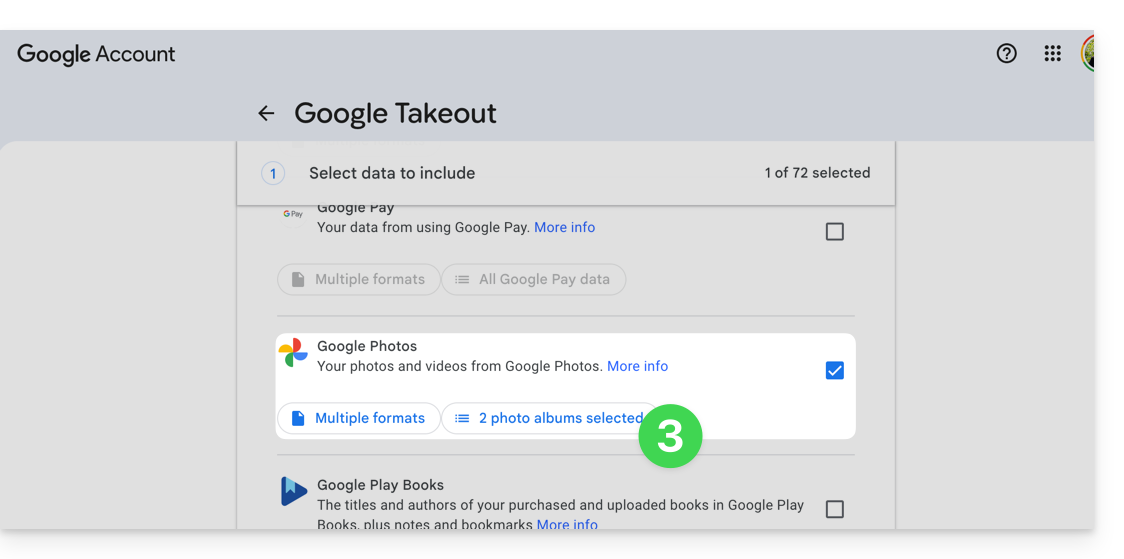
To retrieve all your photos stored on Google Photos on your computer's hard drive, you need to use the Google Takeout service. This allows you to choose which albums to retrieve if you want to proceed in steps:
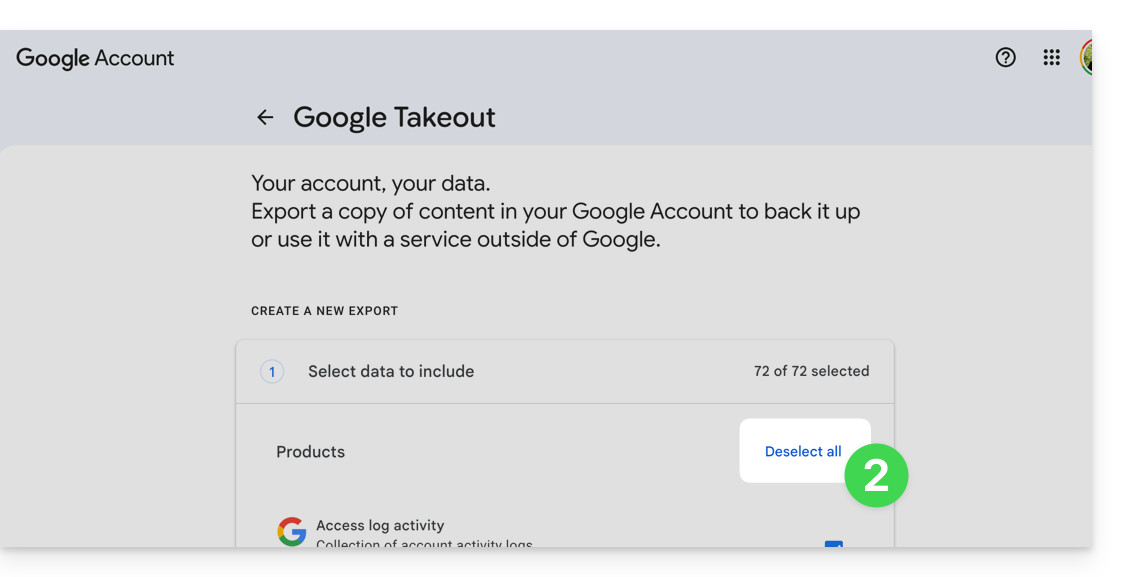
- Log in to Google Takeout.
- Deselect all products to keep only Google Photos:
- If necessary, deselect the albums not to export:
- Move on to the next step at the bottom of the page:
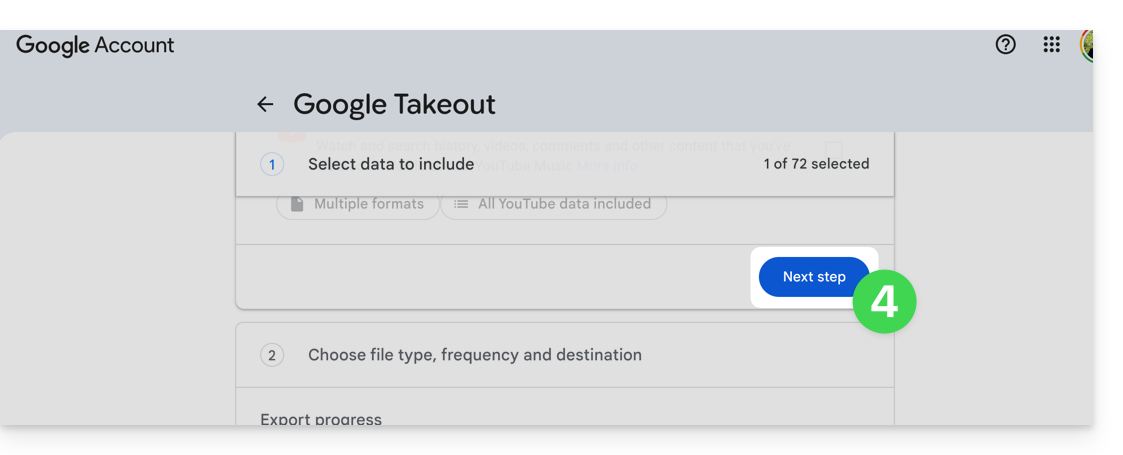
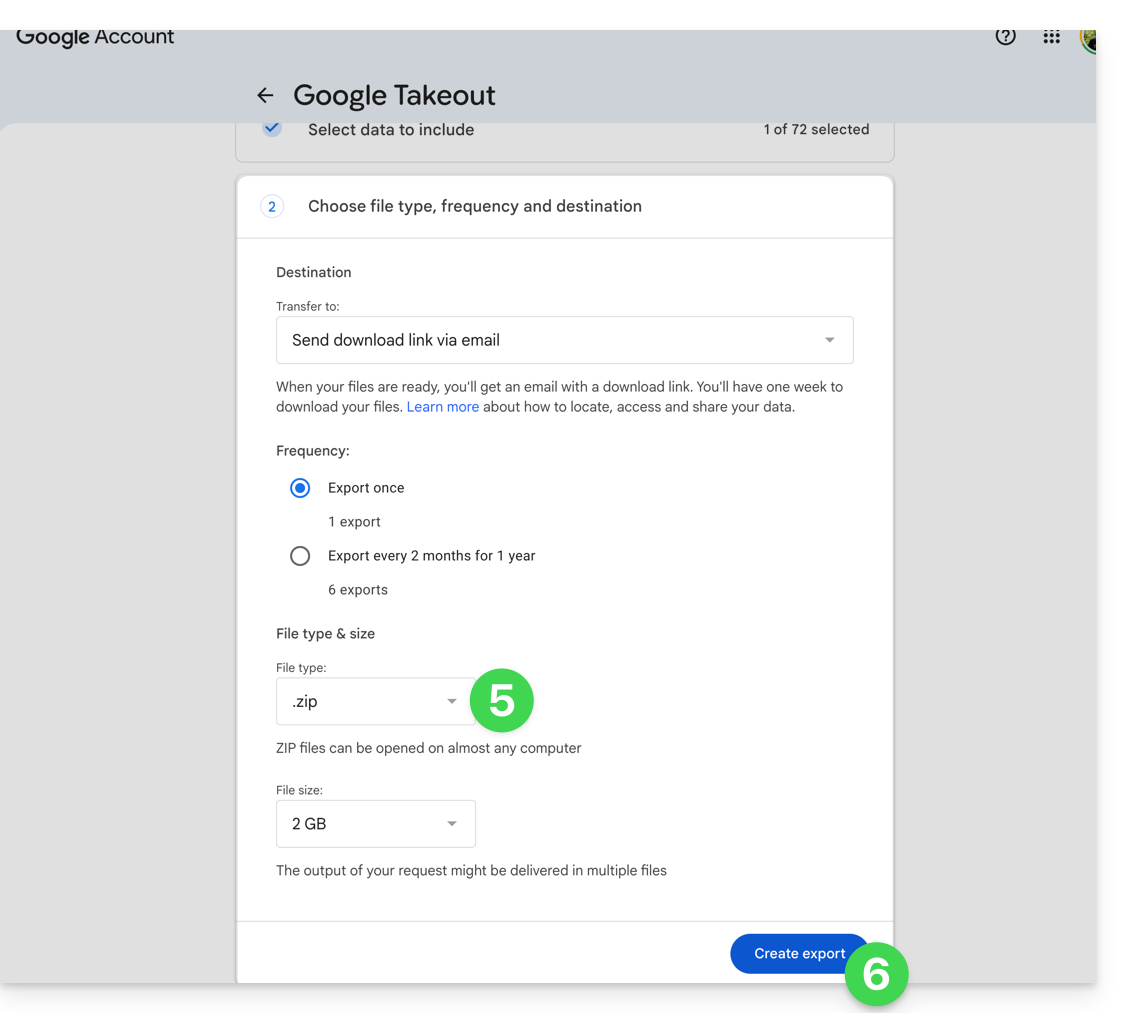
- Configure the export by ZIP archives.
- Click at the bottom on the “Create an export” button to start the export:
- Wait (several hours or even several days) until you receive an email containing the links to the ZIP exports.
- Download and then decompress the content on your computer:
- Clean and merge your different photo folders if necessary.
2. Correct the dates of the exported photos…
During the export, the creation dates of the files are modified and replaced by the export date instead of the original date of capture. You must therefore correct the dates via an appropriate script.
Here is a script for advanced users that allows you to restore the correct data to your files from the EXIF information (it is recommended to process batches of 7000-8000 photos max. to avoid a crash):
… on macOS
- Download ExifTool https://exiftool.org/index.html (macOS Package).
- Install the application by authorizing its opening beforehand if necessary:

- Open Script Editor (located in your Applications > Utilities folder):

- Click on New document.
- Copy and paste the long script provided below into the Script Editor window.
- Click on Run to start the script, a window opens:

- Select the folder to analyze.
- Let the script run, it will modify the dates or write the errors in a file
errors.txton the desktop.
The script to copy and paste entirely:
-- replace file date with EXIF creation date or date from name after the first dash -
tell application "Finder"
    set FolderPath to choose folder with prompt "Select the folder containing the files to update"
    my processFolder(FolderPath)
end tell
on processFolder(aFolder)
    tell application "Finder"
        -- process files:
        set fileList to files of aFolder
        repeat with eachFile in fileList
            -- process a single file

            set theFile to eachFile
            set AppleScript's text item delimiters to {""}
            set fileName to name of eachFile --get the file name

            set eachFile to eachFile as string --file path
            set hasDate to true --initialize date found flag

            try
                --get date if available
                set photoDate to do shell script "/usr/local/bin/exiftool -DateTimeOriginal " & quoted form of POSIX path of eachFile
                if photoDate is "" then set photoDate to do shell script "/usr/local/bin/exiftool -CreationDate " & quoted form of POSIX path of eachFile
                if photoDate is "" then set photoDate to do shell script "/usr/local/bin/exiftool -CreateDate " & quoted form of POSIX path of eachFile

                if photoDate is "" then
                    set hasDate to false --check if date was found
                end if

            on error
                set hasDate to false -- error retrieving date
                set photoDate to ""
            end try

            if length of photoDate > 20 then
                --format extracted date
                set x to (length of photoDate) - 33
                set OriginalDate to text -x thru -1 of photoDate
                set formattedDate to text 1 thru 5 of OriginalDate
                set theYear to formattedDate
                set formattedDate to formattedDate & text 7 thru 8 of OriginalDate
                set theMonth to text 7 thru 8 of OriginalDate
                set formattedDate to formattedDate & text 10 thru 11 of OriginalDate
                set theDay to text 10 thru 11 of OriginalDate
                set formattedDate to formattedDate & text 13 thru 14 of OriginalDate
                set theHour to text 13 thru 14 of OriginalDate
                set formattedDate to formattedDate & text 16 thru 17 of OriginalDate
                set theMinute to text 16 thru 17 of OriginalDate
                set formattedDate to formattedDate & "." & text 19 thru 20 of OriginalDate
                set theSecond to text 19 thru 20 of OriginalDate
                set newName to theYear & "-" & theMonth & "-" & theDay & " " & theHour & "." & theMinute & "." & theSecond

                set testValue to formattedDate as string --check if found date is 000
                if testValue is " 000000000000.00" then
                    set hasDate to false
                else
                    -- set file date to original EXIF date and write to log
                    do shell script "touch -t " & formattedDate & " " & quoted form of POSIX path of eachFile
                    set logFile to open for access ((path to desktop folder as text) & "Date Found.txt") as text with write permission
                    write "Original date found for file: " & OriginalDate & " " & eachFile & return to logFile starting at eof
                    close access logFile
                end if
            end if

            if hasDate is false then
                -- get date from file name after first dash
                set nb to ""
                set nameDate to ""
                set fileName to fileName as string
                set savedDelimiters to AppleScript's text item delimiters --save delimiters
                set AppleScript's text item delimiters to {"-"} --split on "-"
                set nb to offset of "-" in fileName
                if nb is not 0 then
                    set AppleScript's text item delimiters to savedDelimiters --restore delimiters
                    set nameDate to characters (nb + 1) thru (nb + 8) of fileName as string
                    set nameDate to nameDate & "1200.00"
                    set cmd1 to "/usr/local/bin/exiftool -datetimeoriginal=" & nameDate & " " & quoted form of POSIX path of eachFile
                    set cmd2 to "/usr/local/bin/exiftool -createdate=" & nameDate & " " & quoted form of POSIX path of eachFile
                end if
                try
                    -- write date from name to EXIF
                    do shell script cmd1
                    do shell script cmd2
                    do shell script "touch -t " & nameDate & " " & quoted form of POSIX path of eachFile
                    do shell script "rm " & quoted form of POSIX path of (eachFile & "_original")
                on error
                    -- if date from name is invalid, log the error
                    set logFile to open for access ((path to desktop folder as text) & "Date Error.txt") as text with write permission
                    write "No valid date found in file name: " & eachFile & return to logFile starting at eof
                    close access logFile
                end try
            end if
        end repeat

        -- process folders:
        set folderList to folders of aFolder
        repeat with eachSubfolder in folderList
            -- process a subfolder
            my processFolder(eachSubfolder)
        end repeat
    end tell
end processFolder
tell application "Finder"
    display dialog "Done! All files processed." buttons {"Close"}
end tell
… on Windows
- Download ExifTool https://exiftool.org/index.html (Windows executable)
- Place it in an accessible folder (for example
C:\ExifTool). - Rename
exiftool(-k).exetoexiftool.exe. - Note its path (for example
C:\ExifTool\exiftool.exe).- The script looks for the executable in
C:\ExifTool\exiftool.exe. If you place it elsewhere, you need to modify the second line of the script.
- The script looks for the executable in
- Copy and paste the long script provided below into a text file such as Notepad on your computer.
- Modify if necessary the path specified in the file with the one noted in step 4.
- Save it with the
.ps1extension, for exampleUpdateExifDates.ps1. - Right-click on the
.ps1file to run it with PowerShell (a command interpreter and script writing environment, pre-installed on modern versions of Windows). - Select the folder to analyze.
- Let the script run, it will modify the dates or write the errors in a file
DateError.txton the desktop.
PowerShell may block scripts. To allow their execution (if necessary), open PowerShell as an administrator and type Set-ExecutionPolicy RemoteSigned -Scope CurrentUser.
The script to copy and paste entirely:
# === Configuration ===
$exifToolPath = "C:\ExifTool\exiftool.exe"
$desktop = [Environment]::GetFolderPath("Desktop")
$logFound = Join-Path $desktop "DateFound.txt"
$logError = Join-Path $desktop "DateError.txt"

# === Folder Selection Dialog ===
Add-Type -AssemblyName System.Windows.Forms
$folderBrowser = New-Object System.Windows.Forms.FolderBrowserDialog
$folderBrowser.Description = "Select the folder to process"
if ($folderBrowser.ShowDialog() -ne "OK") { exit }
$folder = $folderBrowser.SelectedPath

function Process-Folder {
    param ([string]$path)
    Get-ChildItem -Path $path -Recurse -File | ForEach-Object {
        $file = $_
        $filePath = $file.FullName
        $fileName = $file.Name
        $hasDate = $true

        # Try reading EXIF date
        $photoRaw = & $exifToolPath -DateTimeOriginal -S -n "$filePath"
        if (-not $photoRaw) { $photoRaw = & $exifToolPath -CreateDate -S -n "$filePath" }

        if ($photoRaw -match "\d{4}:\d{2}:\d{2} \d{2}:\d{2}:\d{2}") {
            $photoDate = $matches[0]
            # Nettoyage de la date pour formatage (YYYYMMDDHHMM.SS)
            $dateString = $photoDate -replace '[: ]', ''

            if ($dateString.Length -ge 14) {
                $formattedDate = $dateString.Substring(0, 12) + "." + $dateString.Substring(12, 2)
                try {
                    $newDate = [datetime]::ParseExact($photoDate, "yyyy:MM:dd HH:mm:ss", $null)
                    [System.IO.File]::SetCreationTime($filePath, $newDate)
                    [System.IO.File]::SetLastWriteTime($filePath, $newDate)
                    Add-Content -Path $logFound -Value "EXIF date set for: $fileName → $photoDate"
                } catch {
                    $hasDate = $false
                }
            } else { $hasDate = $false }
        } else { $hasDate = $false }

        if (-not $hasDate) {
            if ($fileName -match "-(\d{8})") {
                $nameDateRaw = $matches[1] + "120000"
                try {
                    & $exifToolPath "-datetimeoriginal=$($matches[1]) 12:00:00" "$filePath"
                    & $exifToolPath "-createdate=$($matches[1]) 12:00:00" "$filePath"
                    $newDate = [datetime]::ParseExact($nameDateRaw, "yyyyMMddHHmmss", $null)
                    [System.IO.File]::SetCreationTime($filePath, $newDate)
                    [System.IO.File]::SetLastWriteTime($filePath, $newDate)
                    Add-Content -Path $logFound -Value "Date from filename set for: $fileName"
                } catch {
                    Add-Content -Path $logError -Value "Invalid date in filename: $fileName"
                }
            } else {
                Add-Content -Path $logError -Value "No valid date found for: $fileName"
            }
        }
    }
}

# Execute processing
Process-Folder -path $folder
[System.Windows.Forms.MessageBox]::Show("Done! All files processed.")
3. Import photos to kDrive
Do not change your passwords until the import is complete.
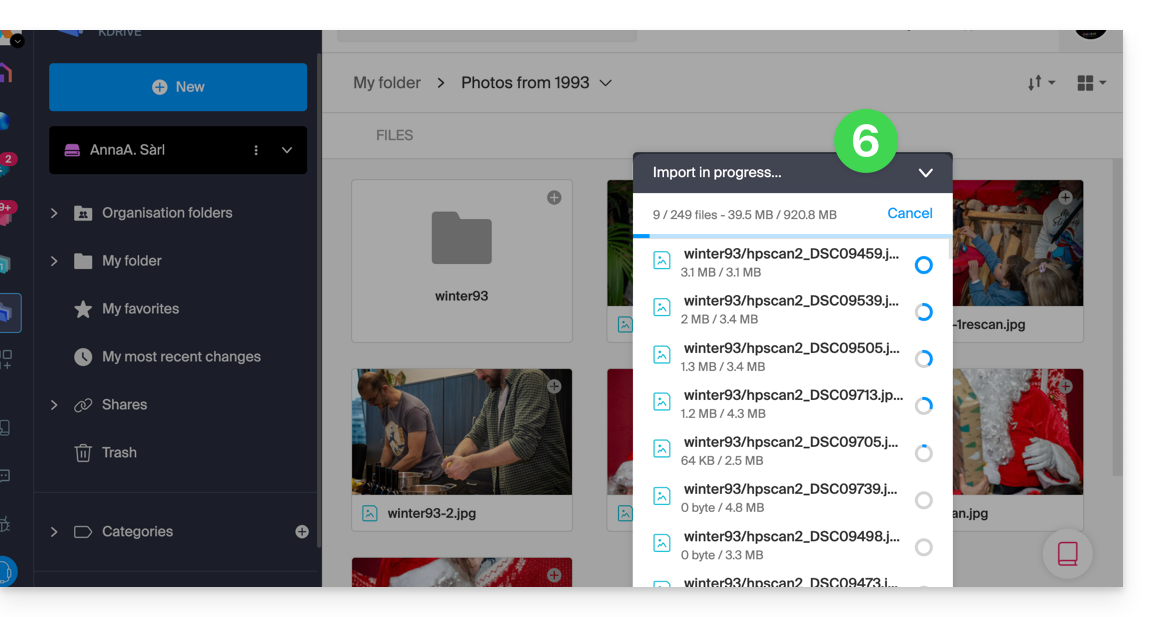
Once your photos are ready, if their number is not too large (a few thousand items) and your Internet connection is suitable, you can simply open the Web app kDrive (online service ksuite.infomaniak.com/kdrive) and choose to import the folder containing your photos to the desired location:
- Click here to access the Web app kDrive Infomaniak (online service ksuite.infomaniak.com/kdrive).
- Navigate to the location where your photos will be stored.
- Click the New button in the top left corner.
- Click on Import a folder
- Select the folder containing your photos on your computer.
- Wait until your data is fully imported (the activity log scrolls at the bottom right):
Otherwise, if you are synchronizing your data using the desktop app, simply place your photos in the folder structure of your kDrive folder on your computer. Synchronization will begin, and your photos will be securely sent to the Infomaniak servers.
4. Access your photos from your devices
You can now access your photos on your various devices connected to kDrive (until they synchronize if it is the kDrive desktop app).
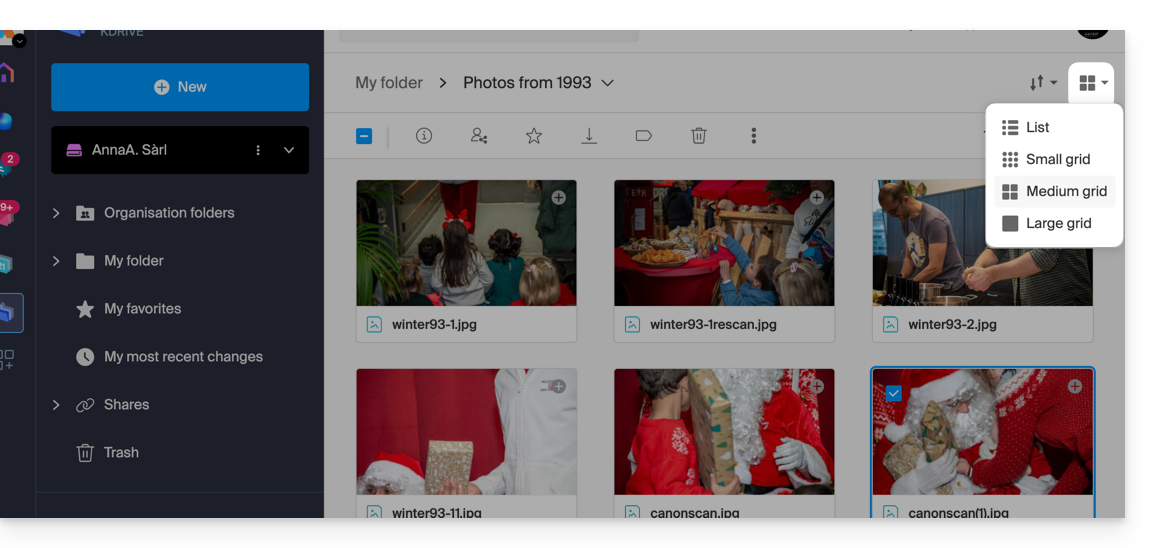
- On the Web app kDrive Infomaniak (online service ksuite.infomaniak.com/kdrive) you can modify the presentation to better view your photos with an enlarged display of thumbnails:
Link to this FAQ:
Has this FAQ been helpful?
This guide explains how to import external data (files, folders, etc.) to your kDrive using the WebDAV protocol provided by your Cloud host.
Preamble
- Refer to this other guide if you are looking for information on how to copy specific data from one kDrive to another when your user has access to both kDrives concerned.
Import external data via WebDAV
Prerequisites
- Have a kDrive or kSuite offer
- Have sufficient permissions within kDrive or kSuite.
- Do not change your passwords until the import is complete!
To access the import tool, where the data needs to be imported:
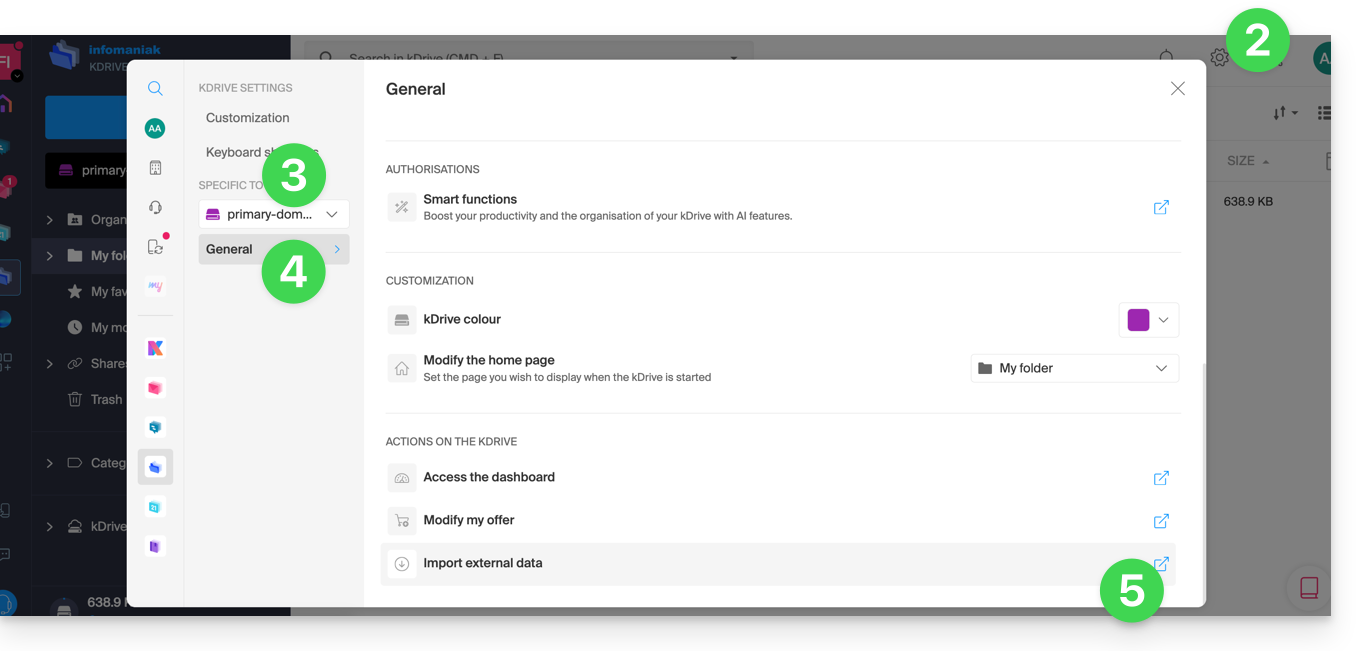
- Click here to access the Infomaniak kDrive Web app (online service ksuite.infomaniak.com/kdrive).
- Click on the Settings icon in the top right corner.
- Check or select the kDrive concerned in the dropdown menu of the left sidebar.
- Click on General in the left sidebar.
- Click on Import external data:
- Click the blue Start button:
- Click on WebDAV.
- Complete the requested information based on the source (including the WebDAV address you have - obtained from the source).
- Choose the destination kDrive and the desired location to host the imported data.
- Click on Start:
Link to this FAQ:
Has this FAQ been helpful?
This guide details the Lite Sync option in the desktop app kDrive (desktop application for Windows). The Lite Sync option is also available on macOS.
Introduction
- The Lite Sync feature saves space by virtually storing your kDrive files on your computer, only downloading them when needed.
- Files are always accessible from the web app kDrive (online service ksuite.infomaniak.com/kdrive), but locally they are present in a "dehydrated" form, requiring loading time to be fully accessible.
- This allows you to view, complete, and synchronize the content of kDrive without saturating the hard drive.
- The Lite Sync option always applies:
- to a specific kDrive (in the case where you synchronize several on the application).
- and to the entirety of the kDrive (or the entirety of an advanced synchronization).
- and via a specific kDrive app (another user of the same kDrive can make a different Lite Sync choice than yours).
- If you encounter any problems, please refer to this other guide on the subject.
Activating the Lite Sync option
Prerequisites & scope of Lite Sync
- Windows OS version ≥ 10 (21H2) — not available with Linux
- 64-bit processor (compatible with ARM64)
- File storage system under NTFS (FAT32 excluded)
The Lite Sync option can be activated during application installation (you will be prompted) or later:
- If necessary, click on the chevron in the notification area of your computer (bottom right on Windows, near the clock) to access the kDrive icon, as Windows hides application icons.
- Left-click on the app icon.
- Click on the action menu ⋮ to the right of the kDrive window.
- Select kDrive Settings.
- Click on the action menu ⋮ to the right of the current synchronization and the cloud symbol:
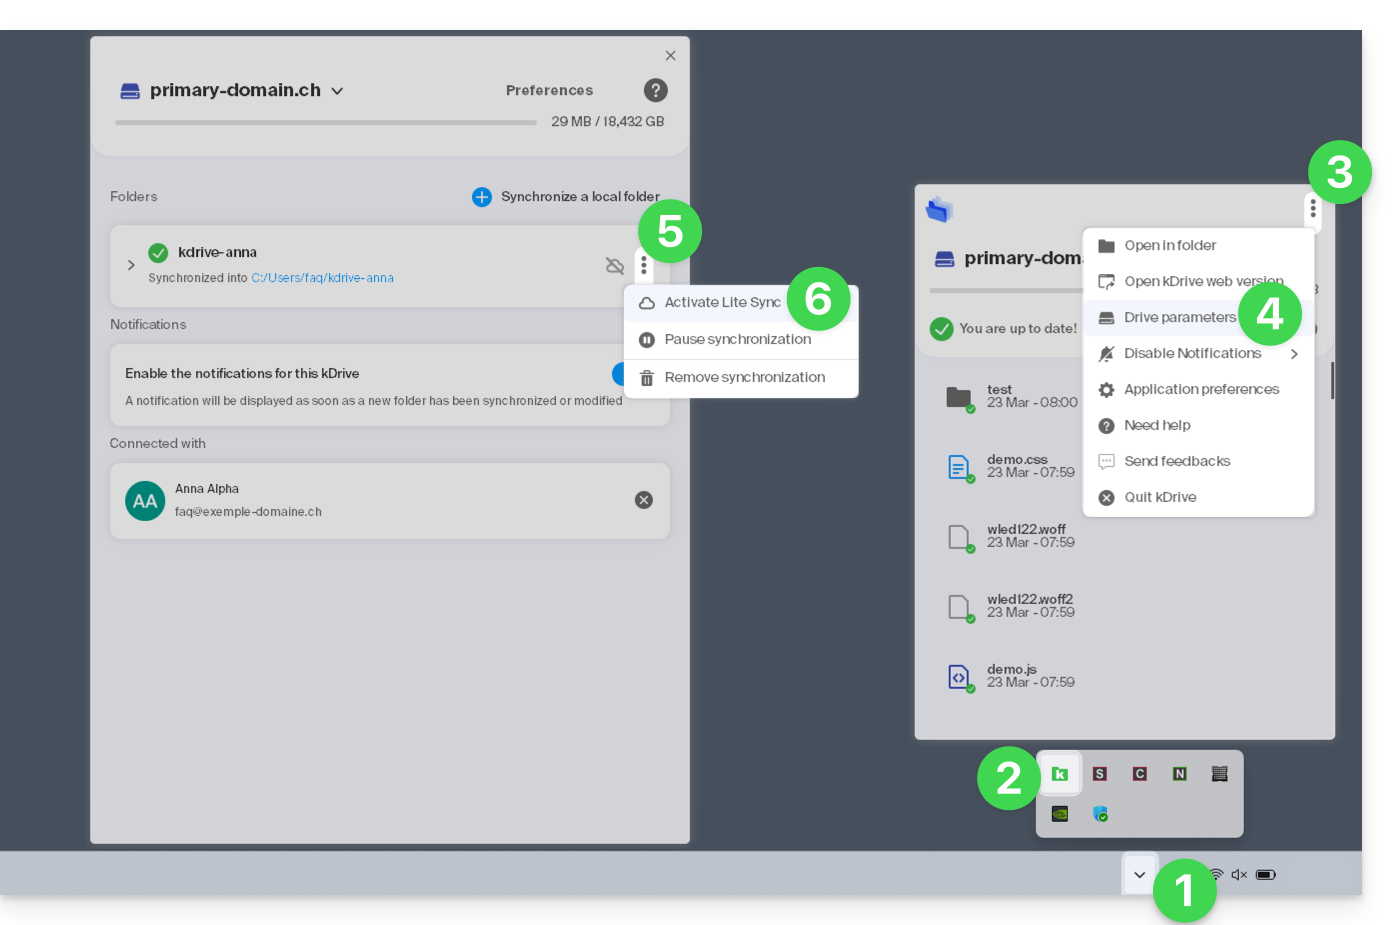
- Click on the menu item:
- If the cloud has a line through it, you can enable Lite Sync, as it was not yet active (confirm).
- In the same place, you can disable Lite Sync if the cloud does not have a line through it (see also at the end of this guide).
- Confirm the operation and wait for the message confirming the end of the operation.
Actions on data synchronized on the disk
Always keep on this device
Once Lite Sync is enabled (and the data on the disk has become “virtual”), you can still make a folder and its subfolders, or only one or more files, available locally:
- From the Windows File Explorer, navigate to a folder synchronized with kDrive and right-click.
- Select the Always keep on this device option under kDrive:
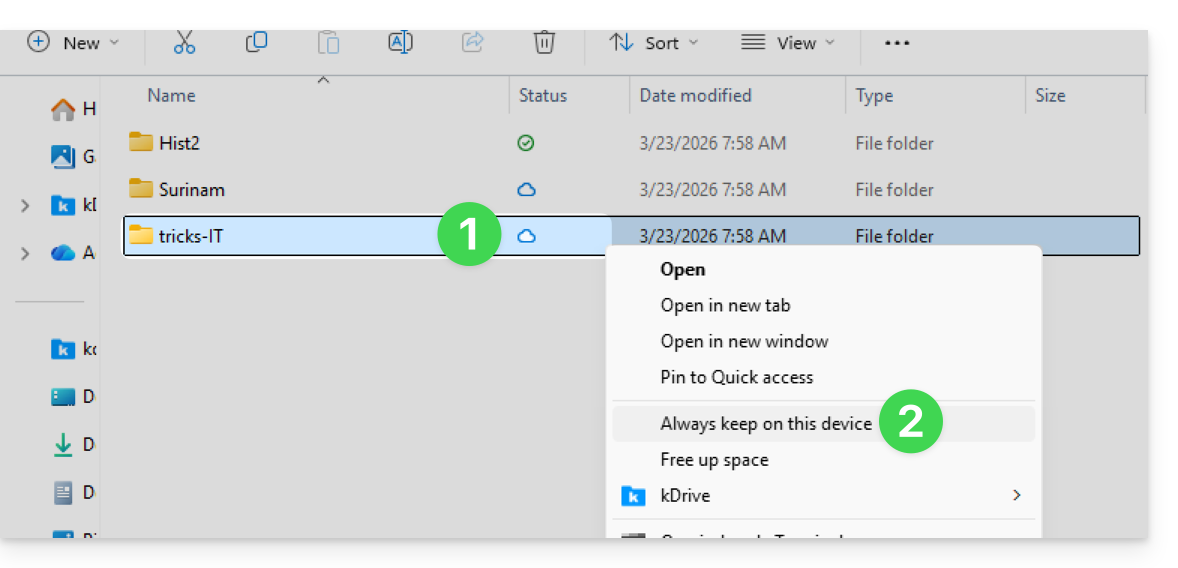
- The symbol visible on the icon of the files in question will change to indicate that the file is no longer "in the cloud" but is physically present on your disk.
Free up space
Conversely, once Lite Sync is activated, you can free up space, file by file or in a folder and its subfolders.
Note: "free up space" is not applied by default to new files or folders added locally.
- From the Windows File Explorer, right-click on the folder or file in question.
- Select the Free up space option under kDrive:
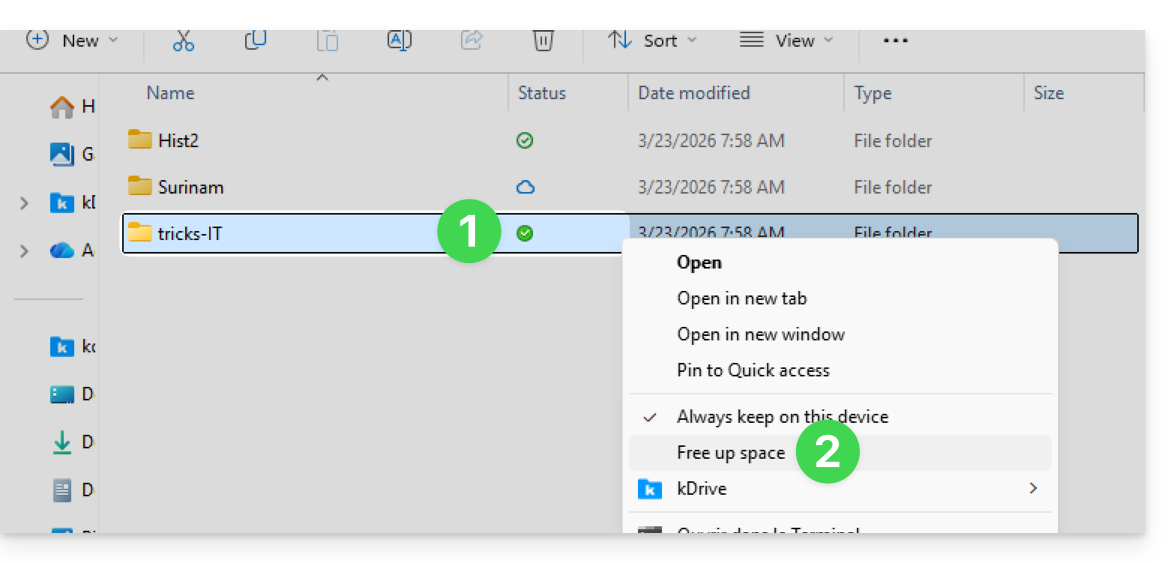
- The symbol visible on the icon of the files/folders in question will change to indicate that the data is "in the cloud" and is no longer fully present on your disk:
- The Free up space action will free up storage space on your computer.
- The files will remain visible but will no longer be accessible without an internet connection.
Example of use (storage space required)
If you activate Lite Sync, the space occupied (900 GB, for example) on the Infomaniak server will be freed up on your hard drive, but the reverse is also true (for example, 900 GB of free space is required on your hard drive if you activate the Lite Sync option while it is already running).
Therefore, it is recommended to stick to the initial choice of whether or not to activate Lite Sync, and not to change it mid-process.
"Dehydration" of files
As explained in the introduction, a dehydrated file is a kDrive file whose full version is not present on the hard drive; instead, a 1 KB "shortcut" is displayed. This is normal behavior when Lite Sync is enabled.
In some cases (for example, if you copy files from your hard drive while Lite Sync is enabled, and then start a new synchronization to a new kDrive), the application will block the import of this type of file. To resolve these errors, you can download the full file from the web app kDrive (online service ksuite.infomaniak.com/kdrive).
Here are the status icons used in Windows Explorer and their explanations:
| Status Icons | Description |
|---|---|
| |
| |
| File temporarily downloaded by Windows (may be released by the OS). | |
| The progress circle indicates an action in progress or pending. | |
| Synchronization issue or Lite Sync problem (contact support). |
Disable the Lite Sync option
To do this, follow the steps at the top of this guide. When disabling LiteSync via kDrive Settings, two scenarios may occur depending on the remaining space on your device's storage:
- If there is enough space on your computer, a message confirming the deactivation will appear; simply click Continue.
- If there is not enough space on your computer, a message will indicate the amount of space needed to allow the deactivation of Lite Sync; the synchronization of your kDrive will be paused until you free up space or select the files to synchronize.
Link to this FAQ:
Has this FAQ been helpful?
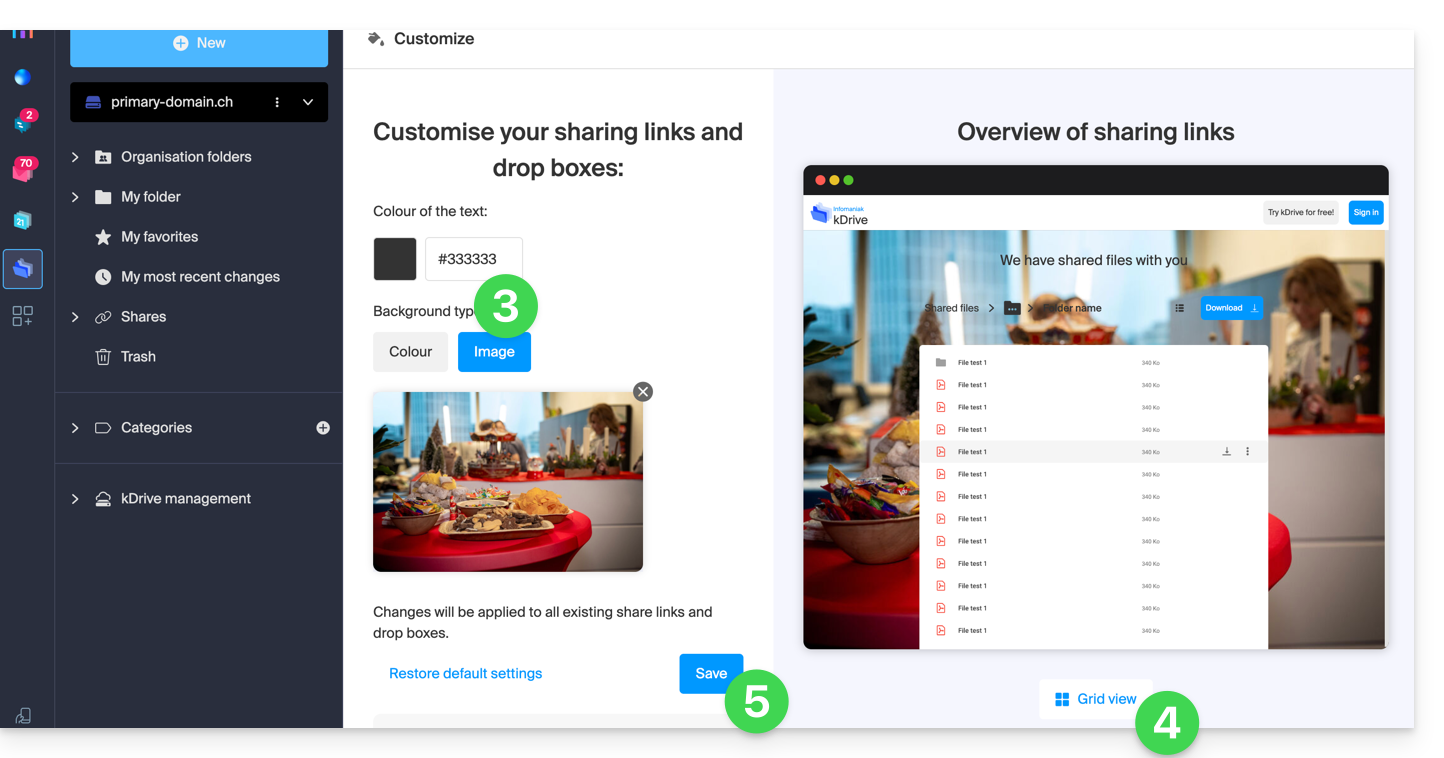
This guide explains how to add background images and change the text color of share links and kDrive drop boxes so that they match the graphic identity of your Organization.
✘ UNAVAILABLE with
kSuite free
my kSuite / my kSuite+ (ik.me, etik.com, ikmail.com)
Preamble
- Any customization from the share link is applied to the drop box (and vice versa).
- The customization of the drop box will only be visible when you share its access via a share link.
- If Custom Brand is active on the Organization where kDrive is located, the customization is managed in the settings of the option:
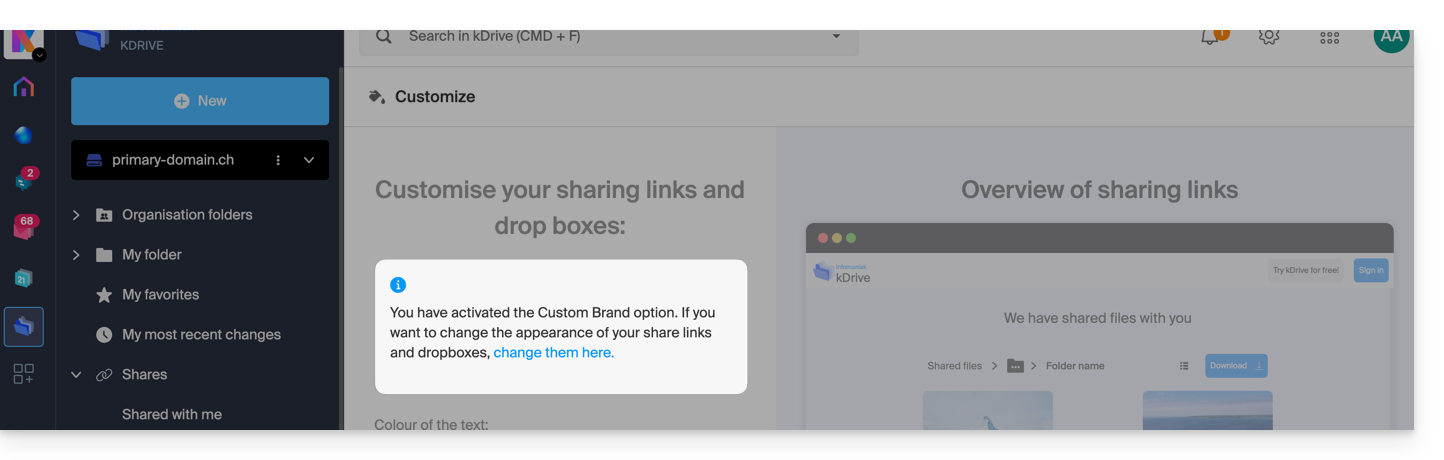
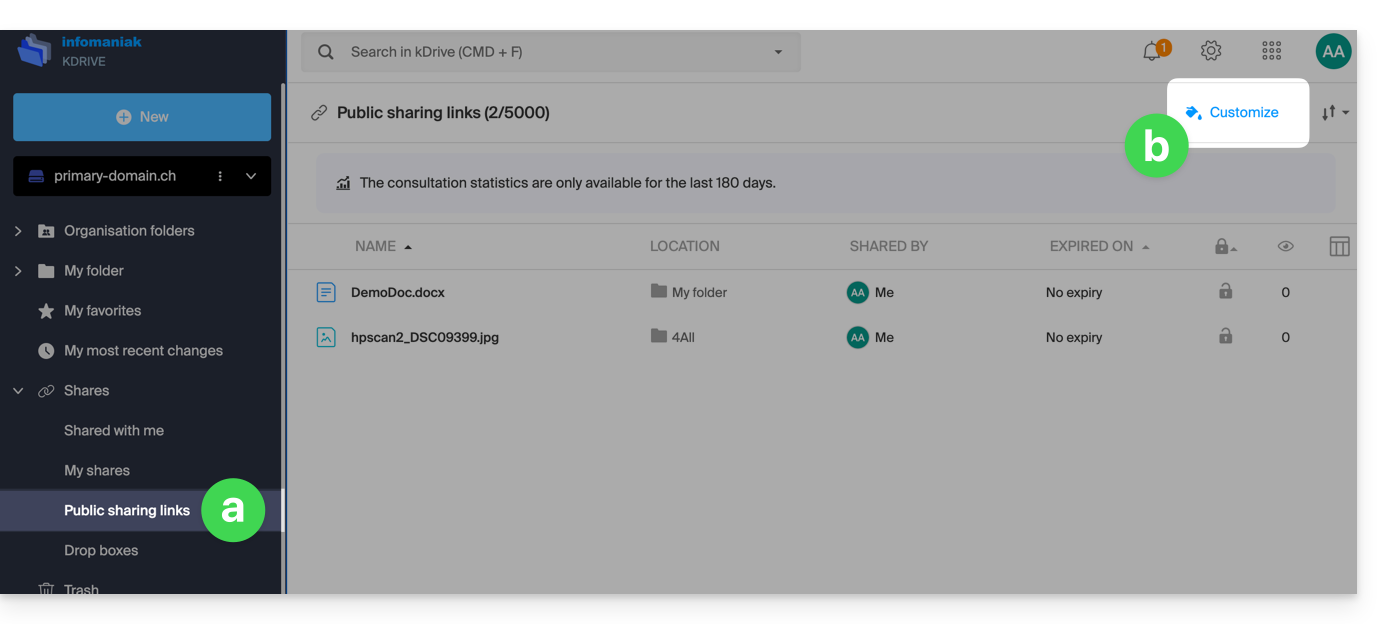
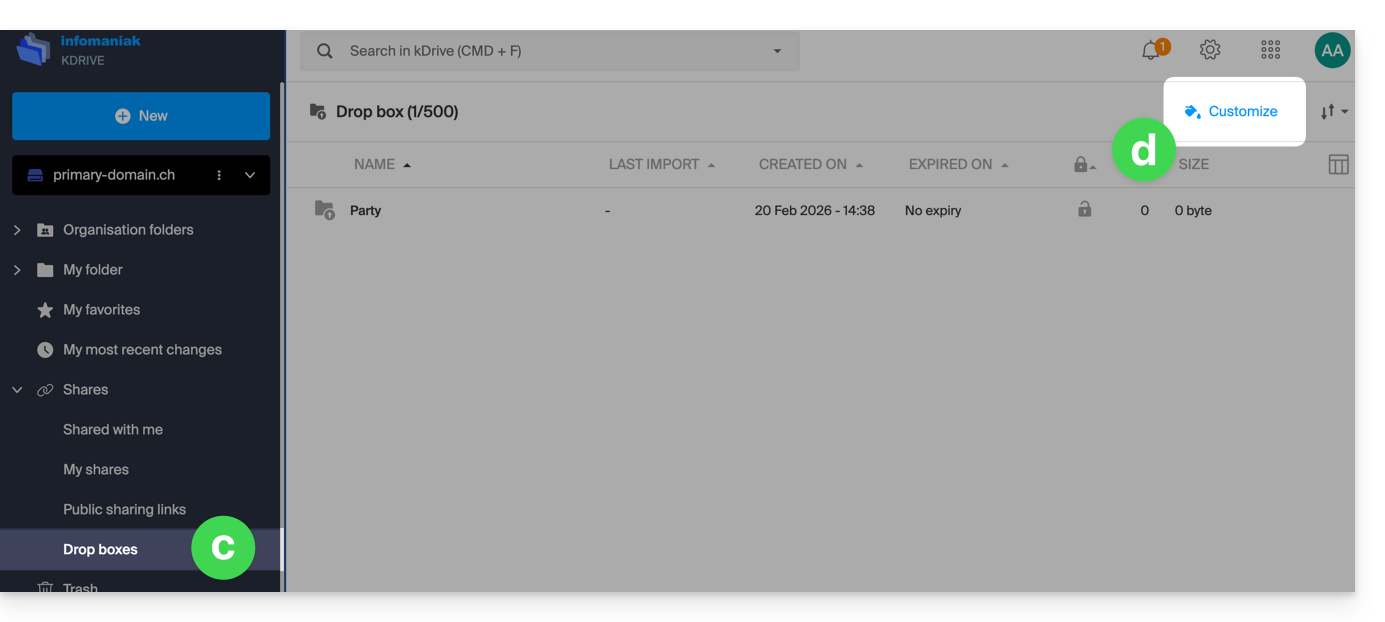
Customize share links & drop boxes
To access kDrive customization:
- Click here to access the Infomaniak kDrive Web app (online service ksuite.infomaniak.com/kdrive).
- Click on the chevron to expand the Shares section in the left sidebar:
- Click on Public share links.
- Click on Customize:
- It's the same principle if you click on Drop boxes.
- Click on Customize:
- Modify the text color and add an image (min. 100 KB; it must be on kDrive) or a background color.
- Preview the effects on the 2 display types.
- Click on Save:
Link to this FAQ:
Has this FAQ been helpful?
This guide will quickly introduce you to the essential features of Euria, the artificial intelligence available within kSuite. It performs particularly well with the kDrive Infomaniak web app (online service ksuite.infomaniak.com/kdrive).
✘ UNAVAILABLE with
kSuite Free / kSuite Standard
my kSuite / my kSuite+ (ik.me, etik.com, ikmail.com)
kDrive Solo / kDrive Team / kDrive Pro
Use AI for your files on kDrive
Prerequisites
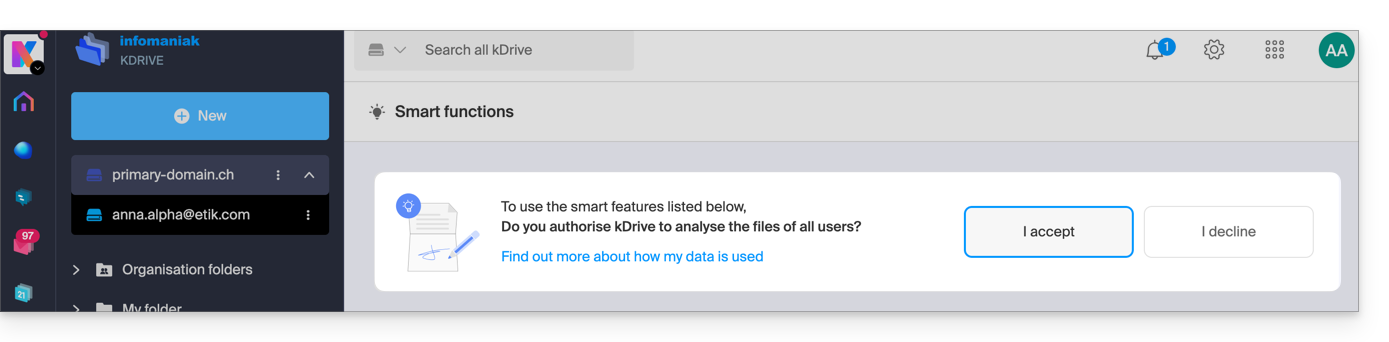
- You must be Administrator or Legal Representative within the Organization that manages the kDrive.
- To activate Euria for all users of your kDrive, follow the wizard that appears when you log in to kDrive.
- Read and understand this other guide about the model used and the responsibilities of each user.
- You can also activate (or deactivate) Euria by going to the unified settings:
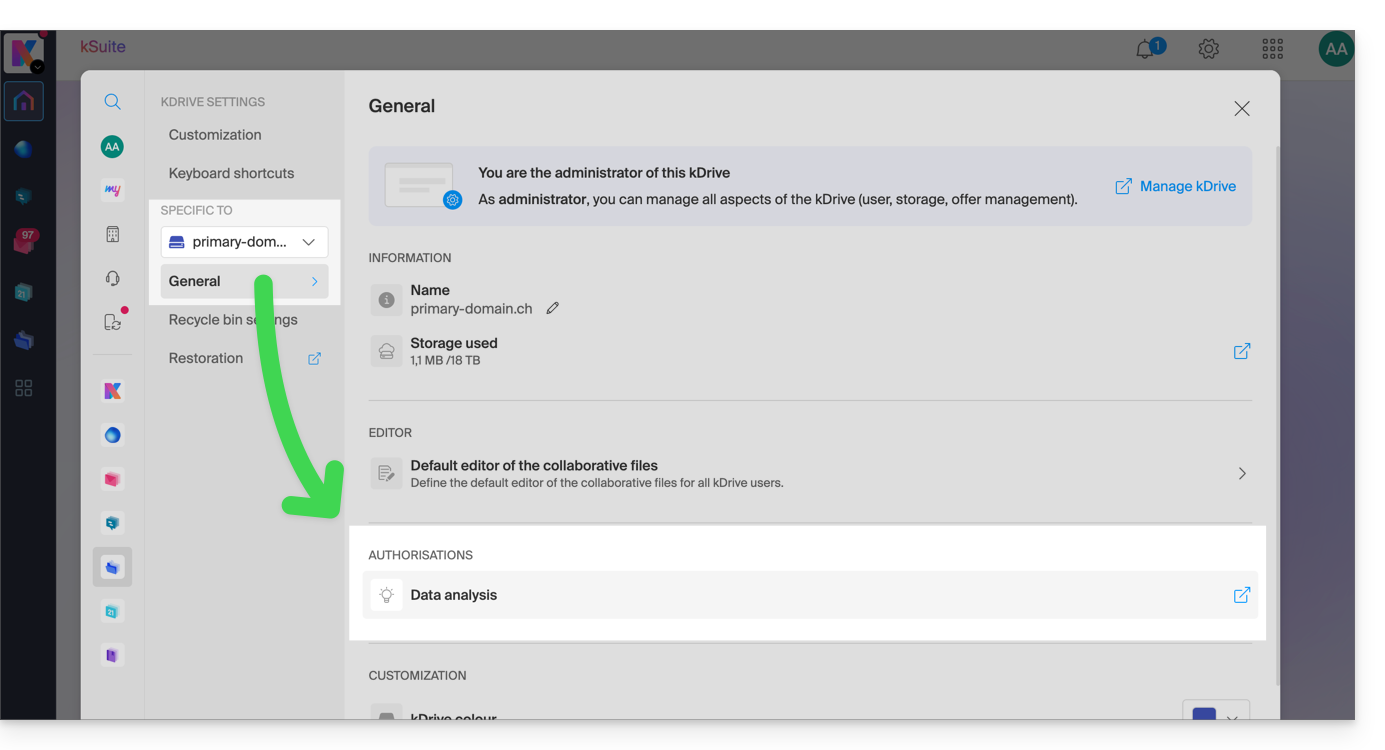
- You will then need to accept (or revoke) the content search features for documents:
To access Euria on kDrive:
- Click here to access the Infomaniak kDrive web app (online service ksuite.infomaniak.com/kdrive).
- Open a PDF document (Euria is also available with other text/code file types:
.md,.txt,.json,.php, etc.) or right-click on the file in question: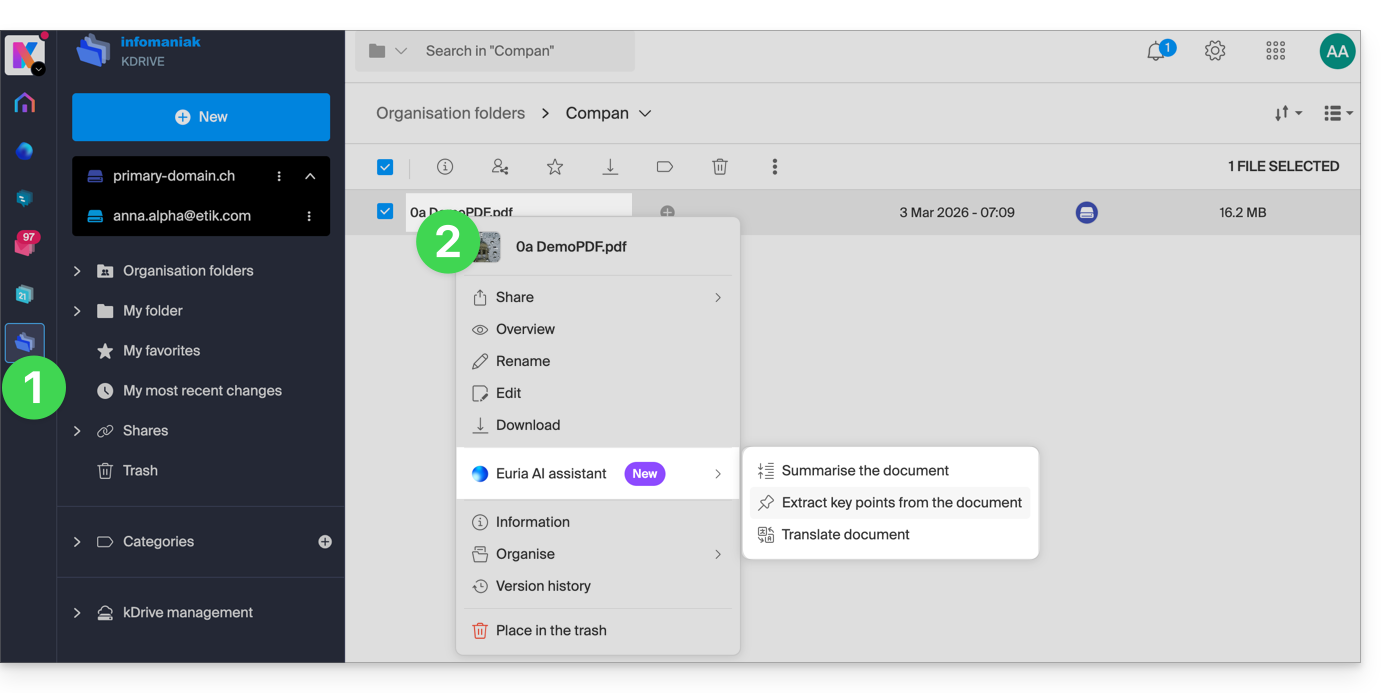
- Euria will open in a side panel on the right; if you close it, Euria remains accessible via the round icon at the top right:
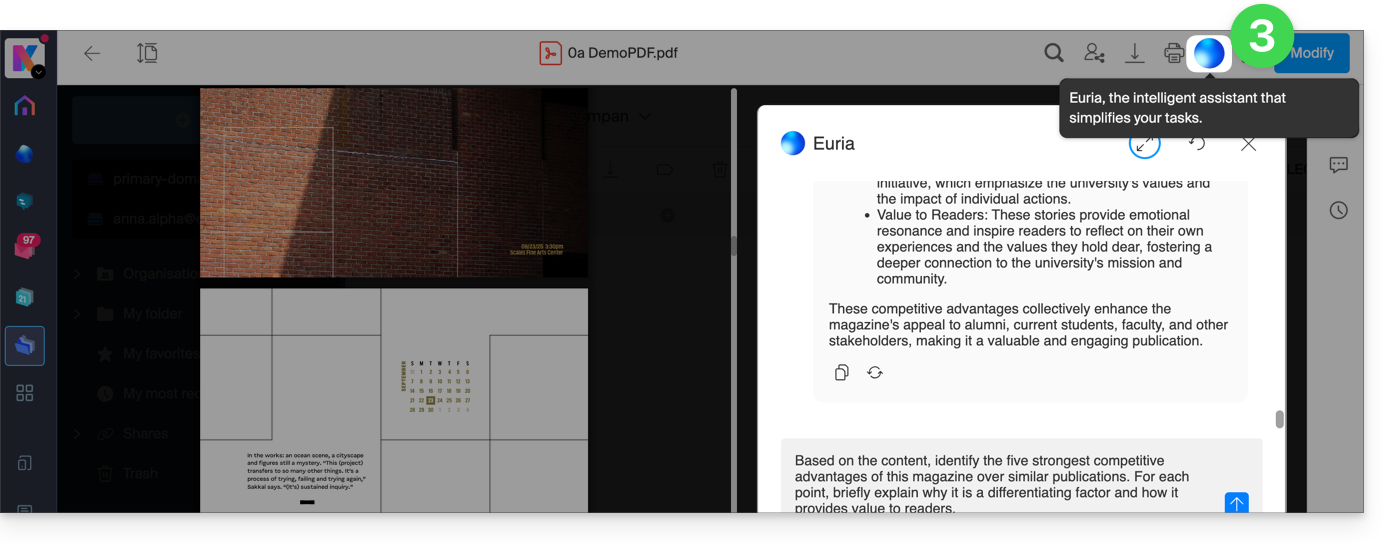
How can Euria help?
Euria helps you to effectively leverage the document you have opened (and only that one); it can, in particular:
- answer your questions about its content (details, statistics, changes)
- summarize the key points (or even simplify them, and even more so if you specify “for a 10-year-old child”…)
- translate it
- provide metadata (size, creation or modification date)
- explain the terms or acronyms used
For example, if the document is a long company report on the past year, you can ask for the current size of the Development department, what the top priority projects are, or the last date the document was modified…
Create an event for your calendar
With a document mentioning an appointment (e.g., a medical appointment), you can ask Euria to create a snippet of code that, once copied and pasted into an appropriate file, will allow you to add an event to your calendar. Example phrasing: “Create an event in ics format, taking the details from this appointment”.
Euria can also extract events from a more complex document: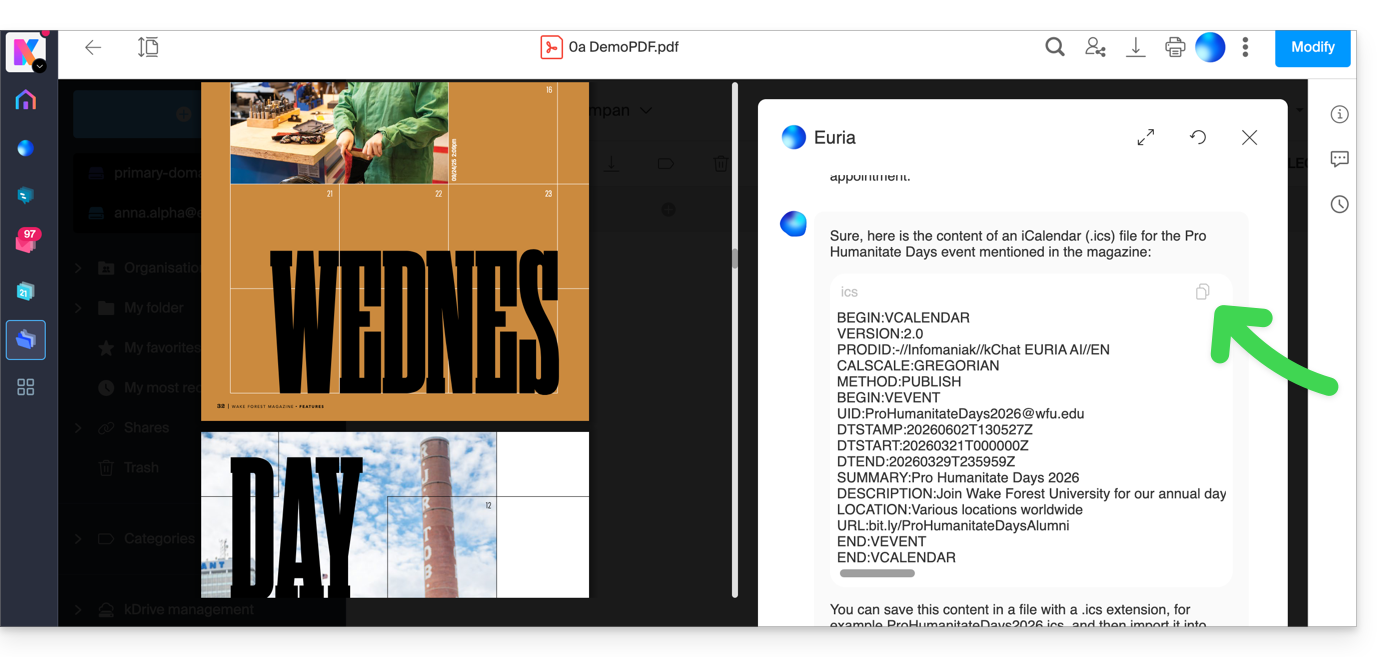
Euria will explain what it has done (a VCALENDAR code) and what you need to do (create a new file with the .ics extension containing the code it generated, and open it on your computer to import it into your usual calendar app or import it into your kSuite calendar):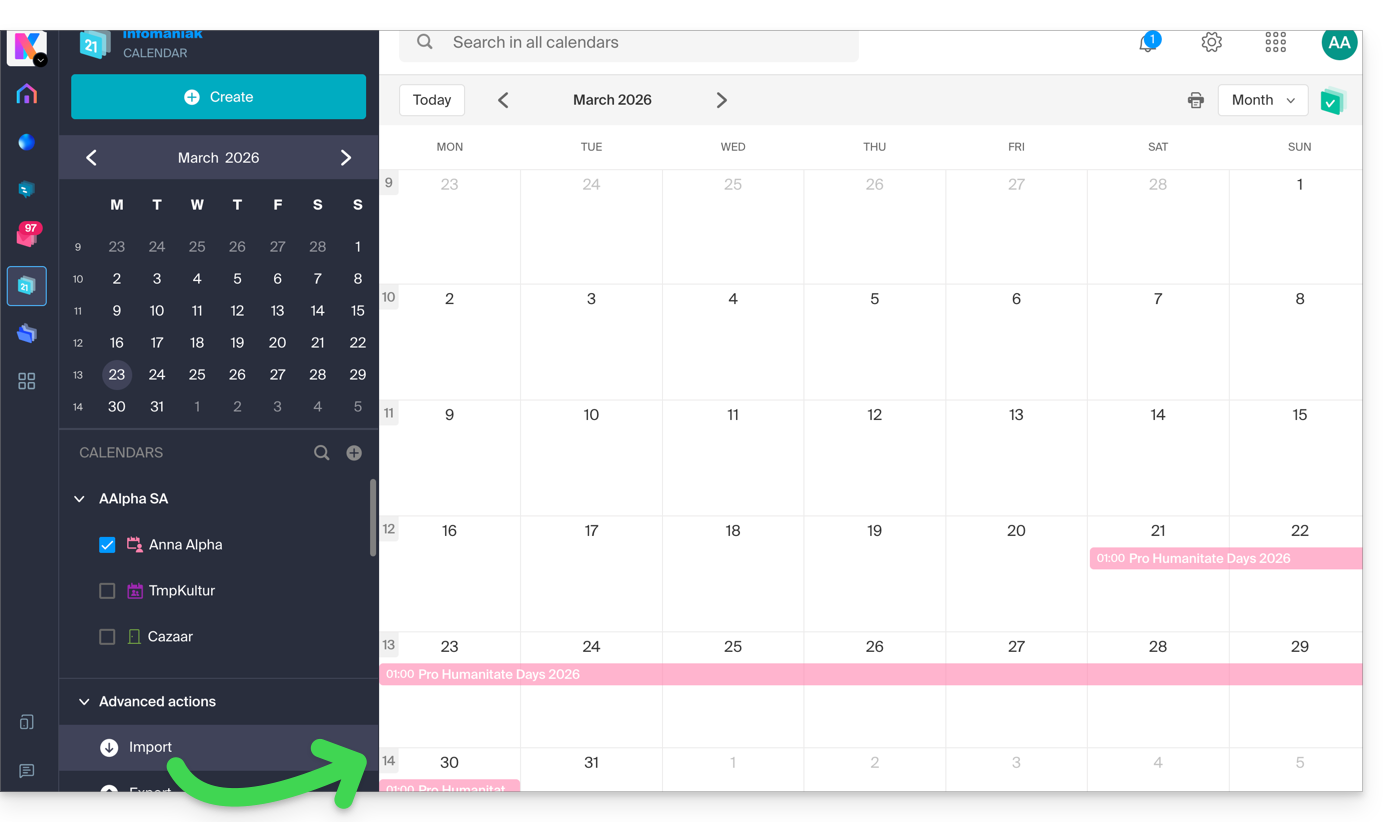
Create a genealogical tree of the characters
With a book stored on your kDrive, you can ask Euria to create a precise and complete genealogical tree to show the relationships between all the characters. You will thus obtain a list of names with their relationships.
But you can take the experience further by then requesting a “Mermaid” diagram based on this list. Simply copy and paste the code provided by Euria into a tool like mermaid.live:
Analyze a survey, write a blog post
Based on a survey/report document, you can ask Euria to write a new article in the tone you want and addressed to the desired target audience. Example: “Based on all of this, write a blog post with an engaging title and text of no more than 400 words, for a target audience of women aged 30 to 40”.
But you can also ask it to find “what are the biases in this survey” or "what elements would deserve to be explored or verified further". Euria can thus help you adopt a critical stance towards a survey or report, by pointing out any potential shortcomings, exaggerations, or biases.
It can also rephrase the conclusions of the survey for different audiences (professionals, teenagers, curious readers, etc.), suggest alternative angles for a related article, or even generate titles, introductions, or summaries according to the desired level of complexity.
The goal is to extract maximum editorial value from a single source of content, by diversifying the formats, tones, and points of view.
Link to this FAQ:
Has this FAQ been helpful?