Knowledge base
1000 FAQs, 500 tutorials and instructional videos. Here, there are only solutions!
This guide explains what a Single Sign-On (SSO) connection is, a mechanism that allows users to log in to multiple applications with a single set of credentials.
The "Log in with SSO" button is exclusively reserved for users whose company has enabled this option. If you are not aware of this feature or are a private Infomaniak customer, log in as usual via the standard blue button.
Log in to Infomaniak with your SSO
Single Sign-On (SSO) is an authentication mechanism that allows users to log in to multiple applications using a single set of credentials. Infomaniak offers this option on its various login pages (including mobile apps) for companies and advanced users who have enabled this feature:
The goal of SSO is to improve the user experience and enhance security. For users whose company has enabled SSO, this means:
- Simplified access: authentication with professional credentials is sufficient to access Infomaniak services, eliminating the need to remember an additional password.
- Enhanced security: the organization's security policies (complex passwords, multi-factor authentication, etc.) are automatically applied to Infomaniak access.
- Immediate update: changes to credentials within the company's internal system are instantly applied to the Infomaniak login.
Currently, only Entra ID (formerly Azure AD) is compatible with Infomaniak's SSO solution. Other identity systems or protocols such as Active Directory (AD), OpenID Connect (OIDC), or other similar identity providers to Entra are not supported.
Talk to your system administrator to find out if enabling this option is possible. If your organization uses Entra ID, SSO allows you to simplify the management of your accesses. Infomaniak will provide the necessary information to connect its platform to your identity system.
Link to this FAQ:
Has this FAQ been helpful?
DNS Fast Anycast replicates the DNS of your domain around the world to reduce latency and increase the availability of your websites.
Preamble
- Thanks to DNS Fast Anycast, the DNS of your domain are replicated within several Points of Presence (POP) around the world (list below).
- No matter where your visitors are, they are redirected to the nearest DNS server to them, which on average speeds up by 34% (DNS resolution) the access speed to your site.
- Moreover, if one of your DNS servers were to become unavailable, the nearest server naturally takes over and your visitors can continue to access your site.
- The replication of your domain's DNS is automatic and no modification of your code is required.
Manage DNS Fast Anycast
Prerequisites
- DNS Fast Anycast is compatible with all websites, regardless of your host.
- All you need is a domain name managed at Infomaniak.
- Transfer the management of your domain to Infomaniak if necessary
- Refer to this other guide to manage external domains.
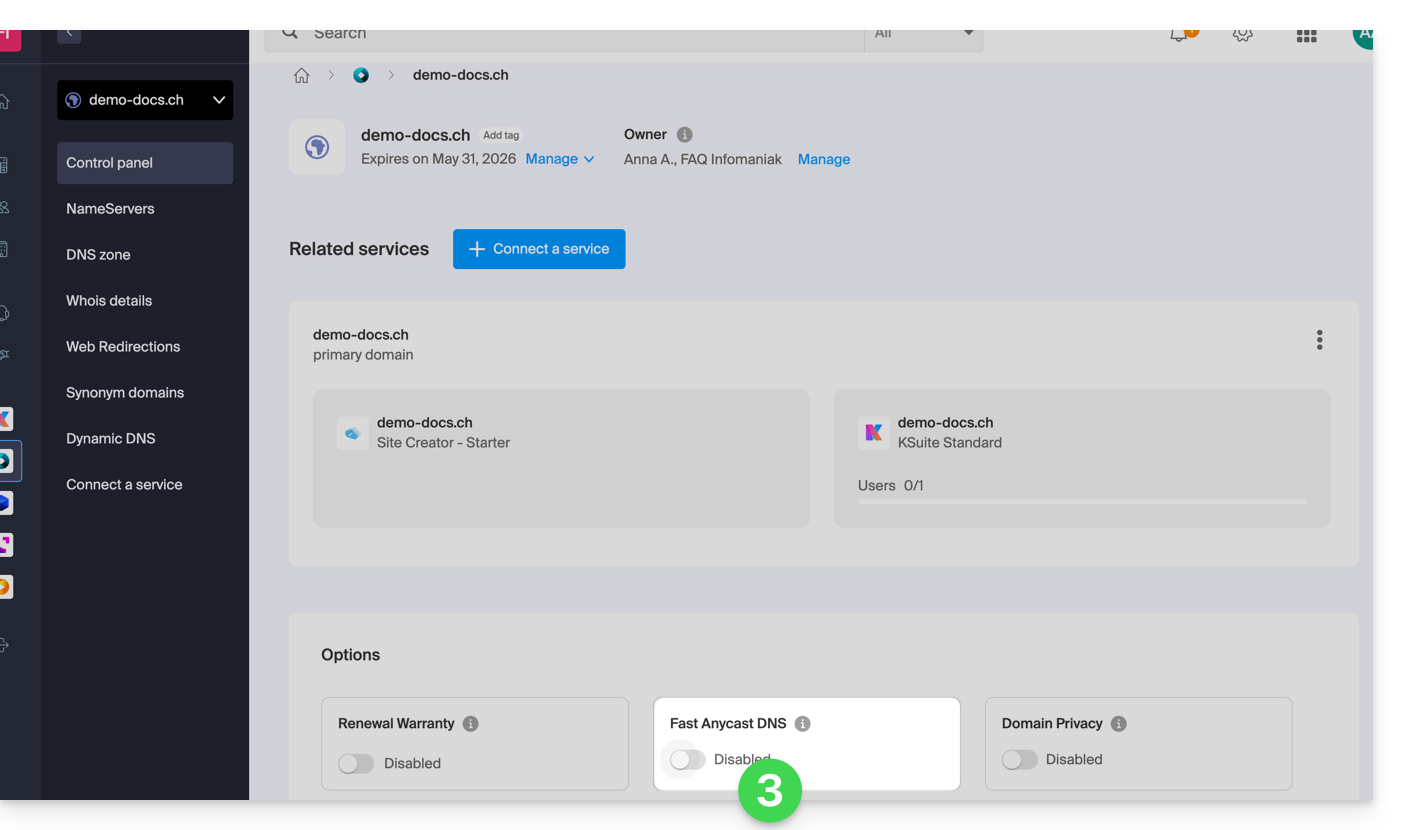
To access the DNS Fast Anycast option:
- Click here to access the management of your product on the Infomaniak Manager (need help?).
- Click directly on the name assigned to the product concerned.
- Enable or disable the DNS Fast Anycast toggle switch on the dashboard:
POP - 'Point of Presence'
By activating DNS Fast Anycast on your domain, your DNS will be automatically replicated in the following points of presence:
Network 1
New York, USA (2x)
Paris, France (2x)
Varsovie , Pologne (2x)
Dublin, Irlande (2x)
Singapour (2x)
Johannesburg, Afrique du Sud
Stockholm, Suède
Vienne , Autriche (2x)
Francfort, Allemagne (2x)
Londres, Royaume-Uni
Dallas, USA
Los Angeles, USA (3x)
Amsterdam, Pays-Bas
Sydney, Australie
Sāo Paulo, Brésil
Miami, USA (2x)
Network 2
Hong Kong, Chine
San José, USA
Dallas, USA
Reston, USA
Chicago, USA
Seattle, USA
Londres, Royaume-Uni
Francfort, Allemagne
Amsterdam, Pays-Bas
Vienne, Autriche
Toronto, Canada
Sydney, Australie
Sāo Paulo, Brésil
Johannesburg, Afrique du Sud
Miami, USA
The points of presence are distributed across two networks that are randomly used when one of your visitors accesses your website.
Link to this FAQ:
Has this FAQ been helpful?
This guide details the specifics and limitations of synchronizing contacts & calendars with Infomaniak using native Apple applications (macOS and iOS), particularly for managing shared data.
Preamble
- Contacts & calendars hosted by Infomaniak can be synchronized with native Apple applications:
Contacts: Synchronizing address books
The CardDAV protocol does not allow individual elements to be selected for synchronization; all account data is retrieved by default.
- Before adding a synchronization:
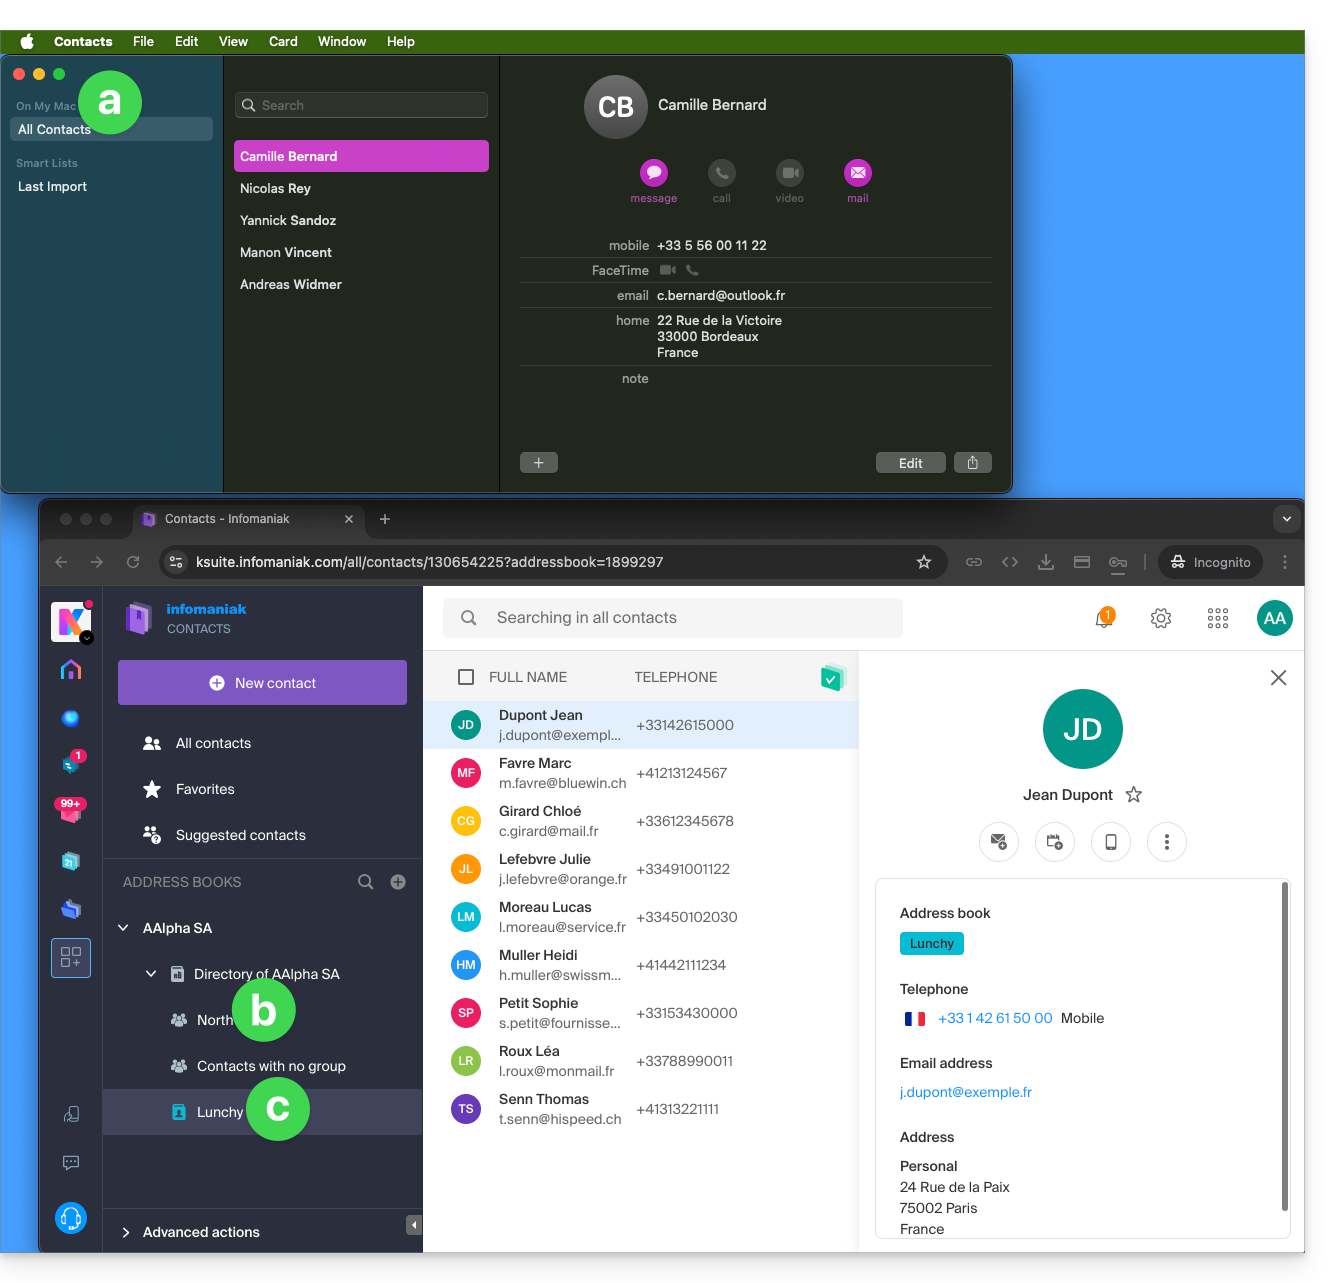
- All existing contacts on the macOS device
- Existing contacts in the Infomaniak user Anna Alpha's Organization (named AAlpha SA here), including the Organization directory, which contains a group called North here (in this case, it is a group automatically formed after setting up a work team).
- The user's address book is named Lunchy here.
- After adding a macOS profile synchronization:
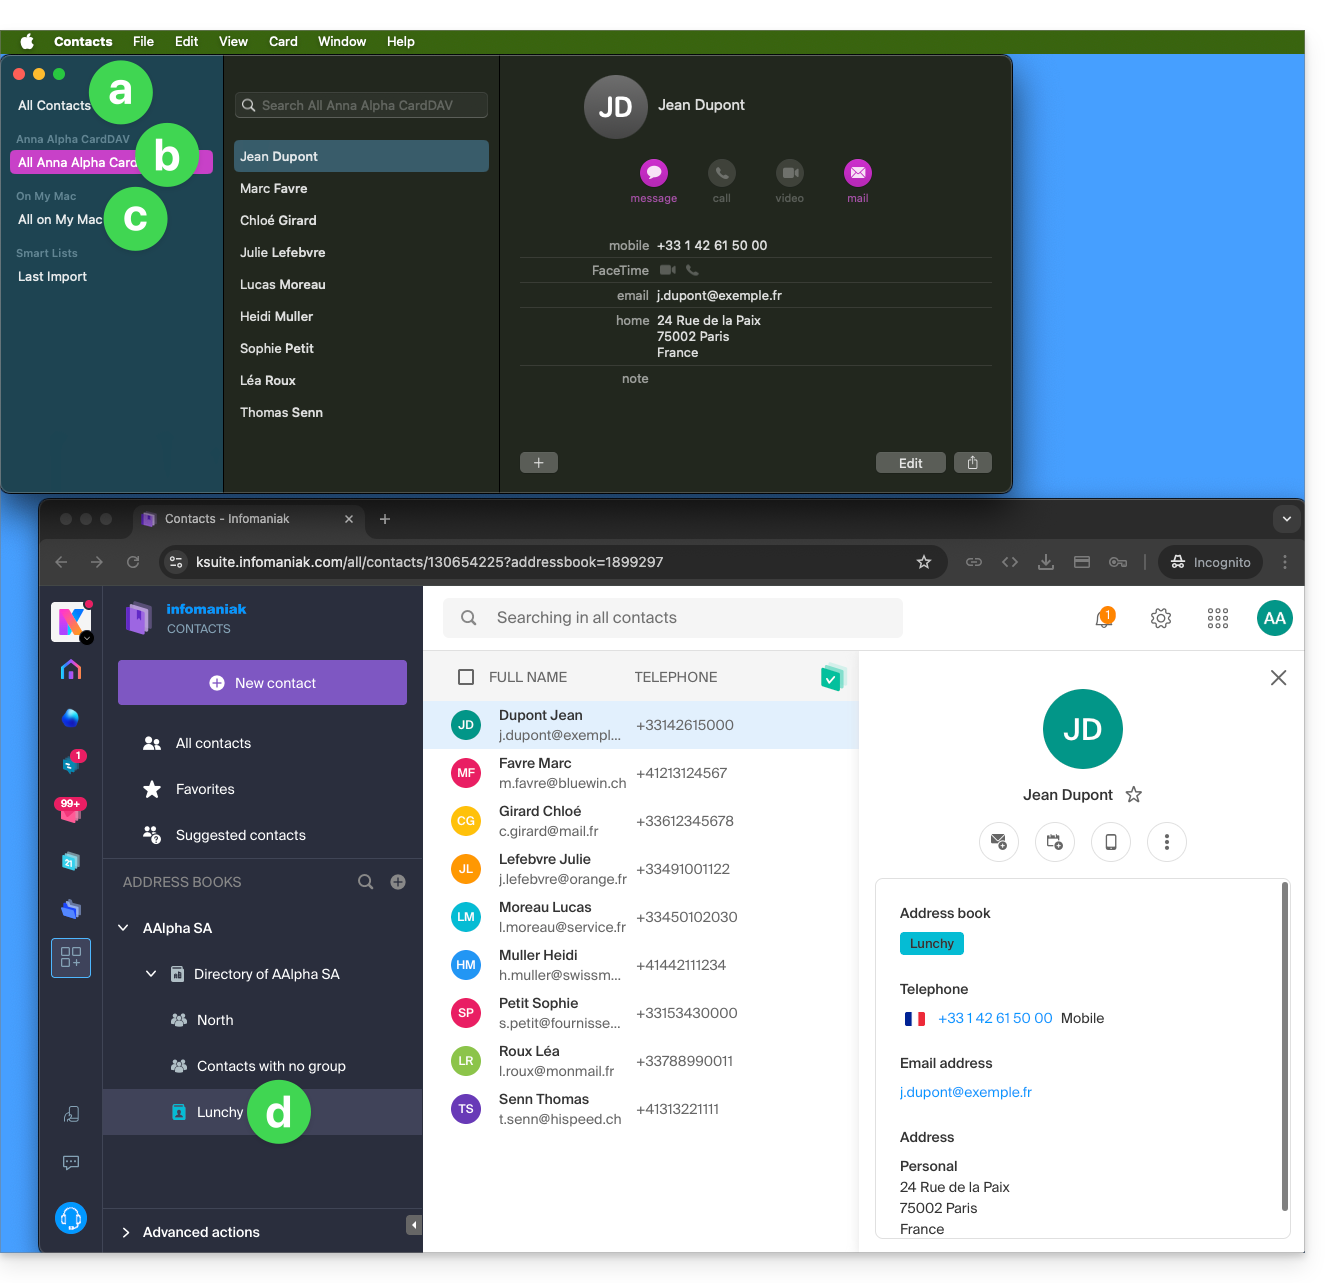
- All existing contacts on the macOS device (they display the contacts that were already present, as well as new contacts from the synchronization).
- Contacts from the synchronization (see point 2.d below).
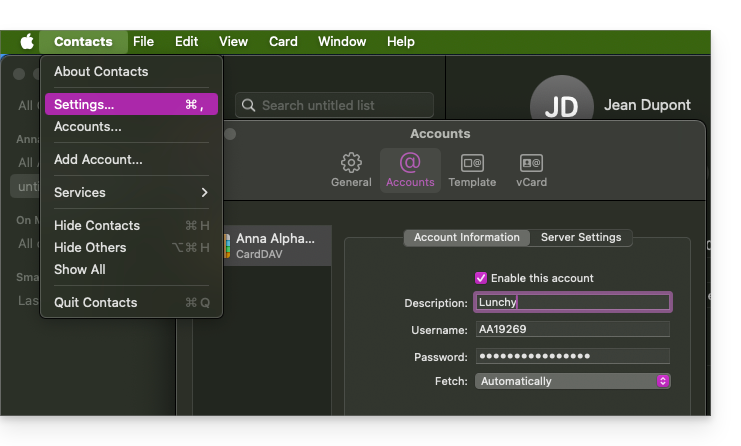
- A downloaded profile contains the Infomaniak account username; this name will be given to the synchronized address book that appears on the Apple side.
- Example below, the username is Anna Alpha and the address book name is Lunchy; it is the username that will appear to describe the contacts on the Apple side.
- You can modify the synchronization name in the Account Information:
- Existing contacts on the macOS device (those from point 1.a above — they remain local on macOS and are not synchronized — they need to be moved if necessary).
- You can modify the default address book used for future contacts created on your device:
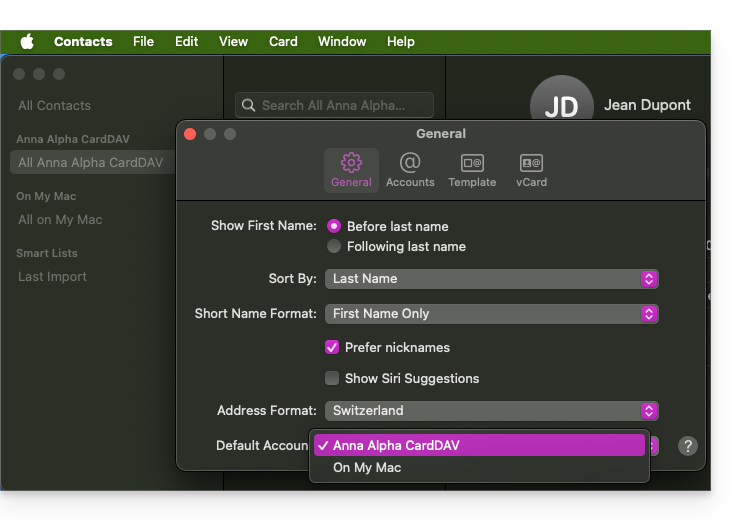
- You can modify the default address book used for future contacts created on your device:
- The user's address book is named Lunchy here — equivalent to point 2.b above).
On iOS
New contacts created on iPhone are often saved locally (On my iPhone"):
- It is necessary to modify the default address book in the device settings so that they are synchronized on the Infomaniak server.
Groups and lists
Grouping contacts into folders or lists does not synchronize bidirectionally. The list system does not use real folders but category tags, making it impossible to retrieve contact groups.
- Lists created on Apple do not appear on the Infomaniak server (but the contacts contained within them do):
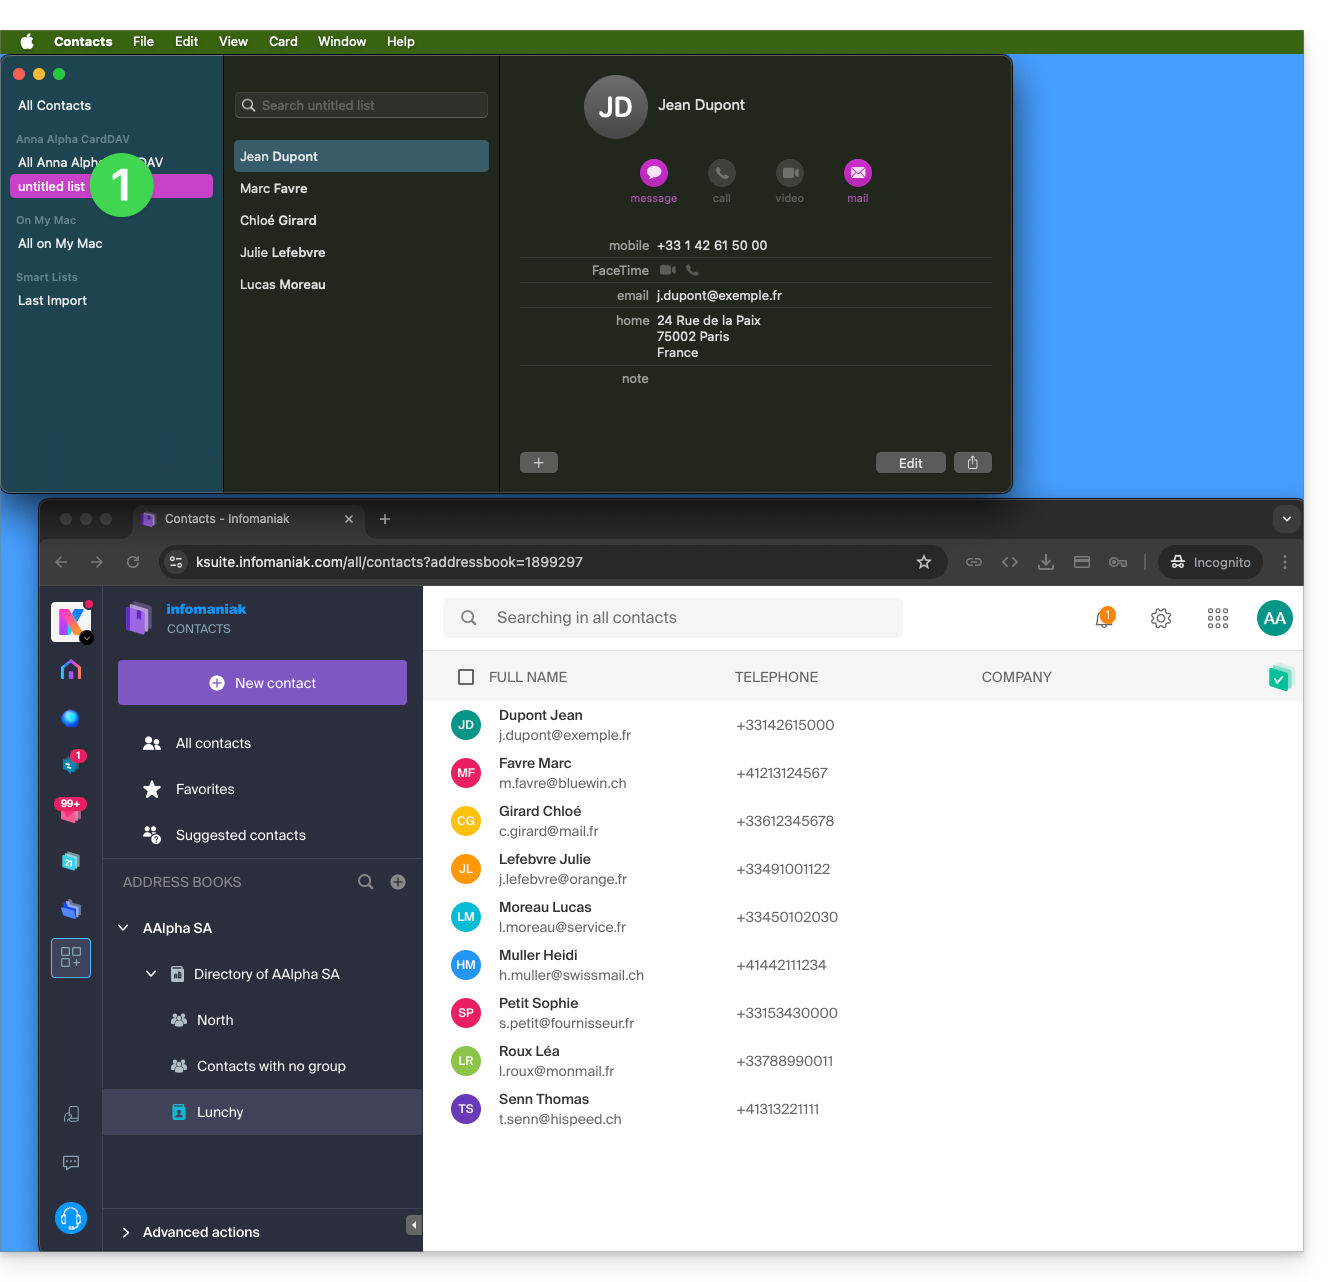
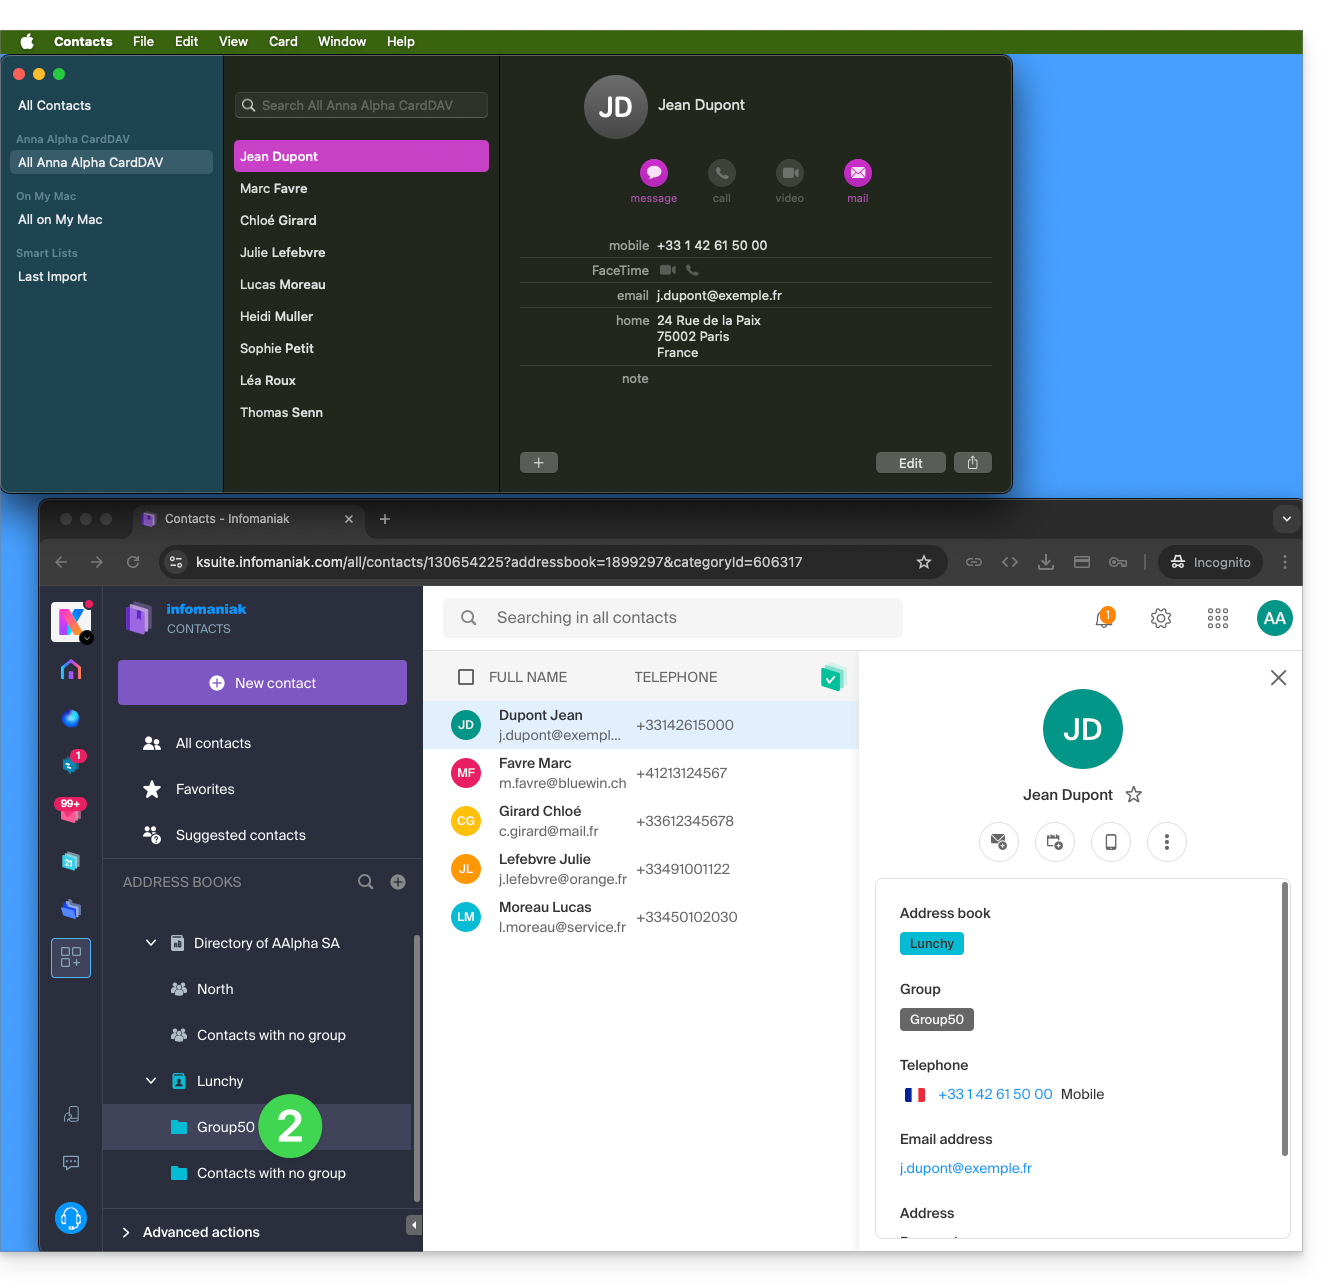
- Groups configured on the web interface do not appear in the Apple Contacts application (but the contacts contained within them do):
- Tip: to delete a list created on the Apple side, select it and press the DEL./SUPPR. key on your keyboard.
Additional address books
The Contacts application does not support multi-address books for the same account:
- Only the default address book is synchronized.
- To access all your address books, a third-party software (type Thunderbird) is required.
Example of a new address book on the Infomaniak side:
- The content of this second address book is not synchronized:
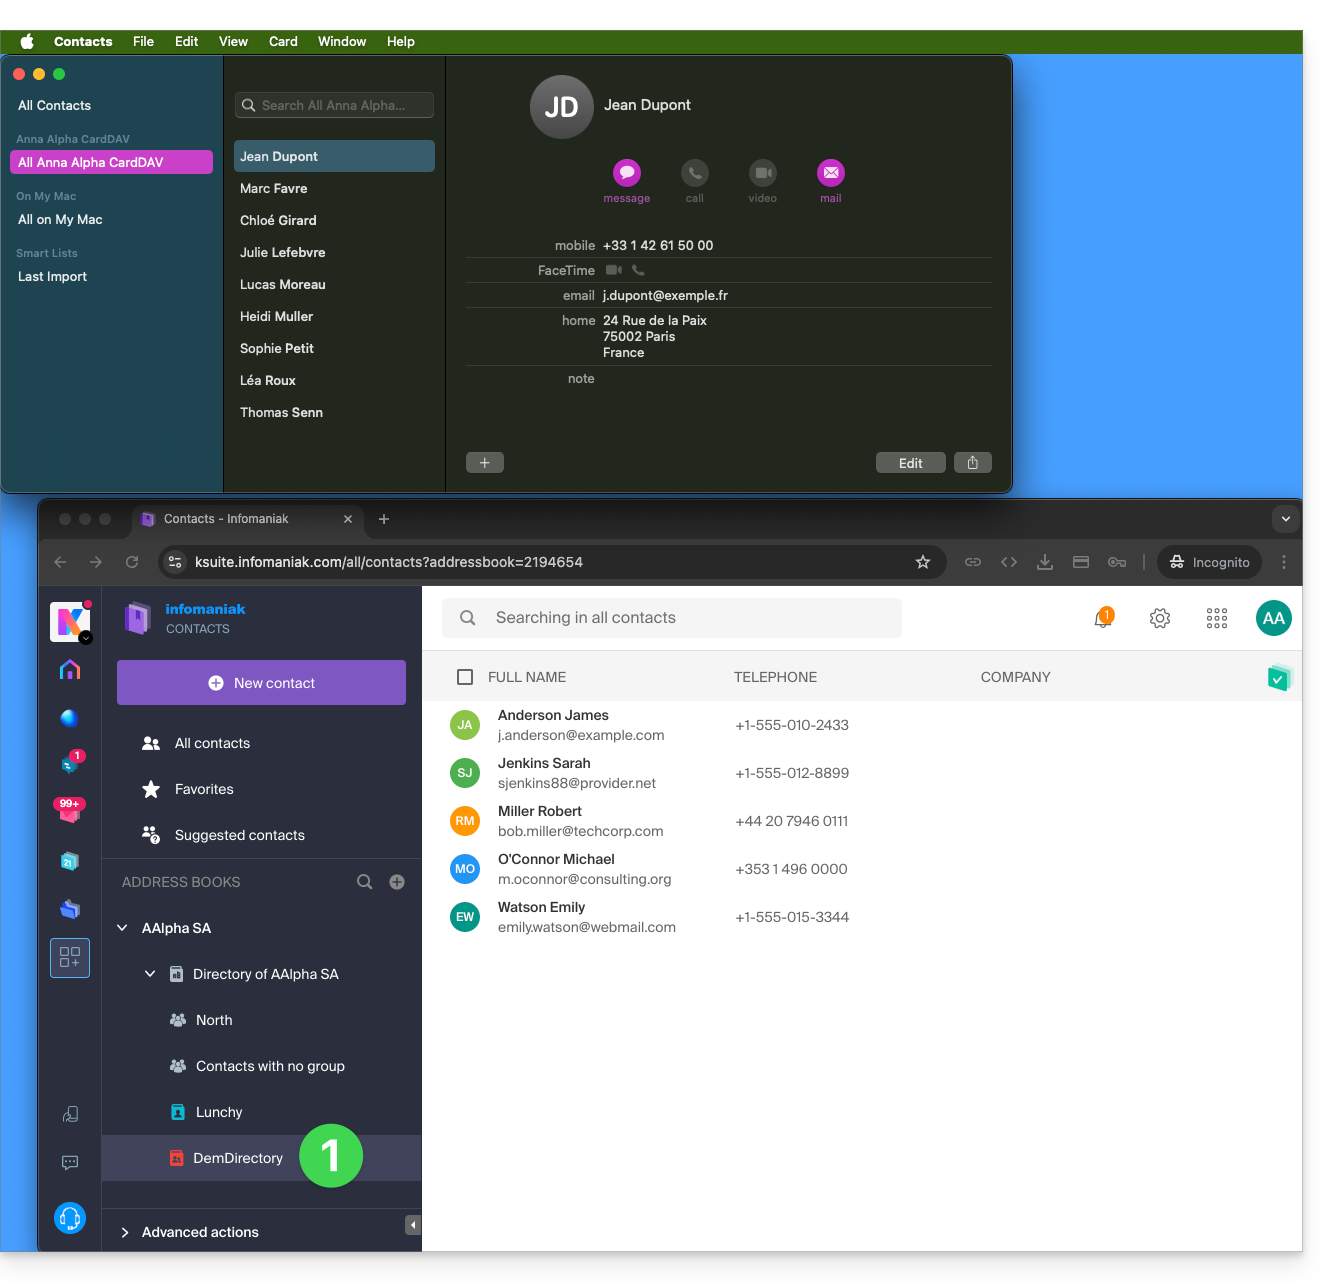
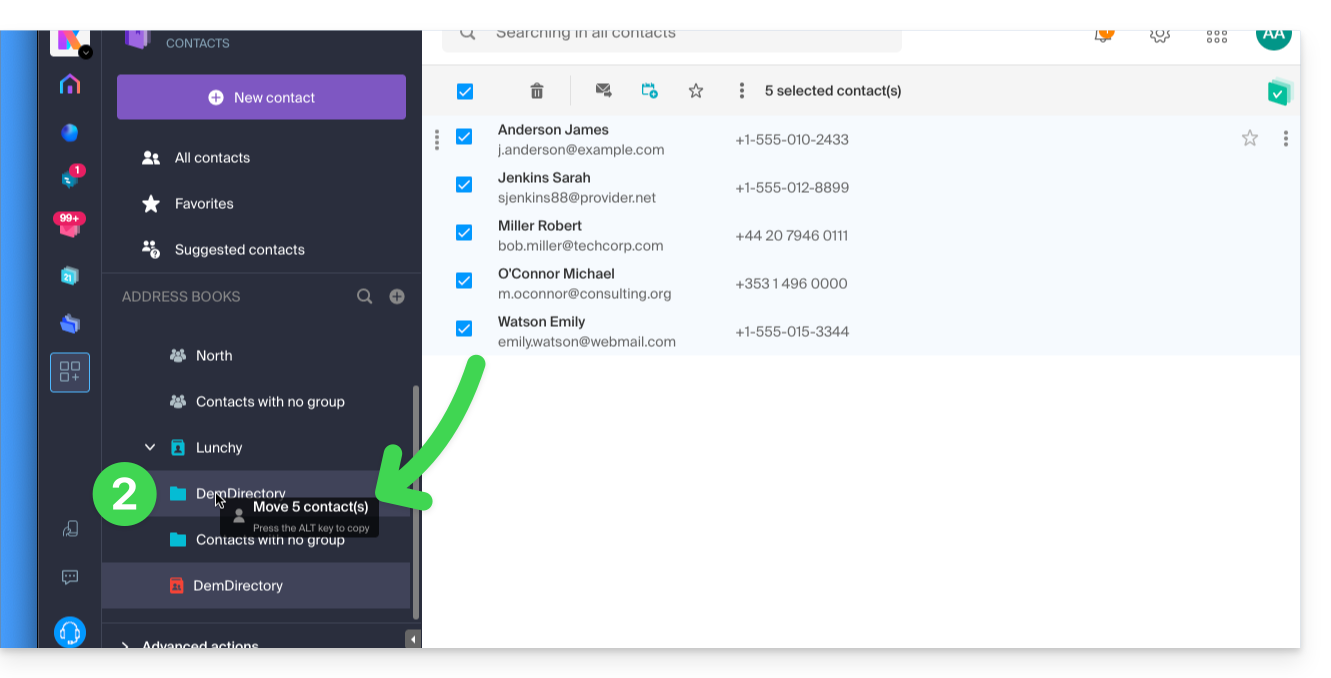
- A solution to organize yourself similarly could be to create a group under Lunchy and add the 5 contacts there:
Shared address books
An address book shared with another Infomaniak user will continue to be synchronized, including if contacts are added/edited via sharing, as in this example of sharing with maximum permissions: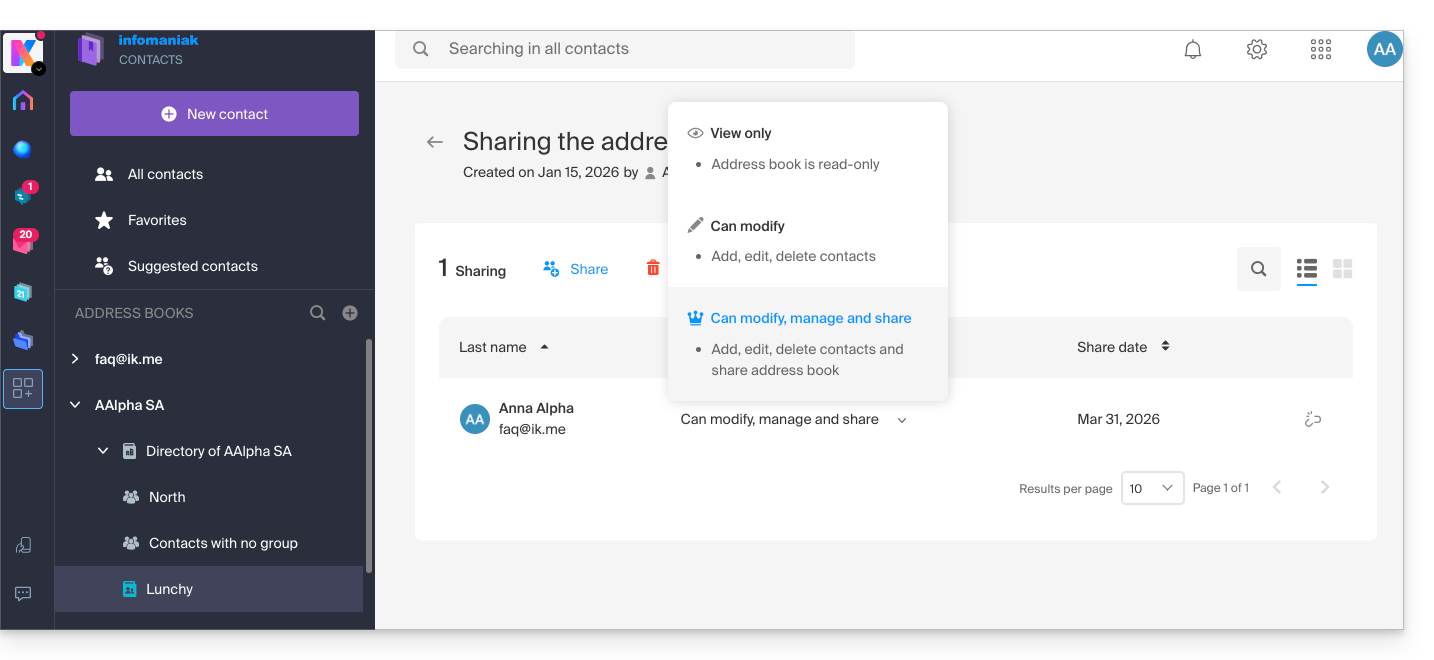
The reverse (receiving contact sharing from another Infomaniak user) adds an additional address book. Synchronization of these additional contacts is therefore not possible (same rule as the one presented in the chapter “Additional address books” above).
Calendar: Displaying shared calendars
The CalDAV protocol does not allow you to choose which items to synchronize; all account data is retrieved, including the calendars you share and those for which you have been granted access/modification rights: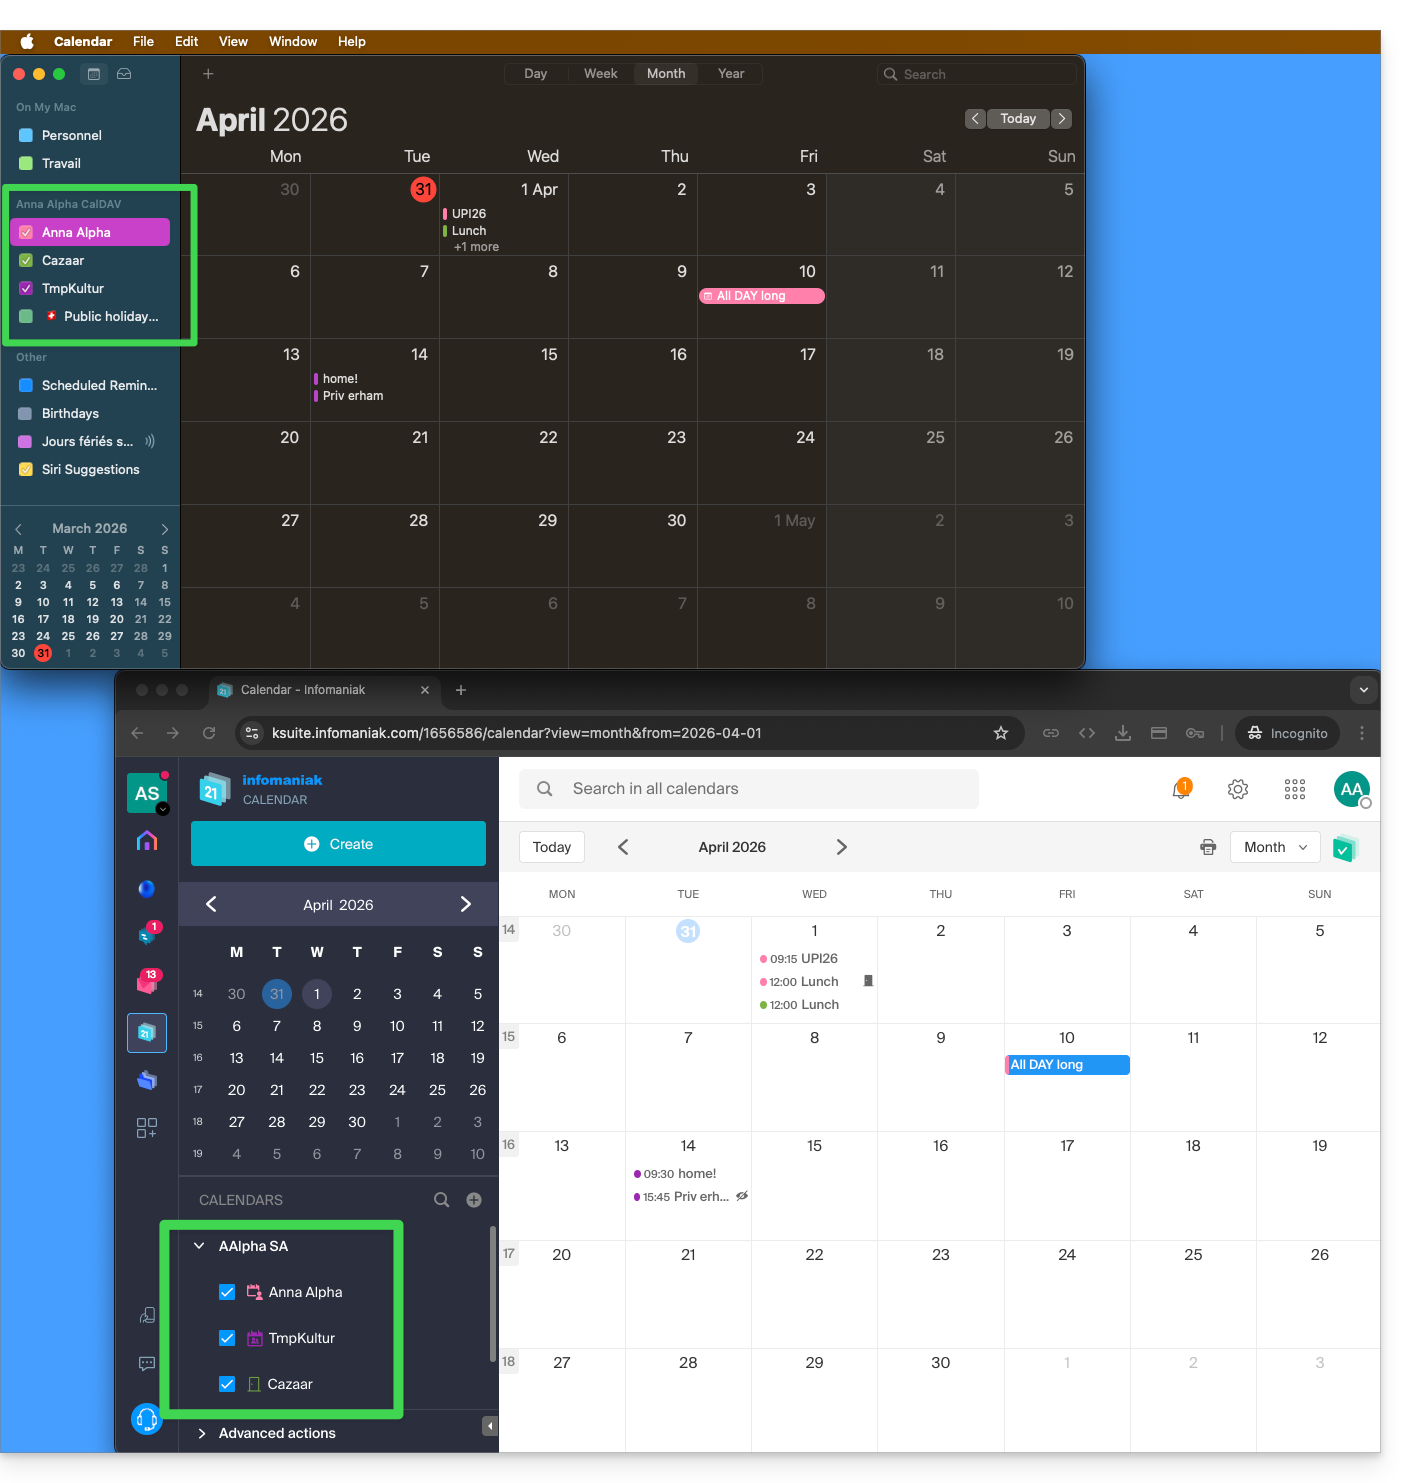
If only your personal calendar is displayed, then try this manipulation to activate additional calendars:
On macOS
- Open iCal / Calendar.
- Go to the Calendar > Settings (or Preferences).
- Go to the Accounts tab.
- Select the Infomaniak account and click on the Delegation tab.
- Check the shared calendars to display.
On iOS
- Open iCal / Calendar.
- Tap the Calendars button at the bottom of the screen.
- Check the shared calendars in the list.
Notifications (iOS)
You can enable or disable alerts for each specific calendar by tapping the ⓘ icon located to the right of its name: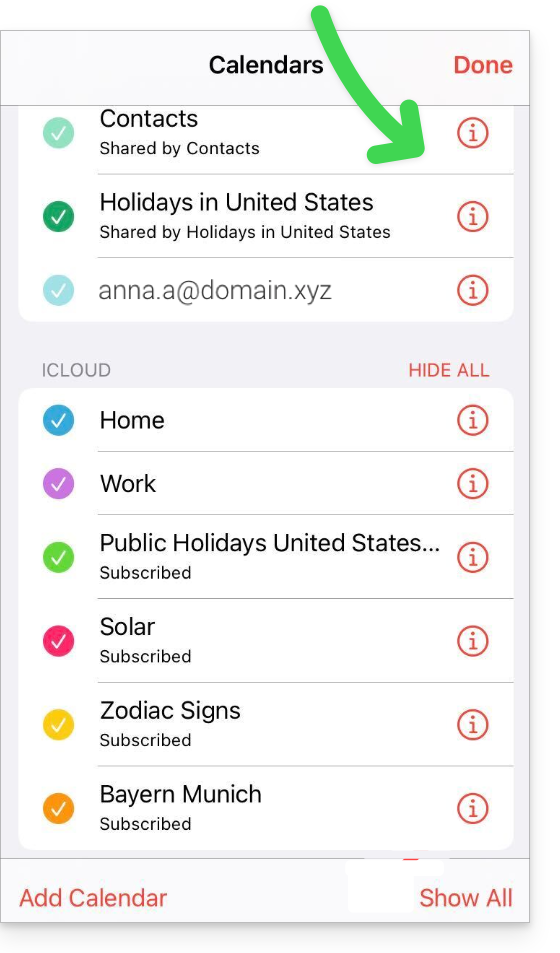
Link to this FAQ:
Has this FAQ been helpful?
This guide explains how to create a pass (as part of the Infomaniak ticketing system). The pass can then be configured in several steps:
- Define the type during creation (subscription, ticket pack, etc.) as well as basic information and parameters (below)
- Associate events with passes
- Configure the visual and information related to the pass
- Define and collect information from subscribers who will be linked to the passes
1. Start creating a pass
To do this:
- Click here to access the management of your product on the Infomaniak Manager (need help?).
- Click directly on the name assigned to the ticketing concerned by the event.
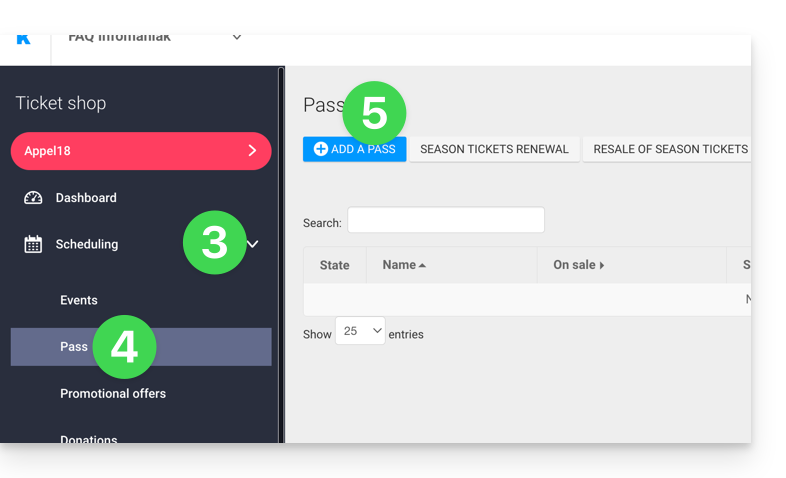
- Click on Programming in the left sidebar menu.
- Click on Pass in the left sidebar menu.
- Click on Add a pass:
Name and description of the pass
This section allows you to define the name of the pass as well as a description of the pass: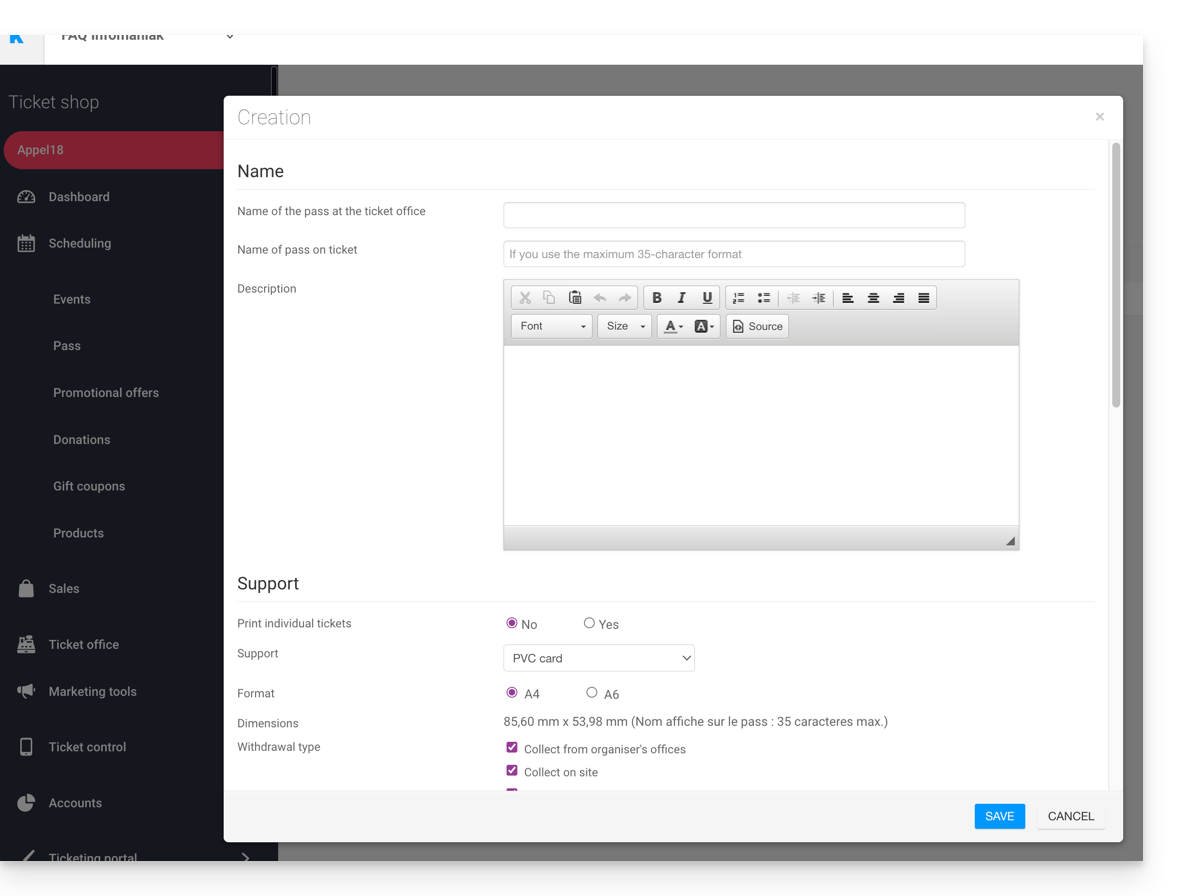
It is recommended to use a sufficiently short name in the Pass name on the ticket section, which will be printed directly on the pass.
Pass support
You can choose two types of support:
- The PVC card, credit card type, often used for seasonal or annual subscriptions.
- Pay attention to the size of the text used for the Name displayed on the ticket which will be taken up here and which will be limited to 35 characters.
- Choose the withdrawal mode that will be made available to the customer.
- The Phone/Paper format, which prioritizes the use of the phone but also allows printing the ticket on A4 or A6 paper.
- The visitor will receive their pass in digital format in an email.
- They will be able to download their pass in PDF format from the link included in the email.
Infomaniak does not send physical passes or tickets to visitors. The sending of the pass is the responsibility of the organizer.
The appearance of the pass can be configured once the pass is created (see step 3).
Manage the display during scan checks
The two options present here allow you to define the parameters used for pass control:
- The passes will have random barcodes upon creation, but the organizer can modify them freely from the management of each pass.
- The icon that will be displayed during the pass check:

Pass price
- Enter the desired amount:

Validity period
- The validity period will be used if you want to ensure that this pass is only available for a limited period.
- It is possible, for example, to configure a ticket pack that can only be used during the winter season for a seasonal promotion.
- Note that if a pass is outside the validity period, it can be purchased but cannot be used or accessed to add tickets to it.
Pass types
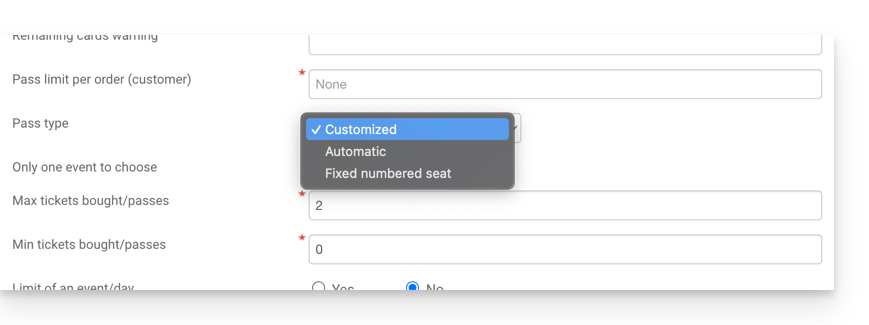
1. Custom
This pass allows the customer to choose the events and dates from the options provided. You must therefore decide on the limitations of the pass:
- Single event choice:
- The customer can only choose one event, but depending on the ticket limit, they can choose one or more for the chosen event.
- Warning: When a customer buys a card, the system will deduct the number of seats entered in this field from all events linked to the pass.
- These seats will be "reserved" for this pass.
- When the customer passes through the scanners, the system will release the seats for all other events.
- Maximum tickets
- The number of tickets that can be associated with the pass.
- Minimum tickets
- If a minimum of 0 is set, the customer can buy an empty pass and choose their seats later.
- Any number other than 0 will force the customer to choose tickets when purchasing the pass.
- Limit of one event per day
- The pass has a limit of one event per day.
- The customer cannot order more than one ticket per day for this pass.
- All seats on the same day
- Allows you to choose a date and then choose the events for that date.
- Limit of one performance per event
- Allows you to define whether the customer can participate multiple times in an event (in the case of multiple dates).
- If enabled, the customer can only take one ticket per event of the "same name" (or "same performance") for this pass.
- Warning: The spelling of the event name must be identical.
- Minimum number of different events / pass
- The customer will have to purchase as many tickets for different shows available on the pass.
- It will be used to prevent the visitor from taking all their tickets for a single show.
2. Automatic
The pass will not be customizable by the customer: it will automatically take the tickets that will be defined by the organizer.
3. Fixed numbered seat
In the event that the event takes place in a venue with a seating plan, this type of pass allows the customer to choose the pass with a numbered seat on the seating plan. This seat will remain unchanged for all events associated with the pass taking place in the same venue.
An Organizer may want to set up passes with registration validation.
After creating the pass, the next step is to associate the corresponding events and configure the various available options.
Link to this FAQ:
Has this FAQ been helpful?
This guide covers data protection regulations in Switzerland and Europe and the measures taken by Infomaniak to secure your customer data and data within Web Hosting and Mail Services.
Understanding the difference between data security and data confidentiality
Data security aims to prevent any unauthorized access to your information. It relies on measures such as encryption, firewalls, or VPNs. A security breach can have disastrous consequences: imagine if a hacker steals your entire customer database and demands a ransom to recover it. This type of attack – ransomware – can paralyze a business overnight.
Data confidentiality concerns who can access your information and how it is used. Even if your data is secure against hacking, it can be collected, analyzed, and resold… legally.
Example: you carefully store your customers' information, but unbeknownst to you, a service you use shares – anonymously – this data with third parties. Result? Your competitors can obtain valuable analyses of your market and target your own customers without ever needing to hack.
LPD & GDPR
In Switzerland, the LPD (Federal Data Protection Act) and nLPD (for the "new Law" in effect since September 2023) protect the confidentiality of residents by regulating the collection and processing of personal data by organizations.
On the other hand, the GDPR (General Data Protection Regulation) of the EU, in effect since May 2018, influences global companies processing the data of European residents, including in Switzerland. While the LPD applies to the data of Swiss residents, the GDPR concerns that of EU residents. Swiss companies managing European data must comply with the GDPR requirements, including the designation of a Data Protection Officer and the conduct of Impact Assessments in case of risky processing.
Your role as an Infomaniak Client
Regarding the hosted data that belongs to you — and especially if it contains personal data of your visitors, contacts, or customers — it is your responsibility to ensure its compliance.
When processing this personal data, it is essential to inform users about the purpose and methods of this processing. This is usually done through a privacy policy or a data processing agreement (DPA).
Agreement between data controller and processor
A DPA (Data Processing Agreement), called in German AVV (Auftragsverarbeitungsvertrag), in Italian ATD (Accordo di Trattamento dei Dati) and in Spanish CTA (Contrato de Tratamiento de Datos), translates to Data Processing Agreement or Personal Data Processing Contract.
It is a mandatory contract provided for by the GDPR between a data controller and a processor. It defines the purpose, duration, and nature of the processing, as well as the obligations and security measures. Its objective is to protect the personal data entrusted to a service provider.
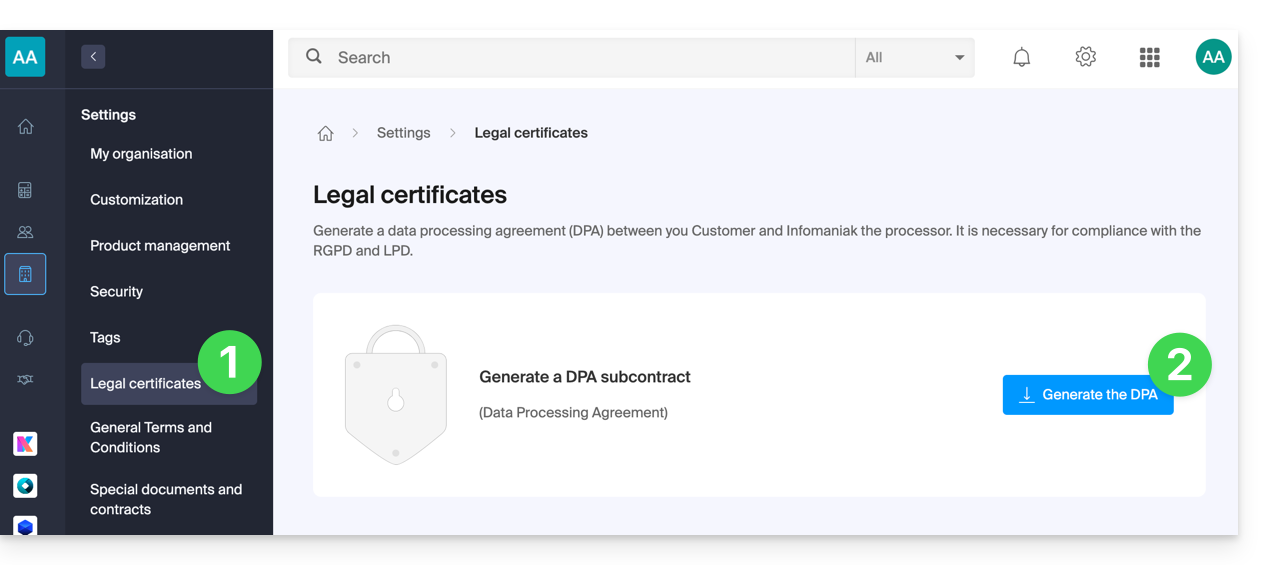
This GDPR certificate (in PDF format) can be generated and downloaded from the Manager (accessible to organization users who are owners or administrators):
- Click here to access DPA management on the Infomaniak Manager (need help?).
- Click the Generate button to download the customized PDF document:
Here are some tips on this subject:
- Inform about all data processing, not just those related to the website.
- Ensure easy access to the privacy statement on the website, for example in the footer of each page.
- In general, it is not necessary to obtain the user's approval for privacy statements (e.g., for forms); it is sufficient to indicate where to find the statement (example Site Creator).
- Keep in mind that new, more in-depth information rules may require adjustments to existing privacy statements.
It is crucial to differentiate between the security of the infrastructure where your data is hosted and the management and implementation of your data. As a host, Infomaniak acts as a subcontractor for your GDPR obligations. In this context, its privacy policies and cookie usage, as well as its terms and conditions, provide the necessary guarantees regarding its compliance as a subcontractor.
If necessary, you can find professionals or online guides to help you through the compliance process.
Infomaniak's Role
Like companies that work with user data, Infomaniak must comply with the LPD and, because some of these users are European citizens, the GDPR as well:
- the data privacy policy details the data that Infomaniak retains to provide and execute its services
- the policy related to the protection of your personal data describes Infomaniak's commitments as a subcontractor that hosts all of your data, including personal data
These commitments, as outlined in the general terms and conditions and specific terms and conditions, are as follows:
- to keep your data within data centers located exclusively in Switzerland and to never transfer your information outside of these infrastructures
- to apply rigorous security standards and to continually improve processes to ensure a high level of security across all services
- to promptly inform you in case of a data breach
- to ensure transparency with you when Infomaniak uses subcontractors who may process your data
- to strengthen and develop physical security measures to prevent any unauthorized access to the infrastructures where your data is stored
- to implement physical and/or logical isolation systems (depending on the services) to separate the hosting of different clients; additionally, Infomaniak conducts annual penetration tests to ensure data integrity between clients
- to demonstrate a high level of reactivity in securing the systems under its responsibility
Manage cookies on the infomaniak.com site
When you visit the page infomaniak.com a choice must be made for the acceptance of certain cookies. To modify this choice later, access your preferences from the footer of the site: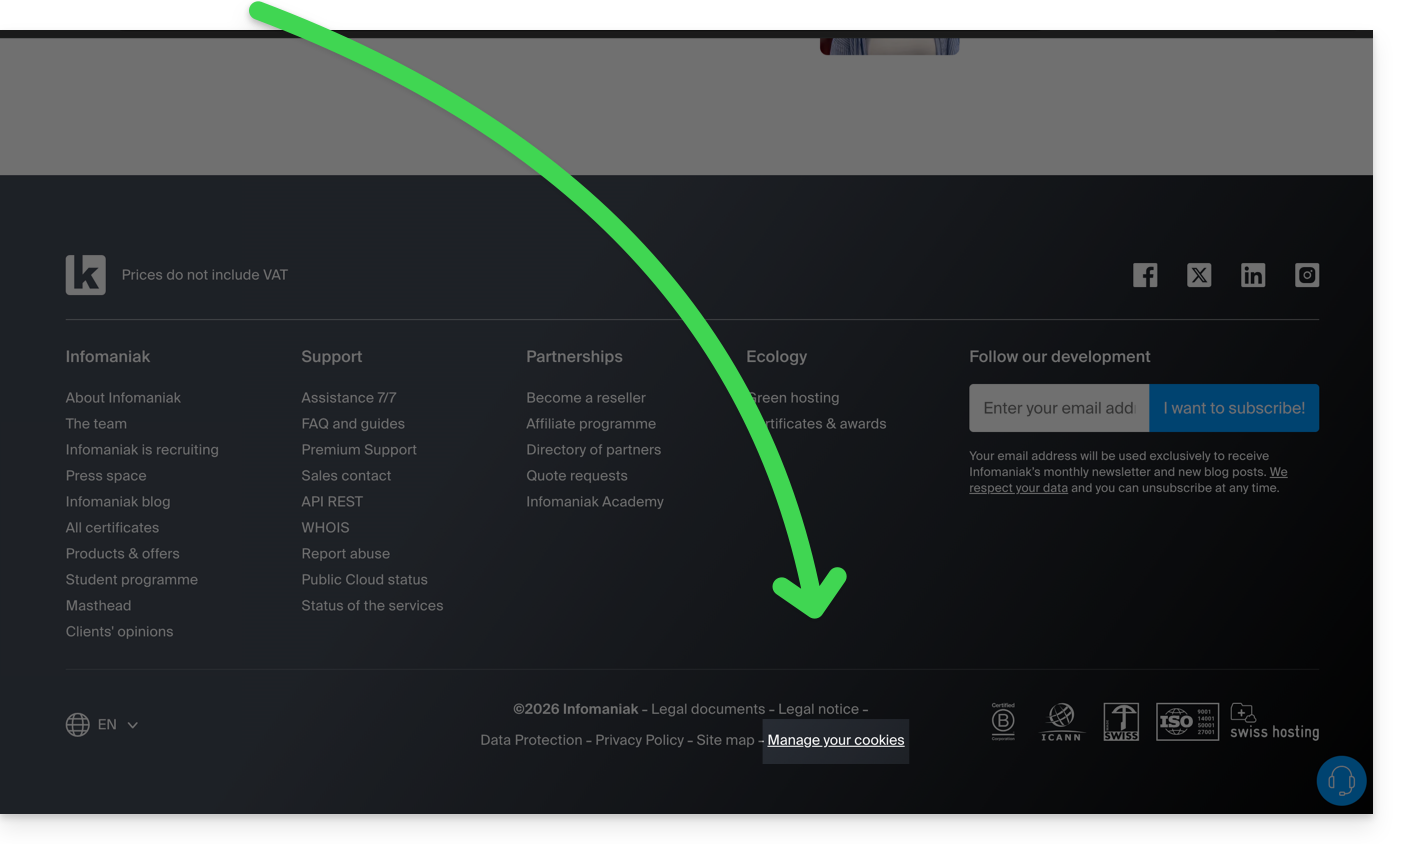
Link to this FAQ:
Has this FAQ been helpful?
This guide allows you to quickly discover the essential features of Euria, the artificial intelligence at your disposal within kSuite, particularly powerful with the Web app kDrive Infomaniak (online service ksuite.infomaniak.com/kdrive).
✘ UNAVAILABLE with
kSuite Free / kSuite Standard
my kSuite / my kSuite+ (ik.me, etik.com, ikmail.com)
kDrive offers (excluding kSuite)
Use AI for your files on kDrive
Prerequisites
- Be Administrator or Legal Representative within the Organization that manages the kDrive.
- To activate Euria for all users of your concerned kDrive, follow the assistant that opens when you log in to kDrive.
- Read and understand this other guide about the model used and the responsibilities of each.
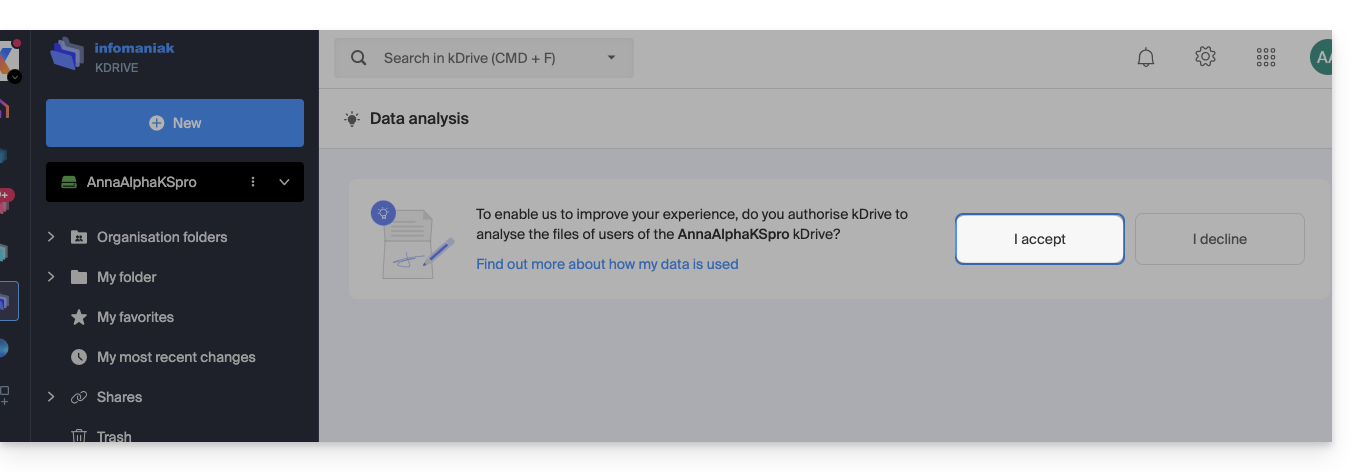
- You can also activate (or deactivate) Euria by going to the unified settings:
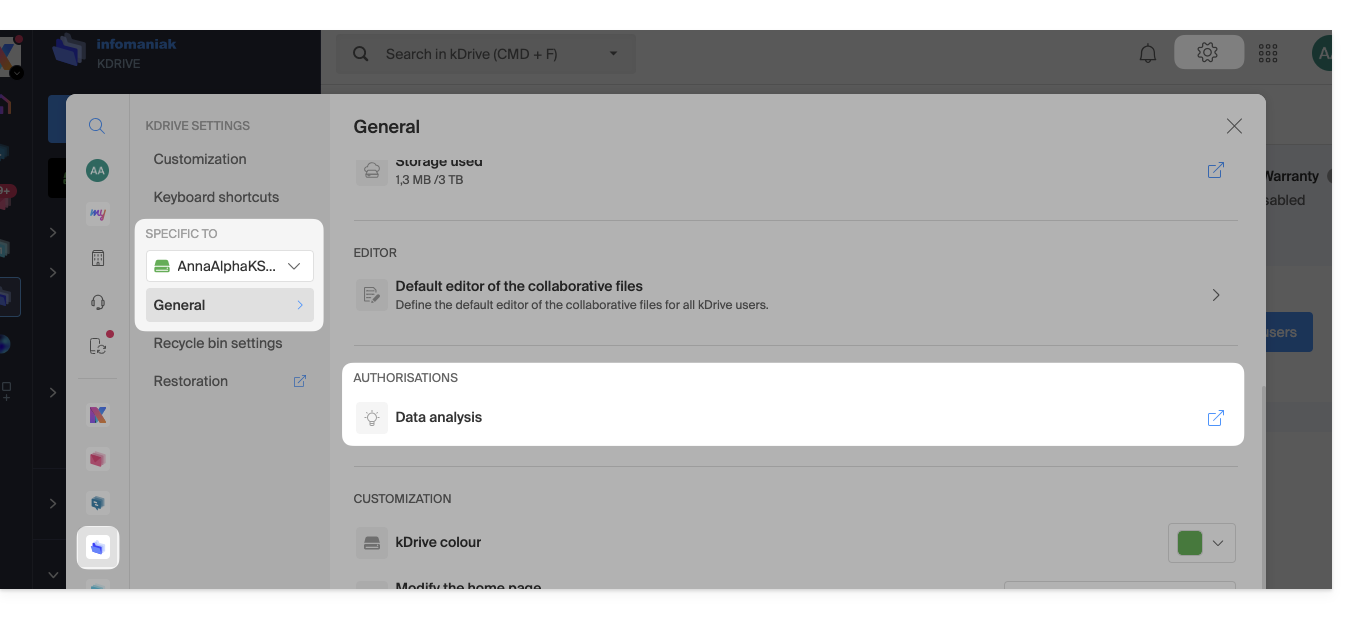
- You then need to accept (or revoke) the content search features on documents:
To access Euria on kDrive:
- Click here to access the Web app kDrive Infomaniak (online service ksuite.infomaniak.com/kdrive).
- Open a PDF document (Euria is also available with other text/code file types:
.md,.txt,.json,.php, etc.) or right-click on the file in question: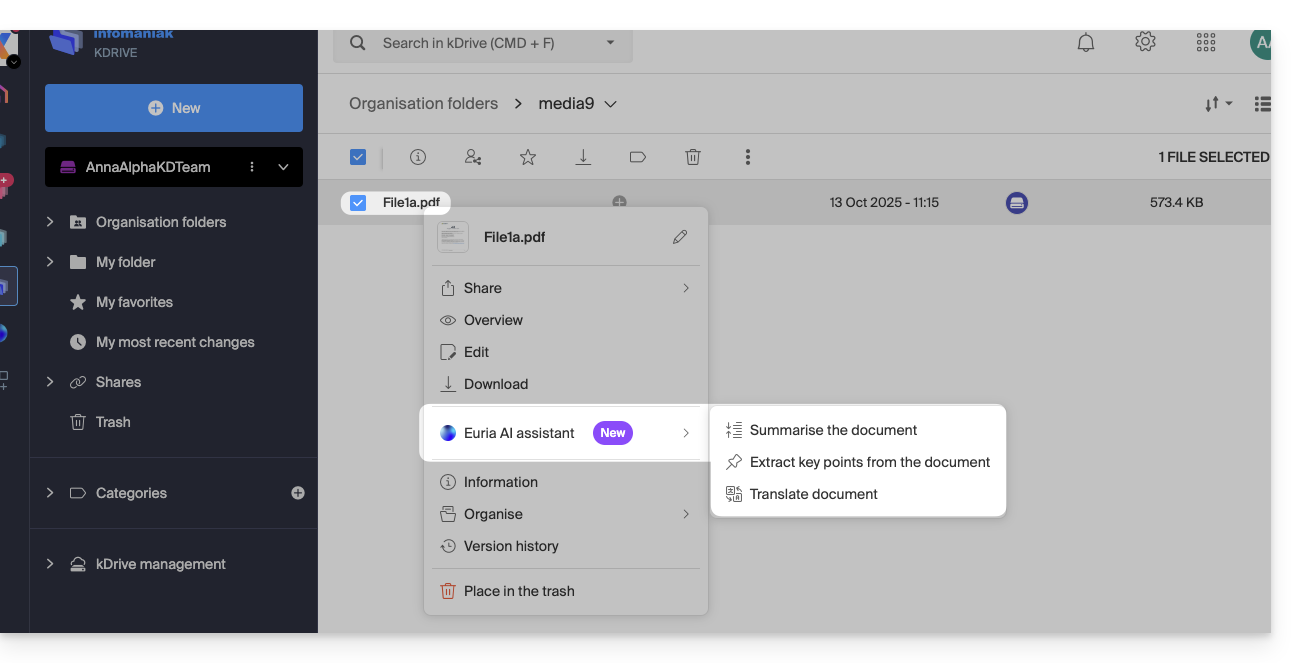
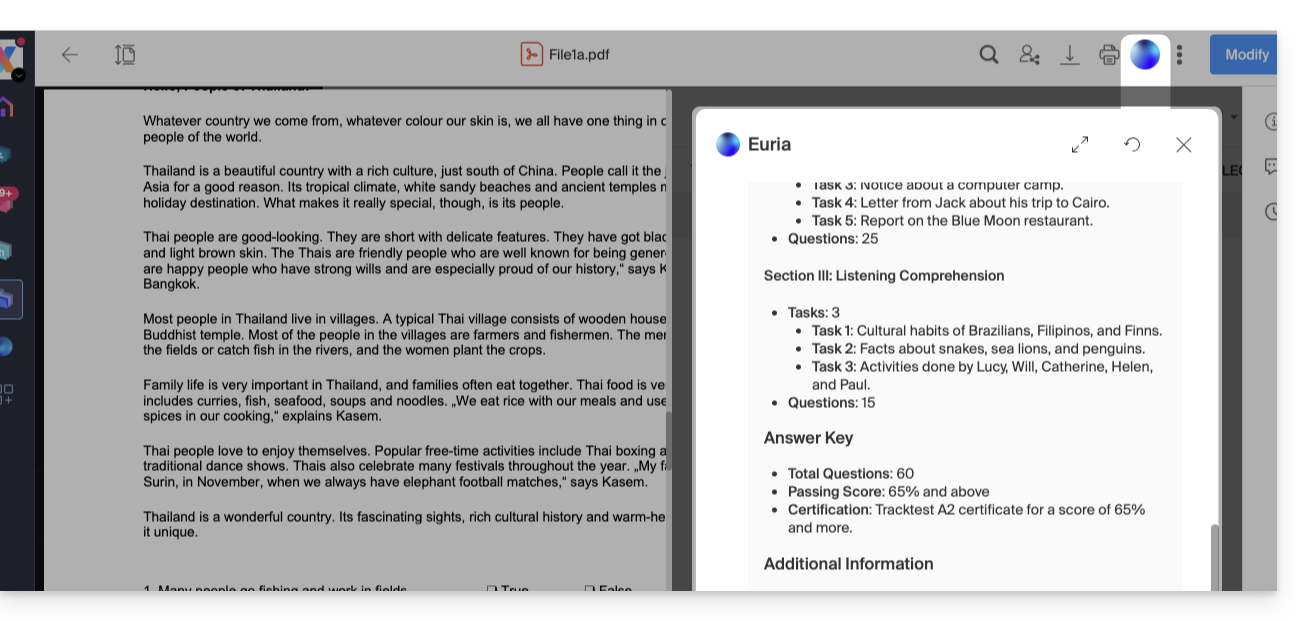
- Euria will open in a right-side panel; if you close it, Euria remains accessible via the round icon located at the top right:
How can Euria help?
Euria helps you effectively use the document you have opened (and only that one); it can, in particular:
- answer your questions about its content (details, statistics, changes)
- summarize the key points (even simplify them and even more so if you specify “for a 10-year-old child”…)
- translate it
- provide metadata (size, creation or modification date)
- explain the terms or acronyms that appear in it
For example, if the document is a long company report on the past year, you can ask for the current size of the Development department, which projects are top priority, or the last date the document was modified…
Create an event for your agenda
With a document mentioning an appointment (medical, for example), you can ask Euria to create a piece of code that, once copied and pasted into an appropriate file, will allow you to add an event to your calendar. Example: “Create an ics format event using the details of this appointment”.
Euria can also extract events from a more complex document:
Euria will explain what it has done (a VCALENDAR code) and what you will need to do (create a new file with the .ics extension containing the code it has generated, and open it on your computer to import it into your usual calendar app or import it into your kSuite calendar):
Create a family tree of characters
With a book stored on your kDrive, you can ask Euria to create a precise and complete family tree to show the relationships between all the characters. You will thus obtain a list of names/first names with their relationships.
But you can take the experience further by then asking for a “Mermaid” diagram based on this list. You will just need to copy and paste the code proposed by Euria into a tool like mermaid.live:
Analyze a survey, write a blog article
From a survey/report-type document, you can ask Euria to write a new article in the tone you want and addressed to the desired target. Example: “From all this, write a blog article with a catchy title and a text of max 400 words, for a target audience of women aged 30 to 40”.
But you can also ask it to find “what are the biases of this survey” or “which elements would deserve to be deepened or verified”. Euria can thus help you adopt a critical stance towards a survey or report, by pointing out potential gaps, exaggerations, or biases.
It can also rephrase the conclusions of the survey for different audiences (professionals, teenagers, curious readers…), suggest alternative angles for a derived article, or generate titles, introductions, or summaries according to the desired level of complexity.
The goal is to extract as much editorial value as possible from the same source content, by diversifying the forms, tones, and viewpoints.
Link to this FAQ:
Has this FAQ been helpful?
This guide concerns Euria, the sovereign AI assistant, a full-fledged kSuite service, also available within an app.
Preamble
- The use of AI at Infomaniak is based on a transparent and ethical approach.
- Each AI-integrated service follows strict principles to ensure reliable and respectful use:
- information protection is guaranteed by complete data processing within infrastructures located exclusively in Switzerland, thus ensuring full control over digital sovereignty,
- the results generated are never used to train models or for advertising purposes,
- and AI is not intended to replace humans but to assist them.
What is Euria?
Designed to offer a European alternative to American tech giants, the sovereign AI assistant Euria stands out for its deep integration into the Infomaniak productivity ecosystem, while ensuring absolute confidentiality of user data.
Euria's strength lies in its local infrastructure:
- Unlike solutions based on foreign public cloud, Infomaniak's AI is hosted exclusively on its own servers in Switzerland.
- This approach ensures strict compliance with data protection standards and guarantees that no processed information is used to train third-party models or shared outside the secure infrastructure of the host.
Euria uses state-of-the-art language models (LLM) selected for their efficiency and performance, while being optimized to minimize their energy footprint. Infomaniak ensures total transparency regarding the algorithms used, adhering to a technological independence and environmental sustainability approach specific to the company.
Usage limits
To ensure a smooth and secure experience, the use of Euria is subject to certain volume and file size conditions:
- Quota calculation (sliding window): the limits (below) are not reset at midnight but calculated in real-time over a 24-hour window; each message sent "occupies" a space in your quota and is automatically released 24 hours after it is sent.
- If you send messages throughout the morning until you reach your limit at 11 AM, your sending rights will be gradually released the next morning, as each message reaches its 24-hour age.
- Global message quota: your daily limit is shared; each request sent to Euria is deducted from your global quota, regardless of the project or conversation in which you are interacting.
- A conversation cannot exceed 254,000 tokens at the moment.
- Transcriptions: transcription services are unlimited.
- Image uploads: image uploads are limited to 10 MB per file.
- A conversation cannot contain more than 20 images.
- Document uploads: file uploads are limited to 100 MB, except for the my kSuite and my kSuite+ offers for which the limit is 20 MB.
- Number of messages per day:
| kSuite | free | 20 |
| Standard | 100 | |
| Business | 500 | |
| Enterprise | unlimited | |
| my kSuite | 20 | |
| my kSuite+ | 100 |
- Web searches per day:
| kSuite | free | 5 |
| Standard | 50 | |
| Business | 75 | |
| Enterprise | 100 | |
| my kSuite | 5 | |
| my kSuite+ | 50 |
- Number of projects:
| kSuite | free | 2 |
| Standard | 10 | |
| Business | unlimited | |
| Enterprise | unlimited | |
| my kSuite | 2 | |
| my kSuite+ | unlimited |
- Number of conversations per project:
| kSuite | free | 5 |
| Standard | 50 | |
| Business | unlimited | |
| Enterprise | unlimited | |
| my kSuite | 5 | |
| my kSuite+ | unlimited |
Supported files
- Images:
- Locales (browser):
BMP,JPG,JPEG,PNG,WEBP - Extended:
TIF,TIFF
- Locales (browser):
- Documents:
- PDF:
PDF - Spreadsheets:
CSV,XLS,XLSX - Word processing:
DOC,DOCX - Text & Code:
JSON,MD,TXT,XML,YAML,YML - Presentations:
PPT,PPTX
- PDF:
- Audio:
AAC,M4A,MP3,OGA,OGG,OPUS,WAV
- Video:
MP4
Some Infomaniak services integrate Euria
- kChat
- The AI Euria integrated into kChat saves time in exchanges: it can rephrase sentences, generate quick responses, correct spelling, or adjust the tone of a message. The user retains full control over the suggestions, which are local to each session only.
- Mail Infomaniak
- In the Mail application, Euria assists in writing emails. It can generate content from a few keywords, rephrase or structure a message, adapting to different registers. Nothing is sent automatically, and the user can modify the texts at any time.
- Site Creator
- An AI-powered writing assistant allows Site Creator to quickly generate content tailored to different types of web pages. This service is useful for people launching a site and looking to produce clear, optimized, and relevant texts.
- kDrive
- On kDrive, artificial intelligence is deployed at two complementary levels to simplify document management. Euria allows interaction with text files stored in the drive. This module can answer questions about the content of a document, summarize, translate, or extract useful information. It is particularly effective for reading reports, understanding complex texts, or quickly generating an overview of a file.
To create an AI project with custom instructions and a knowledge base, refer to this other guide.
Parties' responsibilities
Data provided to the AI
- The AI of Infomaniak is currently based by default on these models.
- Among them, Mistral, Whisper, DeepSeek, Llama, granite…
- By using a writing assistant, the messages and requests addressed to the AI are exclusively processed in Switzerland by Infomaniak's infrastructure.
- No data is processed or shared with a third party.
Data provided by the AI
- The language model generates text based on the data it has assimilated during its training, devoid of consciousness, intentions, or moral responsibilities.
- It is crucial that the user is aware that the information generated by the model is not always accurate and should not be considered an infallible source of information.
- The user must exercise critical judgment and verify the information provided by the assistant from reliable sources when necessary.
- For example, if a person uses the model for critical tasks such as medical, legal, or financial advice, they must take additional precautions to confirm the information from the model.
- In case of inappropriate or dangerous use of this assistant, the responsibility lies with the user who takes these actions.
Discover also AI Services: Infomaniak provides a platform that allows easy integration of open-source models into custom projects. It is possible to leverage text analysis, content generation, translation, or other AI uses via on-demand calls. These services enable developers to benefit from a powerful AI without relying on closed or proprietary solutions.
Link to this FAQ:
Has this FAQ been helpful?
This guide describes the affiliate program of Infomaniak and how to use your affiliate account and affiliate links (affiliate links).
Preamble
- The affiliate program (or commercial collaboration) is an excellent way to create significant and sustainable passive income; it allows you to make money by naturally talking about Infomaniak products:
- Test a product offered by Infomaniak (it is possible to test the Web Hosting + Mail Service once for 3 months).
- Write an article (refer to this other guide if you are looking for advice) that presents the advantages of this product and the particularities of Infomaniak.
- Place a few links in the article that redirect your readers to the product's sales page.
- Then, for 365 days, receive a commission of up to 50% on all orders and renewals of new customers who previously clicked on one of your links.
- Click here to join the active affiliates to whom Infomaniak pays thousands of francs or euros every month! There are as many reasons to create a site as to increase your income.
Manage affiliate links
To obtain the links with your own tag/ID:
- Click here to access the Infomaniak Manager.
- Click on Affiliation in the left sidebar.

- Click on Marketing tools in the left sidebar.
- Click on Affiliate links in the left sidebar.
- Use these links in your content.
You can create a link to any page on the Infomaniak site by adding your unique tag at the end. For example, to redirect your visitors to the page https://www.infomaniak.com/gtl/hosting.ssd your affiliate link will look like this: https://www.infomaniak.com/gtl/hosting.ssd?utm_term=xxyyyyyzzz (xxyyyyyzzz being your unique ID).
The list of orders made via your link remains anonymous. You will simply see the order number and the associated commission.
Payment of earnings
Payment of your earnings is made automatically at the beginning of each month as soon as the amount of commissions reaches CHF/EUR 50.-.
- The affiliate program is valid only for products ordered when creating a new customer account, and not on an existing customer account.
- You will continue to receive a commission for 1 year from the creation of the customer account (on new products and renewals).
- For earnings to be recorded, it must be a new customer who clicked on your affiliate link (the cache is kept for 30 days).
- Earnings are pending validation for 30 days after the order is created, due to the "Satisfied or refunded" guarantee.
- In case of refund during this period, the affiliate will not receive any commission.
- If you receive a payment in a currency different from that of your affiliate account, the amount will be converted at the current exchange rate.
To set the payment method (Infomaniak prepaid account, PayPal, IBAN):
- Click here to access the Infomaniak Manager.
- Click on Affiliation in the left sidebar.
- Click on Earnings and payments in the left sidebar.
- Click on Payment preferences in the left sidebar:

Commission rates
As soon as you sign up for the affiliate program, you earn 25% commission on every order and renewal made by the new customers you have referred. Your commission rate automatically evolves based on the earnings you accumulate:
- 30% as soon as your cumulative earnings reach 50.–
- 35% from 1,000.– in cumulative earnings
- 50% once the threshold of 20,000.– in cumulative earnings is crossed
In other words, the earlier you are active, the sooner your efforts will be rewarded.
Resolve an issue in case of unaccounted commission
Here are the main reasons why a commission might not be taken into account:
- The customer forgot to click on the banner available on the affiliate partner's site.
- The new customer account was created by the person benefiting from the affiliate program (recognized IP).
- The new customer account is managed by an existing user.
- The new products were ordered from an existing customer account.
- The new products were ordered by the person benefiting from the affiliate program.
- The new products were ordered from the office/home of the person benefiting from the affiliate program.
- The new products were not ordered when the new customer account was created.
- The order was canceled within the first 30 days.
The goal of this program is to find new customers and not to place orders for existing customers.
- If you wish to "sell" Infomaniak products to existing customers, use the reseller program (partner), a different system from the affiliation itself.
- ⚠ It is not possible to subscribe to the Infomaniak affiliate program (commercial collaboration) while being an Infomaniak Partner simultaneously!
Products covered by this program
The Infomaniak affiliate program covers almost all products, including…
- ✓ my kSuite: the 100% Swiss alternative to Google Workspace and Microsoft 365
- ✓ VPS Lite / VPS Cloud: Linux/Windows Server
- ✓ Public Cloud (and therefore Kubernetes Service): the sovereign alternative to AWS, GCP or Azure
- ✓ AI Services: the best sovereign alternatives to current AIs
- ✓ Jelastic
… with the exception of the following services :
- ⨉ Renewal Warranty ("renewal guarantee")
- ⨉ Domain Privacy ("domain confidentiality")
- ⨉ Domain Name
- ⨉ Housing
- ⨉ Very High Availability Hosting
Link to this FAQ:
Has this FAQ been helpful?
This guide shows you how to create / import / manage contacts within subscriber lists for Infomaniak Newsletters.
Preamble
- You must obtain the explicit consent of your recipients via the double opt-in model:
- Sending spam and using purchased/rented address lists is prohibited.
- Importing does not send any messages to the added contacts (so read and accept the points above).
- Duplicates will be automatically removed.
- If you re-import an address that is already subscribed, the different custom fields will be updated.
Create a subscriber list
To access the management of Newsletter subscribers:
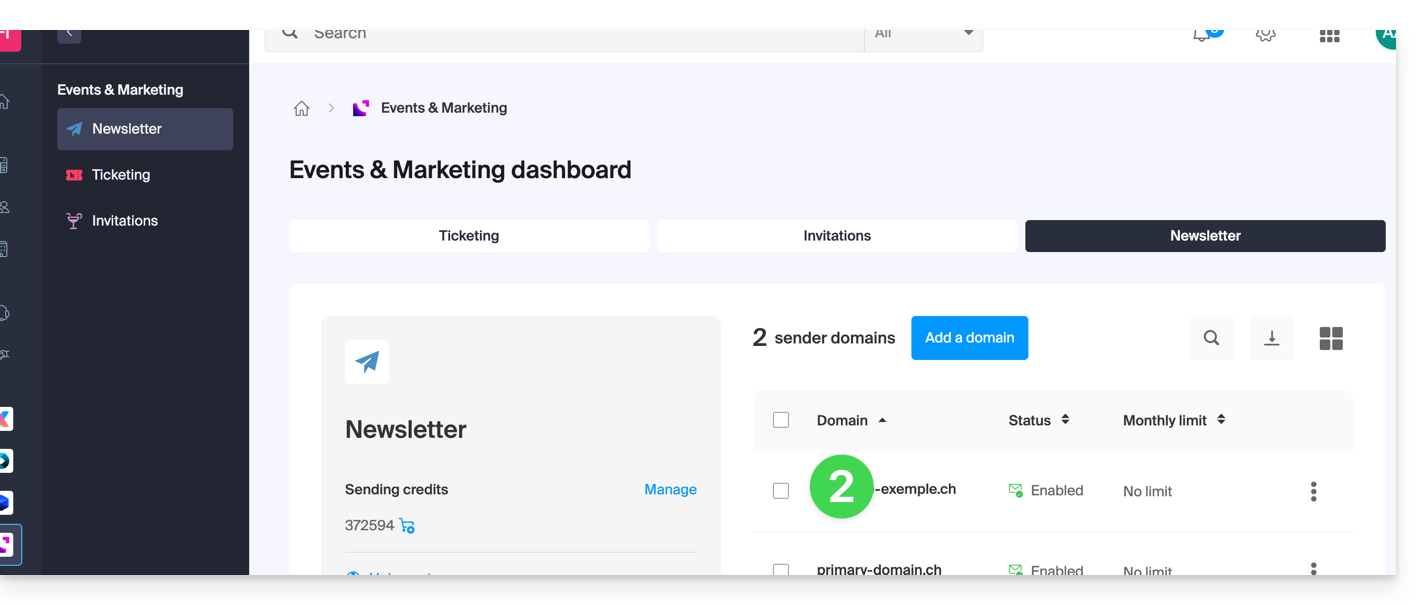
- Click here to access the management of your product on the Infomaniak Manager (need help?).
- Click on the domain name concerned in the table that appears:
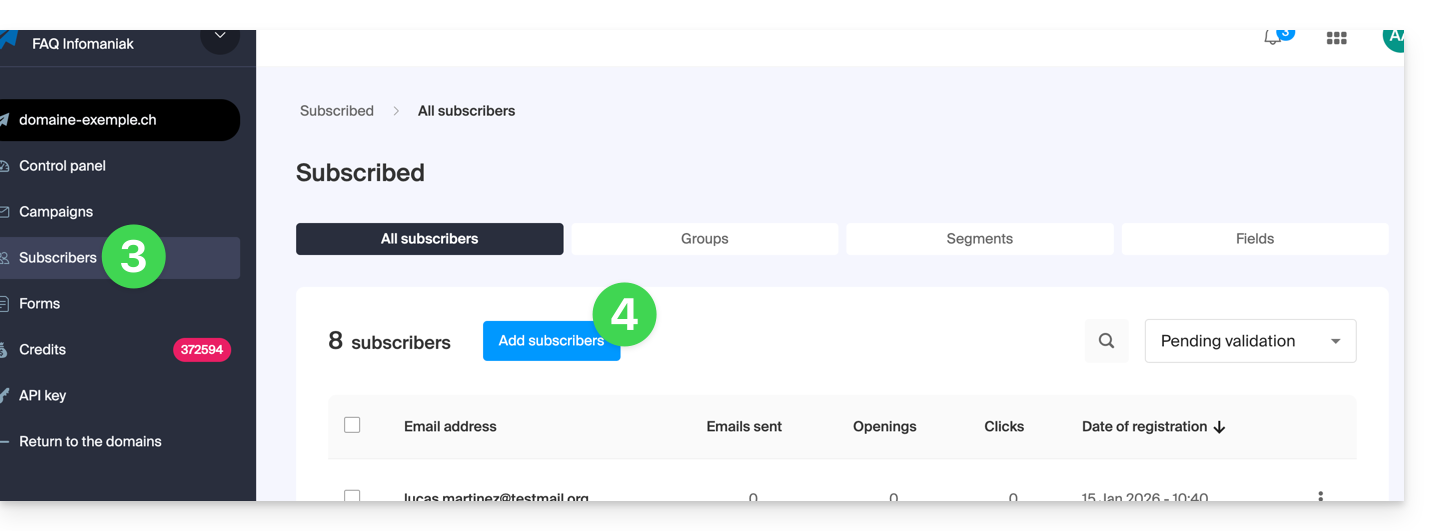
- Click on Subscribers in the left sidebar.
- Click on the blue button Add contacts:
- Read and accept the Terms of Service.
- Choose from the different ways to create a subscriber list:

A. Import a CSV file (format .csv) or .txt file (predefined format)
- The format must be respected (a template to download is available as an example on the page). Maximum size: 300 Mo

- Once the spreadsheet-type document is written, export it as
.csvwhich will create a kind of text document with a separator between each piece of information in the different cells: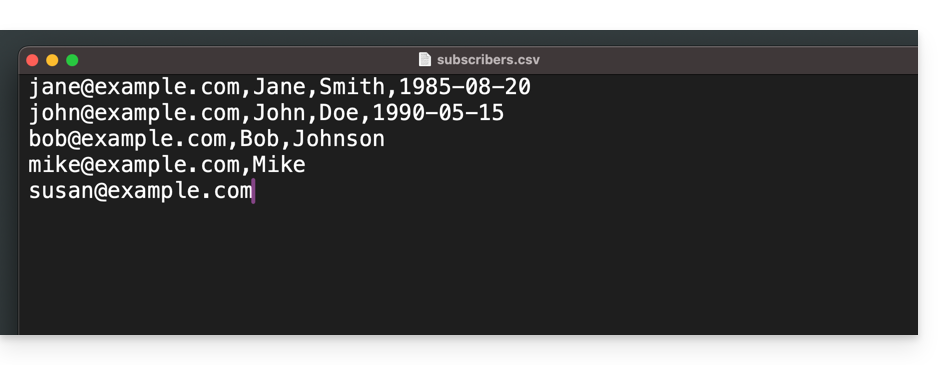
- Select the
.csvfile from the import interface and then click on the blue button Import: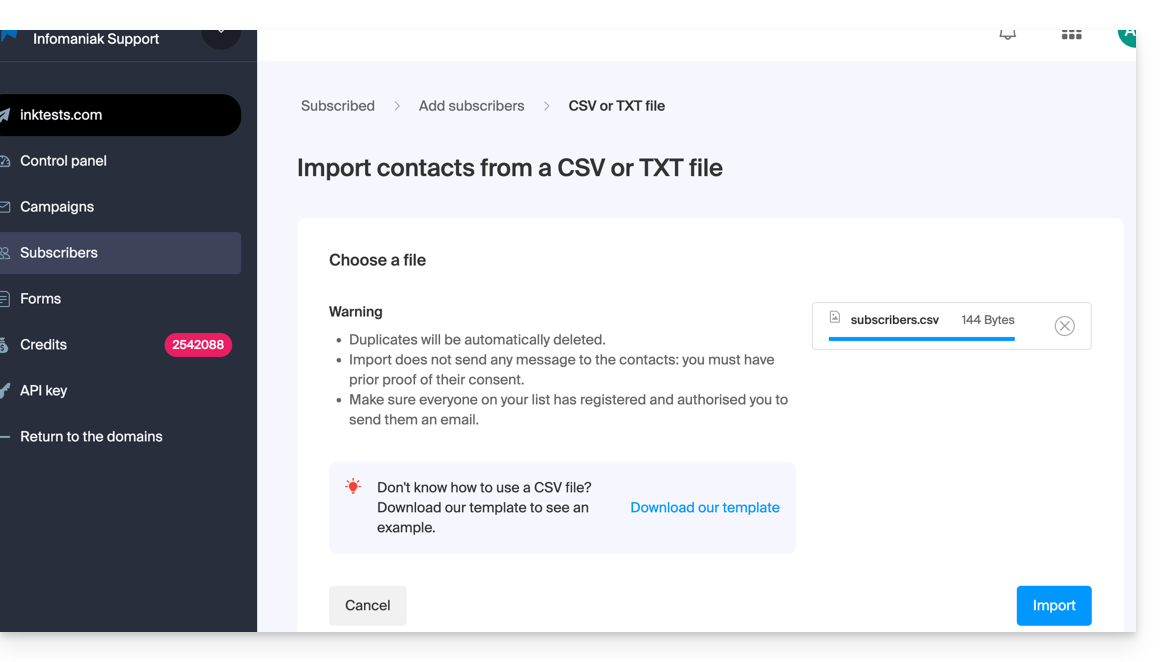
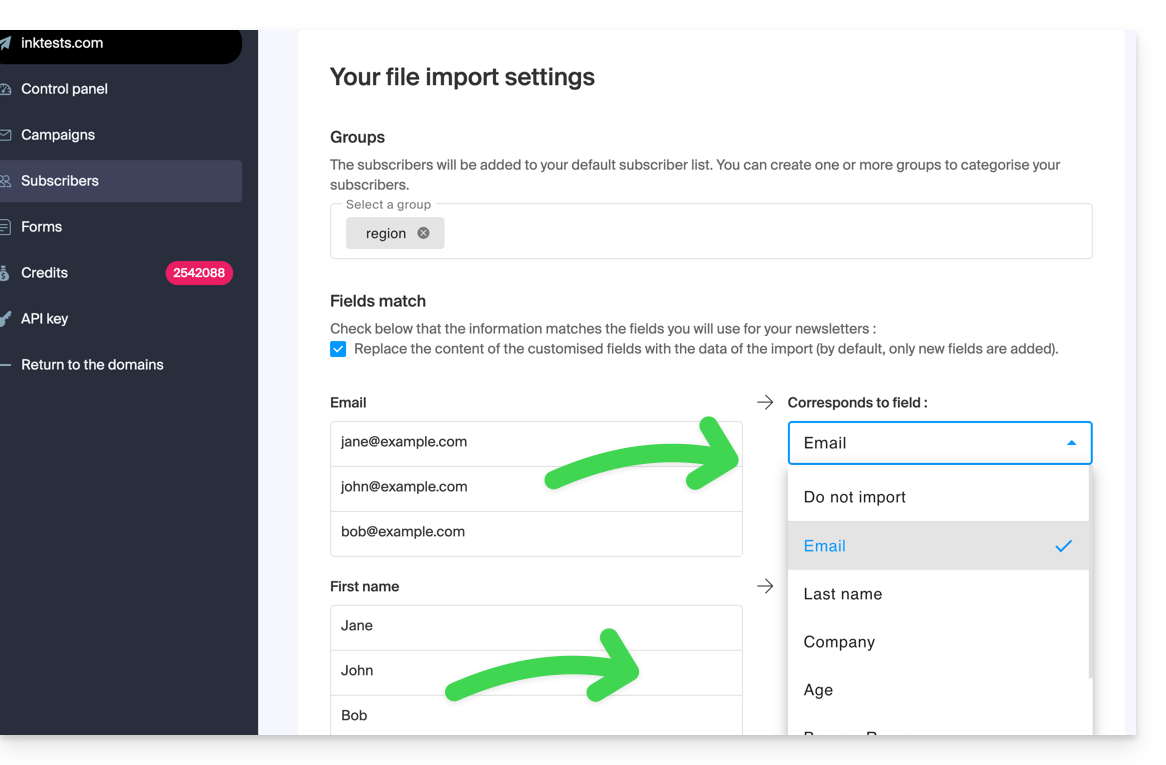
- You need to assign the desired field to the desired information (the information is grouped according to the original columns).
- At the bottom of the dropdown menu, it is possible to create the fields that do not yet exist (the type of field can be forced to numbers or a date, boolean, etc.).
- Choose an optional group from your created groups in which to place the imported contacts:
- There you go, whether under Groups or under Subscribers, your import is visible.
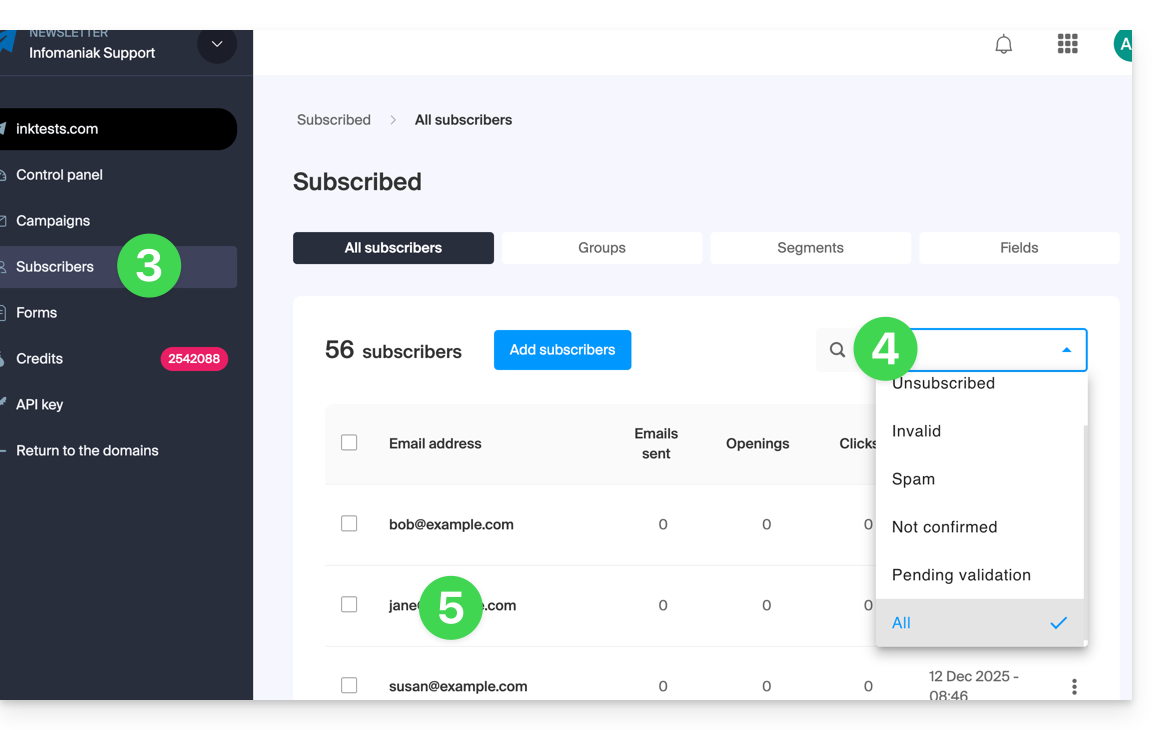
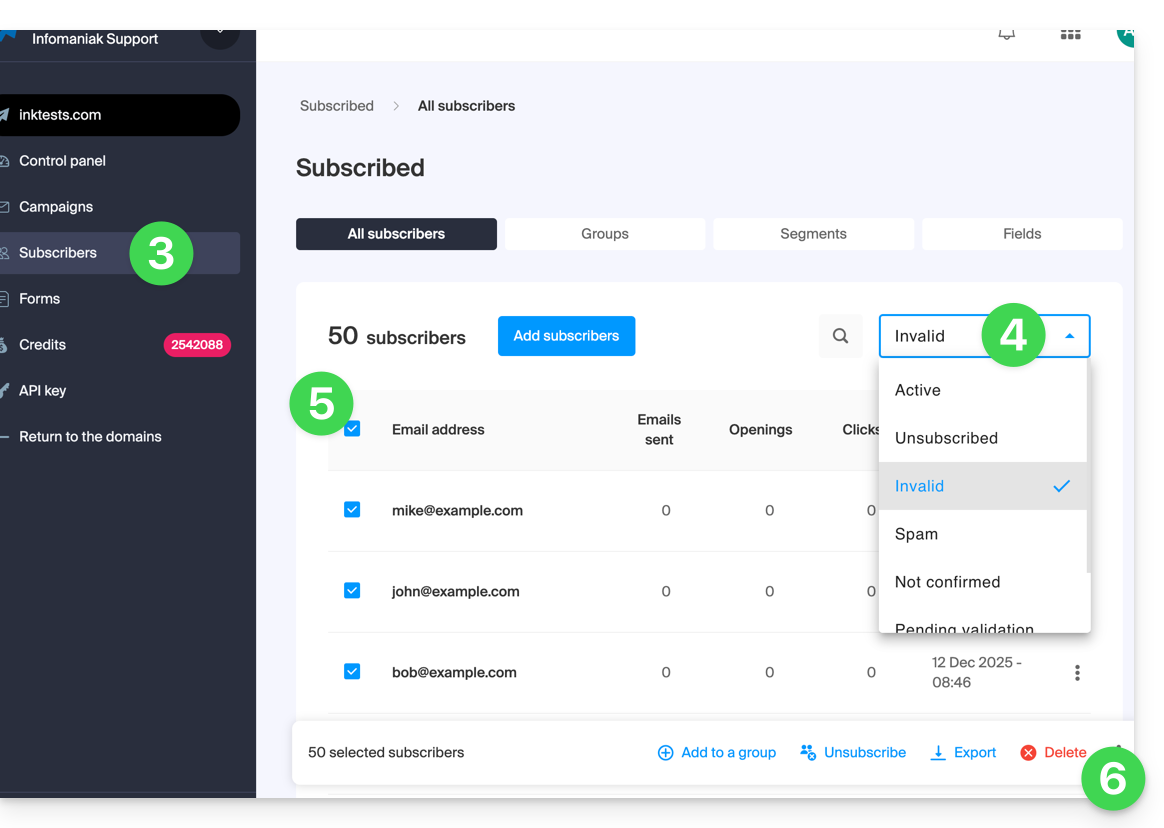
- If this is not the case, check if they are visible with the display filtering "All":
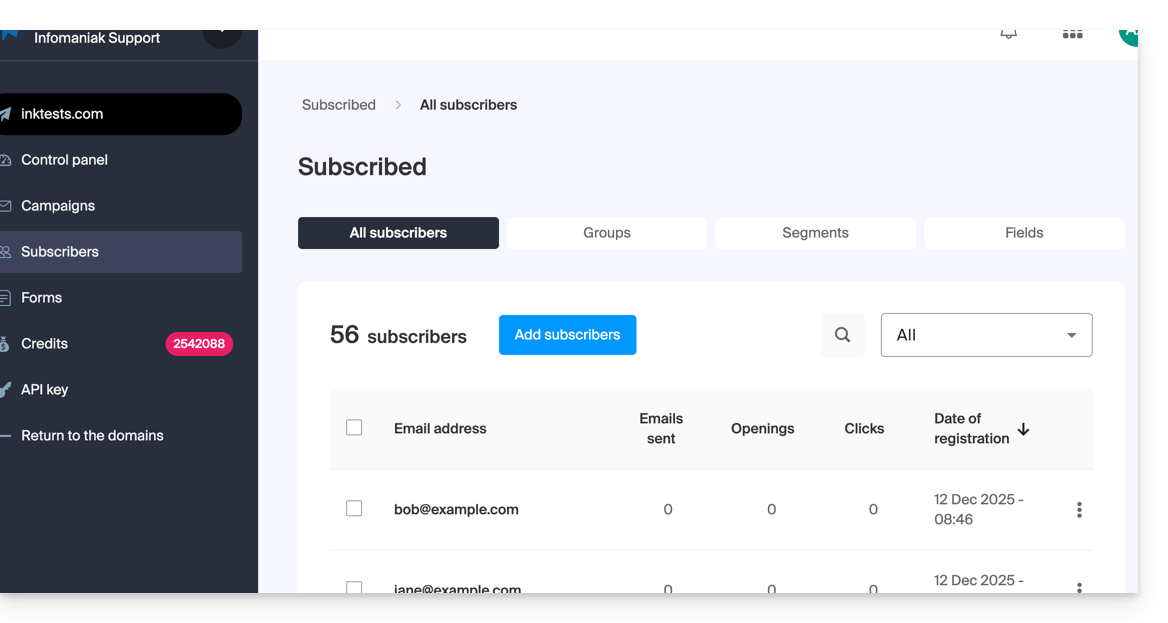
- It may be that after an email verification, the status of the imported subscriber is invalid, so you will not be able to write to them:
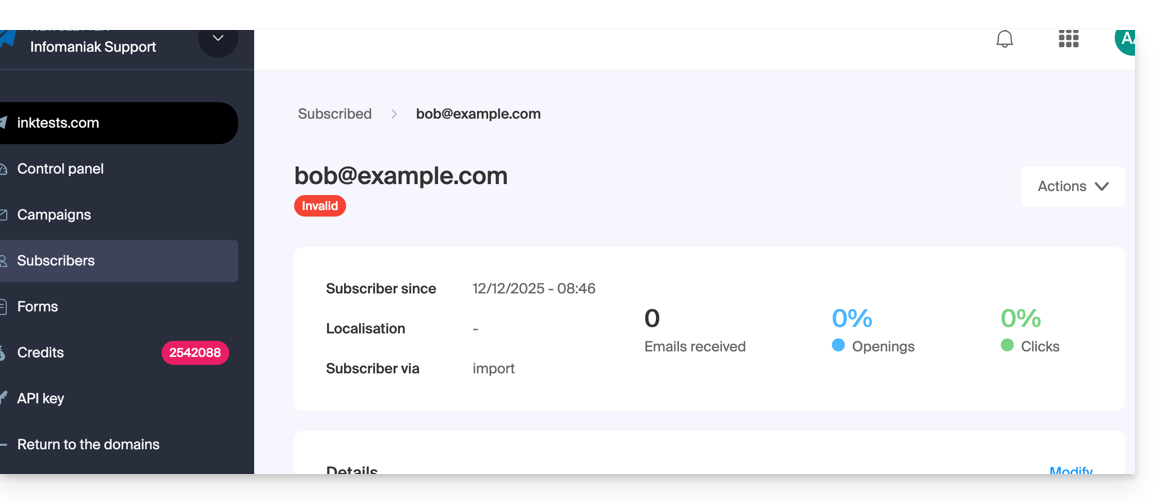
- If this is not the case, check if they are visible with the display filtering "All":
B. Copy-paste the equivalent of a .csv or .txt (predefined format)
- The format must be respected, as in the file to download (see above), for example:
anna.a@domain.xyz,Anna,Alpha,1985-08-20
alfred.a@domain.xyz,Alfred,Alpha
contact@domain.xyz,Support
mail@domain.xyz- Once this information is pasted into the dedicated field, click on the blue Continue button:
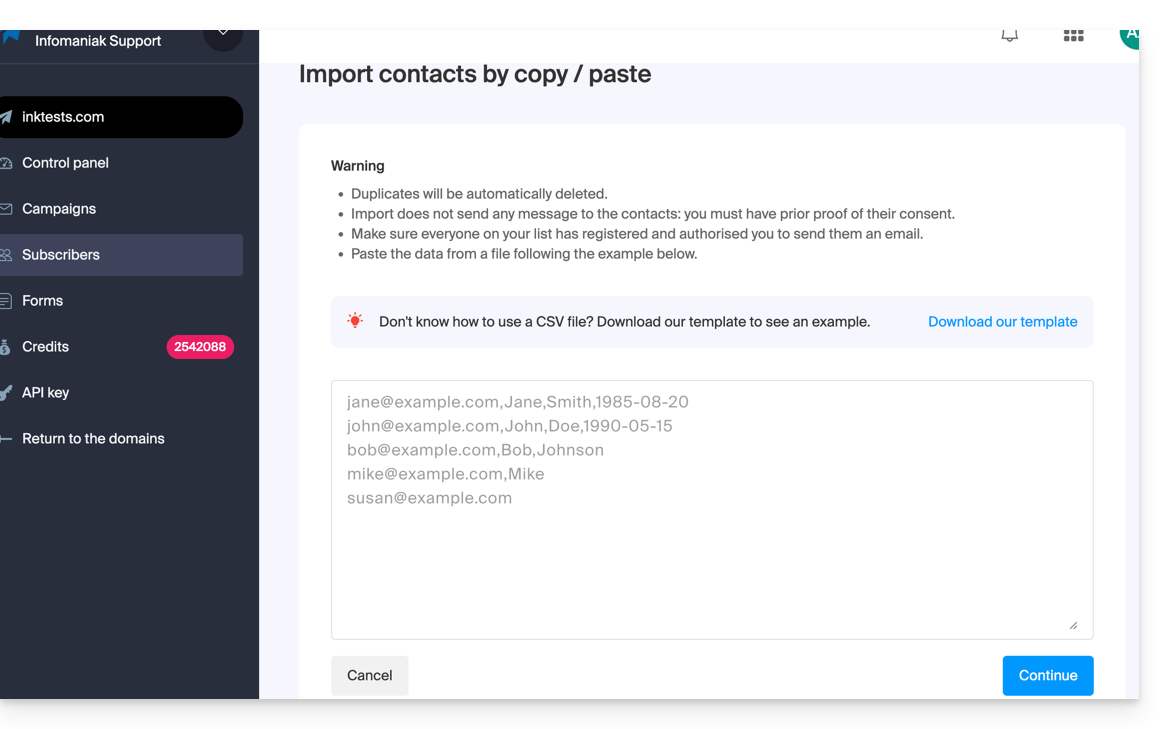
- The rest of the import is identical to point A above.
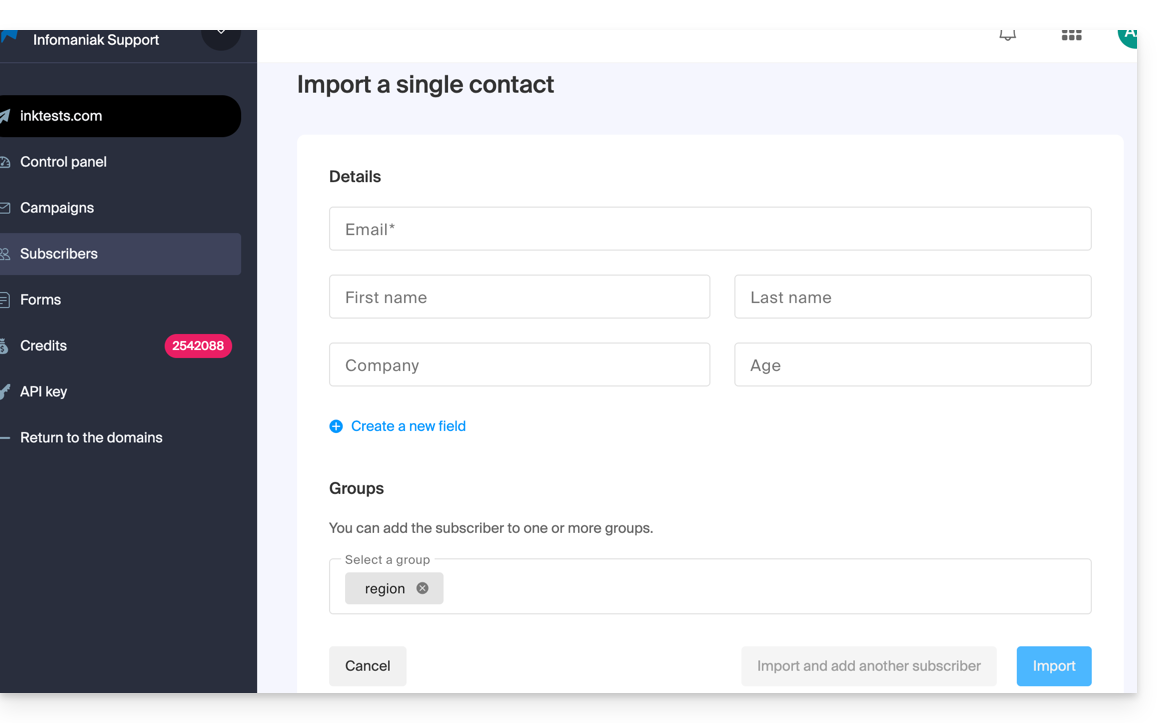
C. Filling out an individual contact form
- Import contacts one by one using the proposed form.
- Add free fields if necessary (the type of field can be forced to numbers or a date, boolean, etc.).
- Specify the optional existing group:
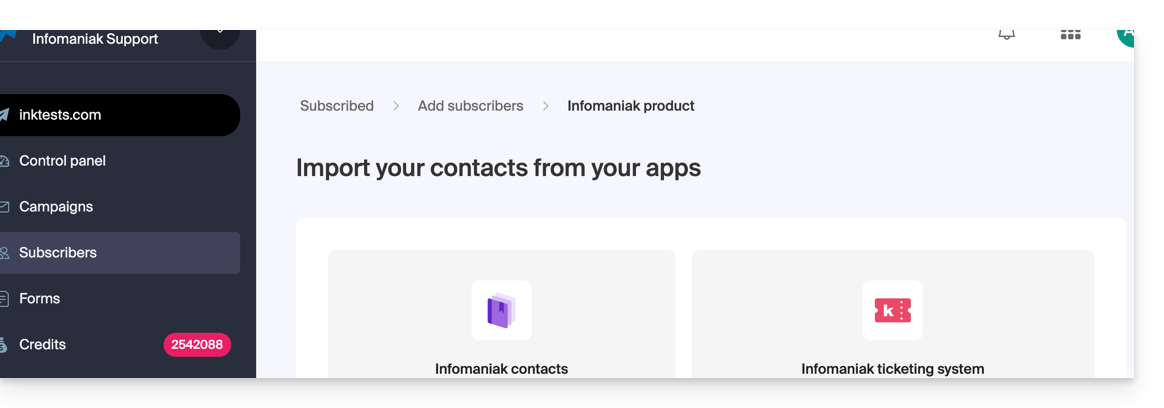
D. Automatic import from other Infomaniak tools
- Import contacts from your Infomaniak address books and from the Infomaniak ticketing tool if available (with the possibility of importing only users who have specified that they want to receive a Newsletter):
Edit a subscriber's details
To edit the information related to your subscribers:
- Click here to access the management of your product on the Infomaniak Manager (need help?).
- Click on the domain name concerned in the table that appears.
- Click on Subscribers in the left sidebar.
- Search or filter the type of display if necessary.
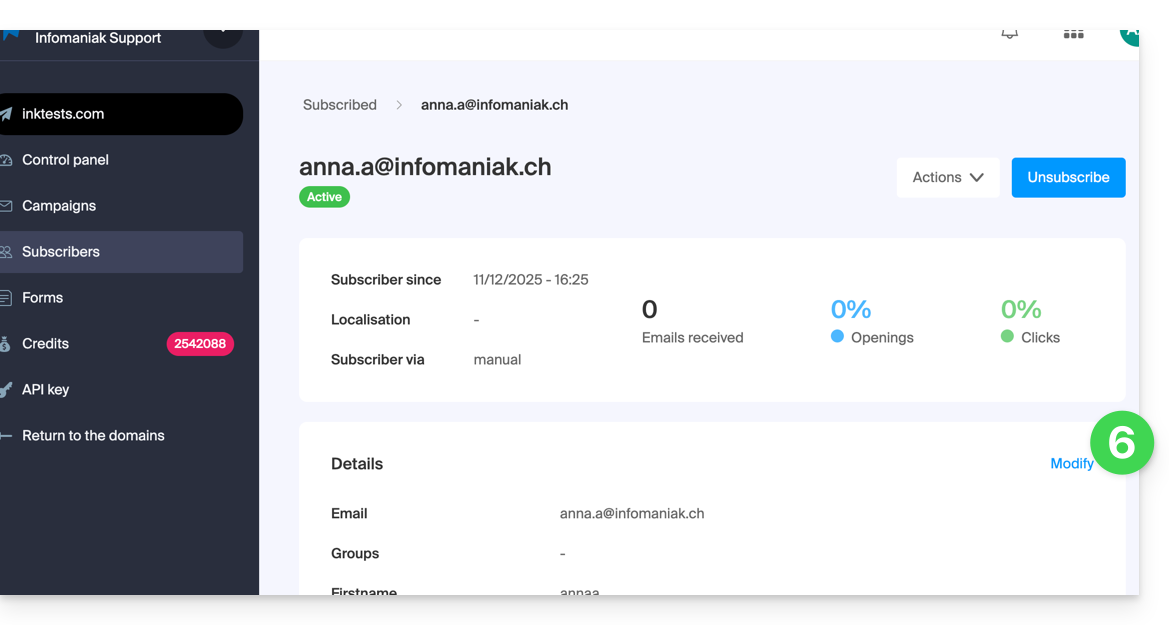
- Click on the subscriber whose details you wish to edit:
- Click on Modify:
- Edit the information (only the email address cannot be modified):
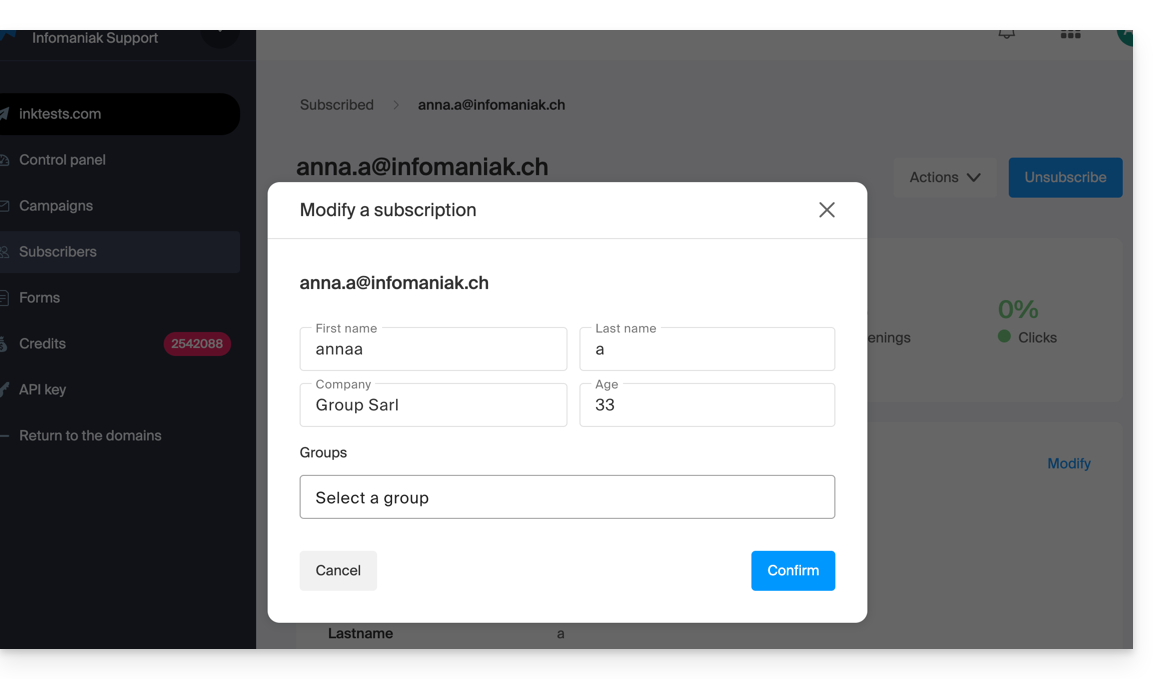
- If you wish to add a new field, you must add it globally by returning to the Subscribers menu.
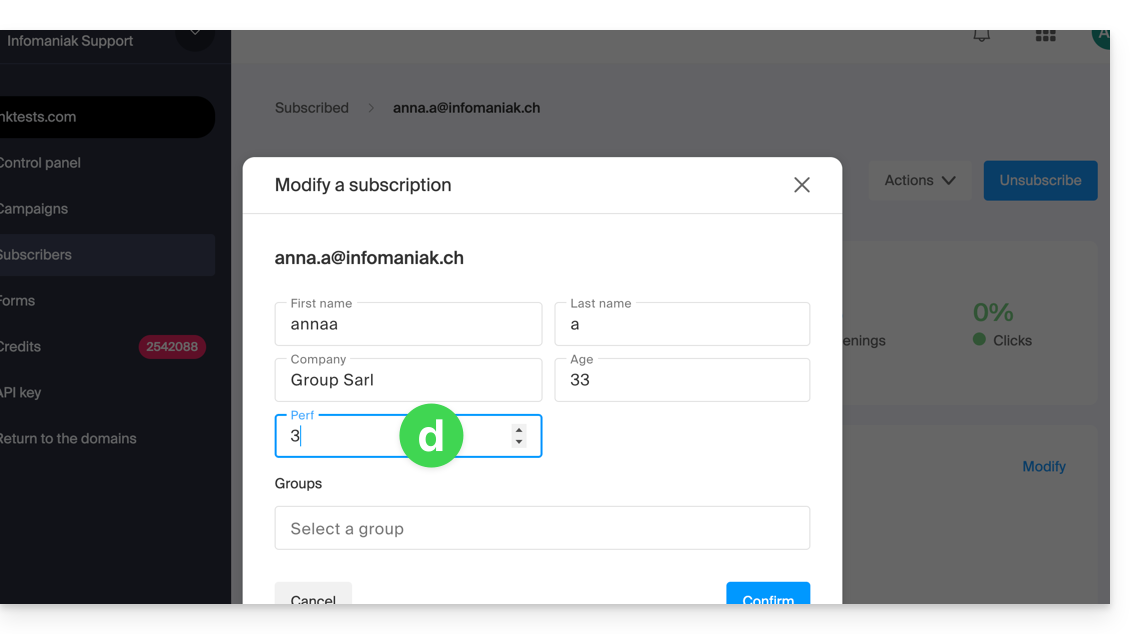
- Click on the Fields tab.
- Click on Create a field.

- The subscriber's details can now be edited at the level of this new field:
Delete subscribers
To delete newsletter subscribers:
- Click here to access the management of your product on the Infomaniak Manager (need help?).
- Click on the domain name concerned in the table that appears.
- Click on Subscribers in the left sidebar.
- Search for or filter the display type if necessary.
- Click the box to select one or more subscribers.
- Click on Delete:
- Confirm the deletion
You can also click on Unsubscribe instead of Delete so that the contacts remain in the list: refer to this other guide.
Export subscribers
To export the list of newsletter subscribers in .csv format and according to selected criteria:
- Click here to access the management of your product on the Infomaniak Manager (need help?).
- Click on the domain name concerned in the table that appears.
- Click on Subscribers in the left sidebar.
- Search for or filter the display type if necessary.
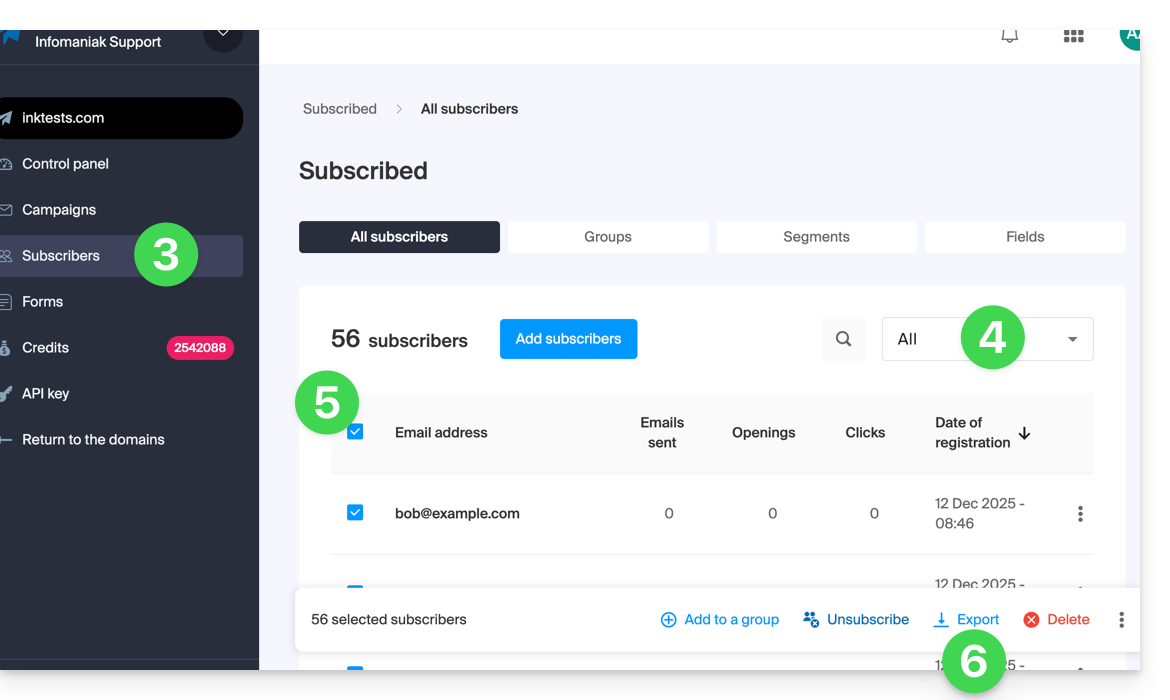
- Click the box to select one or more subscribers.
- Click on Export:
- Click the blue button once the export is prepared to download the data into a CSV file (format
.csv).
The resulting file includes these columns: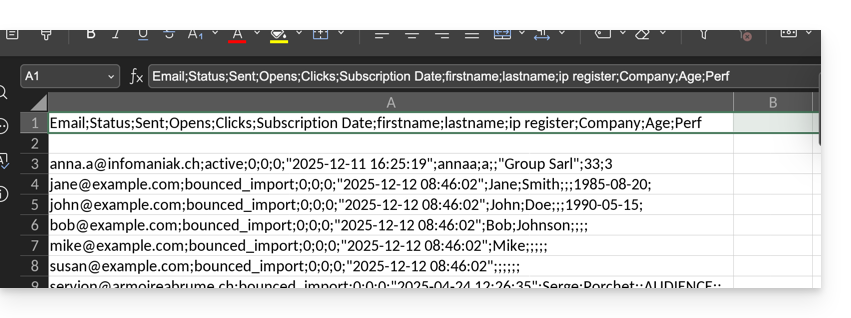
- Status
- Sent
- Opens
- Clicks
- Subscription Date
- firstname
- lastname
- ip register
- and then the custom fields (text, number, date, etc.) created manually…
Link to this FAQ:
Has this FAQ been helpful?
This guide helps you resolve certain cases where you notice that kDrive data is not synchronized between your devices.
Running the kDrive application in the background
For kDrive synchronization to work when there is an update to your data on the kDrive (new file, edited document, etc.), it is obviously necessary for the kDrive app to be open (and for you to be logged in with the correct user account, etc.).
On Windows: Access the kDrive icon for verification
To check if the kDrive app is running on a Windows computer, you need to locate the kDrive icon, which represents a folder (gray, green, or red) in the notification area.
- If necessary, open the kDrive software installed on your computer:
- Click on the Start menu to open it.
- Search for
kdrive. - The search result should display the kDrive app (otherwise reinstall the application).
- Open the kDrive app by clicking on Open or Run as administrator:

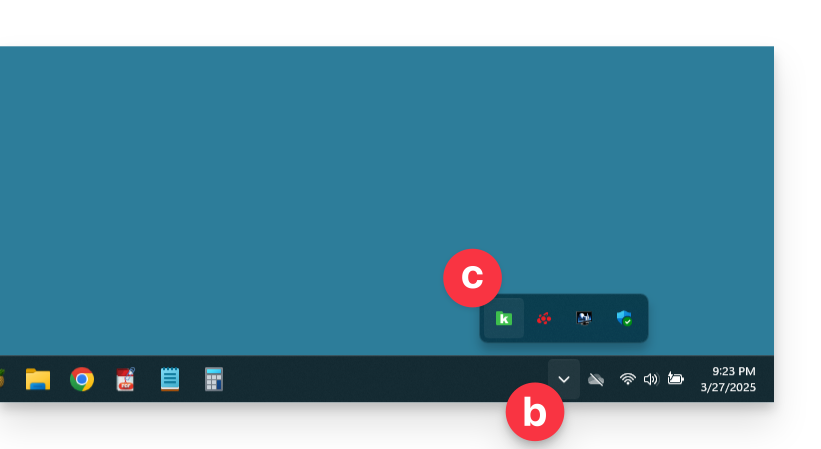
- The app icon should be visible in the notification area of your computer at the bottom right on Windows.
- If it is not there:
- Locate the small arrow (or chevron) that indicates hidden icons:

- Click on this arrow to expand the notification area.
- The hidden icons will then appear, allowing you to view the desired application:
- You can also check the notification area customization settings in Windows system settings.
- Locate the small arrow (or chevron) that indicates hidden icons:
- Click on the icon to access your kDrive synchronization settings and information:

On macOS: Access the kDrive icon for verification
If your computer does not display anything new in the folder corresponding to kDrive (no synchronization):
- Check if you see the app icon in the notification area of your computer (top right on macOS, bottom right on Windows, and a double left-click in the taskbar on Linux).
- If it is missing but you remember having installed the kDrive application on your computer, it is possible that it is simply not open, so look for it and then launch it:
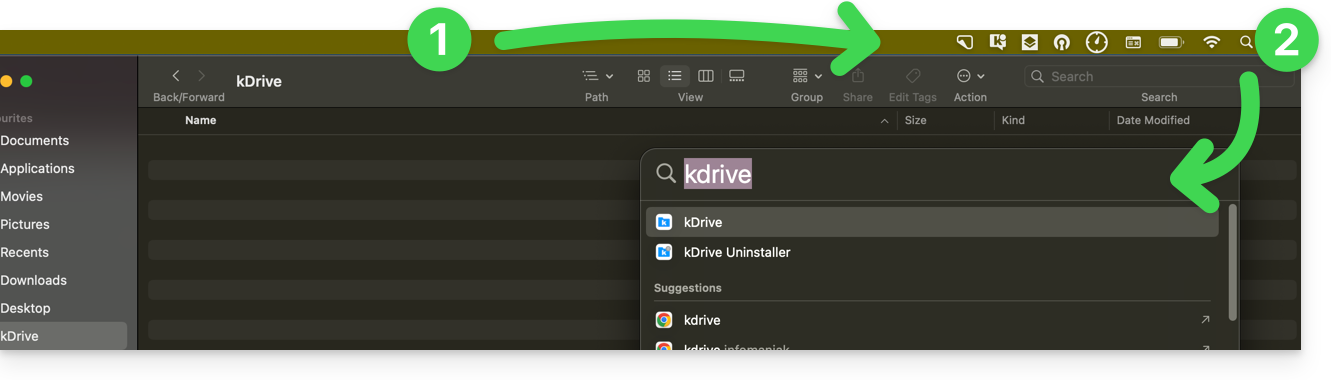
- Once opened (and having passed the step of reconnecting to the Infomaniak account if necessary), the kDrive icon appears:
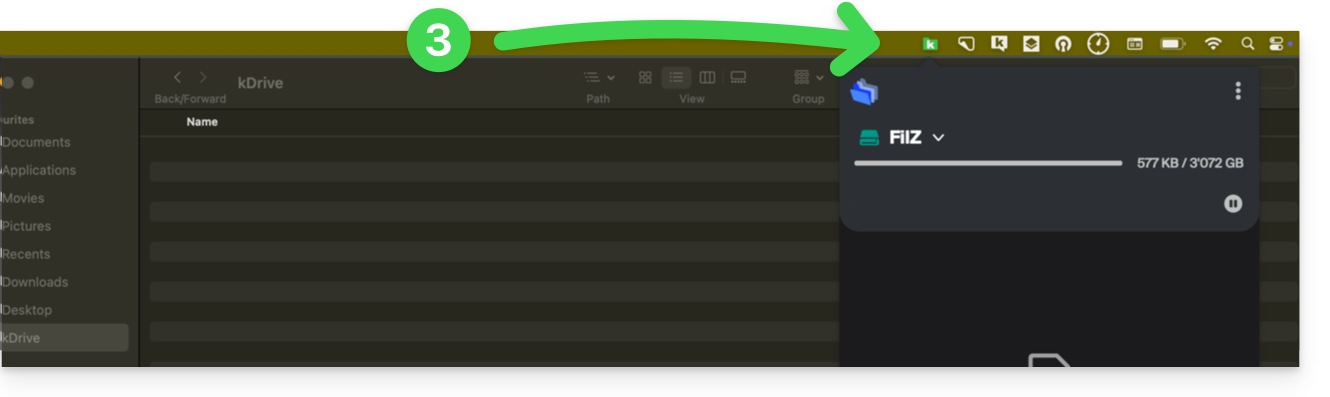
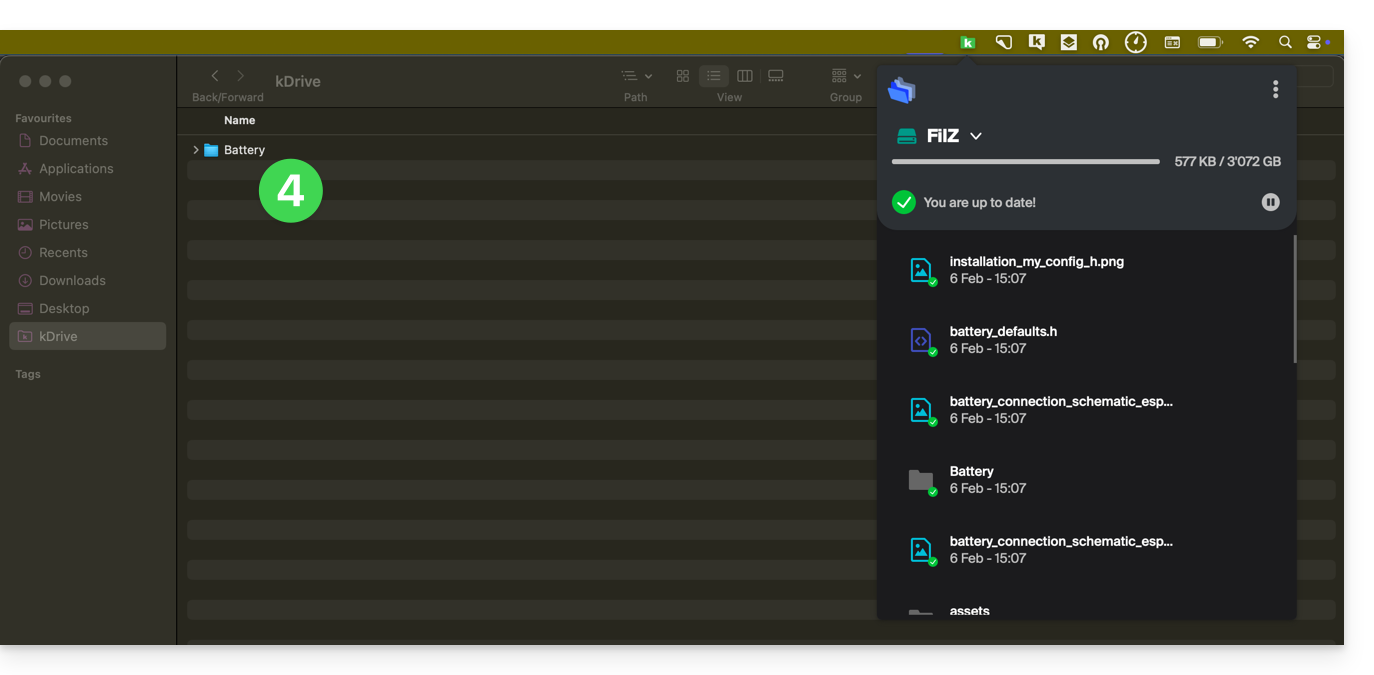
- A few seconds later, synchronization occurs in both directions:
On Android: kDrive and background operation
When you import large files or multiple files into kDrive, this can take several minutes. To ensure data import, the kDrive mobile app needs to be able to continue this task when you close the application or open another one. The automatic photo backup function in kDrive may also be disrupted if the app cannot run in the background.
Due to the power management policy on some devices of certain manufacturers (especially Chinese ones), applications that are not on their whitelist may be automatically stopped, which prevents certain tasks from functioning properly.
It is possible to work around this problem by following the instructions available in English on the don't kill my app website at dontkillmyapp.com:
Don't see your phone's brand? Then your phone is probably not causing any issues.
Absence of certain folders on the computer
If everything seems to be going well…
- … no synchronization interrupted
- … no error message
- … you have the access rights when you view them in their online version (ksuite.infomaniak.com/kdrive)
but you notice that…
- … folders like the Organization Folders or other directories are not visible on your computer…
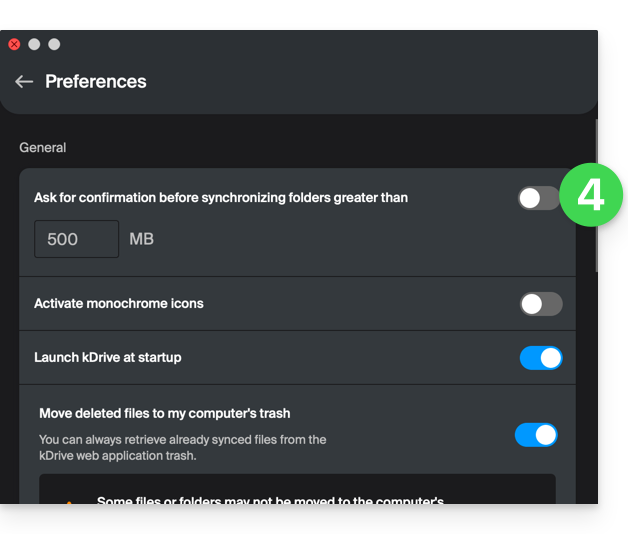
then check on the desktop app kDrive installed on your computer the setting that allows you to limit the synchronization of large folders (500 MB by default):
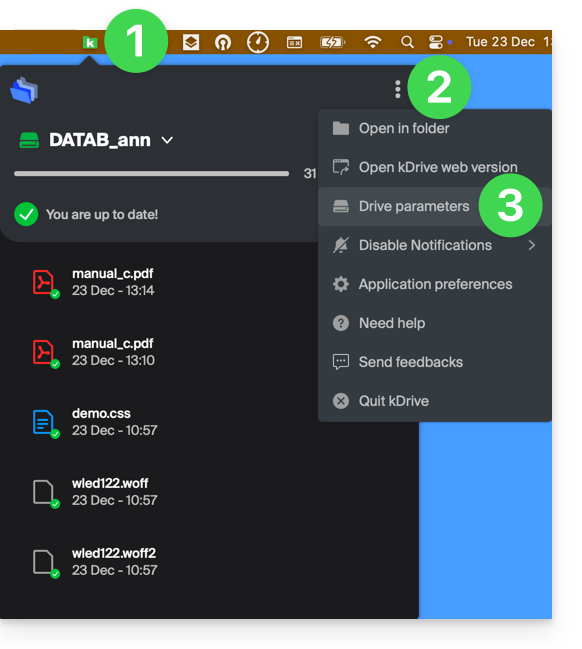
- Left-click on the desktop app icon in the notification area of your computer (top right on macOS, bottom right on Windows and a double left-click in the taskbar on Linux).
- Click on the action menu ⋮ on the right of the window that appears.
- Click on Application Preferences:
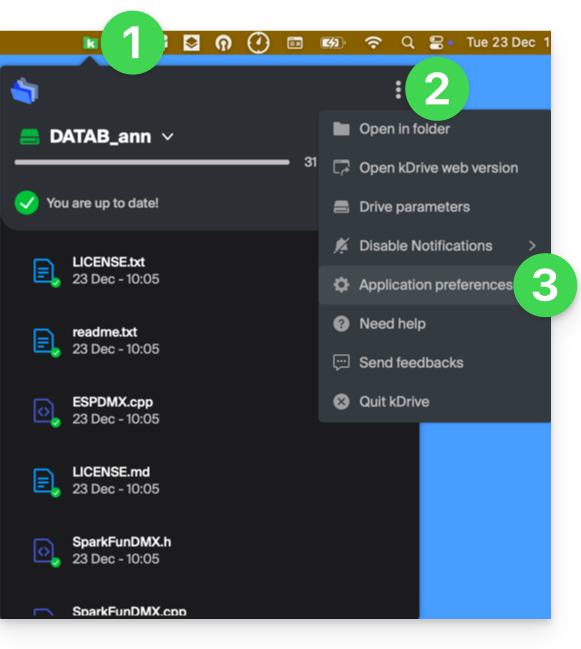
- Disable the toggle switch to have no limits on the size of synchronized folders:
Then check on the desktop app kDrive installed on your computer which folders you want to synchronize:
- Left-click on the desktop app icon in the notification area of your computer (top right on macOS, bottom right on Windows and a double left-click in the taskbar on Linux).
- Click on the action menu ⋮ on the right of the window that appears.
- Click on kDrive Settings:
- Click on the chevron to the left of your synchronization name to expand the list of folders.
- Expand the content of listed folders if necessary and check/uncheck the folders to synchronize with your computer.
- Click on the blue Validate button:
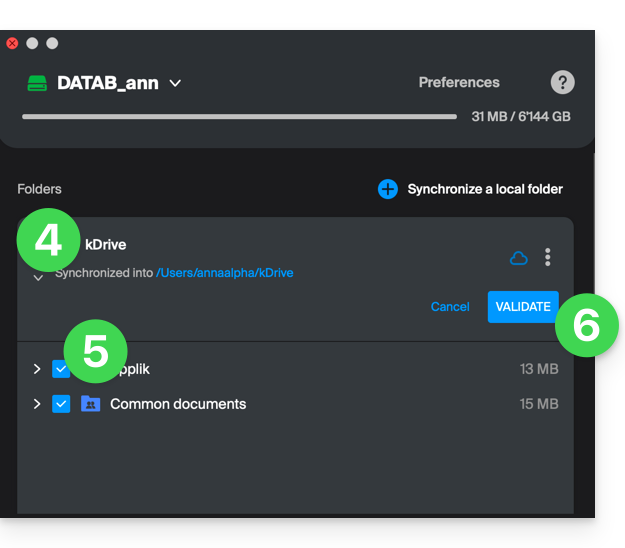
The result will be that your local folder representing kDrive (named kDrive, or kDrive2, or other) on the computer will finally display all desired folders (after the necessary time for synchronization).
Synchronization in progress (0/10) then paused
Check that the Windows Search service is not stopped. Proceed through the Run window (Win + R):
- Enter
services.msc. - Click OK:

- Locate Windows Search in the Services window list and enable it if it is not already:

Continuous synchronization (files .eml)
A problem related to Windows indexing may occur during the synchronization of kDrive files with the .eml extension (a file type corresponding to email export/save). It is therefore necessary to remove the eml type from the indexing options to resolve this issue:
- Open the Start menu and search for indexing options.
- Click on Indexing Options (Control Panel):

- Click on the Advanced button.
- Uncheck the
emltype box:
- Validate and close the windows.
Adobe file synchronization
Adobe applications such as Illustrator, Photoshop, Lightroom, etc., or some architecture/3D applications encounter problems when saving files (error messages in the concerned software, file duplication...) on kDrive. Therefore, it is best to avoid including such files in a synchronization.
Adobe explicitly states that it does not support cloud synchronizations, external drives, and network drives.
Issues related to file names
Structure recommendations
- Use only standard alphanumeric characters.
- Replace trailing spaces with underscores (_) or hyphens (-).
- Limit the total length of the path (folder name + file name) to less than 255 characters.
These characters should be avoided as they are reserved by the Windows file system or cloud storage servers:
- < (less than)
- > (greater than)
- : (colon)
- " (double quotes)
- / (forward slash)
- \ (backslash)
- | (vertical bar)
- ? (question mark)
- * (asterisk)
The location of the space is often more critical than the character itself for synchronization:
- Trailing space in the name: A file named "
project .pdf" causes major synchronization errors on Windows. - Leading space in the name: May make the file invisible or difficult to index.
- Trailing dot in the name: Folders ending with a dot (e.g., "
Archives.") are rejected by Windows. - Unicode spaces (non-breaking): Invisible characters often generated on macOS that appear as spaces but are technically special characters not supported by Windows.
System-reserved file names
The following terms should not be used as file names, as they are reserved for Windows internal communications:
- CON, PRN, AUX, NUL
- COM1, COM2, COM3, COM4, COM5, COM6, COM7, COM8, COM9
- LPT1, LPT2, LPT3, LPT4, LPT5, LPT6, LPT7, LPT8, LPT9
Also refer to this other guide.
Link to this FAQ:
Has this FAQ been helpful?