Knowledge base
1000 FAQs, 500 tutorials and instructional videos. Here, there are only solutions!
This guide explains how to customize the display of the Organization you are in within the Manager Infomaniak.
Preamble
- You can, for example, add a logo to the name of the Organization and completely replace the name display with a small banner.
- For advanced customization of URLs and certain interfaces, including login pages, discover Custom Brand.
Access the customization page
Prerequisites
- Be Administrator or Legal Representative within the Organization.
- Switch to the desired Organization first if necessary.
To customize the Manager interface:
- Click here to access the customization of the Organization on the Infomaniak Manager.
- The left button Customize allows you to edit the part visible at the top left of the Manager:
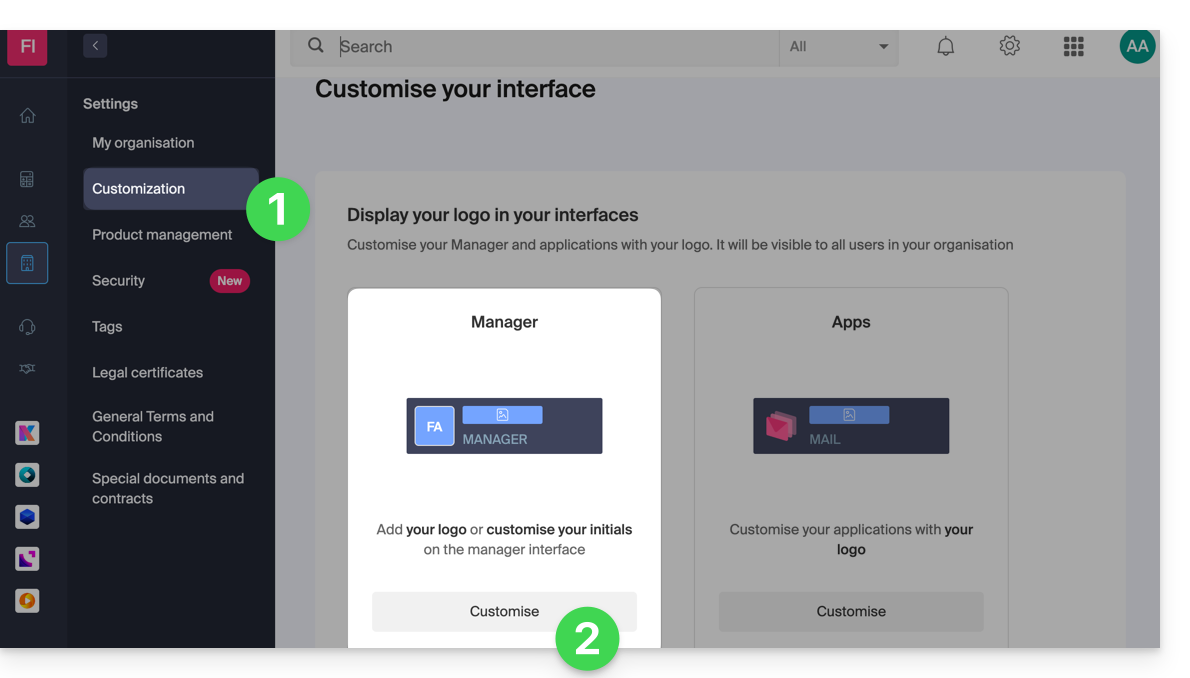
- Choose a square logo alone (in this case, no rectangular logo).
- Choose to put initials in the square (in this case, it is possible to have an additional rectangular logo or no rectangular logo).
- The right button Customize allows you to add a rectangular logo (only) to applications such as kDrive and Mail:
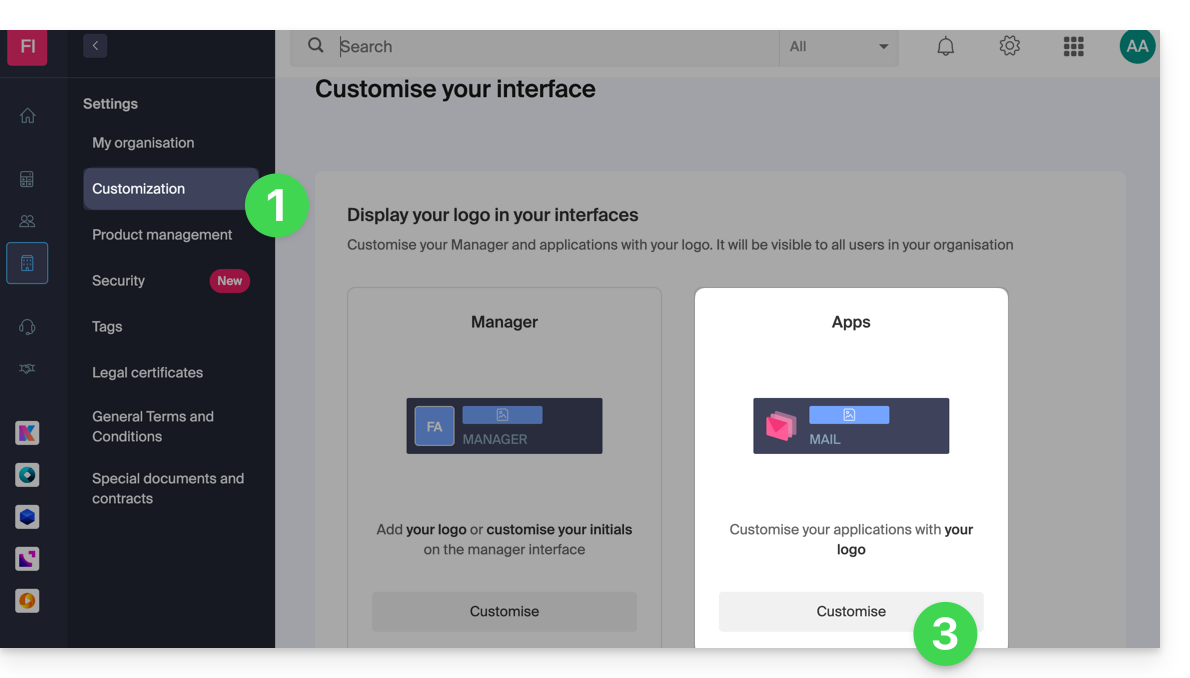
- Note that the rectangular logo will also be taken into account on the Manager side (it is not possible to have a different rectangular logo between these different services).
- If no rectangular logo is configured on the Manager, it simply will not be displayed.
Link to this FAQ:
Has this FAQ been helpful?
This guide explains how to modify product access rights for a user in your Organization on the Infomaniak Manager.
Preamble
- Since you opened your account with Infomaniak, you are part of at least one Organization.
- If you were alone and it was not an invitation, an Organization was created in your name and you automatically become the legal representative.
- Otherwise, you belong to the Organization that invited you (to join its kSuite, to manage a product, etc.).
- It is possible to modify a user's role within your Organization.
- You can then define whether a user…
- … is part of your Organization and should become:
- Legal representative
- Administrator
- Collaborator (this is the part that is detailed below…)
- … is external to your Organization (limited rights):
- External users are not included in the sharing of calendars and address books for the entire Organization.
- … is part of your Organization and should become:
Who can access what…
Prerequisites
- Switch to the desired Organization first if you do not find the expected user list.
- Be Administrator or Legal representative within the Organization.
- Have added a user as a collaborator.
The guide below allows you to manage product access for collaborators and external users. Indeed, a legal representative or an Administrator already has access to all existing products within the Organization and visible on the Infomaniak Manager.
To modify the product access of an Organization user:
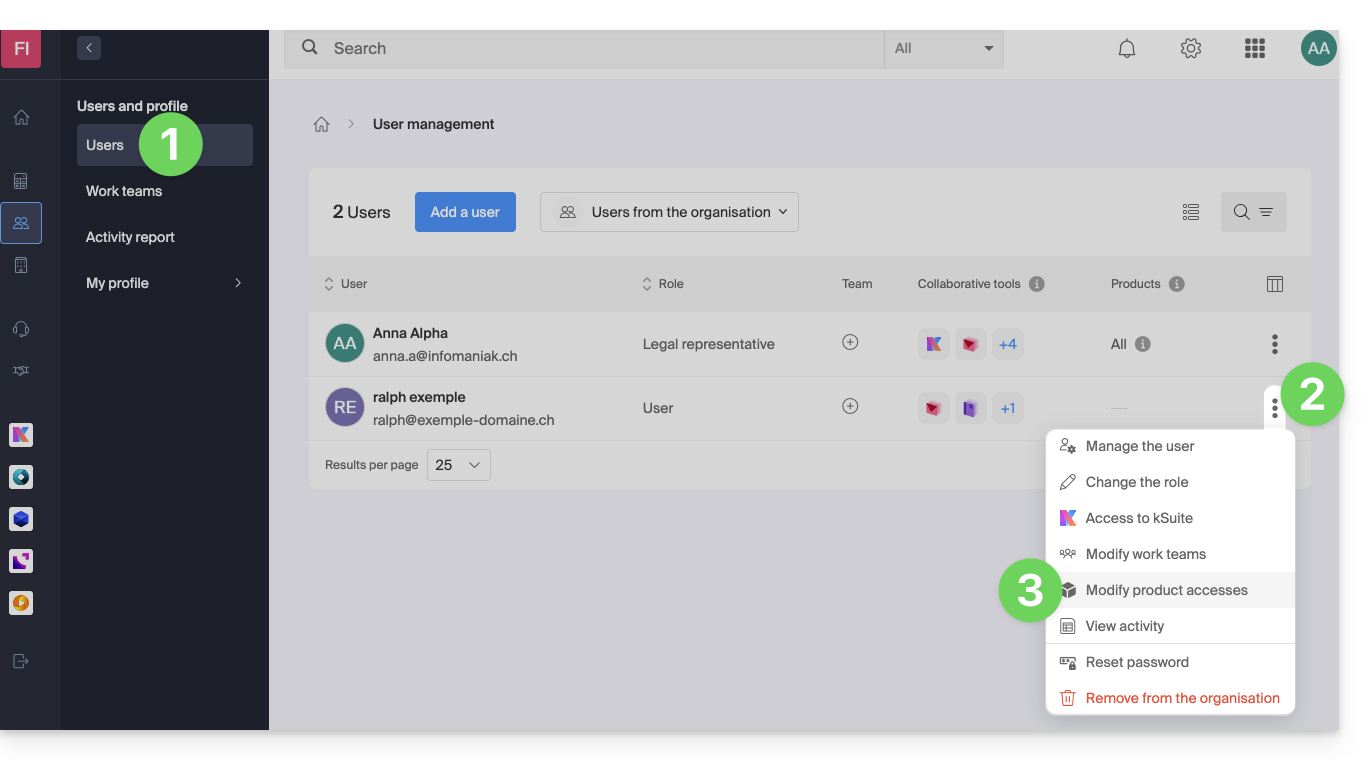
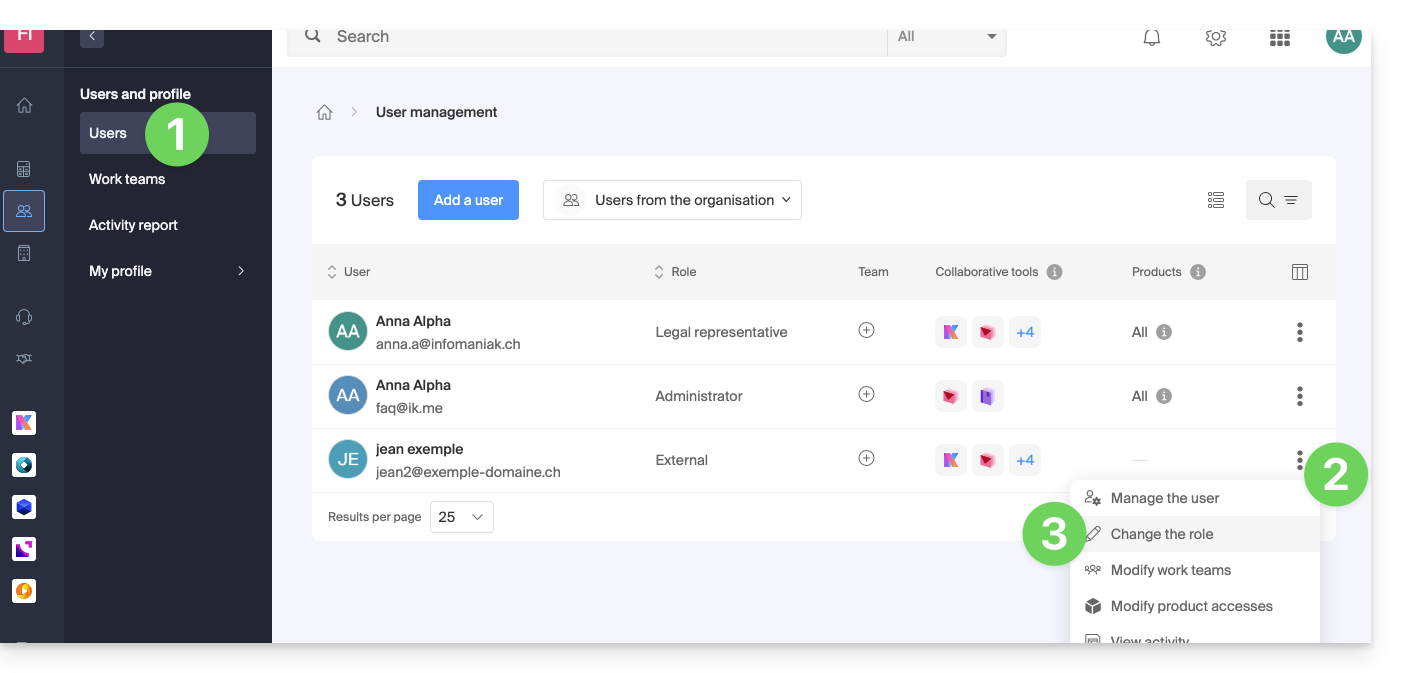
- Click here to access user management on the Infomaniak Manager (need help?).
- Click on the action menu ⋮ located to the right of the user concerned.
- Click on Modify product access:
- You can grant access to everything with maximum permissions in 1 click.
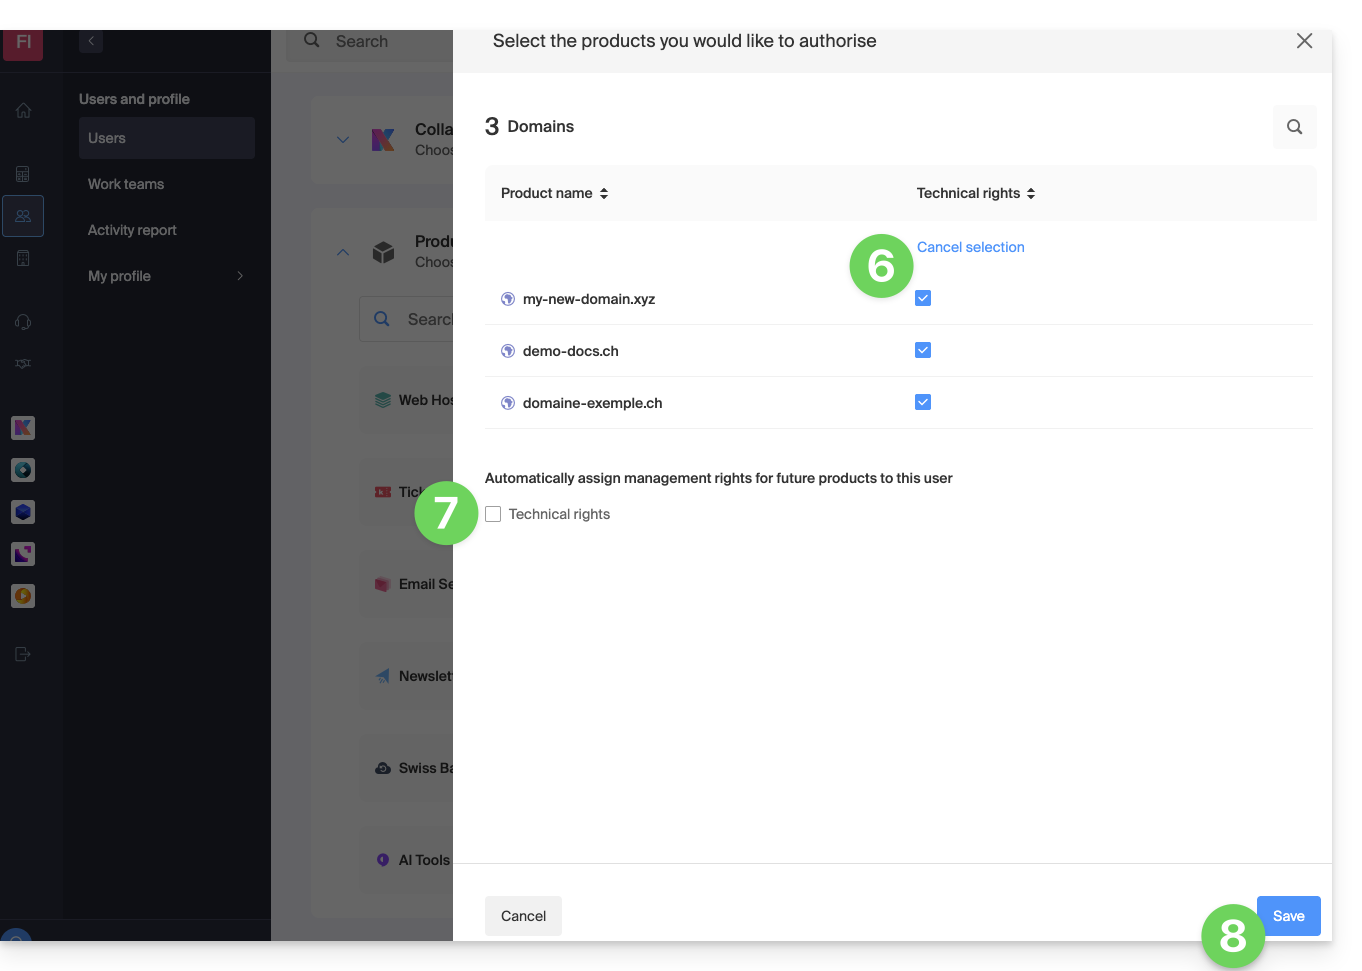
- Otherwise, click on the product category to which you want to grant access.
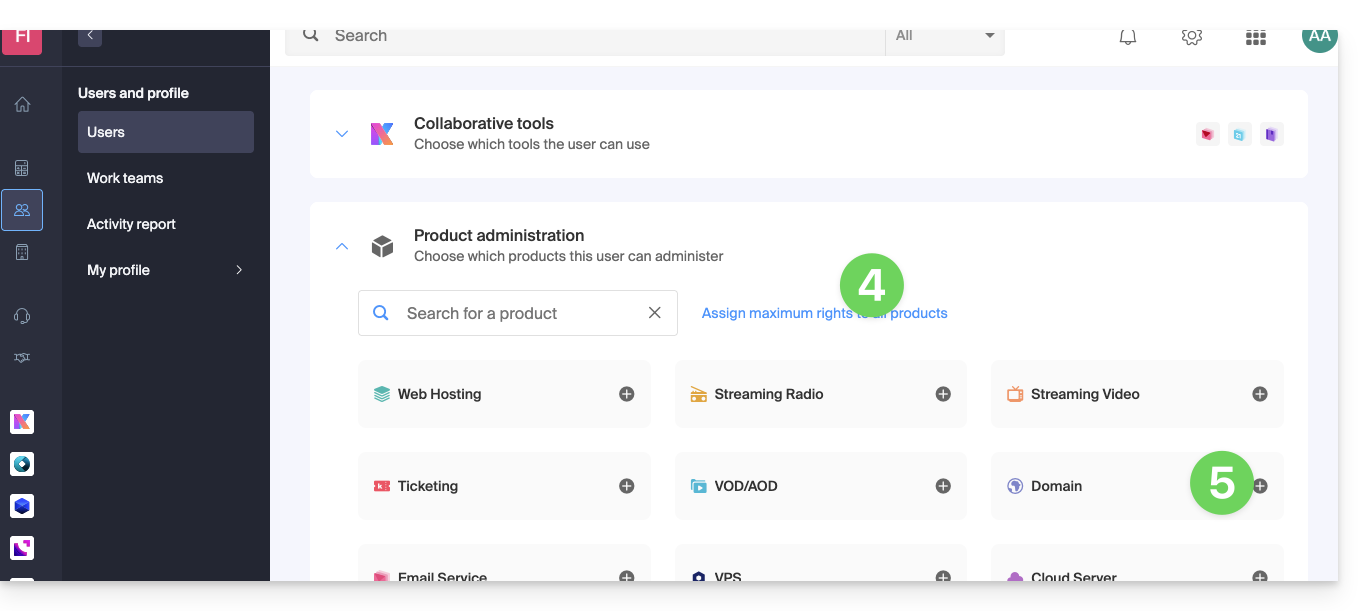
- Select the necessary product(s).
- If you have selected multiple products, decide whether a future additional product should automatically be visible to the user (and with what type of permissions).
- Click on the Save button:
- Rights are granted immediately.
- Click on the pencil icon ✎ to modify permissions:
- Restart at step 5 if you need to grant access to multiple products.
Service usage / Service management
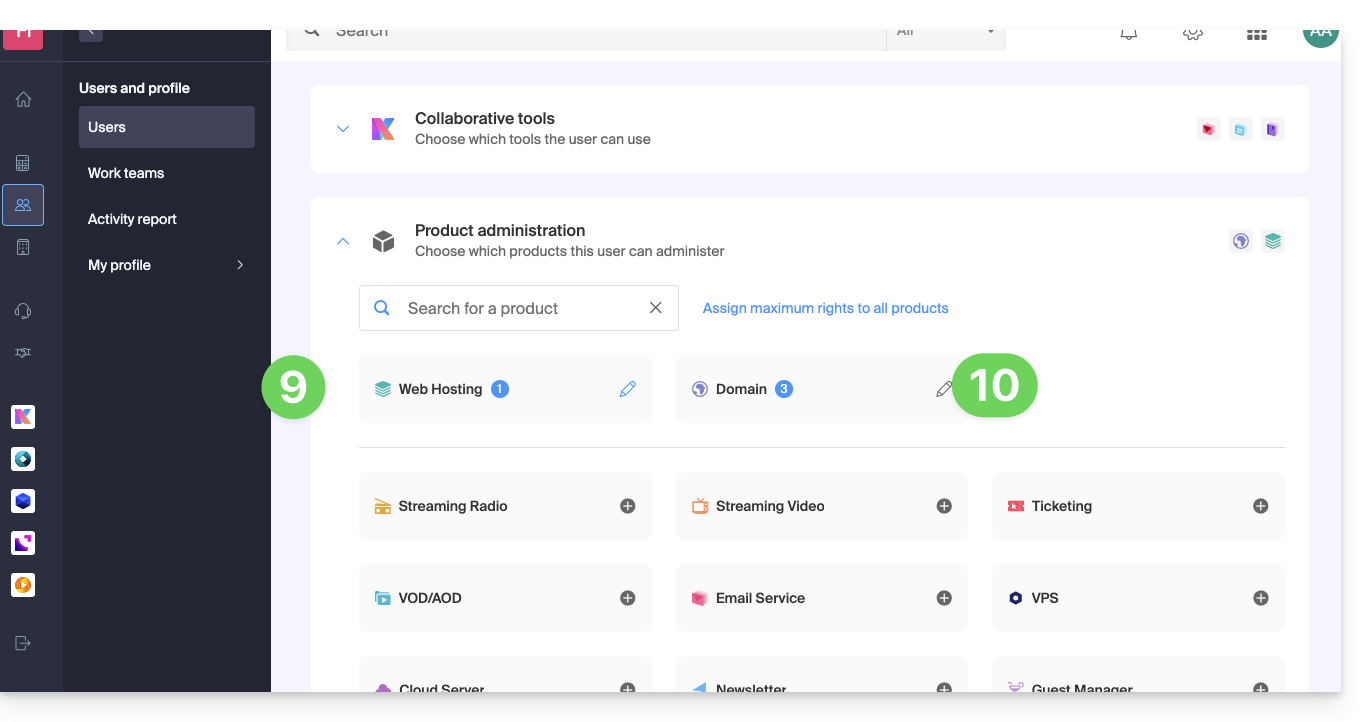
Be careful, on your product table, it is important to distinguish between product access (type kDrive for example, within the kSuite) and product management access: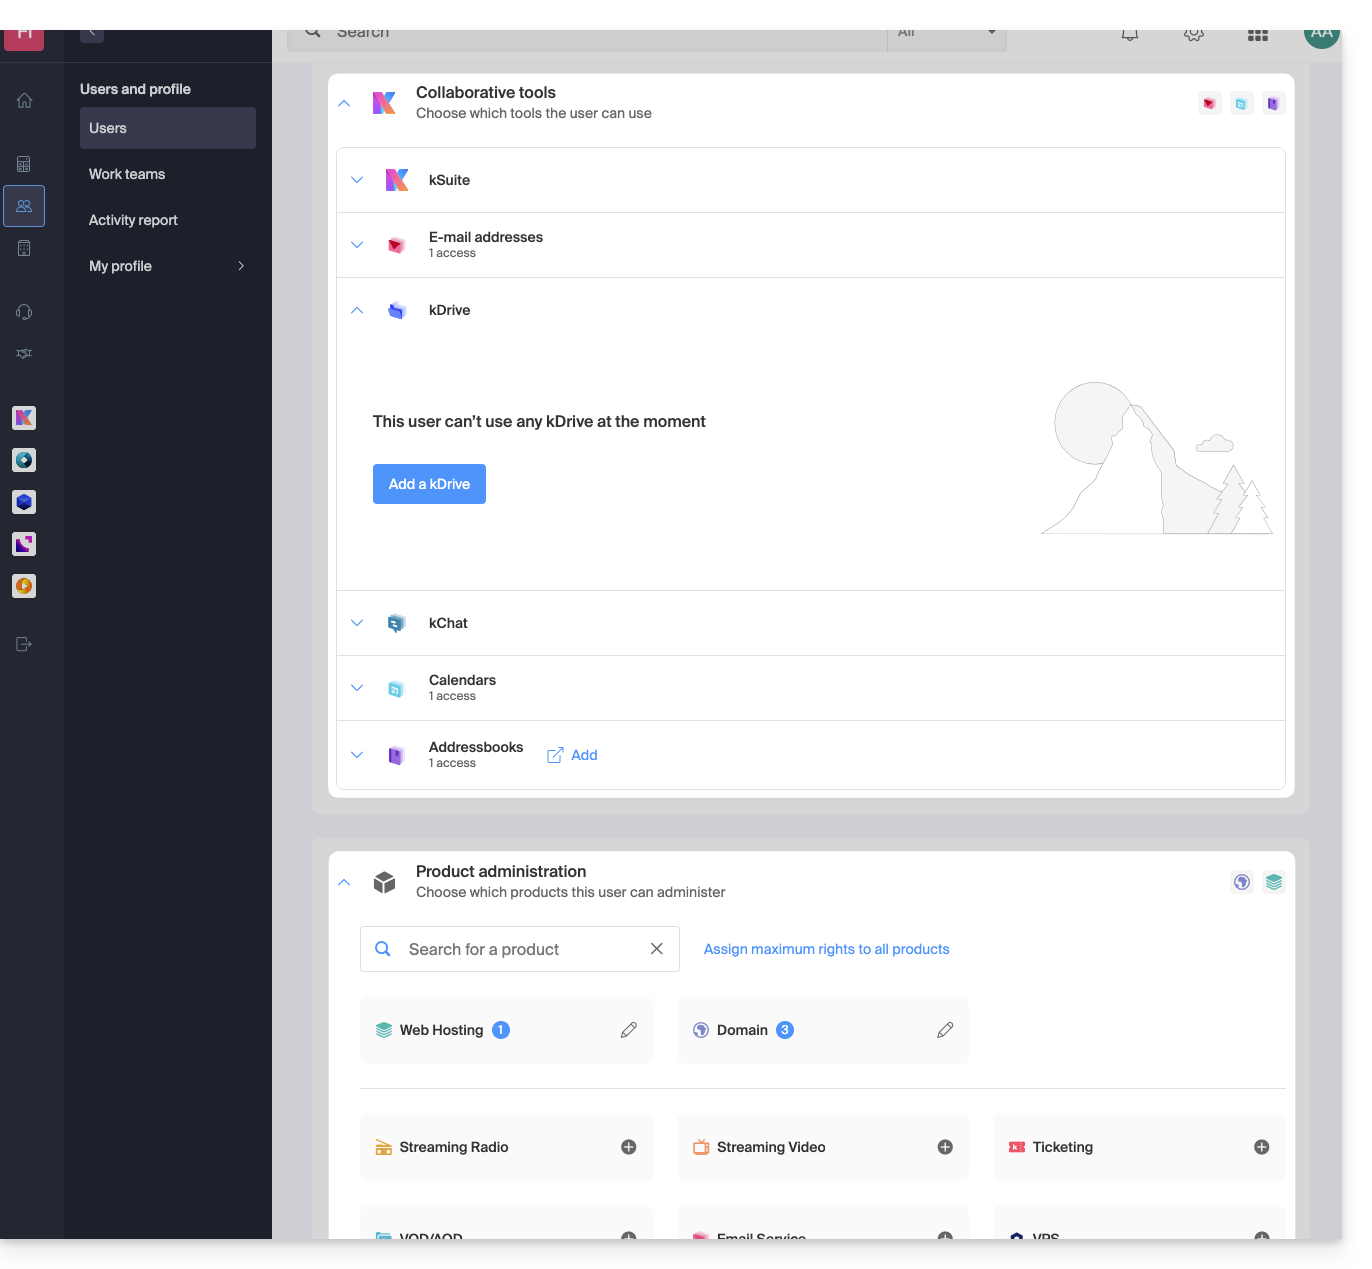
It is possible to authorize a user to use kDrive (they will be able to create a PDF for example) without granting them kDrive service management rights (they will not be able to change the offer, invite a new user, terminate, etc.).
Technical rights / Statistical rights
With certain services like kDrive, it is possible to give a collaborator TECHNICAL and/or STATISTICAL rights (adds access to the dashboard, share links, storage statistics, active users, connected devices, activity on kDrive):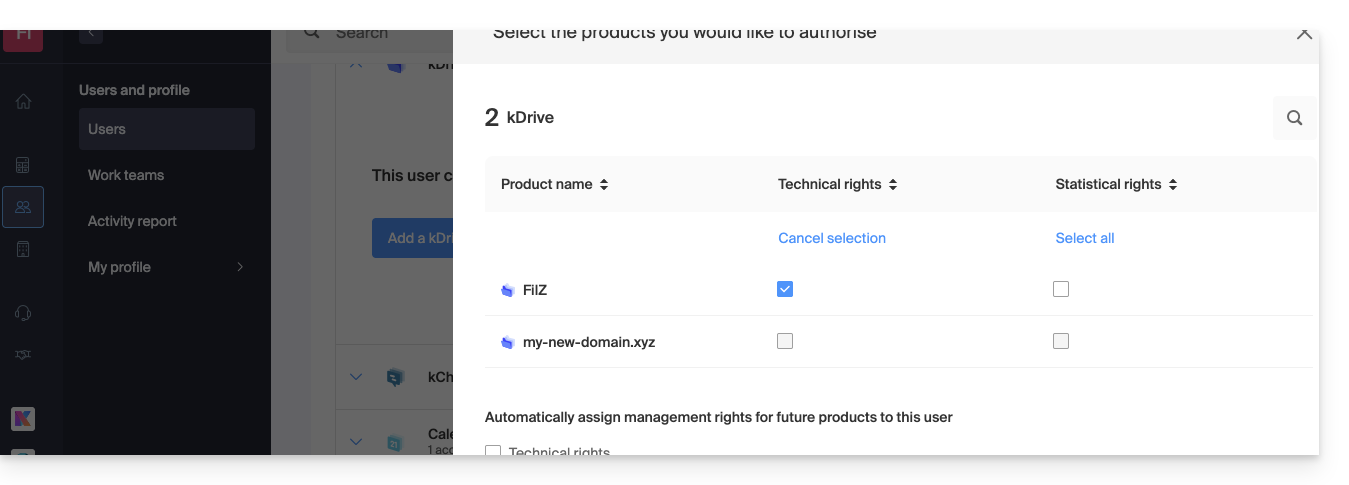
Other services like domain names do not have a STATISTICAL section: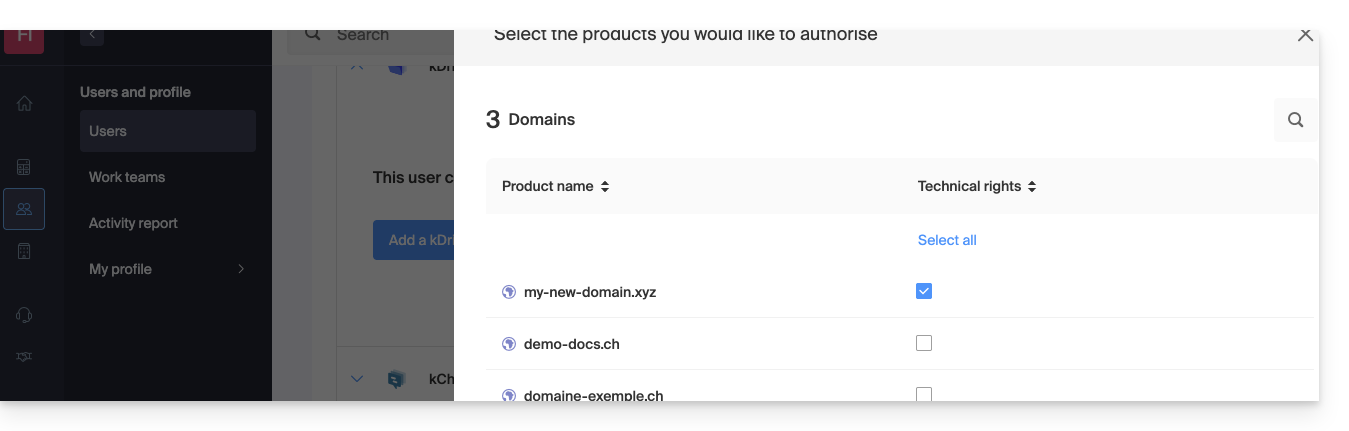
Certain specific services like ticketing allow granting even more detailed rights: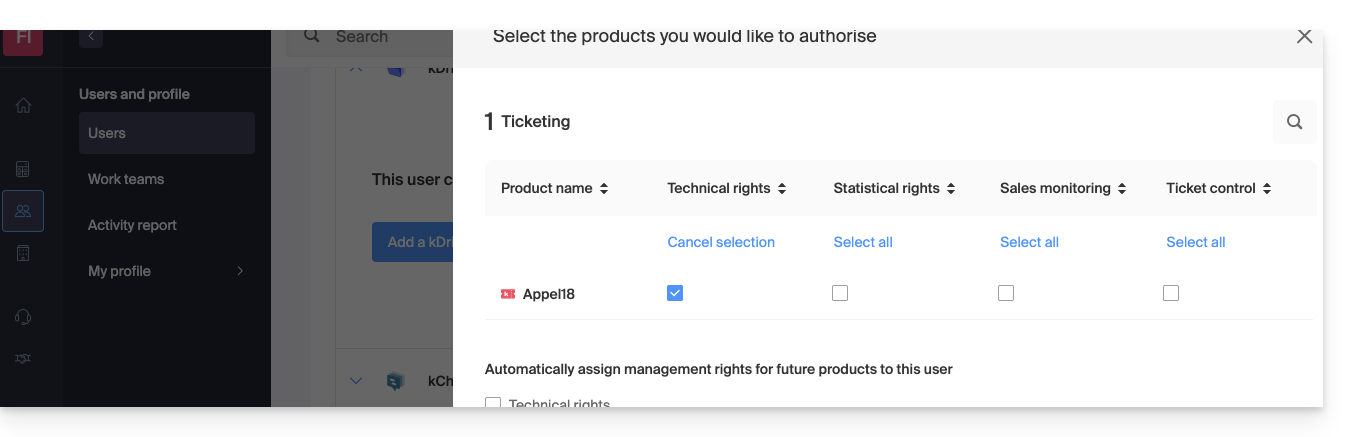
Easier access: Groups
In order to facilitate the addition of access rights to a product that is on your Organization, there are Groups. These allow you to create teams that are linked to Infomaniak products with the desired rights, very practical for giving a new collaborator of your Organization access to the products they will need in their daily activity.
Link to this FAQ:
Has this FAQ been helpful?
This guide explains how to modify the role and permissions of a user so that they only have a limited legal role or access to only certain features of your Organization within the Infomaniak Manager.
Introduction
- Since you opened your account with Infomaniak, you have been part of at least one Organization.
- If you were the only one and it wasn't an invitation, an Organization was created in your name and you automatically became the legal representative.
- Otherwise, you belong to the Organization that invited you (to join its kSuite, to manage a product, etc.).
- You can define whether a user…
- … is part of your Organization and whether they should have the role of:
- Legal Representative
- Administrator
- Collaborator
- … is external to your Organization (limited rights):
- External users are not taken into account in calendar and address book sharing for the entire Organization.
- … is part of your Organization and whether they should have the role of:
Modify a user's rights/permissions
Prerequisites
- Switch to the desired Organization beforehand if you cannot find the expected list of users.
- Be an Administrator or Legal Representative within the Organization.
- Familiarize yourself with the various permissions (e.g., access rights to products) and administrative contact preferences of a user within an Organization.
- Note that it is impossible to remove a legal representative if there is no other legal representative.
To change a user's role:
- Click here to access user management in the Infomaniak Manager (need help?).
- Click on the action menu ⋮ located to the right of the user in question.
- Click on Edit role:
- Change the desired role:
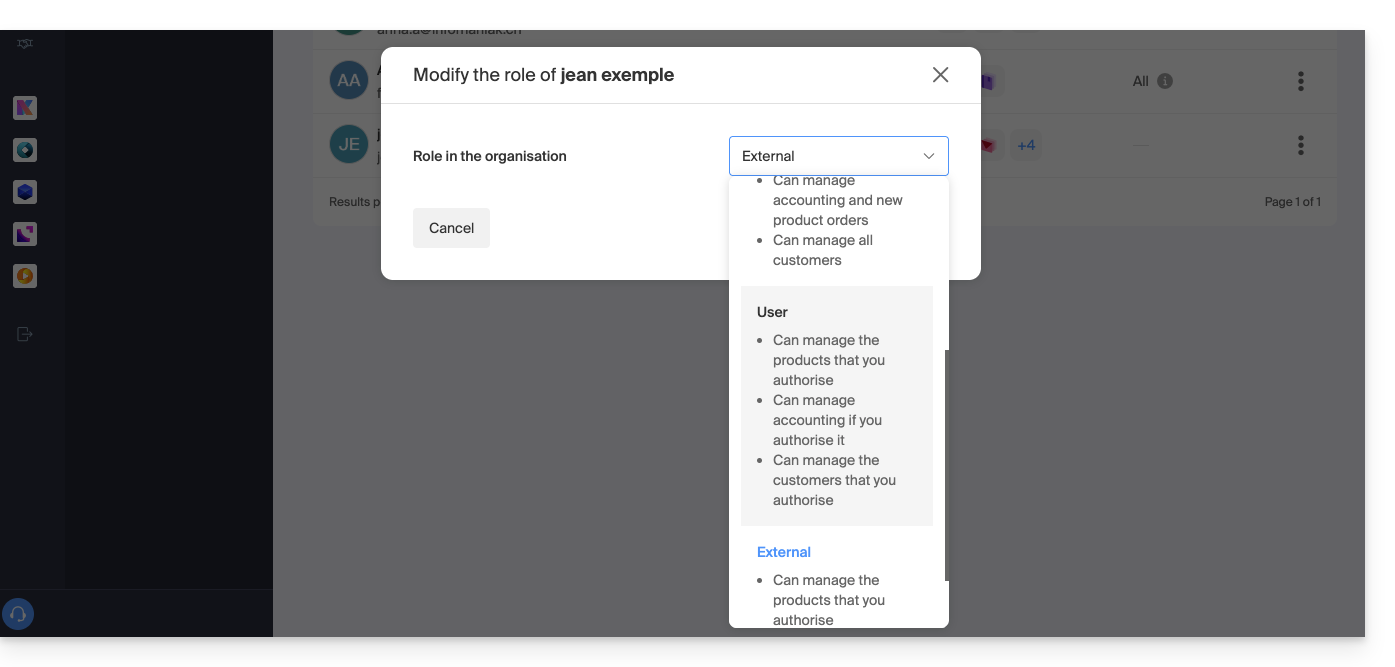
- Click the Save button.
A summary email is sent to the user whose role has been changed.
If you assign the user a simple collaborator role…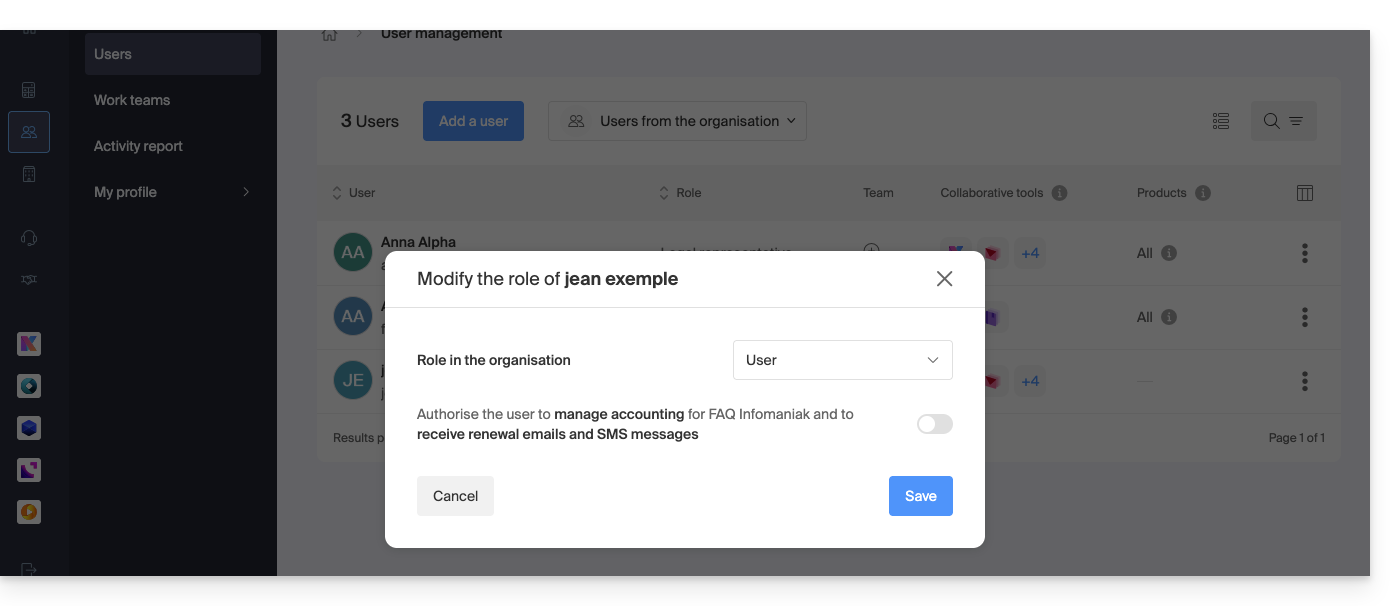
… you can then modify the services to which they will have access; refer to this other guide: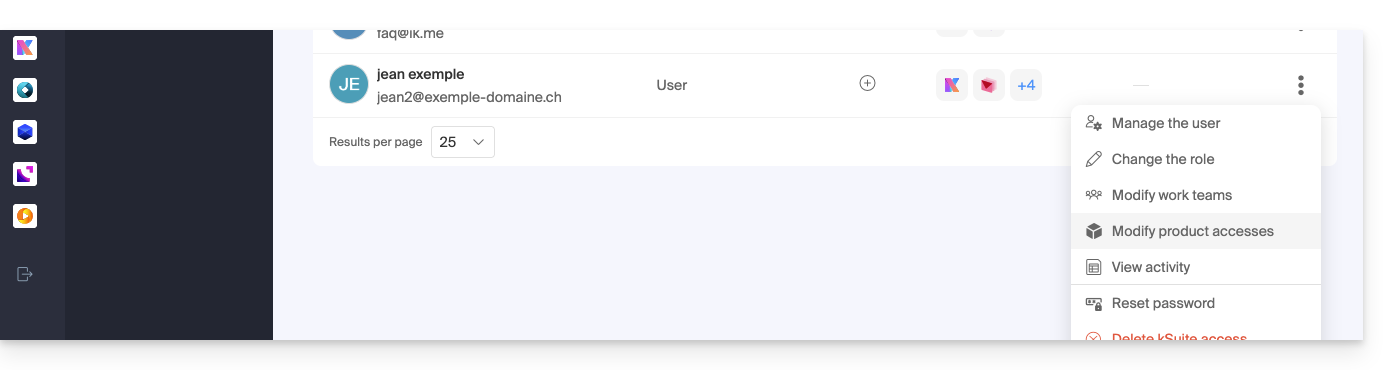
Link to this FAQ:
Has this FAQ been helpful?
This guide explains how to receive email notifications about product due dates, at different intervals that you can configure to avoid being overwhelmed with messages.
Prerequisites
- You must be Administrator or Legal Representative within the Organization…
- … or a simple user account but with the permission to manage accounting enabled:
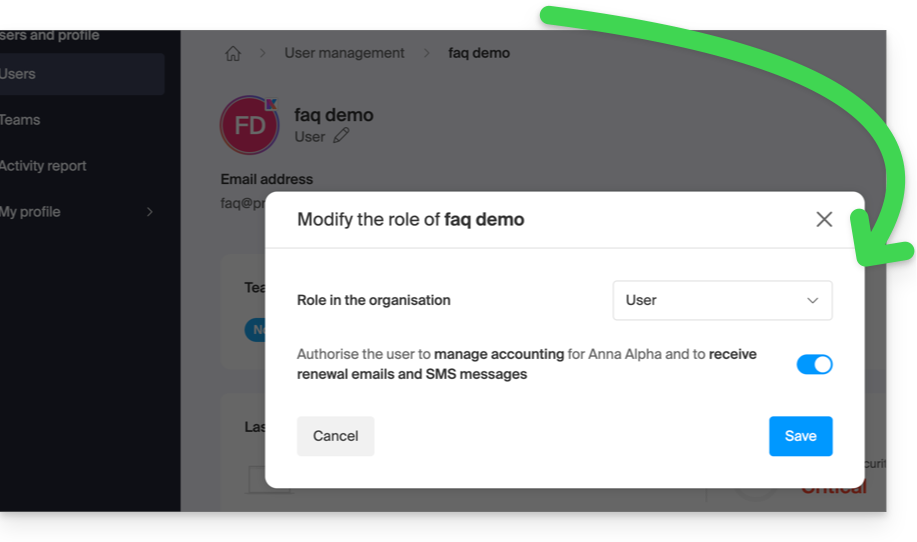
- … or a simple user account but with the permission to manage accounting enabled:
Enable or disable emails
To check and modify the current configuration of billing messages:
- Click here to access the configuration/accounting page in the Infomaniak Manager (need help?).
- On this page, enable or disable the desired notifications:

- Notification when your invoices are issued.
- Reminder email before the automatic renewal date of a product (14 days before due date).
- Confirmation email for renewal and automatic payment.
Your preferences are automatically saved as soon as a change is made on the page.
Also, please refer to this other guide.
Link to this FAQ:
Has this FAQ been helpful?
This guide explains how to suspend the administrative management of a product so that no user of the Organization can use it within the Infomaniak Manager. It is also possible to block a user of your Organization, without deleting them.
Preamble
- By blocking the management of a product:
- Only administrators and the legal representative will be able to unblock it.
- Users with limited rights (collaborators and clients) who have access to this product will no longer be able to manage it.
- An email is sent to the users of the Organization.
Block a product
Prerequisites
- Be an Administrator or Legal Representative within the Organization (users with limited rights (collaborators and clients) who have access to this product will not be able to do so).
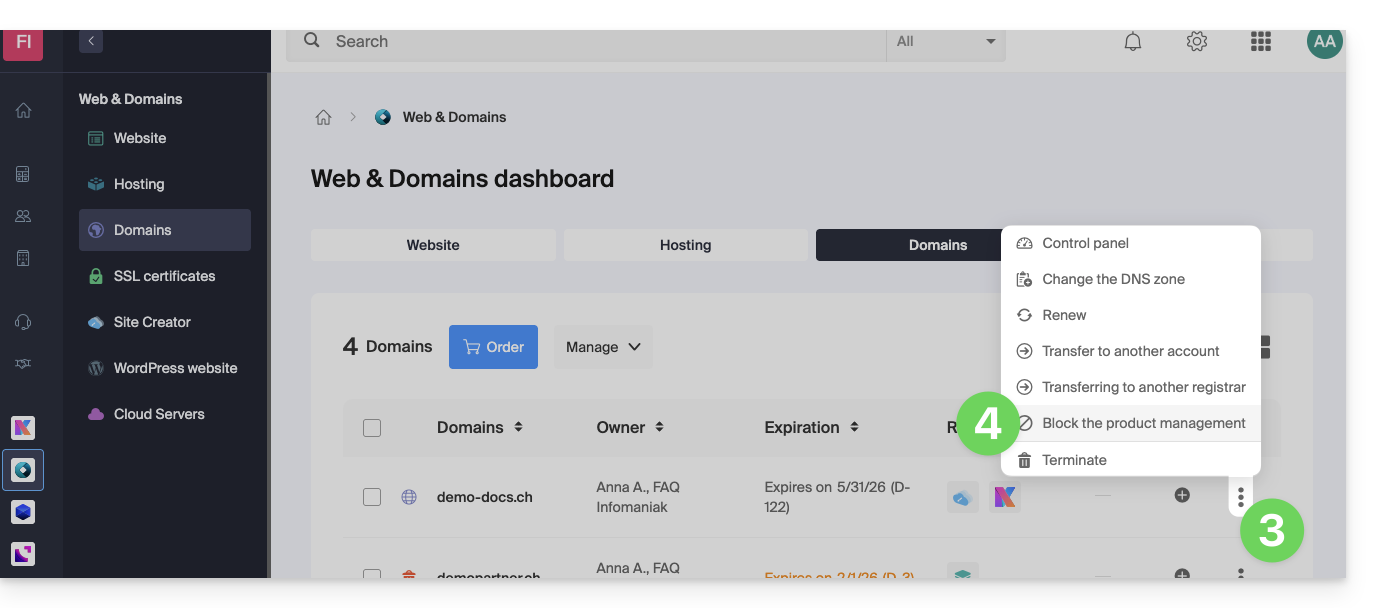
To block or unblock certain products for the entire Organization:
- Click here to access product management in the Infomaniak Manager (need help?).
- Access the service you wish to block.
- Click on the action menu ⋮ located to the right of the item in question.
- Click on Block product management:
- Example 1, Cloud Server:

- Example 2, domain name:
- Example 1, Cloud Server:
- Confirm the suspension.
Suspend emails
A Mail Service cannot be blocked in the way indicated above, but it can be put into maintenance.
Prerequisites
- Be an administrator or legal representative; users with limited rights (collaborators and clients) who have access to this product will not be able to do so.
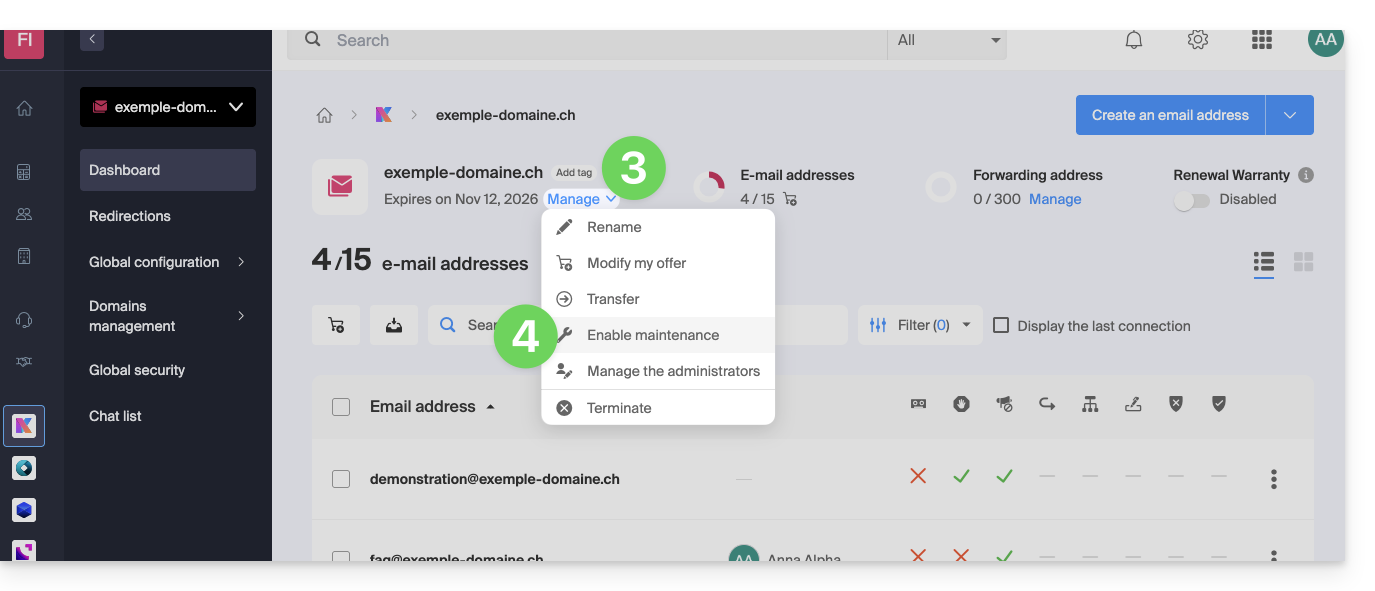
To suspend email addresses:
- Click here to access the management of your product in the Infomaniak Manager (need help?).
- Click directly on the name assigned to the product in question.
- Click on Manage.
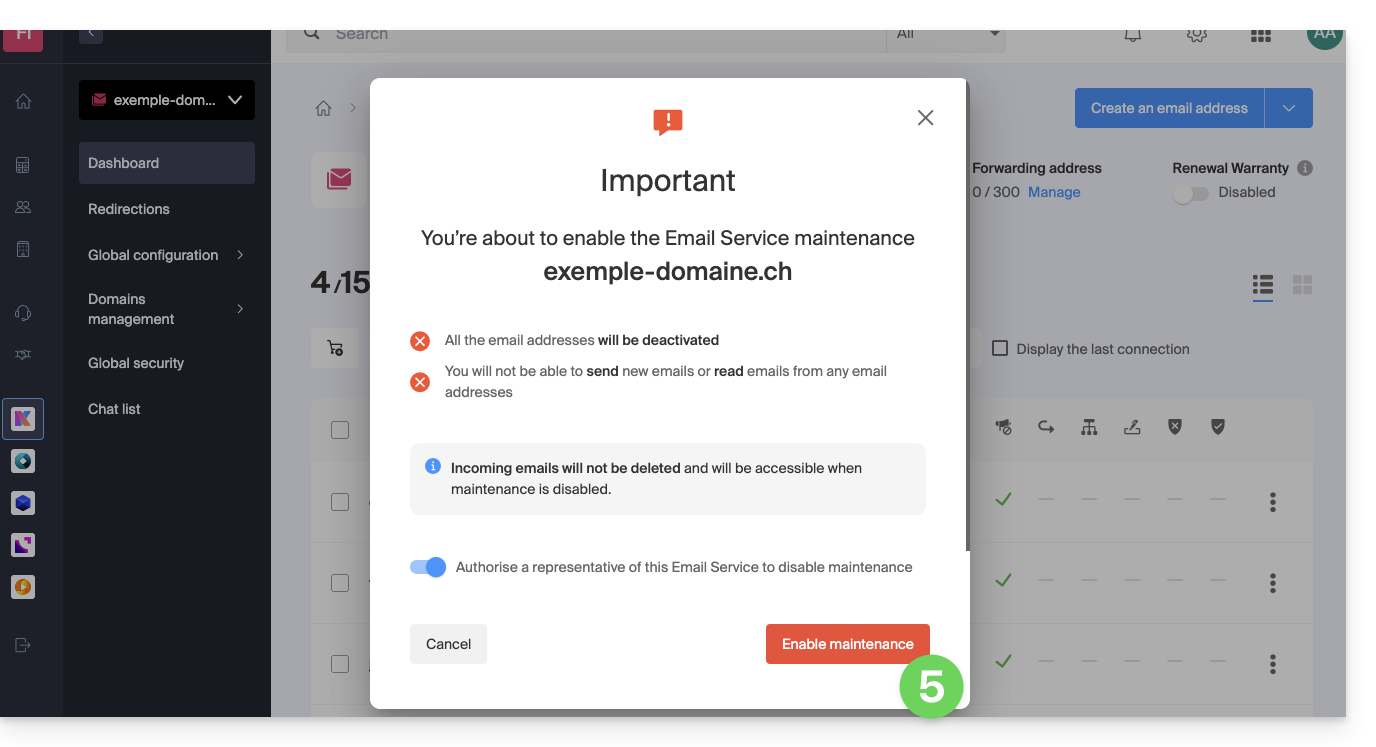
- Click on Enable maintenance:
- Confirm by clicking the red button to suspend the use of email addresses (reception is not interrupted but consultation is impossible):
Block an Organization user
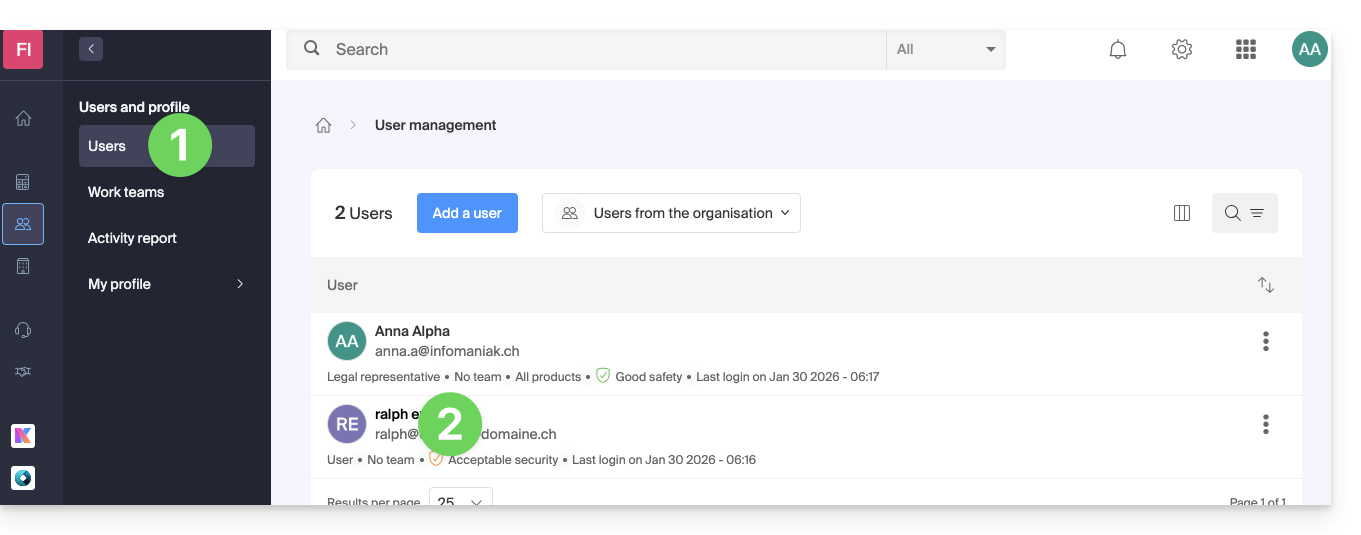
To quickly block an Organization user in case of a security incident, log in to manage your users as an Administrator or Legal Representative of the Organization:
- Click here to access user management on the Infomaniak Manager (need help?).
- Click on the user in question:
- From the Manage button at the top of the page, you can remove the user from the Organization (which also removes their various product management access).
- Further down, you can more finely manage the products to which the user should have access:
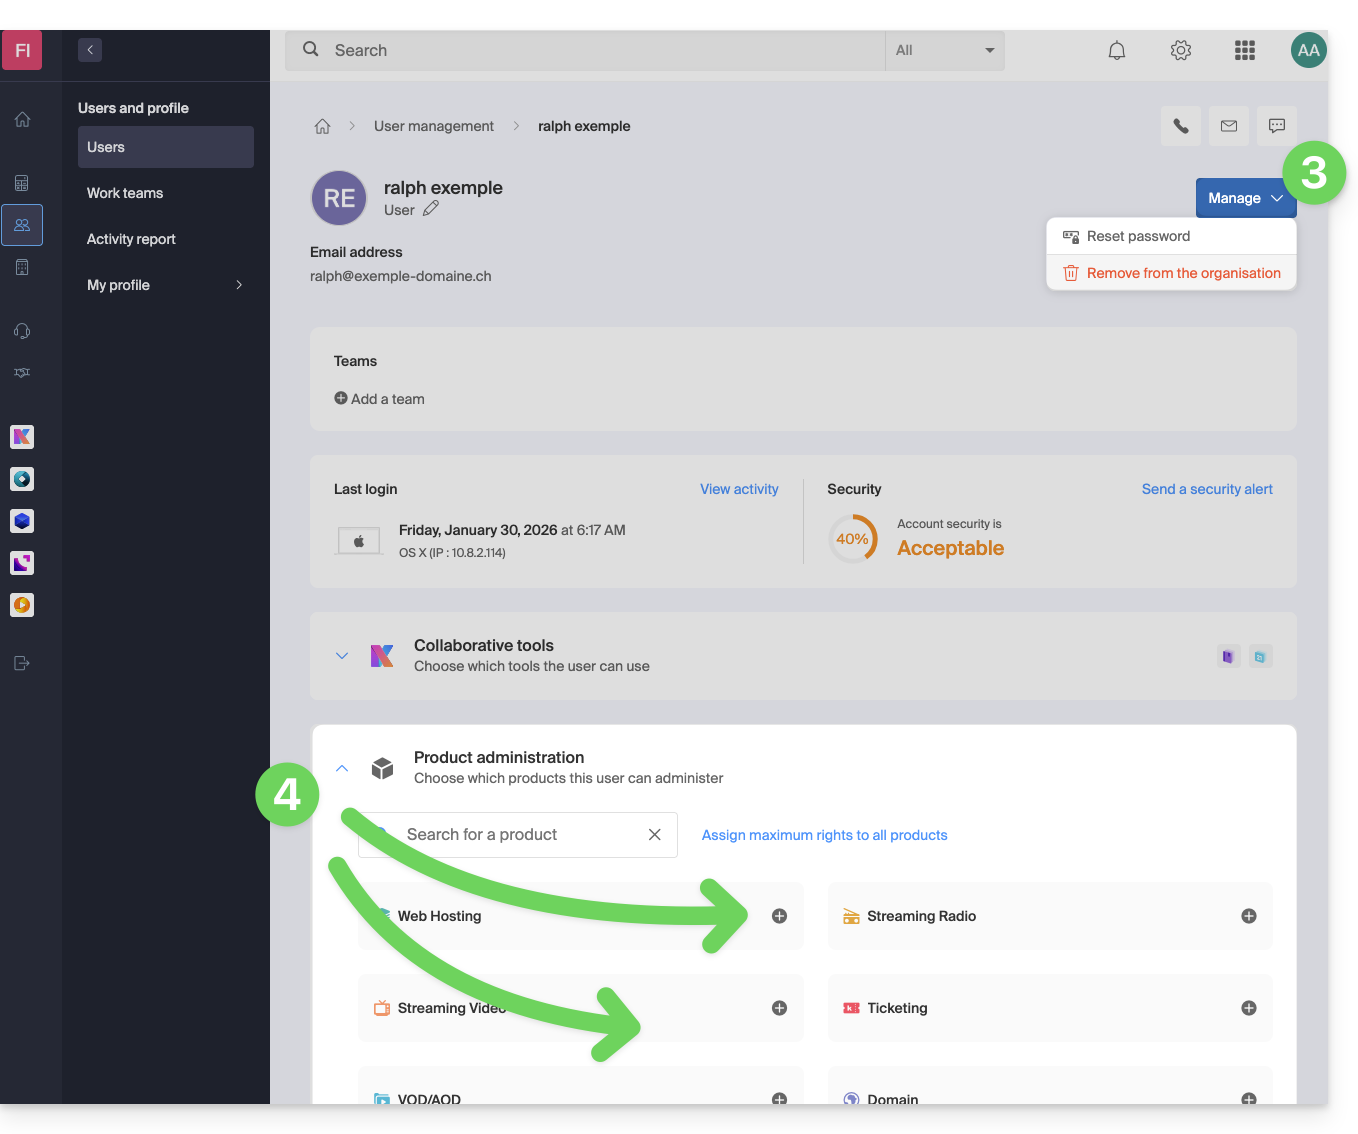
Thus, critical services, such as the Manager interface, of your Organization, the Web app kDrive and the Web app Mail may become inaccessible to them.
Depending on the situation, also refer to these links to block other services such as messaging (IMAP / SMTP) or Web services.
To not block the user yourself but to indicate a procedure for them to follow to secure their account, refer to this other guide.
Link to this FAQ:
Has this FAQ been helpful?
This guide specifies the distinction between the financial settlement of a service and the ownership of the associated property rights.
Payment does not confer ownership
Paying the bills for a service (domain name, hosting) does not automatically grant property rights over it. According to Infomaniak's Terms of Service, the official holder remains the person or entity whose name is associated with the service, even if the payment is made by a third party or a Partner.
This distinction is particularly important during a product transfer between Organizations: the payer is not necessarily the manager nor the legal owner.
Check and update your contact details
To ensure your rights over a service, make sure the identification information is in your name or that of your company. Check the following details:
- Your Infomaniak profile
- The Organization owning the product
- The billing information
- The legal owner of the domain name (registrant)
In case of dispute, only the holder designated in the Infomaniak interfaces is recognized as responsible and owner of the rights.
Link to this FAQ:
Has this FAQ been helpful?
This guide explains how to reset or delete the passwords of an email address from an Infomaniak Mail Service.
Preamble
- Changing the password of an email address means changing the IMAP / SMTP password:
- As soon as the password is changed, you must update your software (Outlook, etc.), mobile devices (iPhone), etc. with the new password (this is your responsibility).
- If you cannot log in to the Manager or Mail / my kSuite, you will not be able to manage the passwords of any of the email addresses: refer to this other guide in this case.
Remove a password / device
To disconnect any current IMAP/POP/SMTP connection made using a password generated on this interface (this does not remove the address from the Infomaniak Mail Web App (online service ksuite.infomaniak.com/mail) — you need to manage the users of the email address for this), you can revoke a device, or even delete all existing configurations in 1 click:
- Click here to access the management of your product in the Infomaniak Manager (need help?).
- Click on the name of the product concerned.
- Click on the email address concerned in the table:
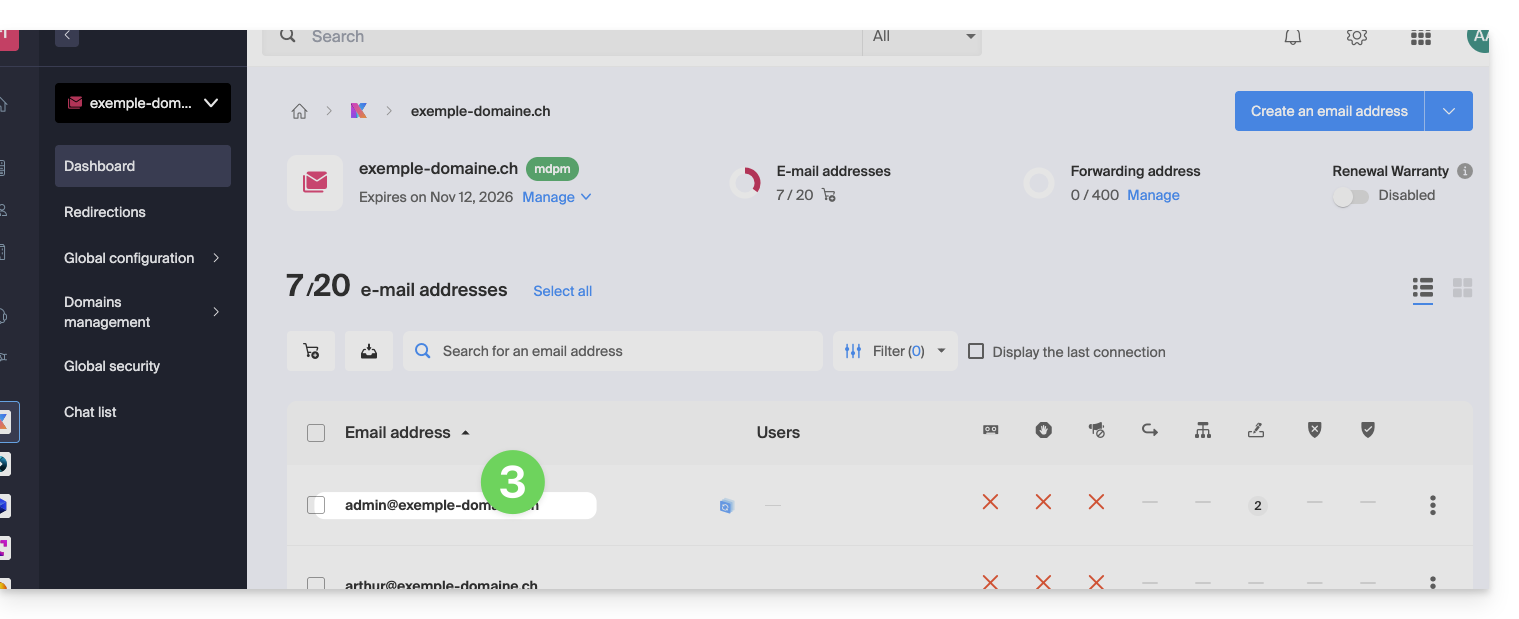
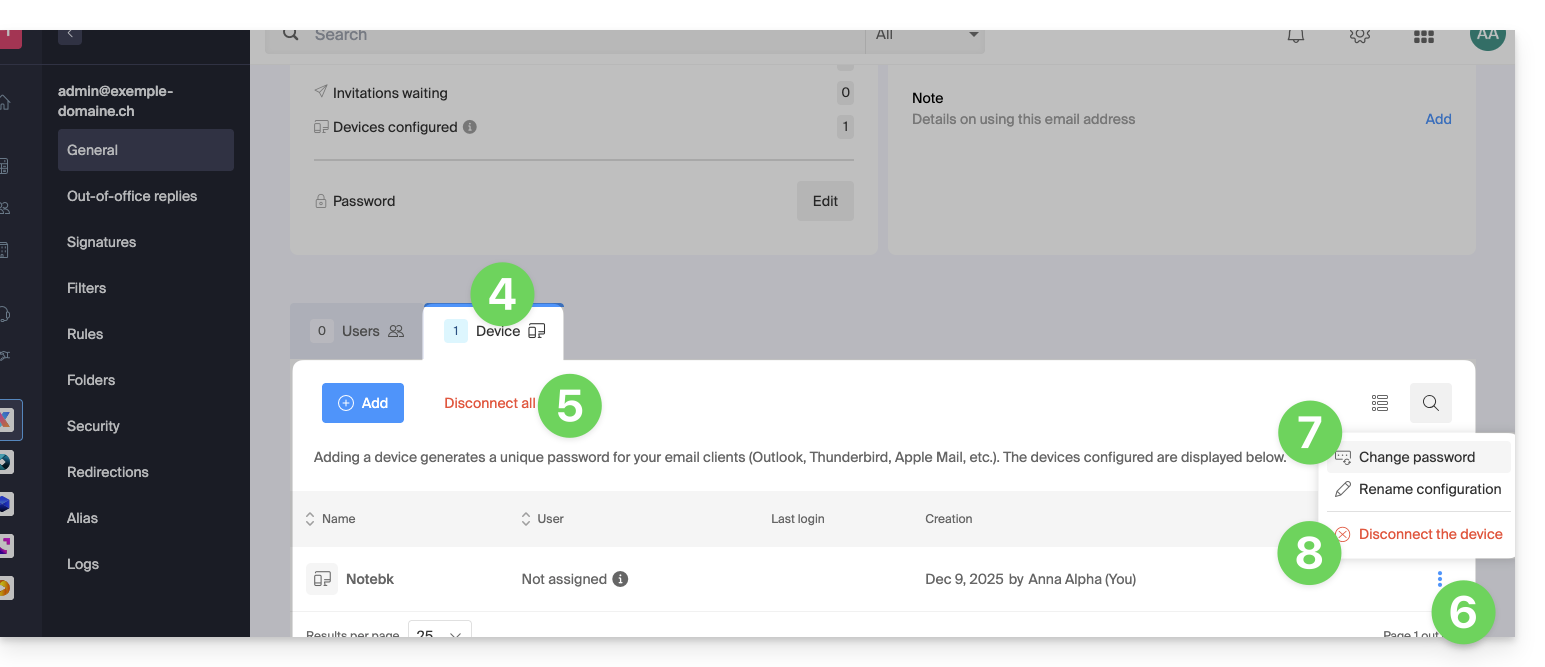
- Click on the Devices tab.
- Click on the red link to disconnect all registered devices (confirmation is required).
- Click on the action menu ⋮ located to the right of the device concerned.
- Click on “Change password” to disconnect the current connection but allow the device to reconnect with a new password directly.
- Click on “Disconnect the device” to remove it from the list and delete the corresponding connection:
What is a “generic” password?
Some email addresses may display a particular indication in the Devices section: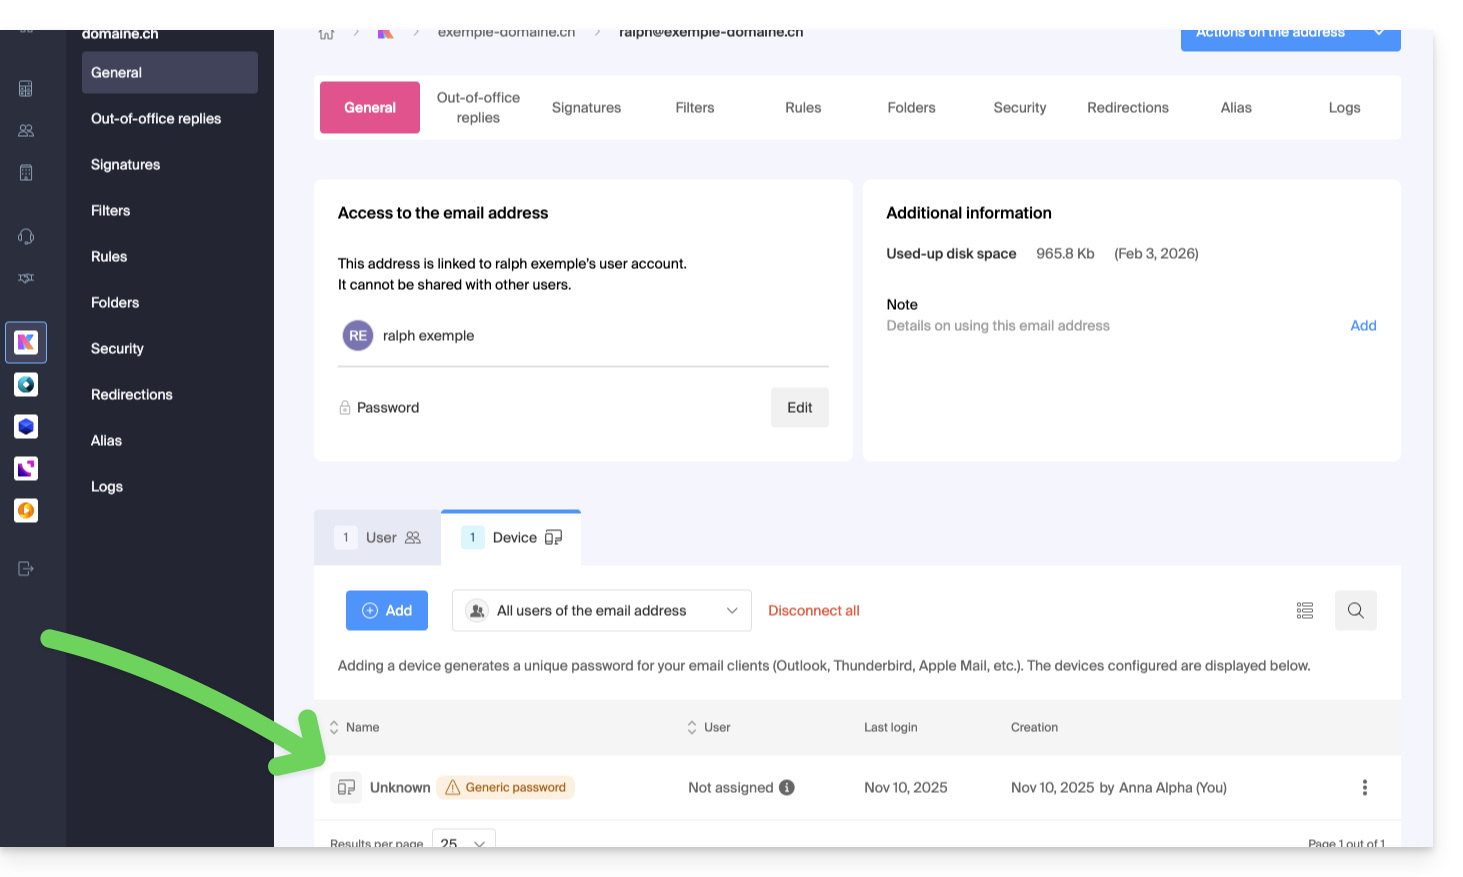
If this is the case, do not worry, this corresponds to the fact that the address has a password assigned when it was created (before the year 2026). This remains valid but, like other passwords, it is impossible to display. And unlike other passwords, this one cannot be reset (the option is grayed out, deactivated):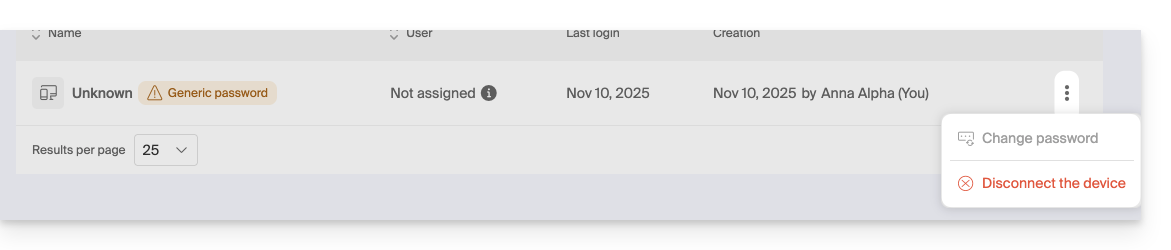
In this case, you can without any problem add an additional password.
Link to this FAQ:
Has this FAQ been helpful?
This guide explains how to remove one of the users from your Organization on the Manager Infomaniak.
Prerequisites
- Switch to the desired Organization first if you do not find the expected list of users.
- Be Administrator or Legal Representative within the Organization.
- Warning, it is impossible to remove a Legal Representative if there is no other legal representative.
Remove a user from your Organization
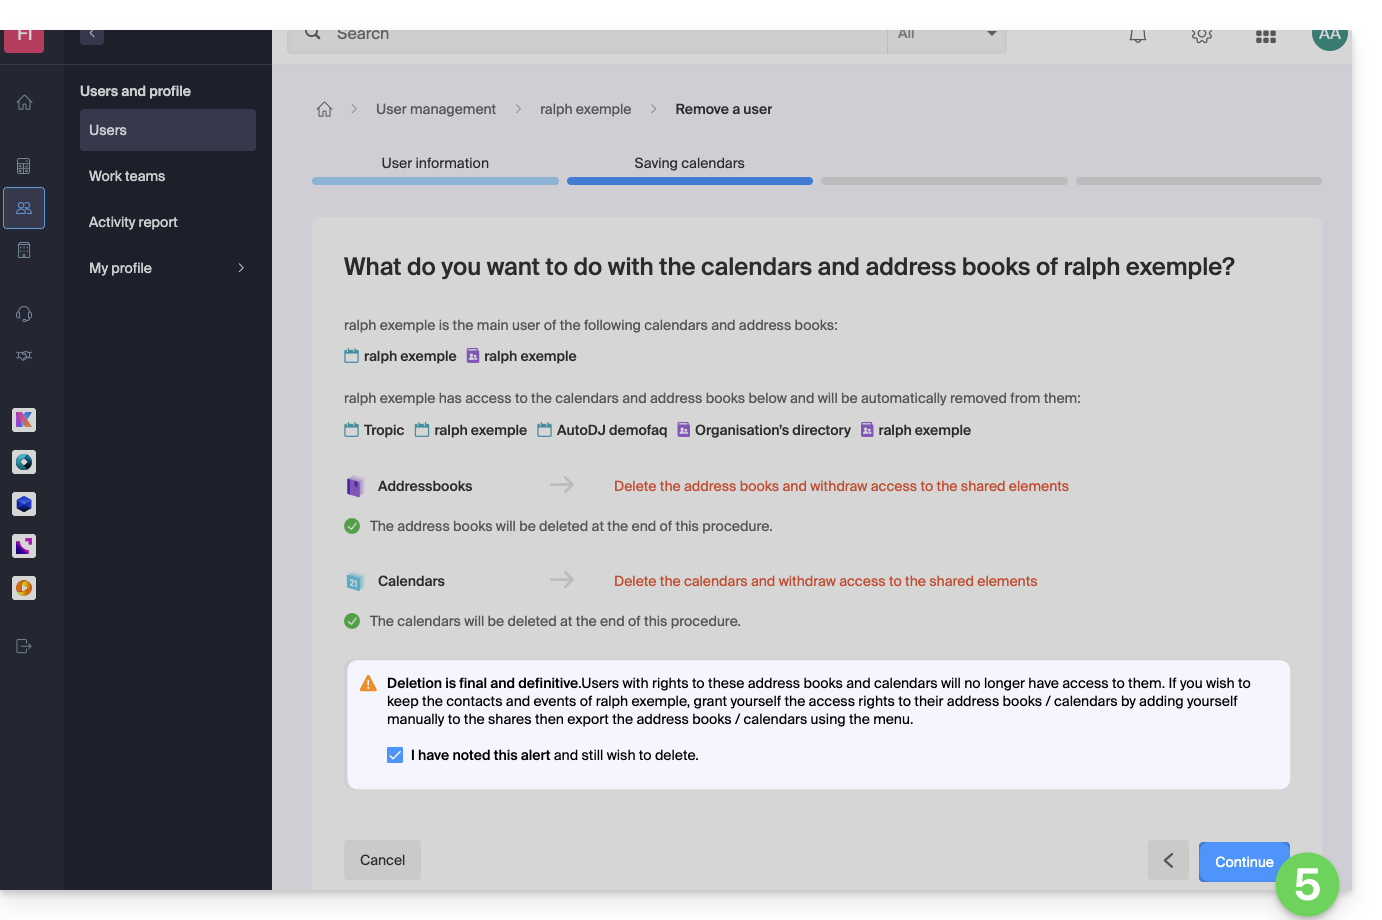
If the user had access to kDrive or was invited to view a third-party email address, several intermediate steps will ask you to take actions with their data and inform you, if necessary, about what happens to calendars and address books. To remove one of the users from the Organization
- Click here to access user management for the Organization on the Infomaniak Manager (need help?).
- Click on the action menu ⋮ to the right of the user concerned.
- Click on Remove from Organization:

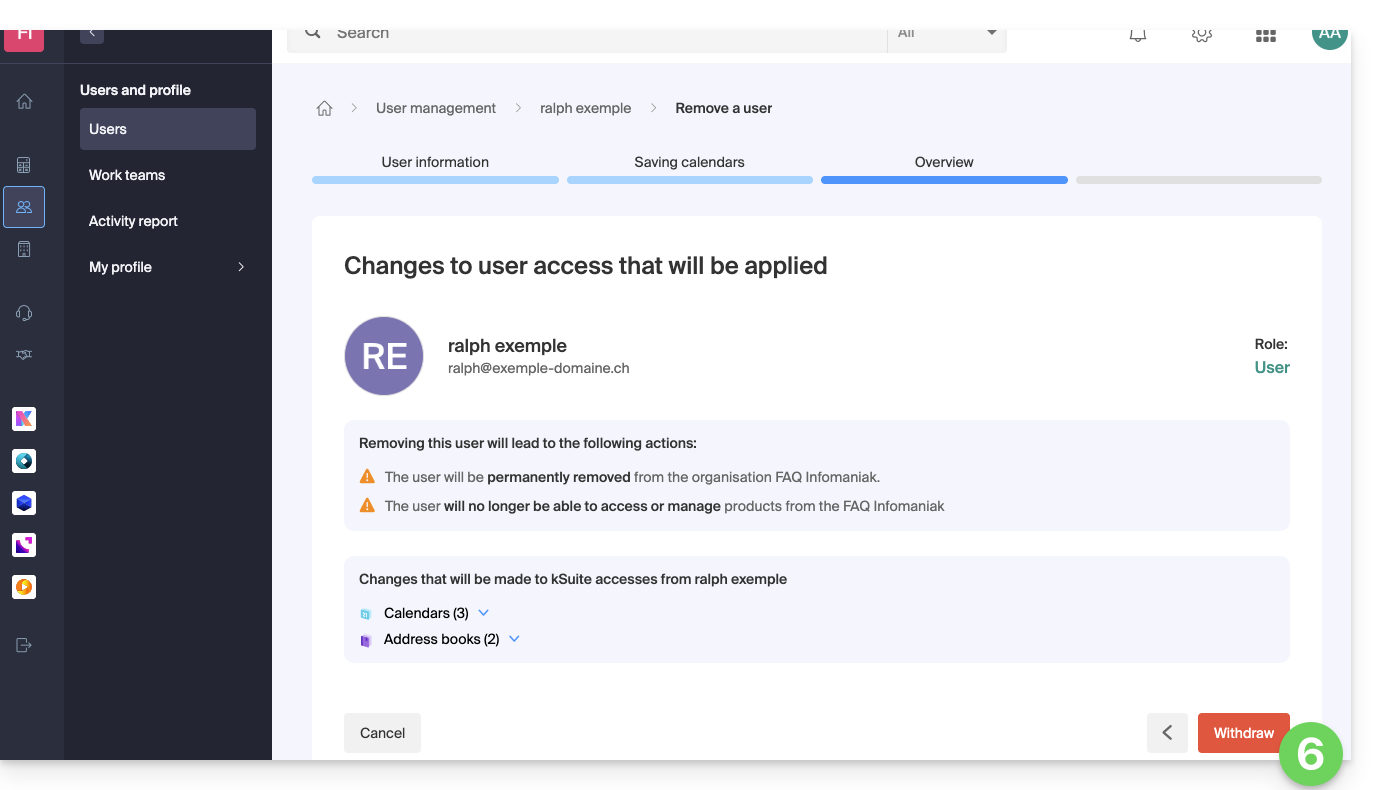
- Review the information (click if necessary on the chevrons to get the details of the deletions) then click on the blue button Continue:
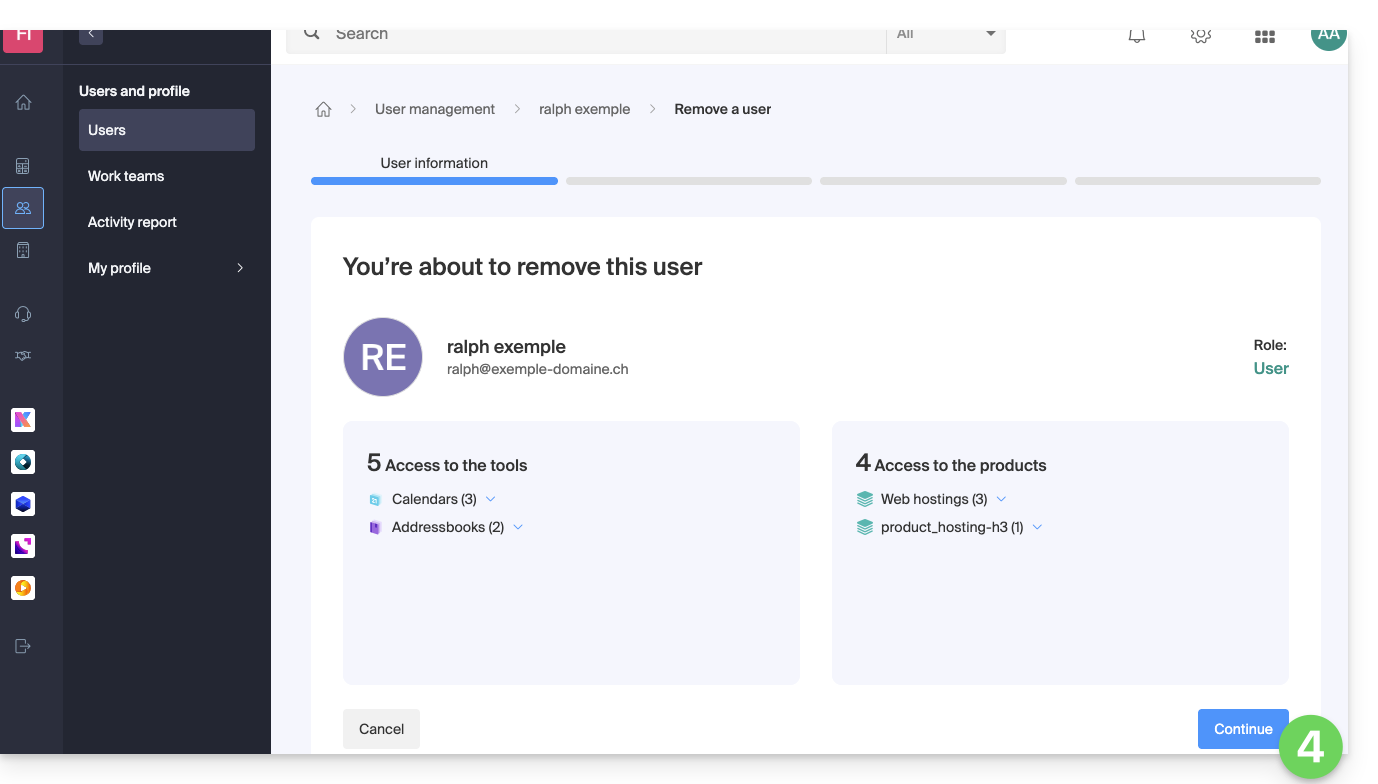
- Review the information, confirm the deletion by checking the checkbox, then click on the blue button Continue:
- Review the information (click if necessary on the chevrons to get the details of the deletions) then click on the red button Remove:
- Enter your email address (login identifier for the Manager), check the confirmation box, then click on the red button Remove this user to permanently remove the user without the possibility of undoing it.
Link to this FAQ:
Has this FAQ been helpful?
This guide explains how to manage and modify user permissions (assigning an additional password, setting up an alias, etc. – see below for the complete list) for an Infomaniak user, so that they can manage more or fewer configuration elements in the Infomaniak Mail web app (online service ksuite.infomaniak.com/mail).
Introduction
- The email address is first created within a Mail Service and can then be used within one or more Infomaniak Mail interfaces by one or more users.
- The creator (or manager) of the address may want to limit the actions possible for one or the other of the users who will use the email address.
- This fine-grained permission management can be done during address creation or afterwards, and you can also define what the default rights should be for any new address created (see Global Configuration below).
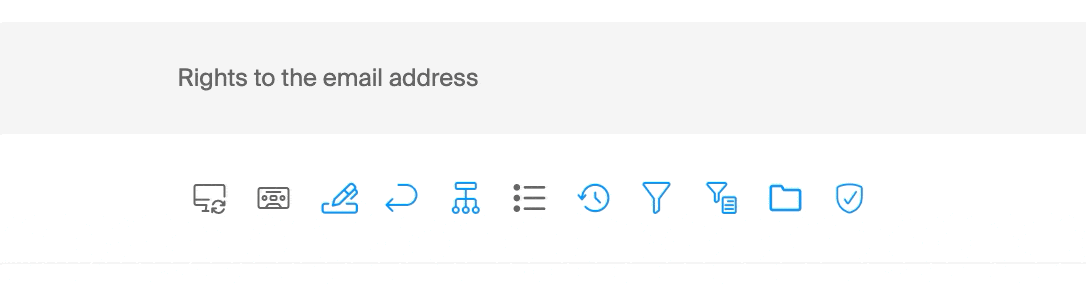
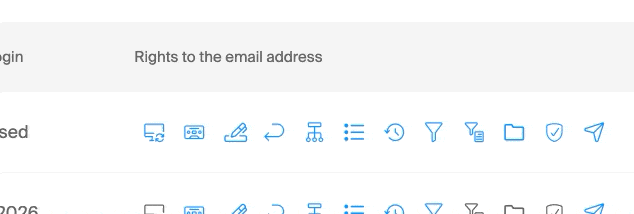
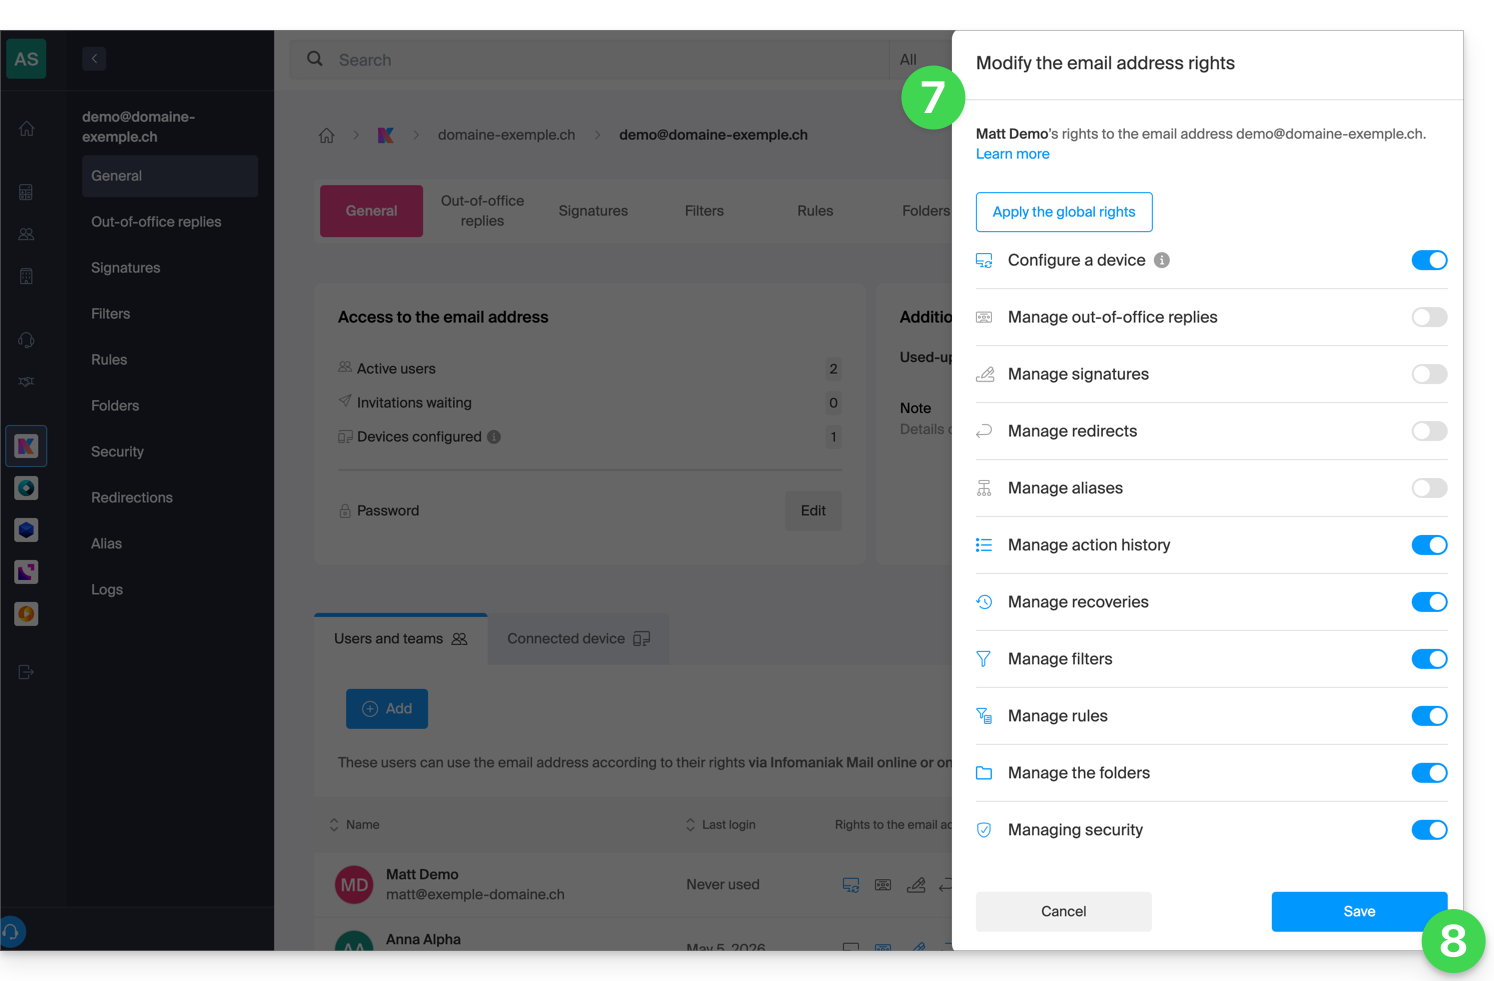
List of email user permissions
| Type / Icon | Description of the permission granted to the user |
|---|---|
| Configure a device | Manage devices (create a dedicated password) |
| Manage auto-replies | Create an out-of-office message (automatic reply) |
| Manage signatures | Add signatures and manage reply email addresses |
| Manage forwarding | Forward emails to one or more other addresses |
| Manage aliases | Create variations of your email address (by modifying what comes before the @) |
| Manage the history of actions | Access the logs for the email address |
| Manage restorations | Access backups and restorations |
| Manage filters | Access SPAM and other filters |
| Manage rules | Automatically sort and categorize new incoming emails |
| Manage folders | Customize IMAP folders |
| Manage security | Manage blocked and approved addresses |
| Manage email sending | Enable sending emails (authorize global SMTP) |
Manage permissions granted to a user
The password for logging into your Infomaniak account may be required to make changes to permissions.
… from the Mail Service
- Click here to access the management of your product in the Infomaniak Manager (need help?).
- Click directly on the name assigned to the product in question.
- Click on the email address in question in the table that appears.
- There are several ways to modify the permissions of a mail address:
- When adding a user to a mail address:
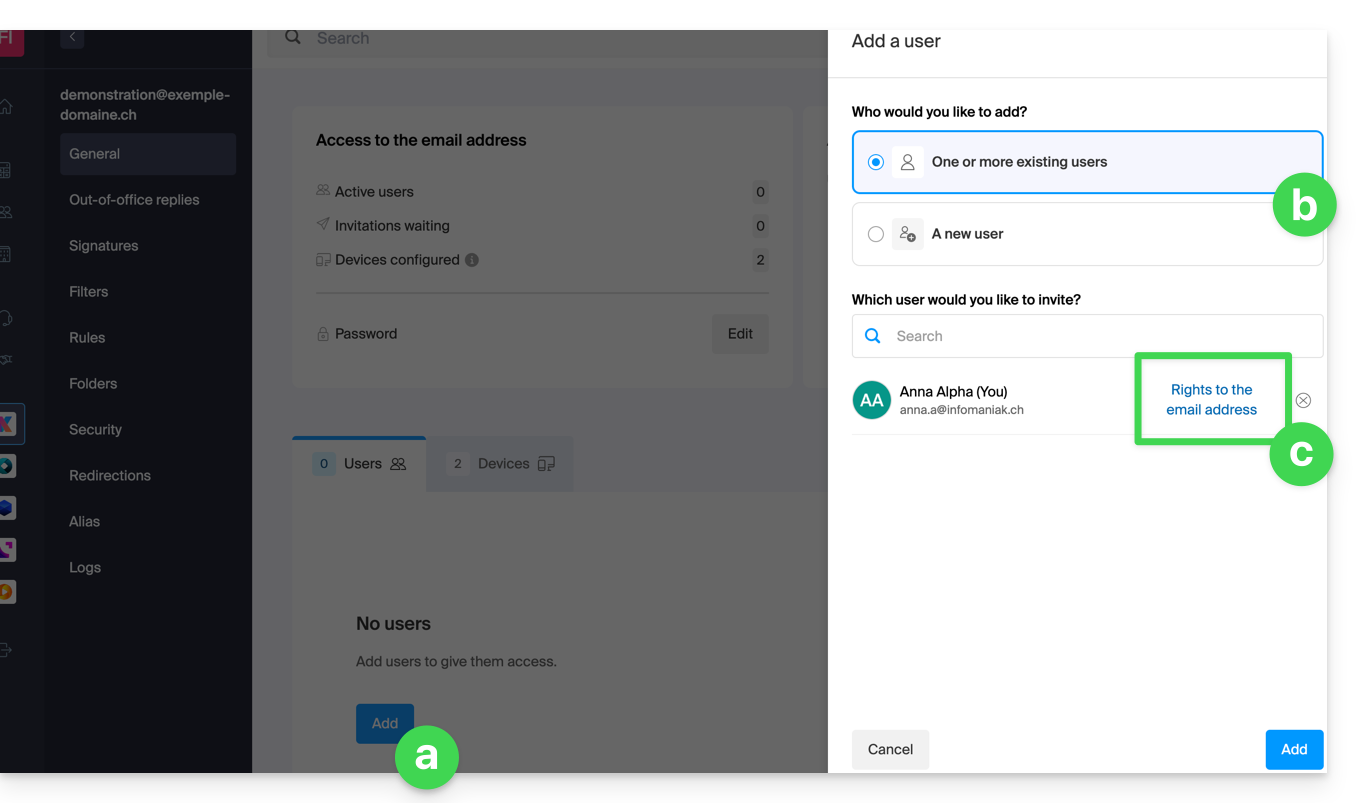
- Once the user has been added:
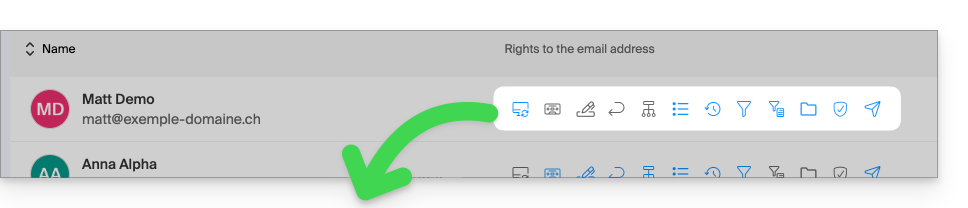
- Click on the action menu ⋮ located to the right of the user's name for the mail address.
- Select ✎ Modify permissions:
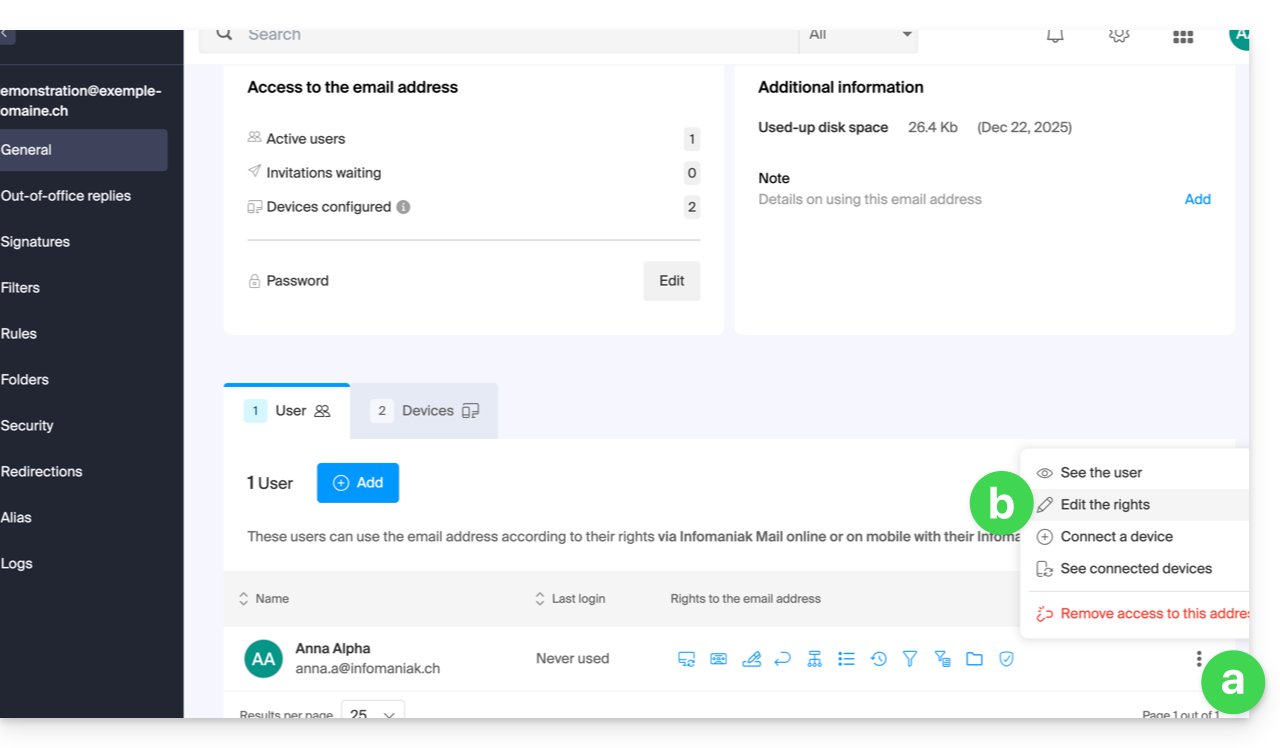
- Or click directly on the icons visible in the table:
- When adding a user to a mail address:
… from the Manager (user management)
- Click here to access user management in the Infomaniak Manager (need help?).
- Click on the user concerned in the table that appears.
- Expand the collaboration tools section by clicking on the chevron .
- Expand the mail addresses section accessed by the user by clicking on the chevron .
- Click on the action menu ⋮ located to the right of the mail address concerned.
- Select Modify permissions:
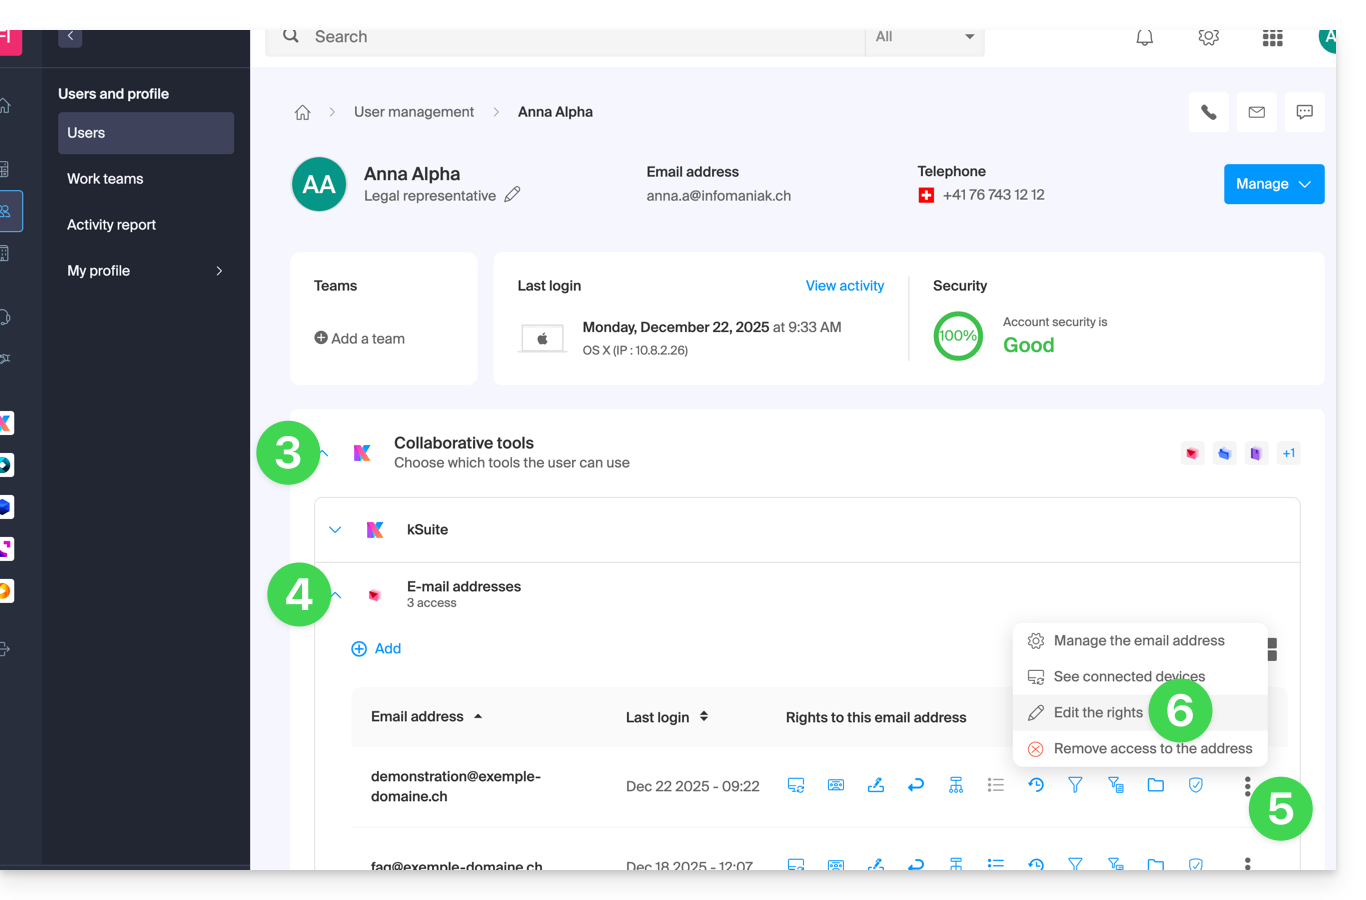
- Or, click directly on the icons visible in the table:
… from the Web Mail app
- Click here to access the Infomaniak Web Mail app (online service ksuite.infomaniak.com/mail).
- Click on the Settings icon in the top right corner of the interface.
- Check or select the email address in question from the drop-down menu in the left-hand menu.
- Click on Shared with.
- Click on the action menu ⋮ located to the right of the email address user's name.
- Select ✎ Edit permissions:
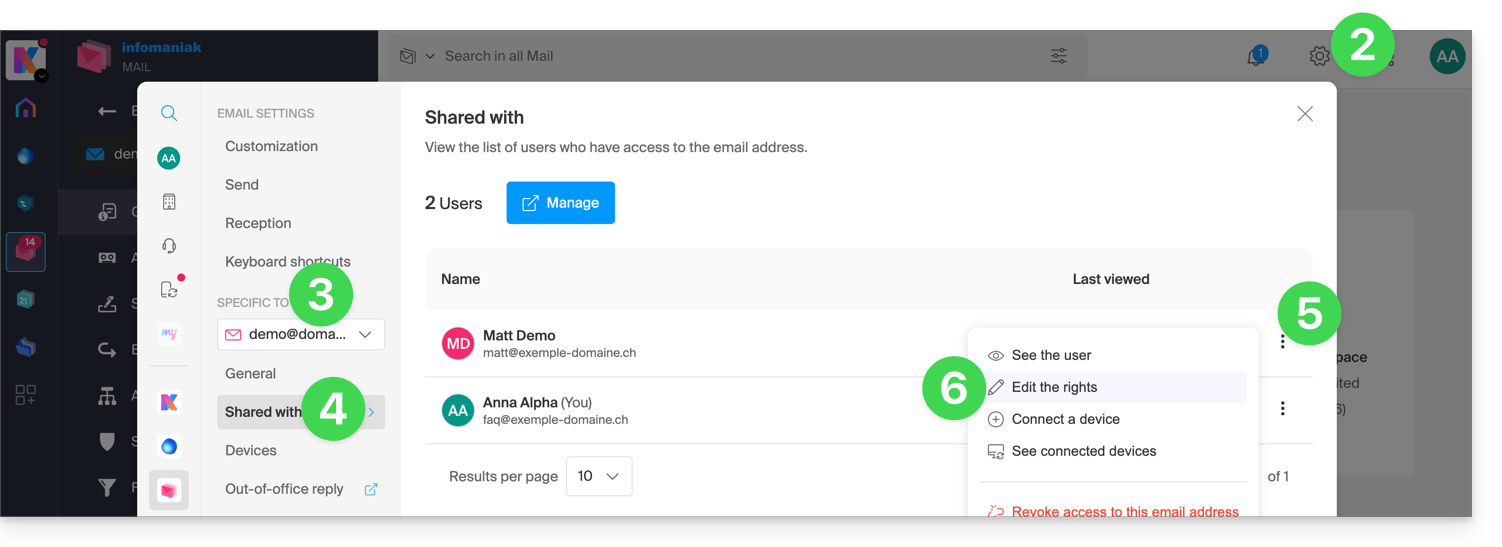
- You will be redirected to the settings for your email address in the Mail Service, and more specifically to the permissions section for the user in question.
- Adjust the permissions and save at the bottom of the page:
Result for the user
The user whose permissions are being revoked will no longer see certain corresponding menus in their email address settings.
For some features, even if the menu is still accessible, some buttons will be inoperative or grayed out: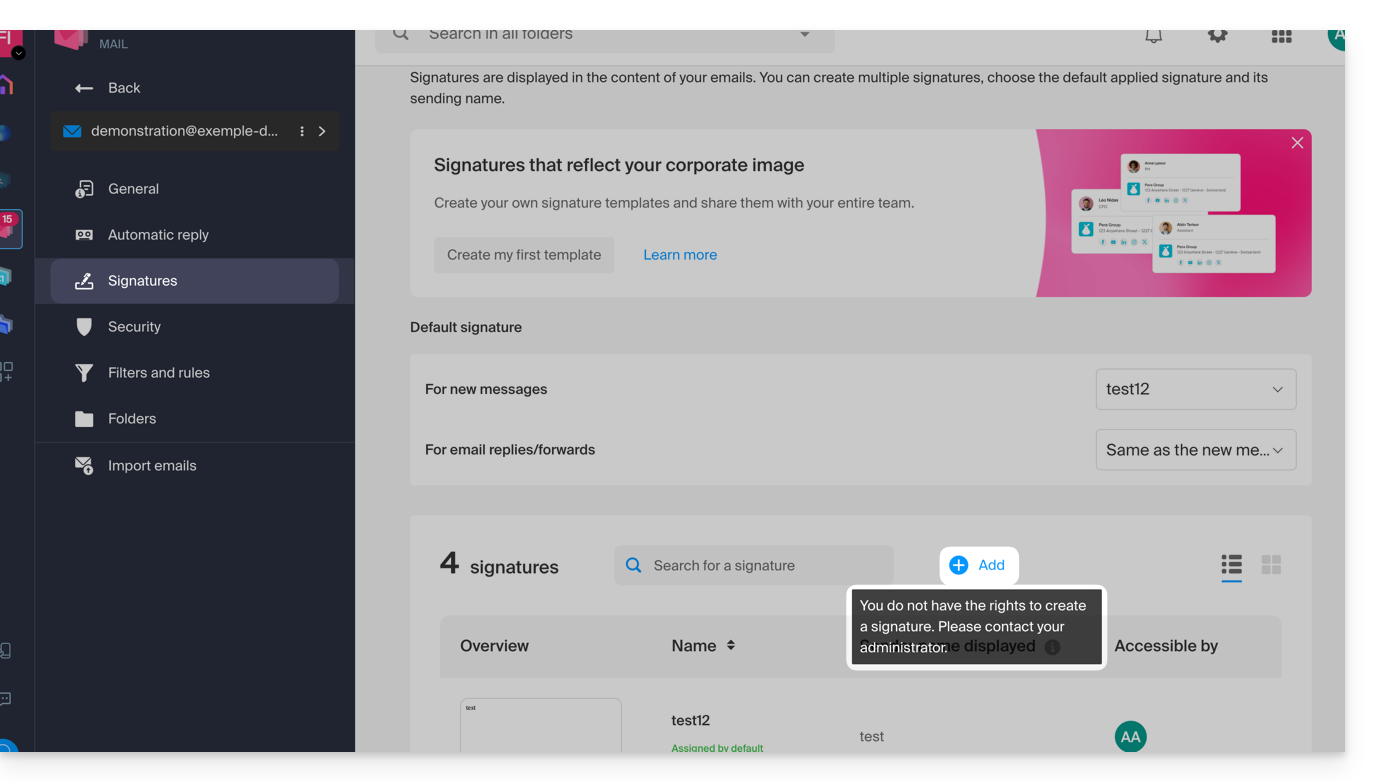
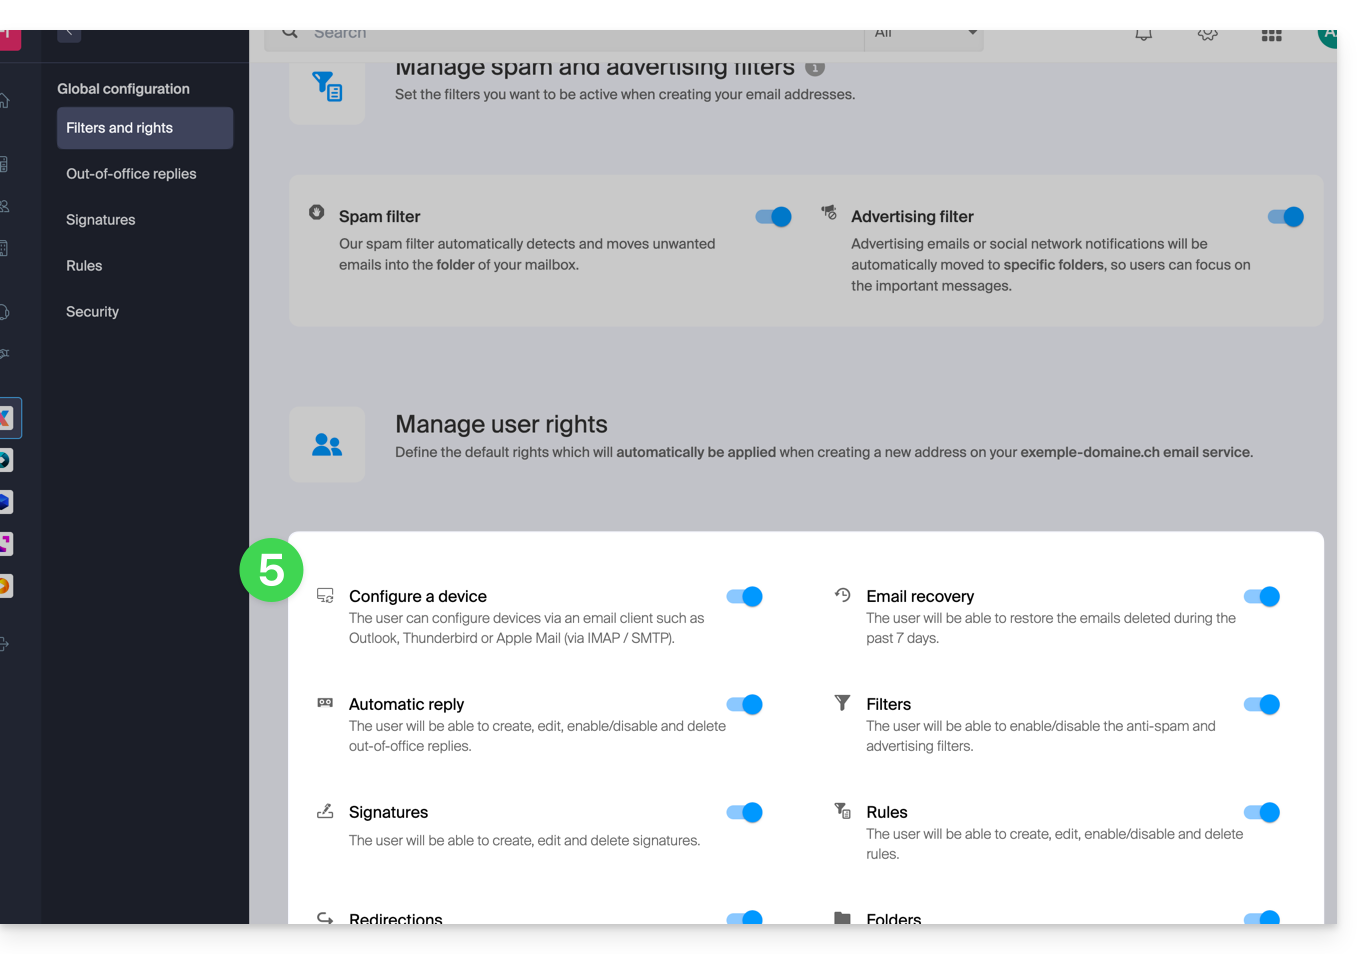
Global configuration
Define default settings
To define the default rights that will be automatically selected when the “global configuration” is applied by the administrator:
- Click here to access the management of your product on the Infomaniak Manager (need help?).
- Click directly on the name assigned to the product in question.
- Click on Global Configuration in the left-hand menu:
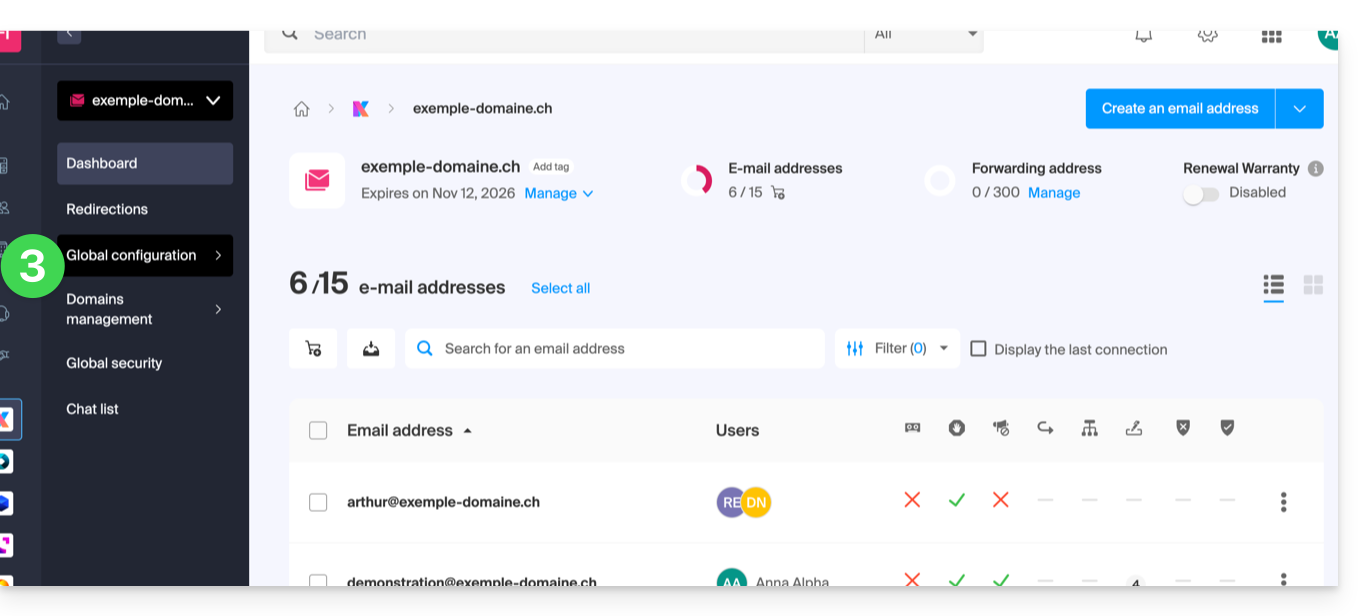
- Then click on Filters and Permissions.
- At the bottom, enable or disable the rights to be granted when creating new email addresses:
Global configuration during email address creation
If a new email address is created for one or more third-party users, the permissions defined in the Global Configuration will be automatically pre-selected during the wizard step: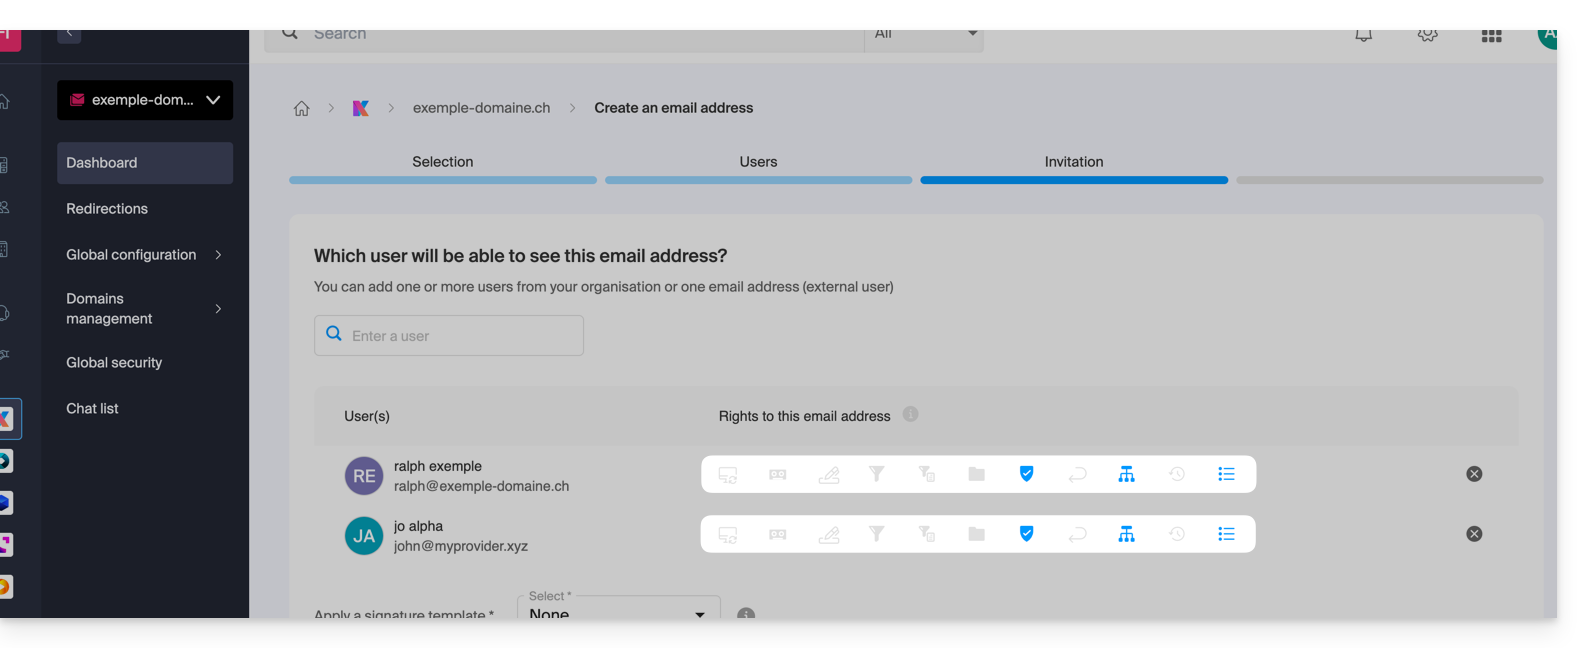
It is, of course, possible to modify the different permissions for the different users on a case-by-case basis.
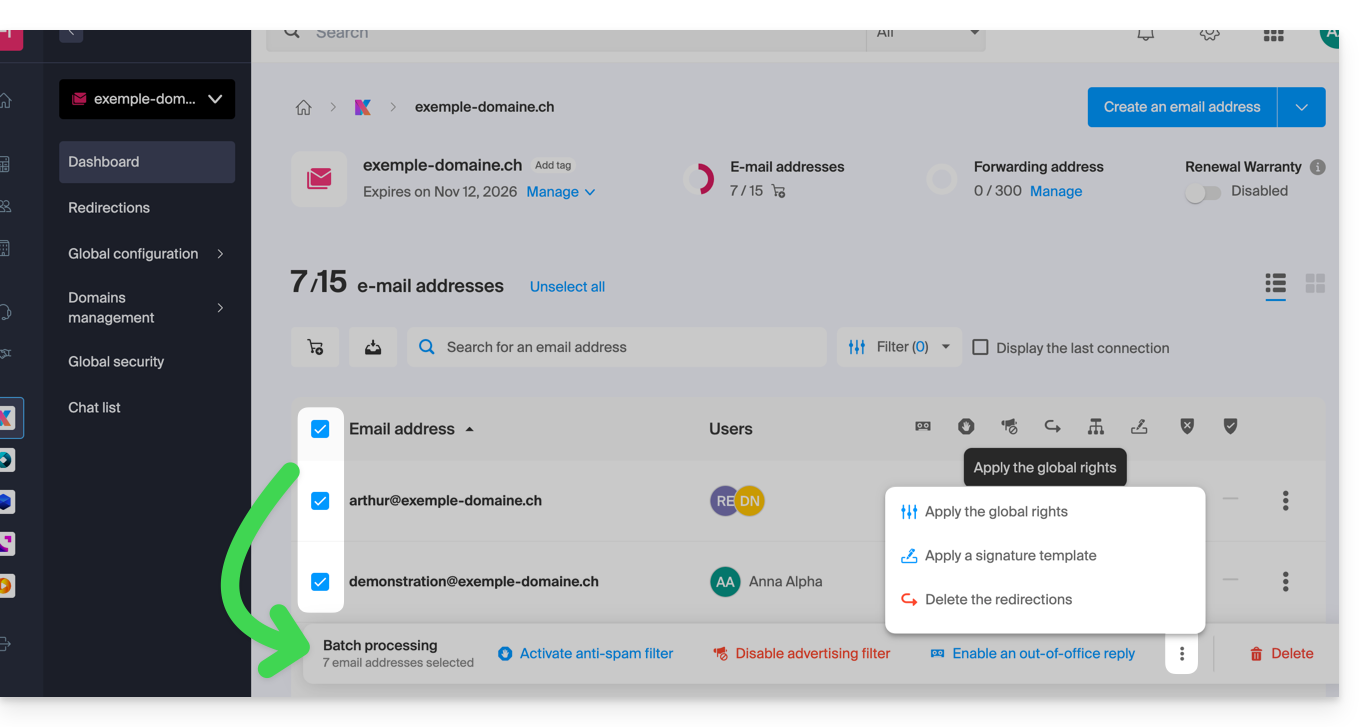
Apply the global configuration to existing addresses
To apply this global configuration to the existing email addresses of a Mail Service (which will then apply to all users concerned, listed in the Users column):
- Click here to access the management of your product in the Infomaniak Manager (need help?).
- Click directly on the name assigned to the product in question.
- Select the email addresses concerned by checking the boxes to the left of the line.
- Click on Apply global configuration at the bottom of the screen (by first clicking on the action menu ⋮ if necessary):
Apply the global configuration when managing permissions granted to a user
To apply this global configuration when you edit a user's permissions for an email address (refer to the "Manage permissions granted to a user" section at the top of this guide), click on the button dedicated to this purpose: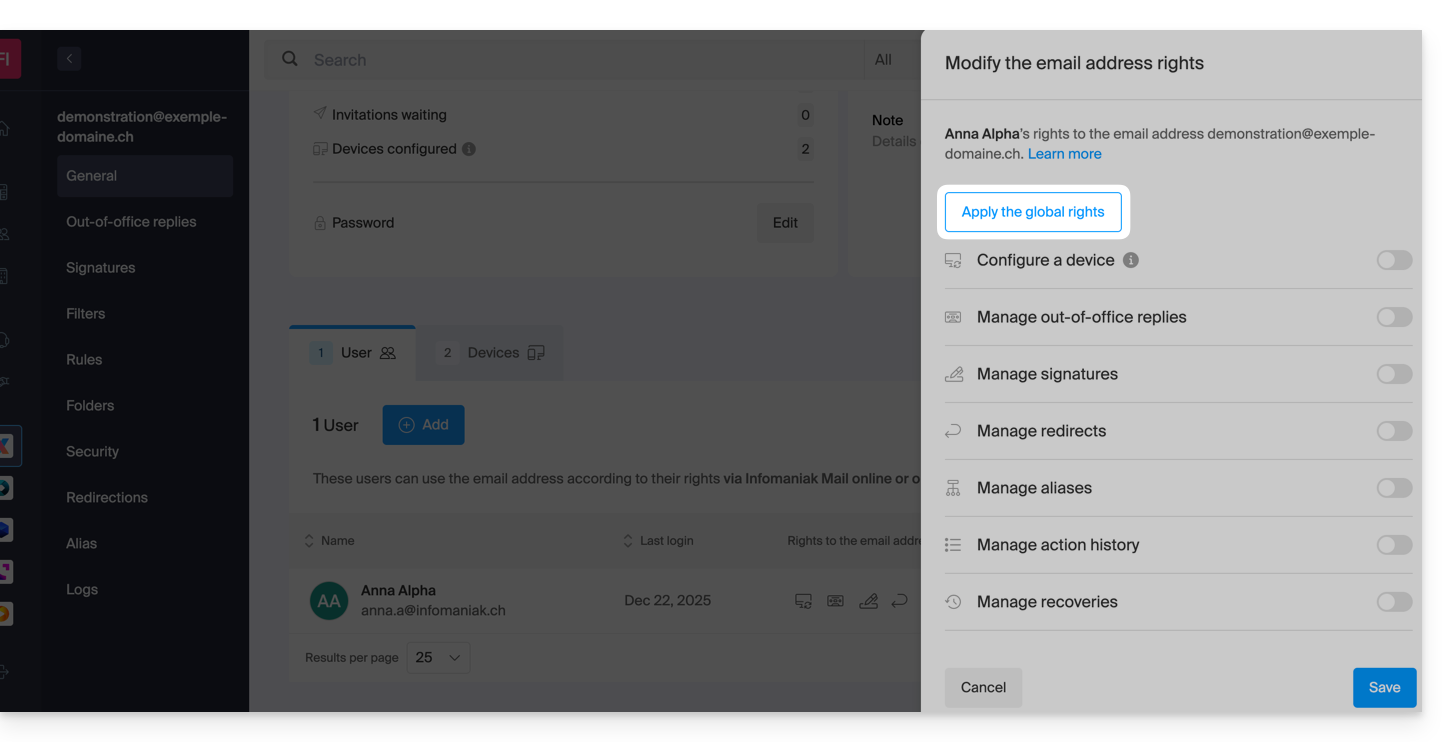
Link to this FAQ:
Has this FAQ been helpful?
This guide explains how to renew or restore a domain name registered with Infomaniak.
Preamble
- You are automatically notified by email (at the address you provided) when one of your domain names is about to expire.
- If this domain name is not renewed before its expiration date, it enters a redemption period during which it can still be recovered/restored.
- The restoration fees and the duration of the redemption period are variable depending on the extension concerned.
- Once the redemption period has elapsed, the domain name is free and can be reserved again by anyone.
- If your domain is important for your activities, Renewal Warranty offers you the assurance of never losing it: Infomaniak will do everything in its power to ensure that you keep it even if you do not provide timely updates at its expiration.
Renew a domain name before expiration
The renewal of one or more domain names is done exactly the same way as any other Infomaniak service renewal. Refer to this other guide if you are looking for information on how to renew the product in question.
Restore a domain name after expiration
To restore a domain during its redemption period:
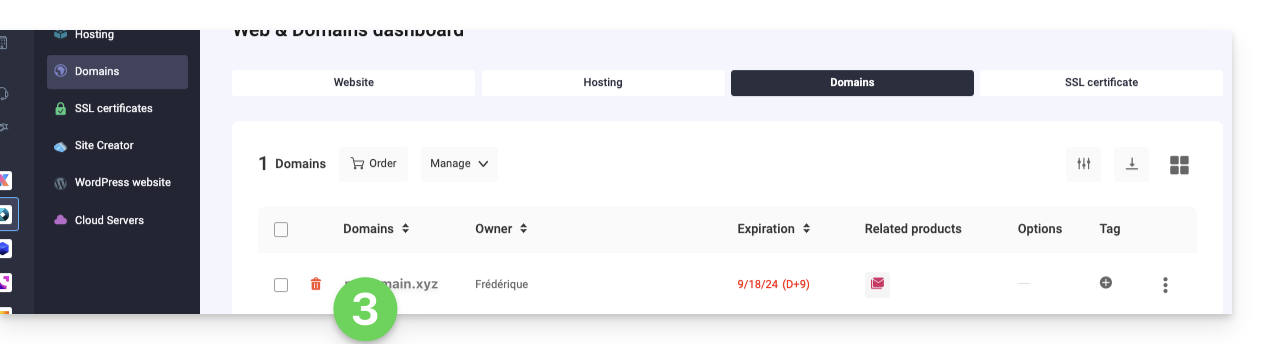
- Click here to access the management of your product on the Infomaniak Manager (need help?).
- An expired domain is indicated as such:
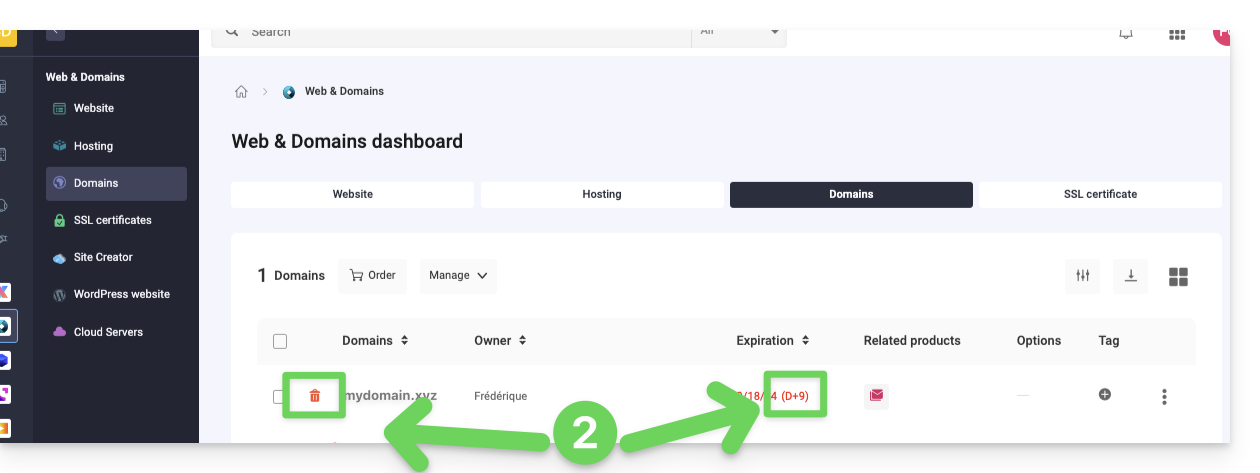
- Click directly on the name assigned to the product concerned:
- Click the Restore button:
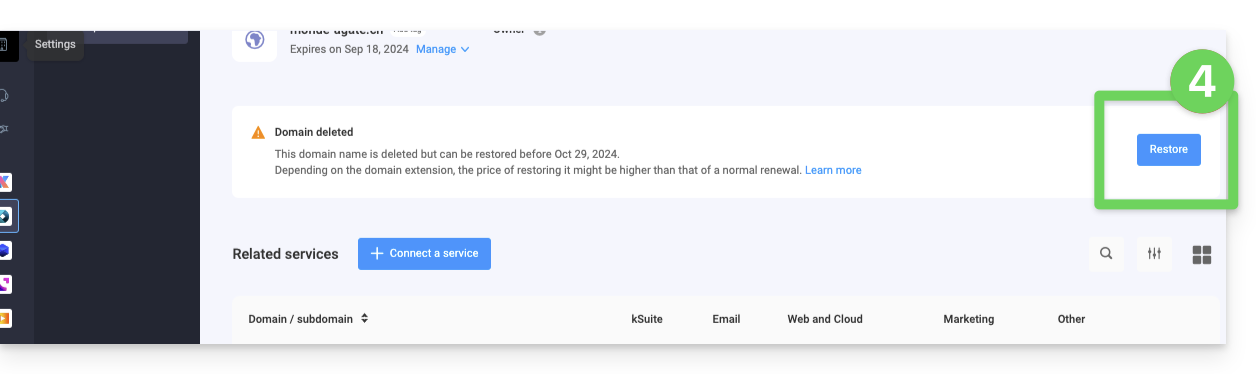
- Follow the restoration steps to the end.
Resolve an issue
What to do if the domain does not seem visible in your account?
- Check that you are logged in with the correct user account, and that you are displaying the correct Organization if you are affiliated with multiple entities.
- Consult the DOMAIN section of the Manager and not in a section of billed or renewable products.
- Repurchase the domain name if it has not been reserved since.
Link to this FAQ:
Has this FAQ been helpful?
This guide explains how to restart the transfer of a domain name to Infomaniak in case of failure.
Manually restart a domain transfer
When the transfer of a domain name fails, you receive an email with the possible reason for the problem.
The message also contains a link to restart the transfer request without paying the transfer fees again.
In case of a problem:
- Click here to access the management of your product on the Infomaniak Manager (need help?).
- Click directly on the name assigned to the product concerned.
- Follow the instructions displayed on a red background at the top of the page.
Link to this FAQ:
Has this FAQ been helpful?
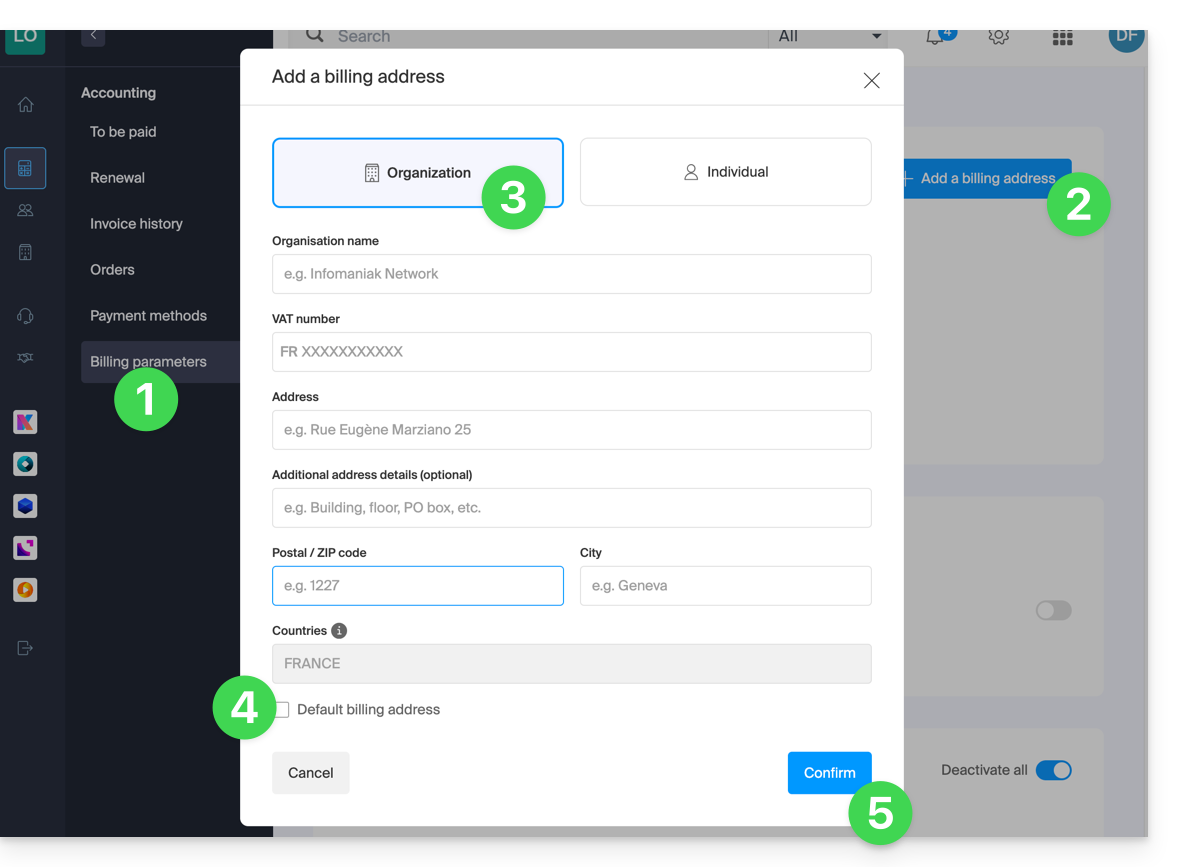
This guide explains how to add a billing address so that the products of your Organization can be billed in the future under new coordinates, for example to assign invoices to different people.
Add billing addresses
To create additional billing addresses:
- Click here to access billing address management.
- Access requires authentication with a user who has sufficient rights.
- Click the Add button.
- Enter the desired coordinates for the additional billing address.
- If necessary, set this address as default.
- Click Confirm:
When renewing a product, choose the desired billing address.
Refer to this other guide if you are looking for information about the postal address currently defined.
Link to this FAQ:
Has this FAQ been helpful?
This guide explains how to enable two-factor authentication to secure your Infomaniak account login (and therefore access to kSuite tools, hosting, etc.).
Introduction
- This two-step validation, also known as multi-factor / two-factor authentication (2FA), protects access to your Infomaniak account by:
- the password of your choice
- and a second method of identity verification, such as a code obtained on your mobile device.
- If a malicious person were to decipher or steal your password, they would still need a validation code that only the legitimate user can obtain on their mobile device.
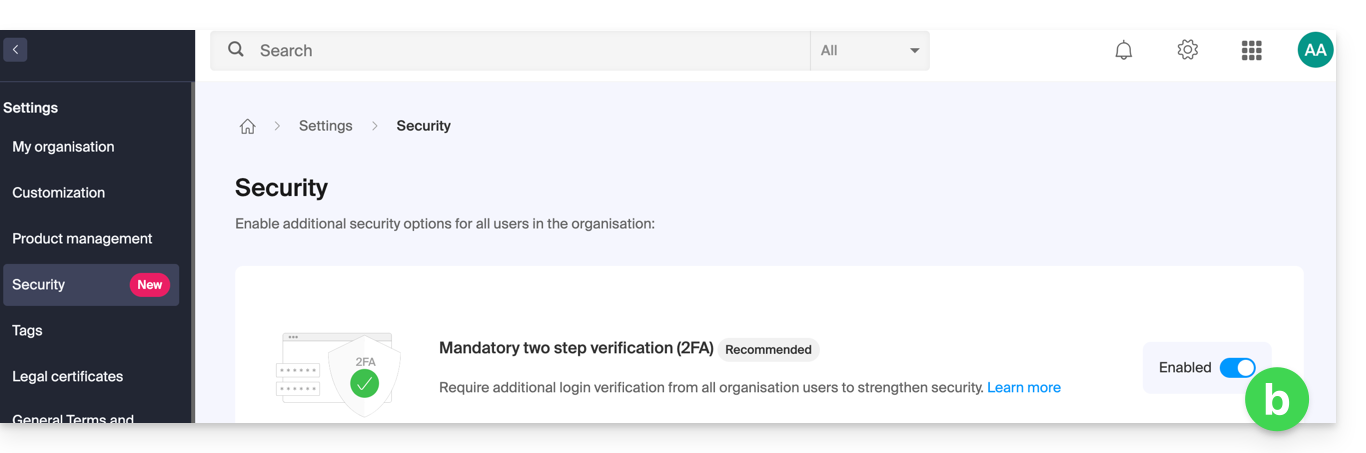
- Refer to this other guide if you are an administrator of an Organization and want to enforce 2FA for all users who have not yet enabled it.
Enable two-step validation
To increase the security level of your Infomaniak account:
- Click here to log in and access the two-factor authentication management on the Infomaniak Manager.
- Once logged in, you can choose a 2FA method:
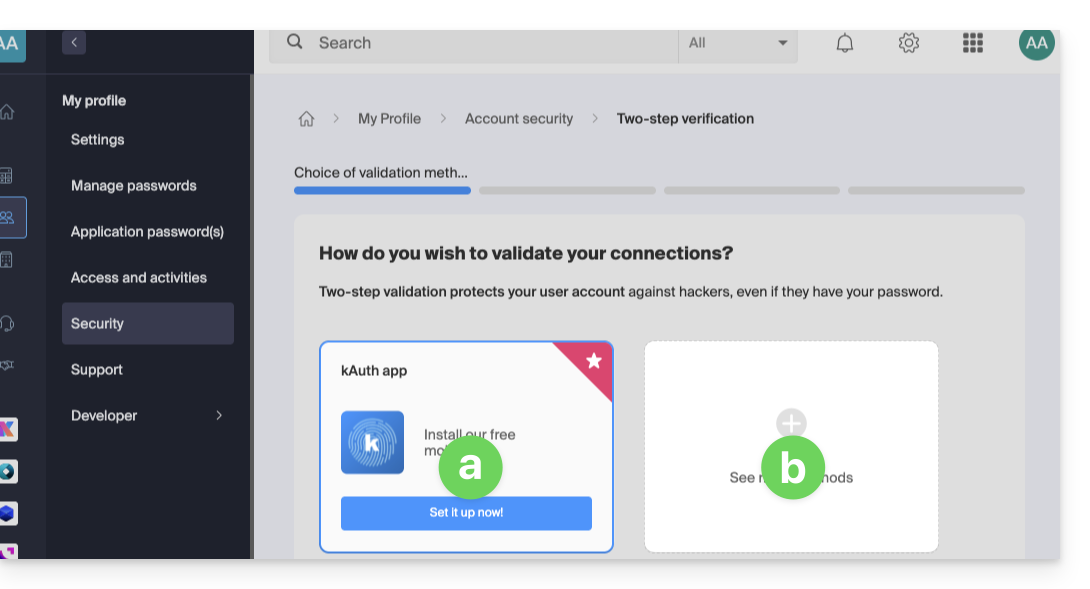
- the kAuth app for iOS / Android devices
- another method
Choose the validation method
In section a above, you can download and configure the iOS/Android app kAuth (please refer to this other guide for more information):
- It allows you to receive a push notification YES / NO to authorize or deny login to your Infomaniak account.
- It also generates a one-time use code, including offline, to allow login.
- If another Infomaniak app (Mail, Euria, kDrive, etc.) is installed and your user ID is also logged in, the authorization request will be made through that app; please refer to this other guide for more information.
In section b above, you can choose to configure another method from the following: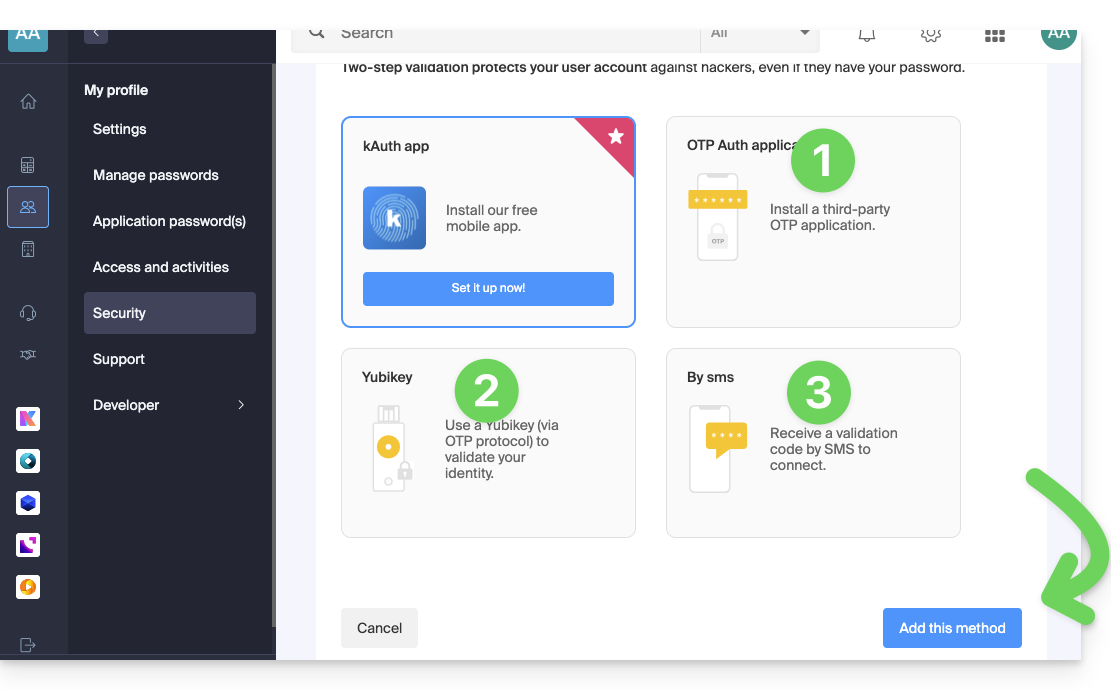
- any OTP application (such as Authy, for example) to obtain a one-time use code,
- YubiKey (from Yubico); please refer to this other guide for more information,
- SMS (only for CH / FR / BE / DE countries) to obtain a one-time use code.
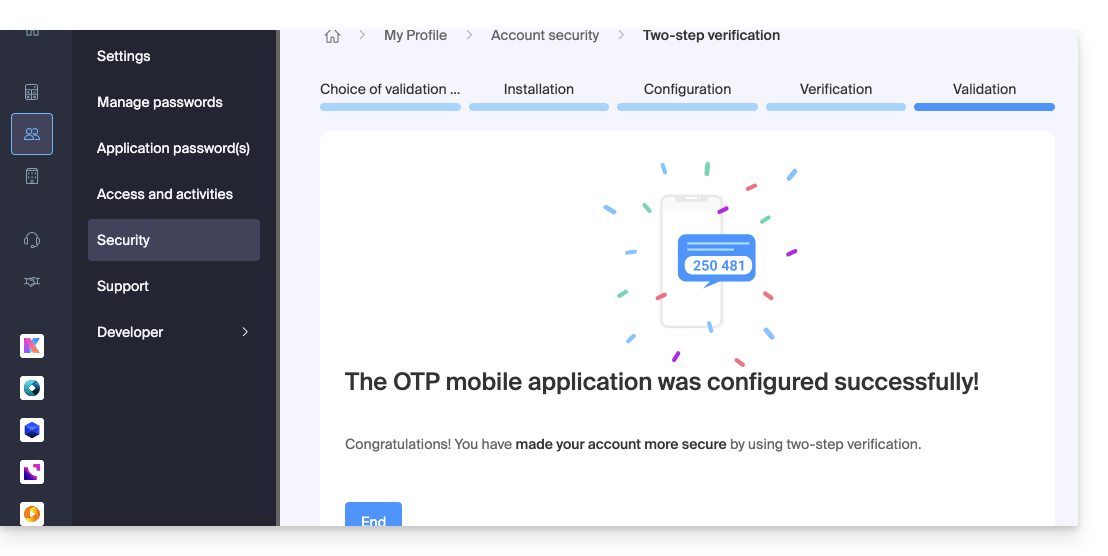
Then, click the button to add the method and follow the information displayed on the screen to complete the configuration.
In all cases, carefully note the backup codes offered for download after each configuration: download and keep a copy of these codes in a safe place, as they will be the only way to access your account if you lose your credentials or to access your account without access to your phone.
Be careful with existing synchronizations
Once two-factor authentication is enabled, to access certain tools (such as CardDAV/CalDAV synchronization), you need to create application passwords.
There is no need to call Infomaniak, as they do not have any of your codes or passwords. For any assistance regarding 2FA, please refer to this other guide.
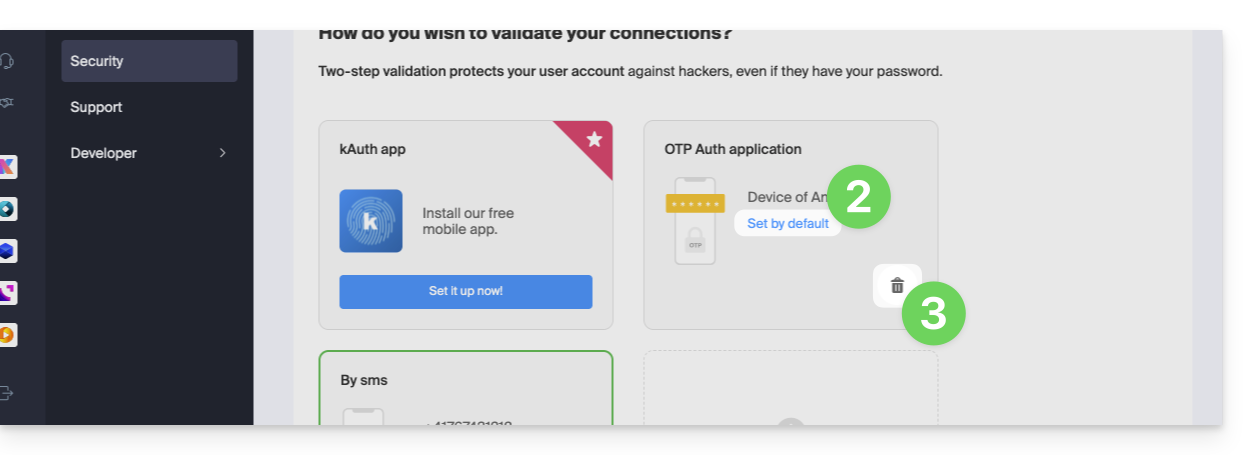
Change the default option or remove one
If you have enabled multiple verification methods (SMS, OTP application, etc.), you can define which one will be offered by default during each login.
However, note that the default method will remain the verification in the Infomaniak app installed (Mail, kChat, kDrive, etc.) on your devices.
- Click here to log in and access the two-factor authentication management on the Infomaniak Manager.
- Click the button to set it as default.
- Click the trash can to remove and no longer offer the selected method:
To completely remove 2FA, please refer to this other guide.
Authenticate each time the browser opens
To prevent cookies from being saved when closing browser windows, and therefore to require authentication each time you access the Infomaniak Manager when you restart your browser…
… on Chrome
Specify the address [*.]infomaniak.com in the Google Chrome settings (chrome://settings/content/siteData – paste this into the address bar, or consult the official documentation):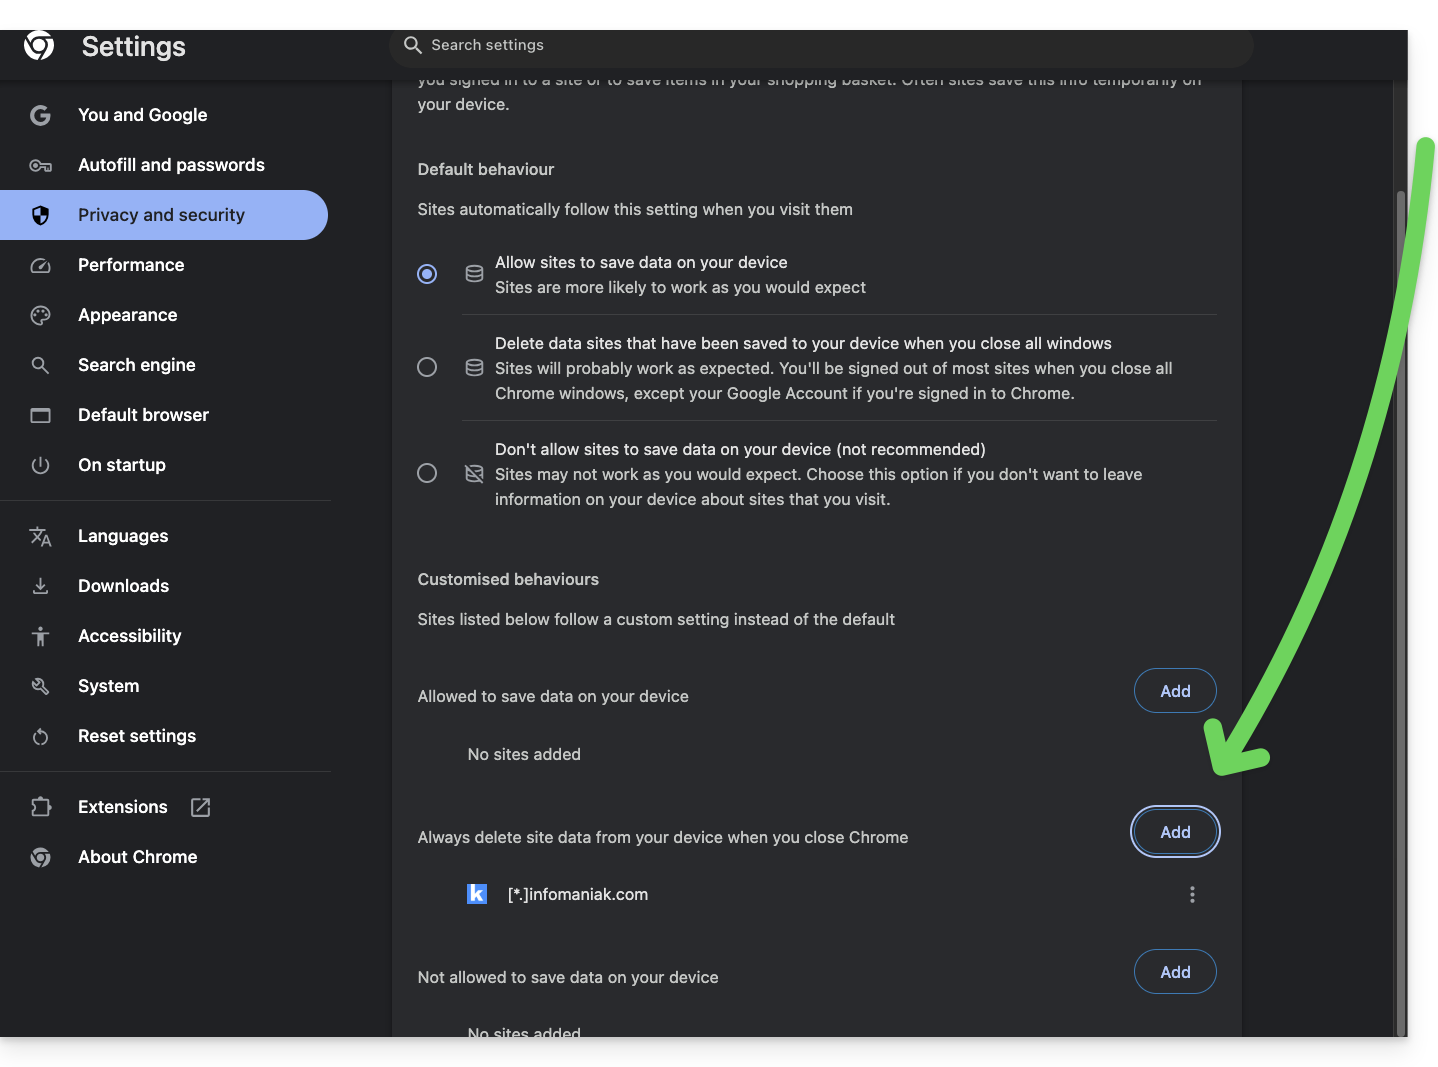
Link to this FAQ:
Has this FAQ been helpful?
This guide for Infomaniak Partners details a very useful accounting feature for exporting billing information related to Managed Clients.
Export the file of Managed Client information
To access the Managed Clients page:
- Click here to access your Managed Clients on the Infomaniak Manager Reseller Space (need help?).
- Click the Download button (top right of your Managed Clients table) to include data from all of your Clients.
- Choose the type of history to export.
- Choose the period to include in the exported data and confirm:

- Click the blue Export button to start downloading the data into a CSV file (format
.csv). - To export data from only part of your Managed Clients, click the checkboxes next to the relevant Clients and activate the export from the menu that appears at the bottom of the page:

Link to this FAQ:
Has this FAQ been helpful?
This guide details the two main types of identifiers. They are distinct, even if the address format may be identical.
Infomaniak Account vs. Email Address
Here is a summary of these 2 types of identifiers:
| Type of Identifier | Use | Where to Use | Associated Password |
|---|---|---|---|
| Infomaniak Account (login identifier) | Access all your Infomaniak services. | Login to: | Password defined when creating the user account. ⚠️ Different from the password for your email addresses. |
| Email address hosted by Infomaniak | Send and receive emails. | SMTP/IMAP login…
| Password specific to each email address (there may be several). ⚠️ Different from the Infomaniak account password. |
What to do if you have connection problems?
There is no need to contact Infomaniak Support (which does not have access to any of your passwords)…
- Problem with the Infomaniak account? Reset the account password.
- Having trouble with your email address? Reset your email password.
Explanation
- As with many other online services, you registered with Infomaniak using a personal email address.
- This personal email address serves as your login ID when you want to access Infomaniak services.
- This login ID has its own password (defined when you created your Infomaniak user account – your personal email address, see above).
There is no connection between…
- … this login ID/password pair described in points 1/2/3 above…
- … and the email addresses that you created or obtained later from Infomaniak.
A connection could exist if the address is identical (for example, you registered with the email address toto@abc.xyz and you also manage this same email address with Infomaniak), but even in this case, the password will most likely be different – once for the login ID toto@abc.xyz and once for the email address toto@abc.xyz.
Other login IDs?
Acquiring other Infomaniak products involves obtaining other login IDs, such as those required for FTP, MySQL, SSH connections, etc., but these login IDs are entirely independent of the two types described above.
Link to this FAQ:
Has this FAQ been helpful?
This guide explains how to switch from one Organisation to another from your Infomaniak Manager when you belong to multiple Organisations.
Introduction
- Since you opened your account with Infomaniak, you have been a member of at least one Organisation.
- If you were the only one and it wasn't an invitation, an Organisation was created in your name and you automatically became its legal representative.
- Otherwise, you belong to the Organisation that invited you (to join its kSuite, to manage a product, etc.).
- You can leave Organisations.
- It is perfectly possible to have access to multiple Organisations from the same login credentials and to quickly switch between them.
Switch to one of the other Organisations
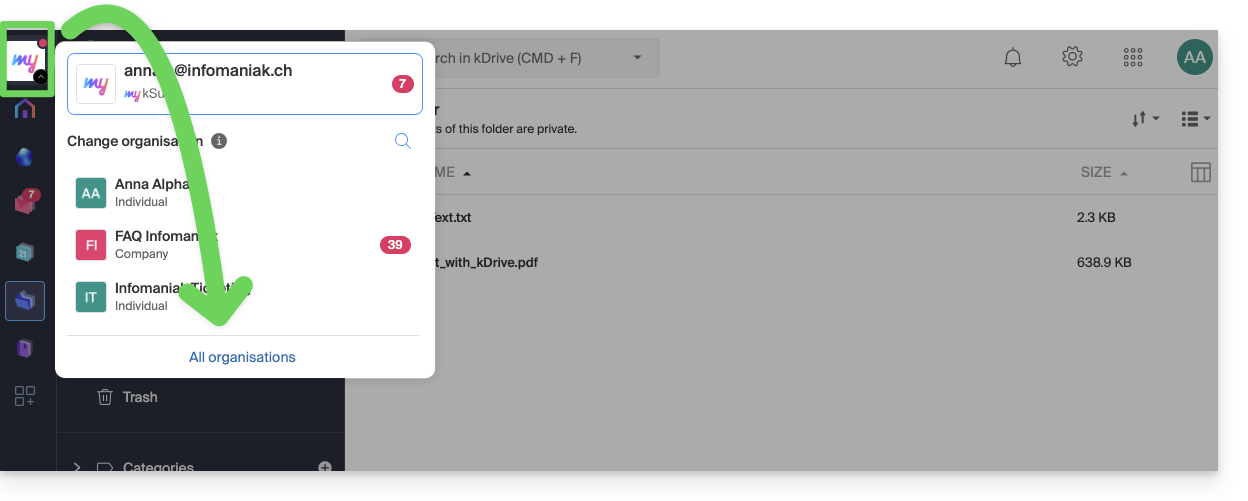
To switch to another Organisation among those to which you belong:
- Click here to access the management of your products (Infomaniak Manager).
- Click on the chevron at the top left of the Manager interface.
- Click on the Organisation you want to access (or display them all to access all the kDrive / email addresses to which you are linked).
- The change of Organisation is immediate, you are automatically switched:
Link to this FAQ:
Has this FAQ been helpful?
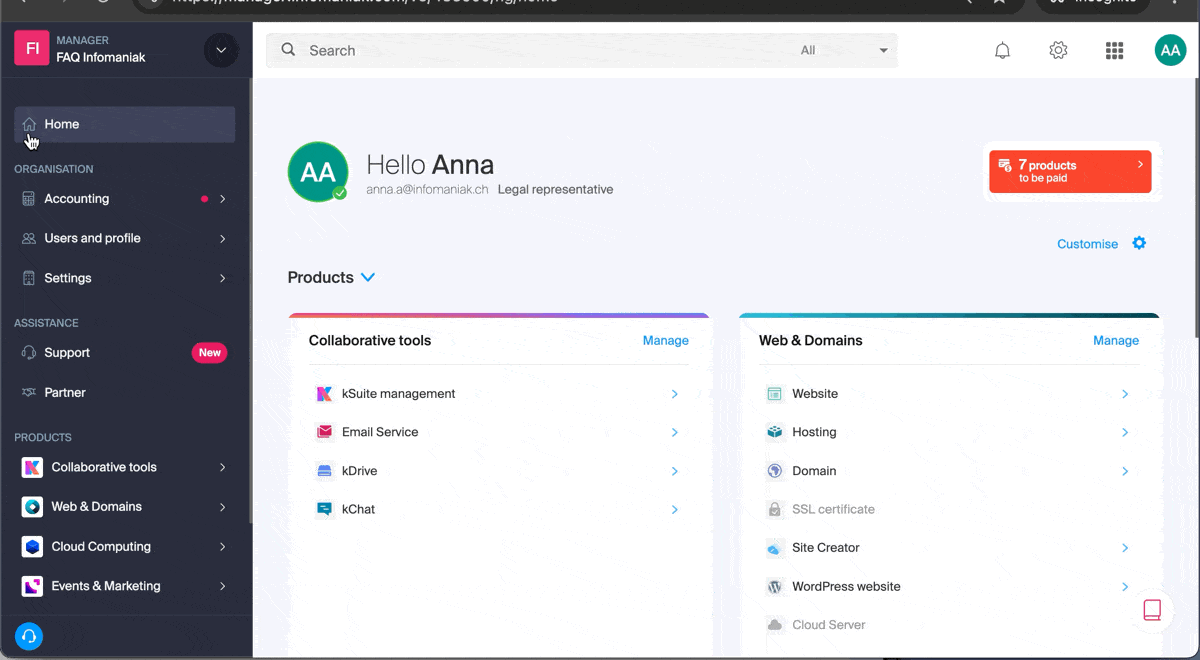
This guide explains how the Infomaniak service administration interface, called Manager, works: https://manager.infomaniak.com.
Introduction
- The Manager is the Infomaniak interface that allows you to manage your various Infomaniak products, such as domain names, hosting, as well as the administrative section, billing, etc.
Ordering a product = creating an account
If you do not yet have any products with Infomaniak, during the ordering process, you will be prompted to create an account (with a login ID), and an Organization is automatically created at this time.
For an individual, the name of the Organization will generally consist of their first and last name, while for a company, it is generally their name or company name.
Once the Organization has been created by this first user, it is possible…
1. Other users can have…
- … all rights and therefore be administrators of the Organization
- … limited rights (access to specific products)
- … with or without billing rights
2. Other Organizations can…
- … contain other products that are not related to the other Organizations
- … have their own users who will not have access to the other Organizations
The Organisation concept is particularly useful for individuals who need to manage multiple products for different clients. For example, imagine a webmaster who needs to administer the products of three different companies, each with its own Organisation containing their respective products. By adding the webmaster or partner as an administrator of their Organisation, they can easily switch between accounts (Organisations) to manage the different products of the three companies without having to log in and out each time. They will use a single login ID.
Navigating and accessing your products
There are several ways to access your products, for example, the list of your hosting accounts (where your websites are located), once you are logged in.
Can't find your products?
If you are on an interface where your hosting products are not displayed, you are probably on kSuite; click on the icon in the top right corner of the interface to switch between the kSuite apps (Mail, for example) and the Manager:
If you still can't find them, check the currently displayed Organisation…
Navigating within the Infomaniak Manager
You can navigate using the left-hand menu by clicking on Web & Domain and then on Hosting:
You can also click in the center of the homepage on Hosting (under Web and domain):
Another option is available in the FAQs: simply click on the link (example) provided in the guide to go directly to the relevant product type.
All you need to do is click on the name assigned to your product (for example, domain.xyz when you reach the page for managing your domain names).
Display the online tutorial
Click on the icon in the bottom right corner to access the visual guide again, which presents the main sections of the Manager:
Troubleshooting in the Manager
Unable to log in?
Refer to this other guide.
The product you are looking for is grayed out or invisible?
You are probably not in the correct Organization or user account if your usual products are not visible. Check and change the Organization (if your user allows it) or re-log in to a different user account.
Clicking does not load the desired page?
Do not click in the checkboxes for the products, as nothing will happen (except for selecting them for a possible batch operation). Instead, click directly on the name assigned to the product:
Is the desired operation not possible or displayed in gray?
Your user may not have sufficient rights within the Organization, or may no longer have them. Try to find out more with this other guide (or this one if it concerns actions related to email).
Link to this FAQ:
Has this FAQ been helpful?
This guide explains how to order an Infomaniak product for which you benefit from a discount or free offer (promo code or free offer already confirmed by one of the Support agents).
Preamble
- In some cases (e.g., special offer for customers moving their data from a competing host that is discontinuing its services), you may be eligible for a discount code (partial discount or equivalent to the total purchase price) that allows you to order hosting, email addresses, etc.
- Don't have a promo code? Discover Infomaniak's free offers!
Using a deal / promo code
A promo code is used at the end of an order placed in the Infomaniak shop for purchasing new products such as Swiss Backup, for example:
- First, choose the desired payment method.
- Enter the promo code.
- Click the Apply button.
Repeat for additional promo codes if you have multiple (and therefore if you have multiple corresponding products in the cart):
Using a free offer
To order a product as part of a free offer:
- Click here to access the management of your product on the Infomaniak Manager (need help?).
- Click on the type of product for which you have received a free offer (then, if necessary, click on Back... in the left sidebar menu).
- Click the Order button (usually a shopping cart icon) or go to the Infomaniak Shop.
- When the order summary appears, activate the free offer using the dropdown menu displayed next to the affected product.
- Complete the order.
In case of a problem
- Check that you are connected to the correct Organization on the Manager.
- Check that you have ordered the correct product, the one for which the free offer was generated.
Link to this FAQ:
Has this FAQ been helpful?
This guide explains how to change the mobile phone number (used in case of forgetting the password to access your Manager) of your Infomaniak account (= user account).
Preamble
- To manage the details of your Infomaniak account instead, refer to this other guide.
- To modify the login identifier, refer to this other guide.
- To manage the details of the Organization to which you belong, refer to this other guide.
Change the mobile phone number
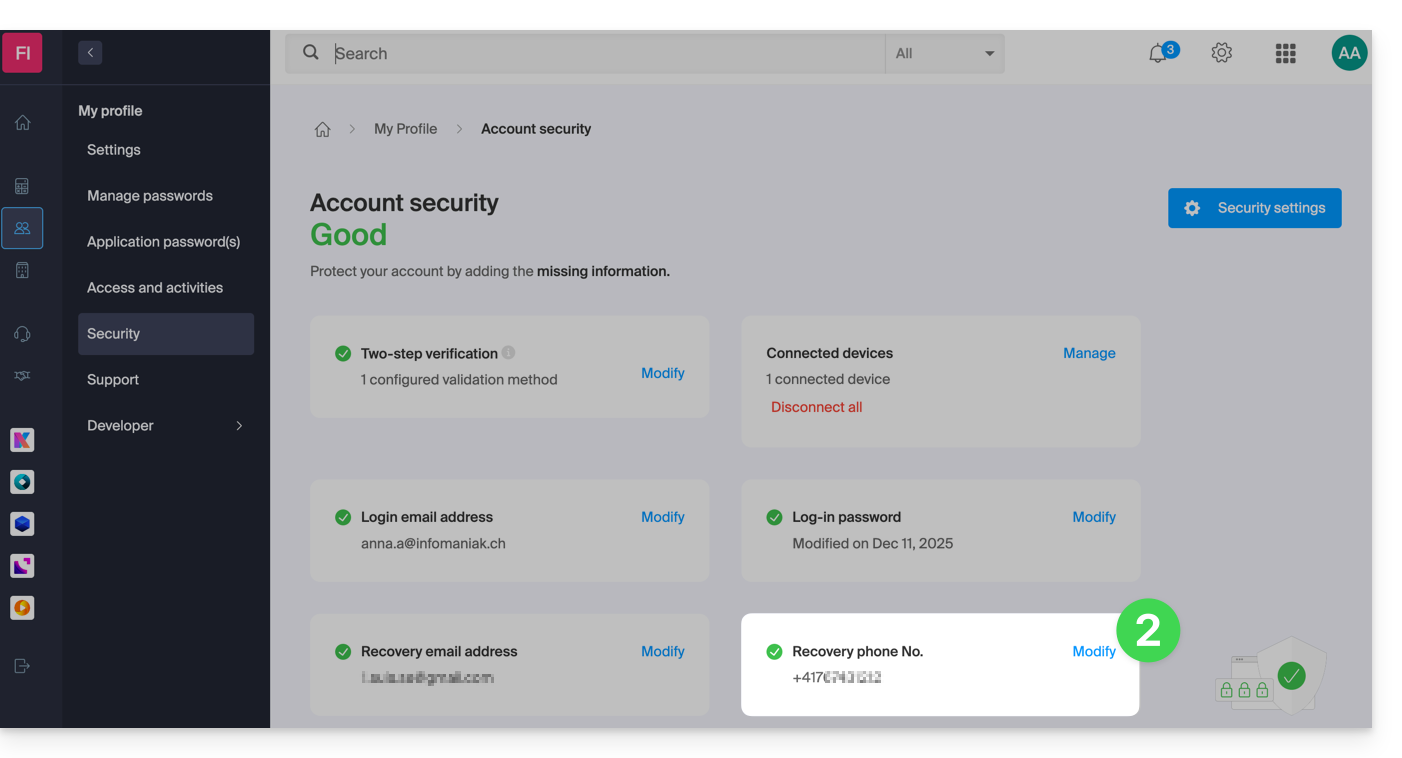
To change the phone number associated with your Infomaniak account:
- Click here to access the security information management on the Infomaniak Manager.
- Click on Modify in the Recovery Phone box:
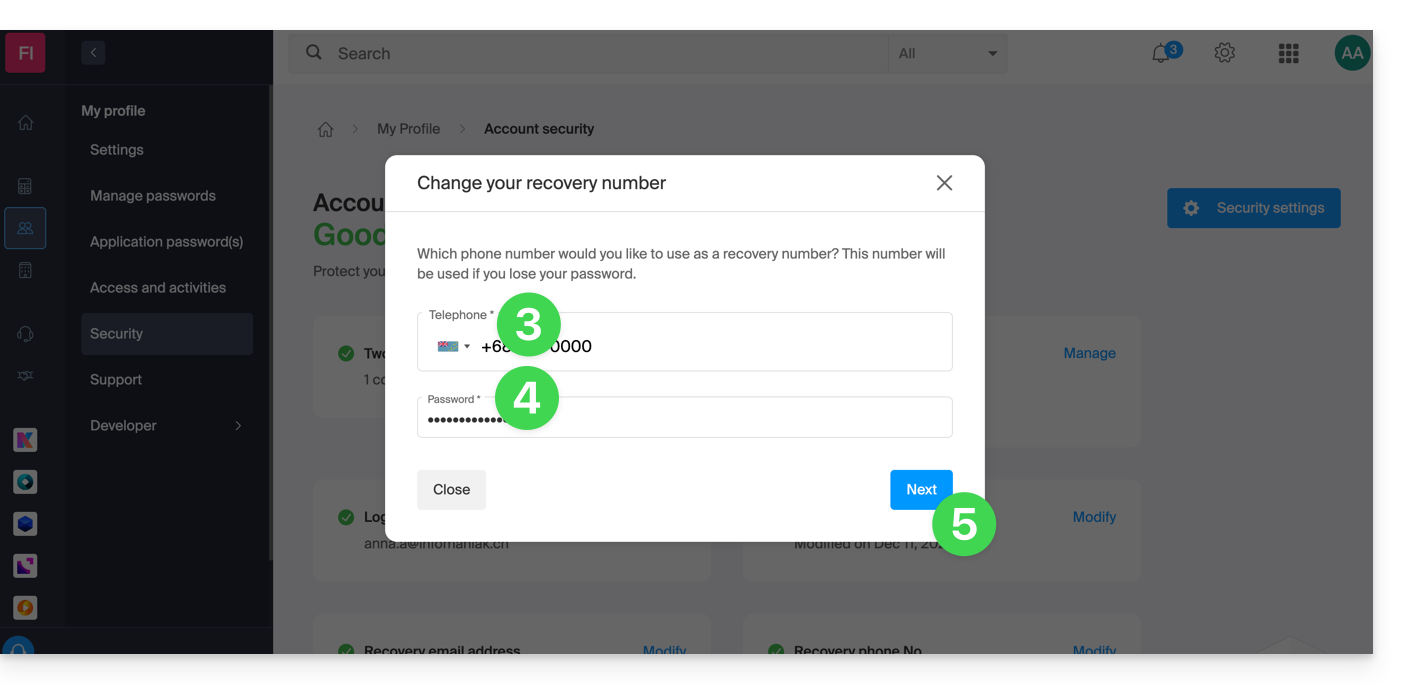
- Enter the country code corresponding to your country and the new mobile phone number.
- Enter your Manager login password.
- Click the Next button to save:
Note: it is possible for an administrator within the Organization to block users from requesting a password reset by SMS: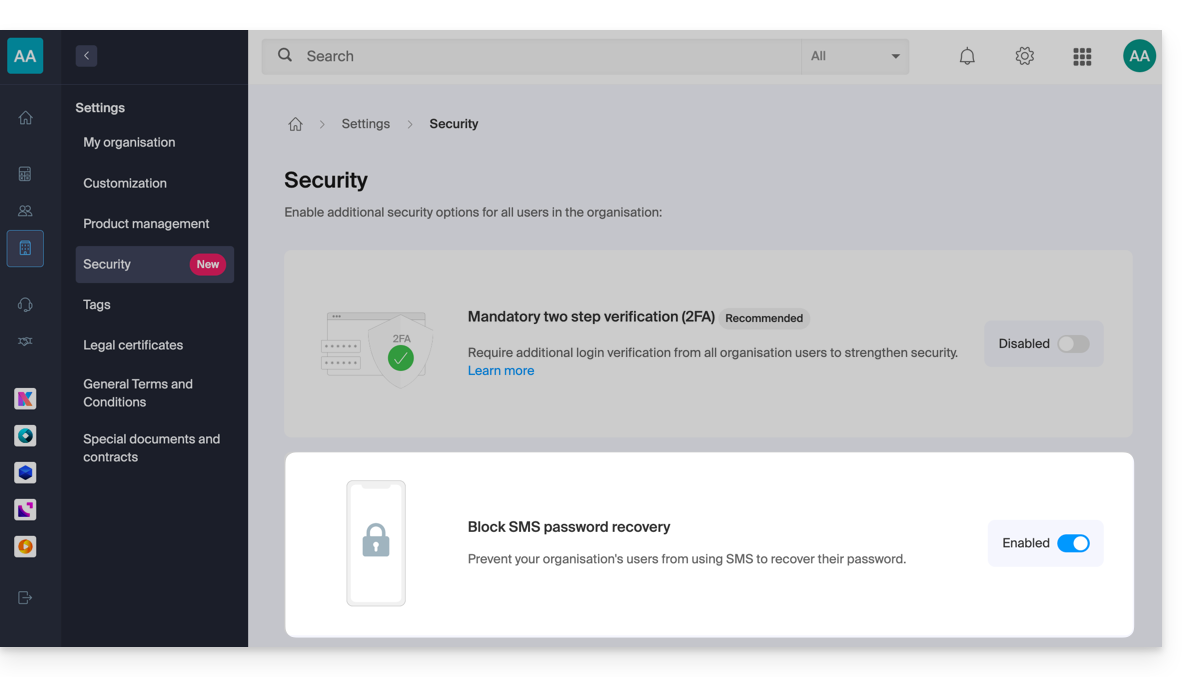
In this case, it is the recovery email that will be used and no longer the phone number specified above.
Link to this FAQ:
Has this FAQ been helpful?
This guide explains how to disable two-factor authentication, also known as two-factor authentication (2FA) or two-step verification for logging into the Infomaniak Manager (manager.infomaniak.com) or Mail Infomaniak (ksuite.infomaniak.com/mail).
Preamble
- For security reasons, Infomaniak support will never disable an enabled login validation method on an account upon simple request.
- You must follow the procedures below.
- Note: If you were using the SMS authentication method, once deactivated, you will only be able to re-enable this method if you are resident in CH / FR / BE / DE.
- Outside of these countries, you will need to use kAuth or any OTP application.
Disable 2FA
If two-step verification is enabled and you wish to disable it:
- Click here to access 2FA management on the Infomaniak Manager.
- Click the Remove button to remove the security:
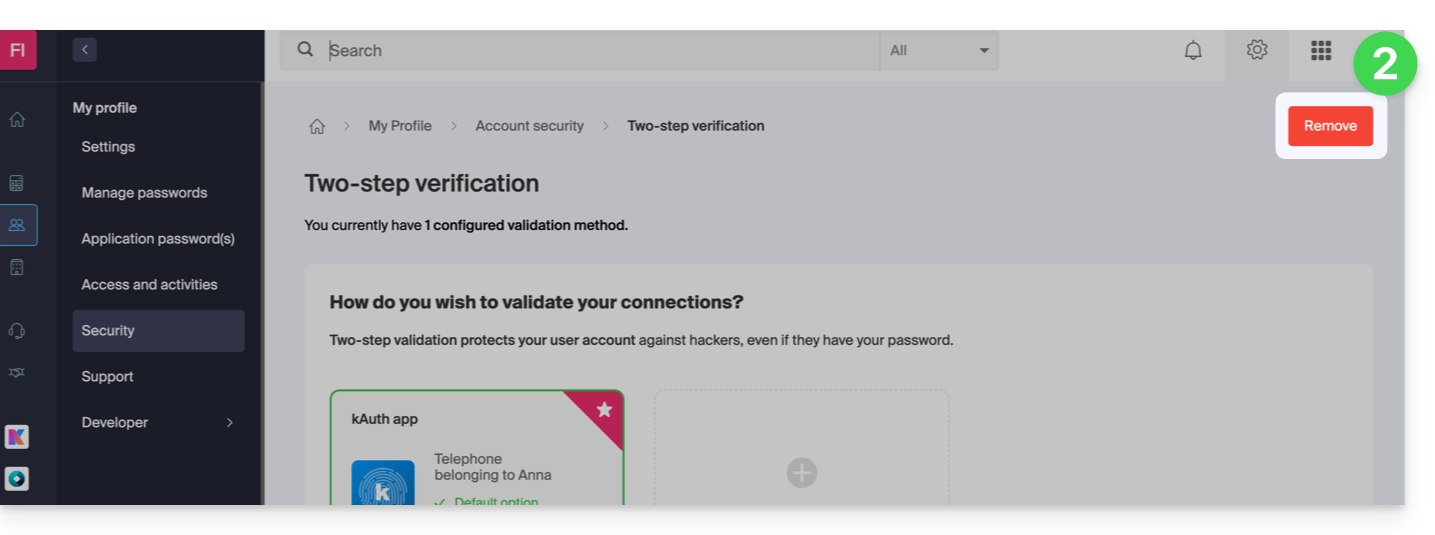
- If the red button is inactive / grayed out…
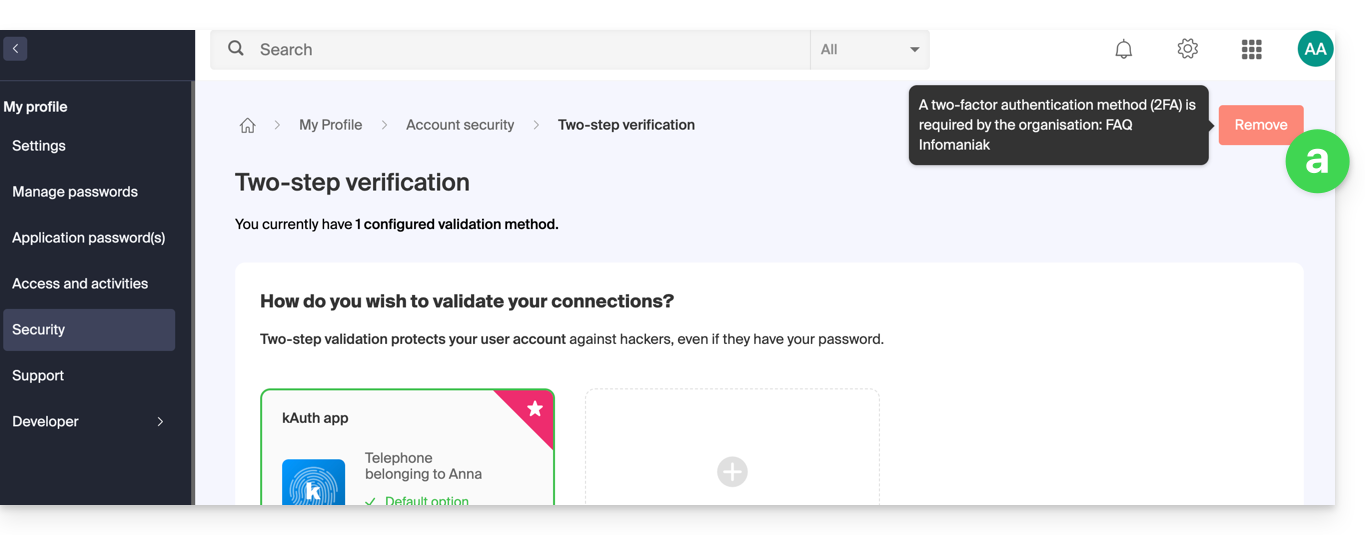
- …there is probably an upstream security option preventing you from disabling 2FA:
- If the red button is inactive / grayed out…
- Enter the password to log in to your account.
In case of problems
Obviously, the procedure above requires logging in one last time with two-factor authentication in order to then be able to disable it.
If you do not have access to the kAuth application or the device that receives the validation SMS, there is no point in calling Infomaniak; in this case, no choice, you will have to provide a number of security elements manually or via the Infomaniak Check (kCheck) app to regain access to your account:
- Click here to access the Infomaniak Manager login page.
- Enter the username and correct usual password.
- When prompted for additional authentication, click on alternative methods:

- Choose to enter one of your recovery codes if you had downloaded the sheet when activating 2FA:

- Otherwise select the last option to request help to access the form allowing you to submit your identity documents and recognition selfie:

- Follow the procedure to the end and wait:

Link to this FAQ:
Has this FAQ been helpful?