Knowledge base
1000 FAQs, 500 tutorials and instructional videos. Here, there are only solutions!
This guide explains how to transfer an Infomaniak product from one Organization to another.
Preamble
- You can move almost all products subscribed with Infomaniak to a different Infomaniak Manager interface than the one on which the product is currently located; this is therefore an internal transfer, from Organization to Organization.
- my kSuite cannot be transferred.
- The users who currently have access to the selected products will not be transferred (and therefore may no longer have access to the products).
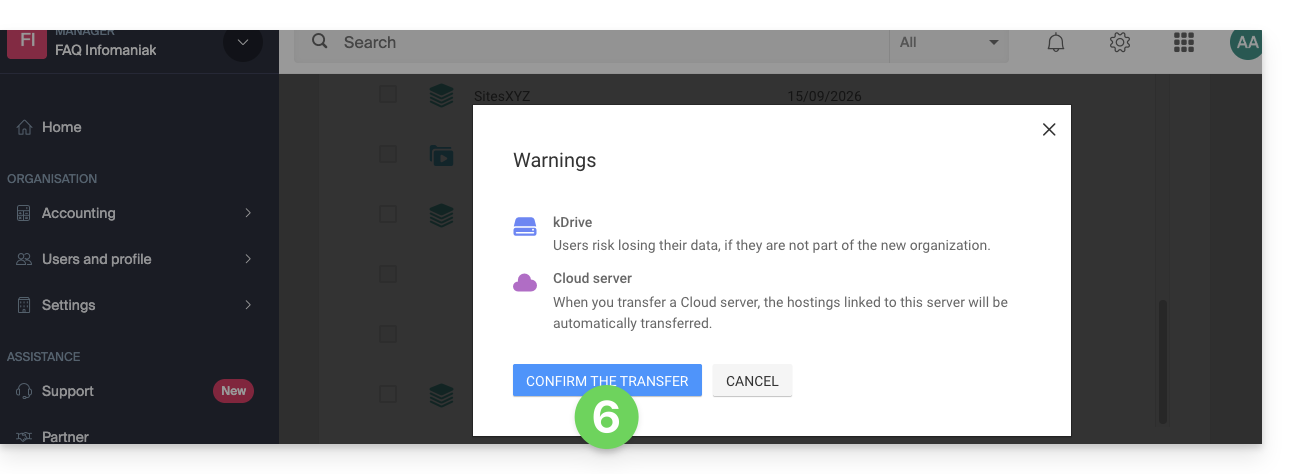
- Regarding kDrive: users who currently have access to kDrive will be integrated into the new Organization.
- They will retain their access, their kDrive permissions, but any management rights they may have over the product itself will be lost.
- Groups (formerly "work teams") are not moved either, rights managed via Groups are also lost.
- If your user has access to multiple Organizations it is even easier to send to one of them the product of your choice.
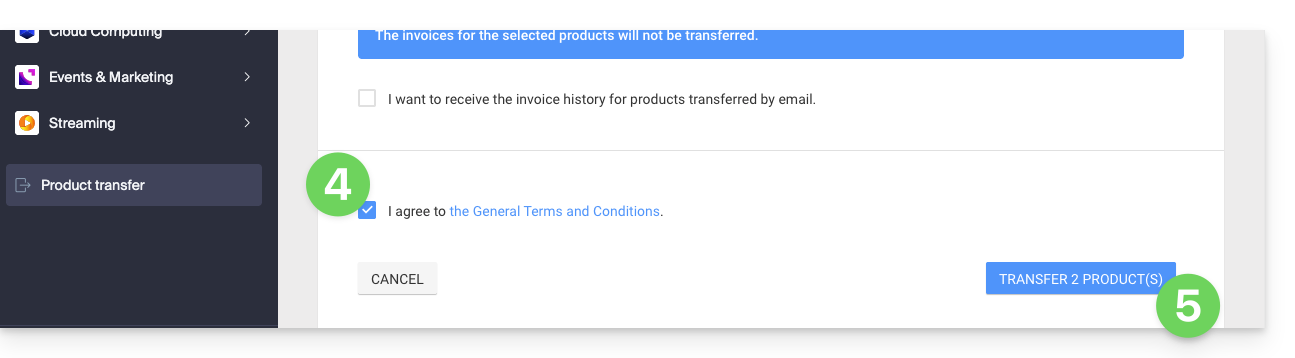
- The invoices of the selected products will not be transferred.
- This operation does not cause any interruption.
Generate a transfer link
Prerequisites
- Be Administrator or Legal Representative within the Organization.
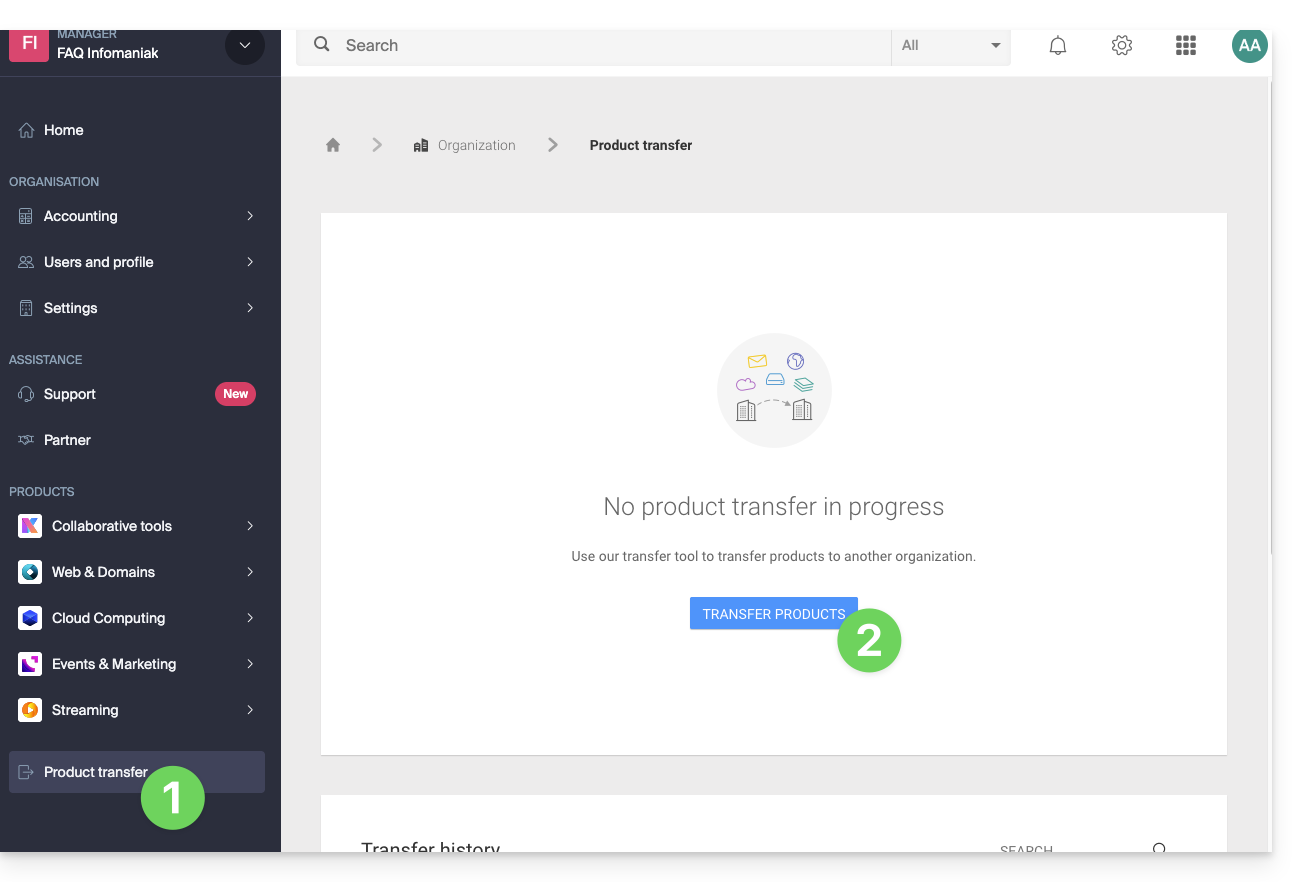
To transfer a product:
- Click here to access product transfers management on the Infomaniak Manager (need help?).
- Click on the Transfer products button:
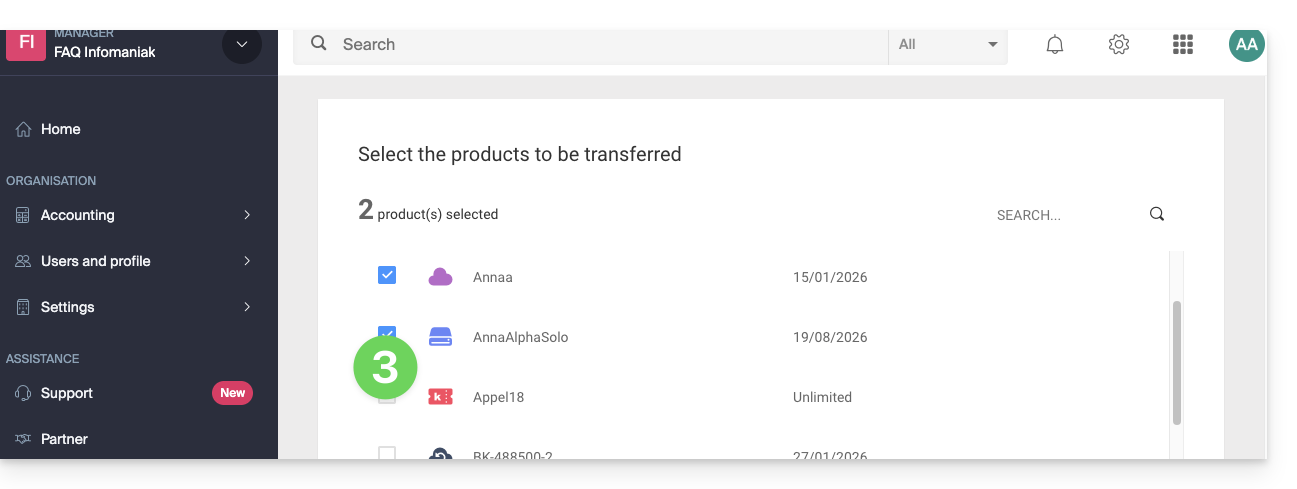
- Check the product(s) to be moved:
- Read and accept the general conditions.
- Click on the Transfer button:
- Read and validate any warnings:
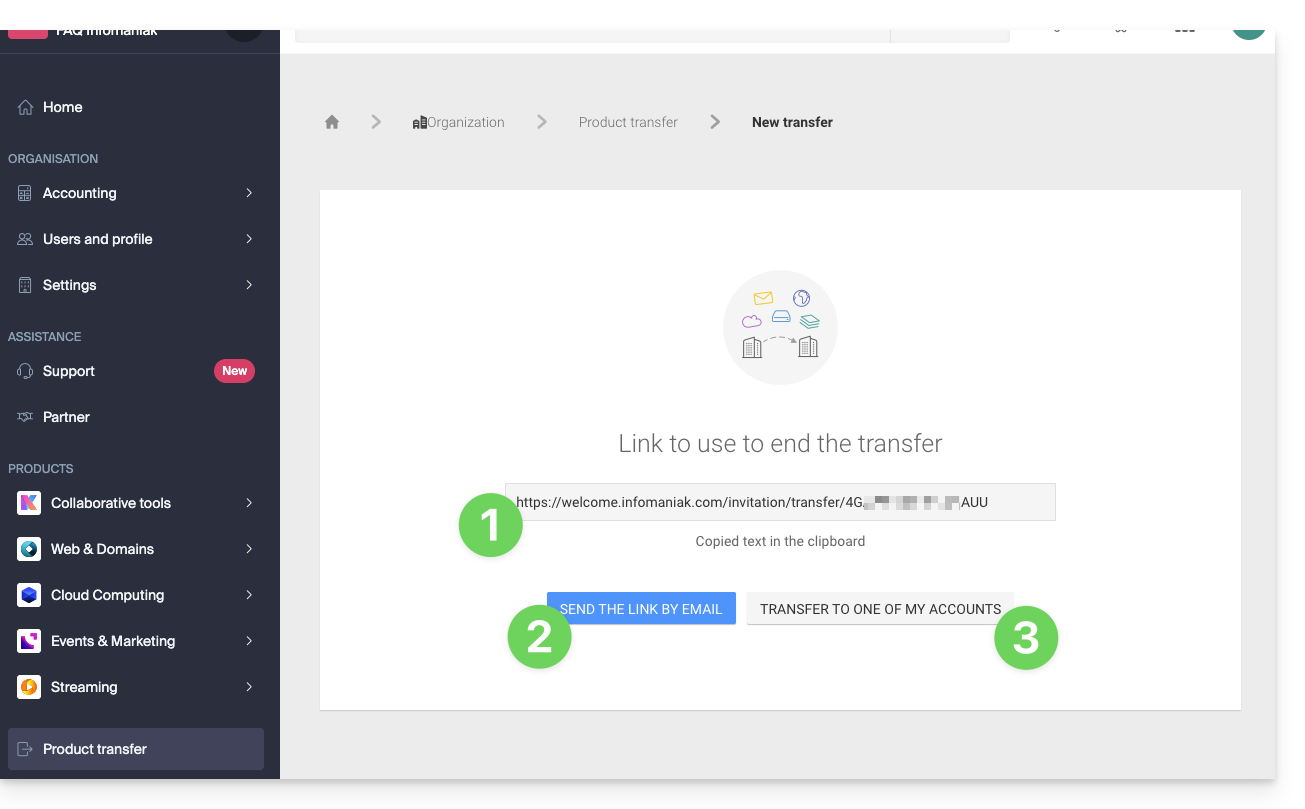
The transfer has started. Now, at your choice, you can:
- Copy the transfer link…
- or send it to the email address of your choice…
- or select directly one of the Organizations to which your user is attached, and the selected product will be transferred there:
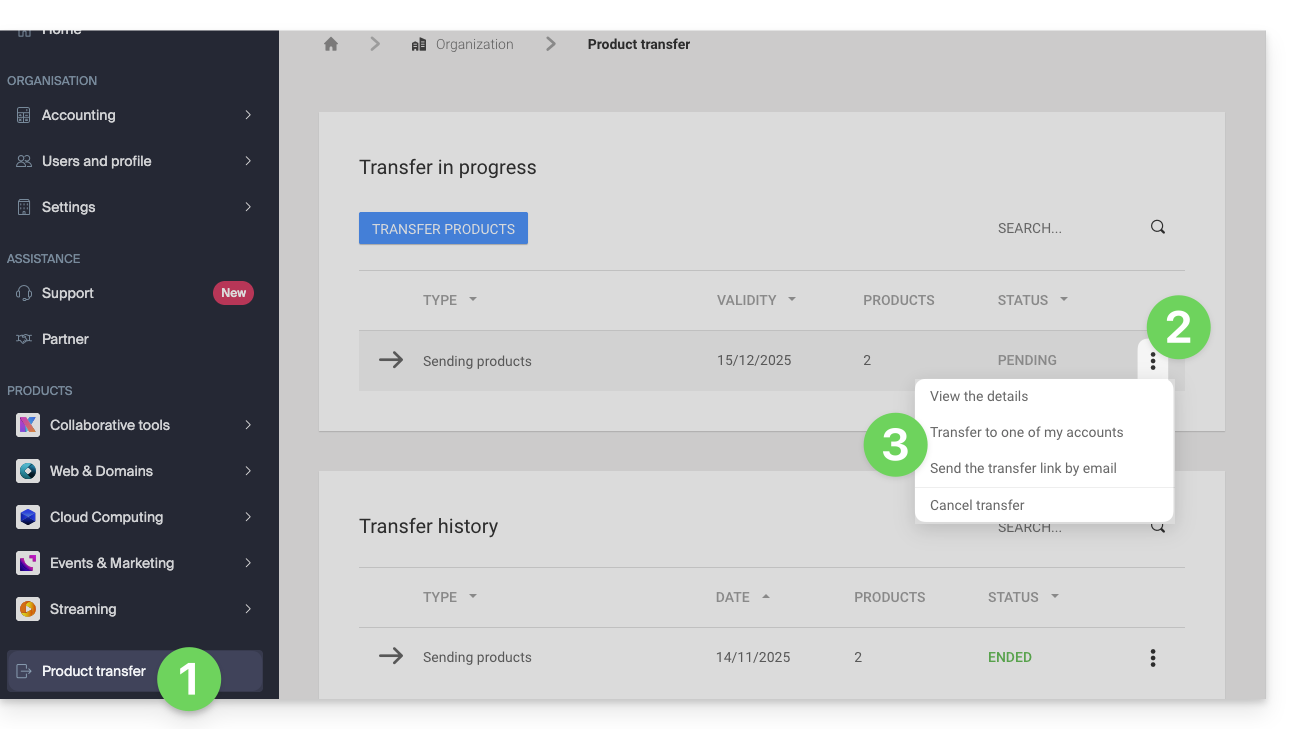
At any time you can return to the product transfer page to find the possibilities listed above:
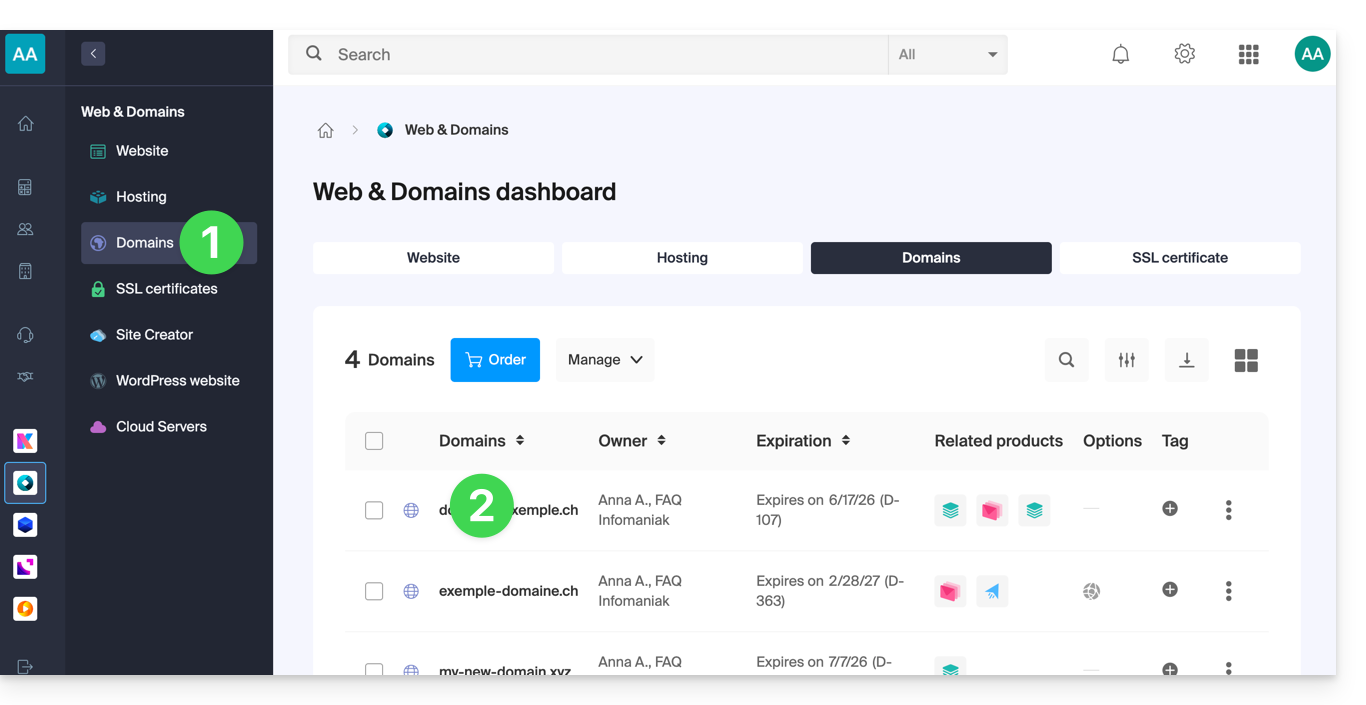
Alternative method
In the case of one-off transfer, you can also go directly to the dashboard of the product concerned and click on Manage (example in the image below) however, since this menu is not always present, it is better to prioritize the first method above, which also allows bulk transfer: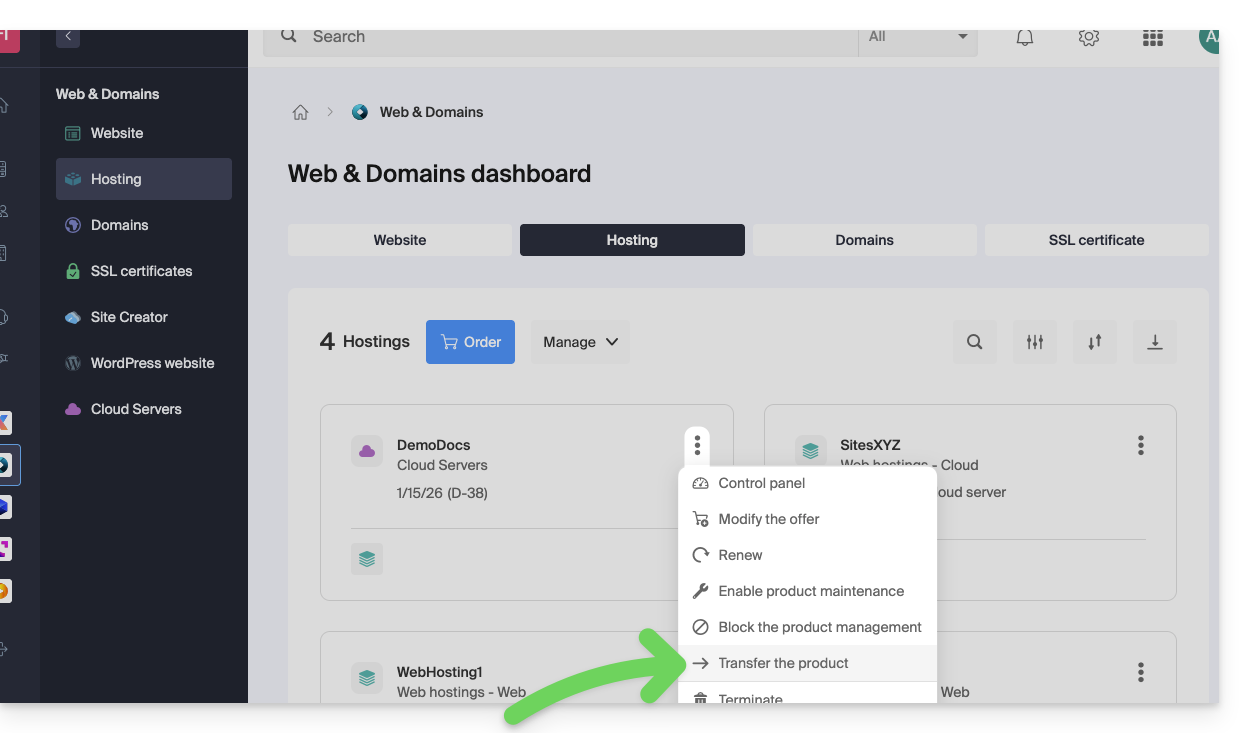
Refer to this other guide regarding Jelastic Cloud.
Receive the product
Once a product transfer has been started by a user…
1. Be on the Organization that must receive the product
- Click here to log in to the Manager on the Organization that must receive the product(s).
- The user specified when logging in to the Infomaniak account must have administrative rights.
- If necessary, you can create a new Organization to receive products.
2. Execute the obtained link
- Click on the link obtained in the first step above.
- You can also simply paste it into a browser while being logged in to the appropriate Infomaniak account.

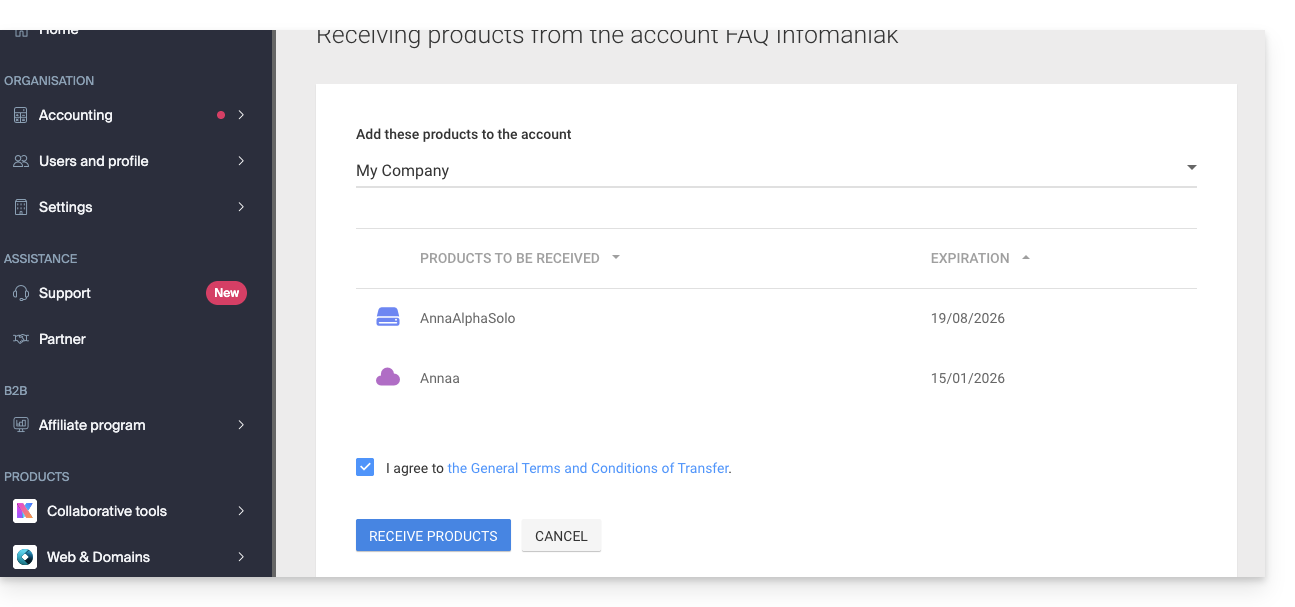
3. Validate the product transfer
- If necessary, choose the destination Organization using the drop-down menu.
- Read and accept the general conditions.
- Click the Receive the product button (if the button is not clickable, make sure you have selected the Organization):
Find transfers in progress or completed from the bottom icon on the left sidebar of the Infomaniak Manager: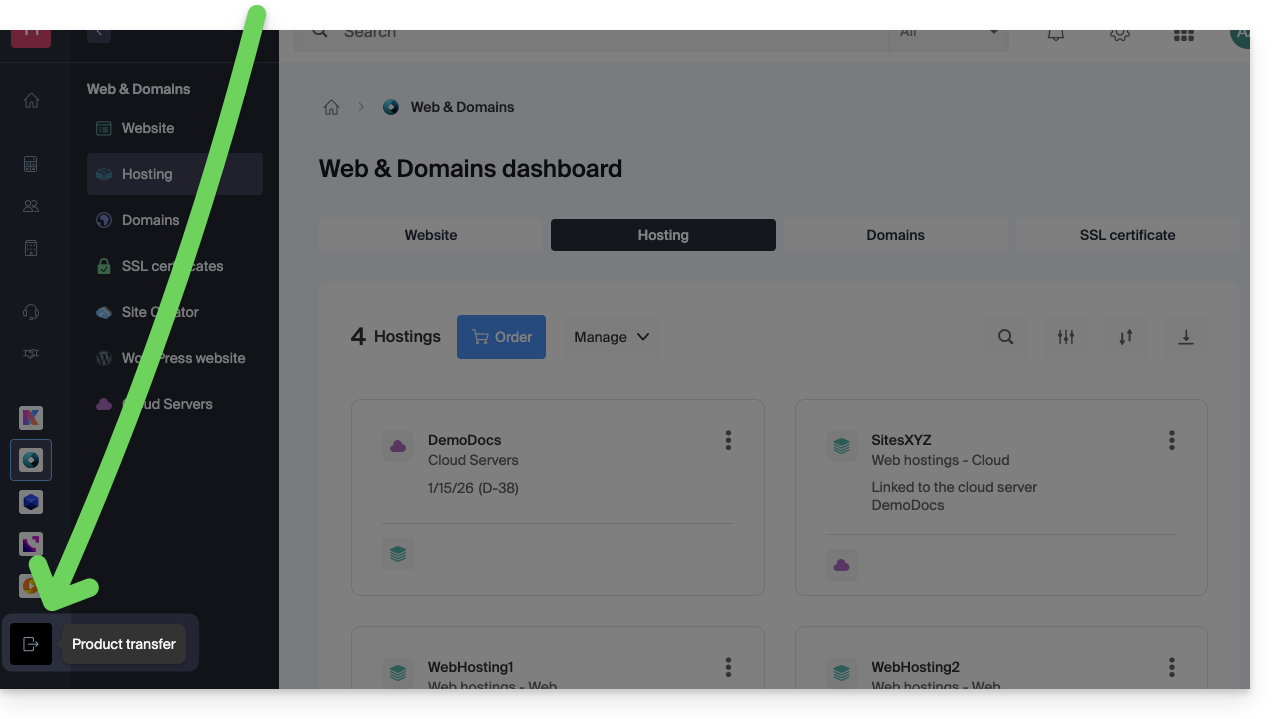
Link to this FAQ:
Has this FAQ been helpful?
This guide explains how the Infomaniak Partner Program works, its eligibility criteria, and its numerous exclusive benefits for IT professionals.
Preamble
- By becoming a Partner, you develop your activities with a provider recognized for its reliability, security (ISO certified) and exemplary ecological commitment.
- The program is open to any professional entity (Switzerland or Europe) that meets the following criteria:
- Be a company registered with the Trade Register (or SIRET/equivalent) with an active website.
- Manage a volume of products equal to or greater than CHF 2000 / € 1800 per year.
- Provide first-level technical support and billing for your own clients.
- Commit to using exclusively Infomaniak solutions for projects from the tender platform.
- Respect the specific conditions for Resellers.
- Become a Partner to immediately benefit from discounts, cashbacks and centralized management tools.
- If you are an individual, turn to the Affiliate Program (cannot be combined with Partner status).
Exclusive benefits for Partners
The Partner Program is designed to maximize your profitability while offering you a sovereign and high-performance infrastructure.
Priority supportSupport Plus included
- Free access to Support Plus: as a Partner, you benefit from privileged access to Infomaniak experts.
- Your requests are processed on a priority basis by technical teams based in Switzerland, guaranteeing maximum responsiveness for your clients.
- A direct line and a dedicated ticketing interface to quickly resolve your complex issues.
Profitability and Savings
- Discounts and Cashbacks: up to 35% discount on Infomaniak's flagship products and recurring cashbacks on managed services.
- Domain Prices: access to the best market prices for the most common extensions.
- Free Tools: free and unlimited access to all WordPress themes and plugins from Elegant Themes (Divi, etc.).
Visibility and Development
- Tenders: receive exclusively the needs submitted by Infomaniak clients via the tender platform.
- Partner Directory: improve your SEO and visibility by being listed for free on the official directory.
Simplified Management (Reseller Console)
- Centralized Interface: a single dashboard to manage all your client base and track your revenues.
- Access Delegation: manage your collaborators' access rights and define precise intervention perimeters on your clients' accounts.
- White Label and Billing: total freedom on the resale of your services and simplified management of financial flows.
Resources and Technical Guides
- What is a Partner?
- What is a Client (in the Partner sense)?
- Add a Client and Manage Their Products
- Authorize a Partner to Manage Your Products
- Manage Access Permissions Between Partner and Client
- Manage Infomaniak Billing Between Partner and Client
- Export Client Billing Data
- Terminate a Relationship Between Partner and Client
Link to this FAQ:
Has this FAQ been helpful?
This guide explains how to obtain the authorization code (EPP code) for a domain name managed by Infomaniak, thus allowing the management of a domain to be transferred to another registrar.
Preamble
- The terms "
EPP", "AuthCode", "AuthInfo", "transfer code" and "authorization code" all refer to alphanumeric sequences specific to the domain whose main purpose is to verify the owner's authorization before a transfer between Registrars. - Refer to the main guide regarding domain transfer procedures.
- The authorization code is always and only sent to the email address of the owner listed in the WHOIS of the domain.
Obtain the authorization code for a domain
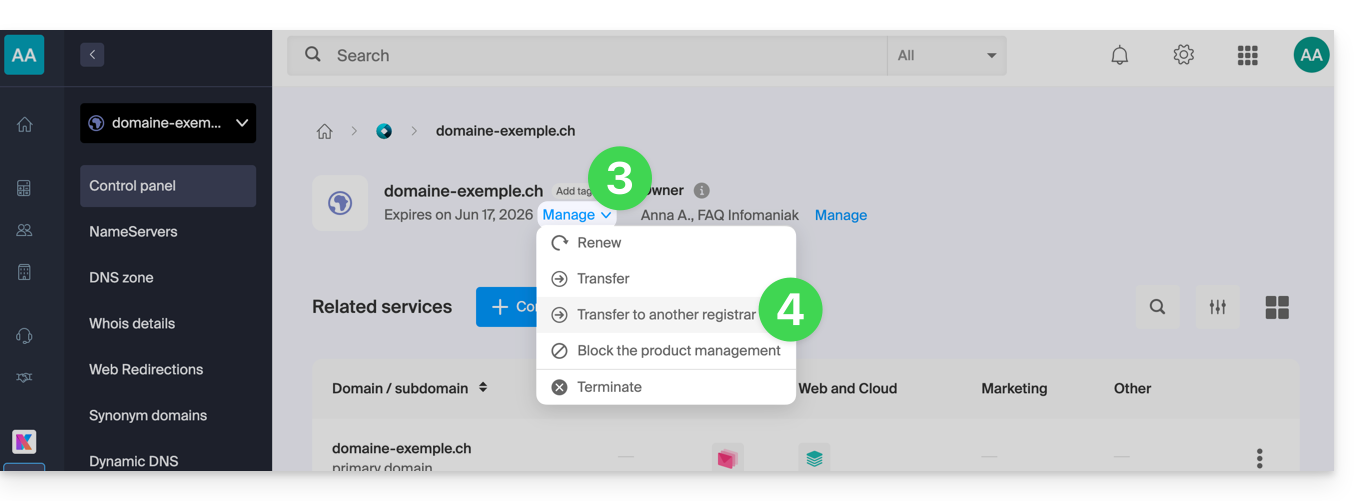
To obtain the transfer authorization code:
- Click here to access the management of your domain on the Infomaniak Manager (need help?).
- Click directly on the name assigned to the domain in question:
- Click on the Manage button .
- Click on Transfer to another registrar:
- If necessary, to authorize the transfer:
- Click to deactivate the Domain Privacy option.
- Click to Unlock this domain.
- Click the button to Continue:
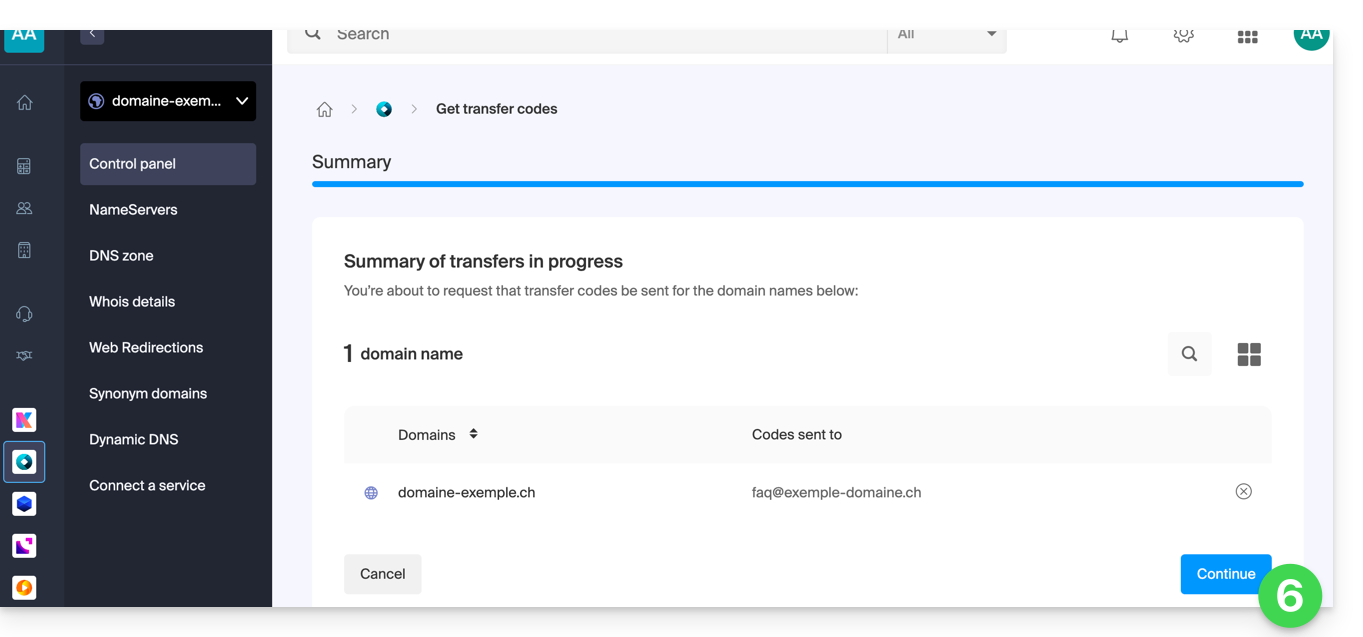
- The code is sent by email to the contact address (see preamble above).
To resend the code, repeat the procedure to the end.
Particularity of some extensions
And then?
Once you have entered the authorization code with the third-party provider and the outgoing transfer has started, Infomaniak is no longer involved.
Contact the new registrar to find out the transfer time during which the domain name will still be visible in your Infomaniak interface. Infomaniak unfortunately cannot intervene in any operation that would speed up the outgoing transfer.
Link to this FAQ:
Has this FAQ been helpful?
Thank you for entrusting Infomaniak with the management of your services, hoping you enjoyed using them.
Preamble
- For most products, confirm the cancellation request by email, otherwise no data will be deleted.
- Outstanding and out-of-package fees remain due.
- A cancellation confirmation is sent to any other administrators of the Organization.
- Backups will be irrevocably deleted upon cancellation, making any restoration impossible.
Which product/service do you wish to delete?
Collaborative Tools
Web & Domains
- Domain Name
- Web Hosting
- Infomaniak Site Creator
- Cloud Server
- SSL Certificate
- Custom Brand (Customized URLs)
Cloud Computing
Events & Marketing
Streaming
Close your Infomaniak account or delete one of your Organizations.
Do not hesitate to share your personal experience with Infomaniak. Feedback from satisfied and less satisfied customers is useful and helps improve service quality and propose solutions tailored to needs!
Link to this FAQ:
Has this FAQ been helpful?
This guide provides instructions on how to obtain one or more Infomaniak invoices before and after payment, view, download, and print all or part of the billing document history for your accounting purposes.
Introduction
- Final invoices can only be printed after they have been paid.
- If necessary, a personalized message can be easily added to your billing documents: refer to this other guide.
Accessing the Invoice History
Prerequisites
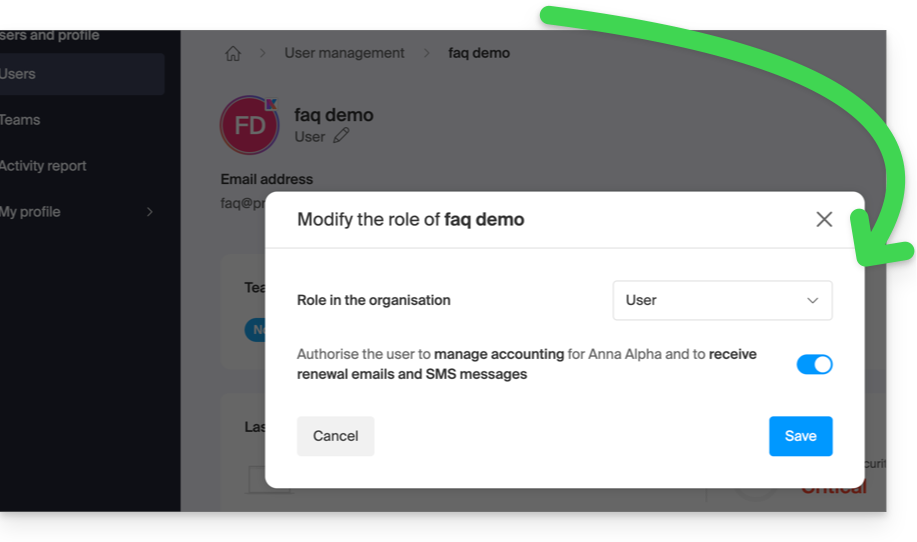
You must be an Administrator or Legal Representative within the Organization…
- …or a standard user account but with the permission to manage accounting enabled:
To access the billing document page:
- Click here to access the invoice history in the Infomaniak Manager:
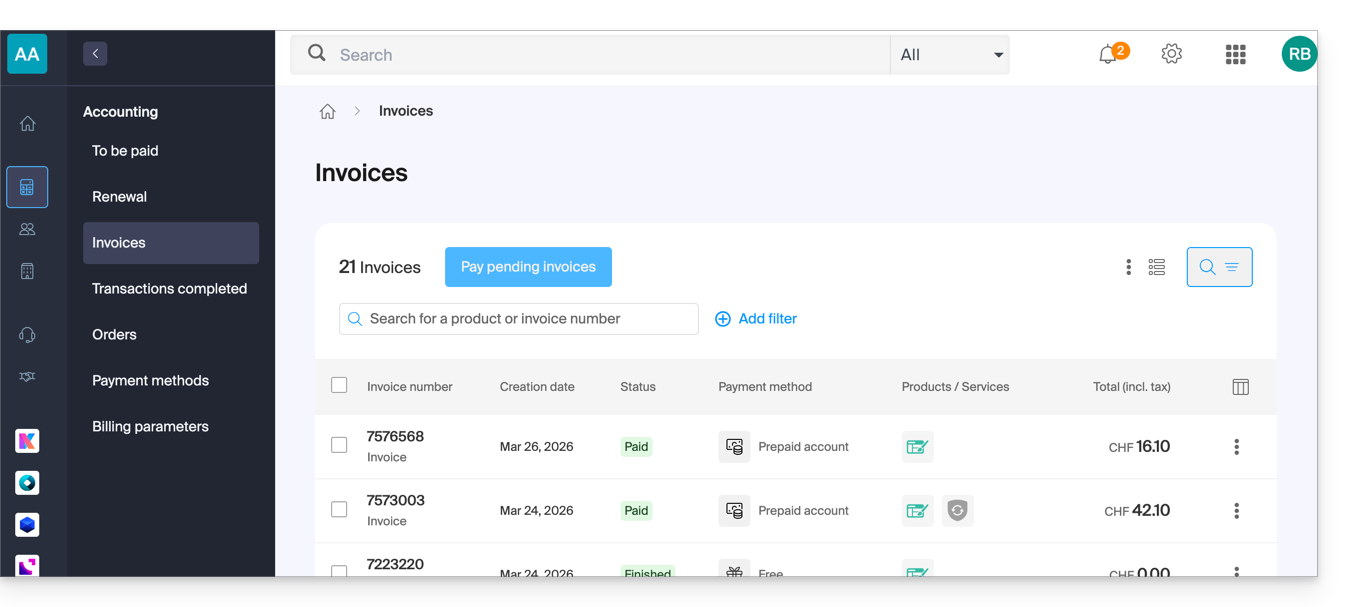
- The table automatically displays the most recent billing documents.
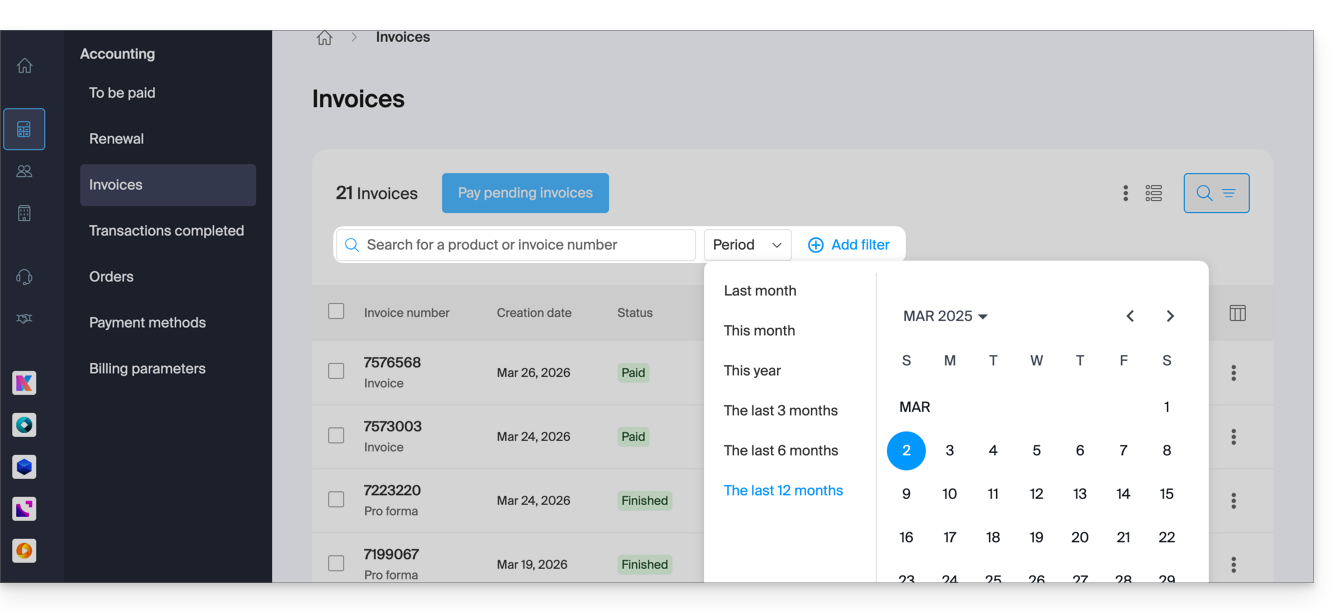
- The top section allows you to filter the documents based on the Paid, Reimbursed, etc. status and based on the desired period (start and end calendar):
Printing/Exporting a Billing Document
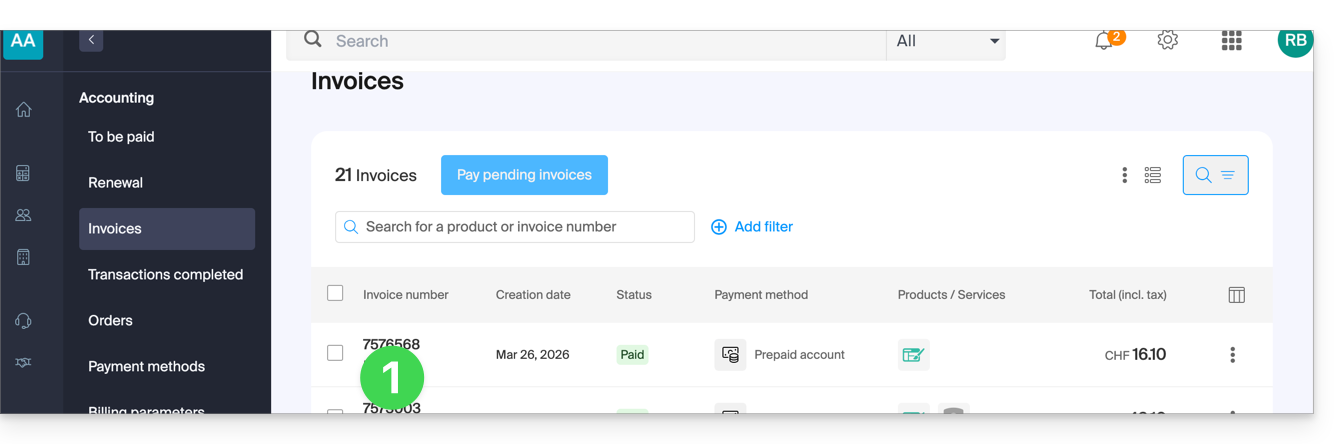
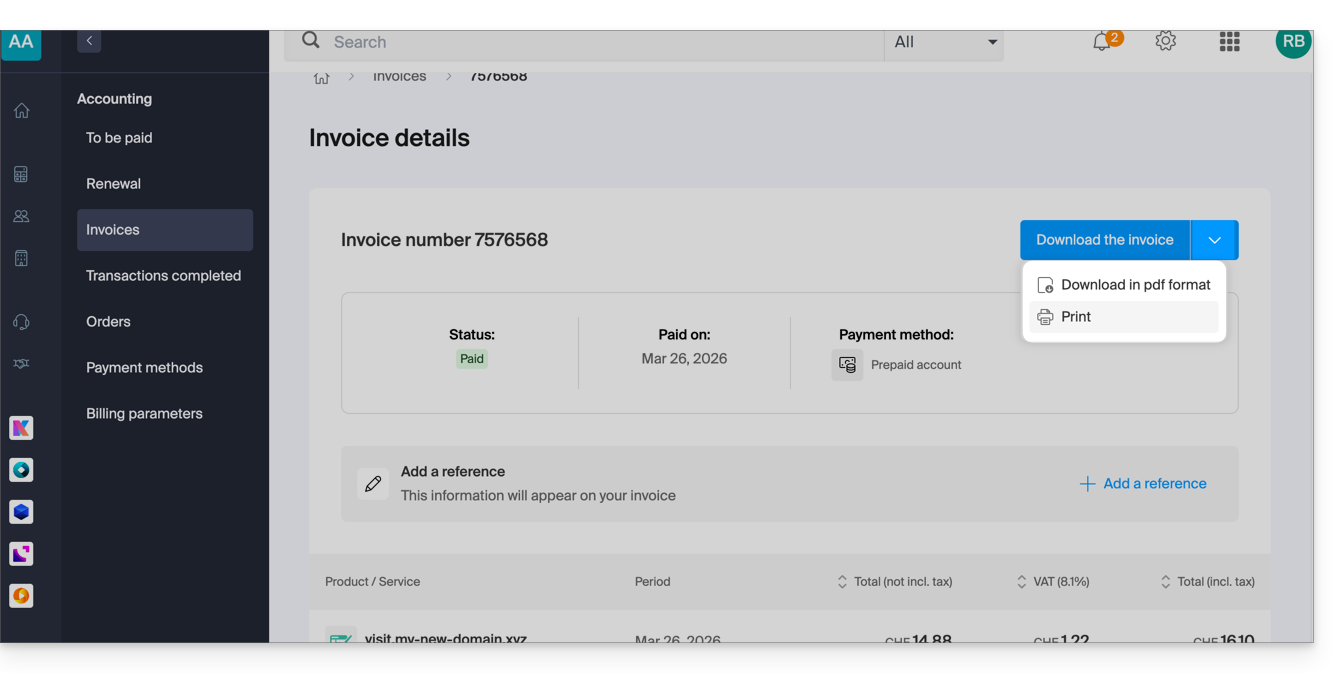
To view one of these documents in PDF format and then save it to your device or print it with your printer:
- On the same page, click on the invoice in question in the table that is displayed:
- Click on the Download button or on the chevron for other options:
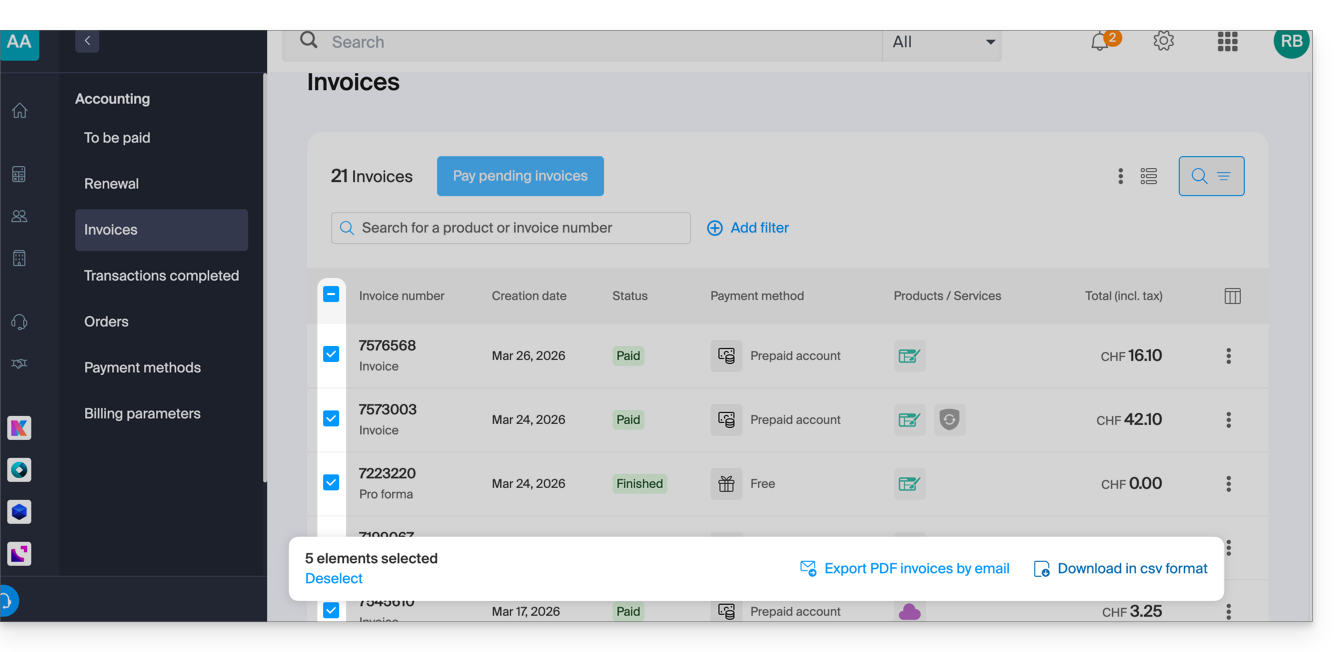
Export a set of billing documents
To download a set of documents in a CSV file in .csv format or receive them by email:
- On the same page, filter the documents according to the Paid, Reimbursed, etc. status and according to the desired period (start and end calendar).
- Click on the button at the bottom according to the desired export type:
Receive the (next) PDF invoice by email
To ensure that the invoice is always attached in PDF format with each renewal email:
- Click here to access the configuration / accounting page in the Infomaniak Manager (need help?).
- Access requires authentication with a user who has sufficient rights.
- On this page, enable or disable the addition of PDF invoices:

Your preferences are automatically saved as soon as a change is made on the page.
Print a Pro Forma Invoice
Pro Forma invoices do not have any legal, judicial, tax, or accounting value:
- Click here to access payment management in the Infomaniak Manager.
- Select the products concerned.
- Click on Generate a Pro Forma Invoice at the bottom of the table
- Once displayed, you can then download the Pro Forma invoice.
Link to this FAQ:
Has this FAQ been helpful?
This guide provides 2 methods to change the billing frequency of services subscribed to with Infomaniak.
Change the billing frequency
First method
The first method involves changing the frequency during a payment:
- Click here to access payment management on the Infomaniak Manager (need help?).
- Select the product concerned.
- Click on the dropdown menu to the right of the item concerned to modify the duration for which the payment should apply:
- Click the blue button at the bottom of the page to pay the selection and change the billing frequency of the selected product.
For this to be taken into account, it is essential to change the frequency AND pay the invoice including the product at the changed frequency.
Second method
The second method is as follows:
- Click here to access the management of your products on the Infomaniak Manager (need help?).
- Click on the type of product concerned (e.g. hosting, Cloud Server, etc.)
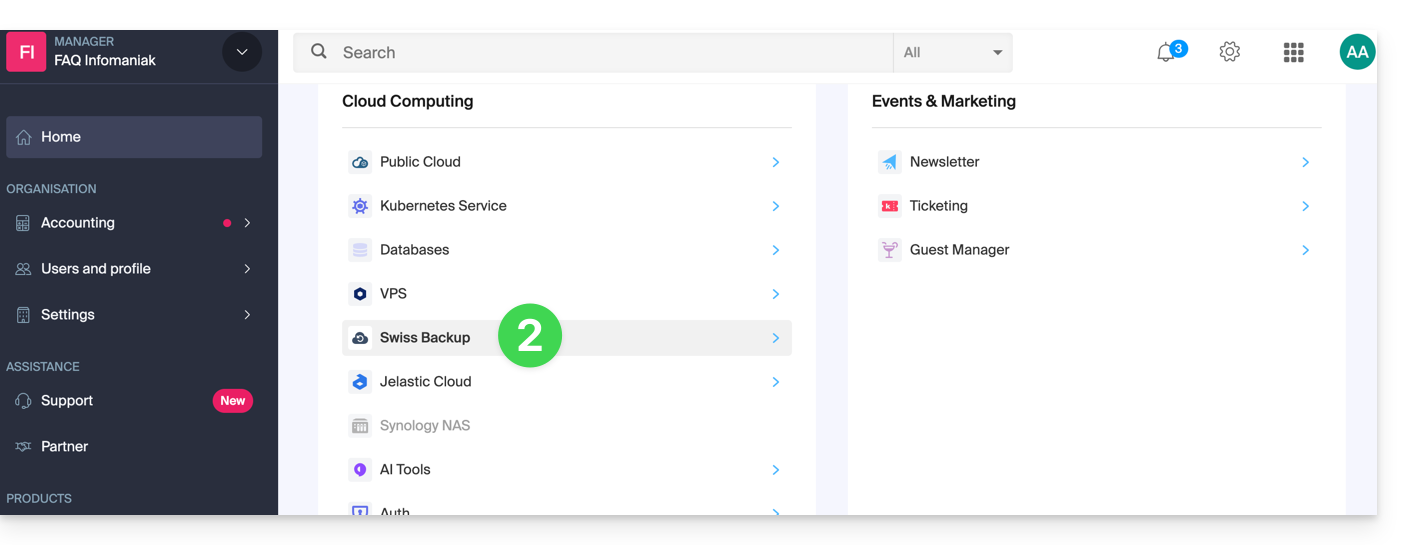
- Click on the name of the product concerned:
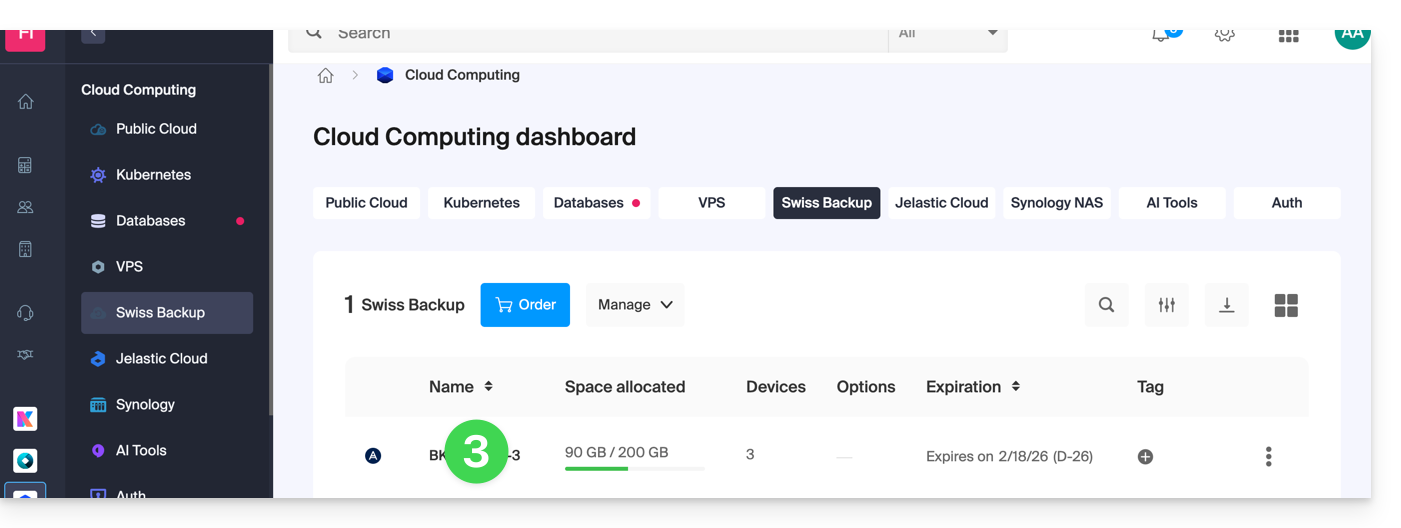
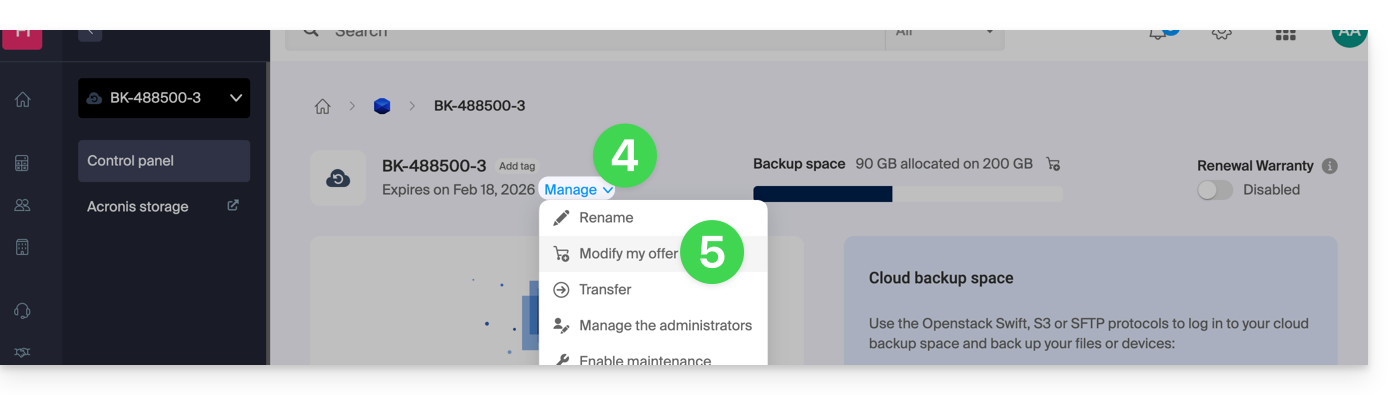
- Click on the Manage button.
- Click on Modify the offer:
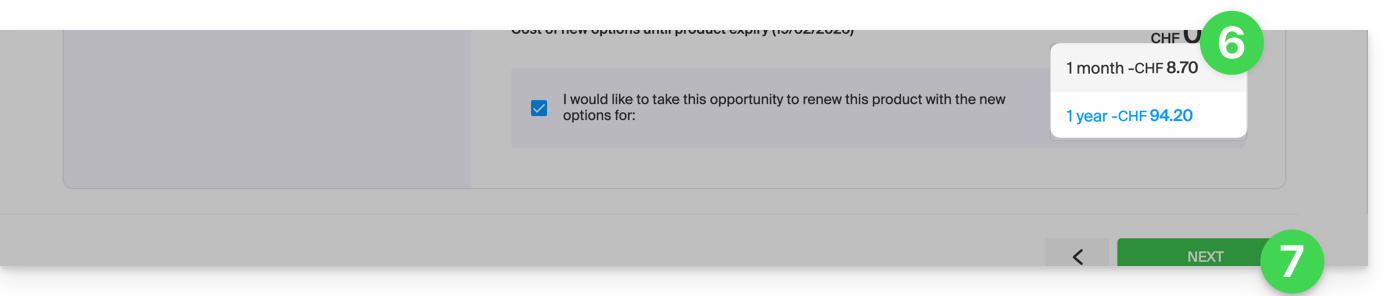
- Choose the desired billing frequency (only possible from a certain amount).
- Confirm the change:
If you switch from annual to monthly billing or from quarterly to monthly billing, only modify the billing frequency during the month preceding the end of the current term. For example, if you paid for or renewed your Cloud hosting for 1 year on January 1st, 2026, do not change the billing frequency before December 1st, 2026, otherwise you will be billed again for all the remaining months of 2026 and it will be necessary to contact Support to be refunded.
Link to this FAQ:
Has this FAQ been helpful?
This guide explains what a Web host like Infomaniak is, and specifies its role, its scope of action, and the limits of its technical support.
Infomaniak, web host since 1996
According to Wikipedia, a Web host is a company that provides Internet hosting for computer systems to individuals or entities who do not wish to do so themselves.
Infomaniak, that’s also:
- … decades of experience in hosting and high-performance online solutions.
- … more than a million users in Switzerland and Europe trusting the management of their critical data.
- … a company certified ISO 27001, 9001, 14001, 50001 and committed to sustainable digital technology.
- … 100% of "Swiss made" technological expertise with data hosted in Switzerland in its own data centers.
- … a rich knowledge base and customer support available to guide you.
Responsibilities and limits of intervention
As a host, Infomaniak installs, secures, and keeps the server infrastructure up to date, evolves its management interfaces (Manager) and assists its customers in the optimal use of the tools provided. Infomaniak strives to offer solutions accessible to all; however, human support for free products is inherently limited to ensure the sustainability of these services.
For security and confidentiality reasons, no assistance will be provided without formal identification of the interlocutor.
Support is exclusively for Organization administrators. End customers or users benefiting from a contract via a Reseller Partner must contact their administrator or dedicated service provider first.
Scope of technical support
Technical assistance does not intervene for:
- Development and programming: debugging sites, correcting source code, personal scripts (PHP, JS, etc.)
- The use and integration of APIs.
- Application maintenance and webmastering: troubleshooting, updating, or managing content for third-party applications (e.g., CMS like WordPress, email clients like Outlook, etc.).
- Local and custom interventions: remote control, configuration of your own hardware, complex manual installations or migrations.
But support will be happy to assist you for:
- The infrastructure and the Manager: resolution of incidents related to the network, hardware, or Infomaniak management interfaces.
- The use of Infomaniak services: clarification of configuration processes and assistance in getting started with our native features.
- Documentation guidance: guiding you to the appropriate technical resources and guides to make you self-sufficient.
A Premium assistance and a migration service are available for more specific needs.
Find external help
For help with the content of your site, its programming, or the advanced organization of your mailboxes, use the Infomaniak tender platform which lists over 1000 verified professionals, or consult the directory.
Link to this FAQ:
Has this FAQ been helpful?
This guide details the payment system for your Infomaniak services via a prepaid account.
Preamble
- A prepaid account consists of a reserve of money on your Infomaniak Manager that you can top up as you wish.
- Once topped up, it allows you to settle your financial transactions.
- Find out about the limits and payment methods for the prepaid account.
Recharge your prepaid account
To top up your prepaid account:
- Click here to access the management of your prepaid account on the Infomaniak Manager.
- Click on the blue button Credit the account:
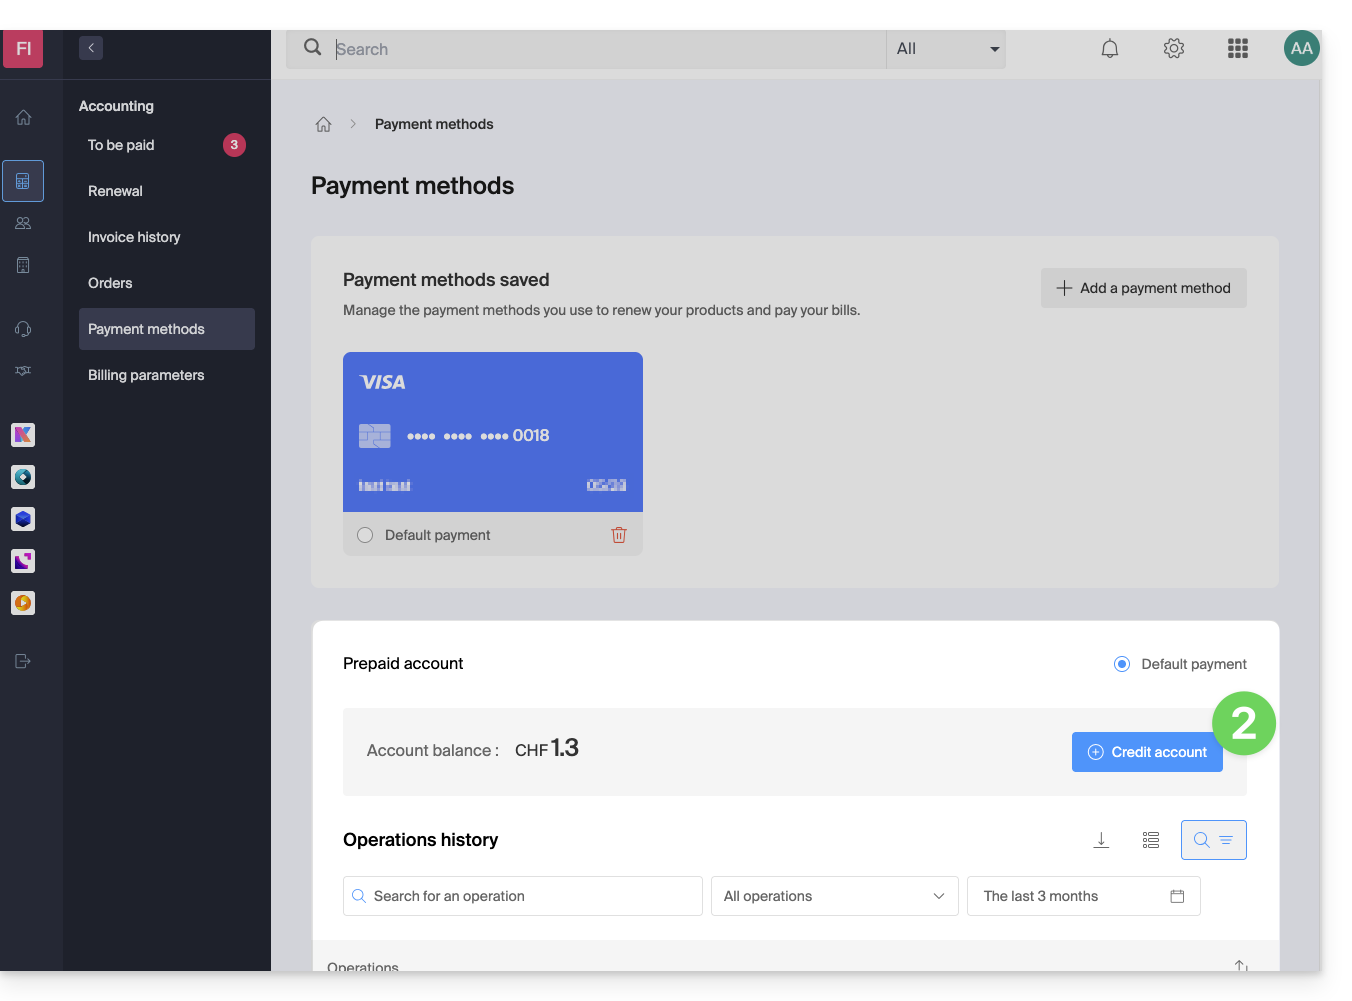
- Enter the amount to credit.
- Follow the displayed instructions to credit the account from your payment methods.
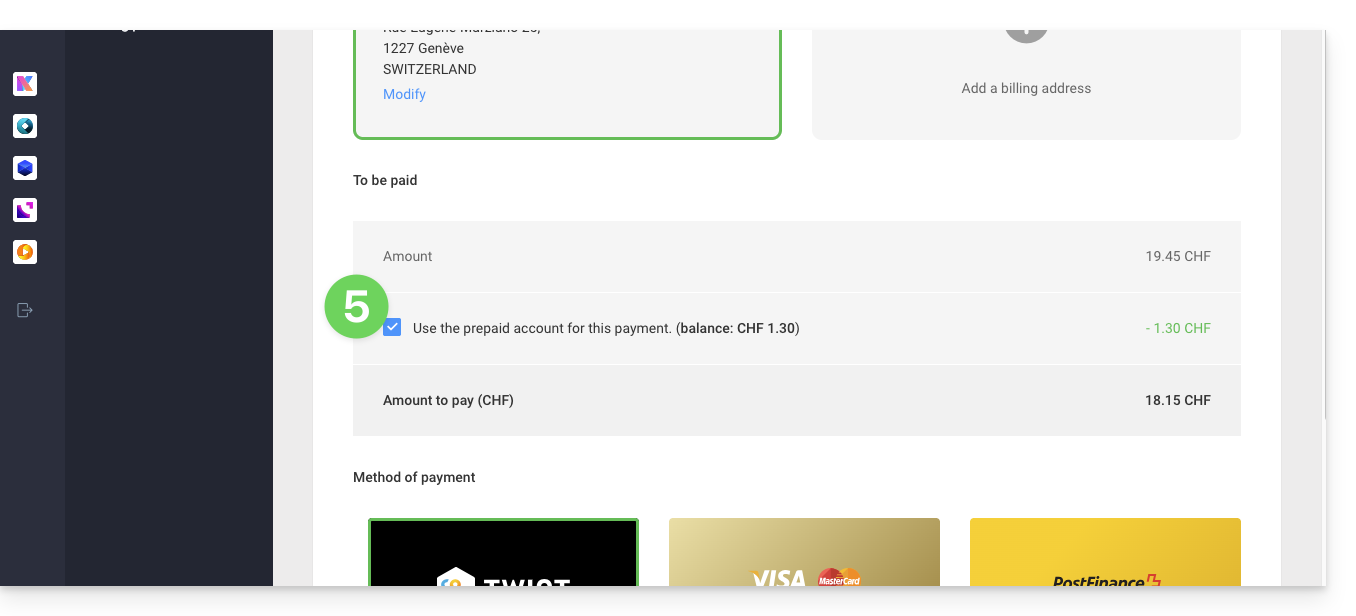
Prepayment to pay for a new purchase
When ordering a new product, in the final step, click on the chevron to access the other payment methods, including the prepaid account: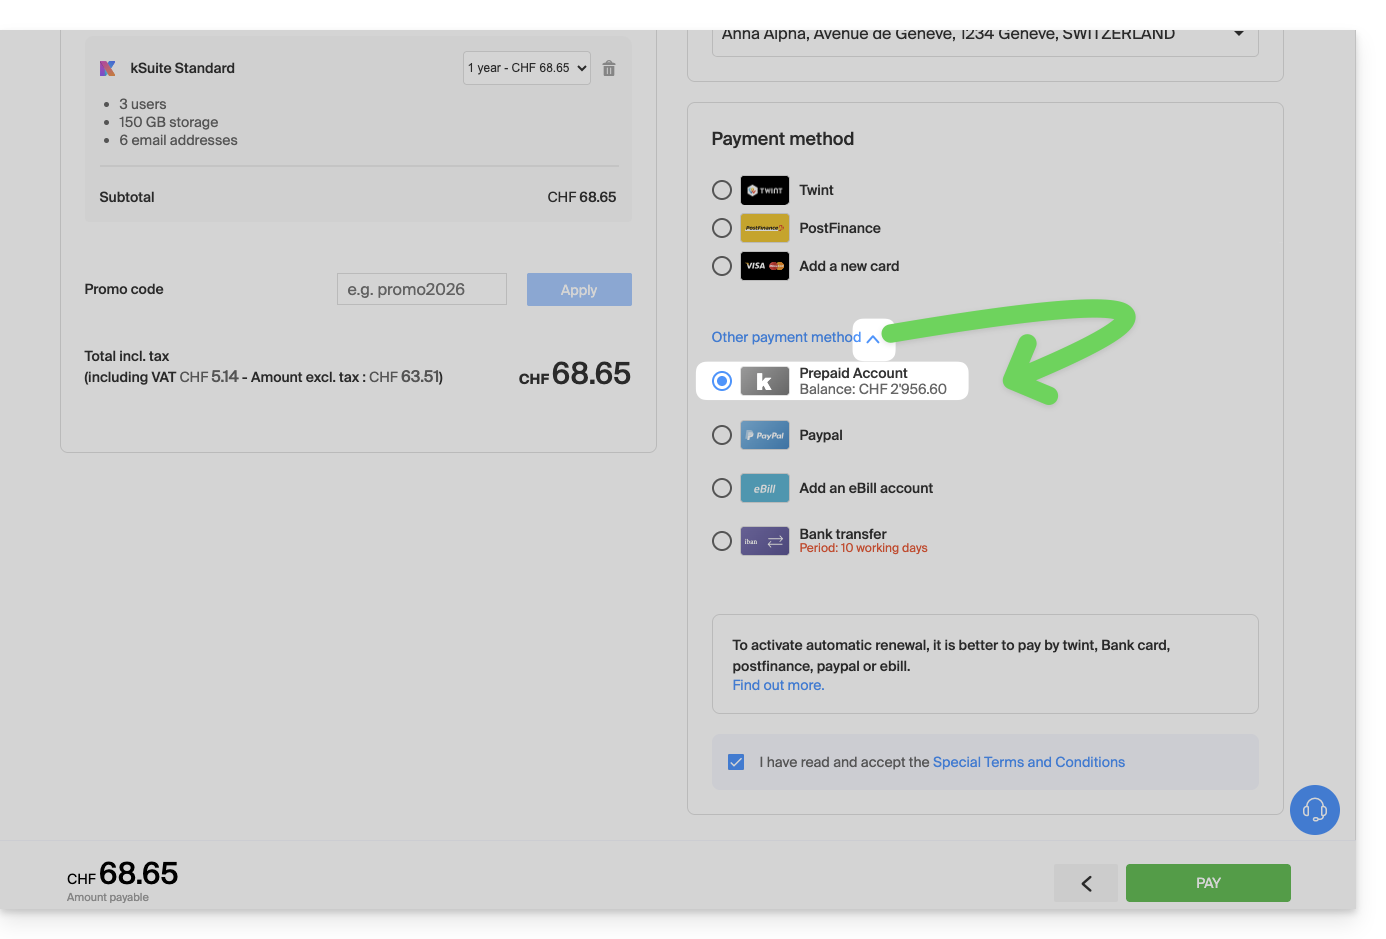
Prepayment to settle an open order
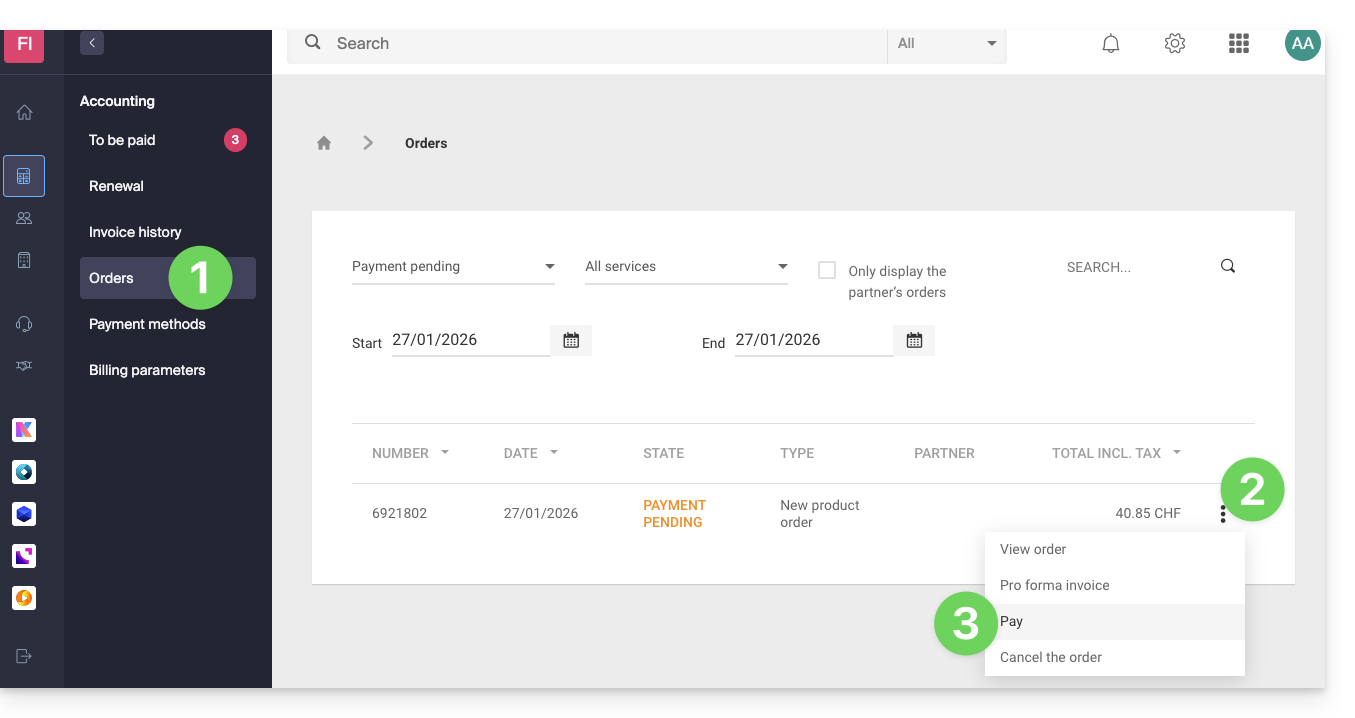
To settle an open order with your prepaid account:
- Click here to access the management of orders on the Infomaniak Manager.
- Click on the action menu ⋮ located to the right of the order in question.
- Choose Pay:
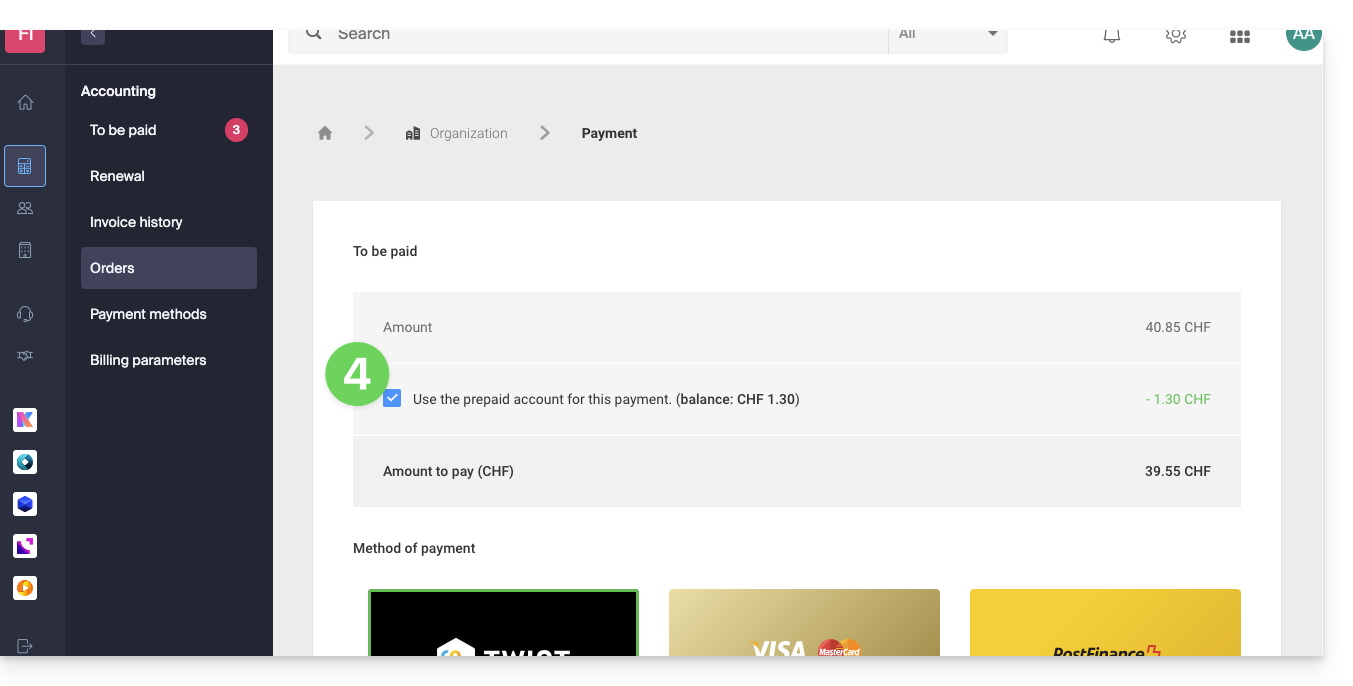
- Choose the prepaid account as the payment method and confirm to complete:
Prepayment to renew a product
To settle an upcoming invoice with your prepaid account:
- Click here to access payment management on the Infomaniak Manager.
- If necessary, click on the date filter (next 2 months) to Show all.
- Select the product(s) to renew.
- Click the button to pay for the selection:
- Proceed to the payment page where you can choose the prepaid account as the payment method and confirm to complete:
Automatically renew products
Activate one-click automatic renewal for the products of your choice. This feature ensures that you do not lose a domain name or inadvertently block access to your services. Modify your payment preferences at any time.
Link to this FAQ:
Has this FAQ been helpful?
This guide explains how to modify certain language settings in the Manager and kSuite (Infomaniak Mail app, Calendar, Contacts, etc.).
Change the language of your Infomaniak account
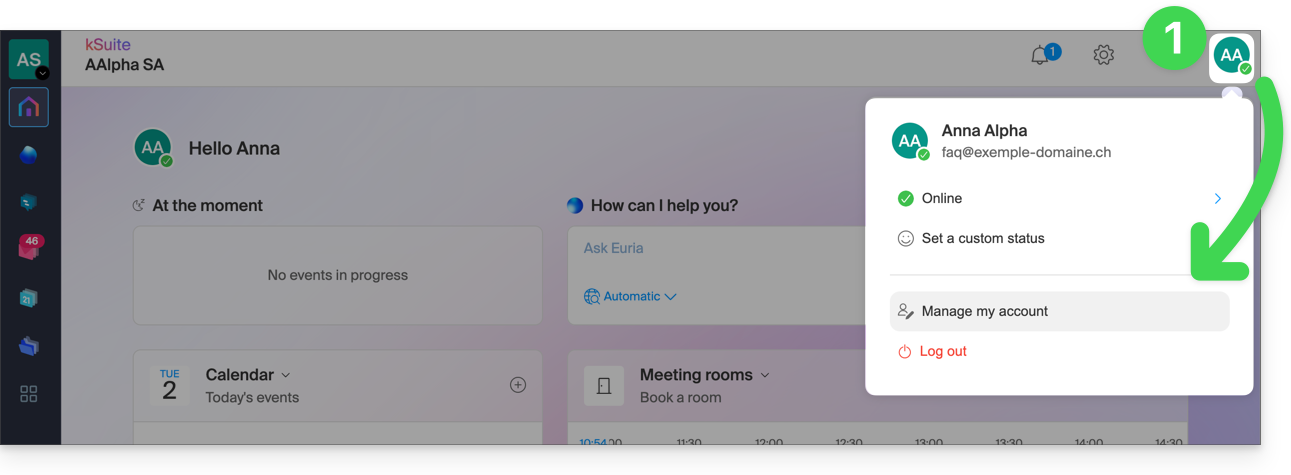
To do this:
- Click here (or on the badge with your initials / avatar in the top right corner of the Infomaniak Manager) to "Manage my account":
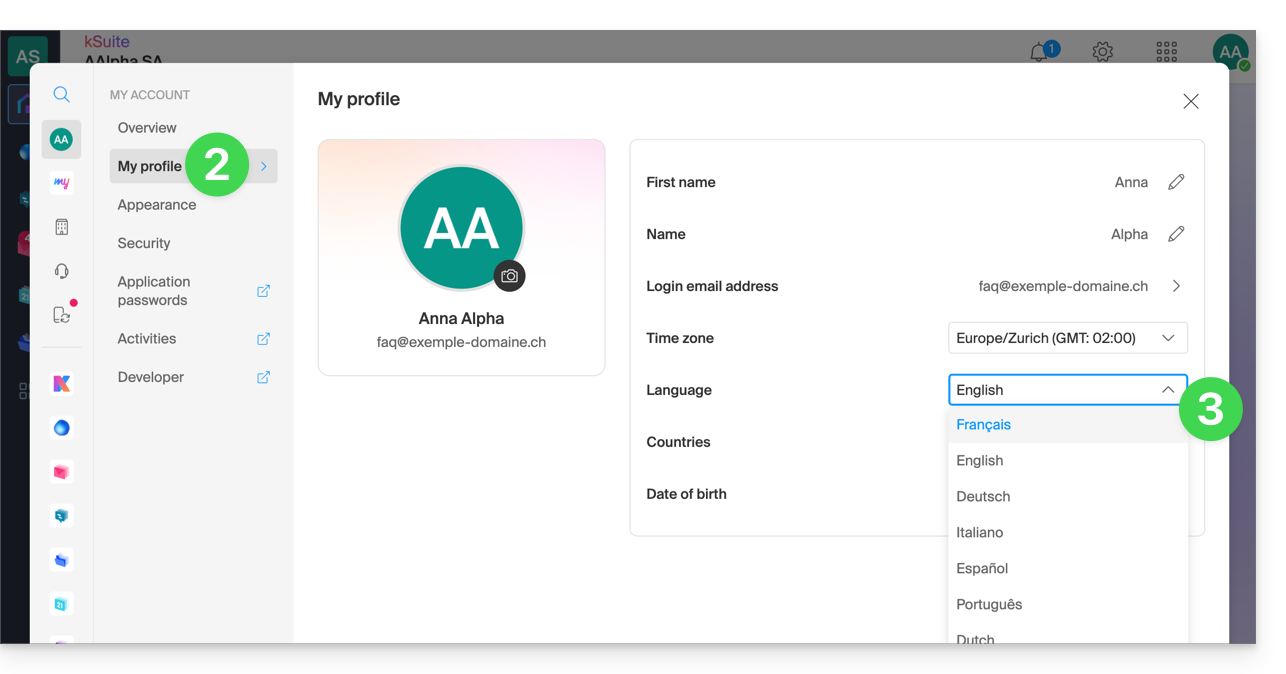
- Click on My profile in the left-hand menu.
- Click on the language dropdown menu to choose from French, English, German, Italian, Spanish, Portuguese, etc.:
Change the regional settings of your account
In the same place, you can set the time zone for your region / country: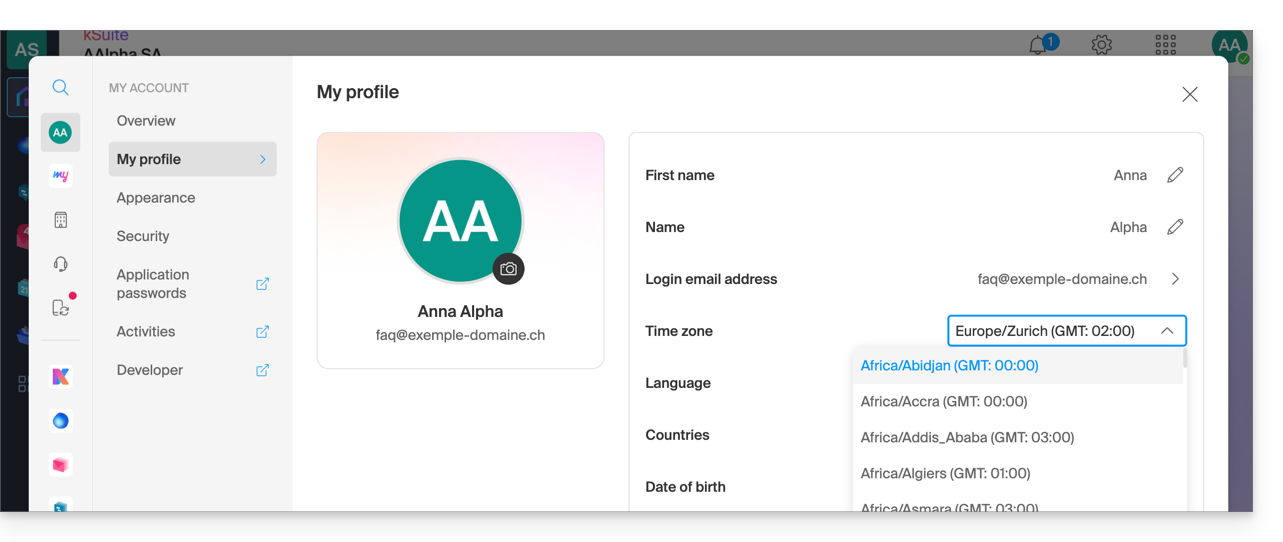
Link to this FAQ:
Has this FAQ been helpful?
This guide explains how to change the email address used to recover access to your Infomaniak account.
Preamble
- When you forget your Infomaniak password, the procedure you can follow includes resetting the password via a link that will be sent to your secondary email address.
- You can specify or modify it in advance by following this guide.
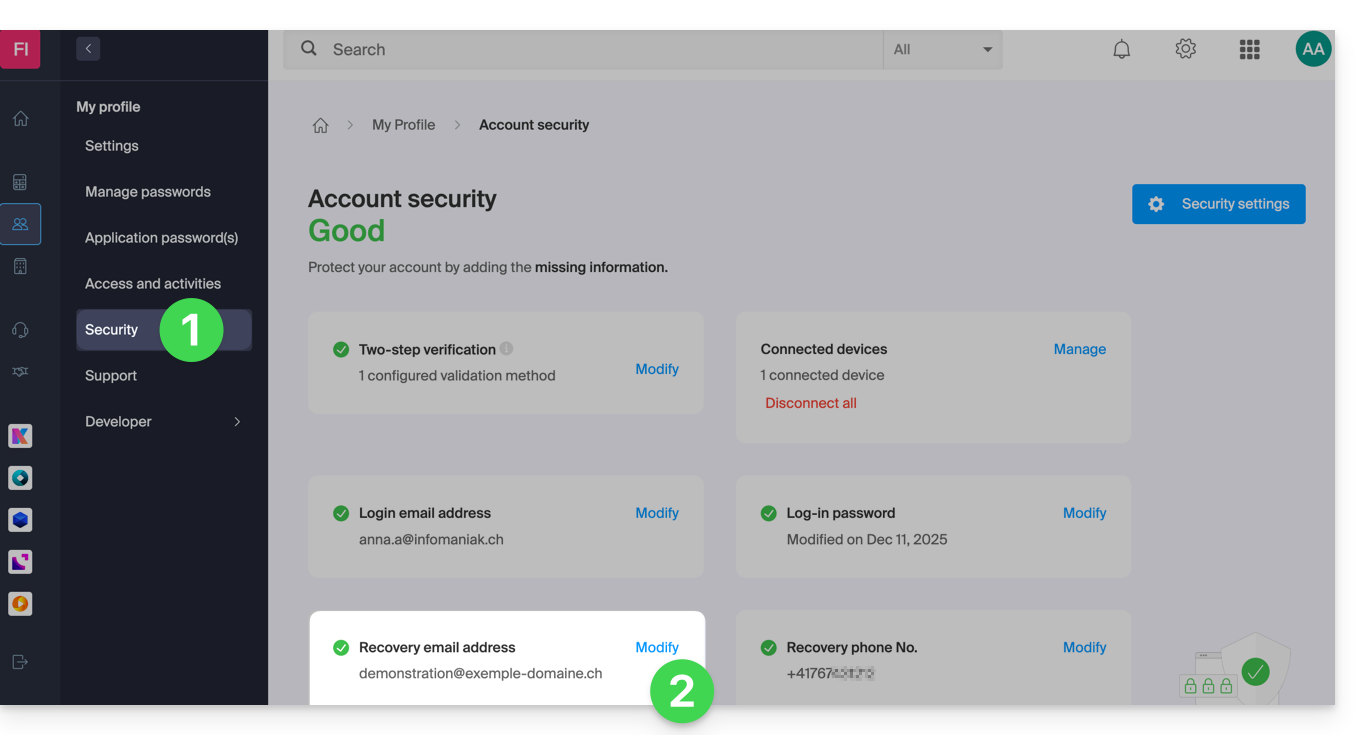
Change the recovery email address
To change the password recovery email address:
- Click here to access the management of your security information on the Infomaniak Manager.
- Click on Modify in the Recovery email box:
- Enter the new recovery email address, then click on Save:
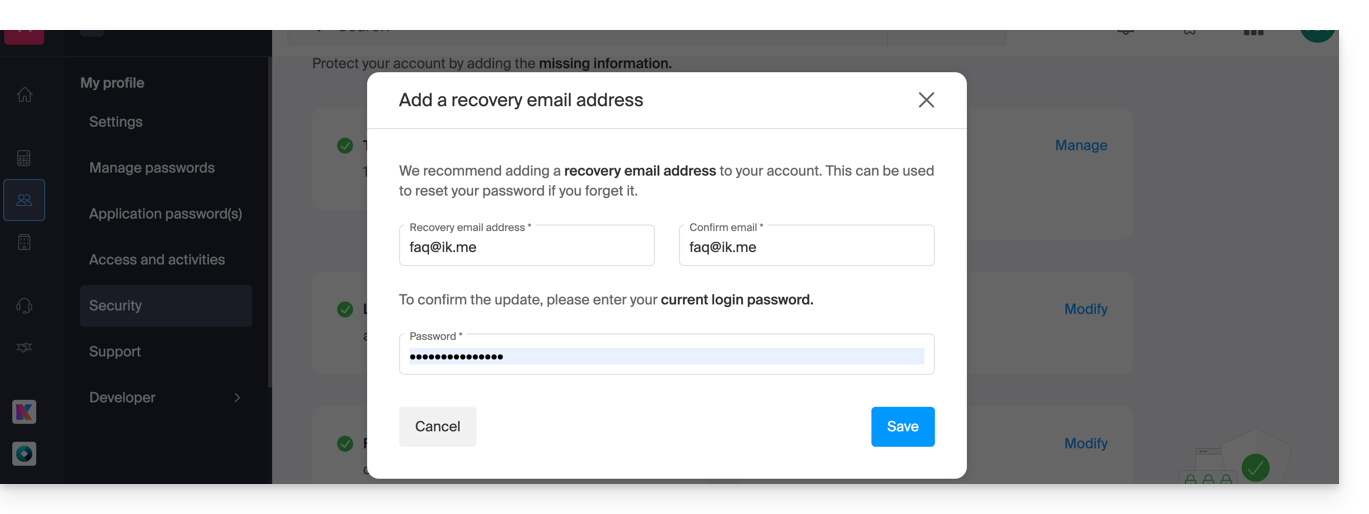
- You will then need to confirm the addition of the email address by clicking on the link received by email following this action.
- You can resend the activation email, or delete the current request, from this window:
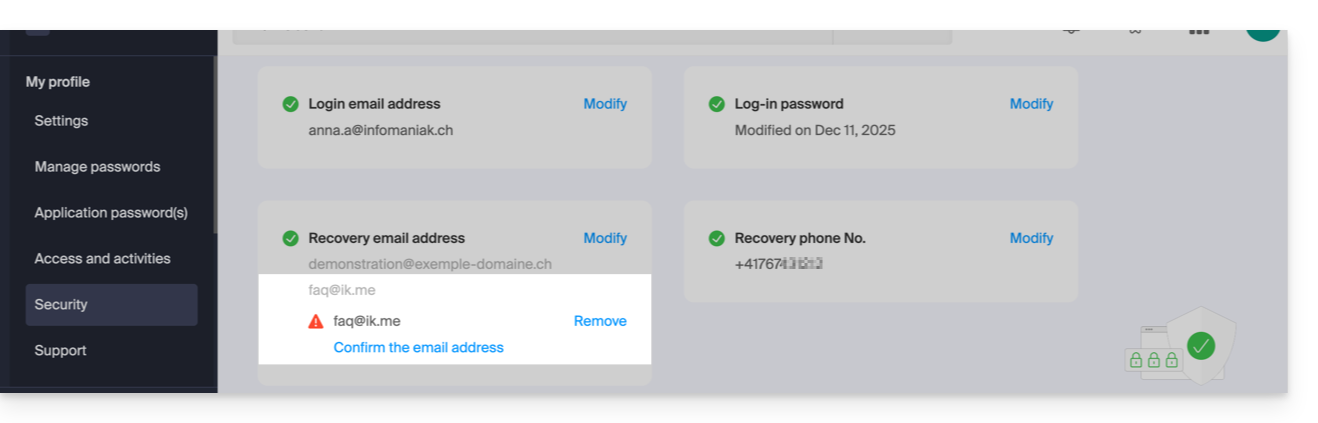
- You can resend the activation email, or delete the current request, from this window:
Link to this FAQ:
Has this FAQ been helpful?
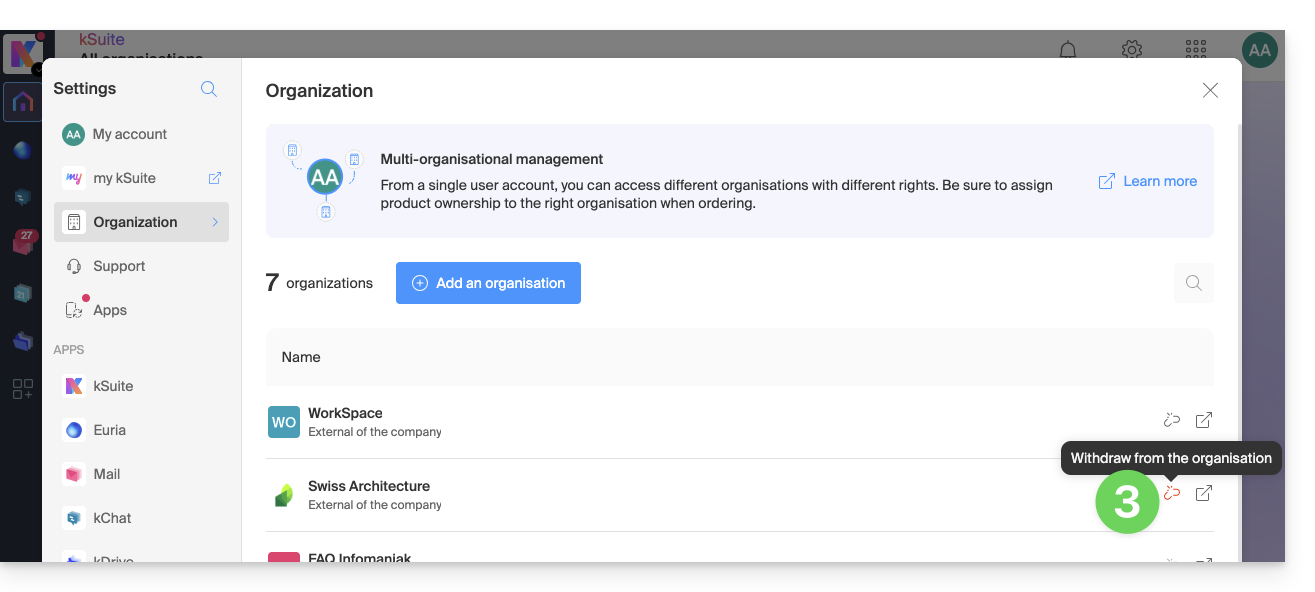
This guide explains how to remove yourself from an Organization to which you belong.
Introduction
- Since you opened your account with Infomaniak, you have been a member of at least one Organization:
- If you were the only user and it wasn't an invitation, an Organization was created in your name, and you automatically became its legal representative (see this other guide if you want to delete it).
- Otherwise, you belong to the Organization that invited you (to join its kSuite, to manage a product, etc.).
- As a user, you can leave any Organization on your own, as long as…
- … this user is not part of the Organization's kSuite.
- … this user's login address is not in a Mail Service of the Organization.
- … this user is not the last owner of the Organization.
Manage Organizations / Leave an Organization
To see all the Organizations to which you belong (because you created them with your Infomaniak account or because you were invited to join them) and possibly remove your membership (if you are not the last user or the only legal representative):
- Click here (or on the badge with your initials / avatar in the top right corner of the Infomaniak Manager) to "Manage my account":
- Click on Organizations in the left-hand menu:
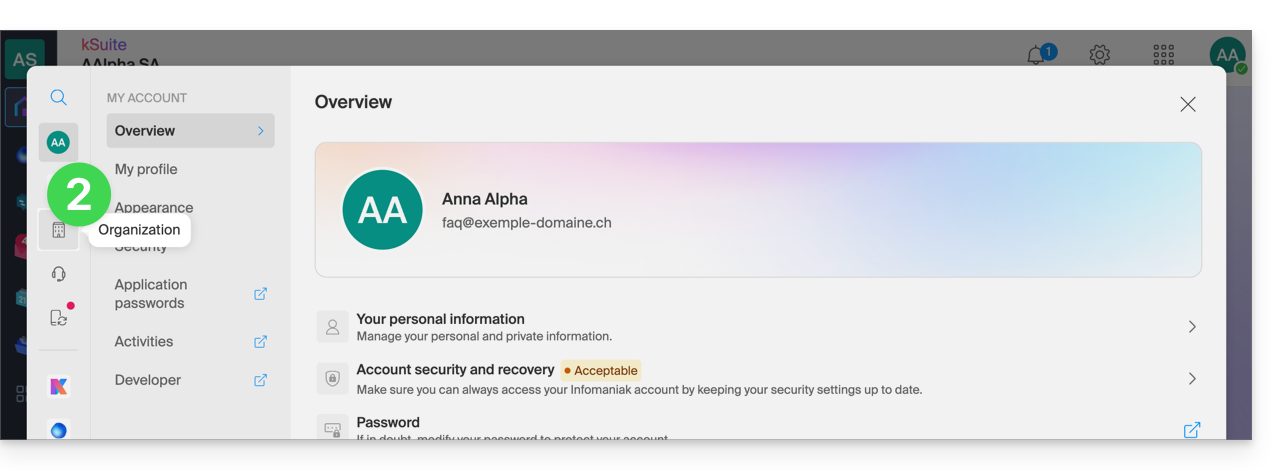
- Click on the non-grayed-out icon to the right of the Organization name to leave it, or hover over the icon if it is grayed out to see why you cannot detach from it:
Link to this FAQ:
Has this FAQ been helpful?
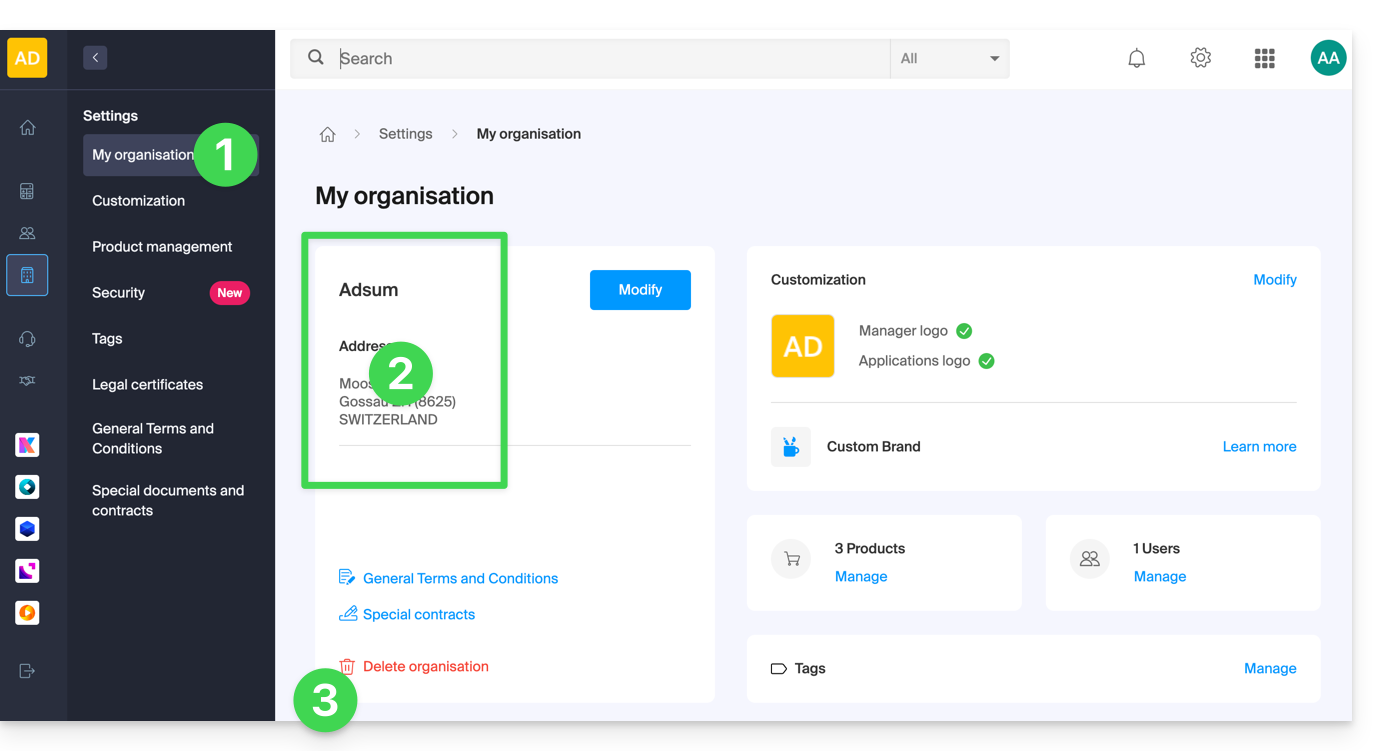
This guide explains how to delete an Infomaniak Organization.
Preamble
- The Organization must be empty of all products and all users except yourself.
- This will not delete your user account.
- As a reminder, you can create multiple Organizations (i.e., a space to manage your products) and be a user of several of them, for example, to manage different products belonging to multiple entities; an administrator can delete one of them.
- If you simply want to leave an Organization on which you are listed as a user, refer to this other guide.
Delete the Organization
Prerequisites
- Terminate all products present in the Organization.
- The stoppage of the services contained in the Organization can be performed during the deletion steps.
- Pay outstanding invoices.
- Invoices already settled can be obtained by email during the deletion steps.
- Remove other users with access to the Organization.
- Withdraw the money that is on the Infomaniak prepaid account.
To delete an Organization to which you still have access:
- Click here to access the management of your Organization on the Infomaniak Manager.
- Check that this is the correct Organization.
- If not switch to another Organization!
- Click on Delete the Organization:
- Confirm the deletion and/or read the on-screen explanations:
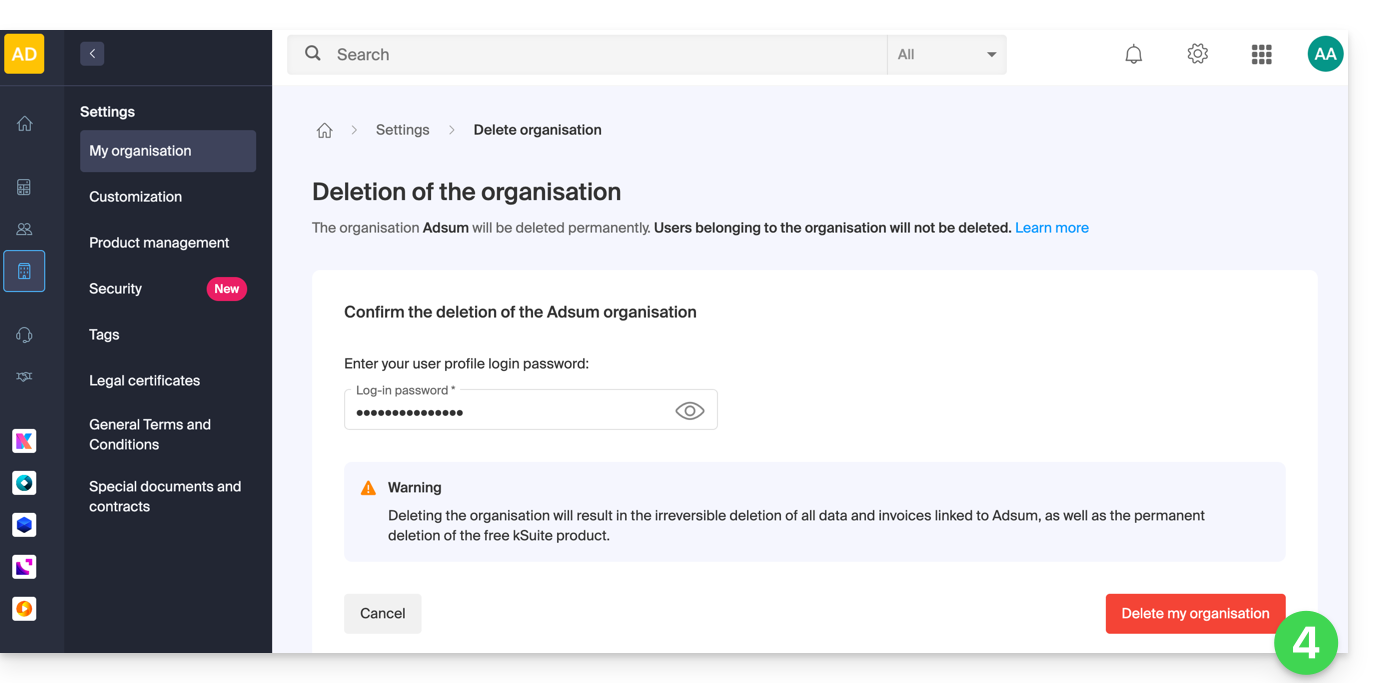
If the red link is not displayed, make sure you have met all the prerequisites above.
Link to this FAQ:
Has this FAQ been helpful?
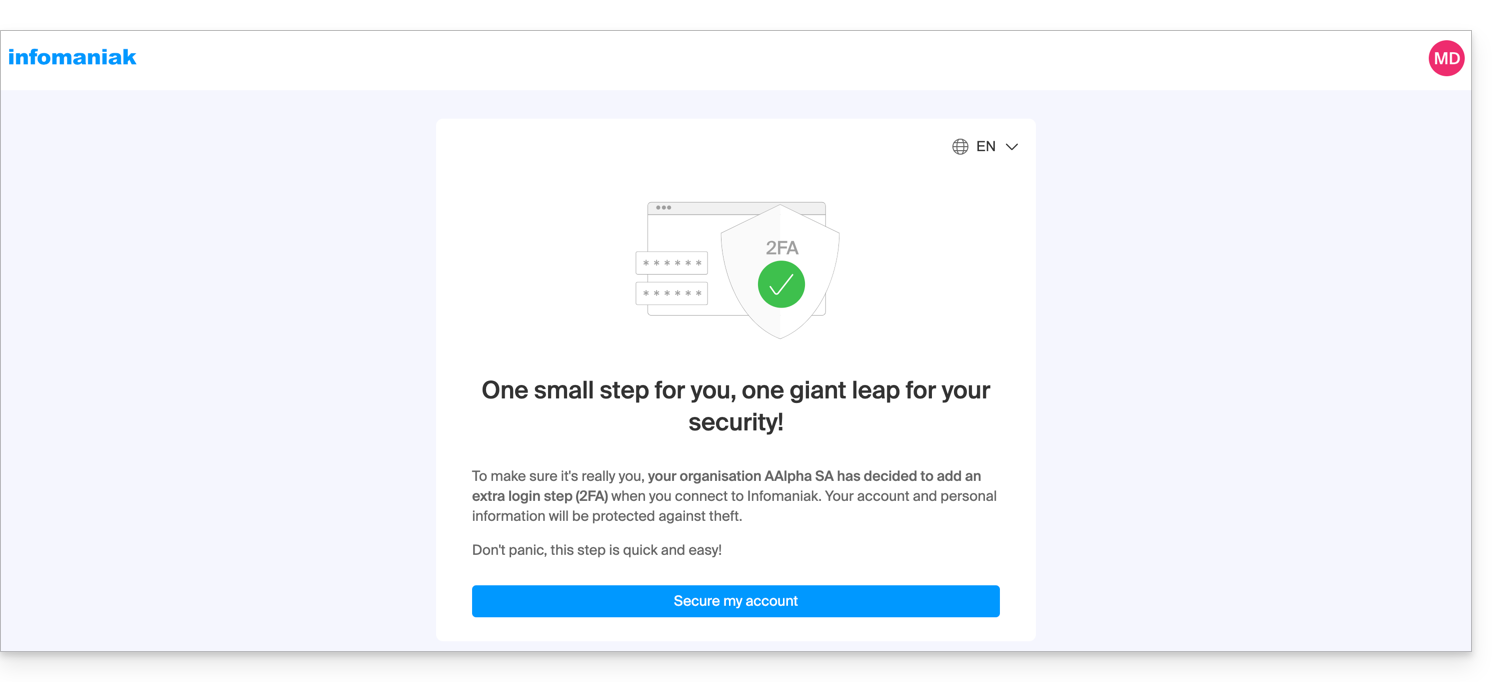
This guide explains how to require users in your Organization to enable the two-factor authentication (2FA) feature, and then verify that it remains enabled.
Preamble
- Each Infomaniak user has the option to enable two-step verification for access to their account, which significantly increases the security of all Organization services…
- A legal representative can require this activation otherwise access to the Manager and Web apps will no longer be possible for the user.
- Access to desktop apps (desktop application on macOS / Windows / Linux) and mobile apps (application for iOS / Android smartphone or tablet) will always be possible without 2FA.
- It is recommended to warn users in your Organization in advance, so they can continue to use the services.
- If an external user does not wish to perform the operation requested by an Organization administrator, they can choose to leave instead of activating it.
Identify and warn users without 2FA
You can easily identify and contact people who have not yet enabled this security on their account:
- Click here to access the user management of your Organization.
- If necessary, enable the Security column:
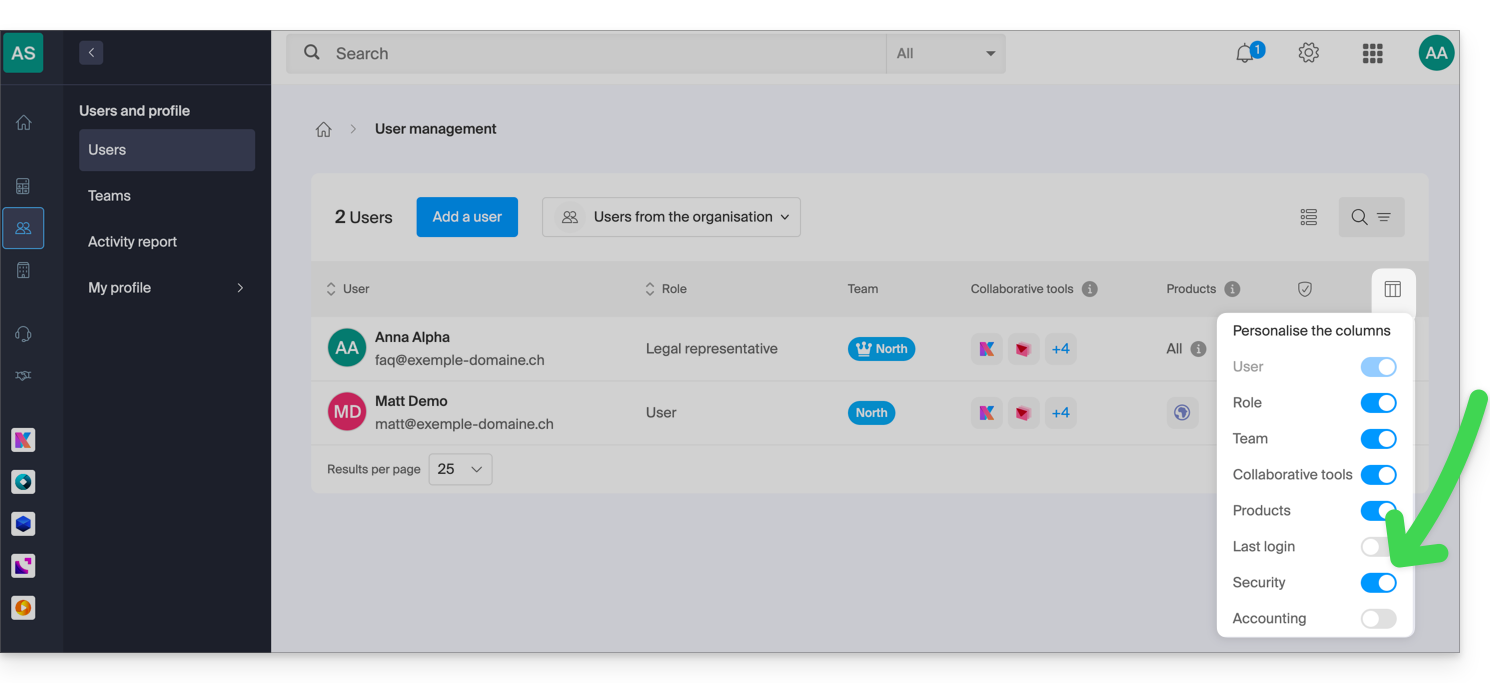
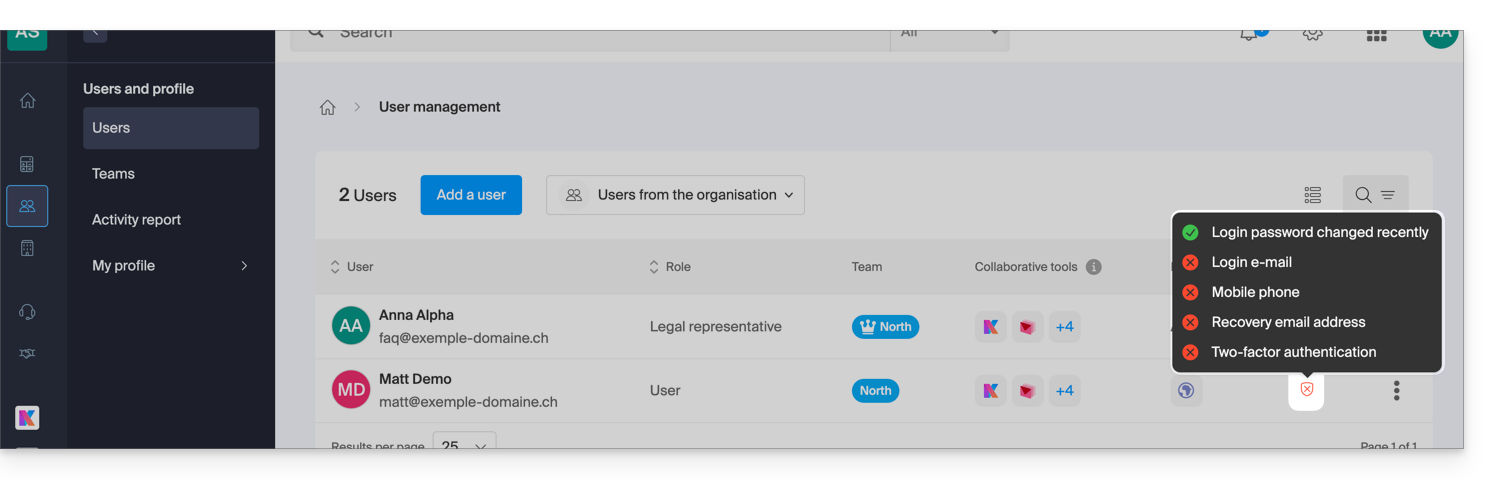
- In this Security column, the red symbol means that 2FA is not enabled:
- Click on the user in question to access the alert sending feature:
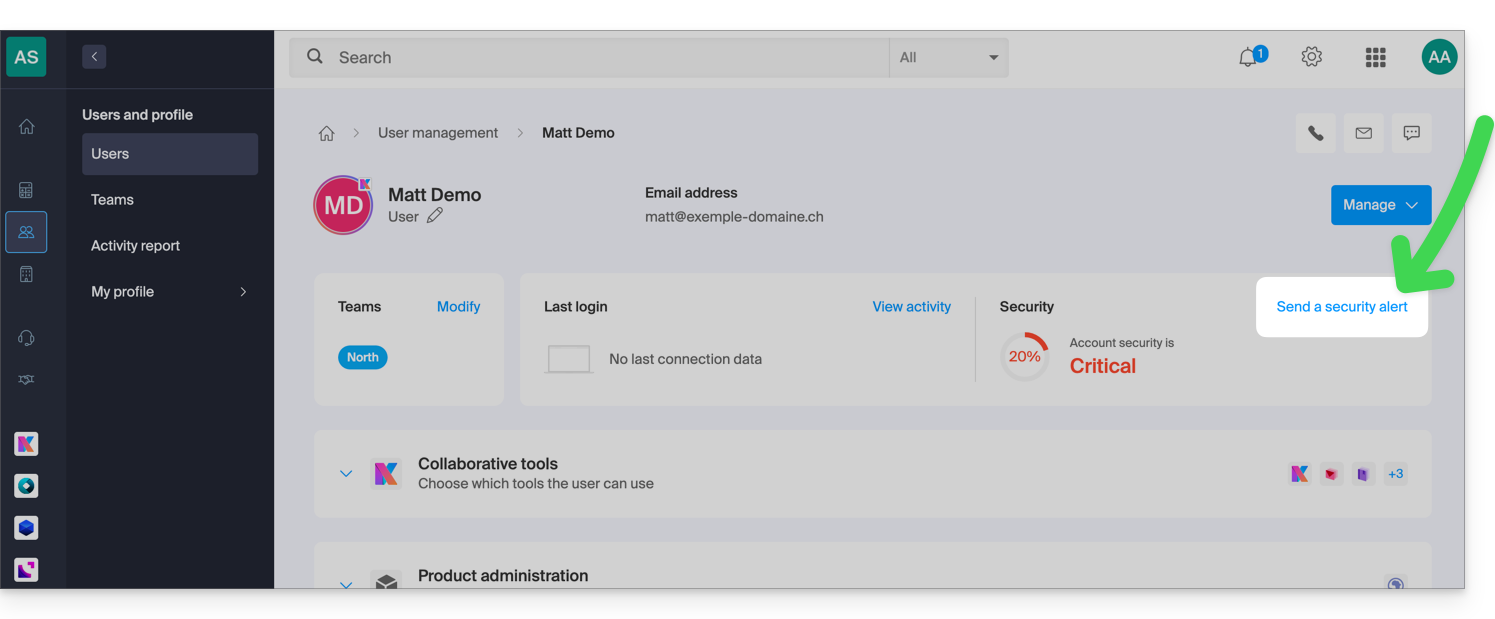
- After confirmation from you, an alert email will be sent from a no-reply address to the user concerned:

Require 2FA activation
Prerequisites
- Be Administrator or Legal Representative within the Organization.
To access settings:
- Click here to access the security management of the Organization on the Infomaniak Manager (need help?).
- Click the toggle switch to require an additional login verification for all Organization users:
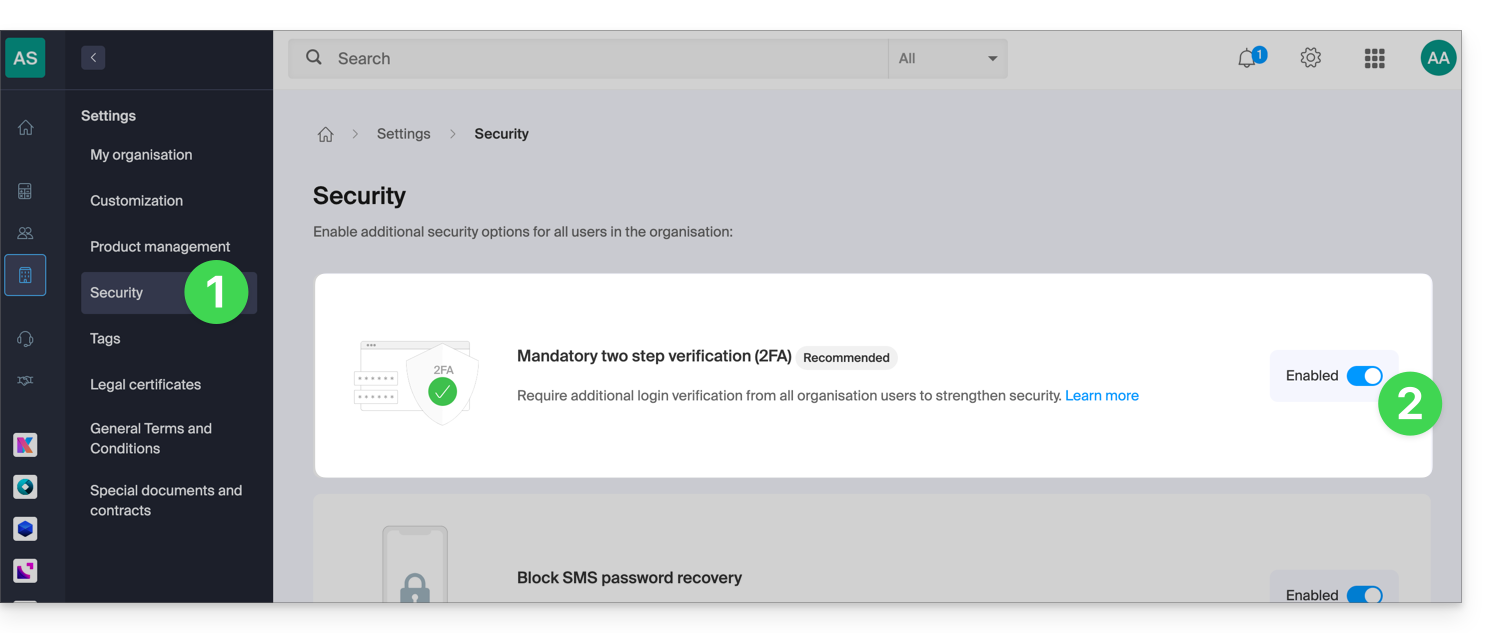
- Confirm the activation of the feature in the window that opens.
- Once the feature is activated, users in the Organization who have not yet activated 2FA receive a message (as soon as they perform their next action on their account) prompting them to set up an additional authentication method from those offered and preventing them from performing any other action before this one:
Link to this FAQ:
Has this FAQ been helpful?
This guide explains how to view and change the login ID for your user account in the Manager, the management interface and dashboard for your Infomaniak products. This same ID also allows you to log in to Mail Infomaniak and various iOS/Android applications such as kDrive, Infomaniak Mail, etc.
Introduction
- To manage your Infomaniak account details, please refer to this other guide.
- To change your phone number, please refer to this other guide.
- To manage the details of the Organization you belong to, please refer to this other guide.
View the currently logged-in ID
The email address used for the current login is displayed in your user menu + on the profile page:
- Click on the badge with your initials / avatar in the top right corner of the Manager Infomaniak to note the login ID currently in use:
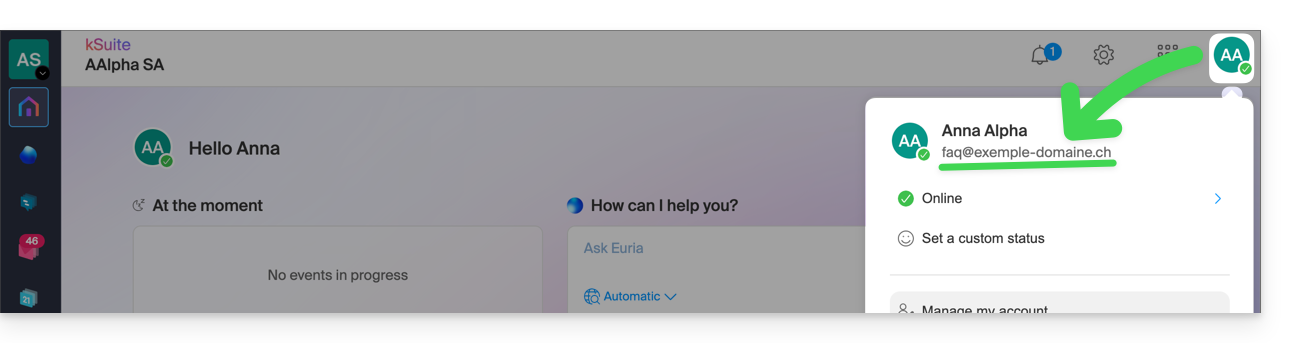
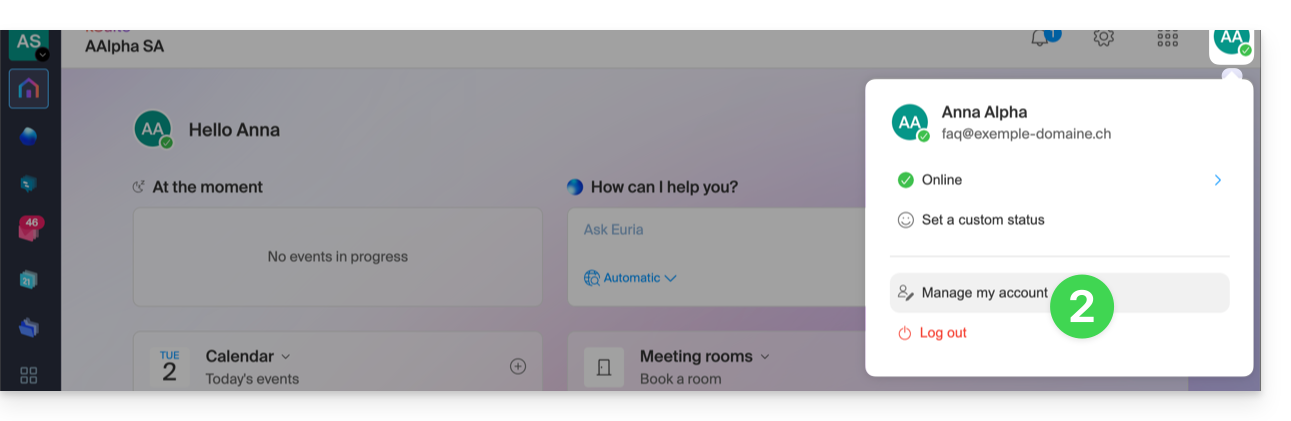
- Click on Manage my account just below to access the management of your profile in the Infomaniak Manager:
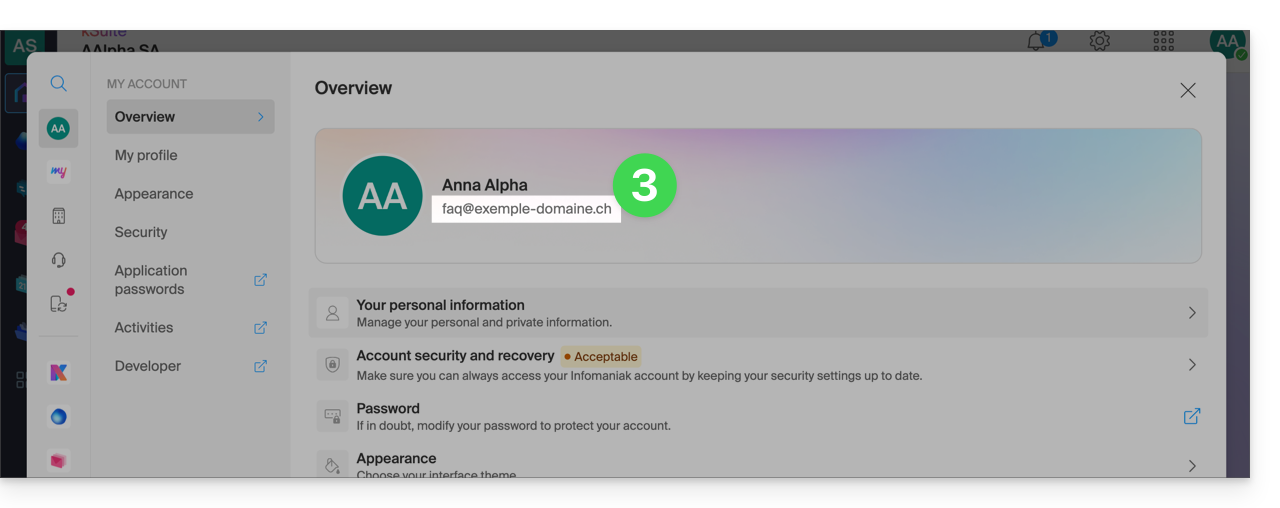
- Your current login ID is also displayed on the page:
Change Login ID (Login Email)
Prerequisites
- The login ID is an email address that must exist and that you must be able to access.
- The new email address must be different from the recovery email address.
- The new email address must not already be used as a login ID for another user account (if so, you should consider inviting them to the Organization beforehand to give them all the necessary rights, and then you can remove the old account with the old login ID).
To change the login ID for your Infomaniak account:
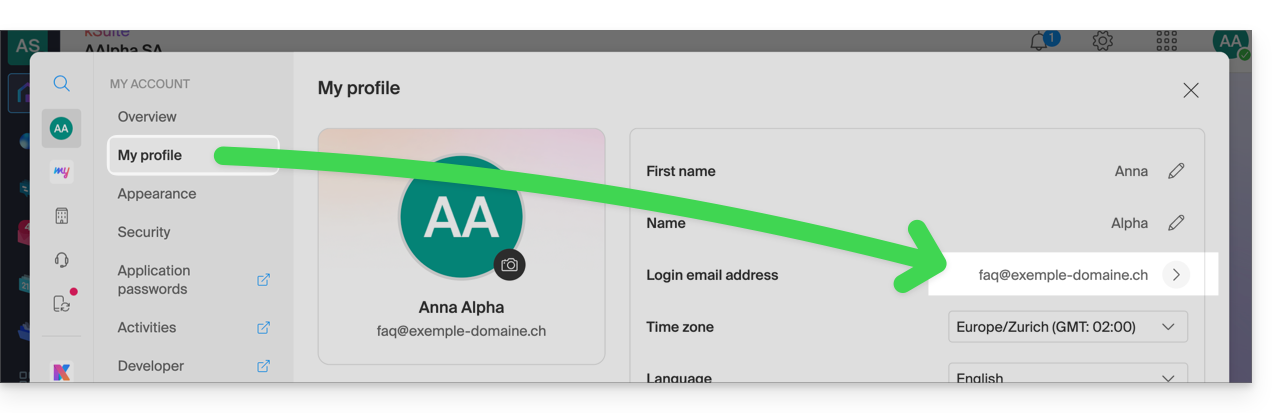
- Click here (or on the badge with your initials / avatar in the top right corner of the Infomaniak Manager) to "Manage my account":
- From the My profile menu, click on your login email address:
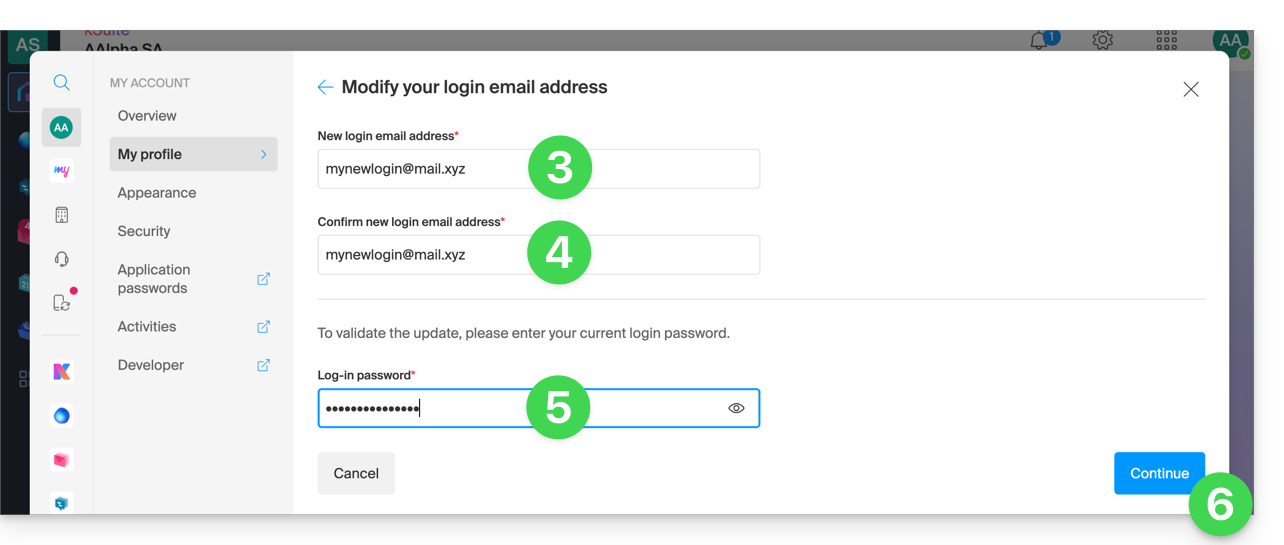
- Enter a new login email address.
- Confirm your new address by specifying it a second time.
- Enter the login password for your Infomaniak account.
- Click on Continue:
Link to this FAQ:
Has this FAQ been helpful?
This guide explains how to modify the kSuite offer.
Preamble
- kSuite is a bundled offer that can be upgraded to a higher offer at any time (increase the number of users and the size of the disk space for data storage)
- It is not possible to subsequently change to a lower rate, nor to transfer kSuite to another Organization.
- The products included in kSuite cannot be moved or canceled independently of each other.
- To help you identify the kSuite offer best suited to your needs, refer to this other guide.
Modify the kSuite offer
To access the modification of the kSuite offer:
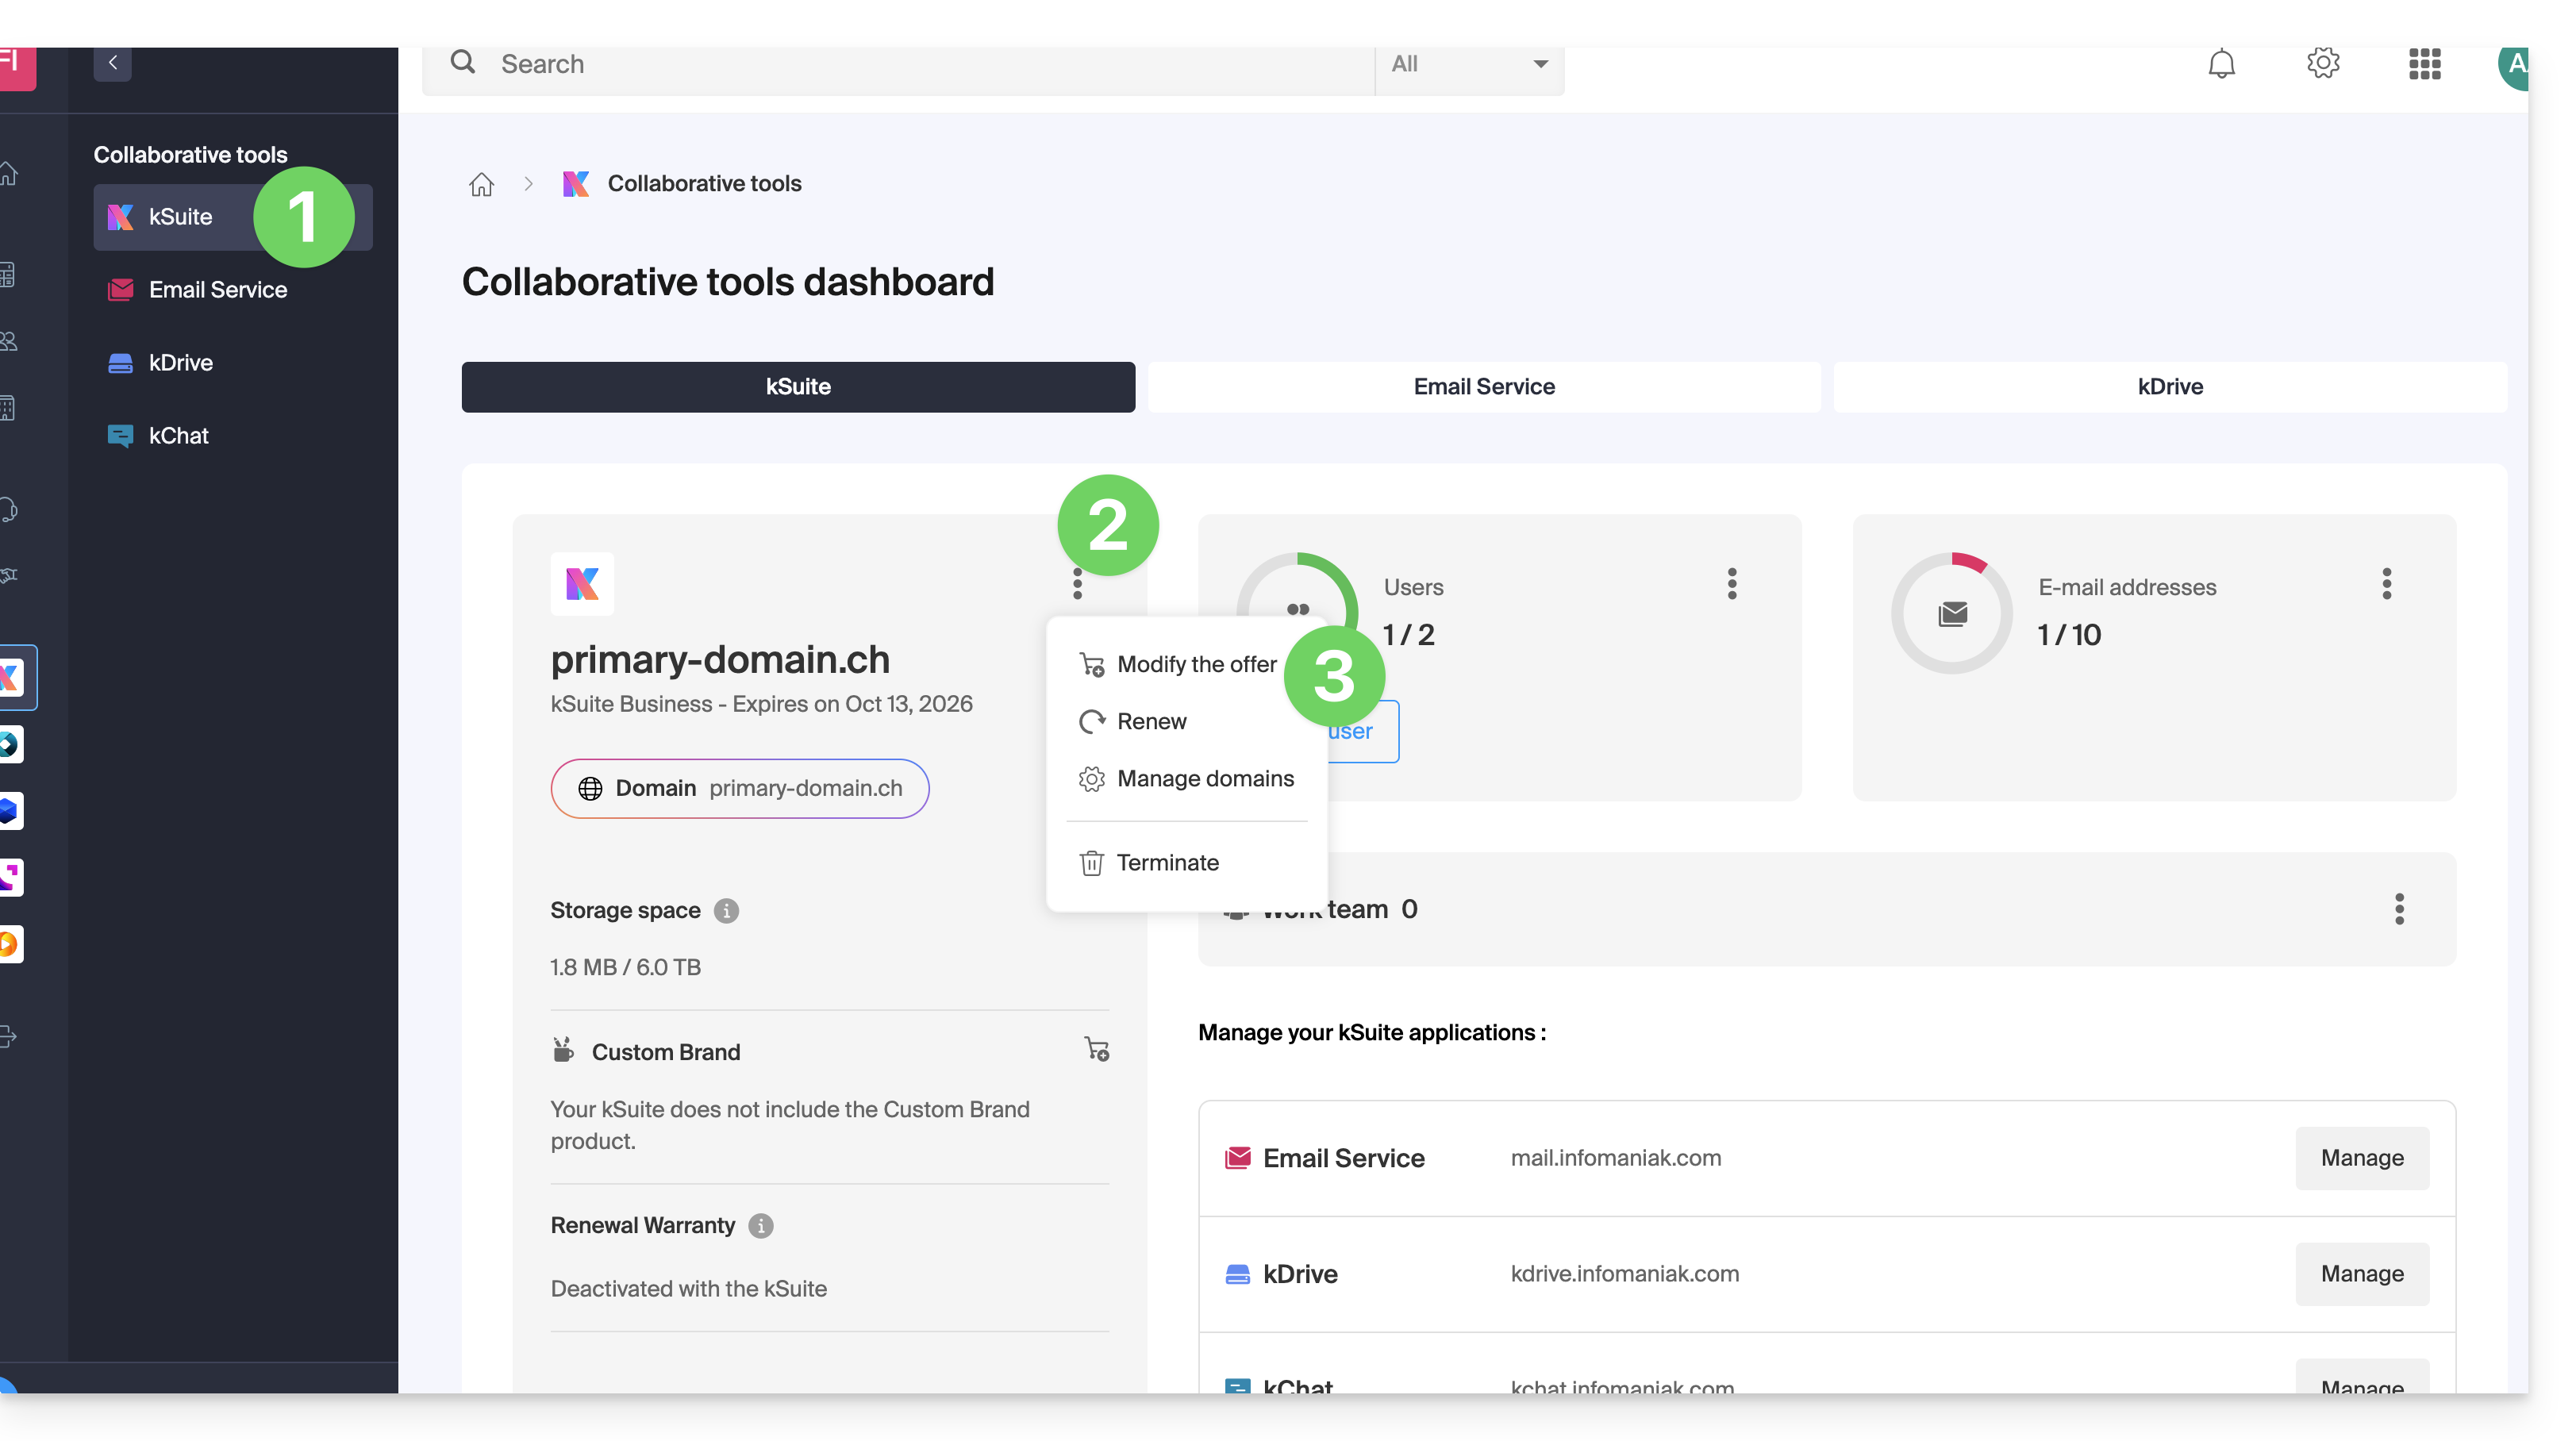
- Click here to access the management of your product on the Infomaniak Manager (need help?).
- Click on the action menu ⋮ to the right of the name of the kSuite.
- Click on Modify the offer:
Link to this FAQ:
Has this FAQ been helpful?
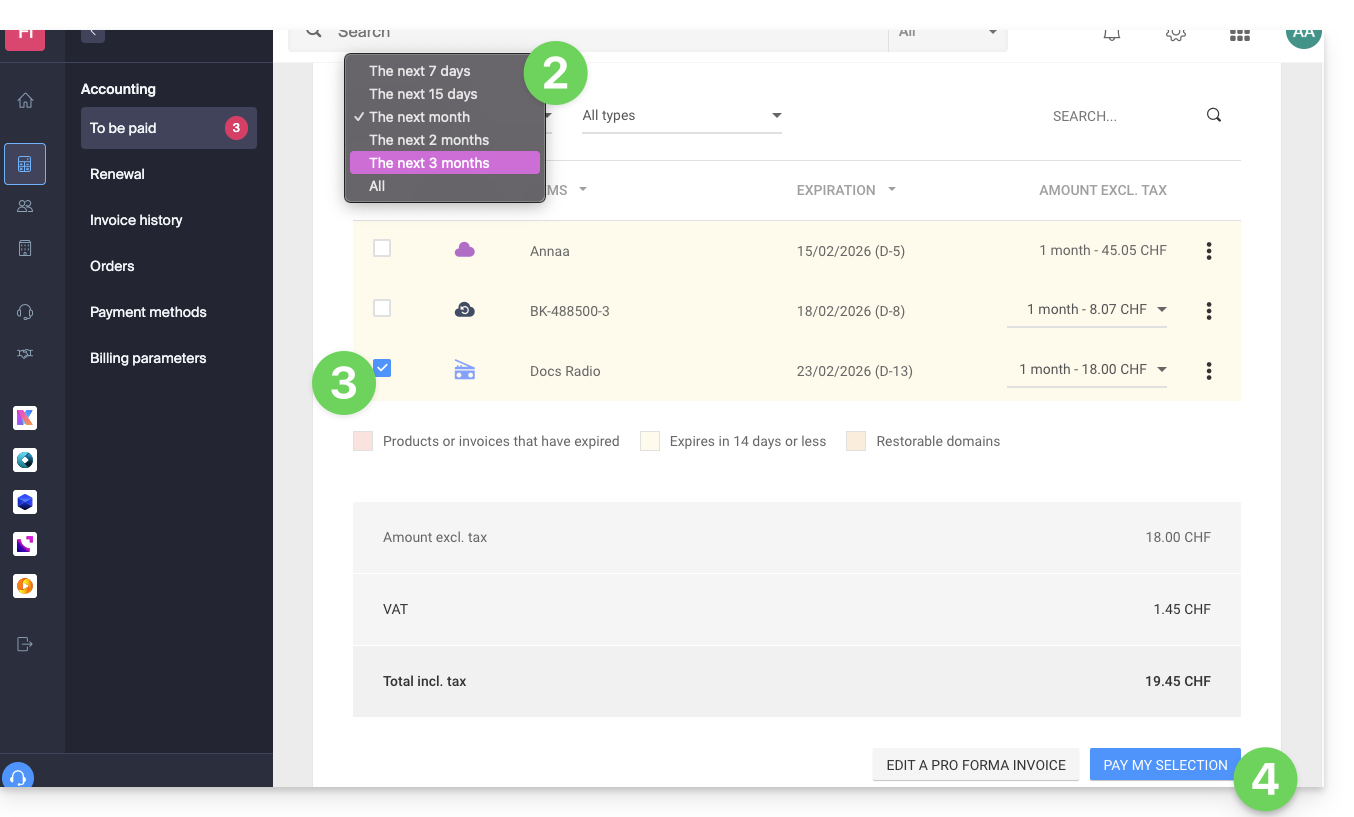
This guide explains how to pay for all your Infomaniak services at once, even in advance and even for several years (if available for the type of product to be paid).
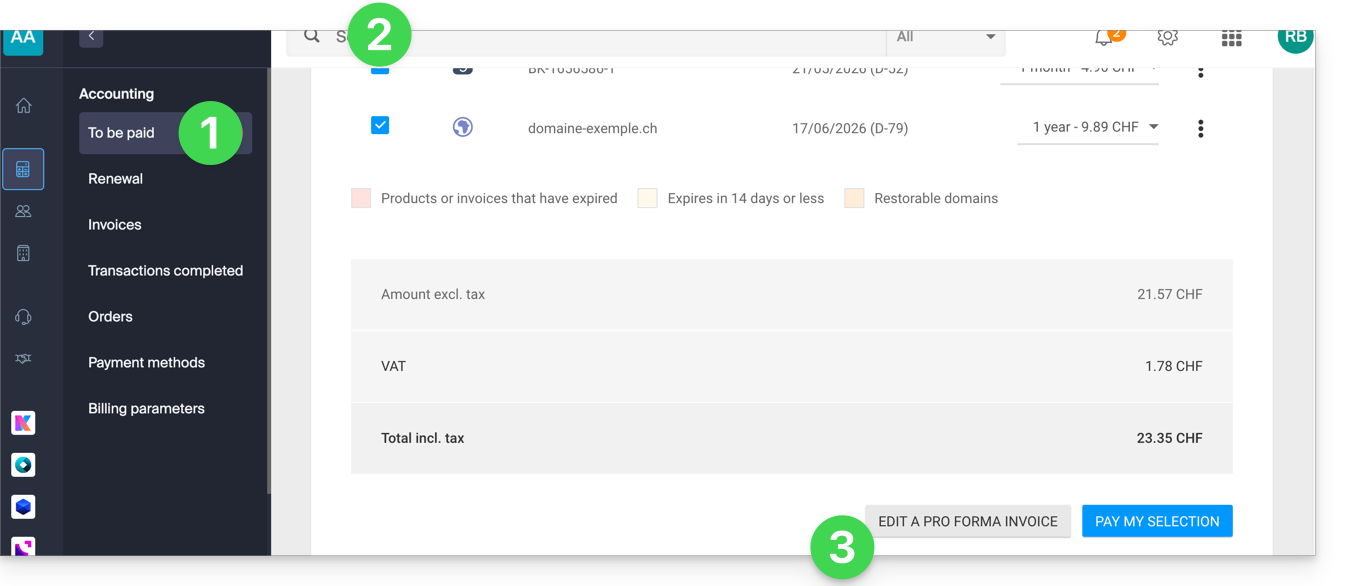
Group products on a single invoice
To group and pay for all future product renewals in one go:
- Click here to access payment management on the Infomaniak Manager (need help?).
- Access requires authentication with a user who has sufficient rights.
- If necessary, click on the date filter (next 2 months) to Show all:

- Select the products to group.
- Click the Pay my selection button:

- Choose a payment method and complete the procedure (choose IBAN to obtain a Pro Forma invoice before payment).
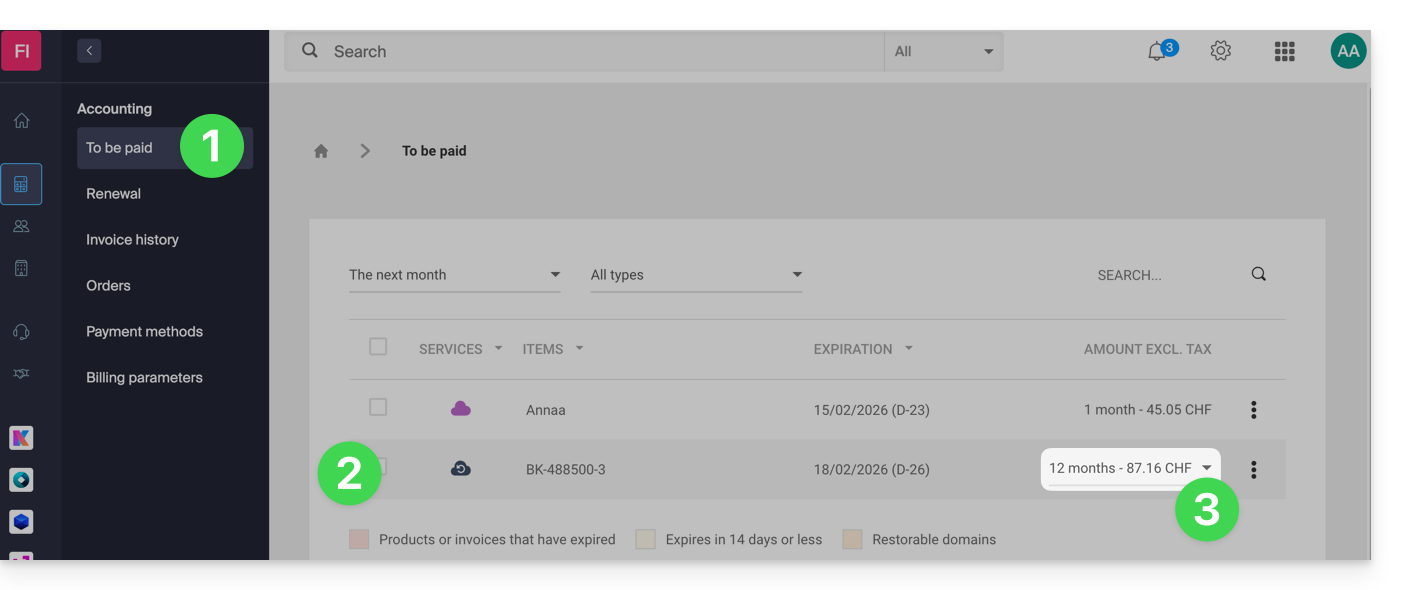
Renew products for several months/years
Some products (domain names with the .ch extension, for example) can also be paid/renewed for several months or years, in advance:
- Click here to access payment management on the Infomaniak Manager (need help?).
- If necessary, click on the date filter (next 2 months) to Show all.
- Select the products to group.
- Choose the desired period (when available - depending on the type of product) using the dropdown menu located to the right of the item concerned:
- Click the Pay my selection button and complete the procedure.
Generate or print a PDF invoice
Refer to this other guide if you are looking for information about invoices.
Link to this FAQ:
Has this FAQ been helpful?
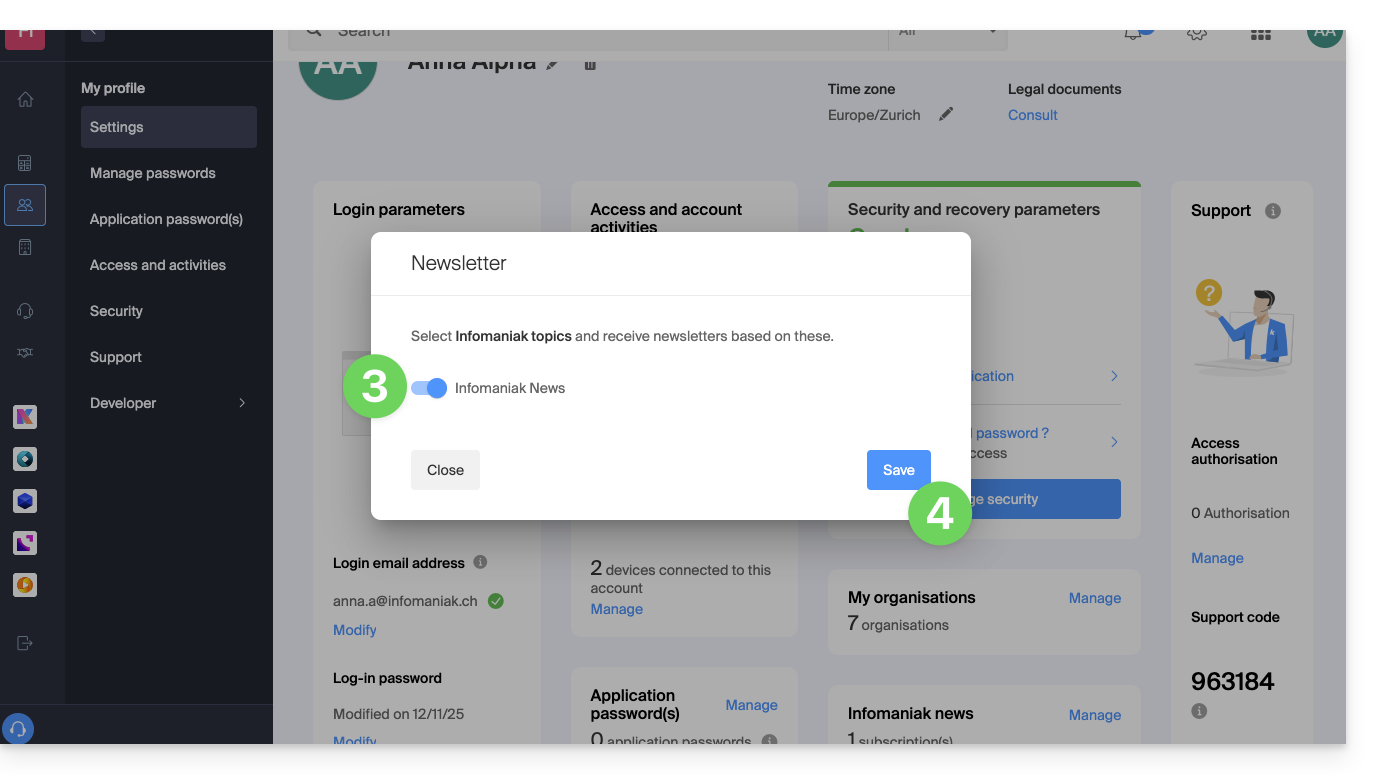
This guide explains how to manage the reception of Infomaniak Newsletters according to the desired topics.
Modify the subscription to Infomaniak news
To select Infomaniak topics to receive newsletters based on them:
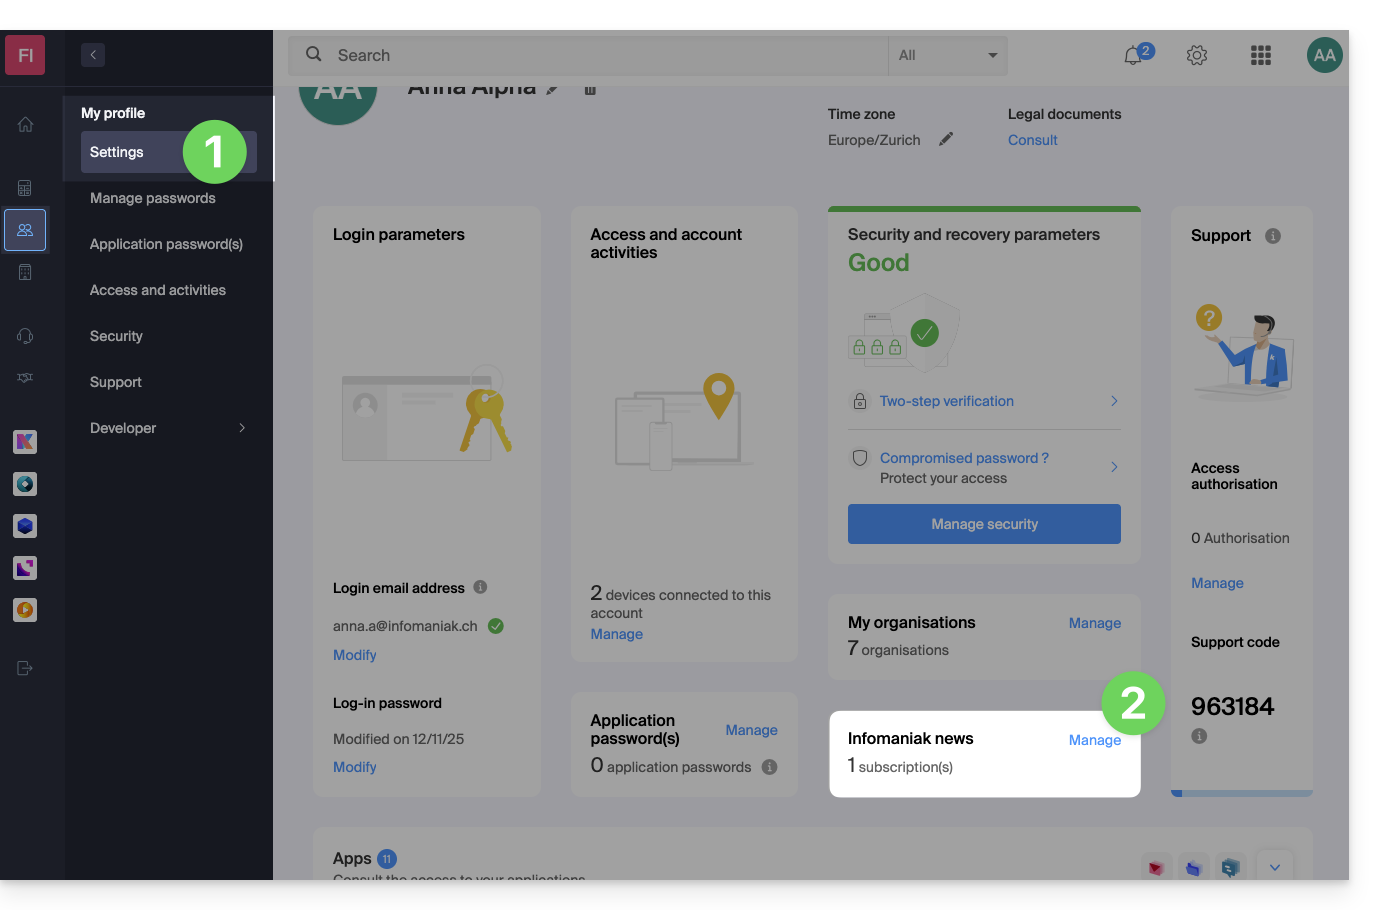
- Click here to access the management of your settings (Infomaniak Manager).
- Click on Manage (in the box Infomaniak News):
- Click on the toggle switch to the left of the news to subscribe or unsubscribe.
- Click on Save:
You can also find Infomaniak News on https://news.infomaniak.com!
Link to this FAQ:
Has this FAQ been helpful?
This guide explains how to create an Infomaniak account, i.e., your user account (customer account) that will then allow you to use Infomaniak services such as the Mail app or kDrive, order additional services, and be attached to one or more Organizations to collaborate effectively in the Infomaniak ecosystem.
Create a new Infomaniak account
To be able to order and manage Infomaniak products (including in the case where a user wants to transfer existing products to you) within one or more Organizations, it is necessary to create a first Infomaniak account with a completely new login identifier:
- Click here to sign up; you will need to enter a valid email address to receive the mandatory verification request.
- Fill out the requested information and complete the registration.
To simply obtain a my kSuite / my kSuite+ account (ik.me, etik.com, ikmail.com) click here to sign up.
Link to this FAQ:
Has this FAQ been helpful?
This guide explains how to enable or disable automatic renewal of your products.
Preamble
- You can automate the renewal of your products that are due to expire via the payment method of your choice.
- When placing new orders or renewing a product, this feature is automatically enabled if you are using a supported payment method (CB, Visa and MasterCard cards).
- It is possible at any time to disable this feature.
- Once automatic renewal is enabled, the first payment attempt occurs 14 days before the product's expiration date.
- It is not possible to enable automatic renewal if the product is less than 14 days from its normal expiration.
- In this case, it is first necessary to renew the product before being able to enable this feature.
- Refer to this other guide if you are looking for information in case you were unable to renew the products on time or if an automatic renewal did not work, and thus avoid any service interruption in the future.
Enable automatic renewal
One product at a time
To enable the future automatic renewal of the product of your choice:
- Click here to access the management of payments on the Infomaniak Manager (need help?).
- Access requires authentication with a user who has sufficient rights.
- If necessary, click on the date filter (next 2 months) to Show all.
- Click on the action menu ⋮ located to the right of the item concerned.
- Choose to enable the automatic renewal of the product:

- A window may then open to choose the desired payment method.
All products at once
To enable the future automatic renewal of all your products:
- Click here to access the management of renewals on the Infomaniak Manager (need help?).
- Click on the checkbox at the top of the column to select all your products in 1 click.
- Click on the Manage renewals button.
- Choose to enable the automatic renewal of products:

Disable automatic renewal
One product at a time
To disable the automatic renewal of your chosen product:
- Click here to access the management of payments on the Infomaniak Manager (need help?).
- If necessary, click on the date filter (next 2 months) to Show all.
- Click on the action menu ⋮ located to the right of the item concerned.
- Choose to disable the automatic renewal of the product:

- A window may then open to choose the desired payment method.
All products at once
To disable the automatic renewal of all your products:
- Click here to access the management of renewals on the Infomaniak Manager (need help?).
- Click on the checkbox at the top of the column to select all your products in 1 click.
- Click on the Manage renewals button.
- Choose to disable the automatic renewal of products:

Link to this FAQ:
Has this FAQ been helpful?
This guide explains how to update a payment profile on the Manager Infomaniak to facilitate your service orders and renewals.
Preamble
- Having a payment profile allows you to speed up your payments.
- Payment data is securely saved.
- The funds available on the prepaid account can, for example, serve as the default payment profile, but other payment methods can be registered.
Add or modify a payment profile
To access the management of payment methods and set a default one:
- Click here to access the management of payment profiles on the Infomaniak Manager (need help?).
- Access requires authentication with a user who has sufficient rights.
- Update or add the desired payment method:

- Select the desired payment method from:
- Twint (Switzerland)
- Visa / Mastercard
- Postfinance (Switzerland)
- PayPal
- eBill (Switzerland)
- Click the button to save the addition:
Link to this FAQ:
Has this FAQ been helpful?