Knowledge base
1000 FAQs, 500 tutorials and instructional videos. Here, there are only solutions!
This guide explains how to modify the display of your events (within the framework of the Infomaniak ticketing system).
Access the options to configure the display
To do this:
- Click here to access the management of your product on the Infomaniak Manager (need help?).
- Click directly on the name assigned to the ticketing concerned by the event.
- Click on Programming in the left sidebar menu.
- Click on Events in the left sidebar menu.
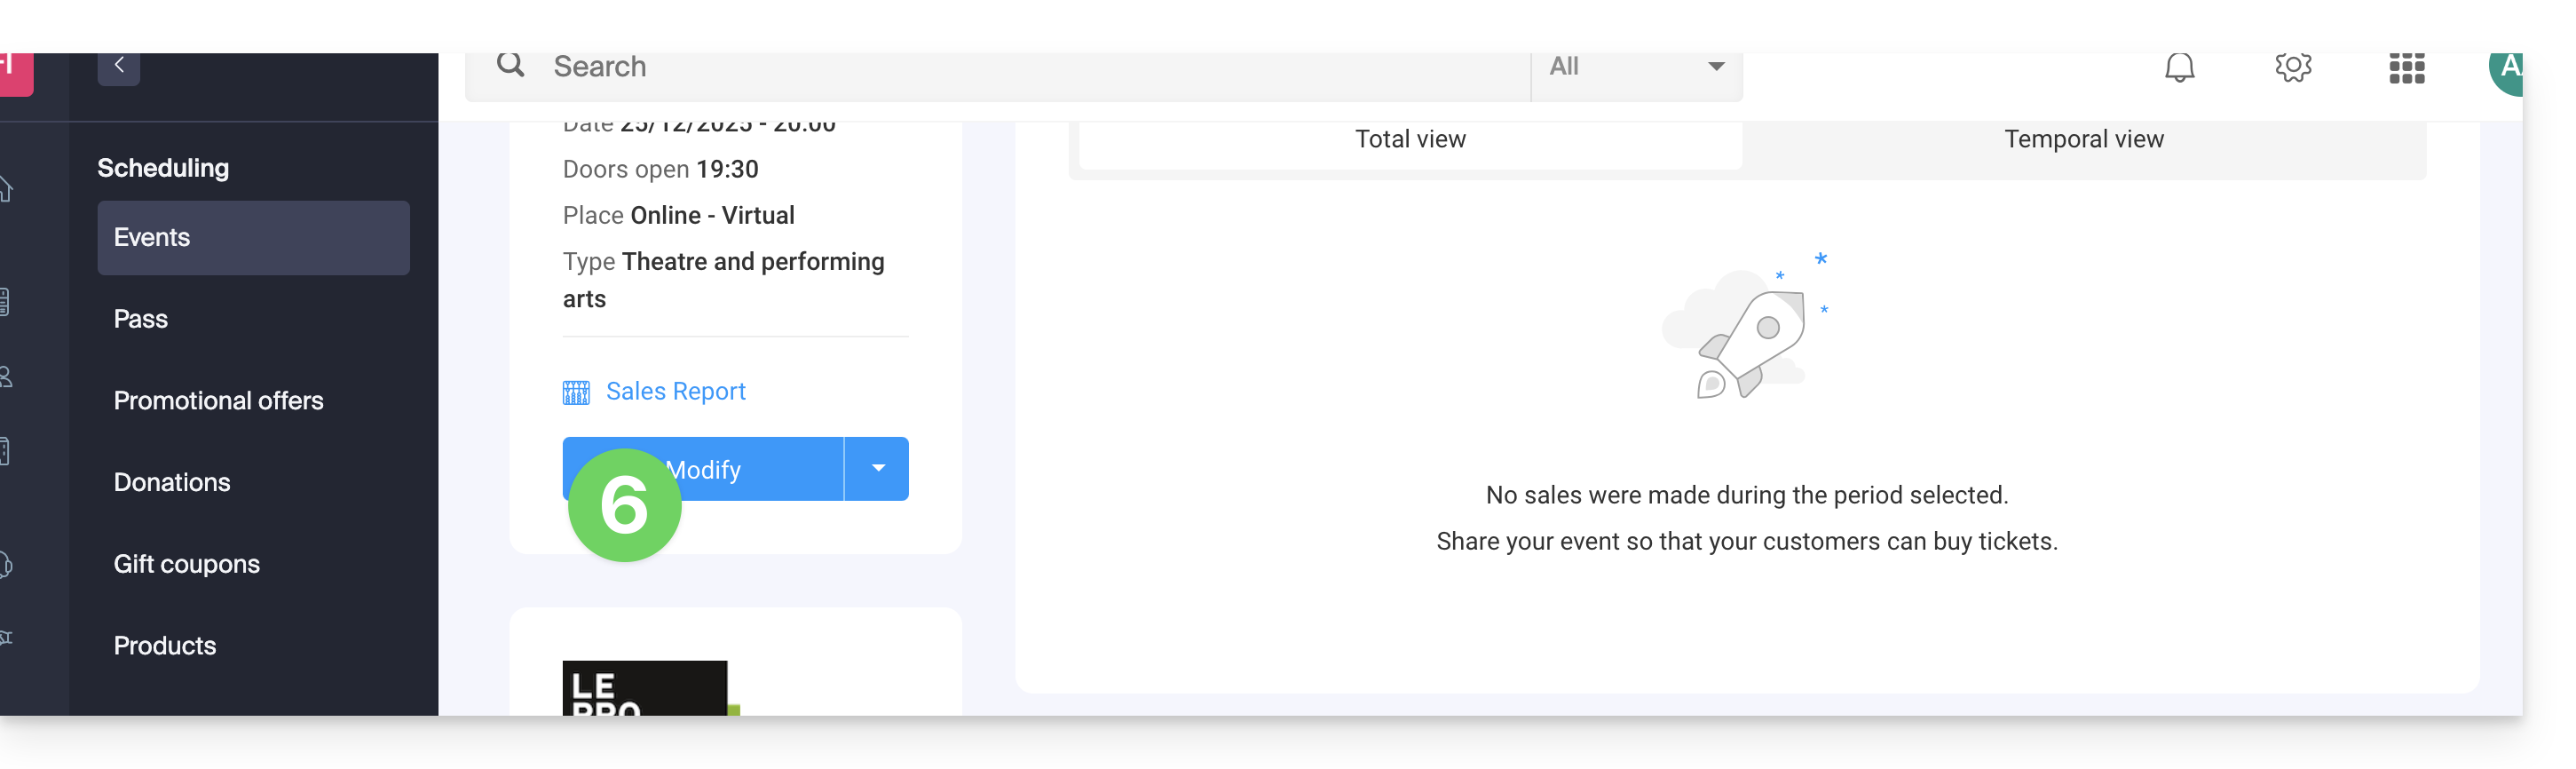
- Click on the name of the event concerned:
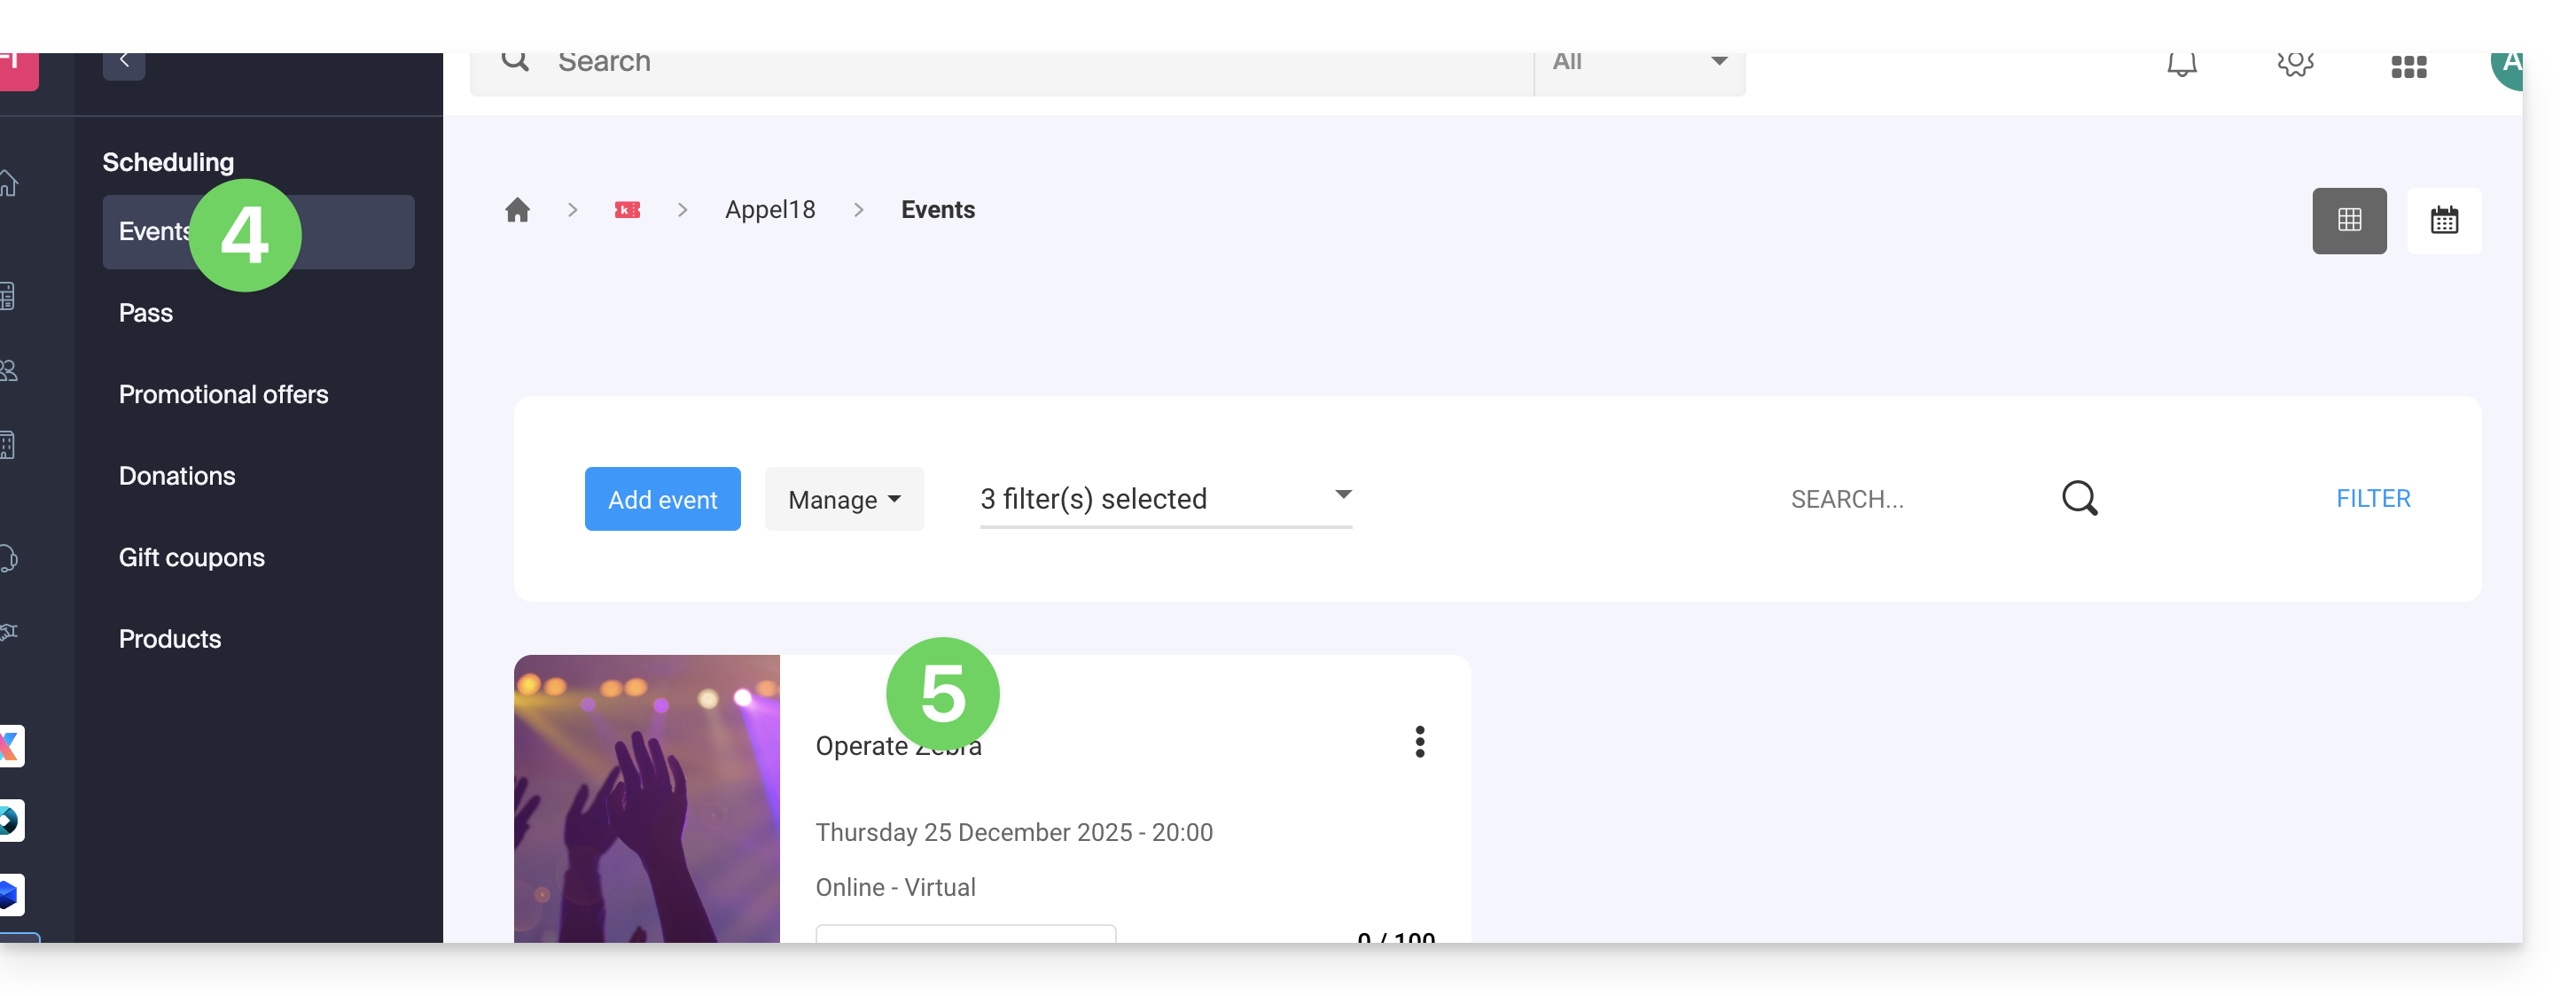
- Click on the Edit button:
Choose a multi-date event display mode
To do this:
- Add new possible dates...
- Choose the methods for displaying these dates on the calendar; these modes will be available on the online ticketing and will allow your customers to switch between the different display modes they prefer (see below)...
- Choose which display mode will be used by default...
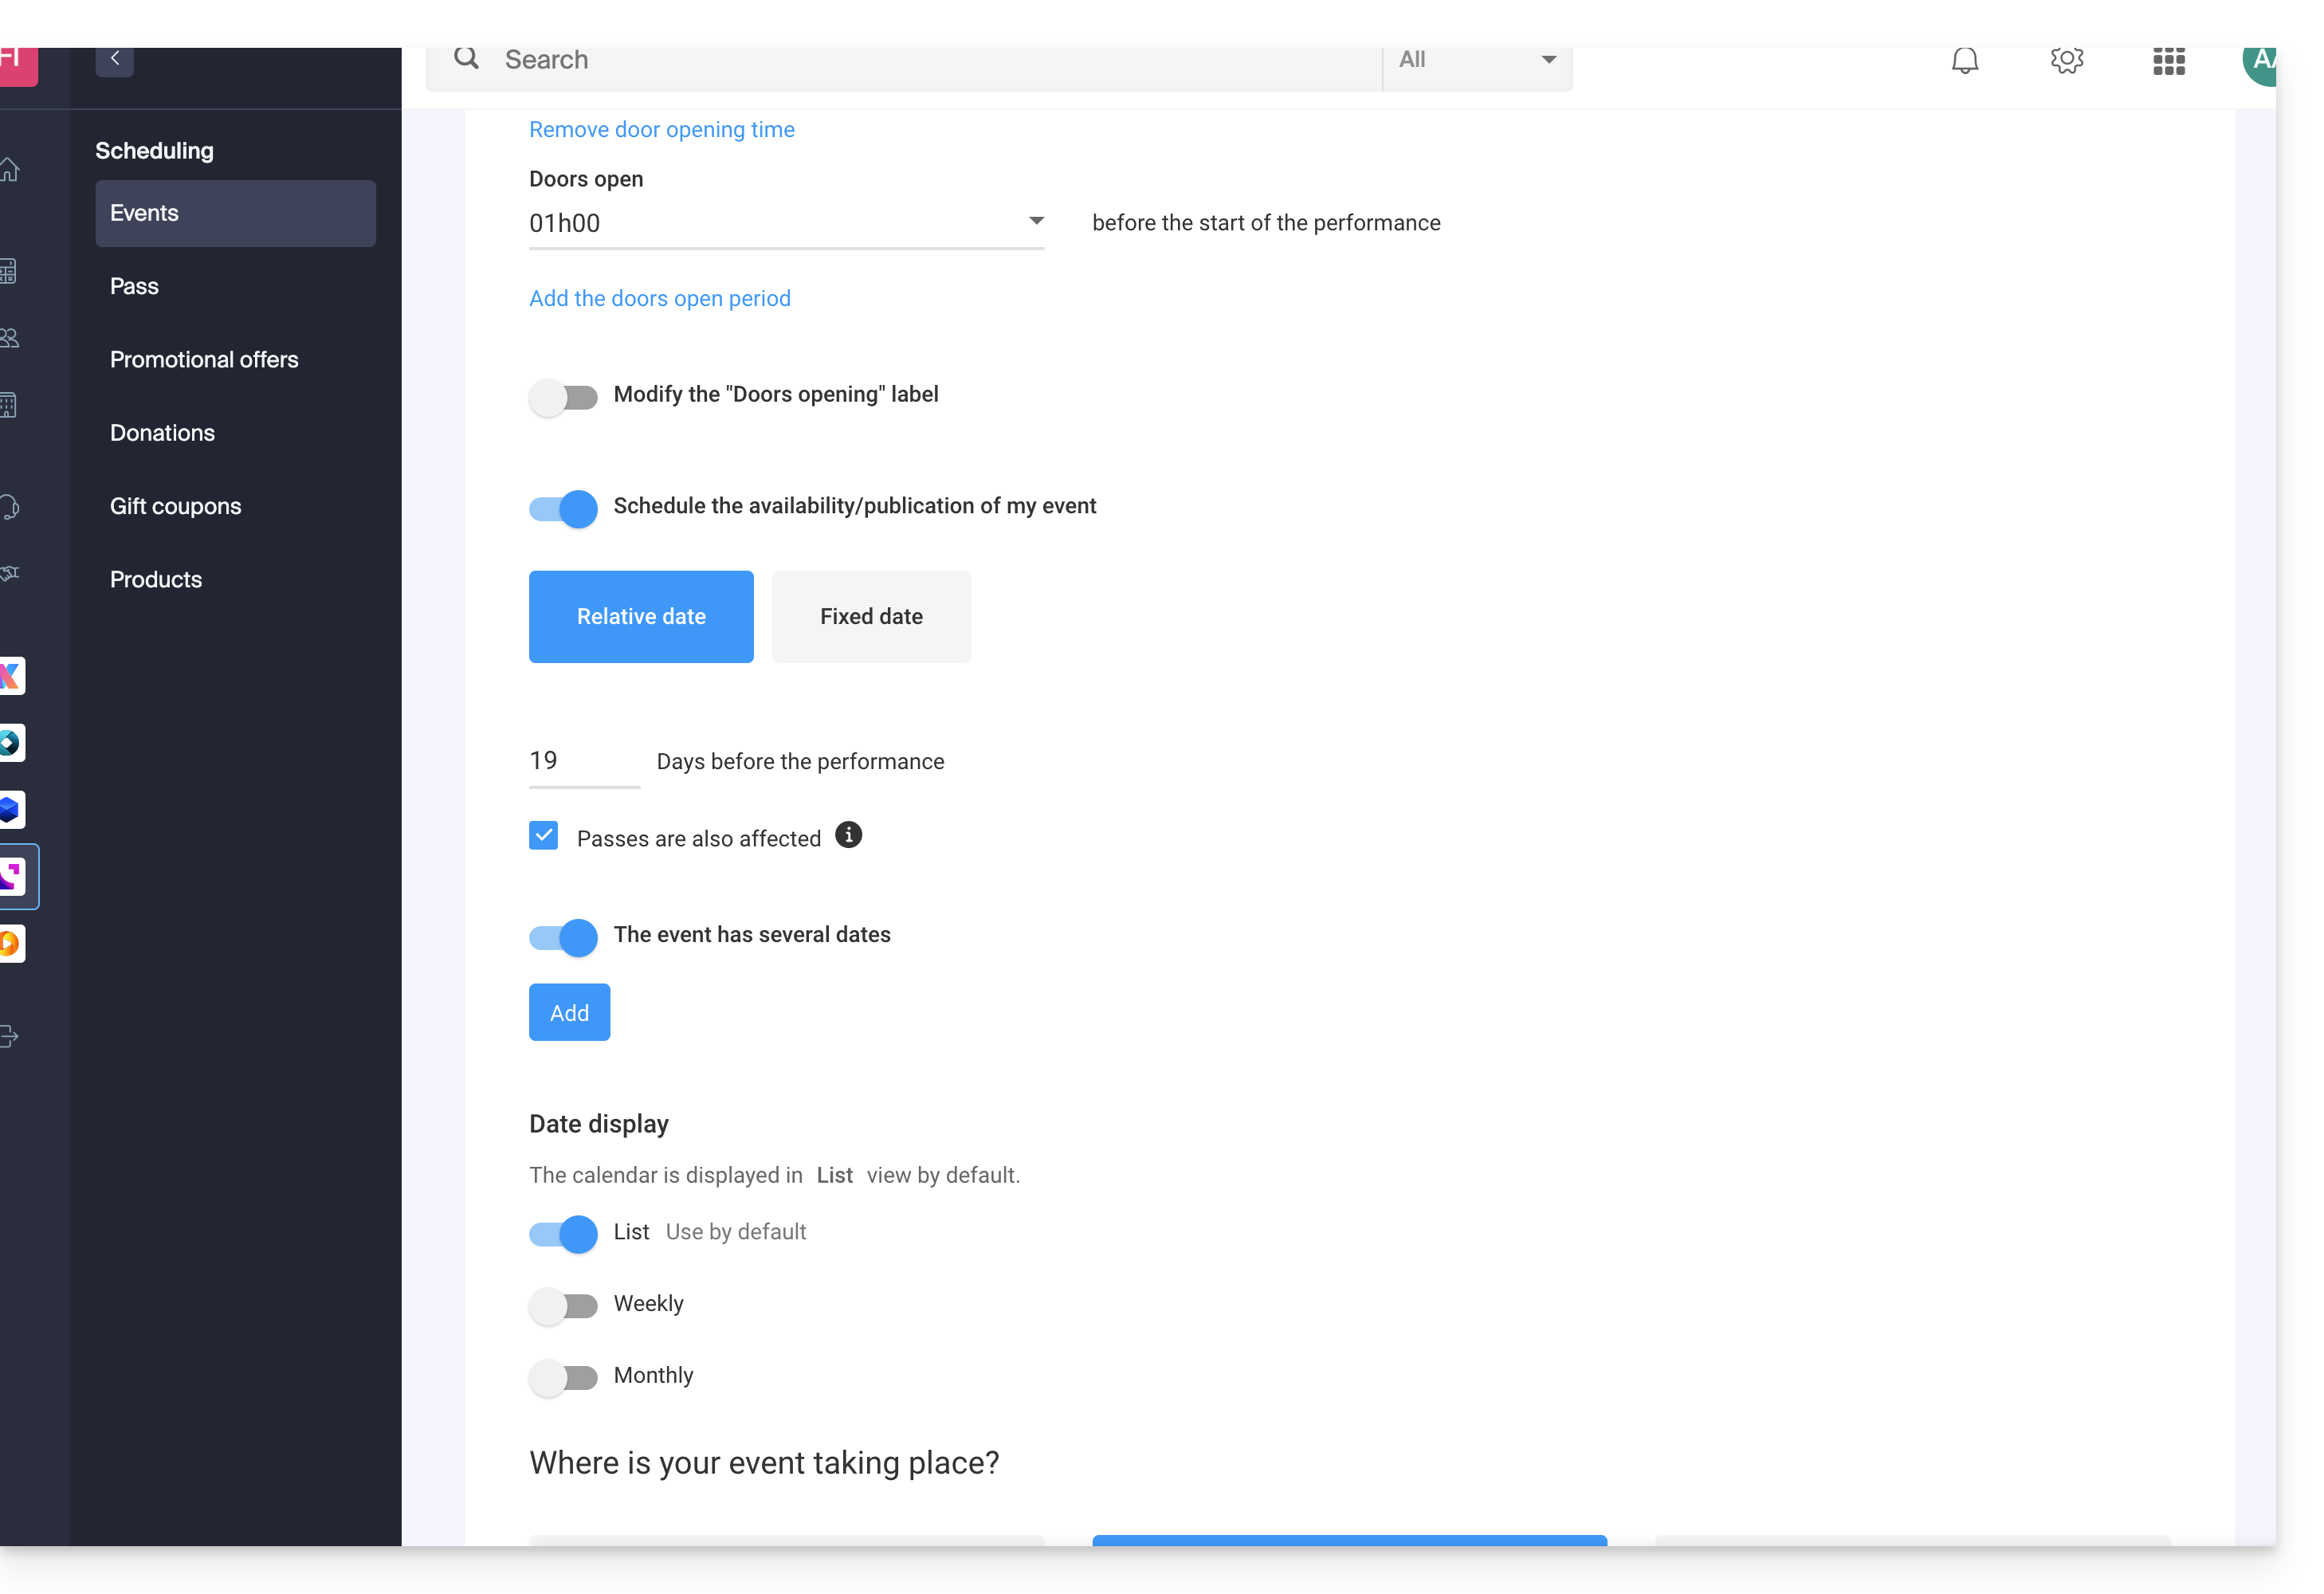
The different available displays
The list display
The list display is practical if the dates are spaced out over time with empty periods (weekly, or monthly for example) and/or if the ticketing needs to be able to offer several dates or sessions, without these being indicated on a calendar.
The monthly calendar
The monthly calendar allows you to place events on a monthly calendar. It is an effective display, but can be very busy if there are many sessions per day.
The weekly calendar
Very useful if you want to display the dates week by week, especially if there are several performances per day, or in the case where the event only lasts for a short period, and you want to display the days of the week.
Link to this FAQ:
Has this FAQ been helpful?
This guide explains how to back up a Cloud VPS in the form of a snapshot.
Preamble
- A snapshot is like a photo of your Cloud VPS at a given moment, containing everything on your server, including your operating system, applications, data, etc.
- Snapshots can be used for...
- ... protect your Cloud VPS in case of a problem: if you encounter a problem with your Cloud VPS, you can restore a snapshot to return to a previous state.
- ... test modifications without risk: before making significant changes to your Cloud VPS, you can create a snapshot to be able to revert if necessary.
- You benefit from a free snapshot to back up your entire server in a dedicated space. If needed, it is possible to order additional spaces or delete a snapshot to create a new one.
- Two types of backups are possible:
- Snapshot of data: allows you to create an image of the volume containing your data (not available for Windows distributions).
- Snapshot of the operating system: allows you to create an image of the volume containing your operating system. This type of backup involves a brief interruption of your applications and websites.
- It is recommended to create snapshots regularly, for example once a week or once a month; this will allow you to have a history of your Cloud VPS and to be able to revert in case of a problem.
- It is obviously possible to restore the state of the Cloud VPS thanks to the previously created snapshot.
Create a snapshot
To do this:
- Click here to access the management of your product on the Infomaniak Manager (need help?).
- Click directly on the name assigned to the product concerned.
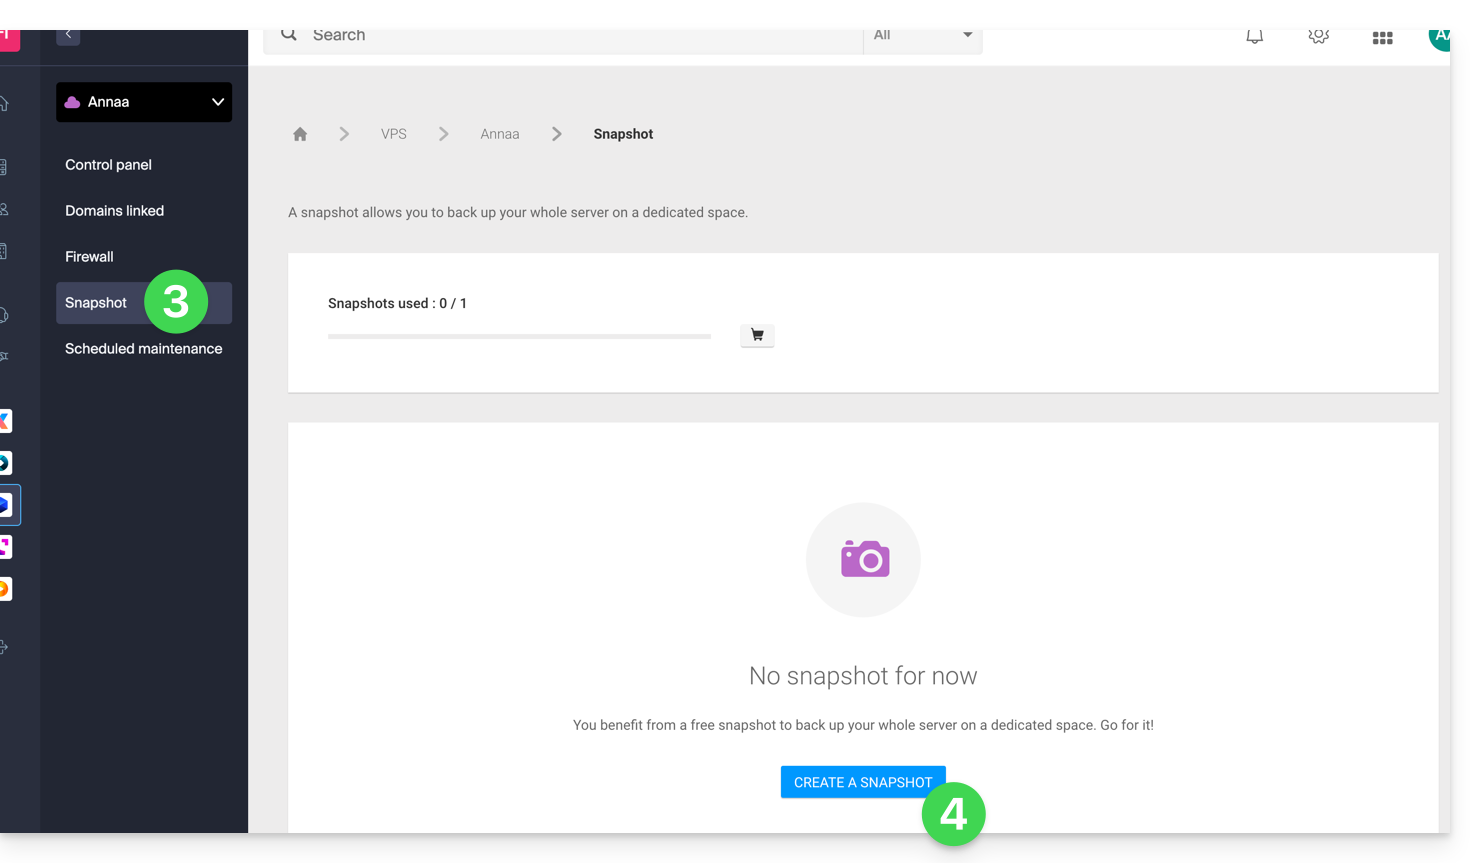
- Click on Snapshot in the left sidebar.
- Click on the blue button Create a snapshot:
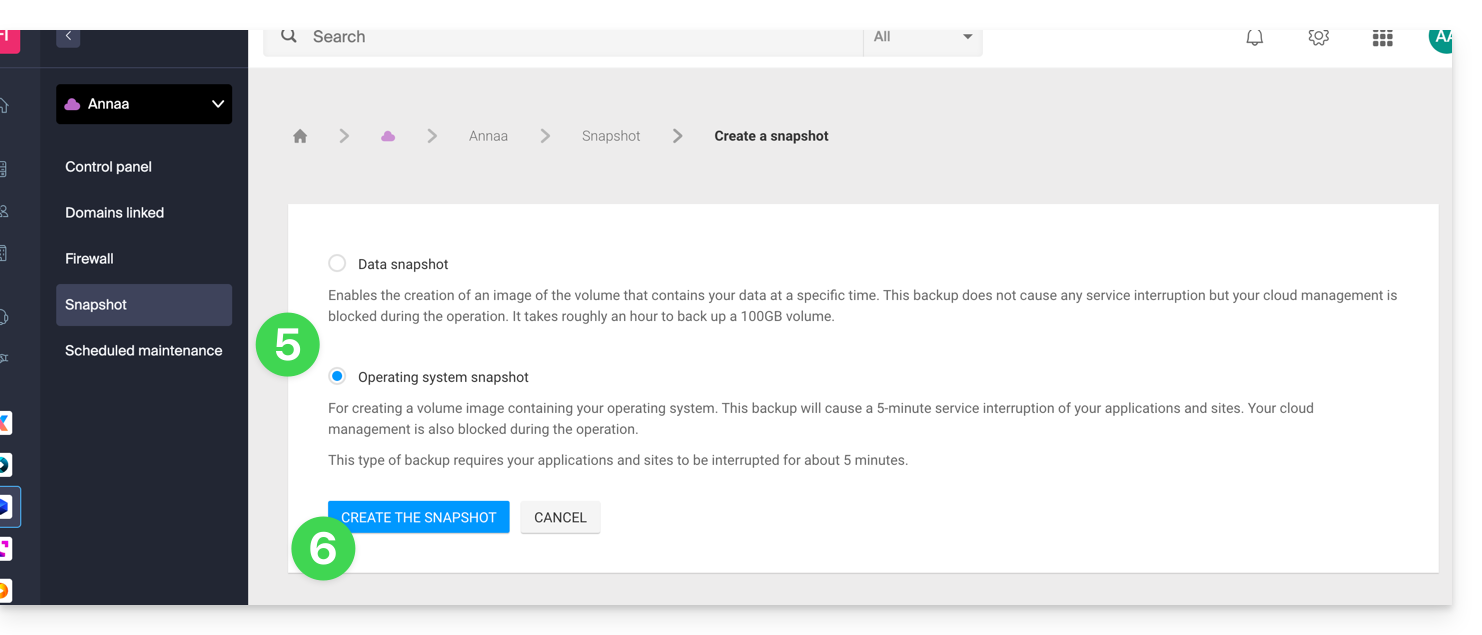
- Choose the type of snapshot to create (data or operating system).
- Click on the blue button to start creating the snapshot:
- An email is sent when the snapshot is generated.
Delete a snapshot
To do this:
- Click here to access the management of your product on the Infomaniak Manager (need help?).
- Click directly on the name assigned to the product concerned.
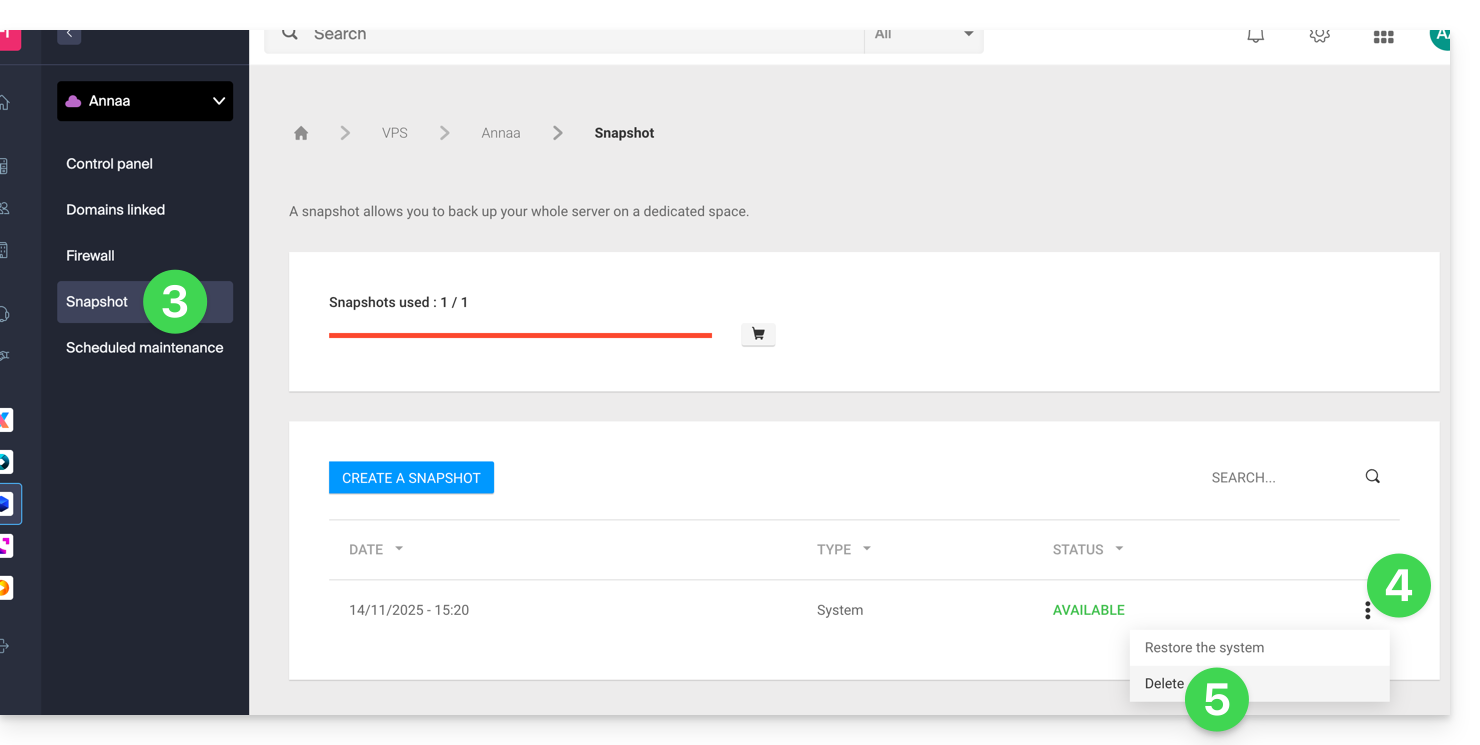
- Click on Snapshot in the left sidebar.
- Click on the action menu ⋮ to the right of the object concerned in the table that appears.
- Click on Delete:
Order additional snapshots
To do this:
- Click here to access the management of your product on the Infomaniak Manager (need help?).
- Click directly on the name assigned to the product concerned.
- Click on Snapshot in the left sidebar.
- Click on the shopping cart icon:
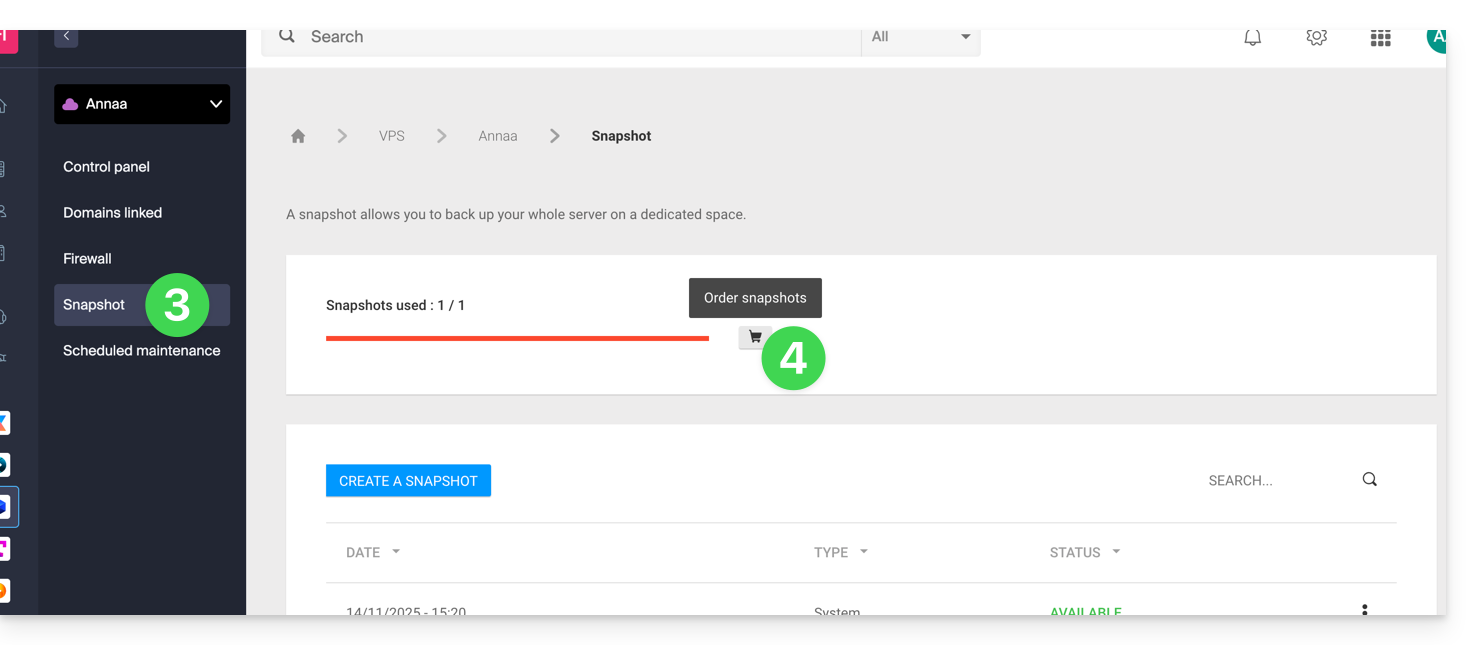
- Follow the instructions to complete the order.
It is not possible to order an additional snapshot if a snapshot is in progress.
Link to this FAQ:
Has this FAQ been helpful?
This guide suggests solutions to resolve common issues and frequent errors that may occur when you try to display your website in https after activating an SSL certificate.
The web browser automatically displays the http version of the site when you try to access it in https
It is recommended to perform the following actions:
- Clear the cache of your applications or your site.
- Check that the pages and scripts of the site do not contain redirects to the
httpversion of the site. - Check that the site's
.htaccessfile does not contain redirects to thehttpversion of the site. - Set the site's
httpsaddress as the default one:
The website is displayed incorrectly (missing images, unsupported stylesheets, etc.) or displays a warning in the address bar
It is recommended to perform the following actions:
- Clear the cache of your applications or your site.
- Check that the pages and scripts do not point to external resources in
http; the site whynopadlock.com can help you identify the unsecured elements of your site. - Also refer to this other guide on this subject.
"This web page presents a redirection loop", "ERR_TOO_MANY_REDIRECTS"
If your web browser displays this error, it is recommended to perform the following actions:
- If the site works with a web application like WordPress or Joomla, disable the extensions one by one to identify the problematic one.
- Check that the pages and scripts of the site do not contain redirects to the http version of the site.
- Try to disable HSTS.
- If Prestashop is used, SSL must be activated on all pages:
- Add your SSL domain:
- Go to Preferences > SEO & URLs.
- In the "Store URL" section, enter your site's address in the "SSL Domain" field (without the
https://, justwww.domain.xyz).
- Activate SSL:
- Go to Preferences > General settings.
- At the top of the page, click on "Click here to use the HTTPS protocol before activating SSL mode."
- A new page will open with your site in the secure HTTPS version.
- Force the use of SSL on the entire site:
- Go back to Preferences > General settings.
- Set the "Enable SSL" option to YES.
- Also set "Force the use of SSL for all pages" to YES.
- Add your SSL domain:
An old SSL certificate is displayed - clear the SSL cache
Web browsers cache SSL certificates to speed up navigation. Normally, this is not a problem. However, when you develop pages for your website or install a new certificate, the browser's SSL state can hinder you. For example, you might not see the padlock icon in the browser's address bar after installing a new SSL certificate.
The first thing to do in this case is to make sure that the domain points to the server's IP address (A and AAAA records) and if it is still the wrong SSL certificate that is returned, clear the SSL cache:
- Chrome: go to Settings and click on Settings. Click on Show advanced settings. Under Network, click on Change proxy settings. The Internet Properties dialog box appears. Click on the Content tab. Click on Clear SSL state, then click OK. Refer to other leads in this other guide.
- Firefox: go to History. Click on Clear Recent History then select Active Connections and click on Clear Now.
Loss of CSS formatting
If the website displays without CSS style, analyze page loading with the browser Console. There may be mixed content errors (mixed content) related to your styles .css, which you will need to resolve for them to be loaded correctly again.
Cloudflare
If you are using Cloudflare, refer to this other guide on the subject.
Link to this FAQ:
Has this FAQ been helpful?
This guide explains how to view the disk space of an Infomaniak Web Hosting and display the size of directories.
Find large folders in a Web Hosting
To do this:
- Connect to the server via SSH (need help?).
Run the following SSH command:
ncdu- Navigate through the folder structure using the keyboard's directional arrows.
- Exit with the key combination
CTRL + C.
Link to this FAQ:
Has this FAQ been helpful?
This guide concerns Site Creator by Infomaniak, which allows you to create a complete site composed of several pages.
Preamble
- The home page is mandatory (with or without header and footer).
- Add additional pages, blank, password-protected, or containing specific content directly (contact form, for example).
- Add legal pages (to include your terms and conditions of use / T&Cs, for example).
- They will all be part of the site's navigation menu(s).
- To (re)create a complete site with pages and subpages (examples of pre-designed sites), you can install a site template.
Add a page to the site
Prerequisites
- Access Site Creator:
- Click here to access the management of your product on the Infomaniak Manager (need help?).
- Click directly on the name assigned to the relevant Site Creator.
- Click the Edit my site button to start the editor:

Once in Site Creator:
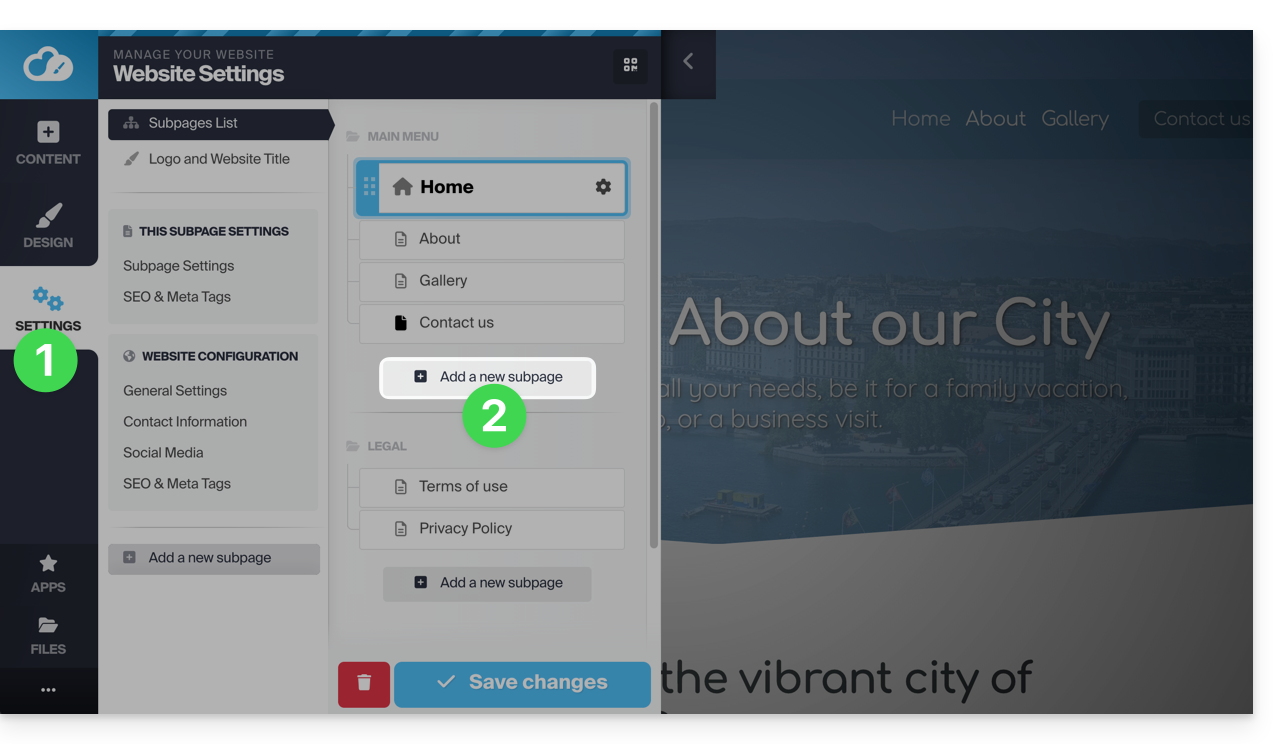
- Click the Settings button in the left sidebar - the list of your pages appears.
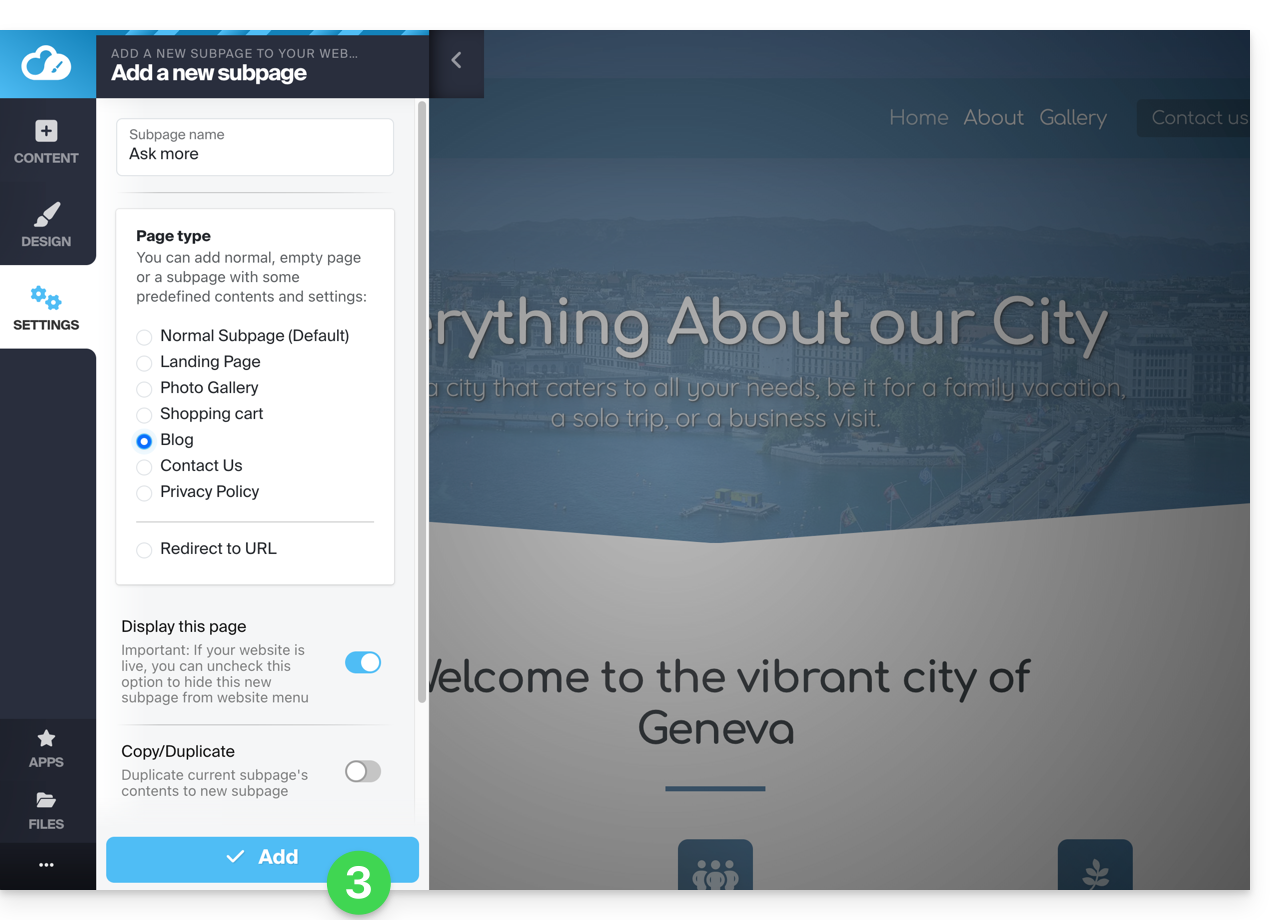
- Click the Add a page button below the existing tree structure:
- Choose a page name and Show more options to choose the page type and other settings, then click to Add the page:
Copy / Duplicate a page
To do this:
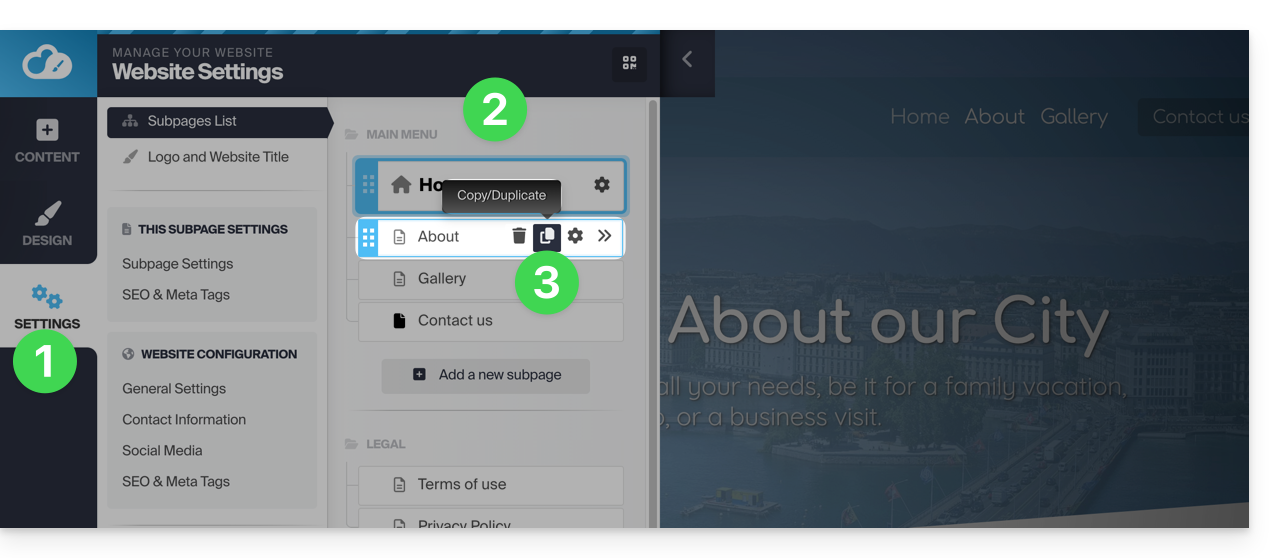
- Click the Settings button in the left sidebar - the list of your pages appears.
- Hover over the desired page in the existing tree structure.
- Click on the duplicate icon that appears on hover:
Other option:
- Go to the page of your site that you want to clone.
- Click on the Settings button in the left sidebar menu.
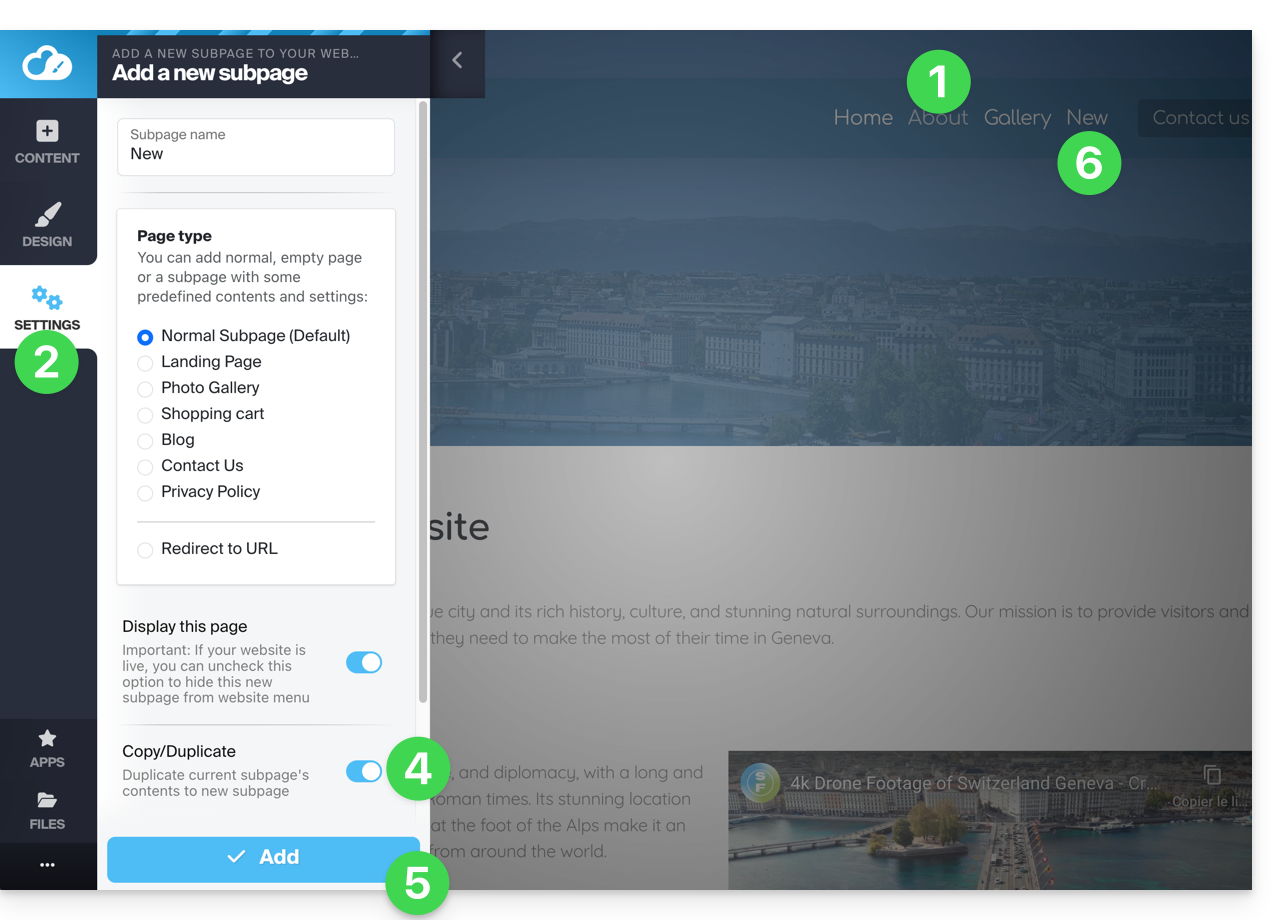
- Click on the Add a page button below the existing tree structure. Choose a page name and Show more options to select the page type.
- In Show more options enable Clone / duplicate, to reuse the content of the current page.
- Click to Add the page.
- The new page appears in the menu with the same content as the page you were on at point 1:
Rename a page
To do this:
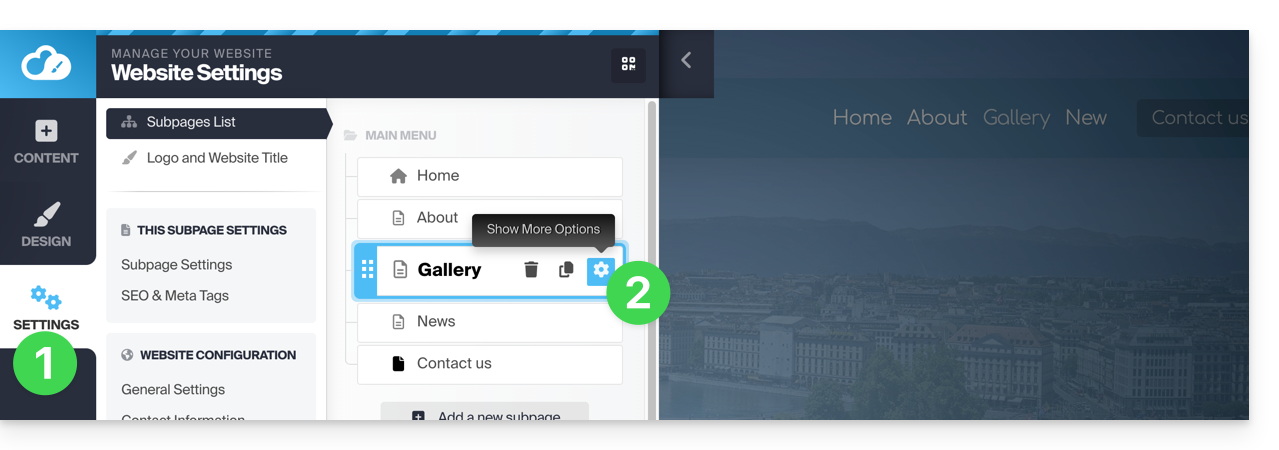
- Click the Settings button in the left sidebar - the list of your pages appears.
- Hover over the desired page in the existing tree structure and click on the gear icon to access the page options, including the display name:
Other option: under Settings, on the existing tree structure, you can directly rename your pages and then Save changes at the bottom of the page: 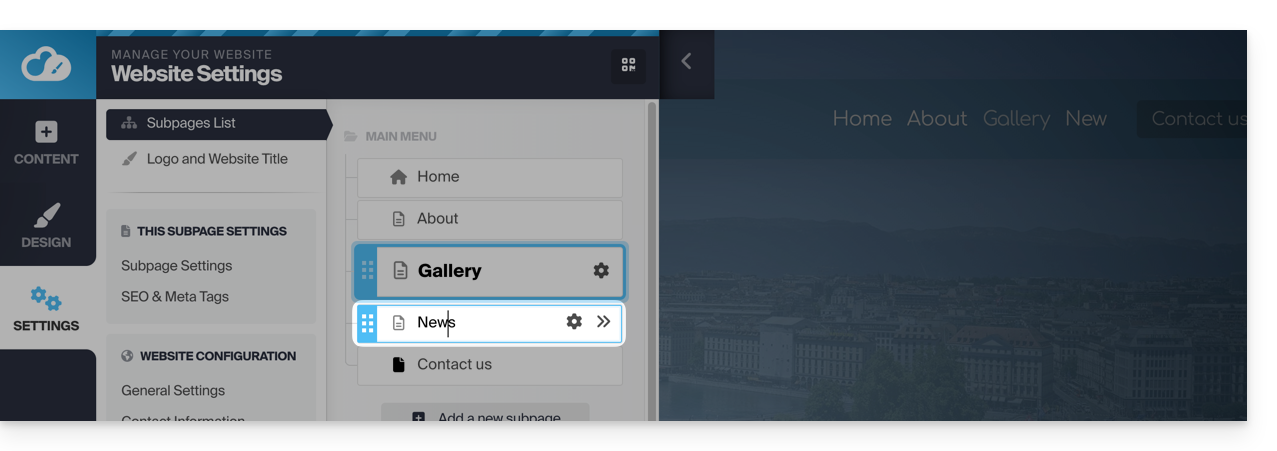
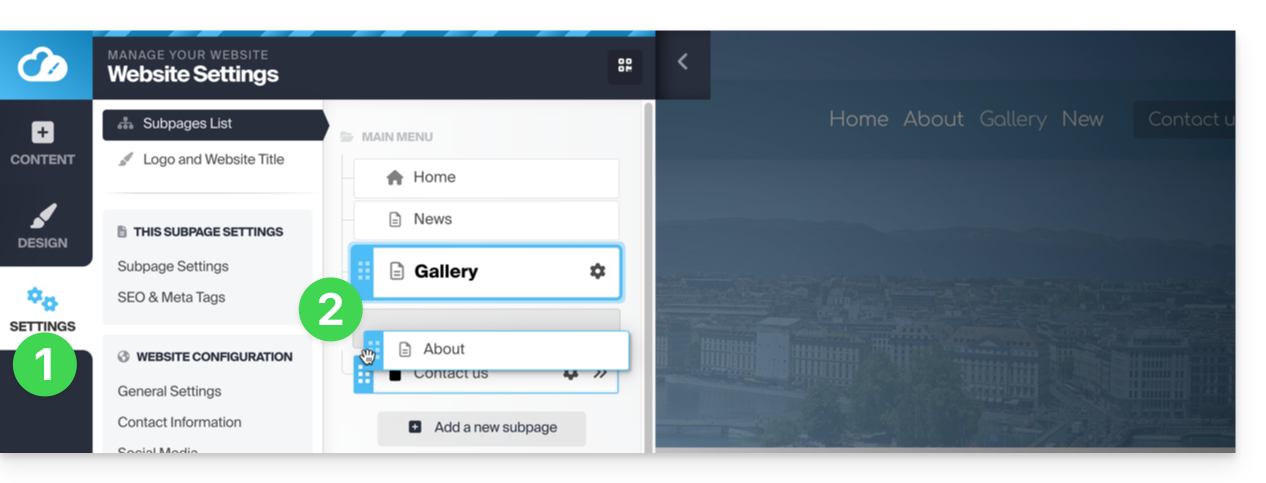
Change the order of pages
This can be useful, for example, to set one of your current pages as the first page (home page) instead of the current home page. To do this:
- Click the Settings button in the left sidebar - the list of your pages appears.
- On the existing tree structure, you can directly drag your pages to change their order (this mainly affects the display of pages within a menu) and then Save changes at the bottom of the page:
Delete a page
To do this:
- Click the Settings button in the left sidebar - the list of your pages appears.
- Hover over the desired page in the existing tree structure.
- Hover over the gear icon and then click on the trash can that appears on hover:
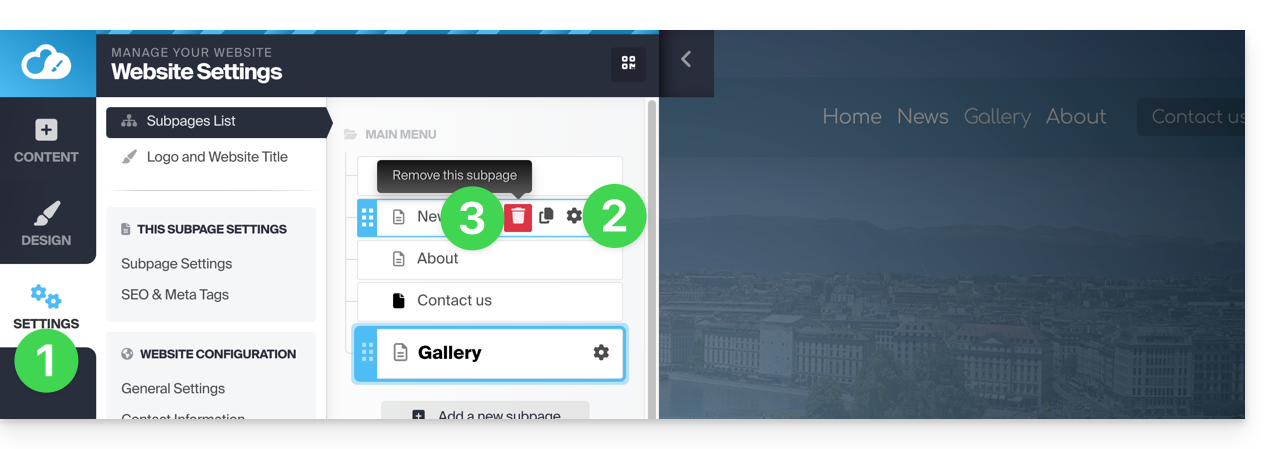
- Confirm the deletion and the page will be removed without the possibility of undoing.
Other option: go to the page you want to delete. Under Settings, click on the red Trash button at the bottom of the page to delete the current page: 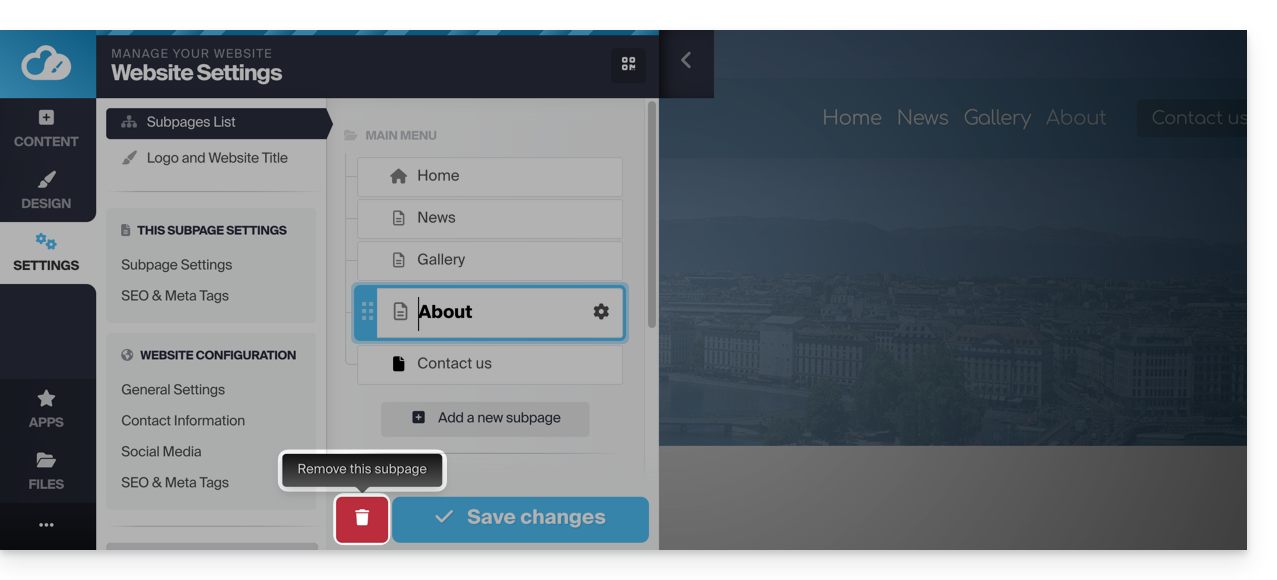
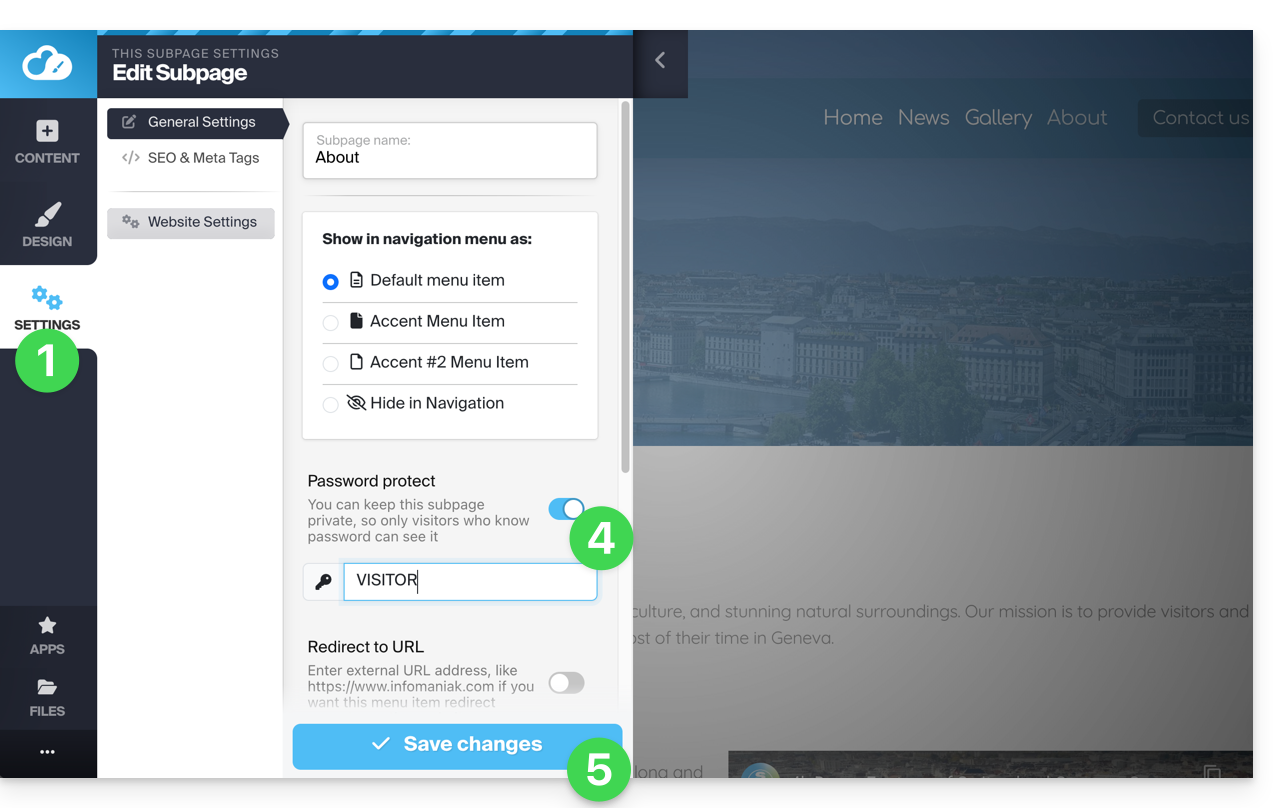
Create a private/password-protected page
To do this:
- Click on the Settings button in the left sidebar - the list of your pages appears.
- Hover over the desired page in the existing tree structure.
- Click on the gear to access the page options.
- Activate the password protection option to set a password that will be requested when viewing the page.
- Save the changes at the bottom of the page:
To test, visit the page from a private browsing window (to avoid being logged in to Site Creator) or preview the page from the editor: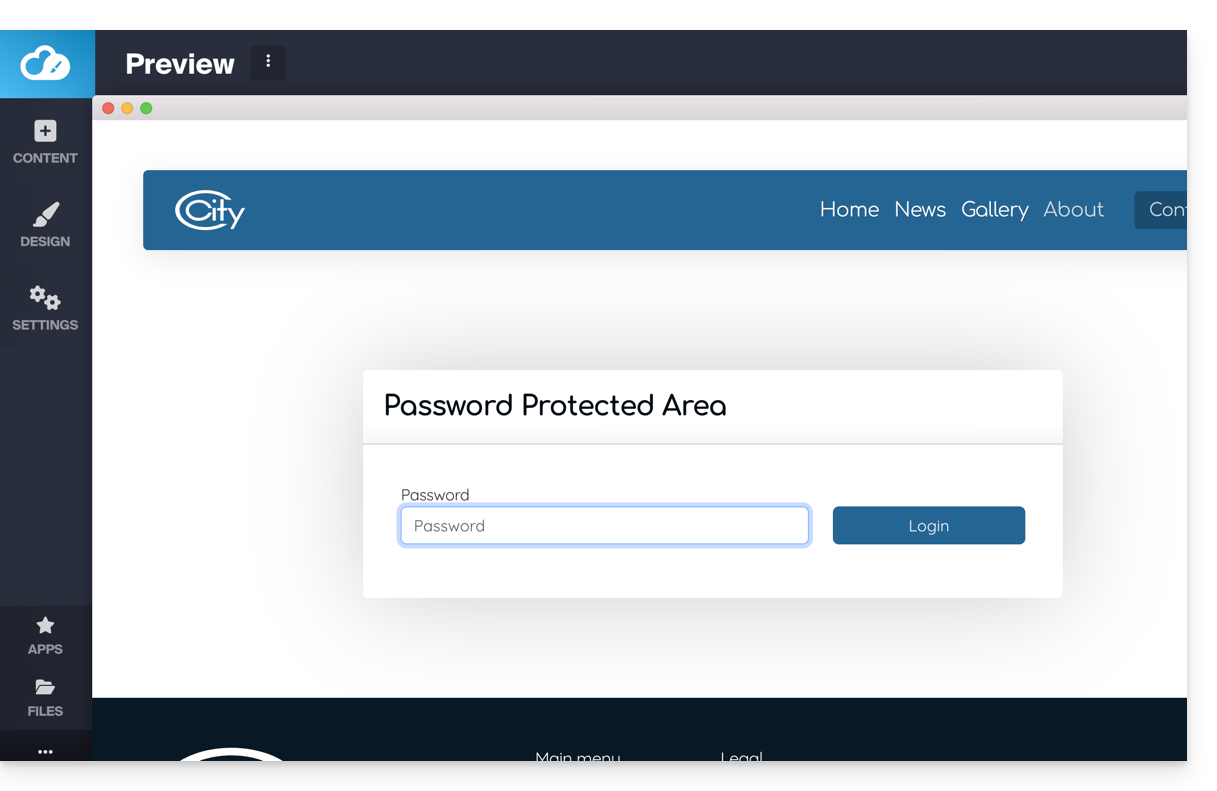
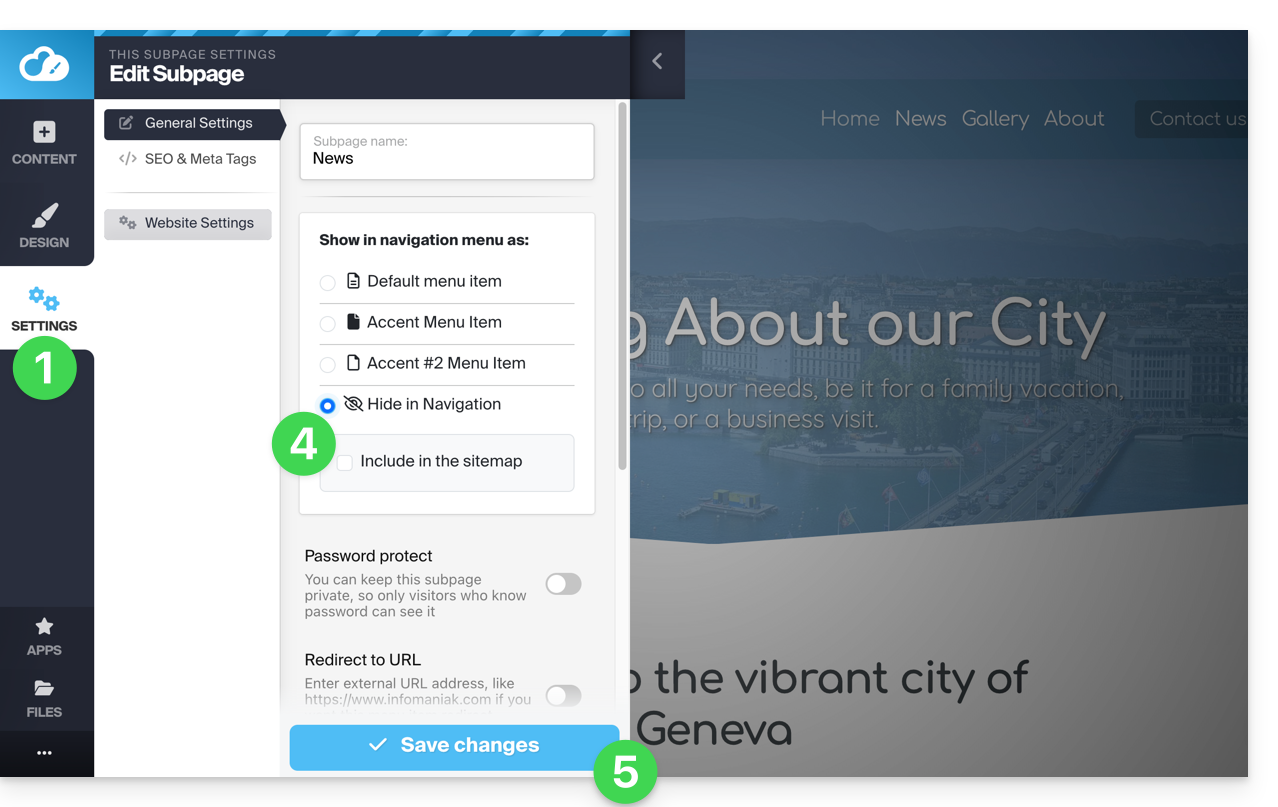
Add a 'hidden' page
To add a page that will not appear in the main menu (but will remain accessible via its direct address and by a search engine if it indexes your page, as well as in the site map if you wish):
- Click the Settings button in the left sidebar - the list of your pages appears.
- Hover over the desired page in the existing tree structure.
- Click on the gear to access the page options.
- Choose the last display type to hide the page in the navigation and determine if you still want to include the page in the site map.
- Save the changes at the bottom of the page:
Another option: hover over the desired page in the existing tree and click on the page icon to the left of your page name until the crossed-out eye appears:
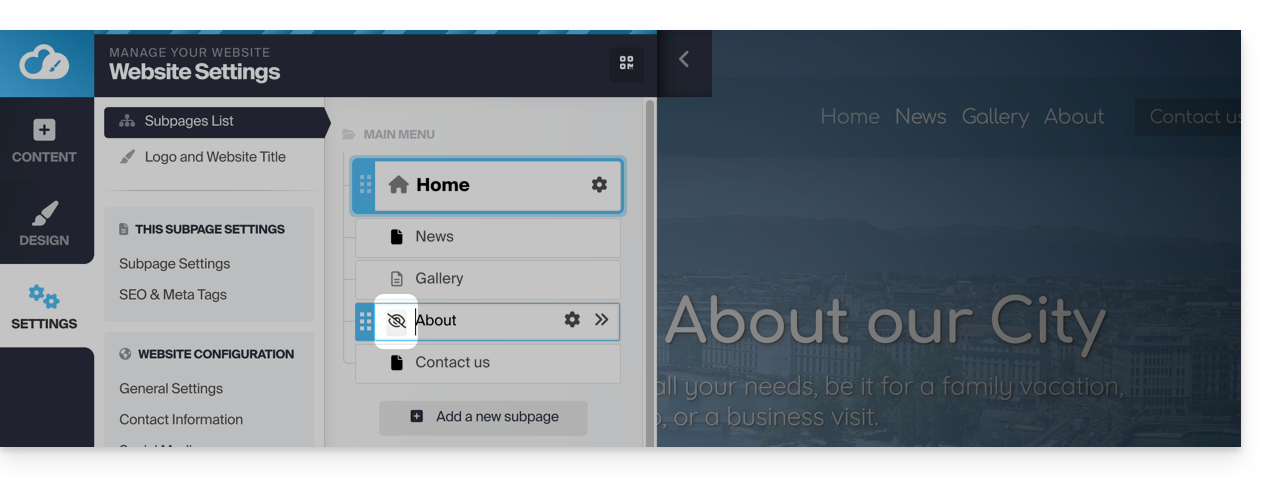
Save the changes at the bottom of the page.
If necessary, you can create a link to this hidden page from another, as the hidden page will still appear in the site's page list when you add an internal link:
Link to this FAQ:
Has this FAQ been helpful?
This guide covers data protection regulations in Switzerland and Europe, and the measures taken by Infomaniak to secure your customer data and data within Web Hosting and Mail Services.
Understanding the difference between data security and data confidentiality
Data security aims to prevent any unauthorized access to your information. It relies on measures such as encryption, firewalls, or VPNs. A security breach can have disastrous consequences: imagine a hacker stealing your entire customer database and demanding a ransom to recover it. This type of attack – ransomware – can paralyze a business overnight.
Data confidentiality concerns who can access your information and how it is used. Even if your data is secure against hacking, it can be collected, analyzed, and resold… legally.
Example: you carefully store your customers' information, but unbeknownst to you, a service you use shares – anonymously – this data with third parties. Result? Your competitors can obtain valuable analyses of your market and target your own customers without ever needing to hack.
LPD & GDPR
In Switzerland, the LPD (Federal Data Protection Act) and nLPD (for the "new Law" in effect since September 2023) protect the confidentiality of residents by regulating the collection and processing of personal data by organizations.
On the other hand, the GDPR (General Data Protection Regulation) of the EU, in effect since May 2018, influences global companies processing the data of European residents, including in Switzerland. While the LPD applies to the data of Swiss residents, the GDPR concerns that of EU residents. Swiss companies managing European data must comply with the GDPR requirements, including the designation of a Data Protection Officer and the conduct of Impact Assessments in case of risky processing.
Your role as an Infomaniak Client
Regarding the data you host that belongs to you — and especially if it contains personal data of your visitors, contacts, or customers — it is your responsibility to ensure its compliance.
When processing this personal data, it is essential to inform users about the purpose and methods of this processing. This is usually done through a privacy policy or a data processing agreement (DPA).
Agreement between data controller and processor
A DPA (Data Processing Agreement), called in German AVV (Auftragsverarbeitungsvertrag), in Italian ATD (Accordo di Trattamento dei Dati) and in Spanish CTA (Contrato de Tratamiento de Datos), translates to Data Processing Agreement or Personal Data Subprocessing Contract.
It is a mandatory contract provided for by the GDPR between a data controller and a processor. It defines the purpose, duration, and nature of the processing, as well as the obligations and security measures. Its objective is to protect the personal data entrusted to a service provider.
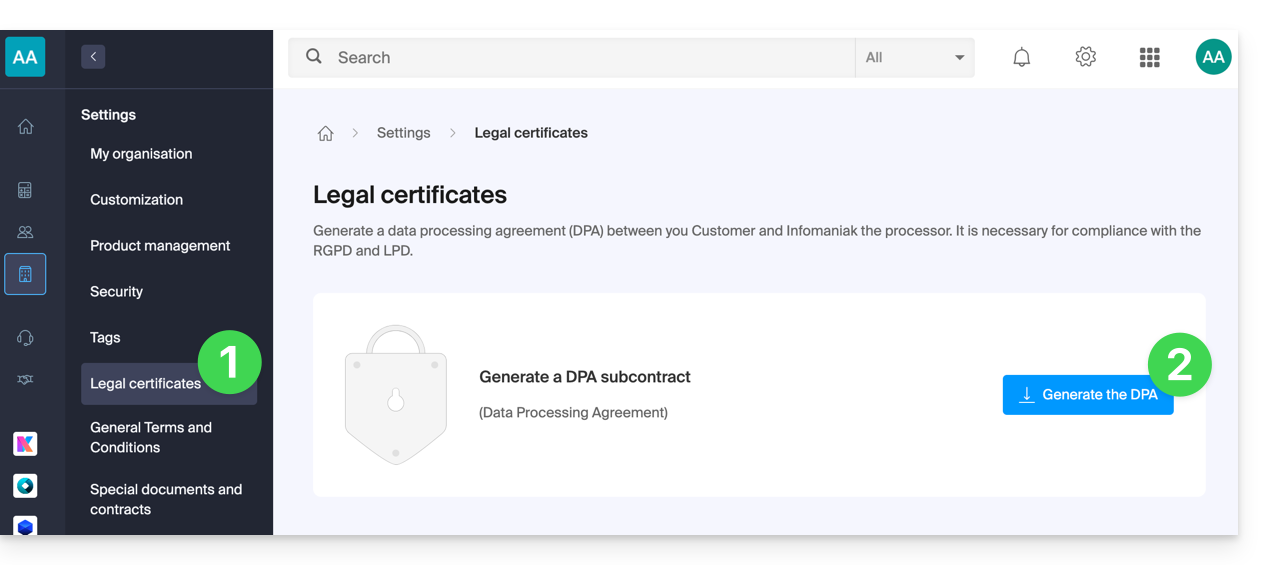
This GDPR certificate (in PDF format) can be generated and downloaded from the Manager (accessible to organization users who are owners or administrators):
- Click here to access DPA management on the Infomaniak Manager (need help?).
- Click the Generate button to download the customized PDF document:
Here are some tips on this subject:
- Inform about all data processing, not just those related to the website.
- Ensure easy access to the privacy statement on the website, for example in the footer of each page.
- Generally, it is not necessary to obtain the user's approval for privacy statements (e.g., for forms); it is sufficient to indicate where to find the statement (example Site Creator).
- Keep in mind that new, more in-depth information rules may require adjustments to existing privacy statements.
It is crucial to differentiate between the security of the infrastructures where your data is hosted and the management and implementation of your data on your side. As a host, Infomaniak acts as a subcontractor for your GDPR obligations. In this context, its privacy policies and cookie usage, as well as its terms and conditions, provide the necessary guarantees regarding its compliance as a subcontractor.
If necessary, you can find professionals or online guides to help you through the compliance process.
Infomaniak's Role
Like companies that work with user data, Infomaniak must comply with the LPD and, because some of its users are European citizens, the GDPR as well:
- the data privacy policy details the data that Infomaniak retains to provide and execute its services
- the policy related to the protection of your personal data describes Infomaniak's commitments as a subcontractor that hosts all of your data, including personal data
These commitments, as outlined in the general and specific terms and conditions, are as follows:
- to keep your data within data centers exclusively located in Switzerland and never to transfer your information outside of these infrastructures
- to apply rigorous security standards and to continually improve processes to ensure a high level of security across all services
- to promptly inform you in the event of a data breach
- to ensure transparency with you when Infomaniak uses subcontractors who may process your data
- to strengthen and develop physical security measures to prevent any unauthorized access to the infrastructures where your data is stored
- to implement physical and/or logical isolation systems (depending on the services) to separate the hosting of different clients; additionally, Infomaniak conducts annual penetration tests to ensure data integrity between clients
- to demonstrate great reactivity in the secure updating of the systems under its responsibility
Manage the cookies on the infomaniak.com site
When you visit the page infomaniak.com a choice must be made for the acceptance of certain cookies. To modify this choice later, access your preferences from the footer of the site: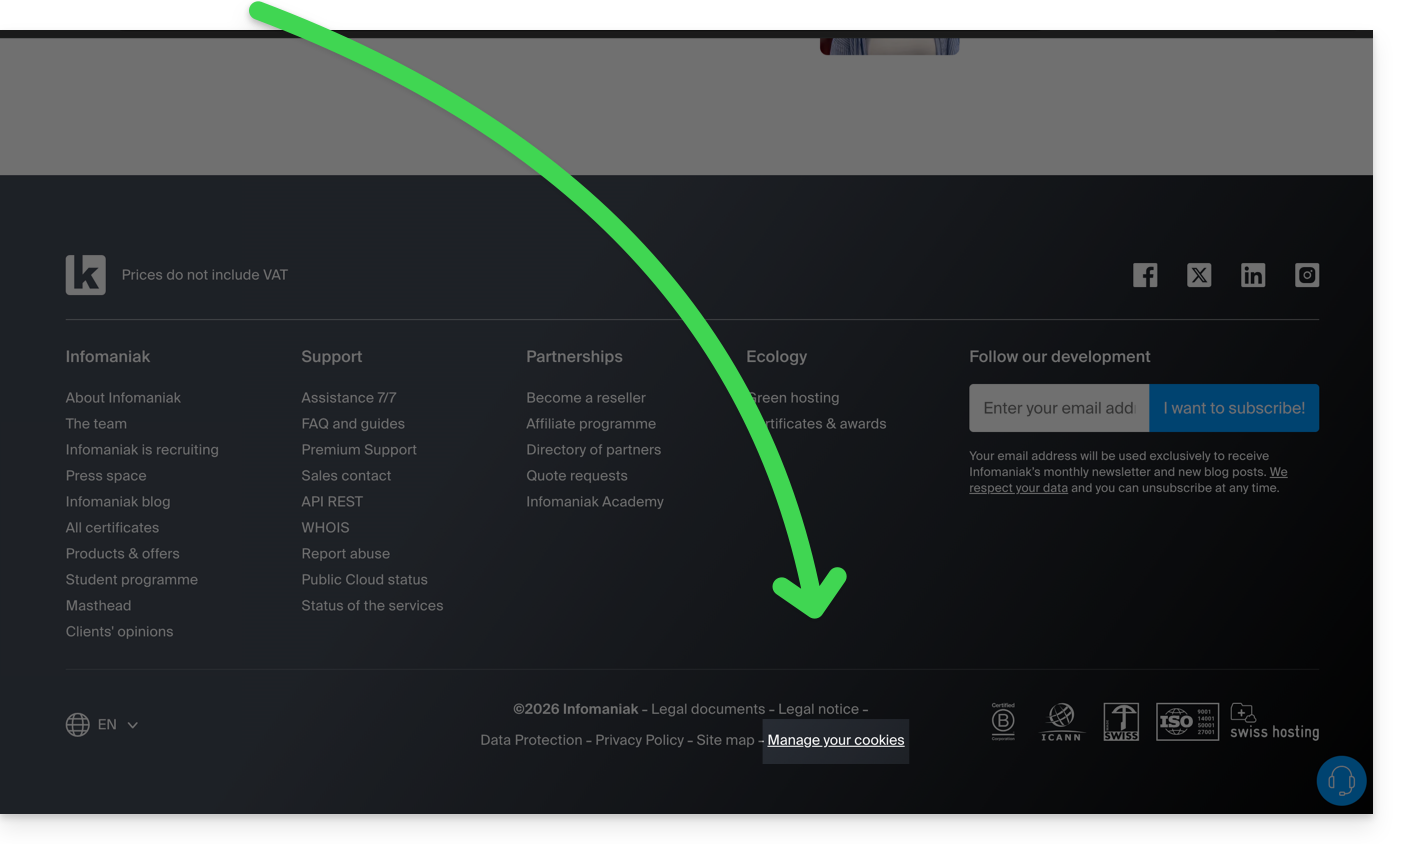
Link to this FAQ:
Has this FAQ been helpful?
The Sectigo guarantee is a financial commitment from Sectigo, the Certification Authority (CA), aimed at protecting the end user.
It applies only if the user suffers a financial loss due to a validation error by Sectigo when issuing the certificate.
It does not cover security vulnerabilities in your server or misconfigurations on your part.
The higher the validation level (DV < OV < EV), the higher the amount of the Sectigo guarantee is generally.
Link to this FAQ:
Has this FAQ been helpful?
This guide details how to import iCloud data using rClone on kDrive Infomaniak.
✘ UNAVAILABLE with
Free kSuite / Standard kSuite
my kSuite / my kSuite+ (ik.me, etik.com, ikmail.com)
Preamble
- Since Apple does not provide an API like its competitors, a solution to retrieve documents from an iCloud Drive is to install the kDrive macOS app to synchronize the icloud folder, which should be in your library. The guide below offers a solid alternative.
- kDrive supports rclone streaming upload via WebDAV, up to 50 Go (extendable to 100 Go) to prevent abuse, with automatic error handling if the limit is exceeded without prior specification of the size via
Content-Length.
1. Configure rclone for drive access
Installing rclone on your computer
There is a version of rclone with a graphical interface (GUI) but it is quite possible to do this via the command line (CLI):
- Install rclone from a
Terminal-type application on your device by typing the entire following command:sudo -v ; curl https://rclone.org/install.sh | sudo bash - Enter the password for your session on your computer to start the installation:

- Refer to the official installation guide if necessary.
Configuring the remote disk (iCloud) on rclone
- Once rclone is installed, enter the command
rclone config.- Refer to the official configuration guide if necessary.
- Then choose to configure a new remote import by answering
nforNew remote. - Name the remote disk, for example
appledrive:
- Then choose the type of disk to import by answering
iclouddrivewhich corresponds to iCloud Drive among the choices offered. - Indicate to rclone the
apple_idby entering your Apple ID (usually an email address). - Choose to use your own password linked to the Apple ID account (
y). - Enter your password twice as requested:

- Answer “No”
nto the question about “advanced configuration”. - A window on your device should open to warn you of a remote connection; authorize it:

- A window on your device should open with a 2FA code; copy it:
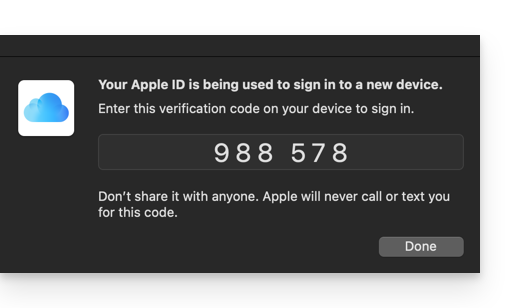
- Paste the code when rclone asks for it.
- Answer “Yes”
yto the last question if all the information presented is correct.
Configuration of the destination disk (kDrive) on rclone
It is possible to act directly on the configuration file of rclone by pasting your kDrive configuration in it in the form for example:
[kDrive]
type = webdav
url = https://kDrive_ID_HERE.connect.kdrive.infomaniak.com/
vendor = other
user = user@email.com
pass = PASSWORD_HERE_OR_APP_PASSWORD_IF_2FA
But here is how to proceed step by step as for the previous configuration:
- Still in the terminal, enter
nfor a new disk configuration and enter the namekDriveto recognize your destination disk:
- Then choose the type of disk to import by answering
webdavwhich corresponds to a WebDAV configuration among the choices offered. - Enter the following information:
url= direct access to kDrive (refer to this other guide regarding the kDrive ID for the connection URL)vendor= rclone (option number 6)user= email address to log in to the Infomaniak user account
- Answer “Yes”
yfor the password question, then enter the password:- application password in case of double authentication activated or the one of your Infomaniak user account if you have not activated 2FA.
- Leave the
bearer_tokenblank, then answer “No”nto the question about “advanced configuration”. - Answer “Yes”
yto the last question and your 2 disks are displayed:
2. Copy data from iCloud to kDrive
Prerequisites
- Consult the options available in the official guide before starting an import.
Example of a command to start copying your iCloud data to the root of your kDrive:
sudo rclone copy appledrive: kDrive:This will immediately start copying your iCloud folders, subfolders, and contents to the personal folder of your Infomaniak kDrive!
Details about the dates of your exported photos
If you export your photos from iCloud to Infomaniak kDrive, be careful about the date metadata. During export, the file creation dates may be changed and replaced with the export date instead of the original photo date.
Here is a script for advanced users that allows you to restore the correct data to your files from the EXIF information (it is recommended to process batches of 7000 photos max. to avoid a crash):
- Download ExifTool https://exiftool.org/index.html (macOS Package).
- Install the application by authorizing its opening in advance if necessary:

- Open Script Editor (located in your Applications > Utilities folder):

- Click on New document.
- Copy and paste the long script provided below into the Script Editor window.
- Click on Run to start the script, a window opens:

- Select the folder to analyze.
- Then let the script run, it will modify the dates or write the errors in a
errors.txtfile on the desktop.
The script to copy and paste entirely:
-- replace file date with EXIF creation date or date from name after the first dash -

tell application "Finder"
    set FolderPath to choose folder with prompt "Select the folder containing the files to update"
    my processFolder(FolderPath)
end tell

on processFolder(aFolder)
    tell application "Finder"
        -- process files:
        set fileList to files of aFolder
        repeat with eachFile in fileList
            -- process a single file

            set theFile to eachFile
            set AppleScript's text item delimiters to {""}
            set fileName to name of eachFile --get the file name

            set eachFile to eachFile as string --file path
            set hasDate to true --initialize date found flag

            try
                --get date if available
                set photoDate to do shell script "/usr/local/bin/exiftool -DateTimeOriginal " & quoted form of POSIX path of eachFile
                if photoDate is "" then set photoDate to do shell script "/usr/local/bin/exiftool -CreationDate " & quoted form of POSIX path of eachFile
                if photoDate is "" then set photoDate to do shell script "/usr/local/bin/exiftool -CreateDate " & quoted form of POSIX path of eachFile

                if photoDate is "" then
                    set hasDate to false --check if date was found
                end if

            on error
                set hasDate to false -- error retrieving date
                set photoDate to ""
            end try

            if length of photoDate > 20 then
                --format extracted date
                set x to (length of photoDate) - 33
                set OriginalDate to text -x thru -1 of photoDate
                set formattedDate to text 1 thru 5 of OriginalDate
                set theYear to formattedDate
                set formattedDate to formattedDate & text 7 thru 8 of OriginalDate
                set theMonth to text 7 thru 8 of OriginalDate
                set formattedDate to formattedDate & text 10 thru 11 of OriginalDate
                set theDay to text 10 thru 11 of OriginalDate
                set formattedDate to formattedDate & text 13 thru 14 of OriginalDate
                set theHour to text 13 thru 14 of OriginalDate
                set formattedDate to formattedDate & text 16 thru 17 of OriginalDate
                set theMinute to text 16 thru 17 of OriginalDate
                set formattedDate to formattedDate & "." & text 19 thru 20 of OriginalDate
                set theSecond to text 19 thru 20 of OriginalDate
                set newName to theYear & "-" & theMonth & "-" & theDay & " " & theHour & "." & theMinute & "." & theSecond

                set testValue to formattedDate as string --check if found date is 000
                if testValue is " 000000000000.00" then
                    set hasDate to false
                else
                    -- set file date to original EXIF date and write to log
                    do shell script "touch -t " & formattedDate & " " & quoted form of POSIX path of eachFile
                    set logFile to open for access ((path to desktop folder as text) & "Date Found.txt") as text with write permission
                    write "Original date found for file: " & OriginalDate & " " & eachFile & return to logFile starting at eof
                    close access logFile
                end if
            end if

            if hasDate is false then
                -- get date from file name after first dash
                set nb to ""
                set nameDate to ""
                set fileName to fileName as string
                set savedDelimiters to AppleScript's text item delimiters --save delimiters
                set AppleScript's text item delimiters to {"-"} --split on "-"
                set nb to offset of "-" in fileName
                if nb is not 0 then
                    set AppleScript's text item delimiters to savedDelimiters --restore delimiters
                    set nameDate to characters (nb + 1) thru (nb + 8) of fileName as string
                    set nameDate to nameDate & "1200.00"
                    set cmd1 to "/usr/local/bin/exiftool -datetimeoriginal=" & nameDate & " " & quoted form of POSIX path of eachFile
                    set cmd2 to "/usr/local/bin/exiftool -createdate=" & nameDate & " " & quoted form of POSIX path of eachFile
                end if
                try
                    -- write date from name to EXIF
                    do shell script cmd1
                    do shell script cmd2
                    do shell script "touch -t " & nameDate & " " & quoted form of POSIX path of eachFile
                    do shell script "rm " & quoted form of POSIX path of (eachFile & "_original")
                on error
                    -- if date from name is invalid, log the error
                    set logFile to open for access ((path to desktop folder as text) & "Date Error.txt") as text with write permission
                    write "No valid date found in file name: " & eachFile & return to logFile starting at eof
                    close access logFile
                end try
            end if
        end repeat

        -- process folders:
        set folderList to folders of aFolder
        repeat with eachSubfolder in folderList
            -- process a subfolder
            my processFolder(eachSubfolder)
        end repeat
    end tell
end processFolder

tell application "Finder"
    display dialog "Done! All files processed." buttons {"Close"}
end tell
Link to this FAQ:
Has this FAQ been helpful?
This guide details the reasons why sending a Newsletter via Infomaniak may be blocked, as well as best practices to prevent these blocks in the future.
Common causes of Newsletter blocking
Sending a Newsletter can be interrupted in the following cases:
- an excessive number of recipient email addresses are invalid or non-existent, generating a high bounce rate.
- a high rate of spam reports from recipients.
As an email host and newsletter sending service provider, Infomaniak is required to implement strict mechanisms to combat spam.
Indeed, if Infomaniak’s IP addresses or domains are listed on blacklists, this would compromise the deliverability of all emails sent by its customers, including compliant ones, and harm the overall reputation of the service.
Preventing blocks when sending a Newsletter
To do this:
- Use only contact lists obtained with explicit consent.
- Prioritize building your lists through double opt-in forms, ensuring active validation of subscribers.
- Regularly clean your contact lists — at least once a year — with specialized services such as NeverBounce, Bounceless, Verifalia or QuickEmailVerification, to remove invalid or inactive addresses.
- Ensure your emails clearly display your brand or company name, building trust with recipients and transparency in your communications.
- Avoid importing lists from other hosts without first performing a thorough cleaning of these contacts.
- Carefully check the targeting of your campaign to ensure that only relevant and consenting subscribers receive the Newsletter.
What to do in case of a sending block?
In case of a block, contact Infomaniak support promptly to diagnose the cause and get assistance to complete the blocked send.
Link to this FAQ:
Has this FAQ been helpful?
This guide explains how to print passes from the Infomaniak tablet counter (as part of the Infomaniak ticketing system).
Preamble
- The equipment is already configured to automatically connect to the network and the tablet.
- It will thus be automatically detected when a pass is ready to be printed.
- It is recommended to use printing with a computer if possible.
Connect the printer to the network
To do this:
- Turn on the printer.
- Connect the printer to your internet network using the RJ45 Ethernet cable.
- Connect the Wi-Fi access point to the network.
Printing passes from the tablet
To do this:
- Log in to the ticketing account from the tablet using the Infomaniak account ID and password.
- The tablet will automatically connect to the counter interface.
- Create an order on the tablet or search for an existing order.
- Click on the printer icon:
In case the printer does not appear in the list on the right
- Try refreshing the list by clicking on the rotating arrows.
- Ensure the printer is properly connected to your network with the RJ45 cable
- Ensure the Infomaniak Wi-Fi access point is properly connected and turned on.
- Ensure the printer and the tablet are connected to the Infomaniak network.
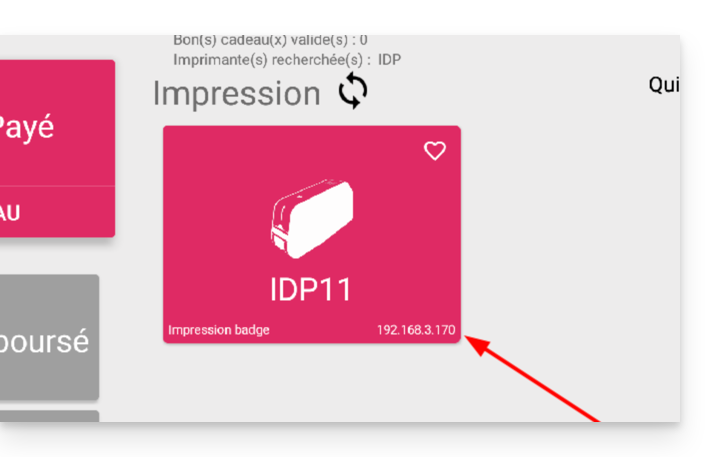
- To ensure the printer is properly connected to the network, click on the button to the left of the printer screen and check if it has an IP address assigned.
- Otherwise, restart the printer.
Warning: if two Wi-Fi access points are connected nearby, this can cause interference. Please ensure that only one access point is connected when using the printer
Learn more
Link to this FAQ:
Has this FAQ been helpful?
This guide details the possible solutions when the desktop app icon kDrive (desktop application on macOS / Windows / Linux) turns orange, which means there has been a synchronization conflict.
Preamble
- kDrive does not indicate if a file is open or being modified on another local device (no alert is displayed in this case):
- It is therefore quite possible to view (read) a file while it is being modified on another device without causing a conflict.
- The conflict only appears in case of simultaneous modification.
kDrive synchronization conflict cases
When do files conflict ?
- When you modify a file locally while it is also being modified on kDrive Web (the two versions become different).
- When you create or move a file while a similar operation is taking place simultaneously on kDrive Web.
- When you modify a file whose parent folder has been deleted on kDrive Web.
- When a file move cannot be synchronized correctly.
In all these cases
- The kDrive Web version is kept as is.
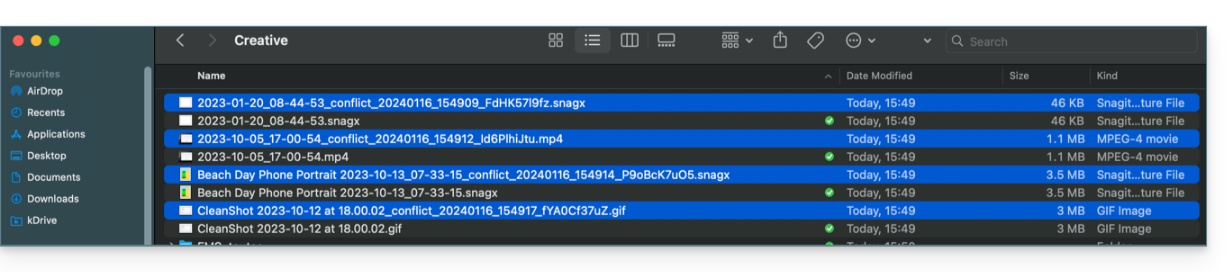
- Your local version is saved as "[file name]_conflict".
- The conflicting file is not synchronized with kDrive Web.
What to do with these files conflict ?
- Either keep both versions (but only the original file will synchronize).
- Or delete the
_conflictfile if it is the least recent version. - Or delete the original version (not
_conflict) if it is obsolete, then rename the_conflictto synchronize it. - Or manually merge the two versions before deleting the
_conflict.
During a reinstallation of the kDrive application
These conflicts can also occur if you uninstall and then reinstall the application without deleting the configuration, while changes have been made on kDrive Web. To avoid this, it is recommended to:
- Either do not keep the configuration during uninstallation.
- Or fully synchronize before any uninstallation.
- Refer to the best practices further down in this guide.
Managing synchronization conflicts
When simultaneous modifications are made to the same file (locally and on kDrive Web, or while the application is closed), kDrive automatically manages these conflicts according to specific rules.
For versions of the kDrive app prior to 3.6.11
- In case of simultaneous creation, concurrent modification, or conflicting move, the kDrive Web version is always prioritized. The local version is renamed with “
_conflict”. - For conflicts involving deletion on the kDrive Web side, the local file is usually kept and resynchronized.
- Conflicting moves are canceled and recalculated based on the state of kDrive Web.
Starting from version 3.6.11
For the files placeholder (files dehydrated via Lite Sync):
- They are automatically deleted locally.
- If the file still exists on kDrive Web, it is correctly resynchronized.
For other cases:
- The kDrive Web version remains prioritized in most situations.
- The conflicting local files are renamed with “
_conflict”. - Important exception: when a locally modified file should be deleted according to the state of kDrive Web…
- … it is moved to a folder named “
kDrive Rescue Folder” (instead of being deleted); this protects your local modifications from accidental deletion.
- … it is moved to a folder named “
Special cases:
- If a parent folder is deleted, locally modified files are kept.
- Move cycles (mutually moved folders) are resolved in favor of the kDrive Web state.
- Rename conflicts prioritize the kDrive Web version.
How to display conflicts?
To display conflicting files:
- Perform a left-click on the desktop app icon kDrive in the notification area of your computer (top right on macOS, bottom right on Windows and a double left click in the taskbar on Linux).
- Click on the information button at the top.
- Click on the listed event to view its details:

- Conflicts and errors are displayed in 2 distinct tabs allowing you to become aware of unsynchronized data:
- The first tab allows you to resolve conflicts:

- You will then need to choose how to resolve the conflict by deciding to send the local version
- to the server (= synchronize)
- or to the computer's recycle bin

Avoid synchronization conflicts
Recommendations:
- Do not work on the same file with multiple people (unless you are working online on a Word, Excel, or PowerPoint document).
- Synchronize your modifications offline before modifying the same files online.
- Avoid creating folders that have the same name as folders you do not synchronize on a device.
If necessary, to manually resolve certain synchronization conflicts that have not been resolved automatically:
- Open both files.
- Compare the differences.
- Retrieve the information from the conflict file (the one with the exclamation mark) in the base file.
- Delete the conflict file that is not synchronized (the one with the exclamation mark and the note
conflicted copy):
Don't see the conflict files on all your devices? That's normal; the conflict file (the one with the exclamation mark and the note conflicted copy in its name) is not synchronized. The idea is that you, the author of the changes, are the best person to resolve the conflict.
Refer to this other guide if you encounter a problem even though the kDrive desktop app icon is green.
Link to this FAQ:
Has this FAQ been helpful?
Here are the different ticket formats available for on-site sales (within the framework of the Infomaniak ticketing system).
Thermal printer printing
- Show Format: 82 x 203.2 mm

- Cinema Format: 101.6 x 76.2 mm

Use of digital tickets
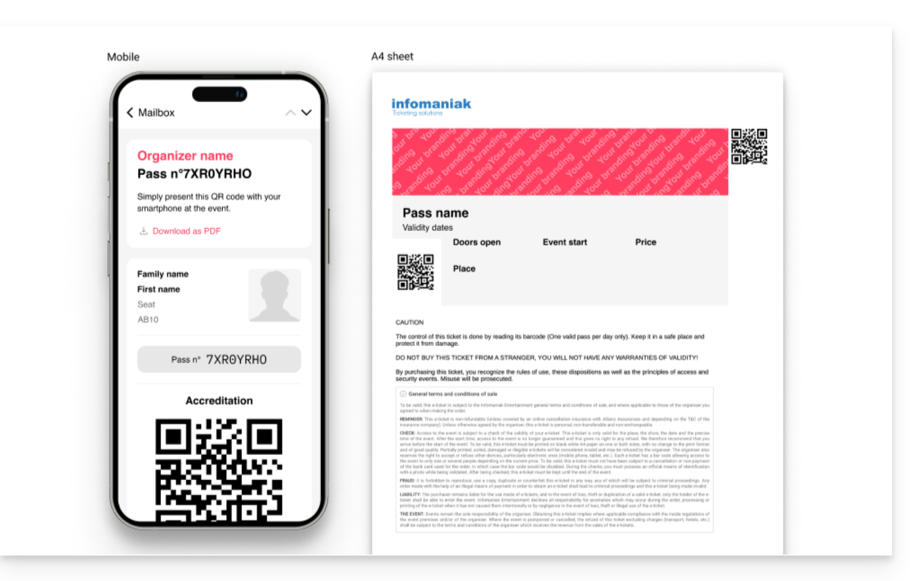
You can also send digital tickets directly to the customer's email address. To do this, when finalizing the order, you will simply need to link a customer file and the ticket sending option will appear directly in the order validation window:

Link to this FAQ:
Has this FAQ been helpful?
This guide provides recommendations to follow in case of a 502 error with Jelastic Cloud Infomaniak.
Recommendations in case of a 502 error
Check these points:
- Check the URL entered in the address bar of your web browser.
- From your Jelastic console, click on the environment concerned, then on the icon "Open in browser":

- Check that the environment is not stopped or paused.
If the problem persists:
- Check that the SSL certificate is active.
- Check the proper functioning of the called application.
If these recommendations do not resolve the issue, contact Infomaniak support.
Link to this FAQ:
Has this FAQ been helpful?
This guide details the different ways to address an email to multiple recipients, including masking the email addresses of other participants.
Preamble
- When you send emails, it is sometimes necessary to include multiple recipients using the fields:
- À
- CC:
- French: Copie Conforme
- English: Carbon Copy
- BCC:
- French: Copie Conforme Invisible
- English: Blind Carbon Copy
- Do not overload the To and CC fields with recipients who are not directly concerned by the email.
- Use the BCC field to protect the email addresses of recipients when there are multiple people in the list.
- For multiple, recurring and/or important sends, beyond the imposed limits, it is recommended to use more suitable tools instead:
Understanding and using these 3 email fields
The To field
This field is used to indicate the main recipient(s) of the email, those who receive the email as a direct copy.
- Use this field for main recipients who are directly concerned by the content of the email.
- Examples: work meeting, project report, direct communication with a client.
The CC field
Used to send a copy of the email to other people in addition to the main recipients. All recipients can see who received a copy of the email.
- Use this field to include secondary recipients who need to be informed but are not the main actors in the discussion.
- Example: informing a supervisor about a conversation, including colleagues interested in the subject without them needing to intervene.
The BCC field
Used to send a copy of the email to people without the other recipients knowing they have also received the email.
- Use this field to include recipients who need to receive the email without the other recipients knowing.
- Example: sending an email to a group with a supervisor in CCI for follow-up, avoid disclosing email addresses to all recipients (often used in mass emails).
Use the fields available on Mail Infomaniak
To access the appropriate fields in your Infomaniak mailbox:
- Click here to access the Web app Mail Infomaniak (online service ksuite.infomaniak.com/mail).
- Click on New message.
- Click on CC & BCC:

- The additional fields appear, they will allow you to insert the email addresses of your recipients:

Usage examples
Each of these fields has a specific function and can be used strategically depending on the context of your communication. Be transparent and ethical in the use of the BCC field to avoid misunderstandings or conflicts:
- Team communication
- To: main project members
- CC: Project manager, other concerned departments
- BCC: Director for information without direct intervention
- Marketing email
- To: do not use (or simply indicate the sender's email address)
- CC: do not use
- BCC: list of subscribers to protect individual email addresses
- Important announcement
- To: main recipients (e.g.: directors)
- CC: board members, key collaborators
- BCC: other stakeholders for confidential information
- Meeting announcement
- To: John Doe, Jane Smith
- CC: project.manager@company.com
- BCC: director@company.com
- Event invitation
- To: main guests
- CC: coordination@event.com
- BCC: list of secondary guests (to protect email addresses)
Link to this FAQ:
Has this FAQ been helpful?
This guide details the specifics and limitations of synchronizing contacts & calendars with Infomaniak using native Apple applications (macOS and iOS), particularly for managing shared data.
Preamble
- Contacts & calendars hosted by Infomaniak can be synchronized with native Apple applications:
Contacts: Synchronizing address books
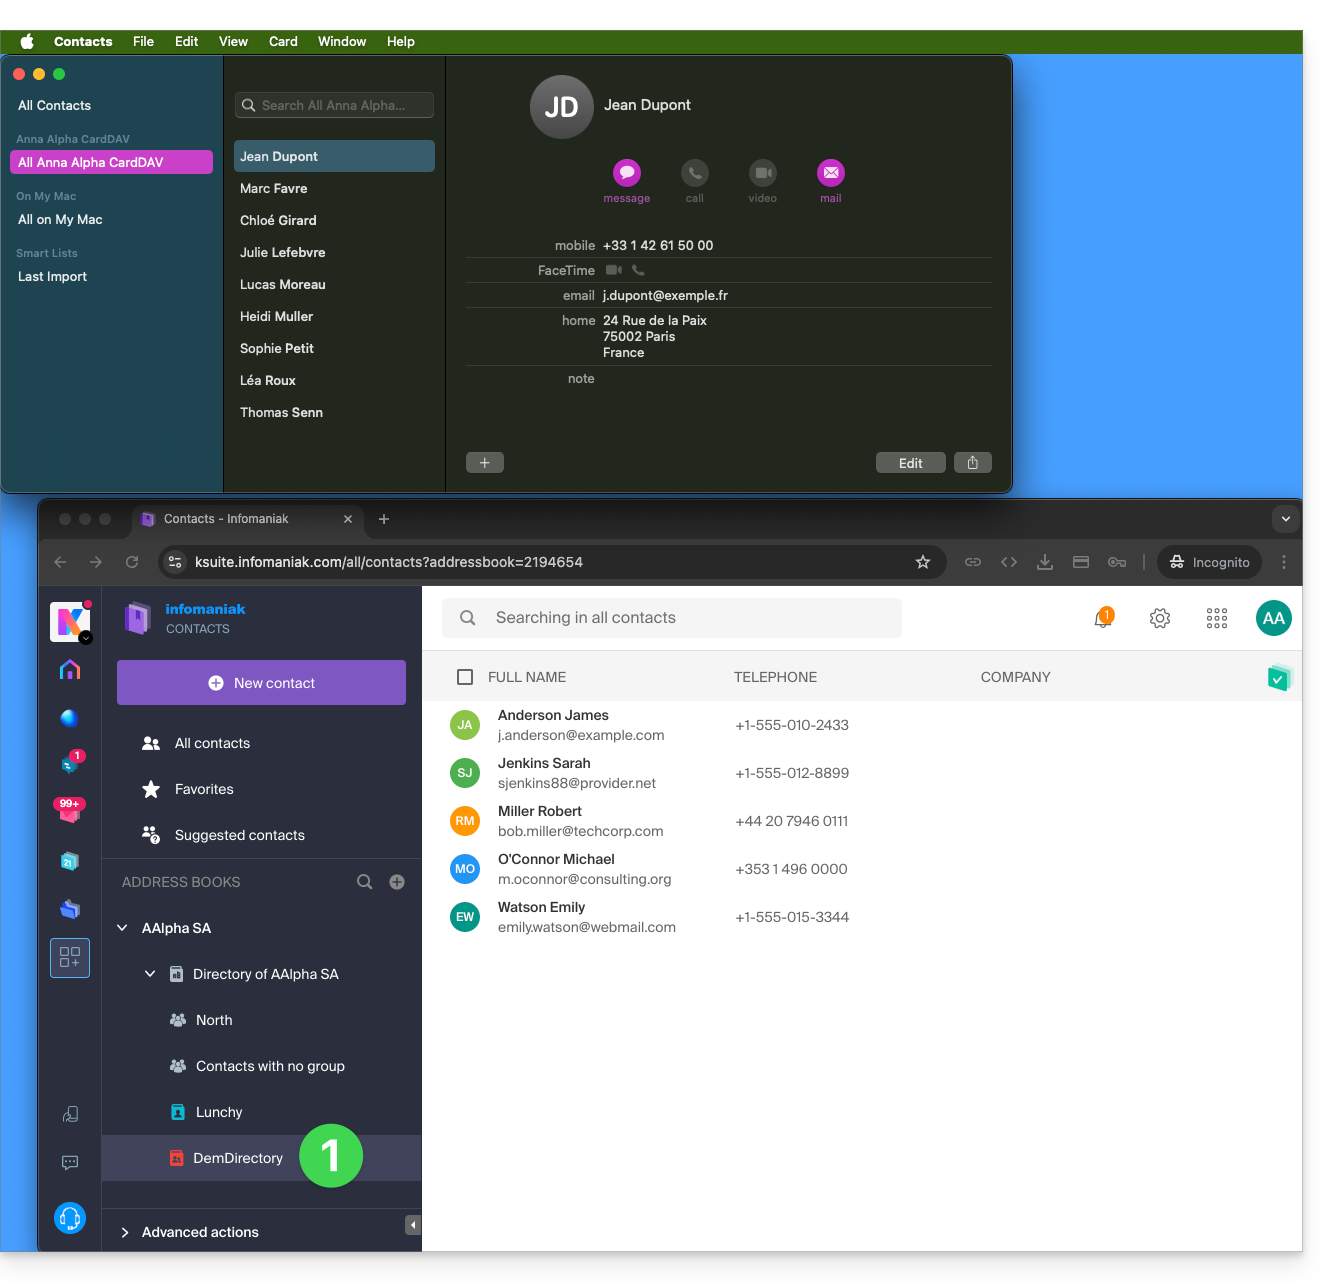
The CardDAV protocol does not allow individual elements to be selected for synchronization; all account data is retrieved by default.
- Before adding a synchronization:
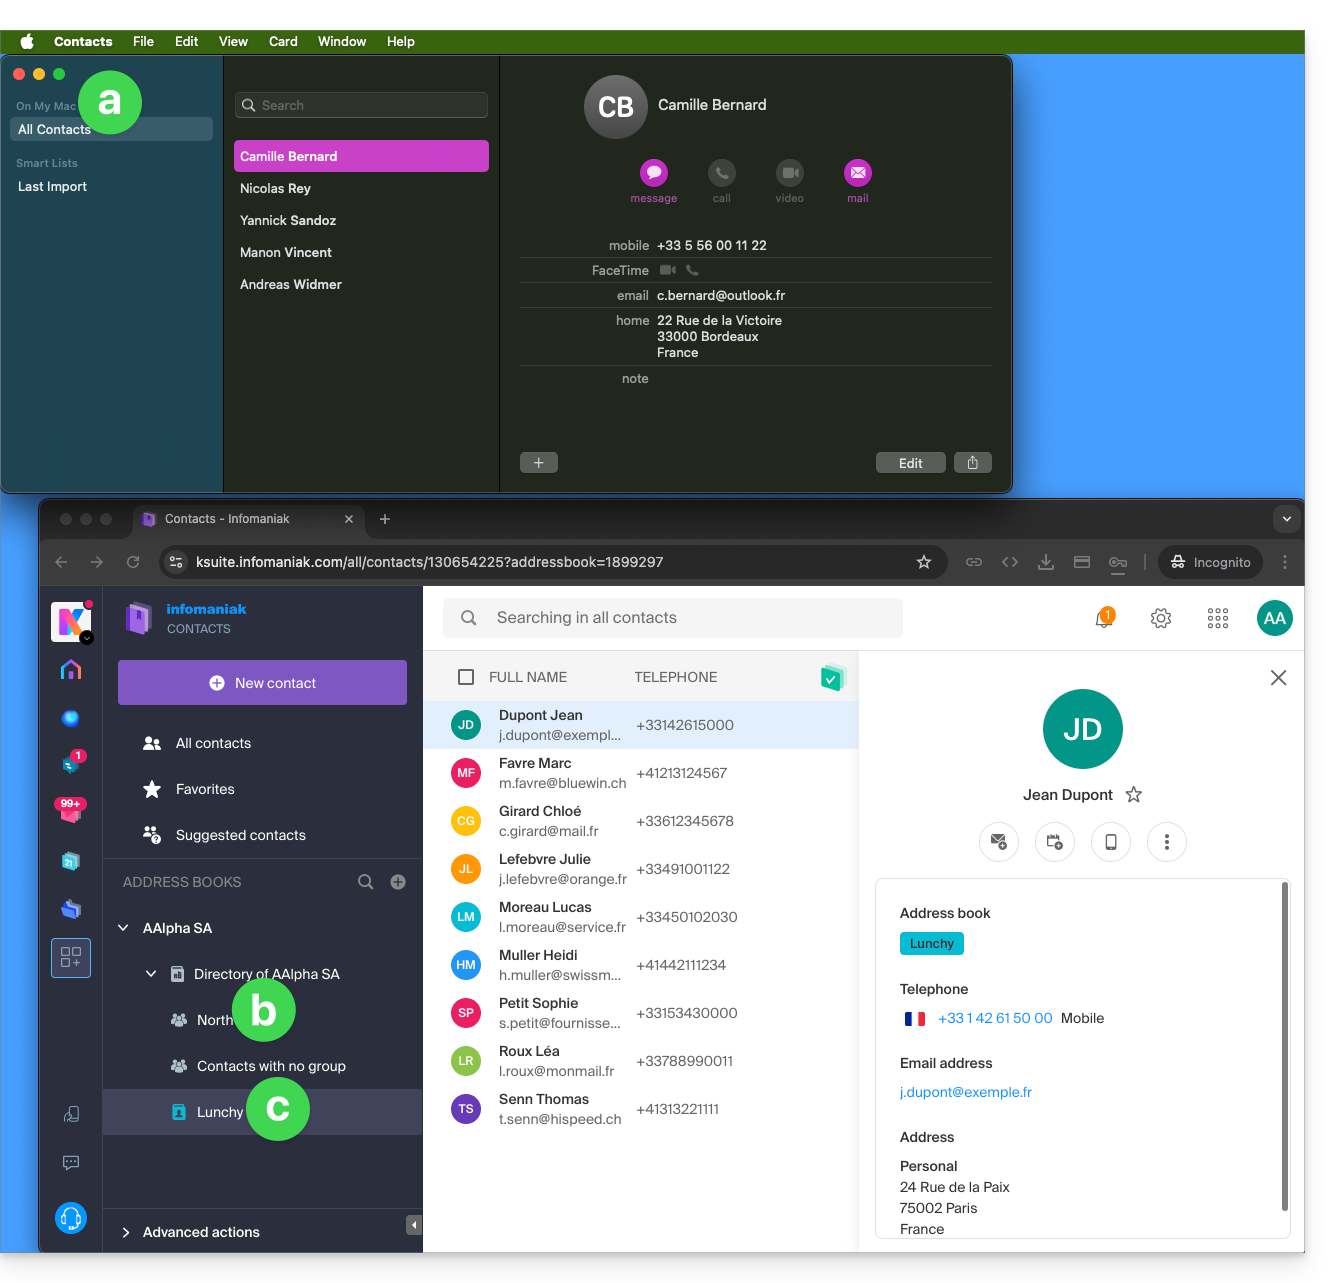
- All existing contacts on the macOS device
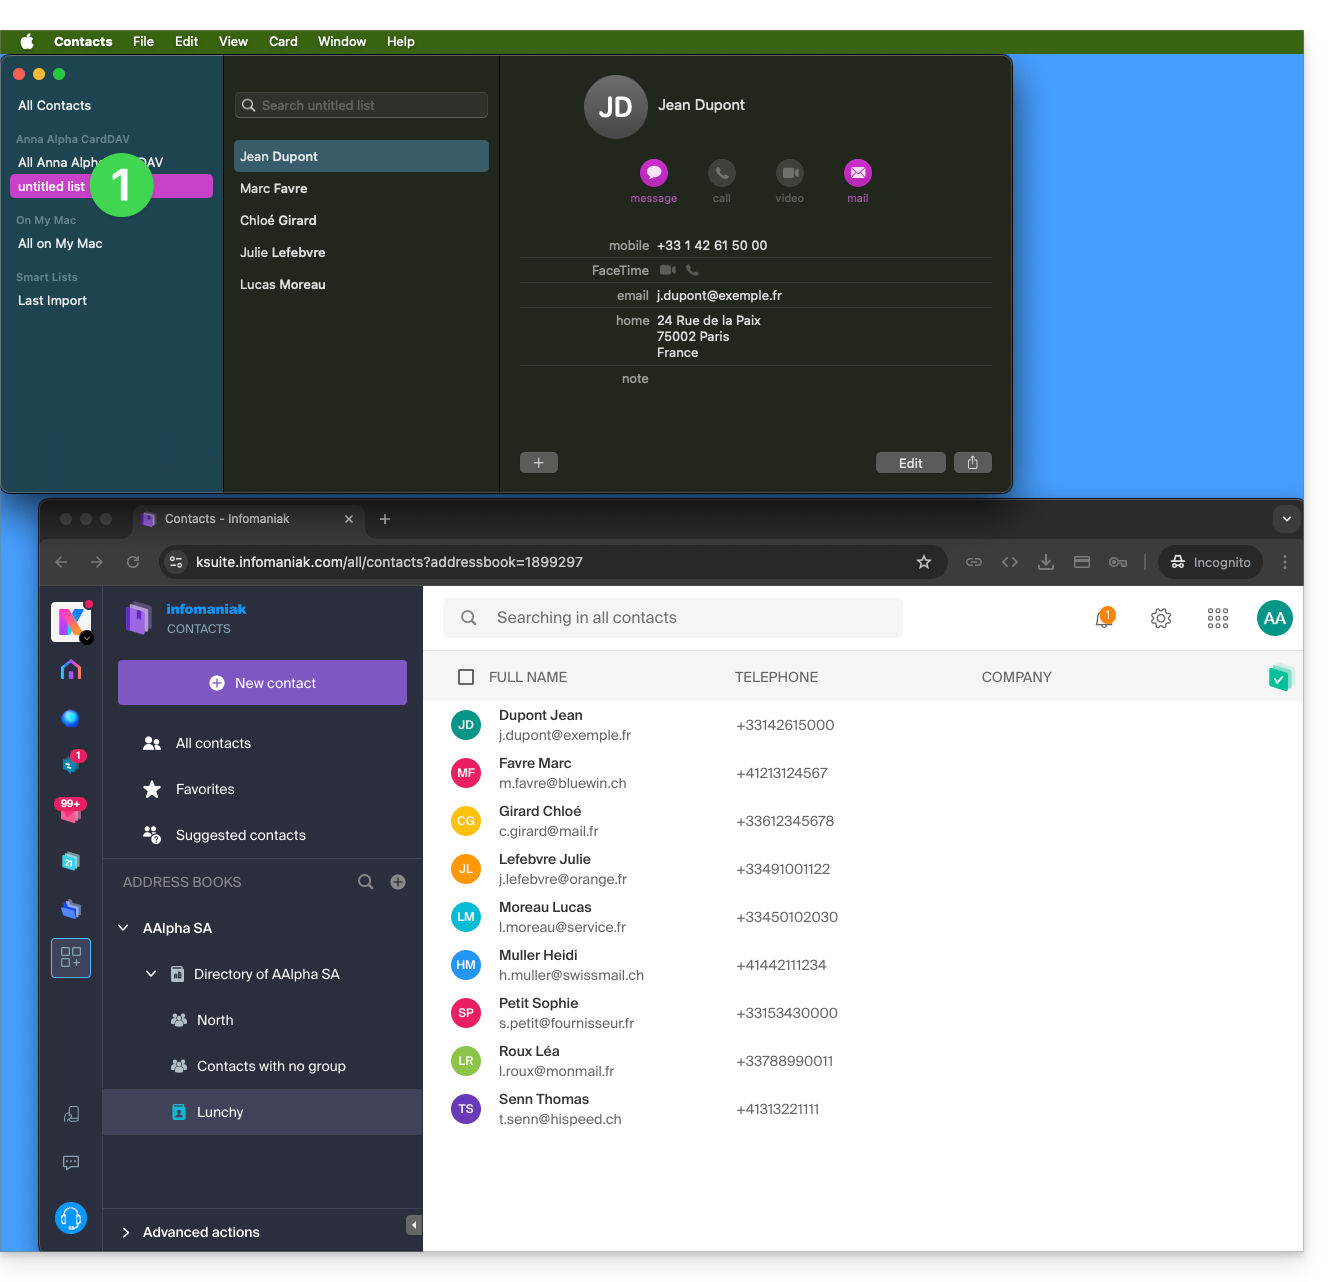
- Existing contacts in the Infomaniak user Anna Alpha's Organization (named AAlpha SA here), including the Organization directory, which contains a group called North here (in this case, it is a group automatically formed after setting up a work team).
- The user's address book is named Lunchy here.
- After adding a macOS profile synchronization:
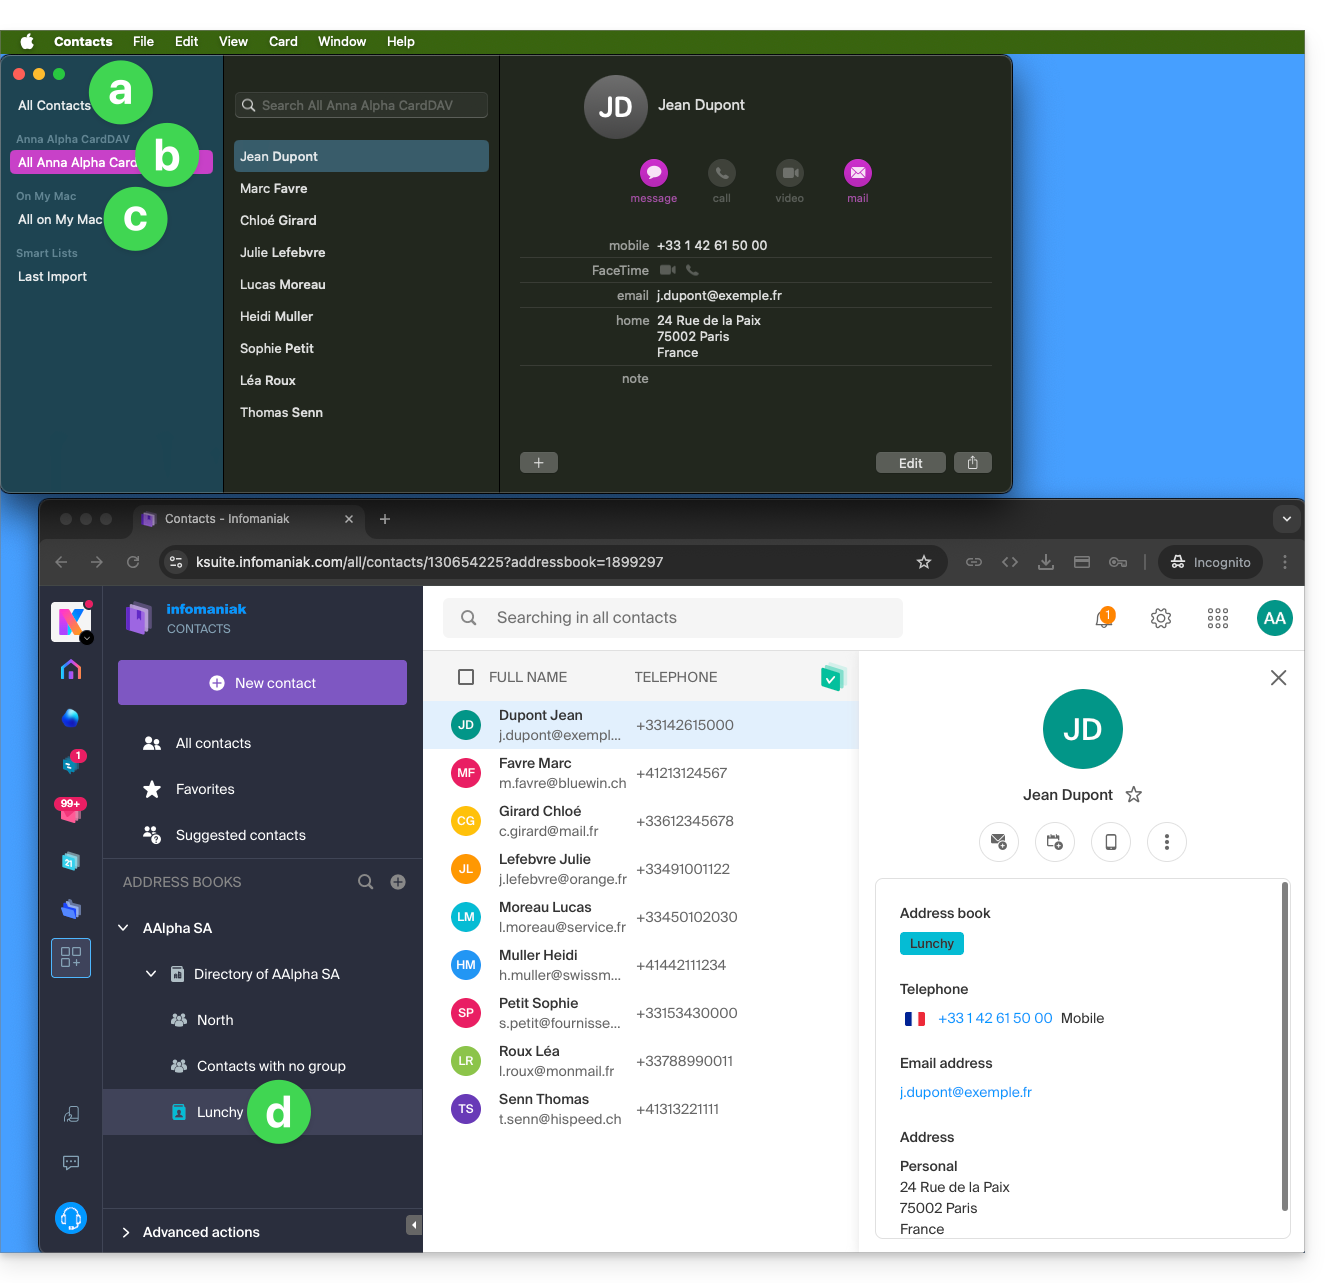
- All existing contacts on the macOS device (they display the contacts that were already present, as well as new contacts from the synchronization).
- Contacts from the synchronization (see point 2.d below).
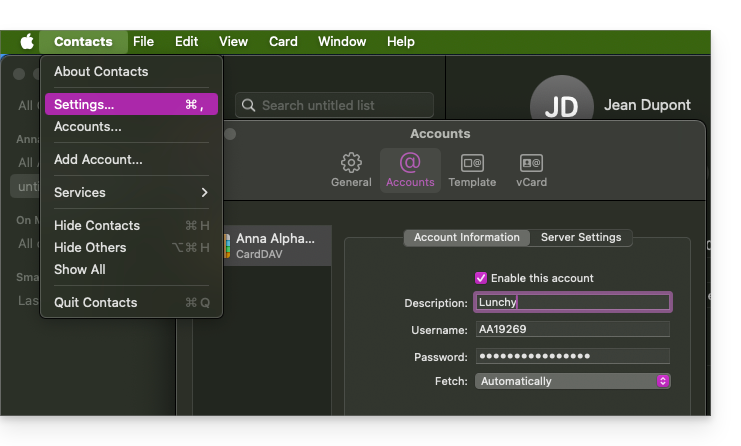
- A downloaded profile contains the Infomaniak account username; this name will be given to the synchronized address book that appears on the Apple side.
- Example below, the username is Anna Alpha and the address book name is Lunchy; it is the username that will appear to describe the contacts on the Apple side.
- You can modify the synchronization name in the Account Information:
- Existing contacts on the macOS device (those from point 1.a above — they remain local on macOS and are not synchronized — they need to be moved if necessary).
- You can modify the default address book used for future contacts created on your device:
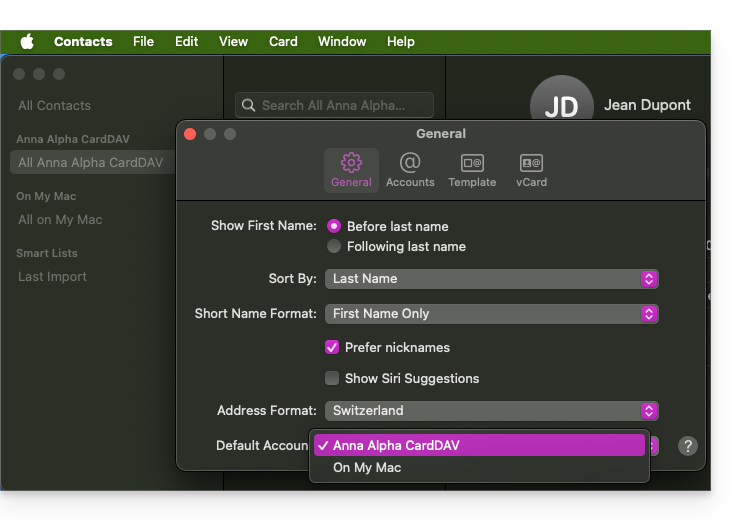
- You can modify the default address book used for future contacts created on your device:
- The user's address book is named Lunchy here — equivalent to point 2.b above).
On iOS
New contacts created on iPhone are often saved locally (On my iPhone"):
- It is necessary to modify the default address book in the device settings so that they are synchronized on the Infomaniak server.
Groups and lists
Grouping contacts into folders or lists does not synchronize bidirectionally. The list system does not use real folders but category tags, making it impossible to retrieve contact groups.
- Lists created on Apple do not appear on the Infomaniak server (but the contacts contained within them do):
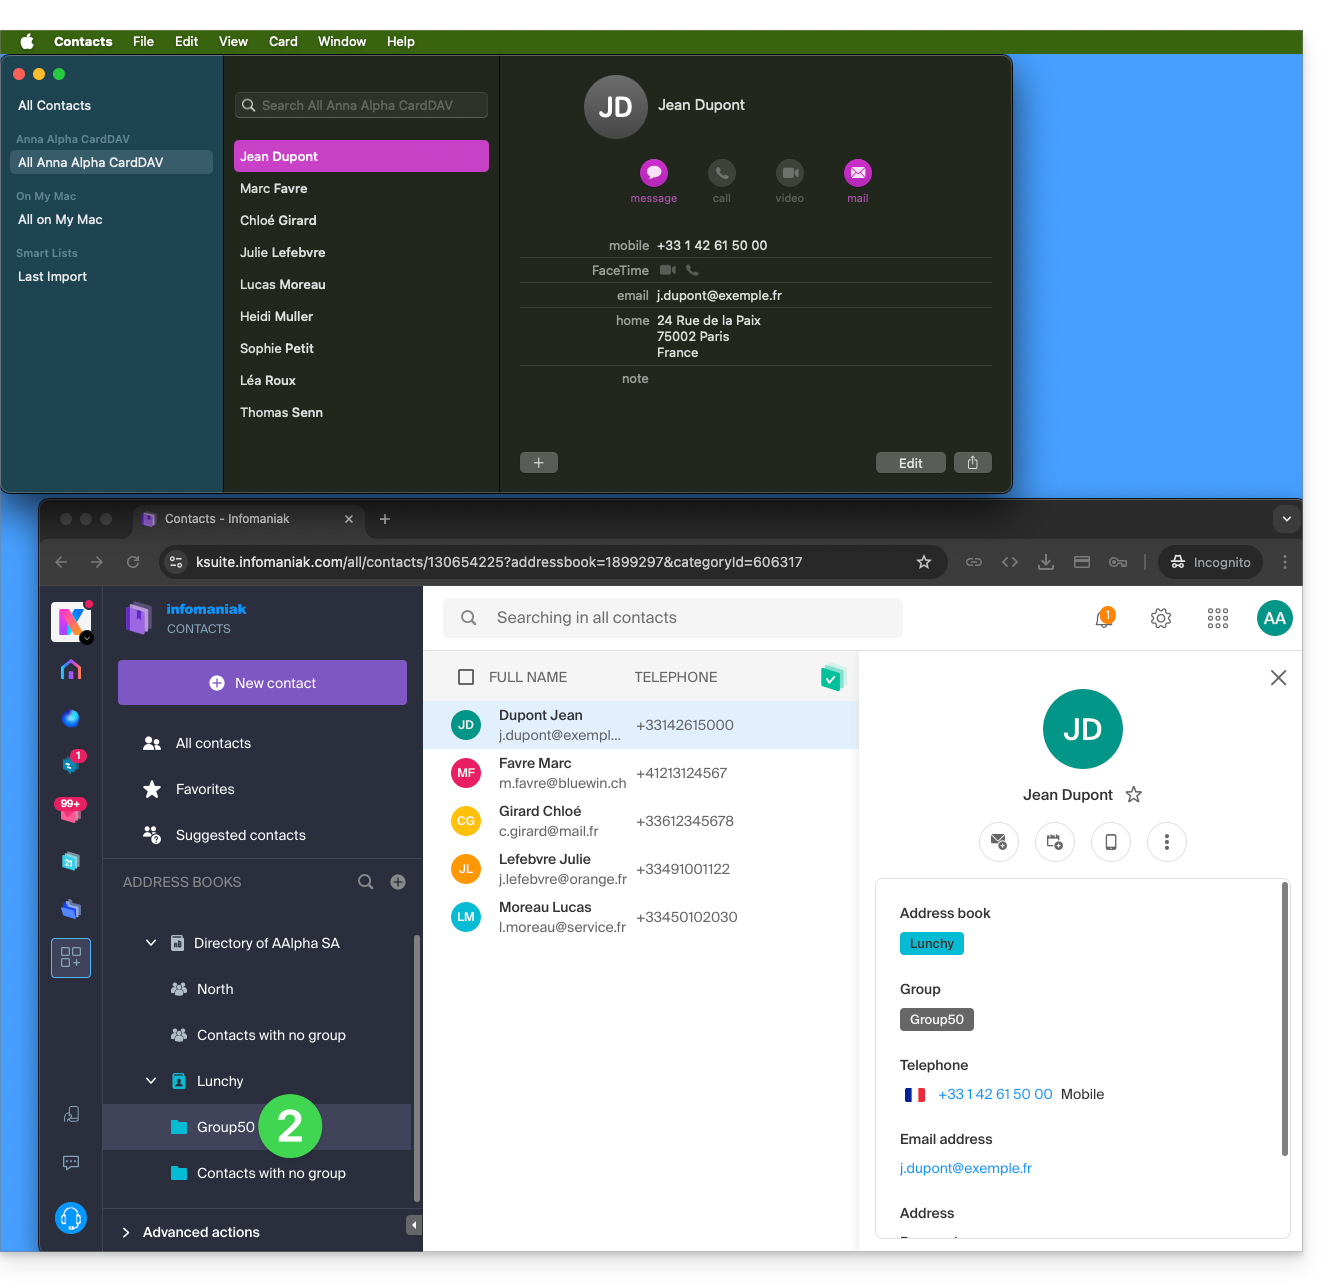
- Groups configured on the web interface do not appear in the Apple Contacts application (but the contacts contained within them do):
- Tip: to delete a list created on the Apple side, select it and press the DEL./SUPPR. key on your keyboard.
Additional address books
The Contacts application does not support multi-address books for the same account:
- Only the default address book is synchronized.
- To access all your address books, a third-party software (type Thunderbird) is required.
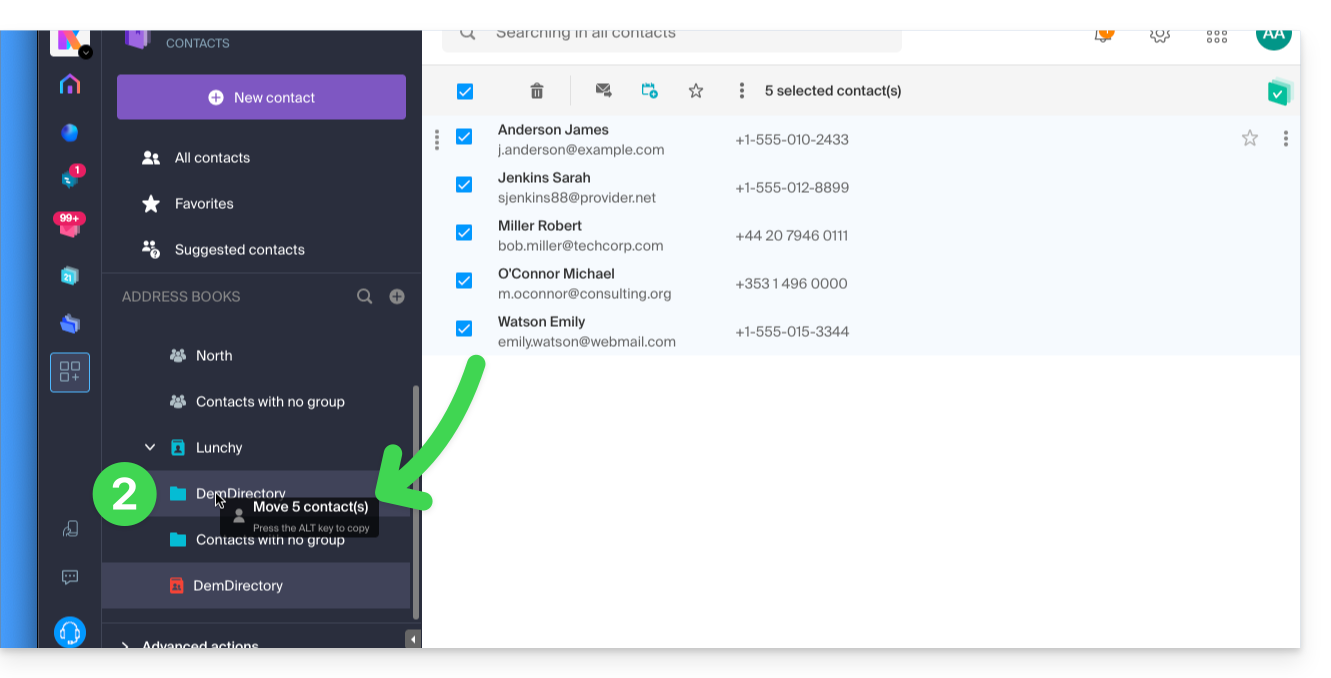
Example of a new address book on the Infomaniak side:
- The content of this second address book is not synchronized:
- A solution to organize yourself similarly could be to create a group under Lunchy and add the 5 contacts there:
Shared address books
An address book shared with another Infomaniak user will continue to be synchronized, including if contacts are added/edited via sharing, as in this example of sharing with maximum permissions: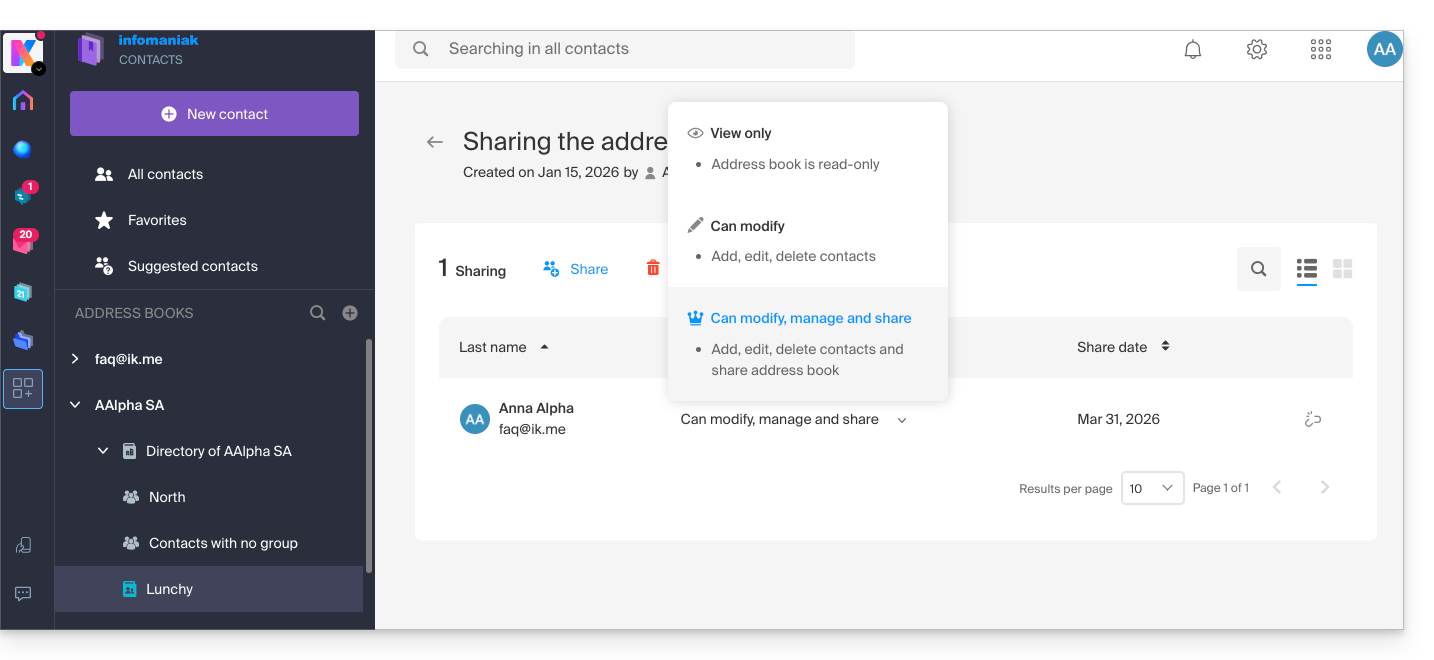
The reverse (receiving contact sharing from another Infomaniak user) adds an additional address book. Synchronization of these additional contacts is therefore not possible (same rule as the one presented in the chapter “Additional address books” above).
Calendar: Displaying shared calendars
The CalDAV protocol does not allow you to choose which items to synchronize; all account data is retrieved, including the calendars you share and those for which you have been granted access/modification rights: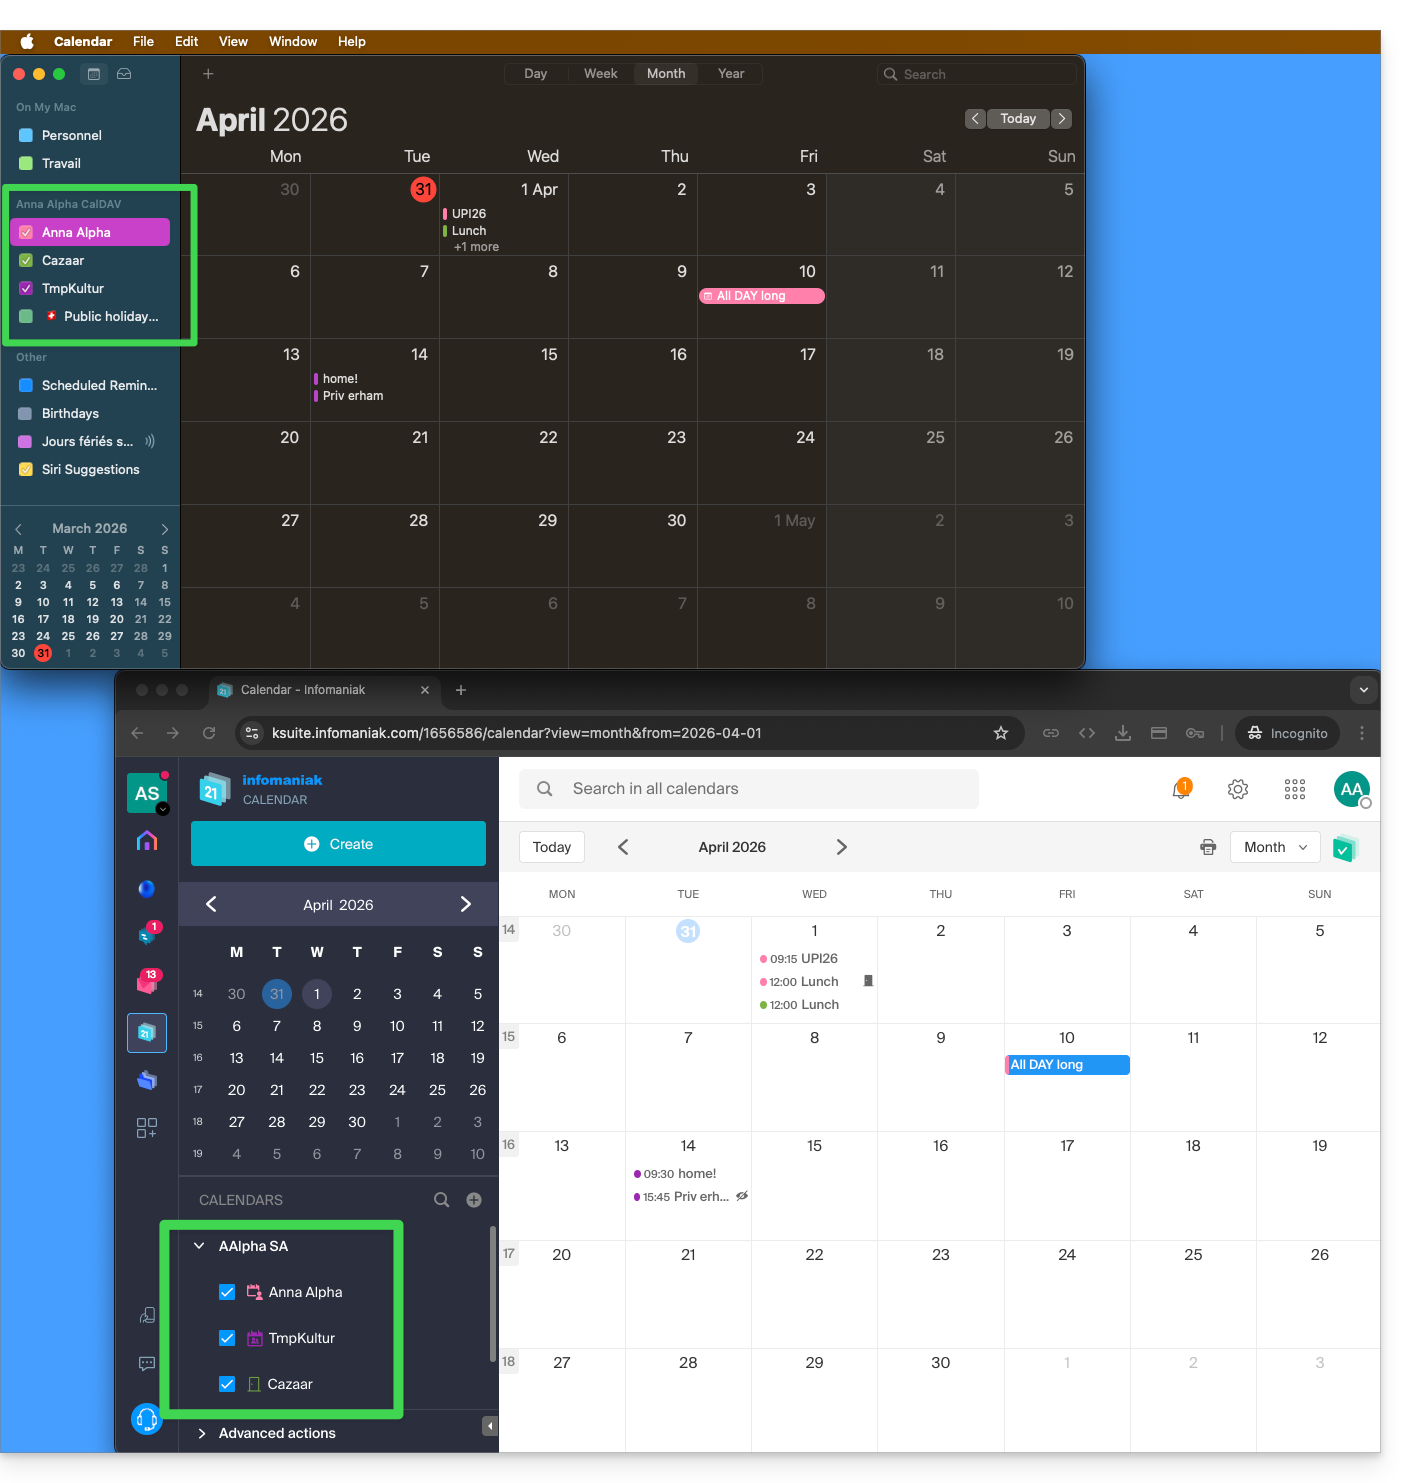
If only your personal calendar is displayed, then try this manipulation to activate additional calendars:
On macOS
- Open iCal / Calendar.
- Go to the Calendar > Settings (or Preferences).
- Go to the Accounts tab.
- Select the Infomaniak account and click on the Delegation tab.
- Check the shared calendars to display.
On iOS
- Open iCal / Calendar.
- Tap the Calendars button at the bottom of the screen.
- Check the shared calendars in the list.
Notifications (iOS)
You can enable or disable alerts for each specific calendar by tapping the ⓘ icon located to the right of its name: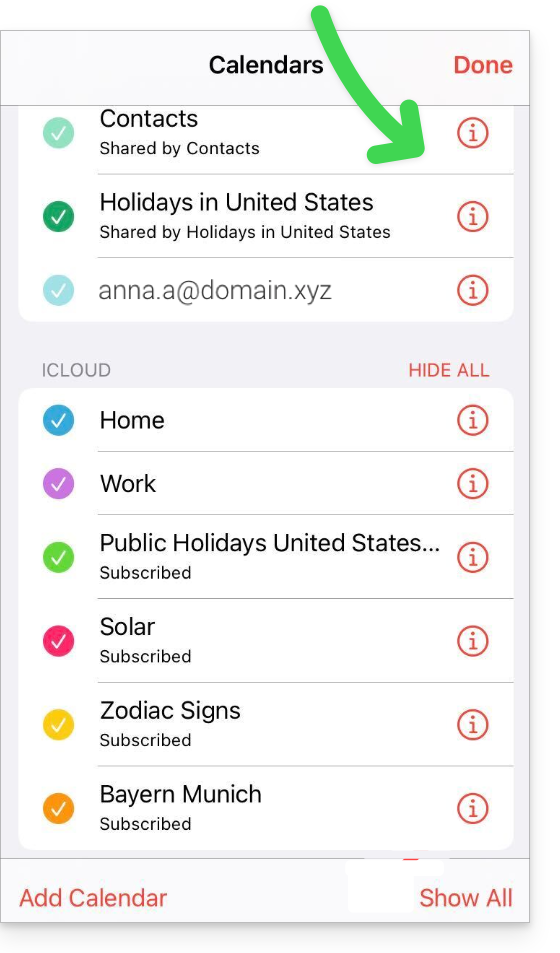
Link to this FAQ:
Has this FAQ been helpful?
This guide explains how to modify certain language settings in the Manager and in my kSuite (Infomaniak Mail, Calendar, Contacts, etc.).
Change the language of your Infomaniak account
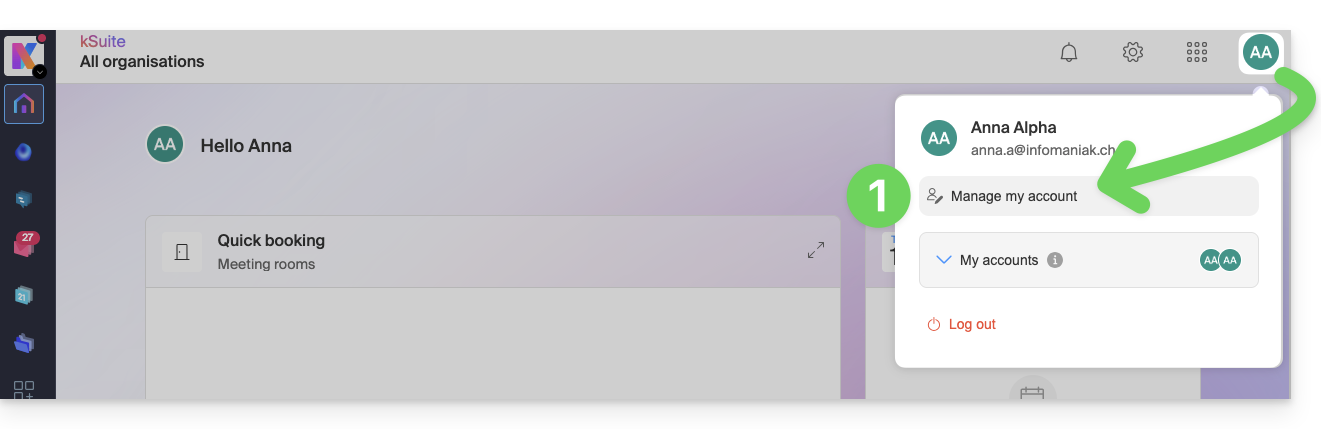
To do this:
- Click here (or on the pill with your initials / avatar in the top right of the Infomaniak Manager) to "Manage my account":
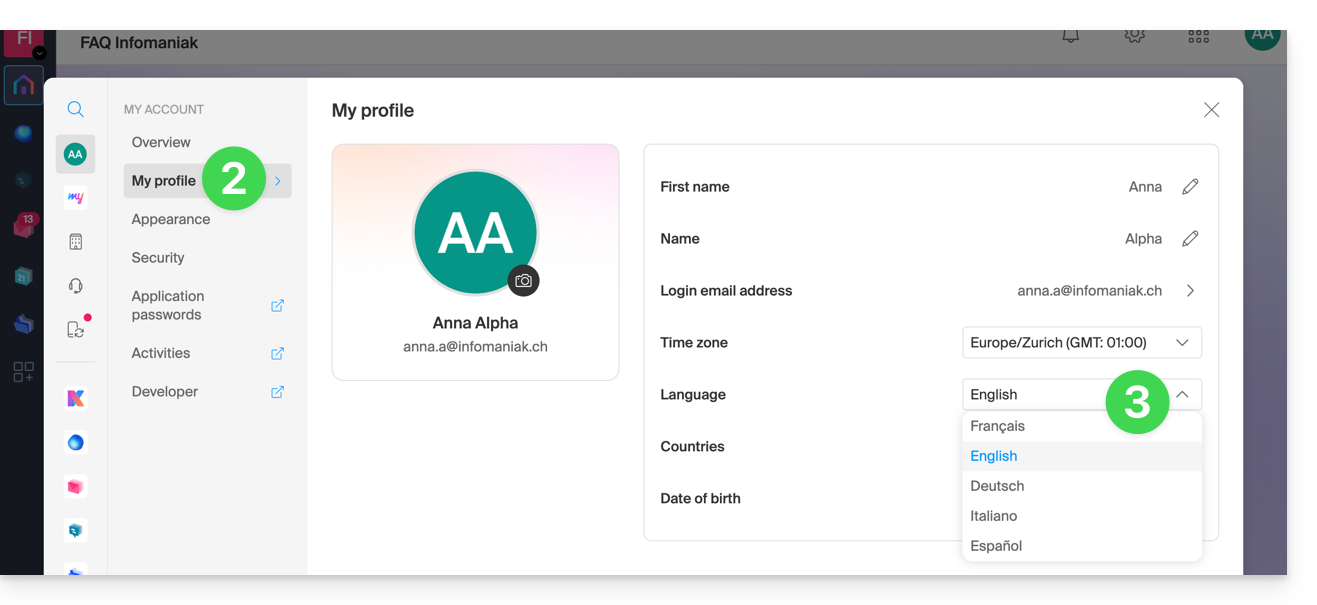
- Click on My profile in the left sidebar.
- Click on the language dropdown menu to choose between French, English, German, Italian, and Spanish:
Change the regional settings of your account
In the same place, you can set the time zone of your region / country: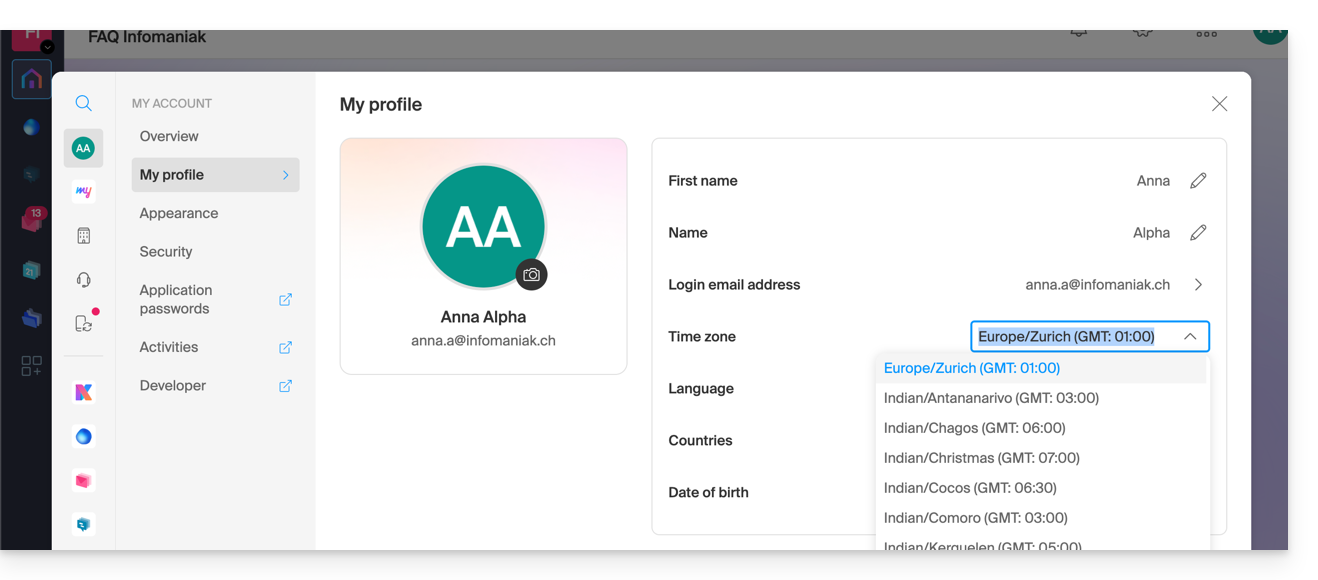
Link to this FAQ:
Has this FAQ been helpful?
This guide explains how to install the Acronis Agent on macOS for Swiss Backup even if the Gatekeeper application attempts to block the installation and causes an error “Unable to open install.pkg because Apple cannot verify that it does not contain malicious software”.
Allow Acronis in Gatekeeper
To do this:
- Open the Acronis
install.pkgfile so that the error appears. - Go to System Preferences (in the Apple menu).
- Select Security and Privacy then the General tab if necessary.
- A text appears regarding
install.pkg, click on Open Anyway. - Confirm your decision to open the file by clicking the appropriate button.
Link to this FAQ:
Has this FAQ been helpful?
This guide concerns OAuth2 applications to connect to your external services via your Infomaniak login ID.
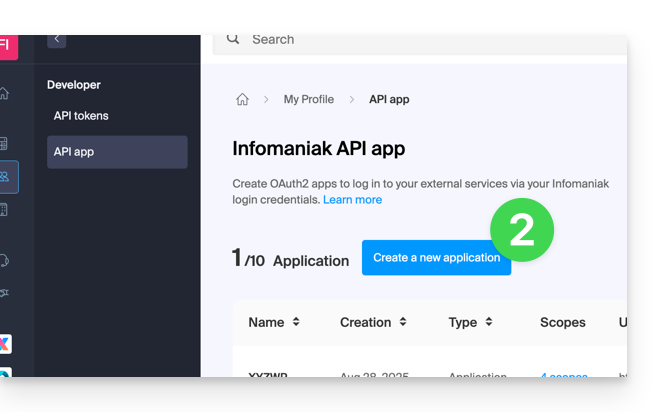
Manage Infomaniak OAuth2 apps
To do this:
- Click here to access the management of your product on the Infomaniak Manager (need help?).
- Click the blue button Create a new application:
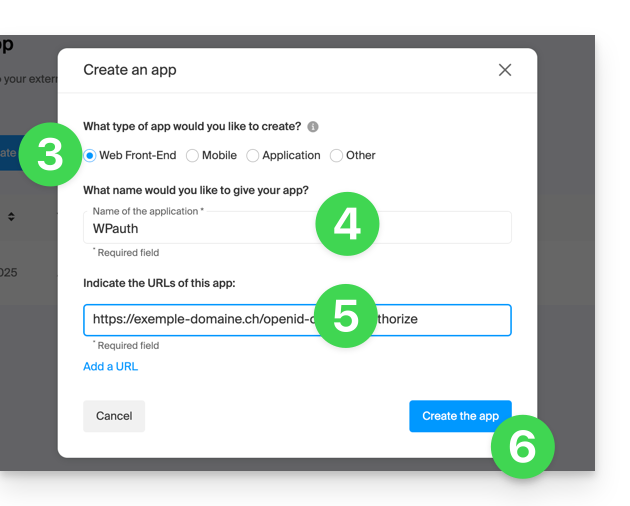
- Choose the type suitable for your current need and project.
- Give a name to the application.
- Enter the URL of the application according to the technical information available to you.
- Click on the button to create the application:
- Copy the information (
Client ID,Client secret) to a safe place - they will no longer be accessible after that: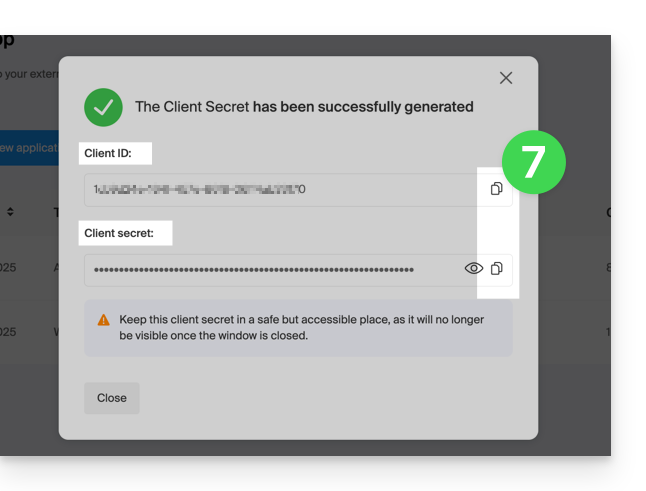
Link to this FAQ:
Has this FAQ been helpful?
This guide explains how to restrict access to Infomaniak's Video Streaming streams based on geographical criteria (geolocation).
Restrict access to broadcasts via GeoIP
To do this:
- Click here to access the management of your product on the Infomaniak Manager (need help?).
- Click directly on the name assigned to the product in question.
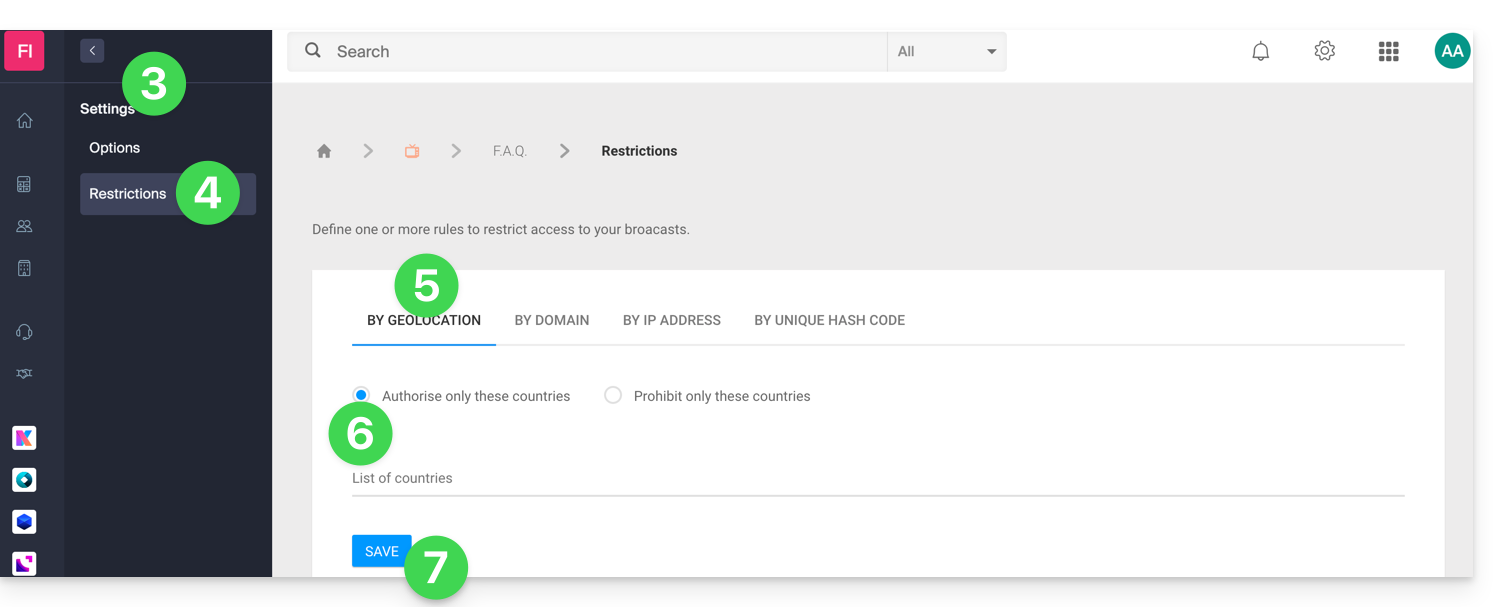
- Click on Settings in the left sidebar.
- Click on Restrictions in the left sidebar.
- Click on the Geolocation Restriction tab.
- Define the countries that should be specifically allowed or blocked.
- Click on the Save button:
Refer to this other guide to customize the replacement image offered to blocked viewers.
Link to this FAQ:
Has this FAQ been helpful?
This guide explains how to import tickets that would be generated by another provider or an external reseller for your event within the framework of the Infomaniak ticketing system.
Prerequisites
- The import of third-party tickets requires that the event is already created on your Infomaniak ticketing system.
- You also need the list of tickets in a CSV format file with the barcode field that will be printed on the ticket.
Access import options
To do this:
- Click here to access the management of your product on the Infomaniak Manager (need help?).
- Click directly on the name assigned to the ticketing concerned by the event.
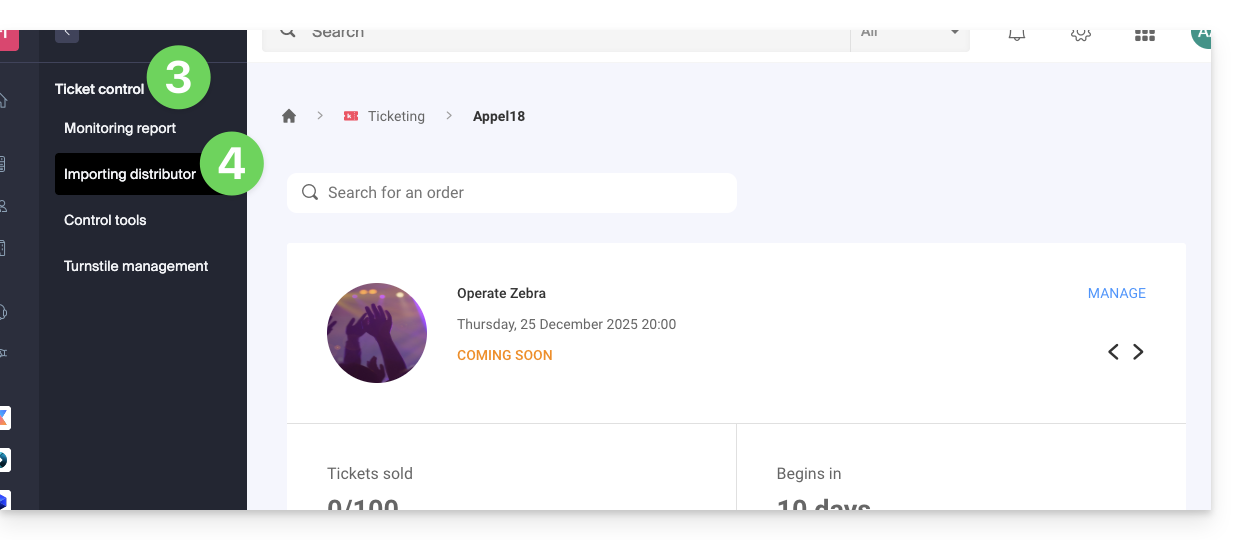
- Click on Ticket Control in the left sidebar.
- Click on Distributor Import in the left sidebar:
Import the CSV file
To do this:
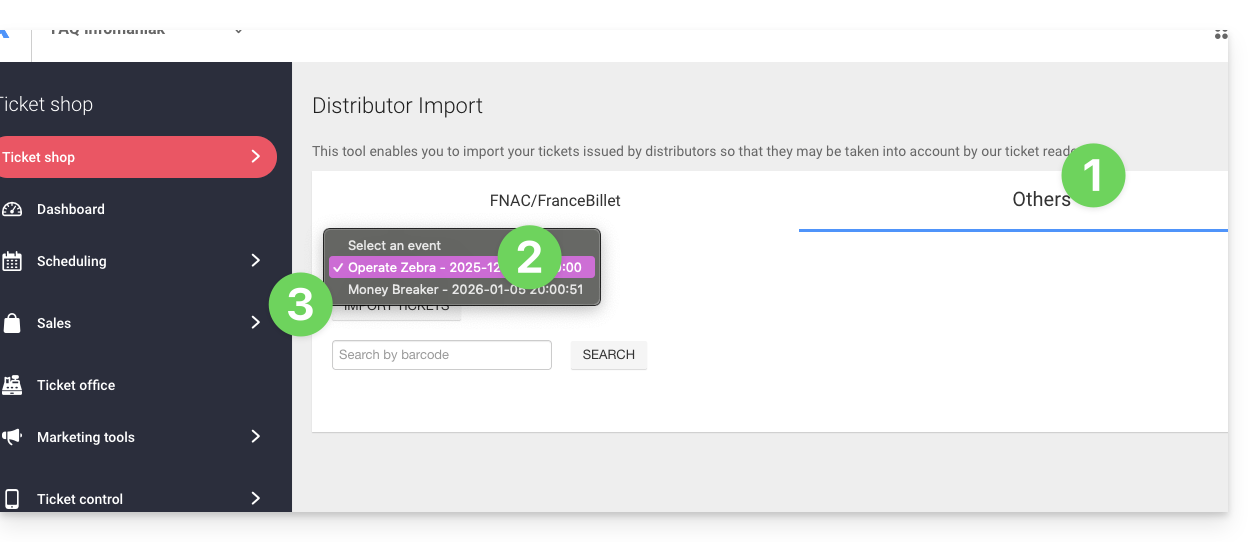
- Click on the tab FNAC/FranceBillet or Others depending on the reseller.
- Choose an event for which to import tickets.
- Click on Import Tickets:
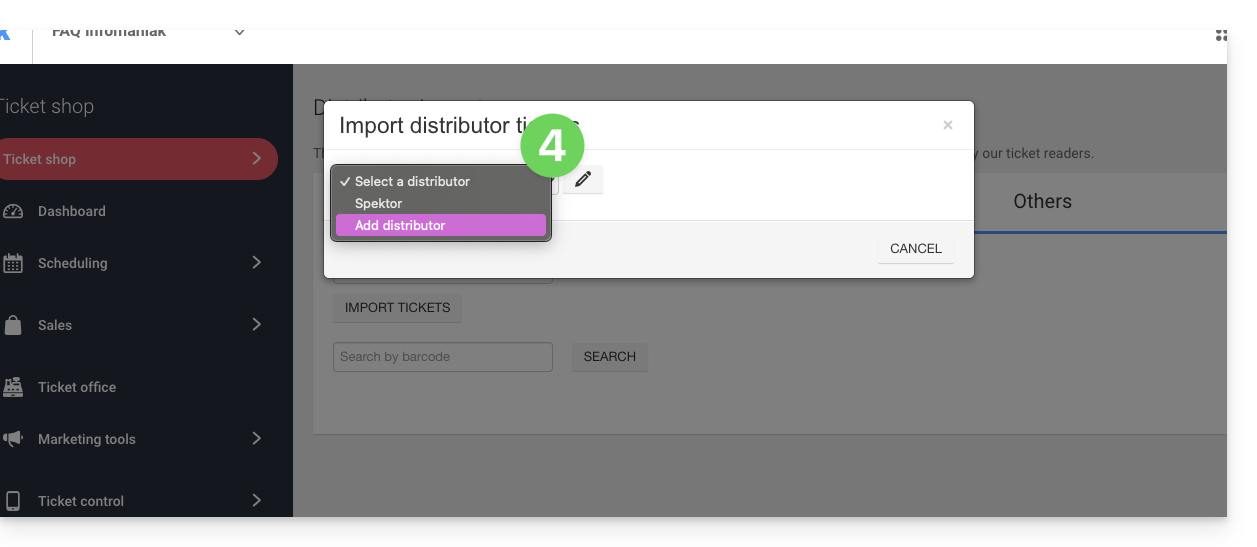
- Choose an existing distributor from the dropdown menu, or create one:
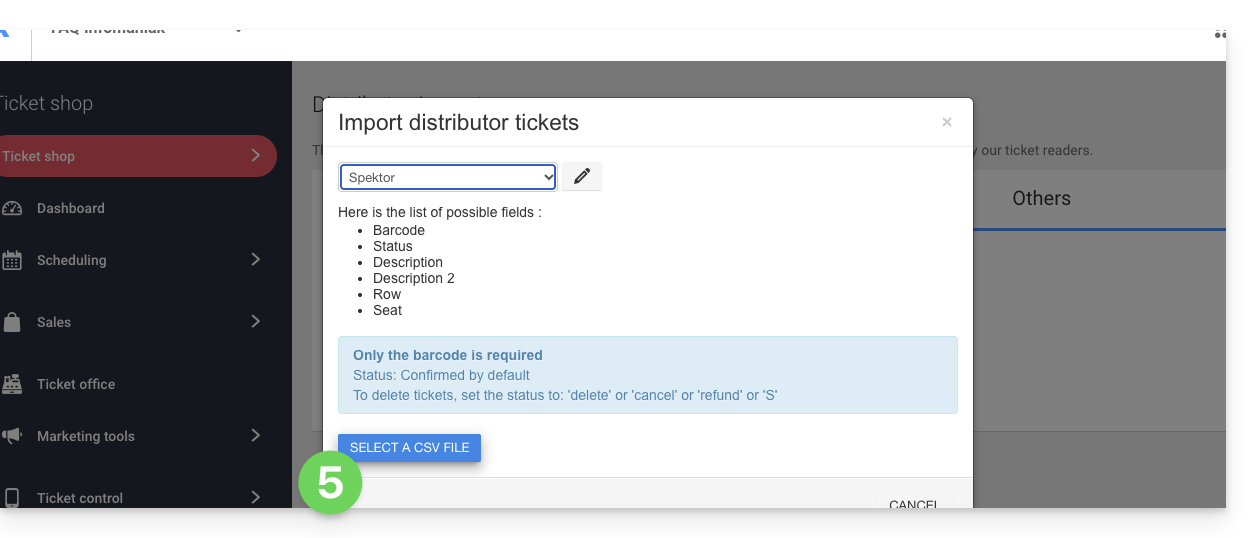
- Click on the button Choose a CSV file and upload the CSV file provided by the distributor:
- Select the rows to import. Warning:
- Check the first and last row of the imported information.
- These may contain headers or blank lines that can cause an error during import.
- Use the options at the top of the page to define the number of first and last rows to ignore:

- Link the columns to the information to be imported.
- The ticket barcode is the only mandatory field.
- If you are importing tickets from another Infomaniak ticketing system, select column 8 which is the QR code (in the form 2000000000A^0^100000000):

- Check the imported information and validate:
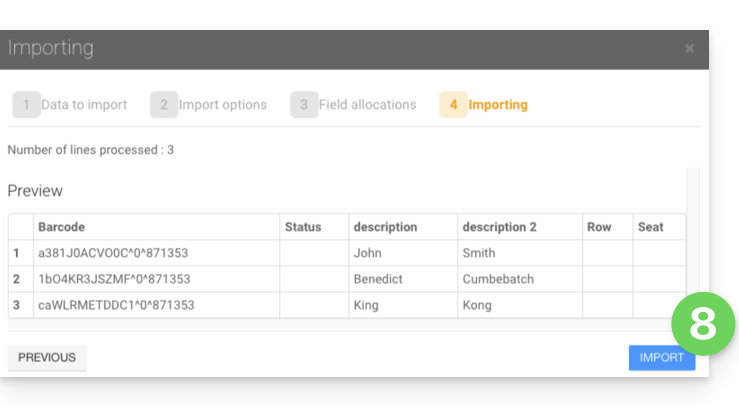
- The imported tickets will appear in a table at the bottom of the page:
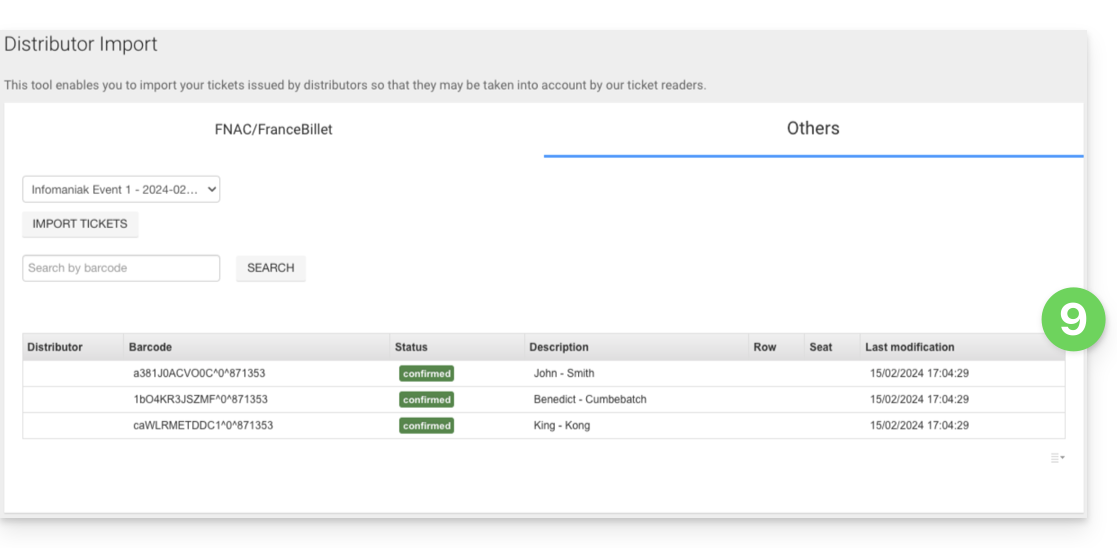
Control of imported tickets
Once the tickets are imported, they can be scanned with the ticket control application (available on iOS and Android).
They will also be deducted in the FNAC or Others column in the control report tool available from the left menu, Ticket Control, Control Report:
Link to this FAQ:
Has this FAQ been helpful?