Knowledge base
1000 FAQs, 500 tutorials and instructional videos. Here, there are only solutions!
This guide is for you if you want to change your current email provider and host your emails with Infomaniak.
Preamble
- To help you identify the offer best suited to your needs, refer to this other guide.
- To avoid losing any messages and experiencing any interruptions:
- Follow the different links provided in order; they will open in a new tab of your browser, and return to this main guide after each completed step.
- If necessary, you can also migrate your:
You order a Mail Service only
Below are the different steps to migrate your mail service to Infomaniak securely.
Step 1
It is necessary to order the mail service by following this guide.
At the time of ordering, you can choose to transfer the domain name at the same time or order the mail service alone.
You can then import the content of your old addresses to Infomaniak: refer to this other guide.
Step 2
Once the addresses are configured and your old content imported, you will be able to link your external domain name to your Infomaniak Mail Service to start receiving emails at Infomaniak. You will need to follow the chapter "Link the external domain to your Mail Service" of this guide.
You will find here the MX / SPF to add in the DNS zone of your domain name:
SPF
Type: TXT
Host: Leave blank
Target: v=spf1 include:spf.infomaniak.ch -all
MX
Priority: 5
Host: Leave blank
Target: mta-gw.infomaniak.ch (for Gandi, it is necessary to add a dot at the end "mta-gw.infomaniak.ch." )
Step 3 (optional)
Once everything is working correctly and if it hasn't been done already, you can transfer your domain name: refer to this other guide.
As soon as the transfer is initiated, you should have access to the DNS zone of your domain name on the Infomaniak Manager. You can therefore check…
1. … in the DNS diagnostic if there are any corrections to be made and if necessary add the DNS entries that might be necessary for other services used with your domain name (newsletter or other).
2. … in the global security tab of your mail service if DKIM is properly activated.
If emails arrived during the migration with your previous provider, you can import the content of your old addresses to Infomaniak again by following this guide (duplicates are managed).
You order a kSuite
Here are the different steps to migrate your external mail service to an Infomaniak kSuite securely.
Step 1
Order kSuite from this page.
Once the order is completed, access your kSuite and add your domain name to it.
You can then create your email addresses and even import the content of your old addresses: refer to this other guide.
Step 2
Once the addresses are configured and your old content imported, link your external domain name to your Infomaniak Mail Service to start receiving emails at Infomaniak. Refer to the chapter "Link the external domain to your Mail Service" of this other guide.
You will find here the MX / SPF to add in the DNS zone of your domain name:
SPF
Type: TXT
Host: Leave blank
Target: v=spf1 include:spf.infomaniak.ch -all
MX
Priority: 5
Host: Leave blank
Target: mta-gw.infomaniak.ch (for Gandi, it is necessary to add a dot at the end "mta-gw.infomaniak.ch." )
Step 3 (optional)
Once everything is working correctly and if it hasn't been done already, you can transfer your domain name: refer to this other guide.
As soon as the transfer is initiated, you should have access to the DNS zone of your domain name on the Infomaniak Manager. You can therefore check…
1. … in the DNS diagnostic if there are any corrections to be made and if necessary add the DNS entries that might be necessary for other services used with your domain name (newsletter or other).
2. … in the global security tab of your mail service if DKIM is properly activated.
If emails arrived during the migration with your previous provider, you can import the content of your old addresses to Infomaniak again by following this guide (duplicates are managed).
Link to this FAQ:
Has this FAQ been helpful?
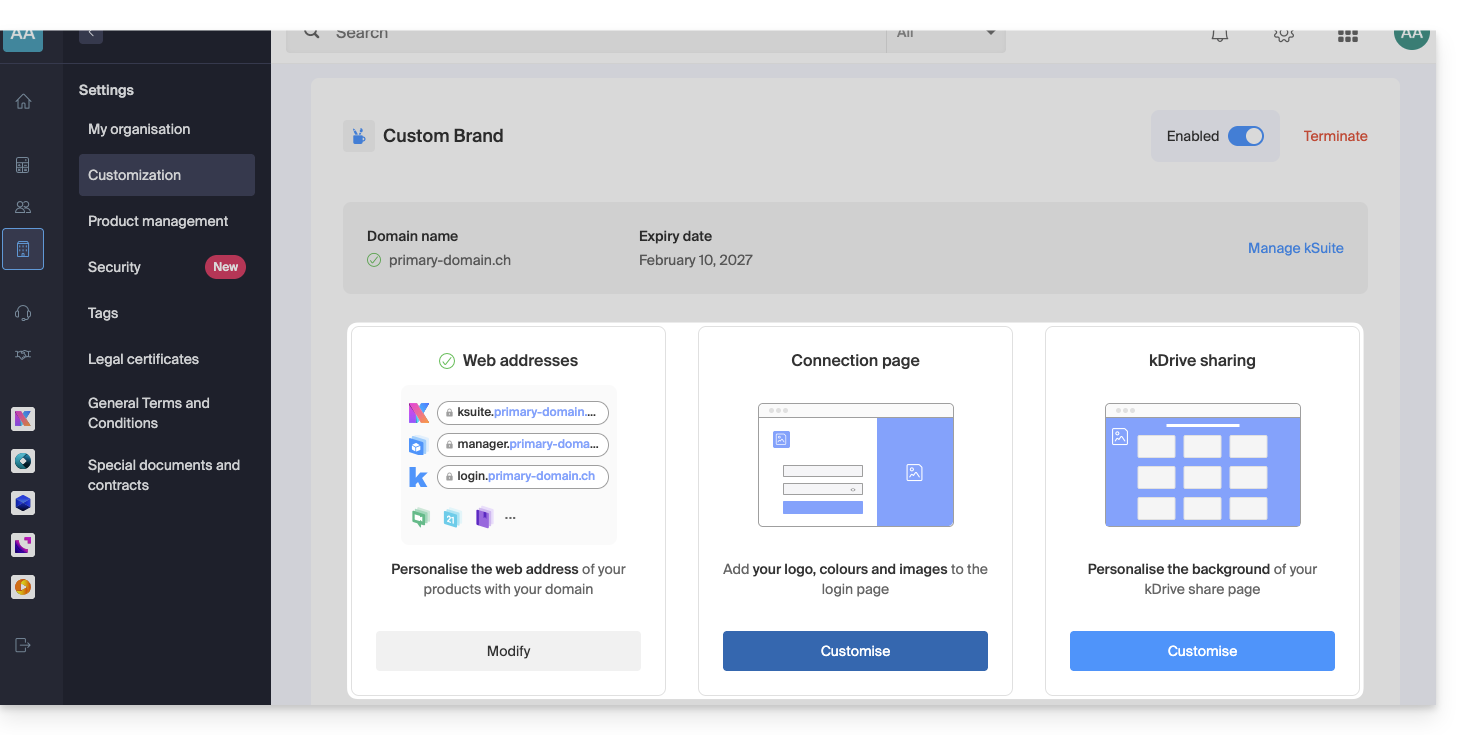
Thank you for choosing to customize your account with Custom Brand!
Preamble
- As an option with any Infomaniak offer or already included withkSuite Enterprise, discover this customization tool to make your web addresses unique, add a logo or an image slideshow to your login page for your Infomaniak Organization.
- The Web Redirection tool will no longer be usable on your domain after activating Custom Brand on it.
Custom Brand customization guides
Prerequisites
- Have a domain name with Infomaniak (transfer it if necessary).
- Its extension must be among those supported by Custom Brand.
- Note that this also works with a subdomain.
- Configure the domain to use Infomaniak's DNS servers.
Then, to use Custom Brand: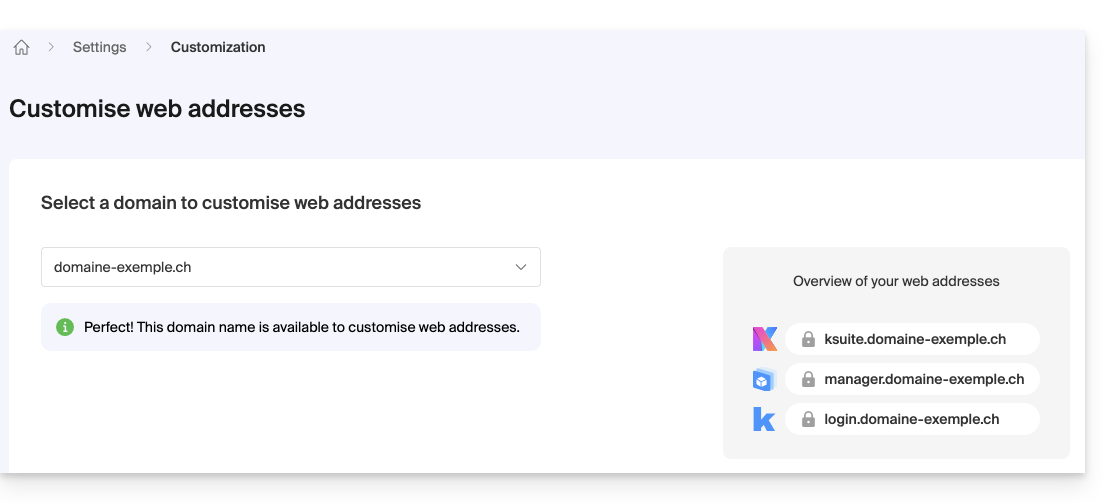
- Get started with Custom Brand: customize the URLs & interface
- Troubleshoot an issue:
Customize your web addresses with your domain
| Access to … | without Custom Brand | with Custom Brand |
|---|---|---|
| kSuite | ksuite.infomaniak.com | ksuite.domain.xyz |
| Manager | manager.infomaniak.com | manager.domain.xyz |
| emails ( Mail) | mail.infomaniak.com | mail.domain.xyz |
| calendars / agendas | calendar.infomaniak.com | calendar.domain.xyz |
| contacts | contacts.infomaniak.com | contacts.domain.xyz |
| kDrive | kdrive.infomaniak.com | kdrive.domain.xyz |
| video conferences kMeet | kmeet.infomaniak.com | kmeet.domain.xyz |
| Euria | euria.infomaniak.com | euria.domain.xyz |
Customize your Organization's interface
The following interface options are modifiable from the my kSuite settings:
- Add your logo to your Organization's interface.
- Add a panorama of 3 images on the login page.
- Modify the text and button color of the login page.
- Customize kDrive shares (see this other guide).
Link to this FAQ:
Has this FAQ been helpful?
This guide presents the Infomaniak Public Cloud, an Infrastructure as a Service (IaaS) solution based on OpenStack that provides the resources you need to develop your projects.
Preamble
- Infomaniak's Public Cloud, a platform powered by open source and free OpenStack technology, offers virtual instances with several performance profiles:
- IOPS-optimized instances
- RAM-optimized instances
- Instances with latest generation GPU
- Panel of tools available:
- Object storage (S3 compatible)
- Managed Kubernetes service
- Managed databases
- Load balancers
- DNS management
- Private network services
- Many integrations, including:
- A unified API
- A Terraform/OpenTofu connector
- An Ansible collection
- The infrastructure is available in several regions in Switzerland, with several availability zones.
To get started
- The Infomaniak Public Cloud user guide presents many tutorials, step-by-step guides, and best practices to follow.
- Also consult all Public Cloud FAQs and in particular:
- The list of scheduled maintenance and current issues is available at https://status.infomaniak.cloud/.
- Discover the presentation of the Public Cloud (replay of the Infomaniak 2022 Webinar):
Pricing
Community space & Feedback
- Click here to share an opinion or suggestion on an Infomaniak product.
- Consult the Reddit page created to facilitate technical exchanges with the user community.
Link to this FAQ:
Has this FAQ been helpful?
This guide explains how to access your Home Assistant smart home box (which is behind a dynamic IP address provided by your ISP) with a domain name at Infomaniak via the free DynDNS option and a free script available here.
Preamble
- The integration you install acts as a messenger: it constantly monitors the IP address of your local network.
- As soon as it detects that your ISP has changed your IP, it instantly sends a signal to Infomaniak.
- Infomaniak then updates your domain name (e.g.
ha.domain.xyz) to point to the new IP address.
Install Infomaniak DynDNS — Home Assistant Integration
Prerequisites
- Have a Home Assistant installation (e.g. on a Raspberry Pi 5) connected to the Internet with a dynamic IP address.
- A dynamic DNS must have been created on the relevant domain.
Next:
- Log in to your Home Assistant backoffice.
- Install HACS if you haven't already; go to the settings of Home Assistant:
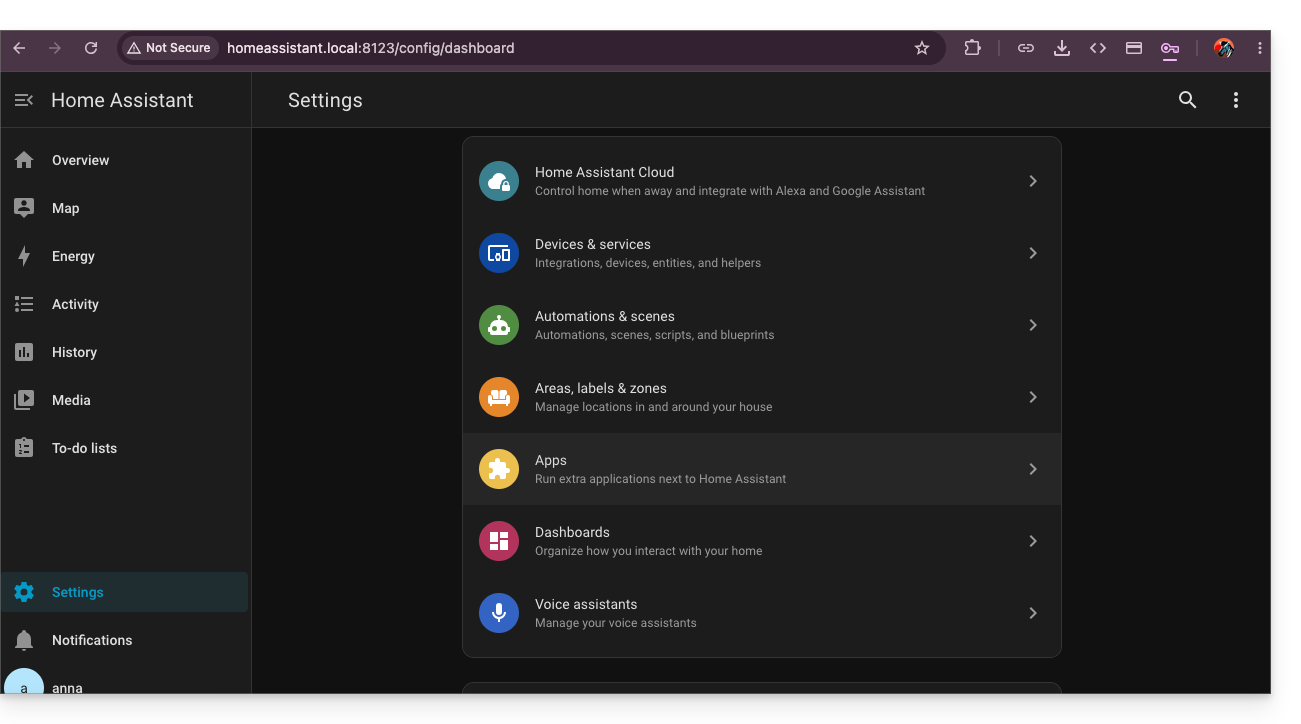
- Install the Terminal & SSH app:
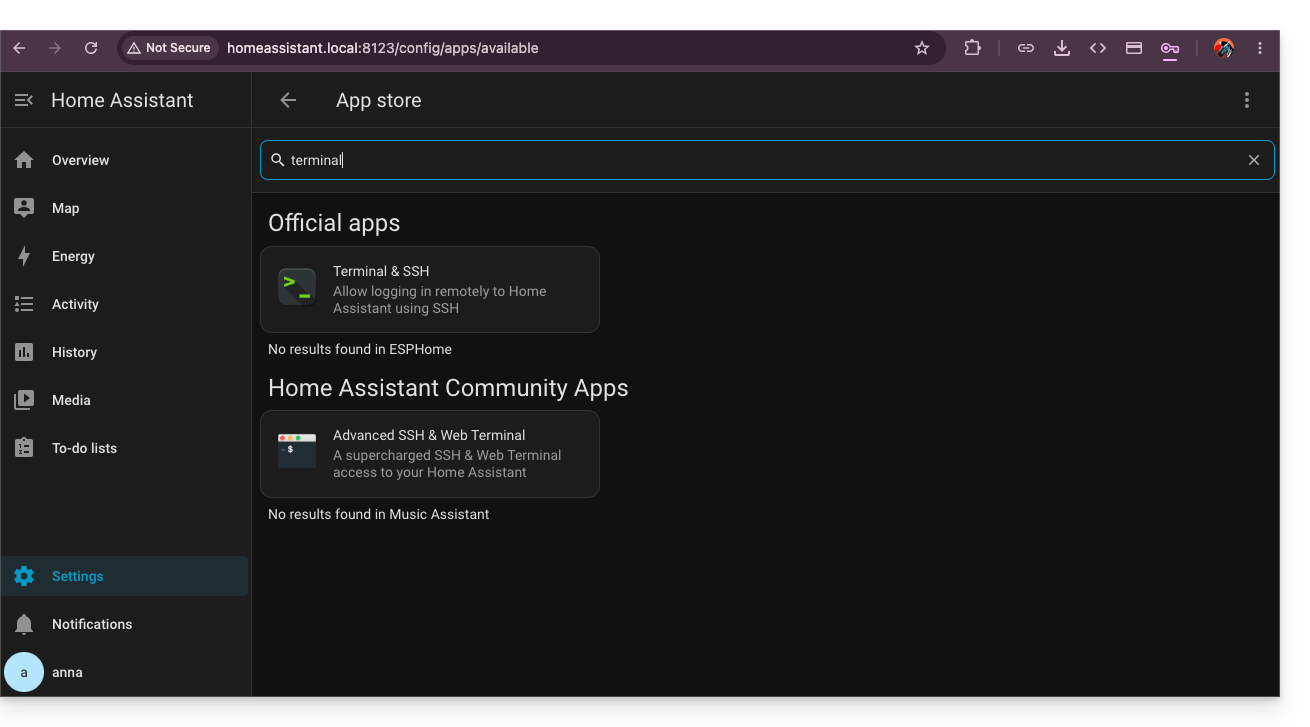
- In this terminal, enter the command
wget -O - https://get.hacs.xyz | bash -: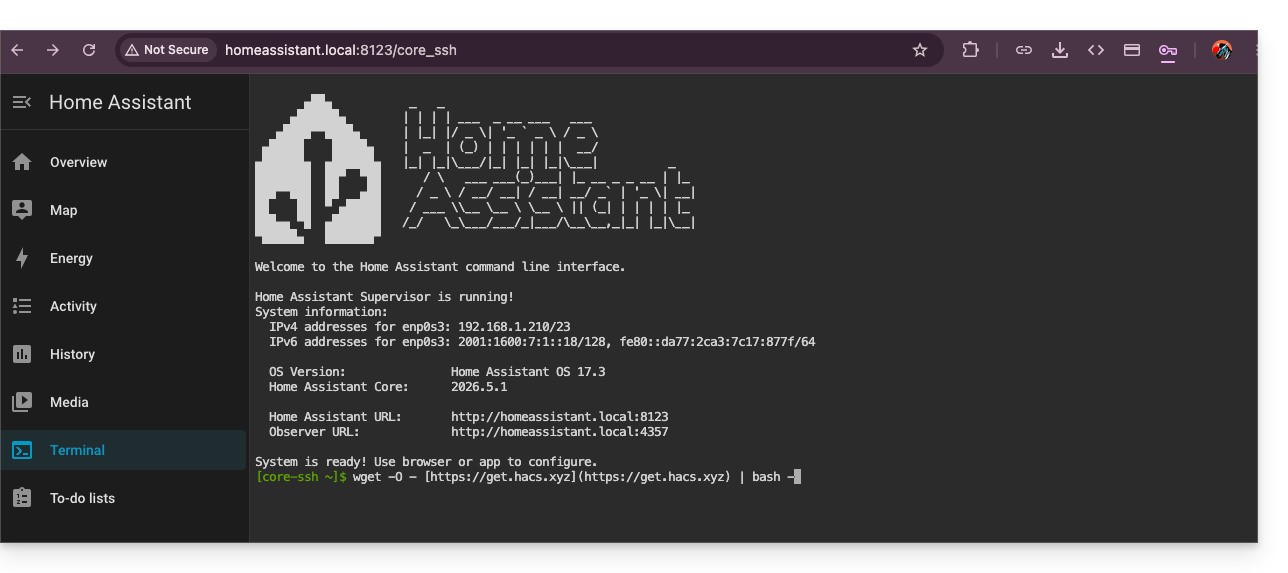
- Once HACS is installed, restart Home Assistant.
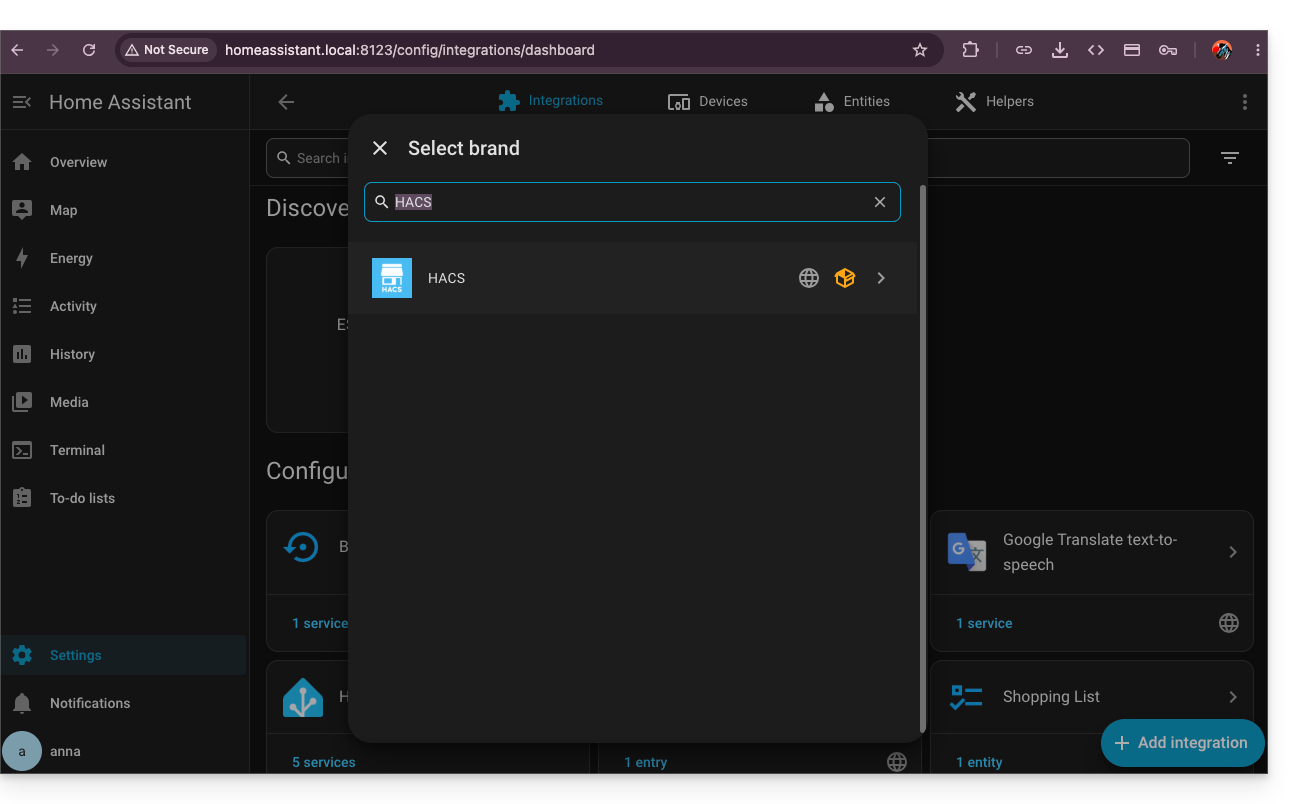
- Activate HACS by searching for it in the integrations:
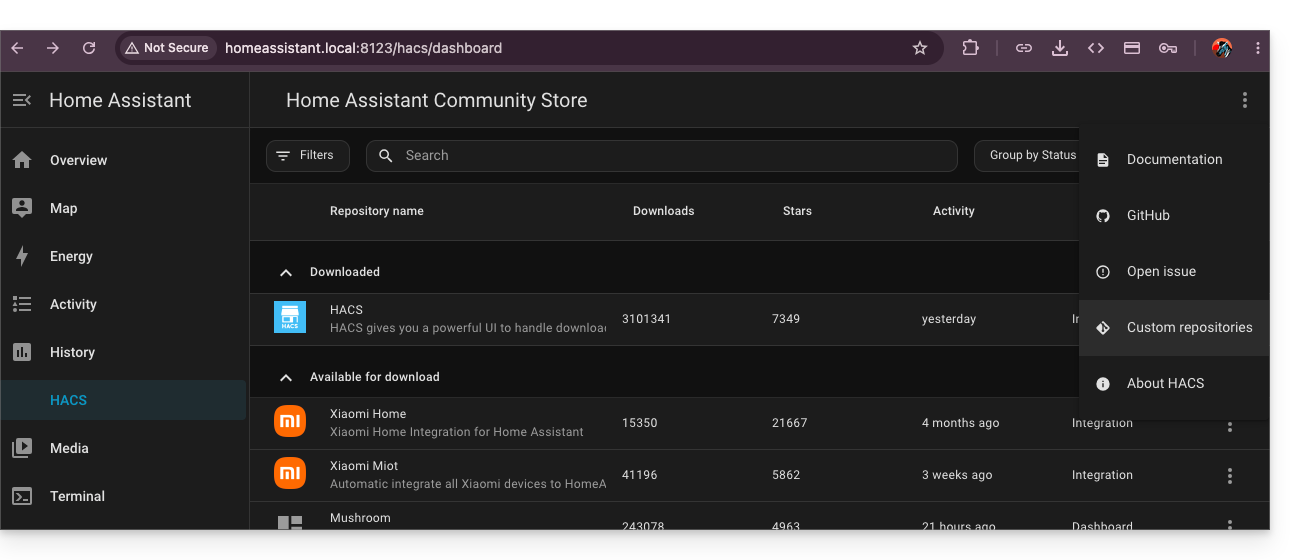
- Once validation via Github is complete, go back to HACS installed in your left sidebar, then click on the action menu ⋮ at the top right of the HACS interface to choose custom repositories:
- Enter the URL
https://github.com/cy-bertrand/Infomaniak-dyndns-haand choose the type Integration, then click on Add: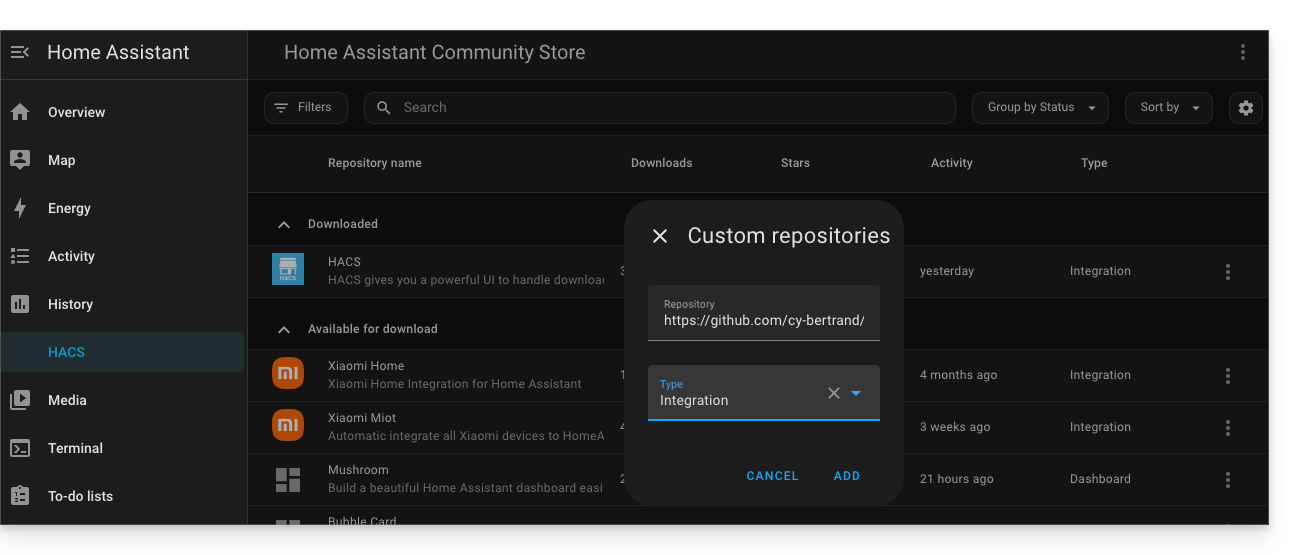
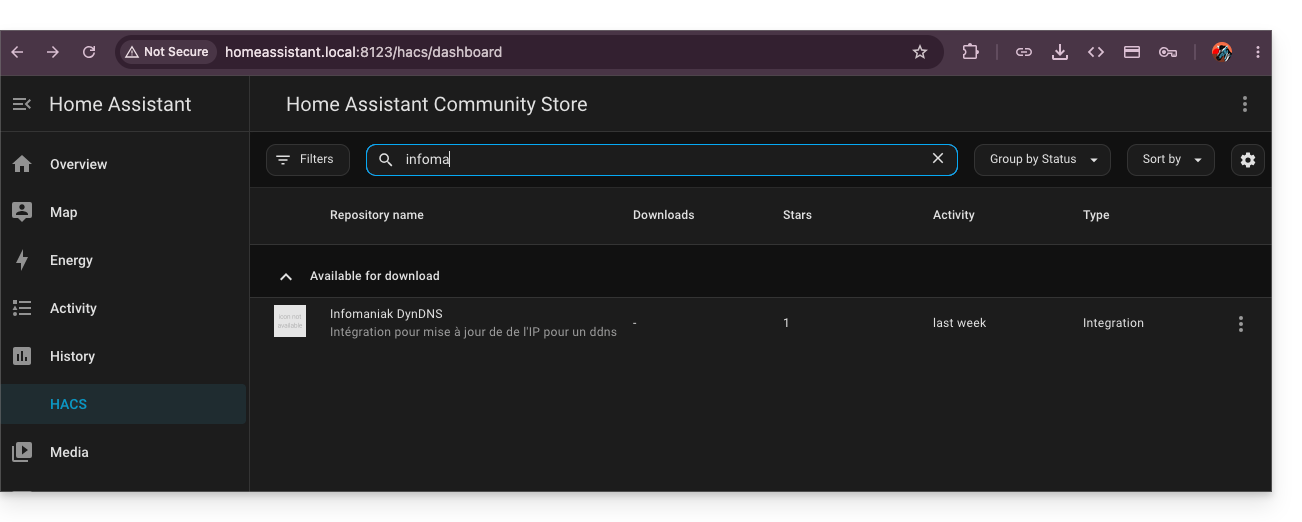
- Then search for Infomaniak DynDNS and click on it:
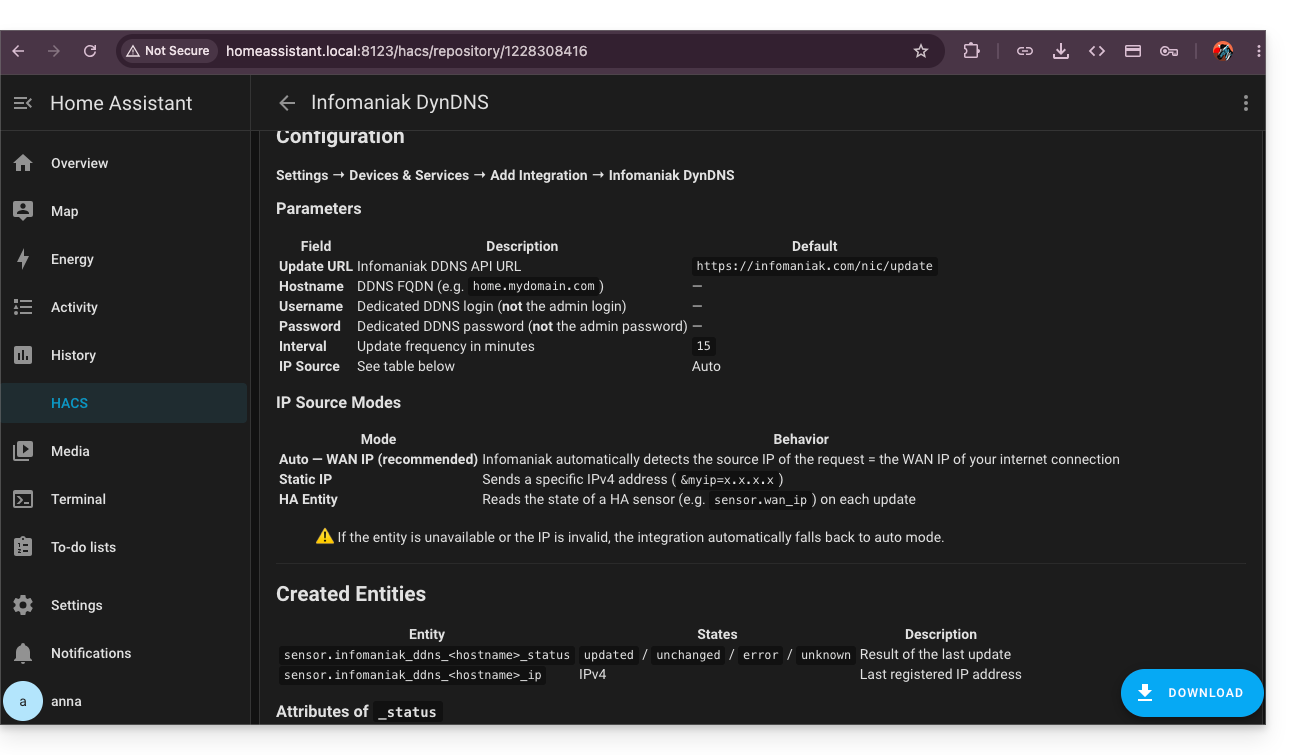
- Install this service by clicking on the Download button at the bottom right:
- Restart Home Assistant.
Configure Infomaniak DynDNS — Home Assistant Integration
To do this:
- Click on Settings in the left sidebar of HA.
- Click on Devices & Services:
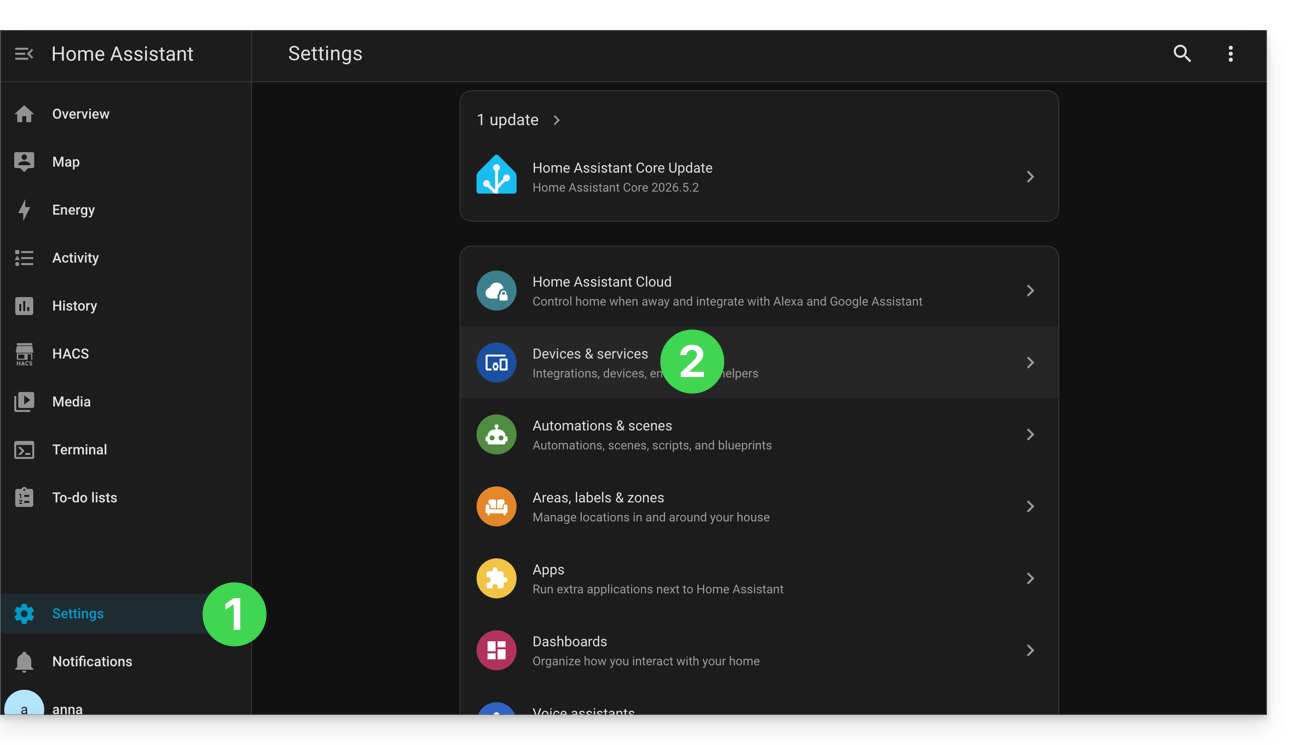
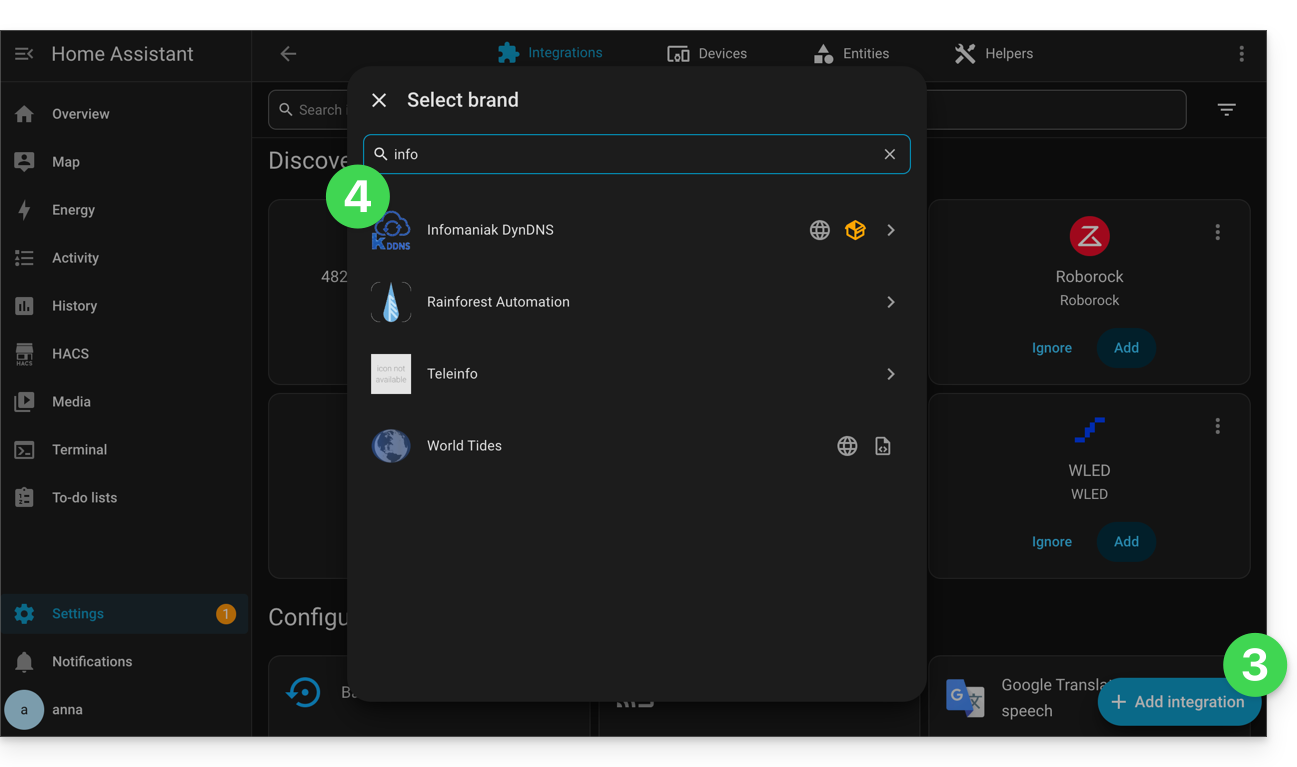
- Click the button to Add an integration.
- Click on Infomaniak DynDNS:
- Configure your device:
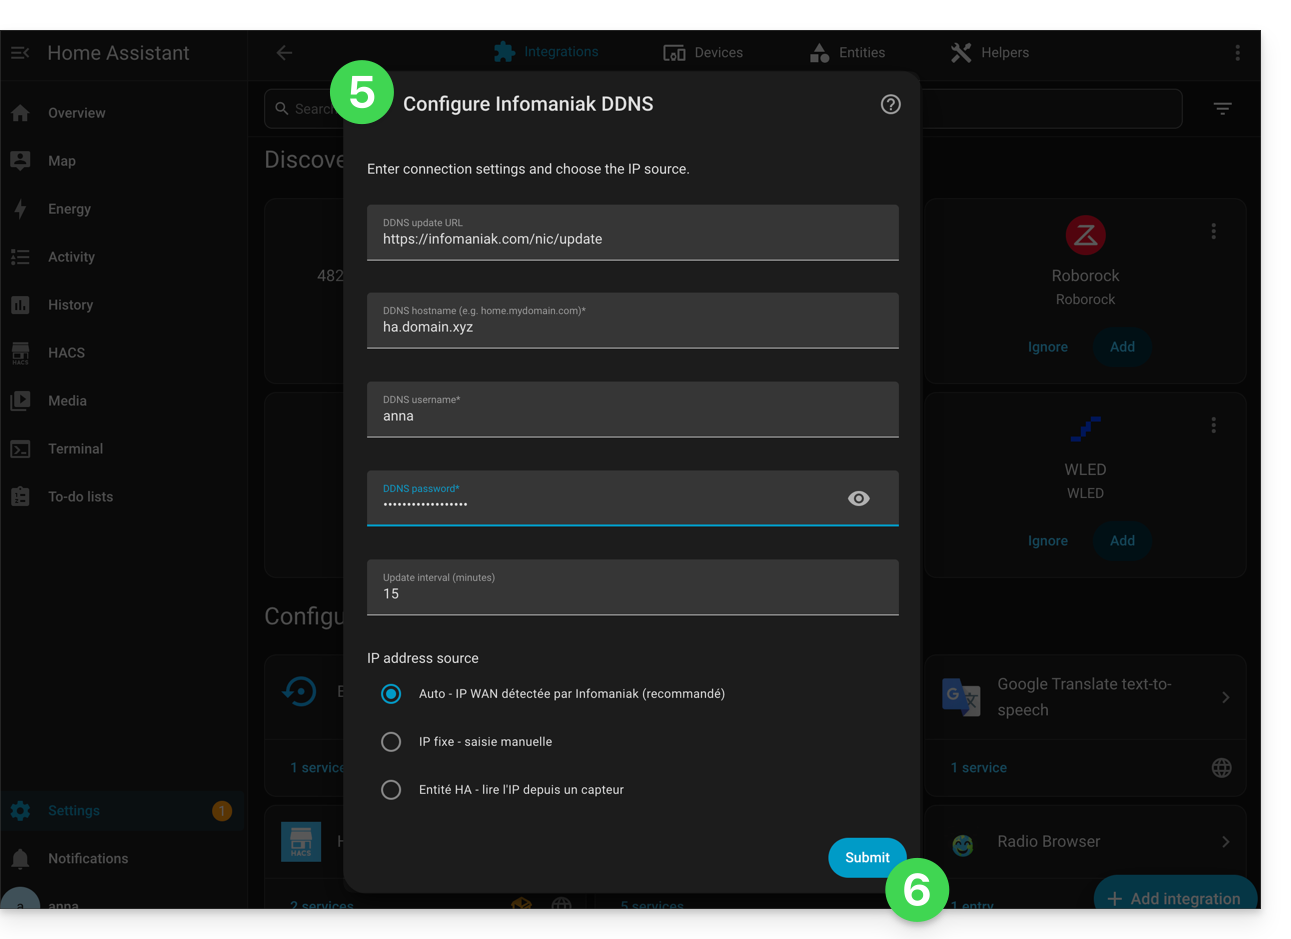
- Hostname: the URL configured in the Manager when adding the Dynamic DNS
- Username: the identifier defined in the Manager when adding the Dynamic DNS
- Password: the password defined in the Manager when adding the Dynamic DNS
- Validate at the bottom of the page.
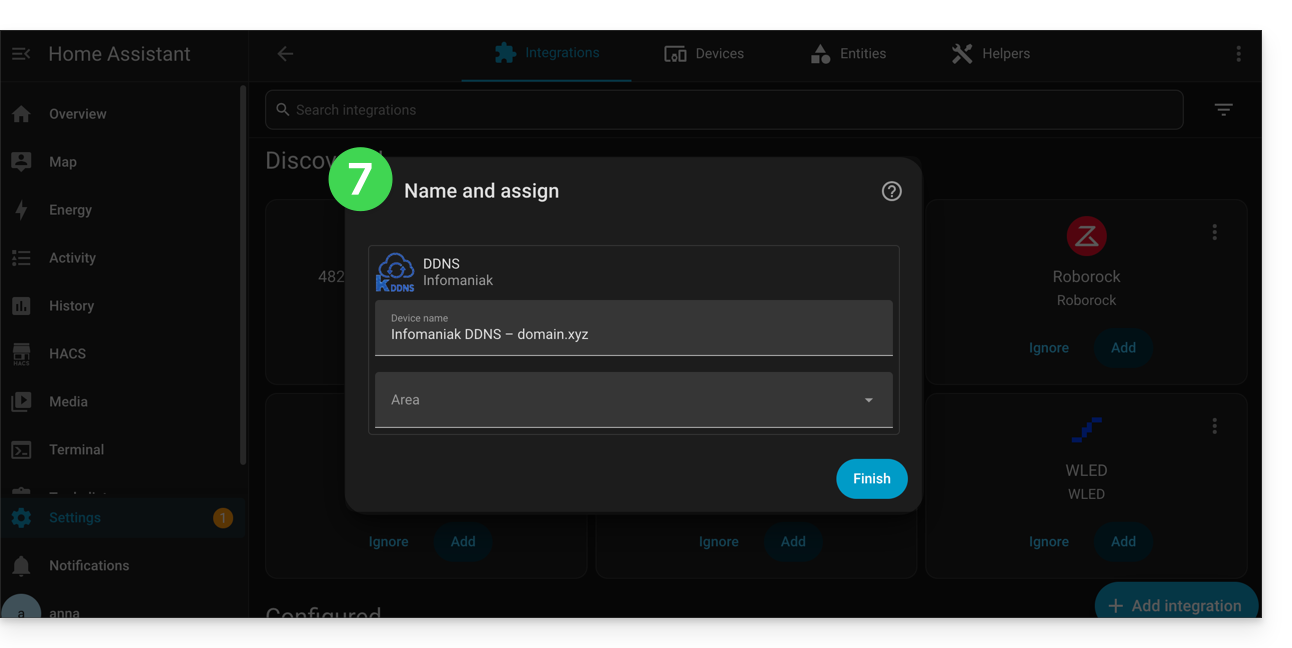
- Give a name to the entity and save your changes by clicking on Finish:
Home Assistant will check the external IP every 15 minutes. If it has changed, the DNS will be updated. Thus, your domain name will always point to your home automation installation, even if your Internet Service Provider changes your public IP address.
Also refer to the official plugin documentation.
Link to this FAQ:
Has this FAQ been helpful?
This guide explains how to add a synonym domain to a domain name.
Preamble
- A synonym domain is a domain name that can serve as a secondary name for another domain.
- When a synonym domain is added, it automatically inherits the content of the DNS zone of the main domain (including
MX,A, etc. records), as well as its Web and Mail hosting. - Alternatively, you can also add a (domain) alias to a website or add a (domain) alias to a Mail Service.
Add a synonym domain to a domain
Prerequisites
- The domain name of the future synonym or the management of its DNS zone…
- … must be reserved with Infomaniak,
- … must be configured with the Infomaniak DNS,
- … must not be linked to any product yet.
- The domain name on which the synonym will be placed…
- … must not be associated with the Infomaniak Newsletter product.
To access your domain names:
- Click here to access the management of your product on the Infomaniak Manager (need help?).
- Click directly on the name assigned to the product in question.
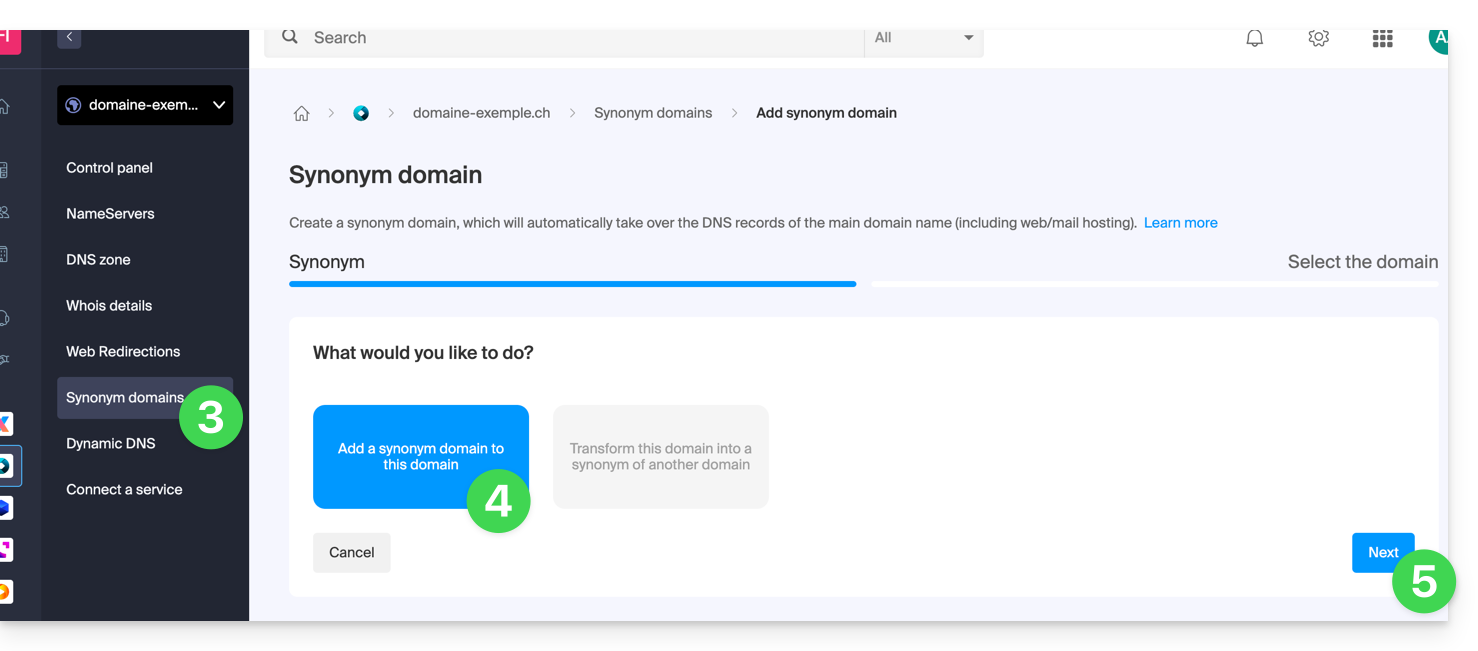
- Click on Synonym Domains in the left sidebar.
- Choose to add a synonym.
- Click on Next:
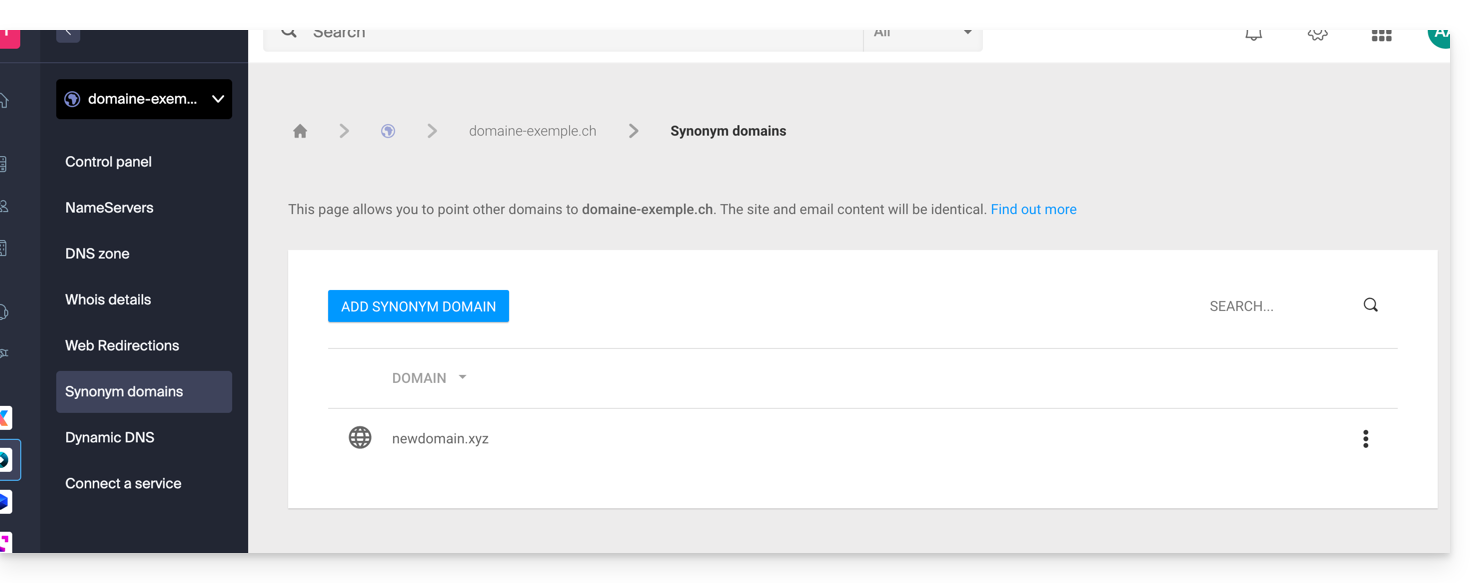
- Choose an existing domain in the current Organization, or order a new domain in advance.
- Click the button to Confirm:

- That's it:
Refer to this other guide if you are looking for information to dissociate a synonym domain name.
Link to this FAQ:
Has this FAQ been helpful?
This guide shows how to use the Newsletter tool provided by Infomaniak to create and send newsletters, i.e., recurring messages to multiple recipients.
Why use Newsletter instead of a Mail Service
A newsletter is a periodic communication tool sent by email to a specific group of subscribers. It generally aims to inform, share news, updates or relevant content on a specific subject and maintain a relationship with a targeted audience.
They can contain articles, announcements, promotions, links to recent content, upcoming events, and sometimes exclusive offers for subscribers. The main goal is to provide interesting and relevant content to stimulate engagement and maintain the interest of subscribers.
Infomaniak Newsletter allows you to schedule and send newsletters to a list of email recipients waiting for your sends; you thus distribute email marketing campaigns effectively and personally and maintain regular and relevant communication with your customers and subscribers.
The features include the creation of templates, management of the subscriber list, performance analysis and all this is not directly feasible with a traditional Mail Service. Moreover, the tool has its own interface, standalone within your browser, completely separate from Mail Infomaniak and does not require a mail application. This means that if you already have contacts to whom you wish to write with their consent, you will need to import them to the tool beforehand.
Prerequisites
- Have a domain name on which you will activate the Newsletter:
- Access to its DNS zone if the domain name is not with Infomaniak.
- Create a new domain name if necessary.
- Have Newsletter credits to allow sending (1 credit = 1 newsletter sent to 1 subscriber).
You must have the explicit consent of your recipients via the double opt-in model. Sending spam and using purchased/rented address lists is prohibited. The owners of the domain name used to send newsletters are legally responsible and violation of the general conditions may result in the suspension of the account.
Activate the Newsletter tool
To activate the Newsletter tool for the first time:
- Click here to access the management of your product on the Infomaniak Manager (need help?).
- Click on START FREE to subscribe to the Newsletter offer.
- Enter the domain name that will be used (and that must belong to you - see prerequisites above).
- Click the blue button to Approve.
- Start using the tool - or refer to this other guide if you encounter a problem or if additional configuration is requested on the screen.
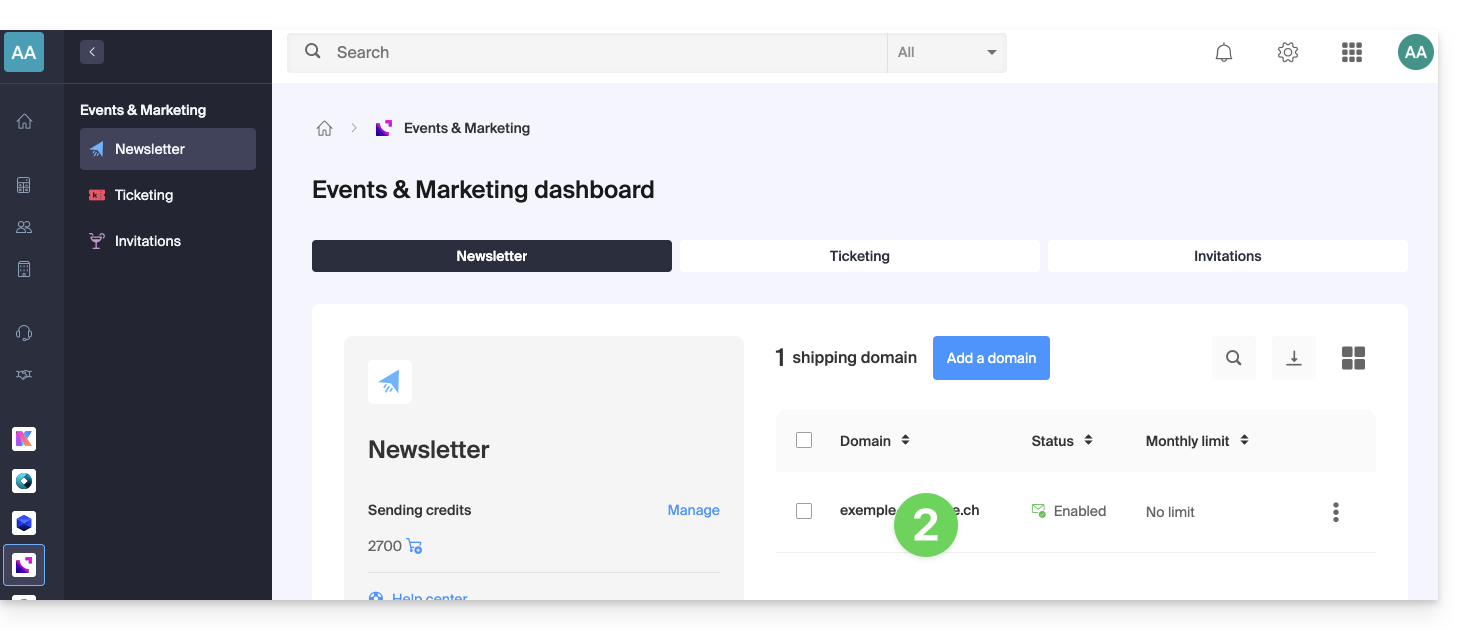
Access the Newsletter tool
To access the Newsletter once activated:
- Click here to access the management of your product on the Infomaniak Manager (need help?).
- Click on the domain name concerned in the table that appears:
Go further with the tool
- Import contacts
- Create and send a newsletter
- Newsletter credits
- Newsletter subscription form
- Double opt-in to avoid being labeled as a spammer
- Resend a newsletter to specific types of subscribers
- The variables to customize your content
- Use the Newsletter API
See all Newsletter FAQs ; click here to share feedback or a suggestion on an Infomaniak product.
Link to this FAQ:
Has this FAQ been helpful?
This guide presents the Global Security tool, which allows you to verify that the relationships between a domain name and an Infomaniak Mail Service are optimal in terms of security. This involves checking SPF / DKIM / DMARC records, and the Global Security tool allows you to intervene in the configuration if necessary.
Any DNS addition/modification can take up to 48 hours to propagate.
Access the Global Security diagnostic tool
To access Global Security:
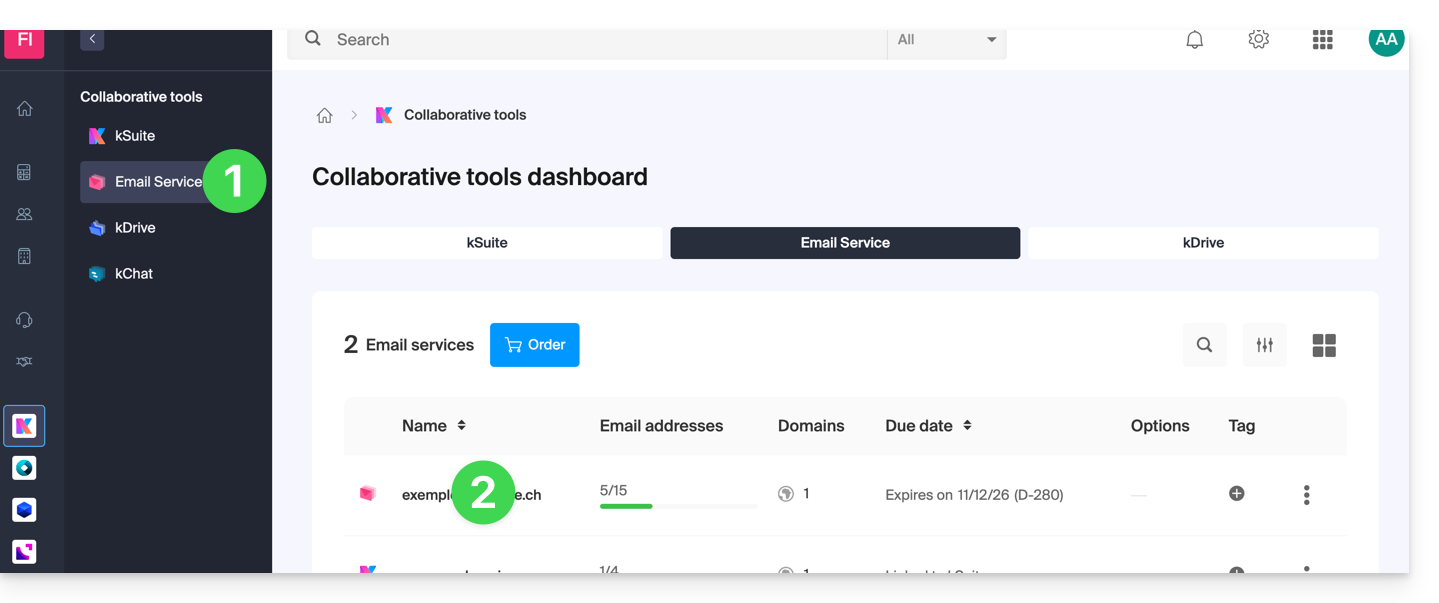
- Click here to access the management of your Mail Service on the Infomaniak Manager (need help?).
- Click directly on the name assigned to the Mail Service concerned:
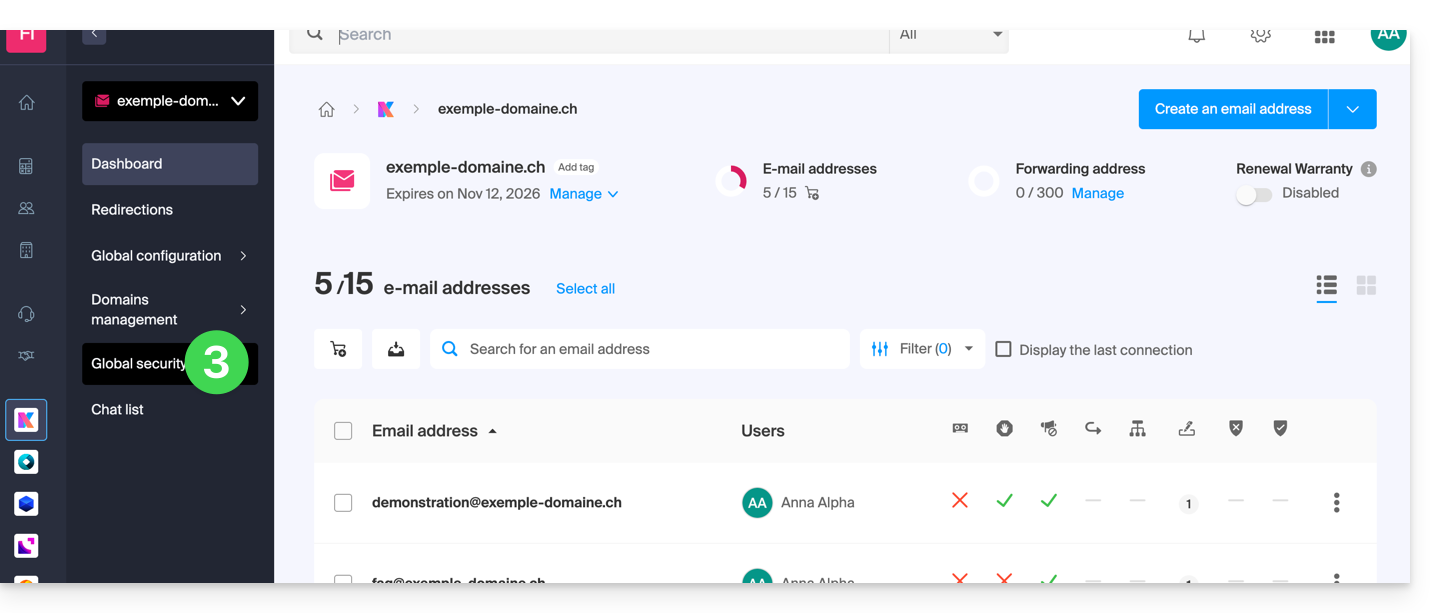
- Click on Global Security in the left sidebar:
Verify optimal email functionality
Once you are on Global Security, familiarize yourself with and verify the three security mechanisms inherent to emails: SPF, DKIM, and DMARC policy. These indications should display in green: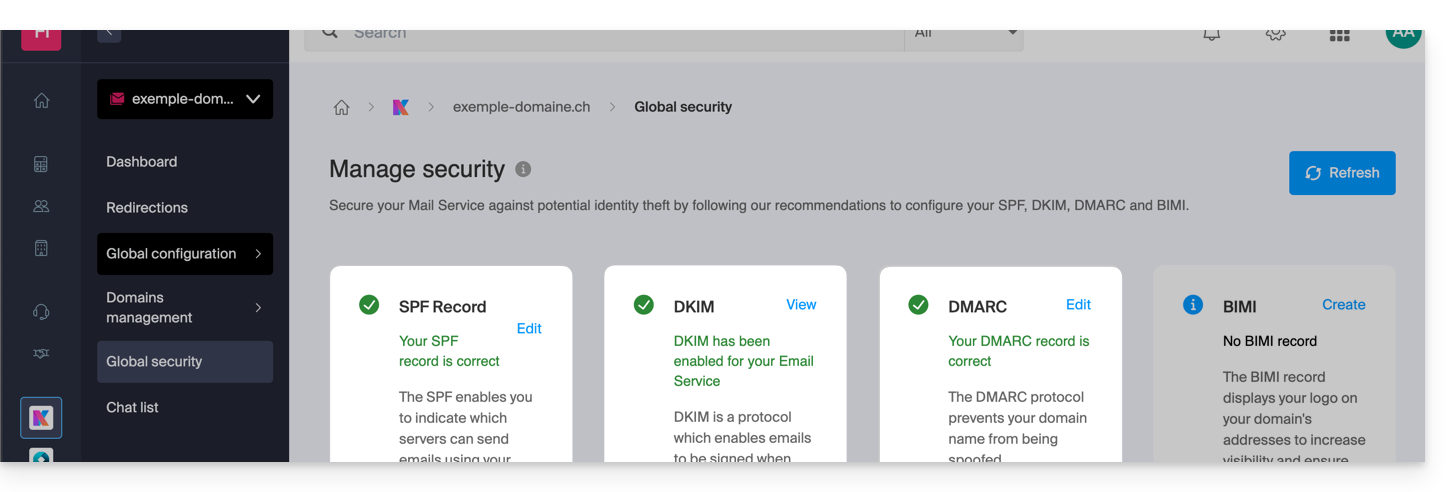
Otherwise, this may explain why an email that is not spam is treated as spam.
Click on Edit or Create to configure SPF, DKIM, and DMARC according to the recommendations below to secure your Mail Service against potential identity theft:
SPF (Sender Policy Framework)
SPF (click here to configure) allows the owner of a domain name to specify which servers are authorized to send emails on behalf of that domain. This helps reduce the risk of spam and phishing since the recipient's mail server can verify if the sender is authorized by consulting the sender domain's DNS records: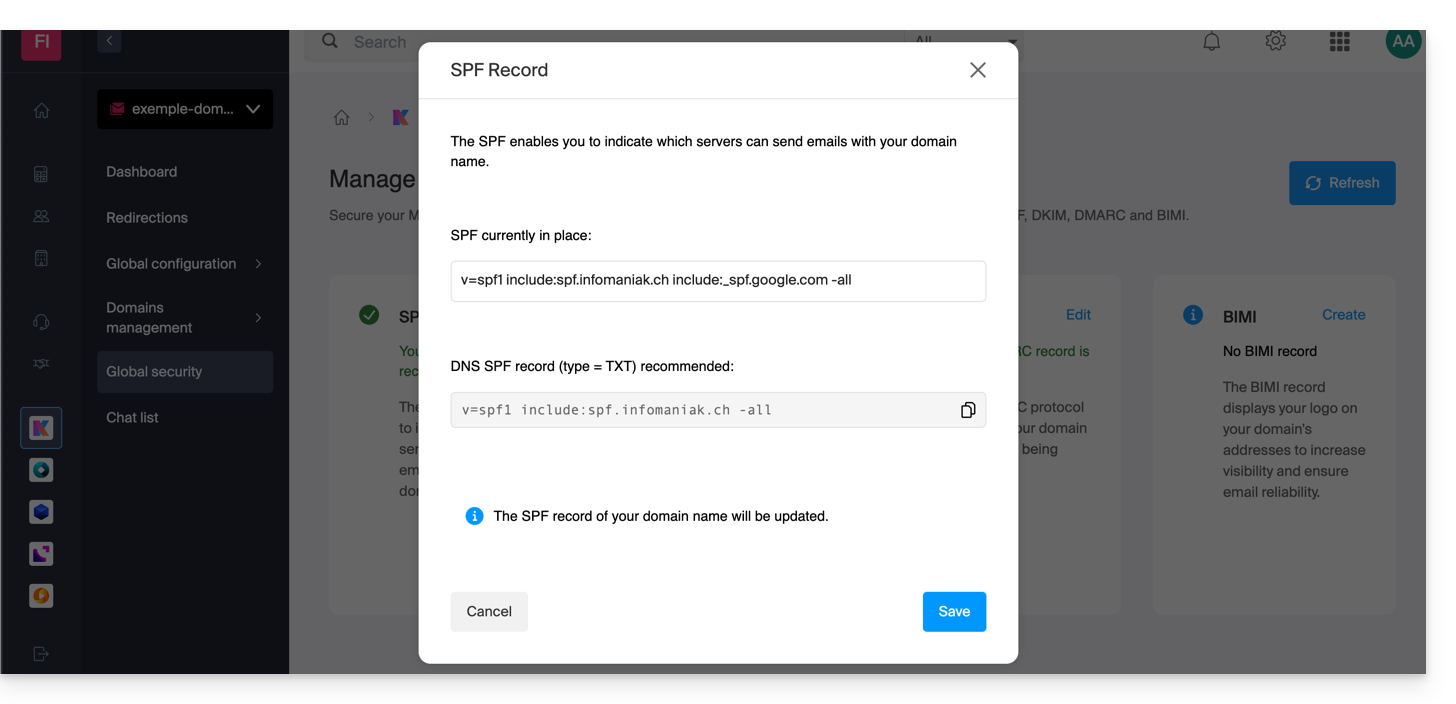
The analyses of the Global Security tool are only relevant if the domain name is with Infomaniak and configured to direct mail traffic to Infomaniak.
Under these conditions and in case of a detected problem, you will find a Correct button that will allow you to automatically update your SPF.
If correcting one or the other of the mentioned issues is not possible, it must be done on the configuration set up by the owner or technician of the sender's domain name.
If your domain name points to Wix or another provider, the SPF must be configured with the provider in question.
DKIM (Domain Keys Identified Mail)
DKIM (click here to configure) is a protocol that allows emails to be signed when they are sent.
When your domain name (or its DNS zone) is managed elsewhere, you will find in this section Global Security > DKIM the DKIM record to add in the DNS zone: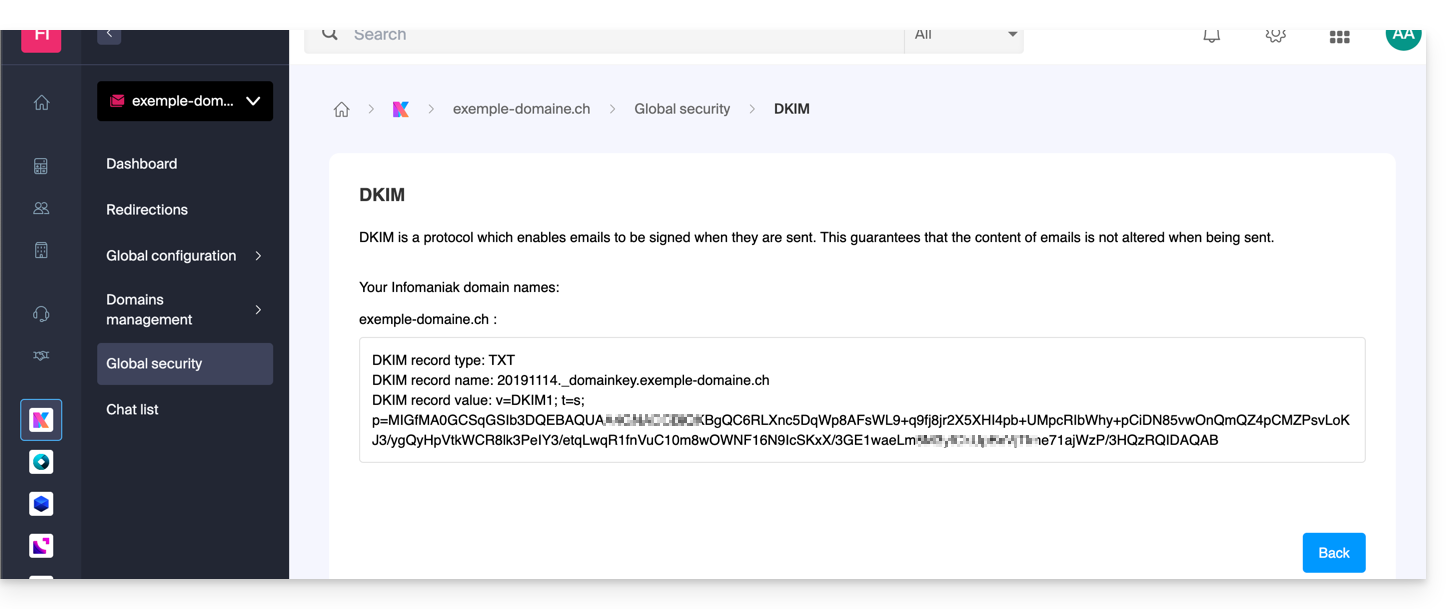
You can configure multiple DKIM records on your domain without a fixed limit, unlike DMARC or SPF. This is crucial if you use multiple third-party email providers for your daily communications.
DMARC (Domain-based Message Authentication, Reporting, and Conformance)
DMARC (click here to configure) allows you to indicate to other mail servers (the email providers of the contacts to whom you send an email) the policy to follow in case of receipt of a "suspicious" email (e.g., unauthenticated) from your mail server (hosted by Infomaniak). Additionally, you can be notified of the "incident" by a summary message (called a "DMARC report") providing information on recent activity related to your email and domain name.
DMARC requires a valid SPF and DKIM. A wizard allows you to configure DMARC according to Infomaniak's recommendations in simple mode or entirely as you wish in advanced mode (this expert mode allows you to enter the record of your choice):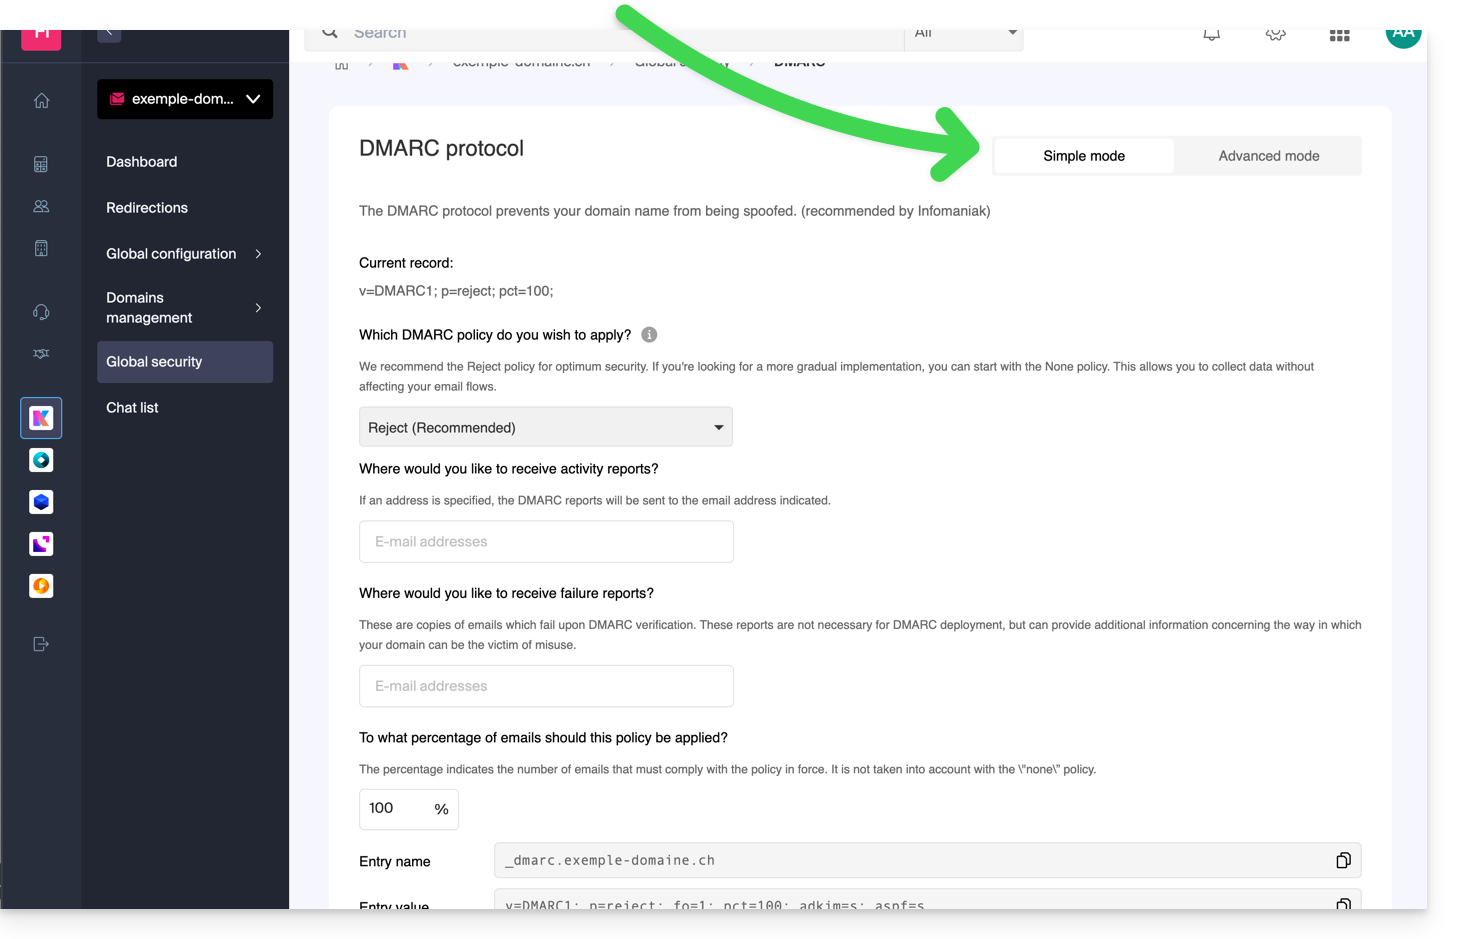 The corresponding necessary entries (type TXT) will then be automatically applied in the DNS zone of the concerned domain name (if administratively possible - domain managed in the same Organization, for example).
Infomaniak is neither able to analyze your potential DMARC reports and records, nor able to comment on the validity or compliance of these, as this is entirely your responsibility.
To verify the records within your DNS, you can also use a free external service like the one mentioned at the bottom of this other guide.
Refer to this other guide if you are looking for information on the fourth point of the Overall Security page.
Link to this FAQ:
Has this FAQ been helpful?
This guide explains how to obtain your email address(es) from the Swiss host Infomaniak.
Preamble
- With the exception of certain free offers, an email address at Infomaniak is always created within an Email Service, and this Email Service revolves around a custom domain name that must exist and be configured for the email to work.
- Example: you want the address
jean.dupont@domain.xyzthen you need:- To own the domain name “
domain.xyz”. - To obtain an Email Service “
domain.xyz”. - To create the email address “
jean.dupont”.
- To own the domain name “
- All of this is offered and requested in the ordering process on infomaniak.com (see below), preceded by the mandatory creation of a user account (for which you will need to provide your personal email address, or an address that already exists in any case).
- If the corresponding domain name is already registered with an external registrar, you may need to enter the correct MX record in the DNS zone.
Order email addresses from Infomaniak
Before or after your registration:
- Click here to choose the offer that suits you and follow the process to start using the email services.
- Once the Email Service is ordered, you will be able to create email addresses and associated passwords.
Add an additional Email Service
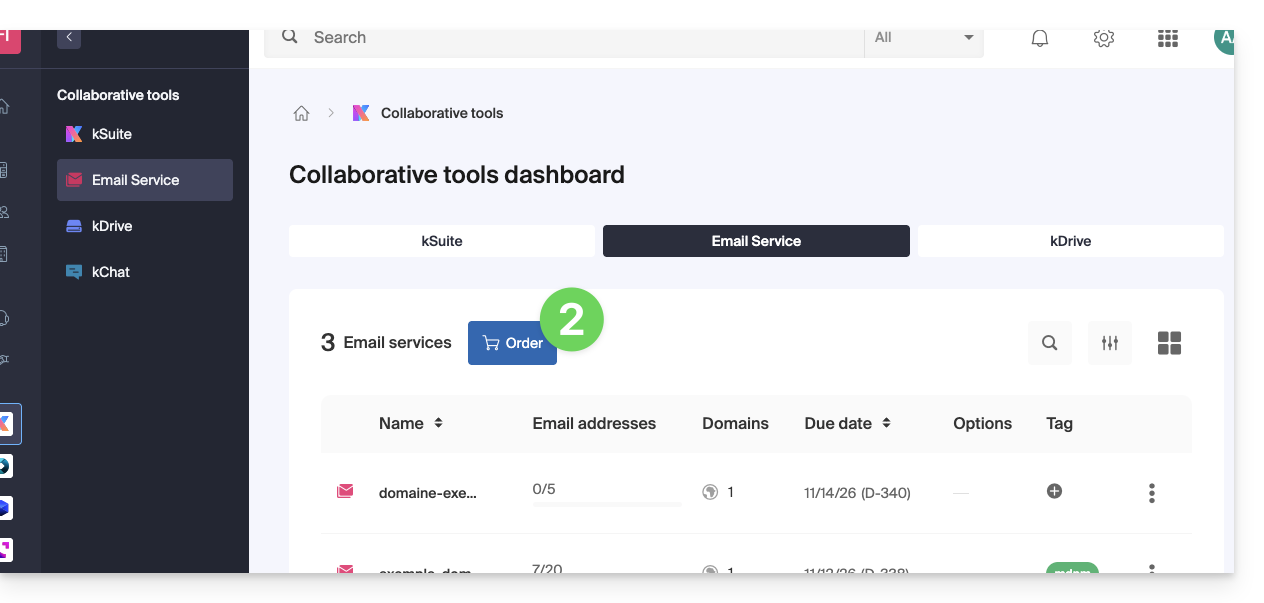
To add a new Email Service (to obtain new addresses on another domain):
- Click here to access the management of your product on the Infomaniak Manager (need help?).
- Click on the cart icon above the displayed table:
Increase the number of available email addresses on an existing Email Service
To increase the quota of available addresses if necessary, refer to this other guide.
Once the Email Service is activated
• Create your email addresses.
• Configure your emails on your computer and devices.
• Synchronize your contacts & calendars on your devices.
• Restore the content (including that present with another provider).
Link to this FAQ:
Has this FAQ been helpful?
This guide explains how to add a new domain name to a Web site Infomaniak.
Preamble
- When you add a new domain name to a website, it is referred to as a linked domain but also as an alias.
- In this case, an alias domain is an additional domain name, also linked to an existing site.
- For the website
domain.xyzto be reachable with a completely different domain name such asprivate.abcfor example, you need to addprivate.abcas an alias to the website. - Second example, for the site
domain.xyzto also be reachable withwww.domain.xyz, you need to add it as an alias to the domaindomain.xyz. In this example,domain.xyzis the parent site of the aliaswww.domain.xyz. Generally, the aliaswwwis already added automatically and present…
- For the website
Adding an alias to an existing site
Prerequisites
- If the domain name (intended to become an alias) or its DNS zone is managed by Infomaniak, everything is OK. If not:
- The A record of the domain name must point to Infomaniak.
- To simplify, you can delegate the management of the domain to Infomaniak.
- It is also necessary that the future alias is not already one, in which case it will be necessary to unlink it from the current site beforehand (same if synonym).
To add an additional domain that will be linked to your website:
- Click here to access the management of your product on the Infomaniak Manager (need help?).
- Click directly on the name assigned to the product concerned:
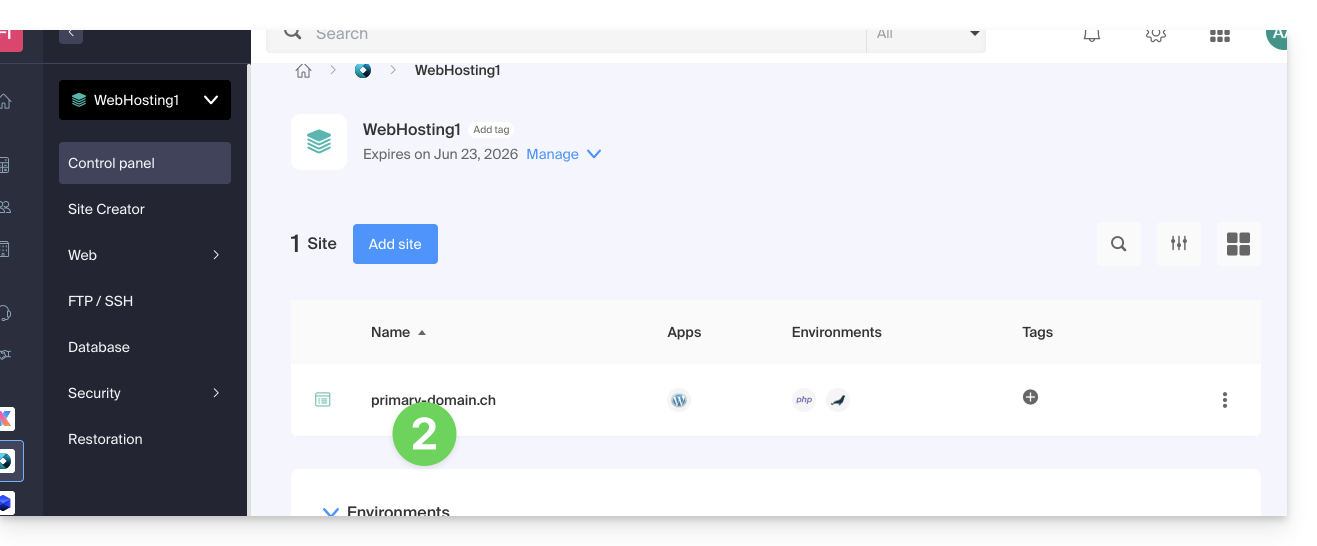
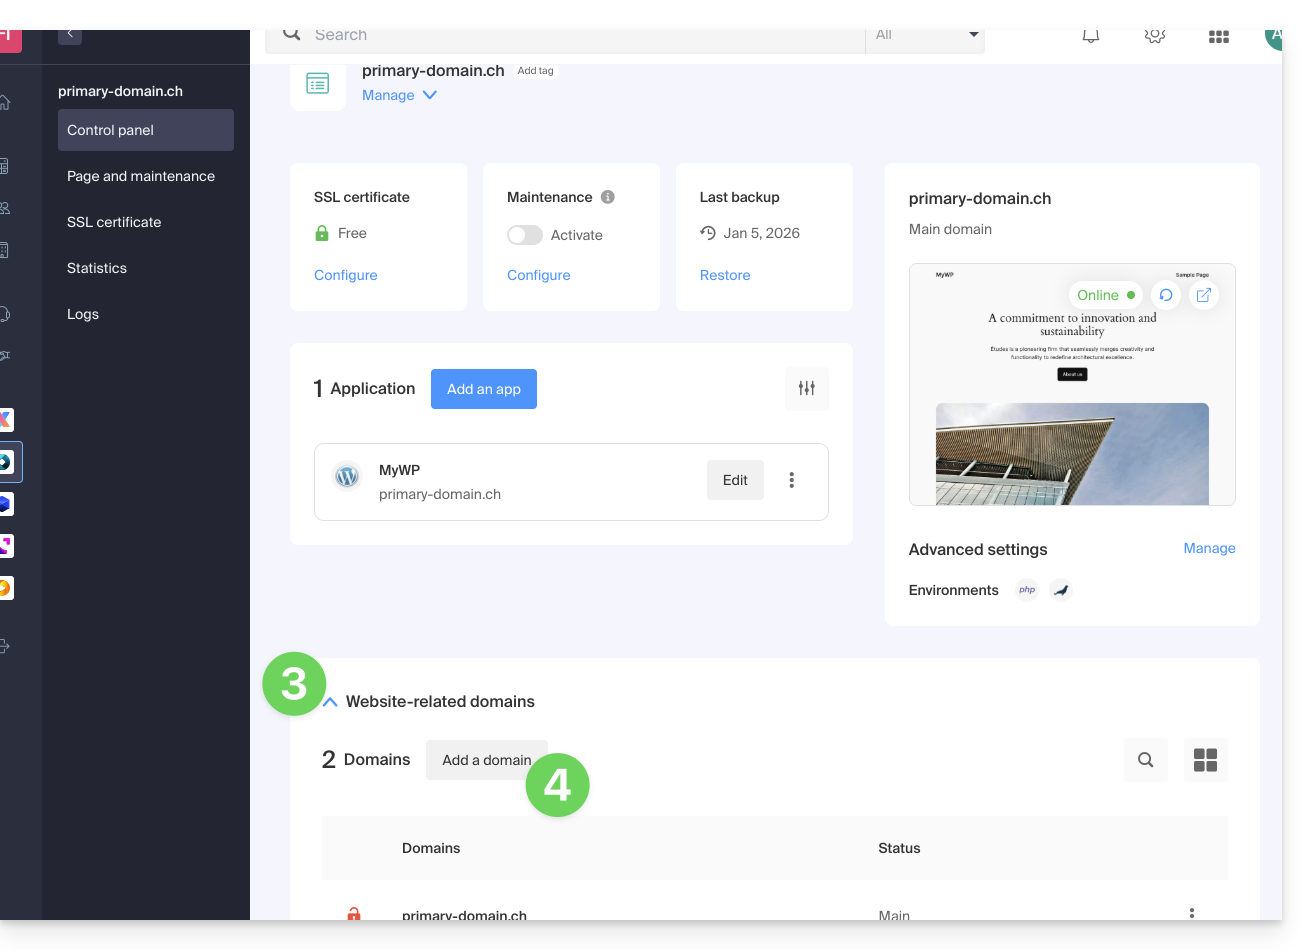
- Then click on the chevron to expand the Domains section of this site.
- Click on the Add a domain button:
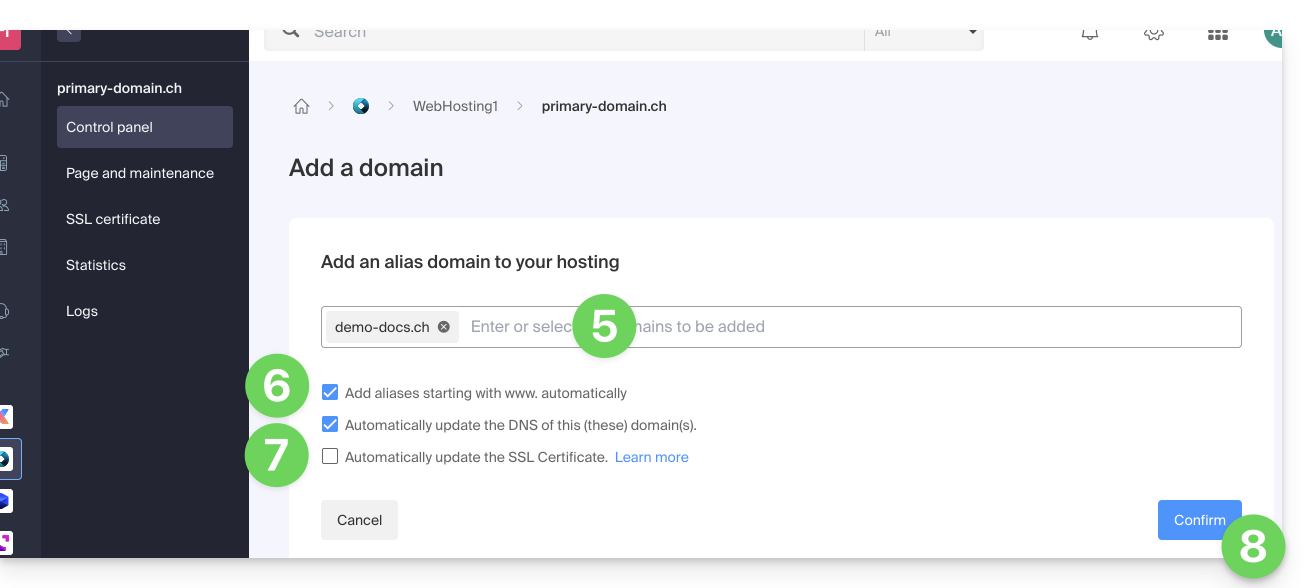
- Enter the domain name(s) to be added, separating them with the Enter key.
- If the alias or its DNS zone is managed by Infomaniak, it is possible to automatically update the DNS entries. In the opposite case, make any necessary changes with your registrar or transfer the management of the domain name to Infomaniak.
- If you have an SSL certificate such as Let's Encrypt, for example, you can request to update it here to include the new names.
- Click on Validate to complete the procedure:
To set the alias as the main domain, refer to this other guide.
Link to this FAQ:
Has this FAQ been helpful?
This guide helps you identify and correct most email errors encountered after sending an email to a recipient. Refer to this other guide if you are looking for information about errors obtained when configuring a mail address in a software/email client.
Preamble
- Generally, a mail error message follows…
- … an incorrect configuration of the domain name used with your mail,
- … a problem with (the mail provider of) your recipient.
- In all cases, a delivery failure report (Mailer Daemon or Mail Delivery Subsystem) containing the explanation is sent to the sender.
Finding and identifying the mail error
When your message does not reach your recipient, an initial failure report (Temporary Delivery Failure Report) is sent and specifies that the server will attempt to resend your message several times.
A final delivery failure report (Final Delivery Failure Report or Undeliverable Mail) issued by the recipient's server is sent to the sender (via a pass through the Infomaniak mail server, hence the mention of Infomaniak at the beginning of most error messages you may receive) to inform them that the email could not be delivered even after several attempts.
The notification always contains the reason for the failure. Example below:
This is the mail system at host smtp-1-1234.mail.infomaniak.ch.
I'm sorry to have to inform you that your message could not be delivered to one or more recipients. It's attached below.
For further assistance, please send mail to postmaster.
If you do so, please include this problem report. You can delete your own text from the attached returned message.
The mail system anna.a@abc.xyz: host mxbw-abc-xyz.abc-ab12.abc.ch[123.456.789.00] said: 550 5.1.1
anna.a@abc.xyz recipient rejected, account administratively disabled (in reply to RCPT TO command)
So here the address of your correspondent is visibly suspended by their mail provider (account administratively disabled).
Sometimes you need to look for the reason for the error message received among its attachments (often a raw text file). Example:
Reporting-MTA: dns; mxbw.abc.ch [123.456.789.00]
Received-From-MTA: dns; smtp-1-1234.mail.infomaniak.ch [12.345.678.99]
Arrival-Date: Tue, 01 Aug 2023 15:49:22 +0200
Final-recipient: rfc822; anna.a@abc.xyz
Diagnostic-Code: smtp; 552 RCPT TO:anna.a@abc.xyz Mailbox disk quota exceeded
Last-attempt-Date: Tue, 01 Aug 2023 15:49:22 +0200Here the mailbox of your correspondent external to Infomaniak seems full (Mailbox disk quota exceeded).
Most common cases
SPF Failure
The SPF (Sender Policy Framework) record is not correctly configured:
Subject: Delivery Status Notification (Failure)
From: Mail Delivery System mailer-daemon@domain.xyz
To: Anna.A anna.a@abc.xyz
This is an automatically generated Delivery Status Notification.
Delivery to the following recipient failed due to SPF failure:
anna.a@abc.xyz
Technical details of SPF failure:
The sender's domain domain.xyz does not have a valid SPF record. Please contact your email administrator to correct the SPF configuration.Solution: check the configuration of your domain name and especially the SPF type record if your website is hosted on Wix or another provider.
User Unknown
The email address specified in the message is invalid or does not exist:
Subject: Delivery Status Notification (Failure)
From: Mail Delivery System mailer-daemon@domain.xyz
To: Anna.A anna.a@abc.xyz
This is an automatically generated Delivery Status Notification.
Delivery to the following recipient failed permanently:
anna.a@abc.xyz
Technical details of permanent failure:
The email address does not exist. Please check the recipient's email address and try again.Solution: carefully check the recipient's email address and correct it if necessary; ensure you are using a valid email address for the recipient.
Temporary Failure
Le serveur de messagerie du destinataire rencontre des problèmes temporaires ou est indisponible.Solution: wait for a certain amount of time, then try sending the message again later. If the problem persists, contact the recipient's technical support for assistance.
Blocked by SPAM Filter (or Content Rejected)
The recipient's mail server has blocked the message due to anti-spam filtering rules:
Subject: Delivery Status Notification (Failure)
From: Mail Delivery System mailer-daemon@domain.xyz
To: Anna.A anna.a@domain.xyz
This is an automatically generated Delivery Status Notification.
Delivery to the following recipient failed due to the message being rejected as spam:
anna.a@domain.xyz
Technical details of delivery failure:
The content of the message triggered the spam filters of the recipient's email server. Please review the message content and try again.Solution: check if your message contains elements that may be considered spam (keywords, suspicious links, etc.). Contact the recipient to verify if the message was filtered into the spam folder.
Refer to this other guide regarding outgoing spam and this other guide regarding incoming spam.
Bad Reputation
The recipient's mail server has blocked the message due to anti-spam filtering rules:
gmail-smtp-in.l.google.com said: 550-5.7.1
Our system has detected that this message is likely suspicious due to the very low reputation of the sending domain.
To best protect our users from spam, the message has been blocked.
Please visit https://support.google.com/mail/answer/188131 for more information.Solution: check the reputation of the domain, determine if there has been a recent unintentional misuse of one of your email addresses for malicious purposes, for example.
Domain Not Found (or DNS Error)
Le nom de domaine du destinataire n'a pas pu être résolu ou n'existe pas.Solution: check the spelling of the recipient's domain and correct it if necessary; ensure that the domain name and DNS are valid and active.
Mailbox Full
La boîte de réception du destinataire est pleine, empêchant la réception de nouveaux messages.Solution: inform the recipient of the situation and ask them to free up space by deleting emails or archiving items.
This cannot happen with email addresses managed by Infomaniak since they do not have storage size limits.
Part of their network is on our block list
If the error message (obtained in principle following a send operation performed from an online tool, placed on the server where your website is located, for example a Prestashop order confirmation or another online store you manage) contains this:
host hotmail-com.olc.protection.outlook.com[104.47.30.97] said: 550 5.7.1
Unfortunately, messages from [89.123.456.789] weren't sent. Please contact your Internet service provider since part of their network is on our block list.Solution: change the email sending method. The sending is unauthenticated and originates from the server with a specific IP address that is apparently blocked by the recipient for some reason (Infomaniak does not intervene to request unblocking). Therefore, you need to configure the online tool to perform authenticated sends.
Less Frequent Errors
Deferred - Delayed
The error message Deferred - Delayed - Warning: message still undelivered after 4 hours, Will keep trying until message is 3 days old means that the Infomaniak mail server attempted to connect to your correspondent's mail server to send the message but was unsuccessful for an undetermined reason. This error message indicates that the Infomaniak server will continue attempting to send your message during the period specified in the error message. If, after this time, the message has still not been delivered, you will receive a final error message informing you that your message could not be delivered and that your correspondent did not receive it.
Greylisting Delay
This Greylisting Delay error occurs when the recipient's mail server, like Infomaniak, uses a technique called "greylisting" which imposes a temporary delay on the first attempt to deliver a message from an unknown sender. The Mailer Daemon may eventually send an error report indicating that delivery has been delayed due to greylisting. The error may also mention banned sender. You should try sending your message again a few minutes/hours later.
Malware message rejected
This Malware message rejected error occurs when the message contains an attachment, a link to a storage site like Dropbox, or dynamic content, including in the "forwarded" part of the message (in the case of a message "forward", for example). You should try resending the message from the Infomaniak Mail Web app (online service ksuite.infomaniak.com/mail) instead of a mail application, and remove any content that may cause this error.
Message Size Exceeded / File Too Large
These Message Size Exceeded / File Too Large errors occur when the size of the message (or attachments) exceeds the limit allowed by the recipient's mail server. The Mailer Daemon will return an error report indicating that delivery failed due to the message size being exceeded.
Rate Limit Exceeded
This Rate Limit Exceeded error occurs when the sender has exceeded the frequency or volume limit allowed by the recipient's mail server. Mail servers may impose limits to prevent spam or system overload.
Sender denied: auth guards failed
Refer to this other guide if you encounter an error Sender denied: auth guards failed.
The message contains a unicode character in a disallowed header
This The message contains a unicode character in a disallowed header error may appear if you have inserted a special character like a heart ♥ for example in the body of the email, the subject, or especially in the full name; the risk of being rejected by providers is very high: it is best to keep the use of signs, characters, and fonts as simple as possible.
Link to this FAQ:
Has this FAQ been helpful?
This guide explains how to link your Wix site to the Mail Service managed by Infomaniak.
Preamble
- By modifying your domain name managed by Infomaniak so that it points to the Wix servers, all web & mail traffic now goes to Wix.
- You must therefore specify to Wix that the messaging is managed by Infomaniak, by specifying 3 technical elements:
- the Infomaniak MX (for this point fortunately a drop-down menu will allow you to choose Infomaniak as a mail provider, without having to manually specify the Infomaniak MX)
- the Infomaniak SPF
v=spf1 include:spf.infomaniak.ch -all - the Infomaniak DKIM
1. Select the Infomaniak MX
- In order for the messaging to work and for the mail traffic to be properly directed, you must choose Infomaniak from the list of providers in your Wix customer account.
- Refer to their official guide on this subject.
- Validate and wait a few hours for the change to take effect (any DNS addition/modification can take up to 48 hours to propagate).
2. Paste the Infomaniak SPF using a TXT
- Refer to their official guide on this subject.
- The information to enter is as follows:
- Hostname: leave blank
- Value (to copy-paste entirely):
v=spf1 include:spf.infomaniak.ch -all - TTL: leave the current indication
- Validate and wait a few hours for the change to take effect (any DNS addition/modification can take up to 48 hours to propagate).
3. Paste the Infomaniak DKIM
- Refer to their official guide on this subject.
- You will find the DKIM on the Infomaniak interface, in the Global Security > DKIM section.
- Validate and wait a few hours for the change to take effect (any DNS addition/modification can take up to 48 hours to propagate).
The various services offered by Infomaniak are all compatible with the corresponding standard protocols (IMAP/SMTP for mail for example), therefore if you encounter a problem with a third-party service, contact its support or a Partner and consult the support policy as well as article 11.9 of the Infomaniak Terms of Service.
Link to this FAQ:
Has this FAQ been helpful?
This guide shows you how to configure your UniFi Gateway equipment UniFi to access your services and devices via Infomaniak DynDNS.
Prerequisites
- Have a UniFi Gateway device (e.g., UDM Pro/SE, UDR, UXG, Ultra or USG).
- A dynamic DNS must have been created on the relevant domain via the Infomaniak Manager.
DynDNS Configuration on UniFi Gateway
UniFi devices include a configurable DynDNS client via the UniFi Network interface:
- Access your UniFi Network controller (via the local IP address or the UniFi cloud portal).
- Go to Settings (gear icon).
- In the left menu, select Internet.
- Click on the relevant WAN interface (usually "WAN" or "Primary").
- Scroll down to the Dynamic DNS section and click on Create New Dynamic DNS.
- Fill in the fields with the following information:
- Service: Select Custom.
- Server:
infomaniak.com - Hostname: The full domain name configured (e.g.,
my-domain.xyzorddns.my-domain.xyz). - Username: The identifier defined in the Infomaniak Manager when creating the DynDNS.
- Password: The password defined in the Infomaniak Manager.
Request URL (Update URL): Copy the URL below exactly (UniFi requires the use of
%hfor the domain and%ifor the IP address):https://infomaniak.com/nic/update?hostname=%h&myip=%i
- Click on Apply Changes (apply changes).
Note: The UniFi device will automatically replace the variables with your actual information when sending the request. Once saved, the status should display "Good" after one to two minutes.
Firewall and port redirection (NAT)
To access a specific service on your local network (NAS, camera, server) from the outside, you must create a redirection rule:
- In Settings, go to Security > Port Forwarding.
- Click on Create New Rule.
- Configure the settings:
- Name : A clear name (e.g., NAS Access).
- Forward IP : The local IP address of your device (e.g., 192.168.1.123).
- Forward Port : The port of the service in question.
- Protocol : Select the required protocol (often TCP).
- Save the rule.
Link to this FAQ:
Has this FAQ been helpful?
This guide explains which protocols and ports can be used with Infomaniak's messaging services (Service Mail in particular).
Recommended ports and parameters for client configuration
When prompted during a software/messaging client configuration (Outlook, Thunderbird, mobile, etc.), prioritize the following parameters:
| IMAPs - Incoming Traffic (Recommended) | SMTP - Outgoing Traffic (Option 1: IETF standard) | SMTPs - Outgoing Traffic (Option 2: Implicit encryption) | |
|---|---|---|---|
| Ports | 993 | 587 | 465 |
| Security Mechanism | SSL / TLS (implicit) | STARTTLS (explicit) | SSL / TLS (implicit) |
| Server Name | mail.infomaniak.com | ||
| Authentication | Required (username = full email address) | ||
Technical note: Port 587 with STARTTLS is the IETF standard practice for secure email submission. Port 465 is a secure alternative using implicit encryption.
If you specify other indications or disable encryption, email errors may occur.
Other supported ports (unencrypted or backward compatibility)
- port
143(Standard port for IMAP reception - unencrypted, use 993) - port
110(Standard port for POP3 reception - unencrypted, use 995) - port
995(Secure port for POP3s reception - secure POP3 option) - port
25(Standard port for server-to-server transfer - may support STARTTLS for submission, but 587 is the standard for clients). - STARTTLS authentication is supported on unencrypted ports (143, 110, 25) to enable TLS encryption.
- SMTP authentication supported (LOGIN or PLAIN methods).
API Usage and Transfer Security
The Infomaniak API does not provide any connection to the mailbox as IMAP and SMTP are the "APIs". Use a library (such as Python: email.examples and imaplib) that uses IMAP and SMTP.
To display emails from PHP:imap_open("{mail.infomaniak.com:993/imap/ssl}", $email, $password);
The MTA-STS mechanism is not implemented or verified, as Infomaniak uses DANE (DNS-based Authentication of Named Entities) to ensure an encrypted connection between servers when the following conditions are met:
- The client sends an email to a domain that has configured DANE.
- The client receives an email from an SMTP server that uses DANE.
- In all other cases (in the absence of DANE), the encrypted connection remains opportunistic.
Link to this FAQ:
Has this FAQ been helpful?
This guide explains how to set up a DMARC policy for your email hosted by Infomaniak, an essential element to prevent potential delivery issues.
Preamble
- The DMARC (Domain-based Message Authentication, Reporting, and Conformance) protocol enhances the security of your domain by relying on SPF and DKIM checks.
- It instructs recipient servers on how to handle emails that fail these authenticity tests, with three protection policies (None, Quarantine, Reject) detailed below.
- In case of authentication failure, the recipient can send you a DMARC report; this data is essential to identify configuration errors or stop phishing attempts using your domain name.
DMARC Policy and Acceptance Percentage
For the instructions that can be given to recipient servers when a suspicious message is detected, 3 policies (p = policy) exist and can be refined with a percentage (pct):
None (none): The email is delivered normally (observation mode)
With "p=none", no email is rejected or quarantined based on the DMARC verification. However, the reception percentage can be used to collect data on unauthenticated emails, indicating how many of these emails should be subject to the DMARC policy. E.g., "p=none; pct=10" means that 10% of unauthenticated emails will be subject to the DMARC policy, while the remaining 90% will be accepted.
Quarantine (quarantine): The email is sent to spam
With "p=quarantine", unauthenticated emails can be quarantined, but the reception percentage determines the proportion actually subject to this policy. E.g., "p=quarantine; pct=50" means that 50% of unauthenticated emails will be quarantined, while the remaining 50% will be accepted.
Reject (reject): The email is purely and simply blocked/deleted
With "p=reject", unauthenticated emails are rejected. The reception percentage determines the proportion of unauthenticated emails that will actually be rejected. For example, "p=reject; pct=20" means that 20% of unauthenticated emails will be rejected, while the remaining 80% will be accepted.
Create a DMARC Record
There are 2 ways to manage DMARC.
If you have a Mail Service with Infomaniak, the simplest way is to go to the Global Security tool to manage your DMARC security policy and reports: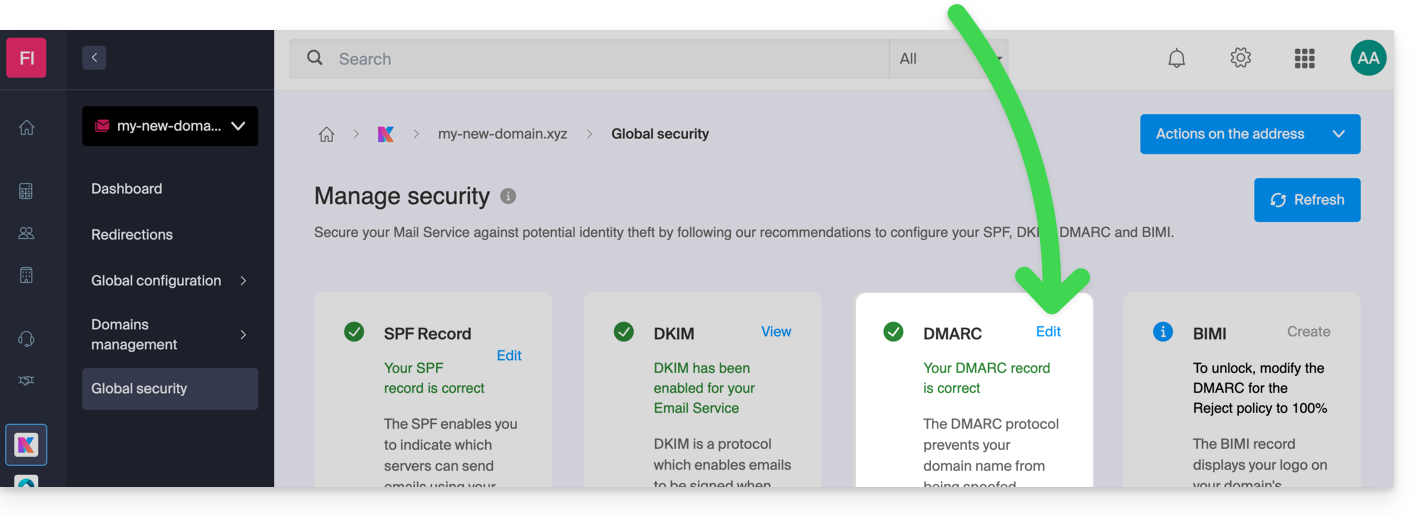
However, since the DMARC record is a type of DNS record, usually of type TXT, you can also manage it from the DNS zone of the domain name:
- Click here to access the management of your domain on the Infomaniak Manager (need help?).
- Click directly on the name assigned to the domain in question.
- Click on DNS Zone in the left sidebar menu.
- Click the button to add a record:
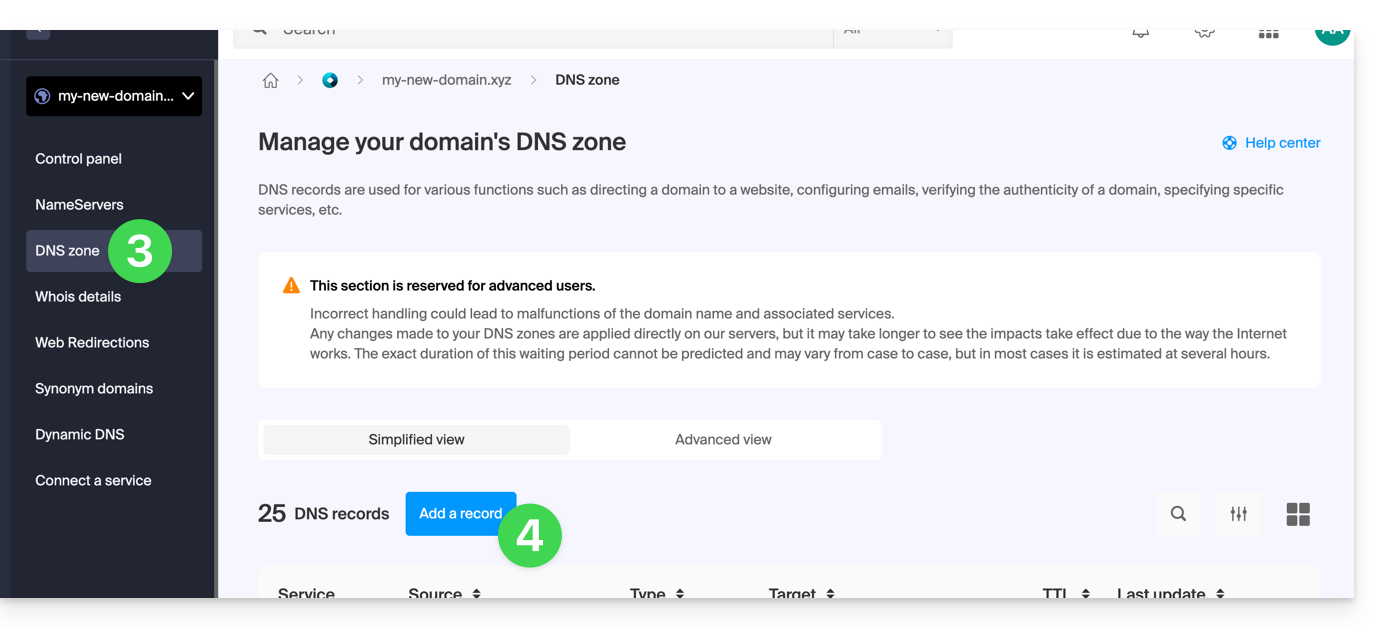
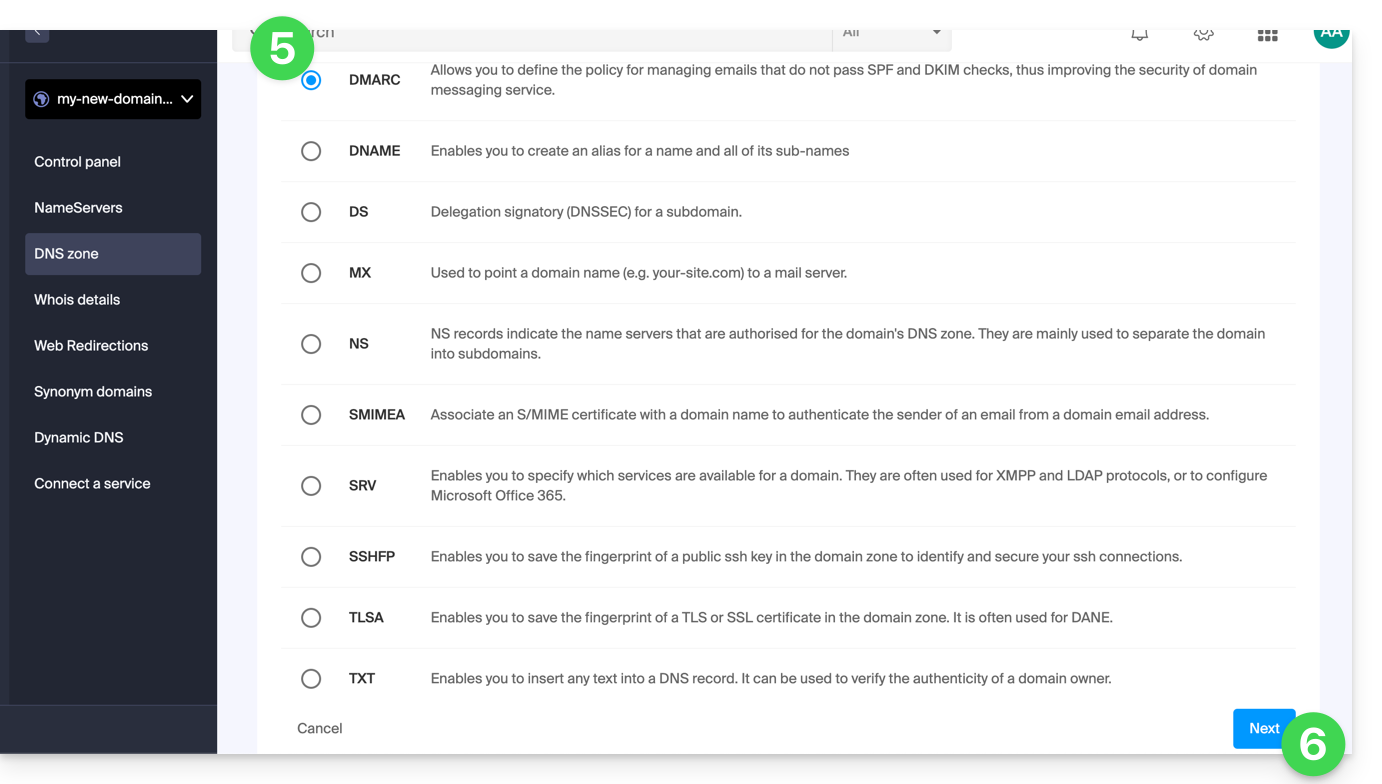
- Click the radio button DMARC to add a record.
- Click the Next button:
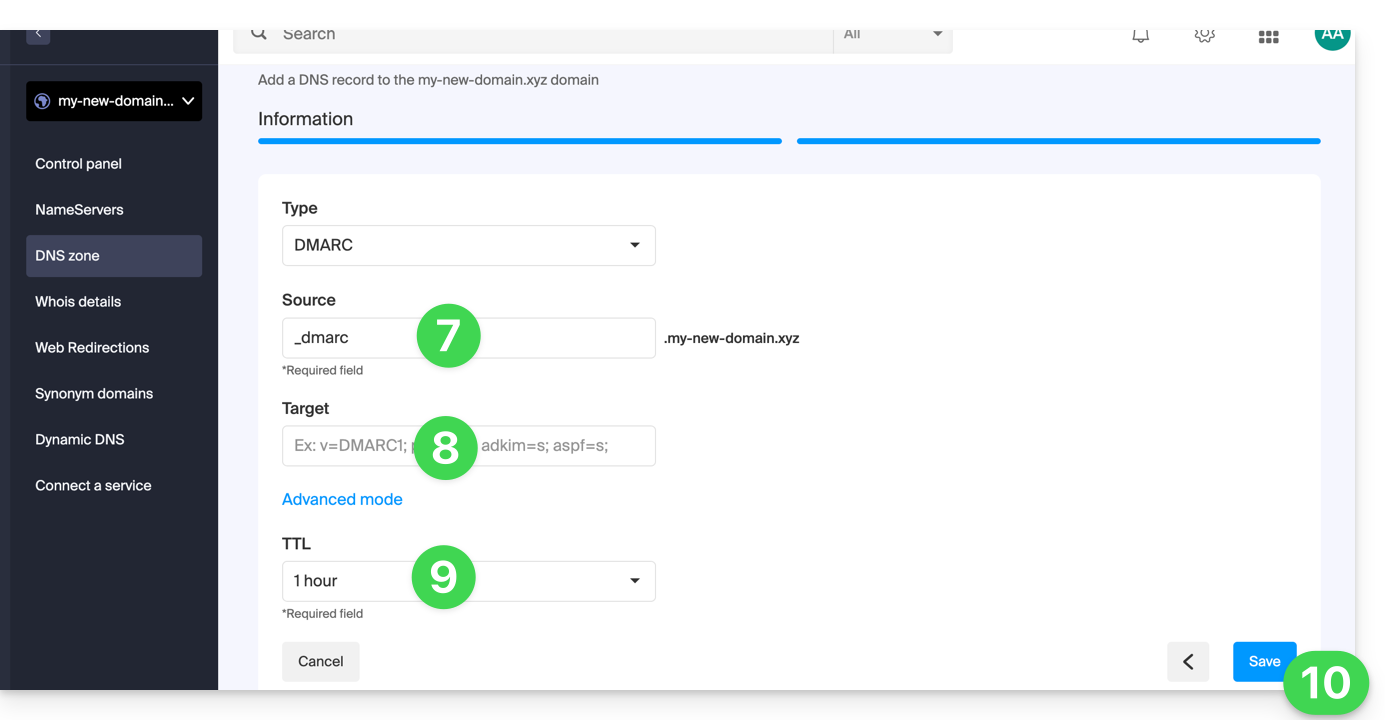
- Leave (or add if necessary) the value
_dmarcin the Source field. The Target field must contain the parameters you wish to use, separated by
;:Tag Name Purpose Example v Protocol version v=DMARC1pct Percentage of messages subjected to filtering pct=20ruf URI for forensic reports ruf=mailto:authfail@domain.xyzrua URI for aggregate reports rua=mailto:aggrep@domain.xyzp Policy for the organizational domain p=quarantinesp Policy for the subdomains of the organizational domain sp=rejectadkim DKIM alignment mode adkim=saspf SPF alignment mode aspf=rwhich can result in, for example,
v=DMARC1;p=reject;pct=100;rua=mailto:postmaster@dmarcdomain.com(source)- Leave the default value for the TTL.
- Click the Save button:
Any DNS addition/modification can take up to 48 hours to propagate.
Link to this FAQ:
Has this FAQ been helpful?
This guide explains how to replace the main domain name associated with a Mail Service in case you want to modify the spelling of everything that comes after the at sign @ of your email address (= the domain name). If your Mail Service is part of a my kSuite, then you will need to act on the my kSuite domain directly.
Preamble
- You can also follow this procedure if the goal is to have completely new email addresses while keeping the history of your emails in Mail (since the email address will continue to exist, for example info@first-domain.xyz will become info@new-domain.xyz without modifying its content).
- Indeed, it is not possible to simply modify the spelling of the domain name concerned; it is therefore necessary to replace the current domain name associated with your email addresses with another domain name.
- To simply add an additional domain name, refer to this other guide.
- To rather modify the part of your email address that comes before the at sign
@, refer to this other guide. - Also note that you can rename your product (example) on the Infomaniak Manager but changing the name of a Mail Service has strictly no impact on its addresses; you need to act on the domain name.
If your Mail Service is part of a my kSuite, then you will need to act on the my kSuite domain directly.
Modify the domain name of the Mail Service
Prerequisites
- Own the new domain name (if necessary, create it in advance).
- Refer to the instructions of this other guide by applying the instructions corresponding to your situation (this is so that the domain name works when it is linked to your Mail Service).
Once the new domain name is ready to be used in place of the old one, you need to add it to the Mail Service and then perform a reversal:
- Click here to access the management of your product on the Infomaniak Manager (need help?).
- Click directly on the name assigned to the product in question.
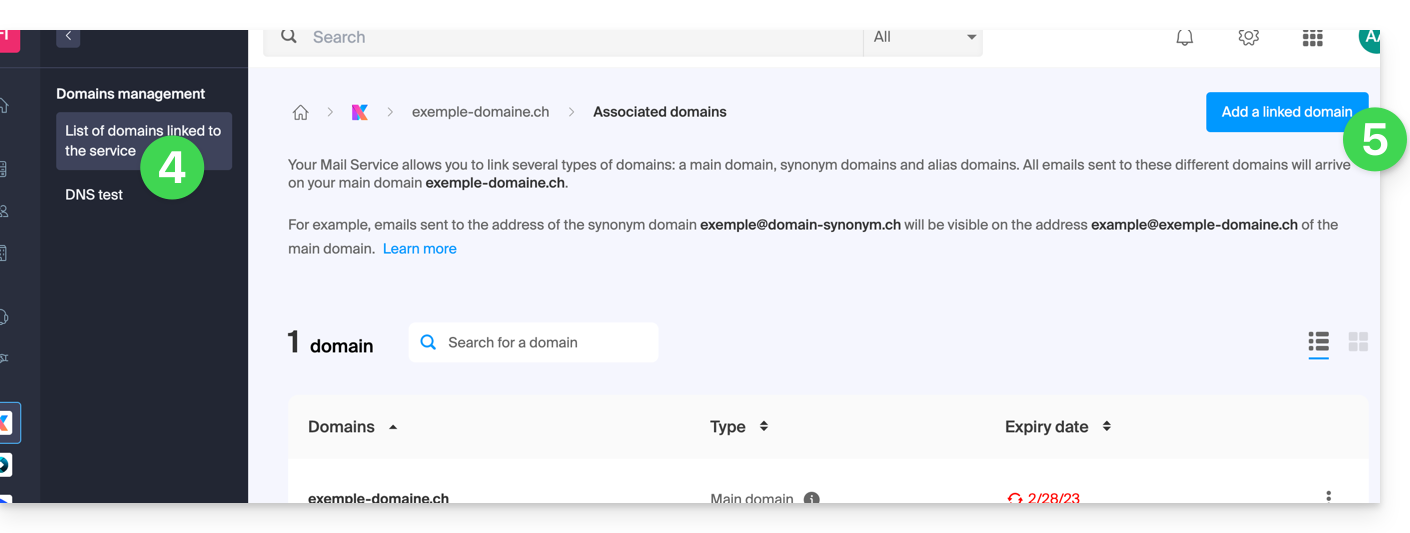
- Click on Domain Management in the left sidebar
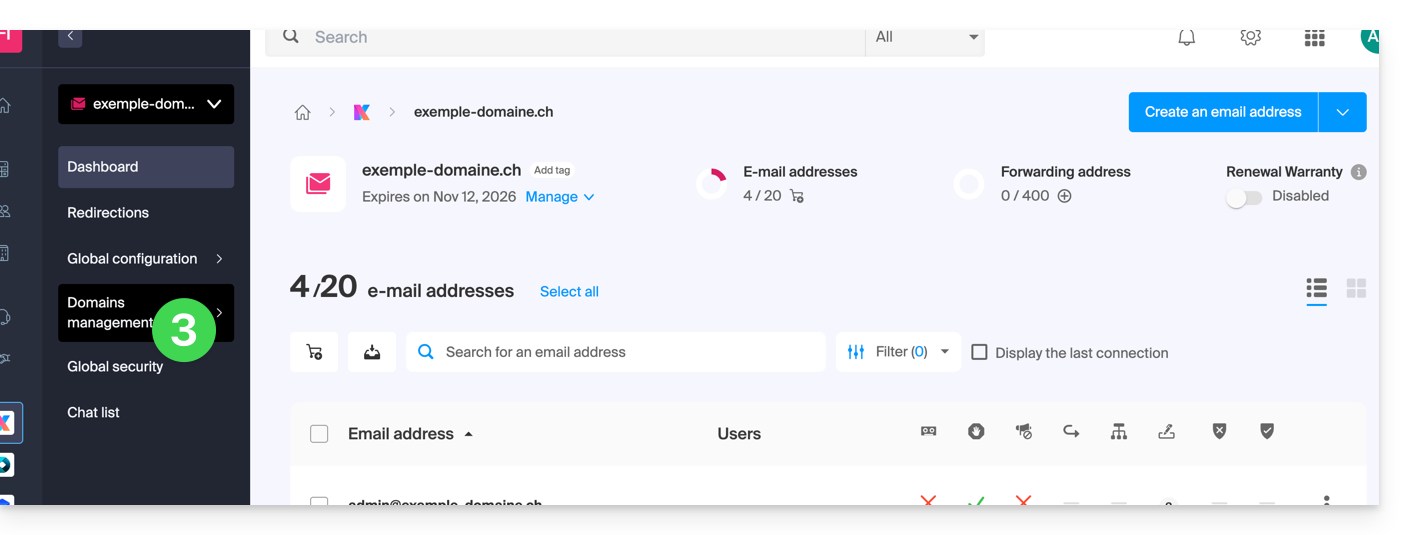
- Click on Service-related domains in the left sidebar.
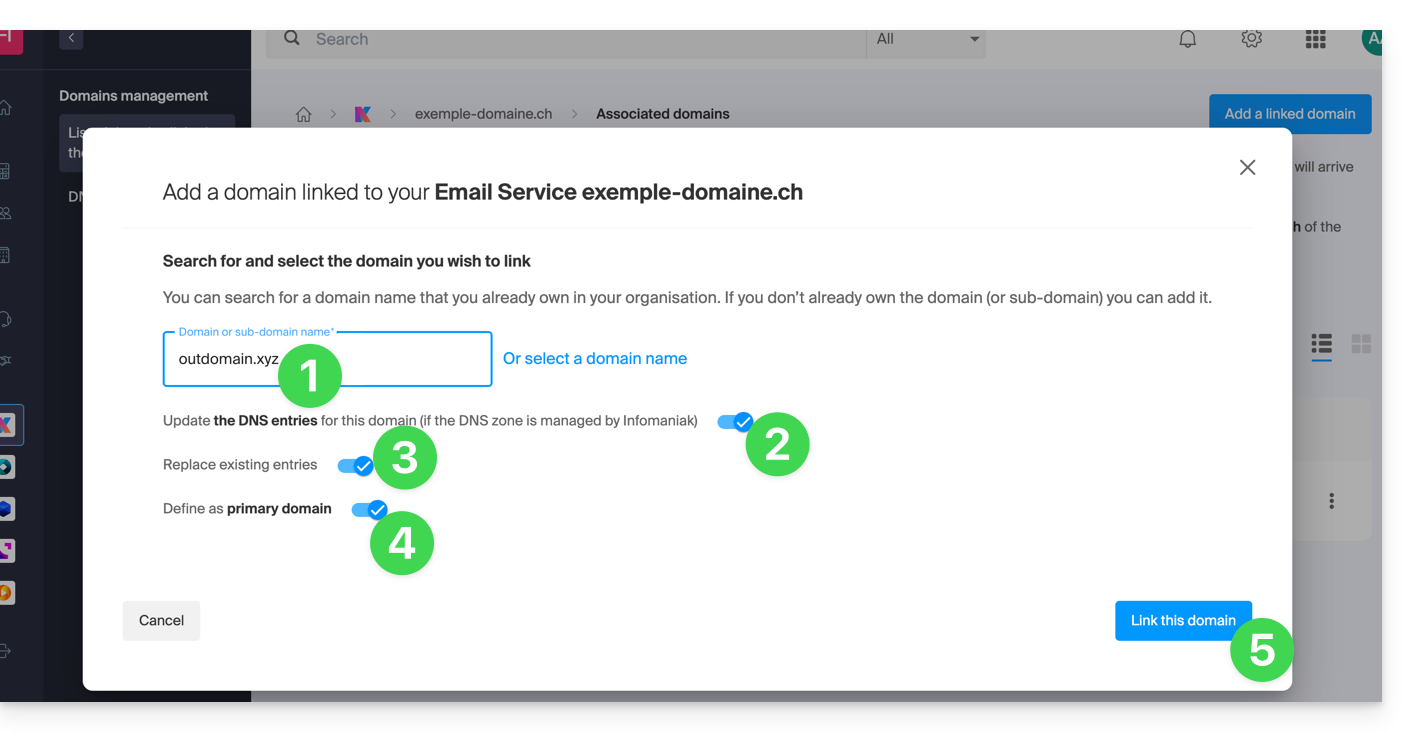
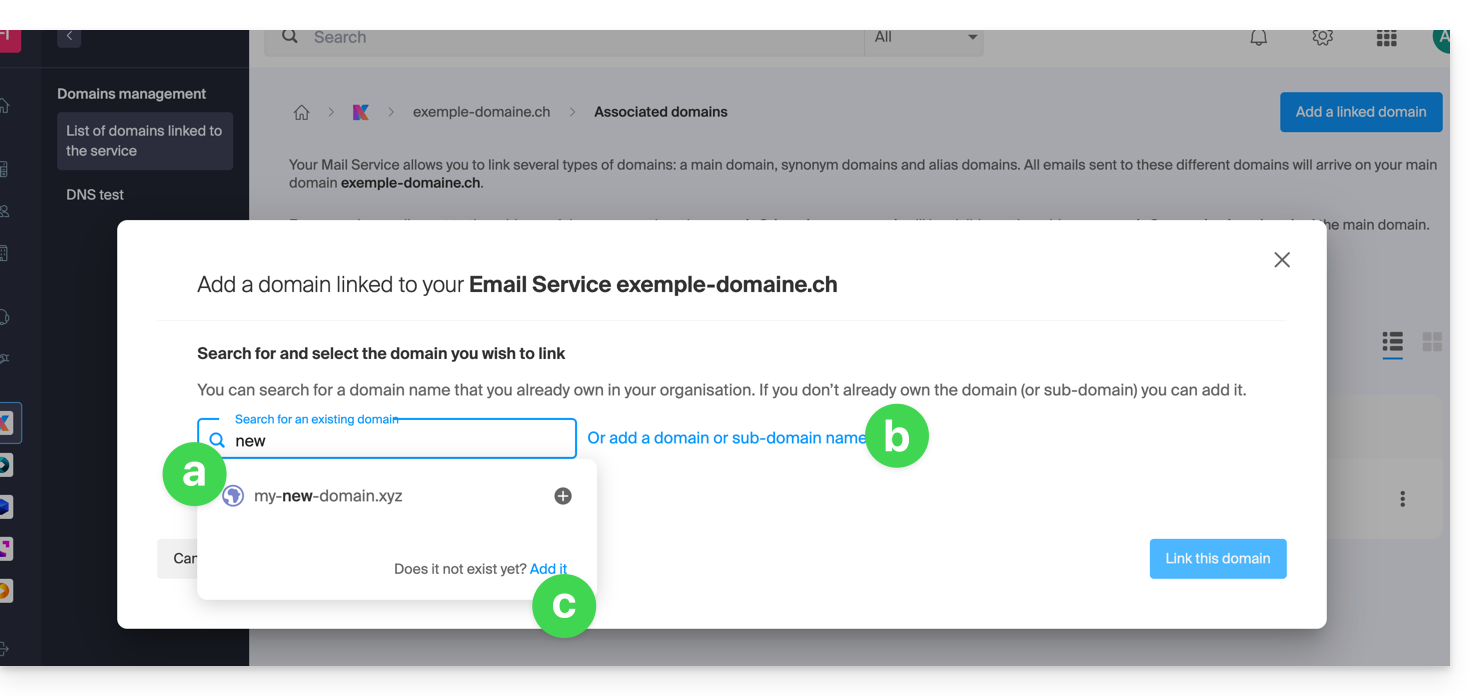
- Click the blue button Add a linked domain:
- You can:
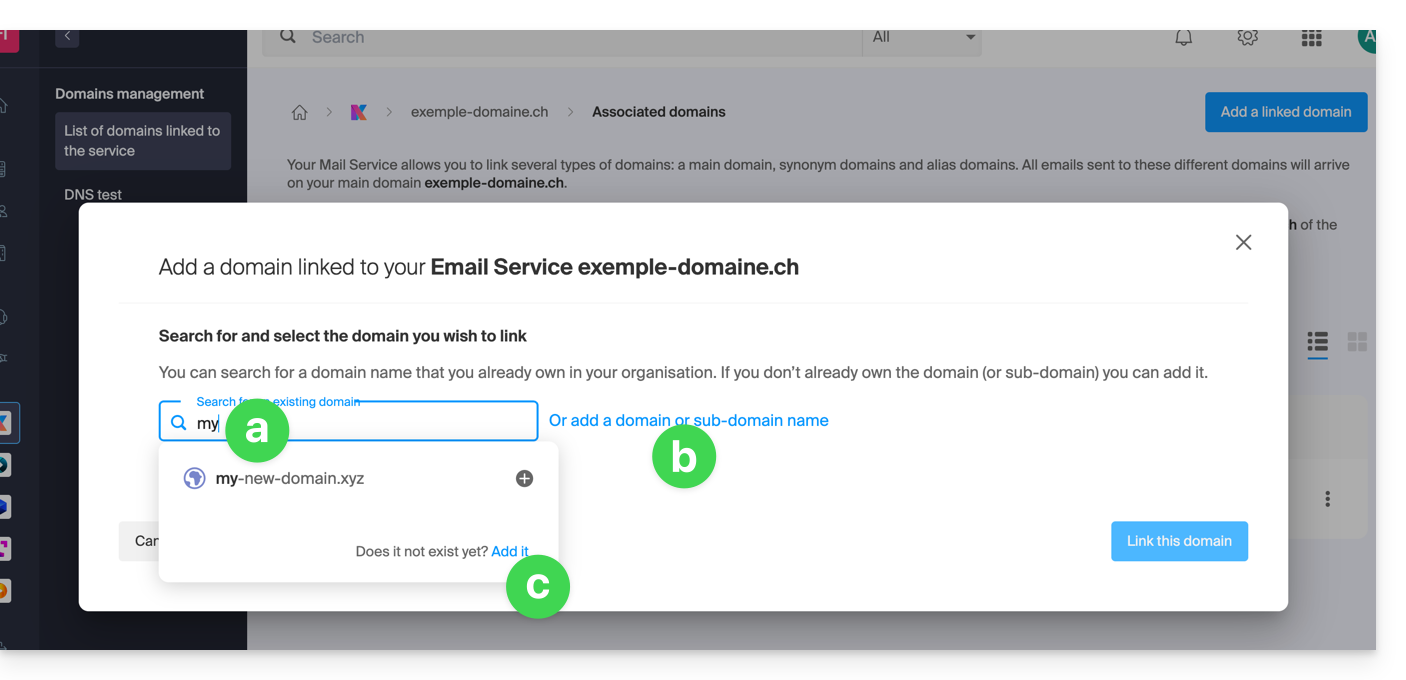
- Search for an existing domain within the Organization you are connected to; this will link and automatically update the DNS zone of the added domain.
- Add a domain name or subdomain to manually specify the domain name or subdomain to use (ideal if the domain name is hosted elsewhere).
- Buy a new domain name (see prerequisites above).
a: The domain exists within the Organization
Before proceeding, make sure to dissociate the domain name if it had been set as an alias domain previously.
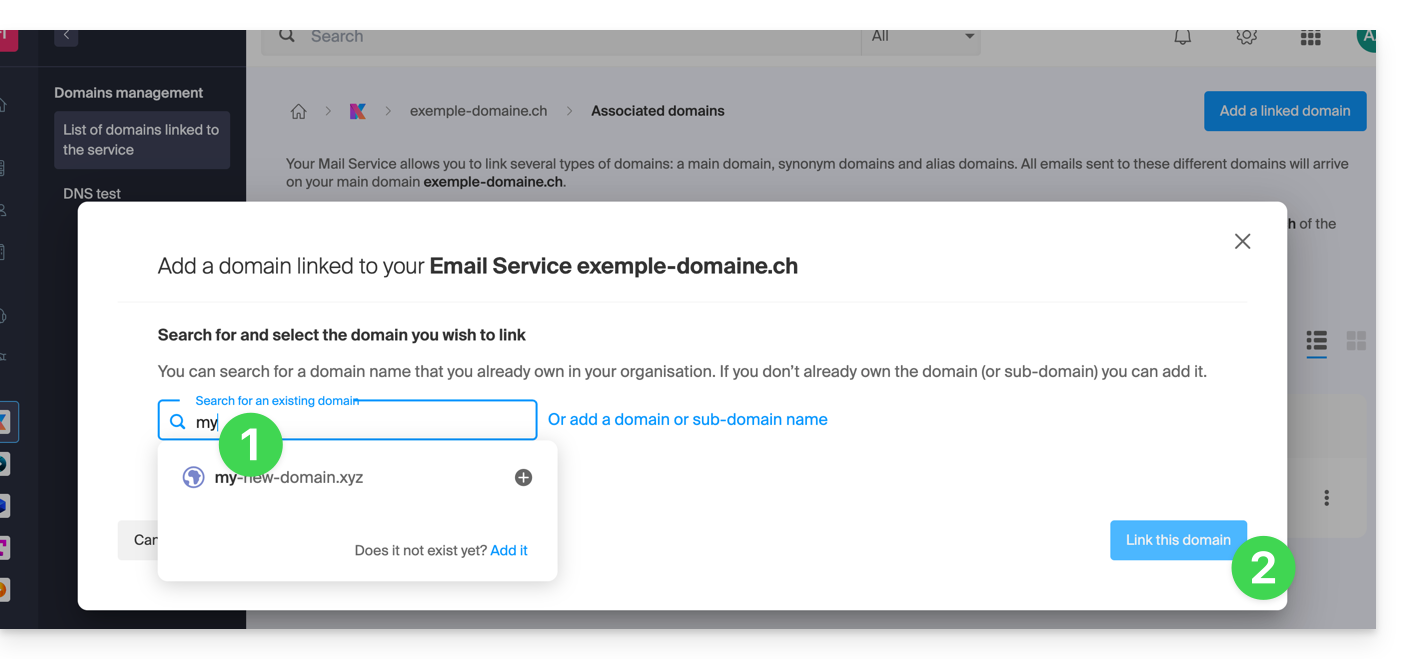
- Click on the proposed domain name.
- Click the blue button Link this domain:
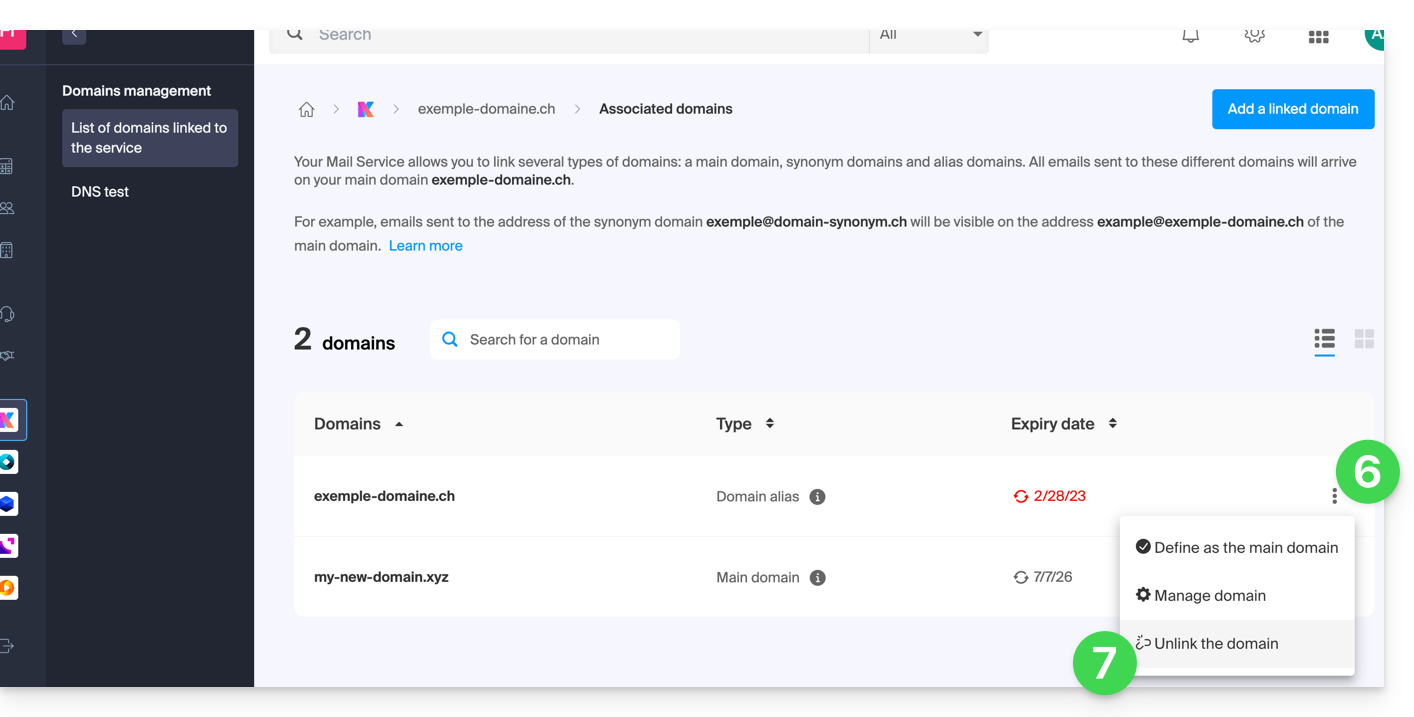
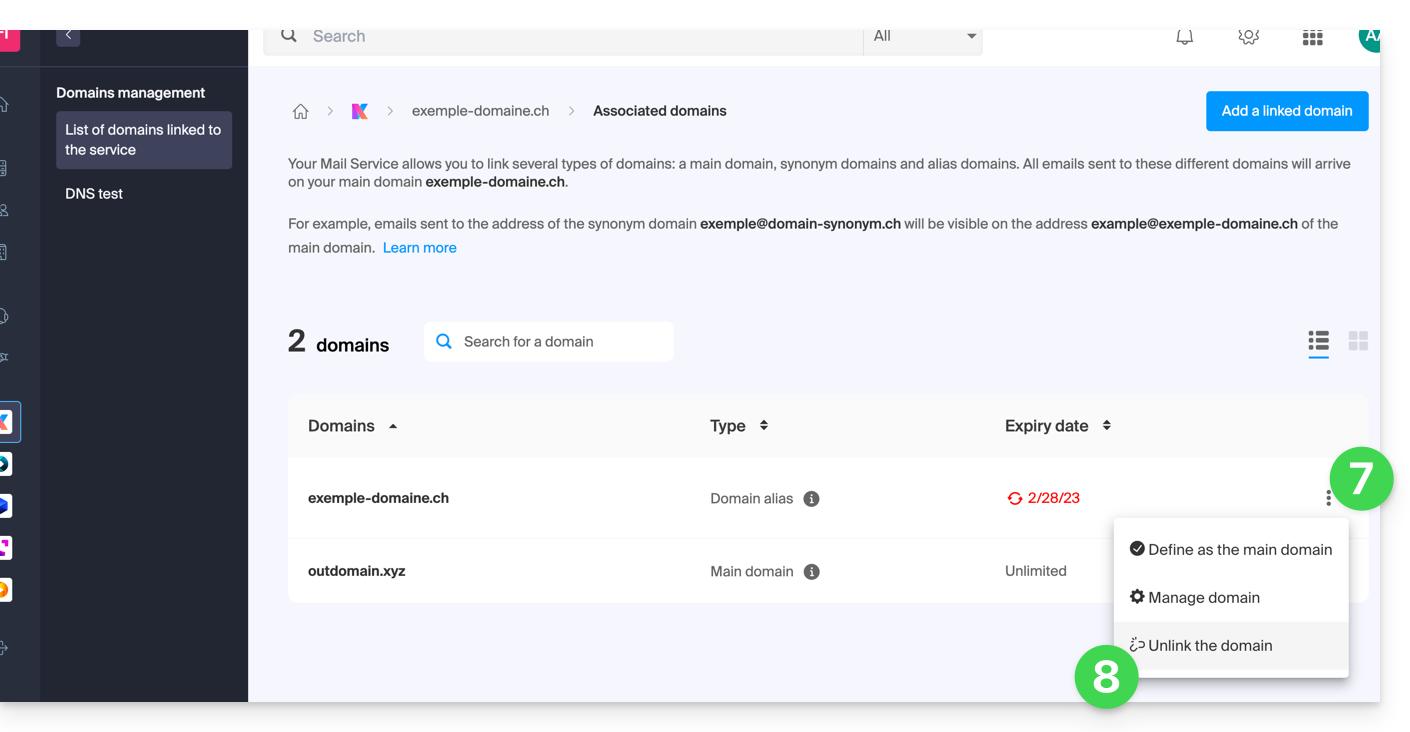
- Click on the icon ⋮ to the right of the newly added domain name.
- Click on Set as primary domain (you must have dissociated the alias domain name from the primary domain name if there was a previous association):

- Confirm the reversal and then wait for the operation to complete.
- Click on the icon ⋮ to the right of the old domain name.
- Click on Unlink the domain:
- Confirm the detachment by verifying if you want to delete the associated DNS records during the detachment operation.
That's it, the Mail Service now responds to a new domain name.
b: The domain exists but elsewhere
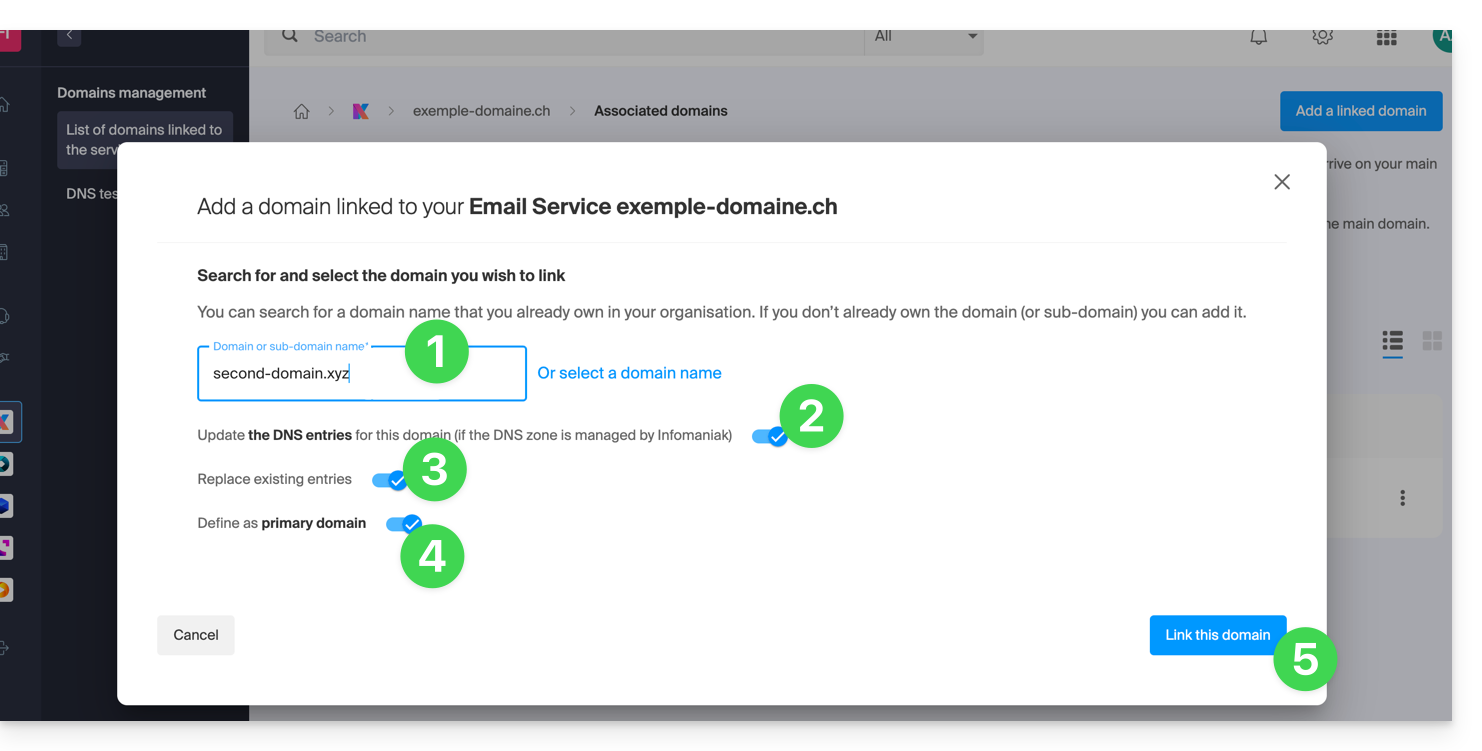
- After clicking on Add a domain or subdomain, enter the domain name that will replace the current name.
- Enable DNS entry updates (if the domain name situation allows it, the DNS zone of the domain name will be automatically updated).
- If the point above is active, then enable the replacement of any existing entries.
- Enable reversal of the domain name (to avoid additional steps as in point "a" above).
- Click the blue button Link this domain:
- Wait for the operation to complete.
- Click on the icon ⋮ to the right of the old domain name.
- Click on Unlink the domain:
Link to this FAQ:
Has this FAQ been helpful?
This guide explains how to resolve various issues related to the domain name when creating custom web addresses Custom Brand!
Preamble
- As long as the domain name is linked to your custom web addresses, it cannot be transferred to another Infomaniak Organization or Registrar.
The domain name is not available
Is the domain name hosted by Infomaniak?
- If this is not yet the case, it is possible to transfer the domain name to Infomaniak.
- It is also possible to order DNS zone management with Infomaniak.
Is the domain name on another Organization? Do you have access to it?
- The domain name must be on the account from which the URL customization will be configured. Therefore, you must either create the custom web address on the account where the domain name is located, or transfer it to the desired account.
Is the domain name already used by other services?
In the event that your domain name is already linked to other services, you will not be able to use it. You will need to…
- … either unlink it from the services it is used on (modification of a DNS entry)…
- … or use a subdomain, e.g. my.domain.xyz.
The domain name extension is unavailable
Infomaniak offers hundreds of extensions for your domain name. However, it may happen that the one used by your domain name is unavailable or under maintenance:
- If the desired extension is not available, consult the list of available extensions at Infomaniak.
- In rare cases, an extension may be indicated as being in "maintenance" by its registry (the organization that manages domain name registrations); this means that global operations are underway on this extension and it is temporarily unavailable for purchase.
The domain name encountered a verification error
Has a domain name verification problem occurred?
When this type of error occurs, contact Infomaniak support.
Link to this FAQ:
Has this FAQ been helpful?
This guide explains how to manage the email address used to send your invitations with the Infomaniak Guest Manager.
Preamble
- Any of your email addresses can be specified for sending Guest Manager invitations.
- There will be no issue with an email address already configured to be used with Infomaniak.
- For an email address from a generic domain such as
outlook.frorgmail.comthe email addressno-reply@infomaniak.comwill be automatically used as a replacement sending address, the same applies to all domain addresses for which you cannot modify the SPF (read below). - However, any responses will be sent to the email address you have provided.
- For an email address on a custom domain not yet configured to work with Infomaniak and for which you have access to the DNS zone, refer to the guide below to add the appropriate SPF.
Specify the sending email address
The email address from which your invitations will be sent must be entered in the first step of configuring your invitations (after creating your subscriber lists):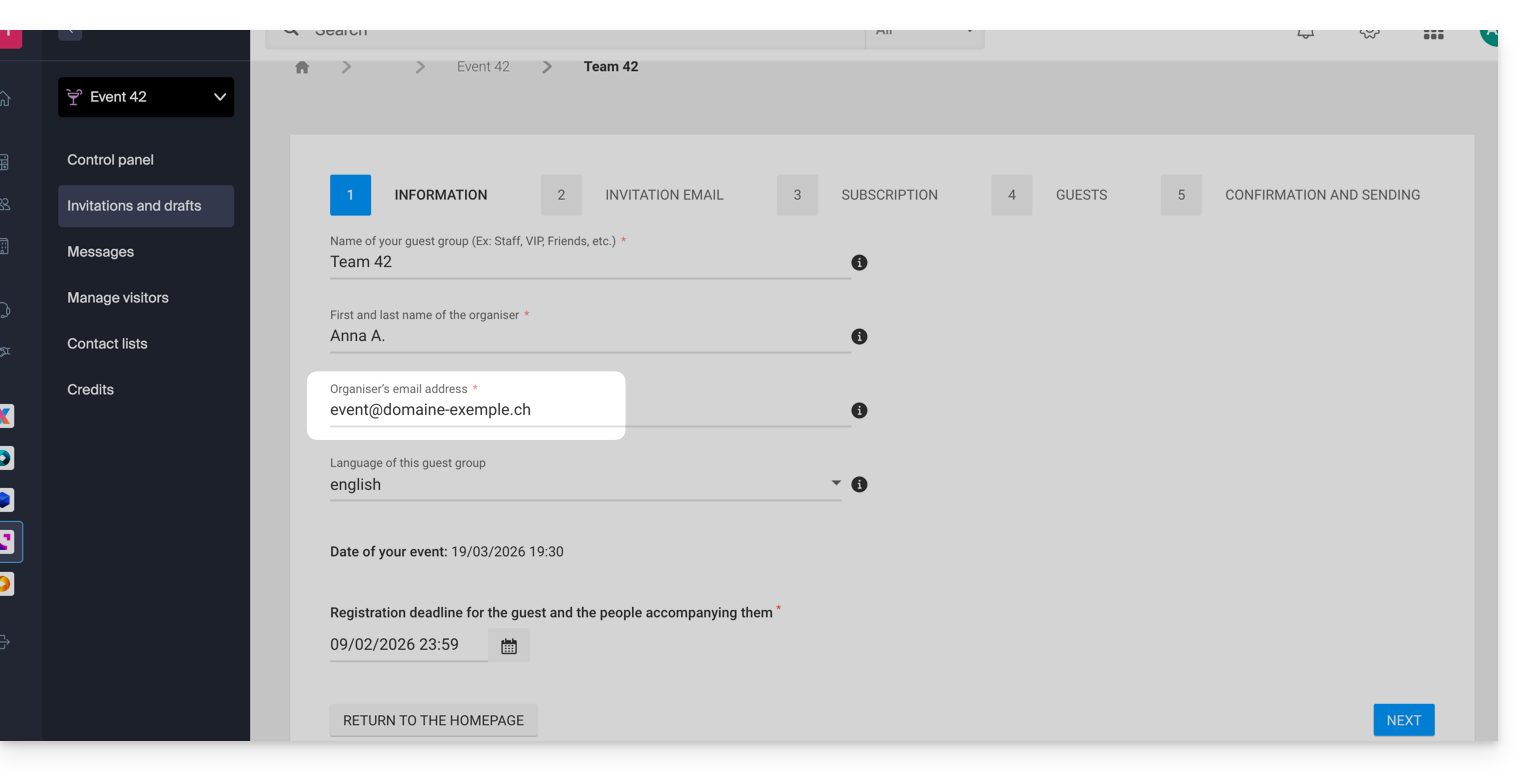
Depending on the specified email address, a popup appears when you click on Next warning you that the SPF must be correctly configured for the sends to be made from the address in question. Otherwise, the invitations will be sent from a no-reply@infomaniak.com address.
You can still review and modify the address in the last step by clicking on the pencil icon ✎: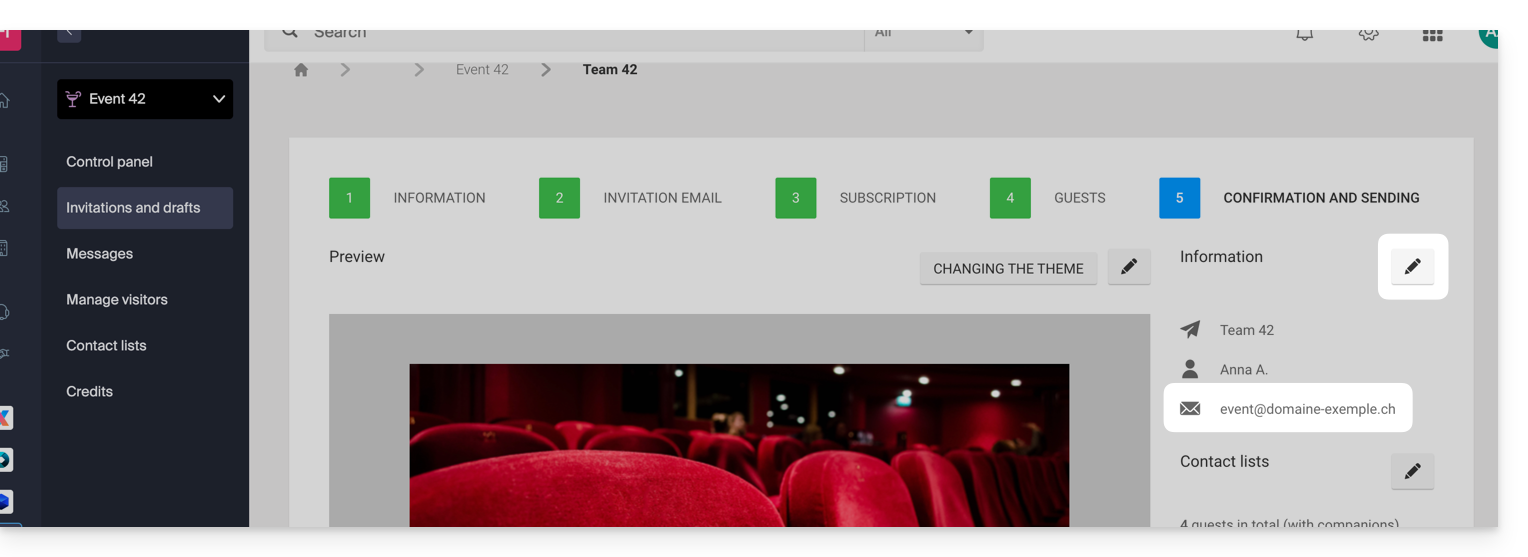
Add the Infomaniak SPF in the DNS zone
If you want to use a custom email address to send invitations, it is necessary to check and, if necessary, modify the SPF record of your domain to authorize Infomaniak to send emails on your behalf.
Refer to this guide especially the chapter “Add multiple SPF” to not replace your SPF but simply add Infomaniak's: v=spf1 include:spf.infomaniak.ch -all
Link to this FAQ:
Has this FAQ been helpful?
This guide explains how to configure ddclient, a tool available on most Linux distributions, to use it with the Infomaniak DynDNS service.
Prerequisites
- Have installed the
ddclientpackage for your distribution (e.g.:sudo apt install ddclient). - Have a DynDNS record already created on the domain or subdomain to update.
- Check that the SSL module for Perl is installed:
sudo apt install libio-socket-ssl-perl.
ddclient Configuration
The configuration file /etc/ddclient.conf must contain the following information:
protocol=dyndns2
ssl=yes
use=web
server=infomaniak.com
login=enter_your_login
password=enter_your_password
yourdomain.xyz- ssl=yes : allows a secure connection. This parameter is mandatory for the update to work correctly.
- use=web : tells ddclient to use an external service to automatically detect your public IP address.
- login / password : DynDNS credentials defined in the Infomaniak Manager when adding the Dynamic DNS (help).
- yourdomain.xyz : replace with your DynDNS domain or subdomain.
Test and Verification
Before launching ddclient as a service, you can test the configuration with:
sudo ddclient -daemon=0 -verbose -debugIf the configuration is correct, you will see a message of type SUCCESS: updating yourdomain.xyz.
Service Startup
Once the configuration is validated, restart and activate ddclient:
sudo systemctl restart ddclient
sudo systemctl enable ddclient
You can check its status with:
sudo systemctl status ddclient
But also:
- Protect the configuration file with:
sudo chmod 600 /etc/ddclient.conf. - Regularly check that the IP address is correctly updated via a DNS lookup (
dig yourdomain.xyzornslookup). - If your IP does not change often, keep a reasonable update interval to avoid unnecessary requests.
Link to this FAQ:
Has this FAQ been helpful?
This guide explains how to add an additional website to an existing Infomaniak hosting plan.
Preamble
- The hosting can be on a shared web hosting plan or on an Infomaniak Cloud Server.
- The additional site can be either:
- a second domain name (for example.
domain2.xyz), - or a subdomain (for example.
abc.domain.xyz) of a domain name that you already own.
- a second domain name (for example.
- In this multisite/multidomain management (virtual host), the total disk space and resources of your hosting are shared between your sites/subdomains.
Access site management
Prerequisites
- If the 20 site slots offered in the Web hosting are already in use, order additional sites.
To access a web hosting plan and add a site:
- Click here to access the management of your products in the Infomaniak Manager (need help?).
- Click directly on the name assigned to the product in question.
- Click the blue button Add:

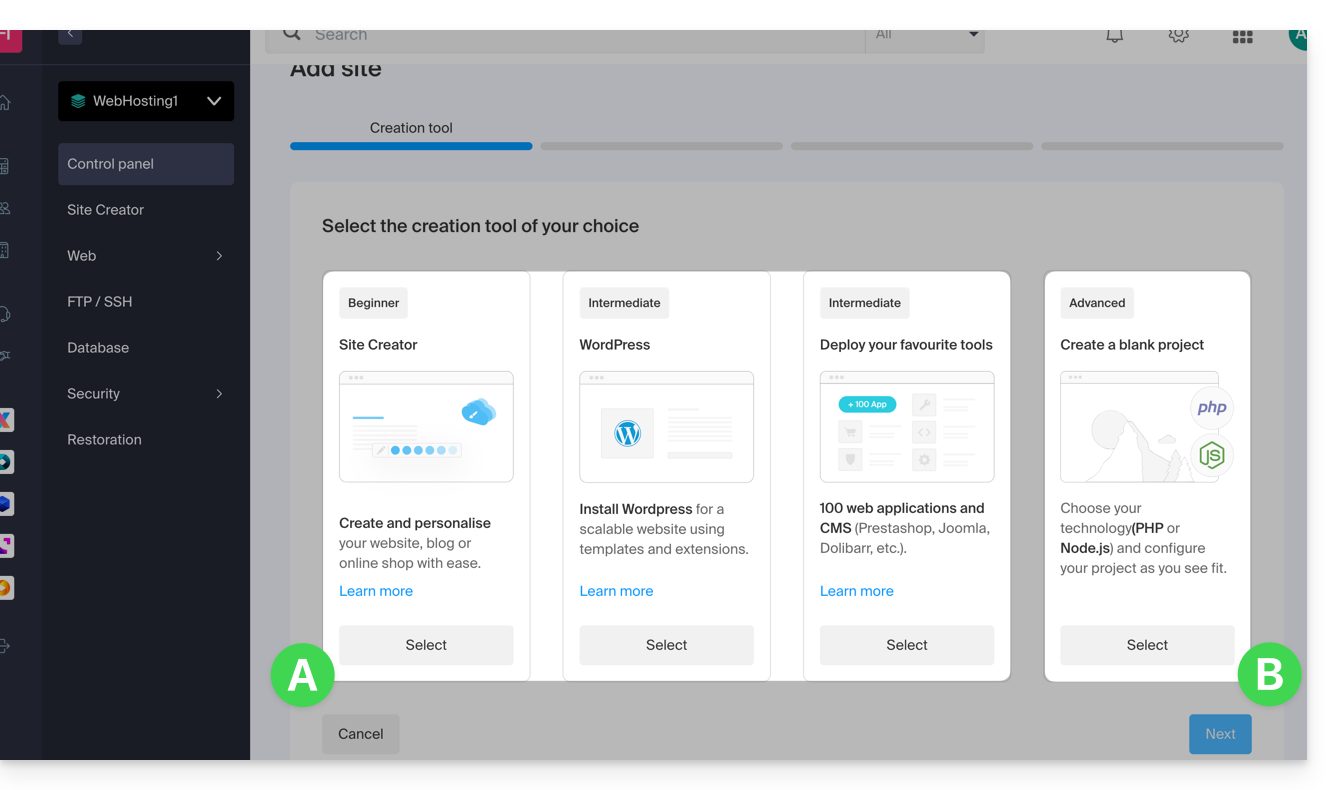
- Choose the optional content for the new site (A) or other specific installation, blank space, advanced technologies (Node.js for example) (B):
- Click on Next.
- Choose the type of domain to assign to this new site:
- an already acquired domain name
- a subdomain created from an already acquired domain name
- a domain name still available and to order
- Enter the domain name (
domain2.xyz, for example) or the subdomain.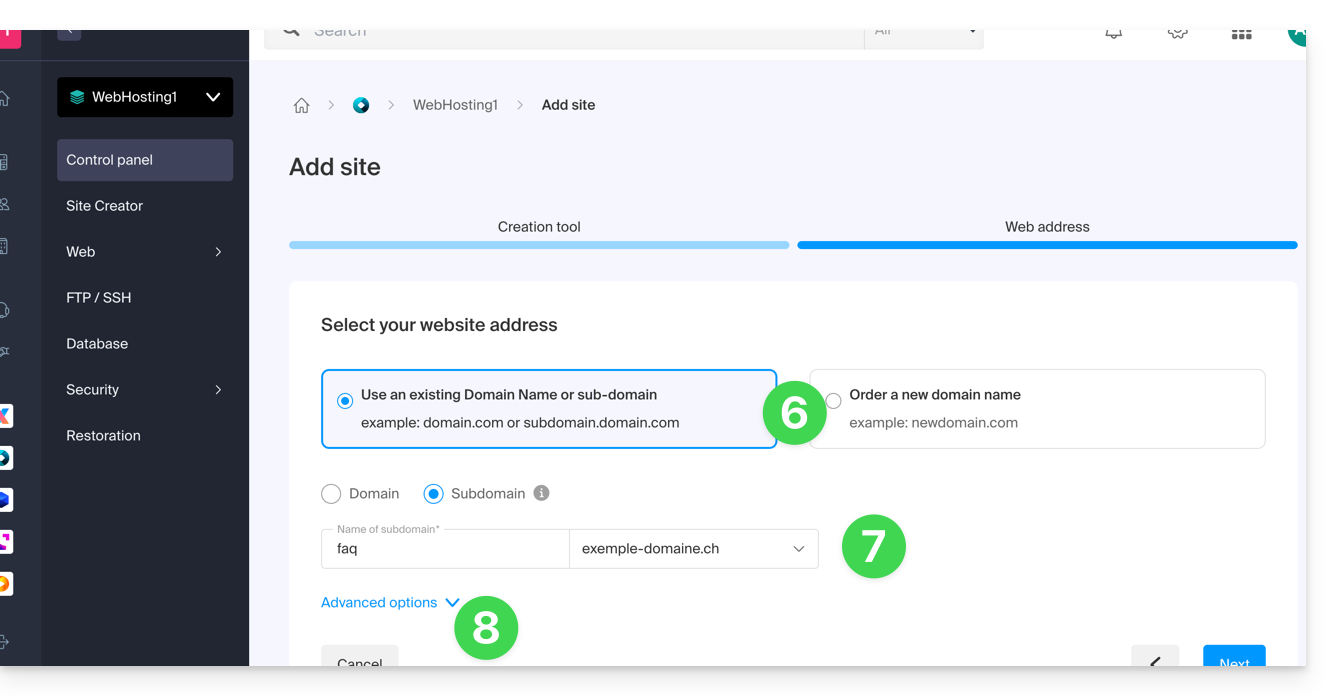
- Choose the optional advanced options, including:
- By default, the new site is added to the directory
/sites/domain2.xyzon your FTP server. - To manually set another directory, check Set location manually and indicate the path and name.
- Create a new folder if necessary:

- By default, the new site is added to the directory
- Click on Continue.
If it's a subdomain or if the domain name or its DNS zone is managed by Infomaniak, it is possible to automatically update the existing DNS entries. Otherwise, make the necessary changes with your registrar or transfer the management of the domain name to Infomaniak.
Link to this FAQ:
Has this FAQ been helpful?
This guide explains how to have multiple denominations (everything that comes after the at sign @ in your email address) for an existing Service Mail, by adding linked domain names.
Preamble
- Existing and future email addresses are automatically valid with all linked domains.
- To completely transform and reverse the domain names of a Service Mail, refer to this other guide.
- To modify the part of your email address that comes before the at sign
@, refer to this other guide. - Note also that you can rename your product in the Infomaniak Manager, but changing the name of a Service Mail has no effect on its addresses; you need to change the domain name.
Add a domain name to the Service Mail
Prerequisites
- Own the new domain name (if necessary, you will need to create it first).
- Refer to the instructions in this other guide by applying the instructions corresponding to your situation (so that the domain name works when it is linked to your Service Mail).
Once the new domain name is ready to be used alongside the old one, you need to add it to the Service Mail:
- Click here to access the management of your product on the Infomaniak Manager (need help?).
- Click directly on the name assigned to the product in question.
- Click on Domain Management in the left sidebar:
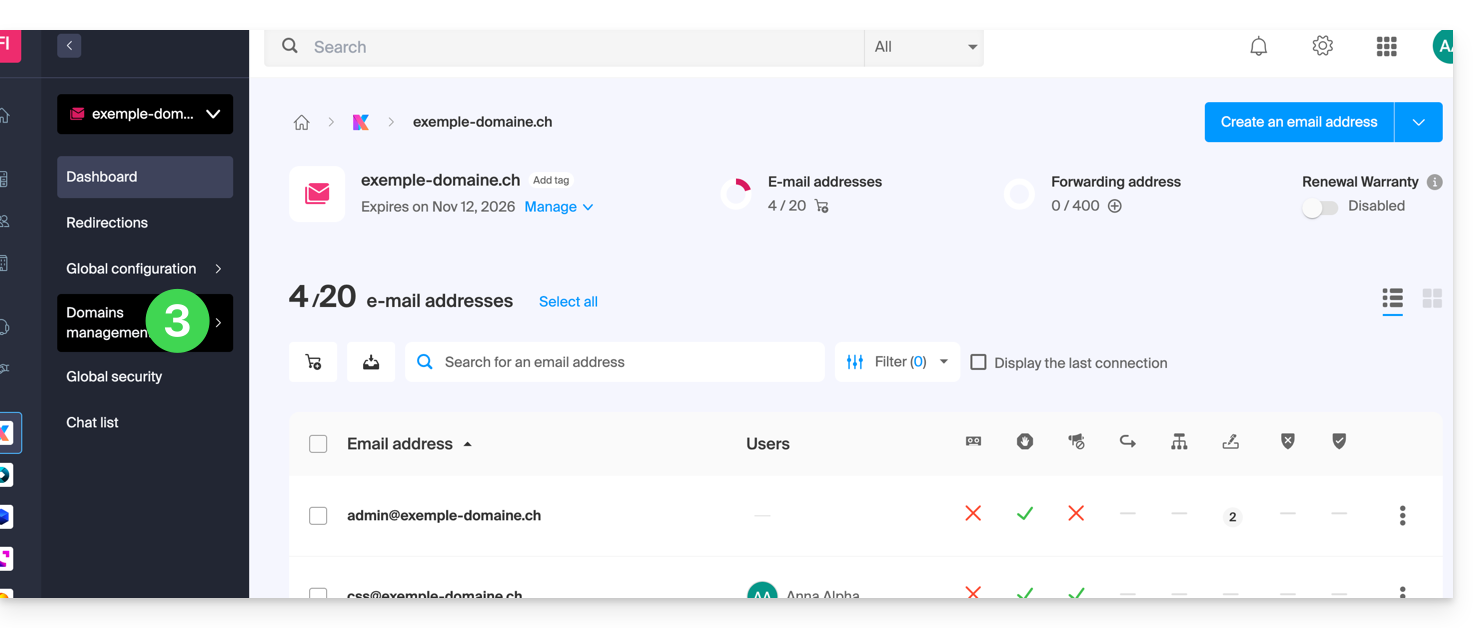
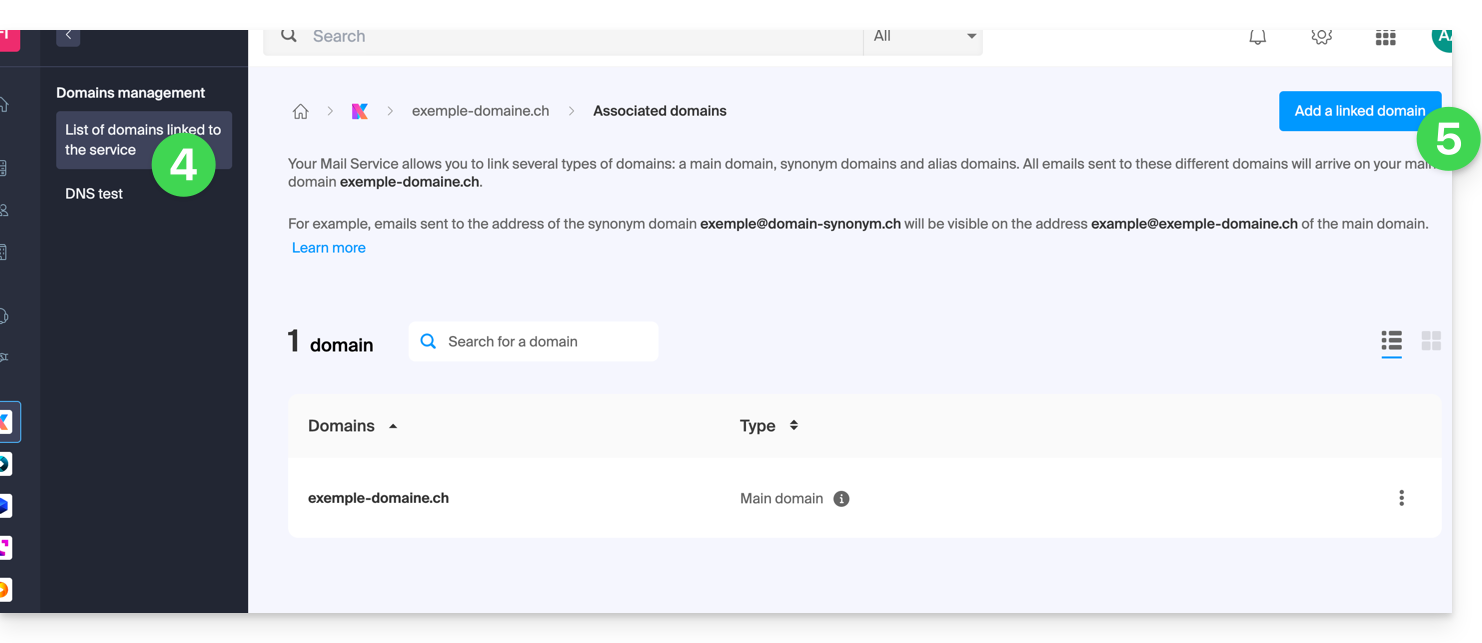
- Click on List of domains linked to the service in the left sidebar.
- Click the blue button Add a linked domain:
- You can…
- … Search for an existing domain on the organization to which you are connected; this will link and automatically update the DNS zone of the added domain.
- … Add a domain name or subdomain to manually indicate the domain name or subdomain to use (ideal if the domain name is elsewhere).
- … Buy a new domain name.
a: The domain exists at the Organization level
- Click on the proposed domain name.
- Click on the blue button Link this domain:

It is done, the Mail Service now responds to a second domain name: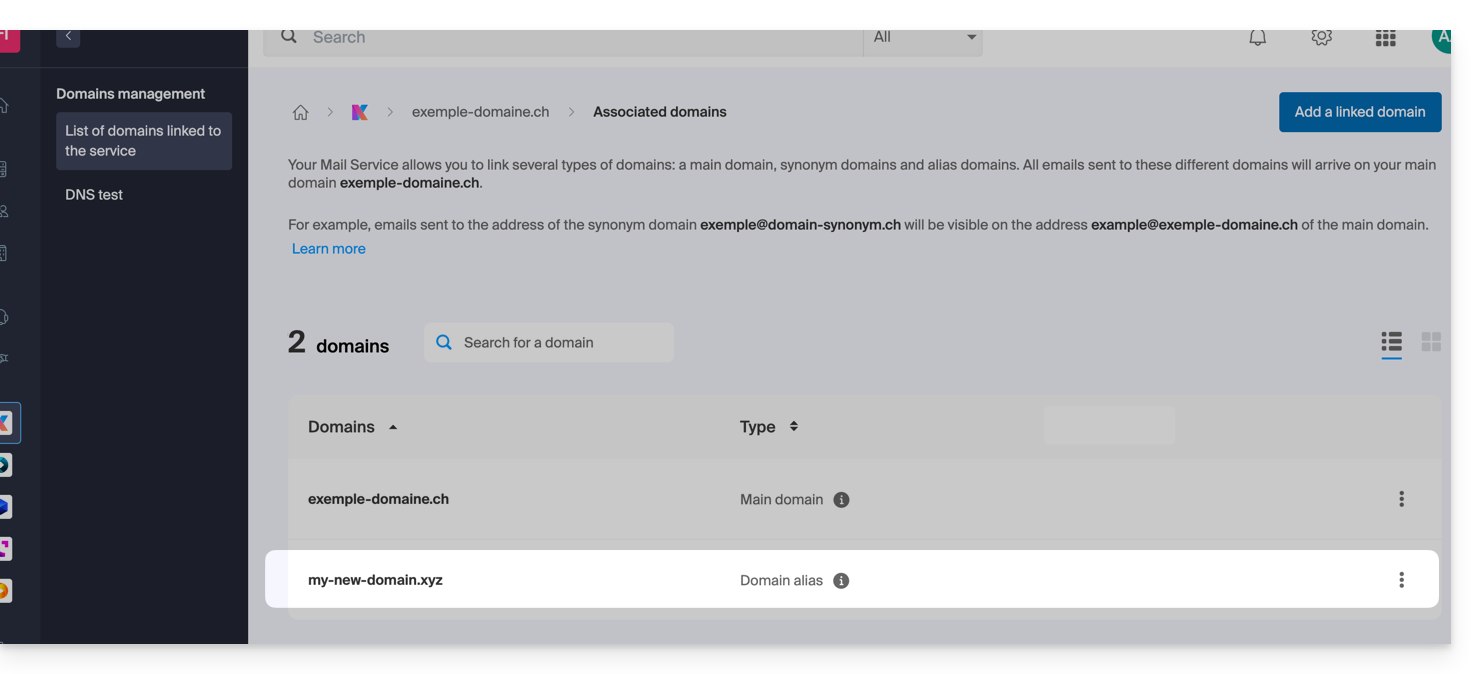
b: The domain exists but elsewhere (other Organization, other Registrar...)
- Enter the domain name to add.
- Activate the DNS entry update (if the domain name situation allows it, the DNS zone of the domain name will be automatically updated).
- If the point 2 above is active then activate the replacement of any existing entries.
- Only reverse the domain name if you want to set this new domain name as the main one (this is mainly an administrative issue rather than a technical one).
- Click on the blue button Link this domain:
Example of use
The email contact@une-super-entreprise-familiale.com is a long email address. The synonym domain contact@usef.com is shorter and easier to remember.
By adding the domain "usef.com" to the Mail Service "une-super-entreprise-familiale.com" you authorize all messages sent to contact@usef.com (the linked domain) to arrive among the messages that the address contact@une-super-entreprise-familiale.com already receives.
Link to this FAQ:
Has this FAQ been helpful?