Knowledge base
1000 FAQs, 500 tutorials and instructional videos. Here, there are only solutions!
This guide explains how to connect via SSH to a Web Hosting or a Cloud Server.
Connecting via SSH…
… via a browser such as Brave, Chrome, Edge, Firefox, Opera, Safari…
- Click here to access the hosting & website management section in your Infomaniak Manager (❓: help).
- Click on the name of the relevant hosting.
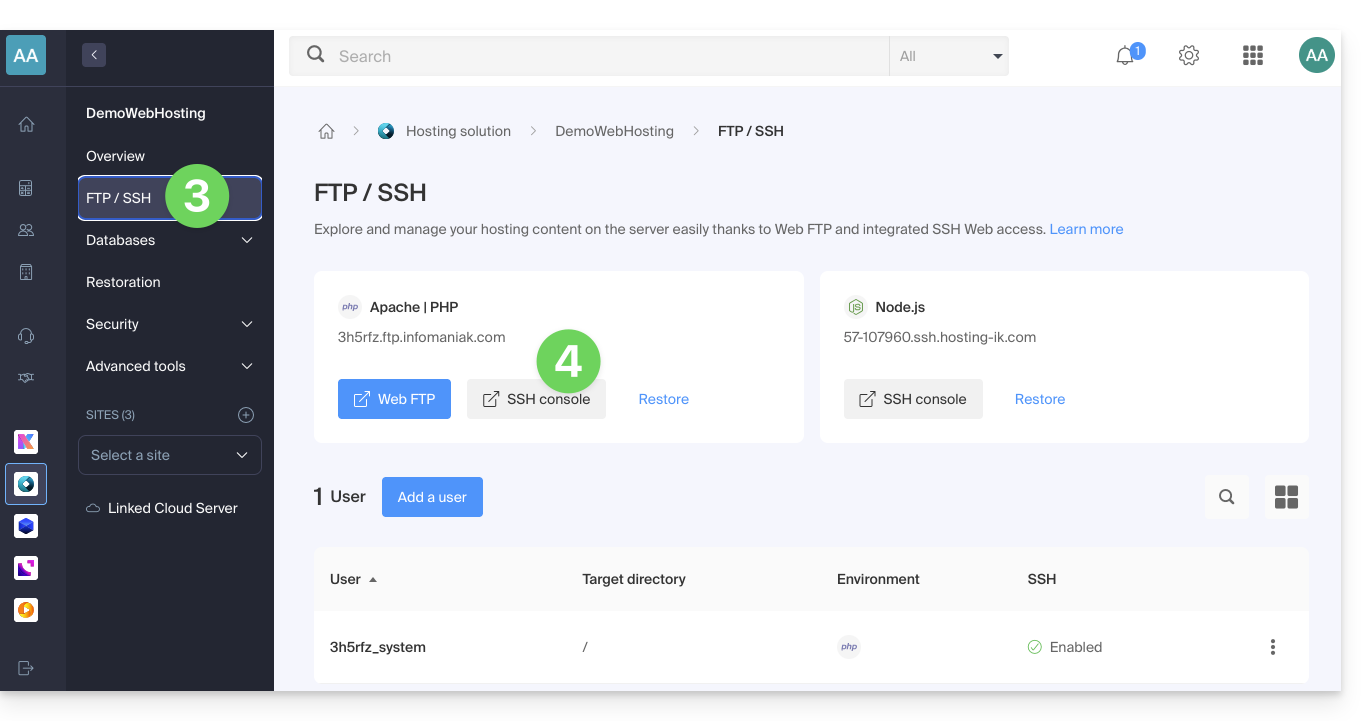
- Click on FTP / SSH in the left-hand menu.
- Click on the SSH Console button:
… via the terminal or an application
To connect via SSH, use the following commands from a Terminal application (command-line interface, CLI) on your device, for example:
- Terminal (an application already integrated into macOS and Linux)
- PuTTY (Windows) (❓: help)
Then, enter the following command:
ssh username@serverusernameis the username for the FTP account (❓: help)serveris the host server (e.g. xxxx.ftp.infomaniak.com)
To find out which command is available and to know the path to use, run the "whereis" command:
$ whereis mysql
mysql: /opt/mysql/bin/mysql
Link to this FAQ: https://faq.infomaniak.com/1941
Has this FAQ been helpful?
This guide explains how to use the remote control feature for a device whose screen is shared, with kMeet, Infomaniak's ethical and free video conferencing solution.
Prerequisites
- Have the desktop app kMeet (desktop application on macOS / Windows).
- Share an entire screen and not just an application window.
Take control of a device
For user A to be able to take control of user B's computer:
- Start the kMeet desktop app, then start a meeting (❓: help) or join one (❓: help) in which users A & B should be present.
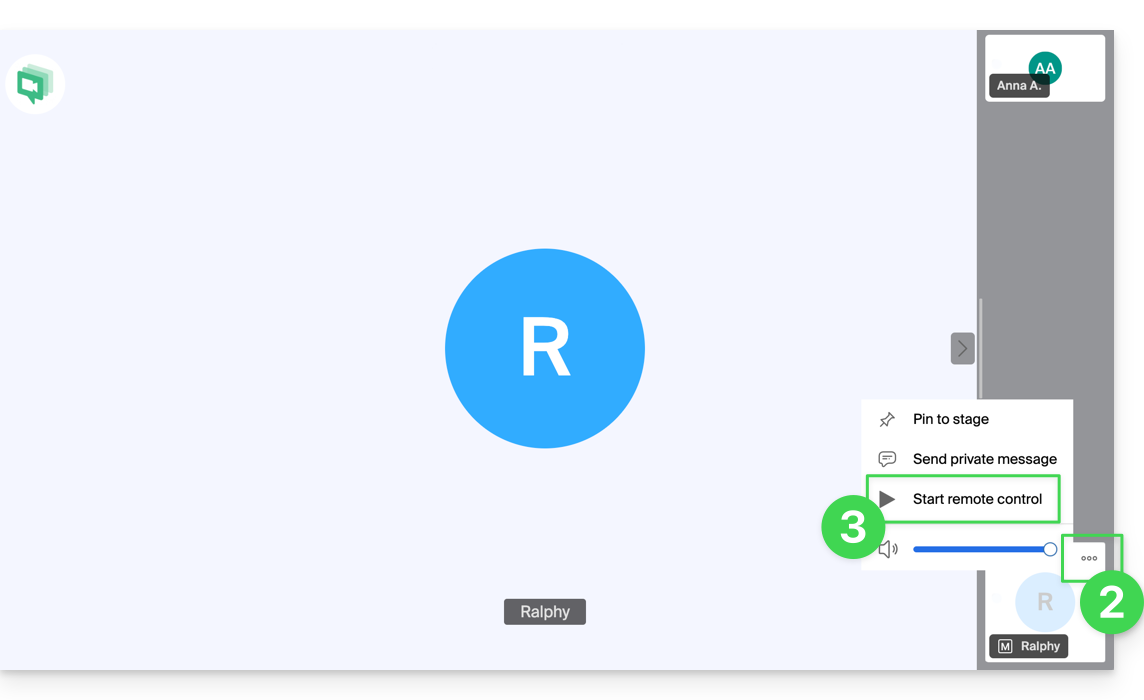
- User A should click on the action menu.○○○ in the upper right corner of user B's thumbnail.
- User A must click on Start remote control, and follow the same steps to stop the remote control:
- User B receives a notification in the app to validate and accept the device control request.
It is also possible to simply annotate a screen sharing session without taking control of the device.
Link to this FAQ: https://faq.infomaniak.com/2622
Has this FAQ been helpful?
This guide explains how to delete one of the users in your Organization from the Infomaniak Manager.
Prerequisites
- Switch to the desired Organization beforehand if you cannot find the expected list of users (❓: help).
- You must be at least an Administrator of the Organization (❓: help).
- Please note that it is not possible to remove a Legal Representative if there is no other legal representative. (❓: help).
Remove a user from your Organization
If the user had access to kDrive or was invited to access a third-party email address, several intermediate steps will ask you what actions to take with their data and will inform you, if applicable, about what will happen to the calendars and address books. To remove one of the users from the Organization:
- Click here to access the organization's user management in the Infomaniak Manager (❓: help).
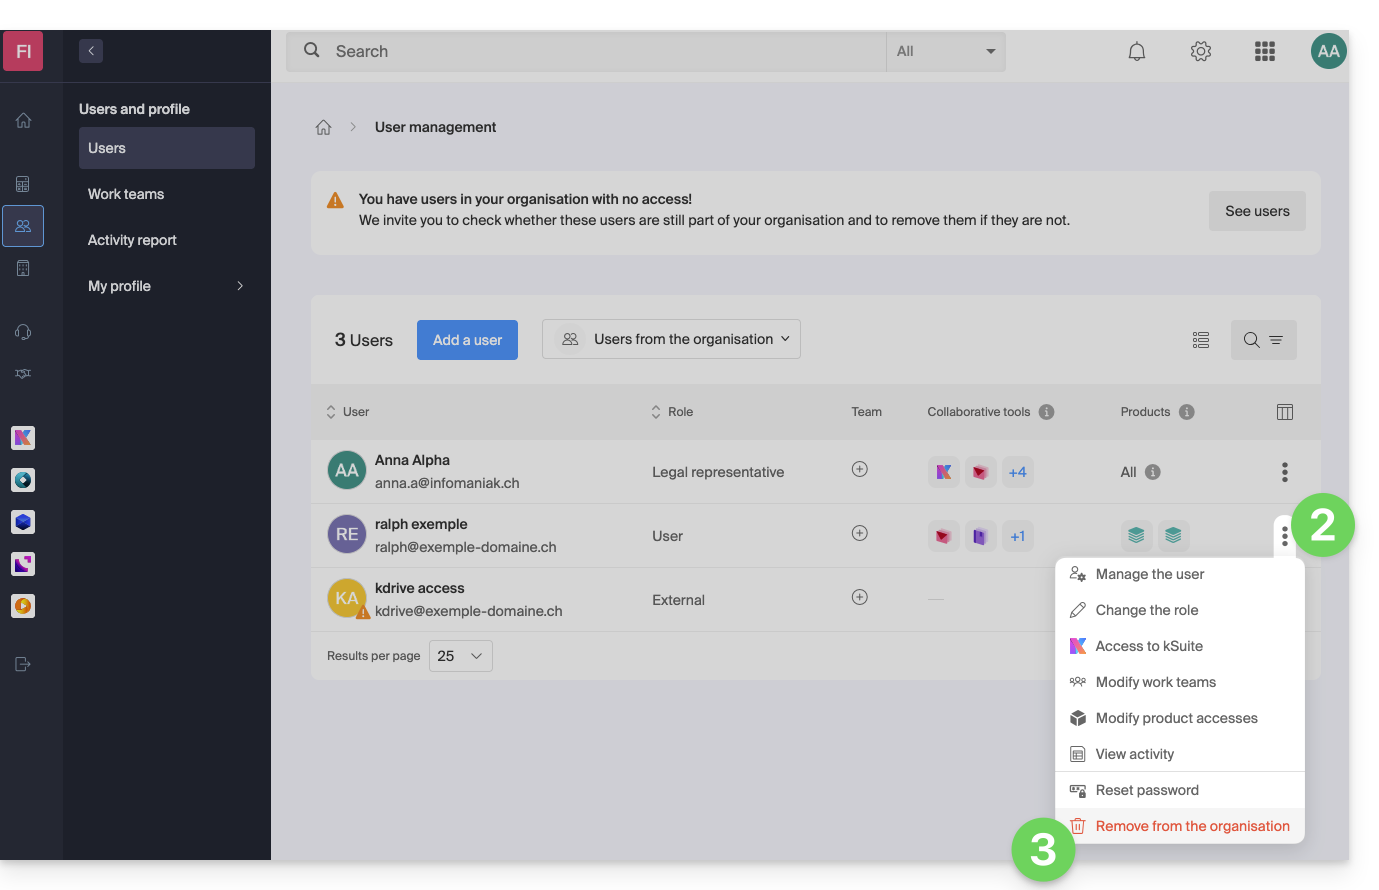
- Click on the action menu ⋮ to the right of the user in question.
- Click on Remove from Organization:
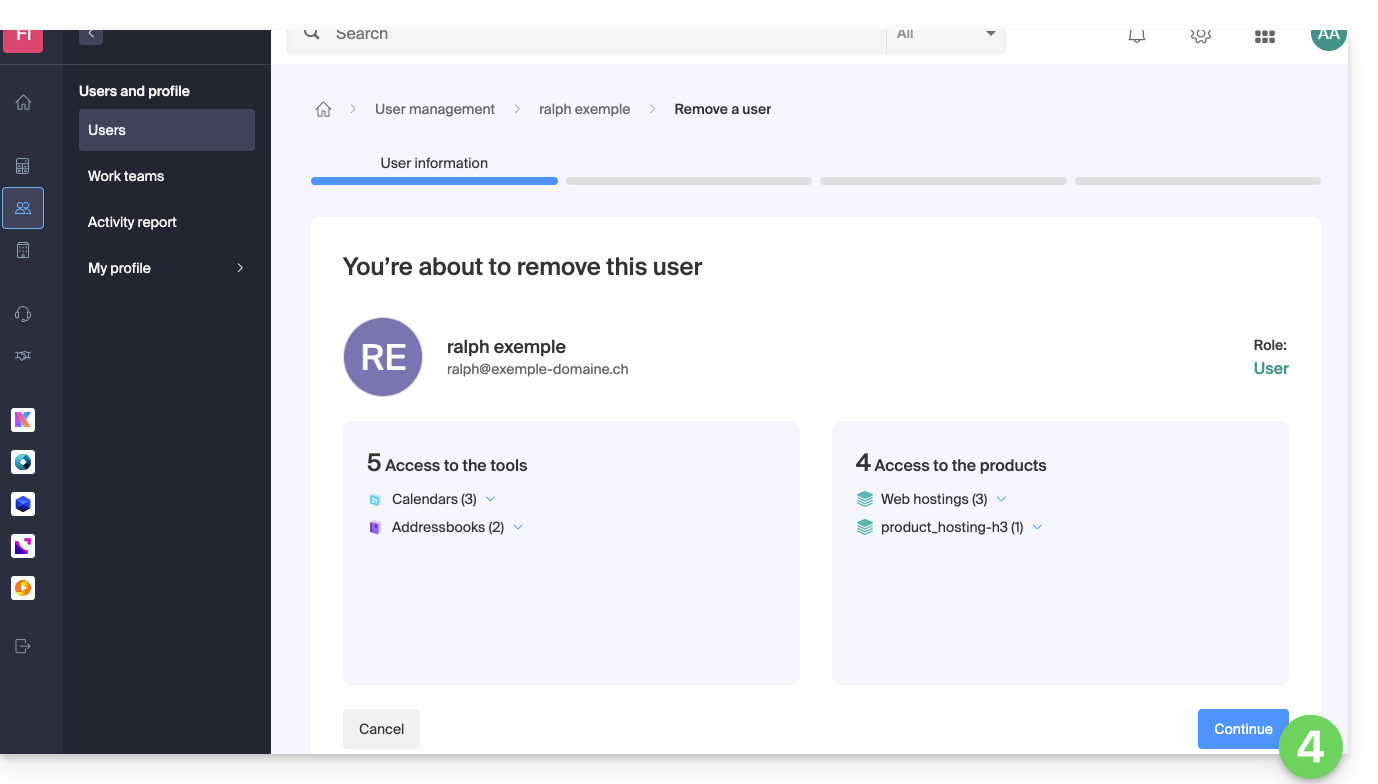
- Review the information (click on the down arrows if necessary to view the details of the deletions) and then click the blue Continue button:
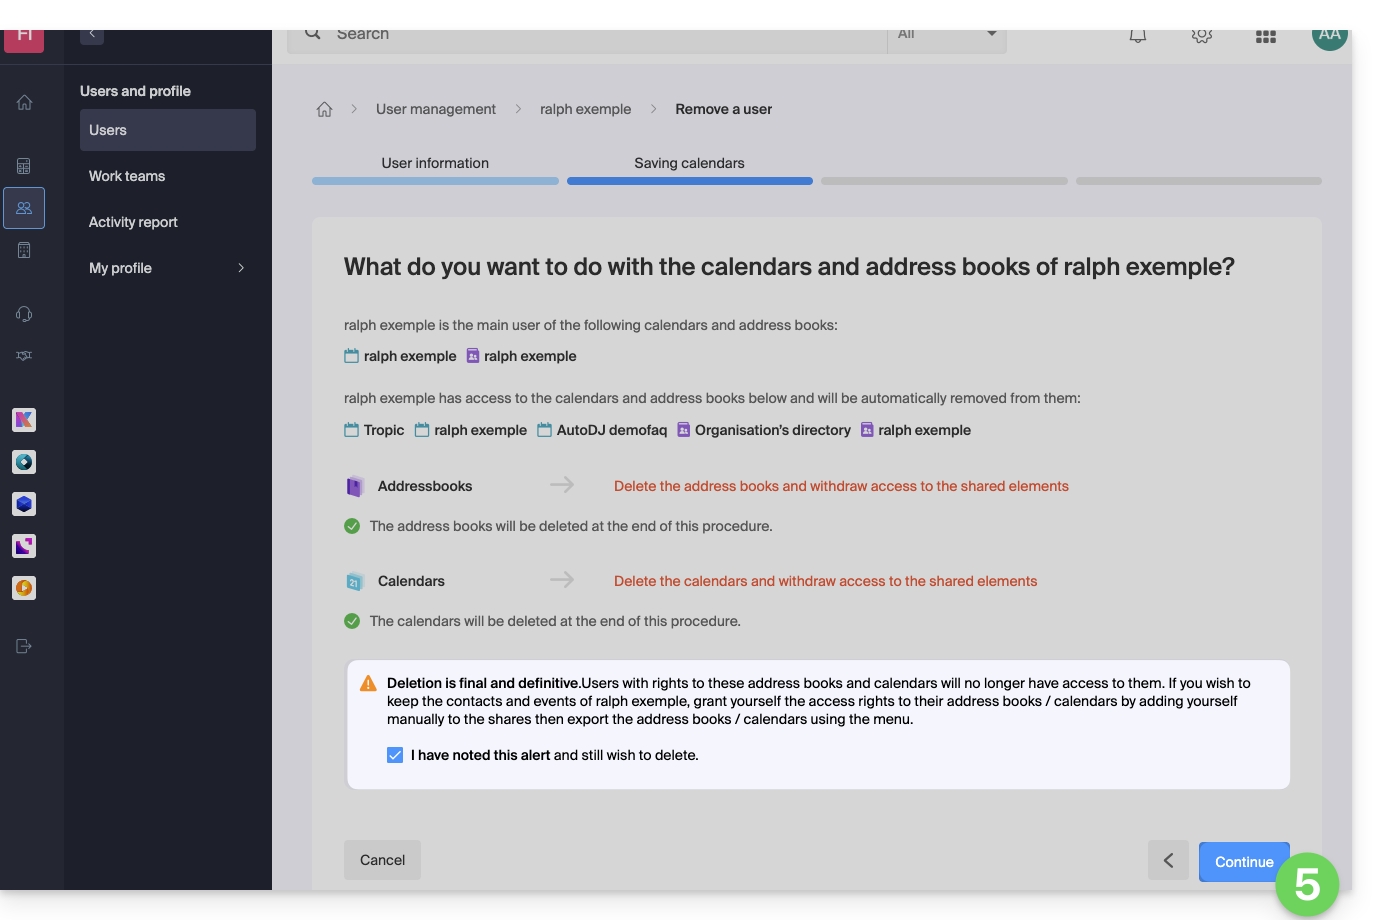
- Review the information, confirm the deletion by checking the box, and then click the blue Continue button:
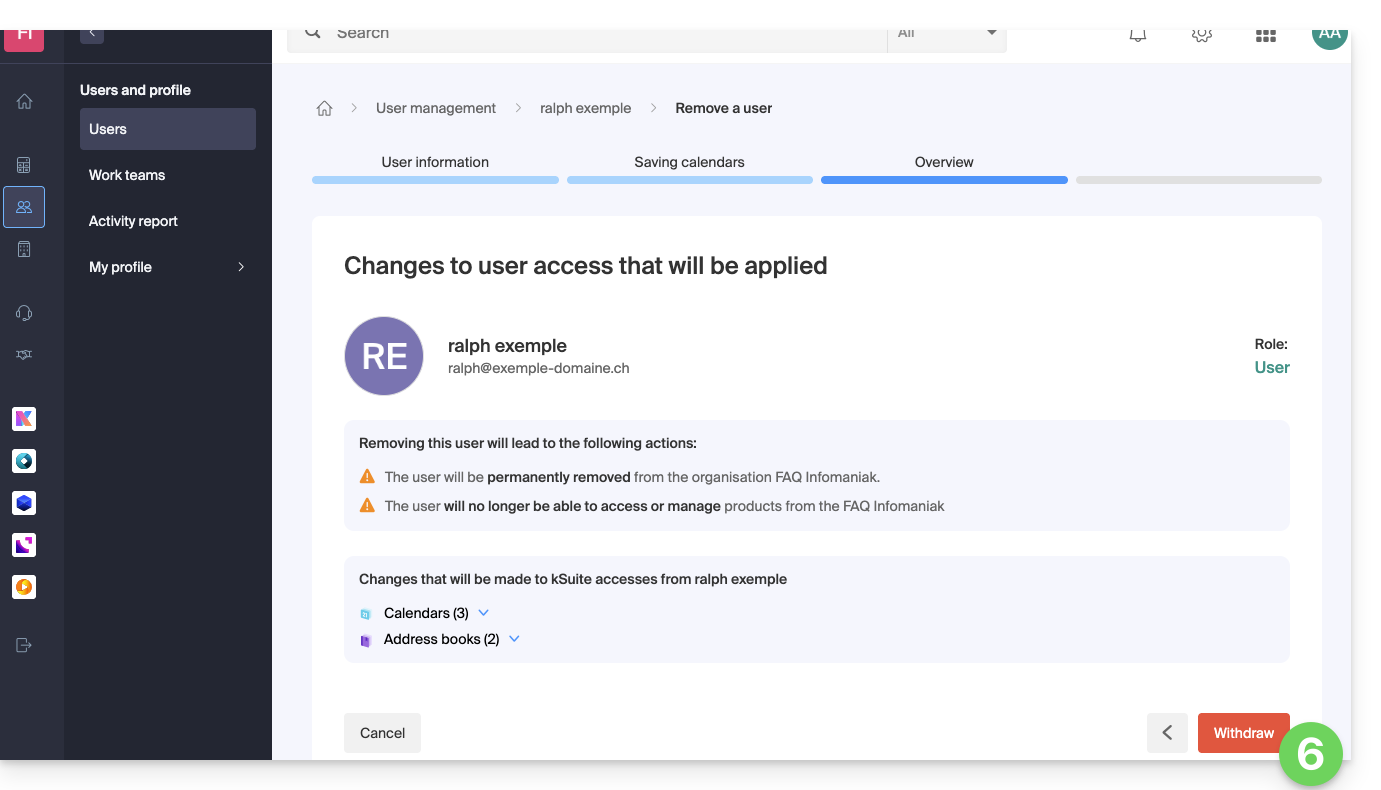
- Review the information (click on the chevrons if necessary to view the details of the deletions) and then click on the red Remove button:
- Enter your email address (login ID for the Manager), check the confirmation box, and then click the red Remove this user button to permanently remove the user, with no possibility of reverting the action.
Link to this FAQ: https://faq.infomaniak.com/1738
Has this FAQ been helpful?
This guide details the steps to take if you don't see any difference between your website after making a change and its version before the change. These tips are also relevant if you encounter issues while using the Infomaniak product interface.
Introduction
- While you browse, a browser like Brave, Chrome, Edge, Firefox, Opera, Safari, etc., saves the data you view in a dedicated space. This is done to avoid repeatedly requesting the same data from the server, saving time and resources.
- Your cache can contain a large amount of data, and sometimes the browser gets confused. As a result, websites may not display correctly or may display an outdated version.
- Clearing the cache ensures that you are viewing the latest version of the page or folder.
Clear your browser's cache…
… on Safari
Choose your macOS version to view the corresponding Apple help.
… regarding Google tools (Chrome, Android, etc.)
Please refer to the Google help.
… on Firefox
Please refer to the Mozilla help.
… on Edge / Internet Explorer
Please refer to the Microsoft help.
Link to this FAQ: https://faq.infomaniak.com/793
Has this FAQ been helpful?
This guide explains how to initialize your Cloud VPS / VPS Lite with Windows during the first connection.
Initializing a Cloud Server with Windows
You must change the password for your Windows user before you can connect via RDP (Remote Desktop Protocol) to your server; otherwise, an error will be returned (indicating that the password must be changed).
To do this, you must connect using the VNC console the very first time.
Once the user's password has been changed (via VNC), it will be possible to connect without any issues via RDP. This protocol is already enabled on Infomaniak Windows images.
Login credentials
- Username:
- for Windows 11 Professional =
Infomaniak - for Windows 10 Professional =
Infomaniak - for Windows Server =
Administrator
- for Windows 11 Professional =
- Password: the one you chose when ordering the server; if you have forgotten it, please reset the server.
- IP address: the one displayed in your server's dashboard.
Connect via RDP…
- … on Windows: remote desktop is an included feature.
- … on macOS: install the free desktop app Windows App (formerly Microsoft Remote Desktop).
- … on Linux: install the Remmina app.
Link to this FAQ: https://faq.infomaniak.com/2316
Has this FAQ been helpful?
This guide explains how to add a user to an Organization within the Infomaniak Manager. This will allow you to grant the user access to certain Infomaniak products, as needed.
Introduction
- Since you opened your account with Infomaniak, you have been part of at least one Organisation (❓: help).
- If you were the only user and it wasn't an invitation, an Organisation was created in your name, and you automatically become its legal representative.
- Otherwise, you belong to the Organisation that invited you (to join its kSuite, to manage a product, etc.).
- You can define whether a user…
- … belongs to your Organisation and whether they should become:
- Legal representative
- Administrator
- Collaborator
- … is external to your Organisation (limited rights):
- External users are not taken into account in calendar and address book sharing for the entire Organisation.
- … belongs to your Organisation and whether they should become:
Invite the new user
Prerequisites
- First, switch to the desired Organization if you cannot find the expected list of users (❓: help).
- You must be at least an Administrator of the Organization (❓: help).
- Learn about the different permissions (e.g., access rights to products) and administrative contact preferencesfor a user within an Organization (❓: help).
To add, and if necessary, create the new user for your Organization:
- Click here to access user management in the Infomaniak Manager (❓: help).
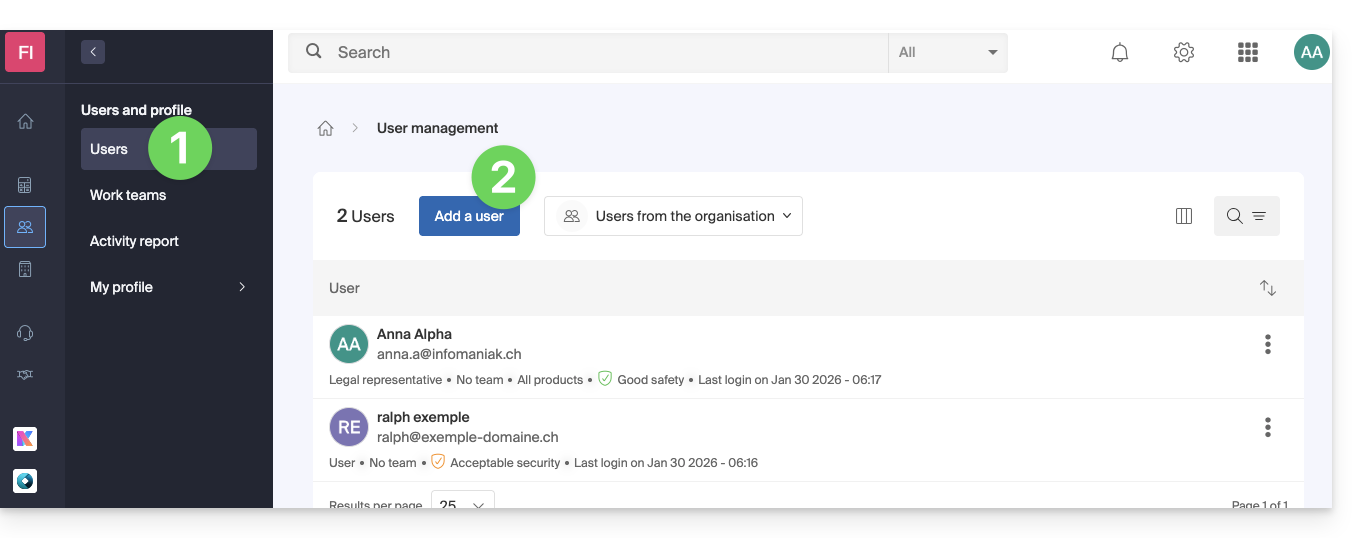
- Click on the Add user button:
- Follow the wizard to complete the process:
- If the added user does not yet have an Infomaniak user account, they will be prompted to create one.
- If the added user already has an Infomaniak account, they will be prompted and then be able to switch from their original Organization to the new one (❓: help).
Link to this FAQ: https://faq.infomaniak.com/1404
Has this FAQ been helpful?
This guide explains how to configure the questions asked to visitors when ordering a pass/subscription (as part of the Infomaniak ticketing system). These settings will be available once step 1 is completed:
- Define the type during creation (subscription, ticket pack, etc.) as well as the basic information and settings
- Associate events with passes
- Configure the visual appearance and information related to the pass
- Define and collect the information for subscribers that will be linked to the passes (below).
Configure the information linked to the passes
This information will be linked to the passes and is therefore independent of the form associated with the order.
To do this:
- Click here to access the management of your product in the Infomaniak Manager (need help?).
- Click directly on the name assigned to the ticketing system for the event.
- Click on Scheduling in the left-hand menu.
- Click on Pass in the left-hand menu.
- Click on the name of the pass in question.
- Click on the Settings tab:

- Activate the desired options:
- Title: dropdown menu offering the choice between Mr. and Mrs.
- Last Name: text field for entering the last name
- First Name: text field for entering the first name
- Organization, Company: text field for entering the company
- Email: text field for entering the email address
- Address: 5 text fields including the number and street, city, and country
- Postal Code: adds a field between the number and street for the postal code
- Mobile Phone: field for the phone number
- Date of Birth: adds a calendar to indicate the date of birth
- Photo: allows uploading a photo that can be displayed on the pass
- Custom Field: text field for free-form information
Link to this FAQ: https://faq.infomaniak.com/2682
Has this FAQ been helpful?
This guide explains how to freely integrate emojis/emoticons/smileys into the title and content of an Infomaniak Newsletter.
Insert an emoticon in the title
To choose an emoticon for your Newsletter title (and/or its preview text):
- Click here to access the Newsletter management section in your Infomaniak Manager.
- If nothing is displayed, you may not be in the Organization to which your Newsletter is linked (❓: help).
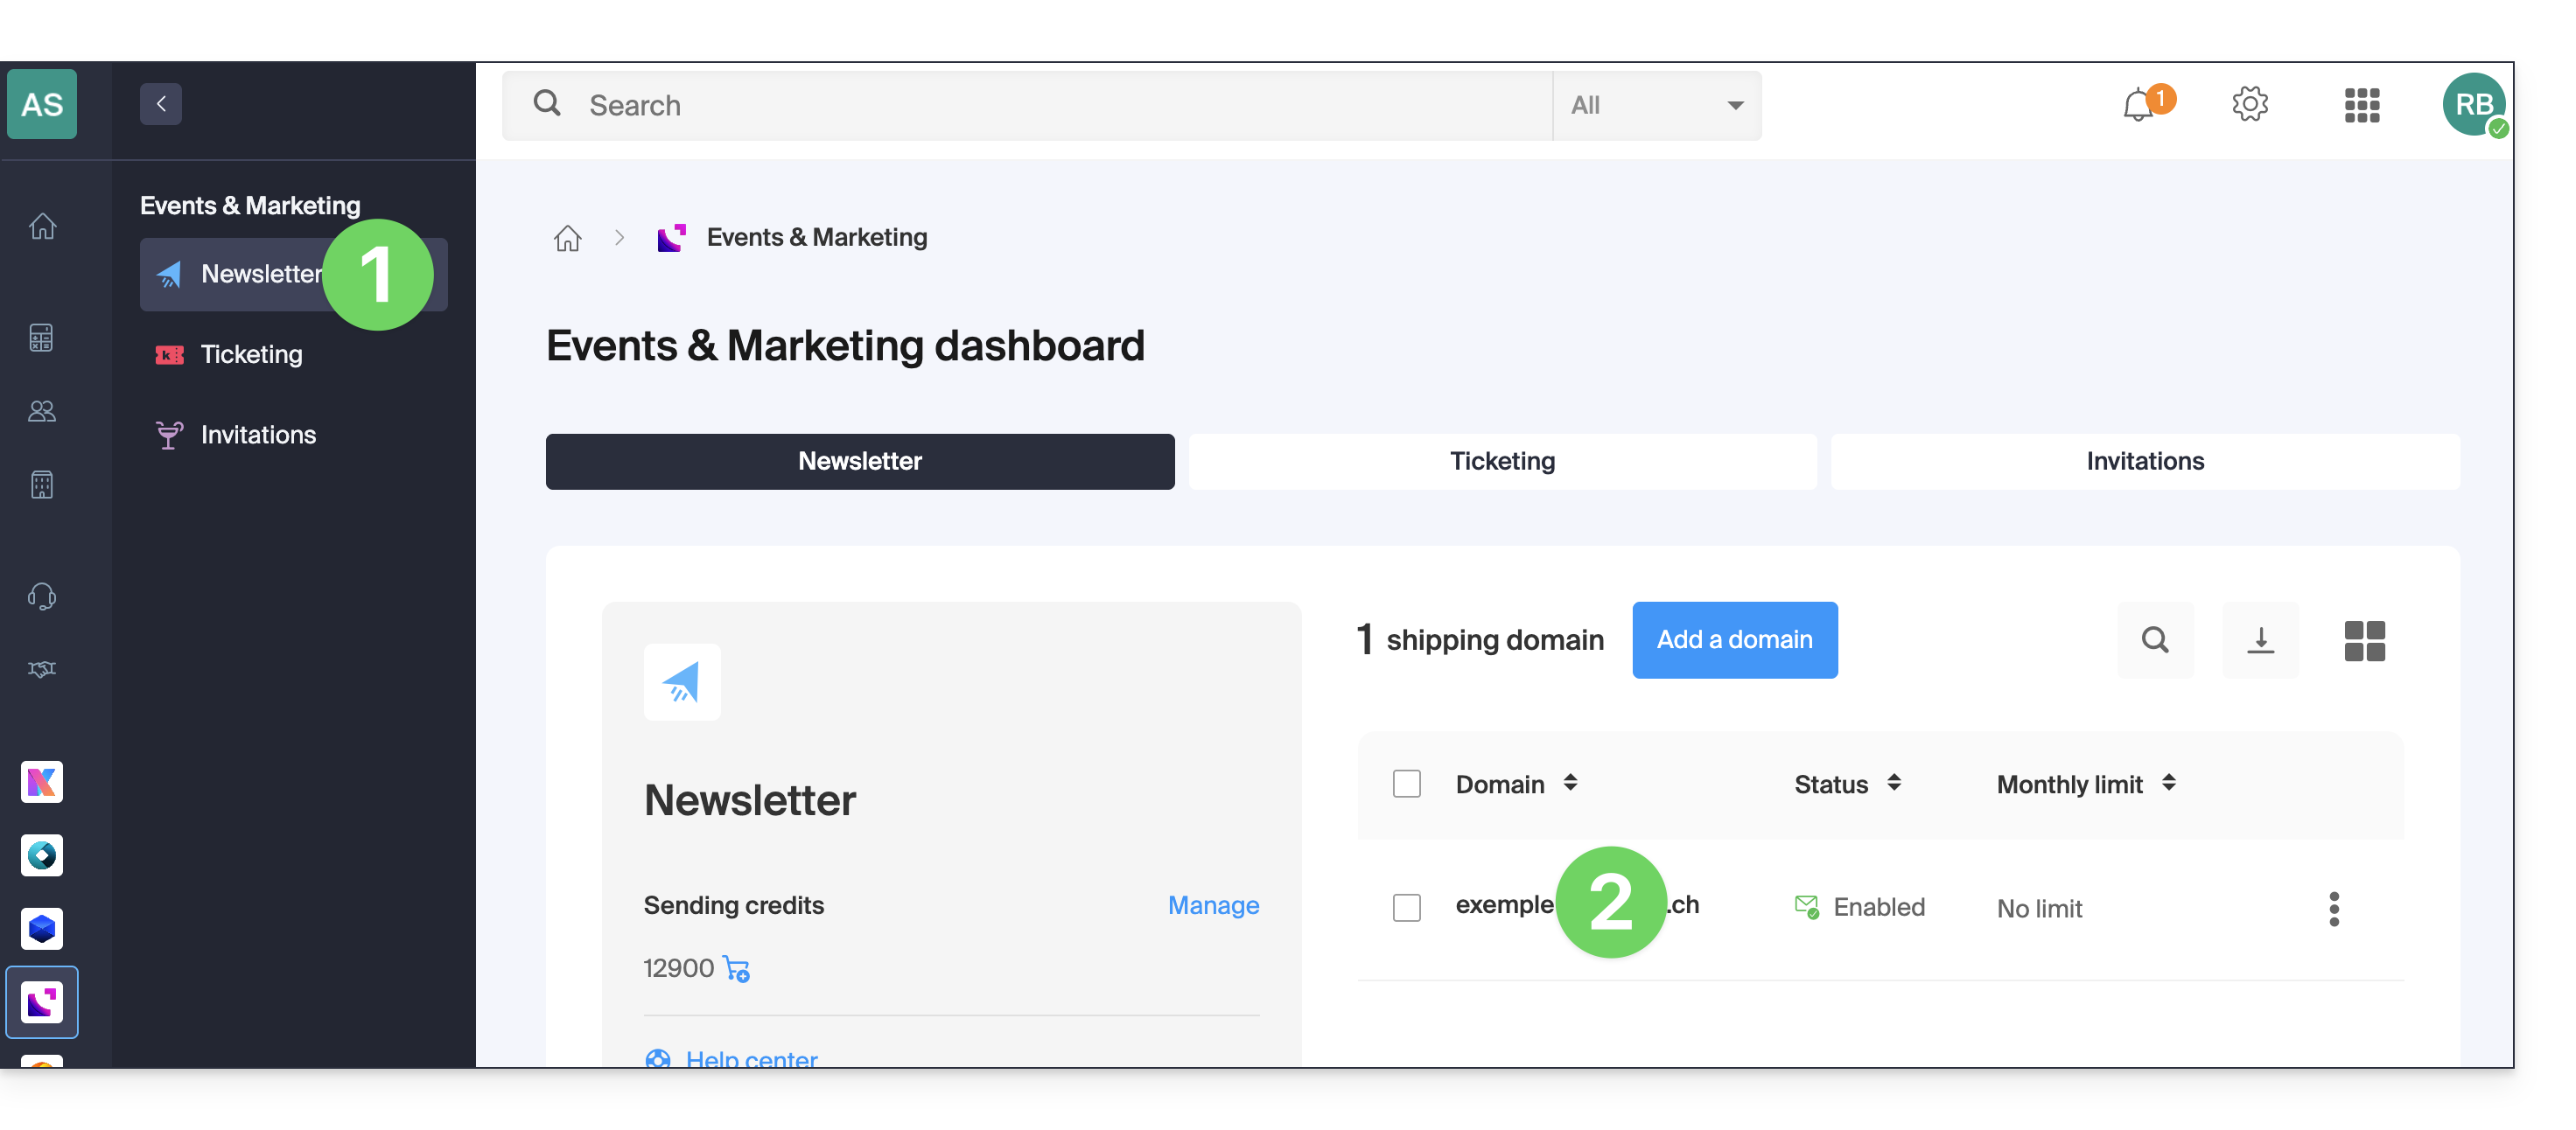
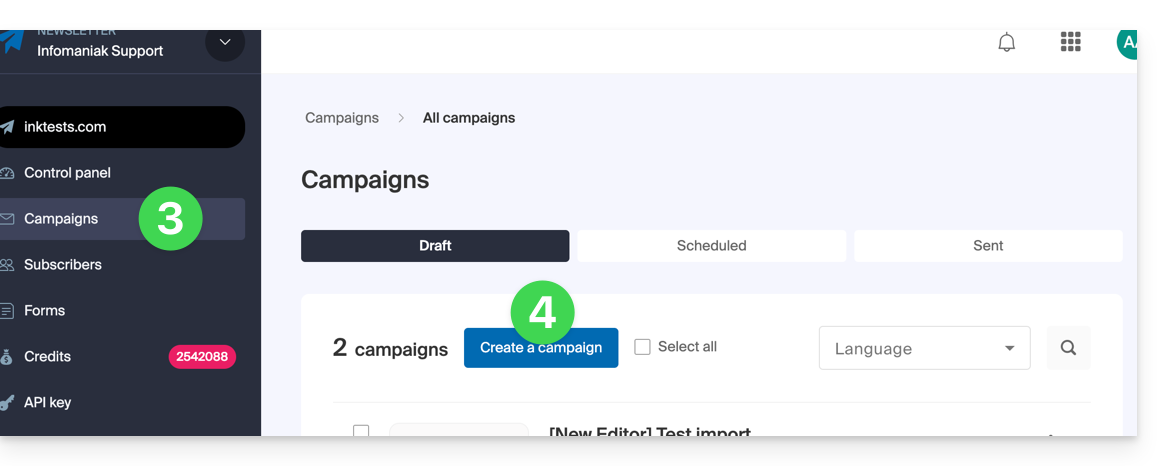
- Click on the domain name associated with your mailings:
- Click on Campaigns in the left-hand menu.
- Click on Create a campaign:
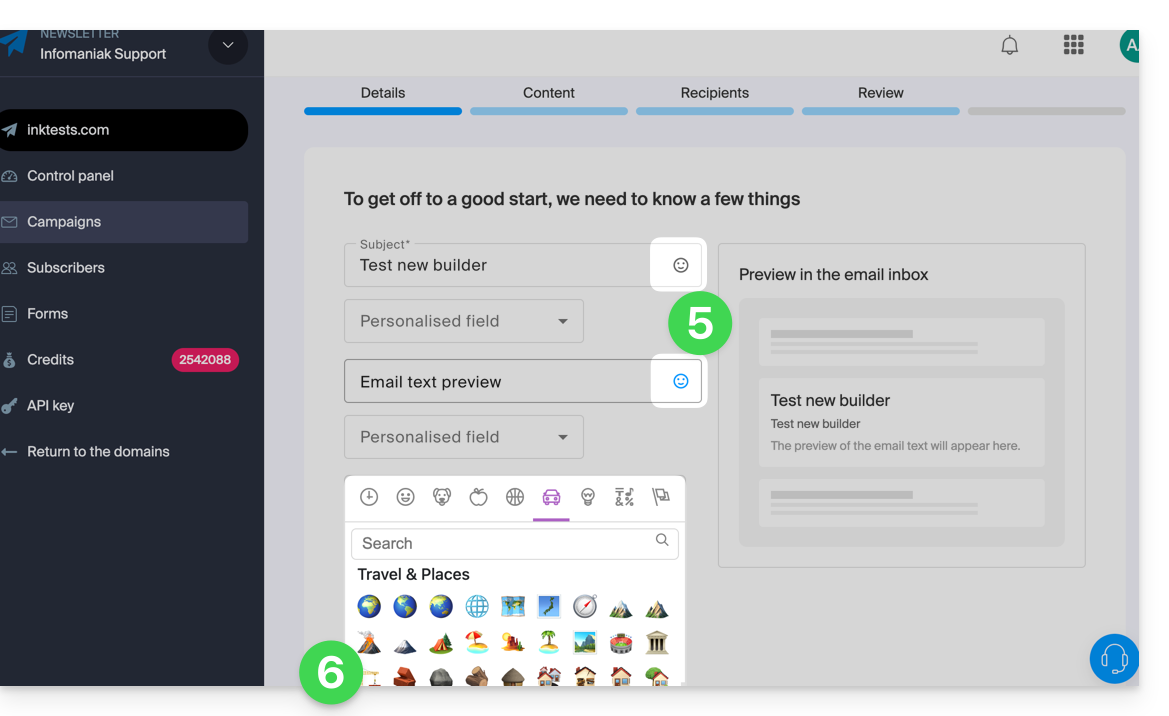
- Click on the Smiley icon in the relevant field to open the emoji panel.
- Click on the emoji to insert:
Insert an emoji in the email body
You can paste any Unicode character or emoji that you have copied from elsewhere into your text: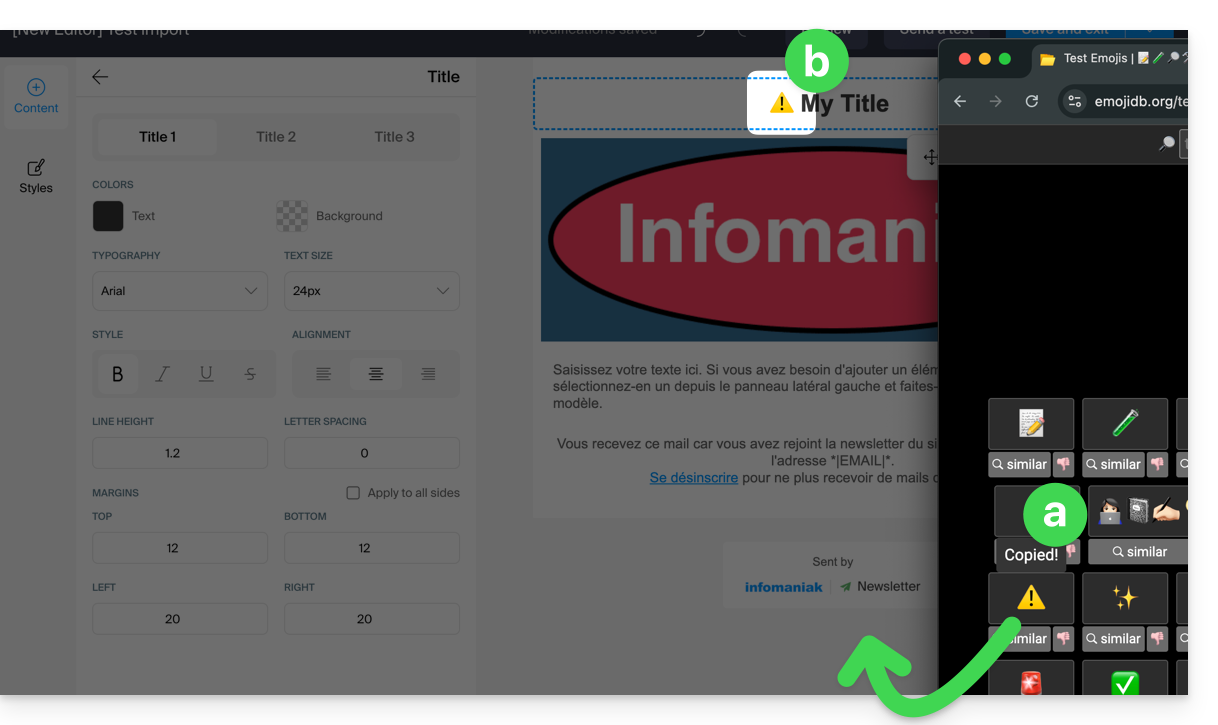
… or display emojis
… on macOS
Press the CTRL + CMD ⌘ + SPACE keys
… on Windows
Press the WINDOWS LOGO + PERIOD (.) keys
Alternative method:
- Right-click on an empty area of the taskbar.
- In the menu, click on Show the on-screen keyboard.
- An keyboard icon will then appear in the taskbar at the bottom right of your screen.
- Click this icon to display the virtual keyboard.
- Click the key with a smiley face in the bottom left corner of the keyboard.
- Use the various Windows emojis.
Link to this FAQ: https://faq.infomaniak.com/869
Has this FAQ been helpful?
This guide explains how to connect Microsoft 365 to an email address hosted by Infomaniak.
Introduction
- Infomaniak email addresses cannot be added directly to Outlook online from a browser using a personal Microsoft account
- Indeed, Microsoft no longer allows adding an external address via IMAP to
outlook.live.com. - Only the Microsoft mailbox linked to the connected account (address
@outlook.fr,@outlook.com,@hotmail, etc.) can be displayed there. - “Microsoft 365” is primarily a subscription; Microsoft has removed the function for connected accounts in Outlook.com, and the equivalent function in Outlook on the web has also been removed.
- Indeed, Microsoft no longer allows adding an external address via IMAP to
- To view an Infomaniak address with Outlook,you must therefore install the Outlook app or use other IMAP-compatible email software/client.
Get the Outlook 365 app
To do this:
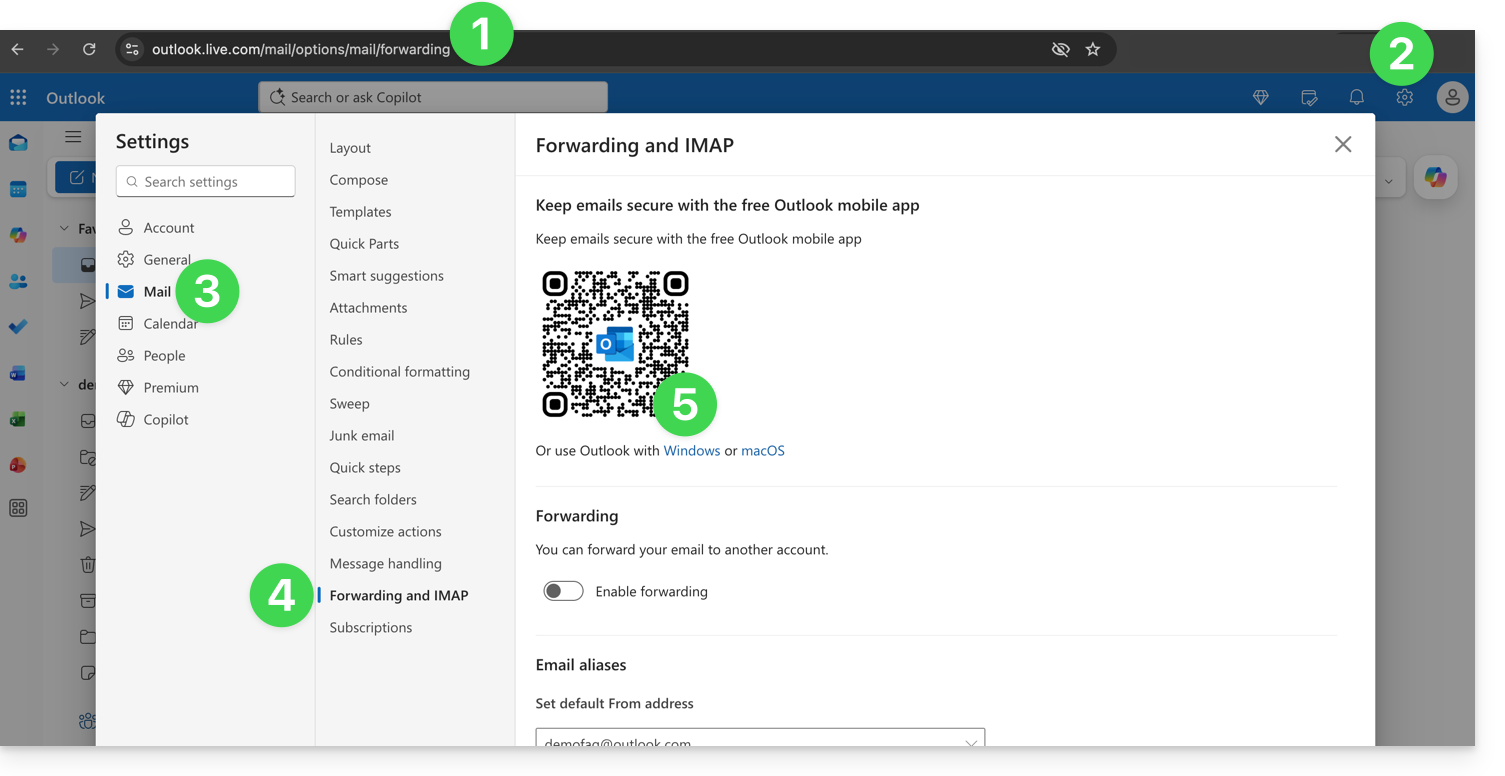
- Log in to https://outlook.live.com/mail/options/mail/forwarding with your personal Microsoft account.
- Click on Settings in the top right corner.
- Click on Mail in the left-hand menu.
- Click on Transfer and IMAP in the secondary menu.
- Download the Outlook application in the version corresponding to your device type:
Add the email address to the Outlook 365 app
On macOS, please refer to this other guide.
On Windows, this other guide and on mobile (iOS / Android), this other guide.
Link to this FAQ: https://faq.infomaniak.com/2428
Has this FAQ been helpful?
This guide details the installation of the kDrive desktop application from Infomaniak on a computer running the Windows operating system. This application allows you to automatically synchronize files from your computer with your online kDrive storage.
Prerequisites
- Have Windows version ≥ 10 (21H2) with a 64-bit processor (ARM64 compatible) and an NTFS file system (FAT32 is not supported).
- v10 1709 is required to use the Online / Offline mode (❓: help)
- or Windows Server 2019
Install the kDrive 4.x app on Windows
To do this:
- Open the downloaded application (❓: help) to start the installation on your device.
- The configuration window opens automatically after installing the application (and the app icon should be visible in the bottom right corner on Windows).
- Click the button to log in to your account:
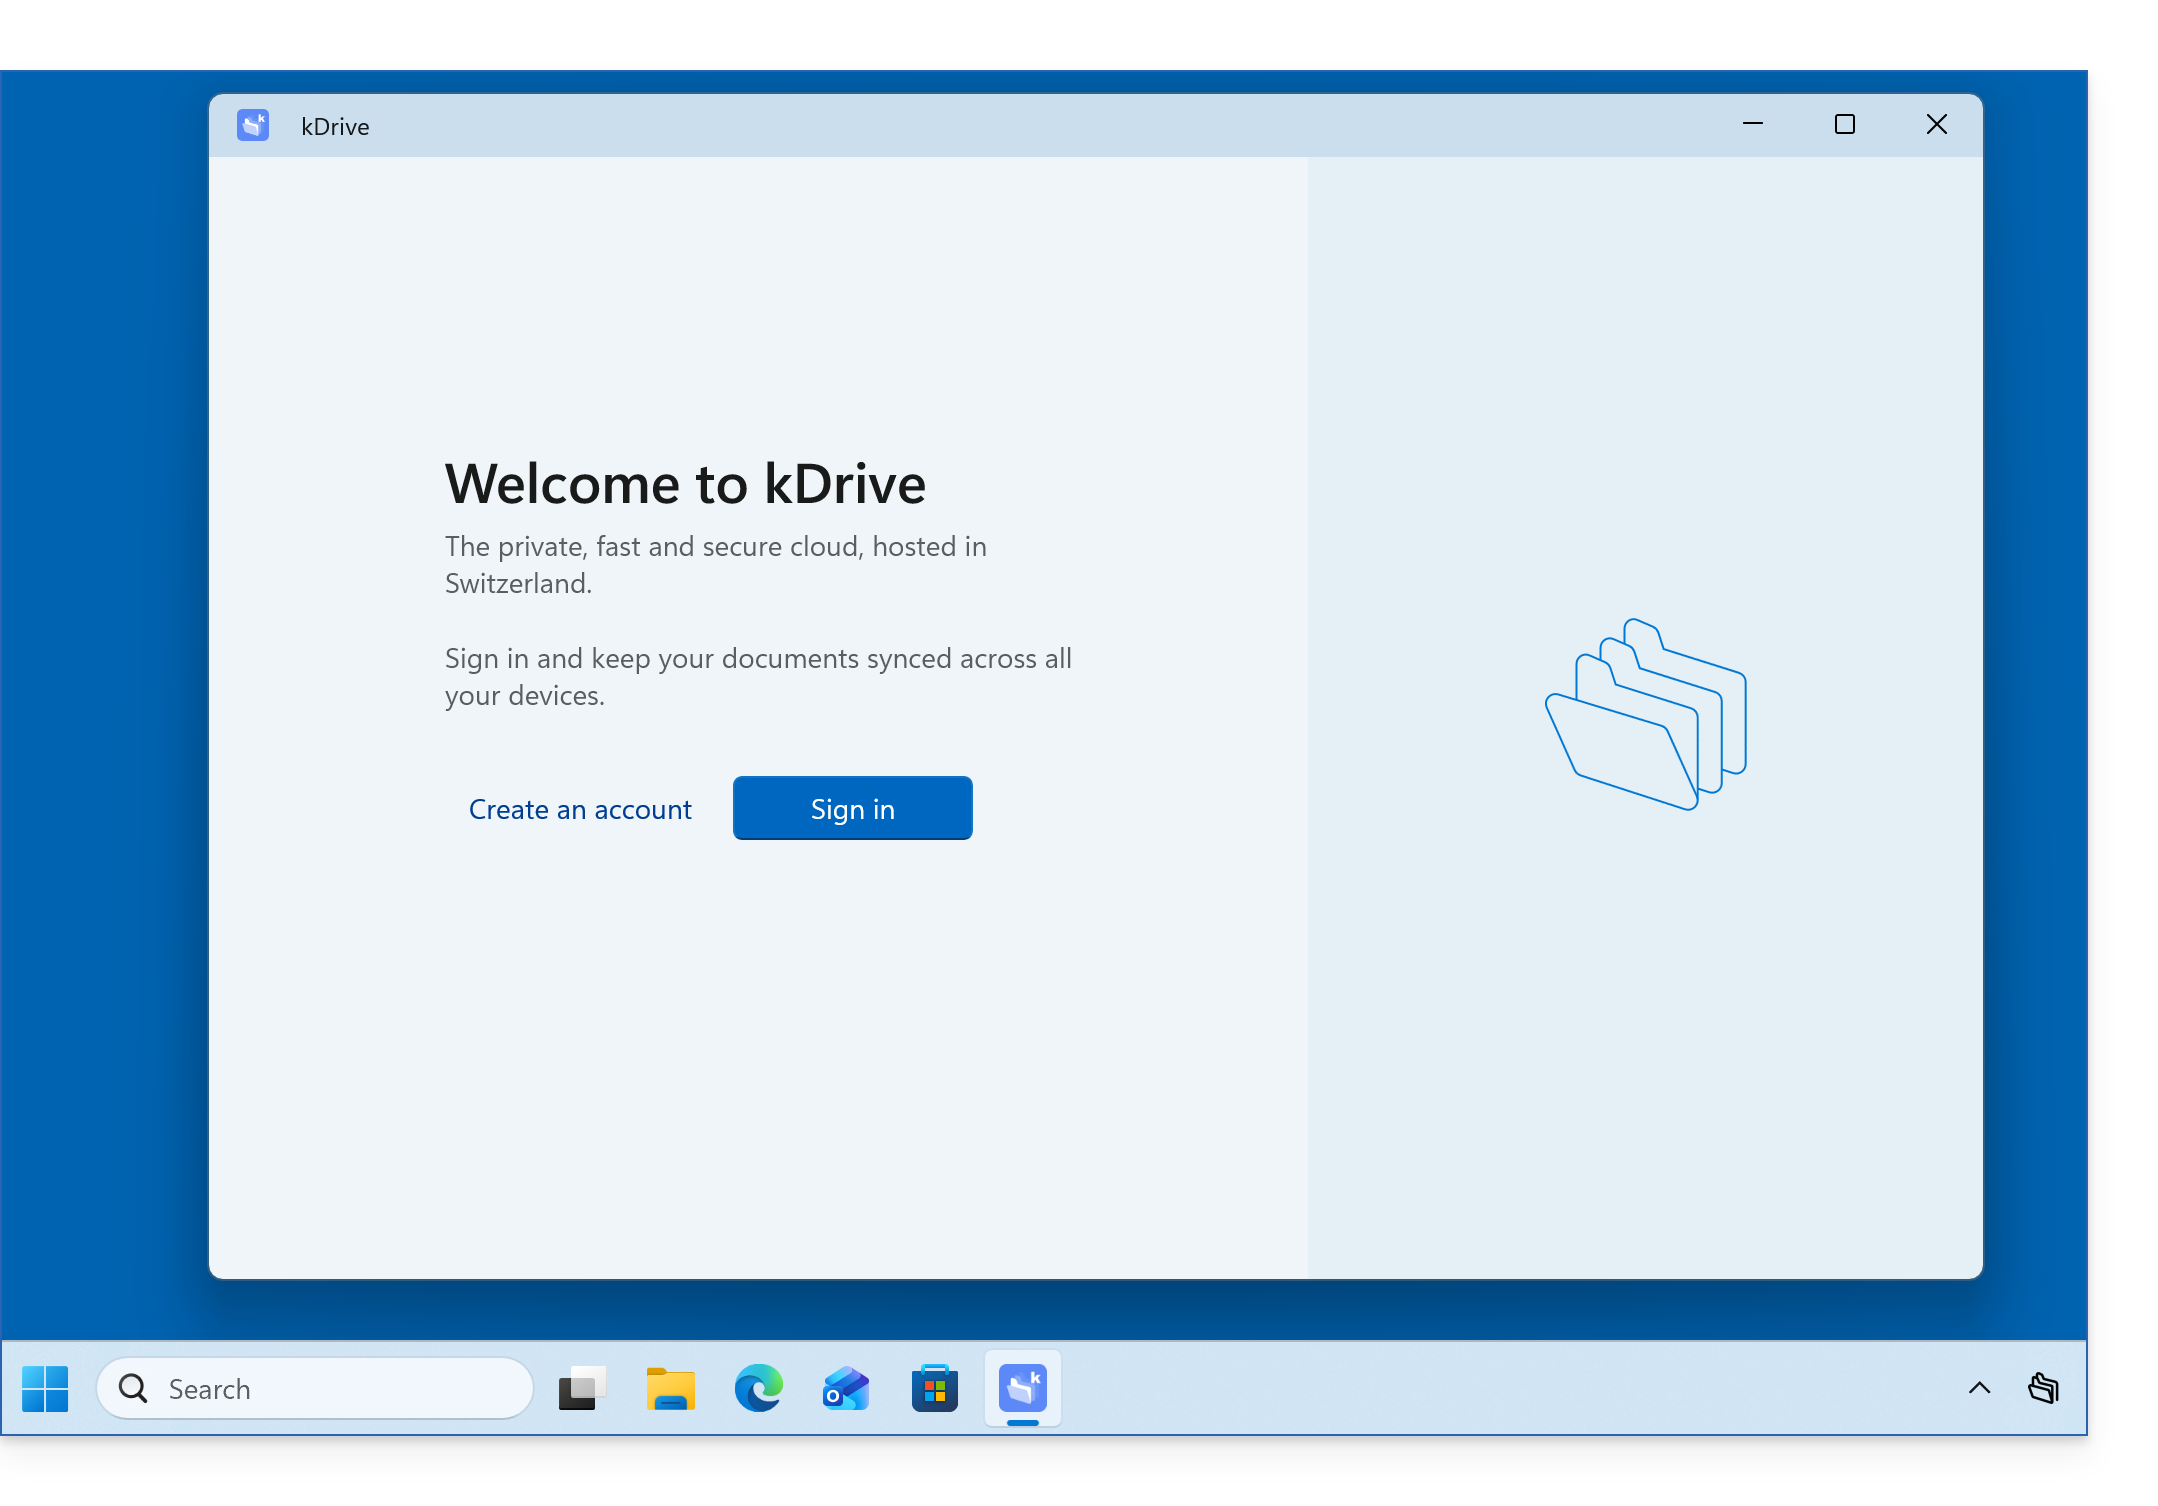
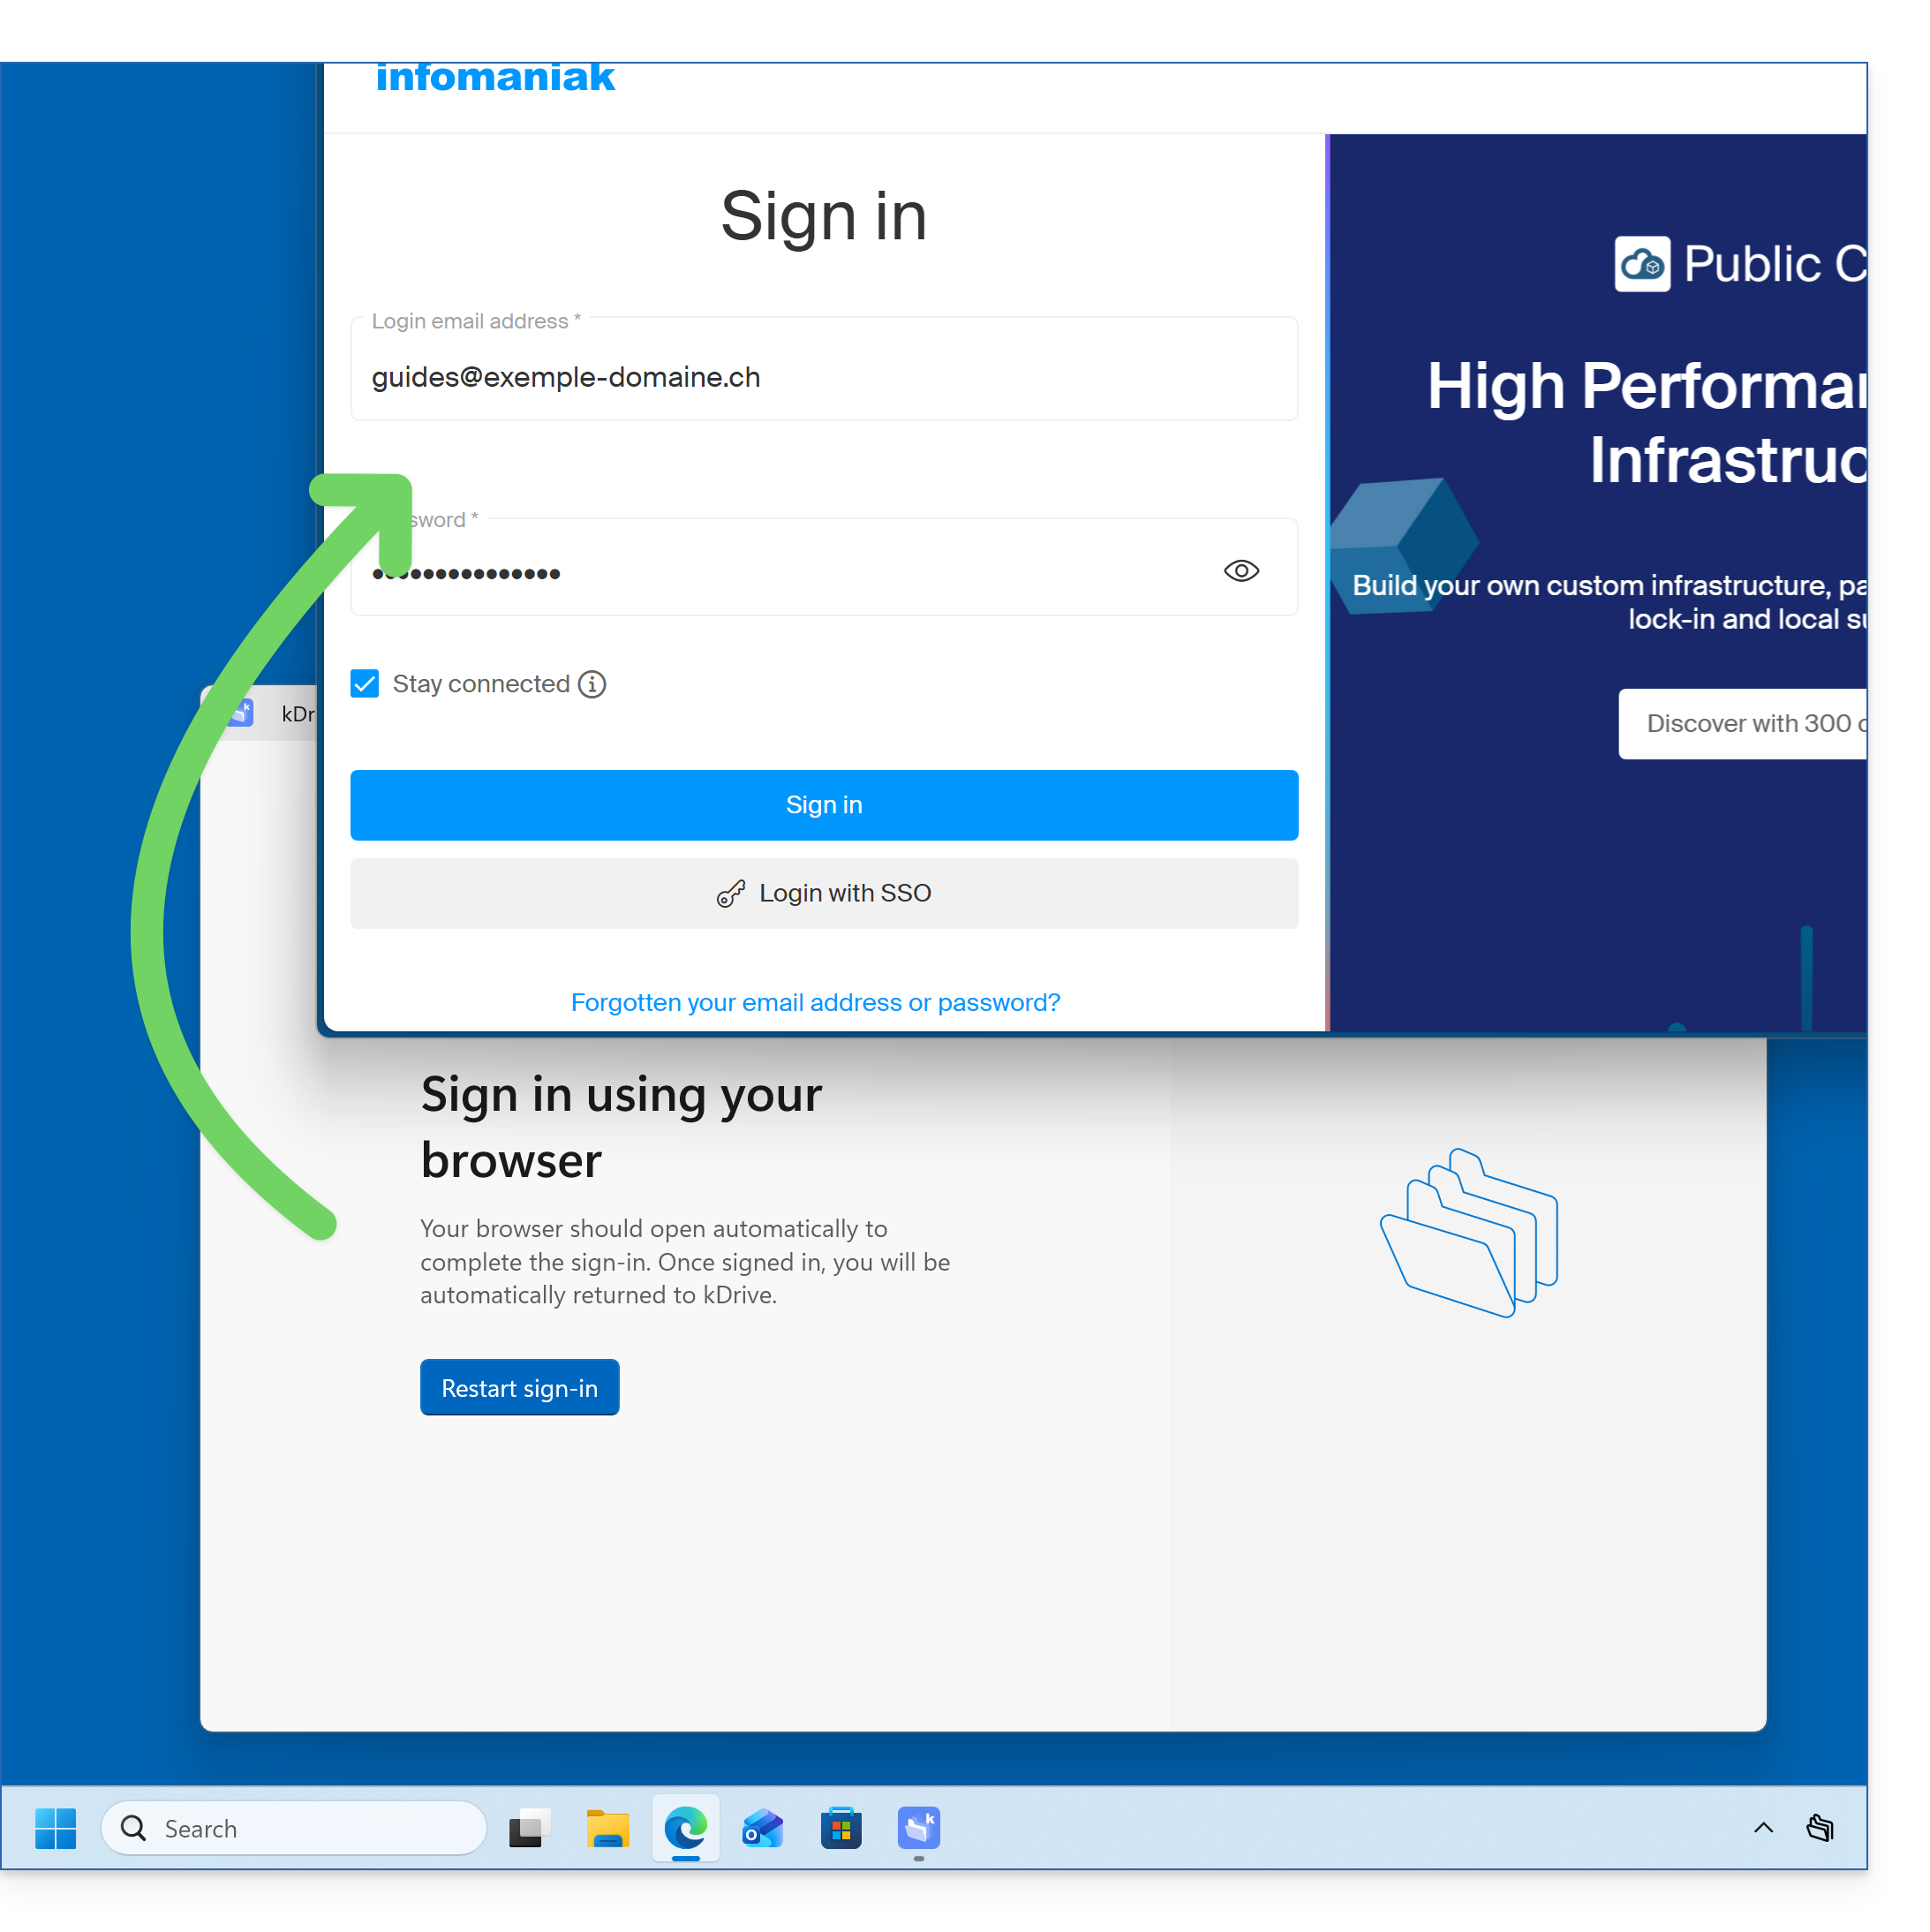
- The browser opens to allow you to connect to your Infomaniak account, which will take you to the Organization(s) containing your kDrive:
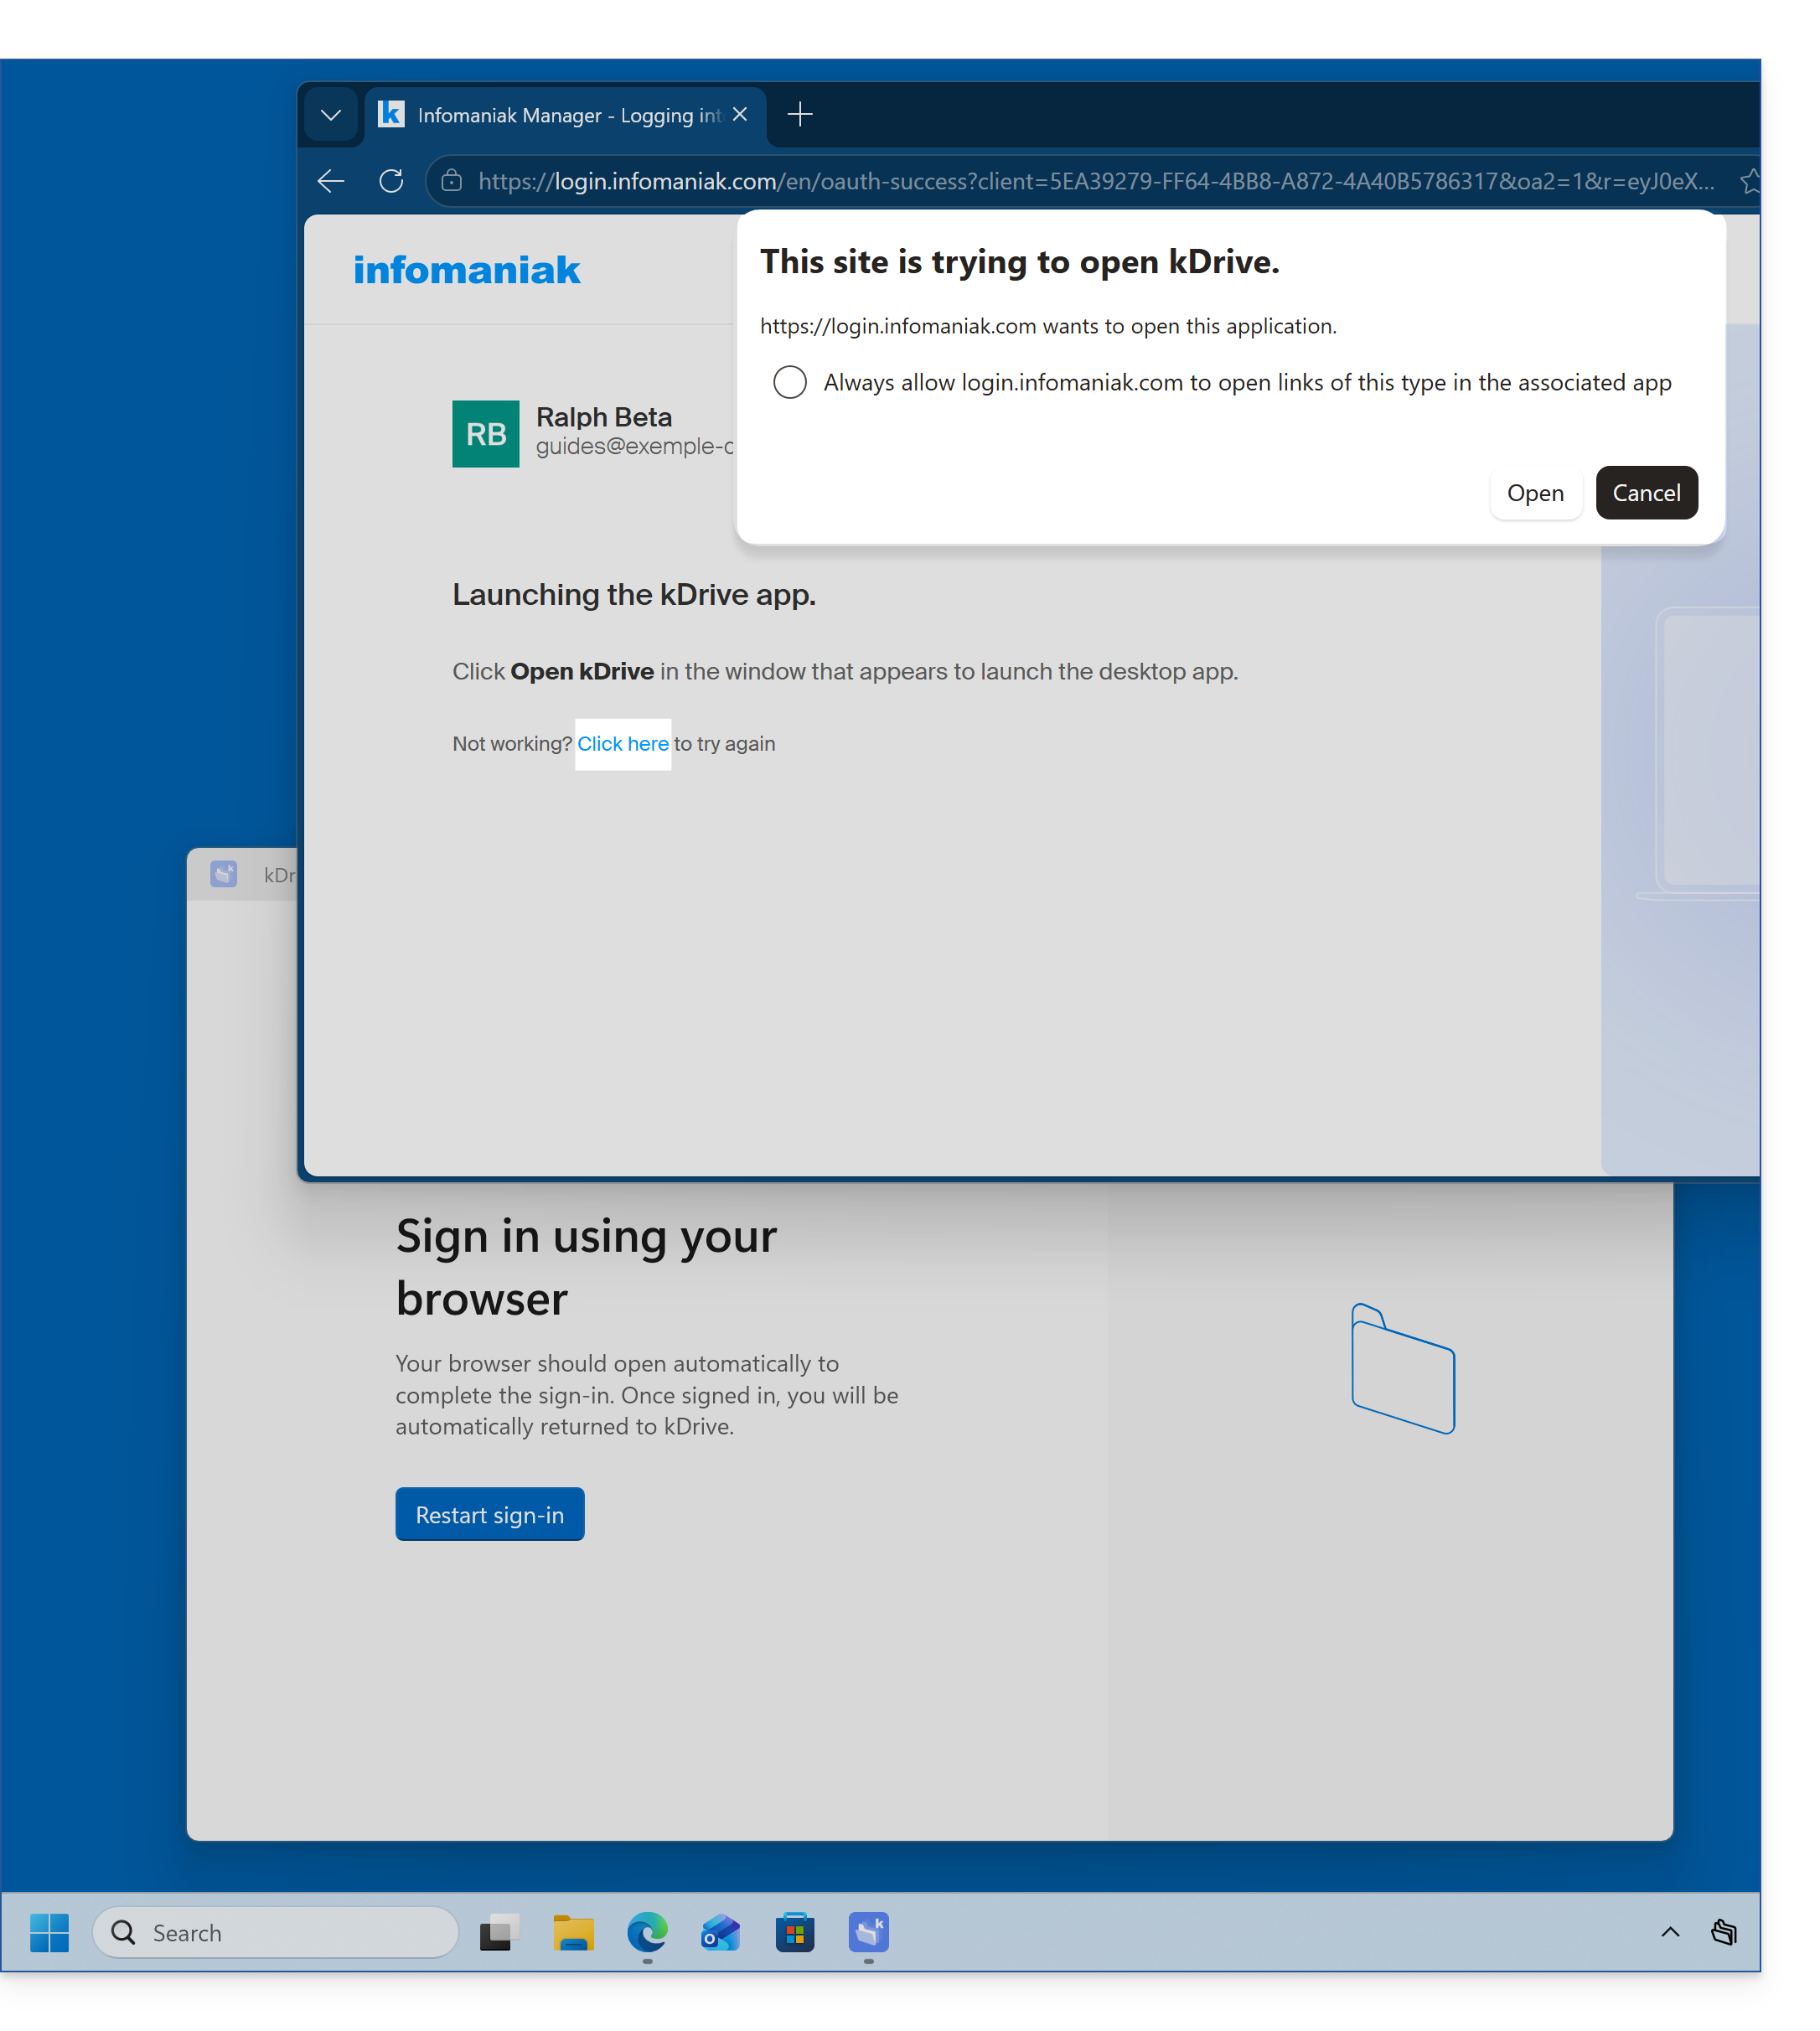
- The browser may ask for your permission to interact with the kDrive application to confirm the connection; click the Open button (if you cancel by mistake, click the link to request it again):
- You can close the browser; select the kDrive(s) that your user has access to and that you want to synchronize on this device, then click on Advanced Settings:
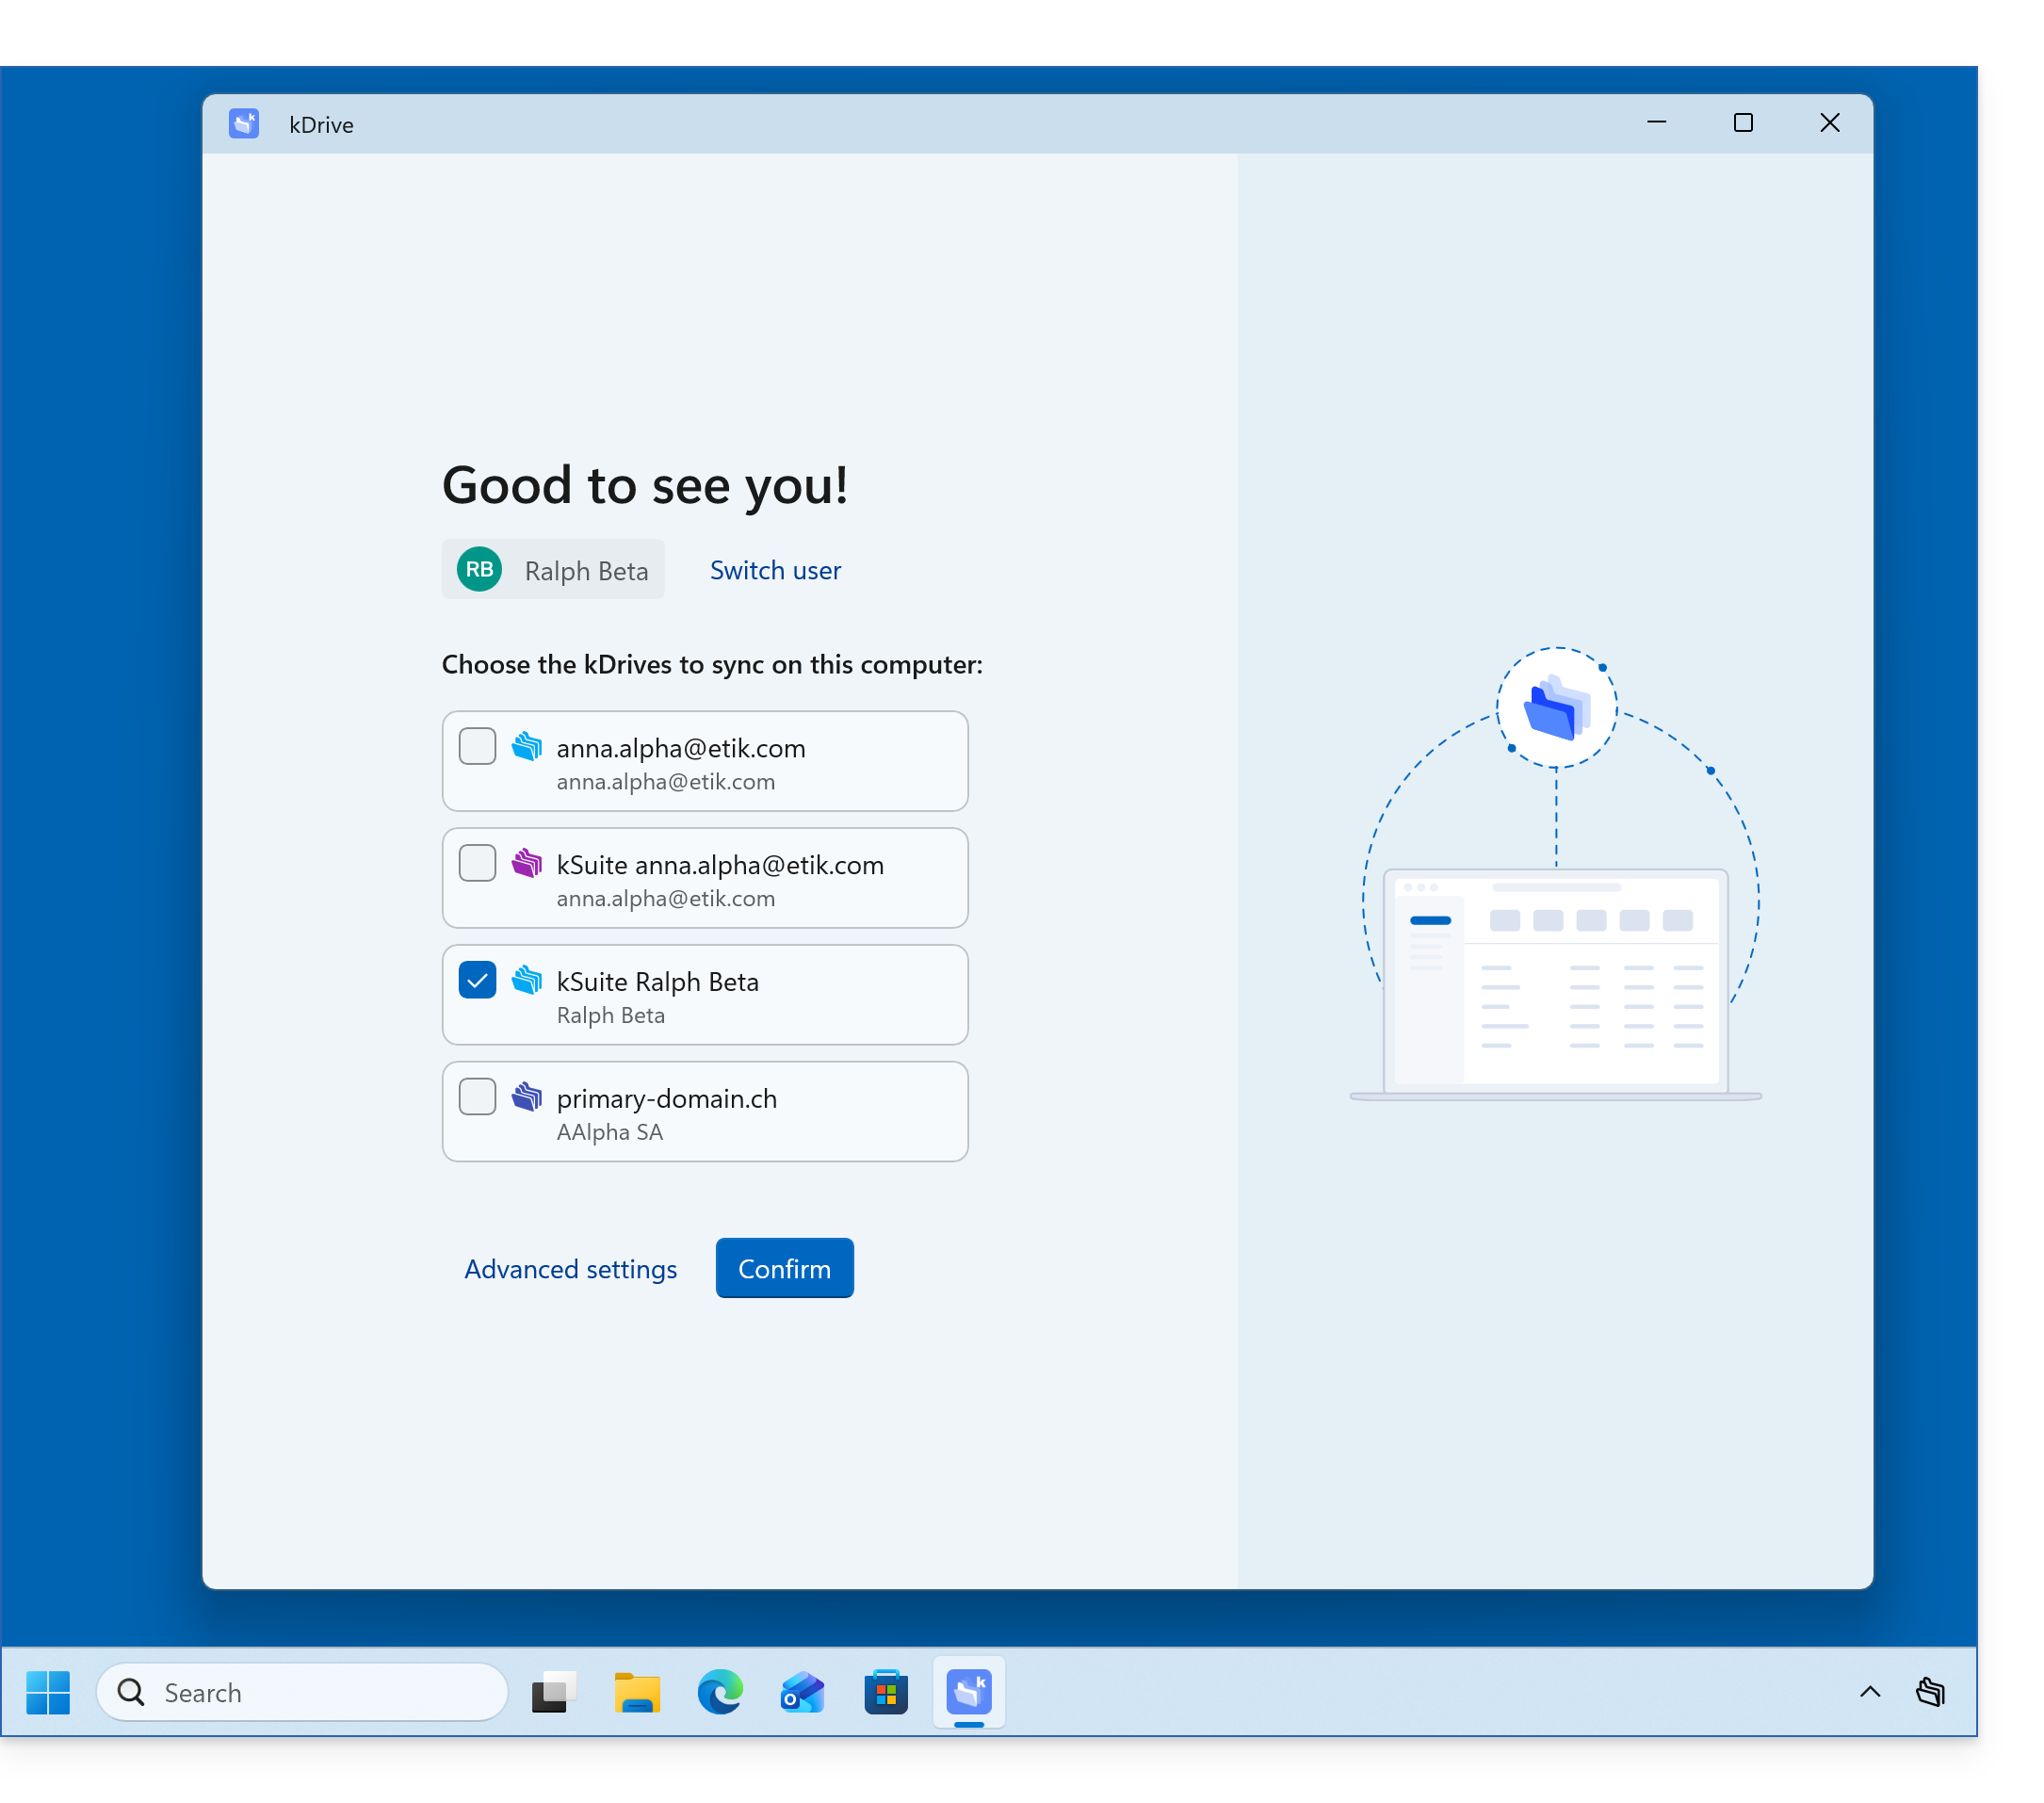
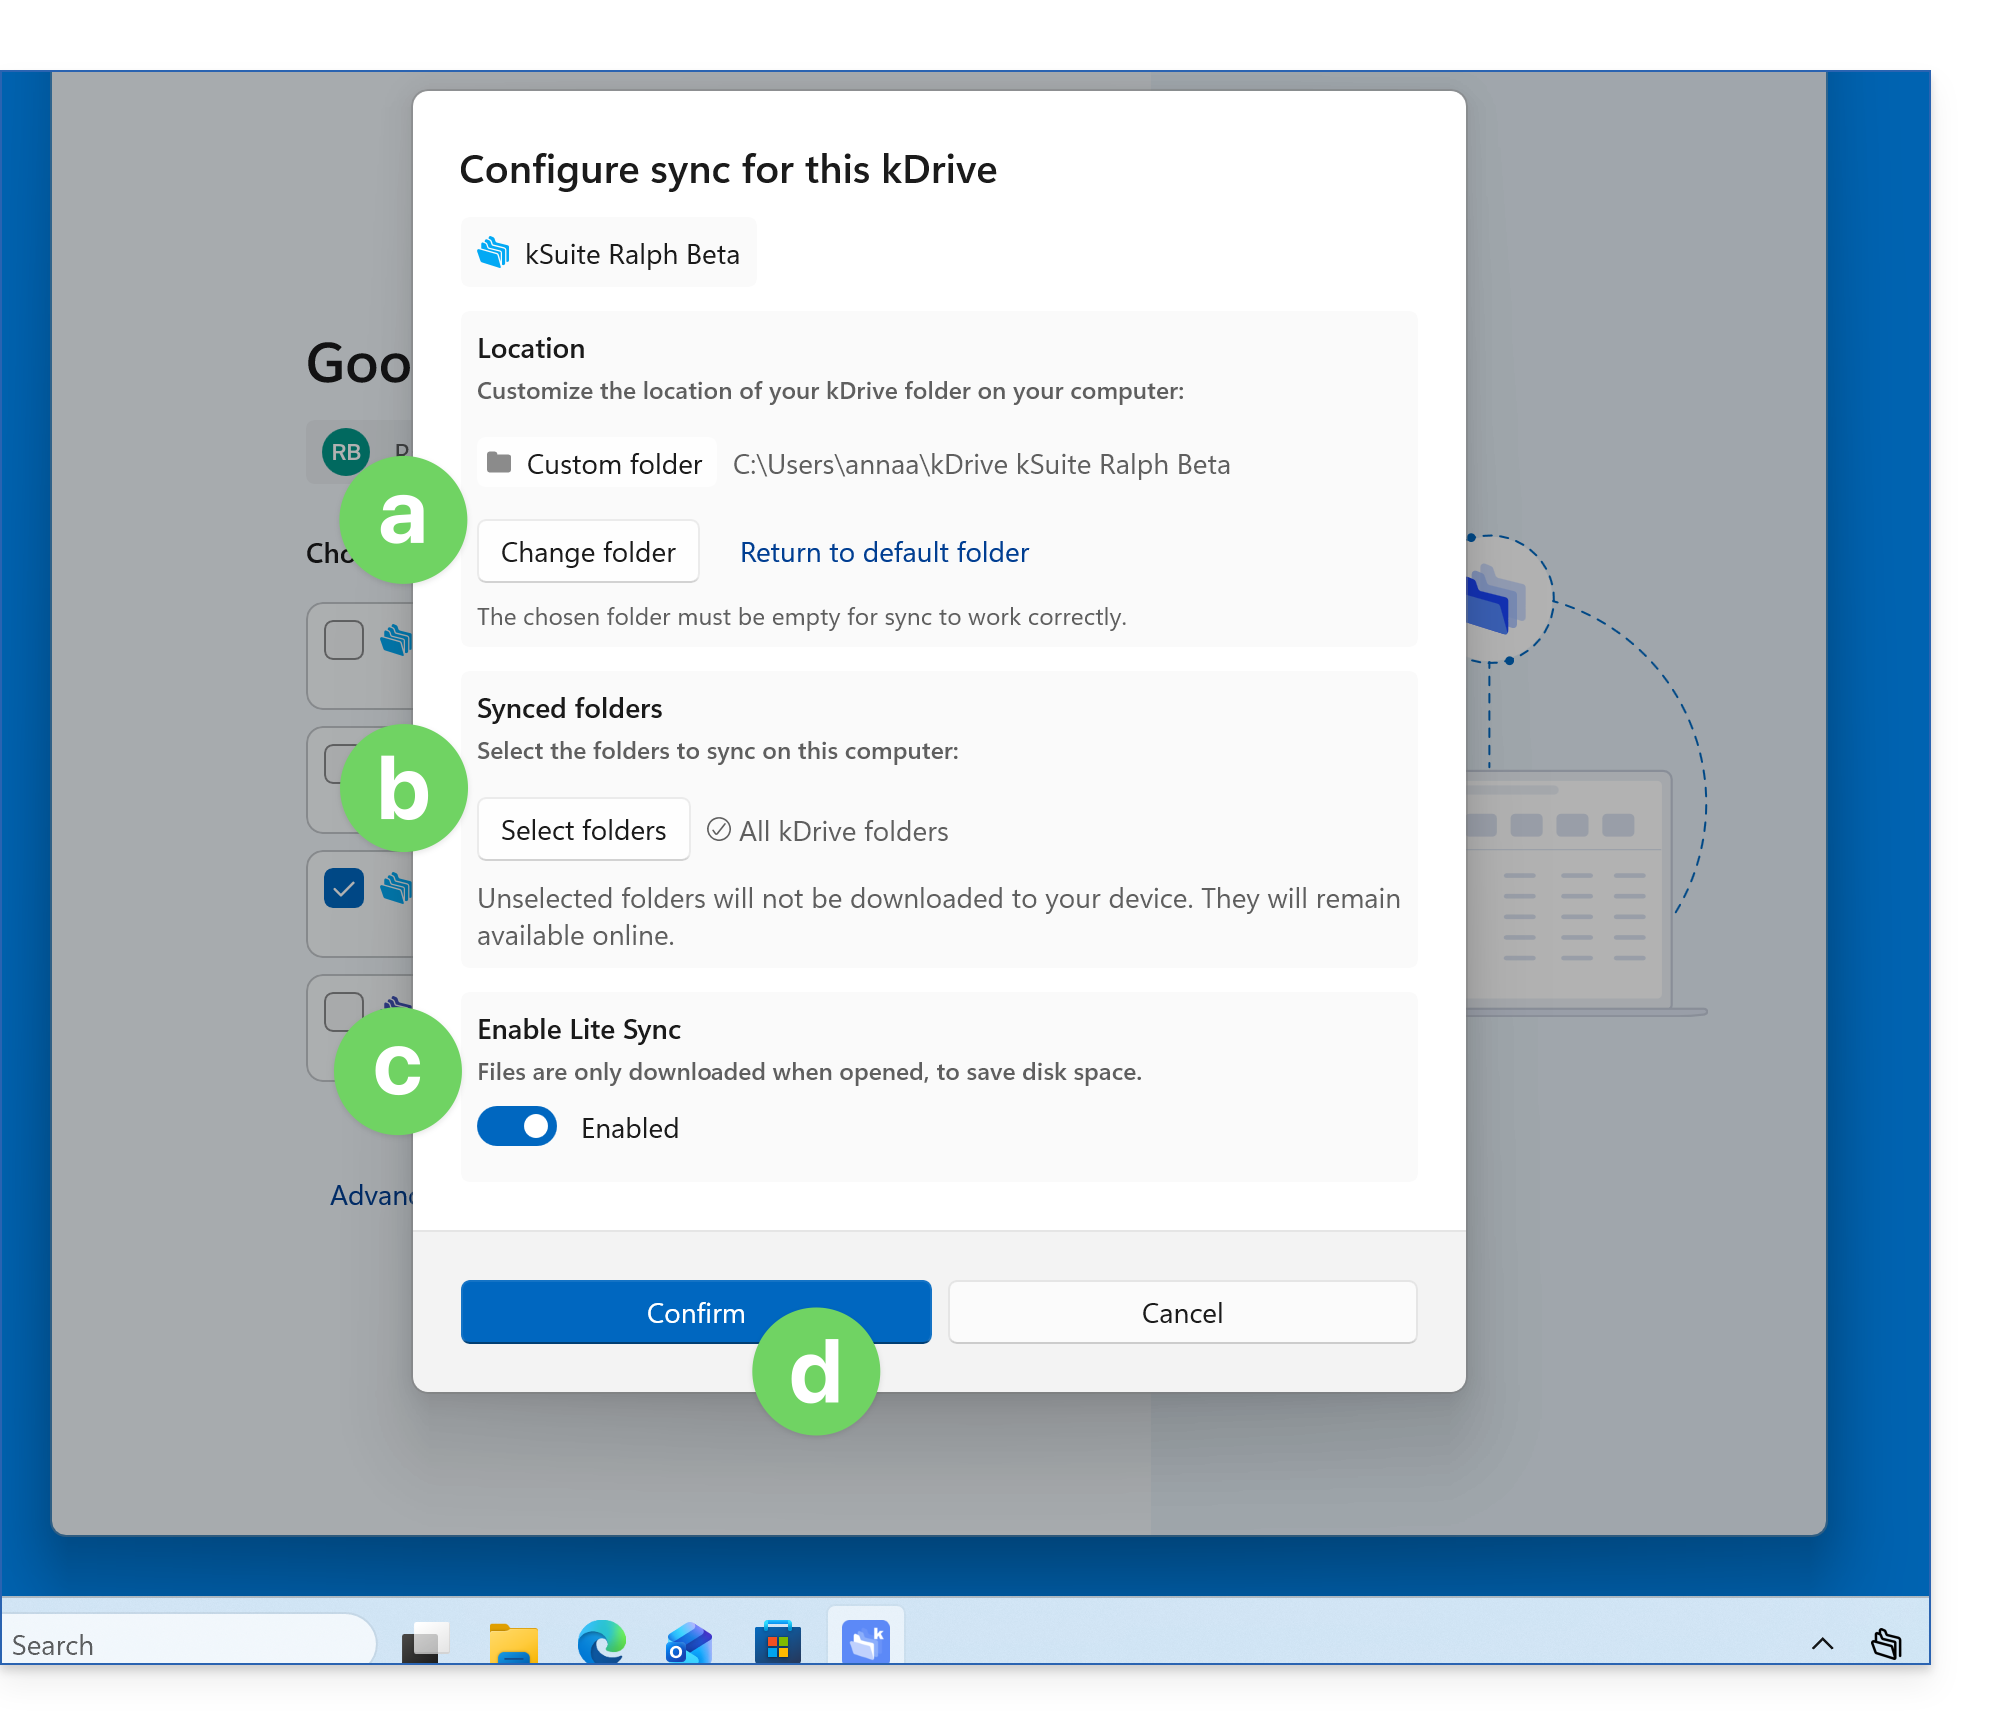
- The Advanced Settings allow you to choose:
- the location where the kDrive data will be stored (the folder must be empty),
- the existing folders on kDrive that should not be displayed on this device (❓: help),
- whether to store the kDrive files on the disk with their actual size, or whether they can be “virtually” listed while being stored on the remote servers (❓: help).
- Confirm at the bottom of the page:
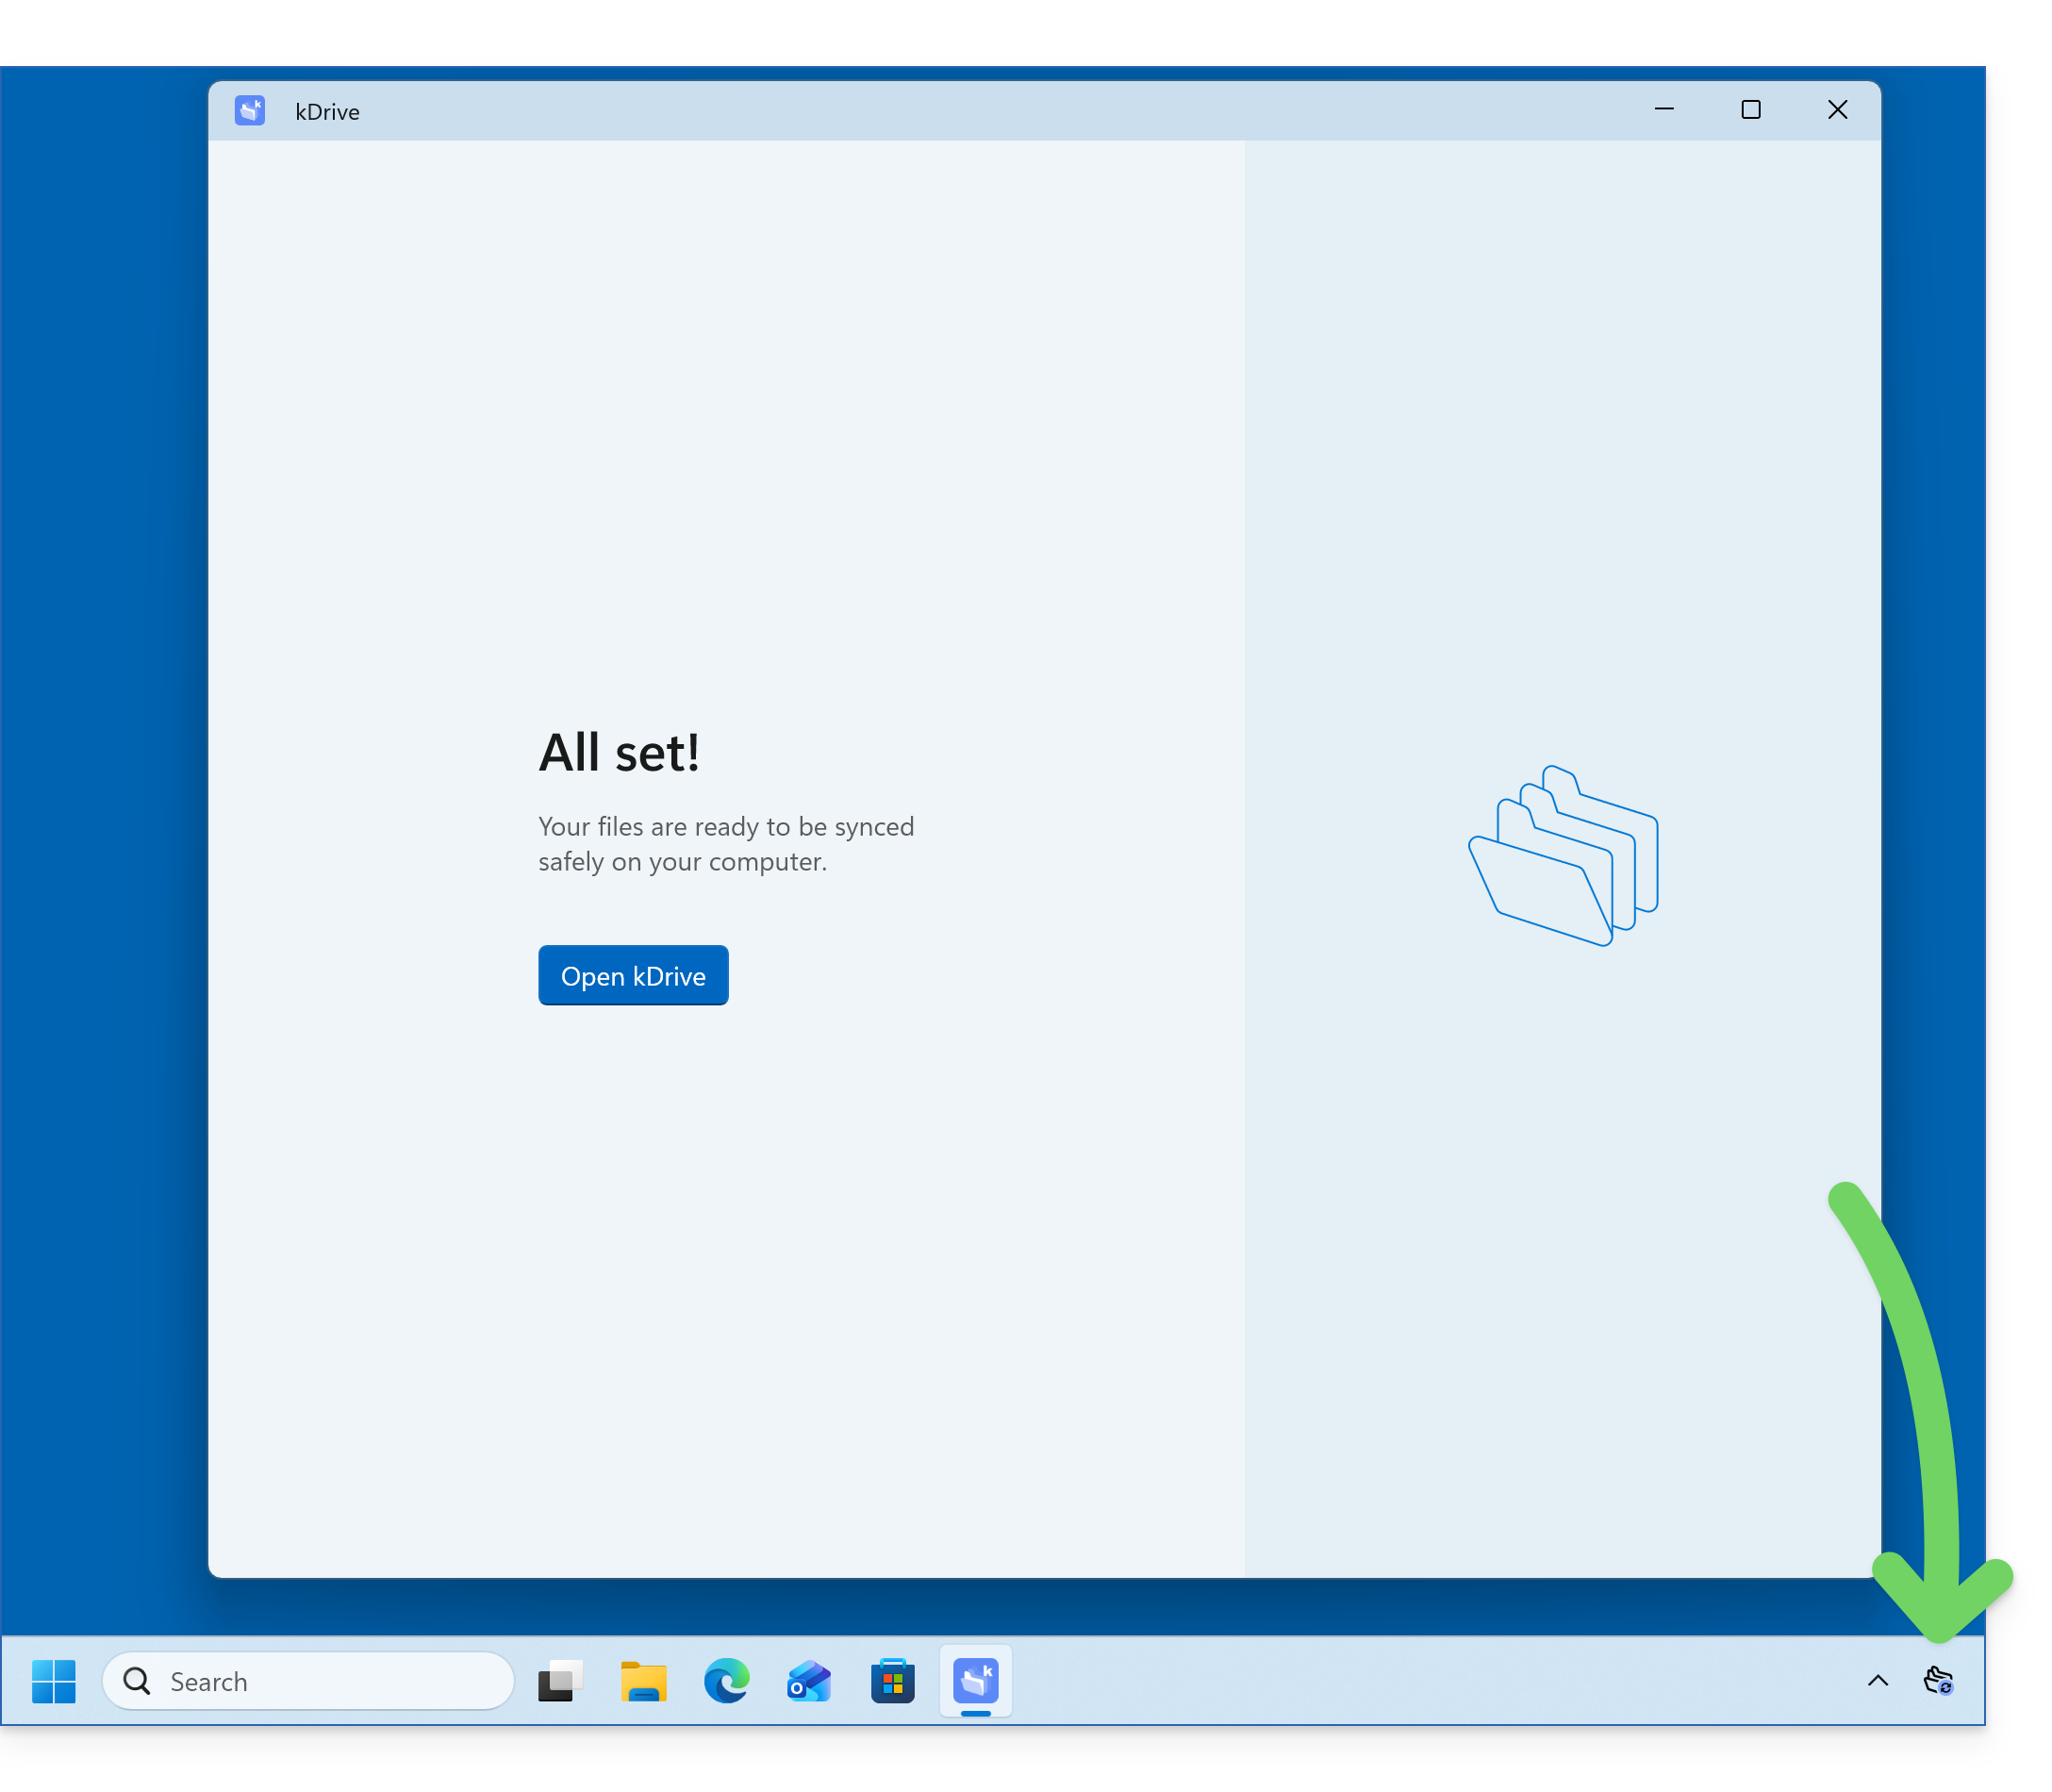
- Click on the Confirm button next to the advanced settings to complete the installation; the app should run in the background, allowing for automatic synchronization; you should always see its icon (❓: help):
- Refer to other guides to continue exploring the kDrive application.
Install the kDrive 3.x app on Windows
To do this:
- Open the downloaded application to start the installation on your device.
- Once the installation is complete, the application should open and a form will prompt you to log in to your Infomaniak account.
- Next, choose the kDrive you want to synchronize from the list, if your account allows access to multiple kDrives — you can link others later if needed (❓: help).
- Enable or disable the Lite Sync option (❓: help), which saves space by virtually storing your kDrive files on your computer, only downloading them when necessary.
- A kDrive folder is created on your hard drive at the specified location (it is recommended not to change this location, but if necessary, you can do so by clicking on the pencil icon ✎):
- It will contain any files that already exist on your kDrive (some folders may be ignored - see below) and will upload all files you place in it to the kDrive server in the future.
- During installation,pay attention to the permissions that may be requestedand that must be granted for the application to function correctly (❓: help).
- Once the installation is complete, you can choose to open the file storage location for kDrive on your hard drive.
- You can then compare the data on your hard drive with the data in the kDrive web app from Infomaniak (online service ksuite.infomaniak.com/kdrive):
- Click on the action menu ⋮ on the right side of the kDrive window.
- Click to open the web version.
Link to this FAQ: https://faq.infomaniak.com/2936
Has this FAQ been helpful?
This guide details how to manage the members of your kChat chat service.
Refer to this other guide if you want to manage the channels to which new members will automatically belong.
Prerequisites
- You must be a kChat administrator:
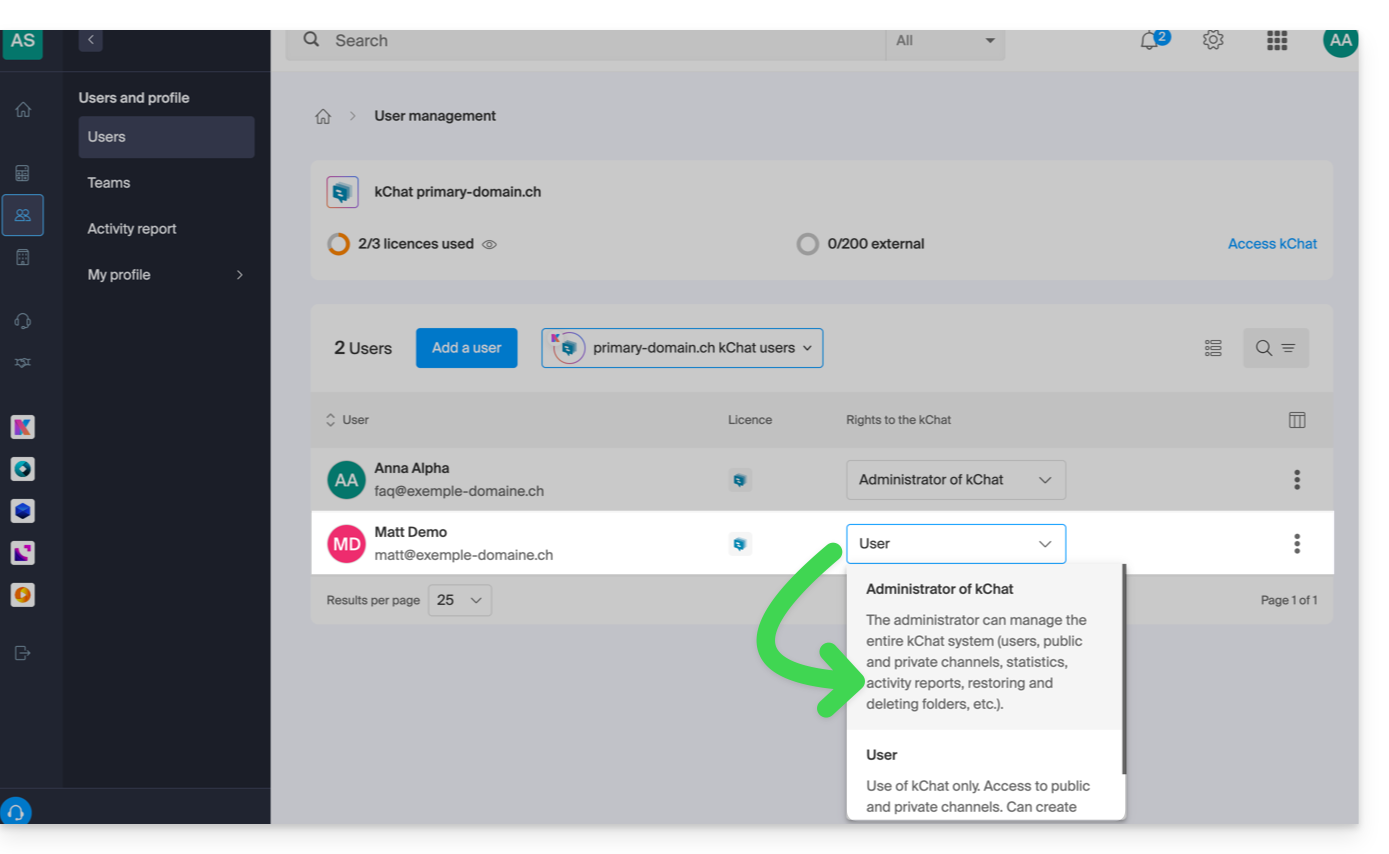
- The role within the Organization is irrelevant; being an Organization administrator in the Organization where kSuite (and therefore kChat) is located is not required, and is not sufficient in any case:
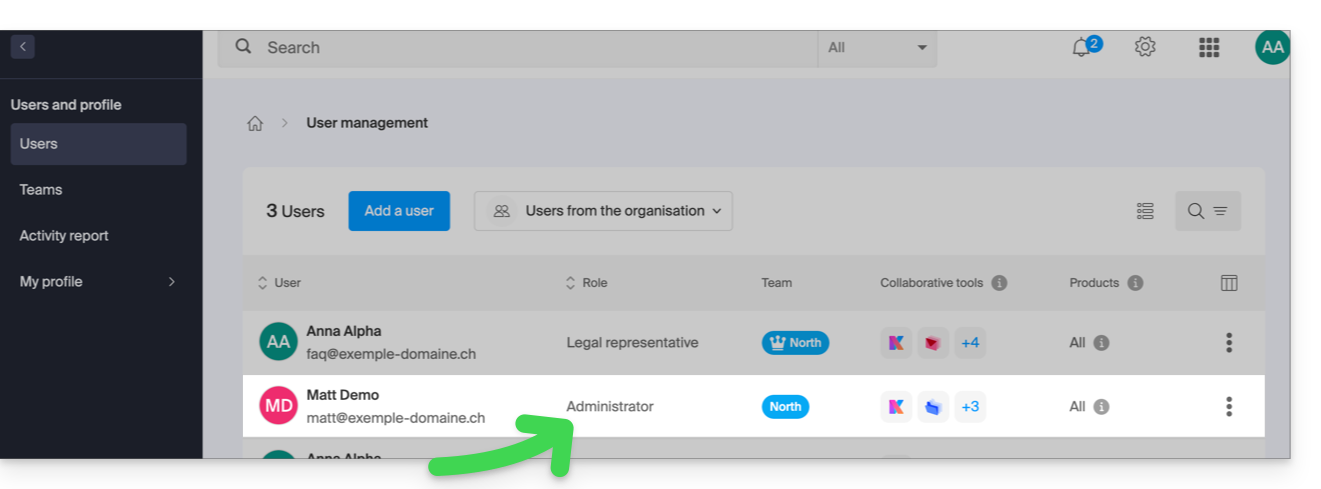
- The role within the Organization is irrelevant; being an Organization administrator in the Organization where kSuite (and therefore kChat) is located is not required, and is not sufficient in any case:
- Invite a user to join kChat.
View the members of a channel
To view the users who have access to the selected channel:
- Click here to access the kChat web app (online service ksuite.infomaniak.com/kchat) or open the kChat desktop app (desktop application on macOS / Windows / Linux).
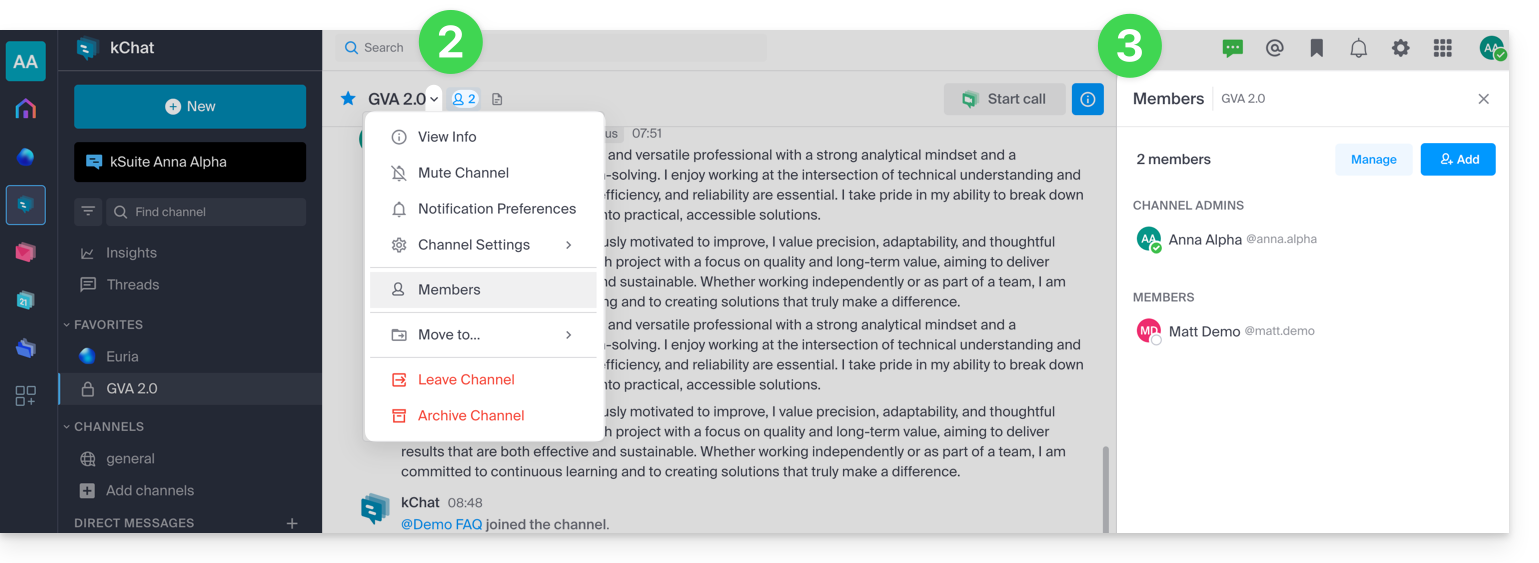
- Click on the profile icon to the right of the channel title or go through the Members menu.
- Participants are displayed on the right side of kChat:
Invite or remove a member from a private channel
When you have opened the members panel of a channel:
- The current participants are displayed on the right side of kChat.
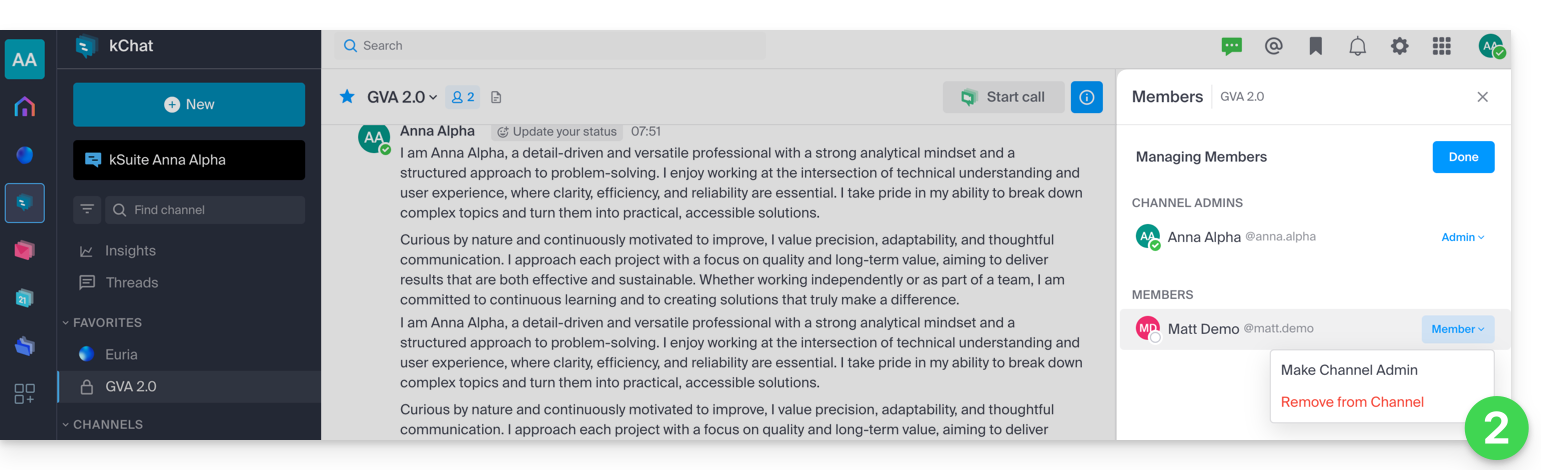
- The Manage button allows you to remove a member from this channel or designate them as the channel Administrator, so that they can, in turn, manage the members:
- The blue Add button allows you to invite a kChat user or an entire Group that does not yet have access to this channel:
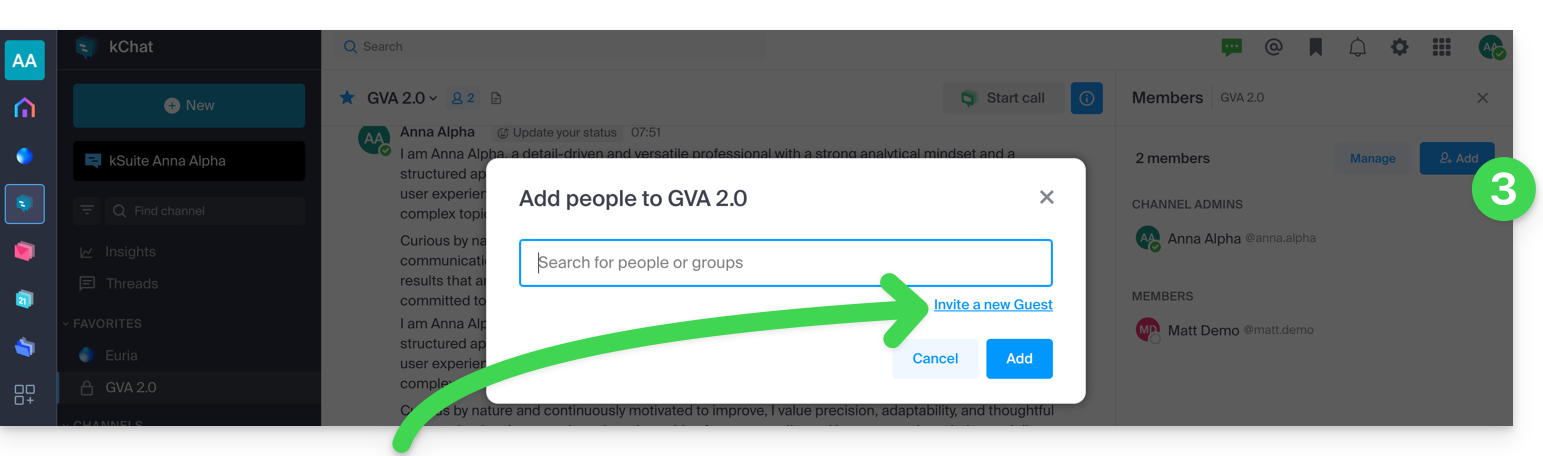
- Refer to this other guide regarding guest additions, i.e., members who will not use a kSuite license to chat with you on kChat.
Link to this FAQ: https://faq.infomaniak.com/1886
Has this FAQ been helpful?
This guide explains how to customize the resources (CPU and bandwidth) used by the Acronis software to back up your computer with Swiss Backup.
Introduction
- This procedure is particularly useful if your internet connection or computer becomes slow while backups are in progress.
- Also, refer to the Acronis documentation on this topic.
- Warning: by limiting the resources allocated to your backups, the latter may take longer to complete.
Customize the resources dedicated to backups
To access the Acronis management interface:
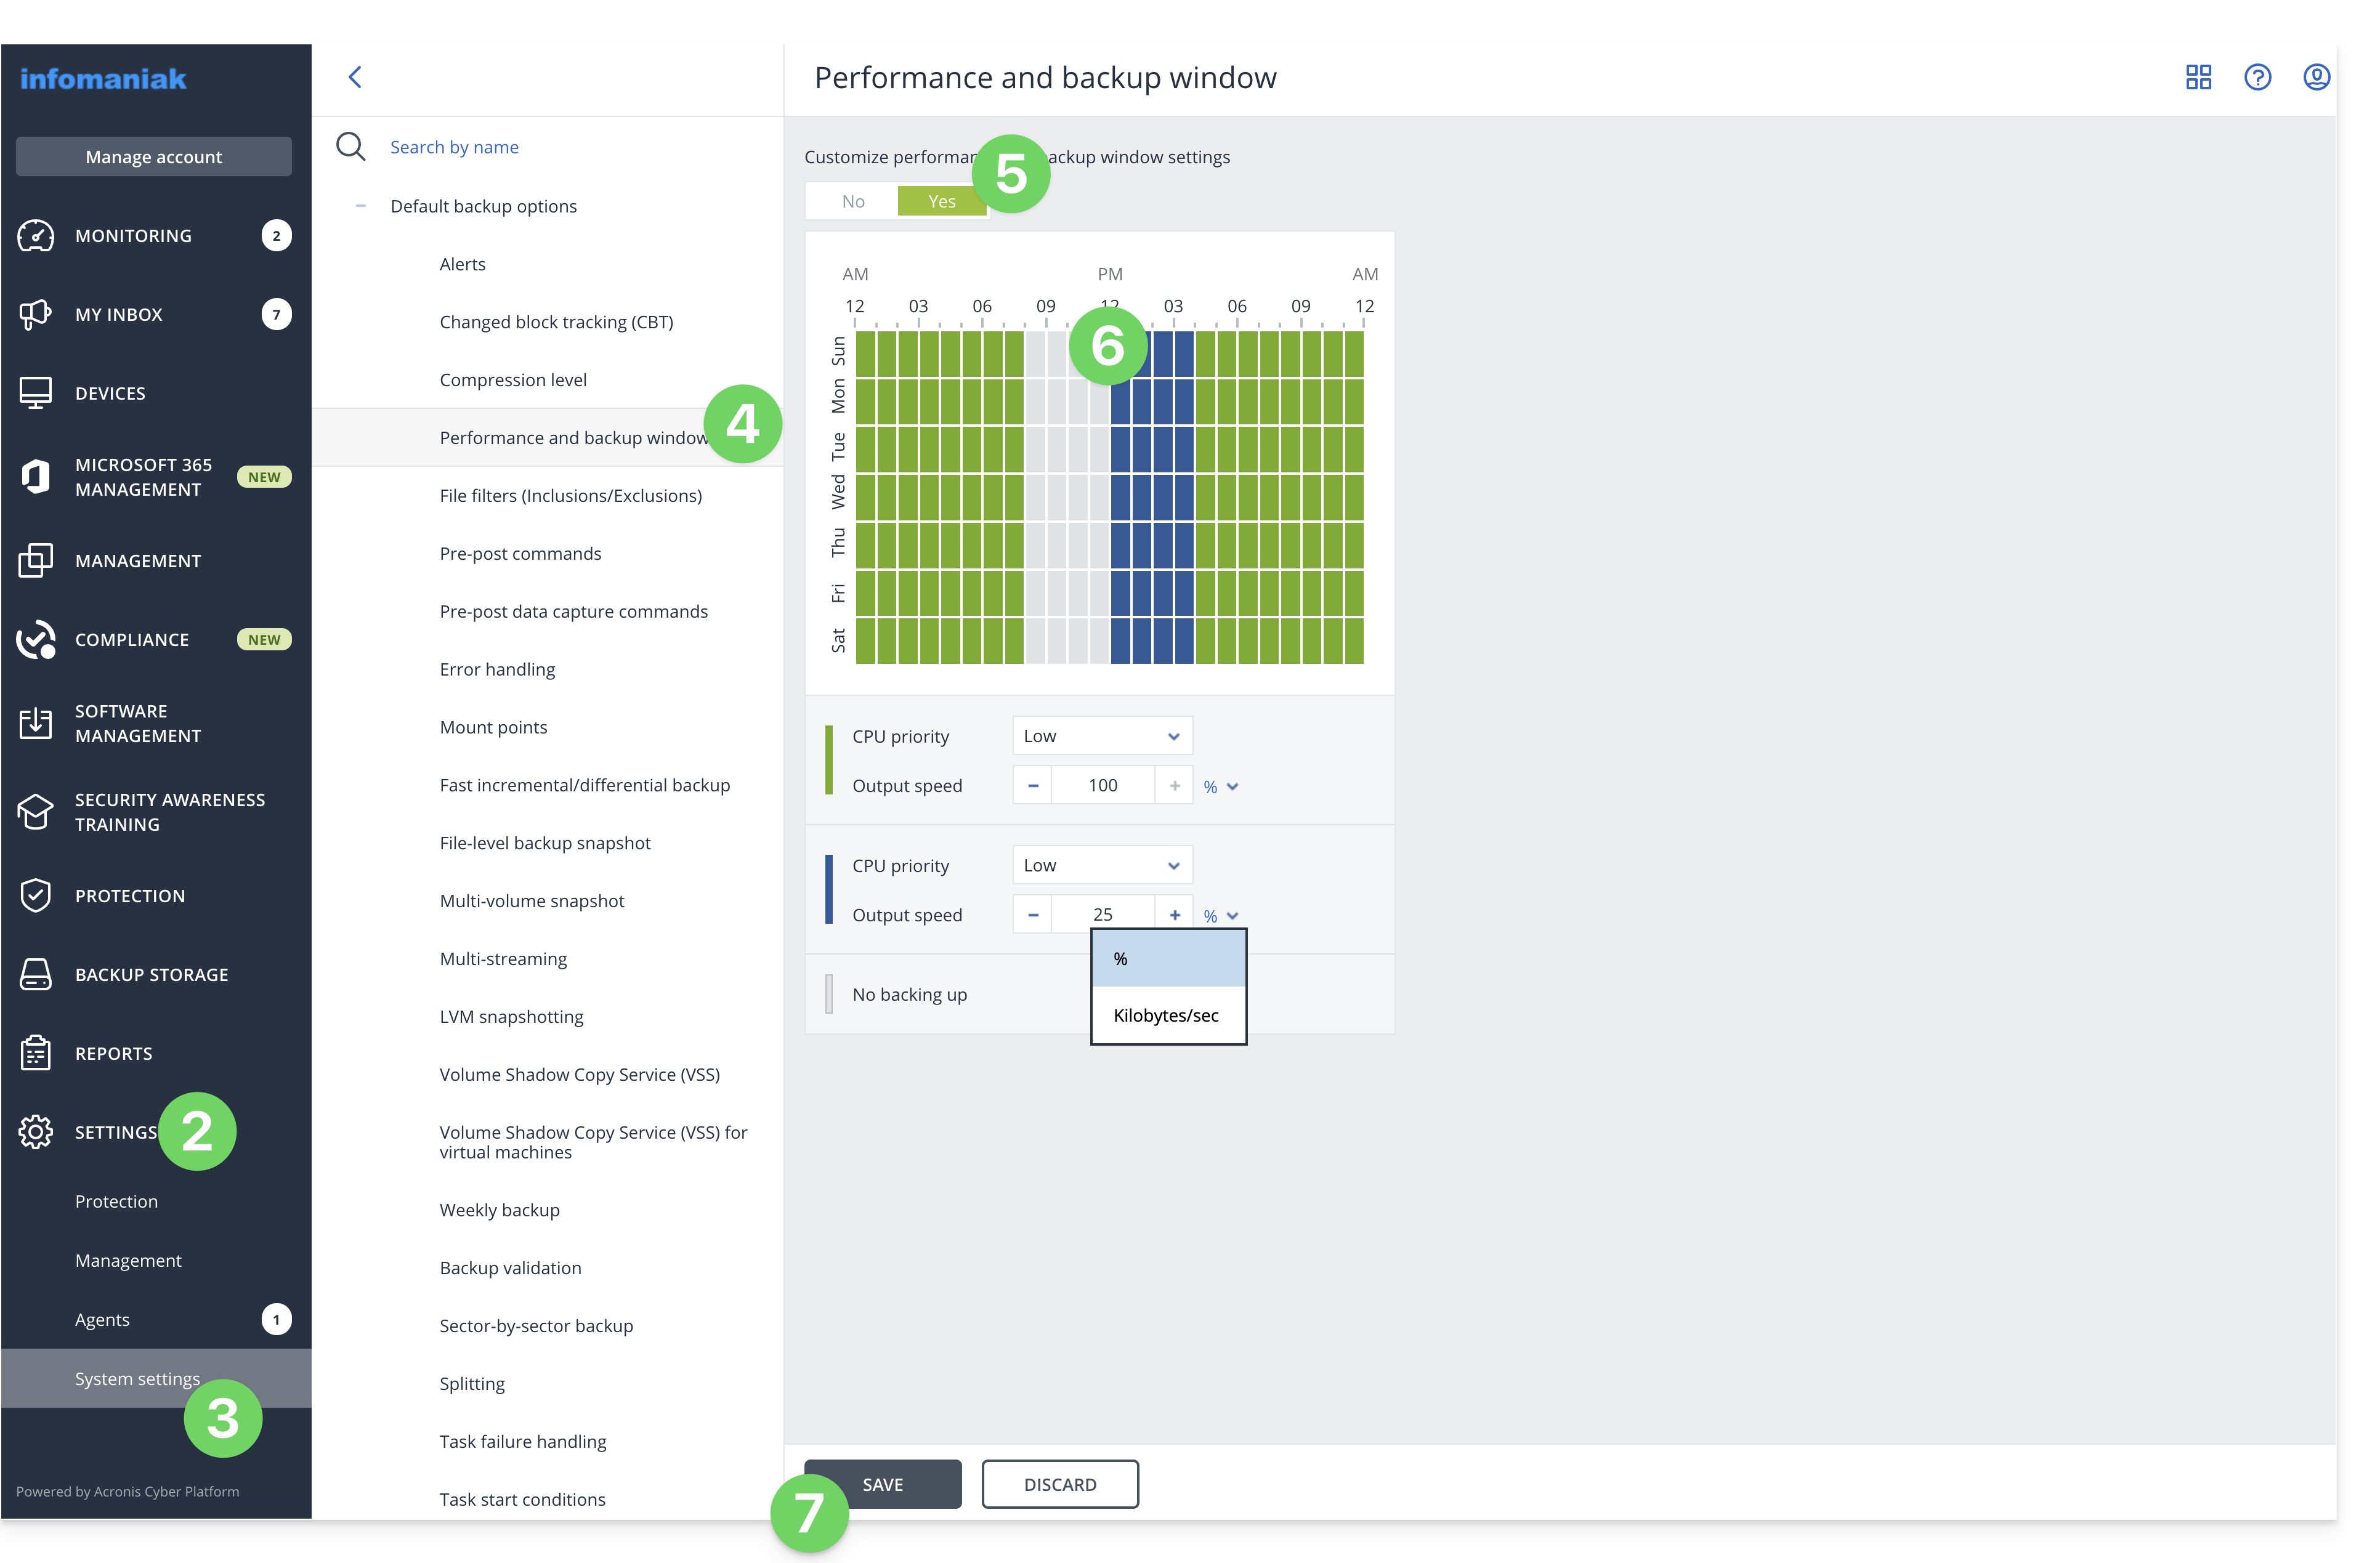
- Click here to access the Acronis Console using the credentials obtained after adding the device (need help?).
- Click on Settings in the left-hand menu.
- Click on System settings in the left-hand menu.
- Click on Performance and backup schedule.
- Click on YES to enable performance customization.
- Define the resources dedicated to Acronis:
- CPU priority: allows you to limit the power allocated to your backups.
- Output speed: allows you to limit the bandwidth allocated to your backups; on macOS, enter this parameter in KB/second because the percentage value is only taken into account under Windows.
- Define a time slot during which the resources will be lower: this allows you to allocate all resources to your backups when you are not using your computer, for example, reduced resources from 6 PM to 6 AM, while Acronis can use all the resources during the night.
- Click on Save:
Link to this FAQ: https://faq.infomaniak.com/2425
Has this FAQ been helpful?
This guide explains how to use the drawing feature with kMeet, Infomaniak's ethical and free video conferencing solution, which allows participants to collaborate visually.
Display a collaborative whiteboard
It is possible to display a blank area where all participants can enter information:
- Start the kMeet desktop app, then start a meeting (❓: help) or join one (❓: help) in which the users will be present.
- Once in the meeting, click on the action menu ○○○ in the kMeet toolbar.
- Click on Show whiteboard:
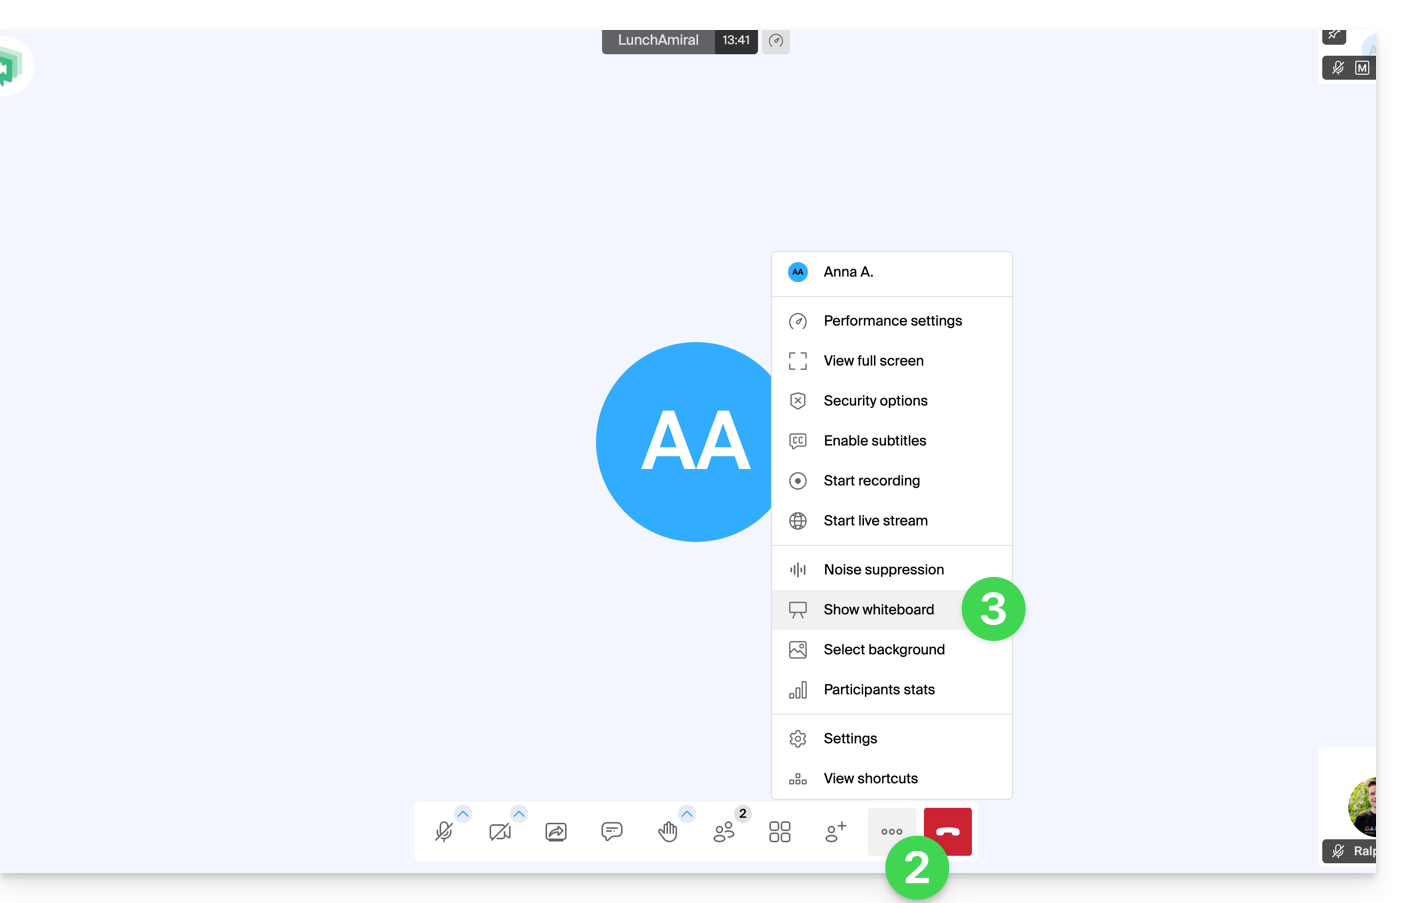
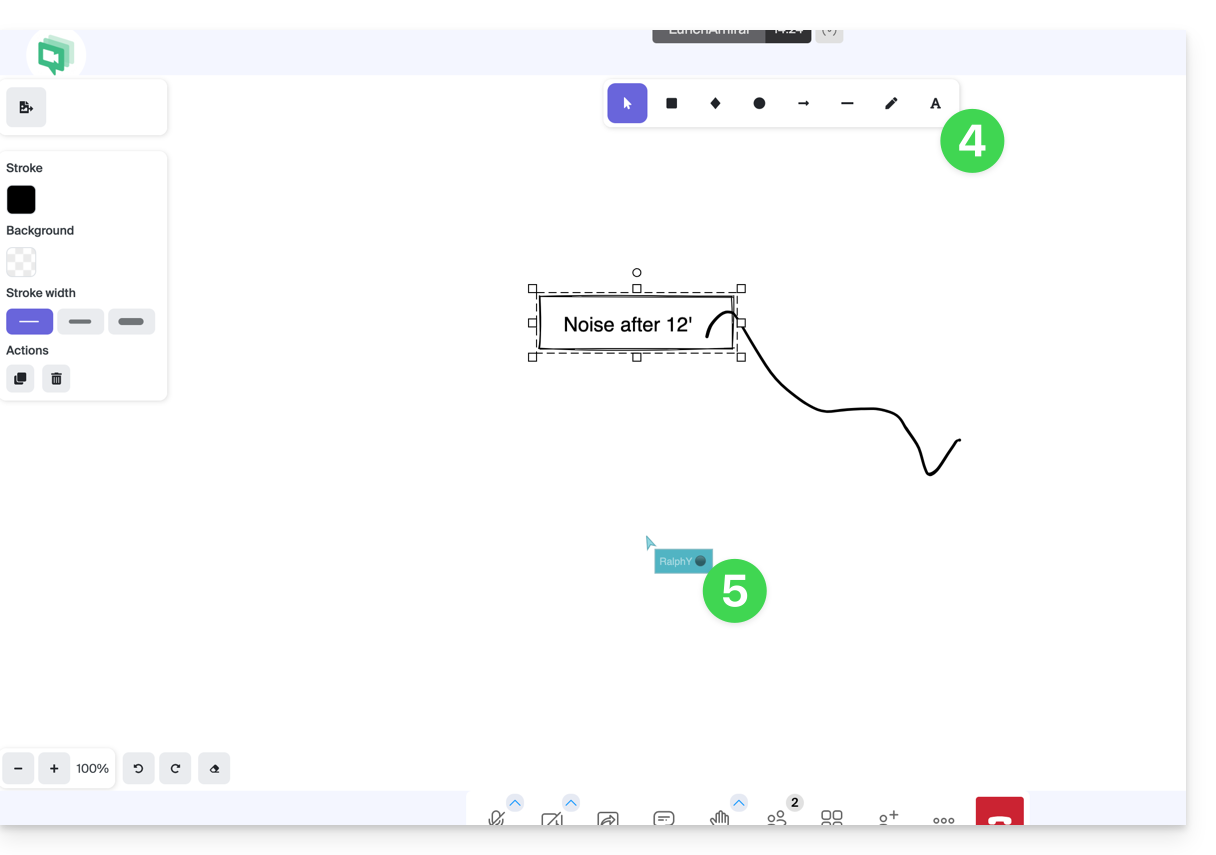
- The drawing area will be displayed for all participants, and each person can write what they want in it.
- Each participant's cursor is displayed:
Drawing on a screen sharing session
Prerequisites
- Have the desktop app kMeet (desktop application for macOS / Windows / Linux).
- Share your entire screen, not just a single application window (see point 2 below).
Next:
- Start the kMeet desktop app, then create or join a meeting room where the users will be.
- One of the participants initiates a screen sharing session (desktop app only - see prerequisites).
- The other participants can then collaboratively draw on the shared screen:
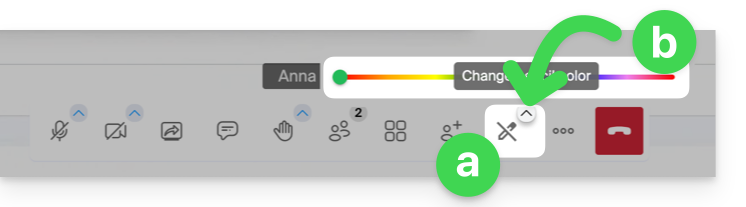
- Click the pencil icon in the bottom toolbar to draw on the screen.
- Change the pen color if needed:
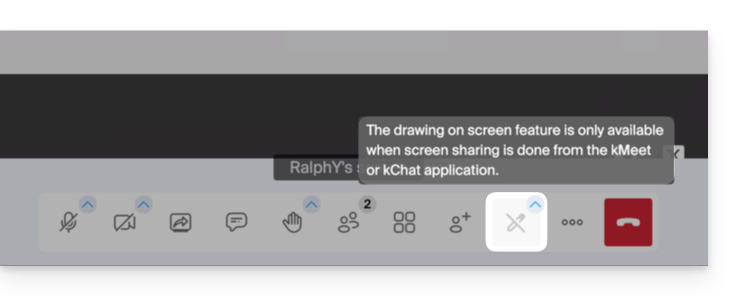
- If the screen sharing is not initiated from the kMeet application (desktop version), this message will appear for participants who want to enable the drawing feature:
It is also possible to take control of the device during a screen sharing session.
Link to this FAQ: https://faq.infomaniak.com/2620
Has this FAQ been helpful?
This guide explains how to transfer files from an iPhone to an Infomaniak kDrive.
Prerequisites
- Have a kDrive or kSuite plan.
- Install the kDrive mobile app (application for iOS smartphones or tablets).
Manually send data to kDrive iOS (iPhone, iPad)
To do this:
- Select the data you want to share on kDrive.
- Click on the share icon on your iPhone:
- Choose kDrive from the options provided:
- Select the kDrive and the backup location - if this is not suitable, tap it to change the storage folder:
- Choose another folder or create a new folder:
- Determine the type of folder to create (shared folder with kDrive users or personal & private folder):
- Name the folder, choose the desired sharing settings, then click the blue button to create the folder:
- Click on the newly created folder to select it as the location:
- Create a possible subfolder within it, or confirm the chosen location using the blue button:
- Press the blue button to start uploading your files to kDrive:
- You can track the progress of the transfer to kDrive:
- The upload is performed in the background:
Once the files have been uploaded, you can access them on all devices connected to kDrive…
- … instantly on the kDrive web app (online service ksuite.infomaniak.com/kdrive).
- … after downloading the list of these new files to the devices on which the desktop app kDrive (desktop application on macOS / Windows / Linux) is installed.
Link to this FAQ: https://faq.infomaniak.com/2796
Has this FAQ been helpful?
This guide details the Auto DJ feature of Infomaniak's Streaming Radio service, which allows you to create a live radio station that broadcasts 24/7 using your own audio content (music, shows, podcasts, jingles, etc.) that you have previously uploaded to your storage space.
Introduction
- The Auto DJ uses the files stored in your Infomaniak AOD (Audio on Demand) space to create a linear stream.
- You can use this same space for your on-demand file storage needs.
- You organize your media, create your playlists, and schedule their broadcast via an intuitive calendar interface.
- This ensures continuous broadcasting without requiring an encoder to be active at all times.
Enable Auto DJ
Prerequisites
- You must have at least the right to manage the VOD/AOD service “autodj” and the related Radio Streaming (❓: help).
- To manage Auto DJ via API, the token created for managing the radio must include the following scopes:
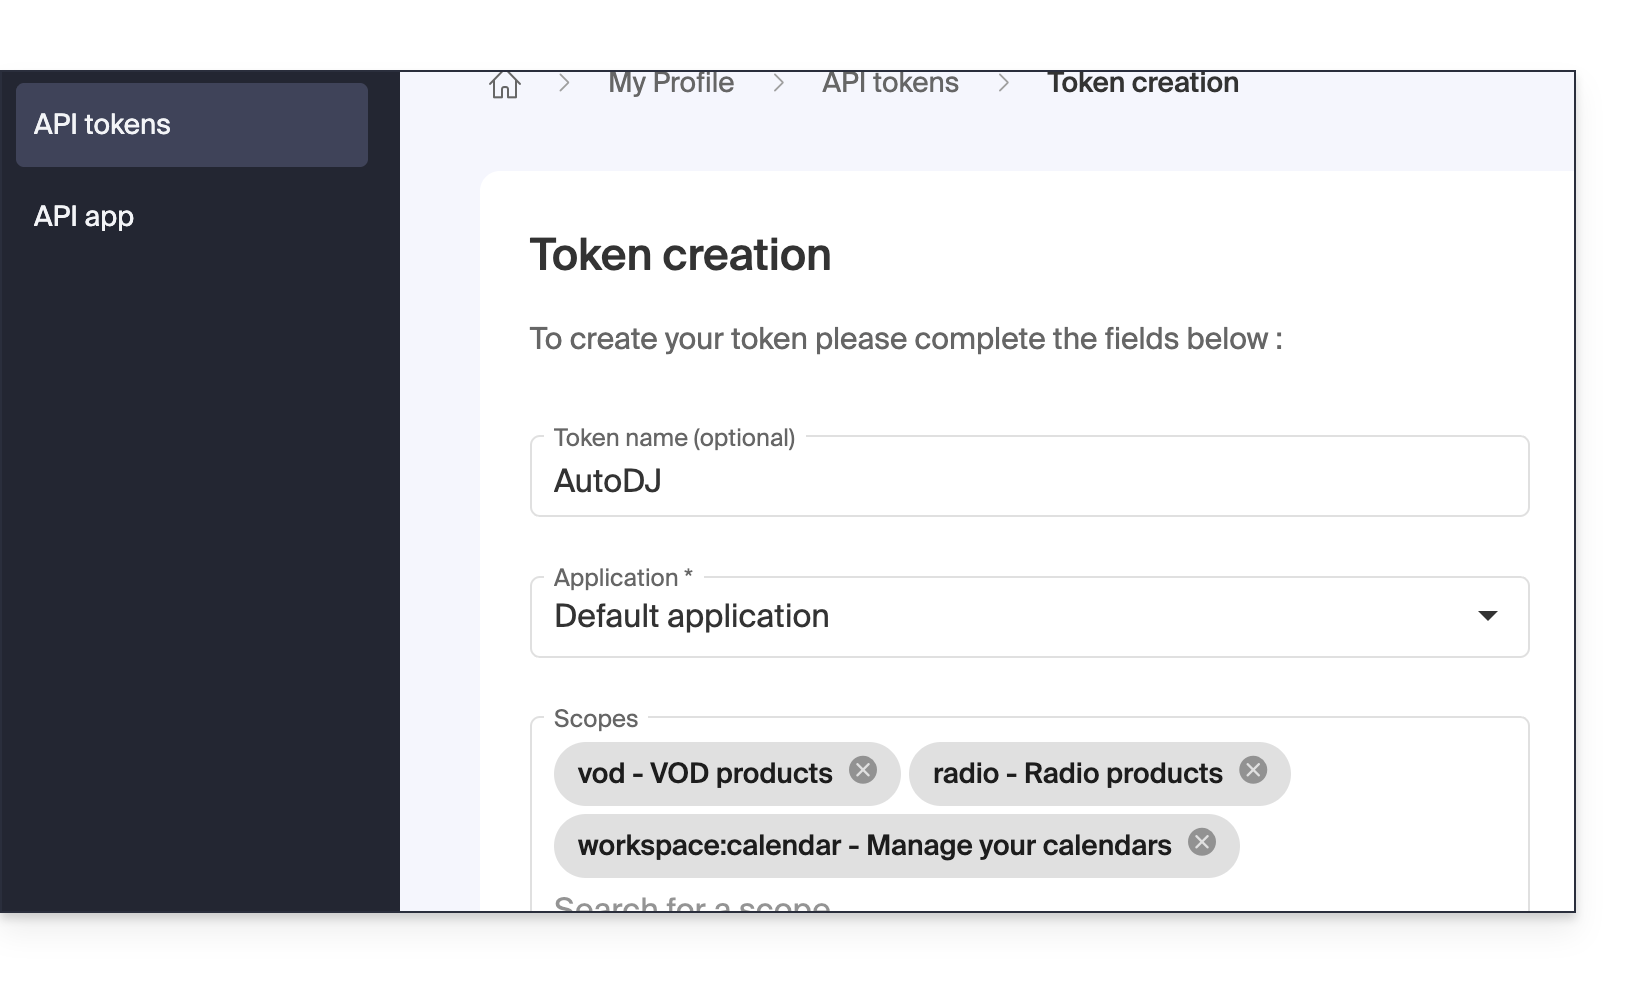
vodradioworkspace:calendar
To activate and start Auto DJ:
- Click here to access the management of your Streaming Radio in the Infomaniak Manager (need help?).
- Click directly on the name assigned to the Streaming Radio in question:
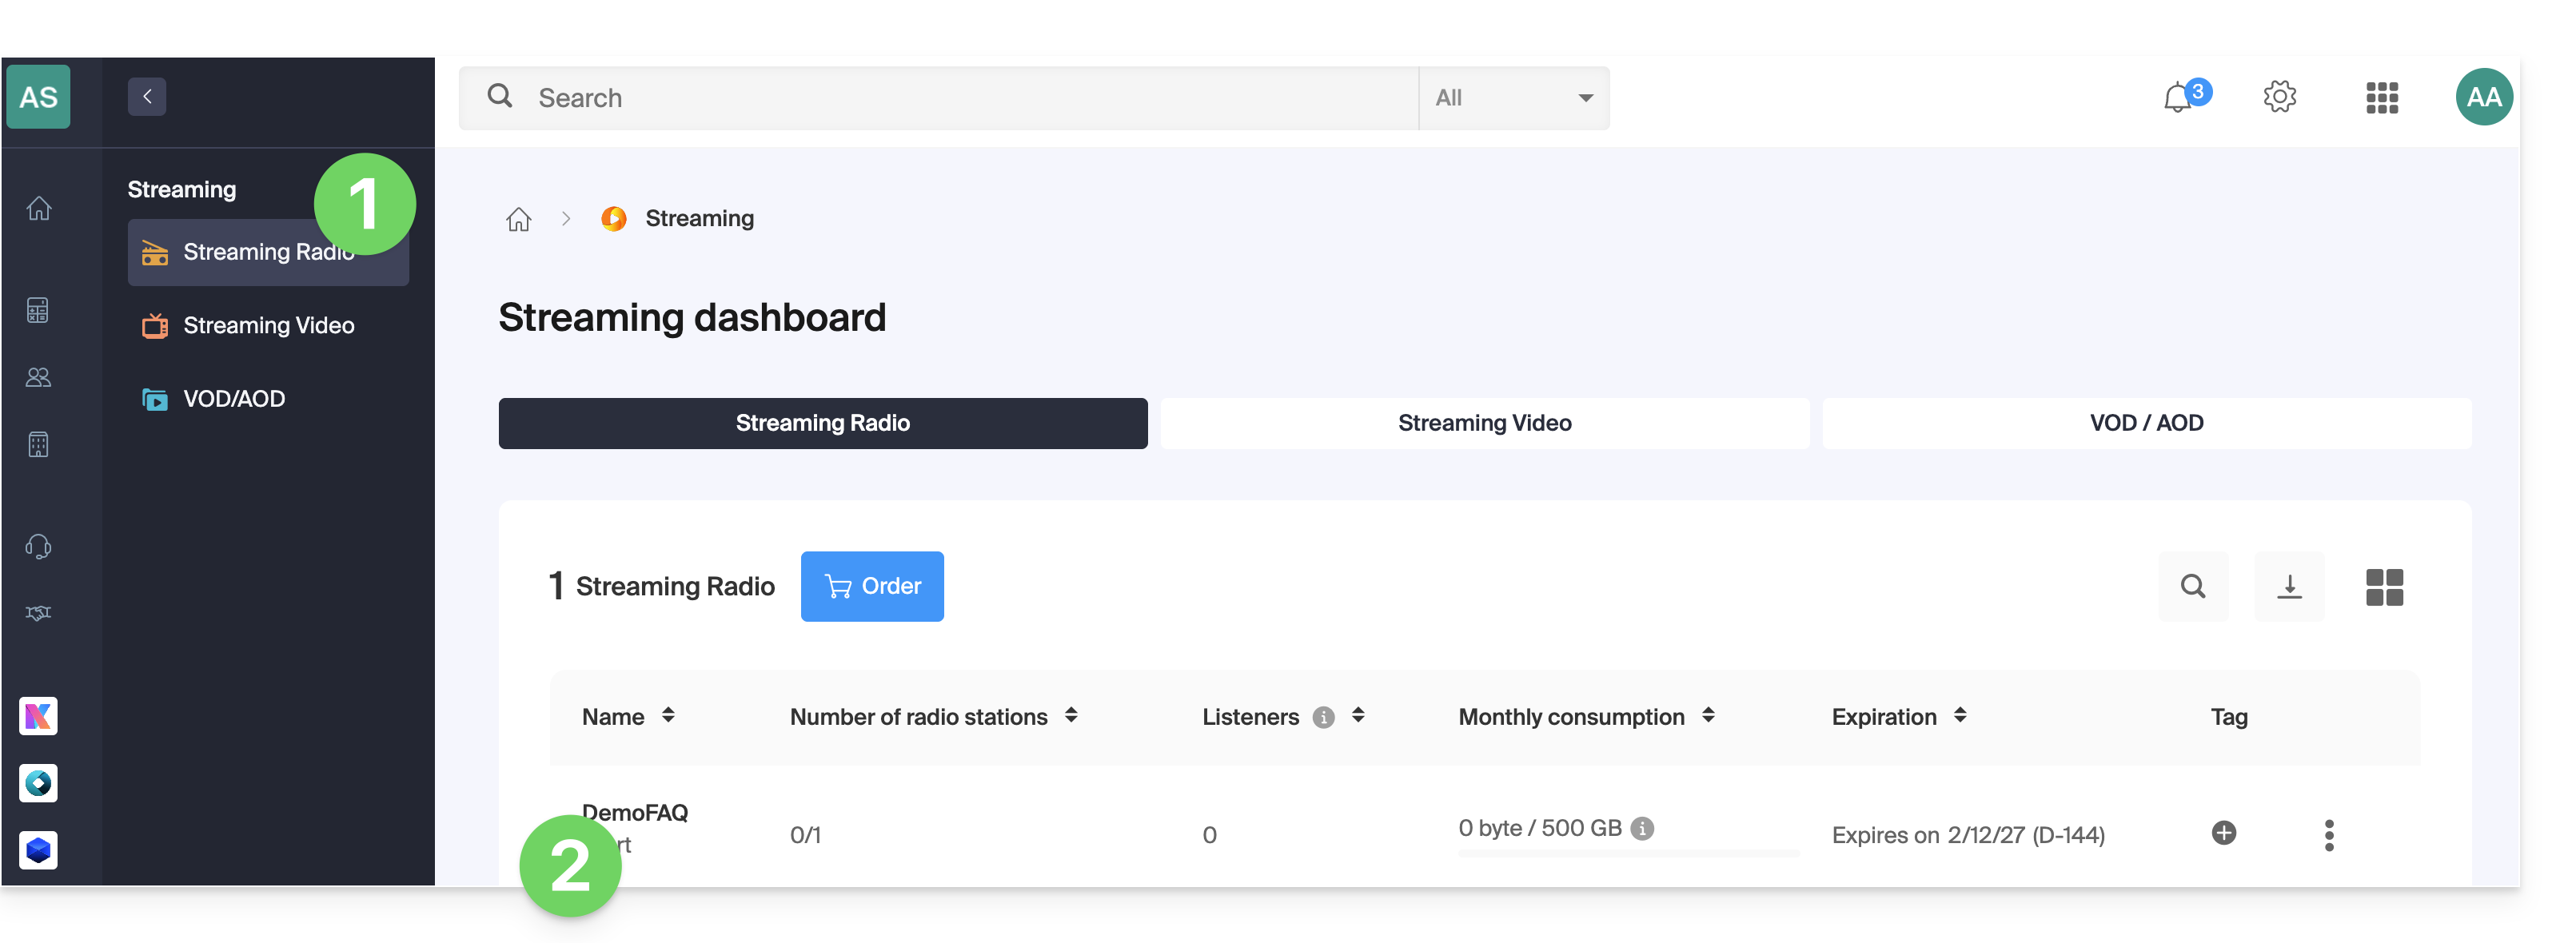
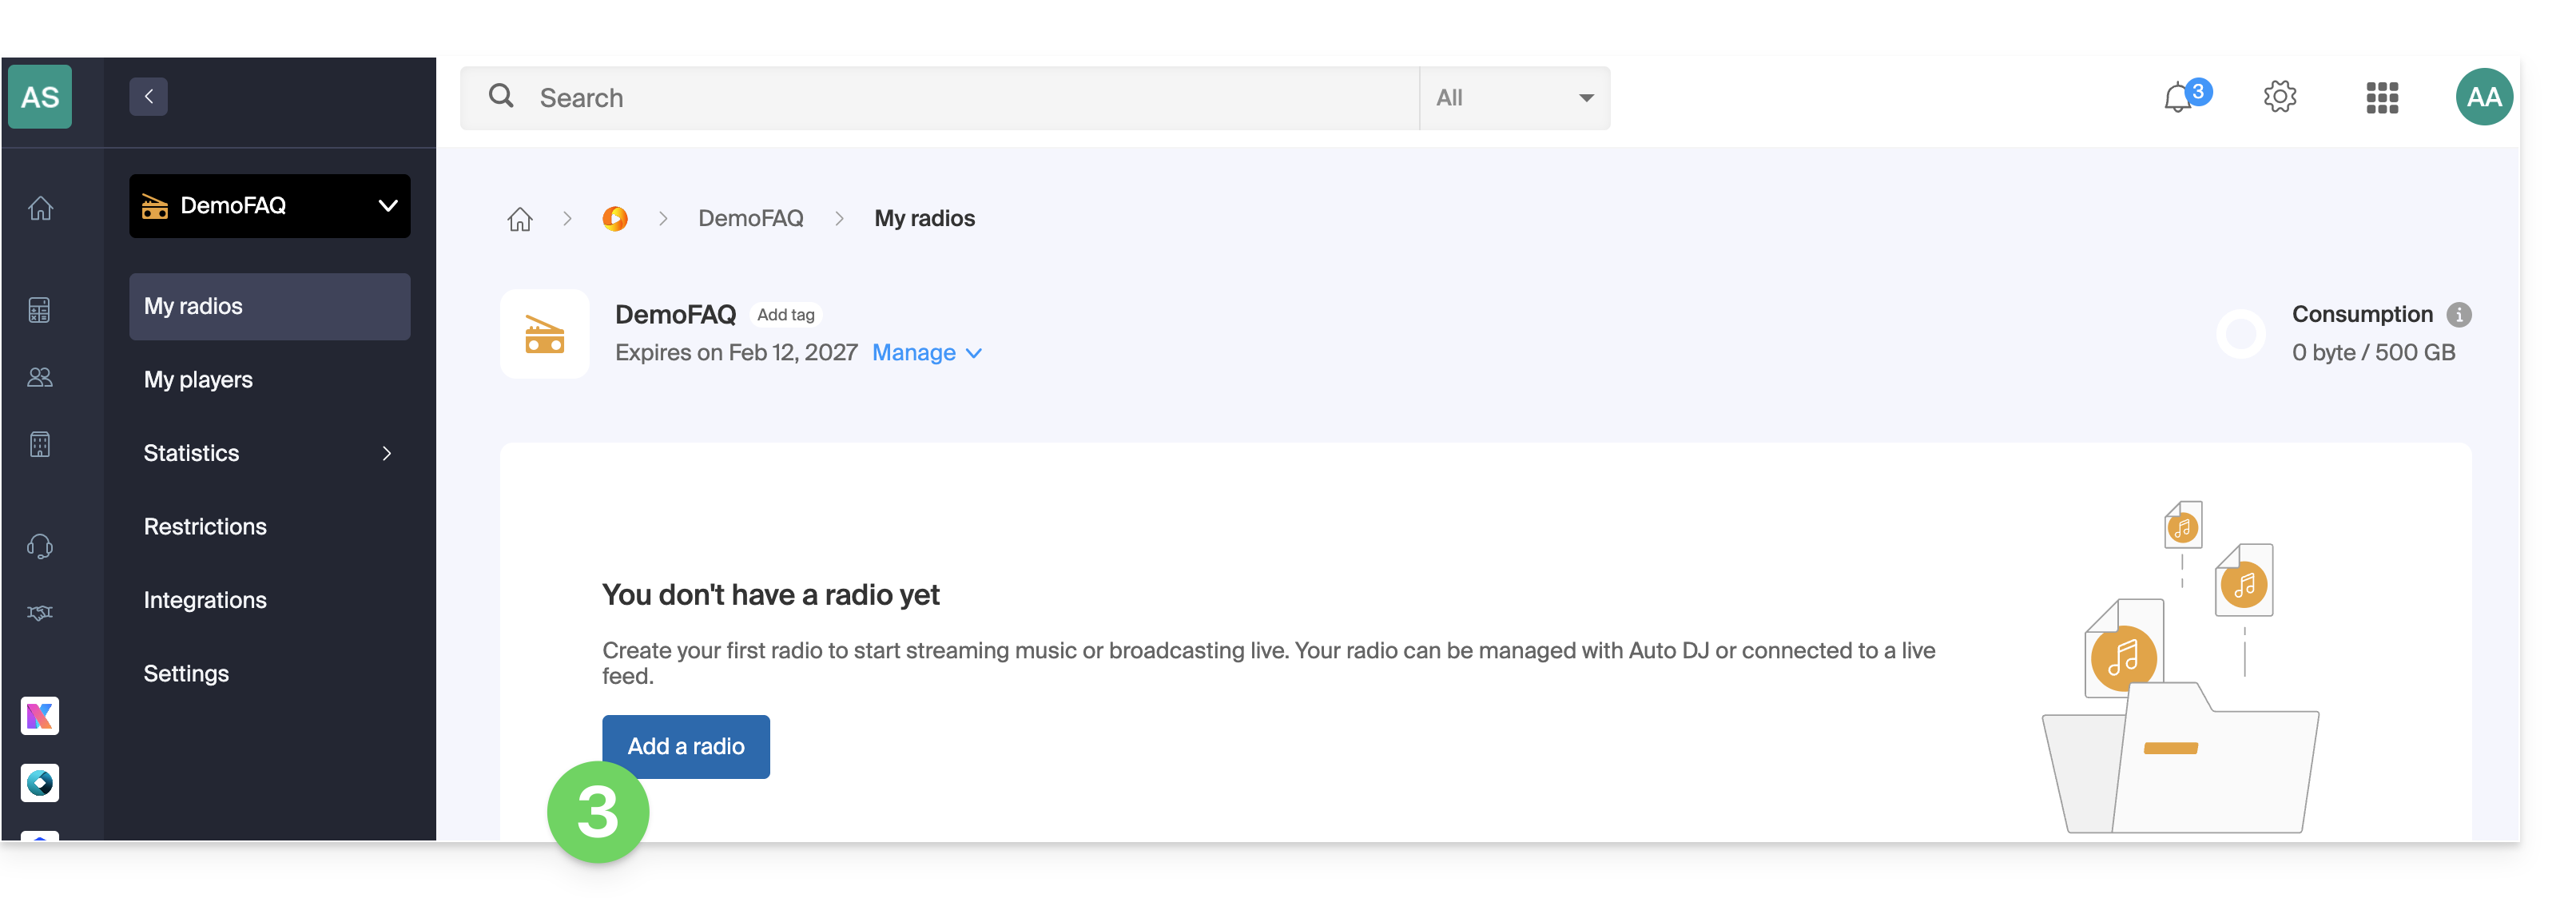
- If you already have a radio configured, click on its name and go to step 8; otherwise, add a new radio:
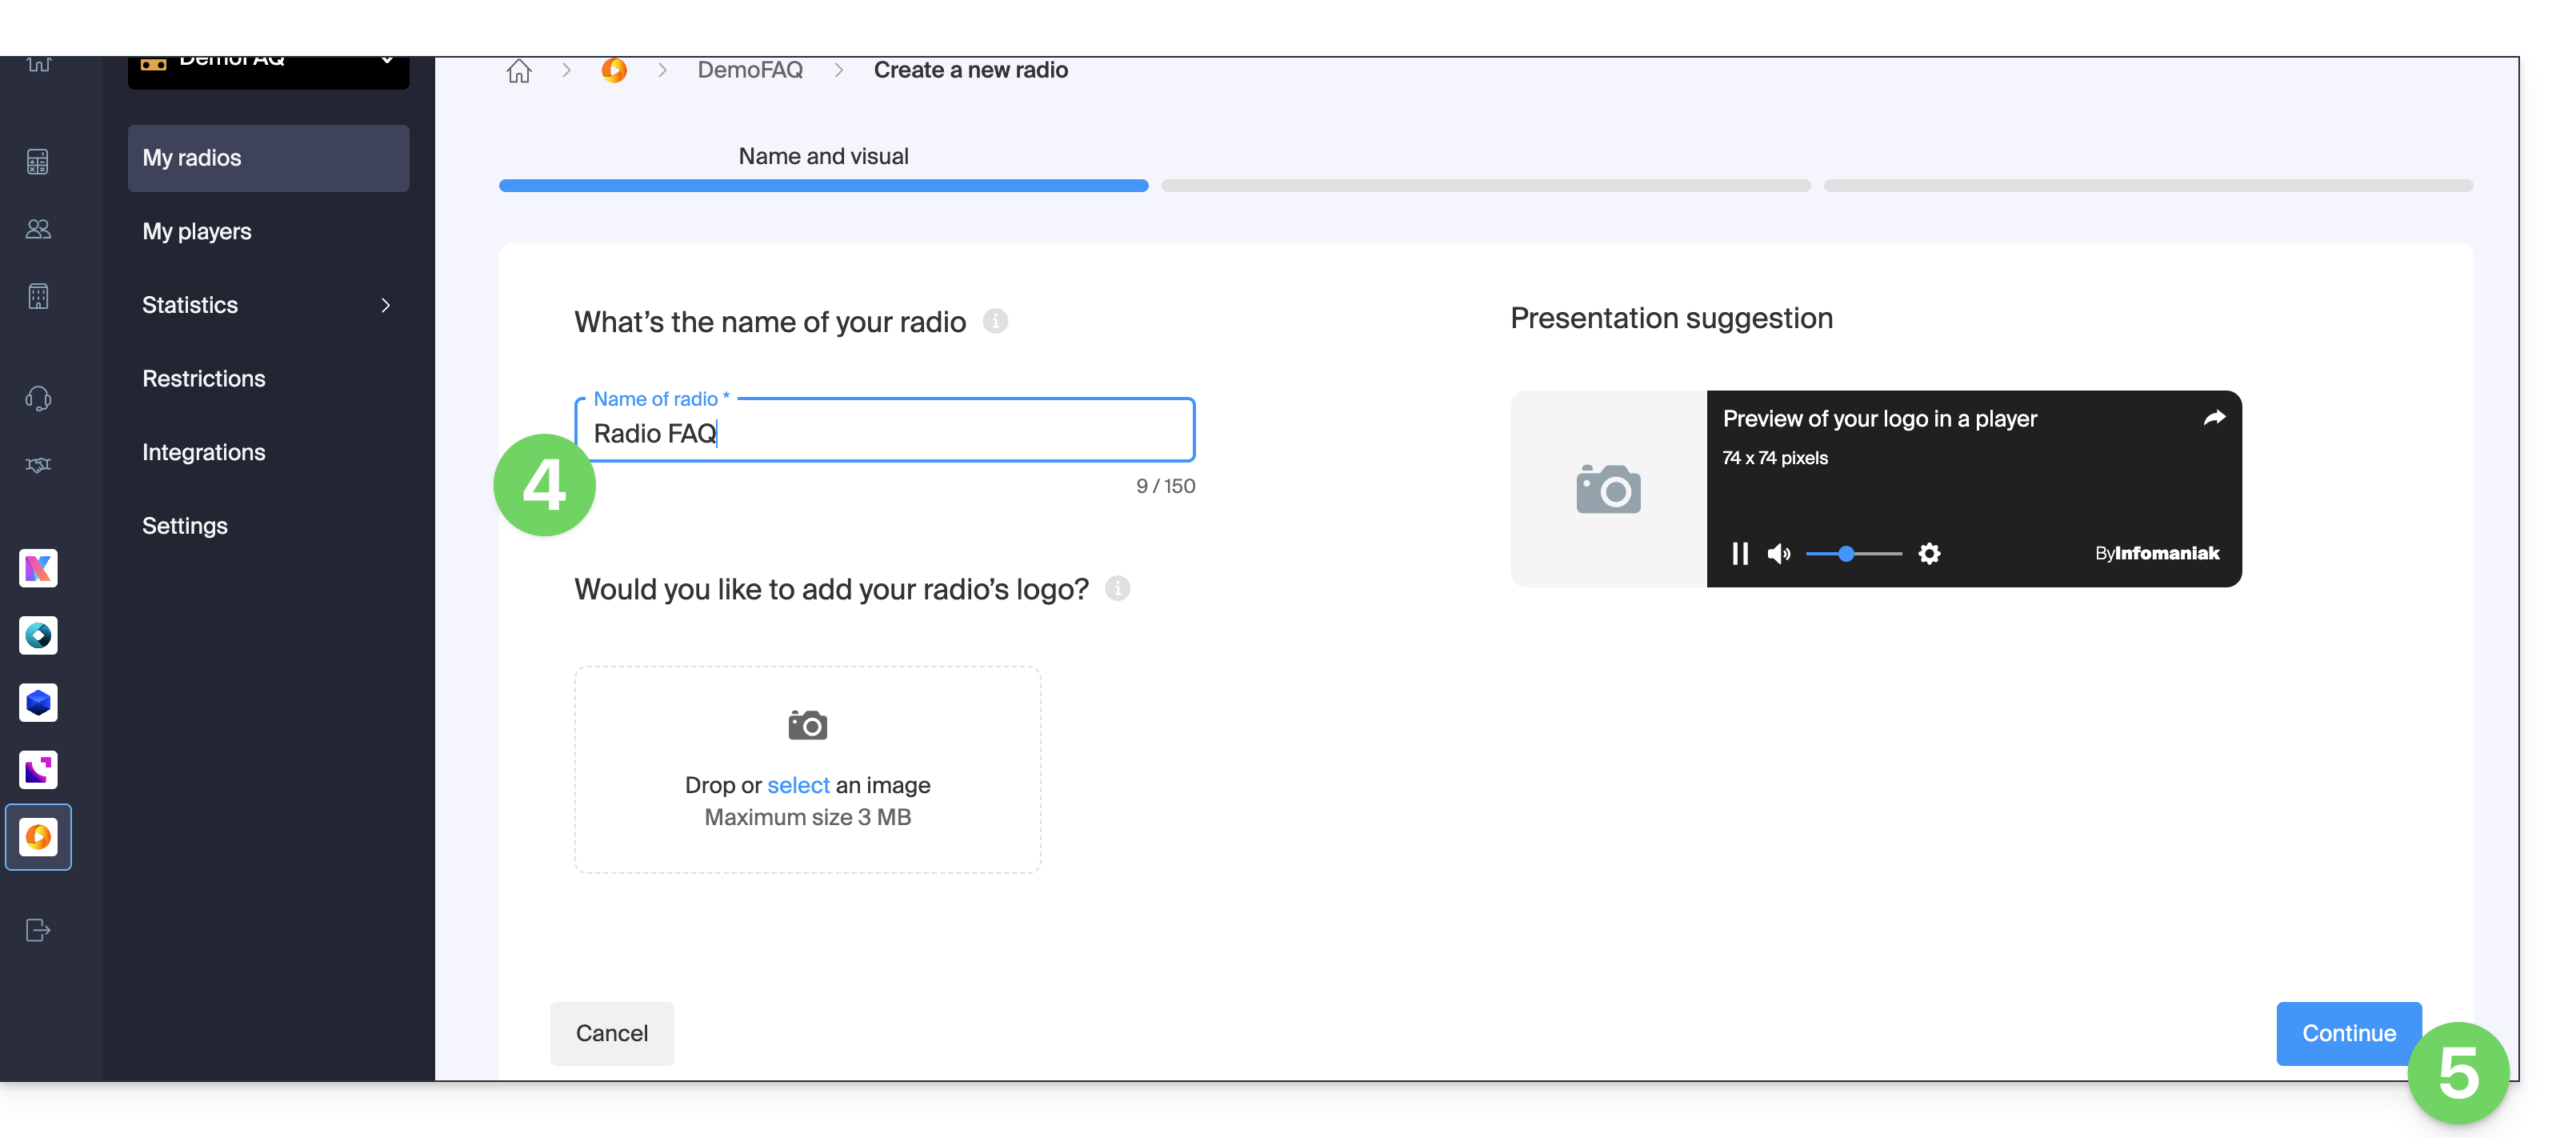
- Give the radio a name and an optional visual.
- Click Continue:
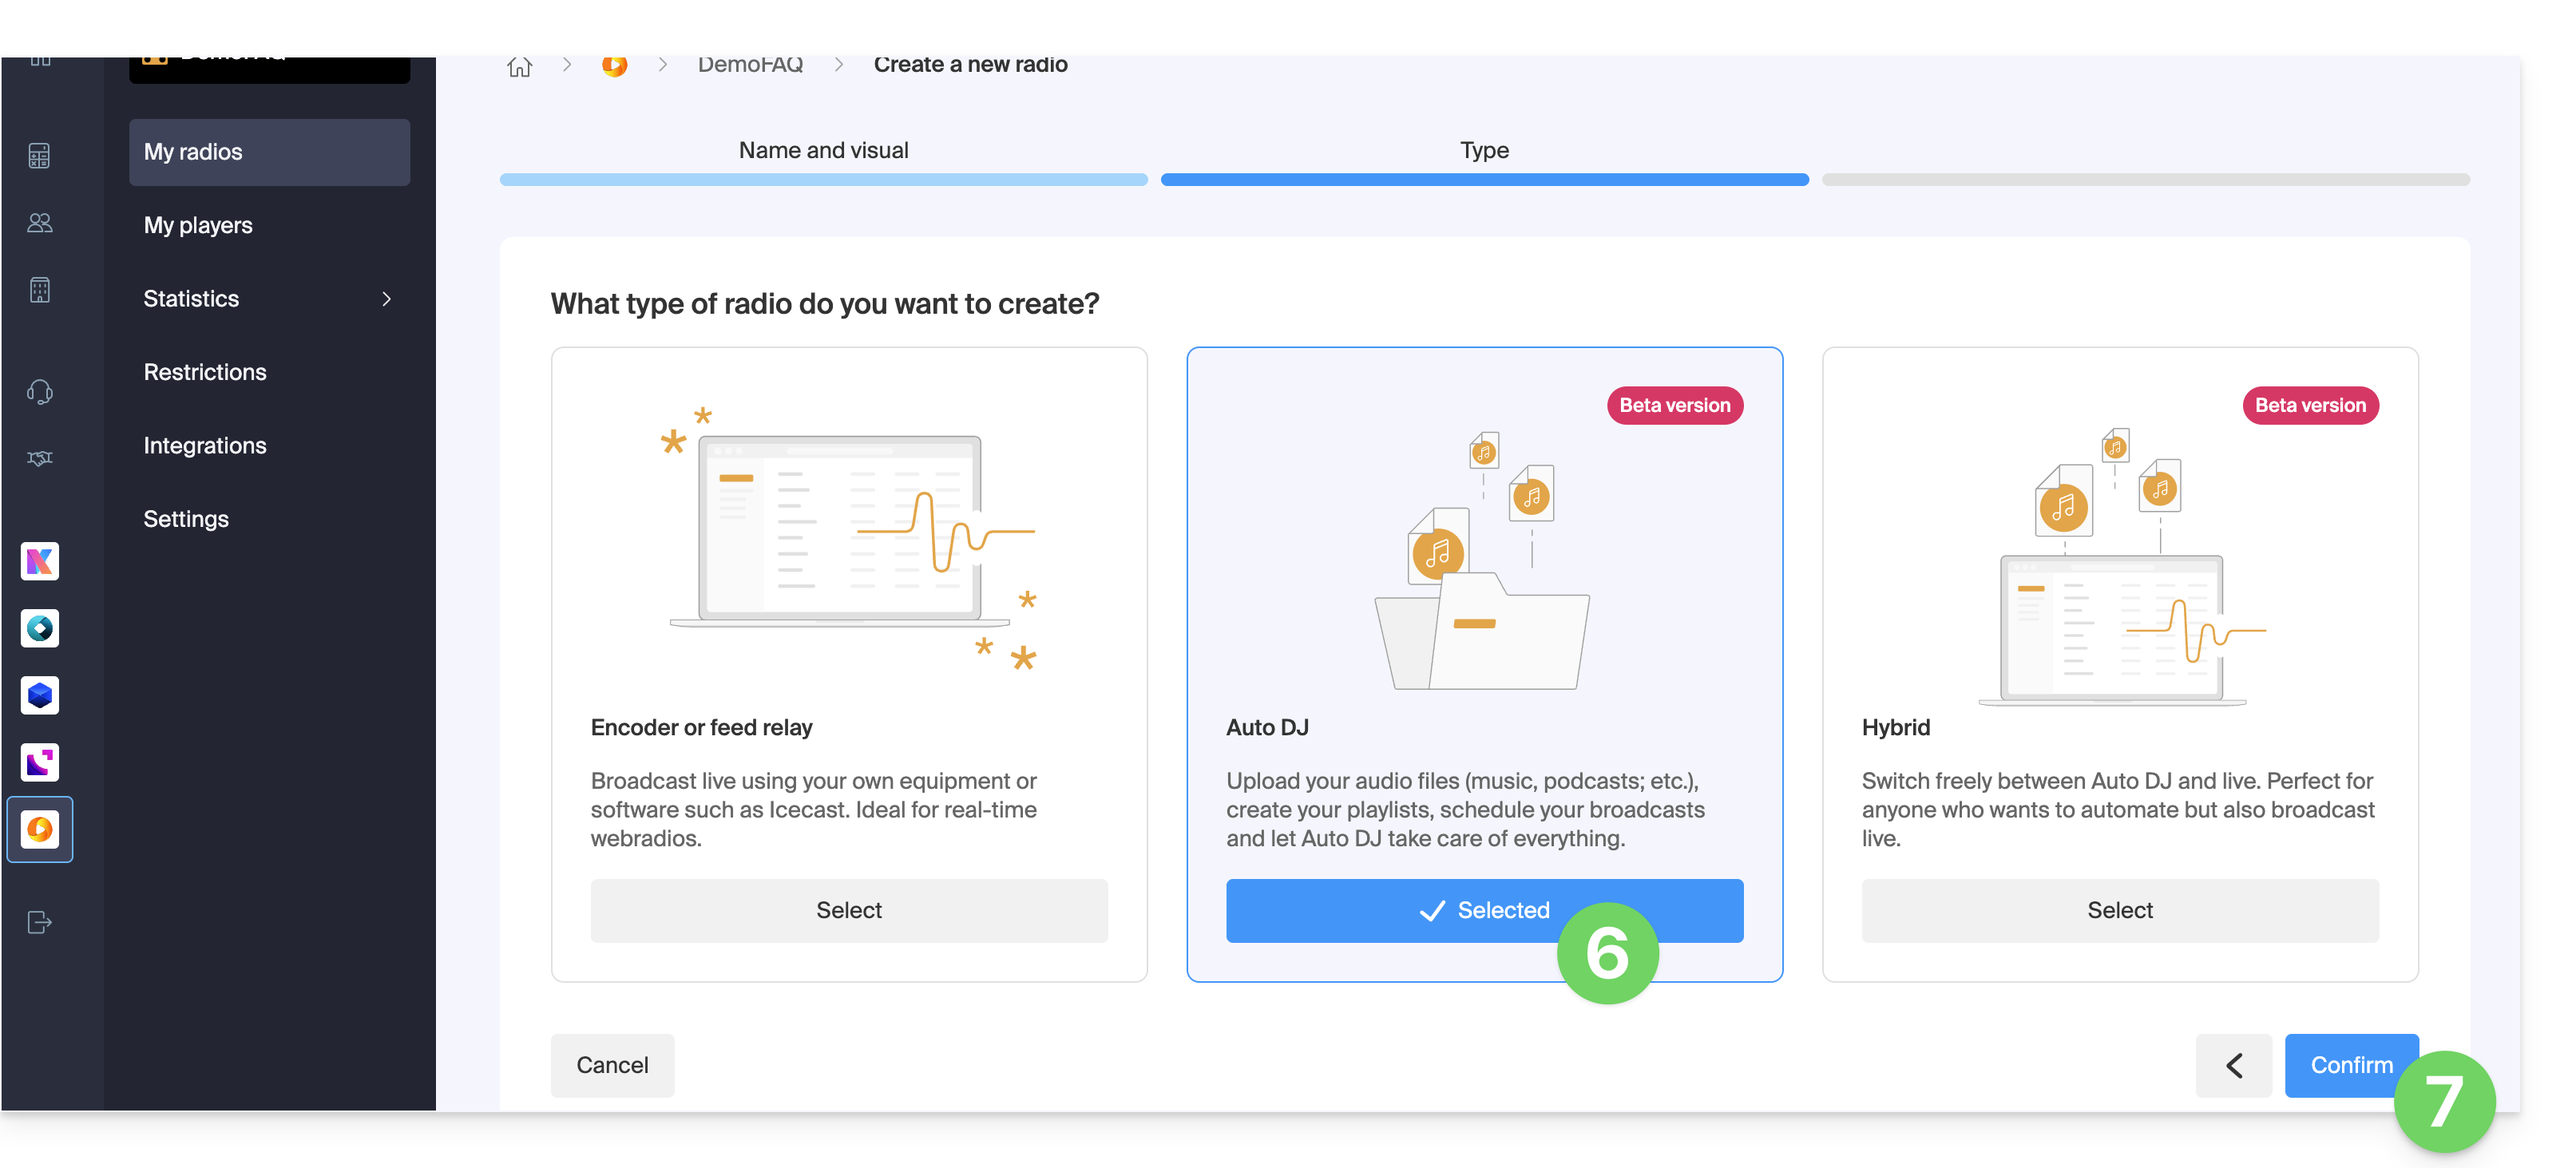
- Select Auto DJ.
- Click to Confirm and proceed to step 11:
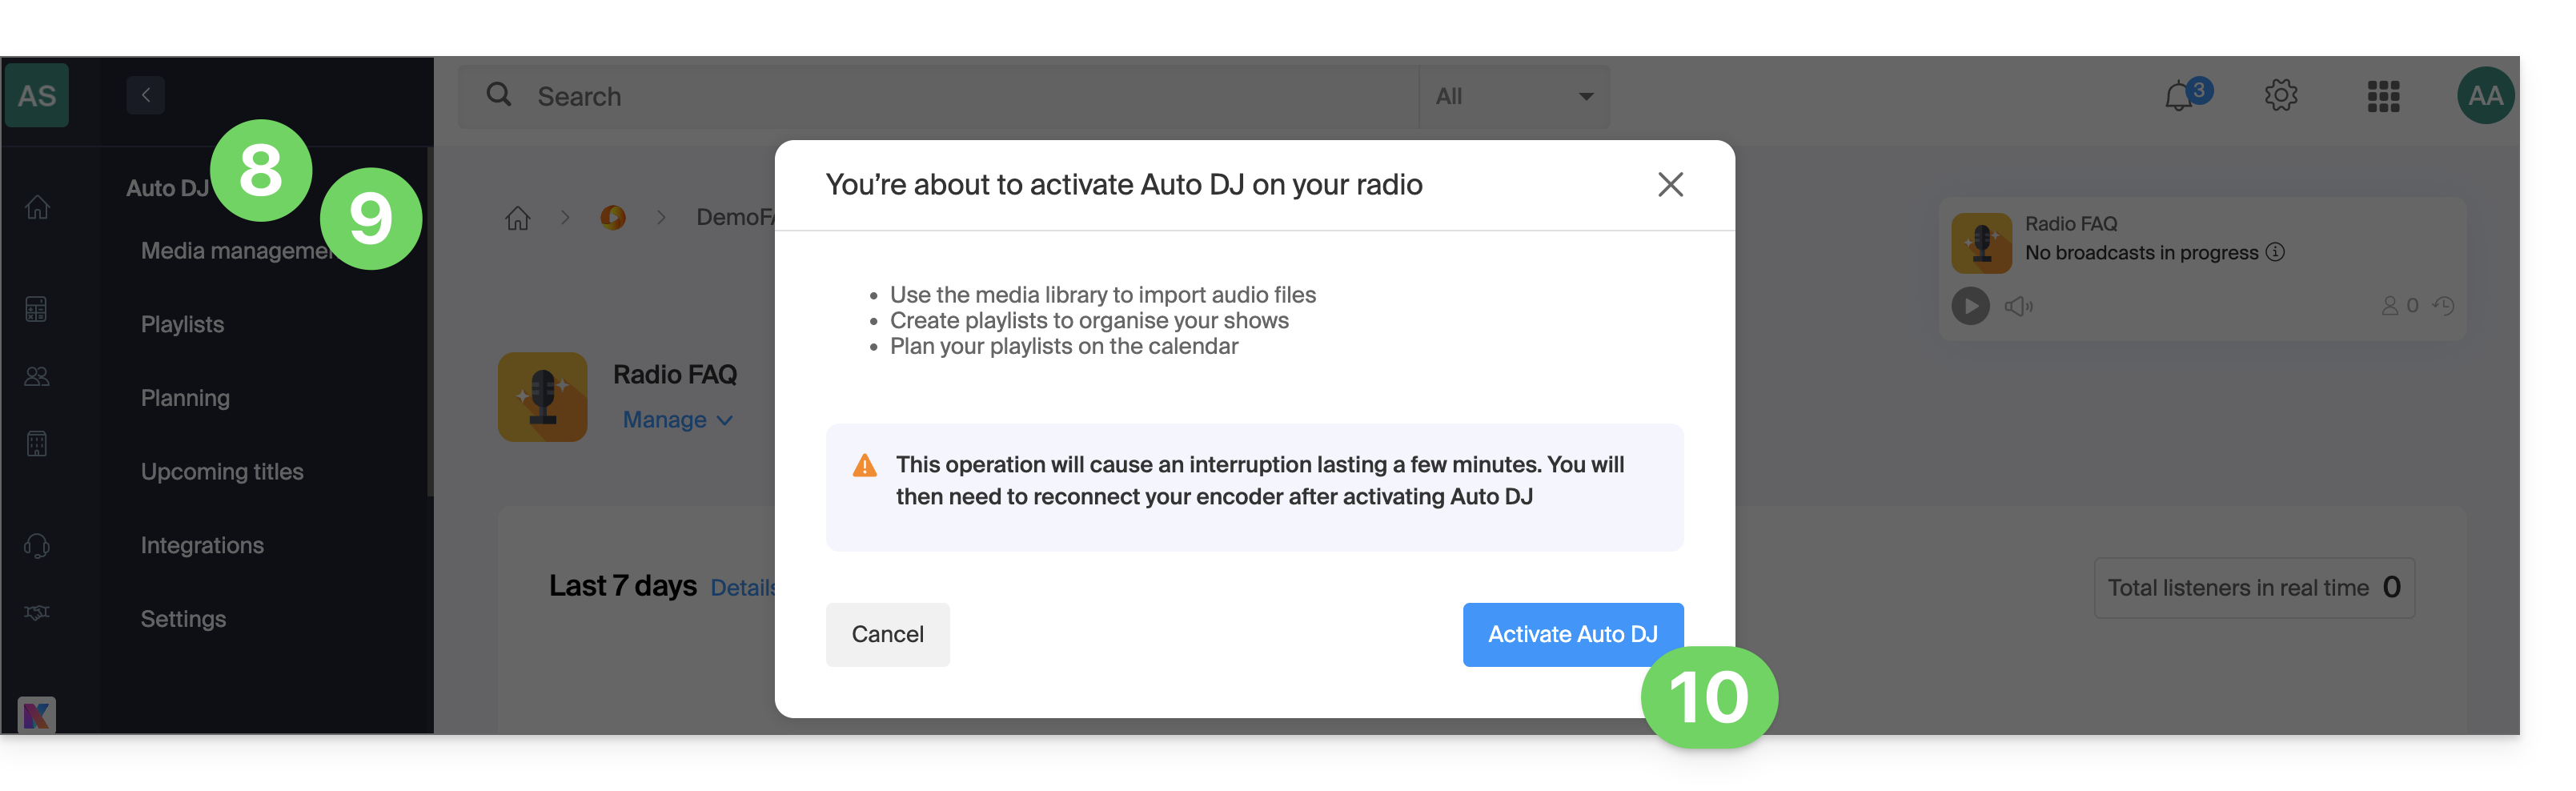
- Click on Auto DJ in the left-hand menu.
- Click on Media Management in the left-hand menu.
- Read the warnings and click to enable Auto DJ:
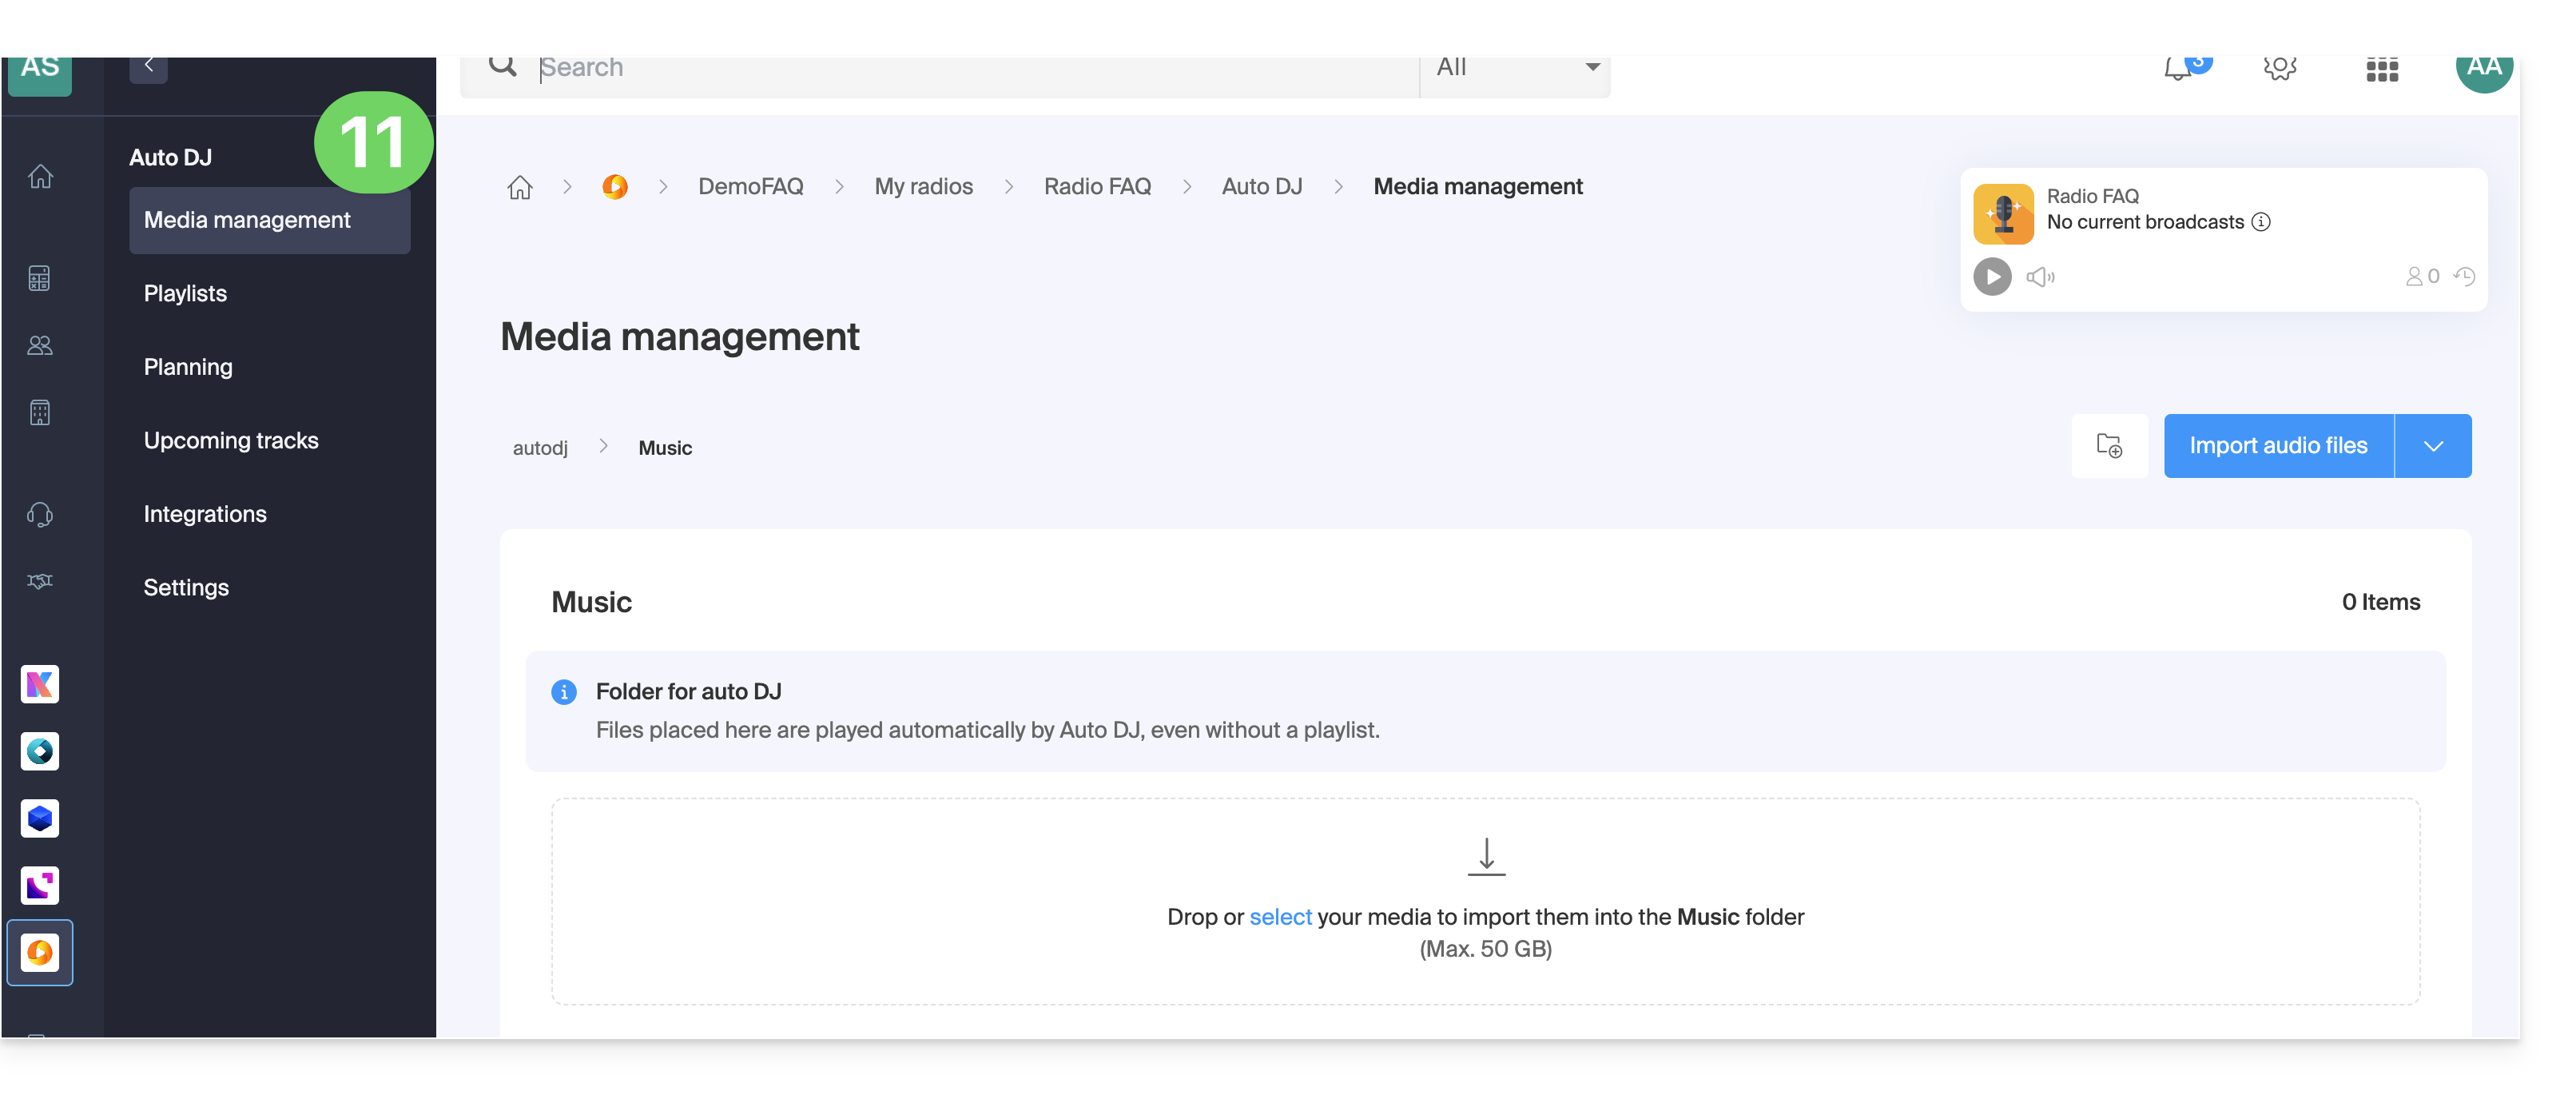
- Select the AOD space to use if you have multiple spaces.
- Auto DJ is now enabled and linked to your AOD space for your audio files:
Refer to this other guide to organize and broadcast your audio files.
Link to this FAQ: https://faq.infomaniak.com/185
Has this FAQ been helpful?
This guide explains the procedures for withdrawing and returning assets when a Public Cloud product is terminated.
Withdrawing and returning assets on Public Cloud
It is recommended to export and manually delete all resources before terminating the product.
When a voluntary termination is performed, the resources associated with the Public Cloud are gradually deactivated and then deleted.
DNS resources of the DNSaaS (Designate) type are immediately deleted upon termination.
All other resources are deactivated across all Public Cloud regions:
- deactivation of users and projects;
- inability to access remaining resources;
- deactivation of resources that are still exposed:
- S3 buckets and Swift containers (Object Storage);
- stopped Compute instances (powered off);
- automatic exit from pause mode before instance shutdown;
- automatic exit from rescue mode before instance shutdown;
- deactivation of Load Balancers (LBaaS);
- deactivation of orchestrations and alarms (Heat).
Resources that are not exposed are not immediately modified, including:
- volumes;
- images;
- backups;
- snapshots;
- public keys;
- private networks;
- secrets.
Asset retention period
With the exception of DNS resources, assets are retained for a period of 7 days after termination.
On the 7th day at 3:00 AM, all remaining resources are permanently deleted, with no possibility of restoration.
Asset recovery after termination
After the product is terminated, a recovery request can be submitted within a maximum of 3 calendar days.
This request requires:
- an active subscription to a Public Cloud product;
- an up-to-date billing status;
- compliance with the applicable contractual terms.
Provided that the data is still available on the storage infrastructure, suspended services can be reactivated within a maximum of 4 days after the request is approved.
Stopped instances are not restarted automatically. However, they can be restarted manually if necessary.
You are responsible for exporting the assets.
Link to this FAQ: https://faq.infomaniak.com/1052
Has this FAQ been helpful?
This guide explains how to start an audio or video conversation between one or more users using kChat, Infomaniak's ethical and free video conferencing solution, kMeet.
Introduction
- The call feature in kChat is available on all Web (browser), mobile (iOS/Android), and desktop (macOS/Windows) versions.
Create a meeting between kChat users
To be able to chat in a virtual room using your device's microphone and webcam, simply press the Call button visible in any kChat conversation, private or public channel, via the application or directly in the browser: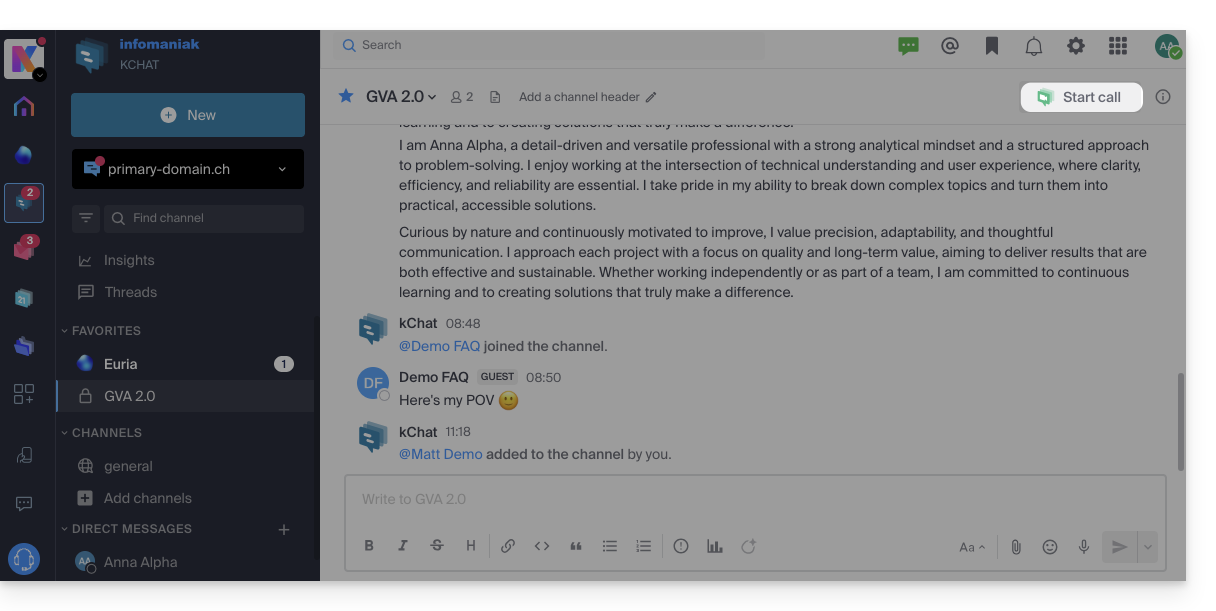
- Call a user directly if you are in a direct conversation with them, or start a call to all members of a channel if you start the meeting from the channel.
- Calling a user who is in “Do Not Disturb” mode will not trigger a ringtone or call notification on their device, but they will see the message in the conversation.
- The microphone is enabled by default when the call is answered, but the camera is not.
- View the meeting participants (who accepted, declined, or missed it) using avatars in the kChat message.
- Once the call has started, an emoji will appear in your kChat status to indicate that you are busy with the conversation.
- A message sent from the video conference (kMeet) will also be visible in the kChat conversation (and vice versa).
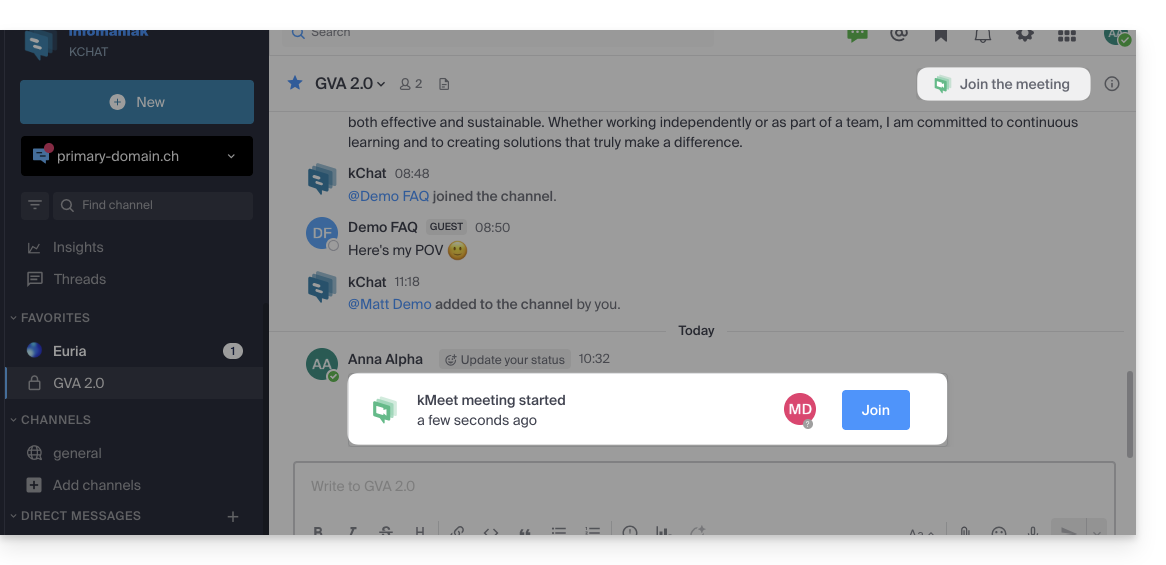
- Notifications regarding the start and end of the meeting are displayed automatically in the relevant kChat conversation thread:
Specifics for calls within channels
- The call will not ring for the call recipients, but they will see a message in kChat as well as a notification.
- A message (as a warning) will appear if you want to start a call in a channel with more than 7 users.
Refer to this other guide if you are looking for information about kMeet.
Link to this FAQ: https://faq.infomaniak.com/2827
Has this FAQ been helpful?
This guide details how to use voice messages within Infomaniak's kChat conversations.
Sending a voice message (and automatic transcription)
To record a voice message using your device's microphone and enable its playback in the current conversation (e.g., a private message, but also in any location where you can send a text message):
- Click here to access the kChat web app (online service ksuite.infomaniak.com/kchat), or open the kChat mobile app (application for iOS/Android smartphones or tablets), or the kChat desktop app (desktop application for macOS/Windows/Linux).
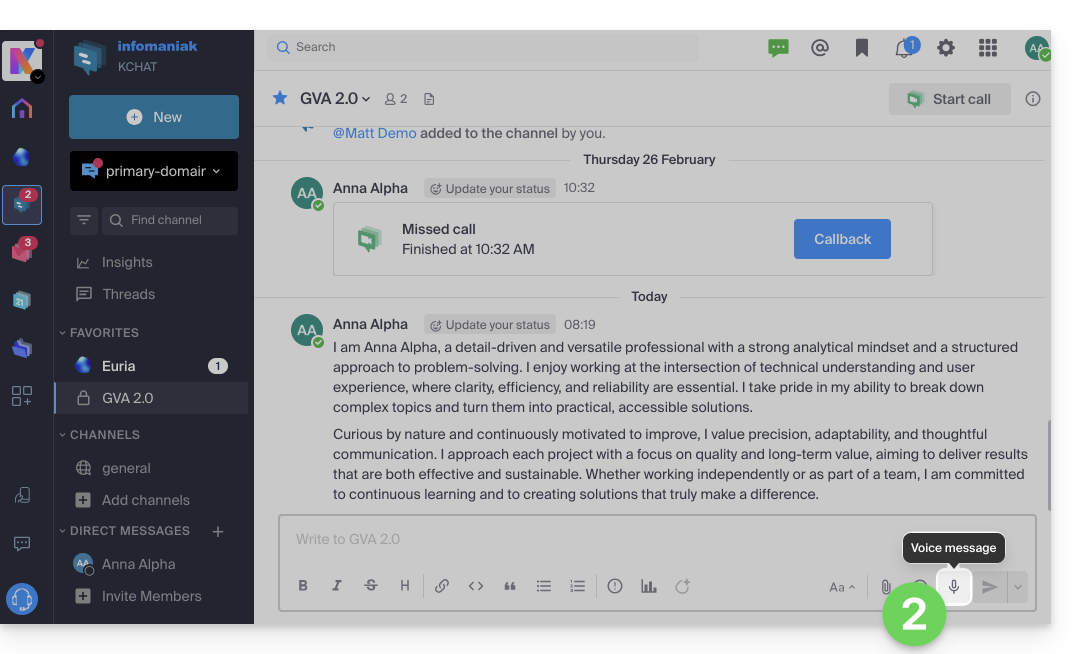
- Click on the microphone icon from the window for composing a new message:
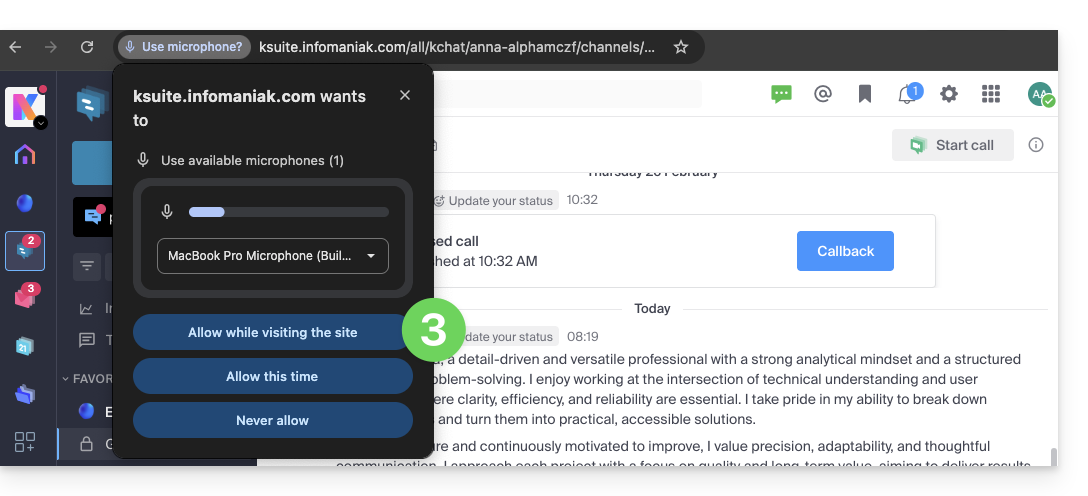
- The system may request certain permissions so that kChat can access your voice and audio interface:
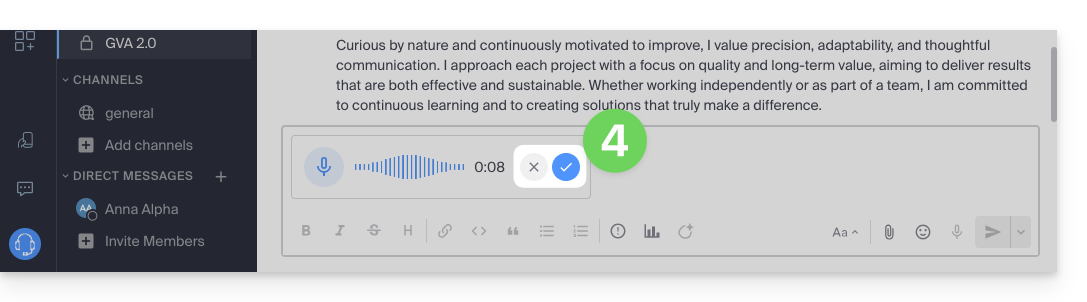
- Once the message is being recorded, click the cross to the right of the recording to delete it, or click the ✓ icon to keep it:
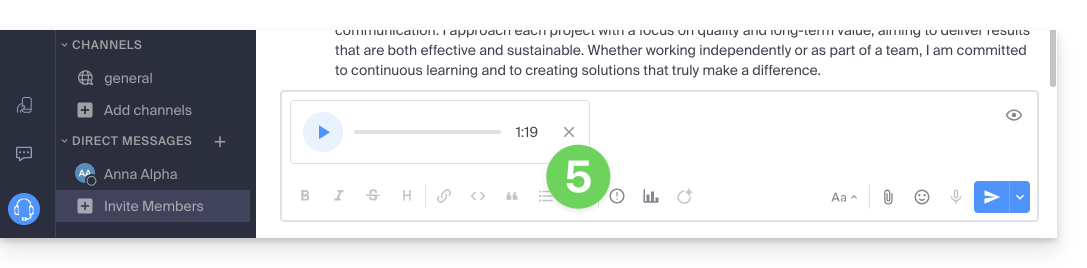
- Once the message is saved, it is not sent directly but is added to a new message. You can listen to it again or delete it, and change the priority of sending it.
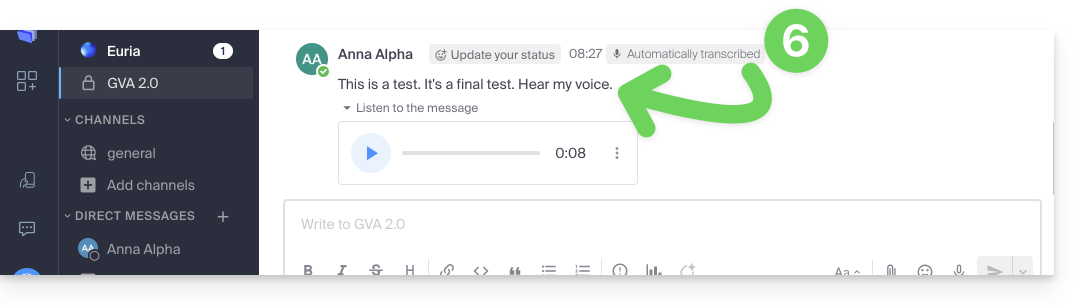
- Once the message is sent, it appears in the current conversation with its text transcribed in plain text:
Listen to a voice message on kChat
To listen to the voice message that was recorded in the current conversation:
- Click the ▶ (Play) button to start listening.
- Click it again (the ⏸ (Pause) button) to stop playback.
Download the voice message
To save the voicemail to your desired location:
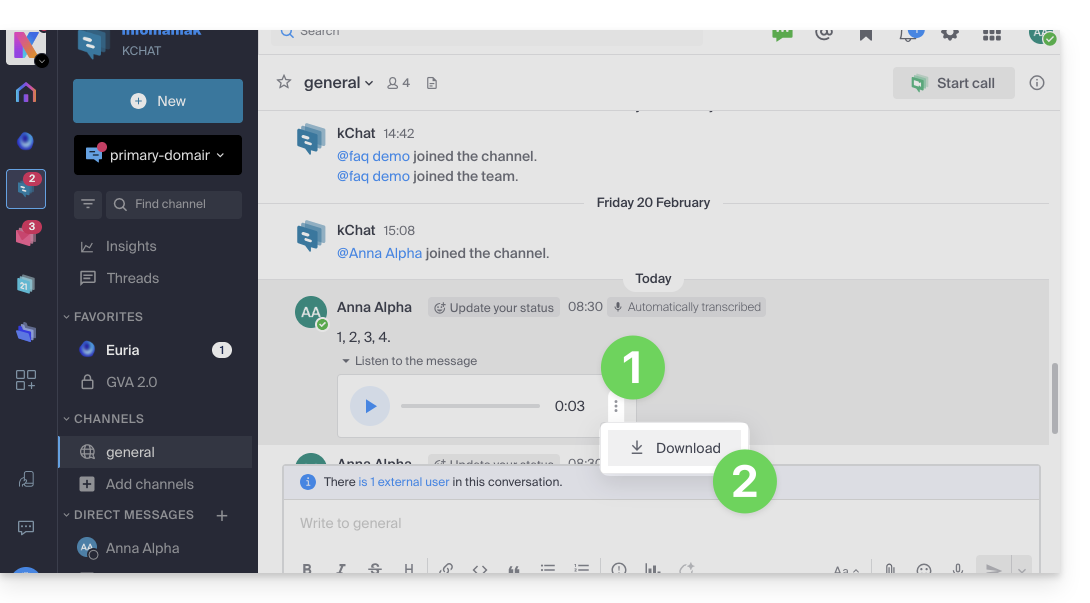
- Click the action menu ⋮ to open a menu.
- Start downloading the voicemail message to your hard drive:
Link to this FAQ: https://faq.infomaniak.com/2876
Has this FAQ been helpful?
This guide explains how to change the local location used by the desktop appkDrive v4.x (desktop application for macOS / Windows / Linux) to, for example, store synchronized data on another hard drive when the first drive chosen no longer has enough space.
Introduction
- Never move the folder used for kDrive synchronization (
/kdrive,/kdrive2, etc.)!- You risk data loss or file conflicts.
- If you are considering such a change to free up disk space, you could simply reduce the size of your downloaded data using Online mode (❓: help).
Change the local directory used by kDrive v4.x
To define a new folder for kDrive synchronization when the first folder initially chosen should no longer be used:
1. Synchronization steps and preliminary checks
- Launch kDrive on your device: the app icon should be visible in the top right corner on macOS/Linux, and in the bottom right corner on Windows (❓: help).
- If a synchronization is currently in progress, you must allow it to complete:
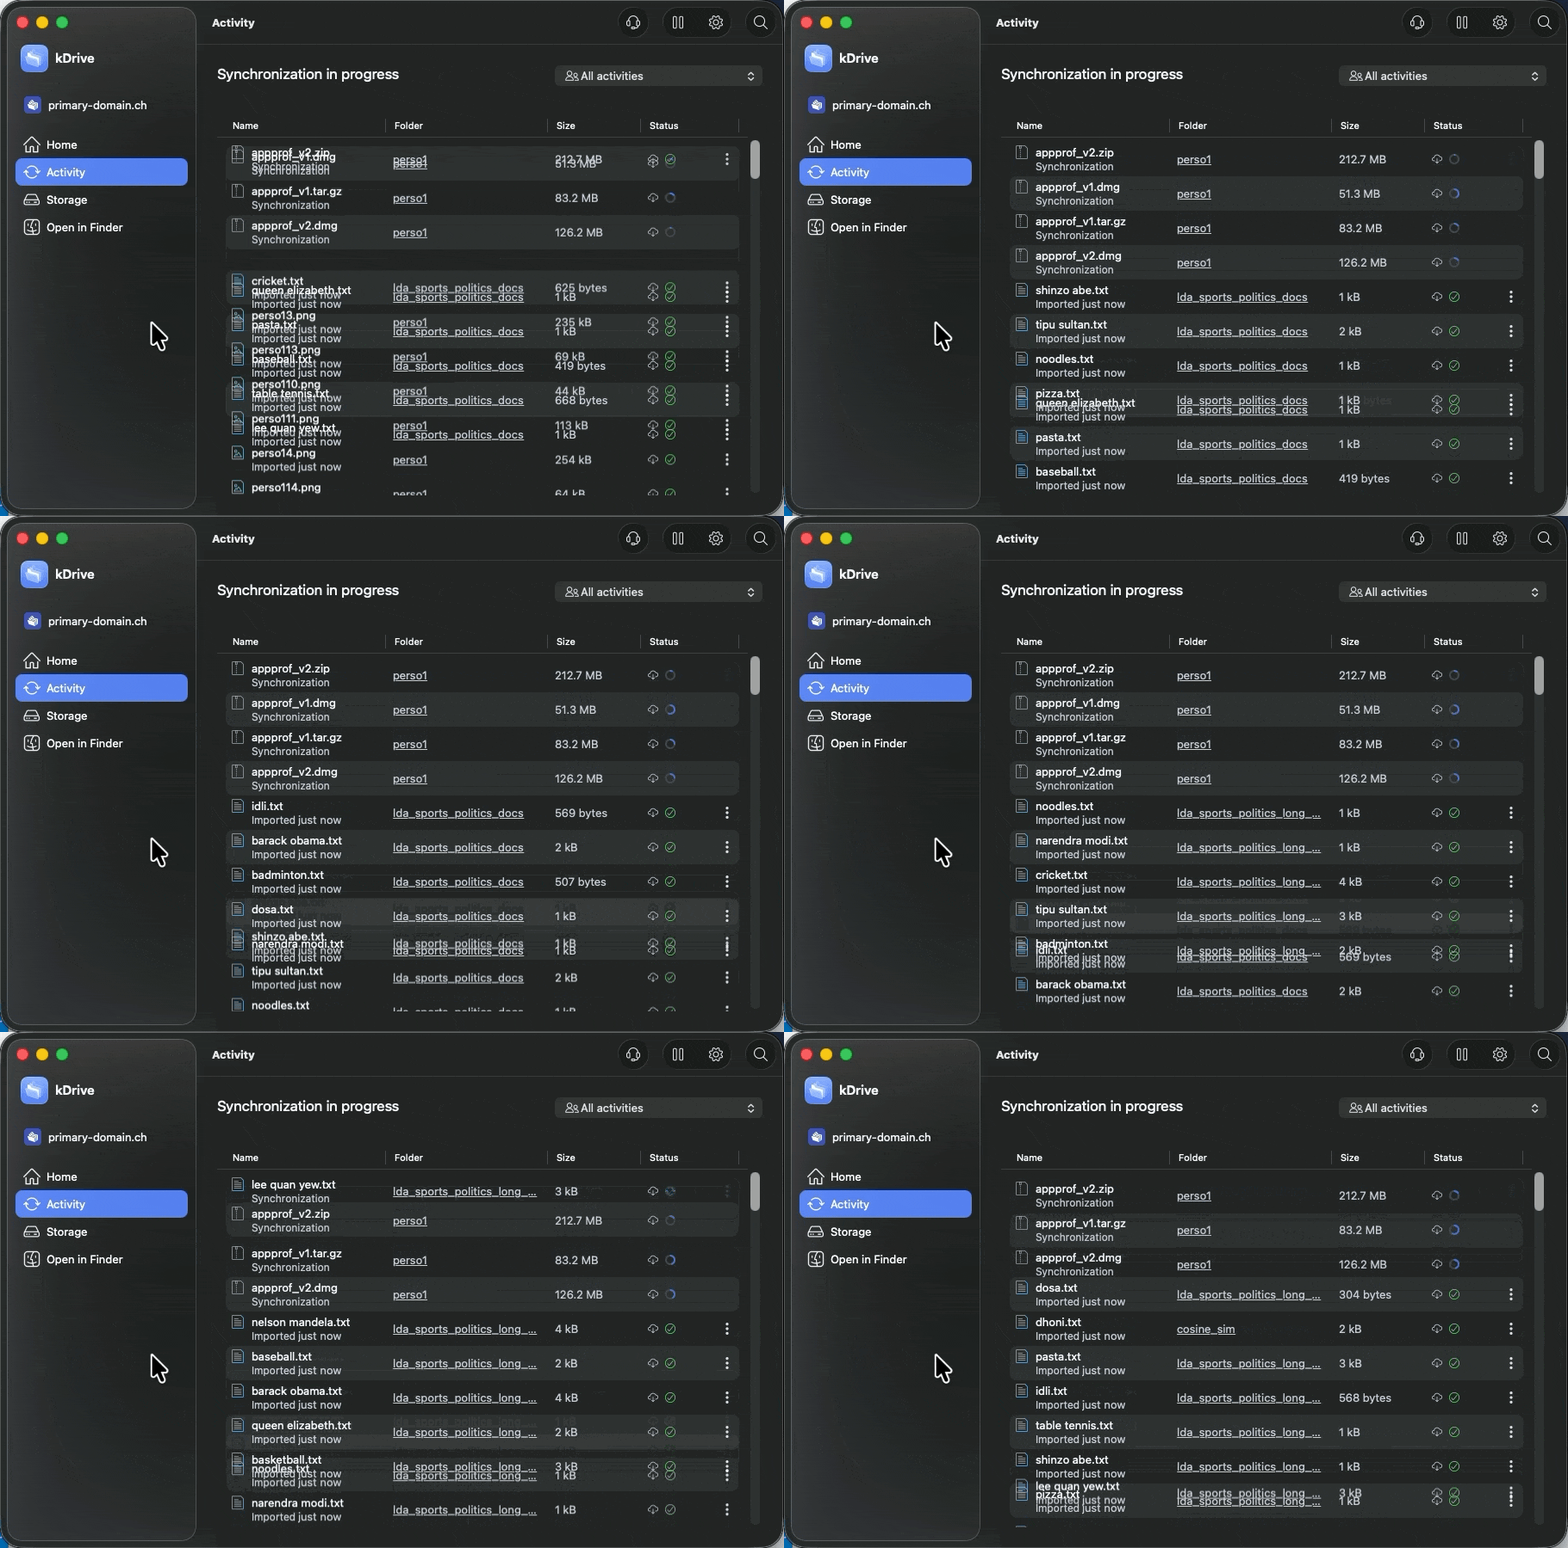
- Make sure that the synchronization status is indicated as complete & finished in the kDrive application:
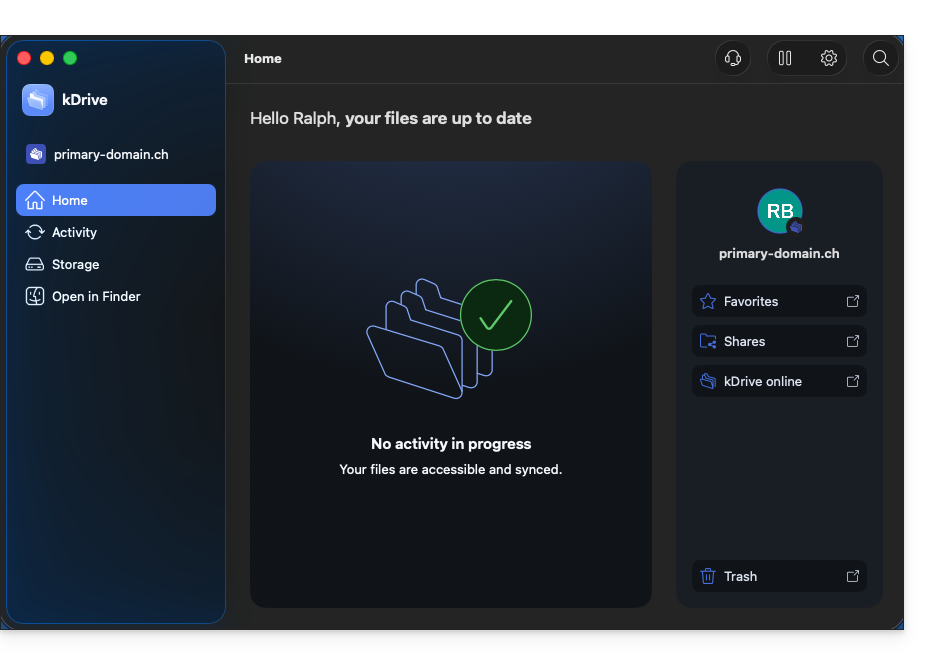
- If not, you must resolve any issues mentioned before proceeding, otherwise it means that some data may not be synchronized and will not be sent to the new storage folder you want to define...
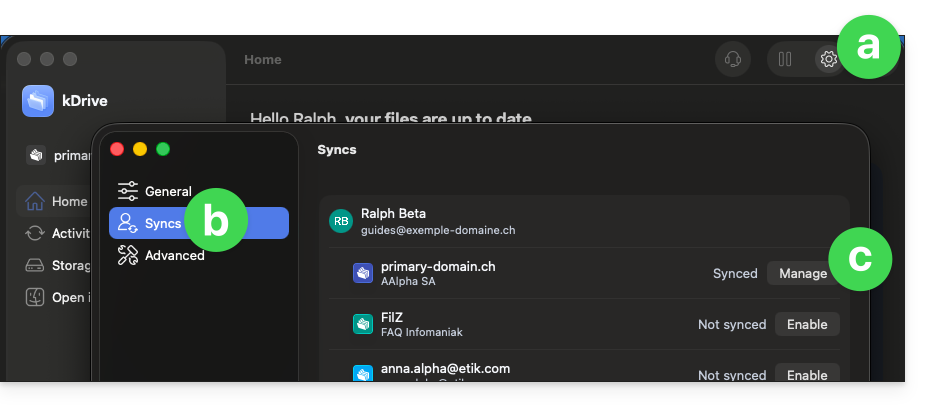
- Go to the settings of your current synchronization in the kDrive application:
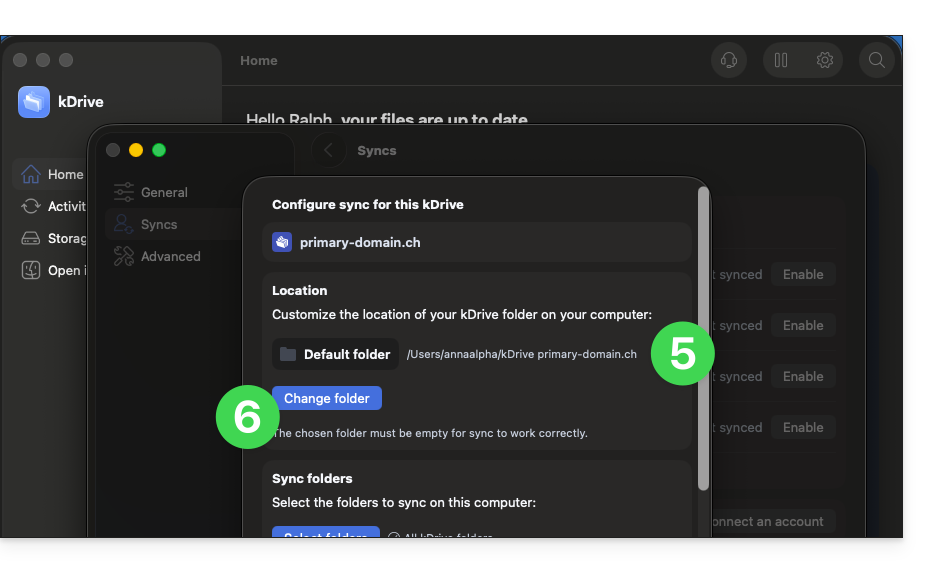
- Make sure you have accurately noted the name and path displayed for the directory currently used on your computer to store your data, here
kDrive primary-domain.ch 2: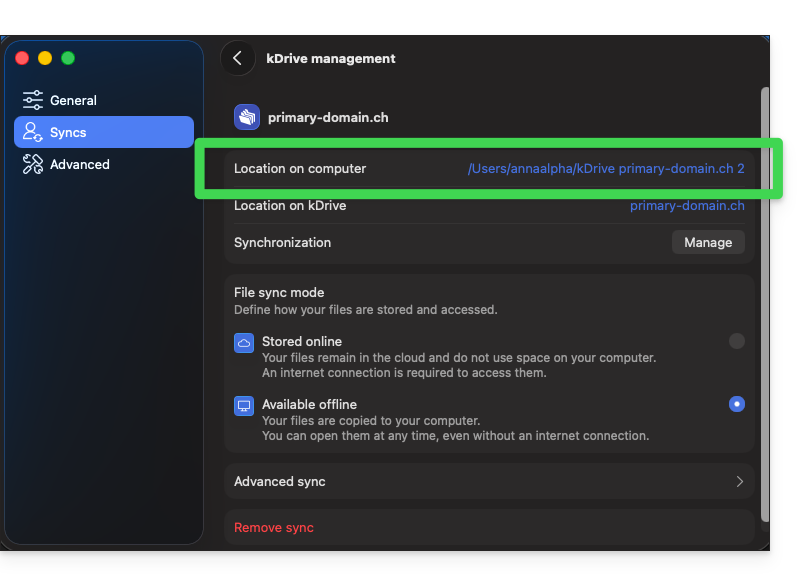
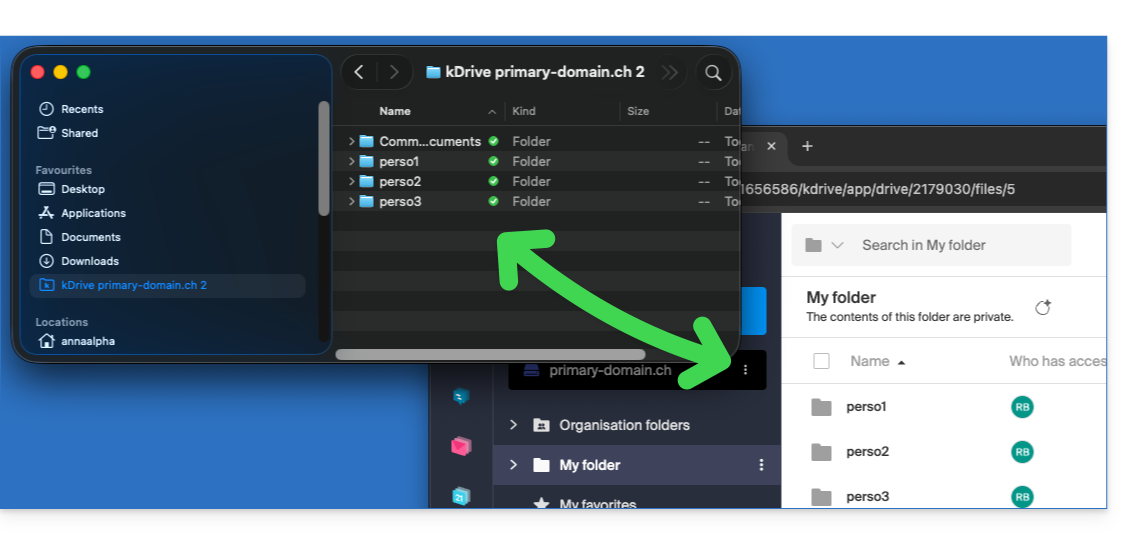
- Click here to access kDrive on your Infomaniak kSuite (❓: help) and make sure that all your data from the folder located in step 5 above is synchronized as you wish.
- If some data is missing on the web app side, it may be because you had excluded certain file types (❓: help) and these were not sent from your computer to the cloud... You should therefore remove the exclusions if necessary and then restart the procedures from step 3 above.
- At this point, if you have followed all the steps above, your entire kDrive is synchronized, so by definition, everything is present on Infomaniak's servers:
2. Steps for switching to the new local storage folder
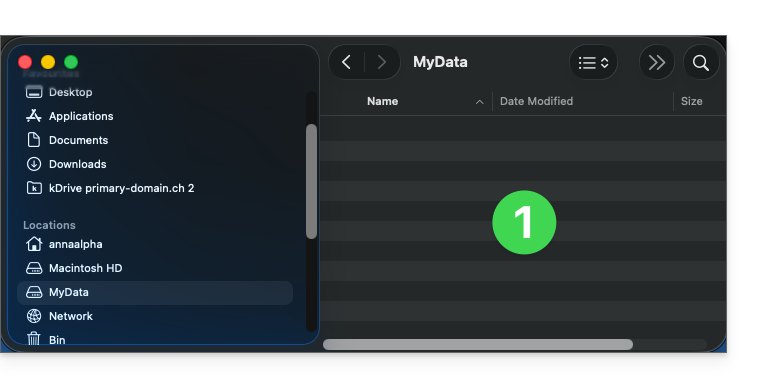
- The new disk on your computer is ready to store your data:
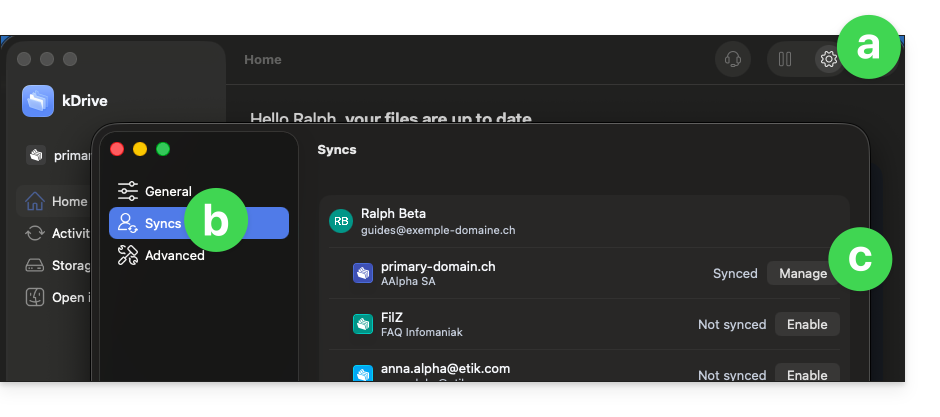
- Go back to the settings of your synchronization in the kDrive application:
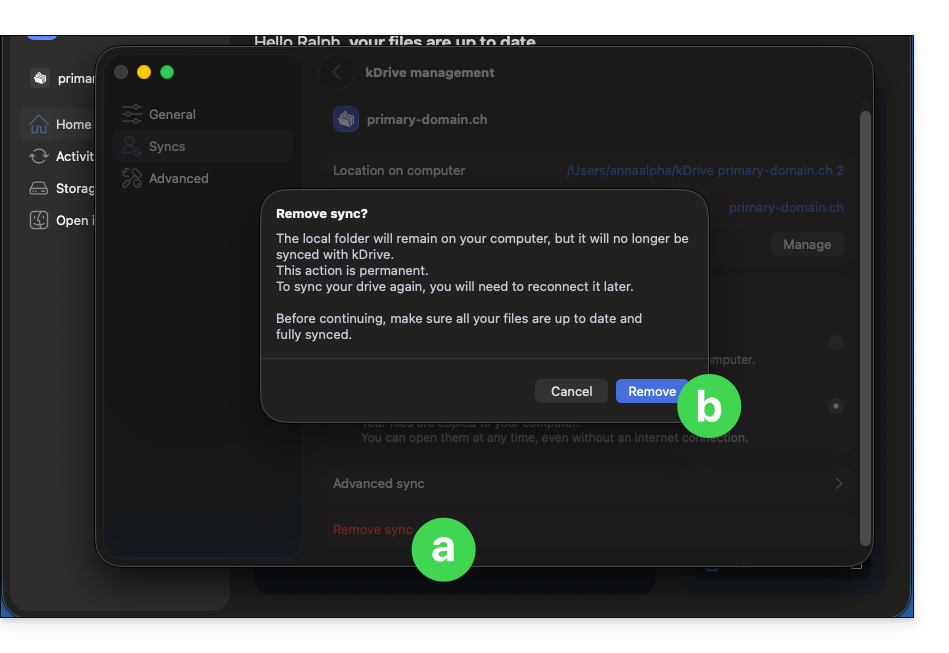
- Click on the red indicator to remove the synchronization and confirm:
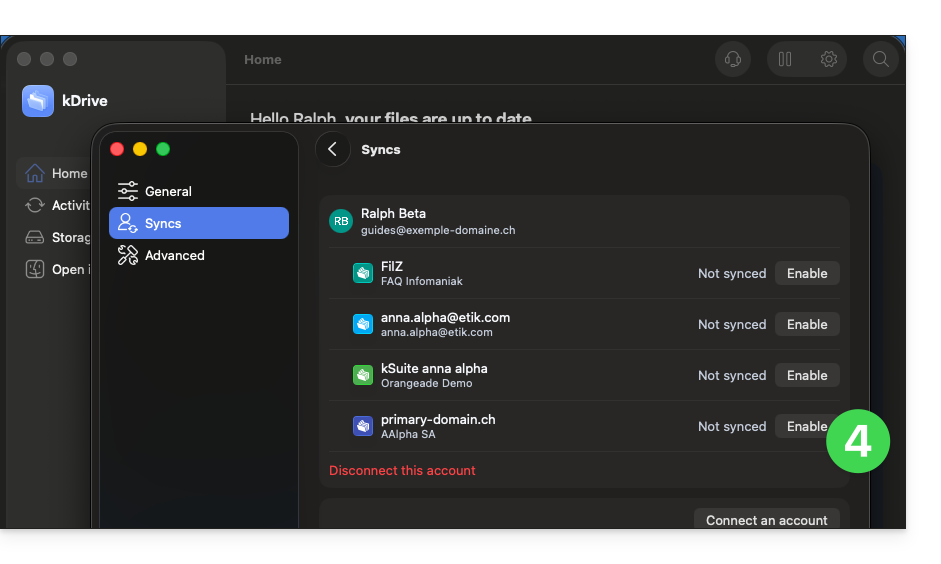
- Click to restart synchronization with your kDrive:
- By default, a new folder in the same location as the old one would be created without any action on your part.
- Click the button to change the folder and choose a different location:
- Select the new location, for example, the desired hard drive, create a new “root” folder there to store your data, and click the button to open it:
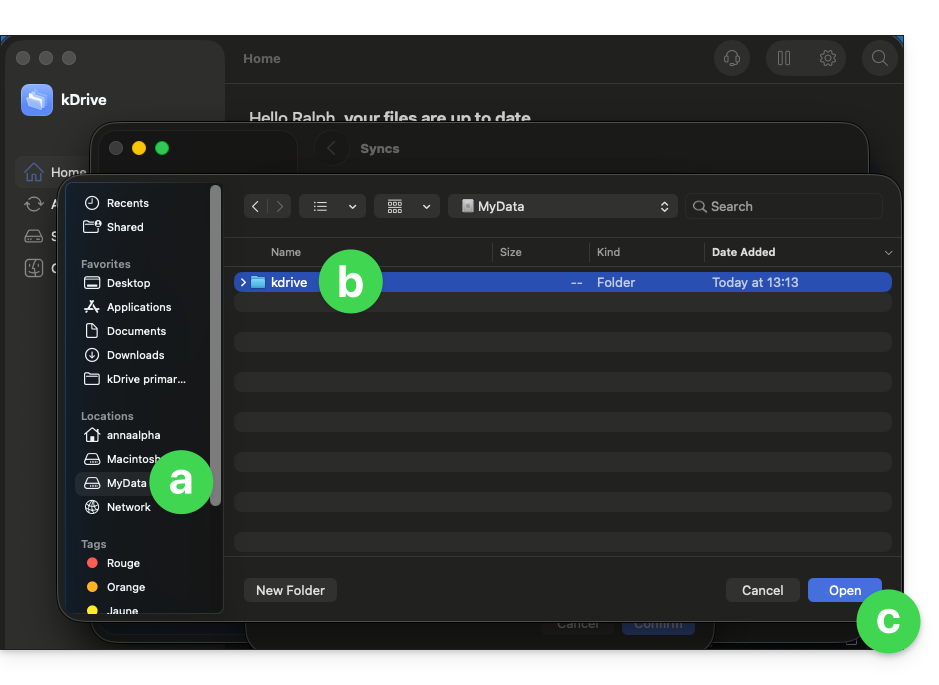
- You cannot simply choose the hard drive and select it without first creating a “root” folder.
- You also cannot select a folder that is not empty.
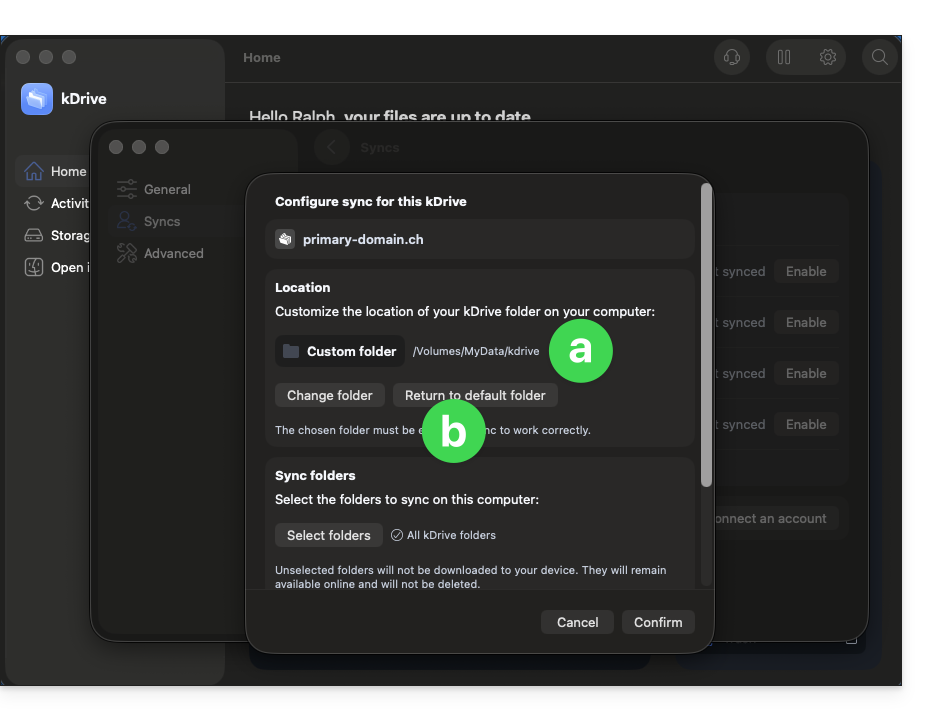
- The path to the new location is displayed; you can return to the default location if needed:
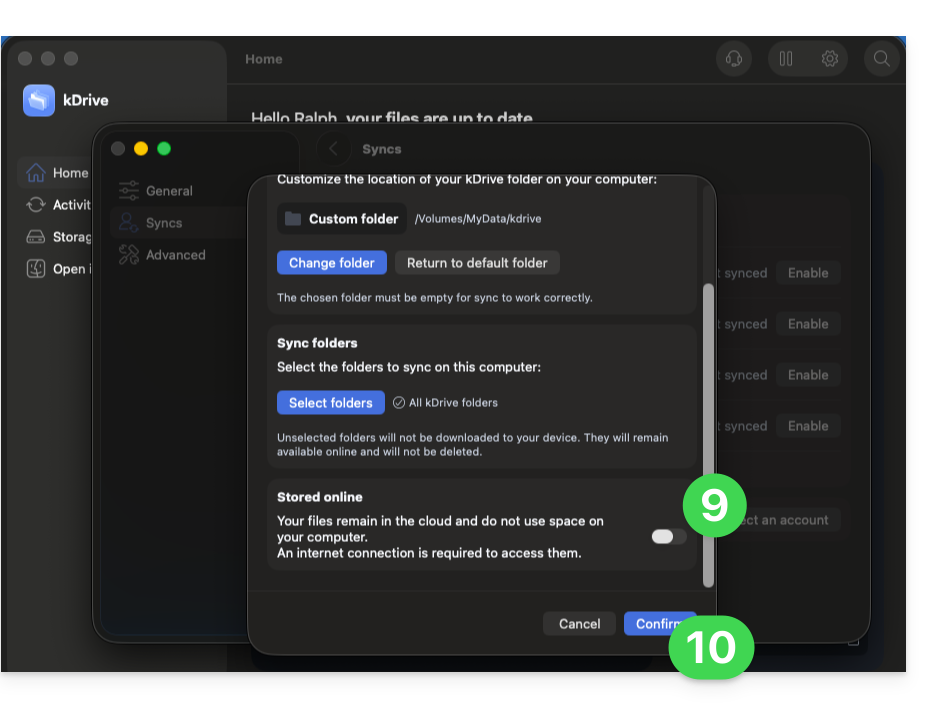
- Scroll down the window and disable Online mode to store your data locally on your computer (❓: help).
- Apply your choices by clicking Confirm:
- The download of the kDrive data located on Infomaniak's servers will begin and continue entirely in the background to the folder named
kdrive: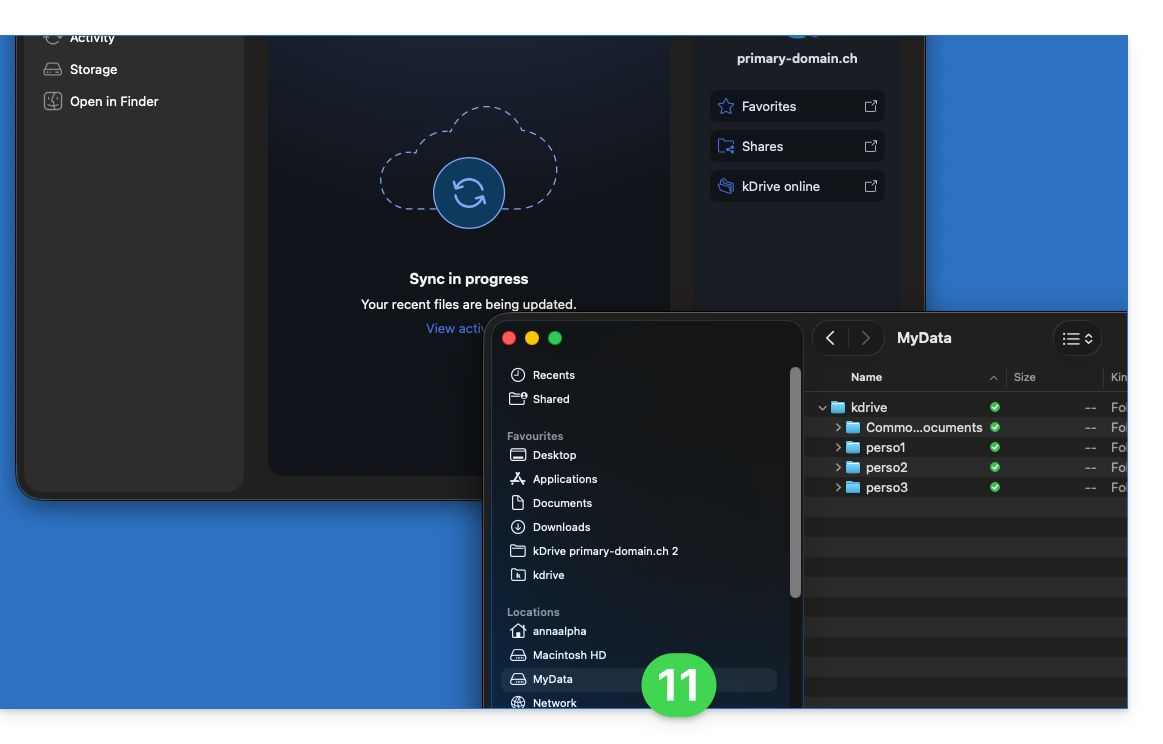
- Refer to this other guide to download only specific folders.
- The old folder
kDrive primary-domain.ch 2can now be deleted from the hard drive, as it is no longer used (but it is recommended to keep it for a while to ensure that the migration has been completed).
Link to this FAQ: https://faq.infomaniak.com/2856
Has this FAQ been helpful?