Knowledge base
1000 FAQs, 500 tutorials and instructional videos. Here, there are only solutions!
This guide presents commands that can be executed to test a connection or a network and thus specify the source of a potential error.
Perform a Telnet...
TELNET allows you to test the connection to a server without considering all the additional settings of a mail or FTP application in order to determine the origin of a problem. If the connection does not go through on an SMTP server, for example, you will need to check if your firewall is not blocking port 587 or 465.
... on macOS
- Search for Network Utility.
- Go to the
Ping,Lookup, orTraceroutetab depending on what you want to test. - You can also use a
Terminaltype application (command line interface,CLI / Command Line Interface) on your device and, depending on what you want to test, enter:traceroute [server]nc [server] [port]
Replace[server]with the server name or its IP address, same for[port]...
... on Windows
Enable Telnet if necessary.
- Use a
Terminaltype application (command line interface,CLI / Command Line Interface) on your device, for example by typing Run thencmd. - In the window that opens, depending on what you want to test, type:
tracert [server]telnet [server] [port]
Example:telnet mail.infomaniak.com 587(allows you to test the SMTP port if your software/email client does not allow sending emails)...
... on Android
- Use the application Simple Telnet Client which allows you to test very simply via 2 fields to fill in (for example
mail.infomaniak.comand port143or993)...
Perform a PING
PING allows you to know if a machine is accessible via the Internet. You can also check with this tool if you are addressing the correct machine, for example during a DNS change, by looking at the IP address obtained. It is possible to perform a ping on a domain name, a hostname or an IP address.
PING is definitely blocked on shared hostings.
Link to this FAQ:
Has this FAQ been helpful?
This guide explains how to view a website hosted by Infomaniak, even if no domain name/URL is currently configured to direct visitors to the site.
Introduction
- Using your website's preview URL, you can view the current version of your content in a browser, regardless of whether the corresponding domain name has been configured correctly.
- This website preview can be accessed using a preview URL and allows you to test a website before pointing a domain name to it, for example, if the domain name is currently pointing elsewhere.
- This temporary URL provided by Infomaniak may change at any time and is only available with paid plans.
Obtaining your website's preview URL
To do this:
- Click here to access the management of your website on the Infomaniak Manager (need help?).
- Click directly on the name assigned to the website in question:
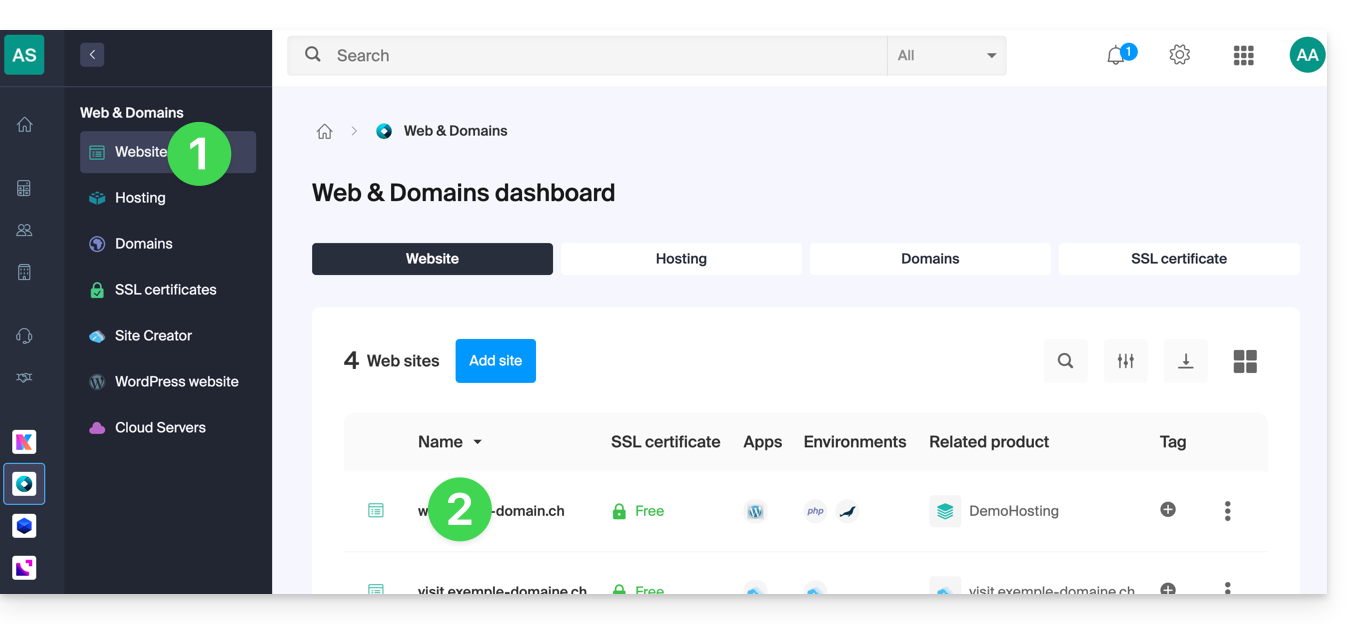
- Click on Advanced.
- The preview address is displayed under Preview URL (e.g.,
XXX.preview.infomaniak.website):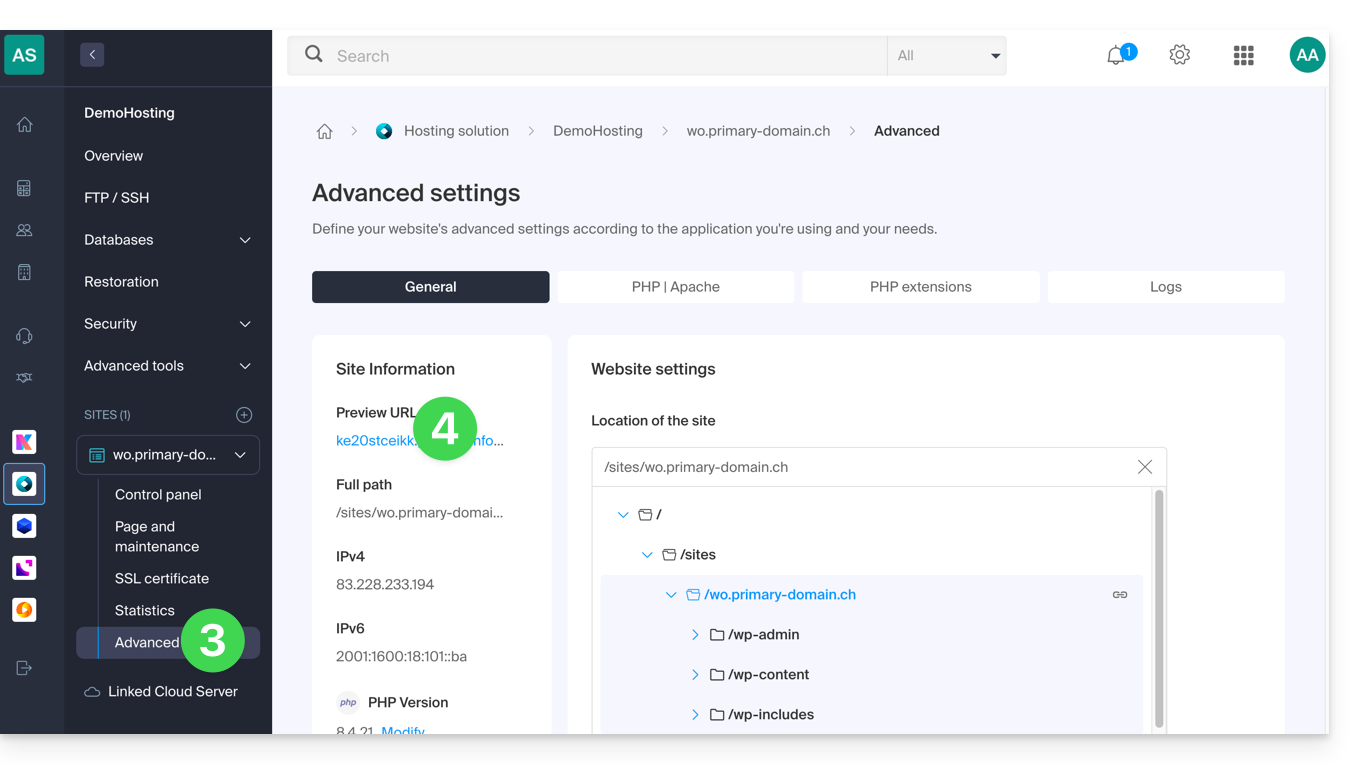
If you encounter a problem…
If, when visiting your preview address, the URL immediately changes to another, it may be due to a .htaccess file that you have modified to include rewrite rules. You should disable it and then test again.
… on WordPress
If the preview URL is always displayed, even though you have taken the necessary steps regarding your domain name, you need to assign the definitive address as the main address in your website's options.
Alternatives for previewing your site
If you wish to use a different method than the preview address provided by Infomaniak (see above), you can modify the hosts file on your computer (including with browser extensions such as this one for Firefox). For this, you will need the IP address of your site.
Once your tests are complete or the domain name's DNS records are updated, remember to delete any changes you made; otherwise, it will be impossible to display your site if the server's IP address is changed or the site is migrated to another web hosting.
Link to this FAQ:
Has this FAQ been helpful?
This guide explains how to generate a certificate signing request (CSR) for a domain name and all its subdomains with a Web Hosting (excluding free hosting of type Starter), thus allowing you to encrypt the connection to your domain name and all its subdomains via a single SSL certificate.
Preamble
- The configuration allows for a "named site" and a "backup site"; to ensure this works without conflict, make sure that the wildcard and your specific subdomains do not overlap on the same web hosting:
- DNS Level the priority is natural: if a specific subdomain exists (e.g.,
private.domain.xyz), it is the one that is requested; otherwise, the request is redirected to the wildcard (*.domain.xyz). - Server Level it is necessary to be vigilant: if the wildcard and the specific subdomain are on the same server, it is the software implementation (Apache) that decides; Apache processes requests according to the evaluation order of the configuration files.
- The risk: if the wildcard is evaluated first, it "captures" all the traffic, making your specific subdomain inaccessible, even if it exists elsewhere.
- Therefore, do not place the wildcard on the same hosting as a more specific overlapping subdomain.
- DNS Level the priority is natural: if a specific subdomain exists (e.g.,
Setting up a Wildcard Certificate
1. Add an alias domain with an asterisk *
To add an alias of type * to your website:
- Click here to access the management of your site on the Infomaniak Manager (need help?).
- Click directly on the name assigned to the site concerned:

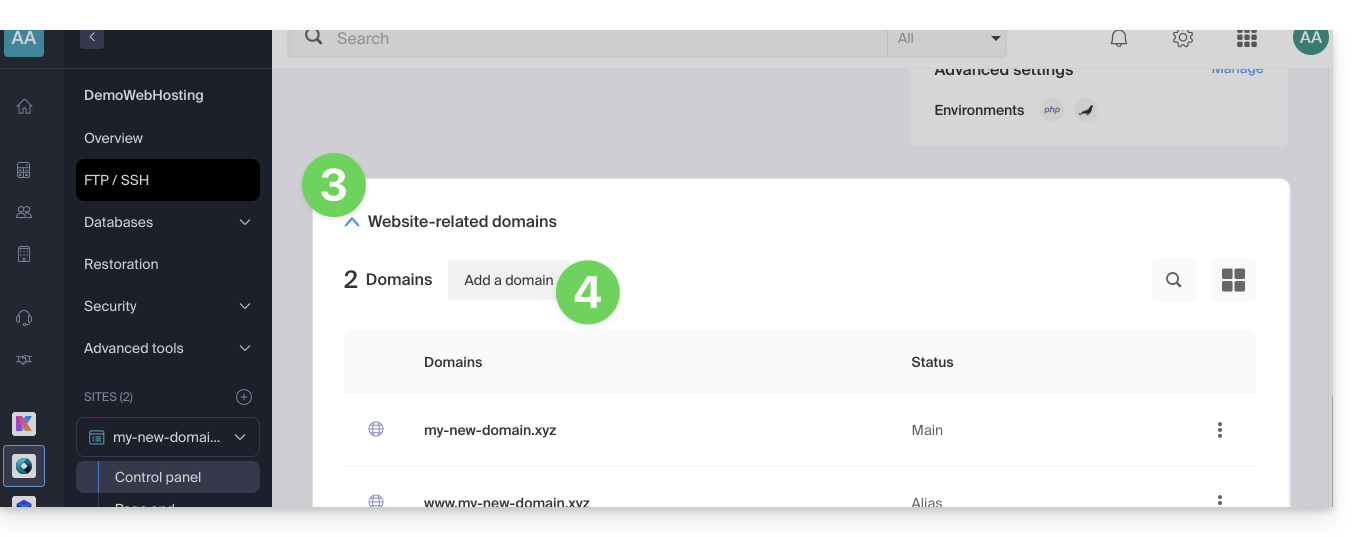
- Click on the chevron to expand the Domains section of this site.
- Click on the Add a Domain button:
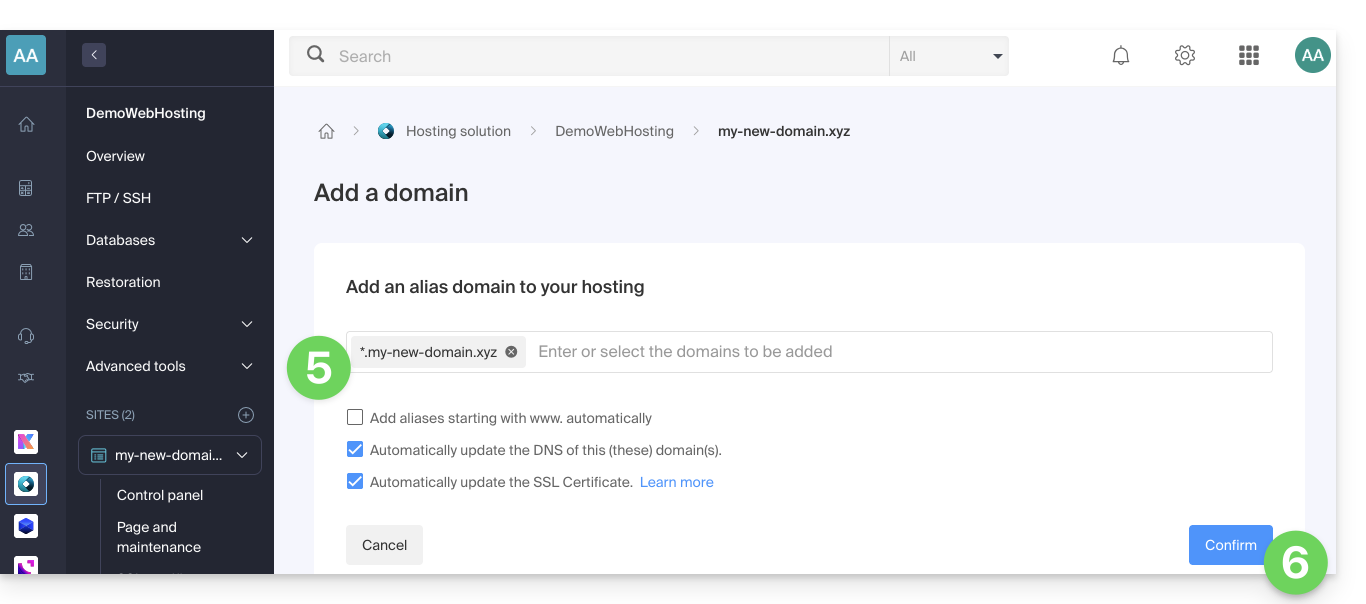
- Enter the domain name to be added in this form:
*.domain.xyz(the asterisk is mandatory, followed by a dot, then the domain name of the website which is domain.xyz in this example)
- Click on the Confirm button to complete the procedure:
2. Install or update an SSL certificate
Example of updating the existing certificate to include the * wildcard subdomain:
- Click here to access the management of your site on the Infomaniak Manager (need help?).
- Click directly on the name assigned to the site concerned.
- Click on SSL Certificate in the left sidebar menu.
- Click on the action menu ⋮ located on the right.
- Click on Update the certificate:

- Make sure the recently added subdomain is selected.
- Click on the Install button at the bottom:

- Wait for the creation or update to complete.
Link to this FAQ:
Has this FAQ been helpful?
This guide is intended for users of Infomaniak's Site Creator who wish to optimize their website's search engine ranking.
Introduction
- Infomaniak is one of the highest-performing hosting providers on the French-speaking market, which contributes to the good search engine ranking of your websites.
- However, Infomaniak will not intervene on the content or development of hosted websites (please refer to this other guide regarding search engine optimization).
Add Site Creator to Google
Prerequisites
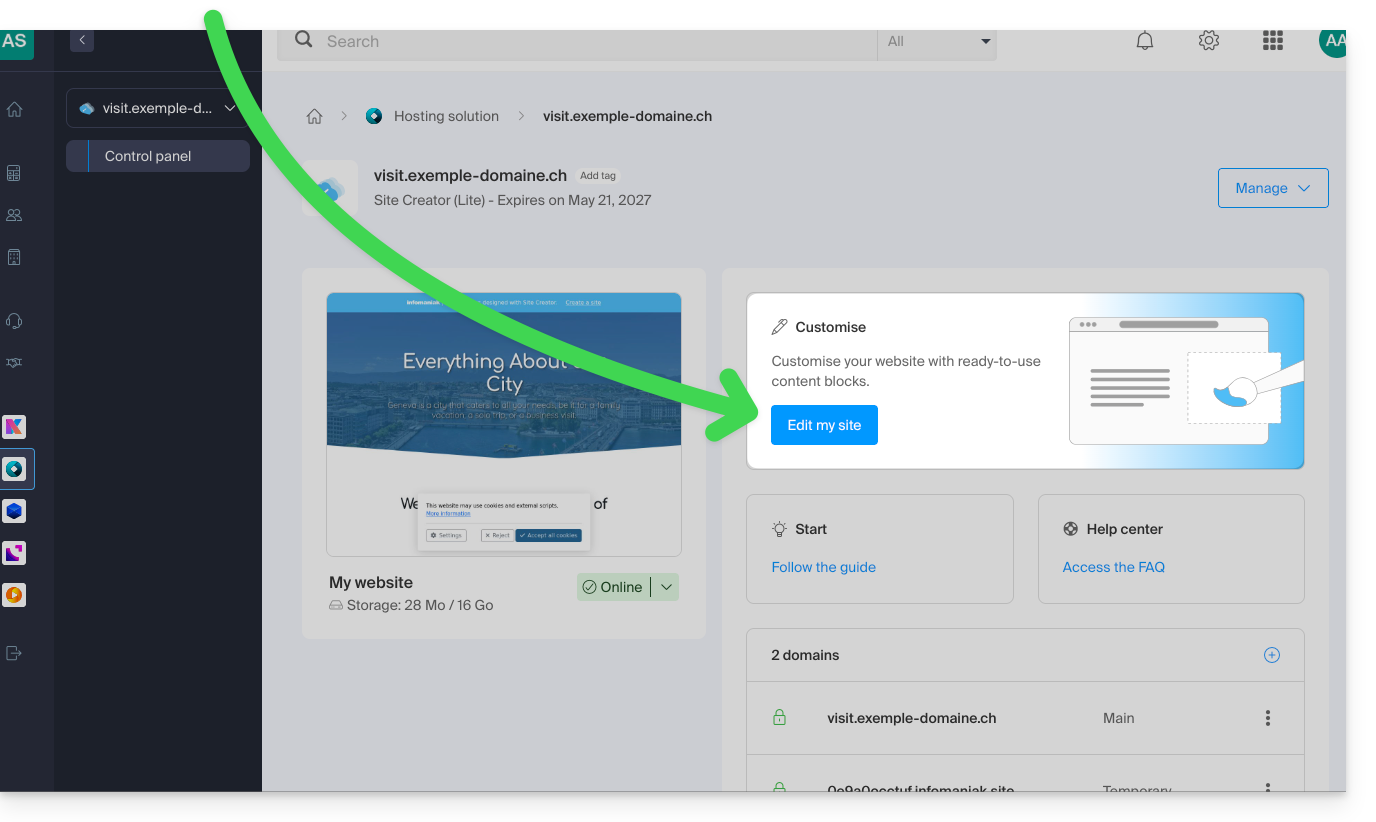
- Access Site Creator:
- Click here to access the management of your product on the Infomaniak Manager (need help?).
- Click directly on the name assigned to the Site Creator in question.
- Click on the Edit my site button to start the editor:
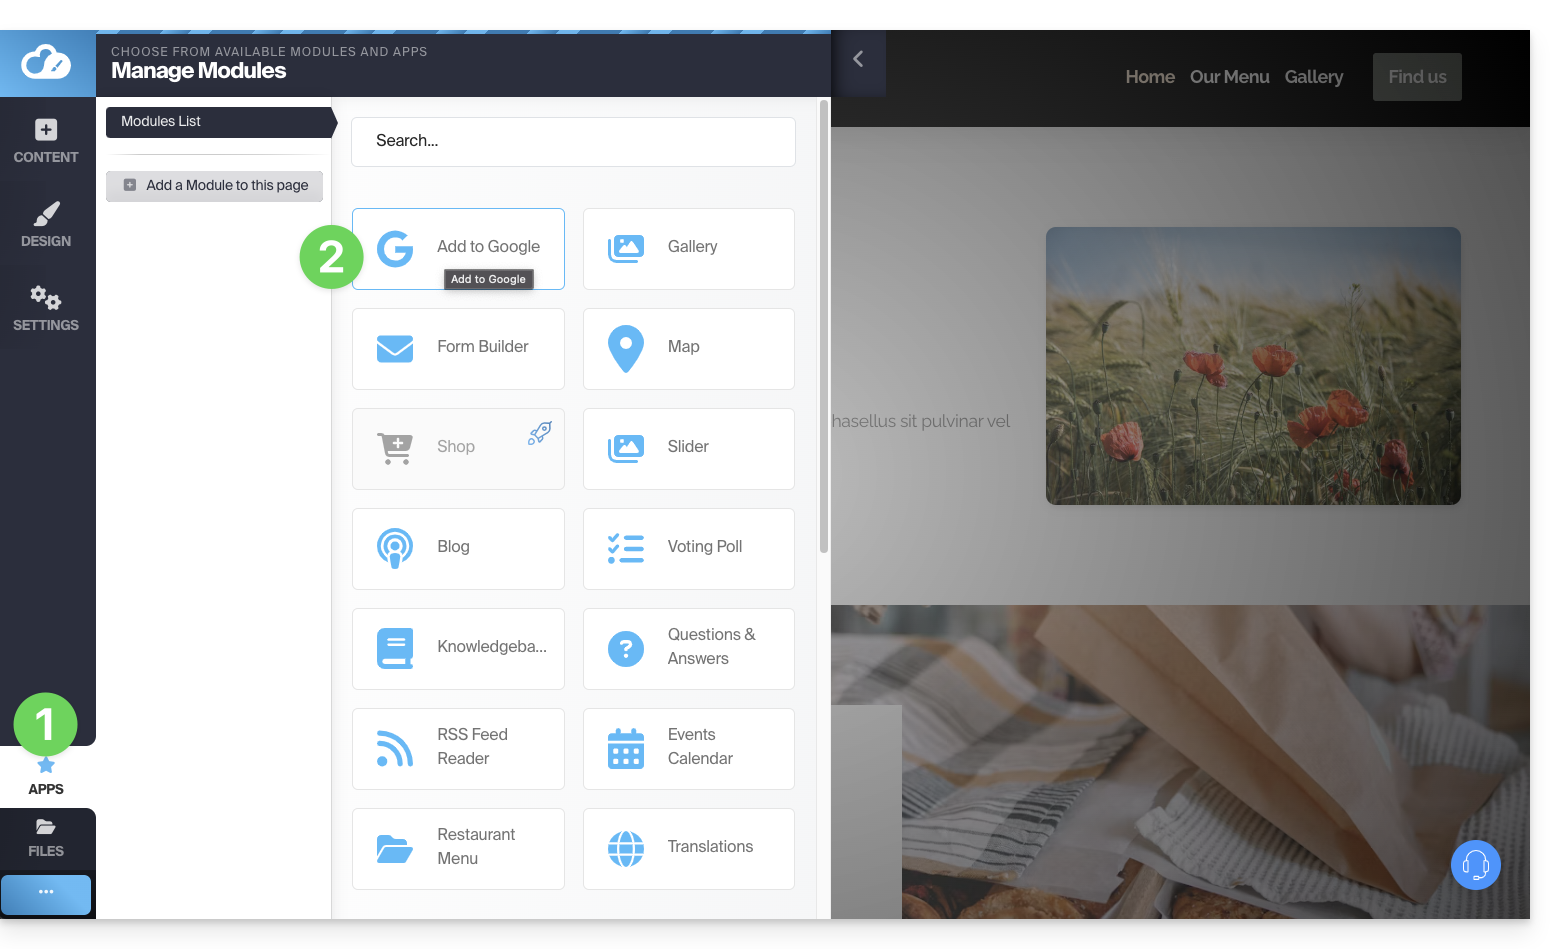
To submit your site to the Google search engine:
- Click on the Applications button in the left-hand menu.
- Click on the Add to Google application:
This application allows for 2 operations:
- Open the Google Search Console interface to manage your site's analytics:
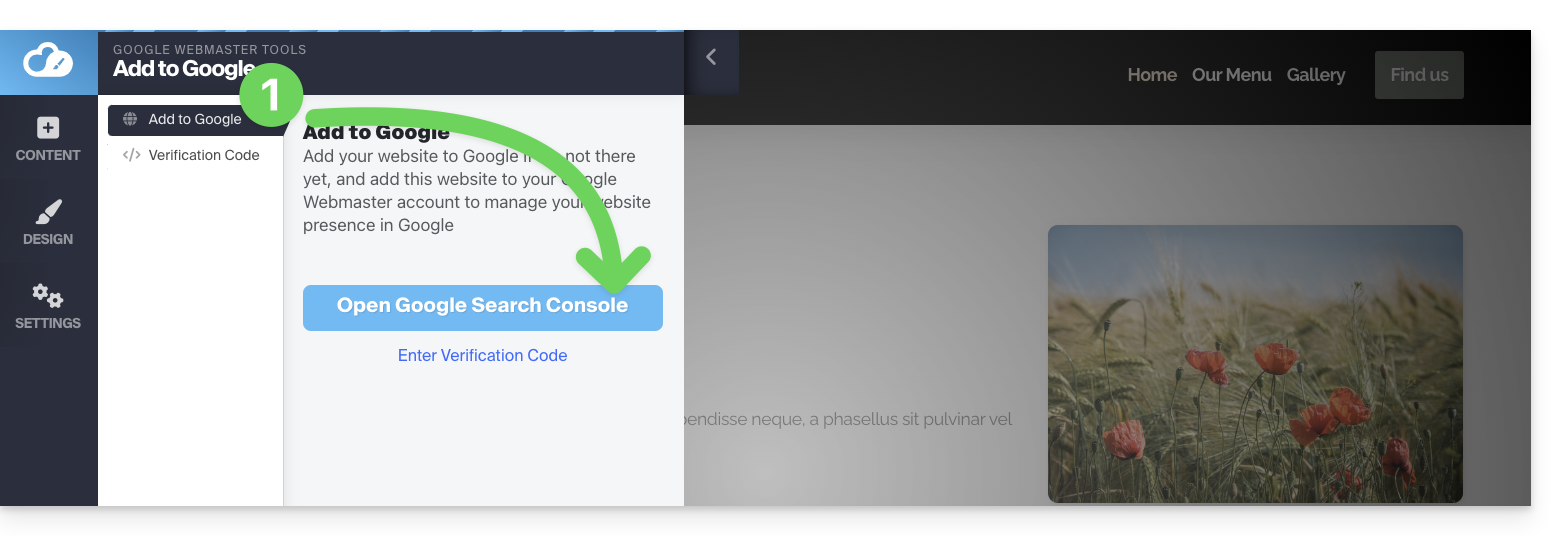
- You can insert the verification code provided by Google Search Console if you choose the simple method (see below):
Ownership Verification (requested by Google)
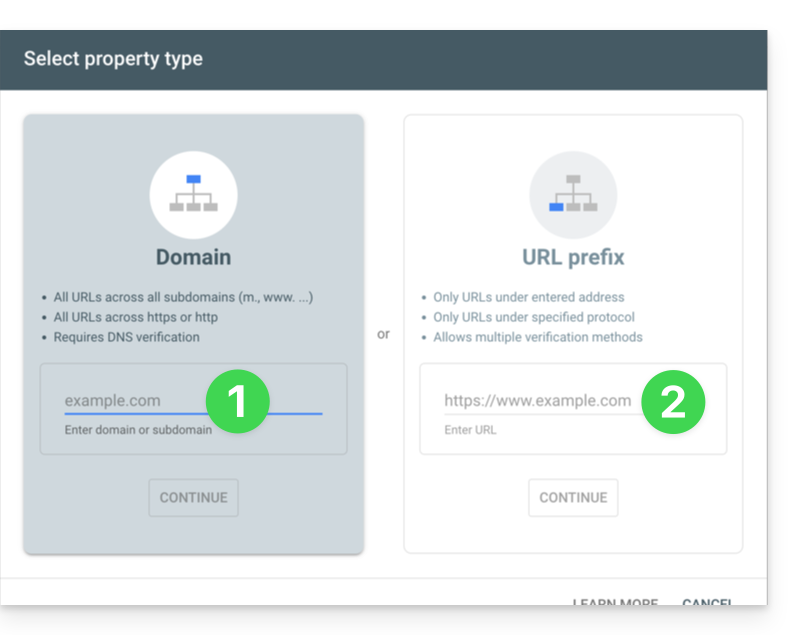
When you want to add your site to the Google tool and click the button in step 1 above, you will be given two options:
- the method for monitoring an entire domain, which requires verification to be performed at the domain name level (in the Infomaniak interface if your domain name/DNS zone is managed by Infomaniak),
- the simpler method, which allows you to specify the exact URL of your site, and for which verification will be done directly from Site Creator:
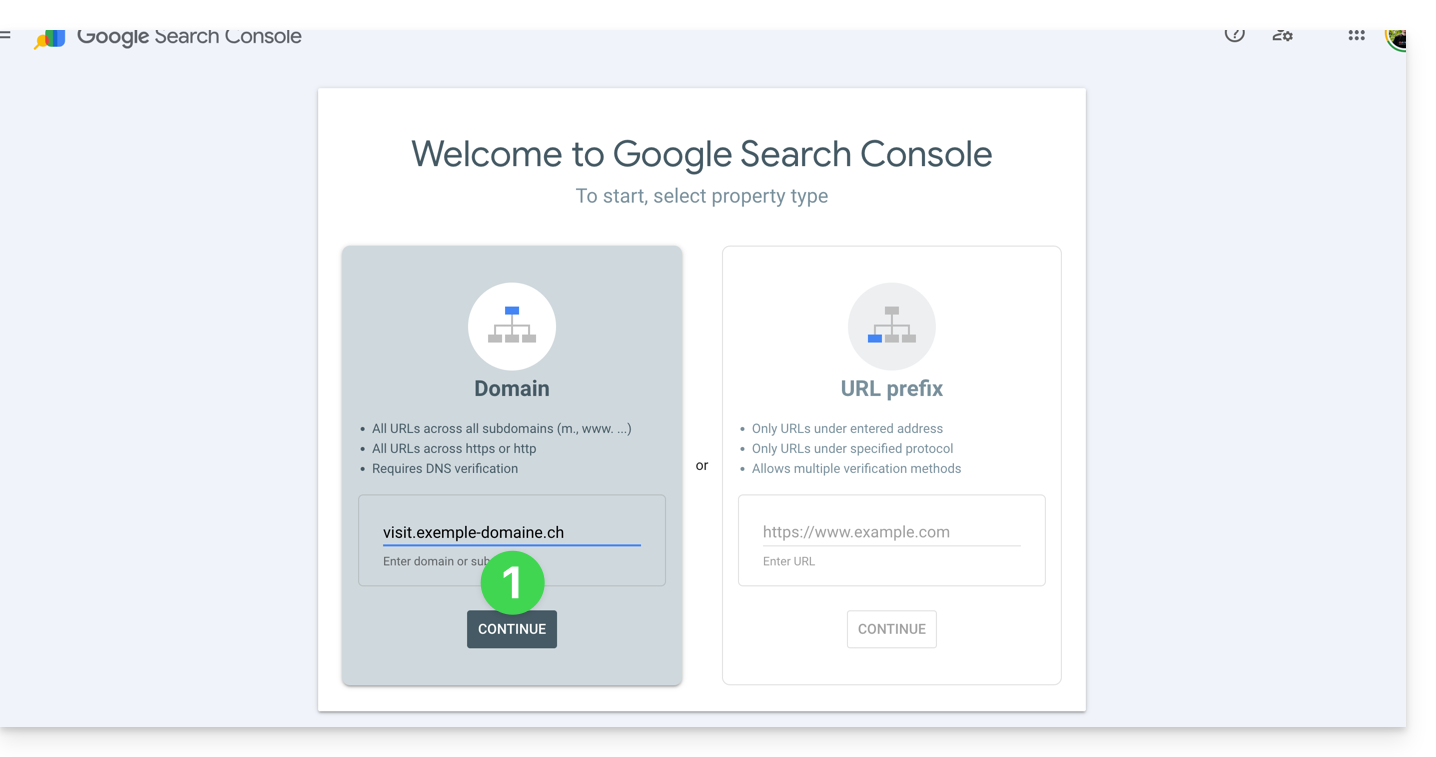
1. Method with domain name ownership verification
- Enter the complete URL of your Site Creator and click Continue:
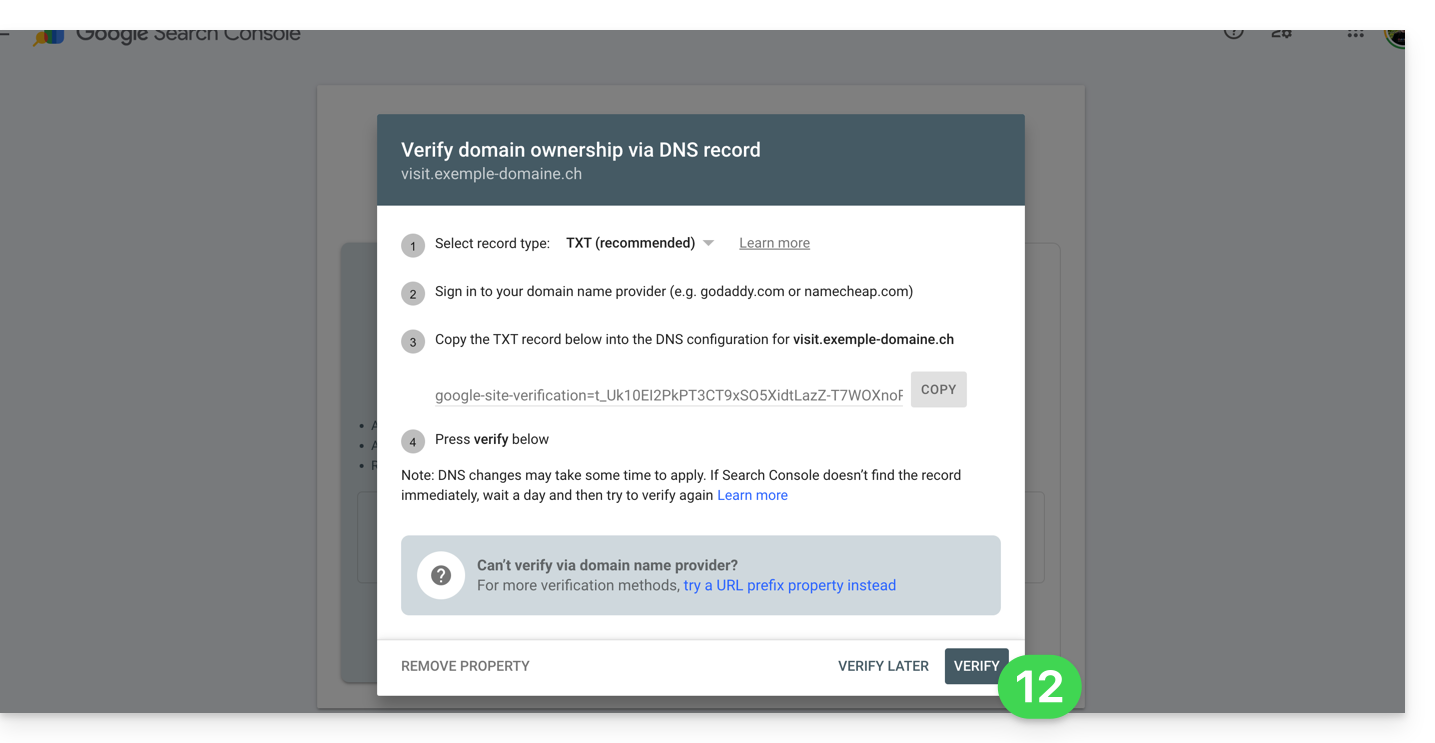
- Make sure that the
TXTtype is selected and click the COPY button: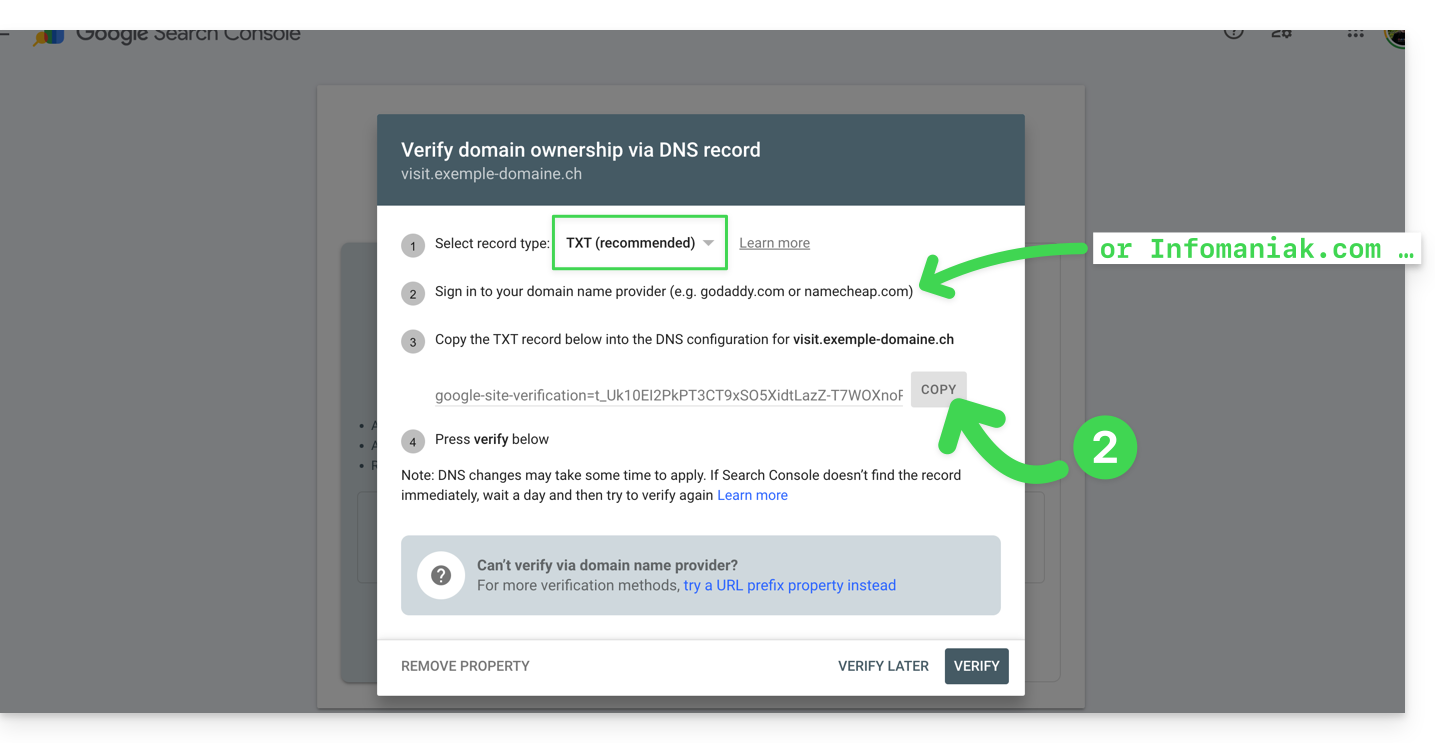
- Click here to access your domain name management if it is managed with Infomaniak (otherwise, you will need to perform these operations with the relevant provider).
- Click directly on the name assigned to the product in question.
- Click on DNS Zone in the left-hand menu.
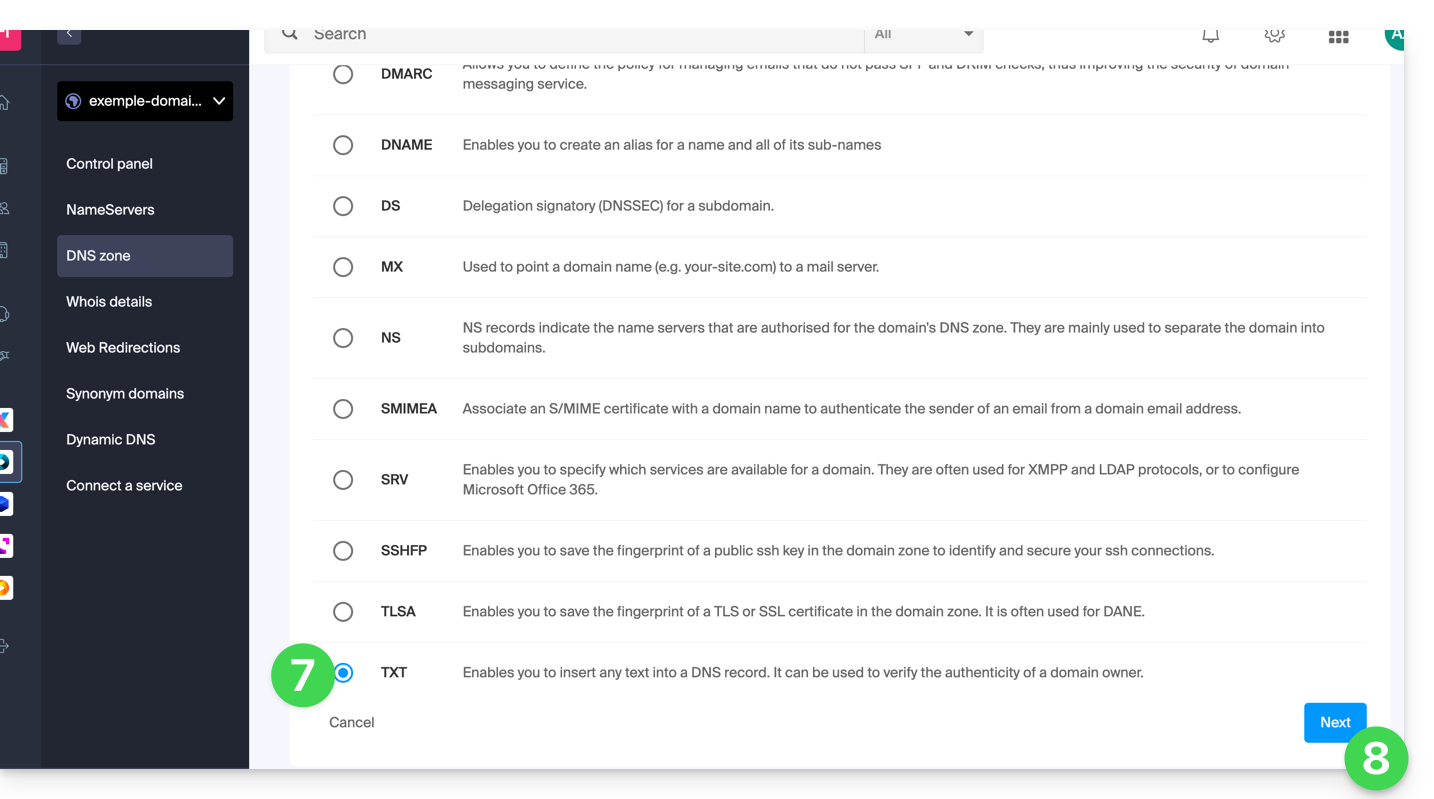
- Click on the button to add a record:
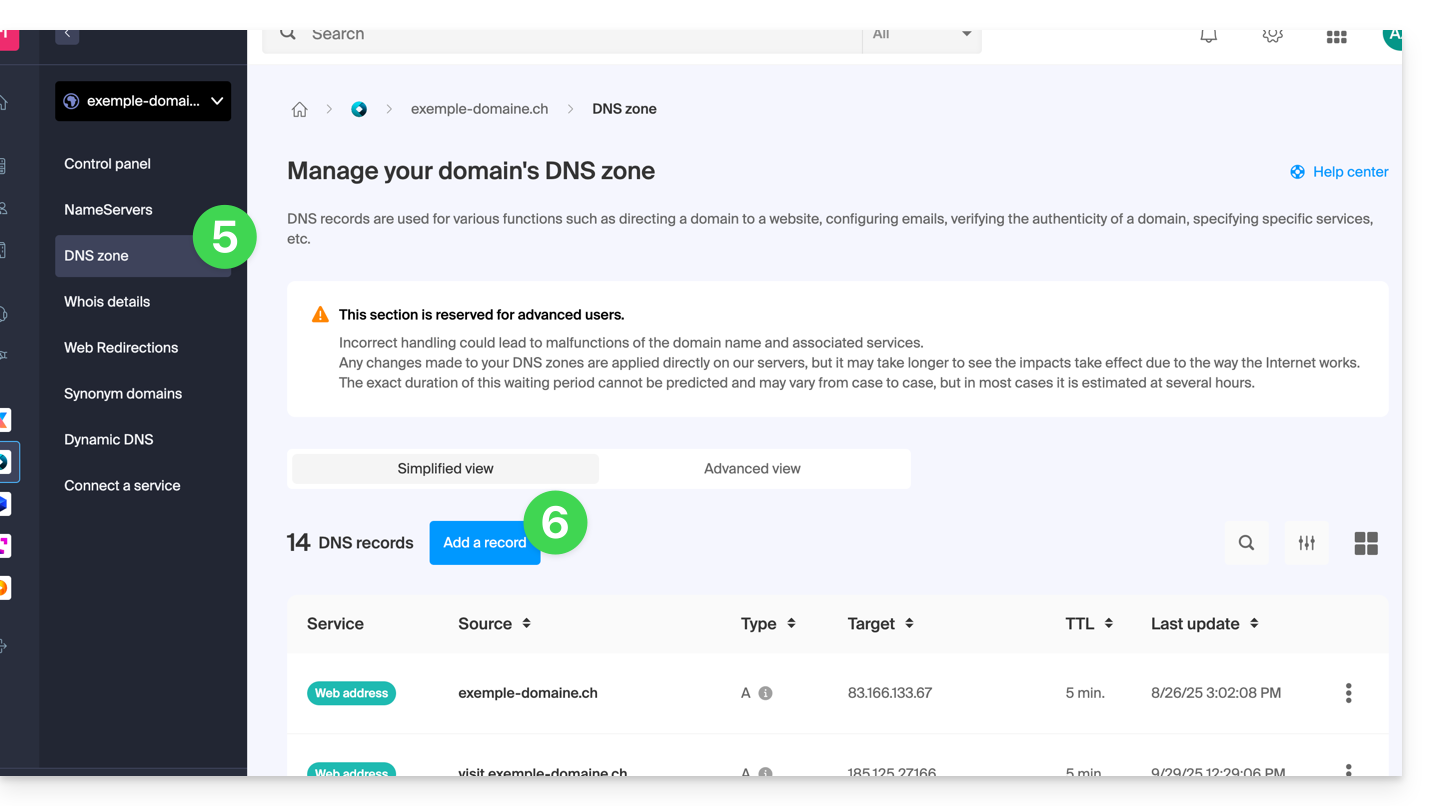
- Select the TXT type from the list.
- Click on the Next button:
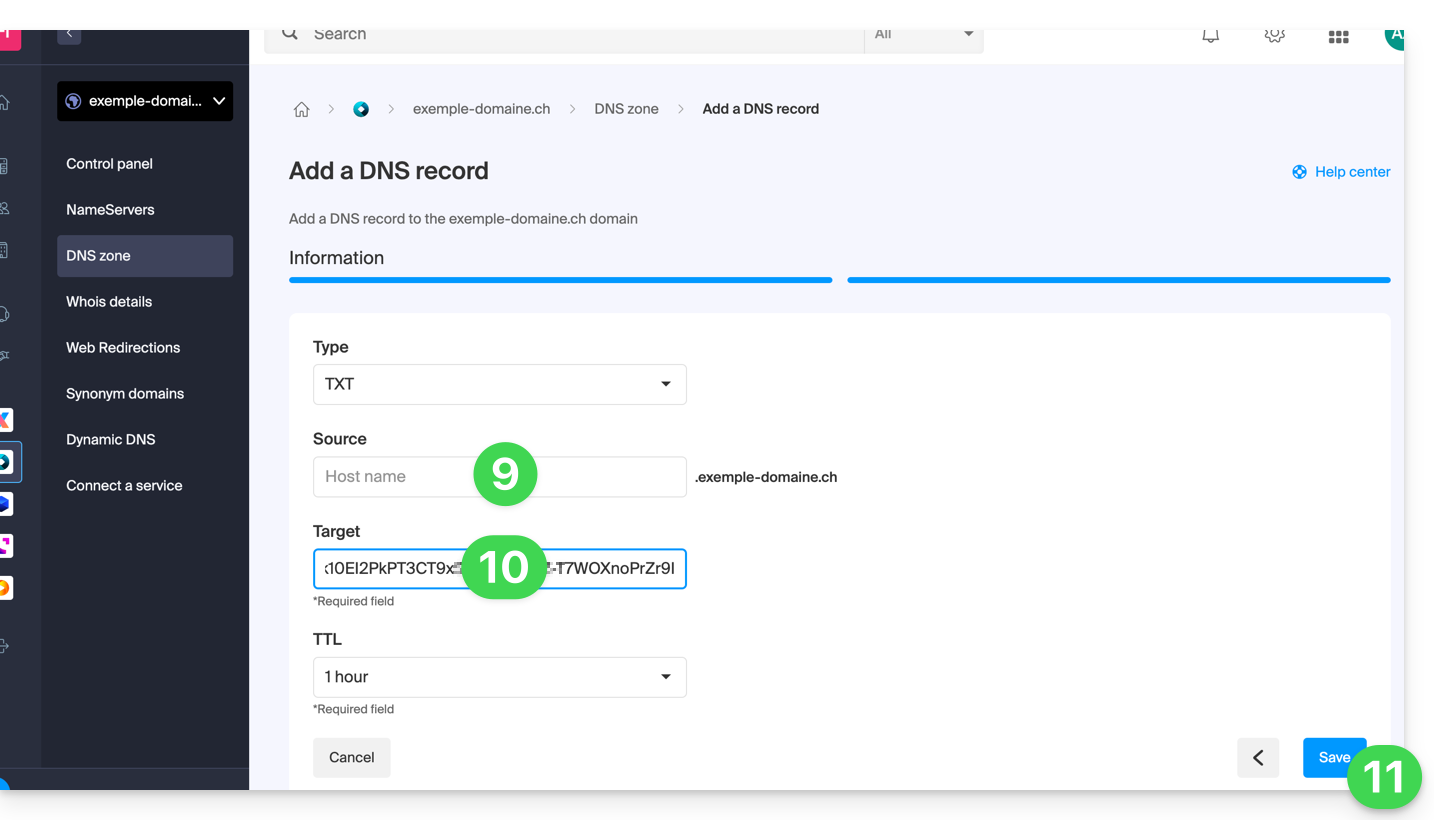
- Leave this field blank or enter the term that comes before your domain name if you have created a site
xxx.domain.xyz(in this example, you would entervisitin the Source field, since Site Creator is created onhttps://visit.exemple-domaine.ch). - Paste the information retrieved in step 2 above.
- Click on the button to Save:
- Go back to the Google tool and click on Verify (wait a few minutes if the verification does not take place):
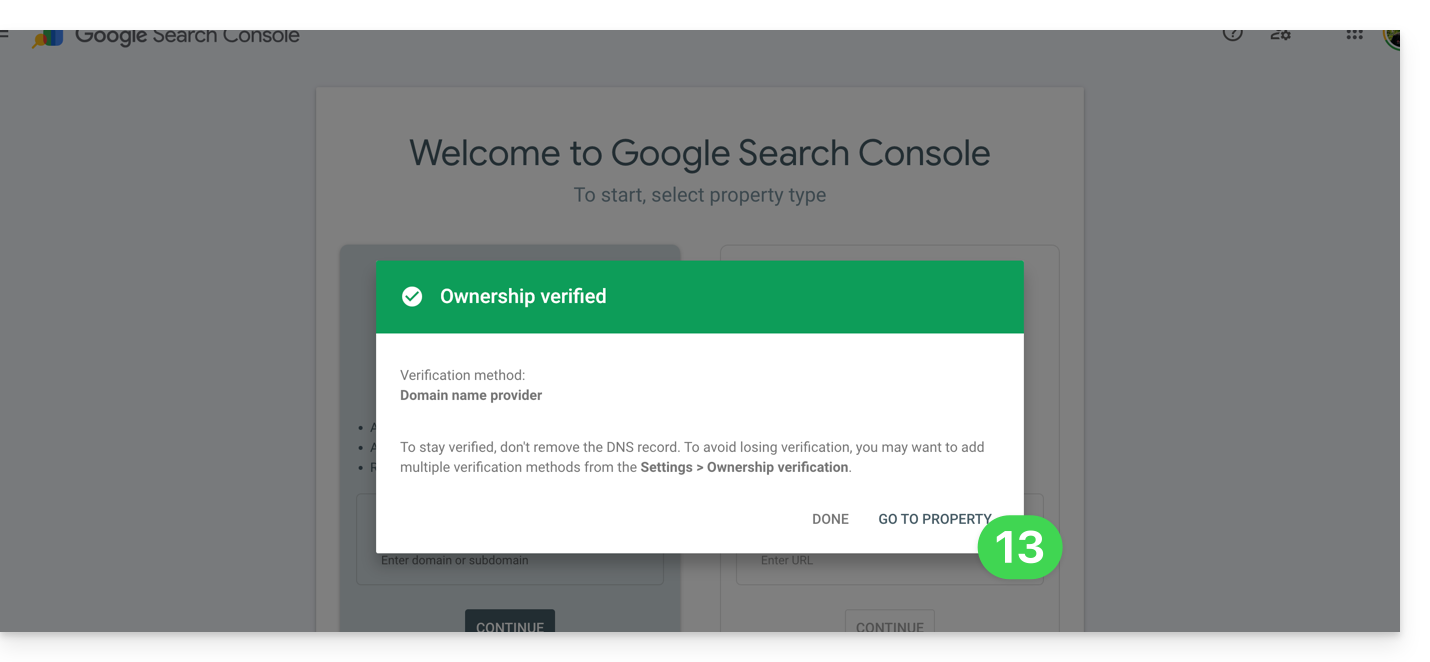
- There you go, the link between your Site Creator and the analytics console has been established; click the button to configure the property:
2. Simple method
- Enter the complete URL of your Site Creator and click Continue:

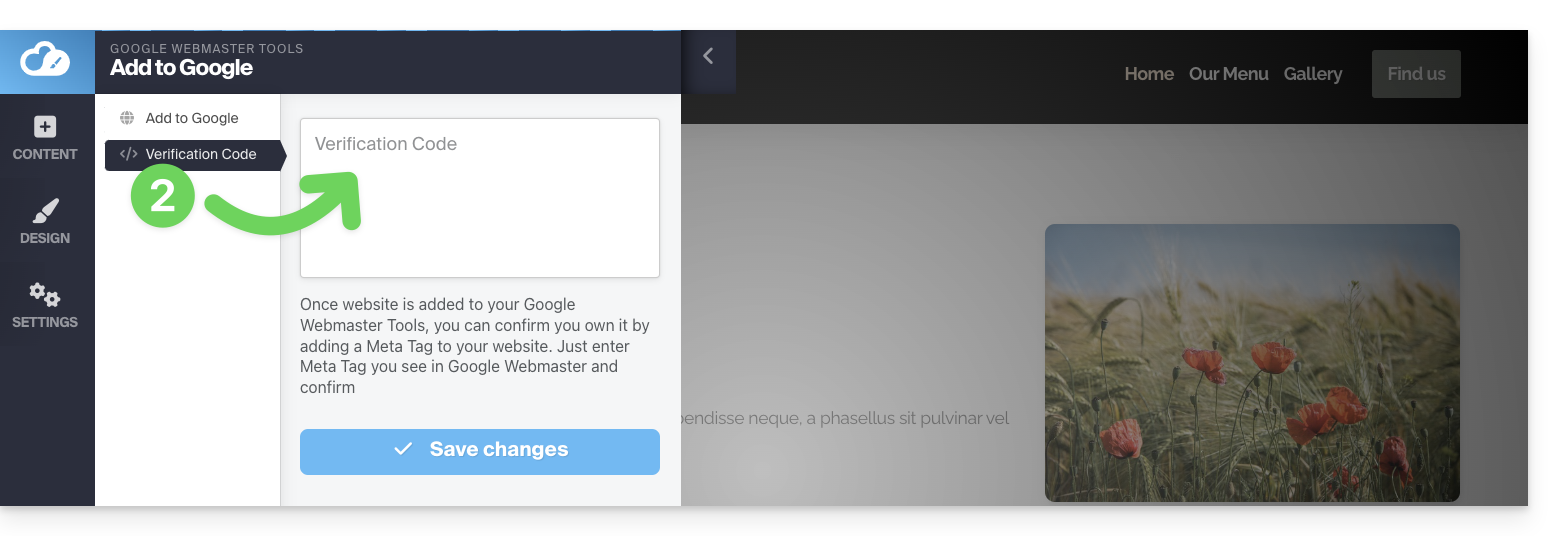
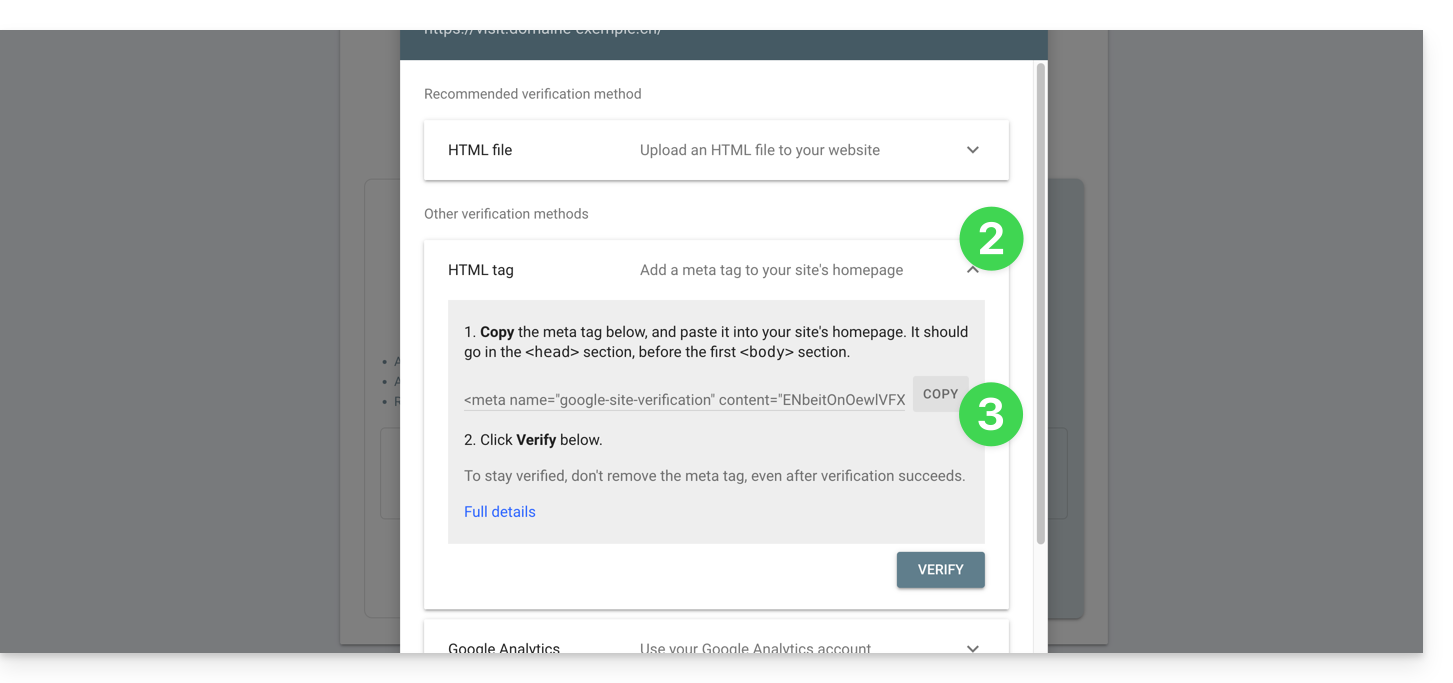
- Click the chevron to expand the HTML TAG section, which provides the information to be pasted into Site Creator to prove its ownership.
- Click the COPY button:
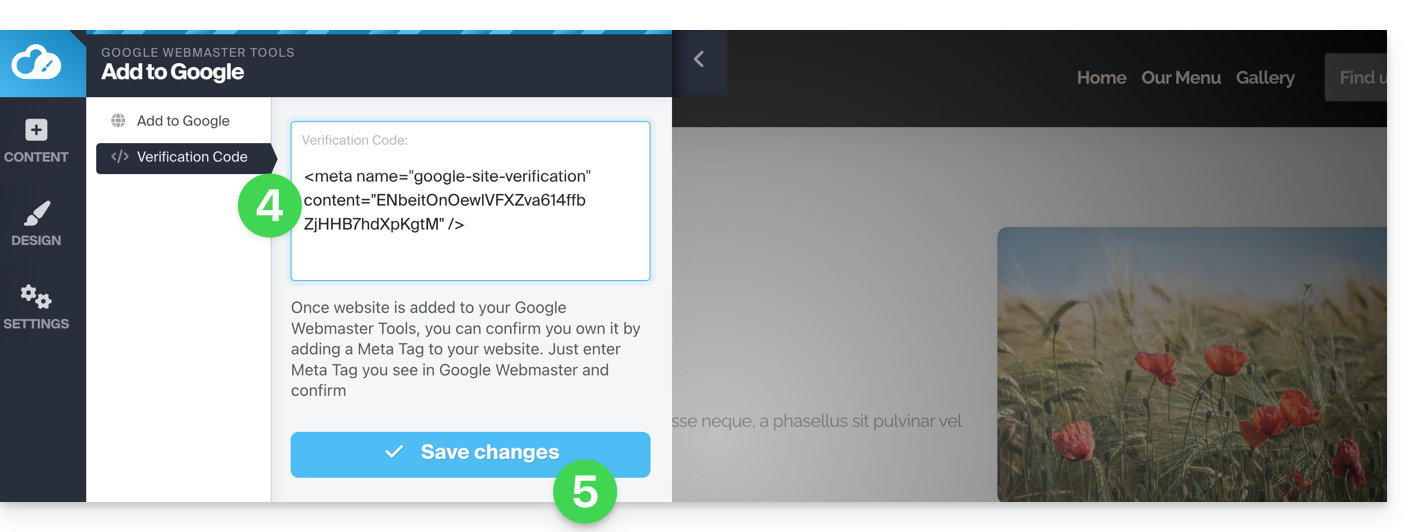
- Paste the information into the designated area in Site Creator.
- Save the changes:
- Go back to the Google tool and click Verify (wait a few minutes if the verification doesn't complete immediately):
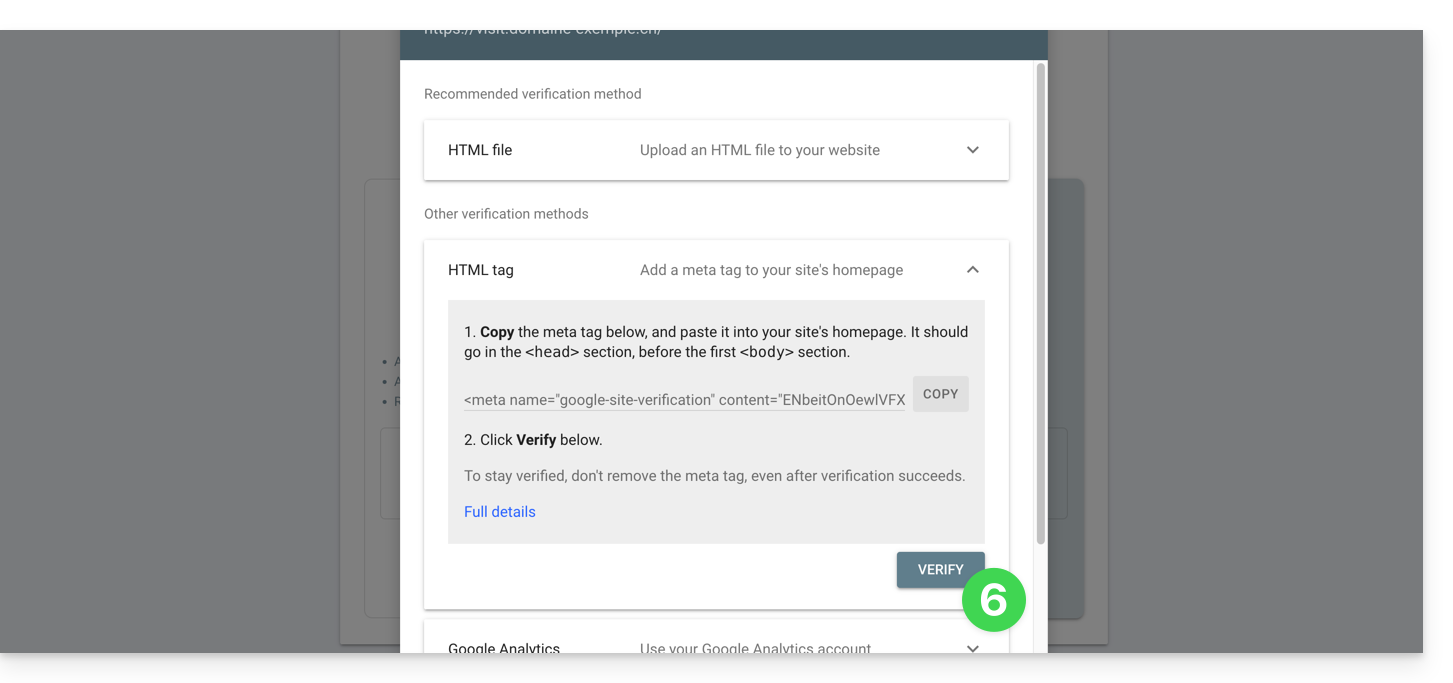
- There you go, the link between your Site Creator and the analytics console has been established; click the button to configure the property:

Define Meta Tags
Once in Site Creator:
- Click the Settings button in the left-hand menu.
- Click General Settings.
- Click SEO and Metadata.
- Enter the title, description, and keywords for the entire site:
This is also where you can manage the robots.txt file if necessary.
To define this, but for a specific page:
- Click on the Settings button in the left-hand menu.
- Click on General Settings.
- Click on Subpage Settings.
- Click on SEO & Metadata.
If you do not make any changes on this page, Site Creator will dynamically manage your tags.
You can also manage the URLs of your pages independently of the SEO title of your page (a page named "Contact" from an SEO perspective, while its URL will be, for example, "/enterprise").
What "Meta Keywords"?
To enter multiple keywords, separate them with a comma or similar:
Sitemap.xml
Do not confuse this with the Sitemap module. The sitemap.xml file lists all the pages of your site to help search engines discover and index them efficiently. You can view it to understand the site structure; replace domain.xyz with your domain name to access it (publicly) from a browser:
https://domain.xyz/sitemap.xmlSubmit your URL to Google Search Console (refer to the first chapter above in this guide) and other webmaster tools to improve indexing.
Insert tracking codes
Your website includes a simple Statistics module, but you can also use Google Analytics or other tracking methods (such as Facebook Pixel, Google Tag, etc.) that require inserting code into your site:
- Click the Settings button in the left-hand menu.
- Click on General settings.
- Click on SEO and statistics.
- Scroll down the page and insert your tracking codes.
Link to this FAQ:
Has this FAQ been helpful?
This guide explains how to prepare your server and install the Acronis Backup Agent for Swiss Backup on AlmaLinux 9.
Install the Acronis CyberProtect agent
1. System requirements
- Use a root privileged account.
- Internet access required for repositories and download.
- Available disk space: approximately 2 GB.
2. System preparation
Switch to root user:
# Switch to root user
sudo -i
Update the DNF metadata cache:
# Refresh DNF metadata cache
dnf -y makecache
Check the current kernel and GCC versions:
# Check current kernel and GCC version
cat /proc/version
If the kernel version does not match the package kernel-devel available, an update will be required in the next step.
Install the build tool (make):
# Install make utility
dnf install -y make
# Verify installation
make -v | head -n 1
Install the GCC compiler:
# Install GCC compiler
dnf install -y gcc
# Verify version (should match the one in /proc/version)
gcc -dumpfullversion
Install the latest kernel and its headers (kernel-devel):
# List available versions
dnf list kernel kernel-devel --showduplicates | sort -r
# Install latest kernel and headers
dnf install -y kernel kernel-devel
Restart the server to load the new kernel:
# Reboot the system
systemctl reboot
After the restart, reconnect and switch back to root (
sudo -i).Confirm the presence of all required tools:
# Final environment check
uname -r
rpm -qa | grep ^kernel-devel
make -v | head -n 1
gcc -dumpfullversion
perl -v | head -n 2
3. Downloading the installer
Install wget if necessary:
# Install wget dnf install -y wget- Get the download URL:
- Log in to https://acronis.infomaniak.com.
- Go to Terminals → All terminals.
- Click on Add and select Linux.
- Copy the full URL containing your token.
Download the binary to your server:
# Download the installer using your URL
wget -O CyberProtect_AgentForLinux_x86_64.bin "metre_ici_URL_obtenue_avant"
Make the file executable:
# Set execution permissions
chmod +x CyberProtect_AgentForLinux_x86_64.bin
4. Agent installation
Start the installation:
# Run the installation script ./CyberProtect_AgentForLinux_x86_64.bin- Use the Tab key to navigate and Enter to validate in the text interface.
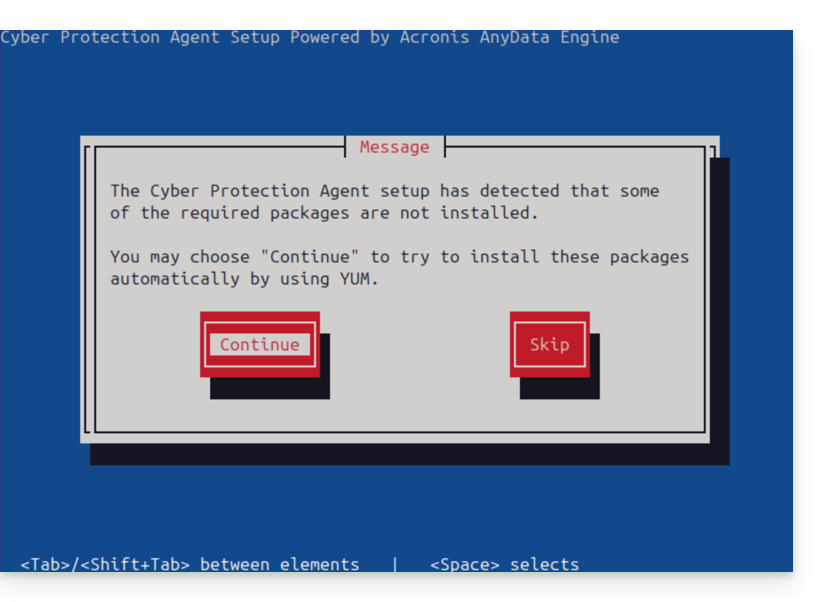
- Select Install.
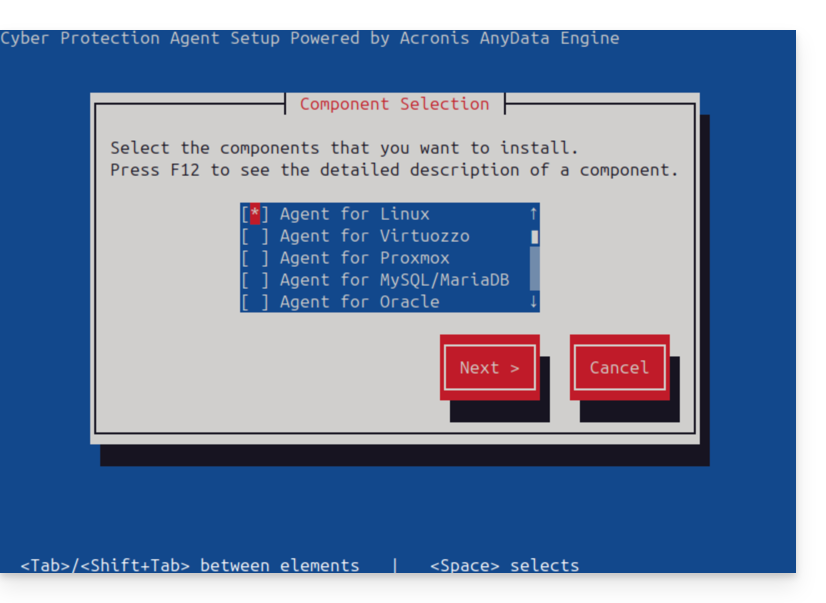
- Accept the automatic installation of missing dependencies via YUM.
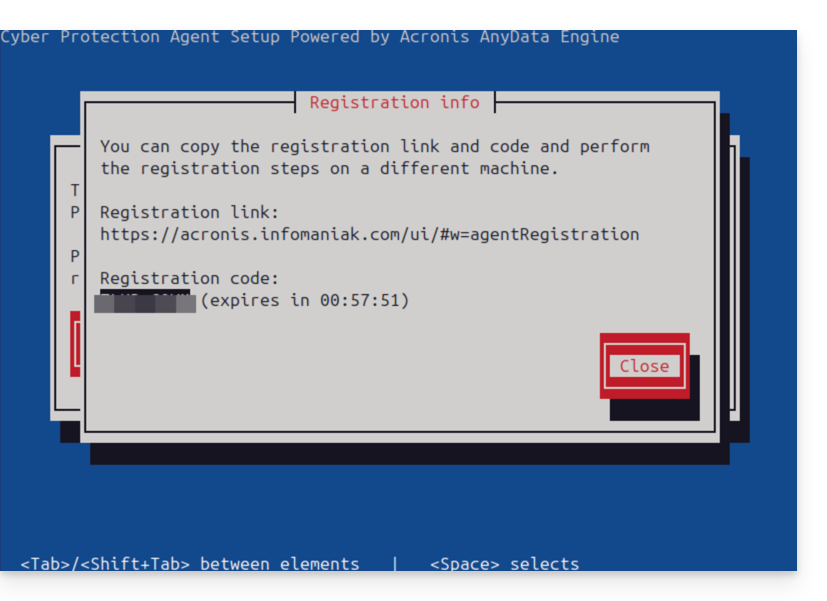
- At the end of the process, choose Display registration information.
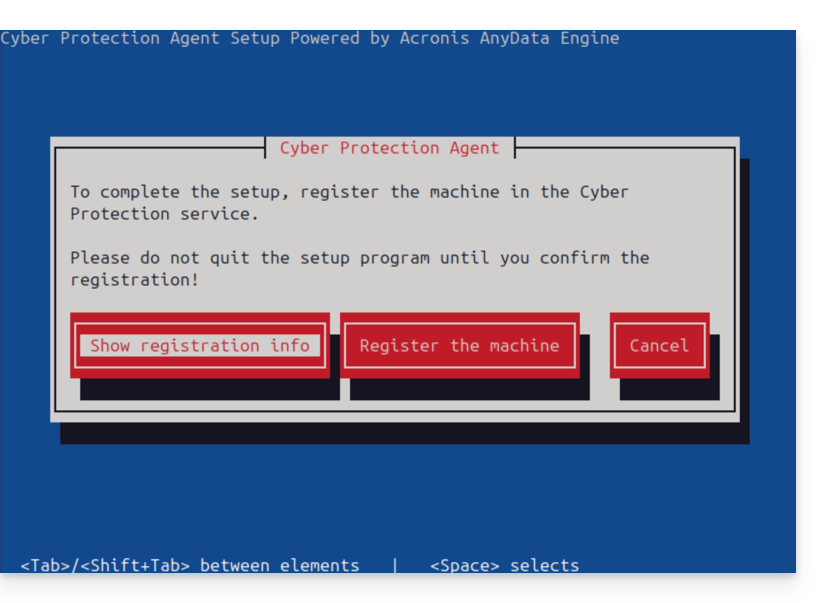
- Carefully note the Registration code displayed (e.g., ABCD-1234).
5. Registration on the Acronis console
- Go back to your Acronis console (browser).
- Click on Add, then at the bottom of the list, choose Registration by code.
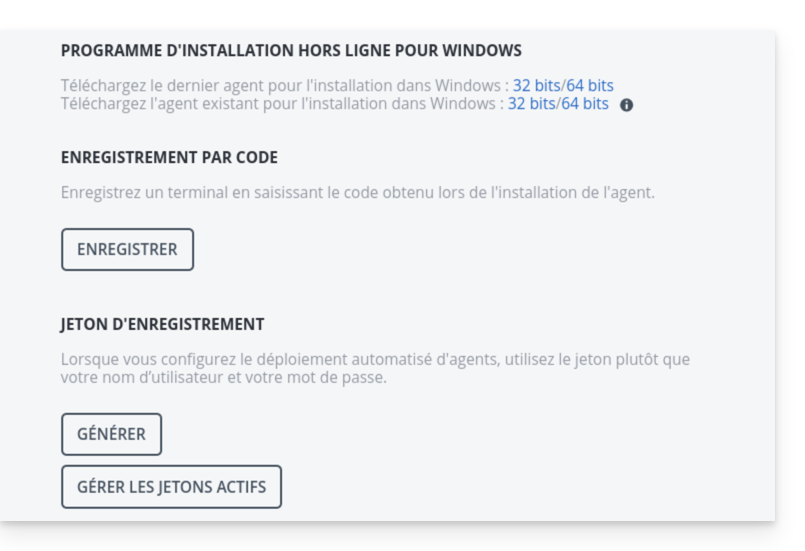
- Enter the code obtained from the server and click on Validate.
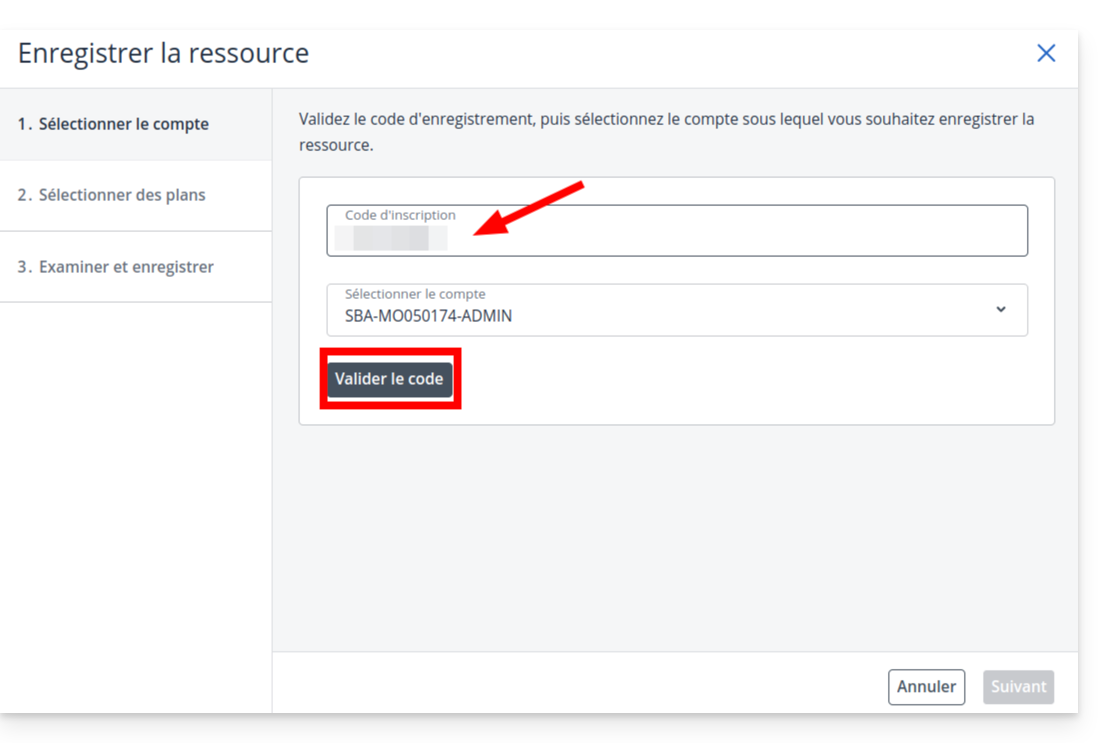
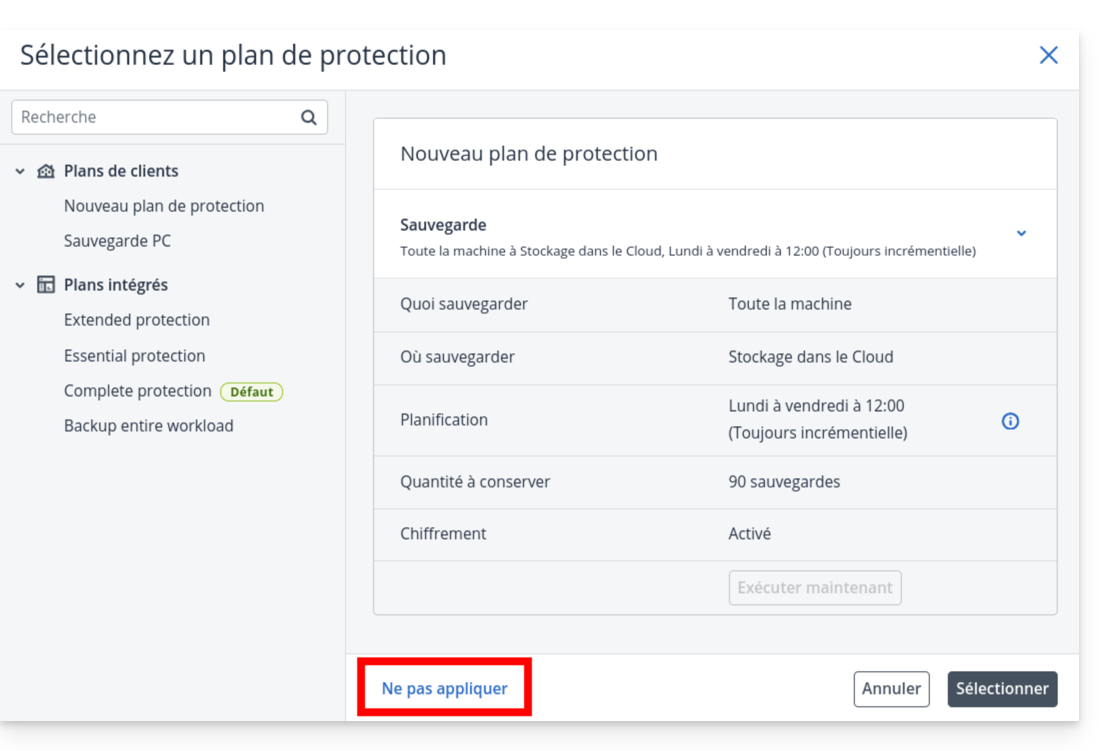
- Important: On the plan selection screen, click on the dropdown menu

- and choose Do not apply.
- Click on Next
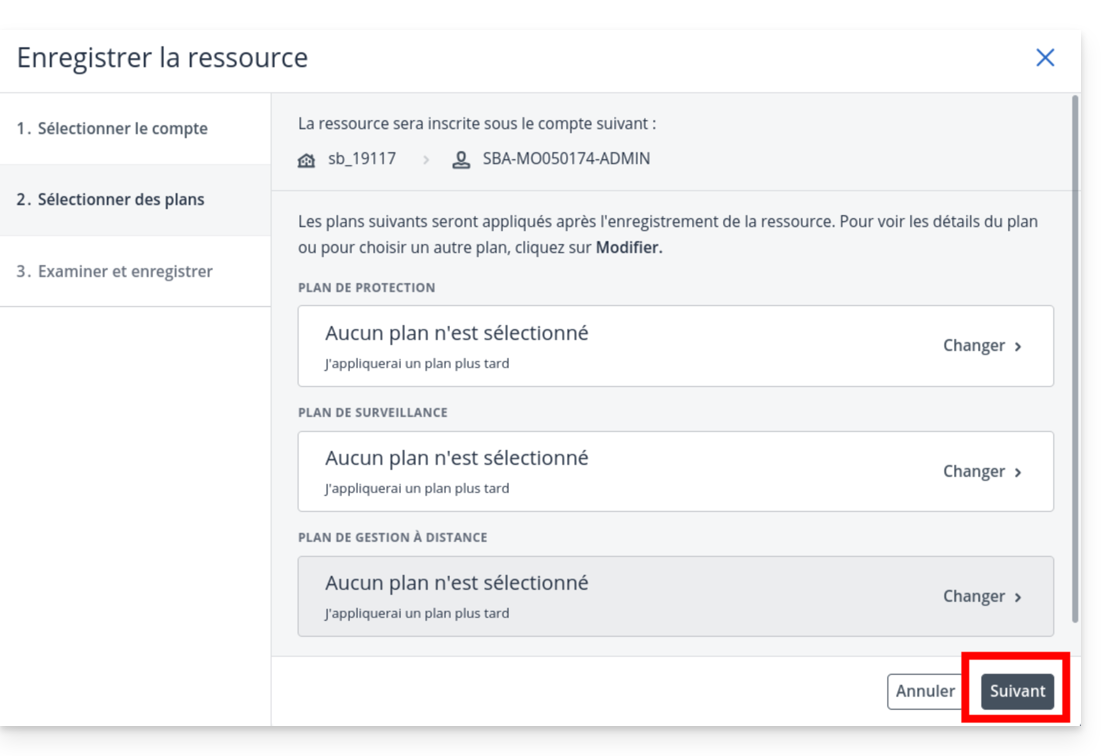
- then on Save.

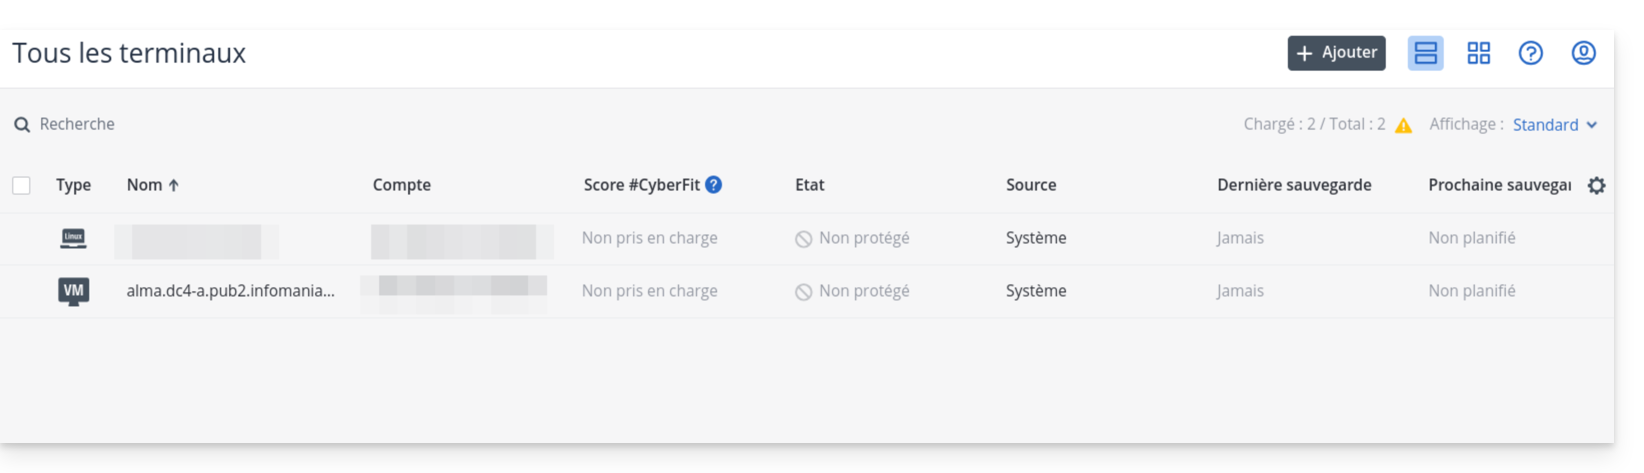
- Check that your server appears in the list of terminals after a few seconds.
6. Creating the protection plan
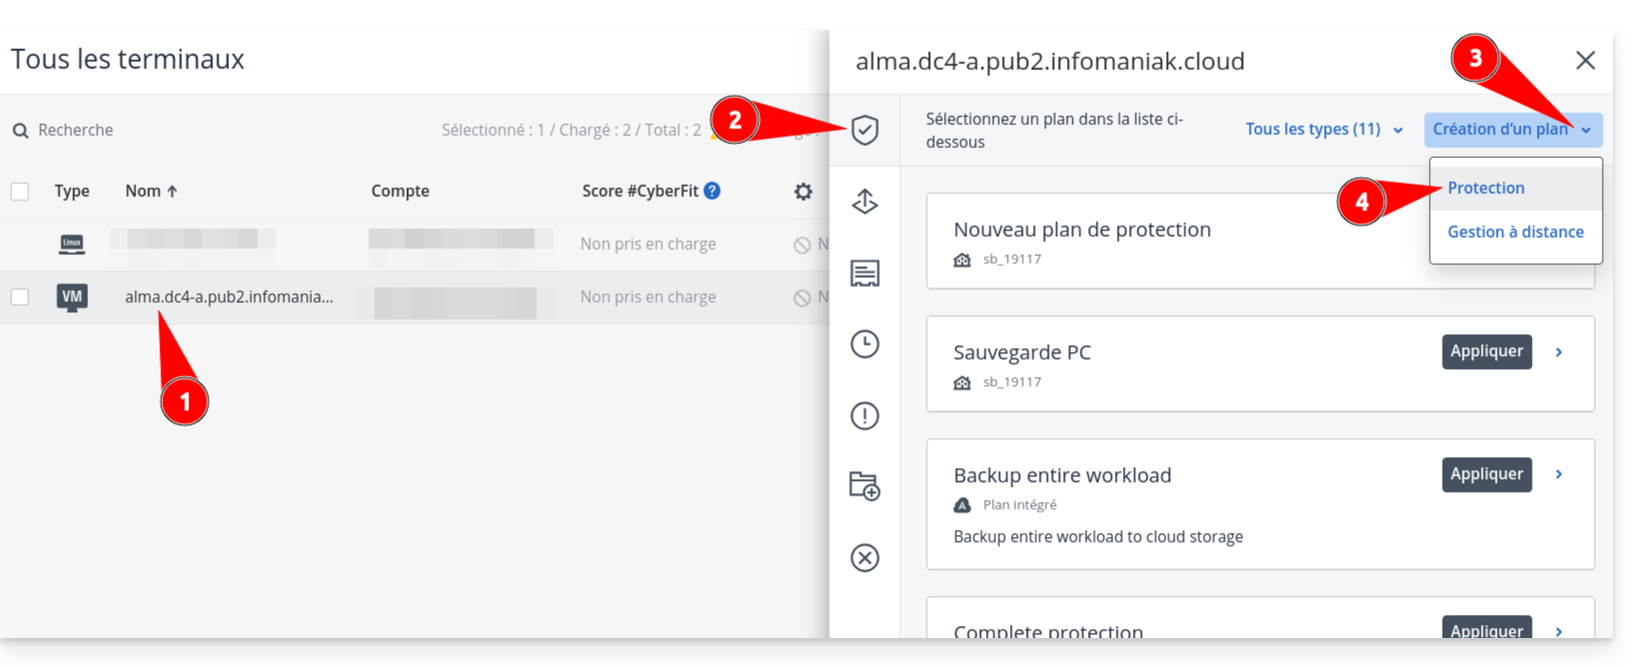
- Click on the name of your server in the list, then on the Protect button.
- Choose Create a plan → Protection.
- Define your backup parameters (frequency, retention, destination).
- Attention: If you enable encryption, keep the password in a safe place. Without it, your backups will be unusable.
- Check the configuration and click on Create.
Link to this FAQ:
Has this FAQ been helpful?
This guide explains how RBLs work, the questionable policies of some of them, and how to resolve any email blocking issues.
Introduction
- RBLs (Realtime Blackhole List) or DNSBL (Black List DNS) are lists containing addresses/IPs/provider names/servers that are considered major spam senders.
- These are often large, general blacklists that identify messages considered undesirable and the senders of those messages, maintained by certain providers (smtpcheck, uceprotect: non-exhaustive list)…
Adding an email address to the RBL
When an email address is identified as belonging to an undesirable sender, it is blocked to prevent the reception of unsolicited messages. A block in the RBL does not expire. Addresses will be listed indefinitely.
If you receive a message indicating that your email address is blocked by an RBL, it means that Infomaniak's security system has detected suspicious or undesirable activity associated with that email address. This may include sending large numbers of unsolicited messages, participating in phishing campaigns, or other malicious behavior.
Resolving an email block (RBL)…
… if the error mentions your address and RBL
If you receive errors such as
anna.a@domain.xyz is rbl blacklisted - http://chk.me/rbl
when sending an email and you believe it is a false positive, contact Infomaniak support.
To prevent your email address from being blocked by the RBL blocking system in the future, follow best practices for email usage:
- Do not send unsolicited messages or mass messages to unknown recipients.
- Regularly review the list of recipients used.
- Do not participate in phishing or cybercrime activities.
- Ensure the highest level of security where your emails are used:
- strong password
- up-to-date software
- up-to-date operating system (iOS, Android, Windows, macOS, etc.)
- up-to-date configuration of the associated domain
… if the error mentions an organization like Sorbs or Barracuda
If you receive errors such as
554 5.7.1 Client host blocked using sorbs
or similar:
- Follow the procedure of the organization mentioned (for example http://www.barracudacentral.org) to have your address removed from the list.
- Temporarily change your internet service provider or connection method - WIFI vs 4G/5G - to send your messages.
- Inform your correspondent and their email provider to take the necessary steps and/or stop using an unreliable RBL.
- Wait a few hours and try again.
Fewer and fewer professionals (ISPs, hosting providers, etc.) are using service providers like Backscatterer / UCEPROTECT, whose primary purpose is financial gain. There are many other highly effective lists available, such as ABUSIX or SPAMCOP, which are well-maintained and whose real goal is to combat spam, one of Infomaniak's top priorities.
Link to this FAQ:
Has this FAQ been helpful?
The BIMI (Brand Indicators for Message Identification) standard, brand indicators for message identification) allows companies to incorporate their logo into the emails they send.
Preamble
- Infomaniak applications (and other companies around the globe - read the in case of problem chapter below) are compatible with BIMI and will display the logos next to the received emails.
- Infomaniak Mail Services allow you to configure your email with your logo; the benefits are numerous:
- increased trust: recipients can visually identify your emails, thus reducing the risk of phishing.
- brand reinforcement: a well-visible logo in inboxes reinforces brand awareness.
- better deliverability: emails compliant with DMARC have a better chance of reaching the main inbox.
1. Create a logo
Create a logo in SVG (Scalable Vector Graphics) format. This format is required as it ensures optimal quality regardless of the device or display size.
To be imported on the Infomaniak interface (read below) it must not exceed 10 Mo, but it can also be hosted on a publicly accessible secure server and you will simply need to indicate its URL for the BIMI DNS registration.
2. Obtain the VMC certificate
A verified logo certification (VMC) is required; it certifies that you are the legitimate owner of the logo. You can obtain this certification from recognized certification authorities such as DigiCert and Entrust.
When your VMC certificate is issued, you receive a PEM file containing the entity certificate. This PEM file includes your logo in SVG format as well as the VMC.
3. Add the logo to the Mail Service
Prerequisites
- All the Global Security indicators of your Mail Service must be green (SPF + DKIM + DMARC)!
To access the Mail Service and set the logo of your company:
- Click here to access the management of your Mail Service on the Infomaniak Manager (need help?).
- Click directly on the name assigned to the Mail Service concerned.
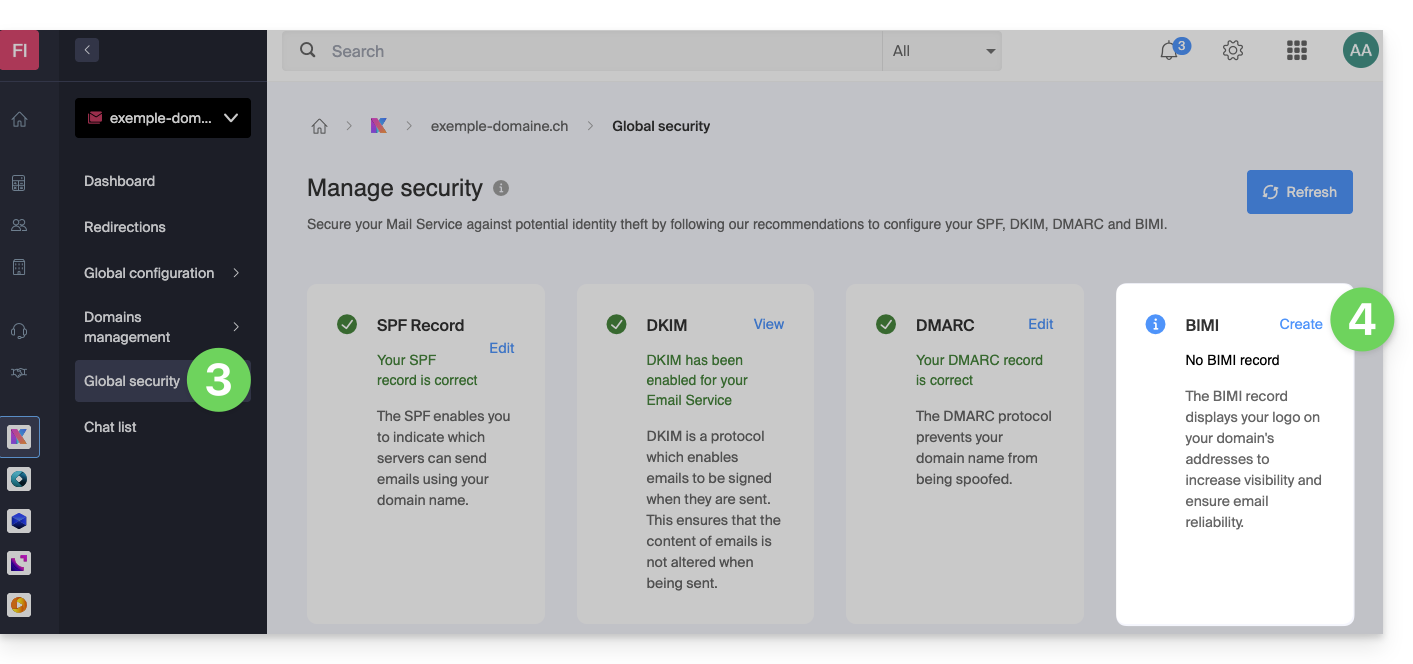
- Click on Global Security in the left sidebar menu.
- Click on the Create button (in the BIMI section):
- Fill in the requested information from the documents received (see chapter 2 above) and do not forget to save.
In case of a problem
- If the Create button in the BIMI box remains gray, make sure to check the informative messages: DMARC may exist but not be at the required rejection percentage, so adjust the parameters according to the indications.
- When there are multiple domains linked to the Mail Service, you must ensure that you have a certificate on each linked domain if you want BIMI on them.
- Note that Apple Mail supports BIMI, unlike Microsoft Outlook, Thunderbird and the Mail app from Samsung which have not yet fully adopted it.
Disable BIMI
To disable BIMI, simply go to the domain name management page linked to the Mail Service and delete the corresponding TXT record.
Link to this FAQ:
Has this FAQ been helpful?
This guide explains how to order, link or remove a dedicated IP from a website.
Manage dedicated IPs on hosting
Order one or more first dedicated IP addresses
To do this:
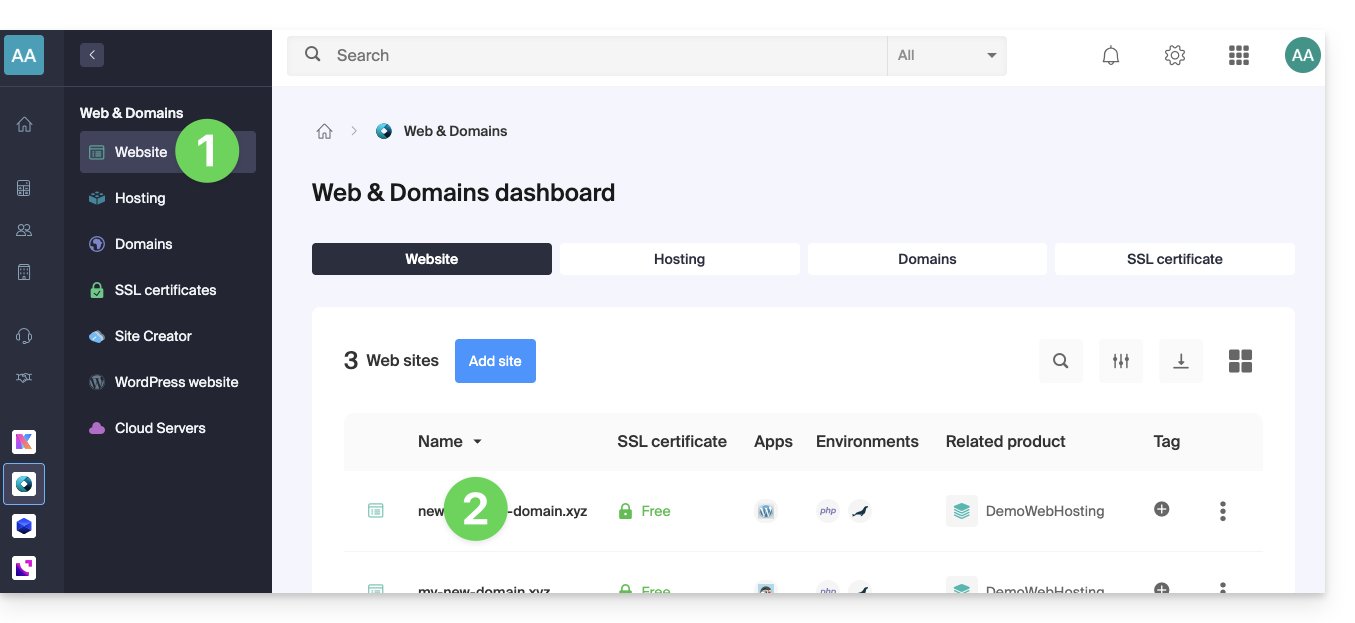
- Click here to access your site management on the Infomaniak Manager (need help?).
- Click directly on the name assigned to the site concerned:
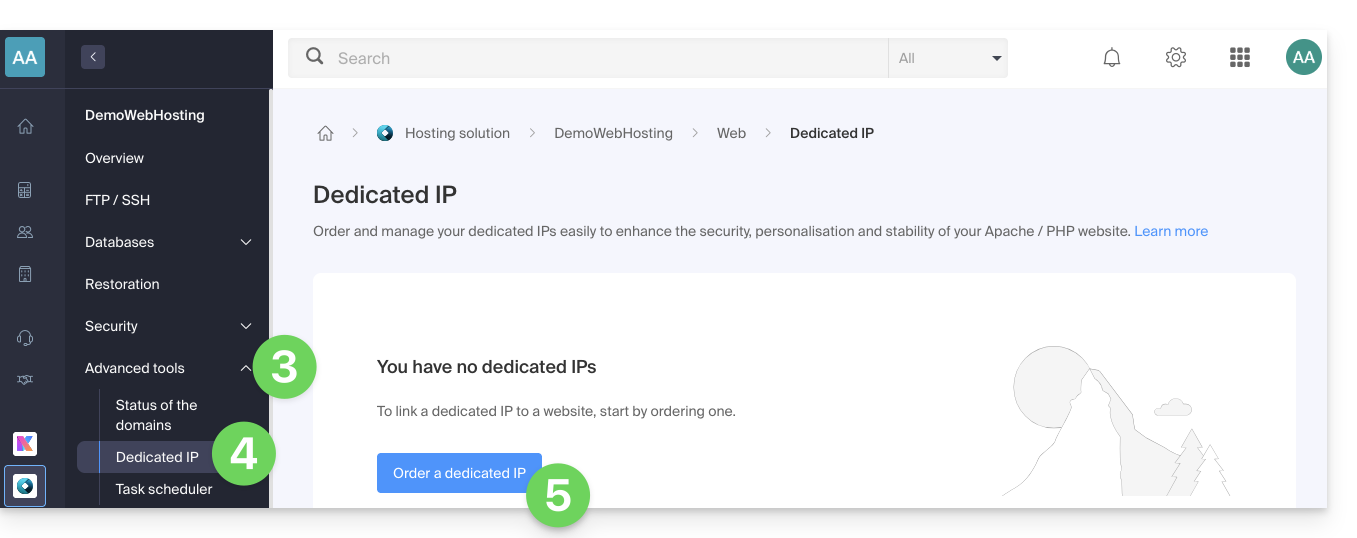
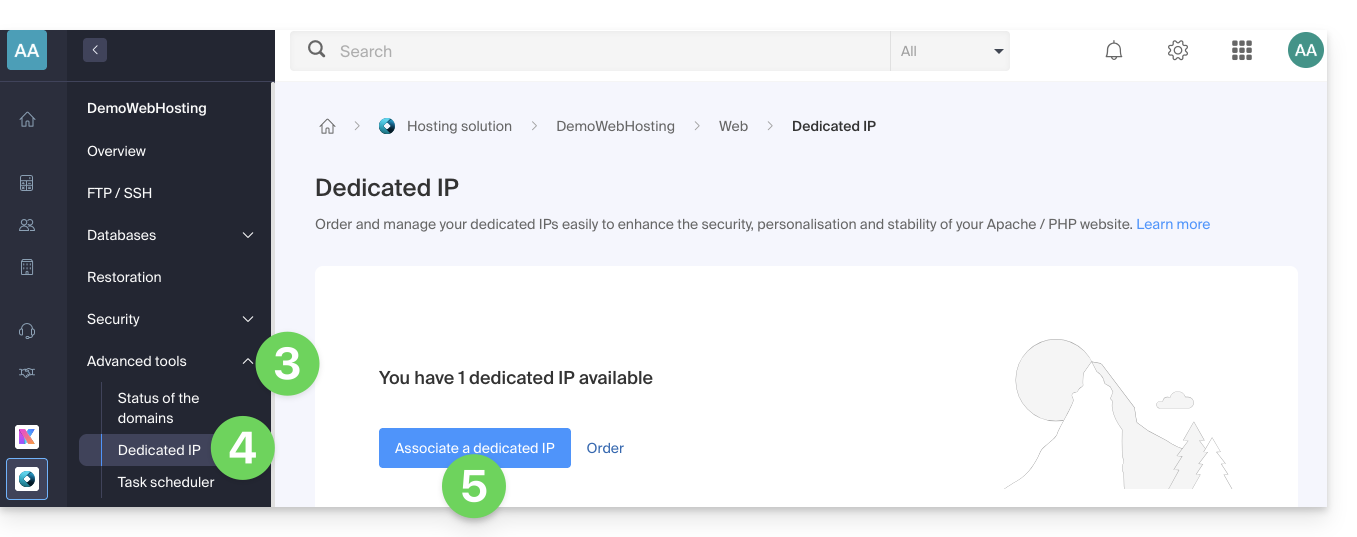
- Click on the chevron to the right of Advanced Tools in the left sidebar menu.
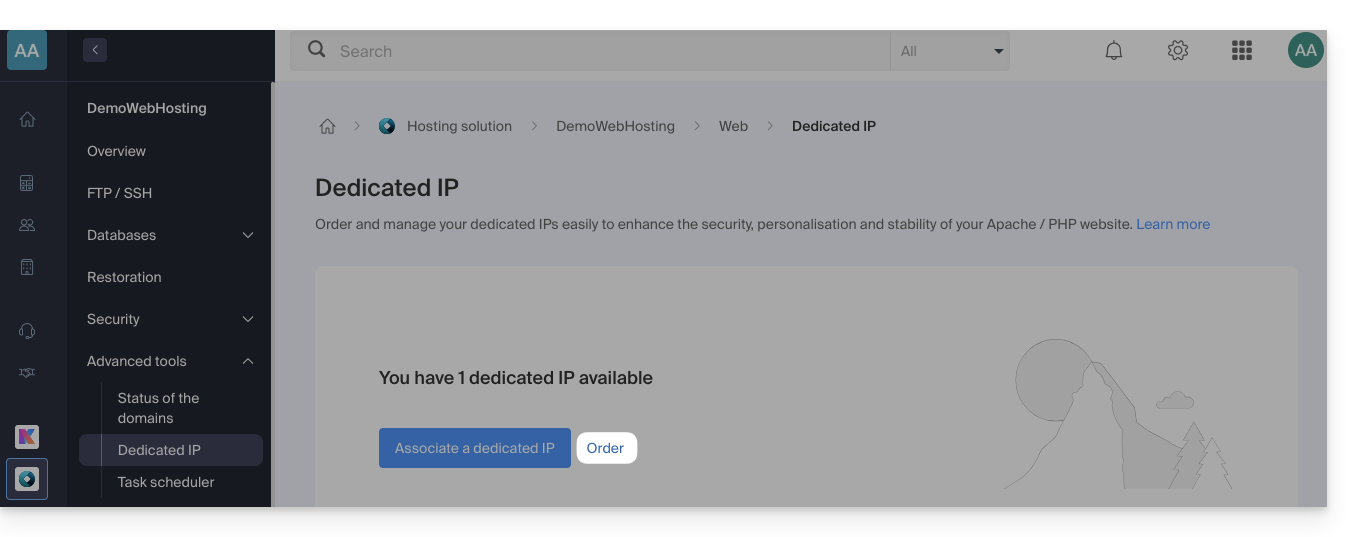
- Click on Dedicated IPs in the left sidebar menu.
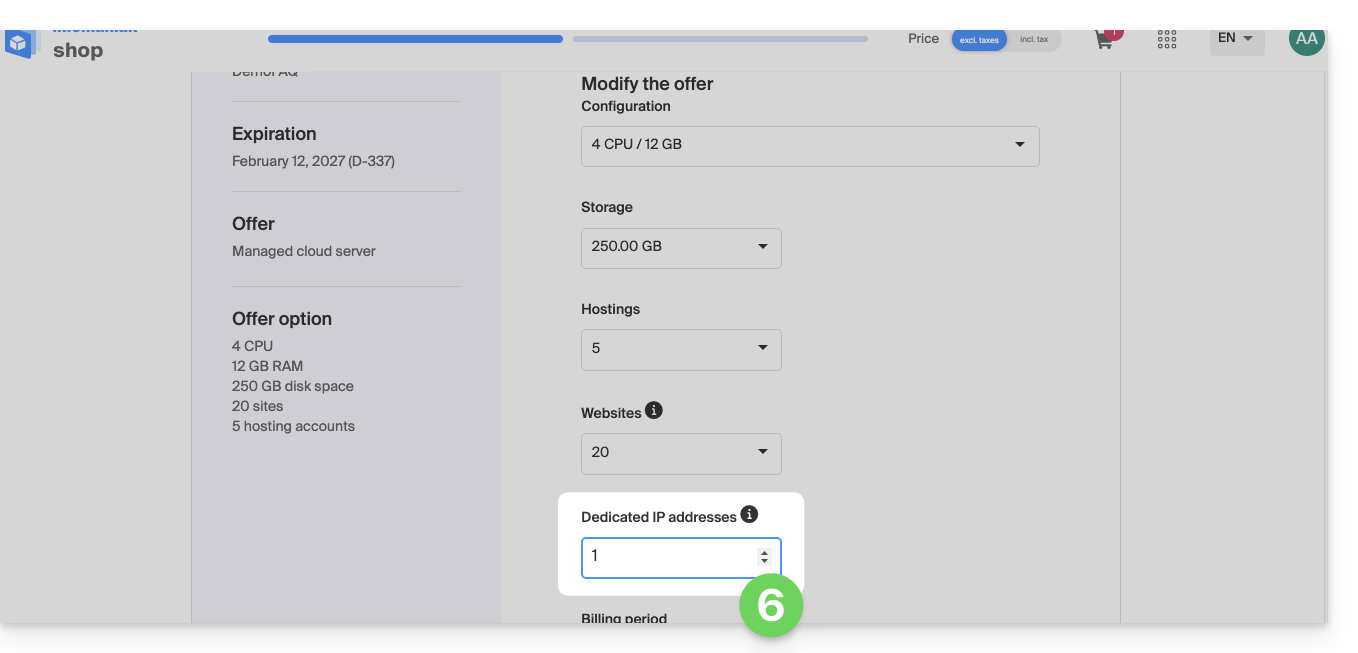
- Click the button to order one or more IP addresses:
- Increase according to the number of desired IPs:
Order one or more additional dedicated IP addresses
To do this:
- Click here to access your site management on the Infomaniak Manager (need help?).
- Click directly on the name assigned to the site concerned.
- Click on the chevron to the right of Advanced Tools in the left sidebar menu.
- Click on Dedicated IPs in the left sidebar menu.
- Click on the text to order one or more additional IP addresses:
- Increase according to the number of desired IPs.
Link a dedicated IP address to a website on hosting
Once the IP is ordered and paid for, be aware of the prerequisites below as switching to a dedicated IP address for a website can cause temporary disruption, especially in the presence of a Let's Encrypt SSL certificate.
Prerequisites
- Start by reducing the TTL of DNS records
AandAAAA(for@andwww) to 5 minutes. - Wait for the previous TTL duration before making any changes.
- The change below should be made during a period of low traffic to limit the inconvenience caused by the inevitable disruption.
- At the end of the procedure, you will need to wait for the new TTL to propagate the new configuration and regenerate the SSL certificate, then check the accessibility of the site in HTTPS to ensure everything is working correctly.
To switch to a dedicated IP address:
- Click here to access your site management on the Infomaniak Manager (need help?).
- Click directly on the name assigned to the site concerned.
- Click on the chevron to the right of Advanced Tools in the left sidebar menu.
- Click on Dedicated IPs in the left sidebar menu.
- Click the button to associate the IP with a site on your hosting:
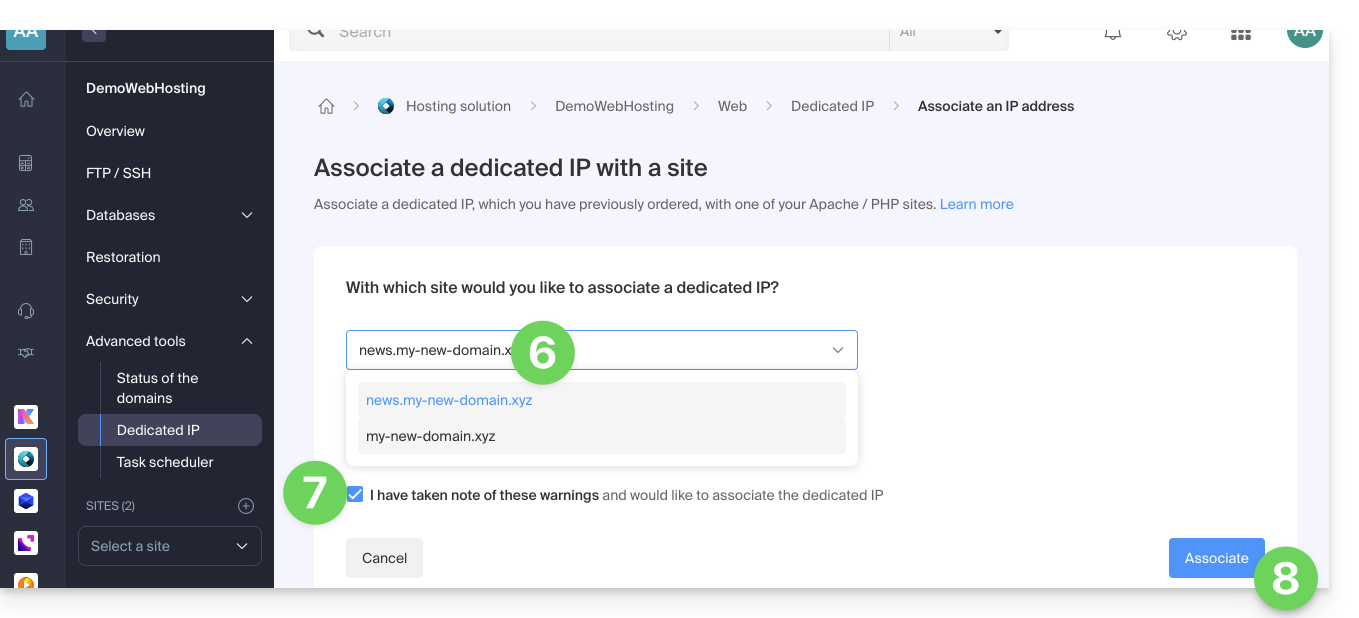
- Choose the site to assign the new IP address to.
- Check the box after reading the warnings.
- Click the Associate button:
Remove a dedicated IP address from a website
Once the IP is installed, to uninstall it:
- Click here to access your site management on the Infomaniak Manager (need help?).
- Click directly on the name assigned to the site concerned.
- Click on the chevron to the right of Advanced Tools in the left sidebar menu.
- Click on Dedicated IPs in the left sidebar menu.
- Click on the action menu ⋮ located to the right of the item concerned.
- Choose Unlink:
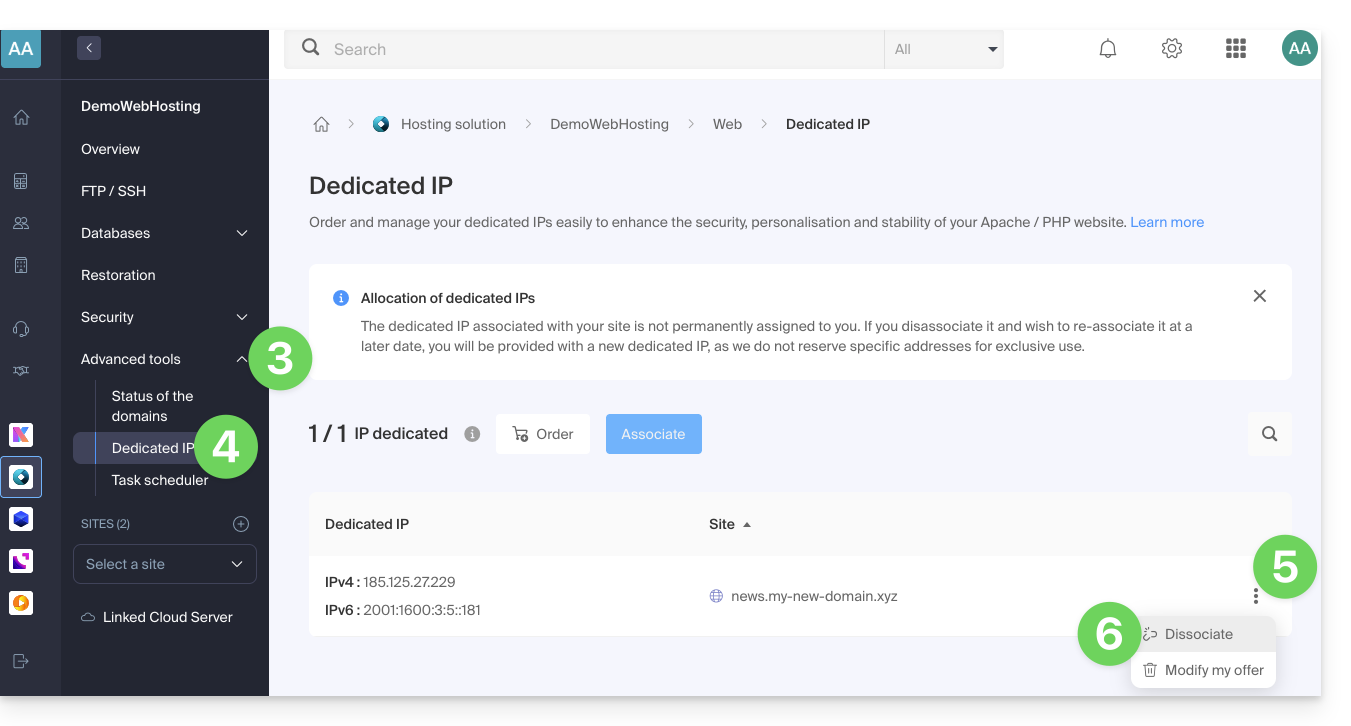
- Read the warnings and confirm the deletion to complete the IP uninstallation procedure.
Refer to this other guide if you are looking for information on potential issues related to your IP.
Link to this FAQ:
Has this FAQ been helpful?
This guide explains how to deploy n8n using its official image Docker on the Jelastic Cloud (Infomaniak PaaS).
Preamble
- Unlike tools like Zapier or Make, n8n, a “fair-code” workflow automation tool, can be self-hosted, allowing you to maintain full control over your data while connecting hundreds of services via an intuitive visual interface.
- The official image used is
n8nio/n8n. - Using an external database (PostgreSQL) is highly recommended for stability and managing large volumes of data.
- The default internal port is
5678.
1. Creating the Jelastic environment
Follow these steps to configure your topology:
- Log in to the Jelastic Cloud dashboard.
- Click on New environment.
- In the creation wizard:
- Go to the Docker tab.
- Click on Select an image and search for
n8nio/n8n. Pin a version (e.g.,latestor a specific version like1.75.0). - Load Balancer: add a node (e.g., Nginx) to handle SSL and public access.
- Database: add a PostgreSQL node (version 14+ recommended).
- Allocate enough Cloudlets (8 min. recommended for peak n8n usage) and name your environment.
- Click on Create.
Note: adding a Load Balancer makes it easy to enable the Let's Encrypt module to secure your exchanges and webhooks in HTTPS.
2. Configuring storage and persistence
By default, Docker data is ephemeral. It is essential to mount a volume:
- On the n8n node, click on the Configuration icon (gear icon).
- Go to the Volumes section.
- Click on Add :
- Local path:
/home/node/.n8n
- Local path:
- Save; configuration files and local encryption will now be preserved.
3. Essential environment variables
Go to the Environment Variables section of the n8n container to set the following parameters:
| Variable | Suggested value / Description |
|---|---|
N8N_HOST | The domain name of your environment (e.g., n8n.name.jpc.infomaniak.com). |
WEBHOOK_URL | The full HTTPS URL (e.g., https://n8n.mydomain.com/). Essential for HTTP triggers. |
GENERIC_TIMEZONE | Europe/Bern (or your local timezone). |
N8N_ENCRYPTION_KEY | Generate a long random string. Keep it safe! |
Linking with PostgreSQL
To use the external database, also add:
DB_TYPE:postgresdbDB_POSTGRESDB_HOST: Internal IP address or DNS of the Postgres node.DB_POSTGRESDB_PORT:5432DB_POSTGRESDB_DATABASE: Database name (e.g.,n8n).DB_POSTGRESDB_USER: Your user.DB_POSTGRESDB_PASSWORD: Your password.
4. First access and security
- Once the container is restarted, open the URL of your environment.
- Account creation: n8n will ask you to create the first administrator account.
- SSL: if you are using a custom domain, install the Let's Encrypt add-on on the Load Balancer node.
Since version 1.0, the old variables N8N_BASIC_AUTH are obsolete. User management is now done directly in the n8n graphical interface.
5. Post-installation verification
- Create a test workflow with a Webhook node and check that the URL starts with
https. - Check the container logs for any connection errors.
Link to this FAQ:
Has this FAQ been helpful?
This guide is about IP addresses, those…
- …assigned to sites/hosting/servers, dynamic or static, shared or dedicated,
- …assigned by your Internet Service Provider (ISP) when establishing an Internet connection to your Infomaniak product.
Preamble
- A dedicated or static IP address for a website is a permanent IP address specifically assigned to it.
- Unlike a shared IP address, which is used by multiple websites, a dedicated IP address ensures that only this platform is associated with this address.
- Dedicated IP addresses for websites are often used in cases where stability, customization, and security are important, such as server hosting, firewall configuration, or activating SSL certificates (although it is possible to proceed without a dedicated IP address to install an SSL certificate).
- Here are the main advantages:
- Configuring a PTR entry or reverse DNS on dedicated IPs is useful, especially for installing a mail server, as some email providers check the PTR record before accepting emails sent from a server.
- Better connection stability.
- Reduced risk of a bad reputation due to websites sharing the same IP address.
- Easier configuration of certain technical aspects.
- A dedicated IP can improve a website's search engine ranking (although there are differing opinions among SEO specialists).
- Note: Infomaniak does not allow access to websites via HTTP(S) by IP (dedicated) on managed servers; you must use a domain name that points to the IP (or use the preview URL).
Add a dedicated IP to the website
To add a dedicated IP to your website, refer to this guide.
If you encounter issues directing web traffic to a defined port, refer to this other guide.
IP address blockage (Internet connection)
If you can no longer access…
- … all your email addresses that you own with Infomaniak (which usually work fine) and this with an email software/client from the same Internet network (i.e., from the same IP address provided by your ISP)…
… or if you unfortunately performed this type of operation:
- repeated unsuccessful connection attempts via FTP, SSH, or on access points such as the WordPress login…
- requests returning too many errors such as mass 403 errors…
… your access to Infomaniak servers may be blocked following the banning of the IP address (banip / ipban) of your internet connection.
To unblock the situation, contact Infomaniak support by email and specify the domain concerned and especially your public IP address concerned.
Permanent Unblocking (IP Whitelisting)
With a Managed Cloud Server, you can request to permanently authorize the IP address in question so that it is never blocked again, regardless of the situation. To do this, you must:
- Have a dedicated IP associated with your Managed Cloud Server.
- Be aware that Infomaniak will no longer block any potential attacks from this IP; attacks or malicious access attempts from this address will no longer be automatically blocked by the security systems.
- Confirm by email and from a contact address associated with the account (owner or administrator) that you understand and accept full responsibility in case of an attack from this IP.
Link to this FAQ:
Has this FAQ been helpful?
This guide helps you troubleshoot various issues related to setting up and using a DMARC policy with your email service.
Refer to this other guide if you encounter a DMARC problem specifically when using Google services.
DMARC error or rejection...
...during a redirection, even though the initial destination address received the message (SPF error)
Email redirection without SRS generating an SPF error
Imagine that you have configured an email redirection from the address "user@example2.com" to the address "user@yourdomain3.com", without using the SRS mechanism. When a message is sent to "user@example2.com", it is received by the first email server and then automatically forwarded to "user@yourdomain3.com". Example:
- sender: john.doe@gmahoo1.com
- initial recipient: user@example2.com
- final destination: user@yourdomain3.com
In simplified terms: when John sends an email to "user@example2.com", the "example2.com" email server redirects it to "user@yourdomain3.com". The destination server therefore receives the message from the "example2.com" servers, while the sender's envelope address still indicates "john.doe@gmahoo1.com".
In detail: during the redirection, the recipient's envelope address is replaced with "user@yourdomain3.com", but the sender's envelope address remains "john.doe@gmahoo1.com". The sender's address visible in the message also remains unchanged.
The SPF check may then fail because the "example2.com" servers are not normally authorized by the SPF record of "gmahoo1.com" to send messages for that domain.
An SPF error, however, does not always result in a DMARC failure. DMARC only fails if no valid SPF or DKIM mechanism is aligned with the domain of the sender's visible address. If the original DKIM signature is missing, invalid, or not aligned, the DMARC policy of the sending domain may then cause the message to be quarantined or rejected.
To prevent SPF from failing solely due to redirection, the provider performing the redirection must support the SRS mechanism.
How redirections work at Infomaniak
When an email received by an Infomaniak address is redirected to another address, Infomaniak uses SRS to rewrite the sender's envelope address. The sender's address visible to the recipient remains unchanged.
This rewriting allows the destination server to verify that the Infomaniak server performing the redirection is authorized to use the new envelope address. SRS does not modify the original DKIM signature and does not, on its own, guarantee DMARC validation. In the context of a redirection, DMARC can be validated, in particular, if the original DKIM signature remains valid and aligned.
...related to an incorrect DNS entry
The DMARC record must be published as a single TXT record on the "_dmarc" subdomain of the domain in question.
Malformed DMARC Record: if the DMARC record is not correctly formatted, it may be considered invalid. Check the syntax, semicolons, tags used, and their values.
Invalid DMARC Policy: the value of the main "p" tag must be "none", "quarantine", or "reject". Any other value renders the DMARC policy invalid.
Multiple DMARC records: a domain should only have one TXT DMARC record. If multiple records are published on the "_dmarc" subdomain, the configuration is considered invalid, and the policy cannot be applied correctly.
Combine all necessary DMARC settings into a single TXT record.
Check your current DMARC entry using a dedicated tool, such as the ones below:
...related to an email that fails to validate any aligned SPF or DKIM mechanism
DMARC does not require both SPF and DKIM to be valid. DMARC verification succeeds as long as at least one of these two mechanisms is valid and aligned with the sender's address domain.
A DMARC error or rejection can therefore occur when neither SPF nor DKIM validates a domain aligned with the sender's domain.
This can happen, for example, if you send an email with your Infomaniak address using the SMTP server of another provider. The server used may not be authorized by your domain's SPF record and may not apply a valid DKIM signature for that same domain.
To resolve this issue:
- Check the overall security of the Mail Service,
- use Infomaniak's SMTP servers to send messages from an Infomaniak address,
- if you are using an external sending service, configure your domain with that provider so that it properly supports SPF, DKIM, and their DMARC alignment.
Messages from a newly created domain are arriving in the spam folder
This behavior does not necessarily indicate a DMARC error. A newly created domain has little or no sending history, and its reputation is therefore not yet established with the various email providers.
Start by sending a small volume of legitimate messages to consenting recipients, then gradually increase the number of sends. Also, make sure that SPF, DKIM, and DMARC are configured correctly and avoid sudden or large-scale sends.
Sending messages to yourself can help test the configuration and mark a message as legitimate in the recipient's inbox. However, this is not enough to establish a general reputation with other email providers.
Successful SPF, DKIM, and DMARC checks do not guarantee that messages will be delivered to the inbox. Providers also take into account the reputation of the domain and sending servers, the volume of messages, their content, and the recipients' reactions.
I'm sending an email from my Infomaniak address and I'm receiving a "Reject DMARC" error message.
To resolve this issue:
- Check the overall security of the Mail Service,
- perform a test send from the Webmail mail.infomaniak.com,
- check the server settings of the software or email client, including the SMTP server used and the authentication of the sending address.
If the message is sent correctly from the Webmail, the problem is likely due to the configuration of the email software or the external SMTP server used for sending.
I'm sending an email from an external address (Microsoft, Google, Yahoo, Orange, etc.) and Infomaniak rejects it with a DMARC error.
The message probably does not comply with the DMARC policy published by the sender's domain. This may mean that SPF and DKIM have failed or that they are not aligned with the visible sender address.
To resolve this issue:
- Check with the sending address provider that messages are being sent in accordance with their recommendations.
- Forward the complete error message to the sending domain provider or administrator so they can check the SPF, DKIM, and DMARC configurations.
I want to receive an email on my Infomaniak address, but the sender is receiving a DMARC error
The message was blocked because it did not comply with the DMARC policy published by the sender's domain. The configuration of the recipient Infomaniak account does not allow for correcting an authentication error originating from the sender's domain.
To resolve this issue:
- Ask the sender to forward the complete error message to their email provider or domain administrator so that the SPF, DKIM, and DMARC configurations can be checked.
- If the Infomaniak address forwards messages to another address, also check at which stage of the redirection the rejection is generated.
Link to this FAQ:
Has this FAQ been helpful?
This guide explains how to check and configure DHCPv6 support on the operating system of your Infomaniak Cloud VPS.
Introduction
- During a planned operation requiring the migration of your Cloud VPS to another cluster, the assignment of the current IPv6 address will now rely on DHCPv6 in order to retain the address already assigned to the server.
- DHCPv6 only serves to automatically transmit this same IPv6 address to the operating system of the Cloud VPS.
- This change only concerns Cloud VPSs where you manage the operating system yourself.
- It does not concern Managed Cloud Servers.
- If your operating system does not support DHCPv6, you can statically configure the IPv6 address in the operating system of your Cloud VPS.
- The IPv6 address to use is indicated in the dashboard of your Cloud VPS, from the Infomaniak Manager.
Check that IPv6 is enabled
DHCPv6 cannot function if IPv6 is disabled on the system. Check the status of IPv6 with the following commands:
sysctl net.ipv6.conf.all.disable_ipv6
cat /proc/net/if_inet6
ip -6 addr show
The first command should return 0. The /proc/net/if_inet6 file should contain at least one IPv6 address.
Check for acceptance of router advertisements
Prerequisites
- Identify the name of the network interface in question, for example
eth0,ens3orenp1s0. - Replace
<interface>in the commands below with the name of this interface.
The triggering of DHCPv6 depends on the flags transmitted by the router advertisements, called Router Advertisements (RA), and not only on the local server configuration.
The router announces the following two indicators in particular:
- M — Managed: use DHCPv6 to obtain the IPv6 address in stateful mode
- O — Other: use DHCPv6 only to obtain additional parameters, such as DNS servers, the IPv6 address then being assigned by SLAAC
Check that the interface accepts RA (Router Advertisement) announcements:
sysctl net.ipv6.conf.<interface>.accept_raThe possible values are:
0: RA announcements are not accepted1: RA announcements are accepted2: RA announcements are accepted even when routing is enabled
If the ndisc6 package is installed under Debian, Ubuntu, Fedora, or RHEL, display the received announcements:
rdisc6 <interface>The following line indicates that the network requests the use of DHCPv6 to assign the IPv6 address:
Stateful address conf. : Yes
Configure DHCPv6 according to the network manager
The configuration to be applied depends on the network manager used by the operating system of your Cloud VPS.
NetworkManager
NetworkManager is used in particular by RHEL, Rocky Linux, AlmaLinux, CentOS Stream, Fedora, and frequently by Ubuntu Desktop.
Display the NetworkManager connections to identify the name of the one associated with the network interface:
nmcli connection showIn the following commands, replace <connection> with the name of this connection.
Display its IPv6 settings:
nmcli connection show "<connexion>" | grep ipv6The determining parameter is ipv6.method. It may contain the following values in particular:
auto: processes RA announcements and uses DHCPv6 when the indicators transmitted by the router request itdhcp: forces the use of DHCPv6 in stateful modemanual: uses a manual IPv6 configurationdisabled: disables IPv6 for this connection
The auto value is recommended so that NetworkManager processes RA advertisements and uses DHCPv6 when the network requests it.
To apply this configuration:
nmcli connection modify "<connexion>" ipv6.method auto
nmcli connection up "<connexion>"
systemd-networkd
systemd-networkd is notably used by Arch Linux and many server-oriented distributions.
In the file corresponding to the interface under /etc/systemd/network/*.network, check for the presence of the following parameters:
[Network]
DHCP=ipv6
IPv6AcceptRA=yes
To enable DHCP in IPv4 and IPv6:
[Network]
DHCP=yes
IPv6AcceptRA=yes
Then, check the actual status of the interface and the DHCPv6 lease obtained:
networkctl status <interface>
Netplan
Netplan is notably used by Ubuntu since version 18.04. It is a layer that generates a configuration for systemd-networkd or NetworkManager.
In the corresponding file under /etc/netplan/*.yaml, enable DHCPv6 for the interface in question:
network:
  version: 2
  ethernets:
    eth0:
      dhcp6: true
      accept-ra: true
Replace eth0 with the name of the interface in question, then display the effective configuration and apply it:
netplan get
netplan apply
wicked
wicked is notably used by openSUSE and SUSE Linux Enterprise Server.
Check the DHCLIENT6_MODE parameter in the file corresponding to the interface:
/etc/sysconfig/network/ifcfg-<interface>Then, check the status of the interface:
wicked show <interface>
Direct DHCPv6 client
The following commands allow you to perform a manual DHCPv6 test or use it directly, especially on Alpine Linux, Gentoo, and some Arch Linux installations.
With the ISC DHCP client:
dhclient -6 -v <interface>DHCPv6 leases are recorded in:
/var/lib/dhcp/dhclient6.leasesWith dhcpcd:
dhcpcd -6 <interface>
Configure the IPv6 address statically
If the operating system of your Cloud VPS does not support DHCPv6, or if you cannot use it, configure the IPv6 address indicated in the dashboard of your Cloud VPS directly, from the Infomaniak Manager.
The method depends on the network manager used by the operating system. In all cases, be sure to use the exact IPv6 address, prefix, and gateway provided for your Cloud VPS.
Link to this FAQ:
Has this FAQ been helpful?
This guide provides instructions for creating a multi-datacenter high-availability infrastructure with Jelastic Cloud.
Preamble
- The principle of a multi-datacenter high-availability infrastructure is to replicate all necessary elements (web server, database server, and load balancer) in another datacenter to ensure the operation of your sites and apps in case of unexpected events (traffic spikes, hardware failure, network outage, etc.).
- The advantages of a multi-datacenter high-availability infrastructure are numerous:
- In case of an unexpected event on a server, another server immediately takes over; your sites and apps remain accessible.
- In case of a disruption with a component of a datacenter, the replicated infrastructure in the other datacenter immediately takes over; your sites and apps remain accessible.
- In case of significant traffic spikes, the traffic is distributed between the two infrastructures by load balancers; your sites and apps remain accessible and fast.
Setting up a high-availability infrastructure with Jelastic Cloud
For the purposes of this example, 2 web servers with 2 load balancers will be set up, each of these elements being hosted in Switzerland in a different Infomaniak datacenter.
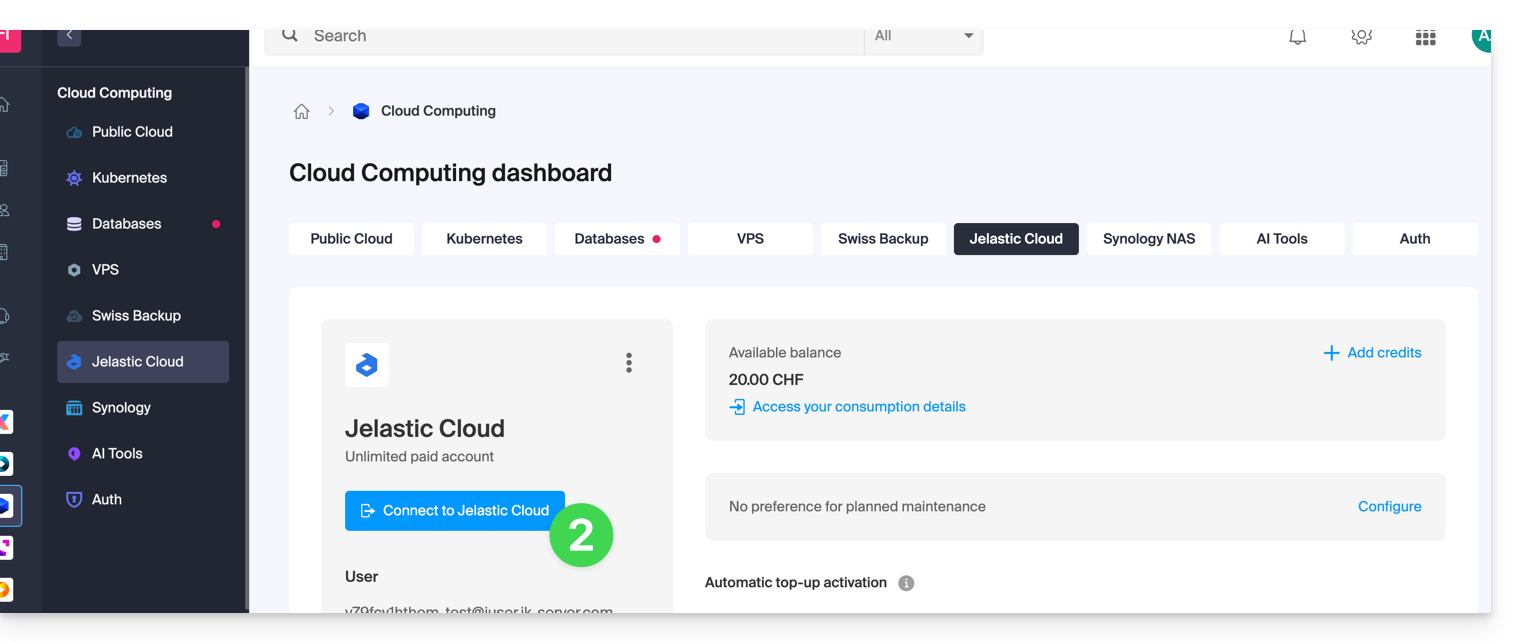
Before proceeding, log in to the administration interface of your Jelastic Cloud server:
- Click here to access the management of your product on the Infomaniak Manager (need help?).
- Click on Log in to Jelastic Cloud:
1. Creating web servers
A web server hosts the content of your sites (php files, images, pdfs, etc.).
Here are the actions to perform to create the first server:
- Click on New environment.
- Click on the PHP tab.
- In App. Servers, choose for example an Apache server.
- Adjust the environment resources according to your needs.
- Choose Geneva DC2 for the server location.
- Rename the environment to easily identify it later (for example DC2-apache).
- Click on Create.
Create the second web server in another datacenter:
- Click on New environment.
- Click on the PHP tab.
- In App. Servers, choose for example a Apache server.
- Adjust the environment resources according to your needs.
- Choose Geneva DC3 for the server location.
- Rename the environment to easily identify it later (for example DC3-apache).
- Click on Create.
2. Creation of load balancers
A load balancer allows you to distribute the load and traffic of your sites between your web servers.
Here are the actions to perform to create the first server:
- Click on New environment.
- Click on the PHP tab.
- In Load Balancing, choose for example an NGINX server.
- Adjust the environment resources according to your needs.
- Choose Geneva DC2 for the server location.
- Rename the environment to easily identify it later (for example DC2-nginx).
- Click on Create.
Create the second load balancer in another datacenter:
- Click on New environment.
- Click on the PHP tab.
- In Load Balancing, choose for example an NGINX server.
- Adjust the environment resources according to your needs.
- Choose Geneva DC3 for the server location.
- Rename the environment to easily identify it later (for example DC3-nginx).
- Click on Create.
3. Configuration of load balancers and domain name
Now, you just need to tell the load balancers which web servers they should distribute the traffic to.
Start by creating the load-balancer.conf file on both load balancers:
- Connect via SSH to the
DC2-nginxserver by clicking on the Web SSH button of the environment. - Open the load-balancer.conf file:
nano /etc/nginx/conf.d/load-balancer.conf. - Adjust the file code with the URL of your web servers:
http {
upstream backend {
server apache-dc2.jcloud-ver-jpc.ik-server.com;
server apache-dc3.jcloud.ik-server.com;
}
server {
listen 80;
location / {
proxy_pass http://backend;
}
}
}
- Repeat these 3 steps for the
DC3-nginxserver.
Modify the load balancers configuration file:
- Connect via SSH to the
DC2-nginxserver by clicking on the Web SSH button of the environment. - Create the following configuration file:
nano /etc/nginx/nginx.conf. - Adjust the server configuration file URL:
user nginx;
worker_processes auto;
worker_rlimit_nofile 2048;
load_module modules/ngx_stream_module.so;
#load_module modules/ngx_http_modsecurity_module.so;
error_log /var/log/nginx/error_log info;
events {
worker_connections 2048;
use epoll;
}
include /etc/nginx/conf.d/load-balancer.conf;
- Restart the NGINX service:
sudo /etc/init.d/nginx restart. - Repeat these four steps for the server
DC3-nginx.
It is now necessary to indicate to your domain name on which servers the traffic should be redirected.
Prior to this, install a public IP address on your load balancers:
- Deploy the server node DC2-nginx.
- Hover over the Public IP line and click on the + that appears on the right.
- Add a public IPv4.
- Repeat these 3 steps for the server DC3-nginx.
At this stage, all you have to do is create two A records in the DNS zone of your domain name with the public IP of your two load balancers.
To ensure that changes are quickly taken into account, it is recommended to configure the A records with a TTL of 5 minutes.
In this example, the domain redirects your visitors to the load balancers, which in turn redirect the traffic to the web servers.
4. High availability infrastructure test
To test the proper functioning of your infrastructure, enter your domain name in a web browser and try in turn to disable an element of your infrastructure (one of the two load balancers, one of the two web servers). If everything works, you should still be able to access the content hosted on one of the two web servers.
Warning: data replication between web servers or database servers must be set up by you.
Link to this FAQ:
Has this FAQ been helpful?
This guide covers messages that start with / on kChat interpreted as slash commands.
Execute a slash command on kChat
To access slash commands on kChat:
- Click in the composition field within a channel.
- Enter a
/(slash or forward slash) and the attached command. - Confirm to send the command.
If you type only the / sign, a modal appears with the commands that can be executed, such as going offline, for example.
Here is a table of the main commands:
| command | description |
|---|---|
| /away | marks your status as "away" |
| /offline | marks your status as "offline" |
| /online | marks your status as "online" |
| /dnd | marks your status as "do not disturb" |
| /code | used to format text as code |
| /collapse | hides the content of the element in the message |
| /expand | expands the content of the element in the message |
| /echo | repeats the text following the command |
| /header | displays a header in a message |
| /purpose | defines or displays the channel description |
| /rename | renames the current channel |
| /leave | leaves the current channel |
| /mute | mutes the current channel |
| /reminders | manages reminders |
| /search | searches for messages and other content |
| /settings | opens the settings |
| /shortcuts | displays keyboard shortcuts |
Create a custom slash command
Prerequisites
- Not be an external user (they will not see the menu Integrations).
To create a custom slash command:
- Click here to access the Web kChat app (online service kchat.infomaniak.com) or open the desktop kChat app (desktop application on macOS / Windows / Linux).
- Click on the New icon next to your kChat organization name.
- Click on Integrations:
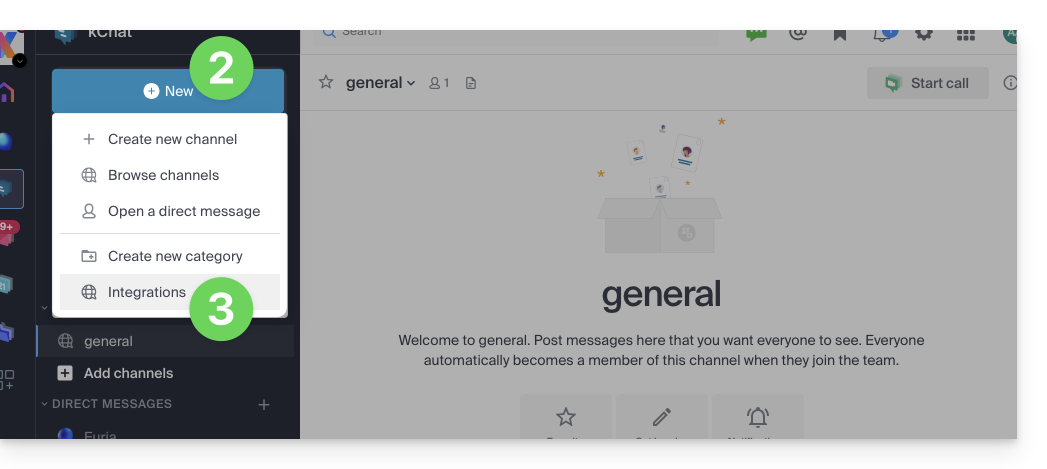
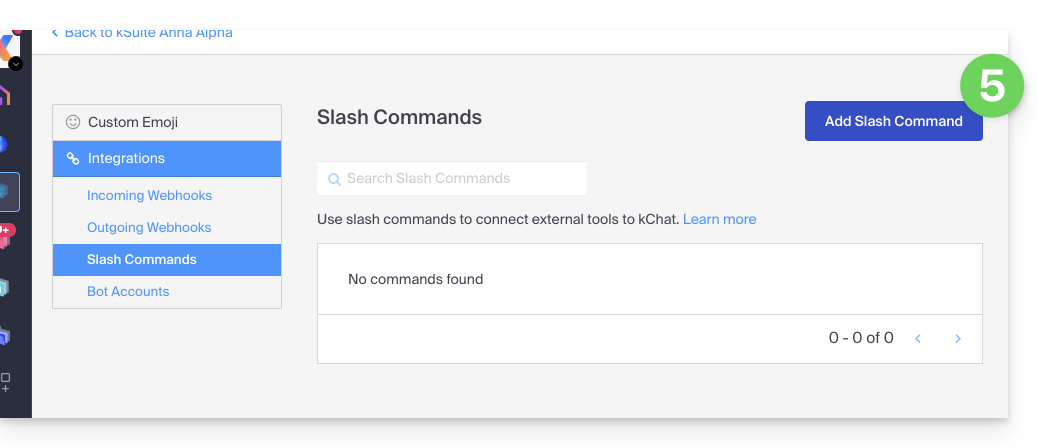
- Click on Slash command:
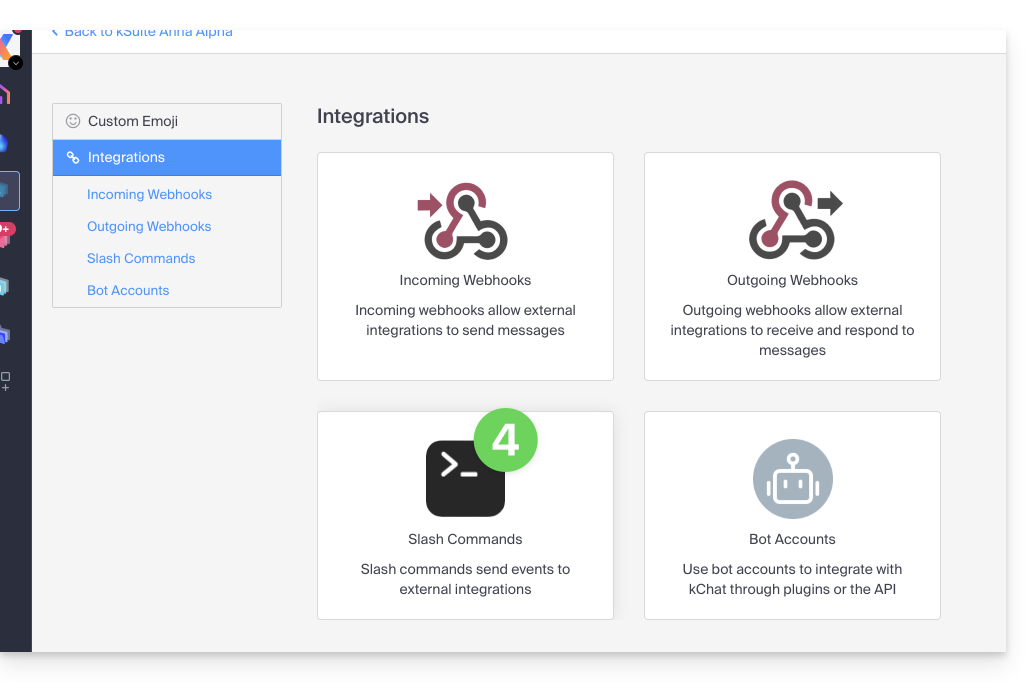
- Click the blue button to Add a command:
- Configure the slash command (name, trigger (without the
/), expected content type, action to execute*, etc., including whether the command should appear in the help modal mentioned in the chapter above).- * This can include calling an external API, running a script, displaying a specific response, etc. For this, you will generally need an external script or application that will respond to the commands. You can also set additional parameters for the command, such as dropdown options, checkboxes, etc., depending on your needs.
- Save the command.
- Make sure to test the command to ensure it works as expected.
Remember that creating custom slash commands may require additional programming skills, especially if you need to integrate custom features or interactions with external systems. Also, make sure to follow security best practices when creating these commands to avoid potential security vulnerabilities.
Link to this FAQ:
Has this FAQ been helpful?