Knowledge base
1000 FAQs, 500 tutorials and instructional videos. Here, there are only solutions!
This guide concerns messages sent from Site Creator (e.g., contact form or e-commerce module).
Introduction
- By default, emails are sent using the unauthenticated PHP mail() protocol (❓: help).
- It is recommended to use the authenticated SMTP method instead (❓: help).
Modify the sending method
Prerequisites
- Have a valid email address or create one (❓: help my kSuite | Mail/kSuite Service).
- Create a device password (❓: help my kSuite | Mail/kSuite Service) named, for example, “
Site Creator” (or “SC2026”, etc. – it doesn’t matter) for this email address: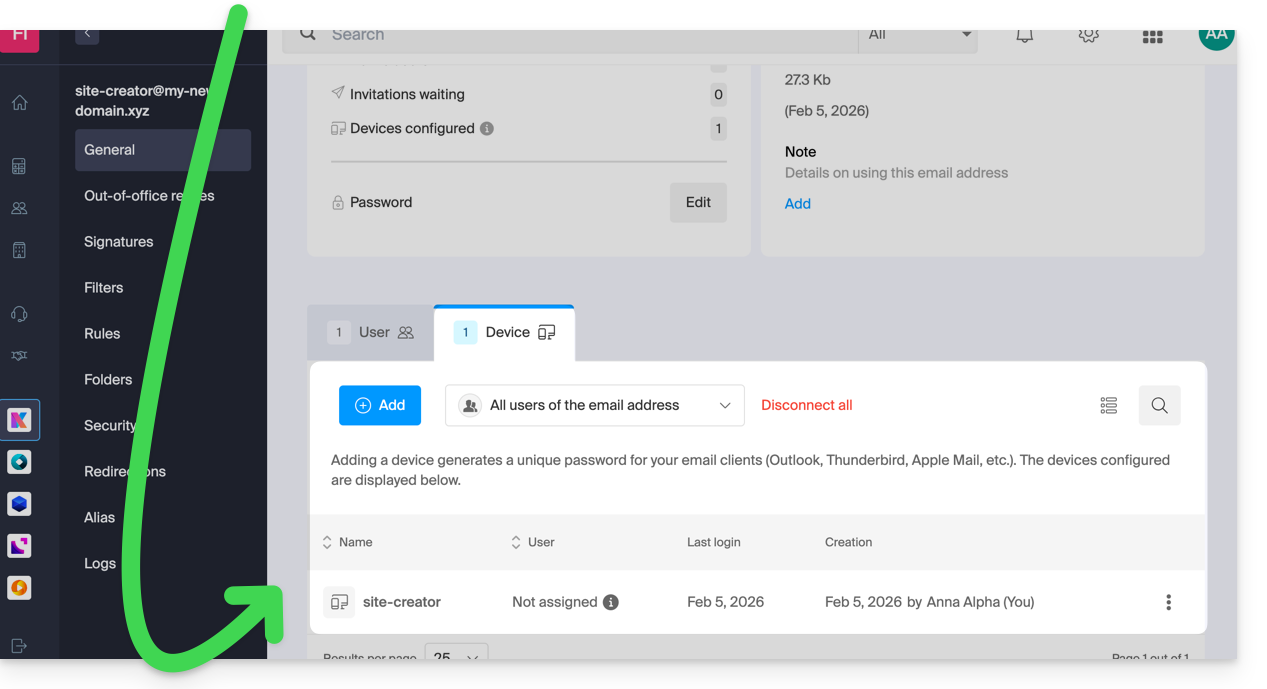
- Check that the domain is configured correctly (❓: help Mail/kSuite service).
Start by logging into the Infomaniak Manager with your login credentials (user with the necessary rights for the product in question):
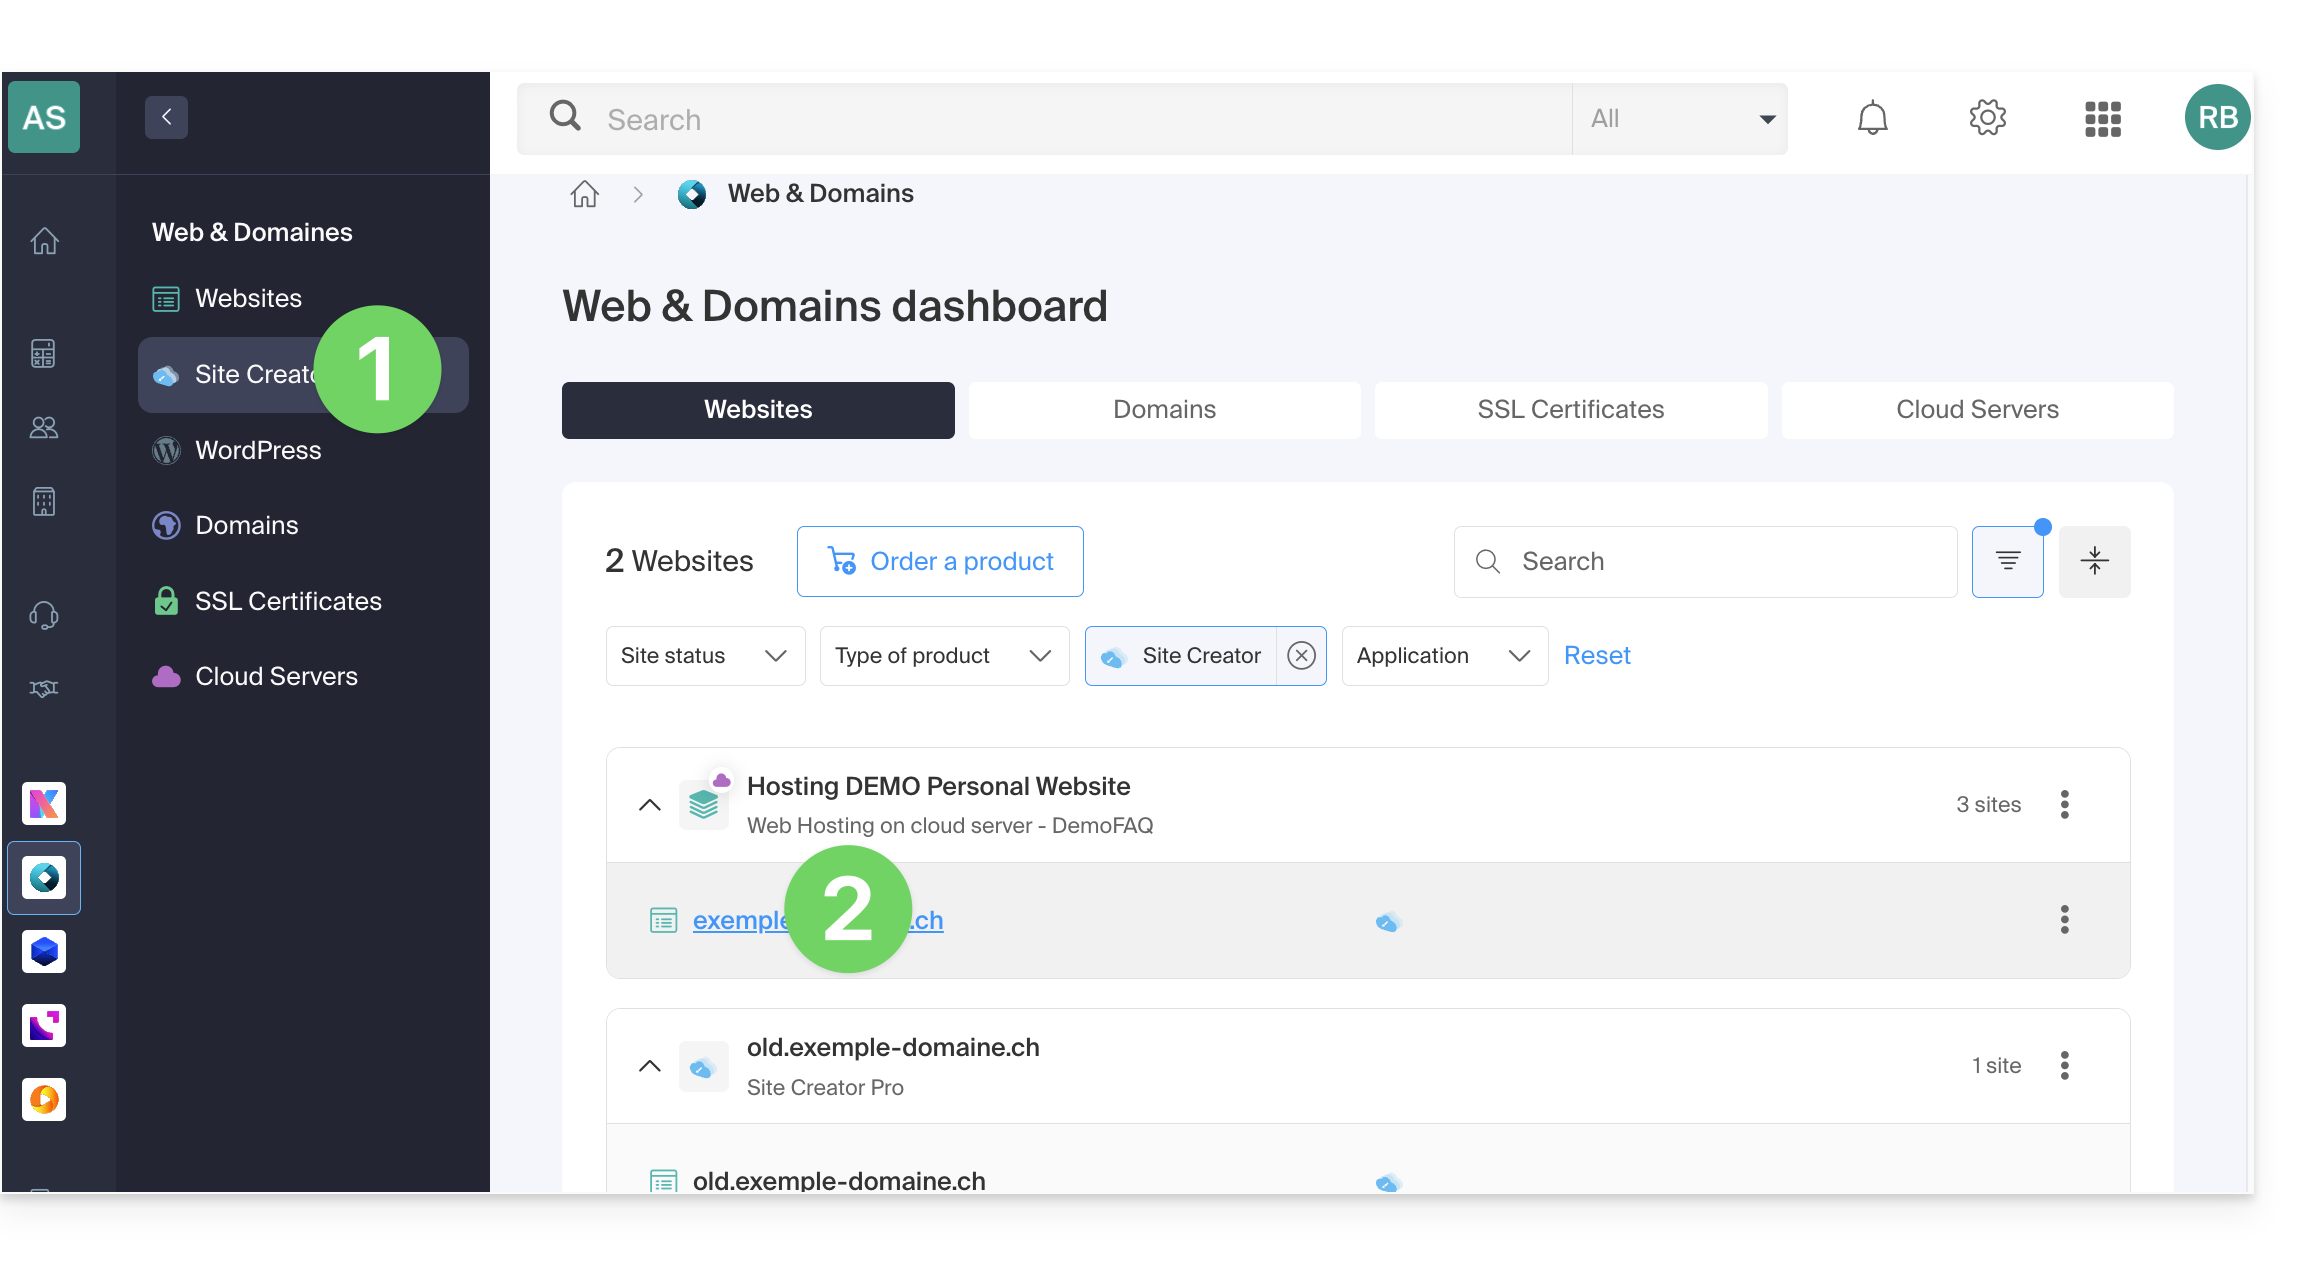
- Click here to access the hosting & site management section (filtered to display only Site Creator).
- If nothing is displayed, you may not be in the Organization to which your site is linked (❓: help).
- Click on the name of the Site Creator in question:
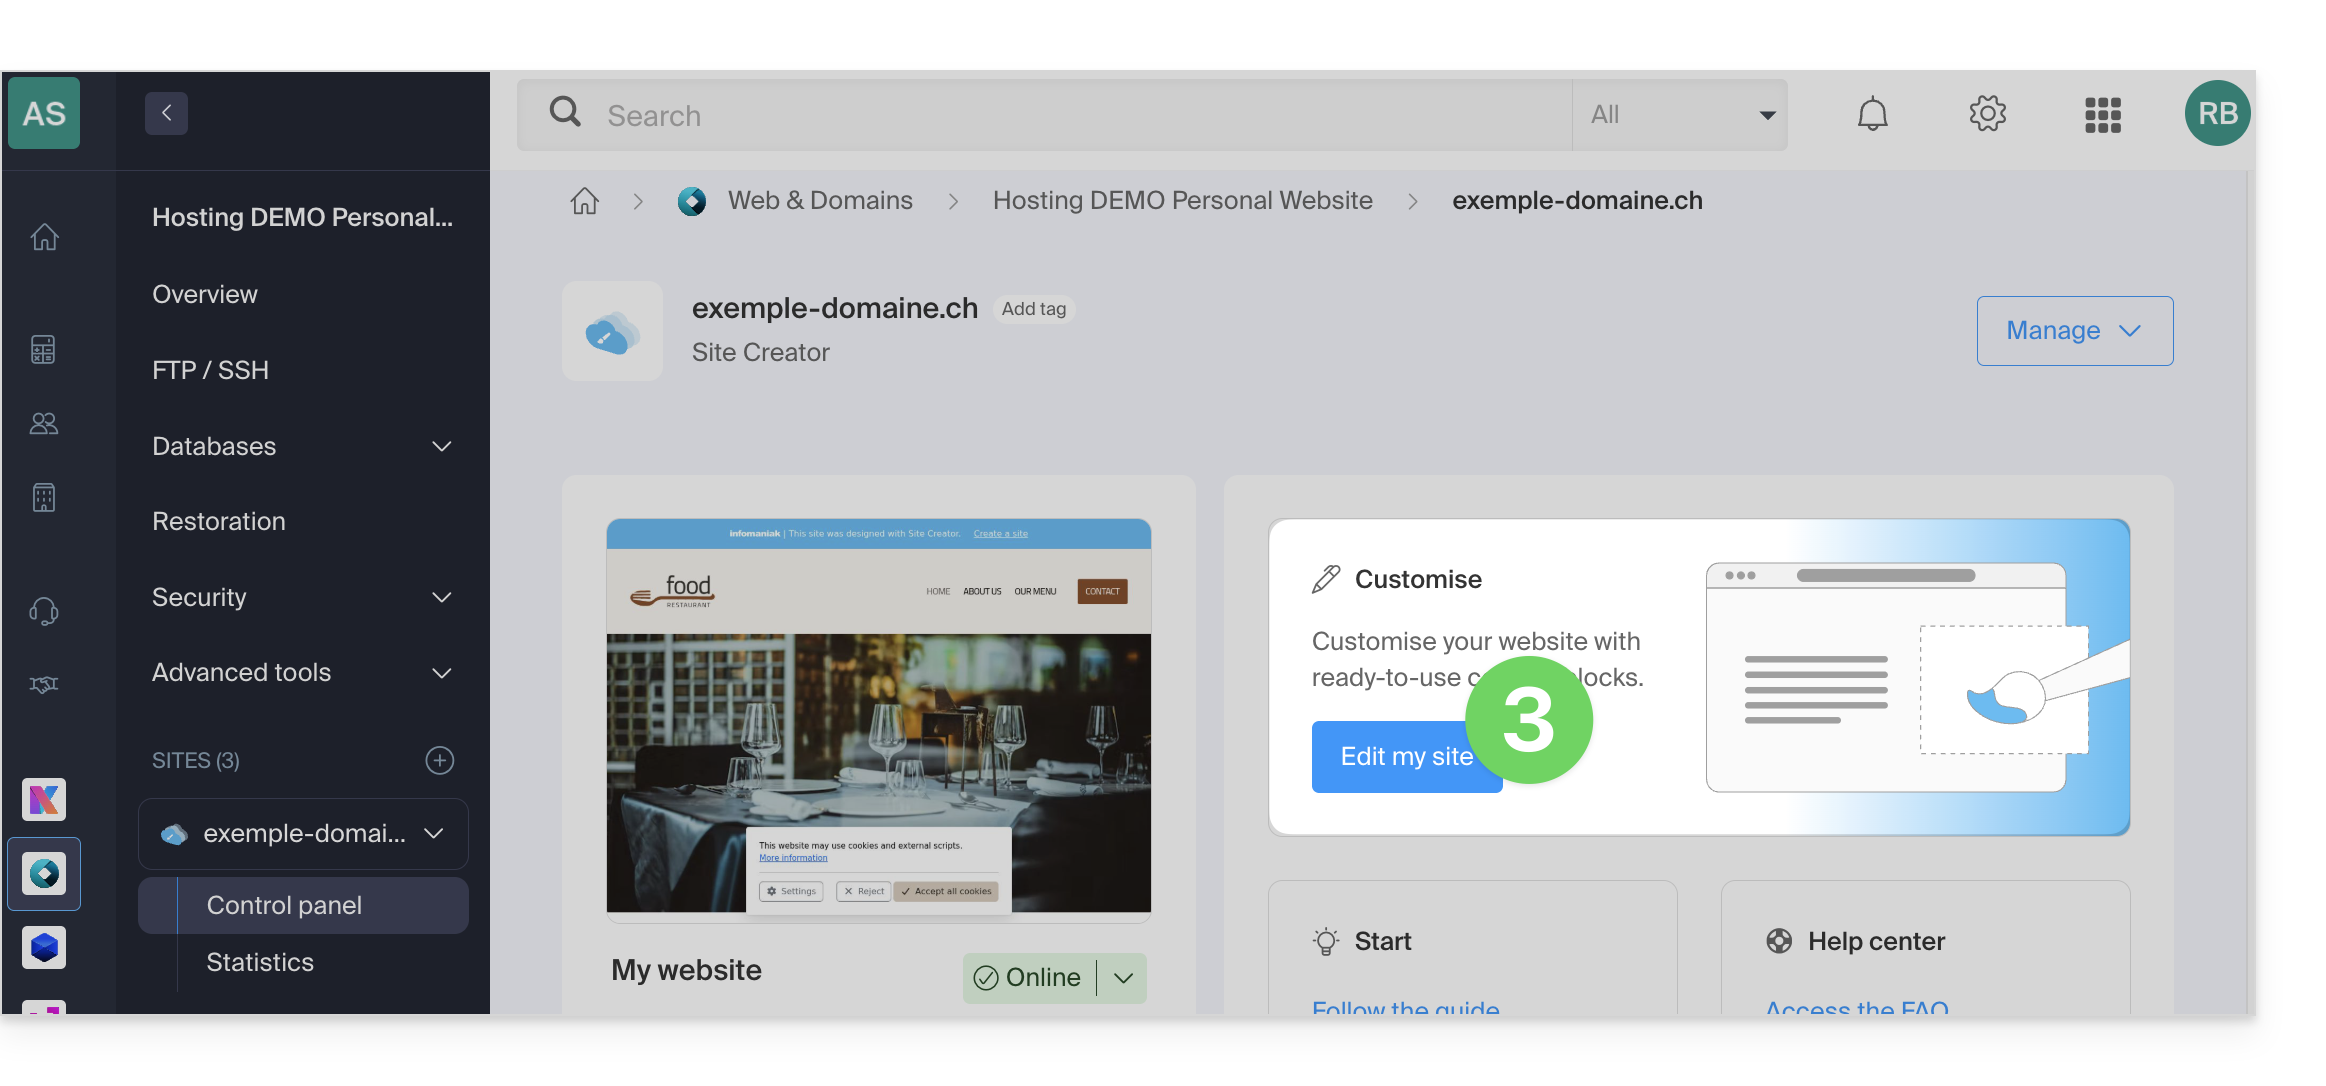
- Click on the button to edit your website:
Once in Site Creator, to modify the email sending method:
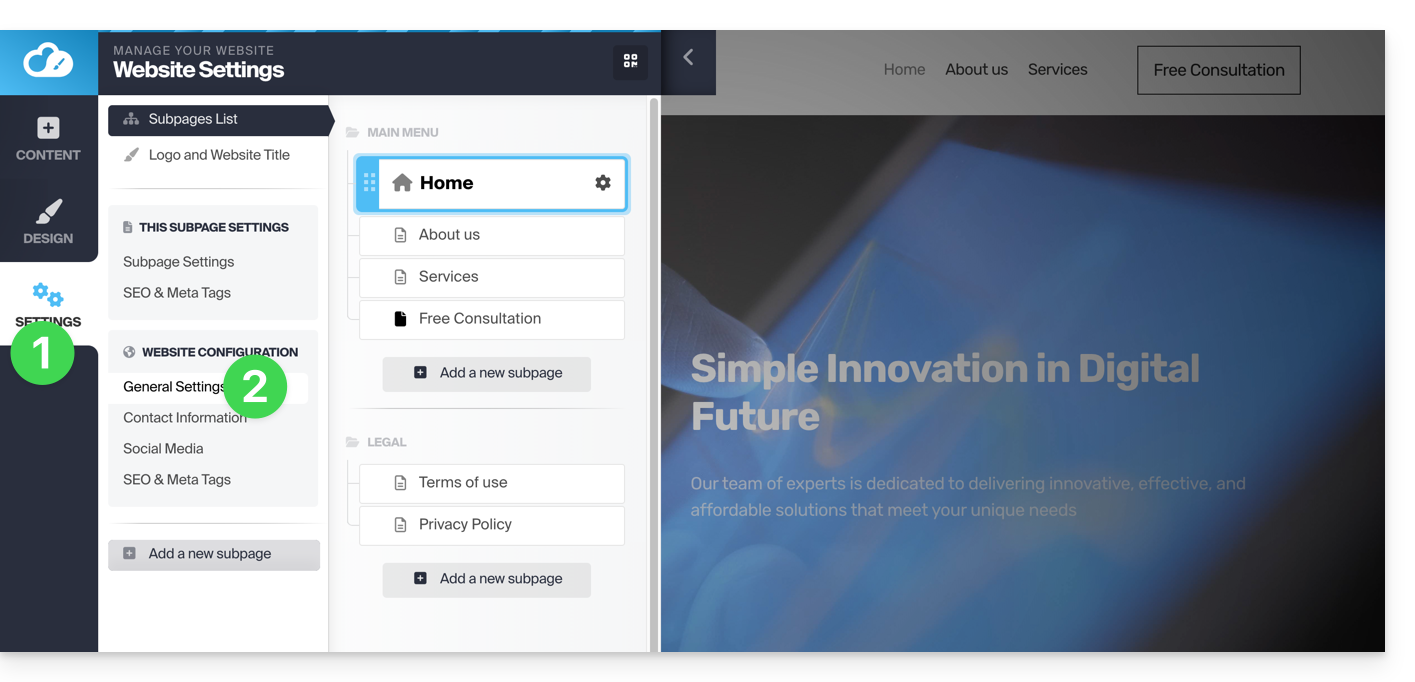
- Click on the Settings button in the left-hand menu.
- Click on General Settings:
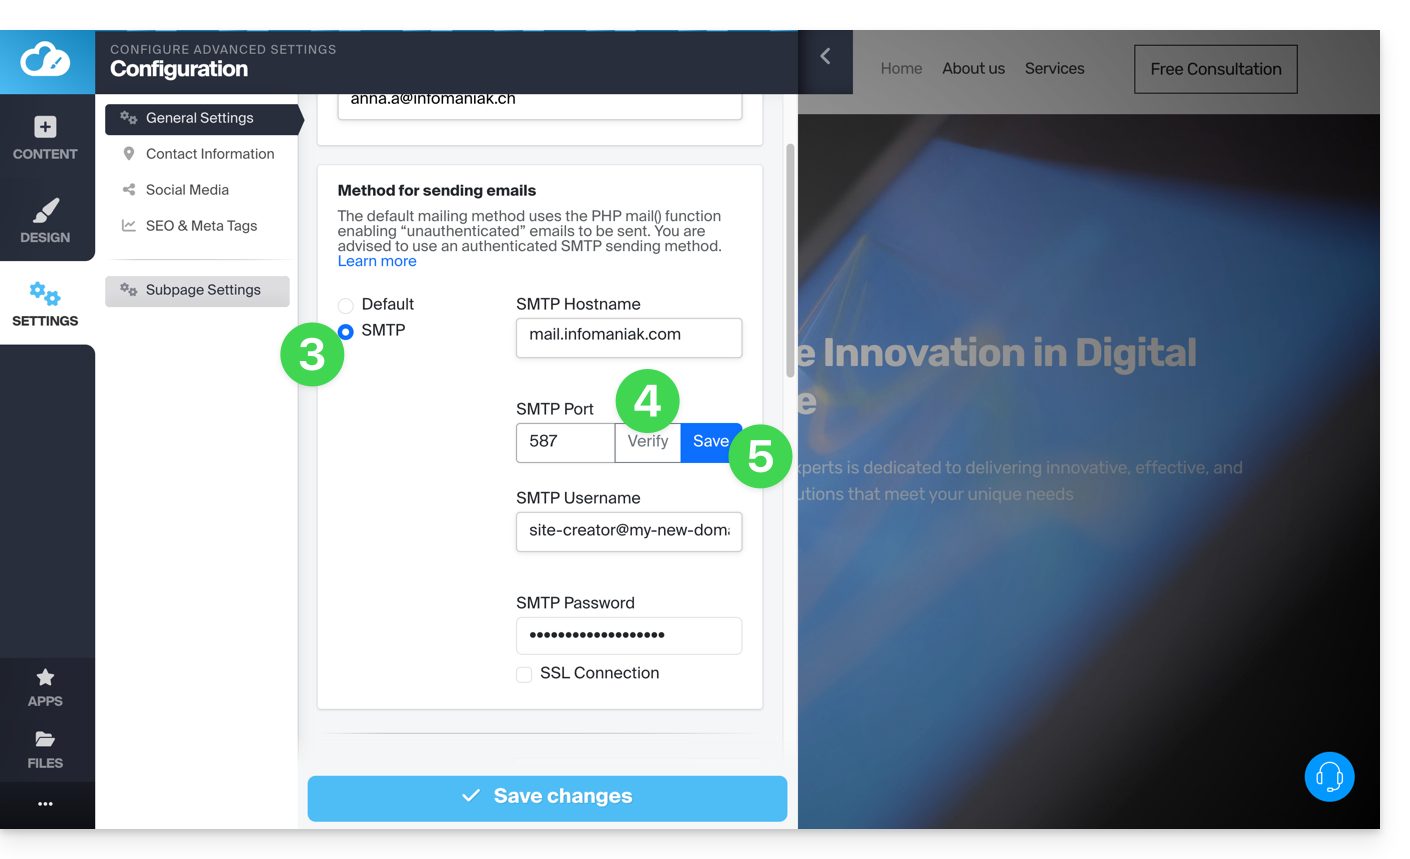
- Choose the SMTP method, then fill in the fields with the SMTP server details and the information related to your email address and its password:
- Outgoing SMTP server =
mail.infomaniak.com - SMTP port:
587 - Username = the complete email address (❓: help)
- Password = the password generated for the email address you want to access (❓: help my kSuite | Mail/kSuite Service).
- Refer to this other guide if you are looking for information about other compatible ports.
- Outgoing SMTP server =
- Once all the fields are filled in, click on the Verify button.
- If everything is correct, the Save button will appear, and you can click it to save your email settings:
Link to this FAQ: https://faq.infomaniak.com/1867
Has this FAQ been helpful?
This guide explains how to transfer to Infomaniak Web data (site, FTP, databases) currently hosted by Swisscom, which has ended its hosting offer in May 2024. Furthermore, Infomaniak offers you the first year of Web + Mail hosting (learn more)!
Prerequisites
- Have an Infomaniak Web hosting (order if necessary).
- Add a blank website to the Infomaniak hosting.
- If you use a WordPress interface to manage your site at Swisscom, refer to this other guide illustrating a simplified method.
Transfer the site from Swisscom to Infomaniak
To retrieve any other site, created with HomepageTool or not, follow the procedure below.
1. Retrieve Web data from Swisscom
a. HTML, PHP, etc. files via FTP
To retrieve Web data on your hard drive, you need to connect via FTP with an FTP software/client like Filezilla (free). To do this, you need the Swisscom server address, FTP username, and password. If you do not have this information:
- Log in to the Swisscom HCP Control Panel (login.hostcenter.com) from a Web browser like Brave or Edge.
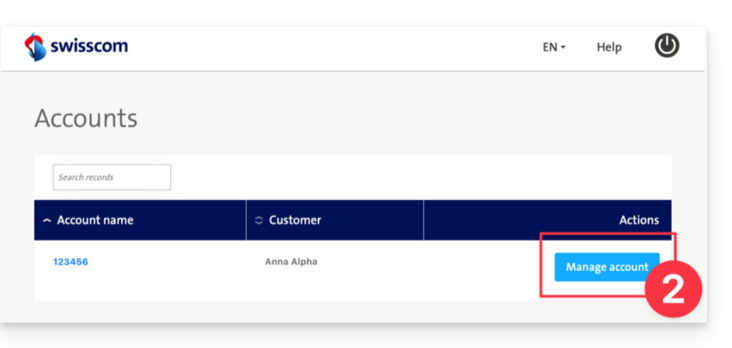
- Click on Manage account:
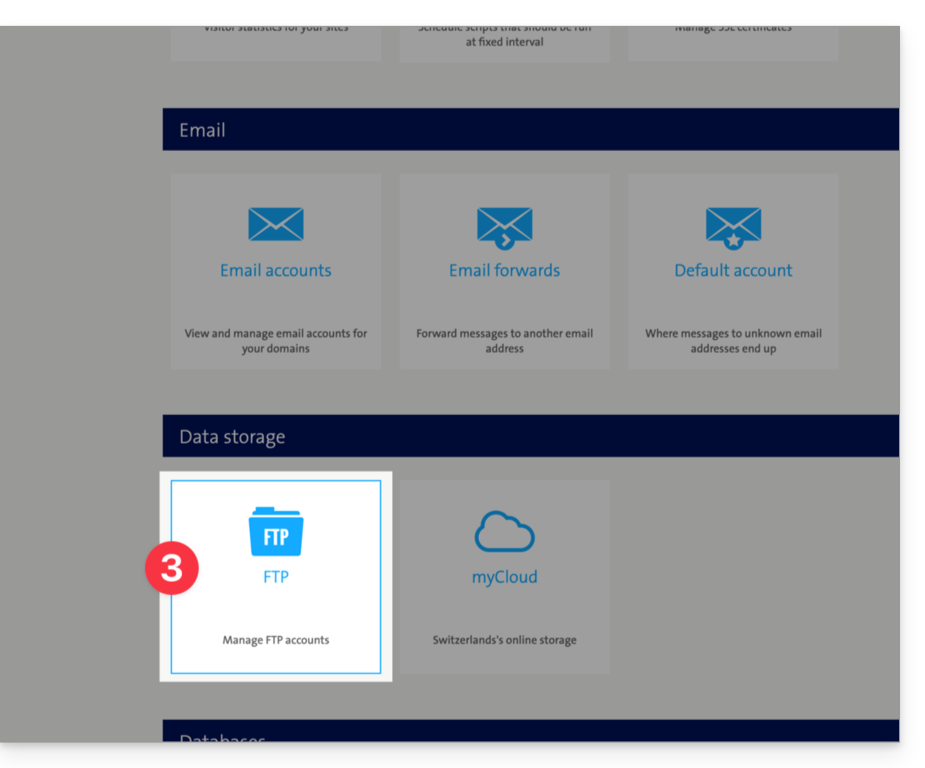
- Click on FTP accounts (in the Data storage section):
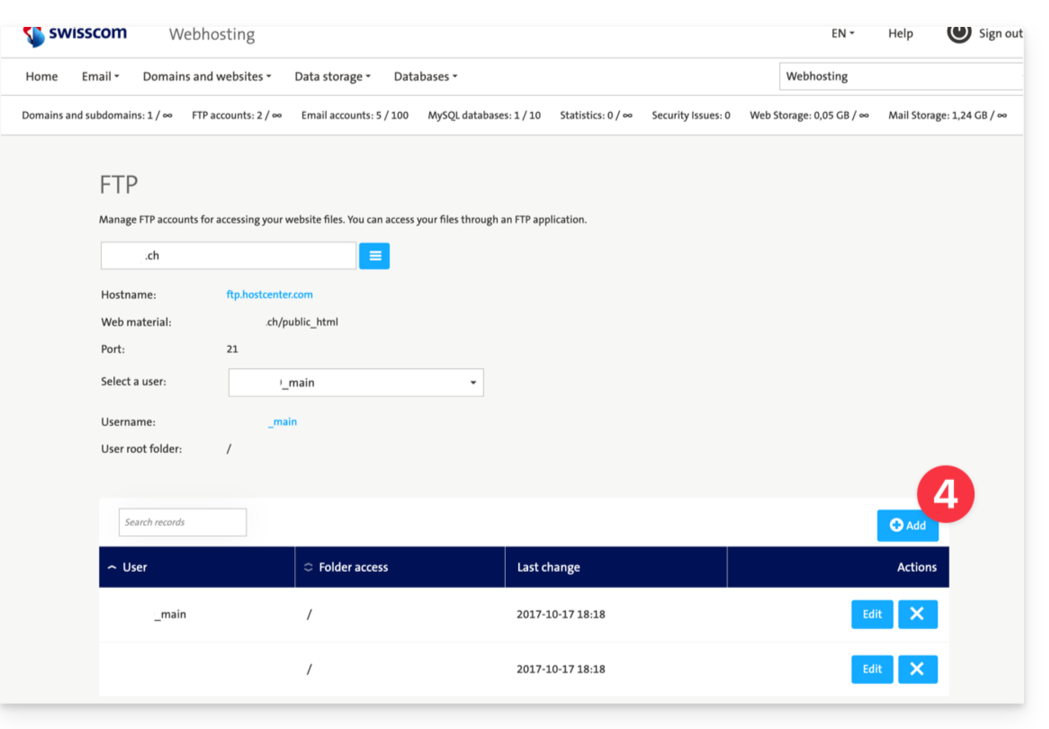
- Click on Add to create an FTP account if necessary:
- Open an FTP software/client like Filezilla.
- Log in to the Swisscom server with the FTP information obtained in step 3 above.
- Download the files corresponding to your Swisscom site to your hard drive.
b. Export MySQL databases
Unless your site is static and simply in HTML, a dynamic site most often requires databases that need to be exported from their administration interface, PHPmyAdmin:
- Log in to the HCP Swisscom Control Panel (login.hostcenter.com) from a web browser like Brave or Firefox.
- Click on Databases > MySQL from the main menu.
- Click on Edit to the right of the corresponding database:
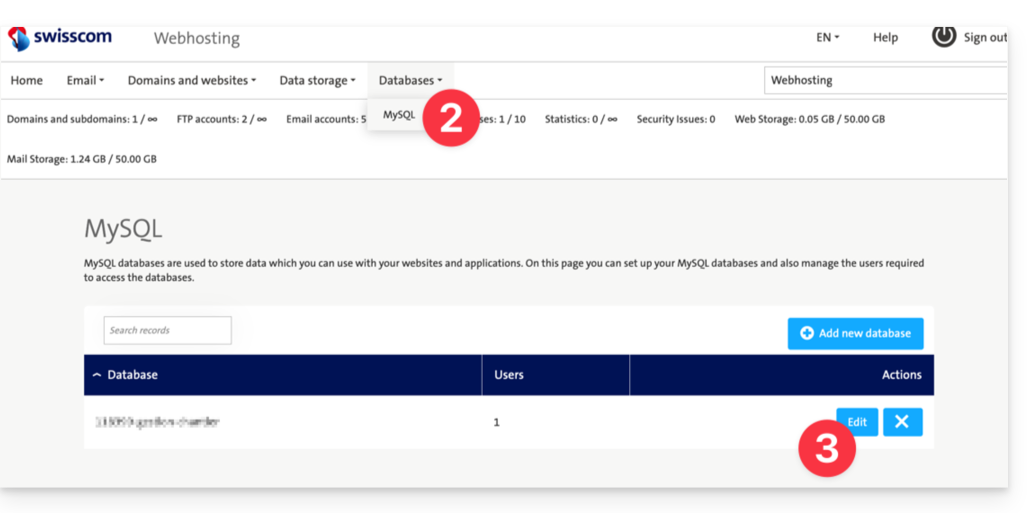
- Click (optional step) on the blue button Add a new database user to create a user and password that will have access to the database.
- Click on the blue link Web-Admin URL to access PHPMyAdmin:
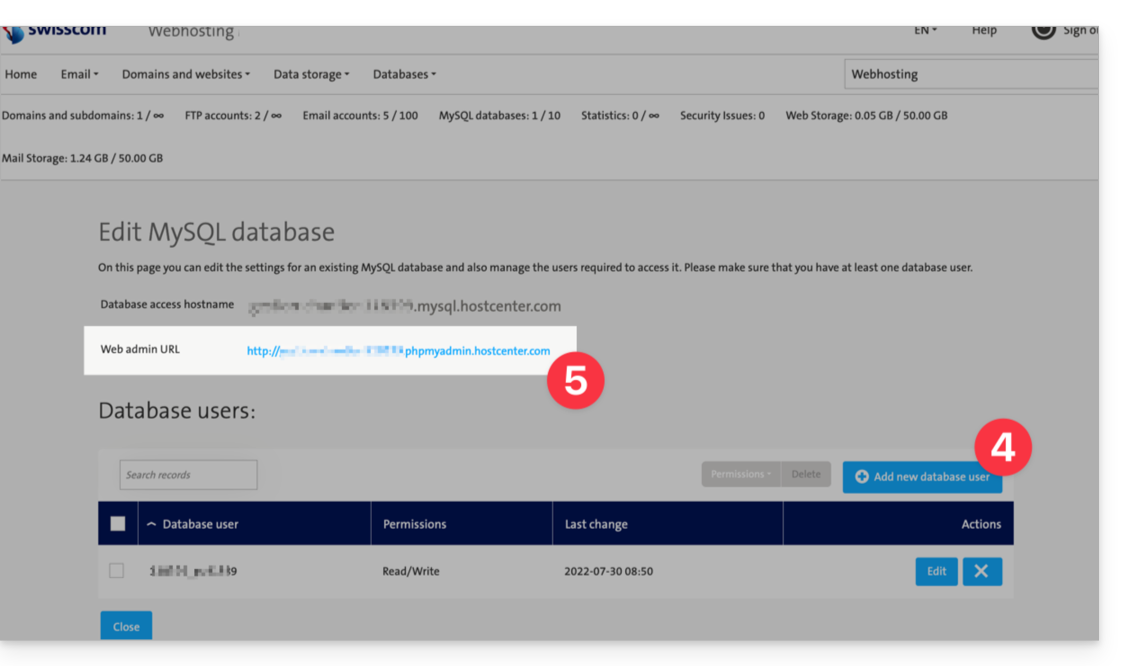
- Log in to the Swisscom server with the usual MySQL information or obtained in point 4 above.
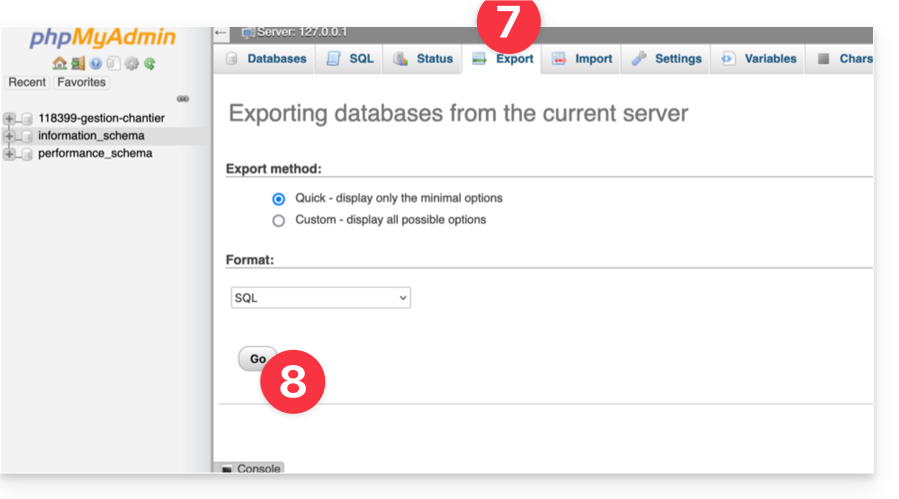
- Click on Export to configure the database export.
- Click on Go to download your SQL data to your hard drive:
2. Send Web data to Infomaniak
a. HTML, PHP, etc. files via FTP
Access Infomaniak Web Hosting and activate the FTP section:
- Click here to access the management of your product on the Infomaniak Manager (need help?).
- Click directly on the name assigned to the product concerned.
- Click on FTP / SSH in the left sidebar menu.
- Click on the Add button to create a new FTP / SSH account.
- Open an FTP software/client like Filezilla.
- Log in to the Infomaniak server with the FTP information obtained in point 4 above.
- Transfer the files from the hard drive (obtained in point 1.a.5) to the server in the folder corresponding to your Infomaniak site.
b. Import MySQL databases
Access Infomaniak Web Hosting and activate the MySQL section:
- Click here to access the management of your product on the Infomaniak Manager (need help?).
- Click directly on the name assigned to the product concerned.
- Click on Databases in the left sidebar menu.
- Click the Add button.
- Enter a database name after the already entered prefix.
- Click the box to Create an associated user.
- Enter a username after the already entered prefix.
- Enter a password.
- Click Validate.
- Click the blue Import button.
- Click Select a file.
- Select the SQL files on the hard drive (obtained in step 1.b.6).
- Choose the database created in step 5 above as the destination.
- Click the blue Import button.
c. Adapt the site for the new infrastructure
If you are using an application such as WordPress, Joomla, Drupal or another web application (ownCloud, phpBB, etc.) using a database, adapt the following information in the appropriate configuration file from the information available on the Manager so that your site works:
- the name of the database
- the database server
- the username that accesses the database
- the password of the username that accesses the database
Refer to these other guides to adapt the configuration file: WordPress and Joomla.
Learn more
Link to this FAQ: https://faq.infomaniak.com/2851
Has this FAQ been helpful?
This guide details the "Database connection error: could not connect to mysql" error that may occur when making changes to an Infomaniak hosting environment on which the Joomla web application is installed.
Introduction
- To get the site working again, you need to check and update certain information in the
configuration.phpfile of Joomla:- The database name — this is often a prefix that has been added to the existing database name and username (for example,
dbnamebefore,abcd_dbnameafter). - The host server of the database (for example,
mysql.domain.xyzbefore,abcd.myd.infomaniak.comafter). - The username that accesses the database (for example,
dbuserbefore,abcd_dbuserafter). - The path to two directories,
/tmpand/logs.
- The database name — this is often a prefix that has been added to the existing database name and username (for example,
Get the updated information
For points 1, 2 and 3 of the preamble above:
- Click here to access the hosting & website management section in your Infomaniak Manager (❓: help).
- Click on the name of the relevant hosting.
- Click on Database in the left-hand menu.
- Find and save your current MySQL information (❓: help).
Regarding point 4 in the introduction above:
- Click here to access the hosting & website management section in your Infomaniak Manager (❓: help).
- Click on the name of the website in question.
- Click on Manage advanced settings:
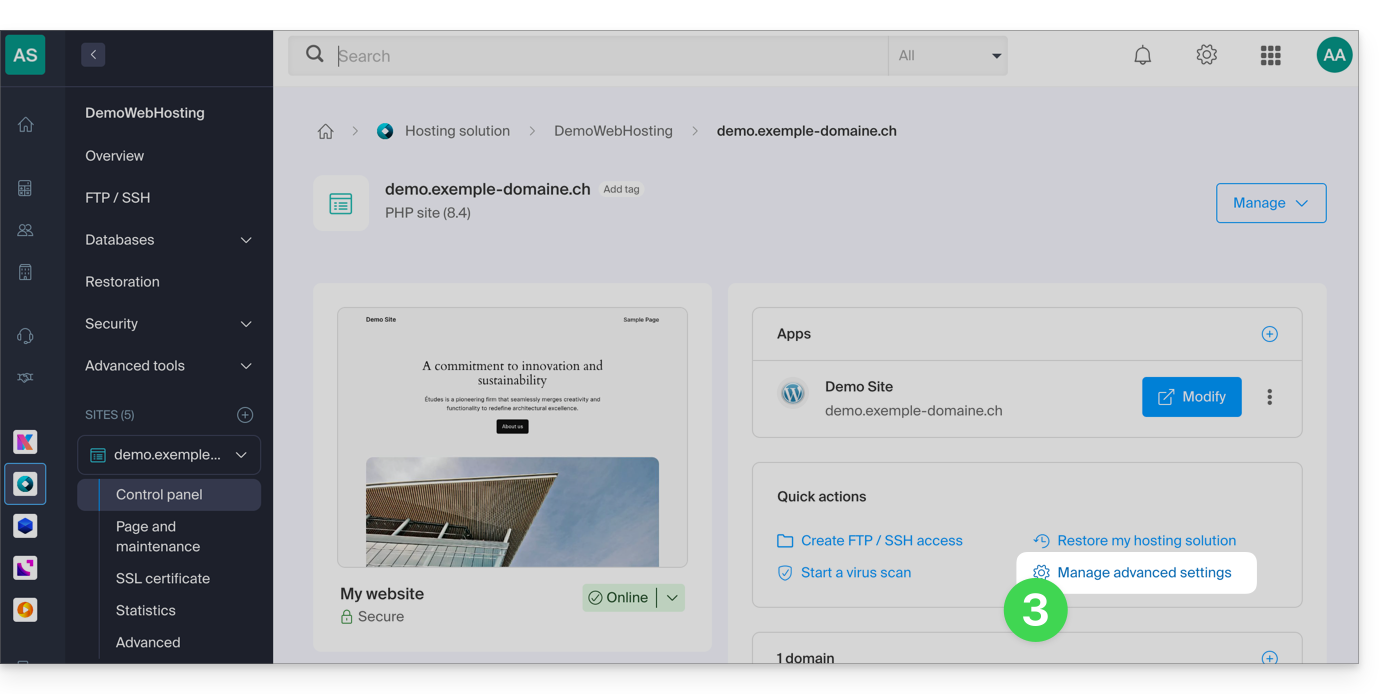
- Click on the PHP / Apache tab:
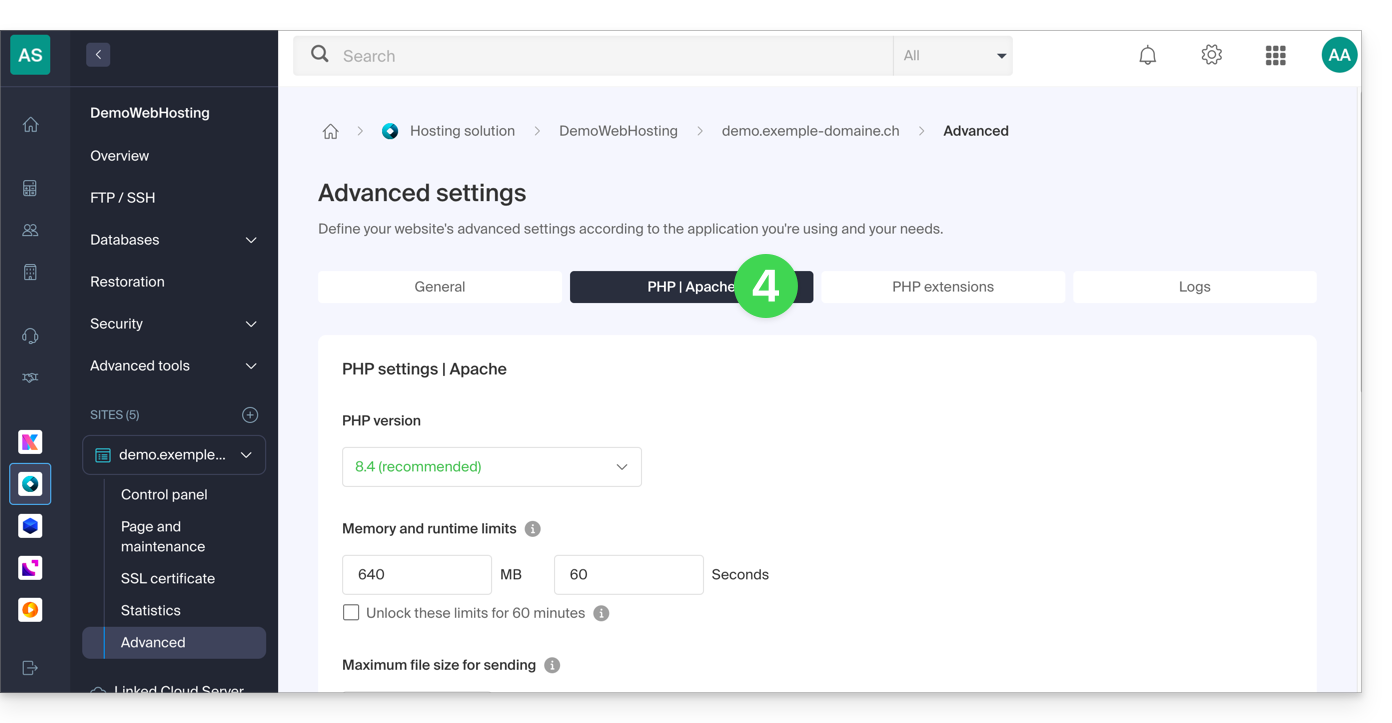
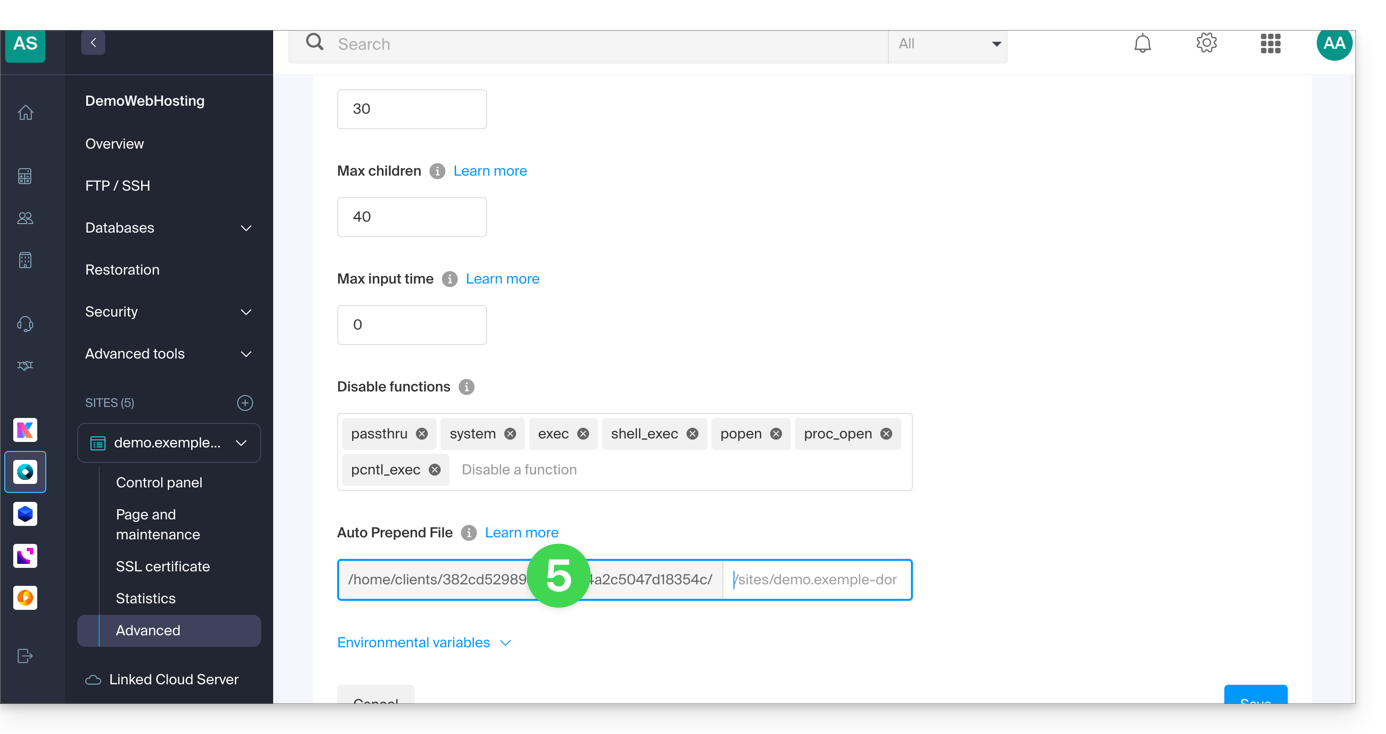
- Copy the path displayed in the first field under Auto Prepend File at the bottom:
Modify the configuration.php file for Joomla
Prerequisites
Then, edit the configuration.php file, which is located in the root directory of your Joomla:
- Replace the old log and tmp paths with the new path:
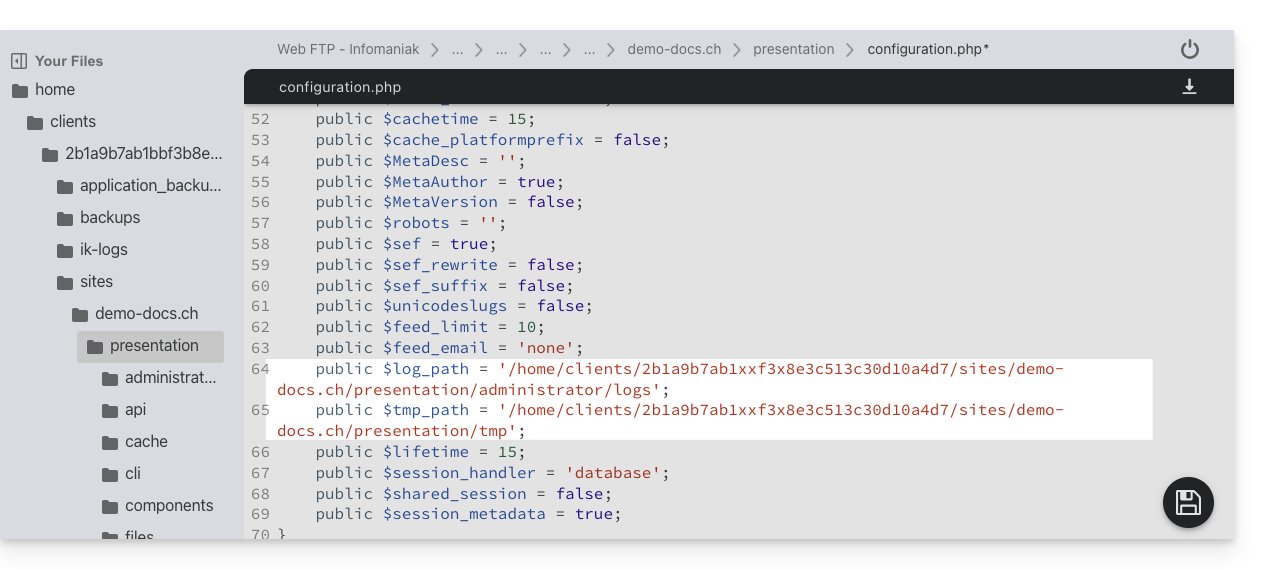
- Find the relevant paragraphs for the remaining information from the introduction above:

- Save the file; your Joomla will now connect to the correct database.
Check the changes made
In the Joomla interface, you can check the paths of the /logs and /tmp folders:
- For the
/logsfolder: go to System / Configuration then Logs: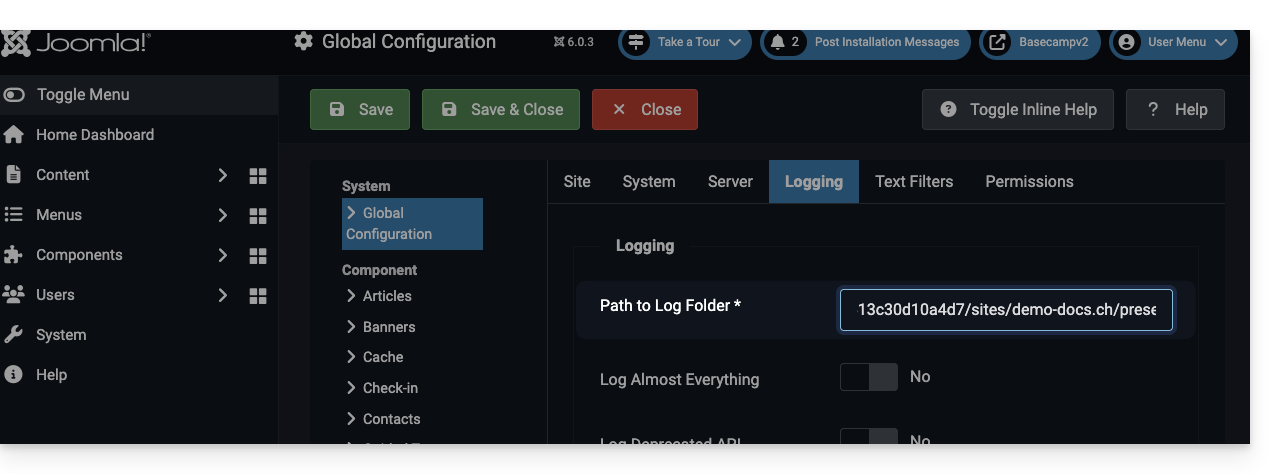
- For the
/tmpfolder: go to System / Configuration, then Server: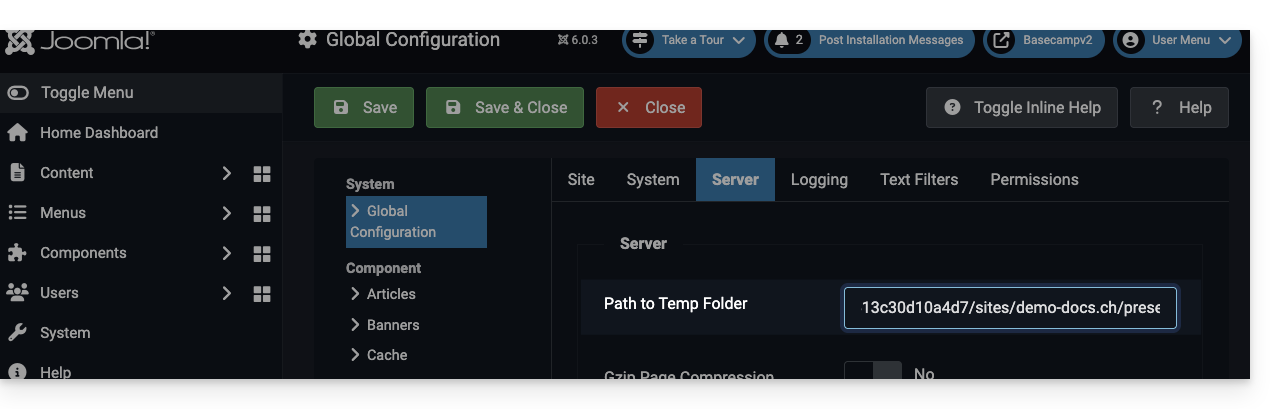
Link to this FAQ: https://faq.infomaniak.com/272
Has this FAQ been helpful?
This guide explains how to restrict access to Infomaniak video streaming using a unique key (hash).
Introduction
- This method offers the best level of protection and allows you, for example, to restrict your broadcasts to a members-only area requiring authentication.
- Since the method of generating this code is specific to each site, you will need to implement the required PHP functions and adapt the integration code for your player accordingly.
Restrict access to broadcasts using a unique key (hash)
To do this:
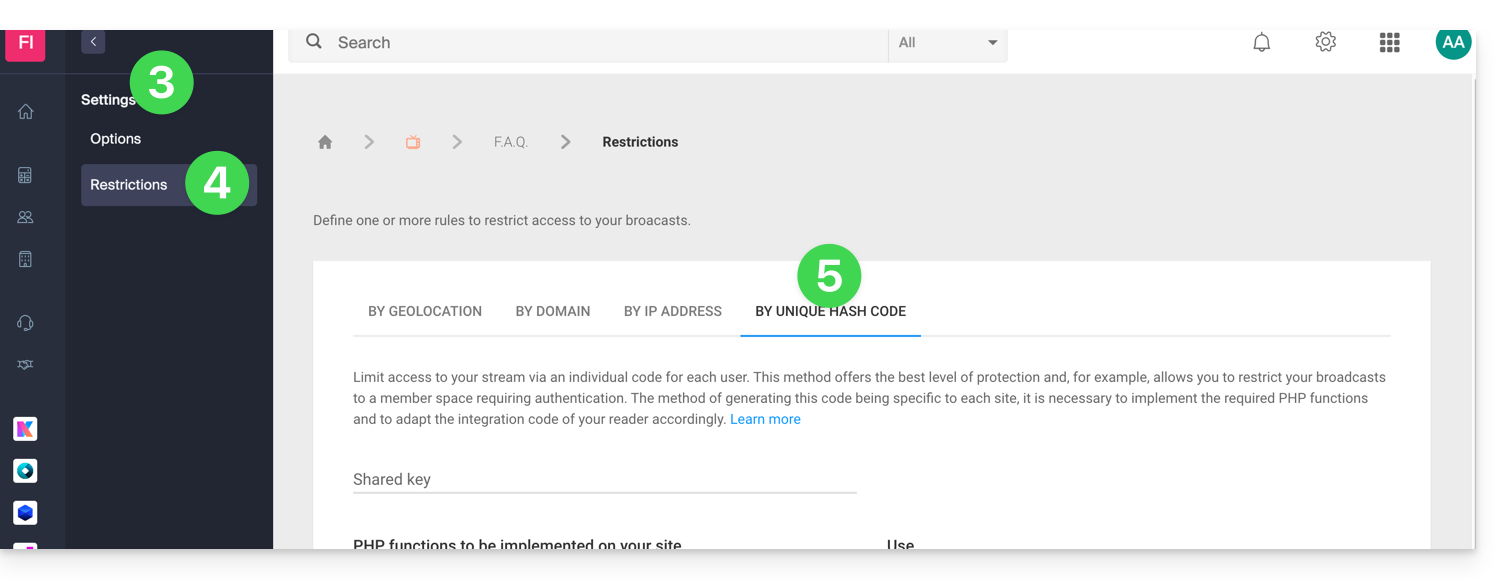
- Click here to access the management of your product in the Infomaniak Manager (need help?).
- Click directly on the name assigned to the product in question.
- Click on Settings in the left-hand menu.
- Click on Restrictions in the left-hand menu.
- Click on the tab (or the dropdown menu item) Restriction by unique hash:
How restrictions work
This method requires retrieving information related to the configuration of your stream and the user connecting.
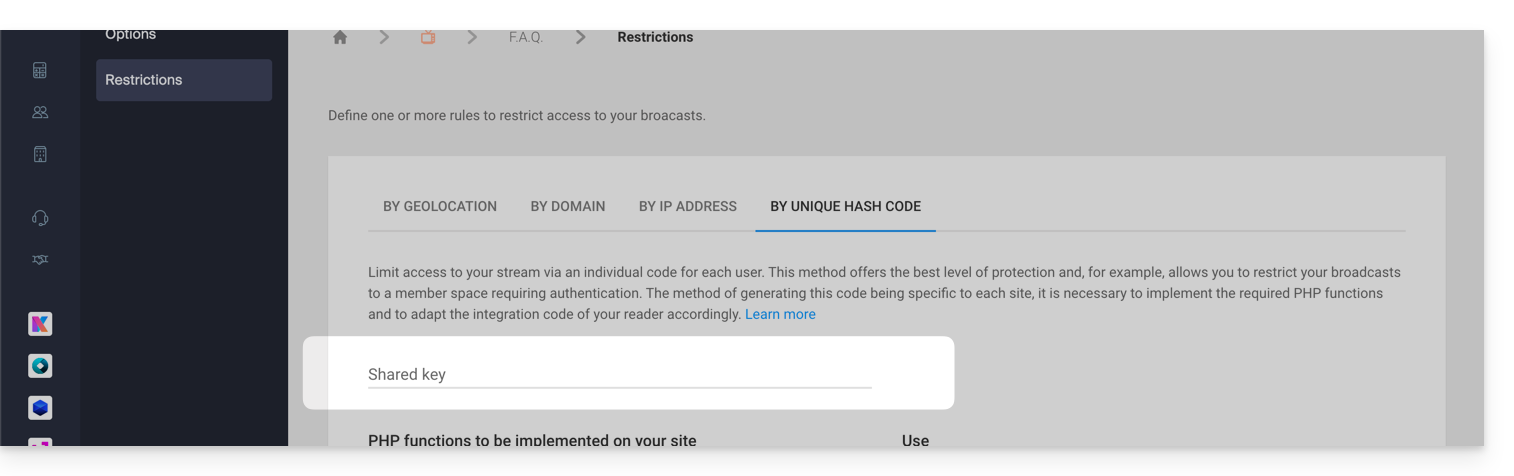
First, you need to create a password (a key) in the Infomaniak Manager. Once this key is added, connected viewers and those attempting to view your stream will be instantly blocked (refer to this other guide to customize the replacement image displayed to blocked viewers).
Here's the process to follow to allow access to your stream:
- Design an authentication system (e.g., a members area).
- Use the password configured above in the Manager.
- Retrieve the IP address of the users, for example, using
$_SERVER["REMOTE_ADDR"]. - Obtain the ID of the stream to target.
- Retrieve the current date and time (without minutes and seconds).
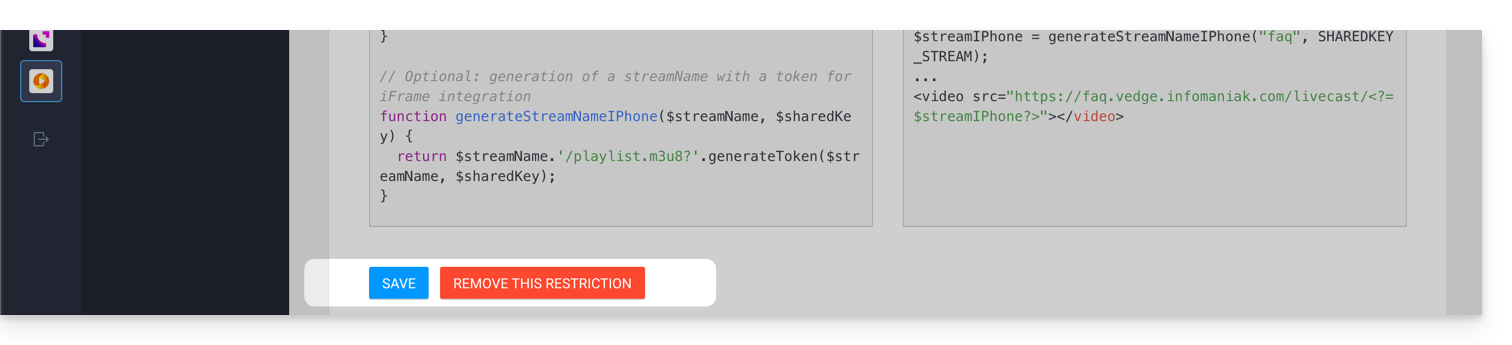
These elements will then be hashed by the code provided in the Manager to generate a unique token specific to each user, which will be transmitted to the stream when it is loaded. The streaming platform will then verify the validity of the hash to allow or reject the connection.
Important notes
- To ensure the security of access to the stream, the validity of each token is limited in time.
- It is important to disable the cache on the pages that allow access to the stream; if the token generation is cached, other users will attempt to authenticate with someone else's hash, which will cause them to be rejected even if they are authorized to view the stream.
Link to this FAQ: https://faq.infomaniak.com/2273
Has this FAQ been helpful?
This guide details the "bogus HELO" email error to help you understand its origin and how to fix it.
When and why does this error occur?
The SMTP protocol (used for sending emails) involves several phases. The first phase involves the sender's server introducing itself to the recipient's server using the HELO command (or EHLO for extended SMTP). This command must be followed by a valid hostname.
If you receive an error mentioning "bogus HELO", it means that the identifier provided by the sending server does not comply with RFC 5321. This check is an essential security measure that helps filter out a large number of misconfigured servers, often used for distributing viruses and spam.
Infomaniak rejects any message originating from a server that identifies itself generically (e.g., "server") or locally. The server must use a FQDN (Fully Qualified Domain Name), meaning a complete and resolvable hostname of the type "server.domain.xyz".
Examples of configurations that will cause rejection:
Using a local or loopback IP address:
220 mta-gw.infomaniak.ch ESMTP Infomaniak Network Mail Servers; HELO 127.0.0.1
Using an IP address enclosed in square brackets instead of a domain name:
220 mta-gw.infomaniak.ch ESMTP Infomaniak Network Mail Servers; HELO [192.168.1.1]
Using an unqualified local hostname:
220 mta-gw.infomaniak.ch ESMTP Infomaniak Network Mail Servers; HELO localhost 220 mta-gw.infomaniak.ch ESMTP Infomaniak Network Mail Servers; HELO mon-serveur
Using a banned or obviously incorrect domain name:
220 mta-gw.infomaniak.ch ESMTP Infomaniak Network Mail Servers; HELO fakedomain.xyz
In these cases, the SMTP transaction will fail with the following code:
MAIL FROM: user@domaine.com 250 2.1.0 user@domaine.com... Sender OK RCPT TO: destinataire@infomaniak.ch 550 5.7.1 destinataire@infomaniak.ch... Access denied - bogus HELO [1]
How to resolve this issue?
If you are using a programming script (PHP, Python, etc.) to send emails via SMTP, make sure that the library used is configured to send a valid domain name in the HELO command, and not the IP address of the web server.
Link to this FAQ: https://faq.infomaniak.com/414
Has this FAQ been helpful?
This guide explains how to install Nextcloud, an enhanced version of Owncloud, in just a few clicks on our paid Web Hosting plans.
Regardless of your hosting products, Infomaniak also offers a high-performance Cloud service: kDrive (file storage, synchronization, and sharing).
Introduction
- Nextcloud is one of the applications (not developed by Infomaniak) and allows you to set up a file storage and sharing system within a "cloud" that you fully control (user management, permissions, quotas, associated mobile applications, etc.).
- Unlike other hosting providers, Infomaniak allows the use of this type of app on its hosting services:
- Personal use is permitted on shared web hosting.
- For intensive and professional use, it is recommended to opt for a Cloud Server to install ownCloud / Nextcloud.
Install Nextcloud
Prerequisites
- You must have an Infomaniak web hosting plan (order if needed).
- Upgrade the Databases section if necessary (especially for Nextcloud).
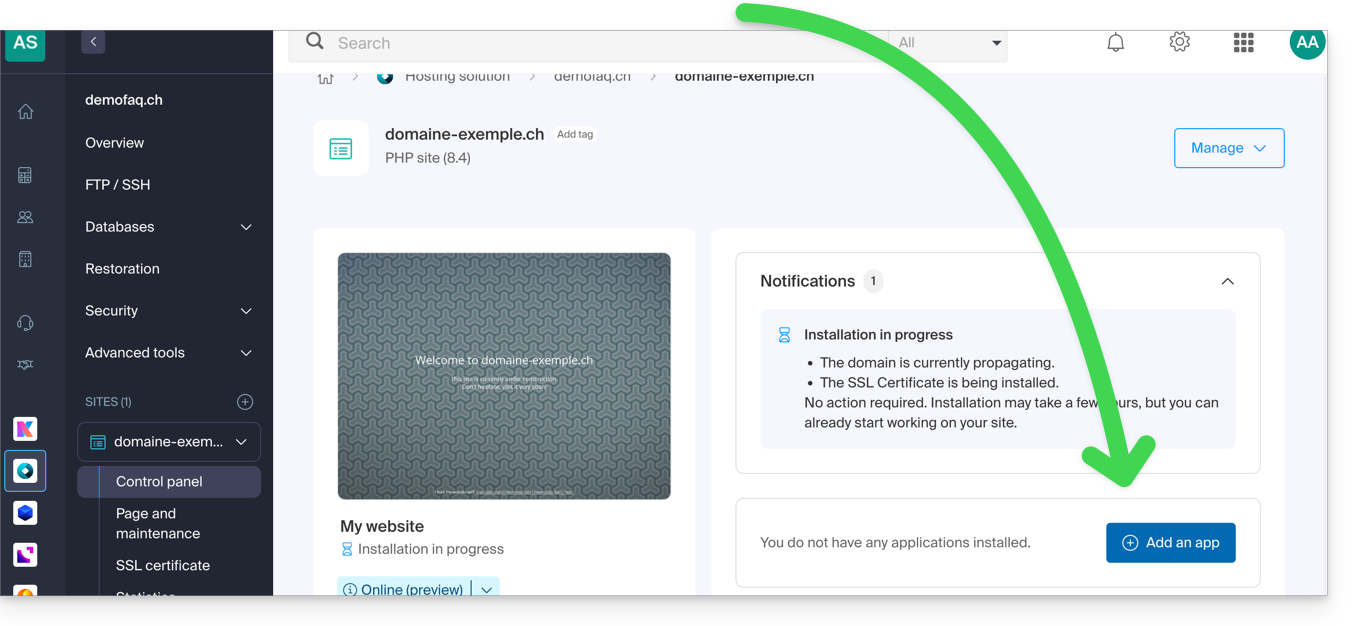
- If a blank website is already present on the hosting, click the button as shown in the image below and skip directly to step 9:
To access Web Hosting and install a new site using the application:
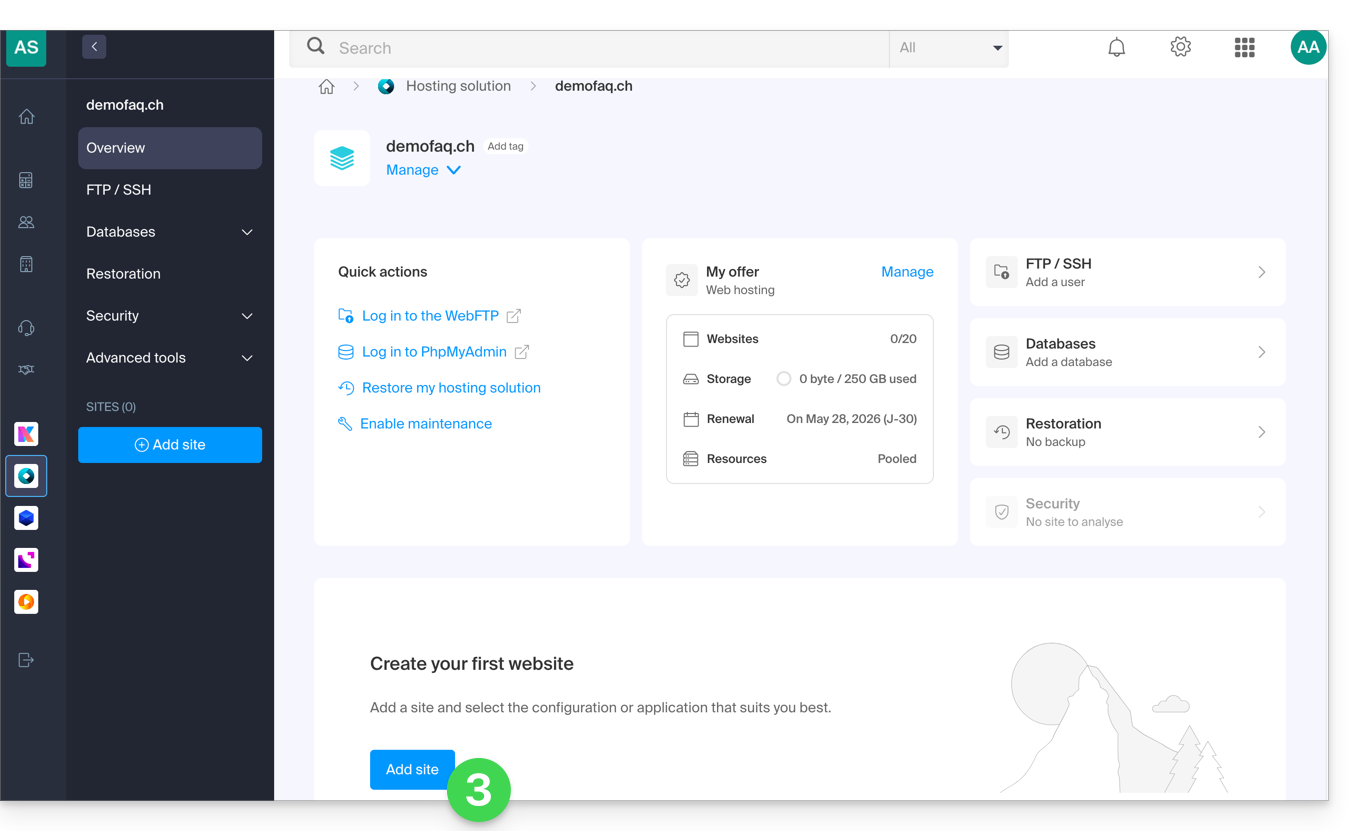
- Click here to access the hosting & site management section in your Infomaniak Manager (❓: help).
- Click on the name of the hosting account in question.
- Click on the Add a site button:
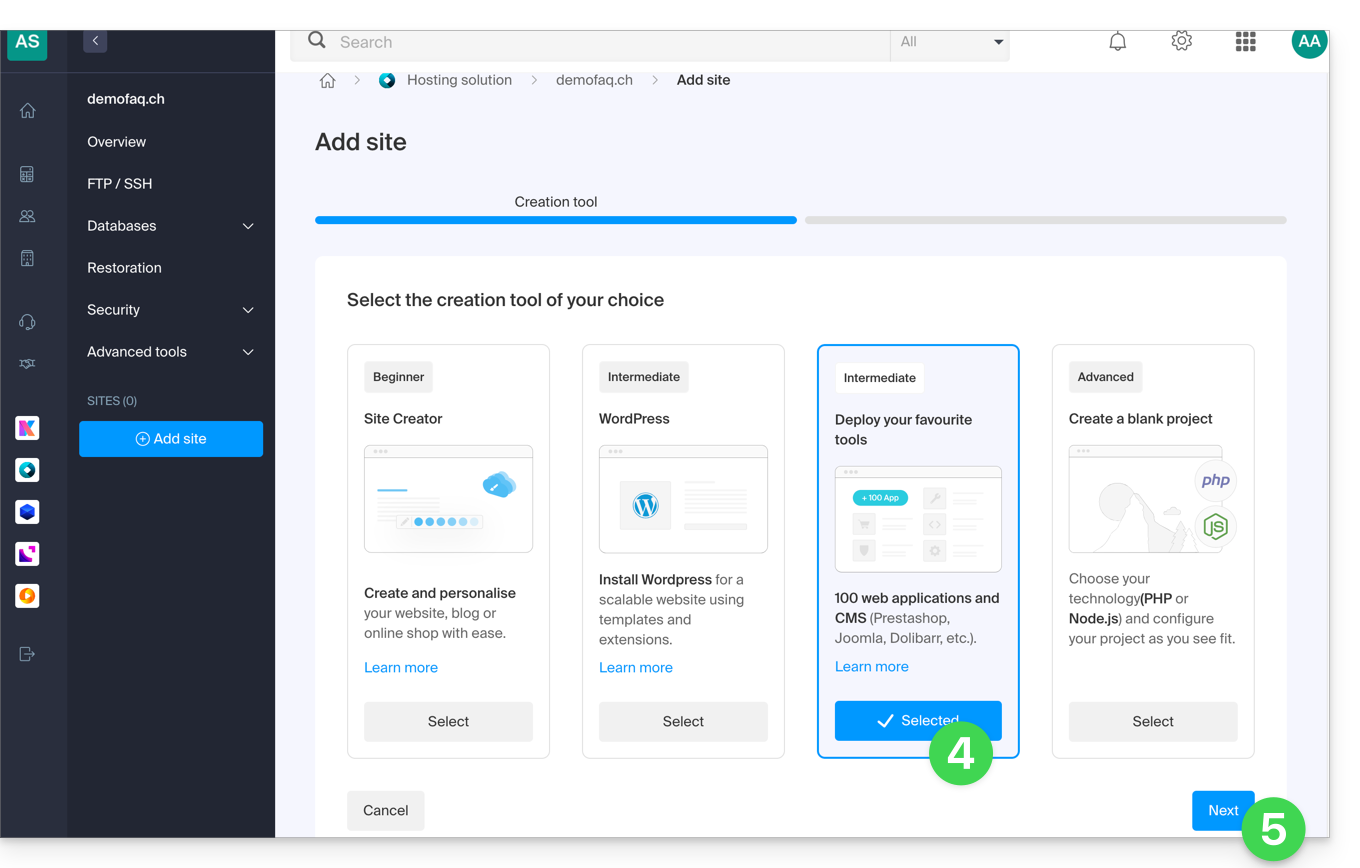
- Select the intermediate option for tool deployment.
- Click on Next:
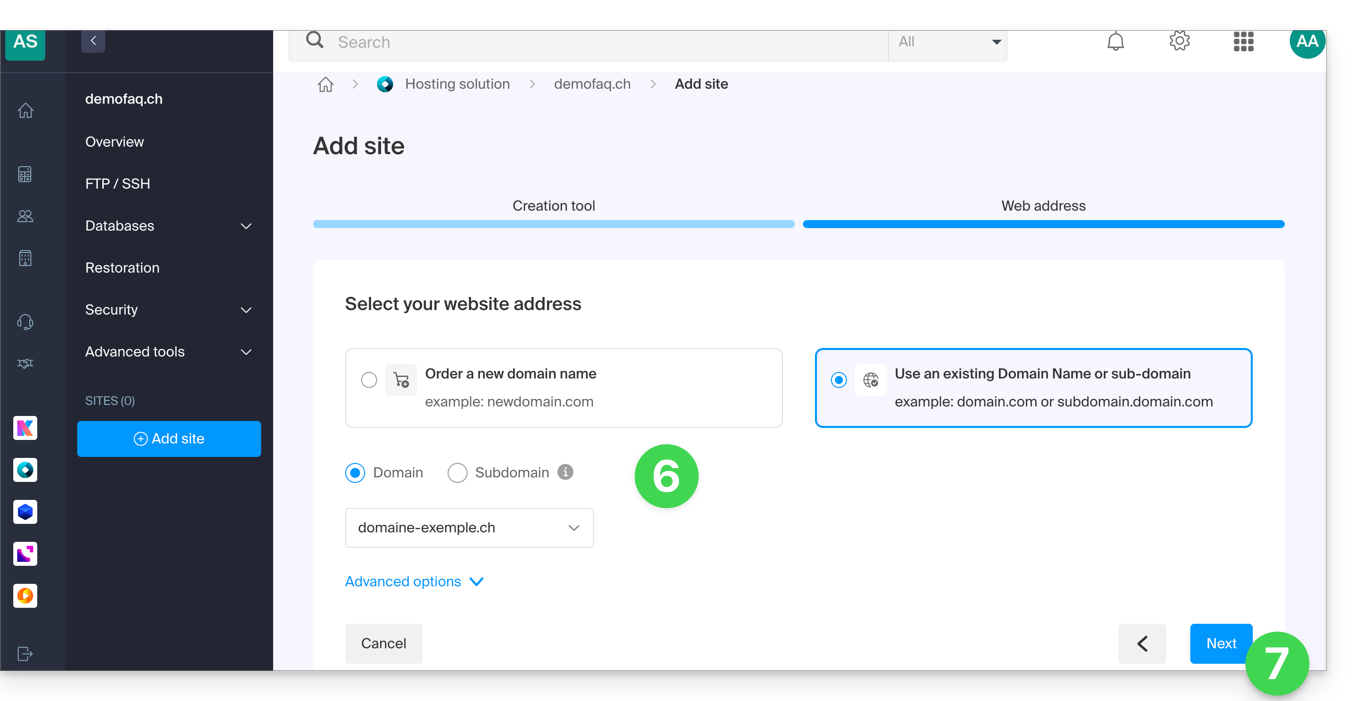
- Select the domain or subdomain and the advanced options if necessary.
- Click on Next:
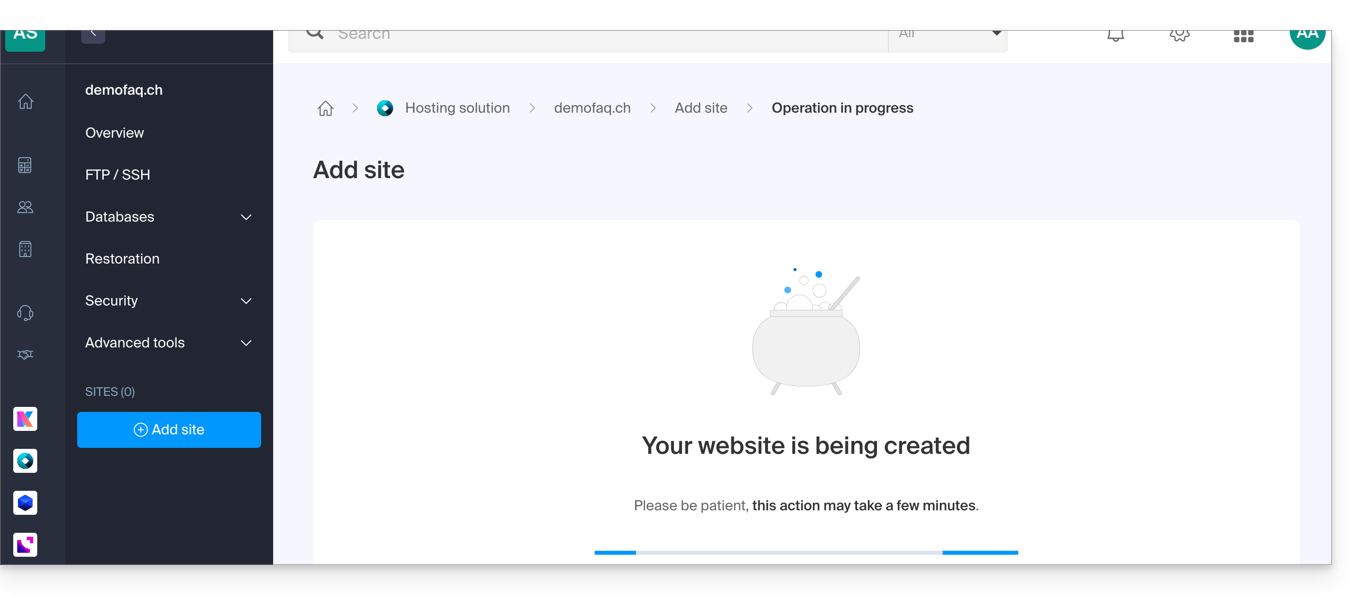
- Please wait a few minutes while the website is being created:
- Select the desired application (if necessary, filter and search):
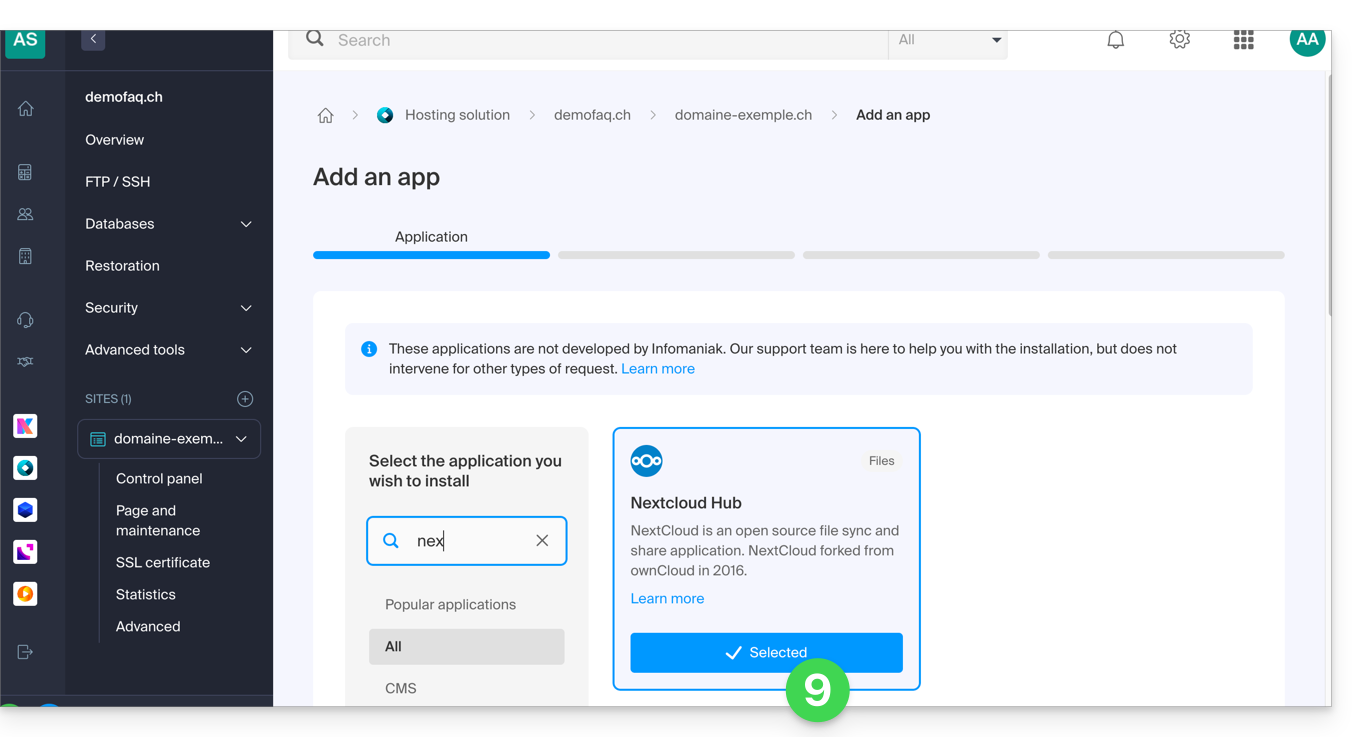
- Click on Next at the bottom of the page.
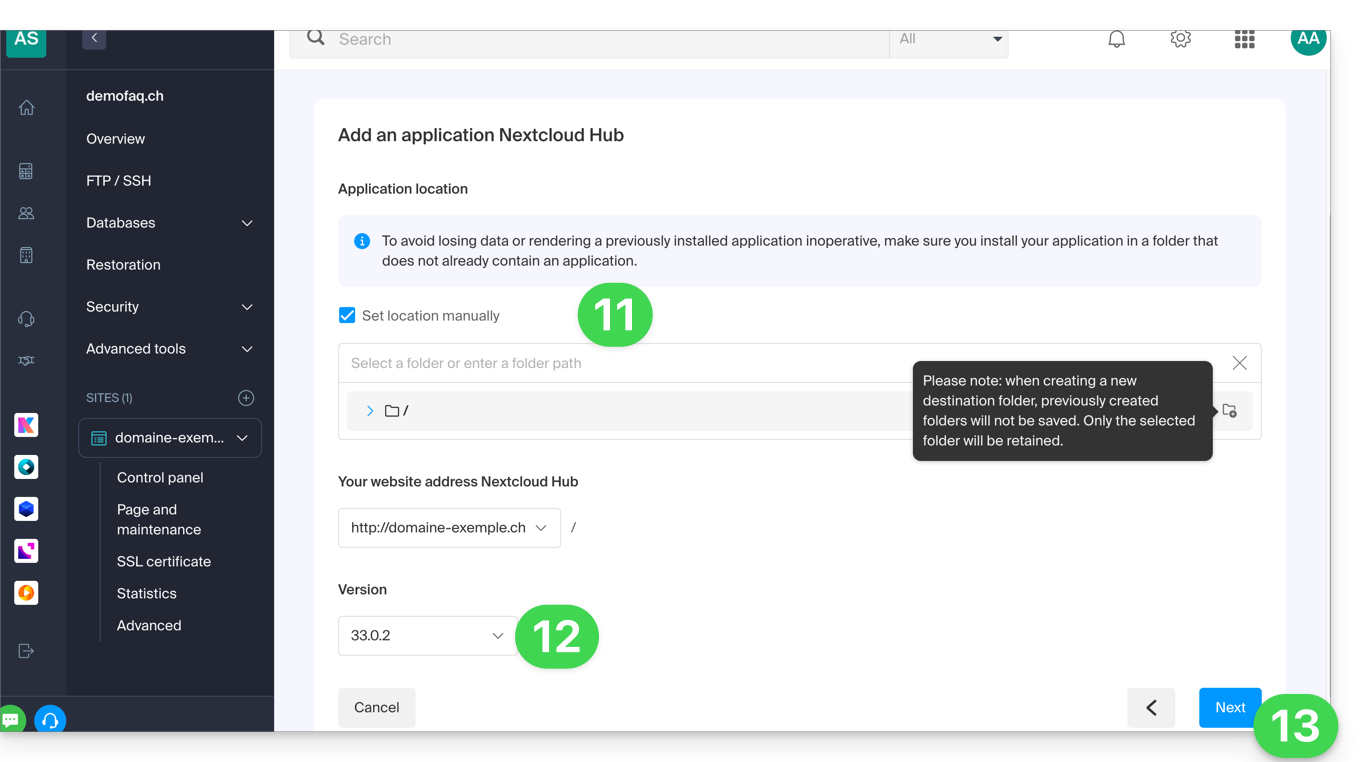
- Leave the default location or check the box to install the app in a new folder, which you can create using the icon visible to the right of point 11 in the image.
- If necessary, select the option to install an older version.
- Click on Next:
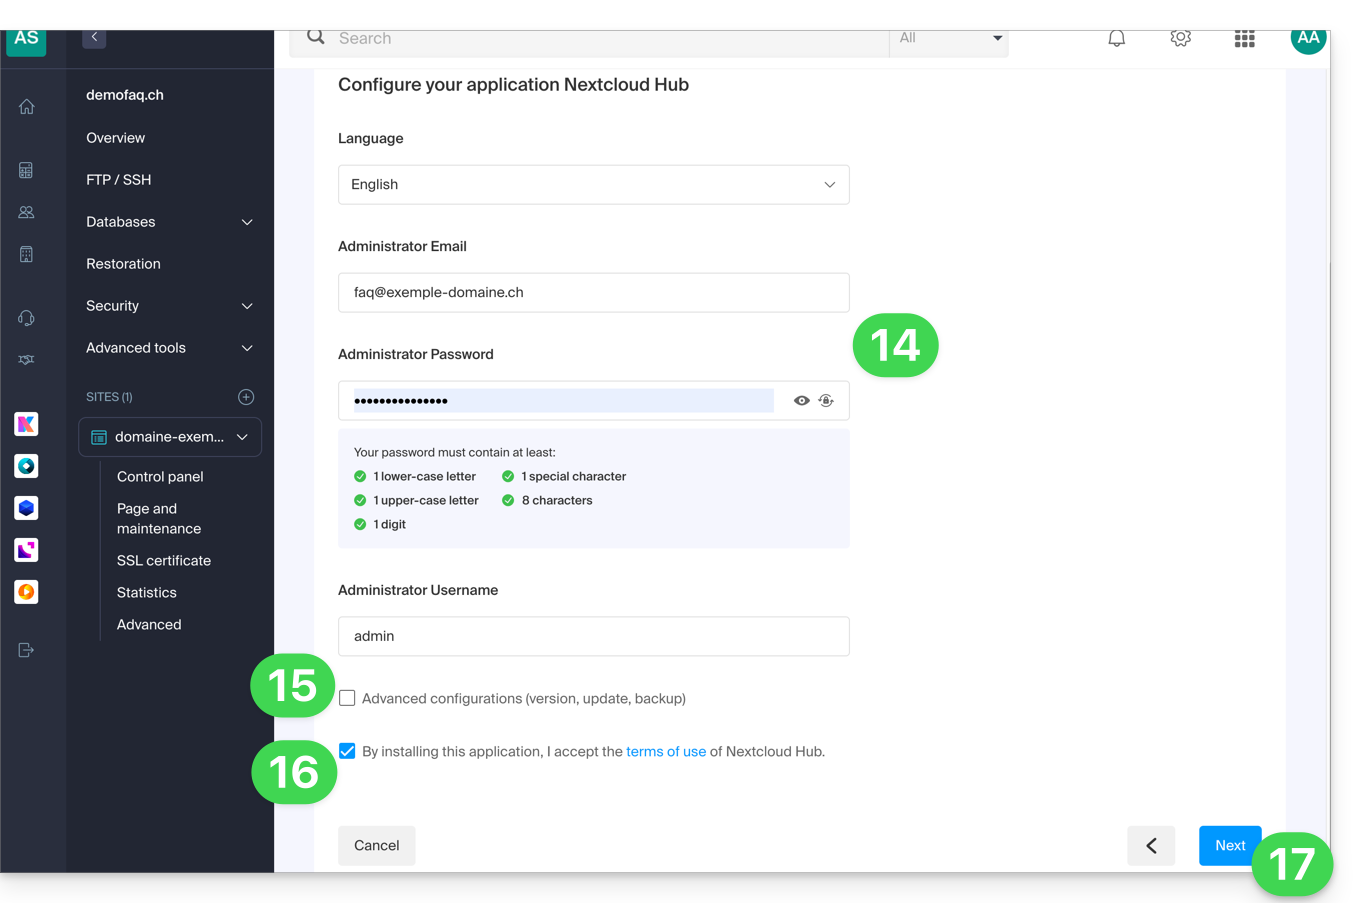
- Configure the username and password.
- Specify certain advanced settings if necessary (e.g., backup type).
- Read and accept the terms of use for the selected app.
- Click on Next:
- Confirm the application installation in the next step and wait:
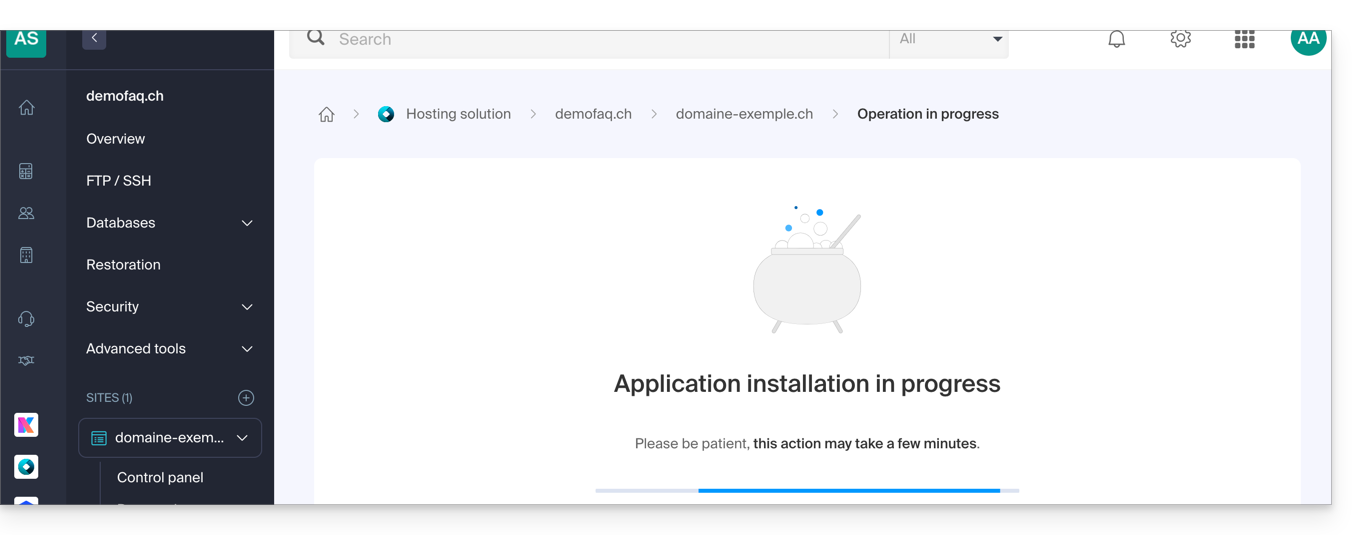
- Take note of any error messages displayed on the screen, for example, if the selected installation folder is not empty or if the PHP version of the website on which you are attempting the installation is not compatible.
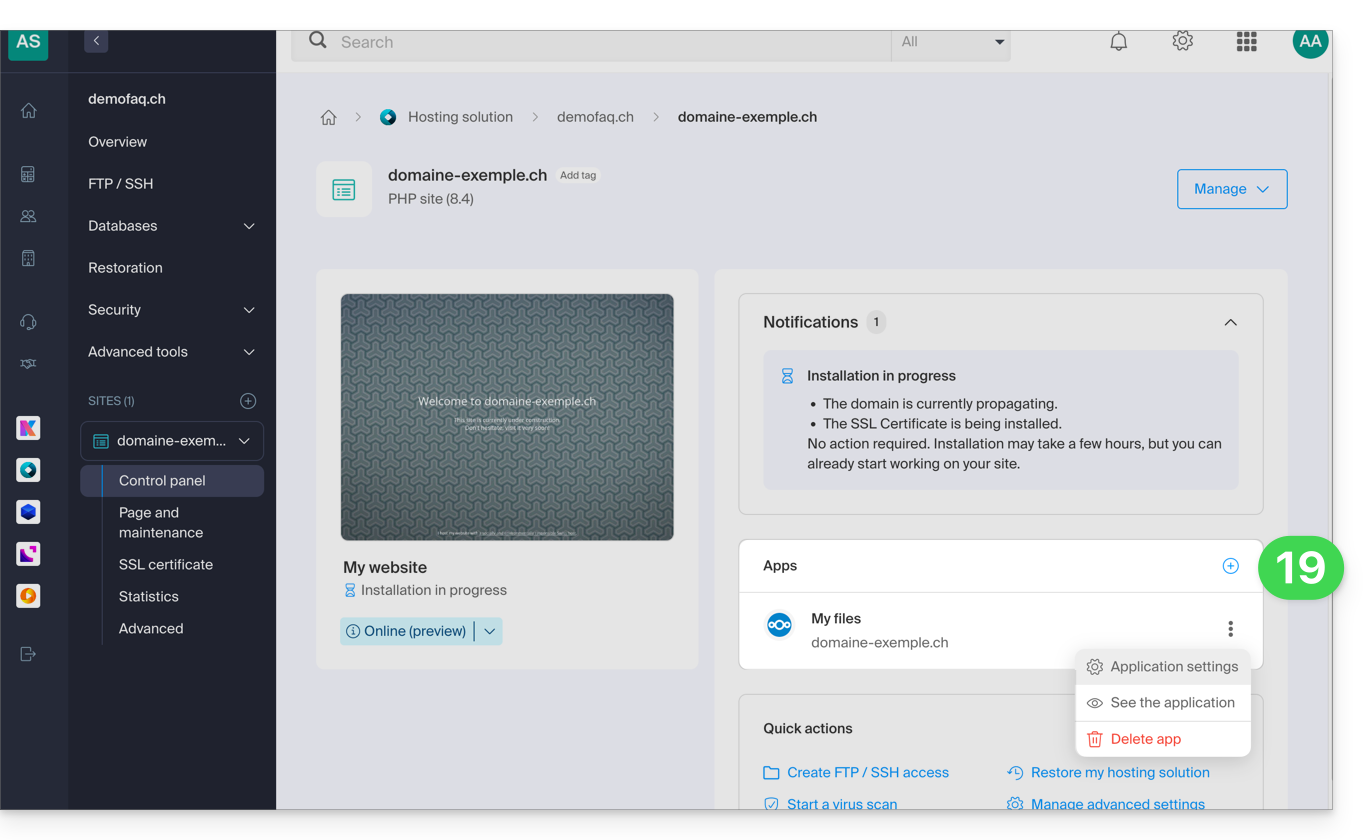
- Once the installation is complete, you can manage your application as desired:
Link to this FAQ: https://faq.infomaniak.com/2162
Has this FAQ been helpful?
This guide explains how to install a new Web Application (Joomla, Drupal, Typo3, PrestaShop, etc.) in just a few clicks on the paid Web Hosting plans.
Prerequisites
- Have an Infomaniak web hosting plan (order if needed).
Specific guides
Refer to these guides if you need specific installation instructions for:
Refer to this other guide about additional technologies that can be installed with just a few clicks, but only on Cloud Server.
Guides for any other Web Application
To access the Hosting and install a new website and a Web Application on it:
- Click here to access the hosting & website management section in your Infomaniak Manager (❓: help).
- Click on the name of the relevant hosting.
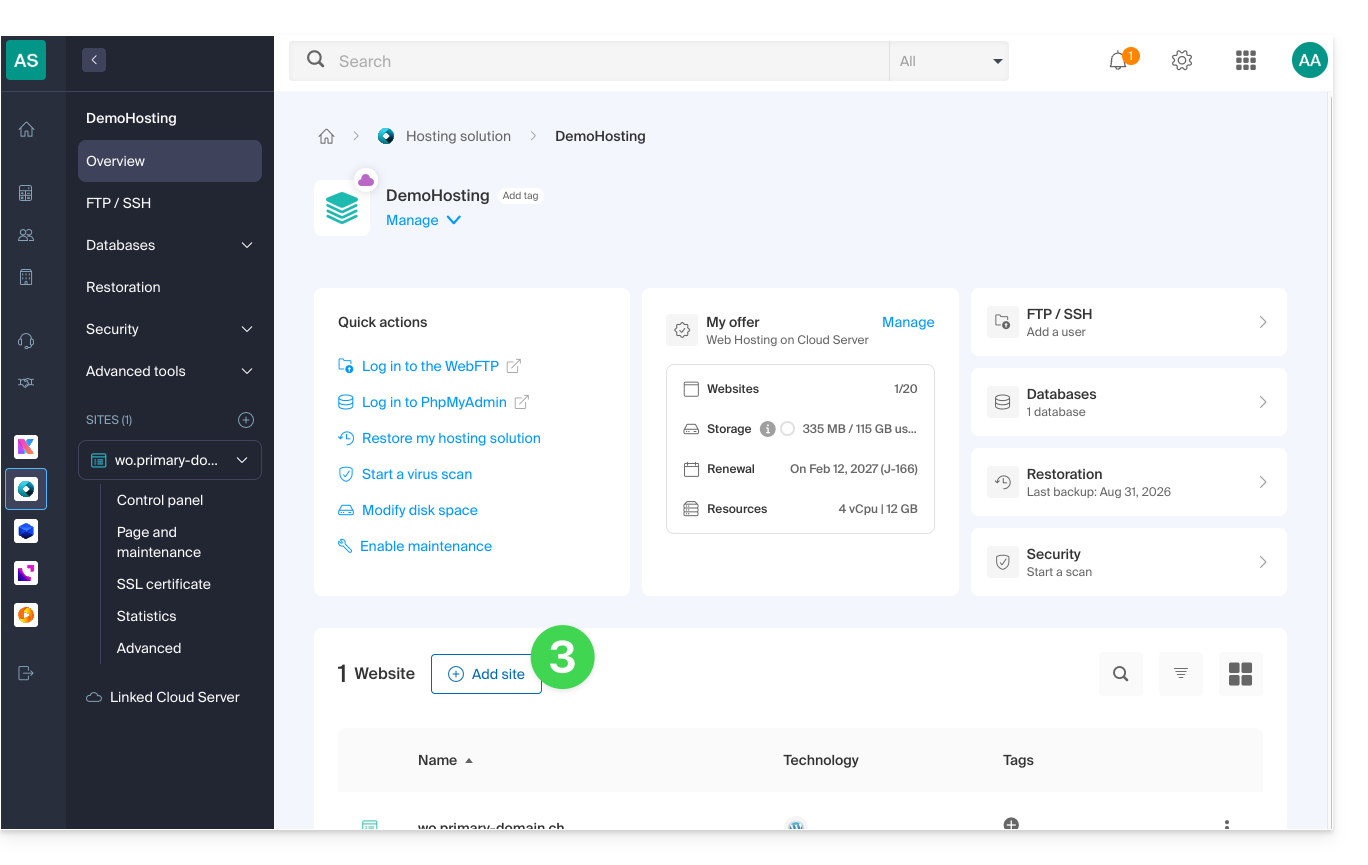
- Click on the Add a website button:
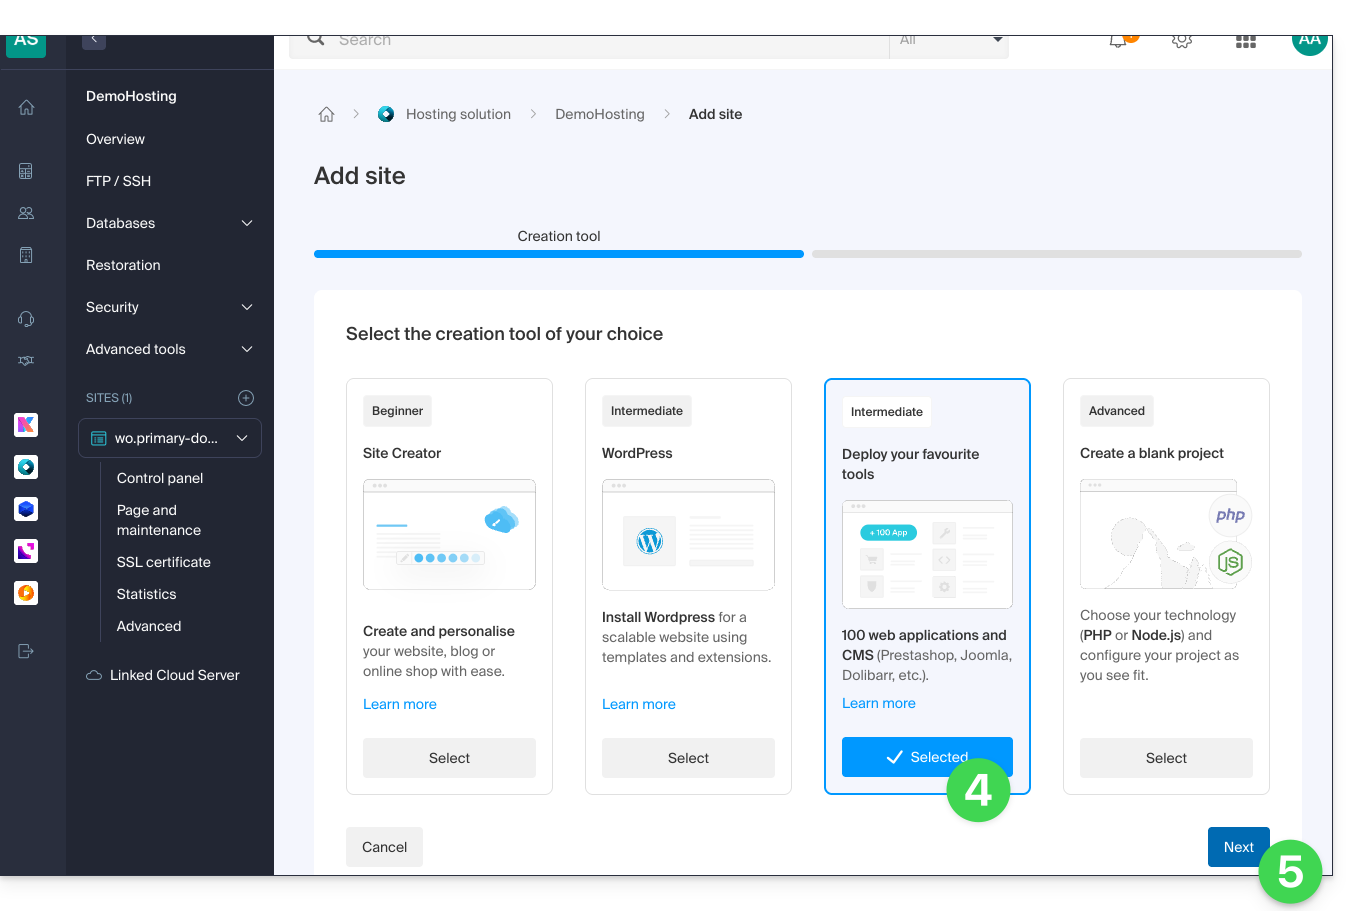
- Choose to install a website with a selected application.
- Click on Next at the bottom of the page:
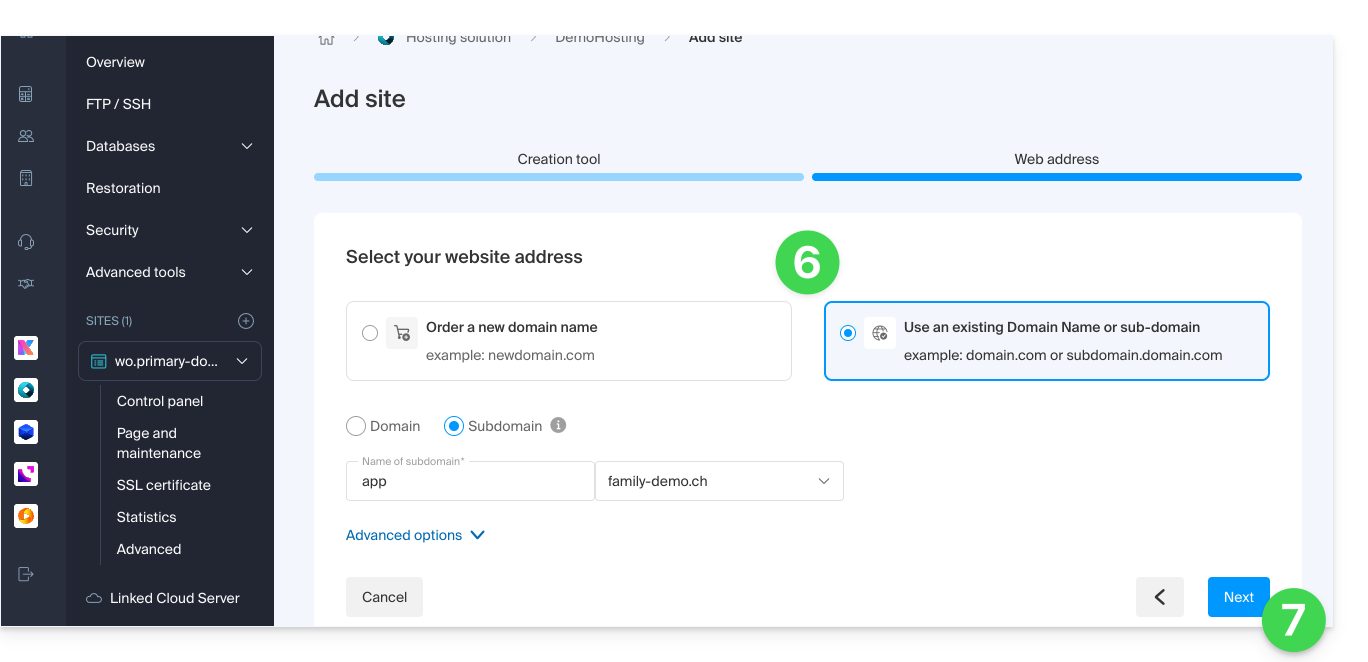
- Choose the domain name that should match the website and the application.
- Click on Next:
- Wait while the website is created on the hosting.
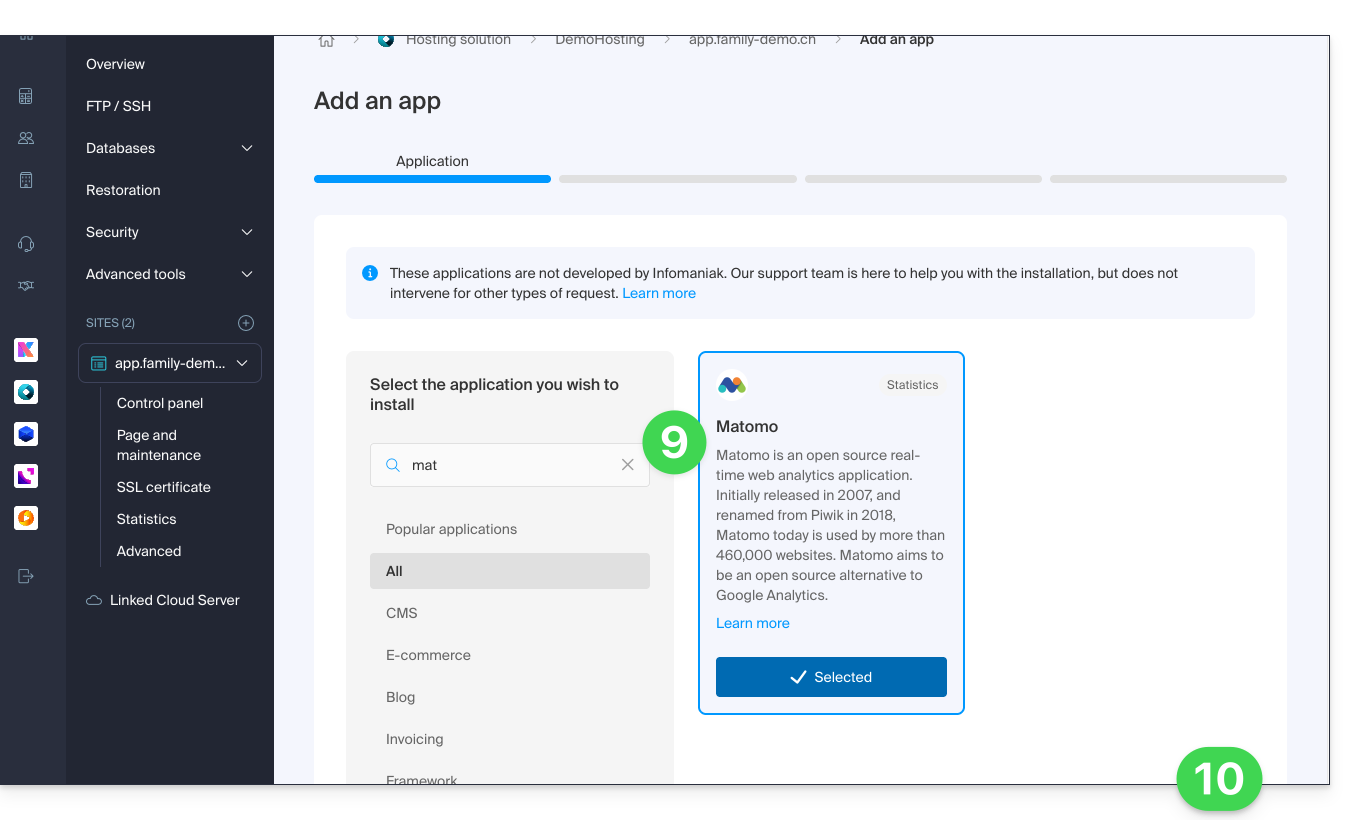
- Select the application to install (if necessary, filter and search).
- Click on Next at the bottom of the page:
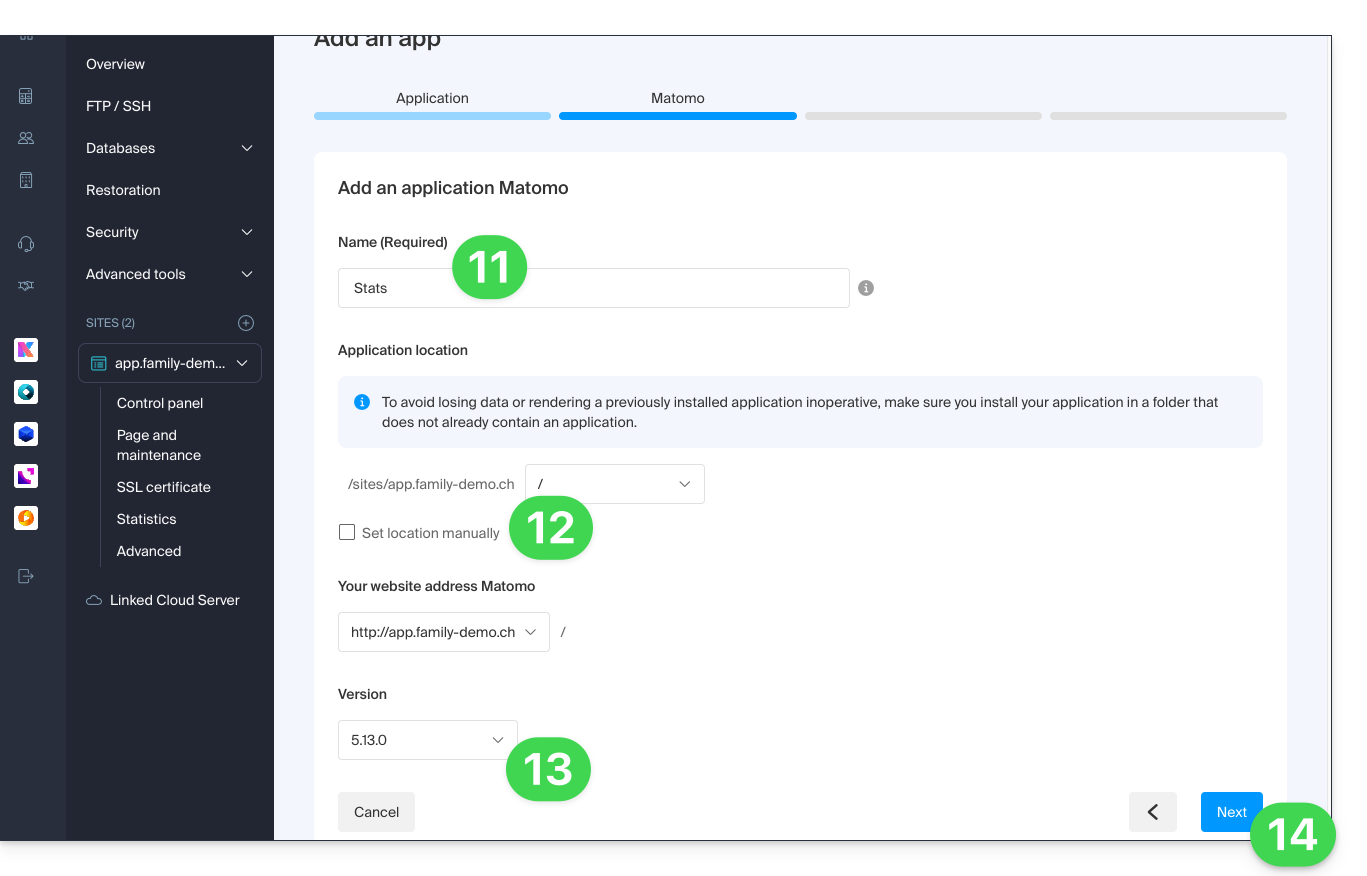
- Enter a name.
- Leave the default location or choose to install the app in a new folder, which you can create using the icon visible to the right of point 8 in the image.
- If necessary, select the option to install an older version.
- Click on Next:
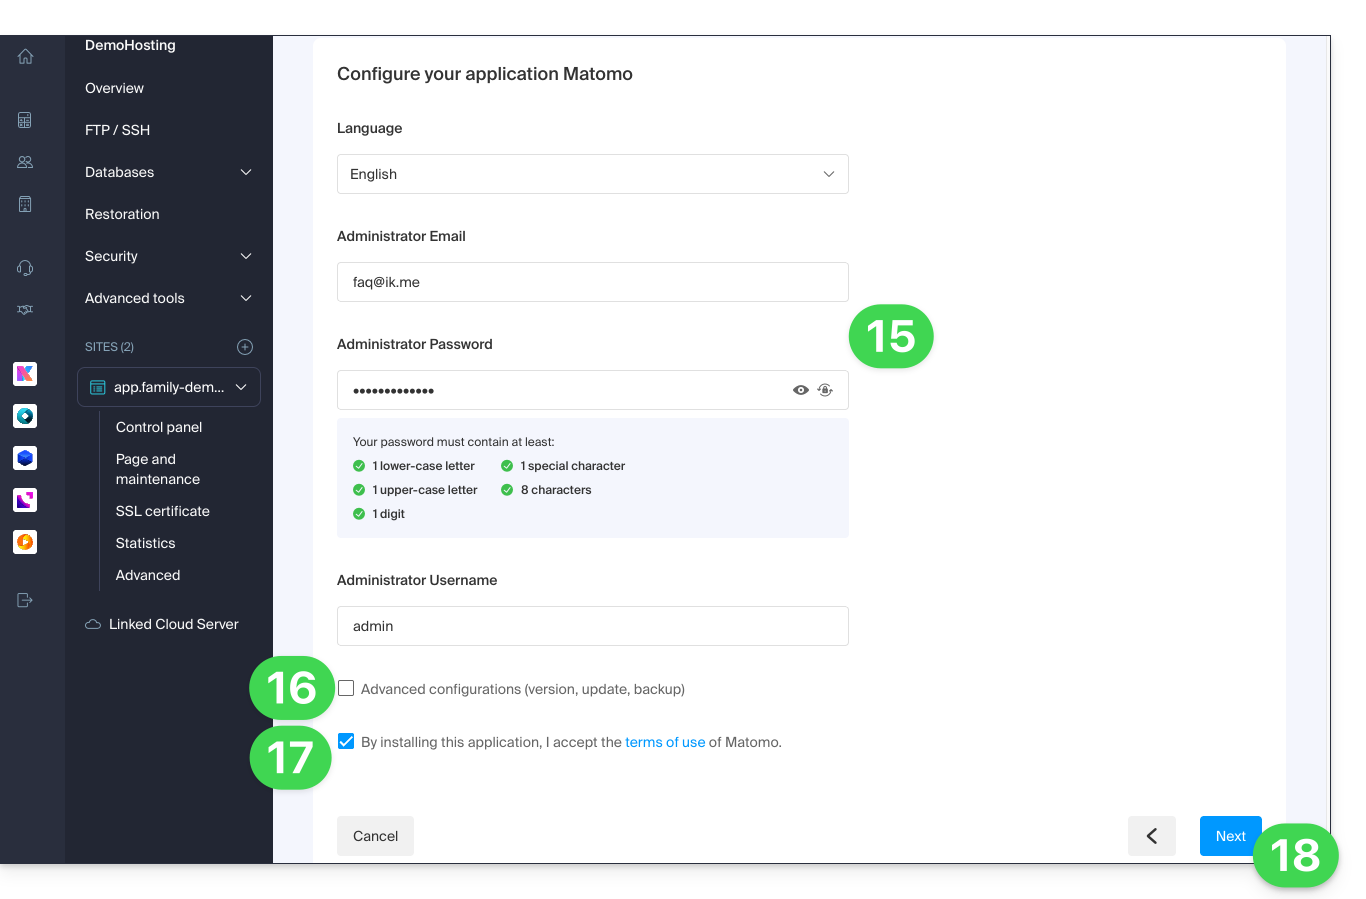
- Configure the username and password.
- Specify certain advanced settings if necessary (e.g., backup type).
- Read and accept the terms of use for the selected app.
- Click on Next:
- Confirm the application installation in the next step and wait:
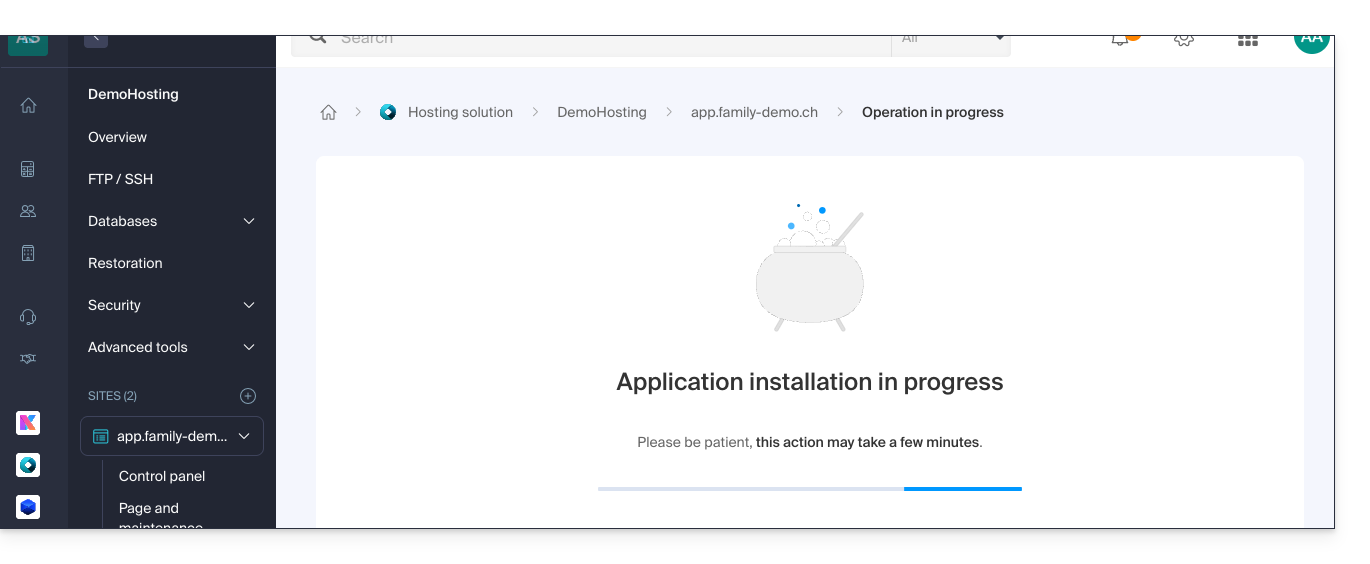
- Check for any error messages on the screen, for example, if the selected installation folder is not empty or if the PHP version of the website on which you are attempting the installation is not compatible.
Uninstall a Web Application
To access Web Hosting and uninstall the previously installed application:
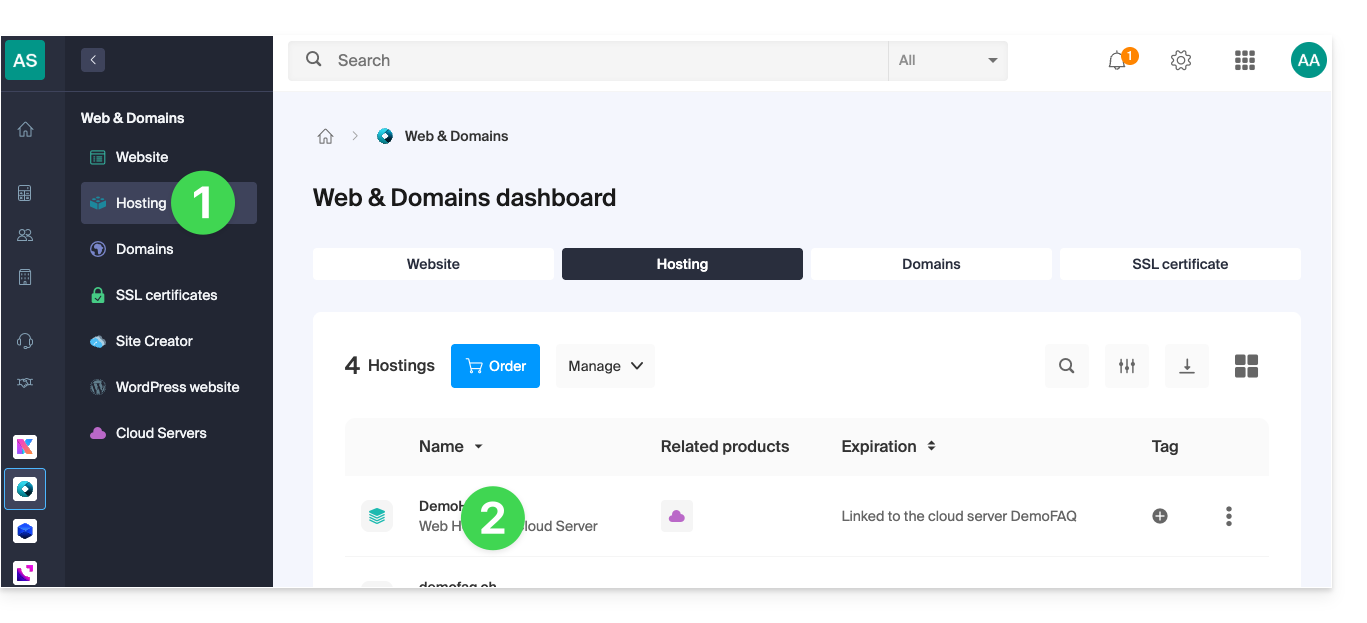
- Click here to access the management of your hosting on the Infomaniak Manager (need help?).
- Click directly on the name assigned to the hosting in question:
- If you remove the site from the hosting:
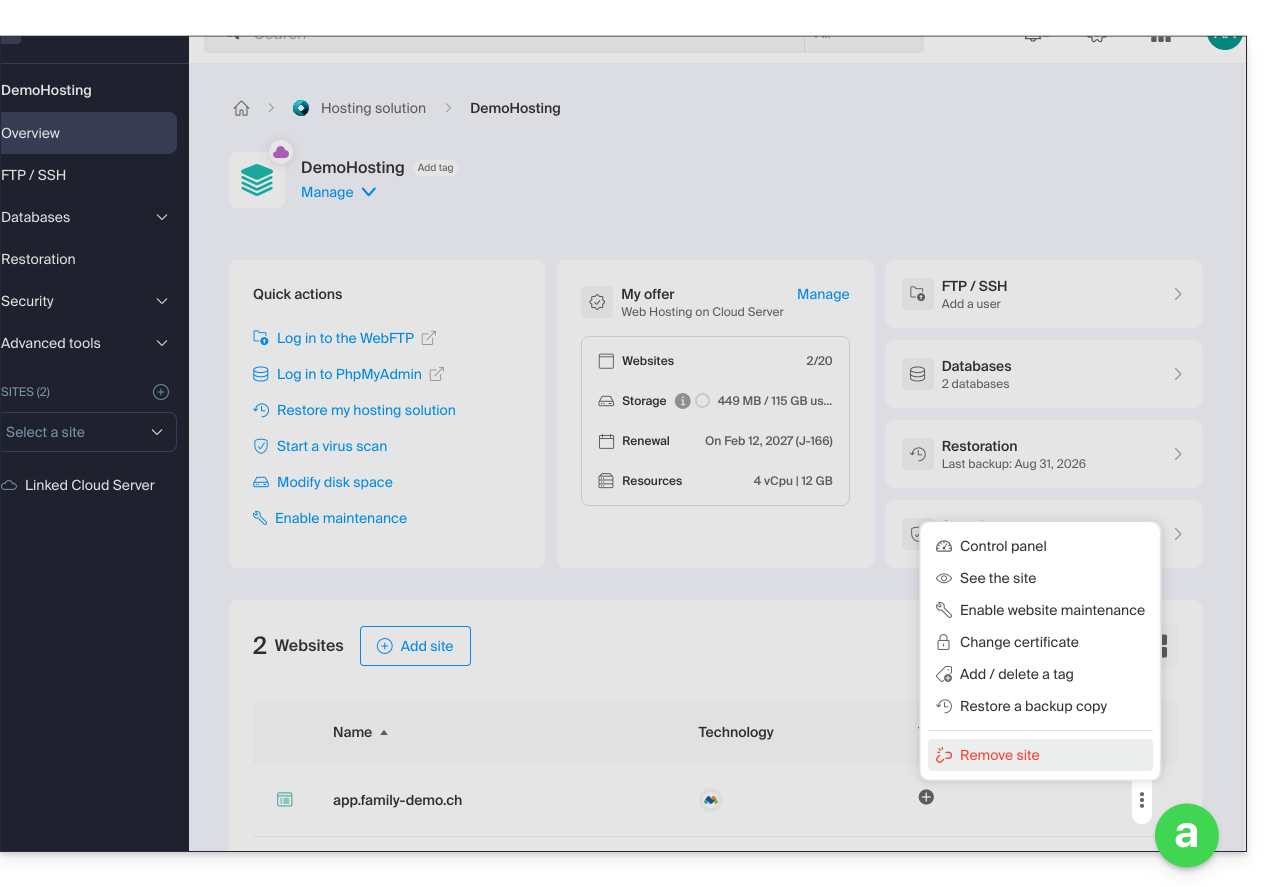
- The application files can be deleted or kept on the server, but in all cases the site is deleted and disappears (the URL assigned to the site will no longer correspond to anything).
- If you click on the site name first:
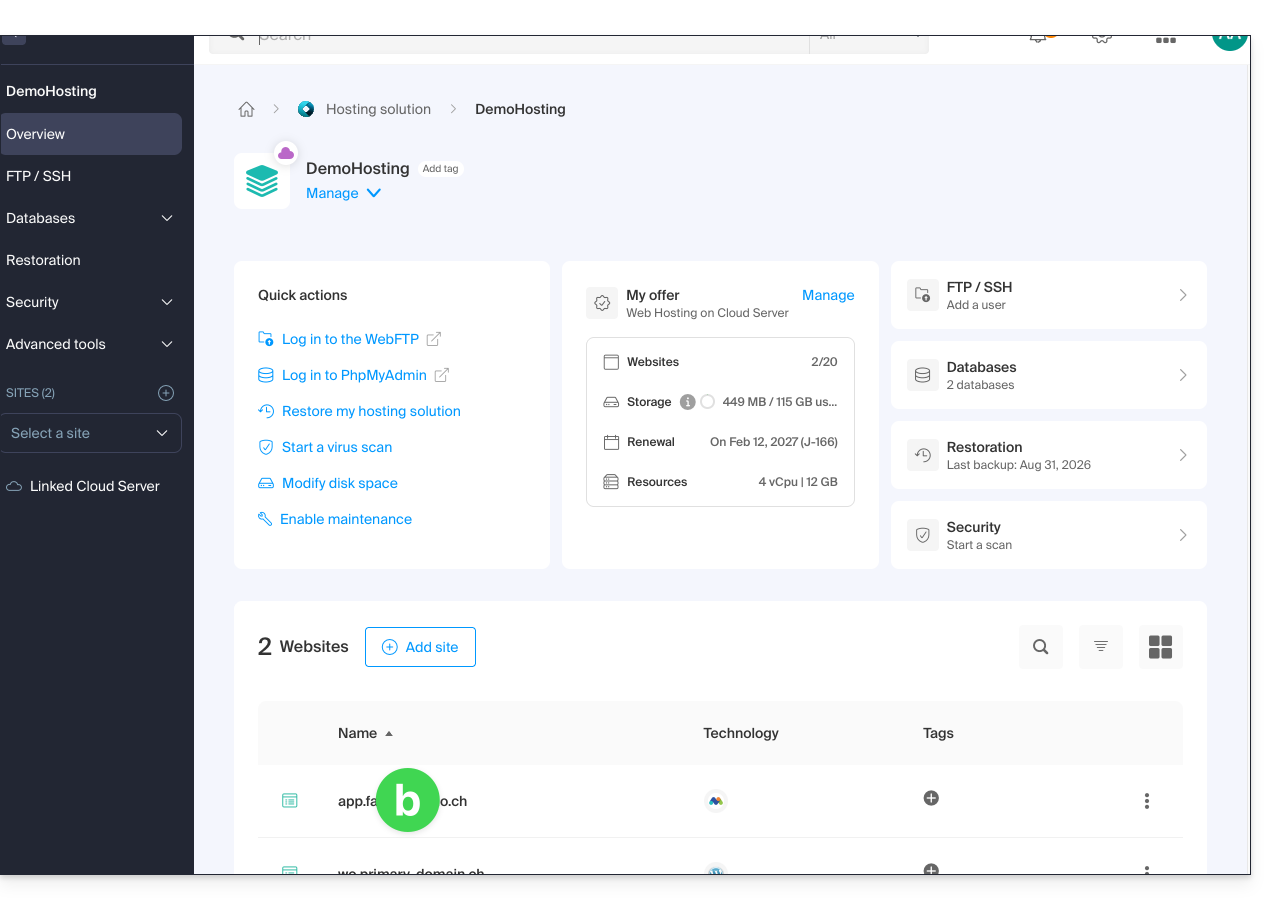
- You can choose to uninstall the previously installed application:
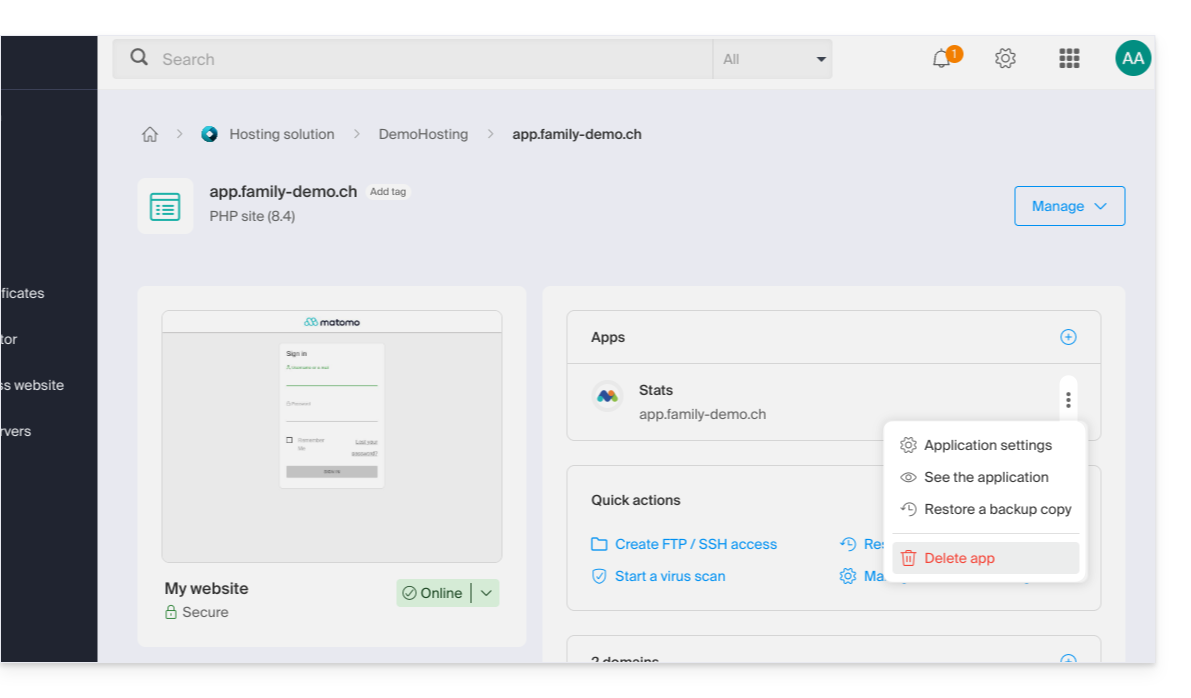
- You can choose to uninstall the previously installed application:
- If you remove the site from the hosting:
Learn more
Link to this FAQ: https://faq.infomaniak.com/1977
Has this FAQ been helpful?
This guide explains how to manage the content of a web hosting account by accessing the server, in particular using the FTP protocol or via the command line (CLI), securely via SSH.
Introduction
- To easily and quickly manage the files on your web hosting without having to install an application or enter FTP credentials, use Web FTP from your Infomaniak Manager (it allows you to perform CHOWN and compress/decompress
zipfiles). - When creating a website via an Apache/PHP hosting, a An FTP/SSH/SFTP user is created automatically.You can create additional FTP accounts.
- However, in the case of a Node.js site, no SSH/SFTP user is created automatically; it is necessary to manually create a user with SSH/SFTP permissionsto access your Node.js environment.
- Regardingprotocols supported by Infomaniak (FTP, SFTP, etc.) depending on your hosting plan (Starter, Node.js, etc.), please refer to this other guide.
Create an FTP account
To manage the FTP settings:
- Click here to access the hosting & website management section in your Infomaniak Manager (❓: help).
- Click on the name of the relevant hosting.
- Click on FTP / SSH in the left-hand menu.
- Then, either click on the Add button to create a new FTP / SSH account…
- either you click on the action menu ⋮ to the right of an existing account to change its password, or to delete it:
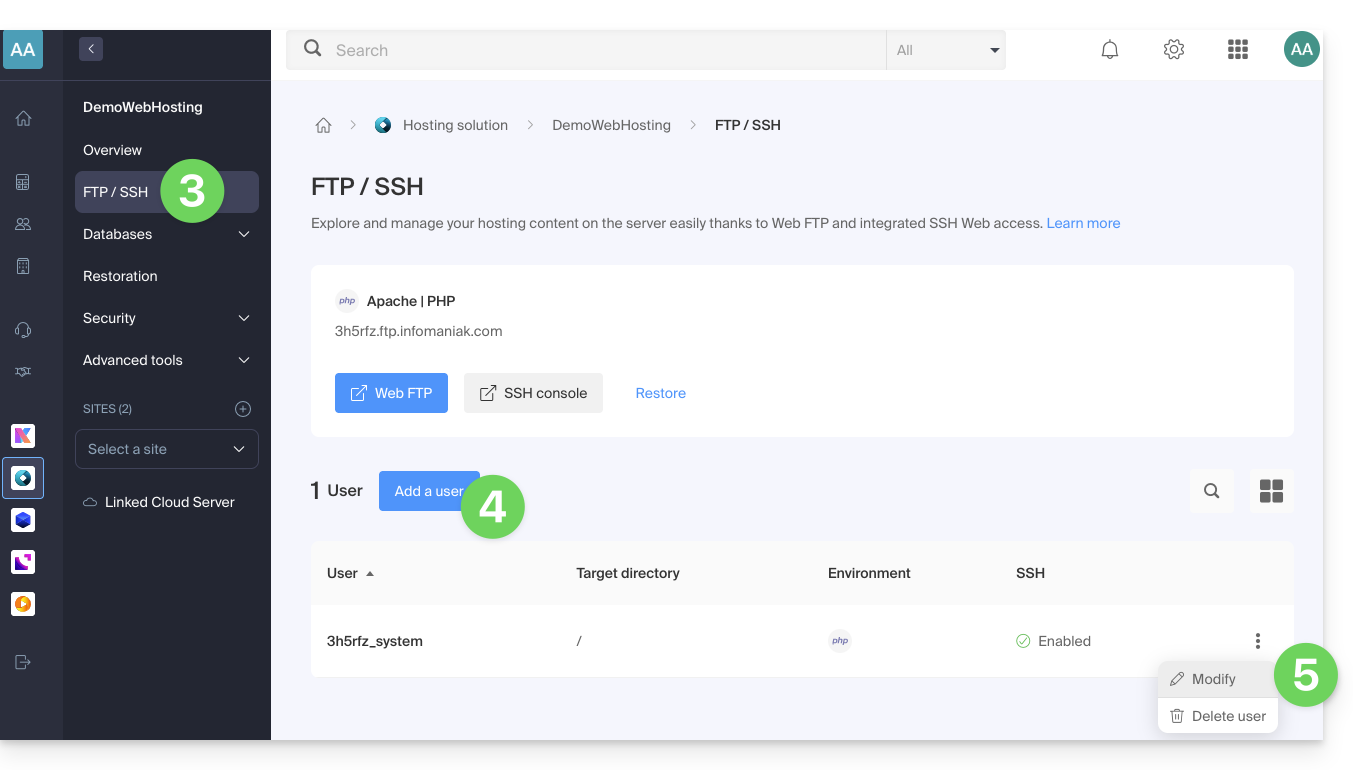
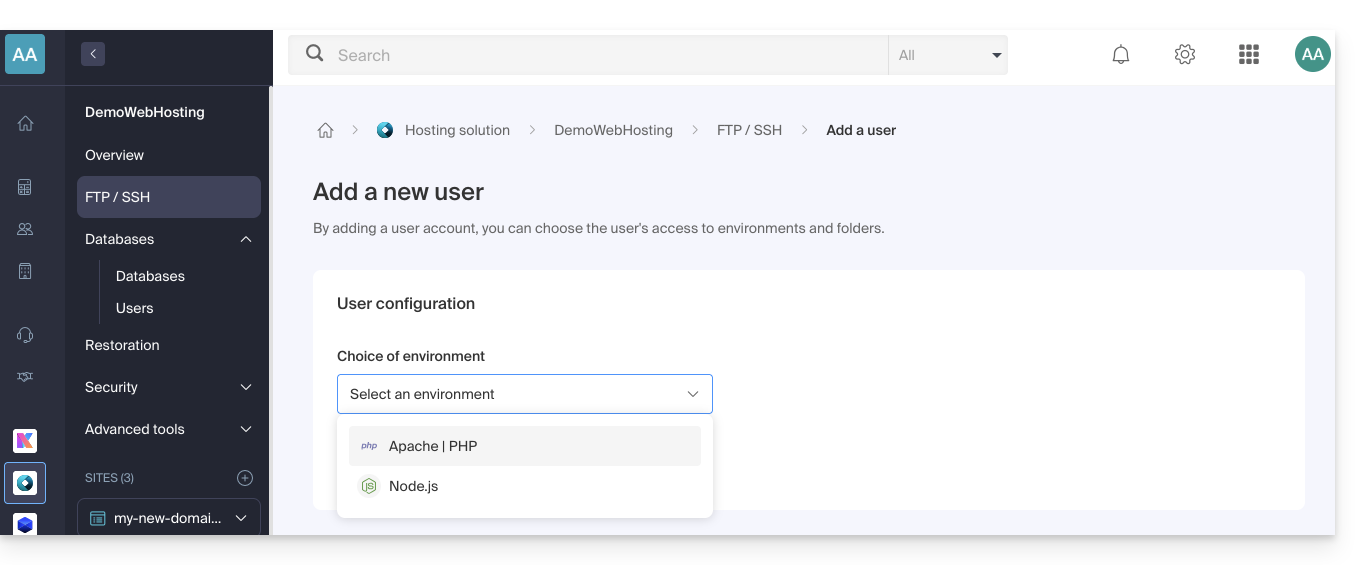
- If you have a node.js site on your hosting, you must choose the desired environment for creating a new FTP/SSH account:
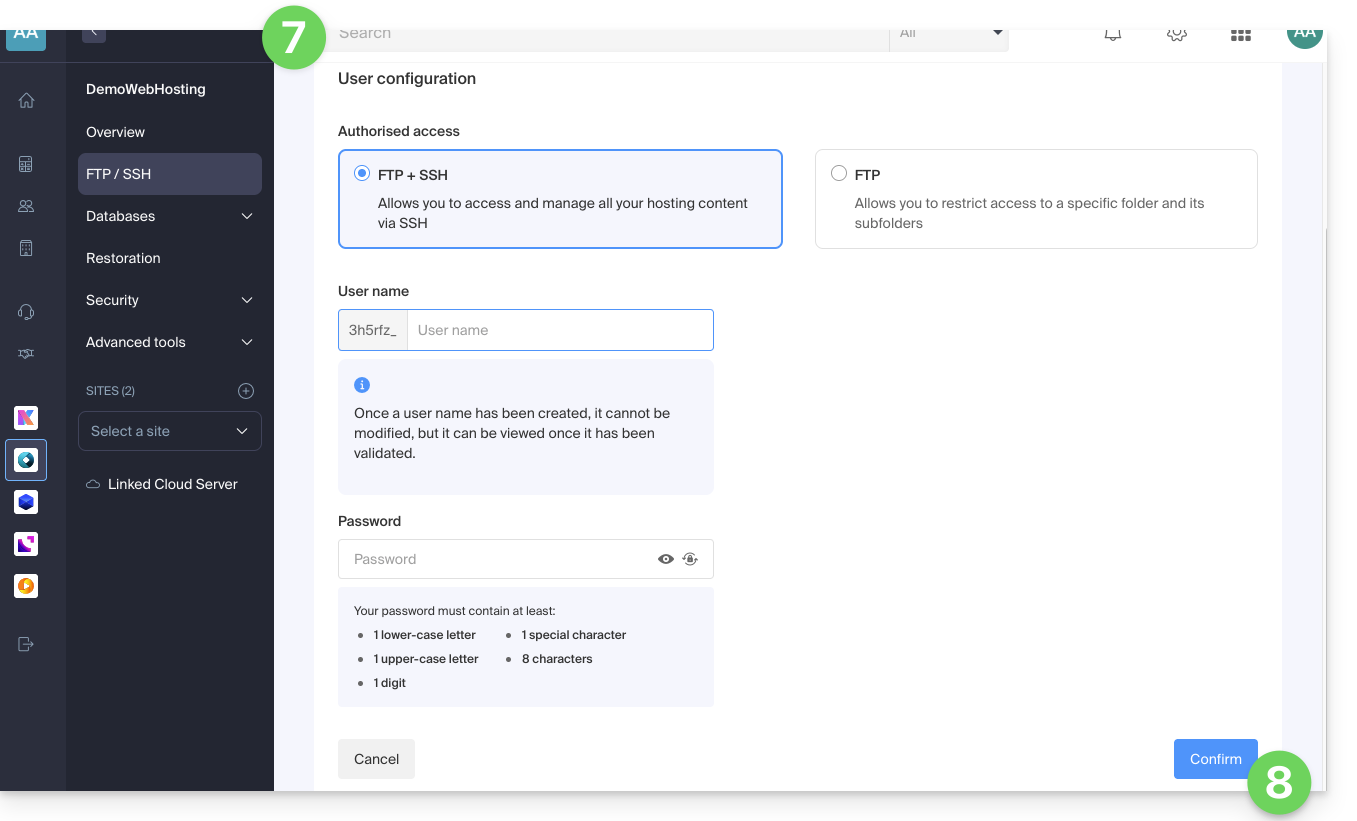
- Then enter the desired information:
- An FTP + SSH account gives the user in question access to all the content of a hosting account and allows them to manage it via FTP/SFTP and SSH.
- An FTP account allows you to restrict a user's access to a folder and its subfolders; if you manage multiple websites on the same hosting account, this allows you to distribute website management among several webmasters, for example.
- Click the button at the bottom of the page to Confirm the account creation:
Configure an FTP software/client
Using an FTP software/client such as FileZilla or Cyberduck, you can manage files via FTP without limitations (background operation, resuming transfers after disconnection, bandwidth limitation, etc.).
Refer to this other guide if you are looking for information on configuring FTP software/client.
Link to this FAQ: https://faq.infomaniak.com/1982
Has this FAQ been helpful?
This guide explains how to protect a section of a website on a Web Hosting plan by requiring a password to be entered before accessing a directory (including subdirectories) from a browser such as Brave, Chrome, Edge, Firefox, Opera, Safari, etc.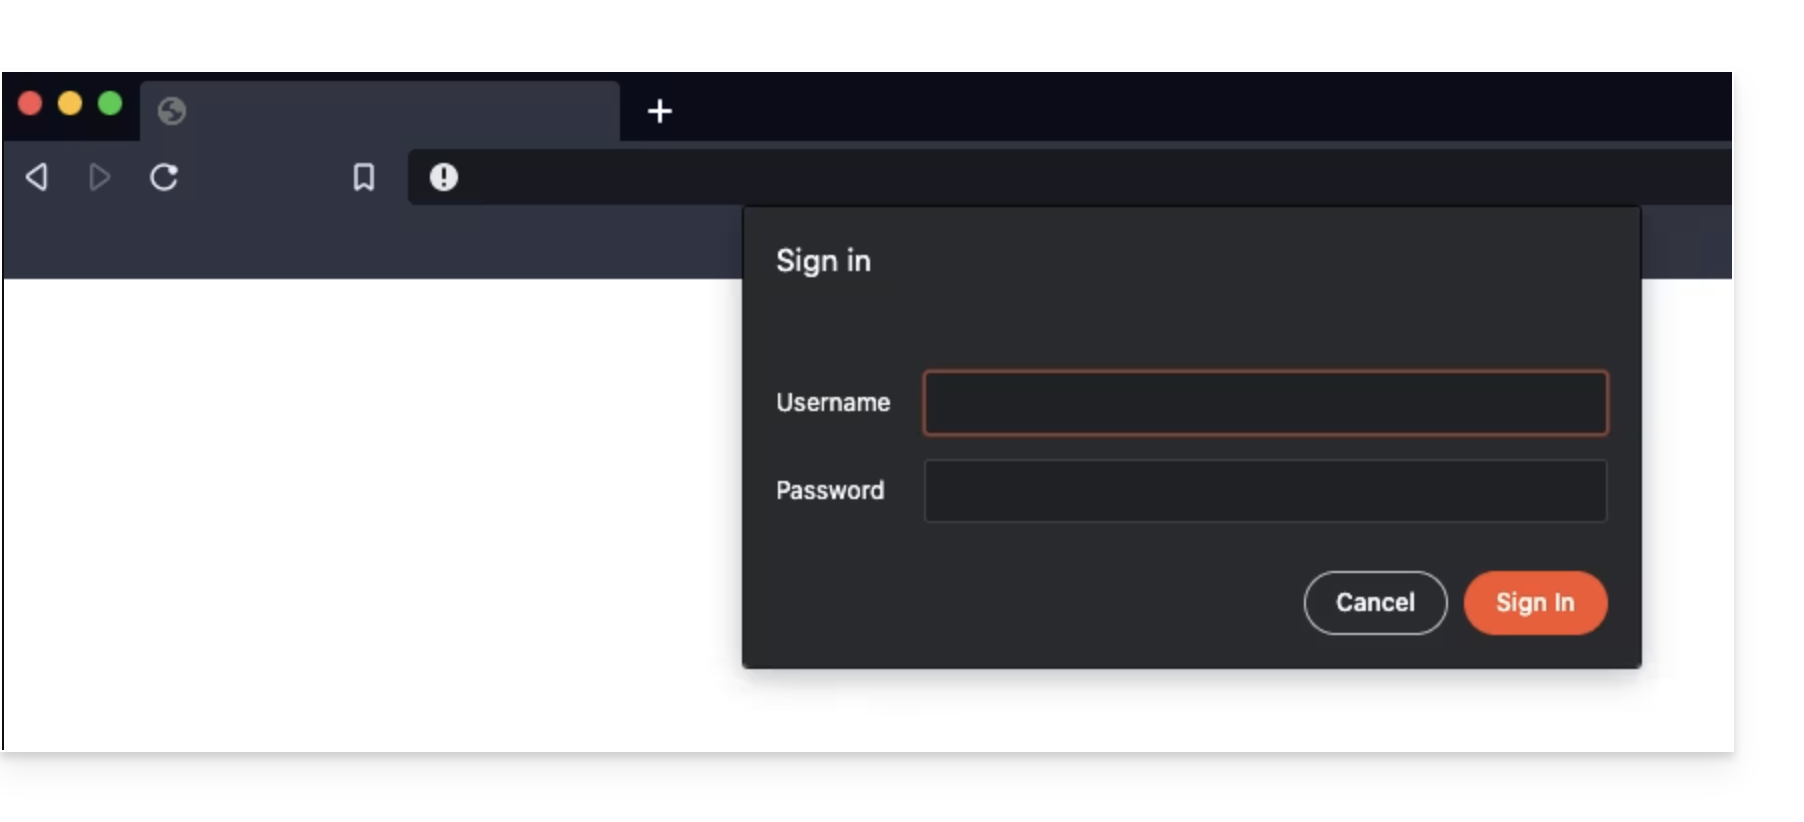
Please note that this does not prevent a user from accessing the directory via FTP.
Simple method
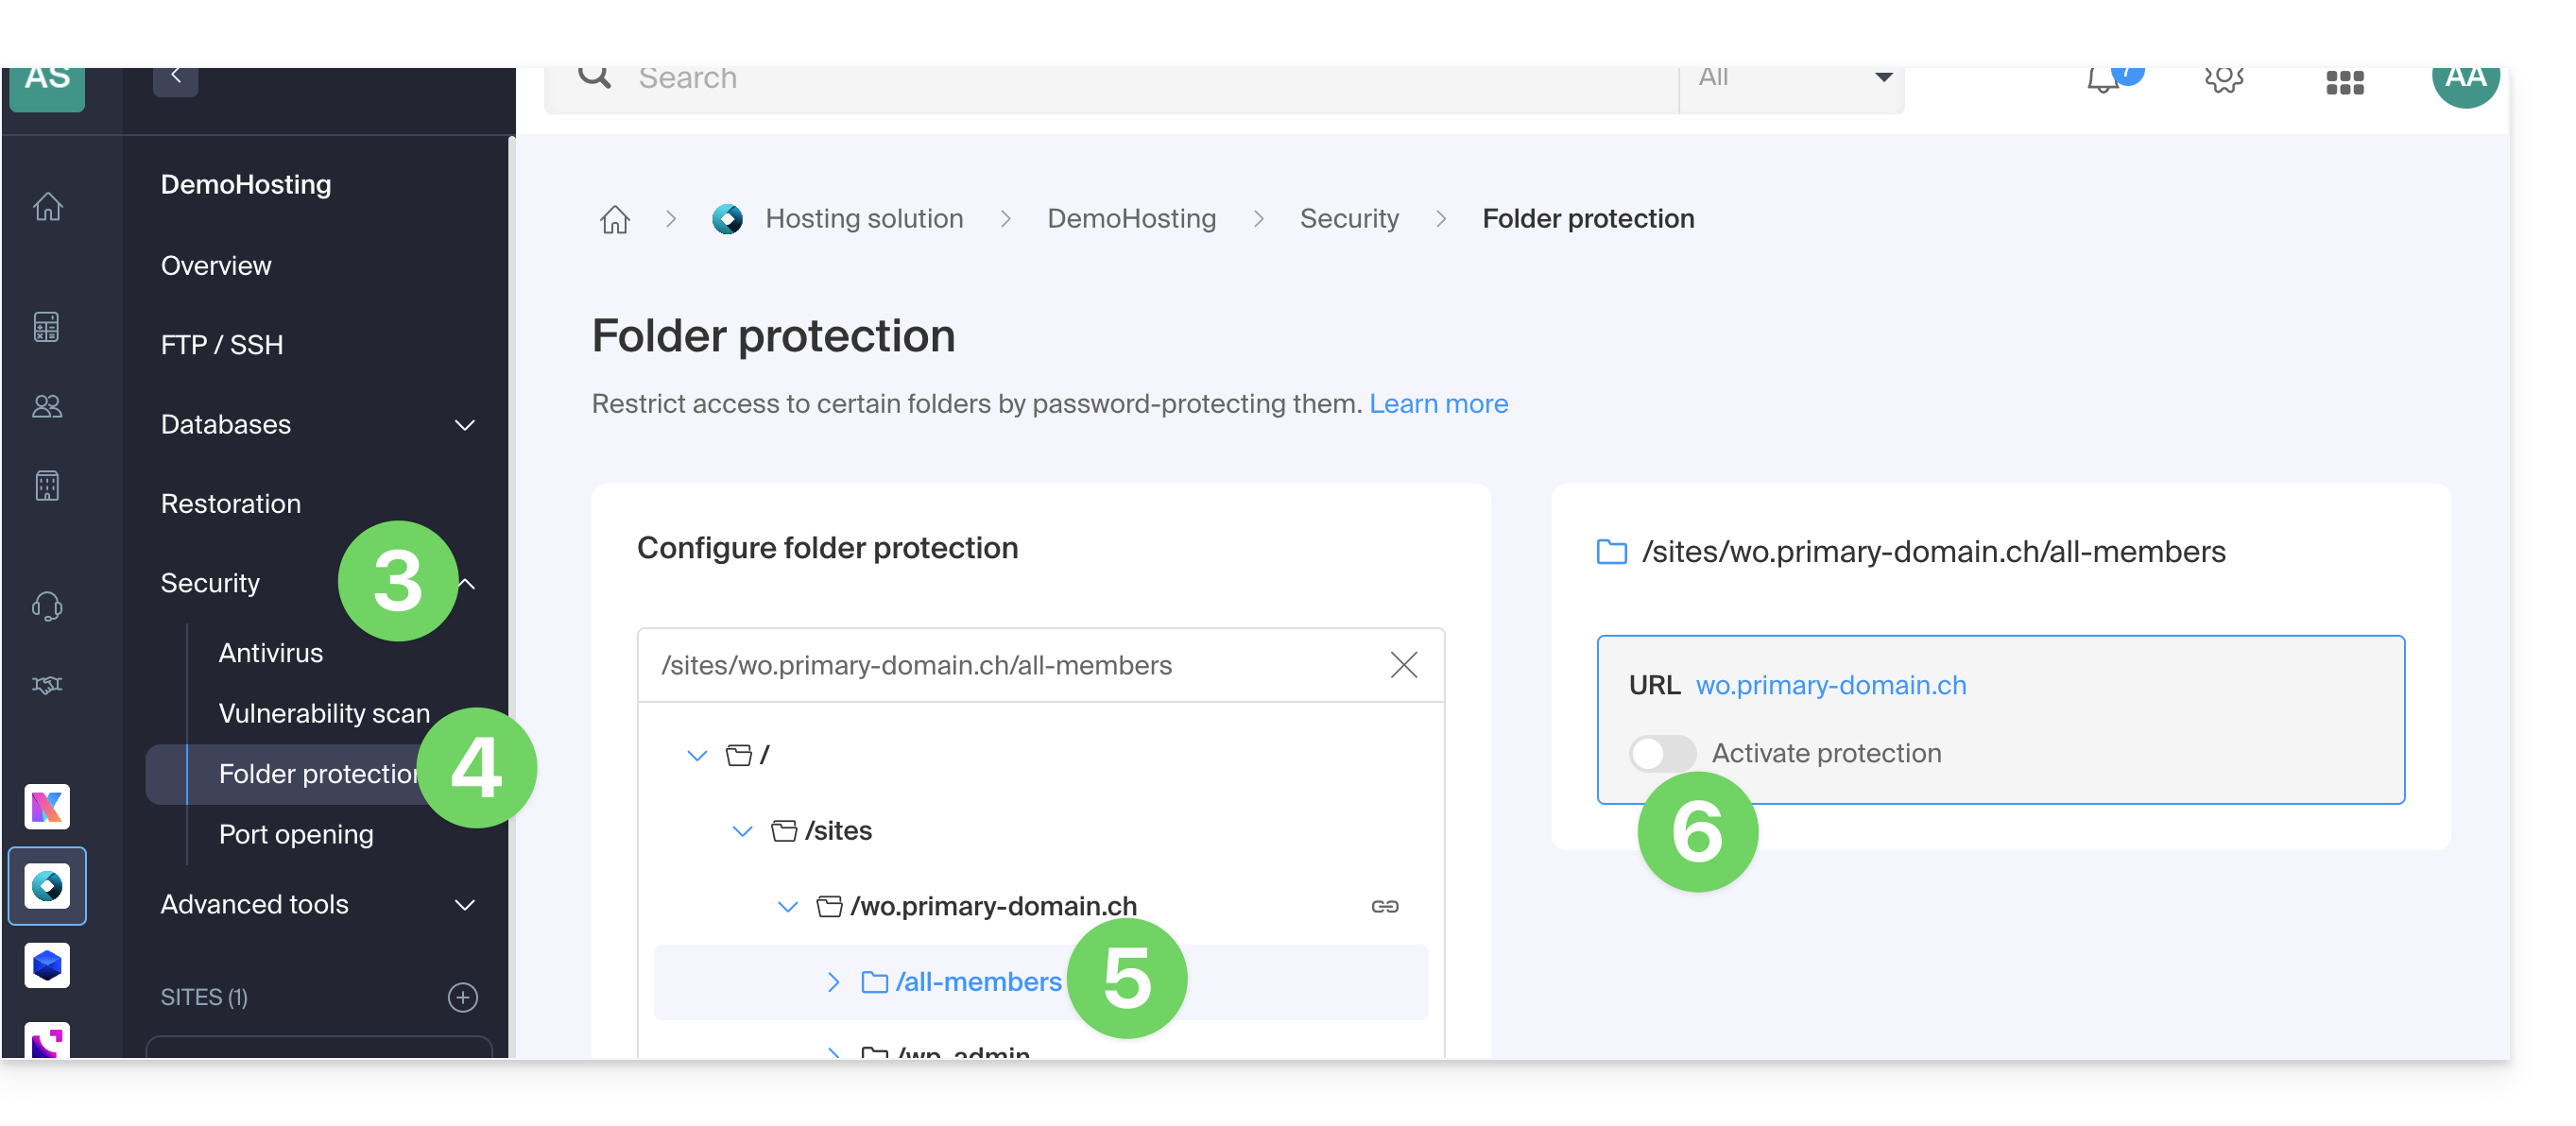
To password-protect (Digest authentication) a directory using the "Folder Protection" tool:
- Click here to access the hosting & website management section in your Infomaniak Manager (❓: help).
- Click on the name of the relevant hosting.
- Click on Security in the left-hand menu.
- Click on Folder Protection.
- Click on the directory you want to protect.
- Enable protection using the toggle switch, then create one or more users:
- Users are defined per directory; the tool does not allow you to manage user groups:
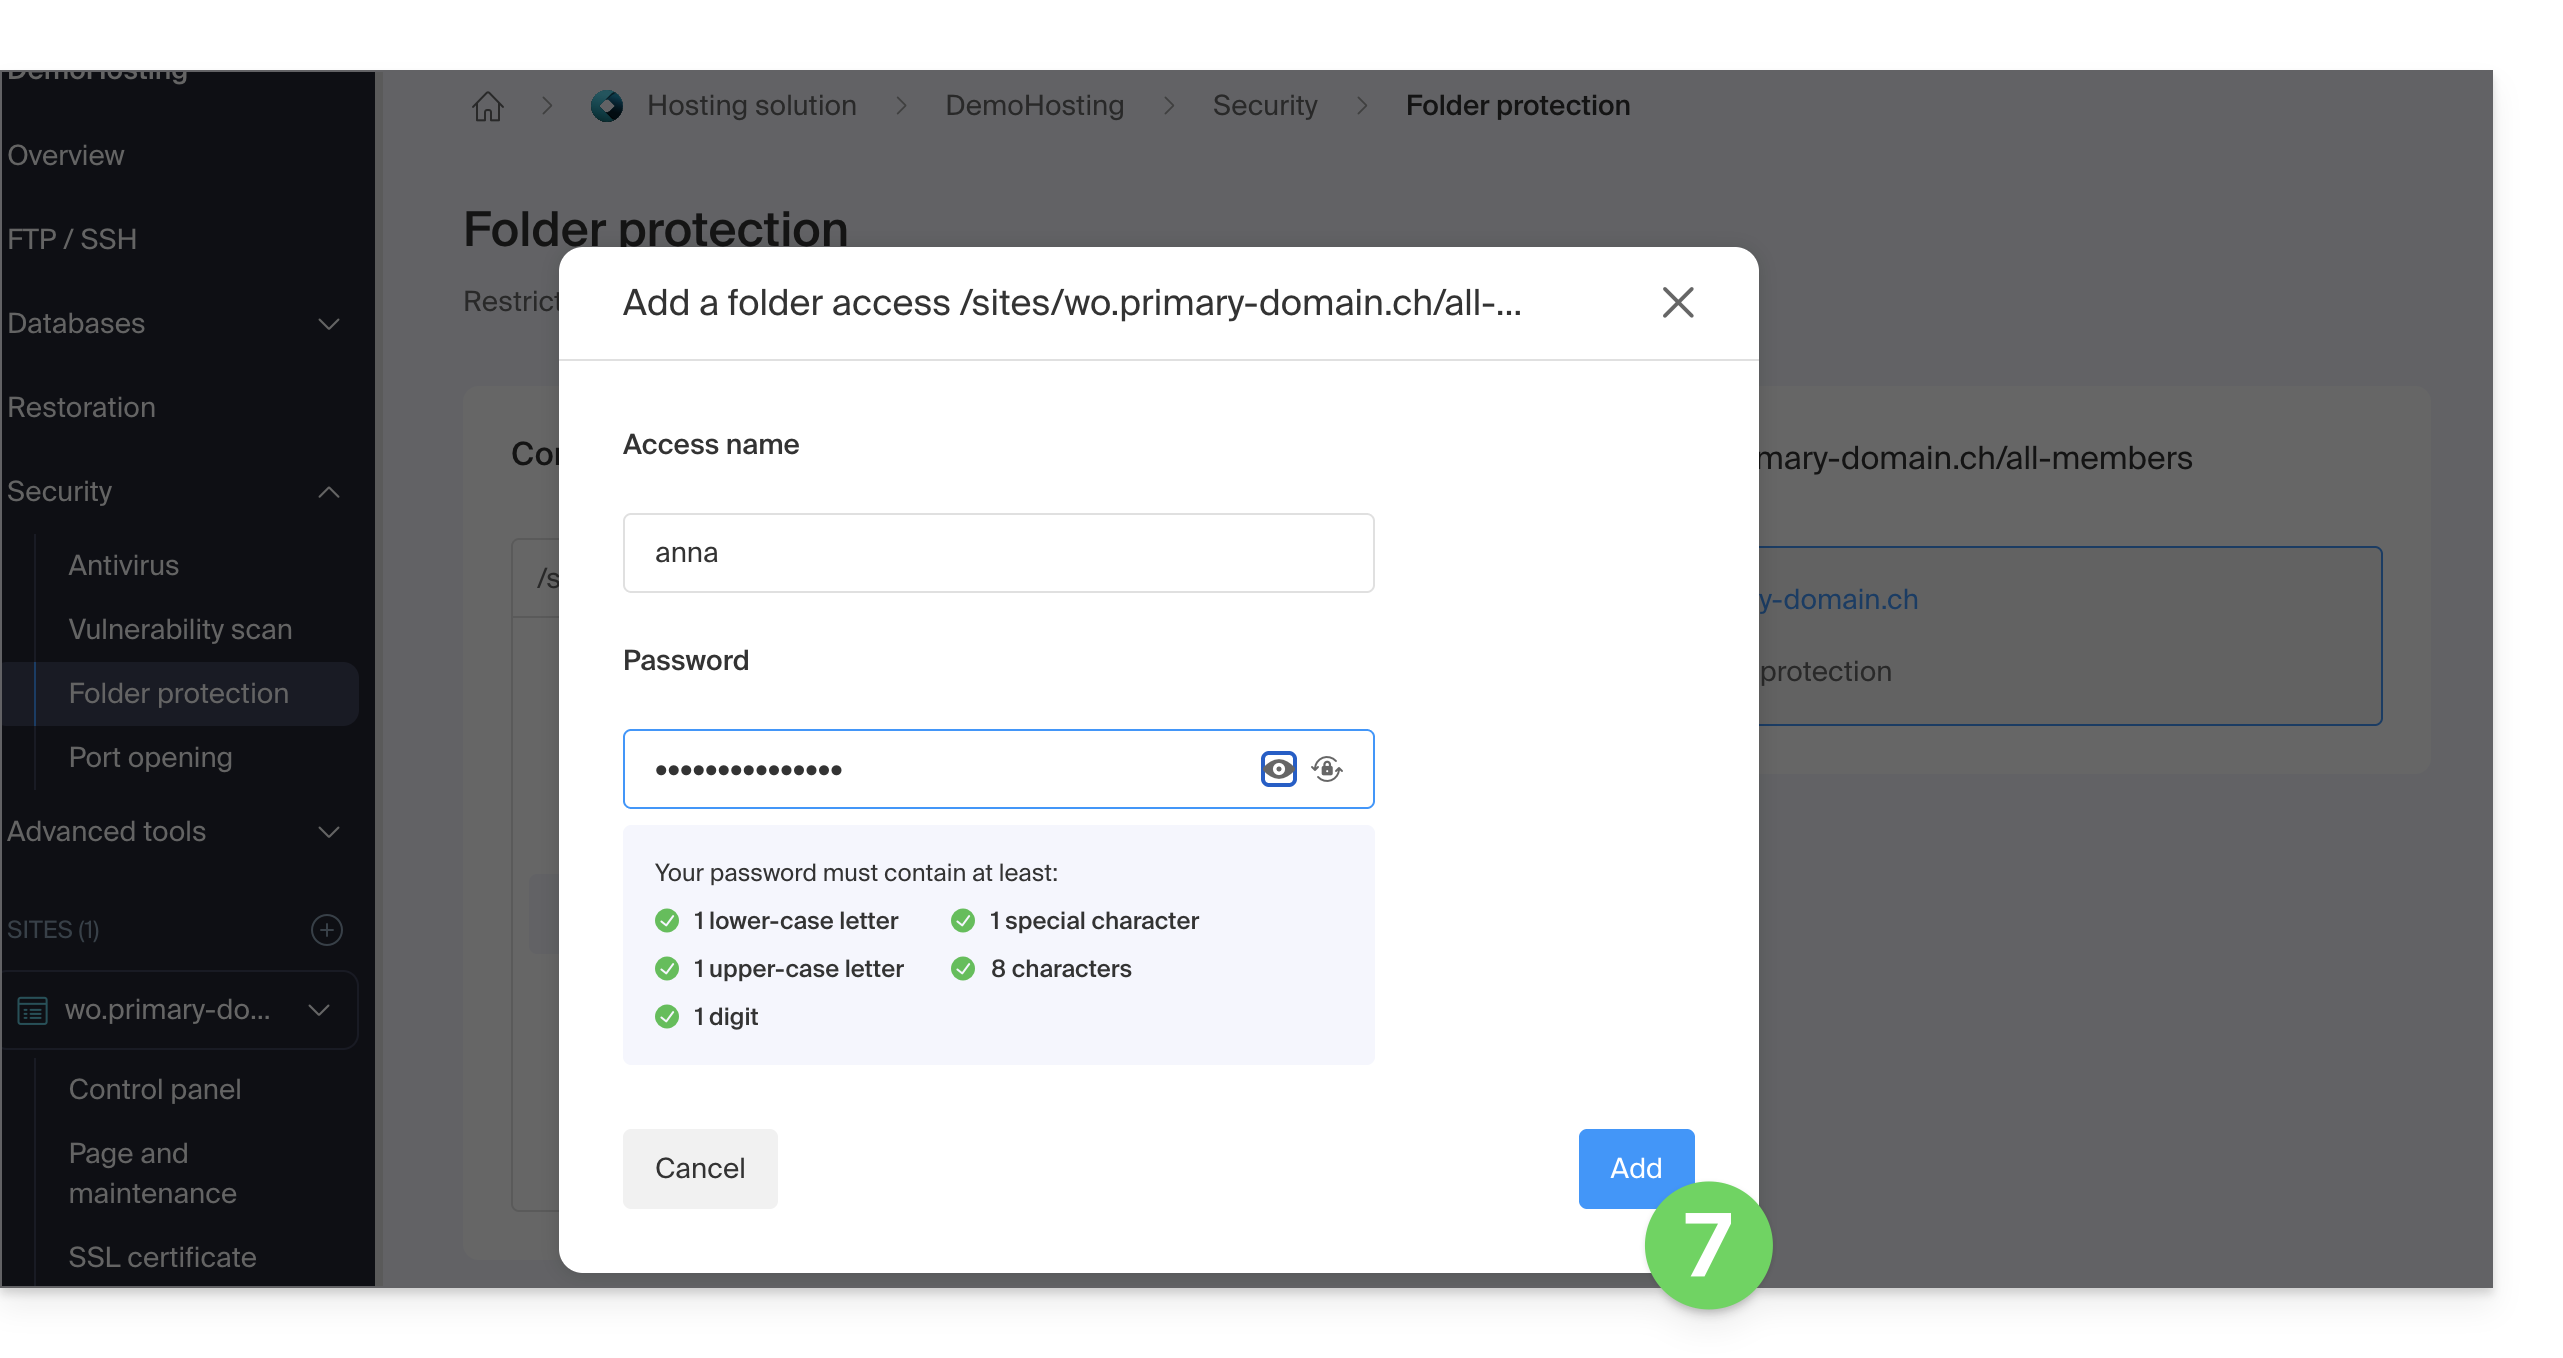
- Users are defined per directory; the tool does not allow you to manage user groups:
- Click the Add button.
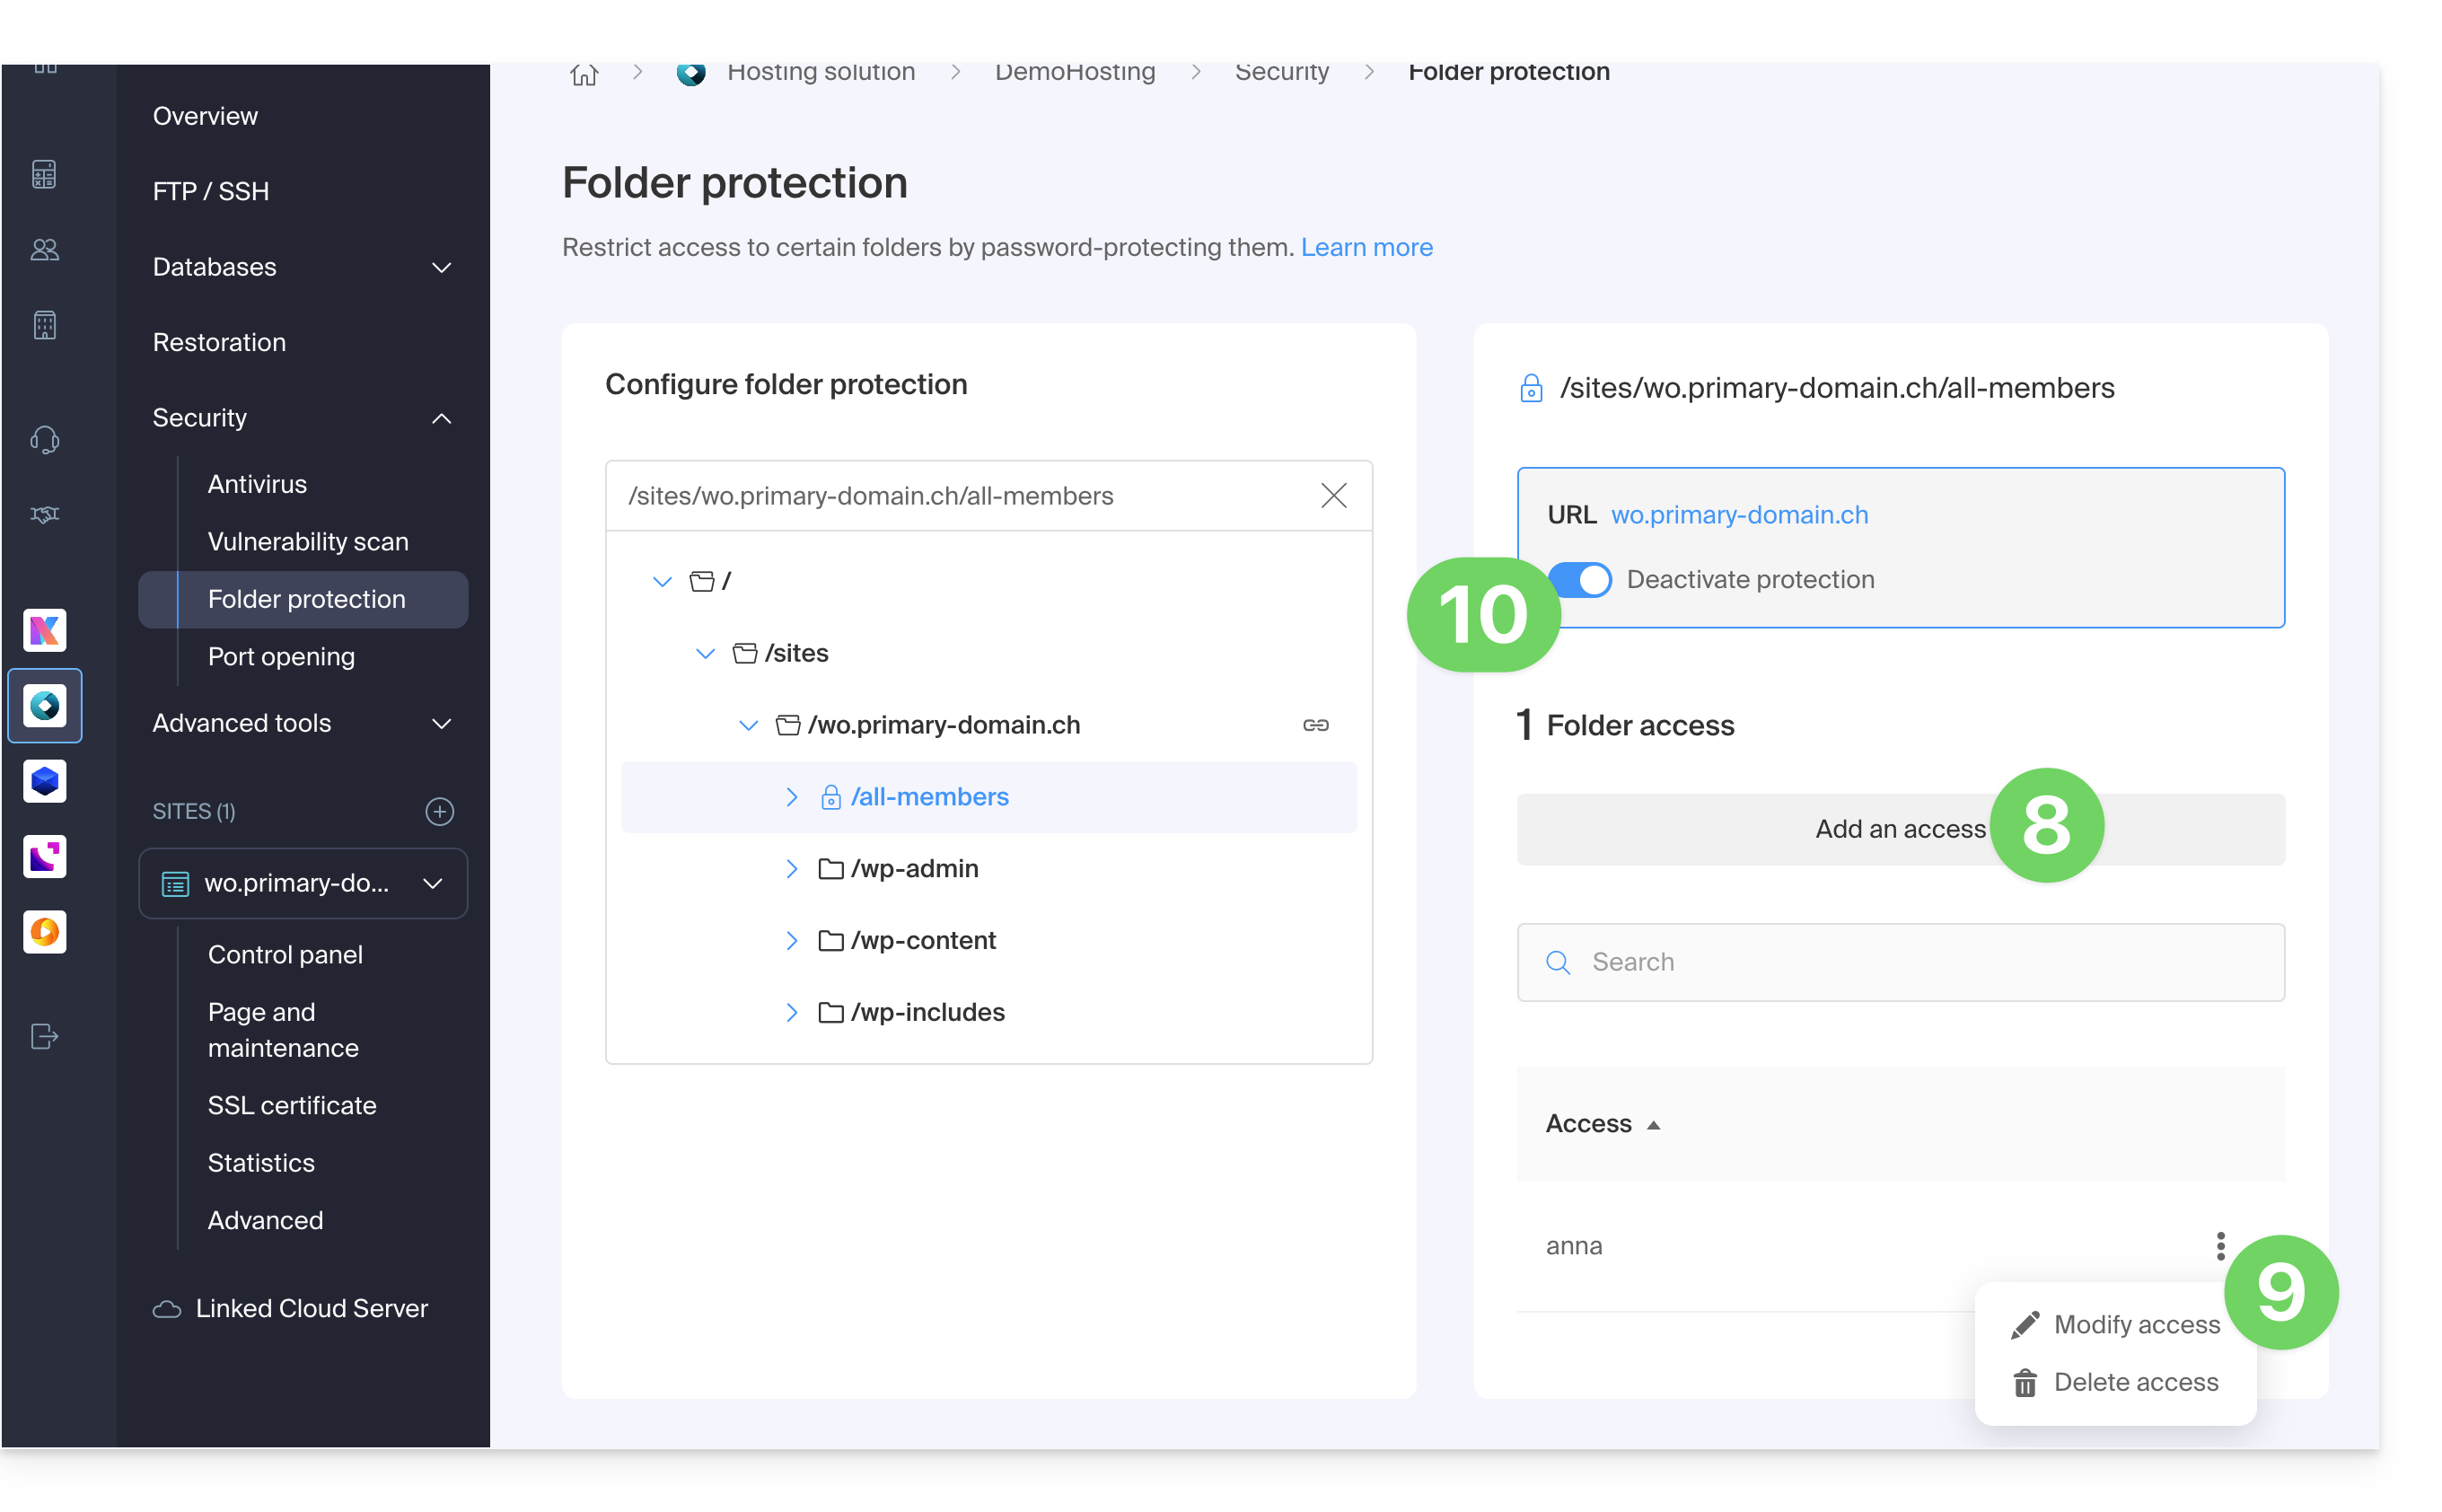
- Click the button to Add access for an additional user if necessary.
- Click on the action menu ⋮ located to the right of the user in question to modify or remove them.
- Click on the toggle switch again to completely disable directory protection:
Manual method via .htaccess
To protect a folder with a password using the .htaccess file of your site:
- Connect to your hosting via an FTP software/client or Web FTP.
In the folder you want to protect, create a file called
password.phpand adapt the following content by replacing12345with the desired password:<?php $password = "12345"; echo password_hash($password, PASSWORD_DEFAULT); // Displays the hashed password ?>- Open a browser and display the
password.phpfile (example: domain.xyz/folder-to-protect/password.php). - The browser will display your encrypted password; copy the encrypted password, as you will need it later.
In the folder you want to protect, create a file called .htaccess and adapt the following content within it:
AuthName "Protected Administration Page"
AuthType Basic
AuthUserFile "/example/.htpasswd"
Require valid-user
Replace /example/ with the absolute path of the folder to be protected. Example:
AuthUserFile "/home/clients/0f83c7afb710e5ae2645a1b704d8772f/web/protected_folder/.htpasswd"In the folder you want to protect, create a file called htpasswd.txt and adapt the following content within it:
username:hashed_password- Replace
usernamewith the desired login. - Replace
hashed_passwordwith the encrypted password copied in step 1 of this guide.
Once the htpasswd.txt file is saved, rename it as follows: .htpasswd.
Open a browser and try to display one of the pages contained in the protected folder. If the instructions have been followed correctly, the login and password (not encrypted) you chose will allow you to access the protected folder.
Other restrictions may also be applied by .htaccess.
Link to this FAQ: https://faq.infomaniak.com/68
Has this FAQ been helpful?
This guide explains how to move a Hosting (and all the websites it contains) from a Cloud Server to another managed Cloud Server.
If you would like toupgrade your current Cloud Server to a new-generation server, please refer to this other guide.
Introduction
- FTP & MySQL
- When moving a hosting account from one Cloud Server to another:
- FTP access and database credentials remain unchanged.
- Only the hosting account's supported PHP and MariaDB versions, as well as the server's IPv4 and IPv6 addresses, will change.
- Hostnames remain unchanged and are automatically updated to point to the new IP addresses.
- When moving a hosting account from one Cloud Server to another:
- Temporary interruption:
- The websites hosted will be unavailable during the data migration.
- This process may take several minutes, depending on the number of files to be transferred to the new Cloud Server.
- Possible switch to HTTP/2:
- HTTP/2 is enabled on the new servers.
- Some directives that may be present in the
.htaccessfile of your server may require adaptation (❓: help).
- Traffic redirection:
- A proxy is set up for 7 days to redirect traffic from the old server to the new one.
- Therefore, you should keep this in mind during this period, especially for crons (see below).
- Crons not migrated:
- Crons via SSH are not migrated.
- Files and crons are generally not deleted immediately, which can lead to duplicates.
- Cron management is your responsibility; depending on the progress of your migration, you need to:
- disable and re-enable crons via SSH if you have any, to avoid any execution conflicts,
- check your crons,
- make sure they are configured correctly on your new Cloud Server.
Move Hosting
Prerequisites
- Both servers must be in the same Organization and accessible to the user performing the operation.
Once the second Cloud Server is operational:
- Click here to access the hosting management section in the Infomaniak Manager (need help?).
- Click directly on the name assigned to the hosting in question.
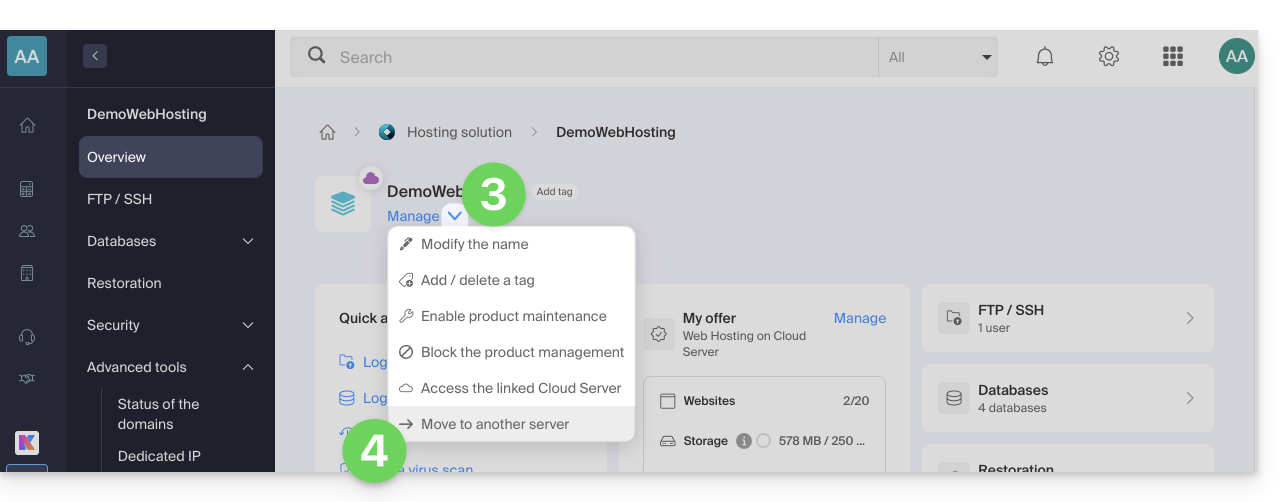
- Click on the Manage button.
- Click on Move to another server in the menu that appears:
- Choose the desired destination server.
- Click on Validate.
Adjust the DNS zone and finish
If your domain namesare not managed at Infomaniak or within the same Organization as the Cloud Server:
Link to this FAQ: https://faq.infomaniak.com/2194
Has this FAQ been helpful?
This guide details CHMOD (short for change mode), which allows you to change the access permissions of a file or directory.
Modify FTP permissions
The permissions available for each user/group are as follows (see this other Wikipedia guide):
- read: grants the right to list (also requires execute permission) and read within a directory and/or read a file.
- write: grants the right to create, modify, rename, and delete files and/or directories
- execute: for a directory: grants the right to access it to read its subdirectories -> For a file: grants the right to execute it if it is a program or script, for example.
- set uid (?): for a file with execution rights, this will cause it to be executed with the rights of the owner if it uses the execve or setuid system call.
- set gid (?): all new files created will belong to the group of the directory, and for a file with execution rights, this will cause it to be executed with the rights of the group.
- sticky bit (?): on a directory, files within the directory can only be renamed or deleted by the owner, even if other users have write permissions. This permission is not very useful for files.
The Web FTP in the Manager allows you to change file permissions (including the permissions for /web).
Most FTP software/clients allow you to change file access permissions; this function is usually called "CHMOD" and can be found under "Properties," "Permissions," or "Attributes" (usually by right-clicking on the file or folder to be modified). A checkbox often allows you to apply the permissions to all subdirectories and files in the folder, in recursive mode.
Once you have checked the permissions you want, validate them, and the rights will be modified, except for those you do not have permission to modify, or rather, that the user under which you are logged in does not have the right to modify.
Learn more
When we talk about changing permissions, it usually involves using a command like "chmod 777", "chmod 666", or something similar. This involves three digits, where:
- the first corresponds to the owner's permissions
- the second corresponds to the group's rights
- the third number corresponds to the rights of other users.
And the permissions are broken down as follows:
- "4" for read permission
- "2" for write permission
- "1" for execute permission
You simply need to add these numbers together. For example, if you want all rights for the owner but no rights for others, you would use "chmod 700" (4 + 2 + 1 = 7). If you only want read and write permissions for everyone (4 + 2 = 6), you would use "chmod 666".
These values are known to all good FTP software/clients, so you will be able to directly enter the number in your software/client to change the permissions.
To change the permissions on files or directories in PHP, you can also do so using the “chmod” function, as in the following example:
chmod ("/a_folder/a_file", 0755)Note that the value to be applied must be in octal format, hence the mandatory leading zero. Be careful if you store the value in a variable, as you will encounter a data type issue, which you can circumvent using the octdec() function, as in the following example:
$mode = 0755;chmod("a_folder/a_file", octdec($mode))Link to this FAQ: https://faq.infomaniak.com/111
Has this FAQ been helpful?
This guide concerns the listening data for Infomaniak Streaming Radio, which can be exported using the FTP protocol. These logs (which are also used to generate listening statistics (❓: help) after being “cleaned” or “processed”) are then automatically transferred via FTP for subsequent processing.
Introduction
- Your radio logs will be provided in the form of a compressed file
xyz.mp3-20140805.log.gz(the log date is inYYYYMMDDformat). - Each log starts at 04:00 Swiss time and ends at 03:59:59 the following day.
- The log is in the following format:
ip user-identifier authuser [date-time] "request" status bytes "referer" "useragent" listening-time:81.56.215.98 - - [09/Apr/2019:08:23:18 +0200] "GET /toto.mp3 HTTP/1.1" 200 1211297 "-" "Mozilla/5.0 (X11; U; Linux i686; en-US; rv:1.9.0.8) Gecko/2019032711 Ubuntu/8.10 (intrepid) Firefox/3.0.8" 69- It may happen that the log line is malformed, for example, due to a referer that is too long; this behavior of Icecast cannot be changed.
- The addresses in the 84.16.67.128/25 range should be ignored because these are the streaming servers.
- From the settings page in the Manager, you can request logs for past days.
- You can also directly export them to ACPM (❓: help) or Mediapulse (❓: help).
Enable sending logs via FTP
To do this:
- Click here to access the management of your product in the Infomaniak Manager (need help?).
- Click directly on the name assigned to the product in question.
- Click on the name of the audio stream in question.
- Click on Settings in the left-hand menu.
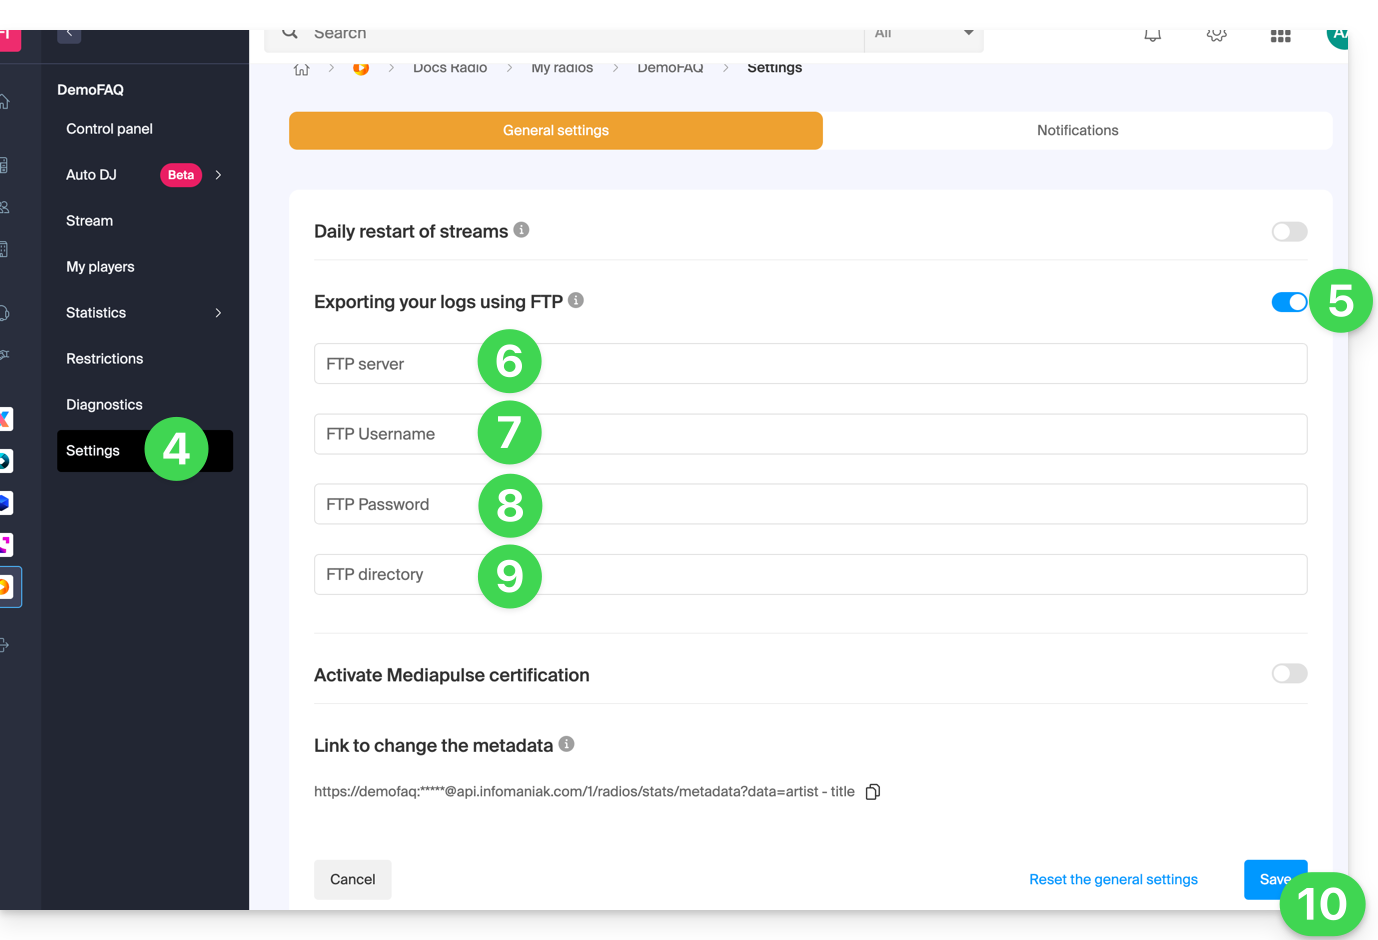
- Enable log export via FTP using the toggle switch.
- Enter a hostname: the address of the FTP server.
- Enter a username: the name of the FTP account.
- Enter a password: the password for the FTP account.
- Enter the directory on the server where the logs will be stored.
- Click the Save button at the bottom of the page:
To retrieve your logs, use only the standard FTP protocol in Passive mode. The service is not compatible with SFTP, FTPS, or SSH keys. The system provides 3 connection attempts in case of interruption.
Processing the logs
The best approach is to use a regular expression like the one below:
"/^(\S+)\s(.+)\s(\S+)?\s\[((\d\d)\/([a-zA-Z]{3,3})\/(\d\d\d\d)\:(\d\d)\:(\d\d)\:(\d\d)\s\+\d\d\d\d)\]\s"GET\s\/([\-a-z0-9]{1,40}(\.)?(mp3|aac|ogg){0,1})(.*)?"\s(\d{3,3})\s(\d+)\s"(.+)"\s"(.+)"\s(\d+)$/i";This syntax is for the PHP function preg_match and will need to be adapted if other functions/languages are used.
The preg_match function returns an array with the following significant positions:
| 1 | ip |
| 4 | date - full time |
| 5 | day |
| 6 | month |
| 7 | year |
| 8 | hour |
| 9 | min |
| 10 | seconds |
| 11 | mount point |
| 15 | result (HTTP code) |
| 16 | length in bytes |
| 18 | user agent |
| 19 | listening duration (seconds) |
Link to this FAQ: https://faq.infomaniak.com/1954
Has this FAQ been helpful?
This guide details sending authenticated emails from a website/CMS hosted by Infomaniak.
Introduction
- Configuring your website to send emails via an authenticated SMTP server improves the reliability and security of email sending compared to using the PHP
mail()function without authentication:- improved email delivery reliability,
- enhanced security,
- more accurate error detection,
- better compatibility with email services,
- and improved email tracking.
SMTP configuration examples
Prerequisites
- You must have an email service.
- You can use the Mail Service offered by Infomaniak or any other email service of your choice.
- Create a device password (❓: help my kSuite | Mail/kSuite Service).
- Use the recommended settings:
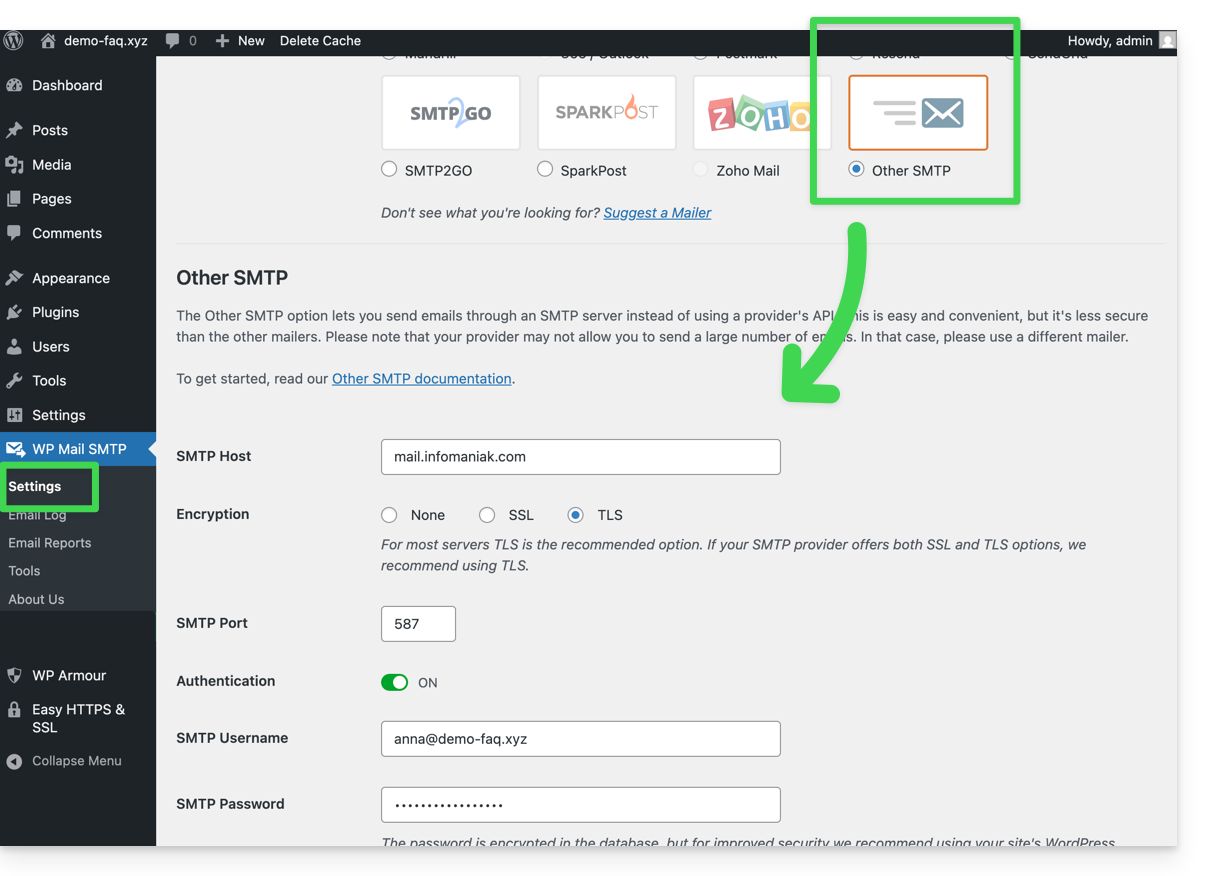
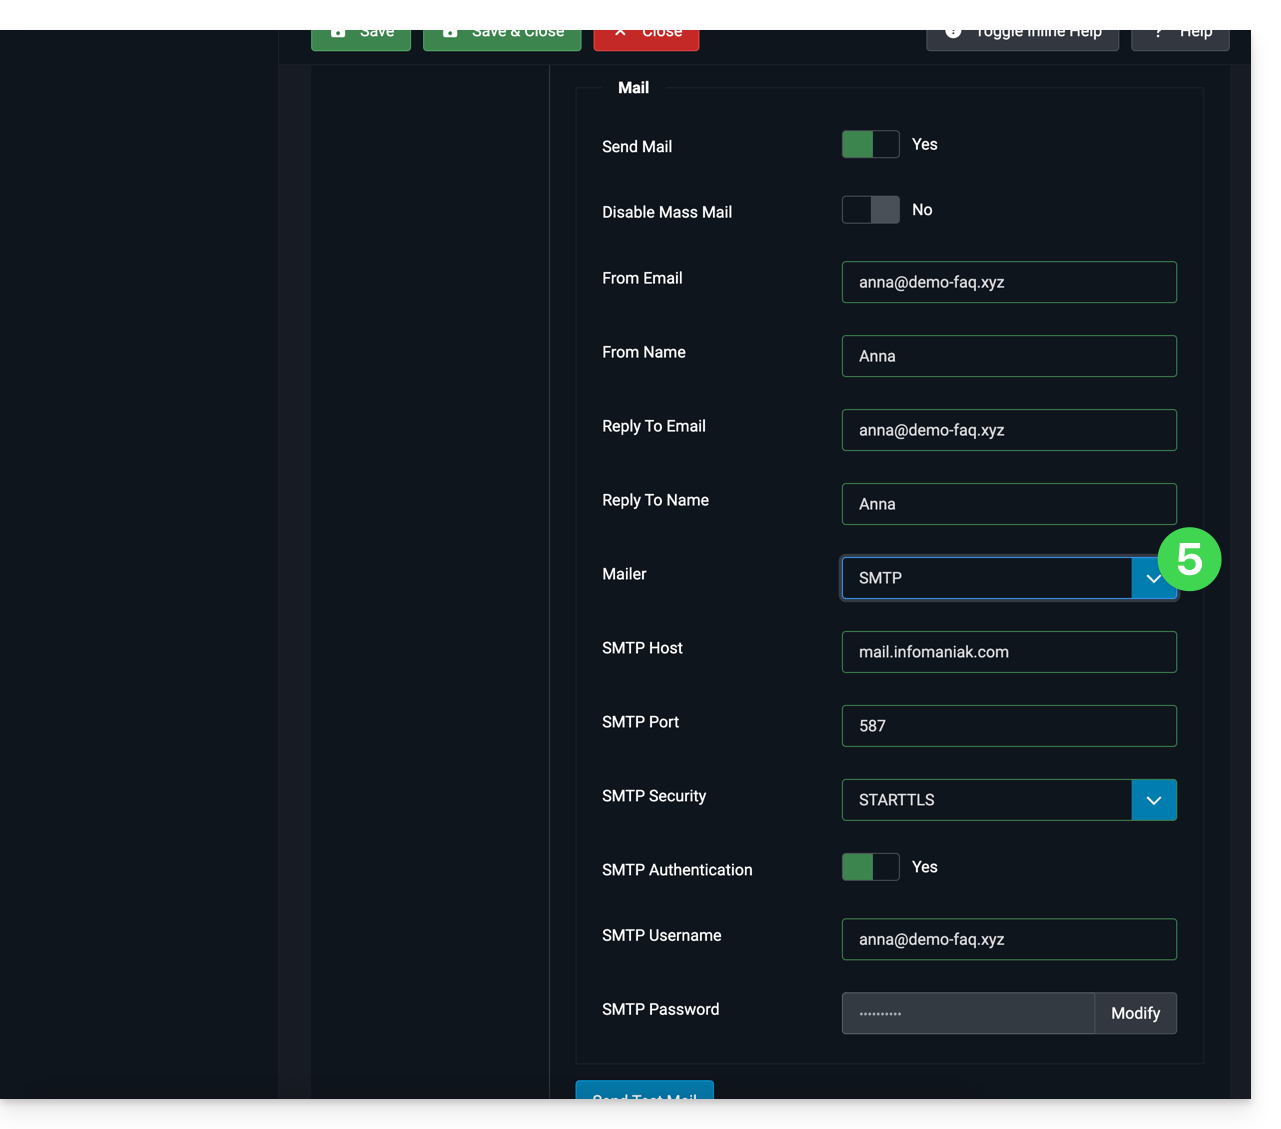
- Outgoing SMTP server =
mail.infomaniak.com - SMTP port & encryption protocol and command/method to activate this protocol:
587+ STARTTLS - Username = the complete and full email address (❓: help).
- Password = the one generated for the email address you want to use
- Authentication is mandatory for sending emails:
- It is activated in the SMTP settings of your CMS.
- Check "use the same settings as the incoming server" or, depending on the CMS, enter a username (= complete and full email address) and the generated password.
- Outgoing SMTP server =
WordPress
To enable your site to send emails, use an email address from its domain (e.g. email@domain-site.xyz) and enter the SMTP settings (see prerequisites):
- Log in to the WordPress administration panel.
- Install an SMTP plugin (e.g. WP Mail SMTP).
- Configure the extension, for example:
From then on, an email sent from a contact form on the website (e.g., the default Divi form) will be sent using the SMTP method.
To verify this, simply examine the headers of a message received through this method, particularly the x-mailer line, which may indicate, for example, WPMailSMTP/Mailer/smtp instead of PHPMailer.
Note: the x-mailer can be any indication and may not necessarily reflect the actual sending method!
Prestashop
To enable your site to send emails, use an email address from its domain (e.g., email@domain-site.xyz) and enter the SMTP settings (see prerequisites):
- Log in to the PrestaShop administration panel.
- Go to Advanced Parameters, then E-mail.
- Configure sending via SMTP:
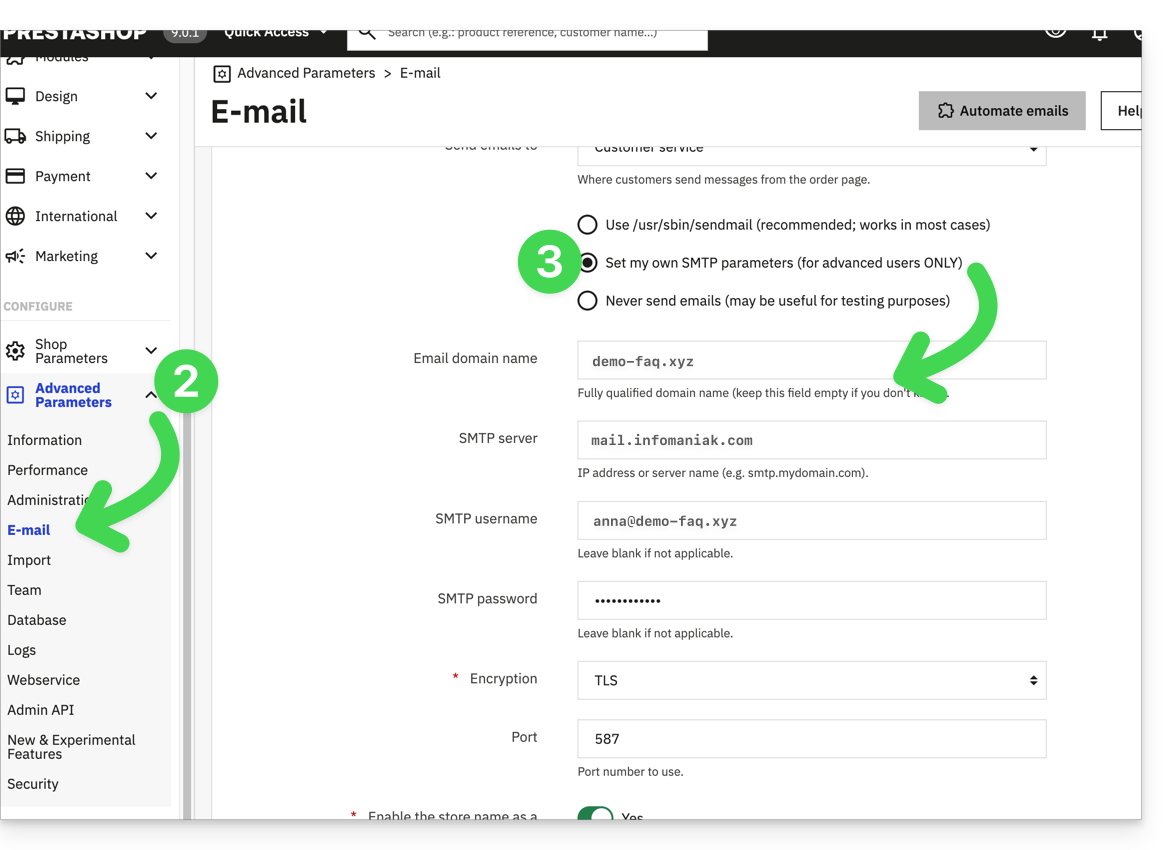
Then, check (to avoid errors such as Could not instantiate mail function or sender mismatch) that the address you configured in these advanced settings matches the address that Prestashop uses when sending emails. To do this:
- Log in to the PrestaShop administration panel.
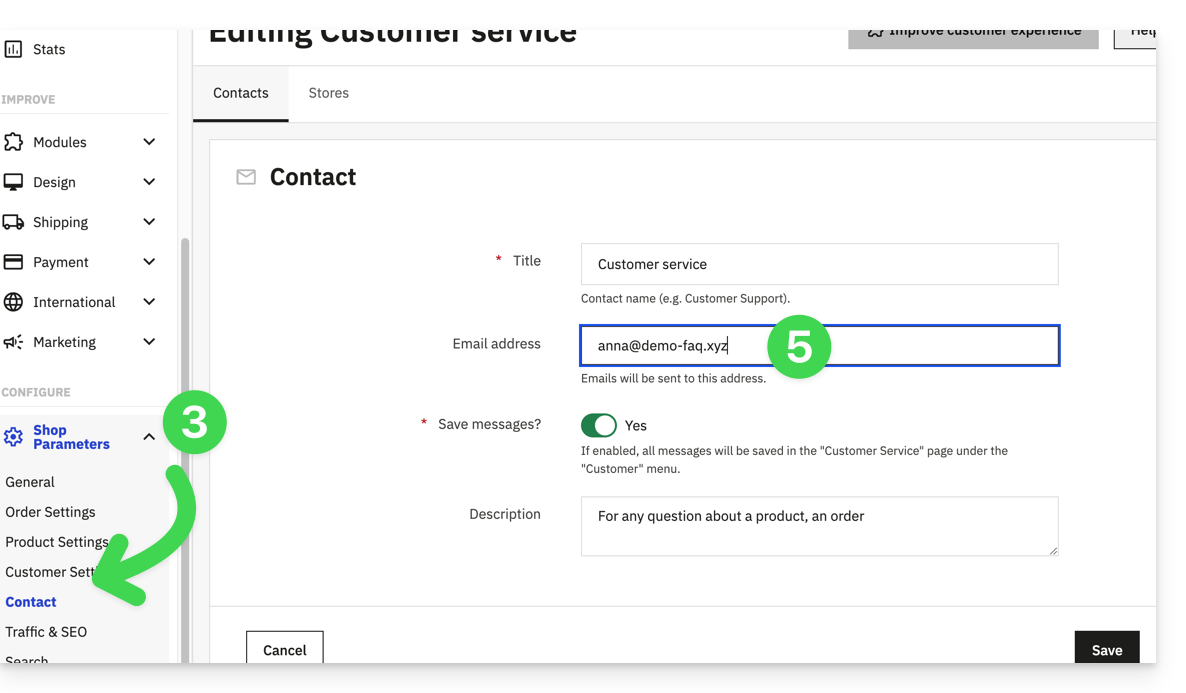
- Go to Shop Parameters.
- Click on Contact in the left-hand menu.
- On the Contacts tab, verify that the email address mentioned is the same as the one configured previously.
- Edit the email addresses if necessary:
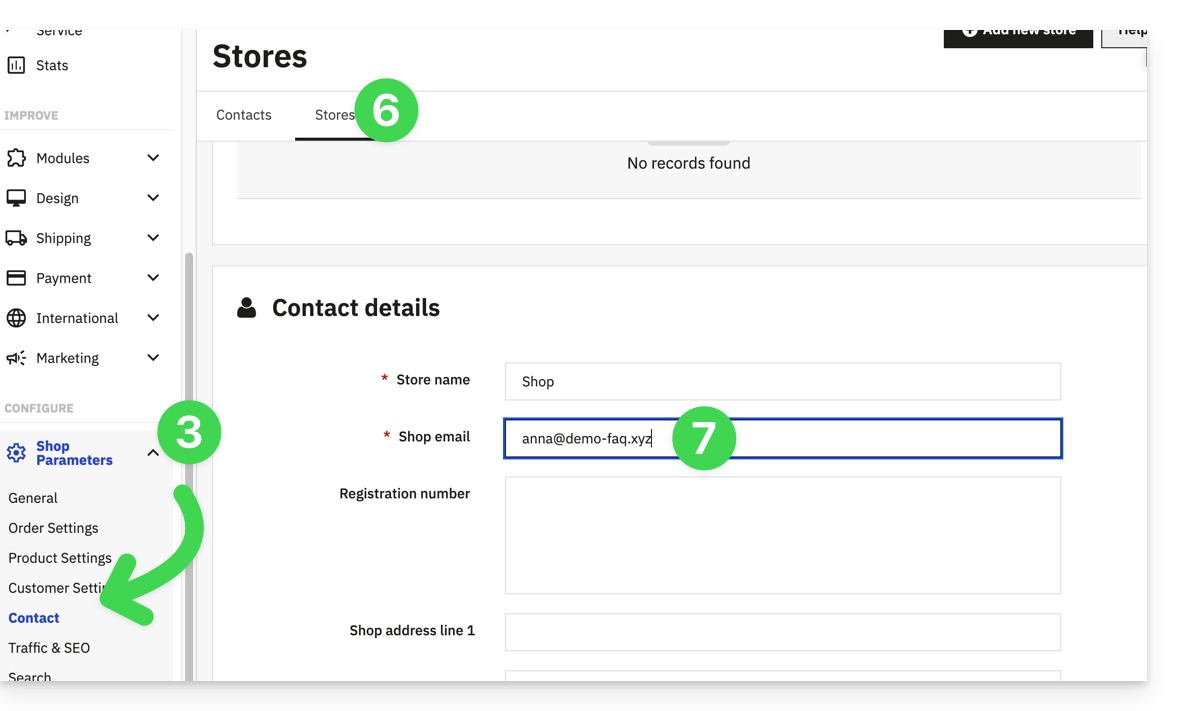
- Click on the Shops tab.
- Check (and correct if necessary) that the email address mentioned is the same as the one configured previously:
Joomla
To enable your website to send emails, use an email address from its domain (e.g., email@domain-site.xyz) and enter the SMTP settings (see prerequisites):
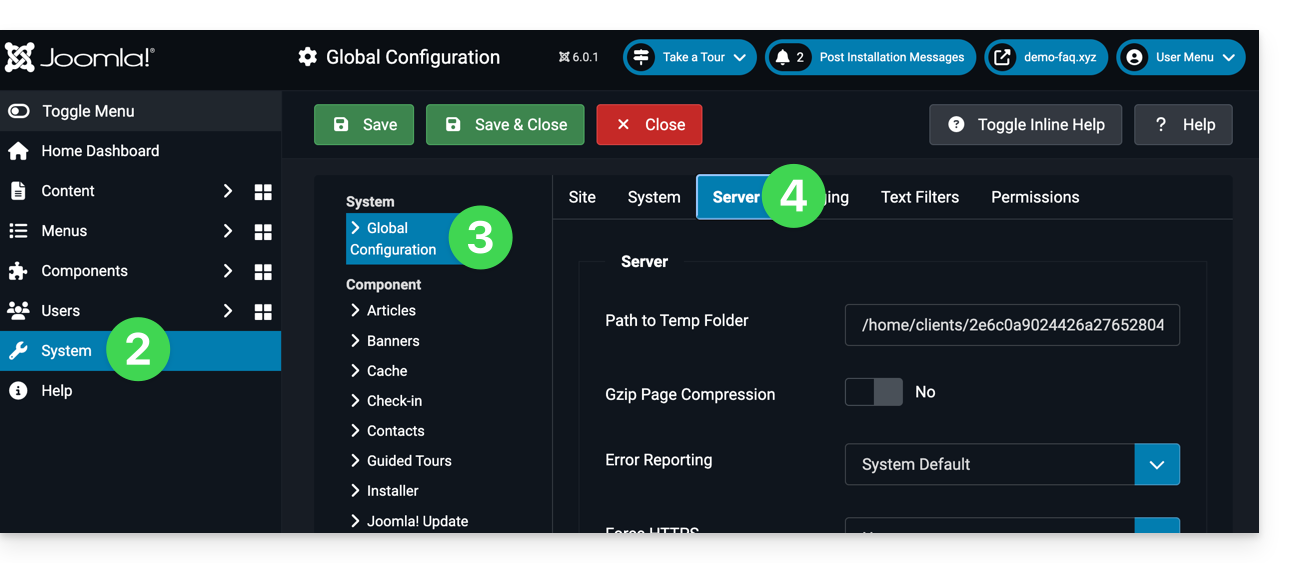
- Log in to the Joomla administration panel.
- Click on System in the left-hand menu.
- Click on General Settings.
- Click on the Server tab:
- Configure sending via the SMTP method:
Link to this FAQ: https://faq.infomaniak.com/2023
Has this FAQ been helpful?
This guide explains how to install a new Infomaniak WordPress site included in the paid Web Hosting plans. You will find 2 different ways to create a WordPress site, as well as explanations about uninstalling it.
Create a WordPress site on an existing hosting account
To access your Web Hosting and add a new website by installing WordPress at the same time:
- Click here to access your hosting management in the Infomaniak Manager (need help?).
- Click directly on the name assigned to the relevant hosting.
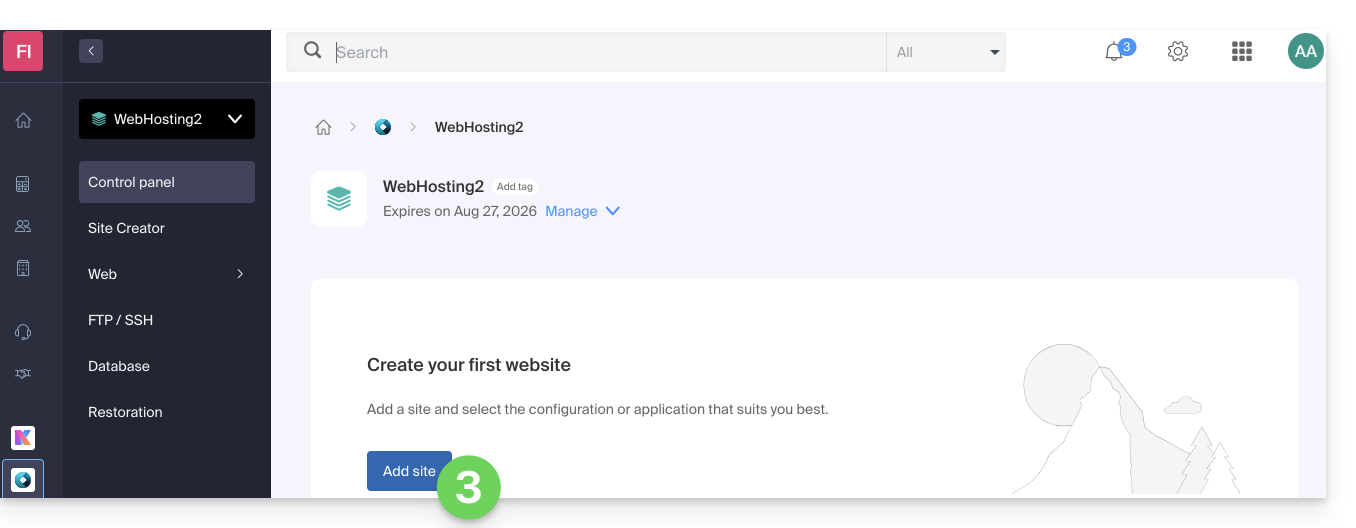
- Click on the button to add a site:
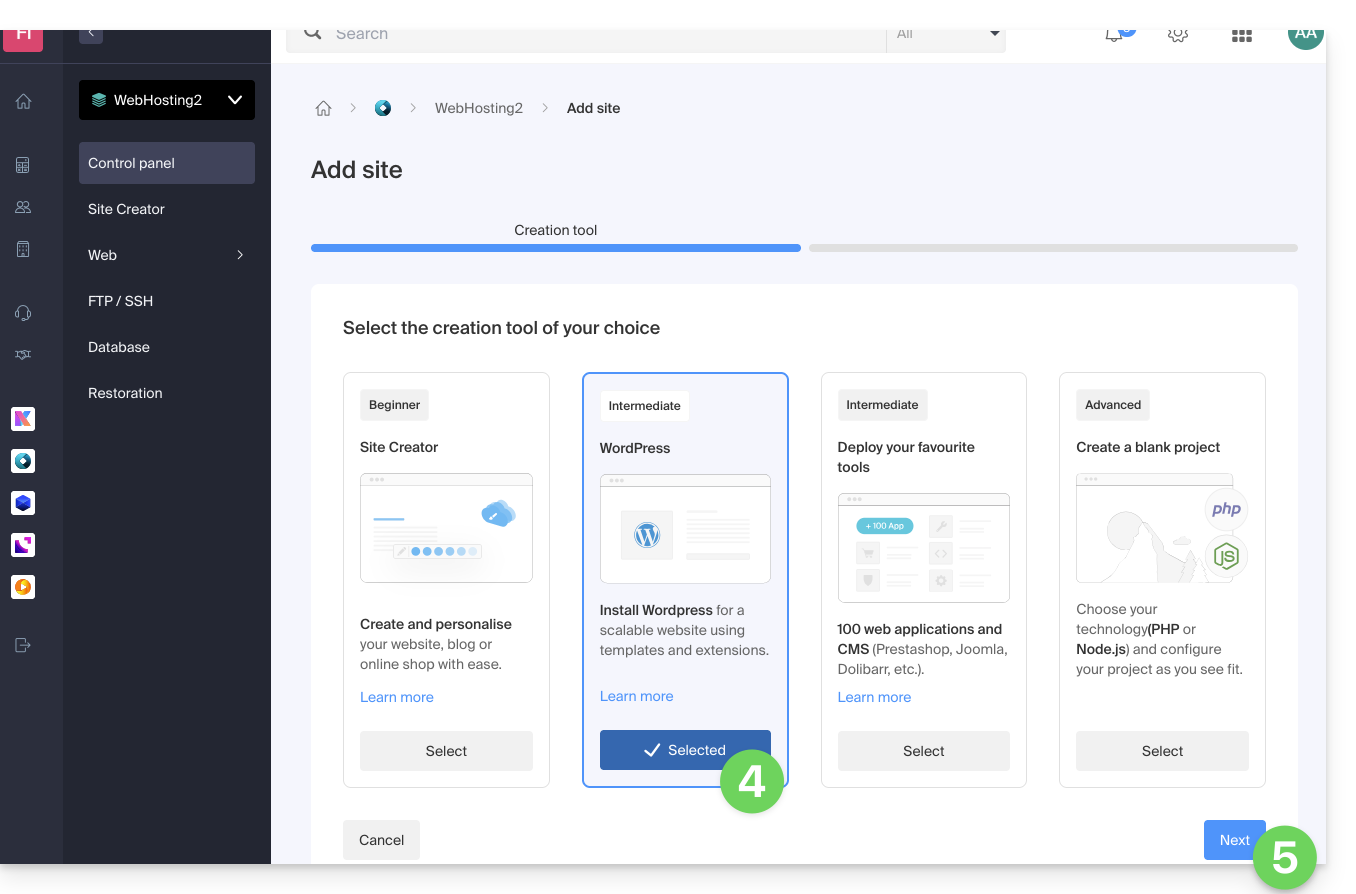
- Choose to install WordPress.
- Click on the Next button:
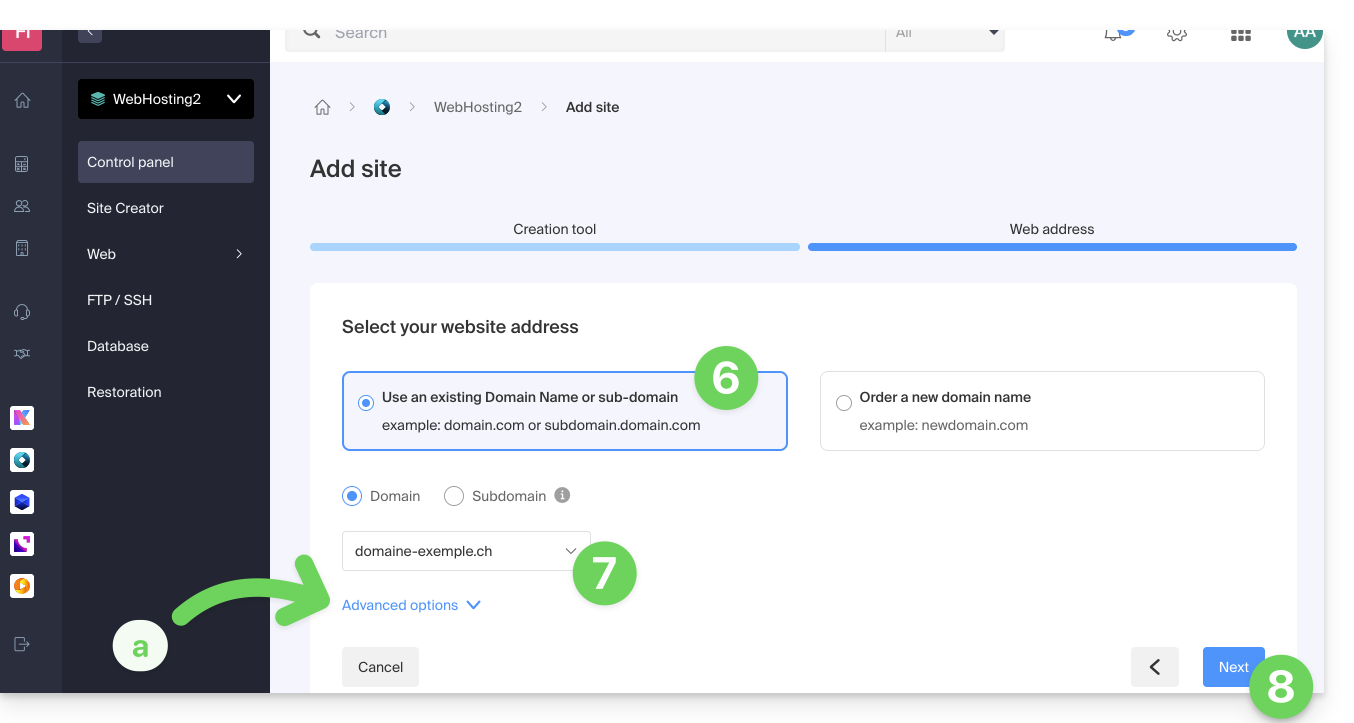
- Click the button to use a domain name that is already present in your Organization (or click the other button if you need to order a new domain first).
- Select the domain name from your existing domains.
- The advanced options allow you, in particular, to choose a custom location on the hosting server and an older version of PHP.
- Click on the Next button:
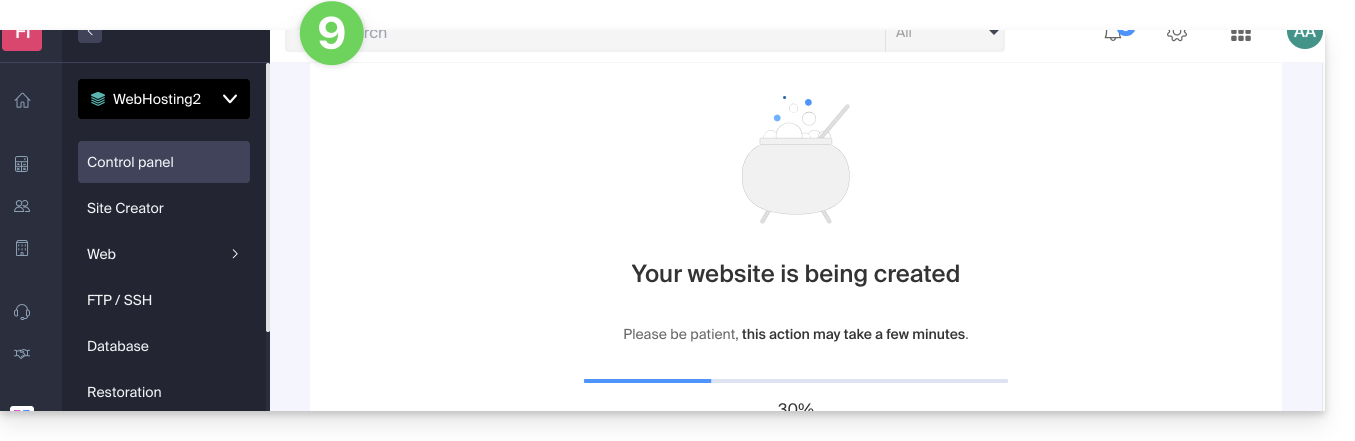
- Wait a few minutes while the site is being created on the hosting server:
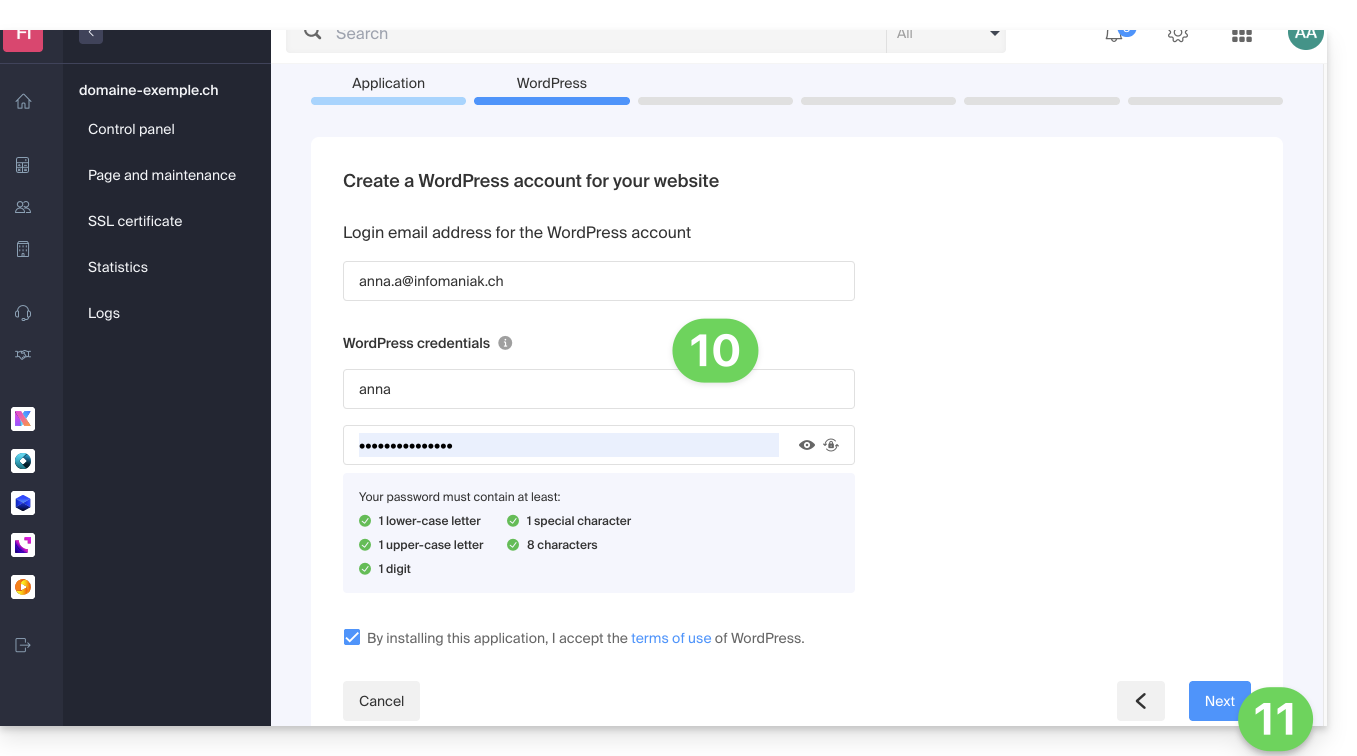
- Enter the requested information, as it will be used to log in to your WordPress dashboard(you can modify this information at any time after installation).
- Click on the Next button:
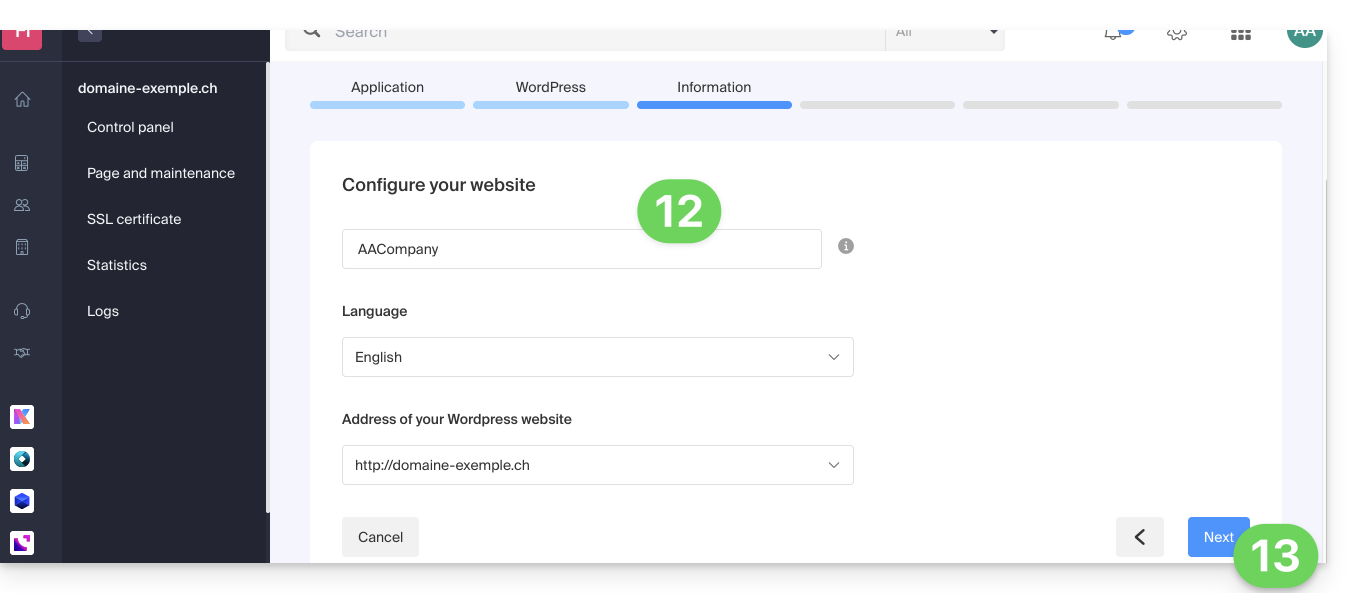
- Enter the information related to your website (you can modify this information at any time after installation).
- Click on the Next button:
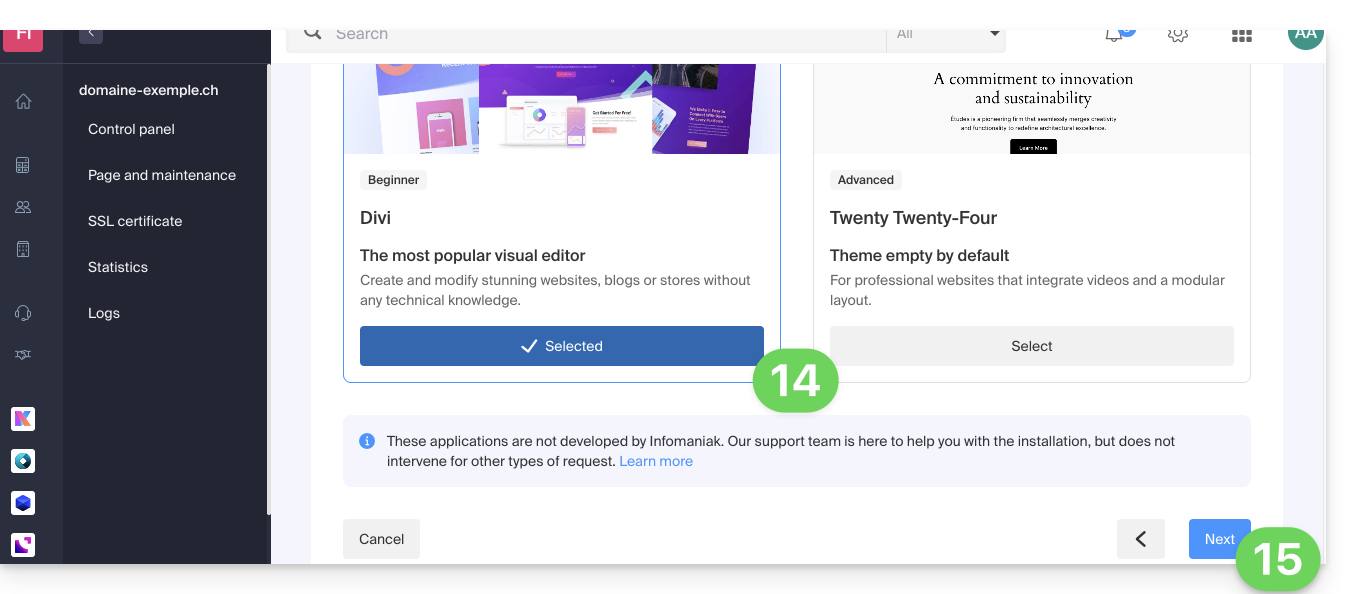
- Choose between the Divi theme and the official theme of the latest WordPress version (you can change this information at any time after installation).
- Click on Next:
- Confirm the installation from the summary page.
- You can then log in to the WordPress dashboard or return to the site management interface.
Install WordPress on an existing blank website
To access the existing blank website on your hosting and install WordPress:
- Click here to access your website management in the Infomaniak Manager (need help?).
- Click directly on the name assigned to the website in question.
- Click the button to add an application:
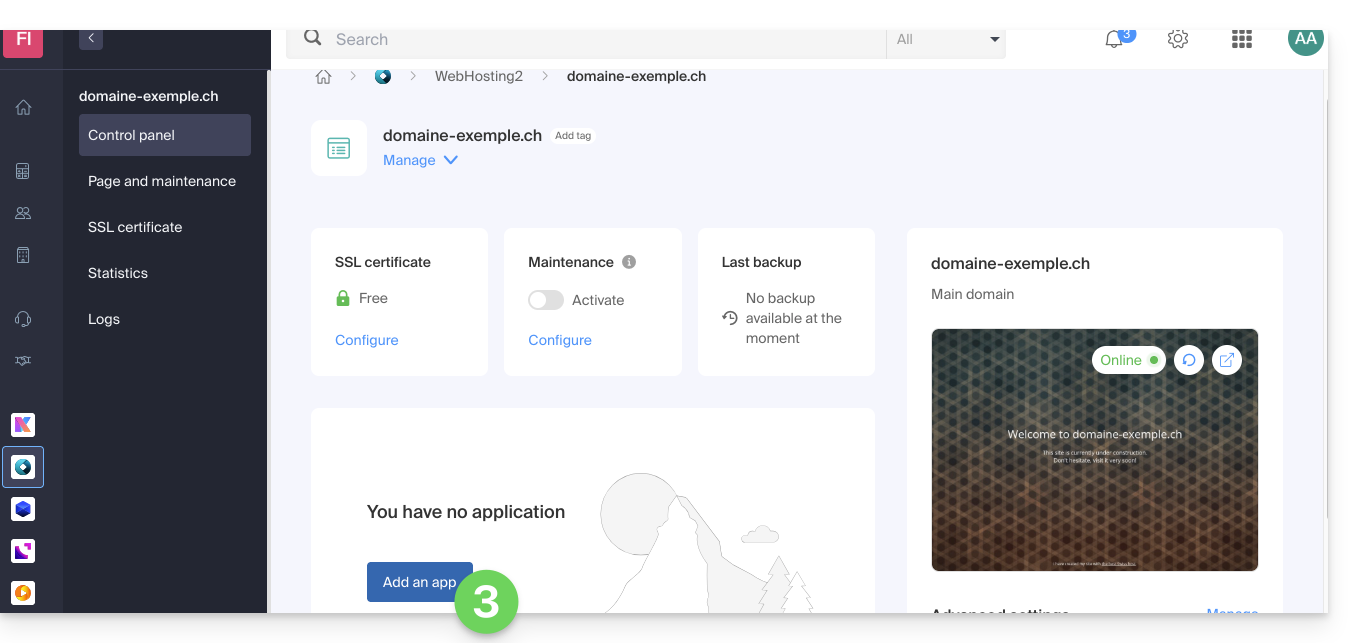
- Choose to install WordPress:
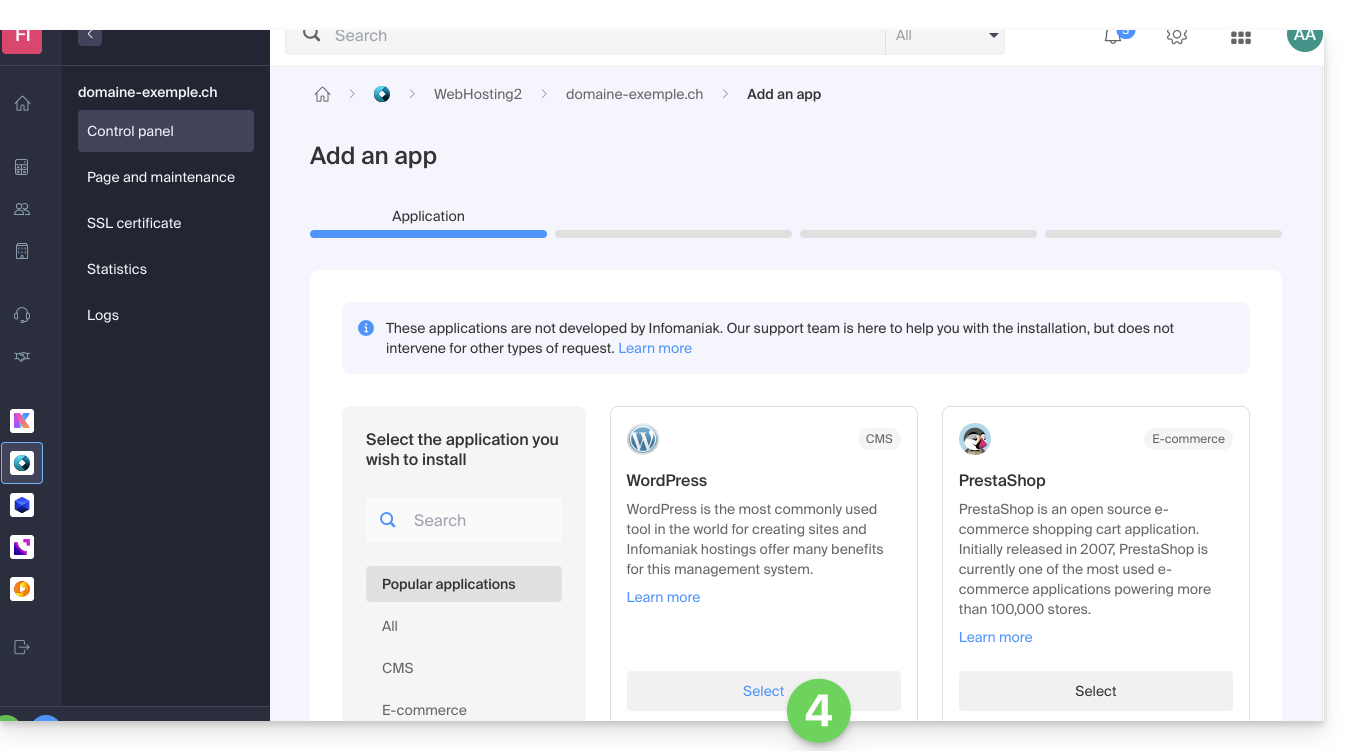
- Click on the Next button at the bottom of the page.
- Enter the requested information, as it will be used tolog in to your WordPress dashboard (you can change this information at any time after installation).
- Click on the Next button:
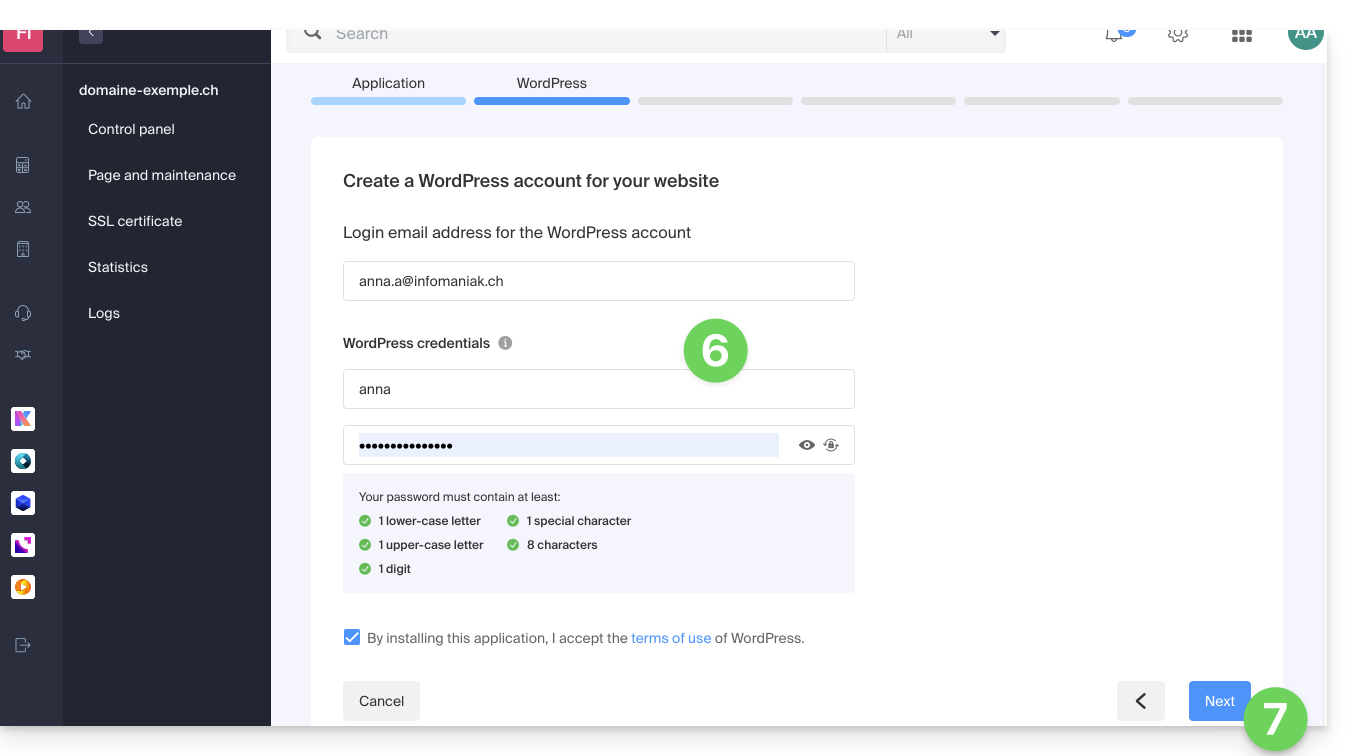
- Continue in the same way as from step 12 of the previous chapter above.
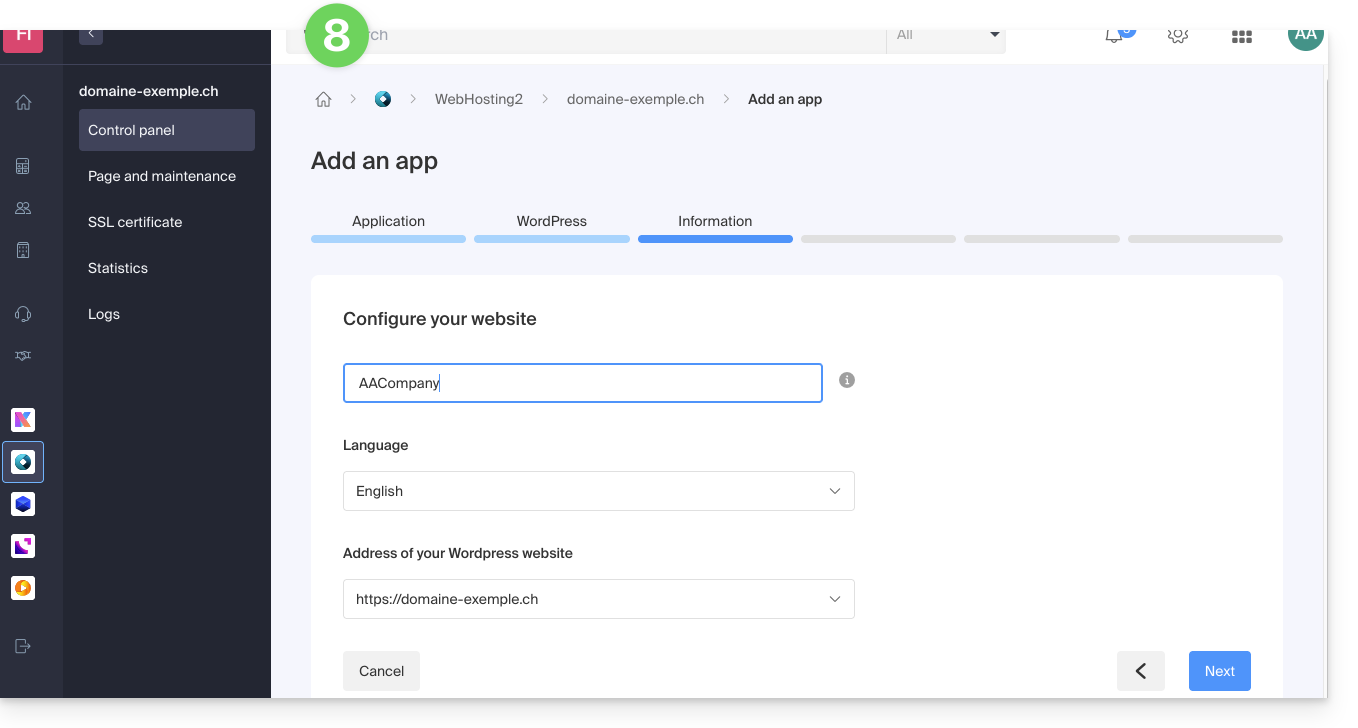
Uninstall Infomaniak WordPress
You can delete a WordPress site:
- by completely removing the site from the hosting (and keeping or not the WordPress data, databases, etc.)
- by keeping the site on the hosting but removing the WordPress app…
Option 1
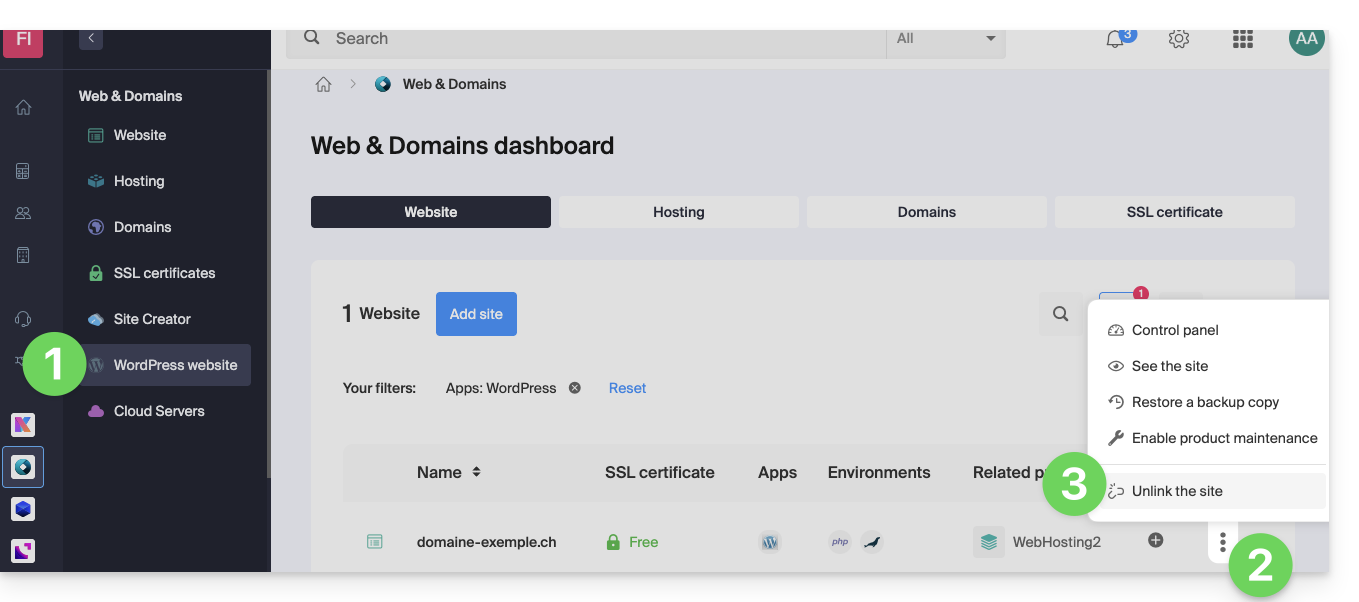
- Click here to access the management of your WordPress site in the Infomaniak Manager (need help?).
- Click on the action menu ⋮ located to the right of the item in question.
- Click on Unlink site:
- Choose whether you want to delete everything or keep a trace of the WordPress data on the hosting server:
- If you check the box, there will be nothing left in the Manager (except for backups):
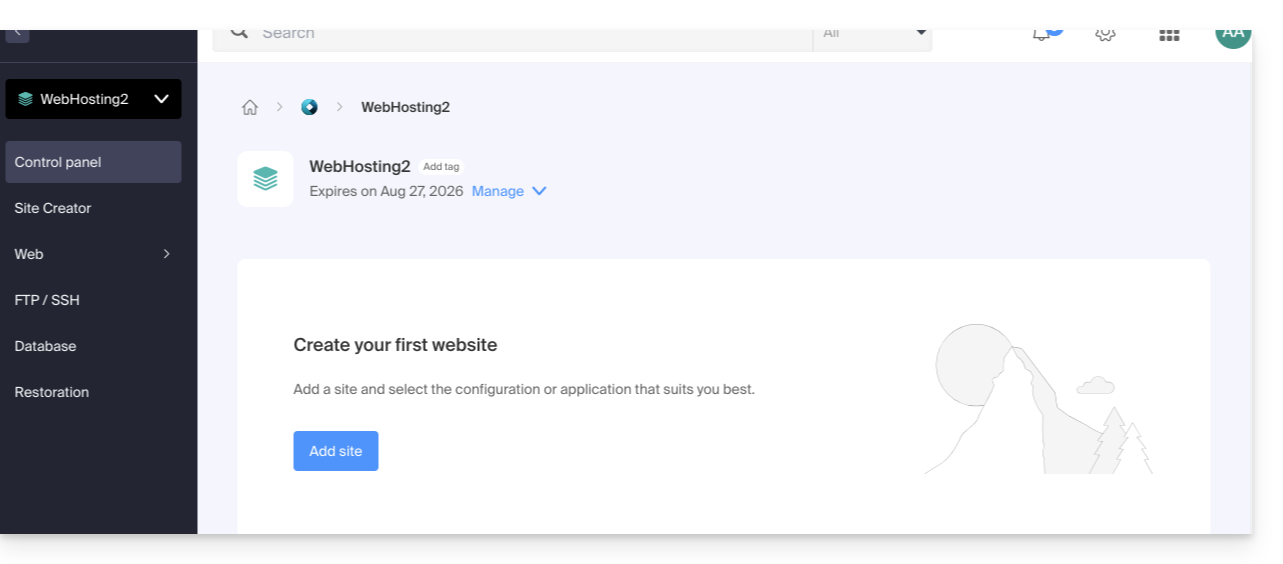
and nothing left on the server: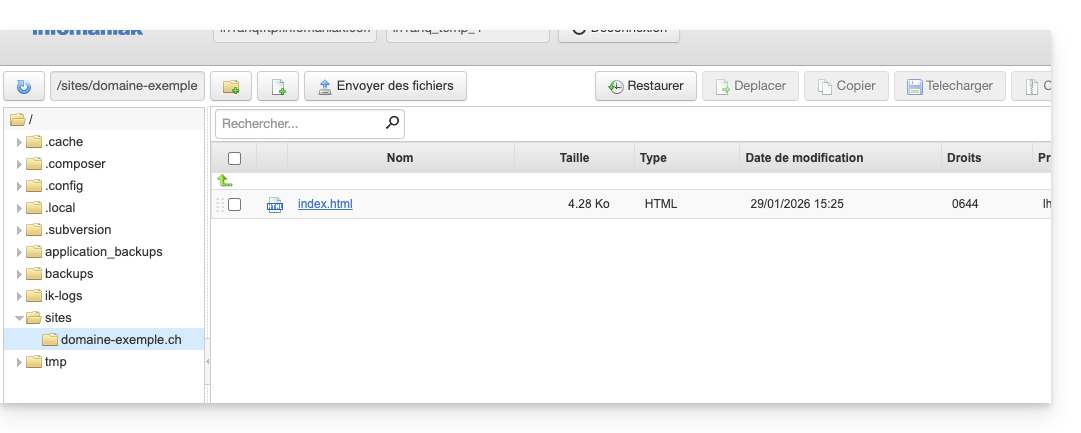
- If you do not check the box, there will be nothing left in the Manager (except for backups):
but the WordPress files will still be accessible on the server: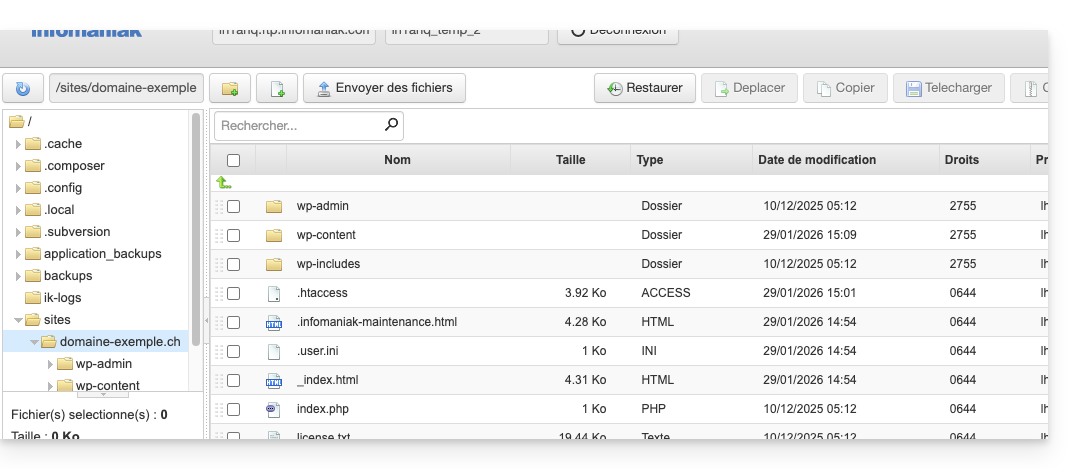
And you will get an error if you later try to reinstall a new WordPress site in the same location with the same domain name: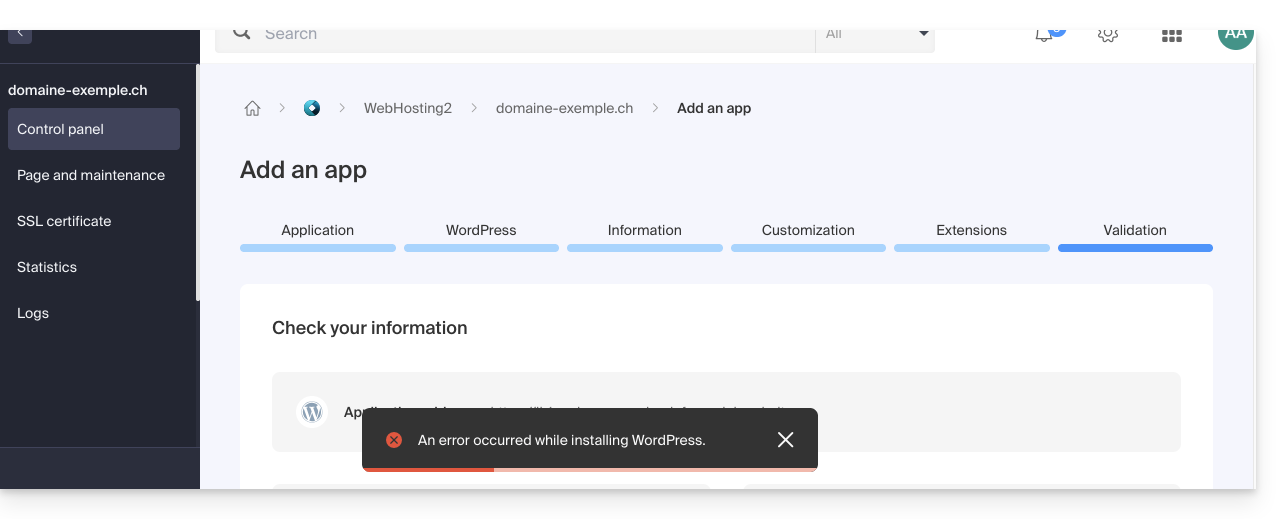
- If you check the box, there will be nothing left in the Manager (except for backups):
- Confirm the deletion.
- Click to delete and wait.
Option 2
- Click here to access the management of your WordPress site in the Infomaniak Manager (need help?).
- Click directly on the name assigned to the site in question:
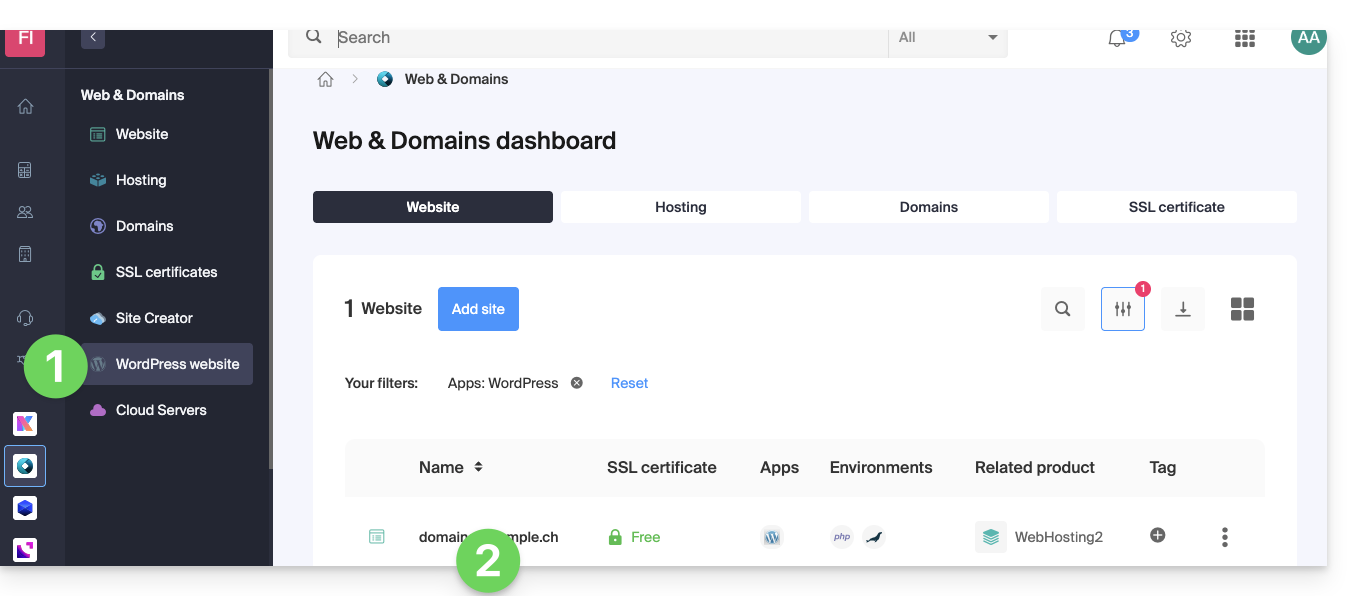
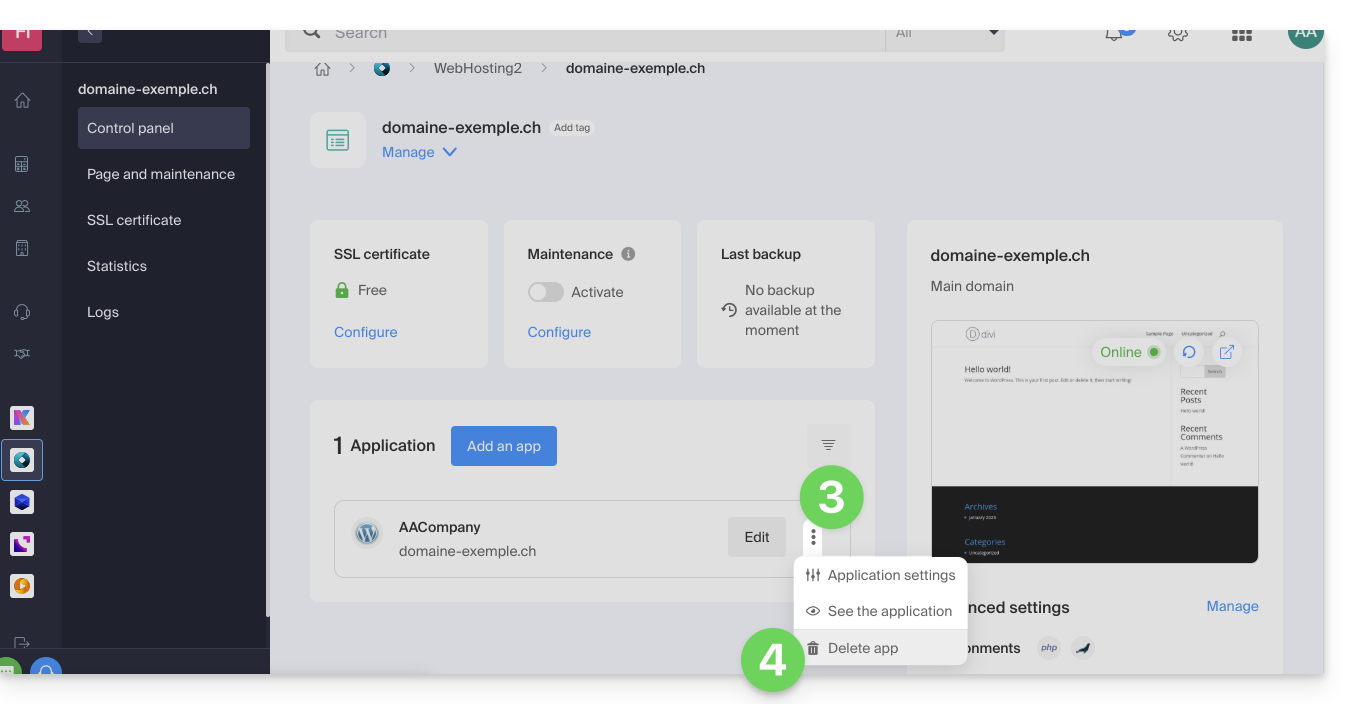
- Click on the action menu ⋮ located to the right of the item in question.
- Click on Remove app:
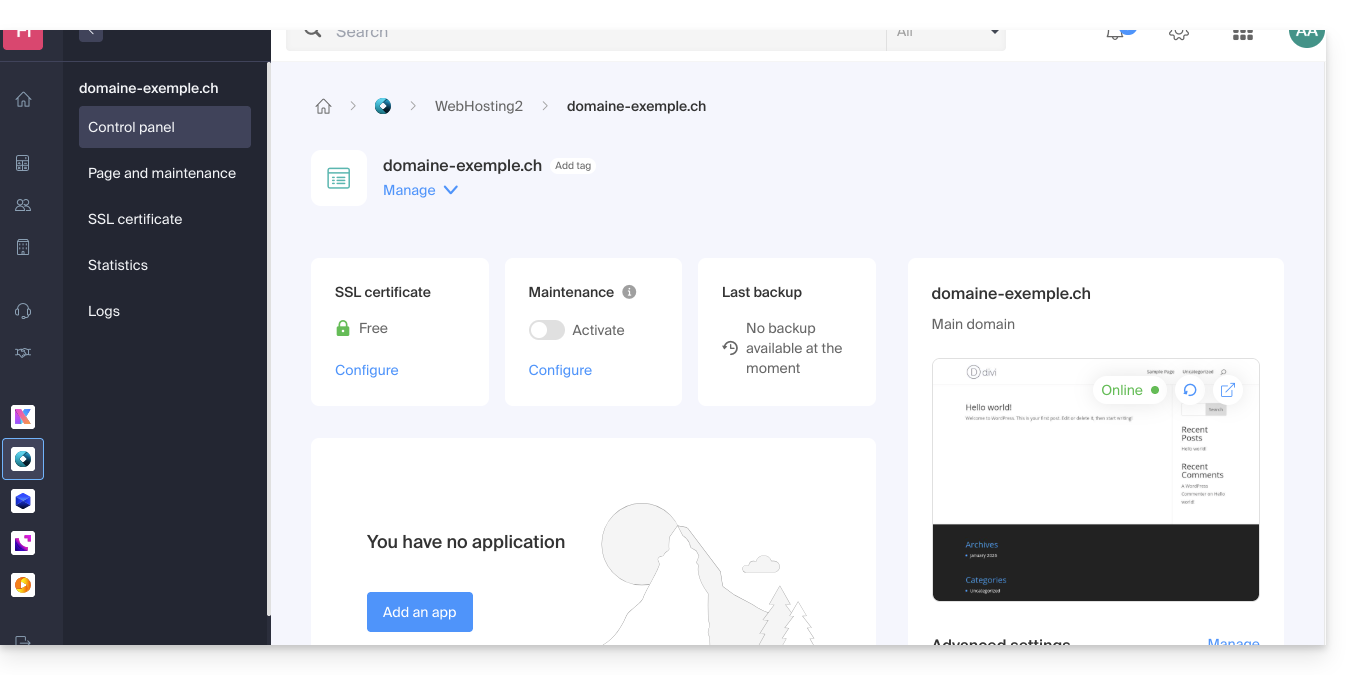
- Confirm the deletion and wait. Your hosting will still contain a website, but without any applications installed:
Learn more
Link to this FAQ: https://faq.infomaniak.com/1931
Has this FAQ been helpful?
This guide will quickly introduce you to the essential features of Euria, the artificial intelligence available within kSuite, which performs particularly well with the kDrive Infomaniak web app (online service ksuite.infomaniak.com/kdrive).
✘ UNAVAILABLE with
kSuite Free / kSuite Standard
my kSuite / my kSuite+ (ik.me, etik.com, ikmail.com)
kDrive Solo / kDrive Team / kDrive Pro
Use AI for your files on kDrive
Prerequisites
- You must be at least an Administrator of the Organization (❓: help).
- Enable Euria for all users of your kDrive: follow the wizard that appears when you log in to kDrive (❓: help).
- Read and understand this other guide about the model used and the responsibilities of each party.
To access Euria on kDrive:
- Click here to access the Infomaniak kDrive web app (online service ksuite.infomaniak.com/kdrive).
- Open a PDF document (Euria is also available with other text/code file types:
.md,.txt,.json,.php, etc.) or right-click on the file in question: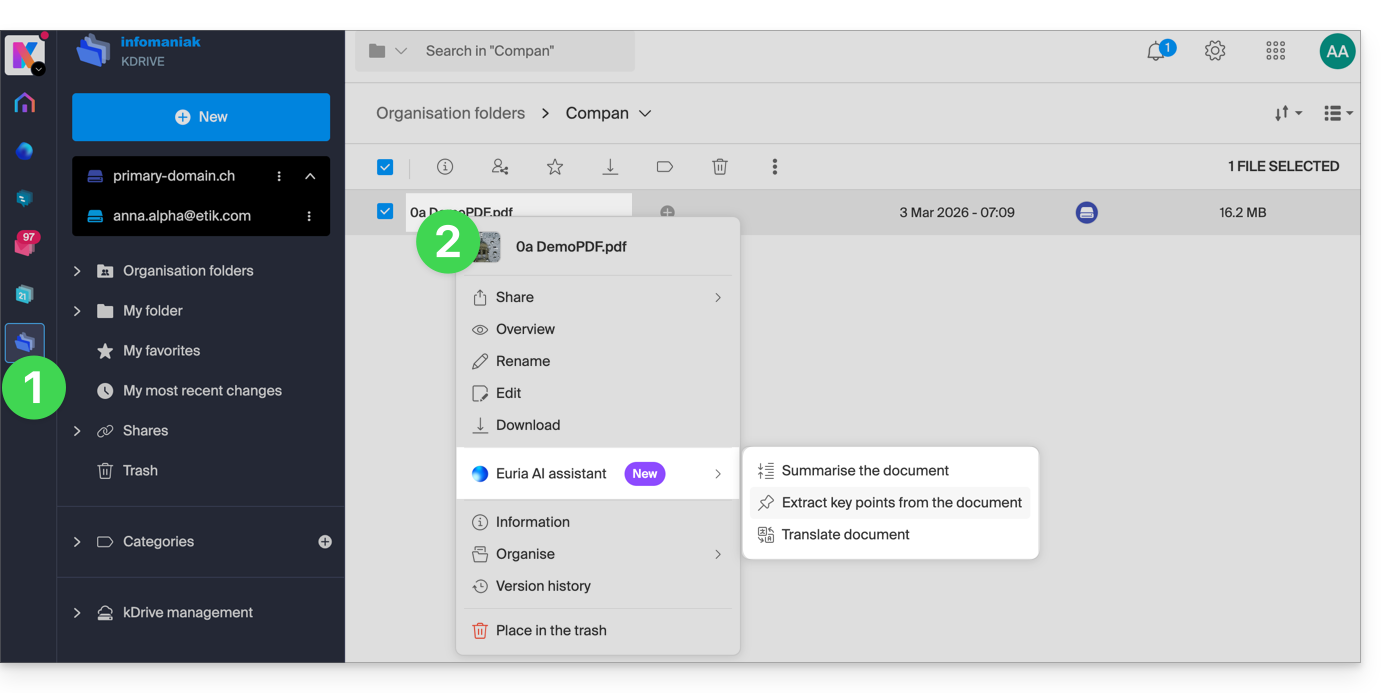
- Euria will open in a sidebar on the right; if you close it, Euria remains accessible via the round icon located in the upper right corner:
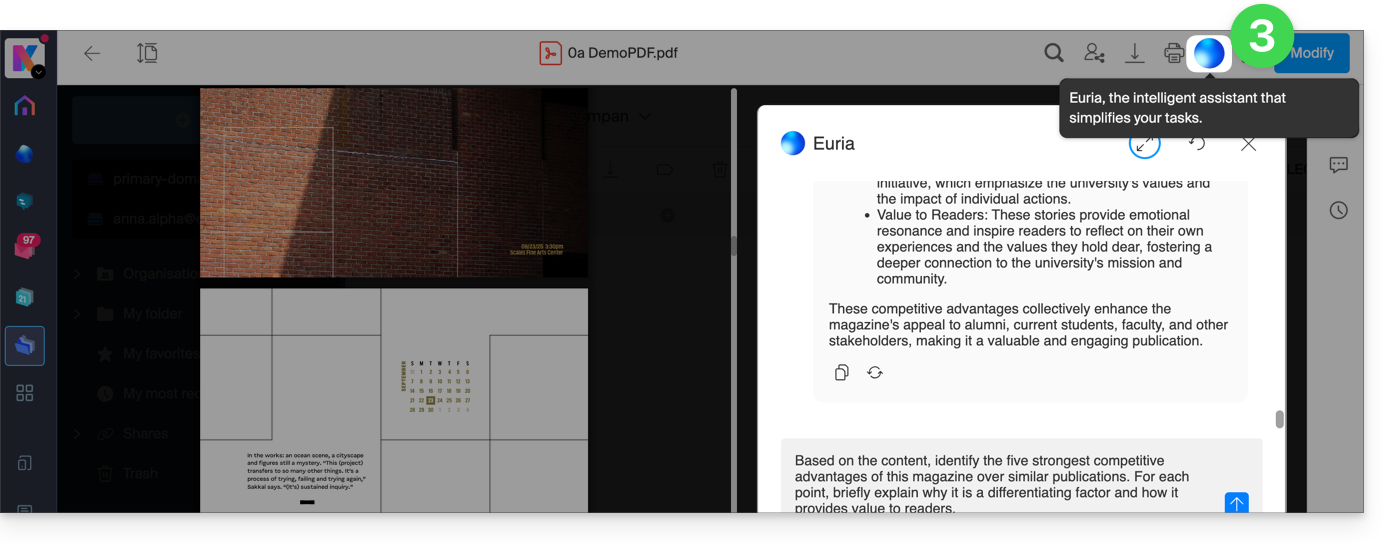
How can Euria help?
Euria helps you make the most of the document you have open (and only this one); it can, in particular:
- answer your questions about its content (details, statistics, changes)
- summarize the key points (or even simplify them, and even more so if you specify “for a 10-year-old”…)
- translate it
- provide metadata (size, creation or modification date)
- explain the terms or acronyms used
For example, if the document is a long company report on the past year, you can ask for the current size of the Development department, which projects are the highest priority, or the last date the document was modified…
Create an event for your calendar
With a document mentioning an appointment (e.g., a medical appointment), you can ask Euria to create a snippet of code that, once copied and pasted into an appropriate file, will allow you to add an event to your calendar. Example phrasing: “Create an event in ics format using the details of this appointment”.
Euria can also extract events from a more complex document: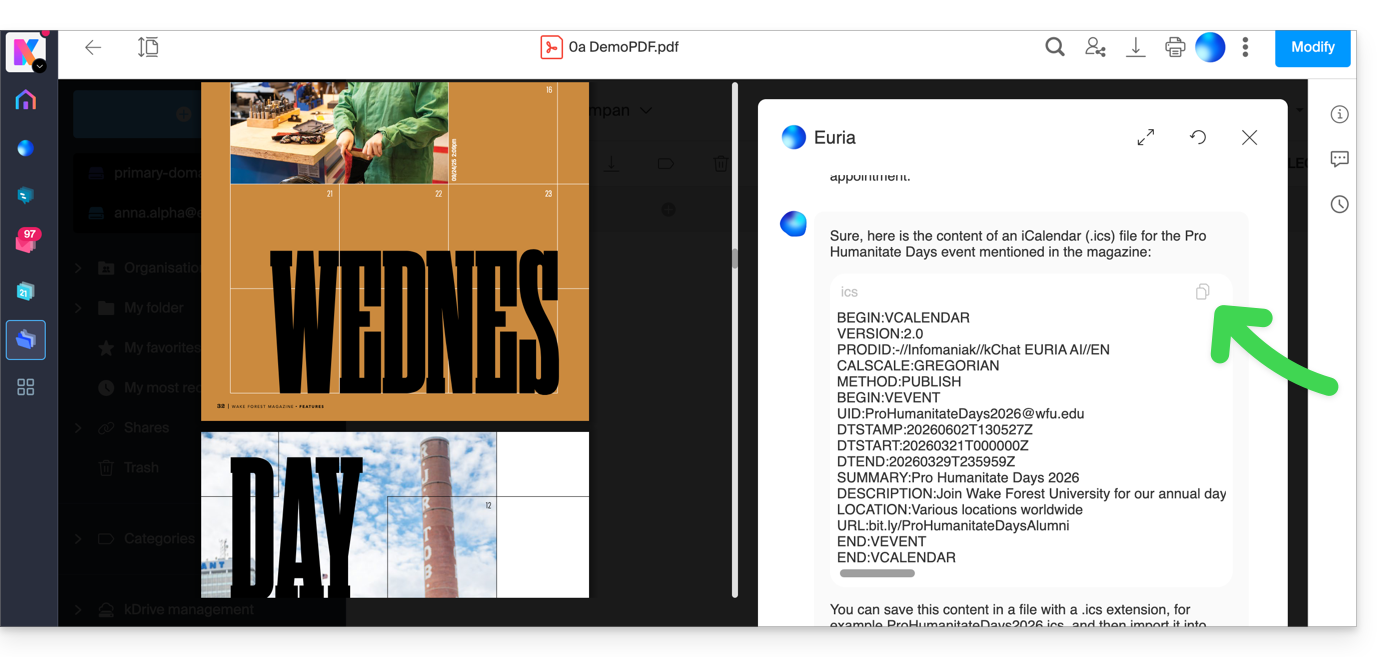
Euria will explain what it did (a VCALENDAR code) and what you need to do: create a new file with the .ics extension containing the code it generated, and open it on your computer to import it into your usual calendar app or import it into your kSuite calendar (❓: help)…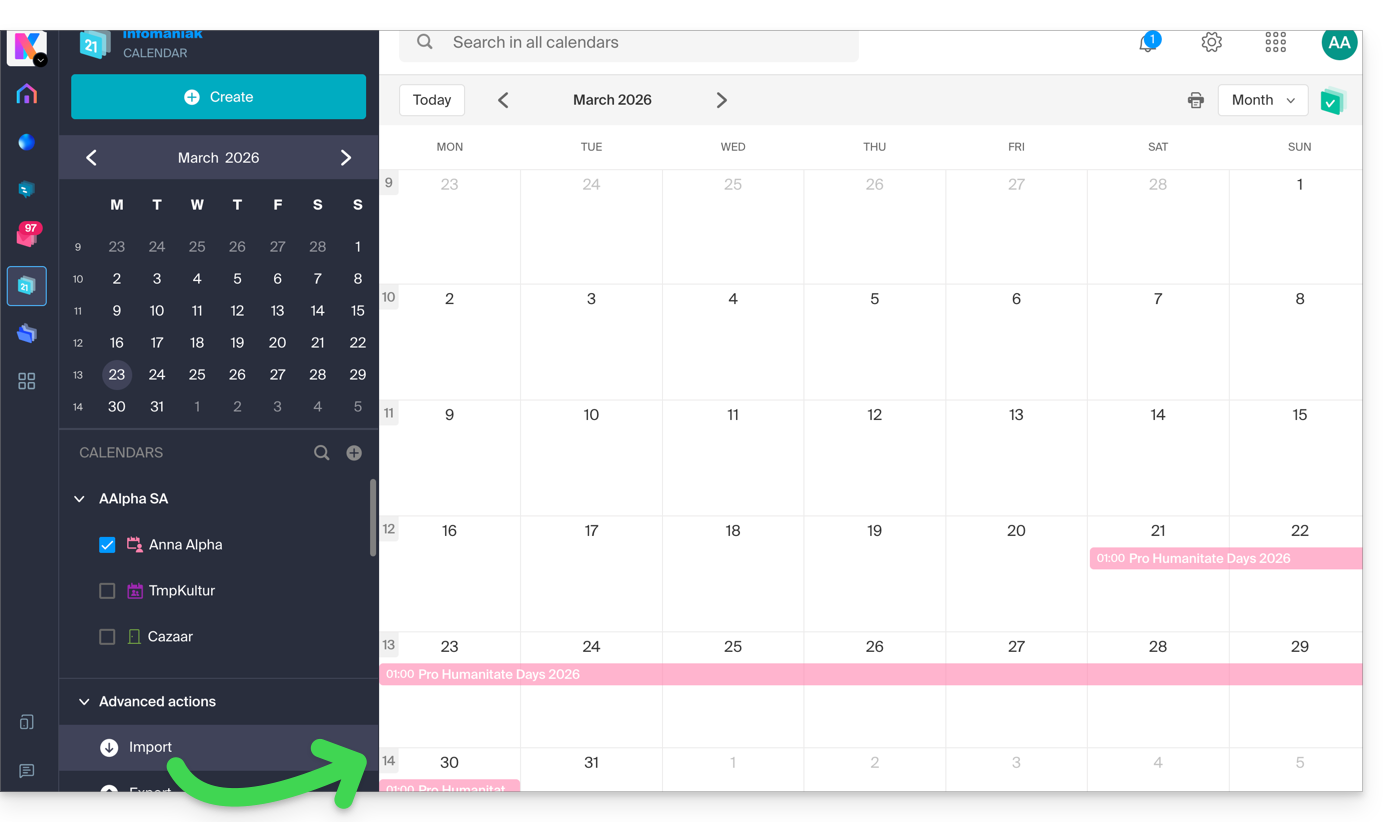
Create a character family tree
With a book stored on your kDrive, you can ask Euria to create a precise and complete family tree to show the relationships between all the characters. You will then obtain a list of names with their relationships.
But you can take the experience even further by then requesting a “Mermaid” diagram based on this list. Simply copy and paste the code provided by Euria into a tool like mermaid.live:
Analyze a survey, write a blog post
Based on a document of the type survey/report, you can ask Euria to write a new article in the tone you want and addressed to the desired target audience. Example: “Based on all of this, write a blog post with an engaging title and text of no more than 400 words, for a target audience of women aged 30 to 40.”.
But you can also ask it to find “what are the biases in this survey” or “what elements should be explored or verified in more detailEuria can thus help you adopt a critical perspective when reviewing a survey or report, by highlighting any potential shortcomings, exaggerations, or biases.
It can also rephrase the survey's conclusions for different audiences (professionals, teenagers, curious readers, etc.), suggest alternative angles for a related article, or even generate titles, introductions, or summaries according to the desired level of complexity.
The goal is to extract maximum editorial value from a single source content by diversifying the formats, tones, and perspectives.
Link to this FAQ: https://faq.infomaniak.com/2566
Has this FAQ been helpful?
This guide explains how to maintain control over your MP3/AAC or HLS Streaming Radio streams by enabling protection with a unique key (token), allowing you to decide, for example, whether a listener can listen to your radio station or not.
Introduction
- Each time you connect, you will send a request to the Infomaniak API, which will return a unique token with a limited and configurable lifespan.
- This token will authorize anyone who possesses it to access the stream during this period.
- You can protect an MP3/AAC or HLS stream independently of each other (the same applies to geolocation).
- Enabling the restriction involves a change to the stream configuration, which may take a few minutes to replicate across the servers.
Protect an audio stream with a unique key
To do this, simply go to the restriction settings and enable token protection for the stream you want to secure:
- Click here to access the management interface for your product in the Infomaniak Manager (need help?).
- Click directly on the name assigned to the product in question:
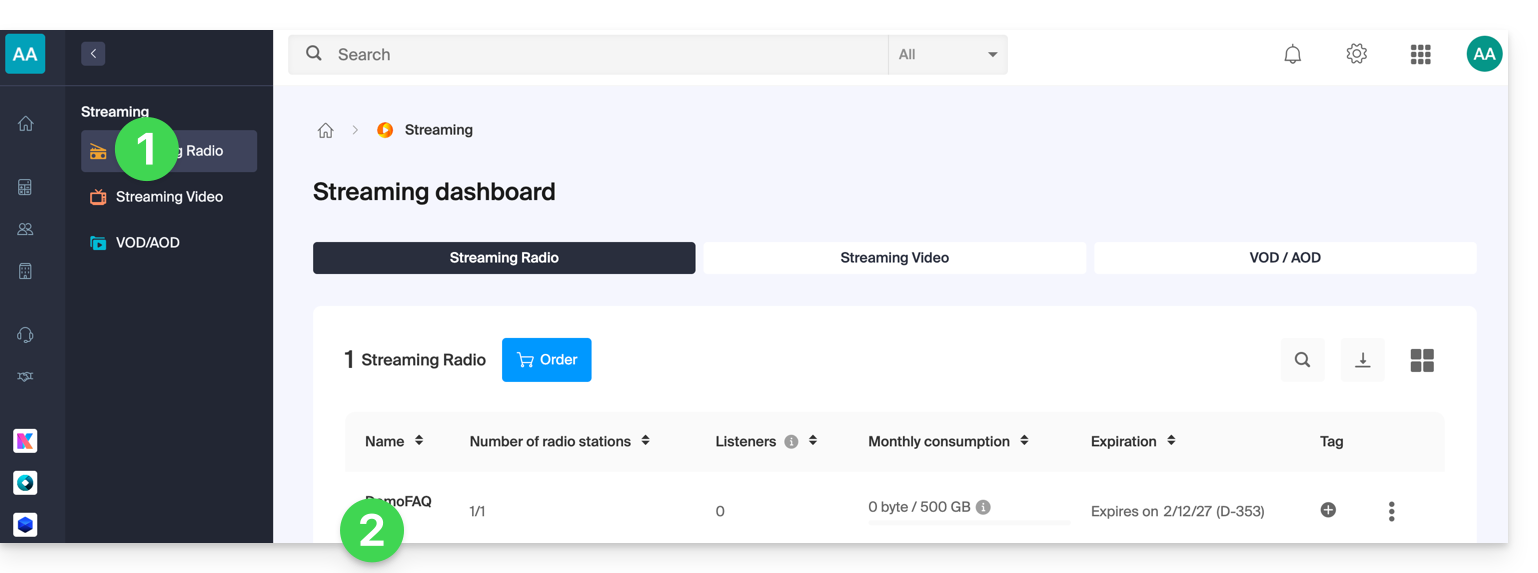
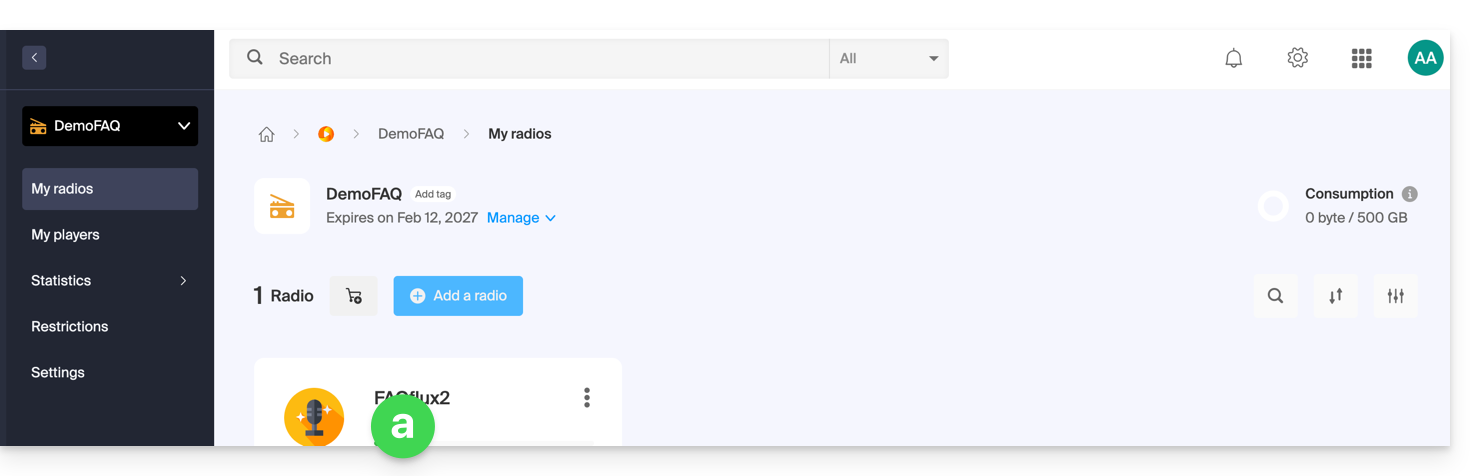
- Click:
- either on the radio station name:
- or on Restrictions in the left-hand menu to apply restrictions to the entire product:
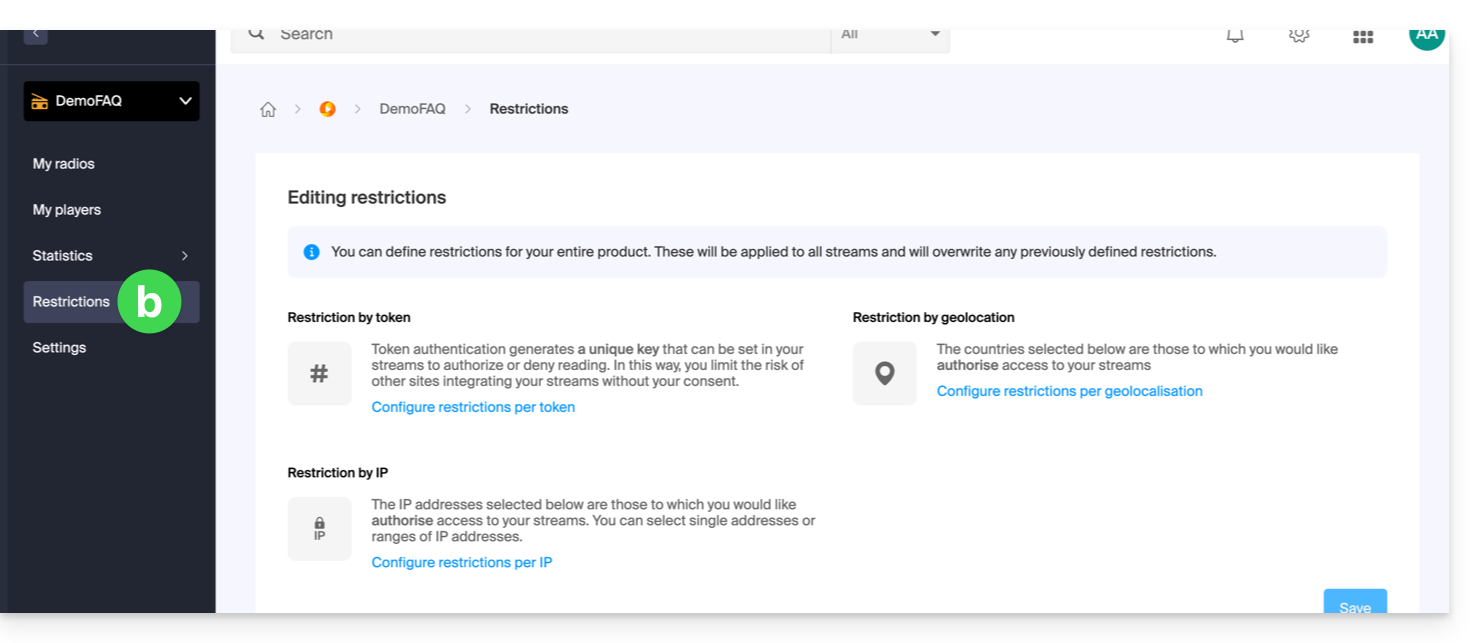
- either on the radio station name:
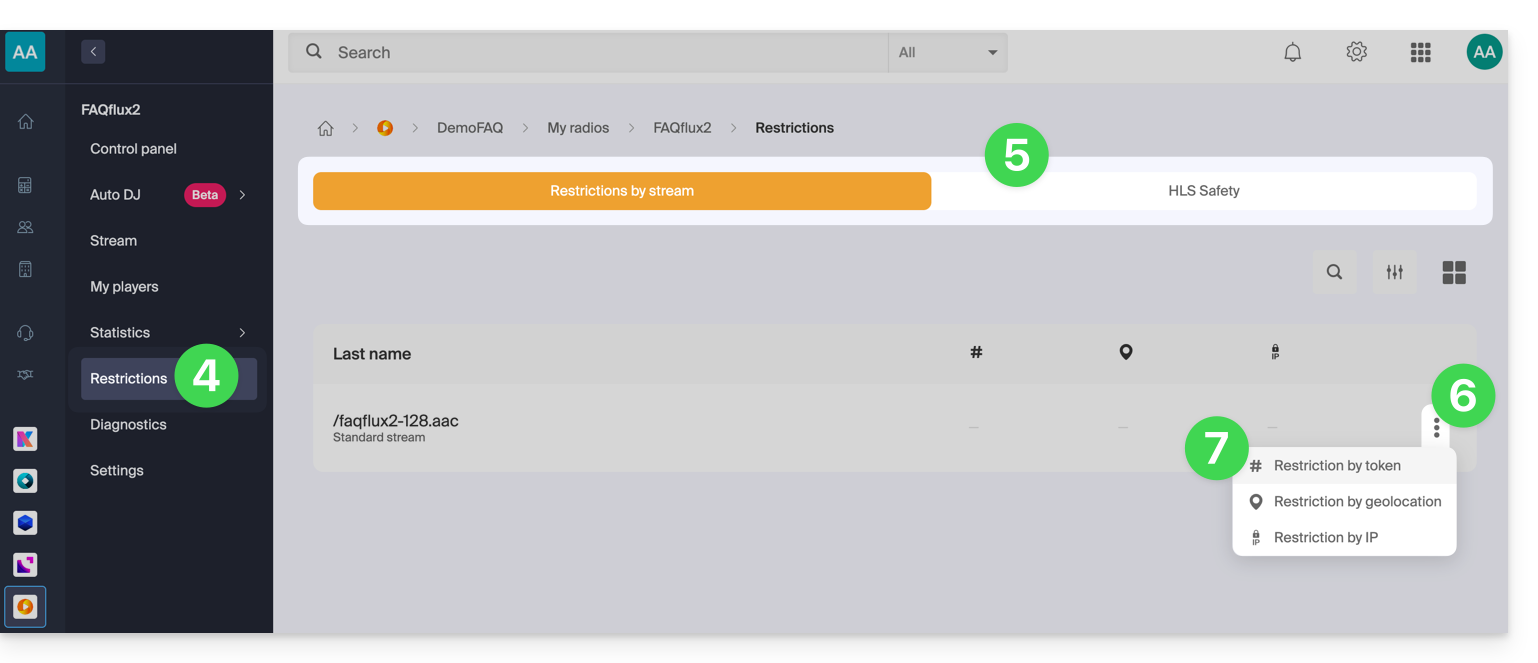
- When selecting
aabove, click on Restrictions in the left-hand menu. - Choose HLS if necessary.
- Click on the action menu ⋮ located to the right of the item in question.
- Click on Token restriction:
Then, activate the protection.
Please note that when you enable this option, access to the stream will be immediately blocked for new connections.Adjust your players to account for the restriction, as illustrated in the example below: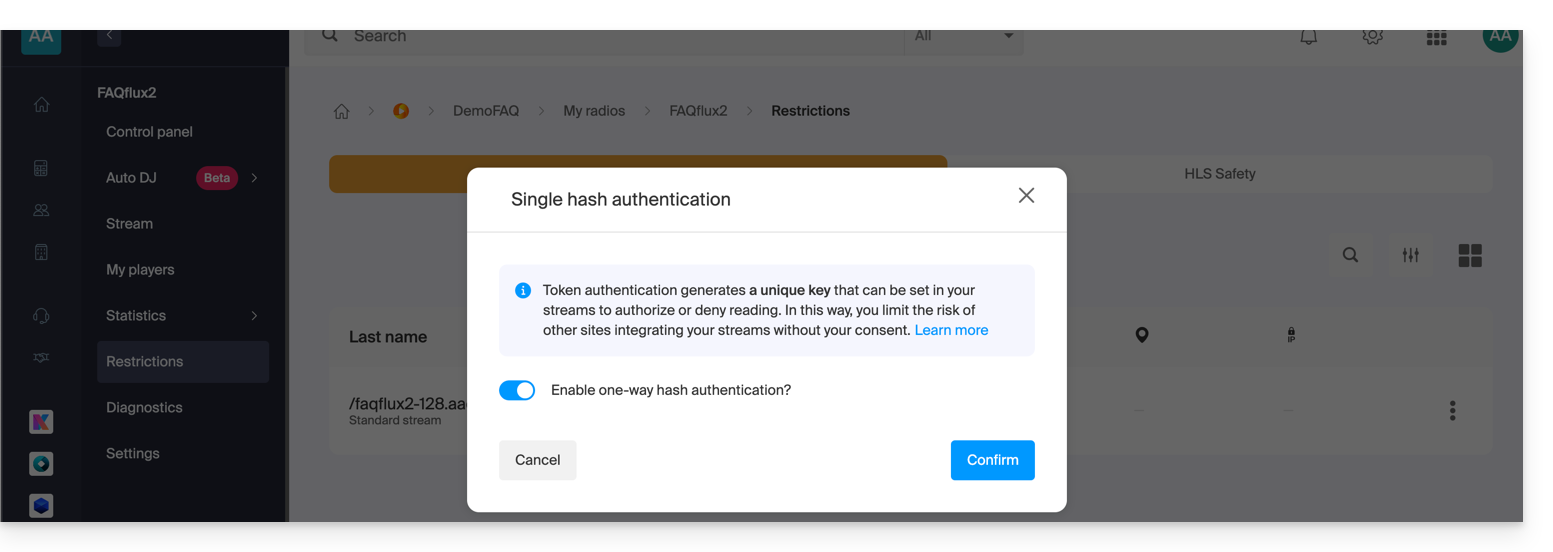
Create a Radio API token
To access the Radio API, you must first authenticate using an application token. This step only needs to be done once. To create this application token, please refer to this other guide.
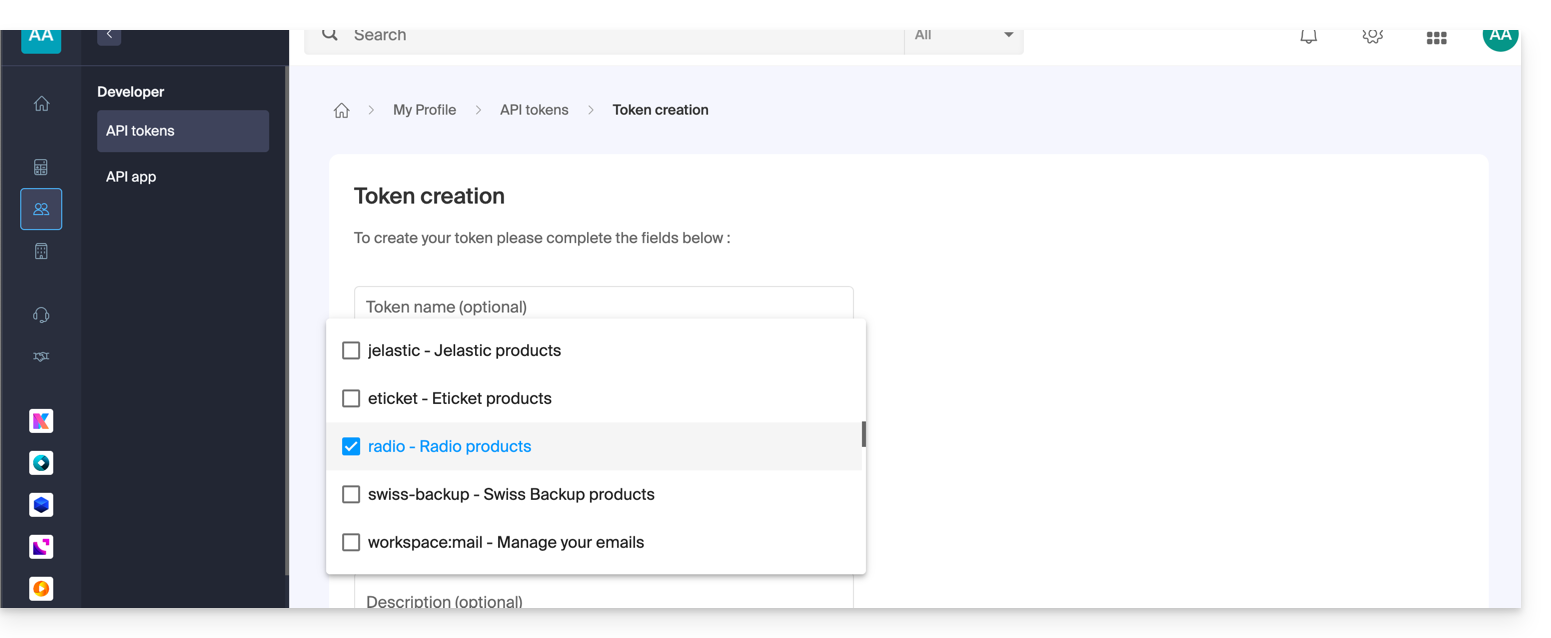
The scope is radio and the lifetime is unlimited to avoid having to regenerate a code regularly. Once the token is generated, copy it and paste it into the example below.
Example of use in PHP
For MP3/AAC or HLS, the code can be largely the same; only the URL called in the POST request changes in its format.
Paste the generated token below, replacing the one provided:
if (!defined('API_TOKEN')) {
     define('API_TOKEN', 'AYF5lSh3c7Xy5974Fs12RTkTThujT-L9R4Xk2ZfGyP6sV7QqJ1oC3jD8nFtKzIxUeMw5oNzR6');
}
/**
 * Fonction générique pour executer des requêtes cURL
 *
 * @param string $method Méthode HTTP (GET, POST, PUT, etc...)
 * @param string $url Url de l'api a requêter
 * @param array $headers Liste des en-têtes HTTP (l'autorisation doit être passée ici avec un ['Authorization: Bearer ']
 * @param array $payload Un tableau contenant les données pour créer un token
 * @return mixed
 */

function request(string $method, string $url, array $headers = [], array $payload = []): mixed{
    // prepare options array
    $opts = [
        CURLOPT_HTTPHEADER => $headers,
        CURLOPT_RETURNTRANSFER => true,
        CURLOPT_URL => $url,
        CURLOPT_CUSTOMREQUEST => strtoupper($method),
    ];

    // add payload if relevant
    if ($payload && $method !== 'GET') {
        $opts[CURLOPT_POSTFIELDS] = json_encode($payload);
    }
    $ch = curl_init();
    curl_setopt_array($ch, $opts);
    $result = curl_exec($ch);
    if(curl_errno($ch)){
        throw new Exception(curl_error($ch));
    }
    $data = json_decode($result, true);
    if ($data['result'] === 'error') {
        throw new Exception($data['error']['description'] ?? 'an error occured');

    }
    return $data['data'];
}
We will now create the token. The URL for creating the token is structured as follows:
- For an MP3 / AAC stream
POST {{URL_11}}Example: to protect https://newradiotest.ice.infomaniak.ch/newradiotest-128.aac, the route will be: https://api.infomaniak.com/1/radios/acl/streams/newradiotest-128.aac/token
- For an HLS stream
POST {{URL_14}}Example: to protect https://myradiostream.radiohls.infomaniak.com/myradiostream/manifest.m3u8, the route will be: https://api.infomaniak.com/1/radios/acl/hls_streams/myradiostream/token
Example: in the case of MP3/AAC, remember to adjust:
$token = request(
    'POST',
   '{{URL_17}}',
    // en-tête d'authorization
    [
        'Authorization: Bearer ' . API_TOKEN,
        'Content-Type: application/json',
    ],
    /**
     * payload pour créer le token, vous pouvez passer les valeurs suivantes
     * window     | 300               | optionnel | durée de validité du token (default: 5 minutes)
     */

    [
        'window' => 3600, // 1h validity
    ]
);
It is important to note that if this code is generated when the page loads, the listener will have "window" seconds to start playing the stream. After this delay, the token will expire, and the stream will no longer be able to start unless the page is reloaded. Depending on your needs and use case, it will be necessary to adjust this delay in the best possible way.
You will also need to replace the stream playback URL below with the one you want, while keeping the $token parameter at the end. Finally, we display the Player (here, a simple HTML5 tag, but you can of course add any overlay after that, with the token passed in the $_GET parameters of the URL).
$streamUrl = "{{URL_18}}";
echo "<audio controls=""><source src="$streamUrl"></audio>";
Link to this FAQ: https://faq.infomaniak.com/2792
Has this FAQ been helpful?