Knowledge base
1000 FAQs, 500 tutorials and instructional videos. Here, there are only solutions!
This guide explains the process for withdrawing and restoring assets when a Public Cloud product is terminated.
Withdrawing and Restoring Assets on Public Cloud
It is recommended to manually export and delete all resources before terminating the product.
When a voluntary termination is performed, the resources associated with the Public Cloud are gradually deactivated and then deleted.
DNS resources of the DNSaaS (Designate) type are immediately deleted upon termination.
Other resources are deactivated across all Public Cloud regions:
- users and projects are deactivated;
- access to the remaining resources is no longer possible;
- resources that are still exposed are deactivated:
- S3 buckets and Swift containers (Object Storage);
- stopped Compute instances (power-off);
- automatic exit from pause mode before instance shutdown;
- automatic exit from rescue mode before instance shutdown;
- deactivation of Load Balancers (LBaaS);
- deactivation of orchestrations and alarms (Heat).
Resources that are not exposed are not immediately modified, including:
- volumes;
- images;
- backups;
- snapshots;
- public keys;
- private networks;
- secrets.
Asset Retention Period
With the exception of DNS resources, assets are retained for a period of 7 days after termination.
On the 7th day at 3:00 AM, all remaining resources are permanently deleted, with no possibility of restoration.
Restoring Assets After Termination
After the product is terminated, a request for restoration can be made within a maximum period of 3 calendar days.
This request requires:
- an active subscription to a Public Cloud product;
- an up-to-date billing status;
- compliance with the applicable contractual terms.
Provided that the data is still available on the storage infrastructure, suspended services can be reactivated within a maximum period of 4 days after the request is approved.
Stopped instances are not restarted automatically. However, they can be restarted manually if necessary.
Exporting assets remains your responsibility.
Link to this FAQ:
Has this FAQ been helpful?
This guide explains how to resolve an SSL certificate (Let's Encrypt or Sectigo) installation issue if you are using Cloudflare with strict security rules, such as country or IP address filtering.
Adjust SSL / geoblocking settings
When an SSL certificate is requested via Infomaniak (free Let's Encrypt or Sectigo), the certification authority must verify that you are the owner of the domain. This verification can be done via HTTP (using special files placed on your site), DNS, or email:
- Let's Encrypt uses
/.well-known/acme-challenge/. - Sectigo usually uses
/.well-known/pki-validation/(or DNS / email depending on the option chosen).
If these verifications fail (for example, because Cloudflare blocks access), the certificate cannot be issued or renewed. However, Let's Encrypt no longer checks from a single location. For some time (and even more since March 2024), it performs its checks from multiple countries at the same time – including new ones like Sweden or Singapore. Result: if one of these countries is blocked by your Cloudflare settings, the certificate request may fail, even if everything else is correctly configured.
Worse still: even if you try to make an exception only for the challenge address (.well-known/acme-challenge), this does not always work with certain Cloudflare rules. Indeed, country or IP blocking rules are applied before any URL path-based exception.
Adjust SSL/TLS mode
In Cloudflare, use the Full or Full (strict) mode. These modes temporarily tolerate an expired or self-signed certificate, until the validation is complete:
Allow validation paths
Avoid blocking "IP Access Rules" and prefer "Custom Rules" that allow unrestricted paths:
/.well-known/acme-challenge/(Let's Encrypt)/.well-known/pki-validation/(Sectigo)
Temporarily disable geoblocking
If necessary, temporarily disable geographic or IP blocking for the duration of the validation, then reactivate your protections after the certificate is issued or renewed.
Link to this FAQ:
Has this FAQ been helpful?
This guide explains how to create a custom MX record (mx.domain.xyz assuming that domain.xyz belongs to you) to be used later in the MX configuration of your NAS.
An MX record cannot be declared directly as an IP address, for example 178.123.456.789
Custom MX record
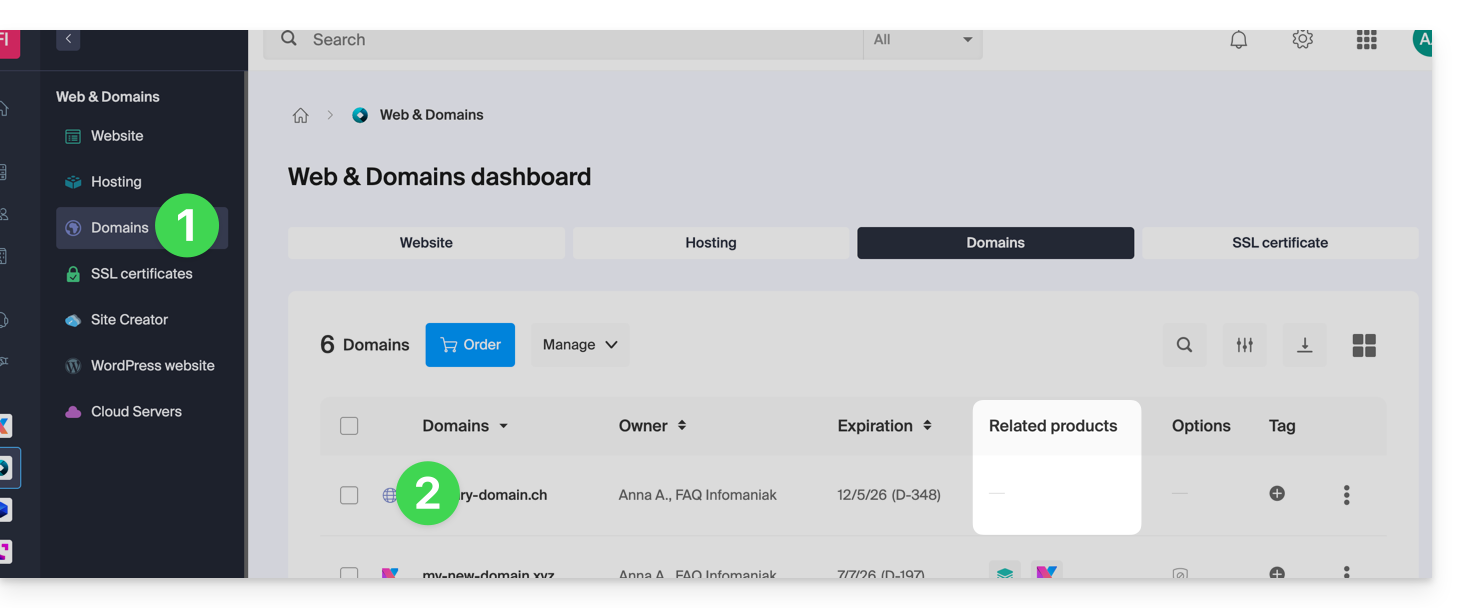
To access your domain names:
- Click here to access the management of your domain on the Infomaniak Manager (need help?).
- Click directly on the name assigned to the domain in question.
- Click on DNS Zone in the left sidebar.
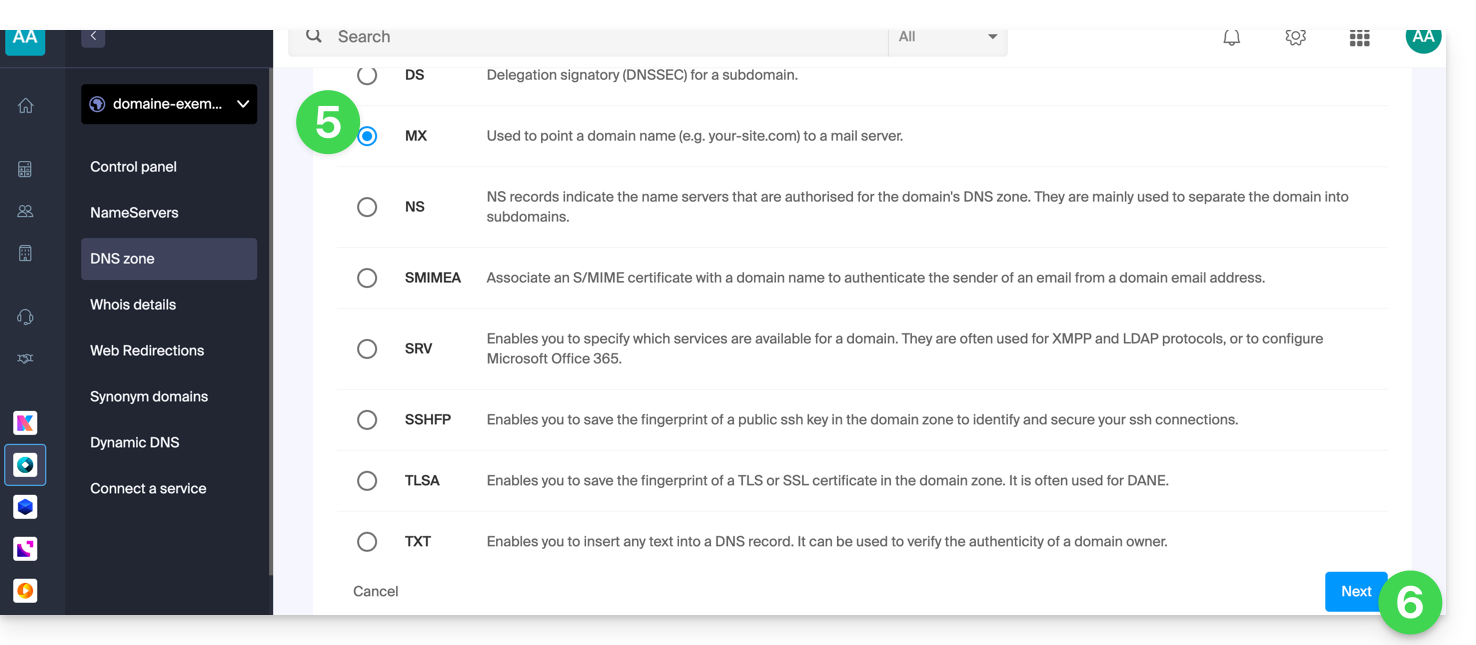
- Click on the blue button Add a record:

- Select MX as the record type.
- Click on Next:
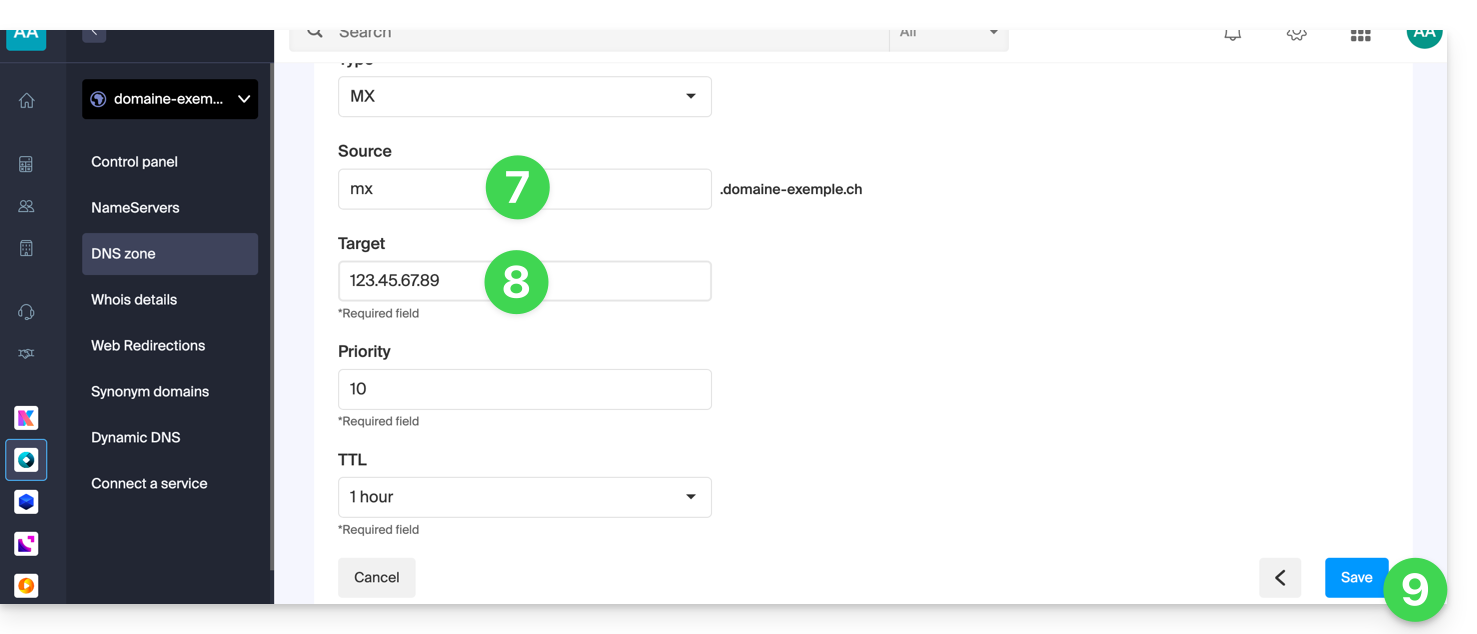
- Enter the desired MX record ("
mx.domain.xyz" for example). - Point the record to the desired IP address (target).
- Click on the Save button:
Link to this FAQ:
Has this FAQ been helpful?
This guide details the "502 Bad Gateway" errors that can be encountered when visiting a website.
Preamble
- The 502 Bad Gateway error occurs when the server acting as a gateway between the browser and the origin web server receives an invalid response.
- This error can be caused by an overloaded web server, communication issues between a CDN and the hosting web server, or a misconfigured proxy server.
- Sometimes, the error can be caused by a bad entry in the DNS server.
Troubleshooting steps
To resolve the 502 Bad Gateway error, you often need to proceed by elimination:
- Check if the server is temporarily overloaded: simply reload the page after a few minutes for the error to disappear.
- Clear the browser cache.
- Try from another browser.
Link to this FAQ:
Has this FAQ been helpful?
This guide provides instructions for using the API to update your Infomaniak DynDNS (dynamic DNS) record.
Preamble
- Not specifying
myip(as per the examples below) will include the source IP of the request by default. - Make sure to connect an
IPv4or anIPv6depending on the type of record to update (AorAAAA). - It is recommended to not use special characters in the username and password.
Using the DynDNS API
Make a POST request (GET also allowed) to the following URL:
https://infomaniak.com/nic/update
The API requires the HTTPS protocol. Here is an example of a request:
https://username:password@infomaniak.com/nic/update?hostname=subdomain.yourdomain.com&myip=1.2.3.4This alternative request can also be used:
https://infomaniak.com/nic/update?hostname=subdomain.yourdomain.com&myip=1.2.3.4&username=XXX&password=XXXLink to this FAQ:
Has this FAQ been helpful?
This guide explains how to remove the link between a domain name and kSuite Free.
Introduction
- Once removed, the domain name is again available to be linked to one of your services.
Remove the linked domain
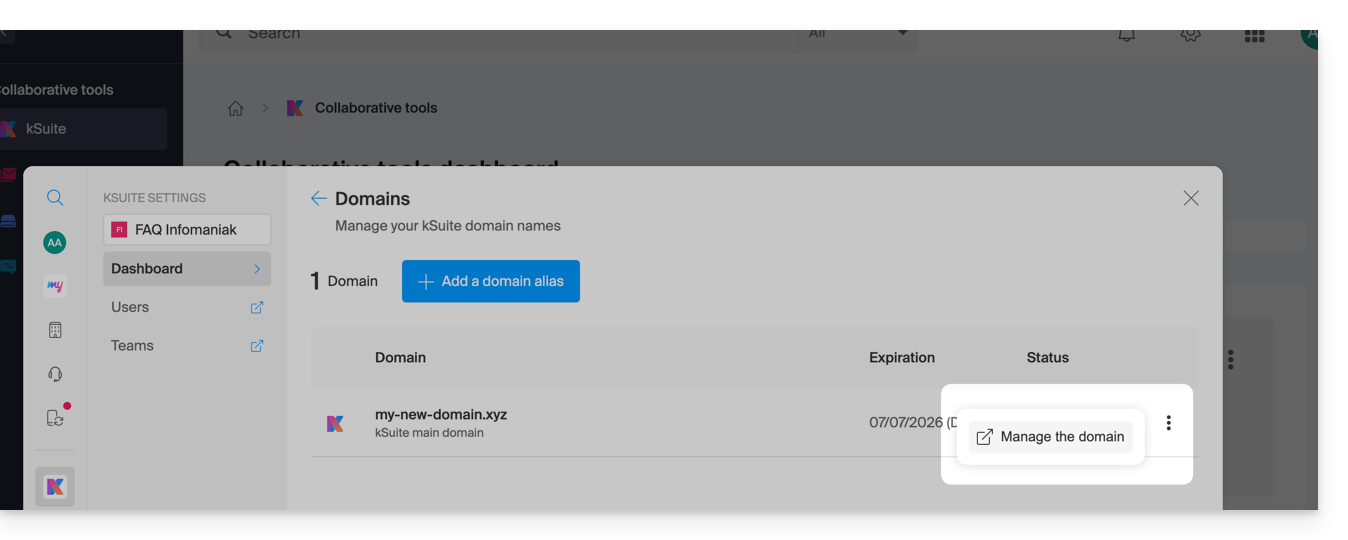
To unlink a domain name from kSuite Free:
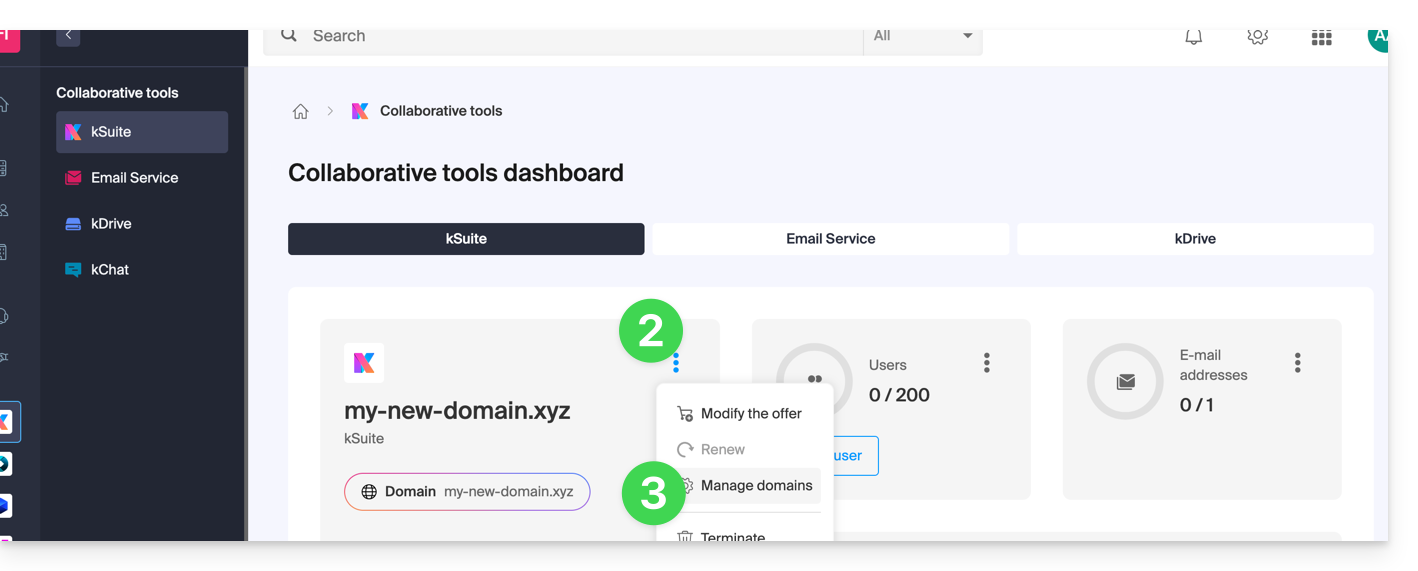
- Click here to access the management of your kSuite in the Infomaniak Manager (need help?).
- Click on the action menu ⋮ to the right of the kSuite name.
- Select Manage domains:
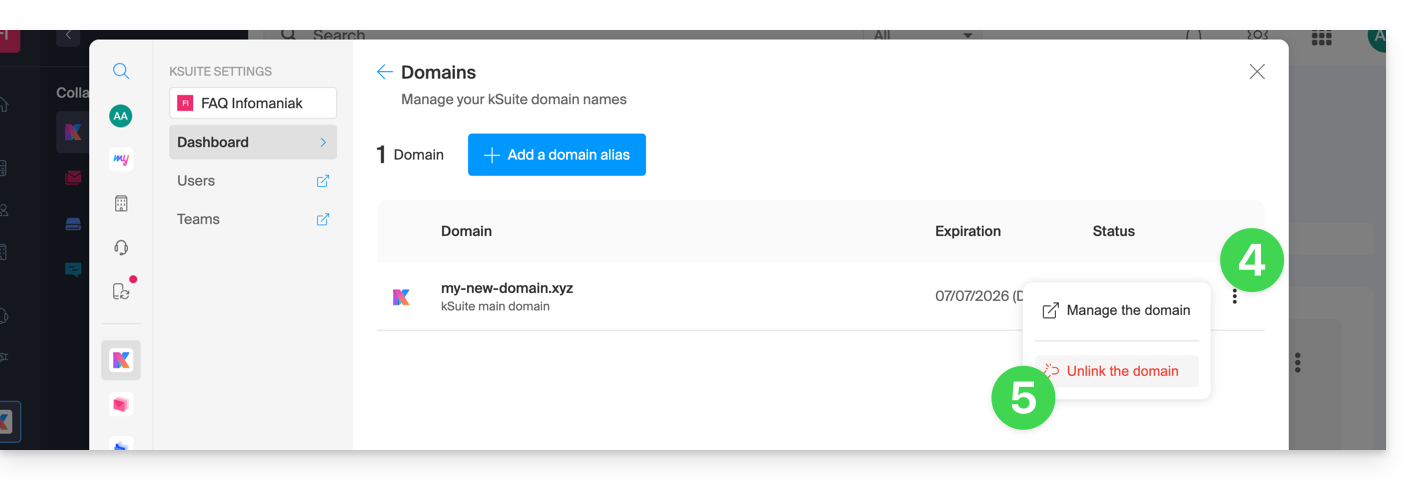
- Click on the ⋮ icon to the right of the domain name you wish to unlink.
- Click on “Unlink domain”:
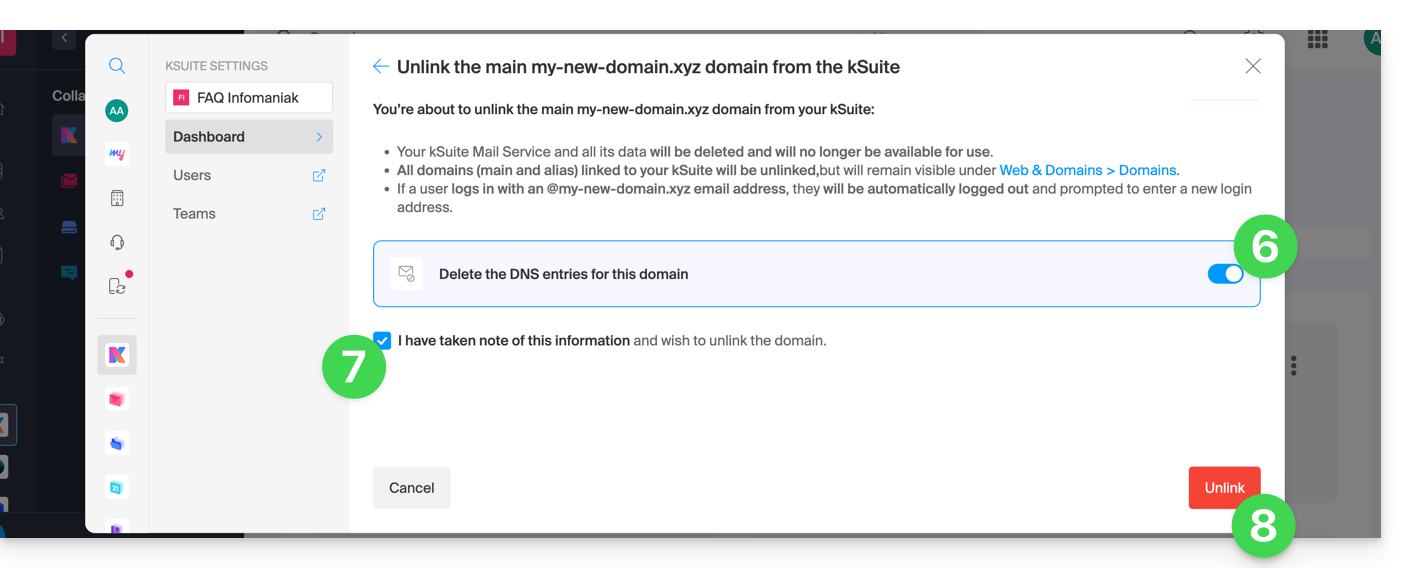
- If you have a paid kSuite plan, you cannot unlink the domain name (cancel the paid plan if necessary):
- If you have a paid kSuite plan, you cannot unlink the domain name (cancel the paid plan if necessary):
- If necessary, enable the deletion of the domain name's DNS entries.
- Confirm the detachment.
- Click on the button to confirm:
Link to this FAQ:
Has this FAQ been helpful?
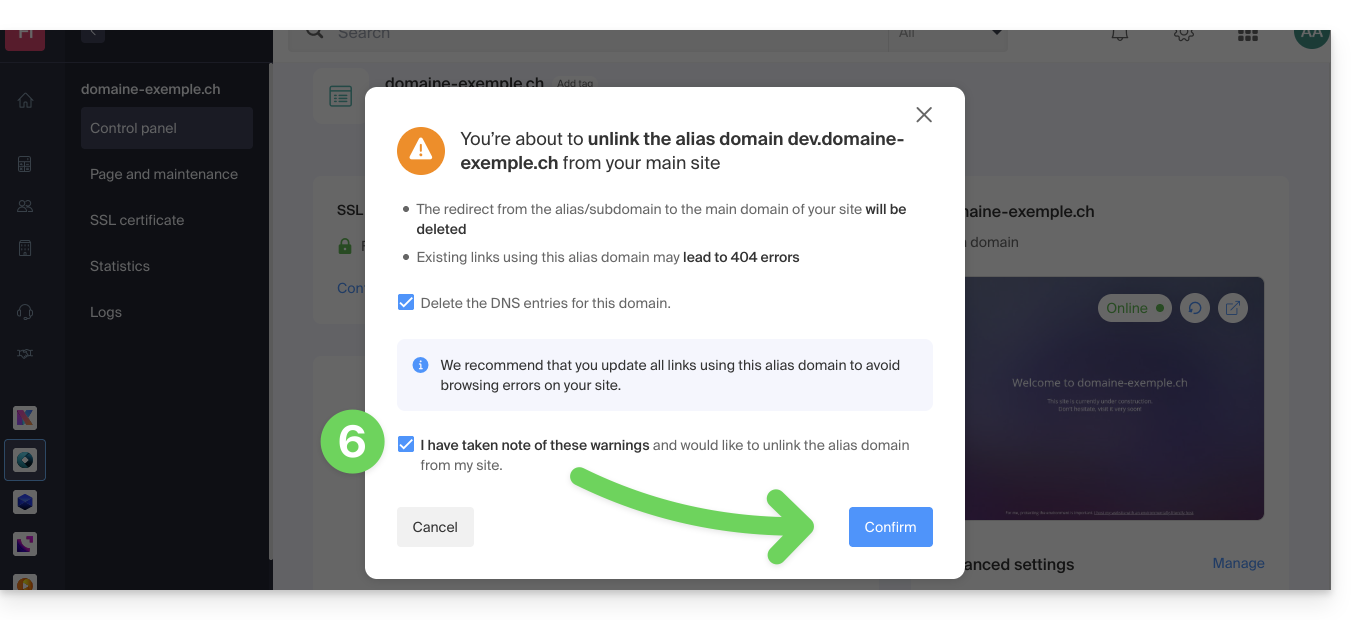
This guide explains how to remove an alias domain from an Infomaniak Web Hosting. The main domain name of the site will then no longer be linked to any other domain name.
This allows you to create a new Web Hosting or distinct site for the domain name thus unlinked.
Prerequisites
- Have dissociated the synonym domain name from the main domain name if there was an association before.
Remove the alias domain
To remove an alias domain from your site:
- Click here to access the management of your site on the Infomaniak Manager (need help?).
- Click directly on the name assigned to the site concerned:
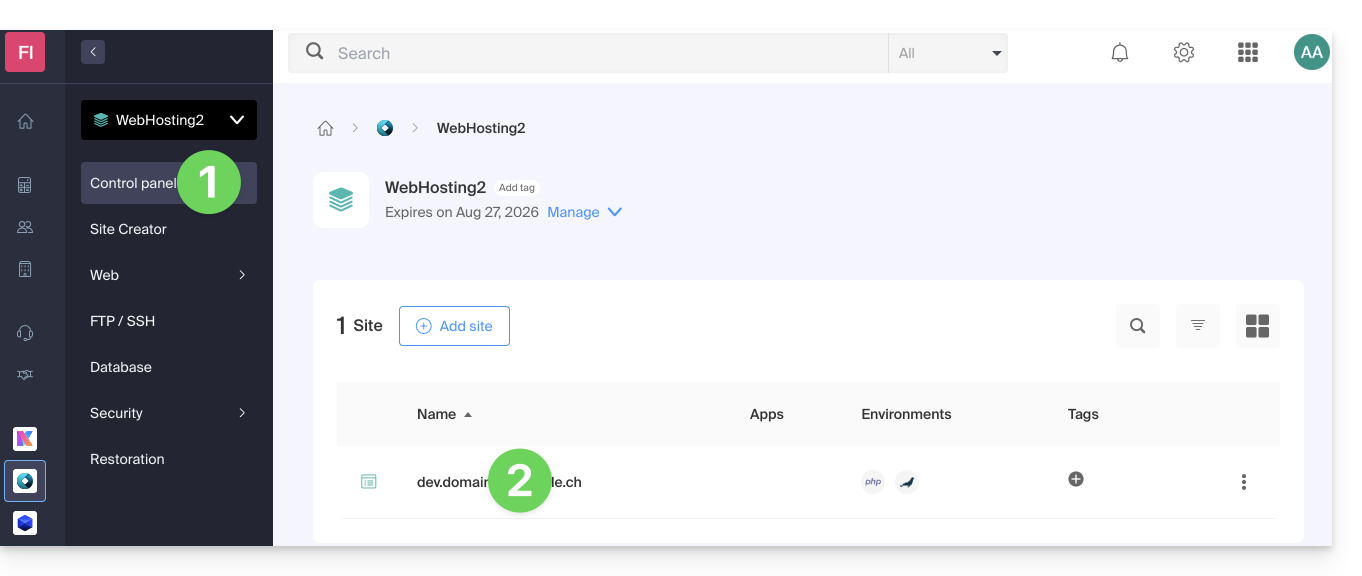
- Click on the chevron to expand the Domains section of this site.
- Click on the action menu ⋮ to the right of the domain to be removed.
- Choose Unlink:
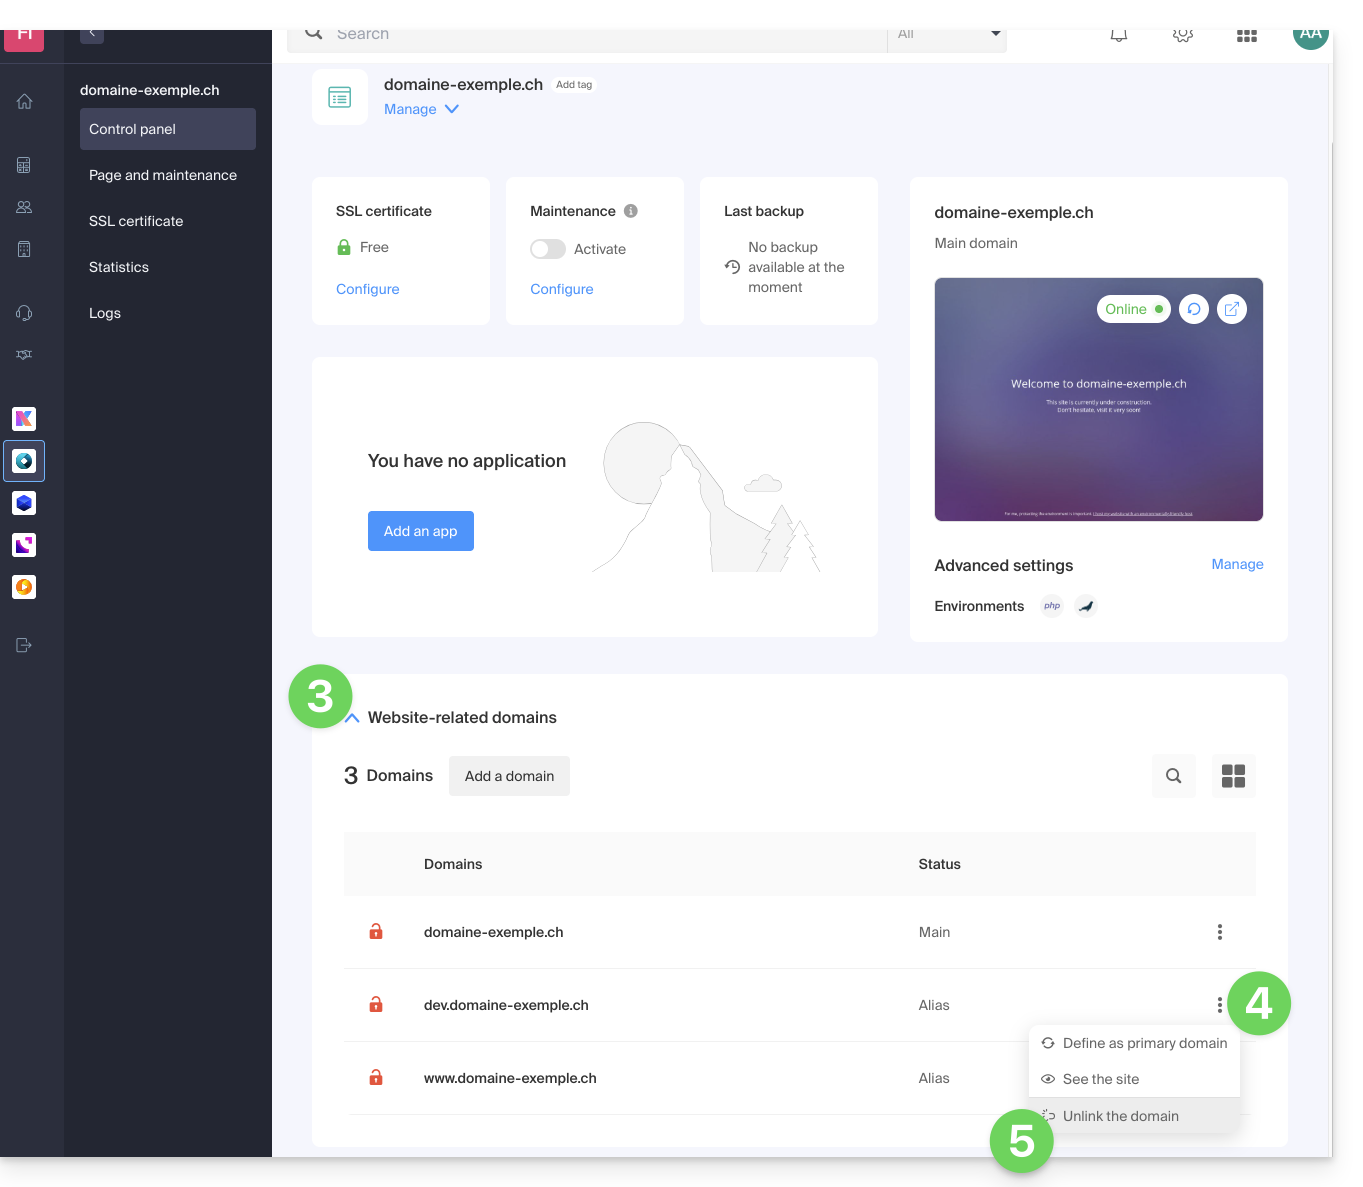
Confirm the deletion of the alias:
- If necessary, you can choose to delete the DNS records related to the domain…
Link to this FAQ:
Has this FAQ been helpful?
This guide explains how to transfer data (Web, Mail, Domain) currently hosted by Swisscom to Infomaniak. The first year of Web + Mail hosting (learn more) is offered to Swisscom customers who decide to switch to Infomaniak!
Transfer your Swisscom services to Infomaniak
To avoid interrupting your website and emails, migrate your services in the order indicated above.
Why join Infomaniak?
By consolidating your domain names, websites, and email addresses with Infomaniak, you simplify the management of your invoices and services. Additionally, linking your domains will be done automatically with your website and email address. You will therefore not need to manually configure the DNS of your domains with another registrar.
Link to this FAQ:
Has this FAQ been helpful?
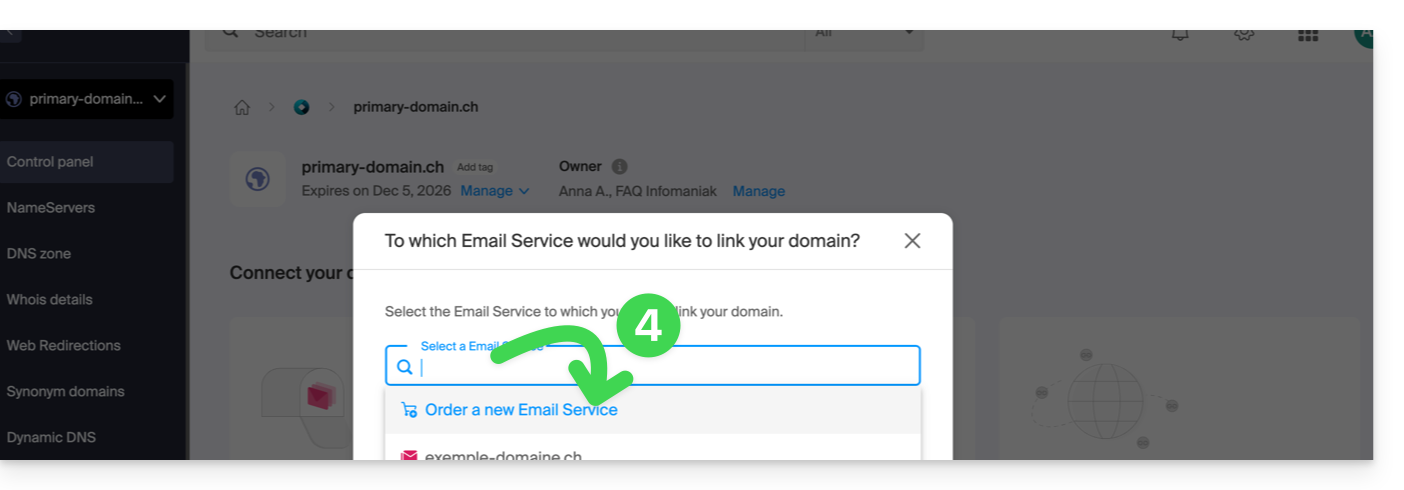
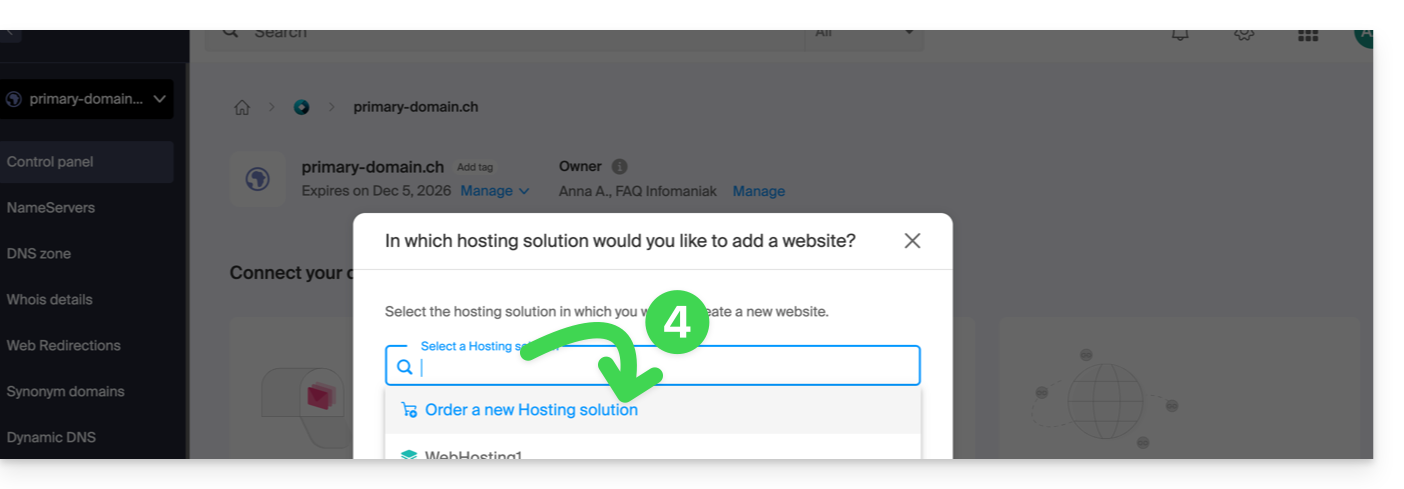
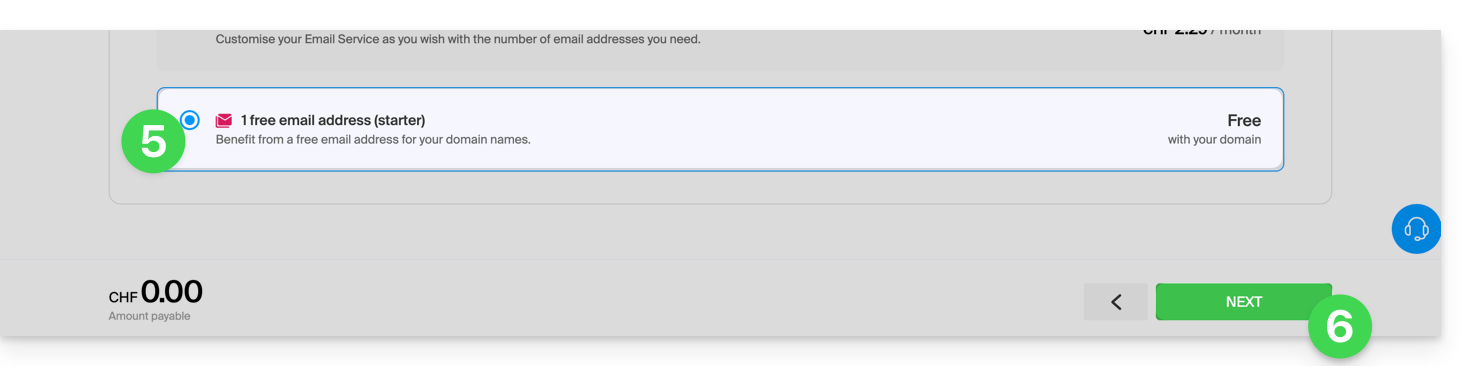
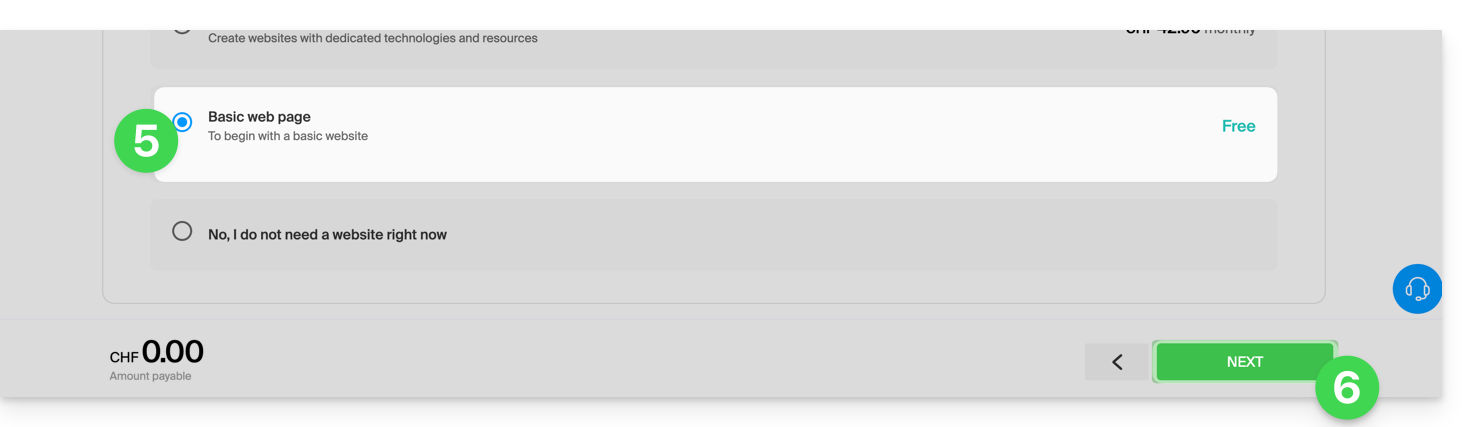
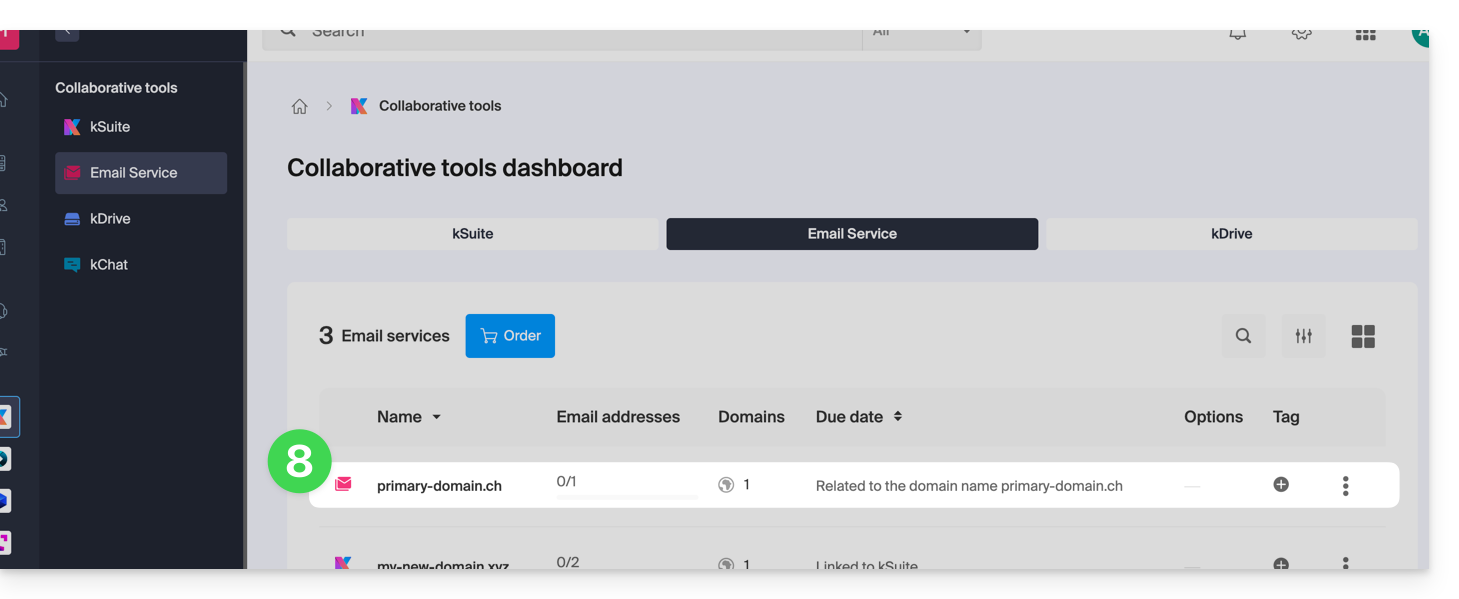
This guide explains how, after purchasing a domain name from Infomaniak, to obtain for free an Email Service + Web Hosting.
Preamble
- For each domain name registered or transferred to Infomaniak, you can benefit from free:
- an email address that gives you access to the Infomaniak Mail app
- and a 10 MB Web space for a basic page.
- It is also possible to have a free Email Service while having a paid Web offer, or vice versa.
- Instead of a Starter type Email Service, there is also kSuite.
Activate the Starter Mail + Web offer
Prerequisites
- Own a domain name with Infomaniak (a DNS zone is not enough).
- Depending on the type (Mail or Web) desired, not to have an existing corresponding product already associated with the domain name and this in any existing Infomaniak Organization.
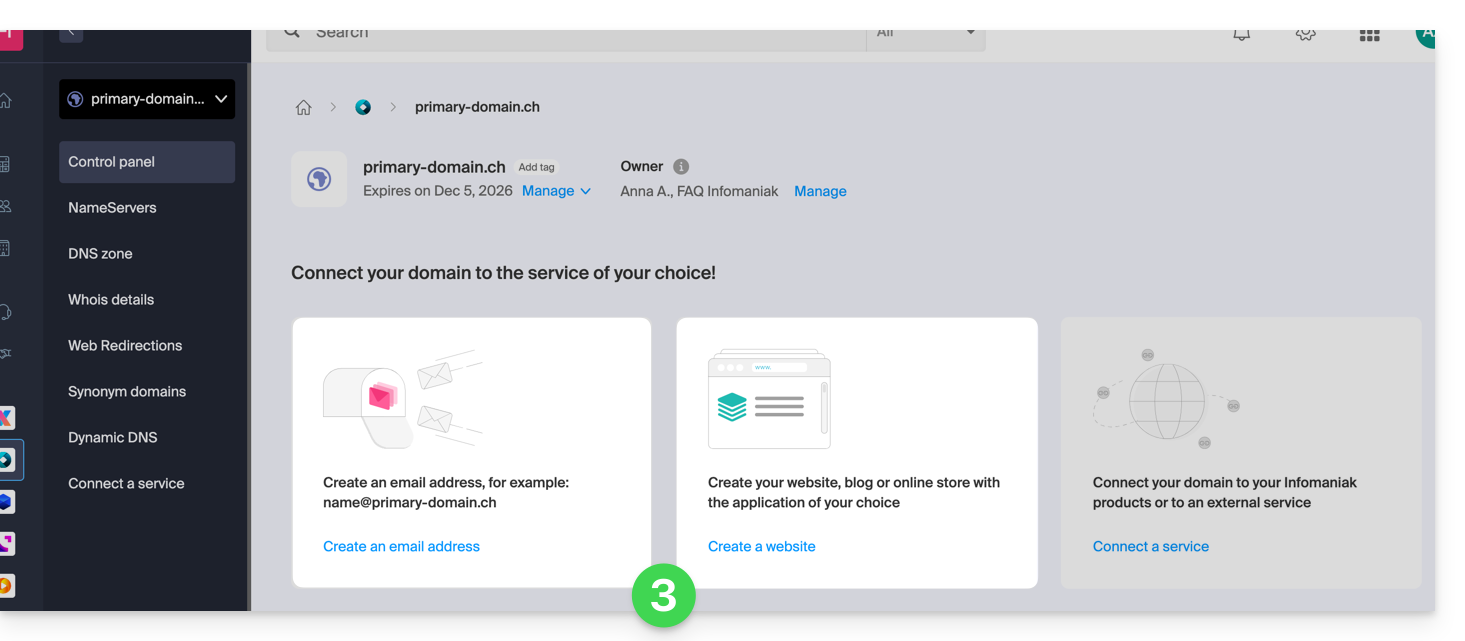
To order a Starter Email Service and Starter Web Hosting included with each domain:
- Click here to access the management of your product on the Infomaniak Manager (need help?).
- Click directly on the name assigned to the product concerned:
- It is necessary that no product is linked at the moment to the domain (visible in the column of linked products).
- Click on one or the other of the shortcuts to Connect a service (mail or web):
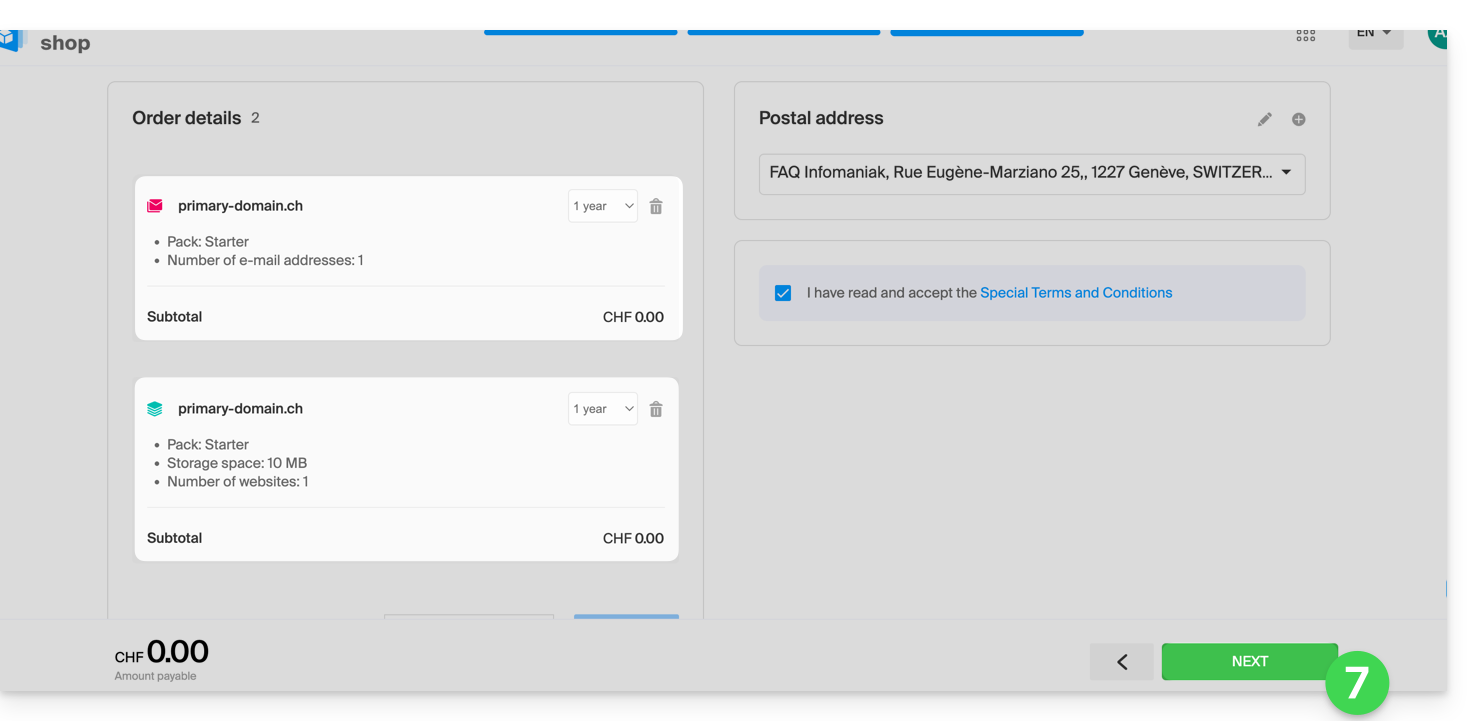
- In both cases, click on Order …:
- You will be able to choose the corresponding free service (mail or web) and the next step will offer you to choose the other (mail or web) if desired.
- Click at the bottom of the page to continue:
- Finalize the order:
- Return to your Infomaniak Manager to discover and use your new products:
Using your Starter products
- Create the desired email address on your Mail Starter Service.
- To use the 10 MB Web space and create a basic web page on your Web Starter Hosting, use:
- the page editor
- or the Web FTP on the Manager to manage your HTML pages
- or any FTP software/client with the classic FTP protocol
Evolving a Starter offer
- Modify a Mail offer (click here).
- Modify a Web offer (click here).
In case of a problem with a Starter hosting
A Starter type Web hosting does not offer IPv6. Be careful with AAAA records in the DNS zone of the domain name concerned which can in particular prevent you from activating SSL; also refer to this other guide.
Link to this FAQ:
Has this FAQ been helpful?
This guide explains how to create subdomains on an existing Infomaniak hosting using a .htaccess file.
Introduction
- The hosting can be on an offer of Shared Web Hosting or on Infomaniak Cloud Server but this function is impossible with a Starter hosting.
- Subdomains can be added very easily to your current hosting since you have in the basic offer 20 sites per hosting (sites = subdomains).
- If you do not want to use this site volume available to you, you can follow the method below.
Create a subdomain as a shortcut
The subdomains thus created make it easier to organize a hosting. For example the address vlog.domain.xyz will be the shortcut of the address domain.xyz/vlog. In other words, the address vlog.domain.xyz will redirect to the vlog folder which must be located at the root of the website domain.xyz. In this example, vlog is the subdomain of domain.xyz.
1. Add the subdomain as an alias of your website
To do this:
- Follow the procedure for adding an alias but please read the points 2 and 3 below.
- In the field to add the related domain, enter the full address of the subdomain (for example
vlog.domain.xyz). - If your domain or its DNS zone is managed at Infomaniak, activate the following two options: Update DNS entries for this domain and Replace existing entries ; if this is not the case, create a A record with your registrar with the following information:
- field: the full URL of the subdomain (for example
vlog.domain.xyz) - target: the IPv4 address (A record) of your site (refer to this other guide to find the A record of your site)
- field: the full URL of the subdomain (for example
2. Modify the .htaccess file of your website
Important: the following instructions are given for informational purposes only. You may need to adapt the code to work in your situation.
Using your FTP software/client or Web FTP on the Manager, add and adapt the following code in the .htaccess file located at the root of your website:
RewriteCond %{HTTP_HOST} ^(.*)\.domain\.xyz [NC]
RewriteCond %{DOCUMENT_ROOT}/%1/ -d
RewriteCond %1::%{REQUEST_URI} !^(.*?)::/\1/?
RewriteRule "^(.*)$" "%{DOCUMENT_ROOT}/%1/$1" [L]
Explanation for the third line: https://stackoverflow.com/a/15981056
Replace on the first line:
domainwith your domain namexyzwith your domain extension (ch, fr, etc.)
Now, the address vlog.domain.xyz should display the content of the vlog folder located at the root of your website. If this is not the case, check that the vlog folder exists at the root of your website.
Link to this FAQ:
Has this FAQ been helpful?
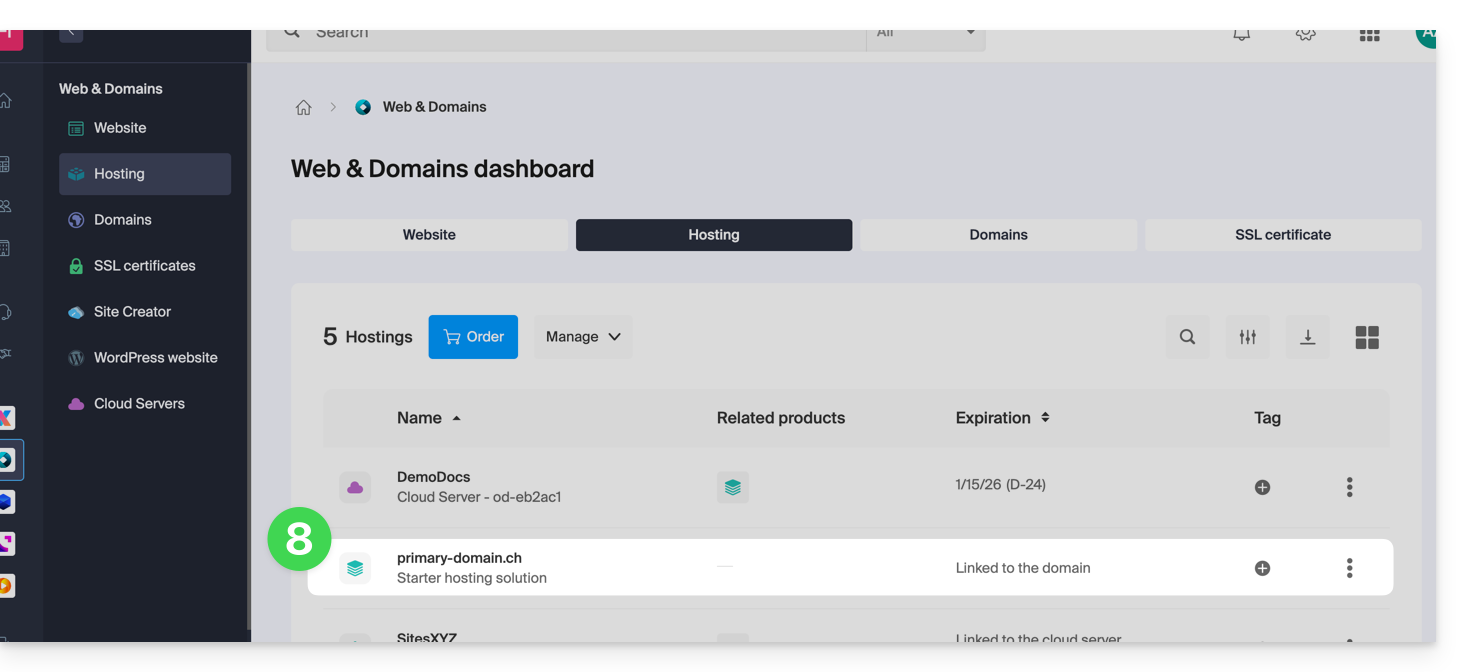
This guide explains how to move a Web Hosting (and all the sites it contains) from a Cloud Server to another managed Cloud Server.
If you wish to update the current Cloud Server to a next-generation server, refer to this other guide.
Preamble
- FTP & MySQL
- When moving a hosting from one Cloud Server to another:
- FTP access and databases do not change.
- Only the supported versions of PHP and MariaDB, as well as the server's IPv4 and IPv6 addresses, change at the hosting level.
- Hostnames do not change and are automatically updated to point to the new IP addresses.
- When moving a hosting from one Cloud Server to another:
- Temporary interruption:
- The sites in the hosting will be unavailable during the data migration.
- This process can take several minutes depending on the number of files to transfer to the new Cloud Server.
- Possible switch to HTTP/2:
- HTTP/2 is active on the new servers.
- Some directives that may be present in your server's .htaccess file could require adaptation.
- Traffic redirection:
- A proxy is set up for 7 days to redirect traffic from the old server to the new one.
- It is therefore advisable to consider this during this period, especially for crons (see below).
- Crons not migrated:
- SSH crons are not migrated.
- Files and crons are generally not deleted immediately, which can result in duplicates.
- Managing crons is your responsibility; depending on the progress of your migration, you need to:
- deactivate and activate crons via SSH if you have them, to avoid any execution conflicts,
- check your crons,
- ensure they are properly configured on your new Cloud Server.
Move hosting
Prerequisites
- Both servers must be in the same Organization and accessible to the user performing the operation.
Once the second Cloud Server is in service:
- Click here to access hosting management on the Infomaniak Manager (need help?).
- Click directly on the name assigned to the hosting concerned.
- Click on the Manage button.
- Click on Move to another server in the menu that appears:
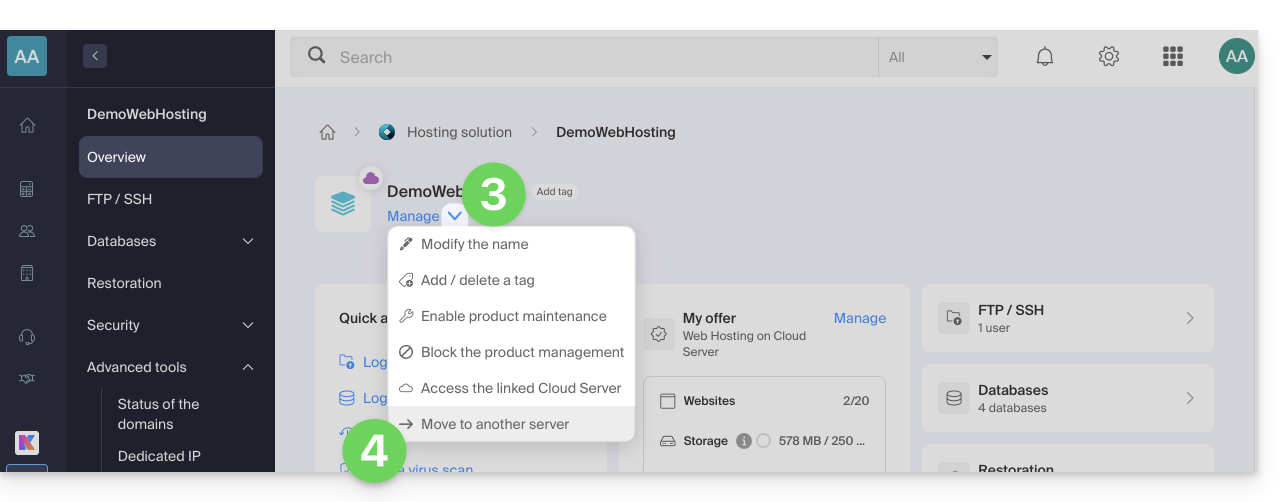
- Choose the desired destination server.
- Click on Confirm.
Adjust the DNS zone and finish
If your domain names are not managed by Infomaniak or in the same Organization as the Cloud Server:
- Adjust the A record of the domains concerned.
- Any DNS addition/modification can take up to 48 hours to propagate.
- It is therefore recommended not to cancel the old Cloud Server before this period.
- Cancel the old Cloud Server if necessary.
Link to this FAQ:
Has this FAQ been helpful?
This guide explains how to link a domain name managed by Infomaniak to a Shopify hosting plan.
Introduction
- A website created on Shopify cannot be exported to be hosted on third-party servers, such as those of Infomaniak.
- It is therefore recommended to create the website directly with Infomaniak using Site Creator or WordPress.
Linking Shopify to your domain name at Infomaniak
To link a website on Shopify with a domain name at Infomaniak:
- Click here to access the management of your domain in the Infomaniak Manager (need help?).
- Click directly on the name assigned to the domain in question.
- Click on Connect a service in the left-hand menu.
- Click on the blue Connect button on the Shopify tile:

- The A records will be replaced with a record with the value
23.227.38.65. - The CNAME record "www" will be modified to have the value
shops.myshopify.com.
- The A records will be replaced with a record with the value
- Click on the Next button.
Web traffic will point to the Shopify servers a few hours later.
The mail configuration is not affected by these two DNS changes.
Link to this FAQ:
Has this FAQ been helpful?
This guide is about the DMARC policy and the optional security reports sent by email that can be activated or deactivated upon request.
Optional DMARC reports
The DMARC reports are optional and provide the following information:
- Third-party senders or servers that send emails on behalf of your domain.
- The percentage of messages from your domain that successfully pass the DMARC verification process.
- The servers or services that send emails failing DMARC verifications.
- The DMARC actions performed by the receiving server for unauthenticated messages from your domain (none, quarantine, or reject).
When the reports indicate that most emails successfully pass DMARC verifications, it is recommended to strengthen your DMARC settings by enforcing stricter measures. This will enhance the protection of your domain against spoofing.
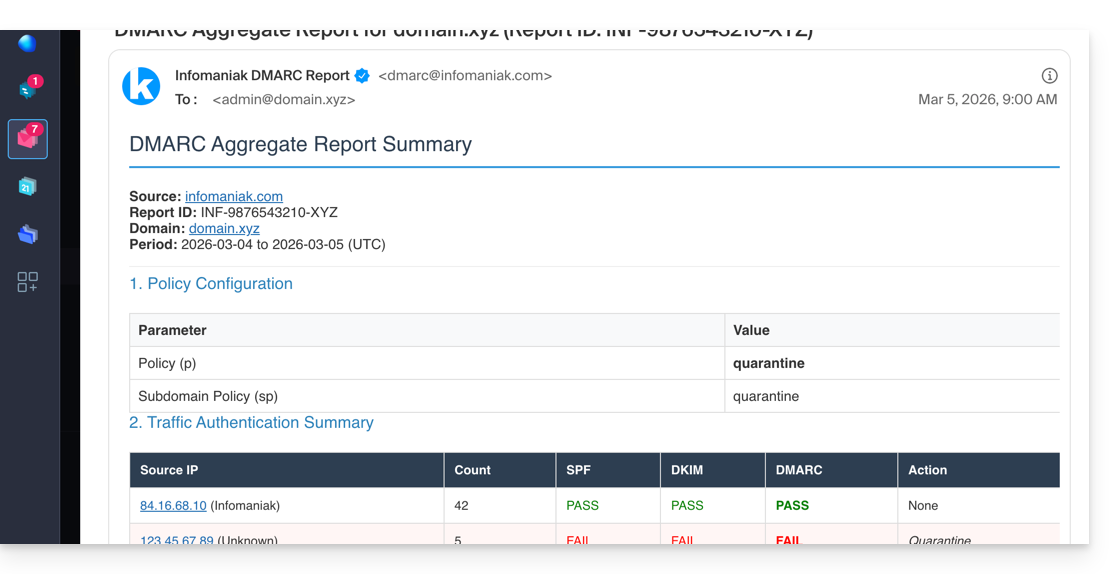
The written report is delivered as a ZIP archive containing the report in XML format. It is sent by email to the address you specify in the configuration, and will come from dmarc@infomaniak.com or other providers such as Microsoft, Google, Yahoo, etc.: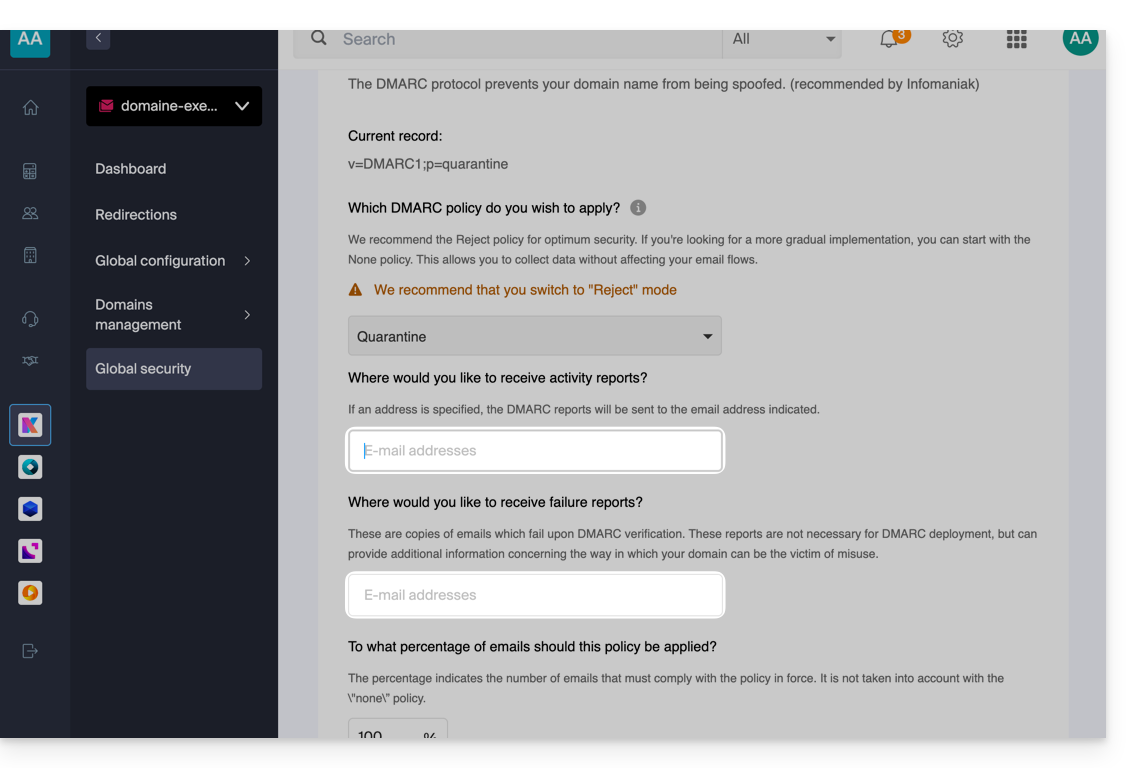
It is also possible to receive copies of problematic emails.
Analyzing a DMARC report
Infomaniak is neither able to analyze your potential DMARC reports and records, nor able to comment on the validity or compliance of these, as this is entirely your responsibility.
It is recommended to use an external service to analyze a DMARC report, such as https://dmarcadvisor.com/dmarc-analyzer/.
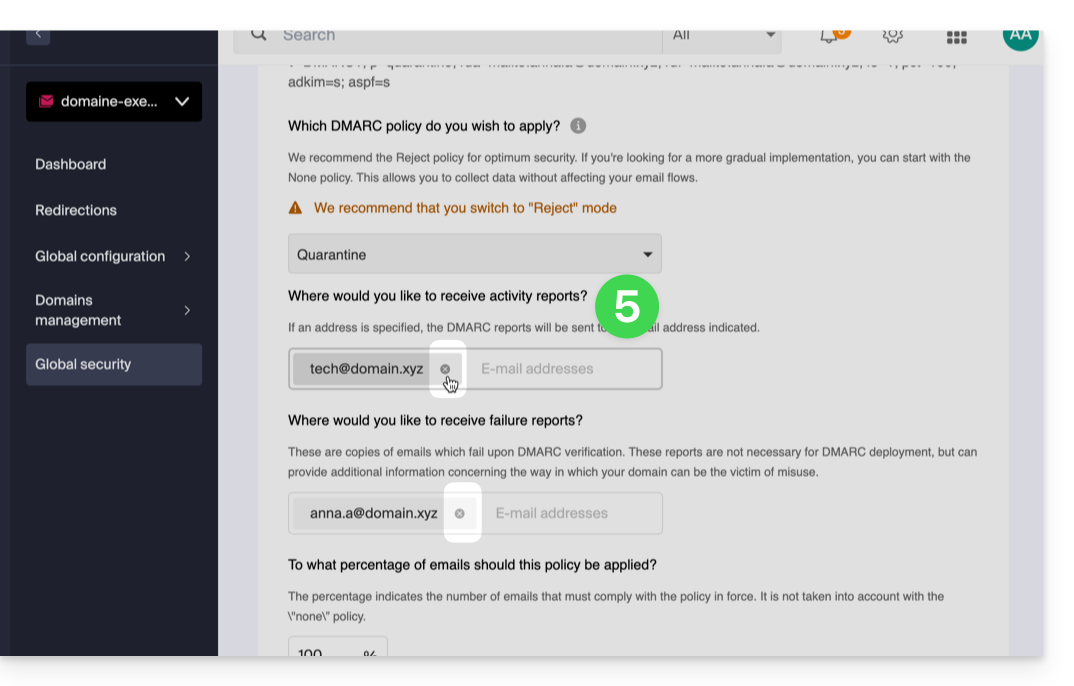
Deactivating a DMARC report…
… from a Mail Service
To deactivate the sending of a DMARC report if you still have a Mail Service (otherwise, see below):
- Click here to access the management of your product on the Infomaniak Manager (need help?).
- Click directly on the name assigned to the product concerned.
- Click on Global Security in the left sidebar.
- Click on Edit (in the DMARC section).
- Remove the registered addresses and validate at the bottom of the page to Apply the changes:
... from the DNS zone of a domain
If the Mail Service is no longer in use but you continue to receive email reports, you need to act directly on the domain name and delete the dmarc record from its DNS zone (or simply edit it to completely remove the 2 tags rua and ruf):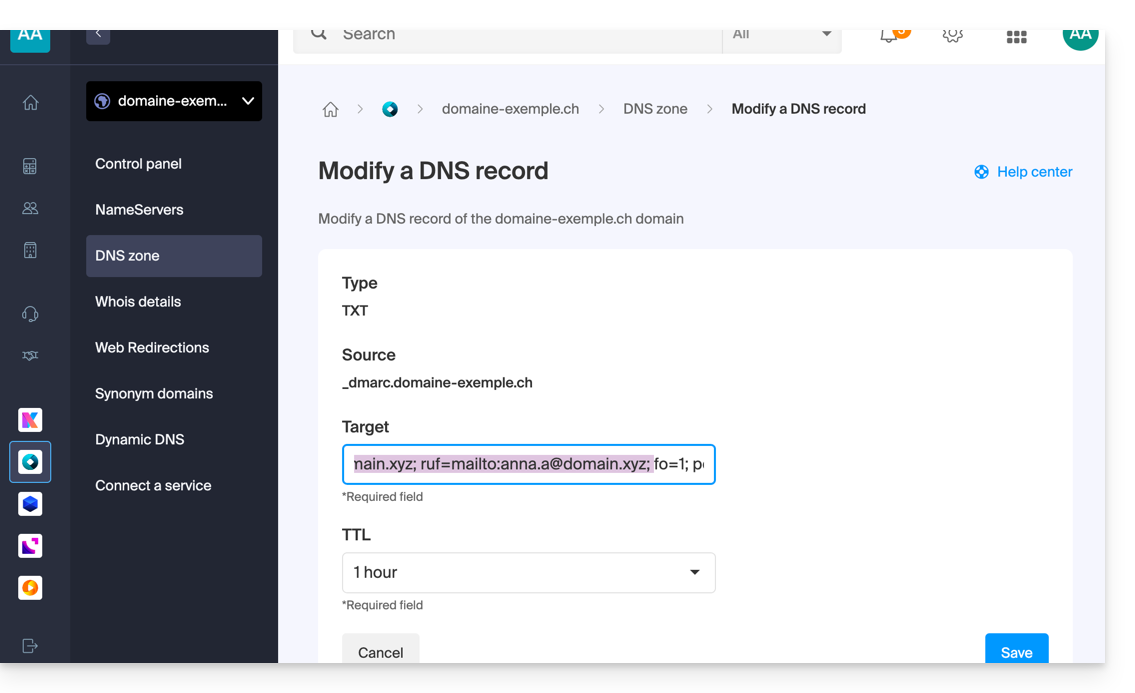
The difference between RUA and RUF
It is important to understand what you are disabling by removing ruf:
- RUA (Aggregate): a daily summary (explained above); it provides statistics: "Yesterday, 50 emails were successful, 10 failed."
- RUF (Forensic/Failure): an email sent instantly as soon as a single message fails the DMARC tests; it often contains the original content of the email (subject, body).
Link to this FAQ:
Has this FAQ been helpful?
This guide details the conditions and procedure for using a Sectigo Infomaniak certificate on a site hosted elsewhere, with a third-party host.
Preamble
- You have the possibility to benefit from Infomaniak's advantageous rates for your SSL certificates while managing your sites with another host.
Install a Sectigo certificate
Due to the different providers, the installation of your certificate will not be automatic:
1. Obtain the CSR
Export the CSR configuration file from your host and enter it when ordering your certificate with Infomaniak.
2. Confirm domain ownership
Validate the domains included in the certificate via one of the following methods:
- Enter a validation code received at one of the following email addresses (the full email address must exist on the domain to be validated, here “
domain.xyz” for example):- admin@domain.xyz
- administrator@domain.xyz
- hostmaster@domain.xyz
- postmaster@domain.xyz
- webmaster@domain.xyz
- Creation of a unique CNAME record in the domain's DNS.
- Validation txt file to upload via FTP to your site.
Link to this FAQ:
Has this FAQ been helpful?
This guide explains how to optimize a website hosted on a Web Hosting service to make it faster and provide a smooth navigation experience for all your visitors, regardless of their connection speed.
The role of the host
The loading speed of a website depends on many factors: server performance, host network infrastructure, visitor's internet connection, and site optimization itself.
As a host, Infomaniak strives to offer the best in hosting by continuously evolving its products and infrastructure:
- All hosting services run on the latest generation of SSD drives.
- The infrastructure benefits from over 70 Gbit/s of interconnection and redundancy with partners like Cogent or Level3.
- To handle traffic spikes, servers use regularly renewed 64-bit Intel Xeon processors. Shared servers use, on average, only 40% of their CPU power.
When you submit a support request regarding slowness, Infomaniak checks the following points:
- Your hosting server is functioning normally and has not encountered any incidents in the last 48 hours.
- The network infrastructure has not experienced any disruptions during this same period.
The role of the site owner and the webmaster
Infomaniak does not intervene on the content of the servers or the development of the sites. The creation and maintenance of a site are distinct professions, although they use the tools and services provided by the host.
Analyze the cause of slowness
Here are the actions to take if you notice slowness on your site:
- Apply the Google PageSpeed Insights recommendations. These points concern the design of the site and not the server configuration. Refer to this other guide if the test recommends enabling resource compression.
- If slowness is noticed from abroad, activate DNS Fast Anycast.
- Install a caching system to reduce redundant database accesses and speed up display.
- Consider using a CDN.
- Test the server response time or TTFB.
- Scan your hosting to detect any potential viruses.
- Purge your databases regularly by deleting unnecessary entries.
- Use the latest PHP version compatible with your site or CMS.
- Avoid images, counters, or media hosted on external servers: if they are unreachable, your site will appear slow.
- Deactivate unnecessary or resource-intensive WordPress extensions.
- Keep your CMS and web applications regularly updated.
- Limit the impact of overly aggressive indexing robots by configuring a Crawl-delay.
- Analyze the error-logs: correcting the errors generated by your site improves its performance.
- Review the slowlogs to identify SQL queries taking more than 5 seconds to execute and optimize them (optimization examples).
- Add a server cache engine like Memcached (available on Cloud servers only).
- Increase the max_children value (only on Cloud servers).
If the problem persists
If you or your webmaster cannot find the source of the slowdowns, contact Infomaniak support in writing by providing the following information:
- Name of the hosted site.
- Exact dates and times of the slowdowns.
- Name of the database or FTP account potentially involved.
- Your public IP address during tests (visible on https://www.infomaniak.com/ip).
- Type of slowdown (display, FTP transfers, etc.).
- Indicate if you can normally access the Infomaniak site during these episodes.
- Complete result of a traceroute to
84.16.66.66. - Result of a speed test on speedtest.net by selecting Infomaniak as the destination server.
If your needs evolve
If shared hosting is no longer sufficient, consider switching to a Managed Cloud Server. Your site can be easily migrated to take advantage of dedicated resources and advanced caching technologies.
Link to this FAQ:
Has this FAQ been helpful?
This guide is for you if you encounter issues with a Sectigo SSL certificate of type DV or EV.
Sectigo Change (June 2025)
Since June 2025, Sectigo uses a new validation infrastructure called MPIC, which performs the necessary checks to issue SSL certificates (including EV and OV) from servers located around the world, and no longer solely from the United States.
A challenge is a method used by the certification authority to verify that the applicant controls the domain. This can be done through an HTTP request, a DNS record, or an email. For EV and OV certificates, this challenge is combined with checks on the organization's identity.
With this new method, validation requests can come from any country or provider. If your site or server uses geoblocking rules, a web application firewall (WAF), or a service like Cloudflare with access restrictions by country or ASN, these checks may be blocked, causing validation to fail.
Even though Sectigo primarily discusses OV and EV certificates, this change can also indirectly affect DV certificates, as domain validation still relies on the ability to access the necessary resources.
⚠️ To avoid any issues, it is therefore recommended to temporarily disable any geographic restrictions or network filtering during certificate validation.
Link to this FAQ:
Has this FAQ been helpful?
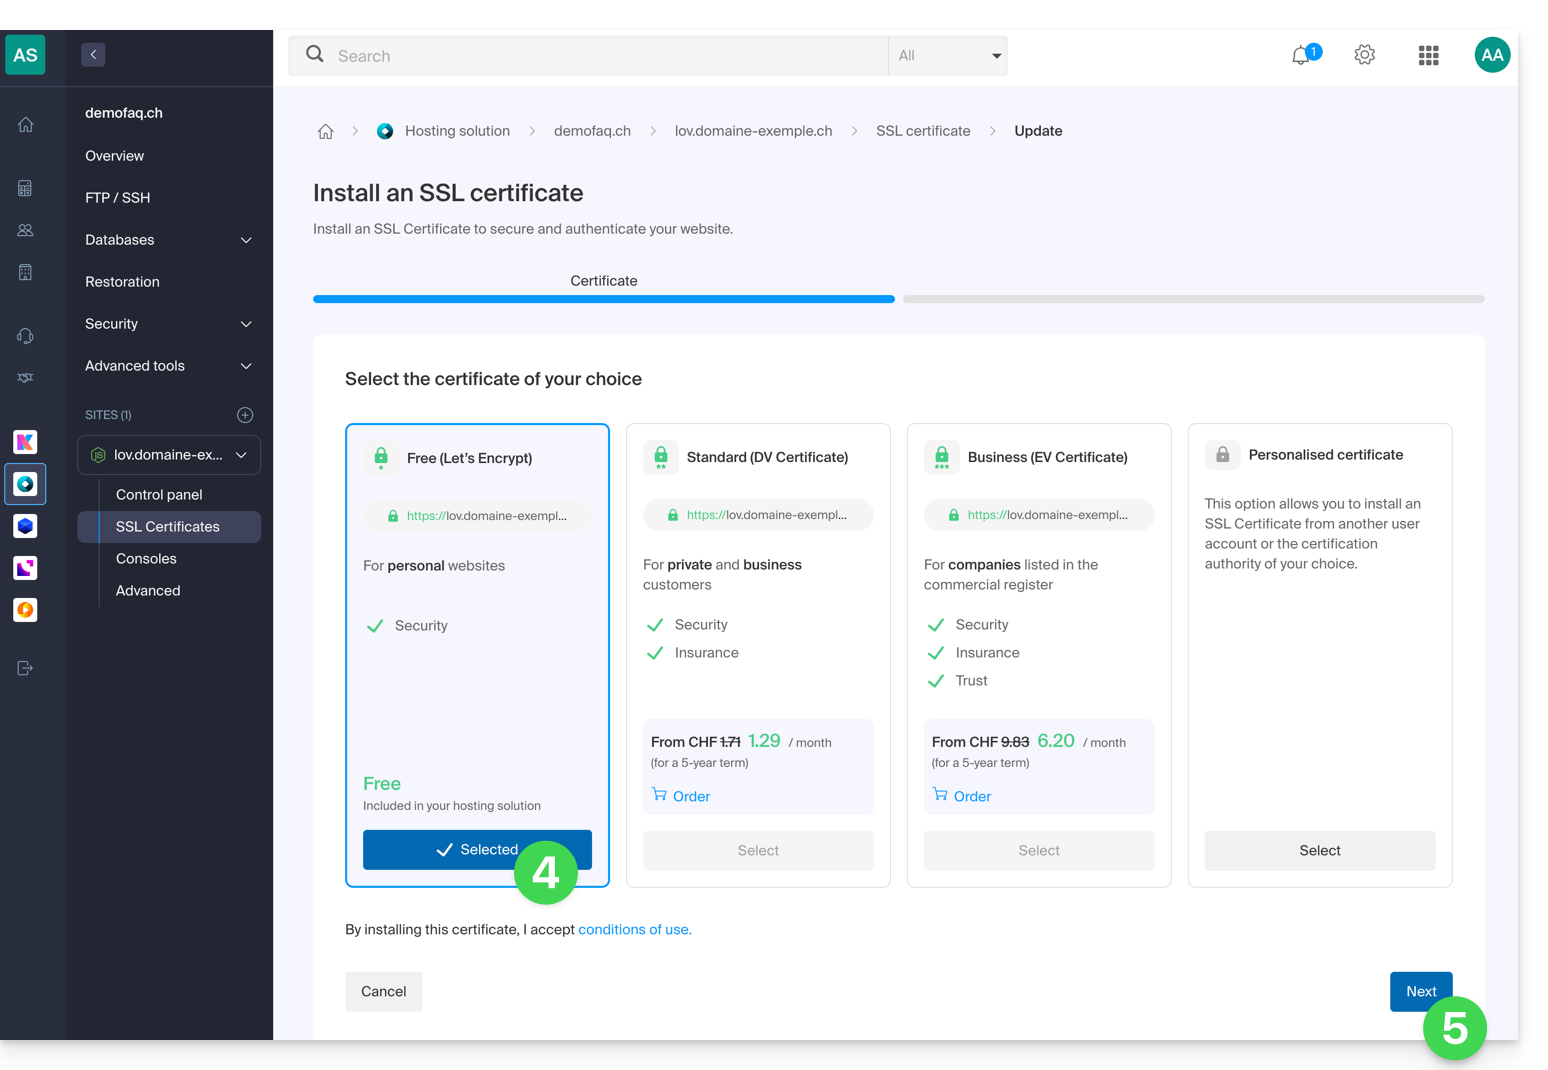
This guide explains how to install a free SSL certificate from Let's Encrypt on a website hosted by Infomaniak.
Introduction
- Once the certificate is installed, your website will be accessible via
httpandhttps… - If you want to include a domain alias that was recently added to your site, which already had a certificate, you need to update it.
- For multiple subdomains, please refer to this other guide.
- Let's Encrypt limits certificate installation to:
- 100 subdomains
- 20 certificates per 7 days per registered domain
- 5 unsuccessful requests per account per hostname per hour
Install a free SSL certificate on a site
Prerequisites
- For the installation to be possible, the DNS records for the domain name must be correctly configured to point to the site in question.
- If a change has just been made at this level, some operations may not be functional immediately.
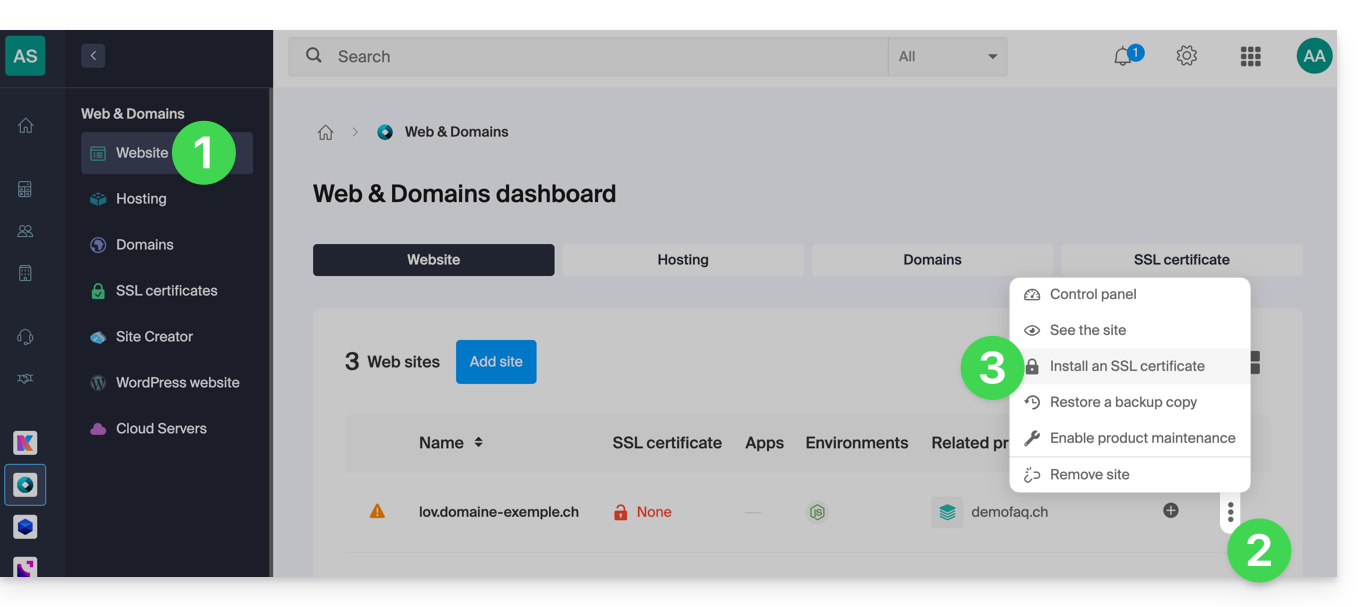
To access the websites to install an SSL certificate:
- Click here to access the management of your site on the Infomaniak Manager (need help?).
- Click on the action menu ⋮ located to the right of the website in question.
- Click on Install an SSL certificate:
- Choose the free certificate.
- Click on the Next button:
- Check or select the domains concerned.
- Click on the Install button:
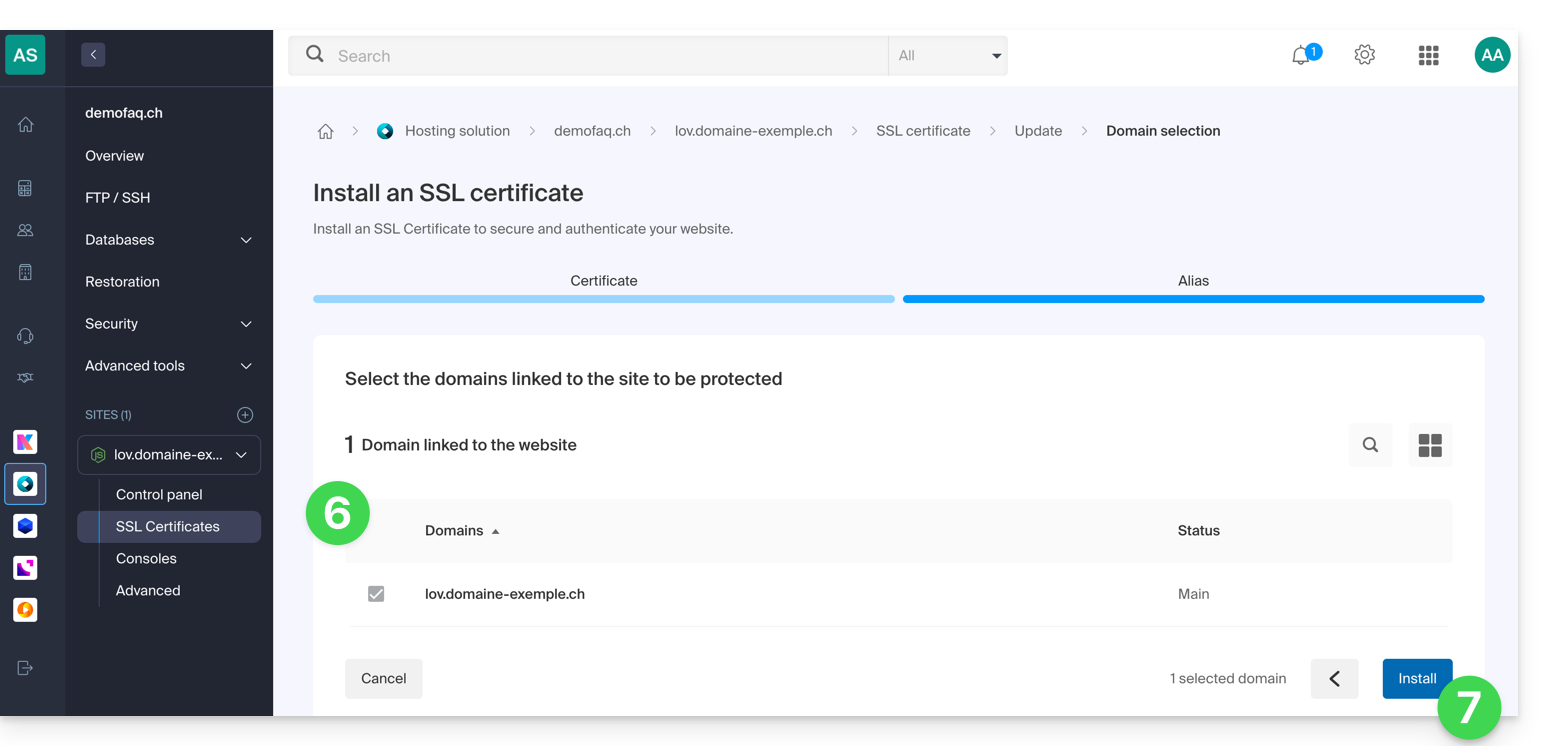
- Wait a few minutes for the certificate to be obtained for the website.
Refer to this other guide if you encounter SSL errors and to this other guide specifically if you are using Cloudflare.
Link to this FAQ:
Has this FAQ been helpful?
This guide explains how to set up a WordPress multisite network to manage multiple sites from a single WordPress installation by Infomaniak, with URLs such as site1.domain.xyz, site2.domain.xyz, or even domain1.com, domain2.com, etc.
WordPress multisite installation
To get started:
- Install WordPress via Infomaniak on your hosting space with a main domain name:

- This first WordPress site must be reachable and functioning correctly:

- This first WordPress site must be reachable and functioning correctly:
- Connect via FTP.
- Edit the
wp-config.phpfile of this first WordPress site. - Above the line "
/* That's all, stop editing! Happy blogging. */" (#94) copy-paste the codedefine('WP_ALLOW_MULTISITE', true);:
- Save your changes.
- Then log in to the administration of your WordPress site.
- Temporarily deactivate all WordPress plugins:

- Go to the TOOLS menu to create a Network:
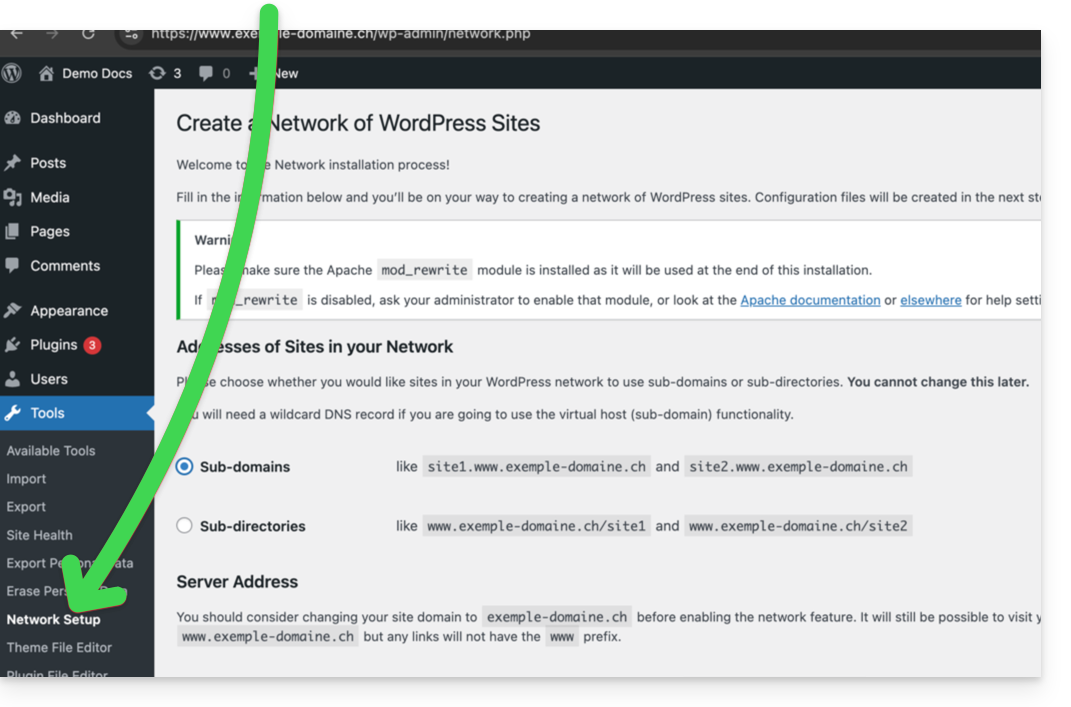
- Choose the method for creating your different WordPress sites (on subdomains)…
- Click the installation button:

- Add the instructions displayed on the screen to the
wp-config.phpand.htaccesson the server. - After reconnecting to your WordPress, you will get a new "My Sites" menu where you can add and manage your different sites in the same network:

- Reactivate your deactivated plugins.
- On the Manager, add an alias to your site in the form
*.your-domain-here (the asterisk allows you to create a wildcard alias) with DNS update so that the correctCNAMEis automatically added to the zone:
- Install or update your SSL certificates:

- When you create a new site within the network, for example by naming it
home2, it will then be accessible viahome2.domain.xyzand so on:
Link to this FAQ:
Has this FAQ been helpful?
This guide explains how to create a PTR record on the dedicated IPs of VPS Cloud / VPS Lite.
Preamble
- A PTR (Pointer Record) is a type of DNS record used to resolve IP addresses into domain names.
- The PTR record is used to associate an IP address with a domain name or subdomain.
- It is the opposite of the A record which is used to resolve domain names into IP addresses.
Create a PTR on the VPS Cloud / VPS Lite IP
If you have a VPS Cloud / VPS Lite and you want to create a PTR record for your dedicated IP address, follow these steps:
- Make sure your domain or subdomain points to the IP address (v4 or v6) of your VPS Cloud / VPS Lite server.
- You can do this by creating an A record for your domain or by modifying the existing record to point to the IP address of your VPS Cloud / VPS Lite.
- Check that your domain points to the IP address of your VPS Cloud / VPS Lite (see 1).
- Contact Infomaniak support to request the creation of a PTR record for your dedicated IP address.
- Specify the IP address of your VPS Cloud / VPS Lite server (you can find this IP address in your server management dashboard or by using a command line command such as "
ifconfig" or "ipconfig" depending on the operating system you are using).
- Specify the IP address of your VPS Cloud / VPS Lite server (you can find this IP address in your server management dashboard or by using a command line command such as "
- Once the PTR record is created, use an online verification tool to ensure that the PTR record points to your domain or subdomain.
Link to this FAQ:
Has this FAQ been helpful?
This guide explains how to replace, within an Infomaniak Web Hosting, the address of a site currently a subdomain (https://dev.domain.xyz) with the main domain (https://domain.xyz).
Preamble
- Operations in brief:
- We start with a site created and accessible via the main domain URL
dev.domain.xyz. - We add an alias
domain.xyzto it. - We reverse the 2 types (the main domain becomes an alias and the alias becomes the main domain).
- We remove the old name
dev.domain.xyz.
- We start with a site created and accessible via the main domain URL
- Note that the site's location remains in the original folder on the server; the name of this location may be of the form
/sites/dev.domain.xyzbut this has absolutely no impact on the production site. - Also refer to the last chapter of this other guide.
Reverse a linked domain
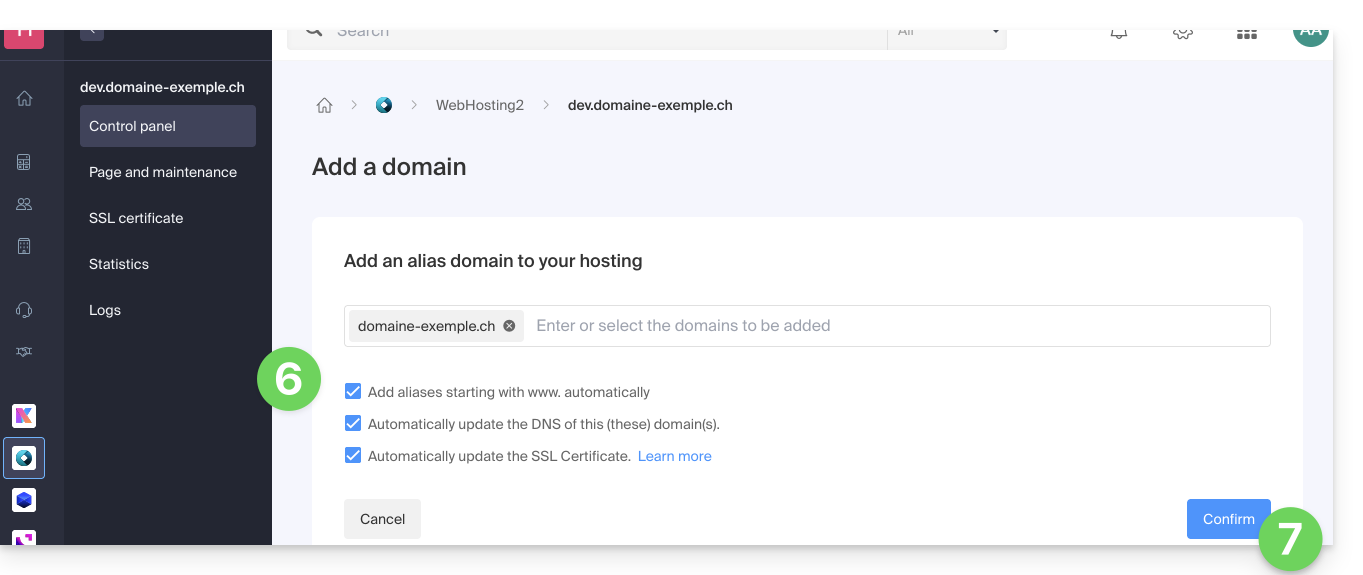
Here are the detailed operations to go from a site with a subdomain type address to a direct address (here dev.domaine-exemple.ch becomes domaine-exemple.ch):
- Click here to access the management of your site on the Infomaniak Manager (need help?).
- Click directly on the name assigned to the site concerned:
- Then click on the chevron to expand the Domains section of this site:
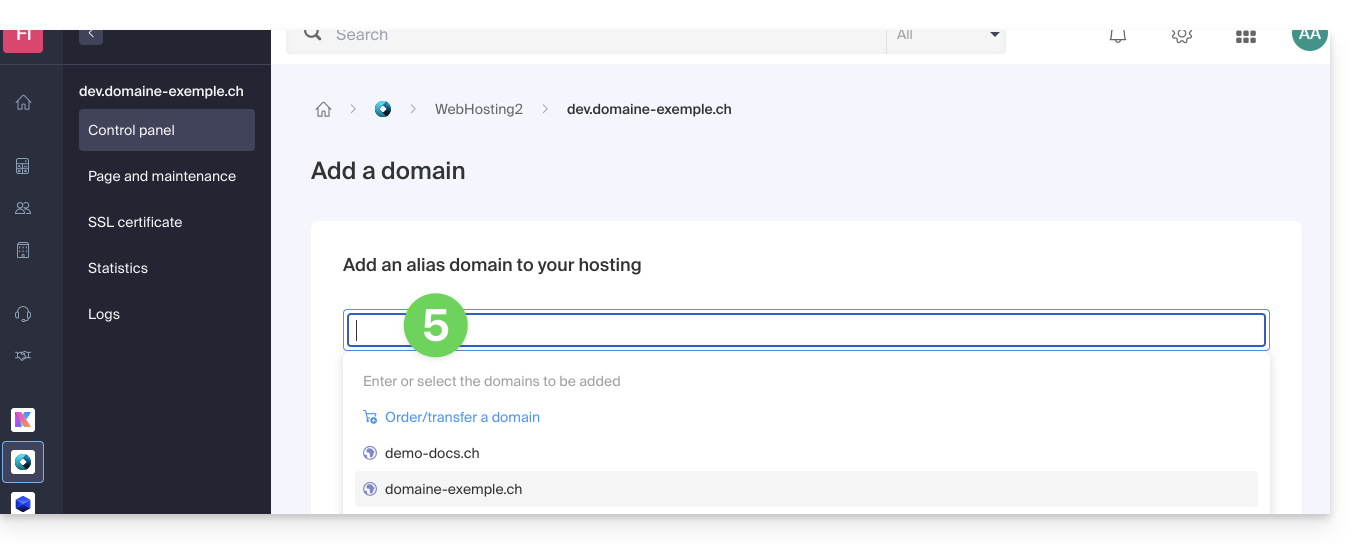
- Click on the Add a domain button:

- Add the desired new name (if the domain name to be added is under the same Organization, it will be suggested in the list, otherwise enter its spelling):
- Enable or disable the checkboxes:
- If the added domain is not in the form of a subdomain, it is possible to request to automatically add the
wwwversion of the domain. - Automatically update (if possible) the DNS records of the added domains.
- Automatically update the related SSL certificates (if possible).
- If the added domain is not in the form of a subdomain, it is possible to request to automatically add the
- Click the button to Confirm and wait:
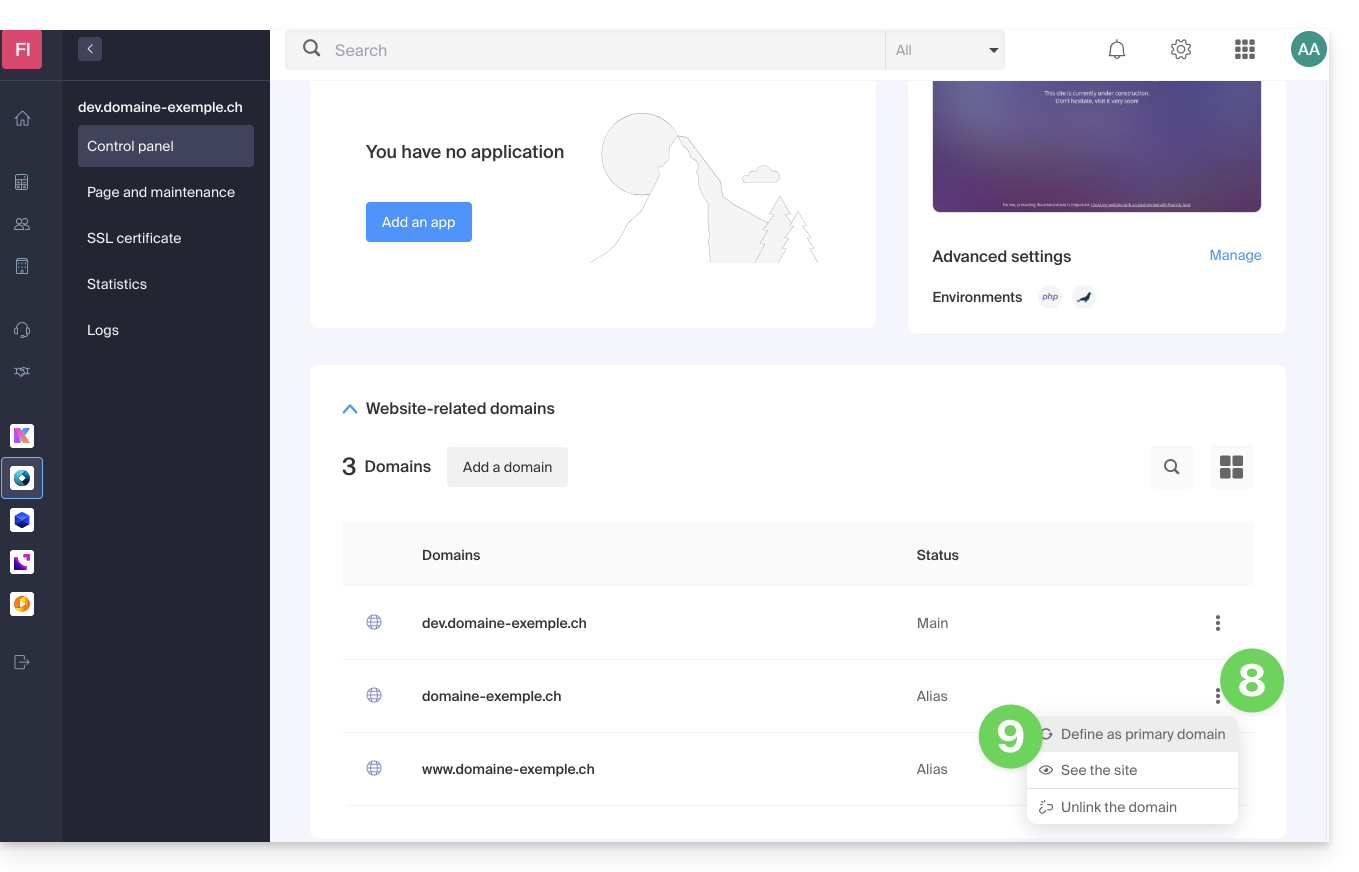
- Once the addition is complete, click on the action menu ⋮ located to the right of the domain that has just been added and that you wish to set as the main domain:
- Choose to set the item as the main domain:
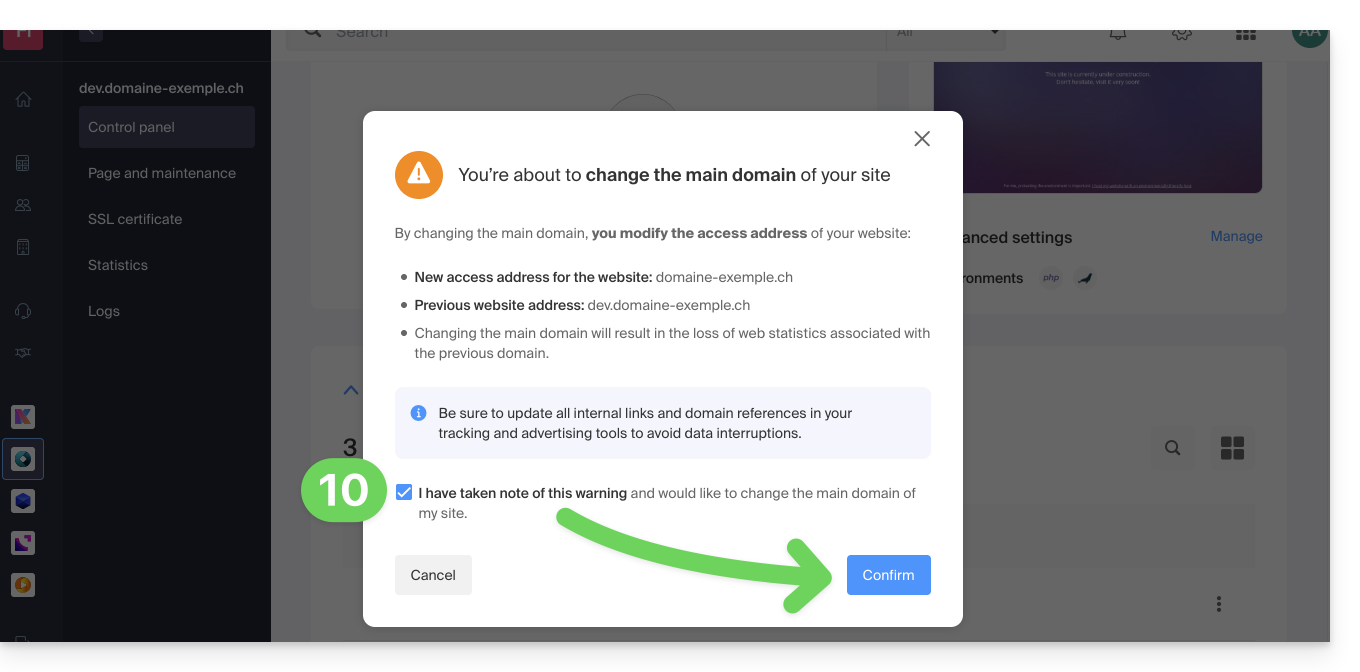
- Confirm the operation to proceed with the domain reversal:
Link to this FAQ:
Has this FAQ been helpful?