Knowledge base
1000 FAQs, 500 tutorials and instructional videos. Here, there are only solutions!
This guide is intended for developers and advanced users and presents the possibilities offered by the Infomaniak API.
Preamble
- The Infomaniak API allows you to leverage the full potential of the Infomaniak ecosystem in your applications and using the language of your choice.
- The Infomaniak API is a REST API; the protocol used is HTTP, requests and responses are encoded in JSON format; authentication is performed via the OAuth 2 protocol.
- Access to and use of the Infomaniak API are completely free.
Infomaniak API Usage Protocol
Using the API, you will be able to automate a wide range of actions and tasks on Infomaniak products and services, without having to use the product interfaces. A few examples of use:
- Store data.
- Send direct mail campaigns.
- Broadcast video or radio streams.
- Order or manage products.
- ... and much more!
For example, for a Mail Service: managing mailboxes, managing aliases, managing automatic responses, managing folders, etc. For kChat, post a message on a channel…
Create your first requests with the Infomaniak API
Refer to the documentation in English only on the possibilities offered by the API.
Request format
The Infomaniak API is a REST API. The protocol used is HTTP, requests and responses are encoded in JSON. Authentication is performed via the OAuth 2 protocol.
To initiate a request, you must use the following syntax: /{version}/{command_path}. It is possible not to specify the version, but in this case, the latest version will be applied. Refer to the full list of available requests with the Infomaniak API.
API Response Codes
When using the Infomaniak API, you may encounter various response codes. These codes precisely indicate the status of your request. Refer to the complete list.
Limits & Restrictions
There is a limit of 60 requests per minute with the Infomaniak API. This limit cannot be increased. The use of the API is restricted to the products listed in the official documentation. Regular additions of products and services are made to it. If the product or service you are interested in is in the documentation, you will be able to use the following requests: GET ; POST ; PATCH ; PUT ; DELETE.
Learn more
Link to this FAQ:
Has this FAQ been helpful?
This guide introduces Groups, a user management system for your Organization, available on the Infomaniak Manager.
Preamble
- To facilitate access and the addition of a collaborator within the Infomaniak ecosystem, the Groups feature allows you to create teams of users and grant them access to the services they need with just a few clicks.
- Some examples:
- You create a Group for a new department: immediately associate its mailboxes, its kDrive organization folders, and its dedicated kChat discussion channels; each new collaborator added to the team will automatically receive all these accesses.
- You are a web agency and you want to give your webmaster teams access to all your web hostings: simply create a new group, choose all the hostings they will need access to, and invite them to join the Group.
- You own a kDrive: authorize access to a folder for a Group and adjust the access based on users added to or removed from the team over time.
- You use Streaming or Ticketing services and want to give your teams access: create a new Group that will have access to these two products or two separate Groups that will have access to the two products completely independently.
- It is entirely possible:
- to associate resources (Mail, kDrive, kChat) upon creation of the Group to automate onboarding,
- to adjust individual access levels: for kDrive, individual access takes precedence over Group access, while for Mail, access levels are cumulative.
- to add the same user to multiple Groups,
- to invite external users to your Organization to one of your Groups,
- to add one or more users to a Group at once,
- to designate a team leader to easily identify a project manager or the point of contact.
Manage your Groups
Group management now allows for complete centralization. No need to intervene in each tool separately: everything is controlled from the Infomaniak Manager for a smooth reorganization of your collaborators. Learn about the guides on this topic:
Link to this FAQ:
Has this FAQ been helpful?
This guide explains how to save and export your contacts from the Infomaniak Contacts web app address books (online service ksuite.infomaniak.com/contacts).
Introduction
- It is not possible to export an Organization directory.
- The export generates a file of type vCard with the .vcf extension.
Exporting contacts
To choose the contacts or address book to export:
- Click here to access the Infomaniak Contacts web app (online service ksuite.infomaniak.com/contacts).
- Click on the chevron to expand the Advanced actions section.
- Click on the Export menu.
- Click on the address book to export.
- Click on the Export button:
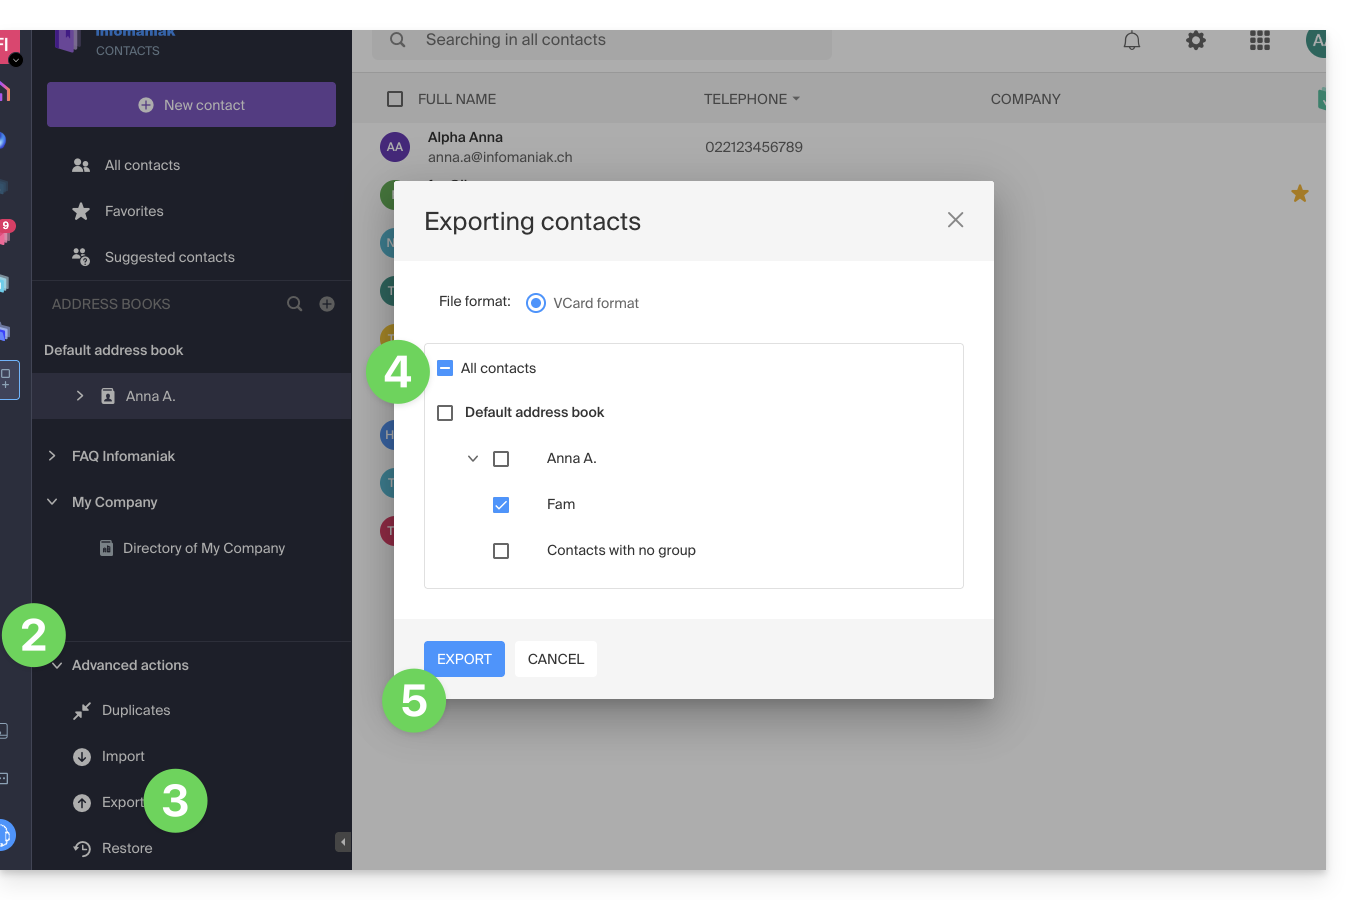
- Choose the location on your device where you want to save the vCard file with your contacts.
You can then open it in macOS contacts or any compatible application.
Link to this FAQ:
Has this FAQ been helpful?
This guide explains how to redirect emails from a Gmail, Bluewin, Outlook, Proton, Yahoo, etc. address to your Infomaniak-managed email address.
Preamble
- By setting up automatic redirection of all incoming emails on your previous messaging system, you can immediately use your new Infomaniak email address while ensuring you don't miss any messages.
- By responding to your emails from your new Infomaniak address, your contacts will automatically use it to write to you in the future.
- You can also import the content from another Mail provider directly to your Infomaniak address.
- For additional help, contact the service provider where you want to activate message redirection.
Specific guides
Refer to the official guides based on your previous provider:
- Gmail
- iCloud
- Microsoft (Outlook / Hotmail / Live)
- Orange
- Proton Mail (note, requires a paid plan)
- Sunrise:
- Click here to log in to Sunrise Mail.
- Click on Inbox.
- Click on Settings => Manage Inbox.
- Enter the corresponding email address under 'Transfer'.
- Yahoo (note, requires Yahoo Mail Pro)
Bluewin
- Bluewin (see also below):
- Click here to log in to Bluewin.
- Click on Settings then Automatic forwarding.
- Click on Set up automatic forwarding.
- Follow the procedure to set up automatic redirection.
- Bluewin (alternative method):
- Click here to log in to MySwisscom.
- Click on the "More" menu then “Settings”:

- Then click on “Manage transfers”:

GMX
Click on these elements in order to set up a redirection rule from GMX:
Link to this FAQ:
Has this FAQ been helpful?
This guide explains how to link a domain name to the kSuite offer from Infomaniak.
Manage the kSuite domain
To get started:
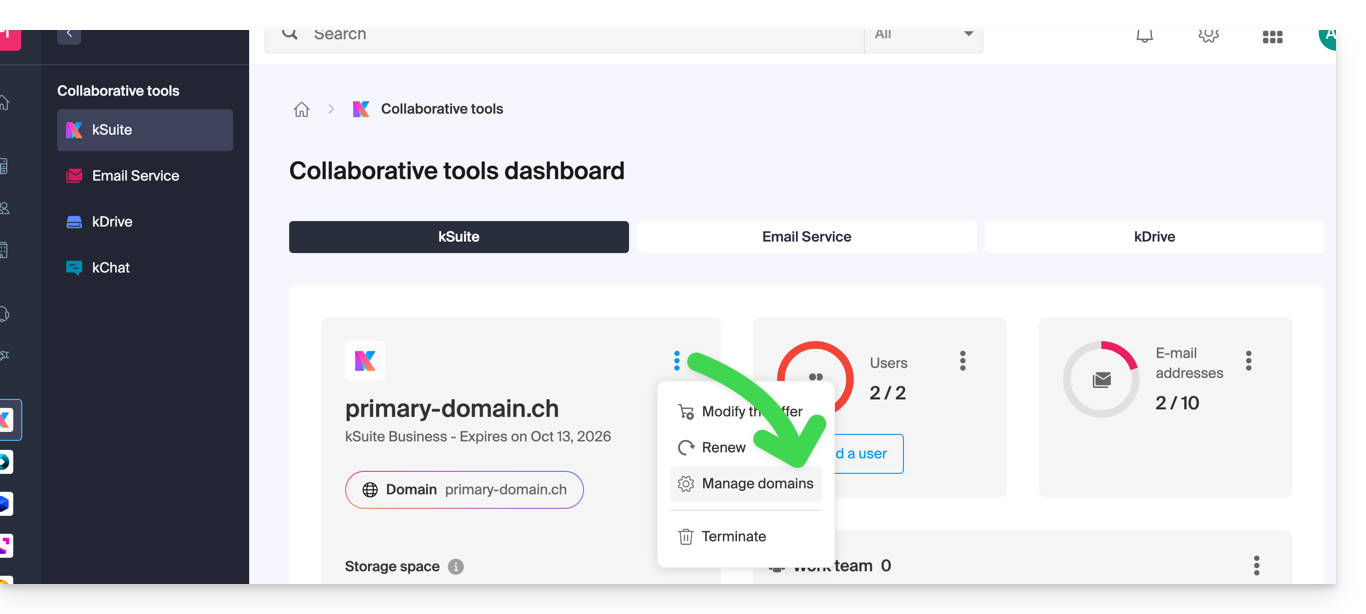
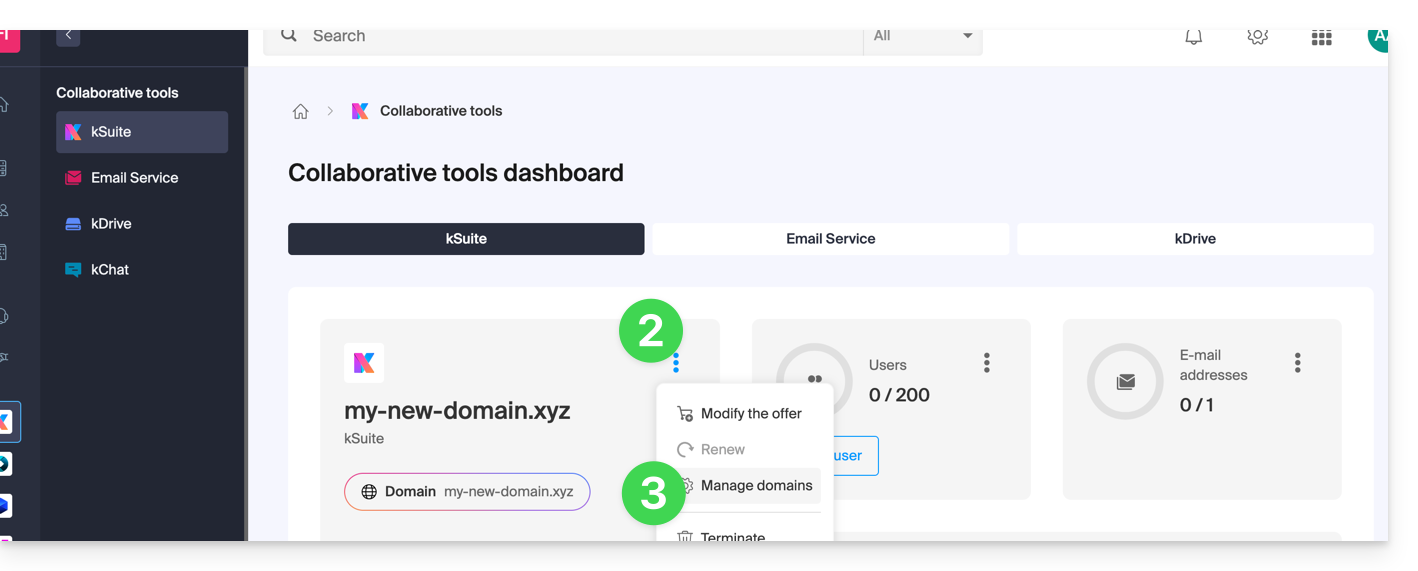
- Click here to access the kSuite management interface in the Infomaniak Manager (need help?).
- If a domain is already linked, you can manage it by clicking on the action menu ⋮ to the right of the kSuite name, then Manage domains:
- If no domain is yet linked, you can add one by clicking on the button:
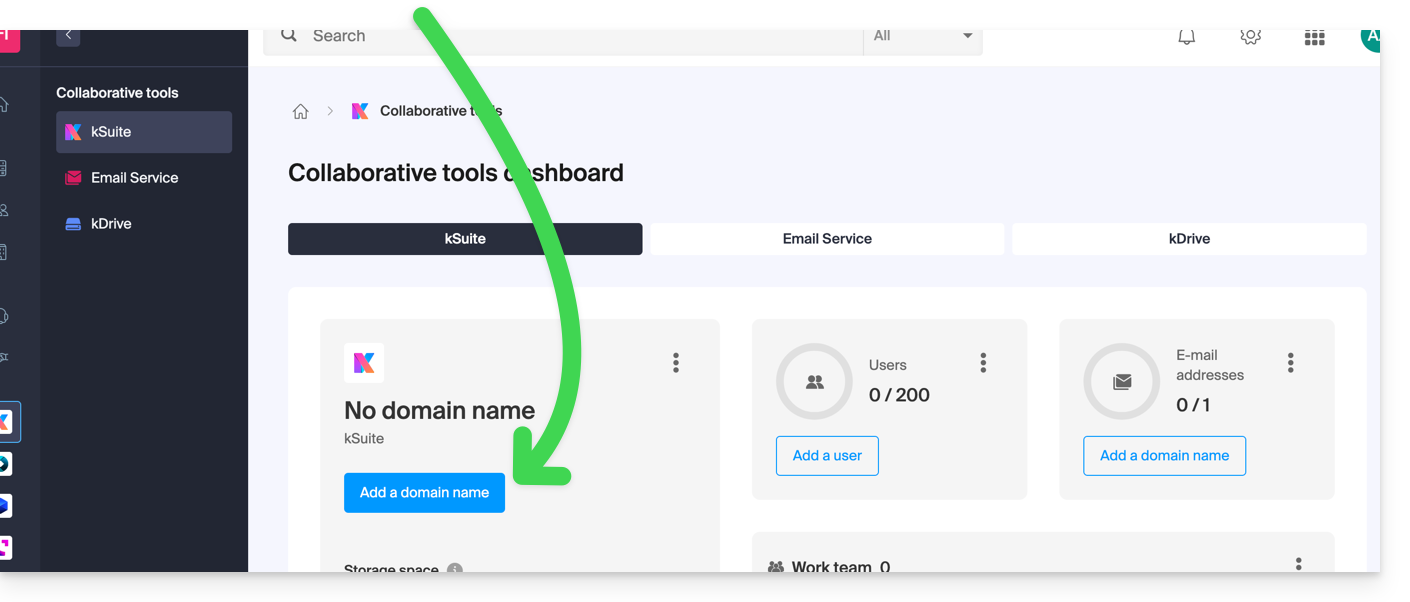
- Click on the button to add a domain:
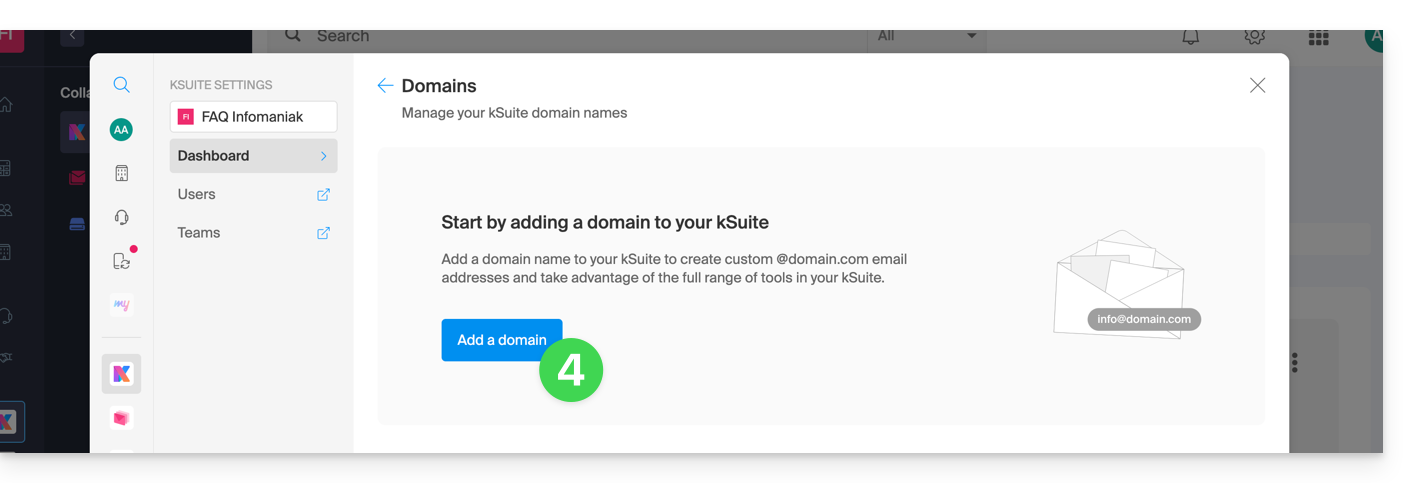
- Choose the domain to associate from among those in your Organization (still available, i.e., not yet associated with any service), or enter an external domain name:
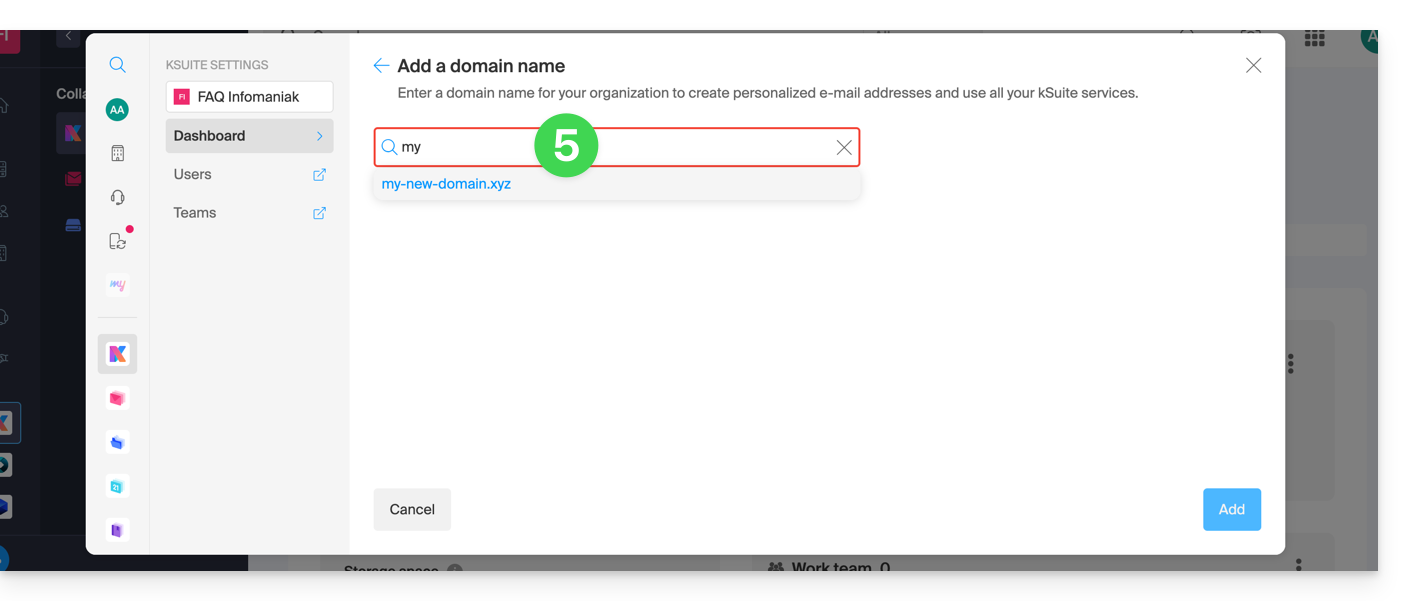
- Depending on the status of your domain (also see the information below), you may need to perform some preliminary steps…
- … or even purchase a domain if necessary:
- Depending on the status of your domain (also see the information below), you may need to perform some preliminary steps…
If the domain name is located…
… with Infomaniak, same Organization
If your domain name is registered with Infomaniak and is in the same user account or Organization as your email, then there is nothing to do.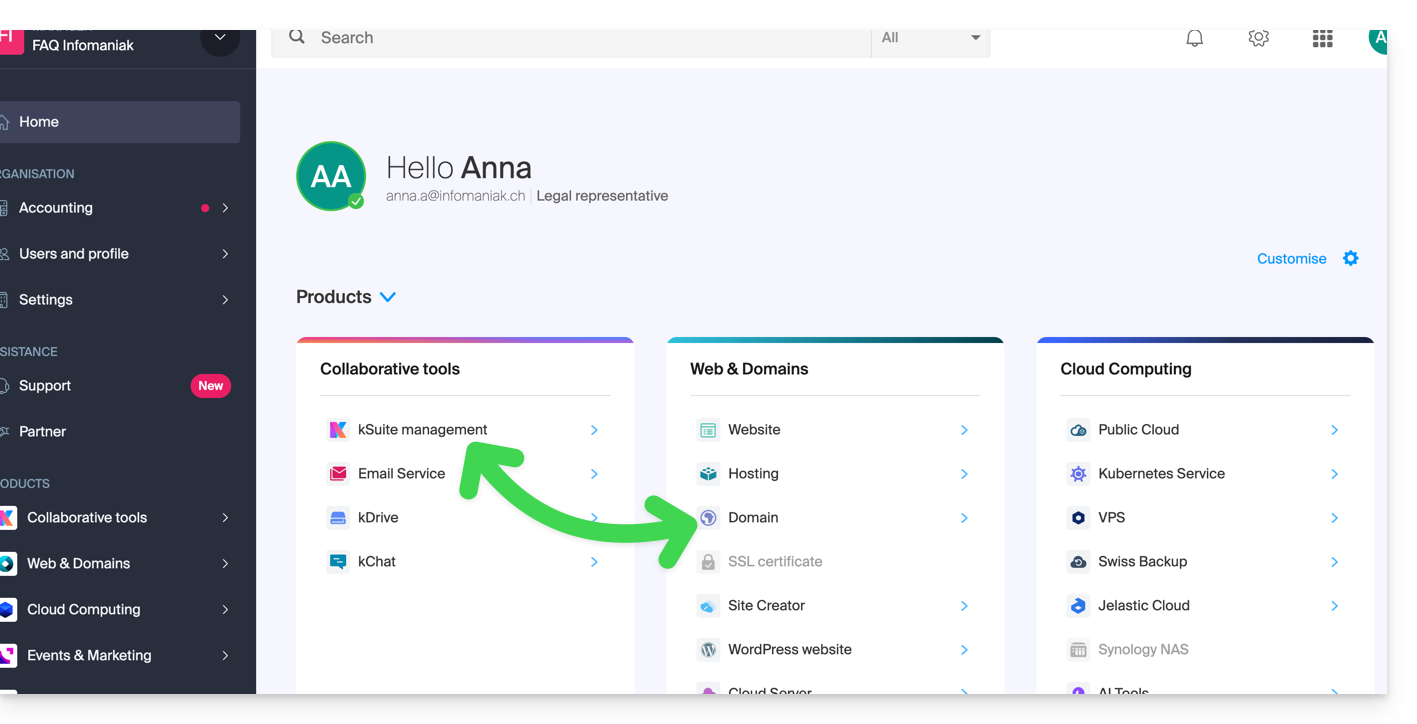
Simply add it to your kSuite: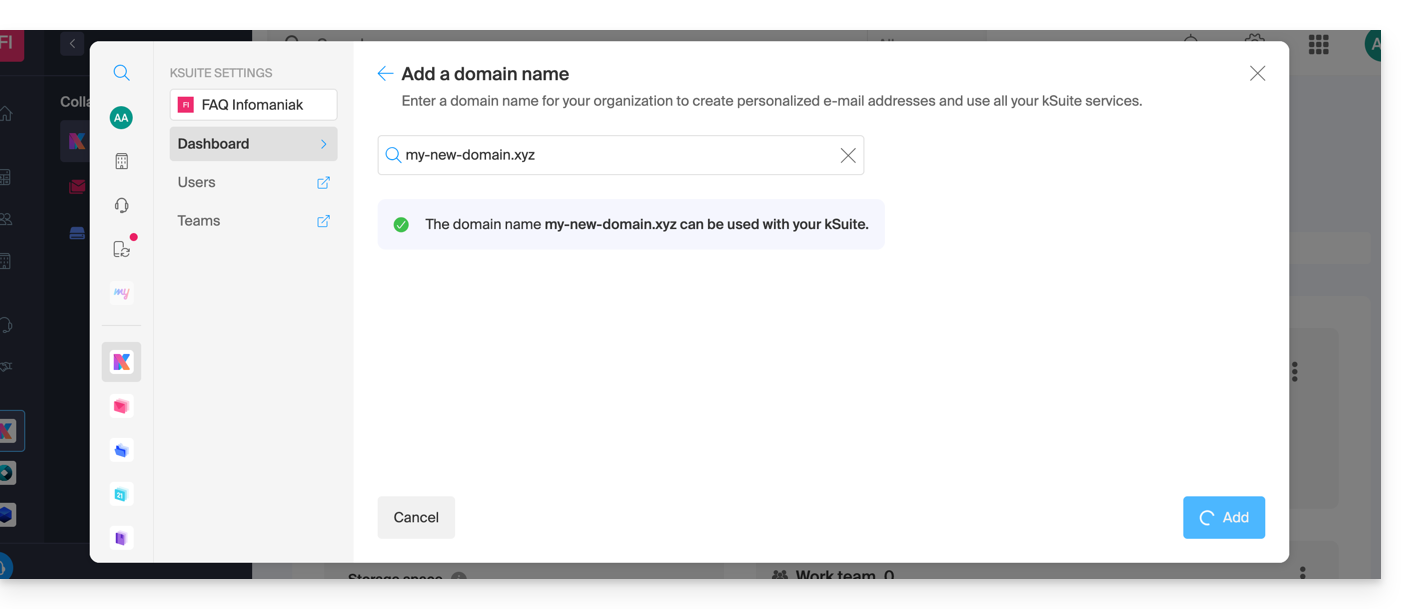
The domain will then be added and visible on the dashboard: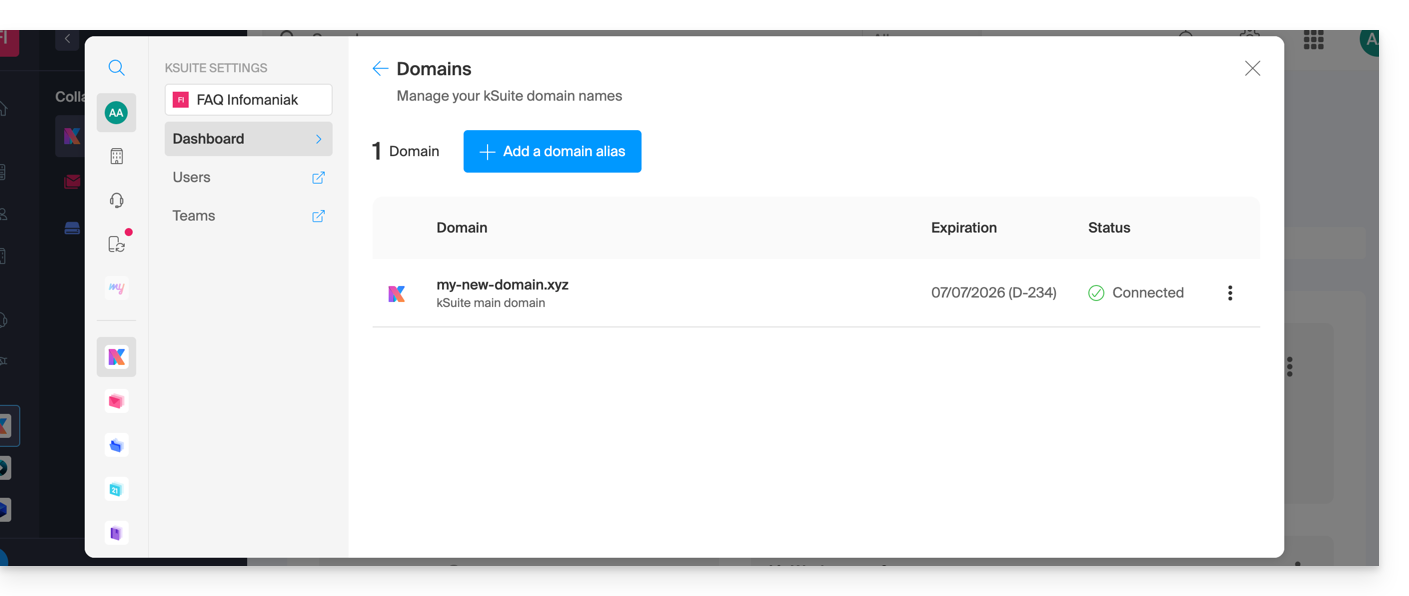
- Refer to this other guide to check and correct any configuration errors.
... with Infomaniak, same Organization and already linked to a Mail Service or kDrive
No problem, you can transform your existing products into a kSuite.
… with Infomaniak, different Organization
If your domain name is registered with Infomaniak but in a different user account or Organisation, then:
- Edit its DNS zone by specifying Infomaniak's MX record (+ SPF & DKIM).
- Any DNS addition/modification may take up to 48 hours to propagate.
OU
- Move it within the same Organisation.
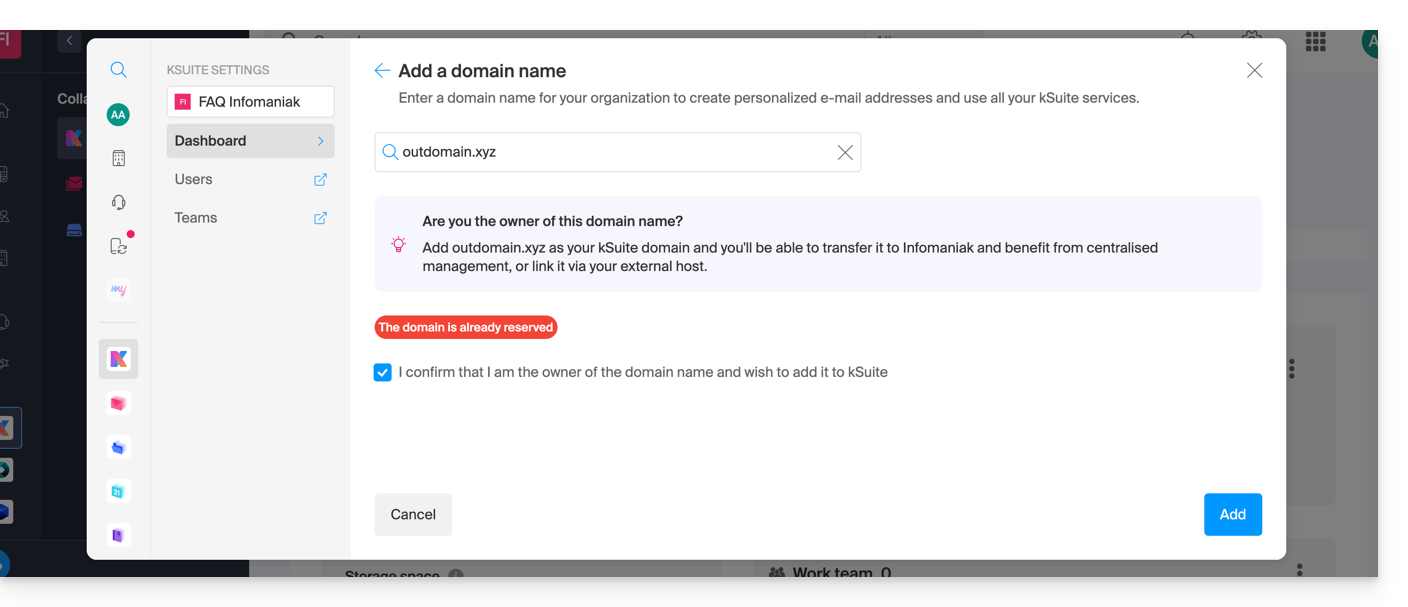
In general, a message will notify you of this situation: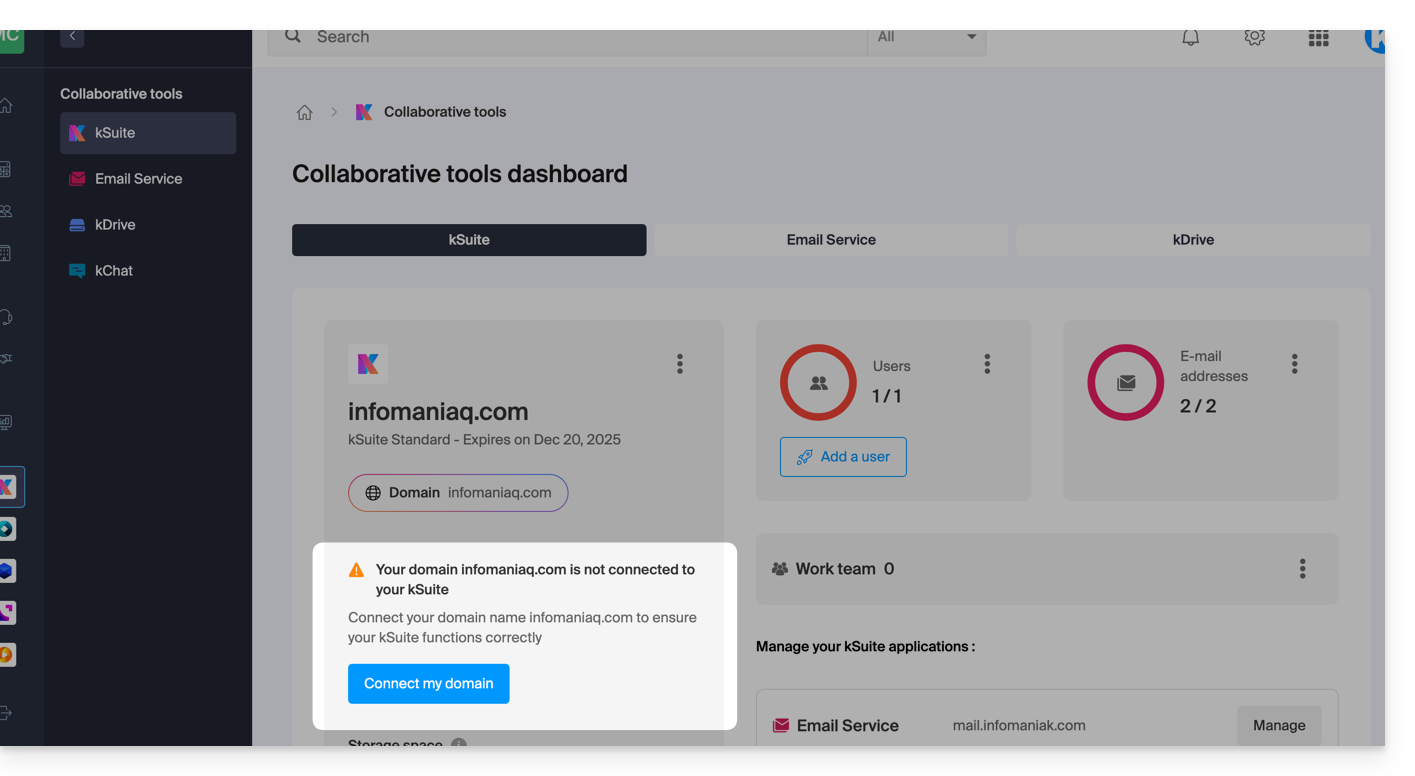
… and the technical information, which you should enter where the domain is located, will be provided: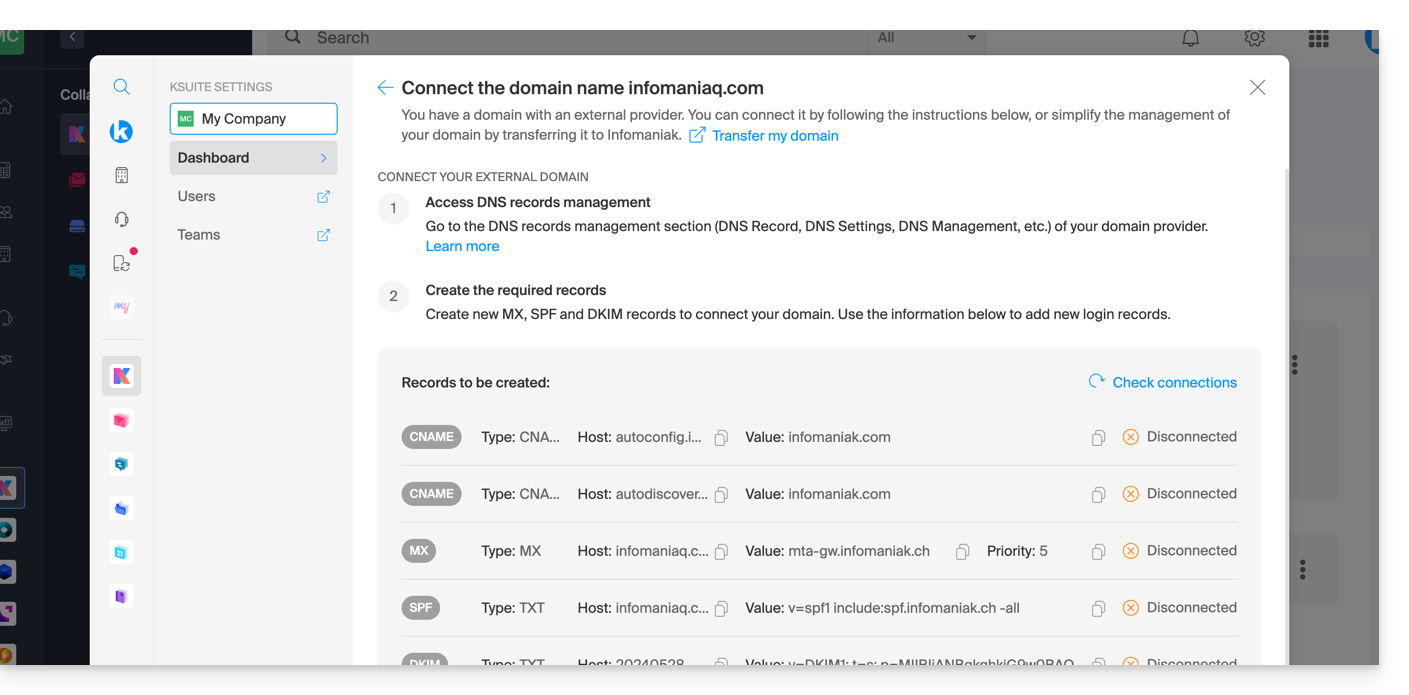
… with Infomaniak, using external DNS
If your domain name uses DNS that is not Infomaniak's, then:
- Edit the current DNS zone where it is located (if necessary, consult the help documentation of the provider in question) by specifying Infomaniak's MX record (+ SPF & DKIM).
- Any DNS addition/modification may take up to 48 hours to propagate.
OU
- Change the current DNS settings and select the option to use Infomaniak's DNS servers.
- Any DNS addition or modification may take up to 48 hours to propagate.
- Refer to this other guide to check and correct any potential configuration errors.
You will be notified (see the images above).
… elsewhere with external DNS
If your domain name is registered with another registrar and uses DNS servers that are not Infomaniak's, then:
- Edit the current DNS zone where it is located (if necessary, consult the help documentation of the provider in question) and specify Infomaniak's MX record (+ SPF & DKIM).
- Any DNS addition or modification may take up to 48 hours to propagate.
OU
- Change the current DNS servers (if necessary, consult the help documentation of the provider in question) to Infomaniak's DNS servers (this requires you to have a DNS zone with Infomaniak).
- Any DNS addition or modification may take up to 48 hours to propagate.
- This DNS zone with Infomaniak will be configured correctly, but refer to this other guide to check and correct any potential configuration errors.
You will be notified (see the images above).
… elsewhere, but you can bring it back
If your domain name is registered with another registrar and you want to move it to the same location as your Infomaniak email, then:
- Transfer the domain name to Infomaniak (it will be configured correctly, but please refer to this other guide to check and correct any potential configuration errors).
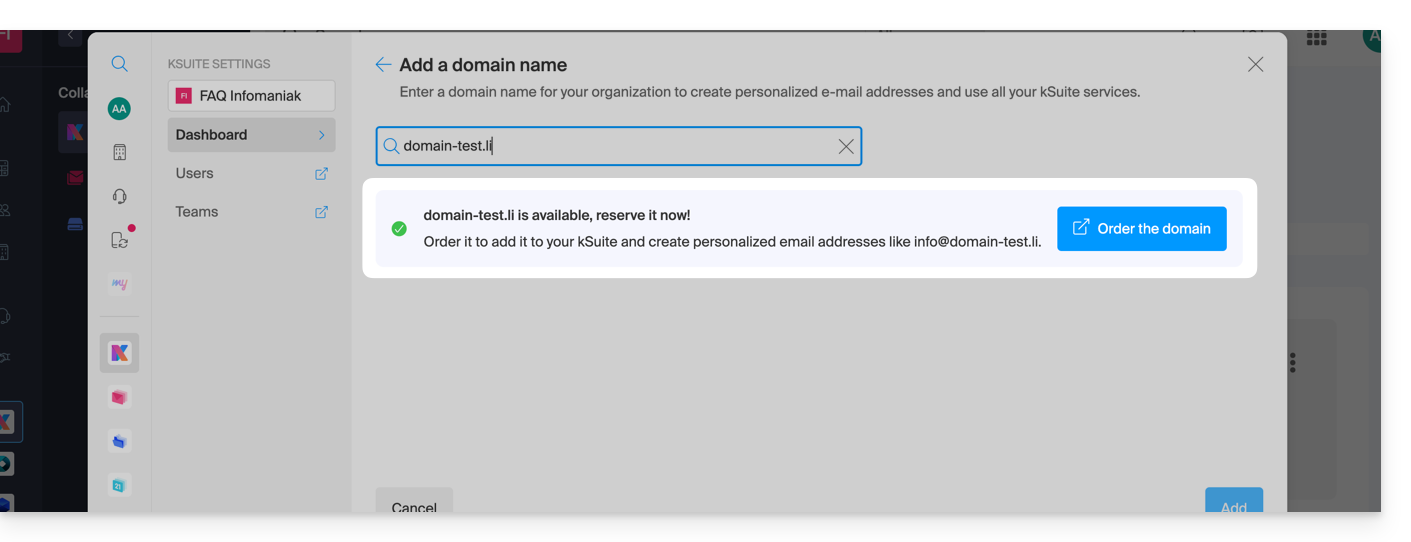
Otherwise, consider ordering a new domain name if necessary.
Link to this FAQ:
Has this FAQ been helpful?
This guide explains how to link multiple domain names to an existing kSuite by adding additional domain names.
Prerequisites
- Own the new domain name (if necessary, create it beforehand).
- Review the information in this other guide and apply the instructions that correspond to your situation (to ensure that the domain name works when it is linked to your kSuite).
Adding a Domain Name to kSuite
Once the new domain name is ready to be used alongside the old one, you need to add it to kSuite:
- Click here to access the management of your kSuite (need help?).
- Click on the Settings icon in the top right corner.
- Click on kSuite in the left-hand menu.
- Click on Domains:
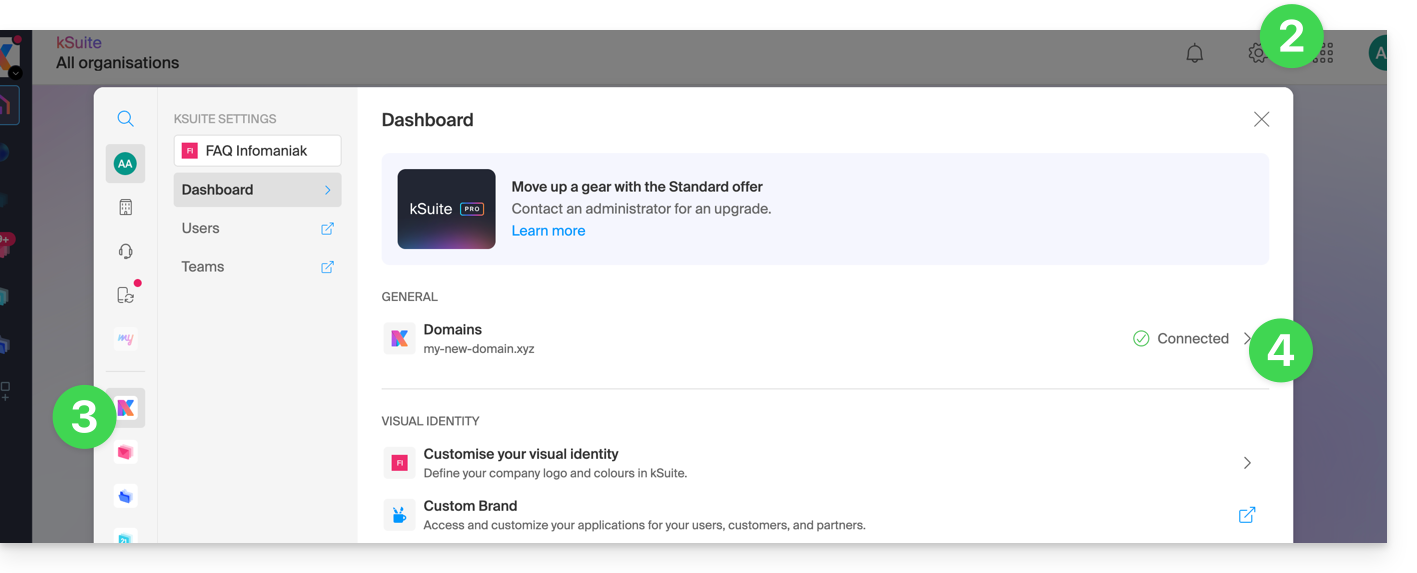
- Click the blue Add a domain alias button:

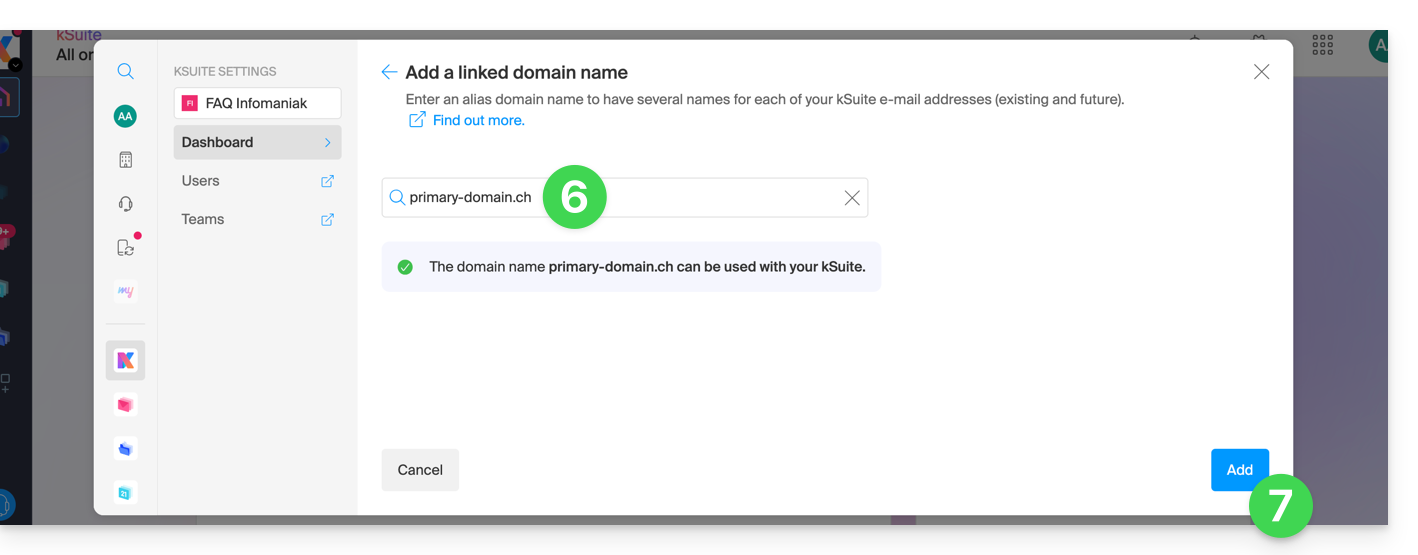
- Choose the domain to link from among those in your Organization (still available, i.e., not linked to any service) or enter an external domain name (see prerequisites).
- Click the button to add the domain:
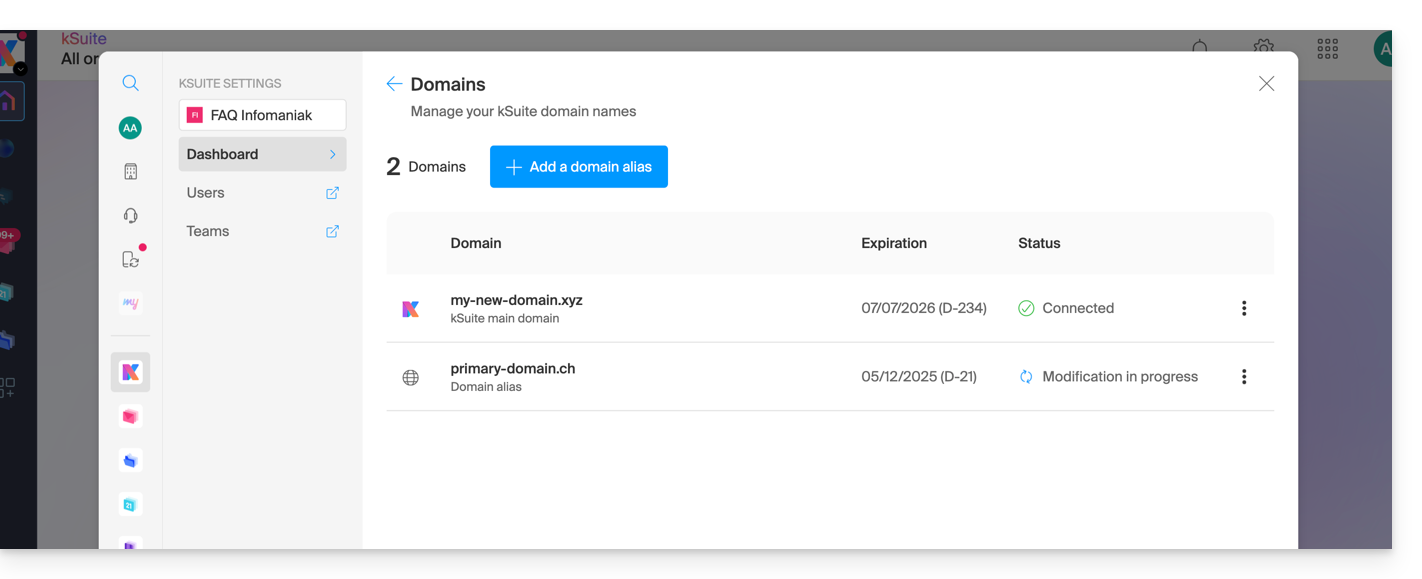
- The domain has been successfully linked:
You can also consider a swap of the additional domain name linked to kSuite with its main domain, in order to change the domain name of your kSuite.
Link to this FAQ:
Has this FAQ been helpful?
Infomaniak takes pride in securing data through an integral and diversified approach to security. For whistleblowers, the company has implemented an internal system for reporting irregularities securely and anonymously, without fear of reprisals. This protection mechanism is known and accessible to all employees, thus reinforcing transparency and accountability within the organization.
Processing times
Infomaniak demonstrates its commitment with concrete and effective measures to protect those who report anomalies. The company commits to processing each report submitted via its abuse form within defined deadlines to ensure optimal reactivity and maintain user trust.
To ensure effective and transparent processing, Infomaniak has established a structured process with precise deadlines:
- It commits to acknowledging receipt of all reports within 24 hours of their submission, thus allowing reporters to confirm that their request has been received by the competent technical teams.
- In a second step, the company conducts a preliminary assessment within 5 business days to determine the admissibility of the report and identify the resources necessary for its processing. This phase allows for the classification of the priority level and the referral of the file to the appropriate specialized teams.
- When an investigation is necessary, Infomaniak conducts an in-depth analysis within a maximum period of 30 business days, depending on the nature and complexity of the reported case. This period allows the security teams to carry out the required technical checks, collect the necessary evidence, and assess the potential impact of the reported situation.
- Finally, the company commits to completing the analysis and implementing the appropriate corrective actions within a period of 60 business days when technically possible.
This final step includes the implementation of preventive measures, communication of the results to the parties concerned, and follow-up on the recommendations issued to prevent the recurrence of identified problems.
Infomaniak also commits to keeping complainants informed of the follow-up given to a complaint, provided that the complainant has completed the form by indicating a contact email address.
Also refer to the blog article on this subject.
Link to this FAQ:
Has this FAQ been helpful?
This guide details how the storage of data from your various kSuite products works.
Preamble
- The space used for data storage is:
- shared among the different users of your kSuite,
- and shared with certain products that make it up (kDrive and kChat for example).
- The total amount of storage space available depends on your subscription and the number of users chosen:
- It corresponds to the maximum amount of storage space that can be used by all of your users.
- There is no quota per user.
Data from the Mail Service is not counted in the kSuite storage.
Increase or decrease kSuite storage space
Do you need more space to store your kSuite data?
- Modify the offer and add users or switch to a higher offer including more users.
- The more users included in your offer, the more storage space will increase.
You can also recover storage space by permanently deleting files from kDrive or kChat.
It is not possible to:
- reduce the storage space,
- go below a certain number of kSuite users depending on the available and already used storage.
Link to this FAQ:
Has this FAQ been helpful?
This guide helps you resolve connection errors on Infomaniak mobile applications (kDrive, Euria, SwissTransfer, Mail) when the security message "your device is not recognized as safe" appears on Android.
Connection issues "Your device is not recognized as safe"
This blockage is related to Google's security protocols (Google Play Integrity API). Infomaniak uses these standards to ensure that data is not accessed on a device whose security could be compromised.
This usually occurs in the following cases:
- Use of an unofficial operating system (Custom ROM / LineageOS).
- Rooted device or unlocked bootloader.
- Android version too old or not certified by Google.
- Certain smartphone models (e.g.: Huawei without official Google services).
Immediate workaround
If your device is healthy but the message persists, you can bypass the blockage by forcing a new manual authentication:
- On the application login screen, click on the down arrow/chevron icon next to your account or avatar.
- Select the option "Log in with another account" (even if it is the same account).
- Enter your credentials manually (Infomaniak email address and password).
This method allows you to ignore the previous connection token and validate access via a new secure session.
Link to this FAQ:
Has this FAQ been helpful?
This guide explains how to replace the main domain name associated with a kSuite.
Introduction
- Switching the domain linked to kSuite is useful if your business changes its name.
- This affects:
- Custom Brand (and therefore the custom URLs leading to your tools such as kDrive or Euria)
- Mail Service (and therefore your email addresses)
Changing the kSuite Domain Name
Prerequisites
- Own the new domain name (if necessary, create it beforehand).
- Review the information in this other guide and apply the instructions that correspond to your situation (to ensure that the domain name works when it is linked to your kSuite).
- Add the domain name to kSuite.
Once the new domain name is ready to be used in place of the old one:
- Click here to access the management of your kSuite (need help?).
- Click on the Settings icon in the top right corner.
- Click on kSuite in the left-hand menu.
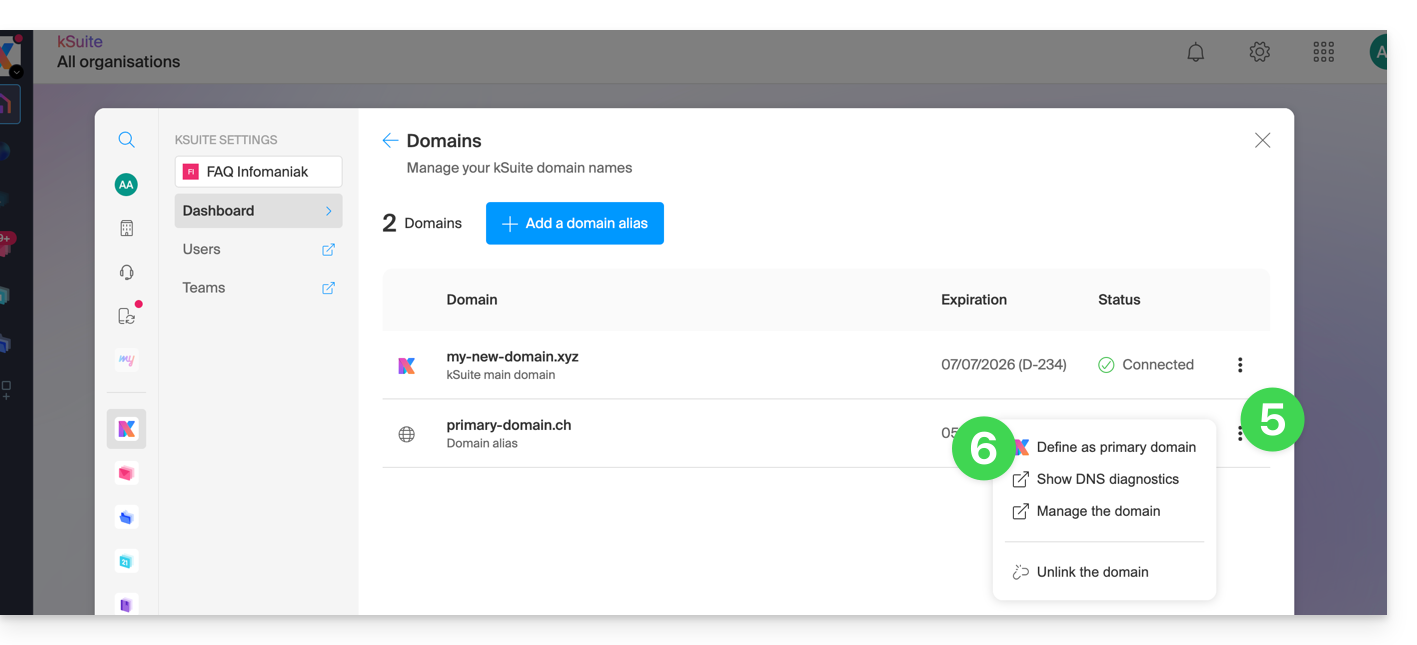
- Click on Domains:
- Click on the action menu ⋮ located to the right of the domain that is intended to replace the current domain.
- Click on Set as primary domain:
- Information will be displayed; click the Continue button.
- Read the information on the screen and confirm that you have read it.
- Click the Continue button:

- Click the Confirm button:
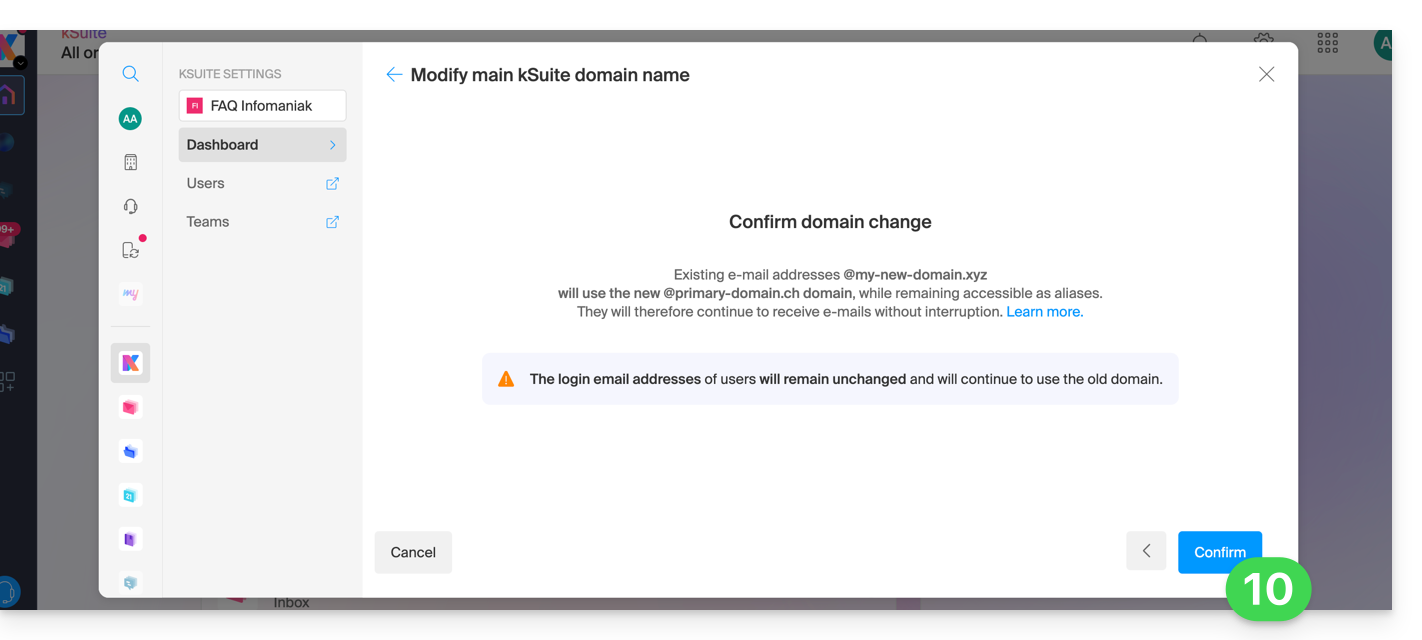
Impact on the Mail Service
By reversing the domain name of the kSuite as described above, the Mail Service within the kSuite is automatically updated. You will go from:
… to this:
Link to this FAQ:
Has this FAQ been helpful?
This guide explains how to remove duplicate contacts in the address book of the Infomaniak Contacts web app.
Remove duplicate contacts
To view existing duplicates in your Infomaniak address books and merge them (or hide them):
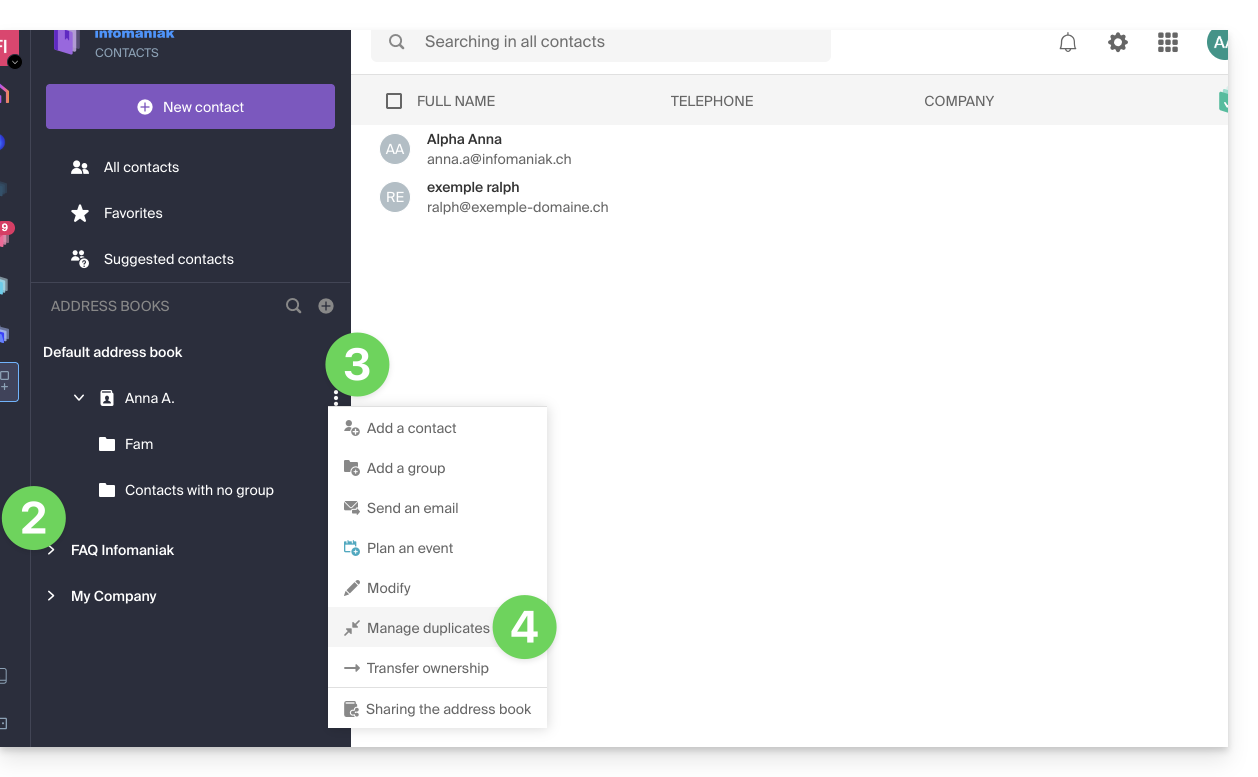
- Click here to access the Infomaniak Contacts web app (online service ksuite.infomaniak.com/contacts).
- Click on the chevron to expand the list of address books if necessary.
- Click on the action menu ⋮ to the right of the address book in question.
- Click on Manage duplicates:
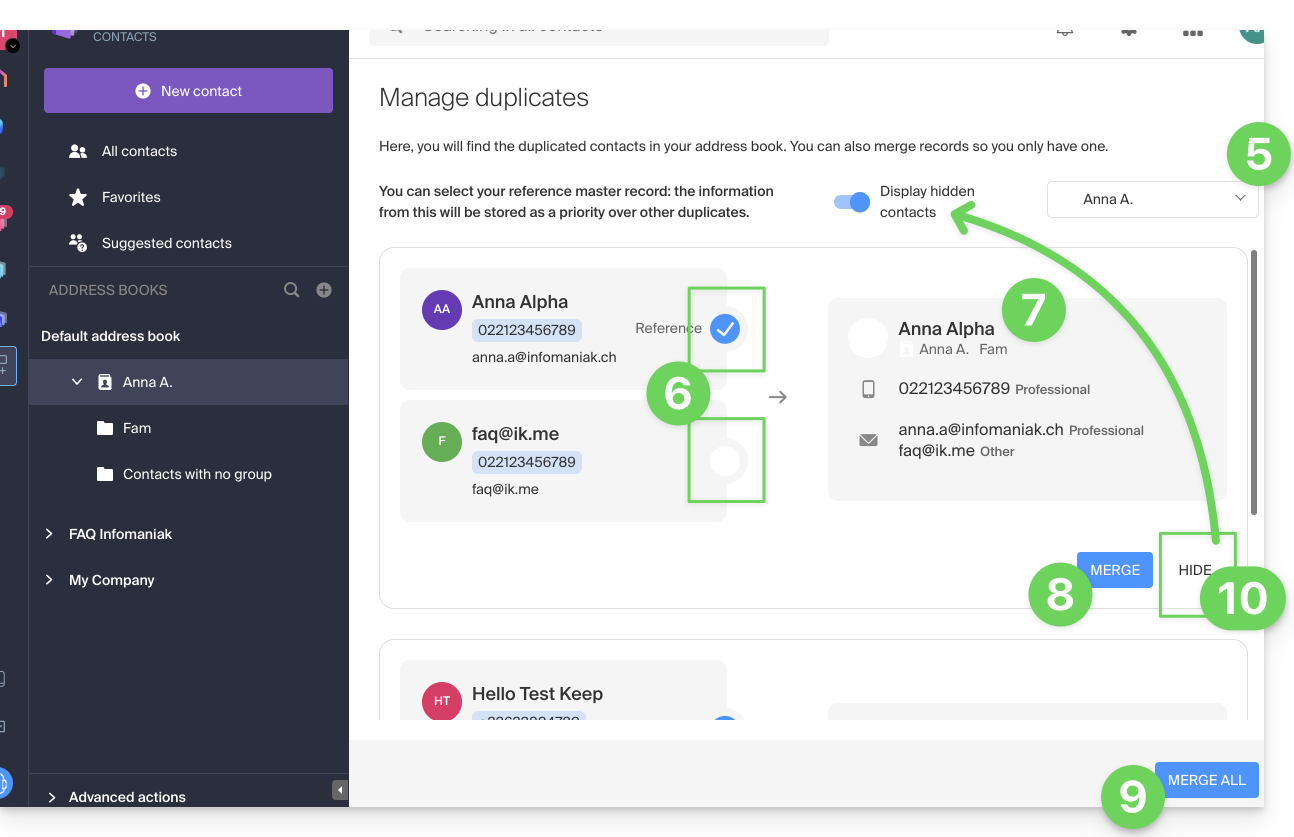
- If necessary, choose the address book in which to search for your duplicates.
- Click on the entry that should be the reference to keep; identical information is highlighted in blue.
- View and check the information from the duplicate entries that will be added to the reference entry (point 6 above):
- Click on the blue Merge button to process the duplicates one by one…
- … or on Merge All to process all duplicates.
- You can also hide a duplicate to avoid processing it, and review it later by clicking on the toggle switch at the top of the page:
Please note that you cannot undo this operation (refer to this other guide if you need information about restoring address books).
Link to this FAQ:
Has this FAQ been helpful?
This guide explains how to add, modify, or remove users from an Organization within the Manager Infomaniak.
Preamble
- Since you opened your account with Infomaniak, you are part of at least one Organization.
- If you were alone and it was not an invitation, an Organization was created in your name and you automatically become the legal owner.
- Otherwise, you belong to the Organization that invited you (to join its kSuite, to manage a product, etc.).
- Only an owner/legal owner can make changes.
- A potential collaborator who also has access to your Organization will not be able to make changes from their restricted account.
Add a new user
As an Organization user with sufficient rights, you can:
- add a new user.
- This can be someone completely external to Infomaniak,
- or someone who already has their own Infomaniak user account that they can reuse if they wish by extending it to your Organization.
When adding, you can:
- specify their role within the Organization,
- the products they will have access to,
- as well as the administrative contact preferences.
Remove a user
As an Organization user with sufficient rights, you can:
Modify a user's permissions/rights
As an Organization user with sufficient rights, you can:
- modify another user's role,
- manage the products they have access to, and the more detailed permissions if it is access to an email address, for example,
- as well as the administrative contact preferences whether yours or those of others.
Replace a legal owner
To change the legal representative of an Organization on the Manager, it is necessary to remove the user who has the role of legal representative, which implies appointing a new legal representative beforehand (indeed, it is impossible to remove a legal representative if there is no other legal representative for the Organization).
Manage users by group (work team)
You can organize the Organization's users within groups.
Link to this FAQ:
Has this FAQ been helpful?
This guide explains how to start an audio or video conversation between one or more users kChat, with Infomaniak's ethical free video conferencing solution, kMeet.
Preamble
- The call function in kChat is available on all Web (browser), mobile (iOS / Android), and computer (macOS / Windows) versions.
Create a meeting between kChat users
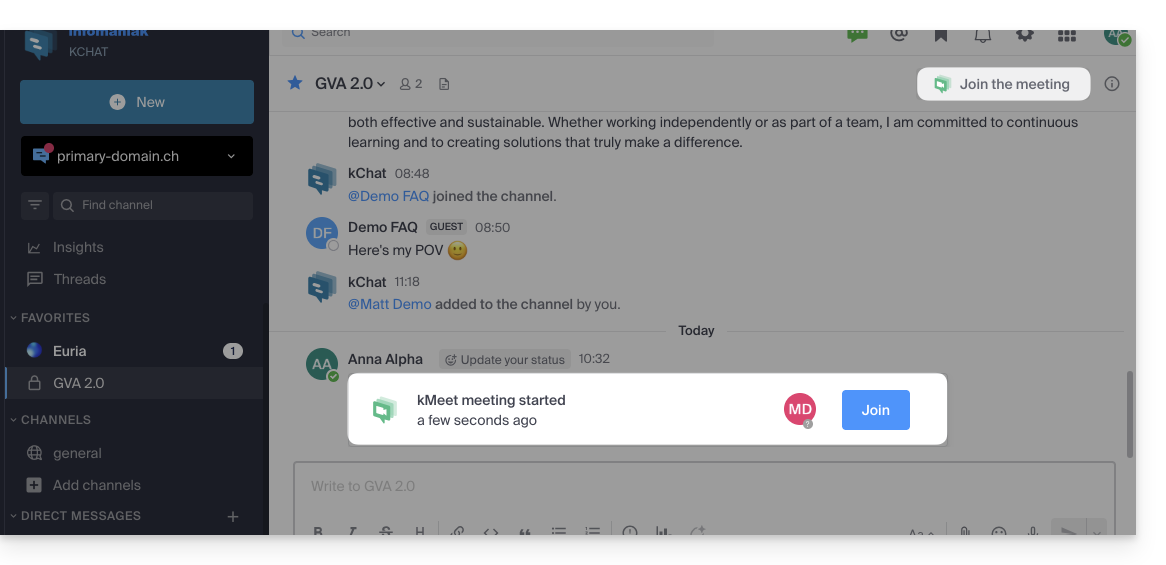
To be able to discuss within a virtual room with the microphone and webcam of your device, simply press the Call button visible on any kChat conversation, private or public channel, via the application or directly on the browser: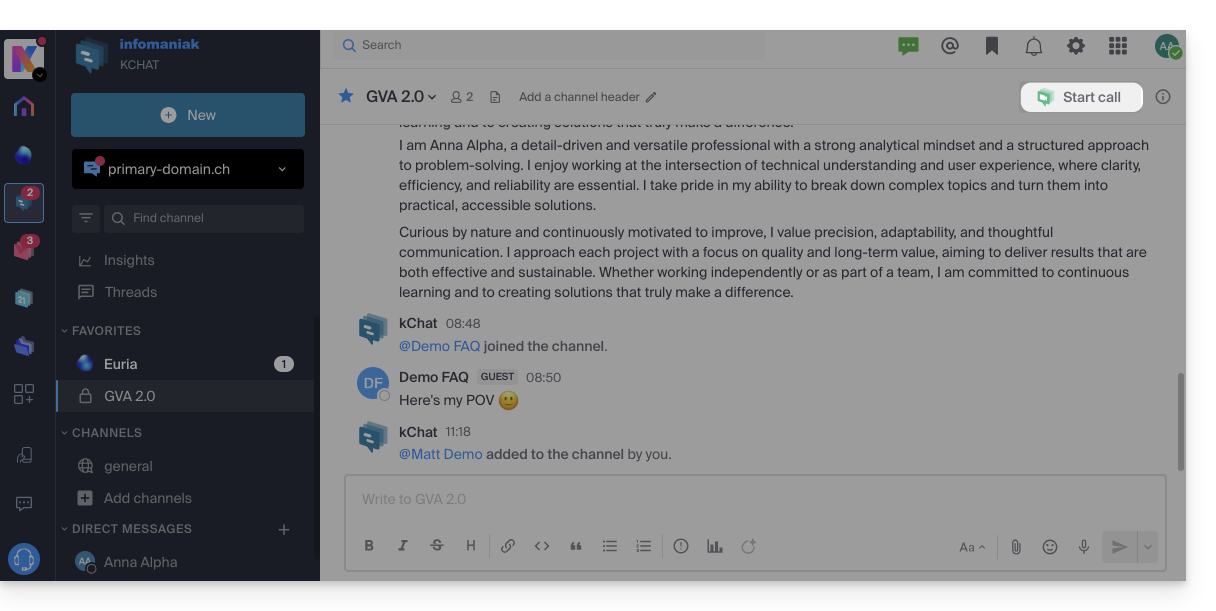
- Call a user directly if you are in a direct discussion with them, or trigger a call to all members of a channel if you start the meeting from the channel.
- Calling a user who is in “Do Not Disturb” will not trigger a ringtone or call modal for them, but they will see the message in the conversation.
- The microphone is enabled by default when the call is accepted, but not the camera.
- View the users of the meeting (who accepted, declined, or missed it) using the avatars in the kChat message.
- Once the call has started, an emoji will appear in your kChat status to indicate that you are busy with the conversation.
- A message sent from the video (kMeet) will also be visible in the kChat conversation (and vice versa).
- Indications related to starting and ending the meeting will automatically appear in the relevant kChat conversation thread:
Specifics for calls in channels
- The call will not ring for the recipients, but they will see a message in kChat as well as a notification.
- A message (warning) will appear if you want to start a call in a channel with more than 7 users.
Refer to this other guide if you are looking for information on kMeet.
Link to this FAQ:
Has this FAQ been helpful?
This guide will quickly introduce you to the essential functions of Euria, the artificial intelligence available to you within kSuite, which is particularly effective as a conversational agent on the kChat app.
Introduction
- Euria can help you perform all kinds of calculations, translations, provide information on various topics, and answer your questions.
- Please read this other guide about the model used and the responsibilities of each party.
- When a new user is added, they receive a message from Euria welcoming them.
- Please read this other guide about the possibilities of AI-powered summaries on kChat.
Add Euria to your kChat contacts
The bots currently available on kChat are already part of your contacts.
If you don't see them yet, click in the left-hand menu of kChat…
- … on the channel search (bots also appear as channels)
- … or on the + icon next to Direct Messages to search for the bot
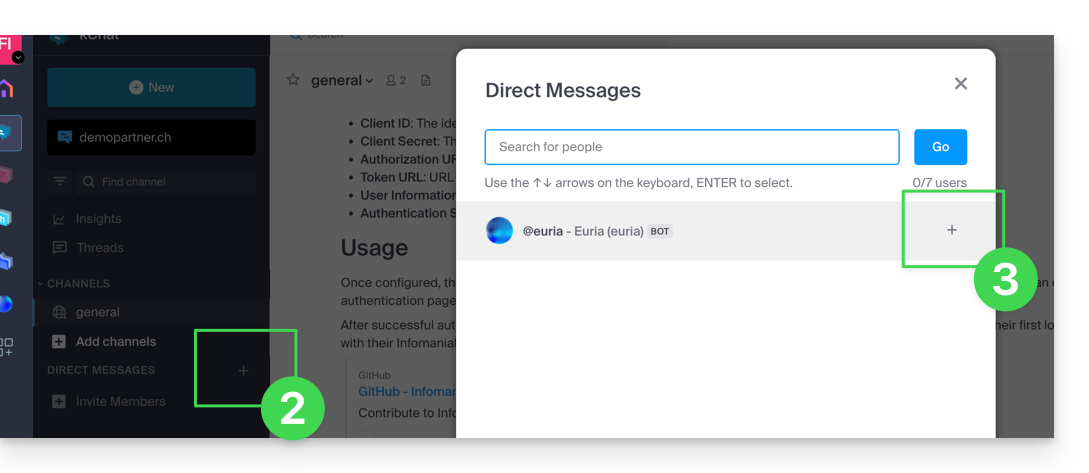
- Add the bots that are identified as such with the [bot] label, or search for the term bot or chat.
Do not create a group conversation between the bots and yourself, as this will not work. You need to create a private chat channel between each bot individually and yourself.
Simply write to it as if you were conversing with an acquaintance: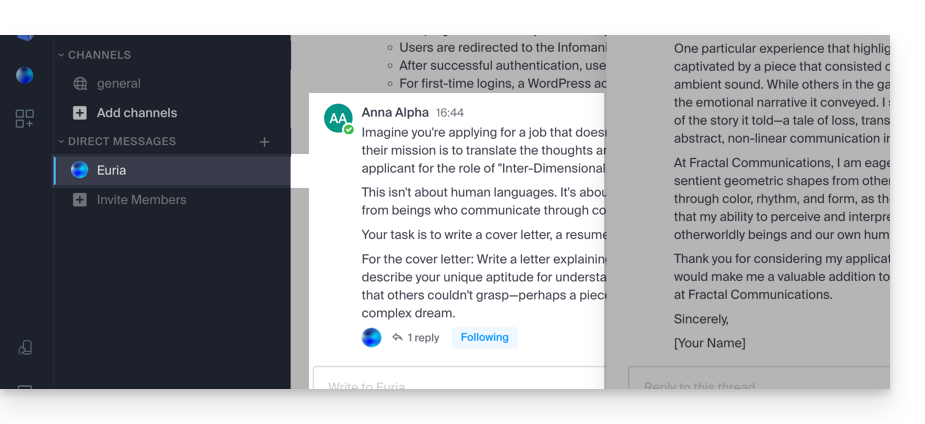
Link to this FAQ:
Has this FAQ been helpful?
This guide explains how to add a completely external user to kChat.
Introduction
- A kChat administrator can invite a completely external user to your Organization who will not be counted as a user.
- However, this user will be invited to create an Infomaniak account if they do not already have one.
- To add a kChat user and give them more rights (they will be counted as a kSuite user), please refer to this other guide.
Invite a user to chat in a private channel
Prerequisites
- Be a kChat administrator:
- The role within the Organization does not matter; being an Organization administrator in the Organization that has kSuite (and therefore kChat) is not required, and is not sufficient in any case:
- The role within the Organization does not matter; being an Organization administrator in the Organization that has kSuite (and therefore kChat) is not required, and is not sufficient in any case:
Next, to send an invitation by email from kChat:
- Click here to access the kChat web app (online service ksuite.infomaniak.com/kchat) or open the kChat desktop app (desktop application on macOS / Windows / Linux).
- Click the button to Invite members:

- Enter the email address of the person you want to invite.
- Click on their email address to add them as a guest:
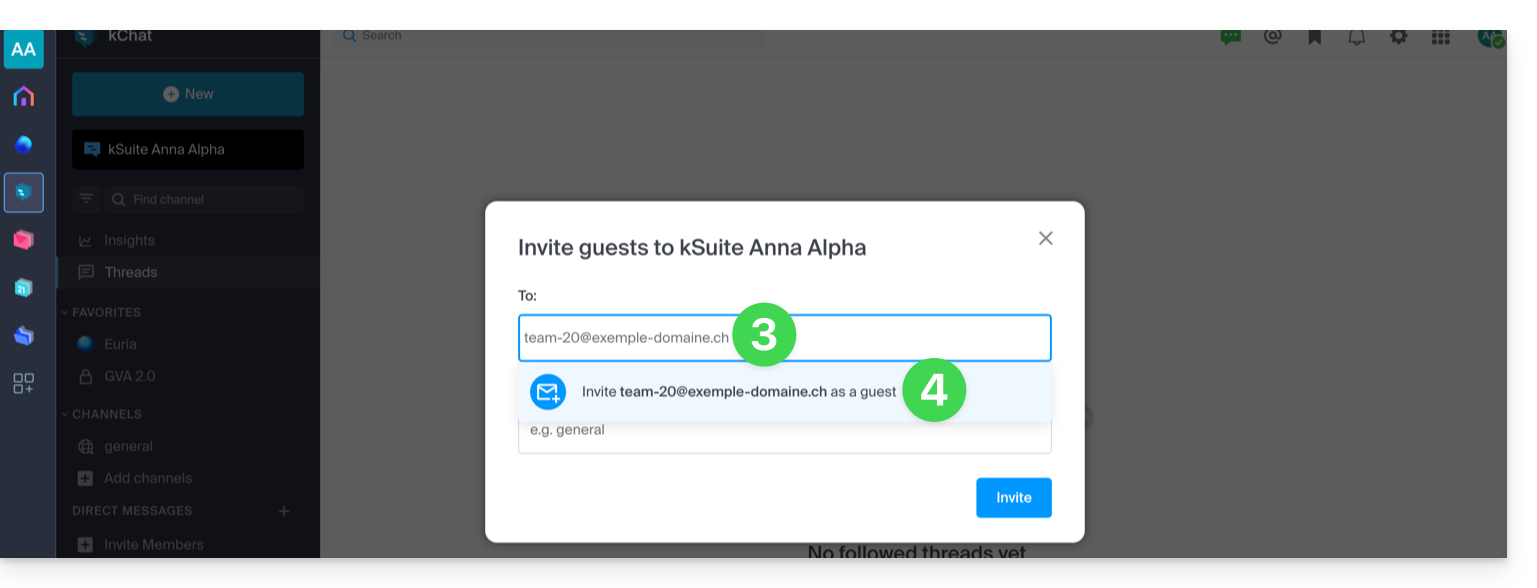
- Specify the channel(s) that these people will have access to.
- Click the blue button to send the invitation:

- The invited person receives an email with a link leading to the kChat interface and the channel shared with them:
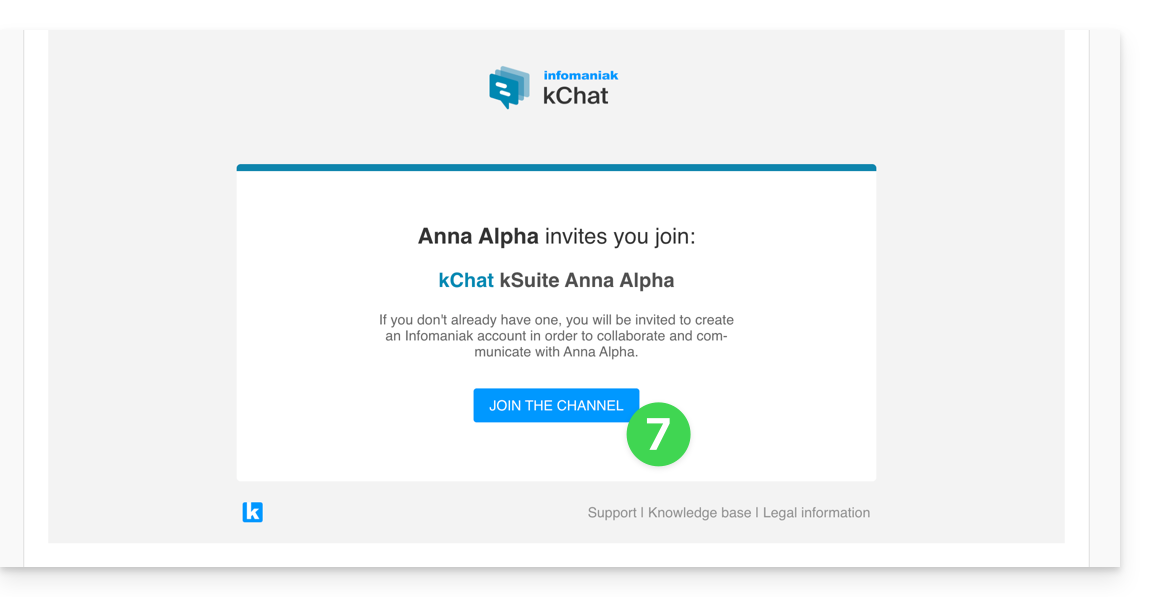
- Obviously, there is a registration phase if the user does not yet have an Infomaniak account (during this time, the invited user is listed as pending on the kChat channel in question):
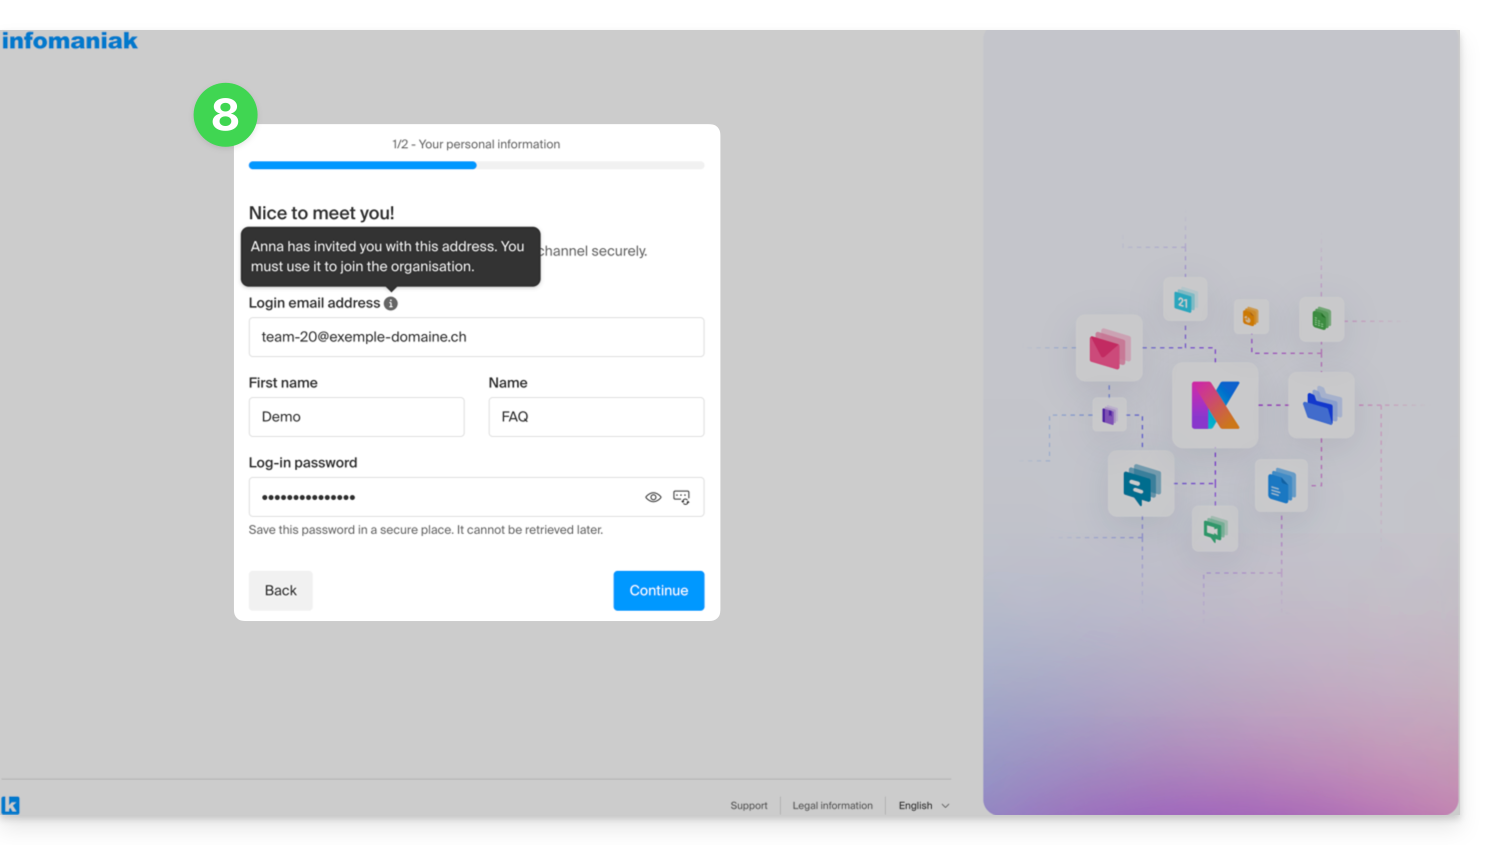
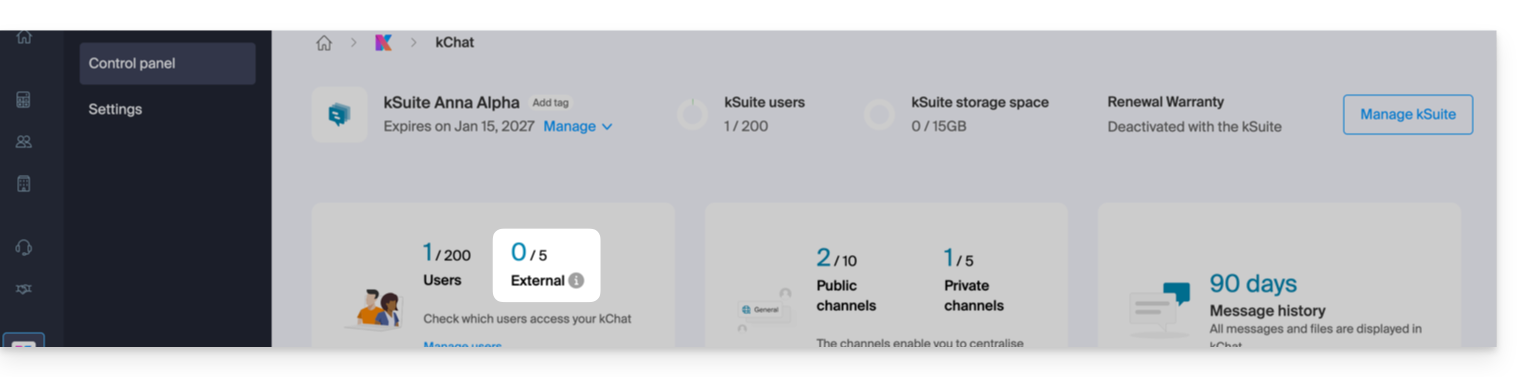
- Note that they will not be listed as pending within kSuite or elsewhere because they are a restricted and external user; and until they have completed their registration, the quota remains at 0 external users:
- Note that they will not be listed as pending within kSuite or elsewhere because they are a restricted and external user; and until they have completed their registration, the quota remains at 0 external users:
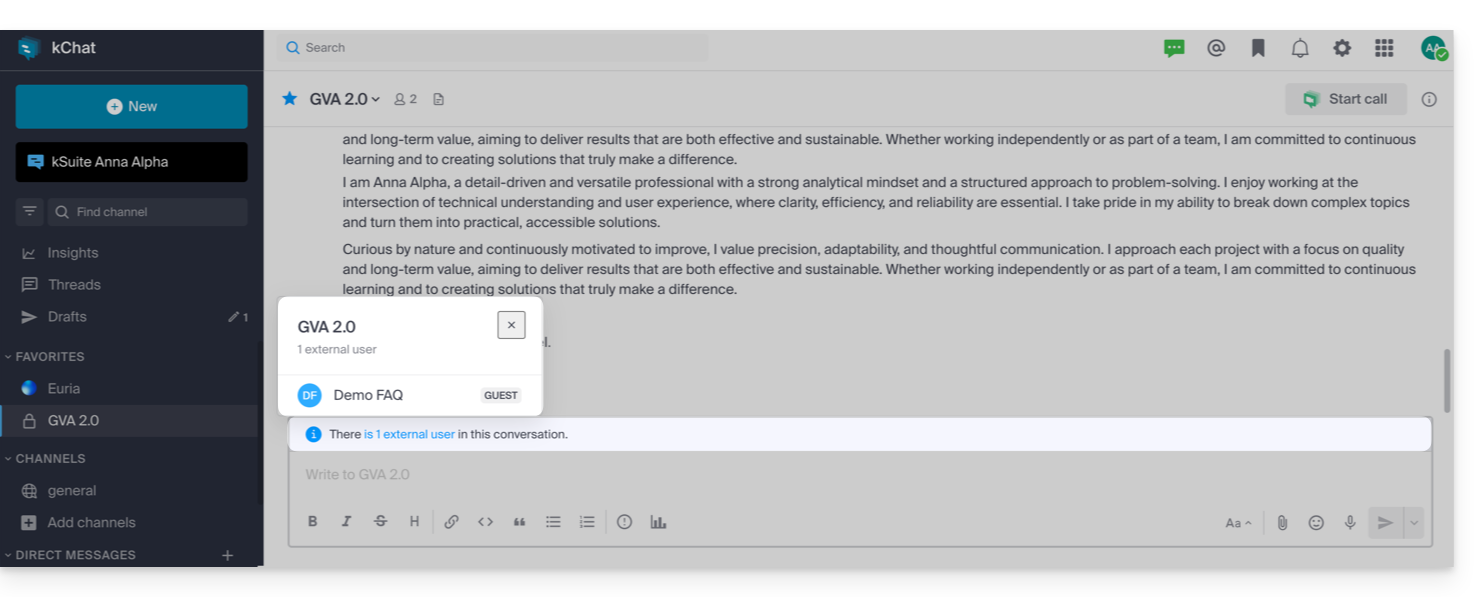
- Once the registration is complete, the guest can access kChat, a restricted version limited to the channels specified by the administrator when creating the invitation:

- They can start a private conversation with other users:

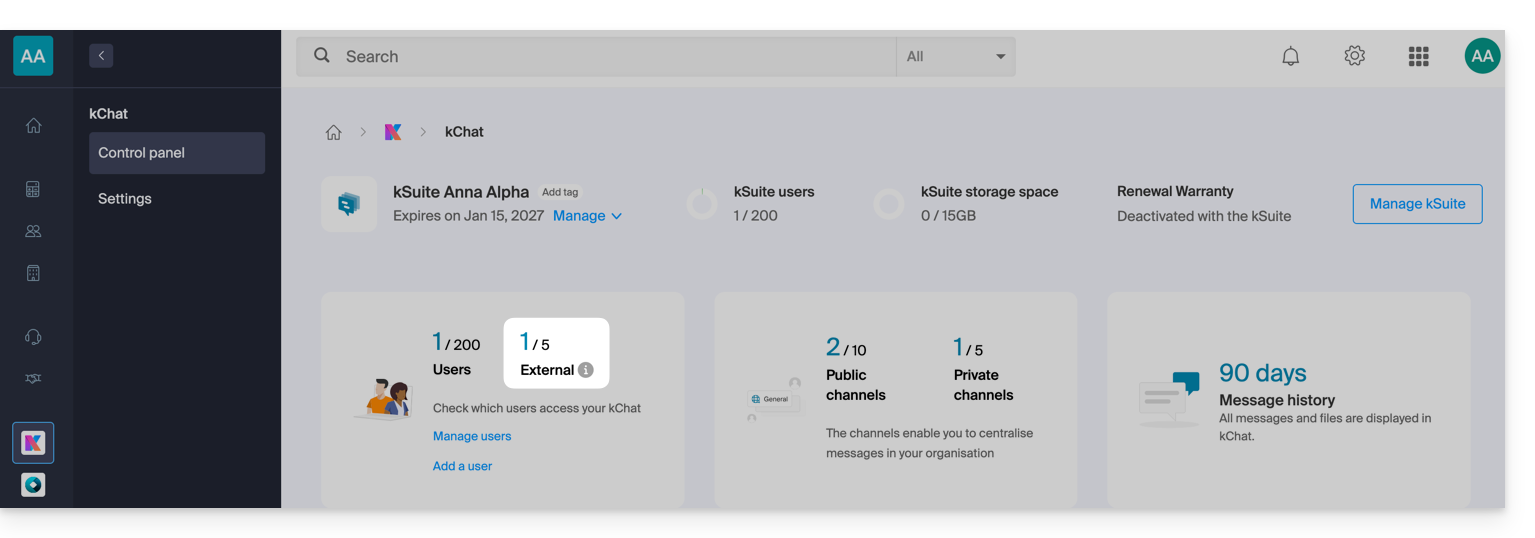
- From the administrator account, once the external user's registration is complete, you will see a notification indicating 1 external user on your dashboard:
- And now you can see on kChat that the user has access to your private channel:
- From the administrator account, once the external user's registration is complete, you will see a notification indicating 1 external user on your dashboard:
Guest user permissions
Guests can…
- … pin messages to channels
- … use "slash commands" (with the exception of restricted commands such as inviting members, renaming channels, modifying headers, etc.)
- … add a channel to their favorites
- … mute a channel
- … update their profile
- … use authentication methods different from those of other users
- … use the kChat application: the guest can open the app (web, mobile, or desktop) whether they are already a member of a kChat or not; this operating principle is different from kDrive, for example.
Guests cannot…
- … discover public channels
- … join open groups
- … create direct messages or group messages with members who are not part of the same channel
- … invite people
In case of a problem
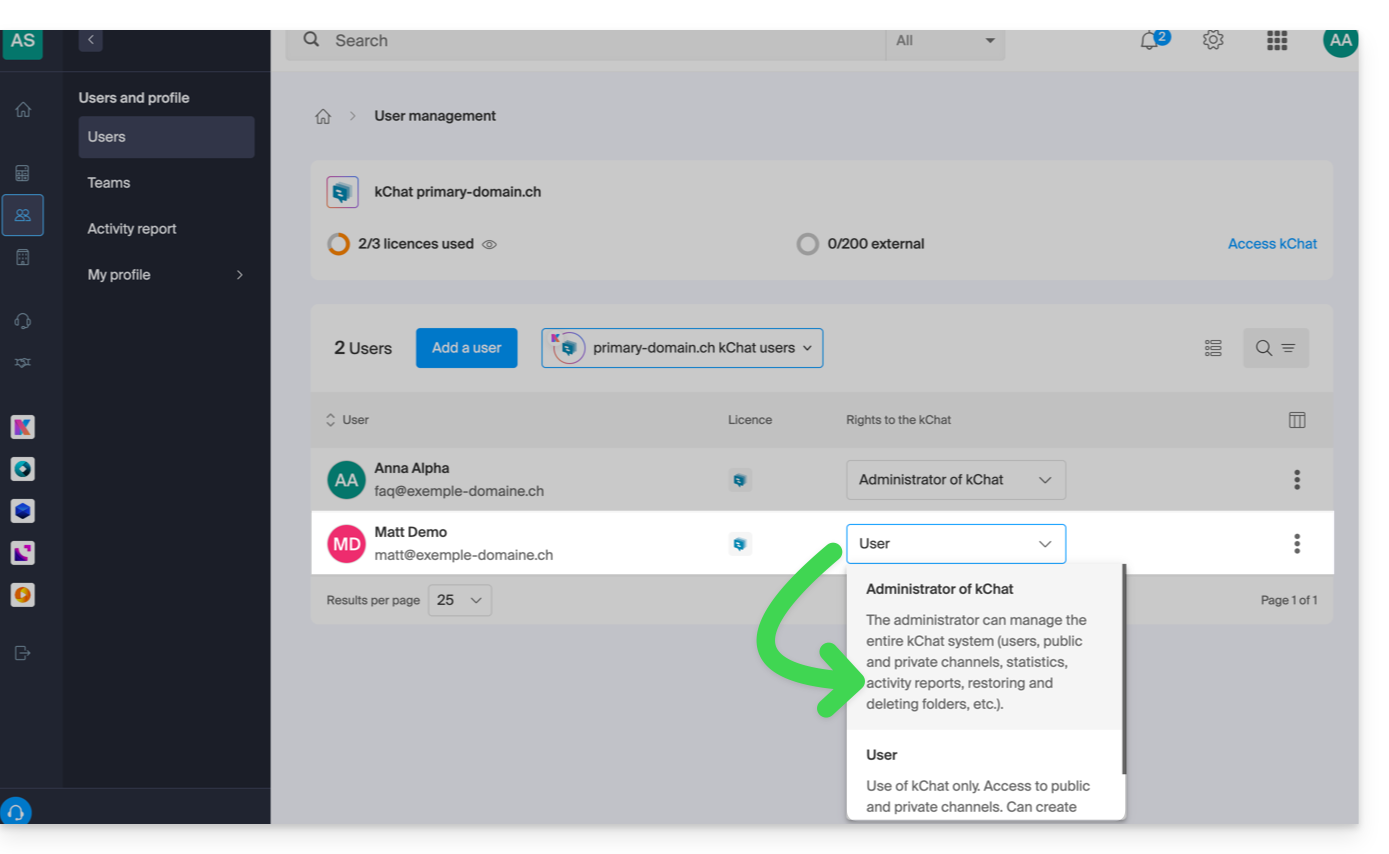
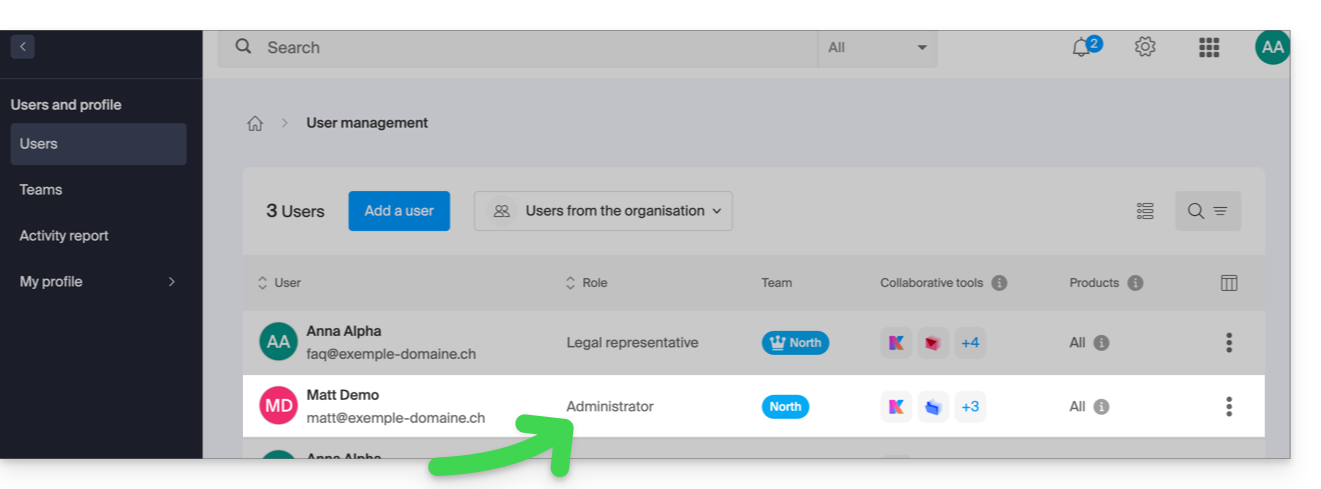
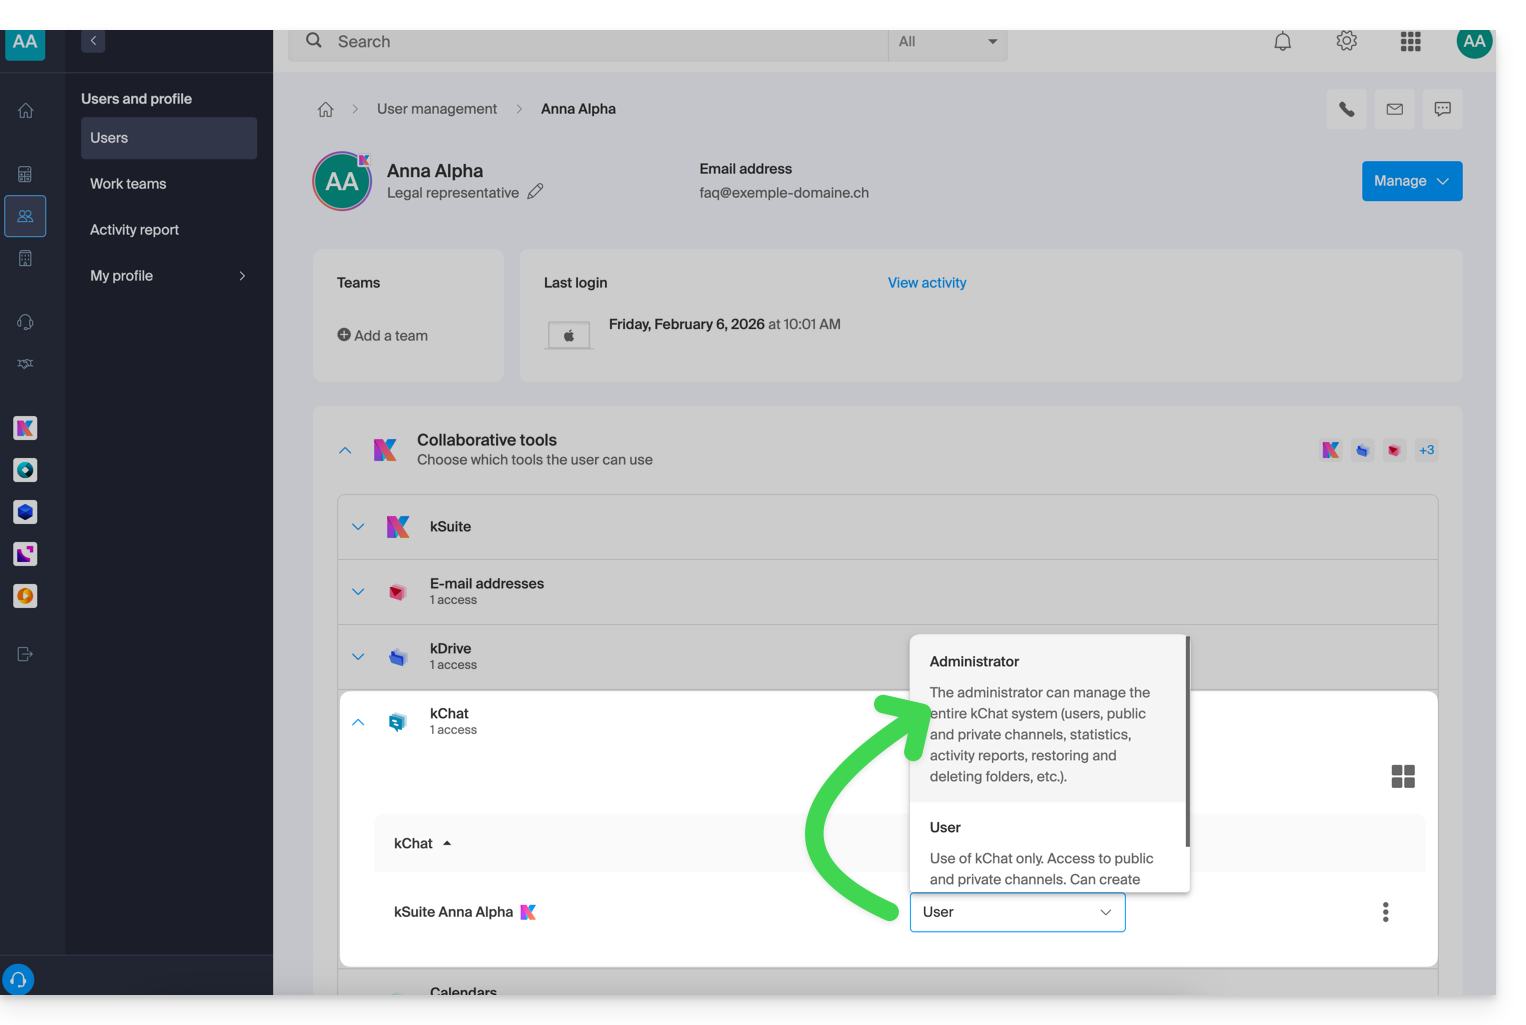
If you are an administrator of the Organization, but you still cannot invite a new user to kChat, check that you are indeed an administrator within kChat, as it is possible to be a simple user/collaborator, even if you are the only user with a license on kSuite:
- Click here to access the management of the Organization's users in the Infomaniak Manager (need help?).
- Click on your username:

- Click on the chevron to expand the kSuite collaborative tools:
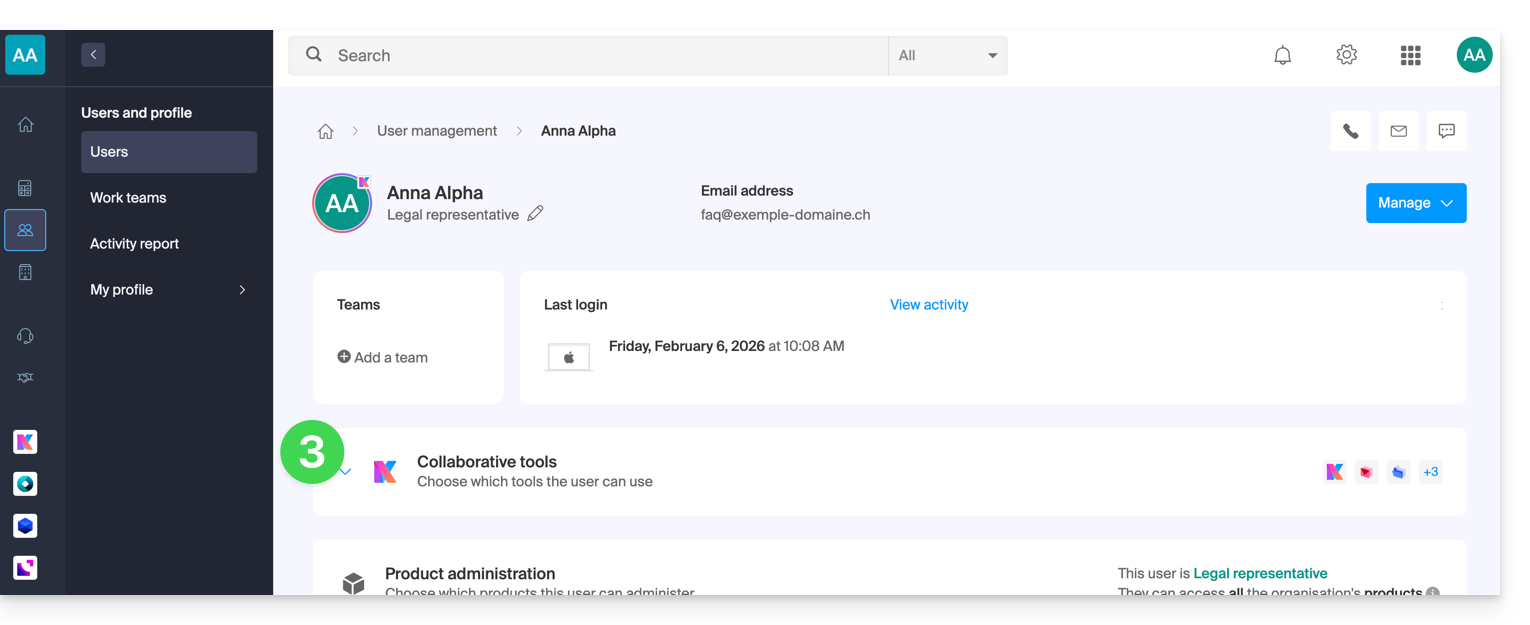
- Under kChat, change the role from user to administrator:
Link to this FAQ:
Has this FAQ been helpful?
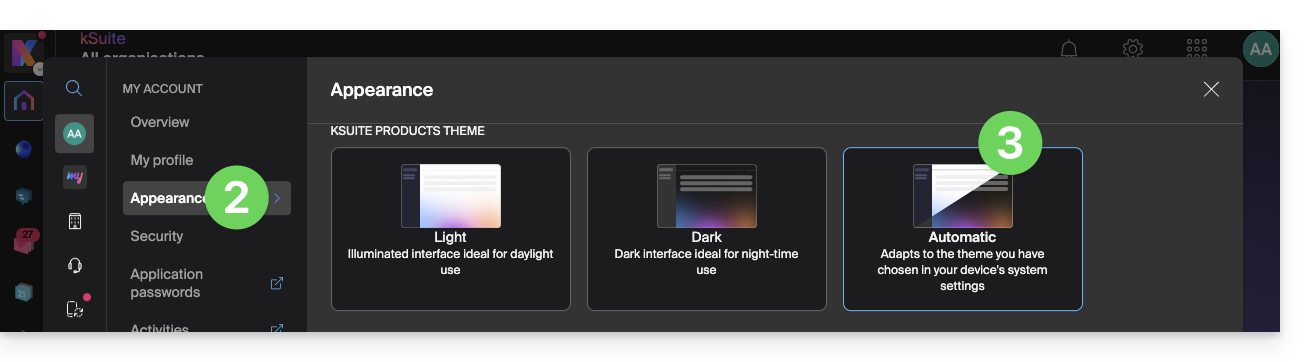
Infomaniak tools, such as the Web Mail app (online service at ksuite.infomaniak.com/mail) or the Calendar, Contacts, kSuite interfaces, can be displayed in light mode or dark mode, including based on the settings of your current operating system:
Enable manual mode
To manually choose a dark or light display, without relying on any different display setting on the operating system:
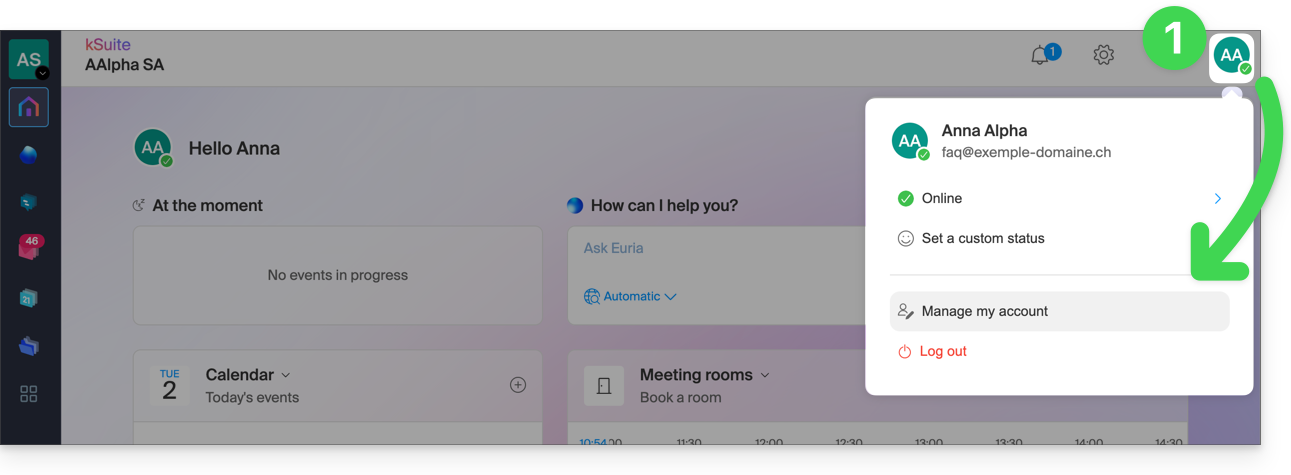
- Click here (or on the badge with your initials / avatar in the top right corner of the Infomaniak Manager) to "Manage my account":
- Then, click on Appearance in the left-hand menu.
- Click on Light to apply light mode:
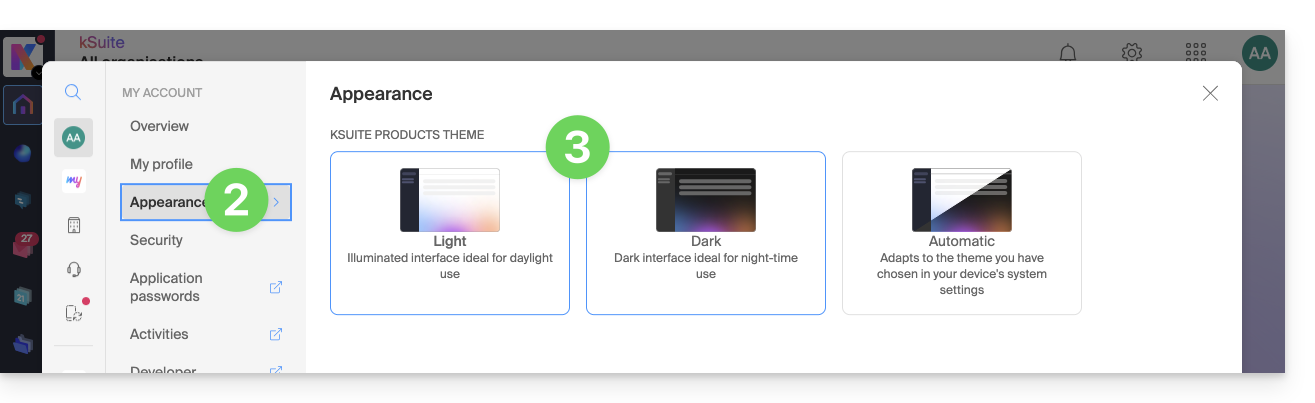
- Click on Dark to enable dark mode.
Enable automatic mode
Automatic mode is based on your operating system settings (macOS / Windows...):
- Click here or on the badge with your initials / avatar in the top right corner of the Infomaniak Manager to "Manage my account":
- Click on Appearance in the left-hand menu.
- Click on Automatic mode:
Then, if you want to change the light or dark theme of your computer, so that the automatic mode of the Manager takes your preferences into account…
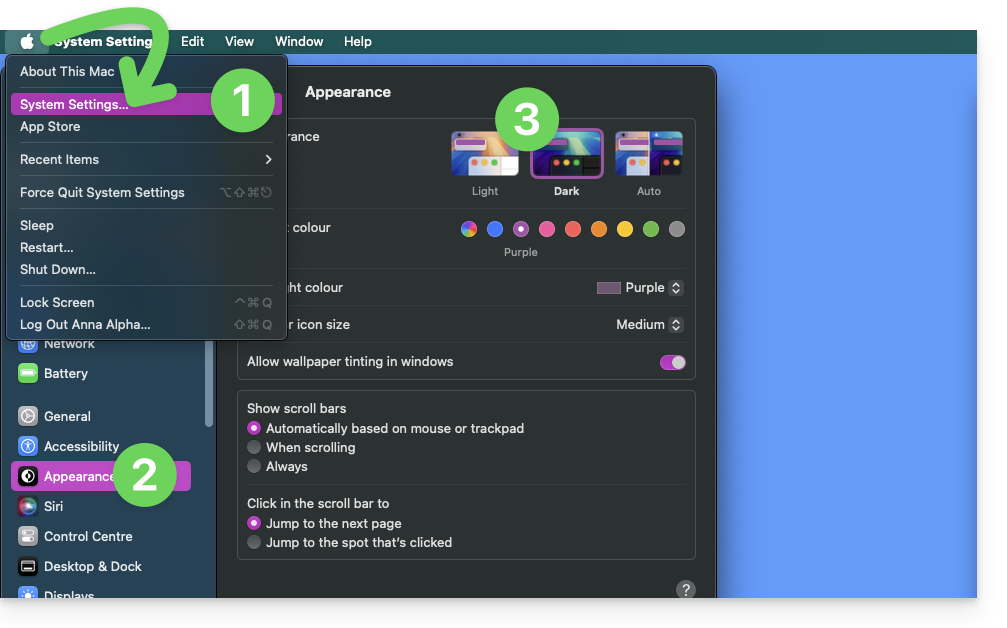
… on macOS
- Click on System Preferences…
- Click on Appearance.
- Choose the desired mode on the right:
… on Windows
- In the Start menu, open Settings > Personalization.
- Select Colors, then Choose your mode:
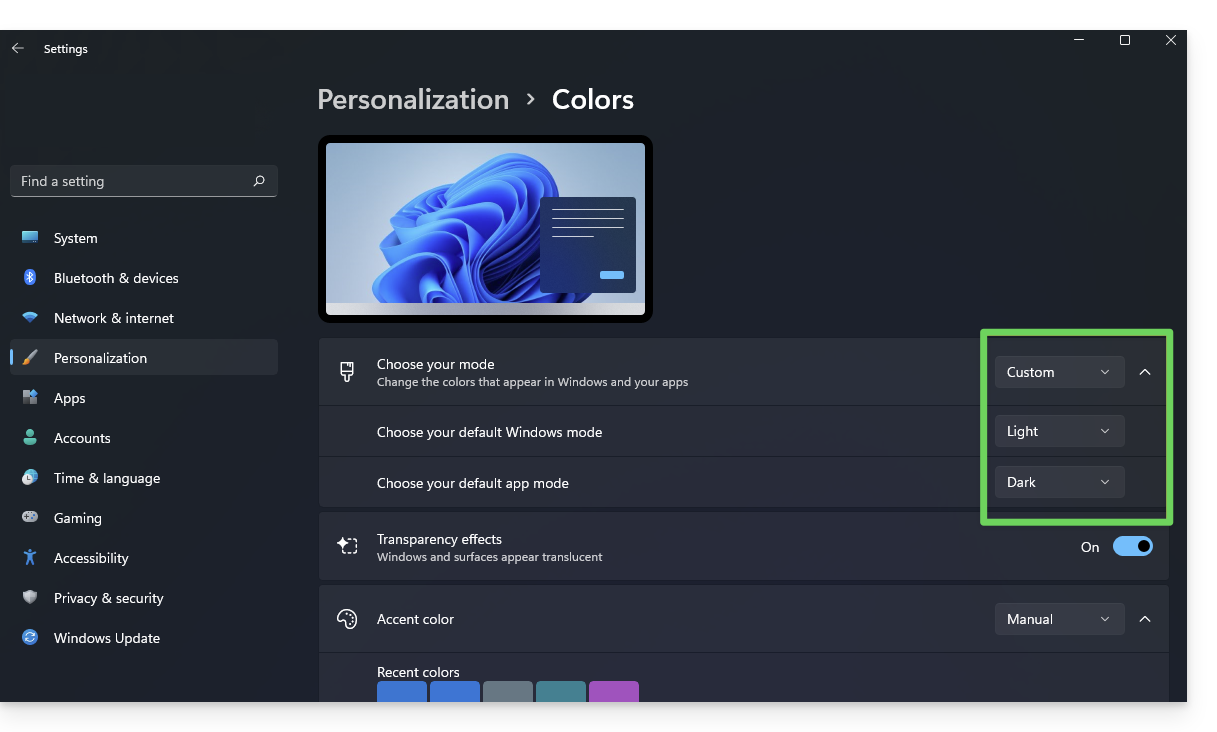
- You can choose between Light, Dark, or Custom.
- If you select Custom, you will be able to choose a default Windows mode and a different default application mode.
And on mobile?
The dark theme is enabled on mobile devices for Infomaniak login and account creation pages; it automatically adapts to the mobile system's preferences, providing a consistent visual experience between mobile applications and login/account creation.
Link to this FAQ:
Has this FAQ been helpful?
This guide explains how to obtain and install an application on a computer from certain Infomaniak interfaces such as kSuite or those that allow you to manage your calendars/agendas or your address books.
Preamble
- A Progressive Web App (PWA) is an application designed for the Web and offers an experience similar to that of a native application.
- PWAs are fast, accessible directly from your browser, and can offer features such as offline operation or sending notifications.
- Installing a PWA allows you to create a standalone application on your computer, without going through a store traditional.
Install a progressive web app (PWA)
To download the PWA app (example here with Infomaniak Mail), depending on the browser used:
- Click here to access the Infomaniak Web app Calendar.
- Once the page is loaded, check for the presence of the installation icon in the browser's address bar (often represented by a screen with a “+”):
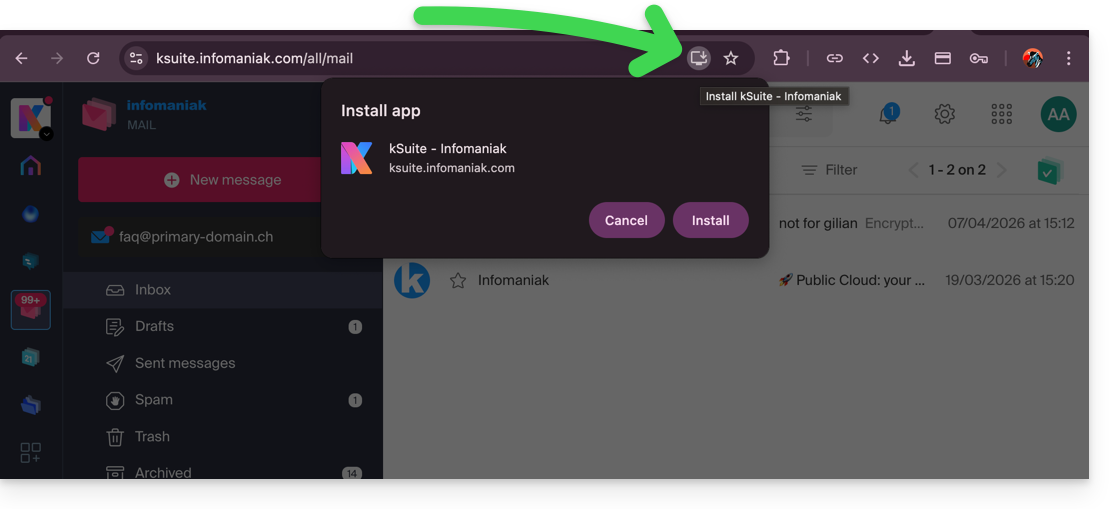
- Google Chrome / Chromium:
Click on the installation icon located in the address bar, or open the ⋮ menu and then click on Install [application name]. - Microsoft Edge:
Click on the Applications icon in the address bar or open the ⋯ menu, then select Applications > Install this site as an application. - Mozilla Firefox:
PWA installation is not fully supported natively. However, it is possible to use alternative solutions (extensions or shortcut creation) to simulate similar behavior. - Safari (macOS):
From recent versions of macOS, open the File menu and then click on Add to Dock to create a web application.
- Google Chrome / Chromium:
- The app is then present on your computer (example here with Infomaniak Calendar) and allows you to open the data while being completely autonomous outside the browser:
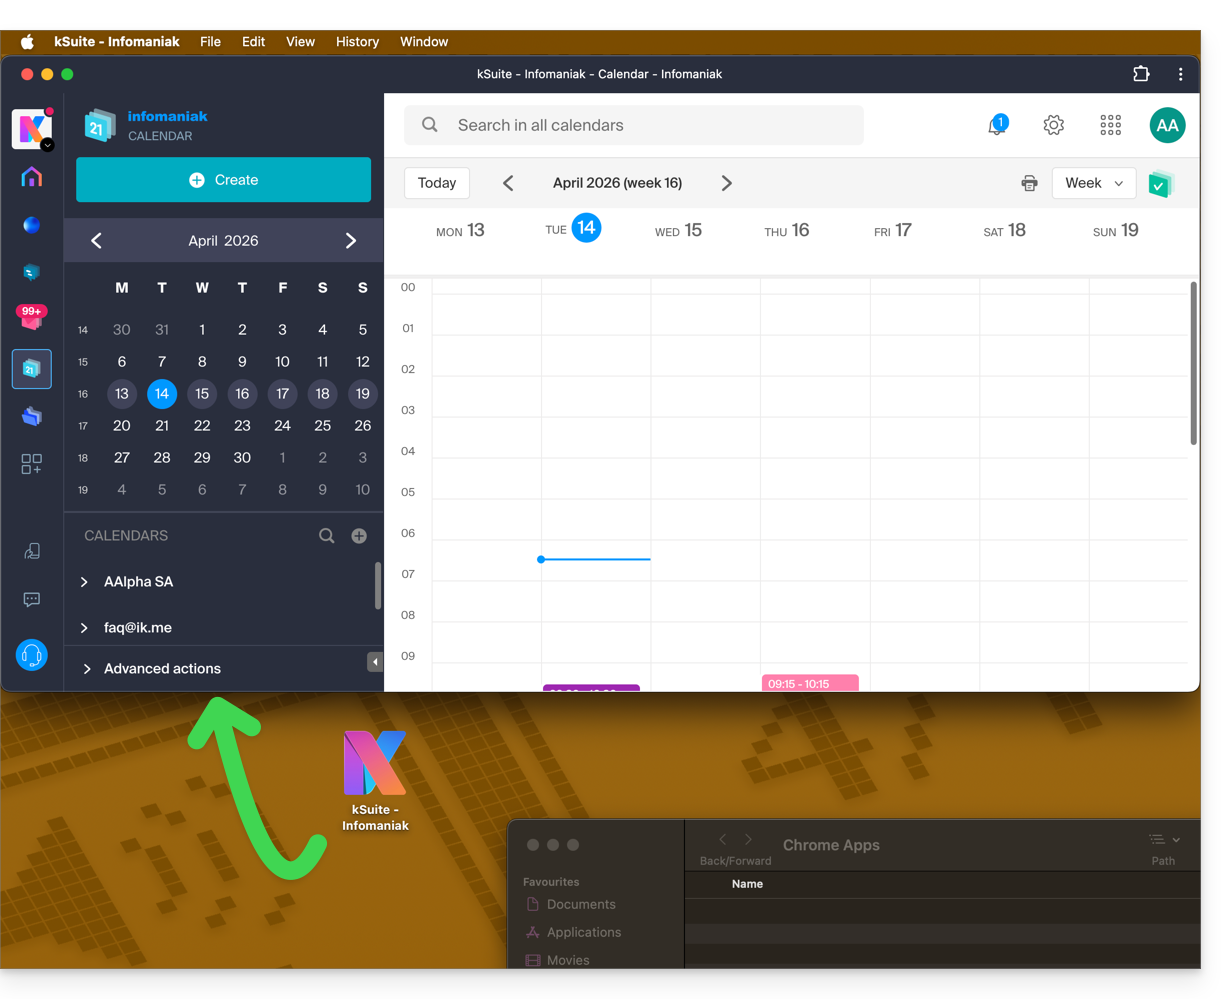
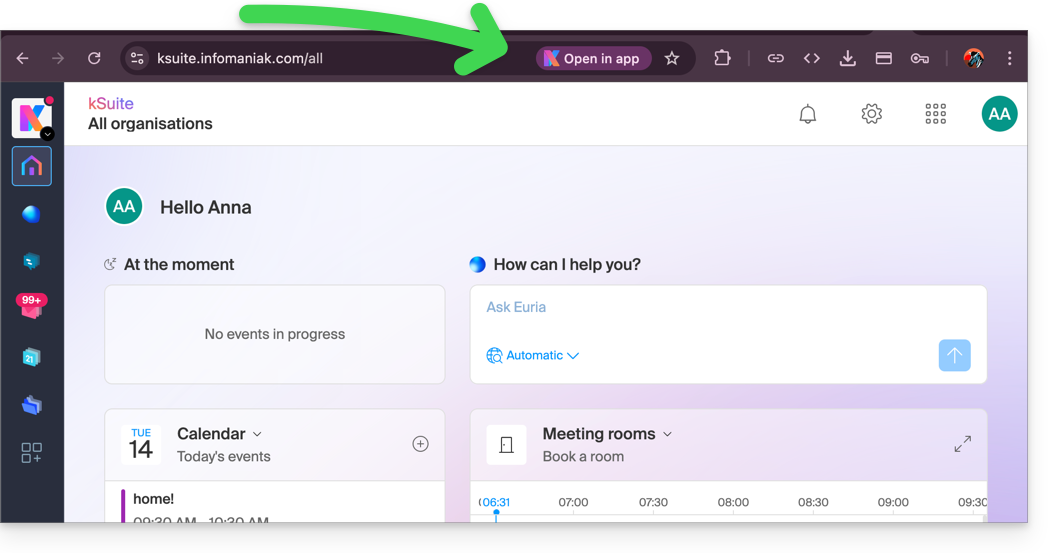
- When the app is detected on your computer, you can easily return to the app from the browser when you are on other Infomaniak pages (example here with a kSuite user space):
Remove the Infomaniak “PWA” application
To remove this local application system:
- Open the previously installed application.
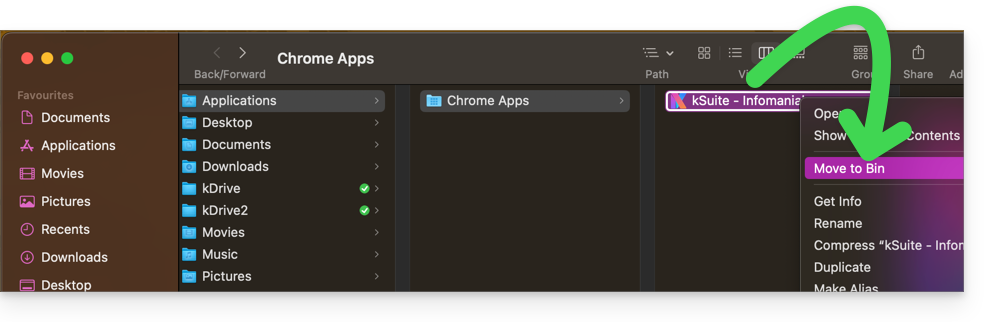
- Click on the action menu ⋮ or ⋯ depending on your browser.
- Select Uninstall or Remove the application.
- Confirm the deletion if necessary.
- You can also delete the application directly from your operating system (like any other application) or move the icon to the trash:
Link to this FAQ:
Has this FAQ been helpful?
Infomaniak offers you alternatives to Skype with its own solutions, whether for individual calls, remote meetings, or group discussions.
kMeet, the video conferencing solution for individuals & businesses
Despite its initial success, the Skype communication platform has seen its usage decline with the emergence of solutions better integrated into new collaborative practices.
One of the easiest ways to replace Skype is to adopt kMeet:
- Unlimited audio and video calls
- Access without registration
- Compatibility with Web, mobile and desktop
- Integrated chat & reactions (emoticons, sounds)
- Screen sharing with drawing, remote control tools
- Breakout rooms
- Integration with the calendar (video link creation)
- Integration with kDrive for storing meeting recordings
- Integration with kChat for video calls
- Respect for privacy (no advertising, hosting in Switzerland)
- Security with AES-256 encryption
- Eco-friendly (renewable energy, CO₂ compensation)
Replace Skype with kMeet
The kMeet alternative to replace Skype can be implemented in several ways:
1. Quick use without registration
To start a private communication between several people on the Internet, simply have one of them go to kMeet and then share the meeting link with the others. Here is the step-by-step procedure:
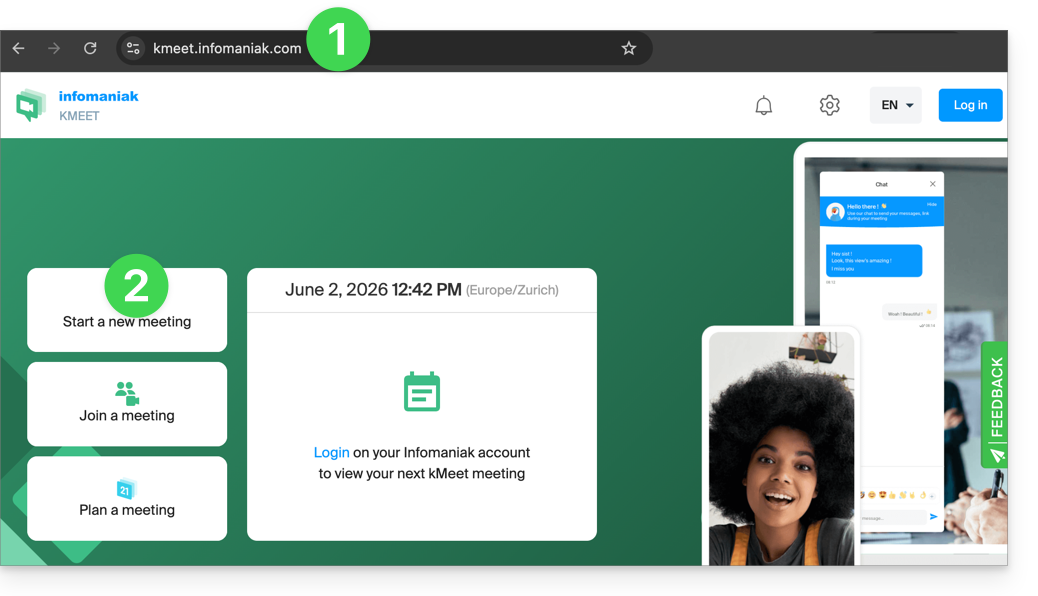
- Enter kmeet.infomaniak.com in a browser such as Chrome or Safari.
- Click on Start a new meeting:
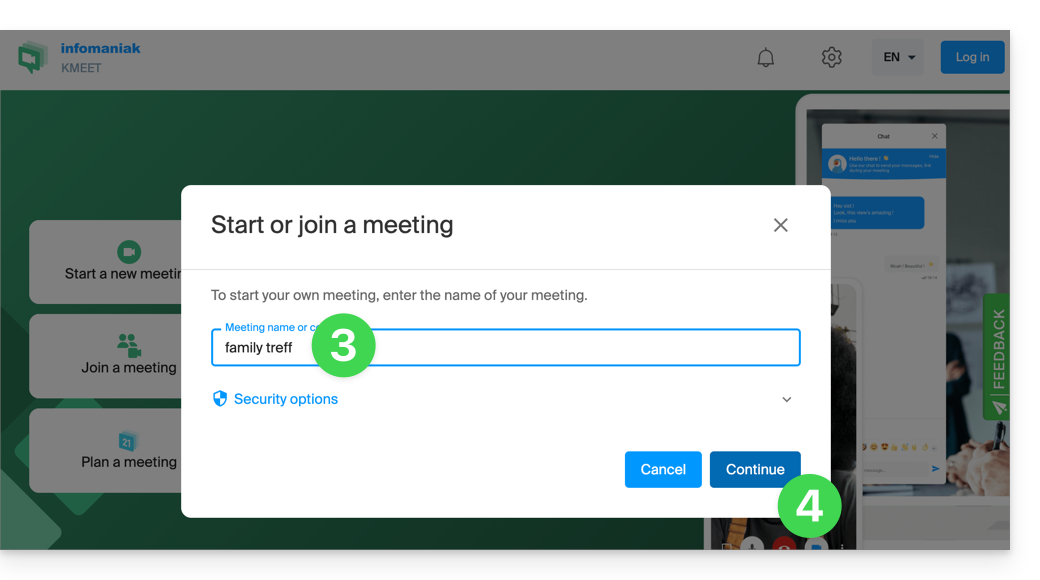
- Enter a name for the meeting, which allows you to indicate to future participants the subject of the discussion they are joining.
- Click the button to Continue:
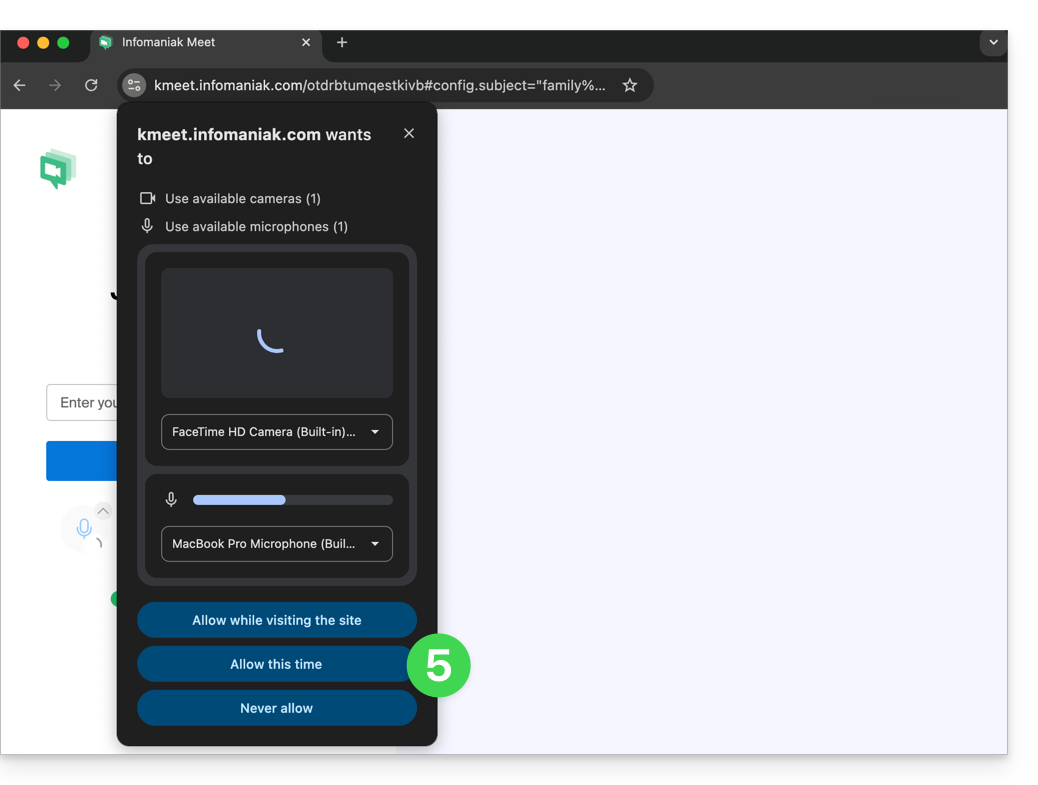
- Grant the necessary permissions to kMeet:
- Enter your name, which is what the other participants will see.
- Enable or disable any communication methods if they should not be used at this time.
- Click the button to join the virtual meeting room (as the first participant since no one else has been invited yet):

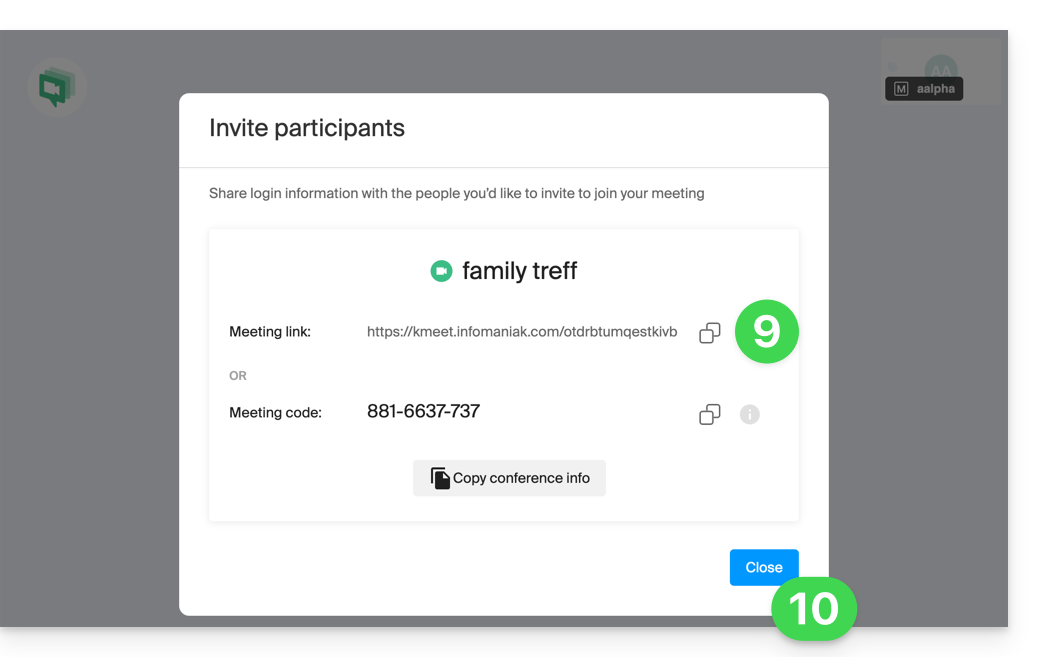
- There you go, the meeting room has been created, and you can now copy the information related to this session and send it to the participants so they can join you (they only need to click on the link you send them).
- Close the information window so you can all chat together:
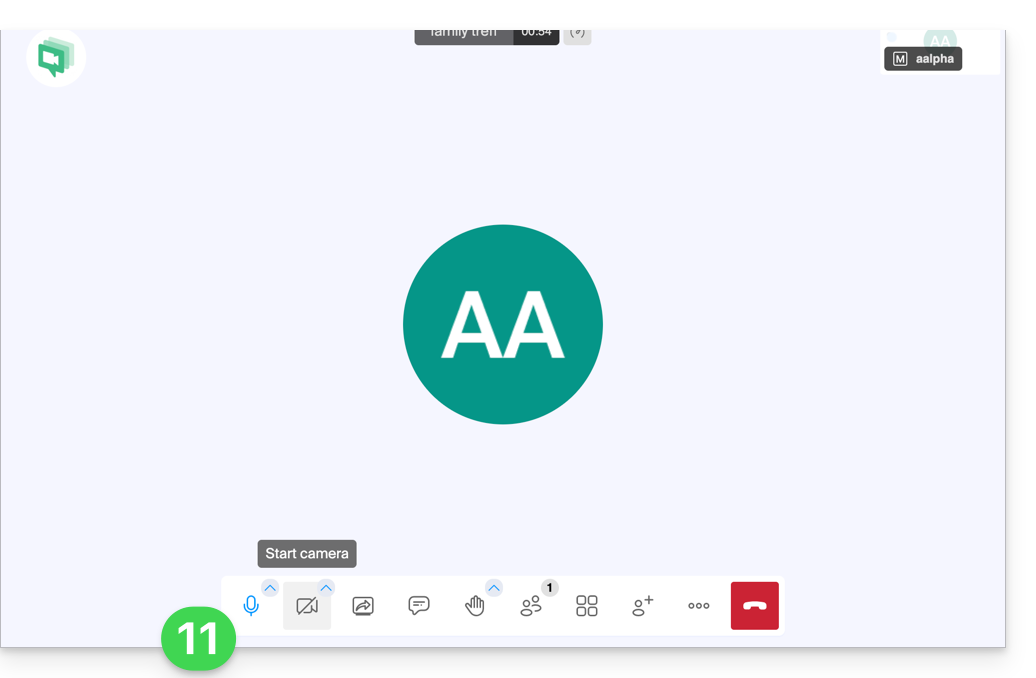
- The toolbar at the bottom of the screen allows you to enable or disable the microphone, camera, etc.:
To discover all the possibilities that kMeet offers, consult this other guide.
2. Scheduling and invitations with my kSuite
To work efficiently, kMeet can be directly linked to your professional calendar. This means that every time you create an event in your calendar…
- … a video conferencing link is automatically generated…
- … participants receive the invitation by email with all the information…
- … and on the day, they can join the meeting with one click, without registration or software to install.
Benefit: you centralize meeting management, reduce forgotten appointments, and simplify organization, all from a single interface.
To set up this solution:
- Sign up for my kSuite for free to have an email address, for example
anna.alpha@ikmail.com, and above all, access to Infomaniak services. - Log in to the calendar at ksuite.infomaniak.com/calendar and then create an event on your chosen date.
- Add participants to the event, even if they are not Infomaniak customers.
- Click the green button to automatically generate a kMeet link, which will be added to the event.
- Click the button to save your event:
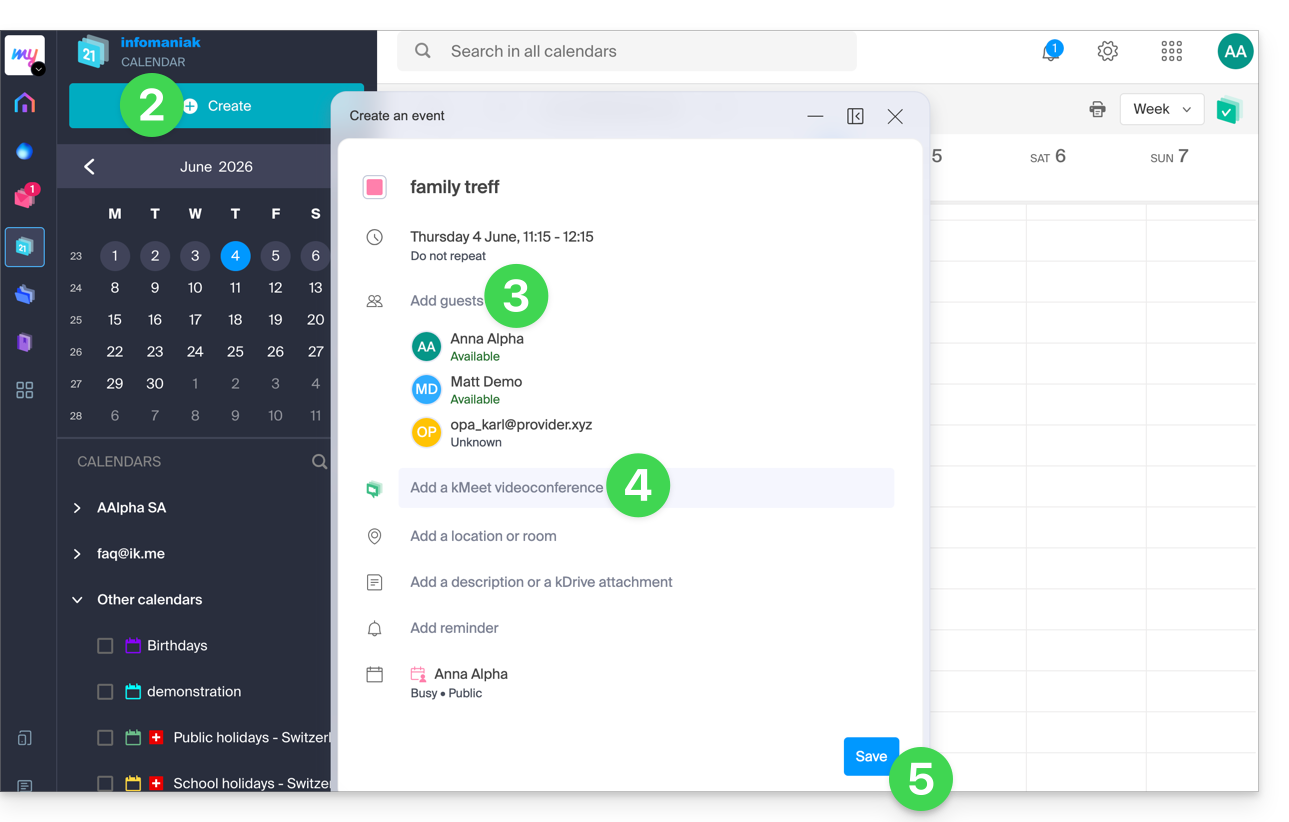
- Answer YES to the prompt to send notifications to the guests.
- Invitations will then be automatically sent to the participants by email, containing the clickable kMeet link that allows them to join the online discussion at the appropriate time:
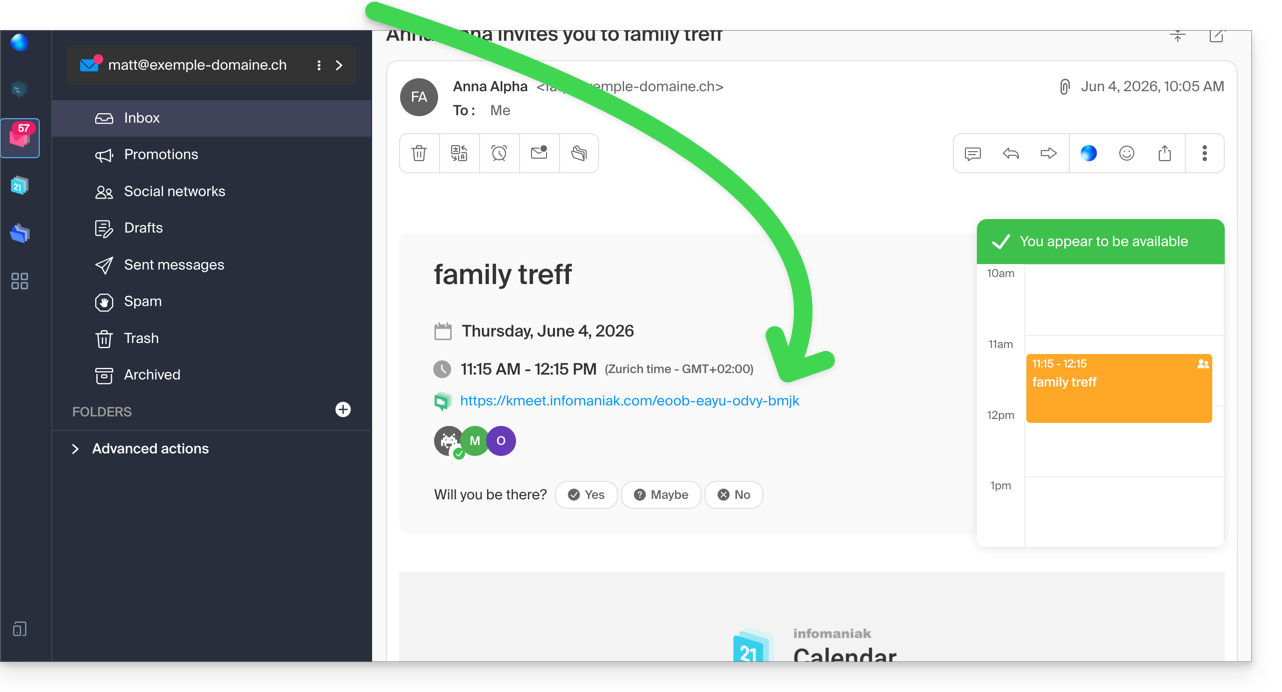
- The kMeet meeting link is also visible on the event in the calendar directly.
3. Call your contact as you would with Skype
To start a conversation at any time with a contact that you have previously saved in your address book, you both need to have kChat, which is available within kSuite Infomaniak. To set up this solution, which can also be extended to an entire group of contacts:
- Sign up for kSuite to gain access to the corresponding Infomaniak services.
- Configure users (they can even be external) on kSuite.
- Install the kChat app or go to the URL https://ksuite.infomaniak.com/kchat
- A user can then be called via kChat, which will ring the recipient's device:
- = Internet browser if the kChat URL is open in it, or computer/mobile device if the kChat app is installed.
- Refer to this other guide to learn more about video calls on kChat.
- Your contact can then answer; the call will be made using kMeet technology within kChat or on the kMeet app if it is installed.
Link to this FAQ:
Has this FAQ been helpful?
This guide explains how to remove the link between a domain name and kSuite Free.
Introduction
- Once removed, the domain name is again available to be linked to one of your services.
Remove the linked domain
To unlink a domain name from kSuite Free:
- Click here to access the management of your kSuite in the Infomaniak Manager (need help?).
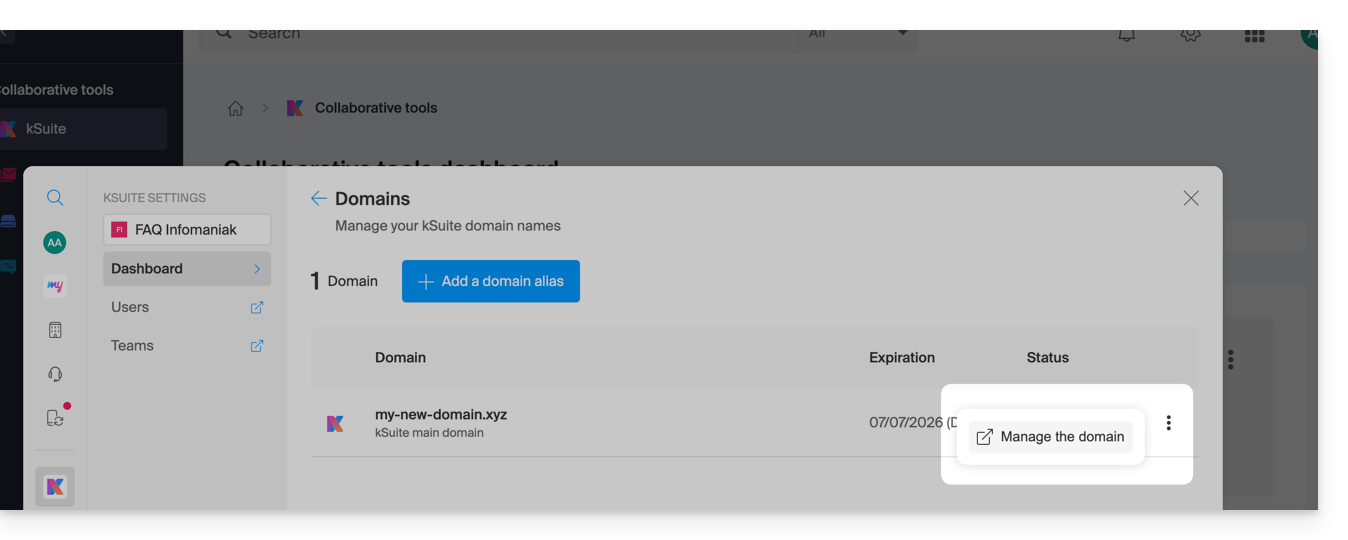
- Click on the action menu ⋮ to the right of the kSuite name.
- Select Manage domains:
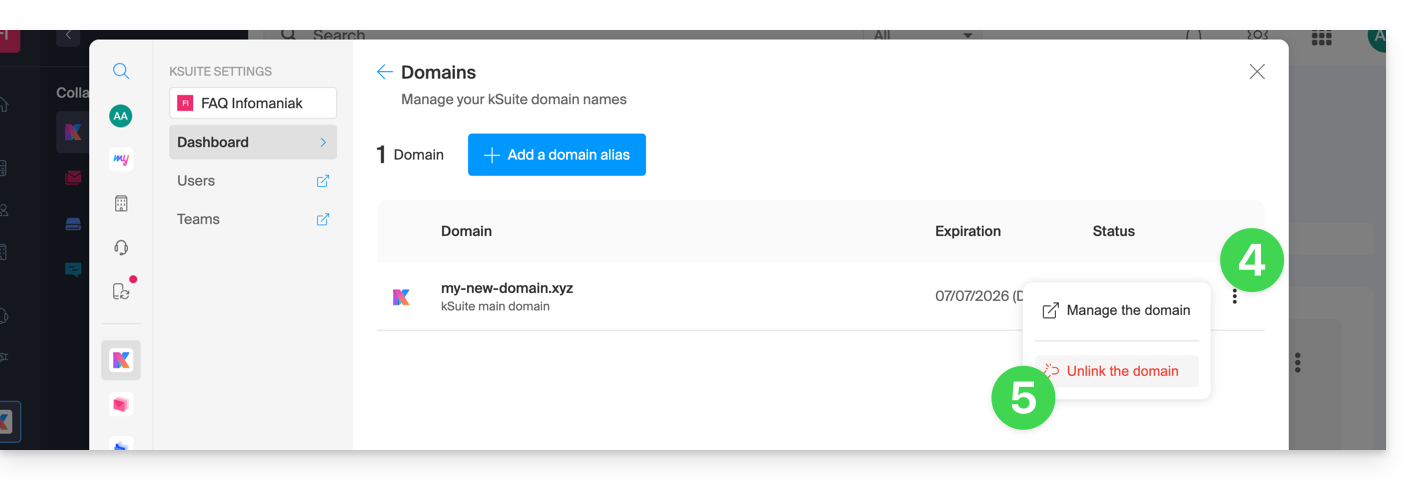
- Click on the ⋮ icon to the right of the domain name you wish to unlink.
- Click on “Unlink domain”:
- If you have a paid kSuite plan, you cannot unlink the domain name (cancel the paid plan if necessary):
- If you have a paid kSuite plan, you cannot unlink the domain name (cancel the paid plan if necessary):
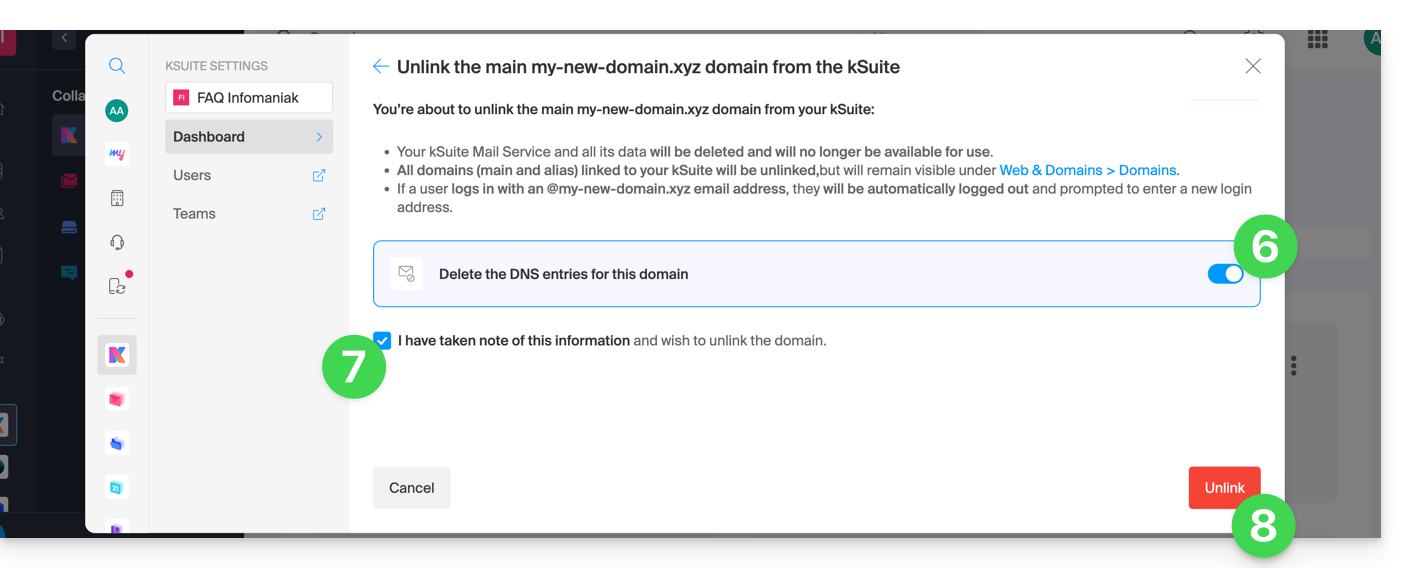
- If necessary, enable the deletion of the domain name's DNS entries.
- Confirm the detachment.
- Click on the button to confirm:
Link to this FAQ:
Has this FAQ been helpful?
This guide explains how to validate two-factor authentication, or two-step verification, through an Infomaniak app already installed on your devices.
Preamble
- Refer to this other guide regarding the activation of the 2FA feature.
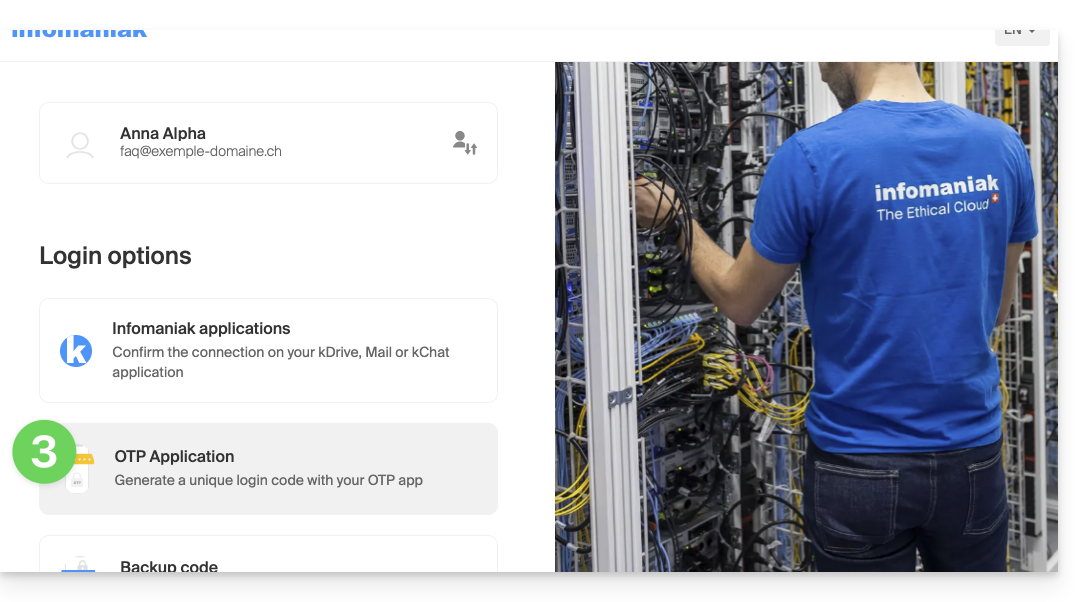
Receive a notification when a login authorization request is made via Infomaniak apps
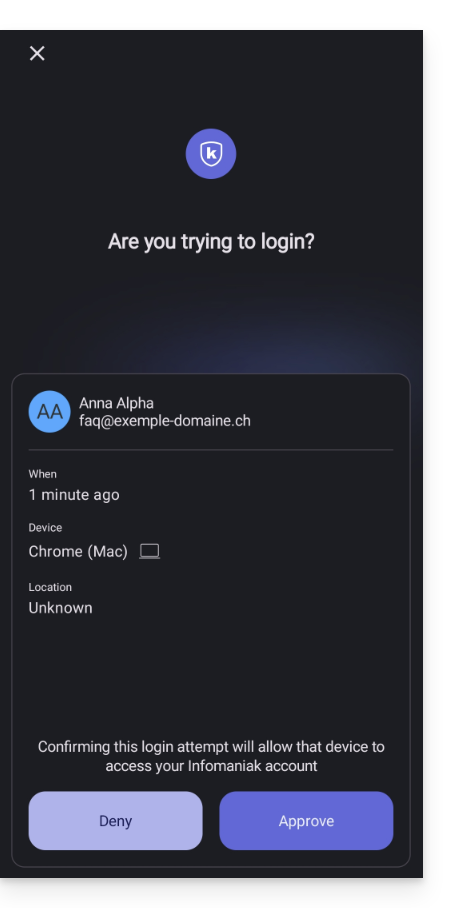
From the moment you activate 2FA by configuring one of the proposed methods, it is automatically the Infomaniak apps (Mail, Euria, kDrive...) that allow you to validate the connection when connecting from another device:
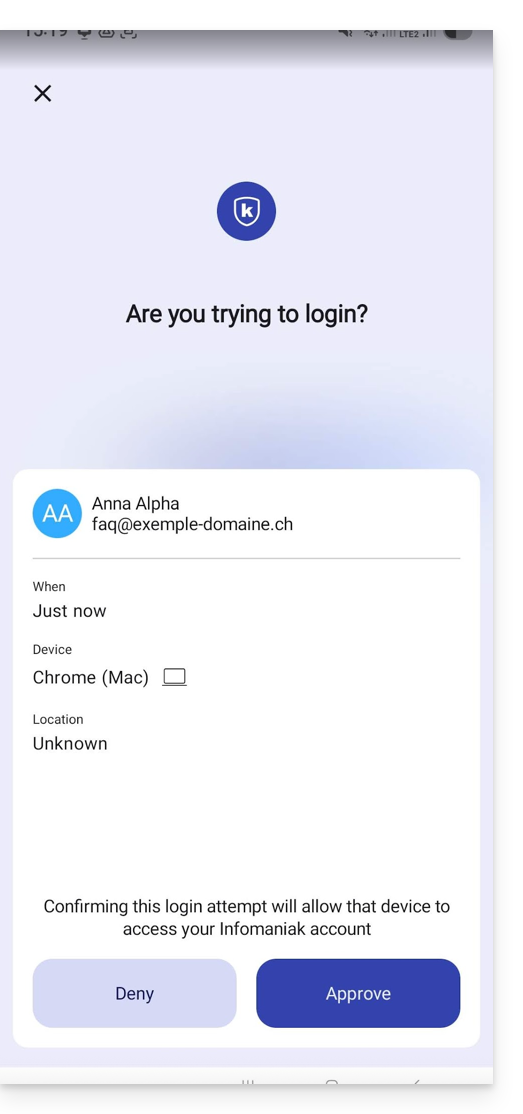
- A modal opens to ask you to validate the connection if it indeed comes from you:
- You can of course request on a case-by-case basis to receive the validation request on one of the other registered methods:
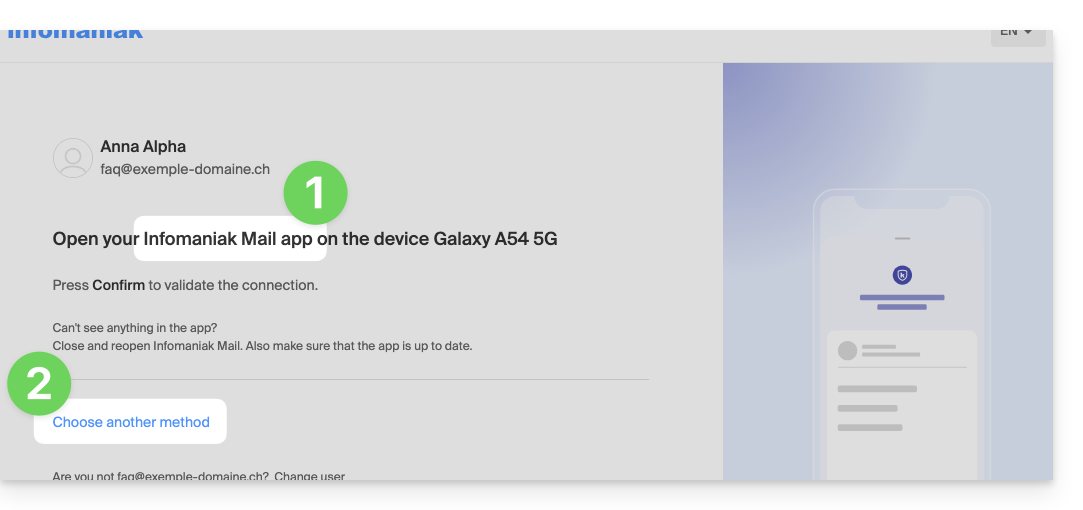
- In this case, you access the different 2FA methods already registered on your account:
If you have activated multiple validation methods (SMS, OTP application...), you can define the one that will be proposed by default for each connection. Note, however, that the priority method will remain the one for validation in the Infomaniak app installed (Mail, Euria, kDrive...) on your devices:
- The notification appears full screen when you open the specified application, and a button allows you to validate the connection (if it is indeed you):
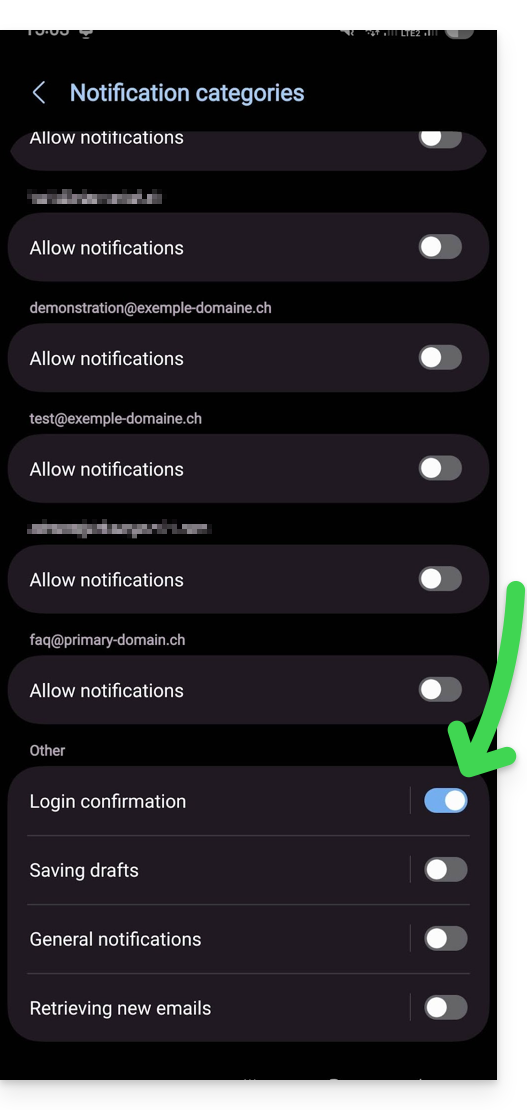
- In the Android settings of the Infomaniak apps (Mail for example), you can choose to activate only the login authentication request notification:
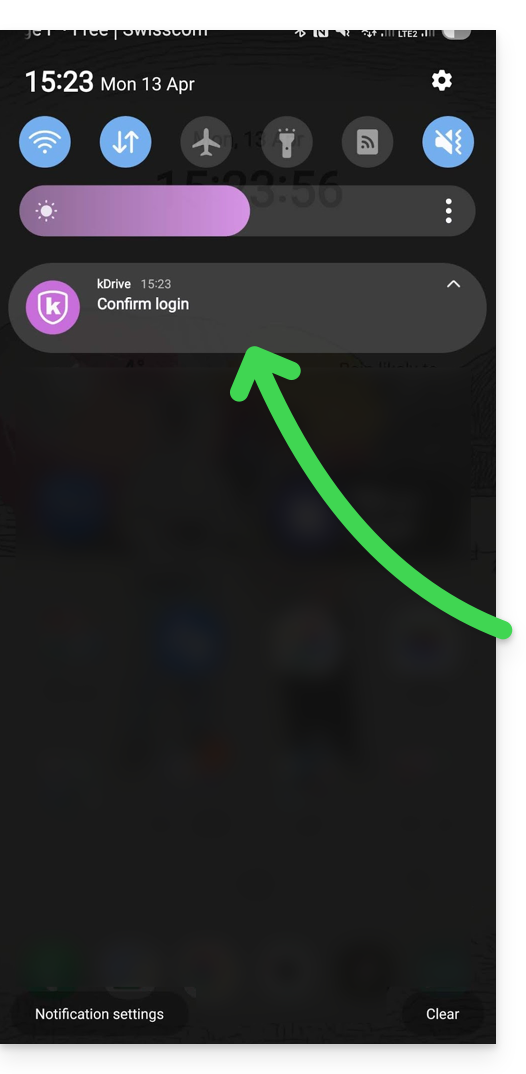
- Thus, an Android notification alerts you to the ongoing authentication request, and you can open the app directly from the notification:
Link to this FAQ:
Has this FAQ been helpful?