Knowledge base
1000 FAQs, 500 tutorials and instructional videos. Here, there are only solutions!
This guide explains how to create a custom MX record (mx.domain.xyz assuming that domain.xyz belongs to you) to be used later in the MX configuration of your NAS.
An MX record cannot be declared directly as an IP address, for example 178.123.456.789
Custom MX record
To access your domain names:
- Click here to access the management of your domain on the Infomaniak Manager (need help?).
- Click directly on the name assigned to the domain in question.
- Click on DNS Zone in the left sidebar.
- Click on the blue button Add a record:

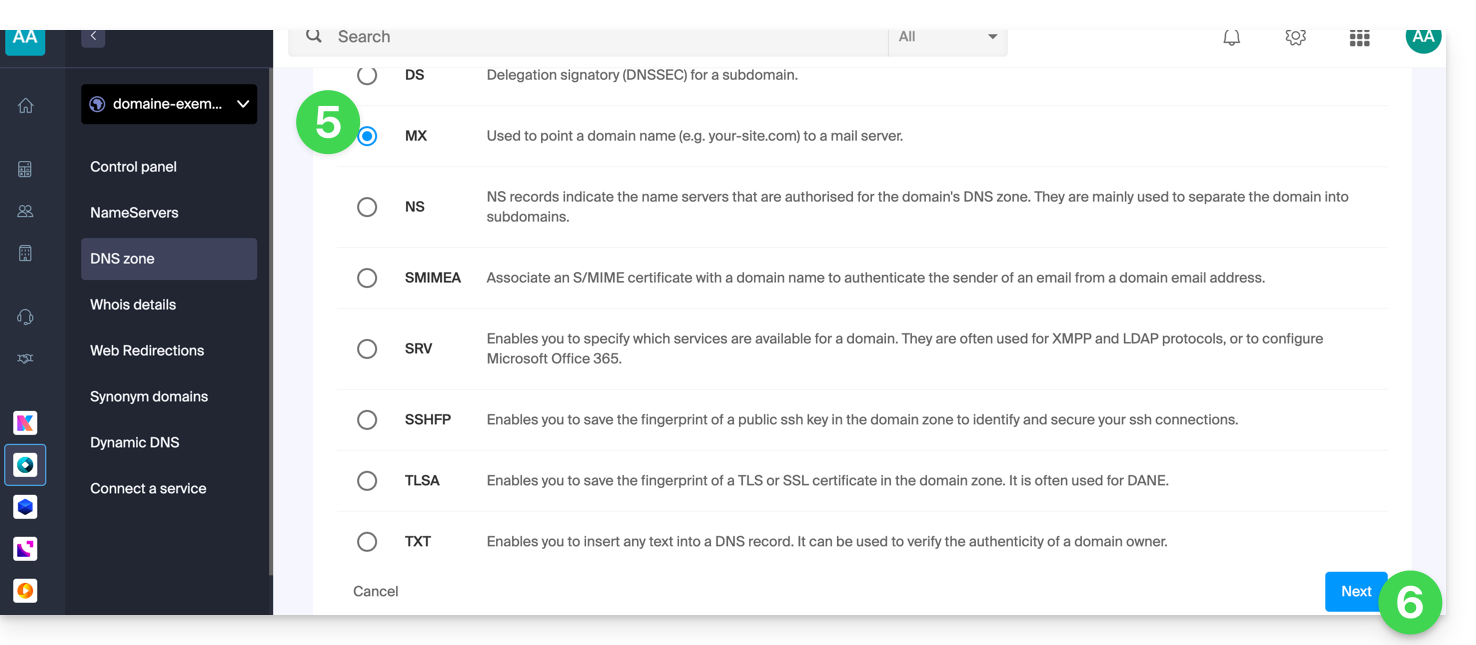
- Select MX as the record type.
- Click on Next:
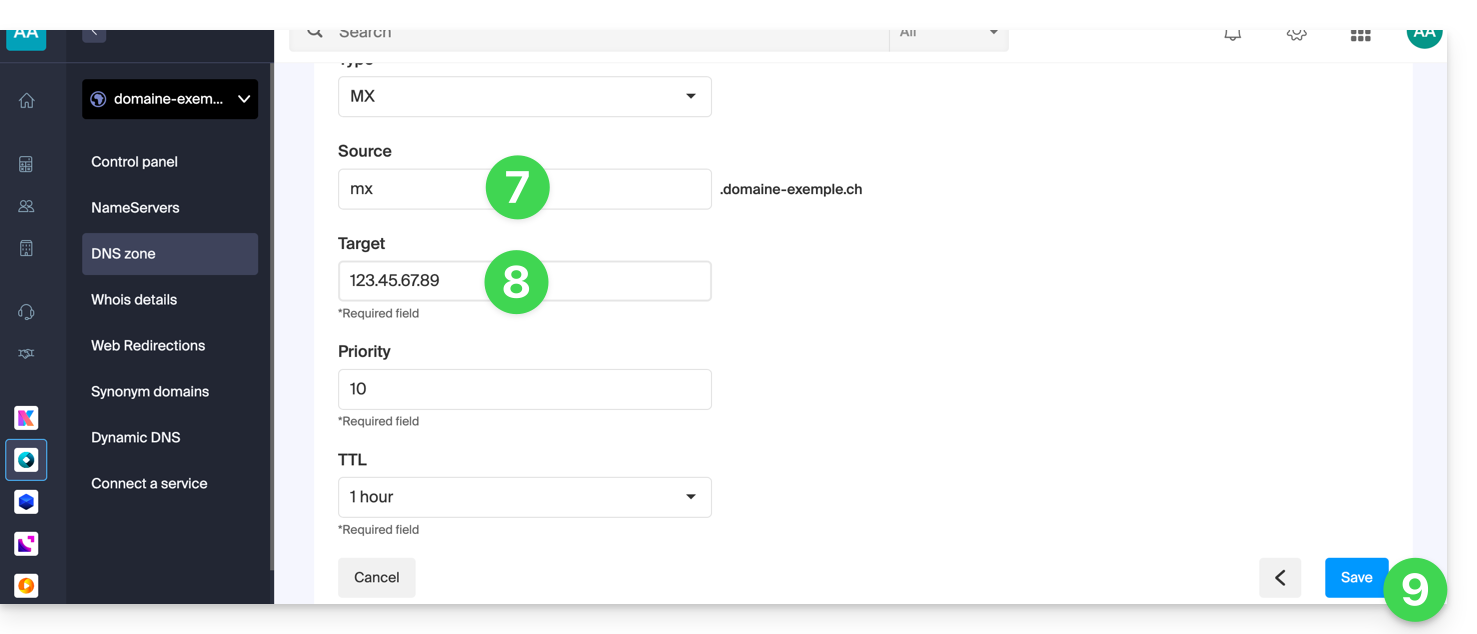
- Enter the desired MX record ("
mx.domain.xyz" for example). - Point the record to the desired IP address (target).
- Click on the Save button:
Link to this FAQ:
Has this FAQ been helpful?
This guide explains how to access your Jeedom home automation box (which is behind a dynamic IP address provided by your ISP) with a domain name at Infomaniak via the free DynDNS option.
Preamble
- The integration you install acts as a messenger: it constantly monitors the IP address of your local network.
- As soon as it detects that your ISP has changed your IP, it instantly sends a signal to Infomaniak.
- Infomaniak then updates your domain name (e.g.:
jee.domain.xyz) so that it points to the new IP address.
Link Jeedom to a domain name
Prerequisites
- Have a Jeedom installation (e.g., on a Raspberry Pi 5) connected to the Internet with a dynamic IP address.
- A dynamic DNS must have been created on the domain in question.
Next:
- Install the official and free DynDNS plugin on your Jeedom application from the Market.
- Activate the plugin as usual.
- Configure a new device by selecting Infomaniak from the list of services:
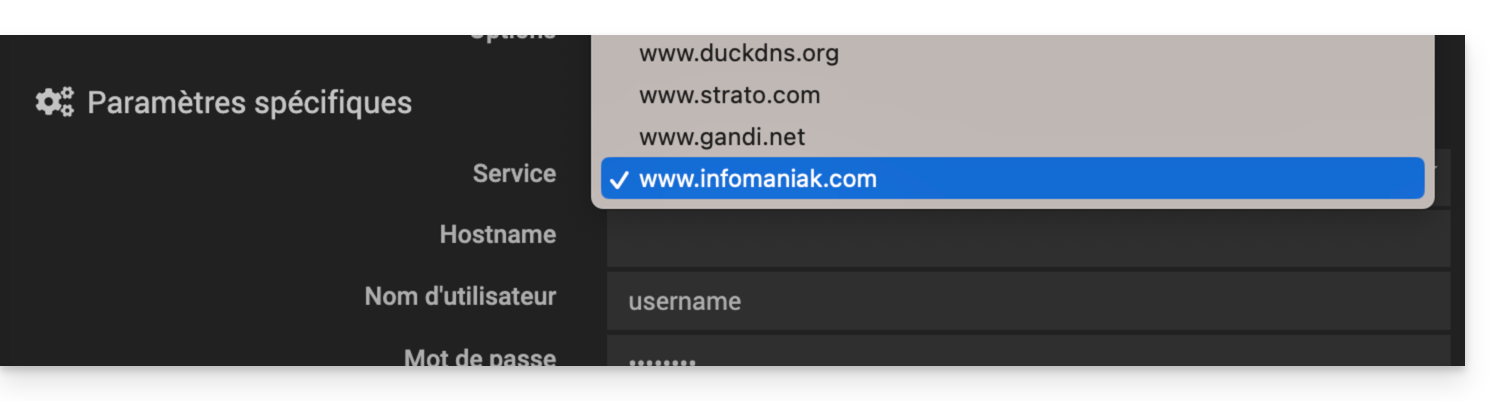
- Hostname: the URL configured in the Manager when adding the Dynamic DNS
- Username: the identifier defined in the Manager when adding the Dynamic DNS
- Password: the password defined in the Manager when adding the Dynamic DNS
Jeedom will check the external IP every 15 minutes. If it has changed, the DNS will be updated. Thus, your domain name will always point to your home automation installation, even if your ISP changes your public IP address.
Also refer to the official plugin documentation.
Link to this FAQ:
Has this FAQ been helpful?
This guide explains how to order a DNS zone from Infomaniak.
Preamble
- Having the DNS zone with Infomaniak is useful if your domain name is registered elsewhere (third-party provider/registrar) and you want to easily link this domain with Infomaniak products.
- Indeed, it is not enough to own a site
domain.xyzwith Infomaniak and to indicate the 2 Infomaniak DNS addresses with the domain name registrar (if it is not Infomaniak) for the site to display when you typedomain.xyzin a browser. - You must add a DNS zone in the same place as the hosting to make the site work easily.
- This will also be particularly useful if the service provider managing your domain name does not offer DNS zone management.
Order a DNS zone
To do this:
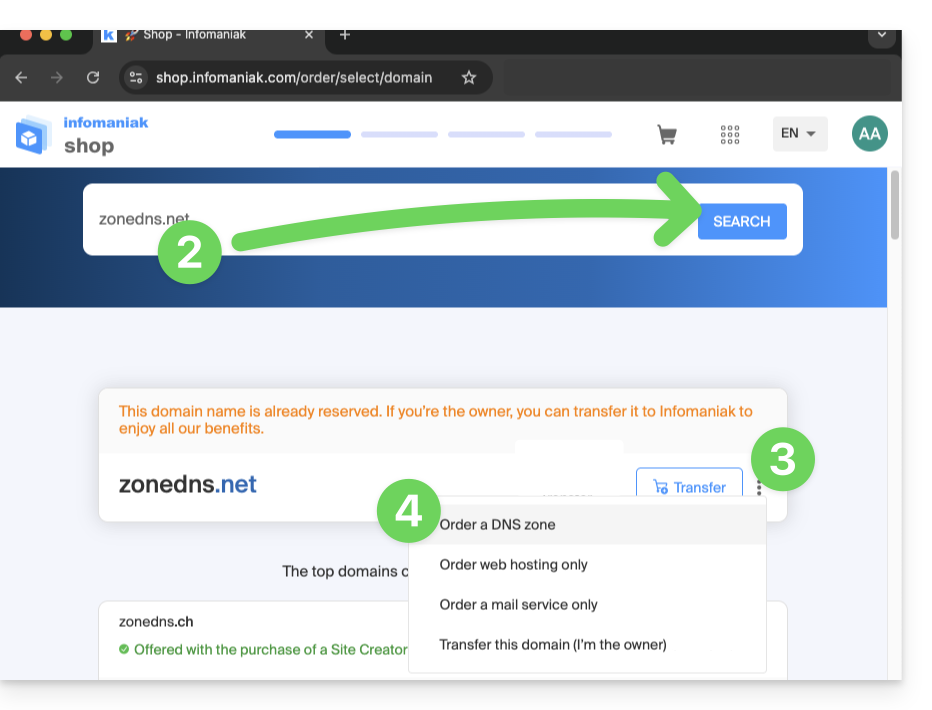
- Click here to access the Infomaniak domain Shop.
- Start a search with the name of the domain registered elsewhere.
- Click on the action menu ⋮ located to the right of the result obtained.
- Select Order a DNS zone:
- Complete the purchase.
- Once added to your Manager, the zone can be edited.
Link to this FAQ:
Has this FAQ been helpful?
This guide explains how to replace the main domain name associated with a Mail Service in case you want to modify the spelling of everything that comes after the at sign @ of your email address (= the domain name). If your Mail Service is part of a my kSuite, then you will need to act on the my kSuite domain directly.
Preamble
- You can also follow this procedure if the goal is to have completely new email addresses while keeping the history of your emails in Mail (since the email address will continue to exist, for example info@first-domain.xyz will become info@new-domain.xyz without modifying its content).
- Indeed, it is not possible to simply modify the spelling of the domain name concerned; it is therefore necessary to replace the current domain name associated with your email addresses with another domain name.
- To simply add an additional domain name, refer to this other guide.
- To rather modify the part of your email address that comes before the at sign
@, refer to this other guide. - Also note that you can rename your product (example) on the Infomaniak Manager but changing the name of a Mail Service has strictly no impact on its addresses; you need to act on the domain name.
If your Mail Service is part of a my kSuite, then you will need to act on the my kSuite domain directly.
Modify the domain name of the Mail Service
Prerequisites
- Own the new domain name (if necessary, create it in advance).
- Refer to the instructions of this other guide by applying the instructions corresponding to your situation (this is so that the domain name works when it is linked to your Mail Service).
Once the new domain name is ready to be used in place of the old one, you need to add it to the Mail Service and then perform a reversal:
- Click here to access the management of your product on the Infomaniak Manager (need help?).
- Click directly on the name assigned to the product in question.
- Click on Domain Management in the left sidebar
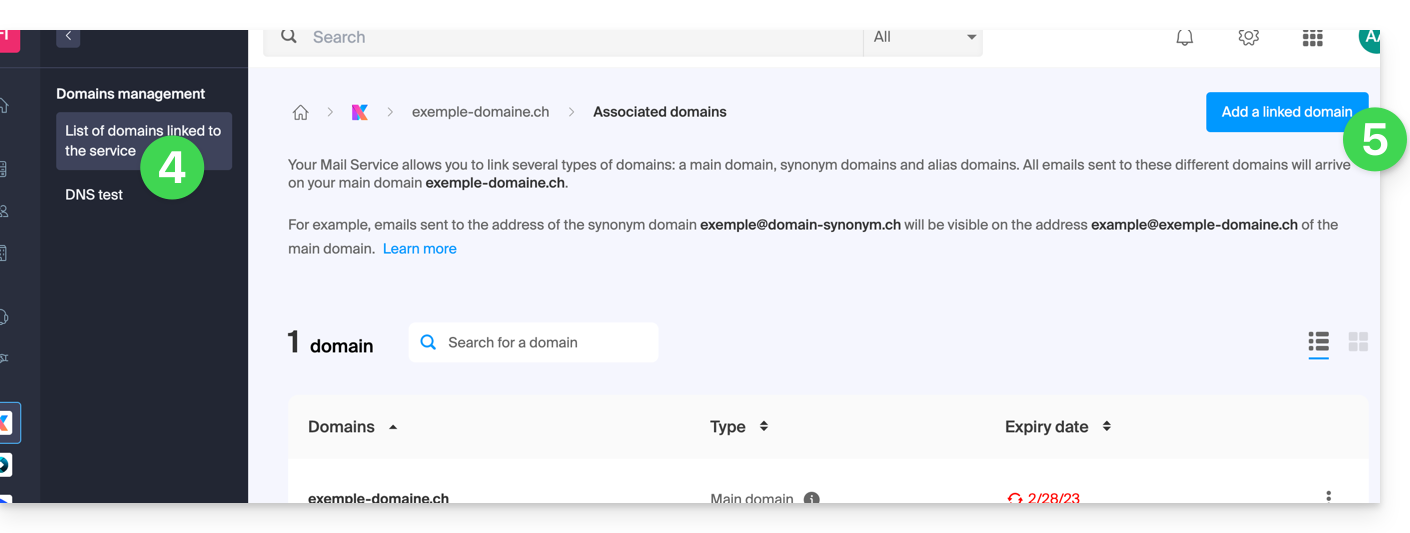
- Click on Service-related domains in the left sidebar.
- Click the blue button Add a linked domain:
- You can:
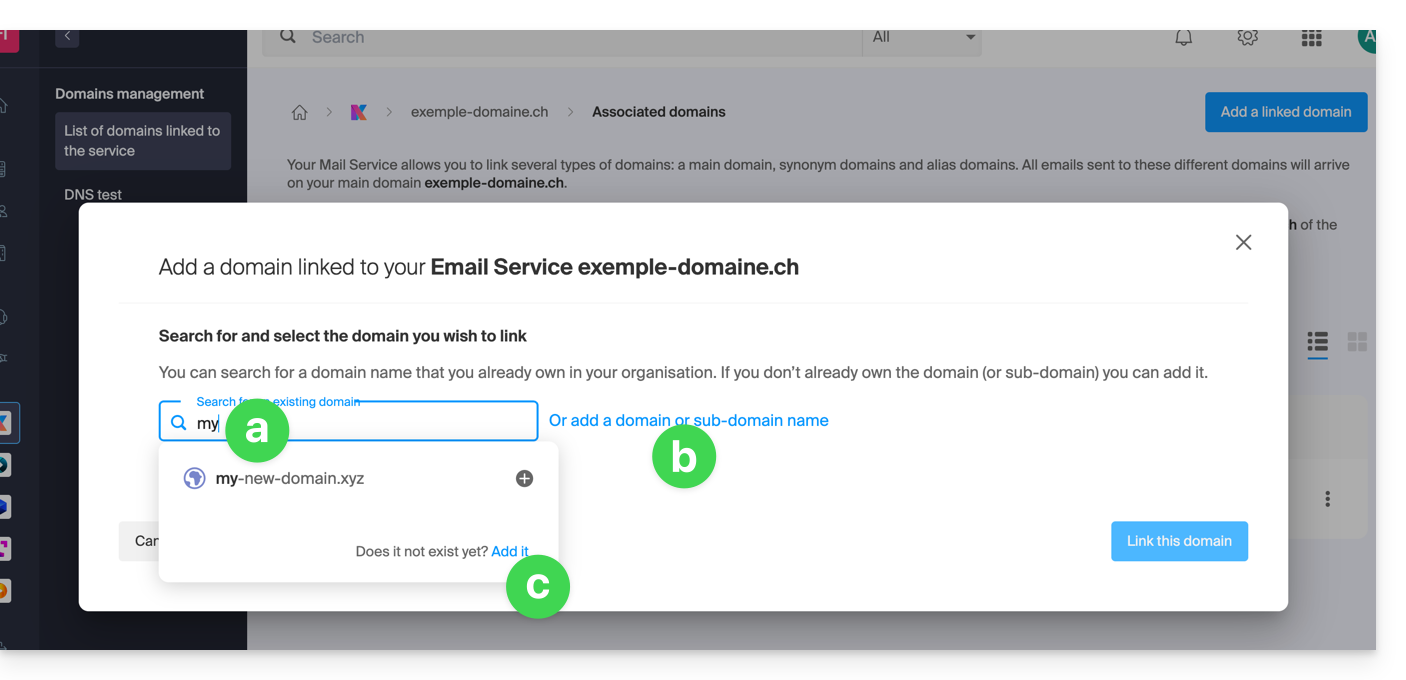
- Search for an existing domain within the Organization you are connected to; this will link and automatically update the DNS zone of the added domain.
- Add a domain name or subdomain to manually specify the domain name or subdomain to use (ideal if the domain name is hosted elsewhere).
- Buy a new domain name (see prerequisites above).
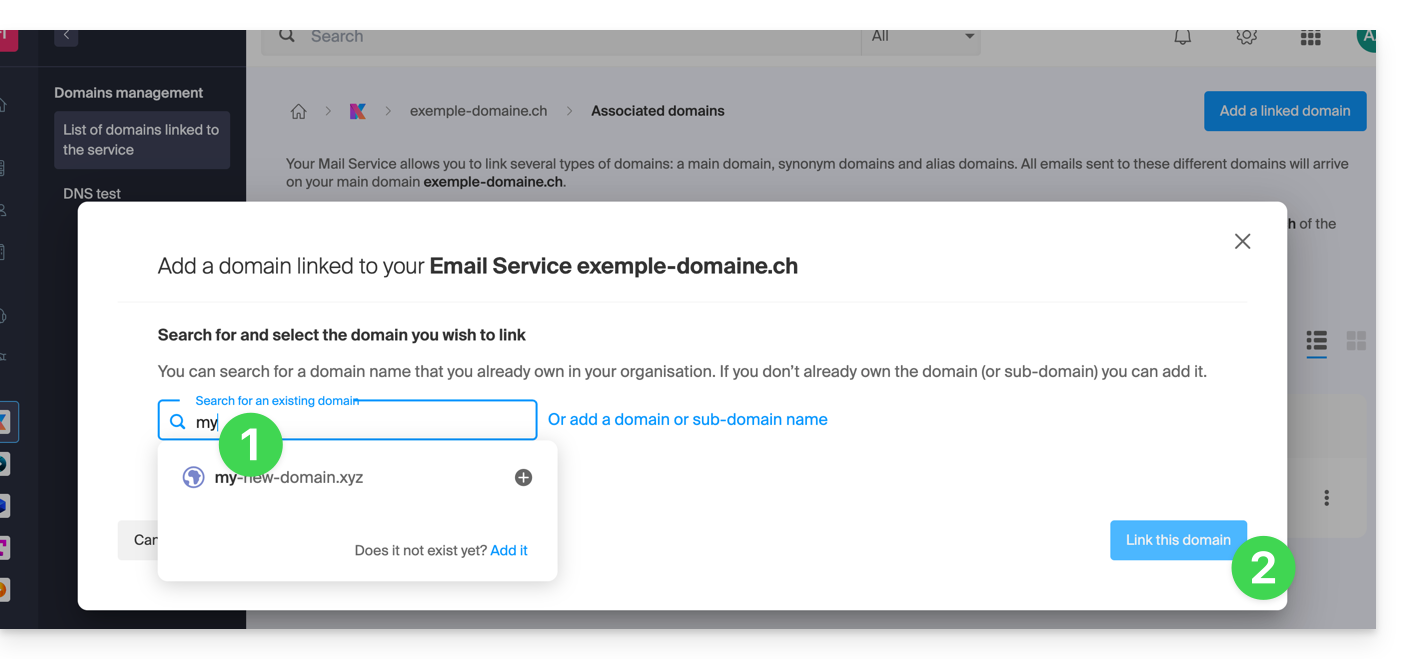
a: The domain exists within the Organization
Before proceeding, make sure to dissociate the domain name if it had been set as an alias domain previously.
- Click on the proposed domain name.
- Click the blue button Link this domain:
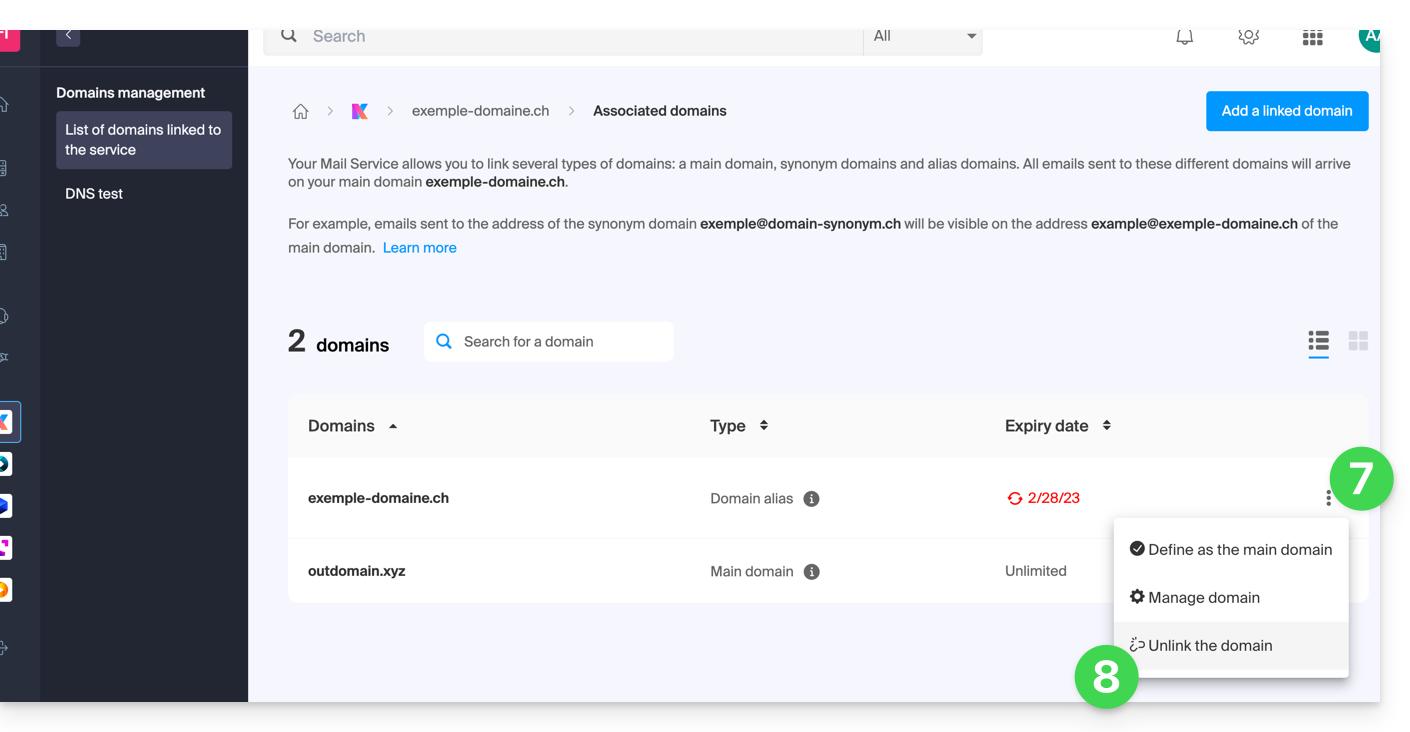
- Click on the icon ⋮ to the right of the newly added domain name.
- Click on Set as primary domain (you must have dissociated the alias domain name from the primary domain name if there was a previous association):

- Confirm the reversal and then wait for the operation to complete.
- Click on the icon ⋮ to the right of the old domain name.
- Click on Unlink the domain:
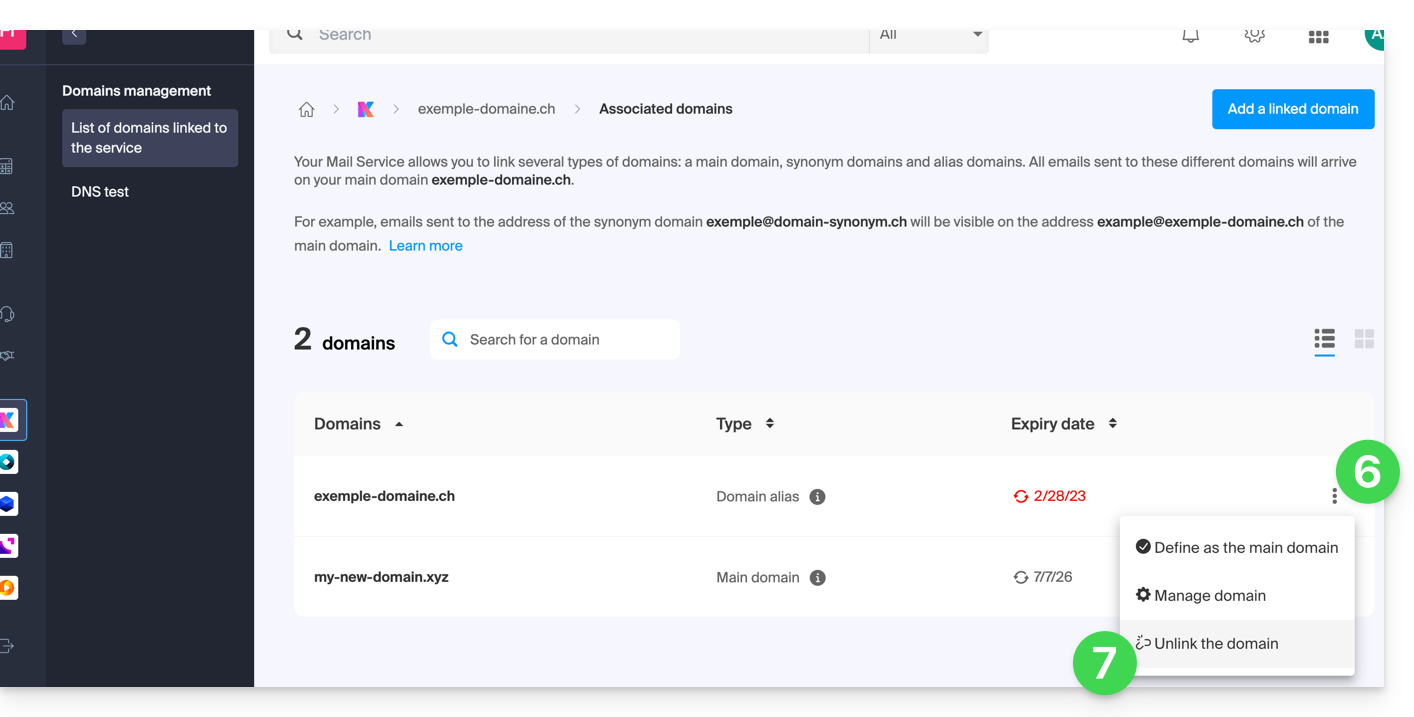
- Confirm the detachment by verifying if you want to delete the associated DNS records during the detachment operation.
That's it, the Mail Service now responds to a new domain name.
b: The domain exists but elsewhere
- After clicking on Add a domain or subdomain, enter the domain name that will replace the current name.
- Enable DNS entry updates (if the domain name situation allows it, the DNS zone of the domain name will be automatically updated).
- If the point above is active, then enable the replacement of any existing entries.
- Enable reversal of the domain name (to avoid additional steps as in point "a" above).
- Click the blue button Link this domain:
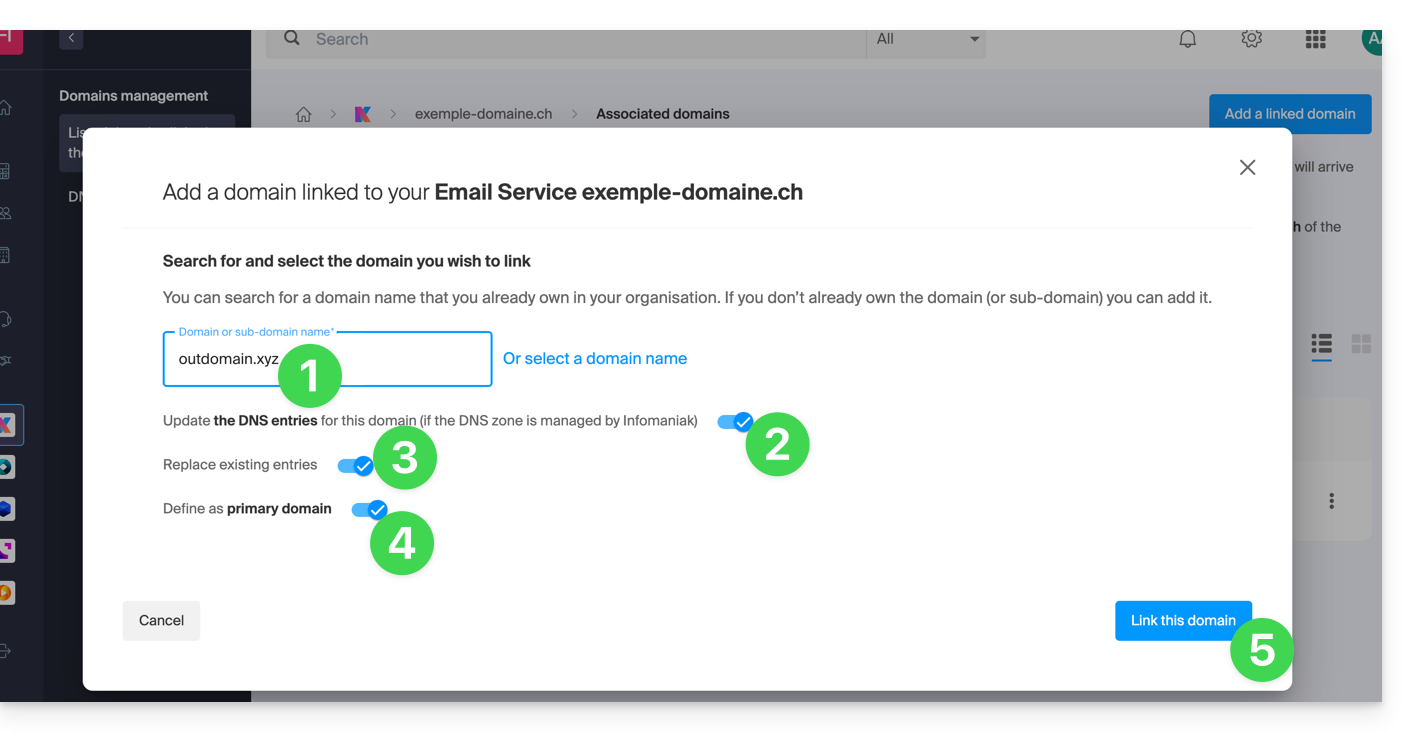
- Wait for the operation to complete.
- Click on the icon ⋮ to the right of the old domain name.
- Click on Unlink the domain:
Link to this FAQ:
Has this FAQ been helpful?
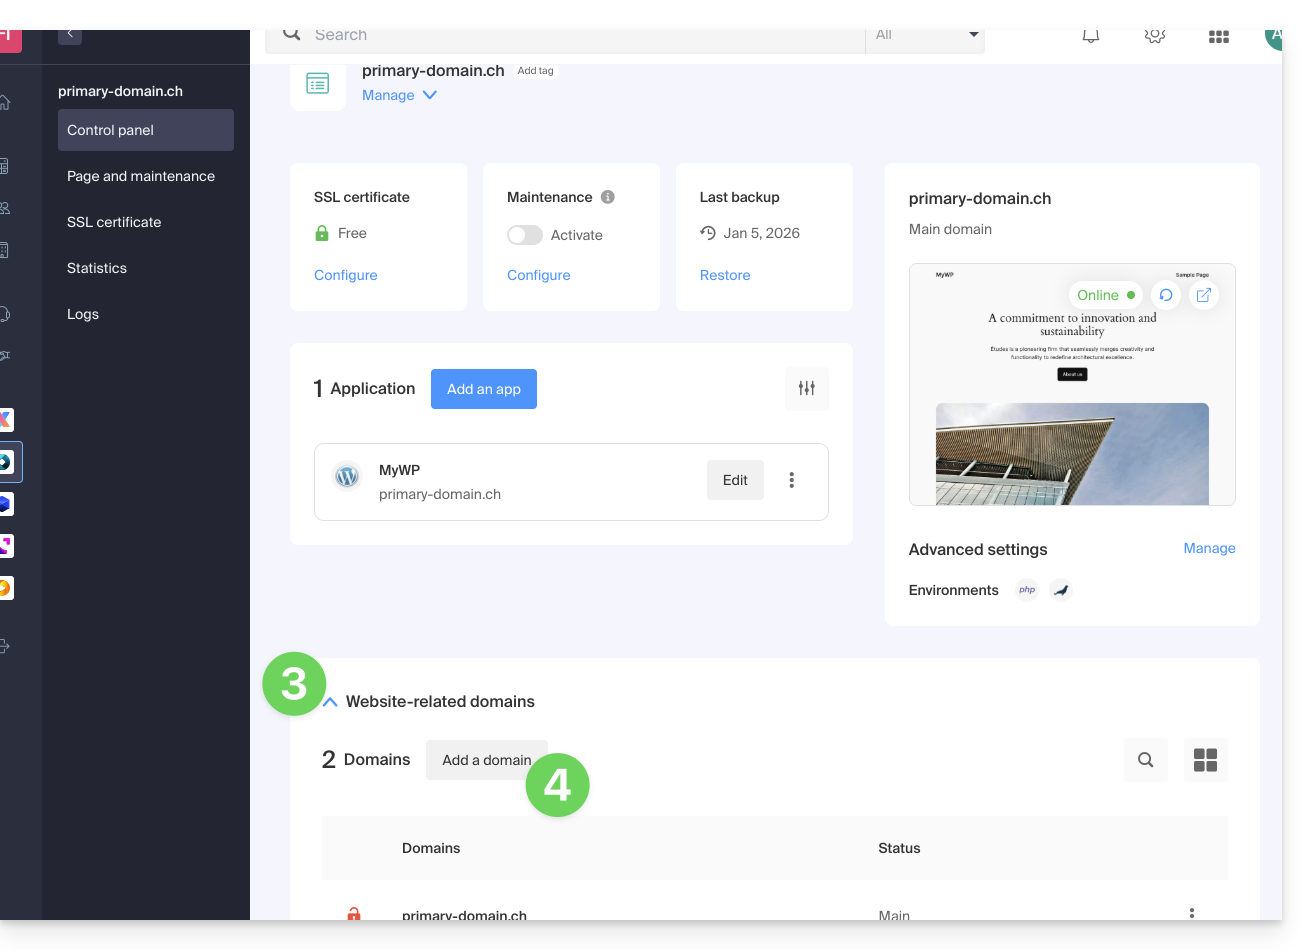
This guide explains how to add a new domain name to a Web site Infomaniak.
Preamble
- When you add a new domain name to a website, it is referred to as a linked domain but also as an alias.
- In this case, an alias domain is an additional domain name, also linked to an existing site.
- For the website
domain.xyzto be reachable with a completely different domain name such asprivate.abcfor example, you need to addprivate.abcas an alias to the website. - Second example, for the site
domain.xyzto also be reachable withwww.domain.xyz, you need to add it as an alias to the domaindomain.xyz. In this example,domain.xyzis the parent site of the aliaswww.domain.xyz. Generally, the aliaswwwis already added automatically and present…
- For the website
Adding an alias to an existing site
Prerequisites
- If the domain name (intended to become an alias) or its DNS zone is managed by Infomaniak, everything is OK. If not:
- The A record of the domain name must point to Infomaniak.
- To simplify, you can delegate the management of the domain to Infomaniak.
- It is also necessary that the future alias is not already one, in which case it will be necessary to unlink it from the current site beforehand (same if synonym).
To add an additional domain that will be linked to your website:
- Click here to access the management of your product on the Infomaniak Manager (need help?).
- Click directly on the name assigned to the product concerned:
- Then click on the chevron to expand the Domains section of this site.
- Click on the Add a domain button:
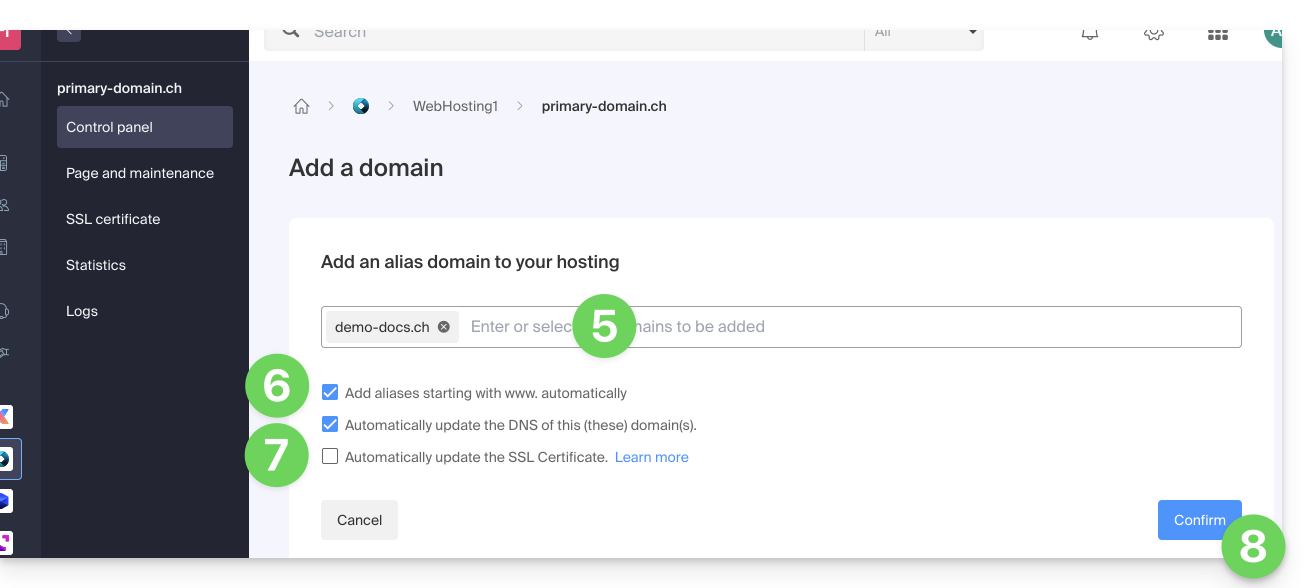
- Enter the domain name(s) to be added, separating them with the Enter key.
- If the alias or its DNS zone is managed by Infomaniak, it is possible to automatically update the DNS entries. In the opposite case, make any necessary changes with your registrar or transfer the management of the domain name to Infomaniak.
- If you have an SSL certificate such as Let's Encrypt, for example, you can request to update it here to include the new names.
- Click on Validate to complete the procedure:
To set the alias as the main domain, refer to this other guide.
Link to this FAQ:
Has this FAQ been helpful?
This guide is intended for users who wish to manage Glue records (or "glue records") at Infomaniak.
Preamble
- Glue records are crucial for linking a domain name to its associated name servers, by providing the IP addresses of these servers directly.
- For example, for the domain
domain.xyz, the glue records specify the name servers (ns1.domain.xyzandns2.domain.xyz) as well as their IP addresses (192.0.2.10and192.0.2.11).
- For example, for the domain
- This speeds up DNS resolution, allowing browsers and online services to find your site faster and more efficiently.
- Warning: adding an NS does not automatically add it to the DNS zone: it is necessary to manually update the DNS zone of your domain!
Create Glue records...
... via "A record"
This method involves creating an A record (address) for ns1.domain.xyz pointing to the IP of the NS. This will have the effect of registering the IP with the registry. You will then be able to add ns1.domain.xyz which will be recognized and redirected to the correct NS.
domain.xyz. 3600 IN NS ns1.domain.xyz.domain.xyz. 3600 IN NS ns2.domain.xyz.
ns1.domain.xyz. 3600 IN A 192.0.2.10ns2.domain.xyz. 3600 IN A 192.0.2.11
... via "Glue records" button
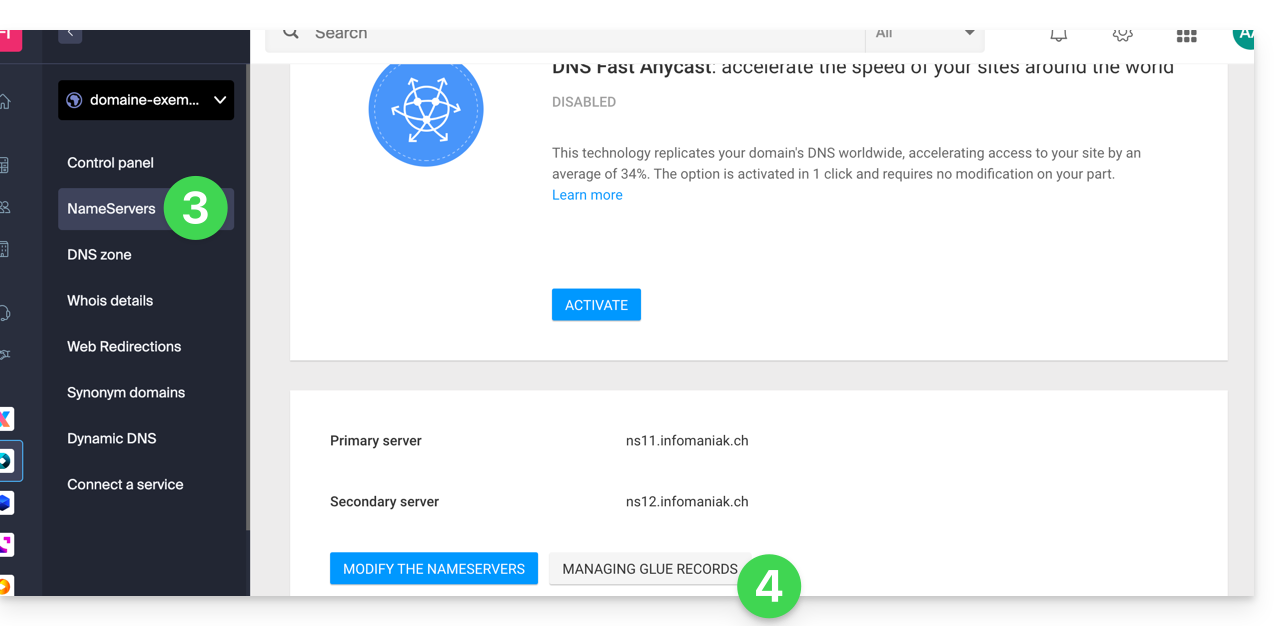
This way of doing things allows you to create, but also modify, existing Glue records:
- Click here to access the management of your product on the Infomaniak Manager (need help?).
- Click directly on the name assigned to the product concerned.
- Click on DNS Servers in the left sidebar.
- Click on the Manage glue records button:
- Click on the Add a server button:
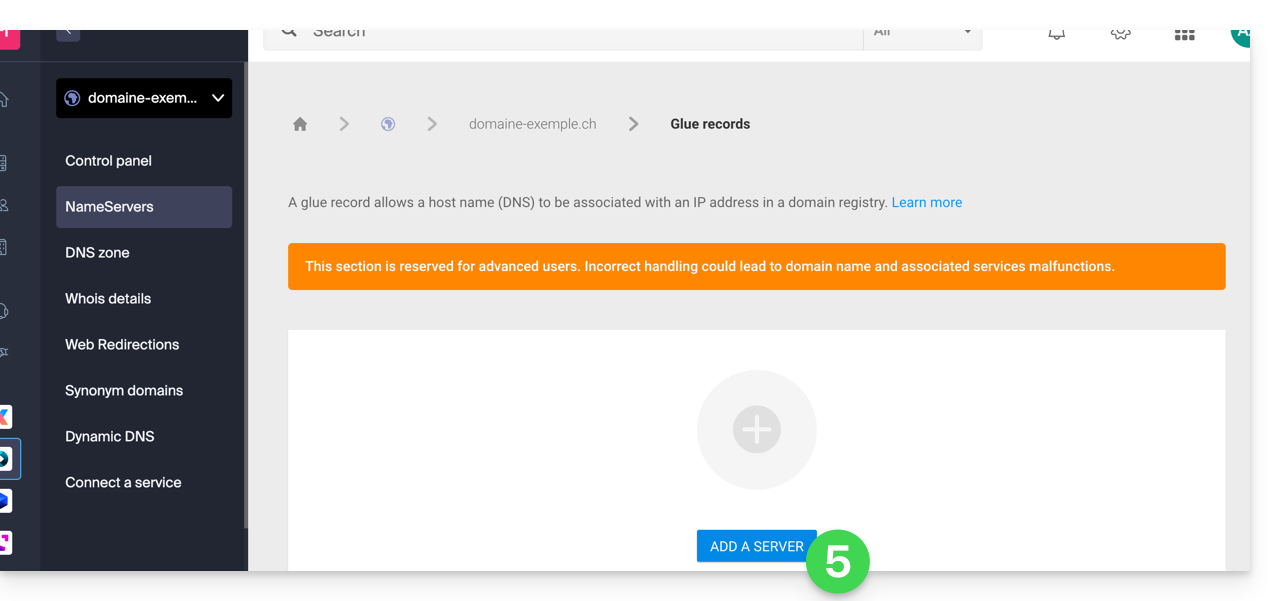
- Enter the name of the server to be added as well as its IP address.
- Click on the Validate button.
Link to this FAQ:
Has this FAQ been helpful?
This guide helps you resolve configuration errors if you encounter difficulties linking your domain name to Site Creator.
Common issues and solutions
Identify the current status of your domain to apply the corresponding solution:
| Domain status | Recommended solution |
|---|---|
| Managed by another provider (external) | Order a DNS zone or transfer the domain to Infomaniak |
| Already associated with a site or defined as alias (synonym) | Delete the existing site or disassociate the domain |
| Currently using a dedicated IP address | Uninstall the dedicated IP |
| Protected by a SSL certificate (Self-signed, DV or EV) | Uninstall the certificate |
| Insufficient permissions on the hosting | Modify access rights |
Link to this FAQ:
Has this FAQ been helpful?
This guide explains how to link a domain name to an Infomaniak Mail Service
If the domain name is…
… with Infomaniak, same Organization
If your domain name is registered with Infomaniak and is in the same user account or Organization as the mailbox, then there is nothing to do.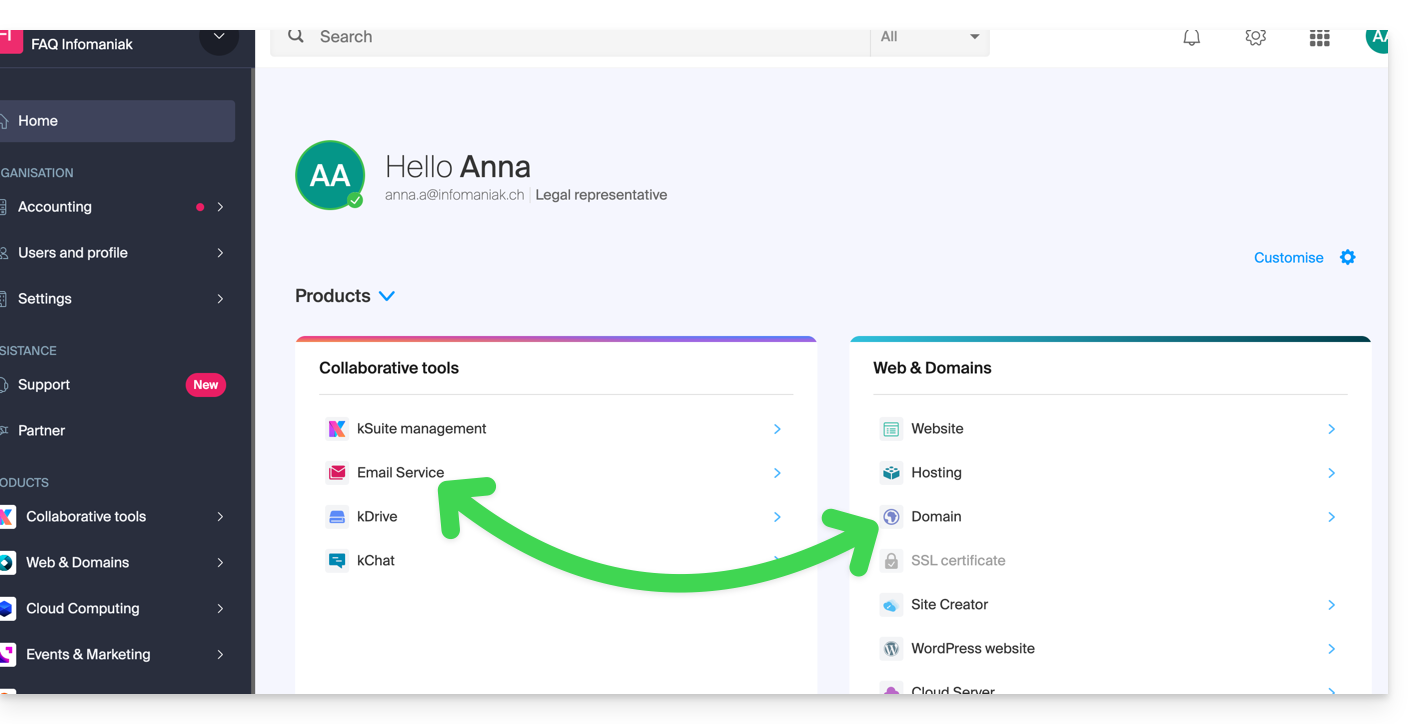
- Refer to this other guide to check and correct any potential configuration errors.
… with Infomaniak, different Organization
If your domain name is registered with Infomaniak but in a different user account or Organization, then:
- Edit its DNS zone by specifying Infomaniak's MX (+ SPF & DKIM).
- Any DNS addition/modification can take up to 48 hours to propagate.
OR
- Move it within the same Organization.
… with Infomaniak with external DNS
If your domain name has DNS that are not Infomaniak's, then:
- Edit the current DNS zone where it is located (if necessary, consult the help of the relevant provider) by specifying Infomaniak's MX (+ SPF & DKIM).
- Any DNS addition/modification can take up to 48 hours to propagate.
OR
- Change the current DNS and select the use of Infomaniak DNS.
- Any DNS addition/modification can take up to 48 hours to propagate.
- Refer to this other guide to check and correct any potential configuration errors.
… elsewhere with external DNS
If your domain name has DNS that are not Infomaniak's, then:
- Edit the current DNS zone where it is located (if necessary, refer to the help of the relevant provider) by specifying Infomaniak's MX (+ SPF & DKIM).
- Any DNS addition/modification can take up to 48 hours to propagate.
OR
- Change the current DNS (if necessary, refer to the help of the relevant provider) by specifying Infomaniak's (this implies having a DNS zone with Infomaniak.
- Any DNS addition/modification can take up to 48 hours to propagate.
- This DNS zone with Infomaniak will be configured correctly but refer to this other guide to check and correct any potential configuration errors.
… elsewhere but you are bringing it back
If your domain name is registered with another registrar and you want to transfer it to the same place as your Infomaniak mailbox, then:
- Transfer the domain name to Infomaniak (it will be configured correctly but refer to this other guide to check and correct any possible configuration errors).
Otherwise, consider ordering a new domain name if necessary.
Link to this FAQ:
Has this FAQ been helpful?
This guide explains how to register a domain name with Infomaniak.
Preamble
- With a new domain name or additional domain name, many possibilities open up to you, including access to free services, such as:
- You will also be able to:
- use your existing Mail Service or Website but with different spelling,
- host a website here or with a third-party host,
- etc.
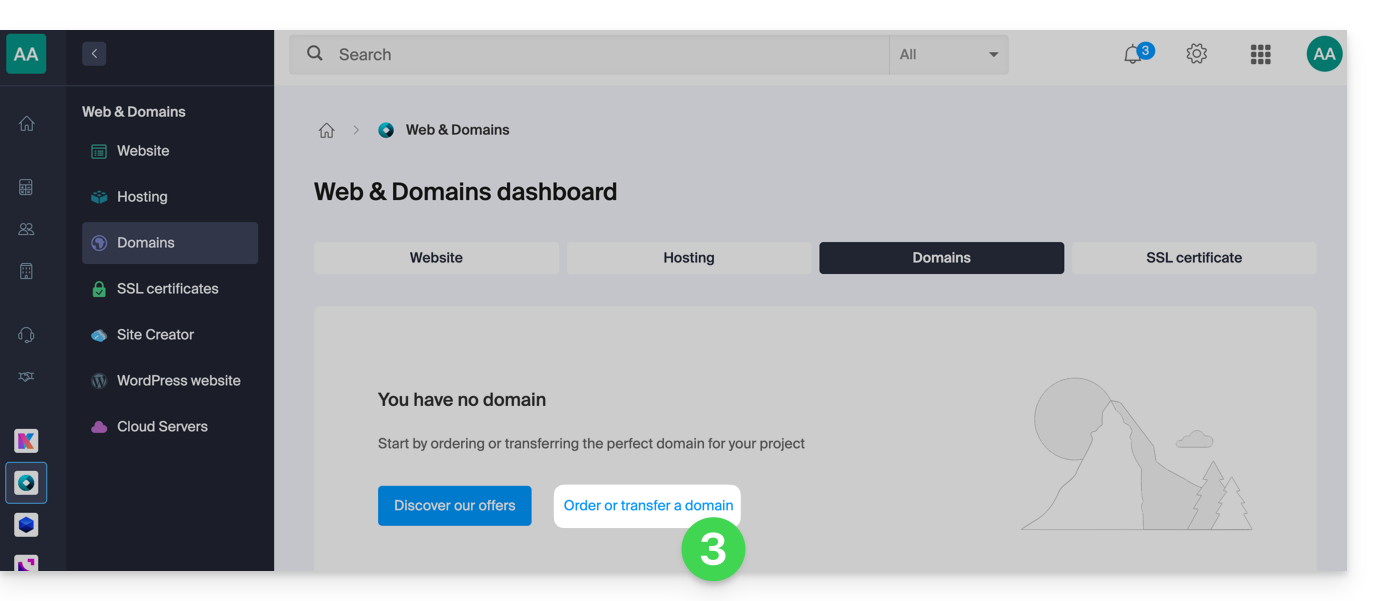
Order a first domain name
To do this:
- If necessary, create an Infomaniak account.
- Click here to access domain management on the Infomaniak Manager.
- Click to open the Shop:
- If the case arises, select the Organization in which to order your domain:
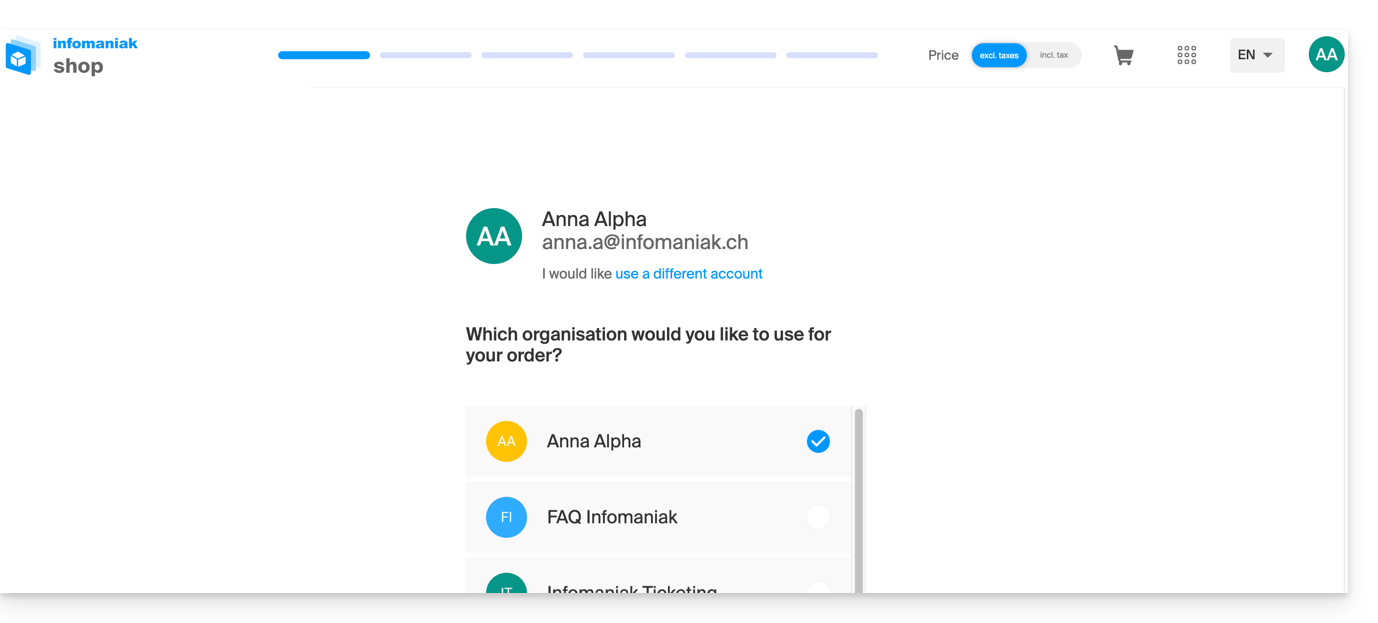
- If the case arises, select the Organization in which to order your domain:
- Once in the Shop, enter the domain name to be registered and search for it:
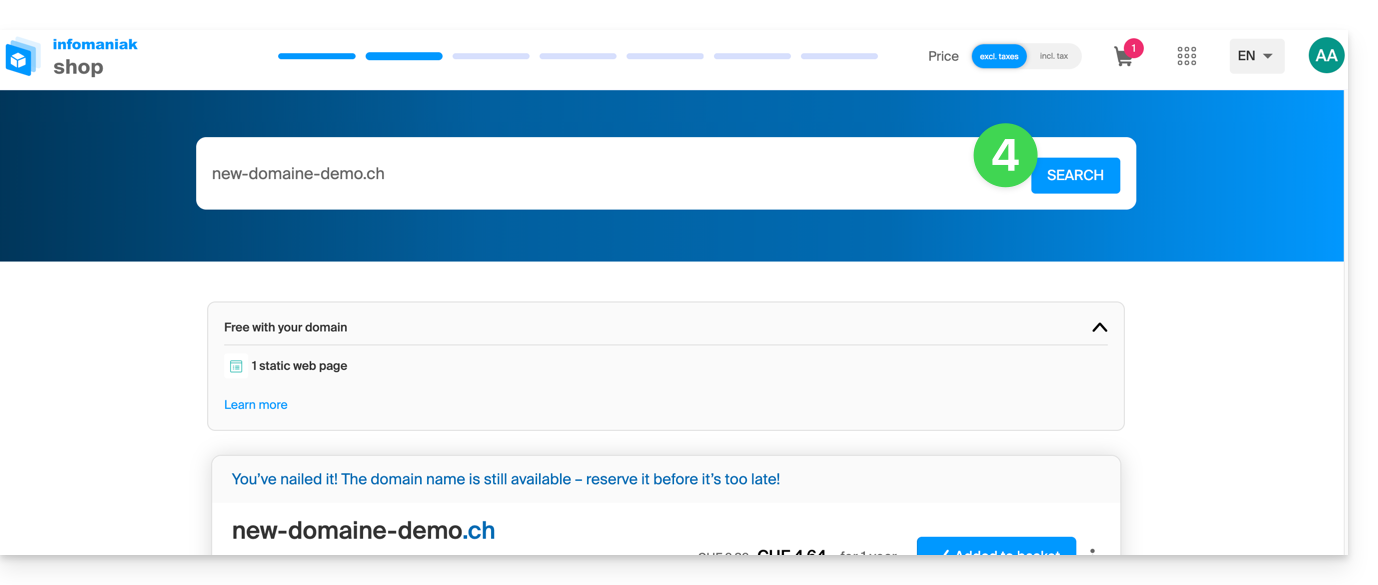
- Check or uncheck the additional options and extensions offered and click on Next to proceed.
- Choose the desired options as you go through the pages, such as the possible Mail Service associated with the domain name:
- Choose the desired options as you go through the pages, such as the possible Web hosting associated with the domain name:
- Enter the details related to the domain name.
- Complete the purchase without forgetting to read and accept the Terms (the box may require scrolling down the page first):
Once ordered, wait a few hours for the setup (and schematically the propagation of your domain name with Internet Service Providers (ISPs) around the world).
Order an additional domain name
To do this:
- Click here to access the management of your product on the Infomaniak Manager (need help?).
- Click on the button to Order an additional domain:
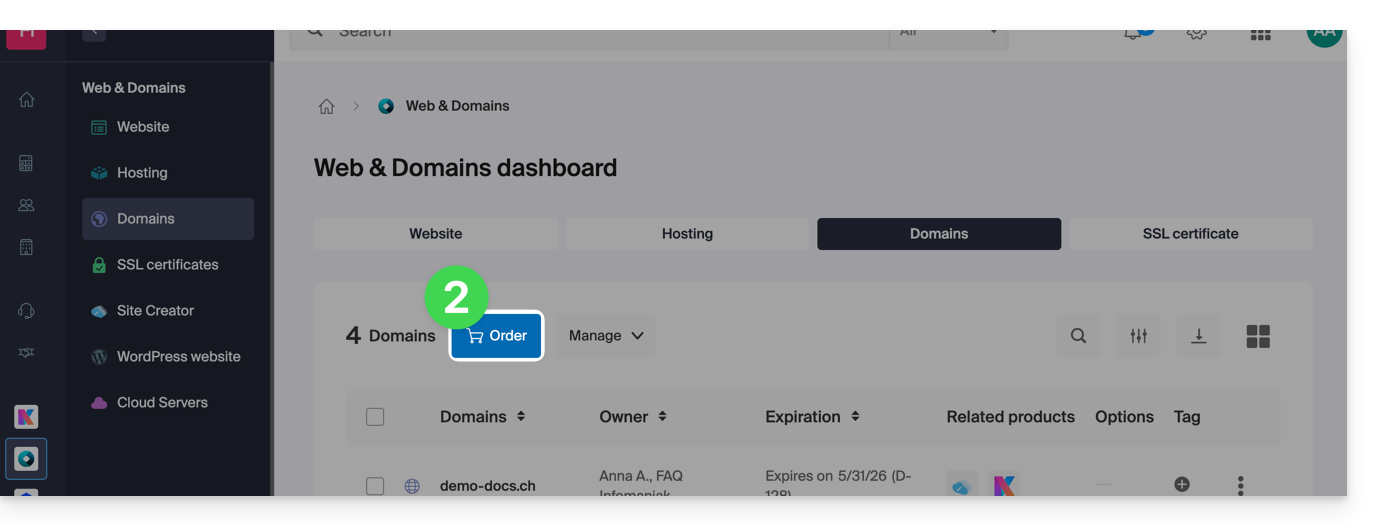
- Follow the first guide above starting from step 4.
Check the availability of a domain name
Refer to this other page which allows you to quickly check if a domain is available for registration or not.
There are at least 3 main indications:
- Available — in this case, it's good, you can reserve it.
- Transferable — you must own it with another provider to transfer it to Infomaniak.
- Unavailable — it will unfortunately not be possible to order it as long as it is not abandoned by its current owner.
Link to this FAQ:
Has this FAQ been helpful?
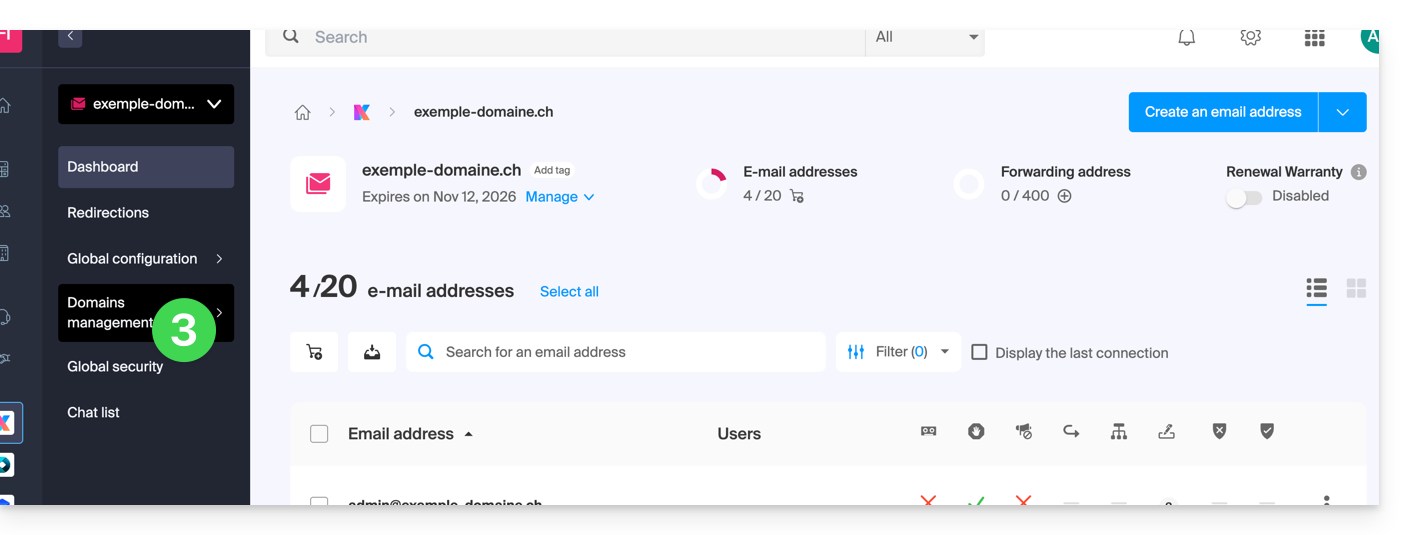
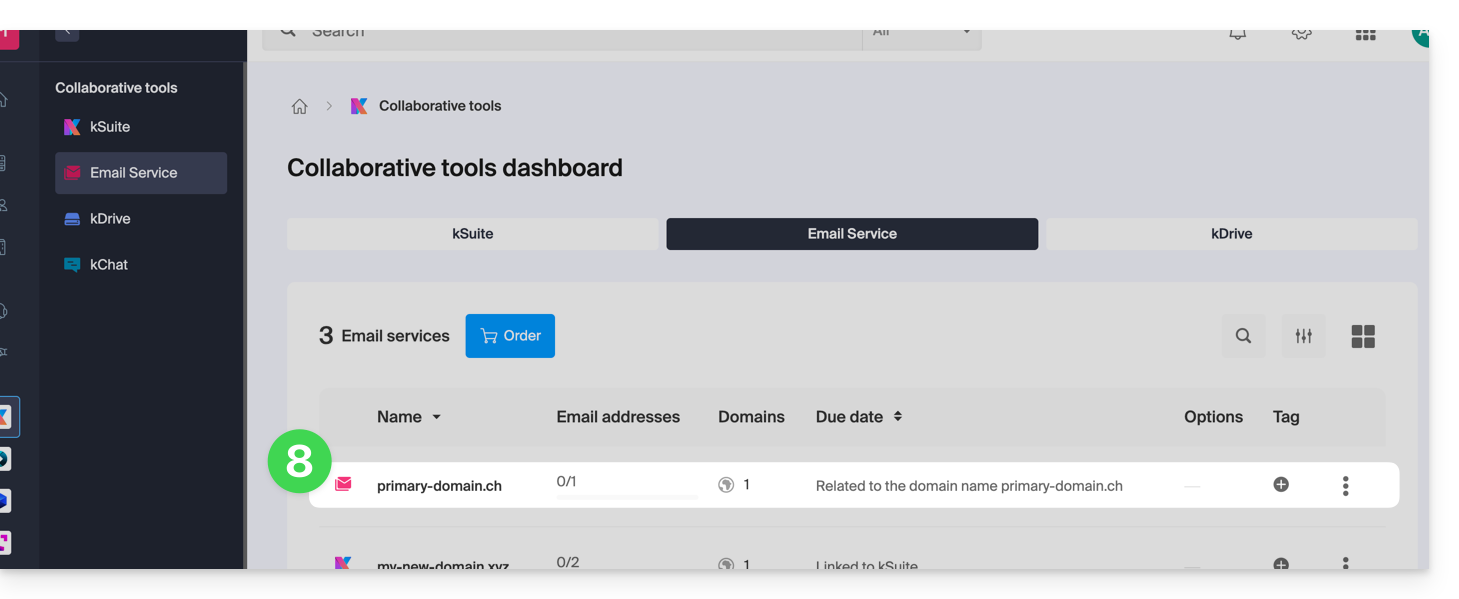
This guide explains how to remove additional designations from an existing Service Mail (everything that comes after the @ sign in your email address), by detaching its linked domain names.
Preamble
- Once removed, the domain name is again available to order a new Service Mail or to be attached to another existing Service Mail.
- It should also be noted that you can rename your product in the Infomaniak Manager, but changing the name of a Service Mail has strictly no impact on its addresses; you need to act on the domain name.
Remove the linked domain
Prerequisites
- Have dissociated the synonym domain name from the main domain name if there was an association previously.
- Have defined the domain name to be detached as a secondary domain (instead of a main) — this reversal can be done by following this other guide in the chapter named "a" from point 3 onwards.
To detach a domain name from your Service Mail:
- Click here to access the management of your product on the Infomaniak Manager (need help?).
- Click directly on the name assigned to the product concerned:
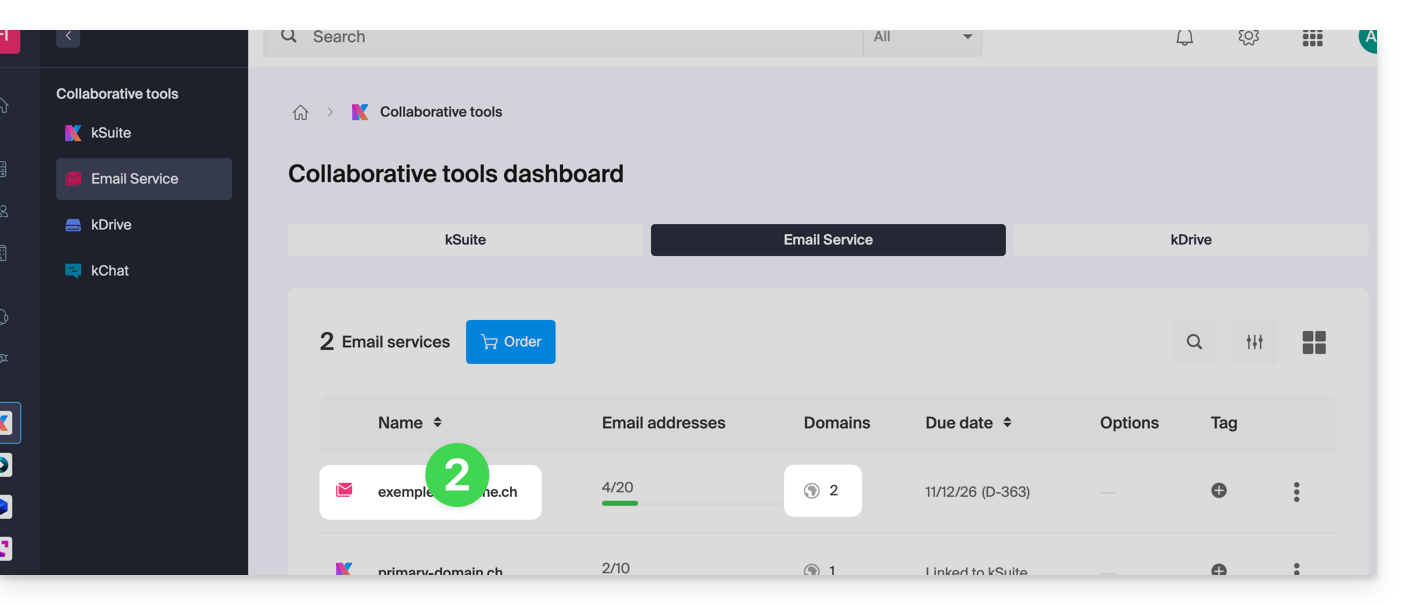
- Click on Domain Management in the left sidebar:
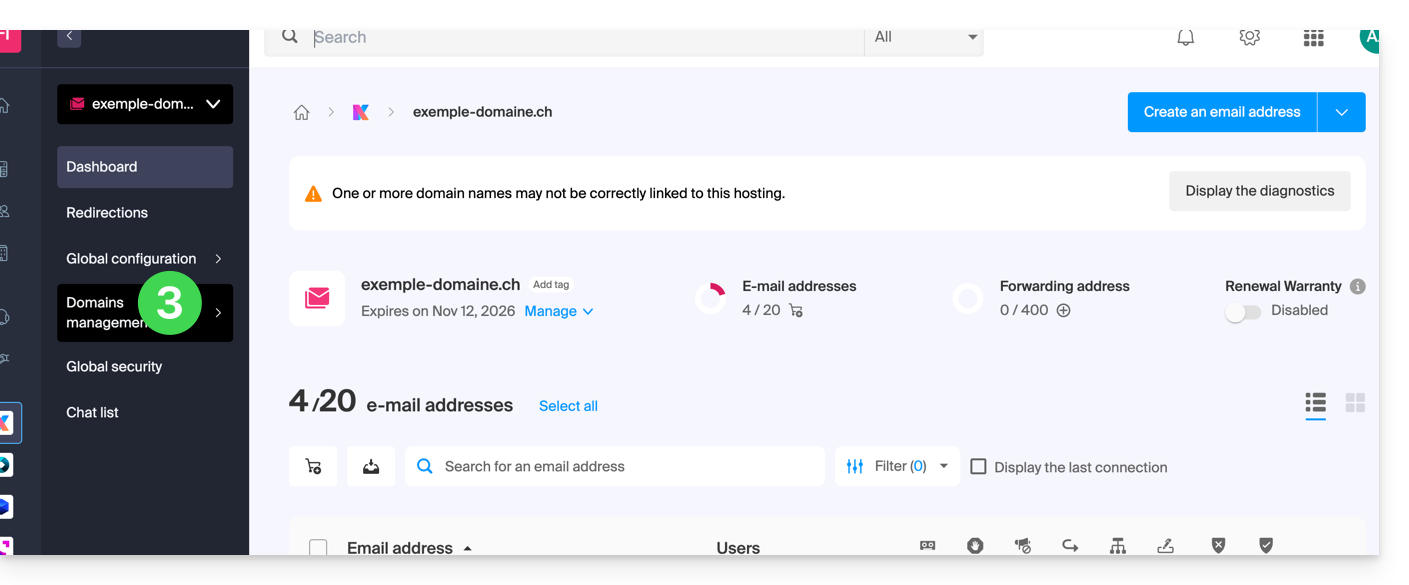
- Click on List of Domains Linked to the Service in the left sidebar.
- Click on the icon ⋮ to the right of the domain name to be detached.
- Click on Detach the Domain (see prerequisites above if the item is not offered):
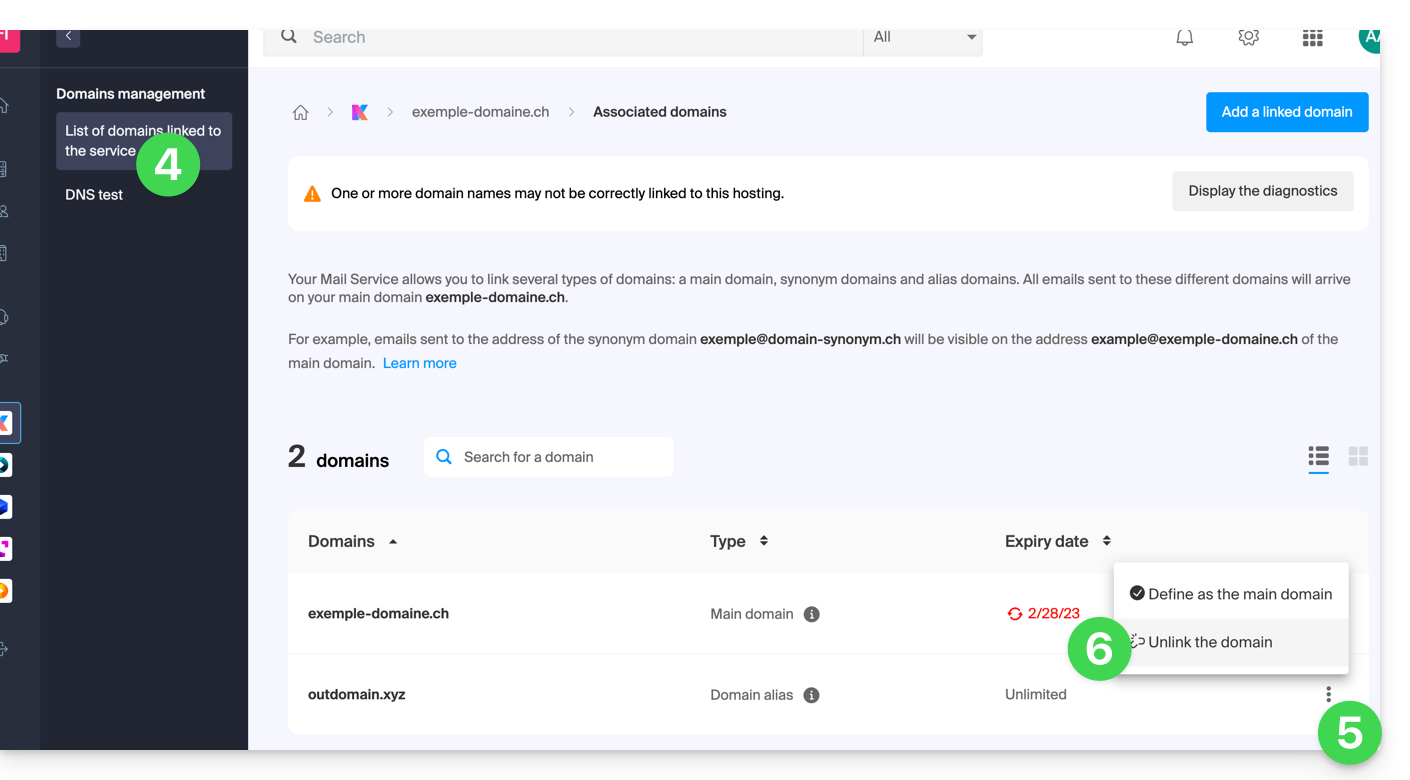
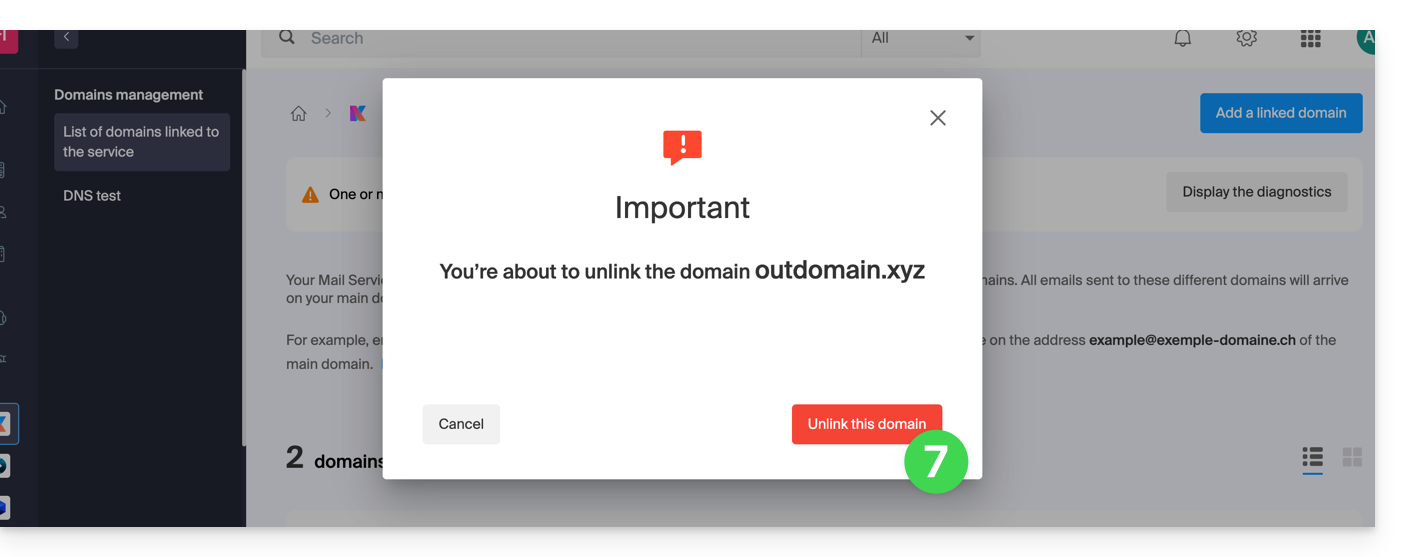
- Confirm the detachment:
Link to this FAQ:
Has this FAQ been helpful?
This guide explains how to remove an alias domain from an Infomaniak Web Hosting. The main domain name of the site will then no longer be linked to any other domain name.
This allows you to create a new Web Hosting or distinct site for the domain name thus unlinked.
Prerequisites
- Have dissociated the synonym domain name from the main domain name if there was an association before.
Remove the alias domain
To remove an alias domain from your site:
- Click here to access the management of your site on the Infomaniak Manager (need help?).
- Click directly on the name assigned to the site concerned:
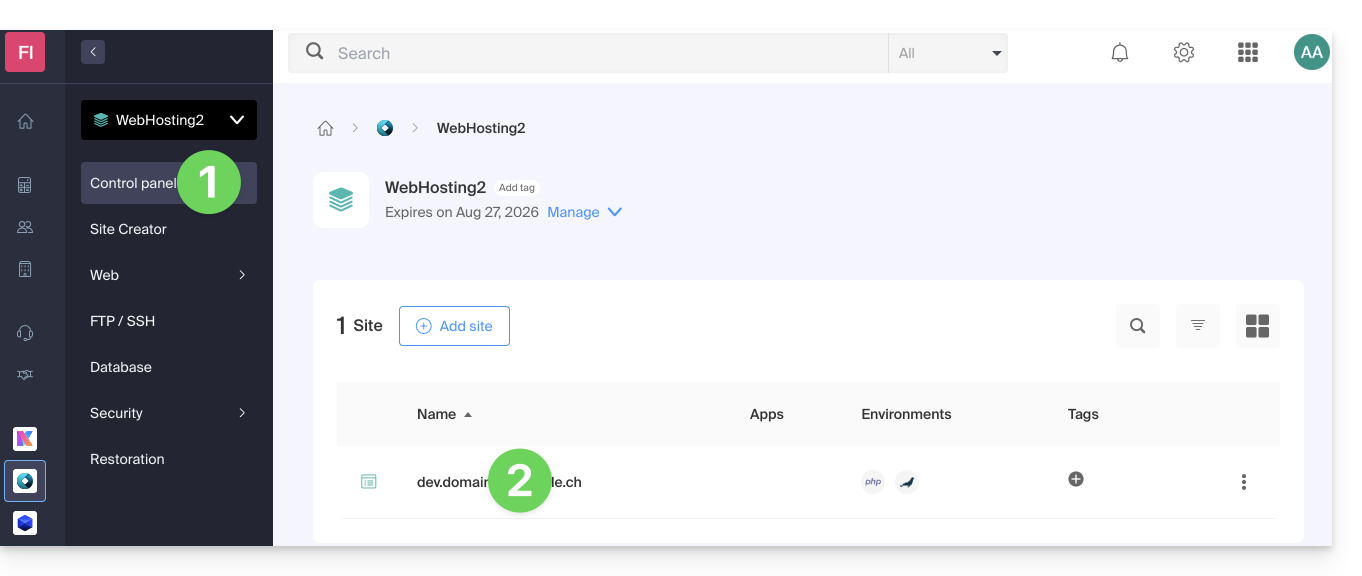
- Click on the chevron to expand the Domains section of this site.
- Click on the action menu ⋮ to the right of the domain to be removed.
- Choose Unlink:
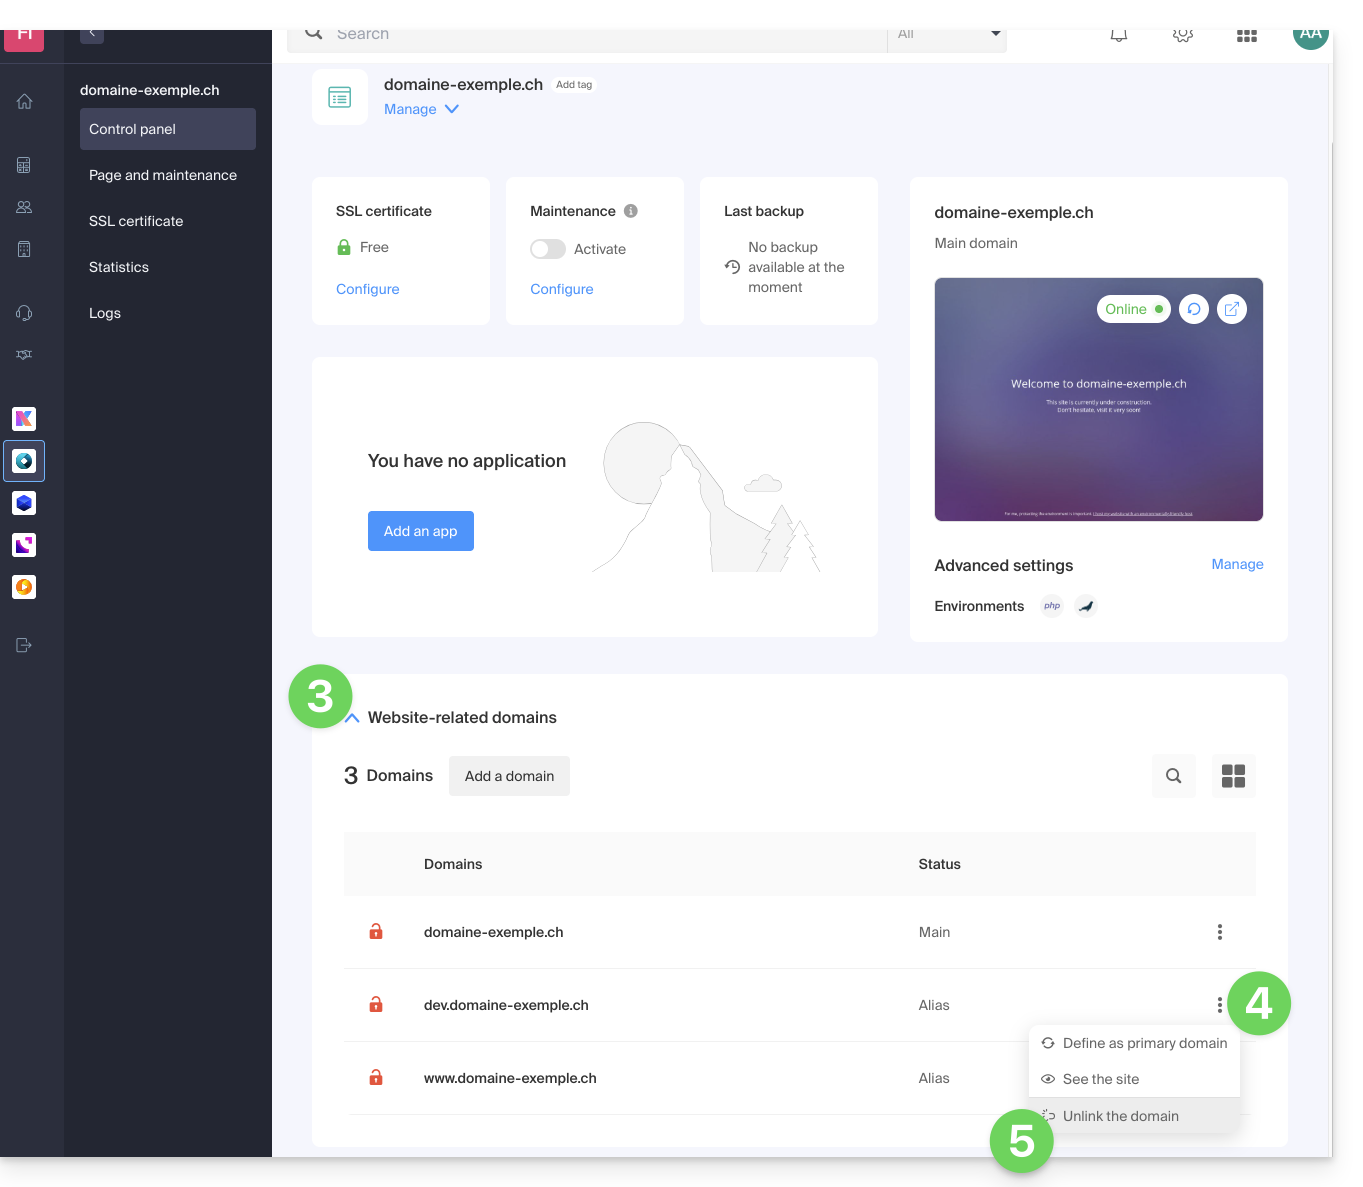
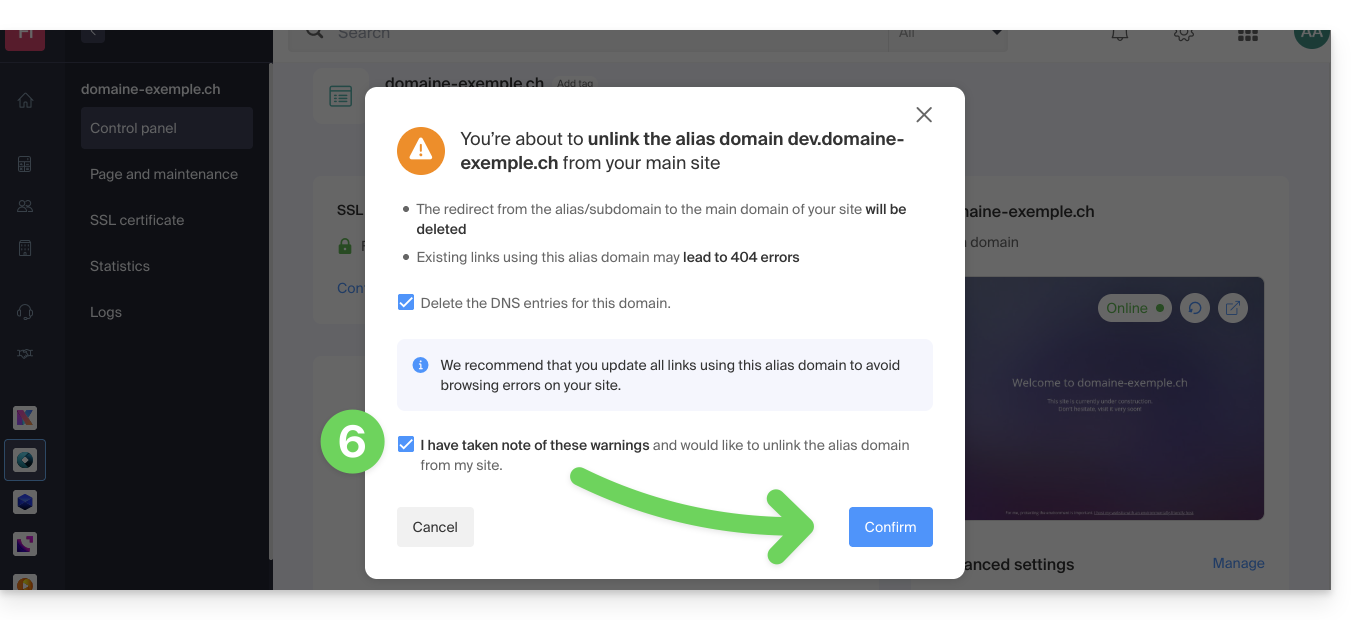
Confirm the deletion of the alias:
- If necessary, you can choose to delete the DNS records related to the domain…
Link to this FAQ:
Has this FAQ been helpful?
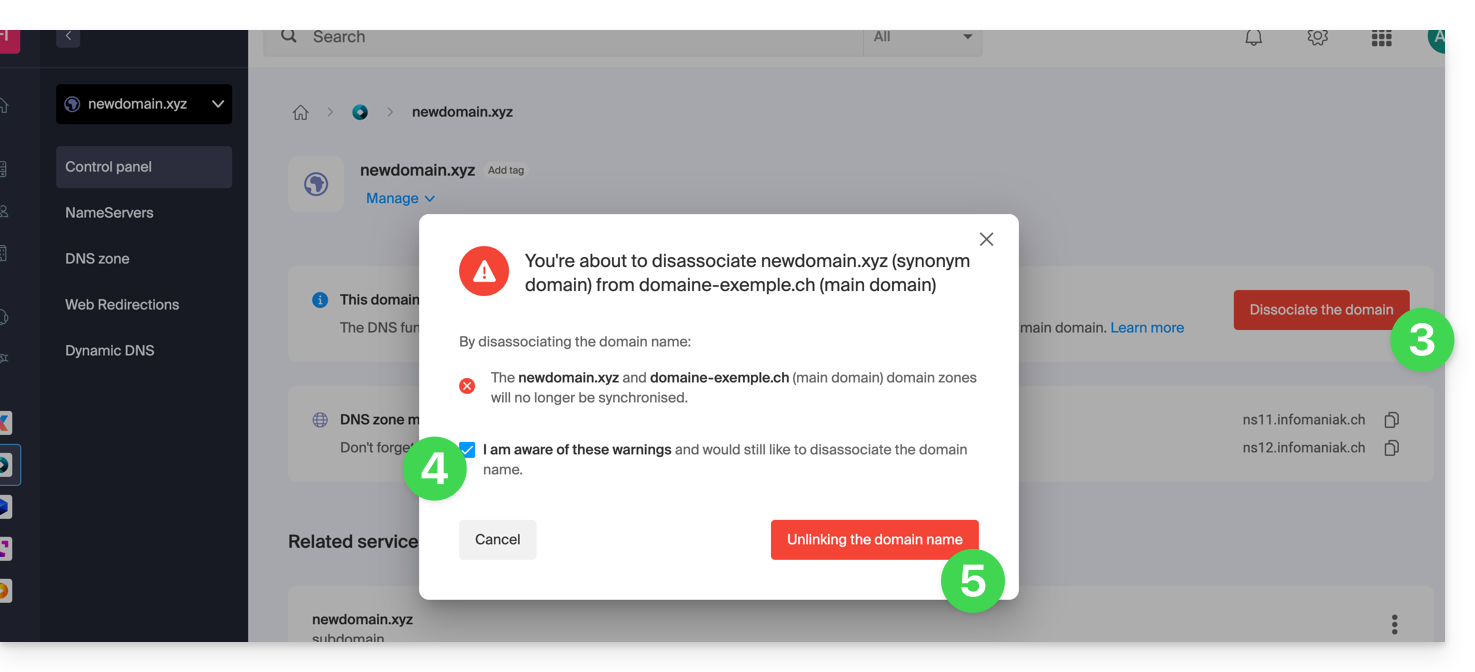
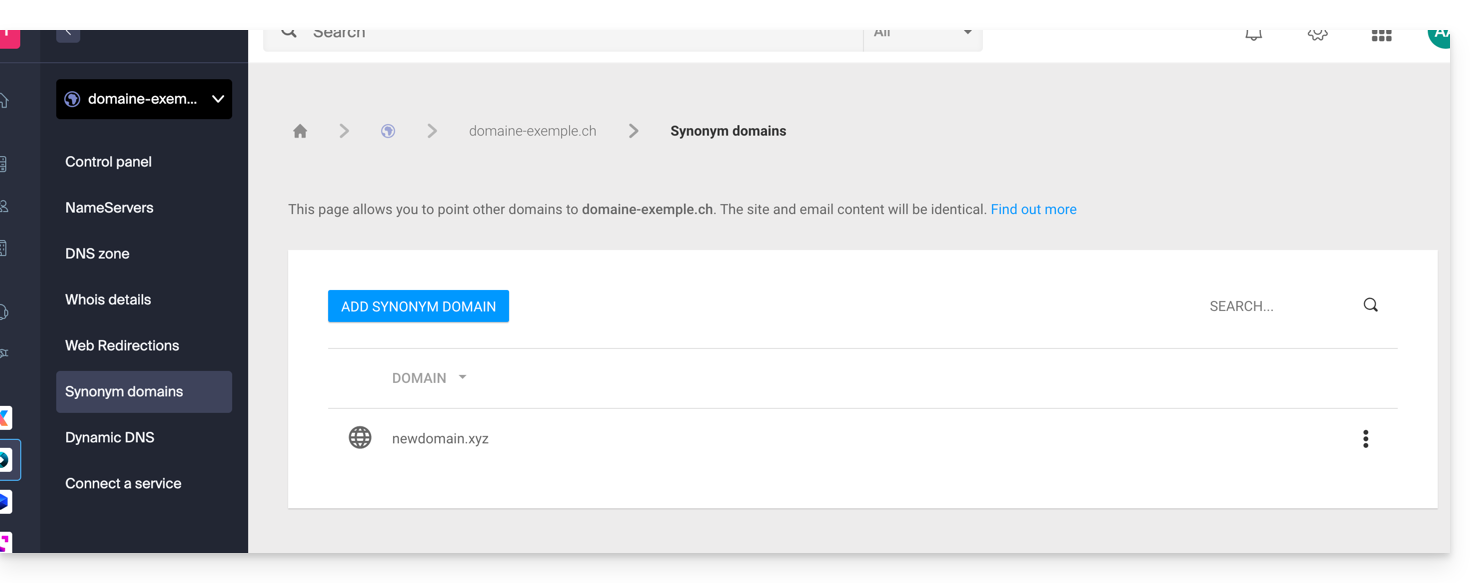
This guide explains how to dissociate a synonym domain from an Infomaniak domain name.
Remove the synonym domain
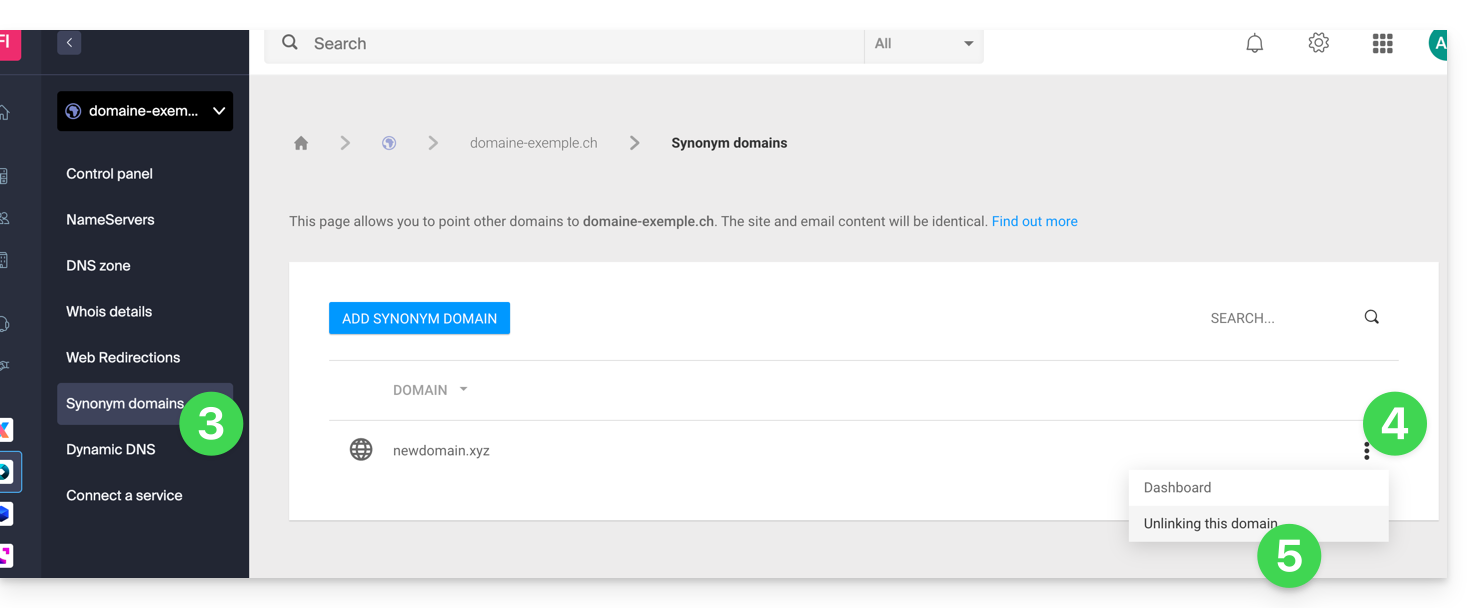
To remove the synonym domain from the main domain dashboard:
- Click here to access the management of your product on the Infomaniak Manager (need help?).
- Click directly on the name assigned to the main domain concerned.
- Click on Synonym Domains in the left sidebar menu.
- Click on the action menu ⋮ to the right of the synonym domain in the displayed table.
- Click on Dissociate this domain:
You can also proceed in the other direction, by going to the synonym domain dashboard:
- Click here to access the management of your product on the Infomaniak Manager (need help?).
- Click directly on the name assigned to the product concerned.
- Click on Dissociate in the top banner.
- Check the box to validate the voluntary desynchronization of these 2 domains.
- Click the red button to Dissociate the domain name:
At this stage, you will still need to dissociate the alias domain from your Web and/or Mail hosting if necessary:
- Refer to this other guide to dissociate an alias domain name from a Mail Service.
- Refer to this other guide to dissociate an alias domain name from a Web Hosting.
Link to this FAQ:
Has this FAQ been helpful?
This guide explains how to add a synonym domain to a domain name.
Preamble
- A synonym domain is a domain name that can serve as a secondary name for another domain.
- When a synonym domain is added, it automatically inherits the content of the DNS zone of the main domain (including
MX,A, etc. records), as well as its Web and Mail hosting. - Alternatively, you can also add a (domain) alias to a website or add a (domain) alias to a Mail Service.
Add a synonym domain to a domain
Prerequisites
- The domain name of the future synonym or the management of its DNS zone…
- … must be reserved with Infomaniak,
- … must be configured with the Infomaniak DNS,
- … must not be linked to any product yet.
- The domain name on which the synonym will be placed…
- … must not be associated with the Infomaniak Newsletter product.
To access your domain names:
- Click here to access the management of your product on the Infomaniak Manager (need help?).
- Click directly on the name assigned to the product in question.
- Click on Synonym Domains in the left sidebar.
- Choose to add a synonym.
- Click on Next:
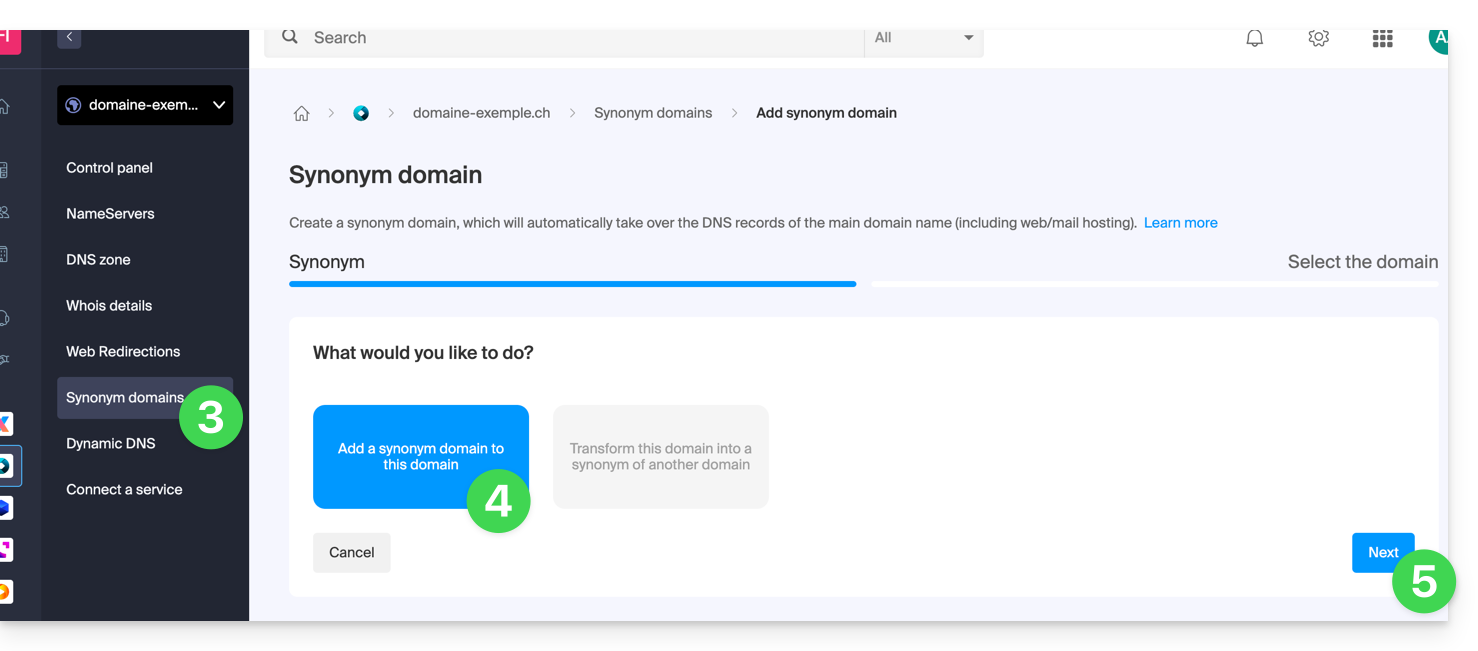
- Choose an existing domain in the current Organization, or order a new domain in advance.
- Click the button to Confirm:

- That's it:
Refer to this other guide if you are looking for information to dissociate a synonym domain name.
Link to this FAQ:
Has this FAQ been helpful?
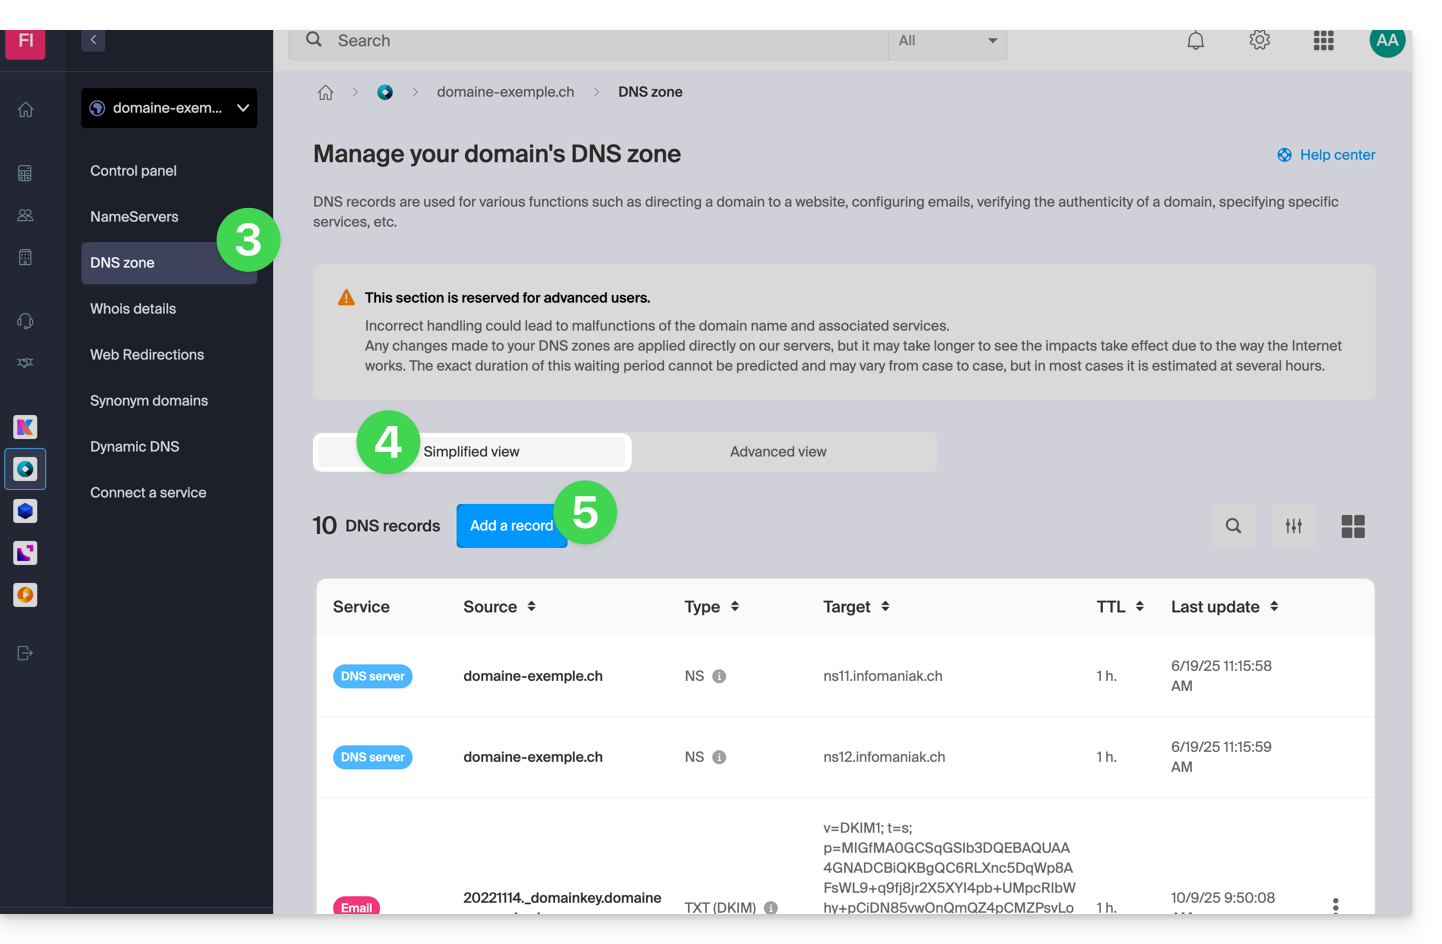
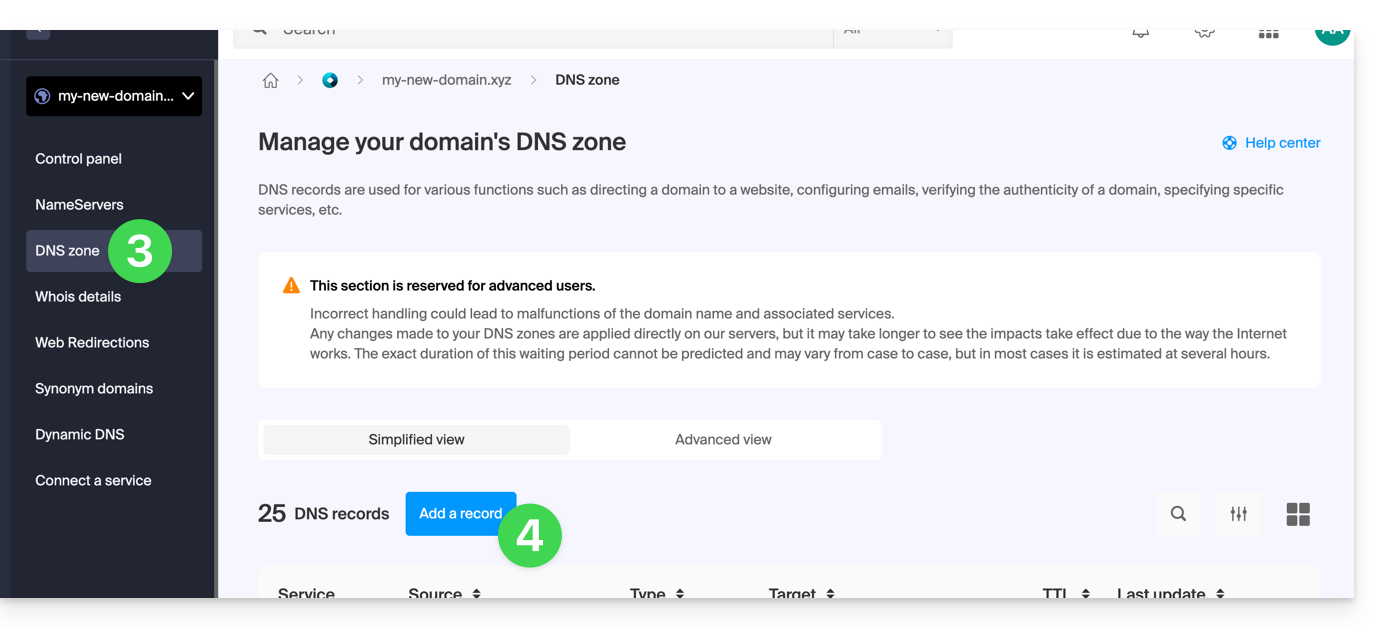
This guide explains how to add, modify, or delete specific entries (records of type A & AAAA, MX, TXT, etc.) within the DNS zone of a domain name registered with Infomaniak.
Prerequisites
- Have a domain name with Infomaniak or at least a DNS zone.
- Understand:
- the operation of a domain and a DNS zone before modifying the latter.
- that the DNS zone presented here is valid and used only if the server names are those of Infomaniak.
- that any DNS addition/modification can take up to 48 hours to propagate.
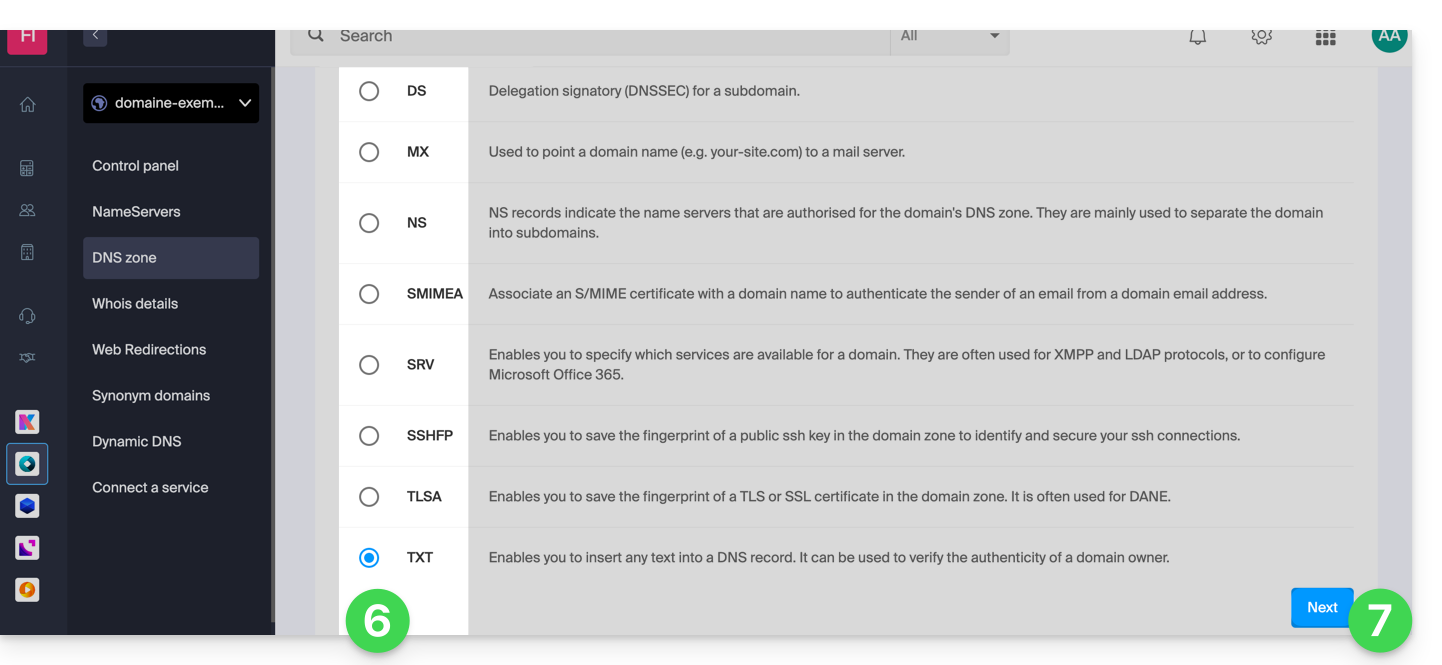
Add a record (simple mode)
To configure the services associated with the domain and allow the appropriate resolution of domain names to the corresponding resources (such as external websites, third-party mail servers, etc.):
- Click here to access the management of your domain on the Infomaniak Manager (need help?).
- Click directly on the name assigned to the domain concerned.
- Click on DNS Zone in the left sidebar.
- The entries currently in place are listed in the Simple Mode table.
- Click the blue Add an entry button:
- Choose the desired record type (records of type A & AAAA, MX, TXT, etc.)
- Click on Next:
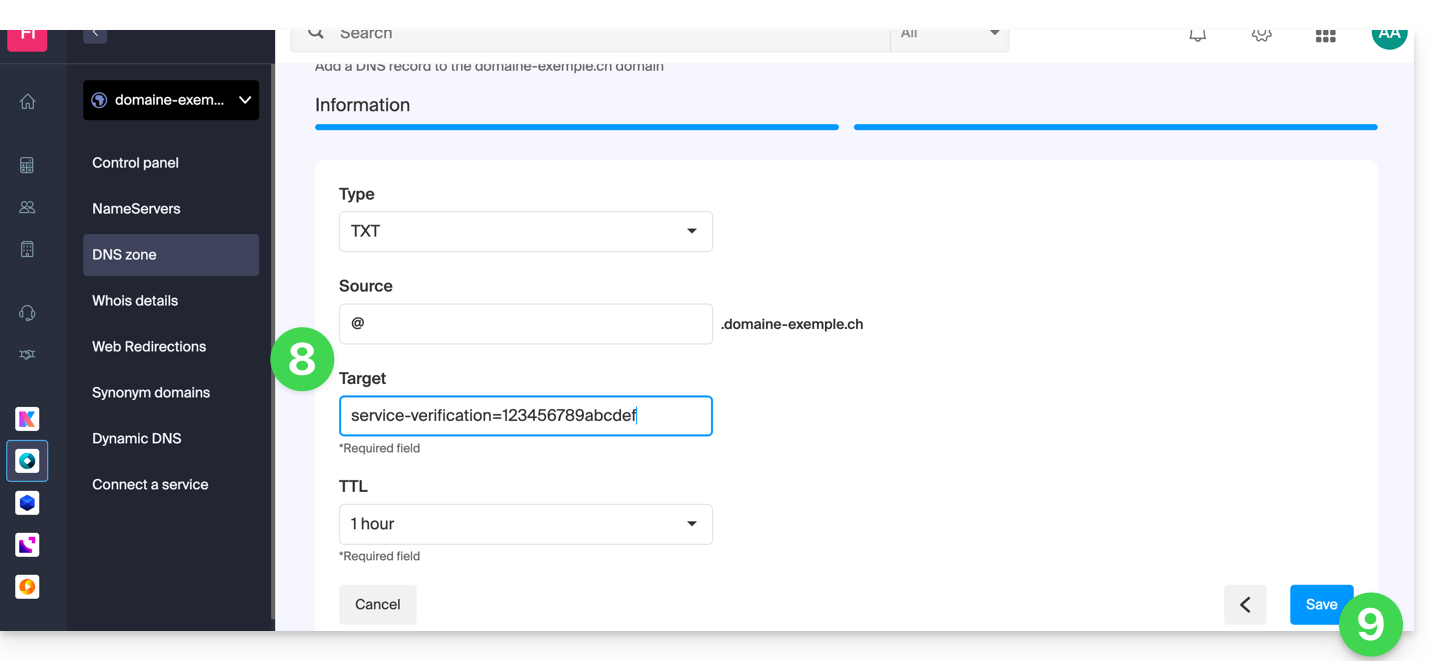
- Complete the different fields according to your information:
- Under Source leave blank or enter any subdomain concerned.
- Under Target enter the information obtained from your external provider or any other useful indication.
- Leave the TTL indicated.
- Save the addition made:
Modify an existing record
To modify an existing DNS record:
- Follow points 1 to 4 above.
- Click on the action menu ⋮ to the right of the record to be modified.
- Click on Modify to access the edit page:
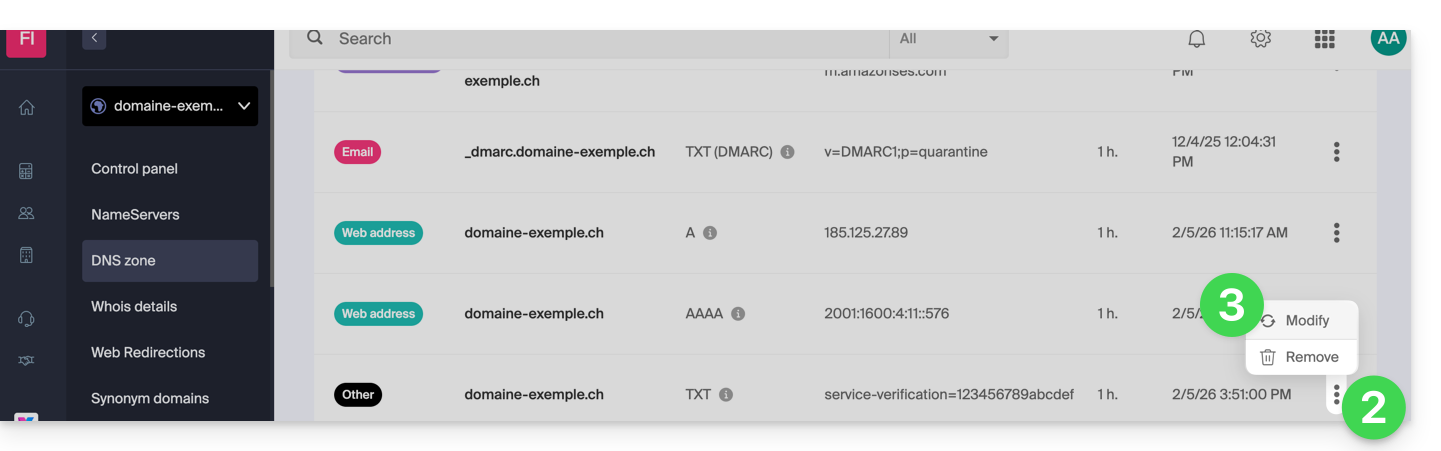
- Proceed with the editing of the desired information and then save your changes.
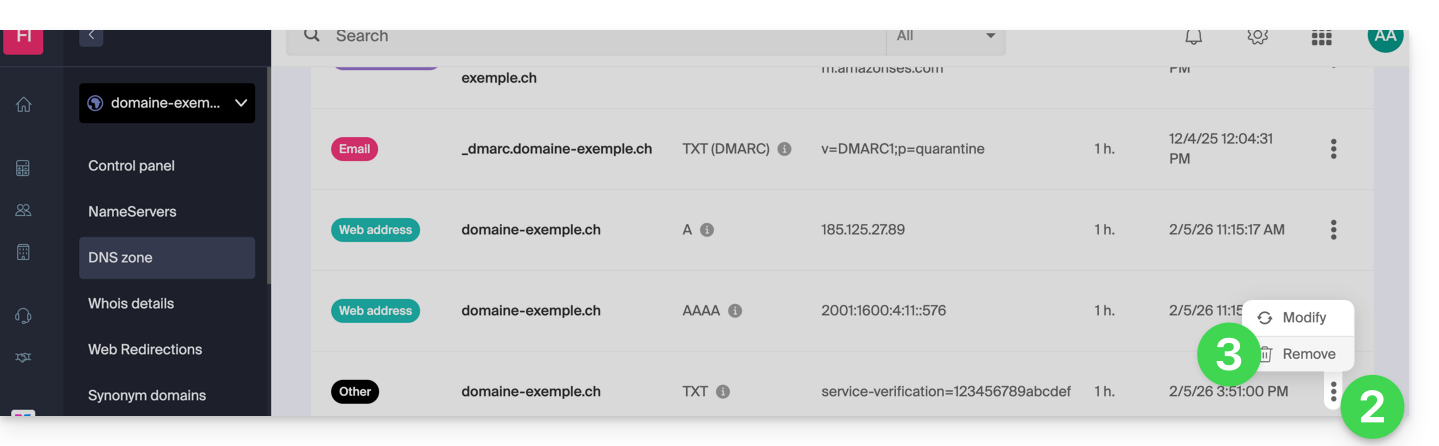
Delete an existing record
To delete an existing DNS record:
- Follow points 1 to 4 above.
- Click on the action menu ⋮ to the right of the record to be modified.
- Click on Delete and confirm the deletion:
DNS diagnostic
A tool available on your Manager allows you to easily correct certain problematic records. You can also use a free external service like the one mentioned at the bottom of this other guide.
Expert mode
To edit the DNS zone in advanced (expert) mode, which allows you to restore a previous version of the different records, refer to this other guide.
Link to this FAQ:
Has this FAQ been helpful?
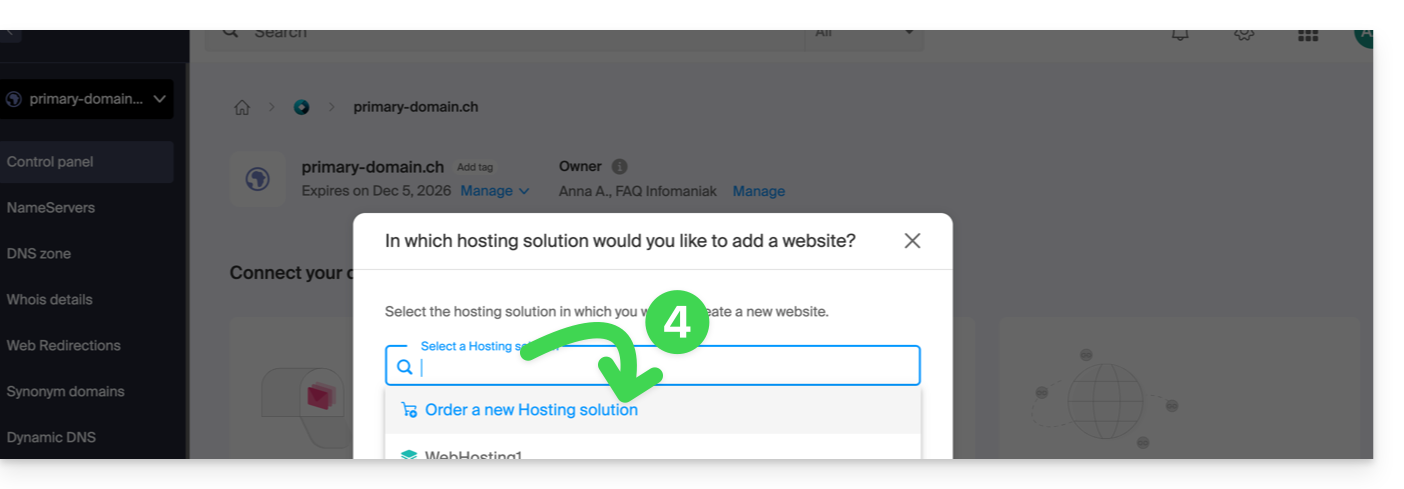
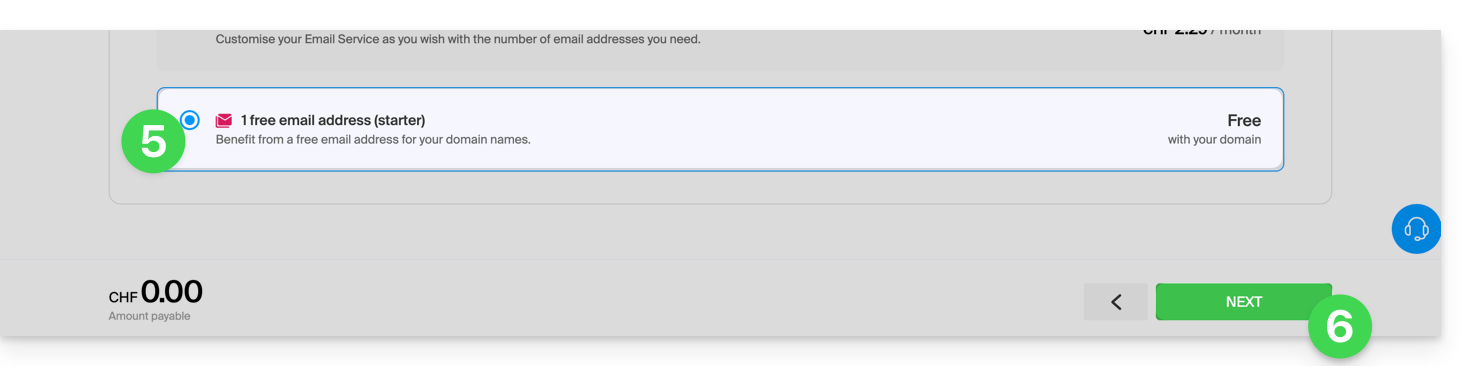
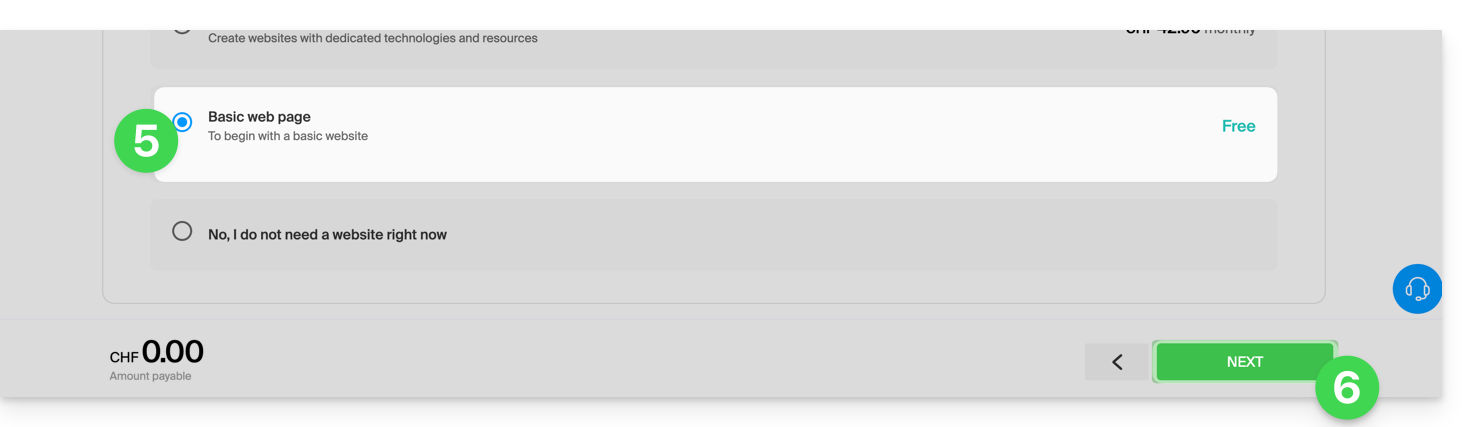
This guide explains how, after purchasing a domain name from Infomaniak, to obtain for free an Email Service + Web Hosting.
Preamble
- For each domain name registered or transferred to Infomaniak, you can benefit from free:
- an email address that gives you access to the Infomaniak Mail app
- and a 10 MB Web space for a basic page.
- It is also possible to have a free Email Service while having a paid Web offer, or vice versa.
- Instead of a Starter type Email Service, there is also kSuite.
Activate the Starter Mail + Web offer
Prerequisites
- Own a domain name with Infomaniak (a DNS zone is not enough).
- Depending on the type (Mail or Web) desired, not to have an existing corresponding product already associated with the domain name and this in any existing Infomaniak Organization.
To order a Starter Email Service and Starter Web Hosting included with each domain:
- Click here to access the management of your product on the Infomaniak Manager (need help?).
- Click directly on the name assigned to the product concerned:
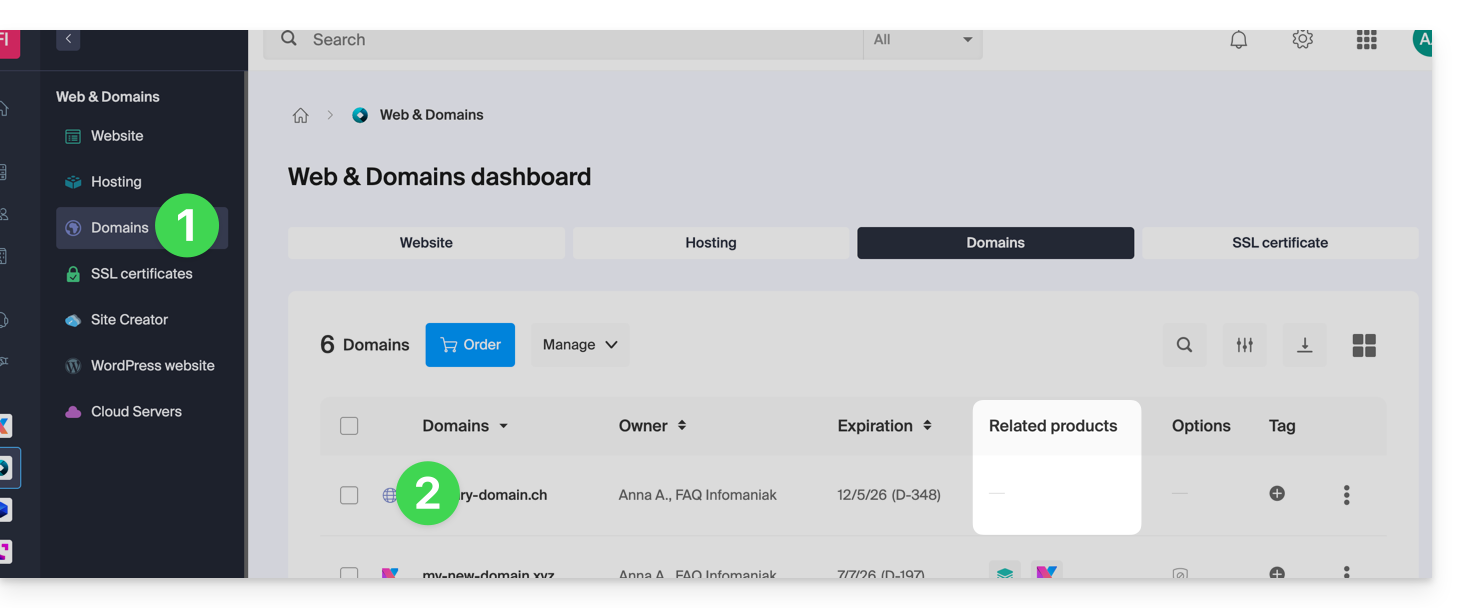
- It is necessary that no product is linked at the moment to the domain (visible in the column of linked products).
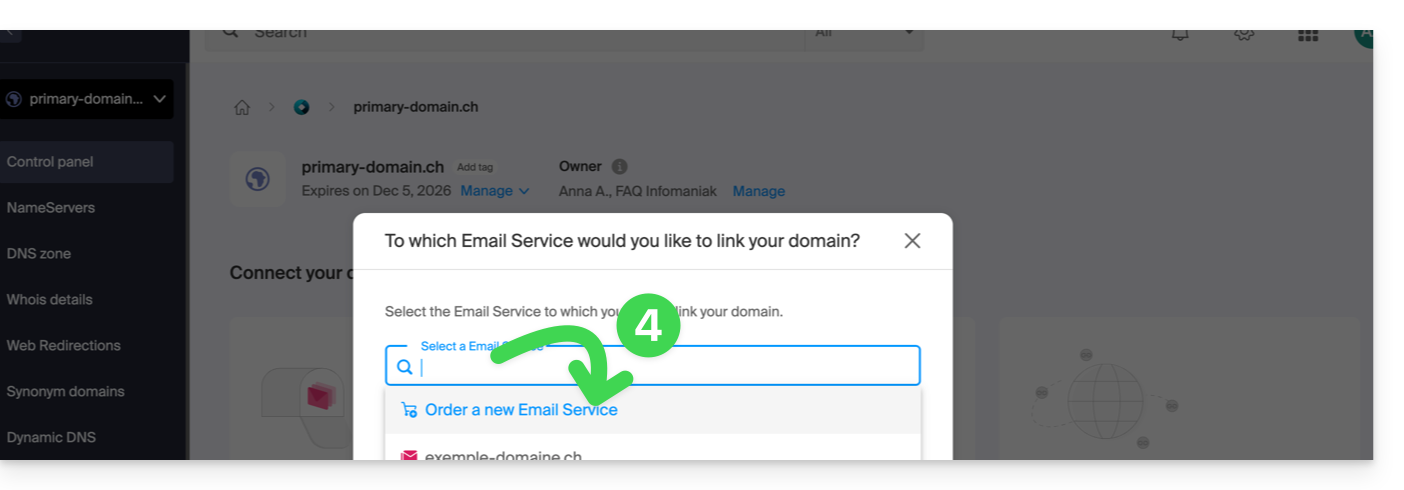
- Click on one or the other of the shortcuts to Connect a service (mail or web):
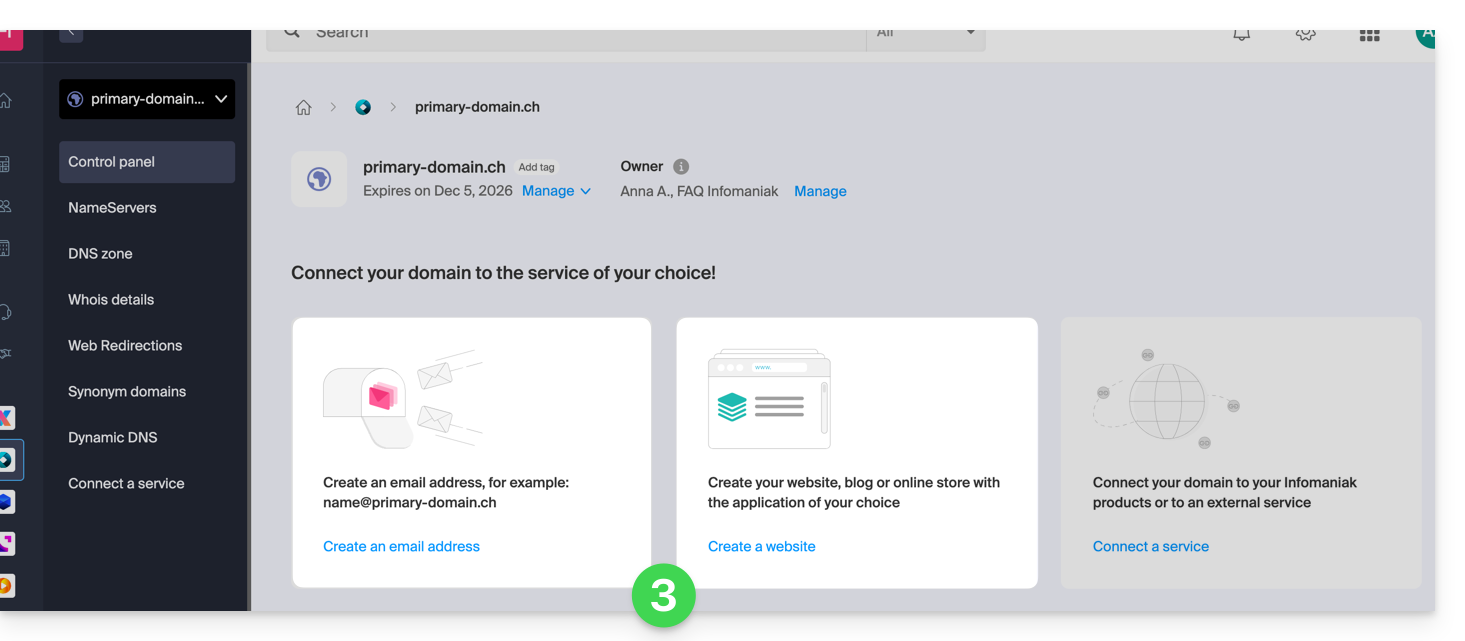
- In both cases, click on Order …:
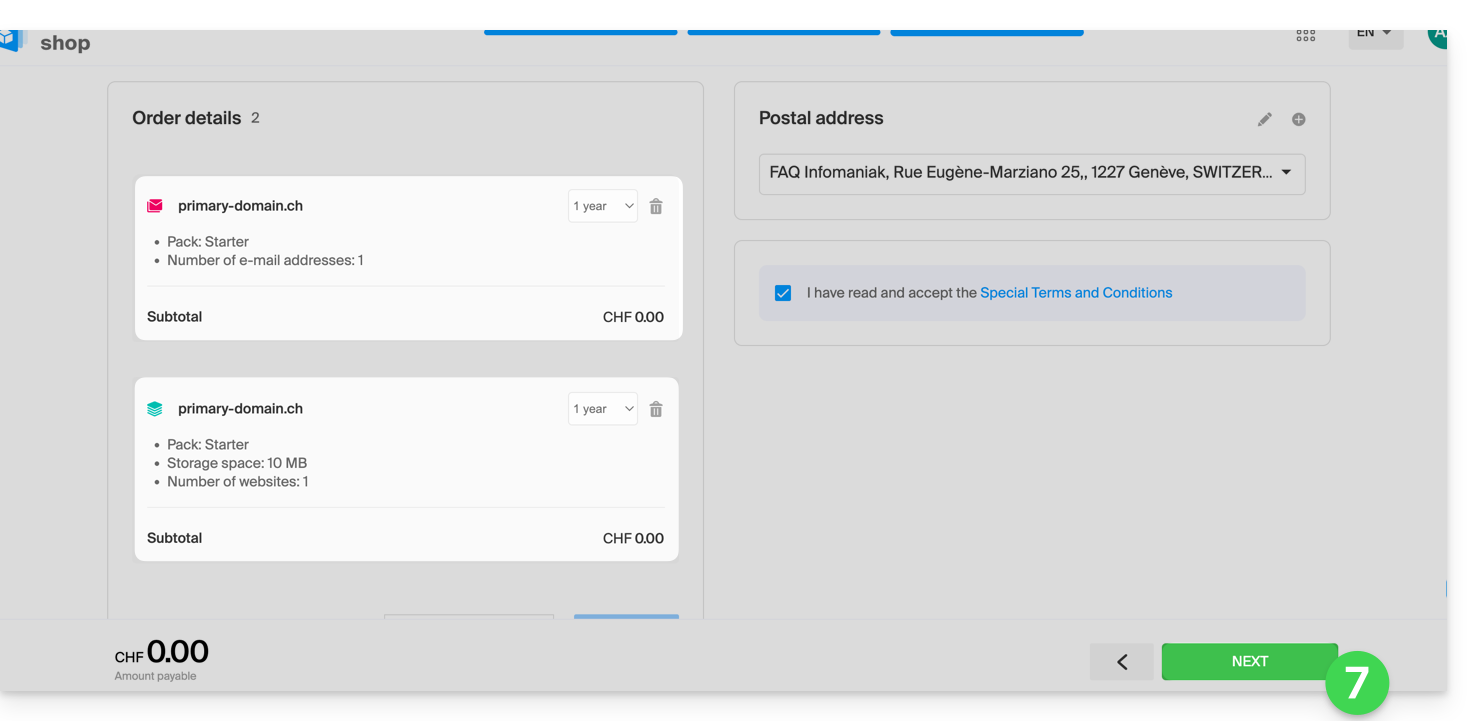
- You will be able to choose the corresponding free service (mail or web) and the next step will offer you to choose the other (mail or web) if desired.
- Click at the bottom of the page to continue:
- Finalize the order:
- Return to your Infomaniak Manager to discover and use your new products:
Using your Starter products
- Create the desired email address on your Mail Starter Service.
- To use the 10 MB Web space and create a basic web page on your Web Starter Hosting, use:
- the page editor
- or the Web FTP on the Manager to manage your HTML pages
- or any FTP software/client with the classic FTP protocol
Evolving a Starter offer
- Modify a Mail offer (click here).
- Modify a Web offer (click here).
In case of a problem with a Starter hosting
A Starter type Web hosting does not offer IPv6. Be careful with AAAA records in the DNS zone of the domain name concerned which can in particular prevent you from activating SSL; also refer to this other guide.
Link to this FAQ:
Has this FAQ been helpful?
Thank you for entrusting the management of your domain names to Infomaniak.
This guide allows you to quickly use the essential functions of your new product.
Some important guides
Administrative
- Protect your personal information in the WHOIS
- Protect your domain from theft and loss
- Modify the domain name coordinates
- Who owns a domain name?
- Use the free services (mail and Web 10 Mo) linked to a domain managed by Infomaniak
- Transfer another domain name to Infomaniak
Technical
- Edit the records (A, MX, Web, Mail, etc.) of a domain registered with Infomaniak to for example join a hosting not managed by Infomaniak
- Modify the DNS servers
- Redirect traffic
- Configure DynDNS
- Link a domain name to the Mail Service
- Link an additional domain name to the Mail Service
- Unlink a domain linked to the Mail Service
- Link a domain name to an Infomaniak Web Hosting
- Link an additional domain name to a website
- Unlink a domain linked to the website
- Link a domain name to the Infomaniak Synology NAS
- Link a domain name to Wix
- Link a domain name to Site Creator
- Link a domain name to the Newsletter
- Link an Infomaniak domain name to an external service
Otherwise, find the desired topic among the rest of the FAQs.
Click here to share feedback or a suggestion on an Infomaniak product.
Link to this FAQ:
Has this FAQ been helpful?
This guide explains the difference between the terms synonym and alias in the context of the Domain Name service offered by Infomaniak.
Synonym domain / alias domain
So-called synonym domain names (i.e., domains that are entirely dependent on the main domain, without their own DNS configuration) and alias (independent domains, with their own DNS configuration) can both serve as secondary domains associated with a main domain.
For example, the domains pomme.xyz (alias) and banane.xyz (synonym) can redirect to a common main domain such as fruits.xyz.
Here is the technical distinction to remember:
- The synonym (also called "linked domain" or "DNS mirror") directly uses the DNS servers of the main domain. It has no DNS zone of its own.
- The alias (also called "redirected independent domain" or "DNS alias") has its own DNS records (independent DNS zone), although it points to the same hosting or services.
| pomme.xyz (domain alias – with custom DNS) ns1.personnalisable.ch ns2.personnalisable.ch | ⇢ | Own DNS zone A records, MX, etc. | Web Hosting Email Service |
| fruits.xyz (domain main) ns1.infomaniak.ch ns2.infomaniak.ch | } | Own DNS zone A records, MX, etc. | |
| banane.xyz (domain synonym – without own DNS) Automatically retrieves the DNS of the main domain (fruits.xyz) |
Learn more
Link to this FAQ:
Has this FAQ been helpful?
This guide explains how to link a domain name to an Infomaniak Web Hosting service.
Where is your domain name located?…
… At Infomaniak, same Organization
If your domain name is registered with Infomaniak and is in the same user account or organization as your email, then there is nothing to do.
- Refer to this other guide to check and correct any configuration errors.
… At Infomaniak, different Organization
If your domain name is registered with Infomaniak but in a different user account or Organization, then:
- Edit its DNS zone by specifying the website's IP address as an A record.
- Any DNS addition/modification may take up to 48 hours to propagate.
OU
- Move it within the same Organization.
… At Infomaniak with external DNS
If your domain name has DNS that is not Infomaniak's, then:
- Edit the current DNS zone where it is located (if necessary, consult the help documentation of the relevant provider) and specify the website's IP address in the form of an A record.
- Any DNS addition/modification may take up to 48 hours to propagate.
OU
- Change the current DNS settings and select the option to use Infomaniak's DNS servers.
- Any DNS addition/modification may take up to 48 hours to propagate.
- Refer to this other guide to check for and correct any configuration errors.
… Elsewhere with external DNS
If your domain name uses DNS servers other than Infomaniak's:
- Edit the current DNS zone where it is located (if necessary, consult the help documentation of the relevant provider) and specify the website's IP address in the form of an A record.
- Any DNS addition/modification may take up to 48 hours to propagate.
OU
- Change your current DNS settings (if necessary, consult the documentation provided by your registrar) and specify Infomaniak's DNS servers (this requires you to have a DNS zone with Infomaniak).
- Any DNS addition or modification may take up to 48 hours to propagate.
- This DNS zone with Infomaniak will be configured correctly, but please refer to this other guide to check for and correct any configuration errors.
… Elsewhere, but you are transferring it
If your domain name is registered with another registrar and you want to transfer it to the same location as your Infomaniak website, then:
- Transfer the domain name to Infomaniak (it will be configured correctly, but please refer to this other guide to check for and correct any configuration errors).
- If the domain name is intended to be an alias for your main website, you need to add the alias to your website.
Link to this FAQ:
Has this FAQ been helpful?
This guide explains how a domain name and a DNS zone work.
Preamble
- When you browse a website
https://www.abc123.xyzfor example,abc123.xyzis the domain name. - Each domain name has DNS (Domain Name System), which indicate where (with which provider, for example) the DNS zone is located.
- The DNS zone then allows the management of various services related to the domain name to be delegated to different providers.
- For a single domain name, it is possible, for example, to delegate:
- web hosting to provider X (via the "
A" type record) - and the Mail Service to provider Y (via the "
MX" type record)
- web hosting to provider X (via the "
- For a single domain name, it is possible, for example, to delegate:
Domain name, DNS and DNS zone, then services
Who manages what?
- Each domain name is reserved and managed by a registrar (registration office). For example, Infomaniak is a registrar, one of the cheapest in Switzerland.
- The DNS of a domain name are configured with the registrar managing the domain name.
- The DNS zone can be managed by the registrar or another provider.
- Web hosting and the Mail Service can be managed by any host.
In the most complex case, it is therefore possible to have 1 different provider for the following services: domain name reservation and DNS management, DNS zone management, web hosting, Mail Service.
The following diagram summarizes these different possibilities with the involvement of different providers:
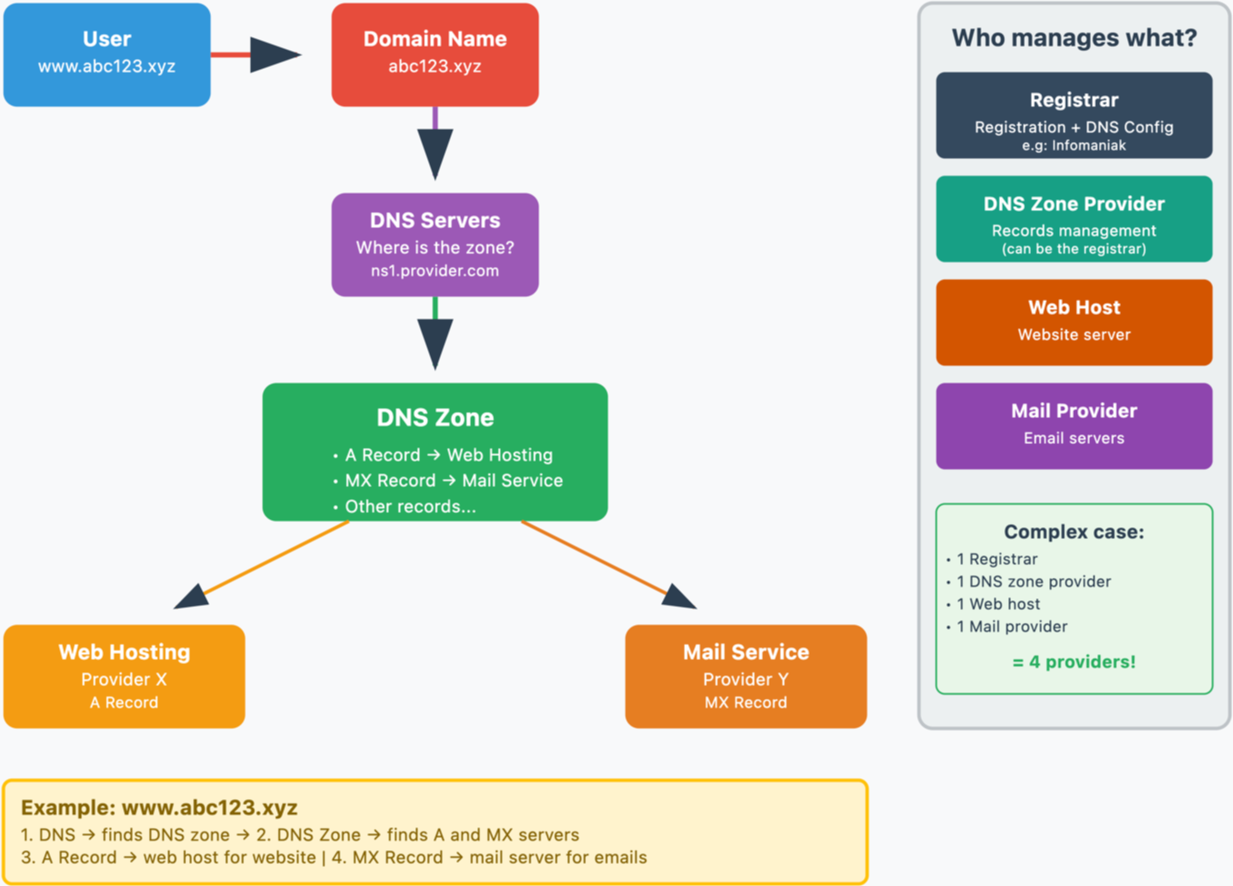
Infomaniak
As a registrar and host, Infomaniak can manage all these services. This is the simplest solution.
- In the case of Infomaniak, the DNS are generally in the form of nsXX.infomaniak.com and nsXX.infomaniak.com (XX like 11 or 12 for example).
- You can modify the DNS of your domain name, as well as modify the "inside" of these DNS, i.e. modify the DNS zone of a domain name.
And in these DNS zones, to redirect traffic to services, we distinguish:
- an MX record that allows you to point a domain name (
domain.xyzfor example) to a mail server. - an A record that allows you to point a domain name (
domain.xyzfor example) or a subdomain (example.domain.xyzfor example) to a Web server that has a static IP address (otherwise you would have to constantly edit the A record to provide the new IP address - refer to this other guide on this subject)
Possible situations
Examples and fictitious names
| All services are with Infomaniak | |||
|---|---|---|---|
| domain name | domain.xyz | registered with -> | Infomaniak |
| DNS of the domain name | ns1.infomaniak.com… | so the DNS zone must exist with -> | Infomaniak |
| website hosted by -> | Infomaniak | so the DNS zone must contain A record | 123.45.67.8 for example |
| mail hosted by -> | Infomaniak | so the DNS zone must contain MX record | mx-mail.maniak for example |
| All services are with Infomaniak except the mail | |||
|---|---|---|---|
| domain name | domain.xyz | registered with -> | Infomaniak |
| DNS of the domain name | ns1.infomaniak.com… | so the DNS zone must exist with -> | Infomaniak |
| website hosted by -> | Infomaniak | so the DNS zone must contain A record | 123.45.67.8 for example |
| mail hosted by -> | Medical Service | so the DNS zone must contain MX record | med-mx.net for example |
| All services are with Infomaniak except the website | |||
|---|---|---|---|
| domain name | domain.xyz | registered with -> | Infomaniak |
| DNS of the domain name | ns1.infomaniak.com… | so the DNS zone must exist with -> | Infomaniak |
| website hosted by -> | Clinic | so the DNS zone must contain A record | 9.87.65.4 for example |
| mail hosted by -> | Infomaniak | so the DNS zone must contain MX record | mx-mail.maniak for example |
| All services are with Infomaniak except the domain name | |||
|---|---|---|---|
| domain name | domain.xyz | registered with -> | GoMamie |
| DNS of the domain name | ns1.infomaniak.com… | so the DNS zone must exist with -> | Infomaniak |
| website hosted by -> | Infomaniak | so the DNS zone must contain A record | 123.45.67.8 for example |
| mail hosted by -> | Infomaniak | so the DNS zone must contain MX record | mx-mail.maniak for example |
| All services are with Infomaniak except the DNS zone | |||
|---|---|---|---|
| domain name | domain.xyz | registered with -> | Infomaniak |
| DNS of the domain name | ns.privateDNS.org… | so the DNS zone must exist with -> | Private DNS |
| website hosted by -> | Infomaniak | so the DNS zone must contain A record | 123.45.67.8 for example |
| mail hosted by -> | Infomaniak | so the DNS zone must contain MX record | mx-mail.maniak for example |
| No service exists with Infomaniak except the domain name | |||
|---|---|---|---|
| domain name | domain.xyz | registered with -> | Infomaniak |
| DNS of the domain name | ns.privateDNS.org… | so the DNS zone must exist with -> | Private DNS |
| website hosted by -> | Clinic | so the DNS zone must contain A record | 9.87.65.4 for example |
| mail hosted by -> | Medical Service | so the DNS zone must contain MX record | med-mx.net for example |
| No service exists with Infomaniak except the DNS zone | |||
|---|---|---|---|
| domain name | domain.xyz | registered with -> | GoMamie |
| DNS of the domain name | ns1.infomaniak.com… | so the DNS zone must exist with -> | Infomaniak |
| website hosted by -> | Clinic | so the DNS zone must contain A record | 9.87.65.4 for example |
| mail hosted by -> | Medical Service | so the DNS zone must contain MX record | med-mx.net for example |
| No service exists with Infomaniak except the mail | |||
|---|---|---|---|
| domain name | domain.xyz | registered with -> | GoMamie |
| DNS of the domain name | ns.privateDNS.org… | so the DNS zone must exist with -> | Private DNS |
| website hosted by -> | Clinic | so the DNS zone must contain A record | 9.87.65.4 for example |
| mail hosted by -> | Infomaniak | so the DNS zone must contain MX record | mx-mail.maniak for example |
etc.
Link to this FAQ:
Has this FAQ been helpful?
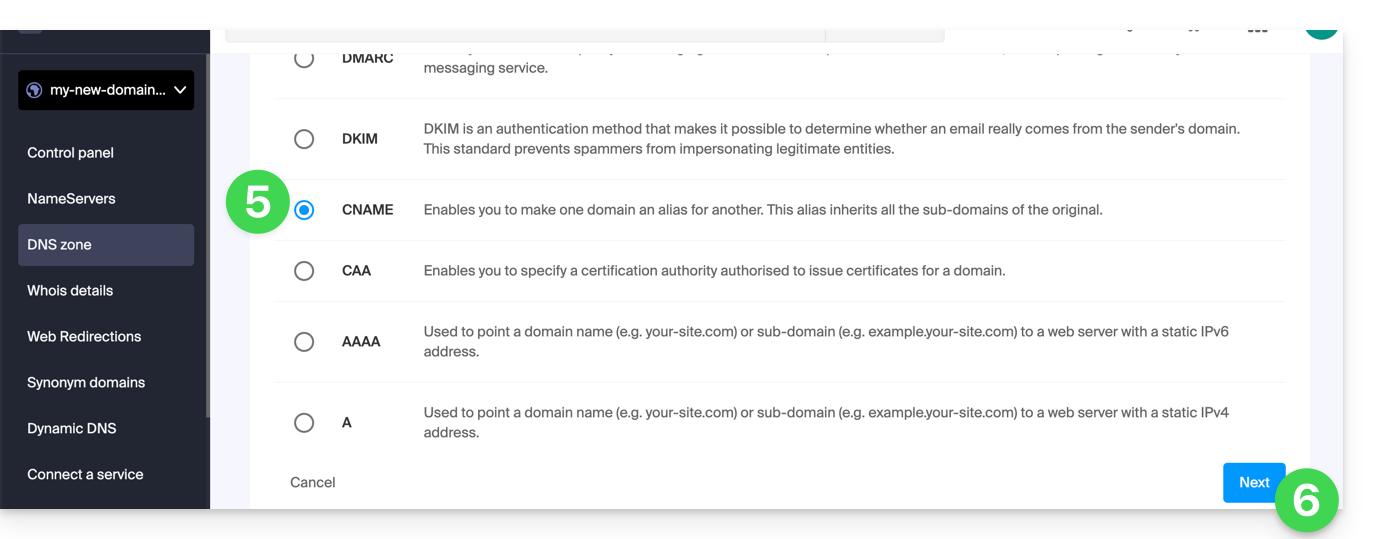
This guide explains how to add or modify one or more CNAME and DNAME type records in the DNS zone (of a domain name) managed on the Manager Infomaniak.
Preamble
- The
CNAMErecord type allows a subdomain to point to a website address.- This is the method generally used to make the
wwwsubdomain work with your site, or to redirect a subdomain to a folder on the web server where your website is hosted.
- This is the method generally used to make the
- The
DNAMErecord type for "delegation name" is particularly useful when reorganizing domains or for smooth transitions of part of your infrastructure to another, while preserving the hierarchical structure of subdomains.- A
DNAMEcreates an alias for an entire domain and all its subdomains.
- A
- Unlike the
CNAMEwhich only applies to a single specific host name, theDNAMEautomatically redirects all subdomains. Example:- A
DNAMEforabc.site1.compointing tosite2.comwill automatically linkxyz.abc.site1.comtoxyz.site2.com,new.login.abc.site1.comtonew.login.site2.com, and so on.
- A
- ⚠ A
DNAMErecord cannot be used at the root zone level of a domain (likesite1.comdirectly). It is generally used on a subdomain. If you want to redirect the main domain itself, you will need to use other types of records such as anA,AAAAorCNAME(with some restrictions for the latter).
Modify the DNS zone
To manage this type of record in a DNS zone:
- Click here to access the management of your domain on the Infomaniak Manager (need help?).
- Click directly on the name assigned to the domain in question.
- Click on DNS zone in the left sidebar.
- Click the button to add a record:
- Click the radio button corresponding to add a record.
- Click the Next button:
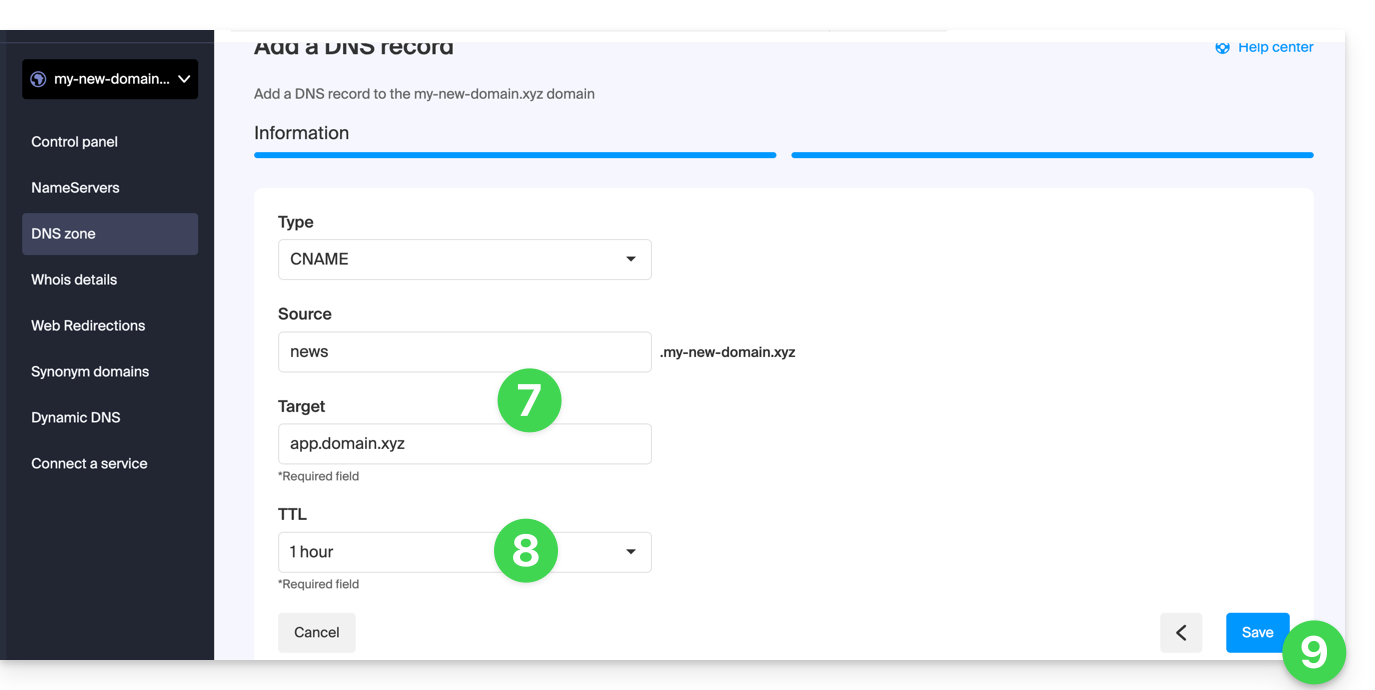
- Enter the values necessary for your DNS zone.
- Leave the default value for TTL.
- Click the Save button:
Link to this FAQ:
Has this FAQ been helpful?