Knowledge base
1000 FAQs, 500 tutorials and instructional videos. Here, there are only solutions!
This guide explains how to create subdomains on an existing Infomaniak hosting using a .htaccess file.
Introduction
- The hosting can be on an offer of Shared Web Hosting or on Infomaniak Cloud Server but this function is impossible with a Starter hosting.
- Subdomains can be added very easily to your current hosting since you have in the basic offer 20 sites per hosting (sites = subdomains).
- If you do not want to use this site volume available to you, you can follow the method below.
Create a subdomain as a shortcut
The subdomains thus created make it easier to organize a hosting. For example the address vlog.domain.xyz will be the shortcut of the address domain.xyz/vlog. In other words, the address vlog.domain.xyz will redirect to the vlog folder which must be located at the root of the website domain.xyz. In this example, vlog is the subdomain of domain.xyz.
1. Add the subdomain as an alias of your website
To do this:
- Follow the procedure for adding an alias but please read the points 2 and 3 below.
- In the field to add the related domain, enter the full address of the subdomain (for example
vlog.domain.xyz). - If your domain or its DNS zone is managed at Infomaniak, activate the following two options: Update DNS entries for this domain and Replace existing entries ; if this is not the case, create a A record with your registrar with the following information:
- field: the full URL of the subdomain (for example
vlog.domain.xyz) - target: the IPv4 address (A record) of your site (refer to this other guide to find the A record of your site)
- field: the full URL of the subdomain (for example
2. Modify the .htaccess file of your website
Important: the following instructions are given for informational purposes only. You may need to adapt the code to work in your situation.
Using your FTP software/client or Web FTP on the Manager, add and adapt the following code in the .htaccess file located at the root of your website:
RewriteCond %{HTTP_HOST} ^(.*)\.domain\.xyz [NC]
RewriteCond %{DOCUMENT_ROOT}/%1/ -d
RewriteCond %1::%{REQUEST_URI} !^(.*?)::/\1/?
RewriteRule "^(.*)$" "%{DOCUMENT_ROOT}/%1/$1" [L]
Explanation for the third line: https://stackoverflow.com/a/15981056
Replace on the first line:
domainwith your domain namexyzwith your domain extension (ch, fr, etc.)
Now, the address vlog.domain.xyz should display the content of the vlog folder located at the root of your website. If this is not the case, check that the vlog folder exists at the root of your website.
Link to this FAQ:
Has this FAQ been helpful?
This guide explains how to set up a zone delegation for a subdomain.
Prerequisites
- Have a domain name with Infomaniak or at least a DNS zone.
- Understand:
- the operation of a domain and a DNS zone before modifying the latter.
- that the DNS zone presented here is valid and used only if the server names are those of Infomaniak.
- that any DNS addition/modification can take up to 48 hours to propagate.
Set up a zone delegation
To do this:
- Click here to access the management of your product on the Infomaniak Manager (need help?).
- Click directly on the name assigned to the product concerned.
- Click on DNS zone in the left sidebar.
- Click on the Advanced view tab.
- Click on the + button:
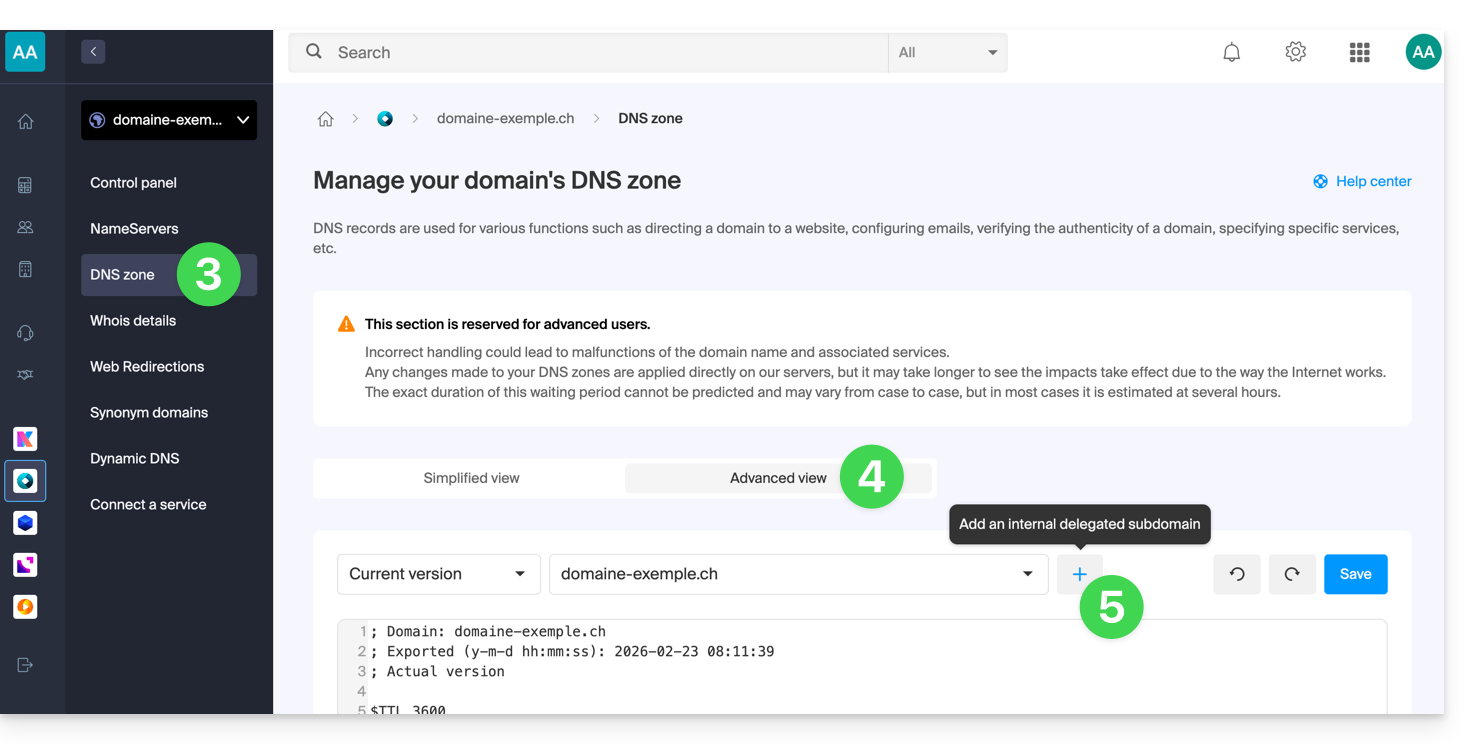
- Enter the desired subdomain (for example
testto gettest.domain.xyz) - It is now possible to edit the DNS zone of the delegated subdomain.
Link to this FAQ:
Has this FAQ been helpful?
This guide explains how to modify in advanced (expert) mode specific entries (records of type A & AAAA, MX, TXT, etc.) within the DNS zone of a domain name registered with Infomaniak.
If you are a beginner, prefer the simple mode.
Prerequisites
- Have a domain name with Infomaniak or at least a DNS zone.
- Understand:
- the operation of a domain and a DNS zone before modifying the latter…
- that the DNS zone presented here is valid and used only if the name servers are those of Infomaniak…
- that any DNS addition/modification can take up to 48 hours to propagate.
Modify an existing record
To configure the services associated with the domain and allow the appropriate resolution of domain names to the corresponding resources (such as external websites, third-party mail servers, etc.):
- Click here to access the management of your product on the Infomaniak Manager (need help?).
- Click directly on the name assigned to the product concerned.
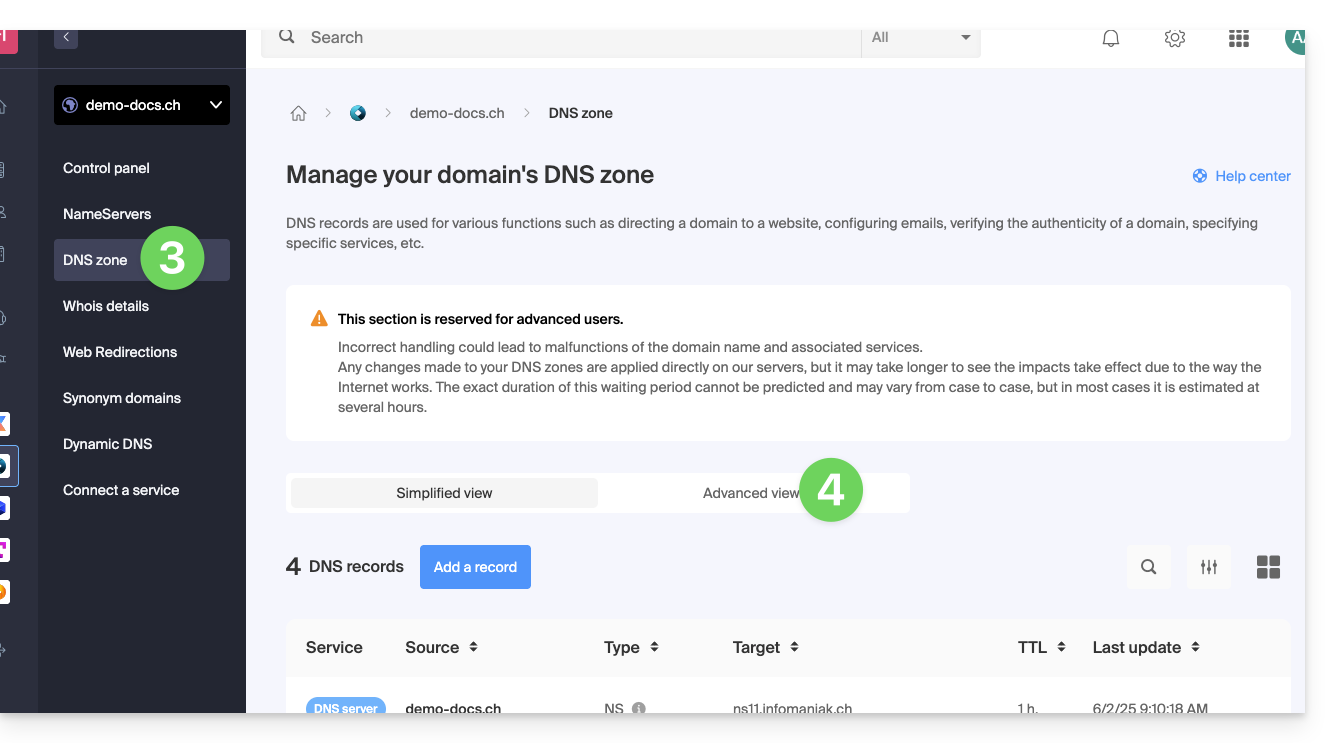
- Click on DNS Zone in the left sidebar
- Click on Advanced View:
- The syntax is accepted in BIND format.
- Proceed with the editing of the desired information.
- Save your changes:

Restore a DNS zone
Thanks to the Expert mode, you can use versioning to find a previous version of the DNS zone of your domain name and thus restore it as it was at a given time:
- Once in the Advanced View tab (see above) click on Current Version to expand the menu containing previous dates.
- Click on the desired date to get a preview of the changes.
- Click on the blue Save button on the right to return to the selected version:
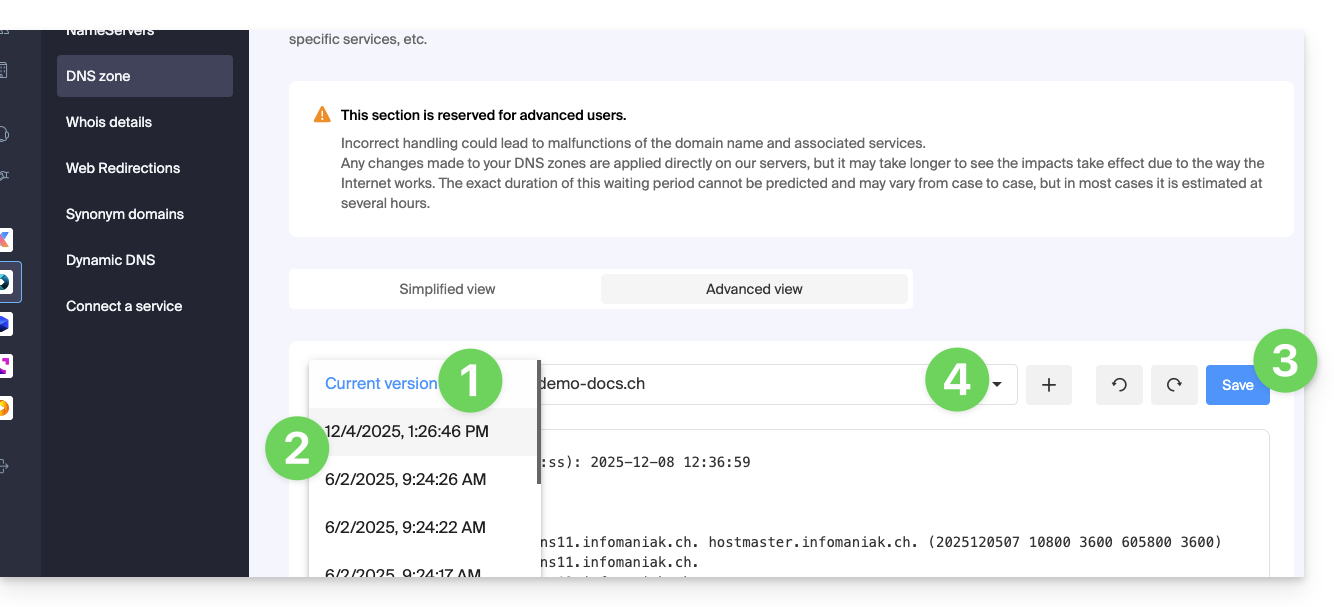
- Click on the second drop-down menu if necessary to access the restoration of delegated subdomain configurations.
DNS Diagnostic
A tool available on your Manager allows you to easily correct certain problematic records.
Link to this FAQ:
Has this FAQ been helpful?
This guide explains how to transfer data (Web, Mail, Domain, and even Cloud) currently hosted elsewhere to Infomaniak. You will, of course, remain the owner of your data, without any loss or interruption!
Introduction
- By consolidating your domain names, websites, and email addresses with Infomaniak, you simplify the management of your invoices and services.
- Furthermore, the link between your domains will be automatically established with your website and email address.
- This means you won't need to manually configure the DNS settings for your domains with another registrar.
Specific Guides
Click on the link corresponding to your current hosting provider:
- Swisscom: complete guide for migrating Web, Mail, and domain name data
Guides for Any Other Hosting Provider
To avoid interrupting your website and emails and prevent data loss when importing your existing data, migrate your services in the order indicated:
Import Web data (any PHP, HTML, etc. website)
- For WordPress specifically, please refer to this other guide…
- For WordPress specifically, please refer to this other guide…
Copy Mail data (addresses and content of mailboxes, etc.) to kSuite or a simple Mail Service
Transfer the domain name (domain management, DNS zone, etc.)
You can also transfer other types of data to Infomaniak servers:
- Dropbox, Google Drive, etc. content: refer to this other guide
- Data on Synology or QNAP NAS: refer to this other guide
Link to this FAQ:
Has this FAQ been helpful?
This guide details the administrative procedures to transfer the management of a domain .lu to Infomaniak.
Transfer a domain .lu
Transferring a .lu domain does not require a transfer code; instead, a validation email will be sent to the domain administrator (as indicated in the WHOIS information) to validate the transfer to Infomaniak.
The domain owner then has 15 days to validate the transfer, otherwise, the transfer will fail.
Once the request is validated, the transfer is almost immediate.
Note, due to the specific process for transferring .lu domains, failed requests cannot be refunded. Any new attempt is billed as a new transfer.
Link to this FAQ:
Has this FAQ been helpful?
This guide explains how to replace the main domain name associated with a Website (excluding Starter hosting) hosted on Infomaniak, in case you want to change your business name or modify the spelling, for example.
Introduction
- It is not possible to simply modify the spelling of the domain name in question.
- You must own the new domain name and install it in place of the current one by performing a switch (see below).
- After making changes to the domain name, it may be necessary to adapt the website content.
- You can also rename your Web Hosting product in the Infomaniak Manager, but changing the name of a hosting account has absolutely no impact on the URLs of the websites.
- During this operation, the statistics are reset.
Changing the website's domain name
Prerequisites
- Prepare the new domain name (if necessary, you must purchase it).
- Install a valid SSL certificate; otherwise, the switch will not be offered.
- If the desired change is more of a "subdomain" to "main domain" type (
dev.domain.xyz→domain.xyz, for example), then refer to this other guide.
Next, to replace the domain name assigned to the website with another domain name:
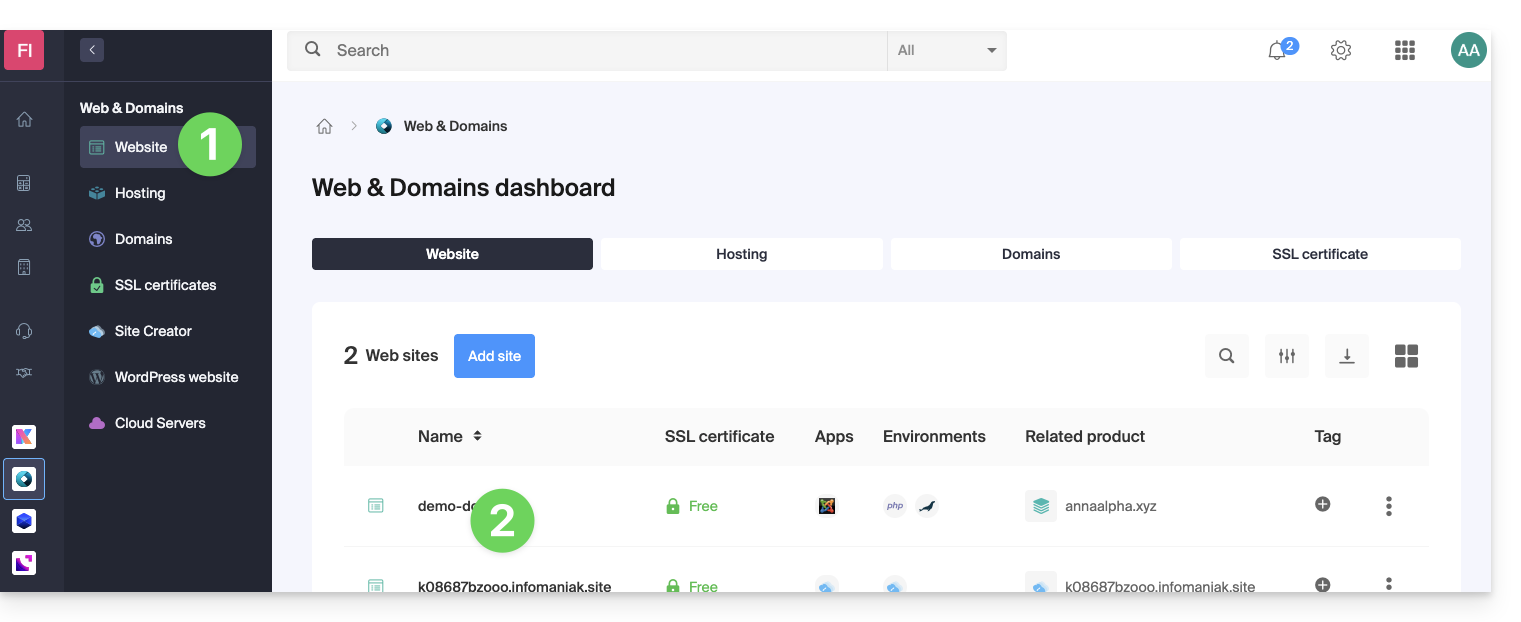
- Click here to access your website management in the Infomaniak Manager (need help?).
- Click directly on the name assigned to the website in question:
- Then, click on the down arrow to expand the Domains section of this website:
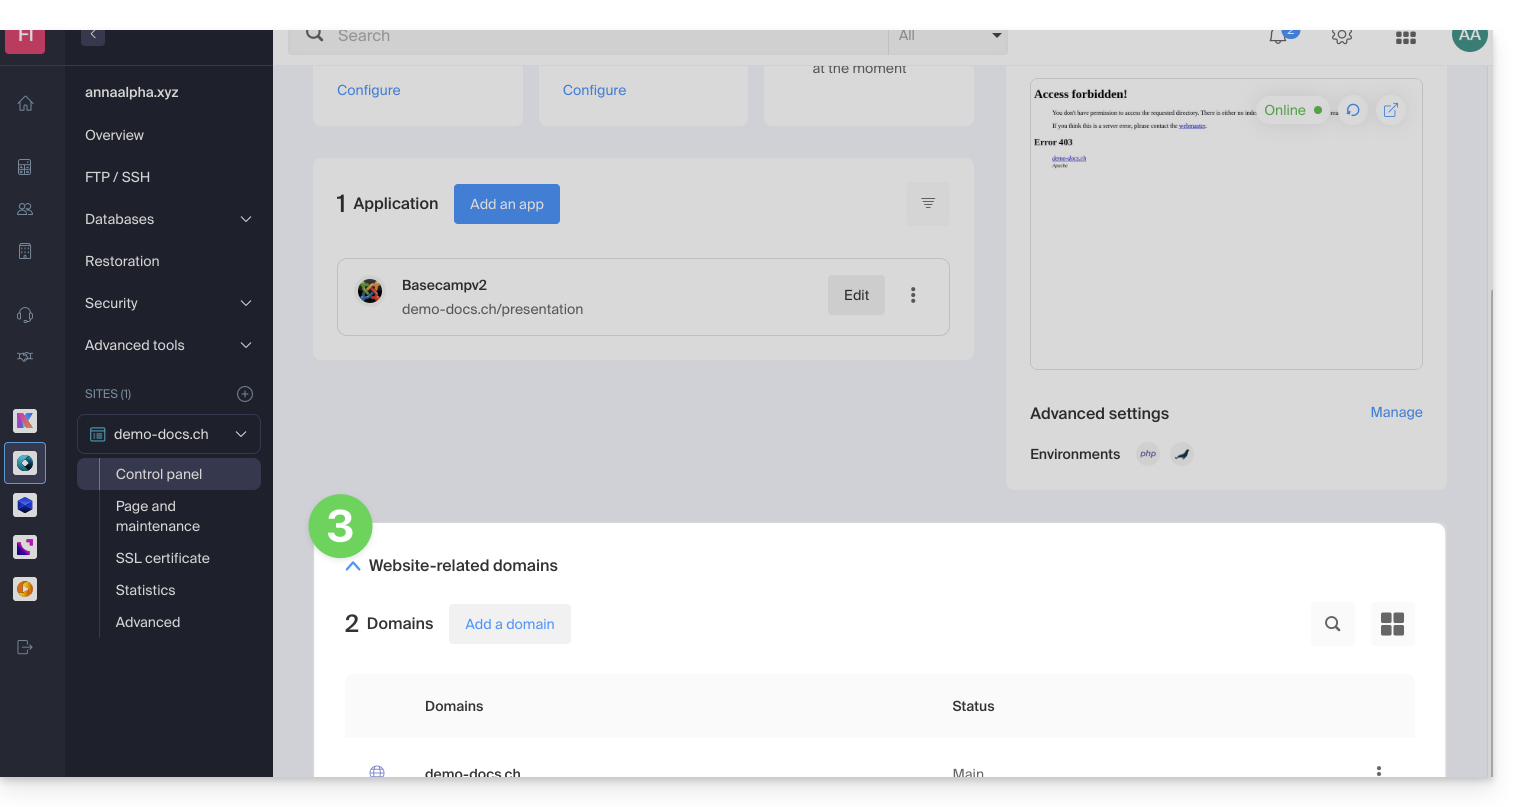
- Review this other guide (especially its Prerequisites) to link the new domain name to your website:
- This new linked domain will replace the current primary domain name after the switch you will perform below.
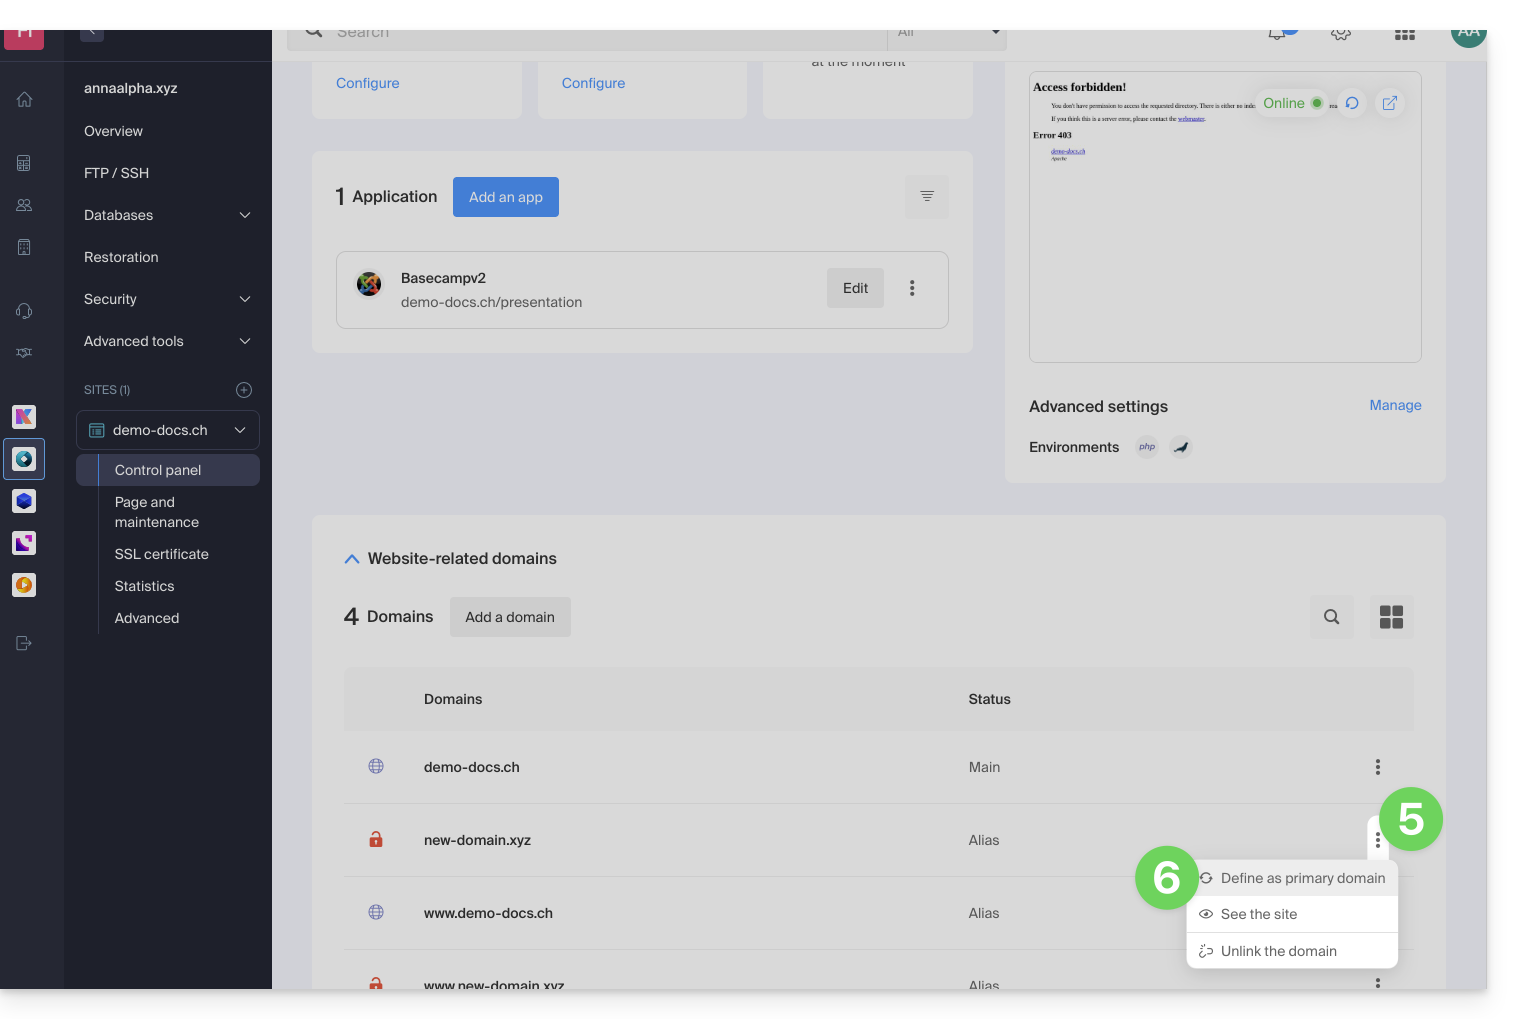
- Once the new domain name is linked to your website, click on the action menu ⋮ to the right of it.
- Choose Set as primary domain:
- If necessary, delete the old domain name and its variants that have become alias domains (and are no longer primary domains).
If you are using an SSL certificate, you will need to update it so that it includes the added aliases.
If you are using the dedicated IP option, you must uninstall it and then reinstall it after performing the domain switch.
Adapt the website content to the new domain name
In some cases, the web application used to develop the site may need some adjustments to function with the new domain name. Click on the link corresponding to your site's development to adapt the content:
Link to this FAQ:
Has this FAQ been helpful?
This guide explains how to obtain the authorization code (EPP code) for a domain name managed by Infomaniak, thus allowing the management of a domain to be transferred to another registrar.
Preamble
- The terms "
EPP", "AuthCode", "AuthInfo", "transfer code" and "authorization code" all refer to alphanumeric sequences specific to the domain whose main purpose is to verify the owner's authorization before a transfer between Registrars. - Refer to the main guide regarding domain transfer procedures.
- The authorization code is always and only sent to the email address of the owner listed in the WHOIS of the domain.
Obtain the authorization code for a domain
To obtain the transfer authorization code:
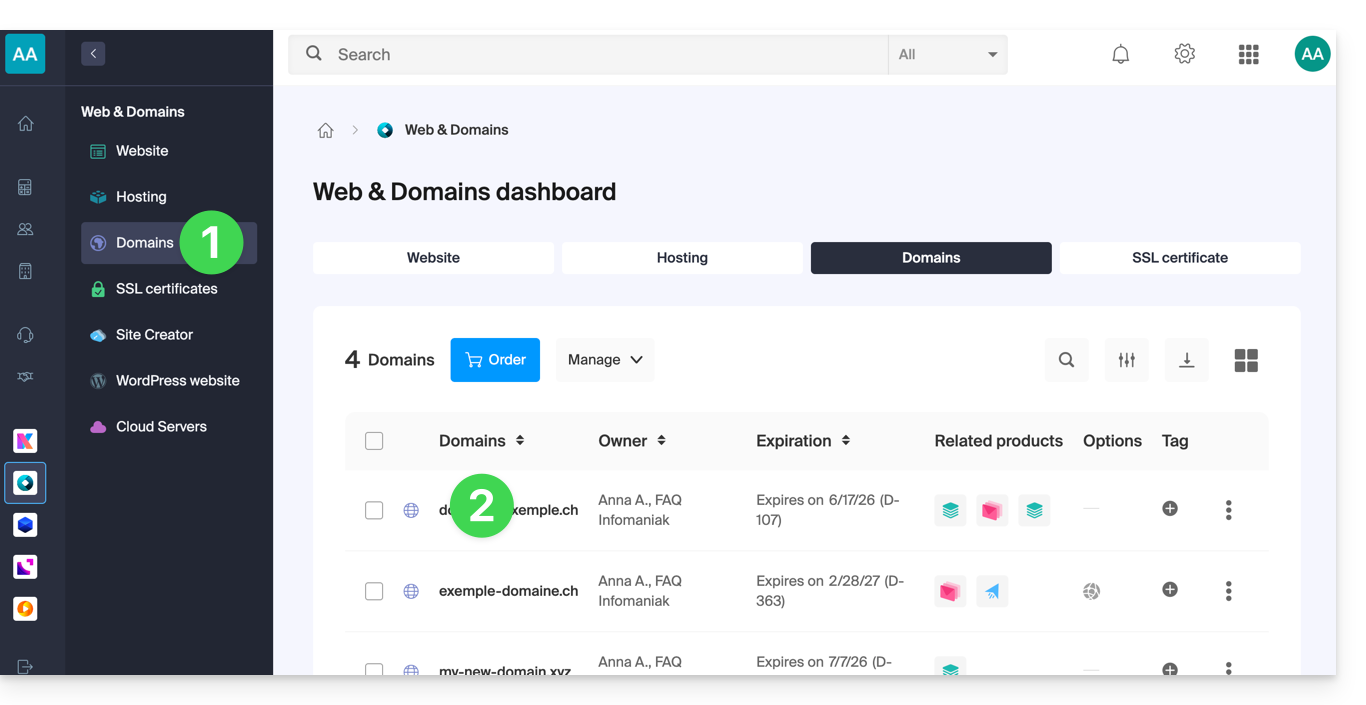
- Click here to access the management of your domain on the Infomaniak Manager (need help?).
- Click directly on the name assigned to the domain in question:
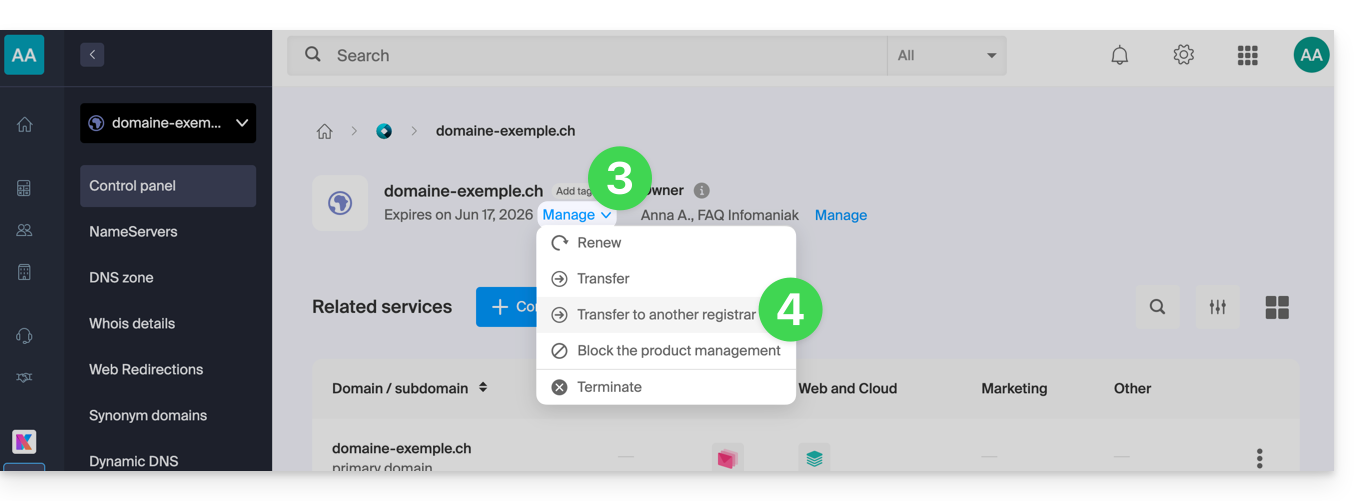
- Click on the Manage button .
- Click on Transfer to another registrar:
- If necessary, to authorize the transfer:
- Click to deactivate the Domain Privacy option.
- Click to Unlock this domain.
- Click the button to Continue:
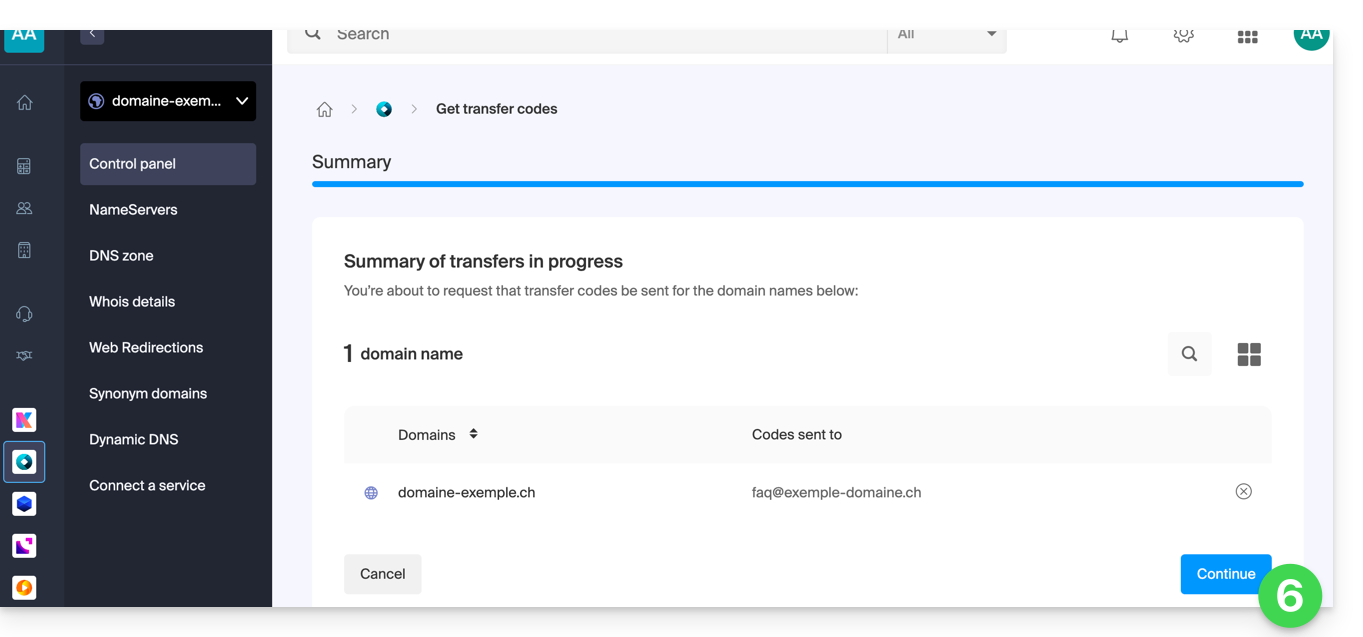
- The code is sent by email to the contact address (see preamble above).
To resend the code, repeat the procedure to the end.
Particularity of some extensions
And then?
Once you have entered the authorization code with the third-party provider and the outgoing transfer has started, Infomaniak is no longer involved.
Contact the new registrar to find out the transfer time during which the domain name will still be visible in your Infomaniak interface. Infomaniak unfortunately cannot intervene in any operation that would speed up the outgoing transfer.
Link to this FAQ:
Has this FAQ been helpful?
This guide explains how to add or modify one or more A and AAAA type records in the DNS zone (of a domain name) managed on the Manager Infomaniak.
Preamble
- This type of record allows a domain name to point to a static IP address (usually a server), type A for an IPv4 and AAAA for IPv6.
- This is the method generally used to redirect your domain name to the IP address of the web server on which your website is hosted. Moreover, this type of pointing is used automatically to link your domain name with your website if they are in the same place and in the same Infomaniak Organization.
- You should only modify this type of record if you have a particular configuration to set up (e.g., pointing a subdomain to an external application).
Modify the DNS zone
To manage this type of record in a DNS zone:
- Click here to access the management of your domain on the Infomaniak Manager (need help?).
- Click directly on the name assigned to the domain in question.
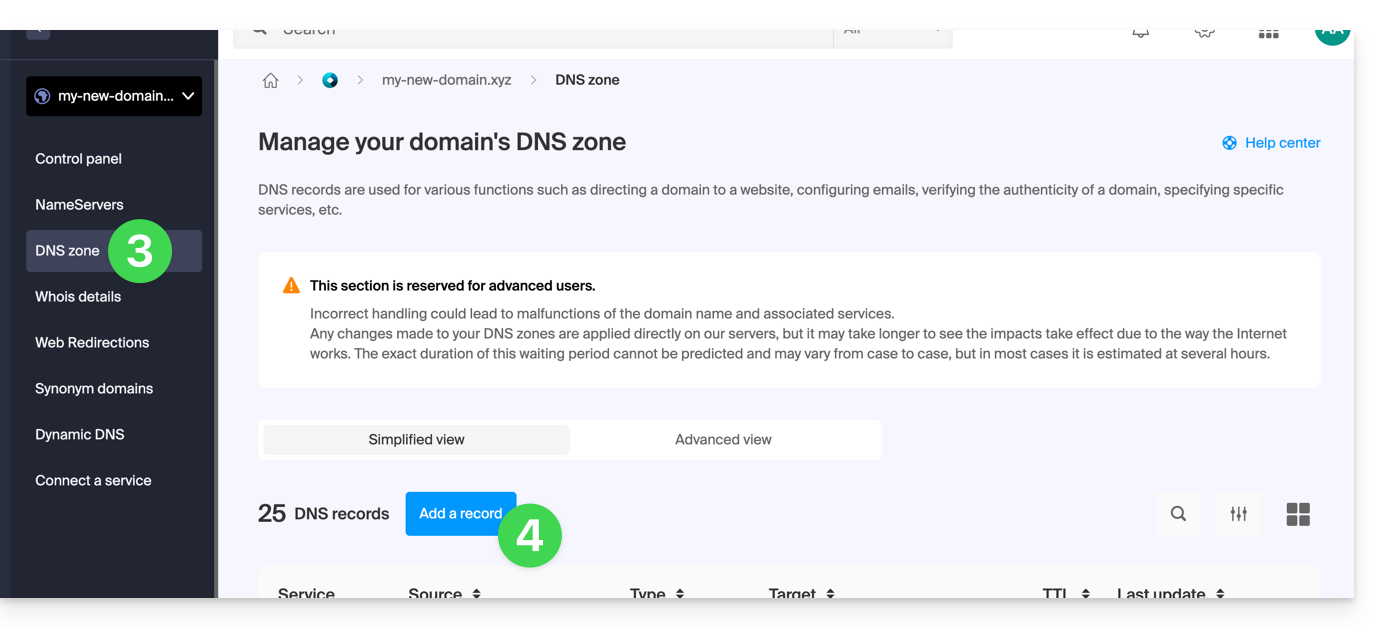
- Click on DNS Zone in the left sidebar.
- Click the button to add a record:
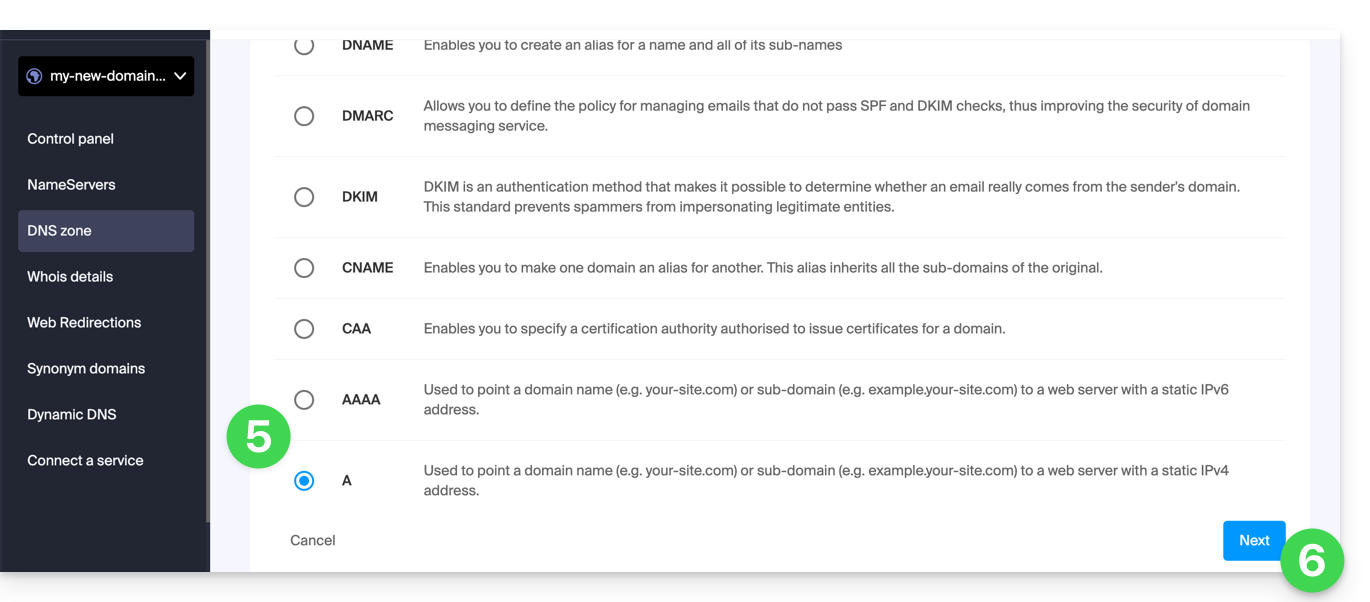
- Click the A or AAAA radio button to add a record.
- Click the Next button:
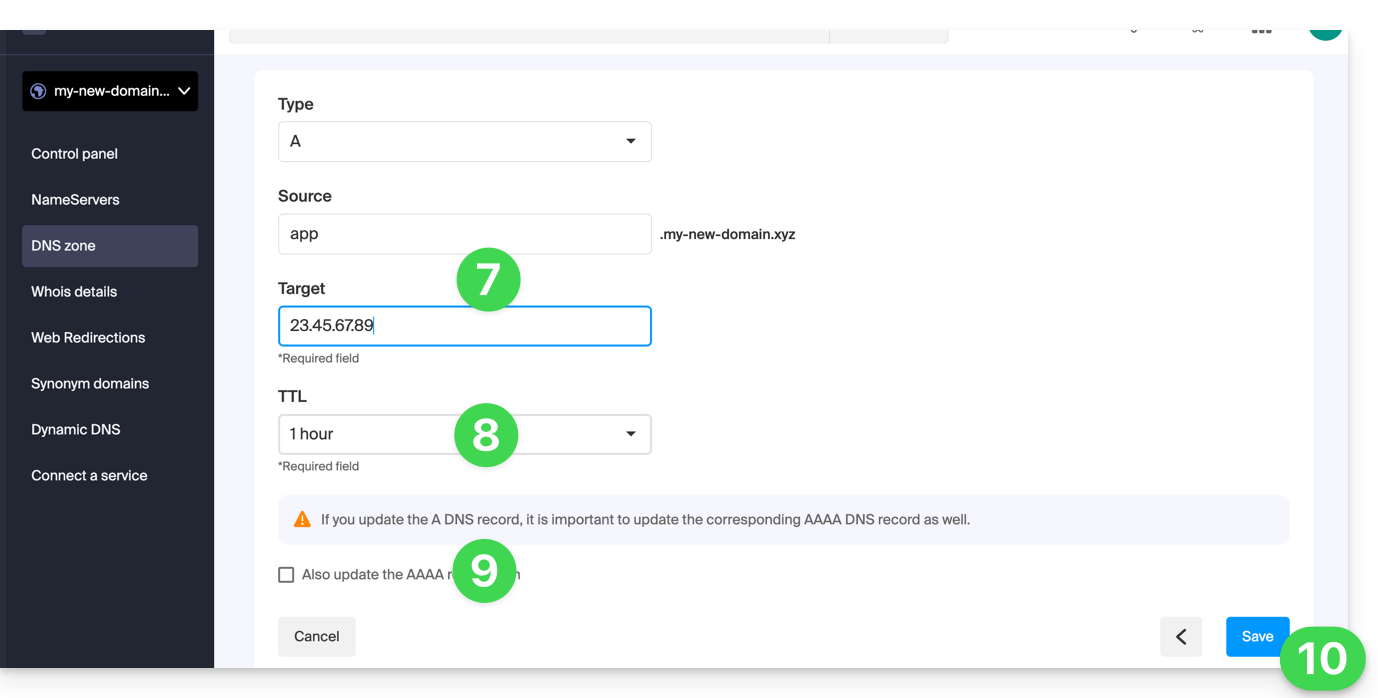
- Enter the values necessary for your DNS zone.
- Leave the default value for the TTL.
- If necessary, you can request the adjustment of the AAAA record by checking the box, which will allow you to indicate an IPv6 at the same time.
- Click the Save button:
Link to this FAQ:
Has this FAQ been helpful?
This guide explains how to easily set up a redirection of your domain name managed by Infomaniak.
Preamble
- A Web redirection allows you to redirect a domain name or subdomain to the Internet address of your choice.
- This procedure is only valid if the DNS of the domain is managed by Infomaniak and if Custom Brand is not activated.
- Any addition/modification may take up to 48 hours to propagate.
- If necessary, create a redirection of your domain with and without the www (
domain.xyzandwww.domain.xyz).
Redirect a domain to the URL of your choice
To do this:
- Click here to access the management of your product on the Infomaniak Manager (need help?).
- Click directly on the name assigned to the product concerned.
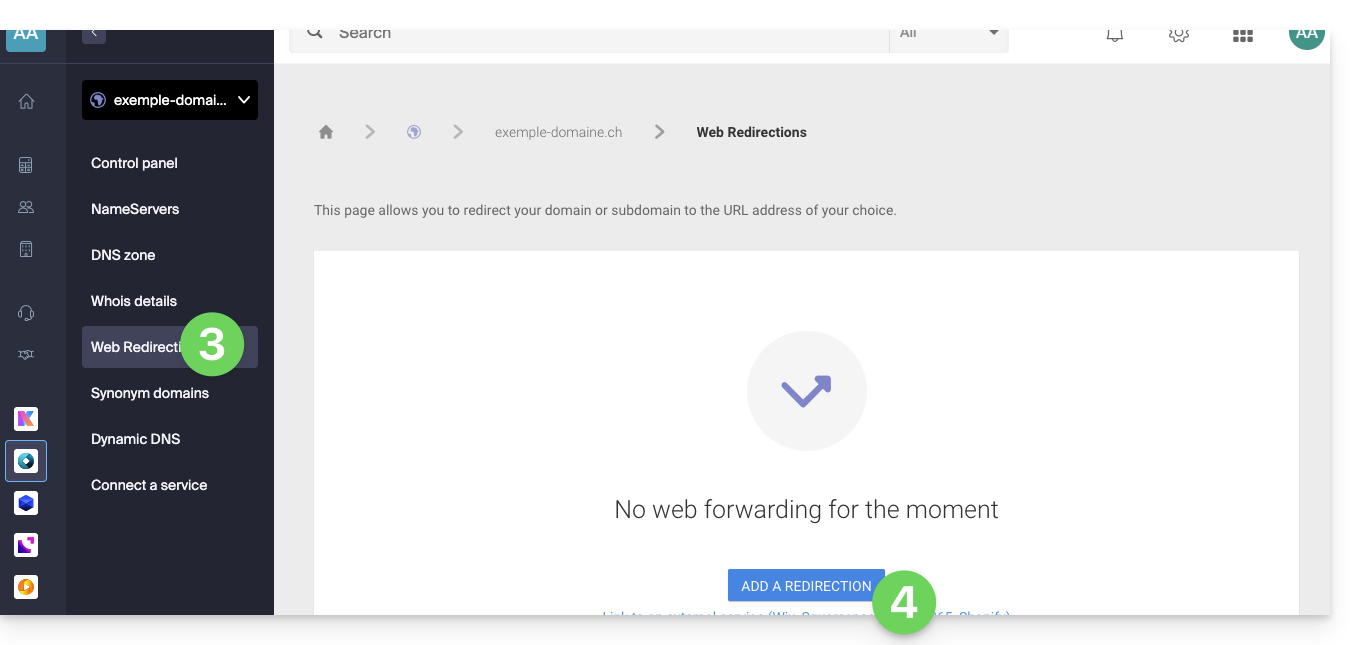
- Click on Web Redirections in the left sidebar.
- Click on the Add a redirection button:
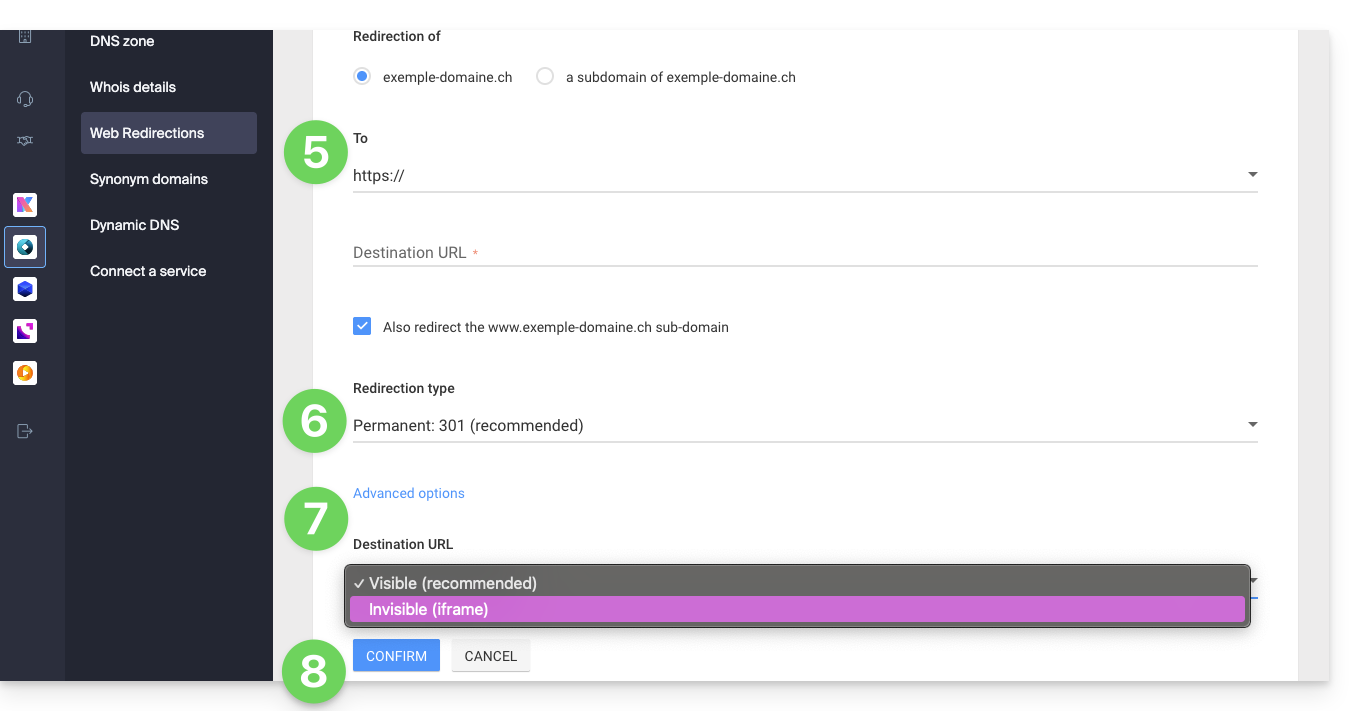
- Enter the destination address (under To).
- Choose between a 301 or 302 type redirection.
- The advanced options allow you to specify a redirection in the form of an iframe (invisible, but not recommended).
- Click on the button to Confirm:
Link to this FAQ:
Has this FAQ been helpful?
This guide explains how to have multiple denominations (everything that comes after the at sign @ in your email address) for an existing Service Mail, by adding linked domain names.
Preamble
- Existing and future email addresses are automatically valid with all linked domains.
- To completely transform and reverse the domain names of a Service Mail, refer to this other guide.
- To modify the part of your email address that comes before the at sign
@, refer to this other guide. - Note also that you can rename your product in the Infomaniak Manager, but changing the name of a Service Mail has no effect on its addresses; you need to change the domain name.
Add a domain name to the Service Mail
Prerequisites
- Own the new domain name (if necessary, you will need to create it first).
- Refer to the instructions in this other guide by applying the instructions corresponding to your situation (so that the domain name works when it is linked to your Service Mail).
Once the new domain name is ready to be used alongside the old one, you need to add it to the Service Mail:
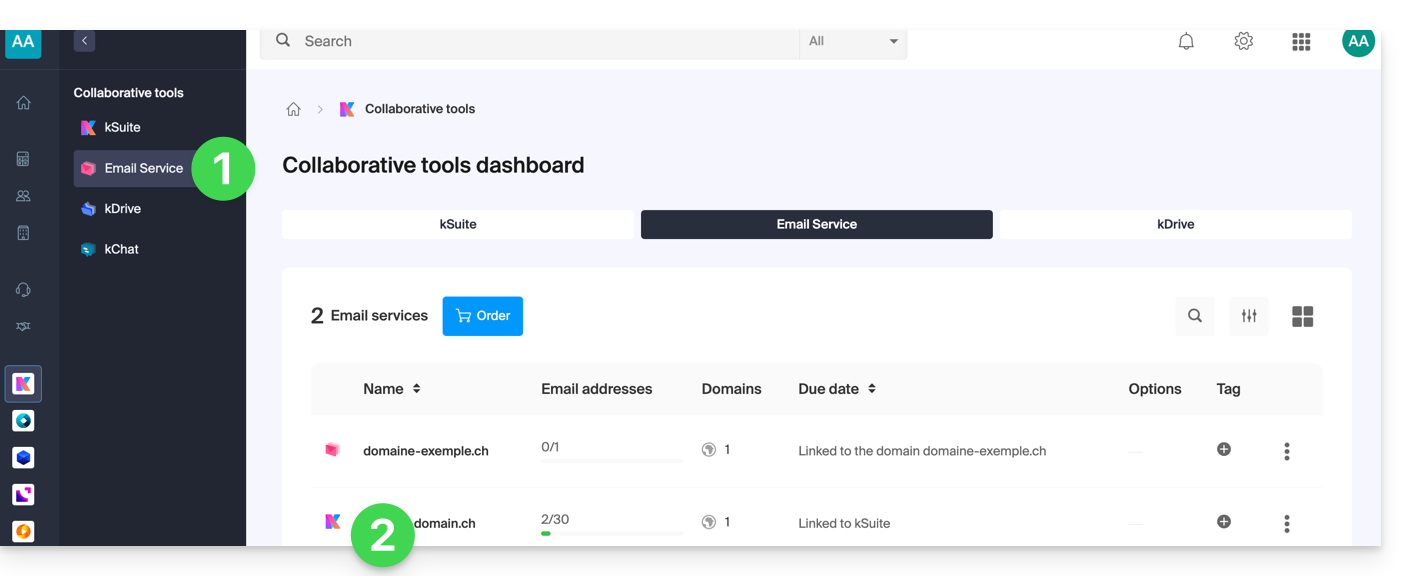
- Click here to access the management of your product on the Infomaniak Manager (need help?).
- Click directly on the name assigned to the product in question.
- Click on Domain Management in the left sidebar:
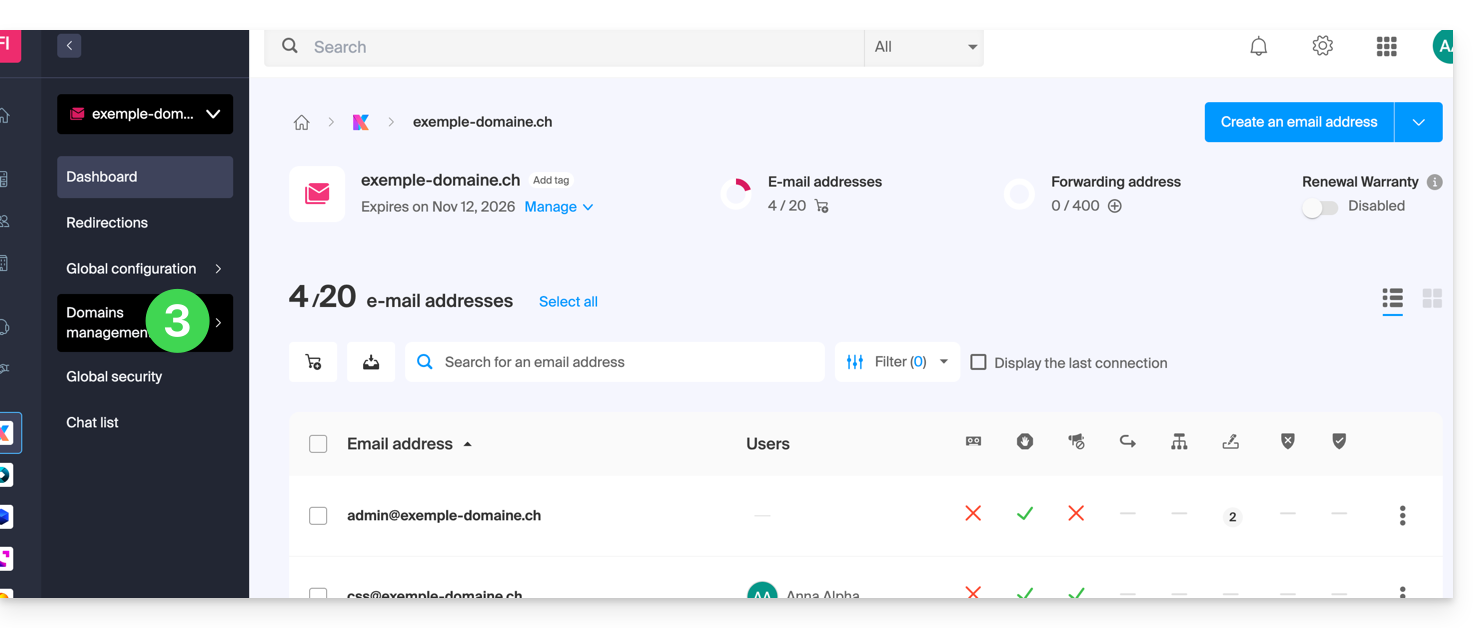
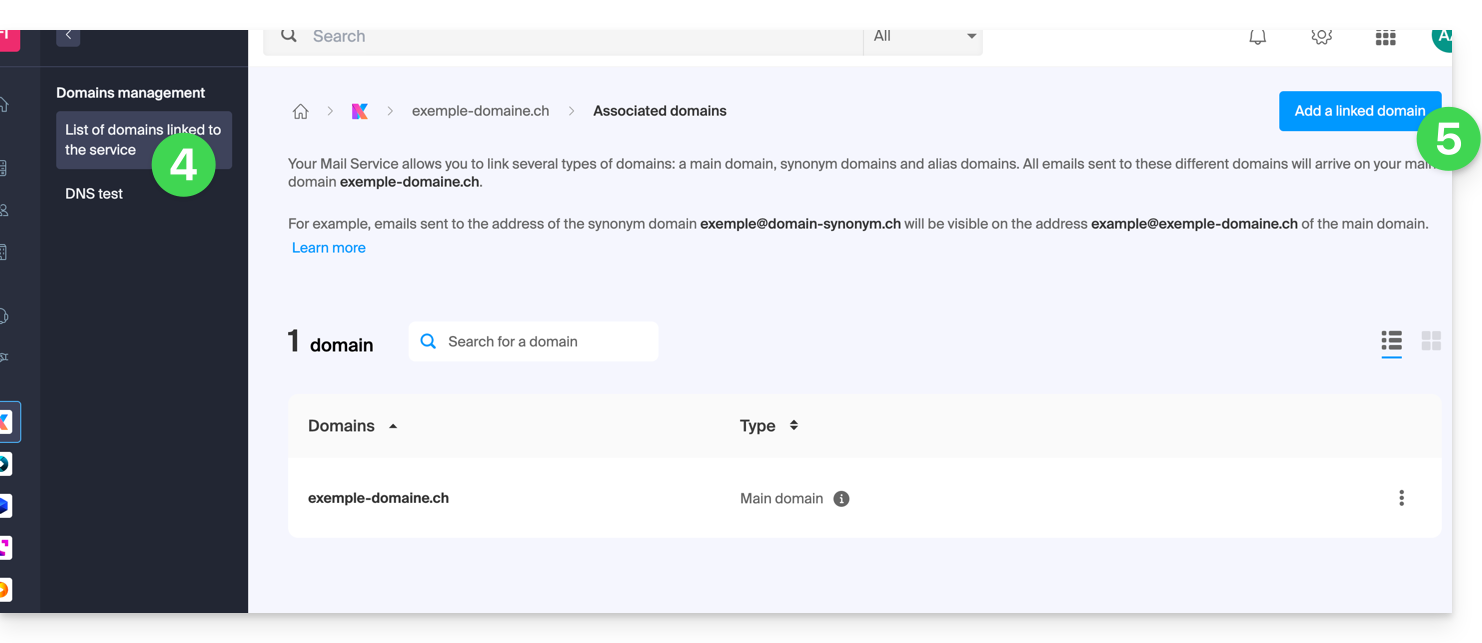
- Click on List of domains linked to the service in the left sidebar.
- Click the blue button Add a linked domain:
- You can…
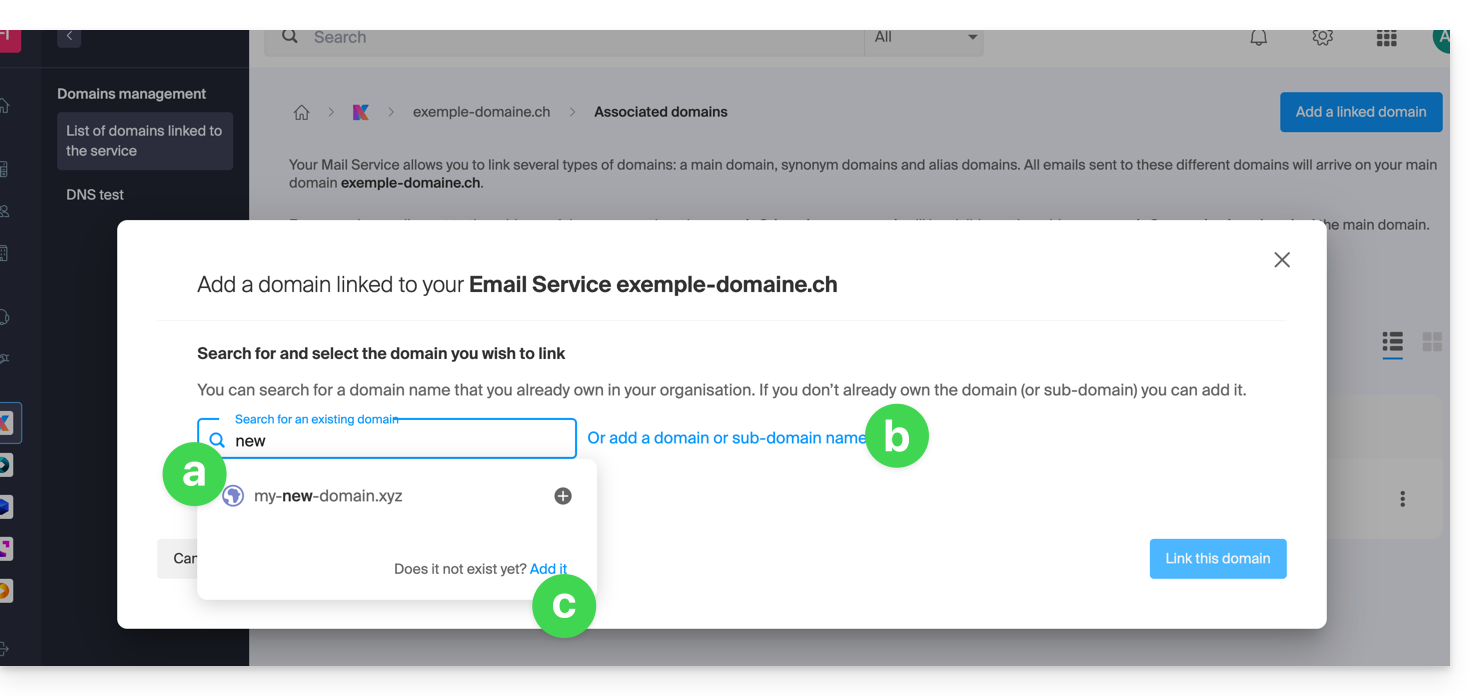
- … Search for an existing domain on the organization to which you are connected; this will link and automatically update the DNS zone of the added domain.
- … Add a domain name or subdomain to manually indicate the domain name or subdomain to use (ideal if the domain name is elsewhere).
- … Buy a new domain name.
a: The domain exists at the Organization level
- Click on the proposed domain name.
- Click on the blue button Link this domain:

It is done, the Mail Service now responds to a second domain name: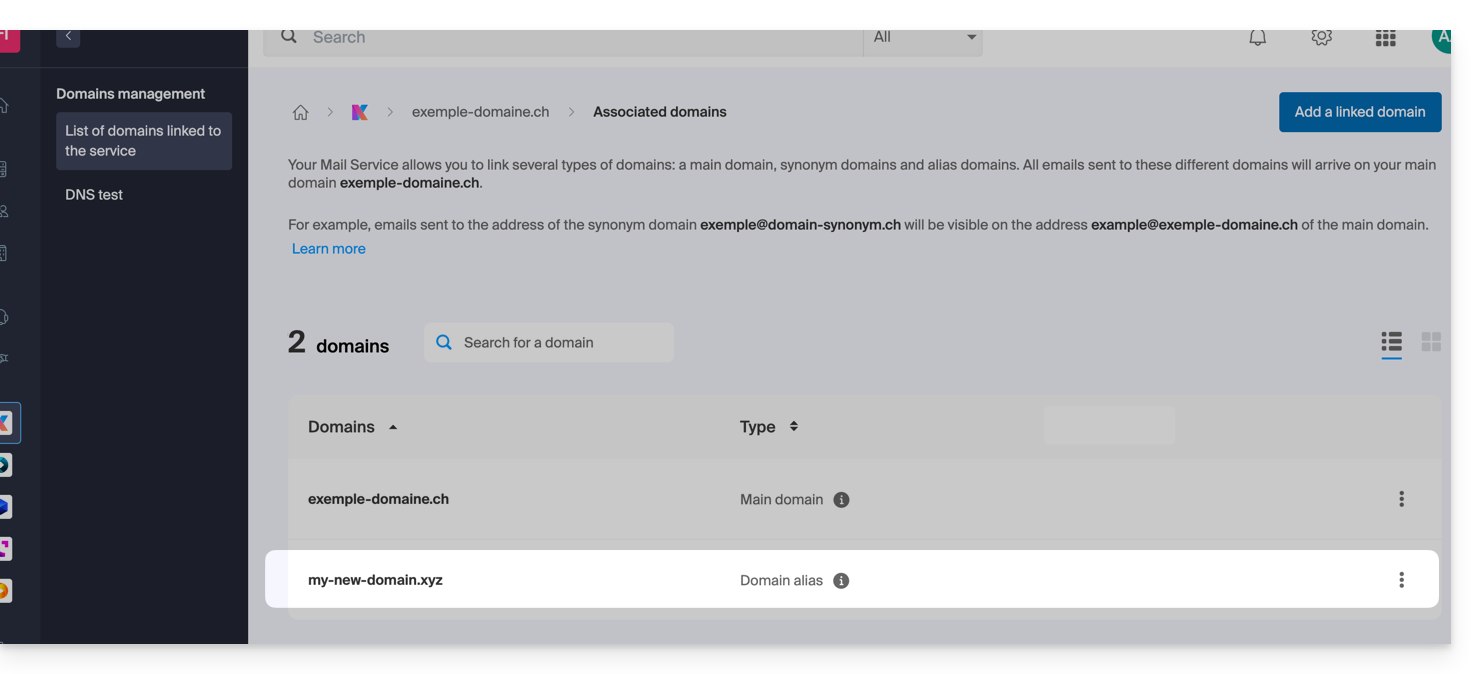
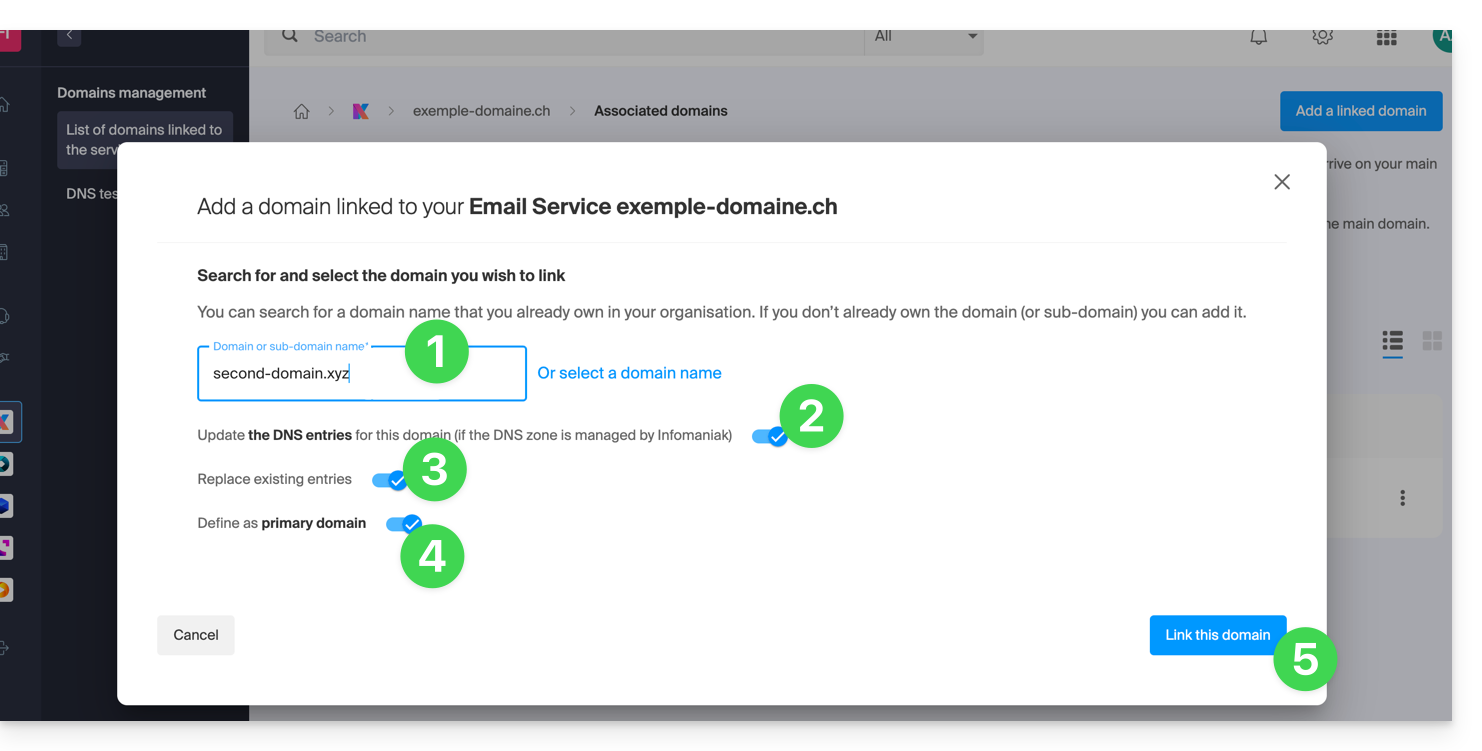
b: The domain exists but elsewhere (other Organization, other Registrar...)
- Enter the domain name to add.
- Activate the DNS entry update (if the domain name situation allows it, the DNS zone of the domain name will be automatically updated).
- If the point 2 above is active then activate the replacement of any existing entries.
- Only reverse the domain name if you want to set this new domain name as the main one (this is mainly an administrative issue rather than a technical one).
- Click on the blue button Link this domain:
Example of use
The email contact@une-super-entreprise-familiale.com is a long email address. The synonym domain contact@usef.com is shorter and easier to remember.
By adding the domain "usef.com" to the Mail Service "une-super-entreprise-familiale.com" you authorize all messages sent to contact@usef.com (the linked domain) to arrive among the messages that the address contact@une-super-entreprise-familiale.com already receives.
Link to this FAQ:
Has this FAQ been helpful?
This guide explains what a Web host like Infomaniak is, and specifies its role, its scope of action, and the limits of its technical support.
Infomaniak, web host since 1996
According to Wikipedia, a Web host is a company that provides Internet hosting for computer systems to individuals or entities who do not wish to do so themselves.
Infomaniak, that’s also:
- … decades of experience in hosting and high-performance online solutions.
- … more than a million users in Switzerland and Europe trusting the management of their critical data.
- … a company certified ISO 27001, 9001, 14001, 50001 and committed to sustainable digital technology.
- … 100% of "Swiss made" technological expertise with data hosted in Switzerland in its own data centers.
- … a rich knowledge base and customer support available to guide you.
Responsibilities and limits of intervention
As a host, Infomaniak installs, secures, and keeps the server infrastructure up to date, evolves its management interfaces (Manager) and assists its customers in the optimal use of the tools provided. Infomaniak strives to offer solutions accessible to all; however, human support for free products is inherently limited to ensure the sustainability of these services.
For security and confidentiality reasons, no assistance will be provided without formal identification of the interlocutor.
Support is exclusively for Organization administrators. End customers or users benefiting from a contract via a Reseller Partner must contact their administrator or dedicated service provider first.
Scope of technical support
Technical assistance does not intervene for:
- Development and programming: debugging sites, correcting source code, personal scripts (PHP, JS, etc.)
- The use and integration of APIs.
- Application maintenance and webmastering: troubleshooting, updating, or managing content for third-party applications (e.g., CMS like WordPress, email clients like Outlook, etc.).
- Local and custom interventions: remote control, configuration of your own hardware, complex manual installations or migrations.
But support will be happy to assist you for:
- The infrastructure and the Manager: resolution of incidents related to the network, hardware, or Infomaniak management interfaces.
- The use of Infomaniak services: clarification of configuration processes and assistance in getting started with our native features.
- Documentation guidance: guiding you to the appropriate technical resources and guides to make you self-sufficient.
A Premium assistance and a migration service are available for more specific needs.
Find external help
For help with the content of your site, its programming, or the advanced organization of your mailboxes, use the Infomaniak tender platform which lists over 1000 verified professionals, or consult the directory.
Link to this FAQ:
Has this FAQ been helpful?
This guide explains how to link a domain name to the Synology NAS that you rent from Infomaniak.
Link an existing domain
To connect your existing domain name to Synology with Infomaniak:
- Click here to access the management of your product on the Infomaniak Manager (need help?).
- Click directly on the name assigned to the Synology concerned.
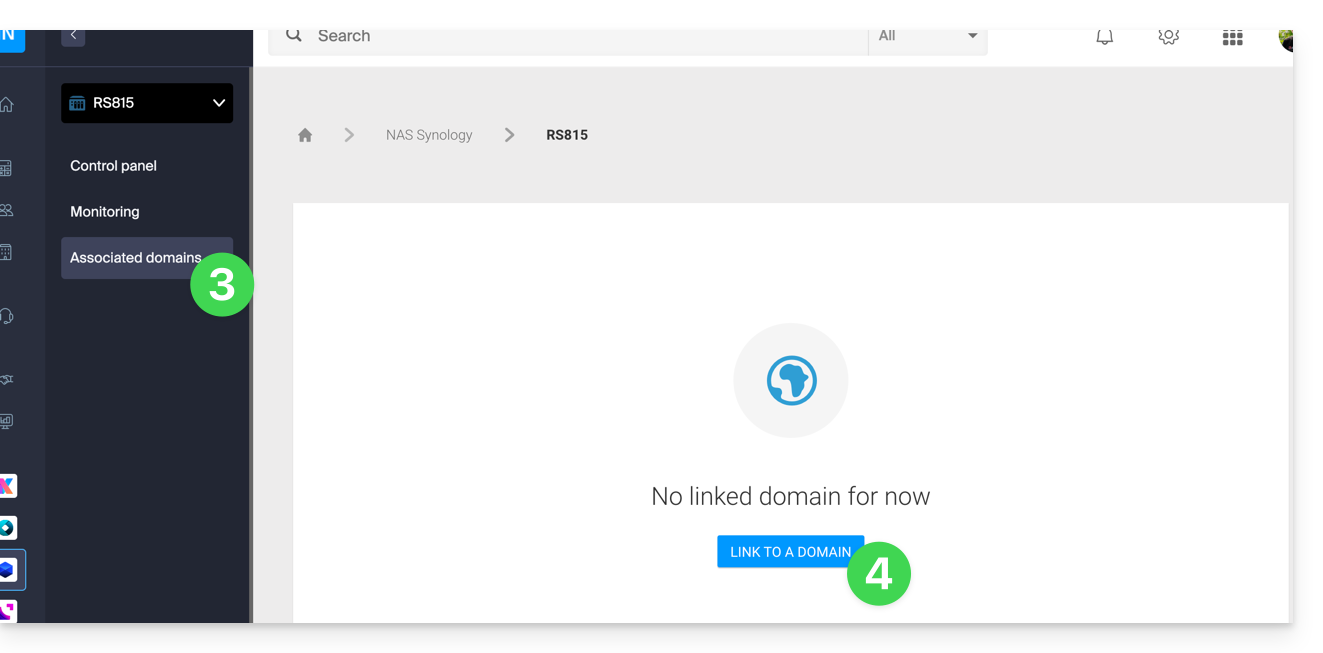
- Click on Linked Domains in the left sidebar menu.
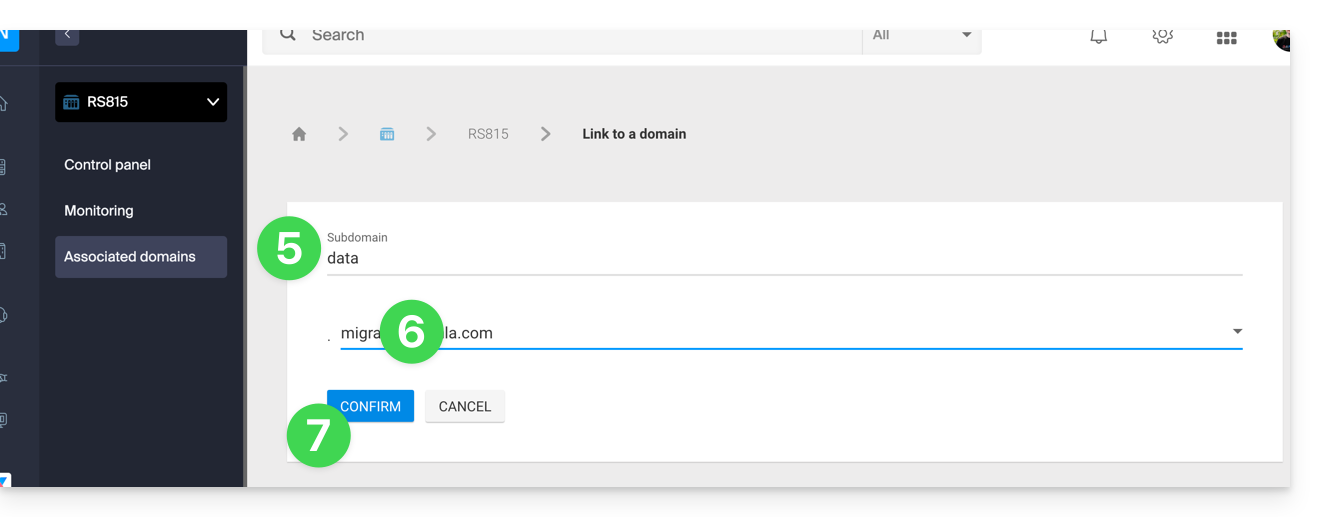
- Click on Link a domain name (in the Associated Domains section):
- Enter any subdomain.
- Choose one of the domain names registered with your Organization.
- Click the button to Confirm:
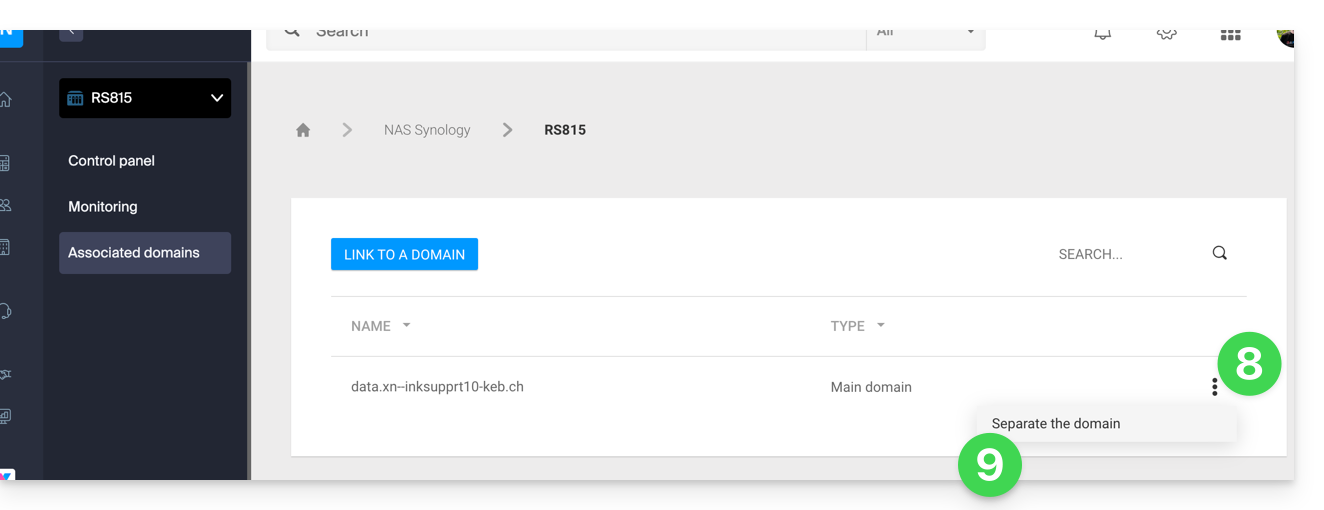
- The domain is linked to the device; to remove the link, click on the action menu ⋮ to the right of the item concerned in the displayed table.
- Click on Unlink the domain and confirm:
Link to this FAQ:
Has this FAQ been helpful?
This guide explains how to add or modify an MX record in the DNS zone (of a domain name) managed in the Infomaniak Manager.
Introduction
- The “MX” record type indicates which provider should manage the email (= the target).
- You should only modify this type of record if you have a specific configuration to implement (for example, a domain name with Infomaniak and an email service with an external provider).
- There can be multiple MX records (so that a second email service can take over in the event of a failure of the first), and in this case, a number indicates the priority of each of them (the lower the number, the higher the priority).
MX for Infomaniak Email
Infomaniak automatically provides the MX record needed to link your domain name and your email, if they are managed within the same organization in the Manager.
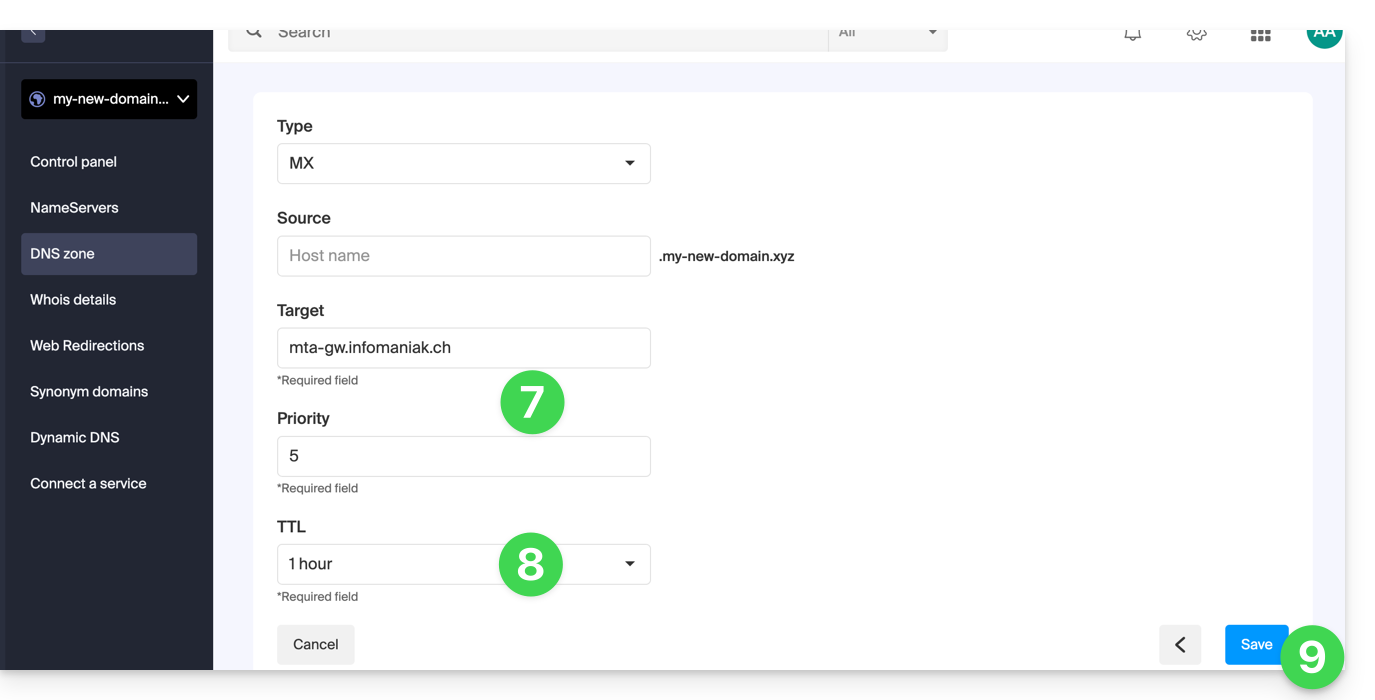
If your configuration requires you to add an MX record yourself to direct email traffic to Infomaniak, then specify the following MX:
mta-gw.infomaniak.ch
with the priority 5.
A correct SPF record is also required for the proper functioning of the Infomaniak email service.
Specific variation for certain providers
On the interface of some providers, such as Gandi, it is necessary to add a period to the end of the MX record: mta-gw.infomaniak.ch.
Modify the DNS zone
In order to manage this type of record in a DNS zone:
- Click here to access your domain management in the Infomaniak Manager (need help?).
- Click directly on the name assigned to the domain in question.
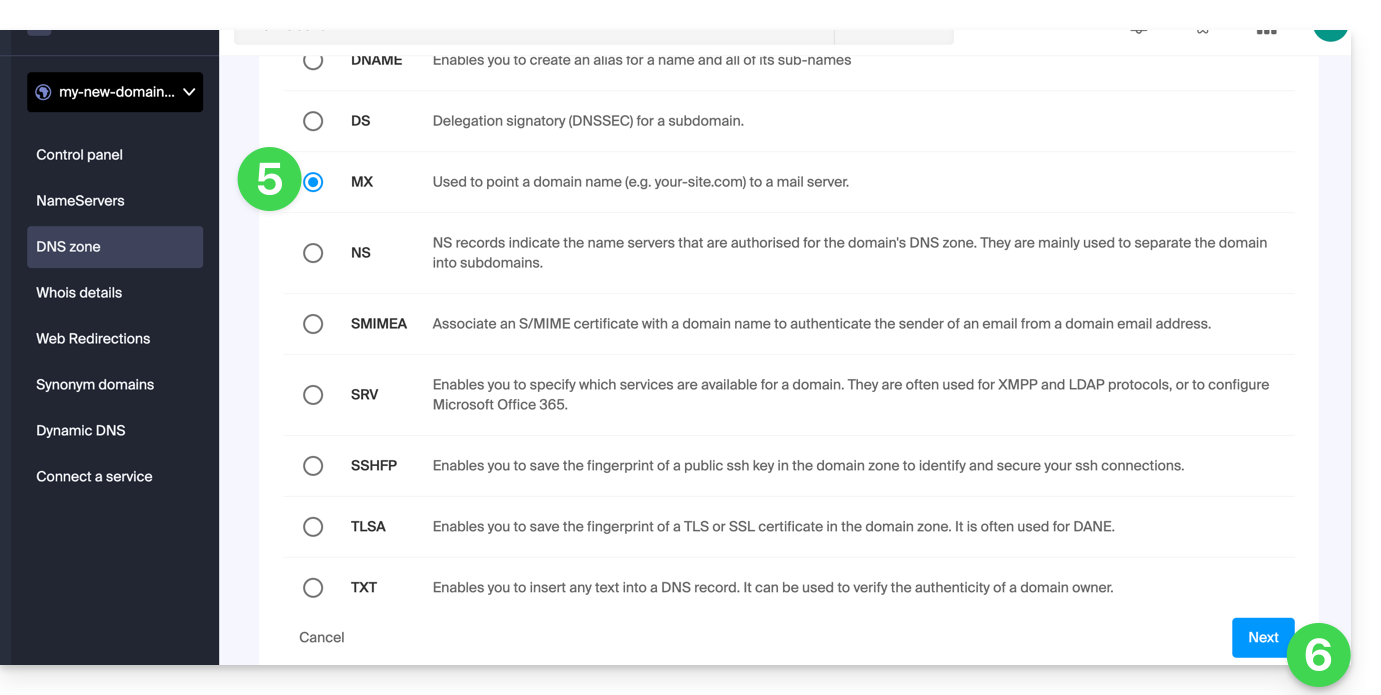
- Click on DNS Zone in the left-hand menu.
- Click the button to add a record:
- Click the MX radio button to add a record.
- Click the Next button:
- Enter the MX values required for your DNS zone.
- Leave the default value for the TTL.
- Click the Save button:
Once added, it will be visible in the DNS zone record table: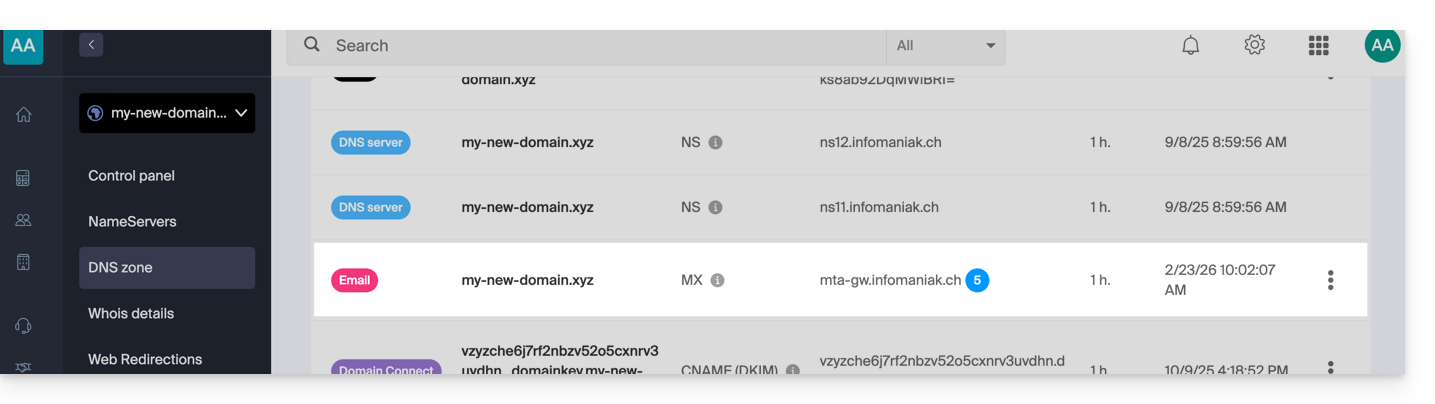
Learn more
Link to this FAQ:
Has this FAQ been helpful?
This guide explains how to convert a free Web Starter offer to a more comprehensive and enhanced paid offer, such as Shared Web Hosting or Web Hosting on a Cloud Server.
Preamble
- By purchasing a domain name from Infomaniak, you can add 1 free email address and a basic 10 MB Web space.
- In a few clicks, it is possible to upgrade this offer to benefit from an enhanced experience.
Modify the Starter Offer - Basic Web Page
To upgrade this free offer:
- Click here to access the management of your hosting on the Infomaniak Manager (need help?).
- Click on the action menu ⋮ located to the right of the item concerned.
- Click on Modify the Offer:
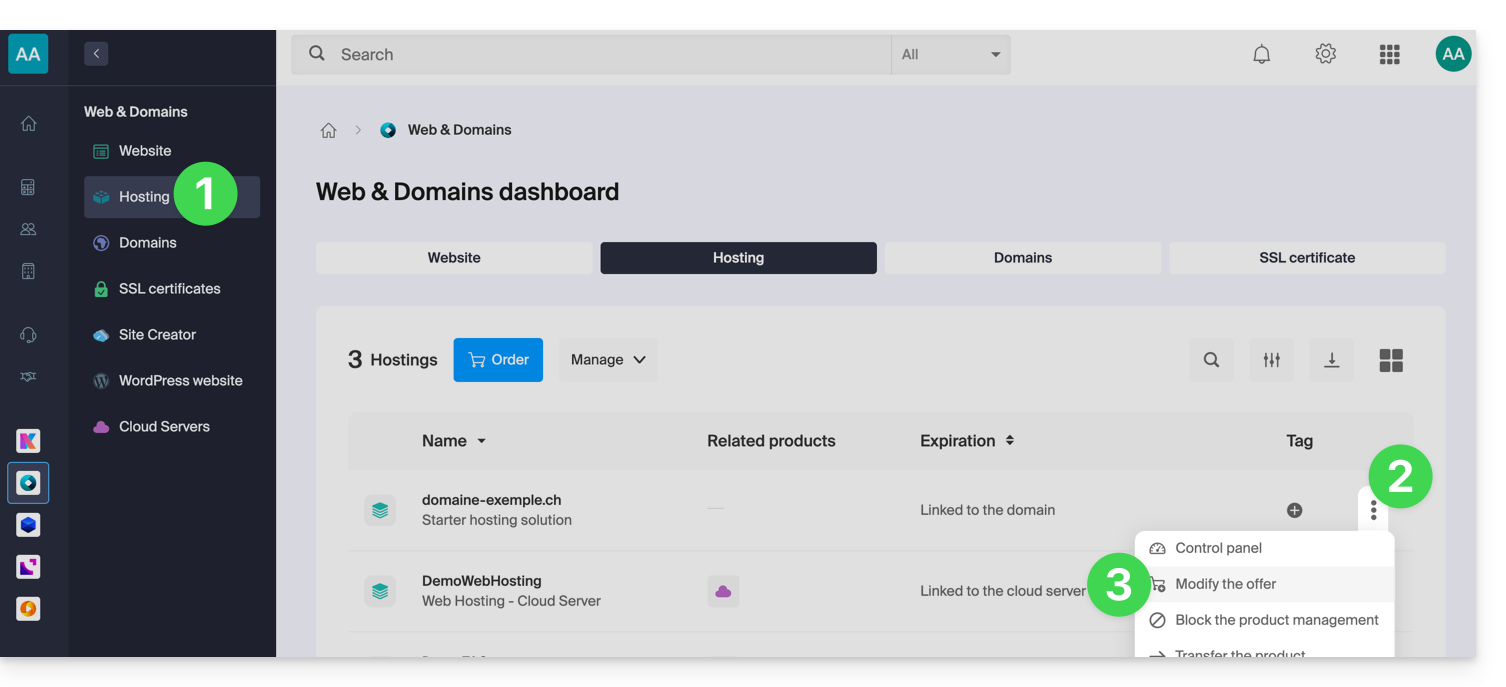
- Follow the wizard to choose the new type of hosting, pay to complete the offer change.
Link to this FAQ:
Has this FAQ been helpful?
This guide explains how to upgrade a free Mail Starter plan to a more comprehensive and enhanced plan, such as the free or paid kSuite.
Introduction
- When you purchase a domain name from Infomaniak, you get 1 free email address and 10 MB of basic web space: this is the Starter plan.
- With a few clicks, you can upgrade these plans to unlock the limits and enjoy an enhanced experience.
- To help you identify the Mail plan that best suits your needs, please refer to this other guide.
Upgrade the Starter plan - Free Mail service
To upgrade the Starter plan:
- Click here to access the management of your product in the Infomaniak Manager (need help?).
- Click on the action menu ⋮ located to the right of the item in question.
- Click on Modify plan:
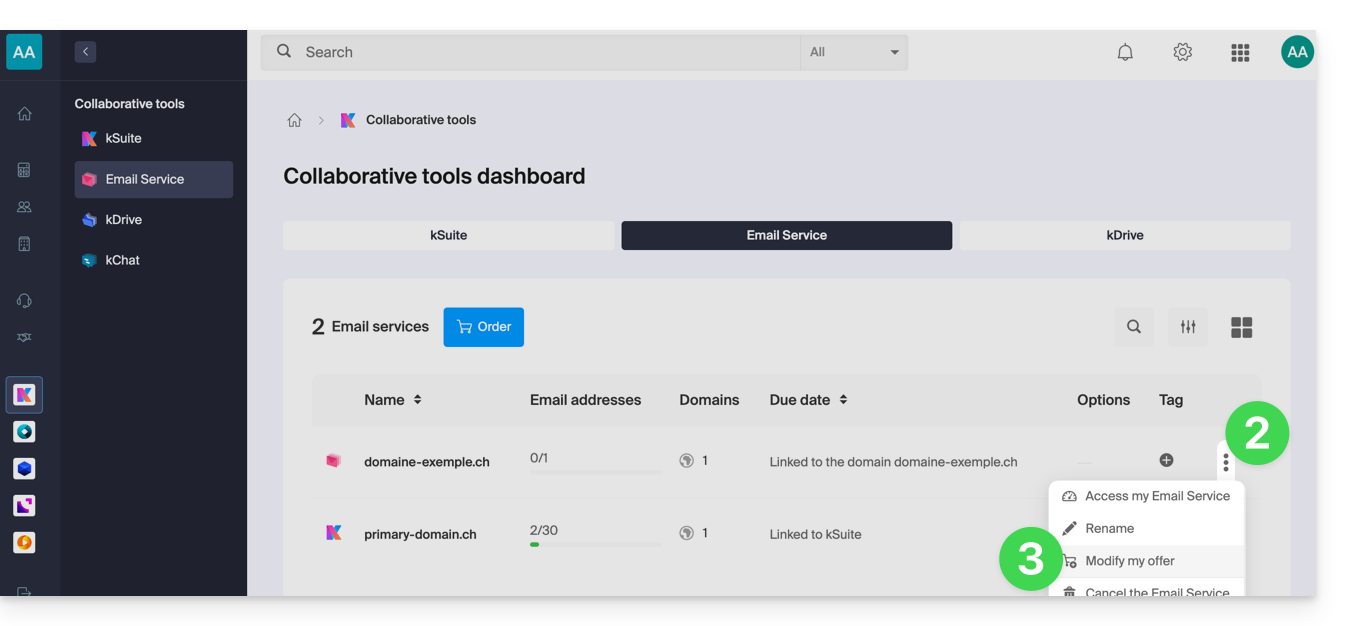
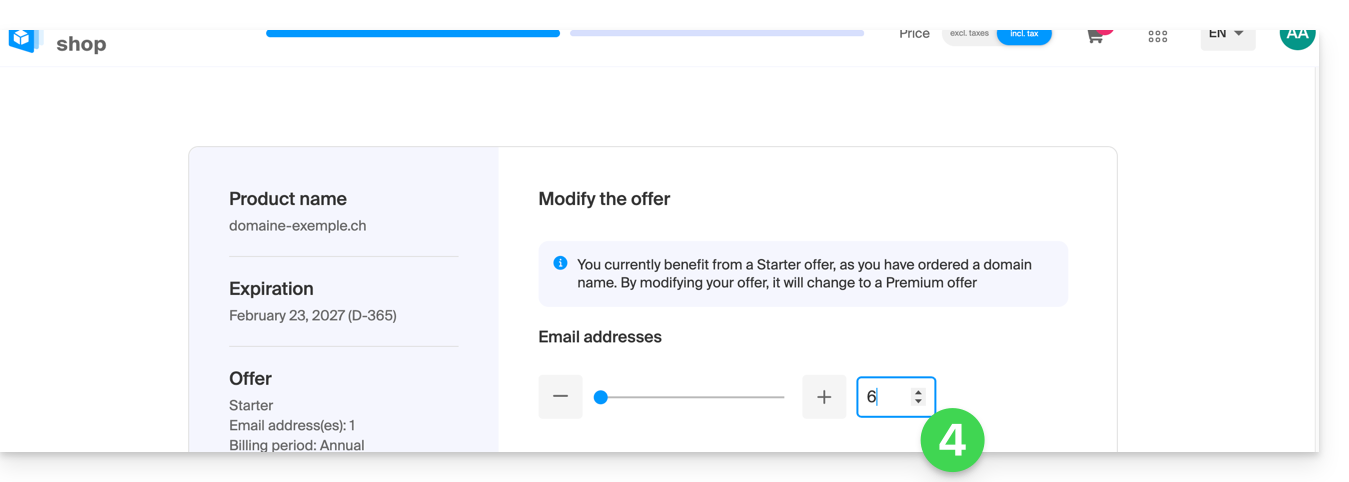
- Adjust, if necessary, the number of email addresses to add to the Mail service using the order wizard, which will guide you through the plan upgrade process:
Link to this FAQ:
Has this FAQ been helpful?
This guide introduces the DNS Diagnostic tool, which allows you to verify that the relationships between…
- DOMAIN NAME at Infomaniak
and
- MAIL SERVICE at Infomaniak
… are correct, so that the Mail traffic is directed to the right place.
Preamble
- To verify, the tool checks the MX, SPF records, etc.
- You will thus be able to detect and correct certain Mail issues, especially if they are related to DNS (technical information that, in short, determines where such and such Mail traffic should be directed) by acting at the level of your domain.
- Automatic correction is only possible when the domain name is present in the same Organization as the product to which it must be attached.
- If this is not the case, then the correction must be done manually.
Diagnose a DNS problem
To access the DNS diagnostic of your domain name:
- Click here to access the management of your Mail Service on the Infomaniak Manager (need help?).
- Click directly on the name assigned to the product concerned:
- Click on Domain Management in the left sidebar:
- Click on DNS Diagnostic in the left sidebar.
- Click the button if necessary to refresh the information that should be green.
- If DNS issues are detected, a red display on the dashboard indicates it:
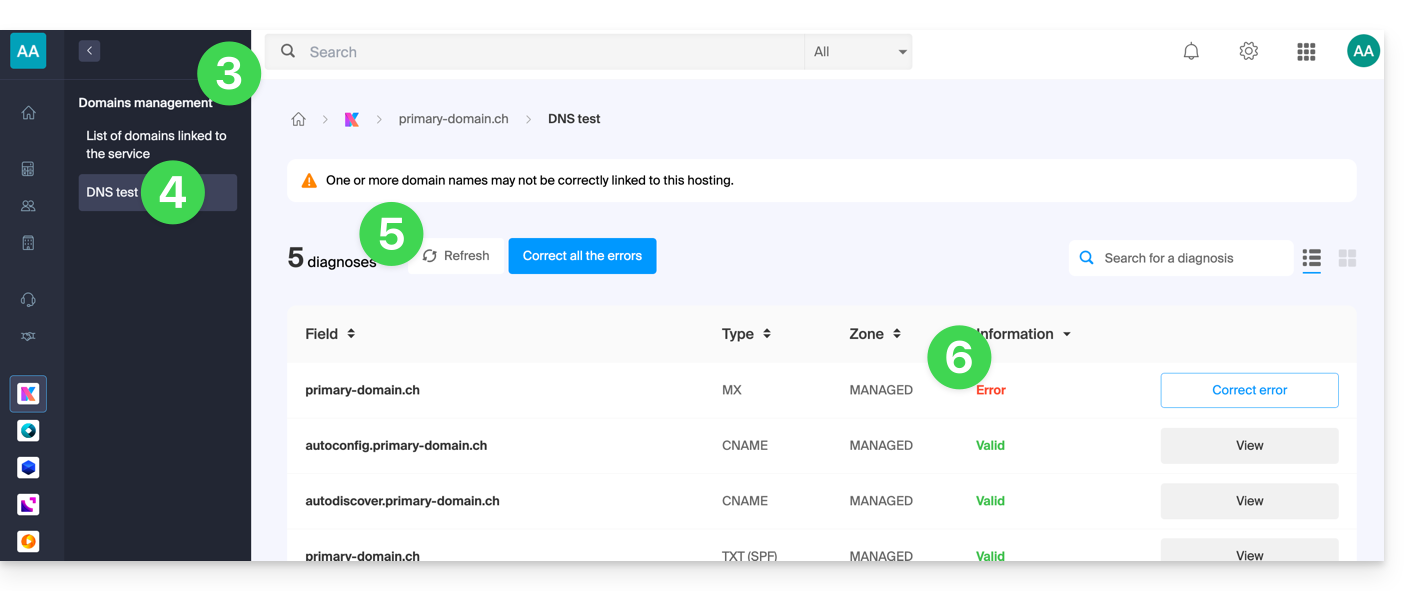
- Correct each error individually by clicking on the button located to the right of the item concerned…
- … or all errors at once with the button located above the dashboard
Refer to this other guide regarding the same automatic verification process but for Web Hosting.
And if necessary, refer to the messaging security diagnostic.
Link to this FAQ:
Has this FAQ been helpful?
This guide details the administrative steps to transfer the management of a domain with the extension .de to another registrar than Infomaniak.
Transfer a .de domain elsewhere
As long as the administrative contact mentioned in the WHOIS of the domain to be transferred does not contain an address located in Germany, it will be impossible to request the transfer code. Refer to this other guide to modify the details.
Otherwise, you can delete the domain name and in this case, you must…
- … either contact Infomaniak support (by entering the email address mentioned in the WHOIS details) and request the deletion
- ... or wait for the domain to expire, after which it will be transferred to DENIC, whom you can contact to request the final deletion.
Link to this FAQ:
Has this FAQ been helpful?
This guide explains how to replace, within an Infomaniak Web Hosting, the address of a site currently a subdomain (https://dev.domain.xyz) with the main domain (https://domain.xyz).
Preamble
- Operations in brief:
- We start with a site created and accessible via the main domain URL
dev.domain.xyz. - We add an alias
domain.xyzto it. - We reverse the 2 types (the main domain becomes an alias and the alias becomes the main domain).
- We remove the old name
dev.domain.xyz.
- We start with a site created and accessible via the main domain URL
- Note that the site's location remains in the original folder on the server; the name of this location may be of the form
/sites/dev.domain.xyzbut this has absolutely no impact on the production site. - Also refer to the last chapter of this other guide.
Reverse a linked domain
Here are the detailed operations to go from a site with a subdomain type address to a direct address (here dev.domaine-exemple.ch becomes domaine-exemple.ch):
- Click here to access the management of your site on the Infomaniak Manager (need help?).
- Click directly on the name assigned to the site concerned:
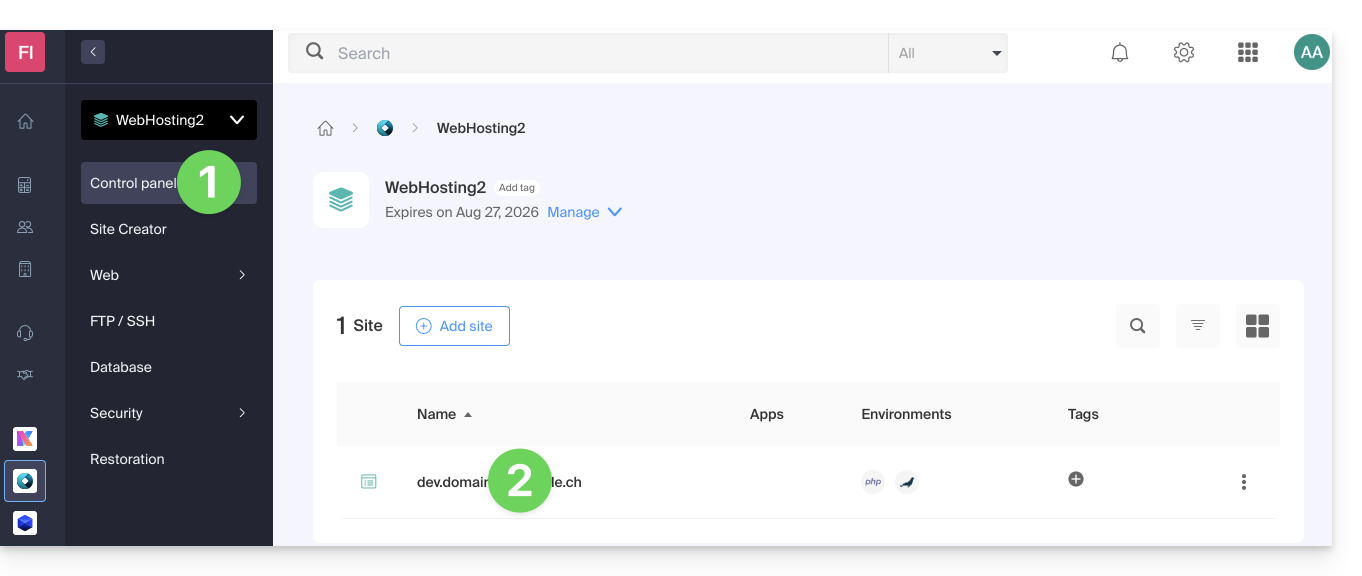
- Then click on the chevron to expand the Domains section of this site:
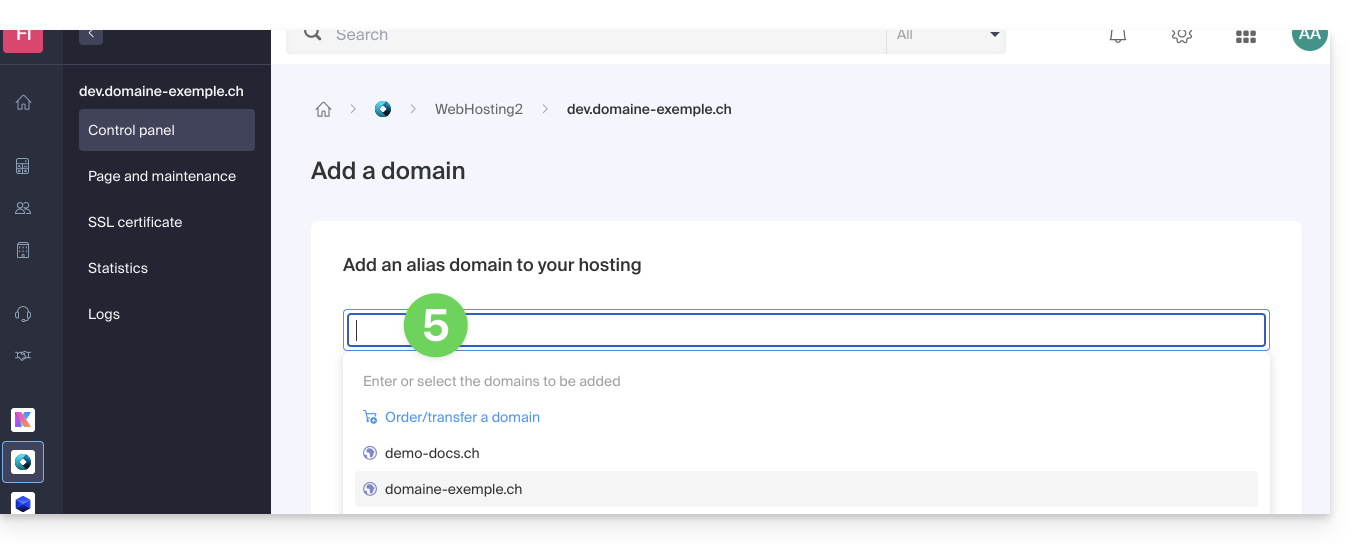
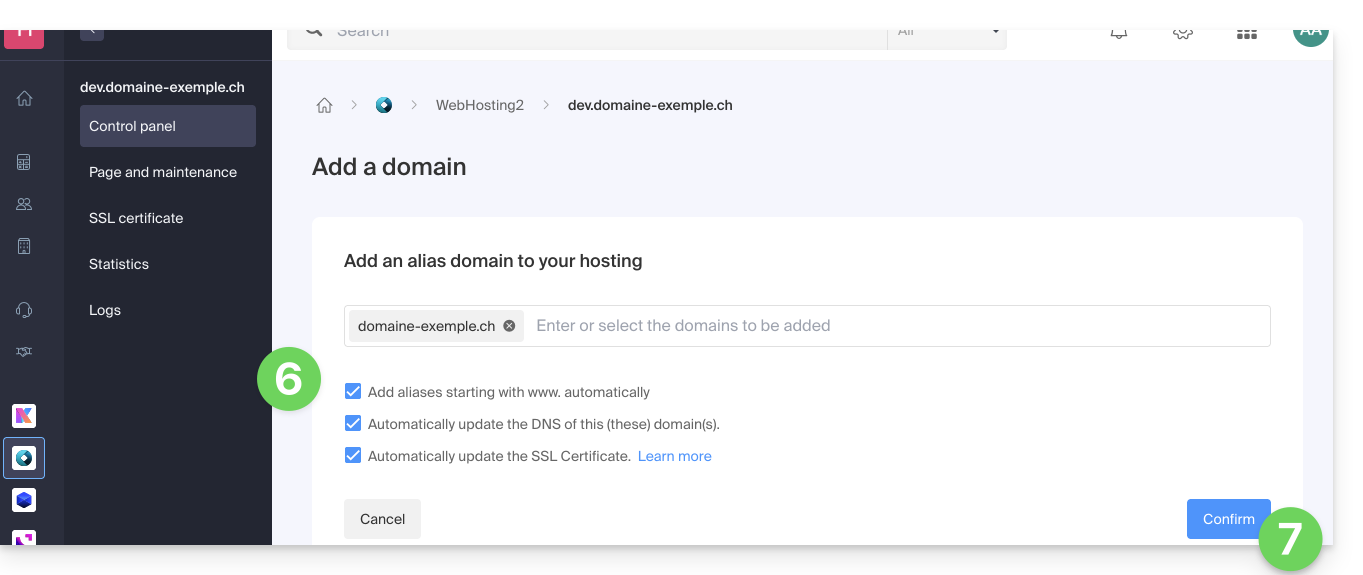
- Click on the Add a domain button:

- Add the desired new name (if the domain name to be added is under the same Organization, it will be suggested in the list, otherwise enter its spelling):
- Enable or disable the checkboxes:
- If the added domain is not in the form of a subdomain, it is possible to request to automatically add the
wwwversion of the domain. - Automatically update (if possible) the DNS records of the added domains.
- Automatically update the related SSL certificates (if possible).
- If the added domain is not in the form of a subdomain, it is possible to request to automatically add the
- Click the button to Confirm and wait:
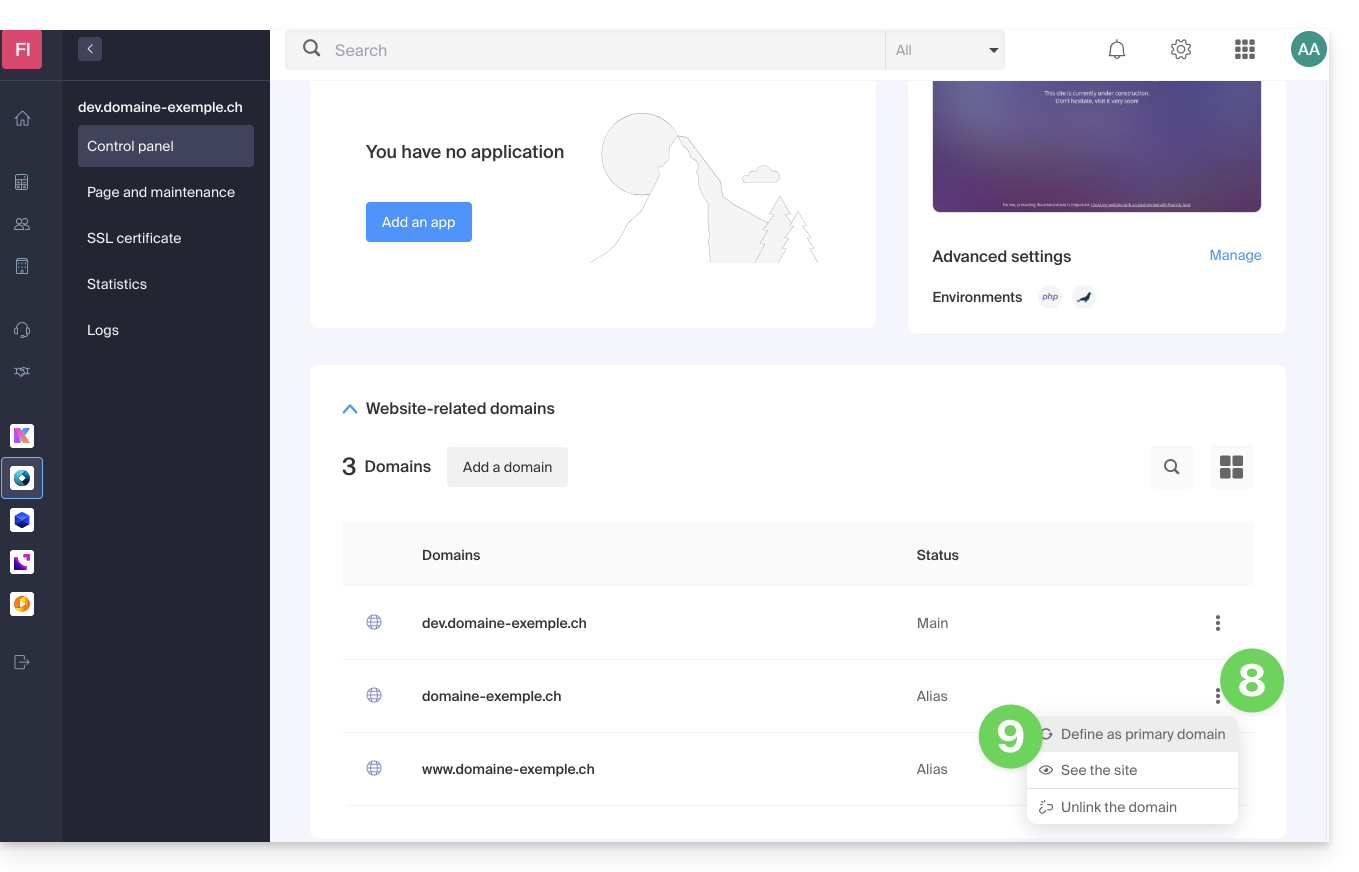
- Once the addition is complete, click on the action menu ⋮ located to the right of the domain that has just been added and that you wish to set as the main domain:
- Choose to set the item as the main domain:
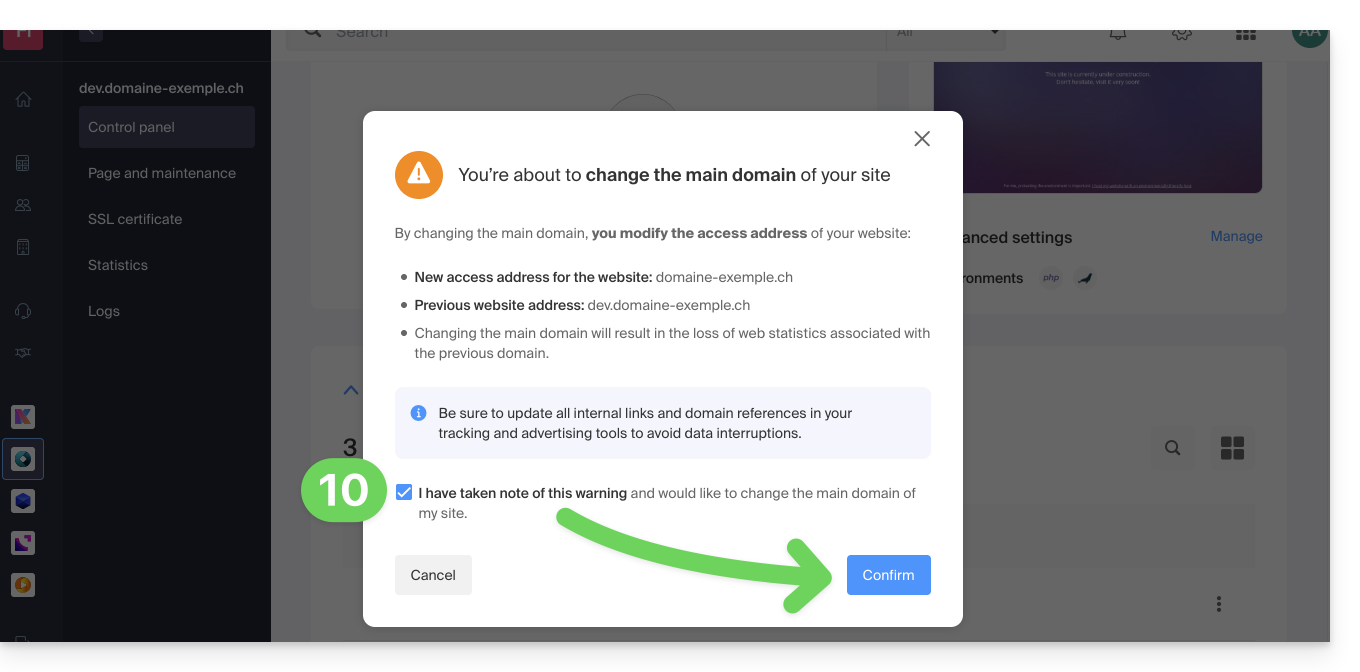
- Confirm the operation to proceed with the domain reversal:
Link to this FAQ:
Has this FAQ been helpful?
This guide explains how to set up DNSSEC with Cloudflare for a domain registered with Infomaniak.
Prerequisites
- The DNS zone of the domain must be managed by Cloudflare.
Configure DNSSEC with Cloudflare
To do this:
- Click here to access the Cloudflare console.
- Go to the DNS tab.
- Click on Enable DNSSEC.
- Keep the following information handy:
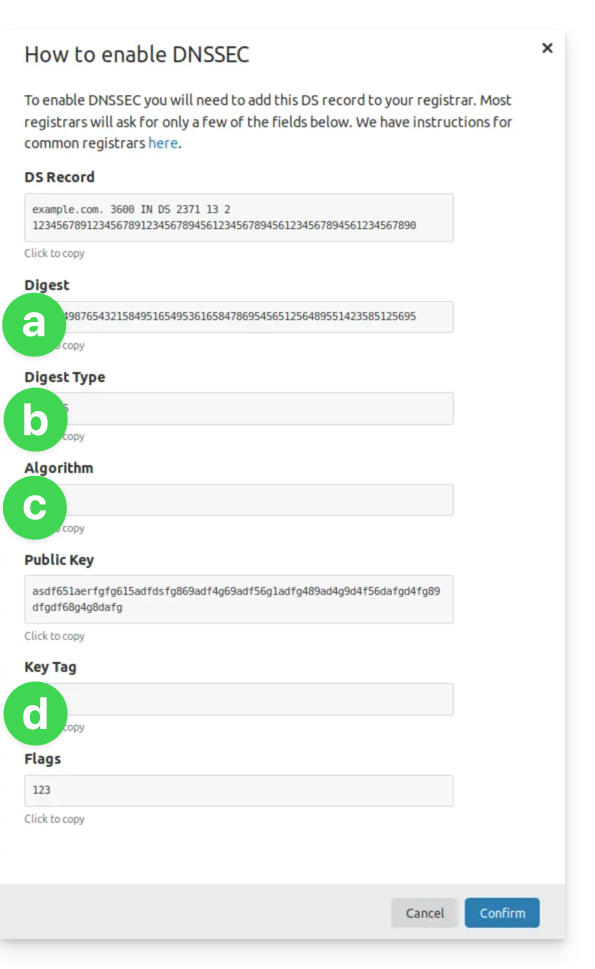
(see points 8 & 10 below)- The details under a will go under HASH
- The details under b will go under HASH TYPE
- The details under c will go under ALGORITHM
- The details under d will go under KEY
- Click here to access the management of your domain on the Infomaniak Manager.
- Click directly on the name assigned to the domain in question.
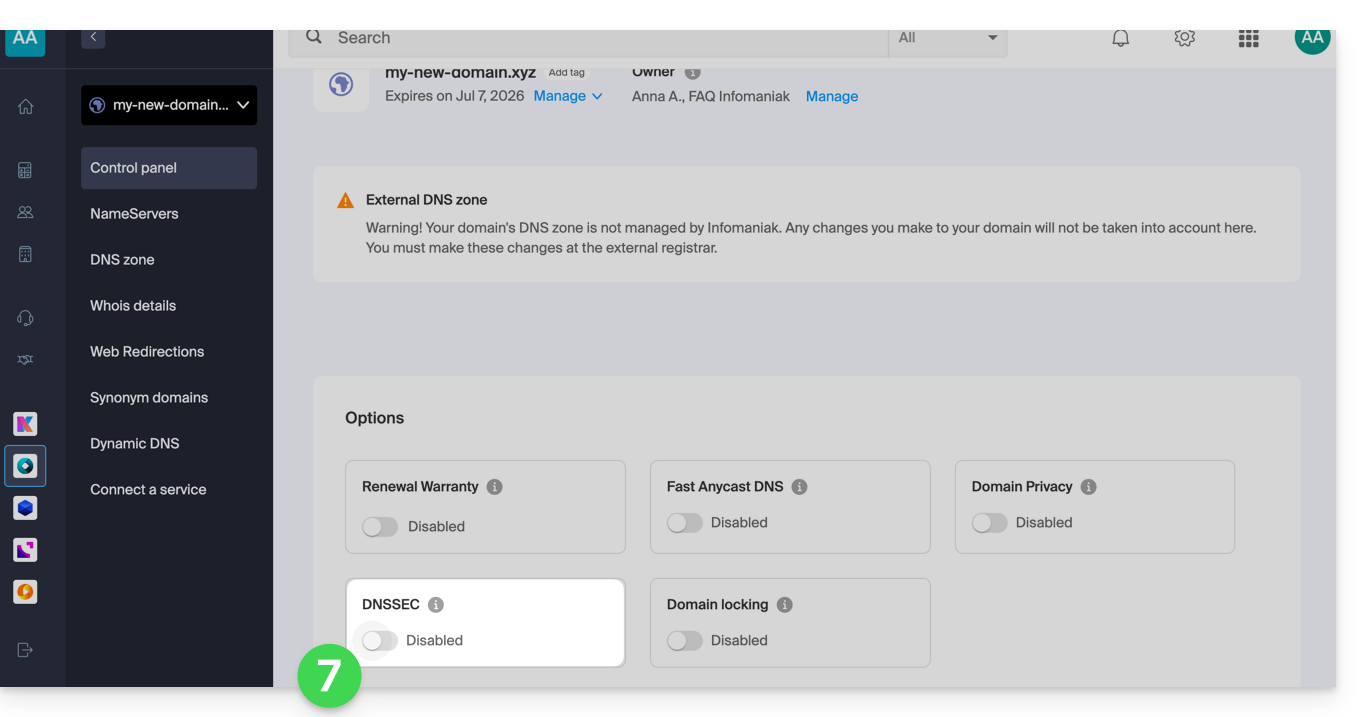
- Activate DNSSEC from the Dashboard:
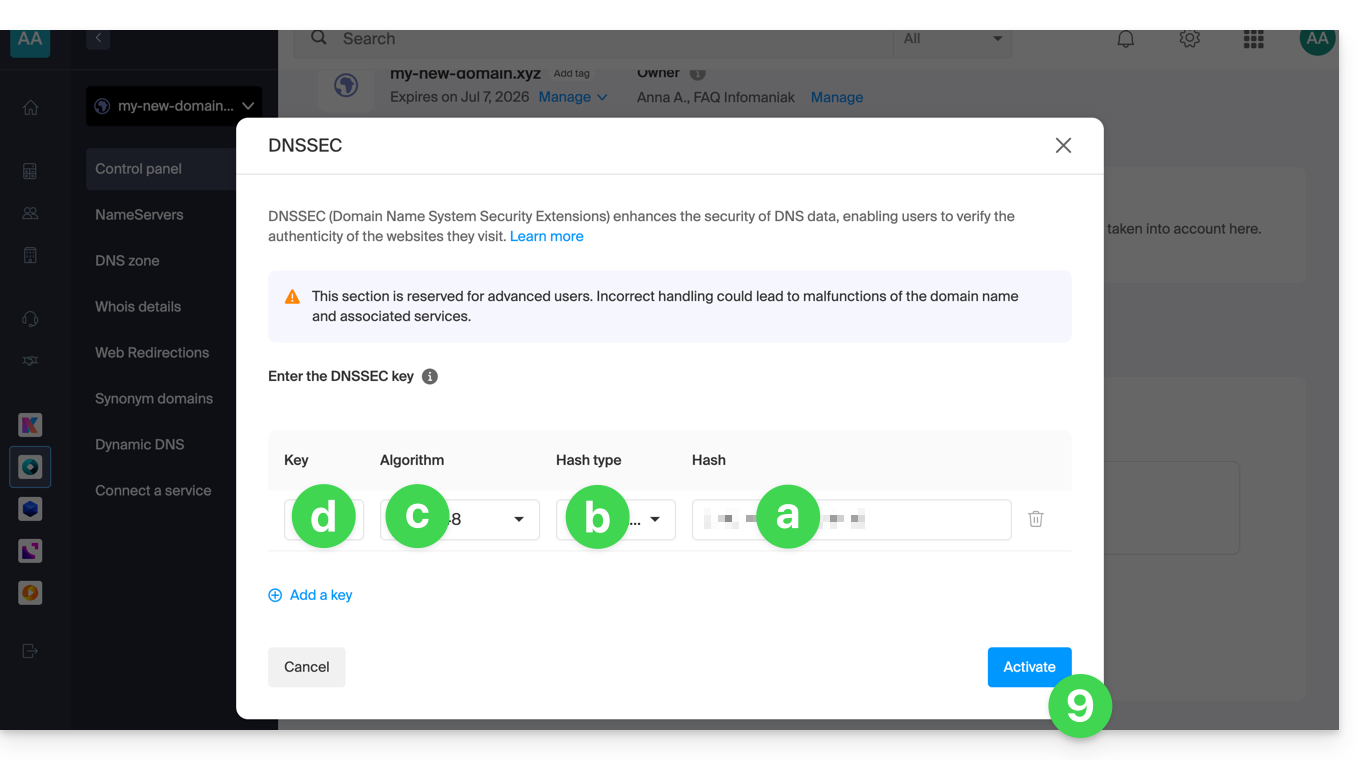
- On the window that appears, enter the requested information with the data provided by Cloudflare (see point 4 above):
- Hash = Digest
- Hash Type = Digest Type
- Algorithm = Algorithm
- Key = Key Tag
- Click on Activate:
- In the case of a domain with extension
.eu, the necessary details may be significantly different (see point 4 above):- The details under FLAGS will go under FLAGS
- The details under PUBLIC KEY will go under PUBLIC KEY
Link to this FAQ:
Has this FAQ been helpful?
This guide explains how to add or modify one or more SPF records in a DNS zone (of a domain name) managed on the Infomaniak Manager.
Preamble
- If your domain name is registered with Infomaniak, your email is managed by Infomaniak, but your website is hosted with another provider (e.g., Wix), you are probably managing the DNS zone (and therefore the SPF) with this other provider: refer to this other guide on this topic.
Understanding SPF records
The SPF (Sender Policy Framework) record type is a standard for verifying the domain name of the sender of an email and aims to reduce SPAM. It is used to indicate which server is authorized or not to send emails for a domain. If the SPF fails for an email, it means that the email was not sent from a server/IP address authorized by the administrator of the sending domain. The email is then considered as spam.
Strict SPF -all: rejection of unauthorized emails
Infomaniak automatically installs this type of record when creating a Mail Service on your domain (strict SPF):
v=spf1 include:spf.infomaniak.ch -allThus, the recipient server of the email you send will evaluate that any email not coming from Infomaniak servers will be rejected. This prevents malicious individuals from impersonating email addresses from your domain.
Flexible SPF ?all: tolerance for certain emails
You can decide to modify the SPF for a more flexible model:
v=spf1 include:spf.infomaniak.ch ?allIn this case, the recipient server of the email you send will evaluate, according to its own rules, whether it accepts emails not coming from Infomaniak servers.
In summary:
?: the receiving server accepts the message even if the sender is not listed in the SPF~: the receiving server generally accepts the message if it is not listed in the SPF but identifies it as suspicious-: the receiving server rejects the message if it is not listed in the SPF (recommended)
Adding an SPF via a TXT record
There are 2 ways to manage SPFs.
If you have a Mail Service with Infomaniak, the simplest way is to go to the Global Security tool to manage SPFs: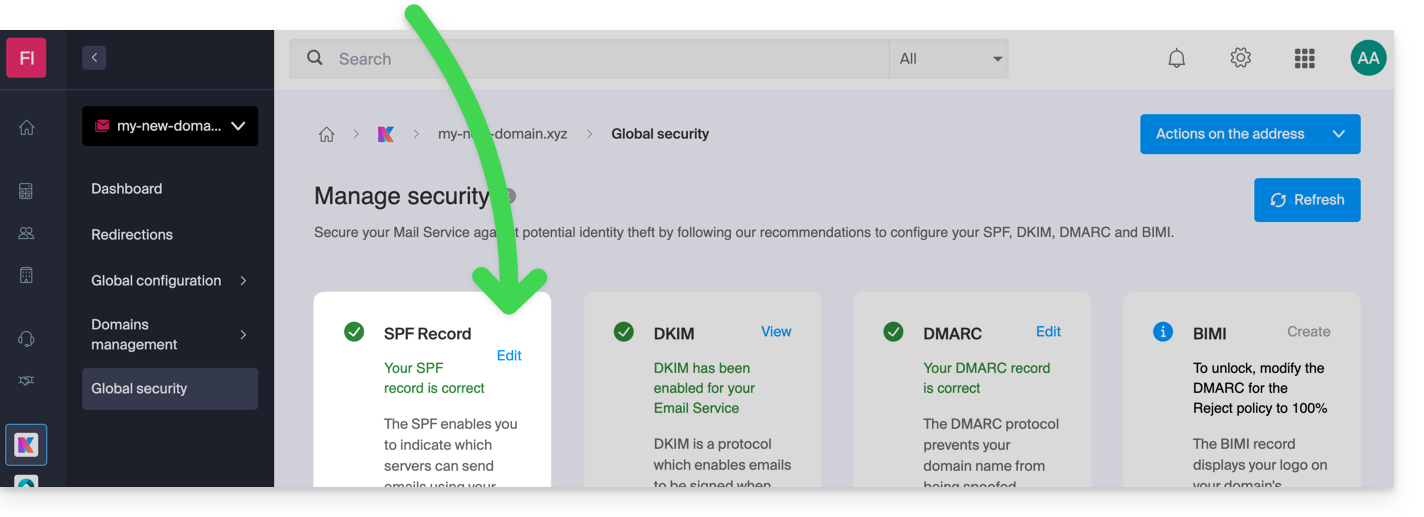
However, since the SPF record is a TXT type DNS record, you can also manage it from the DNS zone of the domain name:
- Click here to access the management of your domain on the Infomaniak Manager (need help?).
- Click directly on the name assigned to the domain in question.
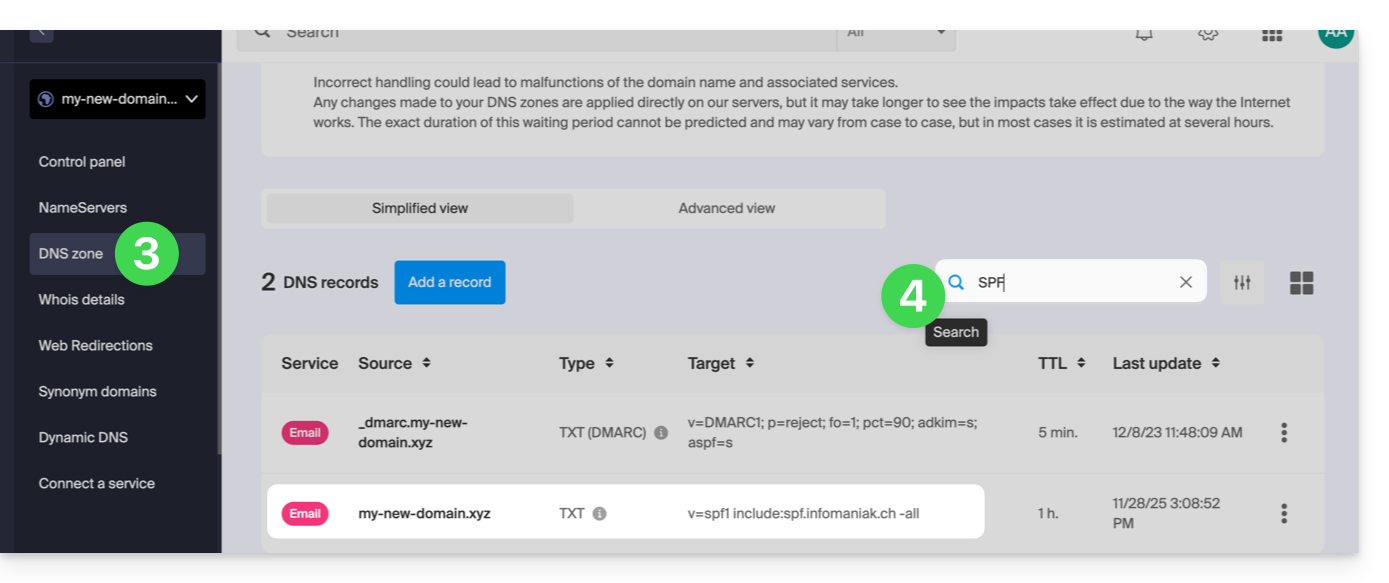
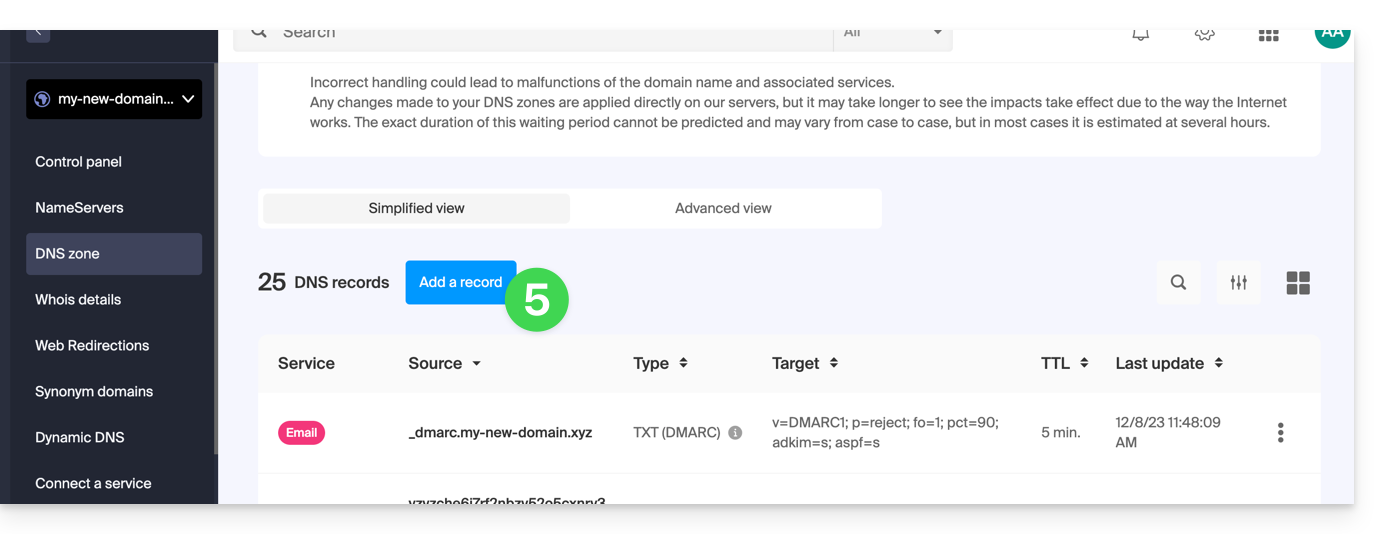
- Click on DNS Zone in the left sidebar menu.
- Check in the table that there is not already a TXT record with a value mentioning SPF as here:
- Click the button to add a record (you will get an error if you try to add a TXT record with an SPF value when one already exists in the zone):
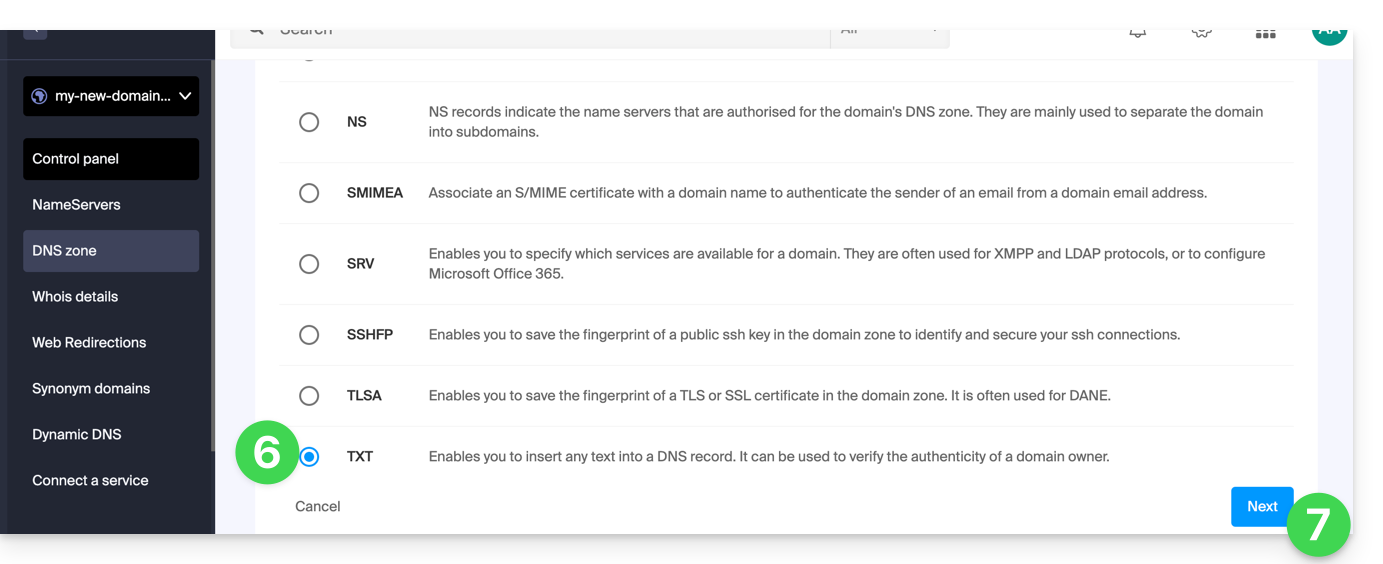
- Click the radio button TXT to add a record.
- Click the button Next:
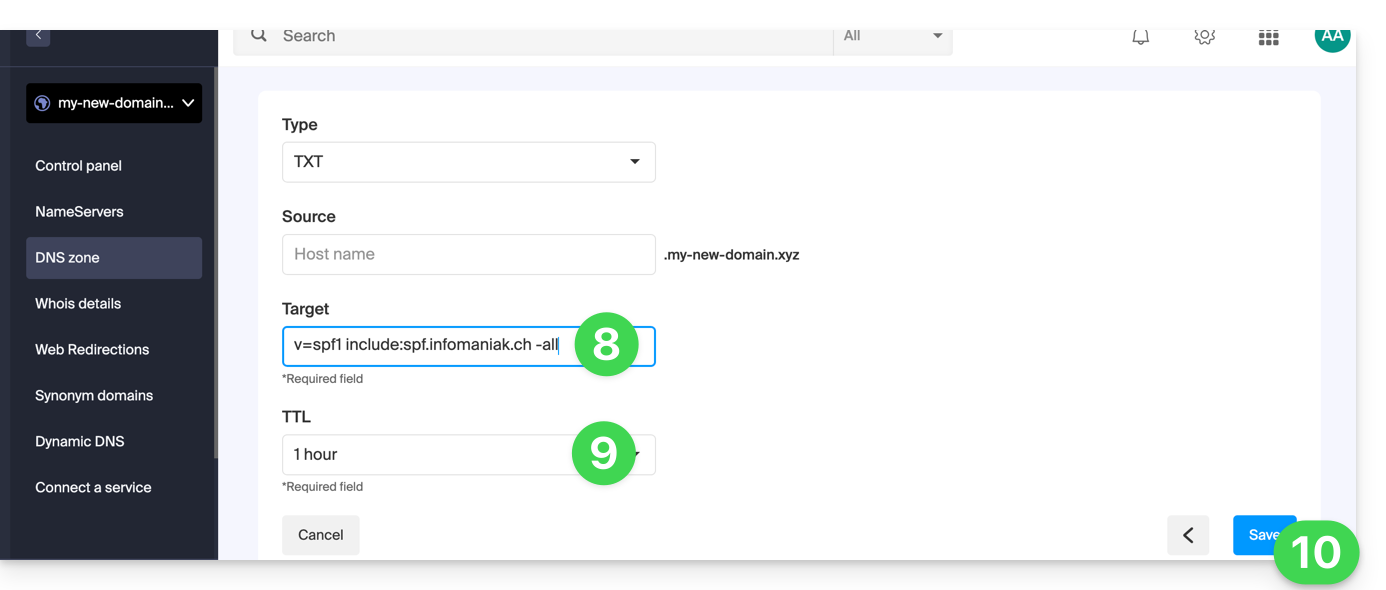
- Enter the SPF value required for your DNS zone.
- Leave the default value for TTL.
- Click the button Save:
Add multiple SPFs
If you use other mail providers in addition to Infomaniak, you need to obtain their SPF and then merge it with Infomaniak's according to a specific syntax.
Having multiple distinct SPF records will cause errors. It is essential to group multiple SPFs into the same TXT!
Example of 3 SPFs to merge:
- That of Infomaniak:
v=spf1 include:spf.infomaniak.ch -all - Those of 2 secondary providers:
v=spf1 include:the-second-domain.xyz ?allv=spf1 include:the-other-domain.xyz ~all
...the final SPF to be inserted into your DNS zone should be in the form:
v=spf1 include:spf.infomaniak.ch include:the-second-domain.xyz include:the-other-domain.xyz -allDelete any other SPF entry from the DNS zone of your domain! Any DNS addition/modification can take up to 48 hours to propagate.
Limits on the number of SPFs
Multiple SPFs are limited to a maximum of 10 inclusions.
The Infomaniak SPF usually already includes 4 inclusions:
include:relay.mail.infomaniak.chinclude:app.mail.infomaniak.chinclude:newsletter.infomaniak.cominclude:amazonses.com
Check the SPF record(s)
The Global Security tool on the Infomaniak Manager allows you to easily check and correct any problematic records you may have.
If you encounter any issues, it is recommended to analyze your domain name on MxToolbox to check if your SPF contains syntax errors, too many inclusions, or any other issues that could lead to an error: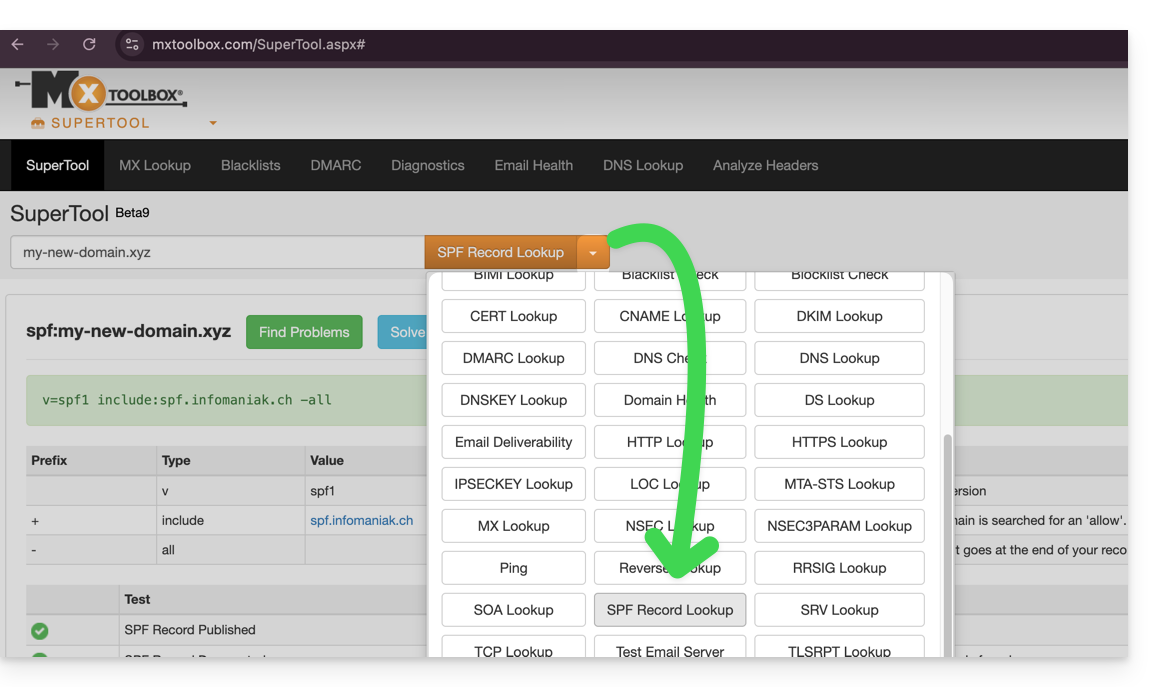
… or directly at the address https://mxtoolbox.com/spf.aspx.
Link to this FAQ:
Has this FAQ been helpful?