Knowledge base
1000 FAQs, 500 tutorials and instructional videos. Here, there are only solutions!
This guide explains how to troubleshoot potential issues during a kMeet meeting, Infomaniak's secure, unlimited, and free video conferencing service.
For a problem specific to the video, refer to this other guide; for the audio, this other guide. In all cases, it is recommended to use the desktop app kMeet (desktop application on macOS / Windows / Linux) if a problem occurs with the Infomaniak web app kMeet (online service kmeet.infomaniak.com) or vice versa.
Unable to see or hear the other party
If the conference has started, and the other party has turned on their webcam and microphone, but you still cannot see or hear them, ask them to check if there is a firewall on their computer or company network.
A firewall can allow solutions like Google Meet or Microsoft Teams without necessarily allowing kMeet traffic.
In your firewall settings, you need to allow the following:
- UDP protocol:
443. - For the turn server (recommended), add TCP port
443. - Authorize the following IP addresses:
185.125.24.0/24(TCP)185.125.24.0/24(UDP)
You can also switch connections (e.g., from Wi-Fi to 4G/5G) to check if a firewall is causing the synchronization issues.
Screen sharing unavailable
When using the kMeet video conferencing solution, if the button to share your screen is not available and/or remains grayed out, check the security settings on your computer/operating system regarding…
- … the kMeet application
- … the browser (if you are using kMeet directly online without using the application):
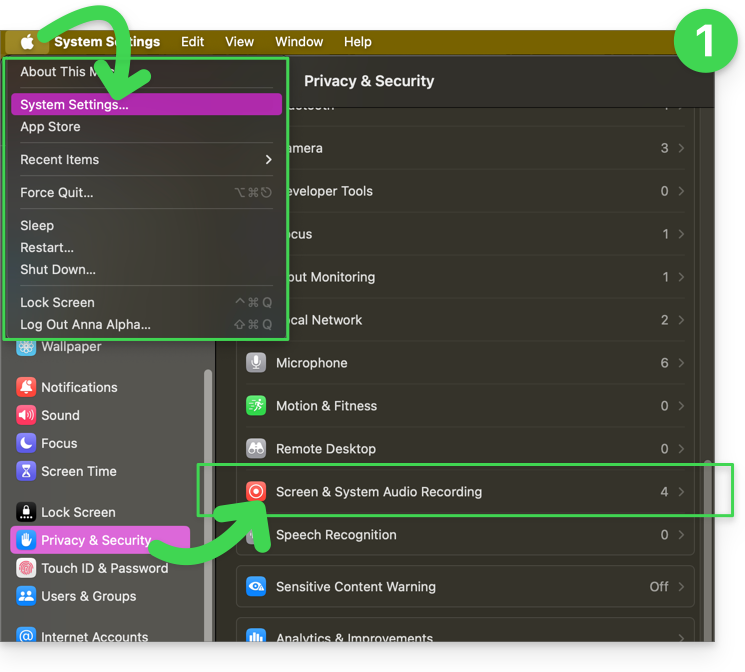
For example, under macOS, check and enable the required permissions:
- Go to System Settings, then Privacy & Security, and finally Screen Recording:
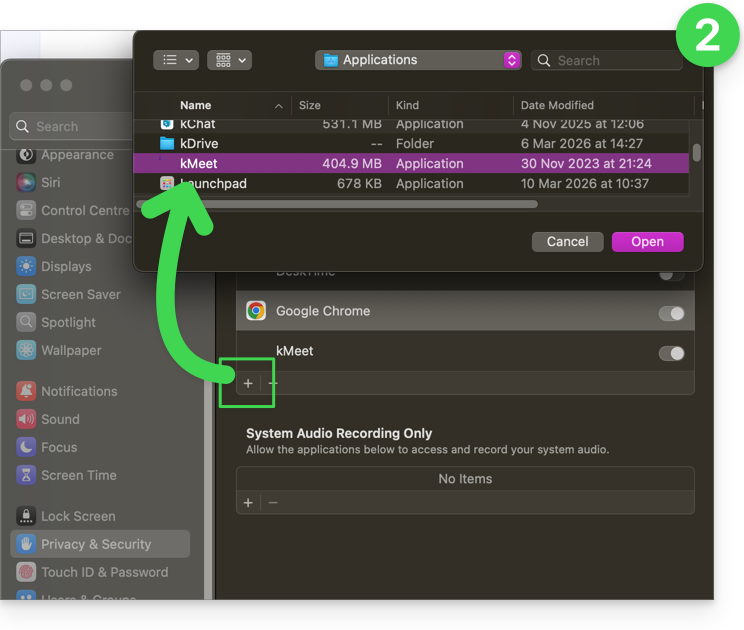
- Add your browser if necessary, and even kMeet if you have the desktop app on your computer:
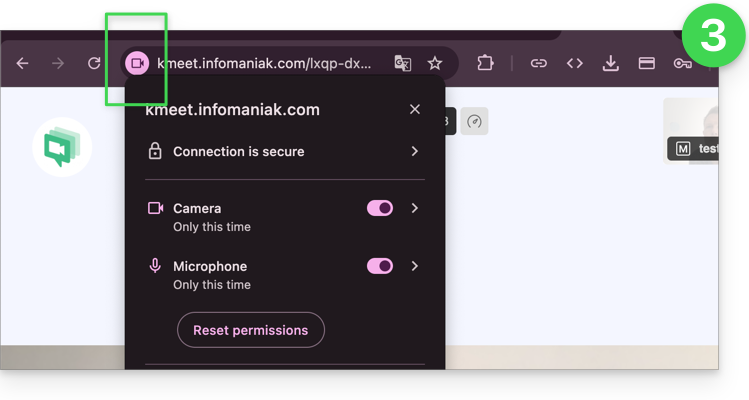
- Then, also familiarize yourself with the icons in your browser's address bar and identify any potential permission issues by clicking on the symbols:
Link to this FAQ: https://faq.infomaniak.com/289
Has this FAQ been helpful?
This guide explains how to troubleshoot access or usage issues with kDrive on Windows and macOS when third-party software may be interfering with your synchronization.
Introduction
- The kDrive application may sometimes encounter interaction issues with Windows or macOS firewalls, as well as with certain antivirus, VPN, or cleaning solutions, which may result in file synchronization difficulties, prevent PDF files from opening in the web interface, or make it impossible to use Online / Offline mode (❓: help).
- It is necessary toallow kDrive within these applications and add the following three essential components to the whitelist:
kdrive.exe(orkdrive.appon macOS)kdrive_client.exe- The domain
*.infomaniakusercontent.com
- If you are experiencing a synchronization issue and missing folders, please refer to this other guide.
Avast
To do this:
- Open the Avast interface.
- Go to Menu > Settings.
- Under the General tab, click on Exceptions.
- Click on Add an exception and enter the domain:
https://*.infomaniakusercontent.com/* - Go to the File paths tab to add the kDrive executables (
kdrive.exe,kdrive_client.exeorkdrive.app).
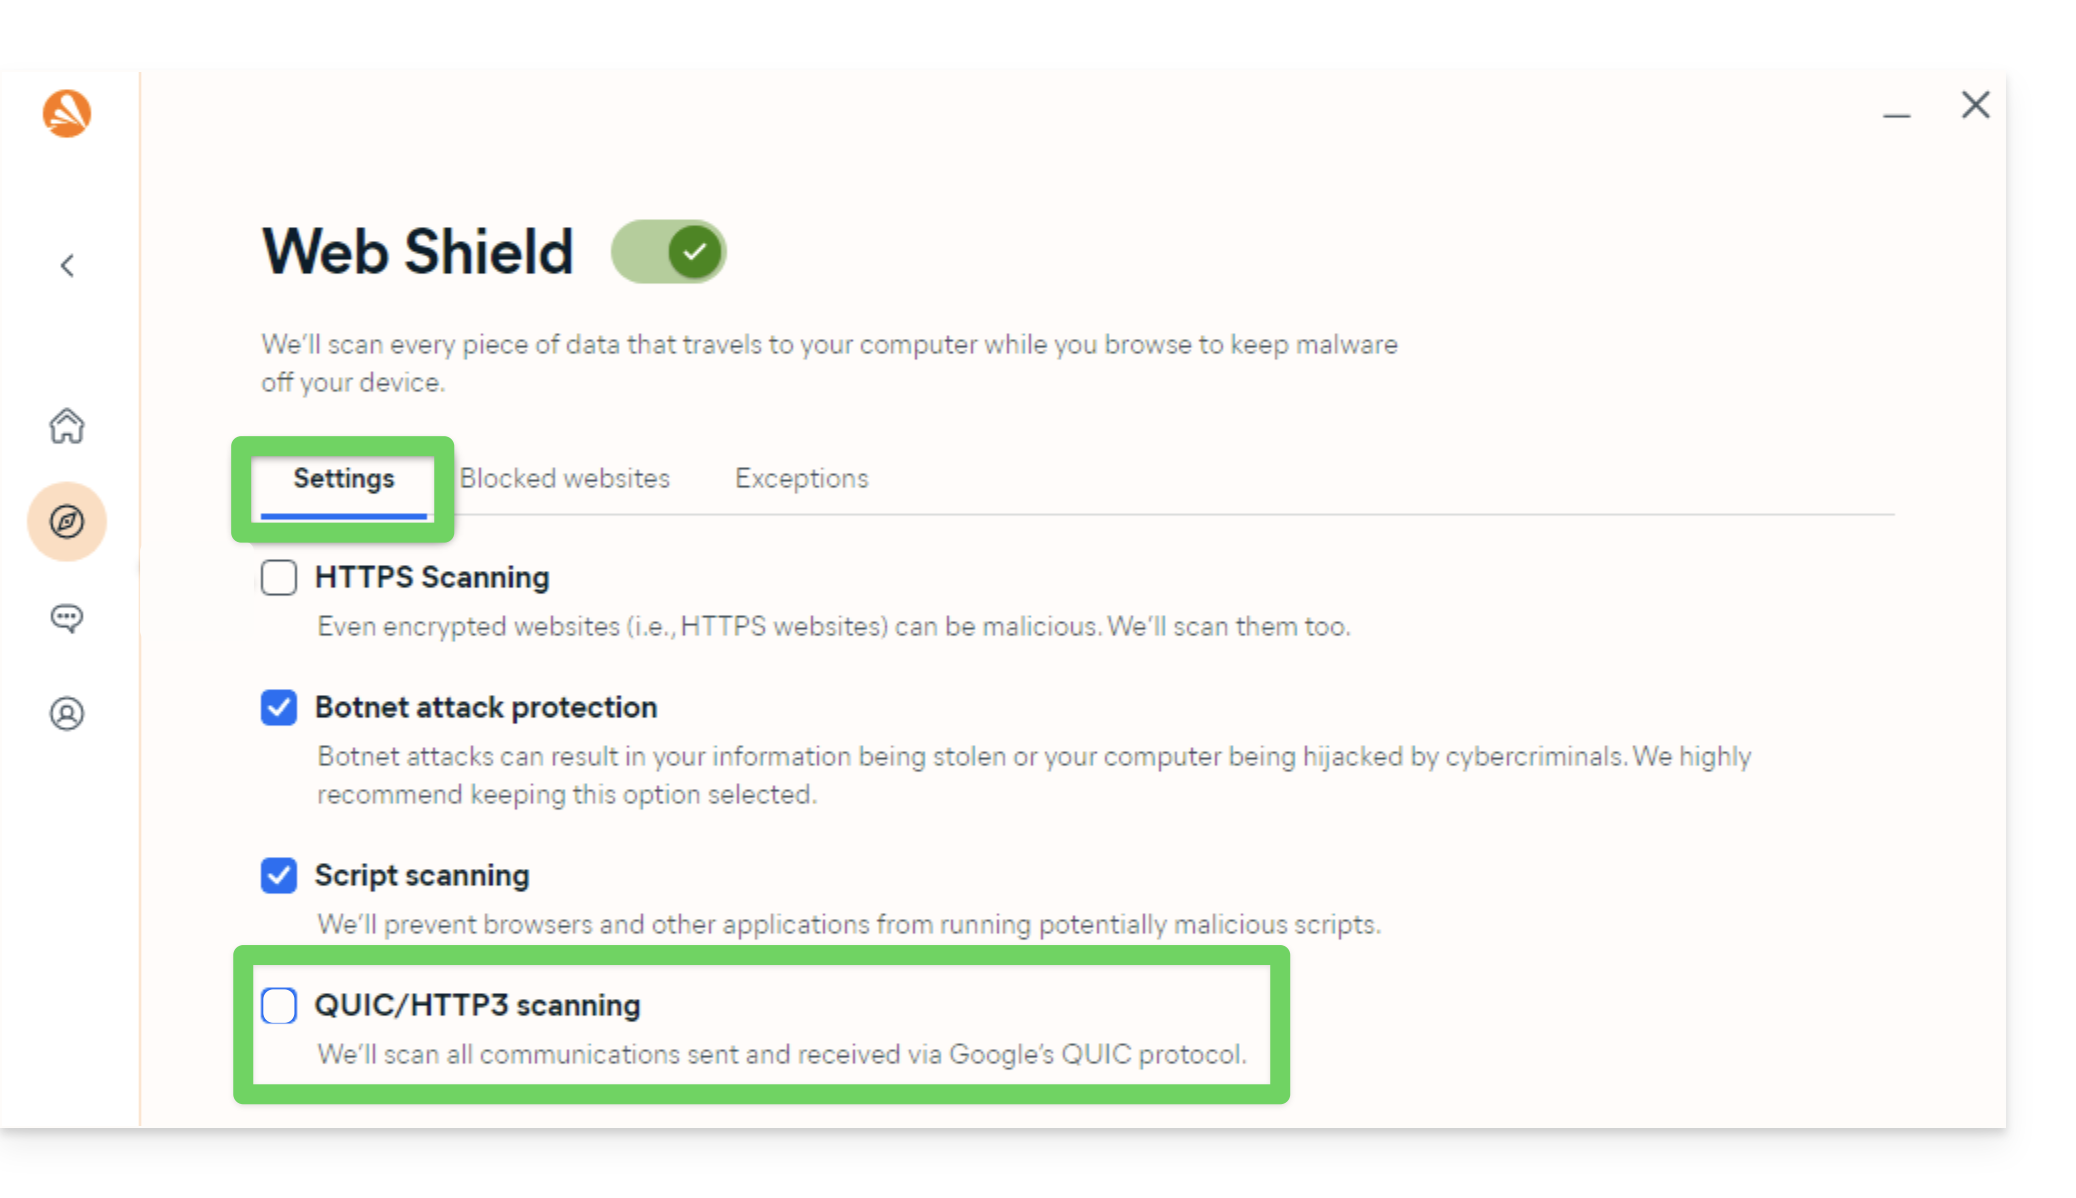
An additional action is recommended on Avast to prevent any blocking (especially when opening PDFs):
- Disable QUIC/HTTP3 scanning (refer to the official documentation under the Windows PC tab):
AVG
Refer to the official AVG documentation.
- Open AVG Antivirus.
- Go to Menu > Settings > General > Exceptions.
- Click on Add an exception and enter the domain
https://*.infomaniakusercontent.com/*. - Also add the paths to the kDrive executables (
kdrive.exeandkdrive_client.exeorkdrive.app).
Avira
Refer to the official Avira documentation.
- Right-click on the Avira icon and temporarily disable the protection.
- Go to Settings > PC Protection > Scan > Exceptions.
- Add the kDrive executable files (
kdrive.exe,kdrive_client.exe, orkdrive.app). - Repeat the operation in Real-time Protection > Exceptions.
- In the Web Protection section, add the domain
*.infomaniakusercontent.comto the list of allowed URLs.
Bitdefender
Consult the official Bitdefender documentation.
- Open Bitdefender and go to Protection > Online Threat Prevention > Settings.
- Click on Manage exceptions and add the domain
*.infomaniakusercontent.com(check the online prevention option). - If you are using the TrafficLight browser extension, also add this domain to its whitelist.
- To exclude kDrive executable files (
kdrive.exe,kdrive_client.exe, orkdrive.app), go to Protection > Antivirus > Settings > Manage exceptions.
CCleaner
Refer to the official CCleaner documentation.
- Open CCleaner and go to Options > Exclude.
- Click Add and select the kDrive executable files (
kdrive.exe,kdrive_client.exe) or the global installation folder to prevent any cache deletion or process interruption.
CleanMyMac
Refer to the official CleanMyMac (MacPaw) documentation.
- Open CleanMyMac.
- In the analysis results screen, hold down the Ctrl key and click on the items related to kDrive (
kdrive.app). - Select Add to exclusion list.
ESET
Refer to the official ESET documentation.
- Open ESET and press F5 (Advanced settings).
- Go to Antivirus > Exclusions and click Add to insert the paths to the kDrive executables (
kdrive.exe,kdrive_client.exeorkdrive.app). - Go to Web & Messaging > Web Access Protection > URL Management and add
*.infomaniakusercontent.comto the list of allowed addresses.
Kaspersky
Refer to the official Kaspersky documentation.
- Open Kaspersky and go to Settings > Exclusions and threat management.
- Add the kDrive executable files (
kdrive.exe,kdrive_client.exe, orkdrive.app) to the list of trusted applications. - To resolve web access issues, exclude the
kdrive.infomaniak.comand*.infomaniakusercontent.comdomains from the scan:
- If you experience persistent issues with secure SSL/TLS connections, uncheck the following box:

macOS (firewall)
Refer to the official Apple documentation (macOS Firewall).
- Open System Settings (or System Preferences).
- Click on Privacy and Security.
- Select Firewall.
- Click on the Firewall Options button (enter your administrator password if prompted).
- Click on the Add Application (+) button.
- Select the kDrive application (
kdrive.app) to allow incoming connections. - Click Add, then click OK.
Malwarebytes
Refer to the official Malwarebytes documentation.
- Open Malwarebytes and go to Settings > Allow list (Exclusions).
- Click Add an allow list entry.
- Select Exclude a file or folder and specify
kdrive.exe,kdrive_client.exe(orkdrive.app). - Select Exclude a website and enter the domain
*.infomaniakusercontent.com.
McAfee
Please refer to the official McAfee documentation.
- Open McAfee and go to Settings (gear icon) > Real-Time Scanning.
- Under Excluded Files, add the kDrive executable files (
kdrive.exeandkdrive_client.exeorkdrive.app). - In the Firewall / Web Protection section, add the domain
*.infomaniakusercontent.comto the list of allowed addresses.
NordVPN
Refer to the official NordVPN documentation (Threat Protection).
- Open NordVPN.
- Access the Pro Threat Protection feature (
Threat Protection). - Check the list of blocked files or activities to authorize the kDrive application (
kdrive.exe,kdrive_client.exeorkdrive.app). - Add the domain
*.infomaniakusercontent.comto the list of authorized domains in the Threat Protection settings. - If the active VPN interferes with local synchronization, configure Split Tunneling to exclude the kDrive application from the VPN tunnel.
Norton
Refer to the official Norton documentation.
- Open Norton and go to Settings > Antivirus > Scans and risks.
- In Exclusions / Low Risks, configure the "URLs to exclude from the scan" and add
*.infomaniakusercontent.com. - To exclude executable files (
kdrive.exe,kdrive_client.exe, orkdrive.app), configure the Security Scan Exclusions and Auto-Protect Exclusions sections.
Windows (firewall)
Learn about the official Microsoft documentation (Windows Firewall).
- Open the Start menu and click on Settings.
- In the search field, enter Firewall.
- Click on Allow an app through Windows Firewall.
- Click on the Edit settings button.
- Check the boxes next to the kDrive applications (
kdrive.exeandkdrive_client.exe). If they are not in the list, click on Allow another application... to browse and add them. - Check the boxes under the network types (Private and Public) and then click OK.
Windows Defender
Consult the official Microsoft documentation (Windows Security).
- Open Windows Security from the notification area or the Start menu.
- Select Virus & threat protection.
- Under *Virus & threat protection settings*, click Manage settings.
- Scroll down to Exclusions and click Add or remove exclusions.
- Click on Add an exclusion and select the files or folders in kDrive (
kdrive.exeandkdrive_client.exe).
Link to this FAQ: https://faq.infomaniak.com/1822
Has this FAQ been helpful?
This guide is for users who own a domain name on the Infomaniak infrastructure and are experiencing a DMARC issue when using certain Google tools such as Meet or Calendar.
Troubleshooting a DMARC error
To ensure compatibility between your domain name configuration (which has a DMARC policy (❓: help) of type reject) and the use of certain Google services, it is necessary to add the corresponding SPF record:
- Before:
v=spf1 include:spf.infomaniak.ch -all - After:
v=spf1 include:spf.infomaniak.ch include:_spf.google.com -all
To edit the SPF record currently configured in the DNS zone of your domain name:
- Click here to access the domain management section in your Infomaniak Manager (❓: help).
- Click on the name of the domain in question.
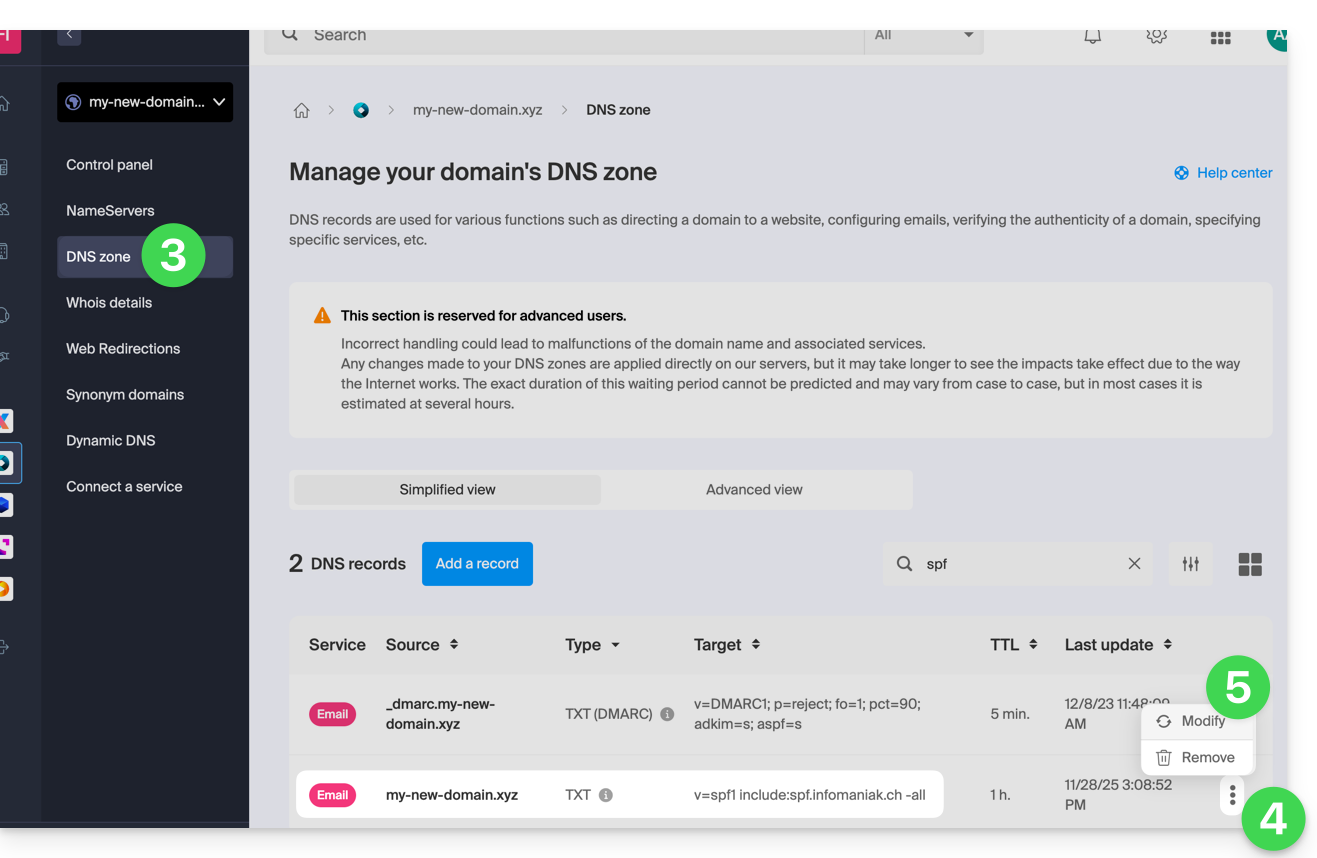
- Click on DNS Zone in the left-hand menu.
- Click on the action menu ⋮ located to the right of the TXT record containing the relevant SPF value.
- Click on Edit:
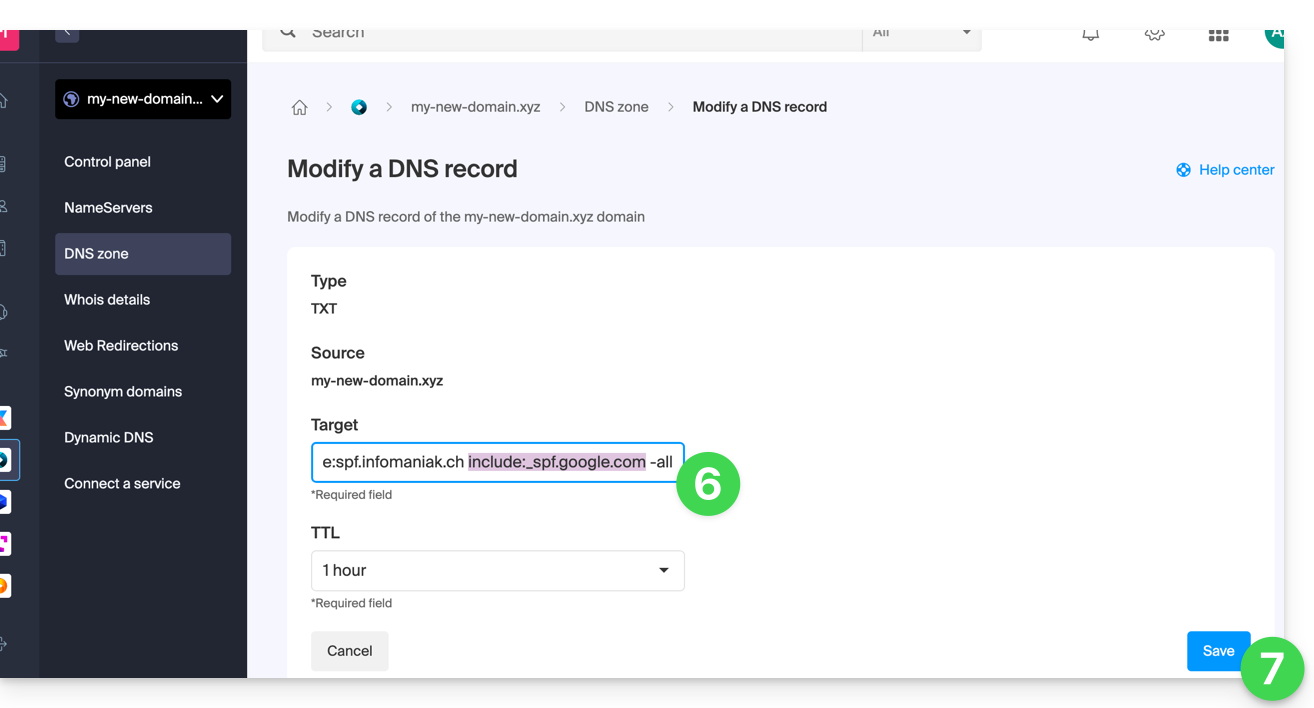
- Edit the field by adding
include:_spf.google.comon the same line after the existing include Infomaniak, and before the final-all. - Click on the Save button:
Any DNS addition or modification may take up to 48 hours to propagate (❓: help).
Please refer to this Google documentation if you need information on configuring Google's SPF.
Link to this FAQ: https://faq.infomaniak.com/1641
Has this FAQ been helpful?
This guide explains how to start an online meeting with kMeet, Infomaniak's ethical and free video conferencing solution.
Introduction
- There is no limit to the number of participants with the paid kSuite plans.
- Participants can write in a common chat (❓: help), annotate a screen share (❓: help), and even control a remote device (❓: help).
- You can create a meeting room in advance and invite participants by creating an associated event in the Infomaniak calendar (❓: help).
- You can also share the video stream within a Streaming Video broadcast (❓: help), for example, to avoid relying on the connection to kMeet.
- Custom Brand: creating rooms on a specific domain (e.g., kMeet.domain.xyz) is not yet supported by the desktop application (especially under Linux).
Create a virtual meeting room
To do this:
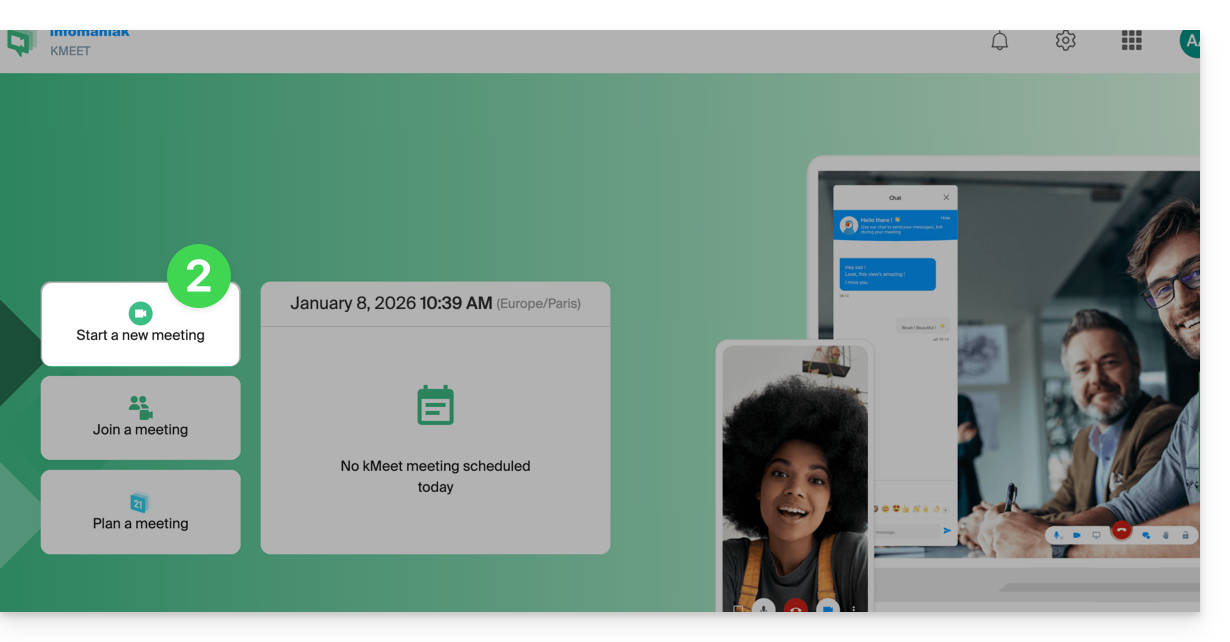
- Click here to access kMeet in your Infomaniak kSuite (or launch the mobile/desktop app — ❓: help).
- Start a meeting (❓: help).
- Enter a name for your meeting room.
- Allow access to your webcam and microphone from your browser or from the application (❓: help).
- Enter a nickname or your first and last name.
- If necessary, enable participant control (❓: help), a password, or a custom encryption key (❓: help).
- Click Join the meeting.
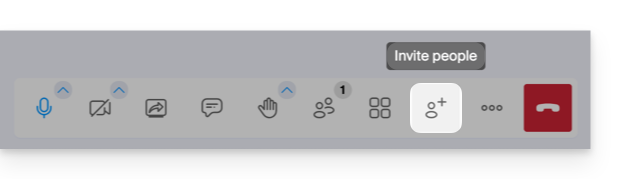
- Share the meeting link to invite participants to join you:
Link to this FAQ: https://faq.infomaniak.com/2475
Has this FAQ been helpful?
Thank you for choosing to customize your account with Custom Brand!
Introduction
- Available as an option with any Infomaniak plan or already included with kSuite Enterprise, discover this customization tool to make your web addresses unique, add a logo, or add an image slideshow to your Infomaniak organization login page.
- The Web Redirection tool will no longer be usable on your domain after Custom Brand is activated on it.
Custom Brand Customization Guides
Prerequisites
- Own a domain name with Infomaniak (transfer it if necessary).
- Its extension must be among those supported by Custom Brand.
- Note that this also works with a subdomain.
- Configure the domain to use Infomaniak's DNS servers.
Next, to use Custom Brand: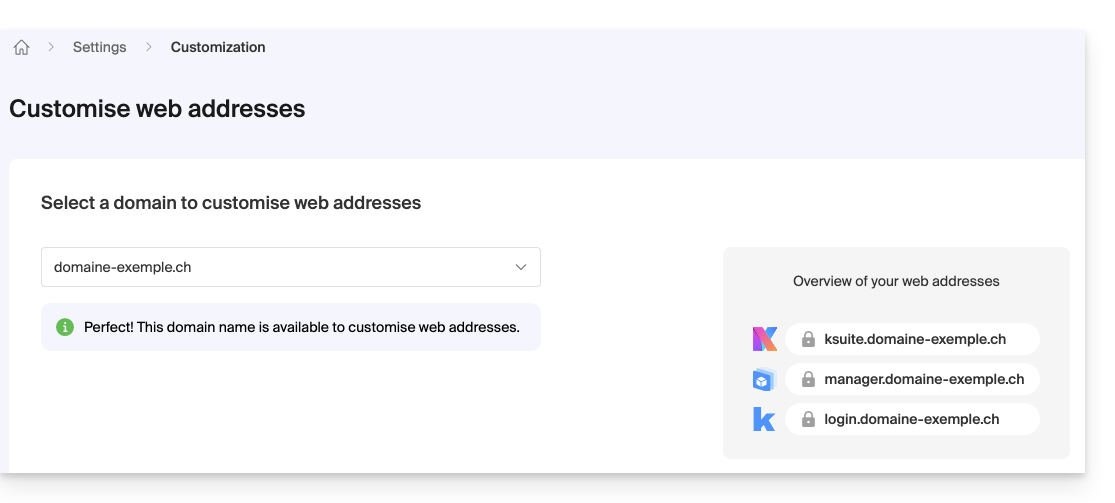
- Getting started with Custom Brand: customize URLs & the interface
- Troubleshooting:
Customize your web addresses with your domain
| Access to… | without Custom Brand | with Custom Brand |
|---|---|---|
| kSuite | ksuite.infomaniak.com | ksuite.domain.xyz |
| Manager | manager.infomaniak.com | manager.domain.xyz |
| e-mails (Mail) | mail.infomaniak.com | mail.domain.xyz |
| calendars | calendar.infomaniak.com | calendar.domain.xyz |
| contacts | contacts.infomaniak.com | contacts.domain.xyz |
| kDrive | kdrive.infomaniak.com | kdrive.domain.xyz |
| kMeet video conferences | kmeet.infomaniak.com | kmeet.domain.xyz |
| Euria | euria.infomaniak.com | euria.domain.xyz |
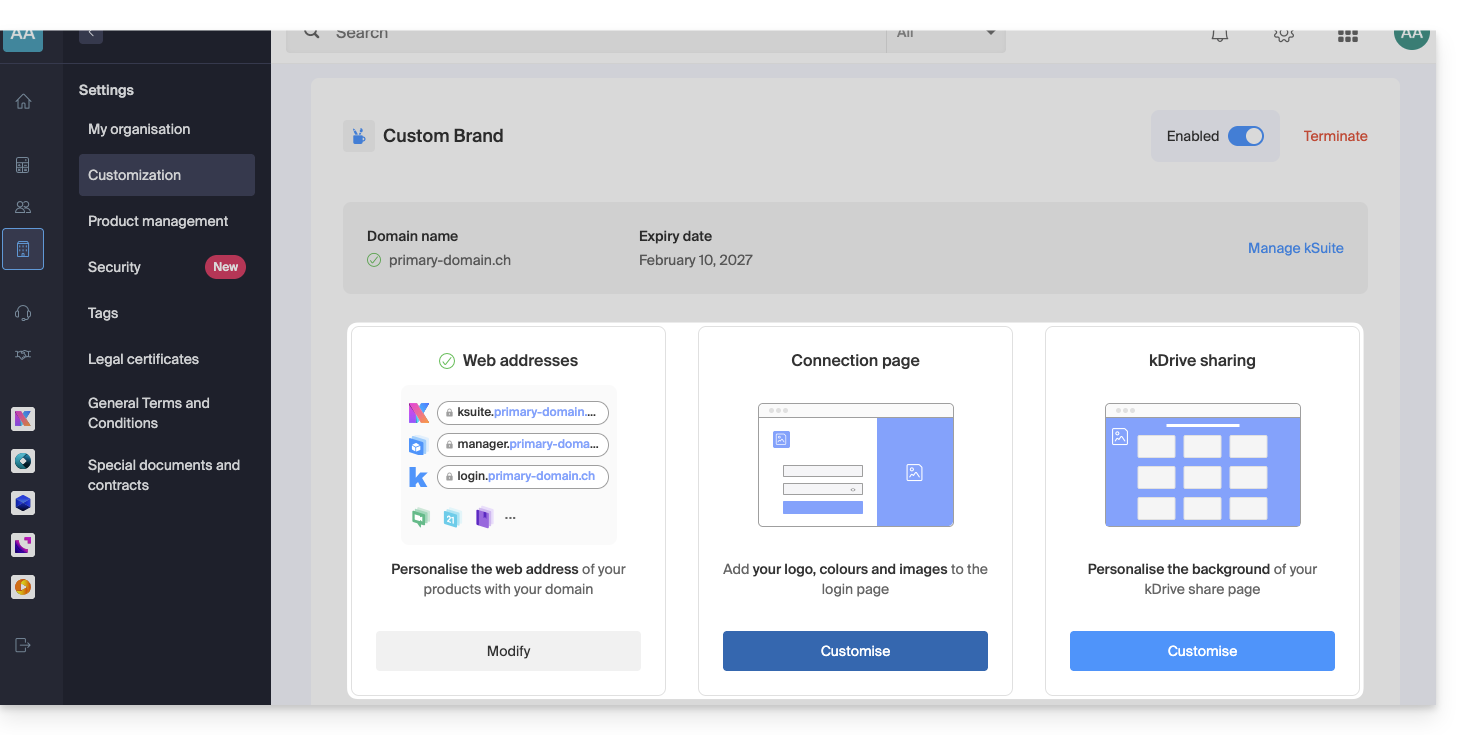
Customize your Organization's interface
The following interface options can be modified from the kSuite settings: :
- Add your logo to your Organization's interface.
- Added a 3-image panorama to the login page.
- Changed the text and button color on the login page.
- Customization of kDrive sharing (see this other guide).
Link to this FAQ: https://faq.infomaniak.com/2465
Has this FAQ been helpful?
Thank you for choosing Infomaniak and kChat as your communication solution for yourself, your network, or your company! These guides will help you organize your channels, users, discussions, and more!
Introduction
- Multi-platform, kChat is the instant messaging application in kSuite that allows you to exchange messages, share files, and coordinate your teams securely from…
- … a browser like Brave, Chrome, Edge, Firefox, Opera, Safari…
- … an iOS / Android device
- … a macOS / Windows / Linux computer
- Download the kChat app on your devices!
- It is not possible to change the location of the
kchat-desktopfolder on your hard drive. - The content of discussions, photos, and videos is stored online on Infomaniak's secure servers.
- The available storage size is that of kSuite.
- It is not possible to change the location of the
What would you like to do?
- Configure kChat
- Manage users
- Manage a channel
- Manage a conversation
- React to messages
- Manage kChat notifications
- Format messages and insert images
- Send a voice message and its automatic transcription
- Translate the content of a message in the Infomaniak kChat app
Have a question or feedback?
- If you encounter any issues, please consult the knowledge base before contacting support.
- Click here to share feedback or a suggestion about an Infomaniak product.
Link to this FAQ: https://faq.infomaniak.com/2076
Has this FAQ been helpful?
This guide explains how to modify the role and permissions of a user so that they only have a limited legal role or access to only certain features of your Organization within the Infomaniak Manager.
Introduction
- Since you opened your account with Infomaniak, you have been part of at least one Organization (❓: help).
- If you were the only user and it wasn't an invitation, an Organization was created in your name, and you automatically become its legal representative.
- Otherwise, you belong to the Organization that invited you (to join its kSuite, to manage a product, etc.).
- You can define whether a user…
- … belongs to your Organization and whether they should have the role of:
- Legal Representative
- Administrator
- Collaborator
- … is external to your Organization (limited rights):
- External users are not taken into account when sharing calendars and address books with the entire Organization.
- … belongs to your Organization and whether they should have the role of:
Modify a user's rights/permissions
Prerequisites
- First, switch to the desired Organization if you cannot find the expected list of users (❓: help).
- You must be at least an Administrator of the Organization (❓: help).
- Learn about the different permissions (e.g., access rights to products) and administrative contact preferencesfor a user within an Organization (❓: help).
- Please note that it is impossible to remove a legal representative if there is no other legal representative (❓: help).
To change a user's role:
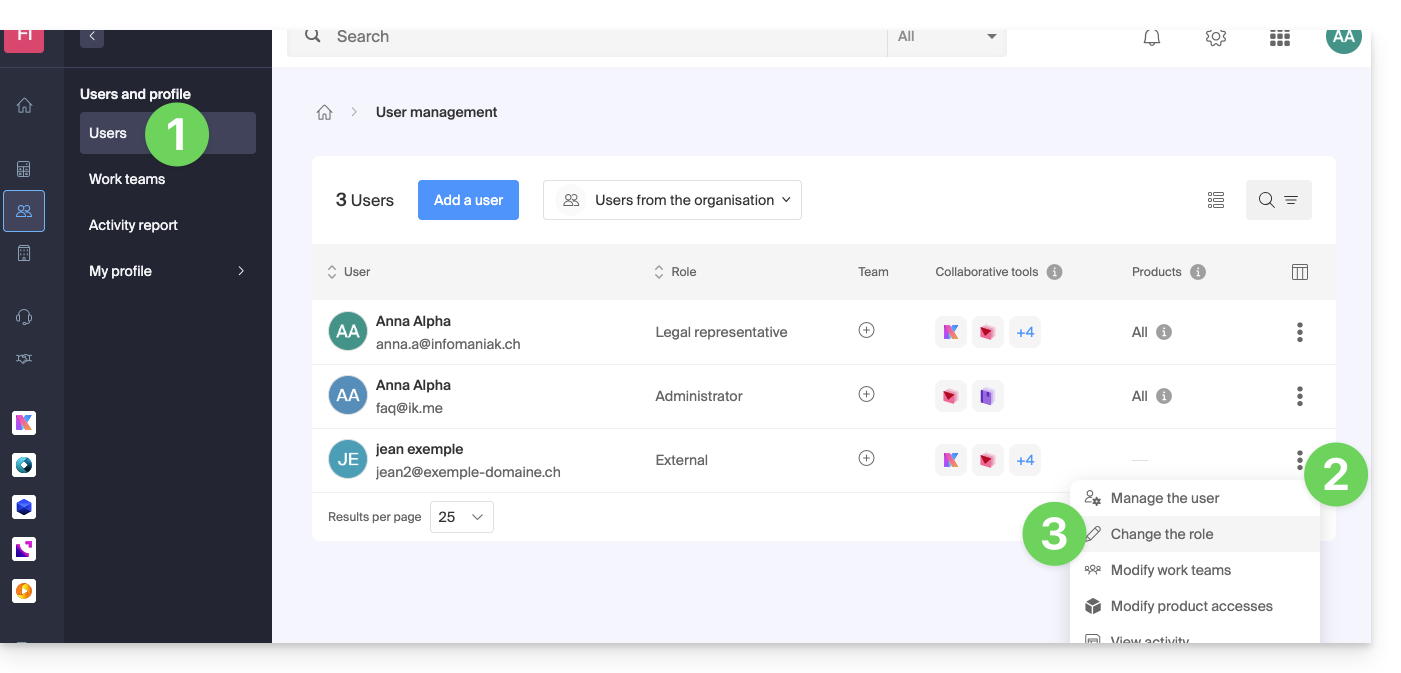
- Click here to access the user management section in the Infomaniak Manager (❓: help).
- Click on the action menu ⋮ located to the right of the user in question.
- Click on Edit role:
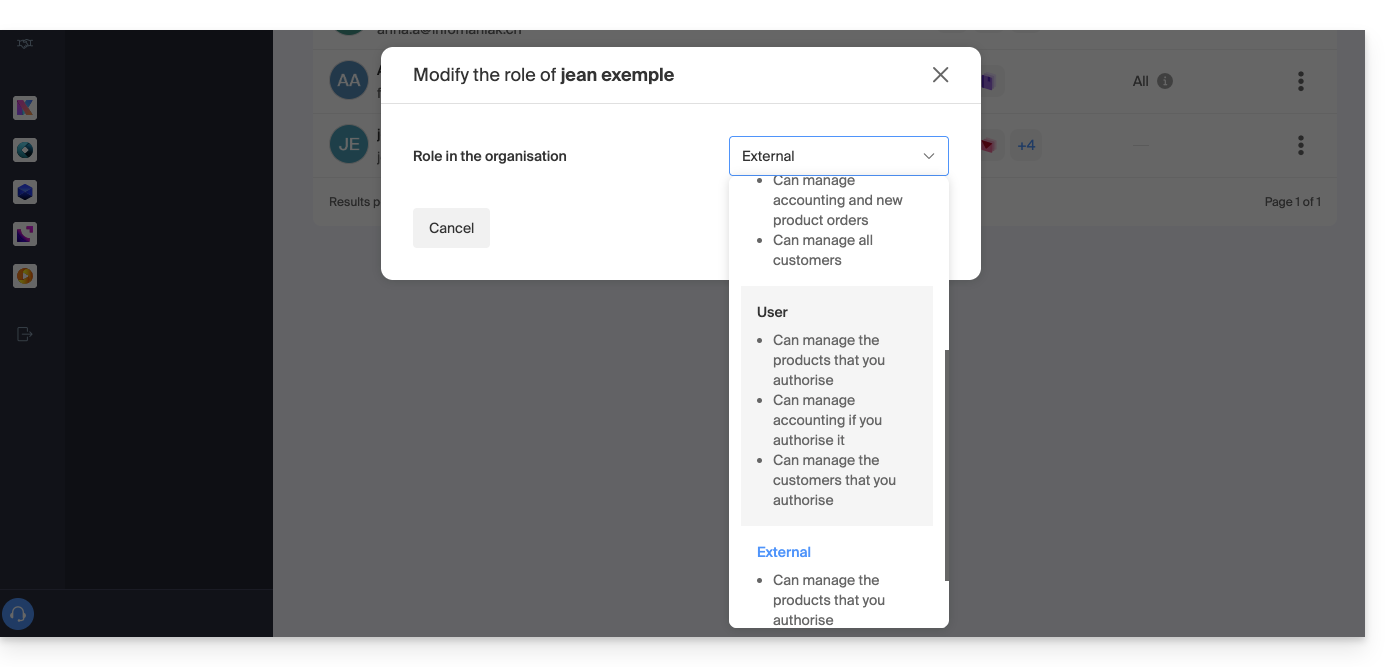
- Modify the desired role:
- Click the Save button.
A summary email is sent to the user whose role has been changed.
If you assign the user a simple collaborator role…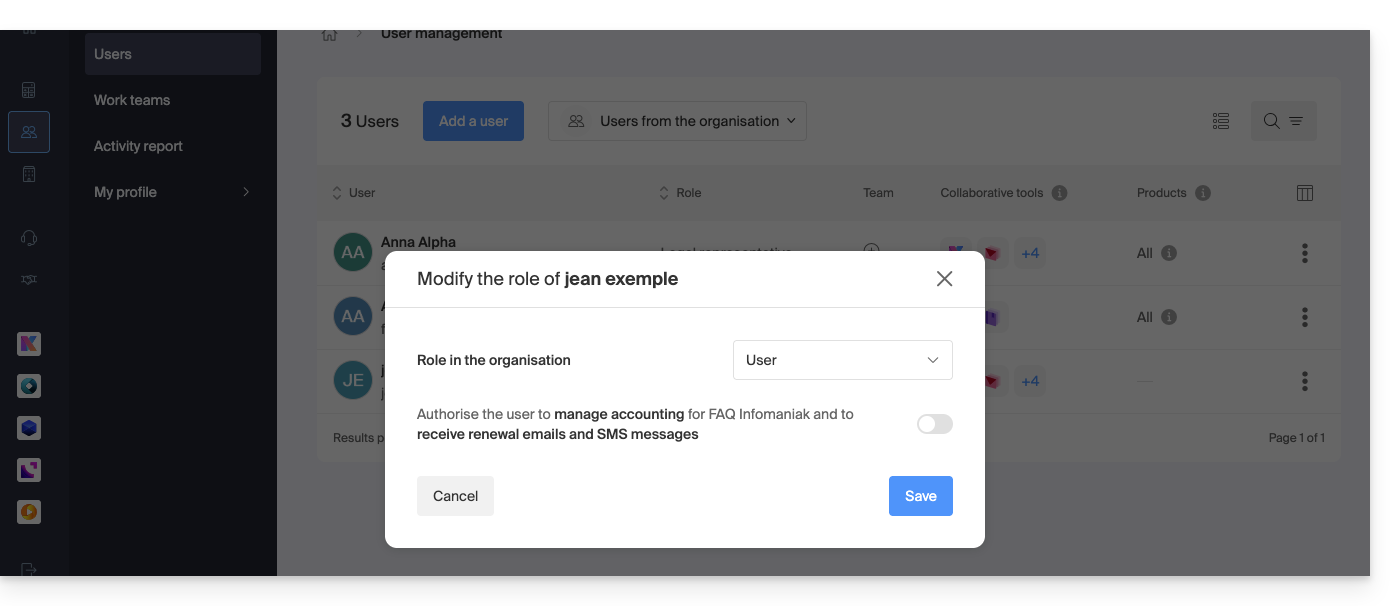
… you can modify the services they can access (❓: help):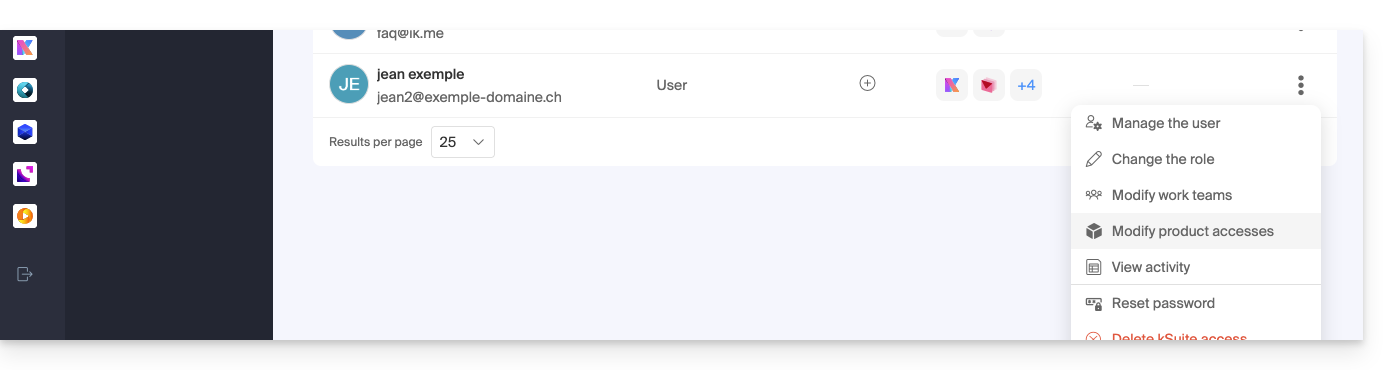
Link to this FAQ: https://faq.infomaniak.com/1633
Has this FAQ been helpful?
This guide helps you troubleshoot potential camera access issues with kMeet, the ethical video conferencing solution offered by Infomaniak.
With current security standards, a browser such as Brave, Chrome, Edge, Firefox, Opera, Safari… or an application installed on an operating system like Windows or macOS will necessarily ask for permission to access the microphone and camera as soon as a video conference starts.
Allow camera access
To do this:
- Click here to access kMeet in your Infomaniak kSuite (or launch the mobile/desktop app — ❓: help).
- Start a meeting (❓: help).
- Enter a name for your meeting room.
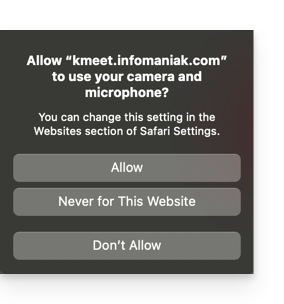
- Continue; a pop-up should appear, asking you to authorize your browser to access your microphone and camera:
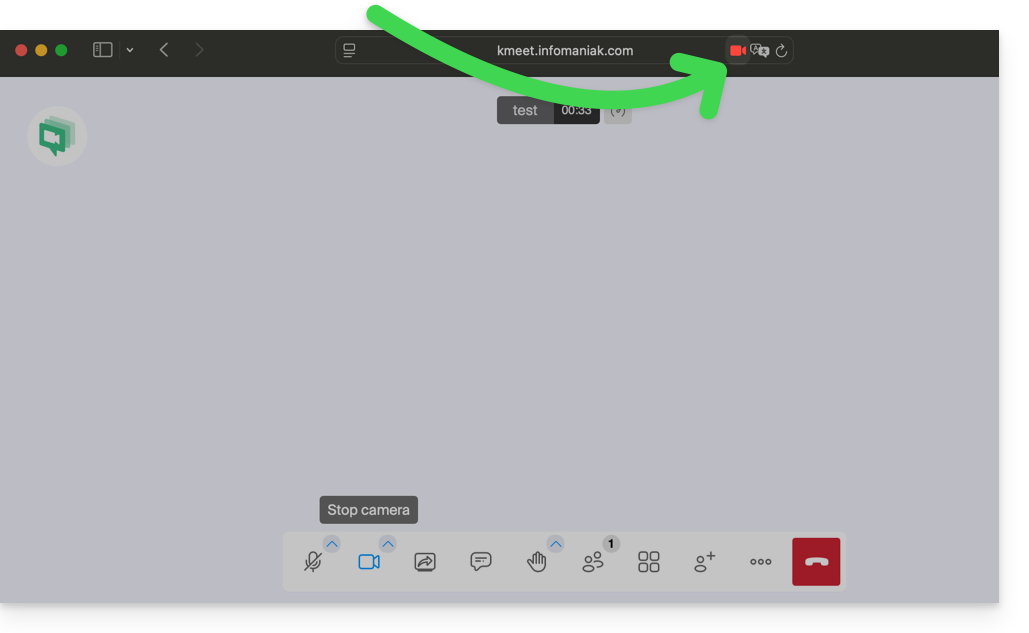
- If the popup does not appear automatically, check the icons in your browser's header:
or here: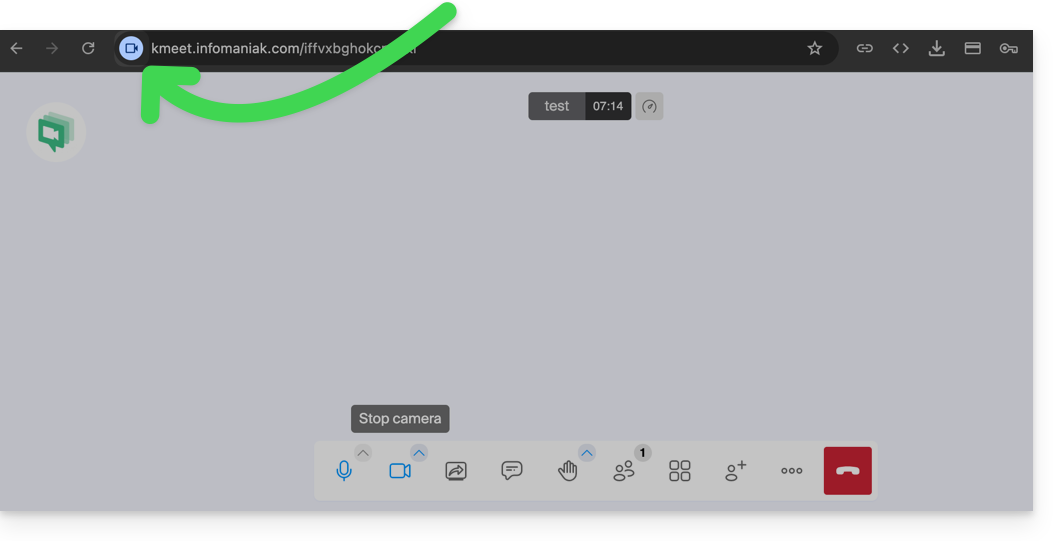
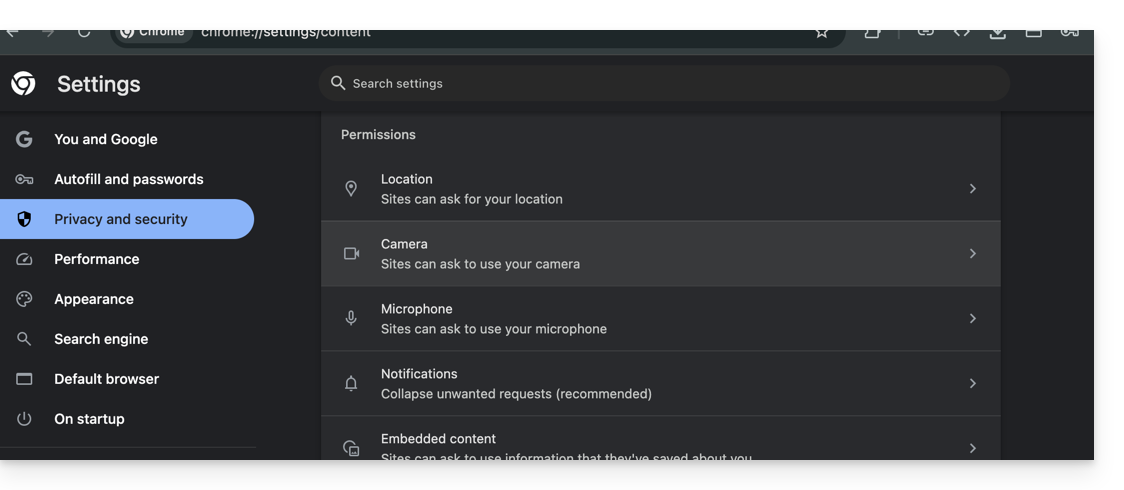
- Your browser settings (here: Chrome) may also allow you to adjust permission settings and choose a camera if several are available:
Your camera isn't working? Check the physical cover.
If your image remains black even though the camera is enabled, the lens may be covered by a built-in privacy cover.
Many laptops have a small mechanical cursor above the screen:
- Observe the camera lens at the top of your screen.
- If you see a red dot or an opaque mark on the lens, the cover is closed.
- Slide the slider sideways to release the image.
Note: As this is a mechanical device, no software setting can activate the image until the cache is manually cleared.
Link to this FAQ: https://faq.infomaniak.com/2452
Has this FAQ been helpful?
This guide helps you troubleshoot audio issues (microphone and speakers) with kMeet, Infomaniak's ethical video conferencing solution.
Introduction
- For kMeet to function, it must obtain your permission to access the microphone.
- This request usually appears via a pop-up window in the top left corner of a browser such as Brave, Chrome, Edge, Firefox, Opera, Safari… or during the first launch of the application.
- An audio problem can be of two types:
- either others cannot hear you (Microphone problem),
- or you cannot hear others (Speakers/Output problem).
Troubleshooting audio issues: possible solutions
1. Check the hardware and basic settings
- The "Mute" button: check that your microphone is not muted in the kMeet interface (red microphone icon) or via a physical button on your headset/microphone:
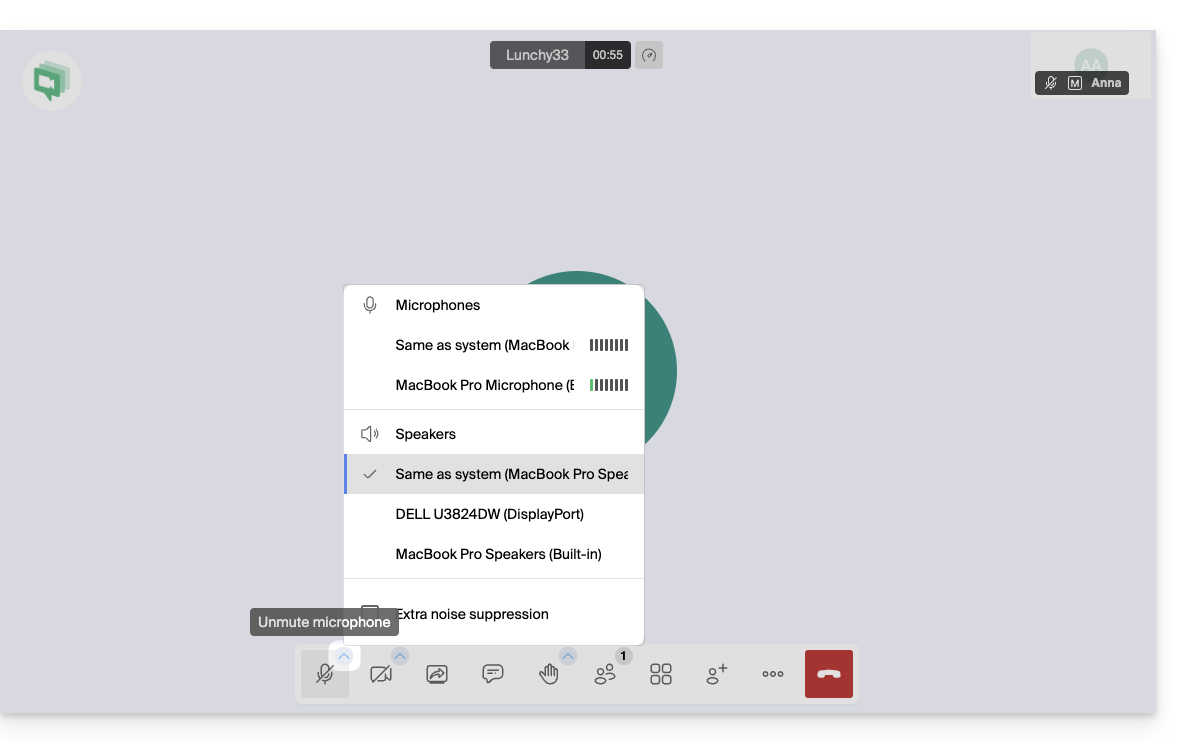
- Connections: if you are using an external headset or microphone, unplug it and plug it back in (prefer direct USB ports rather than hubs).
- System volume: Make sure that the volume on your computer or mobile device is not set to zero or in "Do Not Disturb" mode.
2. Configure audio settings in kMeet (Computer)
Whether on the app or in your browser, you can precisely choose your devices:
- Go to Settings:
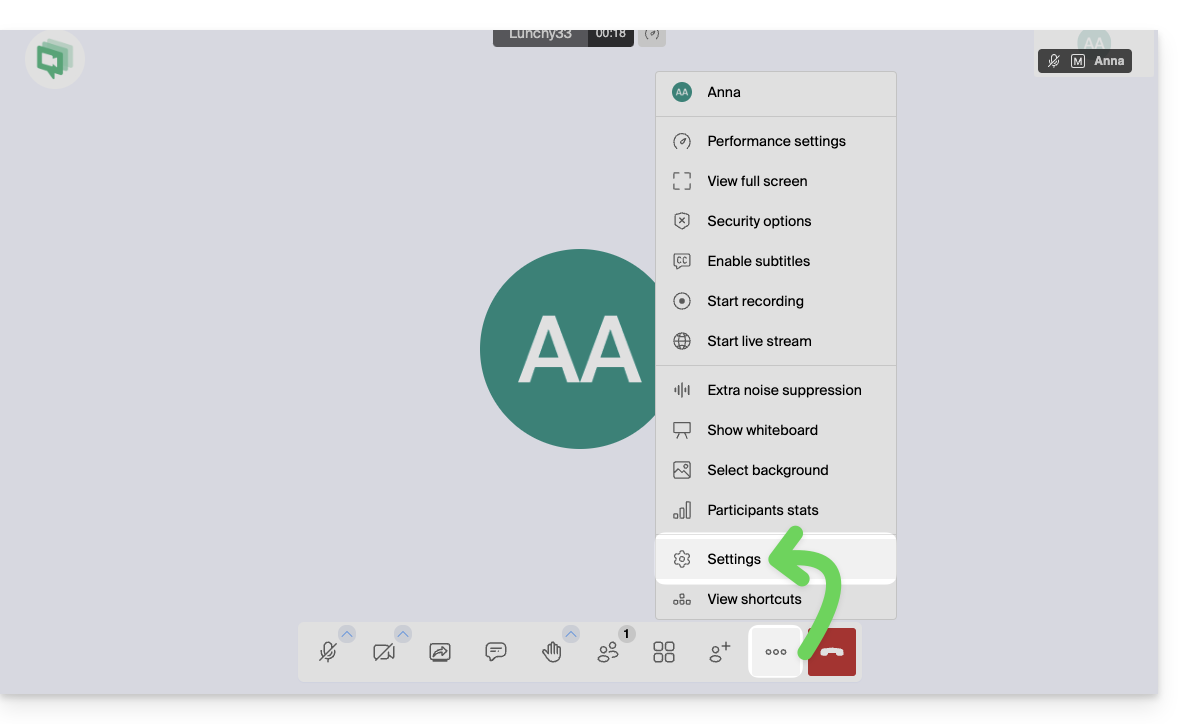
- Go to the Audio tab:
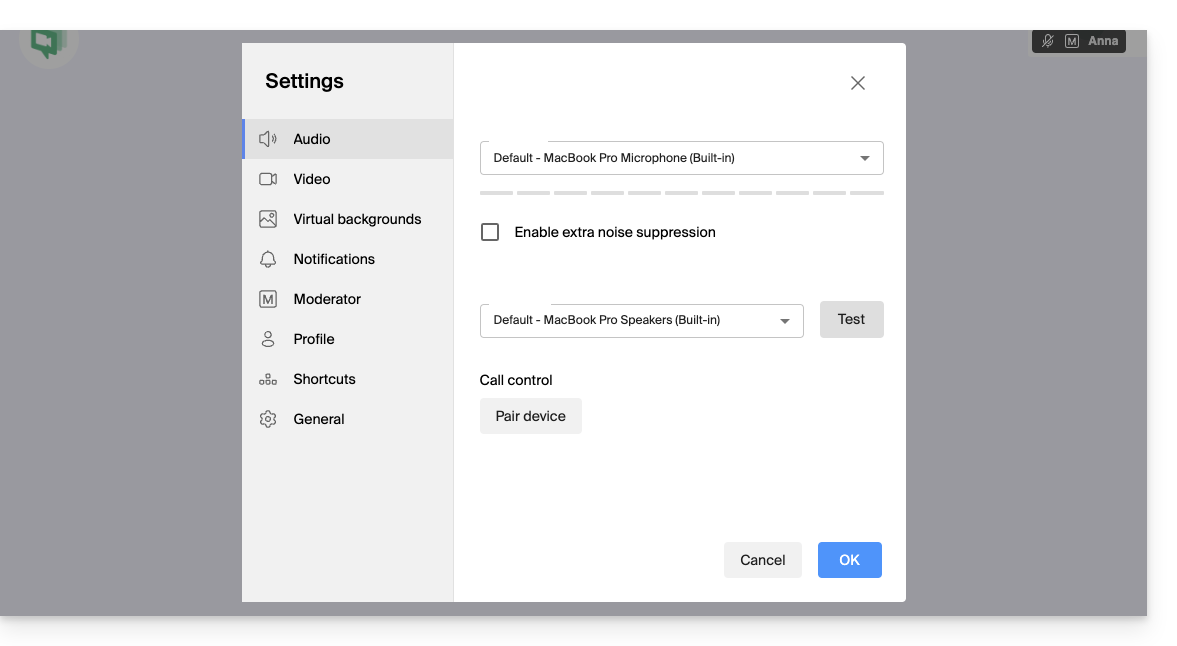
- Microphone: select the correct device from the list.
- Speak: a blue volume bar should move if the microphone picks up sound.
- Audio output: select your speakers or headset.
- Click "Test" to verify that you can hear the test sound.
3. (Re)authorize the microphone in the browser
If you are using kMeet via a browser such as Brave, Chrome, Edge, Firefox, Opera, Safari…:
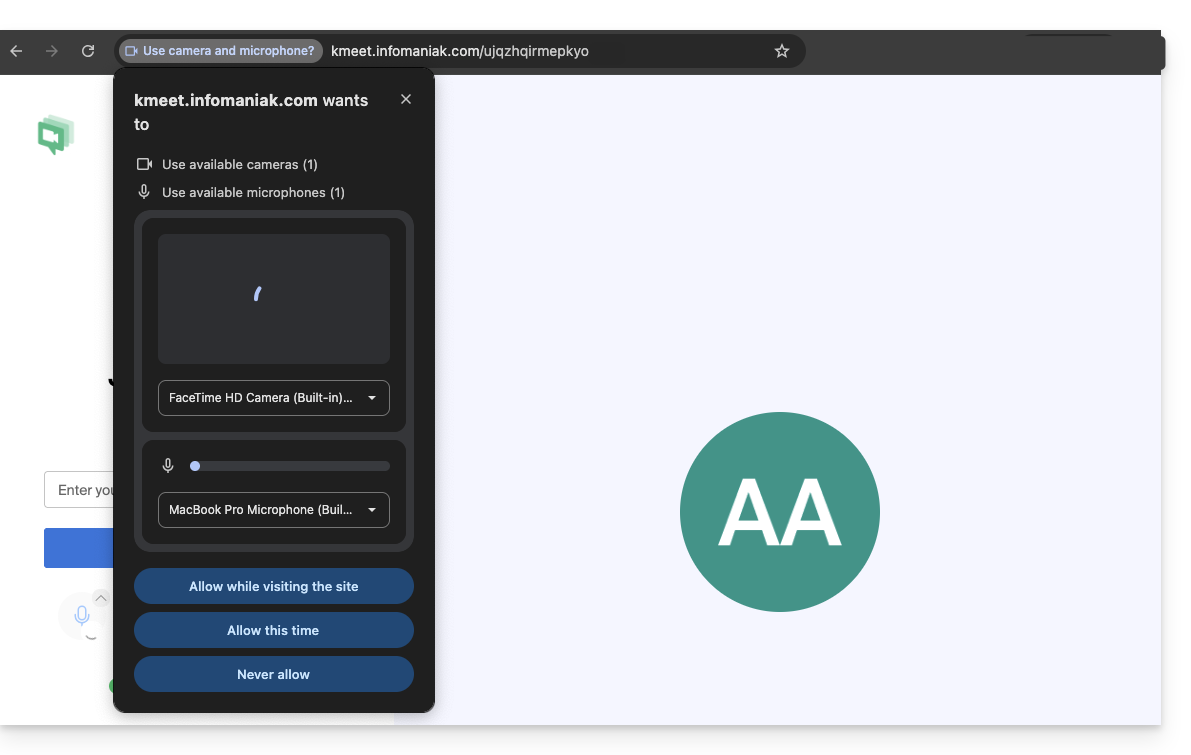
- Click on the lock icon (or the site settings) to the left of the URL address (kmeet.infomaniak.com).
- Make sure "Microphone" is set to Allow.
- If you change this setting but it has no noticeable effect, refresh the page (F5).
4. Check System Permissions (Windows, macOS, Mobile)
On macOS (often overlooked):
- Go to the Apple menu > System Settings > Privacy & Security.
- Click on Microphone.
- Make sure your browser or the kMeet application is checked.
On Windows:
- Go to Settings > Privacy & Security > Microphone.
- Make sure the "Microphone access" option is enabled.
- Make sure "Allow desktop apps to access your microphone" is also enabled for kMeet or your browser.
On Mobile (iOS and Android):
- iOS: Settings > kMeet > Make sure Microphone is enabled. Also, check in Settings > Privacy > Microphone.
- Android: Settings > Apps > kMeet > Permissions > Microphone > Allow only while using the app.
5. Special case: Disable blocking extensions
Some browser extensions (AdBlockers, privacy protection extensions such as uBlock Origin or Privacy Badger) may sometimes block audio/video streams.
- Try disabling your extensions or opening the kMeet link in a private browsing window to test.
6. About Firefox and WebRTC
You can try disabling WebRTC in Firefox for testing purposes (via media.peerconnection.enabled = false), but this is not recommended: kMeet uses WebRTC technology to function; if you disable it, the video conferencing may stop working altogether.
If Firefox is causing problems:
- Check the settings in Firefox > Privacy & Security > Permissions.
- Next to "Microphone", click on Settings and make sure that kmeet.infomaniak.com is not in the "Block" list.
- Also, check that Autoplay is enabled for audio on kMeet.
7. As a last resort: Change devices
If the problem persists, it is probably due to a hardware failure or a driver conflict on the device:
- Join the meeting from another device (switch from your computer to your smartphone using the kMeet app).
- Get the meeting link/code via the shares/invitation:

Link to this FAQ: https://faq.infomaniak.com/2441
Has this FAQ been helpful?
This guide explains how to register a domain name with Infomaniak.
Introduction
- With a new domain name or an additional domain name, many possibilities open up to you, including access to free services, such as:
- You can also:
Order your first domain name
To do this:
- If necessary, create an Infomaniak account (❓: help).
- Click here to access the domain management section in your Infomaniak Manager.
- Click to open the Shop:
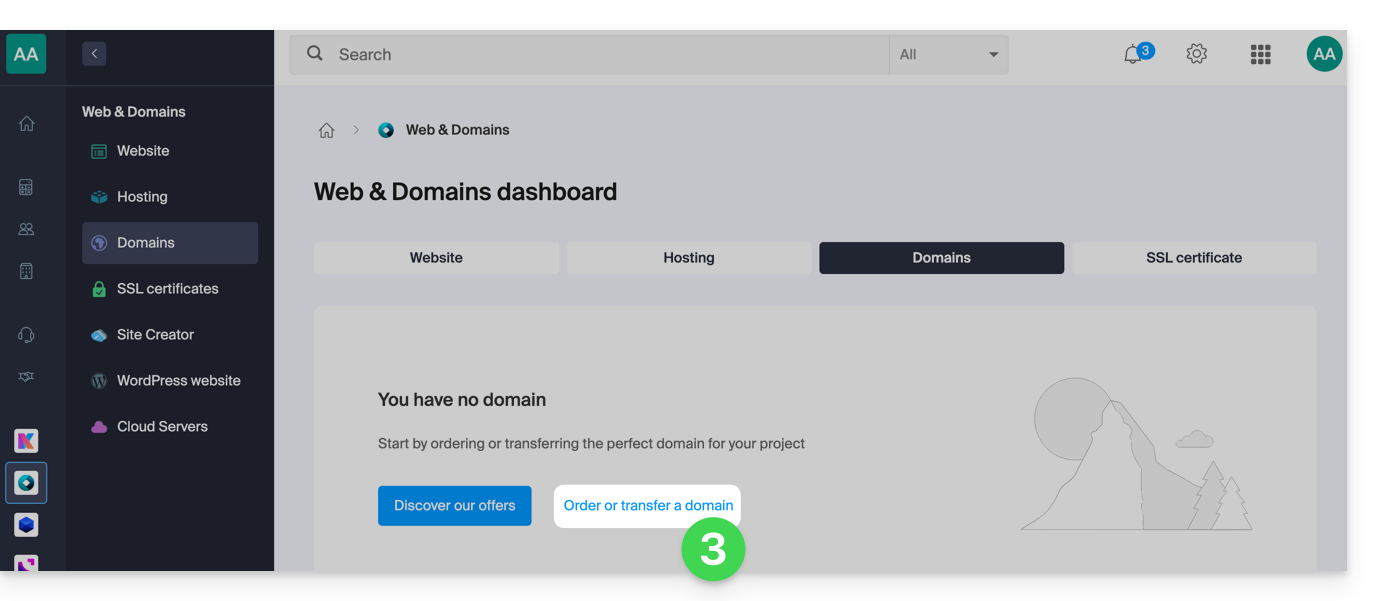
- If applicable, select the Organization in which to order your domain:
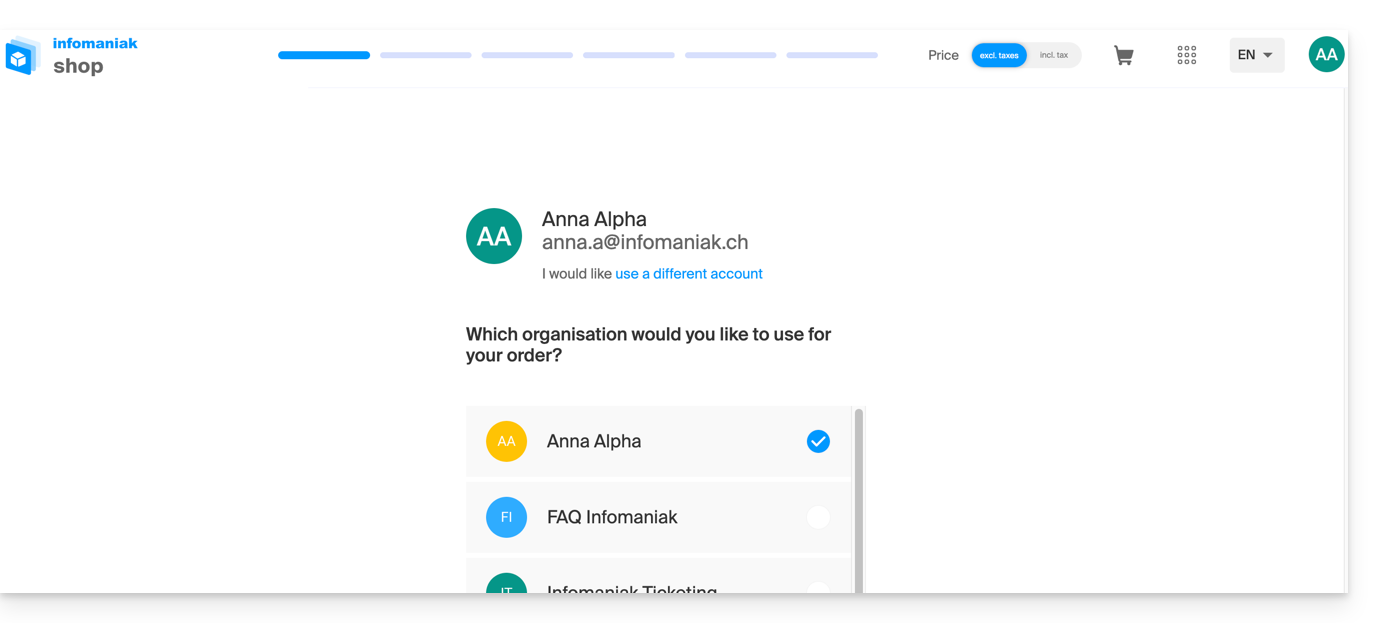
- If applicable, select the Organization in which to order your domain:
- Once in the Shop, enter the domain name to register and search for it:
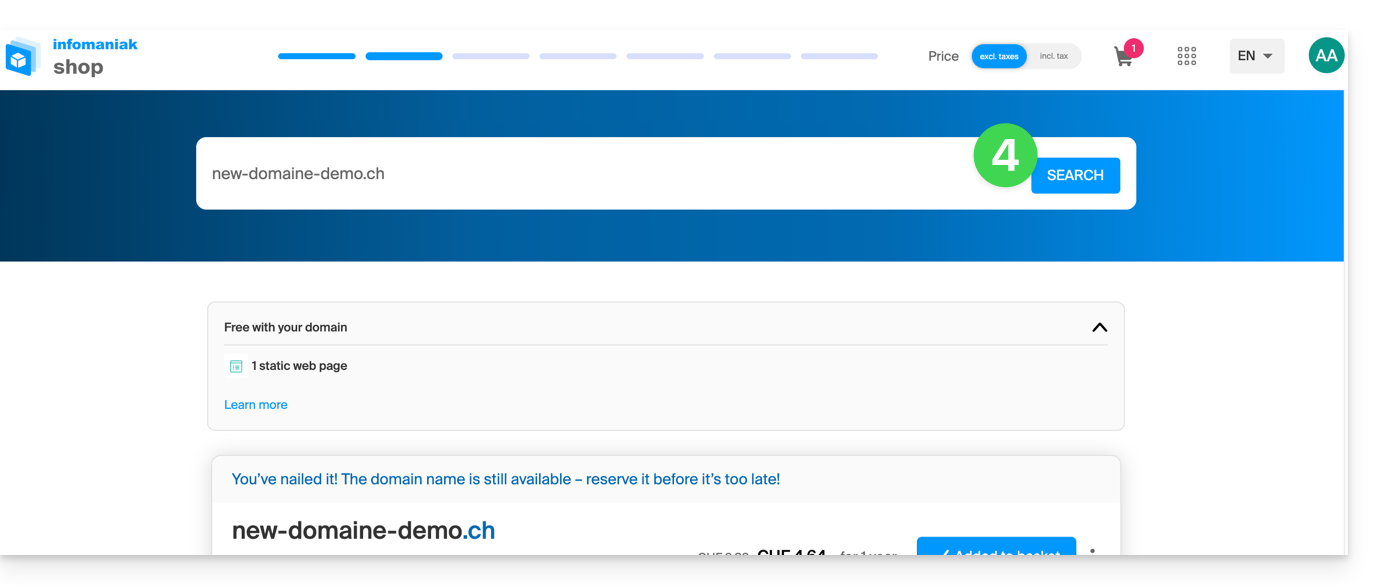
- Check or uncheck the additional options and extensions offered, and click Next to proceed.
- Choose the desired options on each page, such as the Mail service associated with the domain name:
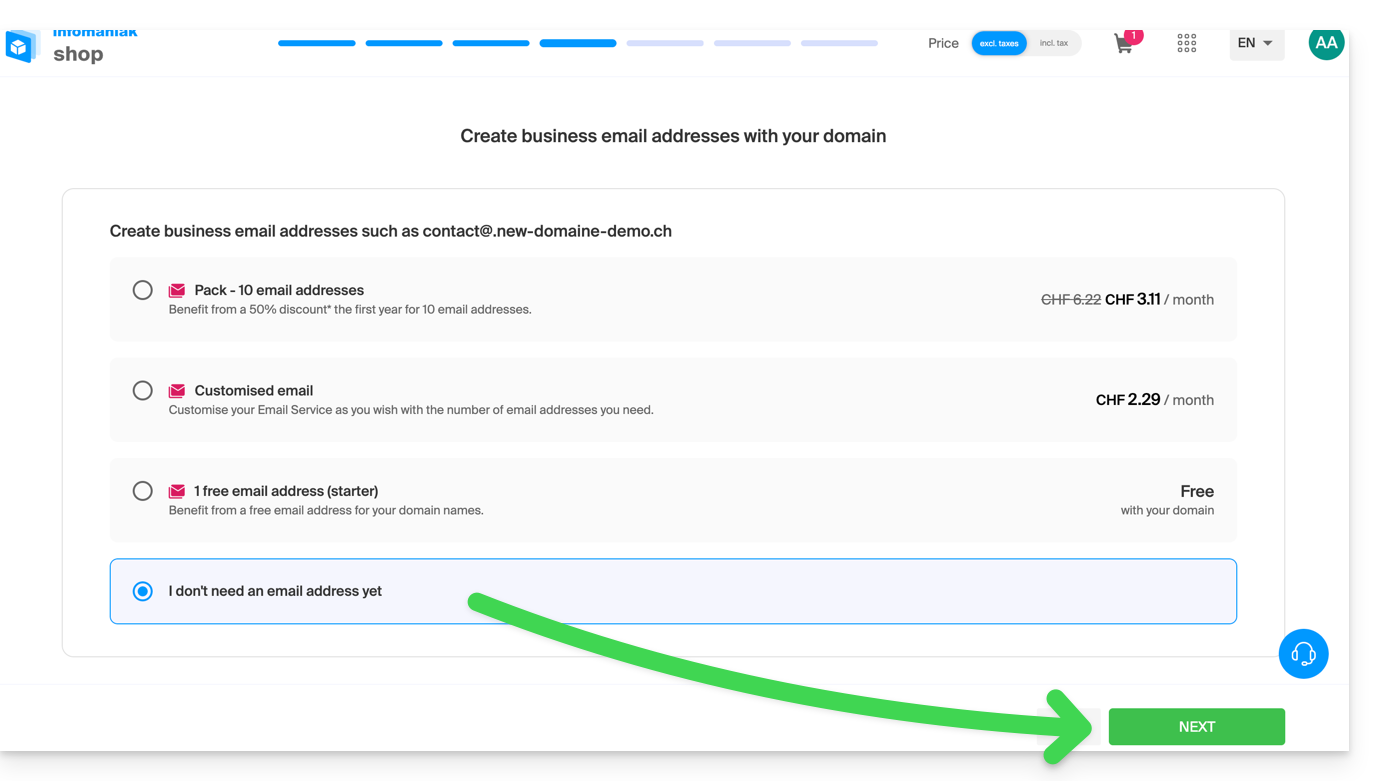
- Choose the desired options on the following pages, such as the web hosting associated with the domain name:
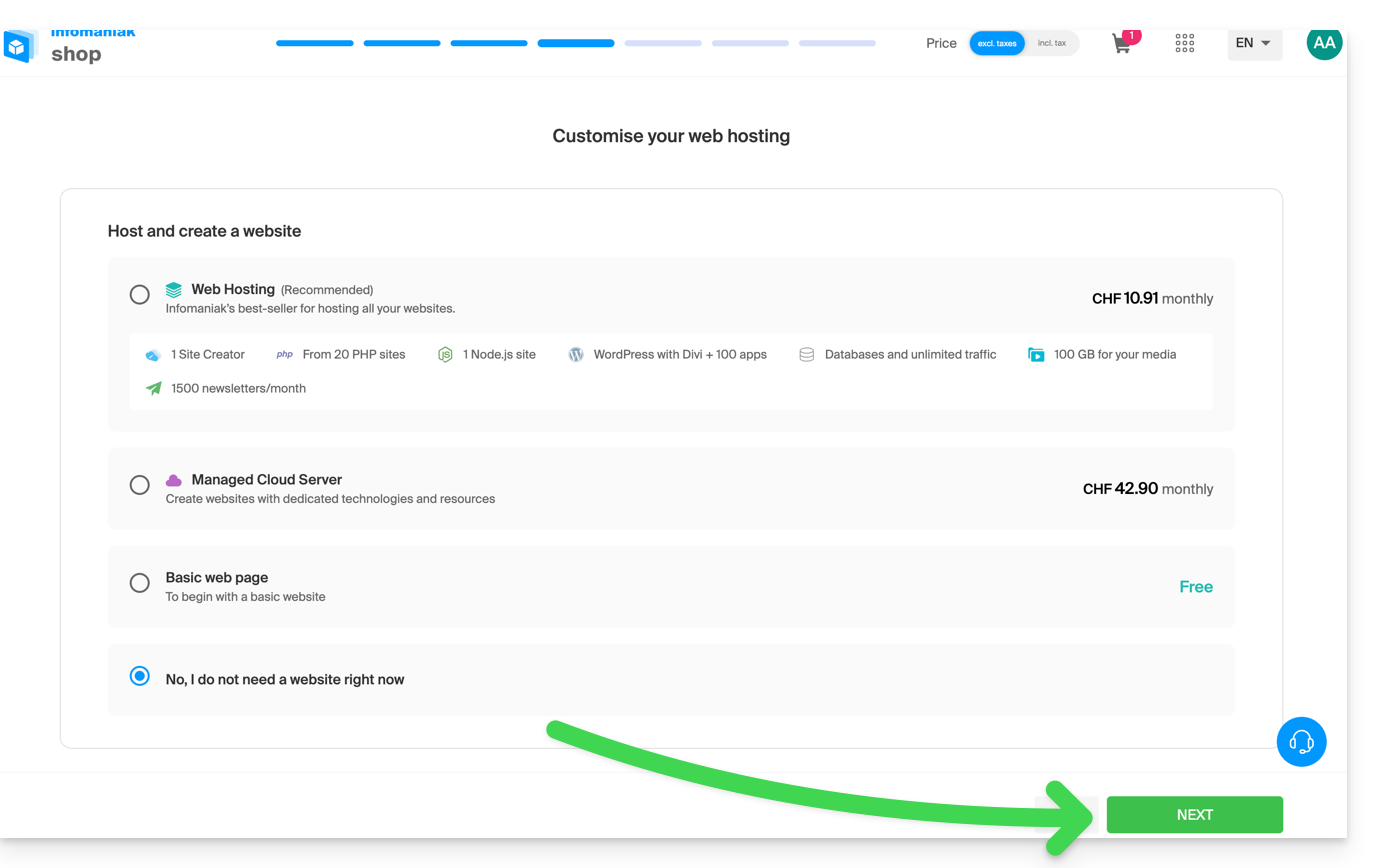
- Enter the contact details related to the domain name.
- Complete the purchase, remembering to read and accept the Terms and Conditions (you may need to scroll down the page first):
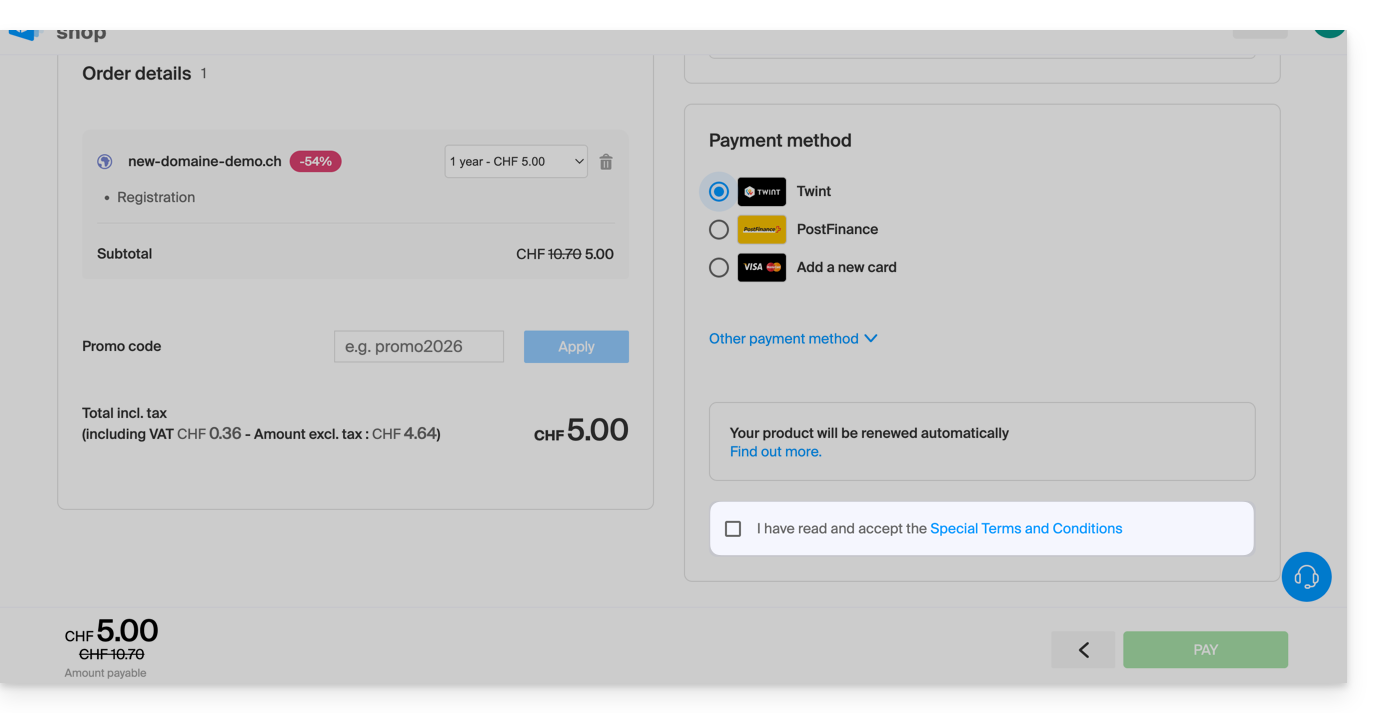
Once ordered, please wait a few hours for the setup to complete.; any DNS addition/modification may take up to 48 hours to propagate (❓: help).
Order an additional domain name
To do this:
- Click here to access the domain management section in your Infomaniak Manager (❓: help).
- Click on the button to Order an additional domain:
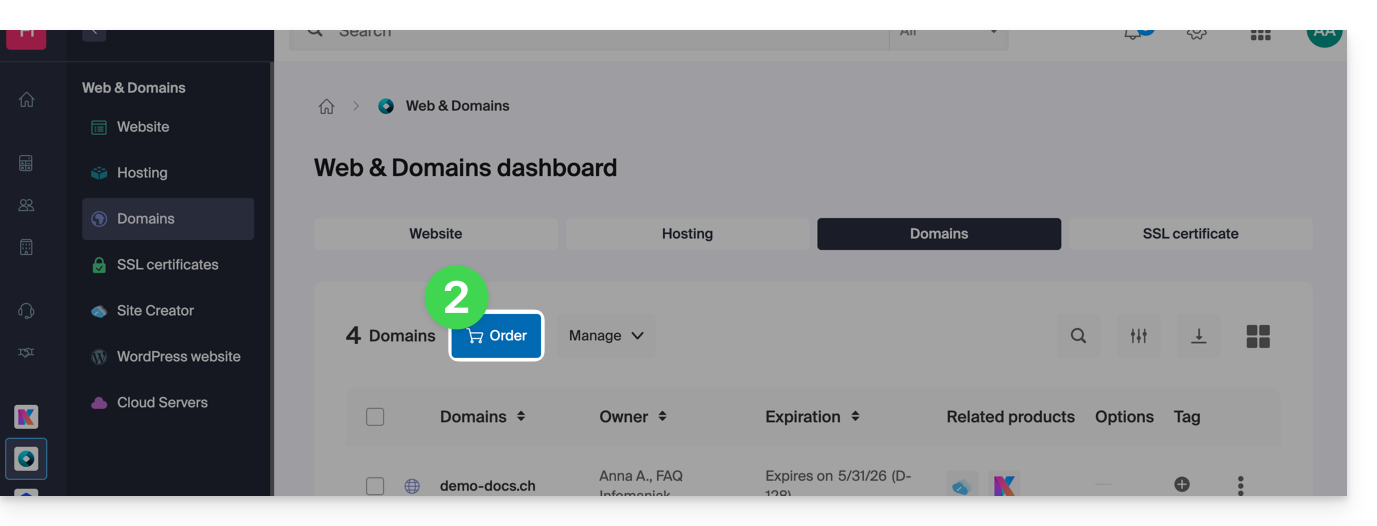
- Follow the first guide above, starting from step 4.
Check the availability of a domain name
See this other page which allows you to quickly check if a domain is available for registration or not.
At least 3 main indications can be identified:
- Available — in this case, it's good, you can book it.
- Transferable — you must own it with another provider in order to transfer it to Infomaniak (❓: help).
- Unavailable – unfortunately, it will not be possible to order it until it is released by its current owner.
Link to this FAQ: https://faq.infomaniak.com/1987
Has this FAQ been helpful?
This guide details the two main types of identifiers. They are distinct, even if the address format may be identical.
Infomaniak Account vs. Email Address
Here is a summary of these 2 types of identifier:
| Type of identifier | Usage | Where to use it | Associated password |
|---|---|---|---|
| Infomaniak account (login ID) | Access all of your Infomaniak services. | Connect to: | Password set during user account creation. ⚠️ Different from the password for your email addresses. |
| Email address hosted with Infomaniak | Send and receive emails. | Connect via SMTP/IMAP…
| Password specific to each email address (there may be several). ⚠️ Different from your Infomaniak account password. |
What to do if you have connection problems?
There is no need to contact Infomaniak Support (which does not have access to any of your passwords)...
- Having an issue with your Infomaniak account? Reset your account password.
- Having trouble with your email address? Reset your email password.
Explanation
- As with many other online services, you registered with Infomaniak using a personal email address.
- This personal email address serves as your login ID when you want to access Infomaniak services.
- This login ID has its own password (defined when creating your Infomaniak user account – your personal email address, see above).
There is no connection between…
- … this username/password combination described in points 1/2/3 above…
- … and the email addresses you created or obtained from Infomaniak.
A link may exist if the address is identical (for example, you registered with the email address toto@abc.xyz and you also manage this same email address with Infomaniak), but even in this case, the password will most likely be different – once for the login ID toto@abc.xyz and once for the email address toto@abc.xyz.
Other login IDs?
Acquiring other Infomaniak products involves obtaining other credentials, such as those required for FTP, MySQL, SSH connections, etc., but these credentials are entirely independent of the two types described above.
Link to this FAQ: https://faq.infomaniak.com/1980
Has this FAQ been helpful?
This guide explains how to copy data within the kDrive desktop app (desktop application on macOS / Windows / Linux) from one kDrive to which your Infomaniak user has access to another kDrive to which the same Infomaniak user has access.
Introduction
- To be able to use multiple Organizations, you must have been added to them (❓: help) and have been granted access to the respective kDrives.
- For example, if the user
abc@domain.xyzhas a kDrive called "ABC" within their Organization "ABC" and is invited to the Organization "VWX", which grants them access to the kDrive "VWX", they will see 2 kDrives on ksuite.infomaniak.com/kdrive and will be able to send data from one to the other in one click.
- For example, if the user
- Without being a user of multiple Organizations, it is also possible to copy data, but only by importing the entire kDrive, without being able to choose specific data: to import all the data contained on another of your kDrives at once, please refer to this other guide and choose kDrive at step 7.
Copy data between kDrive accounts you already have access to
To copy a folder or file to another kDrive account that you already have access to from the same user account:
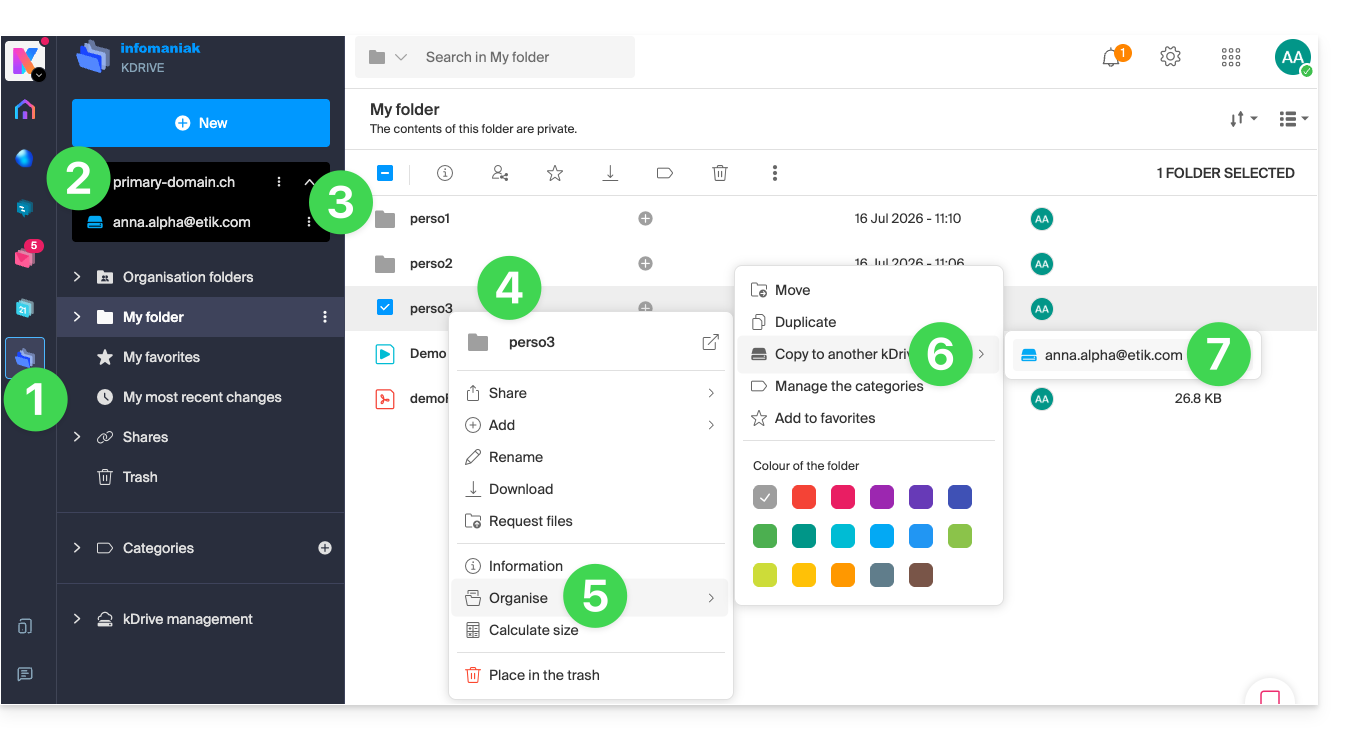
- Click here to access kDrive in your Infomaniak kSuite (❓: help).
- Check or select the relevant kDrive from the dropdown menu in the left-hand sidebar.
- If necessary, select the other kDrive from which you want to copy files.
- Right-click or click on the action menu ⋮ to the right of the folder or file you want to copy to the other kDrive.
- Click on Organize.
- Click on Copy to another kDrive.
- Choose the kDrive in question from the list displayed in this same drop-down menu:
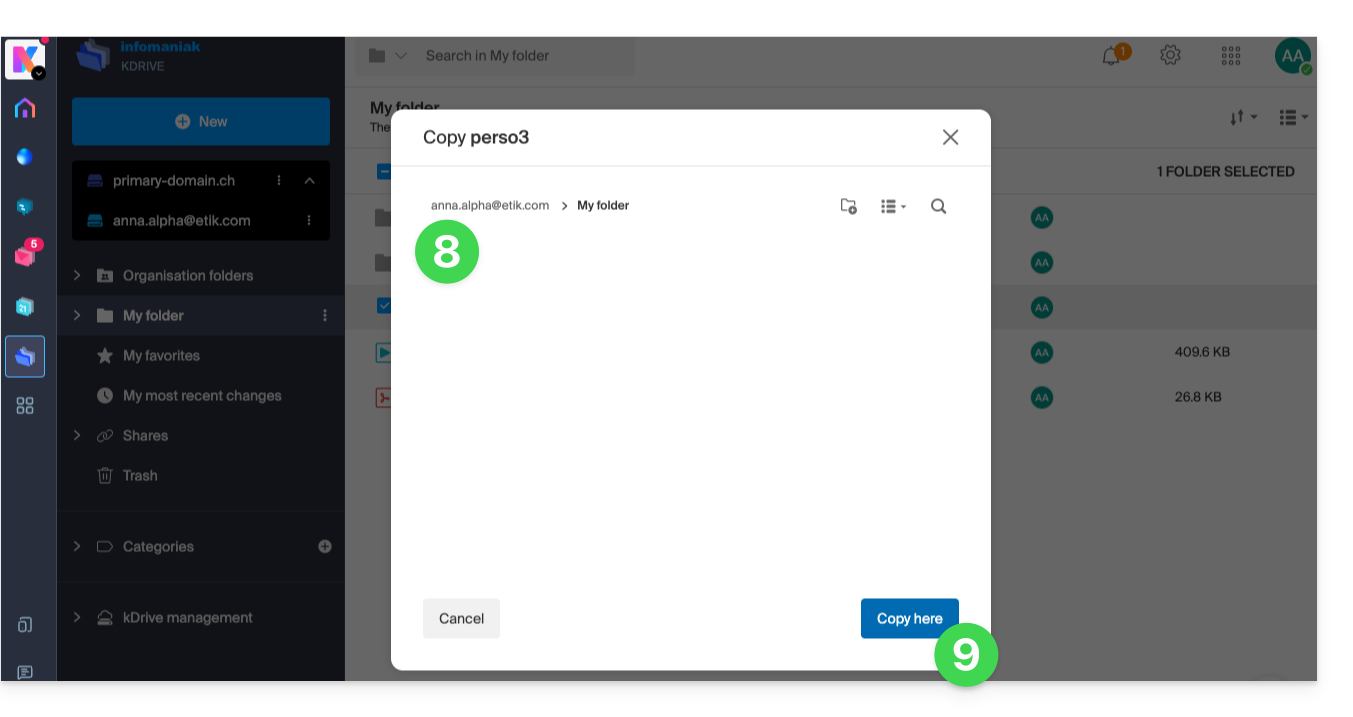
- Choose the destination location (knowing that the shared folder ("Organization Folders") cannot receive files or folders at its root, but you can create a subfolder using the appropriate icon if the user has the necessary permissions).
- Click the blue button to start the copy process:
The copy process is not instantaneous; please wait a few minutes!
Link to this FAQ: https://faq.infomaniak.com/1908
Has this FAQ been helpful?
This guide explains how to obtain a backup space with Swiss Backup, the backup solution in an independent Swiss cloud.
Prerequisites
- Determine which type of device needs to be backed up to Swiss Backup:
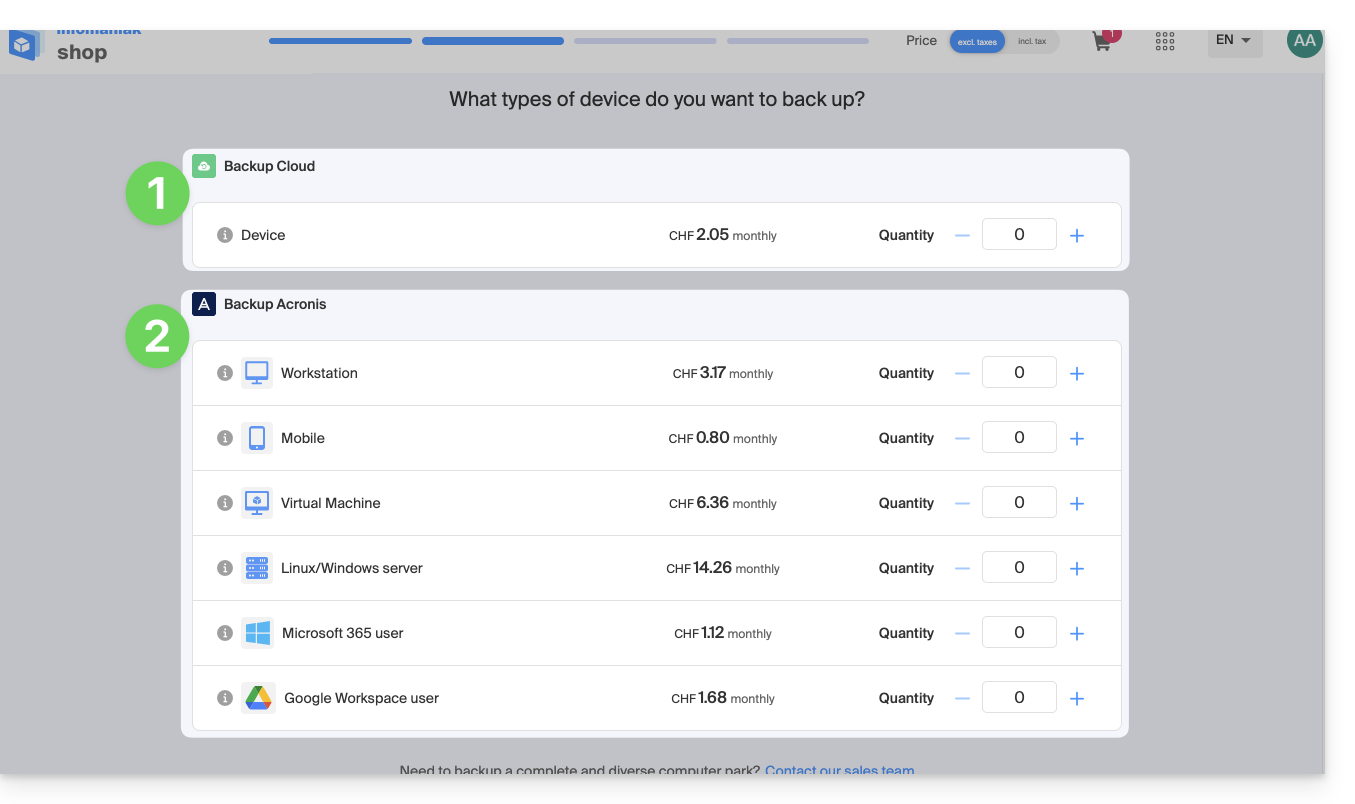
CLOUD backups - allows you to back up and synchronize files via the following protocols:
- Swift (recommended)
- FTP / SFTP
- S3 Compatible
- Synology NAS system
using the application of your choice…
ACRONIS backups - the ideal solution for backing up:
- Windows / macOS workstations
- Android / iOS (iPhone) mobile devices
- Windows / Linux servers
- VMware, Hyper-x, Virtuozzo virtual machines...
- Microsoft 365 / Google Workspace spaces…
using the Acronis Cyber Protect Cloud software, which allows you to store backup data using Swift in the backend and create "protection plans" where you can choose between:
- backing up the entire machine (all hard drives attached to the machine via SATA)
- backing up files / folders (of your choice specifically)
- backing up volumes / disks (if you have external disks)
- scheduling backups
- backup retention period
- restoring backups
- encrypting backups
Get Swiss Backup
To order Swiss Backup storage space:
- Click here to access the management of your product in the Infomaniak Manager (need help?).
- Click on Order:
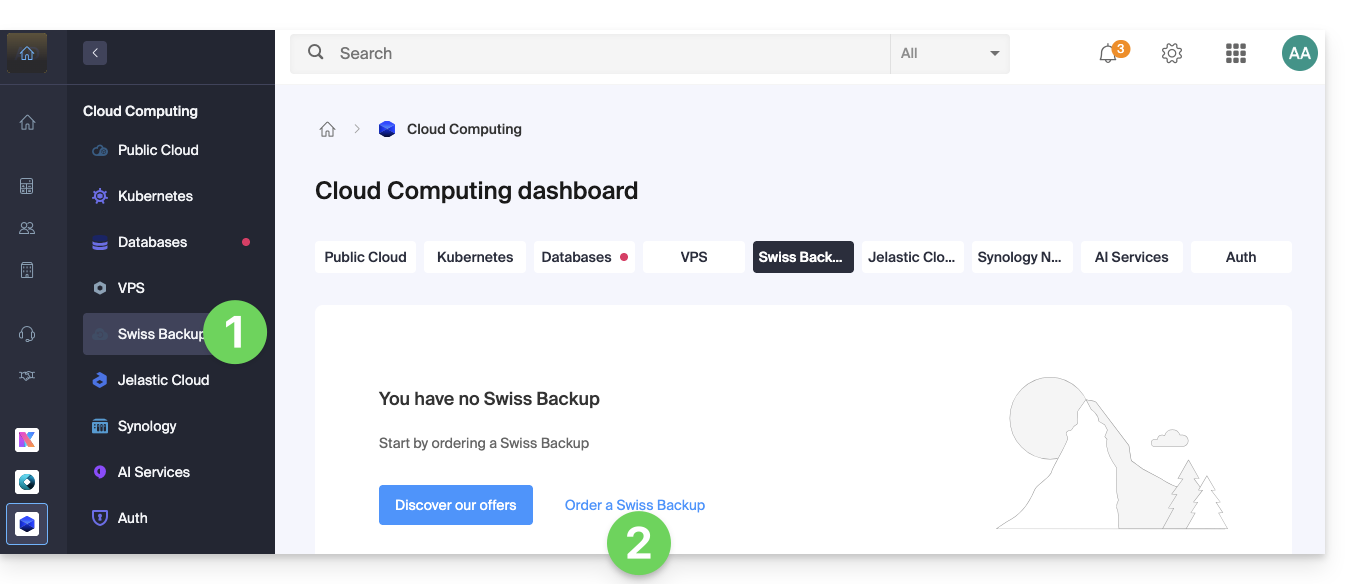
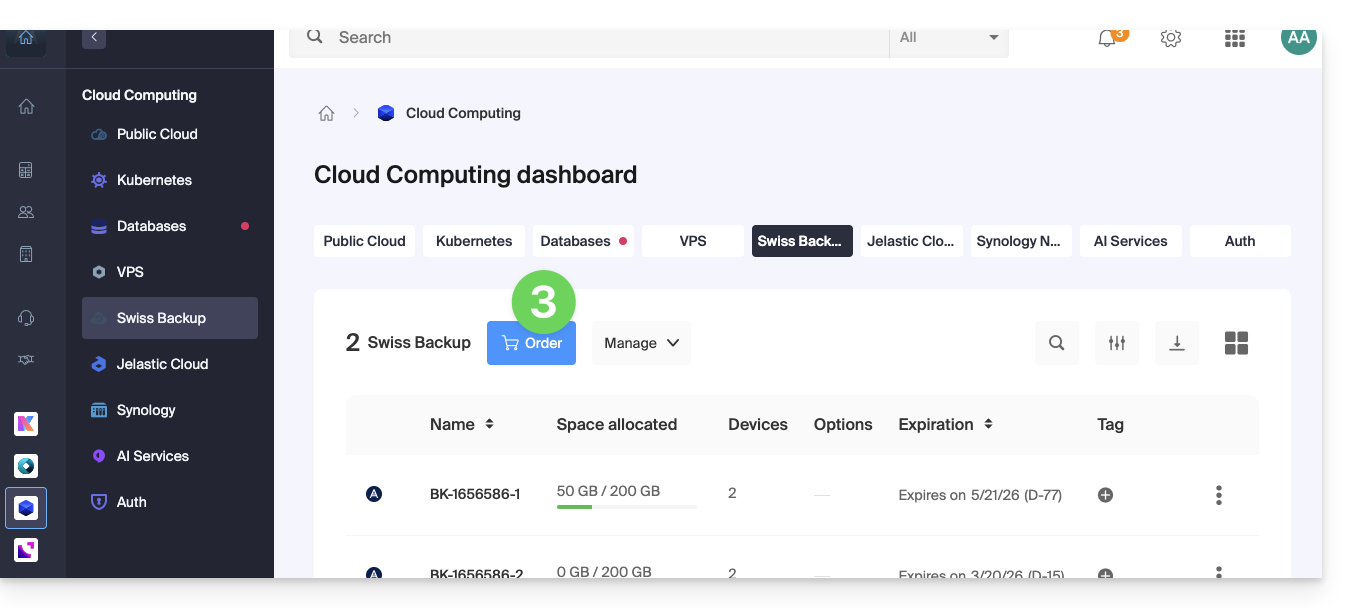
- or on the shopping cart icon if a Swiss Backup product is already active on the Organization and you want to order an additional one:
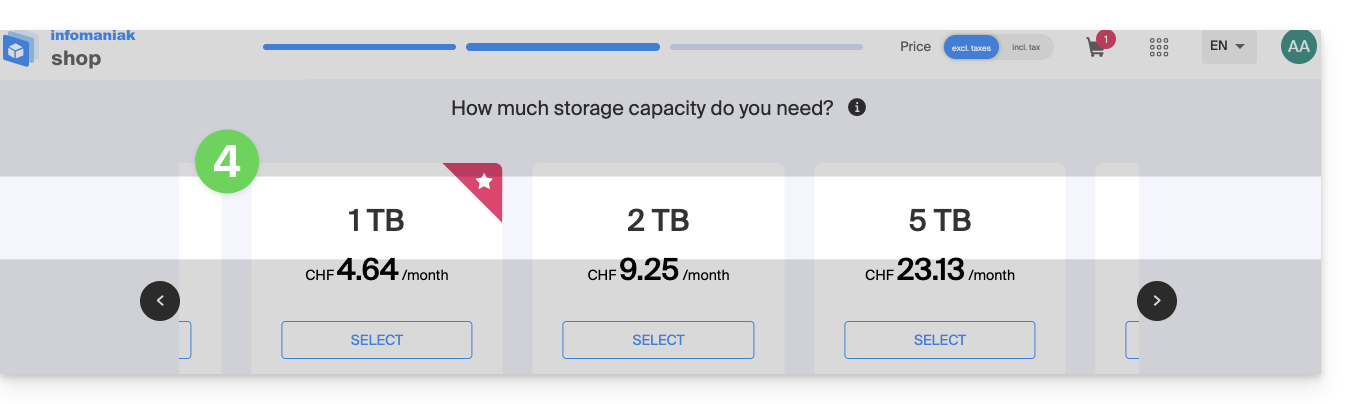
- Choose the maximum size of all the storage space needed for your project(s), regardless of the number and type of backups you will perform:
- Here, the example project involves backing up two things:
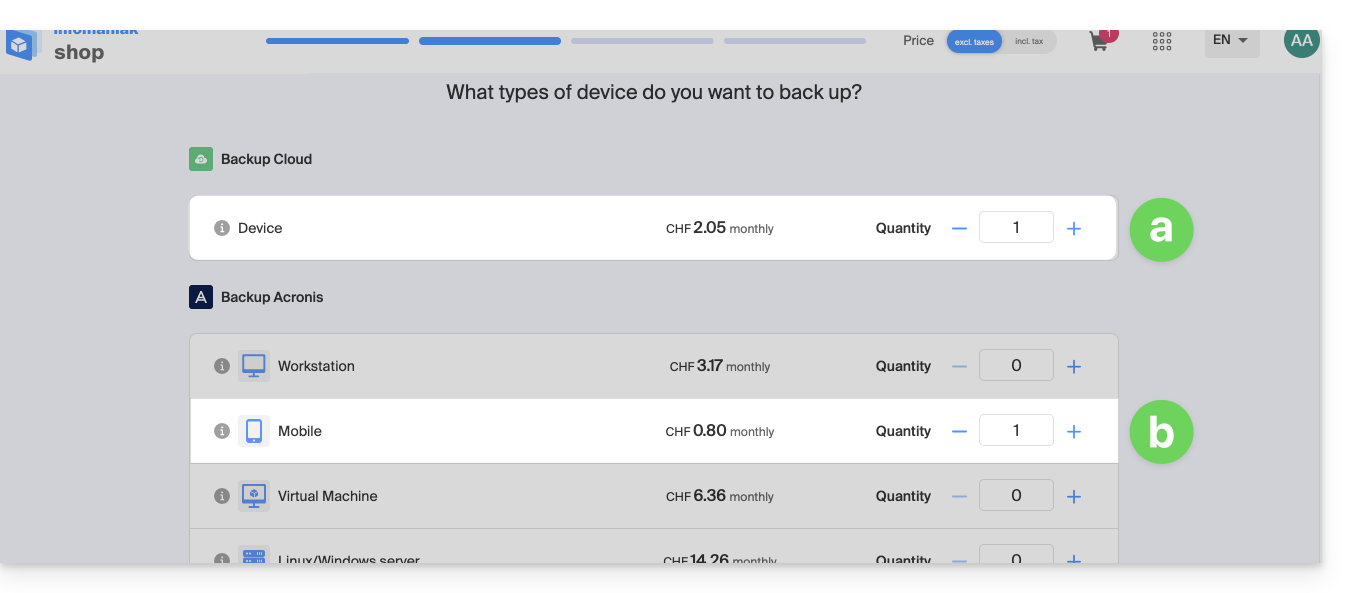
- important and large documents located on 1 NAS
- photos/videos from an Android mobile device
- Complete the order and pay.
- The Swiss Backup product is displayed in your Manager, showing the disk space and quotas selected during the order:
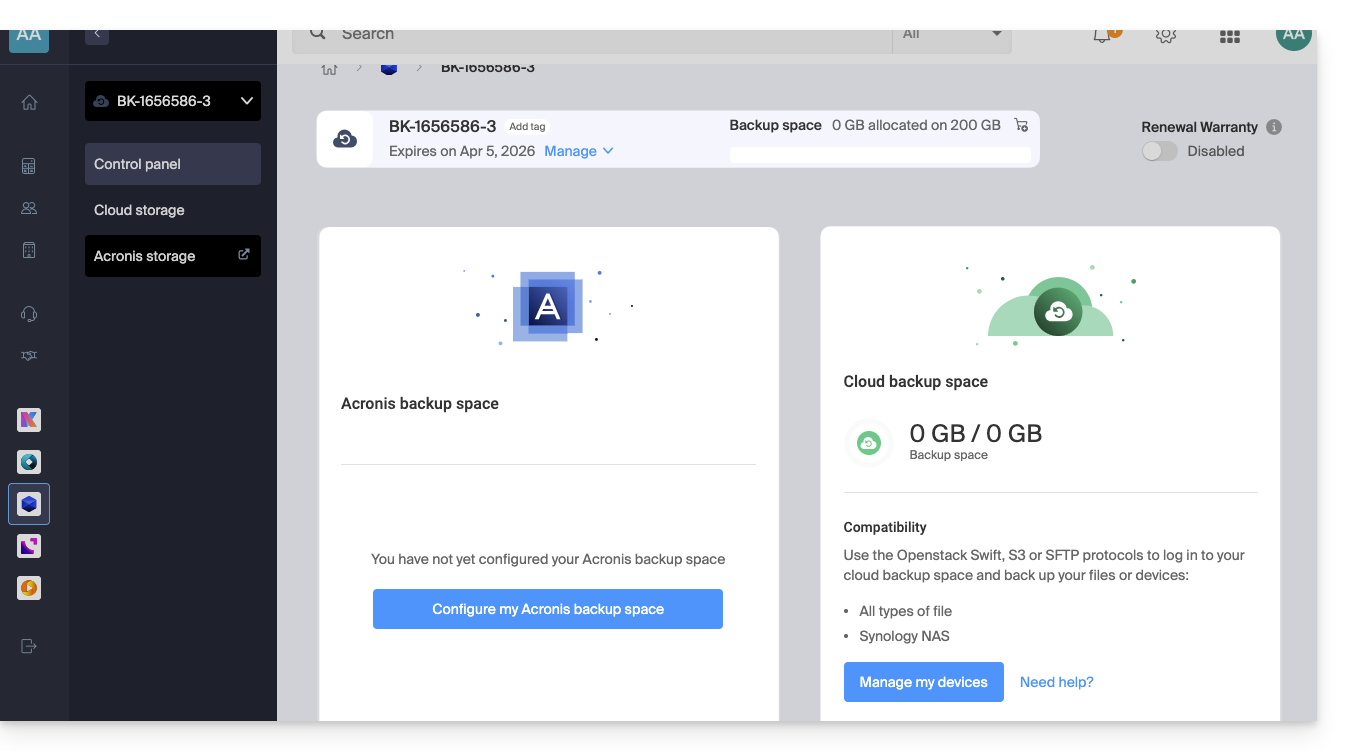
- You can now add the desired devices to your Swiss Backup interface: refer to this other guide.
Link to this FAQ: https://faq.infomaniak.com/2291
Has this FAQ been helpful?
This guide explains how to modify the access rights to products for a user in your Organization on the Infomaniak Manager.
Introduction
- Since you opened your account with Infomaniak, you have been part of at least one Organization (❓: help).
- If you were the only user and it wasn't an invitation, an Organization was created in your name, and you automatically become its legal representative.
- Otherwise, you belong to the Organization that invited you (to join its kSuite, to manage a product, etc.).
- It is possible to change a user's role within your Organization (❓: help).
- You can then define whether a user…
- … is part of your Organization and whether they should become:
- Legal Representative
- Administrator
- Collaborator (this section is detailed below…)
- … is external to your Organization (limited rights):
- External users are not included in calendar and address book sharing with the entire Organization.
- … is part of your Organization and whether they should become:
Who can access what…
Prerequisites
- First, switch to the desired Organization if you cannot find the expected list of users (❓: help).
- Be at least an Administrator of the Organization (❓: help).
- Haveadded a user as a collaborator (❓: help).
The guide below explains how to manage access to products for collaborators and external users. Indeed, a legal representative or an Administrator always has access to all existing products within the Organization, as displayed in the Infomaniak Manager.
To modify a user's product access within the Organization:
- Click here to access user management in the Infomaniak Manager (❓: help).
- Click on the action menu ⋮ located to the right of the user in question.
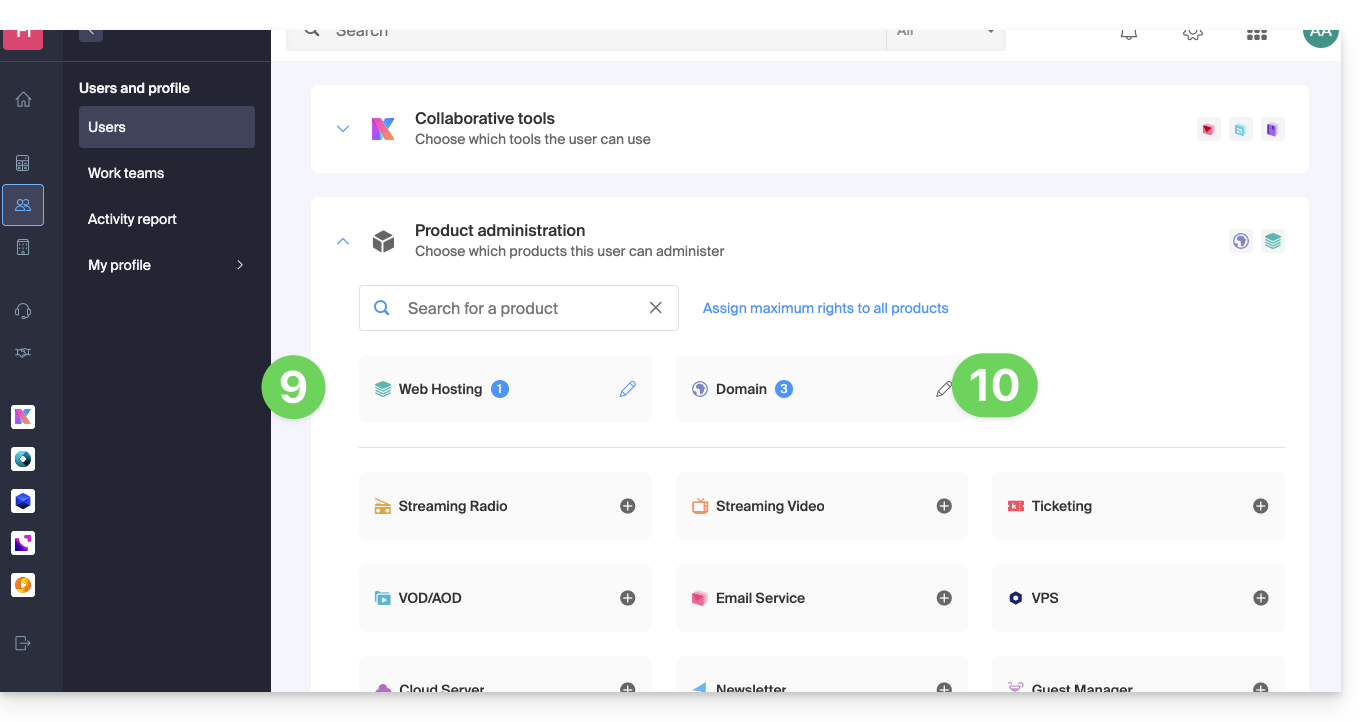
- Click on Modify product access:
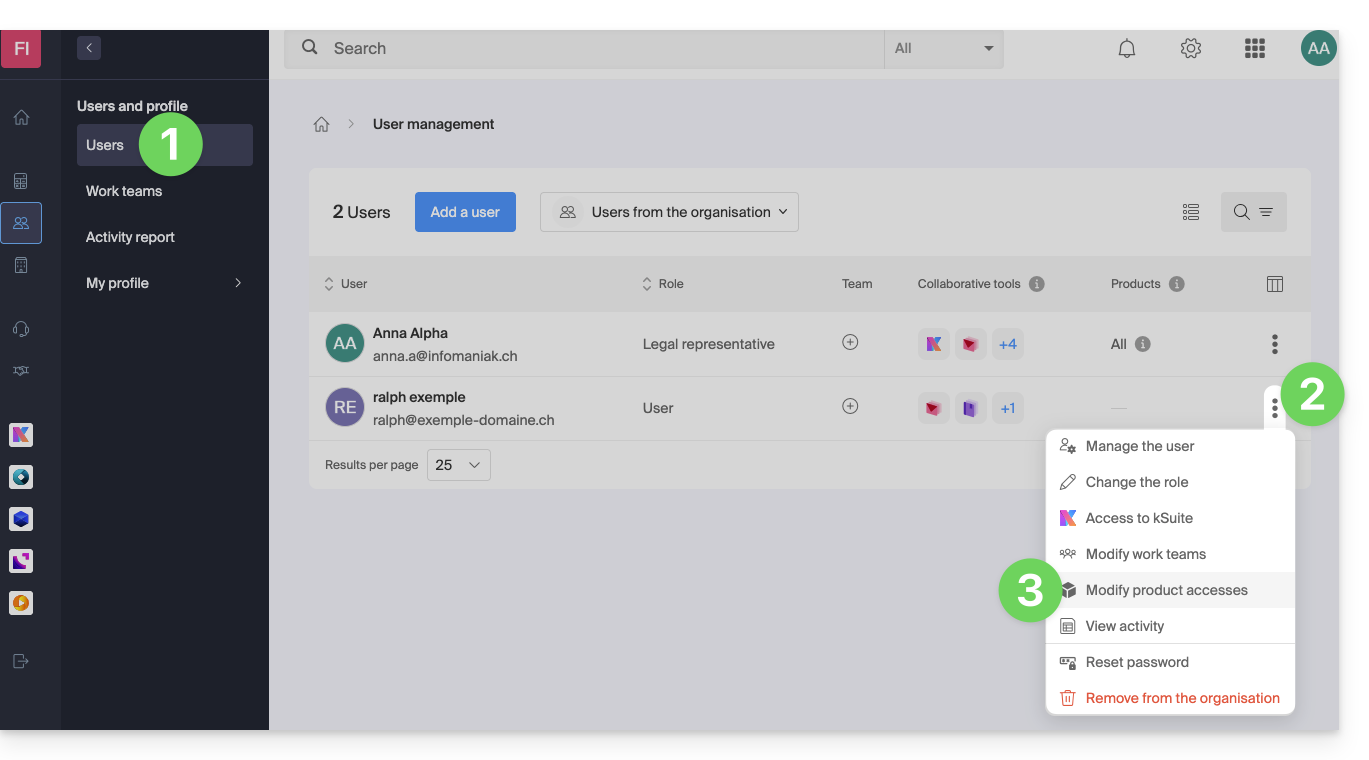
- You can grant access to everything with maximum permissions in one click.
- Otherwise, click on the product category you want to grant access to.
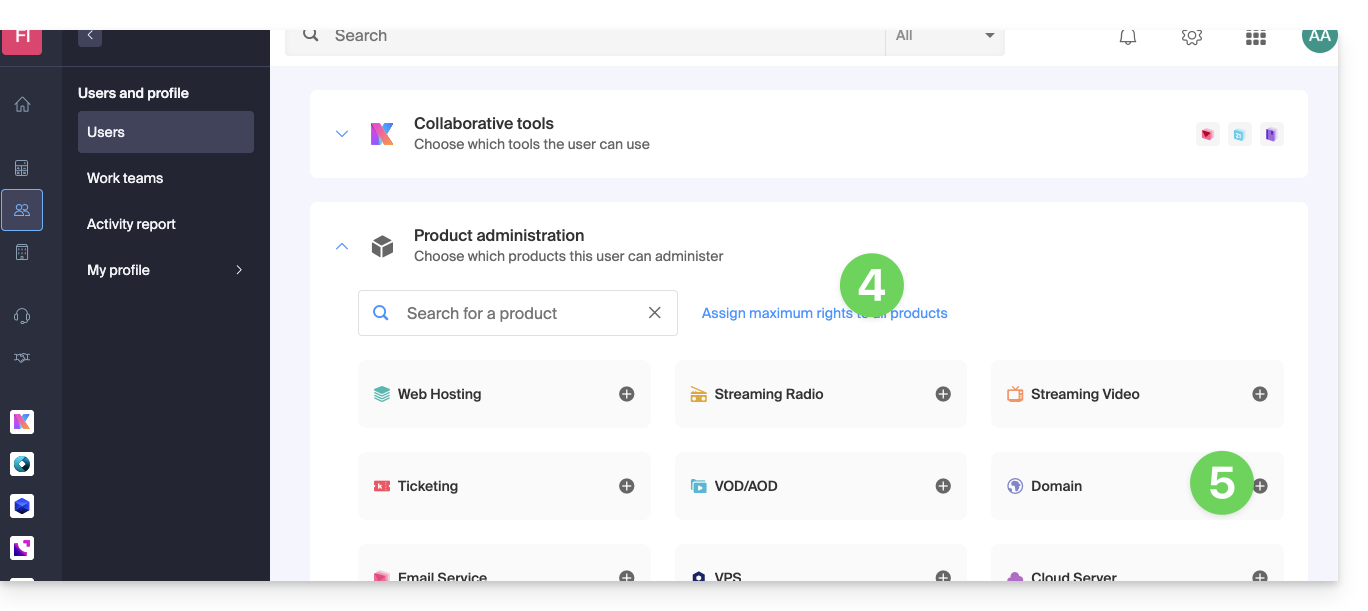
- Select the product(s) you need.
- If you have selected multiple products, decide whether a future additional product should automatically be visible to the user (and with what type of permissions❓: help).
- Click the Save button:
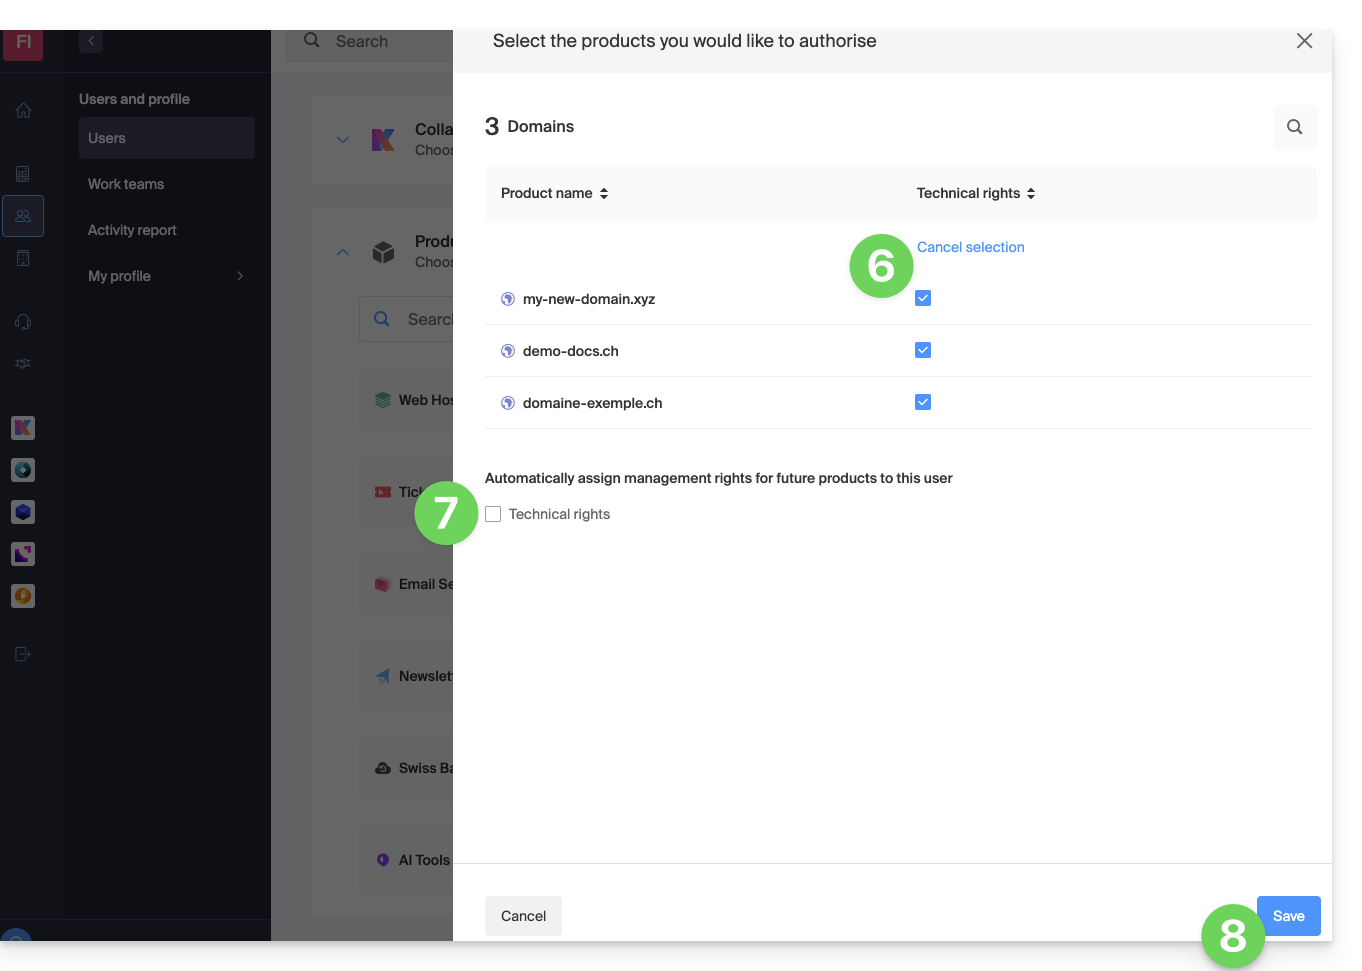
- Permissions are granted immediately.
- Click on the pencil ✎ icon to modify the permissions:
- If you need to grant access to multiple products, start again from step 5.
Using the service / Managing the service
Please note that in the product table, it is important to distinguish between access to the products (e.g., kDrive within kSuite) and access to product management: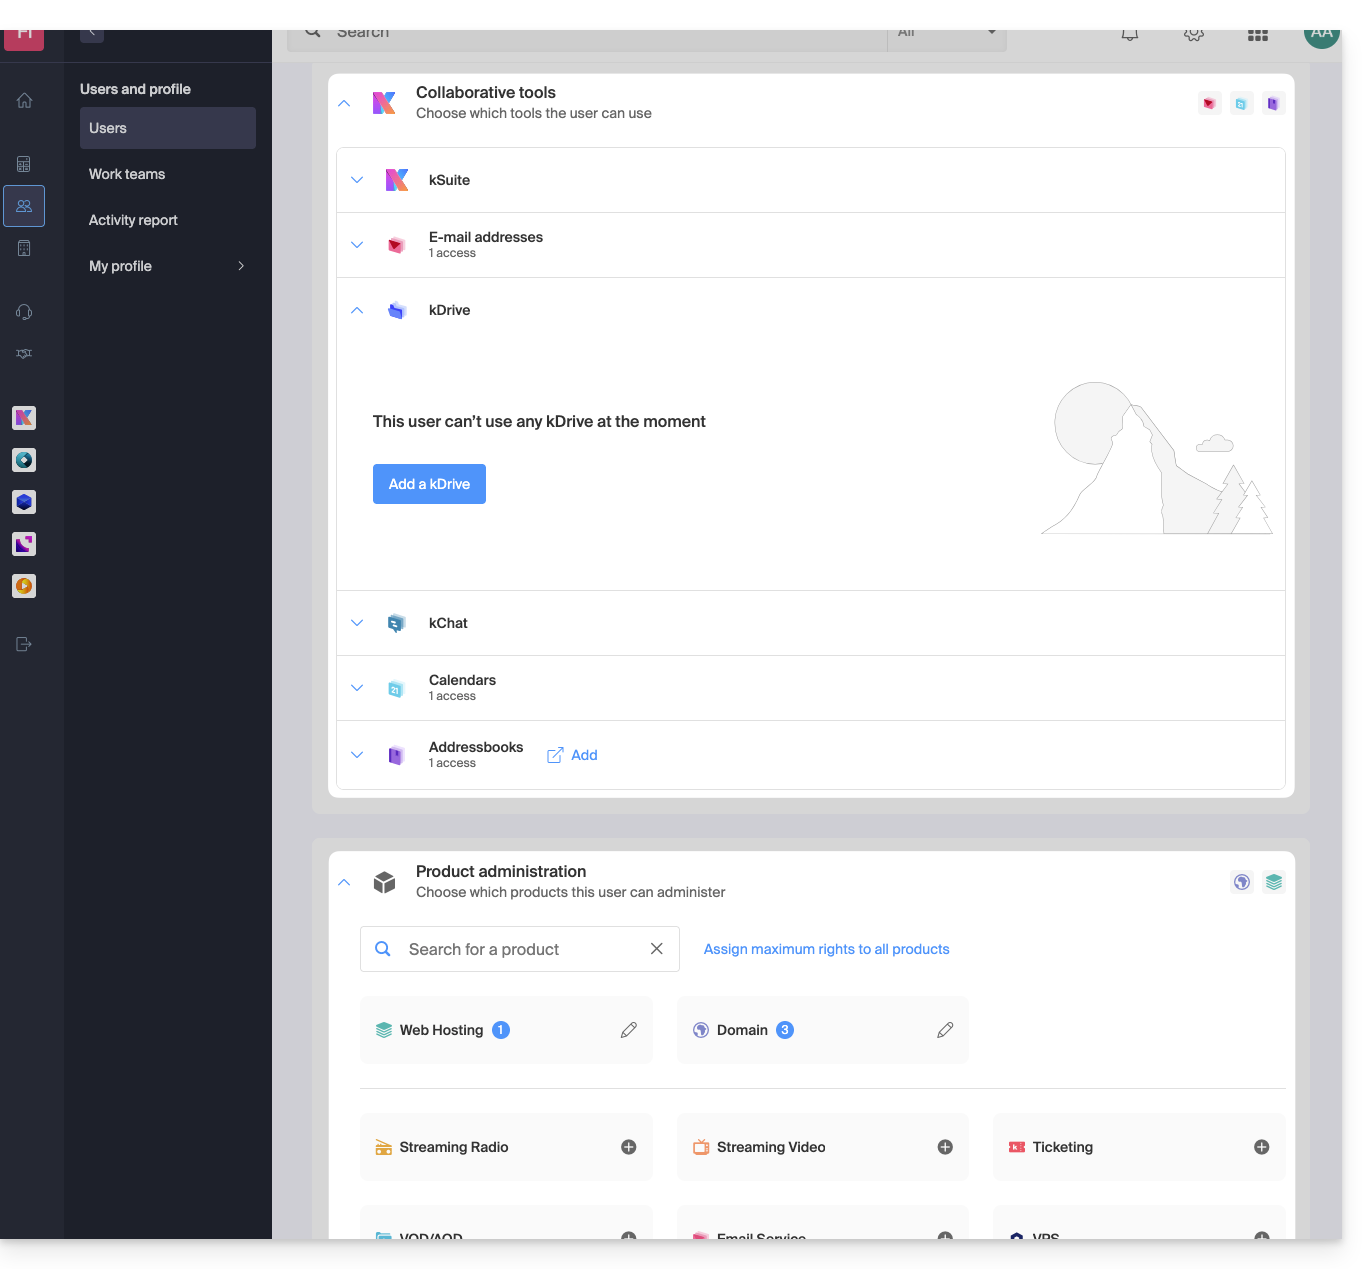
It is possible to authorize a user to use kDrive (e.g., create a PDF) without granting them management rights for the kDrive service (they will not be able to change the plan, invite a new user, cancel, etc.).
Technical rights / Statistical rights
With certain services like kDrive, it is possible to grant a collaborator TECHNICAL and/or STATISTICAL rights (adds access to the dashboard, sharing links, storage statistics, active users, connected devices, activity on the kDrive):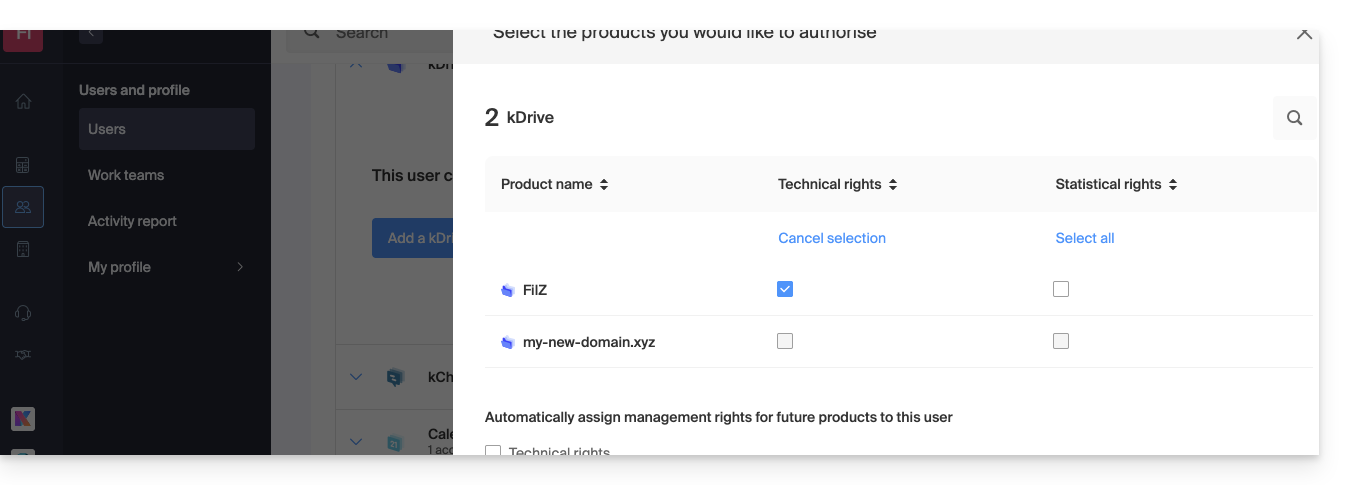
Other services, such as domain names, do not have a STATISTICS section: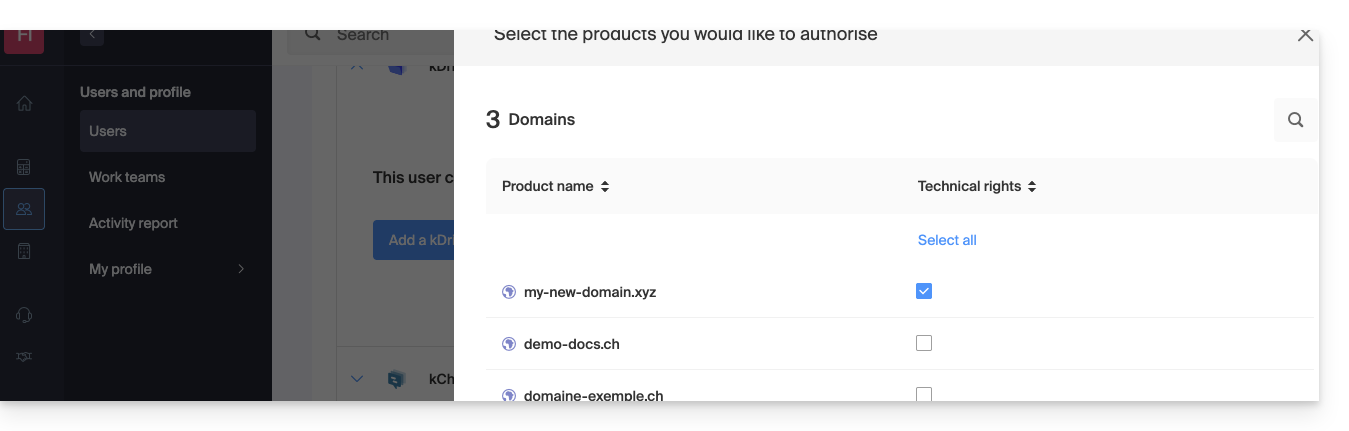
Some specific services, such as ticketing, allow for even more detailed permissions: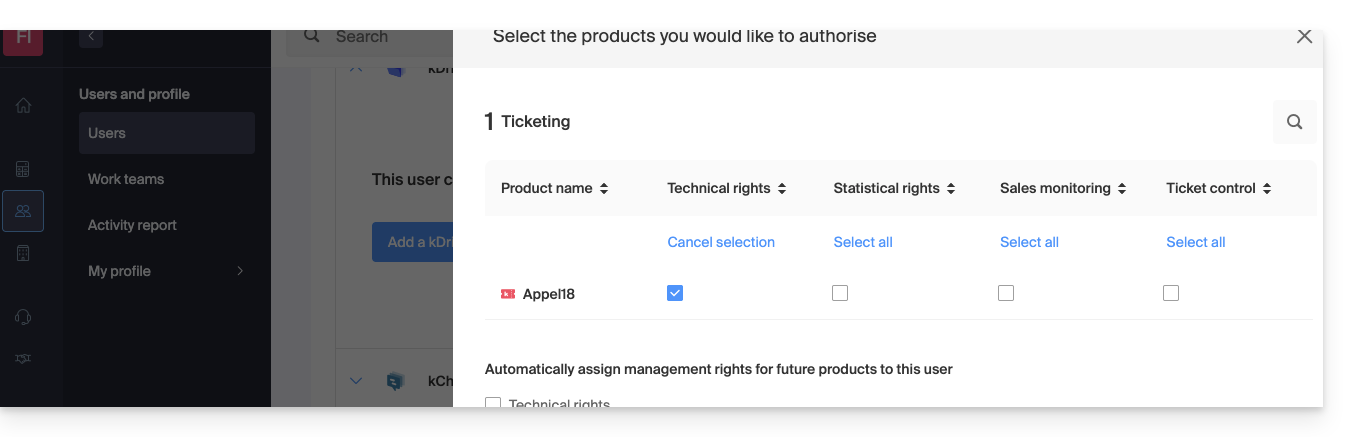
Easy Access: Groups
To simplify the process of adding access rights to a product within your Organization, there are Groups (❓: help). These allow you to create teams that are linked to Infomaniak products with the desired rights, which is very useful for granting a new member of your Organization access to the products they will need in their daily work.
Link to this FAQ: https://faq.infomaniak.com/1610
Has this FAQ been helpful?
This guide details how to manage the synchronization modes and file storage with the desktop application kDrive v4.x on macOS and Windows (this feature is called Lite Sync in version 3.x of the application).
Prerequisites
Two synchronization modes
Managing files online and offline helps optimize your computer's storage space:
1. Stored online (enabled by default when installing version 4 of the app)
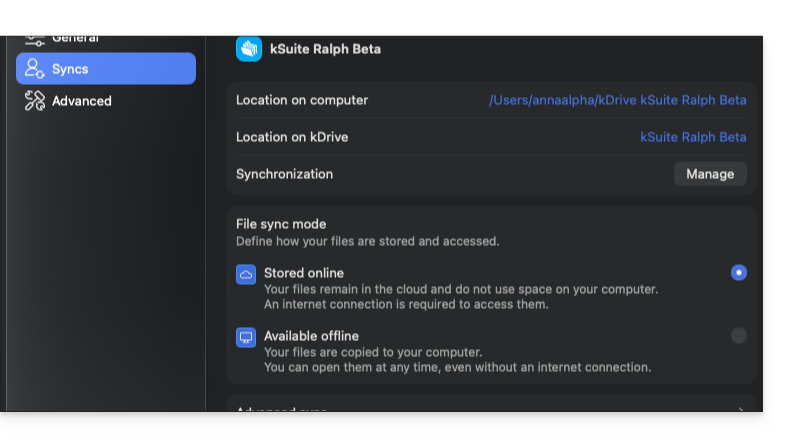
- Your files are primarily stored in the cloud, on the Infomaniak kDrive web application (online service ksuite.infomaniak.com/kdrive) and the kDrive mobile application (iOS / Android).
- They do not take up any local disk space (only traces of a few KB are present, with or without an internet connection).
- The file is downloaded automatically and on demand as soon as it is opened (requires an Internet connection).
- Any new file added to the kDrive folder on your computer is sent to the cloud (as soon as an Internet connection is available), and then immediately reduced in size to represent only a virtual file.
Limited use case: although your files appear in your computer's file structure, they are not physically stored locally. Without an internet connection, it is impossible to open them. You must wait for them to be fully downloaded, for example, to copy them to an external storage device (USB drive, external hard drive).
2. Available offline
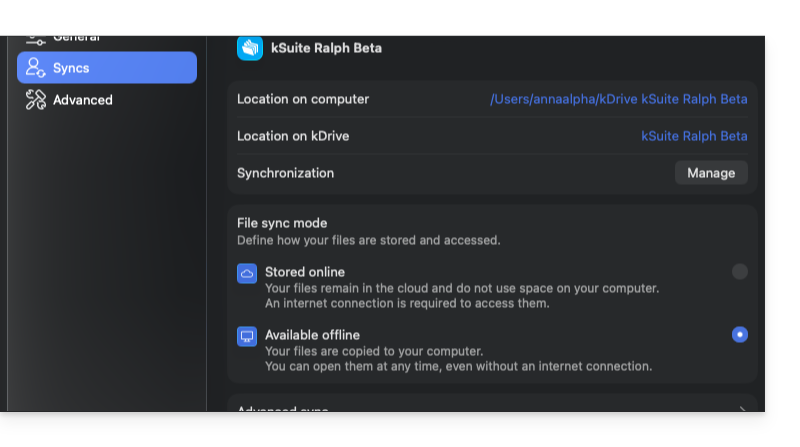
- Your files are stored entirely on your hard drive (exact copy: 1 GB = 1 GB) and remain accessible at any time, even without an Internet connection.
Limitations with local synchronization: on a large-capacity shared kDrive (several hundred GB, or even 1 TB or more) used alone or, especially, by multiple people, the regular addition of many documents will result in their automatic download to your computer. If the total volume exceeds the capacity of your hard drive, the storage will become full, which will block the kDrive application and generate errors.
Choose the default and case-by-case mode
From the kDrive desktop application, you can define how your files are stored and synchronized by default:
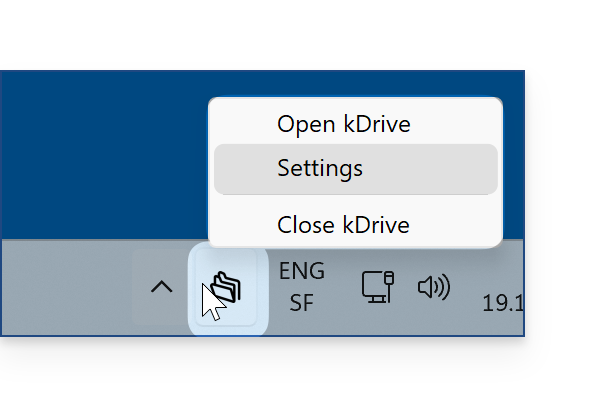
- Launch kDrive on your device: the application icon is visible in the menu bar at the top right on macOS, and in the notification area at the bottom right on Windows (❓: help).
- Right-click on the icon and choose Settings:
- Go to Accounts & Synchronization, then click on Manage (or the ❯ icon) to the right of the synchronization in question:
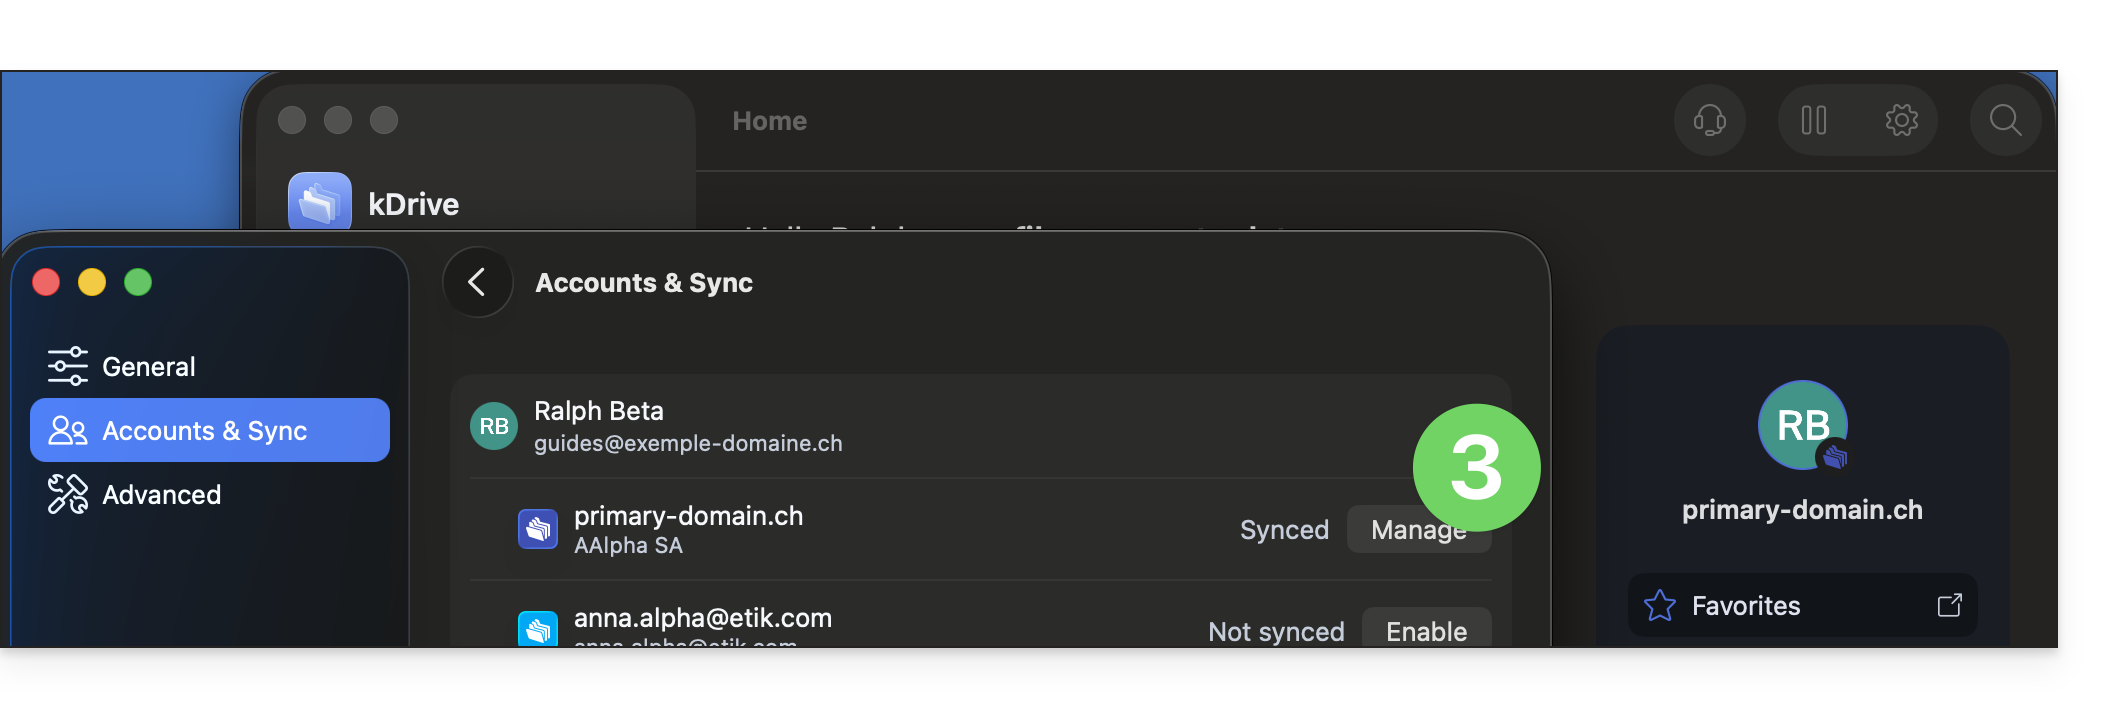
- Then select the desired storage mode:
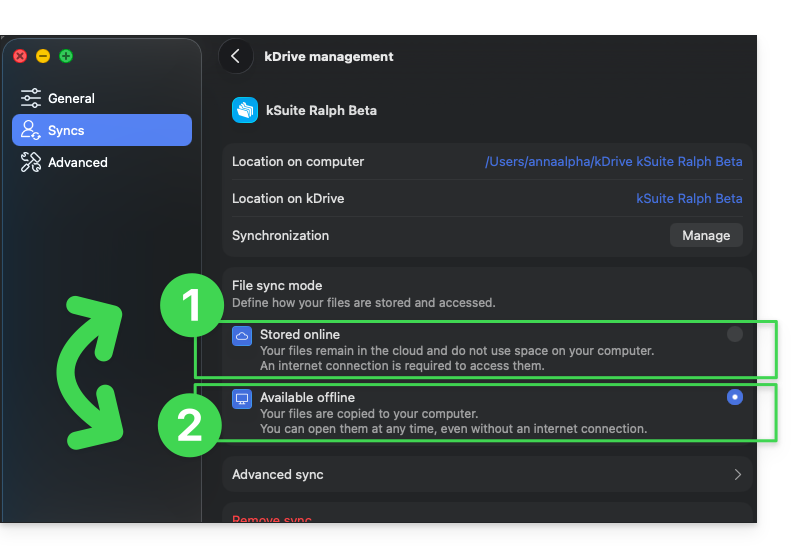
- 1. Stored online: files remain in the cloud and do not use space on your computer.
- 2. Available offline: files are copied to your computer and remain accessible at all times.
If necessary, you will need to repeat these steps for your different synchronizations: each synchronization or managed folder can have its own storage settings according to your needs (see also the last chapter below).
And regardless of the default setting, you can change the behavior of a file or folder on a case-by-case basis directly from File Explorer (Windows) or Finder (macOS):
1. Free up space (online mode)
To free up space on your hard drive by converting local files into online files (by keeping only a small trace of a few KB):
- Right-click on the file or folder that you no longer need locally.
- Select the Free up space option.
- The file remains visible in your file structure but no longer consumes local storage space; it will be downloaded automatically when needed (with an active internet connection).
Note: The "Free up space" action is not automatically applied by default to new files or folders added locally afterward.
2. Make available offline / Always keep on this device
To ensure a file or folder is permanently stored on your device:
- Right-click on the item in your kDrive.
- Select the Always keep available locally or Always keep on this device option.
- The file icon is updated to indicate that the full version is physically saved on your disk.
You can identify the selected setting by the symbols displayed next to the file icons:
Status symbols
Here are the main visual indicators displayed in the File Explorer or Finder:
| Status icons | Description |
|---|---|
| The file is stored in the cloud (light local footprint); on-demand downloading is required to open it. | |
| The file is fully present and physically synchronized on the hard drive. | |
| A synchronization or download operation is in progress. | |
| A synchronization issue has been detected for this item. |
What about advanced synchronization (additional folders)?
Advanced synchronization (❓: help) allows you to select one or more folders located outside the main kDrive directory (on your computer's hard drive) to synchronize them with the kDrive web application. Each folder in advanced synchronization can have its own storage configuration (online or offline), independent of the rest of your kDrive.
Link to this FAQ: https://faq.infomaniak.com/535
Has this FAQ been helpful?
This guide explains how to select one or more additional folders that will be uploaded and synchronized from the desktop app (desktop application on macOS / Windows / Linux) to the Web kDrive app (online service ksuite.infomaniak.com/kdrive), a process called “advanced synchronization”.
Introduction
- An advanced synchronization can have its own Online / Offline configuration (❓: help) independent of the setting applied to the rest of the standard synchronization:
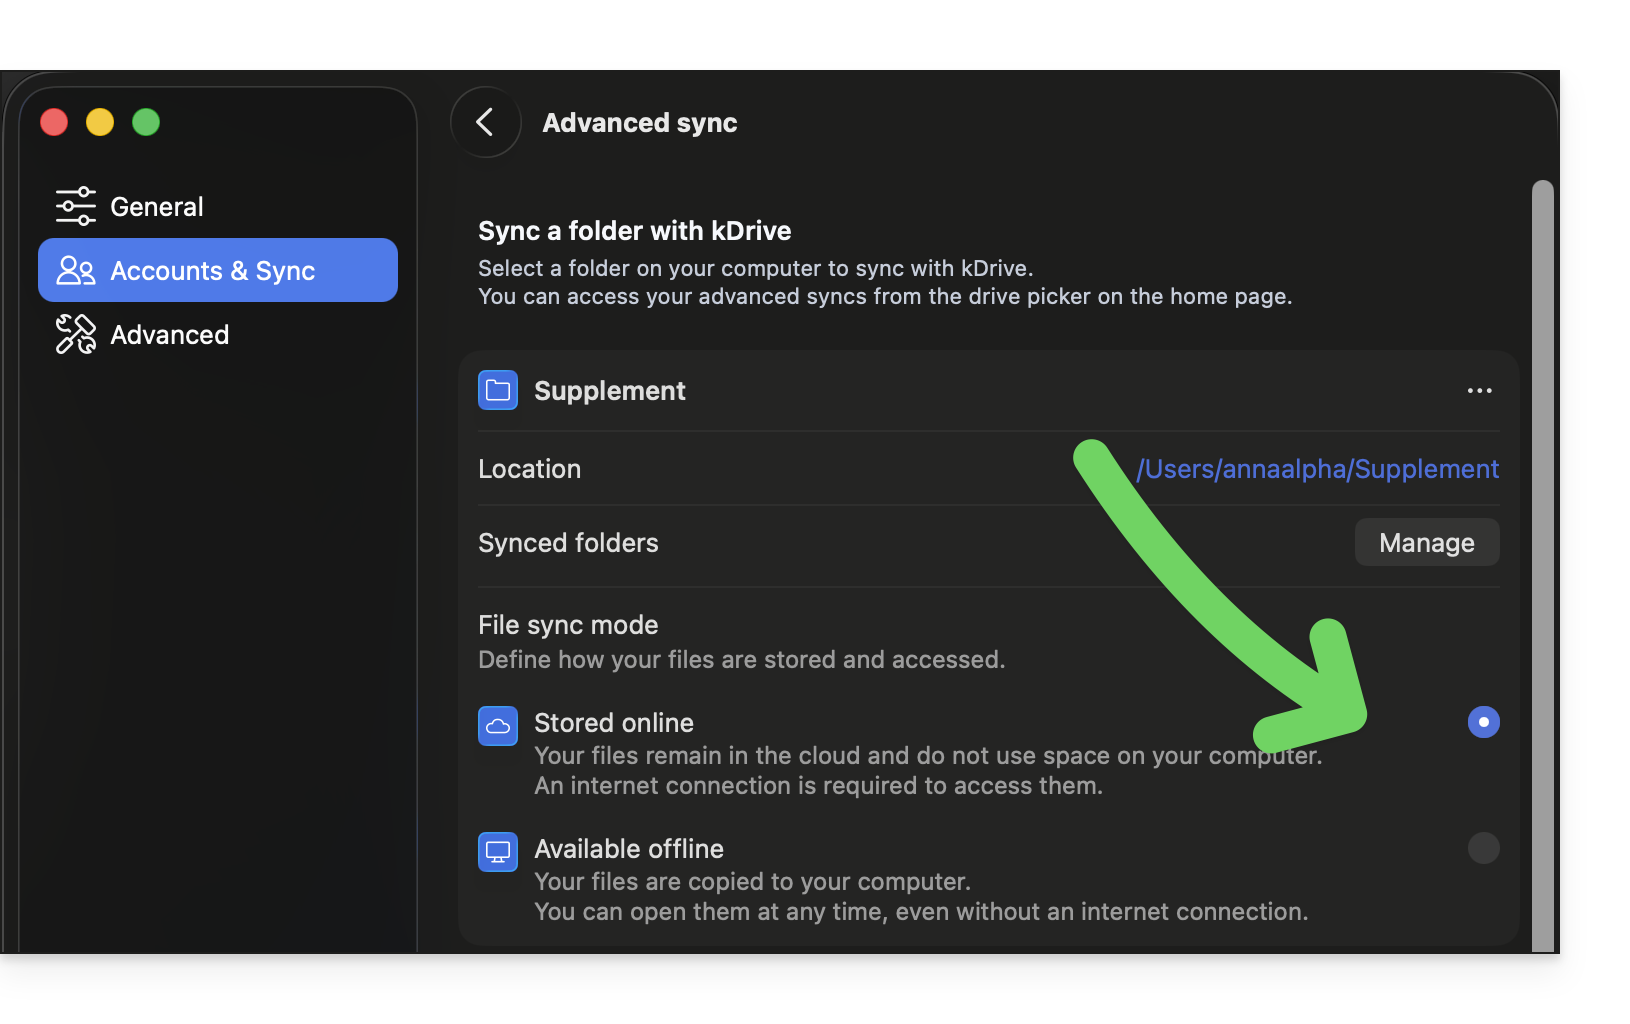
- Note that once an advanced synchronization is configured, the folder containing your new synchronization (advanced synchronization) belongs to you and will not be shared automatically, even if it is created in the organization's folders.
- It is, however, preferable to centralize everything in the "official"
/kdrive(or/kdrive2, etc.) folder rather than distributing your files in different locations. - And be careful not to create duplicates, which could take up unnecessary space and complicate the organization of your files (❓: help).
Choose an additional folder to synchronize with kDrive
Prerequisites
- For synchronization between your devices to work when your data is updated on kDrive (new file, edited document, etc.), it is obviously necessary that:
By default, when you install the kDrive application on your device, everything that is already on the web app kDrive (online service ksuite.infomaniak.com/kdrive) and that belongs to you will be transferred and visible on the device in a /kdrive (or /kdrive2, etc.) folder; and everything that is in /kdrive (or /kdrive2, etc.) will be found on the web version of kDrive.
However, you can instruct the kDrive app on your device to retrieve other folders (on the computer's hard drive, for example) outside the standard /kdrive (or /kdrive2, etc.) directory structure, so that they are also synchronized and sent to Infomaniak's servers.
Desktop app v4.x
To add a local folder for advanced synchronization:
- Launch kDrive on your device: the app icon should be visible in the top right corner on macOS / Linux, and in the bottom right corner on Windows (❓: help).
- Right-click on the icon and select Settings:
- Go to Accounts & Sync and click on Manage (or ❯ ) to the right of the current sync:
- Click on Advanced Synchronization:
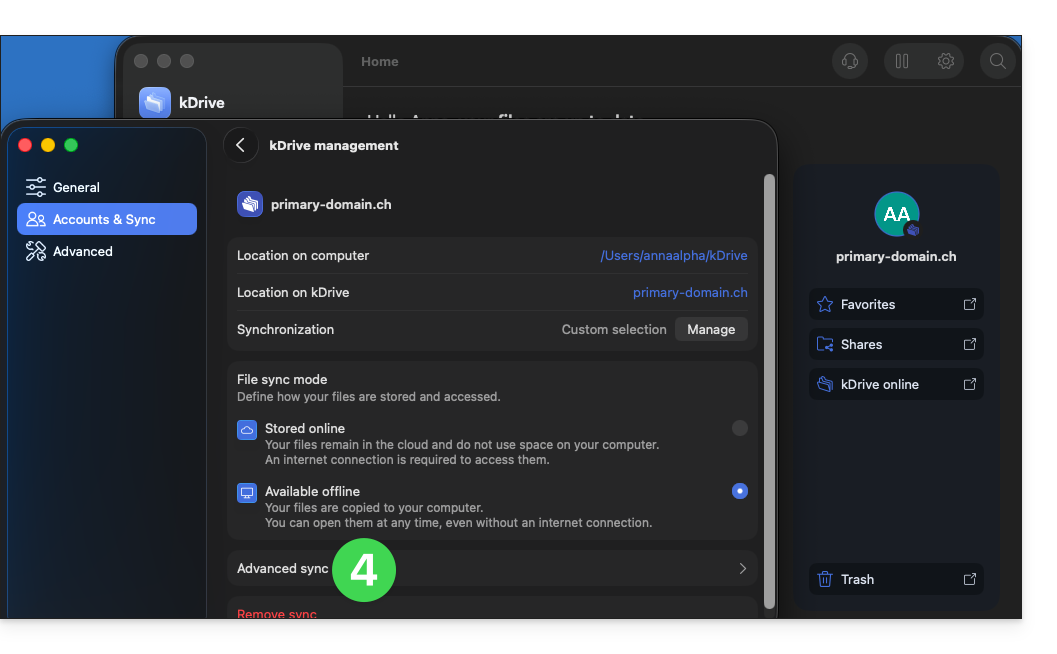
- Click on Synchronize a folder:
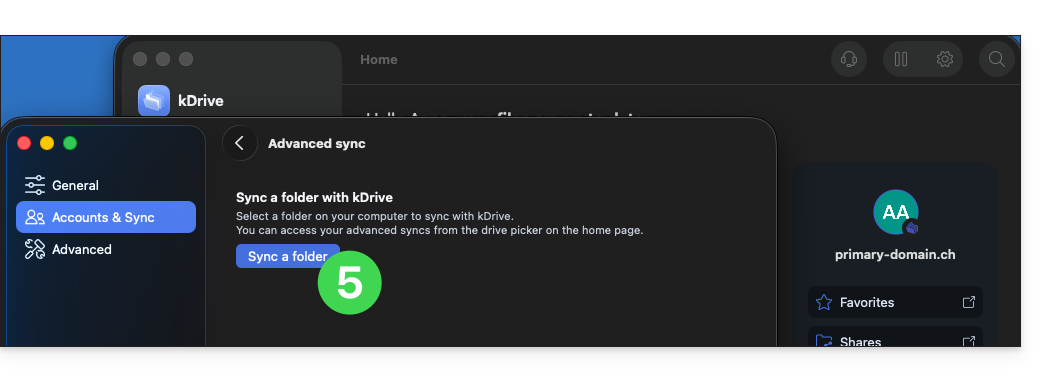
- Click the button to Select a folder:
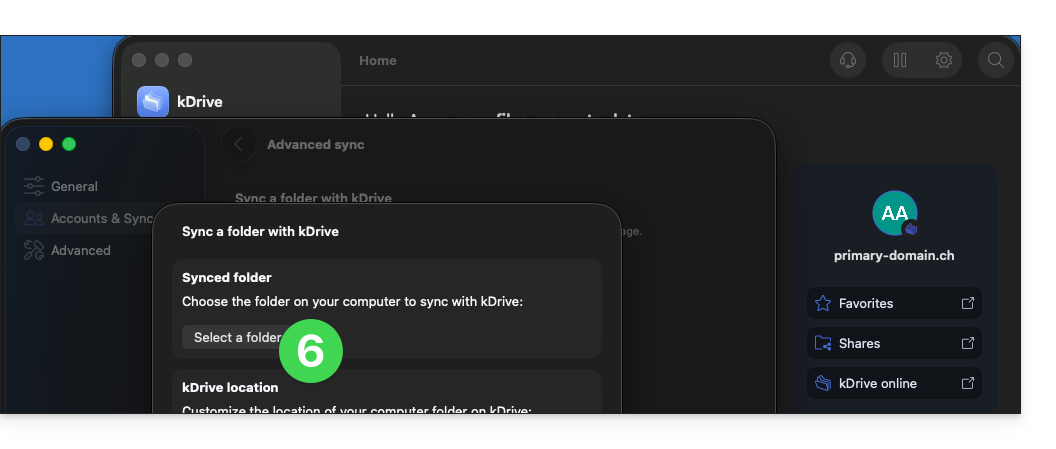
- Find and select the additional folder (outside of your existing and already synchronized kDrive structure) and then click Open:
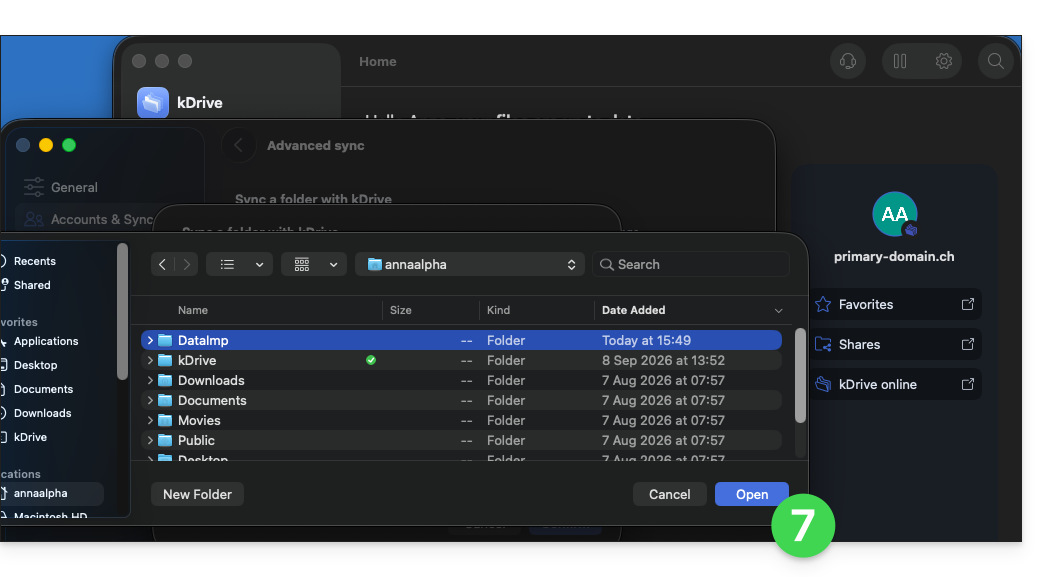
- Then click to choose the location in kDrive Web where the selected additional folder should be sent:
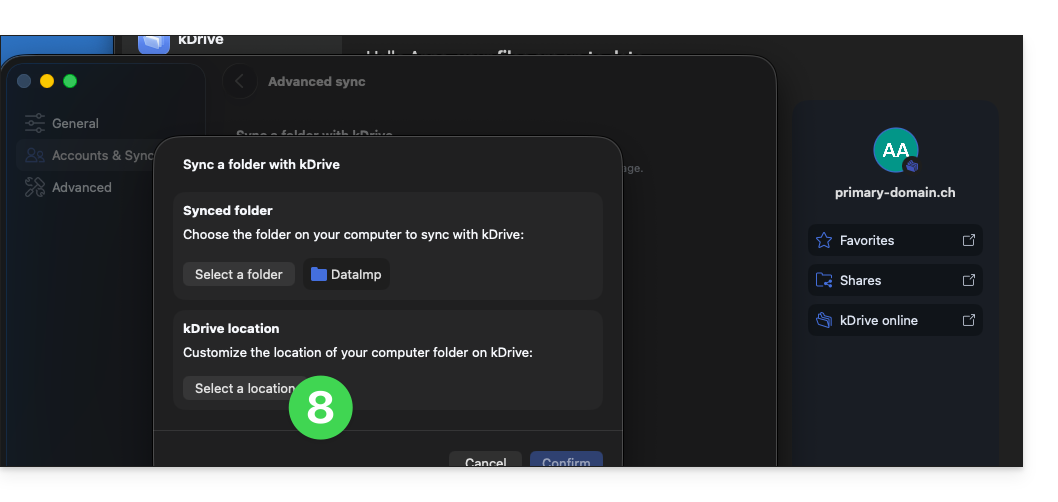
- Find the destination location to use – it is recommended to create a new folder (❓: help) – then click Select:
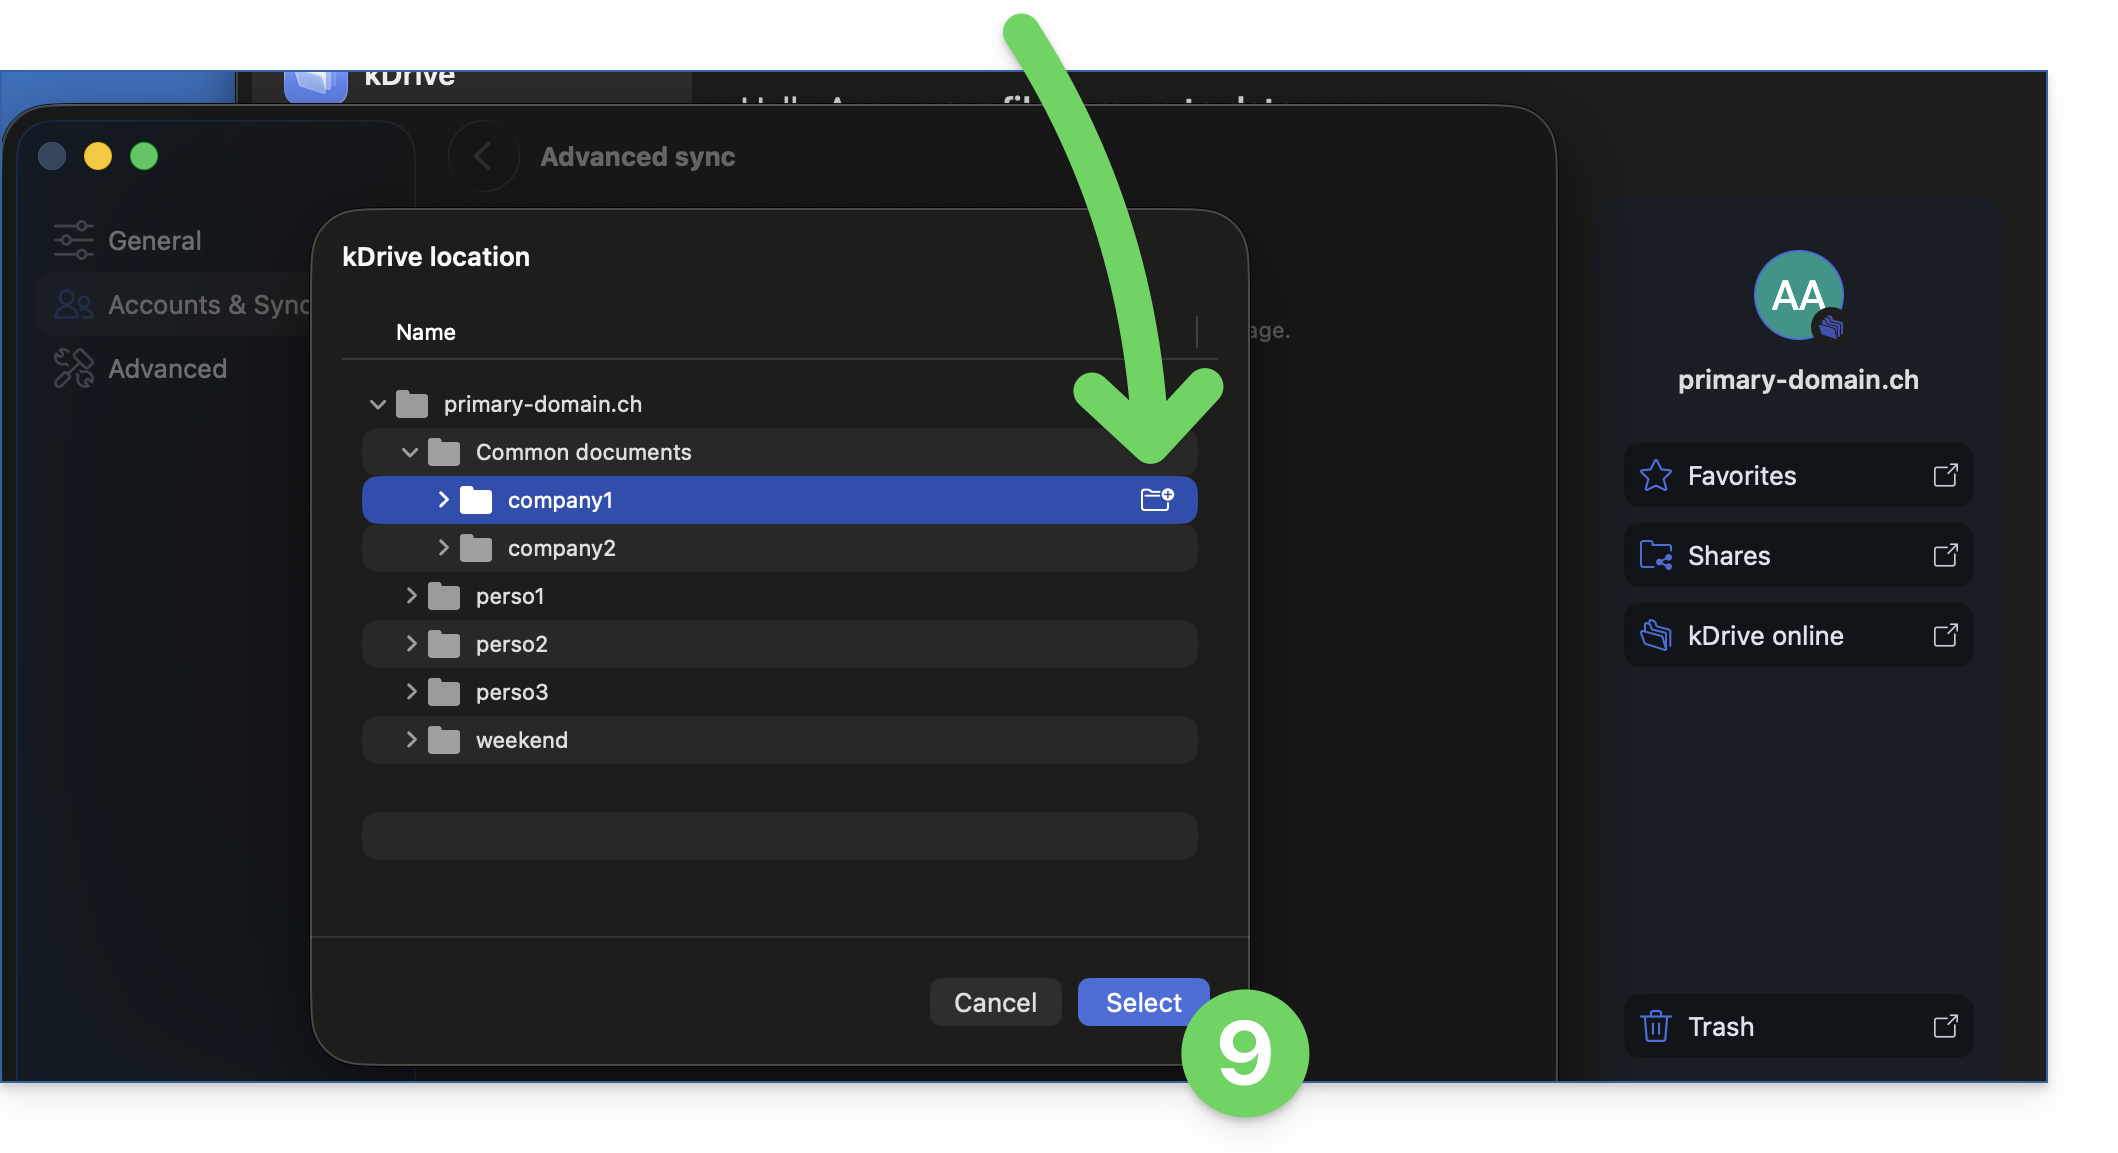
- Confirm your selections:
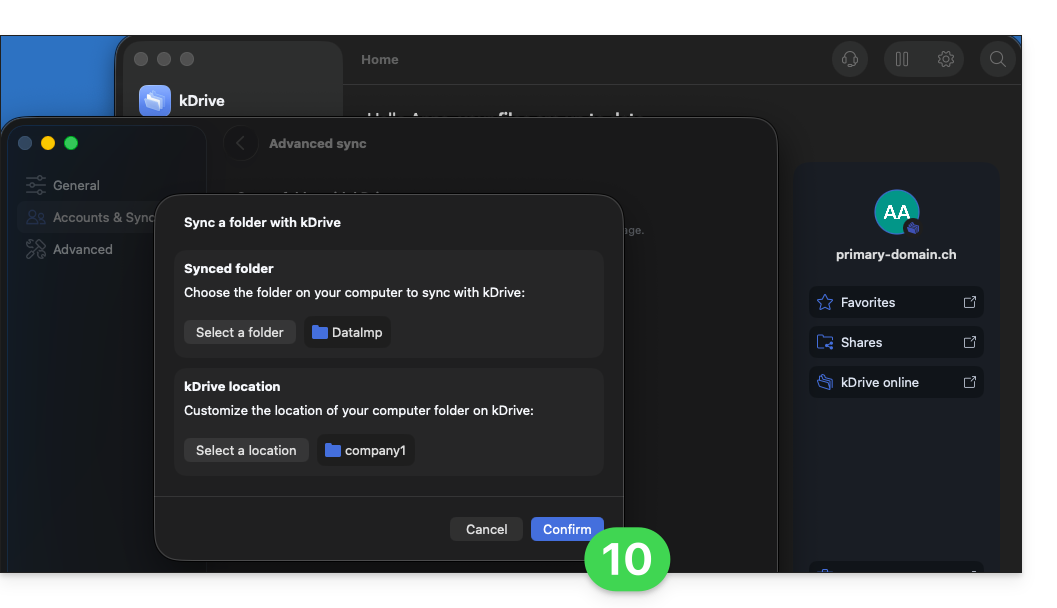
- That's it, the additional data is sent to the specified location and synchronized across your devices:
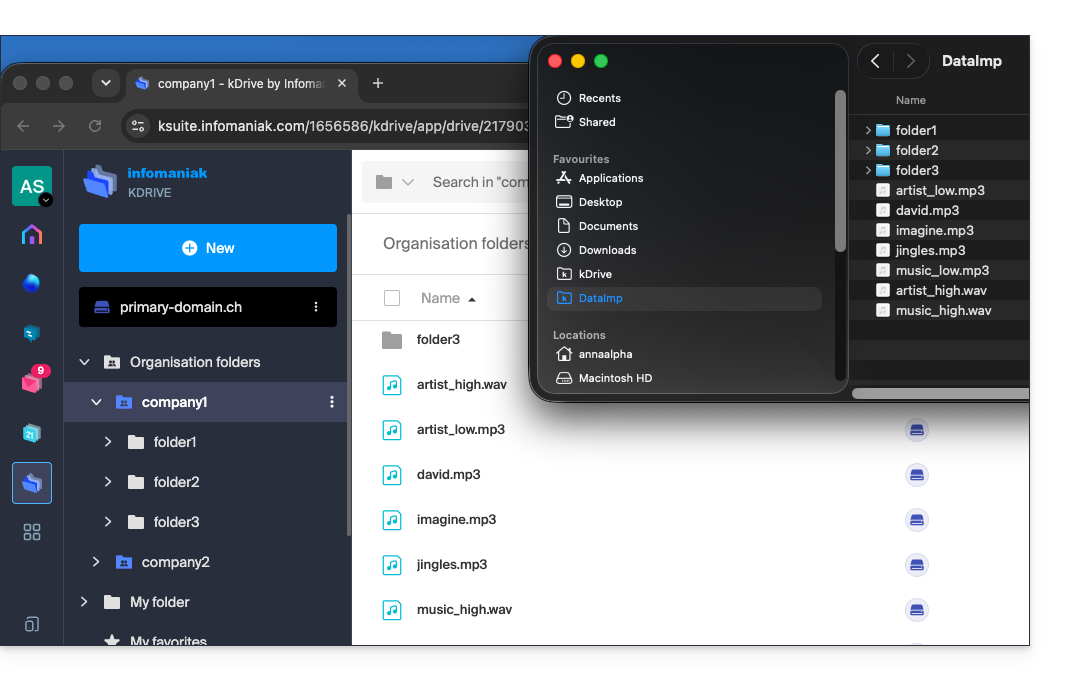
To stop and remove an advanced synchronization:
- In the same location accessible using the procedure above, click on the ••• icon on the far right:
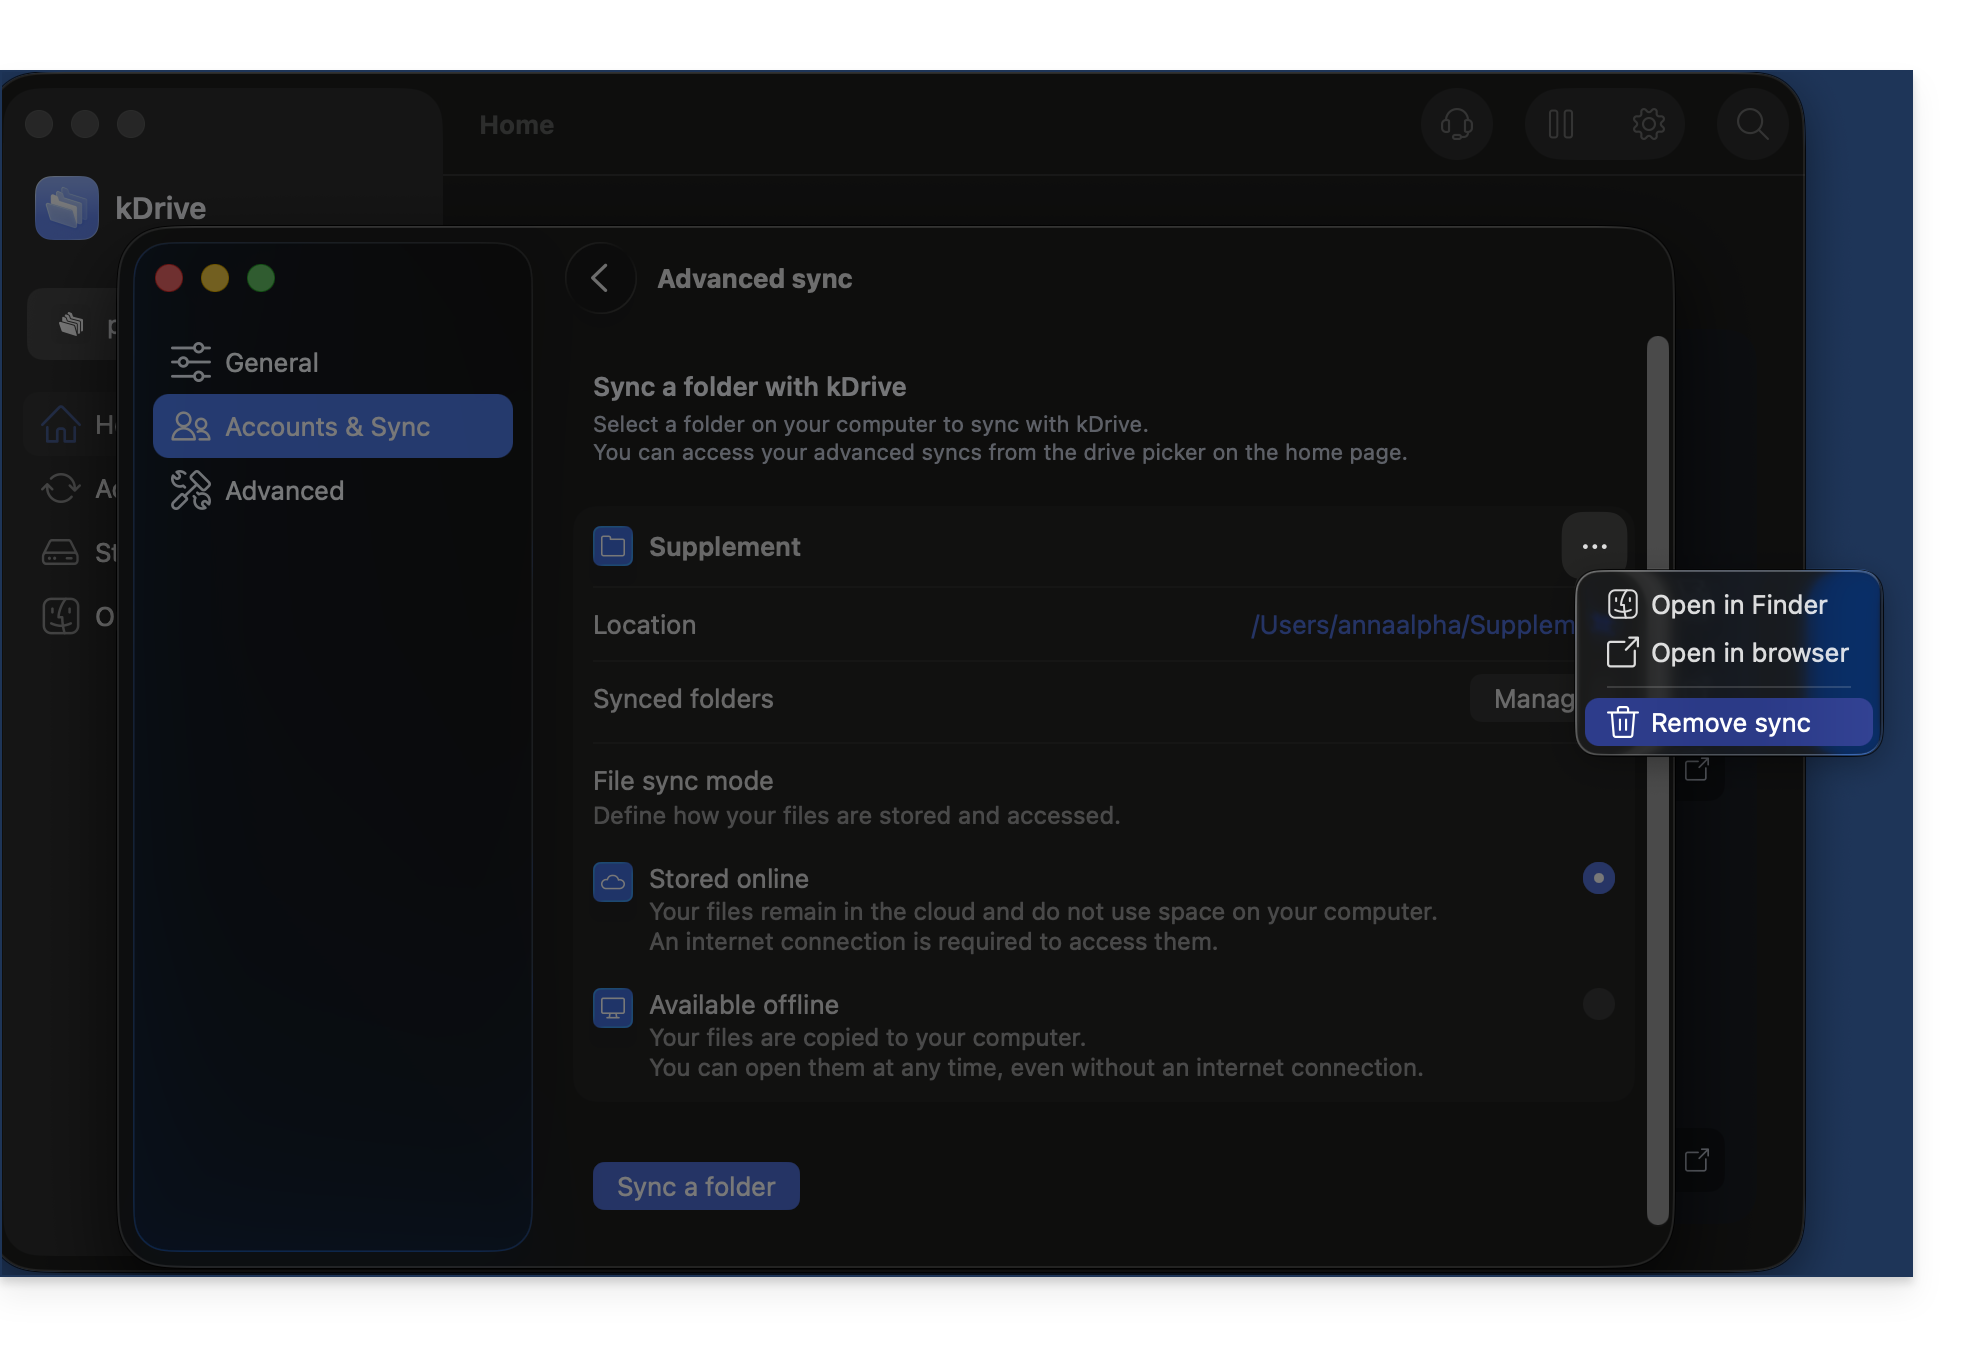
Desktop app v3.x
To add a local folder for advanced synchronization:
- Left-click on the desktop app icon in the notification area of your computer (top right on macOS, bottom right on Windows, and double-left-click in the taskbar on Linux).
- Click on the action menu ⋮ on the right of the window that appears.
- Click on kDrive Settings.
- Click on the chevron to the left of your synchronization name to display the list of folders (currently stored on kDrive Web).
- Expand the contents of the listed folders as needed and check / uncheck the folders to be synchronized with your computer.
- Click the blue Validate button.
- Click on Synchronize a local folder.
- … which will allow you to synchronize one or more new folders from your hard drive with the location of your choice on kDrive.
To stop and remove a synchronization:
- In the same location accessible using the procedure above, click on the ⋮ icon on the far right:
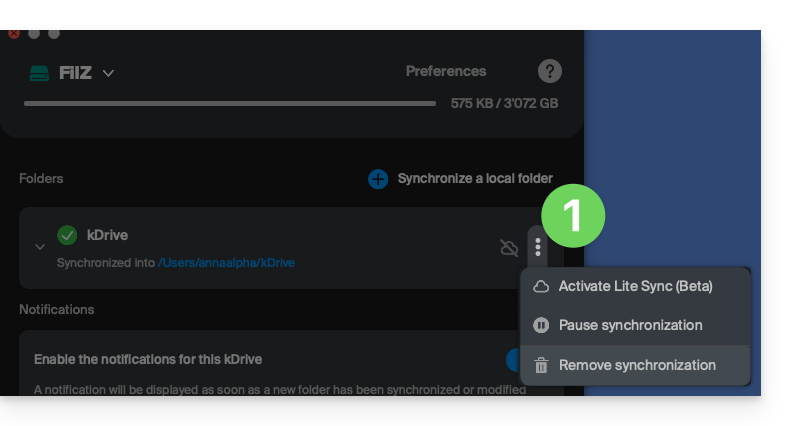
- … which will allow you to:
- Enable Lite Sync
- Pause synchronization
- Delete synchronization (only from your device, without affecting your kDrive) - see this other guide.
Avoid duplicates during advanced synchronization (v4.x)
When you create an advanced synchronization and need to choose its destination, create a new folder specifically for this purpose from the location selection window in kDrive: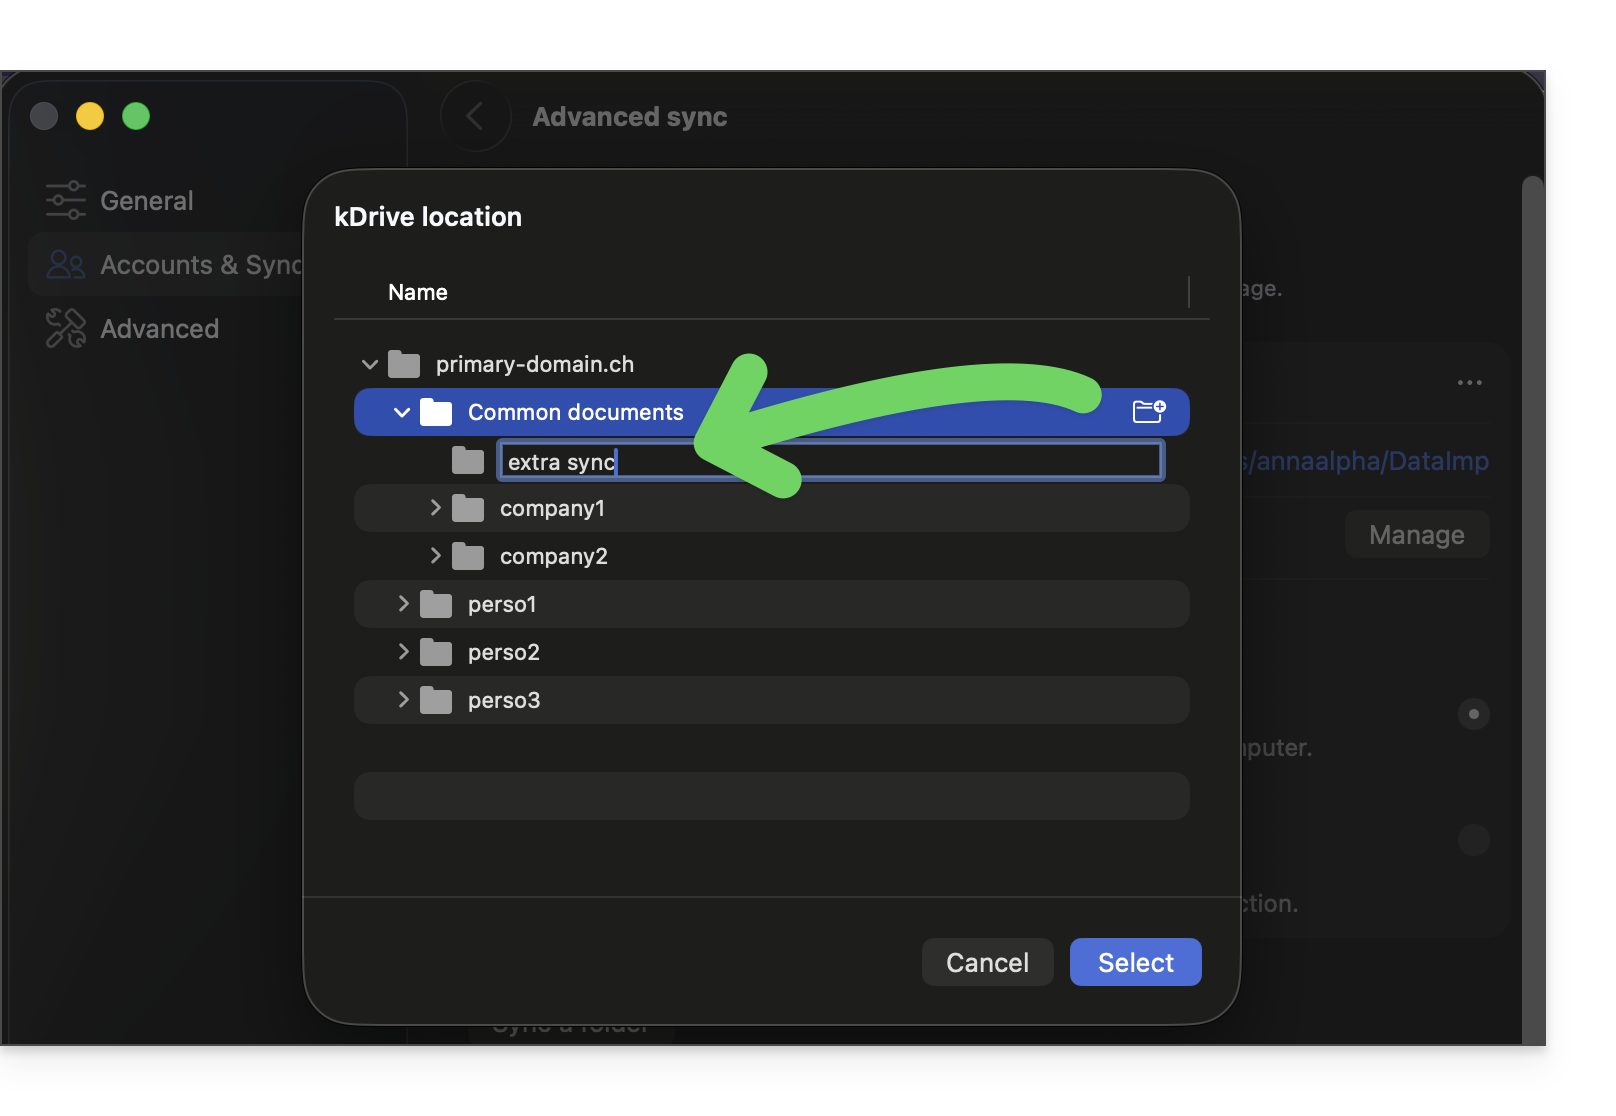
Select it. The folder created in this way will be automatically excluded from any other existing synchronization on kDrive, to avoid duplicate data: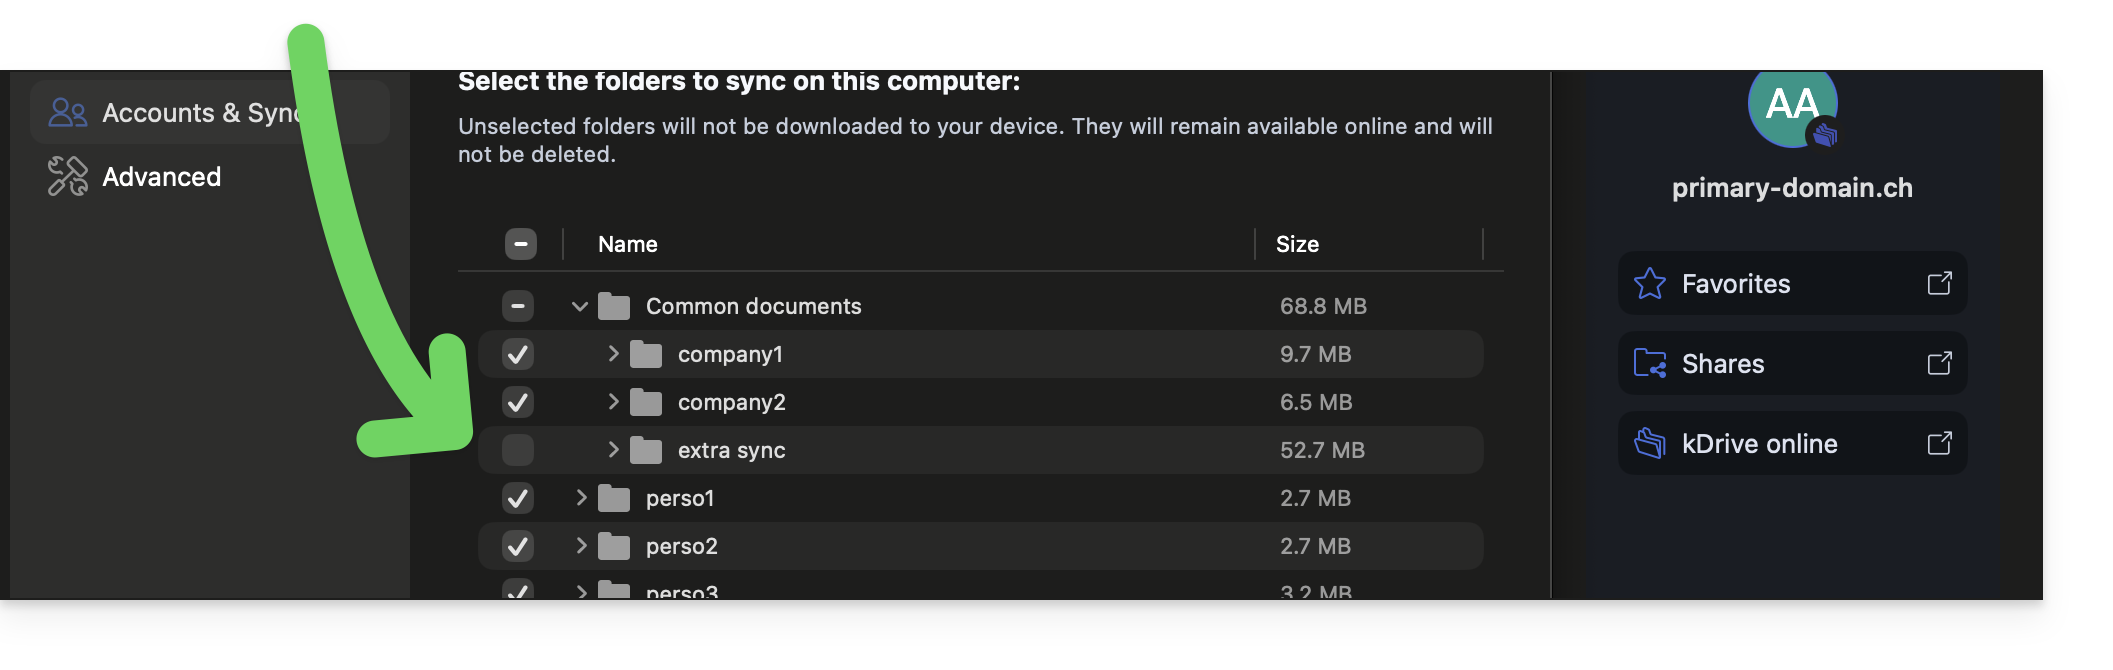
If you have not created a new folder using this method, then it is recommended tomanually exclude your advanced synchronizationotherwise, it will be double-synchronized through the usual synchronization process (since the files are now part of the kDrive file structure).
To do this:
- Click on Settings in the top right corner on macOS.
- Click on Accounts & Sync.
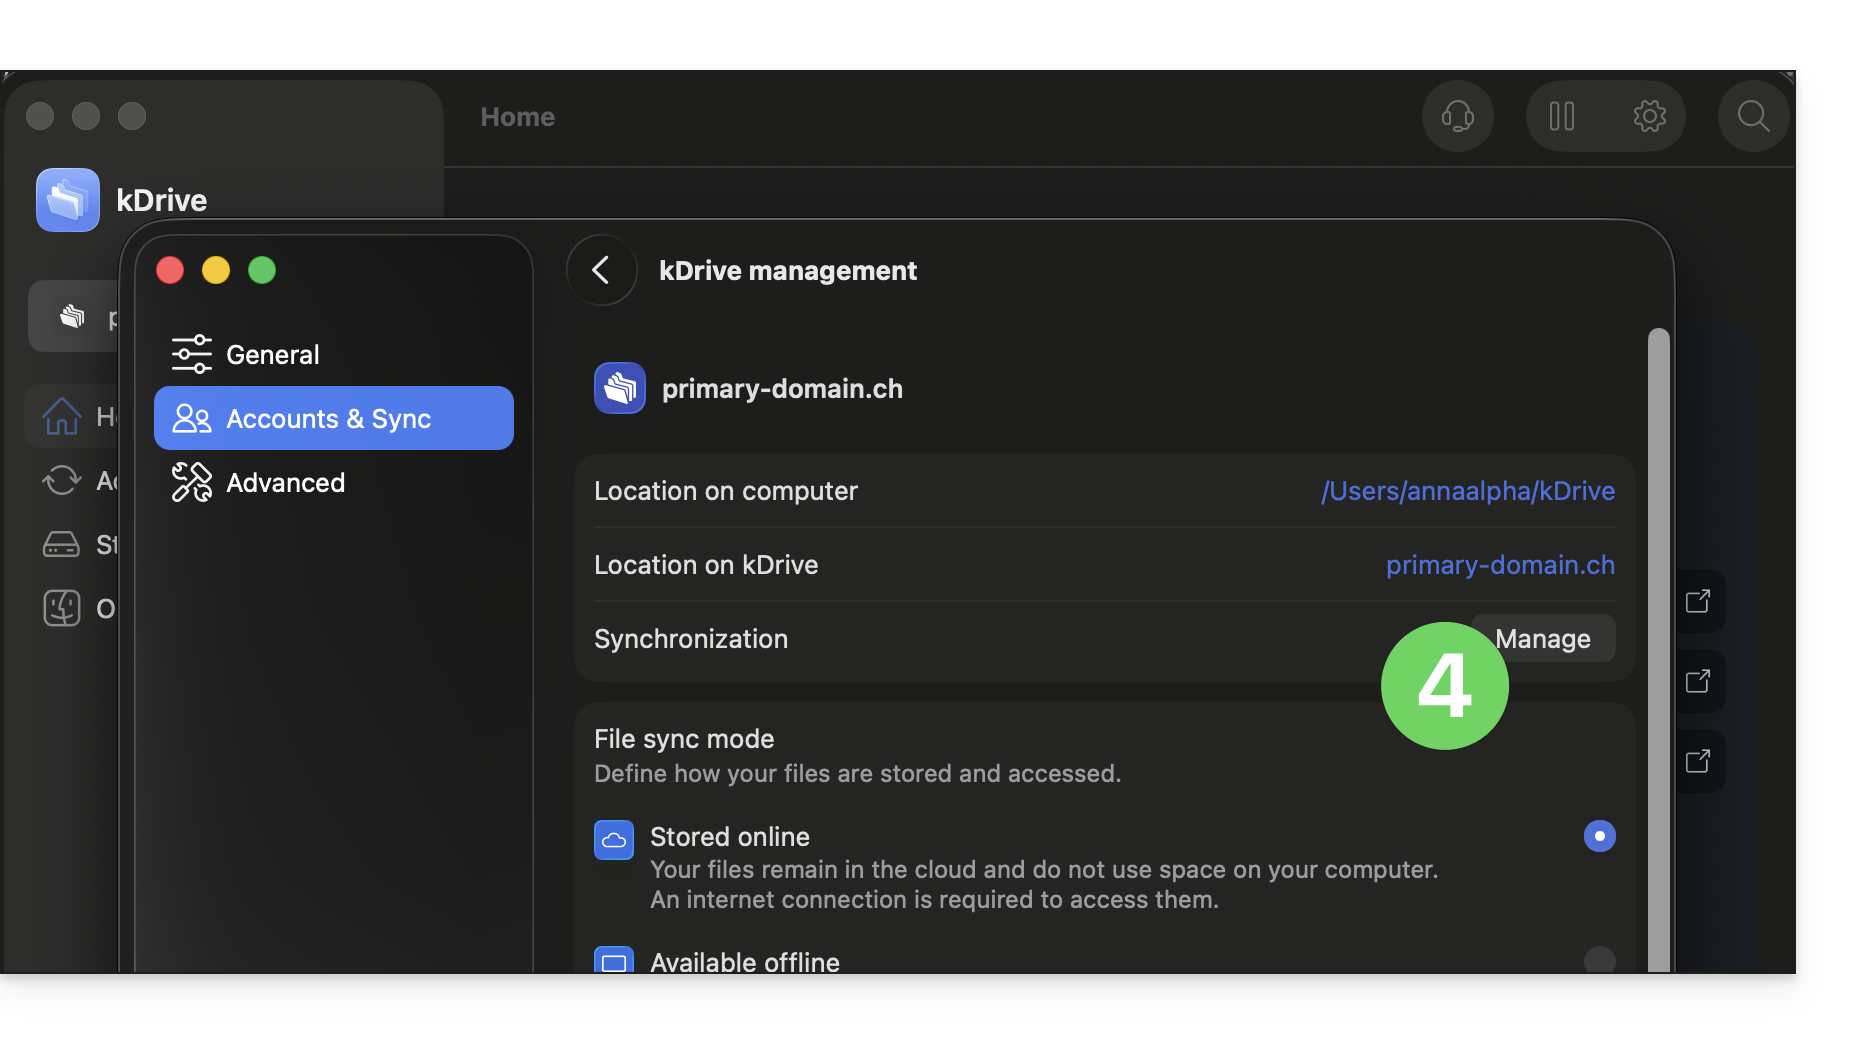
- Click on Manage to the right of the current synchronization:
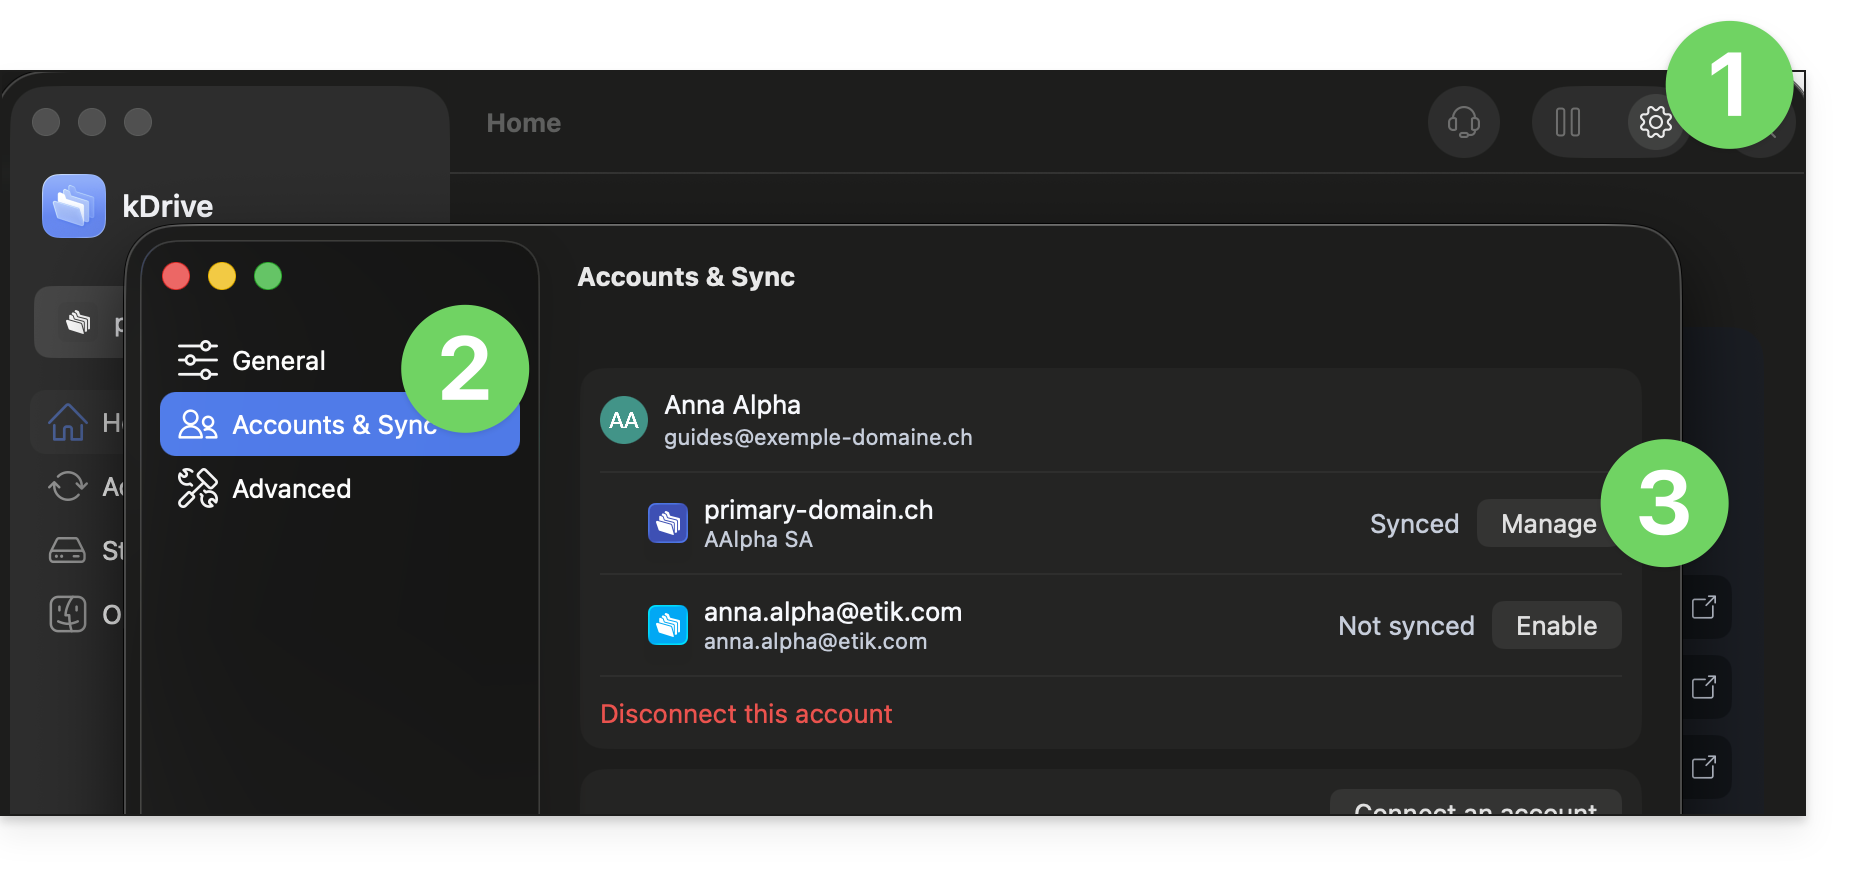
- Click on Manage synchronization:
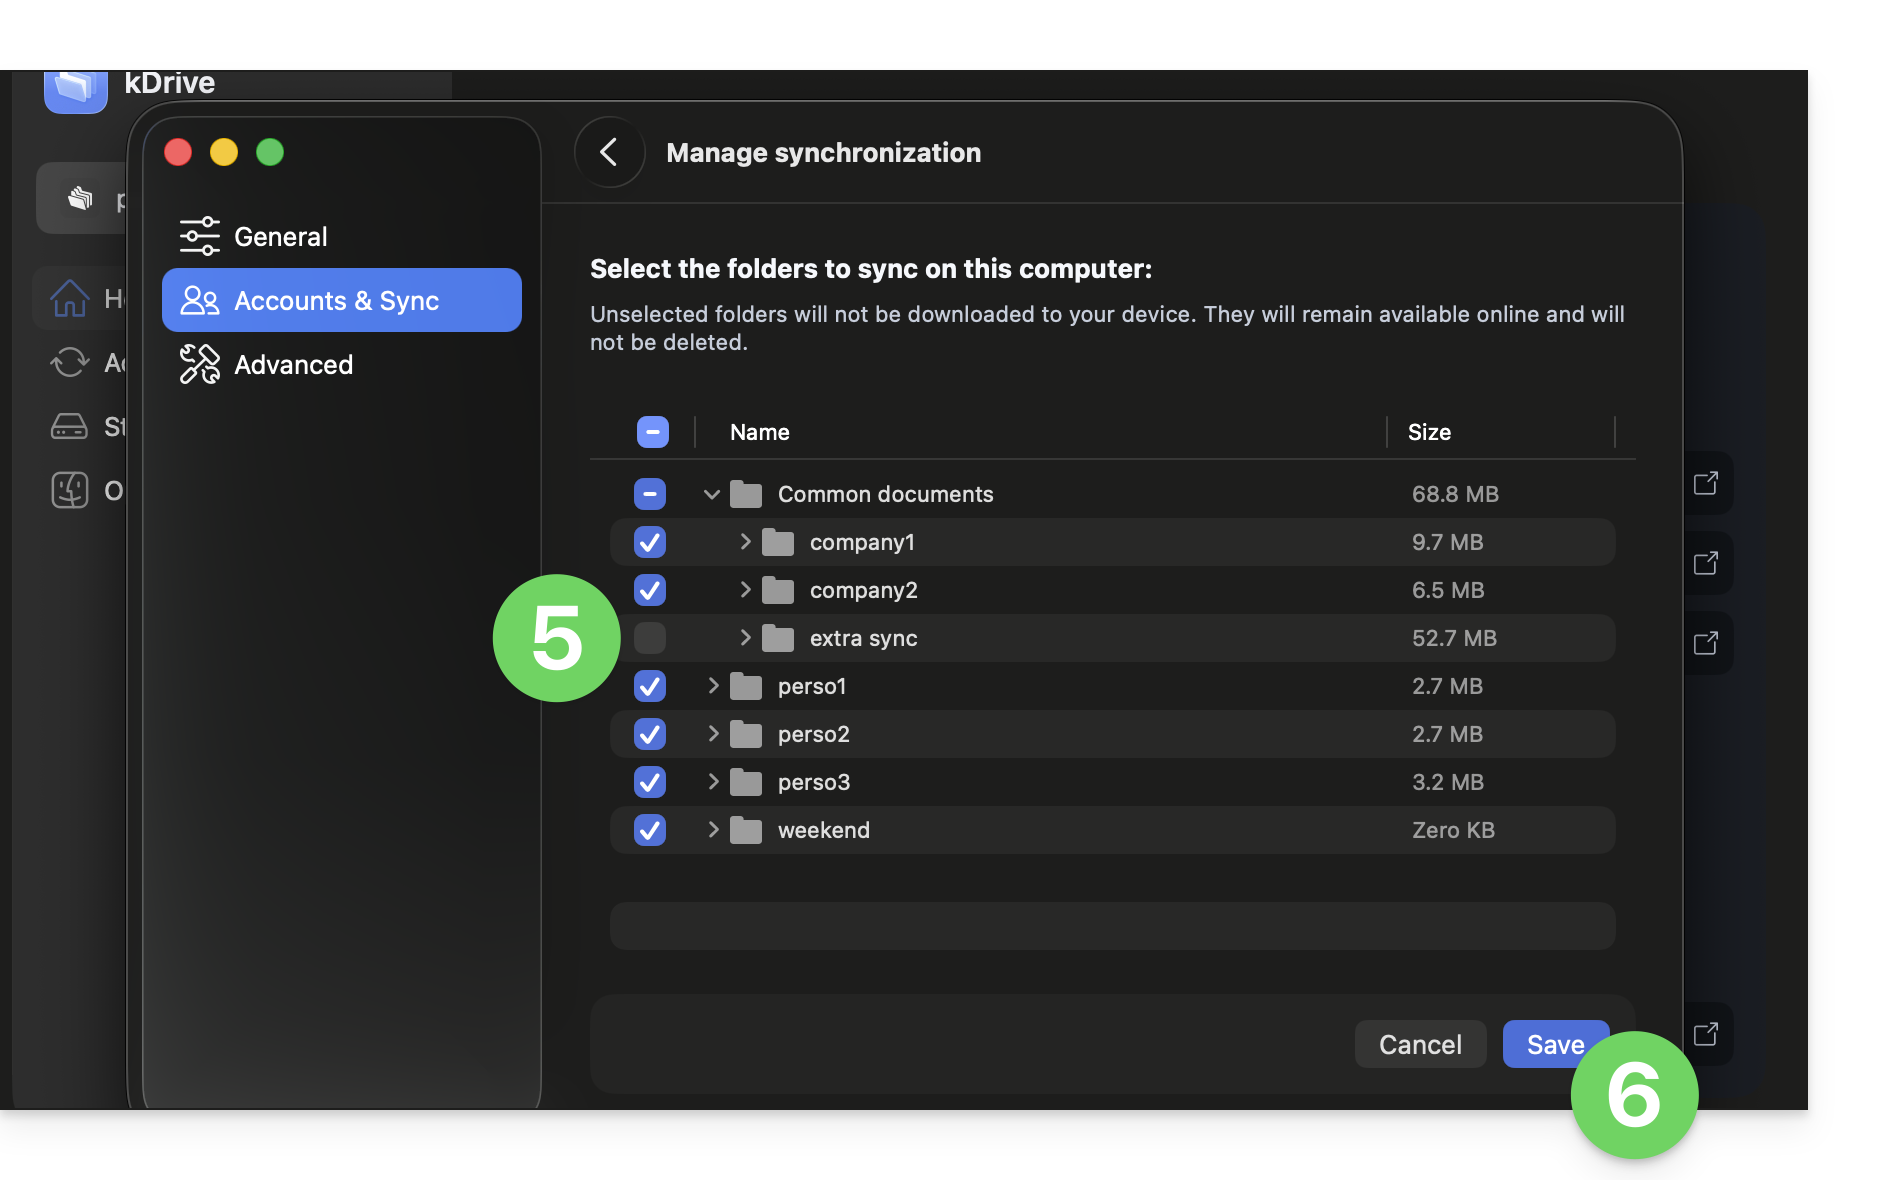
- Enable or disable the checkboxes corresponding to the data that should no longer appear on your device after the next synchronization.
- Save your changes:
Link to this FAQ: https://faq.infomaniak.com/2510
Has this FAQ been helpful?
This guide provides instructions for synchronizing kDrive with a VPS (or vice versa) via the WebDAV protocol, which can be found in the rClone application.
✘ UNAVAILABLE with
kSuite Free / kSuite Standard
my kSuite / my kSuite+ (ik.me, etik.com, ikmail.com)
Prerequisites
- You must have a VPS.
- Know your kDrive ID kDrive ID (❓: help).
Synchronize kDrive and VPS via rClone
This process allows you to retrieve files and folders from kDrive in real time and read, create, or modify these files from your VPS, while ensuring that they are synchronized again on the kDrive server. An rClone mount point can be created with a folder on your VPS to allow you to manage these kDrive files.
Refer to the rClone documentation (❓: help) if you are looking for information about the available options:
- Example rClone command:
rclone mount kdrive:/My_kDrive_Folder_Path /home/ubuntu/Target_Folder_Path --vfs-cache-mode full --vfs-cache-max-age 24h --vfs-cache-max-size 10G --cache-dir /home/ubuntu/rclone/cache --daemon --allow-other --dir-cache-time 1h --log-file /home/ubuntu/rclone/rclone.log --log-level INFO- The
--daemonattribute in this command allows you to run the synchronization in the background, because without it, this sync will end each time you disconnect from the VPS…
- Example rClone configuration file:
[kdrive] type = webdav url = {{URL_3}} vendor = other user = xxx@xxx.xxx pass = ********- Server address:
https://IDkDrive.connect.kdrive.infomaniak.com(❓: help) - Username: the email address used to log in to your Infomaniak account
- Password: create an application password (❓: help) for this specific use.
Link to this FAQ: https://faq.infomaniak.com/2636
Has this FAQ been helpful?
This guide explains how to display the folders in your Infomaniak email account using an email client, via the IMAP protocol.
Introduction
- The various default folders are created by Mail Infomaniak during the very first connection to the interface.
- Therefore, some IMAP email software/clients may not display any folders if no connection has been made beforehand in Mail.
- Even if they are present in Mail, some folders may not appear in your email software/clientconfigured in IMAP.
Force synchronization of IMAP folders…
… on Microsoft Outlook
In some cases, after configuring an Infomaniak address in the Outlook email client, certain folders may not appear. In this case, it is necessary to check the synchronization with subscribed folders in Outlook:
- Start the Outlook software on your computer.
- Under your Infomaniak email address, without selecting it first, right-click on the inbox folder.
- Select IMAP Folders from the menu that appears:

- If the IMAP Folders item is not present, deselect the address beforehand.
- If the IMAP Folders item is not present, deselect the address beforehand.
- Disable the
Only display subscribed folders when displaying the hierarchy in Outlookoption by unchecking the box: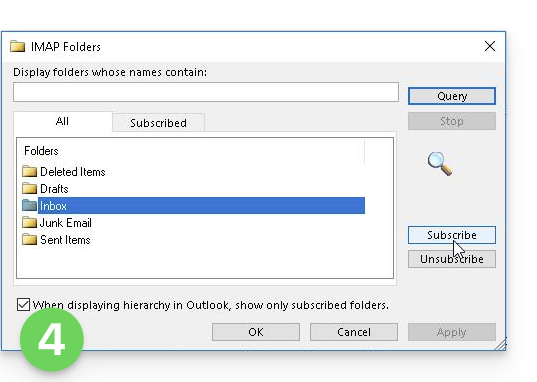
- Click Apply.
Depending on the version, the menu may be located here: 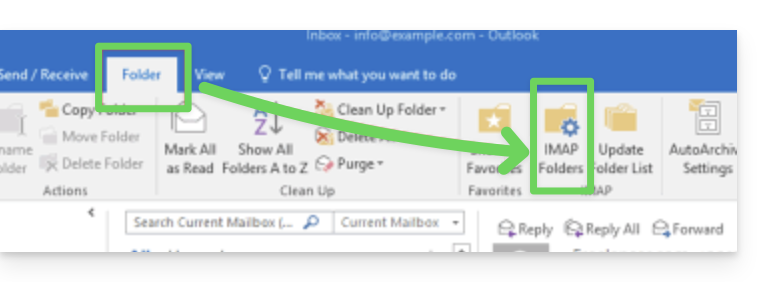
or here: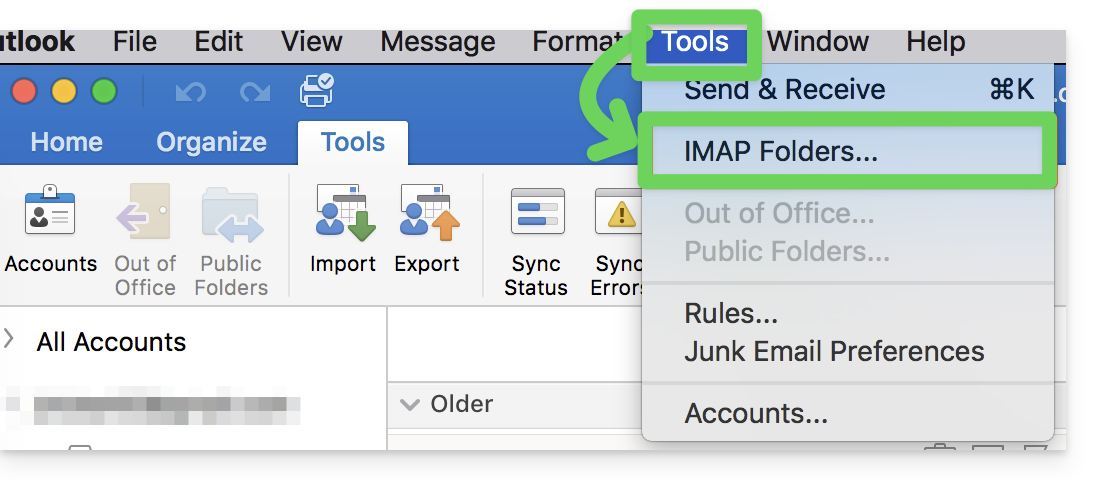
…on Thunderbird
In some cases, after configuring an Infomaniak address in the Thunderbird email client, certain folders may not appear. In this case, you need to manually check these folders from the subscription menu in Thunderbird:
- Start the Thunderbird software on your computer.
- Right-click on the Infomaniak address in question.
- Select the Subscribe menu:
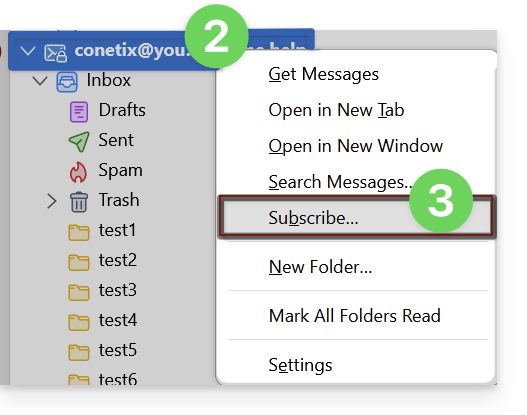
- Check the missing folders.
- Click OK to confirm your selection.
… elsewhere
In your usual email software/client, find the term "IMAP folders" and/or "subscribe", "IMAP subscription", etc.
Modify synchronized folders
Refer to this other guide to change the location of certain default folders.
Link to this FAQ: https://faq.infomaniak.com/2586
Has this FAQ been helpful?