Knowledge base
1000 FAQs, 500 tutorials and instructional videos. Here, there are only solutions!
This guide concerns the links present in the Newsletter that you have written.
Invalid links?
If you perform a test send of your Newsletter…
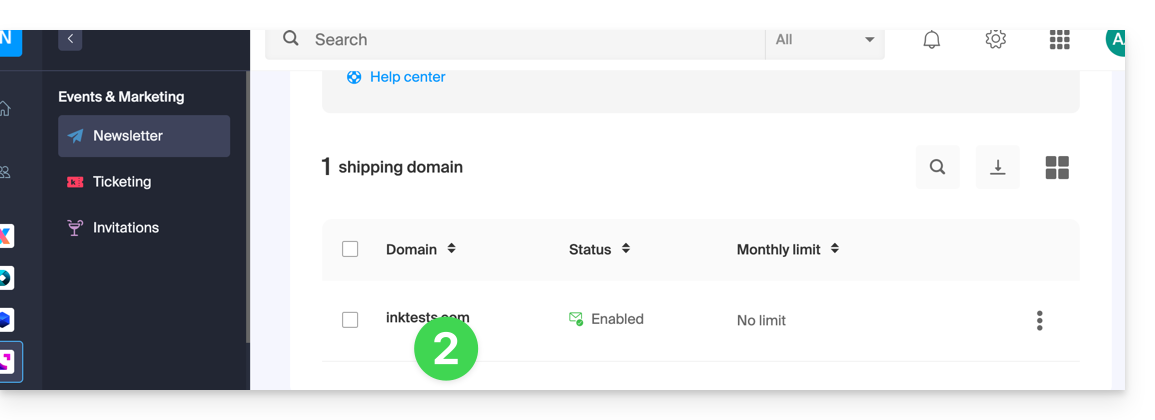
- Click here to access the management of your product on the Infomaniak Manager (need help?).
- Click on the domain name concerned in the table that appears:
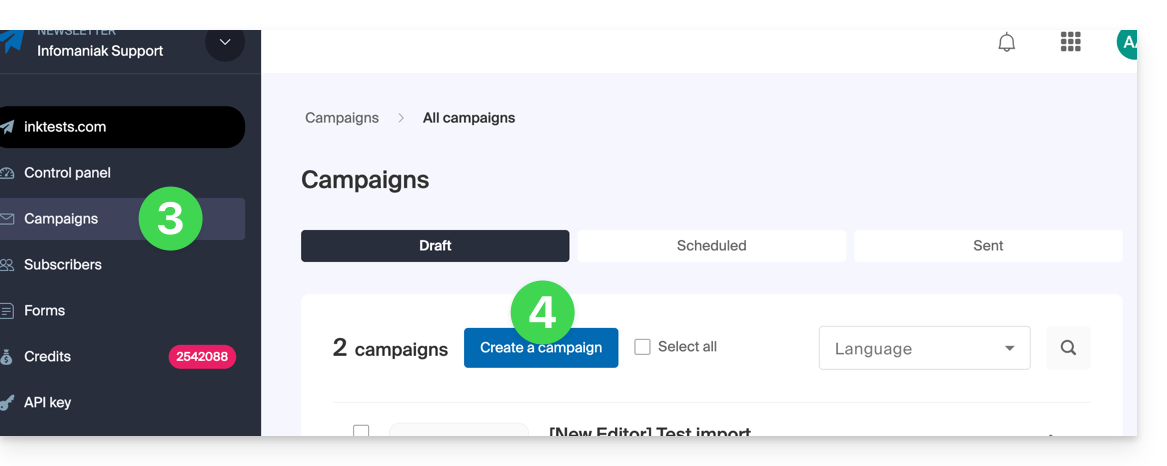
- Click on Campaigns in the left sidebar menu.
- Click on Create a campaign:
- At the content drafting stage, if you send a test (dedicated button for this purpose in the top bar) to the address of your choice…
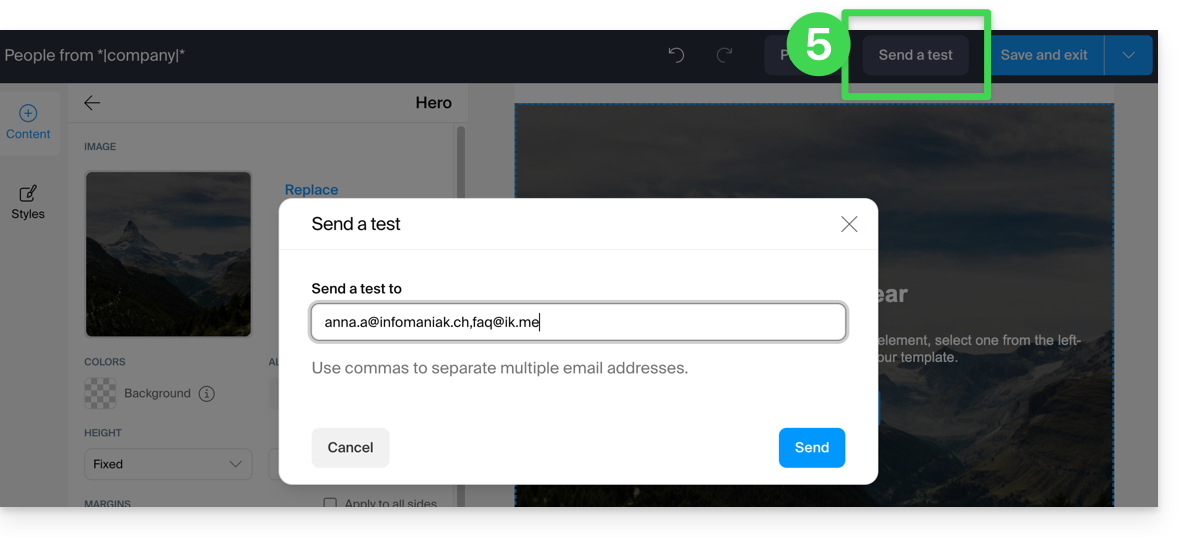
… then it is normal that the links present in your message sent during the test (upper part: "VIEW THIS EMAIL IN MY BROWSER" = link to view the message in a browser and lower part: "UNSUBSCRIBE" = link to allow the user to unsubscribe) do not work.
They will obviously be functional during your final send.
Link to this FAQ:
Has this FAQ been helpful?
This guide explains how to customize an Infomaniak Video Streaming Player so that an image of your choice is offered to viewers, especially in case of stream restrictions.
Preamble
- A video stream can be restricted:
- Scheduled broadcast interruption (possibility to display a countdown before the broadcast resumes)
- Geographical restrictions or other restrictions (blocking via IP, domain(s), token, etc.)
Customize the Video Streaming Player
To do this:
- Click here to access the management of your product on the Infomaniak Manager (need help?).
- Click directly on the name assigned to the product in question.
- Click on Players in the left sidebar menu.
- Click on the name of the Player to customize:

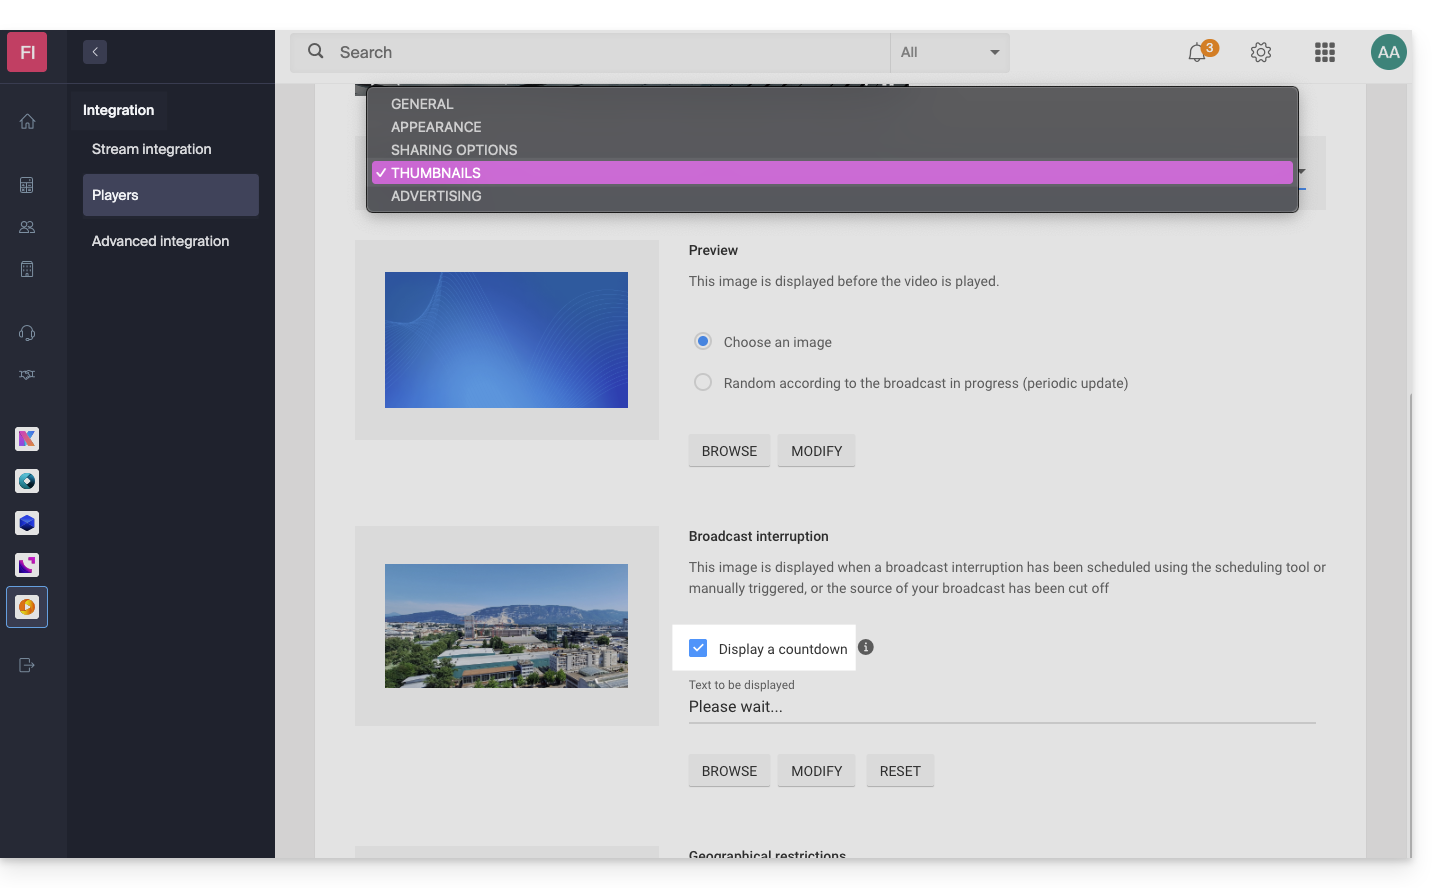
- Click on the tab (or dropdown menu) Thumbnails.
- Customize the desired thumbnails:

- Save your changes.
Link to this FAQ:
Has this FAQ been helpful?
This guide explains how to modify the current user with the highest status within your Organization, a status similar to that of an administrator that includes additional legal responsibility.
Prerequisites
- Switch to the desired Organization first if you do not find the expected user list.
- Be Legal Responsible within the Organization.
- Be aware of the different permissions (access rights to products for example) and administrative contact preferences of a user within an Organization.
Modify the legal responsible of an Organization
Warning, it is impossible to remove a legal responsible if there is no other legal responsible.
You can therefore:
- Add a new user with the role legal responsible in the Organization.
- Assign the role legal responsible to an existing user in the Organization.
- Remove an existing legal responsible (if there is already another one — implies naming a new legal responsible in advance if necessary).
Link to this FAQ:
Has this FAQ been helpful?
This guide explains how to enable the MultiViews option via a .htaccess file on sites hosted by Infomaniak.
Preamble
- In some cases, the MultiViews option must be enabled to manage redirection and URL rewriting issues.
- This option allows the server to guess which file the user is looking for. Example:
- If the
configurationfolder and theconfiguration.phpfile are located at the root of your site and you try to access the addressdomain.xyz/configuration, the MultiViews option must be enabled for the server to guess that you want to access theconfiguration.phpfile.
- If the
- The MultiViews option can sometimes conflict with more complex URL rewriting rules defined by
mod_rewrite(used by many CMS).
Enable the MultiViews option
To do this:
- Open or create the
.htaccessfile located at the root of the affected site. Add the following directive:
Options +MultiViews- Save the changes.
Link to this FAQ:
Has this FAQ been helpful?
This guide details the open ports available for Node.js sites (only) hosted by Infomaniak.
Outbound open ports
Web
- HTTP (tcp/80)
- Alternative HTTP (tcp/8080)
- HTTPS (tcp/443)
- FTP Data (tcp/20)
- FTP Control (tcp/21)
- POP3 (tcp/110)
- IMAP (tcp/143)
- SMTP submission (+ STARTTLS) (tcp/587)
- SMTPS (tcp/465)
- IMAPS (tcp/993)
- POP3S (tcp/995)
DB
- MySQL (tcp/3306)
- MongoDB (tcp/27017)
- PostgreSQL (tcp/5432)
- Redis (tcp/6379)
- Redis TLS (tcp/6380)
- ElasticSearch (tcp/9200)
Misc
- SSH (tcp/22)
- Git pack transfer (tcp/9418)
Inbound open ports
- HTTP (tcp/80)
- HTTPS (tcp/443)
- SSH (tcp/22)
Link to this FAQ:
Has this FAQ been helpful?
This guide explains how to create events with multiple performances (within the Infomaniak ticketing system).
Create a multi-date event
To do this:
- Click here to access the management of your product on the Infomaniak Manager (need help?).
- Click directly on the name of the ticket office concerned.
- Click on Programming in the left sidebar.
- Click on Events in the left sidebar.
- Click on the Add an event button.
- At the Date and Location step, you can choose the option Multiple performances:

- An interface with a calendar appears, choose the start date of the event.
- You can define whether the event lasts for several days, weeks, months, or if it is recurrent several times in the same day:

- Once the event is created and open for sale, you can track the progress of orders for each date using a List mode display:

Link to this FAQ:
Has this FAQ been helpful?
This guide explains how to collect and retrieve customer information when they order tickets through the Infomaniak ticketing system.
Set up a contact form
To collect information from customers:
- Click here to access the management of your product on the Infomaniak Manager (need help?).
- Click directly on the name assigned to the ticketing concerned by the event.
- Click on Settings in the left sidebar.
- Click on Customer Registration in the left sidebar.
- Enable the information to be requested from customers and choose the visibility:
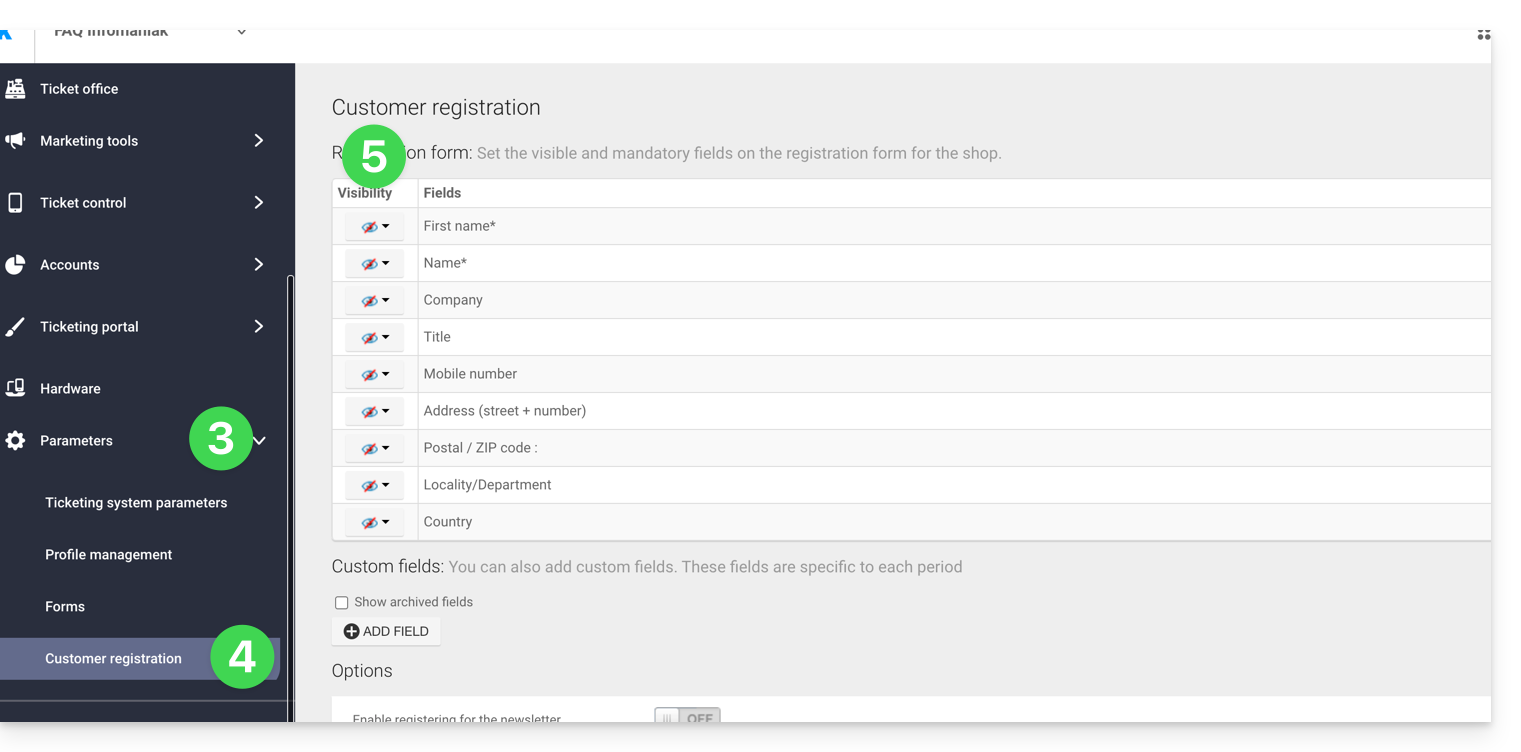
Visible and mandatory
Visible, but optional
Invisible (do not ask)
Add additional fields
It is possible to add additional information to this form:
- Click the Add a field button.
- Name the field and choose the field type.
- Depending on the field type, complete with the options from the drop-down menus or checkboxes.
- Click the button to Confirm:

Link to this FAQ:
Has this FAQ been helpful?
This guide helps you download all the data related to your website hosted by Infomaniak.
Preamble
- Automatic backups are made daily on Infomaniak installations.
- However, you can download a clean and personal version of your website to keep it safe on your local installation, USB key,
.ziparchive on kDrive, etc. - To download a site created with WordPress, refer to this other guide specific to 2 extensions allowing local backup of information.
- With the exception of Site Creator, the data of a website hosted by Infomaniak are accessible and visible on the server via an FTP connection (which means that to make a backup of the data, it is sufficient to download the content of the parent folder on the server).
- All you have to do is add a backup of the site's database (which contains information that is not written in the files accessible by FTP).
Site location
When you arrive in the folder tree on the server, it will not always be easy to know where to go to download the information related to the site that interests you.
Start by noting the exact location of the site you want to download, by going to manager.infomaniak.com on the site's dashboard within your Web Hosting: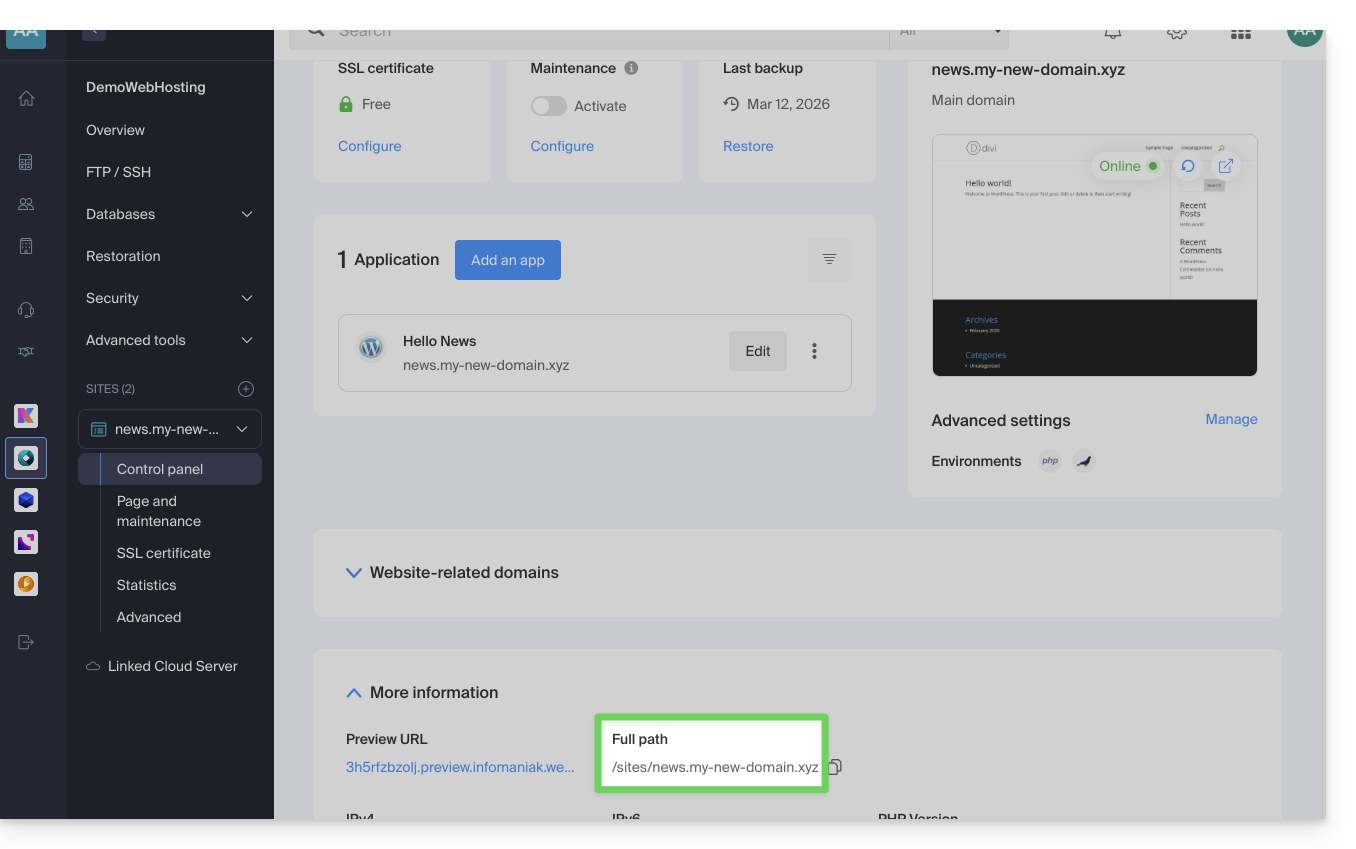
The indication highlighted above is the location of the example site. Check yours!
Connecting to the server
To get to the server, you need to use an FTP software/client or the Web FTP on the Manager which can be suitable in most cases: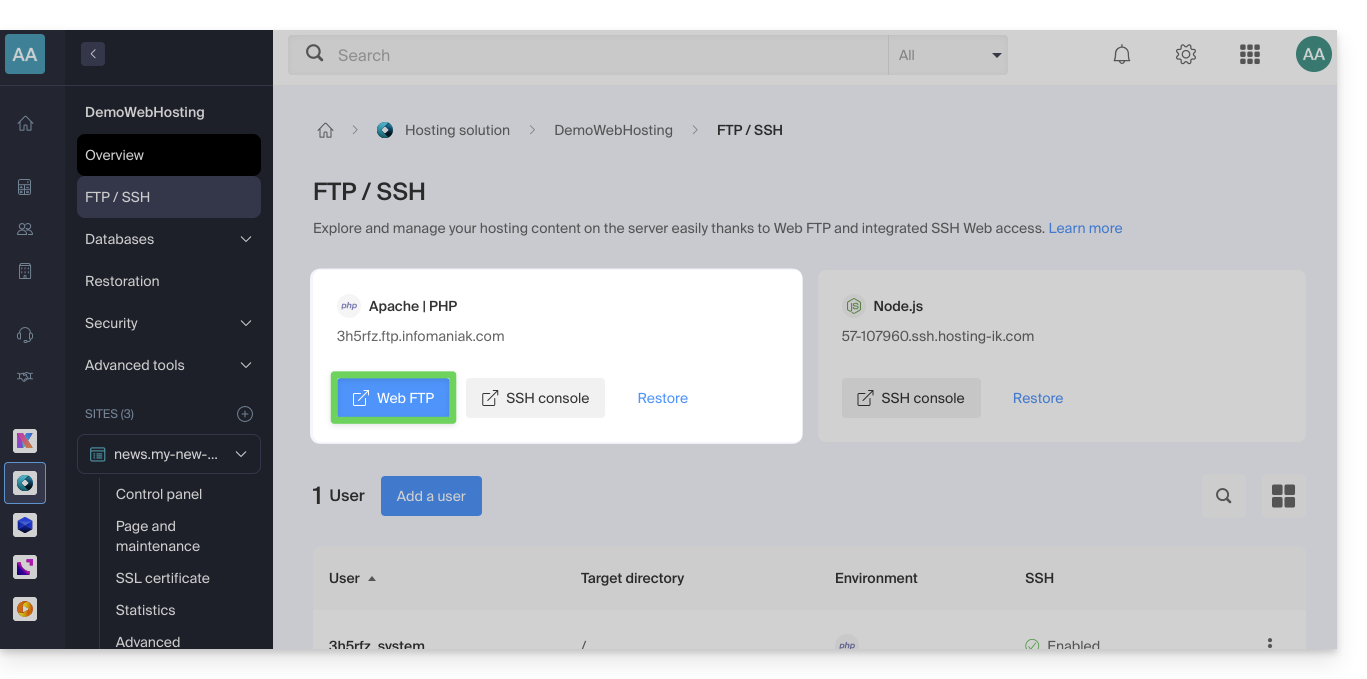
Downloading the site
When you arrive on the Web FTP, you need to go to the location noted in the first chapter above, and click on the download icon to the right of the folder corresponding to your site: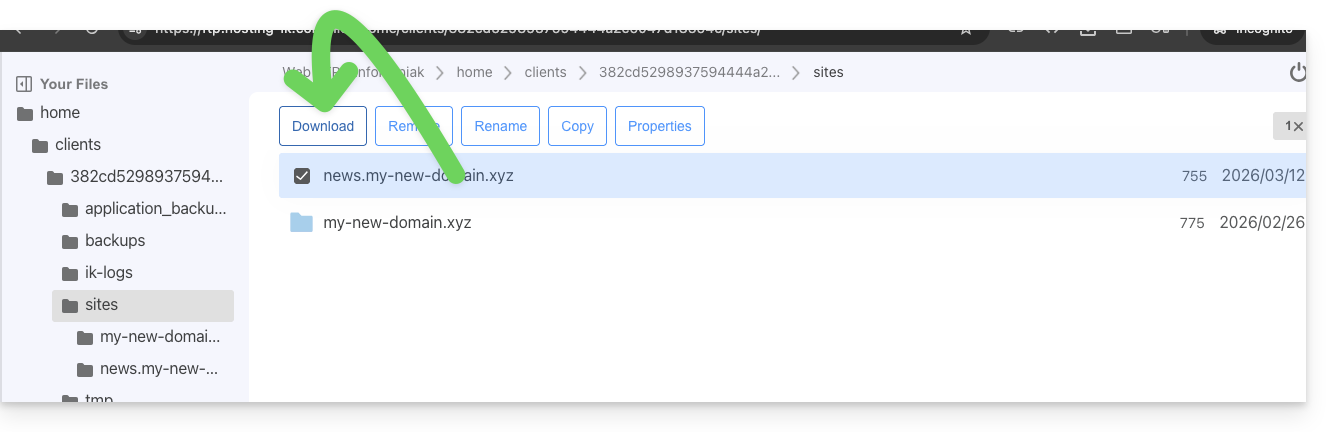
The download starts and you get a .zip archive with all the files making up your website (with the exception of files starting with a "." like .htaccess).
Downloading the database
In most cases, your site uses a database to function. It must therefore also be downloaded.
To do this:
- Click on Databases in the left side menu.
- Click on the action menu ⋮ located to the right of the name of your database (if you are not sure which one to take, repeat the operation for each of them).
- Click on Download:
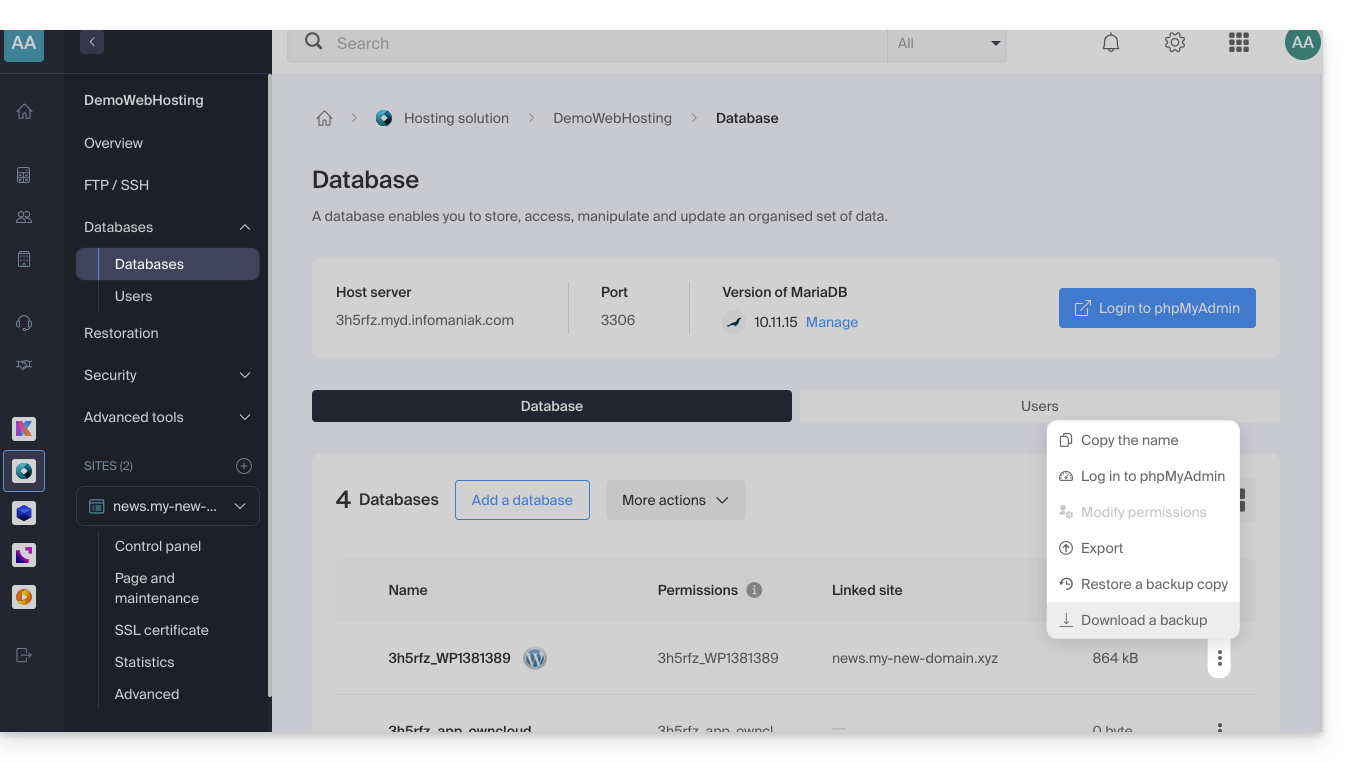
You will need to confirm the download (or export) of the most recent correct file in the next step to obtain a .sql.gz file that corresponds to all the tables in your database, which you should keep safe.
The download link is sent by email.
Link to this FAQ:
Has this FAQ been helpful?
This guide explains how to switch, in an email software/client, from a POP configuration to an IMAP configuration for the same email account. Indeed, for many reasons, it is strongly recommended to use the IMAP protocol instead of POP.
Switching from the POP protocol to the IMAP protocol…
If your email address is already configured with the POP protocol in your email software/client (Mozilla Thunderbird, Microsoft Outlook, etc.), it is impossible to switch to the IMAP protocol directly on the account. Indeed, the most common email software/clients do not allow modifying an existing POP3 account and setting it to IMAP instead.
The solution is to add the same email account but with the IMAP protocol in your email software/client and then to move your messages and folders from the POP account (from your computer) to the IMAP account (on the mail server).
⚠️ Warning: a POP3 account on your email software/client usually means that Infomaniak does not have any backups. Therefore, it is important to back up your messages on your side before any critical operation.
… with Microsoft Outlook
Some versions of Outlook, such as 2016, prevent the simple addition of a second account with the same name (identical email address).
To work around this, you need to add the account from the Profiles:
And from there, you will be able to add the additional account, in IMAP:
- Configure the new email account with the IMAP protocol (the same account as the one configured in POP but this time in IMAP):
- Move one folder at a time by dragging them to the inbox of the new account configured in IMAP:
- Wait during the transfer of the items (this can take a long time depending on the volume to be transferred to the server); the activity is indicated at the bottom of the window:
If your POP account kept a copy of the messages on the server (disrecommended option present in the advanced settings of your Outlook), you may have duplicate messages.
… with Apple Mail
Deleting the email account configured in POP deletes the messages it contains. It is therefore recommended to deactivate the POP account instead of deleting it!
Once the POP account is deactivated, refer to this other guide to configure your email address in Apple Mail, in IMAP.
Once you have finished, all you have to do is drag the messages present in your POP account hierarchy to the hierarchy of the new IMAP account.
Link to this FAQ:
Has this FAQ been helpful?
This guide explains how to move an existing website within an Infomaniak Web Hosting to another Infomaniak Web Hosting.
Preamble
- There are not many turnkey solutions to move a website:
- Generally, few hosts offer the export or import of a complete site with its databases.
- This is mainly due to the fact that there are many ways to build a site and just as many languages that are largely incompatible with each other.
- However, if the site to be transferred is built with WordPress, refer to this other guide illustrating a simplified solution.
- It is also possible to move a complete Web Hosting (see below).
- If necessary, local partners referenced by Infomaniak can handle these procedures: launch a free call for tenders; they take care of everything, freeing you from technical details — also discover the role of the host.
Manual solution: example of site transfer
To do this manually, you need to:
- retrieve the web data as well as the associated databases,
- republish this on a site created on the destination web hosting,
- and if the associated domain name is identical, the first site must be deleted or renamed.
For the rest, here is an example of how to proceed:
- Order the other Web Hosting / Cloud Server if you haven't already.
- Create a "fake site" on this new hosting (for example dev.domain.xyz - see below).
- Manually copy your data in FTP and MySQL (export / import).
- Adapt your site if necessary (database address, etc.).
- Once you are satisfied with the "new site", delete the old one.
- Change the name of the new site to give it its real name.
An alternative is, at point 2 above, to work with the alias www. that you can detach beforehand from your current site. Indeed, the alias www(.domain.xyz) is often installed as an alias of your site, and it is enough to detach it, which allows the creation of a site on the other hosting with the name www.domain.xyz (do not forget, at point 6, to add your alias of type "domain.xyz" without the www to this new site).
Moving entire Web Hostings
There is an automated way to move an Infomaniak Web Hosting to:
- A Infomaniak Cloud Server (if the hosting is currently shared or if the hosting is already on a Cloud Server)
- Another Infomaniak Organization
A Starter hosting cannot be moved but it can be converted.
Link to this FAQ:
Has this FAQ been helpful?
This guide explains how to change the language of the Infomaniak Site Creator interface and how to manage the translations of your pages.
Prerequisites
- Access Site Creator:
- Click here to access the management of your product on the Infomaniak Manager (need help?).
- Click directly on the name assigned to the relevant Site Creator.
- Click the Edit my site button to start the editor:

Change the interface language
To modify the language of Site Creator:
- Click the Settings button in the left sidebar.
- Click on General settings.
- Change the language of Site Creator:
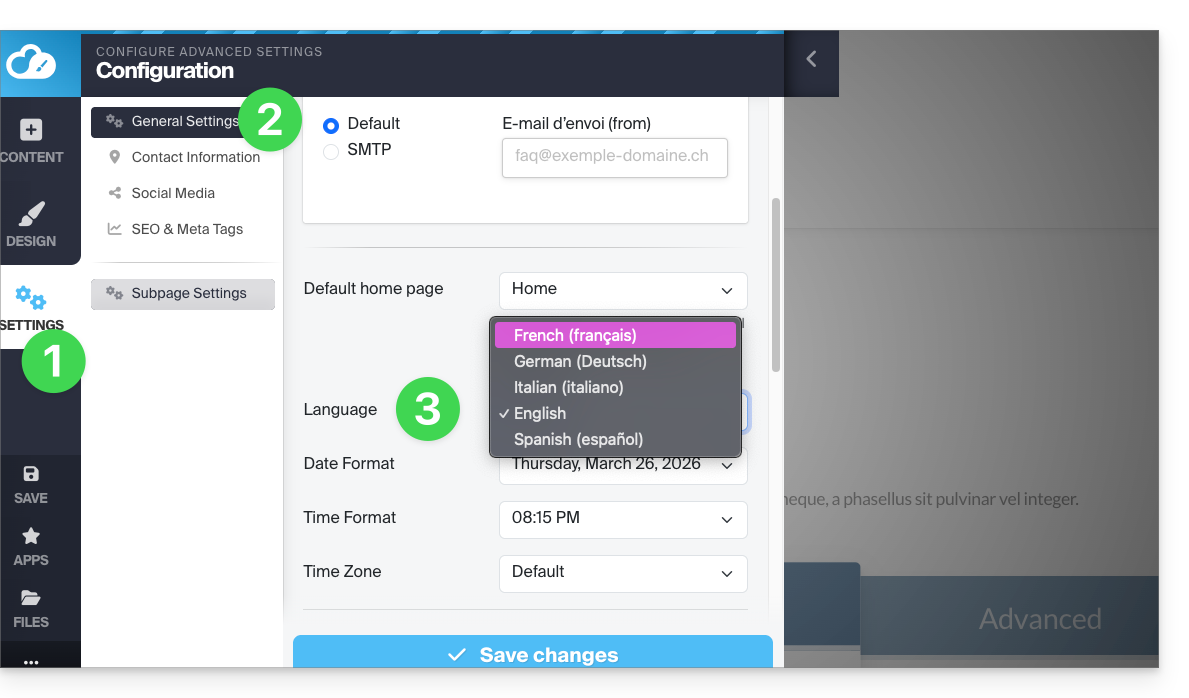
A dropdown menu allows you to change the language of the Site Creator editor interface (this will also translate some elements accessible to the visitor, such as the Search button of the search bar, etc.); the choices are German, French, Spanish, Italian, and English.
Do not forget to save your changes at the bottom of the page.
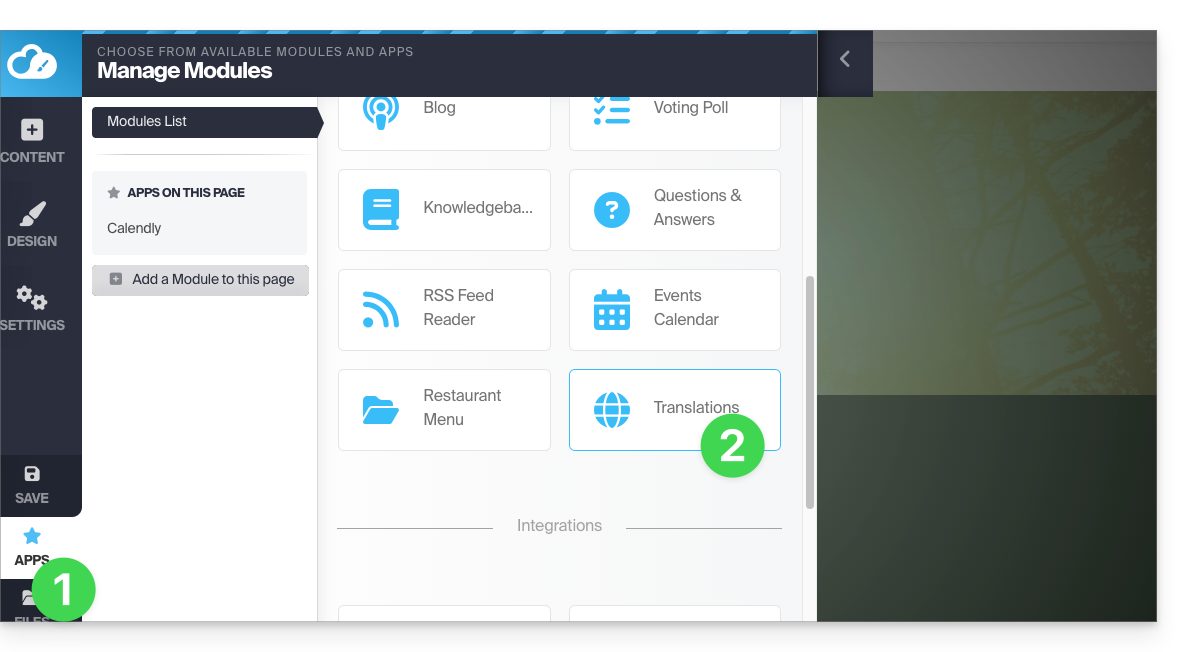
Offer your site in multiple languages
Automatic and on-the-fly translations of all your pages
To offer the translation of your site automatically:
- Click the Applications button in the left sidebar.
- Click on the Translations module:
You can add or remove the languages in which your site will be offered to the visitor: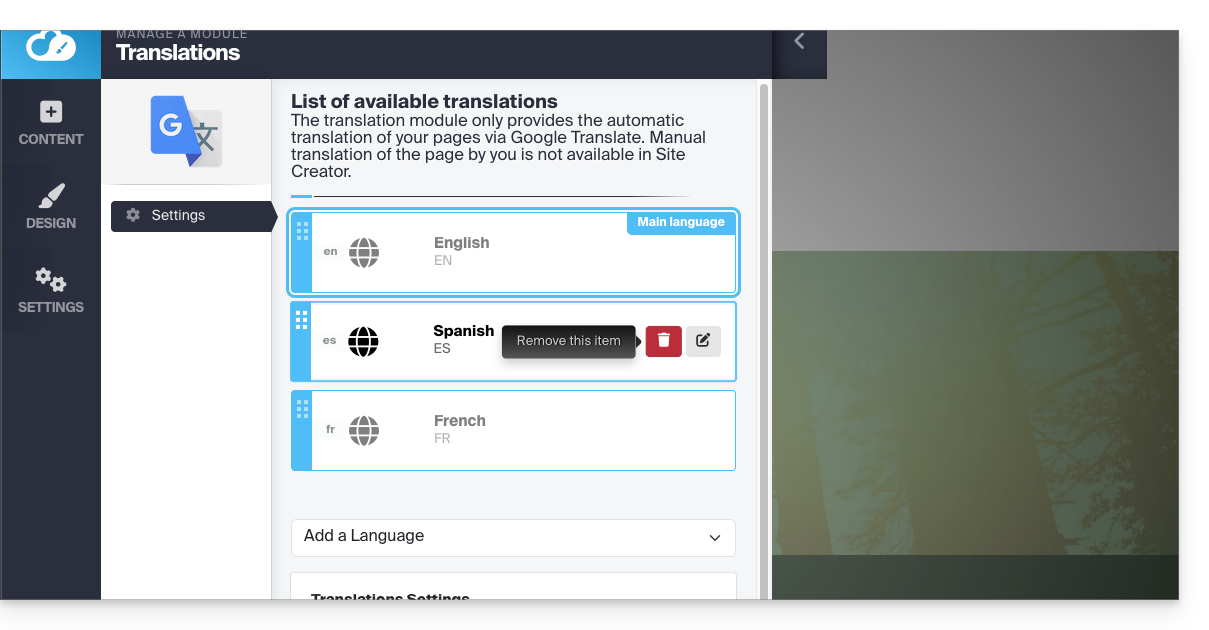
With the mouse, move the languages in the desired order, which affects the language selection dropdown menu (read below).
This menu can be activated in the lower part of the translation module configuration page: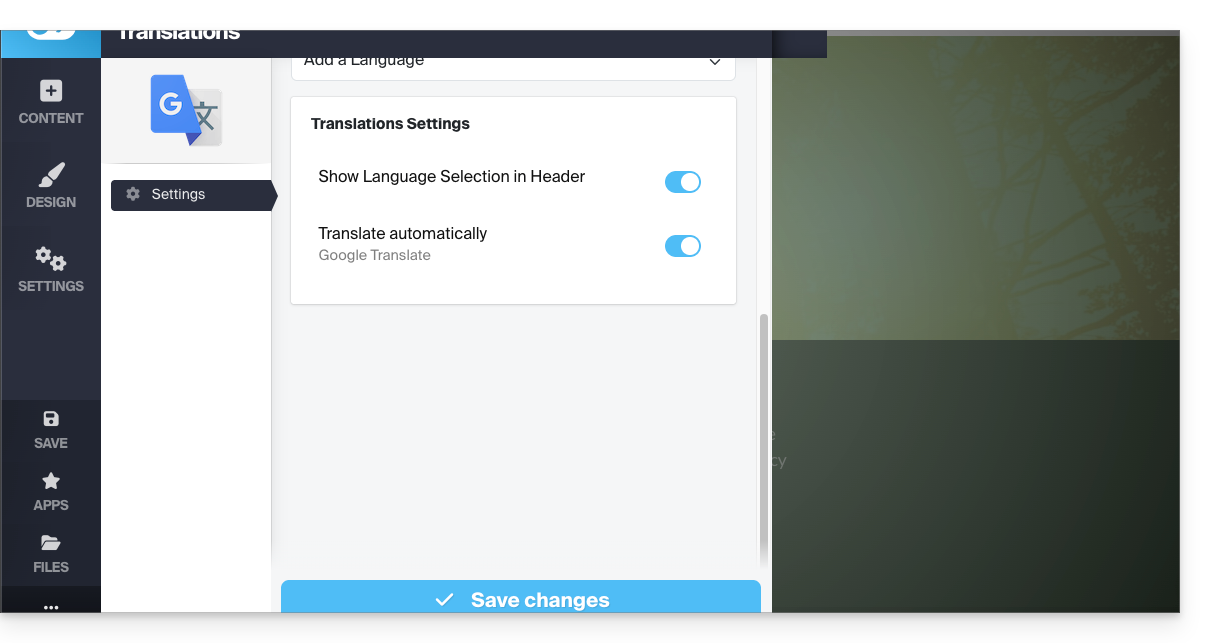
So once the languages have been determined and classified in the upper part (don't forget to save your changes at the bottom of the page), activate the menu to give the visitor the choice of language via a dropdown menu at the top of the page:
Manually translated page
It is possible to propose a page (unique, per language) manually prepared in advance, to which the visitor will be redirected when they choose a language different from the main language via the language selection dropdown menu (see above).
To do this, you need to edit the desired language by clicking on the pencil icon ✎ and then clicking on the second radio button next to the field that allows you to specify the URL of your translated page: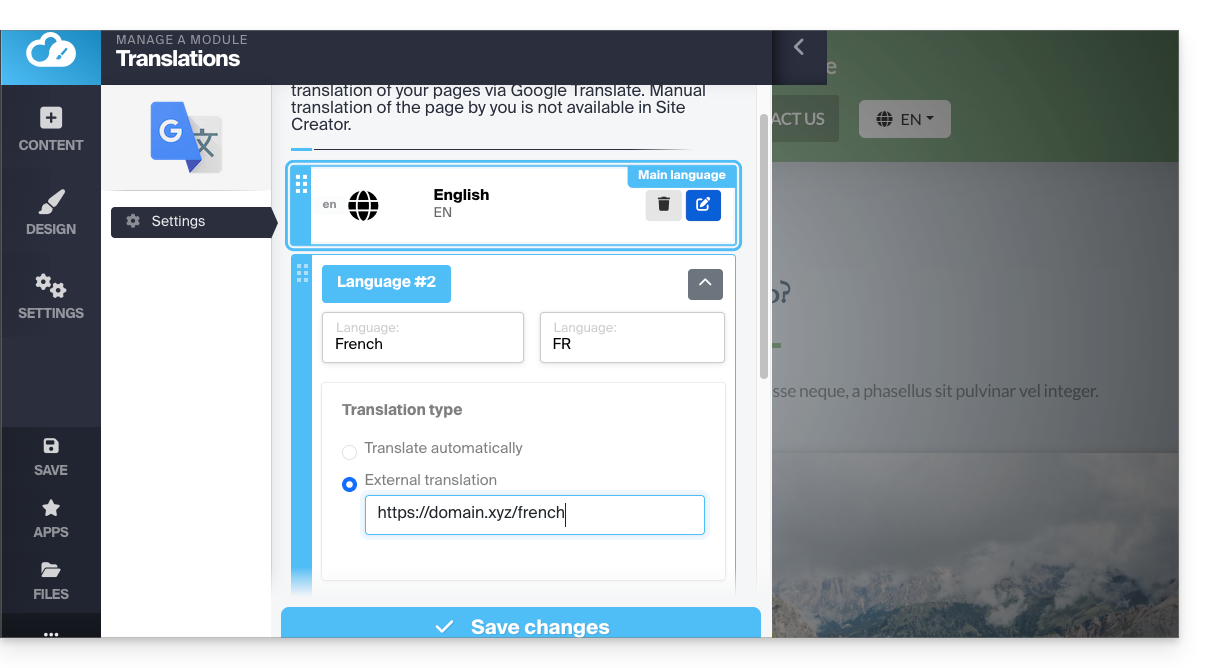
It is therefore possible to write a page per language in advance. To finish, you should ideally hide this type of page from your main menu: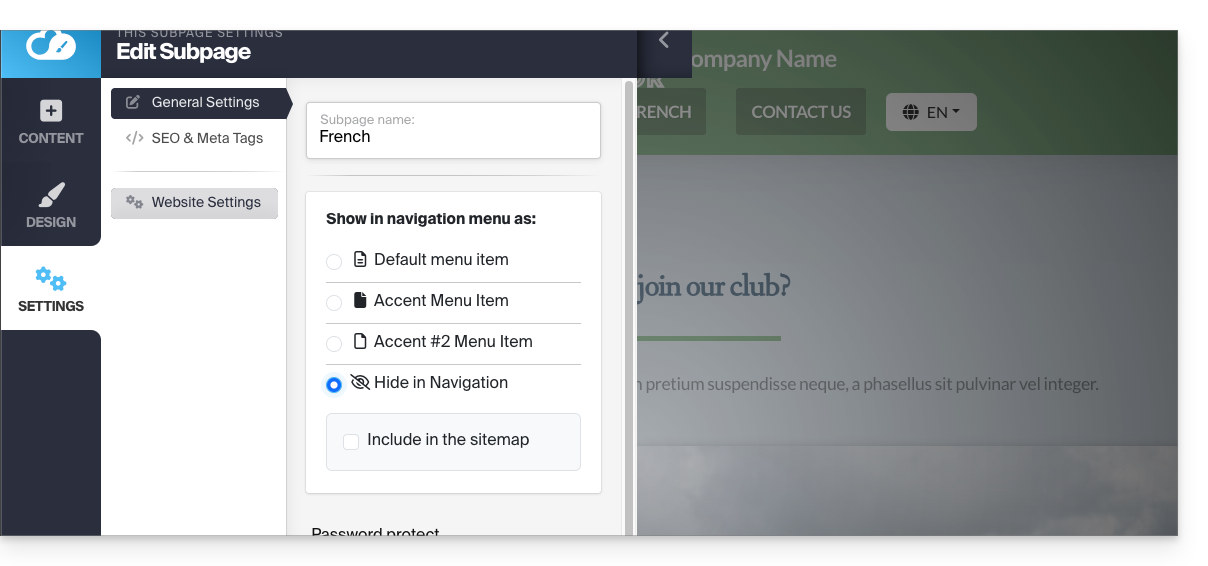
Link to this FAQ:
Has this FAQ been helpful?
This guide details how to save your chosen files and directories using the Duplicati application via the OpenStack Swift protocol on Swiss Backup, the backup solution in an independent Swiss cloud.
Preamble
- The various services offered by Infomaniak are all compatible with the corresponding standard protocols (S3/Swift for storage, for example), therefore if you encounter a problem with third-party software, contact its publisher or a Partner and consult the support policy as well as section 11.9 of the Infomaniak Terms and Conditions.
Install the Duplicati software
To do this:
- Go to the Duplicati website: https://www.duplicati.com/
- Click the "Download Duplicati" button.
- Choose the version corresponding to your operating system or your Linux distribution.
- Launch the program installation, you can keep the default choices.
Configure the Duplicati software
Prerequisites
- Have a Swiss Backup Infomaniak space with available device quota (minimum 1) for a Cloud Backup.
- Add 1 device of type Cloud to obtain the OpenStack Swift parameters.
Then:
- After installation, a web page should have opened; if not, go to
http://localhost:8200. - Click on Add Backup then select Configure a new backup.
- Give a name and optionally a description to your backup plan.
- Enable or disable encryption and create an encryption phrase if necessary.
- In Storage Type select Openstack Object Storage / Swift
- Replace
SBI-XXXXXXXXand "passwd" according to your device's specific information (refer to this other guide):
Bucket Name:default
OpenStack AuthURi:https://swiss-backupXX.infomaniak.com/identity/v3(XX = check your Swiss Backup Manager account and replace the exact URL)
Keystone API Version:V3
Domain Name:default
Username:SBI-XXXXXXXX
Password: your password
Identity Name:sb_project_SBI-XXXXXXXXXX
API Key: leave blank
Container Region: leave blank - Click on Test Connection and verify that your credentials are correct, then click on Next.
- Replace
- Select the folders to back up and click on Next.
- Define your backup preferences.
- It is recommended to leave the Remote volume size option at its default value.
- Choose your data retention preference.
- The Smart backup retention option is recommended - a backup will then be kept for each of the last 7 days, each of the last 4 weeks, each of the last 12 months.
- Click on Save.
- You will be taken back to the home page; you can start a backup immediately by clicking on Start now next to the name of your backup or wait for the next scheduled backup.
Restore a device with Duplicati
To do this:
- Open a web browser and go to http://localhost:8200.
- Click on the "Restore" menu on the left.
- If Duplicati is not configured to access your Swiss Backup space, see above.
- Choose the location from which you want to restore data.
- Choose the date of the data to restore in the Restore from dropdown menu…
- You can also use the search field if you want to restore a specific file/folder.
- Select the data to restore in the tree view.
- Choose the data restoration location:
- Original location restores the data where it was during the backup.
- Choose location allows you to restore data to a different folder than the original one.
- Choose whether you want to keep the files that already exist on your machine in case of conflict or rename the files with their last modification date.
- Click on Restore and wait for the process to complete.
Resolve a 502 bad gateway or 401 unauth error
With Windows 10, connections to the Infomaniak Swift server are made with TLS1.2, whereas with Windows 11, this is done with TLS1.3, which generates errors. If you restrict the choice to TLS 1.2, then everything works fine.
To do this:
- Add the advanced option of allowed SSL versions:

- and select Tls 1 2:

Link to this FAQ:
Has this FAQ been helpful?
Infomaniak kAuth is a free mobile application that enhances and simplifies the security of Infomaniak accounts protected by two-factor authentication (or two-step verification / 2FA). It is one of the methods that allows you to secure access to your Infomaniak user account.
Preamble
- Two-step verification protects your account and personal data when logging in to Infomaniak tools (manager.infomaniak.com and ksuite.infomaniak.com) by requesting:
- your password…
- then a second security method:

- The mobile app kAuth is one of these methods (learn more about 2FA):
Install the kAuth app
Prerequisites
- Have an Infomaniak account (know your username and password).
- Have an iOS or Android mobile device.
- From your iOS or Android mobile device, download the Infomaniak kAuth app here:


- Install and open the application.
Then, you have two options to link your Infomaniak accounts to kAuth:
- Log in from this mobile (recommended):
- Open the kAuth app from your mobile device.
- Click on Log in from this mobile.
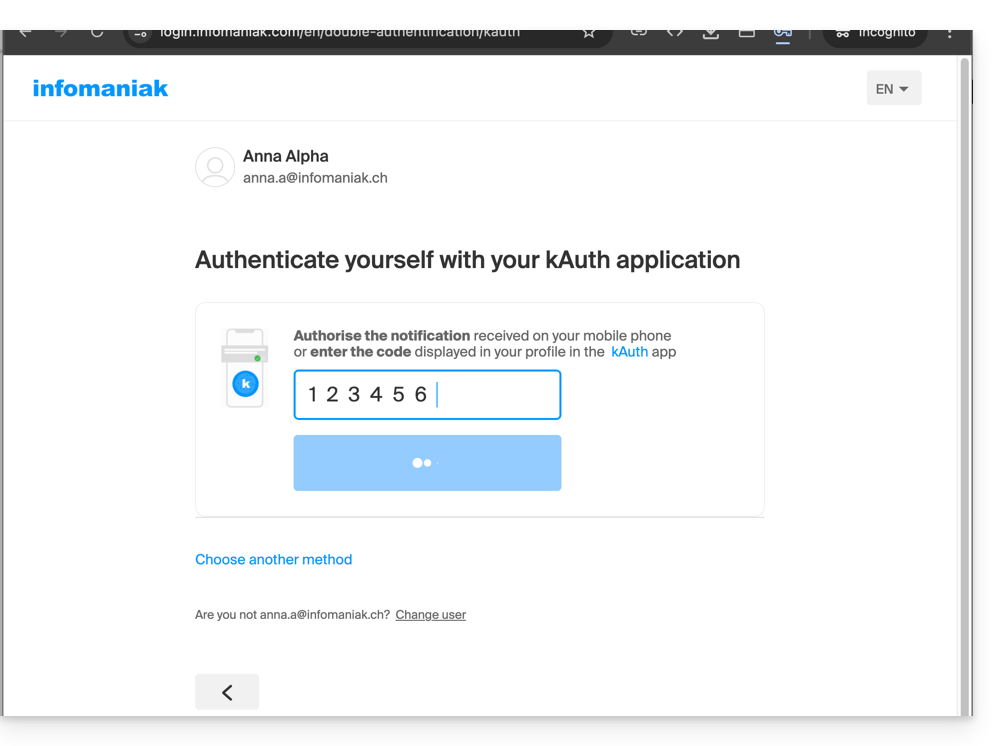
- Enter the credentials of the Infomaniak account to be linked and authenticate your connection if necessary (need help?).
- Click the Authorize button.
- Log in from a computer (if you choose this method, you will need a computer connected to the Internet):
- Open the kAuth app from a mobile device.
- Click on Log in from a computer.
- On your computer, open the page manager.infomaniak.com/2fa
- if two-factor authentication is not yet activated: click on Activate and choose kAuth Application.
- if two-factor authentication is already activated: click on Add an option then choose kAuth Application.
- On your mobile, click on Continue.
- If necessary, authorize kAuth to access your camera (only required to scan the identification QR code).
- On your computer, click Next to display the QR code to be scanned.
- Scan the QR code displayed on the computer.
Save backup codes
If you have just activated two-factor authentication, the application will automatically display your 10 personal backup codes.
Download and keep a copy of these codes as they will be the only way to access your account in case of loss of your credentials or to access your account without access to your phone.
How the mobile app works
When you attempt to log in to your account and after successfully entering your usual password, you receive a push notification on your mobile device asking you to authorize the connection ("YES / NO"), via a notification from the kAuth app:
or directly in the kAuth app: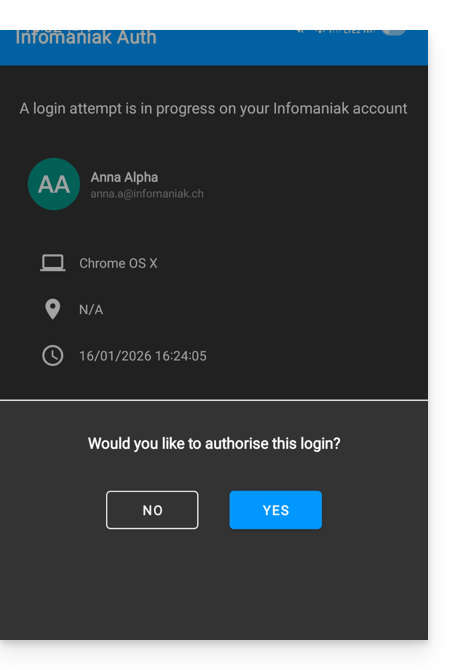
If the connection is authorized, the initial page is automatically redirected to the Infomaniak account. You do not need to manually enter a one-time code as with an OTP app traditional or a code sent by SMS.
And without an Internet connection?
Push notifications do not work without an Internet connection, but kAuth also works without an Internet connection and always allows you to display a one-time code in the same way as a traditional application: Push notifications OTP app do not work without an Internet connection, but kAuth also works without an Internet connection and always allows you to display a one-time code in the same way as a traditional application:
- Open kAuth from your mobile device.
- Click on the relevant Infomaniak account.
- Copy the one-time code (each code is valid for 30 seconds) on the login page:
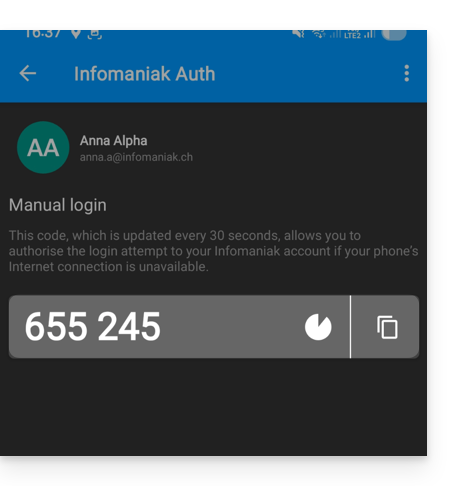
You can thus always access your account while traveling or on vacation.
Add additional accounts
kAuth allows you to manage multiple Infomaniak accounts:
- Open kAuth from your mobile device.
- Click on the blue button
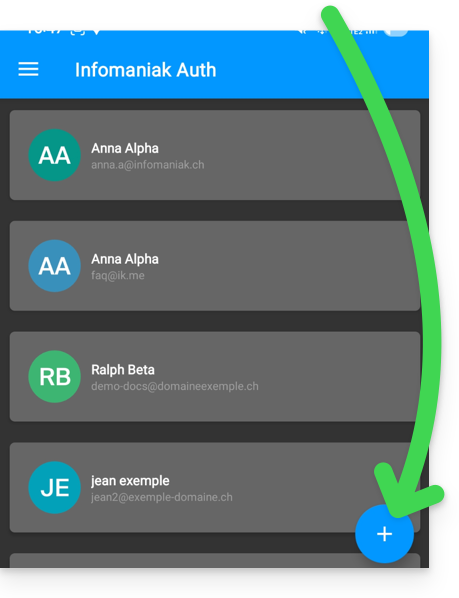
- Repeat the steps described above to link the account.
Delete a kAuth account
To delete your Infomaniak identity from the kAuth app, you must deactivate the kAuth security method from the 2FA section of the Manager of the relevant Infomaniak account.
Link to this FAQ:
Has this FAQ been helpful?
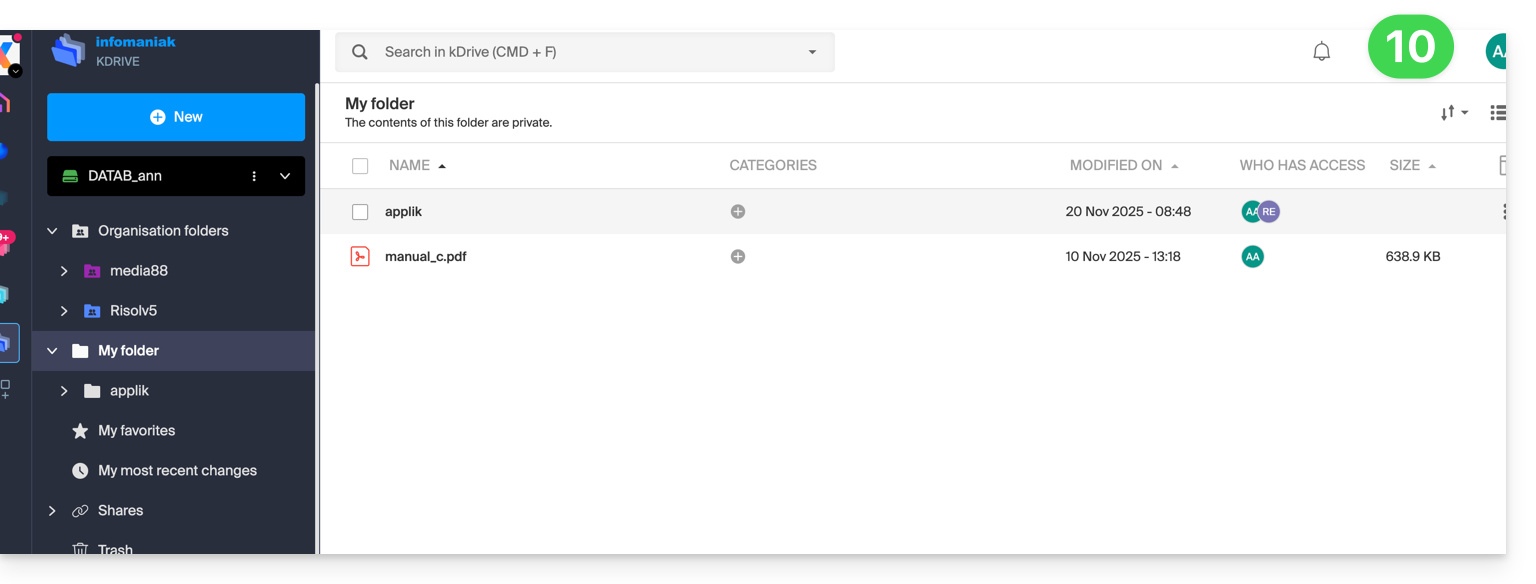
This guide explains how to install and use the kDrive app to synchronize files stored in kDrive and access them easily on all your macOS, Windows, Linux, iOS, and Android devices.
Preamble
- For any changes made to your files & folders on your workstation (Finder / Explorer) to be automatically synchronized…
- on the kDrive Web app Infomaniak (online service ksuite.infomaniak.com/kdrive),
- on the kDrive mobile app (app for iOS / Android smartphone or tablet),
- this for all collaborators who access the data,
- and this in all directions,
- … you need to install the kDrive desktop app (desktop application on macOS / Windows / Linux).
- You have the option to customize the kDrive folders that need to be synchronized on your computer.
- You can also automatically back up photos from your mobile:
- Refer to this other guide for iOS and for Android.
- Note that there is no automatic synchronization between the rest of the content of your mobile device and kDrive; this functionality is identical to competing apps that do not offer it either, as the restrictions of mobile operating systems are too significant to allow it (alternative solutions generally paid for exist via third-party apps using the WebDAV protocol).
Download the kDrive desktop app
Open the kDrive download page to download kDrive (other versions and apps can be downloaded from the unified kSuite settings, including an iOS version optimized for iPad, adapted to the screens of these tablets.
| OS | Minimum required and supported version |
|---|---|
| Windows 10 (v10 1709 to benefit from Lite Sync) | |
| macOS 10.15, ARM OK | |
| Ubuntu 22.04 LTS, ARM OK Neither Lite Sync nor right-click context menu on Linux Desktop environments: GNOME or KDE | |
| iOS 16.4 | |
| Android 8.1 |
Install the kDrive app
To do this:
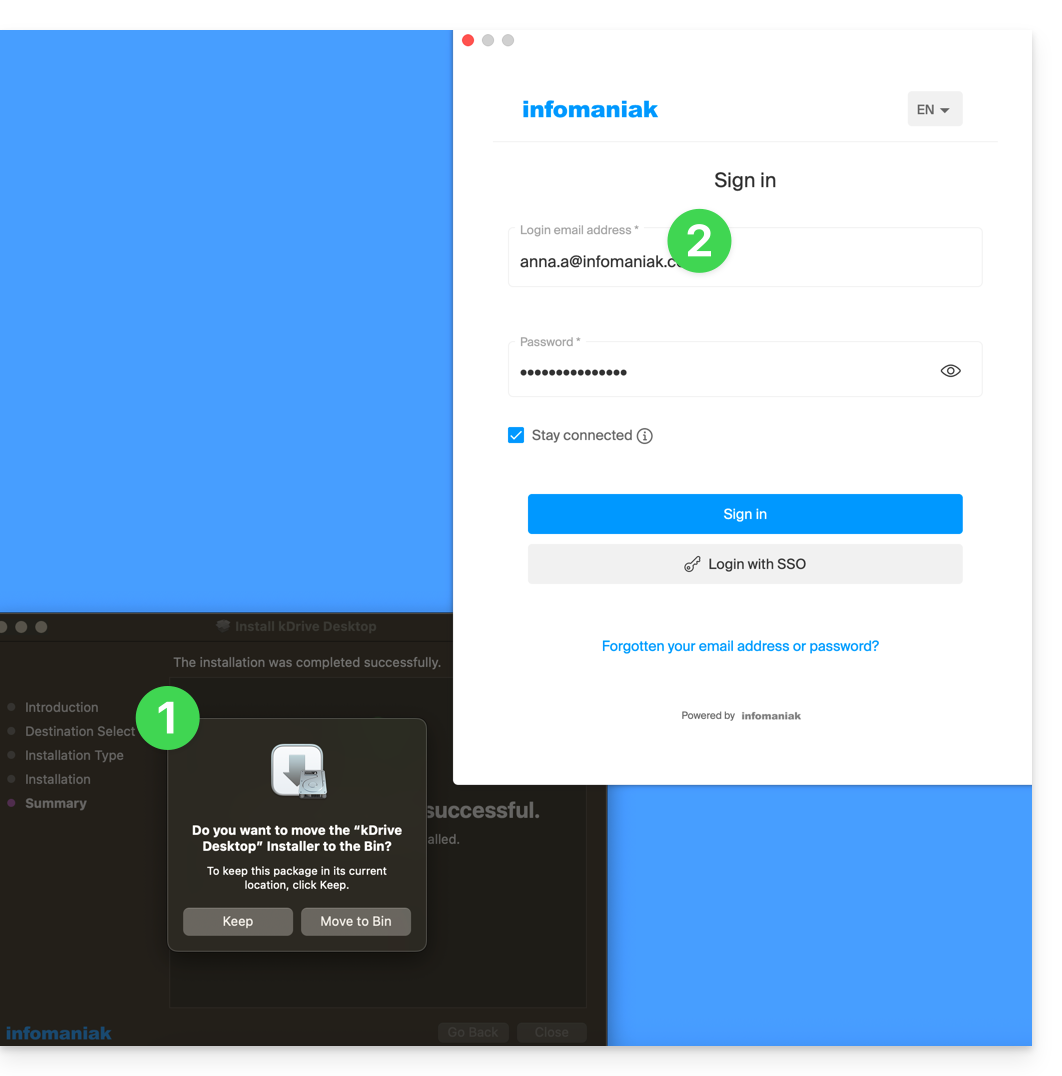
- Open the downloaded application to start the installation on your device.
- At the end of the installation, the application should open and a form will ask you to log in to your Infomaniak account (need help?):
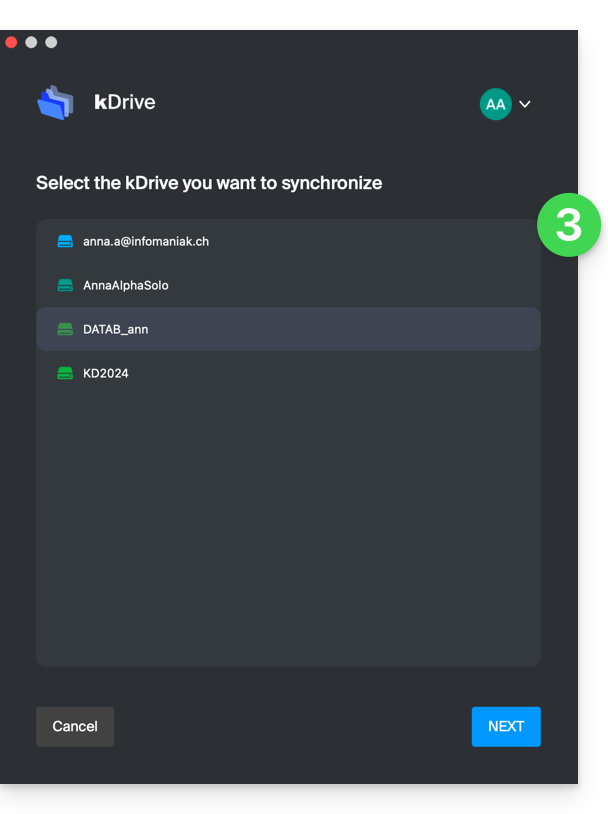
- Then choose from the list the kDrive you want to synchronize (if your account allows access to multiple kDrives — you can link others later if necessary):
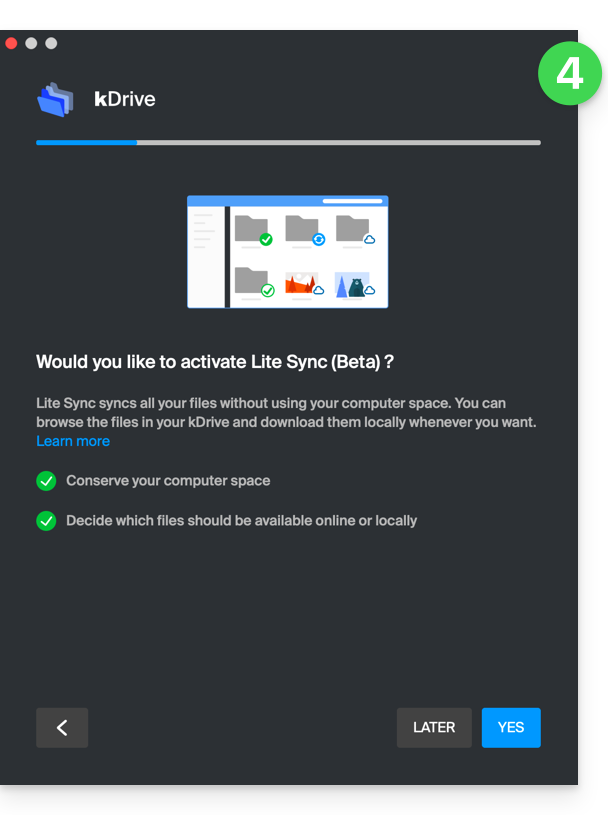
- Enable or disable the Lite Sync option (feature of the Windows and macOS app that saves space by virtually storing your kDrive files on your computer, only downloading them when necessary):
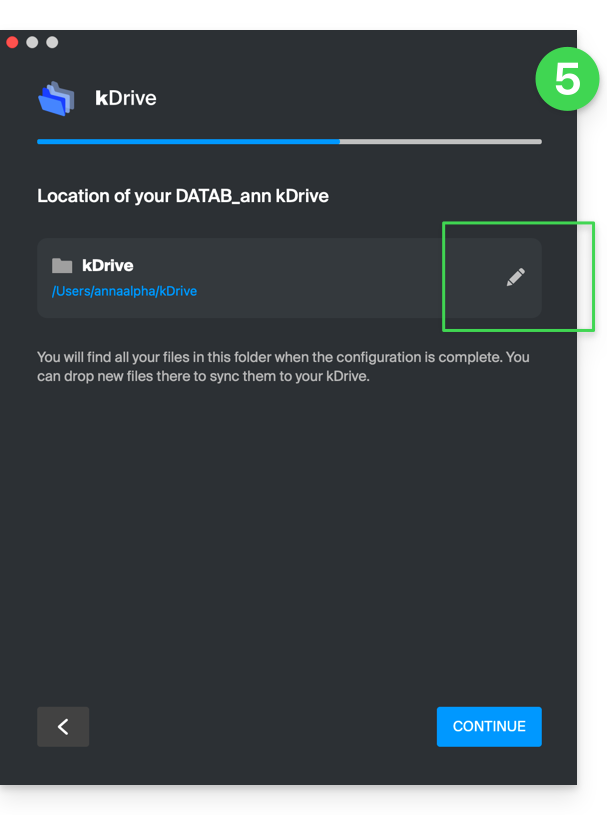
- A kDrive folder is created on your hard drive at the indicated location (a location that is recommended not to be modified, but if necessary you can do so by clicking on the pencil icon ✎):
- It will contain the files that may already exist on your kDrive (some folders may be ignored - read below) and will send to the kDrive server all the files you place there in the future.
- During installation, pay attention to the permissions that may be requested (especially on macOS) and that must be granted for the proper functioning of the application:
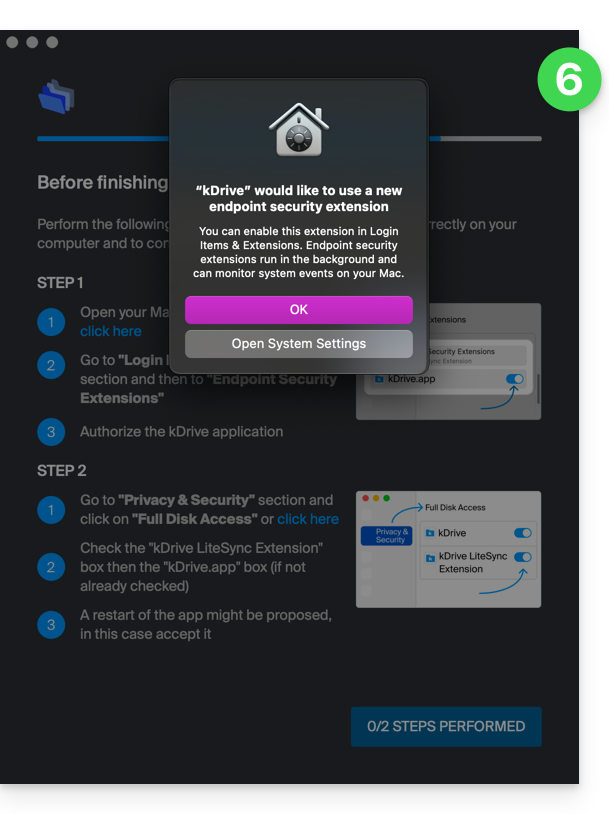
- You need to enable this on macOS:
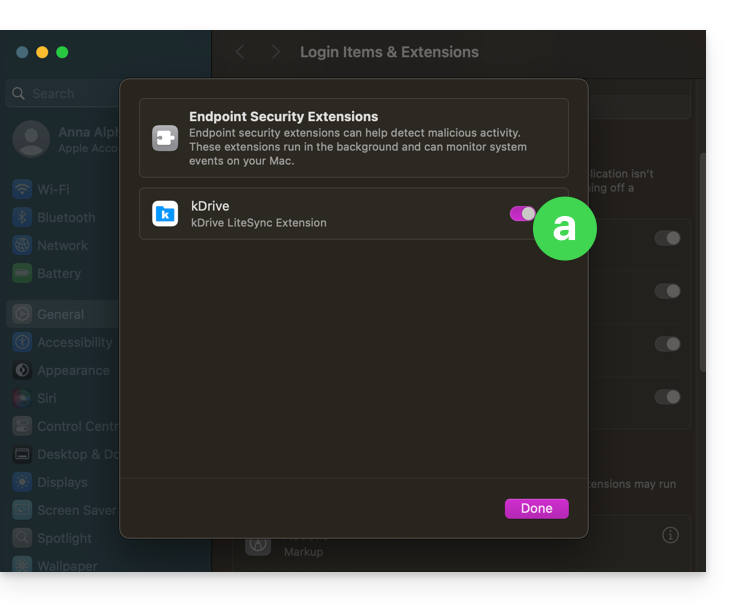
- but also this:
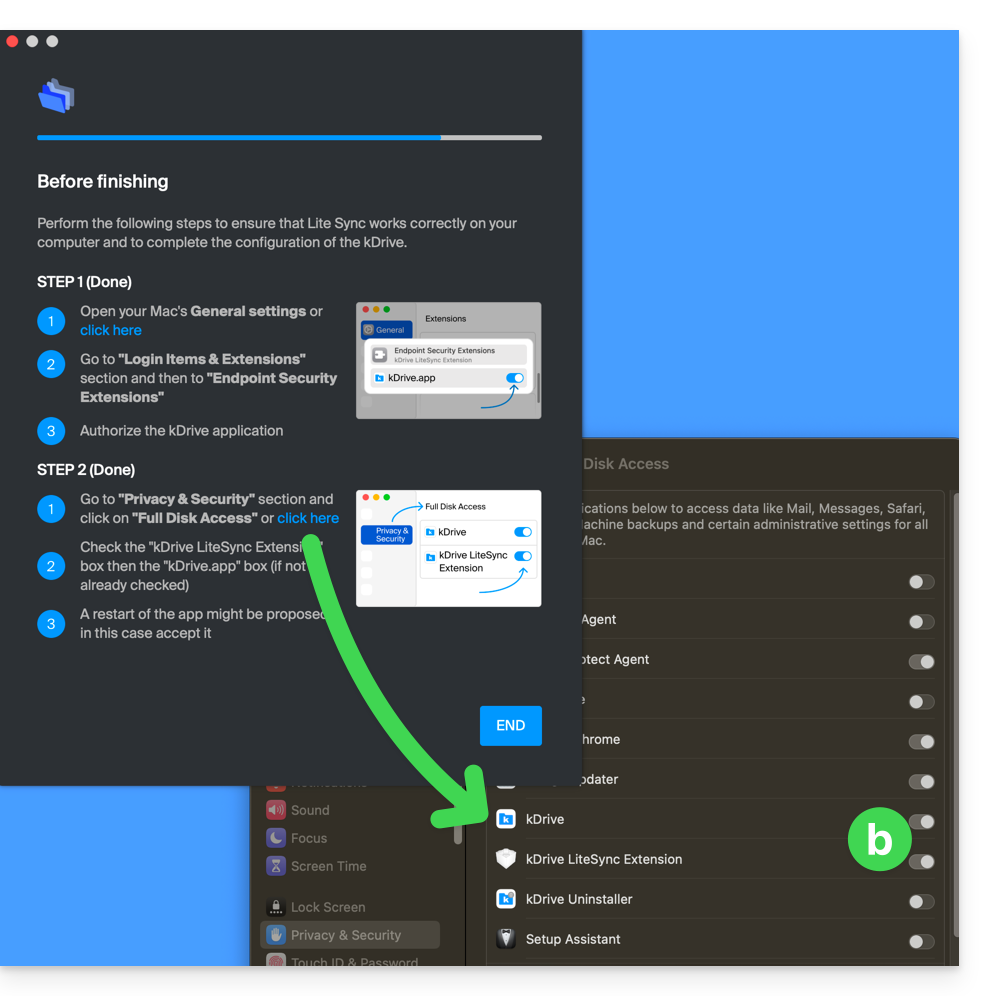
- You need to enable this on macOS:
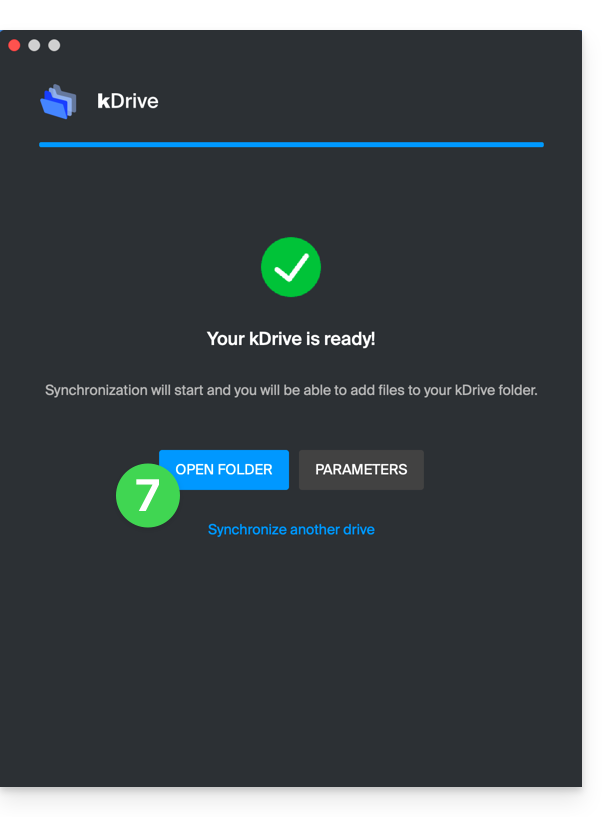
- Once the installation is complete, you can choose to open the location of the kDrive files on your hard drive:
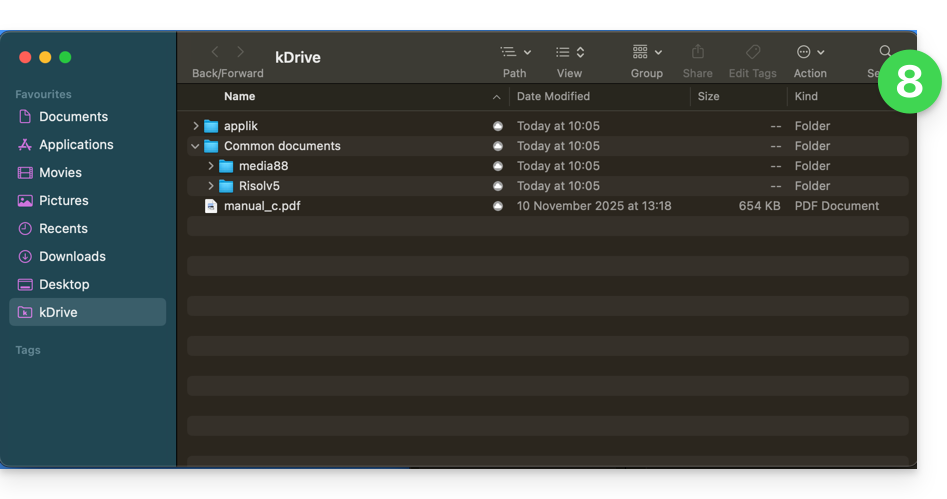
- On a macOS device, for example, it looks like this:
- And you can compare the data present on your hard drive with the data from the kDrive Web app Infomaniak (online service ksuite.infomaniak.com/kdrive):
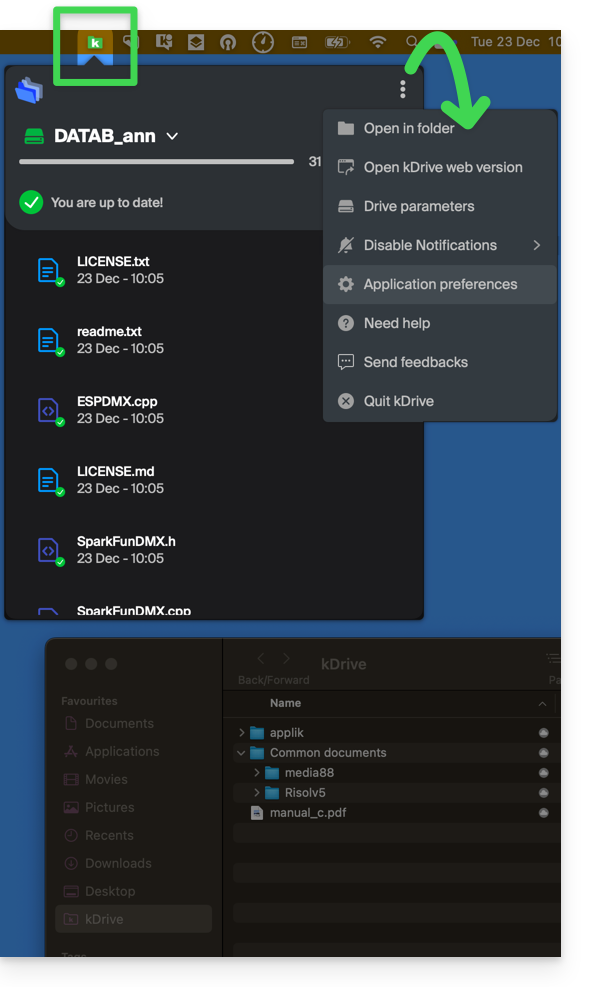
- Click on the action menu ⋮ to the right of the kDrive window.
- Click to open the web version:
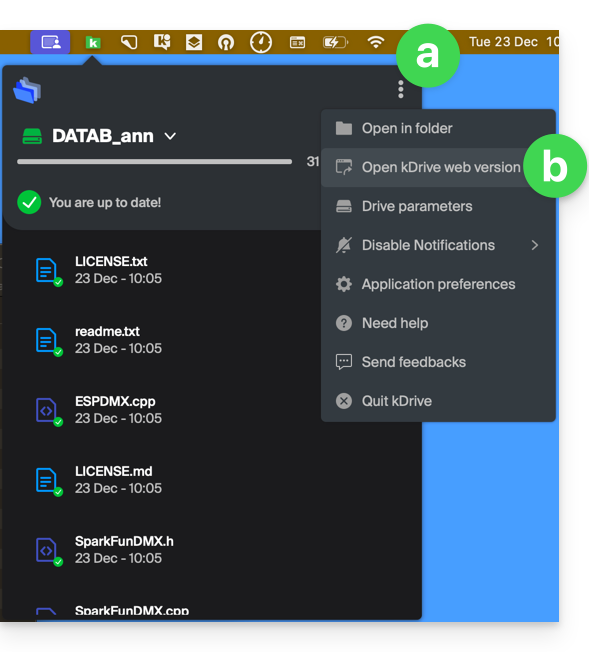
- The data appears, you can compare it with point 8 above:
Synchronize files with kDrive
Once the application is installed and the connection to your account is established, you have the kDrive application on your device:
- On a computer, the app icon appears in the notification area of your computer (top right on macOS, bottom right on Windows and a double left click in the taskbar on Linux).
- Take the opportunity to browse the application preferences and the Drive preferences, from the action menu ⋮ to the right of the kDrive window.
Check out the other guides to continue exploring the kDrive application.
Link to this FAQ:
Has this FAQ been helpful?
This guide is for you if you are looking for a complete messaging & collaborative data storage offer. Its goal is to help you better understand the different Infomaniak product suites when you are hesitant or do not know which one to choose…
If you are looking to host a website, check out this other guide.
The different offers in summary
Here is a summary of the different formulas (excluding web hosting offers):
| Free (or domain name to pay for) | Paid |
|---|---|
my kSuite
| my kSuite+
|
Mail Starter Service
| Mail Premium Service
|
Free kSuite
| Standard kSuite / Business kSuite / Enterprise kSuite
|
Free or paid suites
Infomaniak offers several messaging solutions with or without additional collaborative tools:
- A Mail Service is the name given to the messaging service created by Infomaniak in Switzerland. You can order a Mail Service independently of kSuite.
- kSuite is a collection of Infomaniak services that includes, among other things, a Mail Service and revolves around a personal domain name.
- my kSuite and my kSuite+ are limited versions of kSuite, do not require a domain name, and can also perfectly meet your email needs.
Cost of simple email offers
This email can be…
- … free if you are content with an address with a generic domain name (what comes after the at sign
@), imagined by Infomaniak (etik.com,ik.me,ikmail.com) by taking my kSuite (my kSuite+ unlocks some limitations of my kSuite) - … at very low cost if you are content with one or two free email addresses on a domain name that you pay for (there are domain names for less than 5 CHF/€ per year, these will be your only expenses and it allows you to personalize your email addresses) by ordering:
- either the Starter offer (1 email address only)
- or the kSuite offer
Need a large number of email addresses?
If you need multiple email addresses on the same domain, then it is possible to order a Mail Service only (5 email addresses minimum) or kSuite which exists in 3 different versions:
- Standard
- Business
- Enterprise
The common point of all Mail offers is that you must have a user account with Infomaniak (a login identifier in the form of an email address, as well as a password) which will lead you to your Organization where your email will be found.
Additional tools (kDrive…)
If you choose a Suite (kSuite or my kSuite / my kSuite+), this user account will lead you to your Organization where the suite of tools will be found, therefore your email but also kDrive, kChat etc.
Click on the links to obtain the comparison tables detailed all the functionalities available according to the formula:
- kDrive can be obtained by creating a my kSuite or my kSuite+ account.
- kDrive can be obtained independently in 3 different versions:
- Solo
- Team
- Pro
- kDrive can be obtained if you subscribe (free or by a paid subscription) to kSuite which exists in 3 different versions:
- Standard
- Business
- Enterprise
Do you want to join Infomaniak?
Refer to this other guide.
Link to this FAQ:
Has this FAQ been helpful?
This guide explains how to configure the general settings of the Infomaniak ticketing system.
General settings
The general settings are organized into 3 tabs:
- Ticketing: the general settings used on your ticketing system
- Organizer's contact details: information displayed on the online ticketing system and on the Infomaniak portal so that visitors can contact the organizer
- General conditions: allows you to define the general conditions of your online ticketing system
1. Ticketing tab
- The "Ticketing visibility" button allows you to make your ticketing system visible when everything has been configured and after activating the online store; allows you to quickly make your ticketing system accessible or not online.
- Test mode allows you to reactivate test mode. This option will no longer be accessible as soon as an order is placed in real mode.
- The name of the ticketing system that you type in this box will be visible on the online store as well as on the tickets and emails that will be sent to your customers.
- The URL of your website will be displayed in the General Terms and Conditions (GTC) of the gift vouchers, instead of the legal name of your organization, if you do not want your legal name to be visible to your customers.
- To choose your logo, click on the pencil icon; the chosen logo will appear on your customers' invoice. The dimensions of your logo must be 600 x 160 pixels:

- By default, the currency of your ticketing system is the Swiss franc (CHF). In order to give your customers the choice to pay for their purchases in euros (EUR), check the box "I want to activate another currency" then check the box "EUR". The ticketing system only offers transactions in CHF and EUR.
- VAT liability: Does your organization have to pay VAT? To make sure, please contact your legal or financial representative, or find out from the town hall of your municipality. Check the box "I am liable for VAT" when you have confirmed this information:

- You can choose between different languages for your ticketing system: French - English - German - Spanish - Italian... By checking more than one language box, do not forget to translate the content of your ticketing system (for example the description of your events) into all the selected languages.
- In this space, enter the signature of your organization which will be visible on all communications sent to your customers:

2. Organizer's contact details tab
The contact details you enter in this tab will be used for invoicing and on your online ticketing system.
- Organization name: Enter the name of your organization, company, association or NGO.
- Address - Postal code - City - Country: Make sure to enter the exact address of your legal entity which will be used for accounting/invoicing.
- Email address: The email address you enter in this field will be used for order confirmations, tickets, and event-related information.
- Phone: The number you enter in this field will allow your customers to contact you in case of questions or issues. Make sure to select the correct country code for the number you want to display.
- SMS sender name: Enter the name you want to appear as a signature at the end of SMS messages:

You can leave the phone number field empty if you do not wish to share it with your customers.
3. General conditions
In this tab, you have the option to edit the general conditions. These must be accepted by your customers in their shopping cart before they can proceed to online payment. This tab includes default general conditions that you can consult and modify as needed.
If you have modified the general conditions, you can always revert to the default version by clicking on the blue text 'Restore default general conditions' located under the general conditions area.
Link to this FAQ:
Has this FAQ been helpful?
This guide explains how to display a countdown before the next live stream or during a scheduled interruption on Infomaniak's video streaming service.
Access the scheduling calendar
To do this:
- Click here to access the management of your product on the Infomaniak Manager (need help?).
- Click directly on the name assigned to the product concerned:
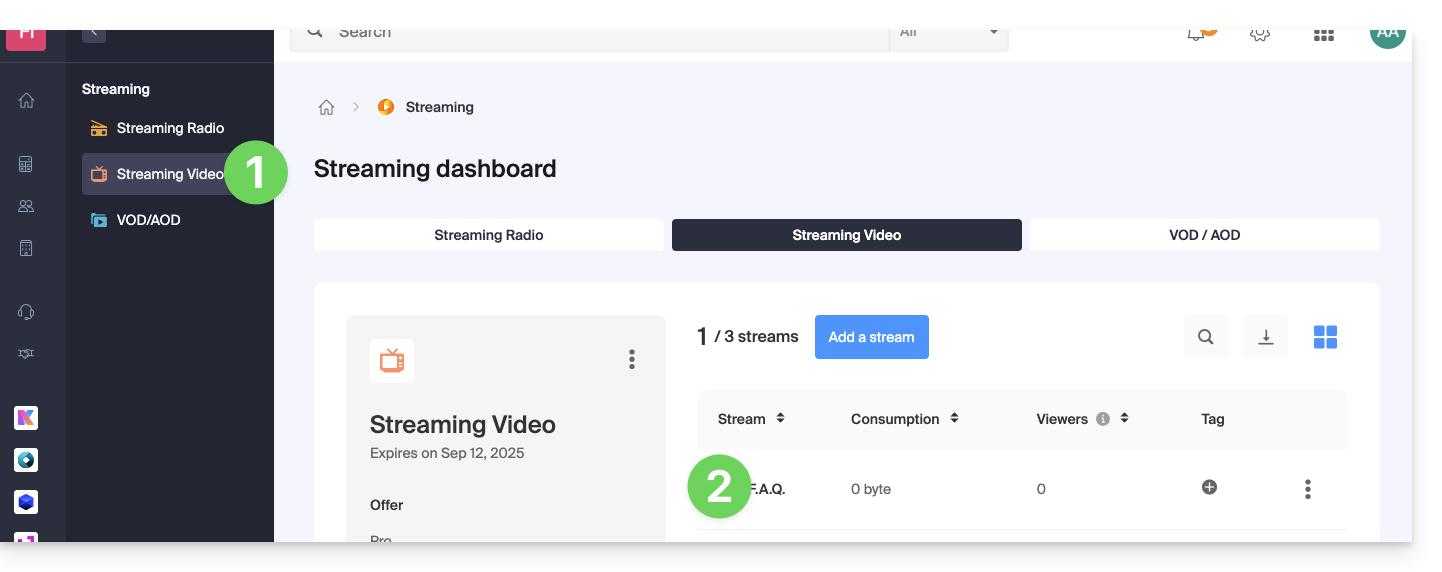
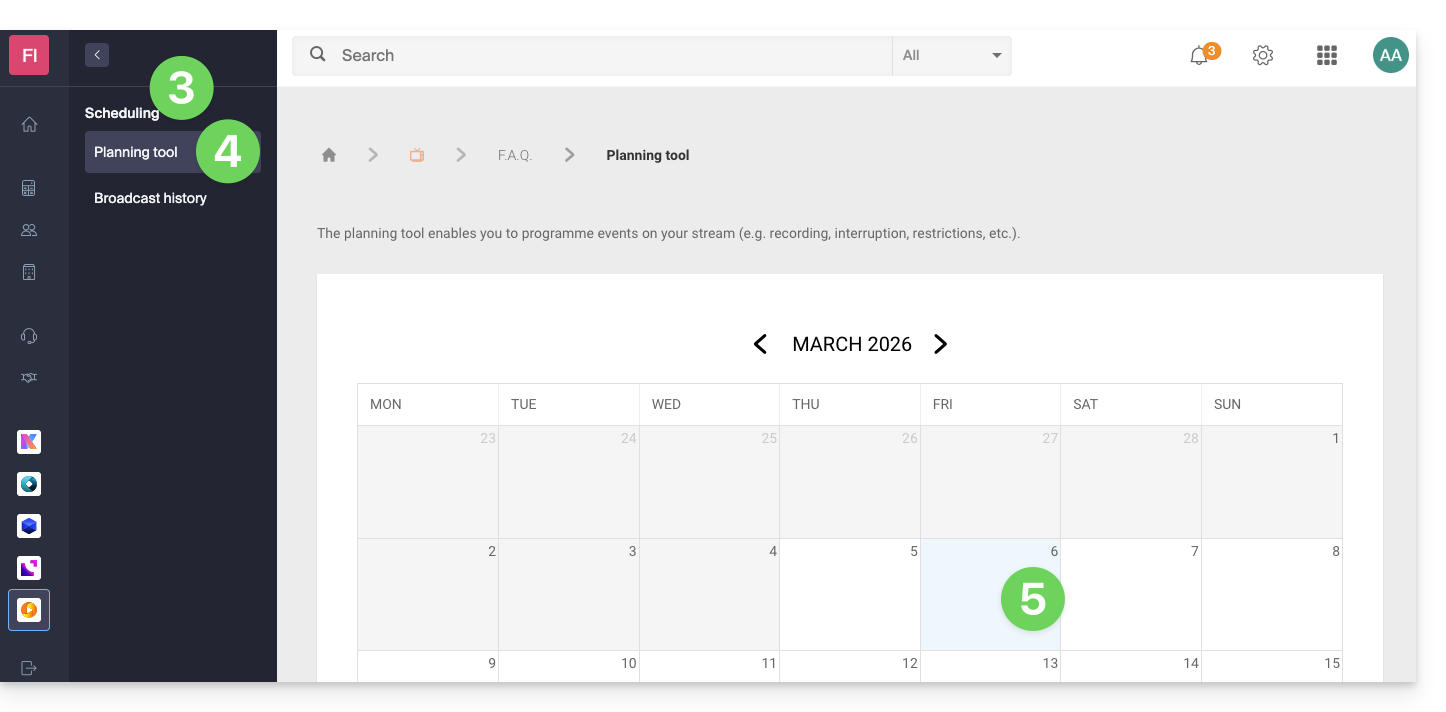
- Click on Scheduling in the left sidebar.
- Click on Scheduling tool in the left sidebar.
- Click on the desired date:
Interruption function on the schedule
For example:
- This configuration on the calendar to interrupt a live program…
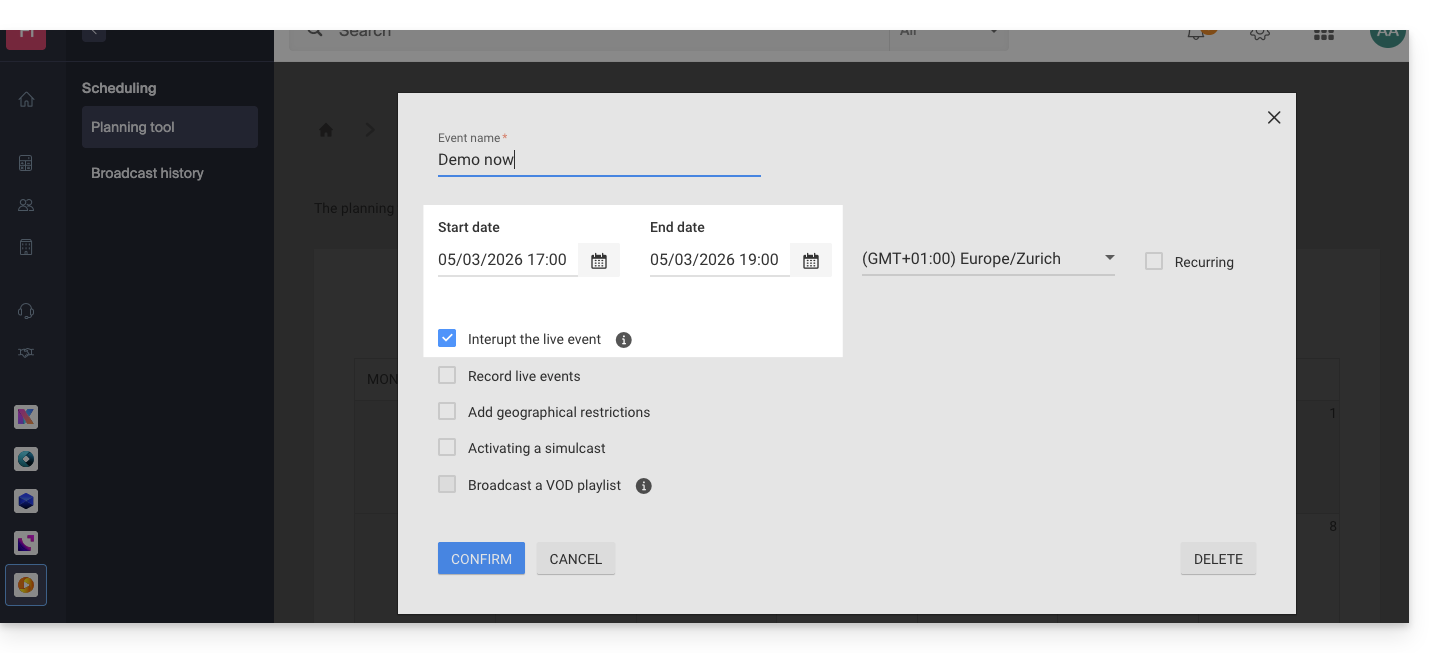
- … and this configuration at the level of the image (thumbnail) and text choice of the video player…
- … will display this result from 5 PM, with a 2-hour countdown in seconds visible on the player of your TV stream:

The countdown, once scheduled, works in correlation with stream interruptions if you set one (or more in succession, thus managing the overlap). Note: it takes 2 minutes for a scheduled interruption to be reflected in the countdown.
Link to this FAQ:
Has this FAQ been helpful?
This guide explains how to connect to your Web Hosting using an SSH key.
✘ UNAVAILABLE with
Node.js type site
Starter hostings
Prerequisites
- Create an FTP + SSH account from the Infomaniak Manager.
- Create an SSH key with a secure algorithm, for example
ed25519:ssh-keygen -t ed25519because with an rsa key (
ssh-keygenorssh-keygen -t rsa), the connection will be refused and the following error will be returned in verbose mode:debug1: send_pubkey_test: no mutual signature algorithm
Upload the SSH key
To do this:
- Connect to the server via SSH (need help?).
Go to the root of your hosting:
cd ~Create the directory «
.ssh»:mkdir .ssh- Change the permissions of the
.sshdirectory to CHMOD 700. - Create the
authorized_keysfile and paste your public SSH key on a single line (important). - Change the permissions of the
authorized_keysfile to CHMOD 600.
Link to this FAQ:
Has this FAQ been helpful?
This guide explains how to properly configure a stream on the Infomaniak Radio Streaming.
Configure radio stream broadcasting
To access the Radio Streaming service:
- Click here to access the management of your product on the Infomaniak Manager (need help?).
- Click directly on the name assigned to the product concerned.
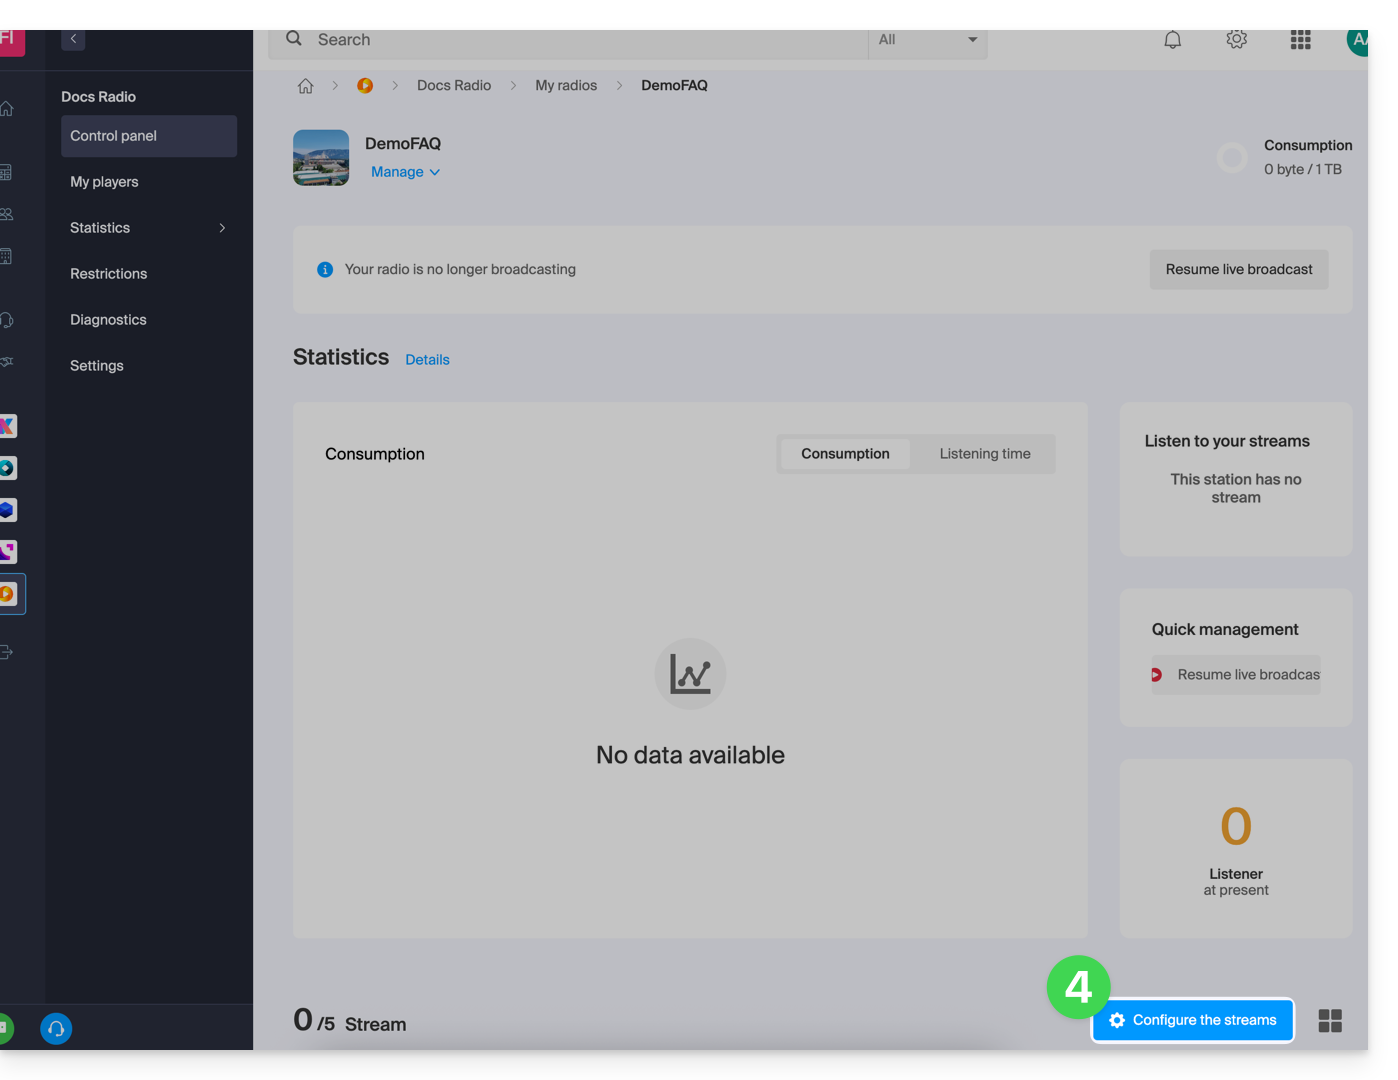
- Click on the radio name.
- Click on the Configure Streams button:
- Click on the Add a Stream button:

- Add a standard stream (refer to this other guide regarding stream relays).
- Click on the button to Continue:

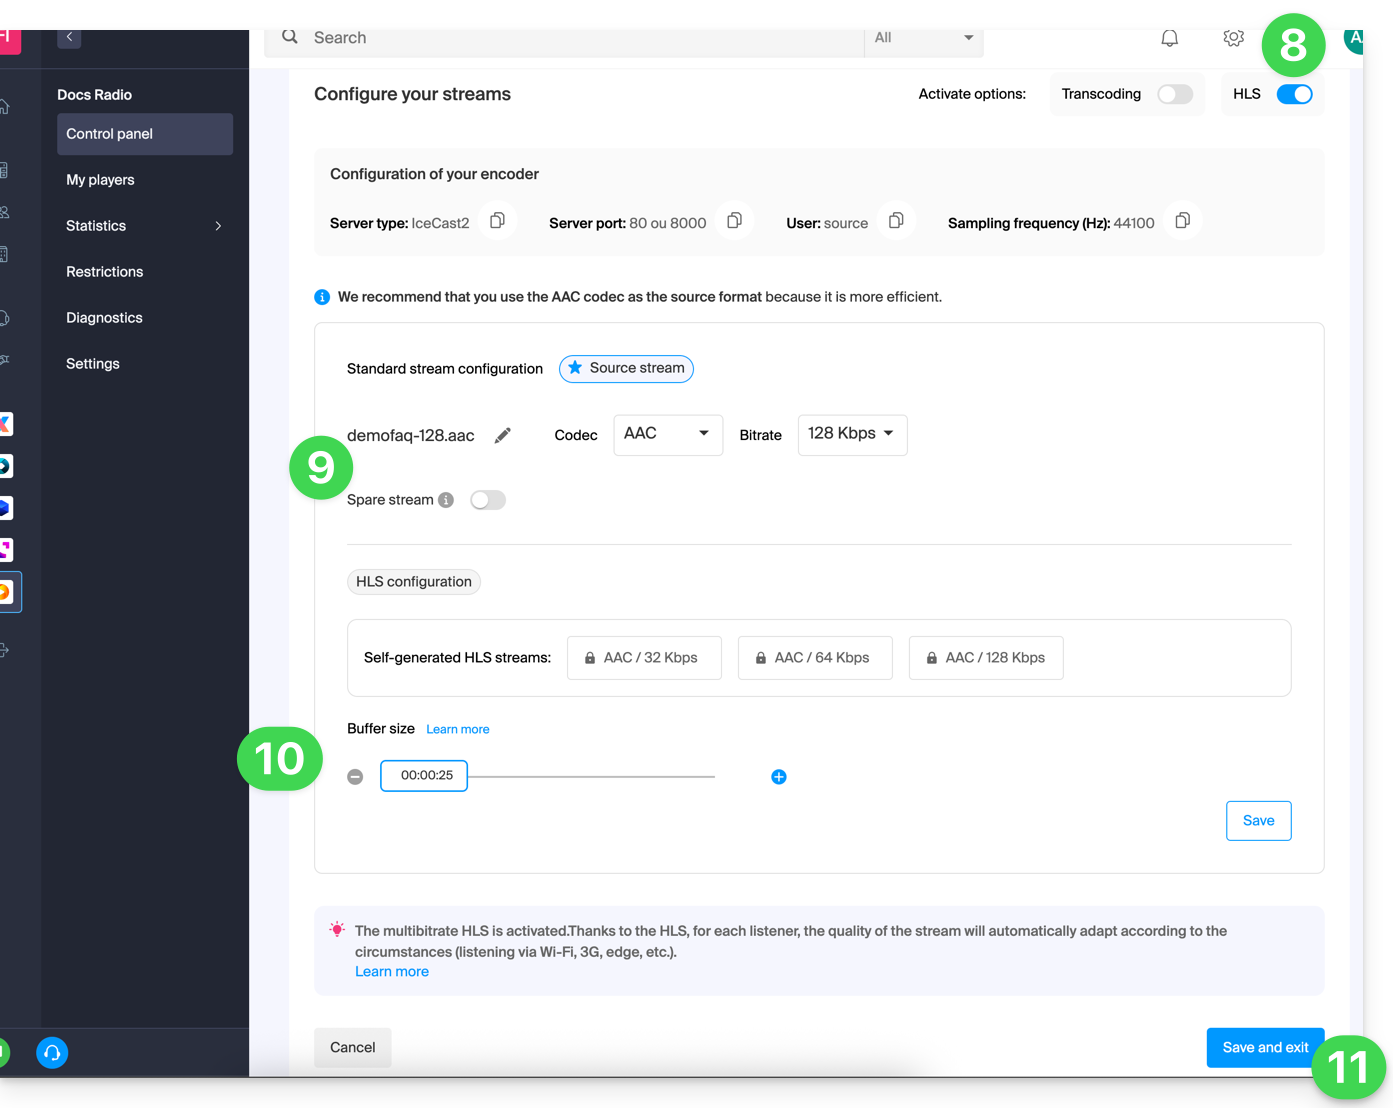
- Choose the desired options, including you can enable HLS which will not be counted in the total number of streams.
- Configure the desired quality and refer to this other guide if you are looking for information about the type of stream.
- Adjust the buffer size if necessary (do not forget to save if necessary).
- Click on the button to Save and Exit:
You can now configure an application with the parameters obtained at the end of this procedure.
Link to this FAQ:
Has this FAQ been helpful?