Knowledge base
1000 FAQs, 500 tutorials and instructional videos. Here, there are only solutions!
This guide explains how to add a folder or subfolder as a favorite on the Infomaniak Web app Mail (online service ksuite.infomaniak.com/mail).
Preamble
- Automatically placed at the top of your folder list, you will get a shortcut and quick access to this folder.
- Several folders can be marked as favorites.
Define a folder as a favorite
To add a folder as a favorite or remove it:
- Click here to access the Infomaniak Web app Mail (online service ksuite.infomaniak.com/mail).
- Click on the action menu ⋮ to the right of the folder concerned in the left sidebar:
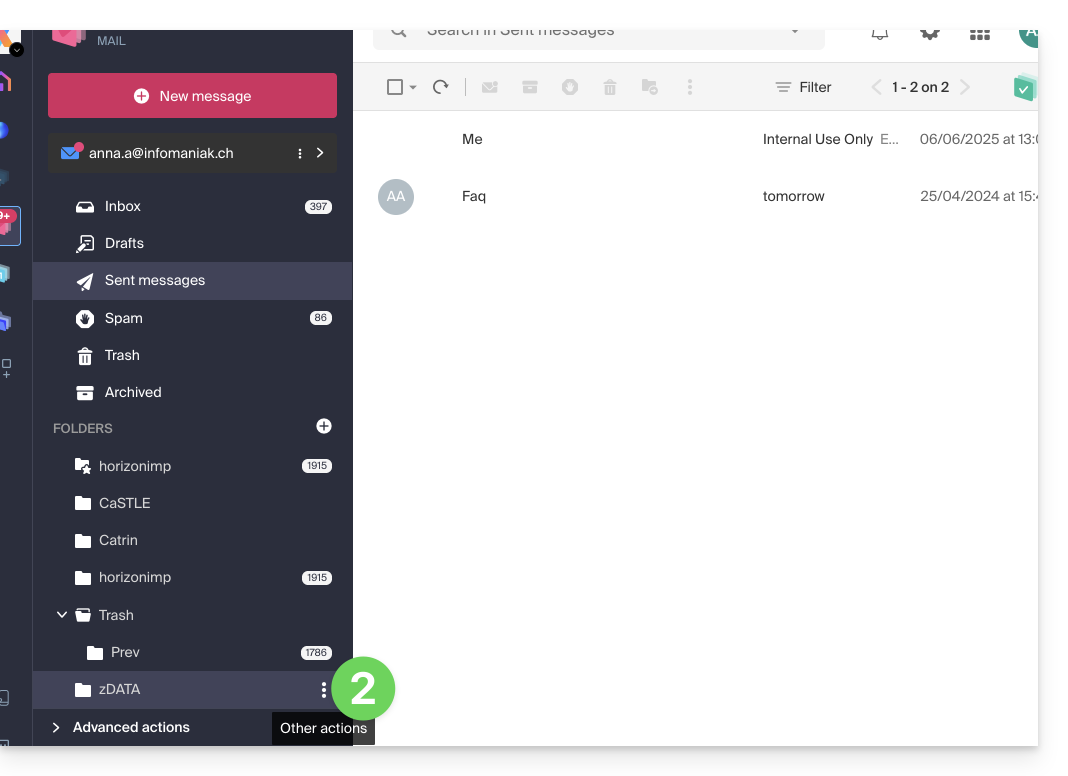
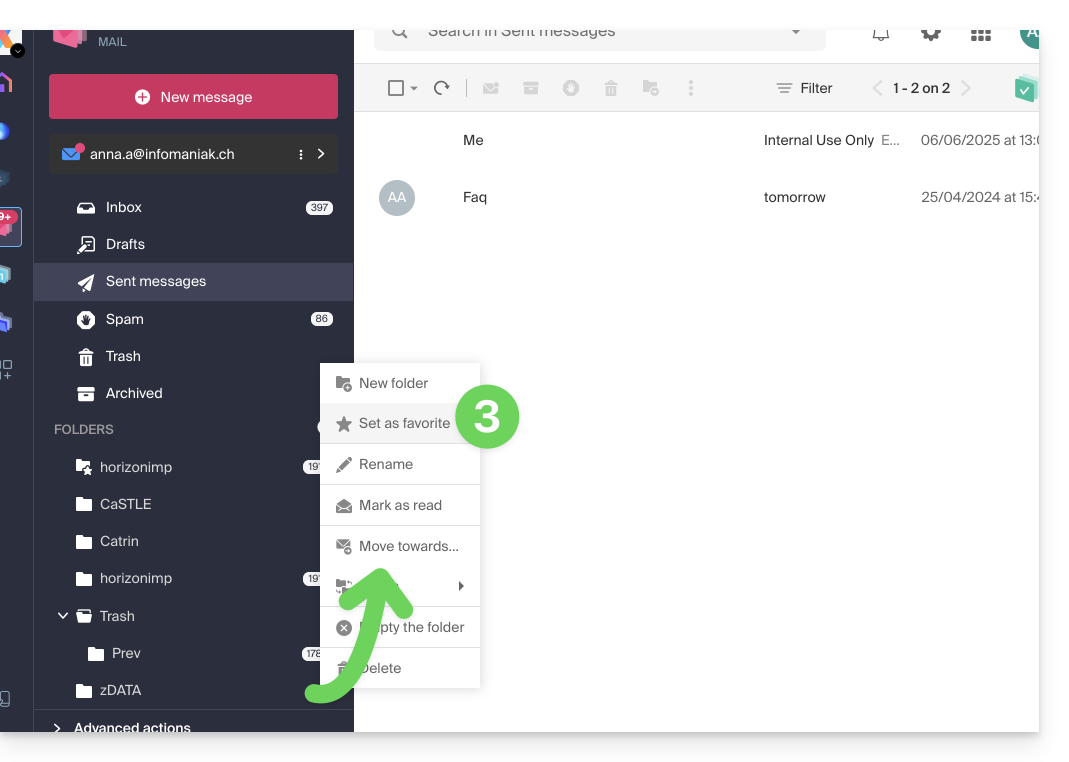
- Choose the desired action:
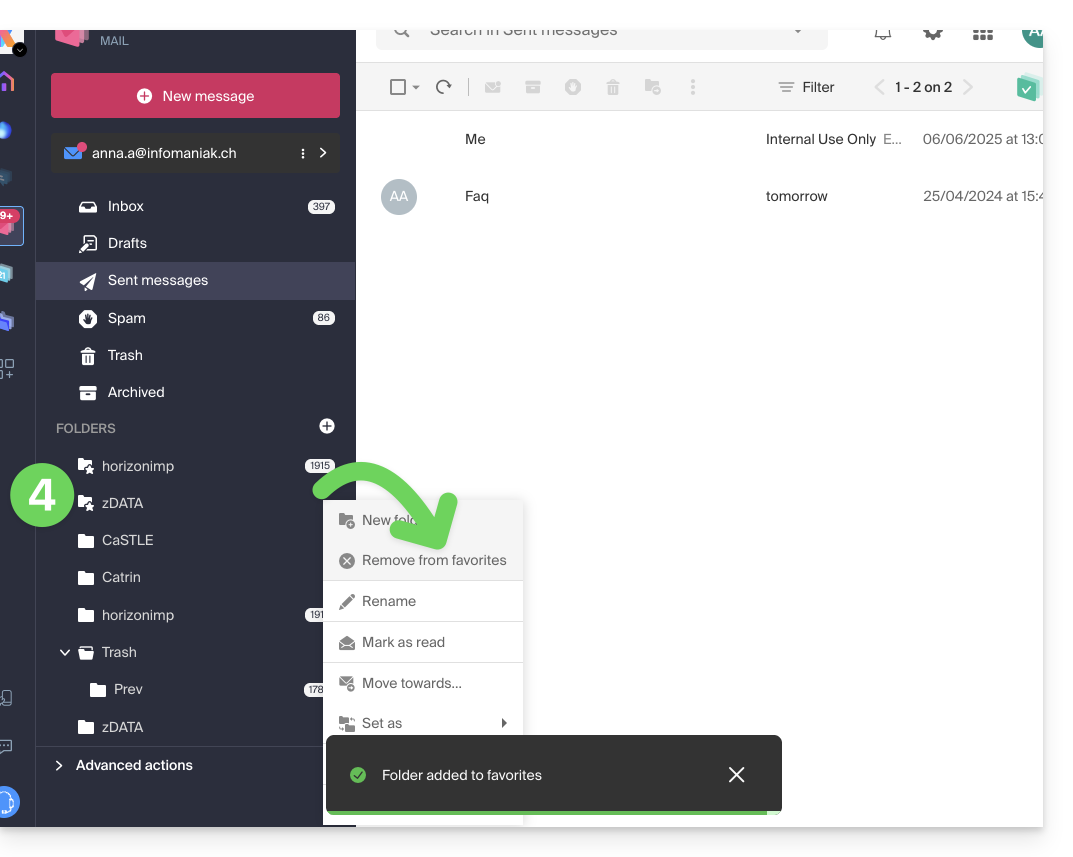
- The folder defined as a favorite is “duplicated” at the beginning of the folder list with a star on its icon (but it is the same folder as the one in the list below); you can remove a favorite at any time via the action menu:
And on the mobile app?
It is not possible to add a folder as a favorite from the Infomaniak mobile app Mail (application for iOS / Android smartphone or tablet).
You can mark messages as favorites to keep track of them.
Otherwise, to access your folders on the mobile app:
- Tap the icon at the top left of the Mail inbox.
- A panel unfolds from the left and displays several sections.
- The collapsible "Folders" section displays your folders in alphabetical order; you can create new folders, then rename or delete them by holding down on the folder name in the list.
Link to this FAQ:
Has this FAQ been helpful?
This guide explains how to forward one or more already received emails to a recipient, by placing them either…
- … in the body of a new message directly,
- … as an attachment (this allows you to forward the entire message with its headers and not just its content).
Preamble
- To obtain a share link allowing you to view a specific email, refer to this other guide.
- To automatically redirect all future incoming messages, refer to this other guide.
- To filter and automatically redirect only certain messages, refer to this other guide.
- To learn how to forward emails but from a third-party software/email client:
Forward a message from the Infomaniak Web Mail app
To do this:
- Click here to access the Infomaniak Web Mail app (online service ksuite.infomaniak.com/mail).
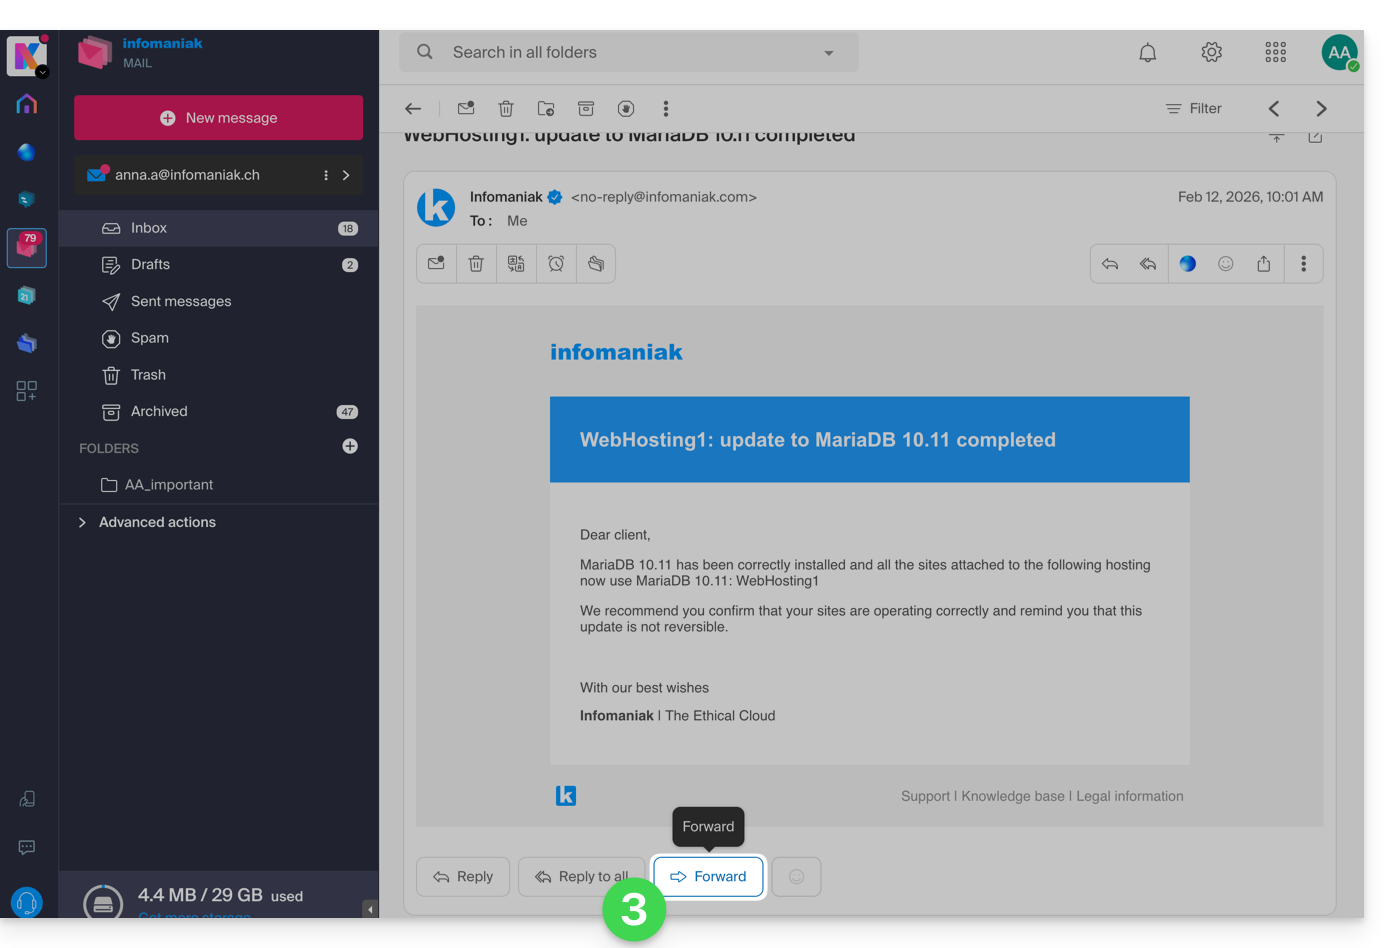
- Open the message to forward.
- The FORWARD button is located below the message:
- You can also enable shortcuts so that a forward button appears above the message, in the toolbar:

Configure the default forwarding method
You can configure Mail Infomaniak so that an email (forward) is always forwarded as an attachment and not quoted in the body of the message.
Indeed, by default the original email will be quoted in plain text directly in the body of the email: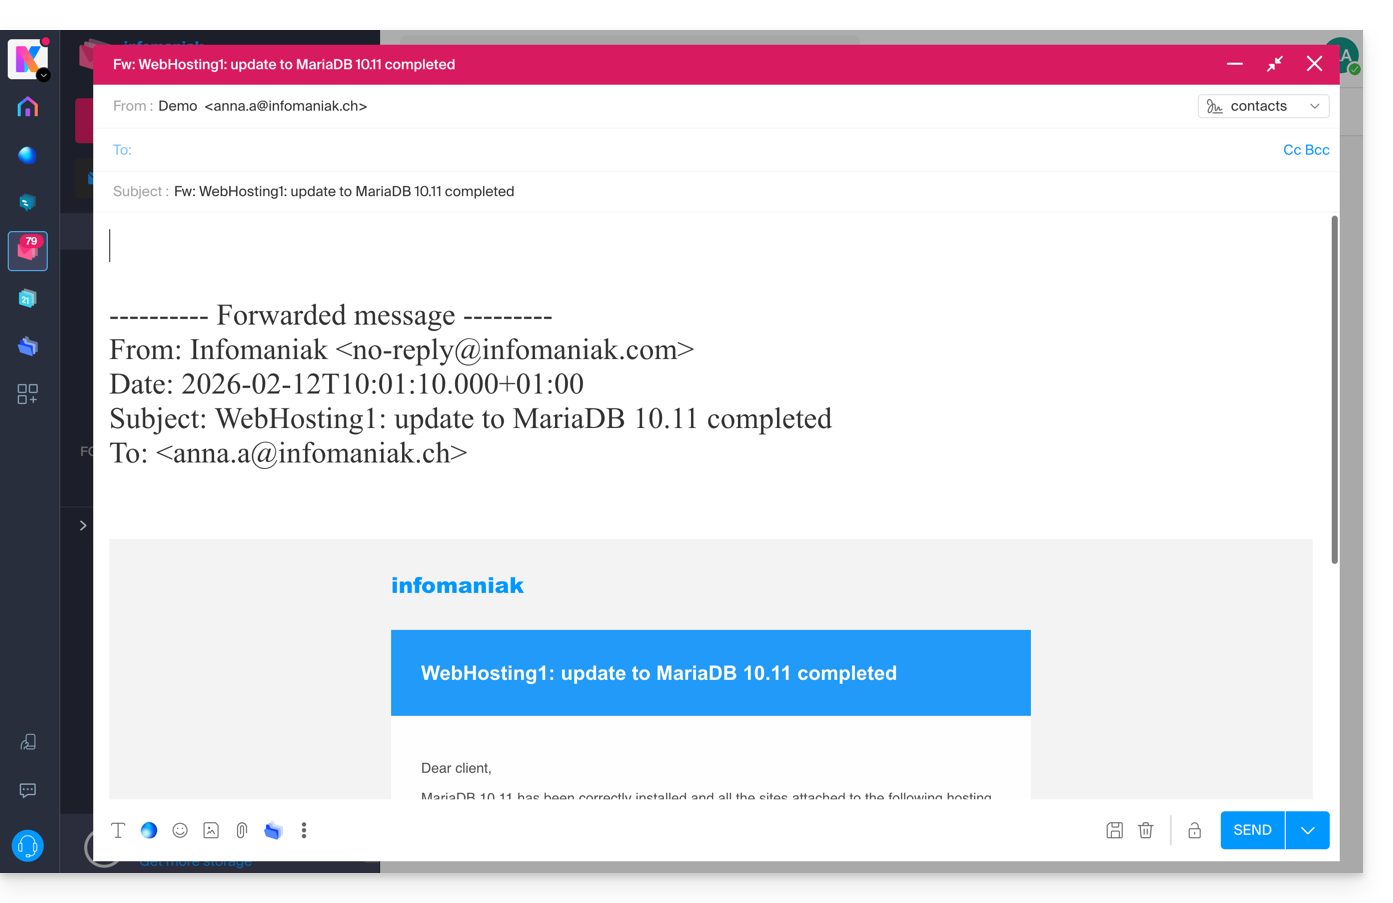
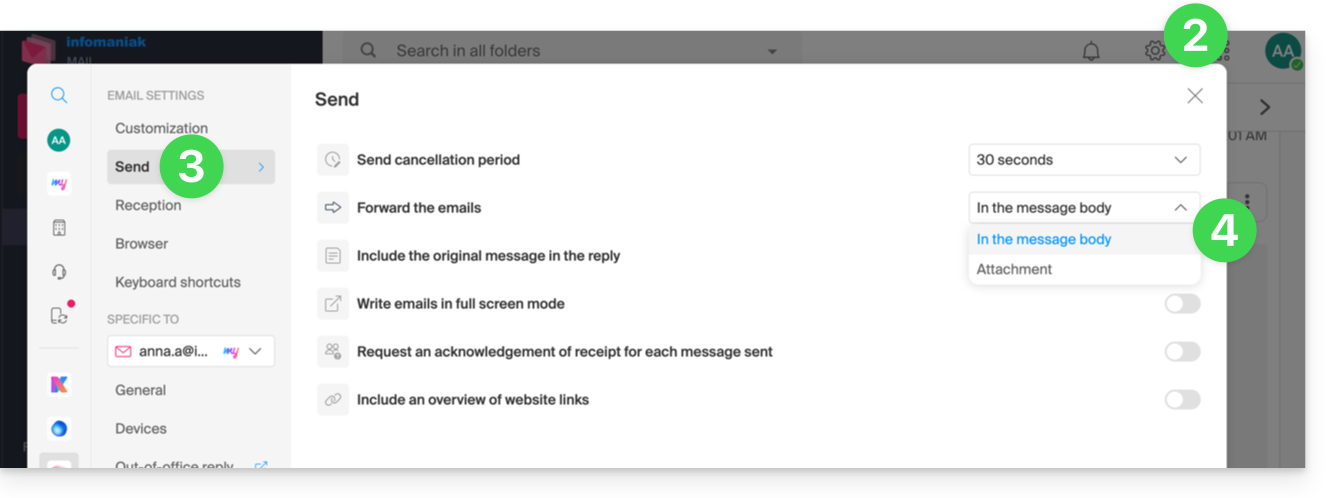
To change this and set the default forwarding method:
- Click here to access the Infomaniak Web Mail app (online service ksuite.infomaniak.com/mail).
- Click on the Settings icon at the top right.
- Click on Sending in the secondary sidebar menu.
- Click on the desired option ("As an attachment" ) to "Transfer emails":
From now on, the original email will be attached as an attachment to the email: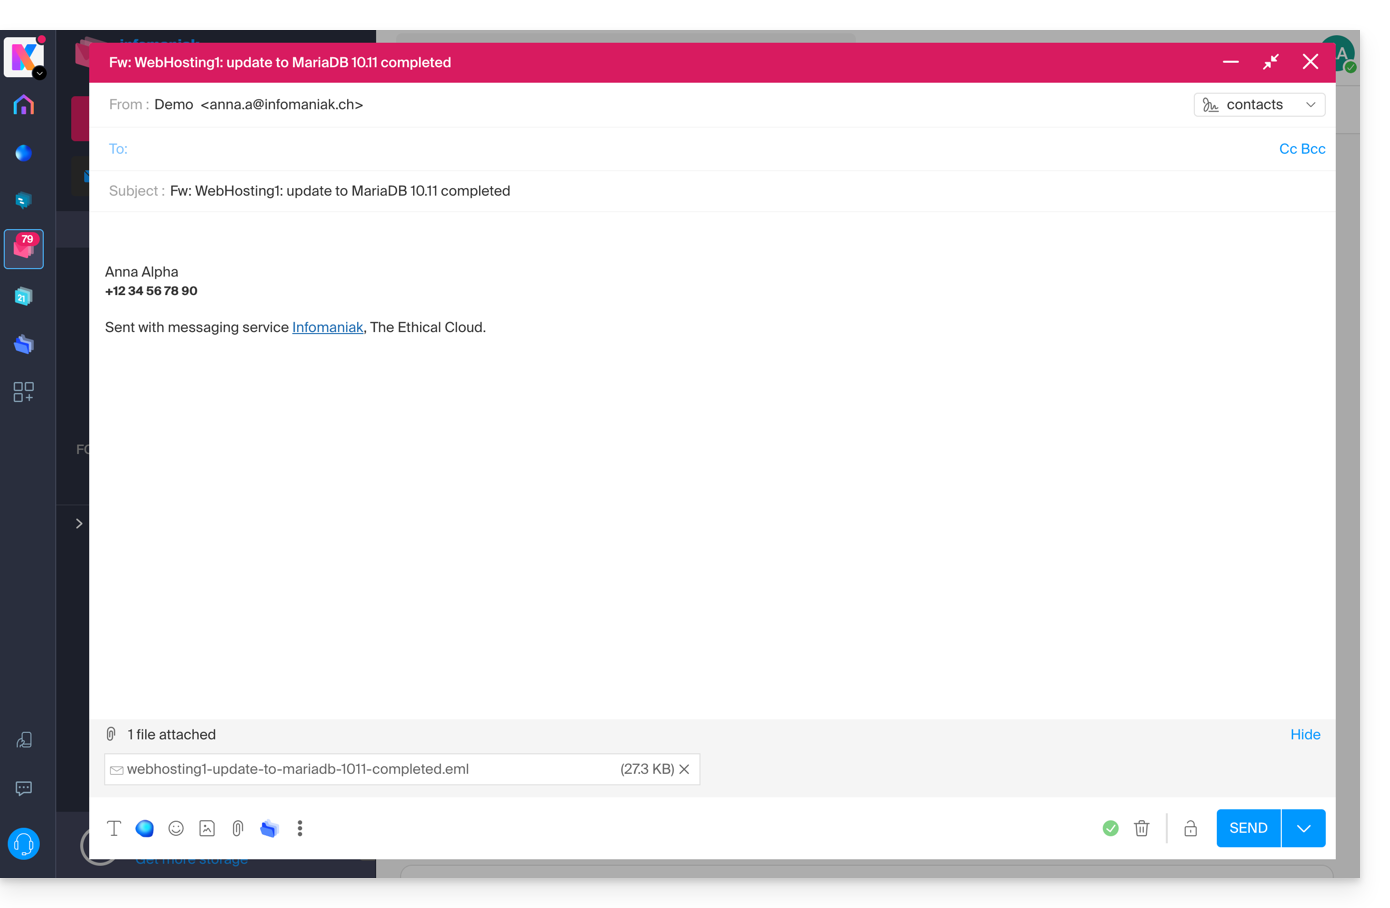
Link to this FAQ:
Has this FAQ been helpful?
To ensure the security of your data and the performance of our services, Infomaniak uses several domain names.
Preamble
- These domains are used to host management interfaces, communication tools, as well as the content of your files in an isolated and secure manner.
- If you use a firewall or antivirus, it is recommended to add these domains to your whitelist (examples) to ensure the proper functioning of your tools (notably my kSuite and SwissTransfer).
Main domains and services
- infomaniak.com: the main site and the Manager (product management).
- status.infomaniak.cloud / infomaniak.cloud
- infomaniakstatus.com
File storage
- infomaniakusercontent.com: domain mainly used for file storage/download.
- ksharelink.com: used for public share links created from my kSuite and Infomaniak Mail.
- chk.me: domain allowing the creation of short links and custom QR codes
Messaging and identity
- ik.me: short domain for Infomaniak Mail.
- etik.com / ikmail.com: alternative domains for free and eco-friendly messaging.
- infomaniak.ch: used for certain technical and institutional services.
Transfer tools and events
- swisstransfer.com: service for transferring large files.
- infomaniak.events / ticket-net.ch: ticketing and event management platform.
⚠️ Warning about Phishing attempts: Infomaniak will never ask you for your password by email; always check that the URL in your browser's address bar belongs to one of the domains listed above before entering your credentials.
Link to this FAQ:
Has this FAQ been helpful?
This guide explains how to activate an out-of-office reply (automatic email message) on an email address managed with Infomaniak. You can thus inform your correspondents that you are unable to respond to them immediately, because you are absent, on vacation, etc.out of office
Preamble
- The automatic reply in case of absence can be activated from the Infomaniak Mail web app (online service ksuite.infomaniak.com/mail) and from the Manager where all the addresses of a Mail Service are managed.
- You can activate or deactivate a previously recorded message, but there cannot be multiple active responders on the same email address: activating a message deactivates another if necessary
Activate the responder from the Infomaniak Mail web app
Prerequisites
- Have permission to manage the responder: if you had been invited to the Infomaniak Mail web app (online service ksuite.infomaniak.com/mail) to manage your address, it is possible that the Mail Service manager has revoked this right from their admin account.
To activate the out-of-office message:
- Click here to access the Infomaniak Mail web app (online service ksuite.infomaniak.com/mail).
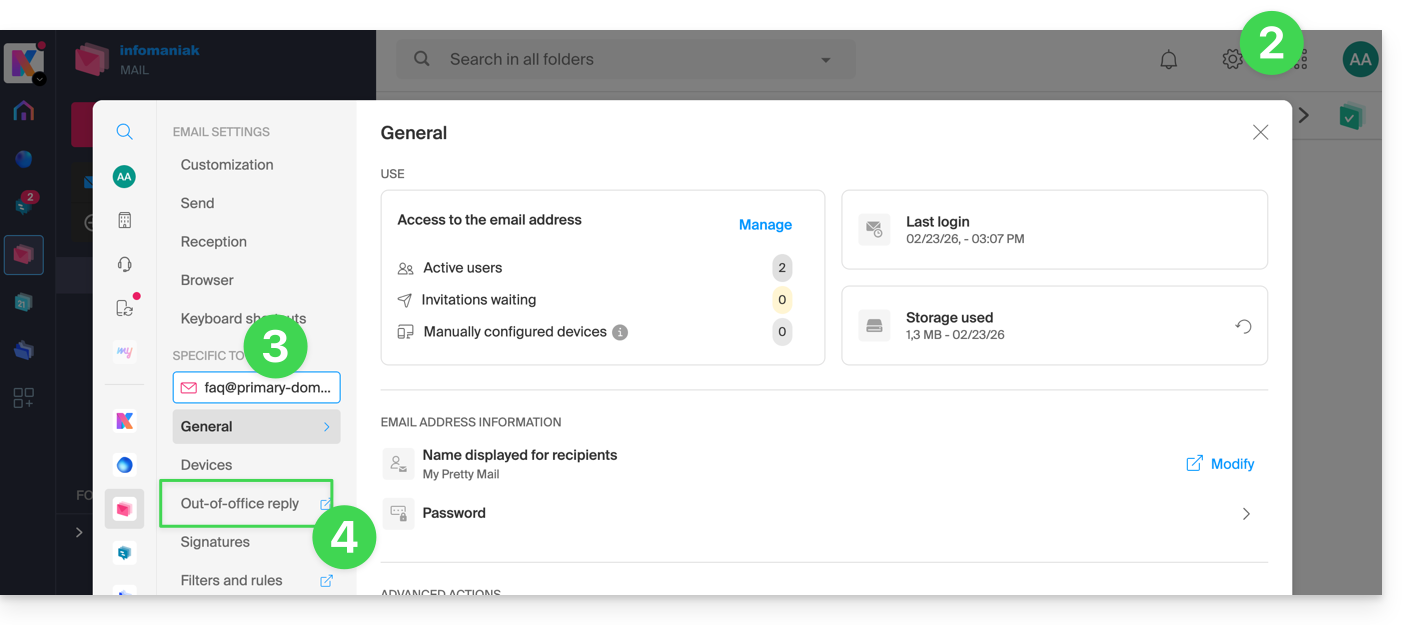
- Click on the Settings icon in the top right corner.
- Check or select the email address concerned in the dropdown menu of the left sidebar.
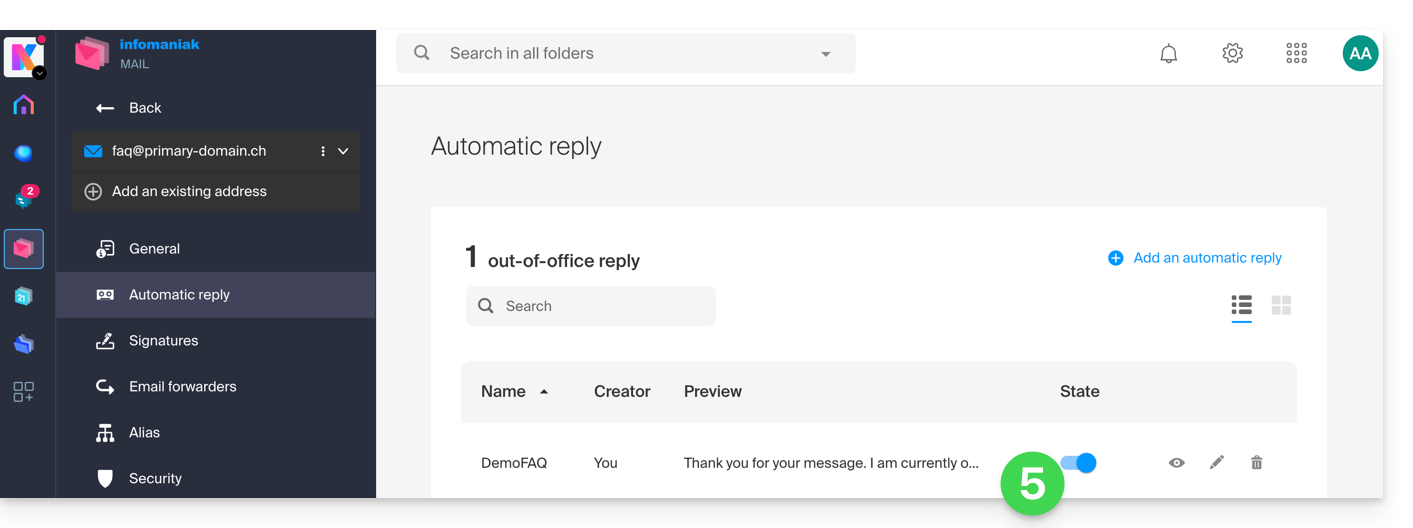
- Click on Responder:
- Activate the automatic message if necessary or read below:
Activate the responder from the Infomaniak Manager
To activate the out-of-office message from the Manager:
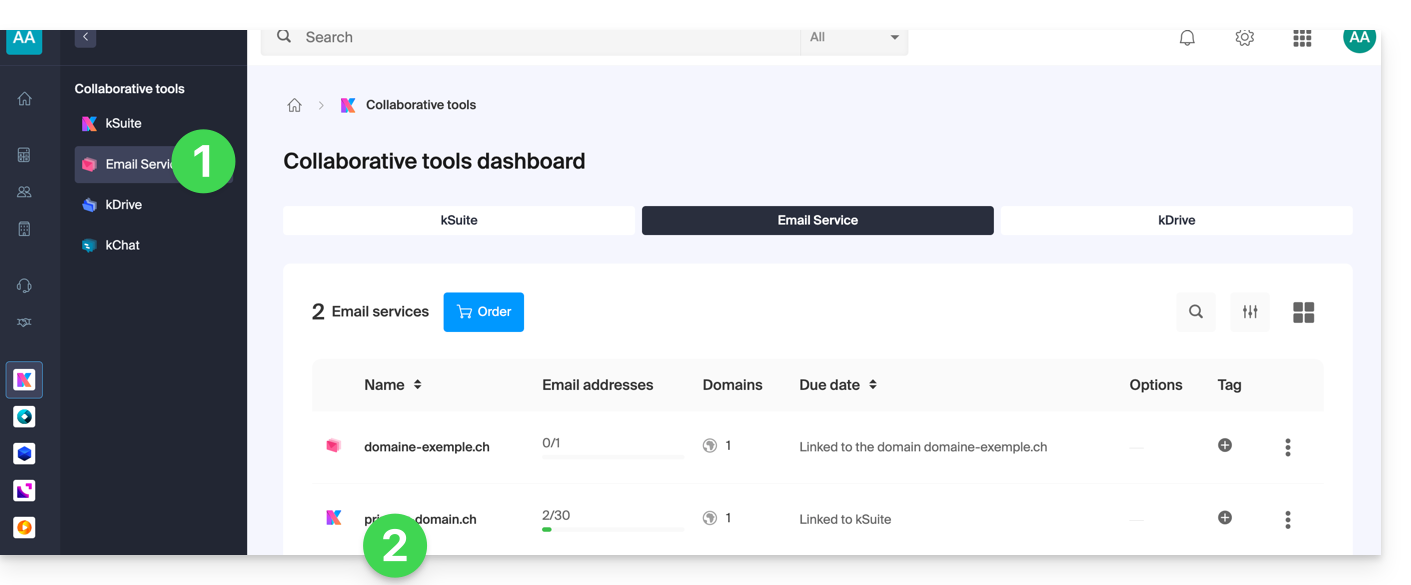
- Click here to access the management of your product on the Infomaniak Manager (need help?).
- Click directly on the name assigned to the product concerned:
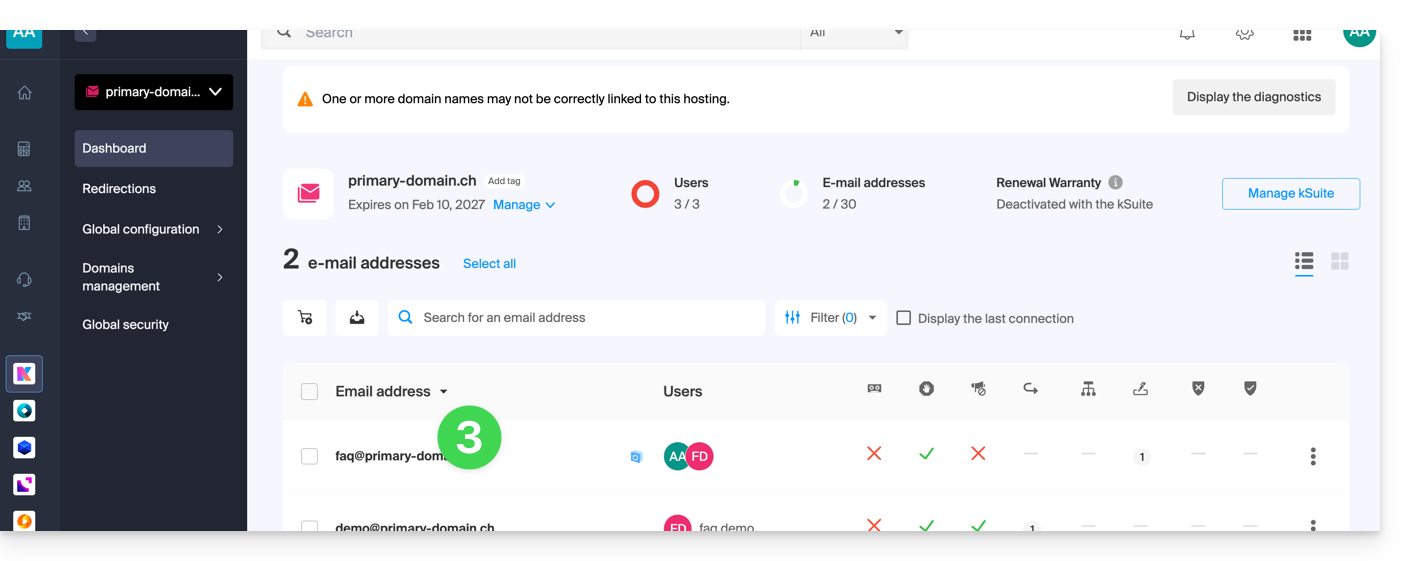
- Click on the email address concerned in the table that appears:
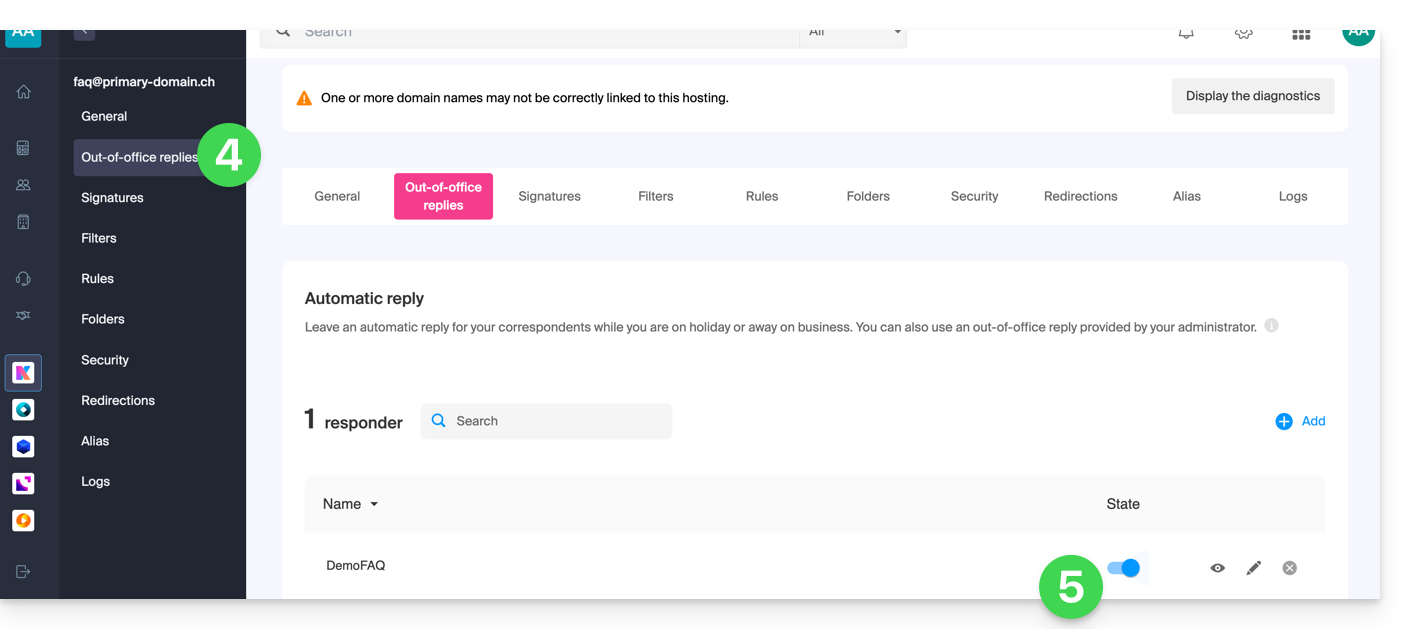
- Click on the Answering Machine menu in the left sidebar.
- Activate the automatic message if necessary or read below:
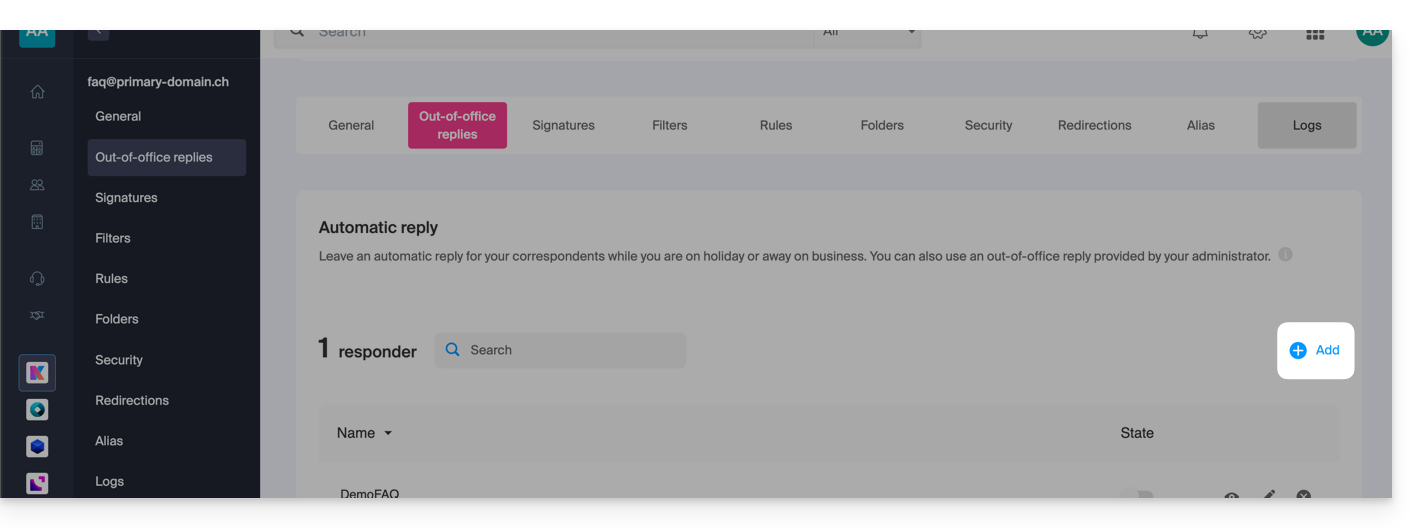
Compose the out-of-office message
- To manage the message that should be automatically sent in response, click on Add:
Then: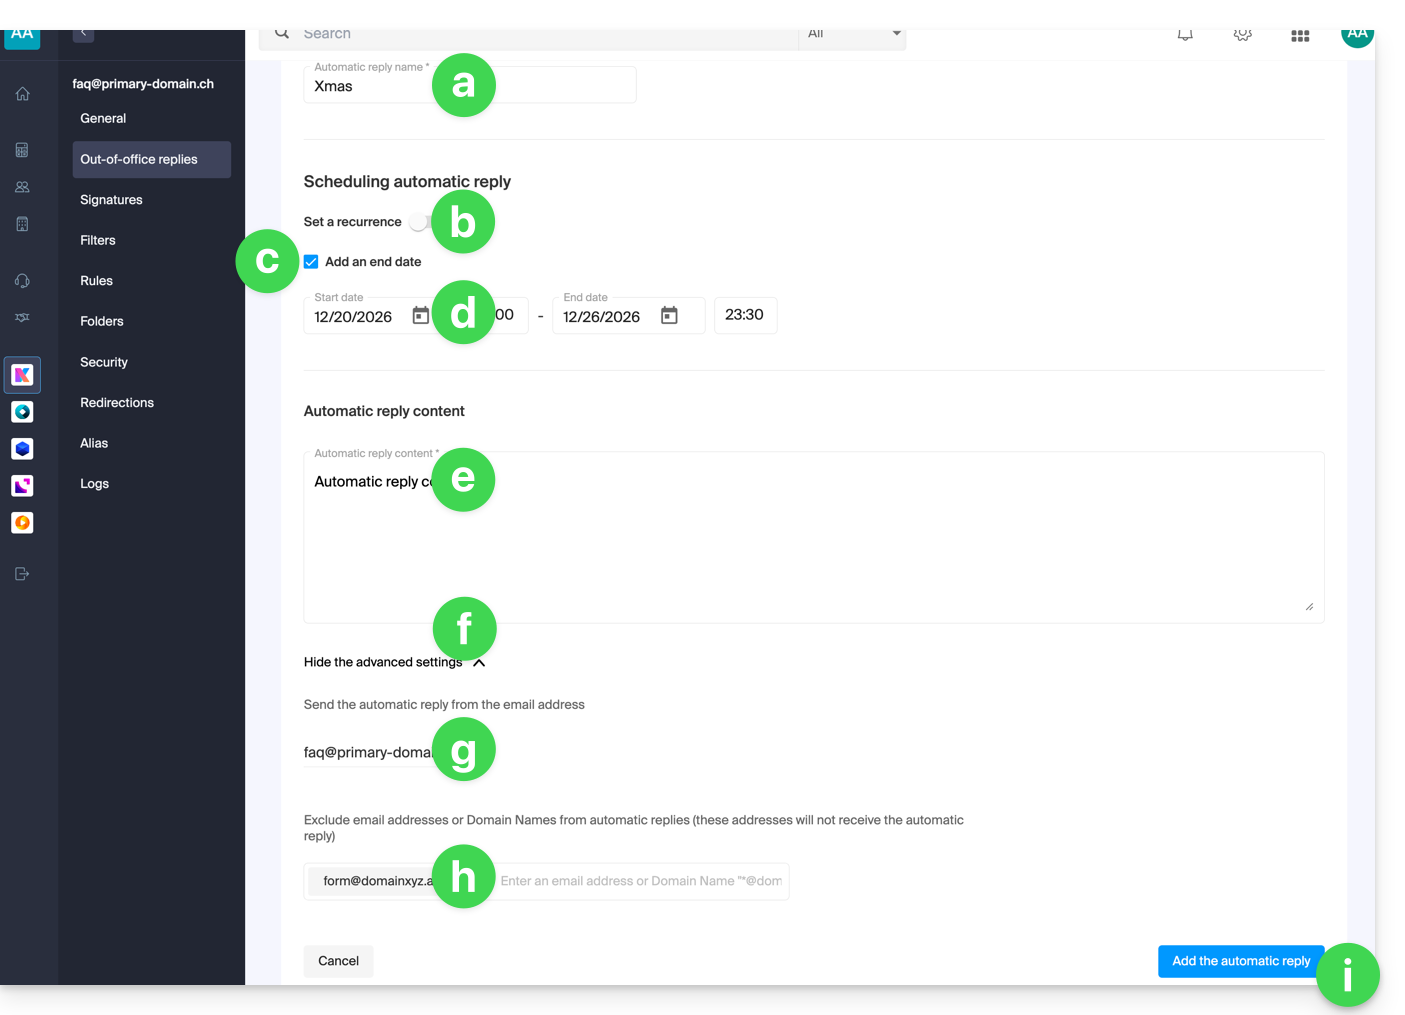
- Enter a name for your answering machine (to distinguish it from other messages if you create several).
- Define whether the automatic response should be provided on a recurring basis on specific days of the week.
- Define an end date/time if the message should no longer be sent after a certain period.
- Define a start date/time if the message is scheduled in advance for a specific period in the future.
- Compose your out-of-office message.
- Display advanced settings.
- If offered, define any other email address that will be used to send your automatic out-of-office message (the address must be verified in advance).
- Enter specific email addresses (or
@domain.xyzfor an entire domain) to prevent them from receiving this out-of-office message. - Click the blue button at the bottom right to Add the message.
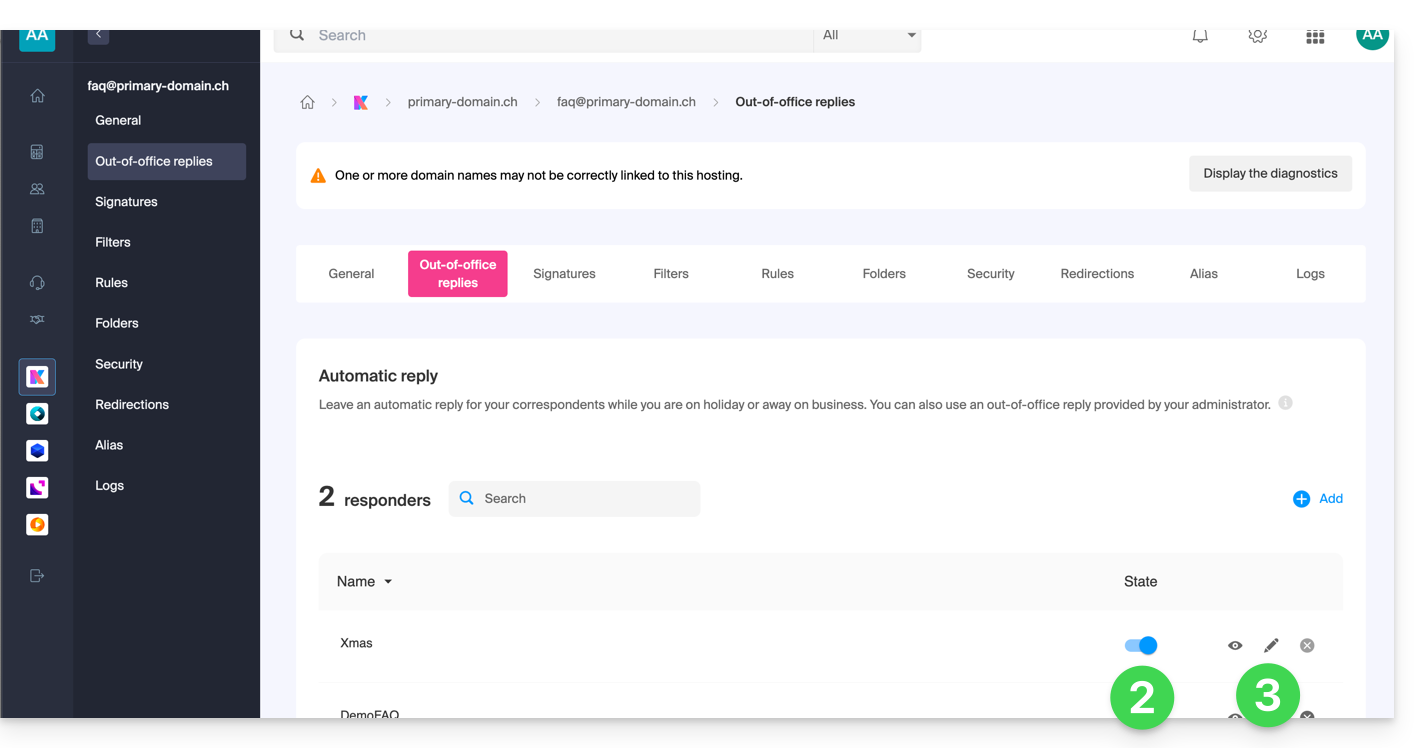
- Once added, you can activate or deactivate it.
- You can also edit a message already saved by the pencil icon ✎ on the right:
How often is the automatic response sent?
Your response is sent only once to people who send you messages.
However, if the same sender sends you a new email 7 days after the previous one and if your automatic answering machine is still activated, an automatic response is sent to them again to remind them that you do not have access to your mailbox.
Be careful if you test it on your address, it is normal that it works only the first time. During subsequent tests, the answering machine no longer sends the message when it detects that the message comes from an address that has already sent a message before. You will therefore need to try again from another email address.
You can reset the 7-day counter by clicking on Reset when you edit your message: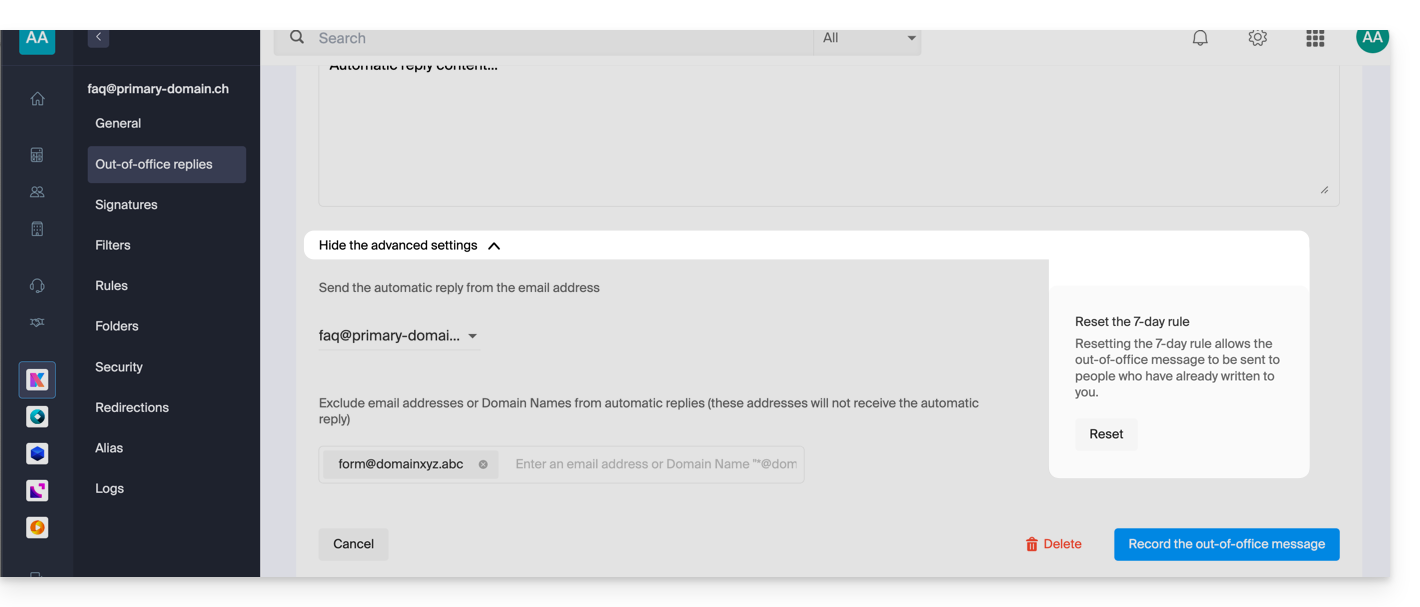
Go further with templates
Custom templates can be applied as soon as a new email address is created on your Mail Service, for example, or in bulk on all addresses in your domain. Learn more
Link to this FAQ:
Has this FAQ been helpful?
This guide explains how to mark your chosen emails as "favorite" on the Infomaniak mail service to have "tracking" of these messages and to display them separately if you wish.
Monitor one or more messages…
… from the Infomaniak Web Mail app
To add a message as a favorite:
- Click here to access the Infomaniak Web Mail app (online service ksuite.infomaniak.com/mail).
- Click on the ☆…
- … to the left of a message in the message list
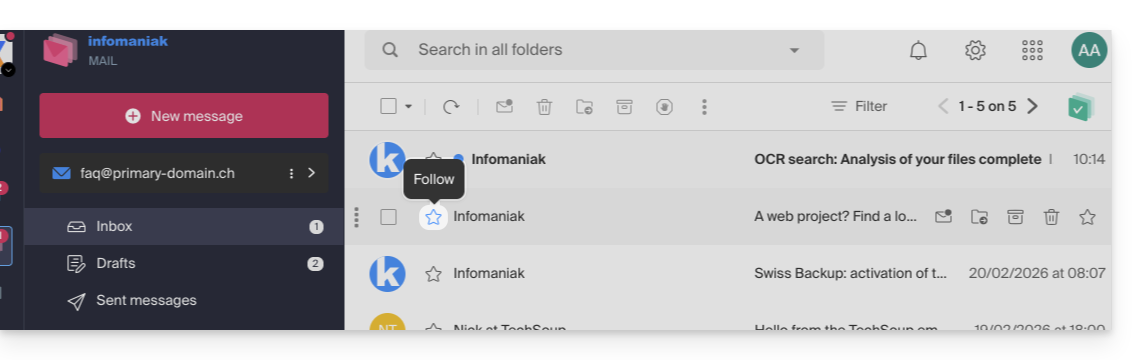
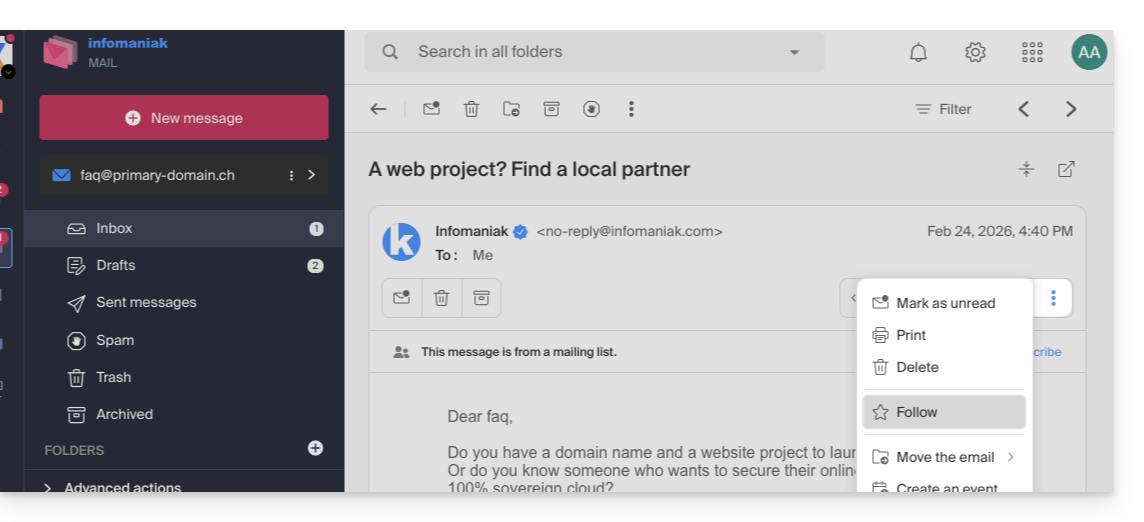
- … at the top right of the message reading window
- … to the left of a message in the message list
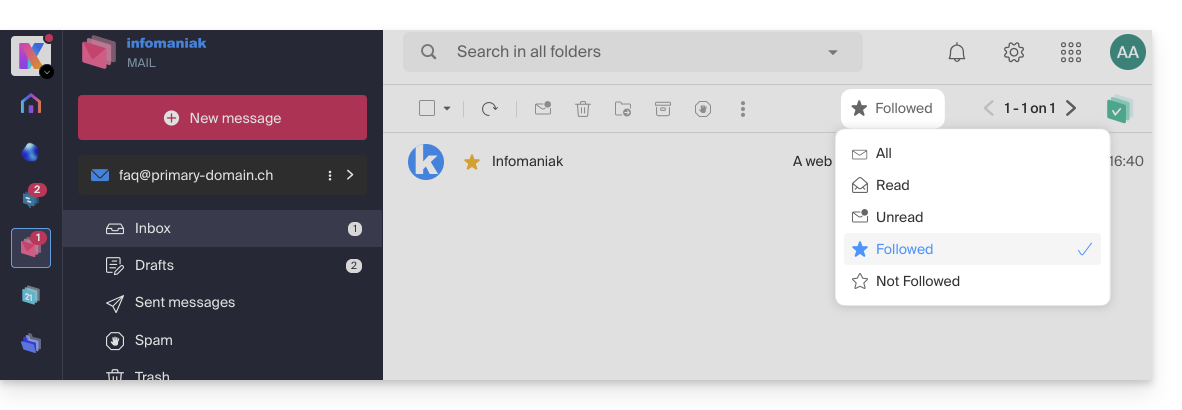
- Once tracking is enabled, a dropdown menu in the top right corner allows you to display only a selection of your received messages according to several criteria: All, Read, Unread, Tracked, Untracked:
It is also possible to define an action on hover or add a shortcut in the bar above the message lists: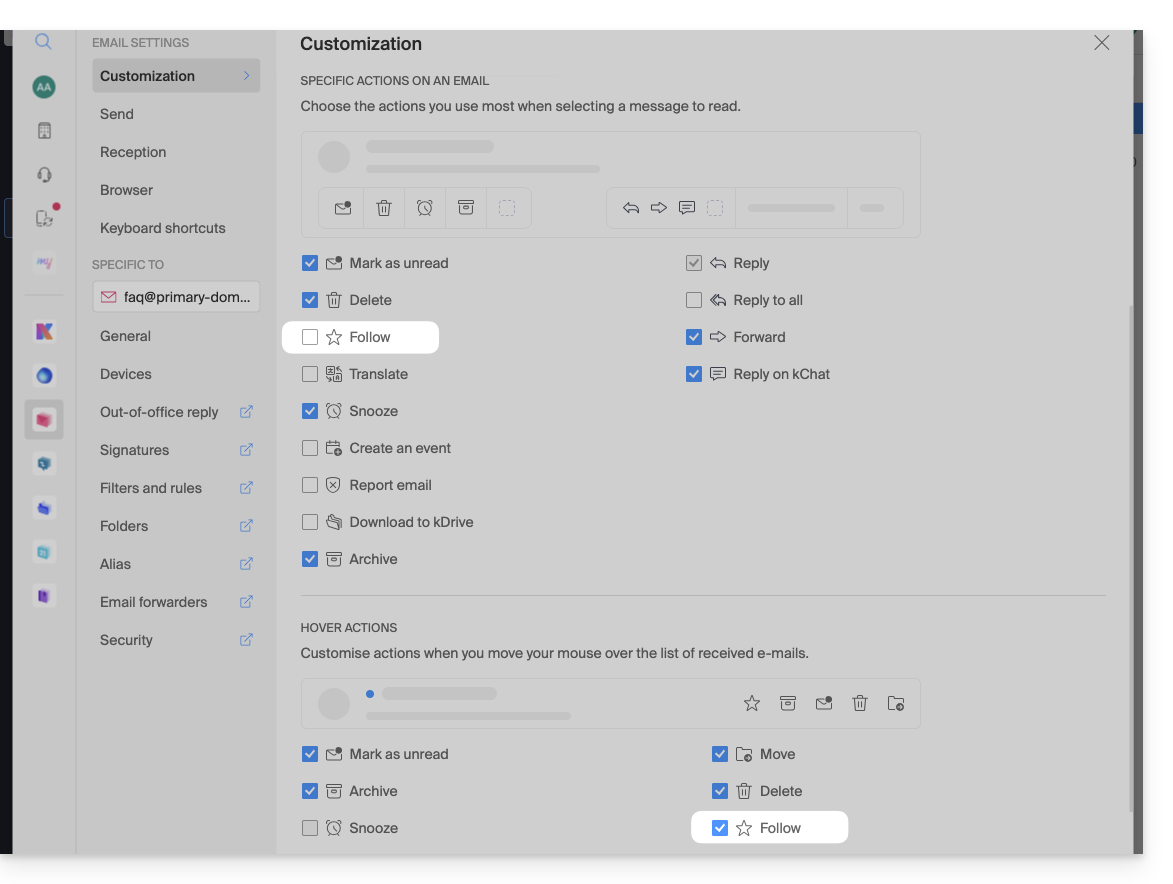
… from the Infomaniak Mail mobile app
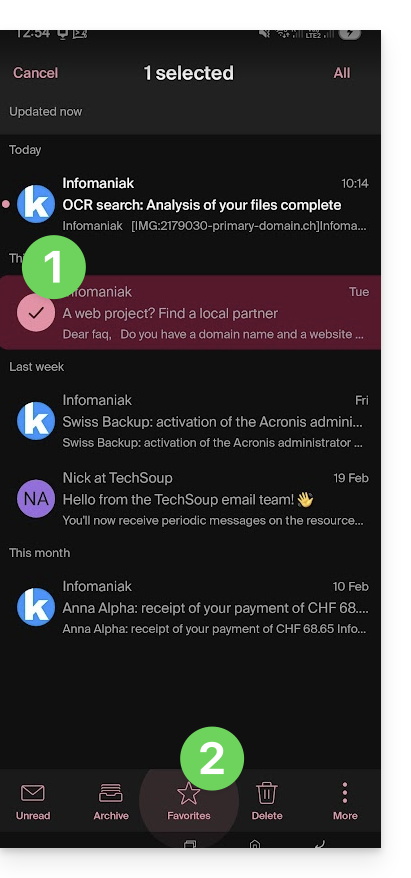
On the message list:
- Press and hold your finger on a message.
- Press the ☆ icon at the bottom of the screen:
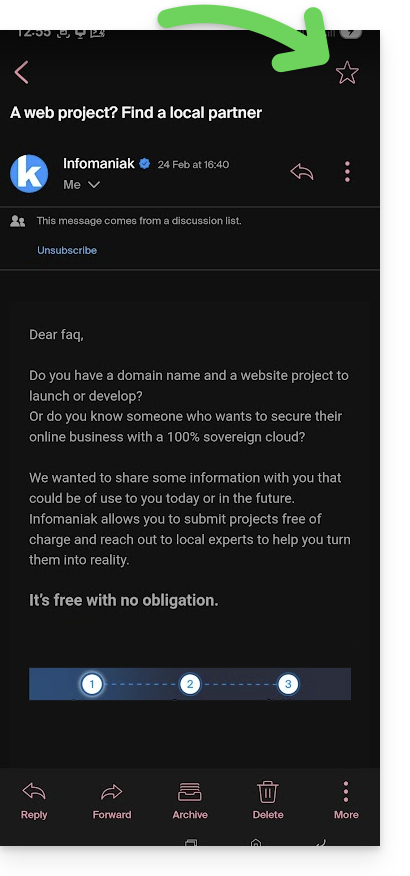
On a message being read:
- Press the ☆ icon at the top right of the message reading window:
It is also possible to define a swipe gesture that would lead to a favorite marking of the message swiped with one finger.
Link to this FAQ:
Has this FAQ been helpful?
This guide explains how to transfer to Infomaniak a Gmail email address hosted by Google; refer to this other guide if you are looking for information on importing email addresses from custom domains.
Preamble
- It is easy to switch the entire structure of your emails to Infomaniak - discover the offers.
- Use your email address on a simple browser, Outlook, etc. and on mobile devices iOS/Android thanks to the Infomaniak Mail app.
- Import your contacts to continue communicating with them from your new email.
- The operation does not affect either the data already present on the destination address, or that of the source address.
- The entirety of the external mailbox will be imported.
- Once the import process has started, it is no longer possible to interrupt it.
- Any duplicates are managed: identical content will only be copied once.
Import the entire history of your emails
Infomaniak Prerequisites
- Have a Mail Service on your Infomaniak Manager.
- Have a quota of free addresses available or adjust it in advance if necessary.
- Ensure that the email is correctly secured
- Create one or more addresses on this Mail Service.
- If you have many (10+) email addresses to create, refer to this other guide regarding mass creations.
- The destination email address must be linked to the user (= to the Infomaniak account) that you are using.
Import Gmail email content to Infomaniak
- Click here to access the import tool (online service https://import-email.infomaniak.com).
- If you have many (10+) email addresses to import, refer to this other guide regarding mass imports.
- If necessary log in to your Infomaniak account on the Organization of your choice; indeed the import will be to one of the email addresses linked to the Web interface Mail Infomaniak (online service ksuite.infomaniak.com/mail) of the Infomaniak account that you are using.
- Click on the single import.
- Fill in the left field with your Gmail address (the content of which is to be copied).
- Click on the "Sign in with Google" button that has appeared:
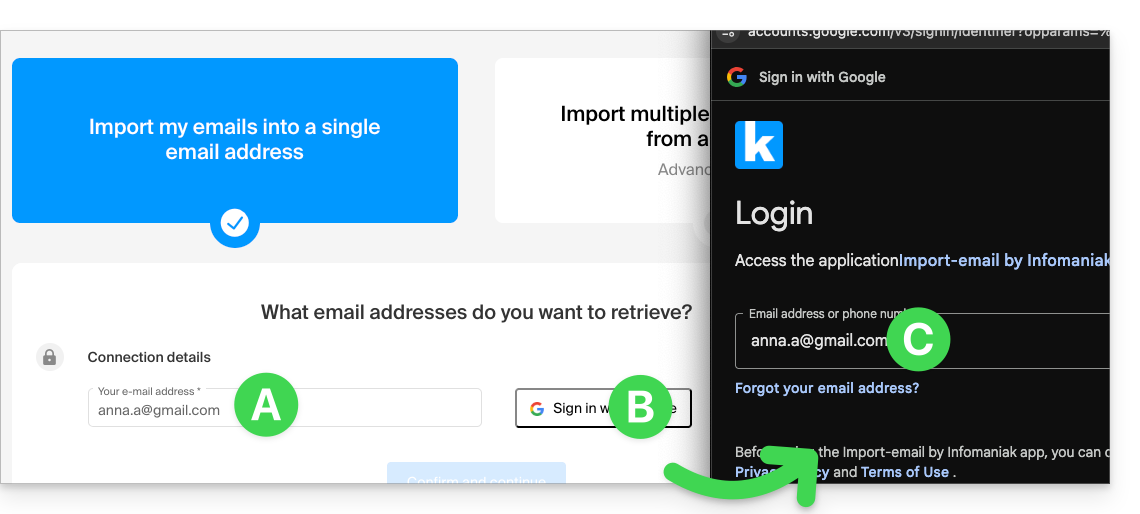
- Make sure you are logging into the Google account concerned by the email copy.
- Confirm that you authorize the Infomaniak tool to connect to your account (automatic procedure).
- Once the popup is validated, you will be able to choose which Infomaniak address to import your emails to (if necessary, refer to this other guide from point 7).
Adjust the application settings
As soon as you take the necessary steps to make the domain name associated with your email work with Infomaniak, modify the settings of the email software/clients you use so that they connect correctly to the Infomaniak servers: follow the configuration assistant.
Labels and data volume
The storage space displayed at Infomaniak may not match the one indicated in Gmail, notably due to the different management of labels/tags. Indeed, those present in Gmail will be converted into folders on the Infomaniak servers (same principle as when retrieving mail with an IMAP email software/client like Thunderbird):
Therefore, an email labeled in multiple Gmail folders may be counted multiple times during migration, which explains why an account displaying, for example, 6 GB in Gmail can occupy 18 GB once transferred to the Infomaniak servers.
Be patient when importing a large volume of emails; Gmail and Microsoft imports are deliberately slowed down (example: 1 GB/day bandwidth for Google) to avoid rejections from their side.
Link to this FAQ:
Has this FAQ been helpful?
This guide for the Web app Mail Infomaniak (online service ksuite.infomaniak.com/mail) or the mobile app Infomaniak Mail (application for iOS/Android smartphone or tablet) explains how to print an email to obtain a paper printout (or better: PDF) of your message and not the interface itself.
Print an email…
… from the Web Mail Infomaniak app
To do this:
- Click here to access the Web app Mail Infomaniak (online service ksuite.infomaniak.com/mail).
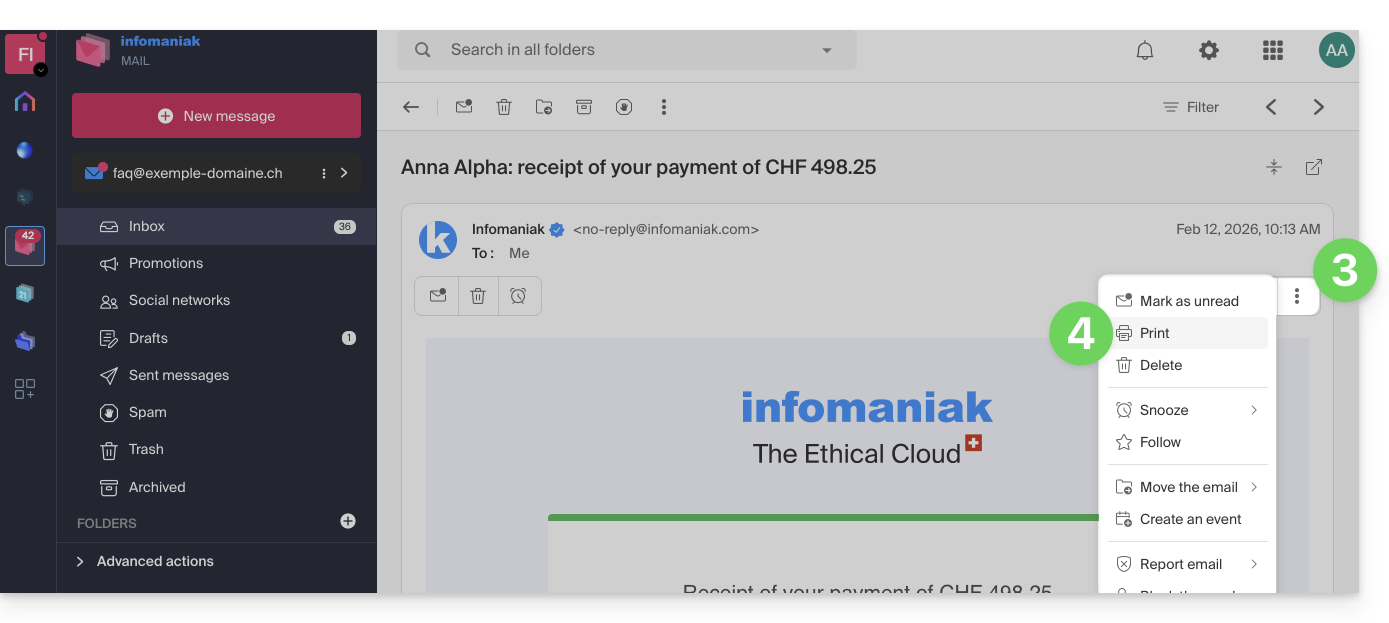
- View the email to be printed.
- Click the action menu ⋮ at the top of your message.
- Click on Print:
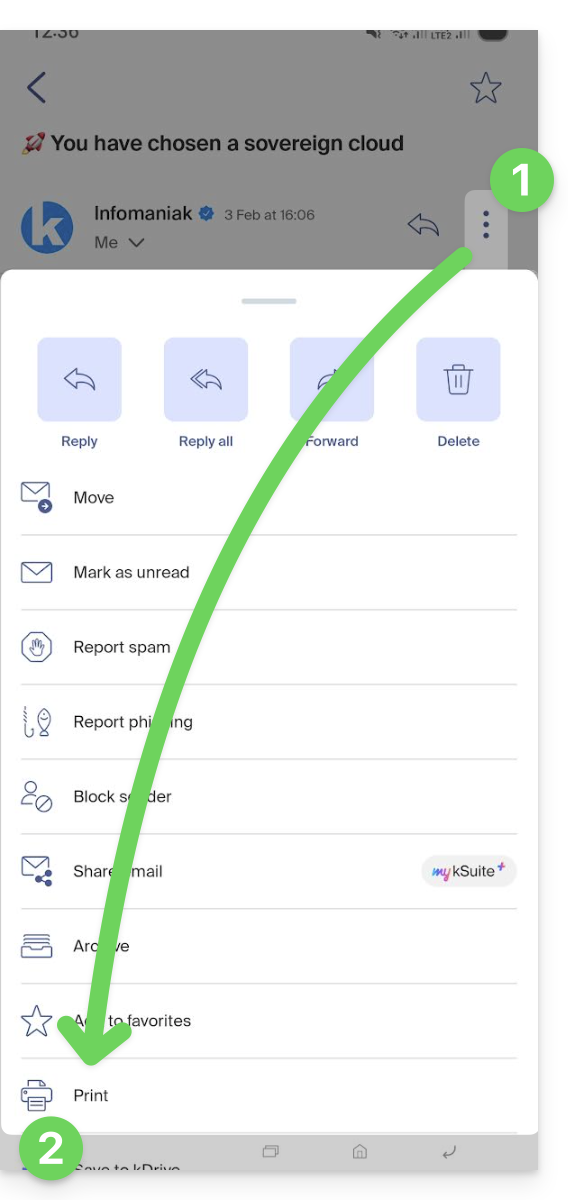
… from the mobile app Infomaniak Mail
To do this:
- Open the mobile app Infomaniak Mail (application for iOS/Android smartphone or tablet).
- View the email to be printed.
- Press the action menu ⋮ at the top right of the message.
- Press Print:
Link to this FAQ:
Has this FAQ been helpful?
This guide explains how to connect the desktop app Outlook 2013 (desktop application on Windows) to an email address hosted by Infomaniak.
Preamble
- The various services offered by Infomaniak are all compatible with the corresponding standard protocols (IMAP/SMTP for email, for example). Therefore, if you encounter a problem with third-party software, contact its publisher or a Partner and consult the support policy as well as article 11.9 of the Infomaniak Terms of Service.
Add the email address to the application
Prerequisites
- Create the email address in my kSuite or a Mail Service / kSuite.
- Create a password for the email address on the device you are going to configure.
- Check that the Mail Service is configured optimally.
To configure the email application:
- Open the application.
- Click on the File menu:
- Click on Account Settings.
- Click on Add or Remove Accounts:
- Click on New:
- Click on Manual Setup:
- Click on POP / IMAP.
- Click on Next:
- Check and complete the missing information.
- Click on More Settings:
- Click on the Outgoing Server tab.
- Click on My outgoing server requires authentication.
- Click on the Advanced tab:
- Replace the port numbers with the correct information and enable SSL.
- Click on OK.
- Click on Next:
- Click on Close:
- Click on Finish:
- Click on Close:
- There you go, your email address is now configured in the application:
Recommended settings
- Incoming IMAP server =
mail.infomaniak.com - IMAP port =
993(with SSL) - Outgoing SMTP server =
mail.infomaniak.com - SMTP port & encryption protocol and command/method to activate this protocol:
587+ STARTTLS - Username = full & complete email address ( ? )
- Password = the one generated for the email address you want to access
- Authentication required for sending emails:
- It is activated in the SMTP settings of your application.
- Check "use the same settings as the incoming server" or depending on the software/email clients, enter a username (= full & complete email address) and the generated password.
Refer to this other guide if you are looking for information about other mail ports and protocols compatible (SSL / TLS for example).
In case of a problem
Check that the Mail Service is configured optimally.
It is not necessary to contact Infomaniak Support if your email address works well outside the application. The most common error concerns the use of an incorrect password. The troubleshooting guides help you resolve any potential issues:
- Refer to the solutions given in this other guide regarding mail in general.
- This other guide is more specifically about Outlook.
… and if your Outlook no longer works since a change of mail password, refer to this other guide.
Link to this FAQ:
Has this FAQ been helpful?
This guide explains how to manage and modify permissions (assigning an additional password, setting up an alias, etc. see below for the full list) for an Infomaniak user, so that they can manage more or fewer configuration items on the Infomaniak Web app Mail (online service ksuite.infomaniak.com/mail).
Preamble
- The email address is first created within a Mail Service and can then be used within one or more Infomaniak Mail interfaces by one or more users.
- The creator (or manager) of the address may want to limit the possible actions for one or the other of the users who will use the email address.
- This fine-grained permission management can be done when creating an address or afterwards, and you can also define what the default rights should be for any new address created (read Global Configuration below).
List of mail user permissions
| Type / Icon | Description of the permission granted to the user |
|---|---|
| Configure a device | Manage devices (create a dedicated password) |
| Manage responders | Create an out-of-office message (automatic reply) |
| Manage signatures | Add signatures and manage reply email addresses |
| Manage redirections | Redirect emails to one or more other addresses |
| Manage aliases | Create variants of your email address (by modifying what is before the @) |
| Manage action history | Access logs of the email address |
| Manage restorations | Access backups and restorations |
| Manage filters | Access SPAM filters and others |
| Manage rules | Automatically sort and classify incoming emails |
| Manage folders | Customize IMAP folders |
| Manage security | Manage blocked and approved addresses |
Manage permissions granted to a user
Attention: the password to access your Infomaniak account may be required to modify permissions.
… from the Mail Service
- Click here to access the management of your product on the Infomaniak Manager (need help?).
- Click directly on the name assigned to the product concerned.
- Click on the email address concerned in the table that appears.
- There are several ways to modify the permissions of an email address:
- When adding a user to an email address:
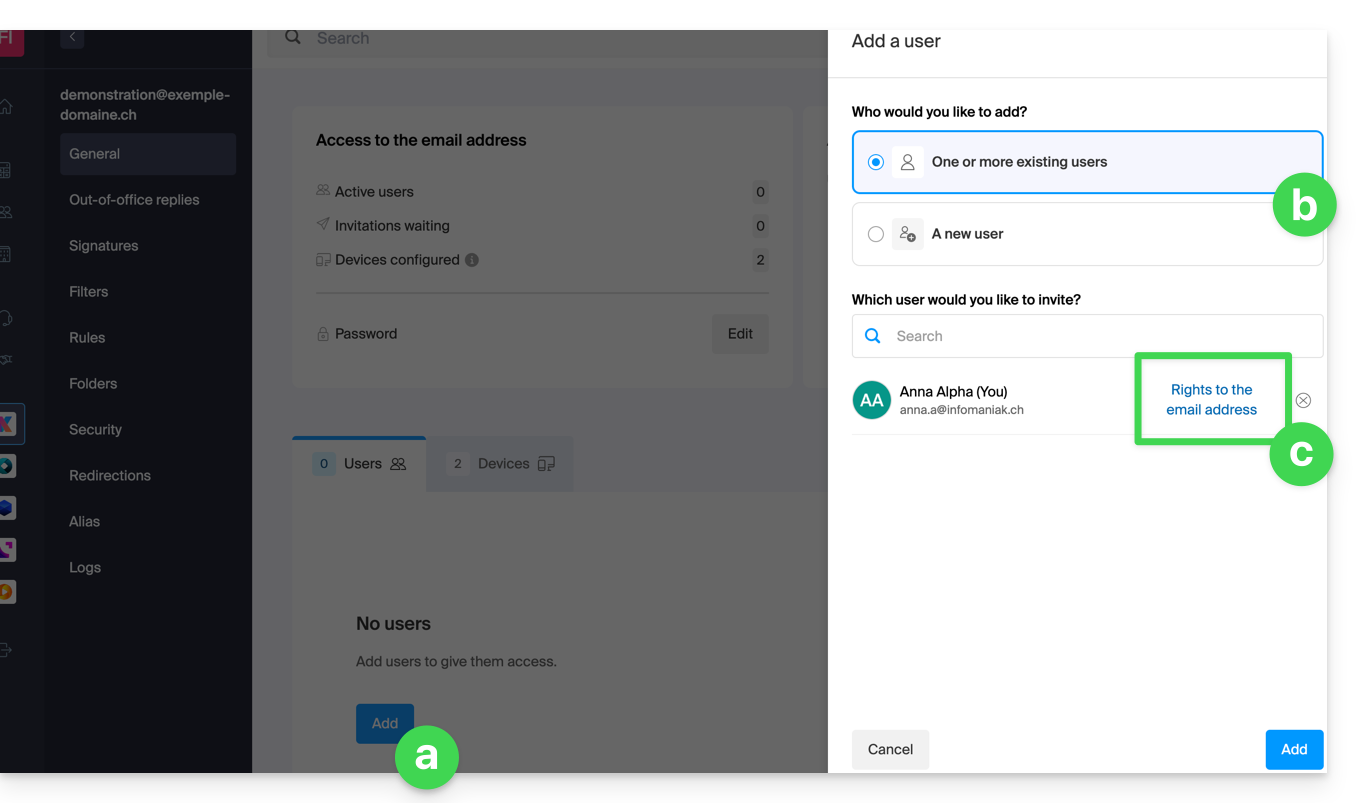
- Once the user has been added:
- Click on the action menu ⋮ located to the right of the user's name of the email address.
- Select ✎ Modify rights:
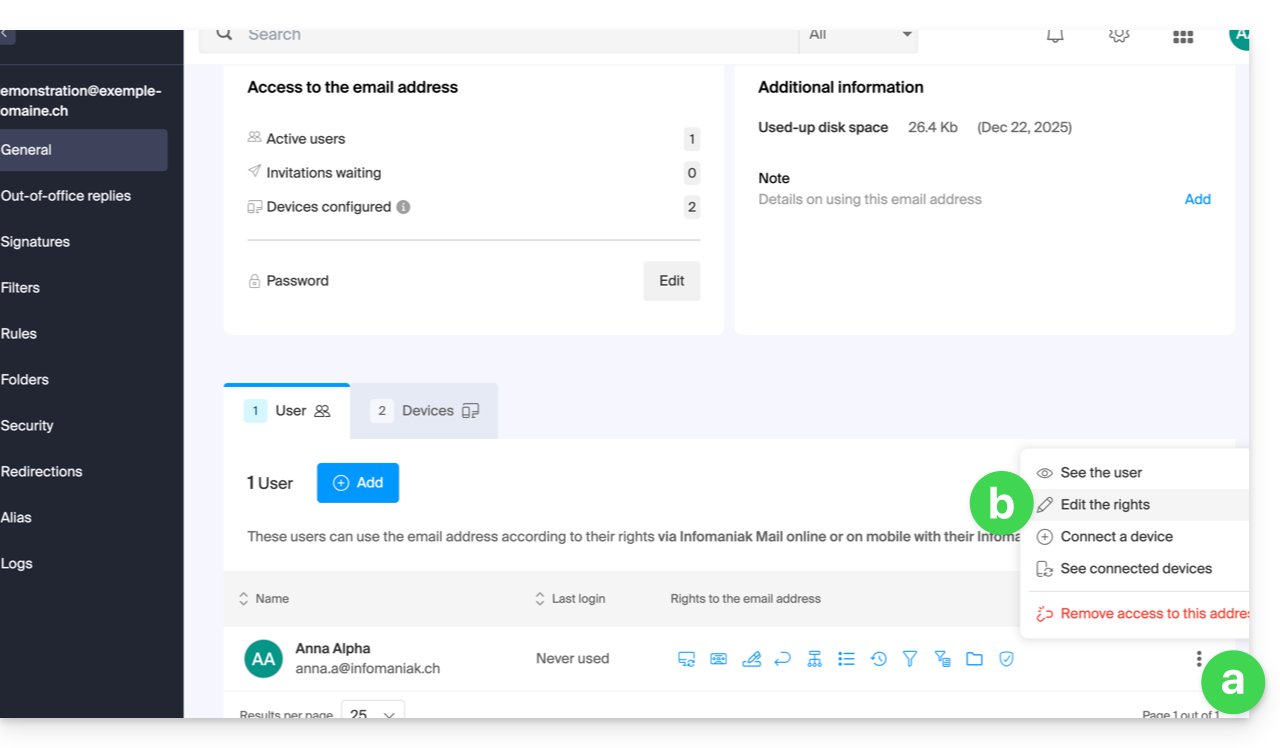
- Or click directly on the icons visible in the table:
- When adding a user to an email address:
… from the Manager (user management)
- Click here to access user management on the Infomaniak Manager (need help?).
- Click on the user concerned in the table that appears.
- Expand the collaborative tools section by clicking on the chevron .
- Expand the section of email addresses accessed by the user by clicking on the chevron .
- Click on the action menu ⋮ located to the right of the email address concerned.
- Select Modify rights:
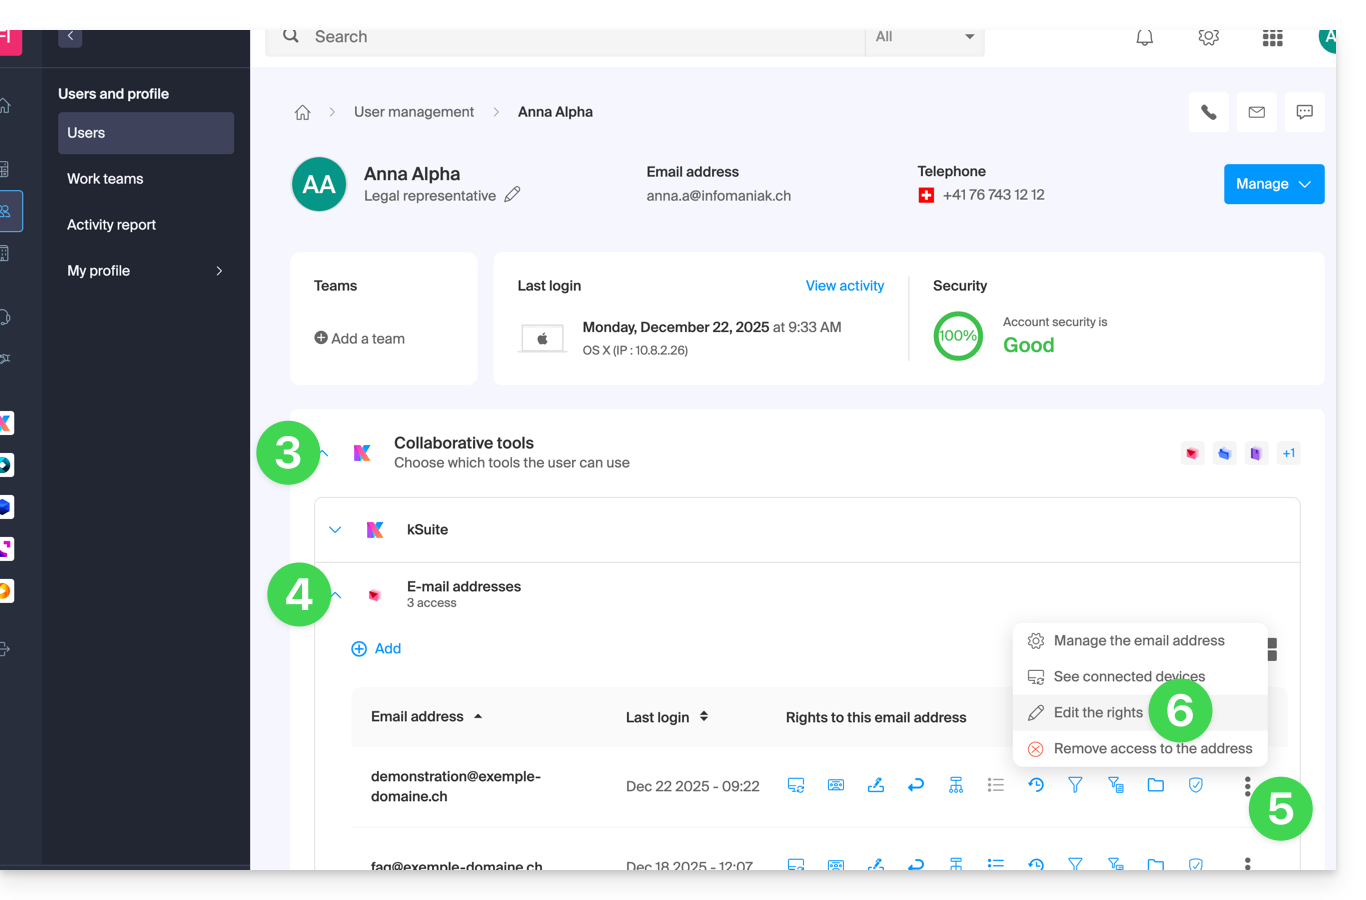
- Or click directly on the icons visible in the table:
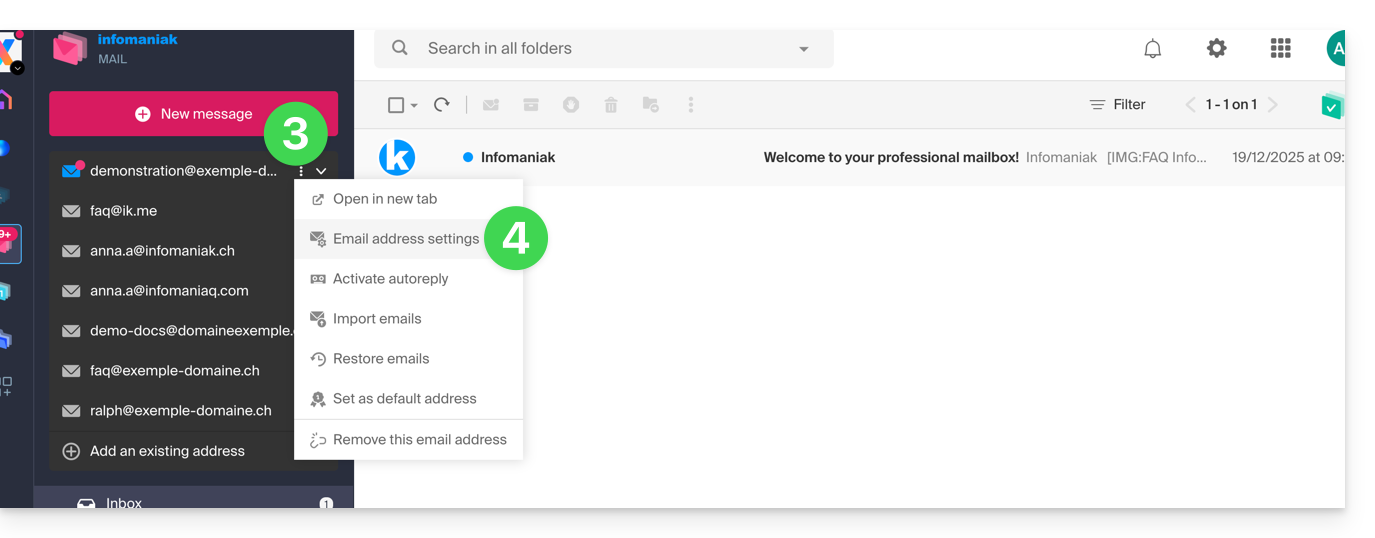
… from the Web Mail app
- Click here to access the Infomaniak Web Mail app (online service ksuite.infomaniak.com/mail).
- If necessary, click on the chevron to the right of the email address currently visible on the Infomaniak Web Mail app.
- Click on the action menu ⋮ to the right of the email address you wish to configure.
- Click on Email address settings:
- Click on the action menu ⋮ located to the right of the user's name of the email address.
- Select ✎ Edit rights:
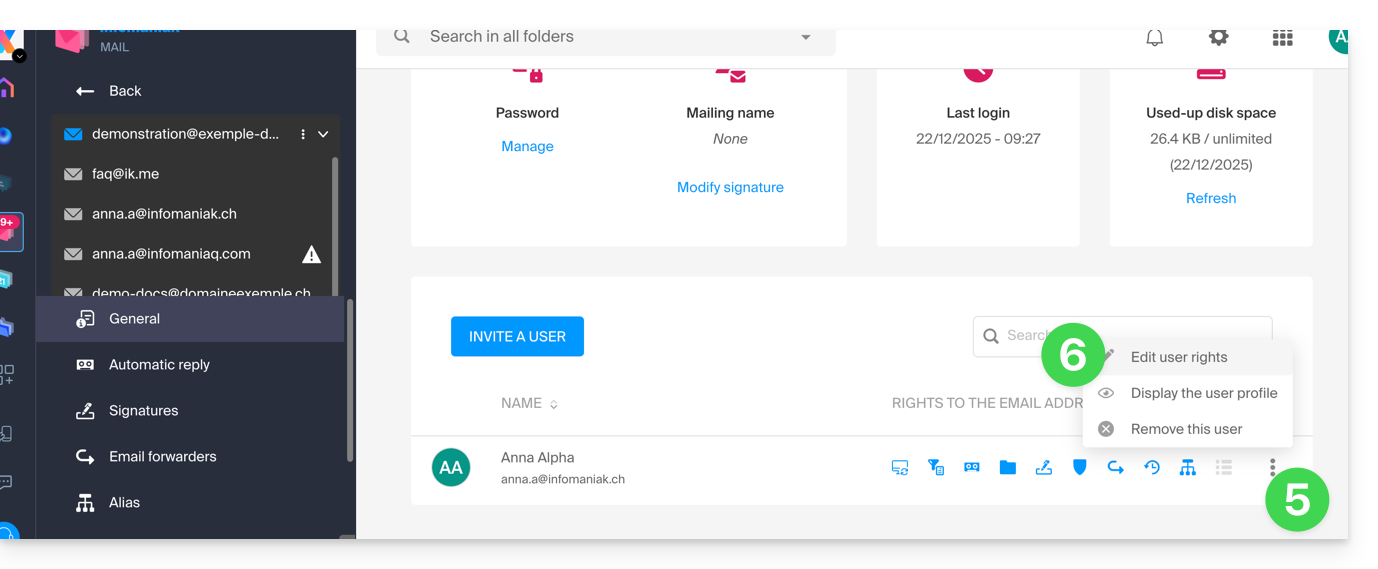
- Or click directly on the icons visible in the table:
Result for the user
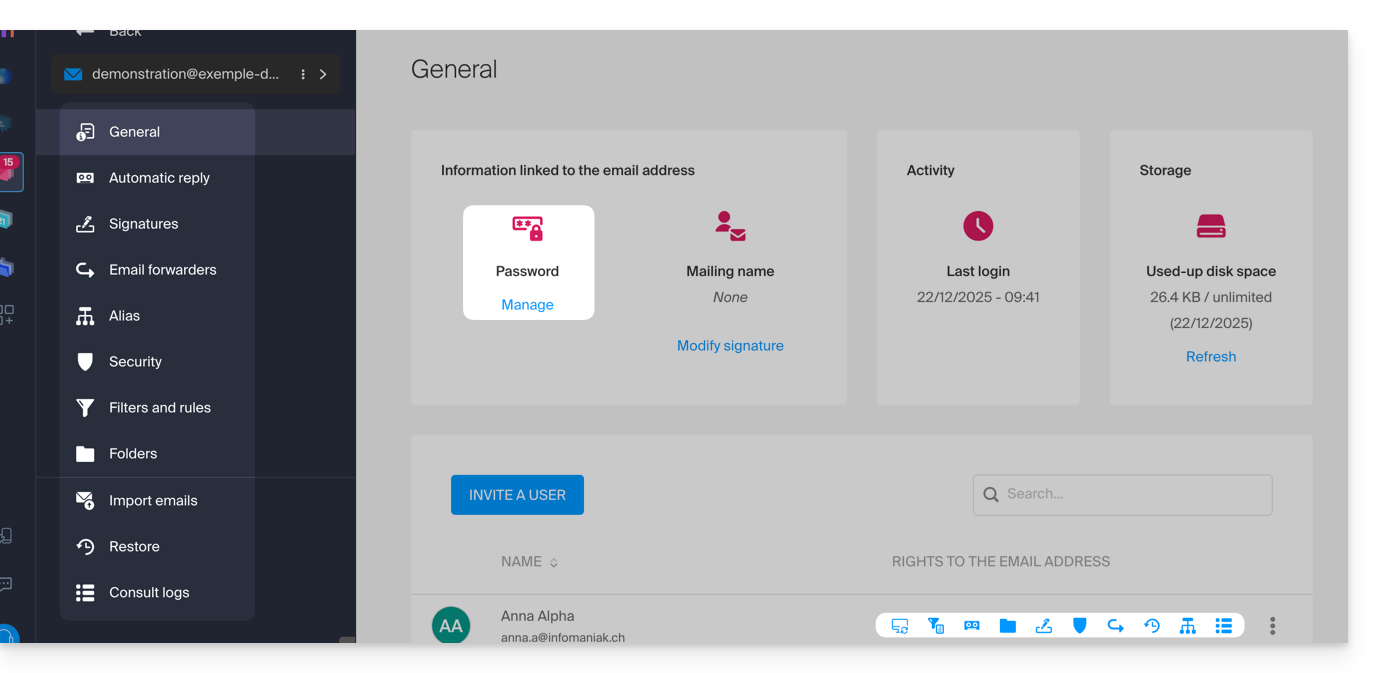
The user who has permissions removed will no longer see certain corresponding menus in their email address settings: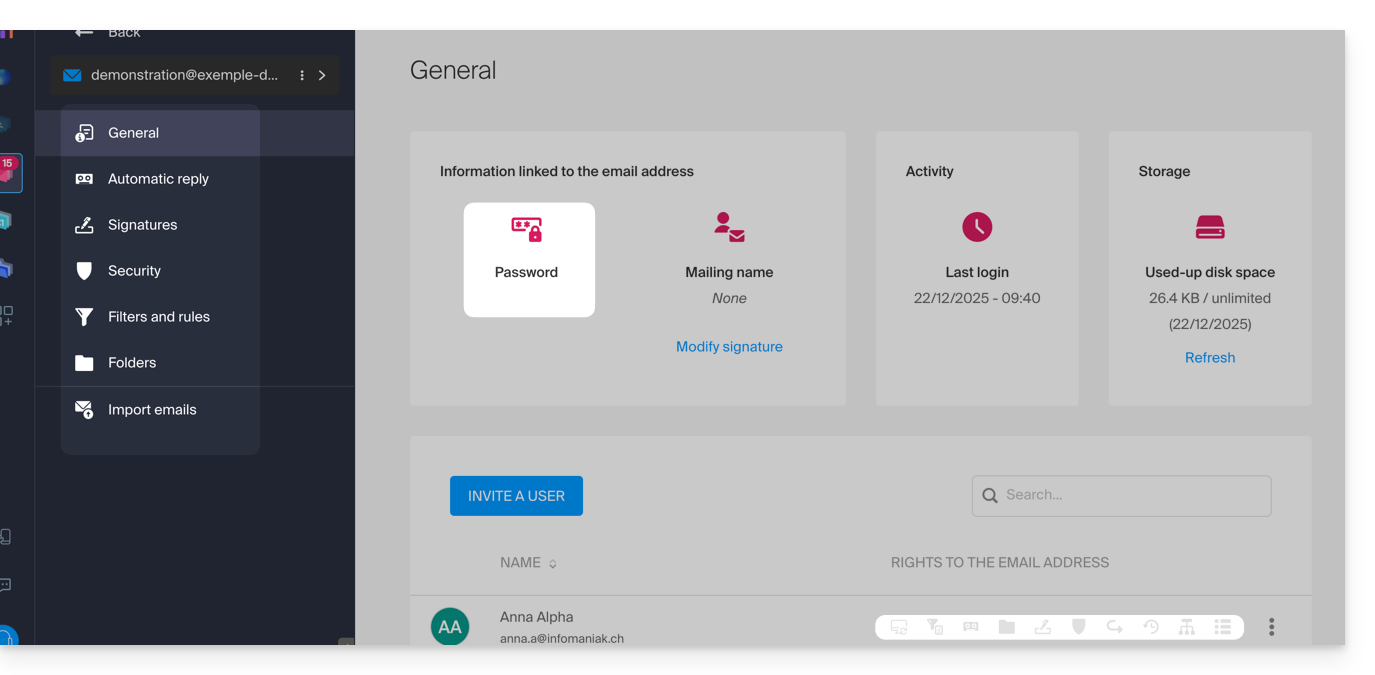
For some features, even if the menu is still accessible, it's the buttons that will be inoperative or grayed out: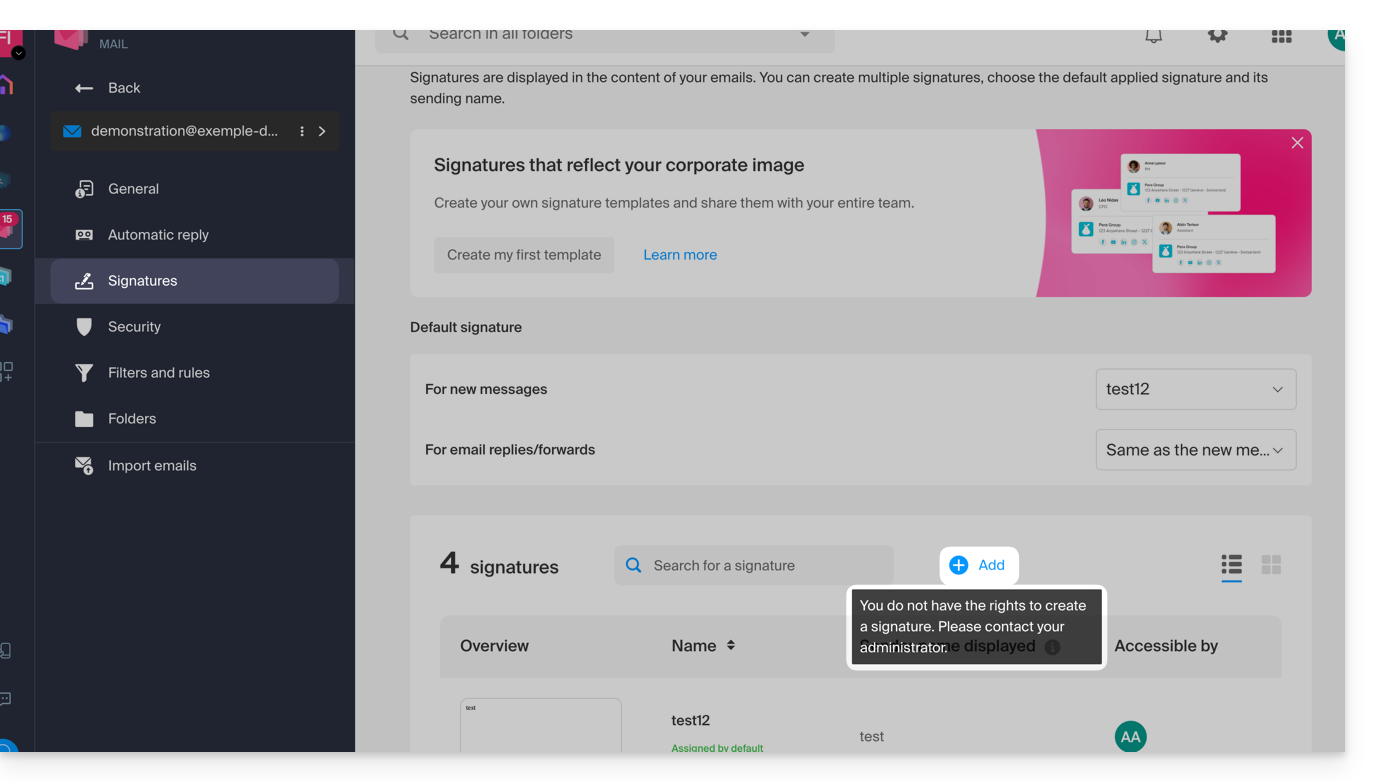
Global configuration
Set default parameters
To set the default rights that will be automatically selected when the “global configuration” is applied by the administrator:
- Click here to access the management of your product on the Infomaniak Manager (need help?).
- Click directly on the name assigned to the product concerned.
- Click on Global configuration in the left sidebar:
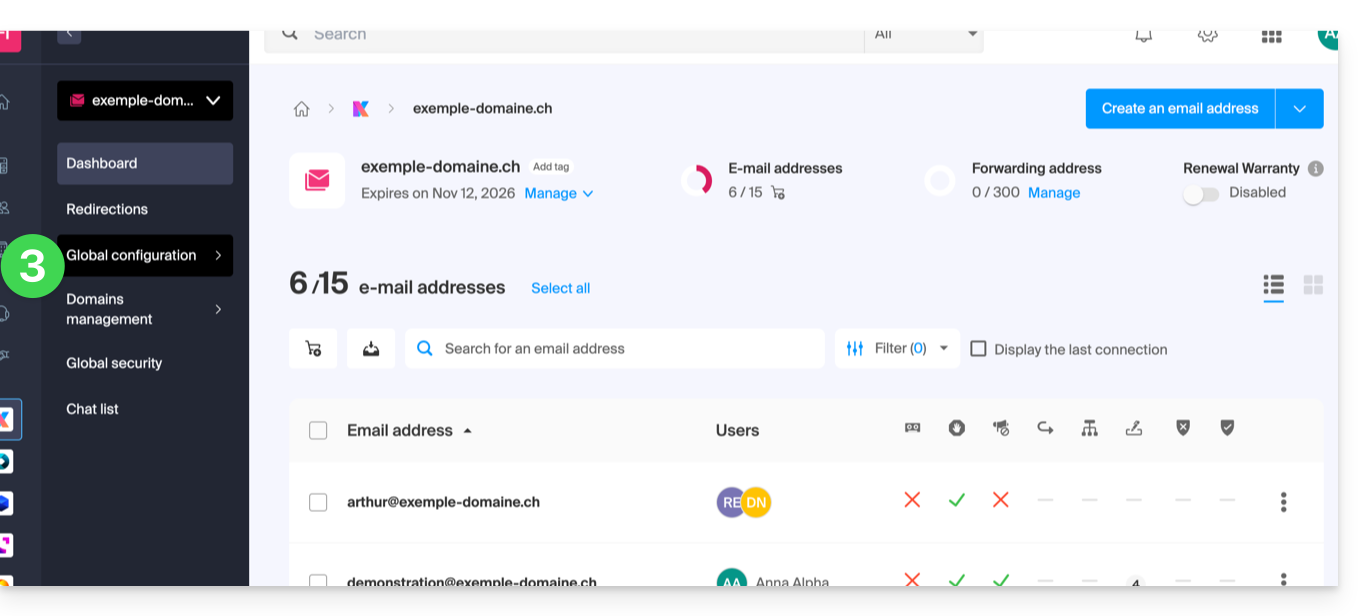
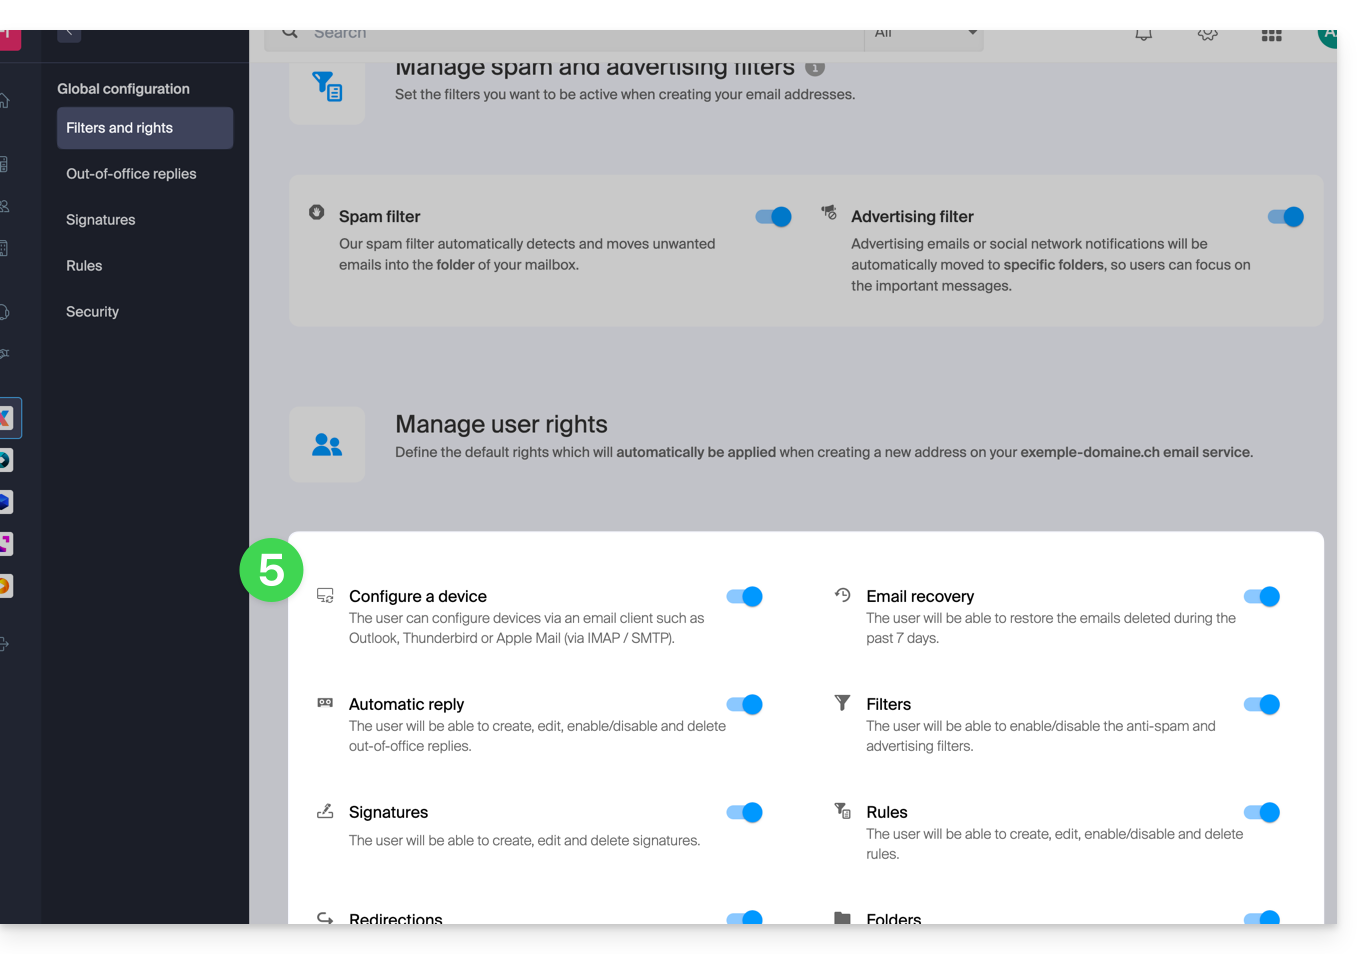
- Then click on Filters and permissions.
- At the bottom, enable or disable the rights to be granted during future email address creations:
Global configuration when creating an email address
If a new email address is created for one or more third-party users, the permissions defined in the Global configuration are automatically pre-selected during the assistant step: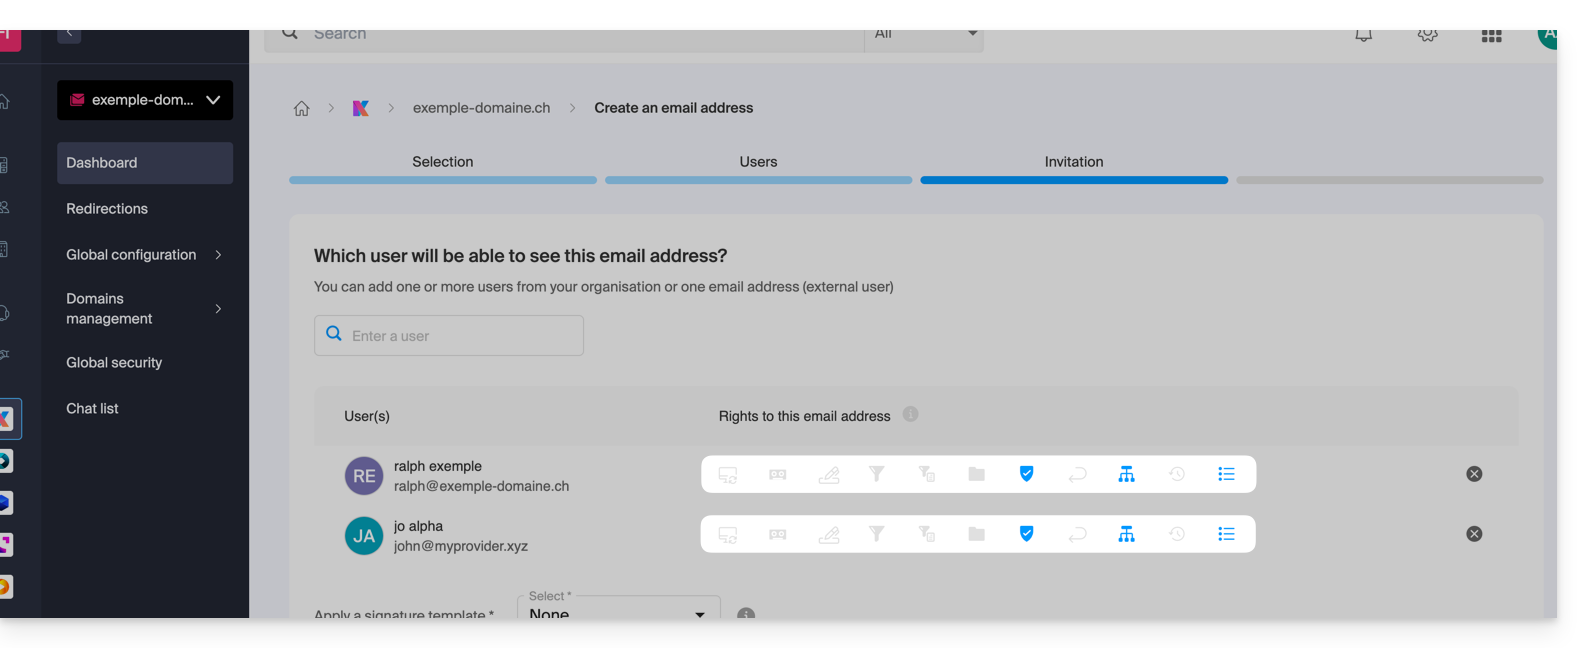
It is of course possible to modify the different permissions of the different users on a case-by-case basis.
Apply the global configuration to existing addresses
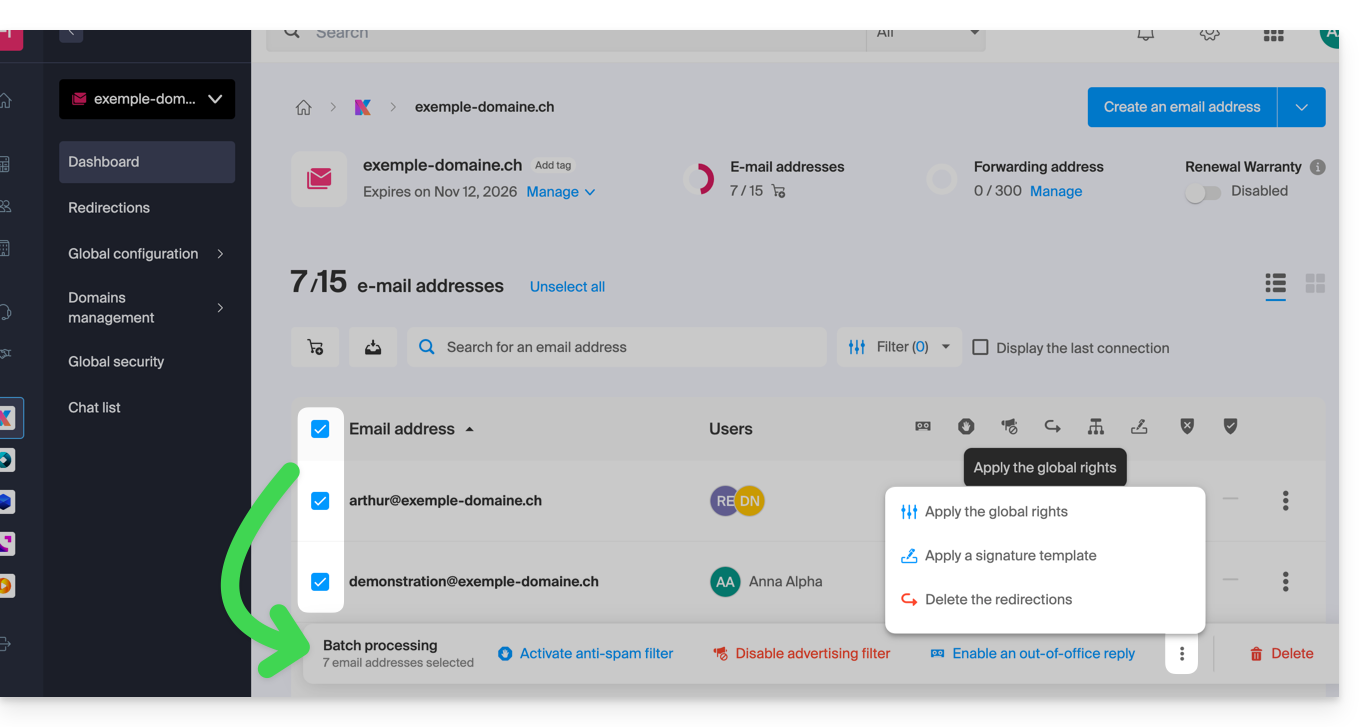
To apply this global configuration to the existing email addresses of a Mail Service (which will then apply to all users concerned, listed in the Users column):
- Click here to access the management of your product on the Infomaniak Manager (need help?).
- Click directly on the name assigned to the product concerned.
- Select the email addresses concerned by checking the boxes to the left of the line.
- Click on Apply the global configuration at the bottom of the screen (by first clicking on the action menu ⋮ if necessary):
Apply the global configuration when managing the permissions granted to a user
To apply this global configuration when you edit the rights of a user on an email address (refer to the chapter “Managing permissions granted to a user” at the top of this guide), click on the button dedicated to this use: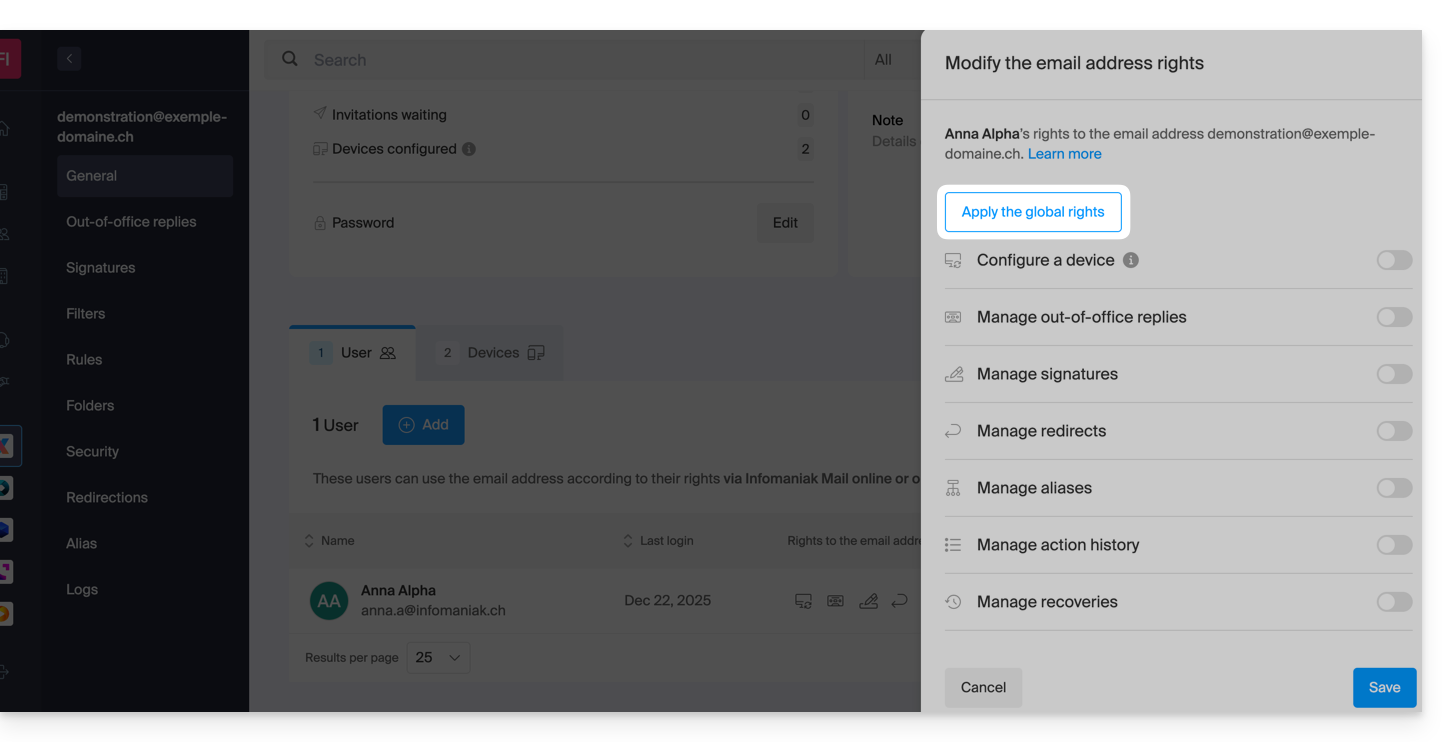
Link to this FAQ:
Has this FAQ been helpful?
This guide explains how to create sorting rules in Advanced mode, scripts in Sieve language, to automatically classify your incoming emails on Infomaniak according to certain conditions.
✘ UNAVAILABLE with
kSuite free
my kSuite (ik.me, etik.com, ikmail.com)
Mail Service Starter
Preamble
- If you do not have a compatible offer or if you prefer a simplified configuration, refer to this other guide.
- ⚠️ No support is provided regarding the Sieve language (refer to this documentation — also discover the role of the host).
- Unlike the sorting rules offered within software/email clients (Microsoft Outlook, Mozilla Thunderbird, Apple Mail...), these rules will act directly on the server of your mailboxes before even the IMAP connection.
- It is possible to import Sieve files via a button.
- By activating this mode, the existing standard rules will be kept but deactivated.
- The
redirectcommand (allowing to forward an email to another address) is not allowed in scripts.- If you import a Sieve script from another host, make sure to remove this command.
- To forward emails, use the assistant in Standard mode or the Redirections section of your Mail Service.
Access rules from the Infomaniak Web Mail app
Prerequisites
- Have permission to manage rules: if you had been invited to the Infomaniak Web Mail app (online service ksuite.infomaniak.com/mail) to manage your address, it is possible that the Mail Service manager has removed this right from their admin account.
To access the sorting filters for your Infomaniak mail:
- Click here to access the Infomaniak Web Mail app (online service ksuite.infomaniak.com/mail).
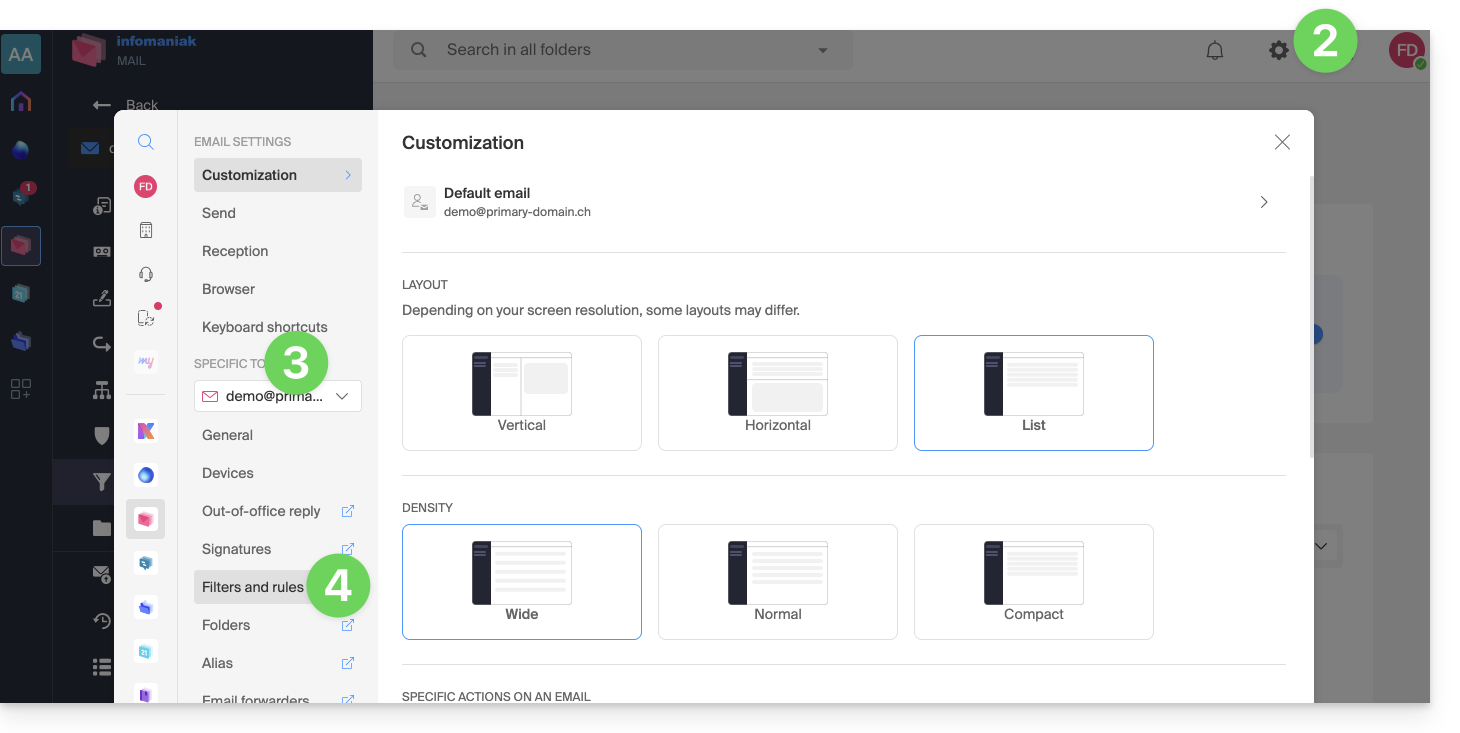
- Click on the Settings icon in the top right corner.
- Check or select the email address concerned in the drop-down menu.
- Click on Filters and rules:
Access rules from a Mail Service
To access the sorting filters for your Infomaniak mail:
- Click here to access the management of your product on the Infomaniak Manager (need help?).
- Click directly on the name assigned to the product concerned.
- Click on the email address concerned in the table that appears.
- Click on the Rules tab from the left sidebar (or top bar):
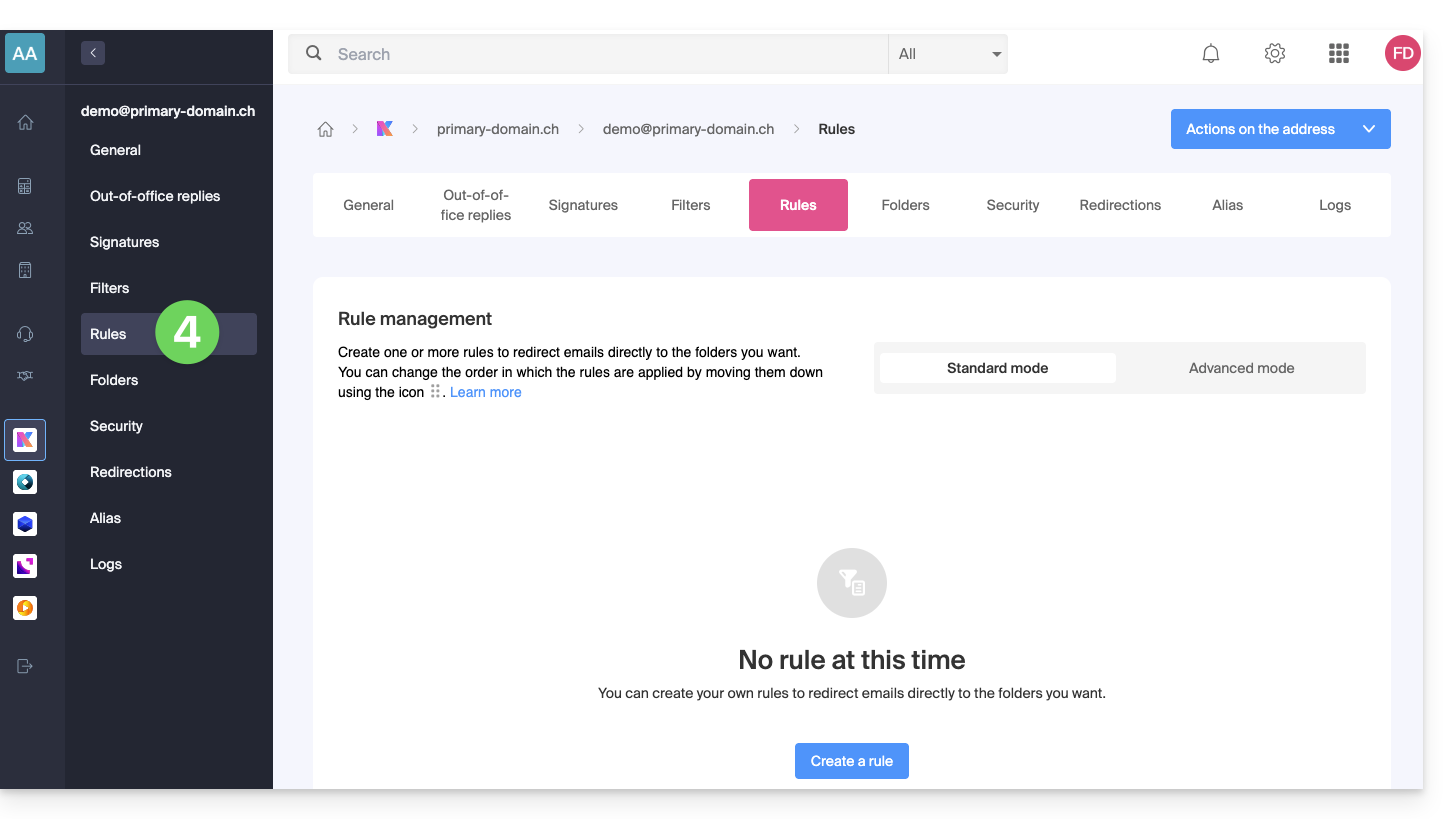
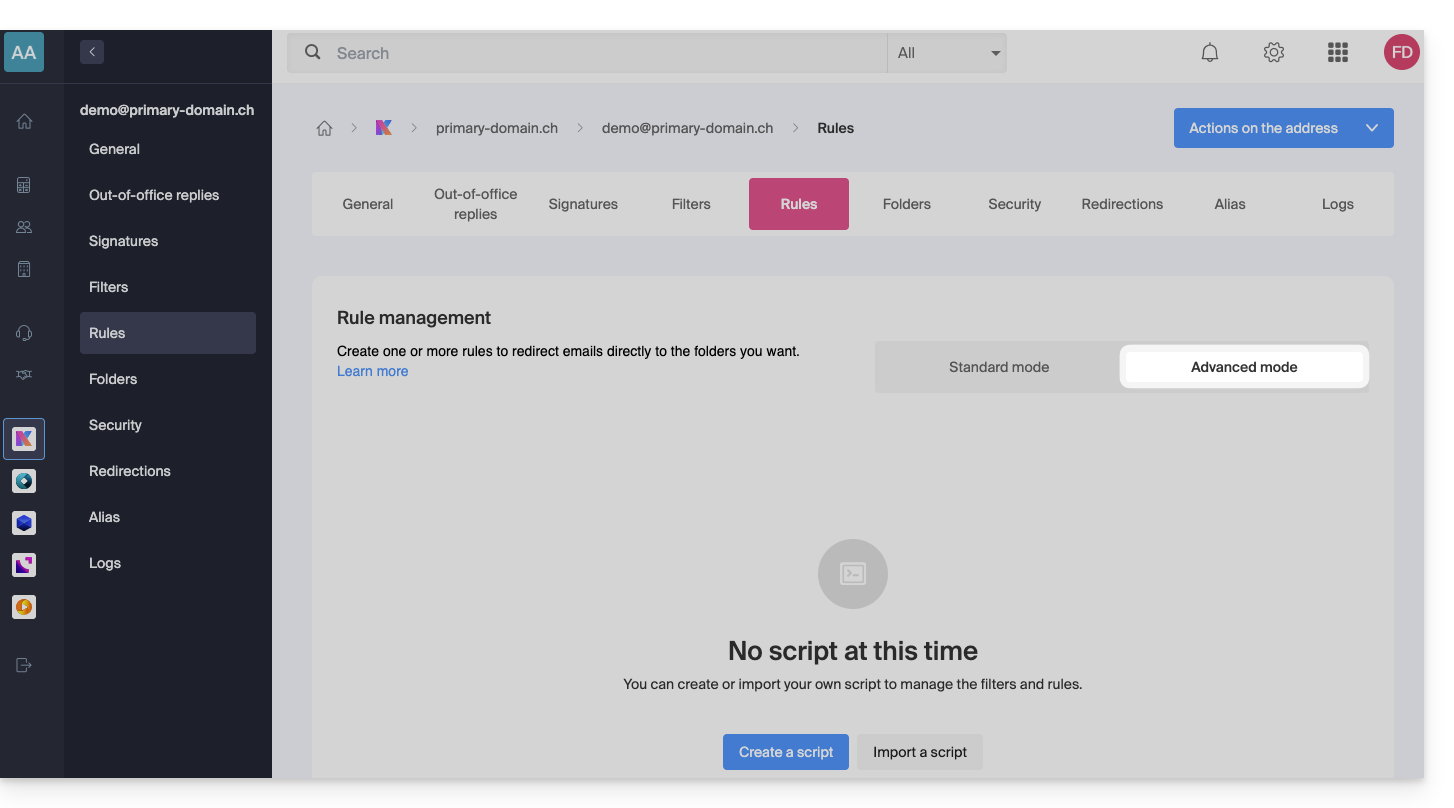
Create a new rule in Advanced (expert) mode
- Make sure to click on Advanced mode:
First example of advanced sorting
Here is a simple example of a command using this language:
require ["fileinto"];
if address :contains "from" "facebook.com" {
    fileinto "fb";
} elsif header :matches "List-Unsubscribe" "*" {
    fileinto "nl";
} else {
    keep;
}
Explanations:
- Loading required extensions: use
require ["fileinto"];to indicate that you will use thefileintofunction. - Filtering Facebook messages: use
if address :contains "from" "facebook.com"to check if the sender's address contains "facebook.com"; if so, the message is filed in the "fb" folder withfileinto "fb";. - Filtering messages with an unsubscribe link: use
elsif header :matches "List-Unsubscribe" "*"to check if the "List-Unsubscribe" header is present in the message; if so, the message is filed in the "nl" folder withfileinto "nl";. - Keeping other messages: use
else { keep; }to keep all other messages that do not match the previous criteria.
Note:
- If you need to mention a subfolder, use the separator
/(as in the second example), but it is not necessary to specifyINBOXin your codes - Make sure that the folders
fbandnlalready exist in your inbox; otherwise, the messages may not be sorted correctly - The filter
address :contains "from" "facebook.com"works correctly for addresses that contain "facebook.com" in the "from" field - The filter
header :matches "List-Unsubscribe" "*"checks only for the presence of the "List-Unsubscribe" header, not its content
Second example of advanced sorting
This code modifies the subject based on thesender (adds a prefix to the subject when an email passes the filter, for example):
require ["fileinto", "editheader", "variables", "regex"];
if address "sender" "owner-scientific-linux-devel at LISTSERV.FNAL.GOV" {
    if header :regex "subject" "((Re|Fwd): *)\\[SCIENTIFIC-LINUX-DEVEL\\] *(.*)" {
        deleteheader "Subject";
        addheader "Subject" "${1}${3}";
    } else {
        # Ajouter un préfixe si l'objet ne correspond pas déjà au modèle
        deleteheader "Subject";
        addheader "Subject" "[SL-Devel] ${1}";
    }
    fileinto "Mail List/SL-Devel";
}
Explanations:
- Required extensions:
fileinto: to file messages in folders.editheader: to modify email headers.variables: to use variables in expressions.regex: for regular expressions.
- Sender condition:
if address "sender" "owner-scientific-linux-devel at LISTSERV.FNAL.GOV": checks if the sender matches.
- Subject condition:
if header :regex "subject" "((Re|Fwd): *)\\[SCIENTIFIC-LINUX-DEVEL\\] *(.*)": checks if the subject matches the specified pattern.deleteheader "Subject";andaddheader "Subject" "${1}${3}";: deletes the existing subject and adds a new subject with the captured parts.
- Add a prefix if the subject does not already match the pattern:
addheader "Subject" "[SL-Devel] ${1}";: adds a "[SL-Devel]" prefix to the subject if it is not already present.
- Message classification:
fileinto "Mail List/SL-Devel";: classifies messages in the "Mail List/SL-Devel" folder.
Note:
- Make sure the folder "
Mail List/SL-Devel" already exists in your inbox. - Check that the script correctly modifies the email subject to add or adjust the prefix if necessary.
Link to this FAQ:
Has this FAQ been helpful?
This guide explains how to quickly share content from the Web app kDrive Infomaniak (online service ksuite.infomaniak.com/kdrive) by email.
Share by email from kDrive
You can email a file (or rather a link to a file, as the email will not contain an attachment) from your kDrive:
- Click here to access the Web app kDrive (online service ksuite.infomaniak.com/kdrive).
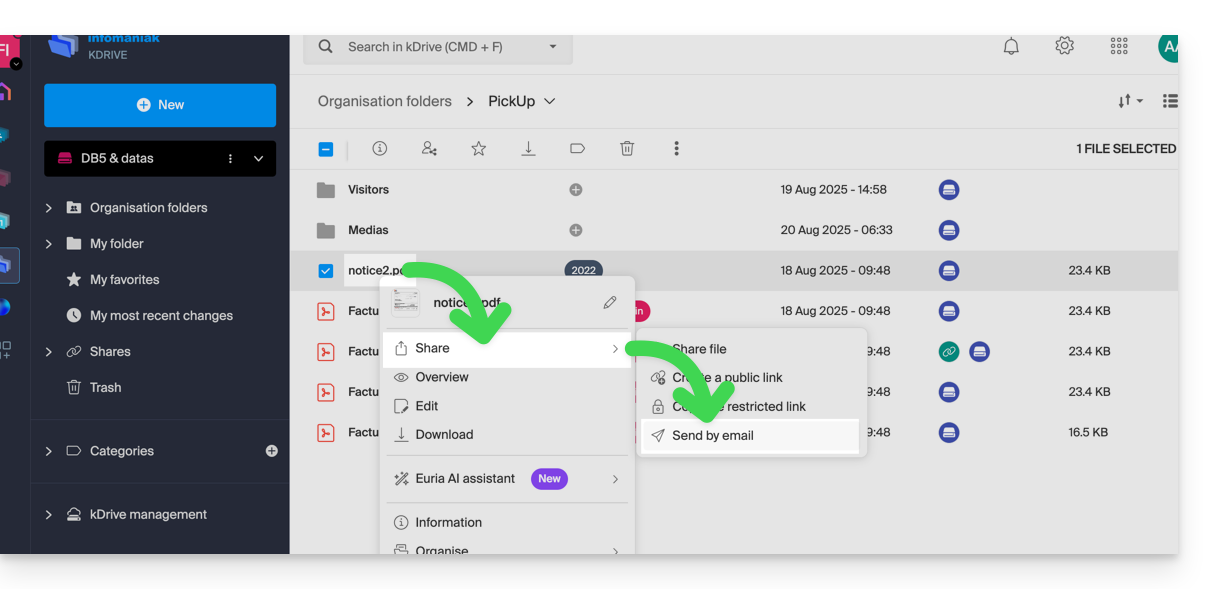
- Right-click on the file/folder in question or click on the action menu ⋮ to the right of the item in question.
- From the dropdown menu that appears, choose to share the item by email:
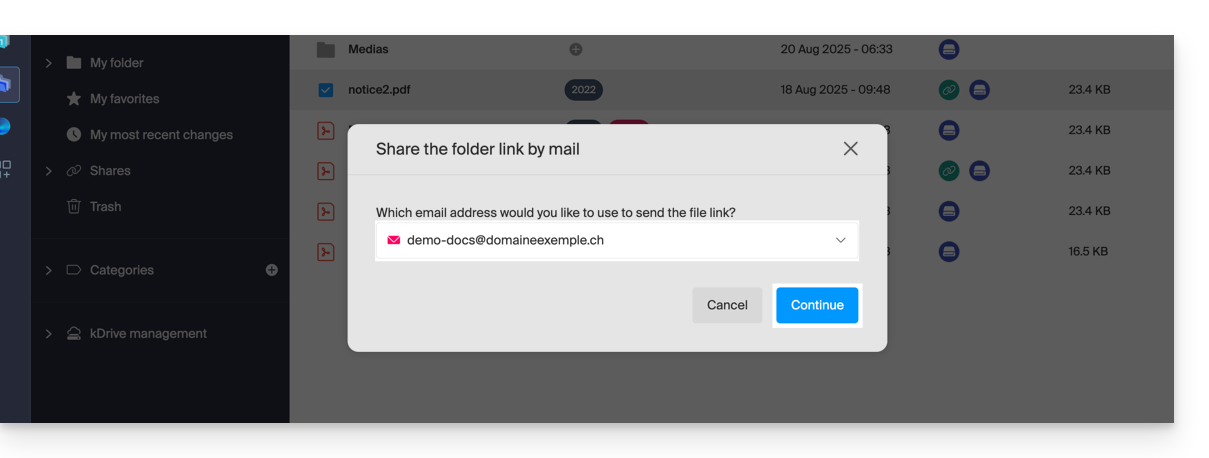
- Choose which address (from those currently linked to your Web app Mail) to send the file from.
- Click on Continue:
- The Web app Mail opens in the browser and the body of the message automatically contains the links to the shared content:
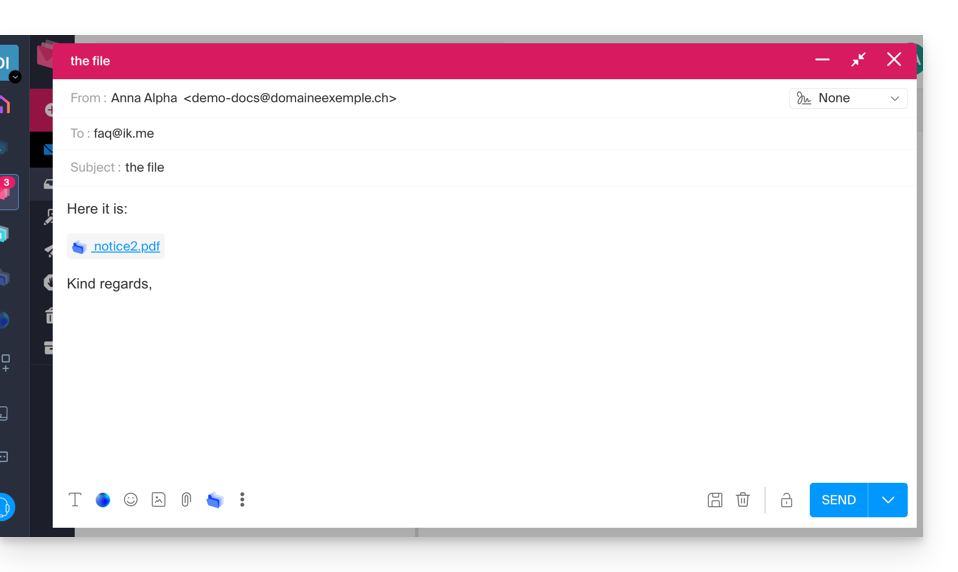
- This is exactly the same method as if you select the file directly from the kDrive icon on the composition window of the Web Mail app:
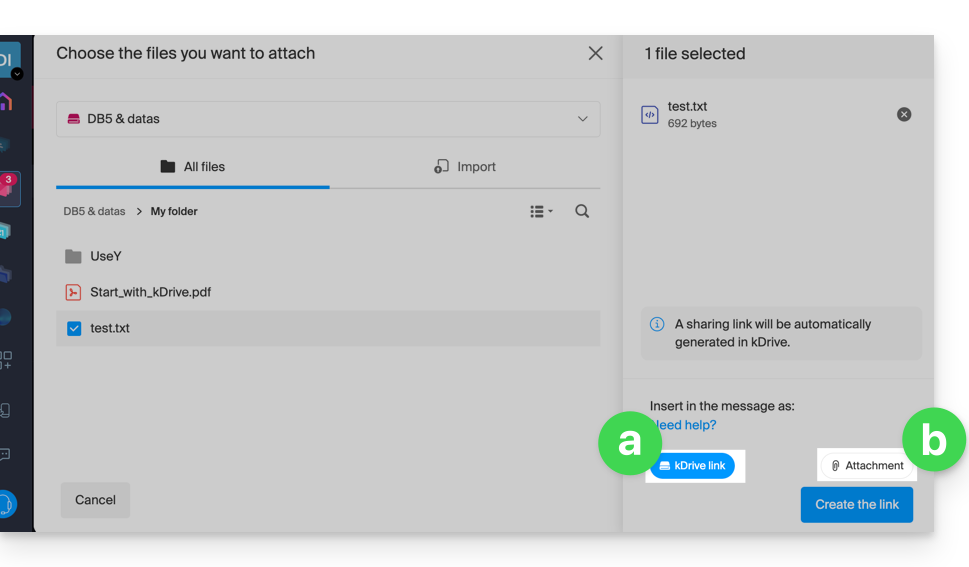
- However, by doing this (linking a kDrive file from Mail directly), an additional choice allows you to attach the file itself, as an attachment (the file will be sent in the state it is in at the moment you select it; there is no longer any notion of collaboration / sharing as is the case with the method explained in this guide and in the choice of point “
a” above).
- This is exactly the same method as if you select the file directly from the kDrive icon on the composition window of the Web Mail app:
Invite to collaborate on the file
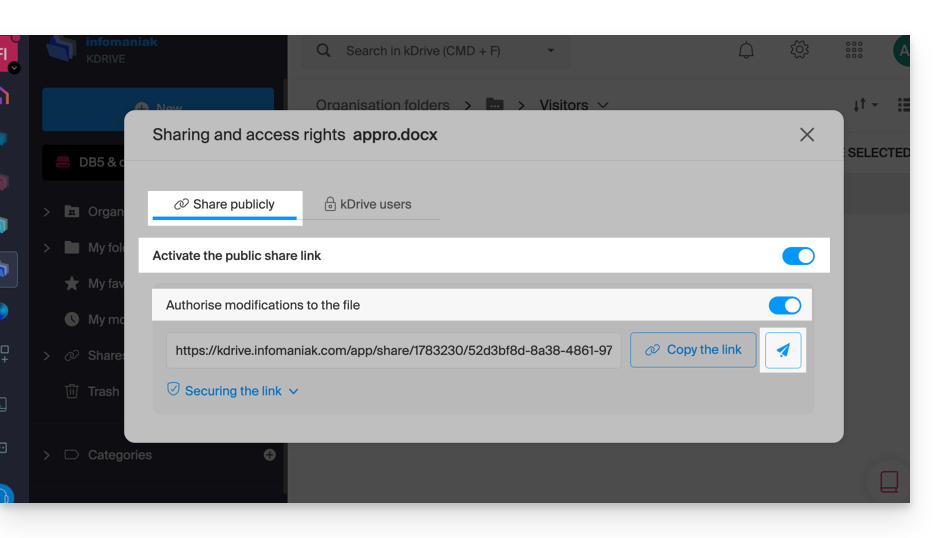
For documents with Office-type file extensions .docx, .xls, etc., it is recommended to perform a standard share of the document (see the image below) which allows you to authorize the modification of the document if you wish: 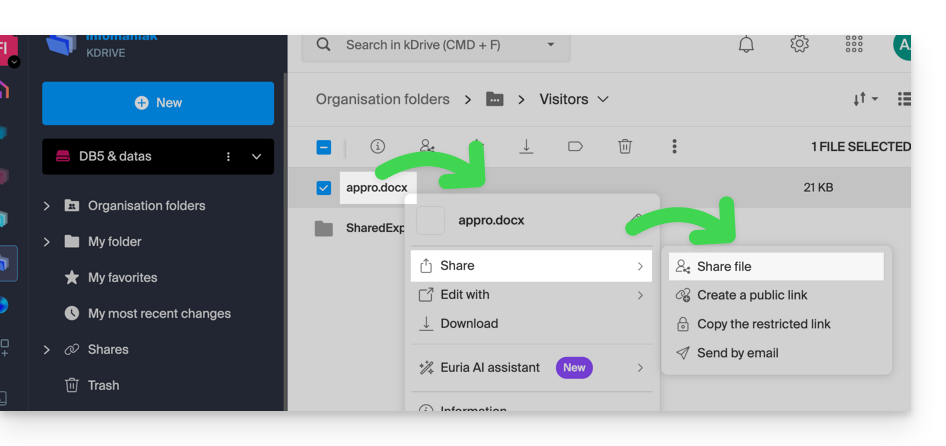
- If you authorize the modification of the document from kDrive, the user will be able to collaborate (with or without prior registration) i.e. modify in their browser and then save the document you have shared:
Link to this FAQ:
Has this FAQ been helpful?
This guide explains how to view your emails with the mobile app Infomaniak Mail (app for iOS / Android smartphone or tablet) designed by Infomaniak.
Download the Infomaniak Mail mobile app
From your iOS or Android mobile device, download the Infomaniak Mail app here:


Other versions and apps can be downloaded from the unified kSuite settings.
On a computer, you can configure your email address with third-party software or use the web app Mail Infomaniak (online service ksuite.infomaniak.com/mail).
Whether on ksuite.infomaniak.com/mail or the Infomaniak Mail app, it is essential to log in with your Infomaniak user account identifier and its password. This will not work by directly entering an email address and its password. Understand the difference
Getting started with the app
- Attach an additional email address in Infomaniak Mail
- Modify the Infomaniak Mail configuration
- Configure Infomaniak Mail notifications
Some features of the web app Mail Infomaniak (online service ksuite.infomaniak.com/mail) are also available on the mobile version:
Limitations of the Infomaniak Mail mobile app
- Only intended for messaging hosted by Infomaniak.
Minimum and supported iOS version: v16.4
No push notifications with the version available on F-Droid.
A question or feedback?
- Contact Infomaniak support
- Click here to share feedback or a suggestion on an Infomaniak product
Link to this FAQ:
Has this FAQ been helpful?
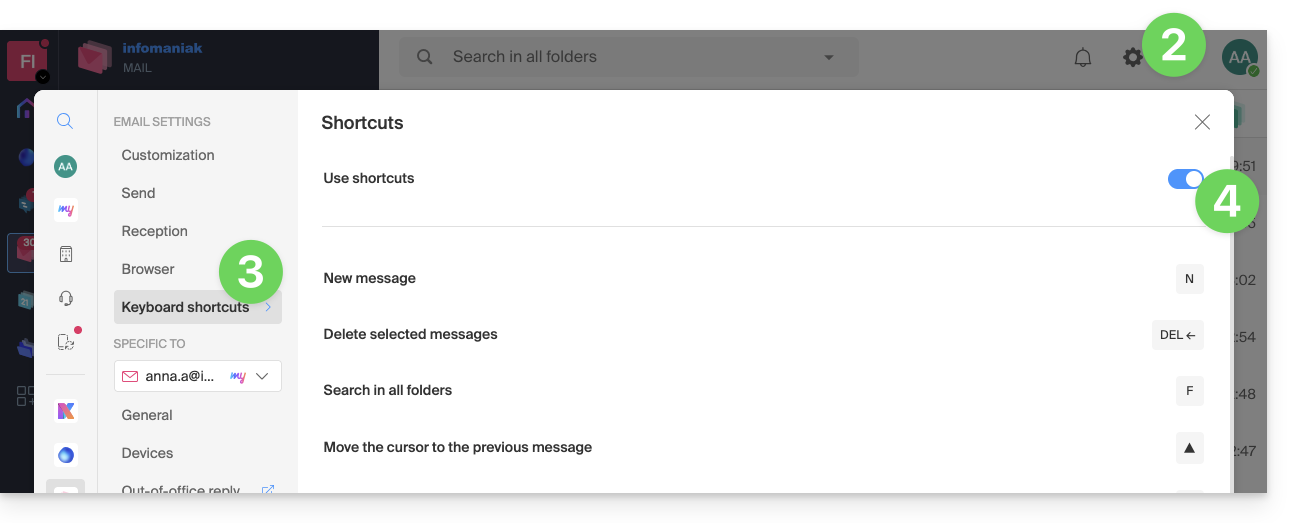
This guide explains how to increase your productivity with the Infomaniak Web app Mail (online service ksuite.infomaniak.com/mail) using its keyboard shortcuts, functions that allow you to perform certain actions without using the mouse cursor.
Enable or disable shortcuts
To enable or disable keyboard shortcuts across the entire Mail Infomaniak interface:
- Click here to access the Infomaniak Web app Mail (online service ksuite.infomaniak.com/mail).
- Click on the Settings icon in the top right of the interface.
- Click on Shortcuts.
- Enable or disable the use of shortcuts:
You can also access it via the key combination SHIFT+ALT+H (OPTION+SHIFT+H on macOS).
Keyboard shortcut examples
Here are a few keyboard shortcuts (refer to the chapters above to go directly to the complete list):
| Keyboard shortcuts | Definition | Action |
|---|---|---|
SHIFT+ALT+H | List of shortcuts | Displays the complete list of available keyboard shortcuts in the webmail. |
! | First message | Allows you to select the first message in the current folder |
SHIFT+LT+A | All messages | Allows you to select all messages in the current folder |
| DOWN | Next message | Allows you to move the cursor to the next message. |
| UP | Previous message | Allows you to move the cursor to the previous message. |
| LEFT | Return to the message list | Allows you to return to the message list |
SHIFT+CLICK | Select multiple messages | Allows you to select multiple consecutive messages |
CMD/WINDOWS+CLICK | Select/Deselect a message | Allows you to select/deselect a message |
SHIFT+R | Reply to the message | Allows you to reply to the sender of the message |
SHIFT+ALT+R | Reply to all | Allows you to reply to the sender and all people in copy of the message. |
SHIFT+ALT+N | New message | Allows you to create a new message |
SHIFT+ALT+DEL | Deletes the selected messages | Allows you to delete all selected messages at once |
SHIFT+ALT+E | Archive the message | Allows you to file the message in the archive folder |
Link to this FAQ:
Has this FAQ been helpful?
This guide explains how to enable two-factor authentication, or two-step verification, to secure the connection to your Infomaniak account (and consequently access to kSuite tools, hosting, etc.).
Preamble
- This two-step validation, also known as multi-factor / two-factor authentication (2FA, in English two-factor authentication, 2FA) protects access to your Infomaniak account by:
- the password of your choice
- and a second method of identity verification, such as a code obtained on your mobile device, for example.
- If a malicious person manages to decipher or steal your password, they would still need a validation code that only the legitimate user can obtain on their mobile device.
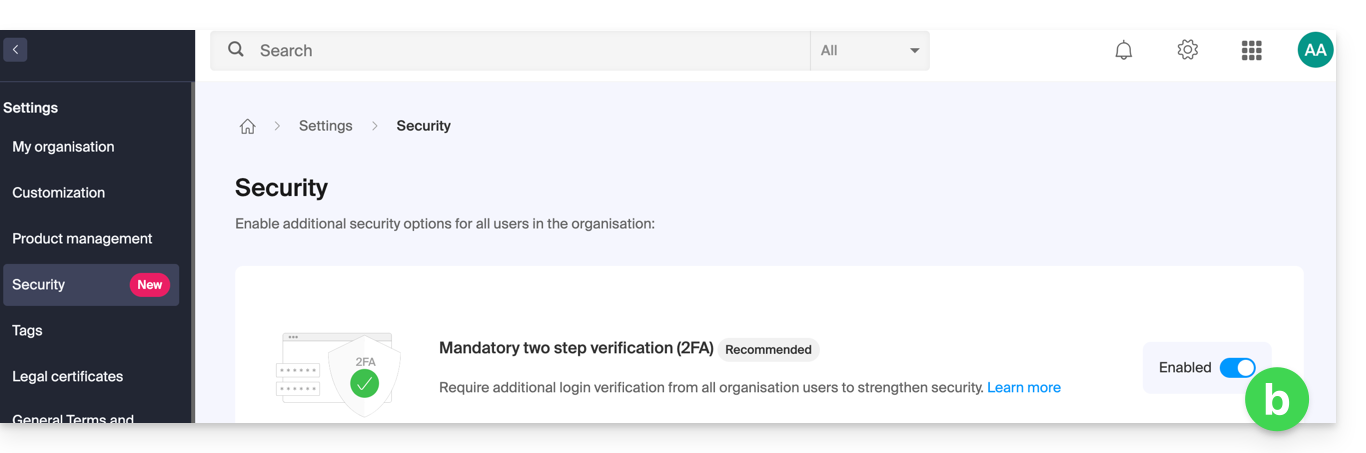
- Refer to this other guide if you are an administrator of an Organization and wish to enforce 2FA for all users who have not yet activated it.
Enable two-step validation
To increase the security level of your Infomaniak account:
- Click here to log in and access the management of two-factor authentication on the Infomaniak Manager.
- Once logged in, you can choose a 2FA method:
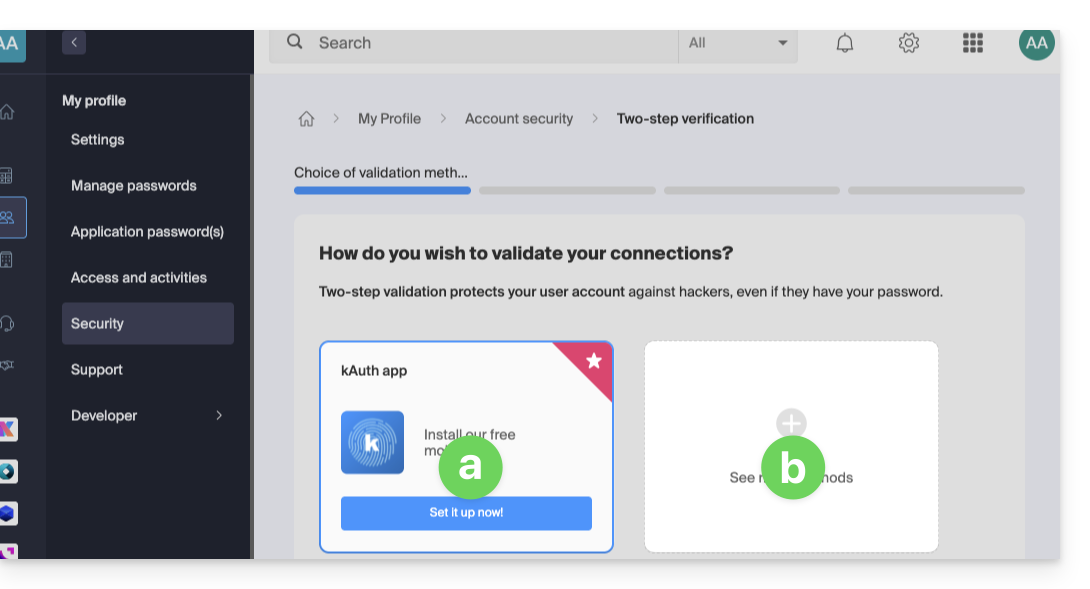
- the kAuth app for iOS / Android devices
- another method
Choose the validation method
At point a above, you can download and configure the iOS / Android kAuth app (refer to this other guide on this subject):
- It allows you to receive a YES / NO push notification to authorize or deny the connection to your Infomaniak account.
- It also generates a one-time code, even when offline, to allow connection.
- If another Infomaniak app (Mail, Euria, kDrive…) is installed and your user ID is also logged in there, then the authorization request will be made through this means; refer to this other guide on this subject.
At point b above, you can choose another method from: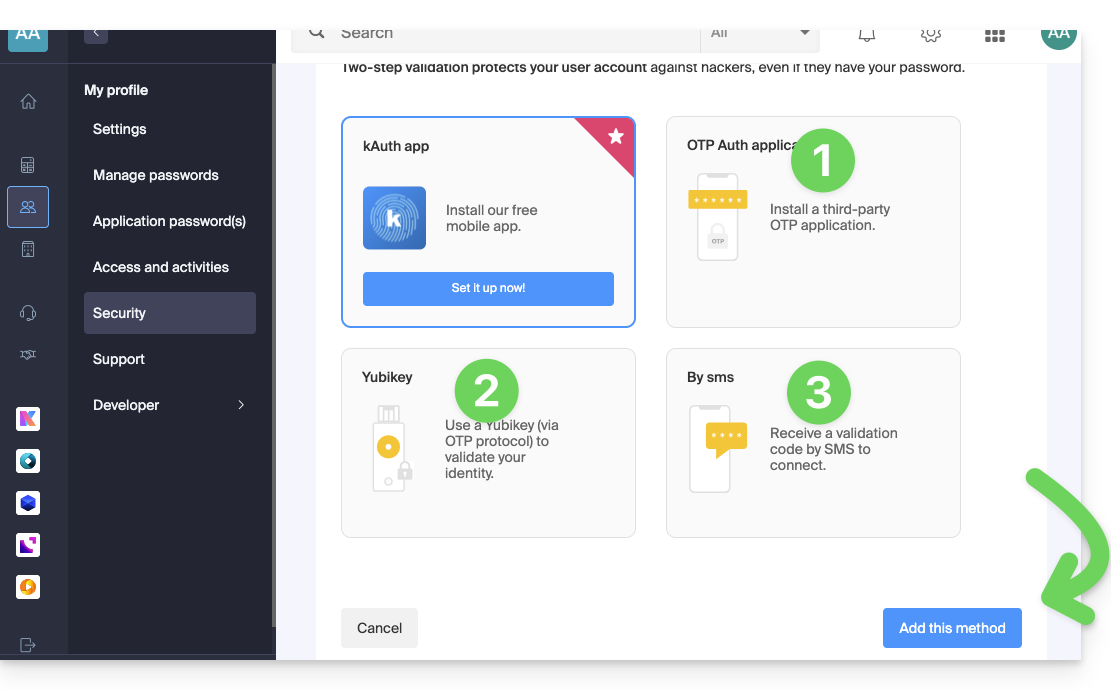
- any OTP application (such as Authy, for example) to obtain a one-time code
- YubiKey (from Yubico)
- SMS (only for CH / FR / BE / DE countries) to obtain a one-time code
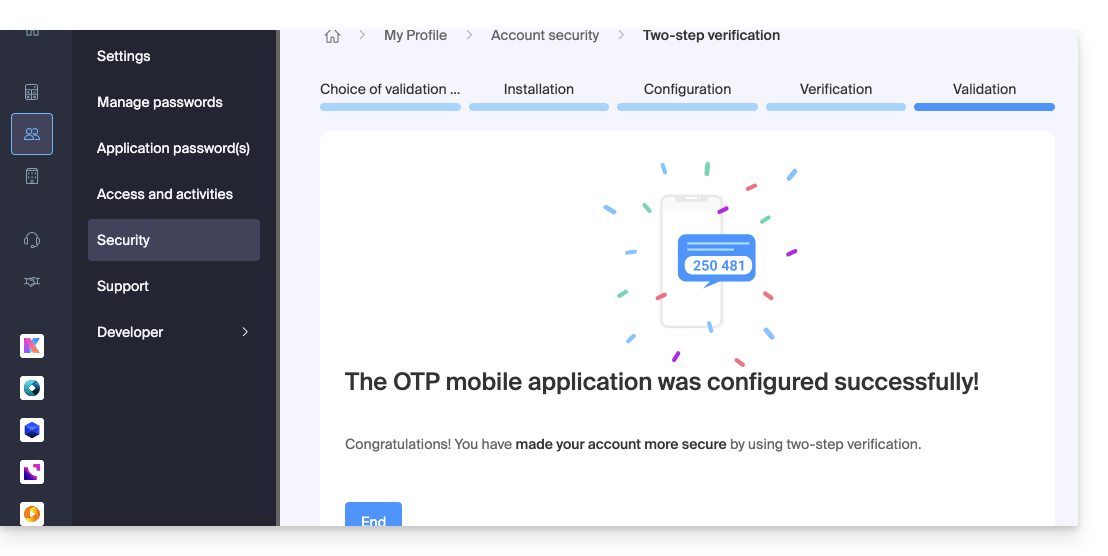
Then click the button to add the method and follow the on-screen instructions to complete the setup.
In all cases, carefully note the recovery codes offered for download after each configuration.
Be careful with synchronizations already in place
Once strong authentication is enabled, to access certain tools (synchronization for example) it is necessary to create application passwords.
It is not necessary to call Infomaniak, which does not have any of your codes & passwords in its possession. For any request for help regarding 2FA, refer to this other guide.
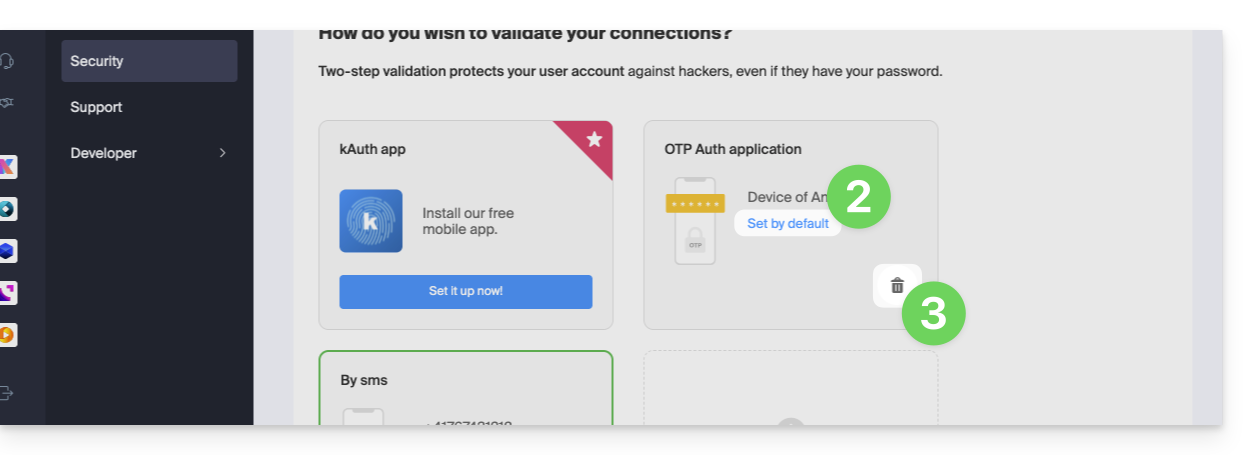
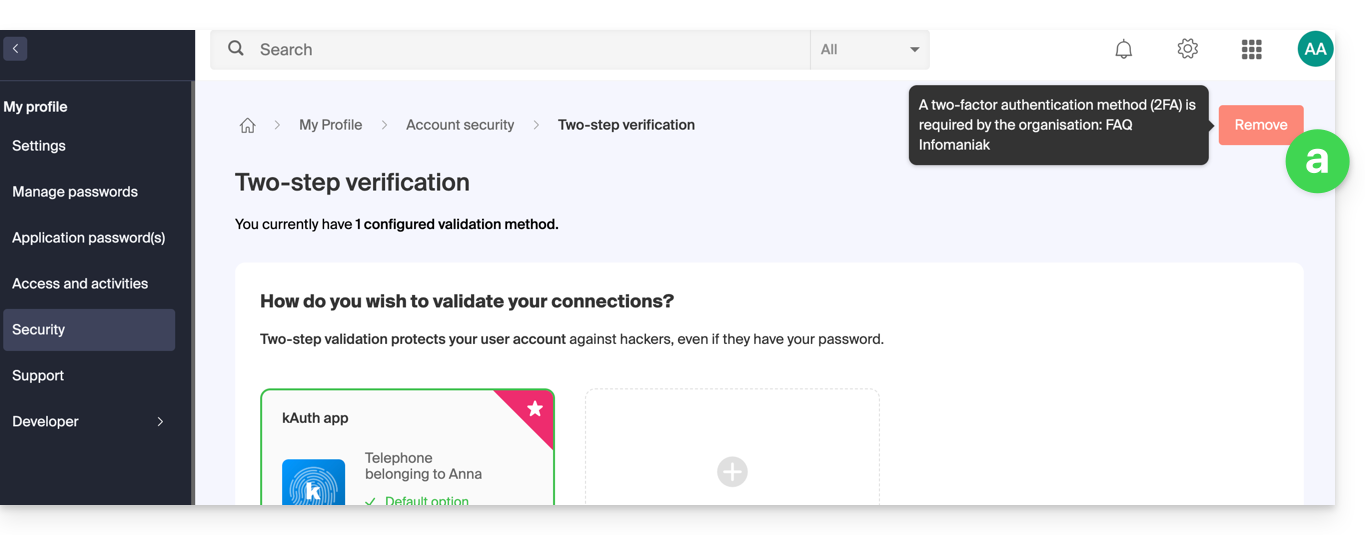
Modify the default option or remove one
If you have enabled multiple validation methods (SMS, OTP application...), you can define the one that will be offered by default for each connection.
Note, however, that the default method will remain that of the validation in the Infomaniak app installed (Mail, kChat, kDrive...) on your devices.
- Click here to log in and access the management of two-factor authentication on the Infomaniak Manager.
- Click the button to set as default.
- Click on the trash can to remove and no longer offer the selected method:
To completely remove 2FA, refer to this other guide.
Authenticate each time you open a browser
To request not to keep cookies when closing browser windows, and therefore request authentication each time you access the Infomaniak Manager when you restart the browser...
... on Chrome
Specify in Google Chrome settings (chrome://settings/content/siteData to paste into the address bar or refer to the official documentation) the address [*.]infomaniak.com: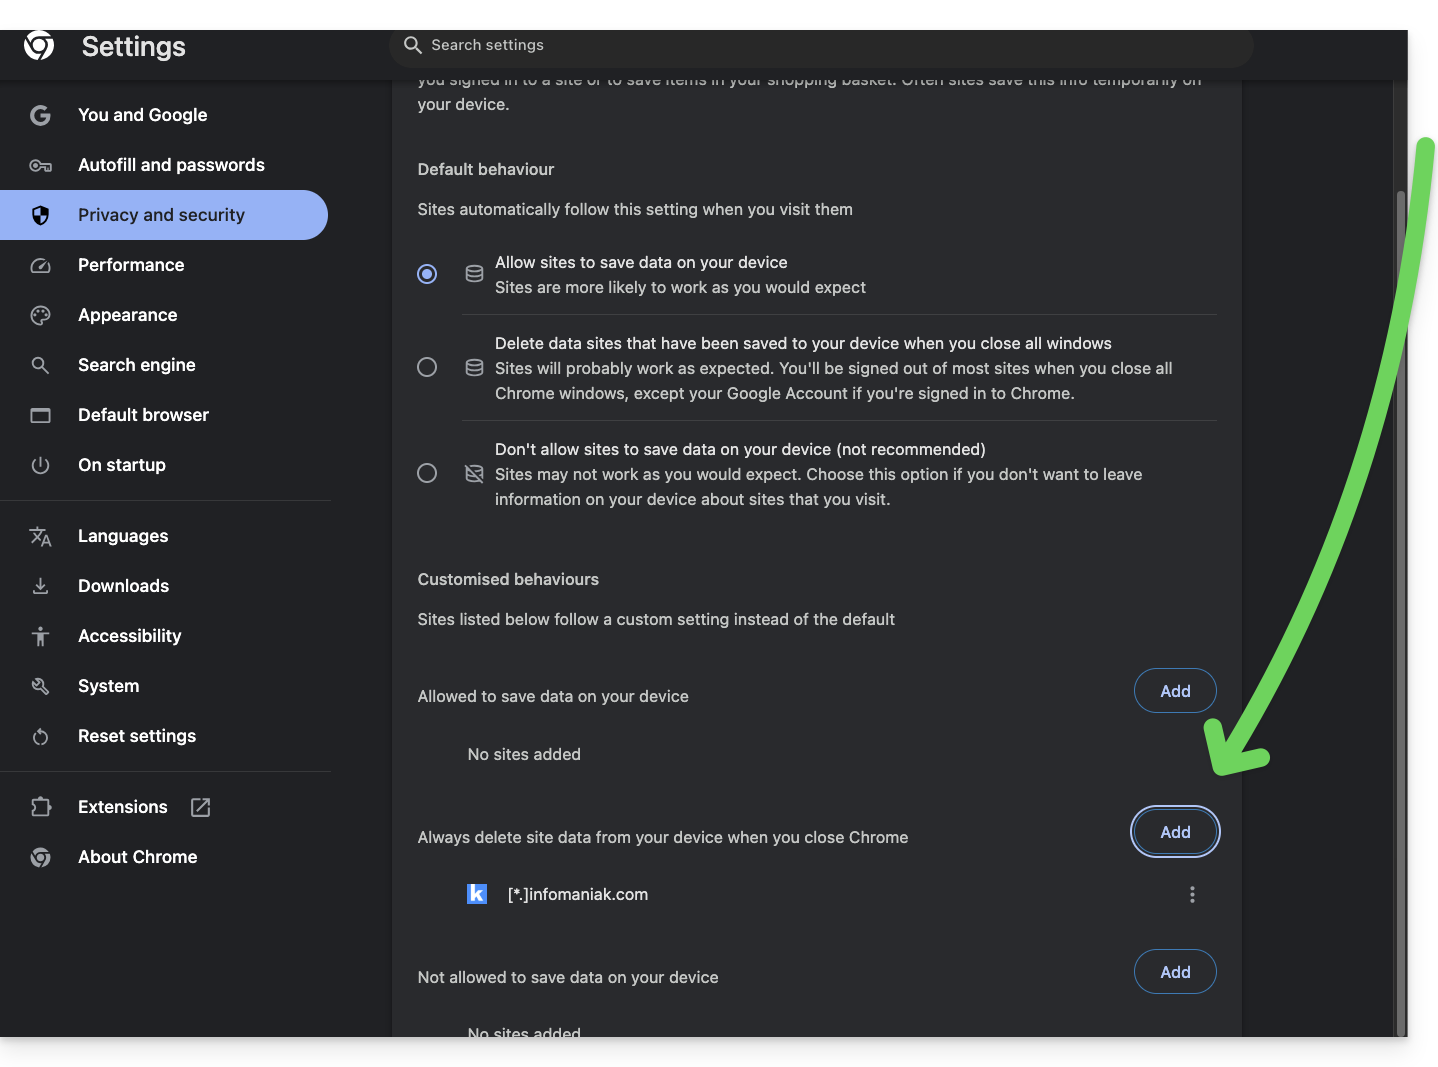
Link to this FAQ:
Has this FAQ been helpful?
This guide explains how to obtain your email address(es) from the Swiss host Infomaniak.
Preamble
- Except for certain free offers, an email address at Infomaniak is always created within an Email Service, and this Email Service revolves around a custom domain name that must exist and be configured for the email to work.
- Example: you want the address
jean.dupont@domain.xyzthen you need:- To own the domain name “
domain.xyz”. - To obtain an Email Service “
domain.xyz”. - To create the email address “
jean.dupont”.
- To own the domain name “
- All of this is offered and requested in the ordering process on infomaniak.com (see below), preceded by the mandatory creation of a user account (for which you will need to provide your personal email address, or an address that already exists in all cases).
- If the corresponding domain name is already registered with an external registrar, you may need to enter the correct MX record in the DNS zone.
Order email addresses from Infomaniak
Before or after your registration:
- Click here to choose the offer that suits you and follow the process to start using the email services.
- Once the Email Service is ordered, you will be able to create email addresses and associated passwords.
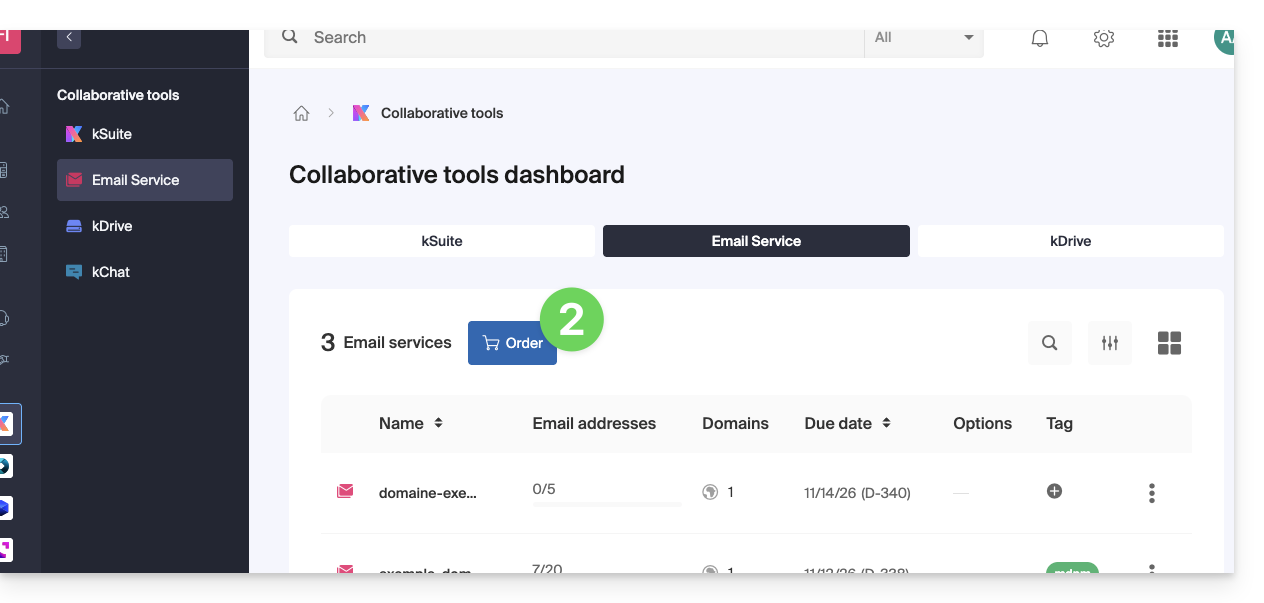
Add an additional Email Service
To add a new Email Service (to obtain new addresses on another domain):
- Click here to access the management of your product on the Infomaniak Manager (need help?).
- Click on the cart icon above the displayed table:
Increase the number of available email addresses on an existing Email Service
To increase the quota of available addresses if necessary, refer to this other guide.
Once the Email Service is activated
• Create your email addresses.
• Configure your emails on your computer and devices.
• Sync your contacts & calendars on your devices.
• Restore the content (including that present with another provider).
Link to this FAQ:
Has this FAQ been helpful?
This guide details the two main types of identifiers. They are distinct, even if the address format can be identical.
Infomaniak Account vs Email Address
Here is a summary of these 2 types of identifiers:
| Type of Identifier | Usage | Where to Use It | Associated Password |
|---|---|---|---|
| Infomaniak Account (login identifier) | Access all of your Infomaniak services. | Login to: | Password set when creating the user account. ⚠️ Different from the password of your email addresses. |
| Email Address Hosted with Infomaniak | Send and receive emails. | SMTP/IMAP Connection…
| Password specific to each email address (there can be several). ⚠️ Different from the Infomaniak account password. |
What to do in case of a connection issue?
It is not necessary to contact Infomaniak Support (who does not have any of your passwords)…
- Issue with the Infomaniak account? Reset the account password.
- Issue with an email address? Reset the email password.
Explanations
- Like many other online services, you registered with Infomaniak using a personal email address.
- This personal email address serves as your login identifier when you want to access Infomaniak services.
- This login identifier has its own password (set when creating your Infomaniak user account – your personal email address, see above).
There is no link between…
- … this identifier/password pair described in points 1/2/3 above…
- … and the email addresses you have created or obtained subsequently with Infomaniak.
A link might exist if the address is the same (for example, you signed up with the email address toto@abc.xyz and you also manage this same email address at Infomaniak) but even in this case, the password will very likely be different — once for the login identifier toto@abc.xyz and once for the email address toto@abc.xyz.
Other identifiers?
Acquiring other Infomaniak products involves obtaining other identifiers, such as those required for FTP, MySQL, SSH, WebDAV connections, etc., but these identifiers are entirely independent of the two types described above.
Link to this FAQ:
Has this FAQ been helpful?
This guide explains how to create an email address from the Infomaniak Mail Service, the powerful and secure solution for hosting your email addresses.
Preamble
- To create multiple email addresses in bulk, refer to this other guide.
- To delete one or more email addresses, refer to this other guide.
Create an address on a Mail Service
Prerequisites
- Have a Mail Service on your Infomaniak Manager.
- Be Administrator or Legal Representative within the Organization.
- Have a quota of available addresses or adjust it in advance if necessary.
Next, to create a new email address:
- Click here to access the management of your Mail Service on the Infomaniak Manager (need help?).
- Click directly on the name assigned to the Mail Service concerned:
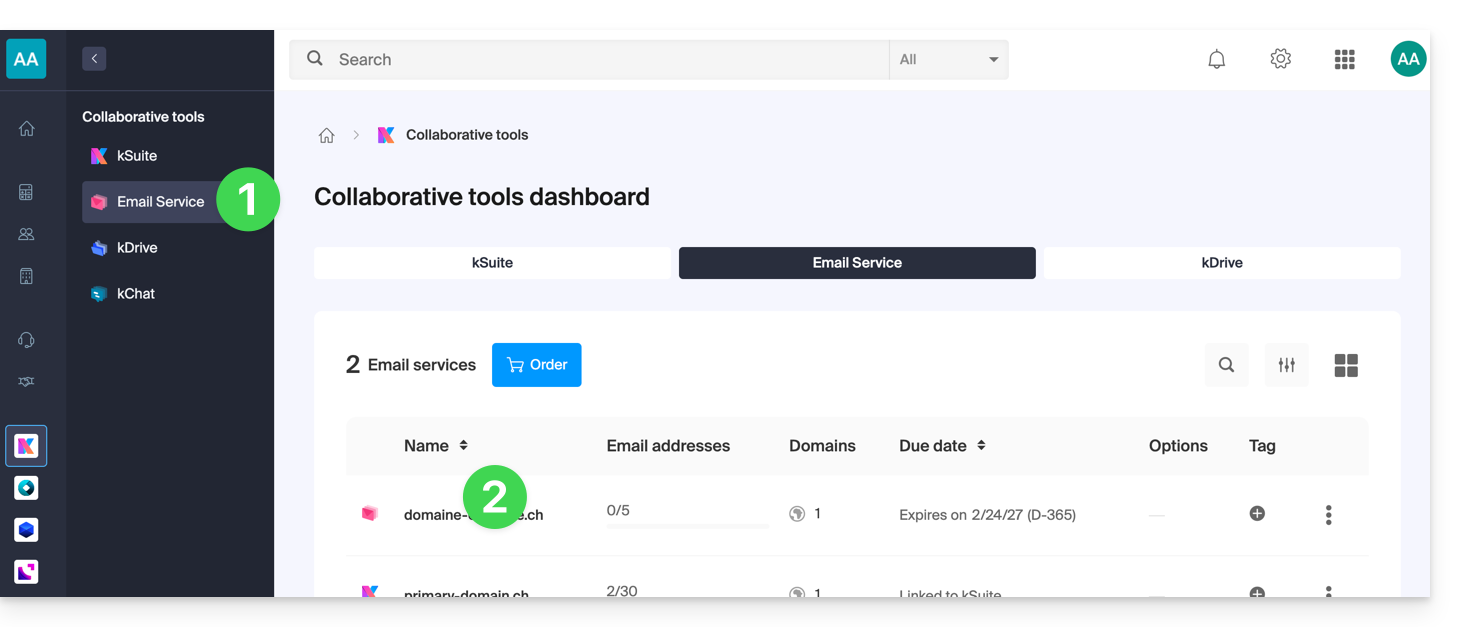
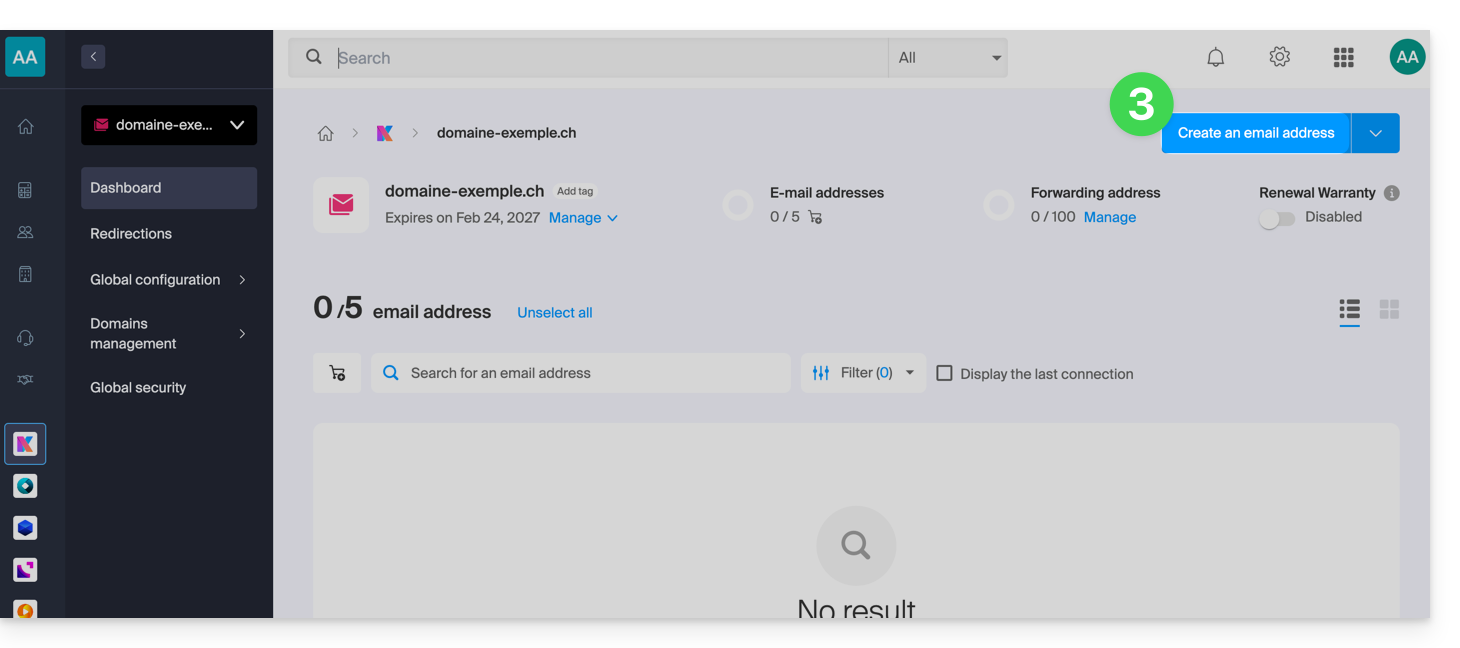
- Click the blue button Create an email address at the top right:
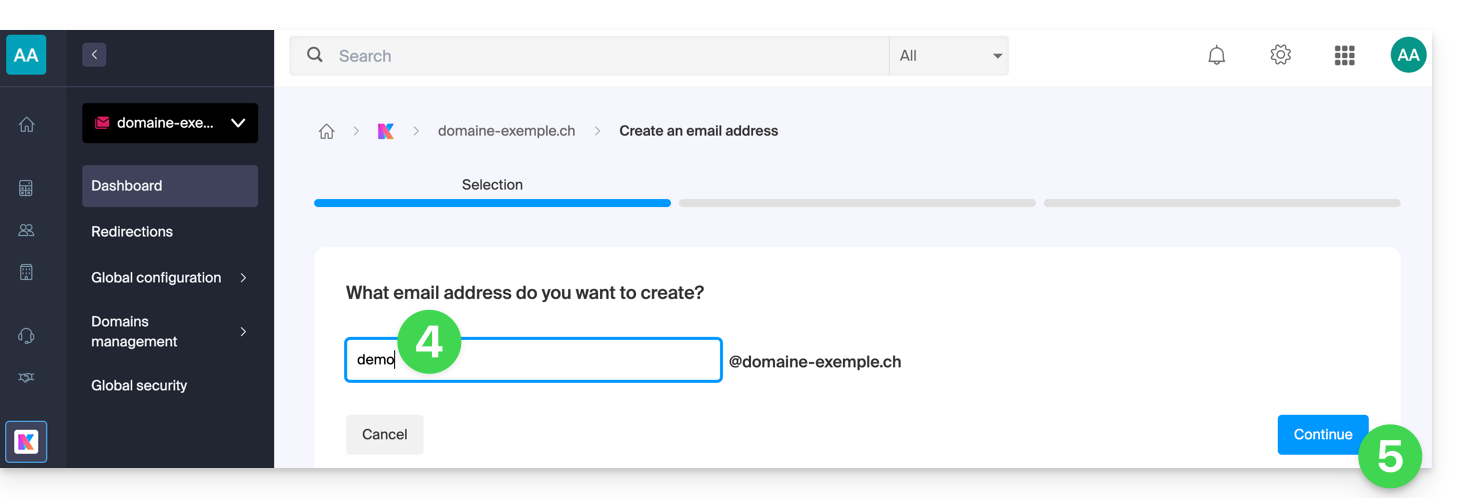
- Enter the name that will compose the email address.
- Click the button to continue:
- Select the creation mode suitable for your situation:
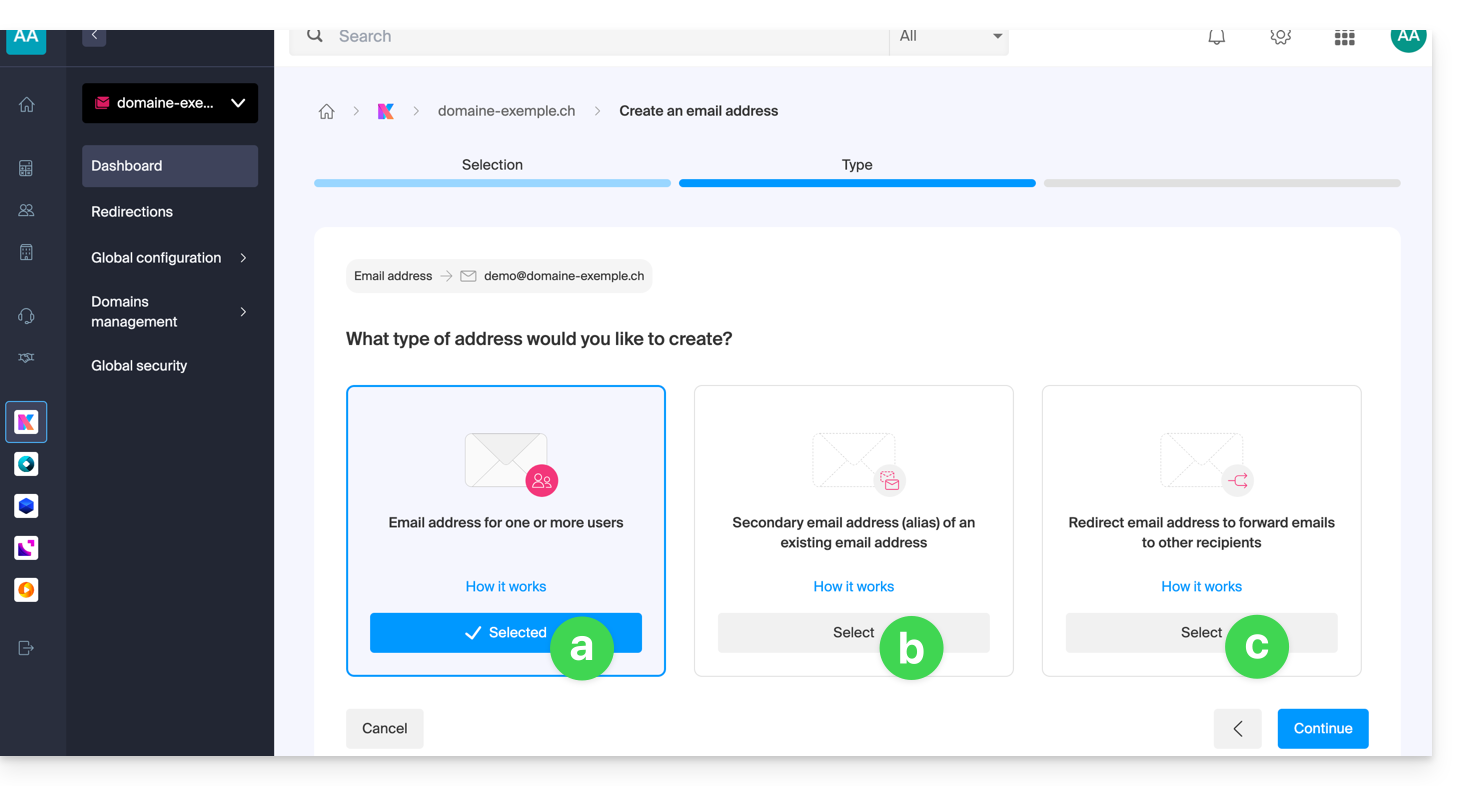
An address for you or other users [ ☍ ]
- Example: make the address directly visible on your Mail interface, or send invitations so that others can use it.
A secondary (alias) address [ ☍ ] that will not be deducted from the main quota
- Requires having a first email address, to which the new designation will be attached.
An address used only to redirect emails [ ☍ ] that will not be deducted from the main quota
- You will not be able to send messages from this address, but only forward incoming emails to the existing address of your choice.
- Click the button to continue after making your choice.
Additional actions (button )
Click on the chevron to the right of the Create an email address button to access additional actions: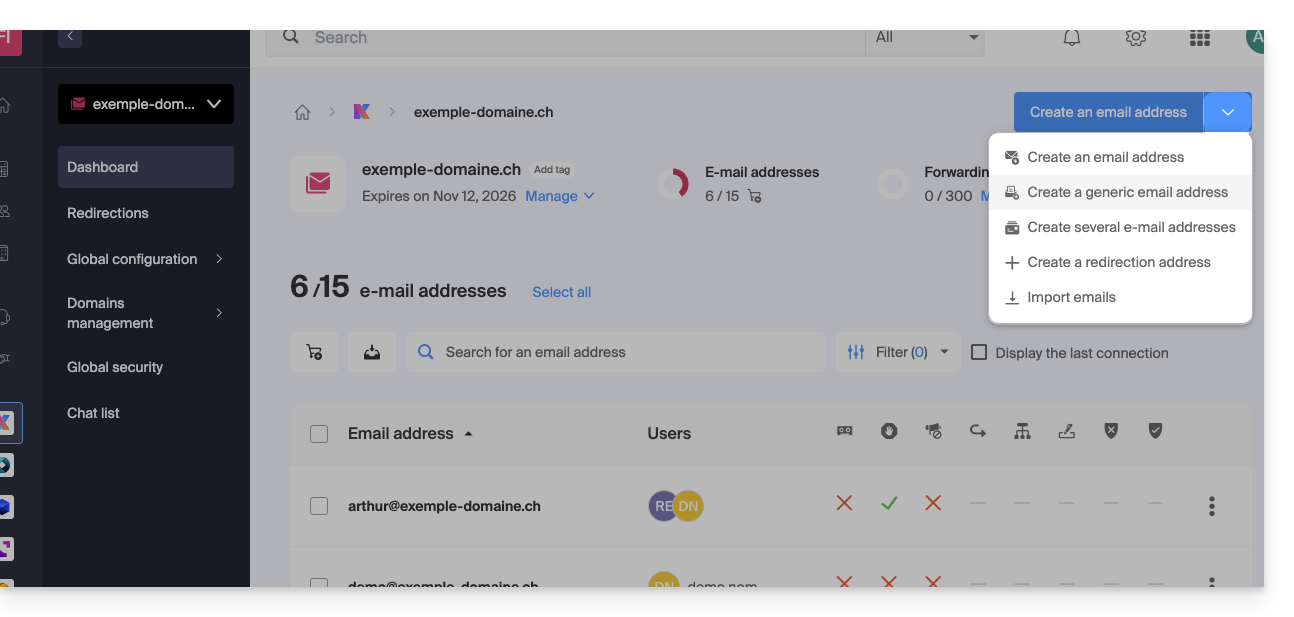
- Create a generic email address of type:
- no-reply (for sending confirmations, validations, invoices, etc.)
- catchall (allows receiving all messages for which there is no specific email address on your domain)
- Create multiple email addresses: allows you to create multiple email addresses at once using a
CSVfile. - Create “virtual” addresses used for redirection.
- Import content from other email addresses.
Link to this FAQ:
Has this FAQ been helpful?
The easiest way to manage your emails is to use the Web app Mail Infomaniak (online service ksuite.infomaniak.com/mail).
A mobile app (Infomaniak Mail, application for iOS / Android smartphone or tablet) is available here!
This interface offers many advantages:
- No software to install or configure.
- Share mail with other users.
- Unified management of all your Infomaniak email addresses.
- Professional anti-spam and antivirus filter on incoming and outgoing mail.
- Automatic sorting of incoming messages (filters).
- Sending large attachments.
- Saved permanently.
- kDrive sharing.
- Secure and respects your privacy, hosted in Switzerland by a neutral and independent company.
How to start Mail Infomaniak?
Whether on ksuite.infomaniak.com/mail or the Infomaniak Mail app, it is essential to log in with your Infomaniak account identifier and its password. This will not work by entering an email address and its password directly. Understand the difference
- Click here to access the Web app Mail Infomaniak (online service ksuite.infomaniak.com/mail).
- If necessary, attach the email addresses to be managed with Mail Infomaniak.
What do you want to do next?
Link to this FAQ:
Has this FAQ been helpful?
This guide explains how to change the mobile phone number (used in case of forgetting the password to access your Manager) of your Infomaniak account (= user account).
Preamble
- To manage the details of your Infomaniak account instead, refer to this other guide.
- To modify the login identifier, refer to this other guide.
- To manage the details of the Organization to which you belong, refer to this other guide.
Change the mobile phone number
To change the phone number associated with your Infomaniak account:
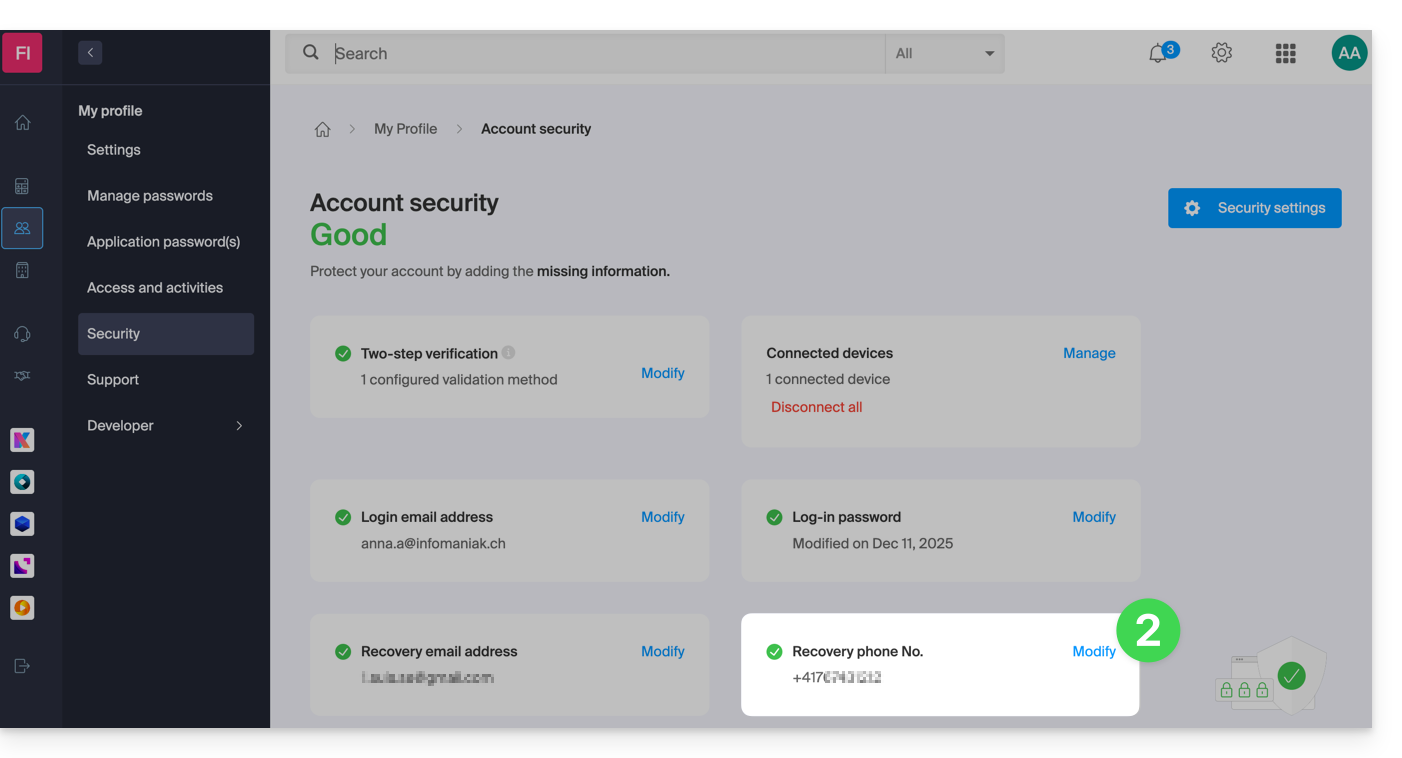
- Click here to access the security information management on the Infomaniak Manager.
- Click on Modify in the Recovery Phone box:
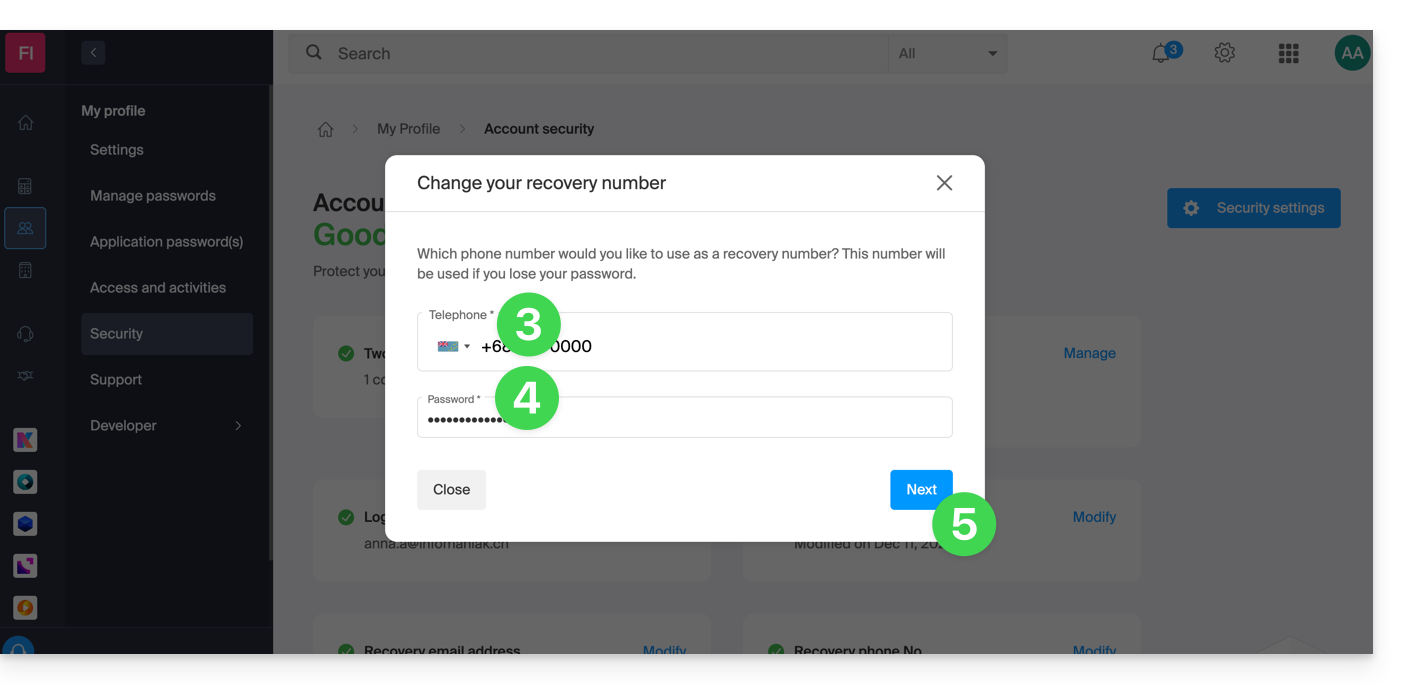
- Enter the country code corresponding to your country and the new mobile phone number.
- Enter your Manager login password.
- Click the Next button to save:
Note: it is possible for an administrator within the Organization to block users from requesting a password reset by SMS: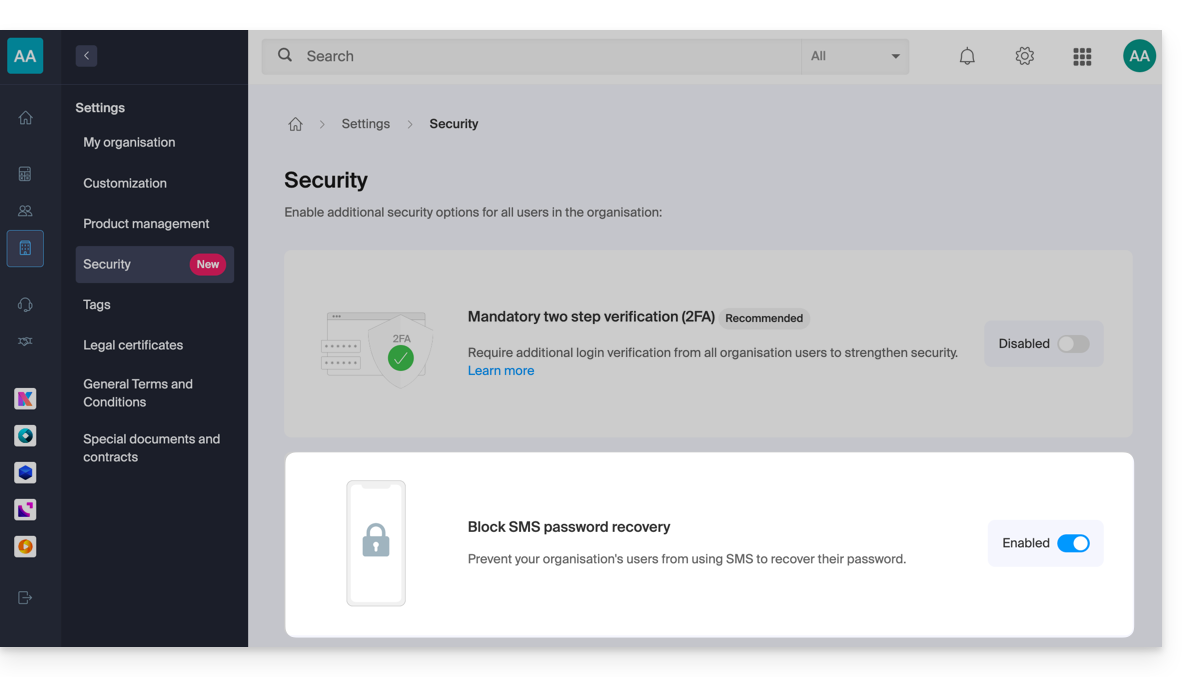
In this case, it is the recovery email that will be used and no longer the phone number specified above.
Link to this FAQ:
Has this FAQ been helpful?
This guide explains how to disable two-factor authentication, also known as two-factor authentication (2FA) or two-step verification for logging in to the Infomaniak Manager (manager.infomaniak.com) or Mail Infomaniak (ksuite.infomaniak.com/mail).
Preamble
- For security reasons, Infomaniak support will never disable a login validation method activated on an account upon a simple request.
- You must absolutely follow the procedures below.
- Attention, if you were using the SMS authentication method, once deactivated, you will only be able to re-enable this method if you are domiciled in CH / FR / BE / DE.
- Outside of these countries, you will need to use kAuth or any OTP application.
Disable 2FA
If two-step verification is enabled and you wish to disable it:
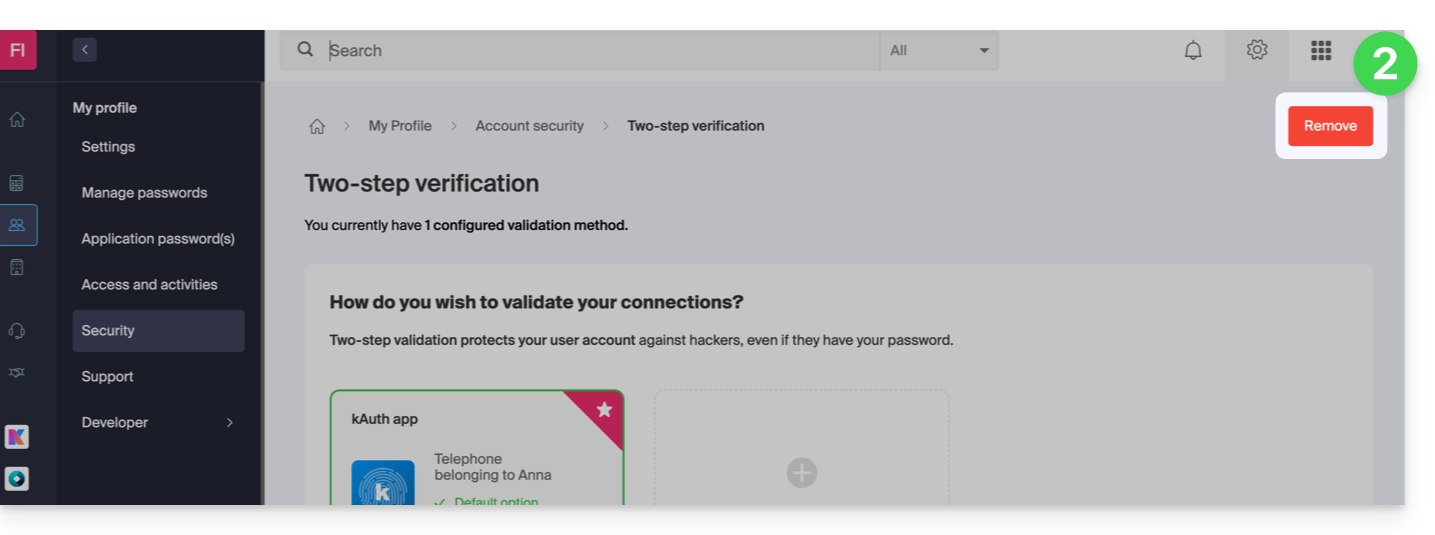
- Click here to access 2FA management on the Infomaniak Manager.
- Click the Remove button to remove the security:
- If the red button is inactive / grayed out…
- …there is probably an upstream security option that prevents you from disabling 2FA:
- If the red button is inactive / grayed out…
- Enter the password to log in to your account.
In case of a problem
Obviously, the procedure above requires logging in one last time with two-factor authentication in order to then be able to disable it.
If you do not have access to the kAuth application or the device that receives the validation SMS, there is no point in calling Infomaniak; in this case, no choice, you will have to provide a number of security elements manually or via the Infomaniak Check (kCheck) app to regain access to your account:
- Click here to access the Infomaniak Manager login page.
- Enter the username and correct password.
- When prompted for additional authentication, click on alternative methods:

- Choose to enter one of your recovery codes if you had downloaded the sheet when activating 2FA:

- Otherwise, select the last option to request help to access the form allowing you to submit your identity documents and recognition selfie:

- Follow the procedure to the end and wait:

Link to this FAQ:
Has this FAQ been helpful?