Knowledge base
1000 FAQs, 500 tutorials and instructional videos. Here, there are only solutions!
This guide explains how to remove from the Web app Mail Infomaniak (online service ksuite.infomaniak.com/mail) an email address currently being viewed by your Infomaniak account.
Any operation (adding or removing an email address) performed from the Web app Mail Infomaniak will be immediately replicated on the mobile app Infomaniak Mail (this does not affect email software/clients like Outlook).
Detach an email address
To remove an email address currently being viewed:
- Click here to access the Web app Mail Infomaniak (online service ksuite.infomaniak.com/mail).
- If necessary, click on the chevron to the right of the email address currently visible on the Web app Mail Infomaniak.
- Click on the action menu ⋮ to the right of the email address you wish to detach.
- Click on Detach this email address:

- Click on the red button to confirm the removal:

Detach an address in error
To remove an email address currently attached and displaying a warning sign ⚠️: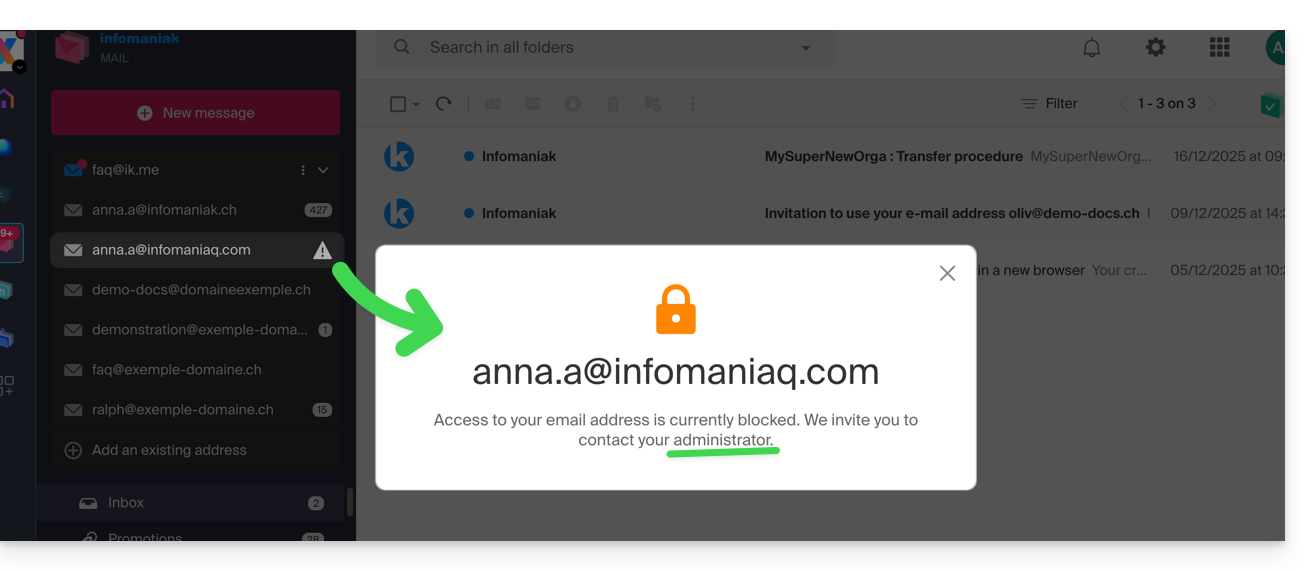
It is up to the administrator of the concerned Mail Service to take the necessary action (either by deleting the user's access from the management of the users of the email address in question, if necessary by unlocking the service beforehand if it is blocked due to an overdue payment deadline, or other security issue):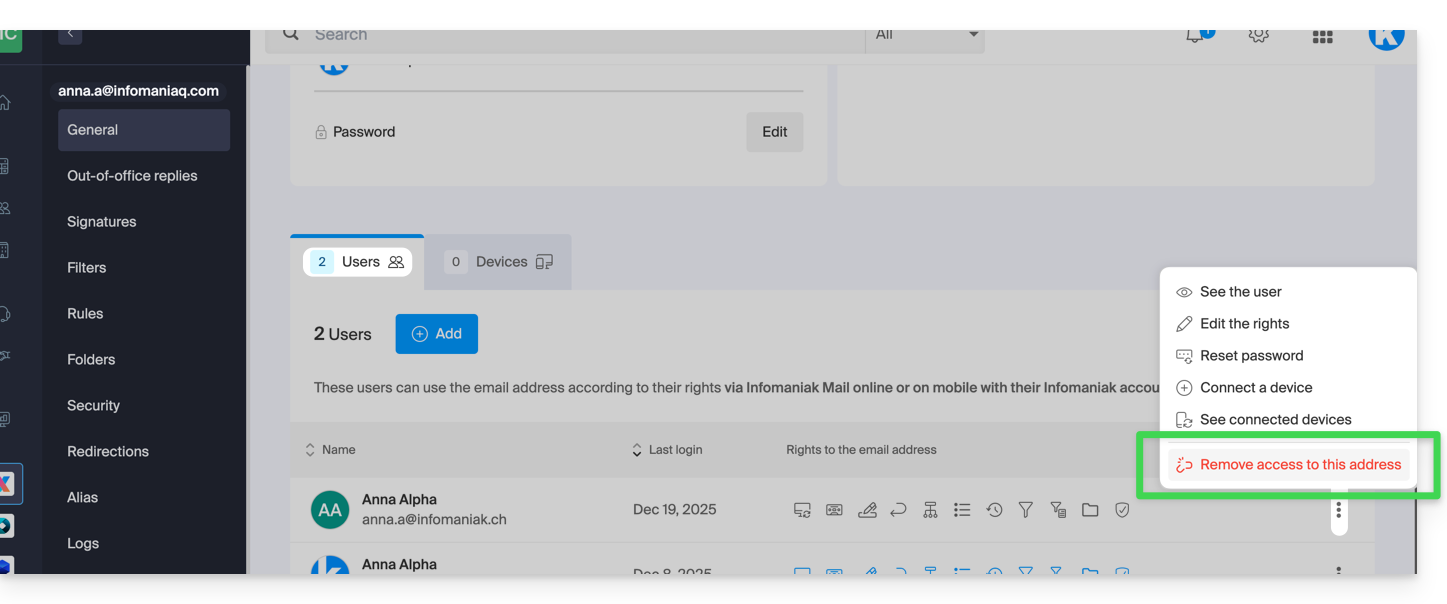
Refer to this other guide if you are looking for information about the deletion of an email address and its content, and to this other guide to link and view an additional email address.
Link to this FAQ:
Has this FAQ been helpful?
This guide details the security measures implemented as part of the Infomaniak email offers to detect abusive and abnormal use of an email address.
Preamble
- Upon written request, justified and authenticated, it is possible to modify these security rules for a specific paid email address.
- For sending emails to a large number of recipients, the Newsletter tool is the most suitable.
- These measures protect you from malicious use of your computer or your account.
- Quota calculation (sliding window): the limits (below) are not reset at midnight but calculated in real-time over a 24-hour window; each sent message "occupies" a space in your quota and is automatically released 24 hours after it is sent.
- If you send messages throughout the morning until you reach your limit at 11 AM, your sending rights will be gradually released the next morning, as each message reaches its 24-hour age.
- 1 message sent to 2, 42, or 99 people in CC/BCC counts as 2, 42, and 99 messages, respectively.
Sending limits per 24 hours
⚠ Number of outgoing emails possible per 24 hours:
| kSuite | free | 500 |
| Standard | 1440 | |
| Business | 1440 | |
| Enterprise | 1440 | |
| my kSuite | 500 | |
| my kSuite+ | 1440 | |
| Mail Service | Starter 1 max. address | 500 |
| Premium 5 min. addresses | 1440 | |
| Web hosting | sending unauthenticated (PHP Mail()) | 50 |
| sending authenticated | * |
* The maximum number depends on the email offer to which the address used belongs
Other email limits
Link to this FAQ:
Has this FAQ been helpful?
This guide explains how to transfer to Infomaniak email addresses currently hosted by Google (with a custom domain); refer to this other guide if you are looking for information on importing a simple Gmail address (…@gmail.com).
Preamble
- It is easy to transfer your entire email directory to Infomaniak - discover the offers.
- Use your email address on a simple browser, Outlook, etc. and on mobile devices iOS/Android thanks to the Infomaniak Mail app.
- Import your contacts to continue communicating with them from your new email.
- The operation does not affect either the data already present on the destination address, or that of the source address.
- The entirety of the external mailbox will be imported.
- Once the import process has started, it is no longer possible to interrupt it.
- Any duplicates are managed: identical content will only be copied once.
Import your entire email history
Infomaniak Prerequisites
- Have a Mail Service on your Infomaniak Manager.
- Have a quota of available addresses or adjust it in advance if necessary.
- Ensure that the email is properly secured
- Create one or more addresses on this Mail Service.
- If you have many (10+) email addresses to create, refer to this other guide regarding mass creations.
- The destination email address must be linked to the user (= to the Infomaniak account) that you are using.
Google Prerequisites
- Activate two-step authentication (2FA):
- It is imperative to activate two-step authentication in Gsuite - if necessary the organization administrator will first have to allow users to activate it from admin.google.com.
- In the settings of your Google account (https://myaccount.google.com/), go to the Security tab and activate Two-Step Verification:

- Read the complete Google guide
- Create an application password:
- Once 2FA is activated, go to application passwords (https://myaccount.google.com/apppasswords).
- Follow the complete Google guide:
- Click on App Passwords.
- Enter, if requested, the password of your Gmail account.
- Give a name to your password (for example ImportINK), it is simply descriptive:
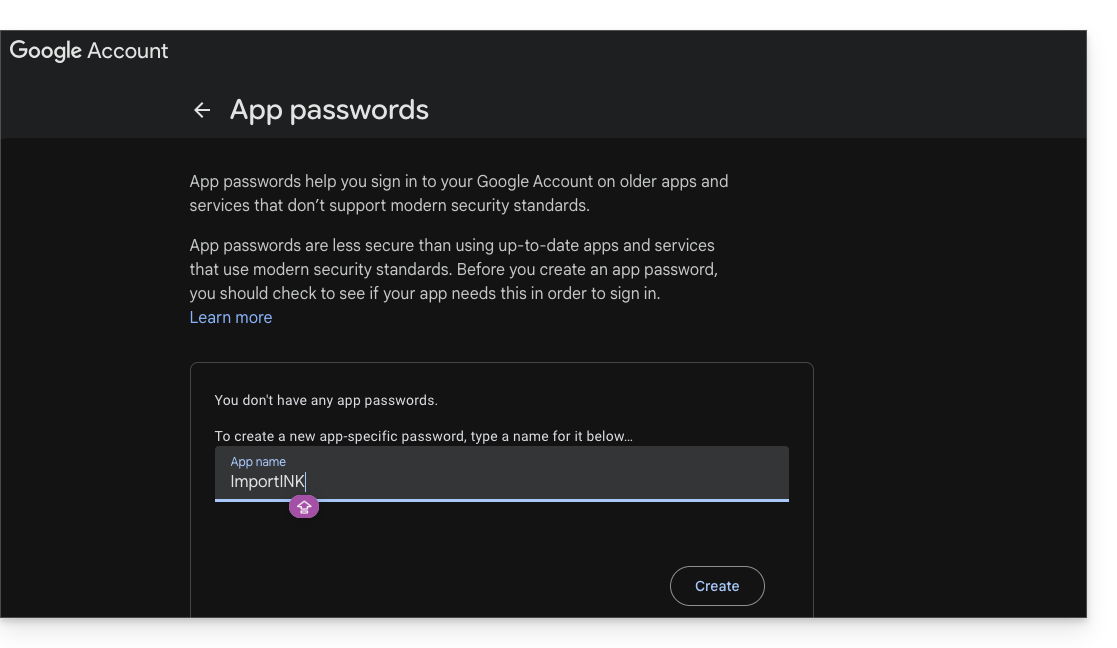
- Click on Generate.
- Copy or note the password that appears on the screen (it does not contain spaces).
Import Google email content to Infomaniak
- Click here to access the import tool (online service https://import-email.infomaniak.com).
- If you have many (10+) email addresses to import, refer to this other guide about bulk imports.
- If necessary, log in to your Infomaniak account on the Organization of your choice; indeed, the import will be to one of the email addresses attached to the Infomaniak Web Mail interface (online service ksuite.infomaniak.com/mail) of the Infomaniak account you are using.
- Click on single import.
- Fill in the left field with your existing Google email address (whose content is to be copied):
- Fill in the right field with the application password created above.
- If necessary, modify the Advanced Settings to specify an IMAP server address:
- Enter the IMAP server name
imap.gmail.com(or trymail.gmail.comin case of error). - Leave the default port (993) and SSL.
- Enter the IMAP server name
- Click on Confirm.
- Choose which email address to import emails to; the dropdown menu lists the email addresses currently attached to your Infomaniak Web Mail interface (online service ksuite.infomaniak.com/mail) of the Infomaniak account you are logged in to.
- After selecting the desired destination address from the list, click the blue Import emails button.
- The copy starts, you can wait and see the result on the page once the import is complete, or close the window (the import continues in the background - refer to this other guide from point 13 about import tracking).
- A confirmation email will be automatically sent to all email addresses concerned by the operation once the import is complete, mentioning the number of messages copied.
Adjust application settings
As soon as you take the necessary steps for the domain name associated with your email to work with Infomaniak, modify the settings of the email software/clients you use so that they connect correctly to the Infomaniak servers: follow the configuration assistant.
Labels and data volume
The storage space displayed at Infomaniak may not match the one indicated in Gmail, notably due to the different management of labels / tags. Indeed, those present in Gmail will be converted into folders on the Infomaniak servers (same principle as when fetching mail with an IMAP email software/client like Thunderbird):
Therefore, an email labeled in multiple Gmail folders may be counted multiple times during the migration, which explains why an account displaying, for example, 6 GB in Gmail can occupy 18 GB once transferred to the Infomaniak servers.
Be patient when importing a large volume of emails; Gmail and Microsoft imports are deliberately slowed down (example: 1 GB/day bandwidth for Google) to avoid rejections from their side.
Link to this FAQ:
Has this FAQ been helpful?
This guide explains what a Web host like Infomaniak is, and specifies its role, its scope of action, and the limits of its technical support.
Infomaniak, web host since 1996
According to Wikipedia, a Web host is a company that provides Internet hosting for computer systems to individuals or entities who do not wish to do so themselves.
Infomaniak, that’s also:
- … decades of experience in hosting and high-performance online solutions.
- … more than a million users in Switzerland and Europe trusting the management of their critical data.
- … a company certified ISO 27001, 9001, 14001, 50001 and committed to sustainable digital technology.
- … 100% of "Swiss made" technological expertise with data hosted in Switzerland in its own data centers.
- … a rich knowledge base and customer support available to guide you.
Responsibilities and limits of intervention
As a host, Infomaniak installs, secures, and keeps the server infrastructure up to date, evolves its management interfaces (Manager) and assists its customers in the optimal use of the tools provided. Infomaniak strives to offer solutions accessible to all; however, human support for free products is inherently limited to ensure the sustainability of these services.
For security and confidentiality reasons, no assistance will be provided without formal identification of the interlocutor.
Support is exclusively for Organization administrators. End customers or users benefiting from a contract via a Reseller Partner must contact their administrator or dedicated service provider first.
Scope of technical support
Technical assistance does not intervene for:
- Development and programming: debugging sites, correcting source code, personal scripts (PHP, JS, etc.)
- The use and integration of APIs.
- Application maintenance and webmastering: troubleshooting, updating, or managing content for third-party applications (e.g., CMS like WordPress, email clients like Outlook, etc.).
- Local and custom interventions: remote control, configuration of your own hardware, complex manual installations or migrations.
But support will be happy to assist you for:
- The infrastructure and the Manager: resolution of incidents related to the network, hardware, or Infomaniak management interfaces.
- The use of Infomaniak services: clarification of configuration processes and assistance in getting started with our native features.
- Documentation guidance: guiding you to the appropriate technical resources and guides to make you self-sufficient.
A Premium assistance and a migration service are available for more specific needs.
Find external help
For help with the content of your site, its programming, or the advanced organization of your mailboxes, use the Infomaniak tender platform which lists over 1000 verified professionals, or consult the directory.
Link to this FAQ:
Has this FAQ been helpful?
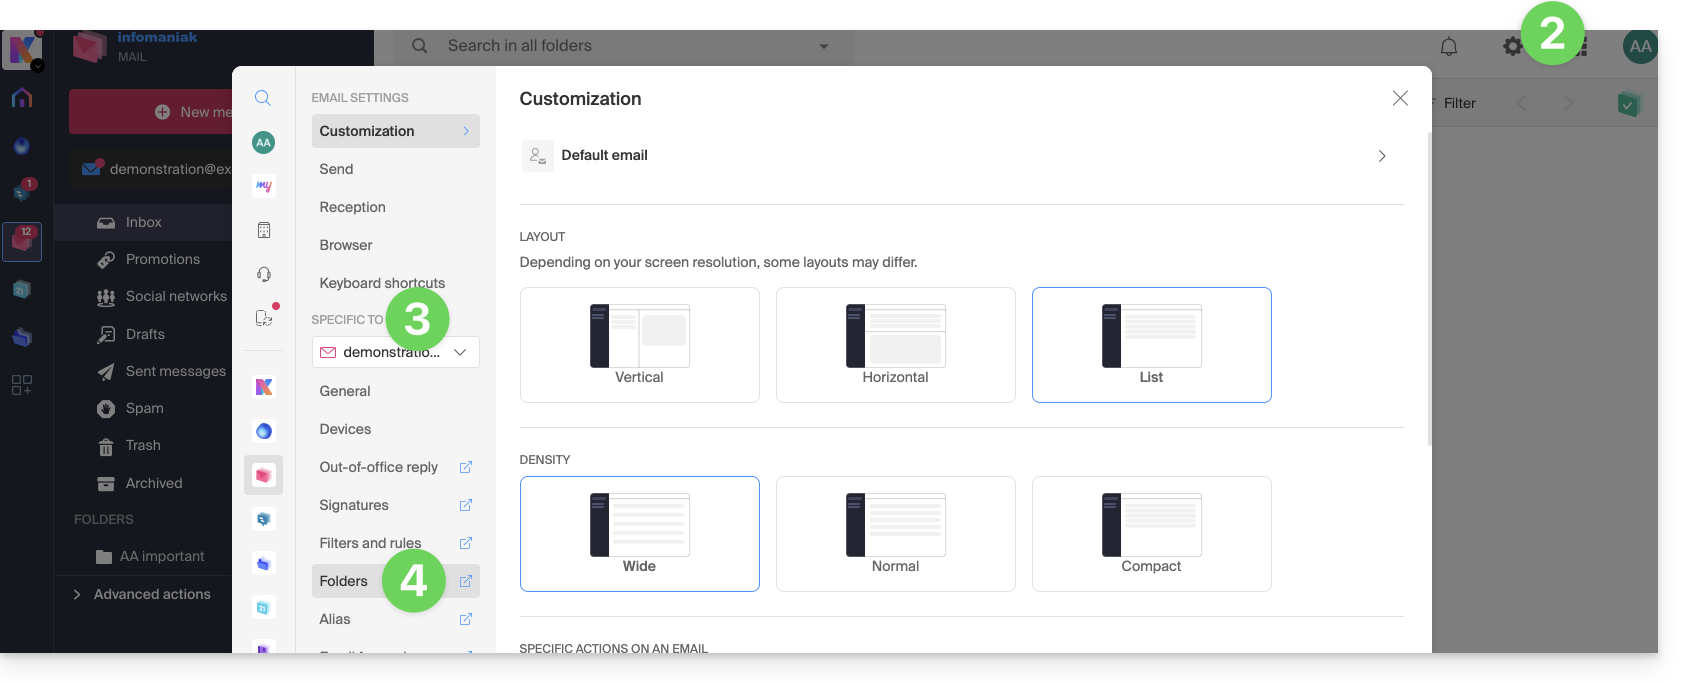
This guide explains how to change the location of certain folders automatically present in the directory of your Infomaniak email address.
Preamble
- The directory of a classic mailbox can contain certain special folders such as the one that stores emails…
- … once they have been sent (= "Sent messages" or "Sent").
- … for a few days before their definitive deletion (= "Trash" or "Bin").
- Everything is already configured so that by default it is synchronized between the different messaging interfaces around the globe.
- If you wish to make adjustments for various reasons, sometimes linguistic, then refer to the guide below to modify these special folders:
- drafts
- sent
- bin
- archives
- This allows, among other things, to customize the synchronization of these folders with IMAP clients such as Outlook, Mail iOS, Thunderbird, Spark, etc.
- Note that this does not change the storage duration limit of emails placed in some of these special folders.
Access from the Infomaniak Web Mail app
Prerequisites
- Have a valid access to the Web Mail Infomaniak app (online service ksuite.infomaniak.com/mail) to which the email address is attached.
- Have permission to modify special folders: it is possible that the Mail Service manager has removed this right from their admin account:
To modify these special folders:
- Click here to access the Web Mail Infomaniak app (online service ksuite.infomaniak.com/mail).
- Click on the Settings icon at the top right.
- Check or select the email address concerned in the dropdown menu of the left sidebar.
- Click on Folders:
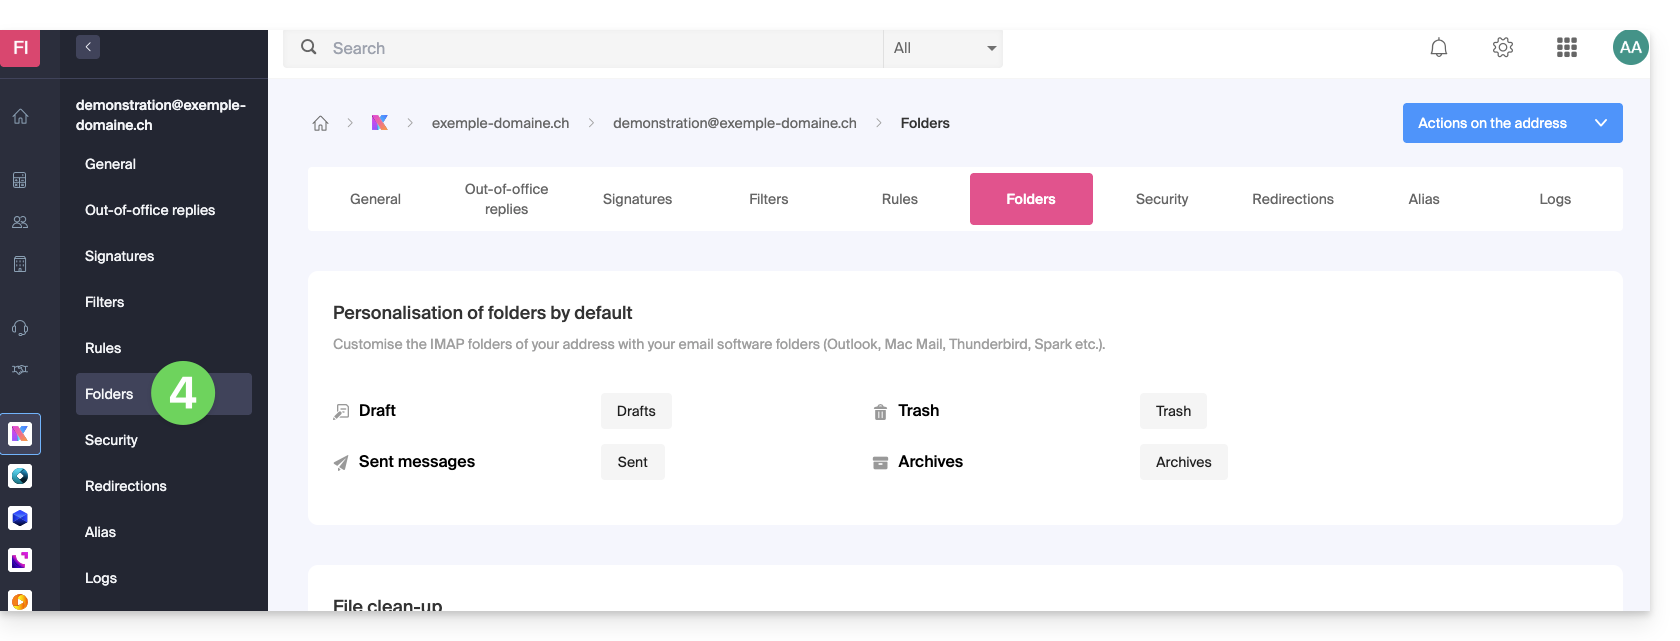
Access from the Mail Service
To access this option from a Mail Service:
- Click here to access the management of your product on the Infomaniak Manager (need help?).
- Click directly on the name assigned to the product concerned.
- Click on the email address concerned in the table that appears:
- Click on the tab/menu Folders:
Configure special folders
For security reasons, folder management is confidential and restricted to users added to the email address concerned.
Select the desired folders to store by default your drafts, archives, sent messages, and your trash by clicking on the area to the right of each item: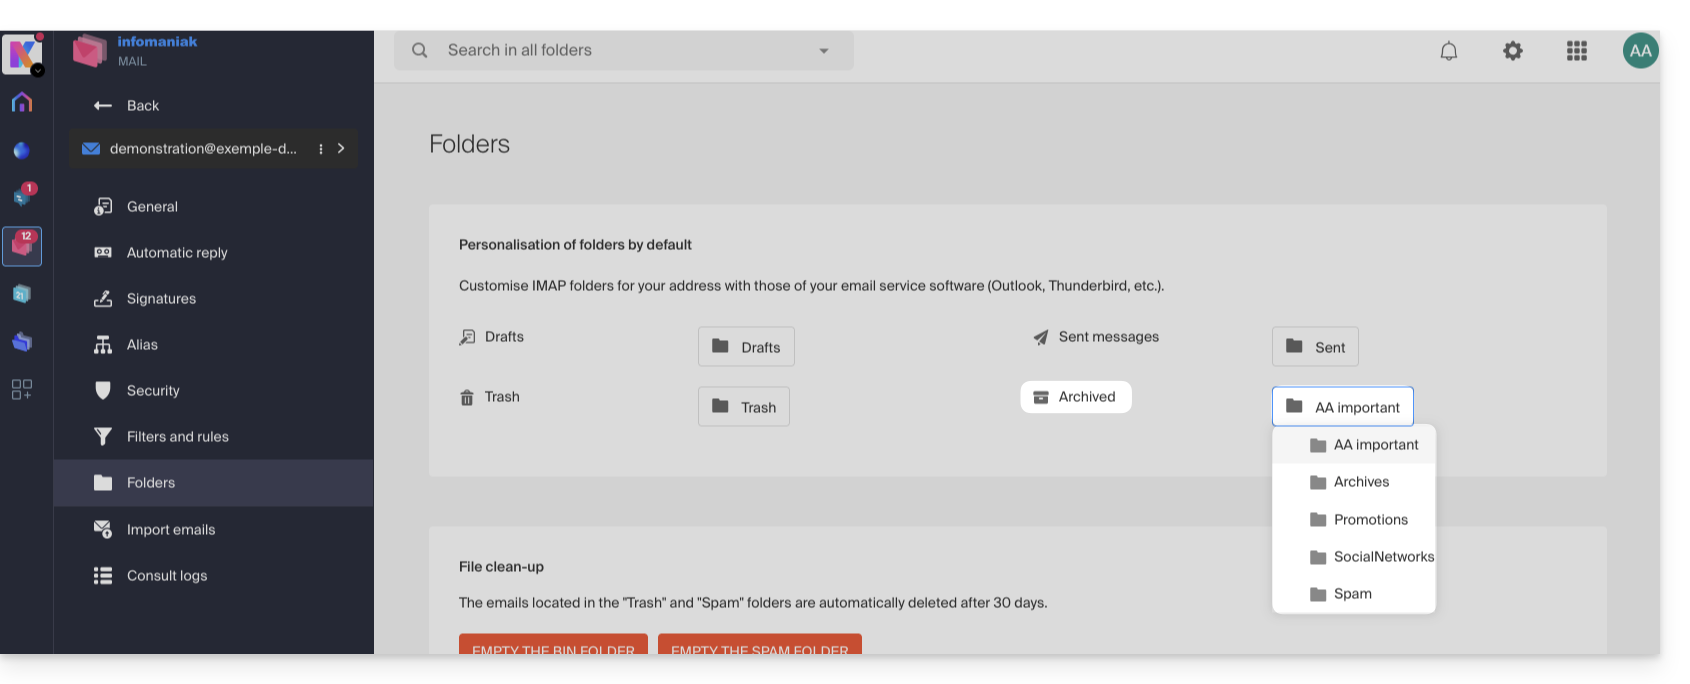
This will display the list of folders already present in the hierarchy of your mailbox.
- If necessary, create the desired folder in advance from Mail or an IMAP software:
To modify the default folders that receive spam and advertising messages & social network notifications you need to do it directly from the Spam Filter and Advertising Filter sections: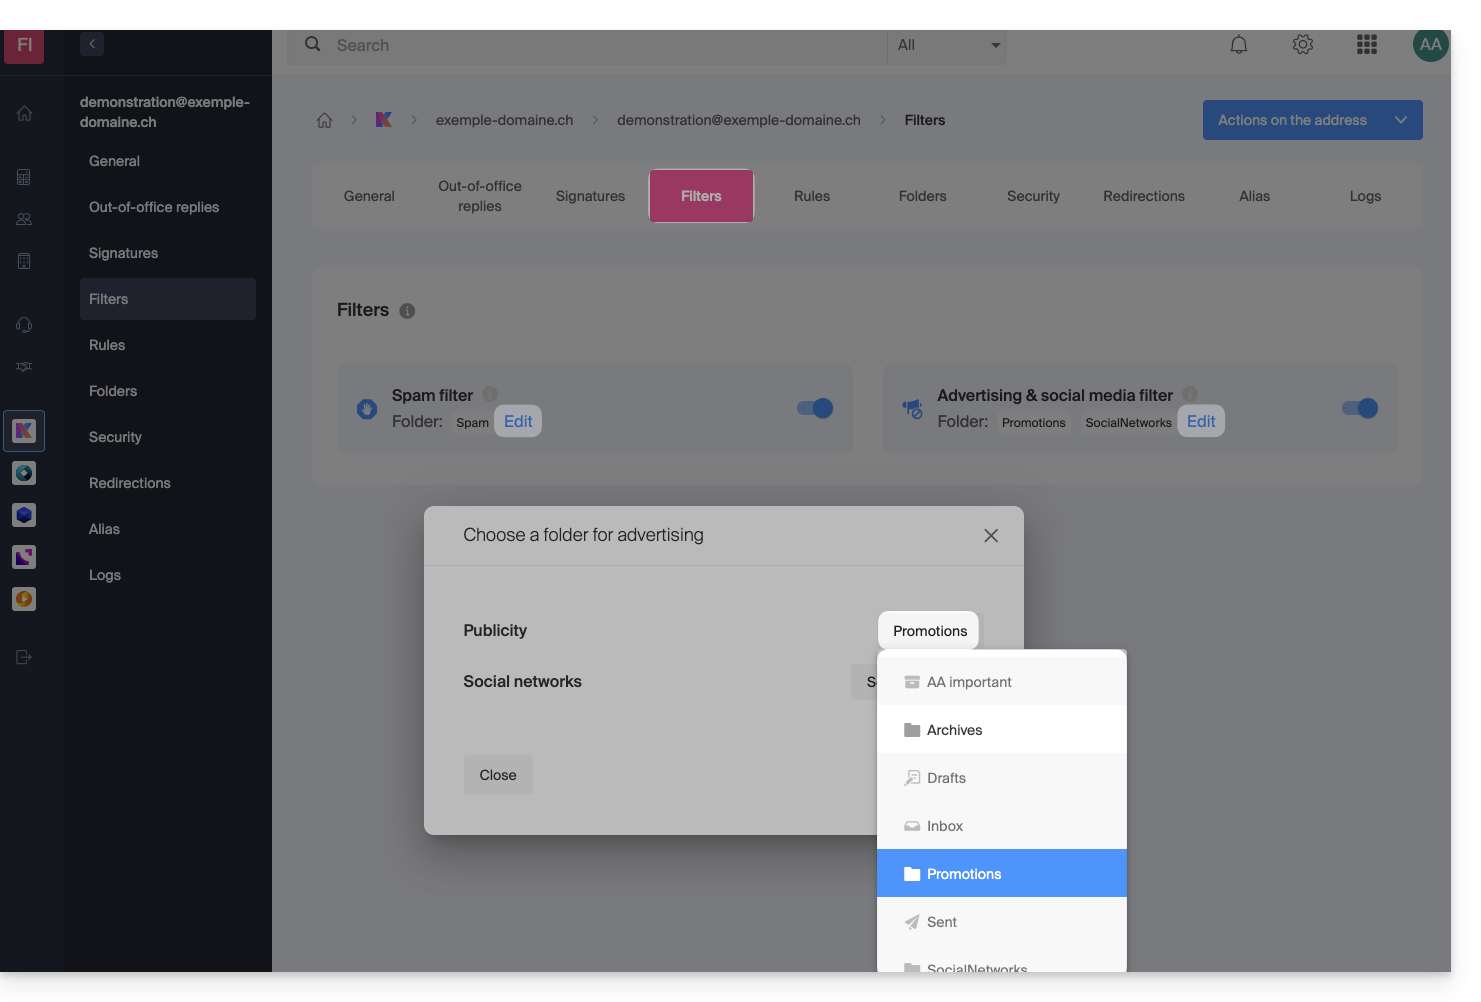
Alternative solutions for…
Some email software/clients also allow you to modify the location of special folders. Refer to the official documentation of your application if needed. The following links are provided for information:
… Mozilla Thunderbird
Refer to this other guide if you are looking for information on assigning specific folders (such as Trash, Drafts, Sent Messages) to the IMAP account and synchronizing them with Infomaniak.
… Microsoft Outlook 2013
Refer to this other guide if you are looking for information on how the use of the IMAP protocol in the application can lead to a configuration where messages are stored only locally and not synchronized with the server, which contradicts the main goal of IMAP to maintain consistency across devices.
… Microsoft Outlook 2021
Refer to this other guide if you are looking for information on how to save sent emails in the “Sent” folder rather than “Sent Items” in the application.
… Apple iOS
Refer to this other guide if you are looking for information on how to configure the sent, draft, and deleted mail folders on an iPhone to synchronize with the mail server by accessing the advanced settings of the Mail app and selecting the corresponding folders on the IMAP server.
Link to this FAQ:
Has this FAQ been helpful?
This guide explains how to create an alias, that is, a variant of your usual email address without having to add a new address to your existing Mail Service.
✘ UNAVAILABLE with
my kSuite / my kSuite+ (ik.me, etik.com, ikmail.com)
Number of possible aliases per email address:
| kSuite | free | 1 |
| Standard | 50 | |
| Business | 50 | |
| Enterprise | 50 | |
| Mail Service | Starter 1 max. address | 1 |
| Premium 5 min. addresses | 50 |
How an alias works
It is possible to create alternative versions of your email addresses by modifying what comes before the @ symbol.
For example:
john-peter.smith@domain.xyz is a long email address…
It can be shortened and used as follows:
jps@domain.xyz
In this example, you must therefore create an alias "jps" on the address "john-peter.smith".
Then if someone writes to jps@domain.xyz:
- their message will arrive in the inbox of the main address (
john-peter.smith@domain.xyz).
If someone writes to john-peter.smith@domain.xyz AND jps@domain.xyz in copy (CC):
their message will arrive twice in the inbox of the main address (john-peter.smith@domain.xyz).
An alternative feature is presented here. To modify what comes after the @ symbol, use alias domains.
Users of the email address on the Infomaniak Mail Web app receive an email each time an alias is added/removed.
Adding an alias from the Infomaniak Web Mail app
Prerequisites
Having permission to manage aliases: it is possible that the Service Mail manager hasremoved this right from their admin account.
Next, to add an alias:
Click hereto access the Infomaniak Web app Mail (online serviceksuite.infomaniak.com/mail).Click on the Settings icon in the top right corner.Check or select the email address concerned in the dropdown menu of the left sidebar.Click on Aliases:
Click on Add an alias to create a variant of your email address.Enter the desired alias (what comes before the at sign @).Click on Add: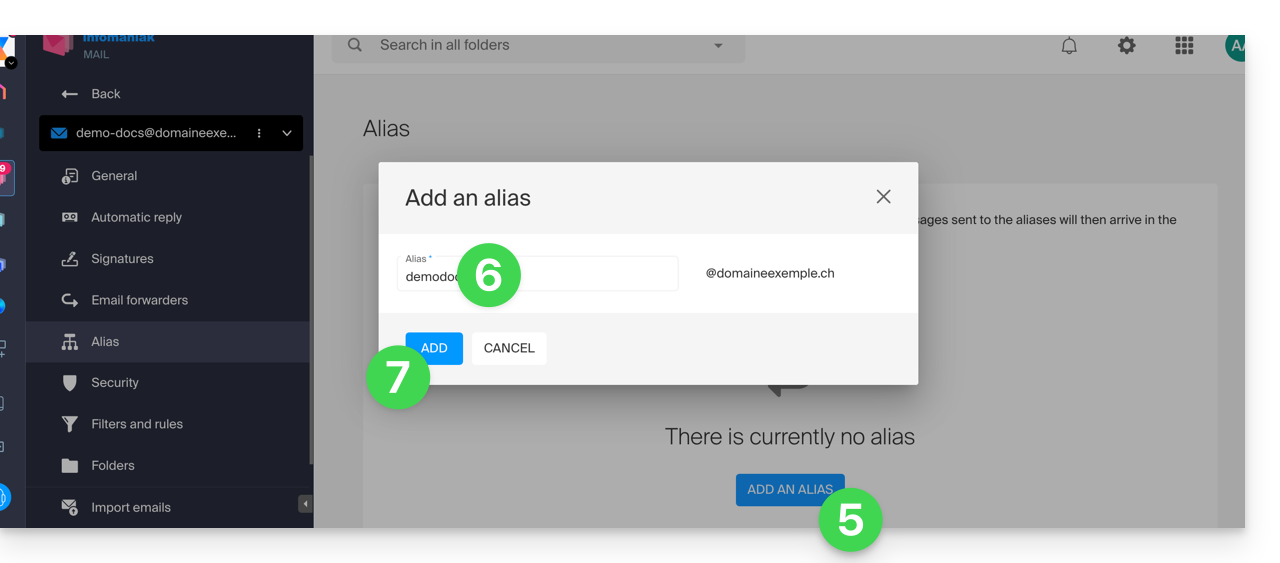
Add an alias from the Service Mail
To access the Service Mail:
Click hereto access the management of your product on the Infomaniak Manager (need help?).Click directly on the name assigned to the product concerned.Click on the email address concerned in the table that appears.Click on the Aliases tab or from the left sidebar on Aliases.Click on the blue Add an alias button.Enter the desired alias (what comes before the at sign @):Click on Apply to save the changes: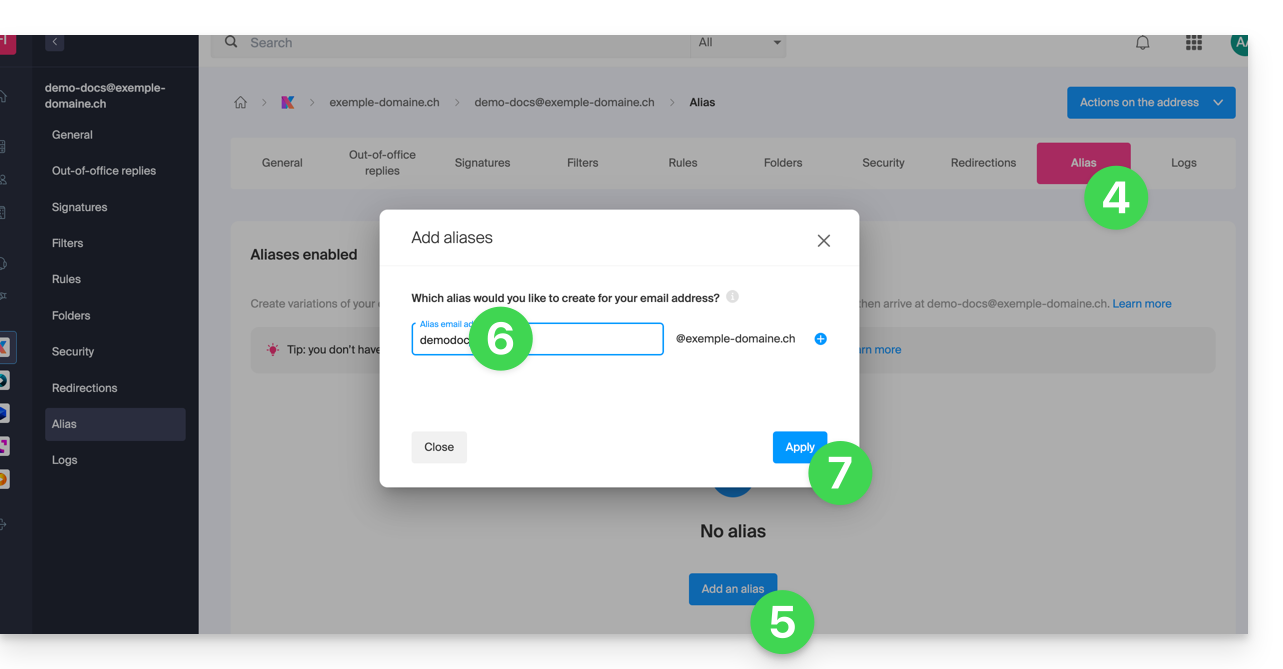
Link to this FAQ:
Has this FAQ been helpful?
This guide explains how to…
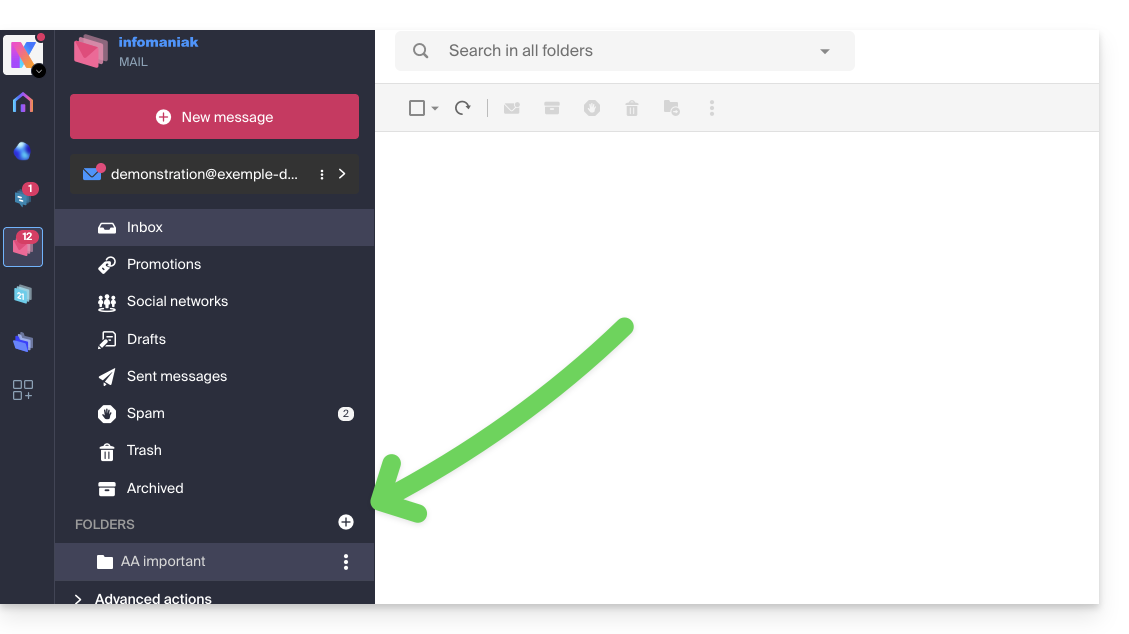
- … enable filtering of incoming emails
- … automatically classify promotional messages
- … report certain fraudulent messages
… in order to reduce unwanted or too many messages on an email address managed by Infomaniak.
Solutions to exclude, sort, filter incoming emails
Automatic filtering methods
- Refer to this guide to use the <Spam> folder by activating the spam filter (it is possible to deactivate it).
- Refer to this other guide to use the <Promotions> and <Social Networks> folders by activating the advertising & social networks filter.
Manual methods
- Refer to this guide to report an incoming message not detected as spam (advertising / unsolicited contact).
- Refer to this guide to report an incoming message not detected as phishing (fraud / misleading fake email).
- Refer to this guide to block or allow specific email addresses or even entire domains.
- Refer to this guide to define your own sorting and classification filters ('Sieve language') for incoming emails…
- … which will allow you, among other things, to filter messages addressed to a temporary alias that you can create to protect yourself when registering on the Internet, for example.
If you are facing a wave of spam or unusual messages, refer to this other guide to perform some checks.
If your own emails are often incorrectly classified as spam, refer to this other guide to perform some checks.
To sort and clean an inbox that has been flooded with messages, refer to this other guide.
Link to this FAQ:
Has this FAQ been helpful?
This guide explains how to connect the desktop app Outlook 2016 (desktop application on Windows) to an email address hosted by Infomaniak.
Preamble
- The various services offered by Infomaniak are all compatible with the corresponding standard protocols (IMAP/SMTP for email, for example), therefore if you encounter a problem with third-party software, contact its publisher or a Partner and consult the support policy as well as article 11.9 of the Infomaniak Terms of Service.
Add the email address to the application
Prerequisites
- Create the email address in my kSuite or a Mail Service / kSuite.
- Create a password for the email address on the device you are going to configure.
- Check that the Mail Service is configured optimally.
To configure the email application:
- Open the application.
- Click on the File menu:
- Click on Account settings.
- Click on Add or remove accounts:
- Click on New:
- Enter the email address to connect.
- Click on Advanced options.
- Click on Manual configuration.
- Click on the blue Connect button:
- Click on IMAP:
- Enter the password for the email address to connect.
- Click on the blue Connect button:
- Uncheck the additional mobile device configuration box if necessary.
- Click on the blue Finish button:
- Click on Repair to correct some automatically added but incorrect information:
- Click on Advanced options.
- Click on Manual Repair.
- Click on the blue Repair button:
- Check and complete the missing or incorrect information.
- Click on Outgoing Server:
- Check and complete the missing.
- Click on Next.
- Click on Finish:
- Click on Close:
- Your email address is now correctly configured in the application:
Recommended settings
- Incoming IMAP server =
mail.infomaniak.com - IMAP port =
993(with SSL) - Outgoing SMTP server =
mail.infomaniak.com - SMTP port & encryption protocol and command/method to activate this protocol:
587+ STARTTLS - Username = the complete & full email address ( ? )
- Password = the one generated for the email address you want to view
- Authentication required for sending emails:
- It is activated in the SMTP settings of your application.
- Check "use the same parameters as the incoming server" or, depending on the software/email clients, enter a username (= complete & full email address) and the generated password.
Refer to this other guide if you are looking for information about other messaging ports and protocols compatible (SSL / TLS for example).
In case of problem
Check that the Mail Service is configured optimally.
It is not necessary to contact Infomaniak Support if your email address works well outside the application. The most common error concerns the use of an incorrect password. The troubleshooting guides help you resolve any potential issues:
- Refer to the solutions given in this other guide regarding email in general.
- This other guide is more specifically about Outlook.
… and if your Outlook no longer works since a change of email password, refer to this other guide.
Link to this FAQ:
Has this FAQ been helpful?
This guide explains how to connect the desktop app Microsoft Outlook for Mac version 16.80 (desktop application on macOS) to an email address hosted by Infomaniak.
Preamble
- Instead of the manual configuration for Outlook below, it is recommended to use Apple Mail with the .mobileconfig configuration profiles offered by Apple.
- The various services offered by Infomaniak are all compatible with the corresponding standard protocols (IMAP/SMTP for email, for example). Therefore, if you encounter a problem with third-party software, contact its publisher or a Partner and consult the support policy as well as article 11.9 of the Infomaniak Terms of Service.
Add the email address to the application
Prerequisites
- Create the email address in my kSuite or a Mail Service / kSuite.
- Create a password for the email address for the device you are going to configure.
- Check that the Mail Service is configured optimally.
To configure the email application:
- Open the application.
- Click on Add an account:
- Enter the email address to be linked.
- Click on Continue:
- Click on IMAP:
- Click on Synchronize via IMAP (without Microsoft Cloud):
- Check and complete the missing information.
- Click on Add the account.
- Understand and go through the different Microsoft information windows:
- Your email address is now configured in the application:
Recommended settings
- Incoming IMAP server =
mail.infomaniak.com - IMAP port =
993(with SSL) - Outgoing SMTP server =
mail.infomaniak.com - SMTP port & encryption protocol and command/method to activate this protocol:
587+ STARTTLS - Username = full & complete email address ( ? )
- Password = the one generated for the email address you want to access
- Authentication required for sending emails:
- It is activated in the SMTP settings of your application.
- Check "use the same parameters as the incoming server" or, depending on the software/email clients, enter a username (= full & complete email address) and the generated password.
Refer to this other guide if you are looking for information about other compatible messaging ports and protocols (SSL / TLS for example).
In case of a problem
Check that the Mail Service is configured optimally.
There is no need to contact Infomaniak Support if your email address works well outside the application. The most common error concerns the use of an incorrect password. The troubleshooting guides help you resolve any potential issues:
- Refer to the solutions given in this other guide regarding email in general.
- This other guide is more specifically about Outlook.
… and if your Outlook no longer works since a change in your email password, refer to this other guide.
Link to this FAQ:
Has this FAQ been helpful?
This guide explains how to cancel the sending of an email from the Infomaniak Web app Mail (online service ksuite.infomaniak.com/mail).
Preamble
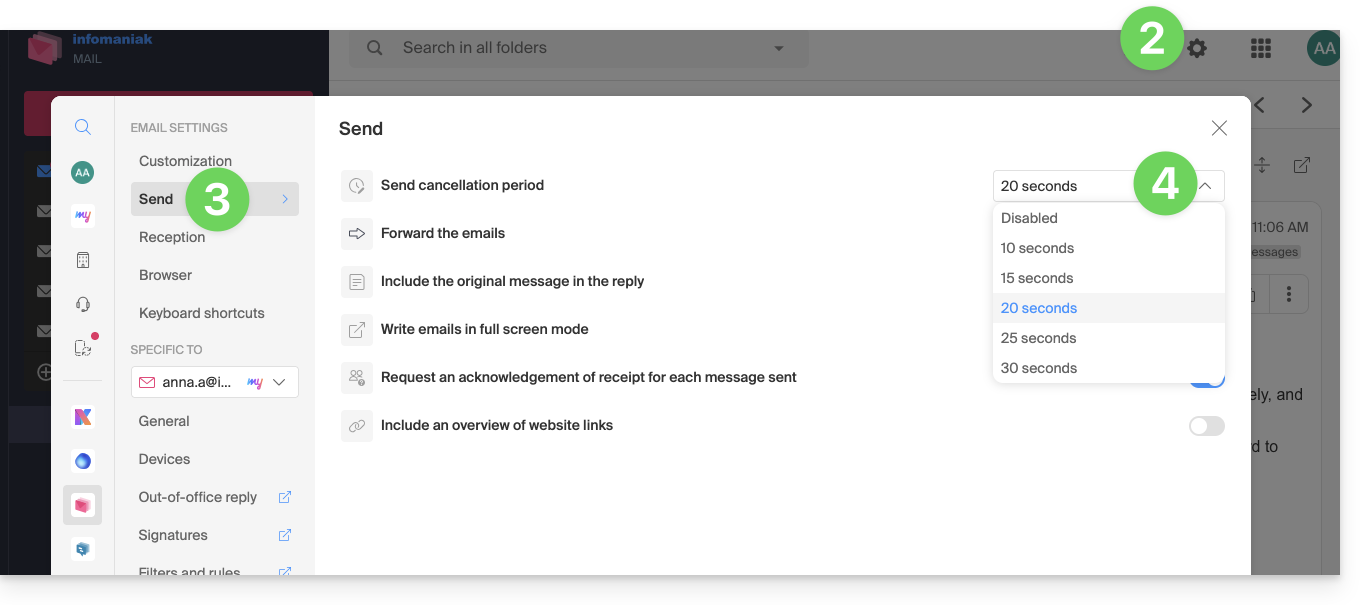
- By default, you have 15 seconds to cancel the sending of an email.
- If necessary, it is possible to disable this feature or increase the sending delay up to 30 seconds.
- This feature applies to all email addresses present in your Mail interface.
Configure the cancellation delay
To do this:
- Click here to access the Infomaniak Web app Mail (online service ksuite.infomaniak.com/mail).
- Click on the Settings icon at the top right of the interface.
- Click on Sending in the secondary sidebar menu.
- Set the cancellation delay (0, 10, 15, 20, 25, 30 seconds) for sending according to your preferences:
Cancel the current sending
When you click on the send button of your message written in Mail, you will be able to cancel your sending within the allotted time from the send notification that appears in the center at the bottom of your screen, by clicking on the CANCEL button: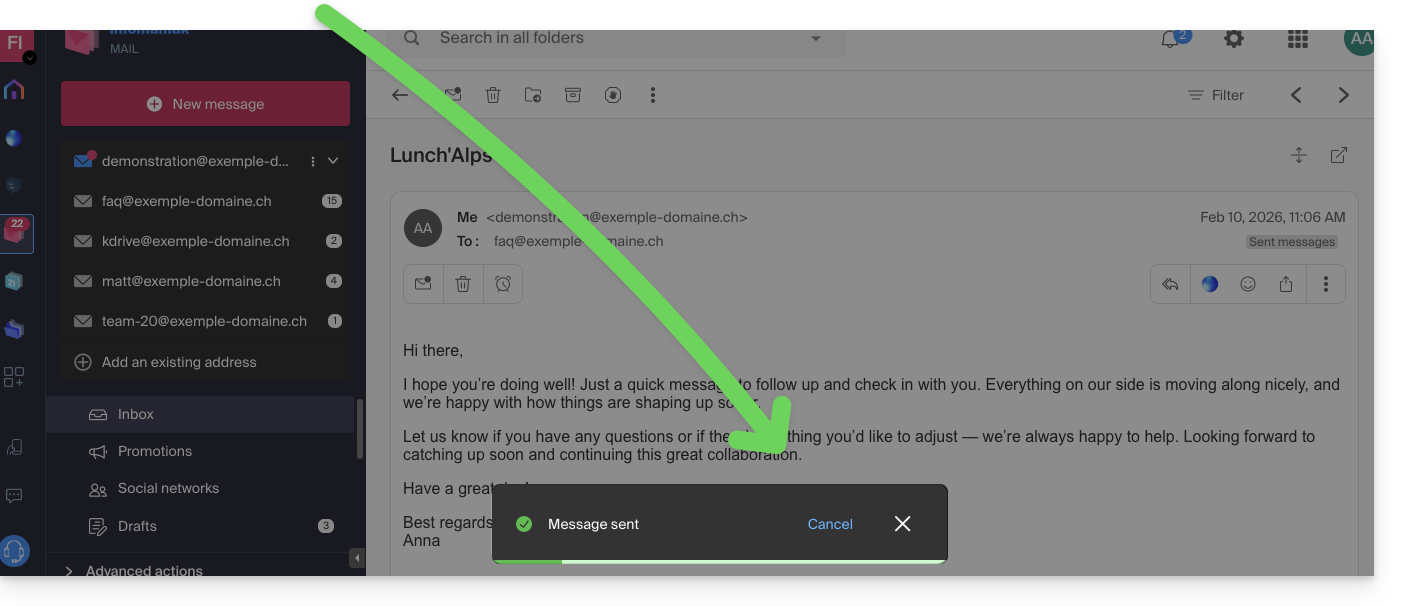
The message in progress will return to the stage of message in progress and you will be able to resend it if necessary or delete the draft.
Link to this FAQ:
Has this FAQ been helpful?
This guide explains how to view and modify the login ID for your user account on the Manager, the management interface and dashboard for your Infomaniak products. This same ID also allows you to log in to Mail Infomaniak and various iOS/Android applications such as kDrive, Infomaniak Mail, etc.
Preamble
- To manage the details of your Infomaniak account, refer to this other guide.
- To modify the phone number, refer to this other guide.
- To manage the details of the Organization to which you belong, refer to this other guide.
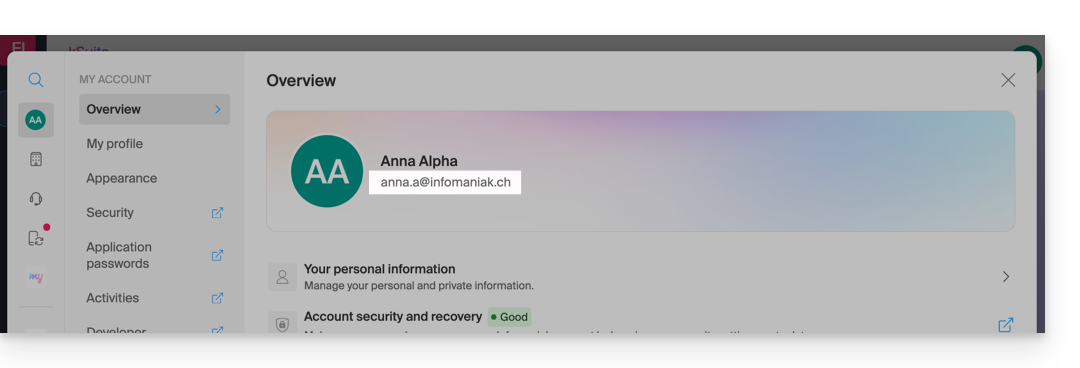
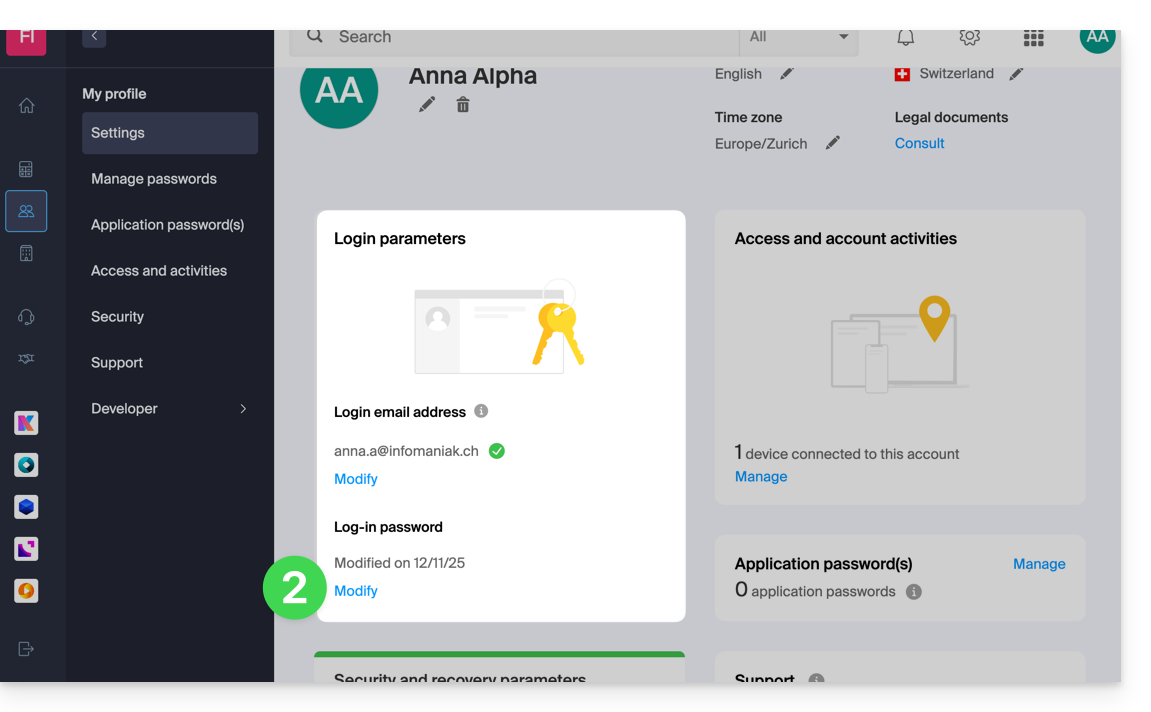
View the currently connected ID
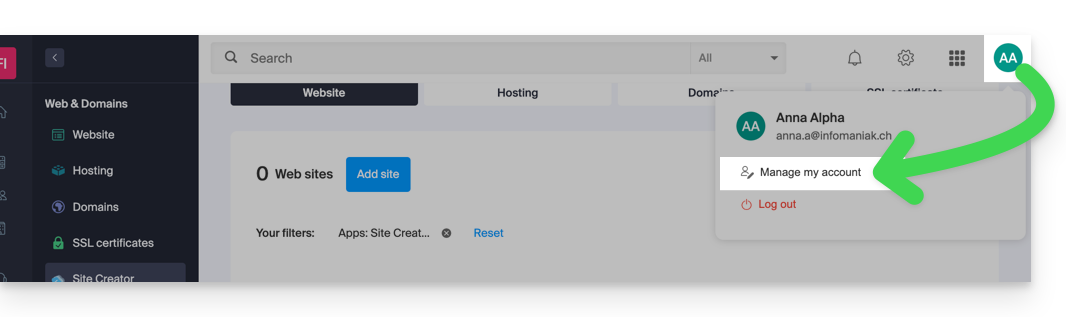
The email address used for the current connection is displayed on your user menu + on the profile page:
- Click on the badge with your initials/avatar in the top right of the Manager Infomaniak to note the current login ID:
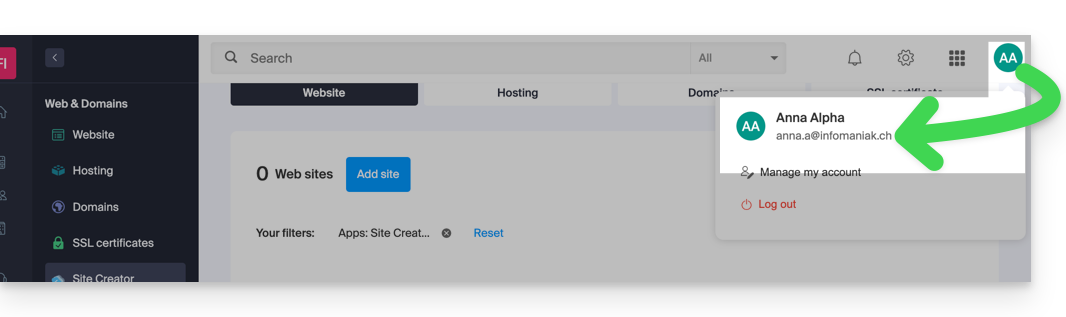
- Click on Manage my account just below to access the management of your profile on the Infomaniak Manager.
- Your current login ID is also displayed on the page reached:
Modify the ID (login email)
Prerequisites
- The access ID is an email address that must exist and that you must be able to access.
- The new email address must be different from the recovery email address.
- The new email address must not already be used as a login ID on another user account (otherwise, you need to consider inviting it to the Organization first to give it all the rights and then be able to remove the old account with the old ID).
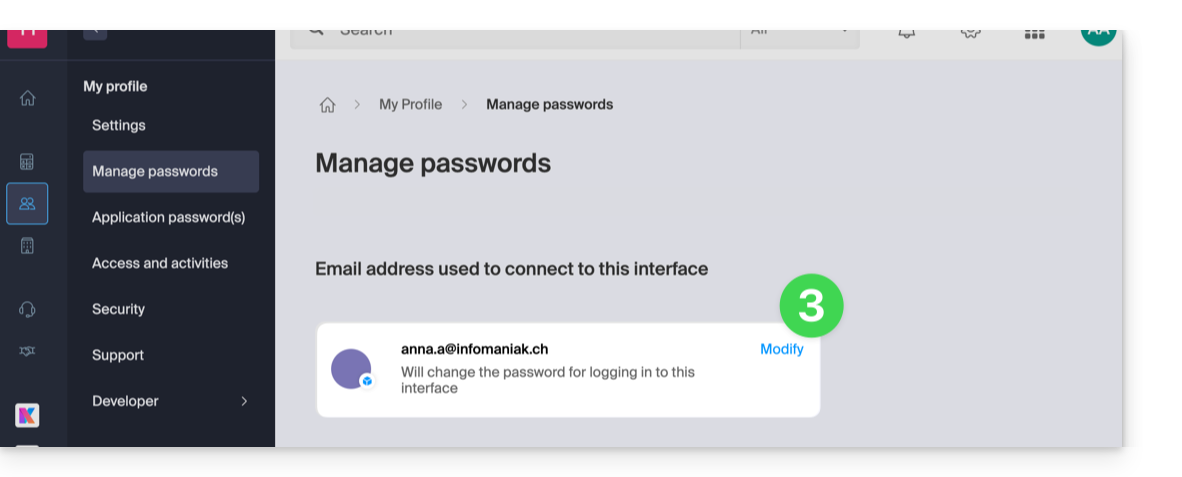
To modify the ID of your Infomaniak account:
- Click here (or on the badge with your initials/avatar in the top right of the Infomaniak Manager) to "Manage my account":
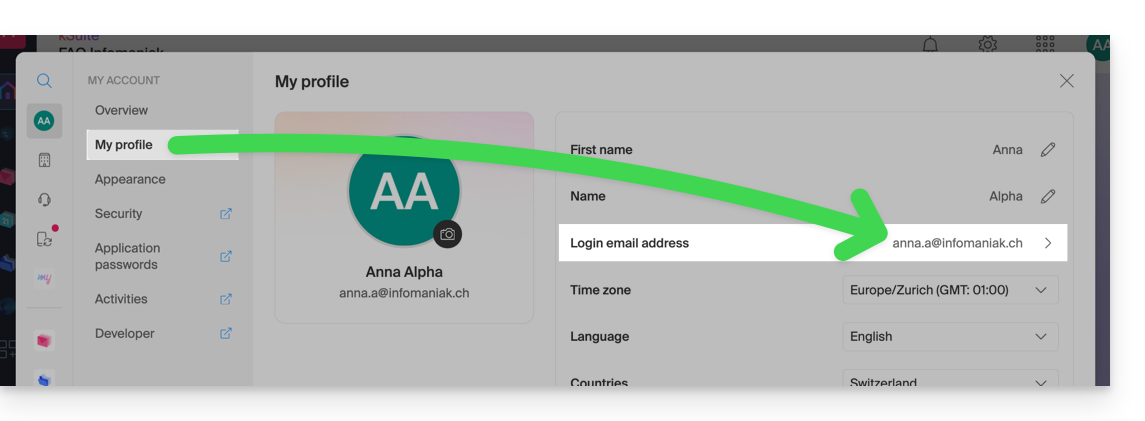
- From the My Profile menu, click on your login email address:
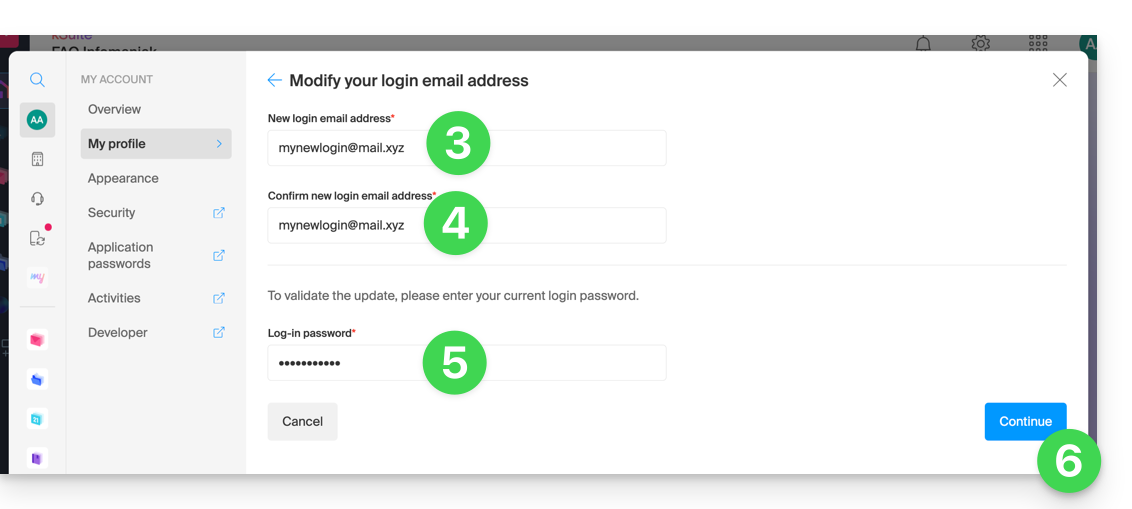
- Enter a new login email address.
- Confirm your new address by specifying it a second time.
- Enter the password to log in to your Infomaniak account.
- Click on Continue:
Link to this FAQ:
Has this FAQ been helpful?
This guide explains how to add or modify one or more SPF records in a DNS zone (of a domain name) managed on the Infomaniak Manager.
Preamble
- If your domain name is registered with Infomaniak, your email is managed by Infomaniak, but your website is hosted with another provider (e.g., Wix), you are probably managing the DNS zone (and therefore the SPF) with this other provider: refer to this other guide on this topic.
Understanding SPF records
The SPF (Sender Policy Framework) record type is a standard for verifying the domain name of the sender of an email and aims to reduce SPAM. It is used to indicate which server is authorized or not to send emails for a domain. If the SPF fails for an email, it means that the email was not sent from a server/IP address authorized by the administrator of the sending domain. The email is then considered as spam.
Strict SPF -all: rejection of unauthorized emails
Infomaniak automatically installs this type of record when creating a Mail Service on your domain (strict SPF):
v=spf1 include:spf.infomaniak.ch -allThus, the recipient server of the email you send will evaluate that any email not coming from Infomaniak servers will be rejected. This prevents malicious individuals from impersonating email addresses from your domain.
Flexible SPF ?all: tolerance for certain emails
You can decide to modify the SPF for a more flexible model:
v=spf1 include:spf.infomaniak.ch ?allIn this case, the recipient server of the email you send will evaluate, according to its own rules, whether it accepts emails not coming from Infomaniak servers.
In summary:
?: the receiving server accepts the message even if the sender is not listed in the SPF~: the receiving server generally accepts the message if it is not listed in the SPF but identifies it as suspicious-: the receiving server rejects the message if it is not listed in the SPF (recommended)
Adding an SPF via a TXT record
There are 2 ways to manage SPFs.
If you have a Mail Service with Infomaniak, the simplest way is to go to the Global Security tool to manage SPFs: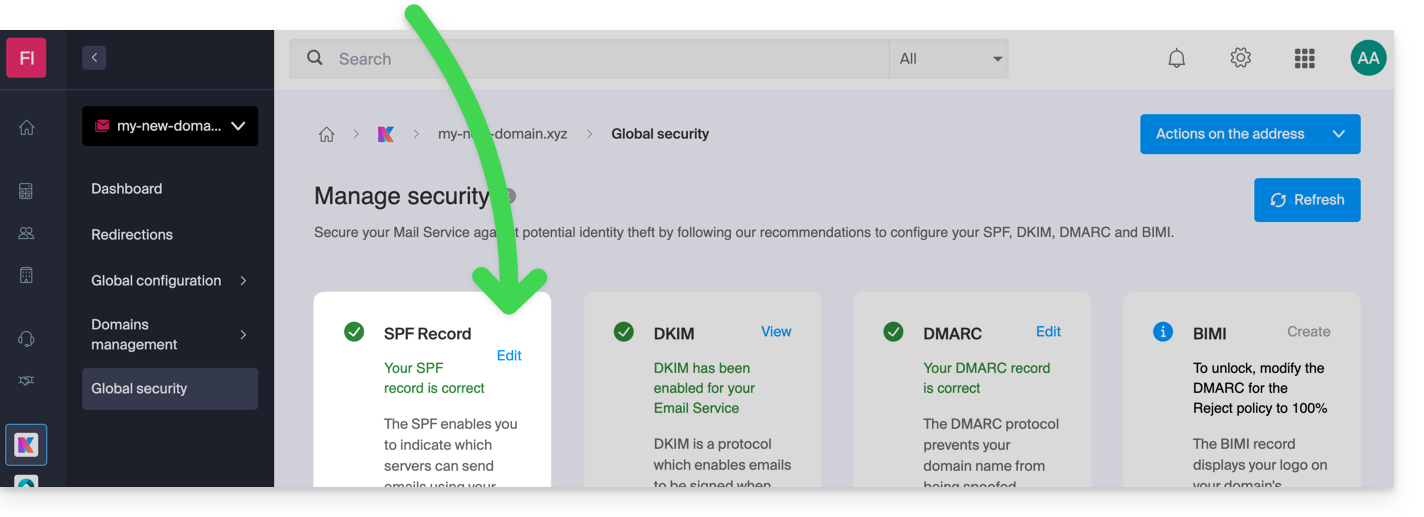
However, since the SPF record is a TXT type DNS record, you can also manage it from the DNS zone of the domain name:
- Click here to access the management of your domain on the Infomaniak Manager (need help?).
- Click directly on the name assigned to the domain in question.
- Click on DNS Zone in the left sidebar menu.
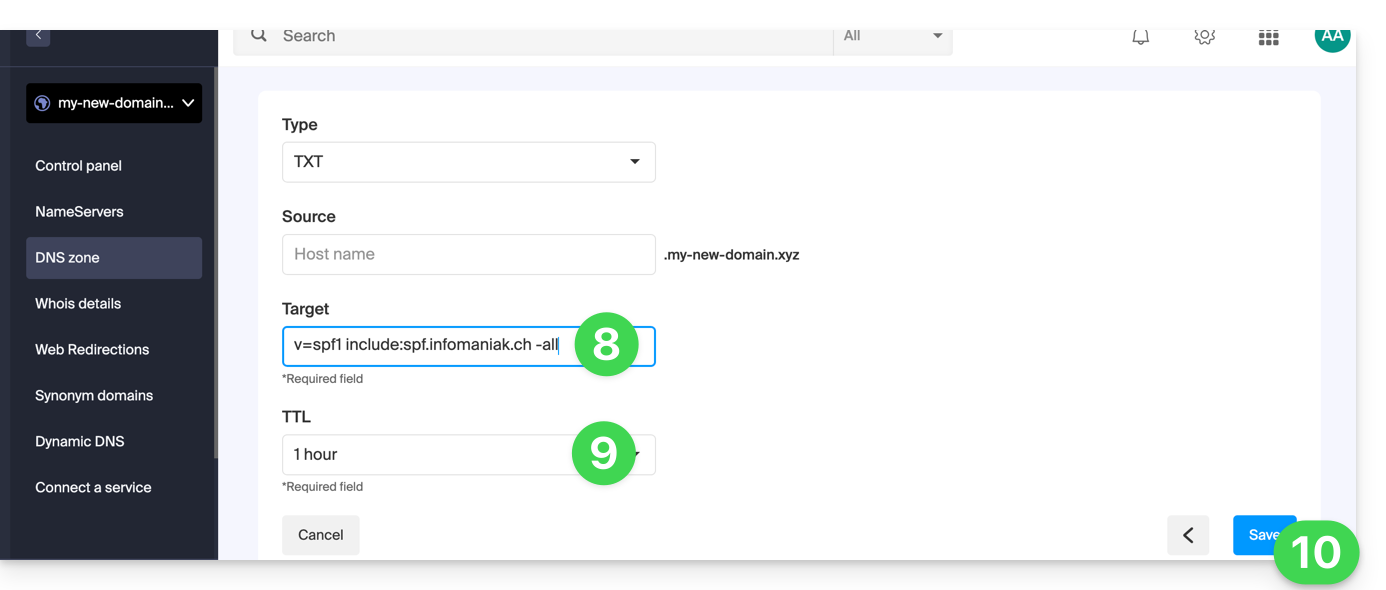
- Check in the table that there is not already a TXT record with a value mentioning SPF as here:
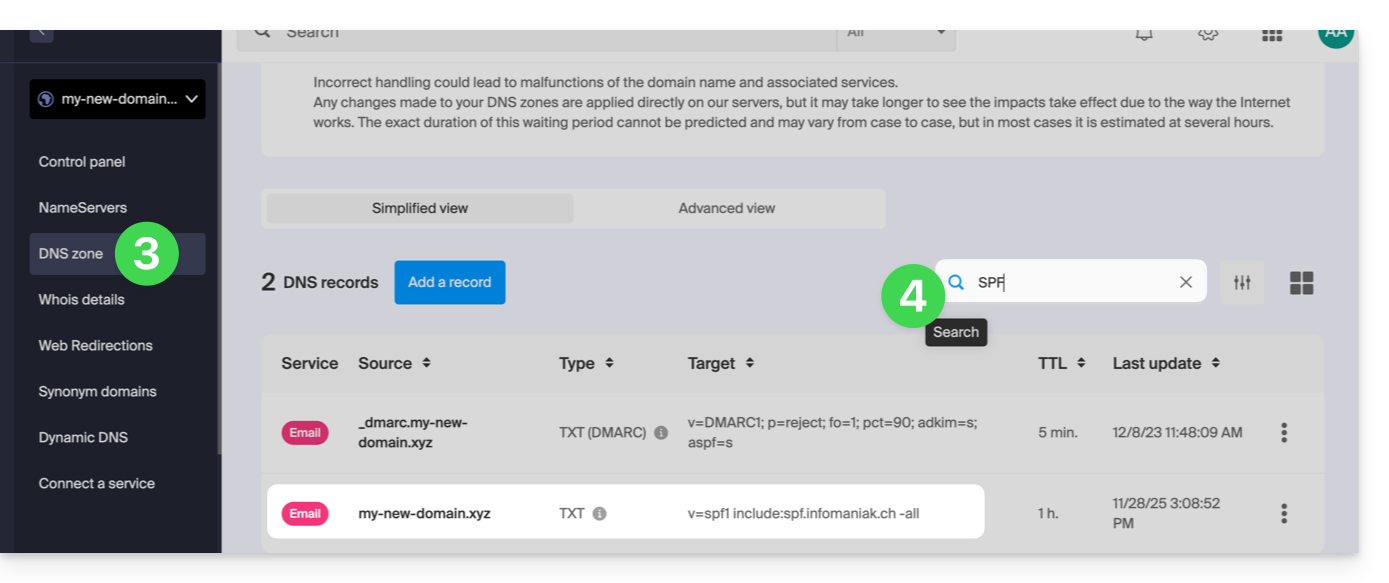
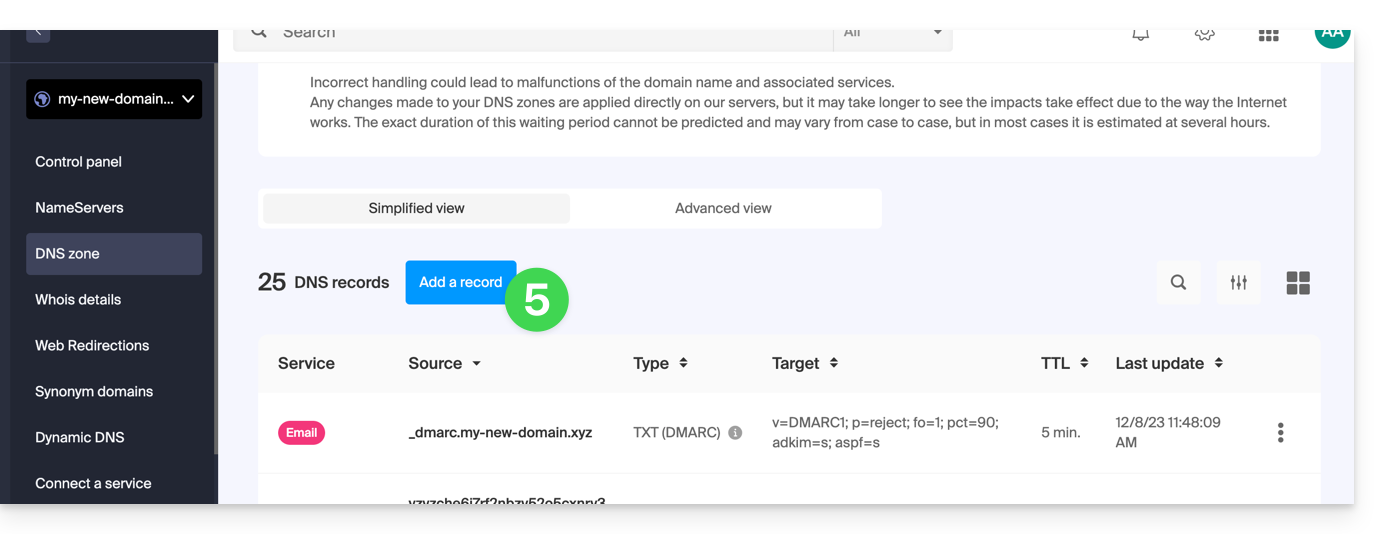
- Click the button to add a record (you will get an error if you try to add a TXT record with an SPF value when one already exists in the zone):
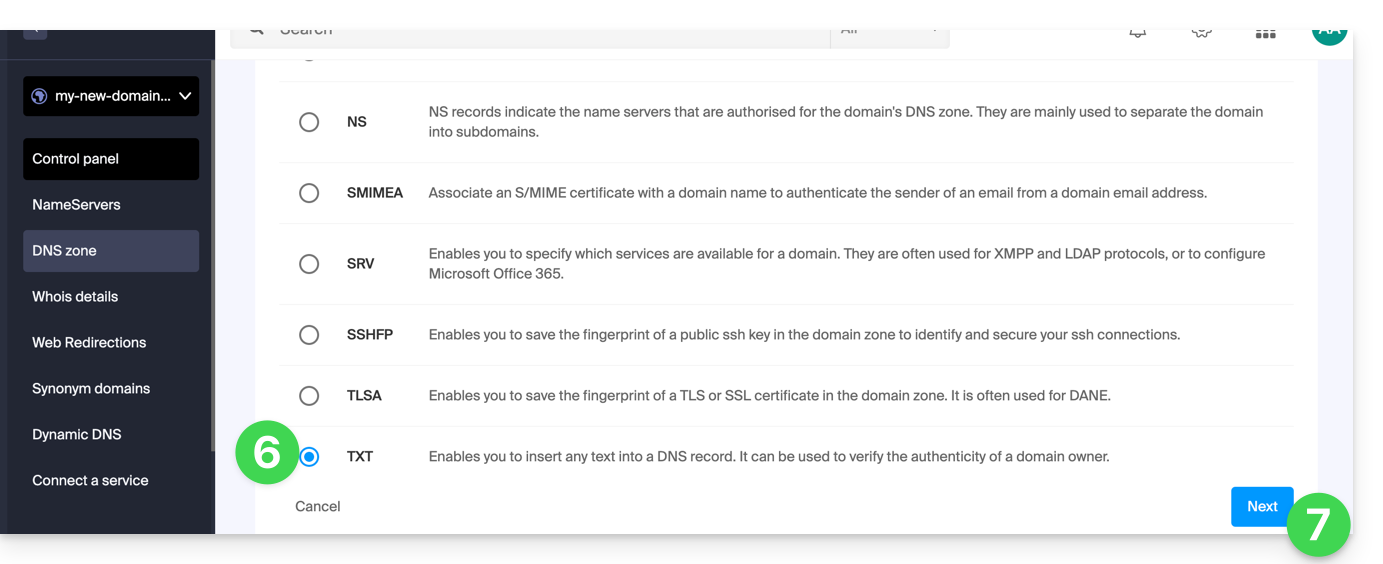
- Click the radio button TXT to add a record.
- Click the button Next:
- Enter the SPF value required for your DNS zone.
- Leave the default value for TTL.
- Click the button Save:
Add multiple SPFs
If you use other mail providers in addition to Infomaniak, you need to obtain their SPF and then merge it with Infomaniak's according to a specific syntax.
Having multiple distinct SPF records will cause errors. It is essential to group multiple SPFs into the same TXT!
Example of 3 SPFs to merge:
- That of Infomaniak:
v=spf1 include:spf.infomaniak.ch -all - Those of 2 secondary providers:
v=spf1 include:the-second-domain.xyz ?allv=spf1 include:the-other-domain.xyz ~all
...the final SPF to be inserted into your DNS zone should be in the form:
v=spf1 include:spf.infomaniak.ch include:the-second-domain.xyz include:the-other-domain.xyz -allDelete any other SPF entry from the DNS zone of your domain! Any DNS addition/modification can take up to 48 hours to propagate.
Limits on the number of SPFs
Multiple SPFs are limited to a maximum of 10 inclusions.
The Infomaniak SPF usually already includes 4 inclusions:
include:relay.mail.infomaniak.chinclude:app.mail.infomaniak.chinclude:newsletter.infomaniak.cominclude:amazonses.com
Check the SPF record(s)
The Global Security tool on the Infomaniak Manager allows you to easily check and correct any problematic records you may have.
If you encounter any issues, it is recommended to analyze your domain name on MxToolbox to check if your SPF contains syntax errors, too many inclusions, or any other issues that could lead to an error: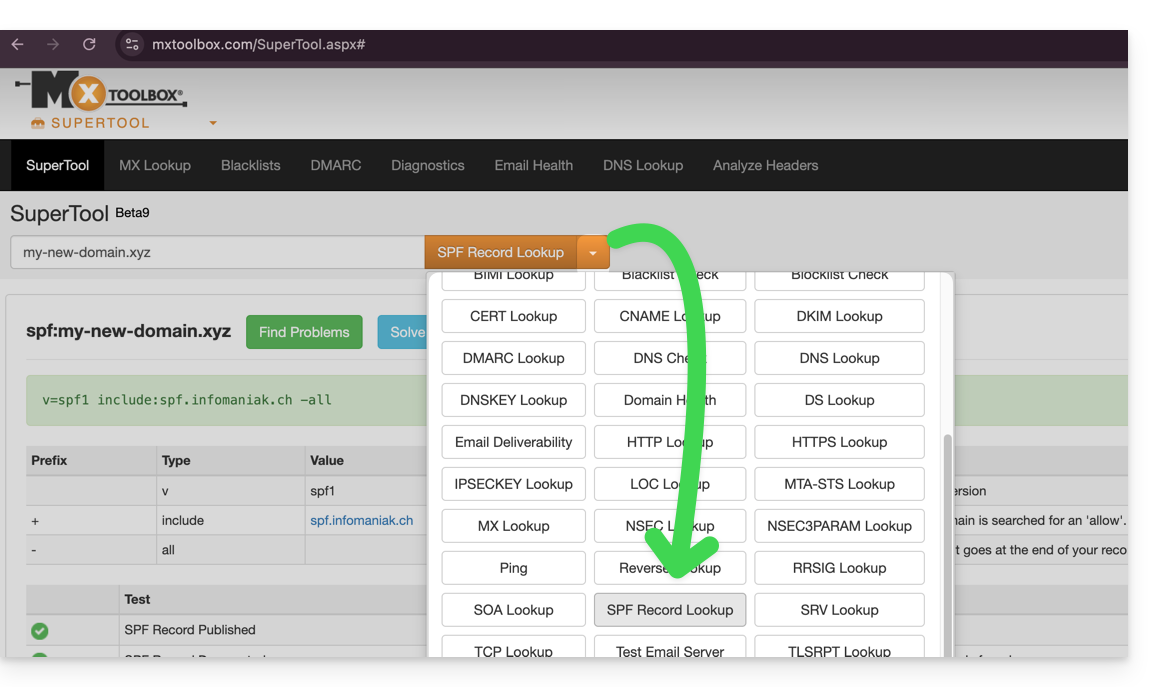
… or directly at the address https://mxtoolbox.com/spf.aspx.
Link to this FAQ:
Has this FAQ been helpful?
This guide explains how to import your email archives in .mbox format to an Infomaniak mail address, an ideal procedure when changing hosts or to restore old messages.
Prerequisites
- Have a valid and functional email address with Infomaniak.
- Have an archive of your previous email in
.mboxformat. - Have installed the software and configured your address on it in IMAP.
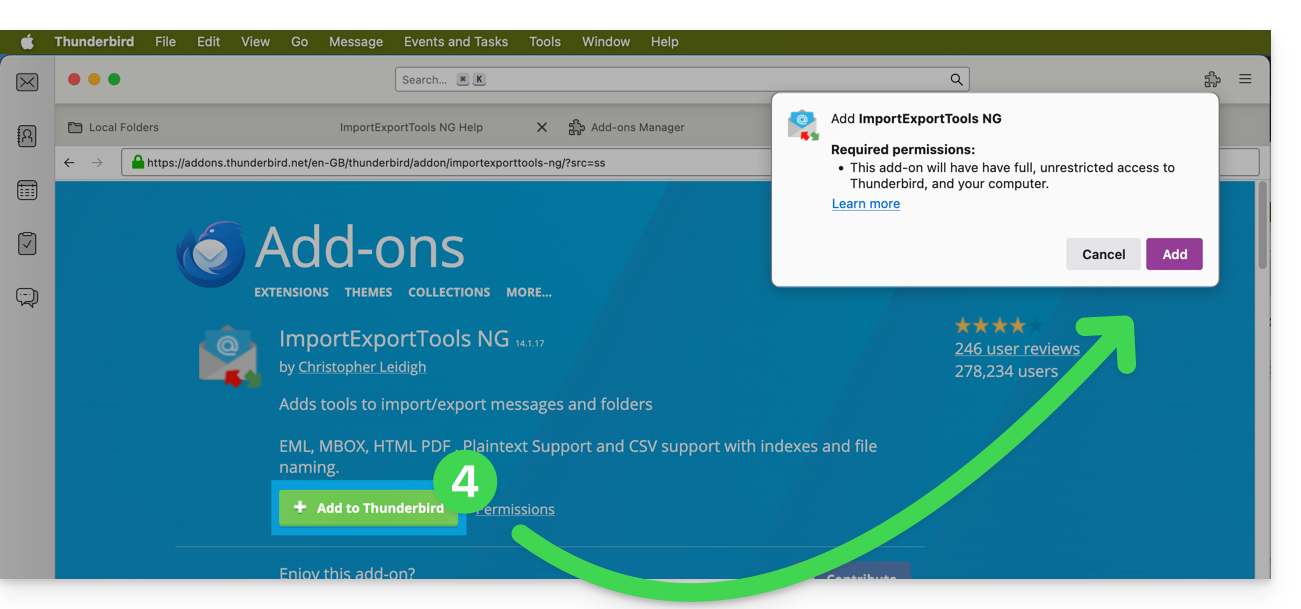
Using Thunderbird (macOS, Windows, Linux)
Thunderbird is the most reliable tool for converting and transferring local data to an IMAP server thanks to the extension ImportExportTools NG.
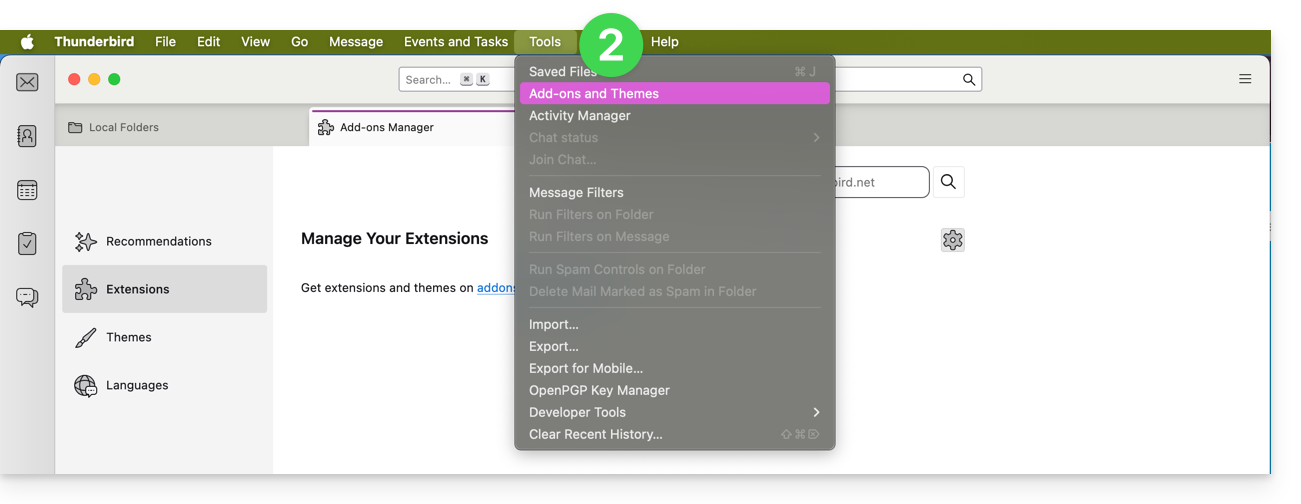
- Open Thunderbird.
- Go to the Tools menu > Extensions and Themes:
- Click to go to Thunderbird extensions:
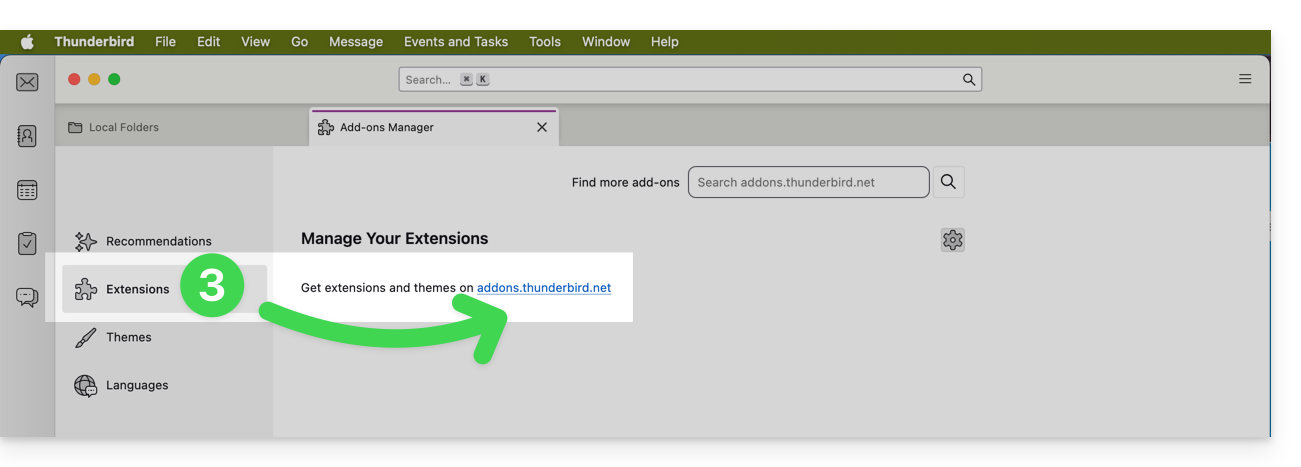
- Search for and install the ImportExportTools NG extension:
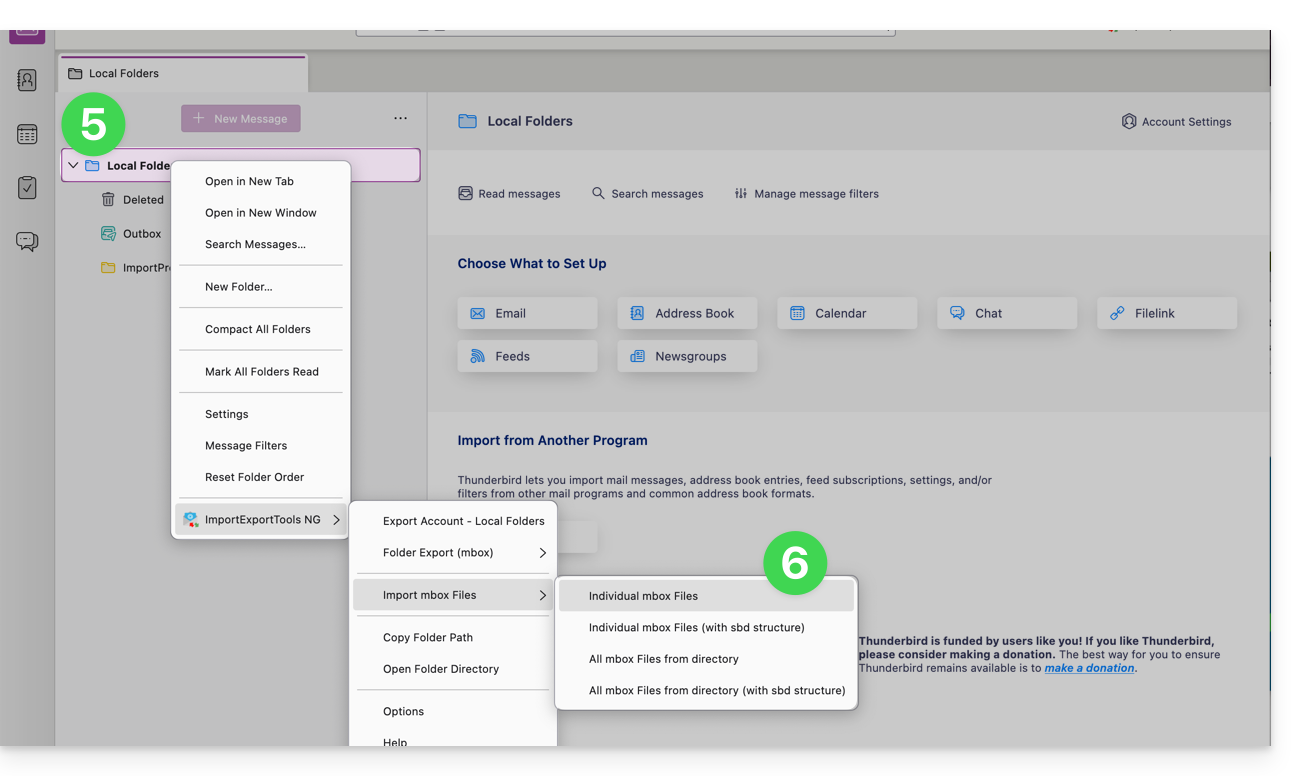
- Once installed, right-click on Local Folders in the left column.
- Select ImportExportTools NG > Import a mbox file:
- Select your
.mboxfile: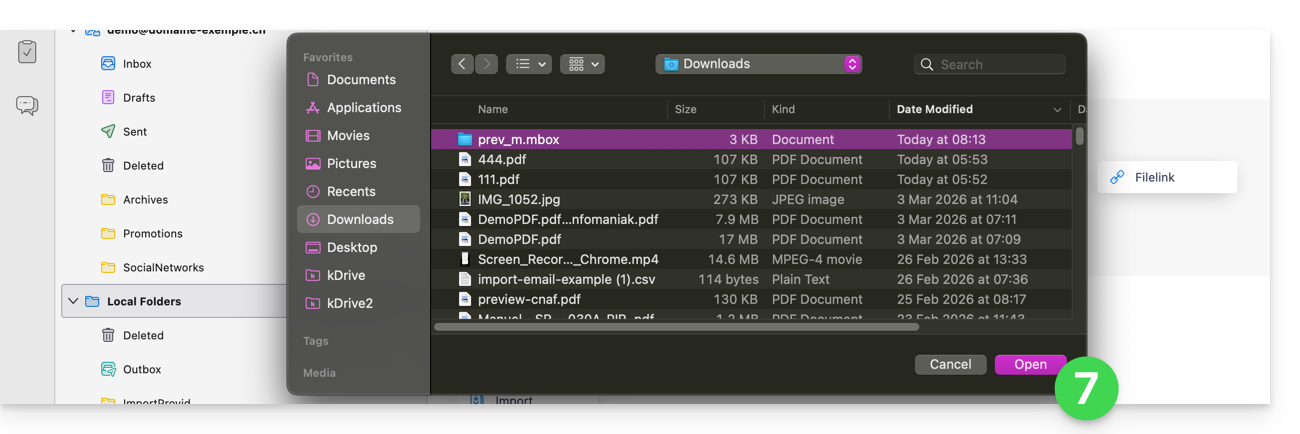
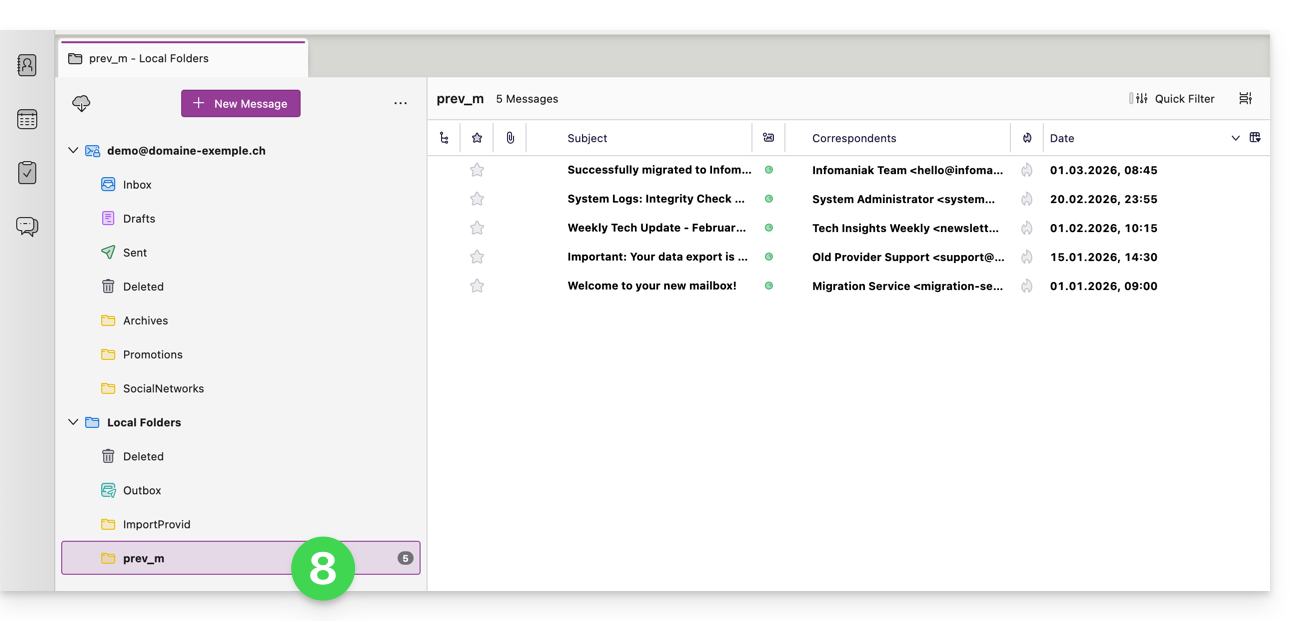
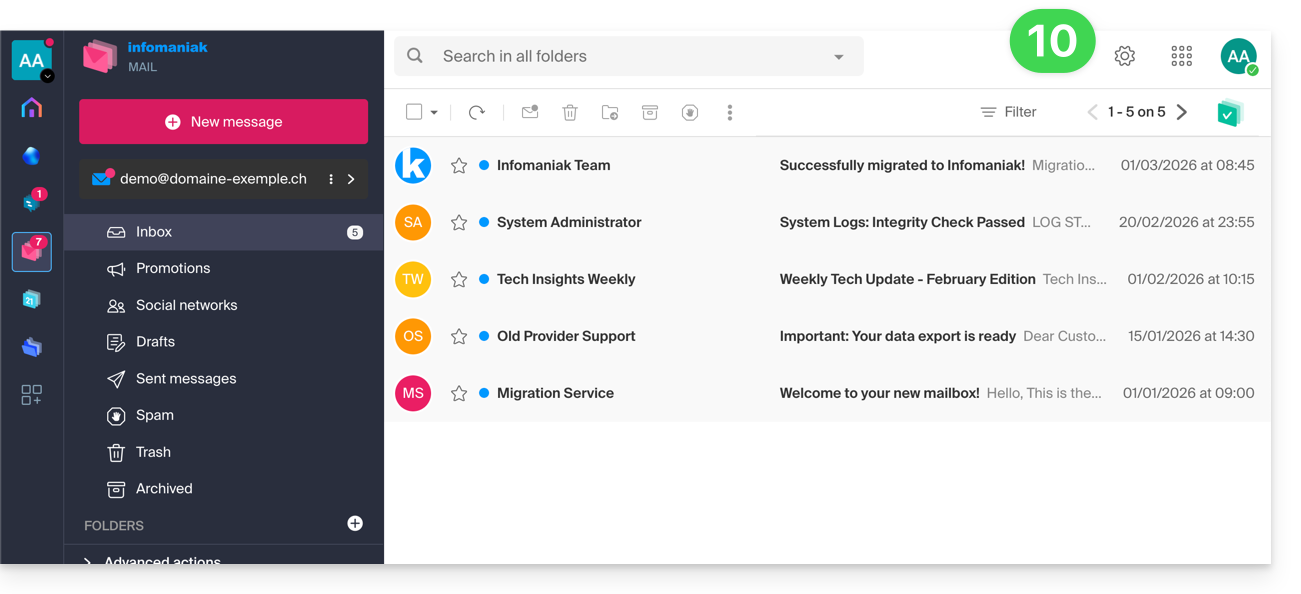
- The messages then appear in your local folders:
- Select the imported messages (or folder) and drag and drop them to a folder in your Infomaniak address to synchronize them with the server:
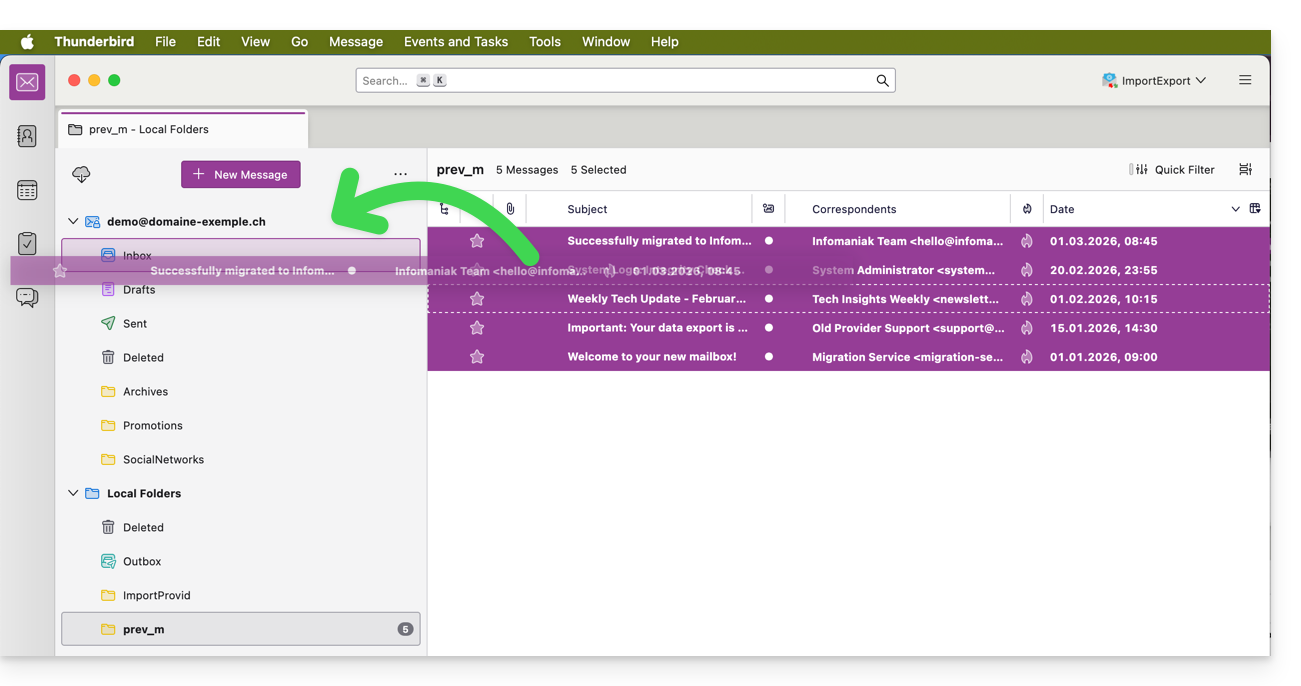
- They then appear on your other devices, on the Web Mail app for example:
Using Apple Mail (macOS only)
If you are on Mac, the import is native and does not require any extension: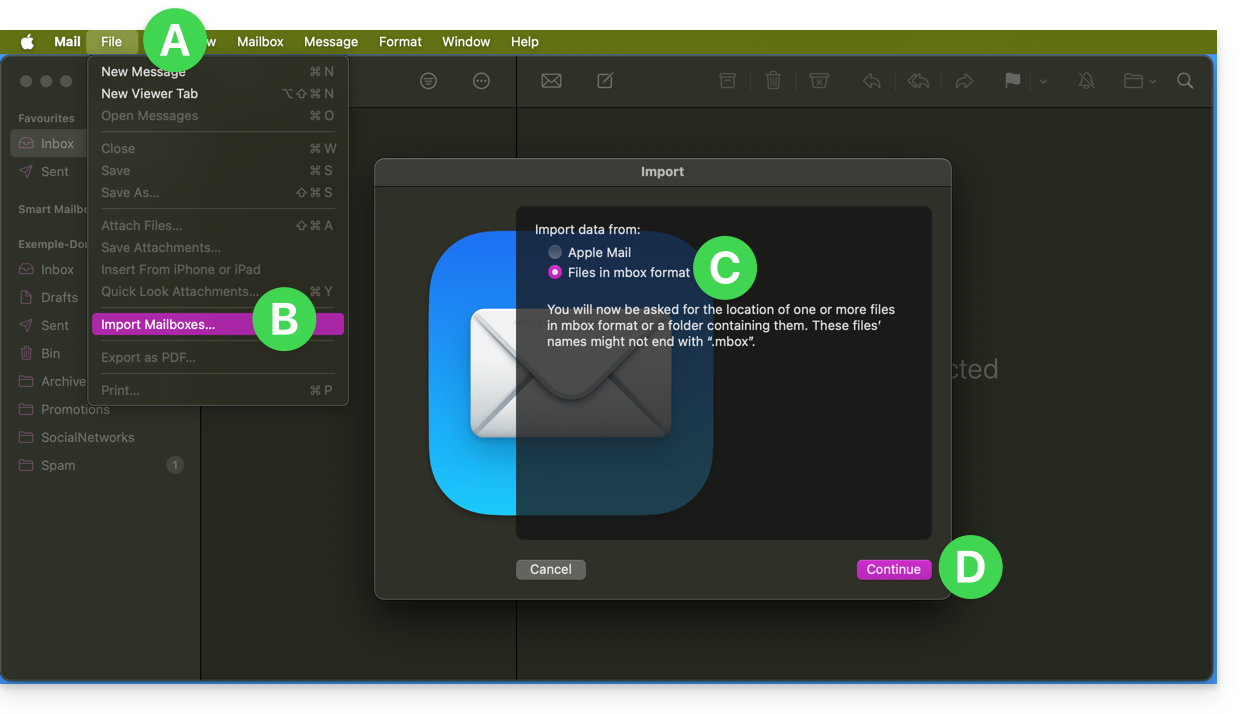
- Open Mail, go to File > Import mailboxes...
- Select Files in mbox format.
- Once the import is complete, simply move the emails from the "Import" folder to your Infomaniak inbox.
Using Outlook or other software after import
Microsoft Outlook does not natively handle the .mbox format (it uses the .pst format). However, once you have performed the import via Thunderbird or Apple Mail, your emails are permanently stored on Infomaniak's secure servers.
You can therefore:
- Close (or uninstall) Thunderbird without worry.
- Open Microsoft Outlook, Apple Mail, or any other software of your choice.
- Configure your address in IMAP: the entire imported archive will be displayed automatically.
- Find your emails on the Infomaniak Web app my kSuite (ksuite.infomaniak.com/mail).
Link to this FAQ:
Has this FAQ been helpful?
This guide explains how to save email attachments from the Infomaniak Web app Mail (online service ksuite.infomaniak.com/mail).
Preamble
- You will then be able to save all the files attached to a message in one click, in a
.ziparchive on your computer, or in your kDrive etc. - Other guides detail how to:
Save the attachment from the Web Mail app
To export files received by email:
- Click here to access the Infomaniak Web app Mail (online service ksuite.infomaniak.com/mail).
- Consult the email message containing the attachments you wish to save.
- Click on the paperclip icon to access the save and preview options for the content:
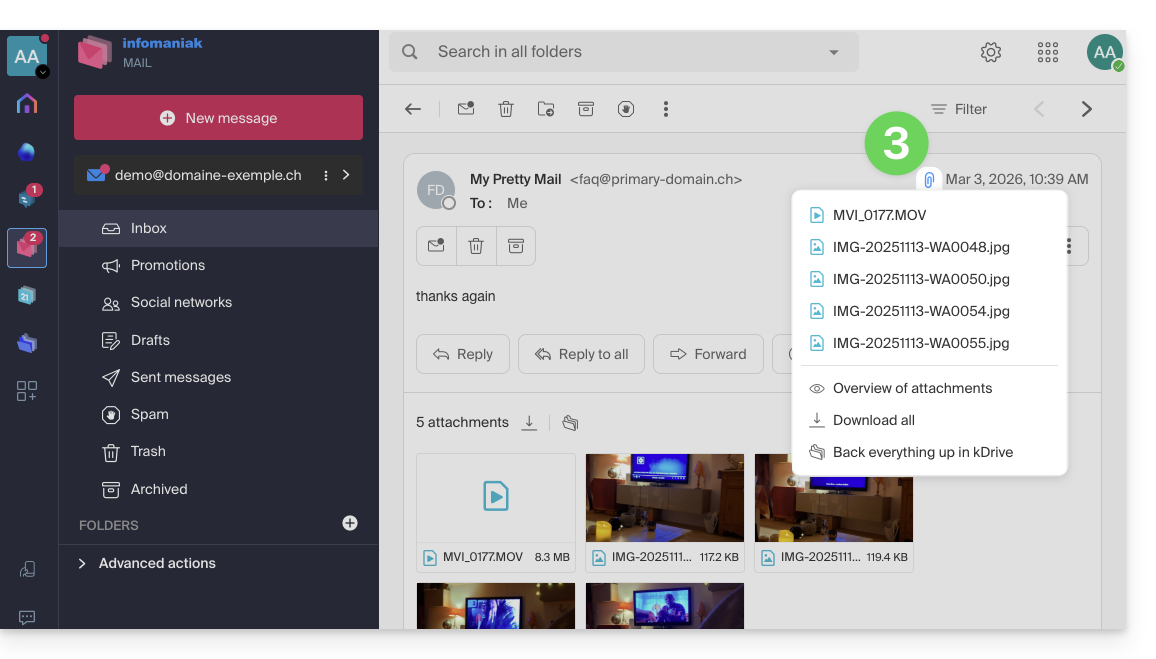
- … or directly above the attached files to start the download or save to kDrive:
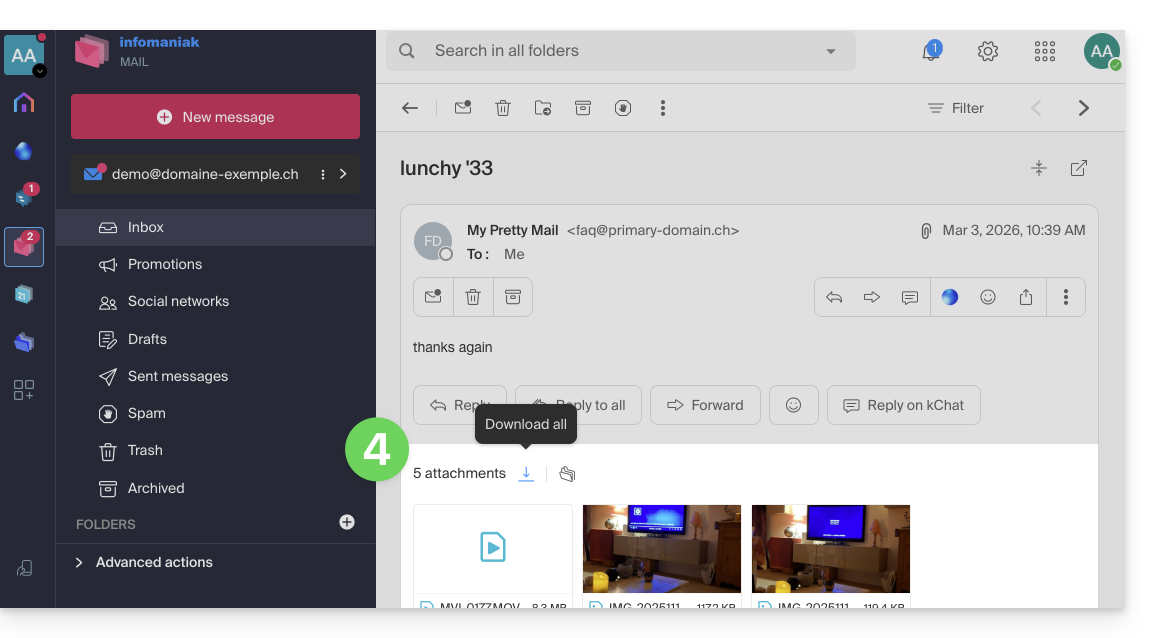
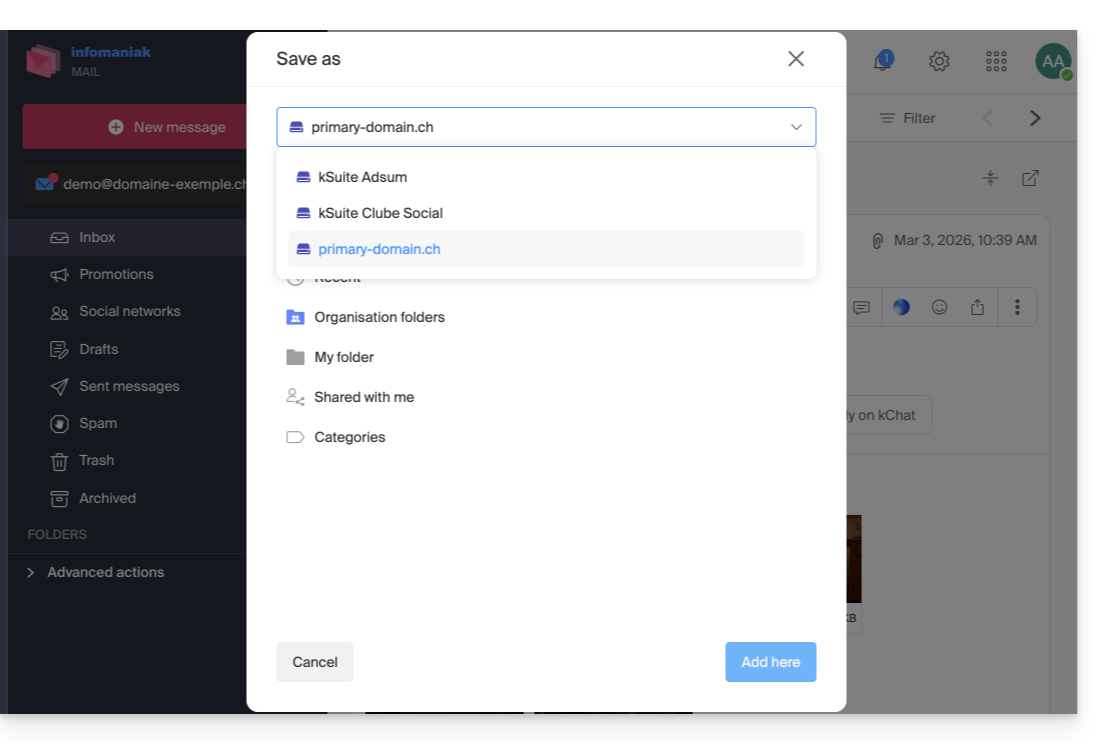
- Download all allows you to create a
zipformat archive to download to your device. - Save all in kDrive allows you to choose the kDrive (from those you are attached to by your Organization) and the desired location on it to save the files:
- Download all allows you to create a
Link to this FAQ:
Has this FAQ been helpful?
This guide explains how to delete an Infomaniak account (i.e., user account), which means deleting your access to the Manager and/or the Infomaniak Web Mail app ksuite.infomaniak.com/mail.
Preamble
- This operation will immediately delete your calendars and address books.
- All access to the Manager with this identifier will be lost.
- This operation does not delete the email addresses accessed from the account in question (except for some free offers, but in this case, this is specified to you before the deletion operation).
- If the account you are using is the only existing account within an Organization, you must first delete the Organization or appoint someone else to be able to delete your account.
Delete an Infomaniak / Mail account
To access the user profile section:
- Click here to access the My profile menu on the Infomaniak Manager.
- Click on the trash can to the right of your name to delete the account and data:
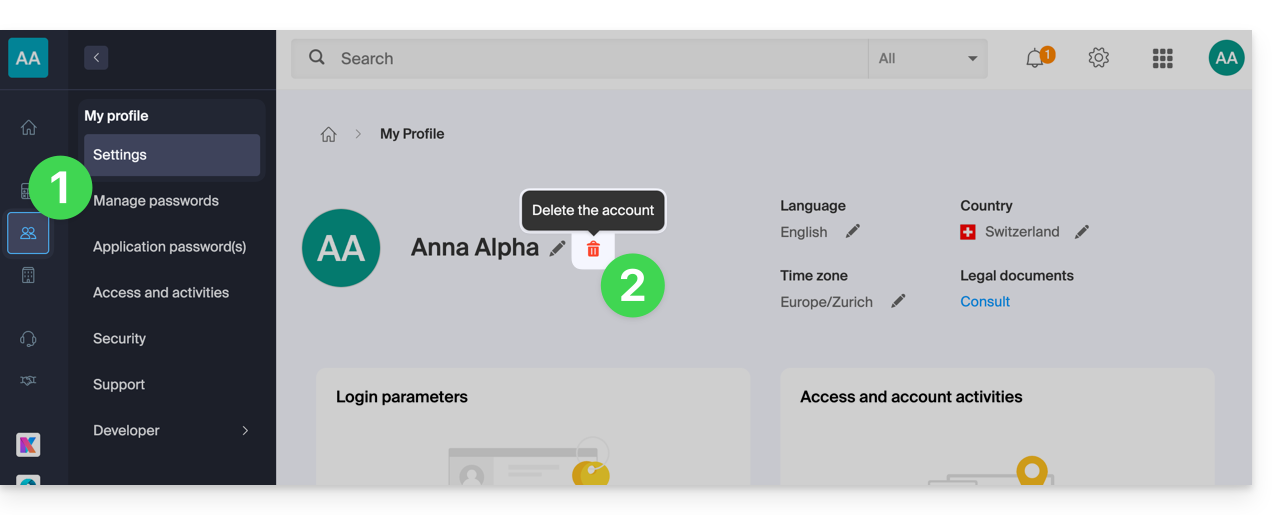
- Enter the login password one last time, then the Infomaniak account will be deleted.
Link to this FAQ:
Has this FAQ been helpful?
This guide explains how to obtain information on…
- … the connections made to the Manager Infomaniak with your Infomaniak account login,
- … the activities performed within the Manager by your Infomaniak account.
Obtain the log of connections to the Infomaniak account
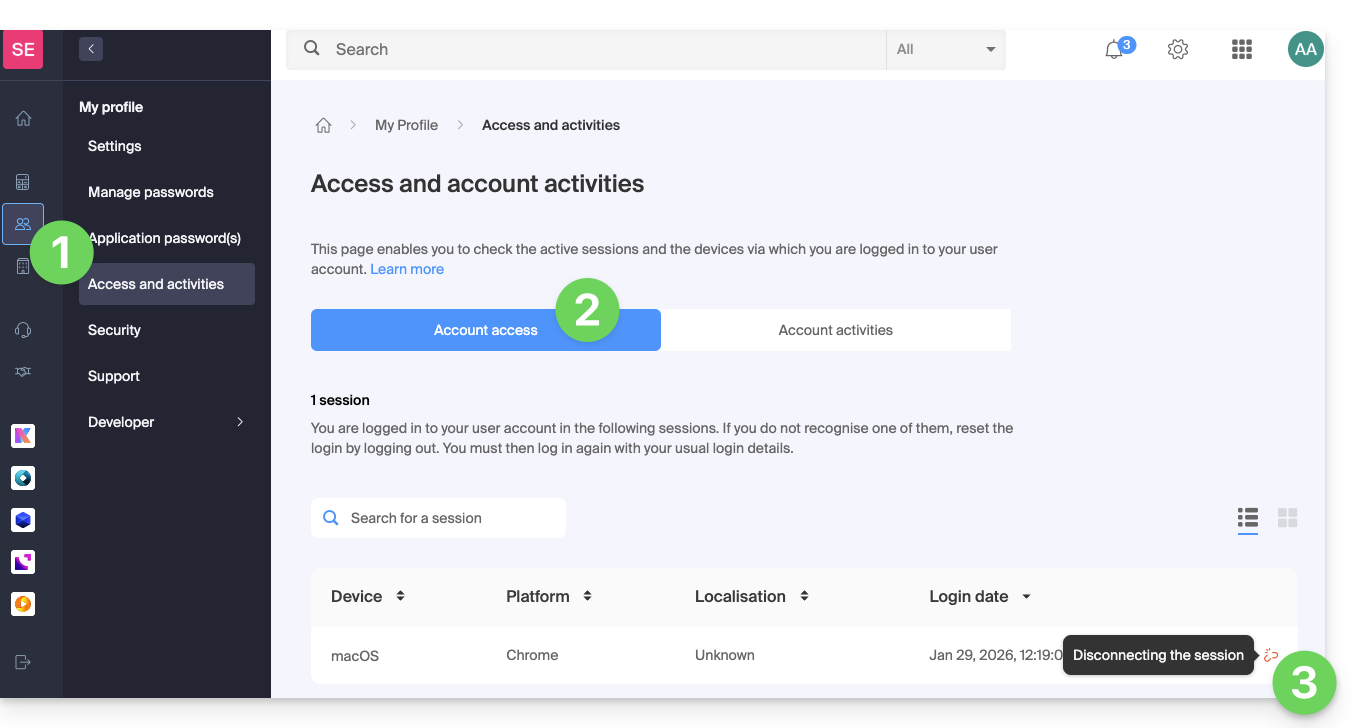
To view a connection log (active sessions) made to the Manager Infomaniak with your Infomaniak account login:
- Click here to access the summary of access to the Infomaniak Manager by your Infomaniak account.
- From the Account Access tab, view the list of devices connected to your Infomaniak account.
- You can end an open session by clicking on the icon to the far right of the name of the device connected to your account, which will log it out.:
Be notified in case of successful or unsuccessful login
To be notified by email upon login or attempted login to your Infomaniak account:
- Click here to access the security summary of your account on the Infomaniak Manager.
- Click on Security Settings:
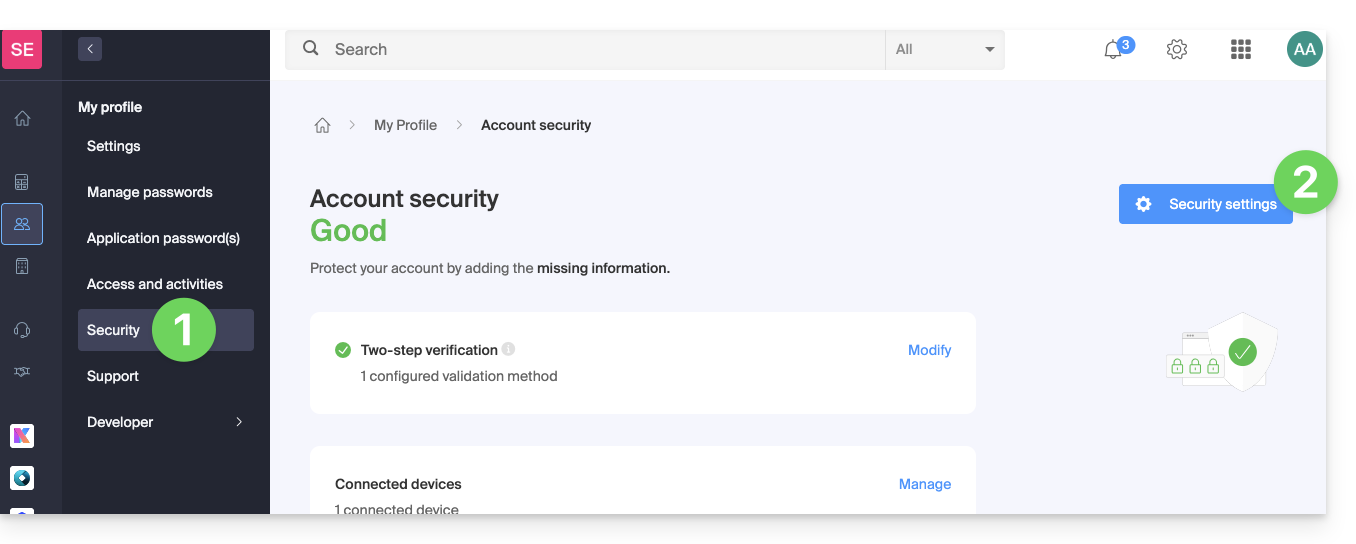
- Select the cases for which you want to be alerted by email (warning upon successful login, or only in case of failed login).
- Click to Save your changes:
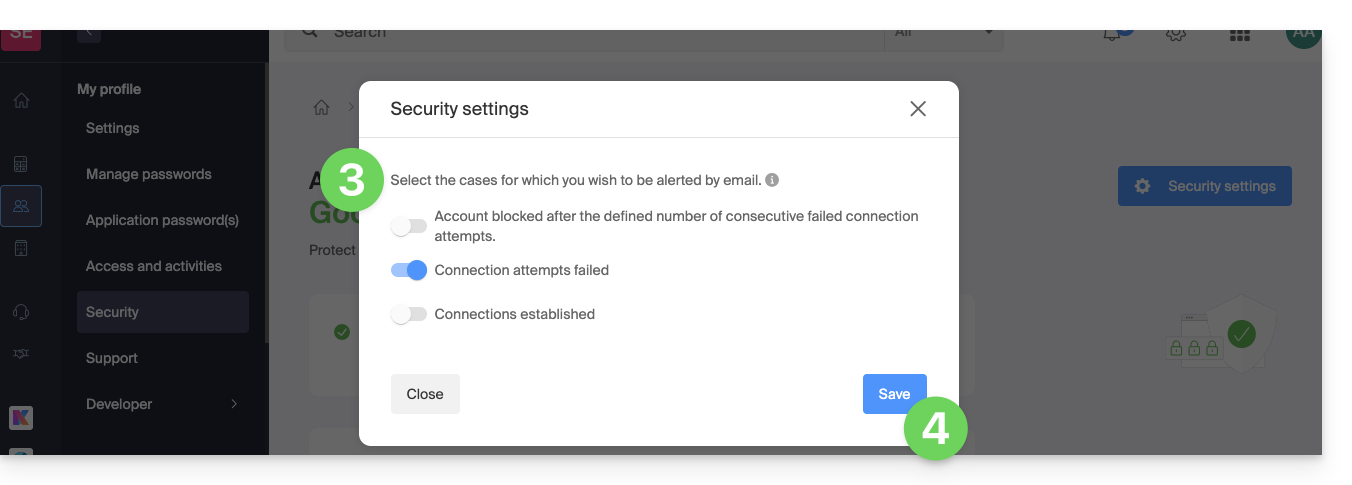
In the same place, you can choose from how many unsuccessful attempts minimum to lock your Infomaniak account: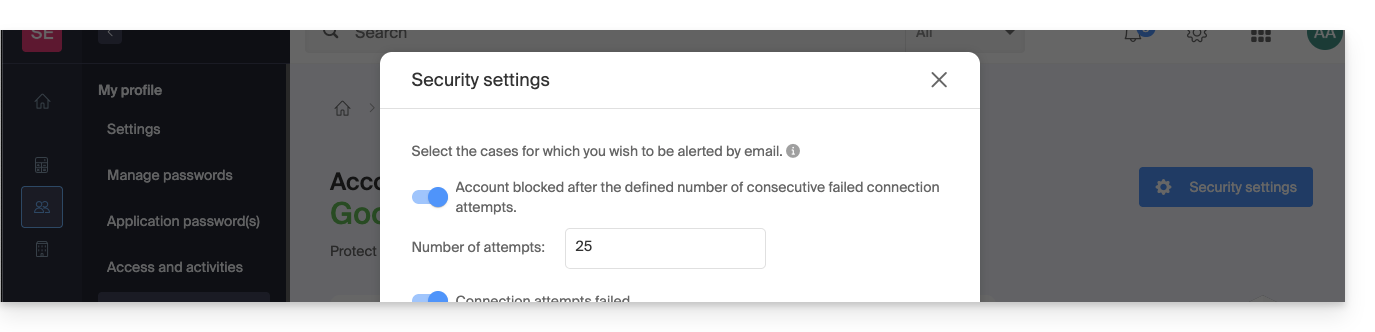
Once locked, the account can be unlocked by an Organization administrator or by a secure form.
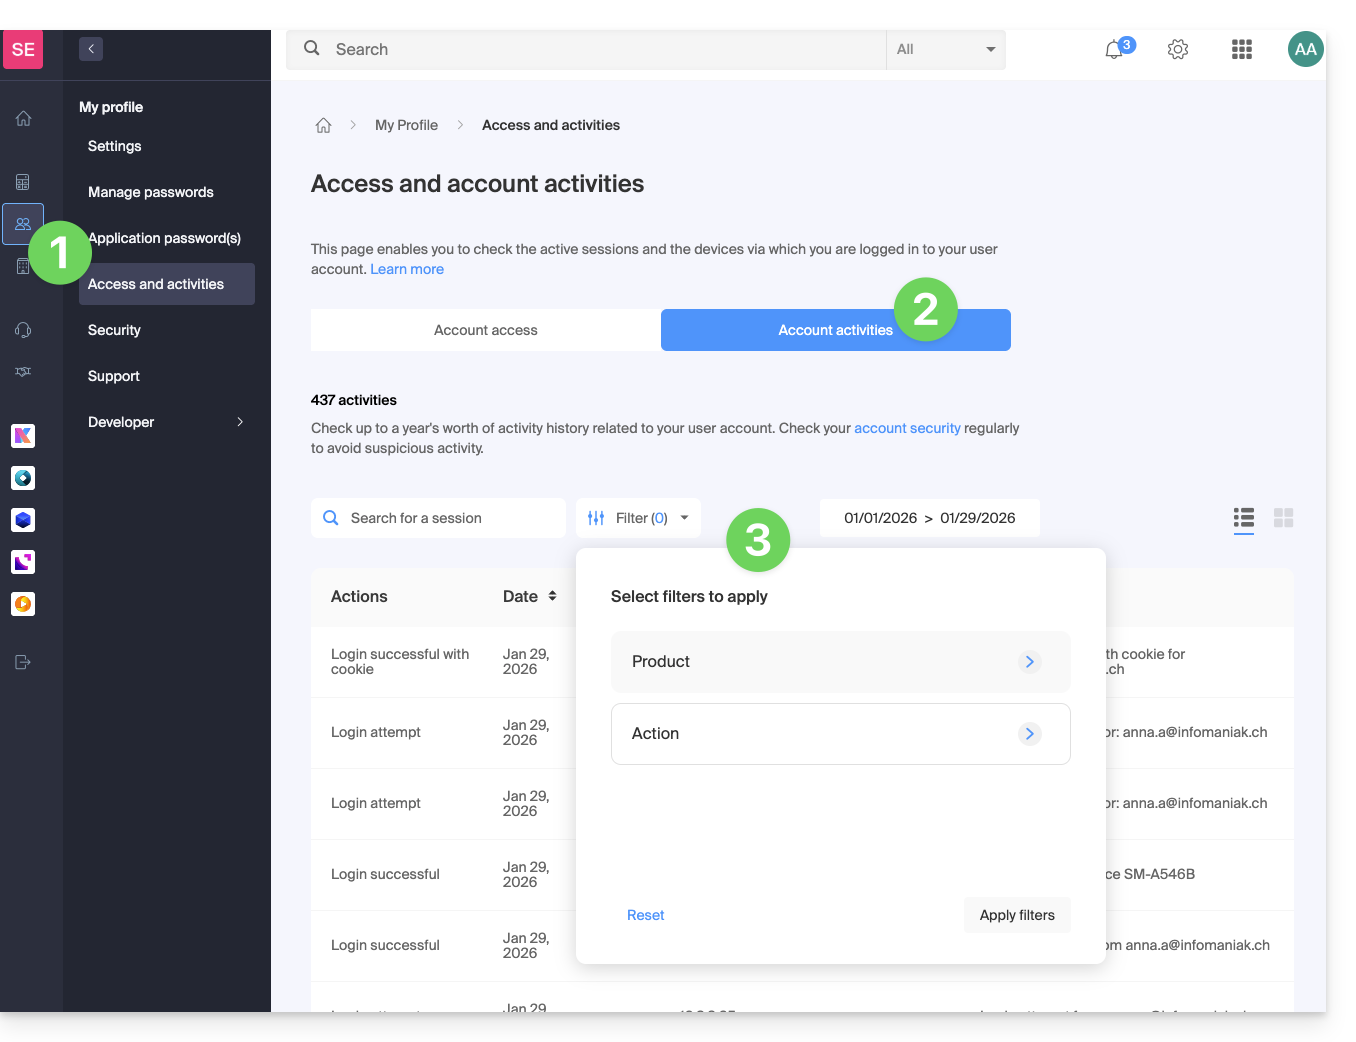
Obtain the activity log of the user account
To view recent activities performed within the Manager by your Infomaniak account:
- Click here to access the activity summary of your account on the Infomaniak Manager.
- From the Account Activities tab, view the latest activities and actions of your Infomaniak account.
- Search and log filtering options are available: date, product or type of action:
Link to this FAQ:
Has this FAQ been helpful?
This guide details the limits of your email in terms of size (message weight and disk space size) set as part of Infomaniak's email offers and guides you to check the storage used.
Email box size limit
⚠ Storage space in GB:
| kSuite | Free | 20 |
| Standard | * | |
| Business | * | |
| Enterprise | * | |
| my kSuite | 20 | |
| my kSuite+ | * | |
| Mail Service | Starter 1 max. address | 20 |
| Premium 5 min. addresses | * |
* unlimited
Limit on the size and number of emails
- The maximum size of an email in sending and receiving is 210,763,776 bytes, or 201 MB exactly.
- This includes header and body (text, html, attachments, etc.) regardless of the means used to send it.
- Note that an attachment can be encoded in base64, so its size in the email is not necessarily the same as its size on disk.
- With the Infomaniak Mail web app (online service ksuite.infomaniak.com/mail) the size limit of attachments is 25 MB.
- Beyond this and up to a limit of 3 GB a SwissTransfer link is generated and integrated into your message: the data is stored in Switzerland in the Infomaniak Cloud and your recipients will be able to use this link to easily download the attachments during a predefined period.
- Beyond 3 GB (and up to 50 GB), it is recommended to go directly through SwissTransfer for your shipments.
- The number of messages in the respective storage space is not limited.
- However, it is not recommended to keep more than 4,000 to 5,000 messages per folder (slowing down message indexing).
- It is therefore advisable to move your messages into subfolders, which also facilitates their consultation (you can do this manually or set up automatic sorting rules).
Email retention time limit
- There is no time limit for message retention in the inbox or in subfolders, except for an email that would be deleted, or marked as spam, or moved manually/automatically to the "Trash" or "Spam" folder (or one of its equivalent names such as "Deleted Items", "Deleted Messages", "Junk Mail", including spelled in another language, "Junk" for example - non-exhaustive list)… In this case, the email is automatically deleted after 30 days without possibility of recovery.
Therefore, never use a folder named, for example, Trash or Infected to store and keep important messages.
- Backups performed by Infomaniak have a retention period.
Display the total size from the Infomaniak Web Mail app
To do this:
- Click here to access the Infomaniak Web Mail app (online service ksuite.infomaniak.com/mail).
- Check or select the email address concerned in the dropdown menu of the left sidebar.
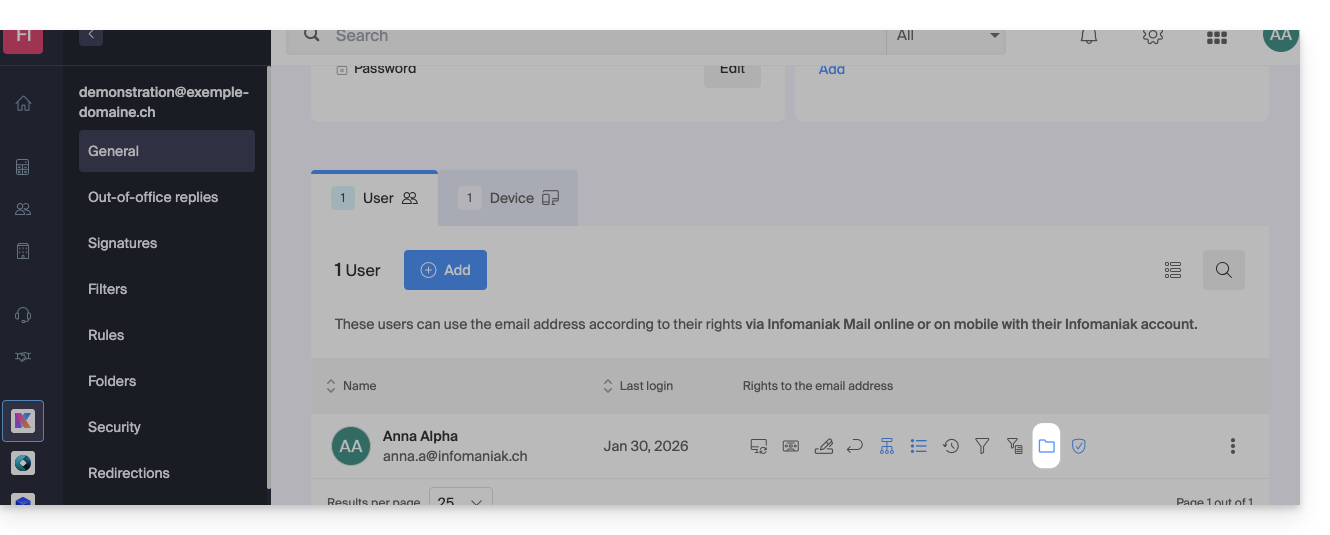
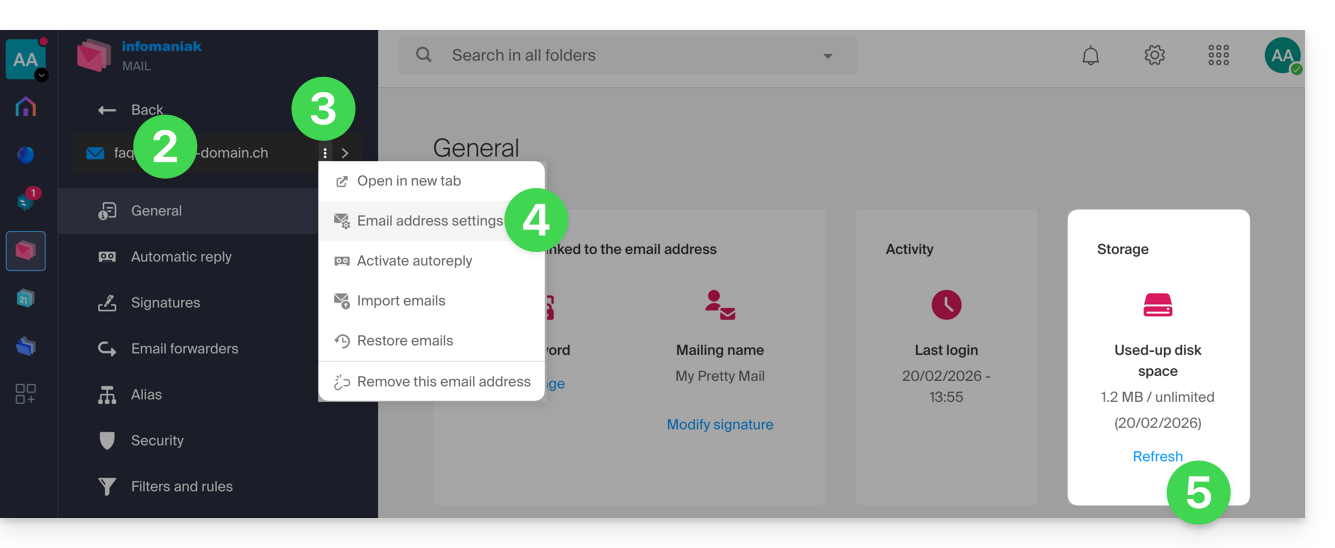
- Click on the action menu ⋮ to the right of the item concerned in the displayed table.
- Click on Email address settings.
- Click on Refresh in the Storage box to display the mailbox size:
Other email limits
Still having trouble?
If the email address of your recipient is not hosted by Infomaniak, you may receive an error message when sending the email. This can take various forms, such as Recipient address rejected: 5.2.2 Over quota 554 5.0.0 Service unavailable.
This may indicate that your recipient's mailbox is full and they can no longer receive emails, or that the email you are trying to send is too large.
In this case, you need to contact your correspondent to ask them to empty/lighten their mailbox or to ask for the maximum size of the messages you can send them.
Link to this FAQ:
Has this FAQ been helpful?
This guide explains how to connect the desktop app Outlook 2019 (desktop application on Windows) to an email address hosted by Infomaniak.
Preamble
- The various services offered by Infomaniak are all compatible with the corresponding standard protocols (IMAP/SMTP for email, for example), therefore if you encounter a problem with third-party software, contact its publisher or a Partner and consult the support policy as well as article 11.9 of the Infomaniak Terms of Service.
Add the email address to the application
Prerequisites
- Create the email address in my kSuite or a Mail Service / kSuite.
- Create a password for the email address on the device you are going to configure.
To configure the email application:
- Open the application.
- Click on the File menu:
- Click on Account Settings.
- Click on Add or Remove Accounts:
- Click on New:
- Enter the email address to connect.
- Click on Advanced Options.
- Click on Manual Configuration.
- Click on the blue Connect button:
- Click on IMAP:
- Enter the password of the email address to connect.
- Click on the blue Connect button:
- Uncheck the additional mobile device configuration box if necessary.
- Click on the blue Finish button:
- Click on Repair to correct some automatically added but incorrect information:
- Click on Advanced Options.
- Click on Manual Repair.
- Click on the blue Repair button:
- Check and complete the missing information by scrolling down if necessary.
- Click on Outgoing Mail:
- Check and complete the missing information.
- Click on Next.
- Click on Finish:
- Click on Close:
- There you go, your email address is now correctly configured in the application:
Recommended settings
- Incoming IMAP server =
mail.infomaniak.com - IMAP port =
993(with SSL) - Outgoing SMTP server =
mail.infomaniak.com - SMTP port & encryption protocol and command/method to activate this protocol:
587+ STARTTLS - Username = the complete & full email address ( ? )
- Password = the one generated for the email address you want to access
- Authentication required for sending emails:
- It is activated in the SMTP settings of your application.
- Check "use the same parameters as the incoming server" or, depending on the software/email clients, enter a username (= complete & full email address) and the generated password.
Refer to this other guide if you are looking for information about other mail ports and protocols compatible (SSL / TLS for example).
In case of a problem
Check that the Mail Service is configured optimally.
It is not necessary to contact Infomaniak Support if your email address works well outside the application. The most common error concerns the use of an incorrect password. The troubleshooting guides help you resolve any potential issues:
- Refer to the solutions provided in this other guide regarding email in general.
- This other guide is more specifically about Outlook.
… and if your Outlook no longer works since a change of email password, refer to this other guide.
Link to this FAQ:
Has this FAQ been helpful?
This guide explains how to change the password of your Infomaniak account (= user account) on the Manager, the administration interface of your Infomaniak products.
Preamble
- This password also allows you to log in to my kSuite and various iOS/Android applications such as kDrive, Infomaniak Mail, etc. (learn more) but it is not your email address password!
- If you cannot log in, you will not be able to change the password; refer to this other guide in this case.
Change the Infomaniak account password
To change the password of your Infomaniak account:
- Click here to access the management of your settings (Infomaniak Manager).
- Click on Modify from the Connection settings box under connection password:
- Click on Modify:
- Enter the current connection password as well as the desired new password.
- Click on Save.
Link to this FAQ:
Has this FAQ been helpful?
This guide details the various possibilities available to you in the incoming email filtering tool (based on sorting rules) of Mail Infomaniak.
Preamble
- Refer to this other guide if you are looking for information about setting up sorting filters on your Infomaniak mailbox.
Discover the possible conditions
The meaning of these different existing conditions and criteria is detailed below:
From
Allows you to filter messages based on the sender (and decide what to do with emails always coming from the same person or domain, for example).
A
Allows you to filter messages based on the recipient (if you receive an email that is always addressed to a specific main recipient, for example volunteers@domain.xyz).
Cc
Allows you to filter messages based on the recipient mentioned in the Cc field (and who therefore receives the email as a copy in addition to the main recipient).
Subject
Allows you to filter messages based on the subject of the message.
Reply to
Allows you to filter messages by looking at the content of the reply-to field (specific condition - example).
Size
Allows you to filter messages based on their size.
Message content
Allows you to filter messages based on certain words that would appear in the body of the incoming message.
Email type
Allows you to filter messages based on the x-infomaniak-type header whose value can be ham, spam, transactional and bounce.
In the case of using a condition "email type = advertising, social media", then the selected action will be performed before the advertising filtering if the latter was activated.
Link to this FAQ:
Has this FAQ been helpful?