Knowledge base
1000 FAQs, 500 tutorials and instructional videos. Here, there are only solutions!
This guide explains how to delete a site from a Web Hosting.
Preamble
- Once removed, the site will no longer appear on the Internet at its previous URL.
- The site quota available on your hosting will regain a free space.
Remove a site from a paid Web Hosting
To access the Web Hostings to remove a site from them:
- Click here to access the management of your hosting on the Infomaniak Manager (need help?).
- Click directly on the name assigned to the hosting concerned.
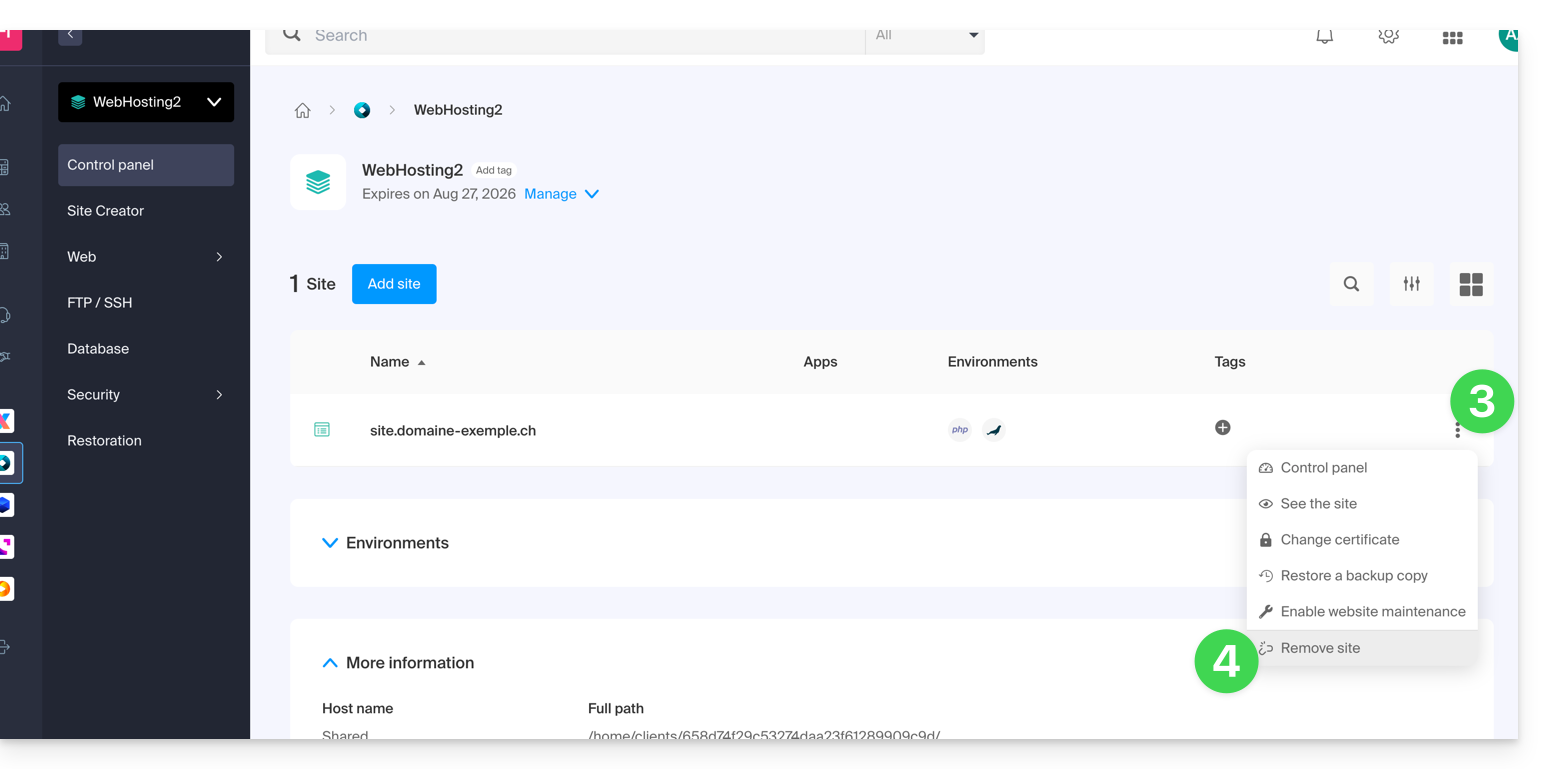
- Click on the action menu ⋮ to the right of the site concerned in the table that appears.
- Click on Remove the site:
Unlink a site from a free Starter hosting
A Starter hosting (basic web page) contains only one site that is specific to the domain name itself, therefore, unlike paid offers, it is not possible to have multisite or remove a site to replace it with another.
You must therefore directly cancel the Starter hosting:
- This will cancel your Starter Web Hosting product only, i.e. the part concerning your website without impacting other products, such as messaging or domain name, for example.
- You will have to confirm the cancellation request by email otherwise no data will be deleted.
- A cancellation confirmation is sent to any other administrators of the Organization.
- Backups will be irrevocably deleted upon cancellation, making any restoration impossible.
To cancel:
- Click here to access the management of your hosting on the Infomaniak Manager (need help?).
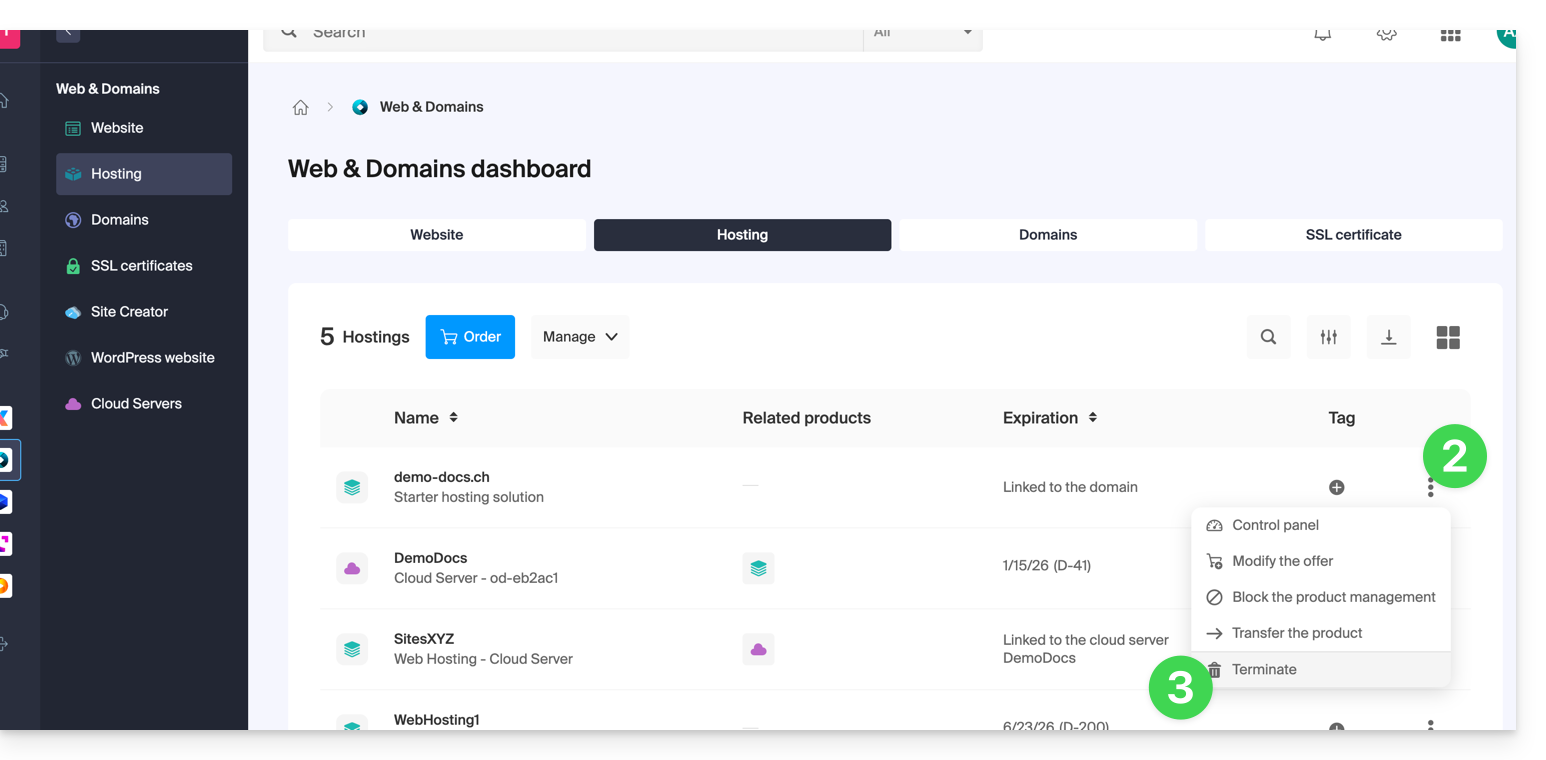
- Click on the action menu ⋮ located to the right of the hosting concerned.
- Select the option Cancel:
- Follow the procedure to the end.
Link to this FAQ:
Has this FAQ been helpful?
This guide explains how to add IP addresses to the whitelist of an Infomaniak website.
Preamble
- Allowing IPs on
xmlrpc.phpallows access to URLs that are blocked by default, as they are considered risky. - This type of blocking is effective on all recent servers.
- Regarding WordPress, its XML-RPC feature is only available by default via Infomaniak services and JetPack for security reasons.
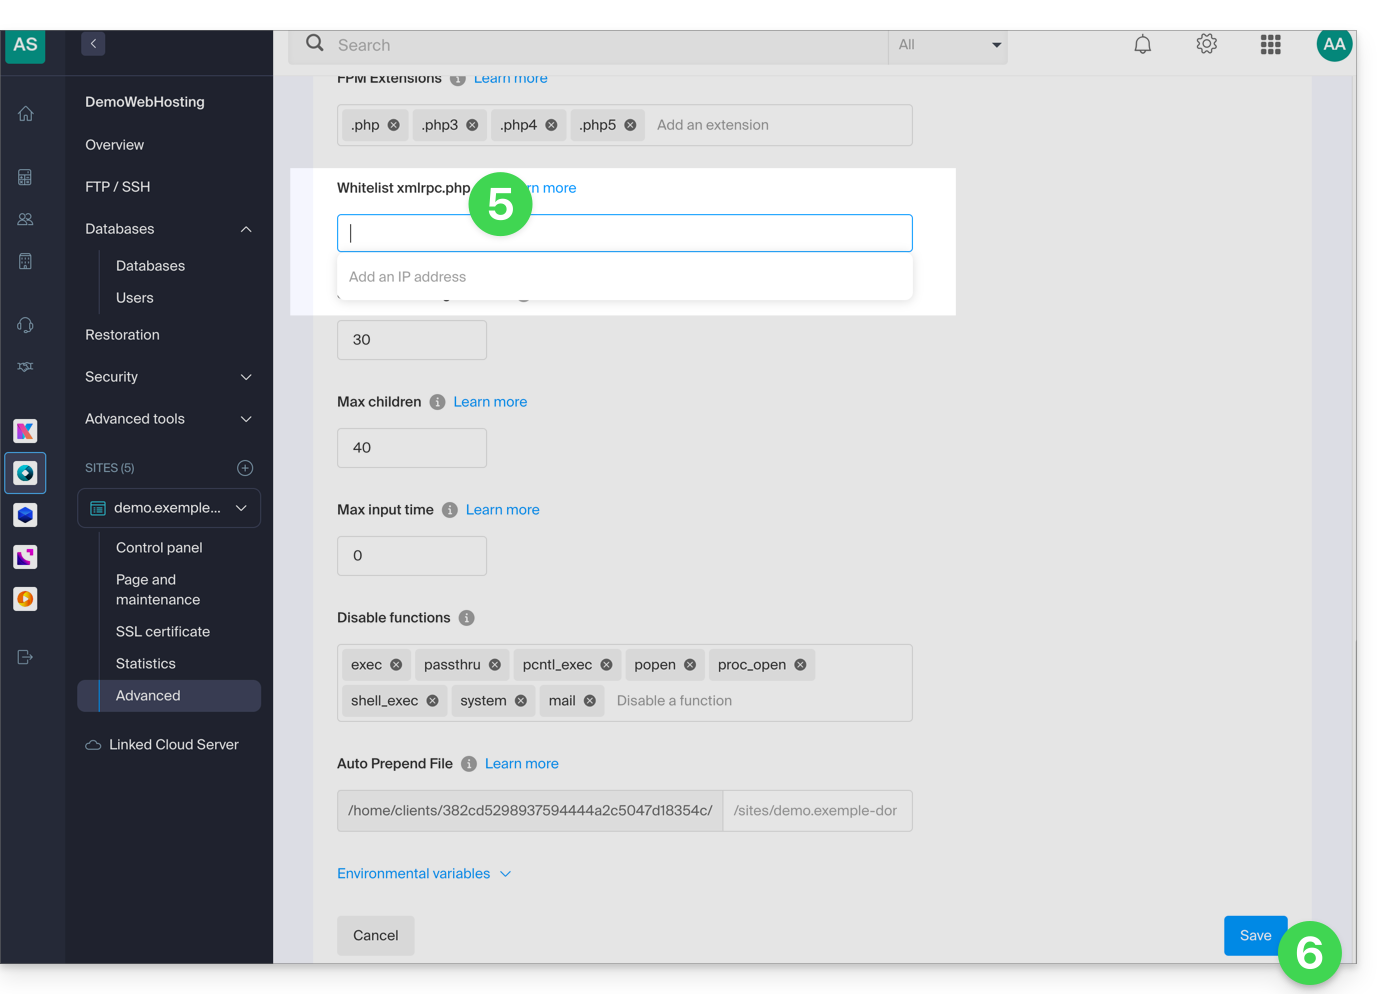
Add IP addresses to the xmlrpc.php whitelist
To access website management:
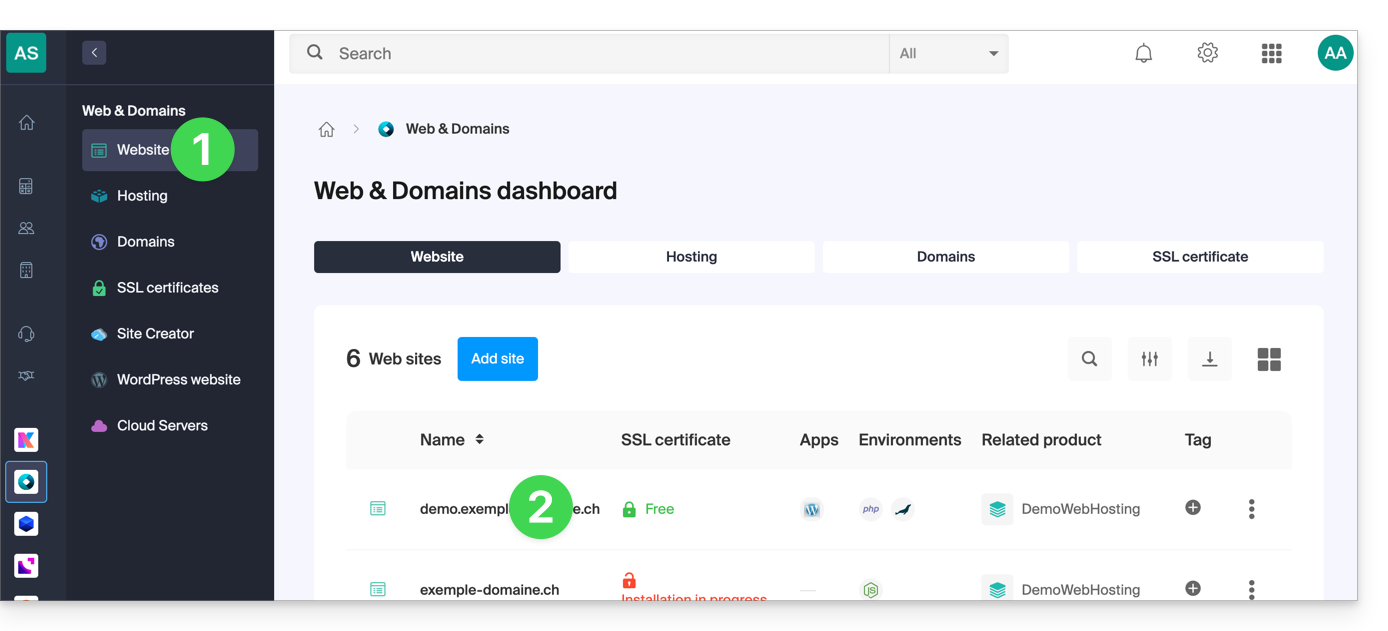
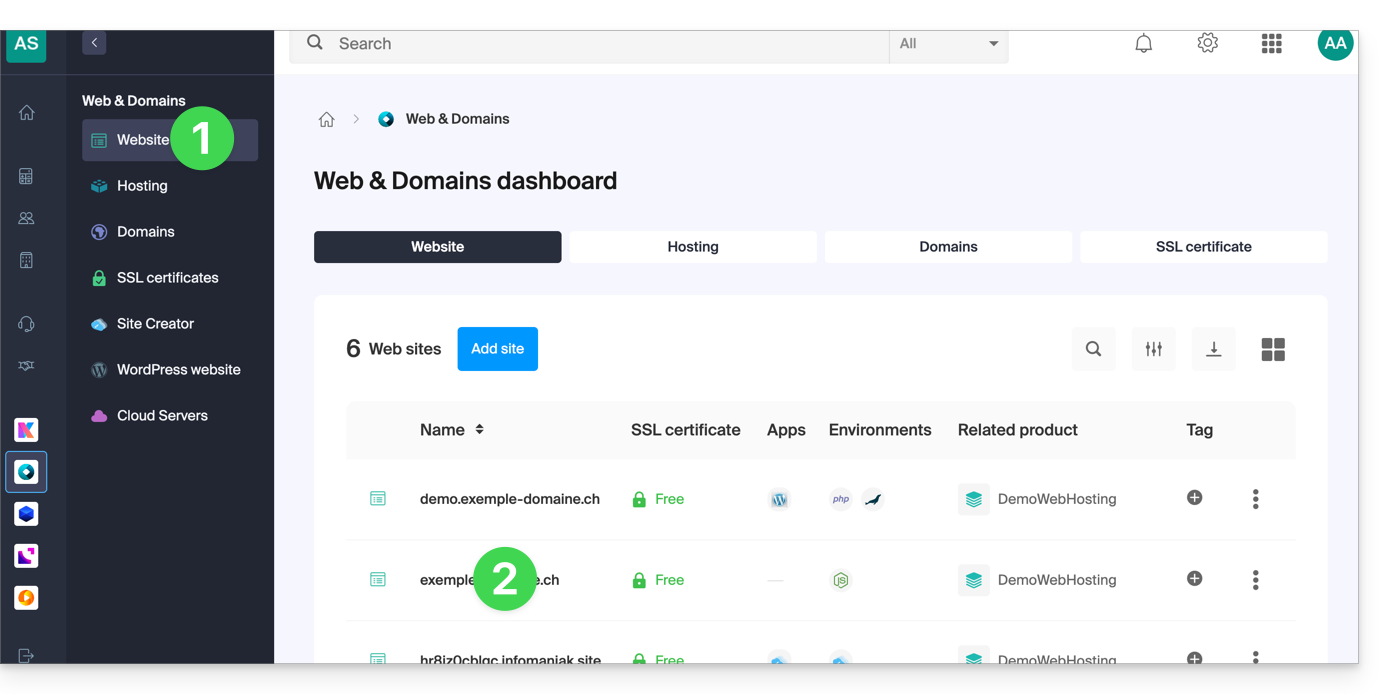
- Click here to access your site management on the Infomaniak Manager (need help?).
- Click directly on the name assigned to the site concerned:
- Click on Manage advanced settings:
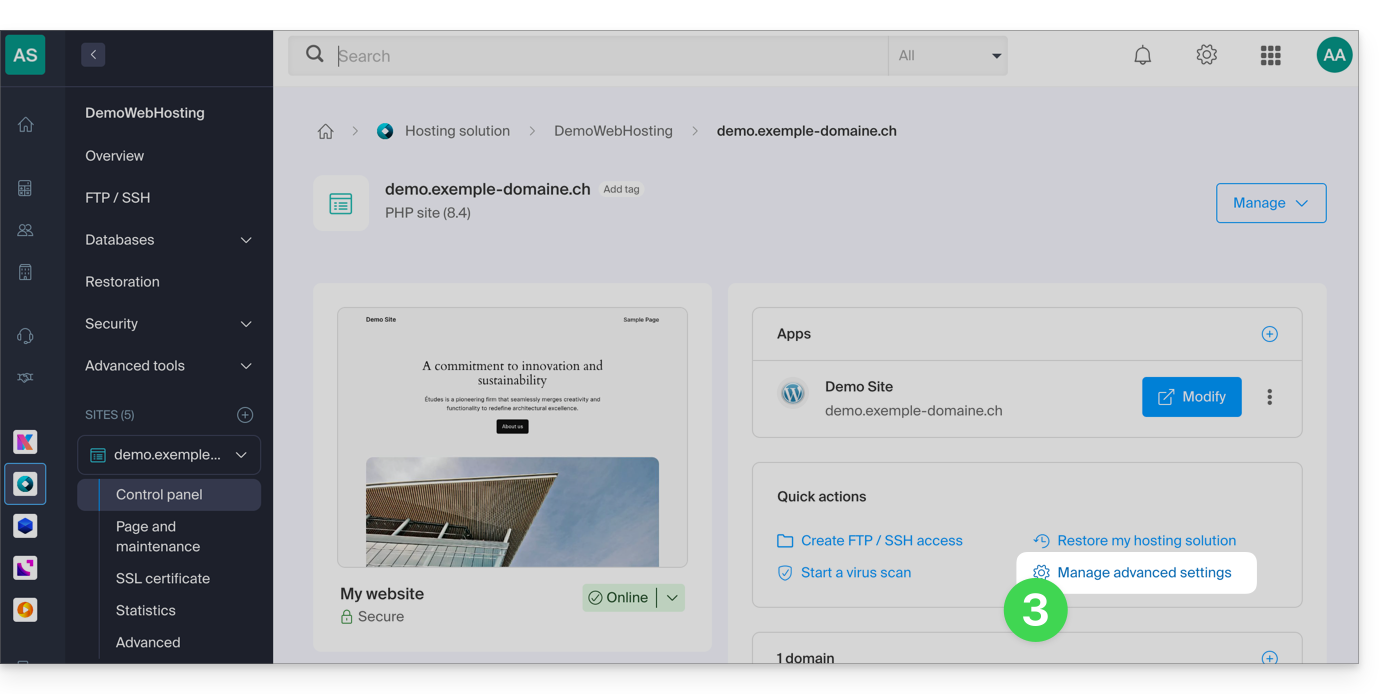
- Click on the PHP / Apache tab:
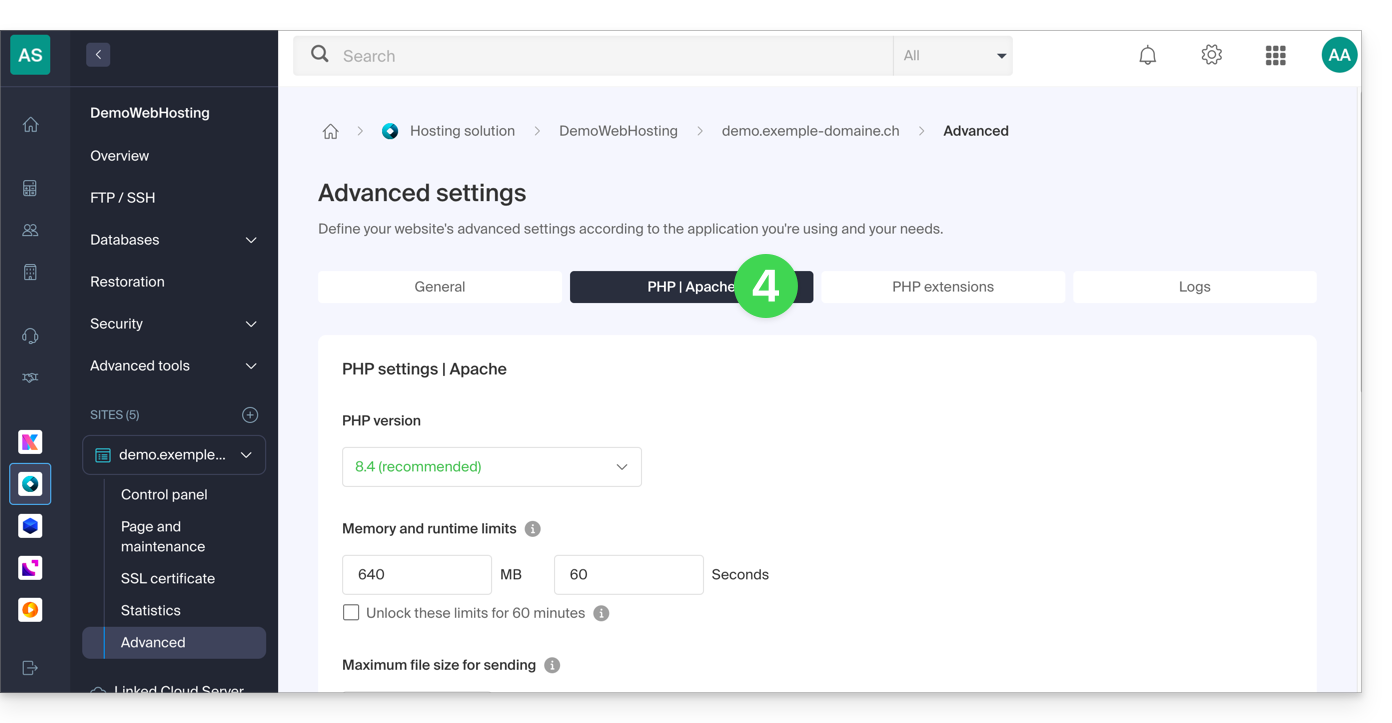
- Complete the relevant line.
- Click on the Save button at the bottom of the page:
Link to this FAQ:
Has this FAQ been helpful?
This guide introduces Groups, a user management system for your Organization, available on the Infomaniak Manager.
Preamble
- To facilitate access and the addition of a collaborator within the Infomaniak ecosystem, the Groups feature allows you to create teams of users and grant them access to the services they need with just a few clicks.
- Some examples:
- You create a Group for a new department: immediately associate its mailboxes, its kDrive organization folders, and its dedicated kChat discussion channels; each new collaborator added to the team will automatically receive all these accesses.
- You are a web agency and you want to give your webmaster teams access to all your web hostings: simply create a new group, choose all the hostings they will need access to, and invite them to join the Group.
- You own a kDrive: authorize access to a folder for a Group and adjust the access based on users added to or removed from the team over time.
- You use Streaming or Ticketing services and want to give your teams access: create a new Group that will have access to these two products or two separate Groups that will have access to the two products completely independently.
- It is entirely possible:
- to associate resources (Mail, kDrive, kChat) upon creation of the Group to automate onboarding,
- to adjust individual access levels: for kDrive, individual access takes precedence over Group access, while for Mail, access levels are cumulative.
- to add the same user to multiple Groups,
- to invite external users to your Organization to one of your Groups,
- to add one or more users to a Group at once,
- to designate a team leader to easily identify a project manager or the point of contact.
Manage your Groups
Group management now allows for complete centralization. No need to intervene in each tool separately: everything is controlled from the Infomaniak Manager for a smooth reorganization of your collaborators. Learn about the guides on this topic:
Link to this FAQ:
Has this FAQ been helpful?
This guide presents the different actions that are possible on a MySQL table depending on the rights granted to a user.
Actions on tables according to user rights…
… on shared web hosting
Read + Write + Admin
GRANT SELECT, INSERT, UPDATE, DELETE, CREATE, DROP, INDEX, ALTER, CREATE TEMPORARY TABLES, LOCK TABLES, CREATE VIEW, SHOW VIEWRead + Write
GRANT SELECT, INSERT, UPDATE, DELETE, CREATE TEMPORARY TABLES, LOCK TABLERead
GRANT SELECT… on Cloud Server
Read + Write + Admin
GRANT ALLRead + Write
GRANT SELECT, INSERT, UPDATE, DELETE, CREATE TEMPORARY TABLES, LOCK TABLESRead
GRANT SELECTLink to this FAQ:
Has this FAQ been helpful?
This guide will help you install n8n on Infomaniak, a powerful and extensible workflow automation solution.
Preamble
- Unlike tools like Zapier or Make, n8n, a “fair-code” workflow automation tool, can be self-hosted, allowing you to maintain full control over your data while connecting hundreds of services via an intuitive visual interface.
Installing n8n
Prerequisites
- A Node.js type site (v22 recommended).
- Stop the Node.js application from your Node.js site dashboard before performing any technical operations.
To configure your hosting (via the Infomaniak Manager):
- Click here to access your site management on the Infomaniak Manager (need help?).
- Click directly on the name assigned to the site concerned:
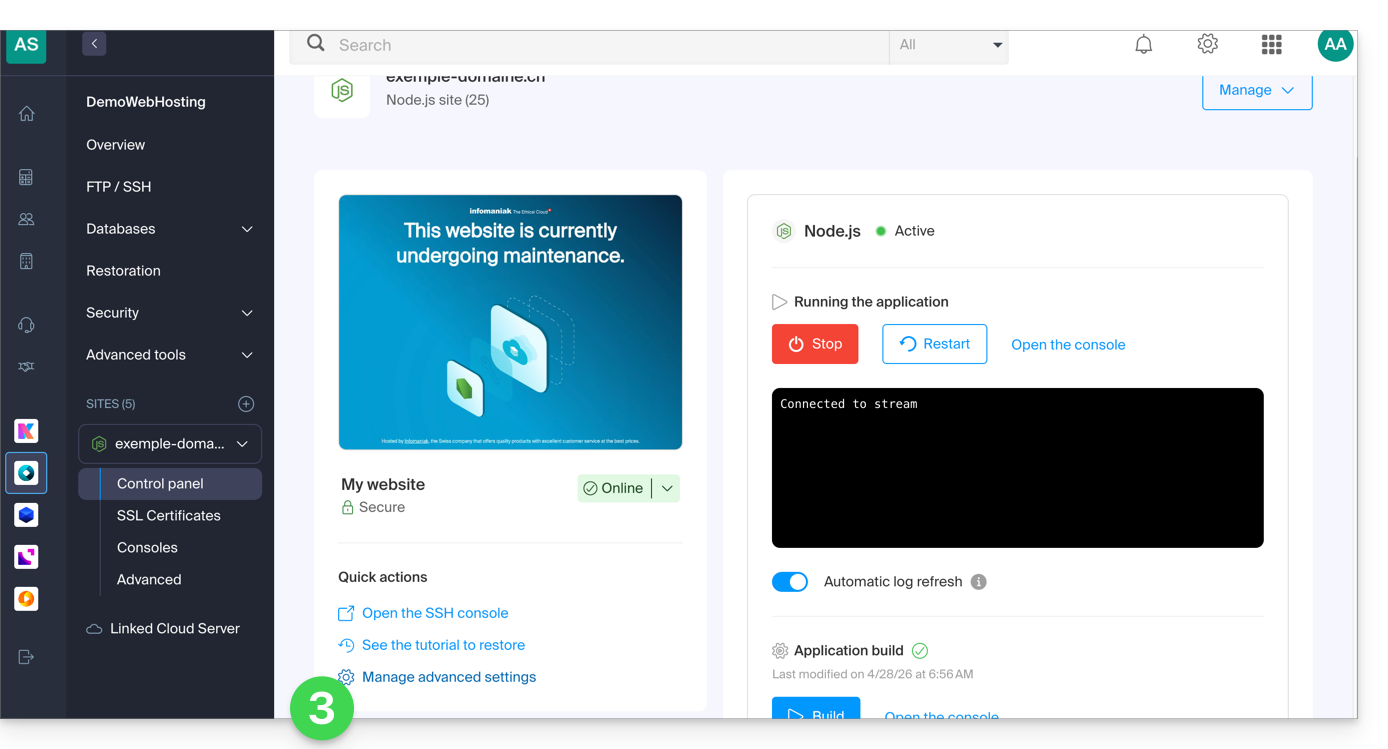
- Stop the application if necessary, then click on Manage advanced settings:
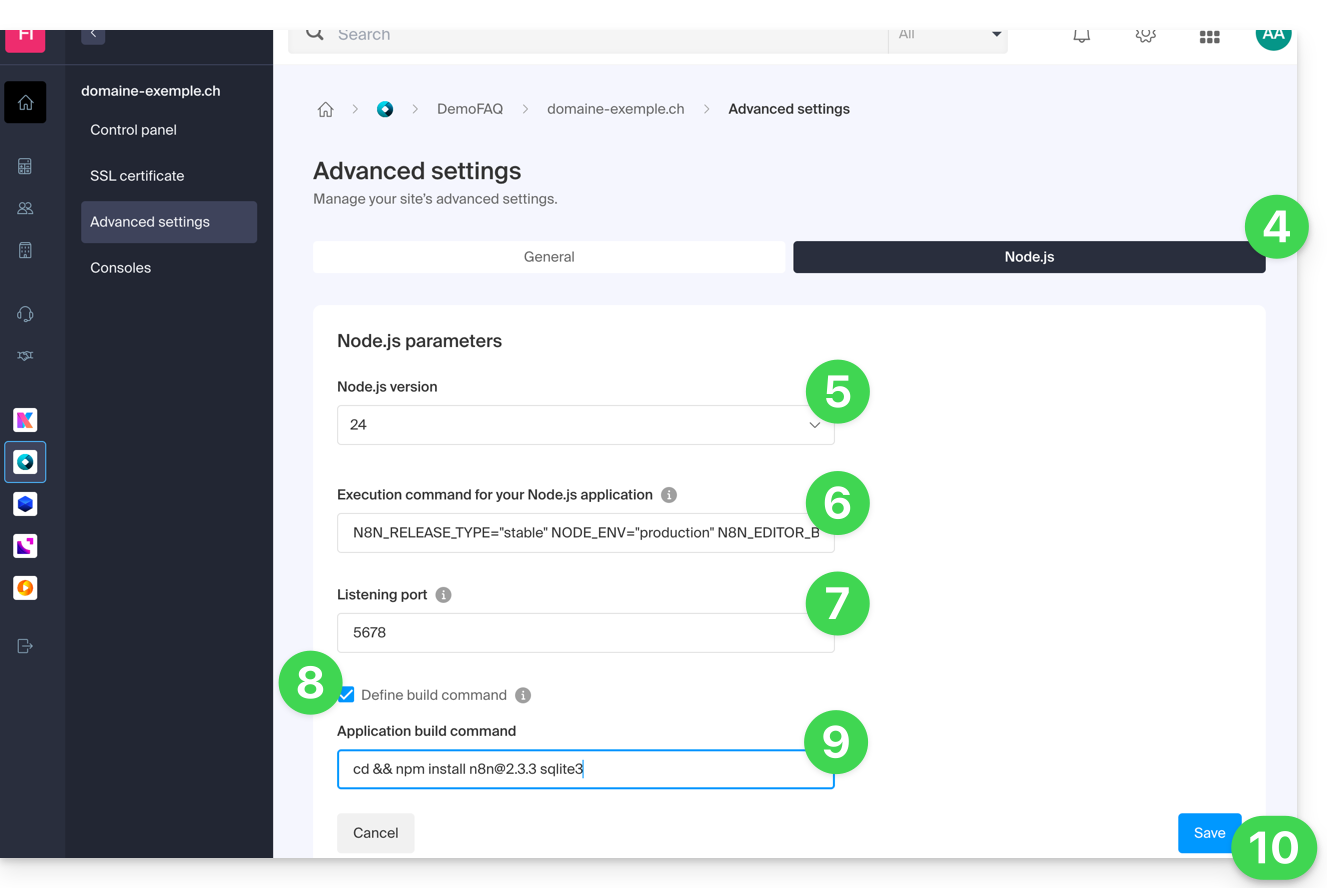
- Click on the Node.js tab to access the settings.
- Select a recent version (e.g., 24 or higher).
Enter the following command, replacing
https://domaine.xyzwith your site's actual address:N8N_RELEASE_TYPE="stable" NODE_ENV="production" N8N_EDITOR_BASE_URL="https://domaine.xyz" WEBHOOK_URL="https://domaine.xyz" GENERIC_TIMEZONE="Europe/Zurich" /srv/customer/node_modules/.bin/n8n start- Specify
5678for the listening port. - Enable the "Set build command" checkbox.
Enter the following command:
cd && npm install n8n@latest sqlite3- Click on Save:
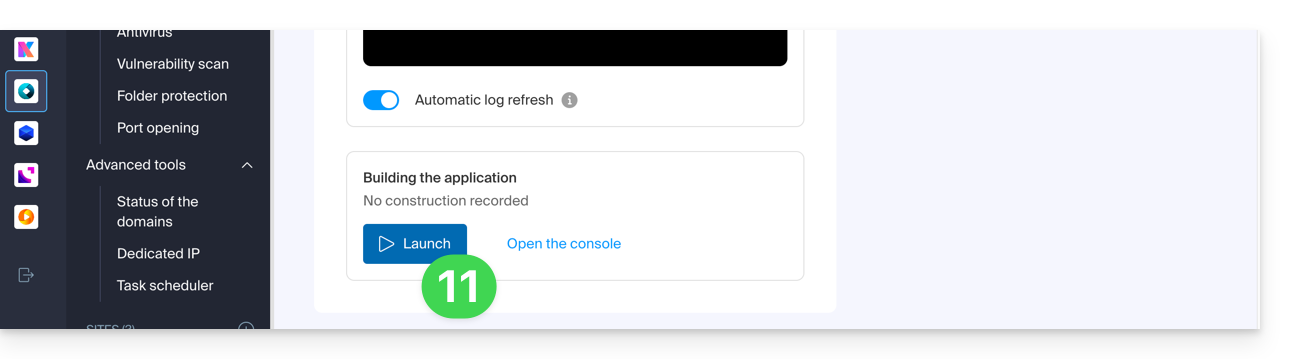
- Start the Build step by clicking the Start button under Application Build:
- On the main page, click the Start (or Restart) button:

- Wait a few minutes, then go to your site's URL (e.g.,
https://domain.xyz). - On your first connection, n8n will ask you to create an owner account to secure your instance.
Your n8n instance is now operational! You can start creating your automations.
If you encounter an error indicating that the port is already in use during startup:
- Temporarily change the Node.js Version in the settings (e.g., switch from v24 to v23) and save. This forces a complete shutdown of the processes.
- Set the desired version (v24) and save again.
- Restart the application.
Update n8n
It is recommended to regularly update your n8n instance to benefit from the latest features and security fixes. Two methods are available to you:
Method 1: via the Infomaniak Manager (Recommended)
To update n8n, simply restart the application build process:
First, check in the Advanced Settings that your build command uses the
@latesttag:cd && npm install n8n@latest sqlite3- Click the Launch button under the Application Build section.
- Important: do not delete the
node_modulesfolder; the system will handle updating the existing packages to their latest versions: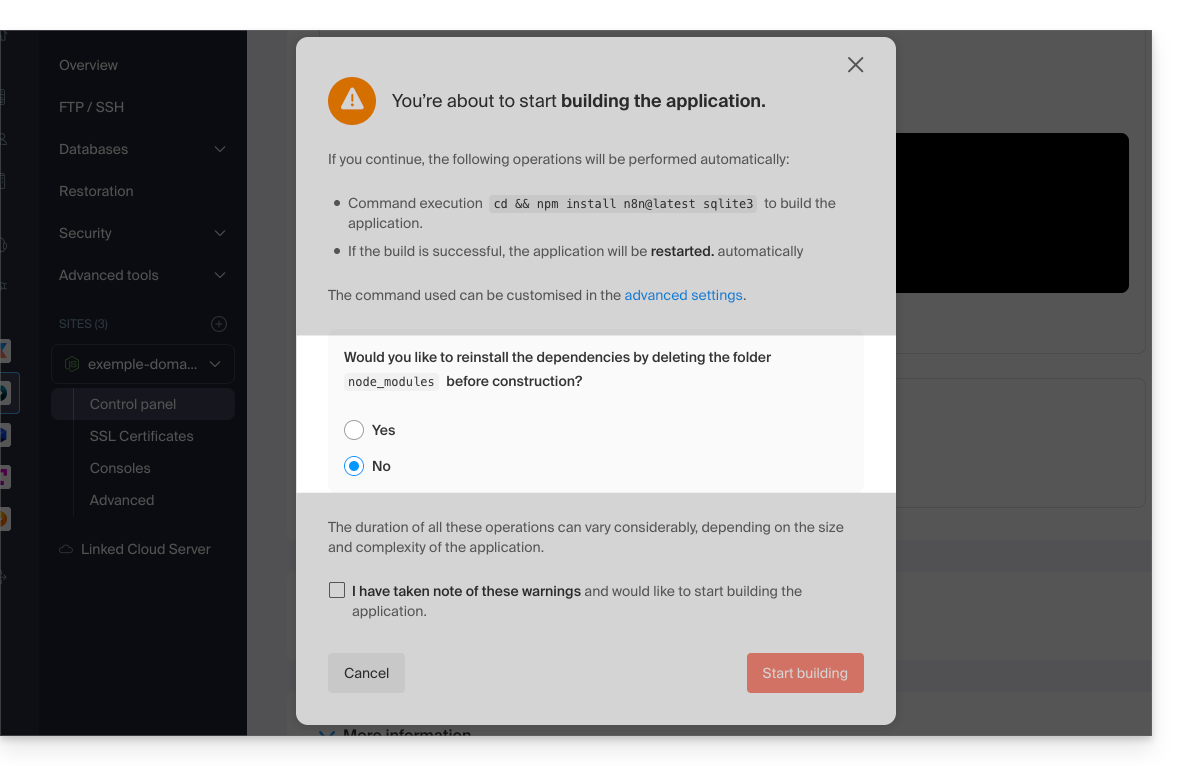
Method 2: via an SSH connection
If you prefer to use the command line, you can update n8n directly from the Node.js environment:
- Connect to your server via SSH.
Navigate to the application directory and start the update:
cd /srv/customer npm update n8n- Once the operation is complete, restart the application from the Infomaniak Manager to apply the changes.
Link to this FAQ:
Has this FAQ been helpful?
This guide provides suggestions for improvement to reduce the response time of your Infomaniak Web Hosting.
Preamble
- TTFB, or *Time To First Byte*, is a unit of measurement used to evaluate the response speed of a web server.
- TTFB measures the time between an HTTP request from a user or browser and the receipt of the first byte of the page to be viewed.
- This delay is particularly important. It can be part of the SEO criteria taken into account by search engines like Google.
Suggestions for improving TTFB
To speed up the site and achieve a better TTFB value:
- Use a content delivery network (CDN).
- Optimize the site's code.
- Optimize database queries.
- Limit HTTP requests.
- Embed CSS and JavaScript in your HTML pages to avoid calling external resources.
- Use an RFPL (*Response First, Process Later*) caching system.
Refer to the article from Criticalcase (in English) for more information.
Test the server response speed
If you are unsure about the server response speed, you can create an index2.html file that will be saved at the same level as the index.html (or .php) file, and thus perform an optimization test (e.g., domain.xyz/index2.html) without the main site/CMS being taken into account.
If the response time is normal, this means that the slowness comes from the site and not the server.
To go further
Refer to the following resources:
Link to this FAQ:
Has this FAQ been helpful?
This guide helps resolve an issue with the PrestaShop v9.x CMS regarding PDF invoice generation from the administration panel (Back Office), particularly when the French language is used.
The problem
When attempting to view or download a PDF invoice for an order in French, PrestaShop (version 9.x) returns a 500 Error. This malfunction is due to an incompatibility between the PDF generation library (TCPDF) using the default font (helvetica) and the hosting configurations.
Define a compatible font
The solution is to force the use of the more compatible font freesans via a custom configuration file.
It is strongly recommended to create a file named defines_custom.inc.php. This method is the safest as it ensures that the fix will not be lost during PrestaShop core updates.
To do this:
- Access your PrestaShop 9.x installation via FTP or the File Manager.
- Navigate to the
/config/directory. - Create a new file named
defines_custom.inc.php. Edit the file
defines_custom.inc.phpand add the following content:<?php /** * Avoid error PDF, force font 'freesans'. */ define('PDF_FONT_NAME_MAIN', 'freesans');- Save the file and test the generation of a French invoice.
Link to this FAQ:
Has this FAQ been helpful?
This guide explains how to rename a Web hosting present in the Infomaniak Manager within your Organization.
Preamble
- A Web hosting is, schematically, the storage space reserved for hosting one or more of your websites.
- By default, your Infomaniak hosting takes the name of the first site you add to this hosting:
- You own the domain name "domaine.xyz" and want a site with this domain name...
- You buy a Web hosting that will be automatically named "domaine.xyz" even if you later add a second site "toto.com".
- The hosting can be renamed with a more generic name like "My Websites" to better reflect its actual content.
- This renaming is intended to improve the readability/understanding of the products listed in your Manager and has strictly no impact on the addresses of the websites: refer to this other guide to act on the domain name.
Renaming a Web hosting
To access the Web hosting to perform the name change:
- Click here to access the management of your product on the Infomaniak Manager (need help?).
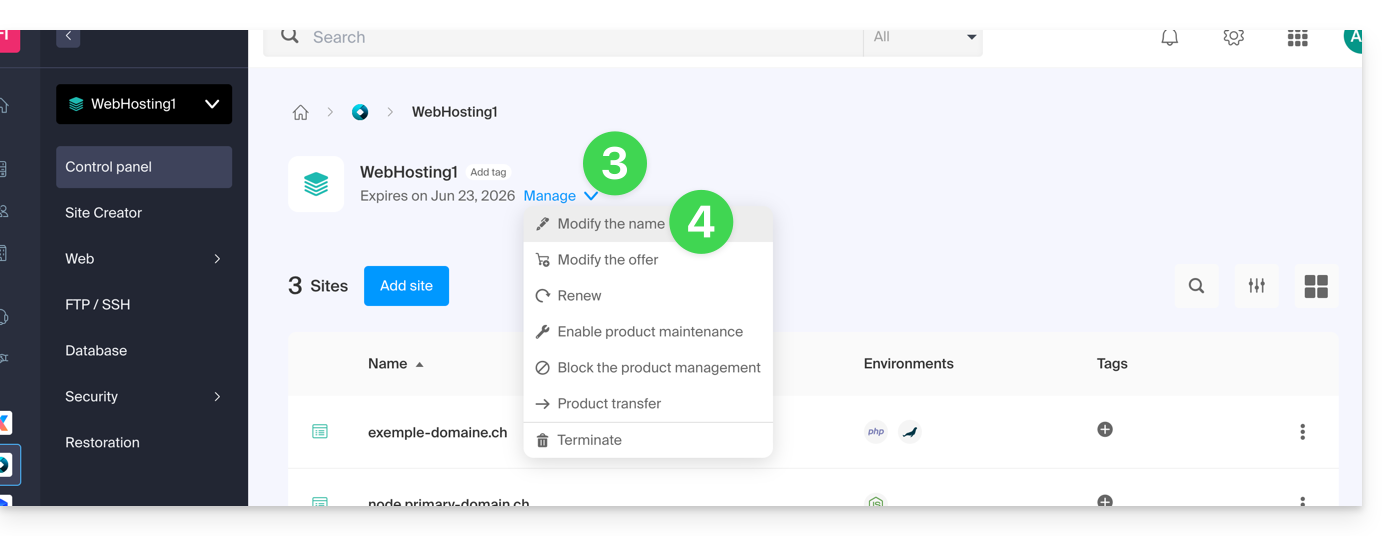
- Click directly on the name assigned to the product concerned.
- Click on the Manage button.
- Click on Edit name:
- Enter the desired name.
- Click on Save.
Link to this FAQ:
Has this FAQ been helpful?
This guide covers data protection regulations in Switzerland and Europe and the measures taken by Infomaniak to secure your customer data and data within Web Hosting and Mail Services.
Understanding the difference between data security and data confidentiality
Data security aims to prevent any unauthorized access to your information. It relies on measures such as encryption, firewalls, or VPNs. A security breach can have disastrous consequences: imagine if a hacker steals your entire customer database and demands a ransom to recover it. This type of attack – ransomware – can paralyze a business overnight.
Data confidentiality concerns who can access your information and how it is used. Even if your data is secure against hacking, it can be collected, analyzed, and resold… legally.
Example: you carefully store your customers' information, but unbeknownst to you, a service you use shares – anonymously – this data with third parties. Result? Your competitors can obtain valuable analyses of your market and target your own customers without ever needing to hack.
LPD & GDPR
In Switzerland, the LPD (Federal Data Protection Act) and nLPD (for the "new Law" in effect since September 2023) protect the confidentiality of residents by regulating the collection and processing of personal data by organizations.
On the other hand, the GDPR (General Data Protection Regulation) of the EU, in effect since May 2018, influences global companies processing the data of European residents, including in Switzerland. While the LPD applies to the data of Swiss residents, the GDPR concerns that of EU residents. Swiss companies managing European data must comply with the GDPR requirements, including the designation of a Data Protection Officer and the conduct of Impact Assessments in case of risky processing.
Your role as an Infomaniak Client
Regarding the hosted data that belongs to you — and especially if it contains personal data of your visitors, contacts, or customers — it is your responsibility to ensure its compliance.
When processing this personal data, it is essential to inform users about the purpose and methods of this processing. This is usually done through a privacy policy or a data processing agreement (DPA).
Agreement between data controller and processor
A DPA (Data Processing Agreement), called in German AVV (Auftragsverarbeitungsvertrag), in Italian ATD (Accordo di Trattamento dei Dati) and in Spanish CTA (Contrato de Tratamiento de Datos), translates to Data Processing Agreement or Personal Data Processing Contract.
It is a mandatory contract provided for by the GDPR between a data controller and a processor. It defines the purpose, duration, and nature of the processing, as well as the obligations and security measures. Its objective is to protect the personal data entrusted to a service provider.
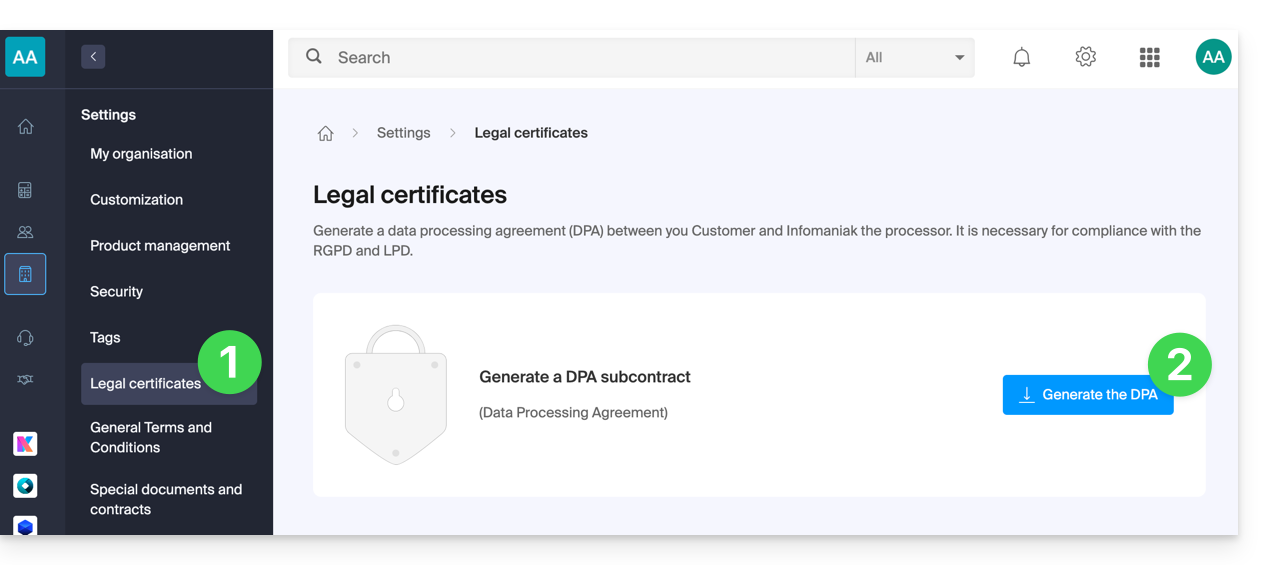
This GDPR certificate (in PDF format) can be generated and downloaded from the Manager (accessible to organization users who are owners or administrators):
- Click here to access DPA management on the Infomaniak Manager (need help?).
- Click the Generate button to download the customized PDF document:
Here are some tips on this subject:
- Inform about all data processing, not just those related to the website.
- Ensure easy access to the privacy statement on the website, for example in the footer of each page.
- In general, it is not necessary to obtain the user's approval for privacy statements (e.g., for forms); it is sufficient to indicate where to find the statement (example Site Creator).
- Keep in mind that new, more in-depth information rules may require adjustments to existing privacy statements.
It is crucial to differentiate between the security of the infrastructure where your data is hosted and the management and implementation of your data. As a host, Infomaniak acts as a subcontractor for your GDPR obligations. In this context, its privacy policies and cookie usage, as well as its terms and conditions, provide the necessary guarantees regarding its compliance as a subcontractor.
If necessary, you can find professionals or online guides to help you through the compliance process.
Infomaniak's Role
Like companies that work with user data, Infomaniak must comply with the LPD and, because some of these users are European citizens, the GDPR as well:
- the data privacy policy details the data that Infomaniak retains to provide and execute its services
- the policy related to the protection of your personal data describes Infomaniak's commitments as a subcontractor that hosts all of your data, including personal data
These commitments, as outlined in the general terms and conditions and specific terms and conditions, are as follows:
- to keep your data within data centers located exclusively in Switzerland and to never transfer your information outside of these infrastructures
- to apply rigorous security standards and to continually improve processes to ensure a high level of security across all services
- to promptly inform you in case of a data breach
- to ensure transparency with you when Infomaniak uses subcontractors who may process your data
- to strengthen and develop physical security measures to prevent any unauthorized access to the infrastructures where your data is stored
- to implement physical and/or logical isolation systems (depending on the services) to separate the hosting of different clients; additionally, Infomaniak conducts annual penetration tests to ensure data integrity between clients
- to demonstrate a high level of reactivity in securing the systems under its responsibility
Manage cookies on the infomaniak.com site
When you visit the page infomaniak.com a choice must be made for the acceptance of certain cookies. To modify this choice later, access your preferences from the footer of the site: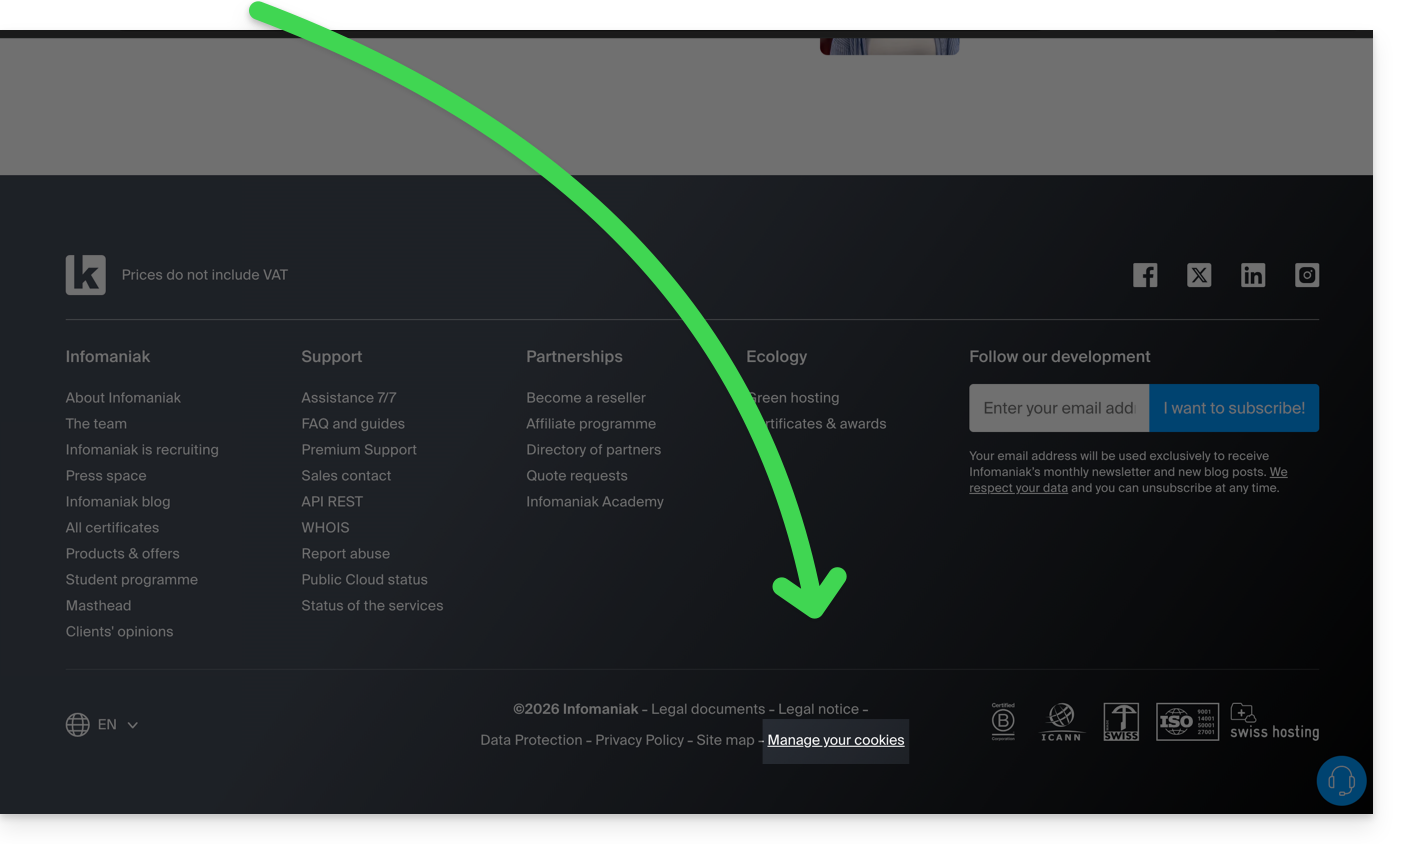
Link to this FAQ:
Has this FAQ been helpful?
This guide details the resource limit errors that can be encountered when managing and visiting a website.
Preamble
- Resource limits are set to maintain the integrity, stability, and performance of the shared server, while ensuring a fair experience for all users.
- If a website or application requires significantly higher resources, it may be necessary to switch to a Cloud Server or another type of virtual hosting where resources are allocated more flexibly.
Error origins
Fatal error: Maximum execution time of 30 seconds exceeded
This error occurs when the server has set an execution time limit for scripts, usually to avoid tasks that take too long. For example, if a script attempts to resize many large images in a single operation, this can exceed the allowed execution time limit. The server imposes this limit to ensure a quick response to user requests. The path often mentioned in the error can indicate a more precise origin (for example Fatal error: Maximum execution time of 30 seconds exceeded in /home/www/1234567abc/web/wp-includes/media.php on line 123)
memory_limit exceeded
This error occurs when the script or application uses more memory than allocated. This can happen when a script processes a large volume of data or when there is a memory leak. For example, an image management script can consume more memory than allowed, resulting in this error.
Resolution tips
A few tips to resolve these errors:
- Check the scripts that make multiple connections to the server to display data.
- Optimize the affected script(s) so that they require fewer resources.
- Increase the limits of the affected site to allow the script to do everything it needs to and/or limit the number of simultaneous connections (especially on a Cloud Server where limits (RAM, execution time, simultaneous connections) can be significantly increased).
- Migrate your hosting to a Cloud Server.
Also refer to this other guide.
Link to this FAQ:
Has this FAQ been helpful?
This guide helps you diagnose and resolve the error "Your connection is not private" (or NET::ERR_CERT_AUTHORITY_INVALID). This security alert can affect both visitors to a site and its administrators.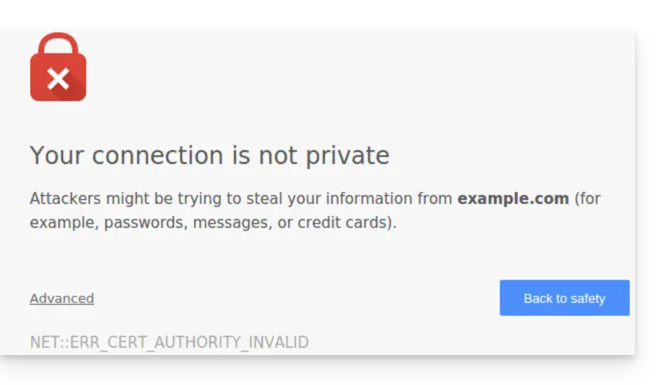
Preamble
- This alert is a protection mechanism for your browser.
- It indicates that a secure connection could not be established with the server for one of the following reasons:
- The site does not have an SSL/TLS security certificate.
- The installed certificate is expired or misconfigured.
- The connection between your device and the server is intercepted or disrupted.
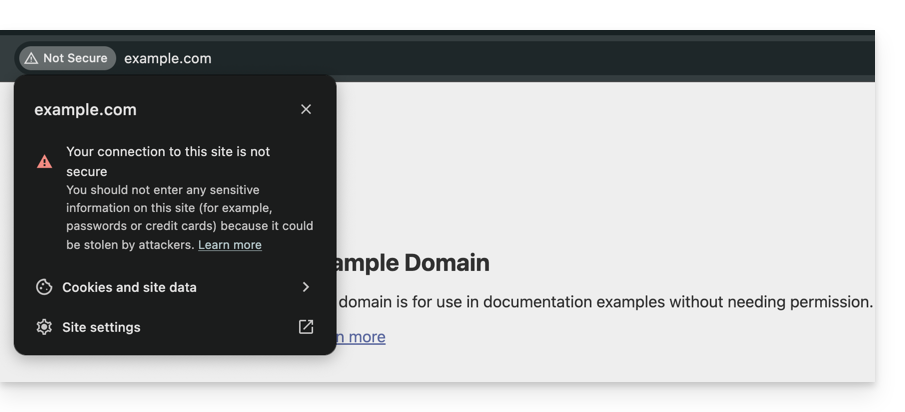
- Warning: on a site displaying this error, the data you enter (passwords, card numbers) are not encrypted and can be intercepted by third parties.
Solutions for visitors
If you encounter this error on a site you do not manage, the problem may sometimes come from your own configuration. Here are the points to check:
- Check the time on your device: if your computer or smartphone is not set to the correct date/time, the certificate validation will systematically fail.
- Test in private browsing: if the error disappears, clear your browser's cache and cookies.
- Check your network: avoid public Wi-Fi networks that may force their own login portals.
- Antivirus and Firewall: some security software analyzes HTTPS connections and can cause false positives.
Solutions for Infomaniak site owners
If you are the site administrator, you must ensure that your SSL certificate is active and valid to cover all your domain names.
1. Is the SSL certificate installed?
If your site is still in HTTP, you need to generate a certificate (free via Let's Encrypt or paid). Learn about the certificates available at Infomaniak.
Important: if you have added aliases (secondary domain names) to your site after installing SSL, you must update the certificate to include them.
2. Check validity and expiration
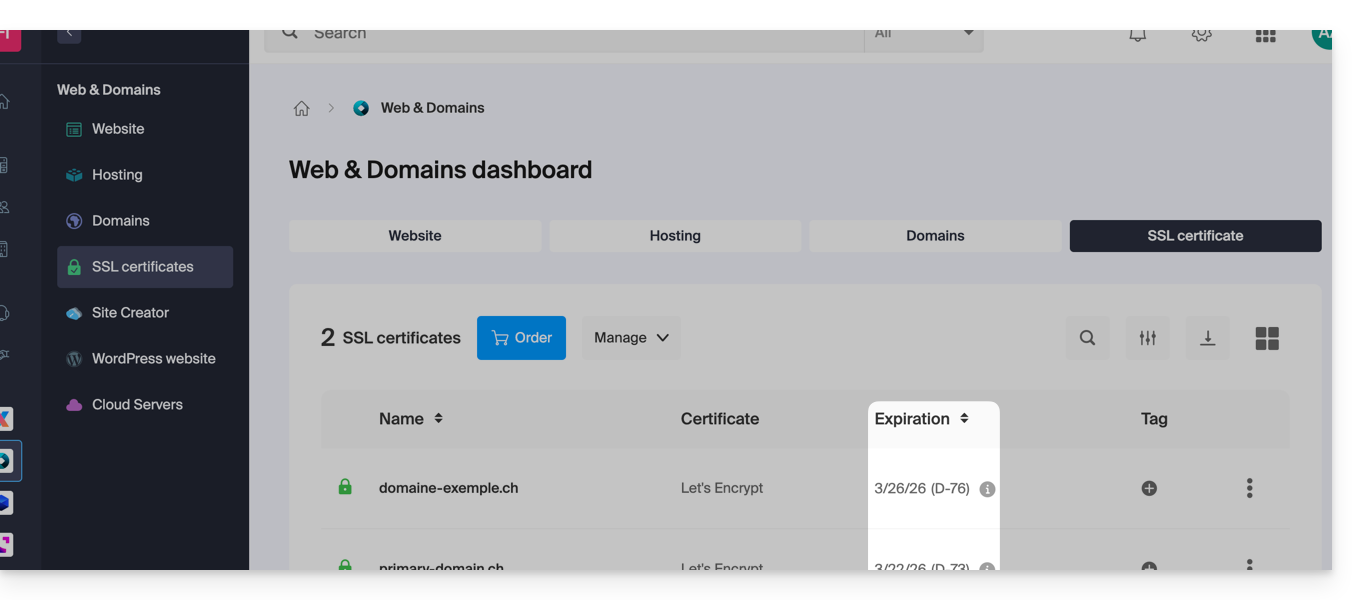
At Infomaniak, certificates are renewed automatically, but a technical issue may sometimes occur. To check the status of your certificate:
- Click here to access the management of your certificates in the Manager (need help?).
- Check the status and expiration date in the dashboard:
3. Force HTTPS and fix "Mixed Content"
If your certificate is valid but the error persists (or the padlock is not green), it is possible that your site is still loading elements (images, scripts) over HTTP. To fix this, refer to this other guide.
Link to this FAQ:
Has this FAQ been helpful?