Knowledge base
1000 FAQs, 500 tutorials and instructional videos. Here, there are only solutions!
This guide explains how to create an event (within the framework of the Infomaniak ticketing system) that will be broadcast via the Infomaniak streaming service.
Prerequisites
- Have an Infomaniak ticketing system to create the event.
- Have an Infomaniak video streaming service to broadcast the event. Are you unsure about your monthly bandwidth needs?
Stream your event
A dedicated page has been set up to ensure that only people who have purchased a ticket to your event will have access to the event.
Creating a virtual event
To do this:
- Click here to access the management of your product on the Infomaniak Manager (need help?).
- Click directly on the name assigned to the ticketing system concerned by the event.
- Click on Programming in the left sidebar menu.
- Click on Events in the left sidebar menu.
- Click on the Add an event button.
- Enter the information related to your event.
- At the Location step, choose: No location or Virtual, then select: Broadcast the event live (livestreaming) and choose the streaming feed to broadcast your event:

Modifying an already created event
You can modify or add a location to an already created event, for example, to offer it for streaming:
- Click here to access the management of your product on the Infomaniak Manager (need help?).
- Click directly on the name assigned to the ticketing system concerned by the event.
- Click on Programming in the left sidebar menu.
- Click on Events in the left sidebar menu.
- Click on the event concerned.
- Click on the blue Modify button.
- At the Location step, choose: No location or Virtual, then select: Broadcast the event live (livestreaming) and choose the streaming feed to broadcast your event.
- To activate the seats for livestreaming, you will need to:
- Either click on the action menu ⋮ located to the right of the current rate, click on Modify and check the box: Live event (livestream) in addition to the box On-site event
- Or click on Add a zone, check the box: Live event (livestream) and indicate the number of seats available for livestreaming

- Click on Save.
The quantity of seats will influence the consumption of your Streaming Video offer. You can estimate the consumption based on the hours of broadcasting, the quality, and the number of viewers with the calculator. If you exceed your monthly consumption, the excess will be billed at CHF 0.20 per GB.
Link to this FAQ:
Has this FAQ been helpful?
This guide explains how to set up invoice payments (within the Infomaniak ticketing system).
Introduction
- This payment method will allow your customers to pay for their order later.
- Regardless of the payment method, you are the one who receives the money. Therefore, you must manually validate the order.
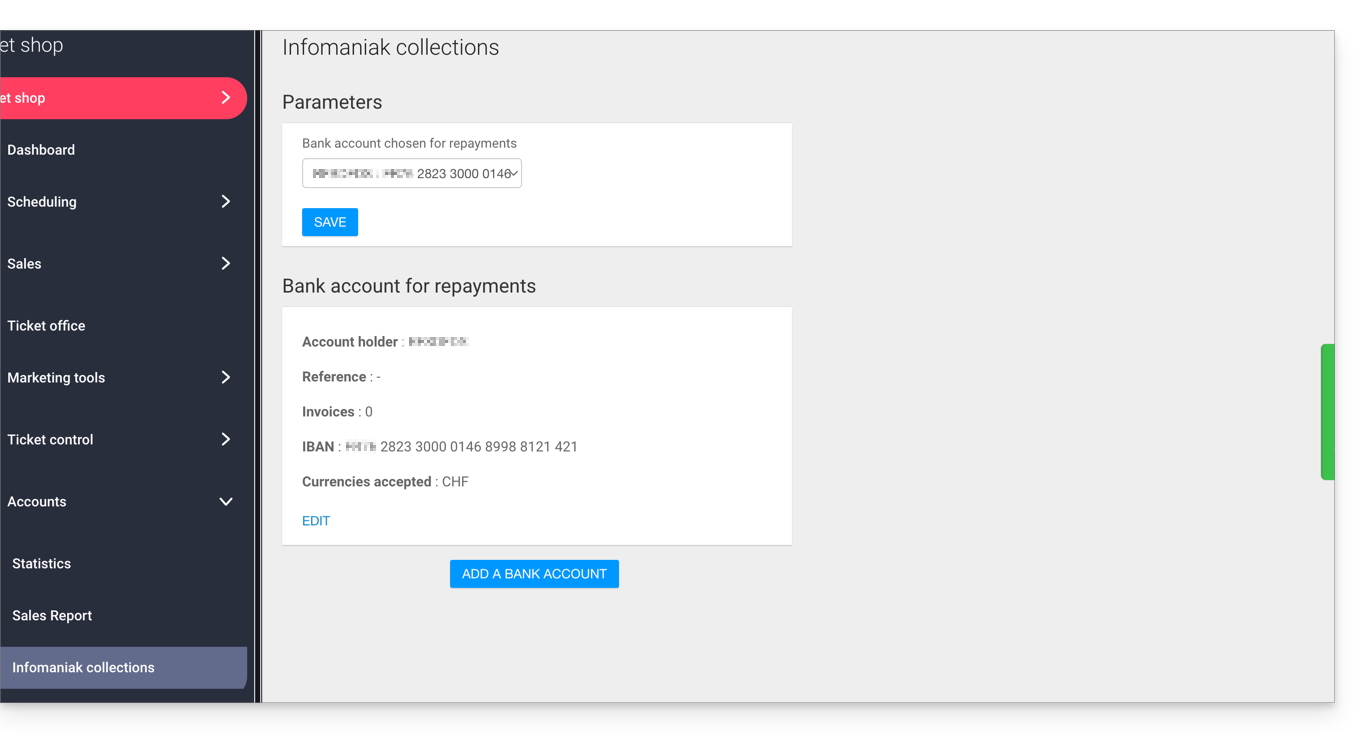
- In the case of a bank transfer, the payment will be directly credited to the RIB/IBAN configured in your ticketing system under Accounting and then Infomaniak Payment in the left-hand menu:
- This payment method is subject to a fixed fee of 0.20 CHF per ticket (see pricing).
Activate the payment method in the Ticketing system
To do this:
- Click here to access the management of your product in the Infomaniak Manager (need help?).
- Click directly on the name assigned to the ticketing system for the event.
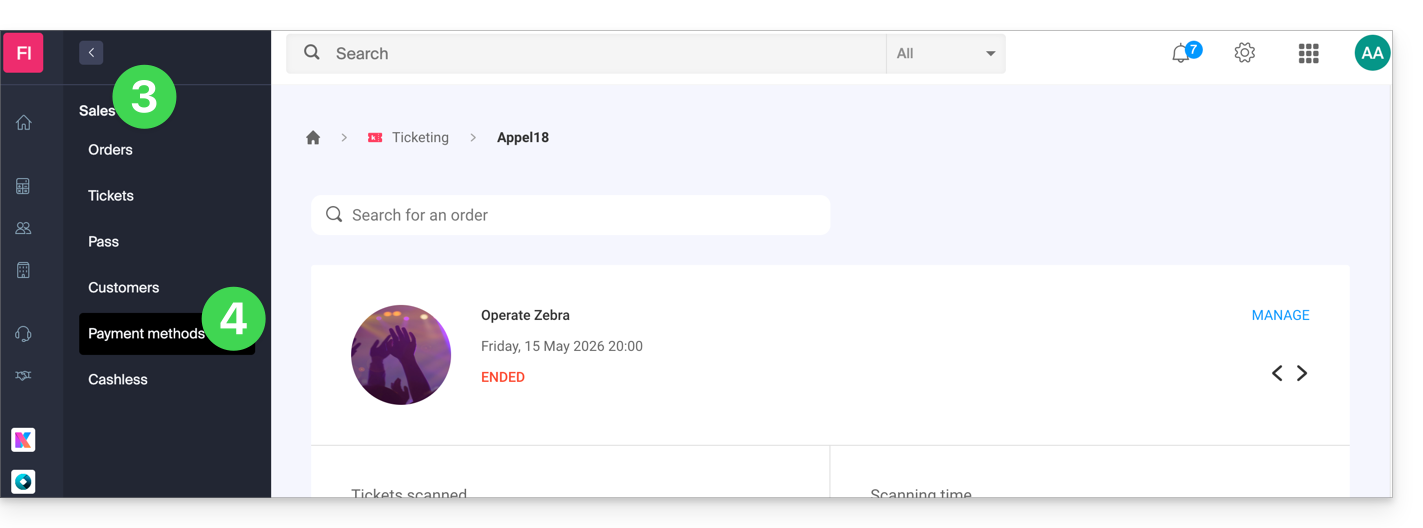
- Click on Sales in the left-hand menu.
- Click on Payment methods in the left-hand menu:
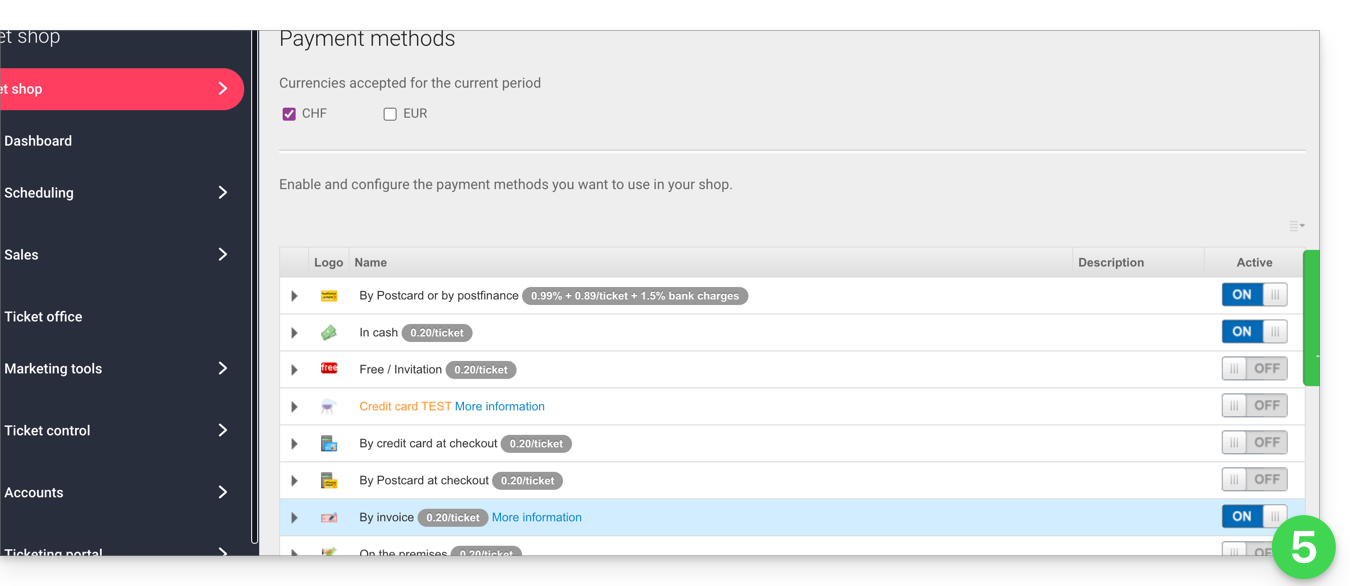
- Switch the toggle button to ON to the right of the Invoice item:
Configure the method
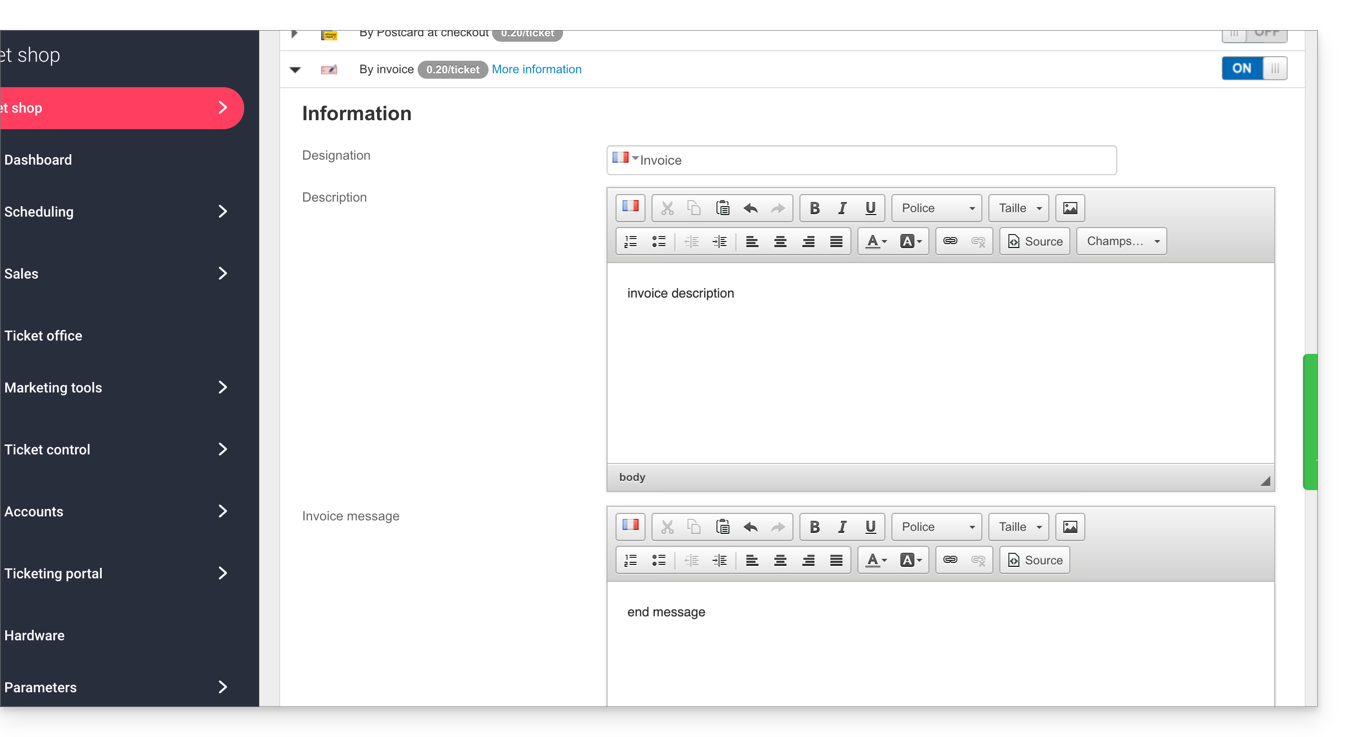
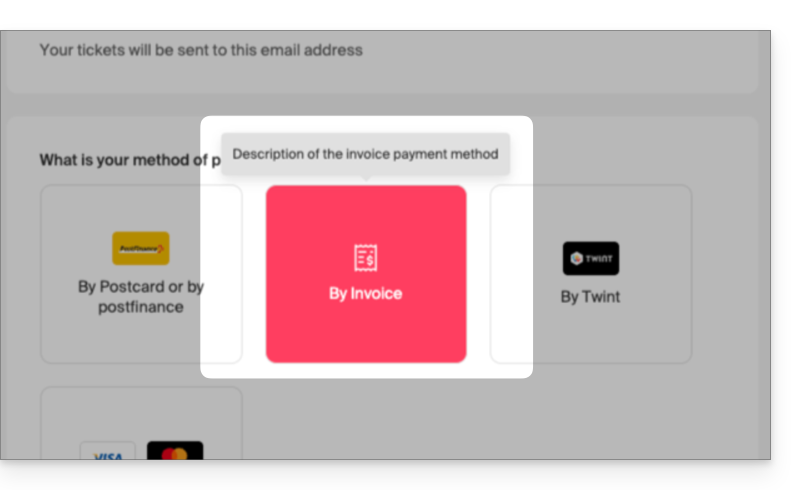
Click on the arrow to the left of the Invoice mode:
- The first section allows you to define the name of this payment method, add a description, and add a message to the end of the generated document:
- Here is a preview of the result:
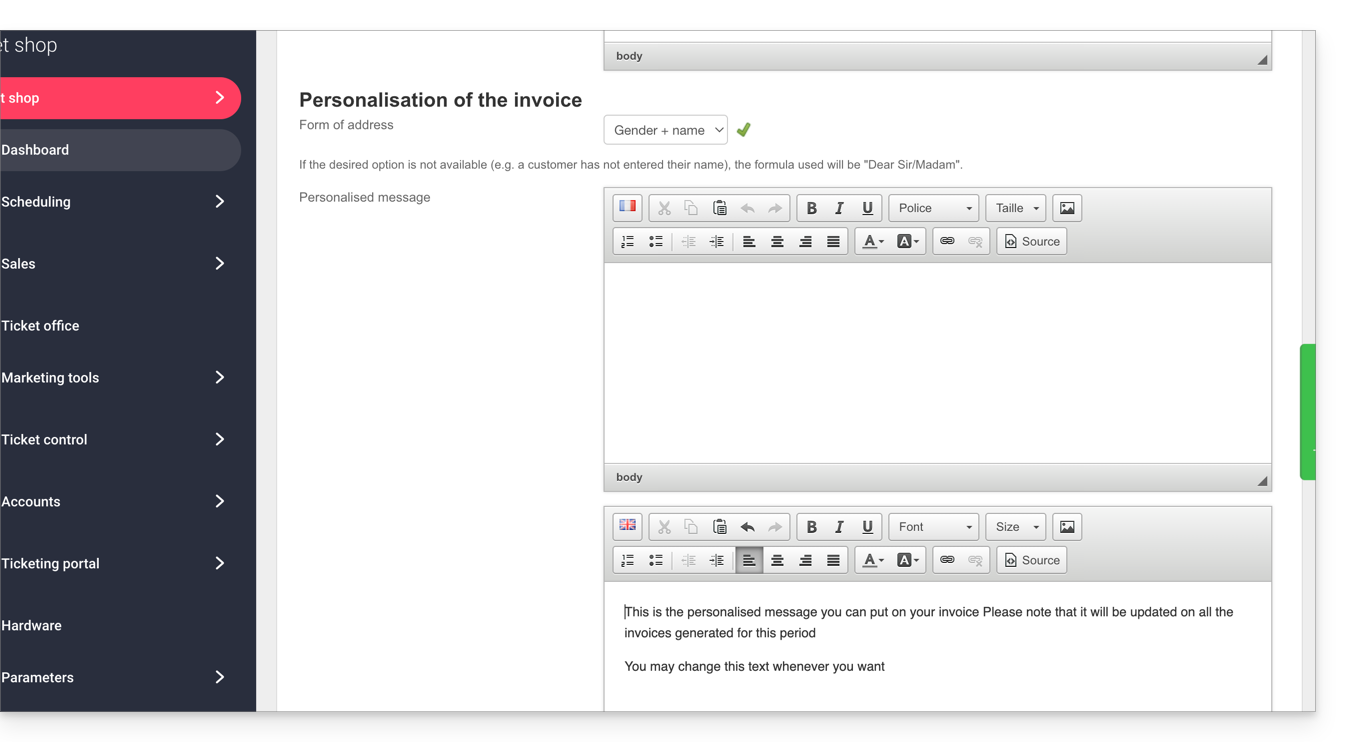
Customize the invoice payment method
You can customize the invoice to address it to the customer and include a personalized message:
- If you want to address the invoice directly to the customer, in the form Mr. Smith, please ensure that the customer records have the Title and Name fields filled in:
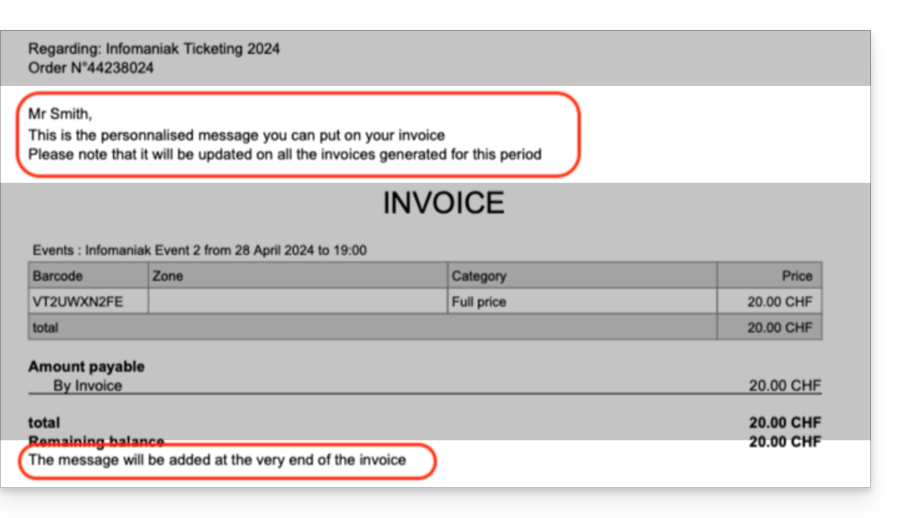
- Here is a preview of the result:
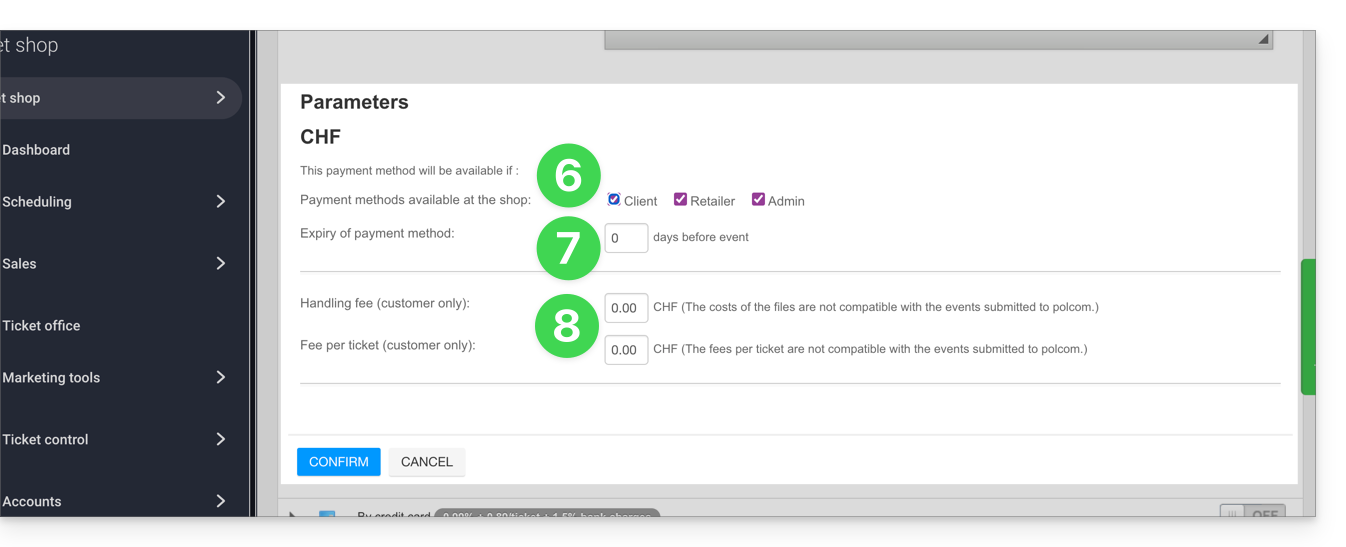
The following settings allow you to manage the use of this payment method:
- The ability to choose the availability of this payment method:
- customer: for online orders by visitors
- reseller and administrator: for the web and mobile interface
- The ability to set a deadline for using this payment method when placing an order.
- It will always be possible to pay an invoice generated before the deadline, but it will no longer be possible to choose this payment method when placing orders during the period indicated in this field.
- Add processing fees to compensate for the management costs of this payment method.
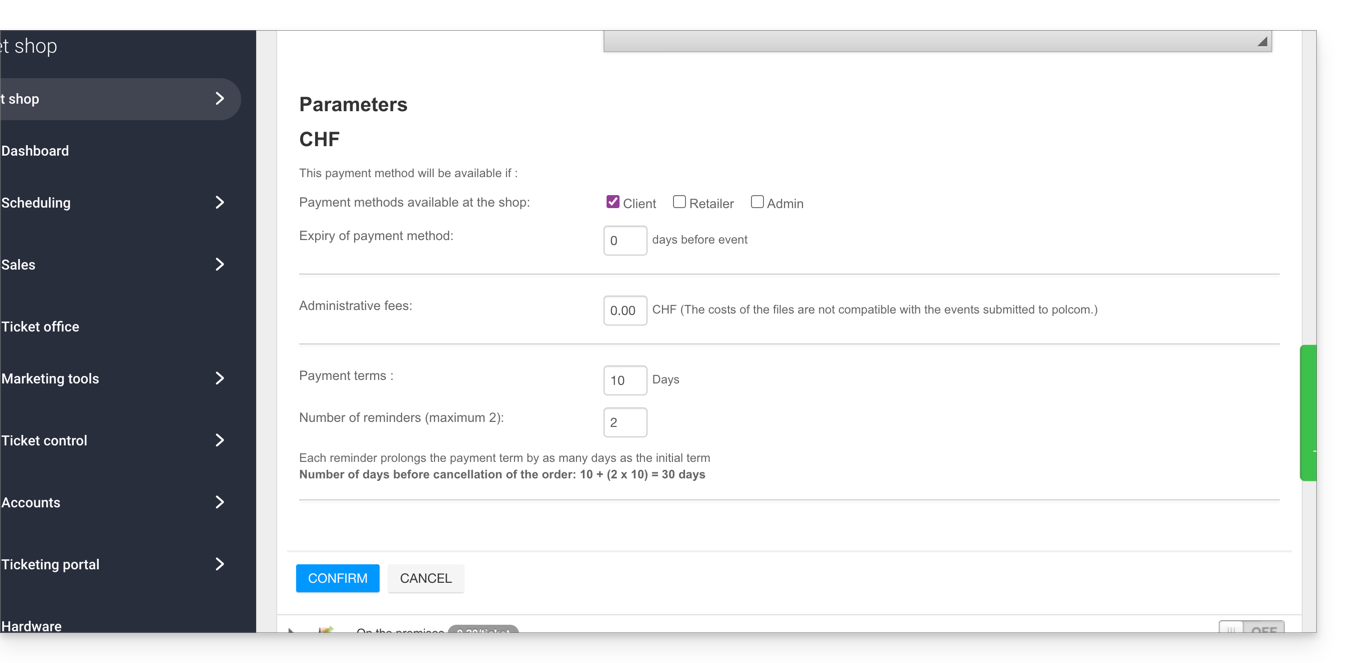
Manage the Payment Due Date for Invoices
To ensure that seats are not blocked indefinitely by this payment method, you can set a payment deadline. Refer to this other guide if you are looking for information on the number of days before each reminder and the number of reminders.
Validate an Order Pending Payment
There are several ways to validate a payment method:
From the Infomaniak Manager
- Click here to access the management of your product in the Infomaniak Manager (need help?).
- Click directly on the name assigned to the ticketing system for the event.
- Click on Sales in the left-hand menu.
- Click on Orders in the left-hand menu.
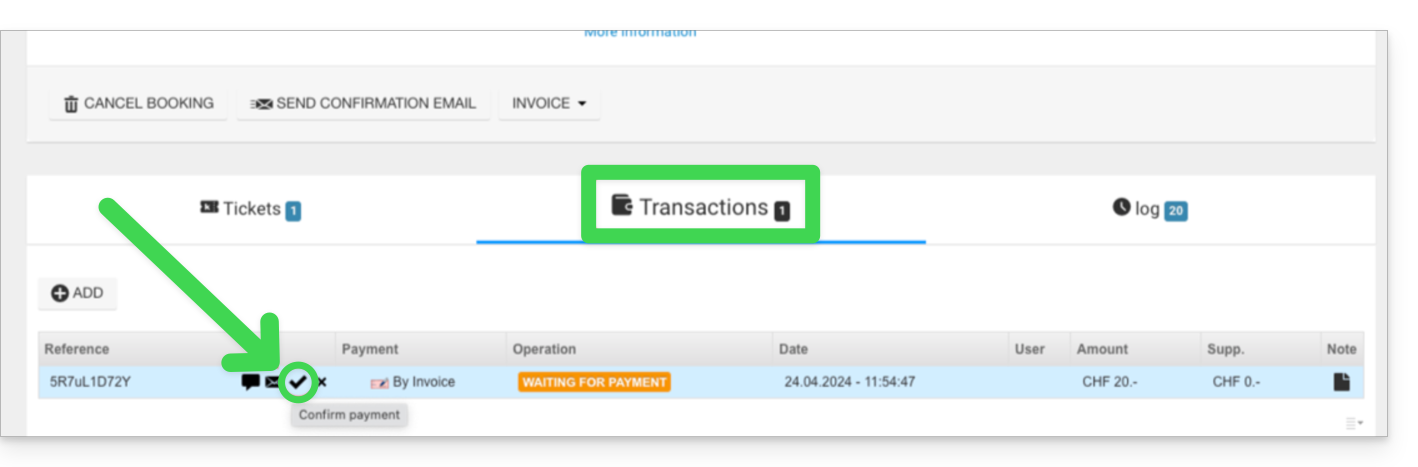
- Click on an order pending payment.
- Click on the Transactions tab, hover over the pending invoice payment, and click on the Validate icon:
From the Web Control Panel
- Log in to the Web Control Panel.
- Search for an order awaiting payment by:
- Order number
- Customer name
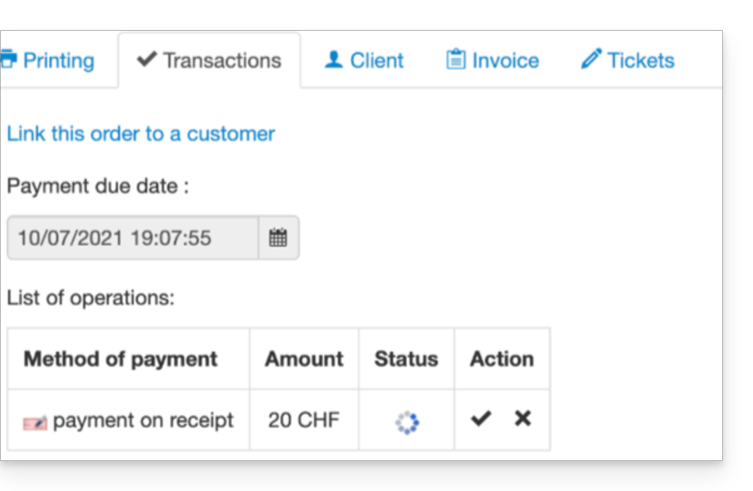
- Click on the order awaiting payment.
- Go to the Transaction tab and click on the Validate icon:
From the Mobile Control Panel
- Log in to the Mobile Control Panel.
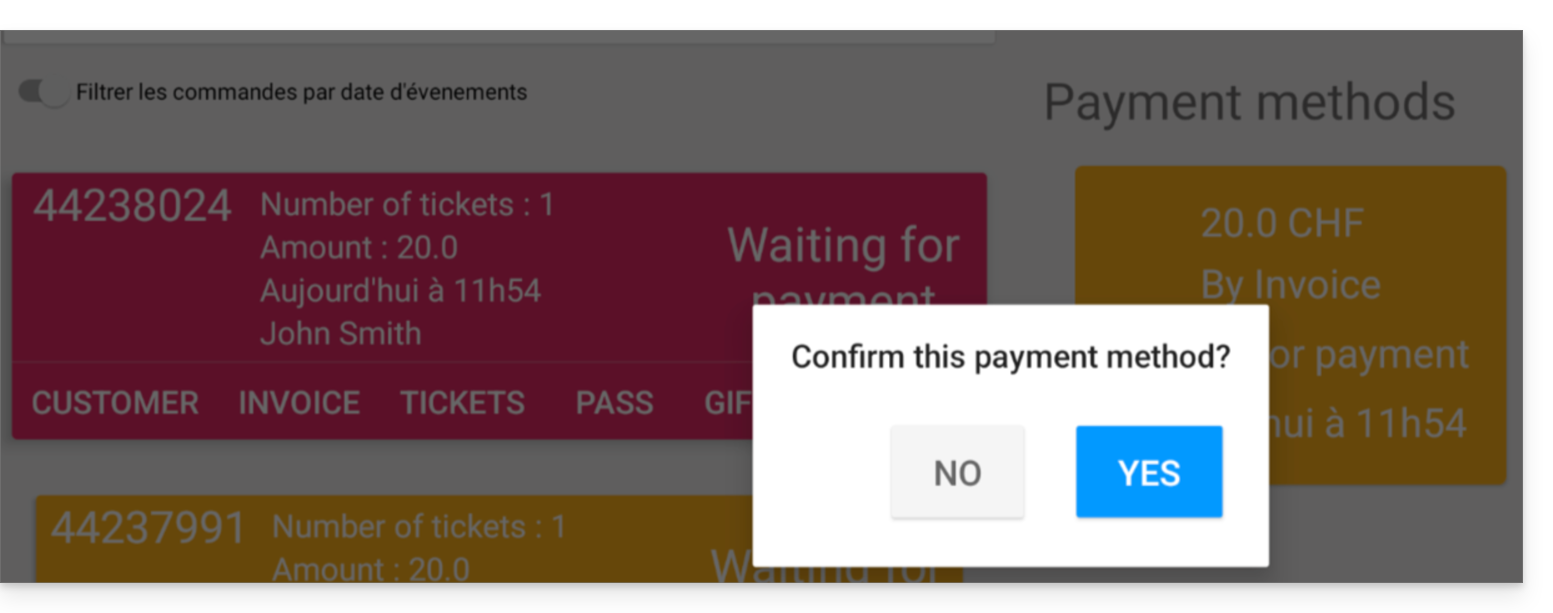
- Search for an order awaiting payment.
- From the list of payment methods, choose the one to validate and select Confirm:
Link to this FAQ:
Has this FAQ been helpful?
This guide explains how to set up the Exchange payment method (as part of the Infomaniak ticketing system).
Introduction
- This payment method will allow your customers to exchange the tickets they have for new tickets.
Activate the payment method in the Ticketing system
To do this:
- Click here to access the management of your product in the Infomaniak Manager (need help?).
- Click directly on the name assigned to the ticketing system for the event.
- Click on Sales in the left-hand menu.
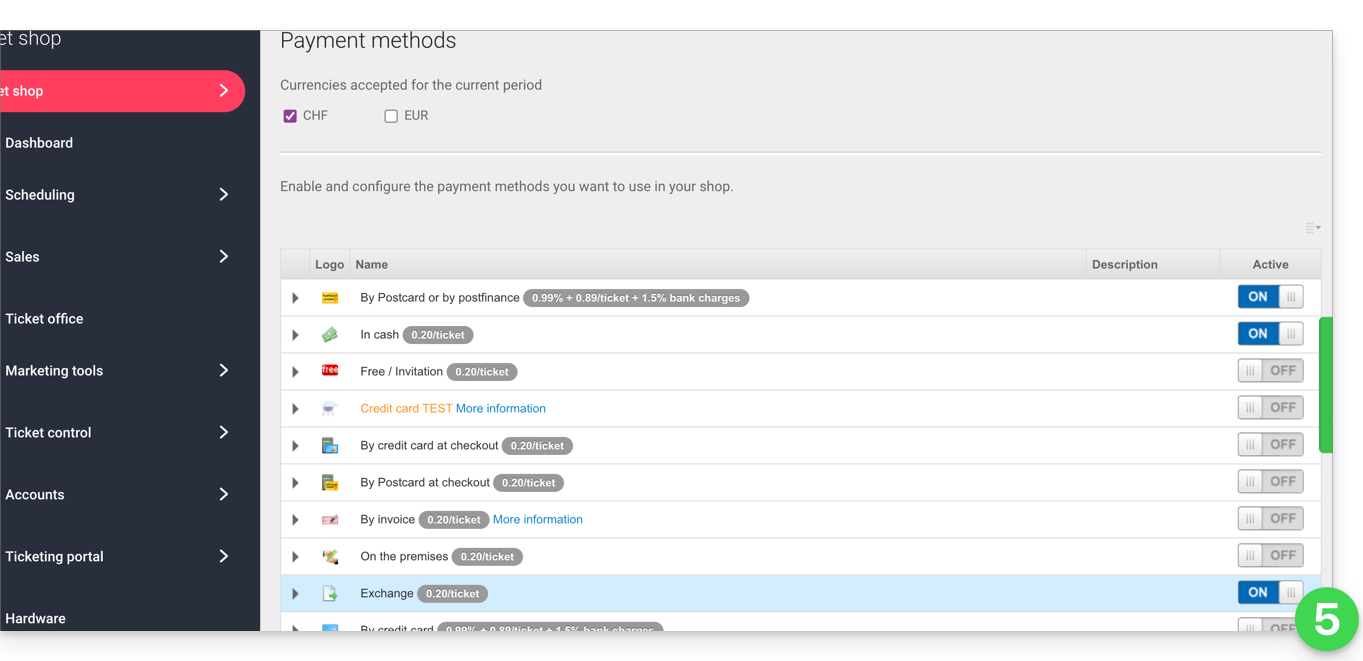
- Click on Payment methods in the left-hand menu:
- Switch the toggle button to ON to the right of the Exchange item:
- Click on the arrow to the left of the Exchange method and then check the customer box to enable this option for customers in the online ticketing system; they will then be able to make exchanges directly from your online ticketing system.
- Define the number of days before the event after which customers will no longer be able to exchange tickets.
- This value prevents customers from changing tickets on the online ticketing platform too close to the event date.
- Next, specify the fees associated with this operation that the customer will have to pay to exchange the tickets:
Once the option is activated, your customers will find the option to exchange tickets at the bottom of the ticketing page.
Link to this FAQ:
Has this FAQ been helpful?
This guide explains how to connect the Zapier management tool to the Infomaniak ticketing system.
Preamble
- Depending on the volume of customers and/or events you manage, you may need to subscribe to a paid plan for Zapier and/or your CRM.
- Infomaniak cannot be held responsible for these costs.
- For additional help, contact the support of the software used or a partner.
Establish the connection with Infomaniak Ticketing
To do this:
- Click here to access Zapier.com.
- Create an account if necessary.
- Create a new Zap (need help?).
- When choosing the applications to use, type Infomaniak Ticketing in the search bar and select the option.
- When Zapier asks you to log in, use the credentials and password of the Infomaniak account linked to the Ticketing.
Link to this FAQ:
Has this FAQ been helpful?
This guide explains how to perform a ticket exchange as a visitor via the Infomaniak Ticketing tool.
Preamble
- If you have chosen the wrong date or tickets, this operation will allow you to exchange them and order new tickets on the ticketing platform.
Provide the tickets to be exchanged
To do this:
- Go to the organizer's ticketing platform, as when ordering the tickets.
- Scroll down the page and click on the Exchange tickets button:

- On the new window, enter the email address used during the booking, and the number(s) of your tickets, then click on Validate:

- Click on Exchange more tickets or Order tickets to proceed to the next step.
Order the new tickets
To do this:
- Proceed as with a normal ticket order, by choosing the new event and date, as well as the number of tickets to order.
- When validating the basket, the exchanged tickets will be indicated as credits at the top of the page:

- Complete the order, and if necessary, settle the basket balance.
You cannot have a positive balance at this stage: the new order must have an amount equal to or greater than the total of the exchanged tickets. For refunds, you must contact the event organizer only.
Link to this FAQ:
Has this FAQ been helpful?
This guide explains how to install IDP PVC badge printers for printing tickets for your ticketing system.
Badge printers are designed to work with the mobile kiosk on the tablet as well as the web kiosk on your computer. It can be connected to the network or used directly by connecting a USB cable.
What do you want to do
Video Guide
Learn more
Link to this FAQ:
Has this FAQ been helpful?
This guide explains how to set up and use your sales pack with the Zebra printer for event and cinema tickets (as part of the Infomaniak ticketing system).
Installation and setup of your sales pack
Connecting the devices
- Plug in the power supply for the Samsung TabS tablet.
- Plug in the power supply for the Zebra printer.
- Plug in the Wifi or 4G terminal and ensure it is connected to the other devices.
Make sure the tablet is connected to the Infomaniak network.
Video Guide
Setting up the printer
- Open the printer using the opening buttons located on the sides:


- Insert the tickets into the slot at the back of the printer. For the ticket orientation, please consider the Infomaniak logos: the first one should come out on the left, and the second on the right. The ticket should be facing the correct way when it comes out from right to left.
 .
. 
- Turn off and then on the printer:

- Press the “Pause” button. Two green indicator lights will illuminate:
Printing tickets with the printer
Format verification
The printers are already configured for the ordered ticket format. If necessary, you can check the configuration by opening the menu in the upper left corner and going to Options. The Cinema ticket format option should only be enabled if the tickets will use this format (see below for calibration when changing the format).
Printing a ticket
To start printing, log in to the ticketing account from the tablet using the Infomaniak account username and password. The tablet will automatically connect to the ticket counter interface.
- Perform a “test” order or use an order from the “Order” menu.
- The printer (ZEBRAXX) should appear on the right side of the tablet.
- Press the printer icon to start printing:

Configuring the correct ticket on the printer
This section only concerns users who have a stock of tickets ordered before July 2024…
Since July 2024, Infomaniak has provided tickets with new separators in the form of a notch. If you still have older types of tickets, please watch the video below to configure your tickets correctly:
Learn more
Link to this FAQ:
Has this FAQ been helpful?
This guide explains how to set up and use your sales pack with the Zebra printer for tickets in show and cinema format (as part of the Infomaniak ticketing system).
Video Guide
Powering and connecting the terminal to the network
Connect the terminal
These Wi-Fi terminals are not routers and therefore require a connection to your wired network
To connect the terminal to your network, you will need to plug it in using the Ethernet connection:
- Connect the terminal (MAIN/48V) to the adapter in the POE slot:
- Plug the adapter into the internet network in the LAN slot:
Turn on the terminal
The terminal will turn on and the light will turn blue, indicating that the terminal is functioning properly:
Connect to the Infomaniak network
Once the terminal is turned on and connected to the network via Ethernet, the terminal will create a network named "Infomaniak".
Learn more
Link to this FAQ:
Has this FAQ been helpful?
This guide explains how to set up and use the 4G terminal to connect your sales terminal or scanners to the Infomaniak ticketing system.
Introduction
- The 4G terminal acts as an access point for your on-site sales terminals and scanners.
- It connects to a mobile network and creates a network to which tablets, printers, and scanners will connect.
- There is no need to use the RJ45 Ethernet connection to use the 4G terminal.
Setting up the 4G terminal
Prerequisites
- Sufficient mobile network coverage is required for the 4G terminal to function.
Refer to the video guide:
Operating the terminal
To do this:
- Press the button on the top of the device for about 4 seconds:
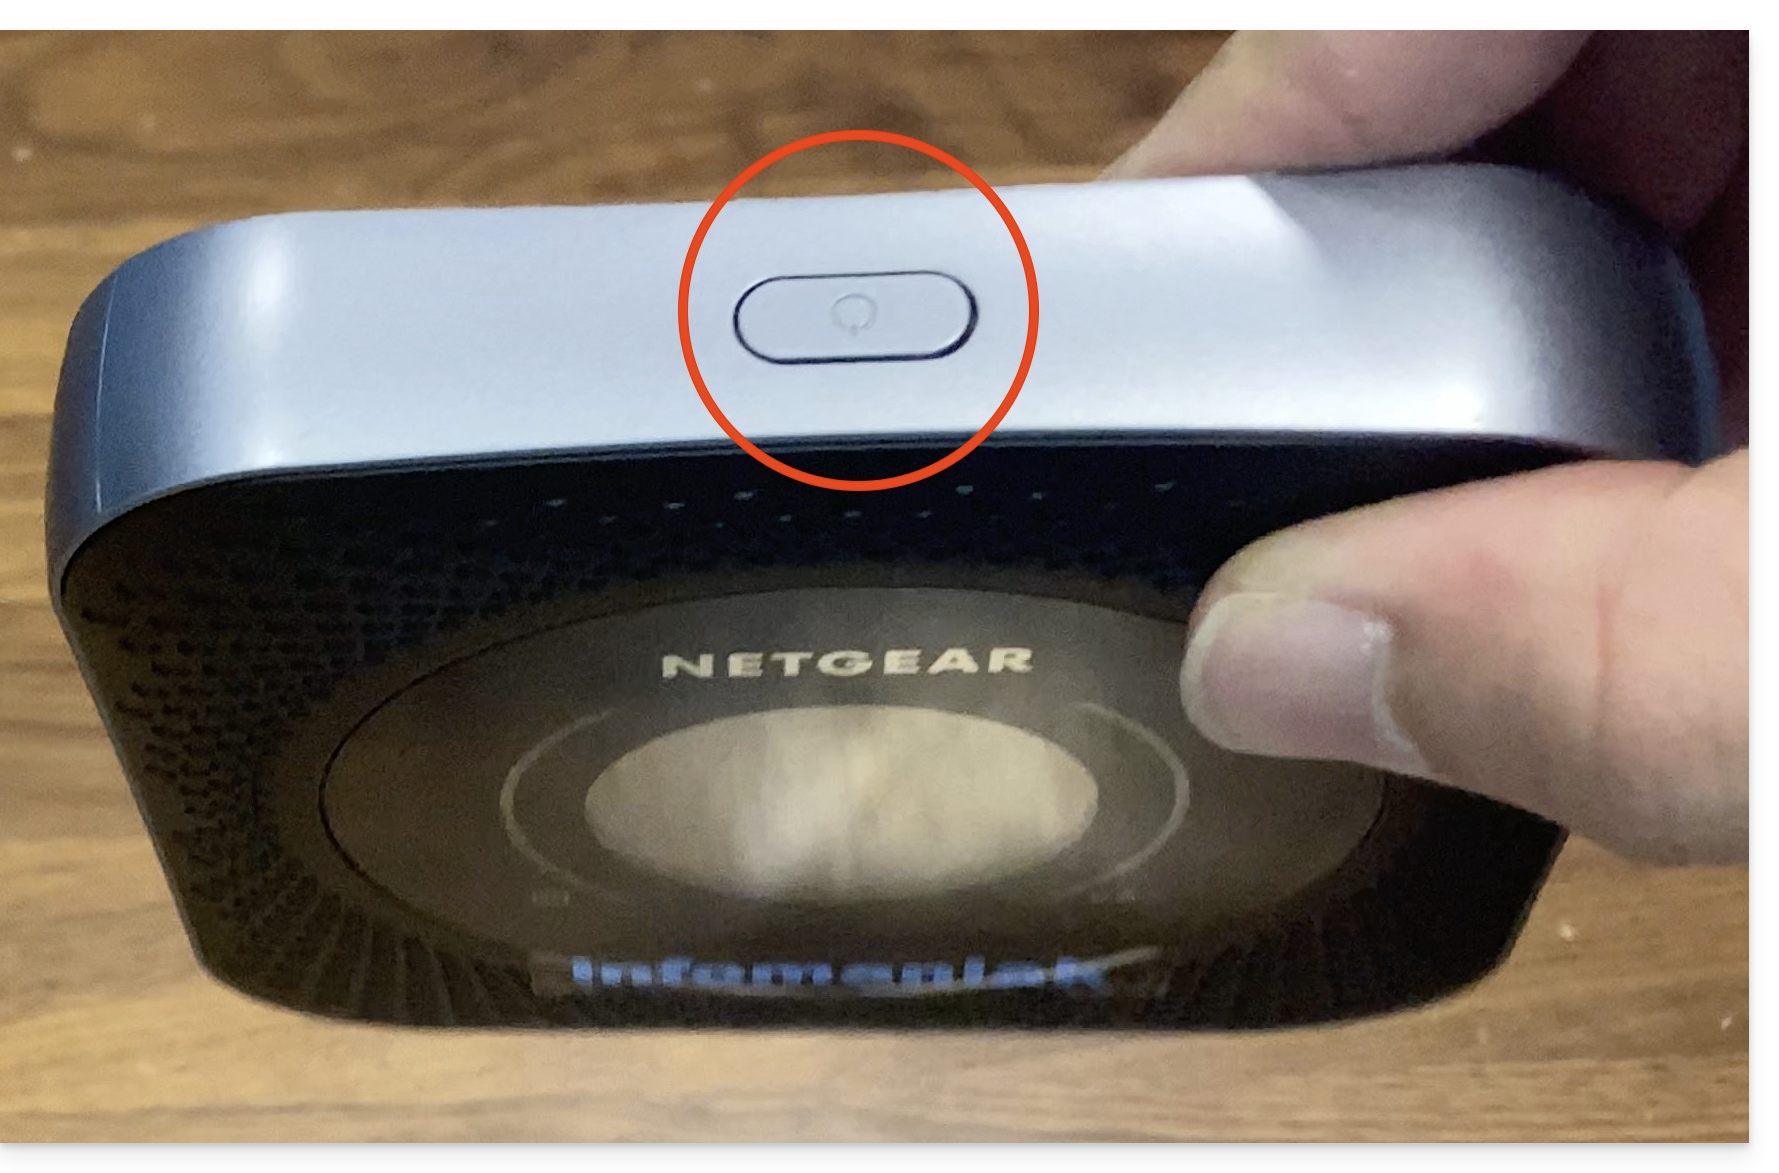
- The screen will light up:
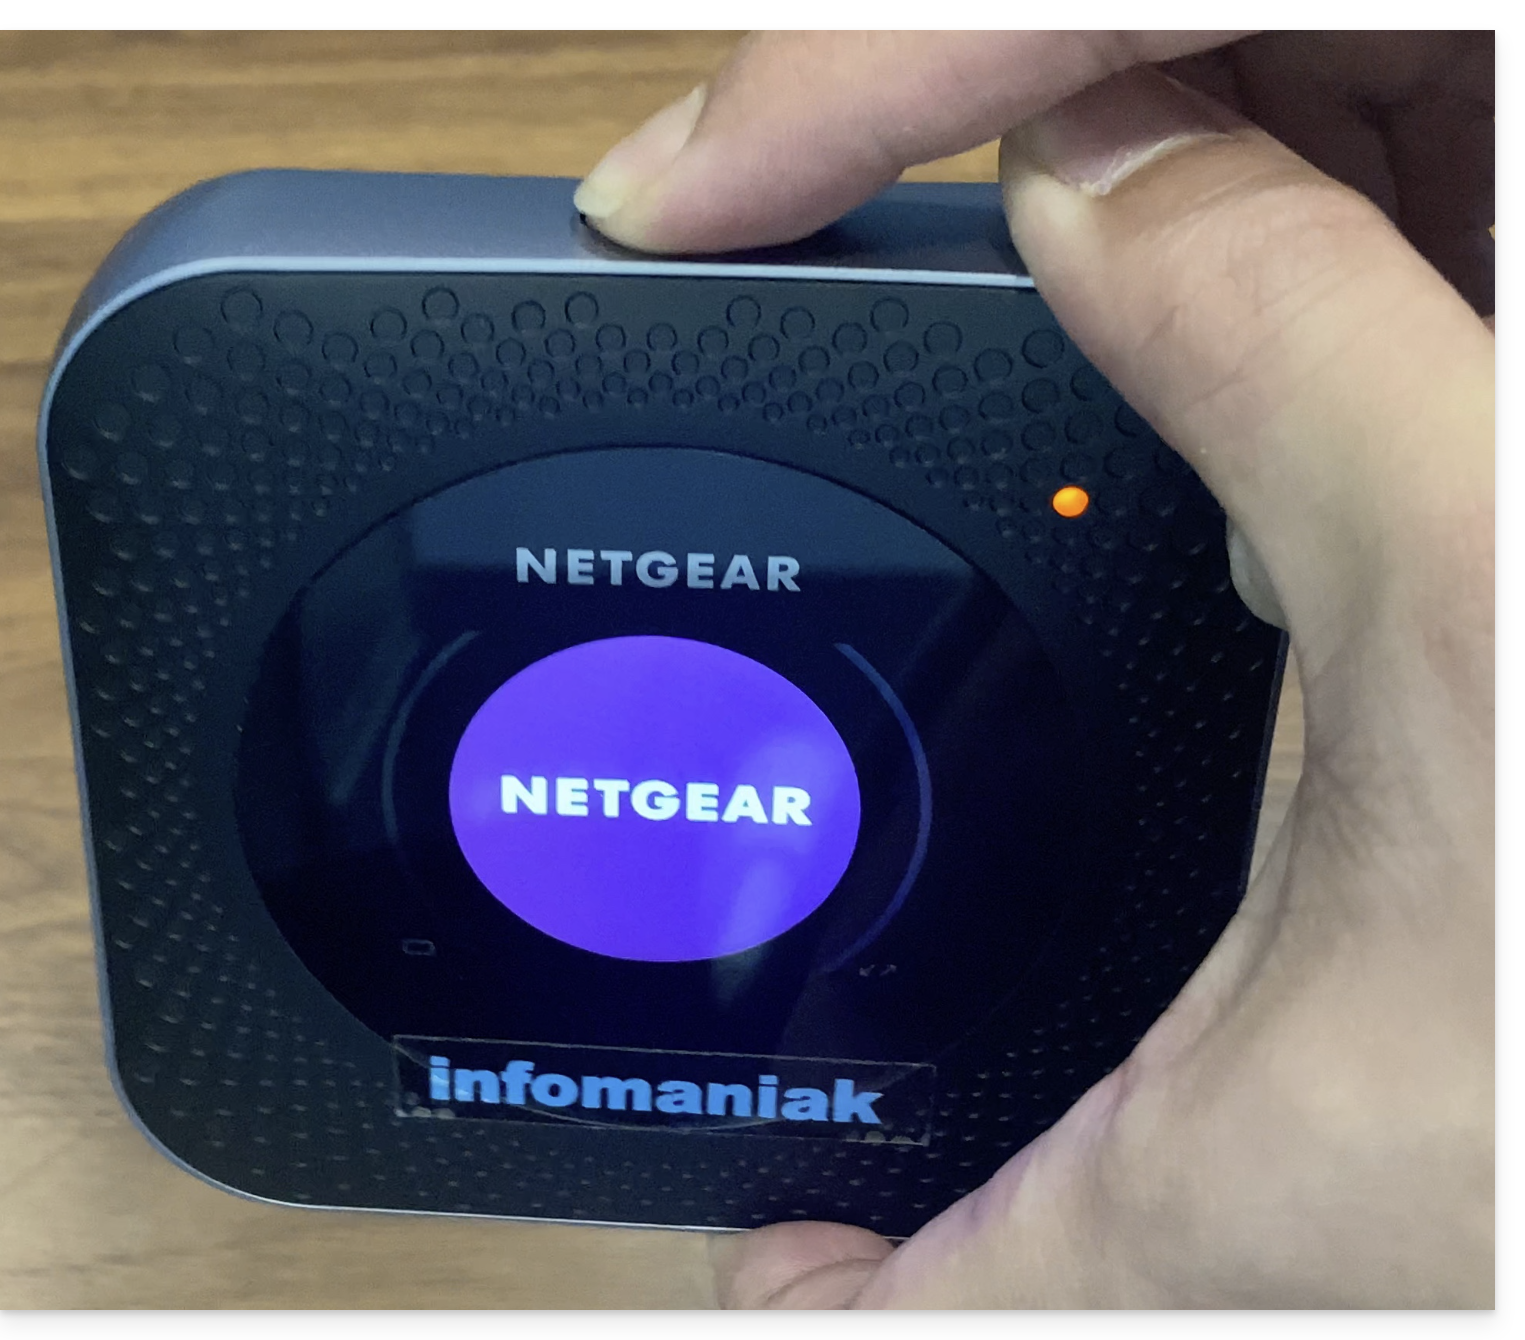
- The terminal automatically connects to the Swisscom network and is ready for use:
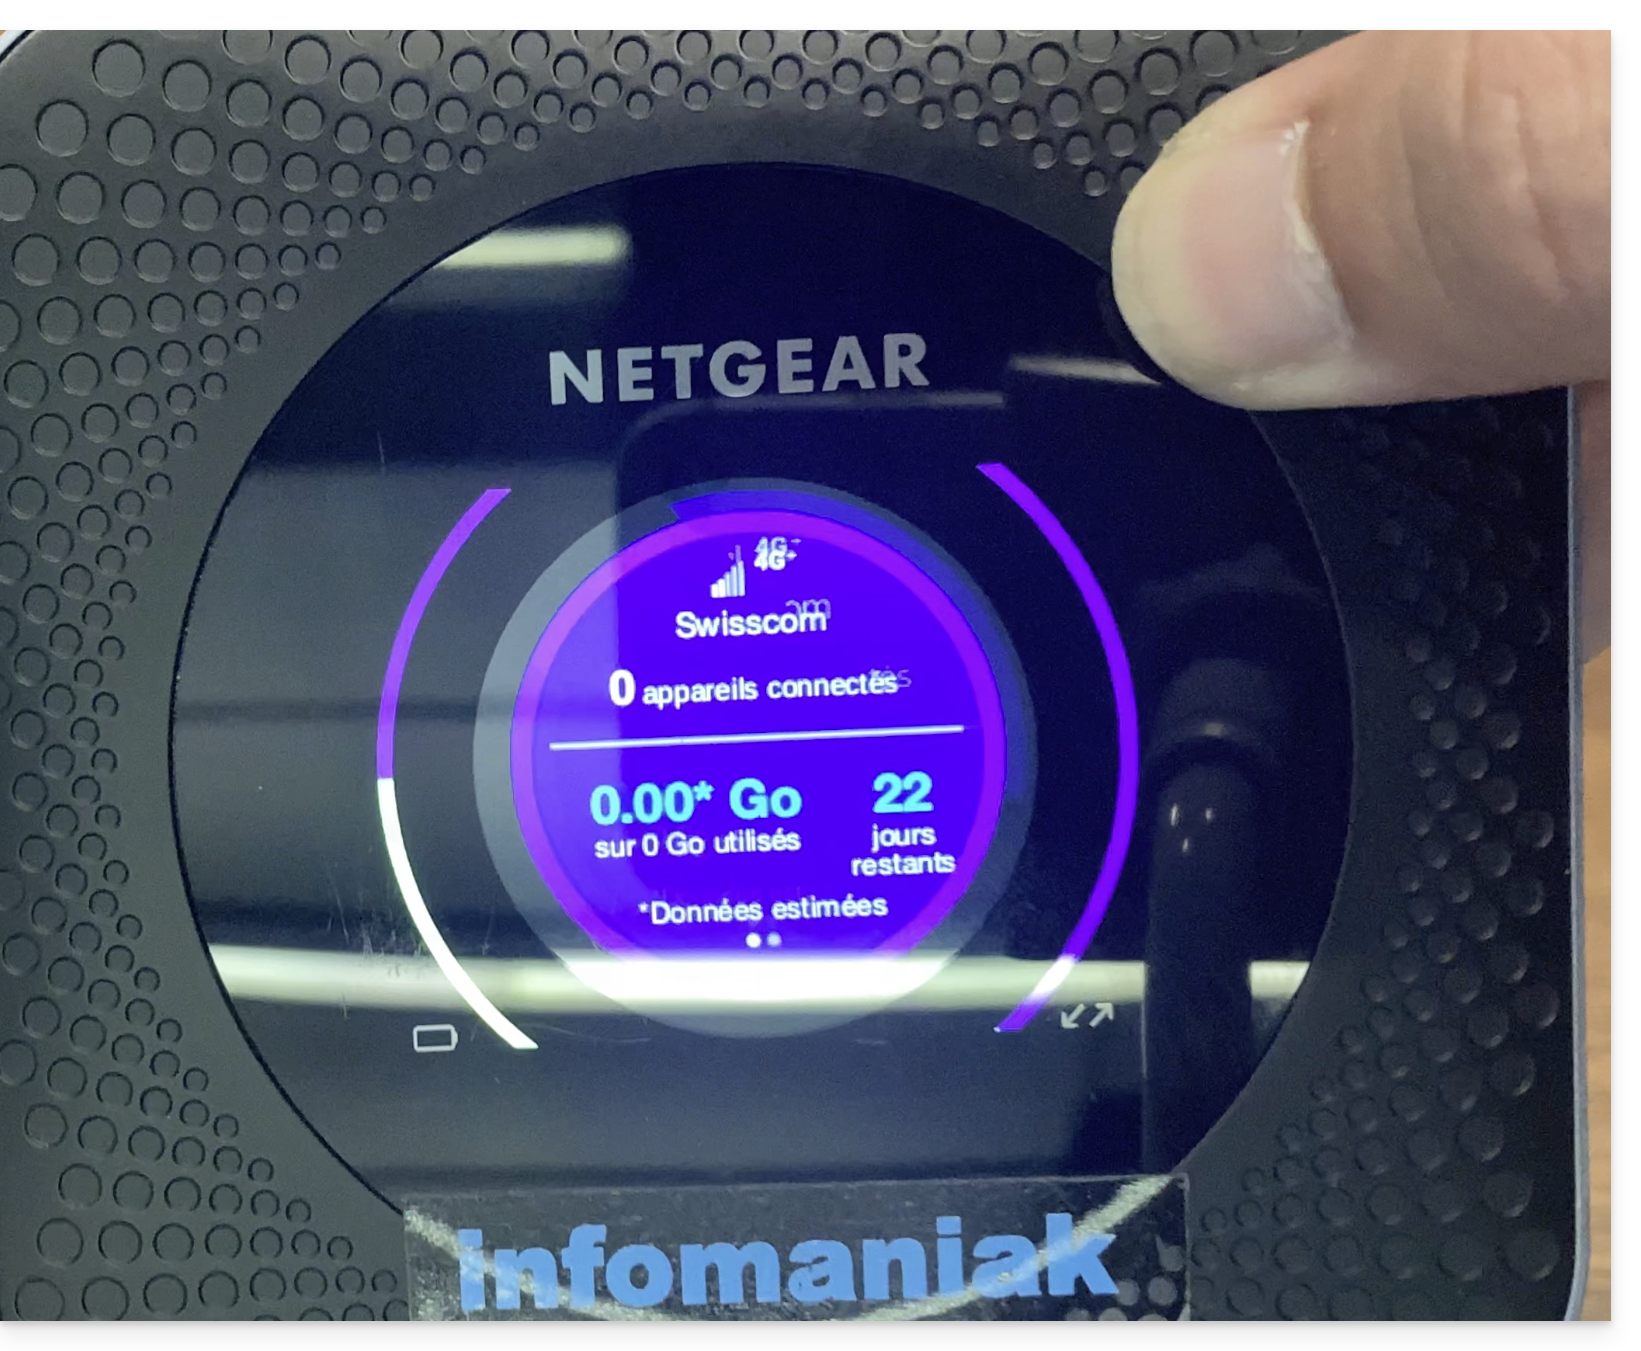
- You can check the number of devices connected to the terminal by pressing the button.
- The number of days remaining is a countdown to the end of the month and has no impact on the use of the terminal…
- Once the terminal is turned on and connected to the 4G network, it will create a network called Infomaniak.
- Infomaniak printers, tablets, and scanners will automatically connect to this network.
Link to this FAQ:
Has this FAQ been helpful?
This guide explains how to use scanners to check tickets for your event (as part of the Infomaniak ticketing system).
Configure the control tools
To activate your control tools on your ticketing:
- Click here to access the management of your product on the Infomaniak Manager (need help?).
- Click on Manage to the right of the Control Tools section:

- Choose the ticketing system for your control session.
- Click the Confirm button:

- Choose one of the control methods:

- Infomaniak Etickets scan mobile app (for iOS/Android smartphone or tablet).
- Rent a barcode/QR code reader.
- Paper printout (not recommended for more than a few dozen customers).
Use the scanner
Hardware prerequisites
- Connect the base power supply and place the scanners on it to charge them.
- The scanners are configured to automatically connect to the Infomaniak network generated by the WiFi and 4G access points
- If no connection is detected, check the connection in the device's Settings menu.
To do this:
- Log in to the mobile app using one of the following methods:
- Email and password of the Infomaniak user account with access to the ticketing system.
- Organizer code (see point 2 above).
- Code generated in the Profile management menu (or click on the action menu ⋮ located to the right of the profile concerned to display a QR code replacing the code):

- If necessary, select the dates at the top to display the correct events.
- Select one or more events to scan (long press on each for multi-selection).
- Point the camera at the QR code on the ticket to perform the scan.
- The scanner will indicate whether the ticket is valid or not:
- Refer to this other guide regarding the customization of the display during scanning.
- The different scanner options are in the menu at the top left.
Manage the app's settings
On the main page
- Quick ticket cancellation
- Allows you to scan pre-printed tickets (your unsold items) to quickly put them back on sale without having to consult the orders in the Infomaniak Manager.
- Scan Mode
- Normal - Classic scan, the ticket is allowed to enter only once.
- Entry / Exit - Validates tickets in either mode to allow participants to enter and exit.
- Multiple Entries - Validates and allows entry multiple times, ticket never refused (unless it is an incorrect date).
- Laser Mode
- Bluebird - to make the application compatible with Bluebird devices.
- Zebra - to make the application compatible with Zebra devices.
On the event page
- Search for an order
- Allows you to find an order with the visitor's name or order number.
- Flash
- Allows you to activate the flash on the device.
- Scan by zone
- Allows you to limit the tickets assigned to the selected zones.
Link to this FAQ:
Has this FAQ been helpful?
Thank you for choosing Infomaniak's ticketing service, which allows you to manage all of your online ticketing: event creation, online publication, ticket control, sales tracking, and customer management. These guides help you quickly use the essential features.
Setting up and managing ticketing
- Create a ticketing system
- Configure an event
- Manage events with multiple performances
- Associate a seating plan
- Use access passes
- Configure promotions
- Issue gift certificates
- Define payment methods
- Create customer forms
Online publication and marketing
- Online publication checklist
- Manage online stores
- Configure automatic emails before the event
- Listing on leprogramme.ch
- Connect the ticketing system to Zapier
- Use the ticketing API
Advanced event management
Ticket sales and control
Direct sales and through resellers
Sales and control materials
- Order rental equipment
- Available ticket formats
- Use sales packs
- Guide to using Badge printers
- Configure control tools
- Manage user profiles
Support and customer request management
- Checks for credit card payment errors
- Exchange tickets at the box office
- Activate online exchange for visitors
- Process a refund
- Offer cancellation insurance
- Cancel an order or tickets
Track sales and customers
Why ticket-net.ch?
If the mention ticket-net.ch appears on your bank statements, this simply corresponds to the purchase of a concert, show, or other cultural event ticket for which Infomaniak is the ticketing service involved in the transaction. Many organizers/partners rely on the Infomaniak Ticketing / Infomaniak Events solution, which explains why this reference may appear when your card or bank account is debited.
Link to this FAQ:
Has this FAQ been helpful?
This guide explains how to activate and use the "test" payment mode (as part of the Infomaniak ticketing system) that allows you to make orders without using your credit card.
Preamble
- This test payment mode allows you to make payments on the online ticketing system as your customers do with a test bank card.
- This creates a real reservation with real tickets, but a commission of 0.99% of the ticket price + 0.89 CHF (or EUR).
- This payment mode is only visible when you are logged into the shop with an administrator account and it is linked to a customer record (see prerequisites below).
Activate the "Test Credit Card" payment mode
Prerequisites
- Add the email address to the customer database, in case the administrator's address is not yet registered as a customer:
- Click here to access the management of your product on the Infomaniak Manager (need help?).
- Click directly on the name assigned to the ticketing concerned by the event.
- Click on Sales in the left sidebar.
- Click on Customers in the left sidebar menu.
- Click on Add a customer and fill in the fields:

Then:
- Click here to access the management of your product on the Infomaniak Manager (need help?).
- Click directly on the name assigned to the ticketing concerned by the event.
- Click on Sales in the left sidebar.
- Click on Payment Methods in the left sidebar:

- Toggle the switch to ON to the right of the test credit card item:

Use the card to place test orders
To do this:
- Go to the online ticket office.
- Log in to the ticket office using an email address of an administrator of the ticket office account:

- Place an order, and when choosing the payment method, select the Test Credit Card.
- Enter the following information when ordering:
- Code:
4242 4242 4242 4242 - CVV:
100 - Expiration date:
01/32or any future date - 3D-Secure password:
Checkout1!(specified directly in the field to fill out)
- Code:
- Complete the order…
Don't forget to cancel orders from the Sales - Orders menu once your tests are complete!
Link to this FAQ:
Has this FAQ been helpful?
This guide explains how to install the driver for the badge printer (as part of the Infomaniak ticketing system) and print from a computer using the USB cable.
Install the drivers
The installation of the drivers is only necessary when using the web kiosk for printing passes. Using the mobile kiosk from the tablet is Plug&Play:
- Turn on and connect the printer to the computer with the USB cable.
- Go to the downloads site Support and Download tab.
- Select Product: SMART-51 Series and Product model: SMART-51S…
- For Mac and Linux, click on EXPAND ALL + to choose the correct version of your operating system:

- For Mac and Linux, click on EXPAND ALL + to choose the correct version of your operating system:
Configure the printer
For optimal use of the printer, it is recommended to configure the printer before using it.
Print passes from a computer
Once the printer driver is installed:
- Connect the printer to the computer.
- Open the front of the printer and insert the badges with the side to be printed facing up:

- On the computer, go to the kiosk of the ticketing system.
- Search for an order with a pass; you can click on Find a booking at the top of the kiosk for a quick search:

- In the pass section of the window that opens, click on Print the passes to generate the PDF:
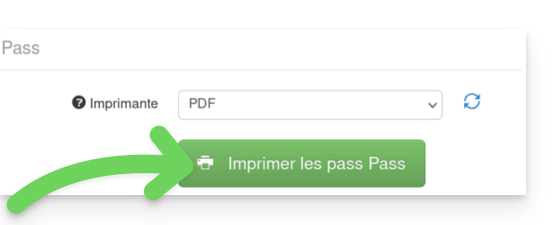
- From the generated PDF, start printing by selecting the Smart 51S printer.
Link to this FAQ:
Has this FAQ been helpful?
This guide explains how to configure your IDP Smart51 badge printer for printing from the computer of your passes (as part of the ticketing system Infomaniak).
Printer Configuration
To this end:
- Access your computer's printer manager
- Select the IDP Smart 51 printer, then the option Printers and Scanners Preferences

- In the Resin Extract option choose Black Dots Only
- Paper size: CR80 Card (54x86mm)
- Orientation: Portrait
- AJUSTER: print all image


- It is possible to save these settings in order to keep them in memory
Read more
Link to this FAQ:
Has this FAQ been helpful?
This guide explains how to print passes from the Infomaniak tablet counter (as part of the Infomaniak ticketing system).
Preamble
- The equipment is already configured to automatically connect to the network and the tablet.
- It will thus be automatically detected when a pass is ready to be printed.
- It is recommended to use printing with a computer if possible.
Connect the printer to the network
To do this:
- Turn on the printer.
- Connect the printer to your internet network using the RJ45 Ethernet cable.
- Connect the Wi-Fi access point to the network.
Printing passes from the tablet
To do this:
- Log in to the ticketing account from the tablet using the Infomaniak account ID and password.
- The tablet will automatically connect to the counter interface.
- Create an order on the tablet or search for an existing order.
- Click on the printer icon:
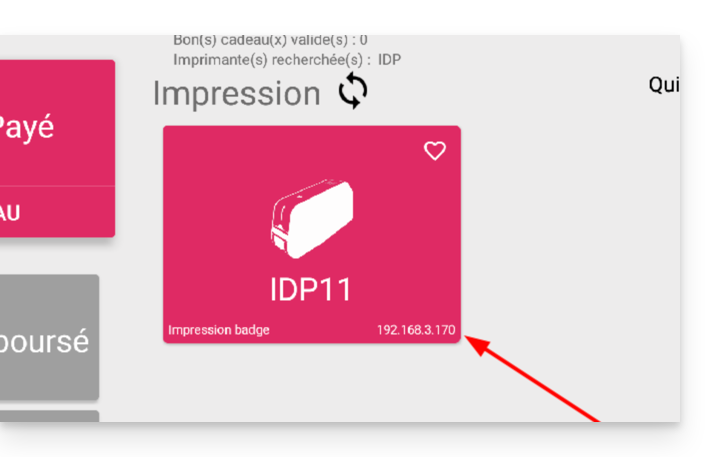
In case the printer does not appear in the list on the right
- Try refreshing the list by clicking on the rotating arrows.
- Ensure the printer is properly connected to your network with the RJ45 cable
- Ensure the Infomaniak Wi-Fi access point is properly connected and turned on.
- Ensure the printer and the tablet are connected to the Infomaniak network.
- To ensure the printer is properly connected to the network, click on the button to the left of the printer screen and check if it has an IP address assigned.
- Otherwise, restart the printer.
Warning: if two Wi-Fi access points are connected nearby, this can cause interference. Please ensure that only one access point is connected when using the printer
Learn more
Link to this FAQ:
Has this FAQ been helpful?
This guide explains how to replace the ribbon in the IDP SMART 51 badge printer (as part of the Infomaniak ticketing system).
Ribbons are used to print on PVC cards, much like ink cartridges. Black and white ribbons can produce approximately 1200 prints, while color ribbons can produce approximately 250.
Replacing the Ribbons
If the quality of your prints starts to degrade, you need to replace the ribbon.
Video Guide
Please follow each of these steps carefully; incorrect handling may cause the printer to malfunction temporarily or permanently.
- Open the printer by pressing on the area indicated in the image below
- Replace the old ribbon with the new one, following the order indicated in the image below: First, insert the part without the toothed wheels into the hole, and then press on the part with the wheels to ensure it fits properly into the slots provided for this purpose.
- Remove the protective film by pulling firmly on the tab provided for this purpose.
- Insert the ribbon into the printer, hook facing the front of the printer, as shown in the image below
- Close the printer
Learn more
Link to this FAQ:
Has this FAQ been helpful?
This guide explains how to activate and set up promotions for visitors to thank them or to encourage loyalty (as part of the Infomaniak ticketing system).
Preamble
- This option allows you to offer a function acting as loyalty cards, for example "buy 4 tickets and the 4th is free".
- The x=y promotion allows you to automatically apply a promotion to the shop/checkout basket based on a tiered number of tickets, without using a promotional code.
- Example:
- This offer is activated for the following condition: For 3 tickets purchased, one of these tickets benefits from a 50% discount.
- In the event that the customer buys three tickets at once, they receive the promotion directly on the tickets in their basket.
- If the customer first places an order for a single ticket, then a second order for two tickets, the offer will be activated on the ticket from this second order; the total number of tickets purchased will be remembered!
- It is possible to modify all parameters later by clicking on modify on the promotional offer page:

Activate the option in your ticketing system
To do this:
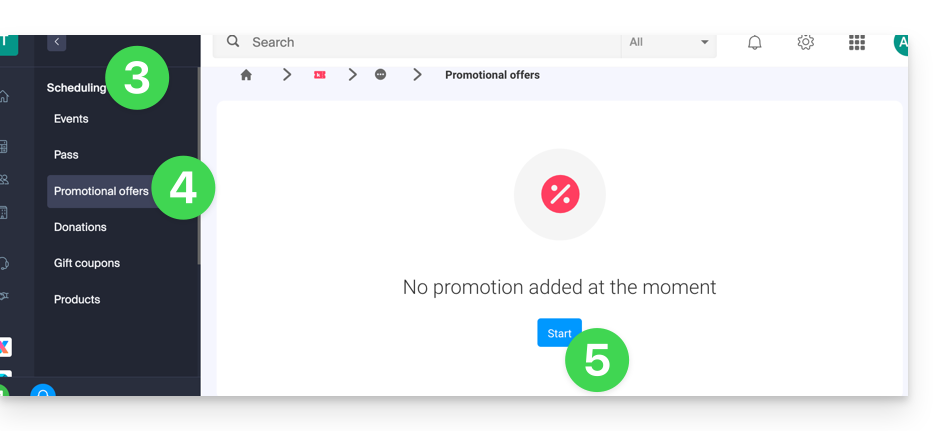
- Click here to access the management of your product on the Infomaniak Manager (need help?).
- Click directly on the name assigned to the ticketing system concerned by the event.
- Click on Programming in the left sidebar menu.
- Click on Promotional Offers in the left sidebar menu:
- Click on the blue button Add:
Configure the offer
Promotional Offer
- Indicate a name for the offer to be proposed; this name will be visible to the customer (when using a promo code, for example).
- In Reduction choose the type of promotion, for example: Tickets purchased, tickets offered.
- Then specify the number of tickets required to activate the offer…
- …followed by the number of tickets that can benefit from the offer.
- Finally, specify the type of promotion applied to these tickets, as a percentage or fixed price.
Once an order is placed, it is no longer possible to modify the type of reduction, the number of tickets to purchase and those reduced, or the value of the reduction.
- Specify the value of the reduction:
- If the reduction value is higher than the ticket price, the ticket will be free.
- Specify the application strategy; this allows you to define the priority of tickets benefiting from the offer: more expensive first or less expensive first.
- Specify the validity dates:
The start date of validity is mandatory for the promotion to work; tickets purchased before the defined date will not count in this promotion.
- Click the button to Continue:
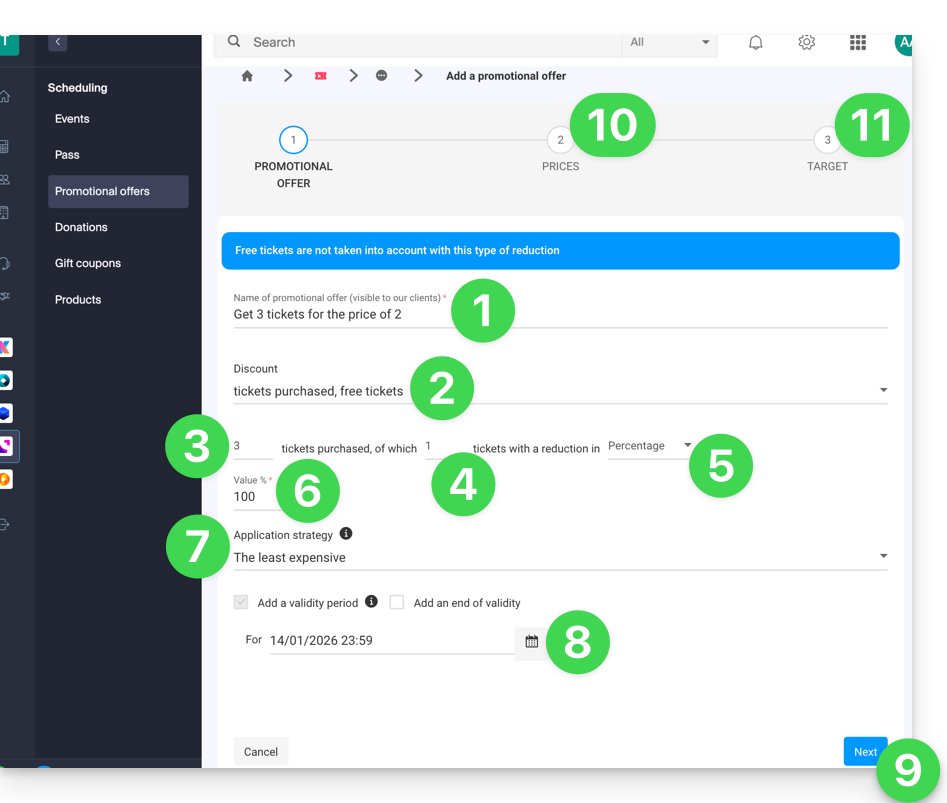
10. Prices
This step allows you to set up the events, zones, and prices for which this promotion will be applicable (it is also possible to set maximum quotas and limits per order per item).
11. Target
This step allows you to set the following conditions for which this promotion will be applicable:
- Limit to certain customers (limit to customers who have already ordered on the ticket office and are therefore already on the customer list on the ticket office, to those who have subscribed to the newsletter, or to a manually selected customer list…)
- Limit to certain box office profiles
The promotion, once activated, will be immediately applied from the start of the validity date.
Link to this FAQ:
Has this FAQ been helpful?
This guide explains how to perform ticket exchanges at the ticket counter (within the Infomaniak ticketing system).
Introduction
- This function allows you to choose new tickets while canceling the current ones.
- This operation is only possible for individual tickets; for passes, you will need to cancel a ticket and add it back from the pass menu.
Activate exchange mode
To activate the Exchange payment method, refer to this other guide and then:
- Go to the Ticket Counter.
- From the ticket counter, select the new ticket(s); they will be added to the cart on the right side of the screen.
- Once all the new tickets have been selected, select the Exchange payment method:
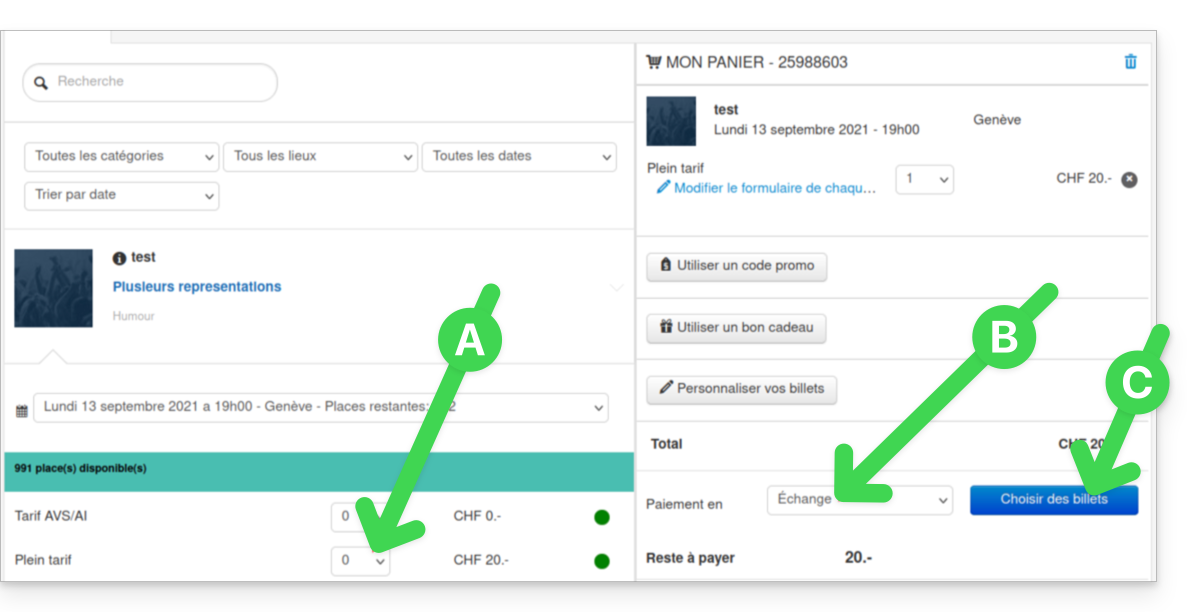
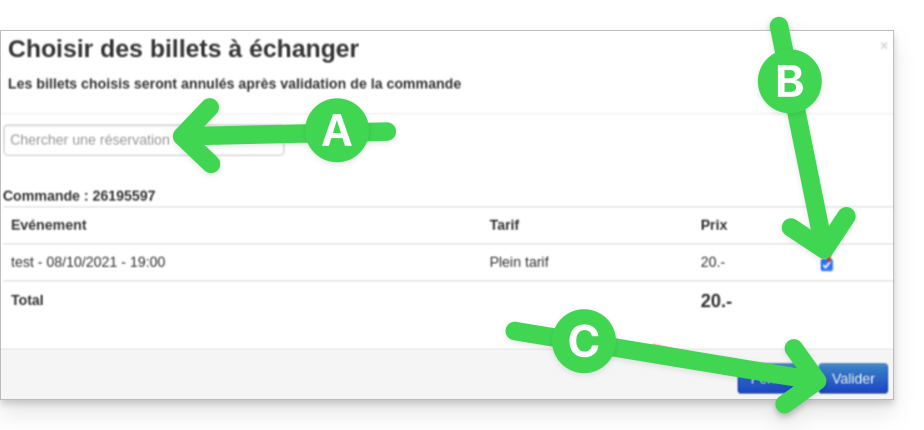
- In the new window, search for the order or ticket number.
- Select the tickets to cancel and validate:
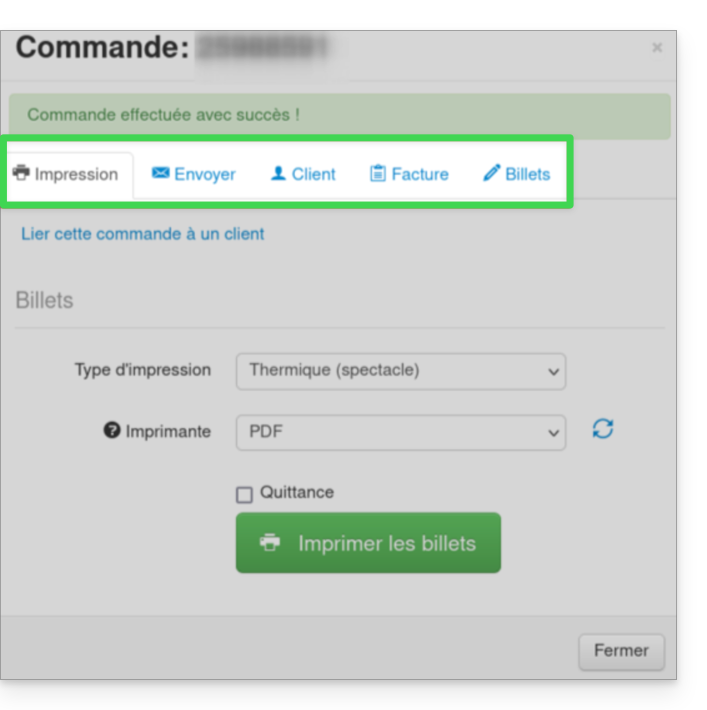
- Enter the customer information and send the order confirmation to the customer, or print the ticket:
Link to this FAQ:
Has this FAQ been helpful?
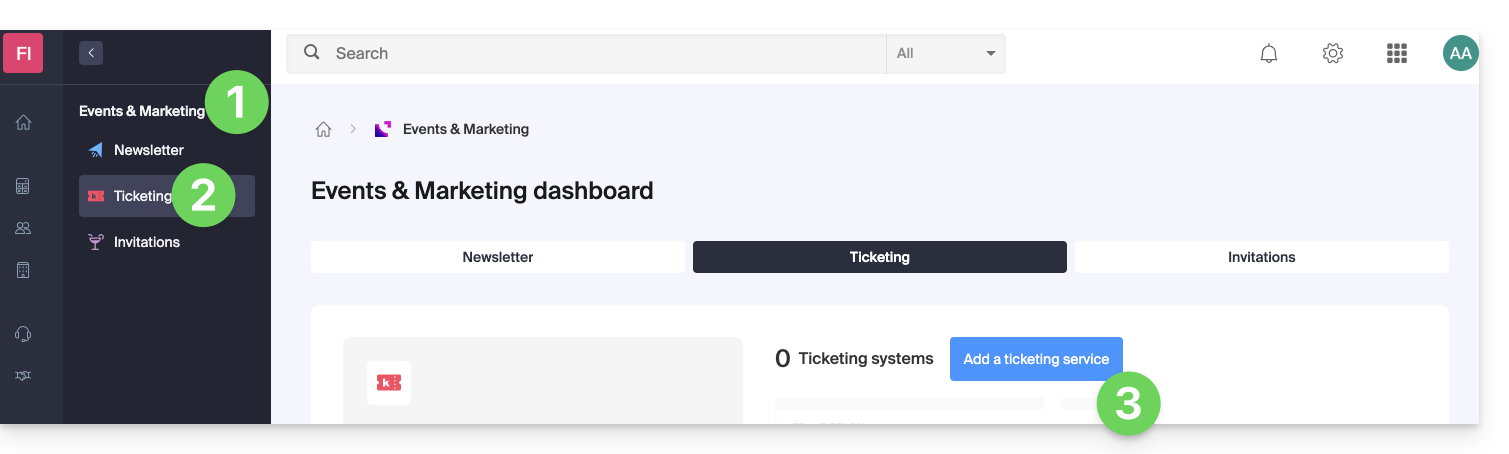
This guide explains how to create a new ticketing system, or new period, within the framework of the Infomaniak ticketing system.
Preamble
- You can create multiple events in the same ticketing system:
- This “period” usually corresponds to an edition, season, or a highlight of your programming (2025-2026 season, summer 2026 festival…).
- It's a simple grouping framework; it does not technically isolate events as a new ticketing system would.
- Creating a new ticketing system allows you to structure and organize your ticket sales independently:
- You organize recurring seasons of events (cultural seasons, sports seasons).
- You manage several distinct clients (case of ticketing partners).
- You want to separate your sales, settings, or statistics from one series of events to another.
- You need distinct management spaces, with different teams or access rights.
- This action should not be confused with creating a new Infomaniak Organization, which is much rarer and more restrictive (kCheck / kAuth level, for example).
- Also, refer to this other guide before any publication.
Add the Online Ticketing tool
To start a new Infomaniak ticketing system:
- Click here to access the management of your products on the Infomaniak Manager.
- Click on Ticketing under the Events & Marketing universe.
- Click the blue Add button:
- Enter the name of the ticketing system, the currencies to be used, as well as the languages to be used on the ticketing system.
- Enter the user's contact information.
- Choose the default appearance of the ticketing system:
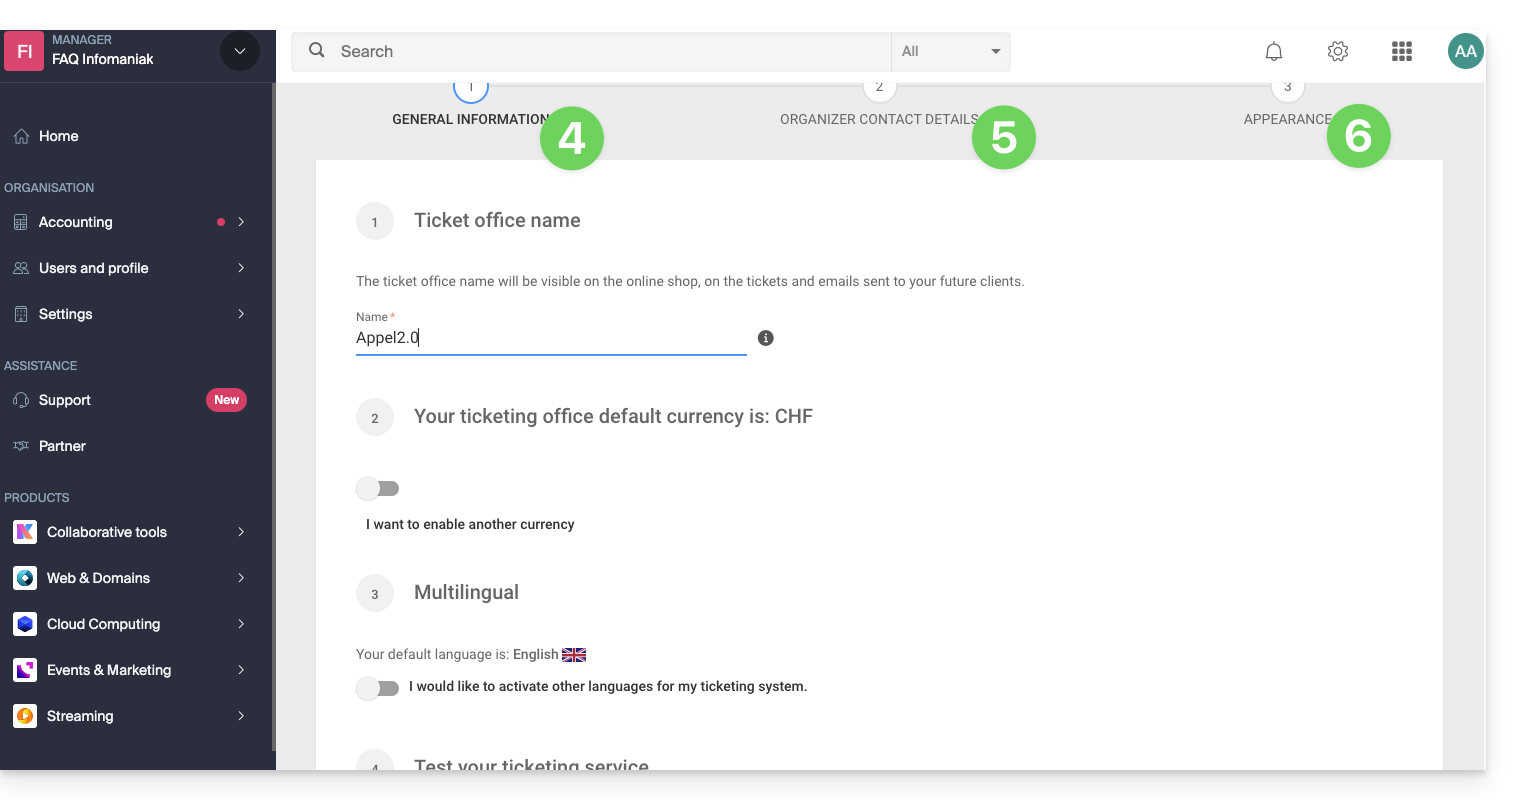
This information can be modified at any time in the ticketing system settings.
Link to this FAQ:
Has this FAQ been helpful?
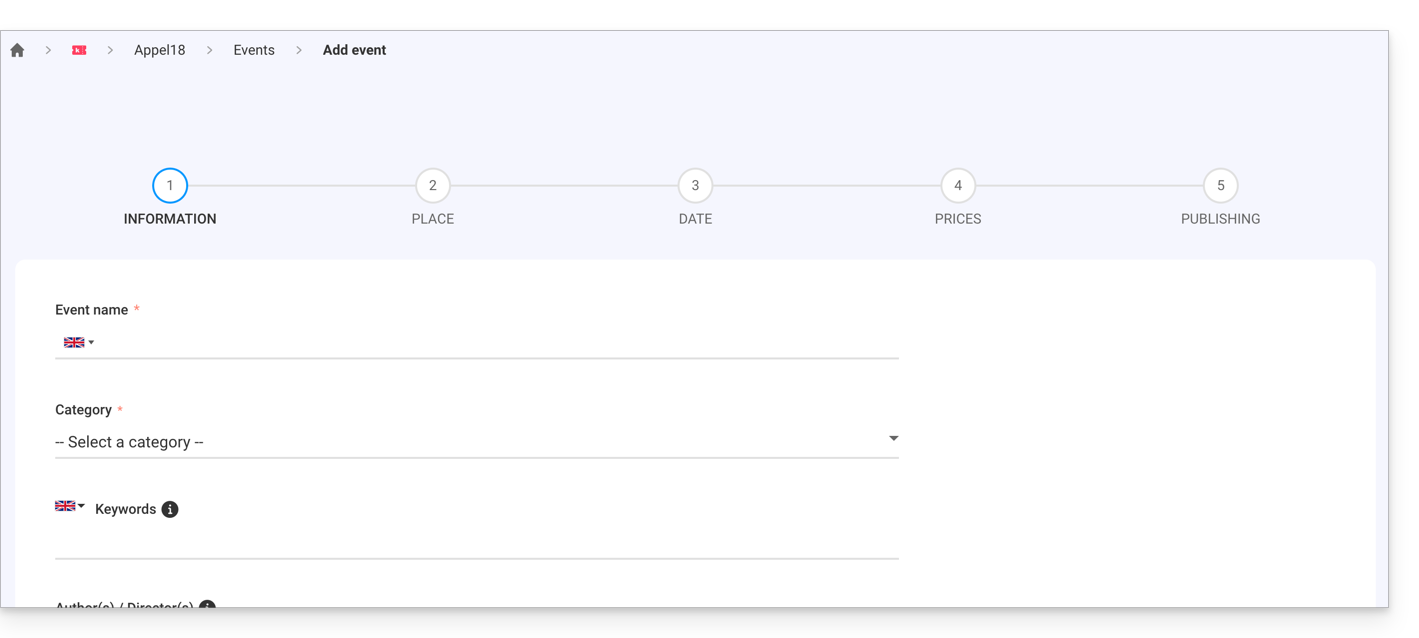
This guide explains how to create a new event (as part of the Infomaniak ticketing system).
Create an event
To do this:
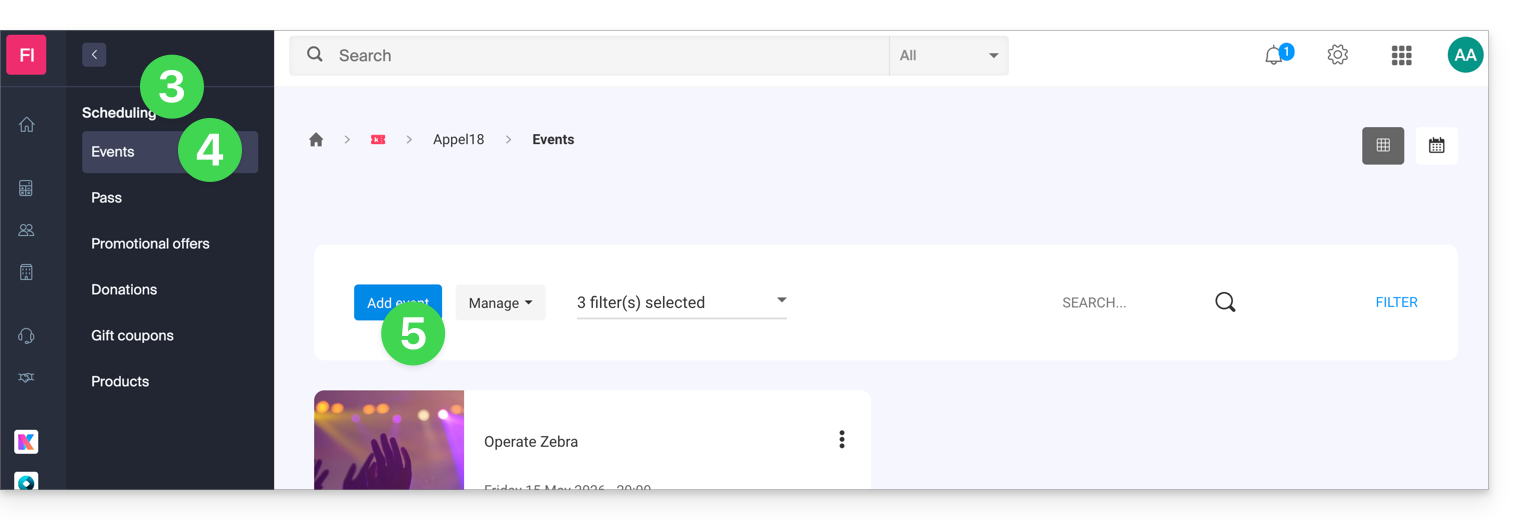
- Click here to access your ticketing management on the Infomaniak Manager (need help?).
- Click directly on the name assigned to the ticketing concerned by the event:
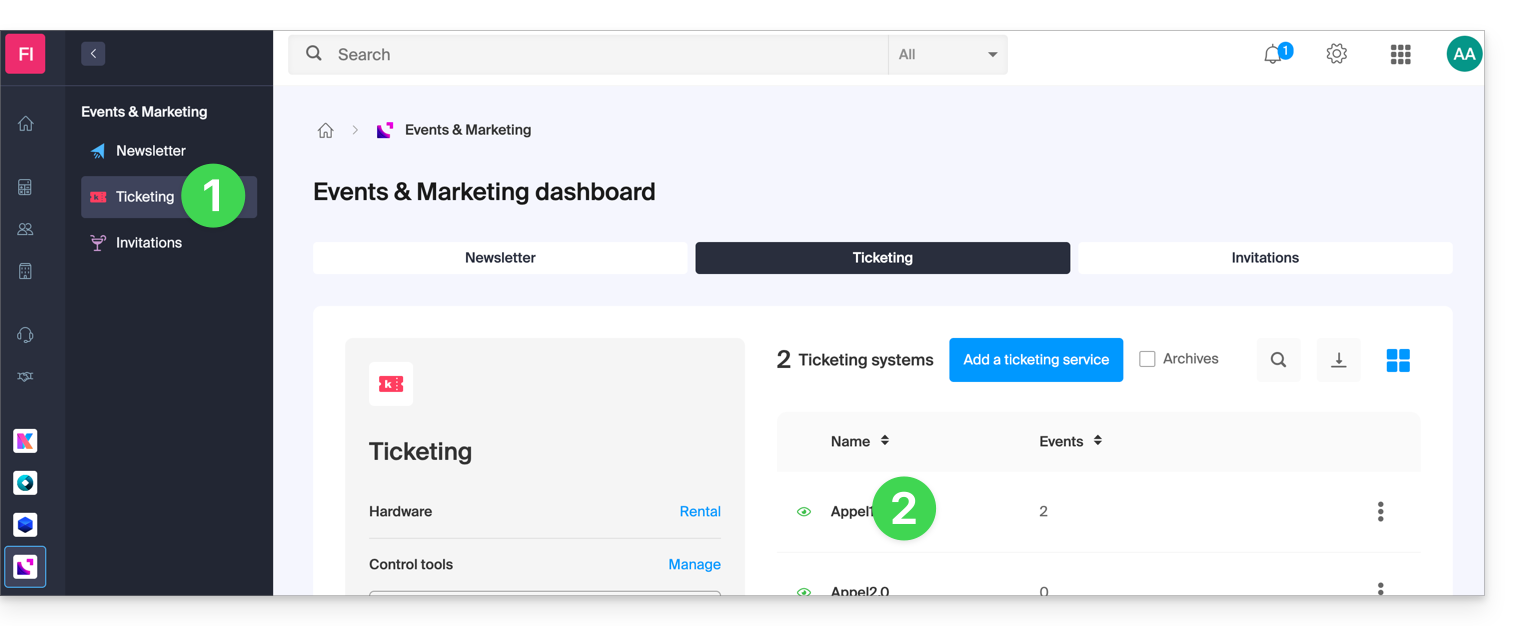
- Click on Programming in the left sidebar menu.
- Click on Events in the left sidebar menu.
- Click the Add an event button:
Configure the event
All information can be added or modified later in the event settings.
Define the event information
- Event name that will be displayed on the ticketing and on the tickets.
- Category of the event that will allow you to identify the event and associate it with other events of the same type on the infomaniak events portal.
- Keywords to find the event on the infomaniak events portal.
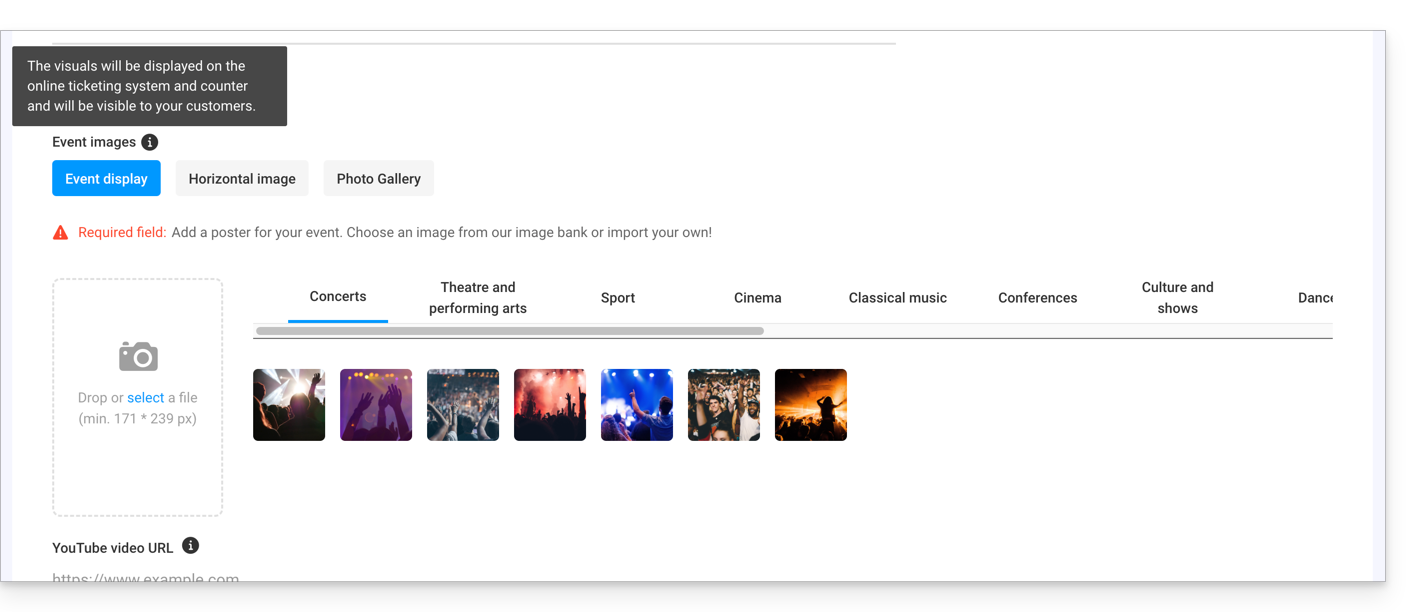
- Event poster and other images associated with your event.
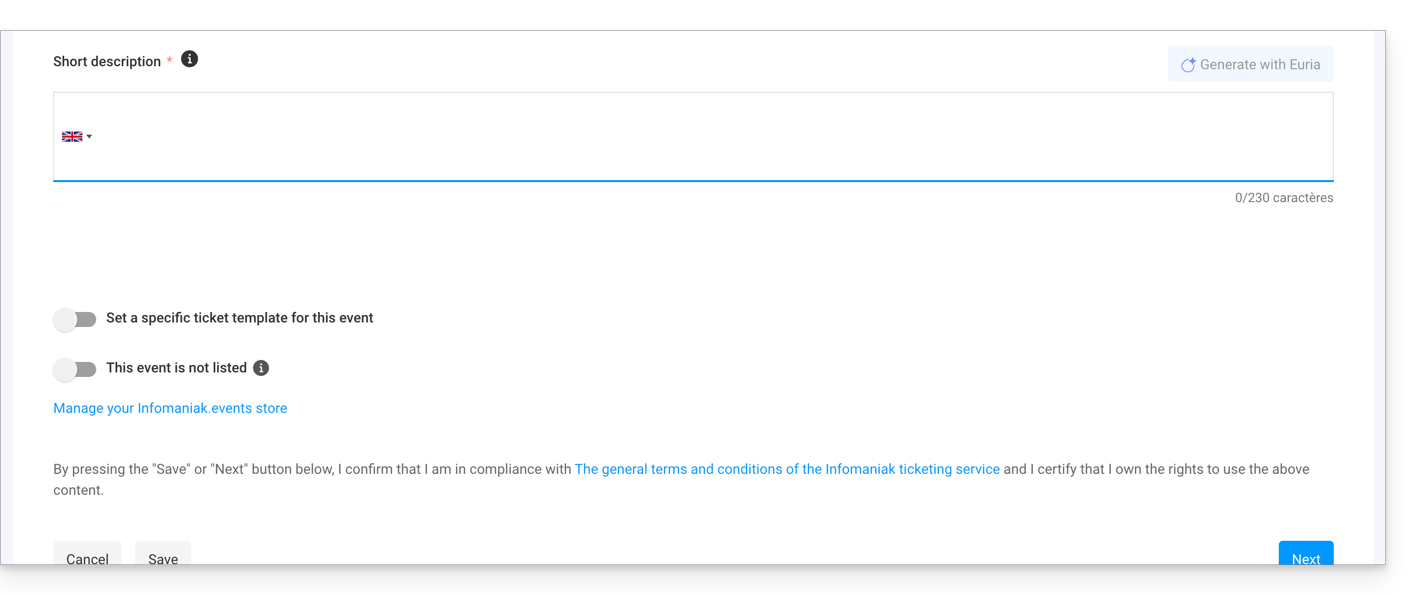
- Description of the event as it will be visible on the online ticketing when purchased by visitors.
- Short description that you can generate via Euria (click the dedicated button) which will then be based on the details of the long description and the event information (director, artists, etc.).
- Define a specific ticket template to use for this event.
- Define whether the event is private or not; leave this option disabled if you want your event to be visible on the infomaniak.events portal.
Define the location of the event
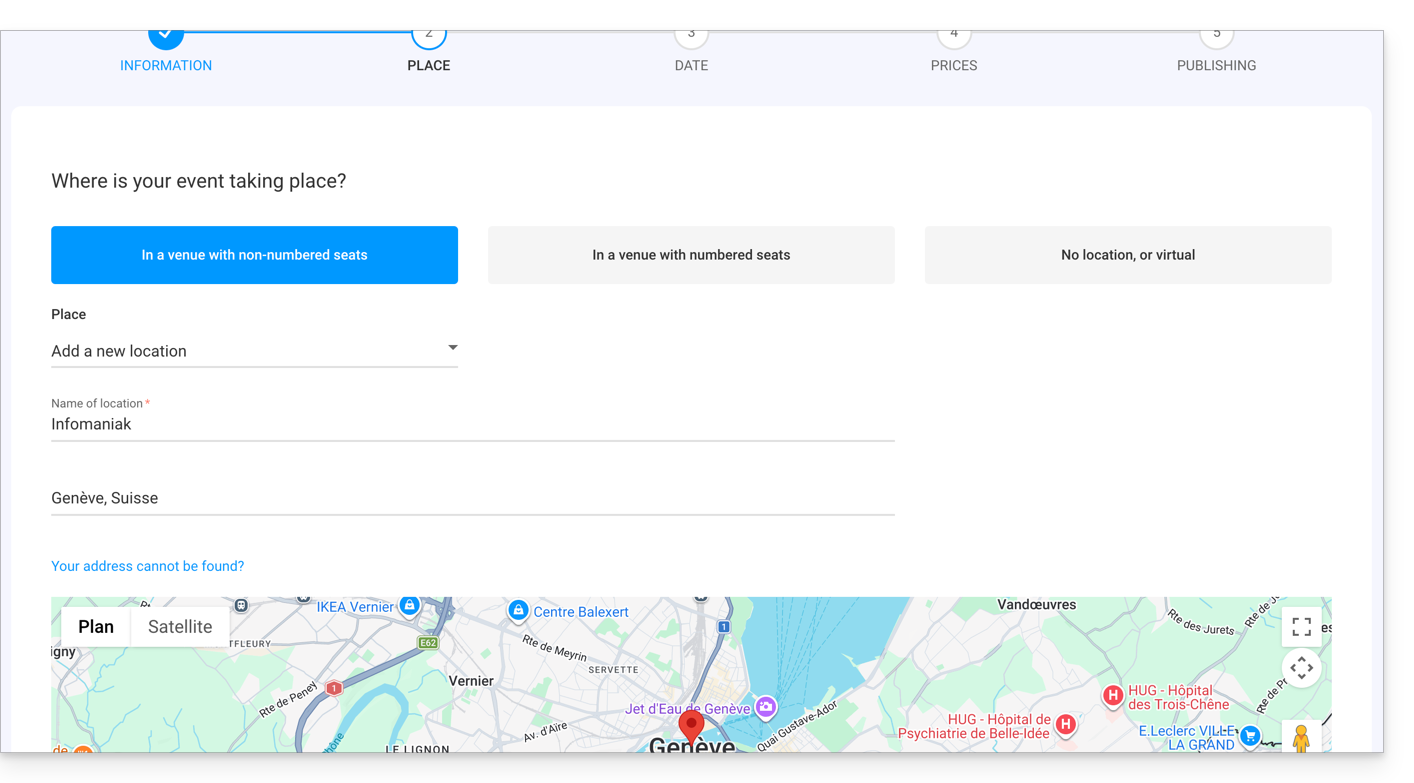
In a venue with free seating
- Seats are not assigned when purchasing a ticket.
- It is possible to define a new or existing venue.
- For an event taking place at a physical address, the address indicated will then be automatically detected and the map will be generated on the event page. It is possible to move the red pointer directly on the map to correct the address.
In a venue with numbered seats
- Allows you to define a seating plan linked to the event.
- It will then be possible to assign seats on the seating plan when purchasing a ticket or pass.
- To create or assign a room to the ticket office, you will need to contact Infomaniak support.
No venue or virtual
- For any event that does not take place in a physical location (online).
- Allows you not to assign a venue or address.
The Broadcast the event online option allows you to use the Infomaniak Streaming tool to broadcast your events live.
Add dates to the event
- Choose the date and time of the event.
- It is possible to add an end date, for example if the event takes place over several days.
- The opening time as well as the duration of the opening of the doors allows you to manage the arrival time of the visitors.
- It is also possible to change the text of the door opening hours in order to have a text that suits your event.
- It is possible to create an event with multiple dates for the event.
- The online scheduling/publication of the event option allows you to define how many days in advance the event becomes accessible online for customers:
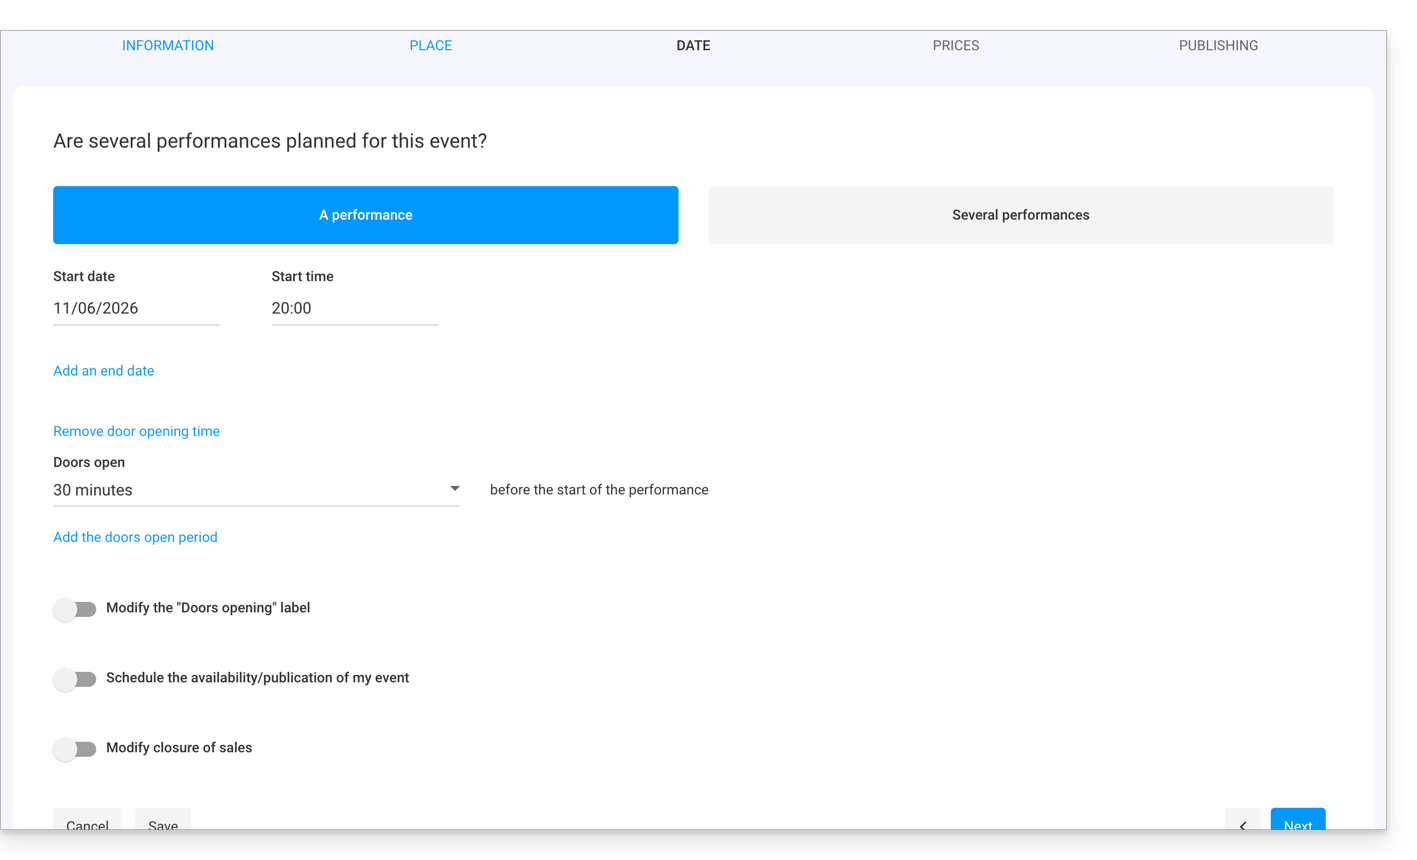
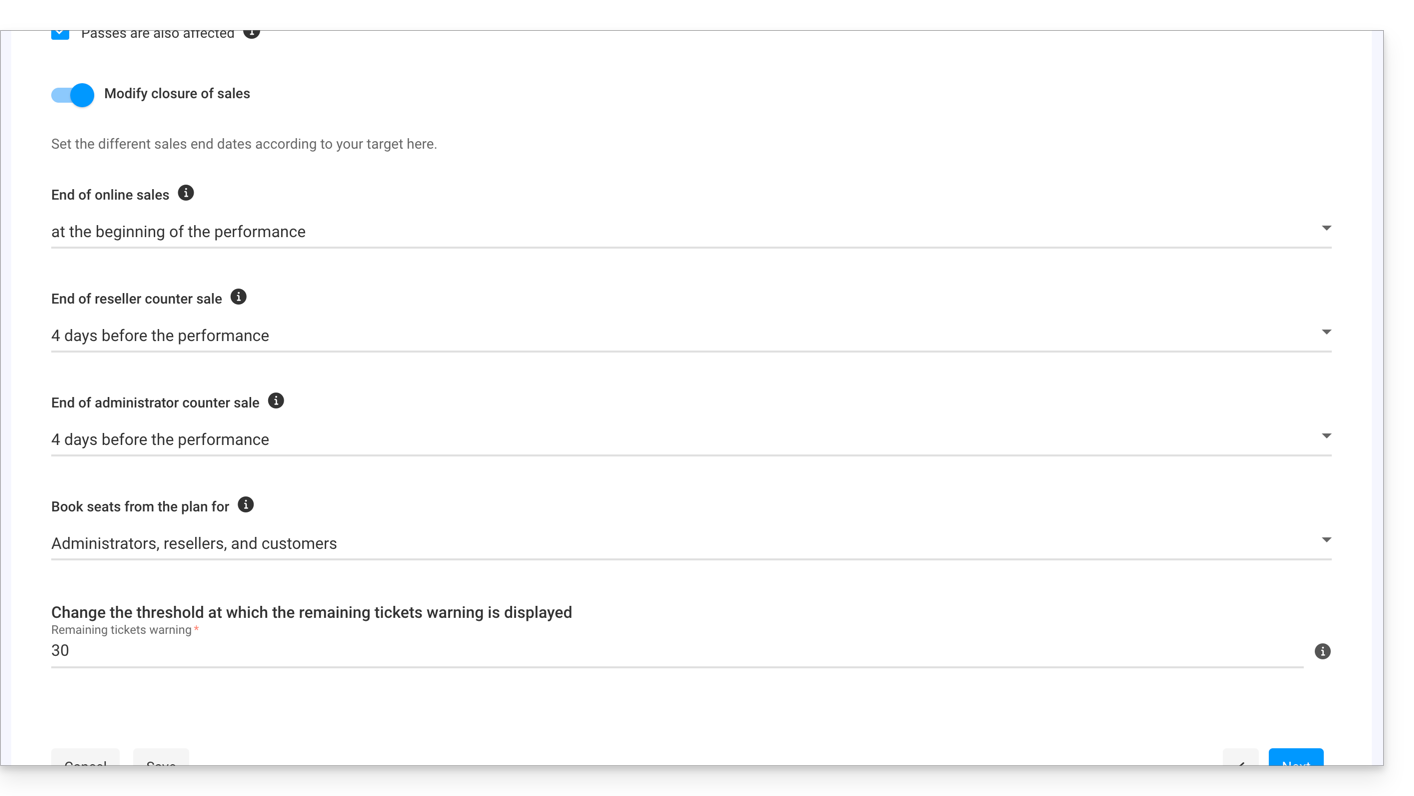
- The last option allows you to configure the closure of online and on-site sales. They will be defined by default at the start of the event for online sales, and 1 day after the event for resellers and the organizer:
Manage prices
This page allows you to define the areas (standing area, bleachers, VIP, etc.), quotas, as well as prices for ticket sales. Refer to this other guide regarding prices per area: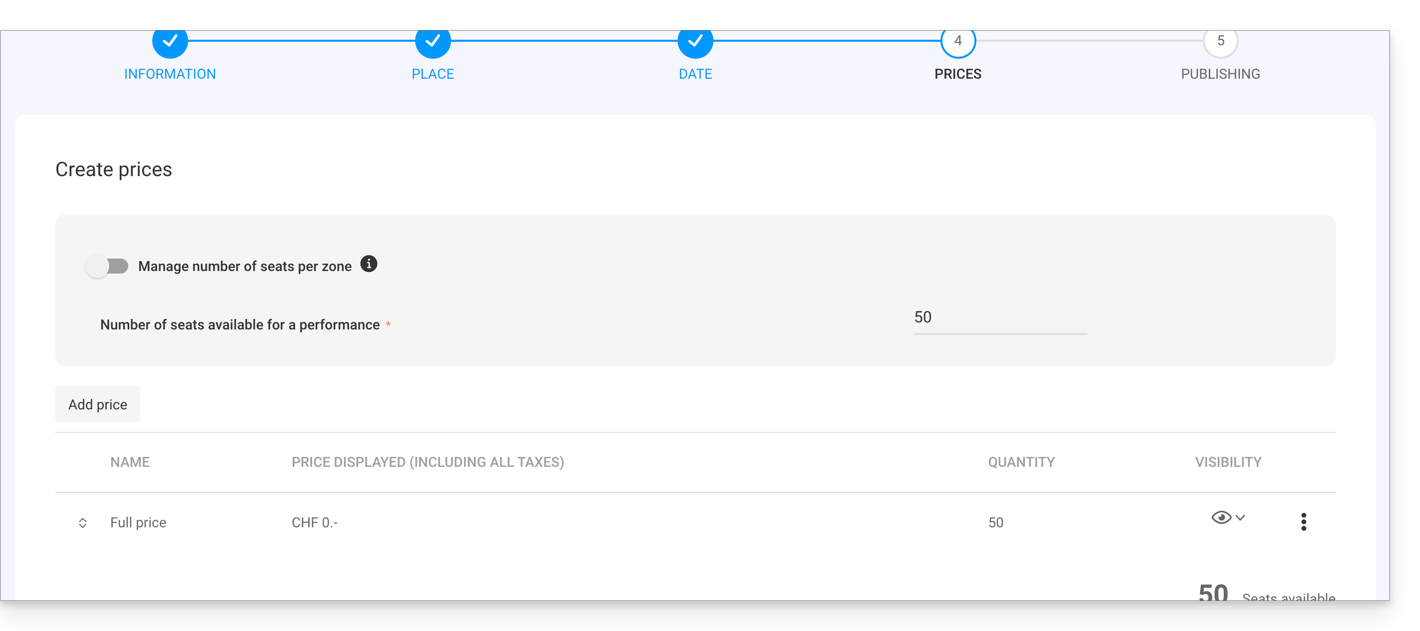
Page preview and publication
Once your event configuration is complete, you can preview the event sales page and choose to make the event available immediately or keep it hidden from sale for now (refer to this other guide to check the essential points before going live).
The event is now ready for sale. You can modify it at any time and track sales.
Link to this FAQ:
Has this FAQ been helpful?