Knowledge base
1000 FAQs, 500 tutorials and instructional videos. Here, there are only solutions!
This guide explains how to connect the Apple Mail iOS app (iPhone, iPad, etc.) to an email address hosted by Infomaniak.
Introduction
- Your iOS device will be automatically configured using .mobileconfig configuration profiles compatible with Apple, unlike a manual configuration.
- It is possible to delete a configuration profile once it has been installed (scroll to the bottom of this page for instructions).
Install a configuration profile
Prerequisites
- Create the email address within my kSuite or a Mail Service / kSuite.
- Verify that the Mail Service is configured optimally.
Then:
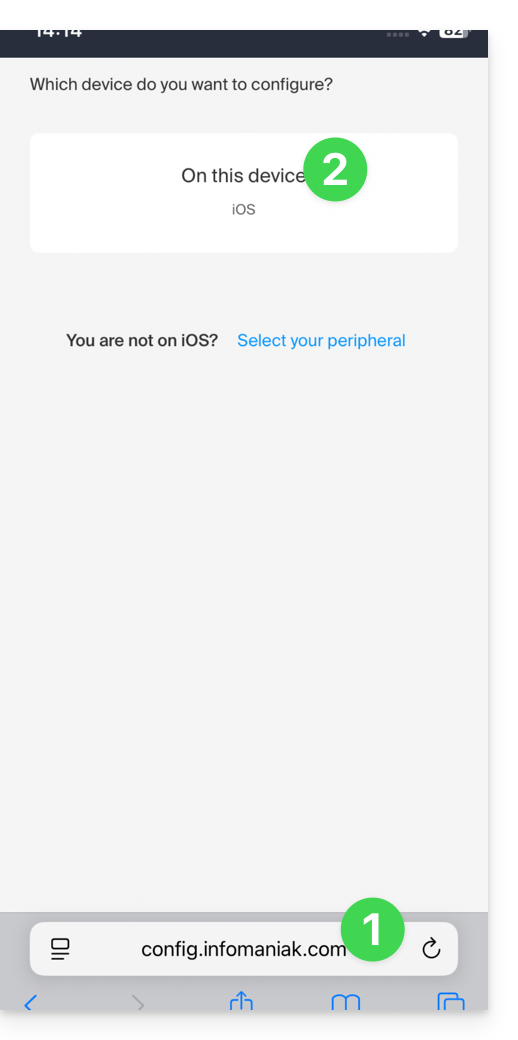
- Click here to access the Infomaniak configuration tool (online service https://config.infomaniak.com) — log in if necessary to your Infomaniak account for the Organization where your email address is managed.
- Choose to install the profile on this iOS device:
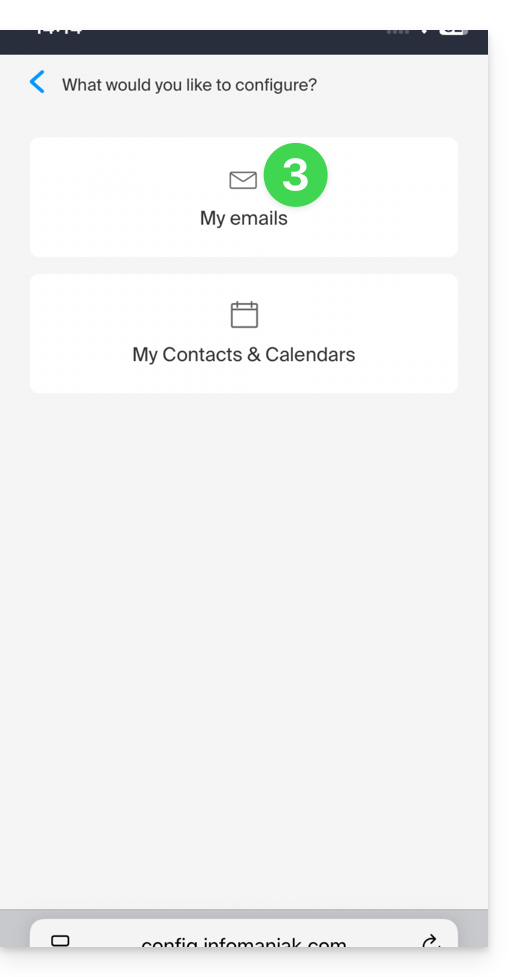
- Choose to synchronize emails:
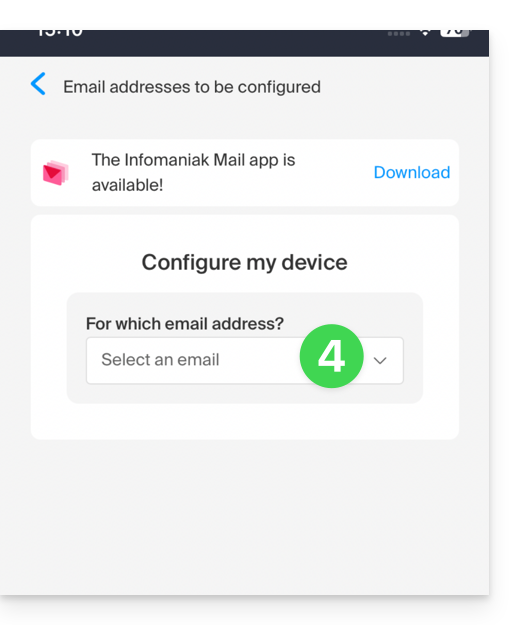
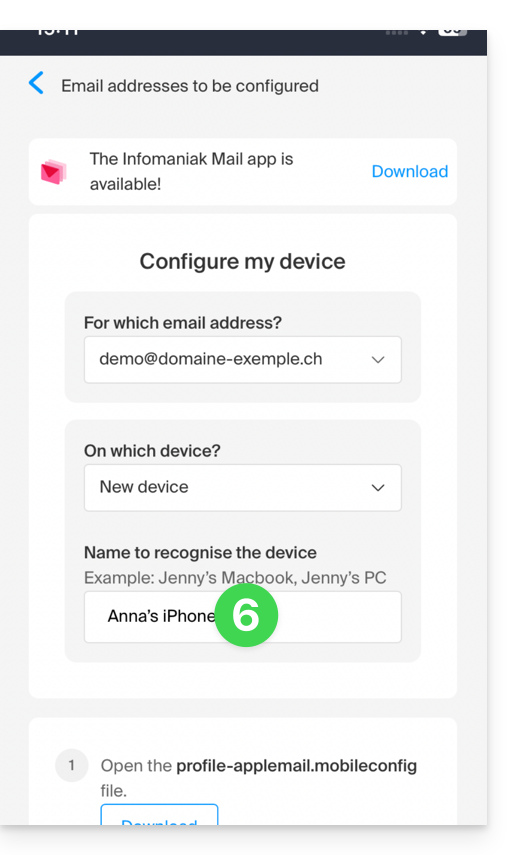
- Choose the email address (from those already linked to your current user) that should be synchronized on your device:
- Choose from the list of devices to enable synchronization on a new device (the one you are using):
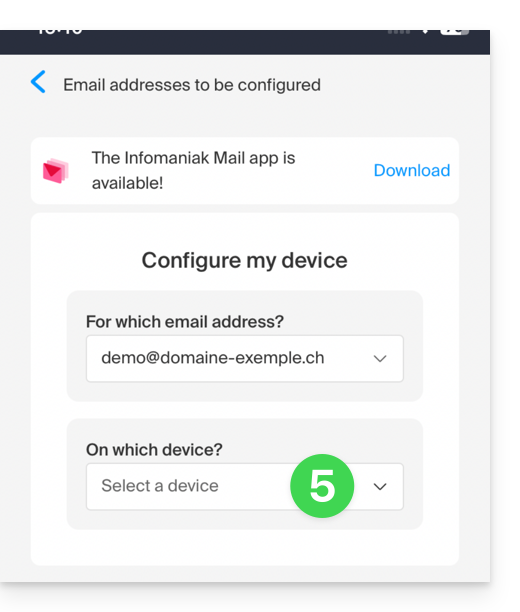
- The device name, which is purely descriptive, is adjusted accordingly, but you can modify it if necessary:
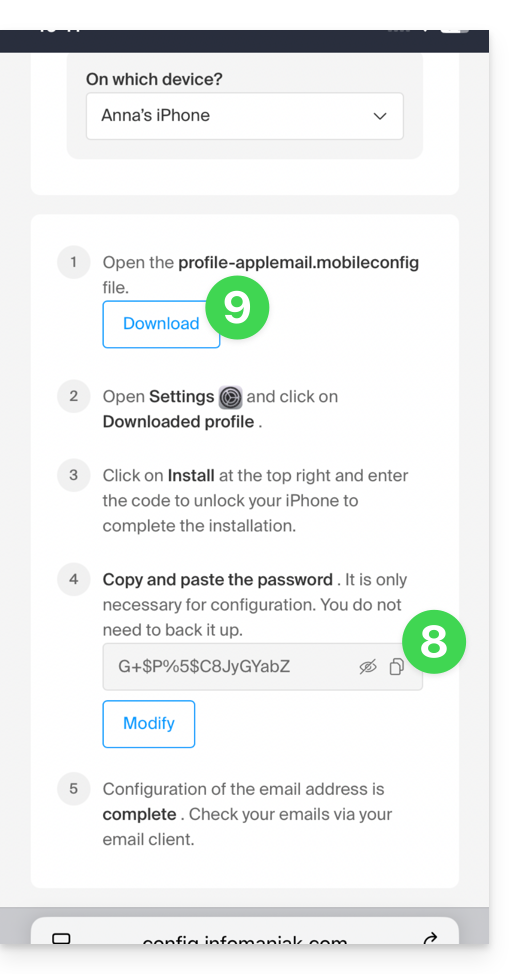
- Scroll down in the wizard and generate a password dedicated to email synchronization:
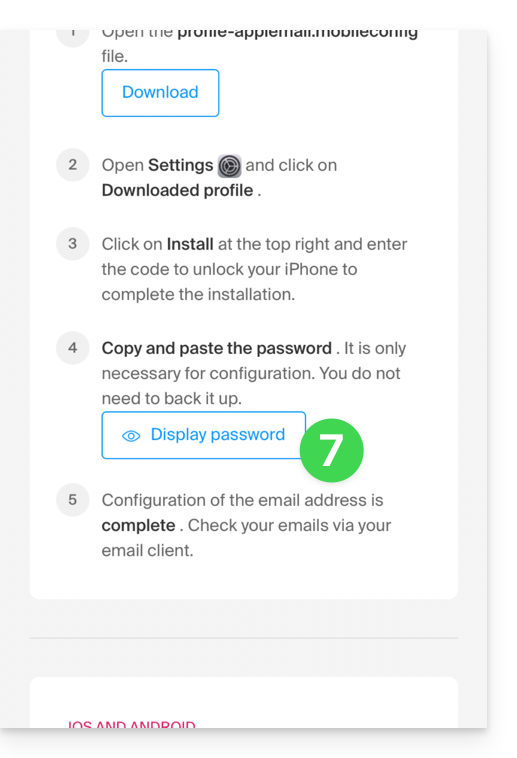
- Copy the generated password (you will be asked for it when installing the Apple profile).
- Download the Apple profile:
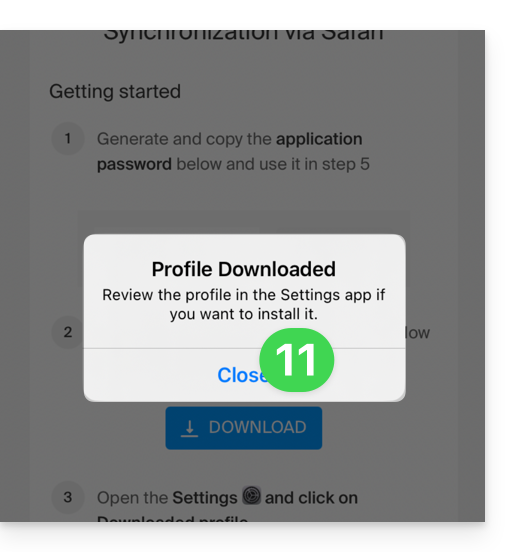
- Allow the download on the device:
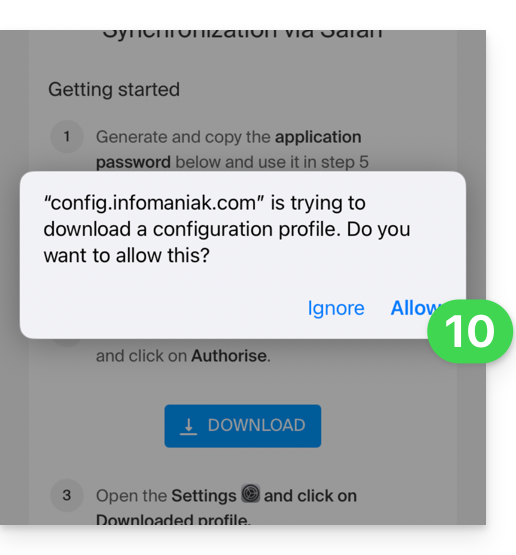
- Tap to close the message:
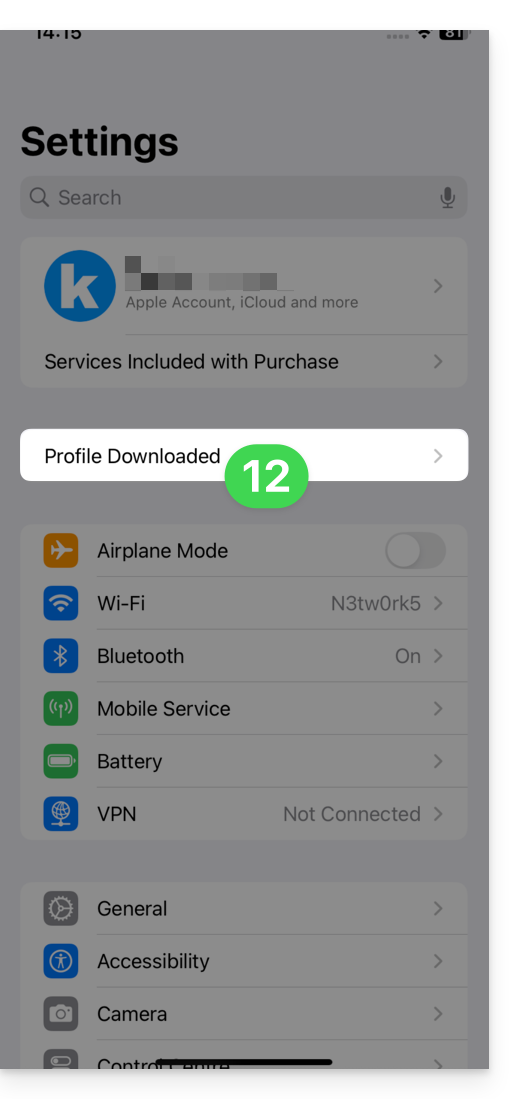
- Open the settings of your iOS device and tap on the banner at the top that informs you that a new profile has been downloaded:
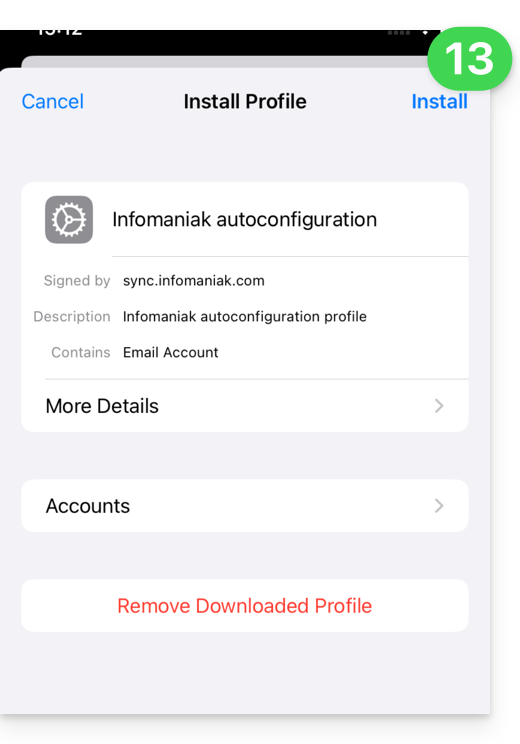
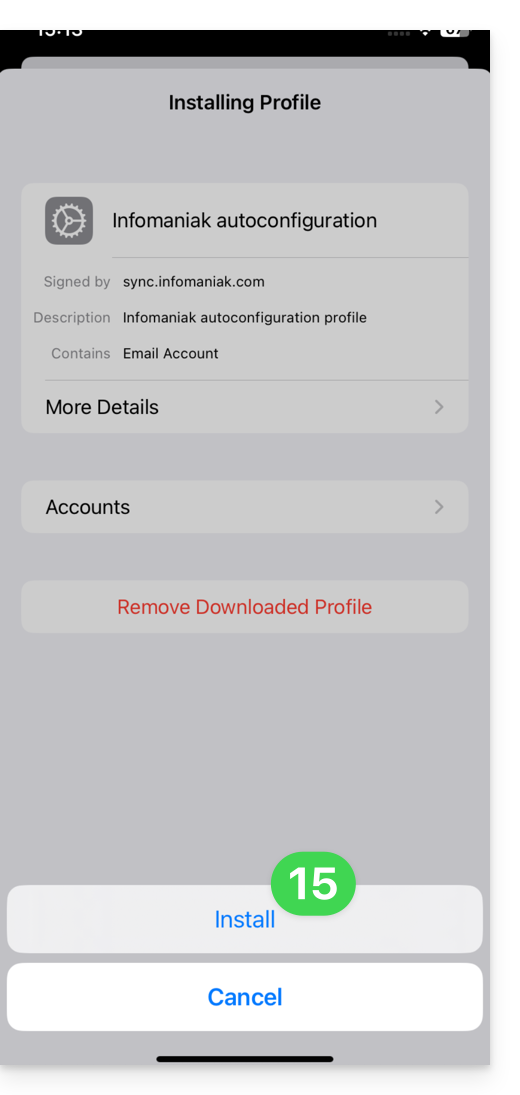
- Tap Install:
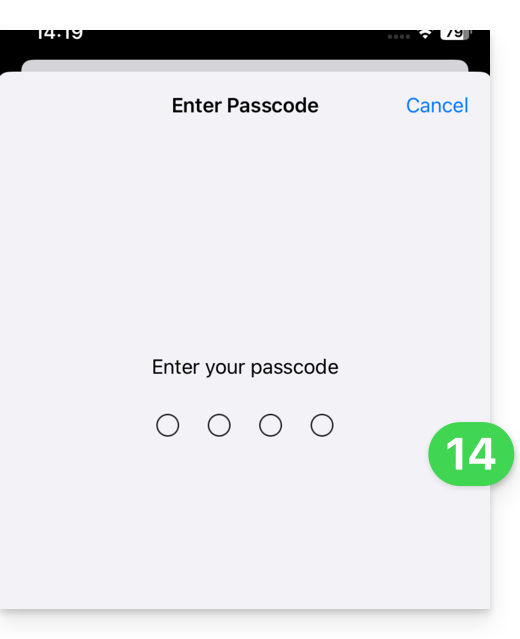
- Enter the code for your iOS device, as if you were unlocking it:
- Tap Install:
- Enter (or paste) the device password that you copied in step 8 above:
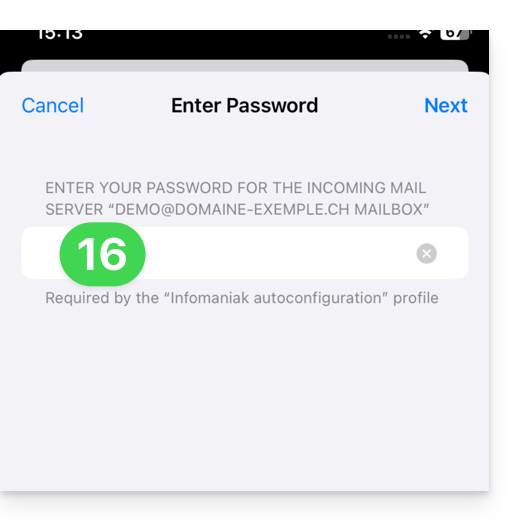
- When the message appears at the top, it's done:

If your Apple Mail iOS app was already open, you need to restart it. You will then see the information added by the synchronization: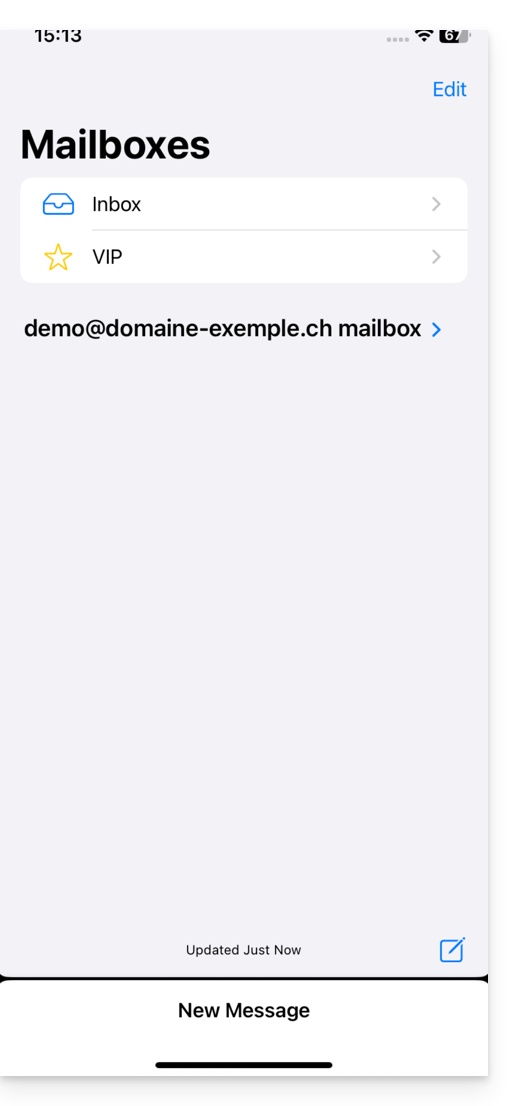
Remove an Apple profile
Refer to the official documentation, changing the version of your system at the top of the page * if necessary.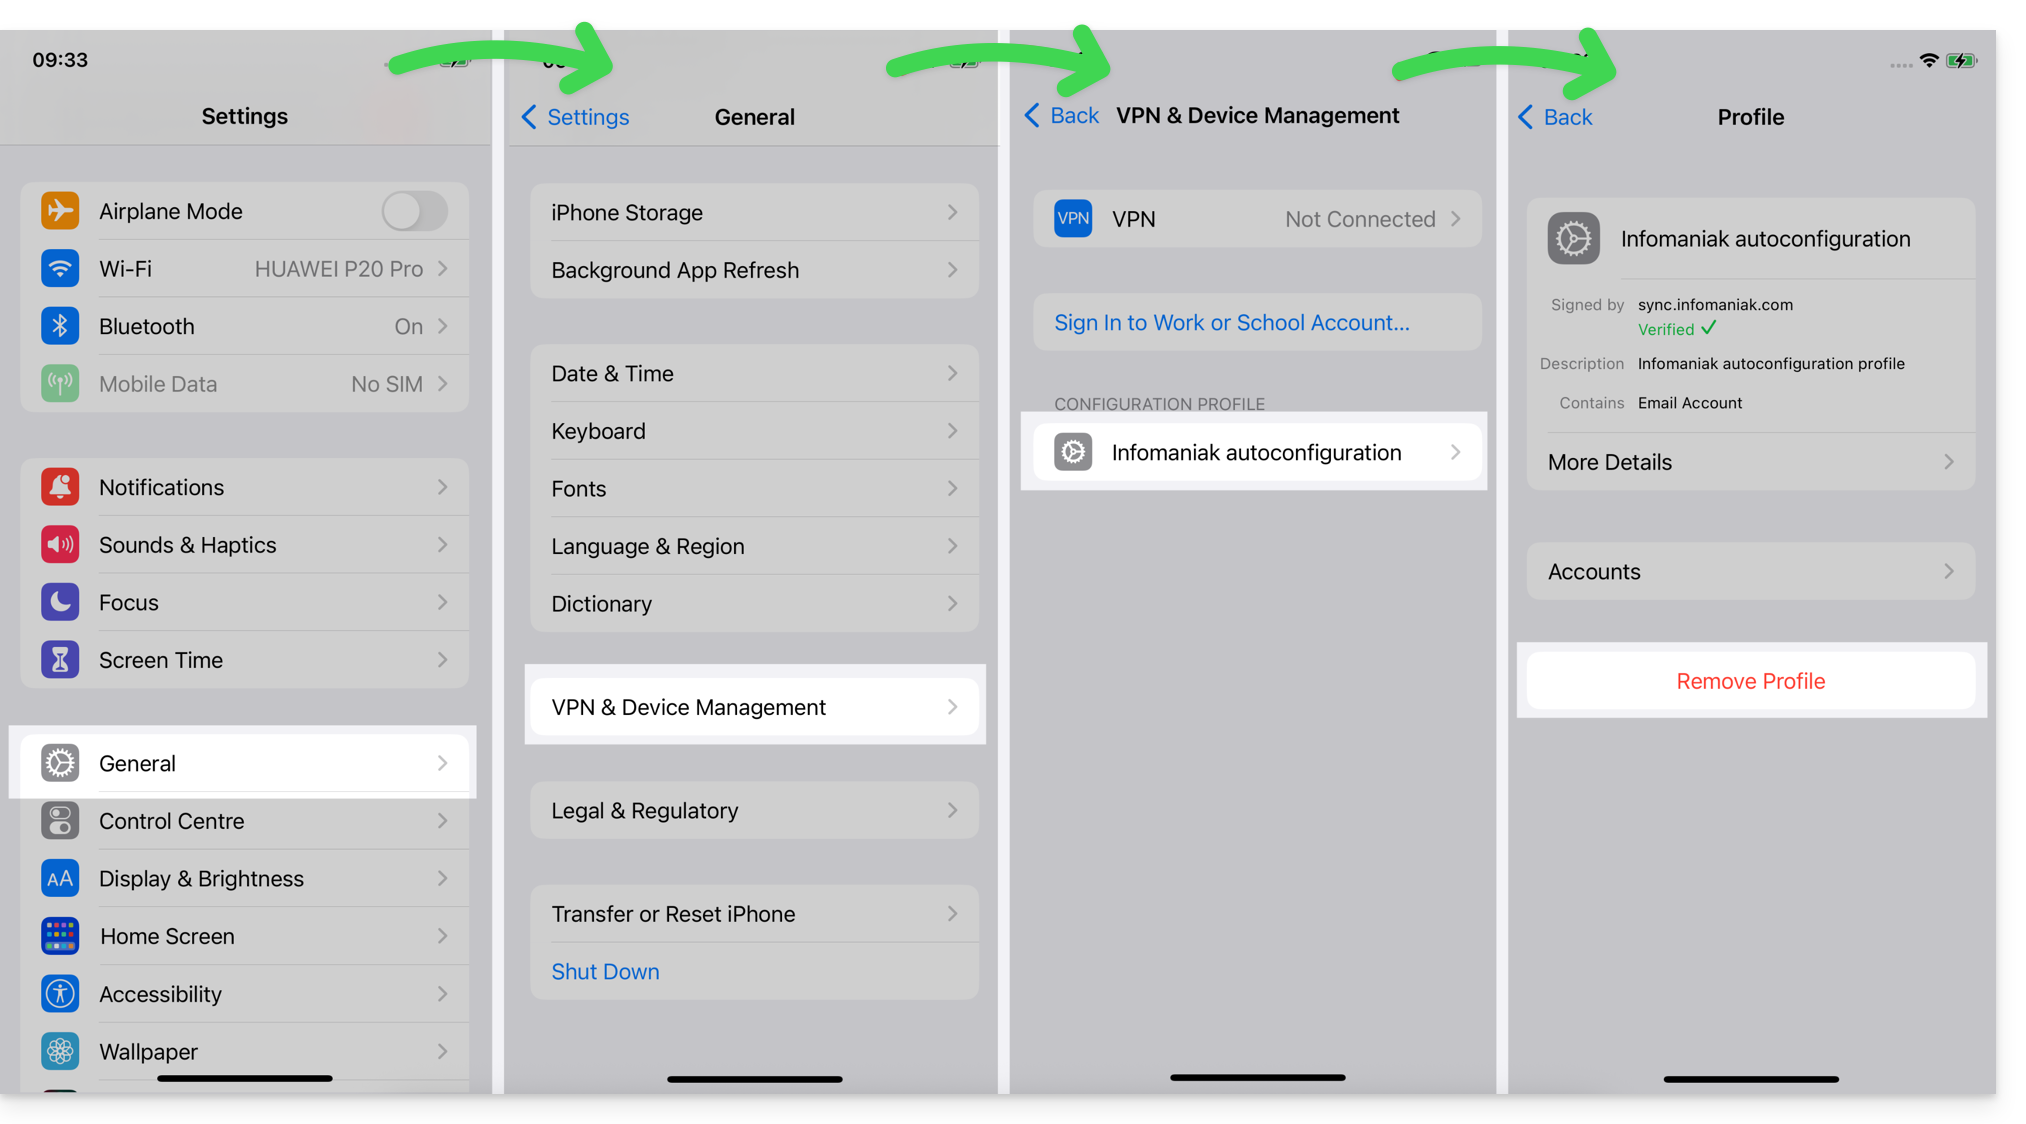
*Why is it necessary to choose the guide version that exactly matches your macOS/iOS system version? Apple introduces subtle changes with each new version of its system. For example, a path on iOS 15…
… becomes this on iOS 18…
Link to this FAQ:
Has this FAQ been helpful?
This guide details the room booking feature (meeting, sports, classes, etc.) available on the Infomaniak Web app Calendar (online service ksuite.infomaniak.com/calendar).
Preamble
- It is possible to create and associate physical meeting rooms with events from Calendar, for example to organize an event in a specific location with limited equipment and seating.
- Each room created displays a dedicated calendar on the app, which can be shared.
- Double (or more) room booking is possible.
- Number of possible rooms per resource:
| kSuite | Free | 1 |
| Standard | 2 | |
| Business | 6 | |
| Enterprise | 50 | |
| 0 | ||
| 0 | ||
| Mail Service | 0 | |
| 0 |
Configure meeting rooms
Prerequisites
- Be an Administrator or Legal Representative within the Organization (users with limited rights (collaborators and clients) who have access to this product will not be able to do so).
To create rooms accessible for booking by collaborators:
- Click here to access the Infomaniak Web app Calendar (online service ksuite.infomaniak.com/calendar).
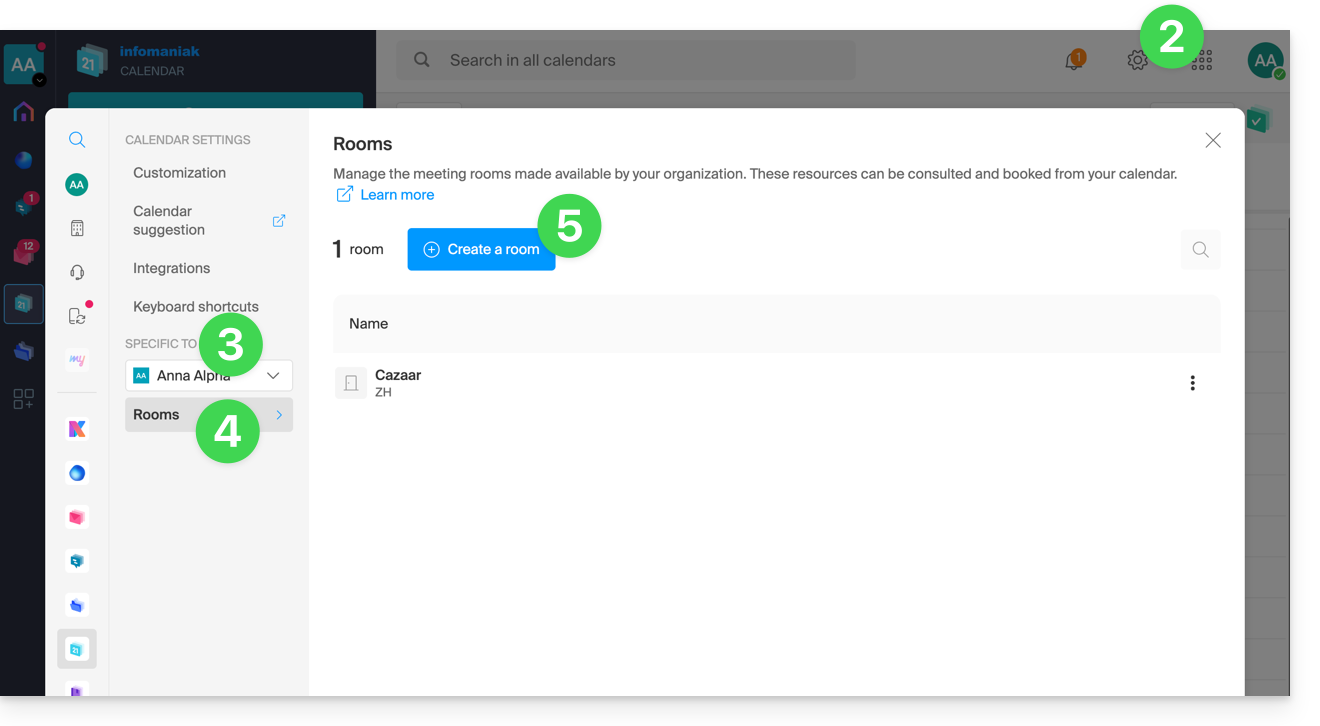
- Click on the Settings icon at the top right.
- Check or select the relevant Organization in the dropdown menu of the left sidebar.
- Click on Rooms in the left sidebar.
- Click on the Create a room button:
- Enter the essential information such as the name, the exact location (full address, floor), a color, the maximum number of people who can be accommodated:
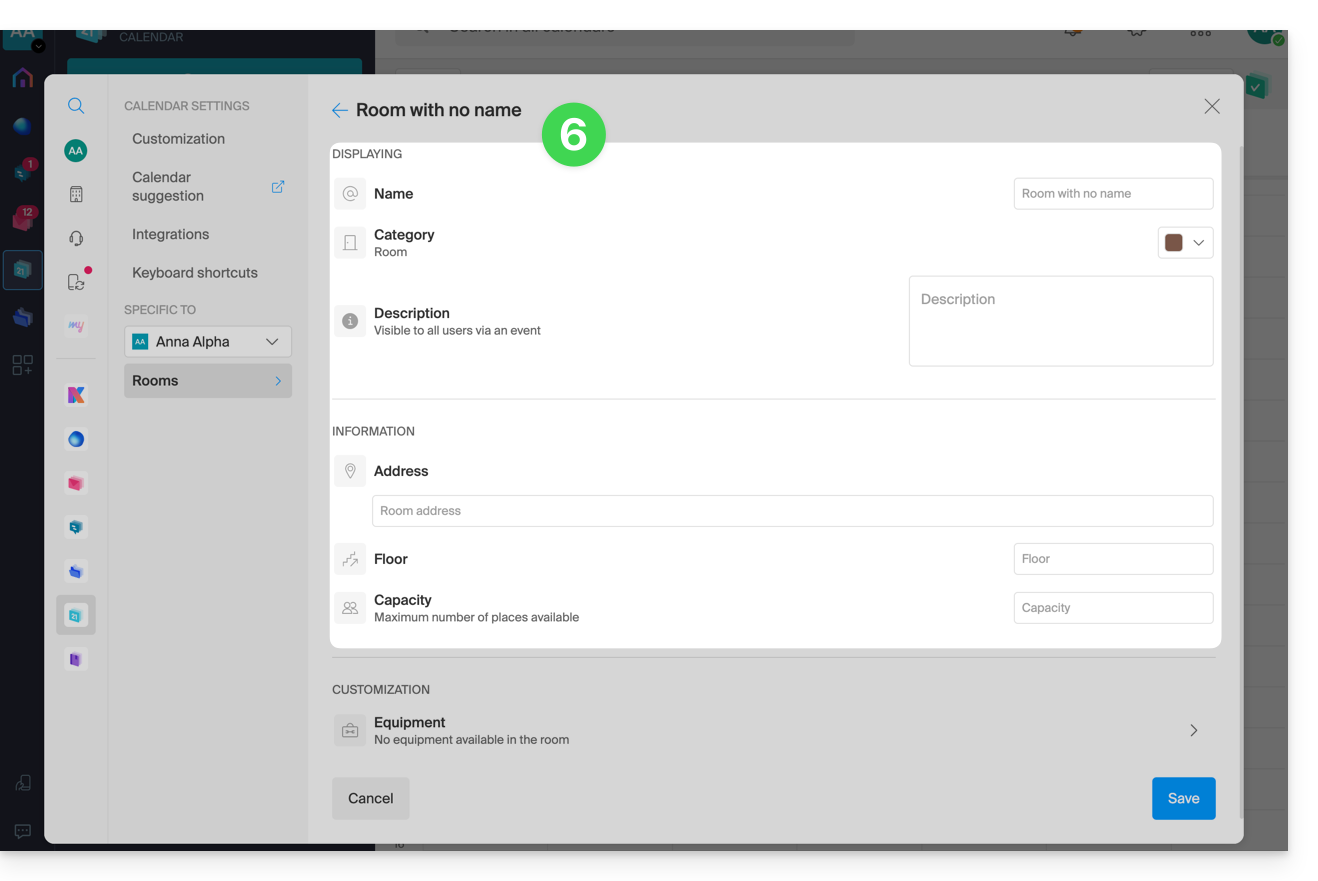
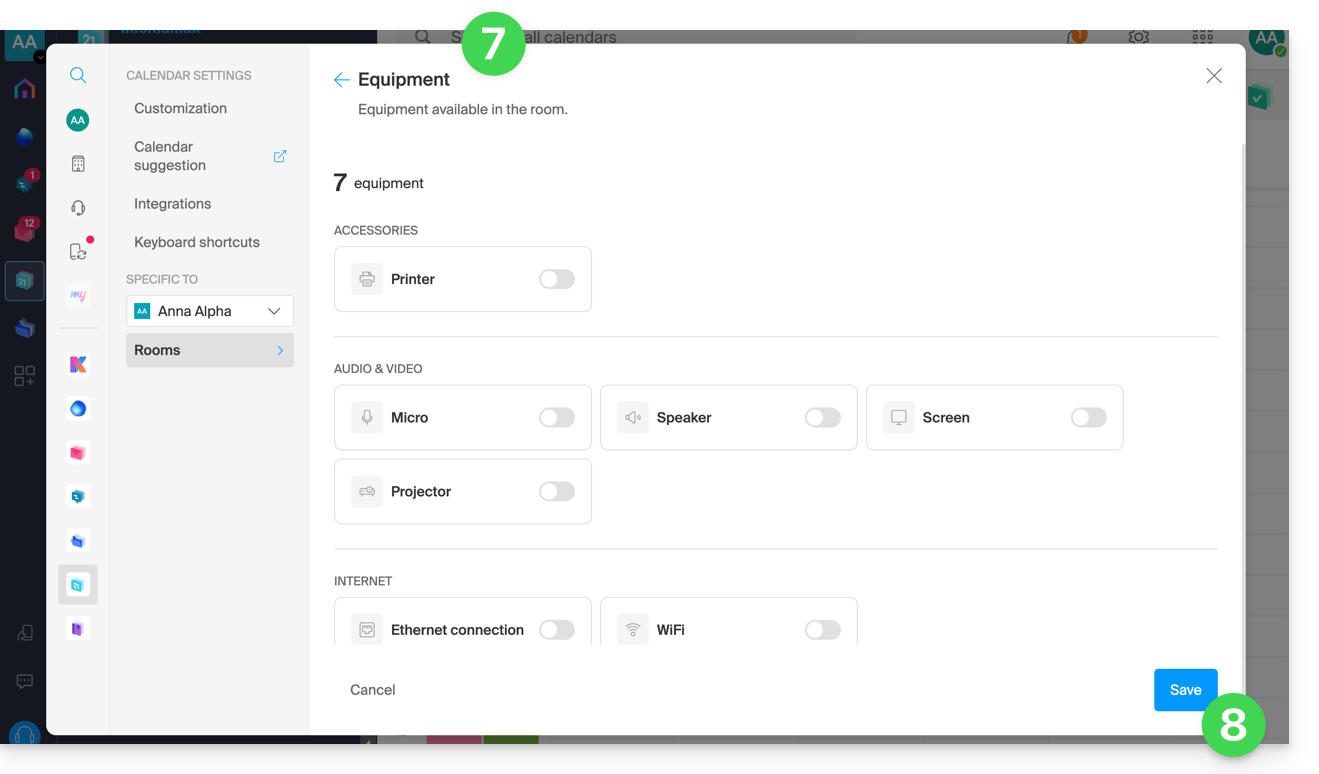
- Add the equipment possibly available in the room and the floor in question.
- Click on Save to save the equipment related to the room:
- Click on Save to create the meeting room.
Actions on the created room
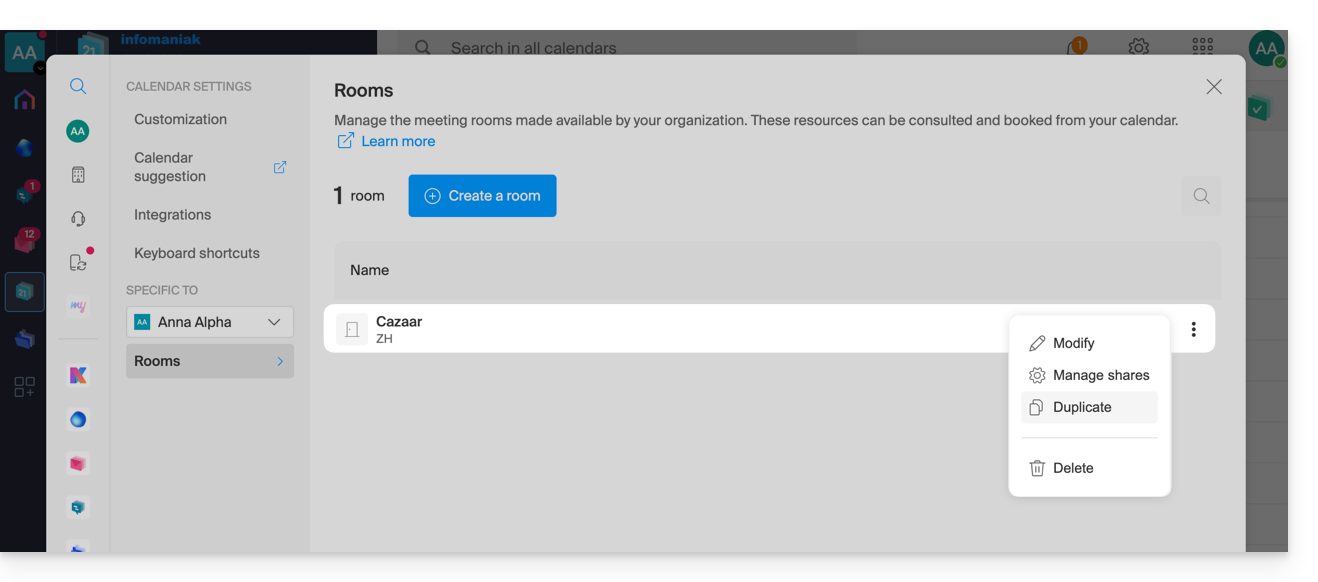
If you have several similar rooms, you can speed up their creation by duplicating the first one:
- Click on the action menu ⋮ to the right of the room in question in the displayed table:
Create an event by associating it with a room
Once the room is created and configured, simply create an event to associate it with the desired room:
- Click here to access the Infomaniak Web app Calendar (online service ksuite.infomaniak.com/calendar).
- Click on the More button at the top left of the interface to create a New event.
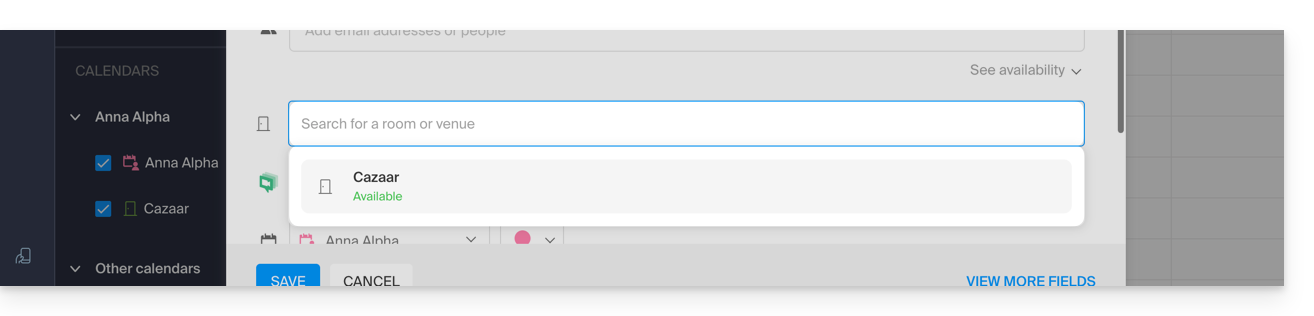
- Click on Add a room:
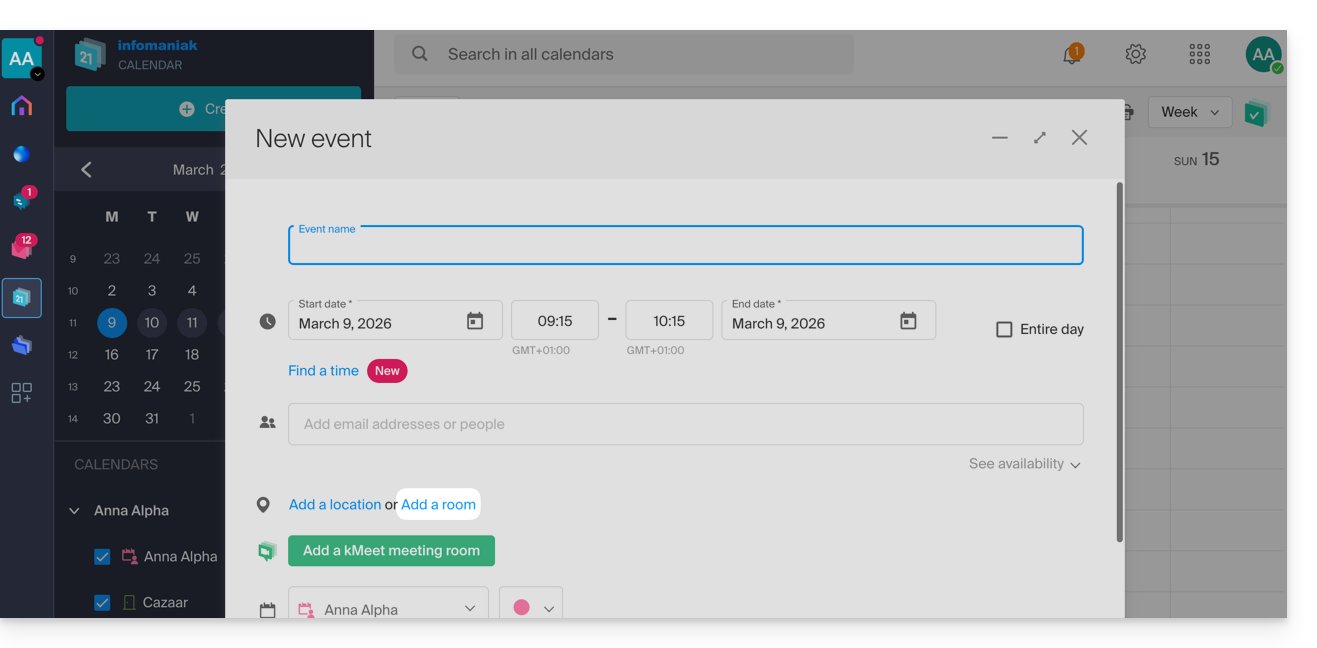
- Click in the Search for a room or location field to display the available rooms during the time slot (the 3 last booked from the most recent to the least recent).
- The equipment available in each room is displayed on the right:
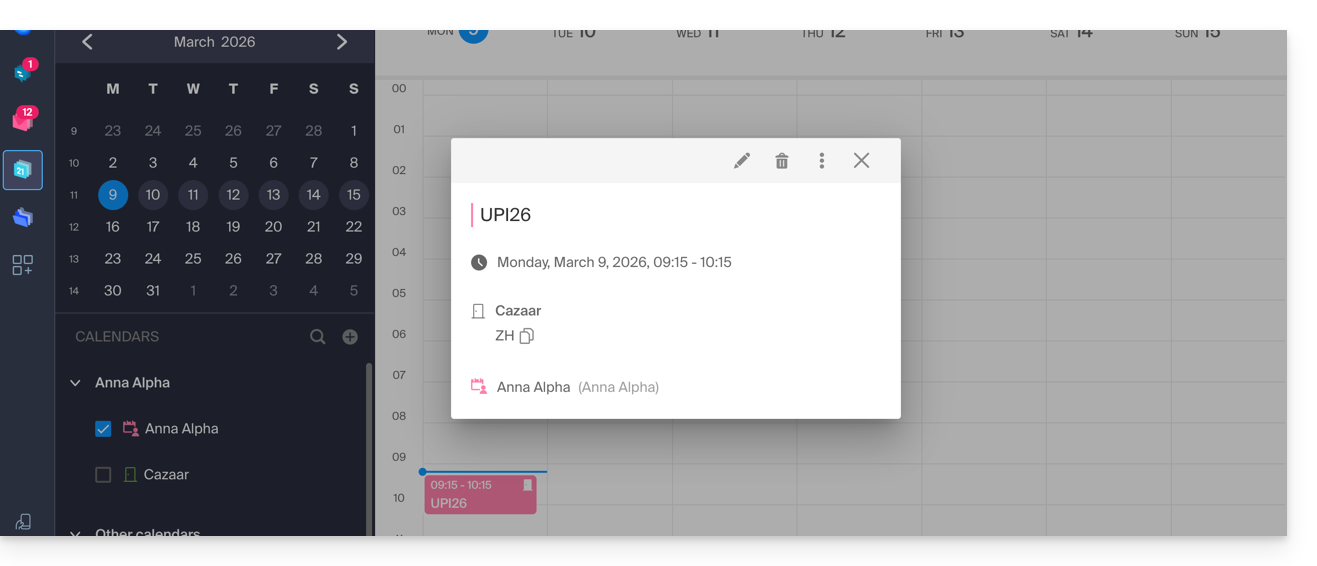
- Click on Save to publish the event and its room in the calendar.
- You will find all the information about the chosen location and the equipment available on the event page in the calendar:
Global view of rooms and their occupancy
It is possible to have a global view on a calendar of each room to see its occupancy. Indeed, when a room is created, a calendar associated with it is created in the Organization's calendars: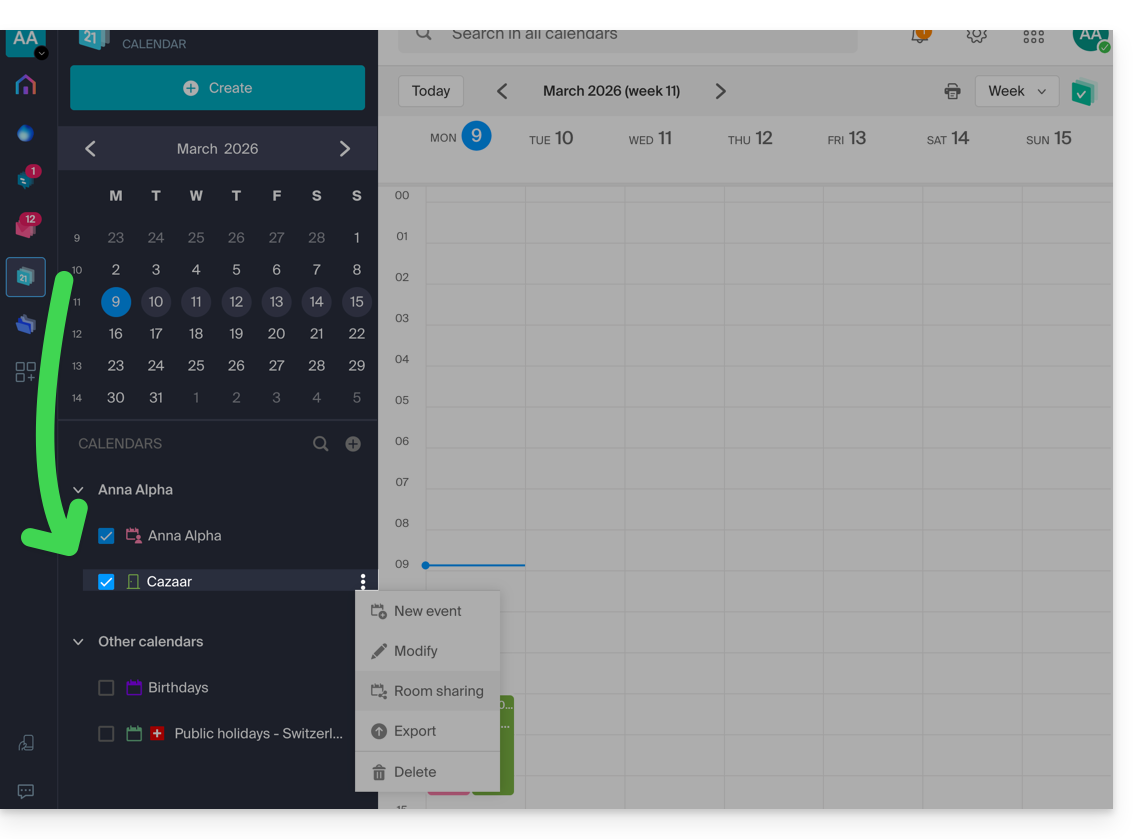
Your dedicated kSuite space also displays a view of the availability of your rooms in real-time, with the possibility of booking one in a few clicks, which will save you time in organizing your meetings: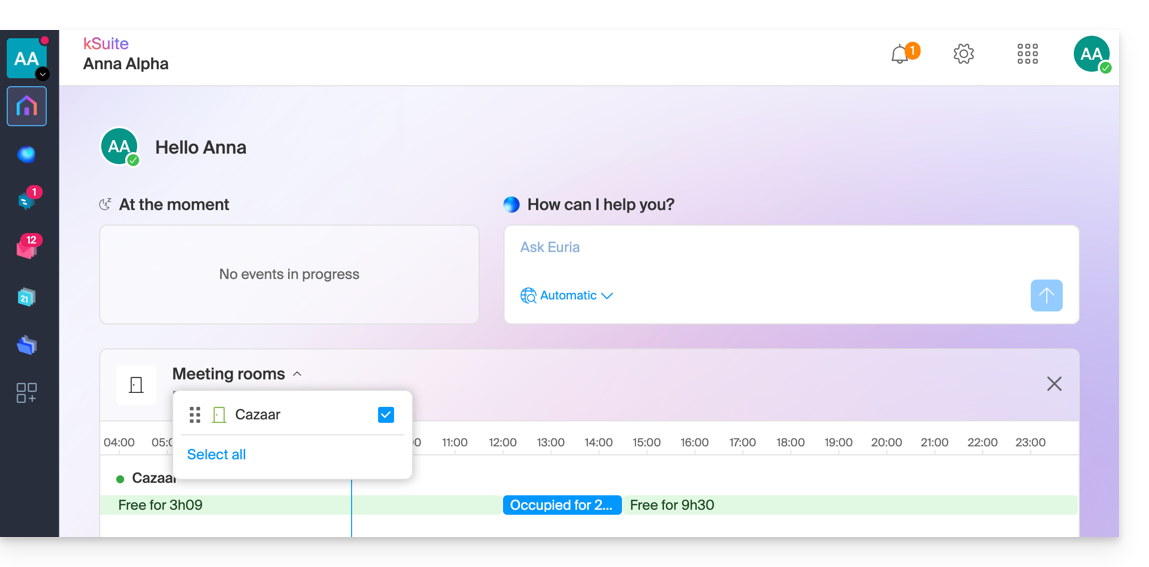
Link to this FAQ:
Has this FAQ been helpful?
This guide presents the security model that allows you to assign users to an email address or dedicate a different password to it for each device or software that needs to access it.
Introduction
- When creating an email address, no password is defined.
- If you remain within the Infomaniak ecosystem, i.e., you only use the Infomaniak Mail web app (online service ksuite.infomaniak.com/mail) and/or the Infomaniak Mail mobile app (application for iOS/Android smartphones or tablets), you do not need to manage passwords because everything is configured with a notion of user, i.e., an Infomaniak account (which does have a password):
- An email address can be viewed/used on these Infomaniak Mail apps without a password other than the one that already allows you to access your Infomaniak account, simply after being invited to do so.
- You only need to authorize your own account or invite someone you know to be a user of the email address.
- Otherwise, outside of this ecosystem, you simply create a password (or several) for your devices (Outlook, iPhone, CRM, etc.) according to your needs:
- Each password can be revoked individually, without affecting other users or devices linked to this address.
- It is not possible to display a previously created password; you simply need to create a new one!
Add a user
= Allow a person to view the address on the Infomaniak Mail interfaces
To allow a user (including yourself) to view the email address on Infomaniak:
- From the Mail Service dashboard:
- add the email address to your Infomaniak Mail apps so you can use the address,
- or decide which other external user should have access to the address on their Infomaniak Mail apps,
- or remove access for a user: other accesses to the email address will remain active.
- Any user of an email address on Infomaniak can view the list of other users who have access from the Mail web app directly.
Add a device
= Add a password to allow a person to view the address on a device (Outlook, iPhone, CRM, etc.)
To allow a user (including yourself) to view the email address on a connected device:
- From the Mail Service dashboard:
- create passwords specific to each device (Outlook, iPhone, CRM, etc.) as needed,
- or revoke the password in question: other accesses to the email address will remain active.
- You can manage connected devices from the Mail web app directly.
Link to this FAQ:
Has this FAQ been helpful?
This guide explains how to broadcast an online meeting using kMeet to a separate stream accessible via a unique URL, thanks to Infomaniak's Video Streaming service.
✘ UNAVAILABLE with
kSuite Free / kSuite Standard
my kSuite / my kSuite+ (ik.me, etik.com, ikmail.com)
Introduction
- Broadcasting a typical conference-style meeting via a Video Streaming feed rather than within the kMeet application offers several advantages:
- Public broadcasting on a large scale without having to restrict access to an audience limited to invited individuals.
- Attracting a wider audience, such as for conferences, webinars, or live events where hundreds or thousands of viewers can follow the event without joining a private call.
- Allows reaching an unlimited number of viewers.
- No need to manage access for each participant; the feed can simply be viewed via a link.
- A simple web browser is sufficient to access the streaming feed.
- Passive access: viewers are not forced to participate actively or interact; they can simply watch the event without registering or logging in, which is better suited for large events.
- No voice interruptions or disruptions related to microphone management; this helps maintain a smoother flow and keeps the focus on the speaker.
- Higher broadcast resolution when kMeet may be limited by bandwidth constraints and lower video quality to avoid network overload.
Create the Video Streaming sharing link
Prerequisites
- You must be a moderator of the kMeet to be able to create a live broadcast link.
- It is not necessary to have an Infomaniak Video Streaming plan.
Then:
- Start kMeet via ksuite.infomaniak.com/kmeet or from one of the applications for desktop or mobile devices.
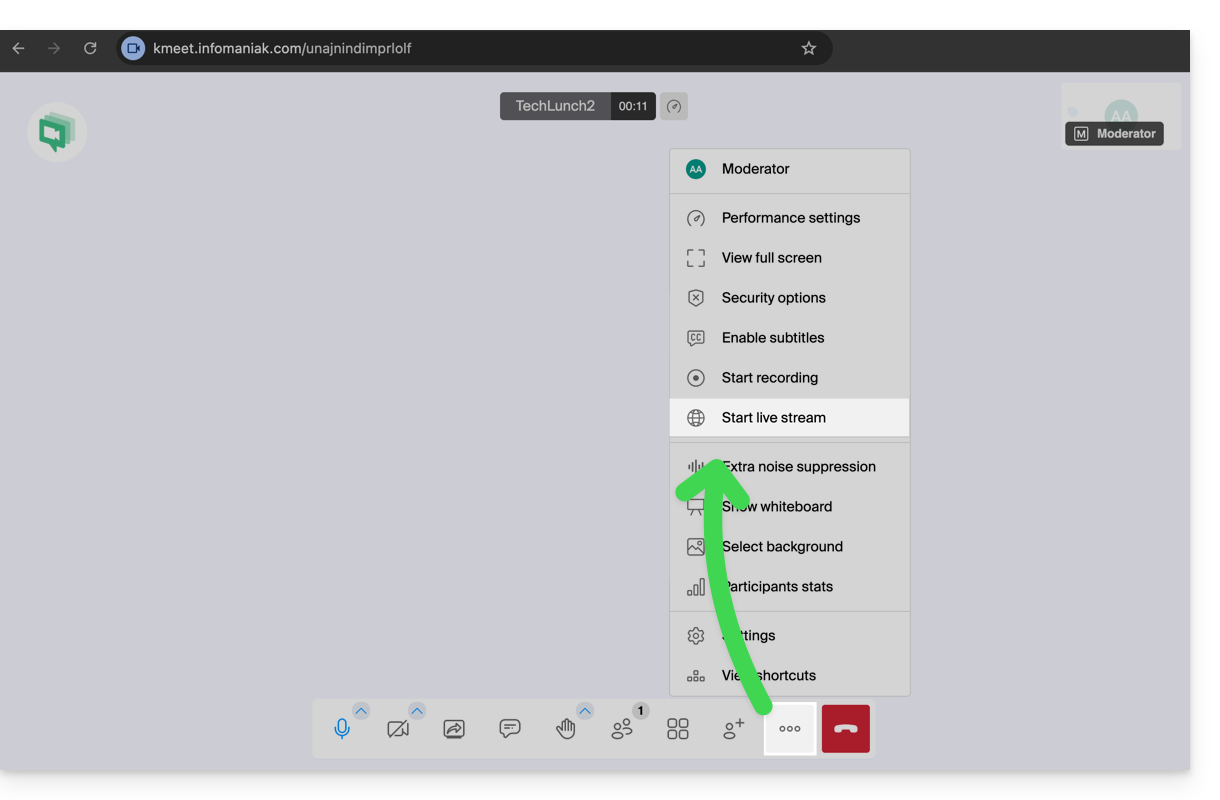
- Once in the meeting, click on the action menu ○○○ in the kMeet toolbar.
- Choose Start Live Broadcast:
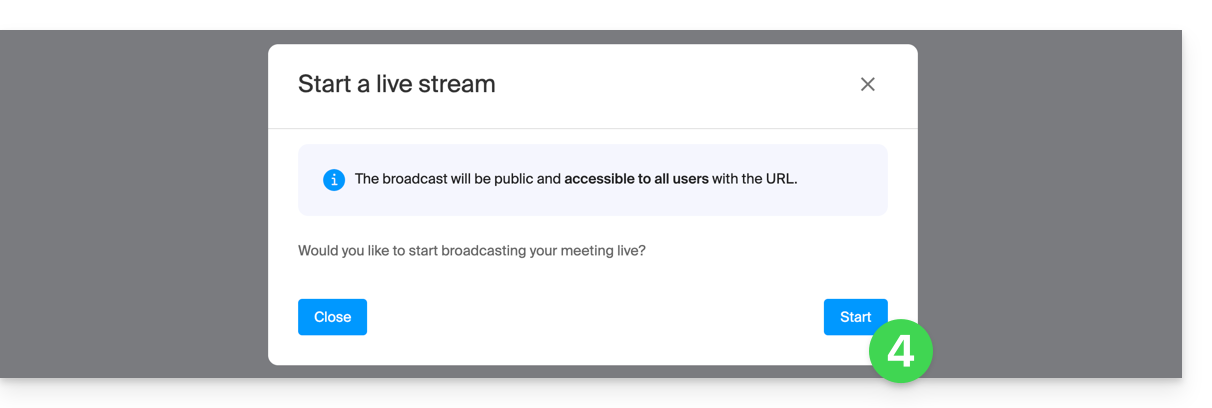
- Click the button to Start:
- Wait for the Video Streaming feed to be created; a symbol displayed on kMeet, as well as an audible signal, indicates the start of the live broadcast.
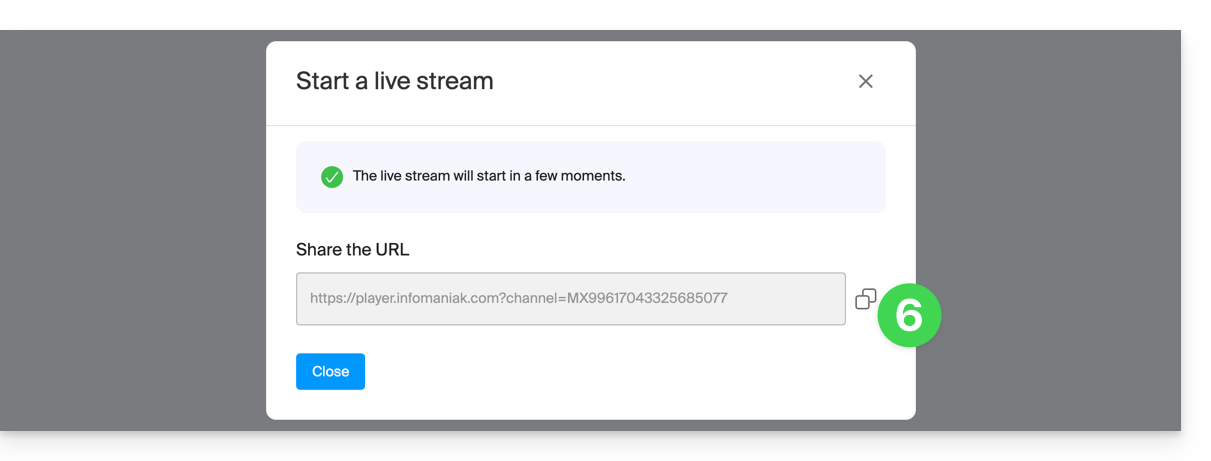
- In the same location, once the stream link is displayed, click the icon on the right to copy the URL corresponding to the live stream; paste the URL into a message for the participants or anyone who needs to watch the live broadcast:
The stream is broadcast continuously for a maximum of 24 hours, and will no longer be accessible once the kMeet meeting is stopped.
Link to this FAQ:
Has this FAQ been helpful?
This guide concerns Euria, the sovereign artificial intelligence assistant, a full-fledged kSuite service, also available within a standalone app.
Introduction
- The use of AI at Infomaniak is based on a transparent and ethical approach.
- Each service integrating AI follows strict principles to guarantee reliable and respectful use:
- the protection of information is guaranteed by the complete processing of data within infrastructures located exclusively in Switzerland, thus ensuring complete control over digital sovereignty,
- the results generated are never used to train models or for advertising purposes,
- and AI is not intended to replace humans, but to assist them.
What is Euria?
Designed to offer a European alternative to American technology giants, the sovereign artificial intelligence assistant Euria stands out for its deep integration into Infomaniak's productivity ecosystem, while guaranteeing absolute confidentiality of user data.
Euria's strength lies in its local infrastructure:
- Unlike solutions based on foreign public cloud, Infomaniak's AI is hosted exclusively on its own servers in Switzerland.
- This approach ensures strict compliance with data protection standards and guarantees that no information processed is used to train third-party models or shared outside the host's secure infrastructure.
Euria uses state-of-the-art language models (LLMs) selected for their efficiency and performance, while also being optimized to minimize their energy footprint. Infomaniak is committed to complete transparency regarding the algorithms used, reflecting the company's commitment to technological independence and environmental sustainability.
Usage Limits
To ensure a smooth and secure experience, the use of Euria is subject to certain volume and file size restrictions:
- Quota Calculation (rolling window): the limits (below) are not reset at midnight but are calculated in real time over a 24-hour window; each message sent "occupies" a slot in your quota and is automatically released 24 hours after it is sent.
- If you send messages throughout the morning until you reach your limit at 11 a.m., your sending rights will gradually become available the next morning as each message reaches its 24-hour age.
- Overall message quota: your daily limit is shared; each request addressed to Euria is deducted from your overall quota, regardless of the project or conversation in which you are interacting.
- A conversation cannot exceed 254,000 tokens at this time.
- Transcriptions: transcription services are unlimited.
- Image uploads: image uploads are limited to 10 MB per file.
- A conversation can contain no more than 20 images.
- Document uploads: file uploads are limited to 100 MB, except for the my kSuite and my kSuite+ plans, for which the limit is 20 MB.
- Number of projects:
| kSuite | Free | 2 |
| Standard | 10 | |
| Business | Unlimited | |
| Enterprise | Unlimited | |
| my kSuite | 2 | |
| my kSuite+ | Unlimited |
- Number of conversations per project:
| kSuite | Free | 5 |
| Standard | 50 | |
| Business | Unlimited | |
| Enterprise | Unlimited | |
| my kSuite | 5 | |
| my kSuite+ | Unlimited |
Supported file types
- Images:
- Local (browser):
BMP,JPG,JPEG,PNG,WEBP - Extended:
TIF,TIFF
- Local (browser):
- Documents:
- PDF:
PDF - Spreadsheets:
CSV,XLS,XLSX - Word processing:
DOC,DOCX - Text & Code:
JSON,MD,TXT,XML,YAML,YML - Presentations:
PPT,PPTX
- PDF:
- Audio:
AAC,M4A,MP3,OGA,OGG,OPUS,WAV
- Video:
MP4
Some Infomaniak services integrate Euria
- kChat
- The AI Euria integrated into kChat helps save time in communications: it can rephrase sentences, generate quick responses, correct spelling, or adjust the tone of a message. The user retains full control over the suggestions, which are only local to each session.
- Mail Infomaniak
- In the Mail application, Euria assists in writing emails. It can generate content from a few keywords, rephrase or structure a message, adapting to different styles. Nothing is sent automatically, and the user can modify the texts at any time.
- Site Creator
- An AI-based writing assistant allows Site Creator to quickly generate content suitable for different types of web pages. This service is useful for people who are launching a website and are looking to produce clear, optimized, and relevant texts.
- kDrive
- On kDrive, artificial intelligence is used at two complementary levels to simplify document management. Euria allows you to interact with text files stored in the drive. This module can answer questions about the content of a document, summarize, translate, or extract useful information. It is particularly effective for reading reports, understanding complex texts, or quickly generating an overview of a file.
To create an AI project with custom instructions and a knowledge base, please refer to this other guide.
Responsibilities of the parties
Data provided to the AI
- Infomaniak's AI is currently based by default on these models.
- These include Mistral, Whisper, DeepSeek, Llama, and Granite.
- When using a writing assistant, messages and requests addressed to the AI are processed exclusively in Switzerland by Infomaniak's infrastructure.
- No data is processed or shared with a third party.
Data provided by the AI
- The language model generates text based on the data it has assimilated during its training, and it lacks consciousness, intentions, or moral responsibility.
- It is crucial that the user is aware that the information generated by the model is not always accurate and should not be considered an unquestionable source of information.
- The user must exercise critical judgment and verify the information provided by the assistant with reliable sources when necessary.
- For example, if a person uses the model for critical tasks such as medical, legal, or financial advice, they should take extra precautions to confirm the information provided by the model.
- In the event of inappropriate or dangerous use of this assistant, the responsibility lies with the user who takes these actions.
Limitations for the use of Euria
The service is not available in these countries:
- Afghanistan
- Saudi Arabia
- Argentina
- Armenia
- Azerbaijan
- Bahrain
- Bangladesh
- Belize
- Bhutan
- Myanmar (Burma)
- Bolivia
- Brunei
- Cambodia
- China
- Colombia
- North Korea
- Costa Rica
- United Arab Emirates
- Ecuador
- El Salvador
- Georgia
- Guatemala
- Guyana
- Honduras
- India
- Indonesia
- Iraq
- Iran
- Israel
- Jordan
- Kazakhstan
- Kyrgyzstan
- Kuwait
- Laos
- Lebanon
- Malaysia
- Maldives
- Mexico
- Mongolia
- Nepal
- Nicaragua
- Oman
- Uzbekistan
- Pakistan
- Palestine
- Panama
- Paraguay
- Peru
- Philippines
- Qatar
- Sri Lanka
- Suriname
- Syria
- Tajikistan
- Taiwan
- East Timor
- Turkmenistan
- Uruguay
- Venezuela
- Yemen
Also discover AI Services: Infomaniak provides a platform that makes it easy to integrate open-source models into custom projects. It is possible to leverage text analysis, content generation, translation, or other AI applications via on-demand calls. These services allow developers to take advantage of powerful AI without relying on closed or proprietary solutions.
Link to this FAQ:
Has this FAQ been helpful?
The easiest way to manage your calendars is to use the Infomaniak Calendar web app (online service ksuite.infomaniak.com/calendar).
This interface offers many advantages:
- No software to install or configure.
- Sharing calendars with other users.
- Permanently saved.
- Synchronization of calendars (+ tasks) between devices.
- Attachment / kDrive.
- Secure and respects your privacy, hosted in Switzerland by a neutral and independent company.
How to get started with Infomaniak Calendar?
Whether on kSuite or the Mail app, it is essential to log in with your Infomaniak account ID and its password. This will not work if you directly enter an email address hosted that is not an Infomaniak account. Understand the difference
- Click here to access the Infomaniak Calendar web app (online service ksuite.infomaniak.com/calendar).
What would you like to do?
- Synchronize calendars on all your devices
- Customize the app's display
- Display public holidays
- Create a task
- Create a single event
- Create a recurring event
- Create an event reminder
- Schedule a meeting
- Schedule a meeting from the Mail web app
- Manage room bookings
- Print a calendar
- Import a calendar
- Import tasks
- Export a calendar
- Share a calendar
- Share a calendar publicly
- Restore deleted events
- Add an attachment to an event
- Set a default calendar in the app
- Create a desktop app (from the Calendar web app, for example) using Chrome
Have a question or feedback?
- Contact Infomaniak support
- Click here to share feedback or a suggestion about an Infomaniak product
Link to this FAQ:
Has this FAQ been helpful?
The easiest way to manage your contacts/address books is to use the Infomaniak Contacts web app (online service ksuite.infomaniak.com/contacts).
This interface offers many advantages:
- No software to install or configure.
- Sharing address books with other users.
- Permanently saved.
- Synchronization of your contacts across devices.
- Secure and respects your privacy, hosted in Switzerland by a neutral and independent company.
How to get started with Infomaniak Contacts?
Whether on kSuite or the Mail app, it is essential to log in with your Infomaniak account ID and password. This will not work if you directly enter an email address hosted on a service that is not an Infomaniak account. Understand the difference
- Click here to access the Infomaniak Contacts web app (online service ksuite.infomaniak.com/contacts).
What would you like to do?
- Synchronize contacts & calendars on all your devices
- Manage contacts
- Manage duplicates
- Import contacts
- Export contacts
- Group contacts
- Copy or move contacts
- Restore contacts
- Search for contacts
- Share an address book
Have a question or feedback?
- Contact Infomaniak support
- Click here to share feedback or a suggestion about an Infomaniak product
Link to this FAQ:
Has this FAQ been helpful?
This guide explains how to invite a user to kChat who is not yet part of your Organization but will be counted as a kSuite user.
Introduction
- Refer to this other guide to grant access to one or more kChat channels to an external user, who can then interact with your team without being counted as a kSuite user and without having any specific rights within the Organization (of which they will not be a part).
- You can also invite an entire Group from kChat.
- Refer to this other guide if you want to manage the channels to which new members will automatically belong.
Invite to use kSuite
Prerequisites
- Be a kChat administrator:
- The role within the Organization is irrelevant; being an Organization administrator in the Organization that has the kSuite (and therefore kChat) is not required, and is not sufficient in any case:
- The role within the Organization is irrelevant; being an Organization administrator in the Organization that has the kSuite (and therefore kChat) is not required, and is not sufficient in any case:
Then, invite the user using the procedure below. Once invited, the user can confirm their membership and will access kChat with the limited permissions you have granted them:
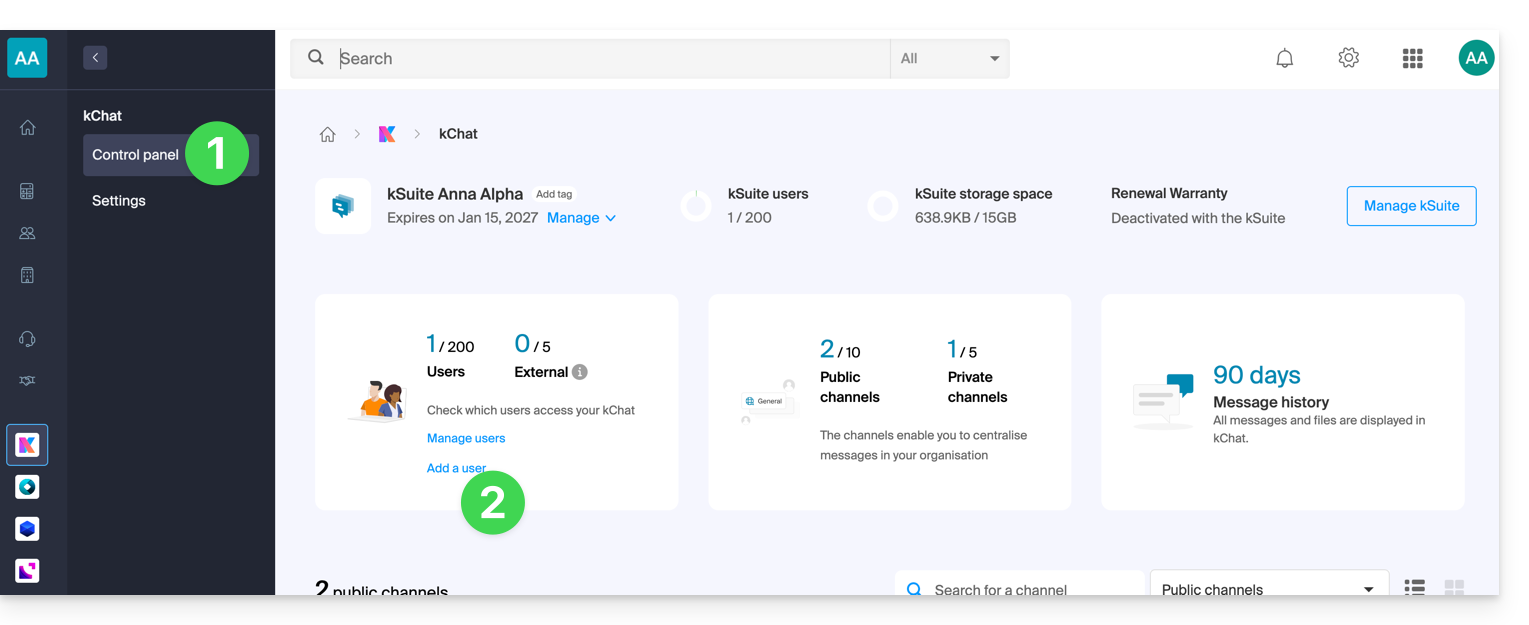
- Click here to access the kChat management section in the Infomaniak Manager (need help?).
- Click on Add a user:
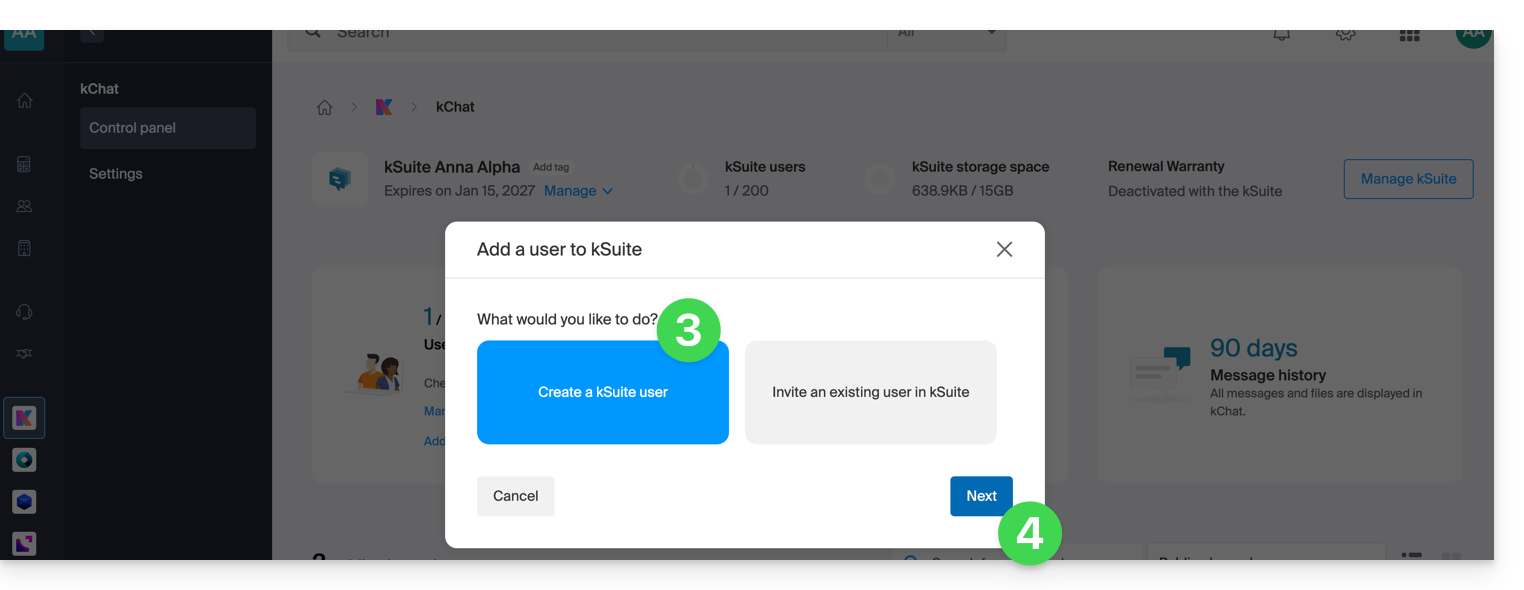
- Click on Create a kSuite user.
- Click on Next:
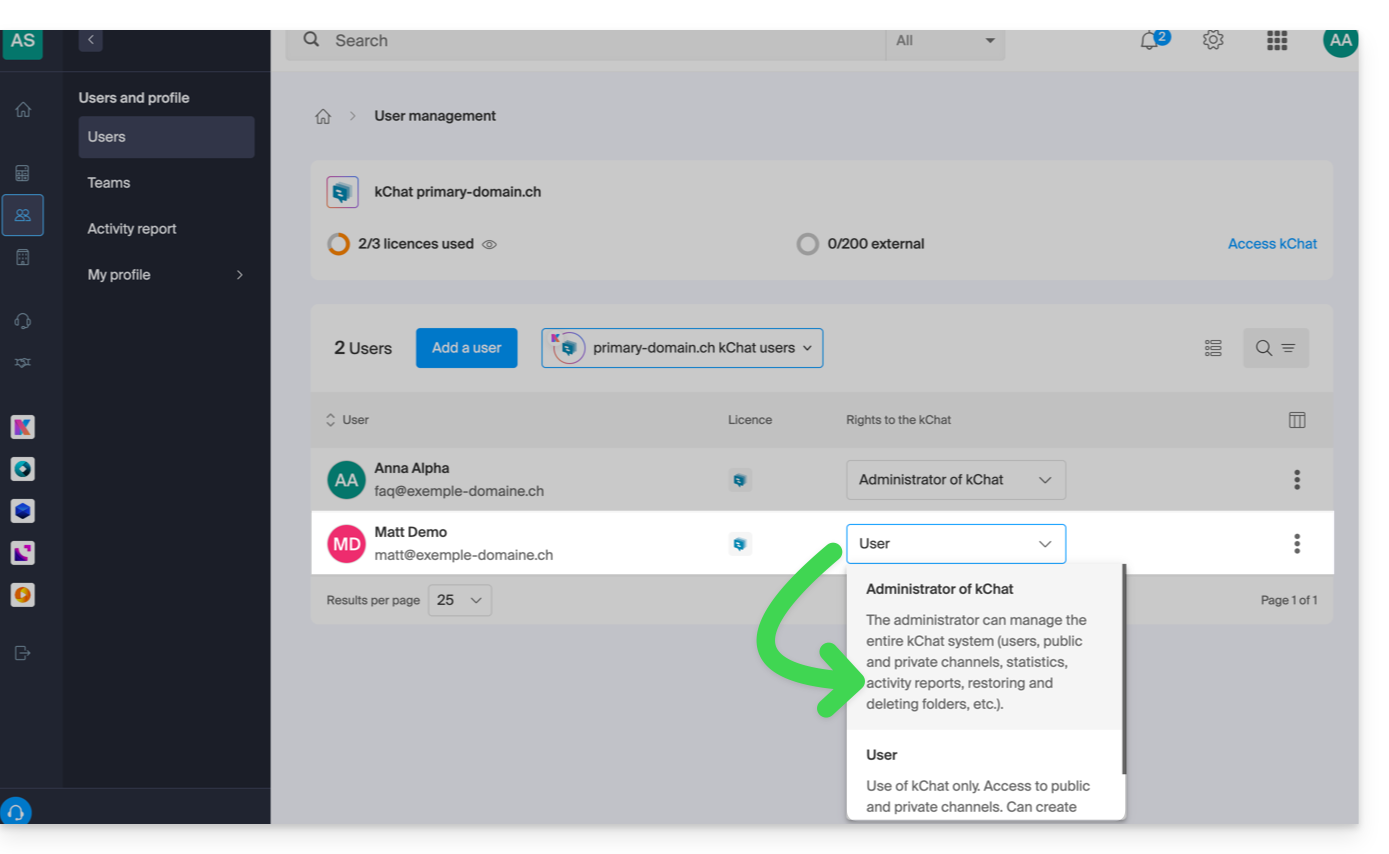
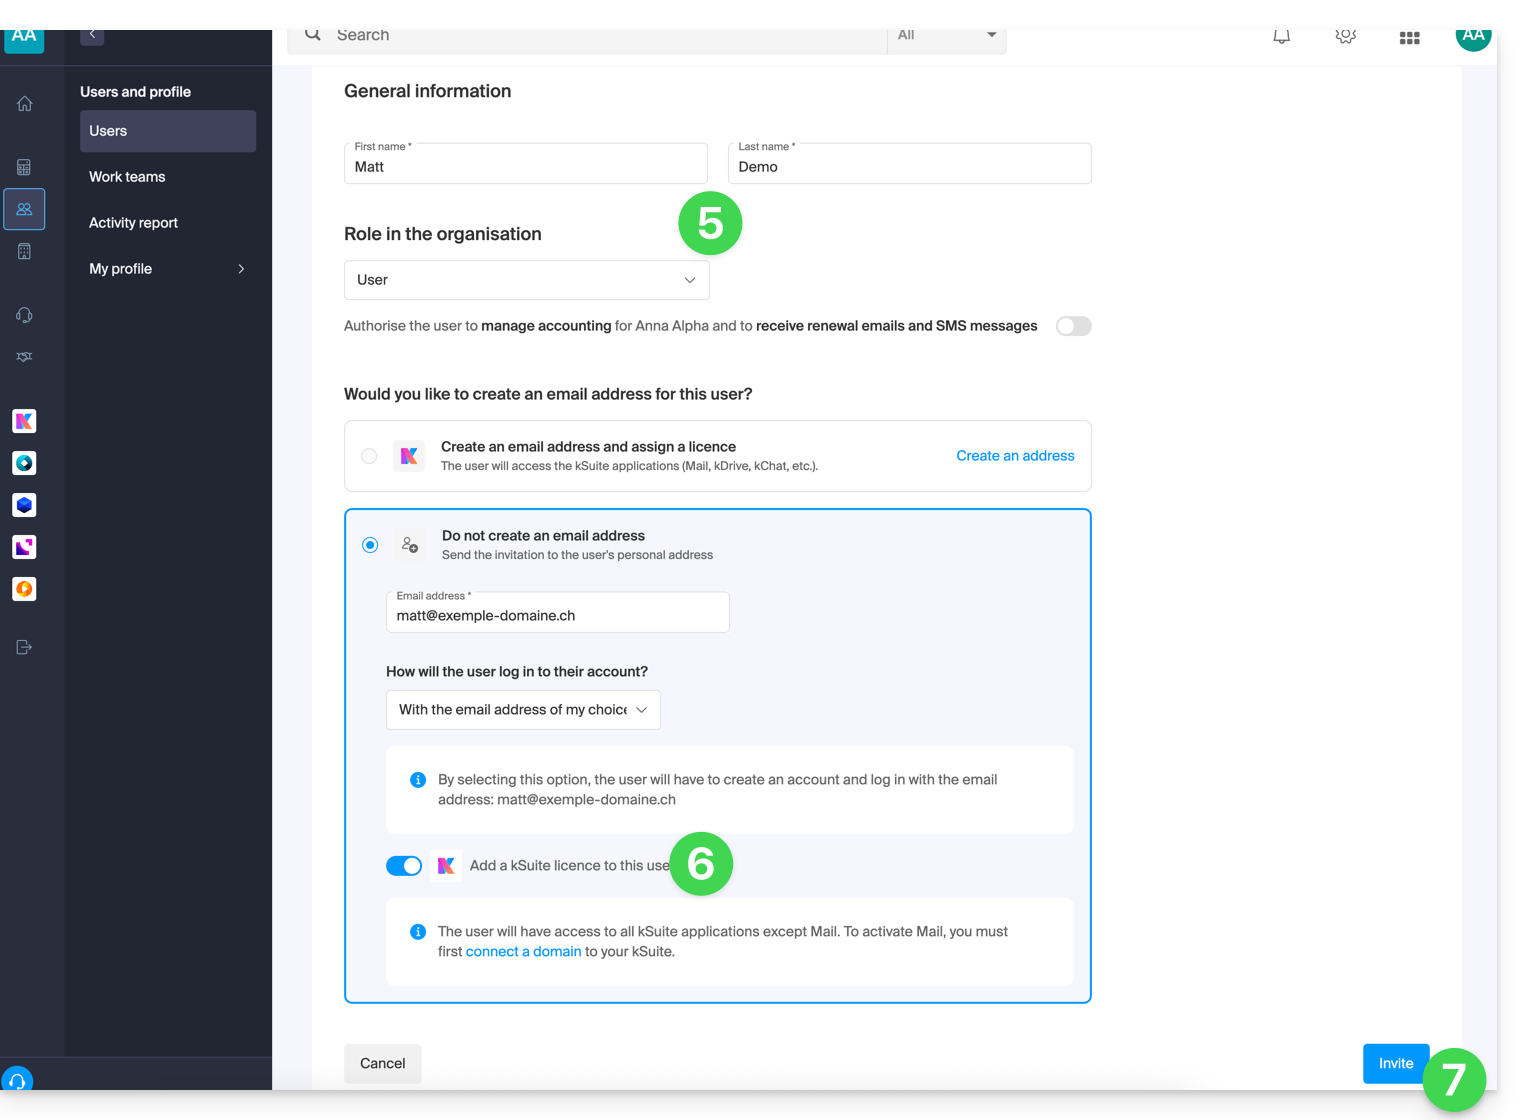
- Enter the user's first name and last name, and define their role as a standard user:
- Legal representative
- Legal responsibility for the organization
- Can manage all products and users
- Can manage accounting and new product orders
- Administrator
- Can manage all products and users
- Can manage accounting and new product orders
- User
- Can manage the products you authorize
- Can manage accounting if you authorize it
- Legal representative
- Do not create a mail address for the user and instead indicate their existing mail address to which the invitation should be sent:
- You can require this future user to log in with this mail address or allow them to specify a different mail address (this is particularly useful if they already have a user account with Infomaniak with a different login ID).
- Add the user to your kSuite using the toggle switch.
- Click the Invite button:
- The invitation is pending until the invited user completes the registration (see below). The organization's user dashboard clearly indicates this status:
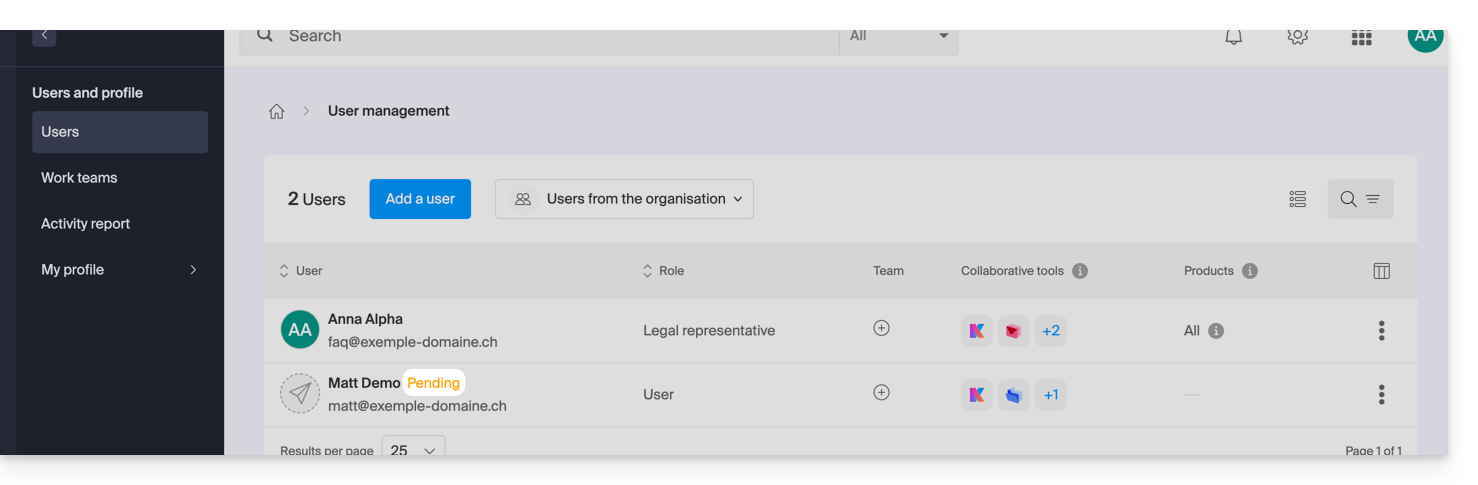
- The invitation is pending until the invited user completes the registration (see below). The organization's user dashboard clearly indicates this status:
Accept the invitation
To access the organization that owns kChat:
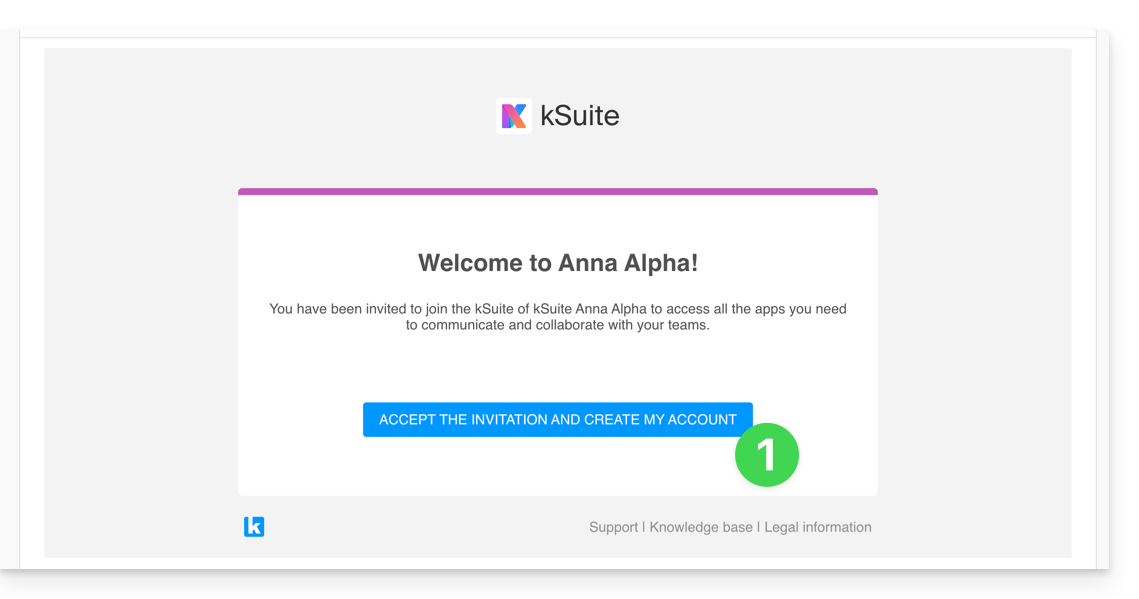
- The invited user receives the invitation at their mail address and clicks the Accept invitation button:
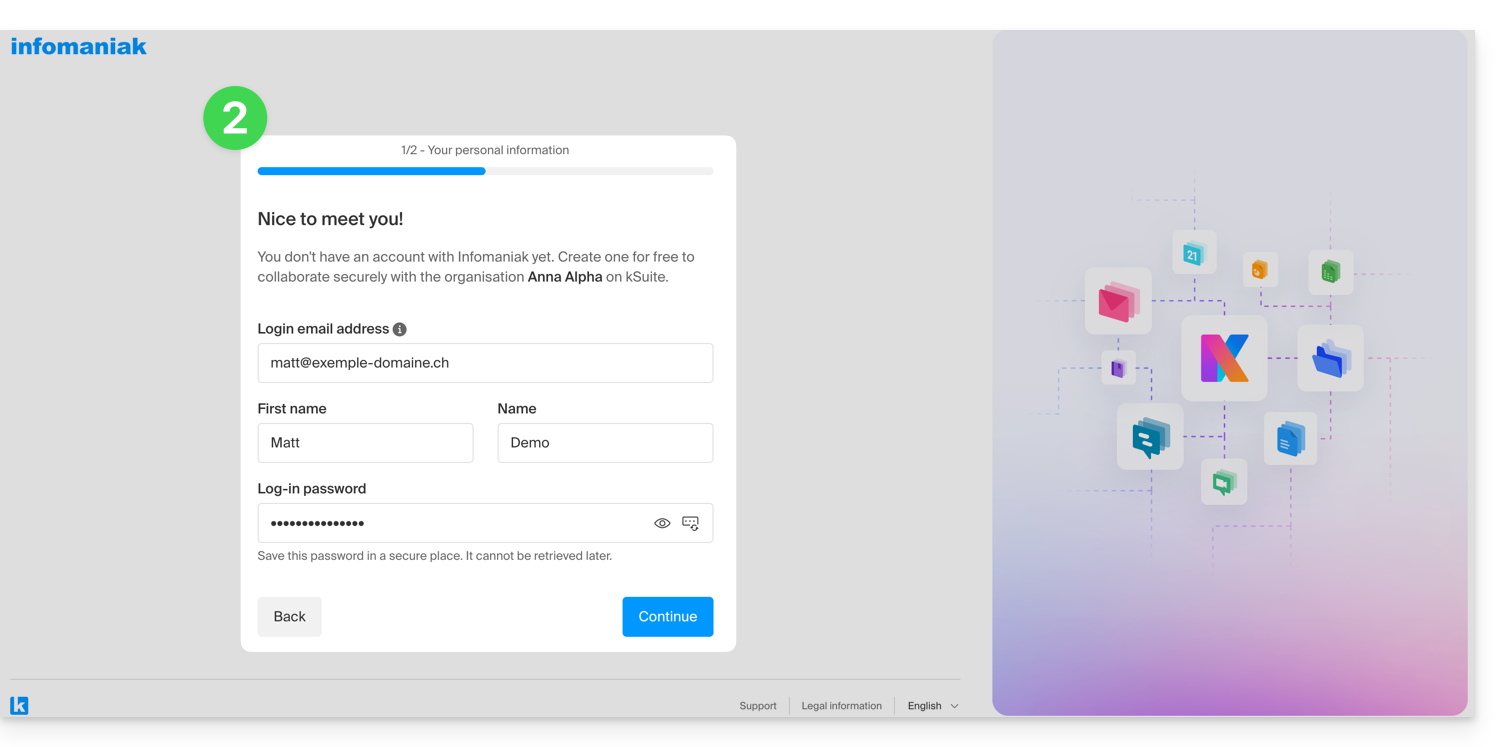
- They specify their contact details as well as the mail address/password they wish to use and complete the registration:
- Once the registration is complete, the newly registered user can log in to their Manager and access the kChat to which they were invited.
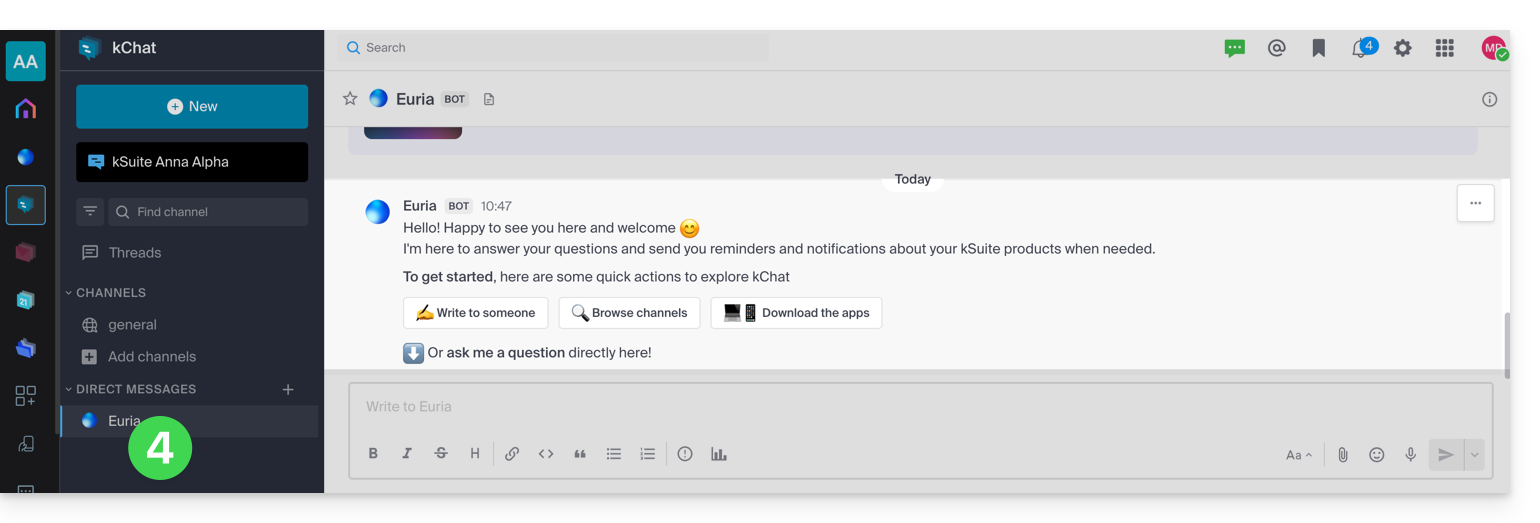
- Existing users are automatically notified of the new participant's arrival and can now chat with them. As soon as they are added, the new user receives a welcome message from Euria (Infomaniak's AI Bot):
Access to kSuite, not access to kSuite management!
It is important to differentiate between using the kChat app (within kSuite) and managing kSuite itself.
In the invitation example above, the new user was invited to join kChat, so they are now counted as a kSuite user when an administrator accesses the kChat user management section: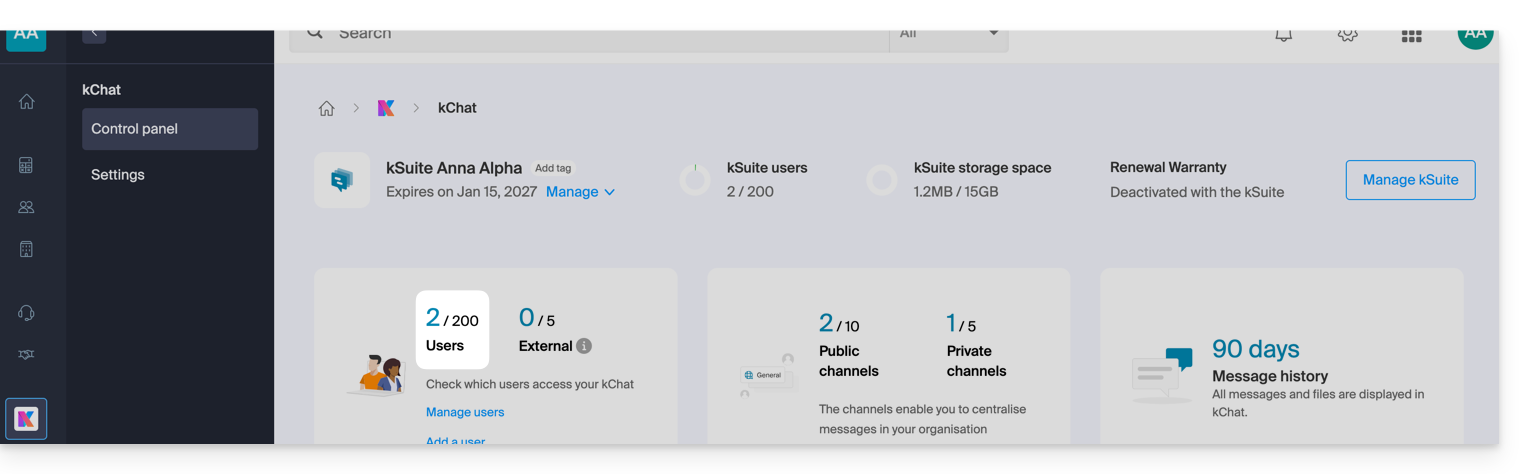
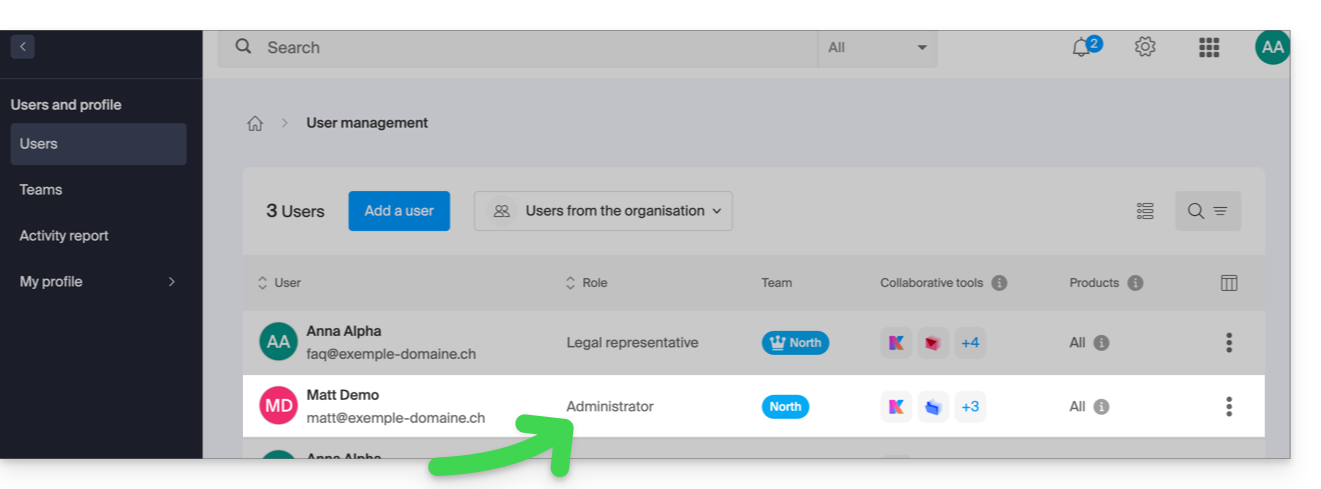
The same applies to kSuite user management:
However, this new user will not be able to directly manage the kSuite to which they were invited, since their role (defined in point 5 above) does not authorize them to do so: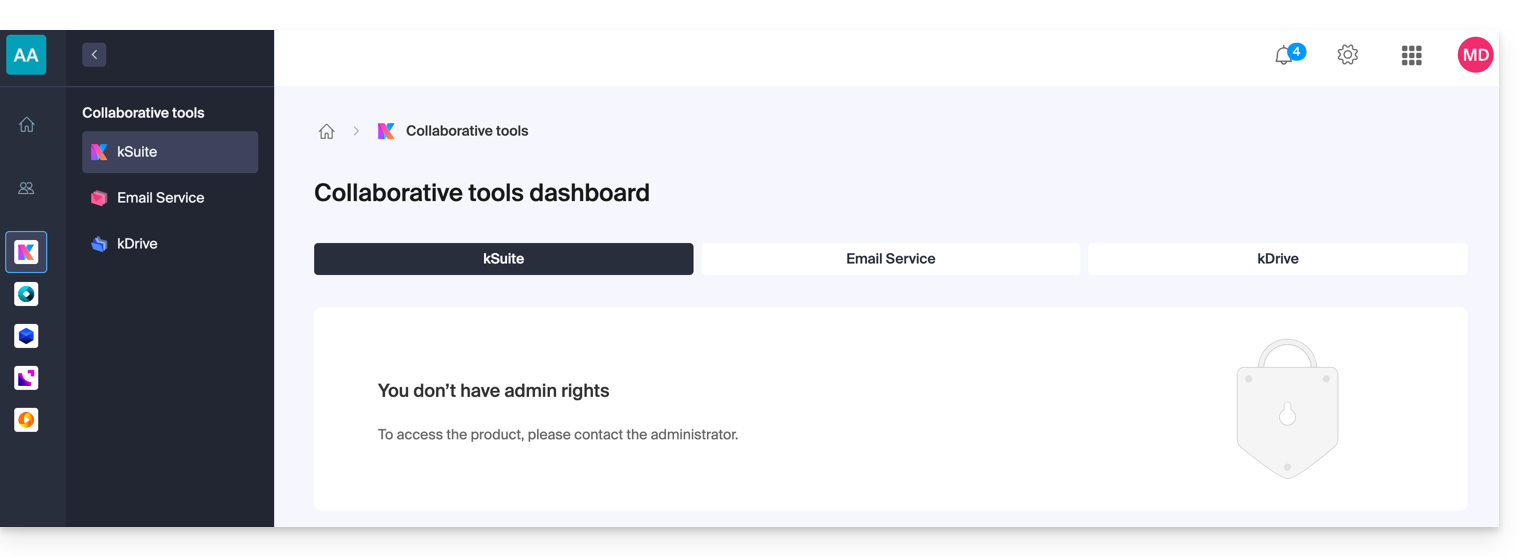
- This is why this user will not see any active links in the Collaborative Tools → kSuite section of their Infomaniak Manager.
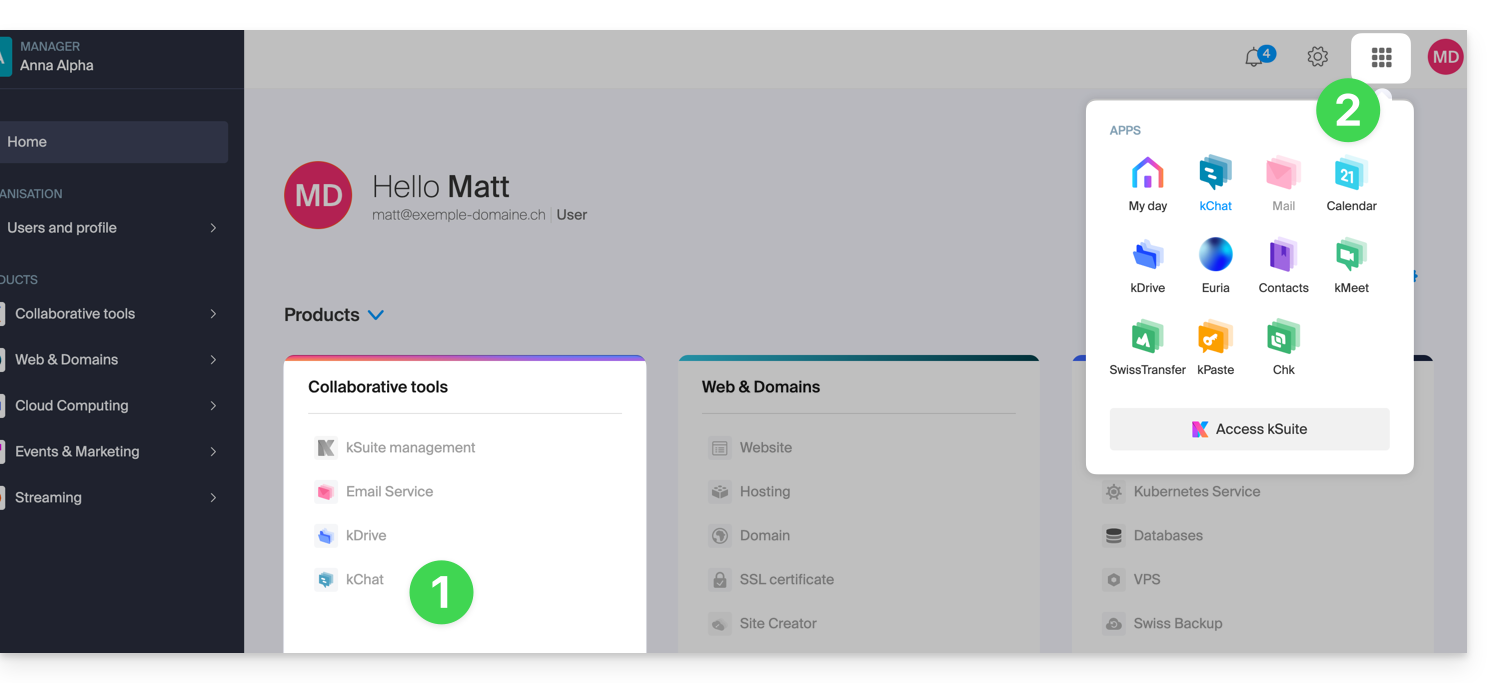
- They will need to switch to the Infomaniak applications using the menu in the top right corner:
Note that, if desired, this user can order their own kSuite, independent of the kSuite to which they were invited.
Link to this FAQ:
Has this FAQ been helpful?
This guide introduces you to the kSuite spaces, the suite of productivity and online collaboration tools developed in Switzerland by Infomaniak.
Preamble
- A kSuite space groups access to your applications and offers an intelligent dashboard to quickly access essential information:
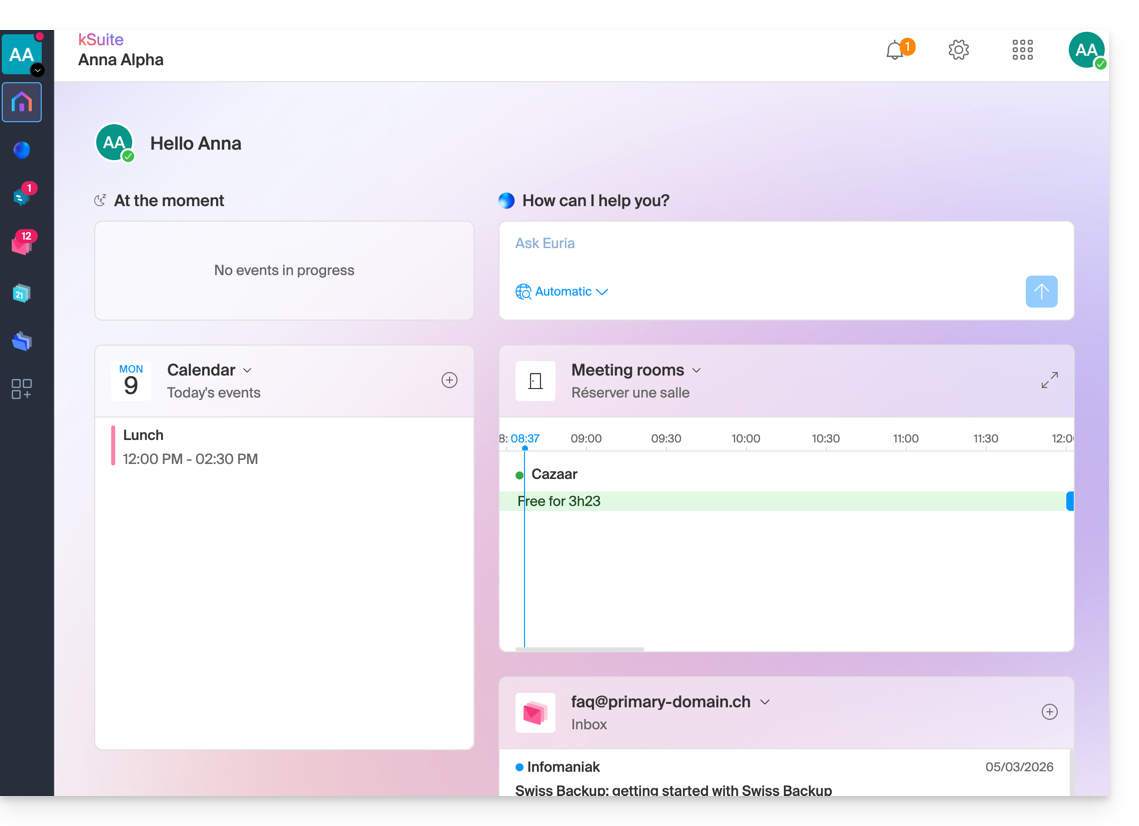
- Widgets like "At the moment" display your appointments (location, participants, kMeet link).
- The widget "Euria" allows you to request AI with one click.
- your last received emails...
- navigation is designed to switch from one application to another smoothly within a single browser window.
- The interface allows you to manage your status and your presence to collaborate more effectively with other users.
- You can switch between the kSuite spaces of your different Organizations in the same way as on the Infomaniak Manager.
- If you have my kSuite, this space will always be offered first.
Access the kSuite page from the Manager
Click on the icon at the top right of the interface, then on My Day to switch between the Infomaniak Manager and the kSuite space as well as the kSuite apps: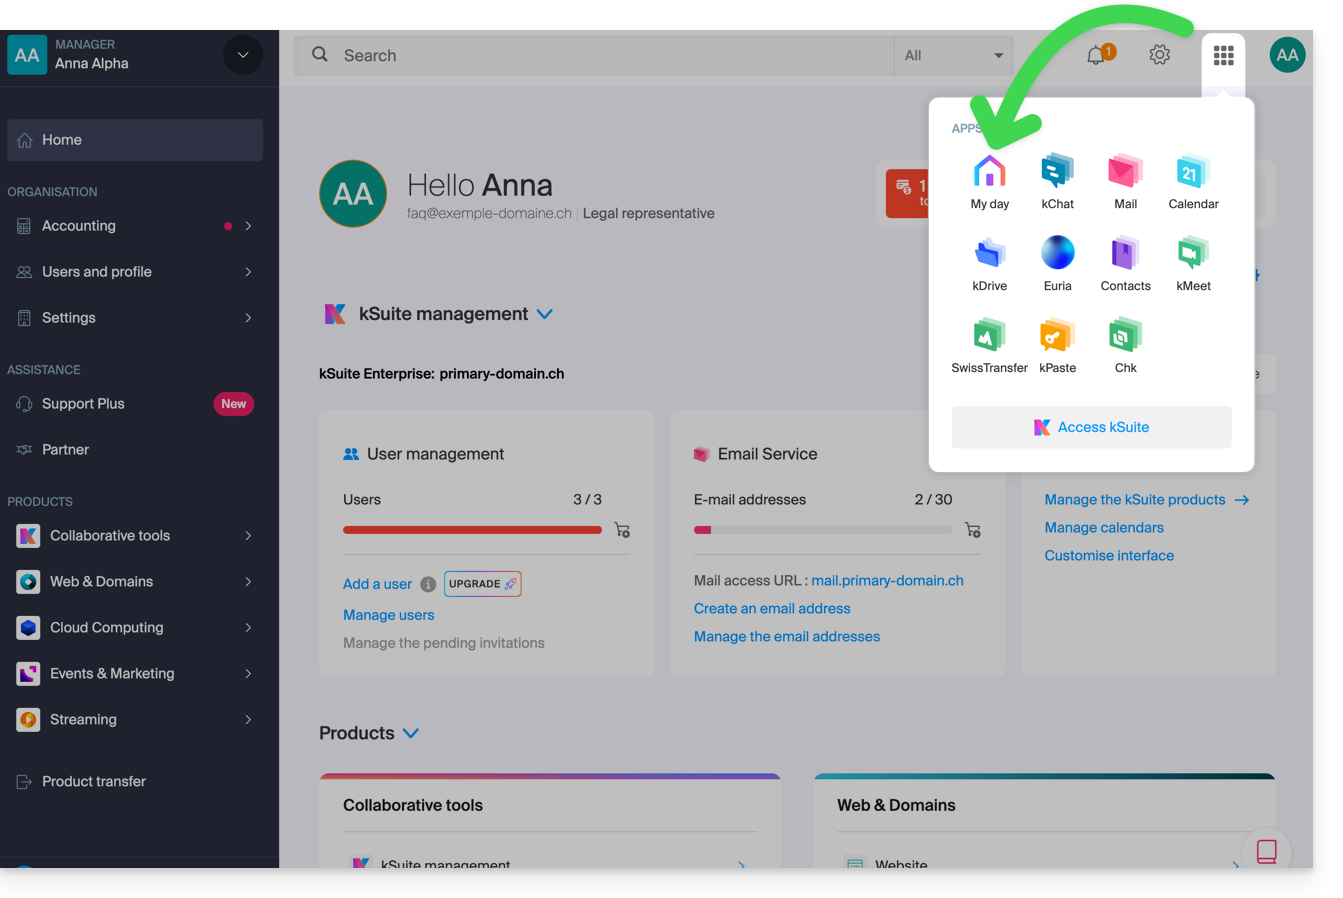
Access the kSuite space from an app
If you are already on a kSuite app, click on the colored house in the left sidebar menu or click on the icon at the top right of the interface, then on My Day: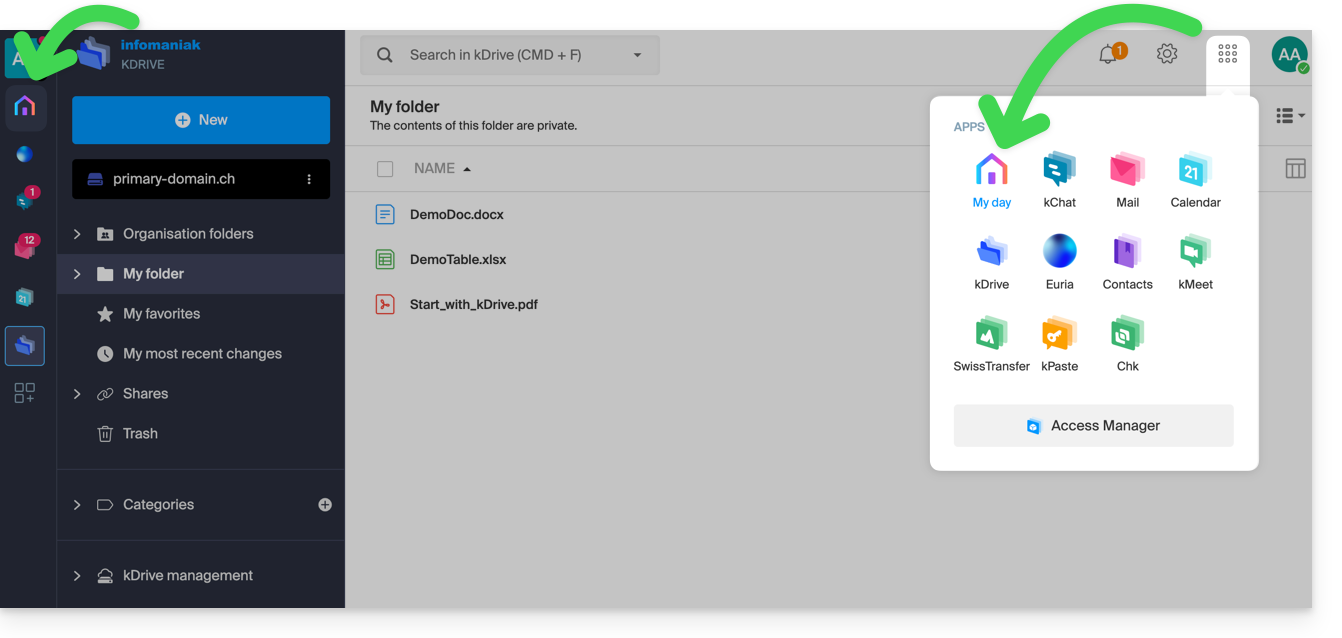
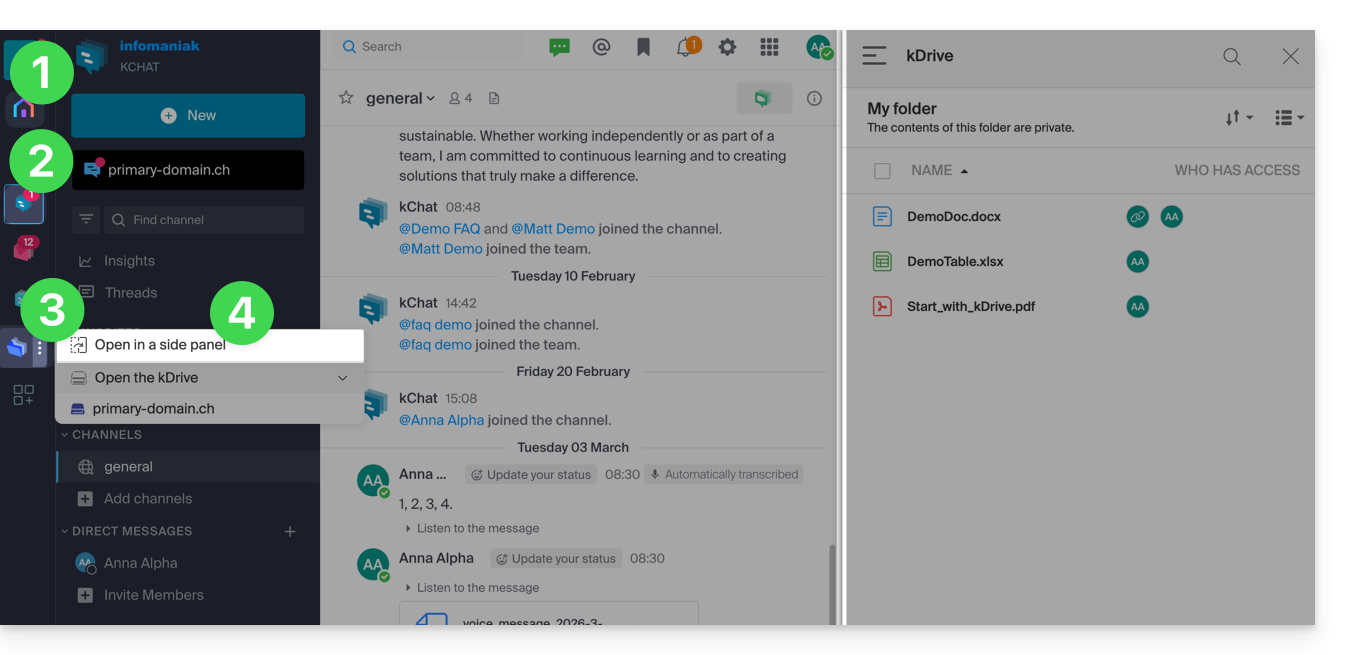
Split the screen for 2 kSuite apps
To work with 2 kSuite apps side by side:
- Click here to access the kSuite space of your Organization.
- Click on the icons in the left sidebar menu to access a 1st kSuite app like kChat for example.
- Click on the action menu ⋮ located to the right of a 2nd kSuite app like kDrive for example.
- Choose to open the app in a sidebar panel to have the 2 apps side by side:
Learn more
Link to this FAQ:
Has this FAQ been helpful?
This guide explains how to add a new recurring event to the calendar/agenda of the Infomaniak Web app Calendar (online service ksuite.infomaniak.com/calendar).
Introduction
- To create a simple one-time event, please refer to this other guide.
- To schedule a meeting between multiple users and find the best time slot, please refer to this other guide regarding the meeting scheduling assistant.
- It is possible to modify (move/delete) a single occurrence of a recurring event in the Infomaniak agenda without affecting the entire series, allowing you to adjust the time, participants, location, or duration of a specific meeting while preserving the original configuration for all other occurrences.
Add a recurring event
To add an event that will be repeated in the future:
- Click here to access the Infomaniak Web app Calendar (online service ksuite.infomaniak.com/calendar).
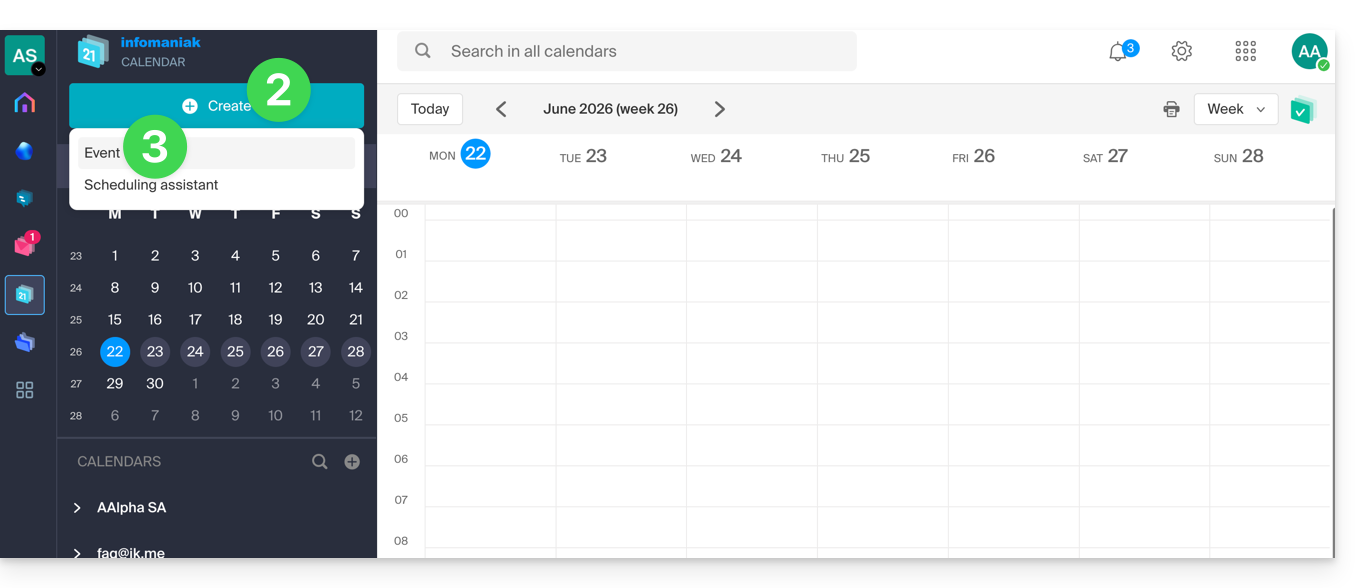
- Click on the Create button in the top left corner.
- Click on Event:
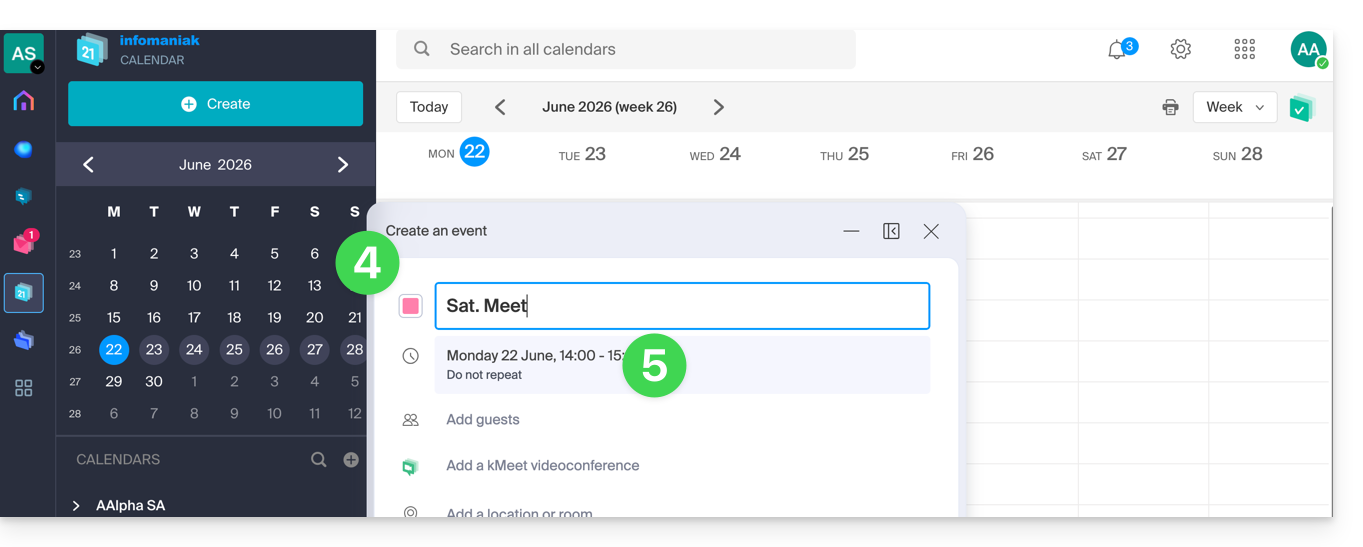
- Enter the event details.
- Click on the time/date section:
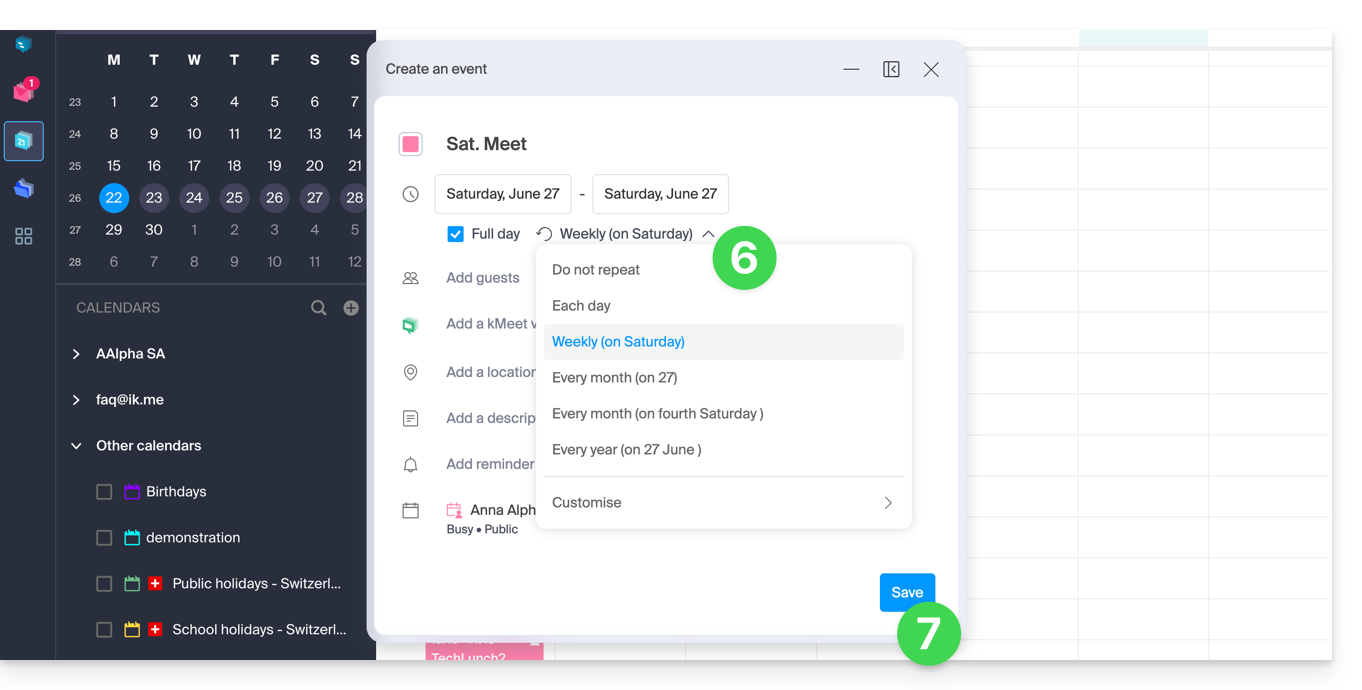
- Enable recurrence and customize it as needed.
- Save the recurring event at the bottom of the page:
Link to this FAQ:
Has this FAQ been helpful?
This guide explains how to change your kDrive plan, the collaborative cloud storage solution that is 100% Swiss Made.
Introduction
- kDrive is the name given to the file storage/sharing service offered by Infomaniak in Switzerland.
- kDrive is accessible free of charge or through a subscription, depending on whether you are the only user or if you want collaborators to also have access.
- kDrive exists as an independent product, or as a product among others within the kSuite & my kSuite / my kSuite+ suite.
- To help you identify the plan that best suits your needs, please refer to this other guide.
If you have been invited to view/collaborate on a file in a kDrive, you may not actually own the kDrive product; you only have access to the kDrive managed by someone else. Therefore, you cannot make changes to the current plan.
Determine your current kDrive plan
From the kDrive web app
To find out which plan you currently have:
- Click here to access the Infomaniak kDrive web app (online service ksuite.infomaniak.com/kdrive).
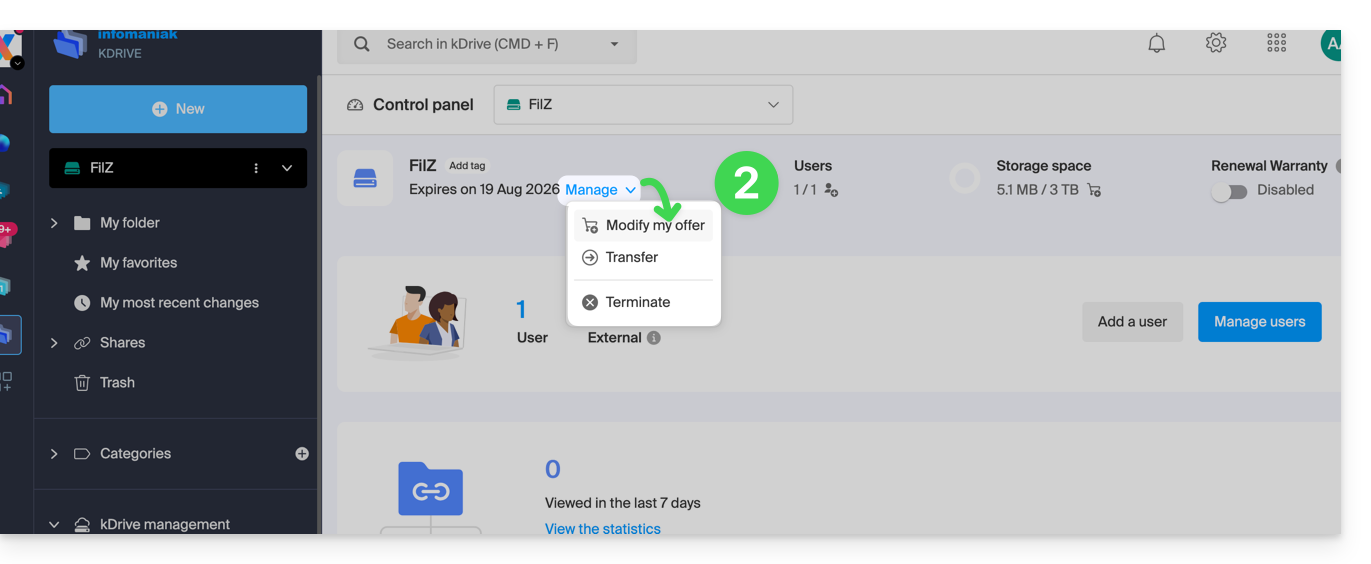
- Click on Manage to go to the plan change section and view the current plan:
If no dashboard is accessible in the bottom left corner, you have limited features (e.g., the my kSuite plan) that can be unlocked by upgrading to a higher plan: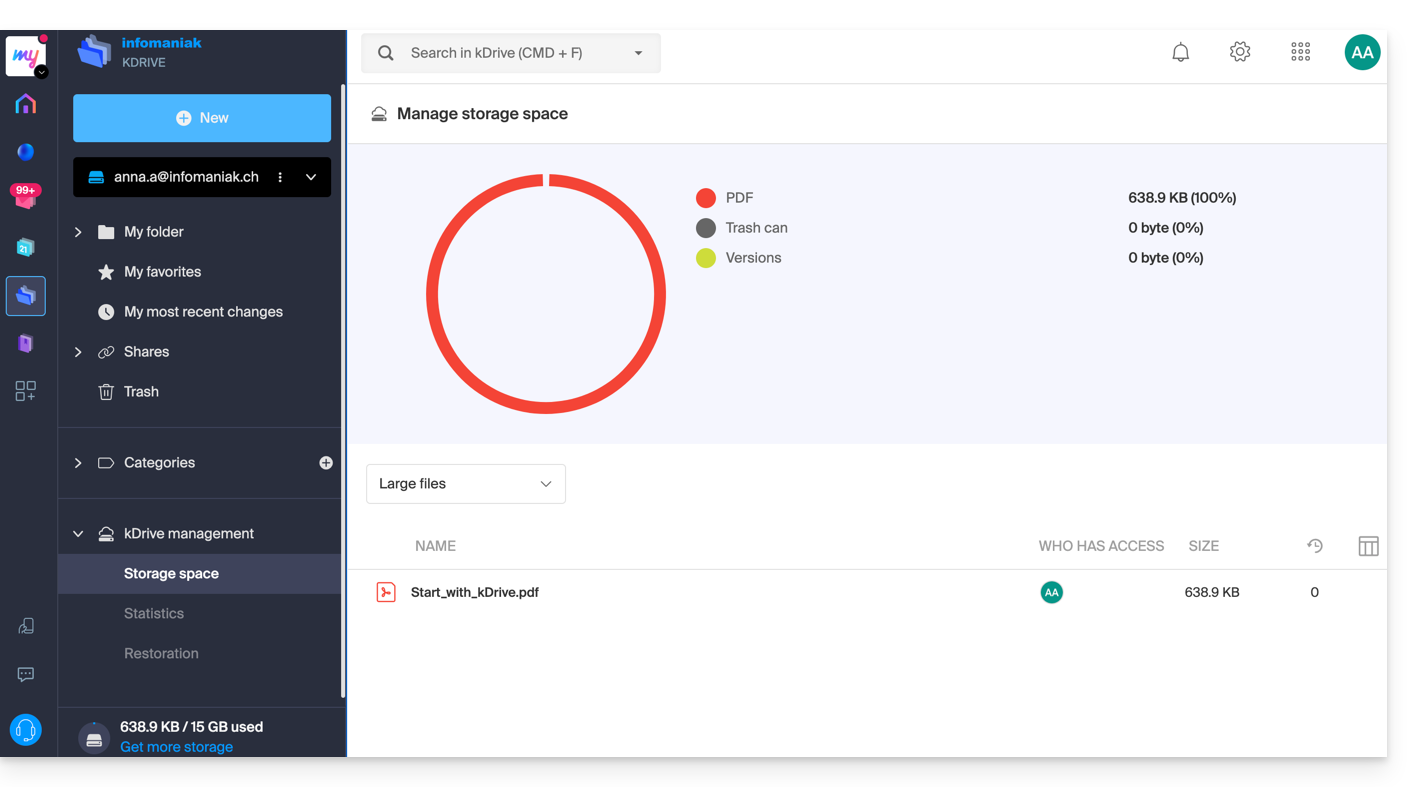
From the Infomaniak Manager
You can also find information about your current plan in the Manager, the dashboard for your products.
If no kDrive product is present in the Manager, the kDrive app is accessible only among the apps in the top right corner, because you have…
- either a my kSuite / my kSuite+ plan:
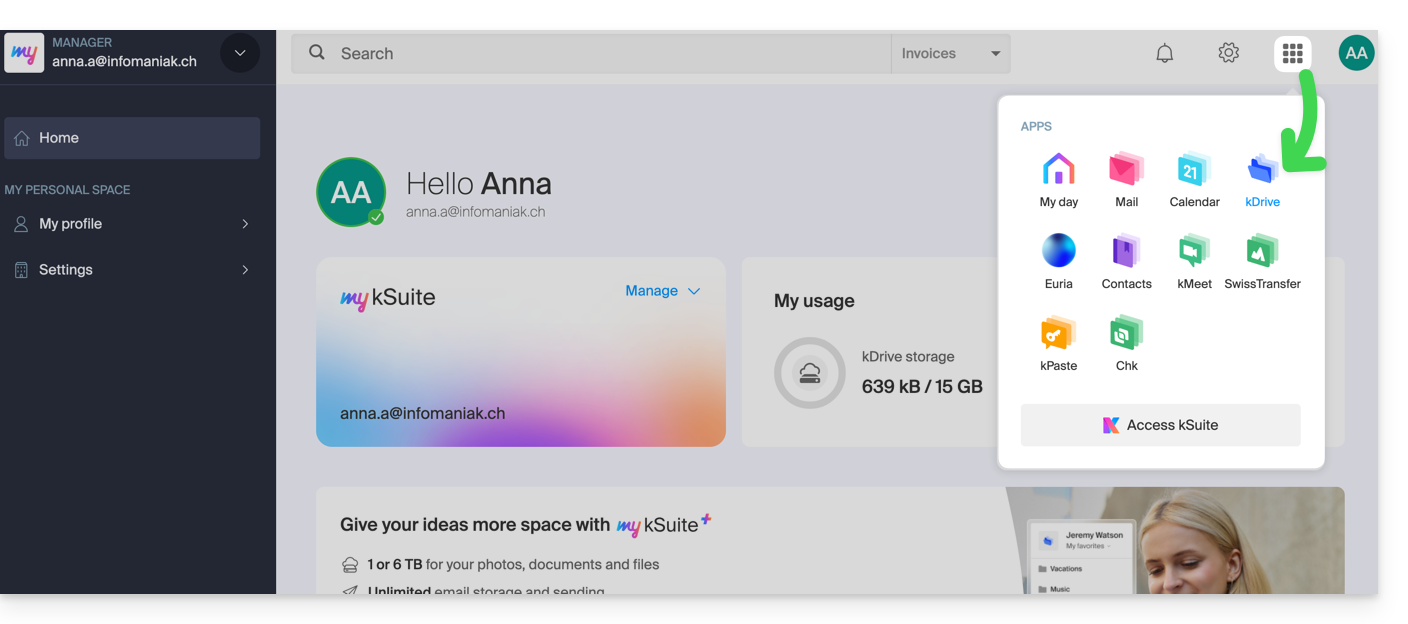
- or you were invited to share a document (you are therefore an external kDrive user):
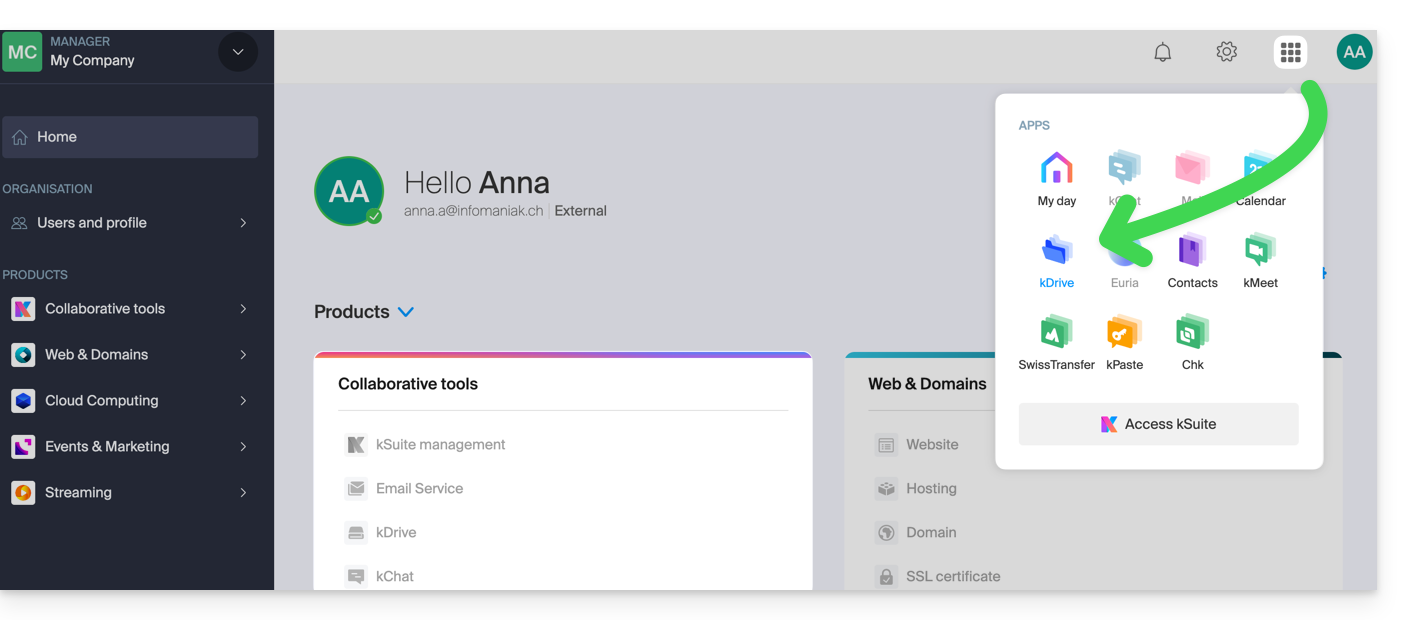
Otherwise, find your kDrive among your collaboration tools:
Change the current kDrive plan
Your kDrive can evolve with you. As your needs grow – whether to accommodate new collaborators, integrate a family member, or store an increasing volume of data – easily increase its capacity to unlock its full potential.
Prerequisites
- You must have sufficient permissions within the Organization.
To change your current kDrive plan:
- Click here to access the Infomaniak kDrive web app (online service ksuite.infomaniak.com/kdrive).
- Click on Manage to go to the plan change section and view your current plan:
This will allow you to switch to a higher plan from the Infomaniak Shop: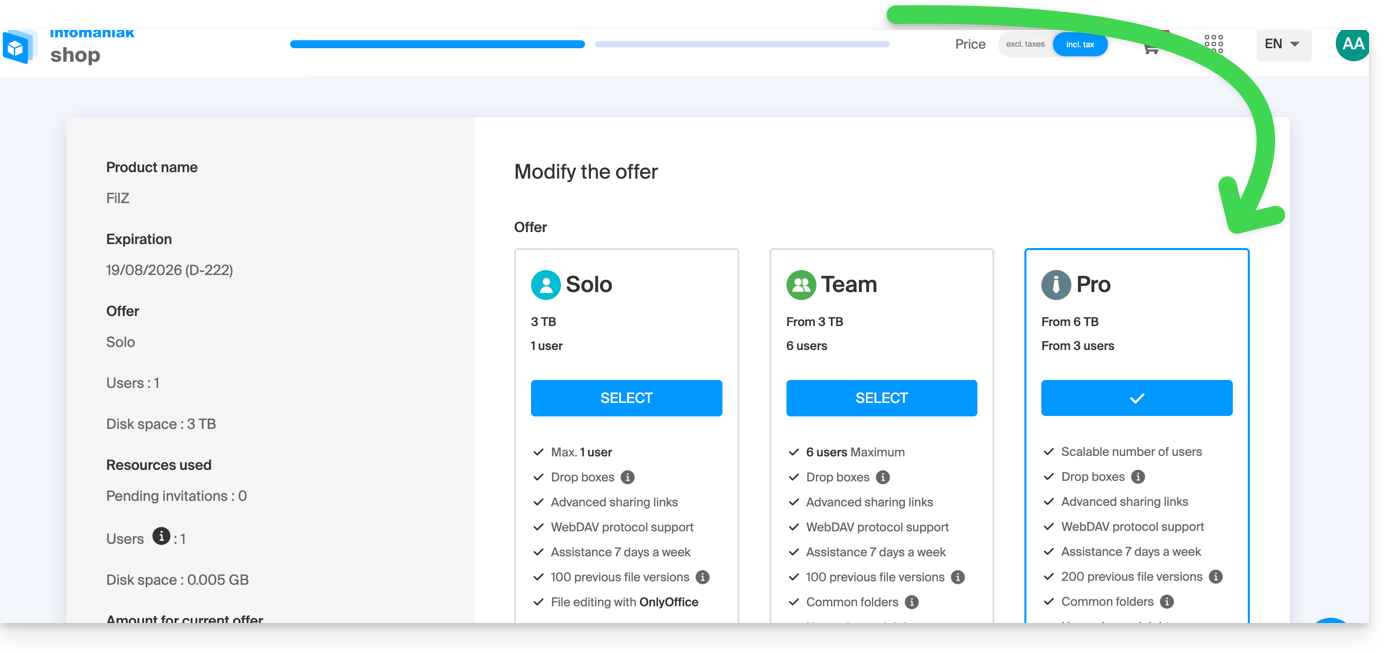
If, for example, your new plan increases the number of users that can be added to your kDrive, please refer to this other guide to invite them to join.
Link to this FAQ:
Has this FAQ been helpful?
This guide for the Web app Mail Infomaniak (online service ksuite.infomaniak.com/mail) or the mobile app Infomaniak Mail (application for iOS/Android smartphone or tablet) explains how to activate encryption for emails sent from Infomaniak Web and mobile services.
Preamble
- When encryption is activated, emails and attachments are encrypted as soon as they are received on Infomaniak servers, via the public keys of senders and recipients.
- Each email address generates a key upon its first use, securely stored in Infomaniak datacenters.
- The keys are based on elliptic curve cryptography (ECC) and use the OpenPGP standard.
- They are themselves encrypted in AES-256-GCM with automatic decryption via Infomaniak authentication.
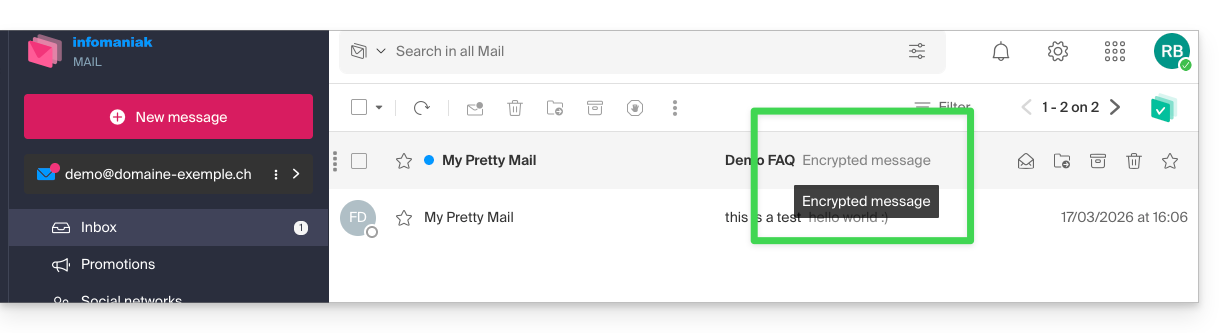
- In search results, only the subject of encrypted messages will be visible, while their content will remain secure during storage.
Activate email encryption…
…from the Infomaniak Web Mail app
To automatically encrypt a message sent to an email address:
- Click here to access the Web app Mail Infomaniak (online service ksuite.infomaniak.com/mail).
- Compose a new message as usual.
- Click on the padlock icon to the left of the Send button to activate encryption:
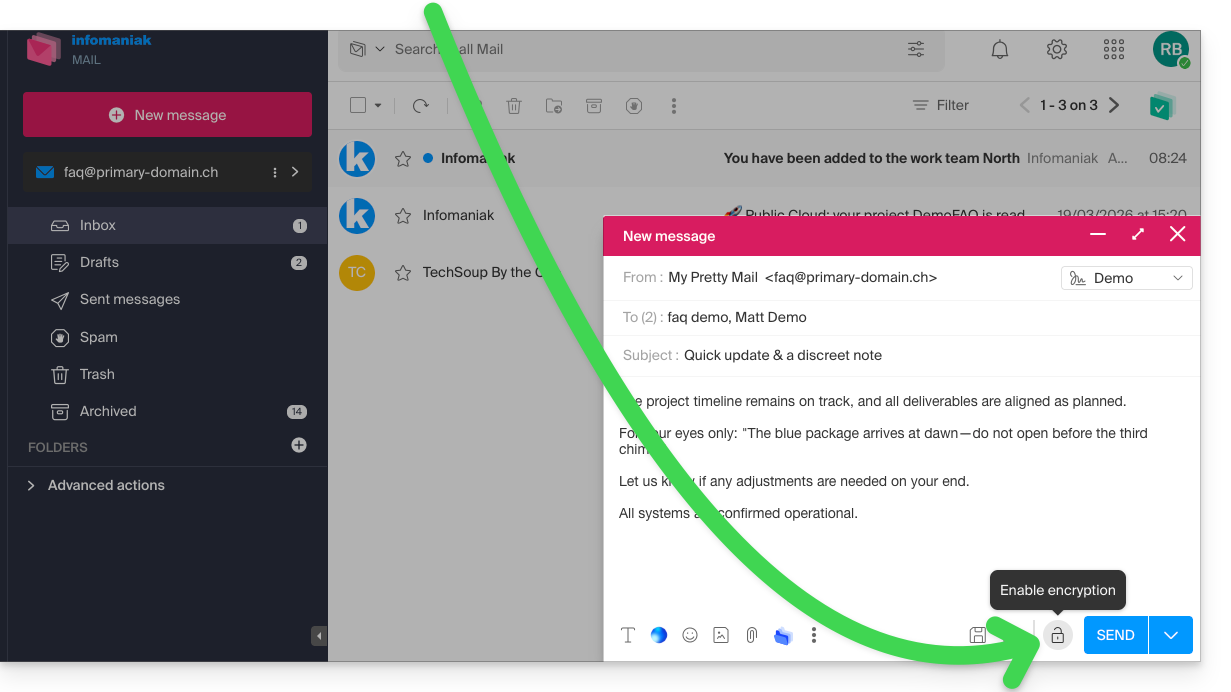
- Confirm the action if a confirmation window appears.
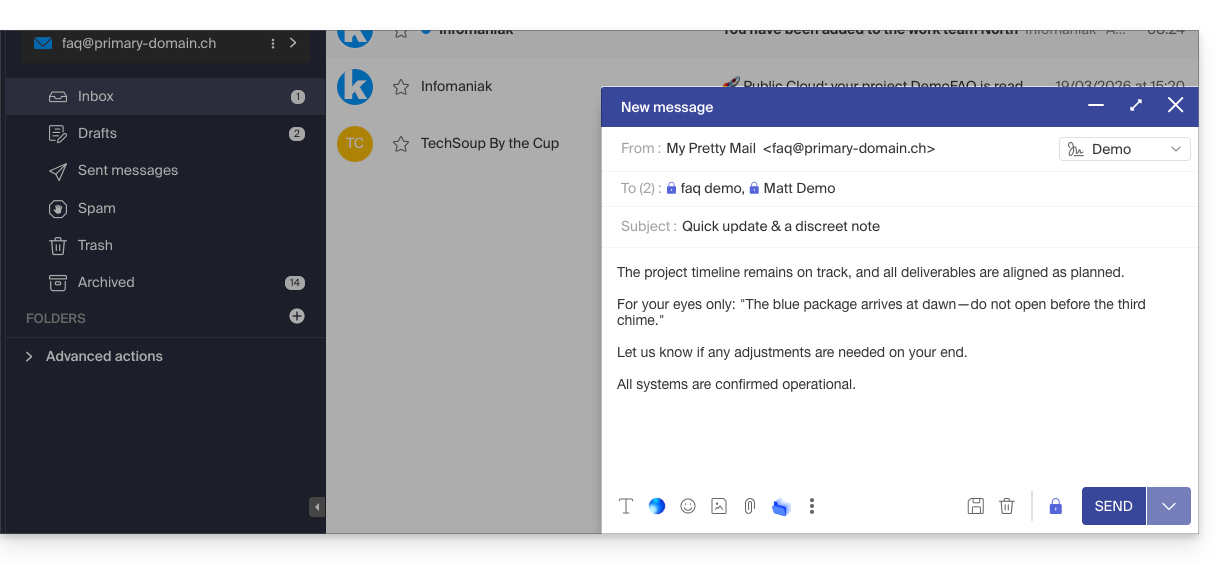
- The icon now represents a closed padlock and the color of the whole is changed:
- Press the Send button.
The action must be performed for each new send.
A. Recipient whose email is managed with Infomaniak
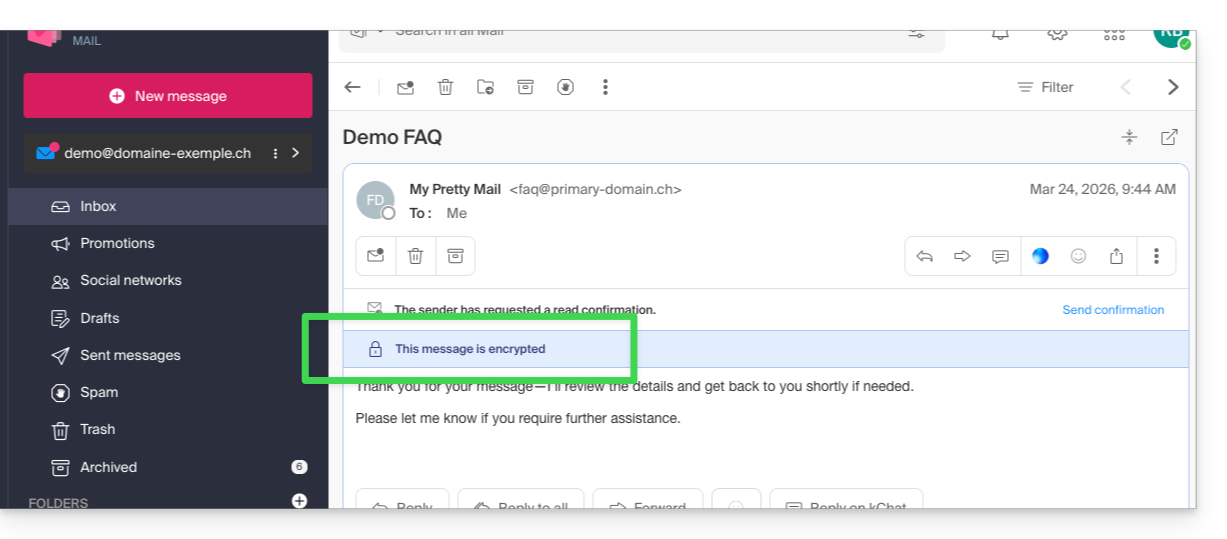
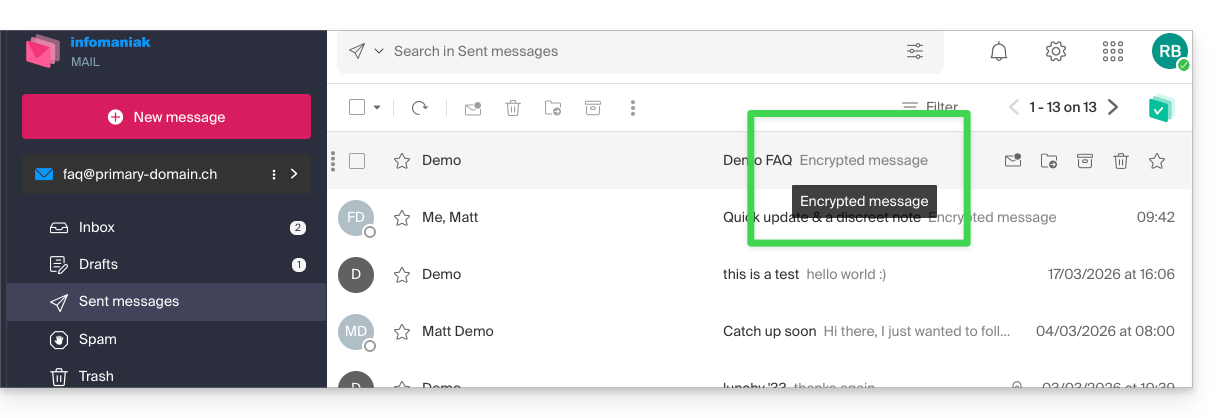
If the recipient of the encrypted email has an email address managed with Infomaniak, encryption is done in a completely transparent manner for both the sender and the recipient. A note will indicate the encryption of the message…
- …in the recipient's inbox:
- … when opening the received message:
- ... and in the sender's sent folder:
B. External recipient
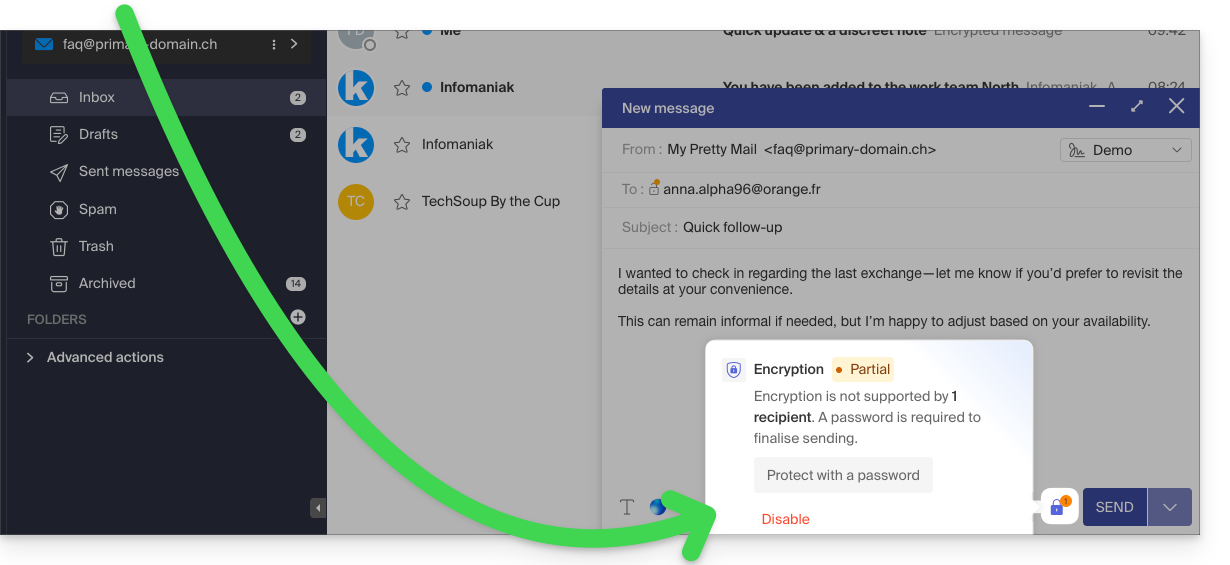
If the recipient of the encrypted email has an email address managed outside of Infomaniak services, encryption is still possible, but it requires setting a password:
- Click here to access the Infomaniak Mail app (online service ksuite.infomaniak.com/mail).
- Compose a new message as usual, but addressed to an email address outside of Infomaniak.
- Click on the lock icon to the left of the Send button to enable encryption.
- A modal opens to allow you to create a password:
- Enter a password and copy it to send it by your own means (kPaste for example) to the recipient (you can agree on a password in advance so the recipient is already informed):
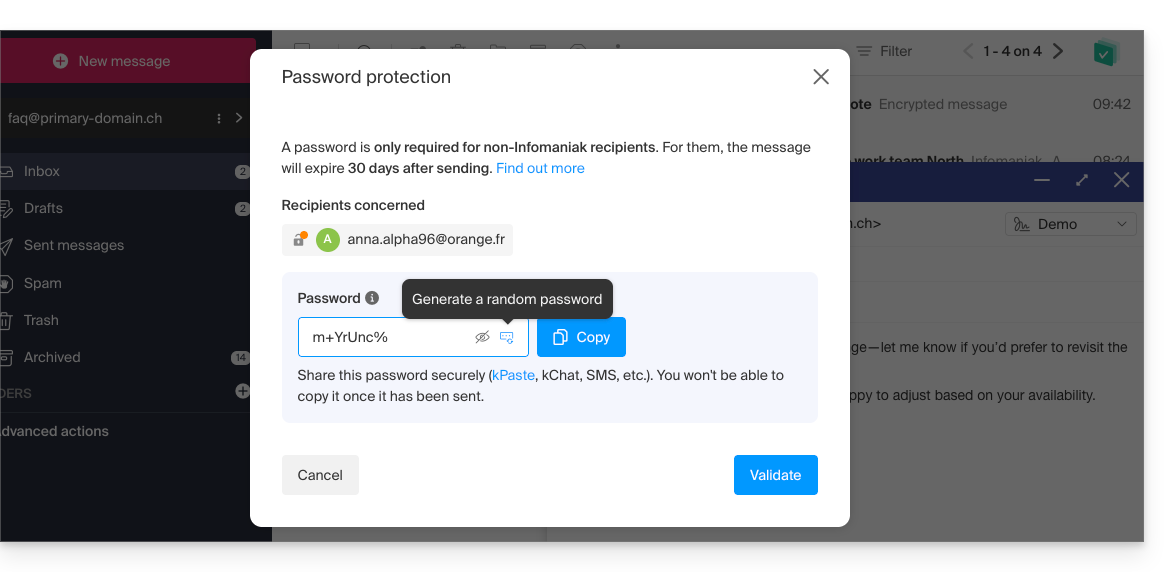
- Enter a password and copy it to send it by your own means (kPaste for example) to the recipient (you can agree on a password in advance so the recipient is already informed):
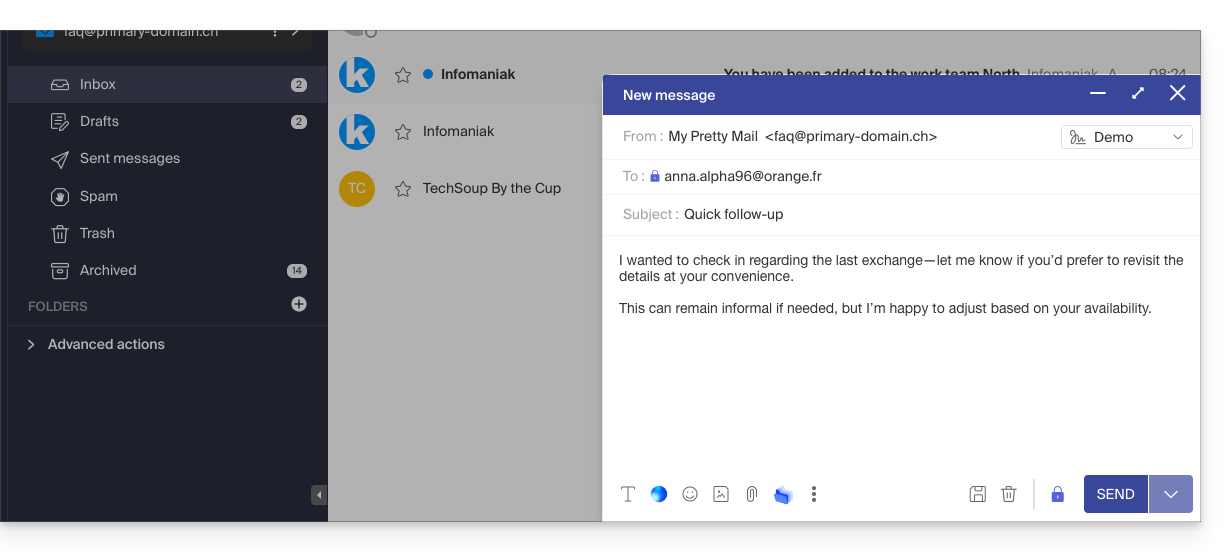
- The icon now represents a closed lock without an orange chip, and you can send the email as usual:
- Recipients will then receive a message notifying them that an encrypted email is waiting for them:
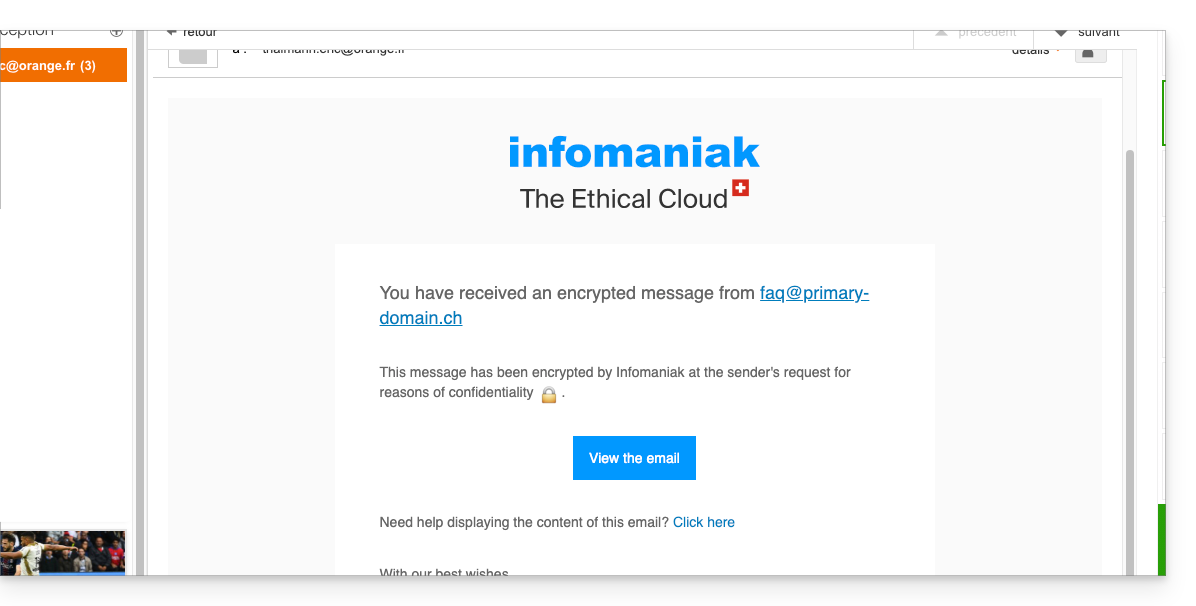
- By clicking on the provided button, they will be redirected to a secure web page where the password must be entered.
- Once the password is validated, the encrypted message can be viewed on the same page valid for 30 days.
... from the Infomaniak Mail mobile app
To automatically encrypt a message sent to an email address:
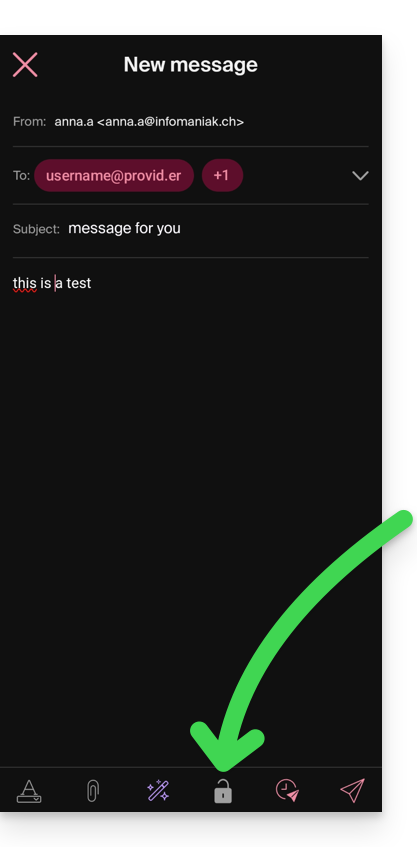
- Open the Infomaniak Mail mobile app (app for iOS/Android smartphone or tablet).
- Compose a new message as usual.
- Press the lock icon at the bottom of the composition window to enable encryption:
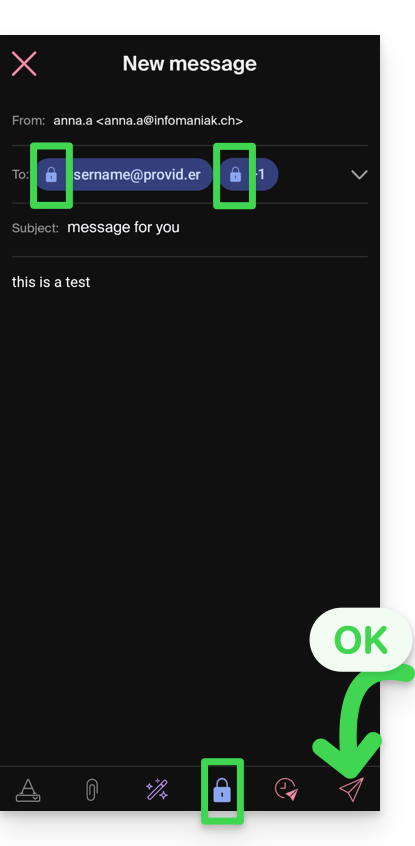
A. Recipient whose email is managed with Infomaniak
If the recipient of the encrypted email has an email address managed by Infomaniak, encryption is done completely transparently for both the sender and the recipient:
- Closed locks are displayed on the screen.
- Press the send icon:
B. External recipient
If the recipient of the encrypted email has an email address managed outside of Infomaniak services, encryption is still possible, but it requires setting a password:
- . Sending will not be possible as the send icon will remain grayed out and symbols will appear on the locks:
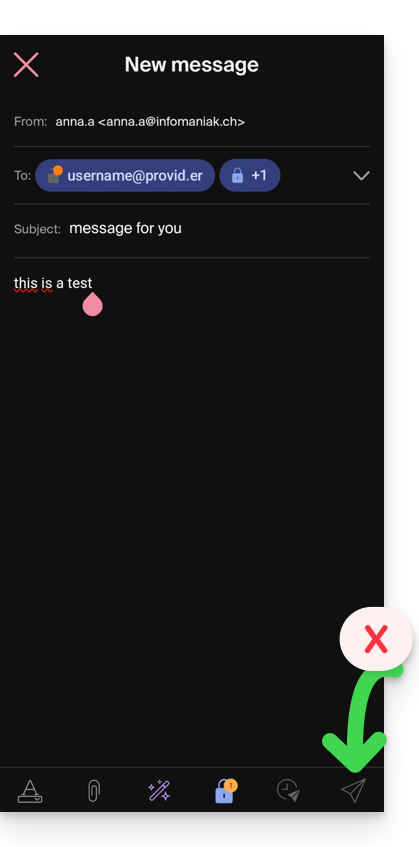
- Press the lock icon.
- A modal opens to allow you to create a password.
- Leave the suggested password or enter a new password and copy it to send it by your own means (kPaste for example) to the recipient (you can agree on a password in advance so the recipient is already informed).
- Press the cross in the top left corner if you have finished managing the password.
- Here we go, the sending can now be done in an encrypted way:
Link to this FAQ:
Has this FAQ been helpful?
This guide explains how to import contacts into the address books of the Infomaniak Contacts web app (online service ksuite.infomaniak.com/contacts).
Introduction
- A wizard facilitates the import of contacts from various sources, such as Outlook, macOS address books, Thunderbird, Gmail, etc.
- The import can be done using a file in
VCARDorCSVformat. - The file must not exceed 50 MB or contain more than 10,000 lines.
Importing Contacts
To do this:
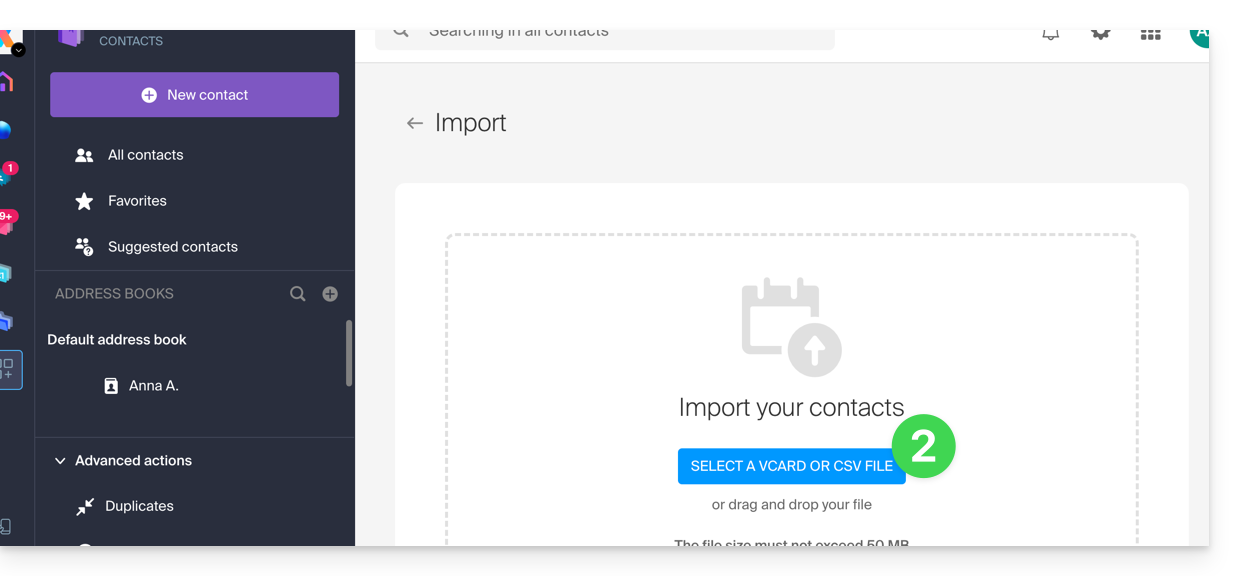
- Click here to access the Import section of the Infomaniak Contacts web app (online service ksuite.infomaniak.com/contacts):
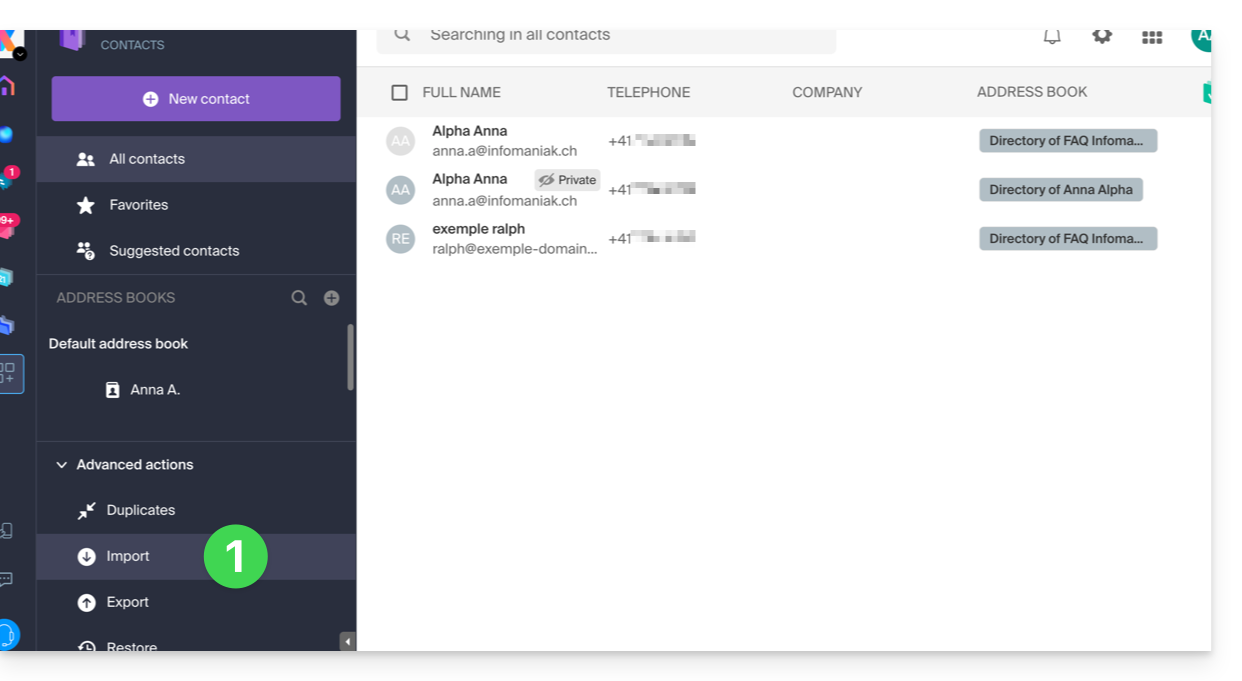
- Click on the blue Select a VCARD or CSV file button:
Importing from a vCard file (.vcf)
The content of a contact export in vCard format looks like this:
BEGIN:VCARD
VERSION:3.0
FN:Jean Dupont
N:Dupont;Jean;;;
EMAIL;TYPE=INTERNET:jean.dupont@email.com
TEL;TYPE=CELL:0601020304
ORG:Logistique SAS
END:VCARD
BEGIN:VCARD
VERSION:3.0
FN:Alice Martin
N:Martin;Alice;;;
EMAIL;TYPE=INTERNET:a.martin@web.fr
ORG:Indépendante
END:VCARD
...
When you select your .vcf file in the import tool, the following steps will be performed:
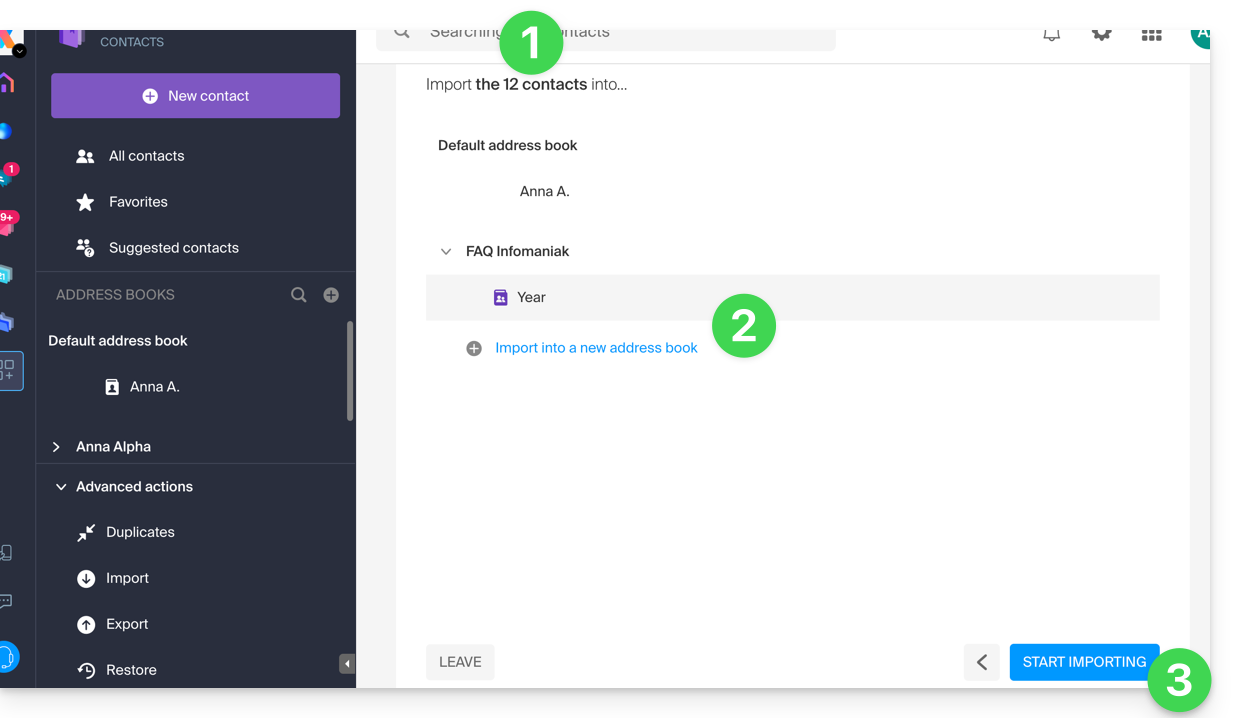
- The wizard indicates the number of contacts detected in your file.
- Choose the address book (or create a new one) to store your contacts.
- Click the button to start the import:
Import from a CSV file (.csv)
The content of a contact export in CSV format looks like this:
Nom,Prénom,Email,Téléphone,Organisation,Note
Dupont,Jean,jean.dupont@email.com,0601020304,Logistique SAS,Client VIP
Martin,Alice,a.martin@web.fr,,Indépendante,
Bernard,Marc,,0788990011,,Ancien collègue
Petit,Sophie,sophie.p@service.com,0140506070,Mairie de Paris,
Gérard,Lucas,lucas.gerard@brico.org,,,Besoin devis mars
Morel,Élise,,0611223344,BioShop,
Fournier,Thomas,t.fournier@tech.io,0655443322,InnoTech,Expert Python
Leroy,Julie,j.leroy@gmail.com,,,
...
When you select your .csv file in the import tool, the following steps will occur:
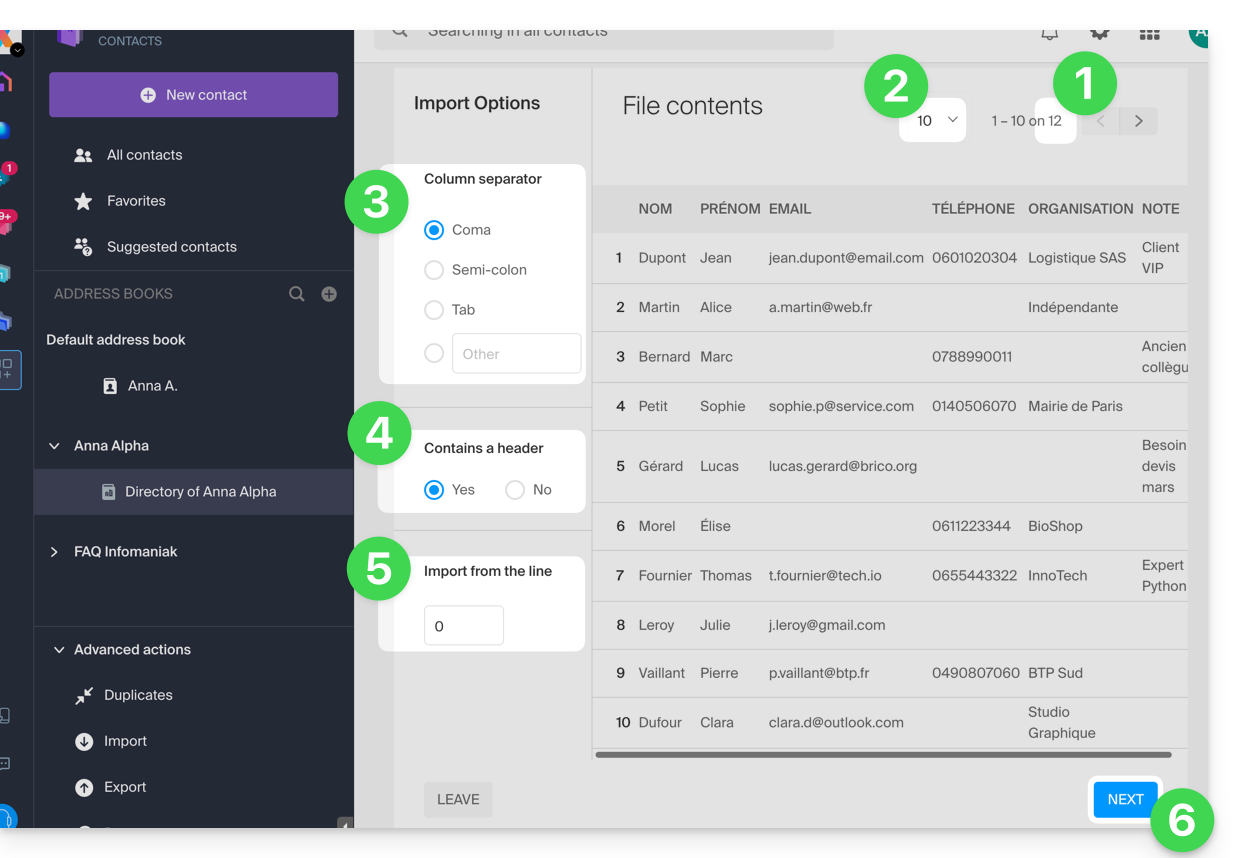
- The wizard indicates the number of contacts detected in your file.
- You can increase the number of contacts displayed per page, so you can better preview them in their entirety if needed.
- Choose the separator used to delimit the information in your text file.
- Specify whether the file contains a first line without contact information (only column header information).
- Specify whether you want to import contacts starting from a specific line.
- Click the button to continue:
- Assign the information detected in the file for each contact to the available fields in your address book:
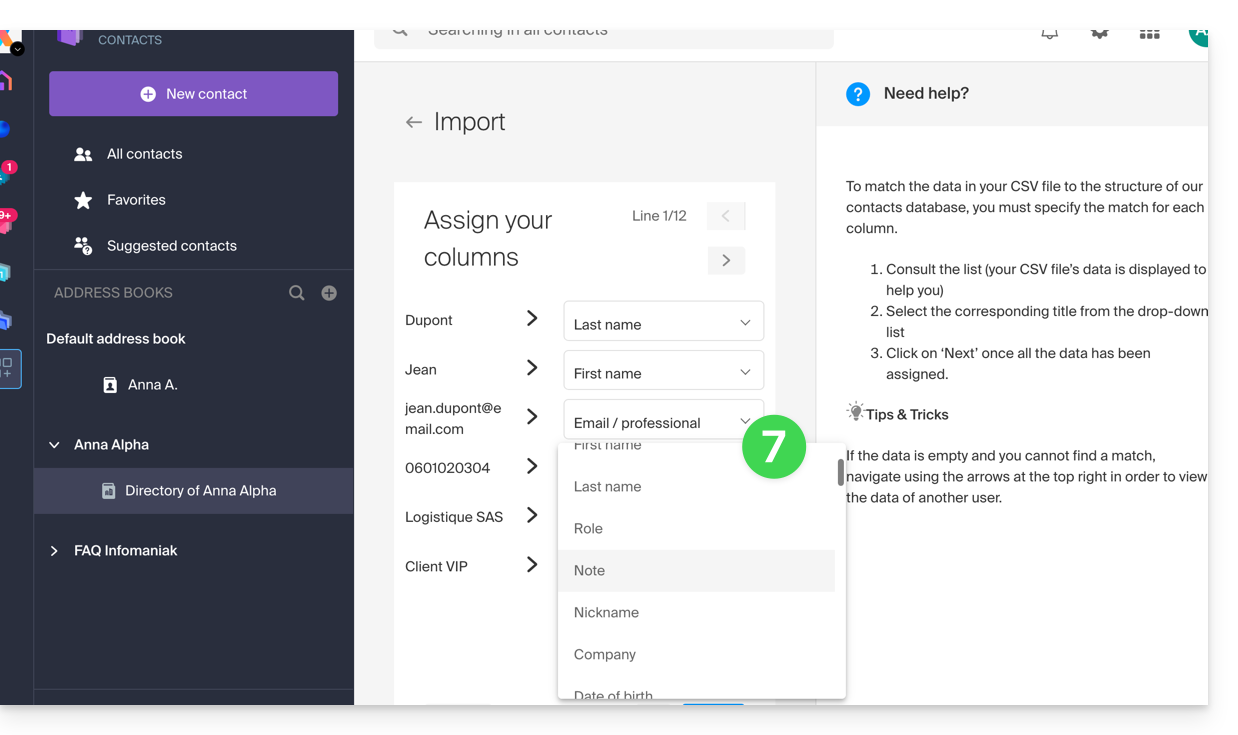
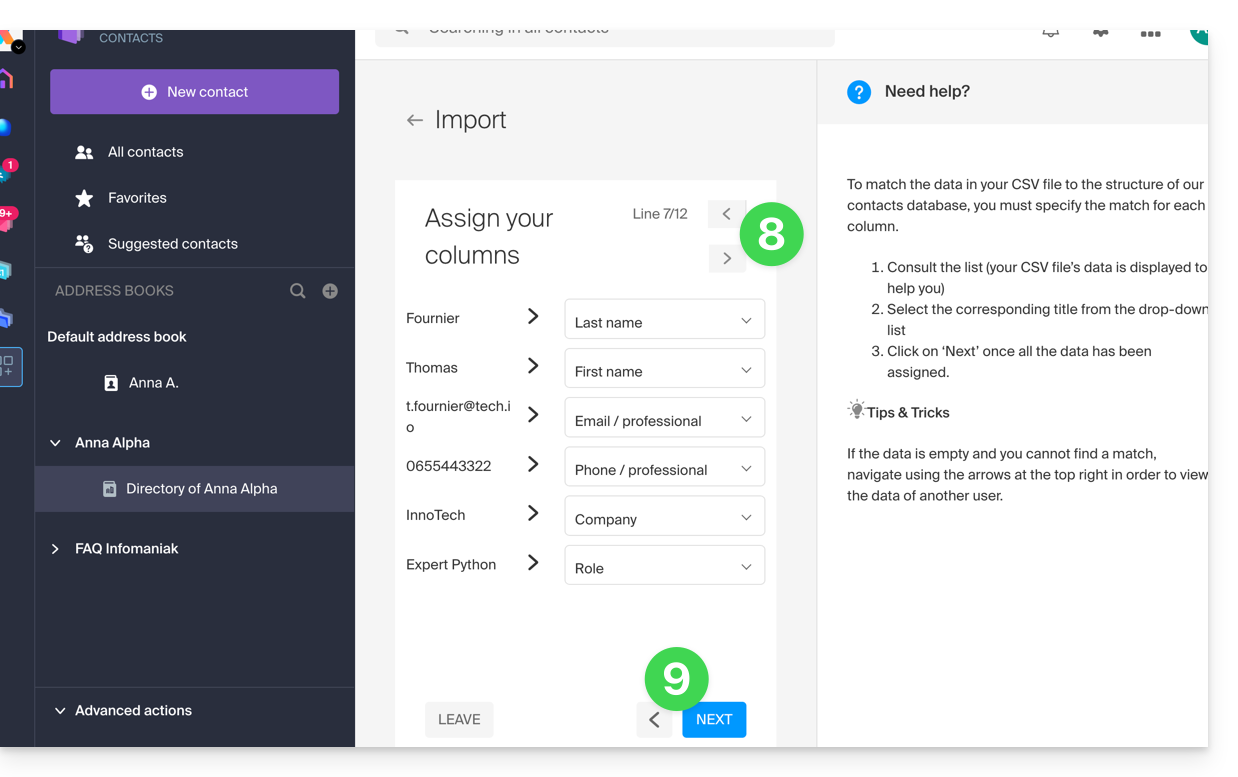
- Navigate through the contacts to be imported to specify other fields if necessary.
- Go back to check the impact of your changes, then click the button to continue:
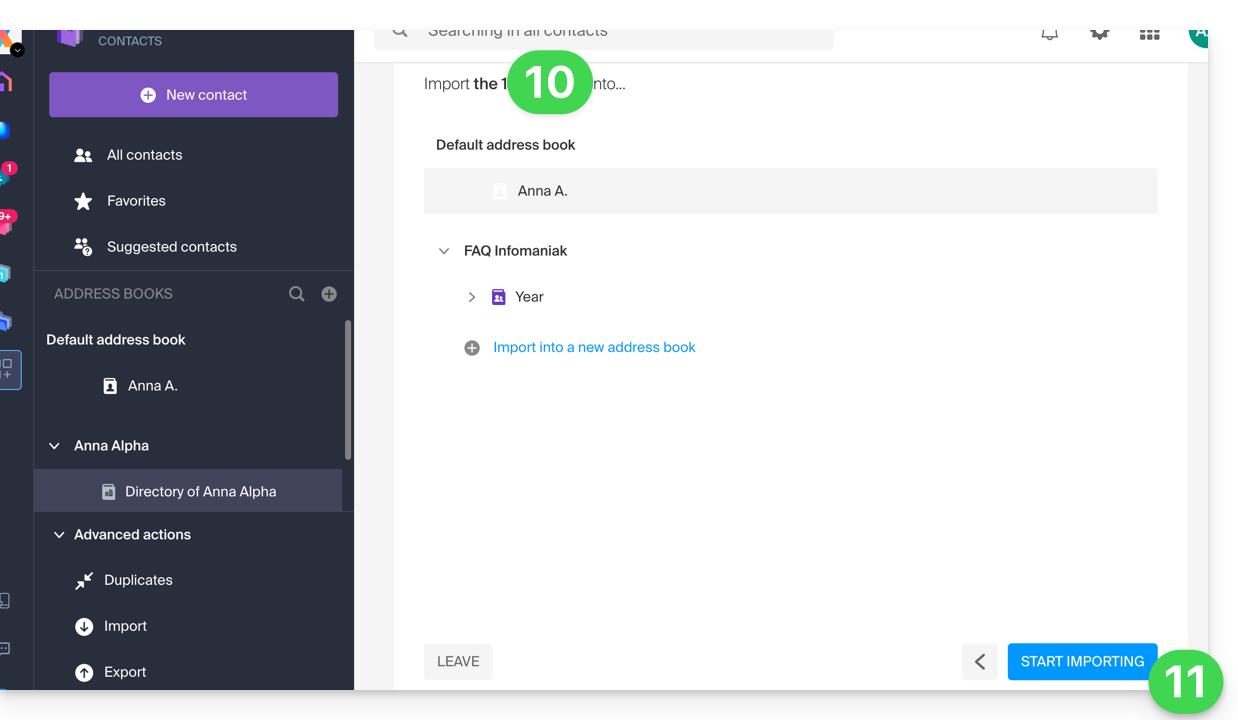
- Choose the address book (or create a new one) to store your contacts.
- Click the button to start the import:
Contacts imported
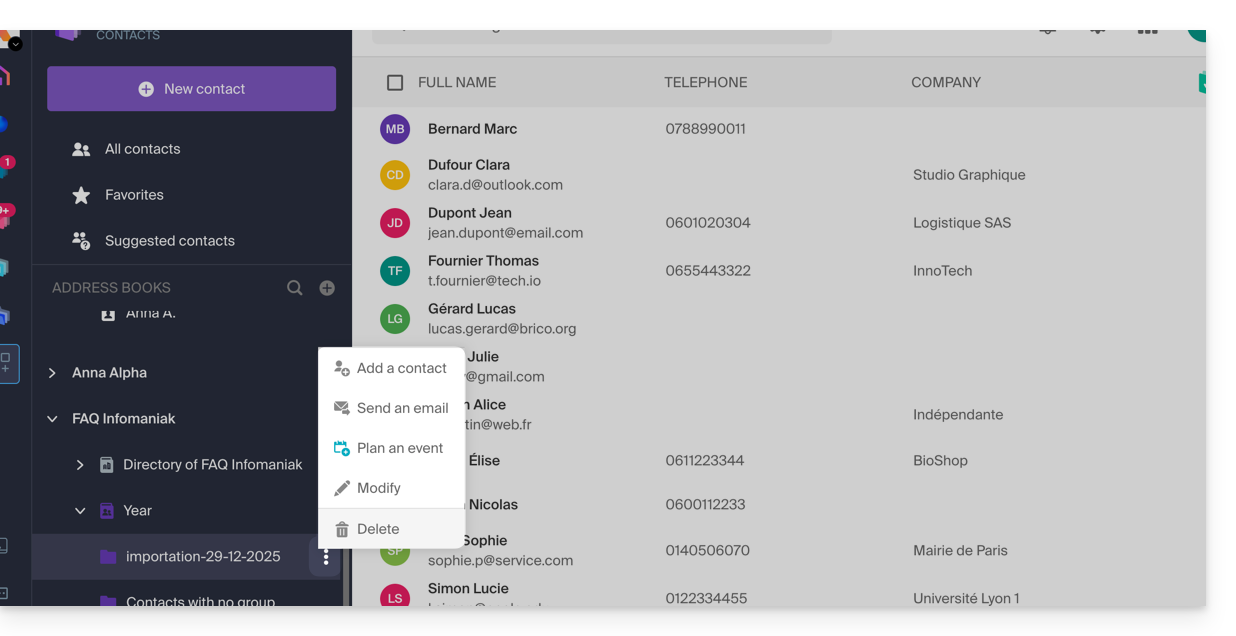
The contacts are imported into the specified location, within a group. If necessary, you can delete this folder, which was created for this purpose (this will not delete the contacts unless you enable this option when deleting the folder):
- Click on the action menu ⋮ located to the right of the name of the group created with the import date.
- Click on Delete:
If you encounter any problems
- Complete the contact details:
- A contact containing only the first and last name may be ignored by the system for security reasons.
- Make sure that at least one additional piece of information is present (email address or phone number).
- Check the header of your (CSV) file:
- The columns must be clearly named (e.g., "First Name", "Last Name", "Email").
- If the headers are missing or incorrect, the system will not be able to read the data.
- Data format:
- Check that phone numbers do not contain unusual special characters and that email addresses are spelled correctly (presence of
@and a period).
- Check that phone numbers do not contain unusual special characters and that email addresses are spelled correctly (presence of
- File encoding:
- For optimal results, save your CSV file in UTF-8 format; this ensures that accents and special characters are displayed correctly.
If you need to export them first from...
... Outlook (older version)
- In your Outlook software, go to your address book.
- Select the contacts to export.
- In Actions, click on Transfer as vCard.
- Send the email containing the vCard.
- Retrieve the email in the Infomaniak Mail web app (online service at ksuite.infomaniak.com/mail)
- Click on Add all contacts.
... macOS (or refer to this other guide)
- In your Contacts software, go to File and select Export.
- Choose Export vCard.
- Save your vCard file to your computer.
... Thunderbird (or refer to this other guide)
- In your Thunderbird software, go to Window and select Address Book.
- In Tools, select Export.
- In the save options, choose Comma Separated as the format.
- Save your CSV file.
... Gmail (or refer to this other guide)
- In your Gmail account, go to the Contacts section.
- Click the Export button.
- Select vCard format.
- Save your vCard file to your computer.
... Office 365 (or refer to this other guide)
- In your Outlook software, go to the Contacts section.
- Click on Manage and choose Export.
- Save your CSV file to your computer.
... Yahoo Mail: refer to this other guide
... Proton Mail: refer to this other guide
... Bluewin: refer to this other guide
Link to this FAQ:
Has this FAQ been helpful?
This guide explains how to modify product access rights for a user in your Organization on the Infomaniak Manager.
Preamble
- Since you opened your account with Infomaniak, you are part of at least one Organization.
- If you were alone and it was not an invitation, an Organization was created in your name and you automatically become the legal representative.
- Otherwise, you belong to the Organization that invited you (to join its kSuite, to manage a product, etc.).
- It is possible to modify a user's role within your Organization.
- You can then define whether a user…
- … is part of your Organization and should become:
- Legal representative
- Administrator
- Collaborator (this is the part that is detailed below…)
- … is external to your Organization (limited rights):
- External users are not included in the sharing of calendars and address books for the entire Organization.
- … is part of your Organization and should become:
Who can access what…
Prerequisites
- Switch to the desired Organization first if you do not find the expected user list.
- Be Administrator or Legal representative within the Organization.
- Have added a user as a collaborator.
The guide below allows you to manage product access for collaborators and external users. Indeed, a legal representative or an Administrator already has access to all existing products within the Organization and visible on the Infomaniak Manager.
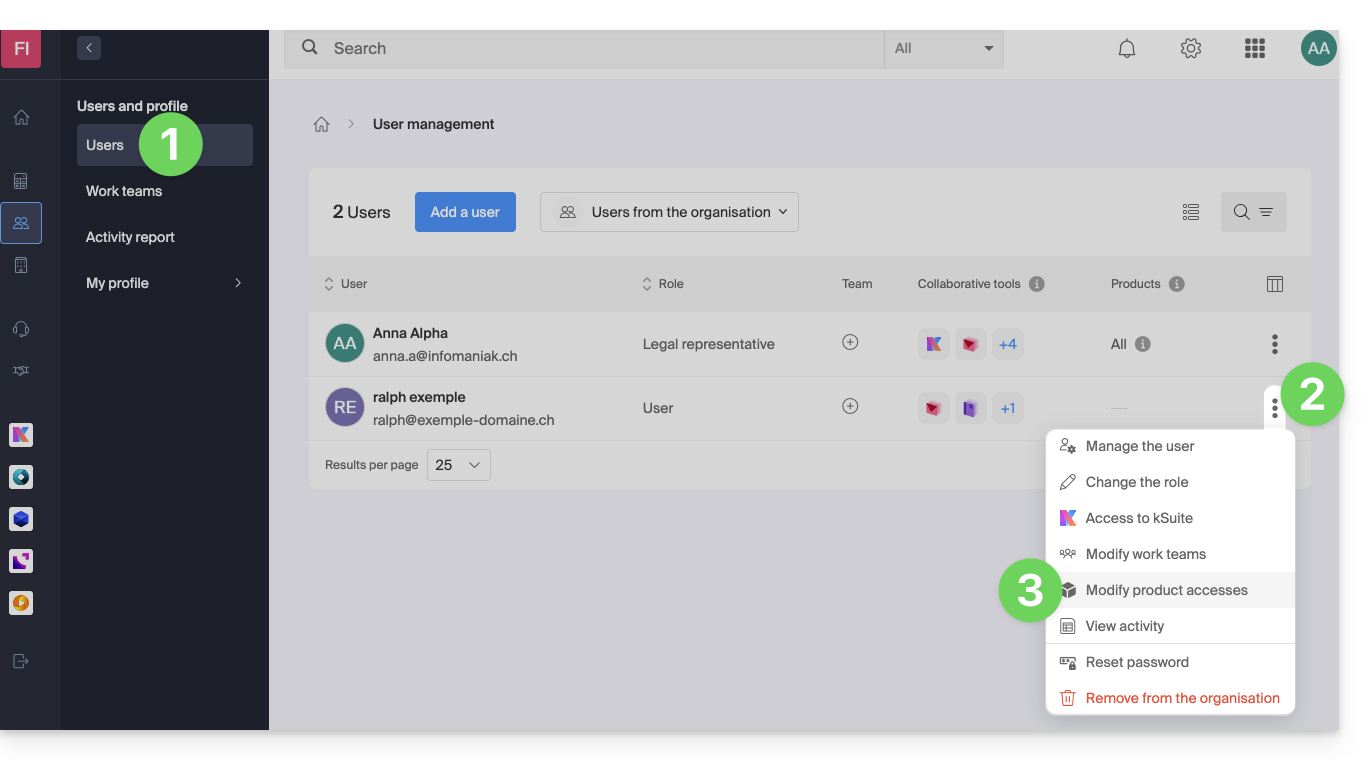
To modify the product access of an Organization user:
- Click here to access user management on the Infomaniak Manager (need help?).
- Click on the action menu ⋮ located to the right of the user concerned.
- Click on Modify product access:
- You can grant access to everything with maximum permissions in 1 click.
- Otherwise, click on the product category to which you want to grant access.
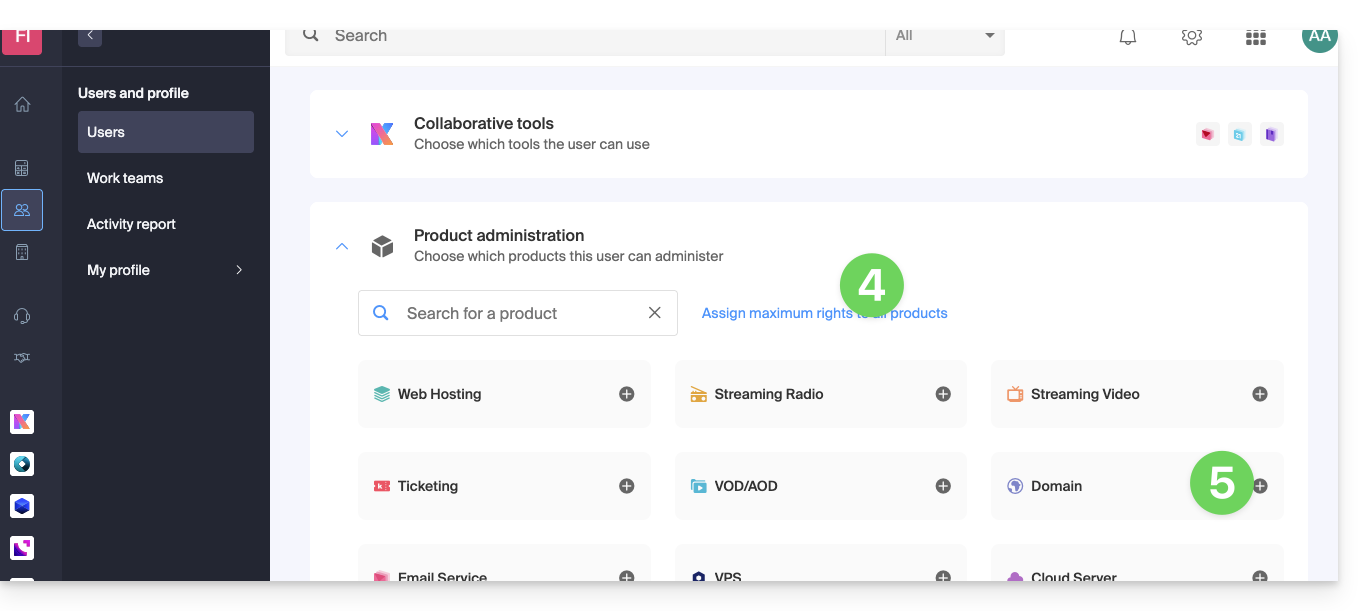
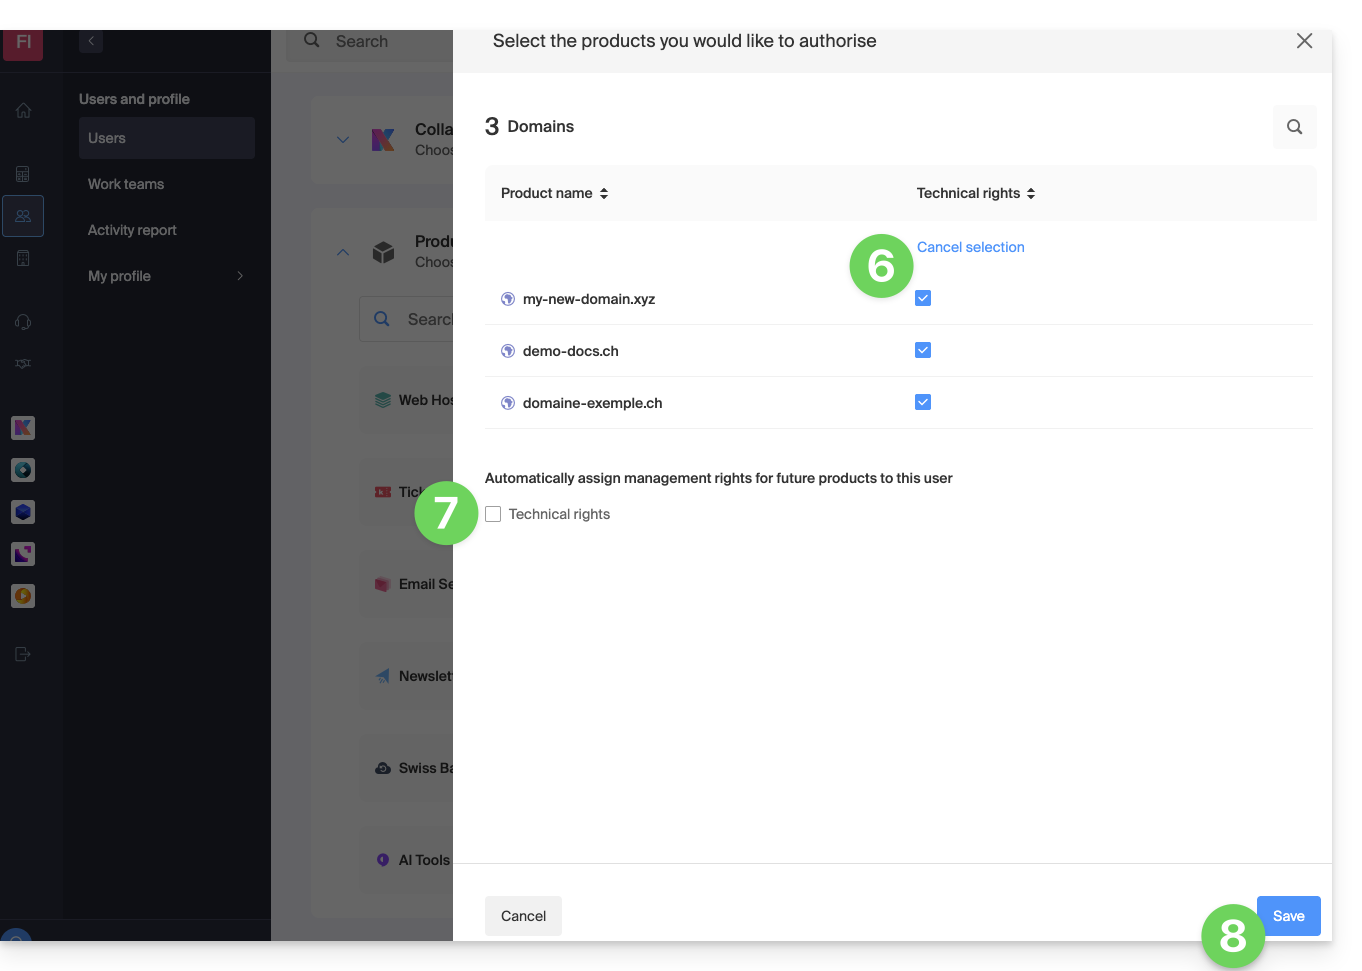
- Select the necessary product(s).
- If you have selected multiple products, decide whether a future additional product should automatically be visible to the user (and with what type of permissions).
- Click on the Save button:
- Rights are granted immediately.
- Click on the pencil icon ✎ to modify permissions:
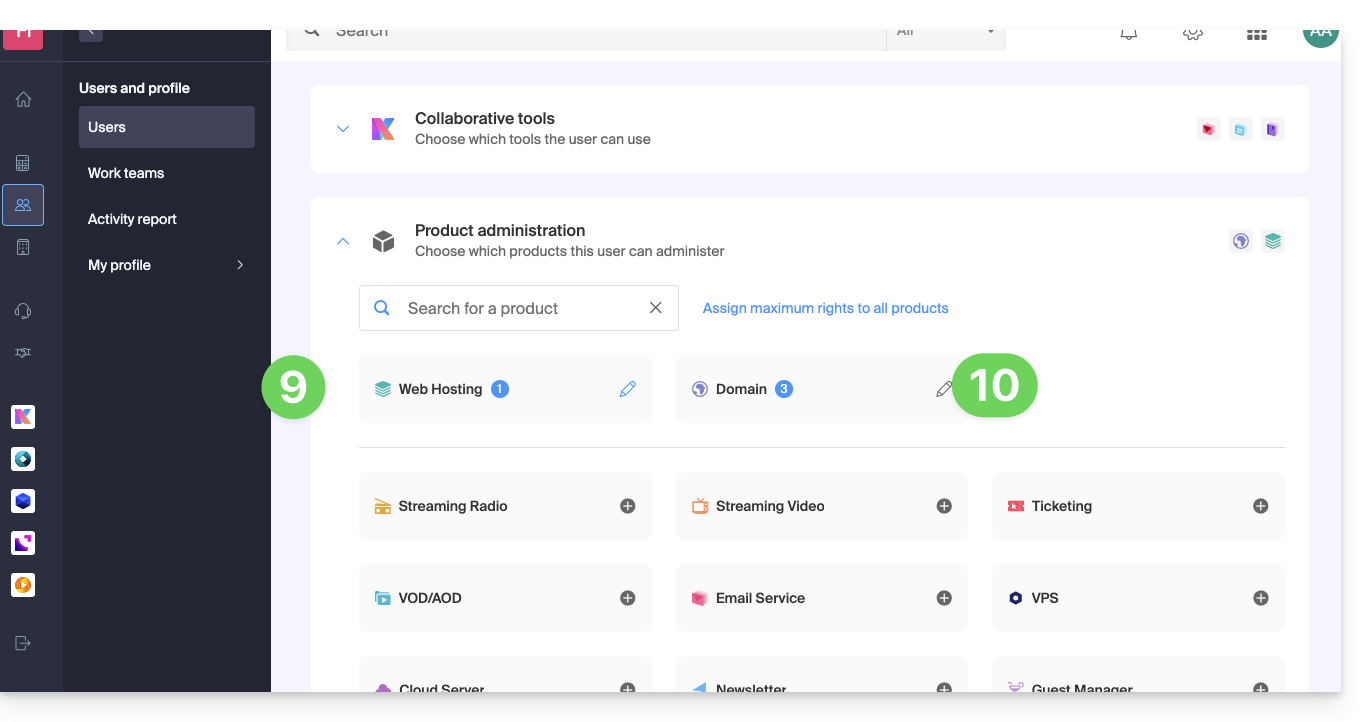
- Restart at step 5 if you need to grant access to multiple products.
Service usage / Service management
Be careful, on your product table, it is important to distinguish between product access (type kDrive for example, within the kSuite) and product management access: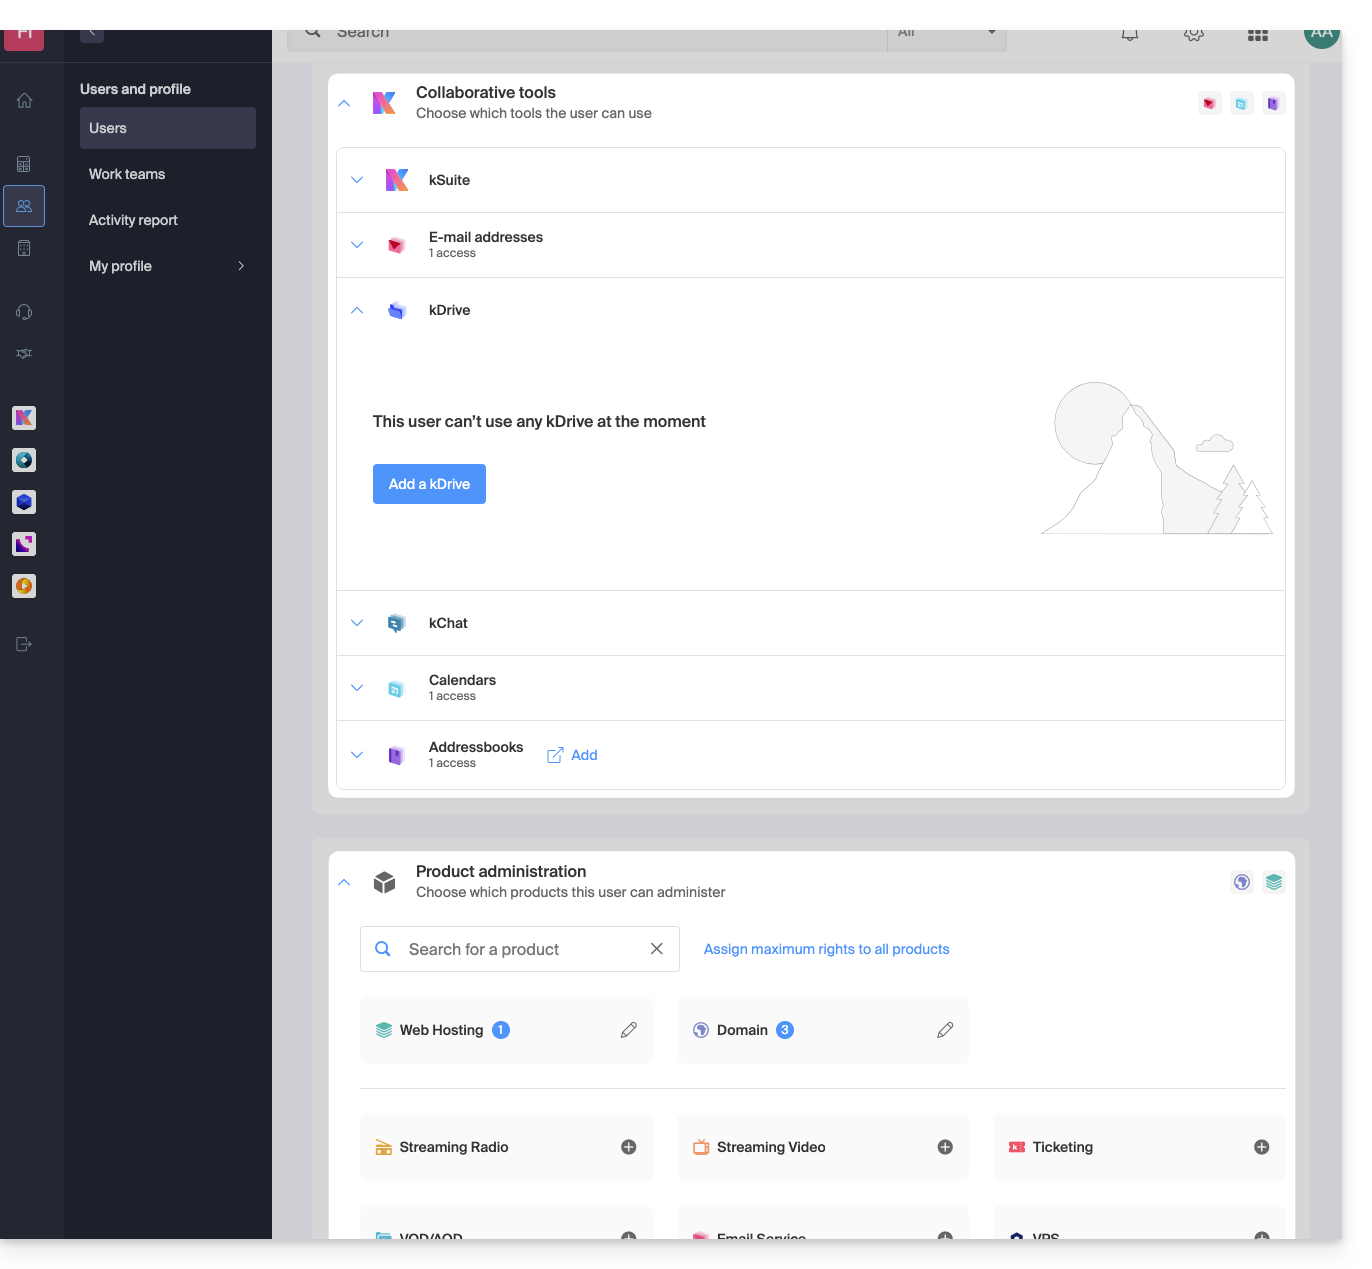
It is possible to authorize a user to use kDrive (they will be able to create a PDF for example) without granting them kDrive service management rights (they will not be able to change the offer, invite a new user, terminate, etc.).
Technical rights / Statistical rights
With certain services like kDrive, it is possible to give a collaborator TECHNICAL and/or STATISTICAL rights (adds access to the dashboard, share links, storage statistics, active users, connected devices, activity on kDrive):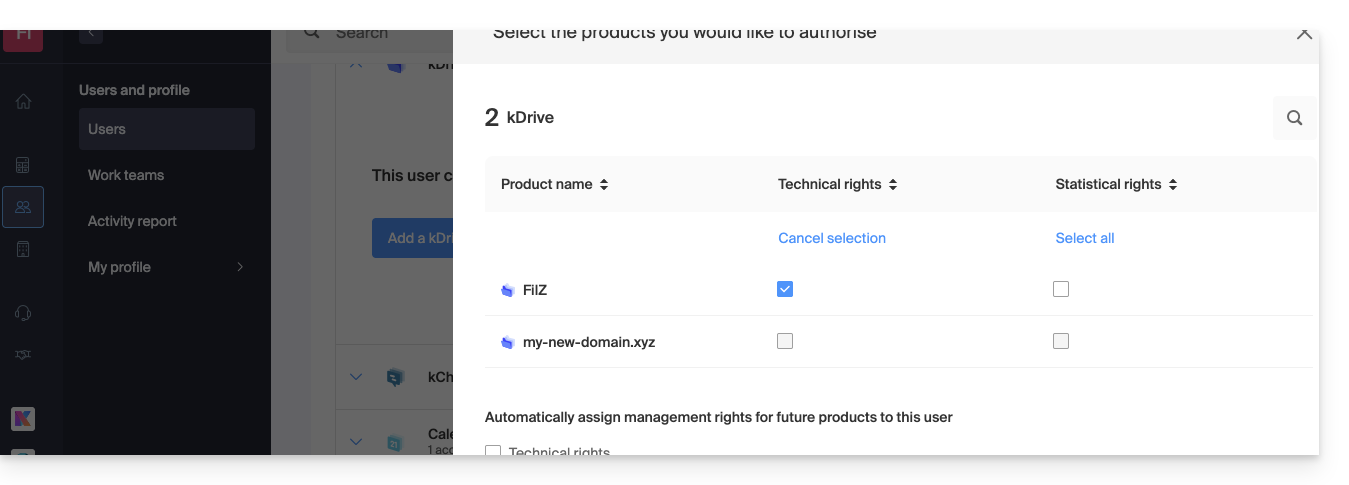
Other services like domain names do not have a STATISTICAL section: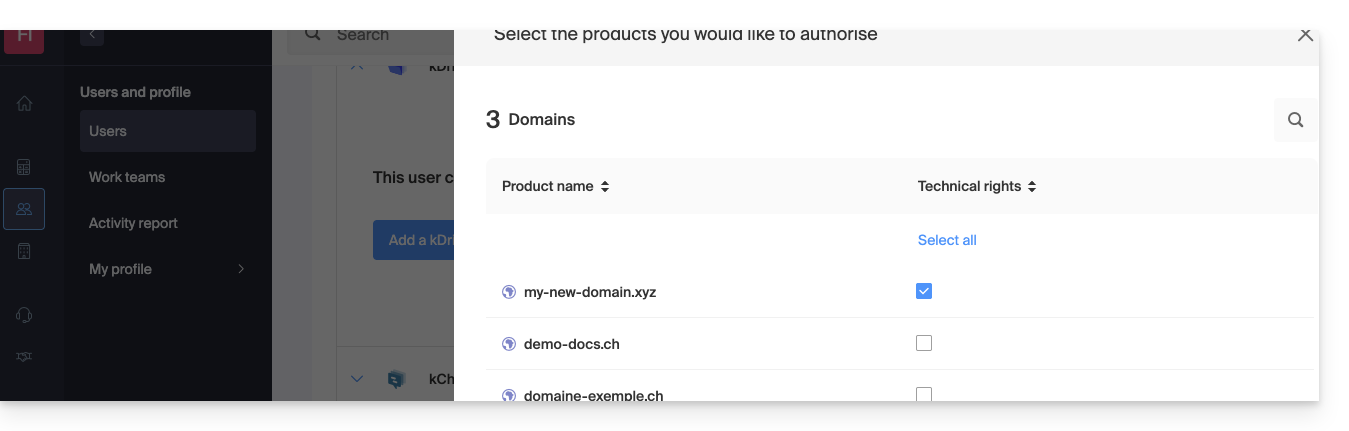
Certain specific services like ticketing allow granting even more detailed rights: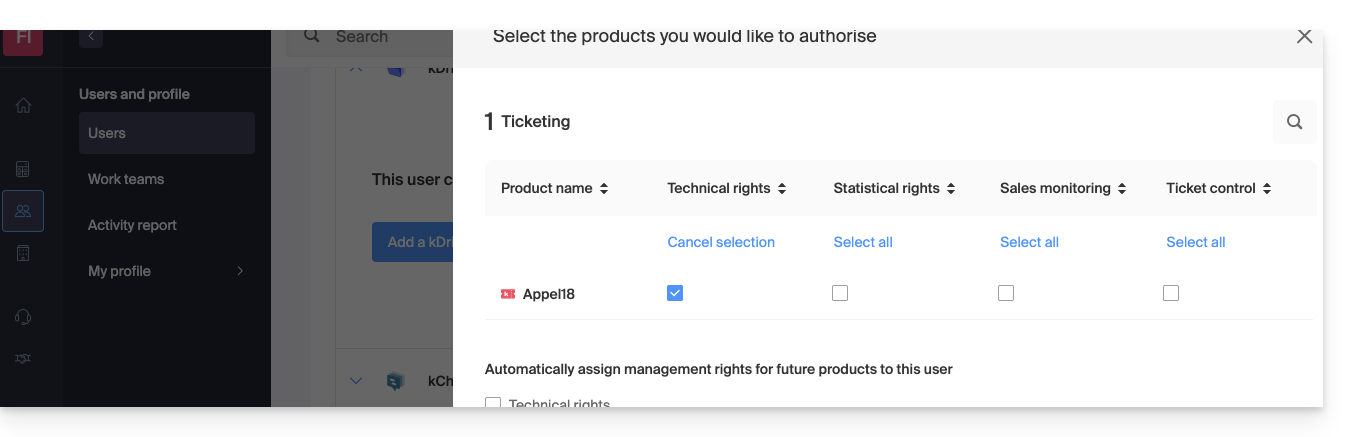
Easier access: Groups
In order to facilitate the addition of access rights to a product that is on your Organization, there are Groups. These allow you to create teams that are linked to Infomaniak products with the desired rights, very practical for giving a new collaborator of your Organization access to the products they will need in their daily activity.
Link to this FAQ:
Has this FAQ been helpful?
This guide explains how to automatically receive a summary of your activities scheduled on Calendar Infomaniak in your Mail and/or kChat inbox every morning.
Preamble
- This feature is disabled by default on all calendars.
- This summary is sent to your email address (the one used to log in to your Infomaniak account).
- It contains a list of all the day's events with their most important information (possible kMeet link, location, times, etc.).
- You can even imagine forwarding this daily schedule to your team or assistant so they know the best time to contact you, even by creating a rule for automatic forwarding based on the criteria corresponding to the received email.
Obtain a schedule automatically and daily
Prerequisites
- Sending a summary on kChat requires having kChat within your Organization.
To start the day by consulting a message in your Infomaniak inbox containing the schedule based on your Infomaniak agenda:
- Click here to log in to the unified settings of your Infomaniak Web apps and more specifically to the settings of the daily reminder of the Calendar app.
- Check or select the relevant Organization in the dropdown menu of the left sidebar.
- If you modify it, return to the settings by clicking on the daily reminder item to access the settings:
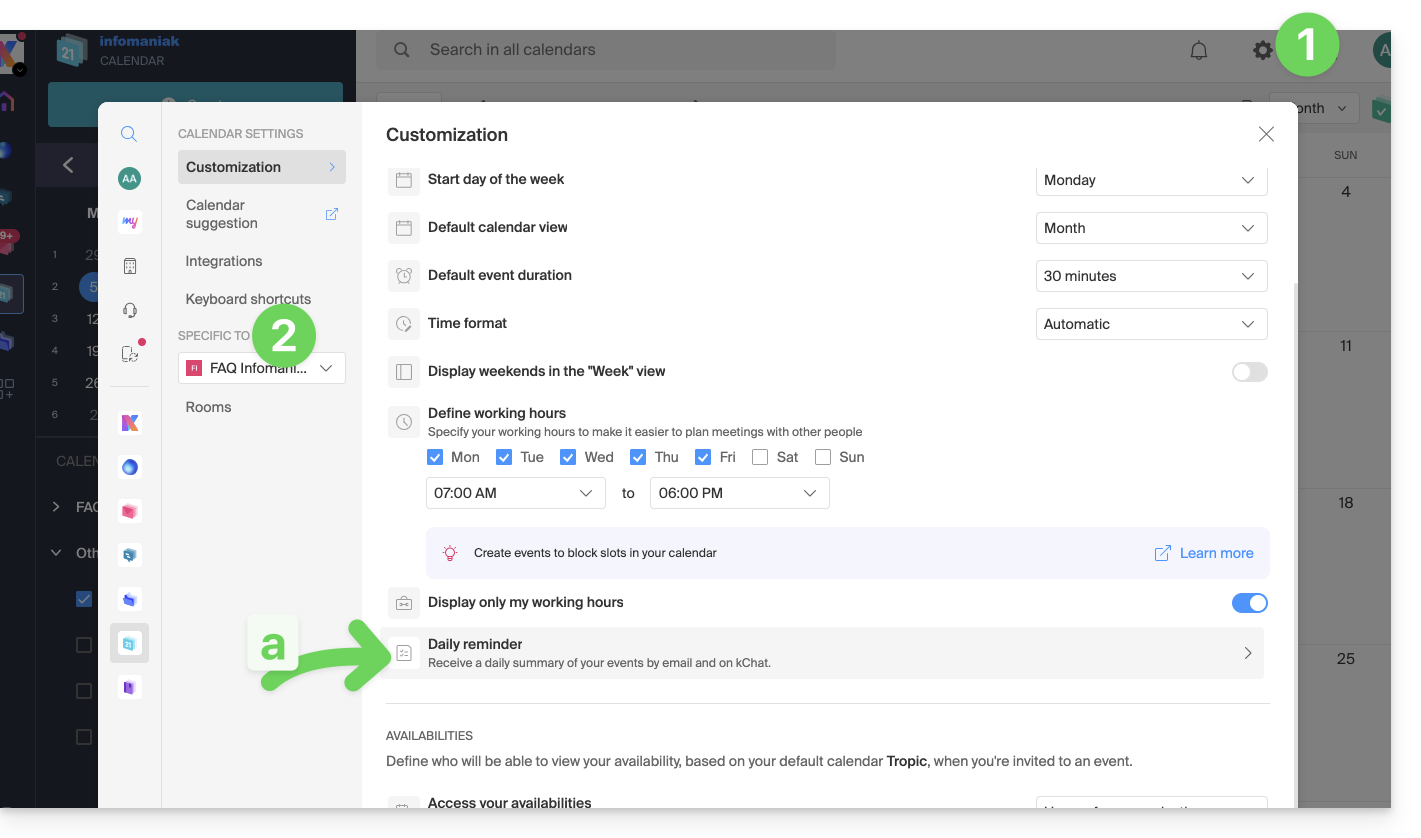
- If you modify it, return to the settings by clicking on the daily reminder item to access the settings:
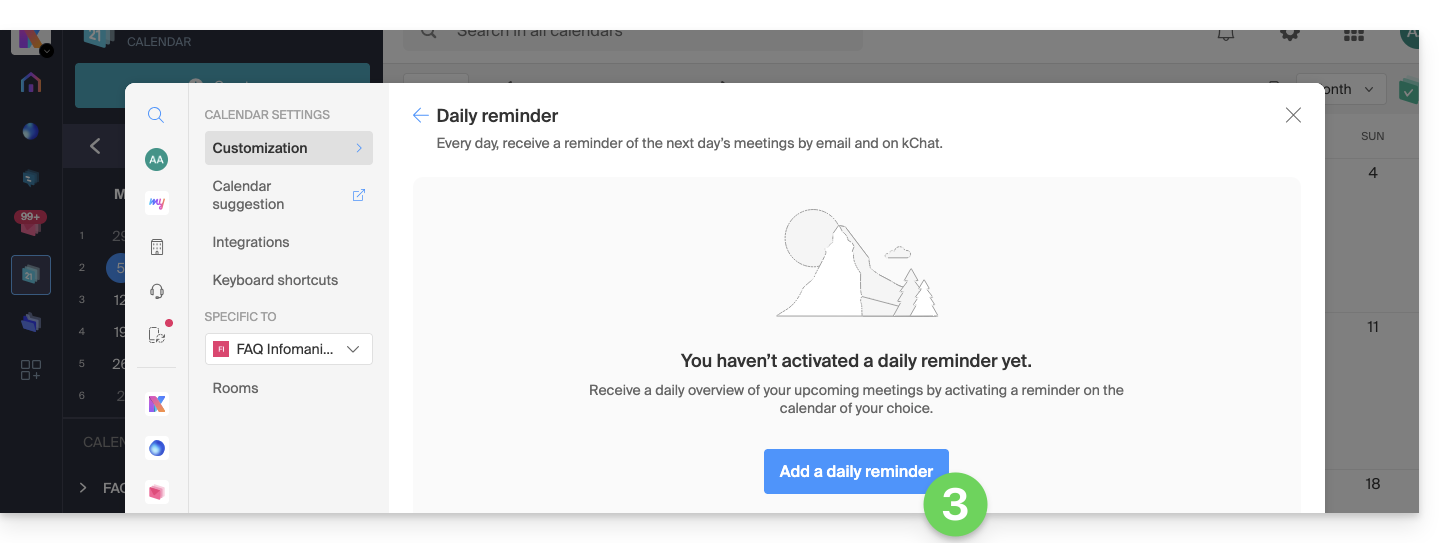
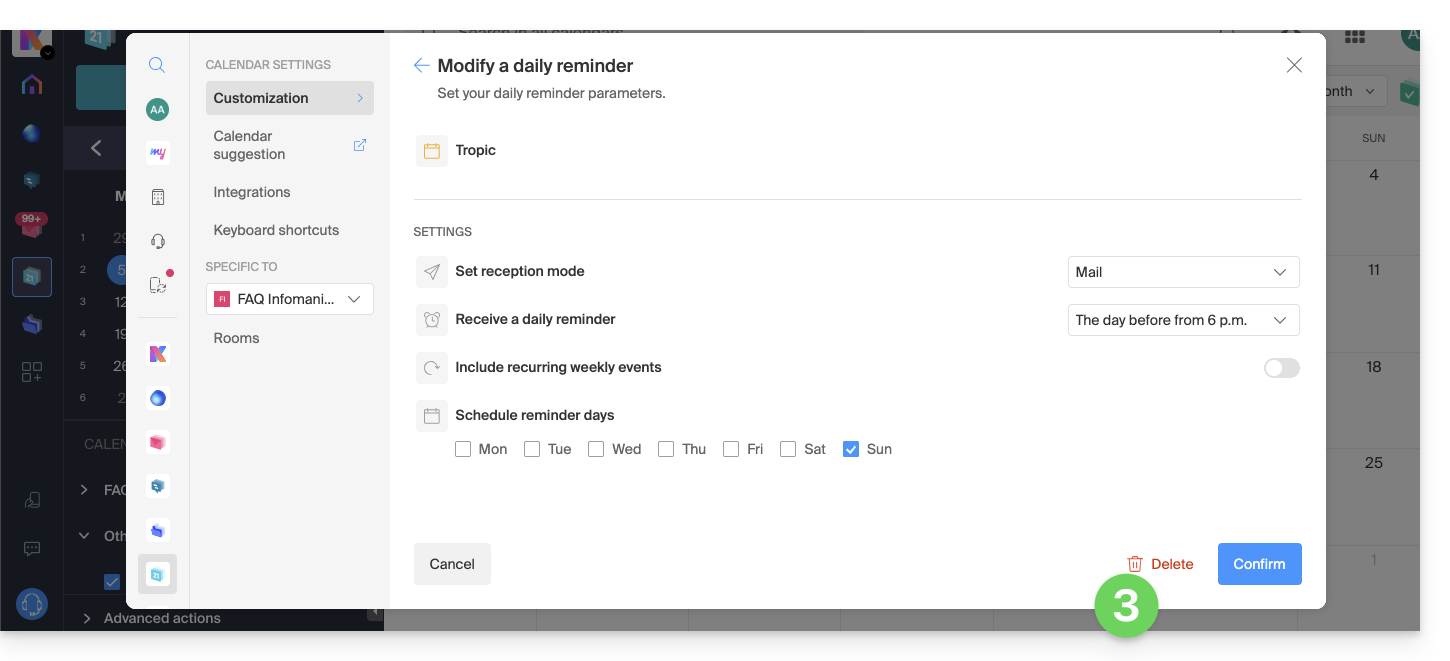
- Click the button to Add a daily reminder and configure it:
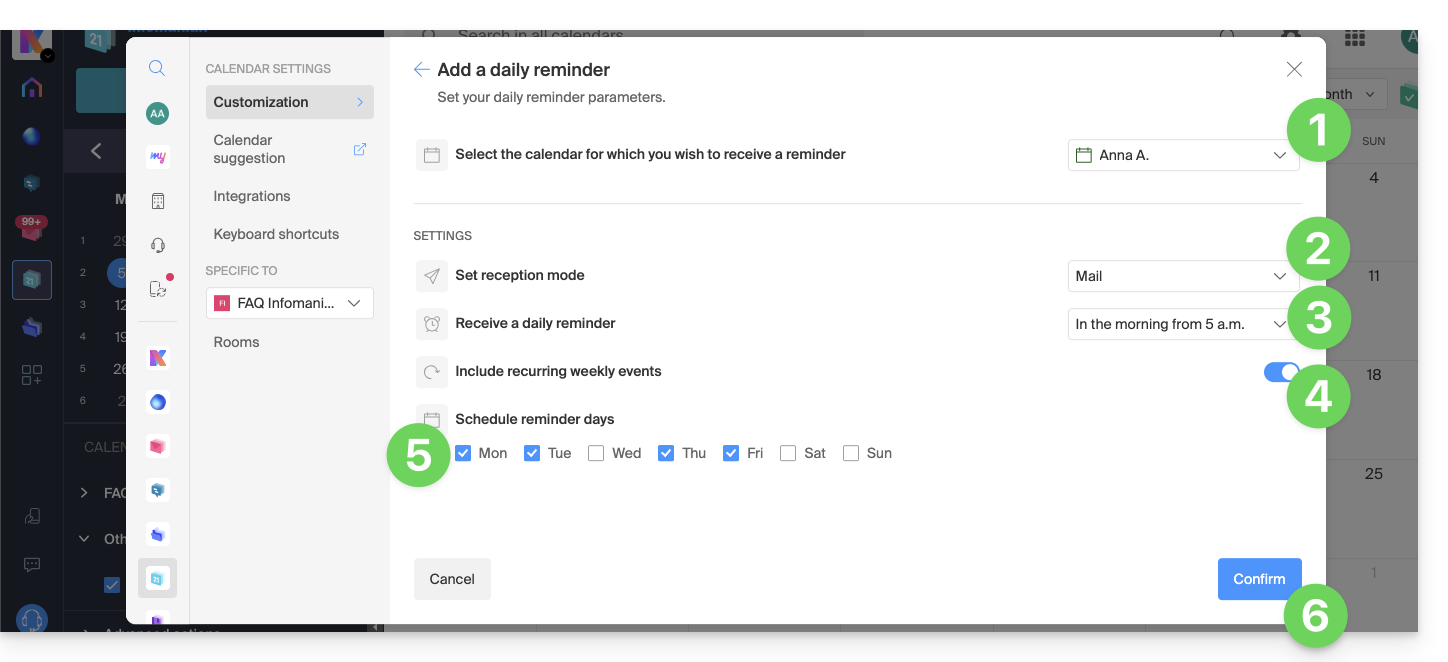
To customize your reminder according to your needs:
- Select the relevant calendar.
- Choose the reception mode (Mail, kChat or both).
- Choose the time you want to receive the reminder (the evening before or early the same day).
- Choose whether or not to include recurring events.
- Choose the days on which the daily reminder will be sent.
- Confirm your choices at the bottom of the page:
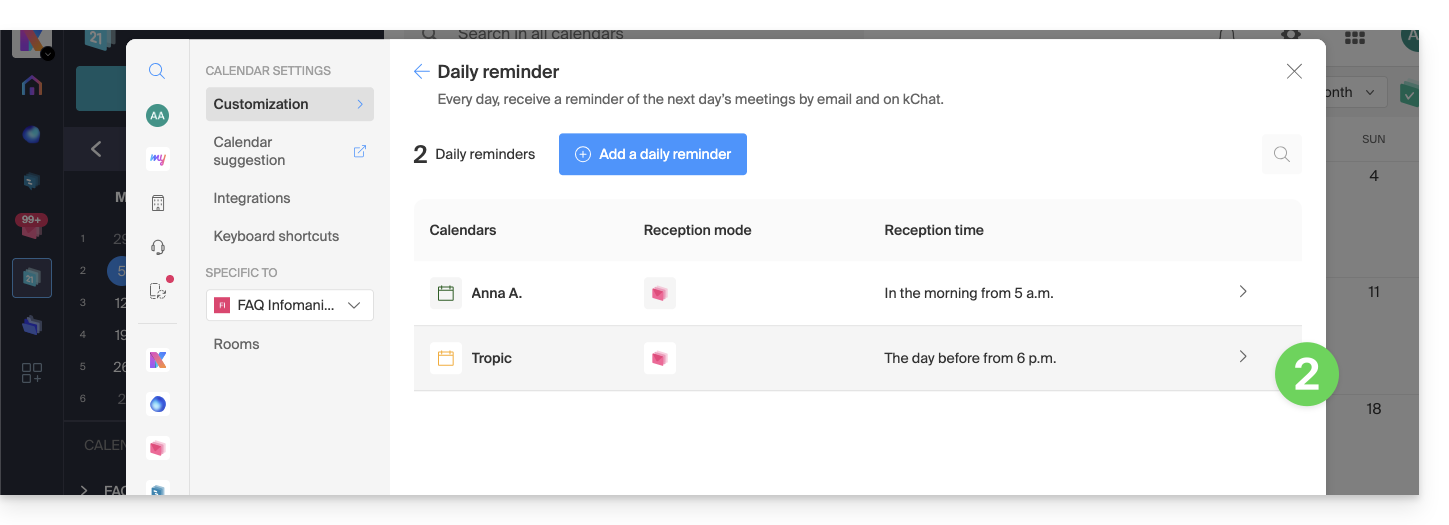
Disable the daily reminder
To stop receiving the daily summary by email or via Euria on kChat:
- Click on the link located at the bottom of the notification received:

- Click on the reminder to delete:
- Delete the reminder from the edit page:
Link to this FAQ:
Has this FAQ been helpful?
This guide explains how to modify the role and permissions of a user so that they only have a limited legal role or access to only certain features of your Organization within the Infomaniak Manager.
Introduction
- Since you opened your account with Infomaniak, you have been part of at least one Organization.
- If you were the only one and it wasn't an invitation, an Organization was created in your name and you automatically became the legal representative.
- Otherwise, you belong to the Organization that invited you (to join its kSuite, to manage a product, etc.).
- You can define whether a user…
- … is part of your Organization and whether they should have the role of:
- Legal Representative
- Administrator
- Collaborator
- … is external to your Organization (limited rights):
- External users are not taken into account in calendar and address book sharing for the entire Organization.
- … is part of your Organization and whether they should have the role of:
Modify a user's rights/permissions
Prerequisites
- Switch to the desired Organization beforehand if you cannot find the expected list of users.
- Be an Administrator or Legal Representative within the Organization.
- Familiarize yourself with the various permissions (e.g., access rights to products) and administrative contact preferences of a user within an Organization.
- Note that it is impossible to remove a legal representative if there is no other legal representative.
To change a user's role:
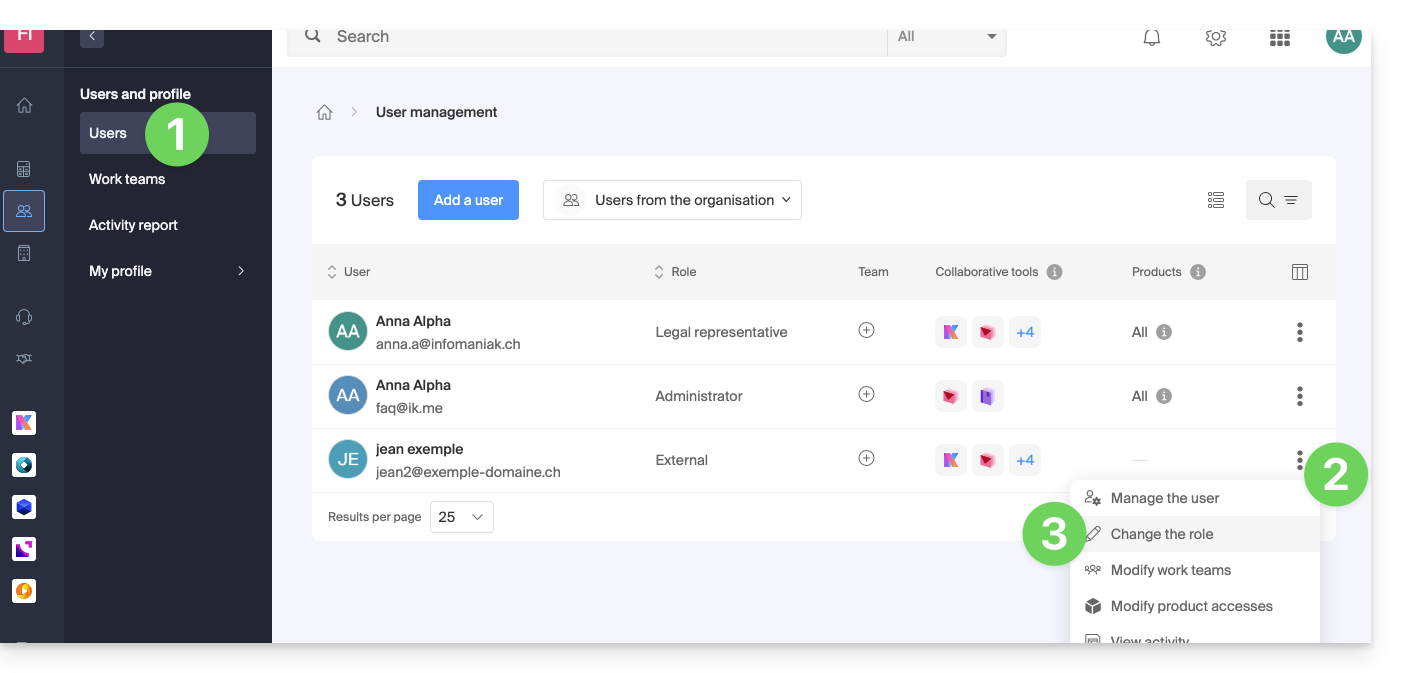
- Click here to access user management in the Infomaniak Manager (need help?).
- Click on the action menu ⋮ located to the right of the user in question.
- Click on Edit role:
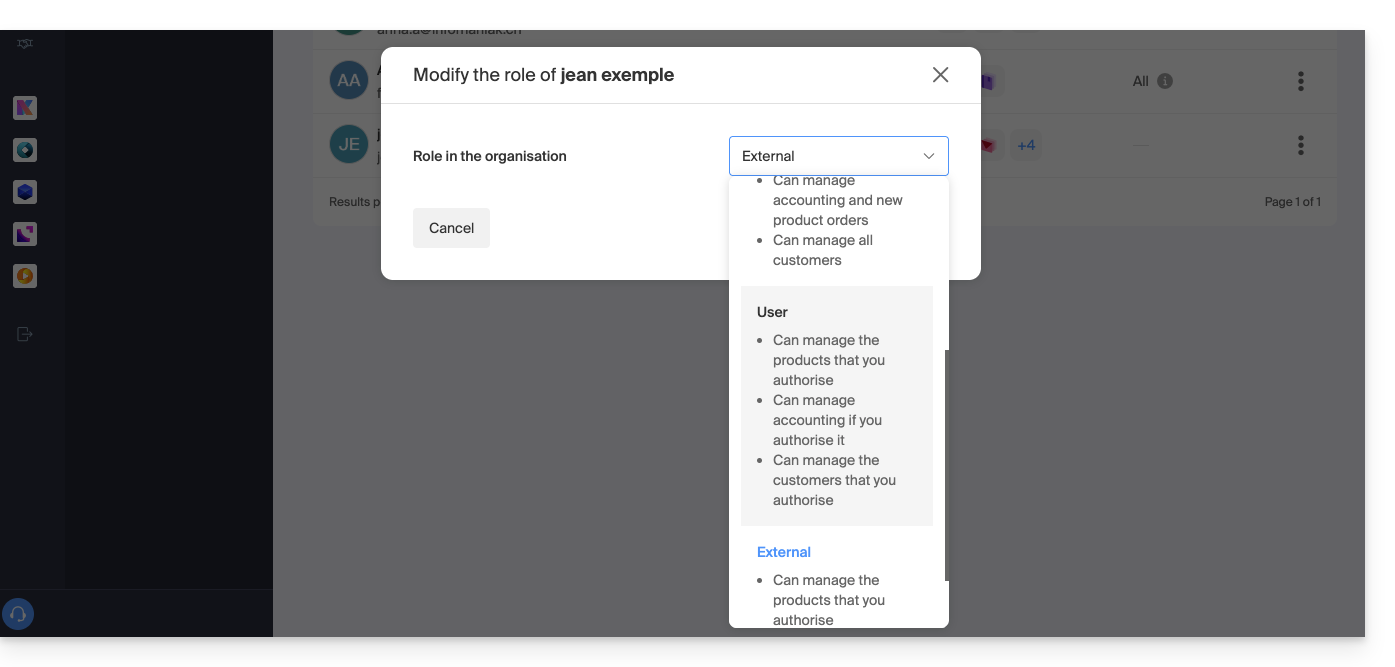
- Change the desired role:
- Click the Save button.
A summary email is sent to the user whose role has been changed.
If you assign the user a simple collaborator role…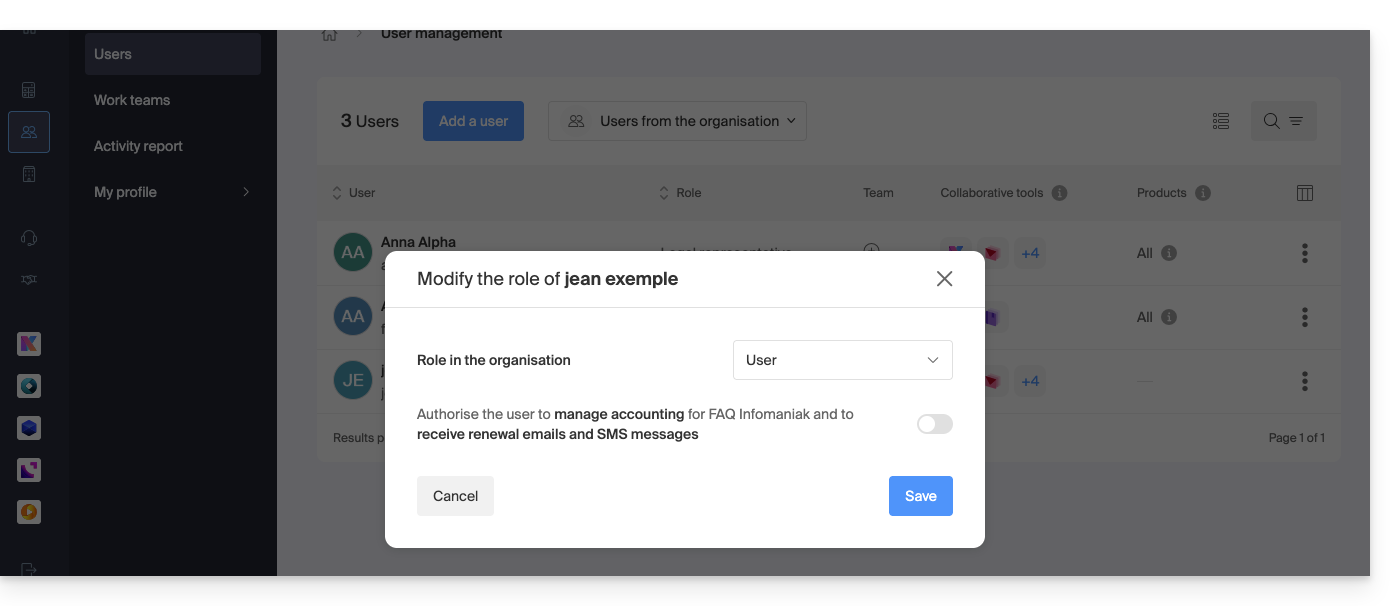
… you can then modify the services to which they will have access; refer to this other guide: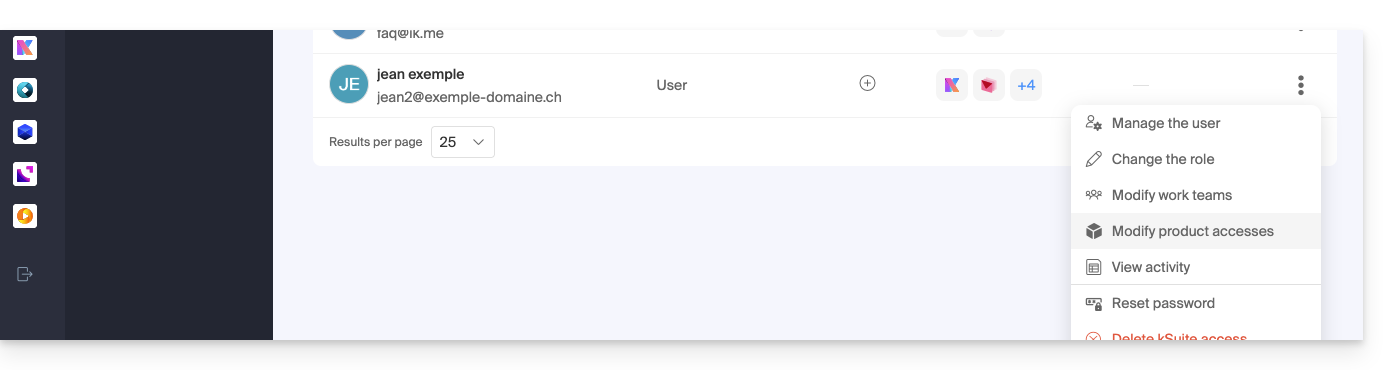
Link to this FAQ:
Has this FAQ been helpful?
This guide explains how to copy or move contacts to address books in the Infomaniak Contacts web app (online service ksuite.infomaniak.com/contacts).
Introduction
- Contacts can also be managed within groups, i.e., subfolders of your address book.
Copy or move a contact
To do this:
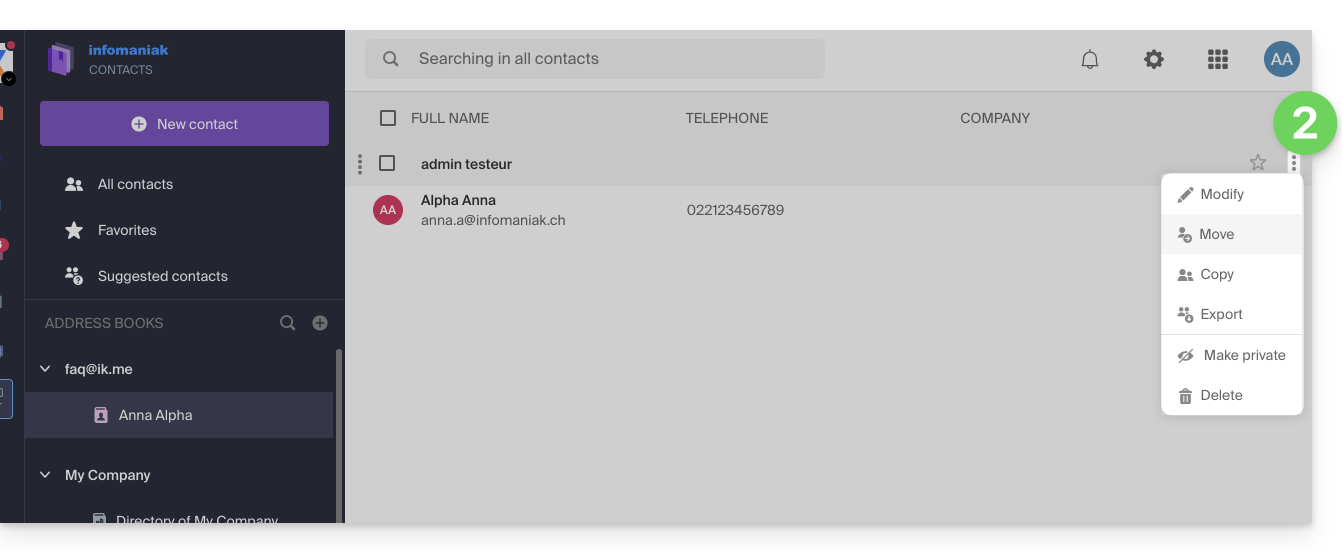
- Click here to access the Infomaniak Contacts web app (online service ksuite.infomaniak.com/contacts).
- Click on the action menu ⋮ to the right of a contact to choose to copy or move the contact to the desired location using a wizard:
You can also click and hold the mouse at the far left of a contact's row to copy or move a contact (or several contacts if you select them beforehand) to the desired address book in the left sidebar: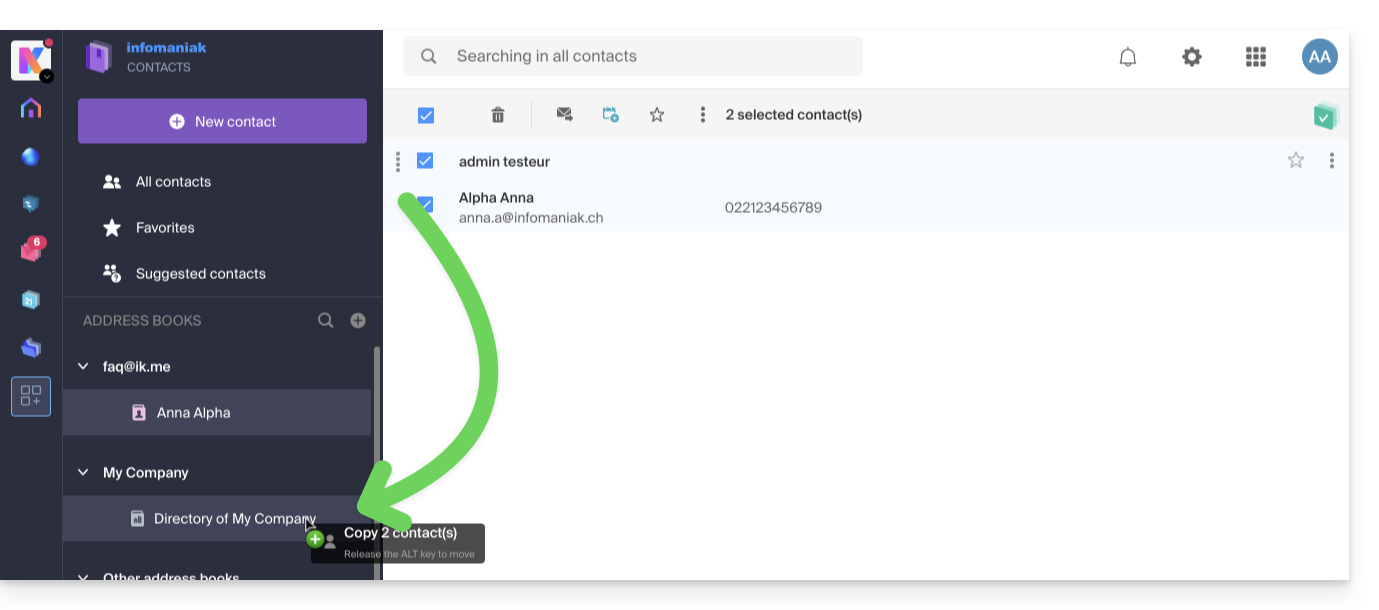
The default behavior when moving a contact from one address book to another folder or address book is "move".
By pressing the keyboard key you usually use to copy files from your computer (the ALT key, for example) while dragging them from one place to another, you can "copy" contacts instead of moving them.
Link to this FAQ:
Has this FAQ been helpful?
This guide explains how to add an attachment from kDrive to an event in the Infomaniak Calendar web app (online service ksuite.infomaniak.com/calendar).
Introduction
- Some software or applications also allow you to add an attachment, and in this case, if you synchronize the calendar with your solution, the attached file can be up to a maximum size of 64 KB.
Adding a kDrive attachment
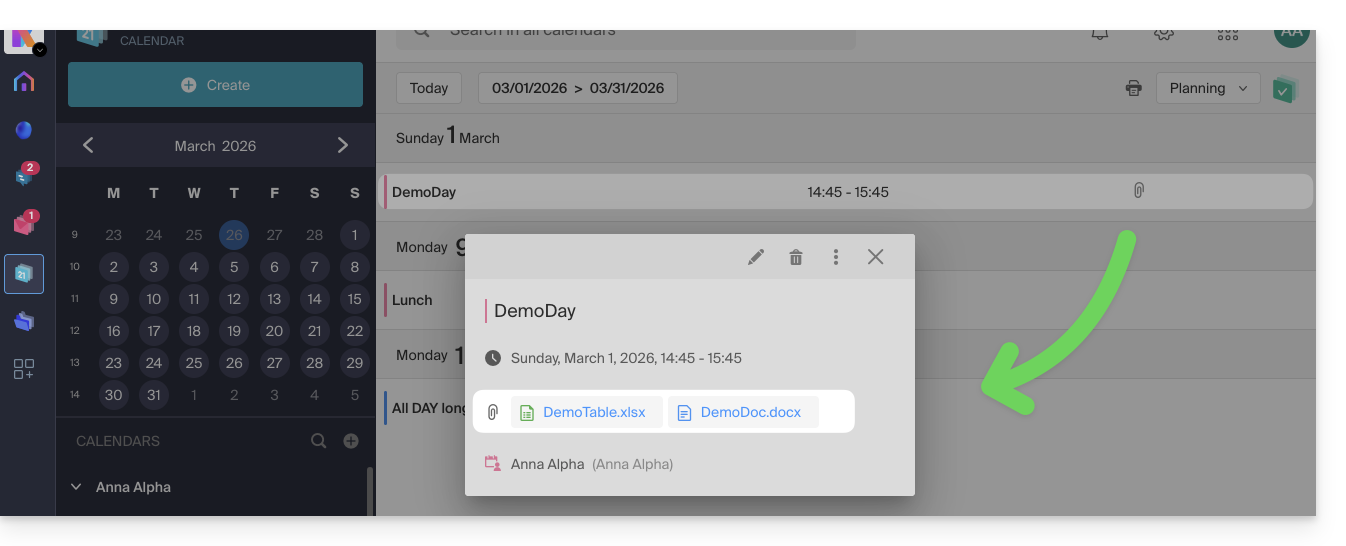
When you create a new event in the Infomaniak Calendar web app (online service ksuite.infomaniak.com/calendar), you can add one or more attachments (links to files in kDrive):
Then, click on the “Insert kDrive link” link, and you will be taken to kDrive directly from the event creation window in Calendar: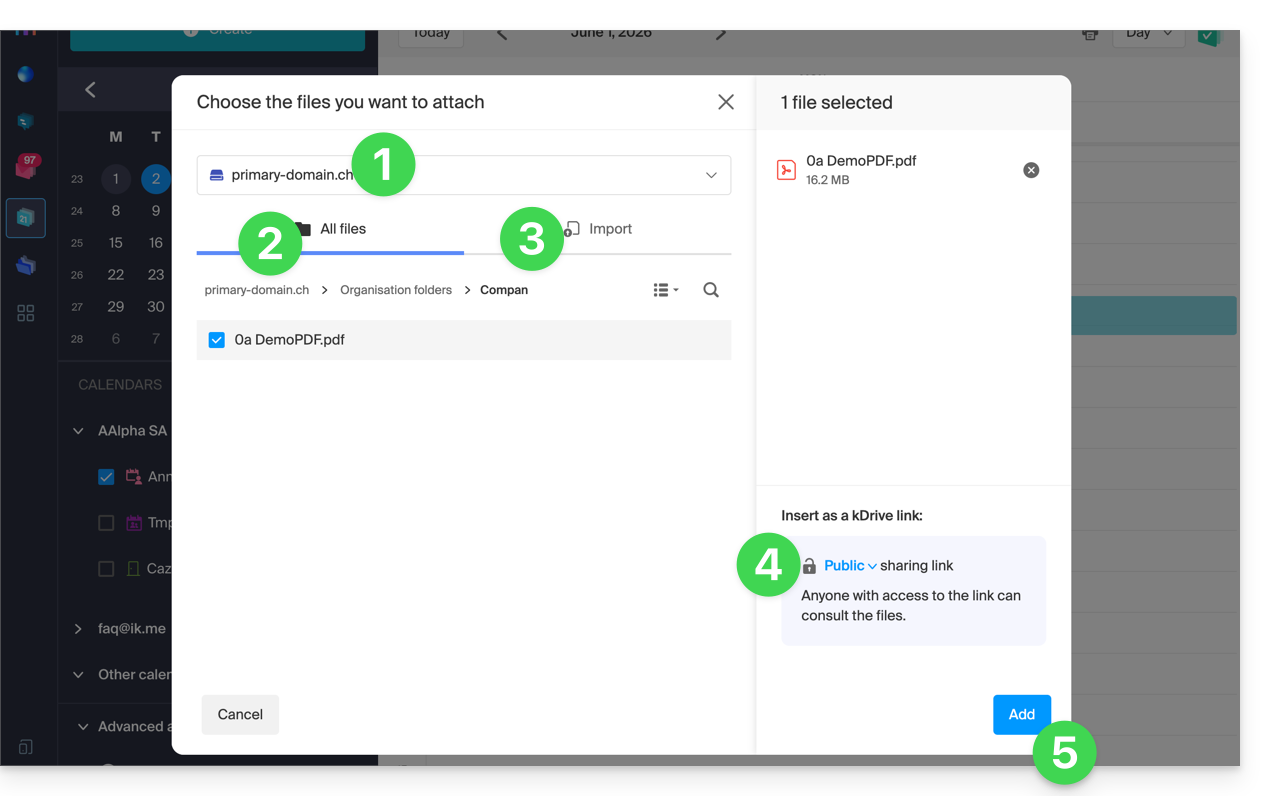
- Choose the kDrive if necessary.
- Browse and select the files to add to the event.
- Alternatively, import new documents that will be stored on kDrive.
- Once selected, choose whether their link should be:
- a public link (everyone can access it)
- a restricted link (only people with access can access it)
- Click on Add.
Whether the event is recurring or not, you can add files that will be shared with those who view the event in the calendar:
Link to this FAQ:
Has this FAQ been helpful?
This guide explains how to share contacts with other users from the address books in the Infomaniak Contacts web app (online service ksuite.infomaniak.com/contacts).
Sharing an address book
To share contacts:
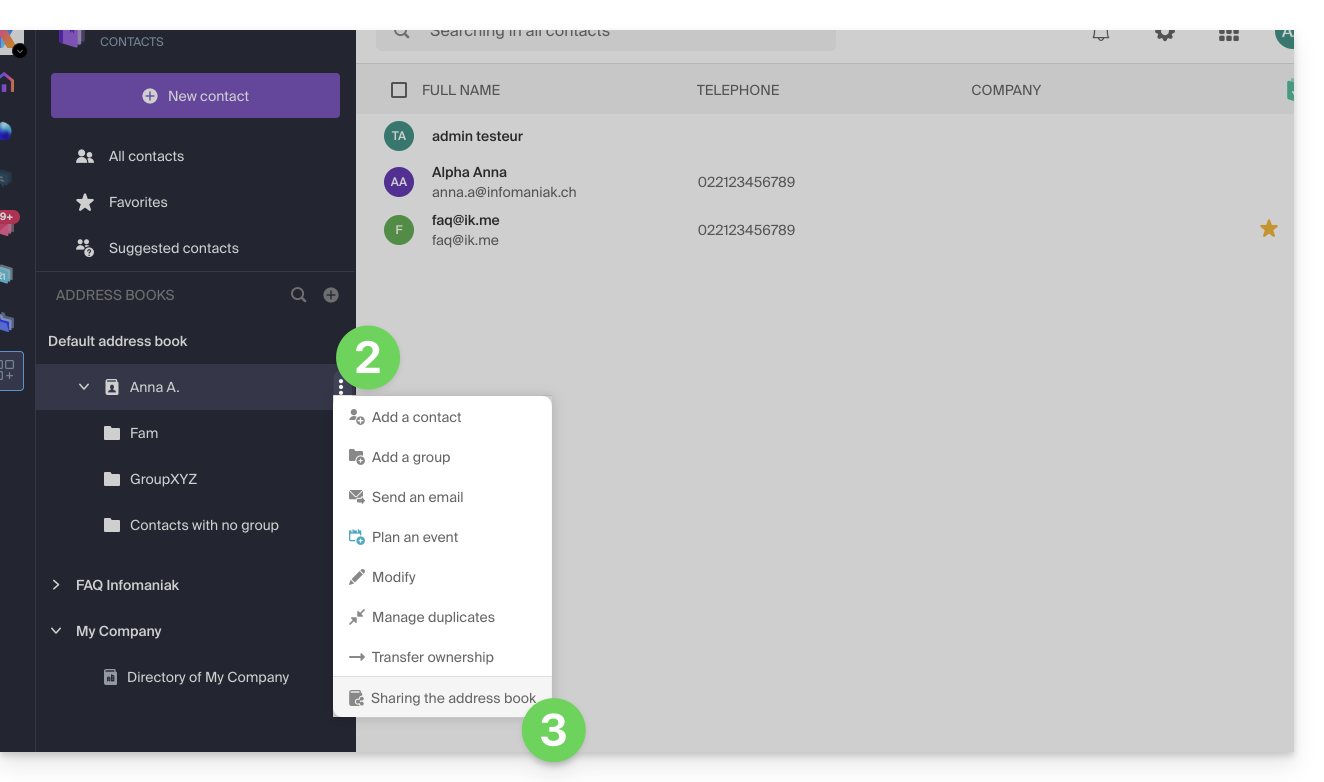
- Click here to access the Infomaniak Contacts web app (online service ksuite.infomaniak.com/contacts).
- Click on the action menu ⋮ to the right of an address book (above any groups, which cannot be shared specifically but will be visible when the sharing is accepted).
- Click on Share:
- If there is already a sharing in progress and you want to start another one, click on Share at the top; otherwise, click on the Share button further down.
- Enter the email address of the user who will access the address book:
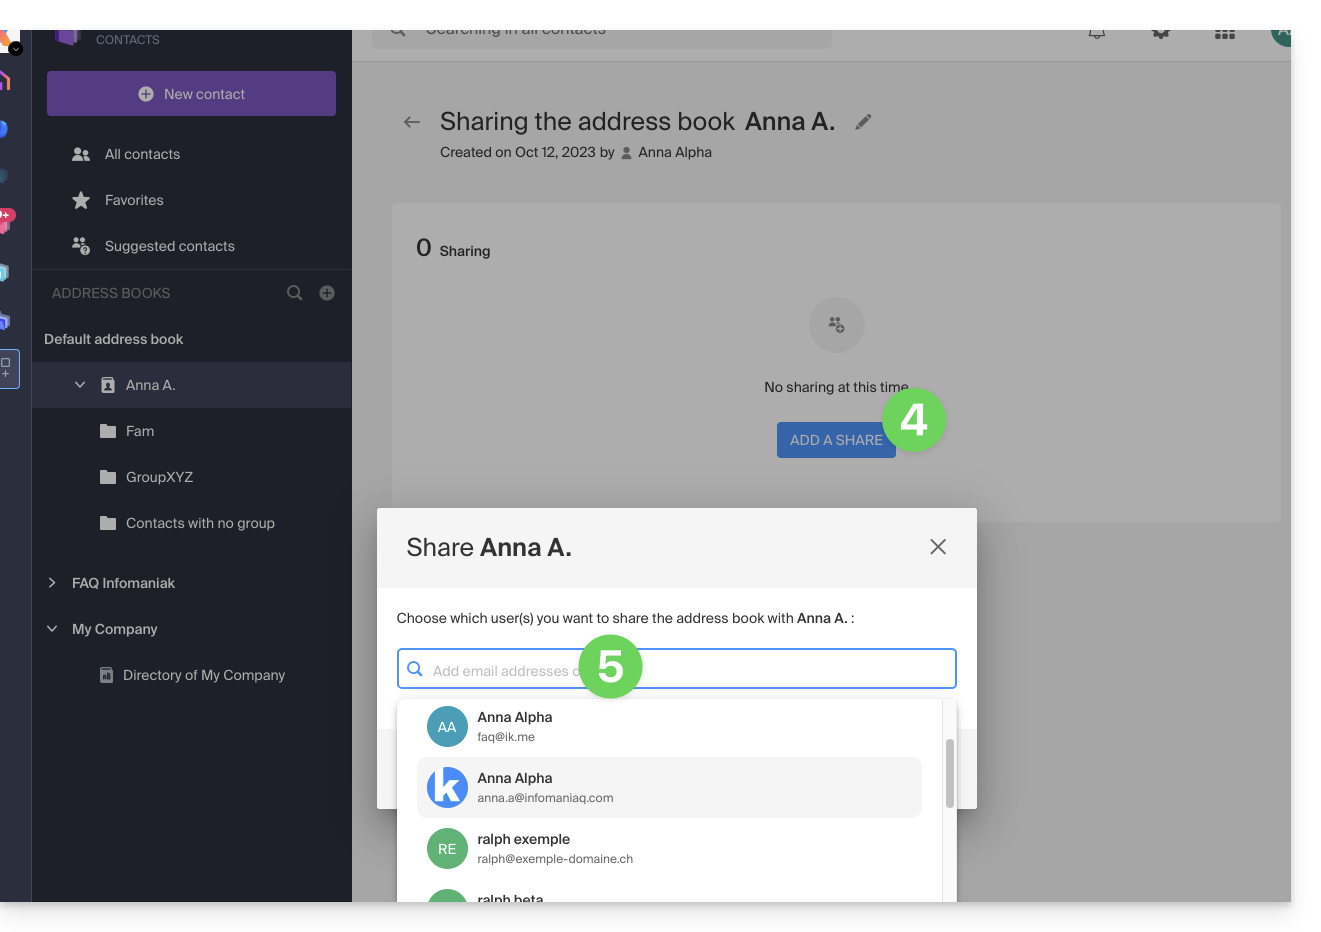
- If the user does not yet have one, they can create one for free.
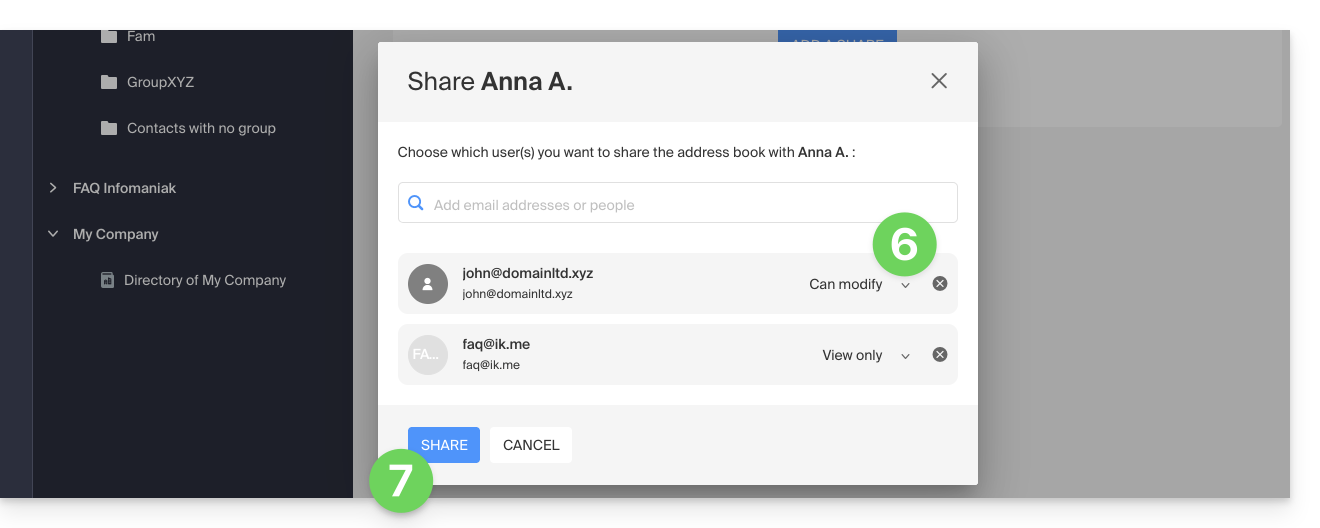
- Specify the user's permissions for this address book (Administration, Read-only, Read and write).
- Finish by clicking on the share button:
Contacts created or moved/copied to this address book in the future will be dynamically visible to all users who have access to the shared resource.
Accept the share
The invited user must accept the share to access the shared data (group names are already visible before acceptance), which will be located in an “Other address books” section: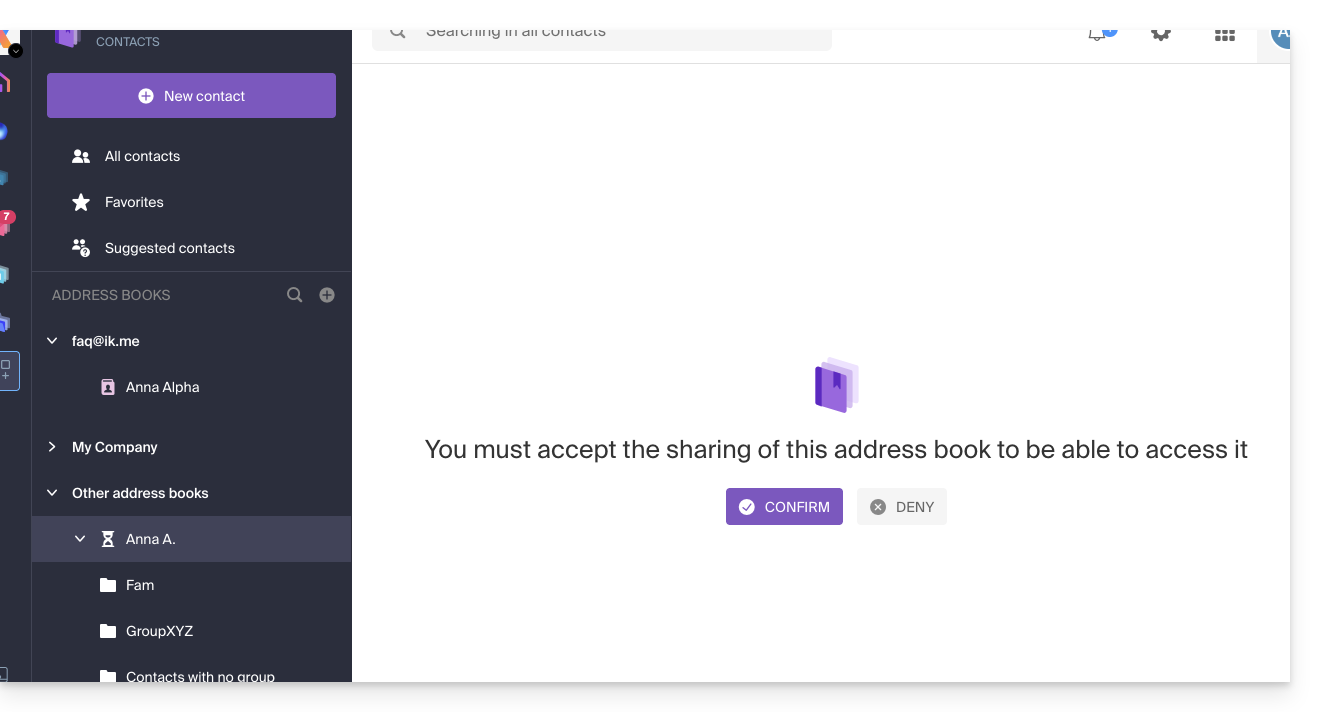
Depending on their permissions, they can perform certain operations on the contacts or simply view them, including when composing a new email:
Withdraw from a share that has already been accepted
A user can withdraw from a share from the action menu ⋮ to the right of the shared address book: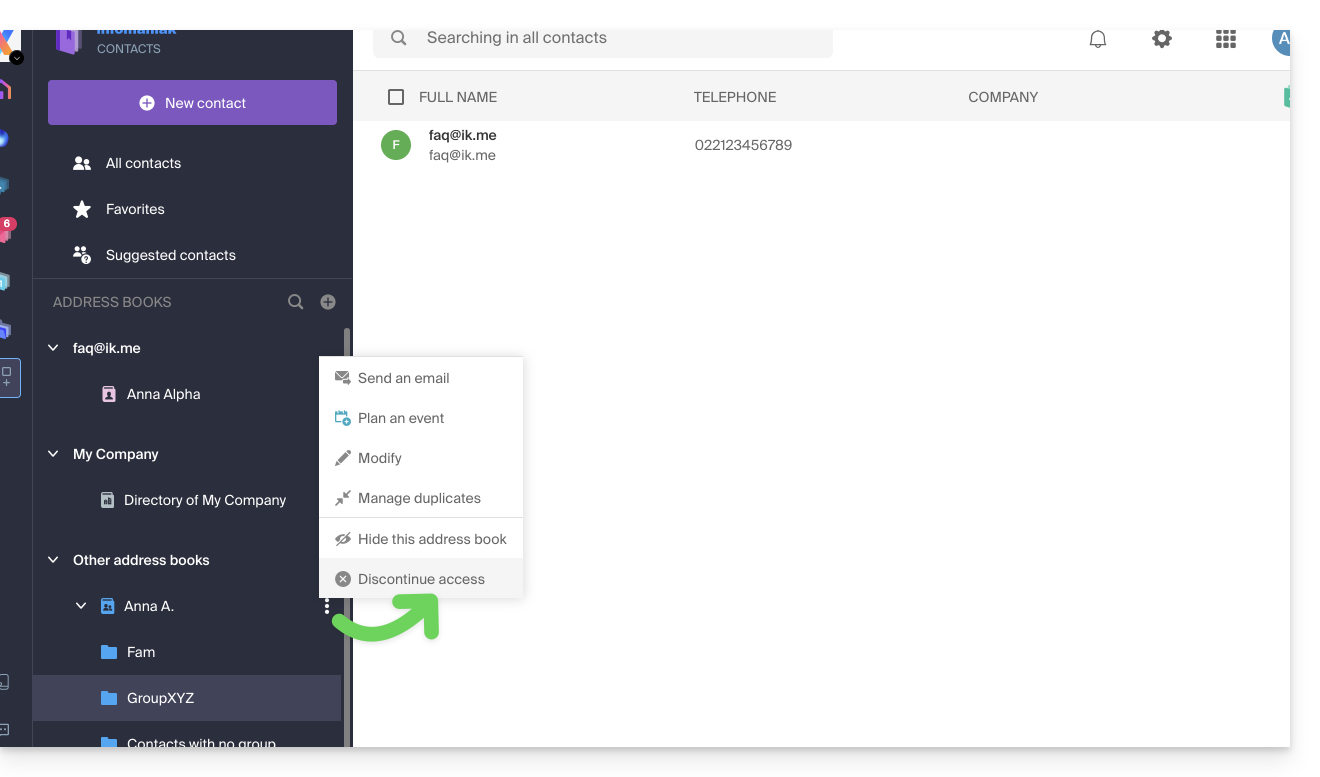
Link to this FAQ:
Has this FAQ been helpful?
This guide explains how to share one of your calendars with other Infomaniak users, collaborators, from the Infomaniak Web app Calendar (online service ksuite.infomaniak.com/calendar).
Introduction
- Refer to this other guide to configure the synchronization of your calendars, or this other guide to integrate a read-only calendar into a third-party tool.
Share an Infomaniak Calendar
To enable sharing of one of your calendars:
- Click here to access the Infomaniak Web app Calendar (online service ksuite.infomaniak.com/calendar).
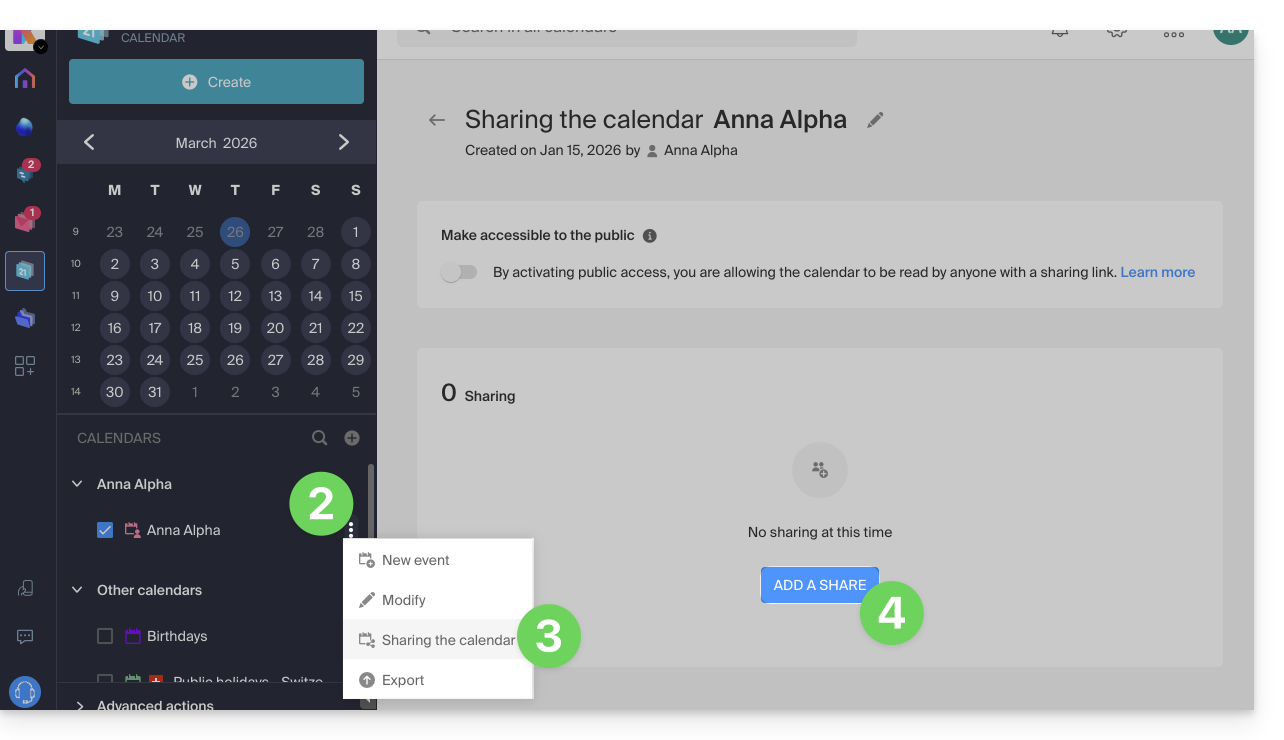
- Click on the action menu ⋮ to the right of a calendar.
- Click on Share calendar.
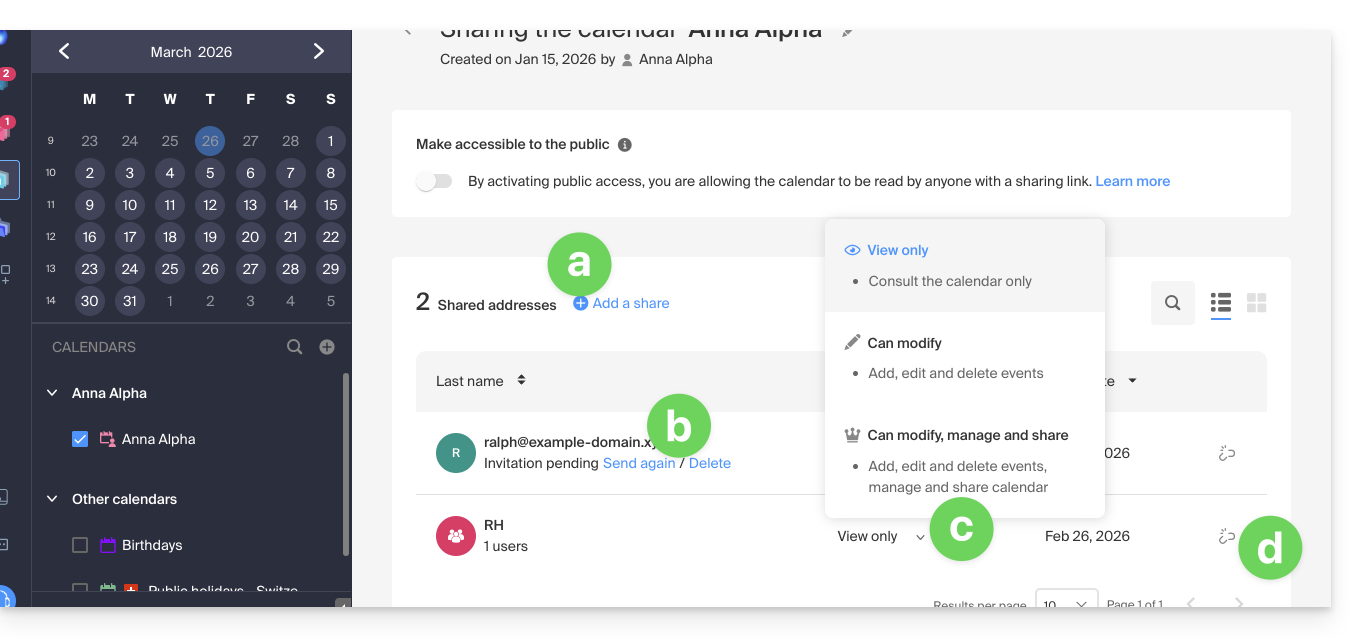
- Click on the button to Add a share:
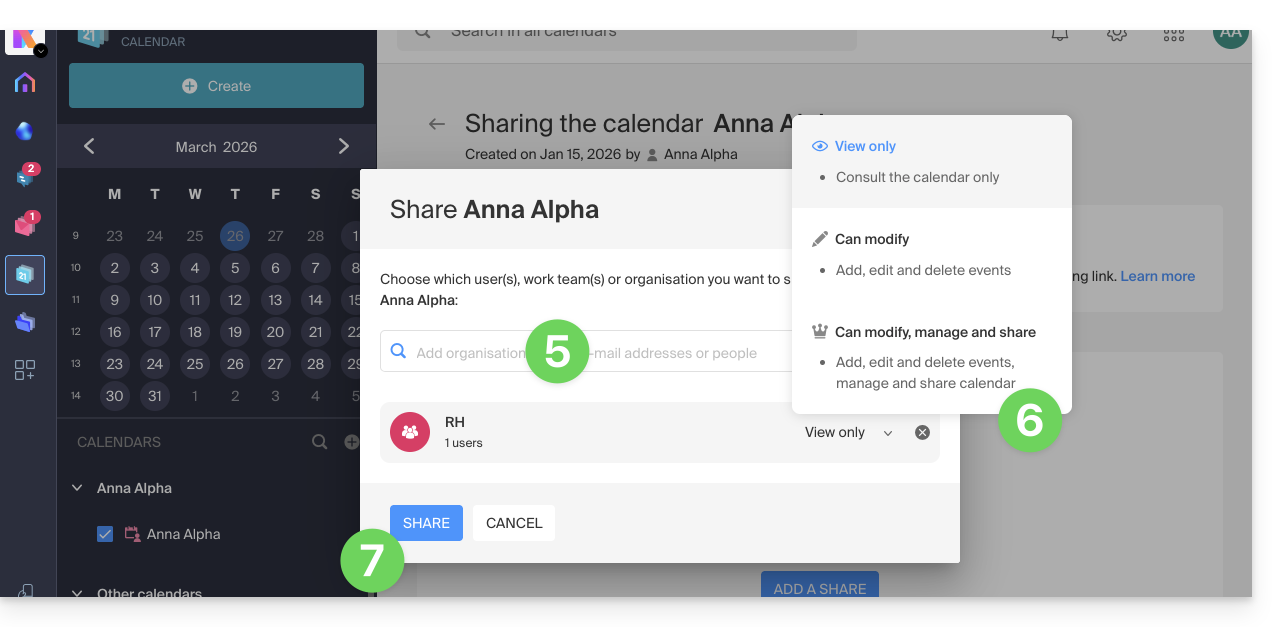
- Enter the Organization, group, or email address corresponding to the Infomaniak user account that will access the calendar (if the user does not yet have an account, they can create one for free with the invitation they receive).
- Determine the user's permissions for this calendar (Can view, Can edit, Can edit and share).
- Finish by clicking the button:
- You can perform other actions from the same page at any time:
- add an additional share
- resend or delete an access invitation
- modify the permissions related to calendar sharing
- delete / revoke the share
Share a meeting room calendar
To share the calendar of meeting rooms, the principle of sharing and assigning rights is based on the same principle as above: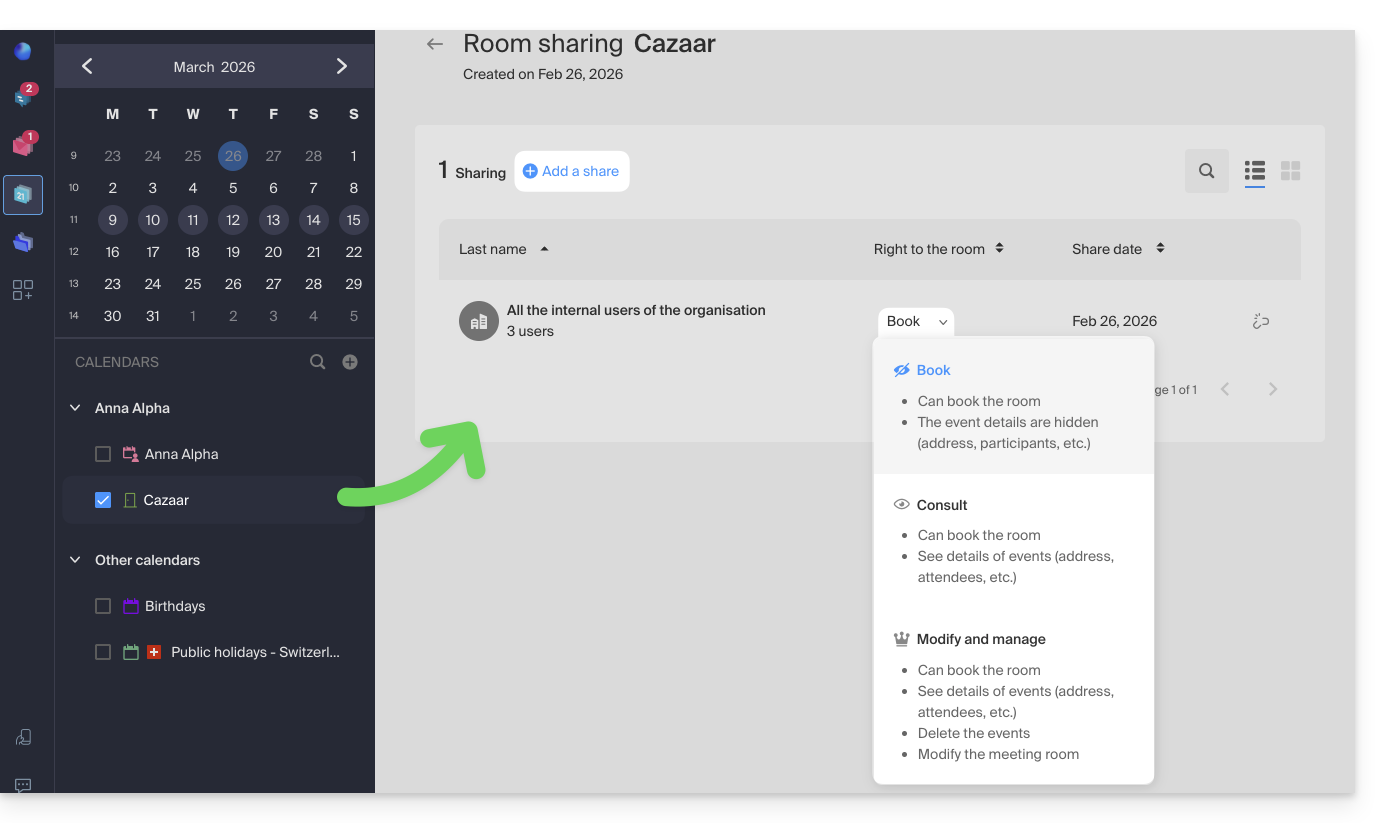
Link to this FAQ:
Has this FAQ been helpful?