Knowledge base
1000 FAQs, 500 tutorials and instructional videos. Here, there are only solutions!
This guide explains how to recover events, tasks, unavailable time slots, and deleted time slots from one of your calendars in the Infomaniak Calendar web app (online service ksuite.infomaniak.com/calendar for managing your events and appointments).
✘ NOT AVAILABLE with
kSuite free
my kSuite (ik.me, etik.com, ikmail.com)
Mail Starter service
By upgrading one of these free plans, you will be able to recover the backup for up to 30 days.
Calendar/Agenda Restoration
Backup Retention Period
Restore points are created every day. Once a backup of the complete state of your calendar has been created, Infomaniak makes it available to you for 30 days.
If events can be restored, you can revert to the point from 24 hours, 48 hours, 7 days, and 30 days ago:
- Click here to access the Infomaniak Calendar web app (online service ksuite.infomaniak.com/calendar).
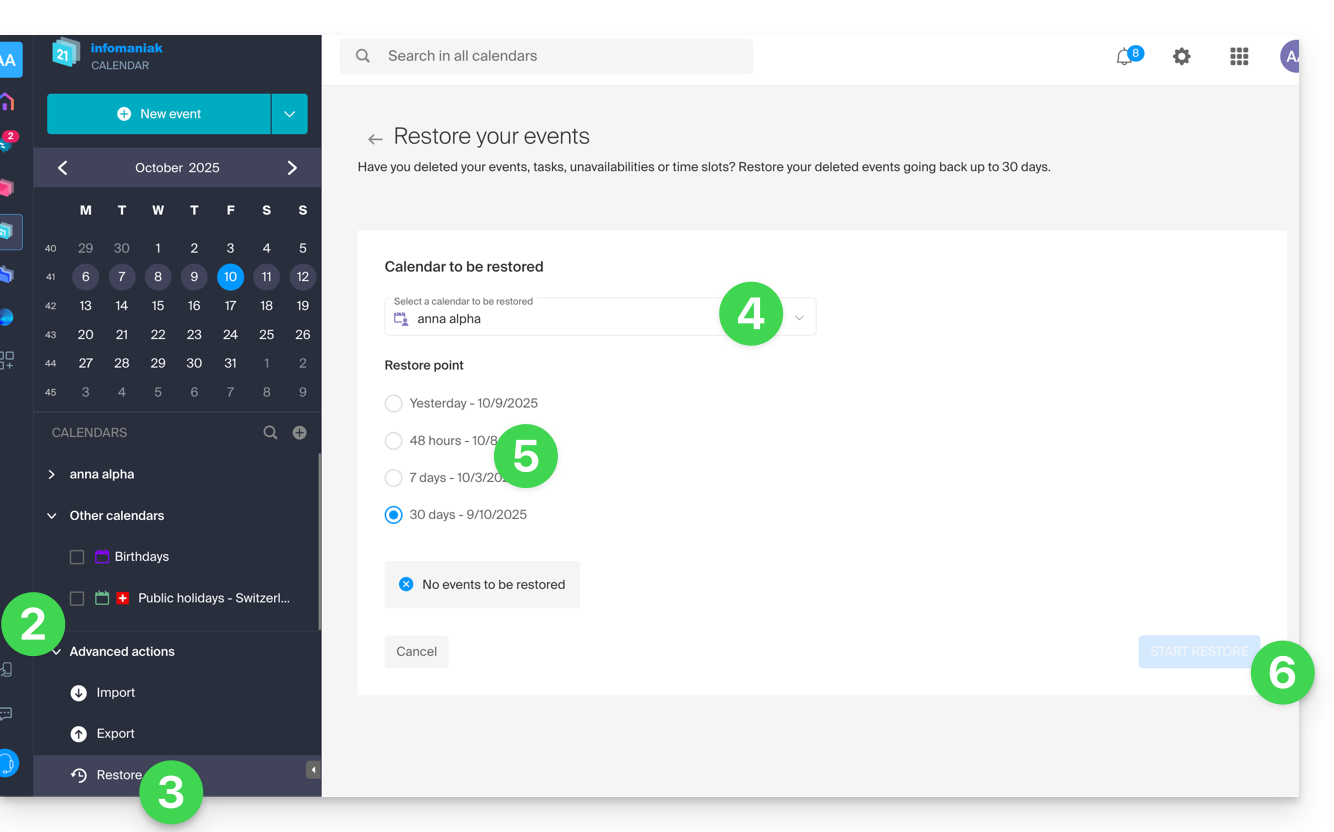
- Click on Advanced Actions from the left-hand menu.
- Select Restore.
- Choose the calendar to restore.
- Choose the desired version (1/2/7/30 days).
- Start the restoration using the button at the bottom of the page, which becomes active if events can be restored:
Link to this FAQ:
Has this FAQ been helpful?
This guide concerns kSuite and the possibility for users to set a status as well as manage the display of presence or absence.
Preamble
- Once defined, your custom status is visible to users of the Organization on various pages related to kSuite:
- Home page ksuite.infomaniak.com

- Mail
- Agenda
- Contacts
- kDrive
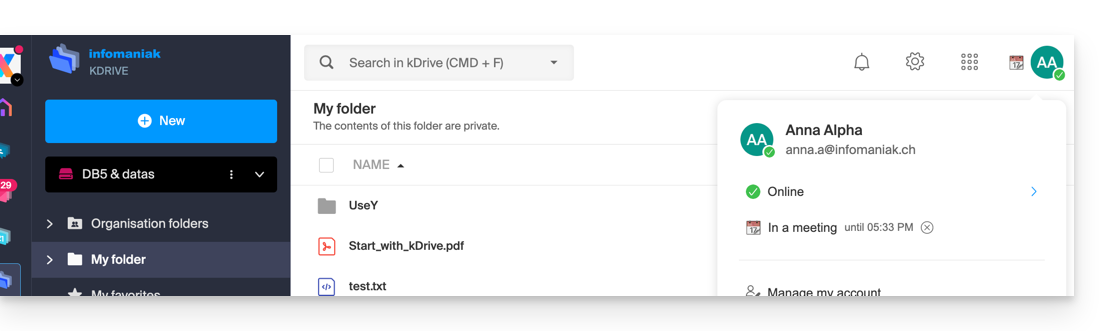
- Euria
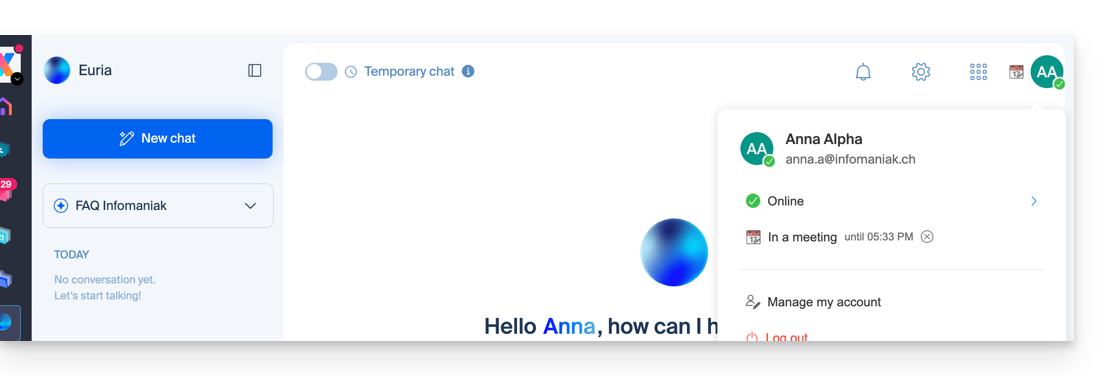
- Chk
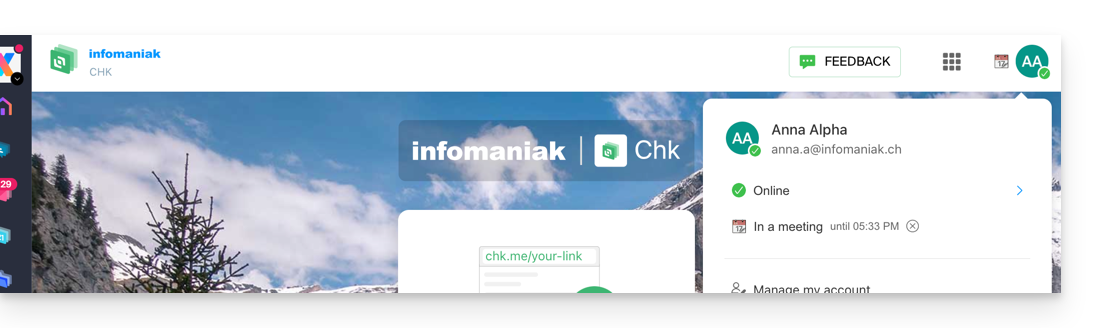
- kPaste
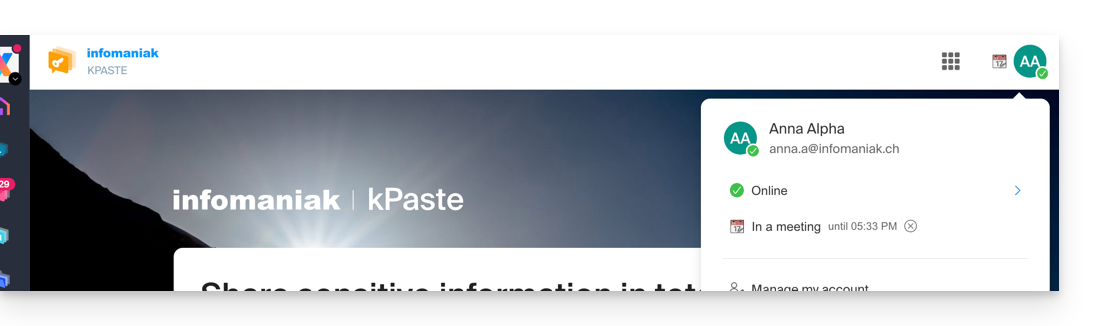
- kMeet
- Home page ksuite.infomaniak.com
- A presence status different from the default status, such as "Do not disturb", can affect certain notifications.
Update the kSuite profile status
To do this:
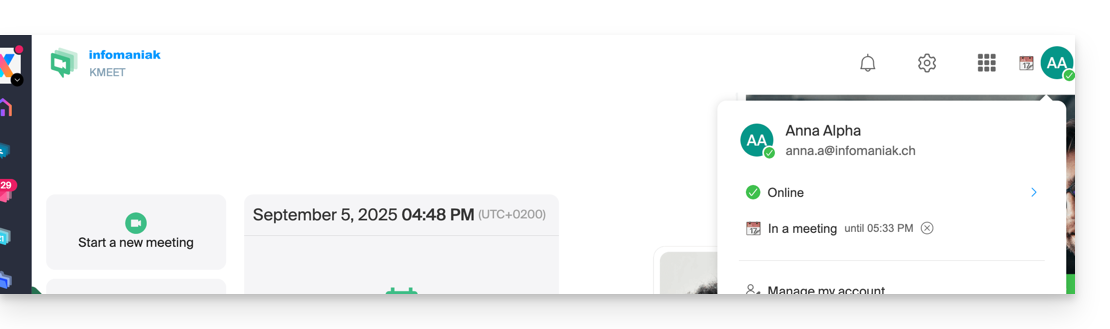
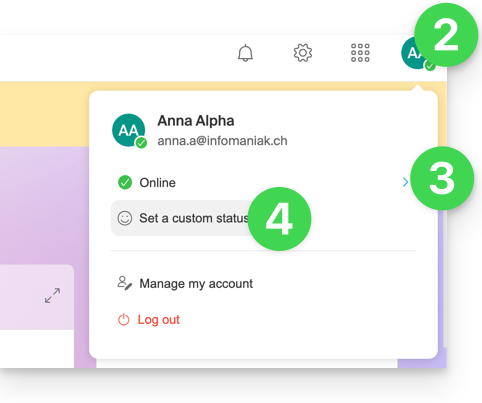
- Click here to access the kSuite interface.
- Click on the badge with your initials/avatar in the top right corner.
- Click on Online to choose another status if necessary (absent or do not disturb)…
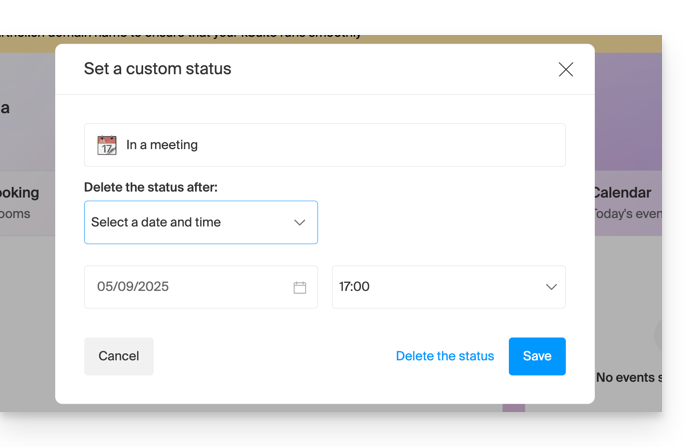
- … or click on Set a custom status to enter a custom status or choose one from the suggestions:
- Specify an expiration date if necessary and save:
Link to this FAQ:
Has this FAQ been helpful?
This guide details what can be searched on the Web app Mail Infomaniak (online service ksuite.infomaniak.com/mail) or other kSuite services. To search on kDrive refer to this other guide.
Search for an email
On ksuite.infomaniak.com/mail, type in the search bar at the top of the page the term to be found.
The search will be performed within the email address mentioned in the left sidebar (to search across multiple email addresses at once, use an IMAP email software / client to which you connect your different addresses):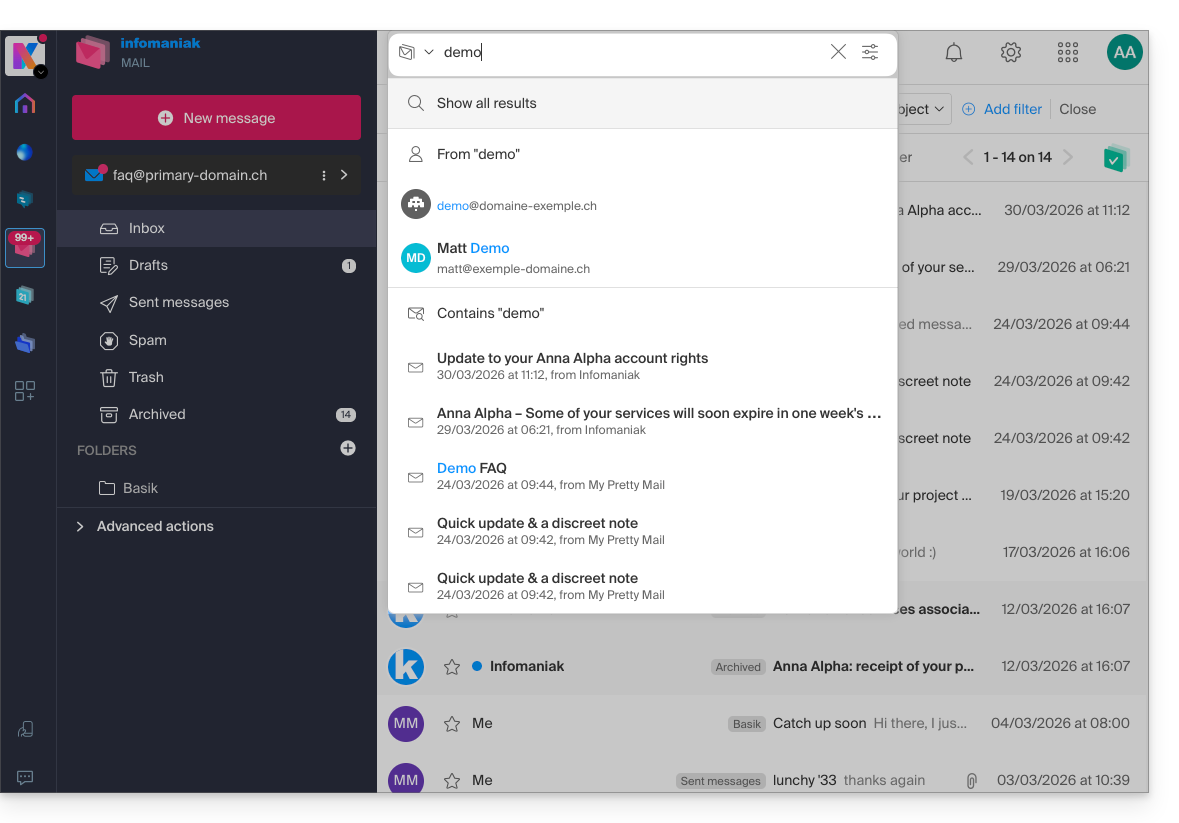
The advanced search is accessible to the right of the search field at the top of your Mail: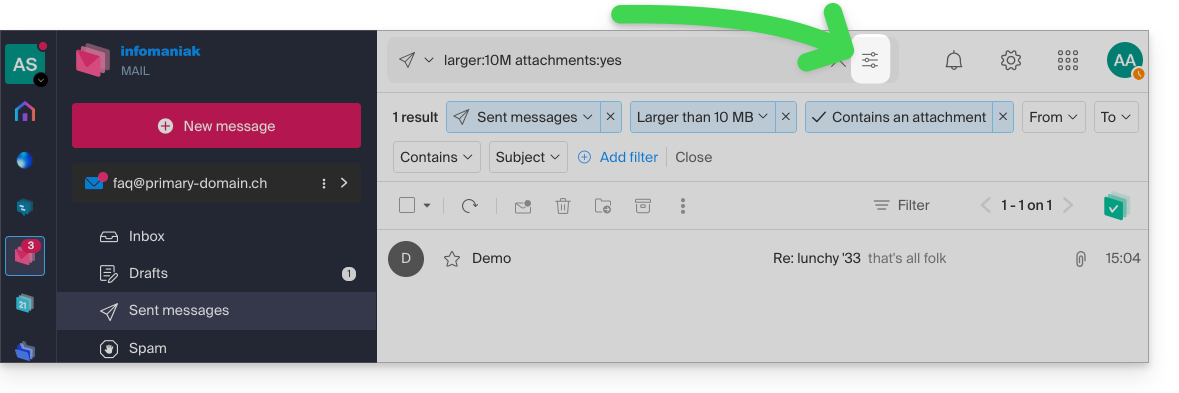
You can search for content…
- either in the body of the message,
- either in its subject,
- either among its senders/recipients…
You can also filter the search by message size and by presence of attachment or not.
Regarding the scope of searches:
- The content of encrypted emails is not indexed (except the subject of the email).
- The content of attachments, as well as their name, is not indexed: it is therefore not possible to find an email by searching for the name of the file that was associated with it.
- The mention "Search all emails" does not include the Trash, nor the Spam folder:
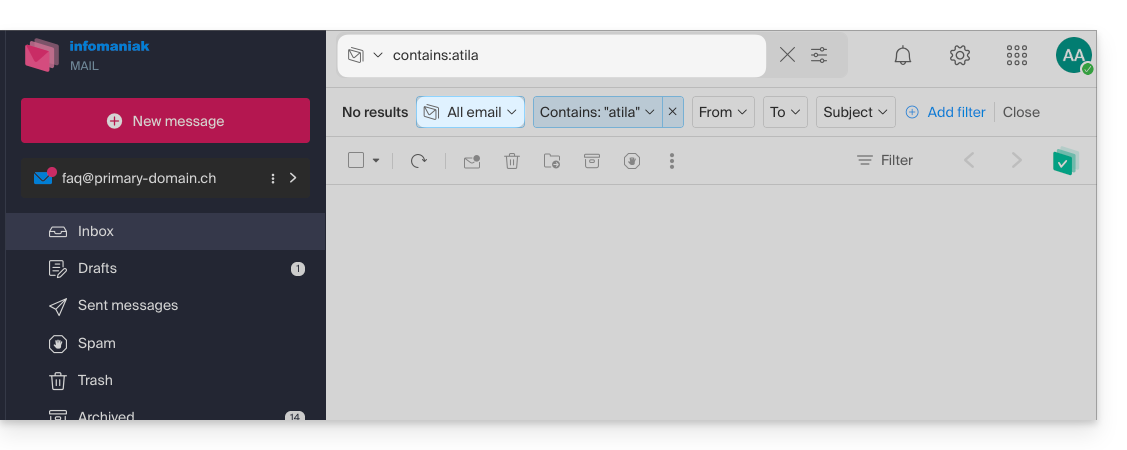
- If a global search yields no results, it is possible that the email is in one of these two folders.
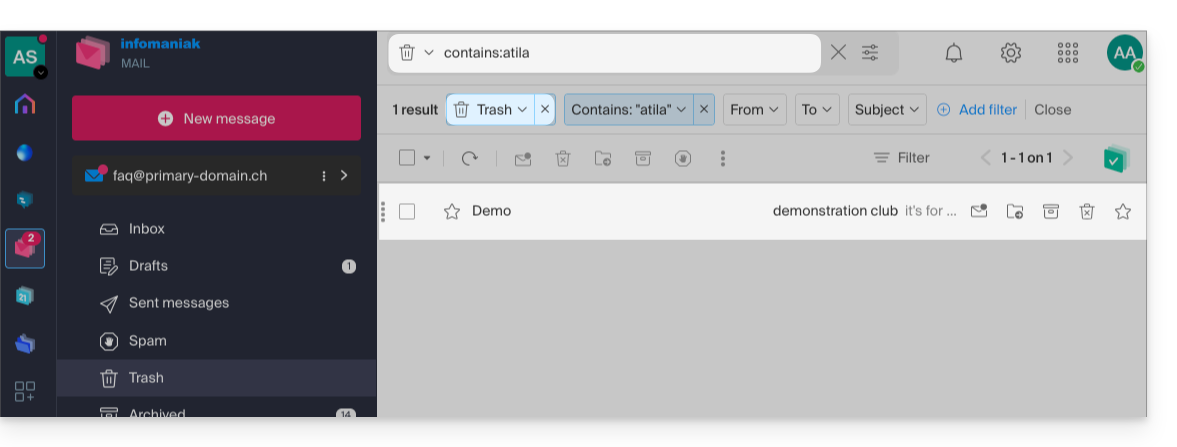
- You will then need to go specifically to the Trash or Spam to perform the search there, or launch the search by selecting one of these 2 elements:
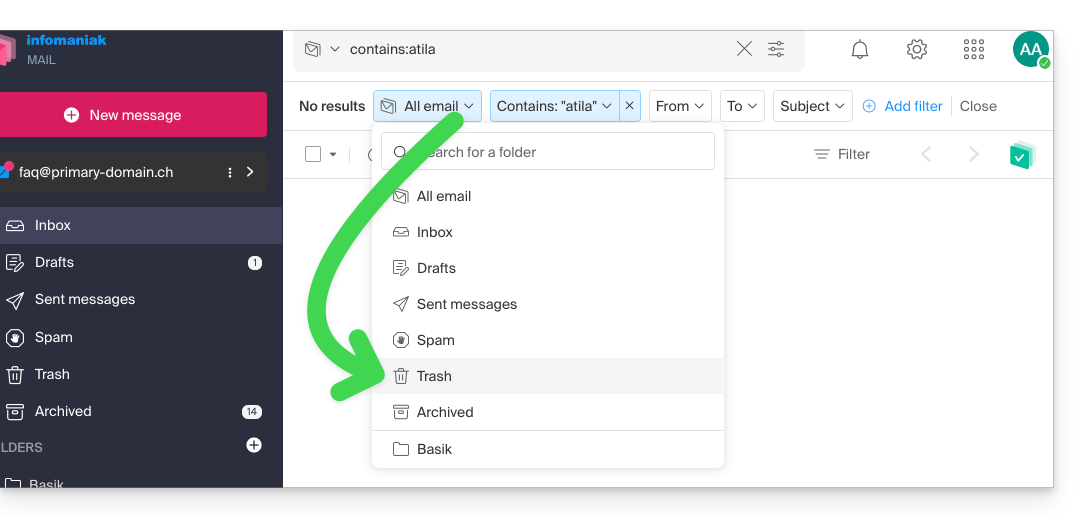
- The possible elements found will then be displayed:
- Same when you want to find a message in a specific directory, it is better to first go there from the left sidebar menu, then launch a search.
To search for the trace of an email or know its activity, you can also search in the logs of an email address.
Email search with a software/messaging client
To know how your specific messaging application performs searches, consult its documentation. For example, desktop apps (desktop application) Thunderbird and Outlook can synchronize messages locally and perform local searches, while other applications may prefer to search on the IMAP server and in this case, the software/messaging client sends a search command to the server, which then searches through all messages stored on the server and returns the results to the software/messaging client.
Search for a contact
Searching for an item is done automatically among all your address books, groups, contacts, thanks to the search field at the top of the interface ksuite.infomaniak.com/contacts: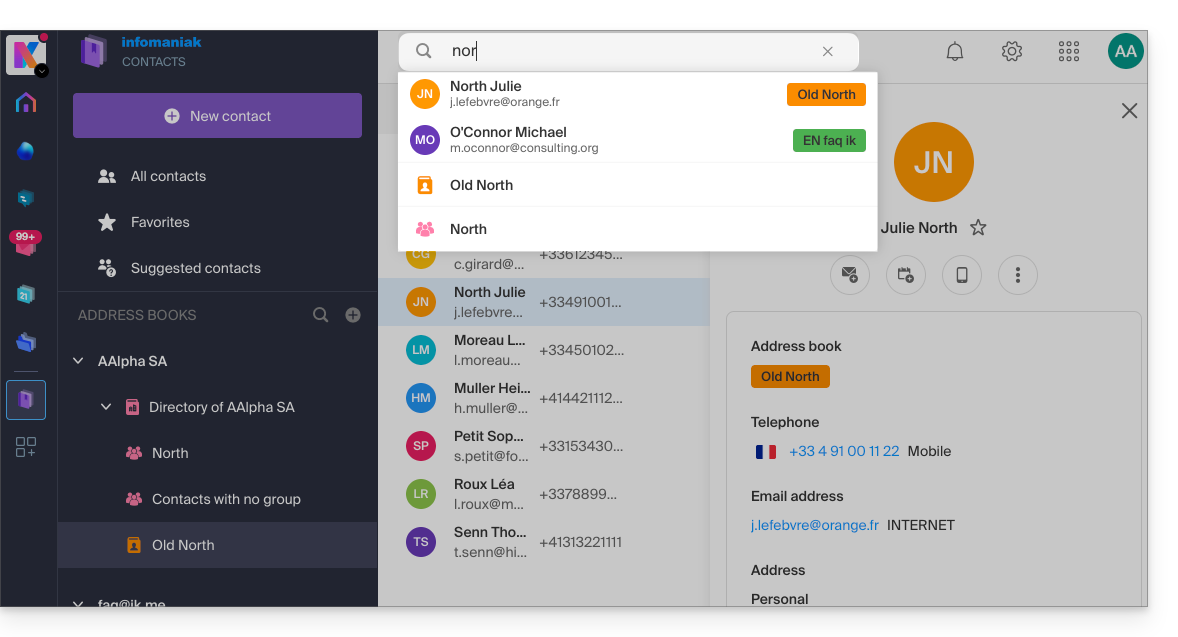
Search for an event
Searching for an item on ksuite.infomaniak.com/calendar is done automatically among all your calendars, events, rooms, including the description of these and the people associated with them (if you click on a contact, you get the events in common with this person):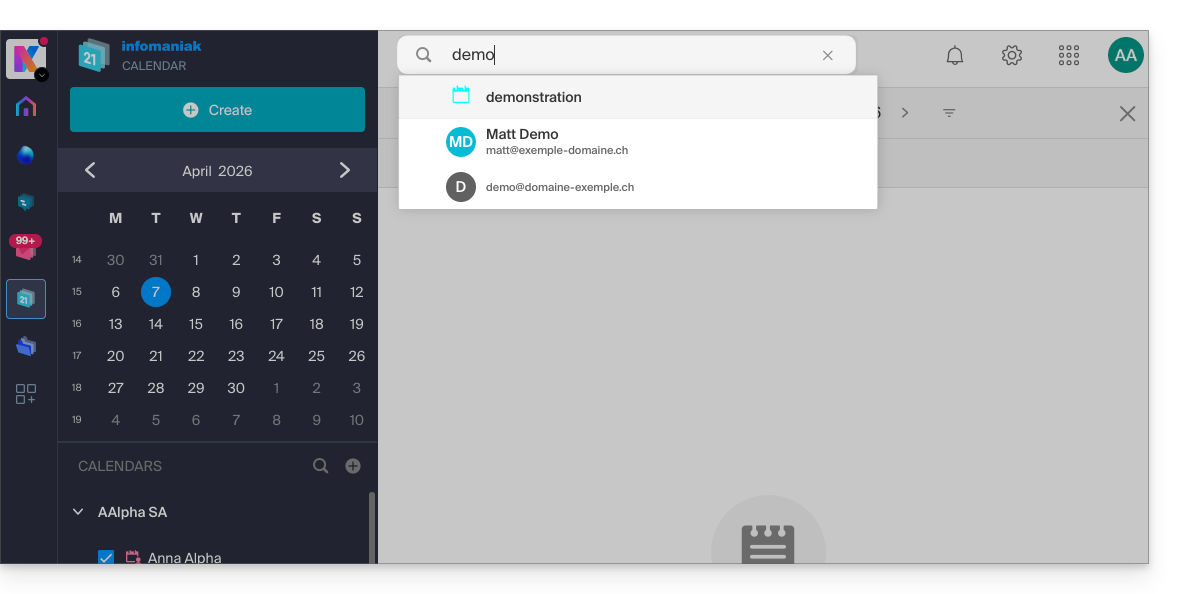
Link to this FAQ:
Has this FAQ been helpful?
This guide explains how to remove one of the users from your Organization on the Manager Infomaniak.
Prerequisites
- Switch to the desired Organization first if you do not find the expected list of users.
- Be Administrator or Legal Representative within the Organization.
- Warning, it is impossible to remove a Legal Representative if there is no other legal representative.
Remove a user from your Organization
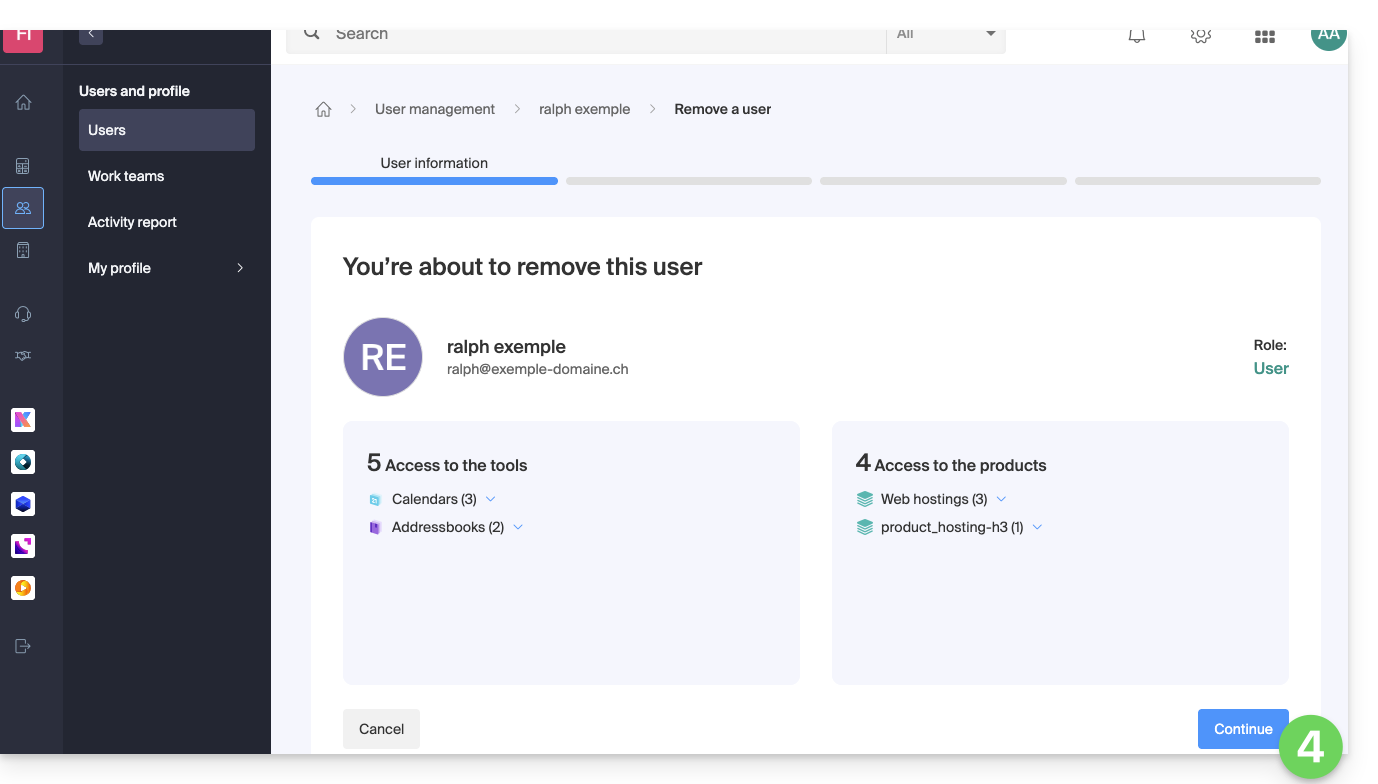
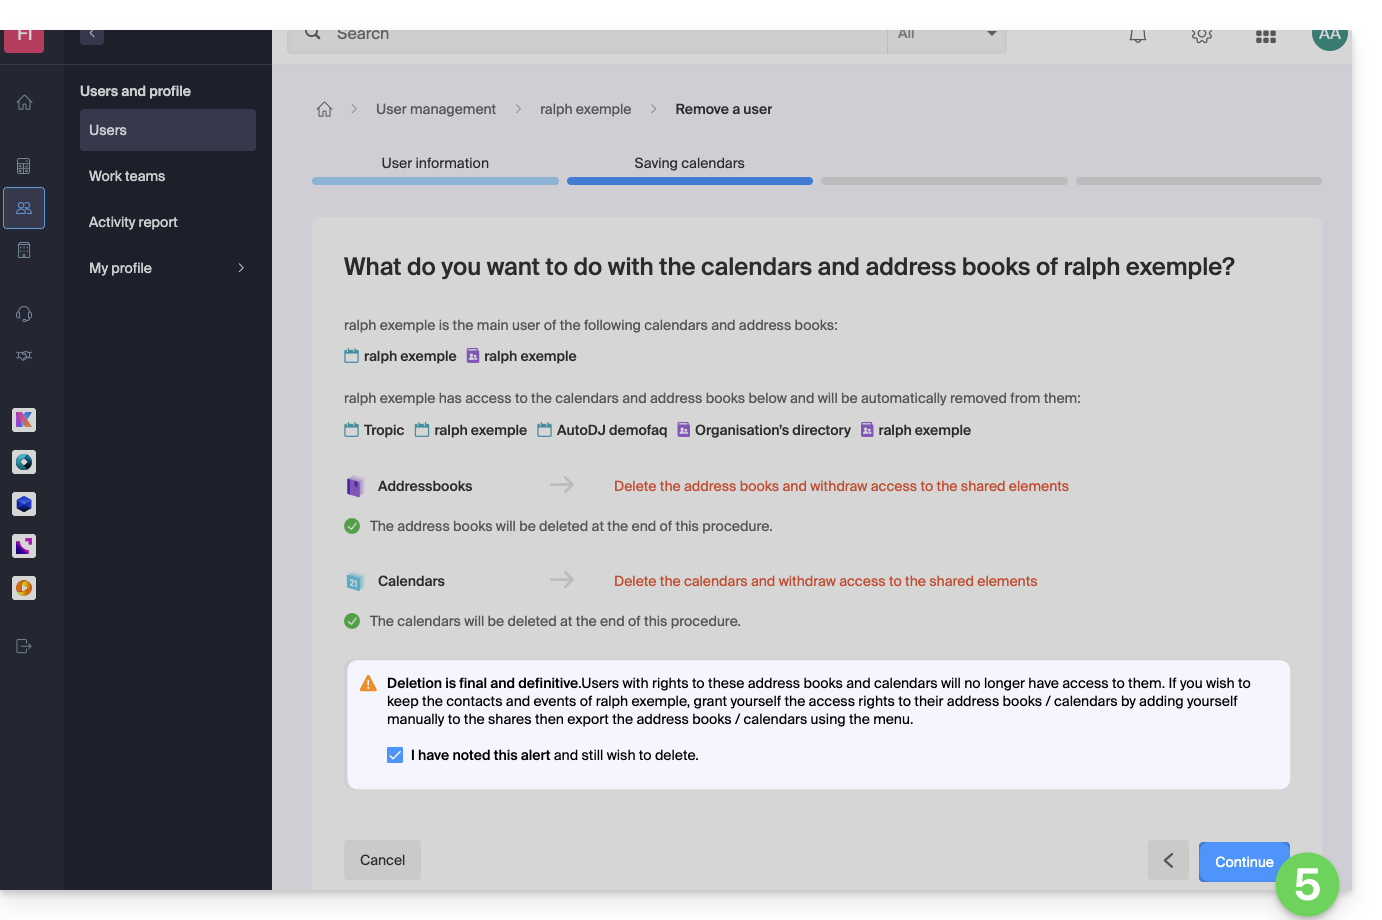
If the user had access to kDrive or was invited to view a third-party email address, several intermediate steps will ask you to take actions with their data and inform you, if necessary, about what happens to calendars and address books. To remove one of the users from the Organization
- Click here to access user management for the Organization on the Infomaniak Manager (need help?).
- Click on the action menu ⋮ to the right of the user concerned.
- Click on Remove from Organization:

- Review the information (click if necessary on the chevrons to get the details of the deletions) then click on the blue button Continue:
- Review the information, confirm the deletion by checking the checkbox, then click on the blue button Continue:
- Review the information (click if necessary on the chevrons to get the details of the deletions) then click on the red button Remove:
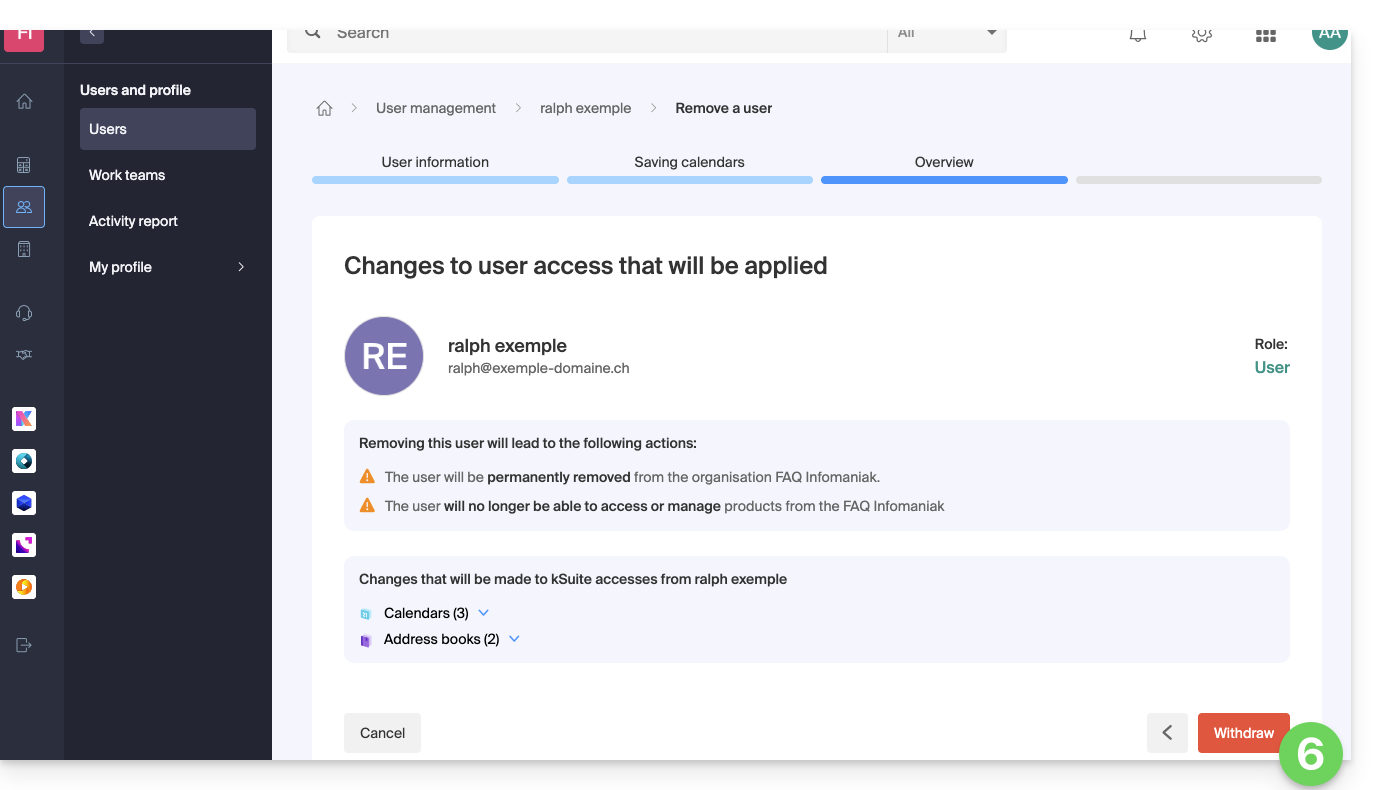
- Enter your email address (login identifier for the Manager), check the confirmation box, then click on the red button Remove this user to permanently remove the user without the possibility of undoing it.
Link to this FAQ:
Has this FAQ been helpful?
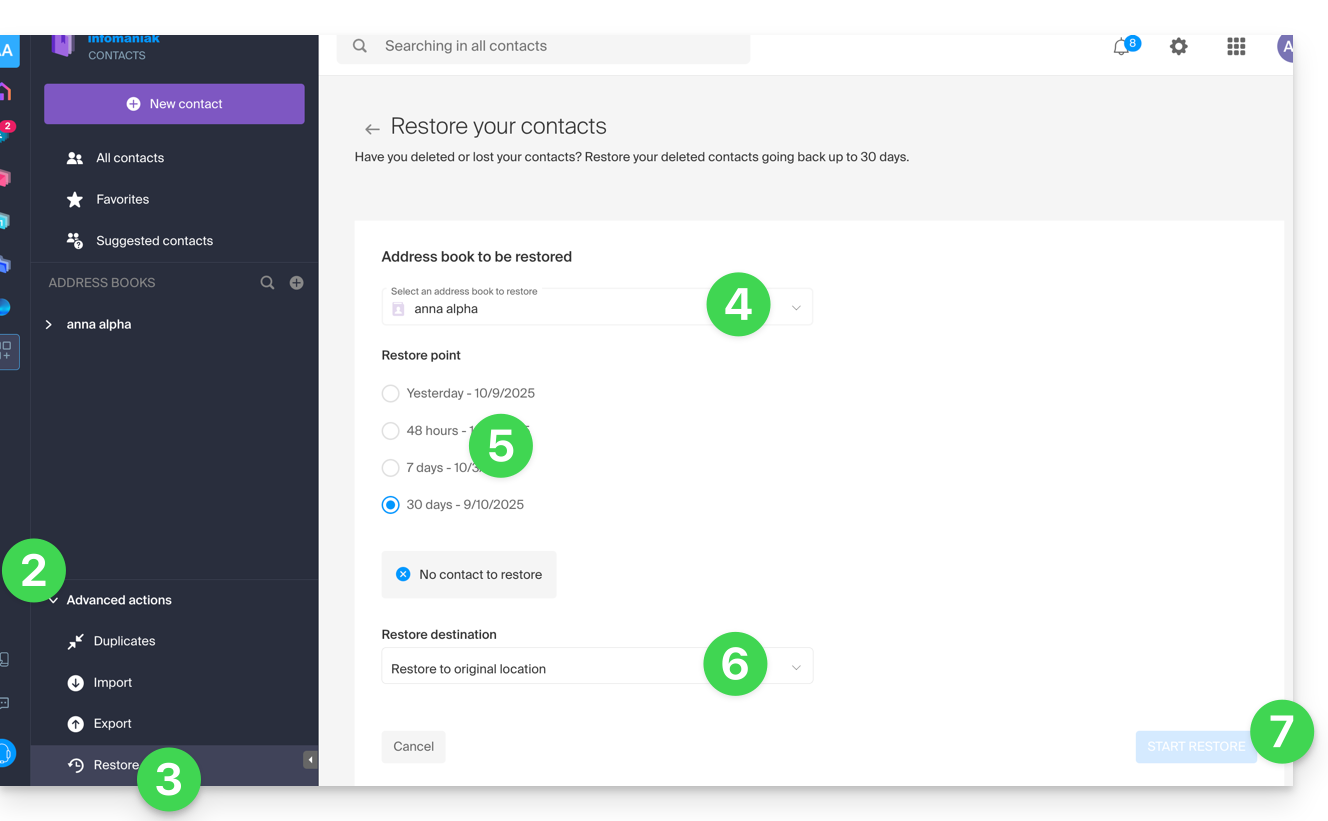
This guide explains how to restore accidentally deleted contacts in the Infomaniak Contacts web app address books (online service ksuite.infomaniak.com/contacts).
Backup Retention Period
Once a backup of your address book's complete state has been created, Infomaniak makes it available to you for a certain number of days, depending on your plan.
⚠ Retention period in days:
| kSuite | Free | 0 |
| Standard | 30 | |
| Business | 30 | |
| Enterprise | 30 | |
| my kSuite | 0 | |
| my kSuite+ | 30 | |
| Mail Service | Starter 1 address max. | 0 |
| Premium 5 addresses min. | 30 |
By upgrading a free plan, it will be possible to recover the backup for up to 30 days.
Restoring Contacts
It is possible to recover deleted contacts from the last 24 hours, 48 hours, 7 days, or 30 days:
- Click here to access the Infomaniak Contacts web app (online service ksuite.infomaniak.com/contacts).
- Click on the chevron to expand the Advanced Actions section.
- Click on Restore.
- Choose the address book to restore.
- Choose the version from yesterday, 48 hours ago, or 7 and 30 days ago.
- Choose the destination (in the original location or in another address book if available).
- Start the restoration using the button at the bottom of the page, which becomes active if contacts can be restored:
Link to this FAQ:
Has this FAQ been helpful?
To guarantee the security of your data and the performance of its services, Infomaniak uses several domain names.
Introduction
- These domains are used to host the management interfaces, communication tools, and the content of your files in an isolated and secure manner.
- If you use a firewall or antivirus, it is recommended to add these domains to your whitelist (examples) to ensure the proper functioning of your tools (especially kDrive and SwissTransfer).
Main domains and services
- infomaniak.com: the main website and the Manager (product management).
- status.infomaniak.cloud / infomaniak.cloud
- infomaniakstatus.com
File storage
- infomaniakusercontent.com: domain mainly used for storing/downloading files.
- ksharelink.com: used for public sharing links created from kDrive and Mail Infomaniak.
- chk.me: domain allowing you to create short links and custom QR codes.
Messaging and identity
- ik.me: short domain for Infomaniak Mail.
- etik.com / ikmail.com: alternative domains for free and eco-friendly email.
- infomaniak.ch: used for certain technical and institutional services.
Transfer tools and events
- swisstransfer.com: large file transfer service.
- infomaniak.events / ticket-net.ch: ticketing and event management platform.
⚠️ Beware of phishing attempts: Infomaniak will never ask for your password via email; always check that the URL in your browser's address bar belongs to one of the domains listed above before entering your credentials.
Link to this FAQ:
Has this FAQ been helpful?
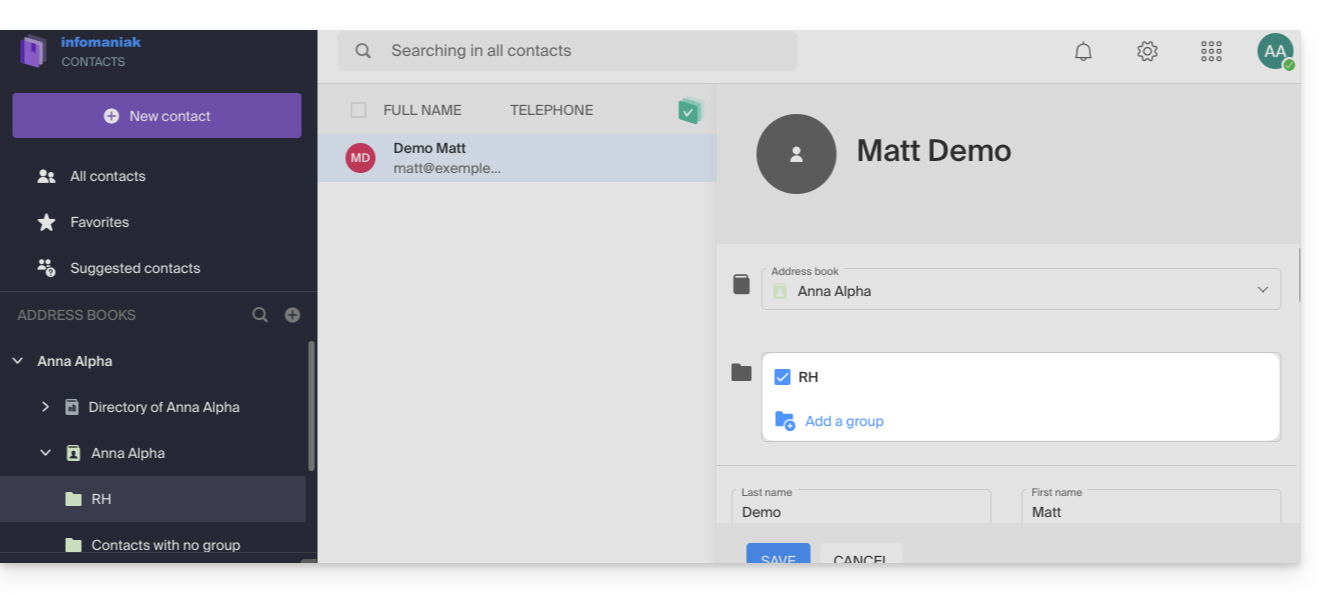
This guide details how to group contacts within Infomaniak address books using the Infomaniak Contacts web app (online service: ksuite.infomaniak.com/contacts).
Introduction
- Creating a contact group makes it easier to reach them.
- It also simplifies sending emails to a specific type of contact.
Creating the group
To manage contact groups:
- Click here to access the Infomaniak Contacts web app (online service: ksuite.infomaniak.com/contacts).
- Click on the action menu ⋮ located to the right of the address book in question.
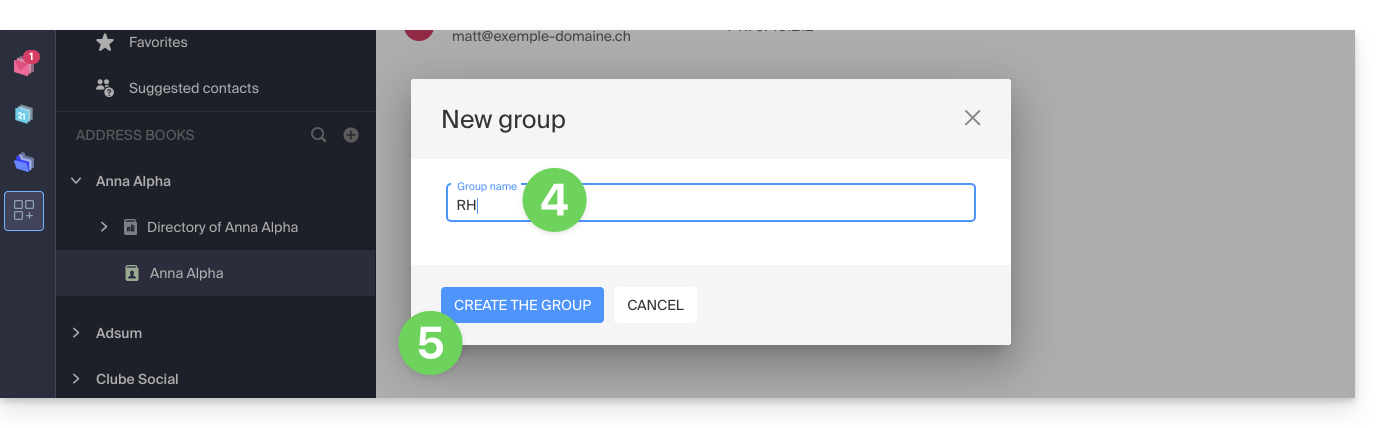
- Click on Add a group:
- Enter the group name.
- Click the blue button to validate (and thus automatically create the "folder" with the name of the chosen group, as well as a second mandatory "folder" that will group all contacts that are not classified in your new group, called "Contacts without group"):
- From the main address book or from “Contacts without group”, drag and drop the contacts that should be associated with this new group:

- You can also assign membership to a specific group when editing a contact.
- To change a contact's membership in an address book or group, simply check/uncheck the corresponding boxes and save the changes:
Workgroups
If you have defined one or more workgroups…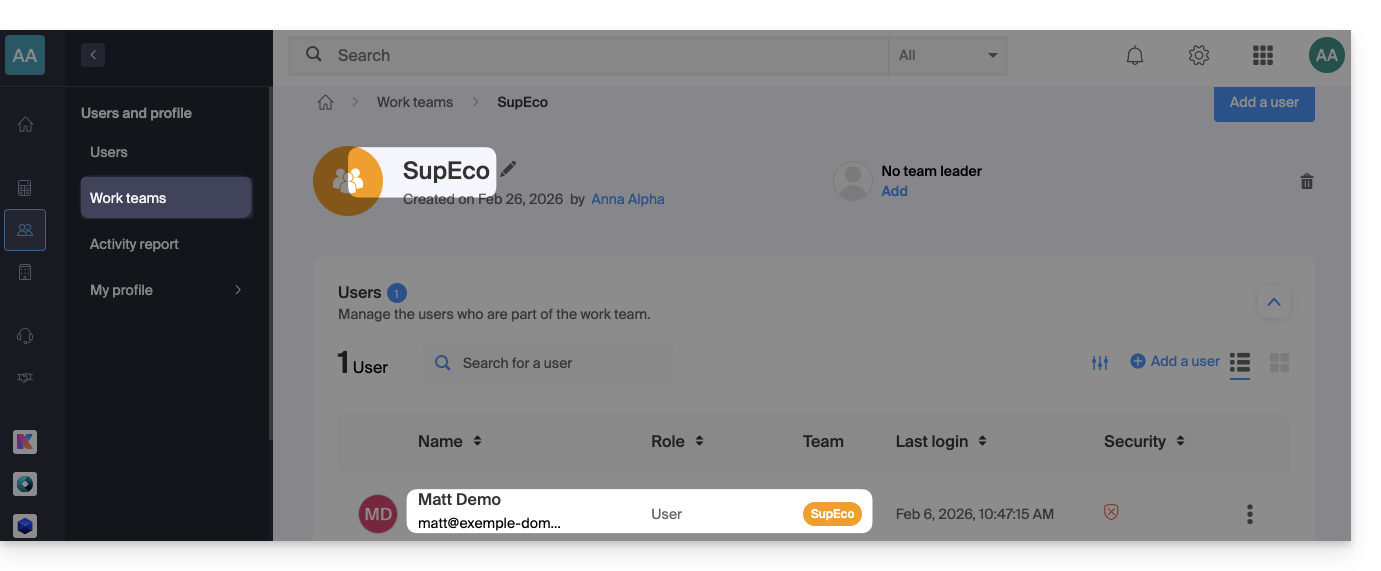 … then the users placed within them will be automatically visible in the Organization address books section:
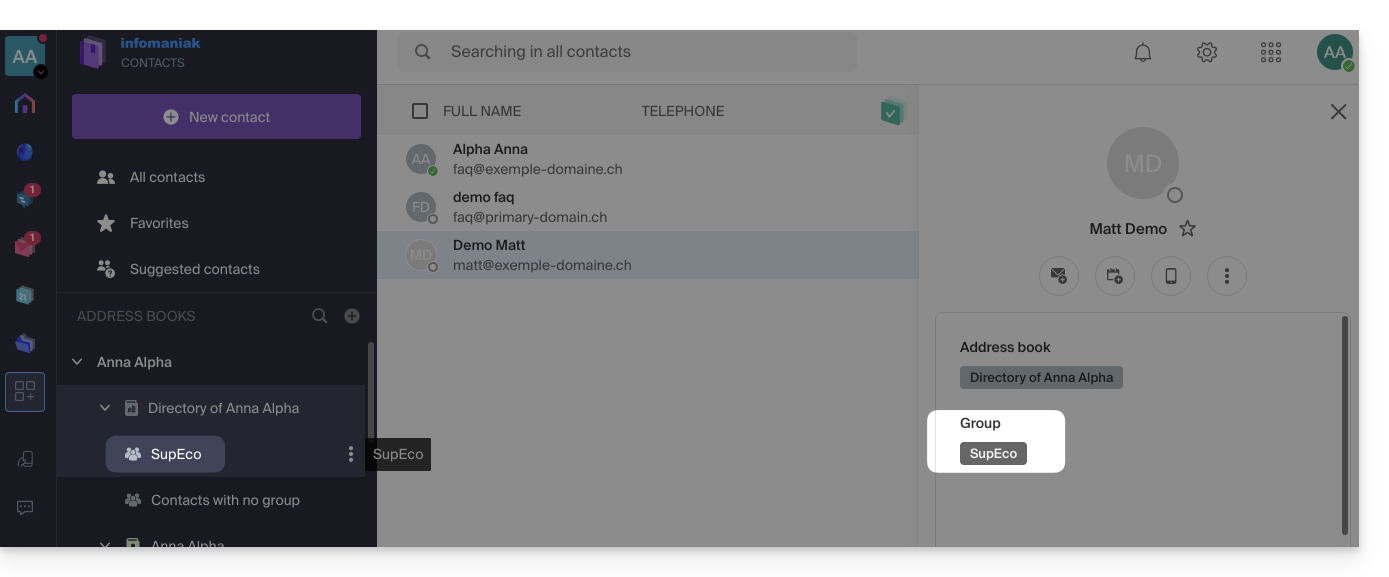
Delete a group with or without the contacts
When you choose to delete a contact group, you can decide whether the contacts it contains should also be deleted: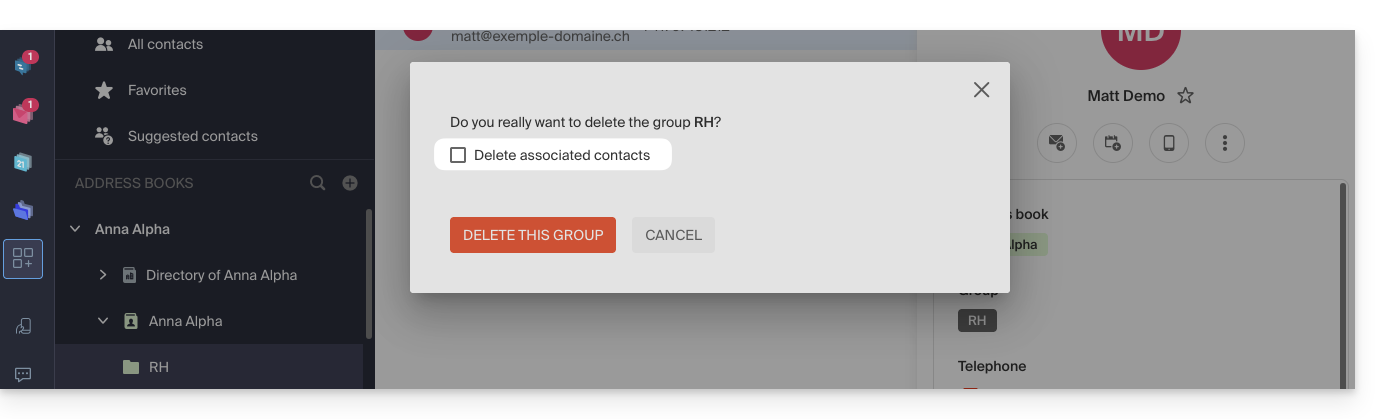
Group sending
To send an email to the entire group:
- Click here to access the Infomaniak Mail web app (online service ksuite.infomaniak.com/mail).
- Compose a new message.
- Type the beginning of the contact's name to display it and select it:
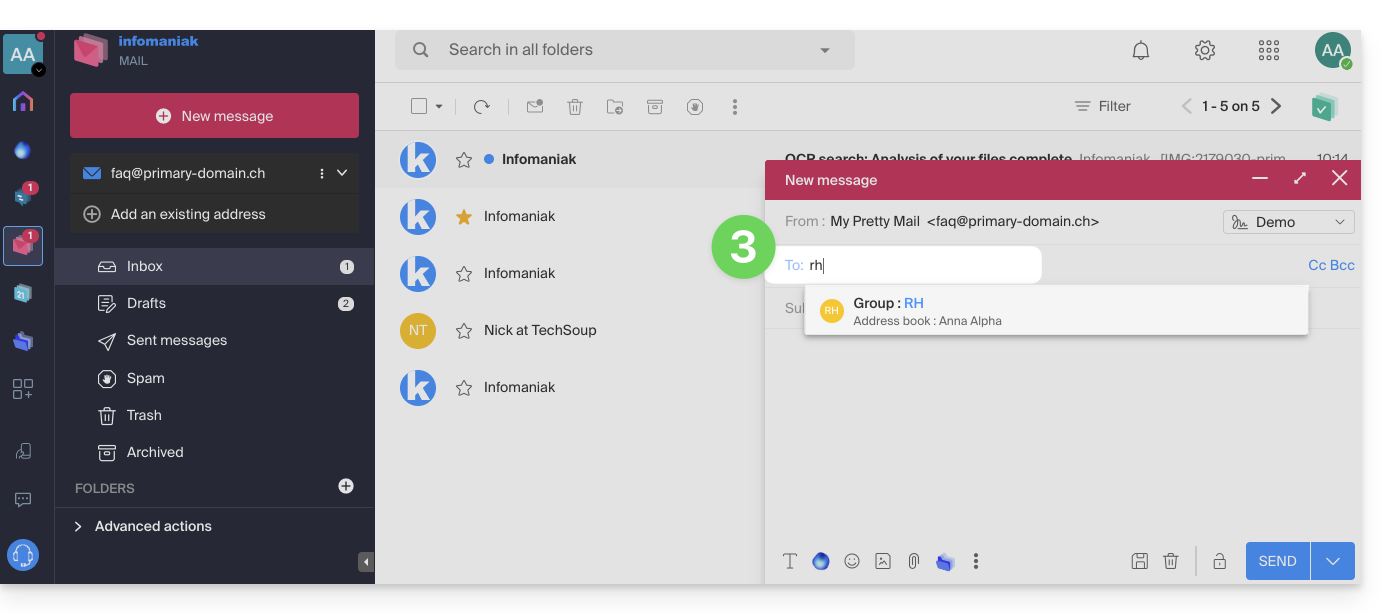
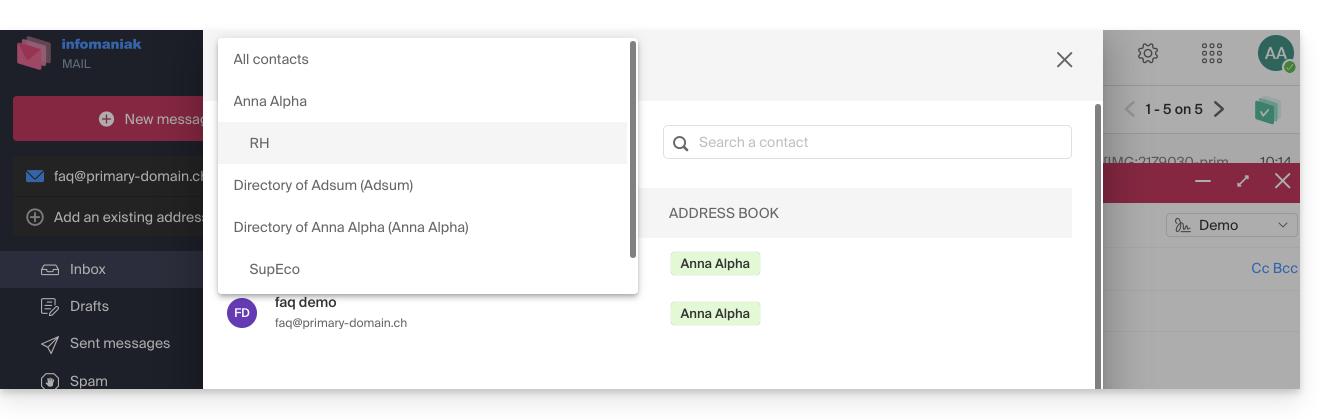
- You can also click on the "A" to the left of the recipient address field to access your address book and its subfolders (contact groups):
- Of course, you can also use the contacts currently in your address book to send them an individual or group message by typing their first few letters.
- You can also click on the "A" to the left of the recipient address field to access your address book and its subfolders (contact groups):
You can share an entire address book with other users (users that you have invited and selected, of course), but not just a specific group.
Link to this FAQ:
Has this FAQ been helpful?
This guide explains how to mark your chosen emails as "favorite" on the Infomaniak mail service to have "tracking" of these messages and to display them separately if you wish.
Monitor one or more messages…
… from the Infomaniak Web Mail app
To add a message as a favorite:
- Click here to access the Infomaniak Web Mail app (online service ksuite.infomaniak.com/mail).
- Click on the ☆…
- … to the left of a message in the message list
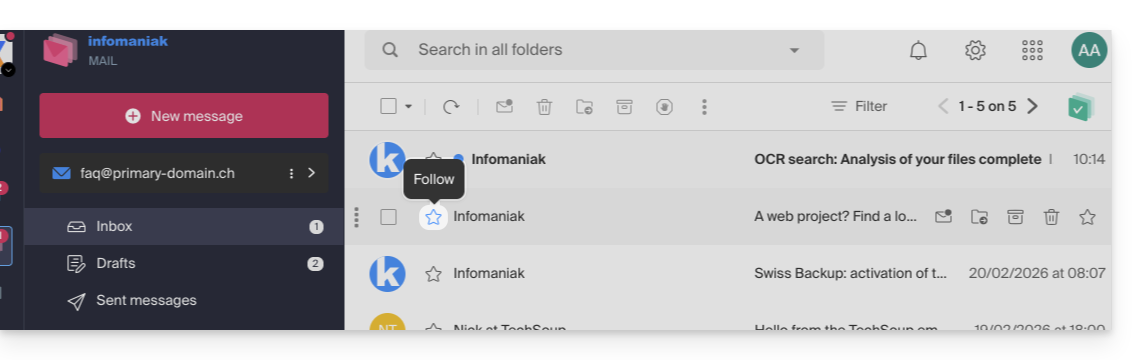
- … at the top right of the message reading window
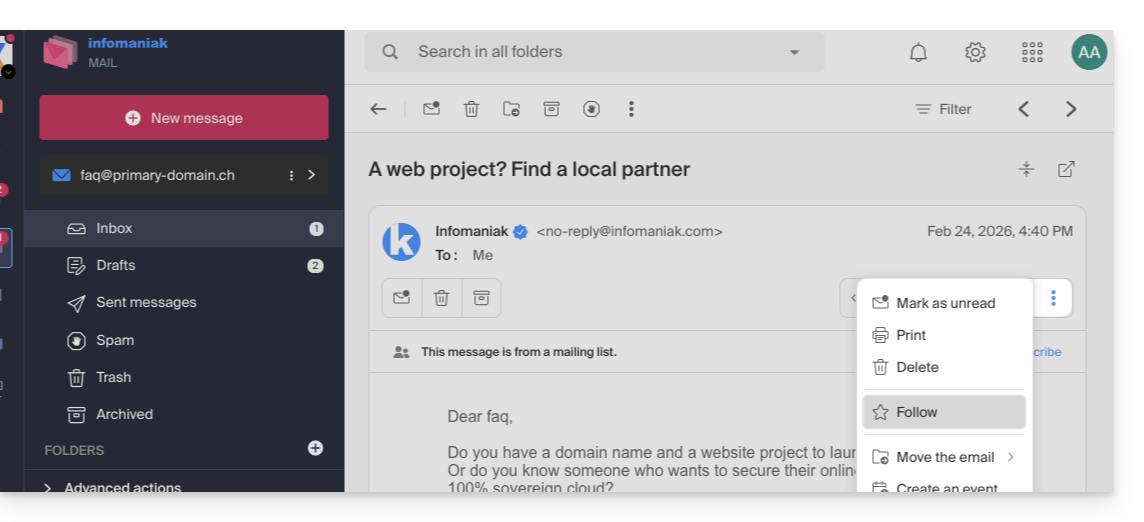
- … to the left of a message in the message list
- Once tracking is enabled, a dropdown menu in the top right corner allows you to display only a selection of your received messages according to several criteria: All, Read, Unread, Tracked, Untracked:
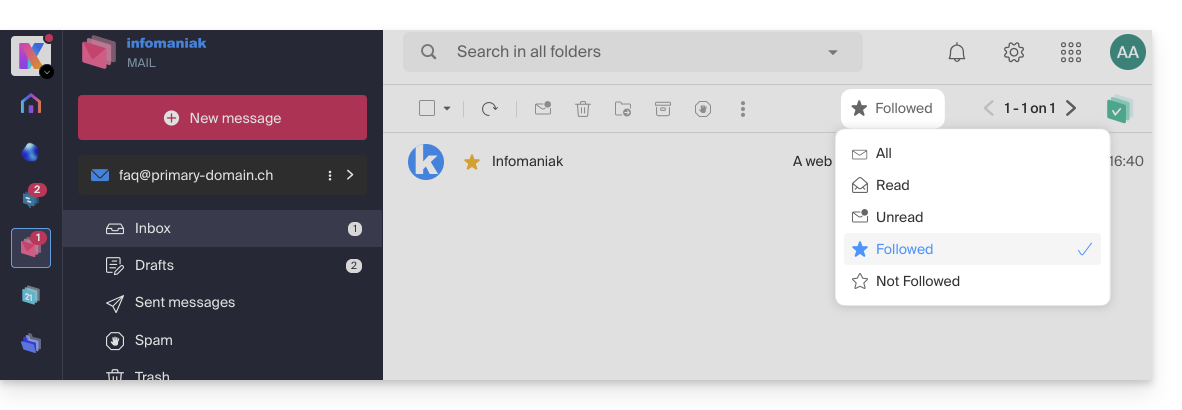
It is also possible to define an action on hover or add a shortcut in the bar above the message lists: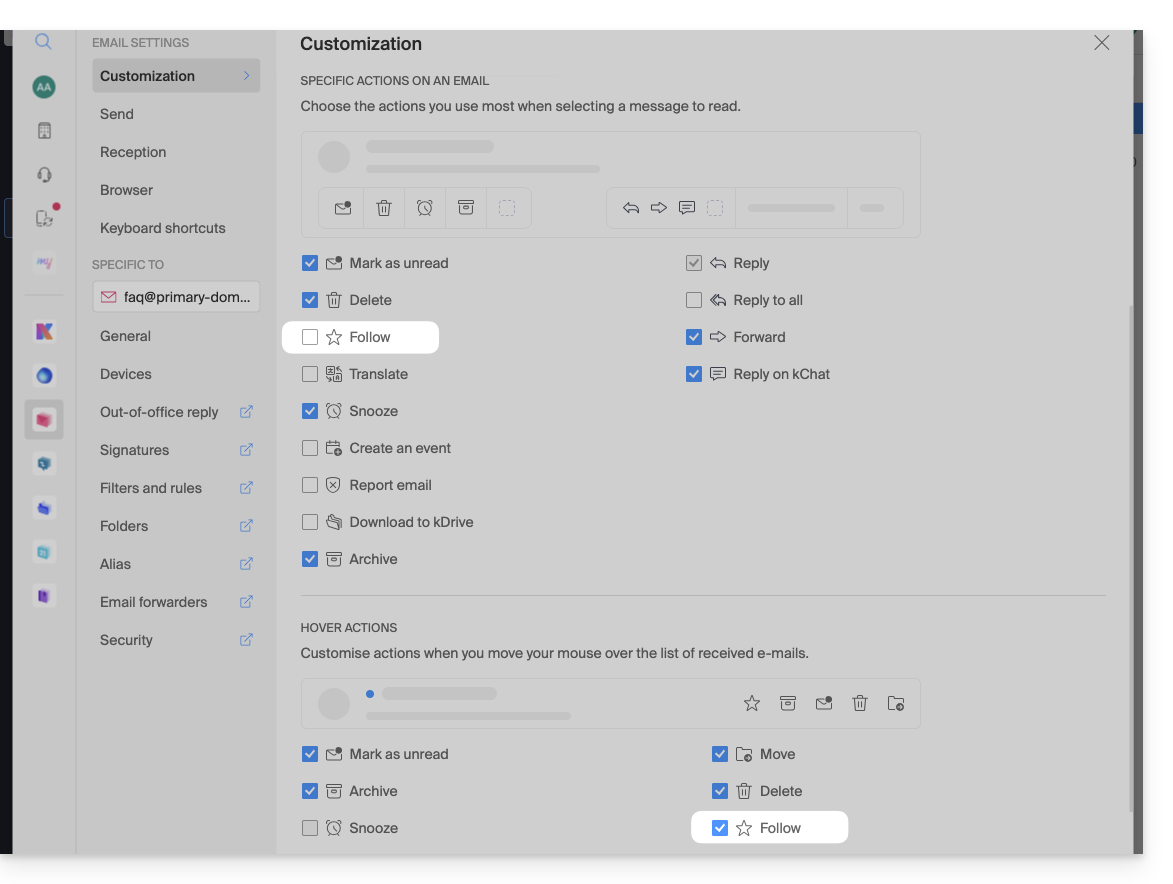
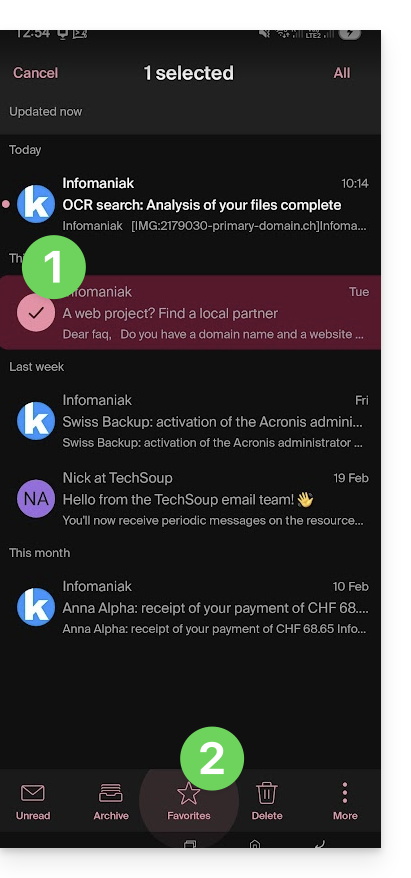
… from the Infomaniak Mail mobile app
On the message list:
- Press and hold your finger on a message.
- Press the ☆ icon at the bottom of the screen:
On a message being read:
- Press the ☆ icon at the top right of the message reading window:
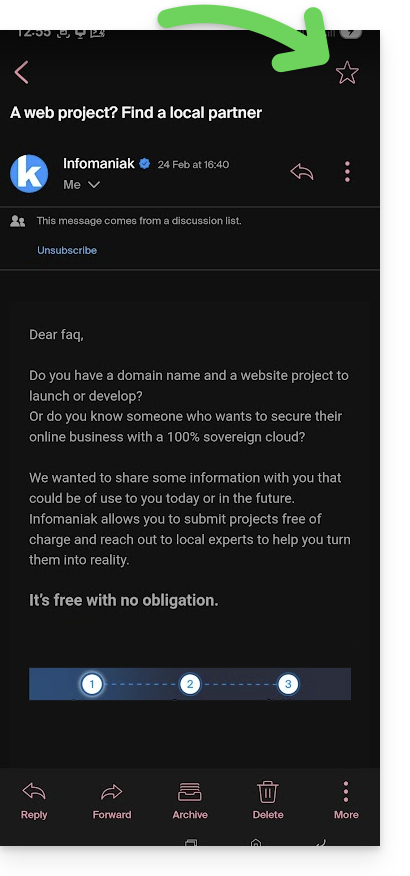
It is also possible to define a swipe gesture that would lead to a favorite marking of the message swiped with one finger.
Link to this FAQ:
Has this FAQ been helpful?
This guide explains how to make one of your calendars public from the Infomaniak Calendar web app (online service ksuite.infomaniak.com/calendar).
Introduction
- You will obtain a specific URL for your calendar in the format
.icsthat Calendar (formerly iCal Apple), Calendrier (formerly iCalendar Microsoft), Thunderbird (formerly Lightning Mozilla), or even Google Calendar can recognize to display your calendar:
- The data contained in the shared calendar will no longer be private but will only be available in read-only mode to users who "subscribe" to it.
- The frequency of the updates made by the application that subscribes to the URL of your calendar must be defined within that application.
- PHP scripts (not provided) can also be used to parse such files, allowing you, for example, to include events on a website.
- Refer to this other guide to configure the synchronization of your calendars, or to this other guide to share a calendar with your colleagues with different permissions.
Enable public sharing of an Infomaniak calendar
To share a calendar publicly:
- Click here to access the Infomaniak Calendar web app (online service ksuite.infomaniak.com/calendar).
- Click on the action menu ⋮ to the right of a calendar.
- Click on Share calendar.
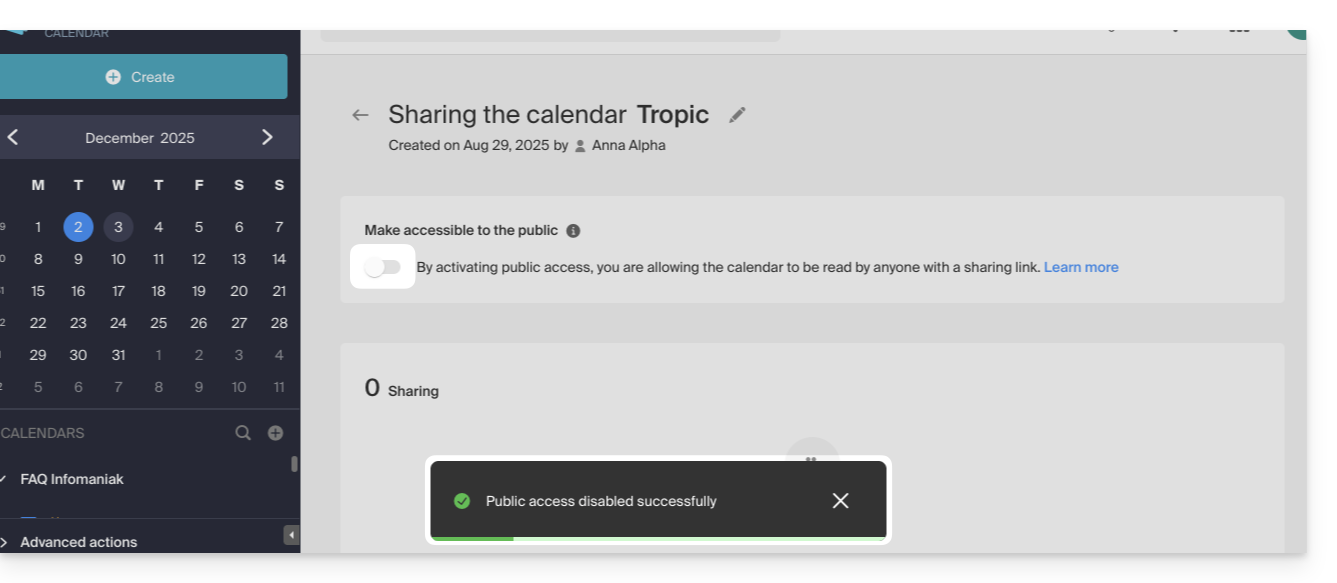
- Activate the toggle switch for public sharing.
- Click on the icon to copy the address to the clipboard:
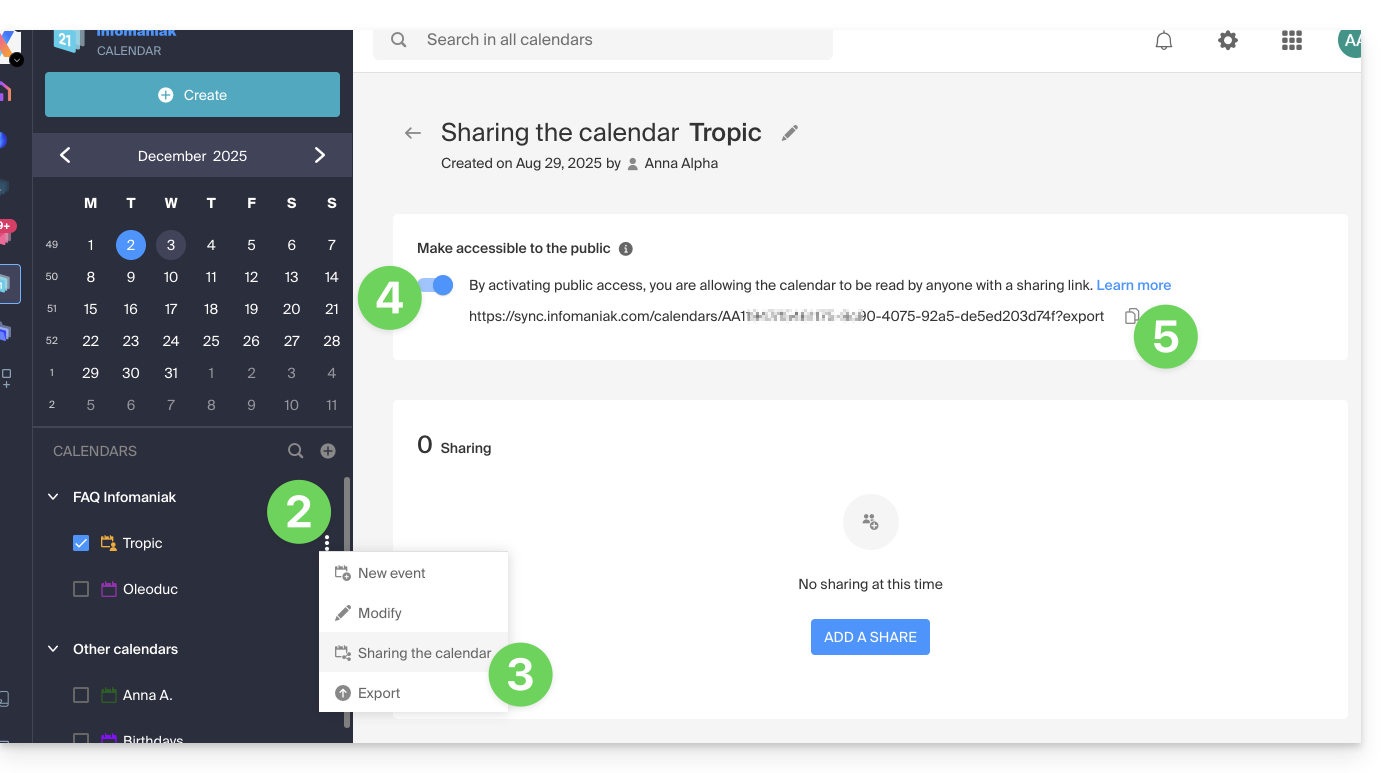
- You can always remove public access from this sharing page (see point 4 above):
- You can always remove public access from this sharing page (see point 4 above):
Link to this FAQ:
Has this FAQ been helpful?
This guide explains how to change the color of events in your calendars within the Infomaniak Calendar web app (online service ksuite.infomaniak.com/calendar) and customize the displayed period.
Define Default Settings
To do this:
- Click here to access the Infomaniak Calendar web app (online service ksuite.infomaniak.com/calendar).
- Click on the Settings icon in the top right corner.
- Click on Customization.
- Refer to this other guide regarding the default calendar setting.
- Settings such as the default event duration or the working hours to display on the calendar will help improve the use of the appointment scheduling assistant:
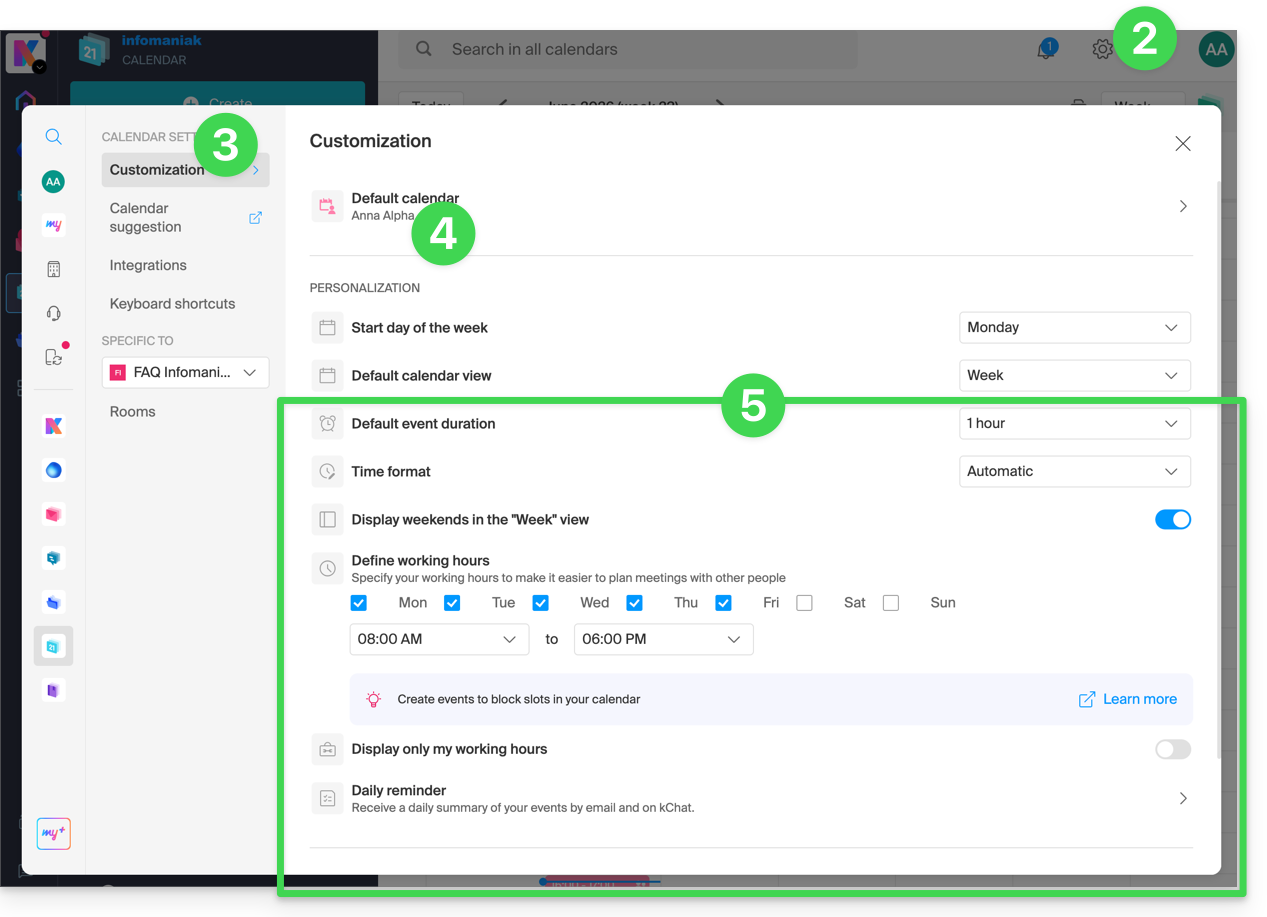
- Regarding these menu items:
Refer to this other guide.
Refer to this other guide.
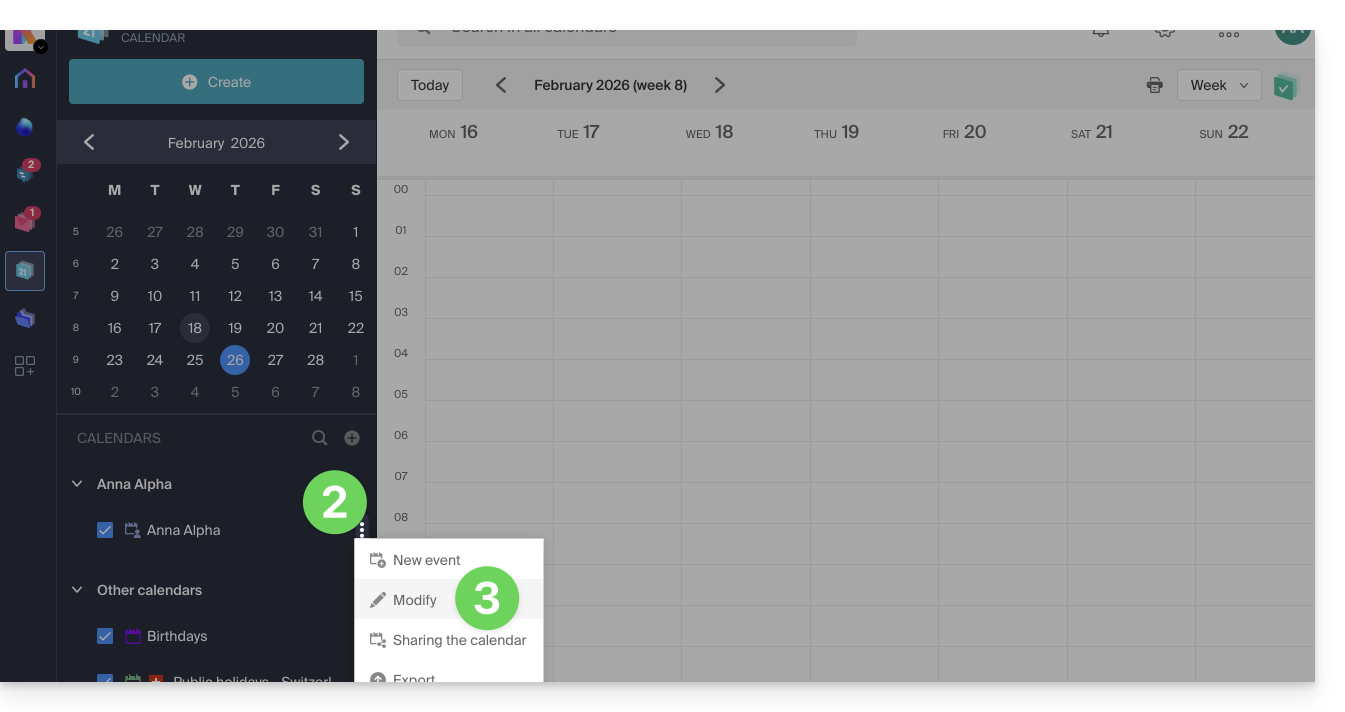
Define the Color of a Calendar
To do this:
- Click here to access the Infomaniak Calendar web app (online service ksuite.infomaniak.com/calendar).
- Click on the action menu ⋮ to the right of the calendar in question.
- Click on Edit:
- Choose the desired color.
- Click the button to Save:
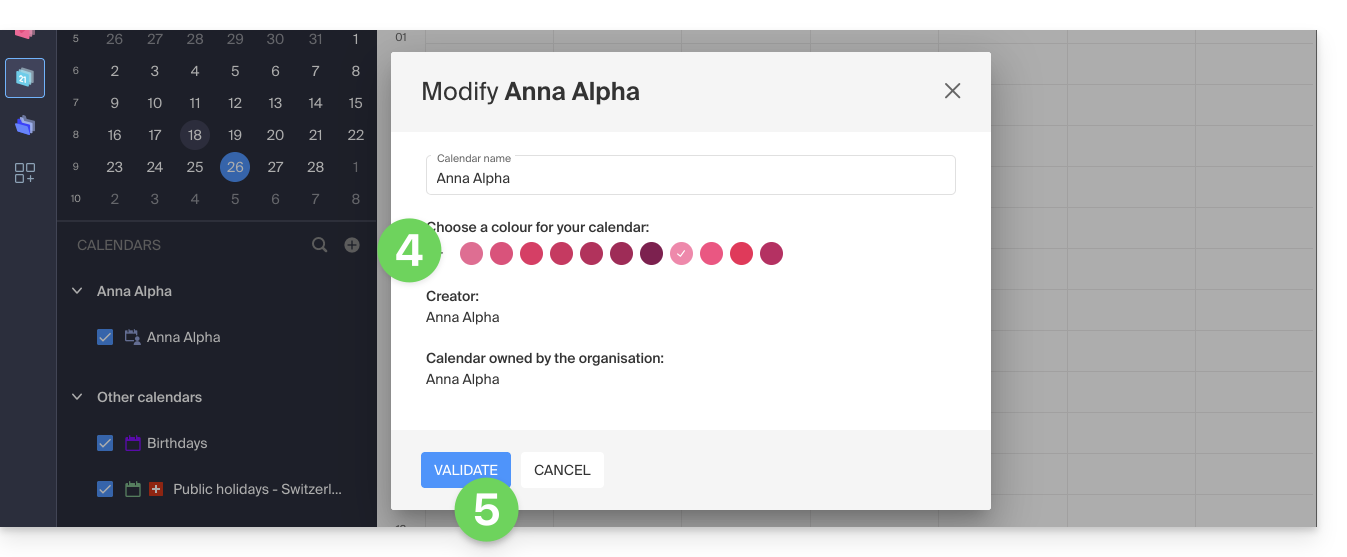
- The specified color will then be visible:
- at the level of the Calendar name,
- for fixed-time events in the monthly view,
- for all-day events in the monthly view,
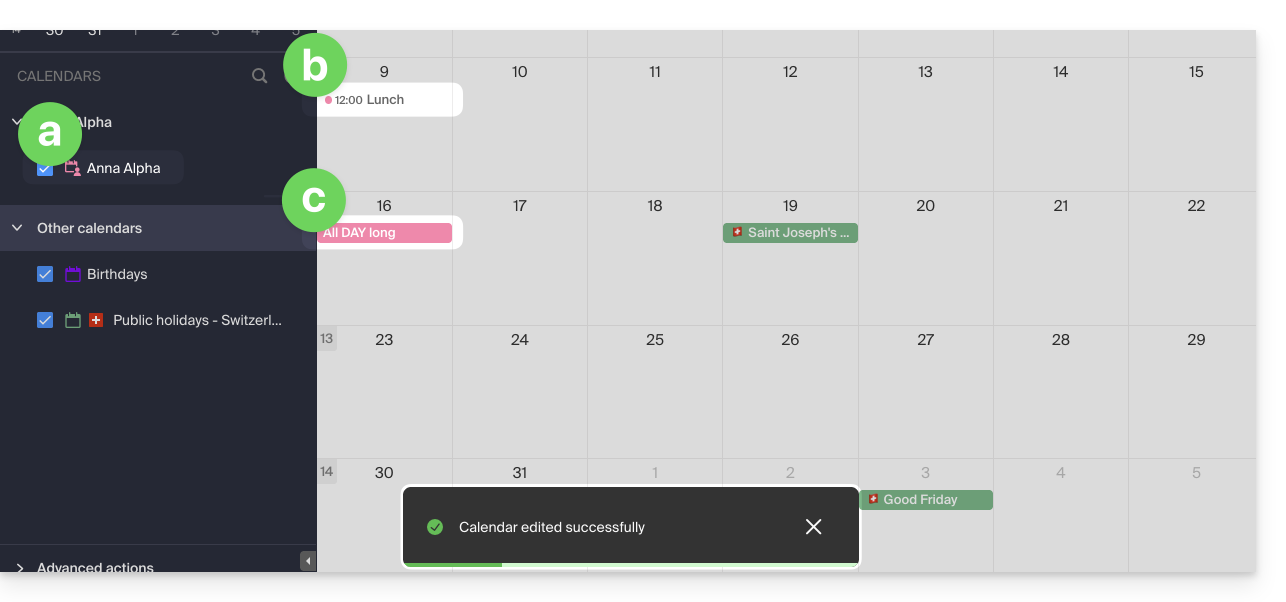
- in the daily view:

- in the agenda view:
etc.
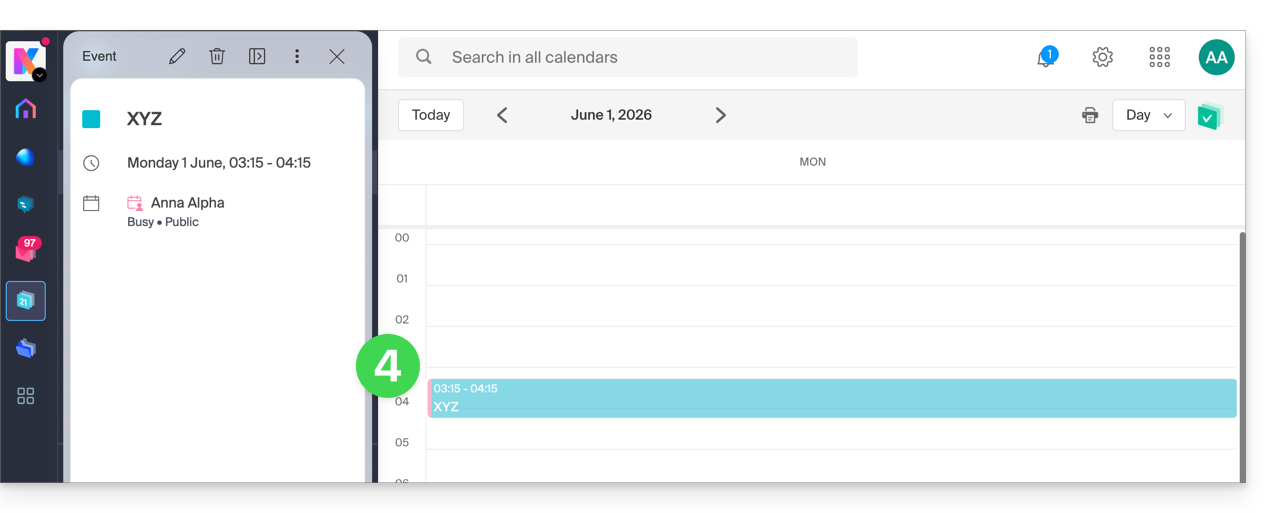
Define the color of an event
To manually change the color of a specific event, a color that will override the calendar's color:
- Click here to access the Infomaniak Calendar web app (online service ksuite.infomaniak.com/calendar).
- Create an event and choose its color, or click on an existing event and then on the pencil ✎ icon to edit the details, including its color:

- Confirm at the bottom of the page.
- The specified color will then be visible on the event itself:
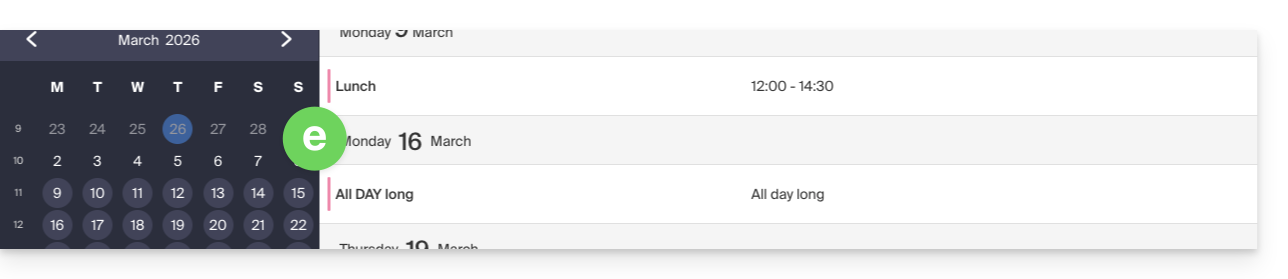
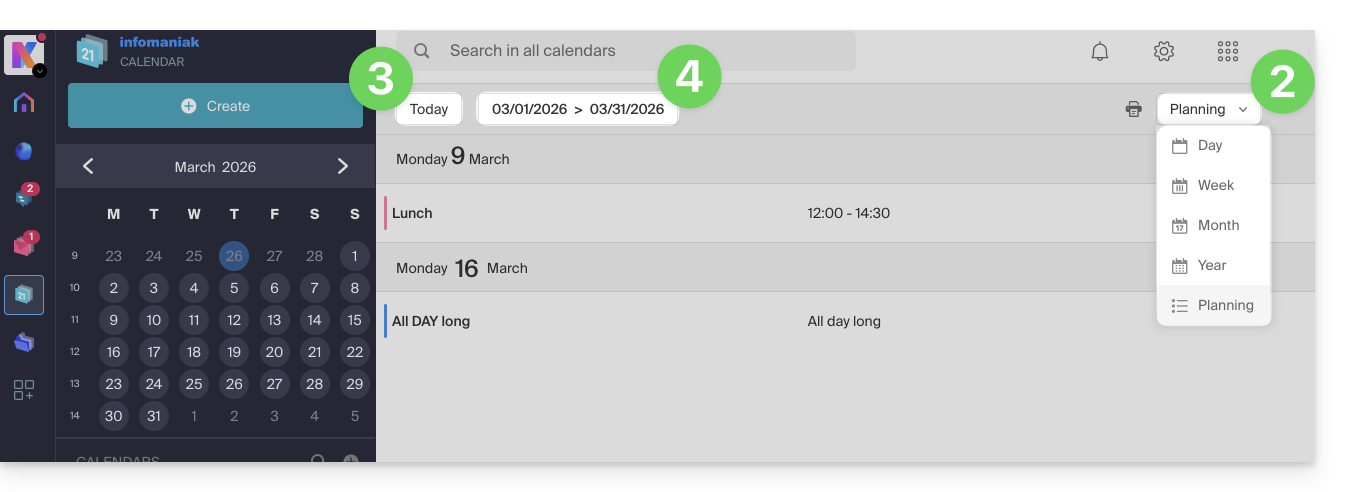
Customize the displayed period
To do this:
- Click here to access the Infomaniak Calendar web app (online service ksuite.infomaniak.com/calendar).
- Choose to display the calendar in: Day, Week, Month, Year, or Planning view.
- At any time, click on Today to reset the current view.
- In Planning view, you can choose the period to display ("this week", "next month", etc.):
Link to this FAQ:
Has this FAQ been helpful?
This guide explains how to connect the desktop app Outlook 2013 (desktop application on Windows) to an email address hosted by Infomaniak.
Preamble
- The various services offered by Infomaniak are all compatible with the corresponding standard protocols (IMAP/SMTP for email, for example). Therefore, if you encounter a problem with third-party software, contact its publisher or a Partner and consult the support policy as well as article 11.9 of the Infomaniak Terms of Service.
Add the email address to the application
Prerequisites
- Create the email address in my kSuite or a Mail Service / kSuite.
- Create a password for the email address on the device you are going to configure.
- Check that the Mail Service is configured optimally.
To configure the email application:
- Open the application.
- Click on the File menu:
- Click on Account Settings.
- Click on Add or Remove Accounts:
- Click on New:
- Click on Manual Setup:
- Click on POP / IMAP.
- Click on Next:
- Check and complete the missing information.
- Click on More Settings:
- Click on the Outgoing Server tab.
- Click on My outgoing server requires authentication.
- Click on the Advanced tab:
- Replace the port numbers with the correct information and enable SSL.
- Click on OK.
- Click on Next:
- Click on Close:
- Click on Finish:
- Click on Close:
- There you go, your email address is now configured in the application:
Recommended settings
- Incoming IMAP server =
mail.infomaniak.com - IMAP port =
993(with SSL) - Outgoing SMTP server =
mail.infomaniak.com - SMTP port & encryption protocol and command/method to activate this protocol:
587+ STARTTLS - Username = full & complete email address ( ? )
- Password = the one generated for the email address you want to access
- Authentication required for sending emails:
- It is activated in the SMTP settings of your application.
- Check "use the same settings as the incoming server" or depending on the software/email clients, enter a username (= full & complete email address) and the generated password.
Refer to this other guide if you are looking for information about other mail ports and protocols compatible (SSL / TLS for example).
In case of a problem
Check that the Mail Service is configured optimally.
It is not necessary to contact Infomaniak Support if your email address works well outside the application. The most common error concerns the use of an incorrect password. The troubleshooting guides help you resolve any potential issues:
- Refer to the solutions given in this other guide regarding mail in general.
- This other guide is more specifically about Outlook.
… and if your Outlook no longer works since a change of mail password, refer to this other guide.
Link to this FAQ:
Has this FAQ been helpful?
This guide explains how to manage and modify user permissions (assigning an additional password, setting up an alias, etc. – see below for the complete list) for an Infomaniak user, so that they can manage more or fewer configuration elements in the Infomaniak Mail web app (online service ksuite.infomaniak.com/mail).
Introduction
- The email address is first created within a Mail Service and can then be used within one or more Infomaniak Mail interfaces by one or more users.
- The creator (or manager) of the address may want to limit the actions possible for one or the other of the users who will use the email address.
- This fine-grained permission management can be done during address creation or afterwards, and you can also define what the default rights should be for any new address created (see Global Configuration below).
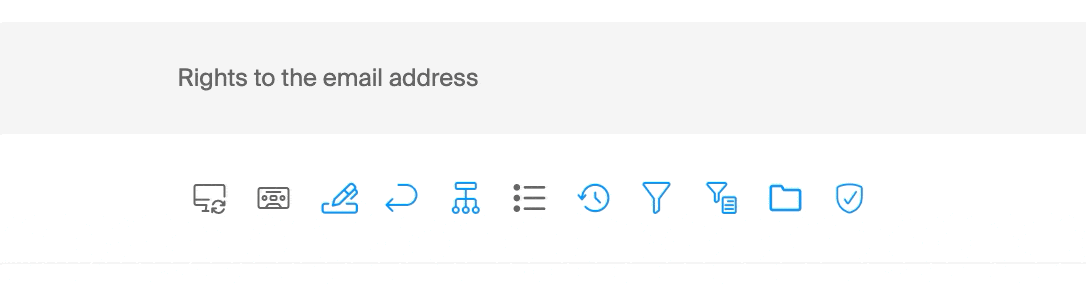
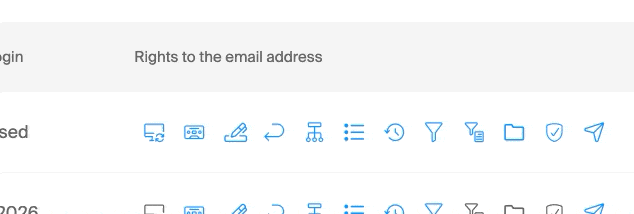
List of email user permissions
| Type / Icon | Description of the permission granted to the user |
|---|---|
| Configure a device | Manage devices (create a dedicated password) |
| Manage auto-replies | Create an out-of-office message (automatic reply) |
| Manage signatures | Add signatures and manage reply email addresses |
| Manage forwarding | Forward emails to one or more other addresses |
| Manage aliases | Create variations of your email address (by modifying what comes before the @) |
| Manage the history of actions | Access the logs for the email address |
| Manage restorations | Access backups and restorations |
| Manage filters | Access SPAM and other filters |
| Manage rules | Automatically sort and categorize new incoming emails |
| Manage folders | Customize IMAP folders |
| Manage security | Manage blocked and approved addresses |
| Manage email sending | Enable sending emails (authorize global SMTP) |
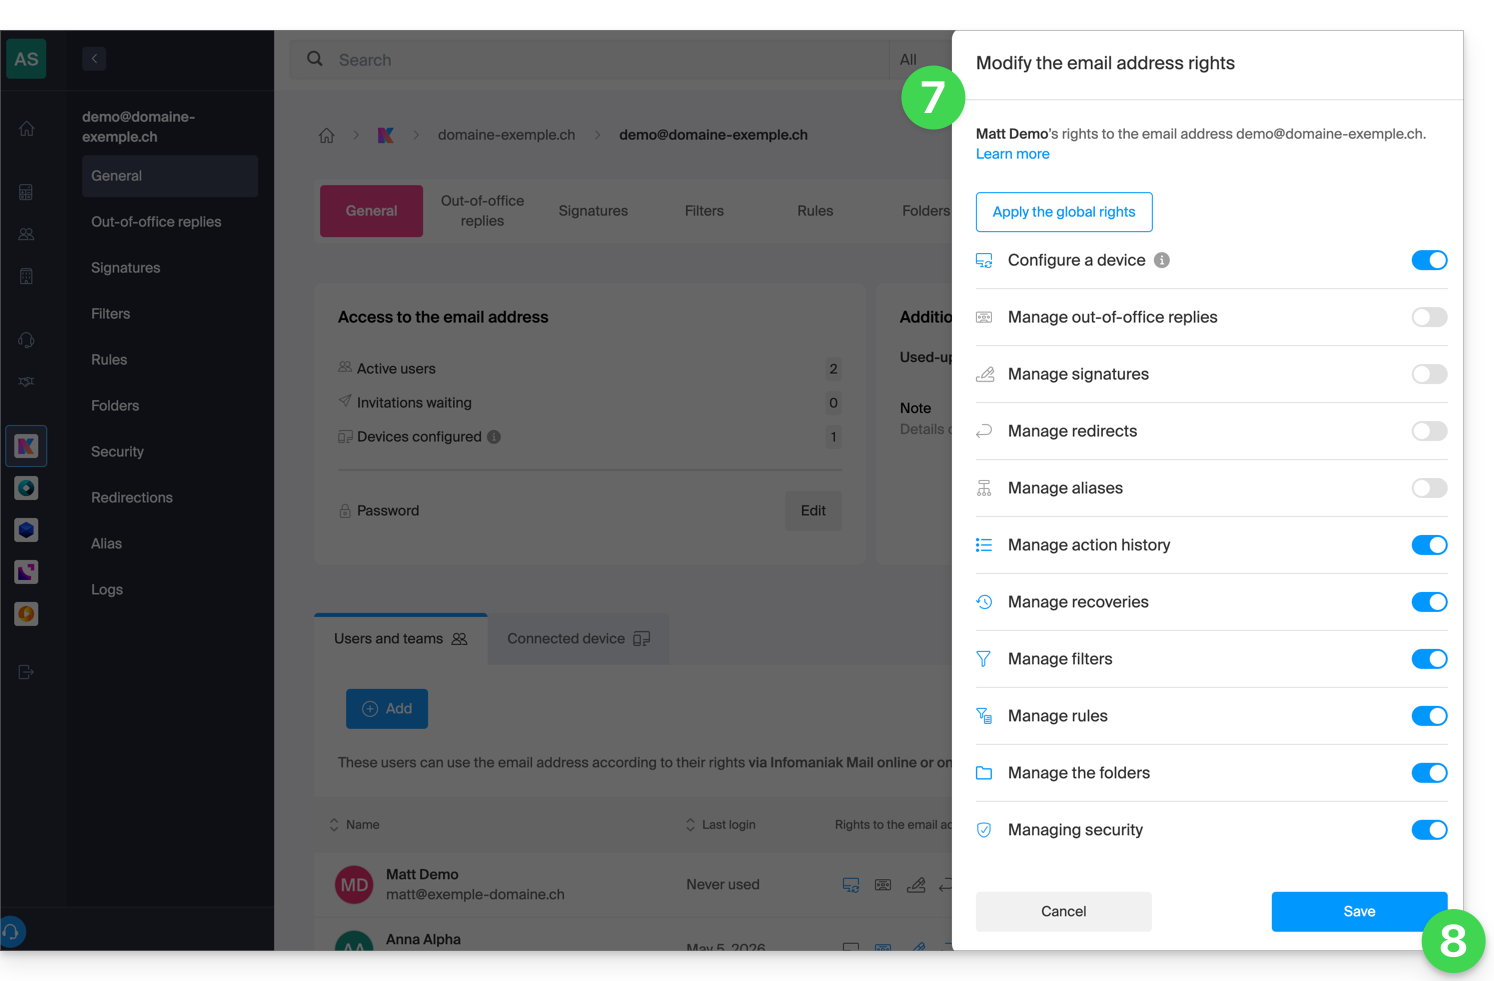
Manage permissions granted to a user
The password for logging into your Infomaniak account may be required to make changes to permissions.
… from the Mail Service
- Click here to access the management of your product in the Infomaniak Manager (need help?).
- Click directly on the name assigned to the product in question.
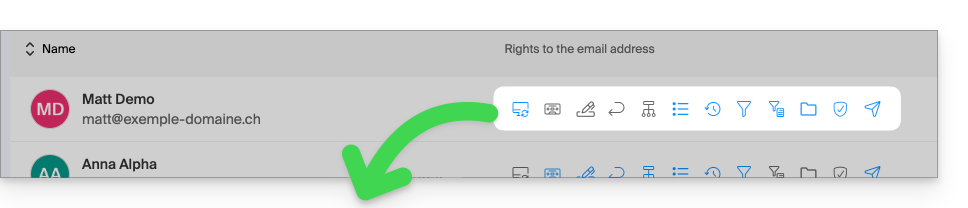
- Click on the email address in question in the table that appears.
- There are several ways to modify the permissions of a mail address:
- When adding a user to a mail address:
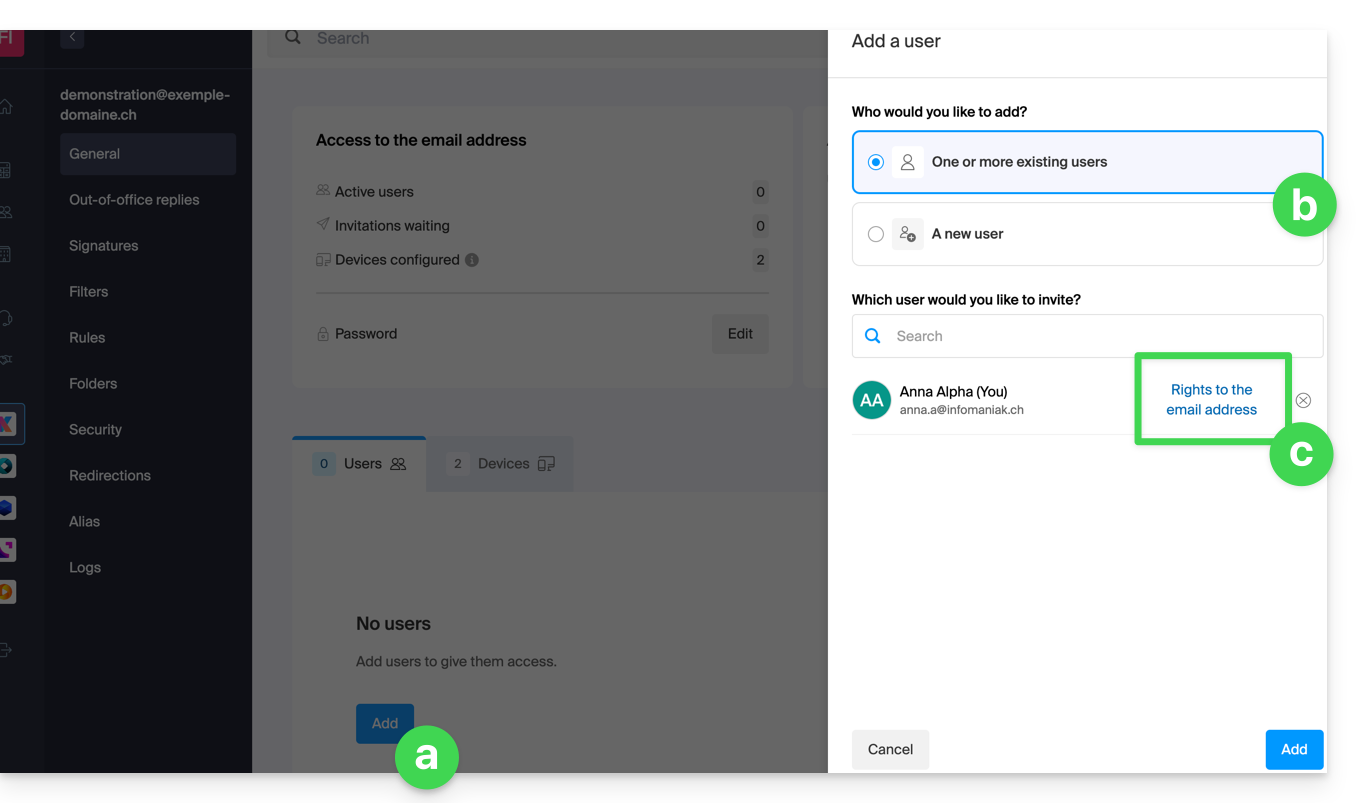
- Once the user has been added:
- Click on the action menu ⋮ located to the right of the user's name for the mail address.
- Select ✎ Modify permissions:
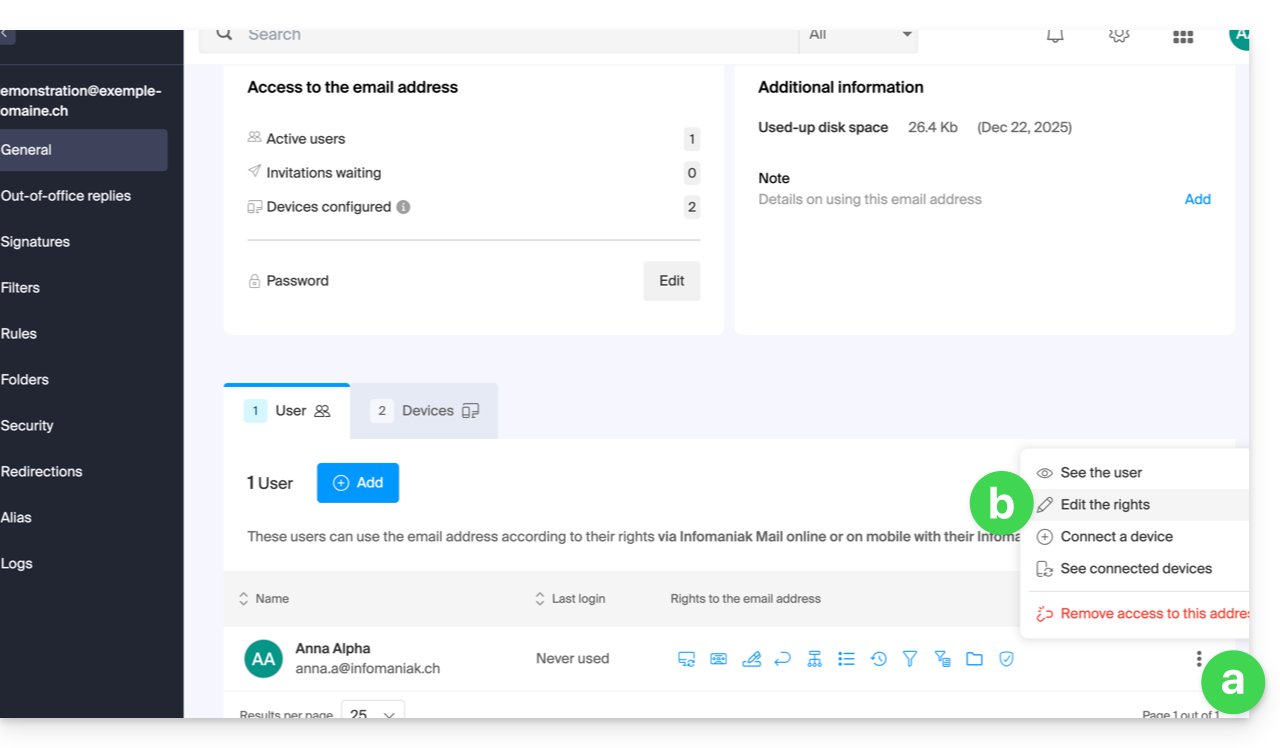
- Or click directly on the icons visible in the table:
- When adding a user to a mail address:
… from the Manager (user management)
- Click here to access user management in the Infomaniak Manager (need help?).
- Click on the user concerned in the table that appears.
- Expand the collaboration tools section by clicking on the chevron .
- Expand the mail addresses section accessed by the user by clicking on the chevron .
- Click on the action menu ⋮ located to the right of the mail address concerned.
- Select Modify permissions:
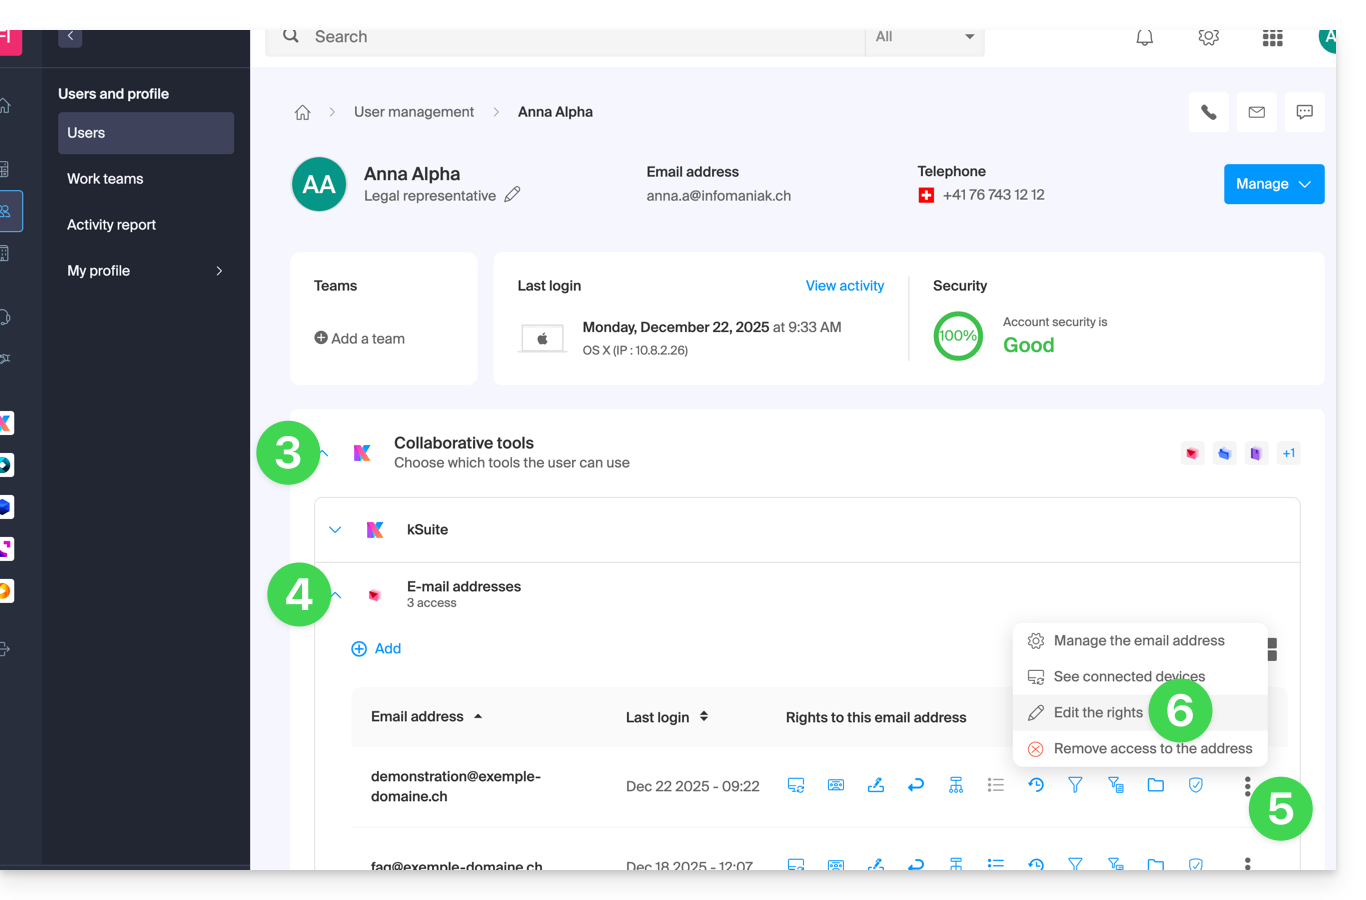
- Or, click directly on the icons visible in the table:
… from the Web Mail app
- Click here to access the Infomaniak Web Mail app (online service ksuite.infomaniak.com/mail).
- Click on the Settings icon in the top right corner of the interface.
- Check or select the email address in question from the drop-down menu in the left-hand menu.
- Click on Shared with.
- Click on the action menu ⋮ located to the right of the email address user's name.
- Select ✎ Edit permissions:
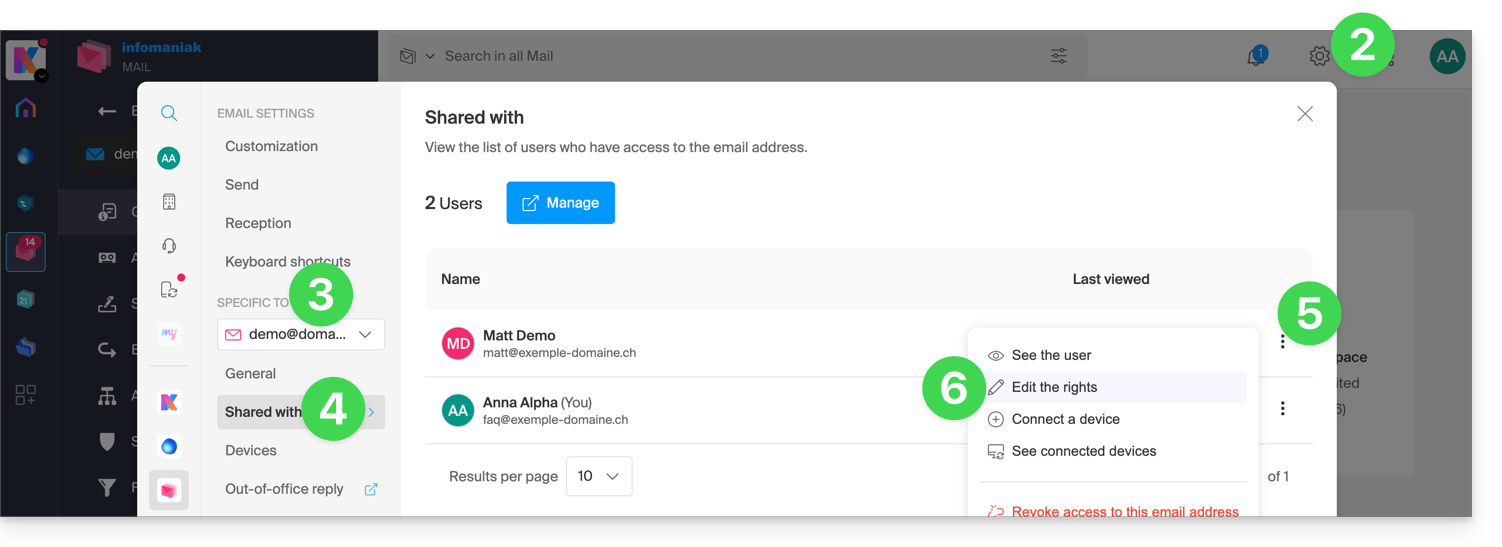
- You will be redirected to the settings for your email address in the Mail Service, and more specifically to the permissions section for the user in question.
- Adjust the permissions and save at the bottom of the page:
Result for the user
The user whose permissions are being revoked will no longer see certain corresponding menus in their email address settings.
For some features, even if the menu is still accessible, some buttons will be inoperative or grayed out: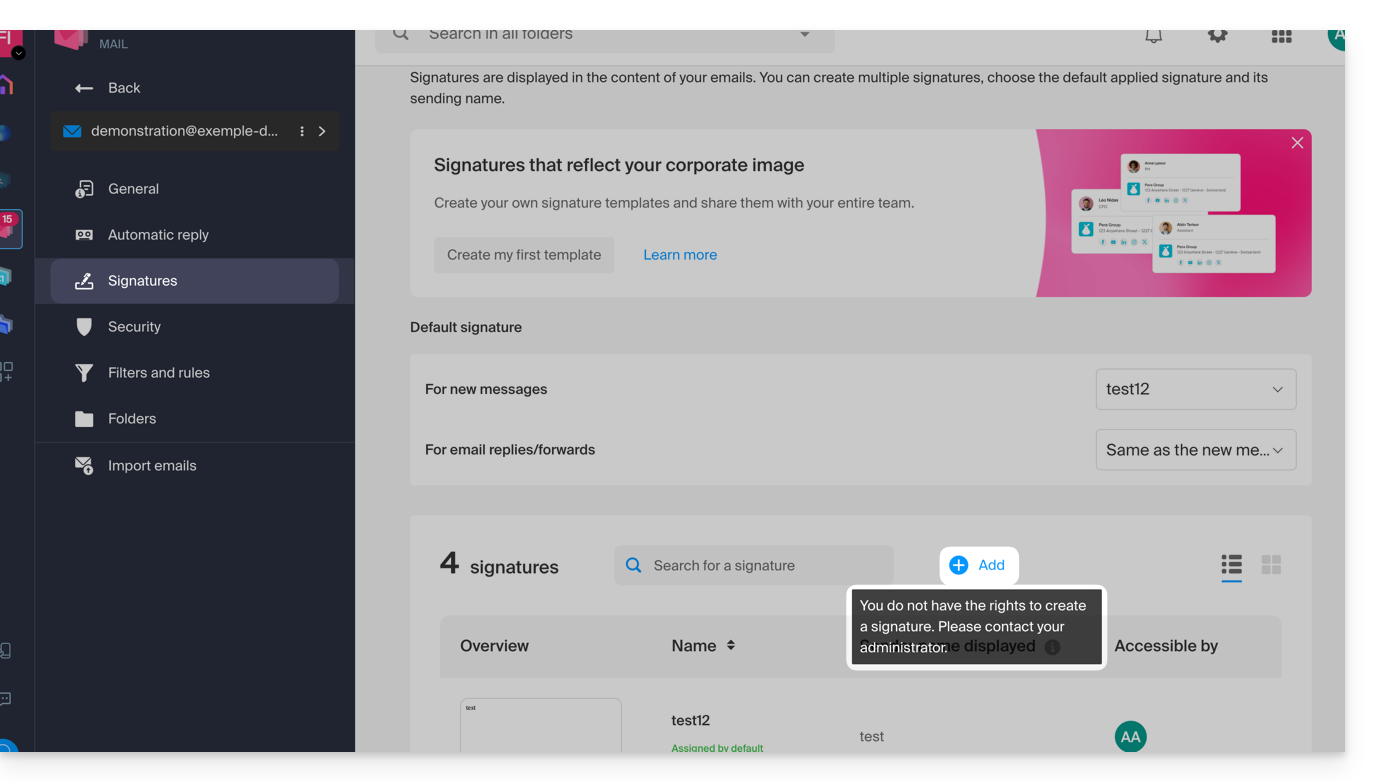
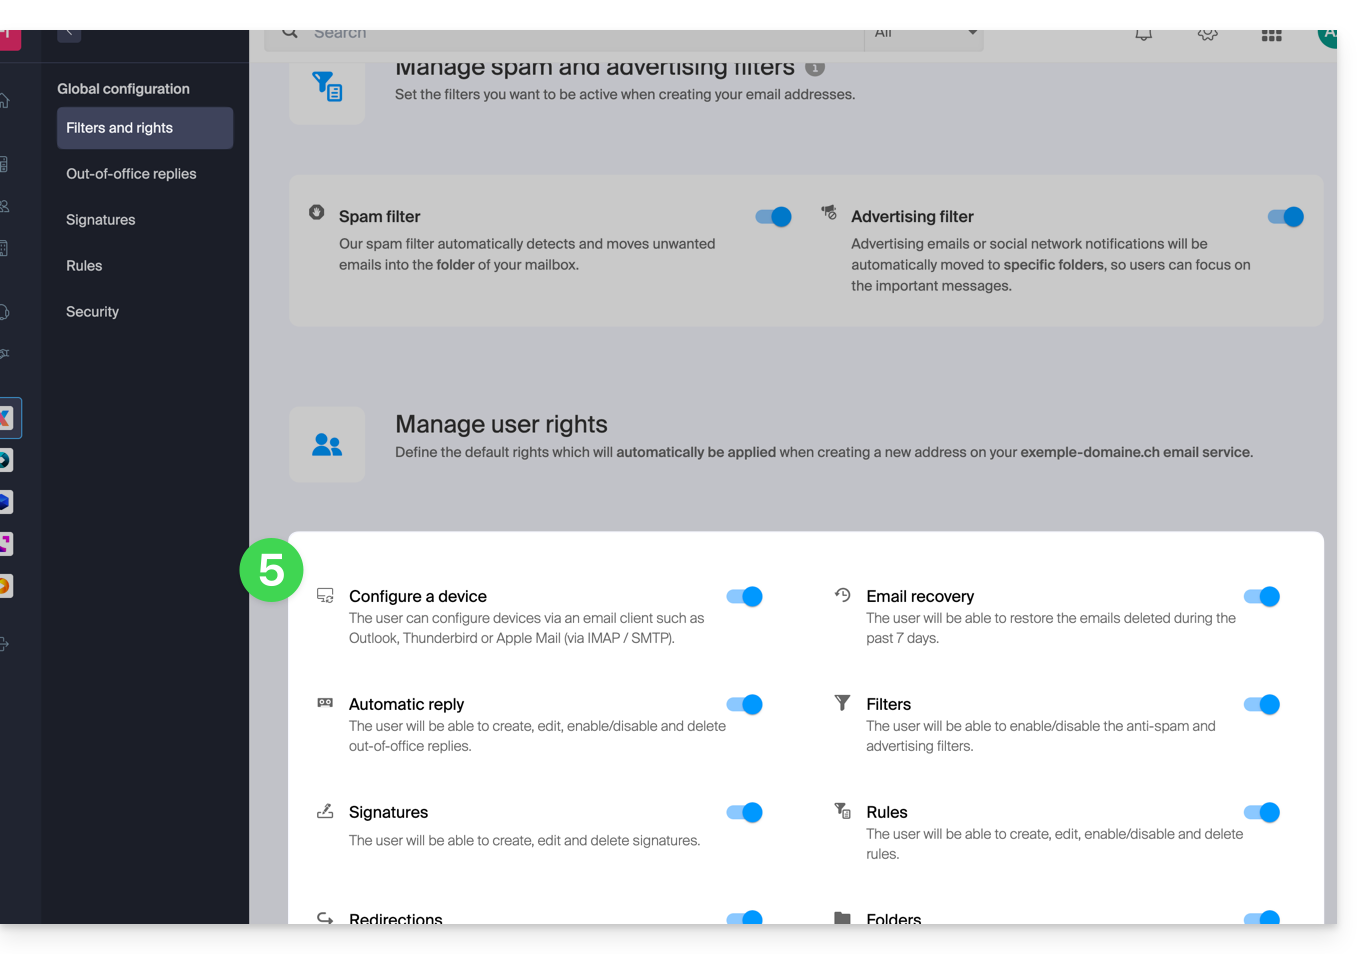
Global configuration
Define default settings
To define the default rights that will be automatically selected when the “global configuration” is applied by the administrator:
- Click here to access the management of your product on the Infomaniak Manager (need help?).
- Click directly on the name assigned to the product in question.
- Click on Global Configuration in the left-hand menu:
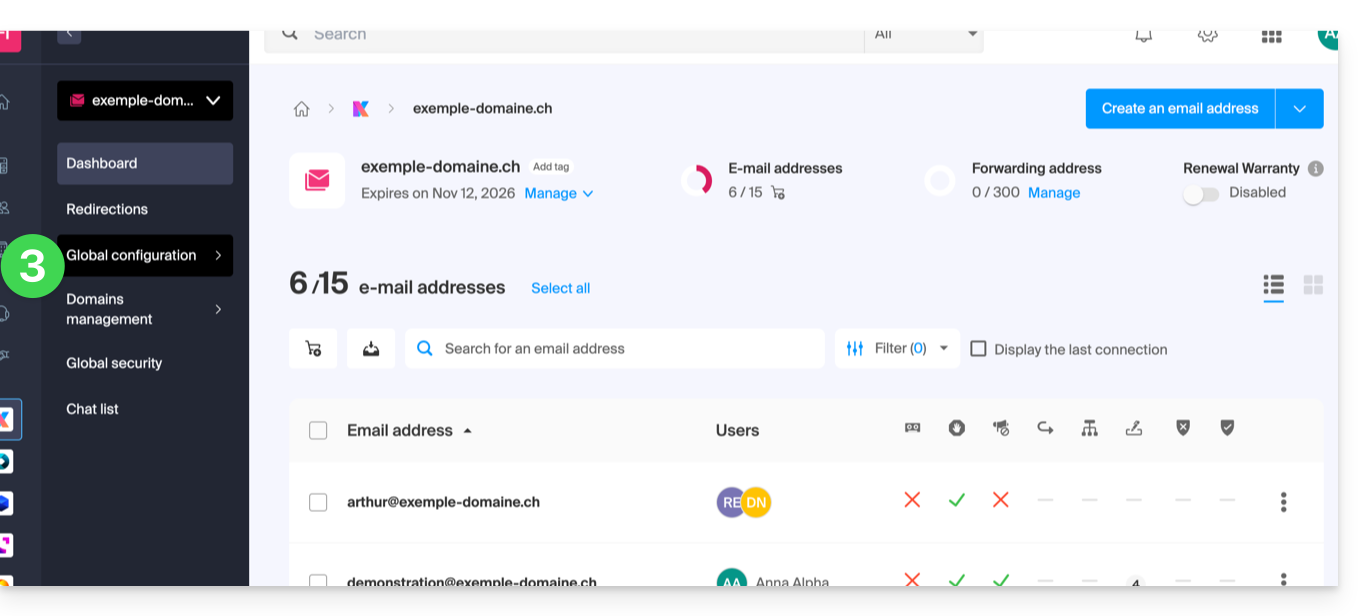
- Then click on Filters and Permissions.
- At the bottom, enable or disable the rights to be granted when creating new email addresses:
Global configuration during email address creation
If a new email address is created for one or more third-party users, the permissions defined in the Global Configuration will be automatically pre-selected during the wizard step: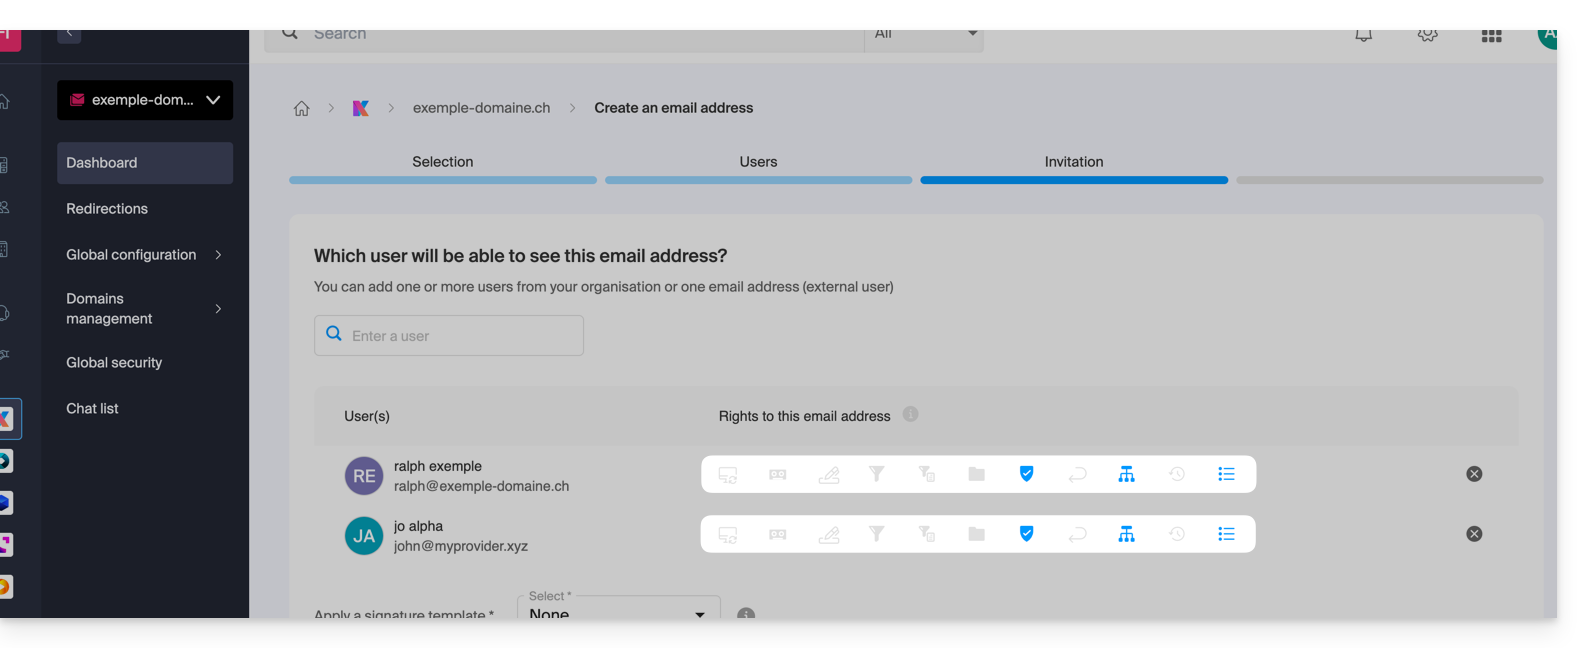
It is, of course, possible to modify the different permissions for the different users on a case-by-case basis.
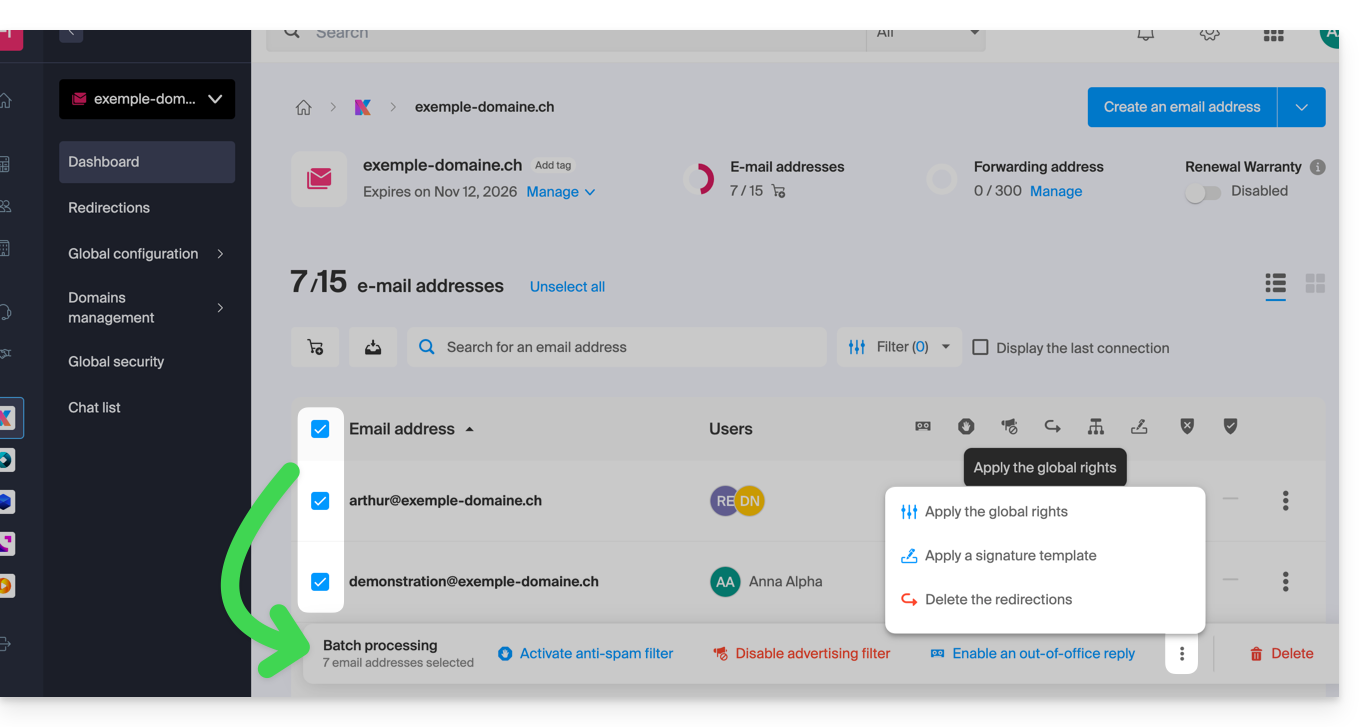
Apply the global configuration to existing addresses
To apply this global configuration to the existing email addresses of a Mail Service (which will then apply to all users concerned, listed in the Users column):
- Click here to access the management of your product in the Infomaniak Manager (need help?).
- Click directly on the name assigned to the product in question.
- Select the email addresses concerned by checking the boxes to the left of the line.
- Click on Apply global configuration at the bottom of the screen (by first clicking on the action menu ⋮ if necessary):
Apply the global configuration when managing permissions granted to a user
To apply this global configuration when you edit a user's permissions for an email address (refer to the "Manage permissions granted to a user" section at the top of this guide), click on the button dedicated to this purpose: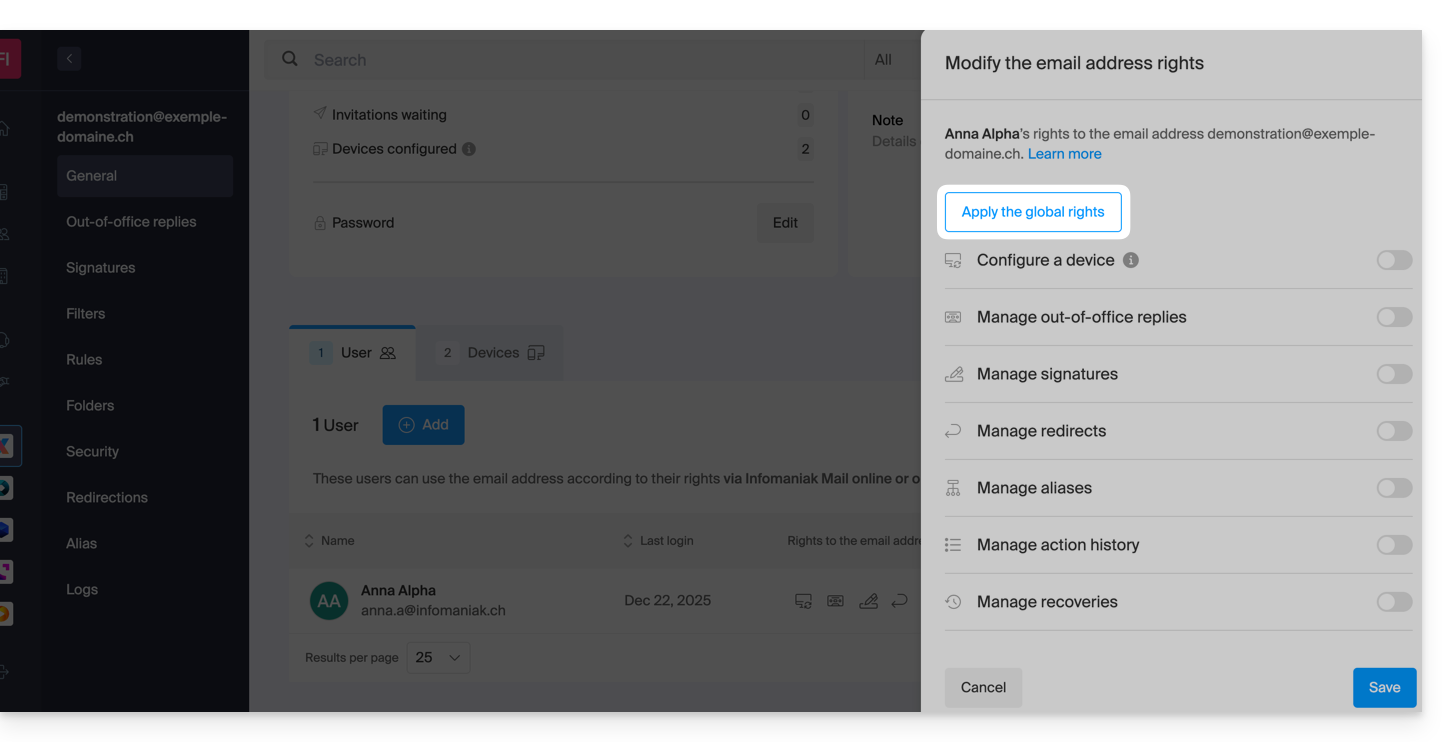
Link to this FAQ:
Has this FAQ been helpful?
This guide explains how to troubleshoot access or usage issues with kDrive on Windows and macOS when third-party software may be interfering with your synchronization.
If you are experiencing a synchronization problem and missing folders, please refer to this other guide.
Introduction
- The kDrive application may sometimes encounter interaction problems with Windows or macOS firewalls, as well as with software solutions for antivirus, VPN, or cleaning.
- This can lead to the inability to synchronize files correctly, failure to open PDFs on the web, or the inability to use Lite Sync mode (on-demand files).
- If you encounter a problem, you must authorize kDrive within these applications and whitelist three essential components:
kdrive.exe(orkdrive.appon macOS)kdrive_client.exe- The domain:
*.infomaniakusercontent.com
Authorize kDrive on…
… macOS
- Open System Settings (or System Preferences).
- Click on Privacy & Security (or Security & Privacy).
- Select Firewall.
- Click the Firewall Options button (enter your administrator password if prompted).
- Click the Add Application (+) button.
- Select the kDrive application to allow incoming connections.
- Click Add and then OK.
… Windows
- Open the Start menu and click on Settings.
- In the search field, enter Firewall.
- Click on Allow an app through Windows Firewall.
- Click on the Change settings button.
- Check the boxes next to the kDrive applications (refer to the introduction).
- Check the boxes under the network type (private or public) and then click OK.
… Windows Defender
- Open Windows Security from the notification area.
- Select Virus & threat protection.
- Go to Manage settings.
- Scroll down to Exclusions and click Add or remove exclusions.
- Click Add an exclusion and add the kDrive files or folders (see introduction).
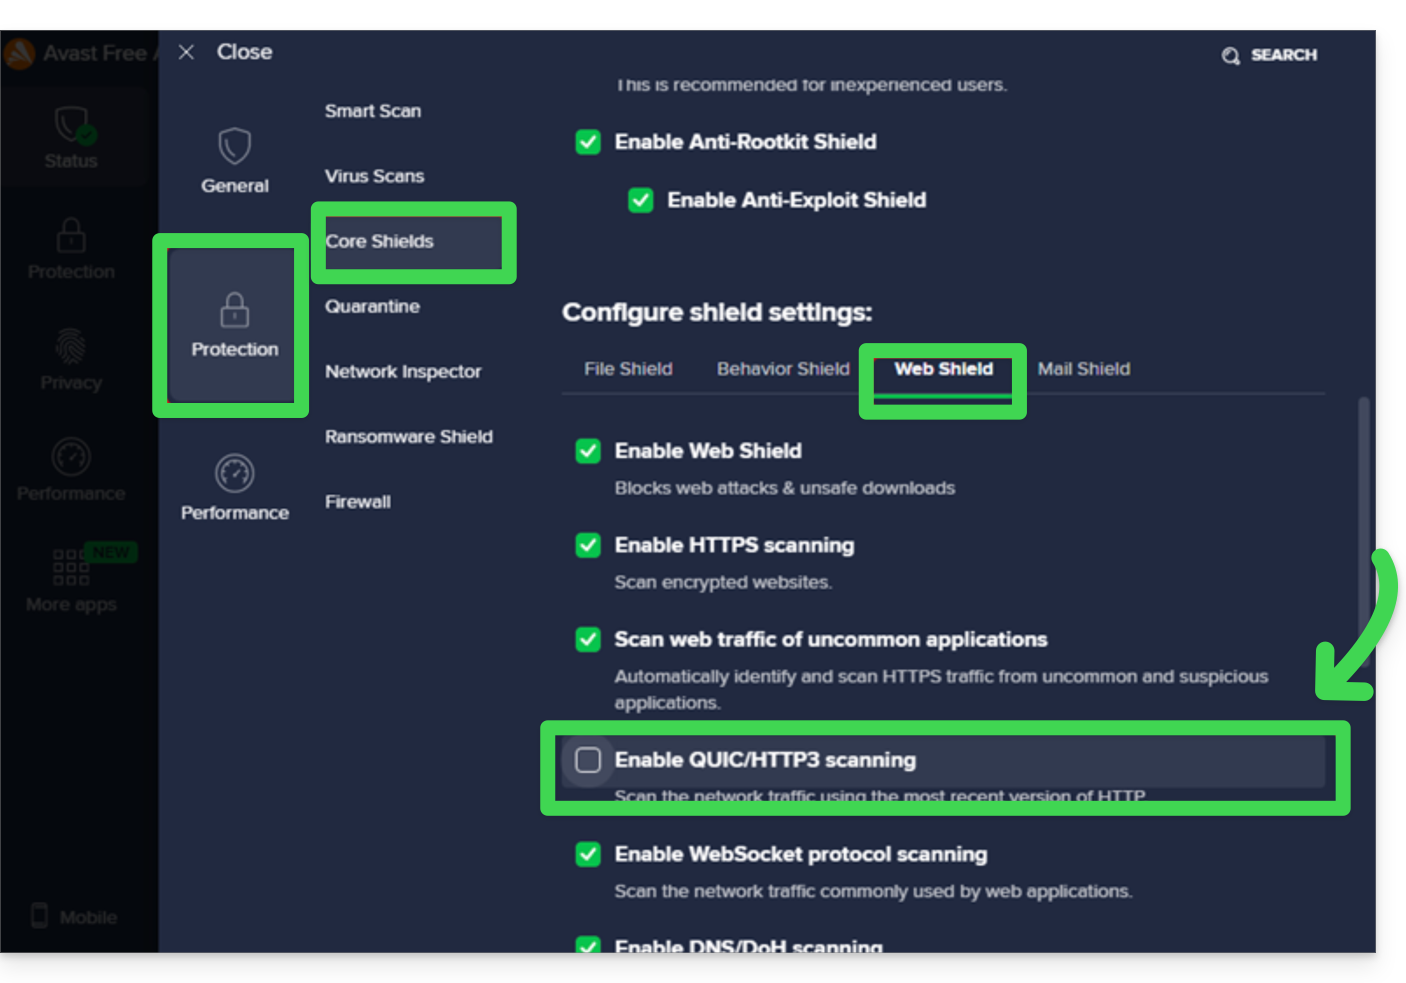
… Avast
- Open the Avast interface.
- Go to Menu > Settings.
- Under the General tab, click on Exceptions.
- Click Add exception and enter
https://*.infomaniakusercontent.com/* - Also go to File Paths to add the kDrive executable files.
An additional action to perform on Avast to prevent any blocking (especially when opening PDFs):
- Disable QUIC/HTTP3 scanning:
… AVG
- To exclude files from the executable (.exe … see the introduction above), refer to this other guide (step 5).
… Avira
- Right-click on the Avira icon and temporarily disable protection.
- Go to Configuration > PC Protection > Scan > Exceptions.
- Add the kDrive files (see the introduction).
- Repeat the operation in Real-time Protection > Exceptions.
… Bitdefender
- Go to Protection > Online Threat Prevention > Settings.
- Click on Manage exceptions.
- Add the domain
*.infomaniakusercontent.comand check the online prevention option. - If you are using the TrafficLight browser extension, also add this domain to its whitelist.
- To exclude files from the executable (.exe … see the introduction above), refer to this other guide.
… CCleaner
- Go to Options > Exclude.
- Click on Add and select the kDrive files or folders.
… CleanMyMac
- In the scan results screen, hold down the Ctrl key and click on the kDrive items.
- Select Add to exclusion list.
… ESET
- Open ESET and press F5 (Advanced settings).
- Go to Antivirus > Exclusions.
- Click on Add and enter the paths to kDrive.
… Kaspersky
To resolve kDrive file issues, exclude kdrive.infomaniak.com and *.infomaniakusercontent.com from the scan:

If the problem persists, uncheck the box (3) below:

… Malwarebytes
- Go to Settings > Exclusions.
- Click Add Exclusion and select the kDrive files.
… McAfee
- To exclude files from the executable (.exe … see the introduction above), refer to this other guide.
… Norton
- Go to Settings > Antivirus > Scans and Risks.
- In Exclusions / Low Risks, configure the "URLs to exclude from the scan".
- Add
*.infomaniakusercontent.com. - To exclude files from the executable (.exe … see the introduction above), refer to this other guide.
… NordVPN
Check within NordVPN, and more specifically in Threat Protection, the list of blocked files or activities to allow kDrive and the domain *infomaniakusercontent.com.
Link to this FAQ:
Has this FAQ been helpful?
This guide explains how to copy within the desktop app kDrive (desktop application on macOS / Windows / Linux) data from a kDrive to which your Infomaniak user has access to another kDrive to which the same Infomaniak user has access.
Preamble
- To be a user of multiple Organizations, you must have been added to them and have been granted access to the respective kDrives.
- For example, if the user
abc@domain.xyzhas a kDriveABCwithin their OrganizationABCand is invited to the OrganizationVWXwhich grants them access to the kDriveVWX, they will see 2 kDrives on ksuite.infomaniak.com/kdrive and will be able to send data from one to the other in 1 click: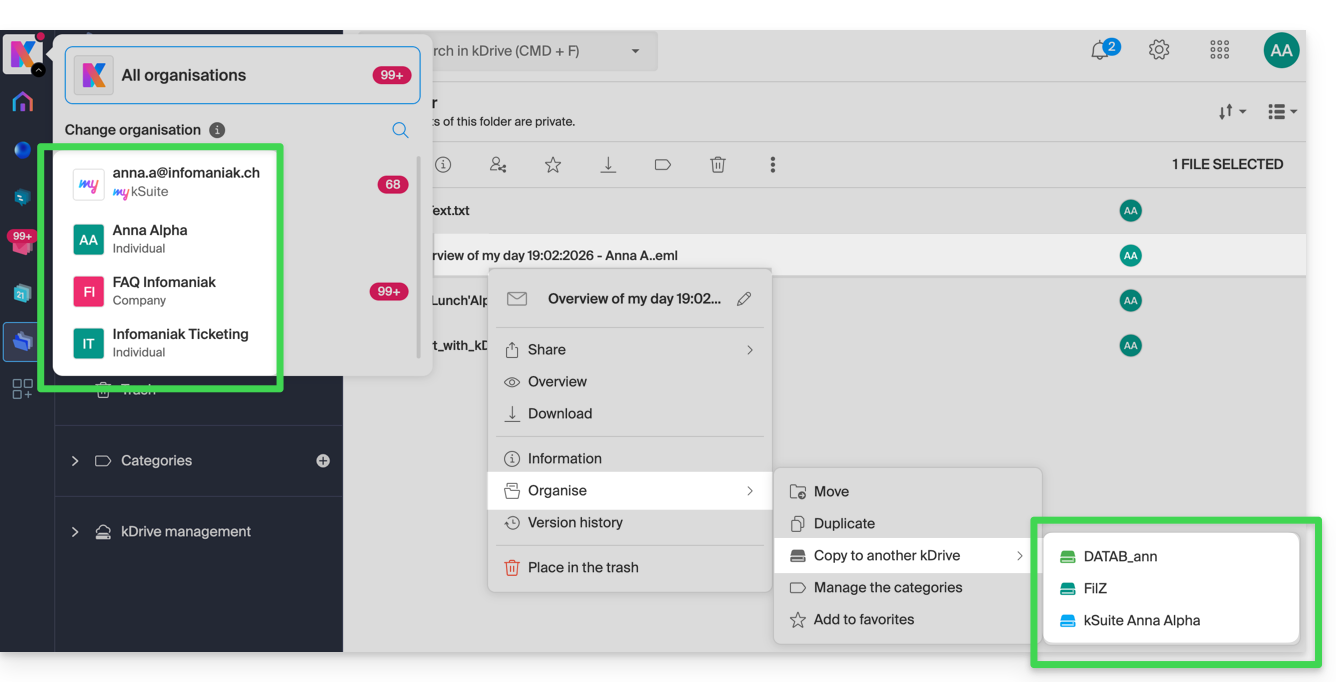
- For example, if the user
- Without being a user of multiple Organizations, it is also possible to copy data but only by importing the entire kDrive, without being able to choose specific data.
- If you wish to import all the data contained on the other kDrive at once, refer to this other guide and choose kDrive at point 6.
Copy data between multiple kDrives
Prerequisites
- Ensure that all Organizations are displayed, otherwise you will not be able to switch from one kDrive to another and consequently will not have the copy function to other kDrives:

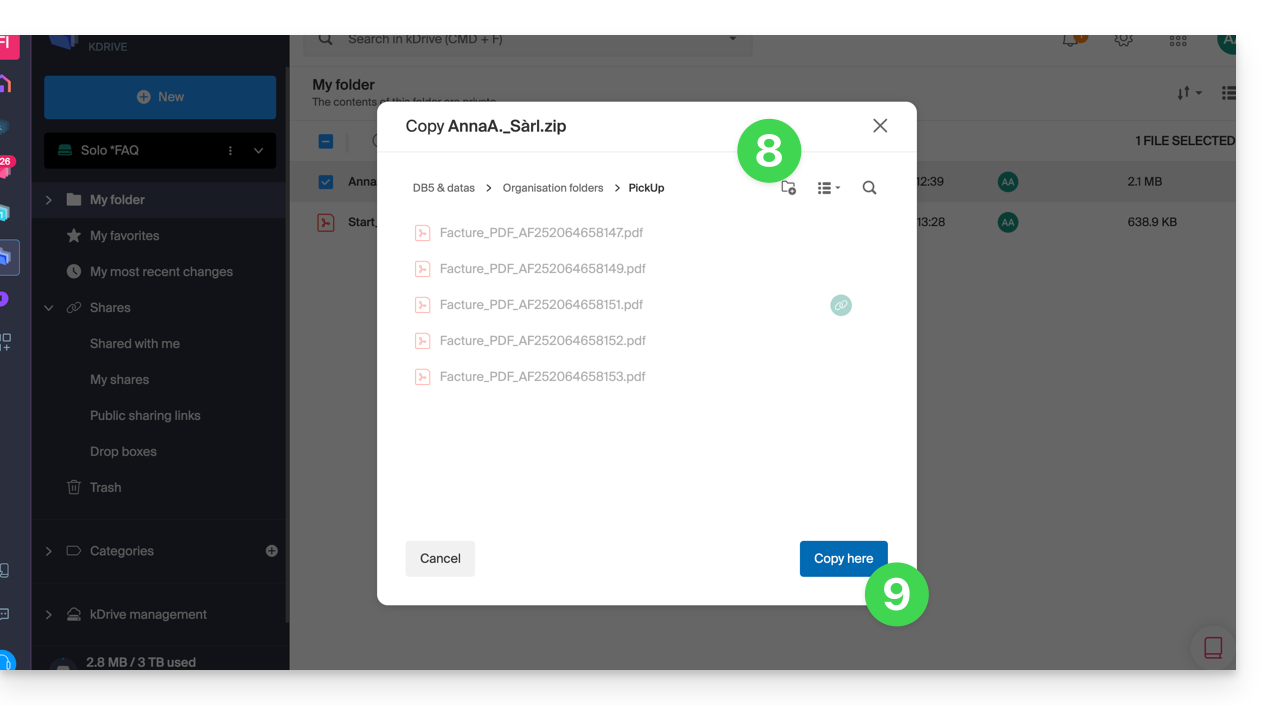
To copy a folder or file to the other kDrive to which you have access from the same user account:
- Click here to access the Infomaniak Web app kDrive (online service ksuite.infomaniak.com/kdrive).
- Check or select the relevant kDrive in the dropdown menu of the left sidebar.
- If necessary, select the other kDrive from which you wish to copy files:
- Right-click or click on the action menu ⋮ to the right of the folder or file you wish to copy to the other kDrive.
- Click on Organize.
- Click on Copy to another kDrive.
- Choose the relevant kDrive from the list visible in this same dropdown menu:
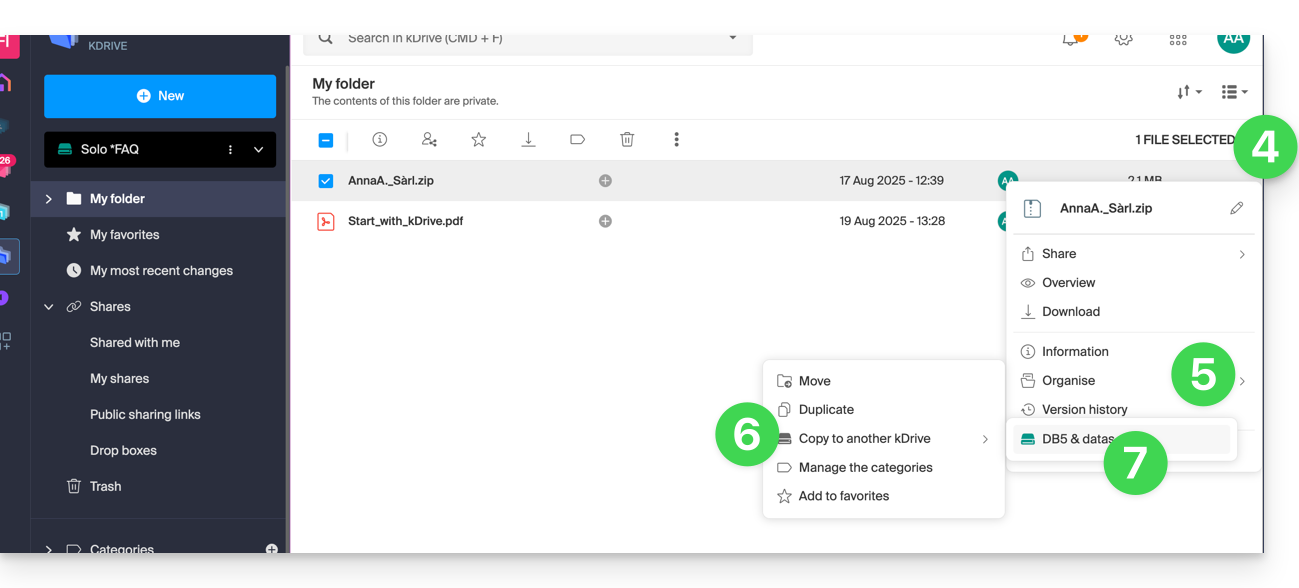
- Choose the destination location (knowing that the shared folder ("Organization Folders ") cannot receive a file or folder at its root but you can create a subfolder using the appropriate icon if the user has the rights).
- Click the blue button to start the copy:
The copy is not instantaneous or immediate - please wait several minutes!
Link to this FAQ:
Has this FAQ been helpful?
This guide explains how to import a calendar into the Infomaniak Calendar web app (online service ksuite.infomaniak.com/calendar).
Introduction
- Refer to this other guide if you only want to display an Infomaniak calendar in read-only mode on Google Calendar (web and mobile app).
- Refer to this other guide if you want to edit calendar events on both sides, but only on the mobile version of the Google Calendar app.
- It is also possible to import tasks into the dedicated section of the calendar.
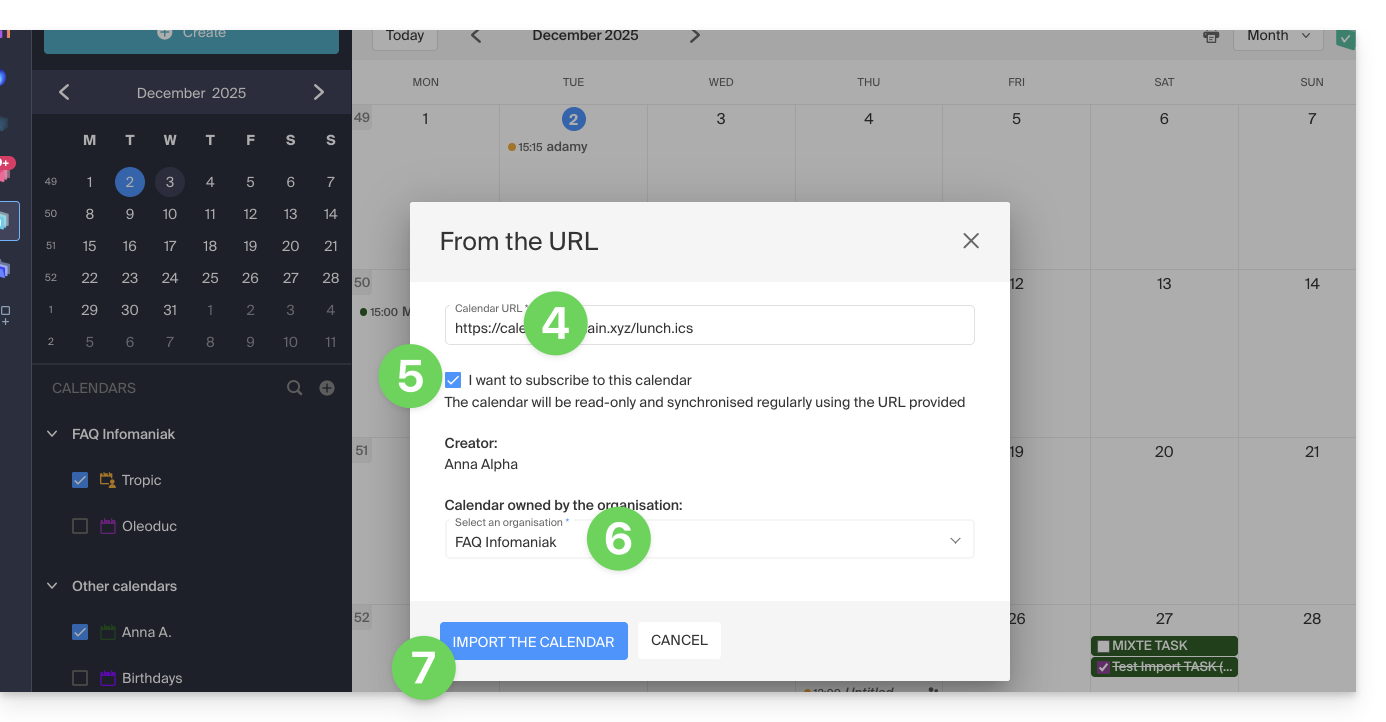
Import a calendar via a URL
It is possible to display an existing calendar managed externally in Calendar. It will be automatically updated every hour via the URL you specify.
Please note that this is not a calendar synchronization, but a read-only, one-way display.
To do this:
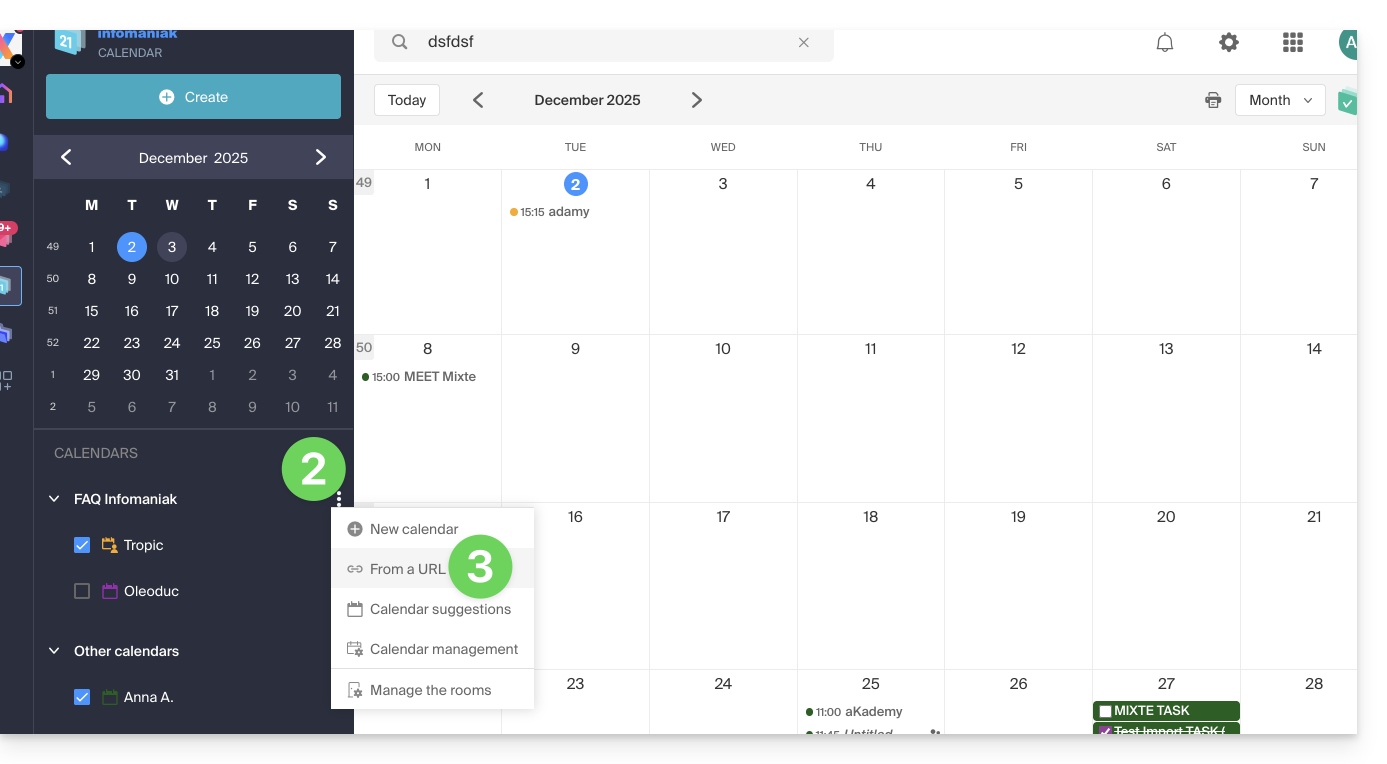
- Click here to access the Infomaniak Calendar web app (online service ksuite.infomaniak.com/calendar).
- Click on in the left-hand menu.
- Click on "From a URL":

- Enter the URL of the calendar to import.
- Check the box I want to subscribe to this calendar.
- If necessary, select the Organization in which the calendar will be imported.
- Click on Import calendar:
You can also go directly through one of the Organizations you belong to:
- Click here to access the Infomaniak Calendar web app (online service ksuite.infomaniak.com/calendar).
- Click on the action menu ⋮ to the right of the Organization in the table that appears.
- Click on "From a URL":
Link a Google calendar using its "secret" URL
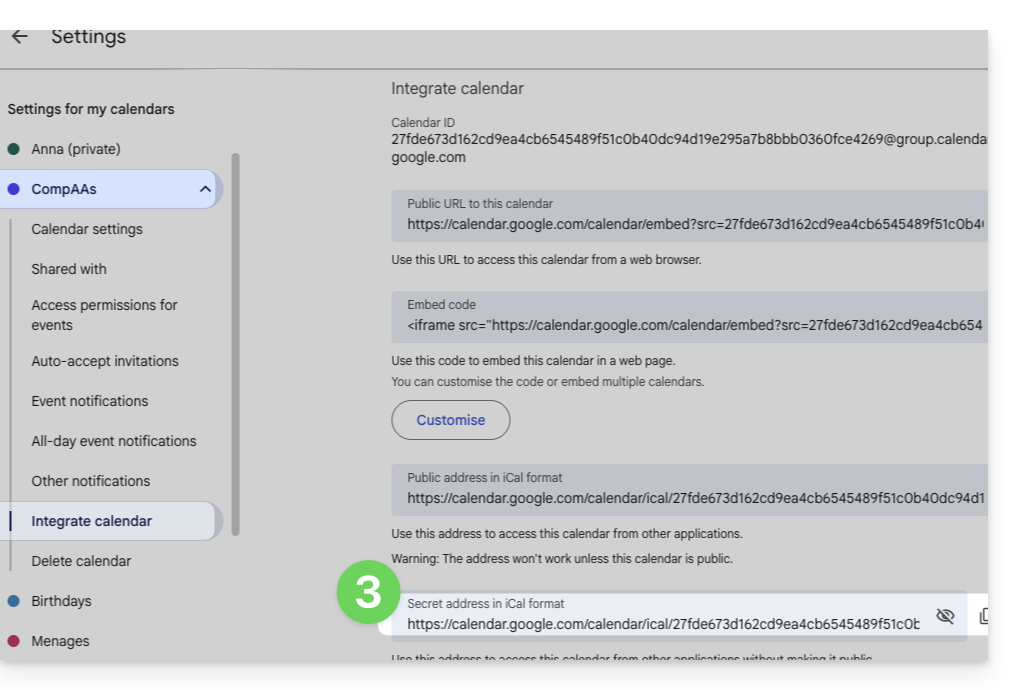
The "secret" URL of a Google calendar, which you can paste in step 3 above, can be found in the Google calendar settings:
- Click on the action menu ⋮ to the right of the Google calendar in question.
- Click on Settings and sharing:
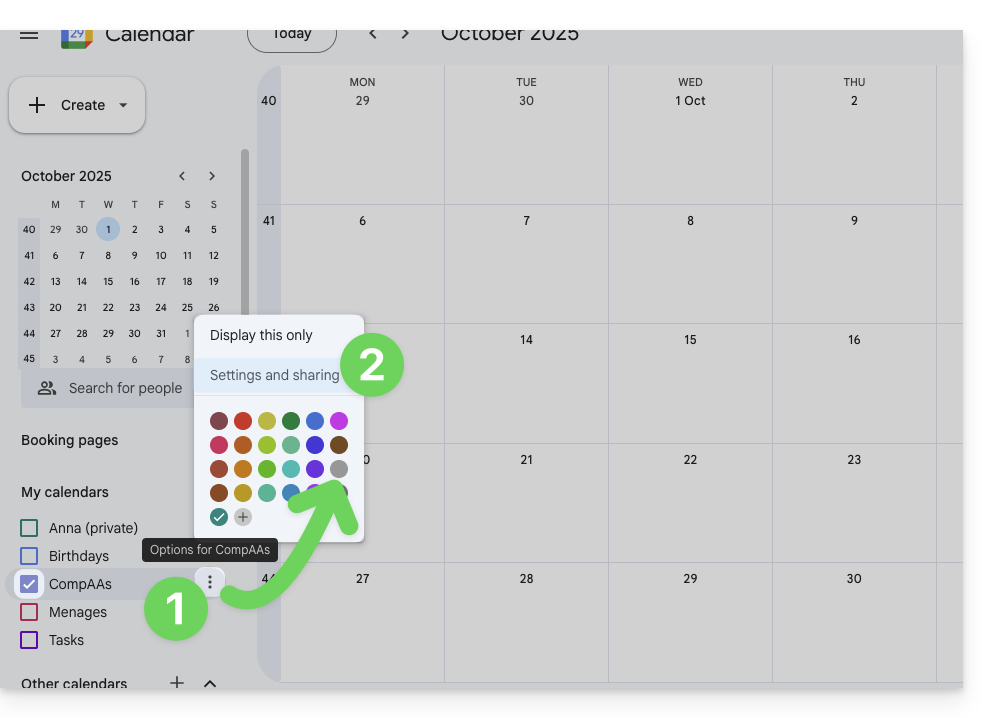
- Scroll down the page until you find the secret iCal URL and click on the icons to view and/or copy the URL:
- Paste the URL according to the procedure in step 3 of the previous chapter above.
Please note that this is not a calendar synchronization but a read-only, one-way link.
The calendar will be visible and will regularly display any updates made, but it will not be possible to edit it directly from the Infomaniak interface; this is a "one-way synchronization" with Google.
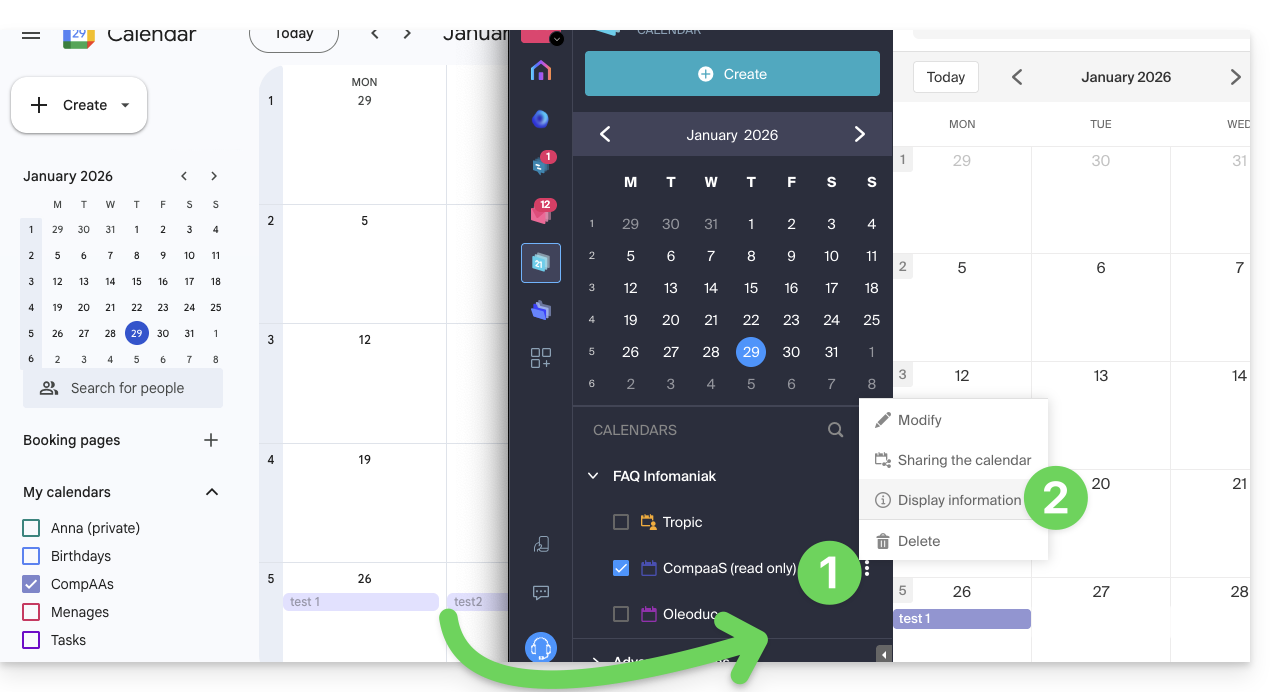
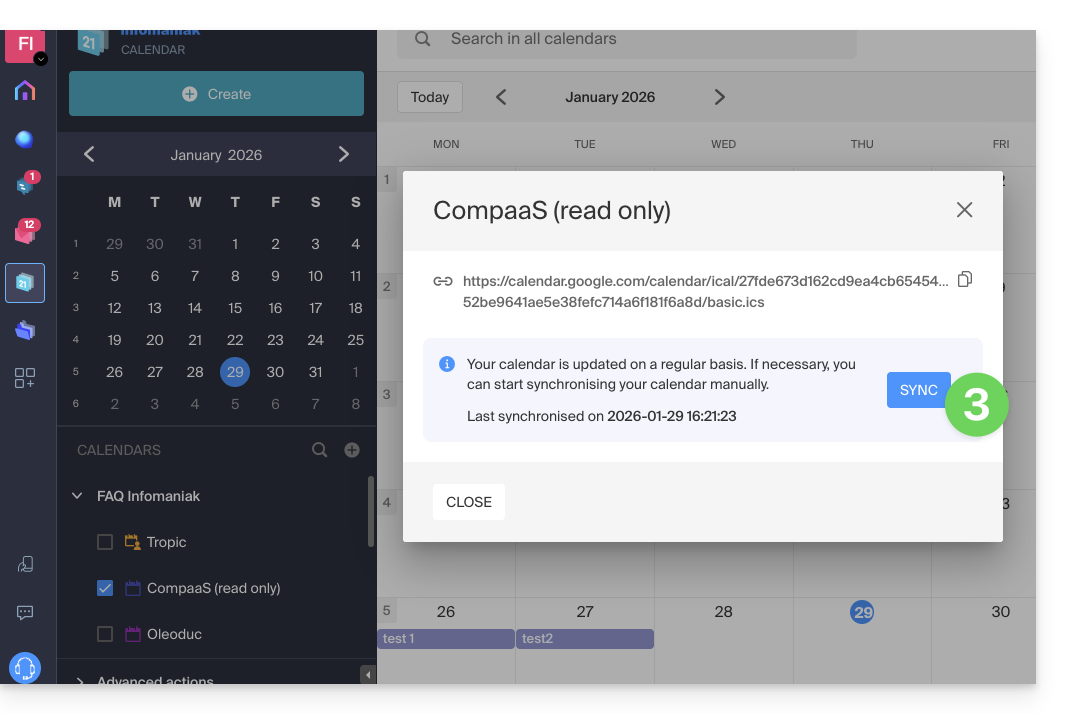
However, you can force synchronization to immediately display any new events or changes:
- Click on the action menu ⋮ to the right of the imported calendar in Infomaniak.
- Click on Display information:
- Click the SYNC button to synchronize the imported content, then wait a few seconds:
Import events via .ics file
To access the Advanced actions that allow you to import, export, and restore calendars:
- Click here to access the Infomaniak Calendar web app (online service ksuite.infomaniak.com/calendar).
- Click on Advanced actions in the left-hand menu.
- Click on Import.
- Upload the
.icsfile corresponding to the export made from your previous provider: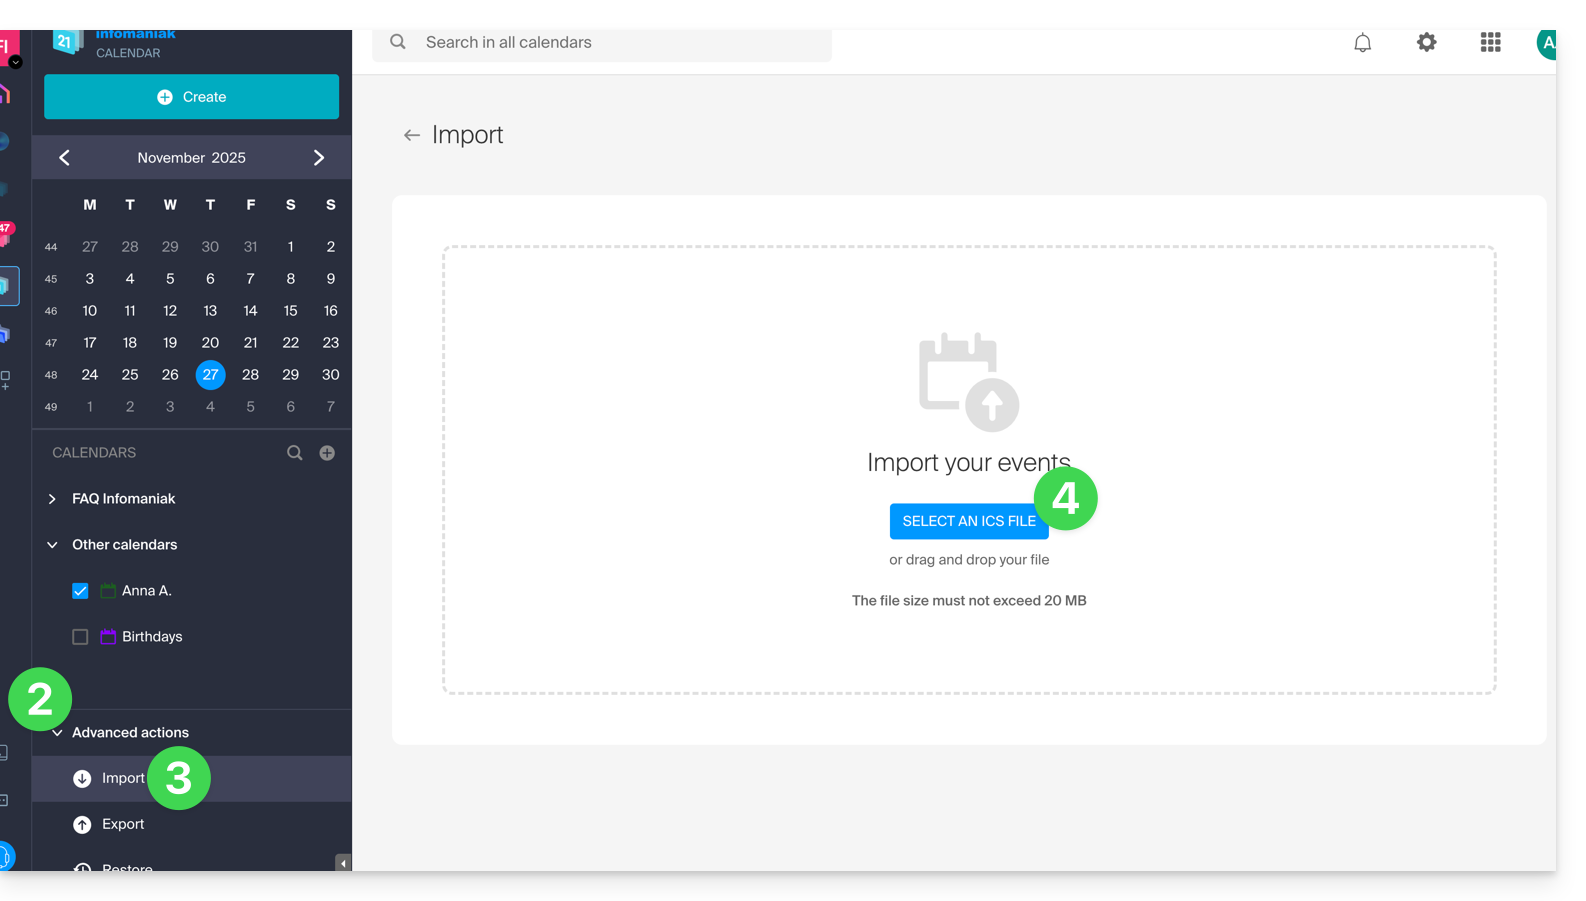
You can choose which existing calendar to import the events into, or create a new calendar (tasks are also imported if the .ics file contains them).
Please note that this is not a calendar synchronization, but a one-time, one-way import.
Export data from your previous provider
Here are some specific guides provided for reference to export the calendar from a third-party provider, which will allow you to re-import this data into Infomaniak:
- Apple Mail
- Gmail
- Outlook (section Publish > ICS link)
- Yahoo
- Proton
- Thunderbird
Link to this FAQ:
Has this FAQ been helpful?
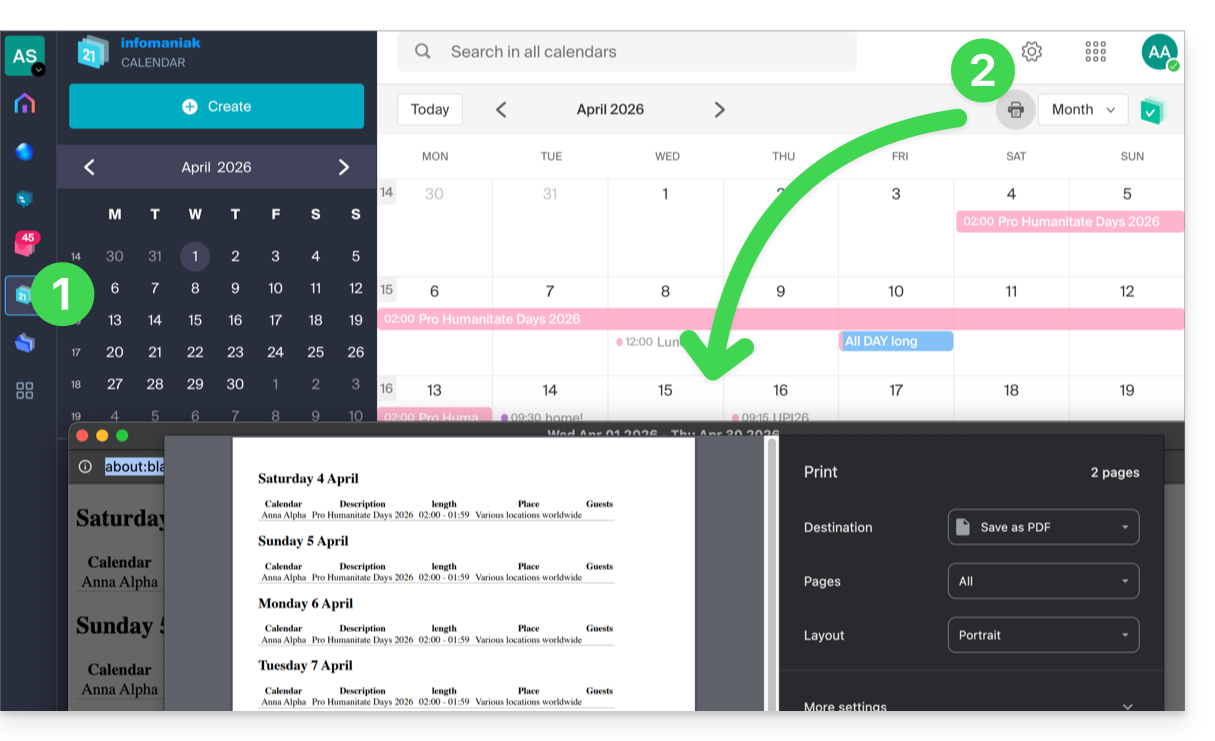
This guide explains how to print a calendar from the Infomaniak Calendar web app (online service ksuite.infomaniak.com/calendar).
Printing the content of a calendar
If you only use your browser's print function with Calendar, you will print the interface and not necessarily the calendar content. To print the list of your schedule (regardless of the display mode usually selected):
- Click here to access the Infomaniak Calendar web app (online service ksuite.infomaniak.com/calendar).
- Click on the printer icon located in the top right corner:
Link to this FAQ:
Has this FAQ been helpful?
This guide explains how to import tasks into the dedicated section of the Infomaniak Calendar web app (online service ksuite.infomaniak.com/all/calendar/tasks).
Introduction
- The
.icsfile is a standard container (RFC 5545), and within this file, you will find “components”:VEVENT(Event): this is what you see on the calendar grid, with a notion of occupied time (start timeDTSTARTand end timeDTENDor duration).VTODO(Task): this is an action to be performed, often with a due date (DUE), but not necessarily a duration, and a binary status (done or not done).
- Therefore, when importing a
.icsfile into the Infomaniak Calendar app, the system imports the data into the calendar and its “Tasks” section based on their type.
Importing tasks
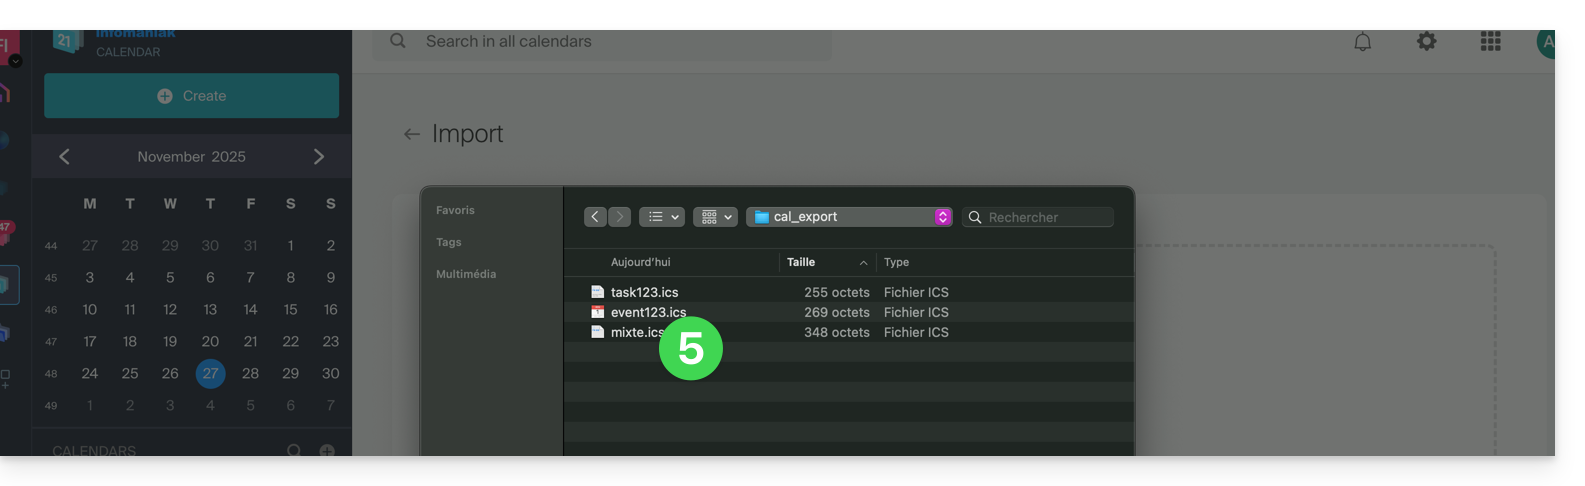
If you have a .ics file to import:
- Click here to access the Infomaniak Calendar web app (online service ksuite.infomaniak.com/calendar).
- Click on the chevron to expand the Advanced actions section.
- Click on Import.
- Click on the button to select an ICS file (20 MB max):
- Select the file containing the tasks (and/or events):
- Choose the calendar in which to import the data (or create a new calendar for this purpose).
- Click the button to start the import:
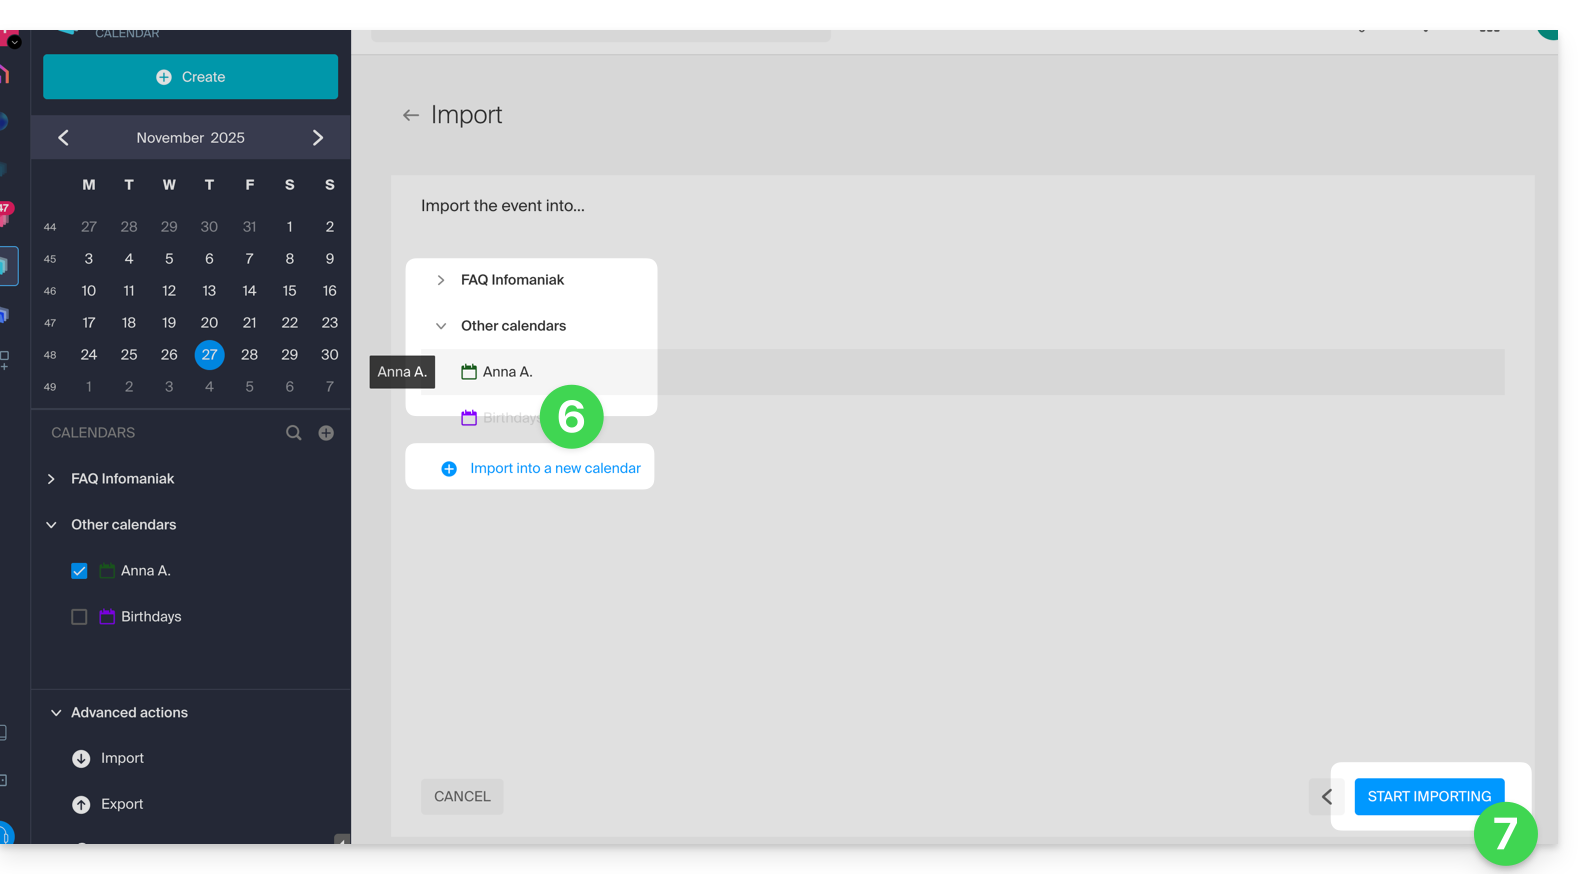
- If the
.icsfile contained tasks, you will find them in the Tasks section (and any events present in the file will be displayed on the calendar):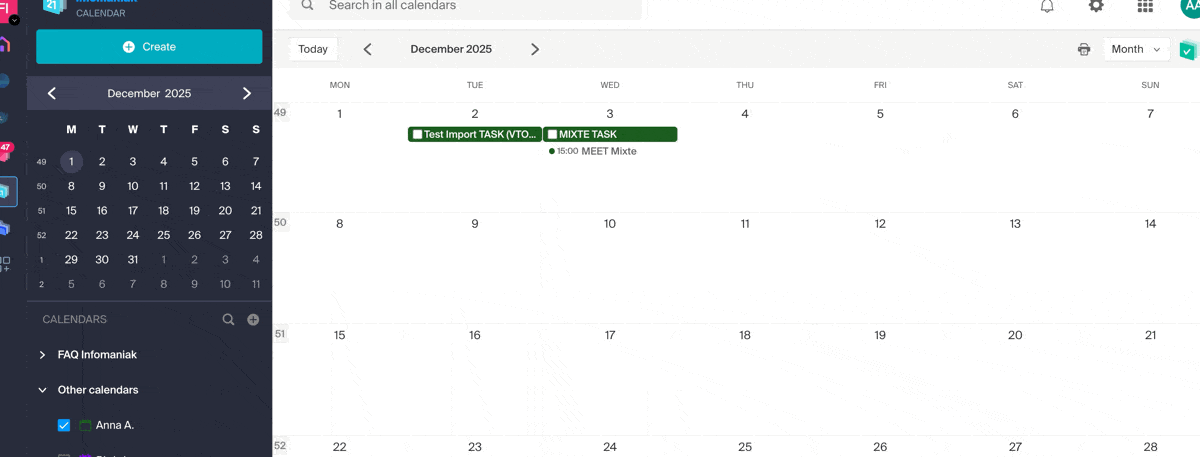
Link to this FAQ:
Has this FAQ been helpful?
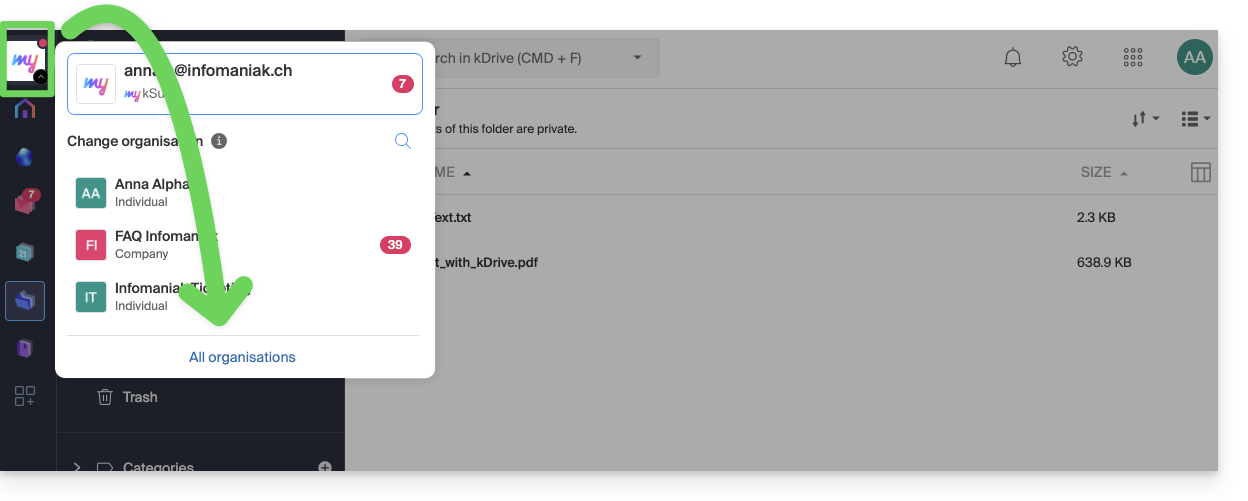
This guide explains how to switch from one Organisation to another from your Infomaniak Manager when you belong to multiple Organisations.
Introduction
- Since you opened your account with Infomaniak, you have been a member of at least one Organisation.
- If you were the only one and it wasn't an invitation, an Organisation was created in your name and you automatically became its legal representative.
- Otherwise, you belong to the Organisation that invited you (to join its kSuite, to manage a product, etc.).
- You can leave Organisations.
- It is perfectly possible to have access to multiple Organisations from the same login credentials and to quickly switch between them.
Switch to one of the other Organisations
To switch to another Organisation among those to which you belong:
- Click here to access the management of your products (Infomaniak Manager).
- Click on the chevron at the top left of the Manager interface.
- Click on the Organisation you want to access (or display them all to access all the kDrive / email addresses to which you are linked).
- The change of Organisation is immediate, you are automatically switched:
Link to this FAQ:
Has this FAQ been helpful?
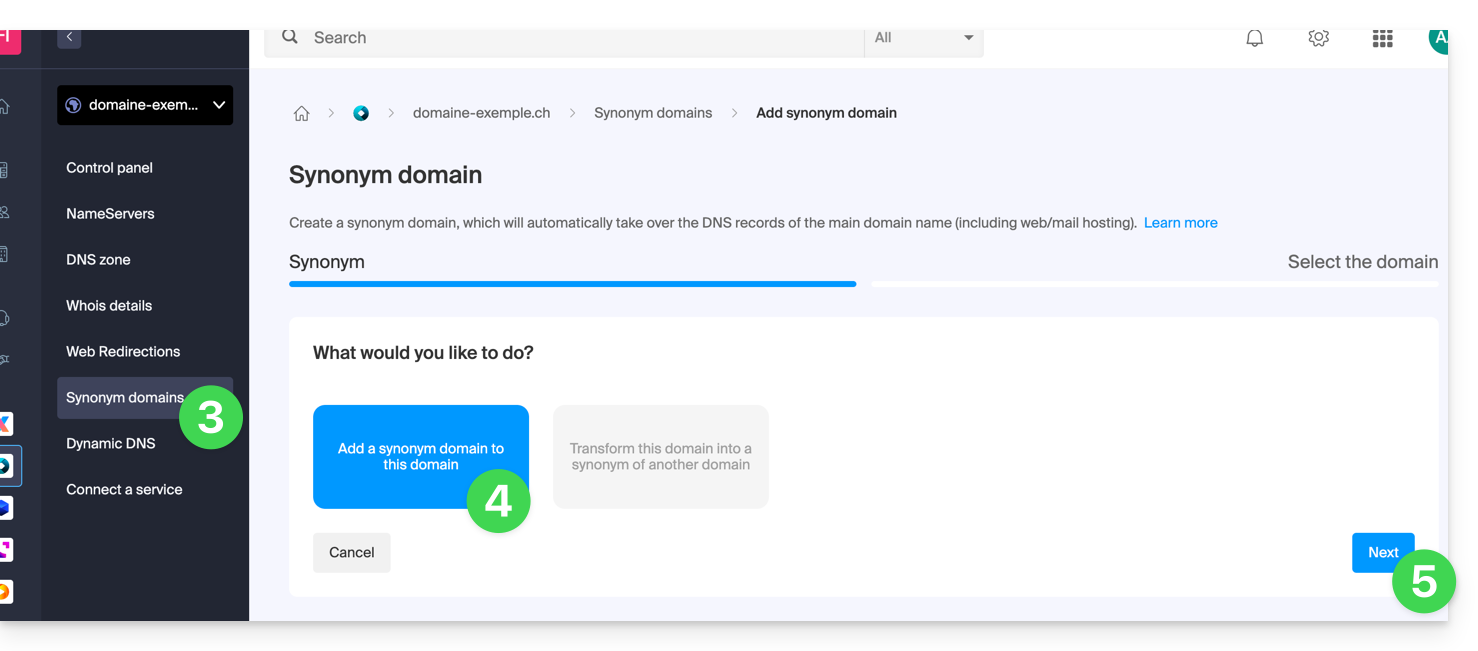
This guide explains how to add a synonym domain to a domain name.
Preamble
- A synonym domain is a domain name that can serve as a secondary name for another domain.
- When a synonym domain is added, it automatically inherits the content of the DNS zone of the main domain (including
MX,A, etc. records), as well as its Web and Mail hosting. - Alternatively, you can also add a (domain) alias to a website or add a (domain) alias to a Mail Service.
Add a synonym domain to a domain
Prerequisites
- The domain name of the future synonym or the management of its DNS zone…
- … must be reserved with Infomaniak,
- … must be configured with the Infomaniak DNS,
- … must not be linked to any product yet.
- The domain name on which the synonym will be placed…
- … must not be associated with the Infomaniak Newsletter product.
To access your domain names:
- Click here to access the management of your product on the Infomaniak Manager (need help?).
- Click directly on the name assigned to the product in question.
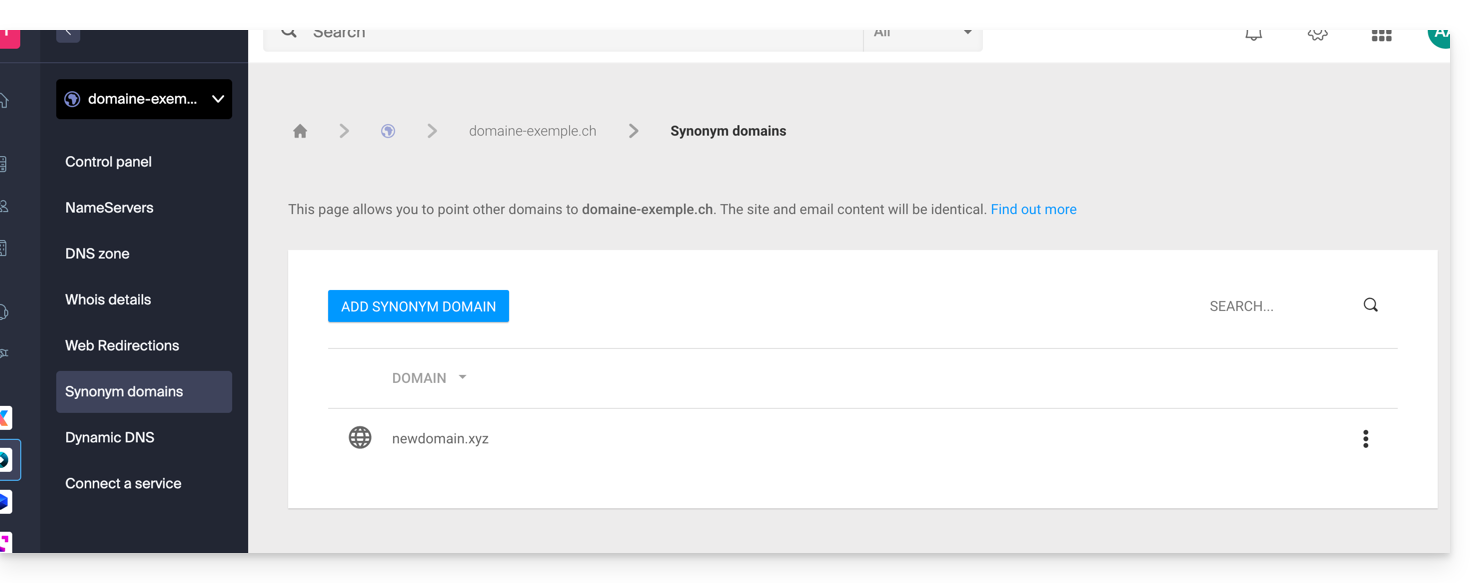
- Click on Synonym Domains in the left sidebar.
- Choose to add a synonym.
- Click on Next:
- Choose an existing domain in the current Organization, or order a new domain in advance.
- Click the button to Confirm:

- That's it:
Refer to this other guide if you are looking for information to dissociate a synonym domain name.
Link to this FAQ:
Has this FAQ been helpful?