Knowledge base
1000 FAQs, 500 tutorials and instructional videos. Here, there are only solutions!
This guide explains how to use the screen sharing feature of kMeet, Infomaniak's ethical and free video conferencing solution.
Prerequisites
- Have the desktop app kMeet (desktop application for macOS / Windows) or the mobile app kMeet (application for smartphone or Android tablet).
- The Web app kMeet (online service kmeet.infomaniak.com) is also compatible.
- Screen sharing is not yet possible with the mobile iOS app.
- If this is your first time using the app or sharing your screen, the permissions requested by the operating system (macOS, Windows, etc.) or a browser such as Chrome, Edge, Firefox, etc., may require a restart of the application and, consequently, an interruption of the meeting.
It's best to prepare the technical aspects in advance to avoid finding yourself in a difficult situation during the broadcast; refer to this other guide for more information.
Start screen sharing
To start sharing your screen:
- Click here to access kMeet in your Infomaniak kSuite (or launch the mobile/desktop app — ❓: help).
- Start a meeting (❓: help) or join one (❓: help).
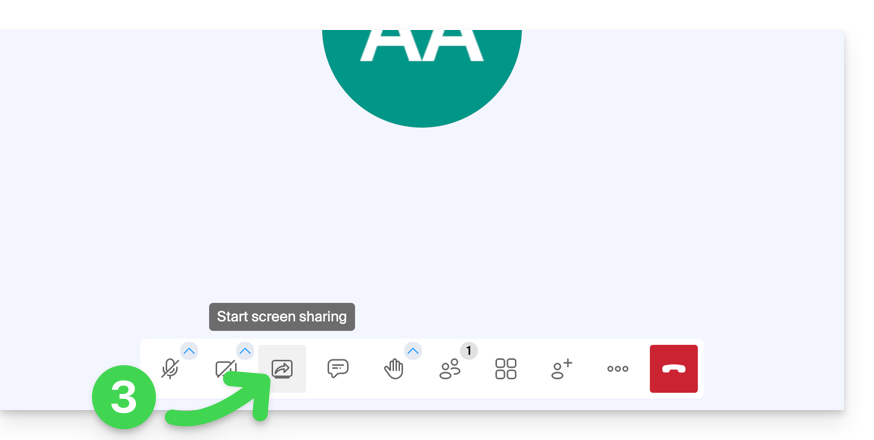
- Click on the screen sharing icon to Share your screen:
- Read any warning message displayed by your device and grant permission to access the screen content.
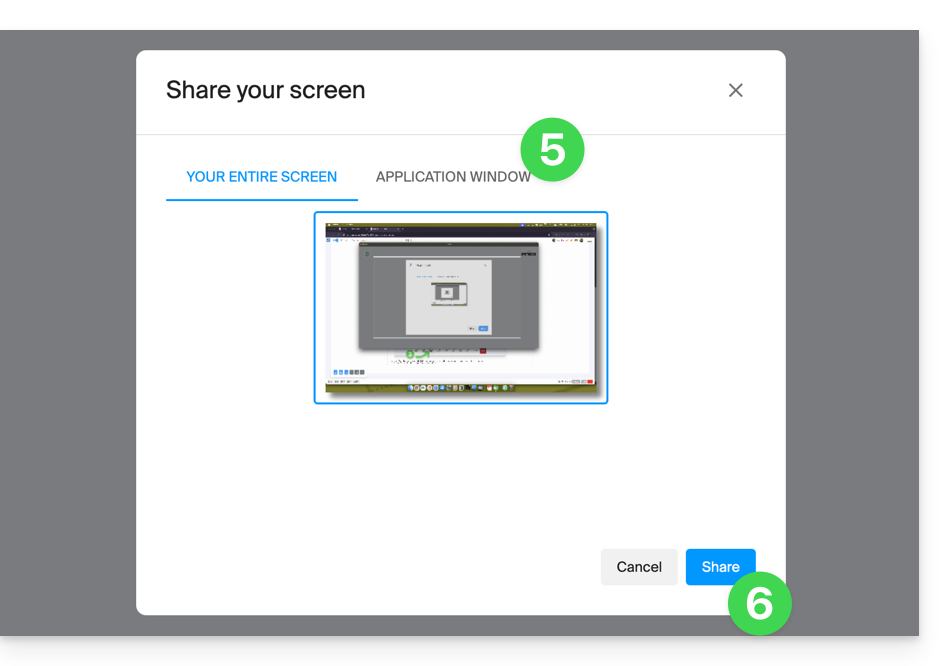
- By default, the entire screen will be shared in the next step, but you can also choose a specific window, such as that of an application, to restrict participants' view to a specific activity on the device.
- Note that if the purpose of sharing is to allow participants to interact by drawing, you must choose to share the entire screen.
- Click the button to start sharing:
- To stop the broadcast, click the toolbar icon again.
Link to this FAQ: https://faq.infomaniak.com/2477
Has this FAQ been helpful?
This guide details how to manually back up data using the FileZilla application (macOS / Windows / Linux) via the SFTP protocol to Swiss Backup, the backup solution in a Swiss independent cloud.
Introduction
Configure FileZilla
Prerequisites
- Have an Swiss Backup Infomaniak account with an available device quota (minimum 1) for a Cloud backup.
- Add 1 device of type Cloud to obtain the SFTP parameters.
- Download and install FileZilla (macOS / Windows / Linux).
To configure a new backup:
- Fill in the fields according to the information specific to your device (refer to this other guide):
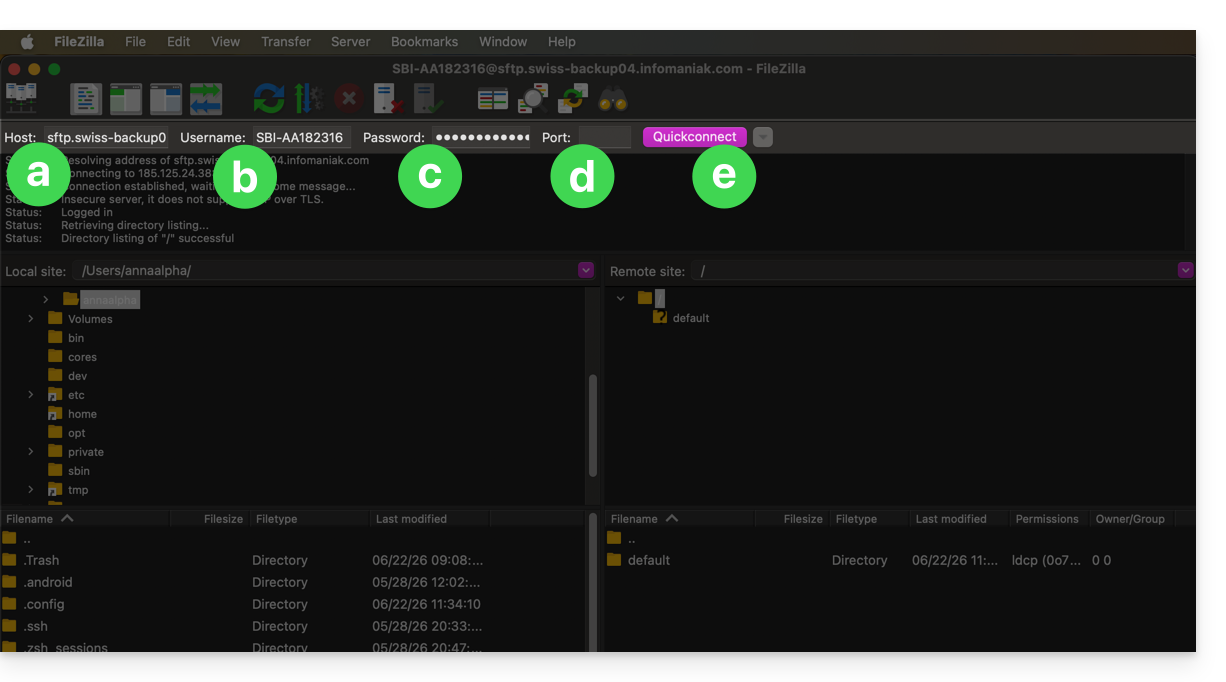
- Host:
sftp.swiss-backup02.infomaniak.com - Username: Swiss Backup device name (e.g.
SBI-MS0020) - Password: Password generated via the email received after creating the Swiss Backup device
- Port:
22 - Click on Connect
- Host:
FileZilla also allows you to configure connections so that you don't have to re-enter your login credentials:
- Click on the Site manager icon.
- Click on New site:
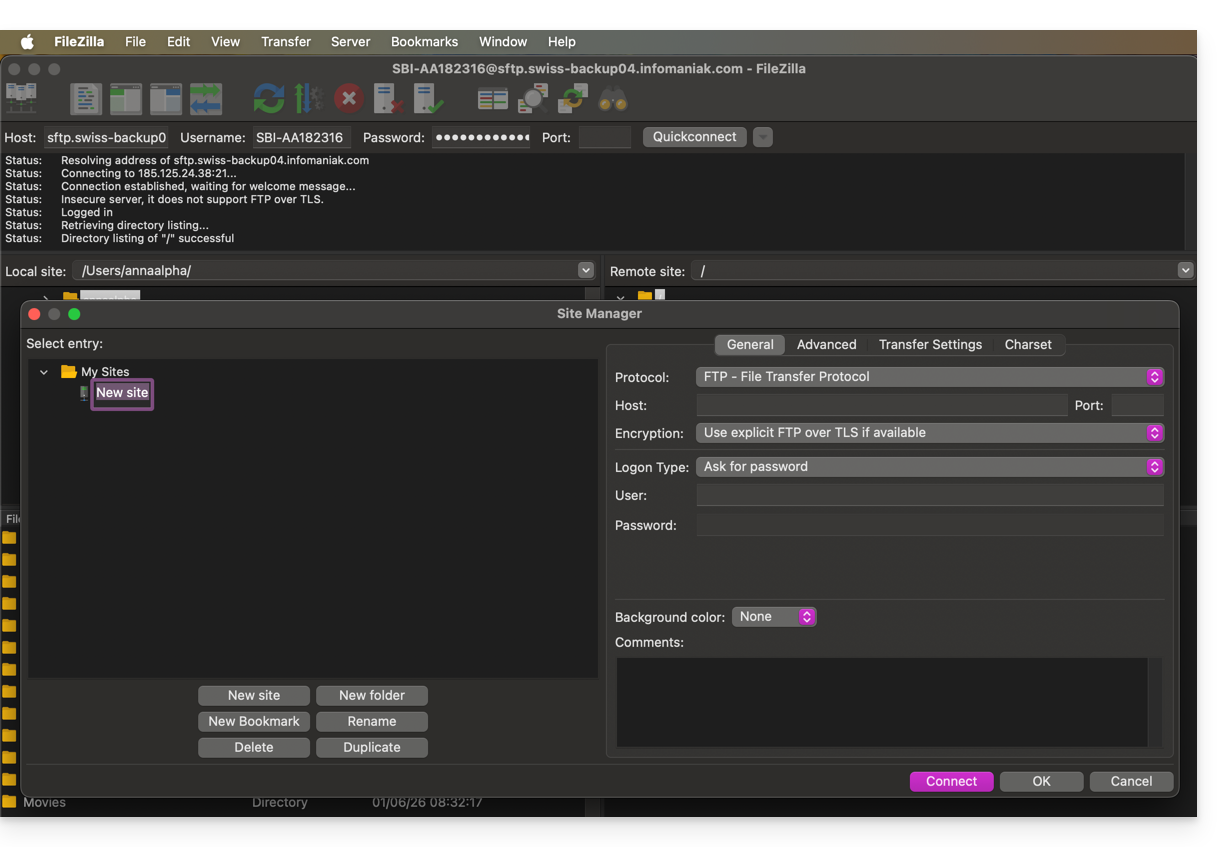
- Fill in the fields according to the information specific to your device.
The SFTP connection is recommended to ensure that data is transmitted securely.
- Cliquez sur l'icône Site manager.
- Cliquez sur Nouveau site:
- Renseignez les champs selon les informations propres à votre appareil.
La connexion SFTP est recommandée pour que les données soit transmises de façon sécurisées.
Link to this FAQ: https://faq.infomaniak.com/2547
Has this FAQ been helpful?
This guide explains how to create events with multiple dates (within the Infomaniak ticketing system).
Create a multi-date event
To do this:
- Click here to access your product management interface in the Infomaniak Manager (need help?).
- Click directly on the name of the relevant ticketing system.
- Click on Programming in the left-hand menu.
- Click on Events in the left-hand menu.
- Click on the Add event button.
- In the Date and Location step, you can select the Multiple occurrences option:
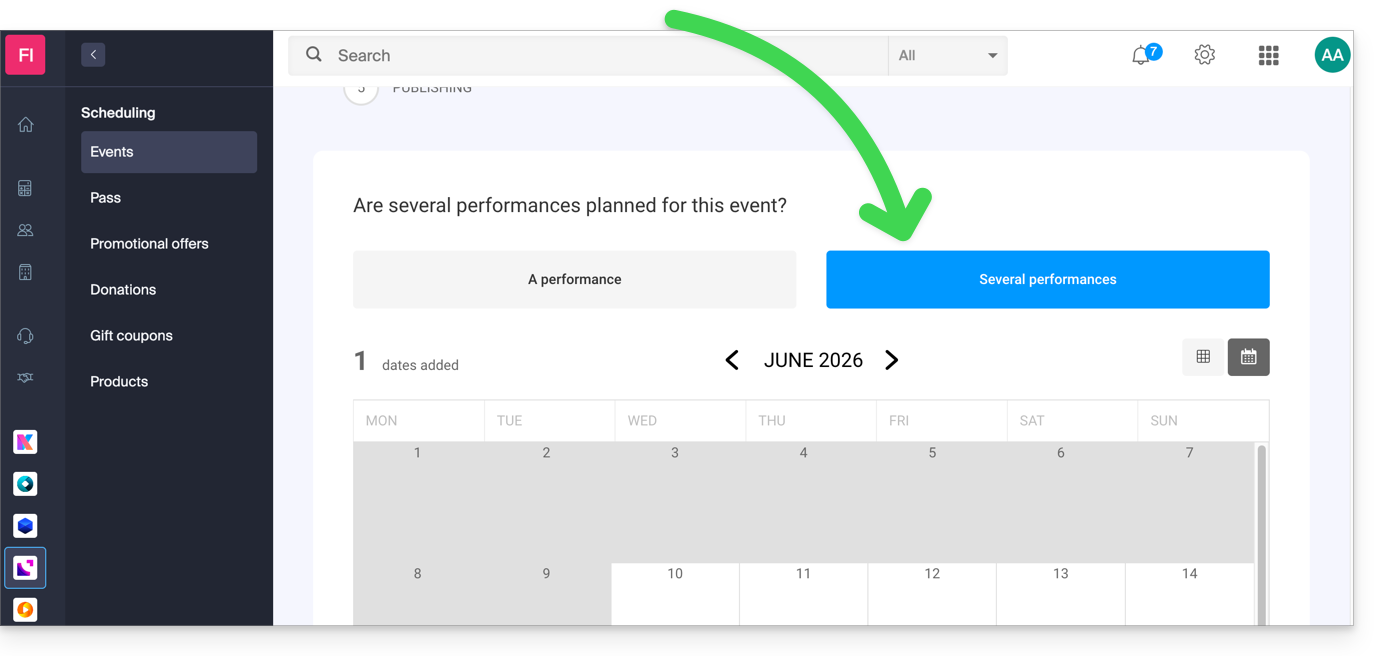
- An interface displaying a calendar appears; choose the start date of the event.
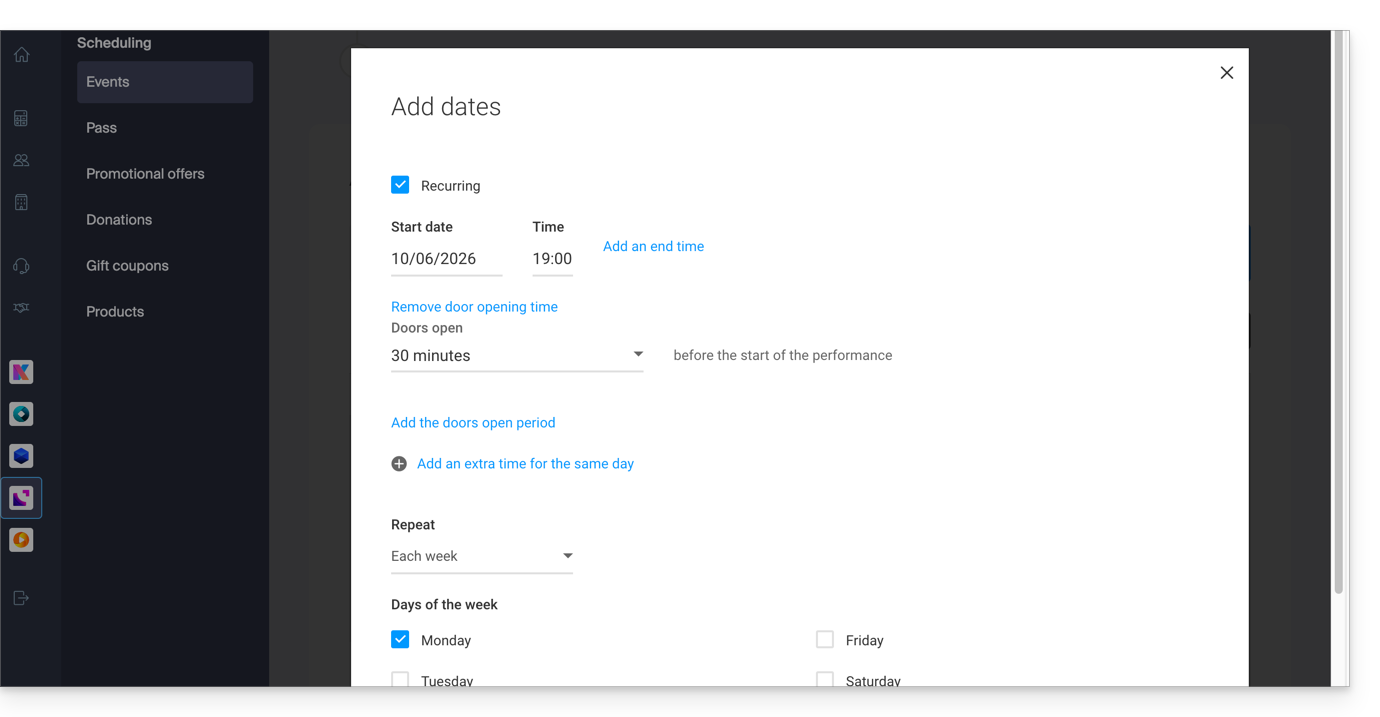
- You can specify whether the event lasts for several days, weeks, or months, or whether it recurs several times in the same day:
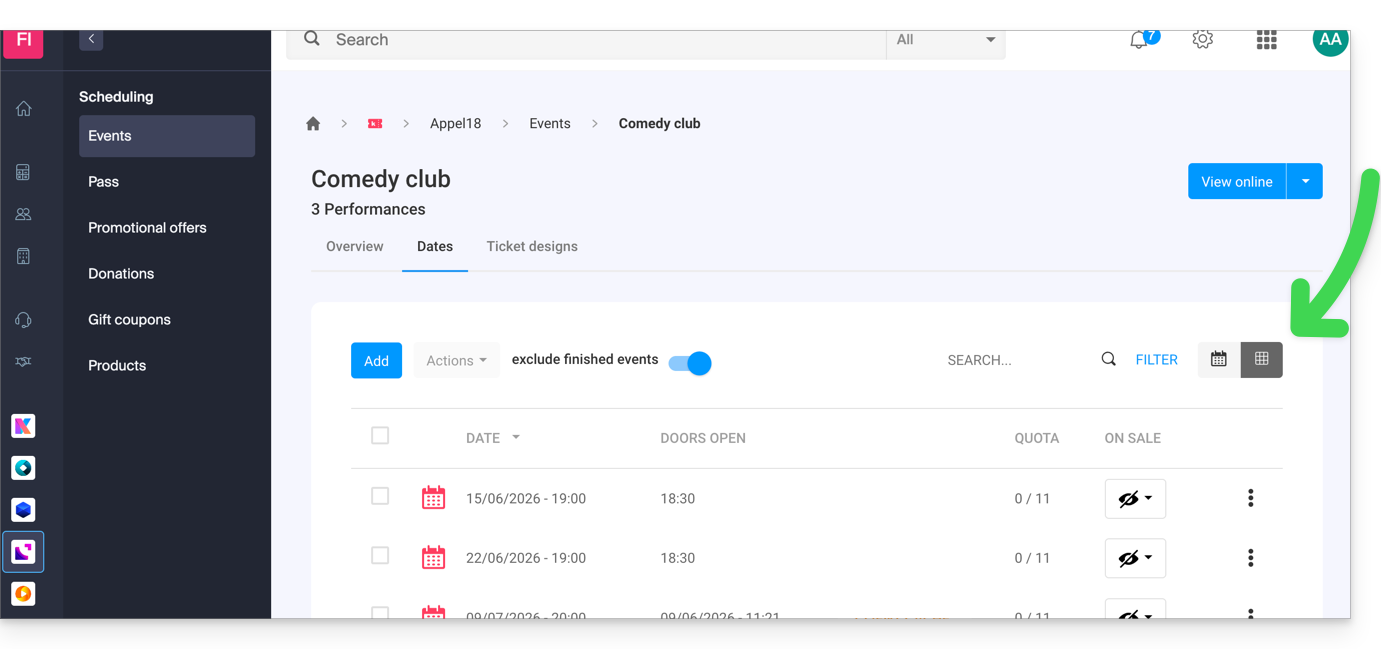
- Once the event is created and open for sale, you can track the progress of orders for each date using a List view:
Link to this FAQ: https://faq.infomaniak.com/2574
Has this FAQ been helpful?
This guide details what you can search for in the Infomaniak Mail web app (online service ksuite.infomaniak.com/mail) or other kSuite services.
Introduction
- For information on searching in kDrive, please refer to this other guide.
Search for an email
On ksuite.infomaniak.com/mail, type the term you want to find in the search bar at the top of the page.
The search will be performed within the email address specified in the left sidebar(to search across multiple email addresses at once, use an IMAP email client to which you connect your different addresses):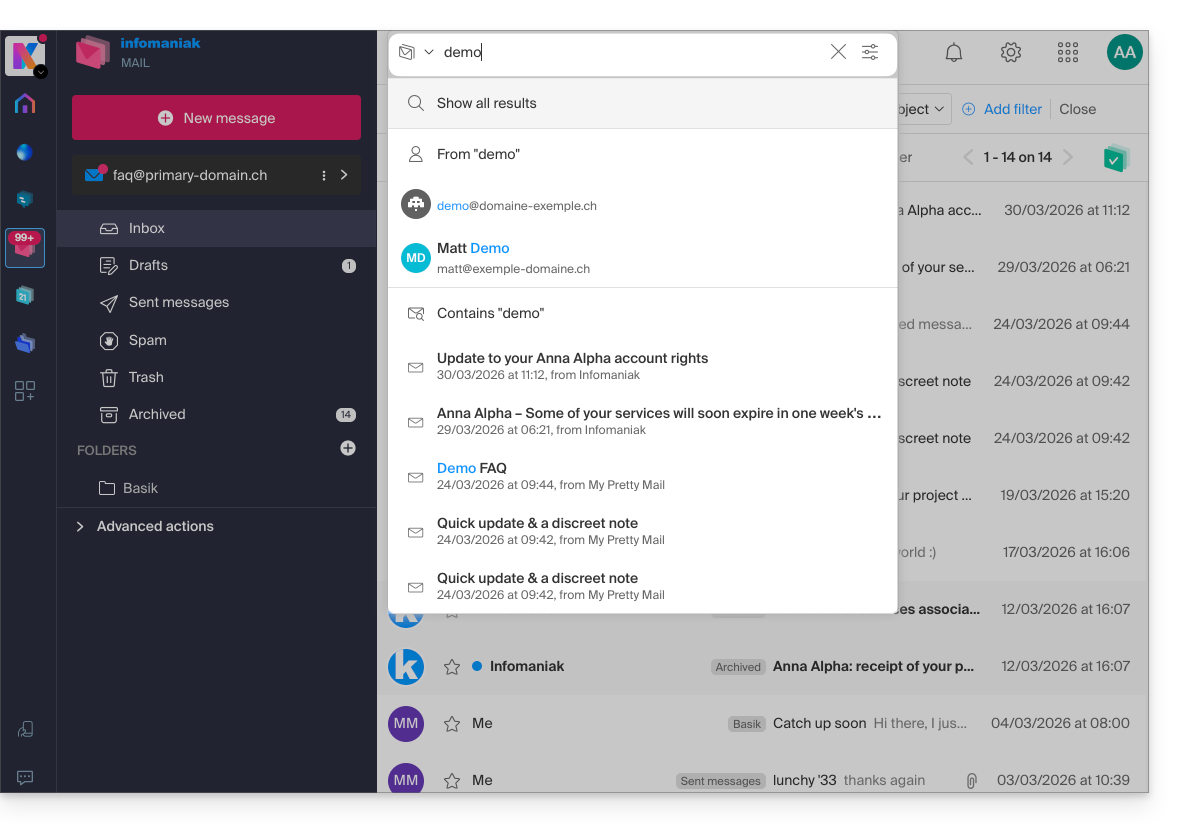
Advanced search is accessible to the right of the search field at the top of your Mail: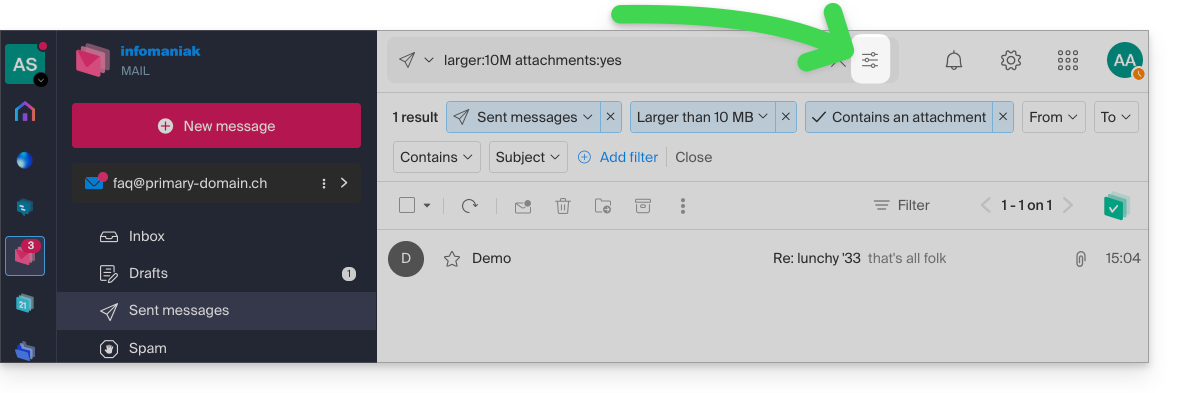
You can search for content…
- either in the body of the message,
- either in its subject,
- or among its senders/recipients…
You can also filter the search by message size and by whether or not it contains an attachment.
Regarding the scope of the searches:
- The content of encrypted emails is not indexed (except for the email subject).
- The content of attachments, as well as their name, is not indexed: therefore, it is not possible to find an email by searching for the name of the file that was attached to it.
- The "Search all emails" function does not include the Trash or Spam folder:
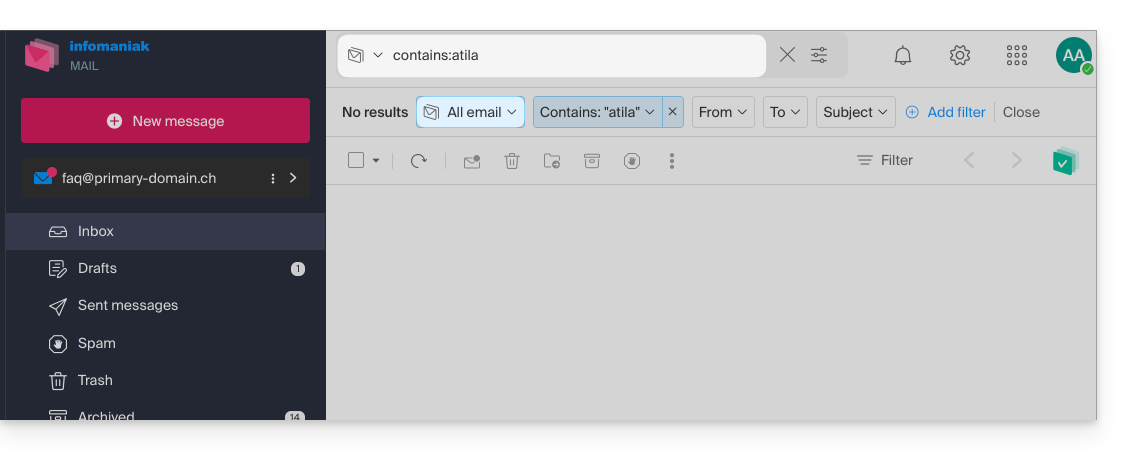
- If a global search returns no results, the email may be in one of these two folders.
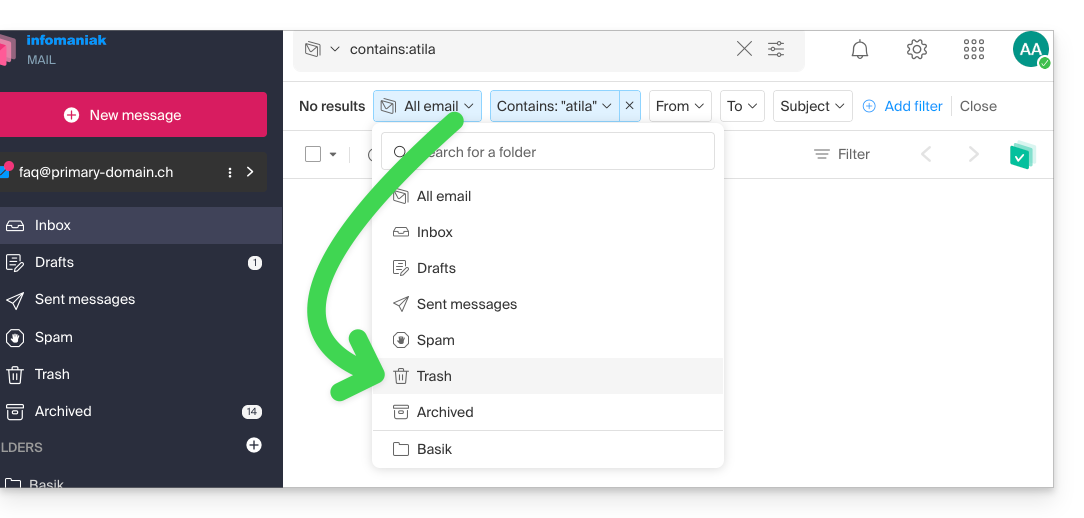
- You will then need to go specifically to the Trash or Spam folder to perform the search, or launch the search by selecting one of these two items:
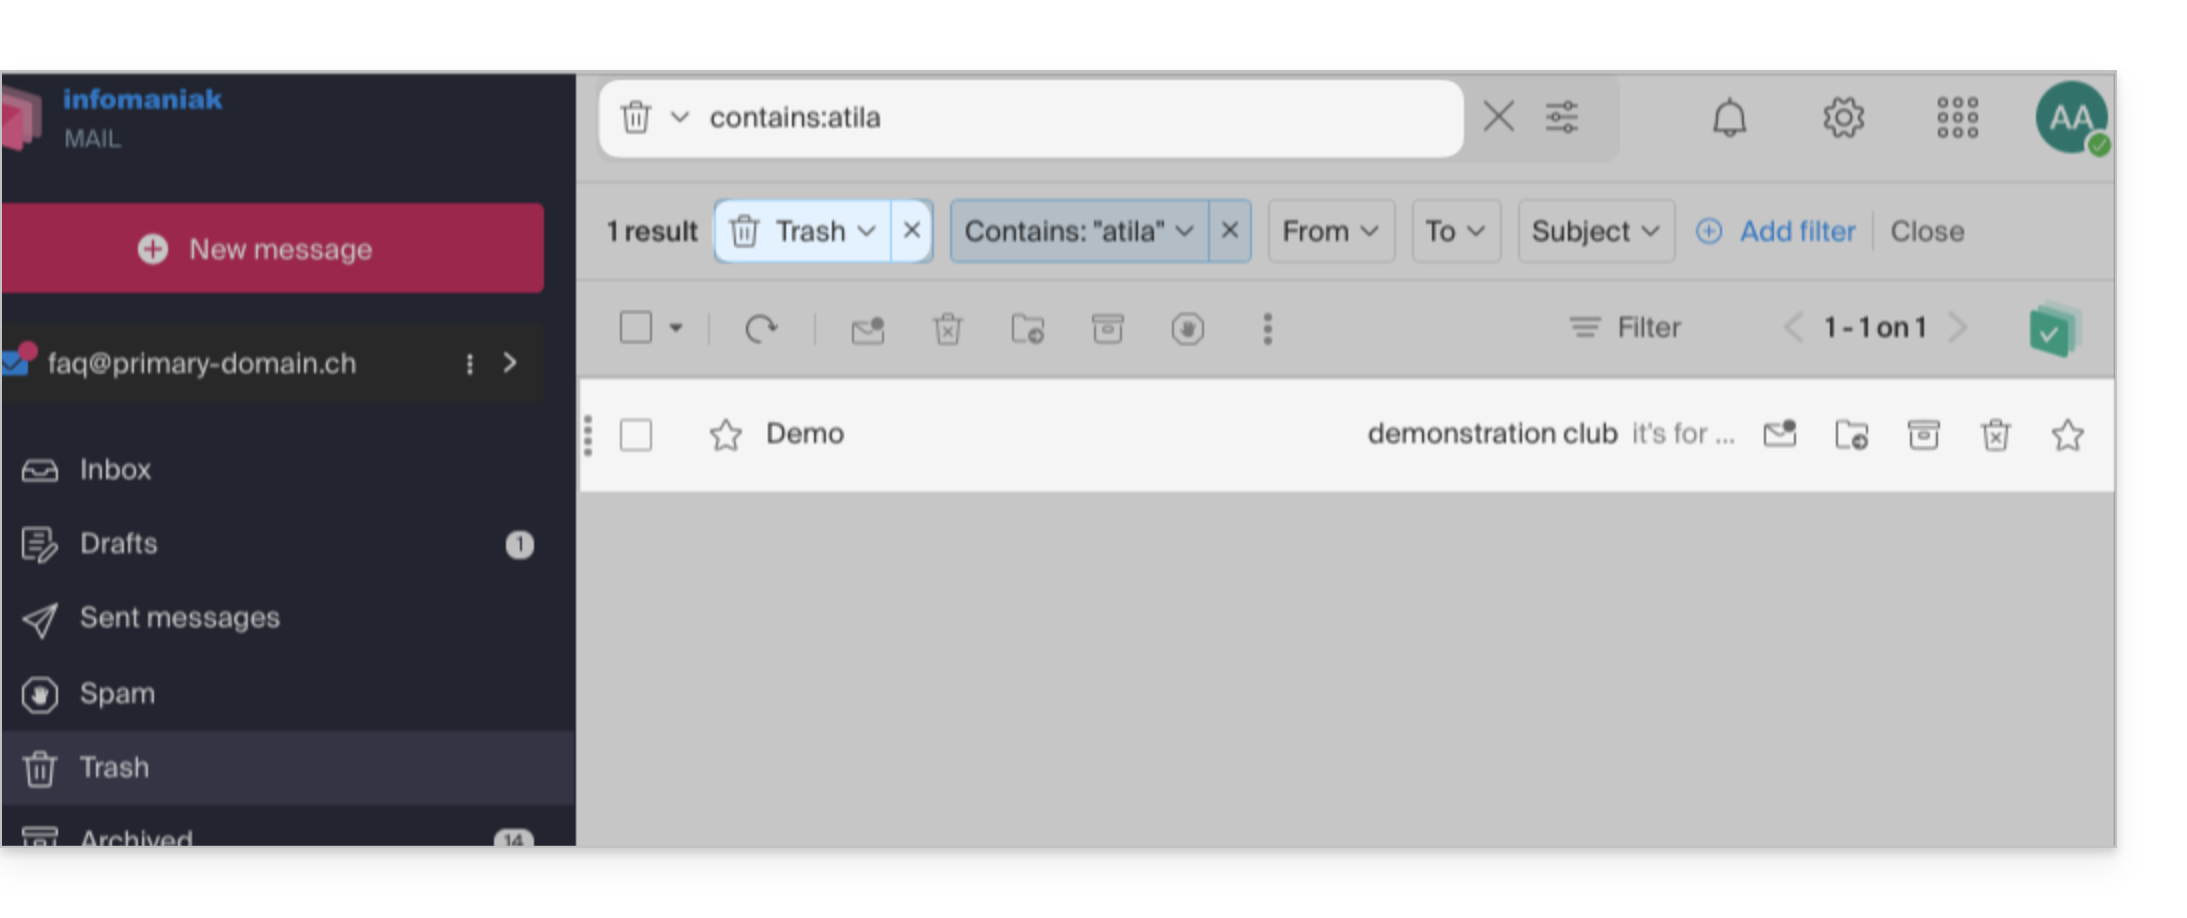
- Any items found will then be displayed:
- Similarly, if you want to find a message in a specific folder, it is best to go there first from the left-hand menu, and then launch a search.
To search for traces of an email or to see its activity, you can also search in the logs of an email address.
Email search with a software/email client
To find out how your specific email application performs searches, consult its documentation. For example, desktop apps such as Thunderbird and Outlook can synchronize messages locally and perform local searches, while other applications may prefer searching on the IMAP server. In this case, the software/email client sends a search command to the server, which then searches through all messages stored on the server and returns the results to the software/email client.
Search for a contact in your address books
The search is performed automatically across all your address books, groups, and contacts, using the search field at the top of the ksuite.infomaniak.com/contacts interface: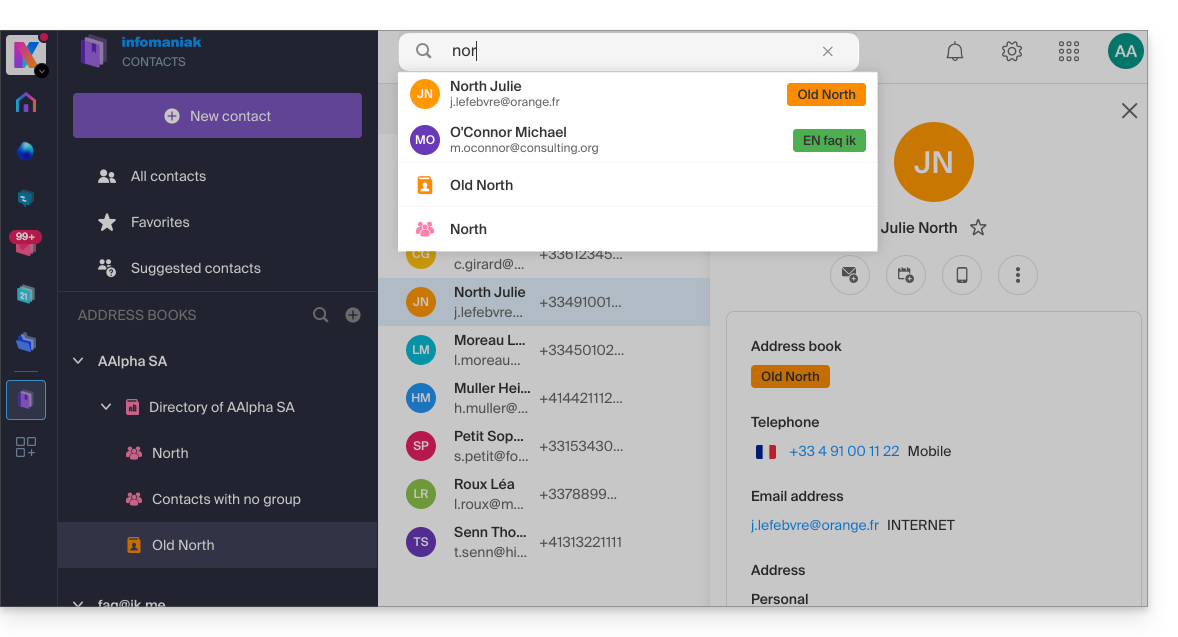
Search for an event in your calendars
Searching for an item on ksuite.infomaniak.com/calendar automatically searches through all your calendars, events, rooms, including the description of these, and the people associated with them (if you click on a contact, you will see the events you have in common with that contact):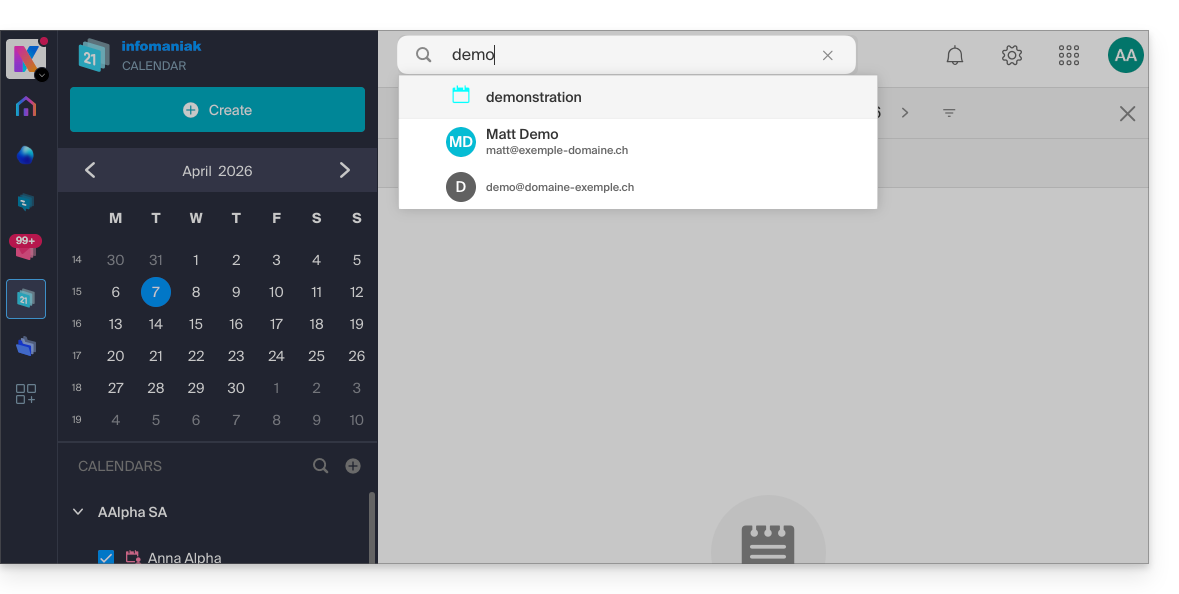
Search in kChat
To search for an item on ksuite.infomaniak.com/kchat, use the main search field to find messages, replies, or file content: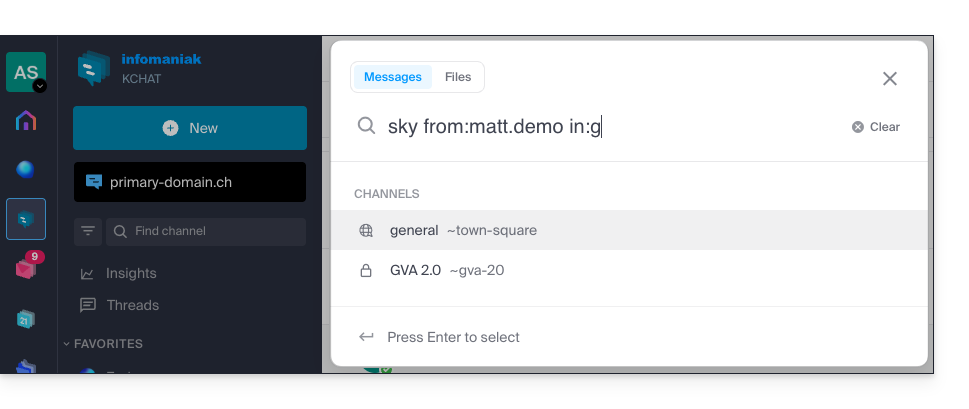
To refine your search results, several search modifiers are available:
from:: to find messages sent by a specific user (e.g.,from:jean.dupont).in:: to restrict the search to a specific public channel, private channel, or direct message (e.g.,in:channel-name).before:,after:,on:: to target a specific date (in YYYY-MM-DD format) or period (e.g.,on:2026-09-01).
Exclude a channel or terms from a search (exclusions)
It is possible to exclude certain search results by using the hyphen - before a term or modifier. This is an extremely useful feature for filtering out irrelevant results:
- Exclude a channel: add
-in:channel-nameto your query to completely exclude results from that channel. - Exclude a word: type
test -releaseso that the results include the term "test" while excluding messages containing "release". - Exclude a user: type
-from:userto hide messages sent by that specific person.
You can perfectly combine these exclusions. For example, the search test -release -in:release-discussion -from:anna will find the word "test", excluding the word "release", completely ignoring the "release-discussion" channel, and excluding messages from the user “anna”.
Link to this FAQ: https://faq.infomaniak.com/1733
Has this FAQ been helpful?
This guide explains how to install the Acronis Agent on macOS for Swiss Backup, even if the Gatekeeper application attempts to block the installation and causes the error “Unable to open install.pkg because Apple cannot verify that it does not contain malicious software”.
Allow Acronis in Gatekeeper
To do this:
- Open the
install.pkgfile from Acronis so that the error message appears. - Go to System Preferences (in the Apple menu).
- Choose Security and privacy, then the General tab if necessary.
- A text will appear about
install.pkg; click Open anyway. - Confirm your decision to open the file by clicking the appropriate button.
Link to this FAQ: https://faq.infomaniak.com/2402
Has this FAQ been helpful?
This guide presents the benefits of kSuite (Standard, Business, Enterprise), the suite of productivity and online collaboration tools developed in Switzerland by Infomaniak.
Introduction
- kSuite simplifies user management for businesses and consolidates your products into a single invoice with a single due date.
- It also includes advanced user management for all the applications you need to collaborate online.
- You choose the domain name, and kSuite is then configured based on your needs in terms of the number of users and storage space.
- kSuite is a bundled offer that can be upgraded to a higher tier at any time.However, it is not possible to switch to a lower-priced plan later, nor is it possible to transfer kSuite to another Organization.
- The products included in kSuite cannot be moved or cancelled independently of each other.
- To help you identify the kSuite plan that best suits your needs, please refer to this other guide.
Choosing kSuite over individual apps
The question of whether to choose kDrive and/or Mail separately, as standalone products, rather than the kSuite, may indeed arise.
kSuite is more cost-effective, simplifies user management for businesses, and groups all your products into a single invoice with a single due date. This offer is recommended if you own or would like to have a domain name that will be associated with it.
It also includes advanced and unified user and team management, as well as kChat, which cannot be ordered separately.
Here are some other points:
- unlocked features
- single invoice
- address book & dynamic calendar for the Organization
- larger disk storage (per user)
- Custom Brand offered with kSuite Enterprise
In summary, choosing this suite of web tools rather than individual applications offers advantages in terms of integration, simplified management, real-time collaboration, multi-platform accessibility, and flexibility. These advantages can improve your efficiency, productivity, and overall user experience.
Products included in kSuite
On your ksuite.infomaniak.com interface, you can access: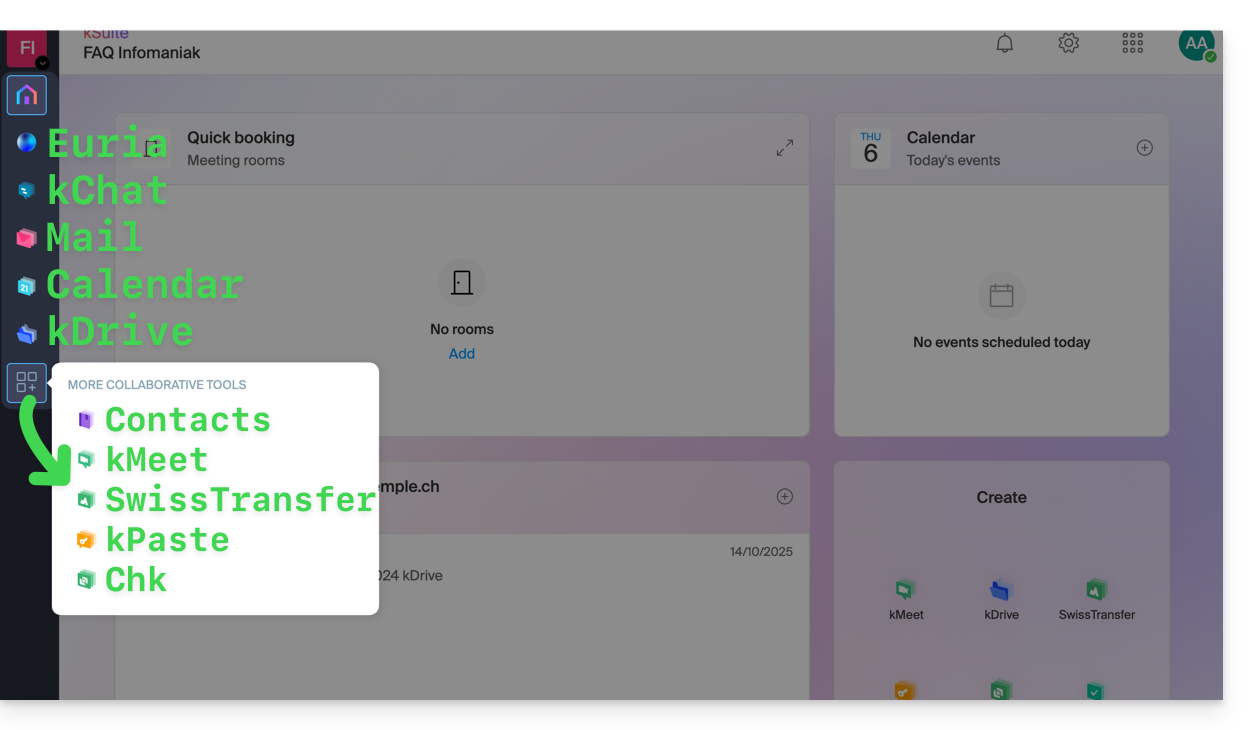
Create, communicate, plan, collaborate, share…
- Euria
- kChat
- A Mail Service (even if you already have a Mail Service)
- Calendar
- kDrive (even if you already have a kDrive)
And also:
Management
- The Manager interface with Custom Brand included or available as an option, depending on the plan.
Are you a Partner or would you like to become one in order to resell kSuite?
Link to this FAQ: https://faq.infomaniak.com/80
Has this FAQ been helpful?
This guide concerns kSuite and the possibility for users to define a status and manage the display of their presence or absence.
Introduction
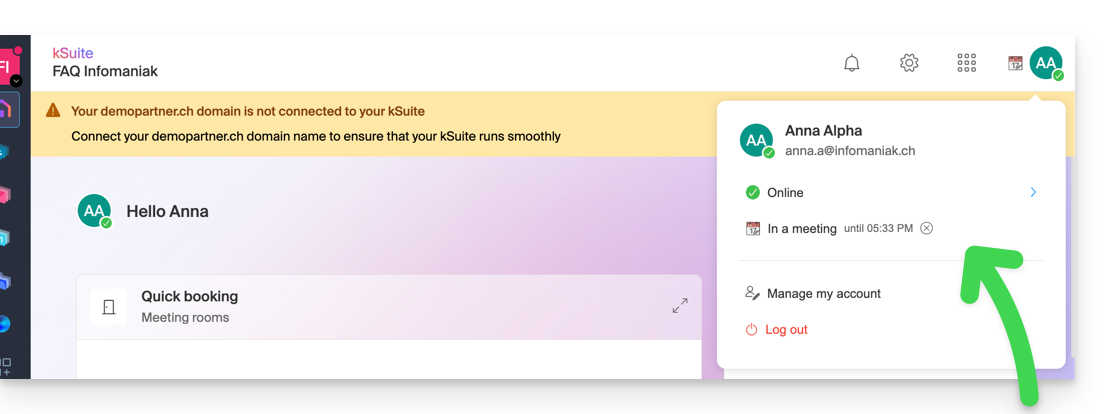
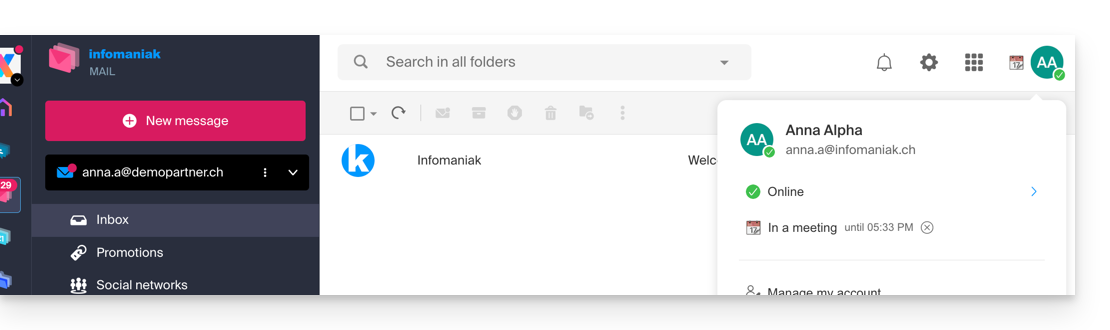
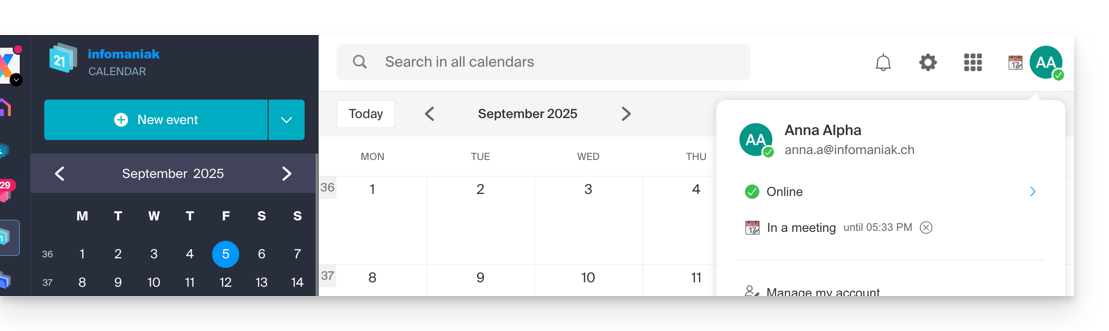
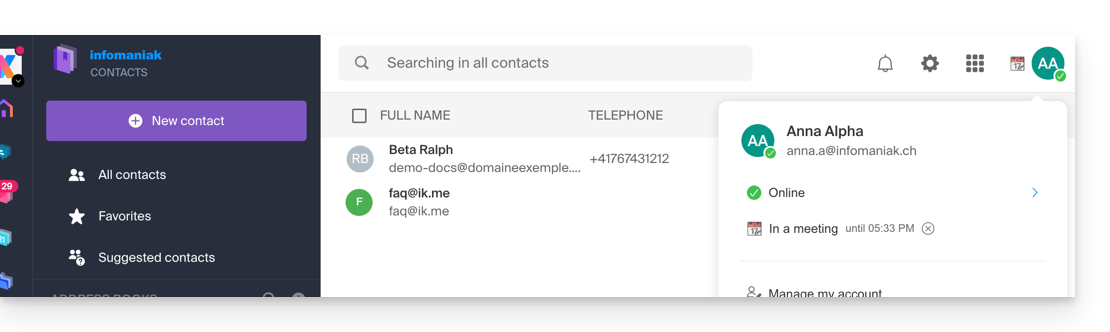
- Once defined, your custom status is visible to users within the Organization on various pages related to kSuite:
- Home page ksuite.infomaniak.com
- Mail
- Calendar
- Contacts
- kDrive
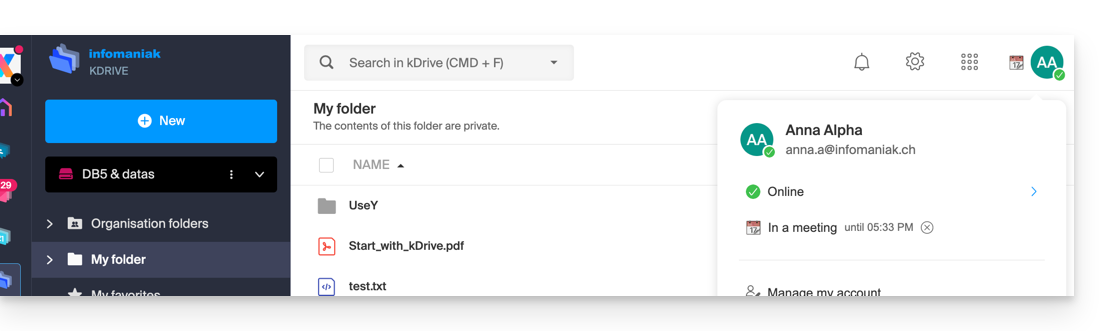
- Euria
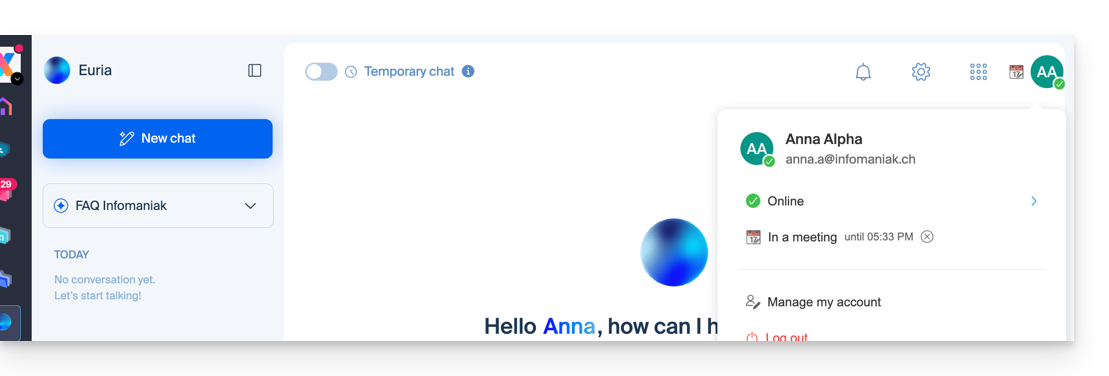
- Chk
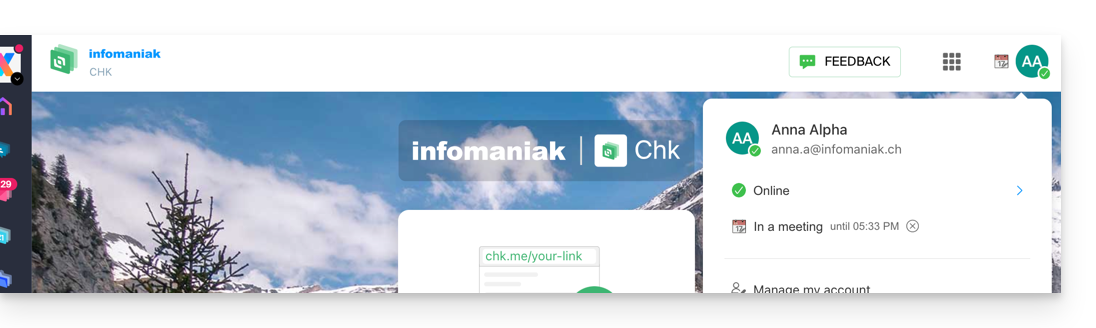
- kPaste
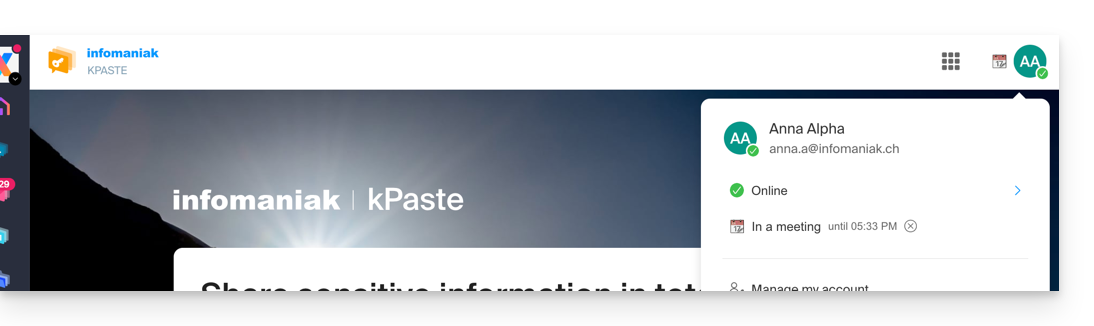
- kMeet
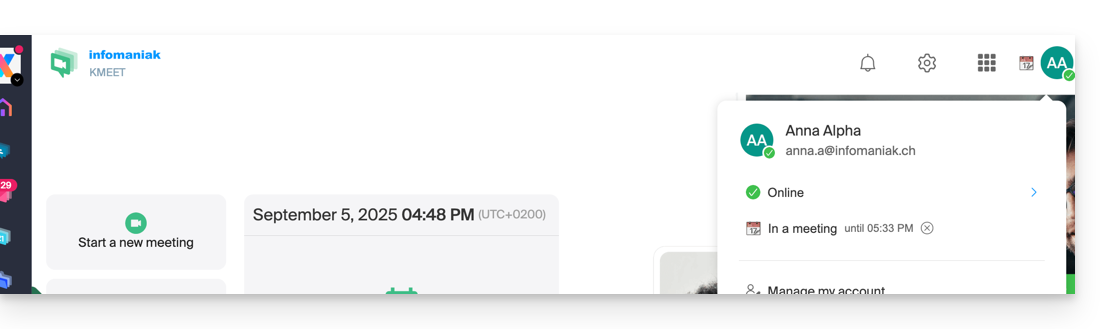
- Home page ksuite.infomaniak.com
- A presence status different from the default status, such as "Do not disturb," may affect the notifications of certain services (❓: help).
Update the kSuite profile status
To do this:
- Click here to access kSuite.
- If nothing appears after logging in, you may not be in the Organization to which your kSuite is linked (❓: help).
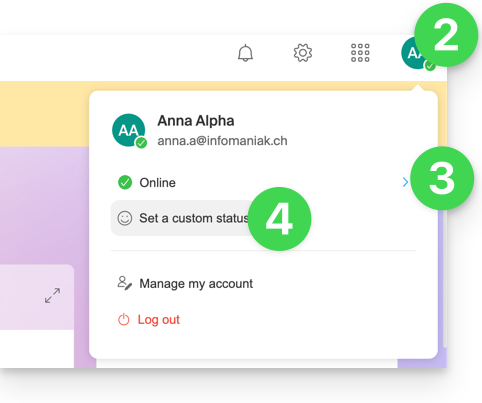
- Click on the badge with your initials/avatar in the top right corner.
- Click on Online to choose a different status if needed (away or do not disturb)…
- … or click on Set a custom status to enter a custom status or choose one from the suggestions:
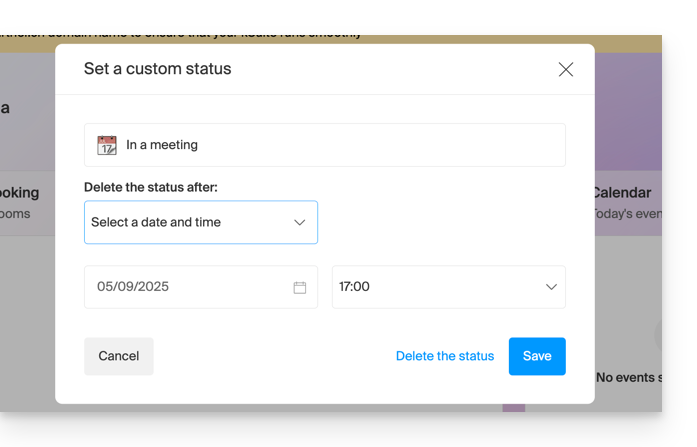
- Specify an expiration date if necessary and save:
Link to this FAQ: https://faq.infomaniak.com/1712
Has this FAQ been helpful?
This guide explains how to delete an Infomaniak account (i.e., a user account), which means removing your access to the Manager and/or the Mail web app at ksuite.infomaniak.com/mail.
Introduction
- This operation will result in the immediate deletion of your calendars and address books.
- All access to the Manager using this ID will be lost.
- This operation does not delete the email addresses accessed from the account in question (except for certain free offers, but in this case, this is specified before the deletion operation).
- If the account you are using is the only account within an Organization, you must first delete the Organization or appoint someone else in order to delete your account.
Delete an Infomaniak / Mail account
To access the user profile section:
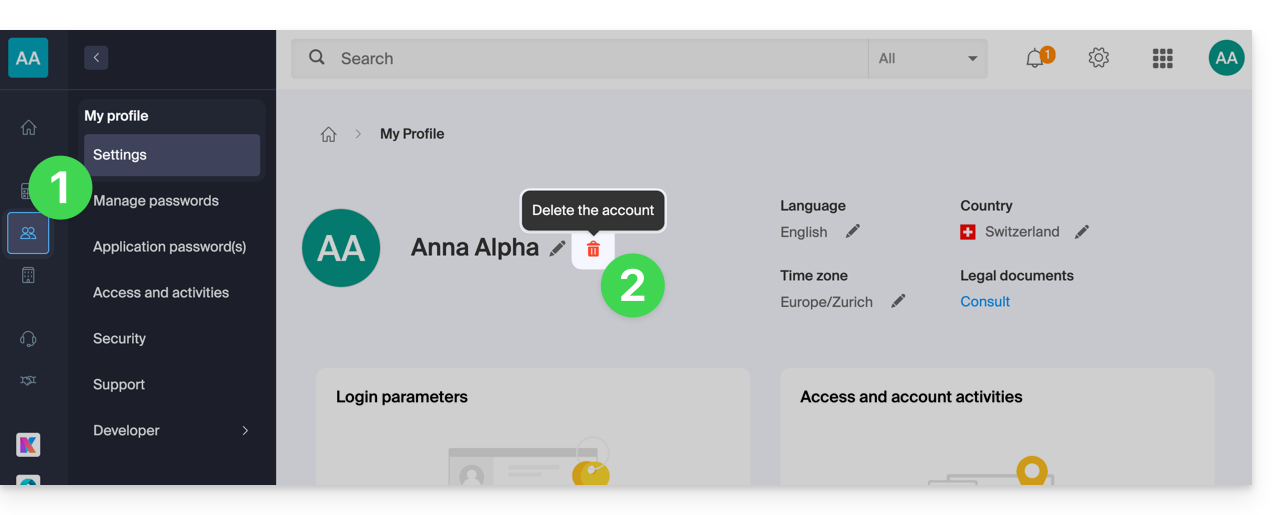
- Click here to access the My profile menu in the Infomaniak Manager.
- Click on the trash can to the right of your name to delete your account and data:
- Enter your login password one last time, and the Infomaniak account will be deleted.
Link to this FAQ: https://faq.infomaniak.com/2333
Has this FAQ been helpful?
This guide explains how to import new data into kDrive from a computer using the kDrive v4.x application, and how to proceed if the synchronized data becomes too large for your devices.
Prerequisites
- For synchronization between your devices to work when your data is updated on kDrive (new file, edited document, etc.), it is obviously necessary that:
Import files to kDrive v4.x
If you want to add files currently on your hard drive to your kDrive:
- Launch kDrive on your device: the app icon should be visible in the top right corner on macOS / Linux, and in the bottom right corner on Windows (❓: help).
- Then, in Windows Explorer or macOS Finder, open the folder defined as the storage location for your kDrive data; by default, when the application is installed, this folder is named after your kDrive.
- You will find the files belonging to your personal folder, “My folder”, in the root directory.
- The
Common documentsfolder corresponds to the Organization's folders and is, by default, shared with other users of this kDrive: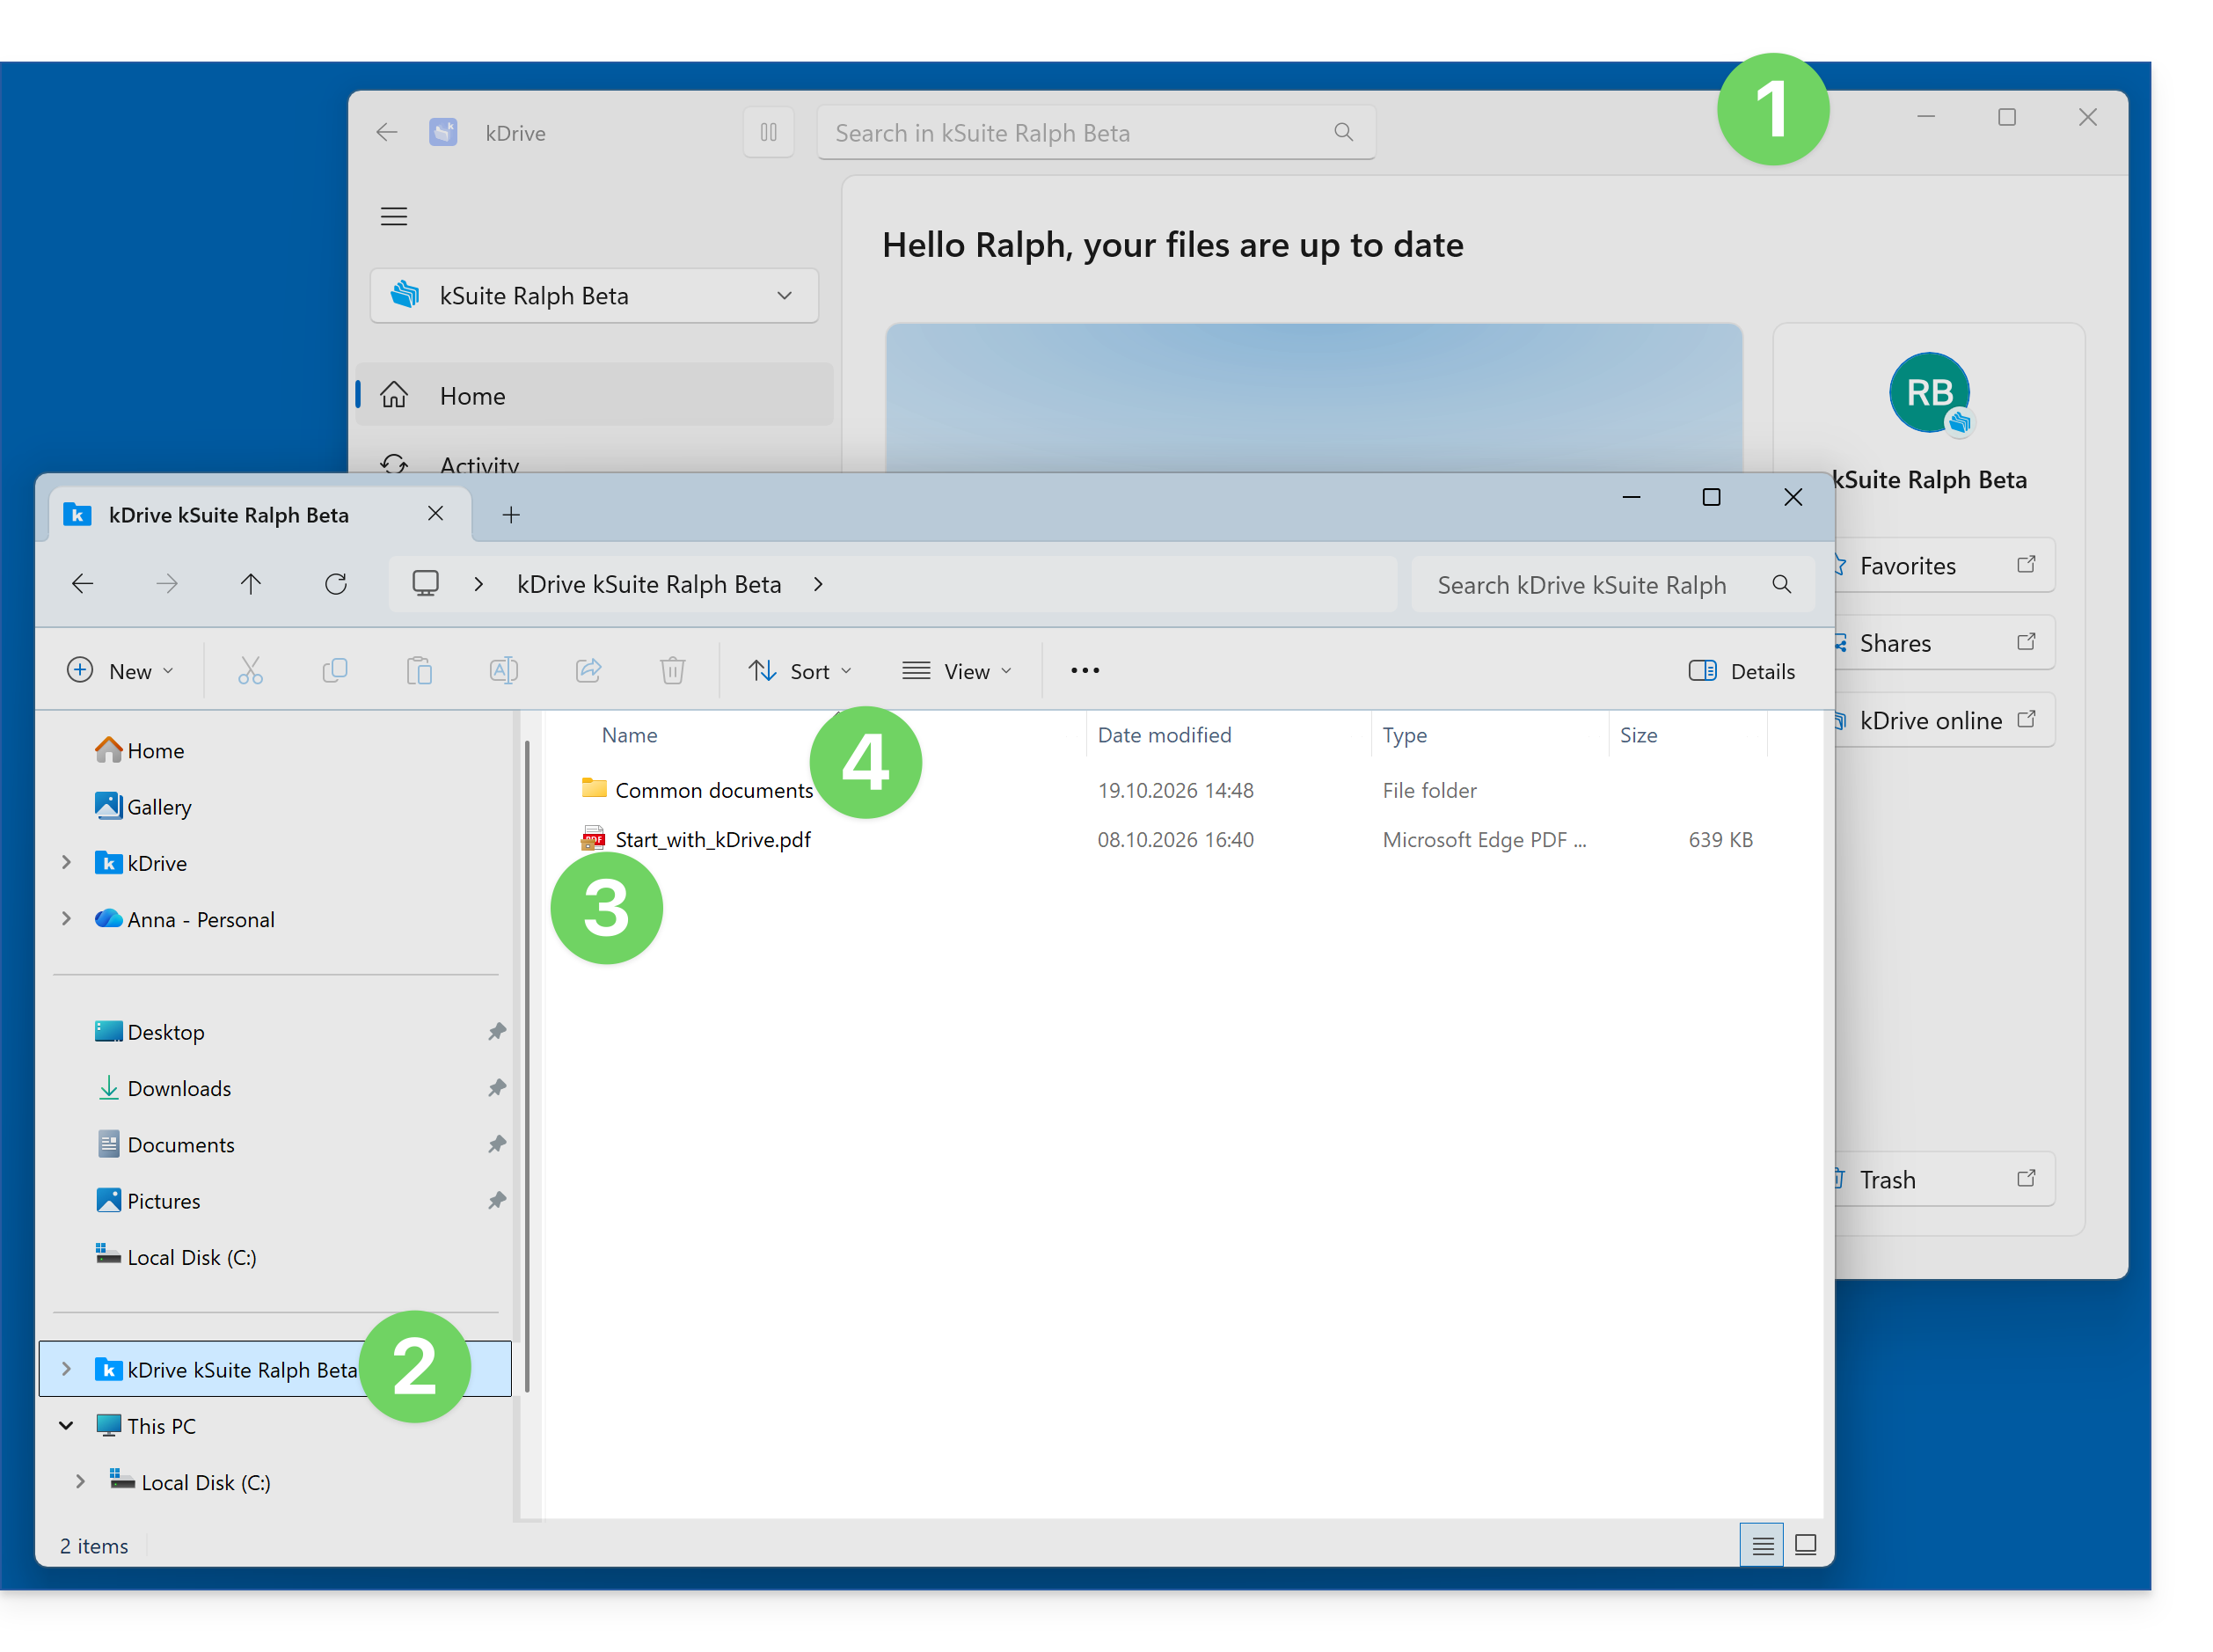
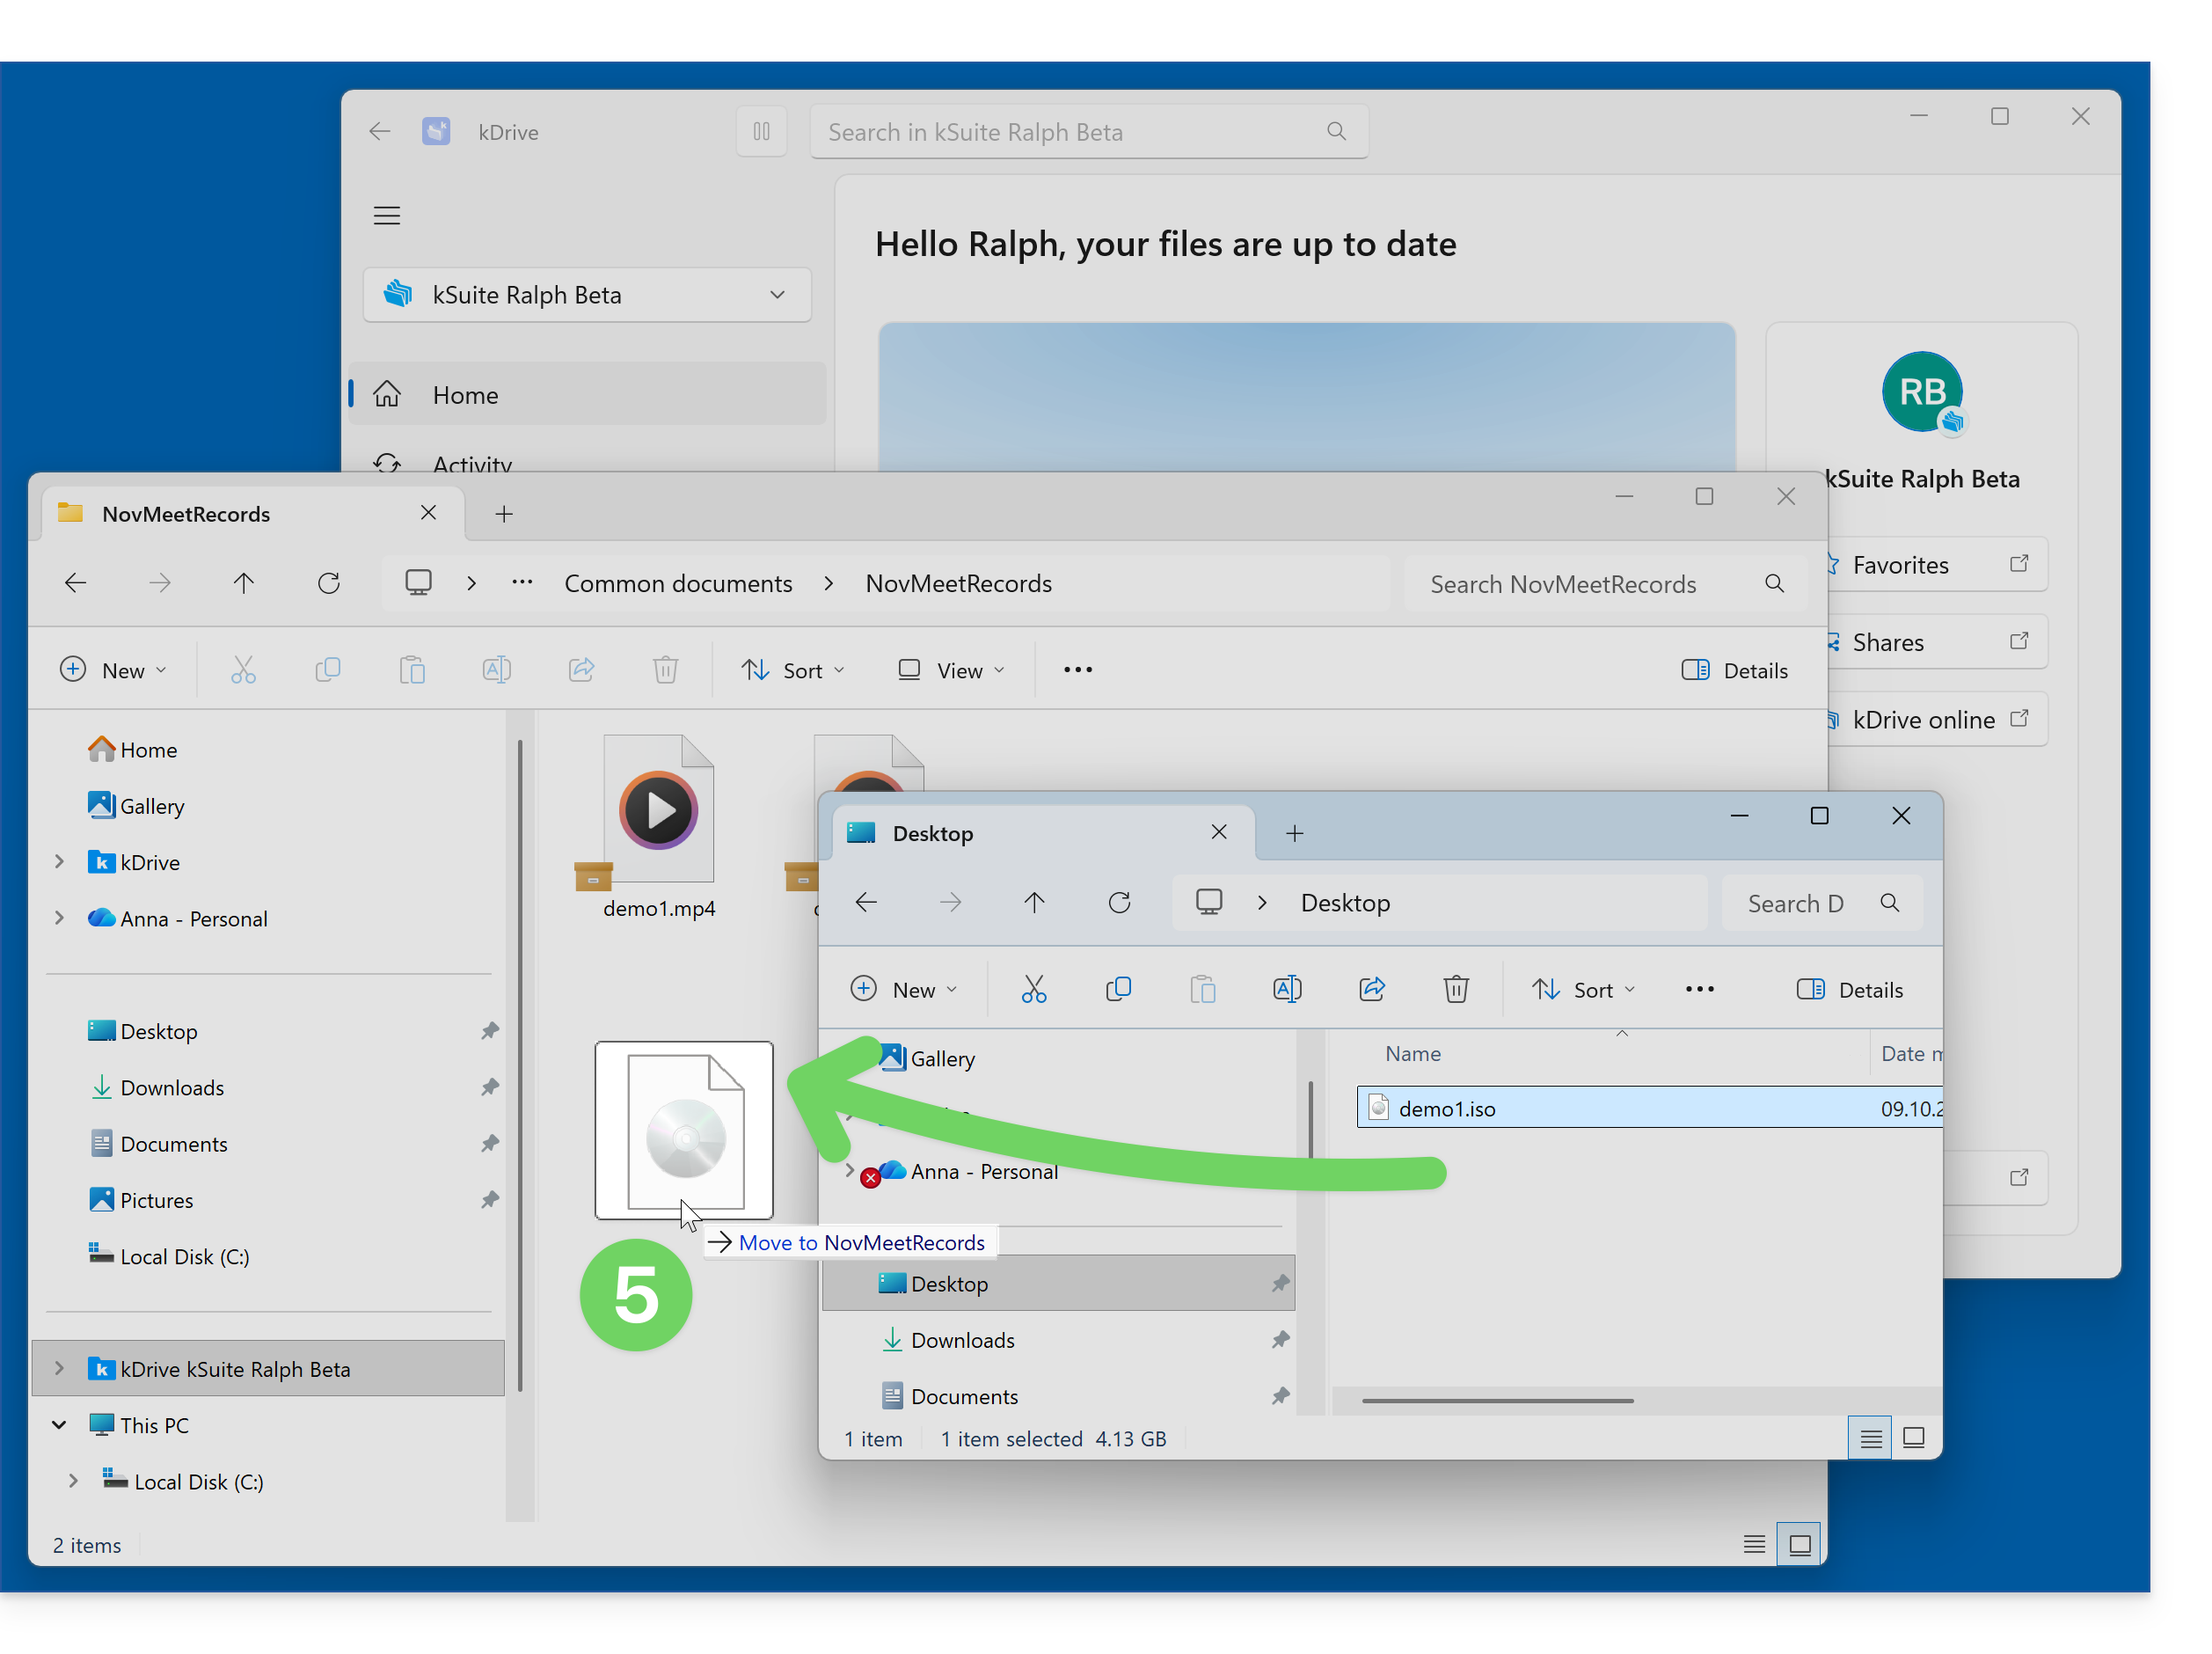
- Add your file to the desired location within your kDrive by copying or dragging it to move it:
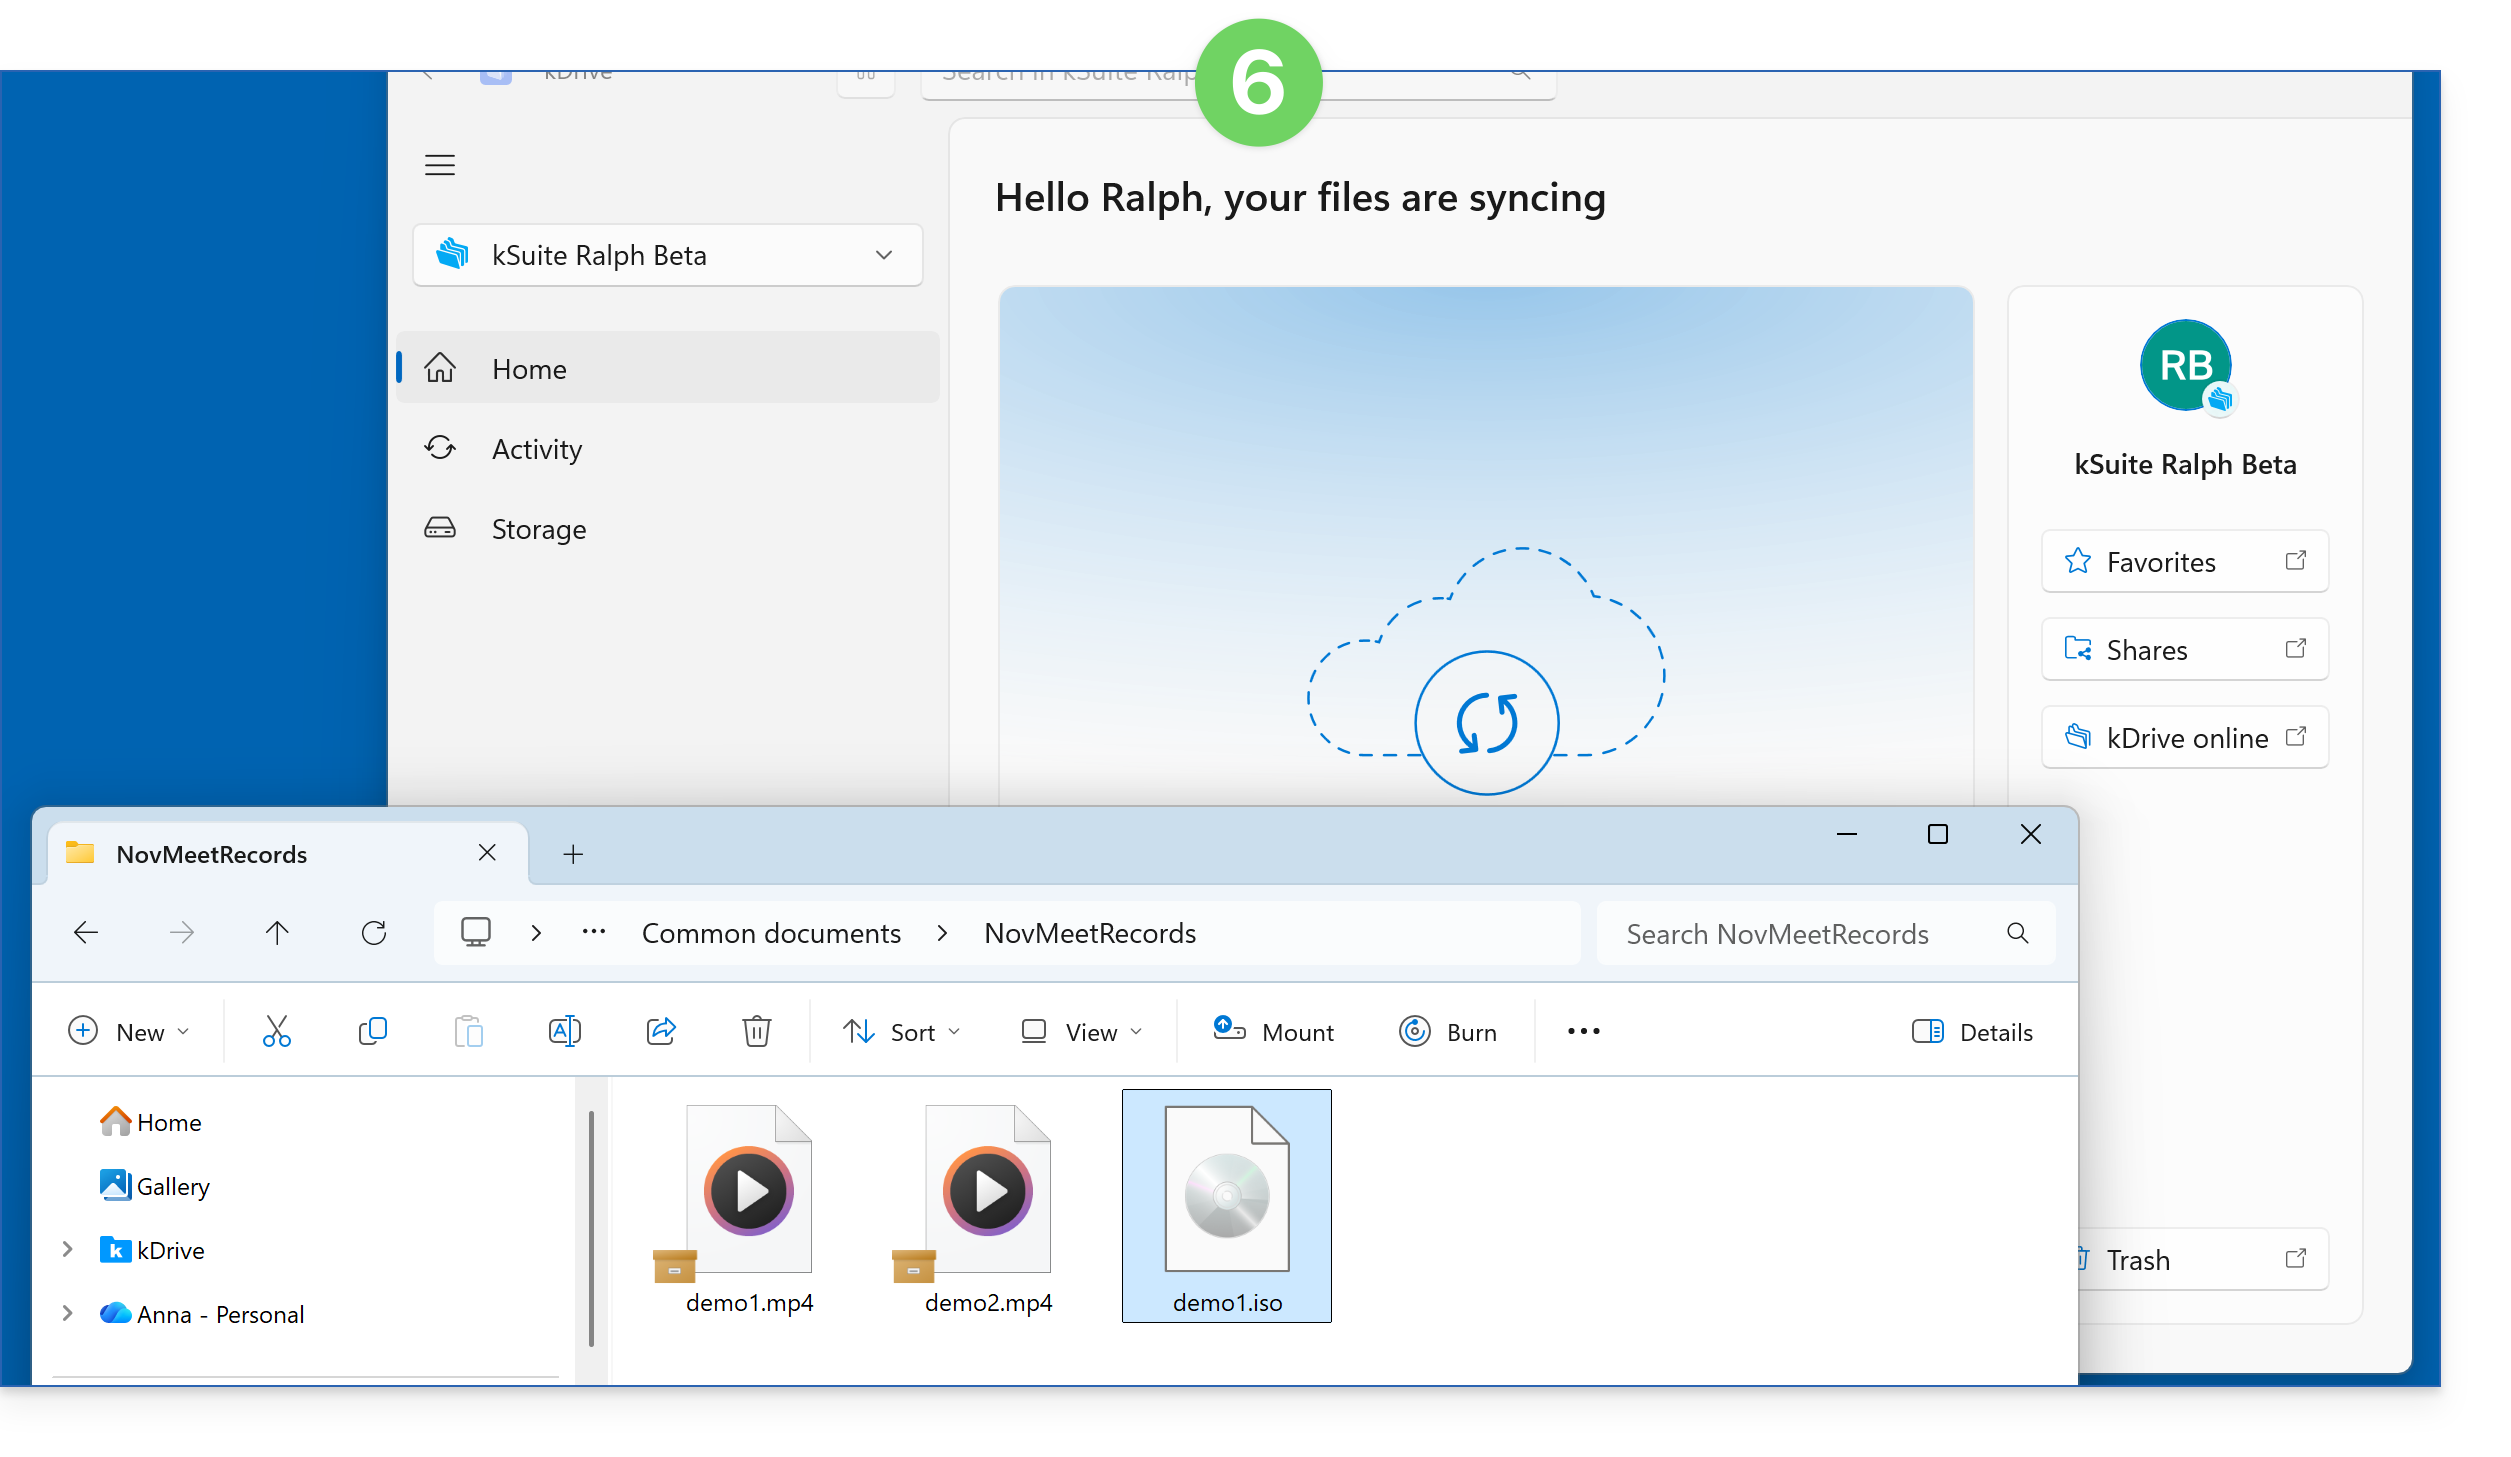
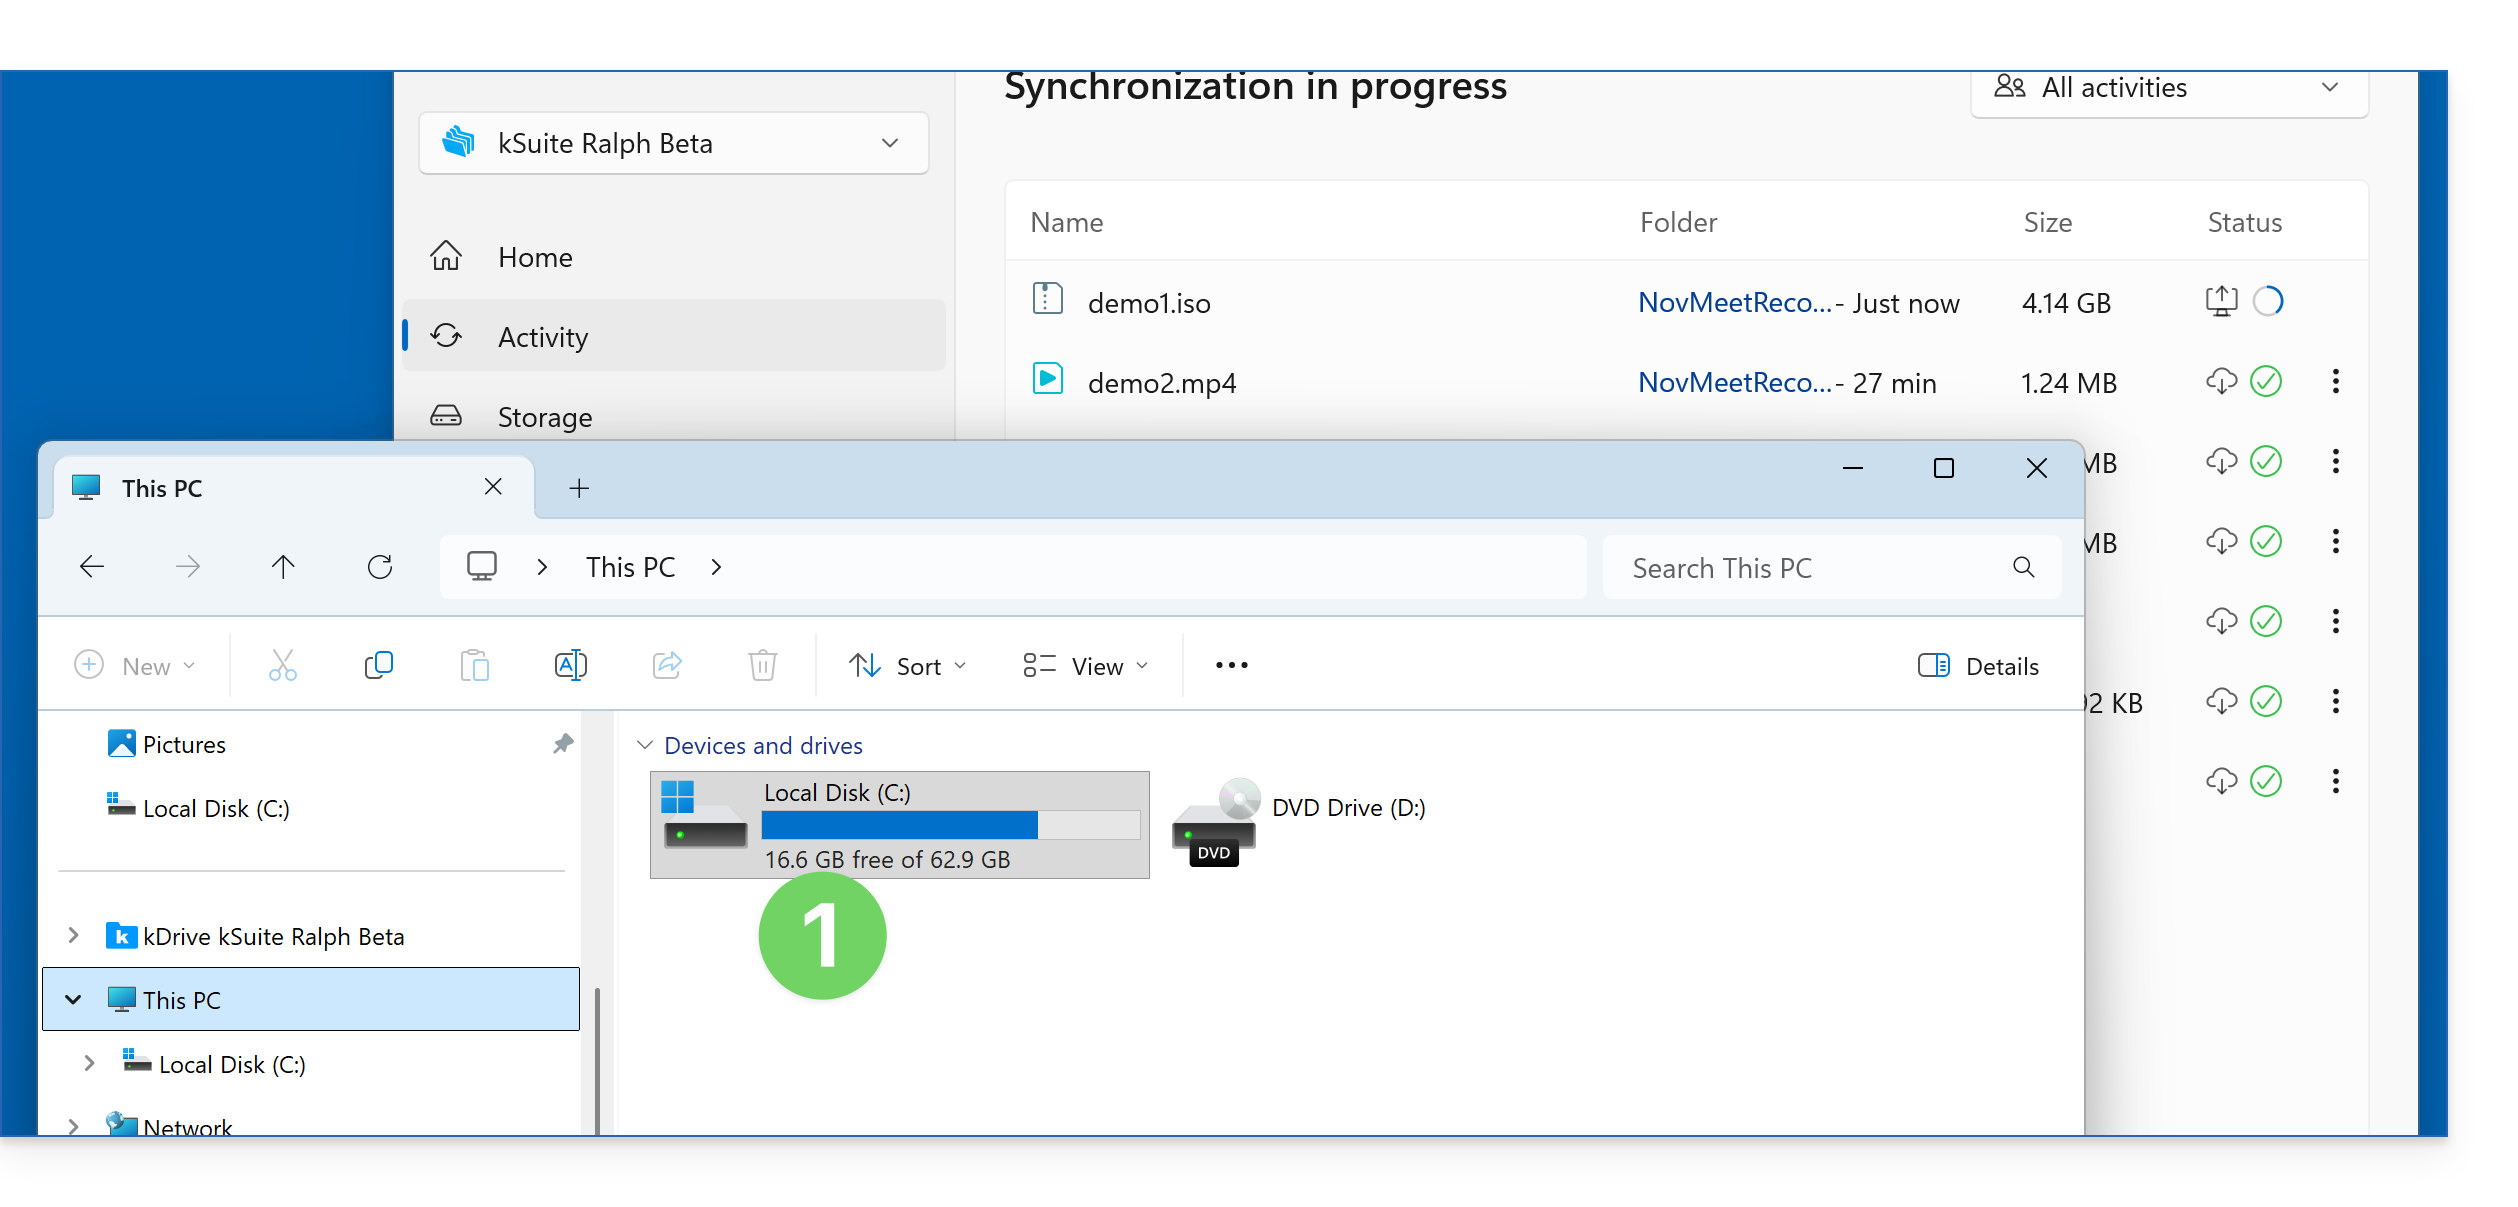
- kDrive then indicates that a synchronization is in progress; the kDrive icon on your taskbar also indicates this, and at this stage, the file is still only present on your computer:
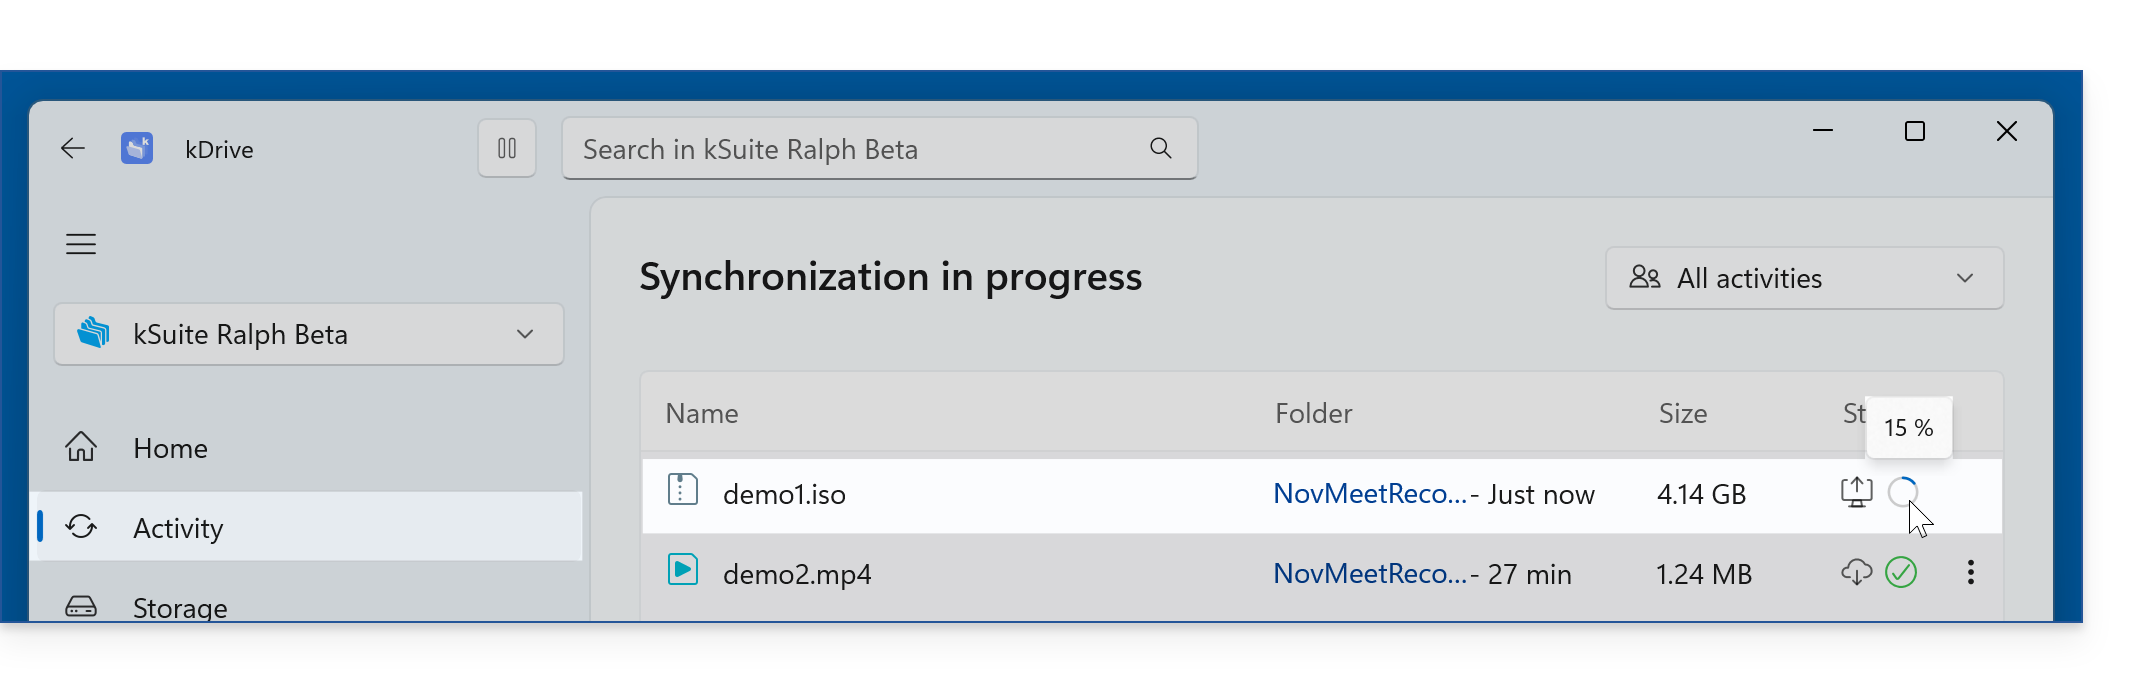
- Under Activities, you can see the percentage of data already sent by hovering over it with your mouse:
- As long as the synchronization is not complete (and this may take a long time, depending in particular on the speed of your Internet connection – as long as the device is active; otherwise, the file sending will continue at the next startup), the kDrive space on the Internet will not yet display your incomplete data:
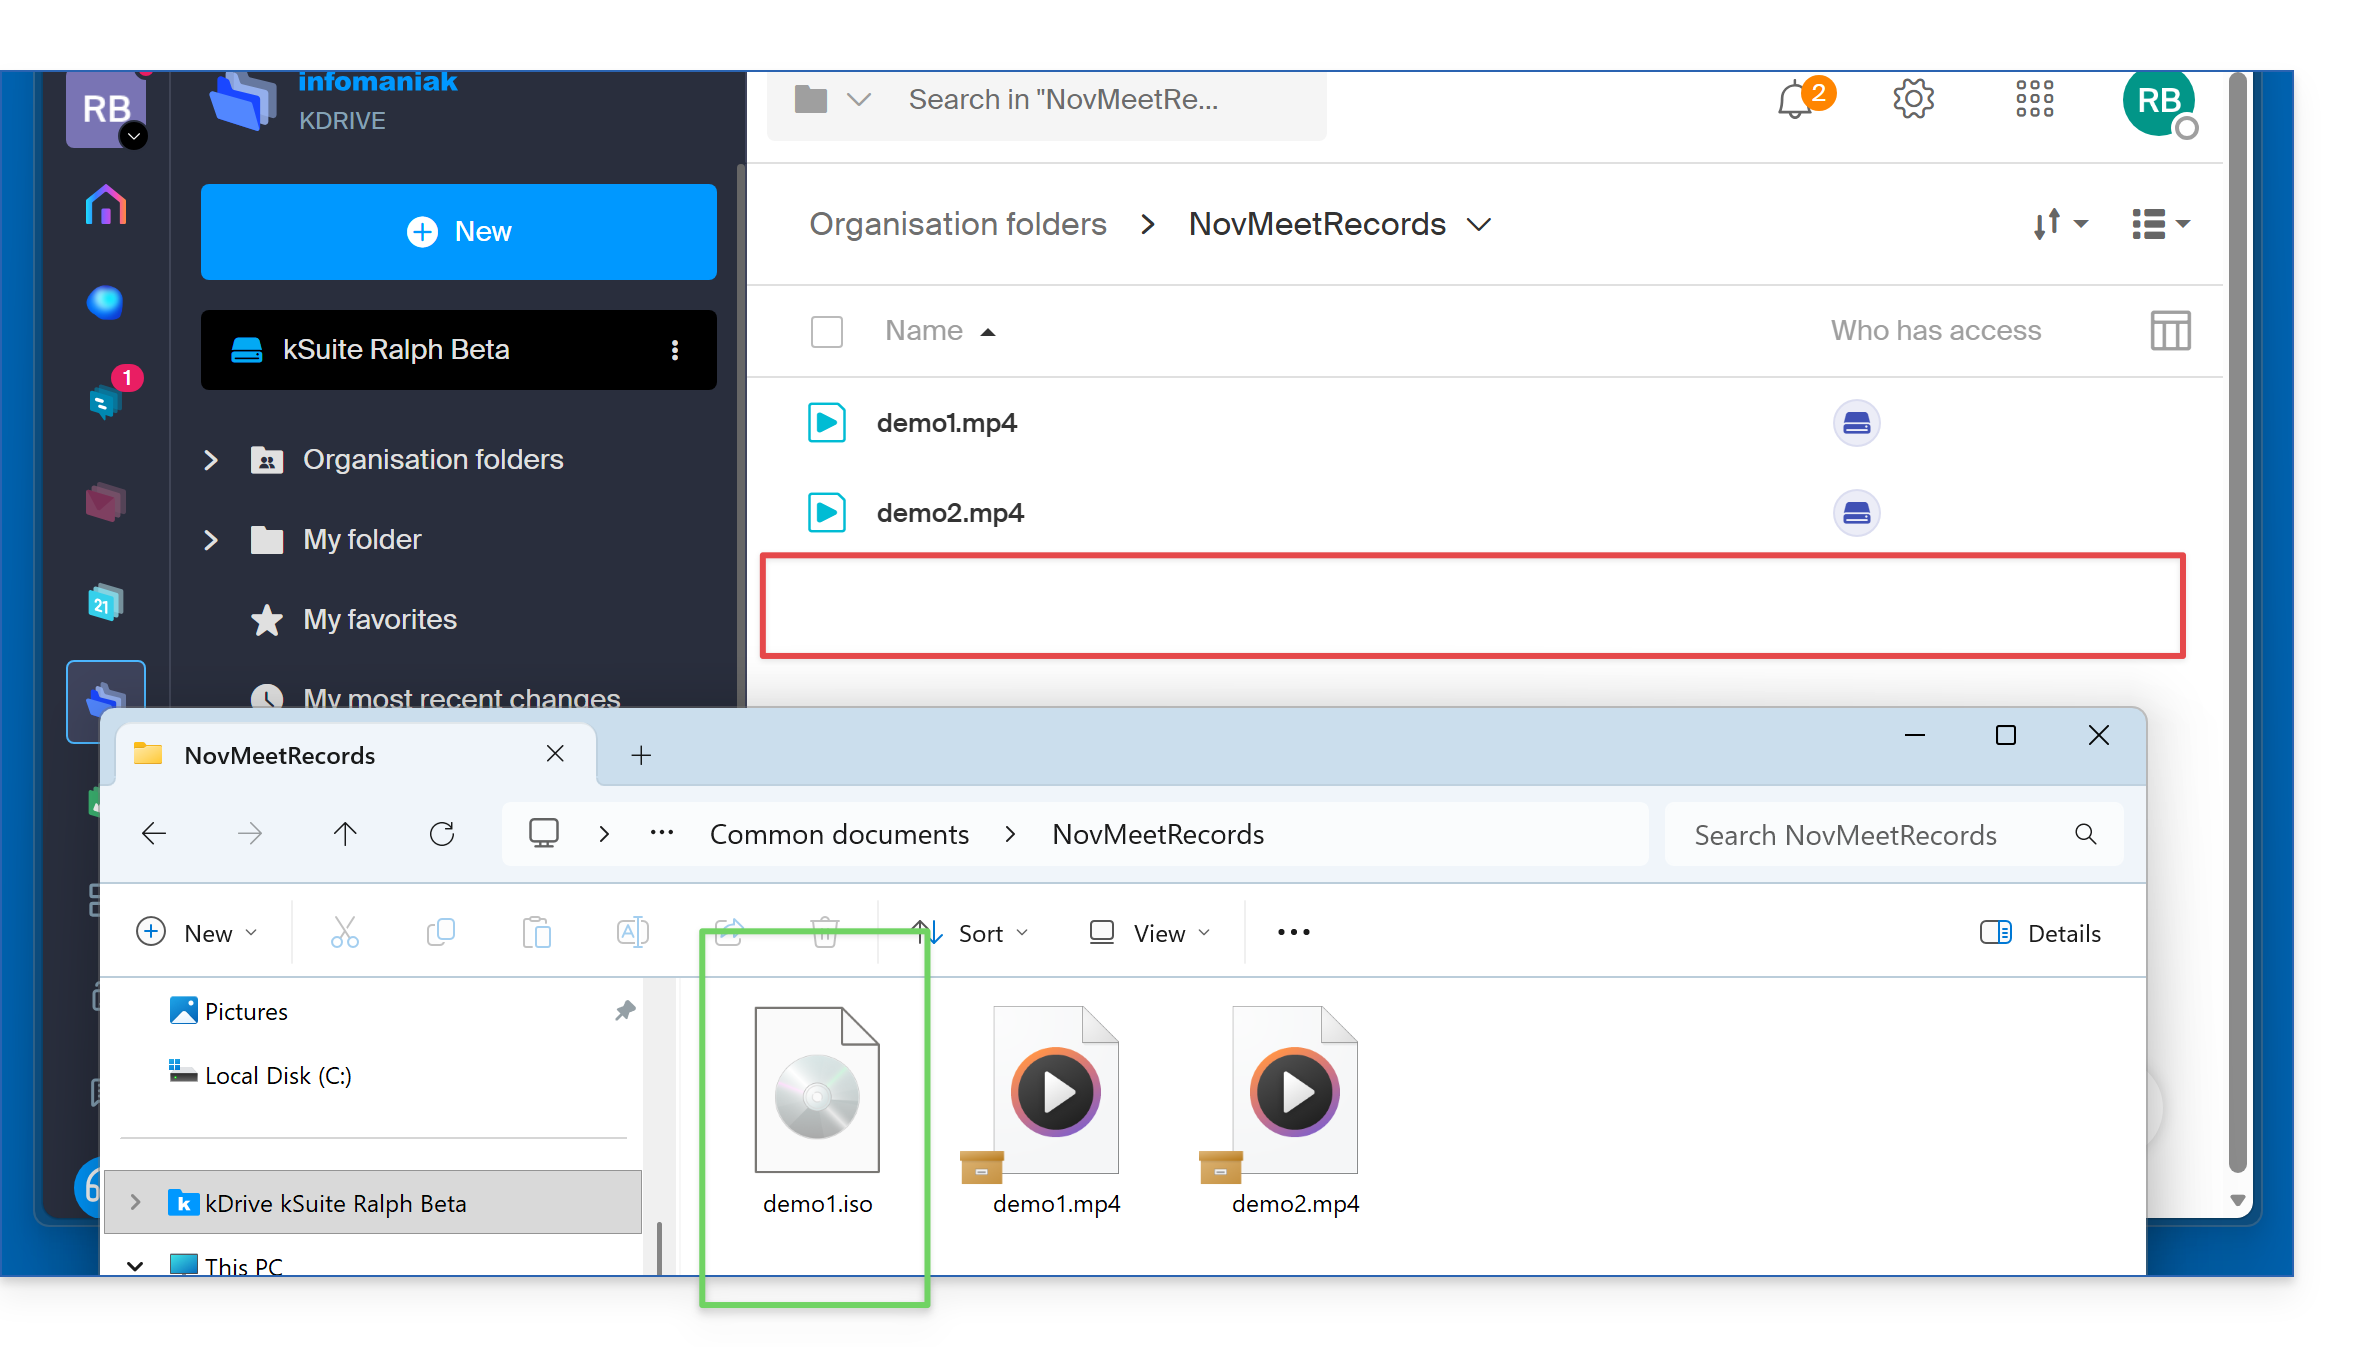
- Under Activities, you can see the percentage of data already sent by hovering over it with your mouse:
Once the sending is complete and the file is fully stored on the kDrive server as well as on your hard drive, the download of this data begins for other users of kDrive who have the application open on their device. Otherwise, this download/synchronization will take place the next time the application is opened.
Large kDrive, full hard drive
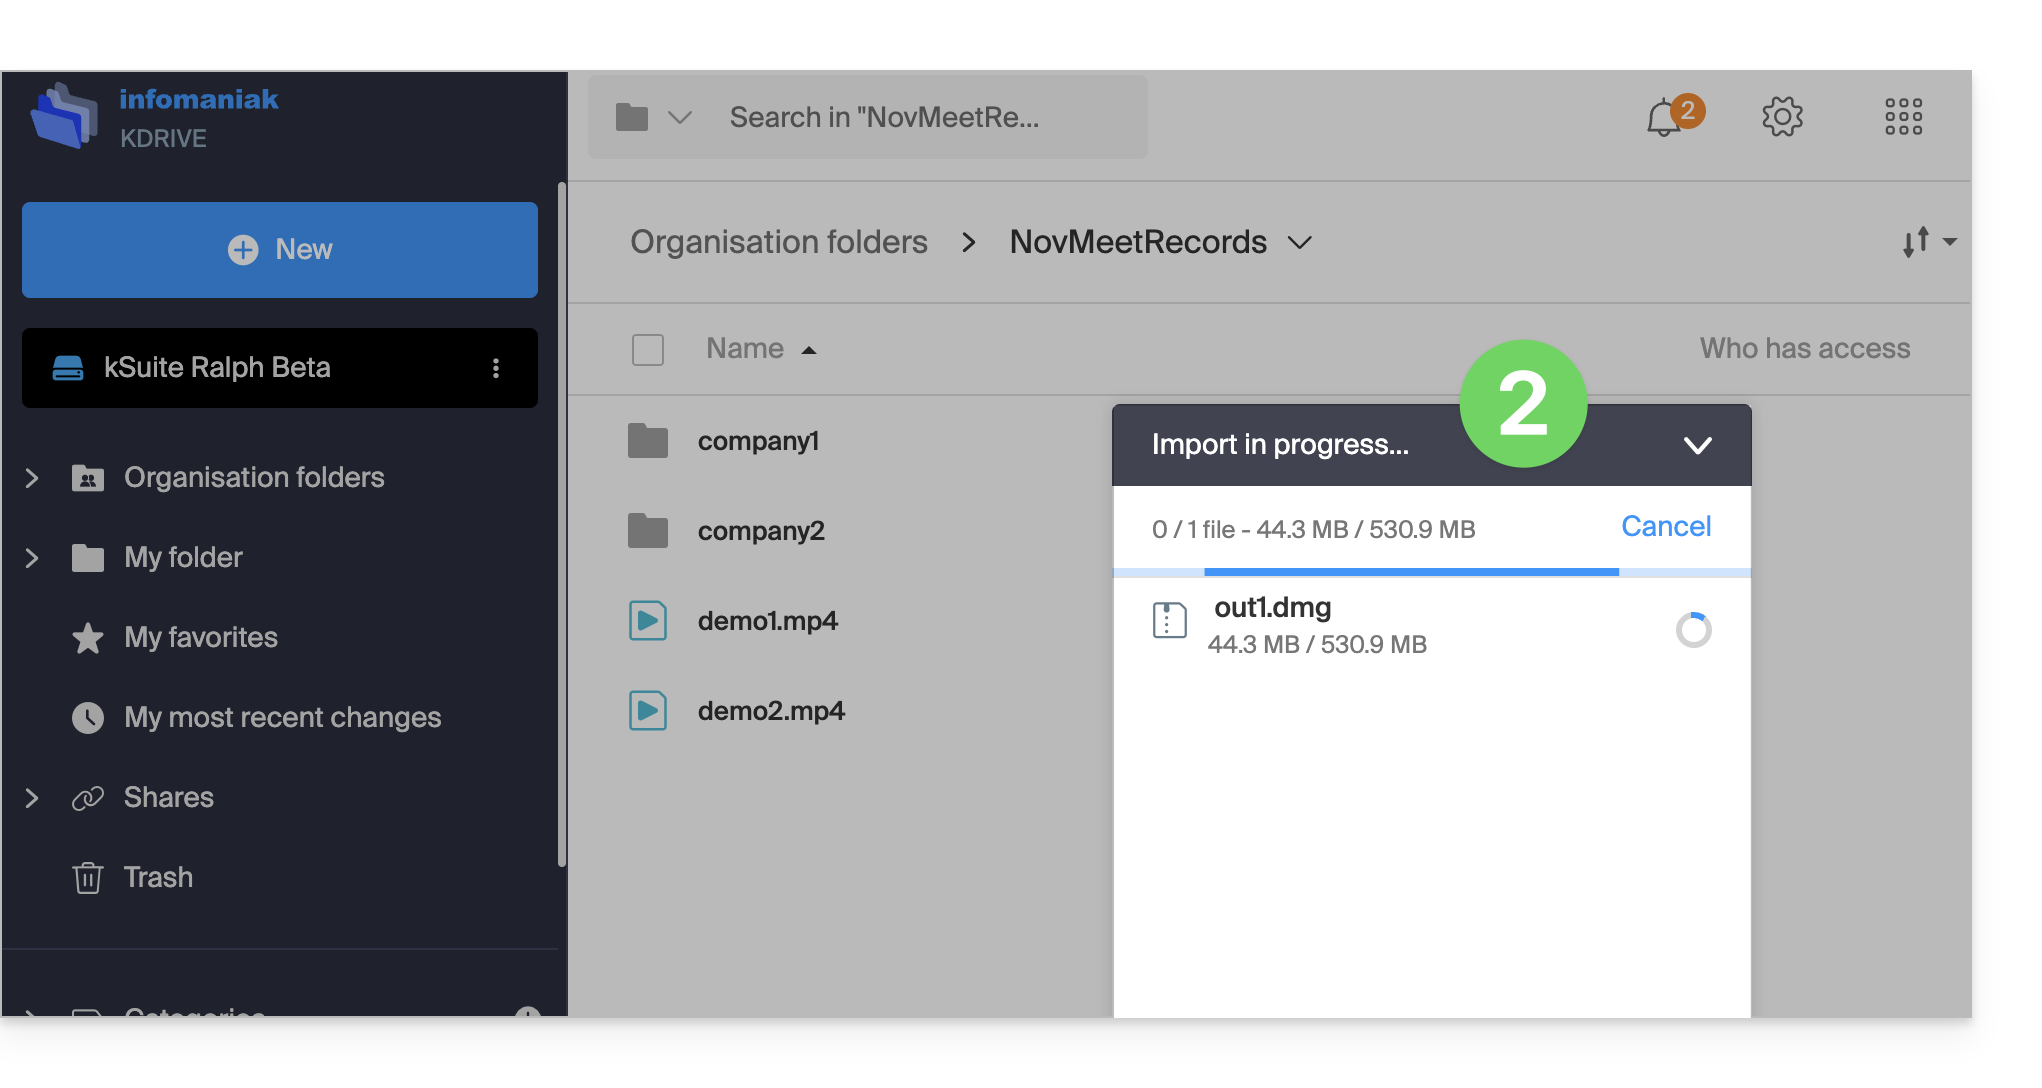
The previous chapter illustrates the sending of a file of approximately 4 GB. If other files are also sent by users, kDrive may then represent a larger volume than the kDrive folder on the users' hard drives can accommodate. What solutions should be adopted in this case?
- Here, the hard drive of this computer will not be able to accommodate more than 16 GB of new data:
- It will become saturated because large files are being uploaded to the shared kDrive using other methods:
To reduce storage space on your computer, you can make each file “virtual”: only a representation of the file is visible on your computer, while its content is stored remotely on the kDrive servers. You can enable this feature on Windows and macOS (❓: help):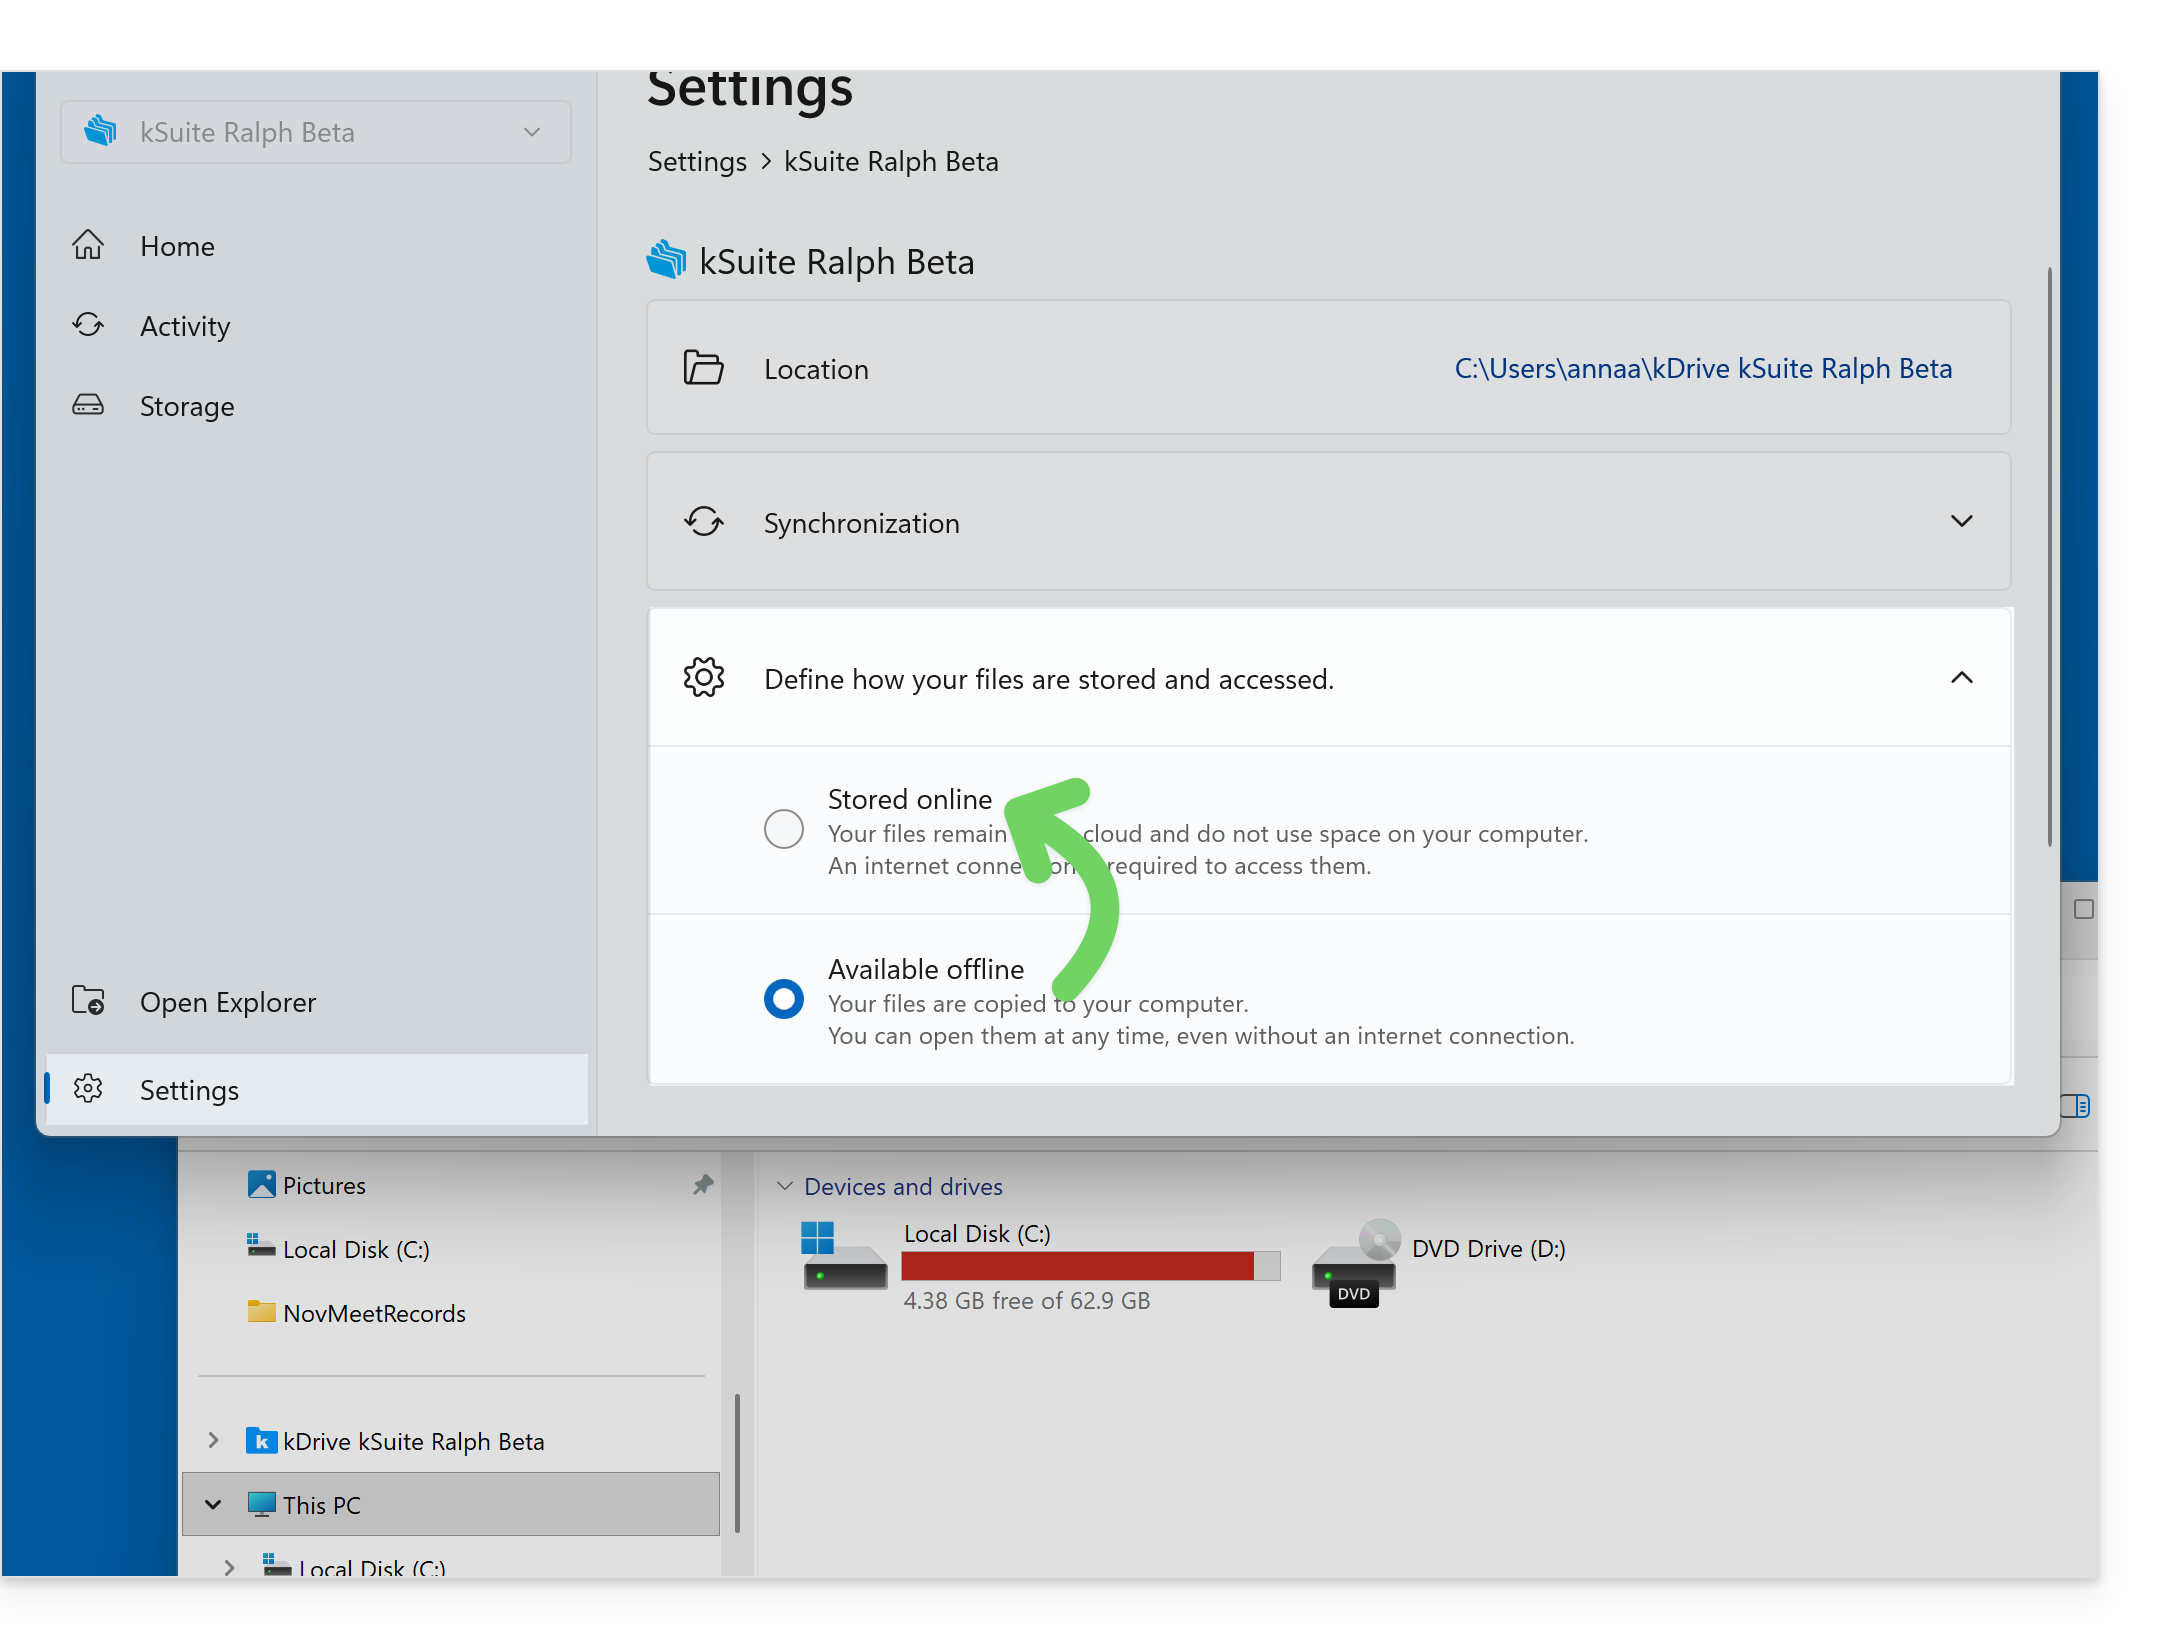
Another solution would be to not synchronize certain parts of kDrive, so that you only keep the folders that you use frequently on your computer locally (❓: help), while the rest is stored securely on the kDrive servers and is visible on other computers and/or to other collaborators who have more disk space.
By taking certain precautions, you can also move the storage directory for your data to a location with more available space (❓: help).
Link to this FAQ: https://faq.infomaniak.com/2934
Has this FAQ been helpful?
This guide details the settings required to configure email sending (scan-to-mail / scan-to-email) from a printer, scanner, or any other device (Hewlett-Packard, Xerox, Canon, Epson, Brothers, etc.) connected via an Infomaniak email account.
Introduction
- Your device must support SMTP authentication.
- Anonymous sending is not allowed.
- Manually configure your emails, contacts & calendars on your devices
SMTP Configuration Settings
Use the following settings in your device's configuration interface:
- Outgoing server (SMTP):
mail.infomaniak.com - Port and security:
465(SSL/TLS) or587(STARTTLS) - Authentication: required /
yes - Username: the complete email address (e.g.
scan@domain.xyz) - Password: the password created for this email address
In case of problems
If the connection fails, check that port 465 or 587 is not blocked by your local network's firewall.
Also, test the connection by temporarily disabling encryption (port 25 or 587 without SSL), although this is strongly discouraged for security reasons.
Link to this FAQ: https://faq.infomaniak.com/1236
Has this FAQ been helpful?
This guide details how to back up an Android device (Samsung, Huawei, OnePlus, etc.) using Acronis on Swiss Backup Infomaniak, the backup solution in an independent Swiss cloud.
Introduction
- What you can back up:
- Contacts & Calendars
- Photos (the original size and format of your photos are preserved)
- Videos
- It is also possible to back up other types of data.
Configure Backup
Prerequisites
- Own an Infomaniak Swiss Backup space with an available device quota (minimum 1) for Mobile:
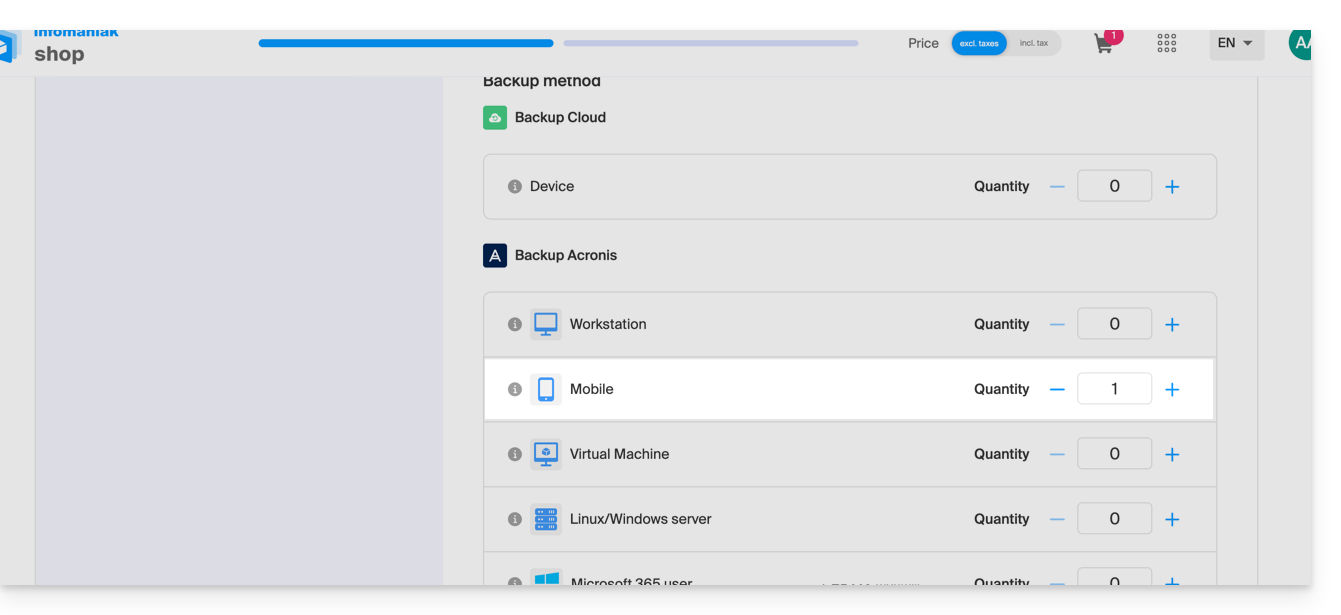
- If necessary, increase the device quota according to your needs.
- Add the device to the Infomaniak Manager to receive the login credentials.
- Consult the Acronis documentation on this topic.
To configure mobile backup on Android with Acronis:
- Download and install the Acronis Cyber Protect application from the Google Play Store.
- Open the Cyber Protect mobile app by logging in to the Acronis Agent with the credentials obtained after adding the device (need help?).
- Click on Back up and choose the data to back up.
- Click Validate to start the data backup.
Link to this FAQ: https://faq.infomaniak.com/2294
Has this FAQ been helpful?
This guide details how to back up an Apple iOS device (iPhone, iPad, etc.) using Acronis on Swiss Backup, the backup solution in a Swiss independent cloud.
Introduction
- What you can back up:
- Contacts & Calendars
- Photos (the original size and format of your photos are preserved)
- Videos
- It is also possible to back up other types of data.
Configure Backup
Prerequisites
- Own an Infomaniak Swiss Backup space with an available device quota (minimum 1) for Mobile:
- If necessary, increase the device quota according to your needs.
- Add the device to the Infomaniak Manager to receive the login credentials.
- Consult the Acronis documentation on this topic.
To configure mobile backup on Android with Acronis:
- Download and install the Acronis Cyber Protect application (not Acronis Mobile) from the App Store.
- Open the application by logging in to the Acronis Agent using the credentials obtained after adding the device (need help?).
- Click Back up and choose the data to back up.
- Click Confirm to start the data backup.
Link to this FAQ: https://faq.infomaniak.com/2295
Has this FAQ been helpful?
This guide details how to use a my kSuite account, and it is important to distinguish between the Infomaniak account password and the passwords for the my kSuite address (ik.me, etik.com, ikmail.com).
1. Registration: creating the login and password
When you registered for my kSuite, you chose an email address, which is also your login ID, in the format xxx@ik.me or xxx@ikmail.com, etc., as well as a login password: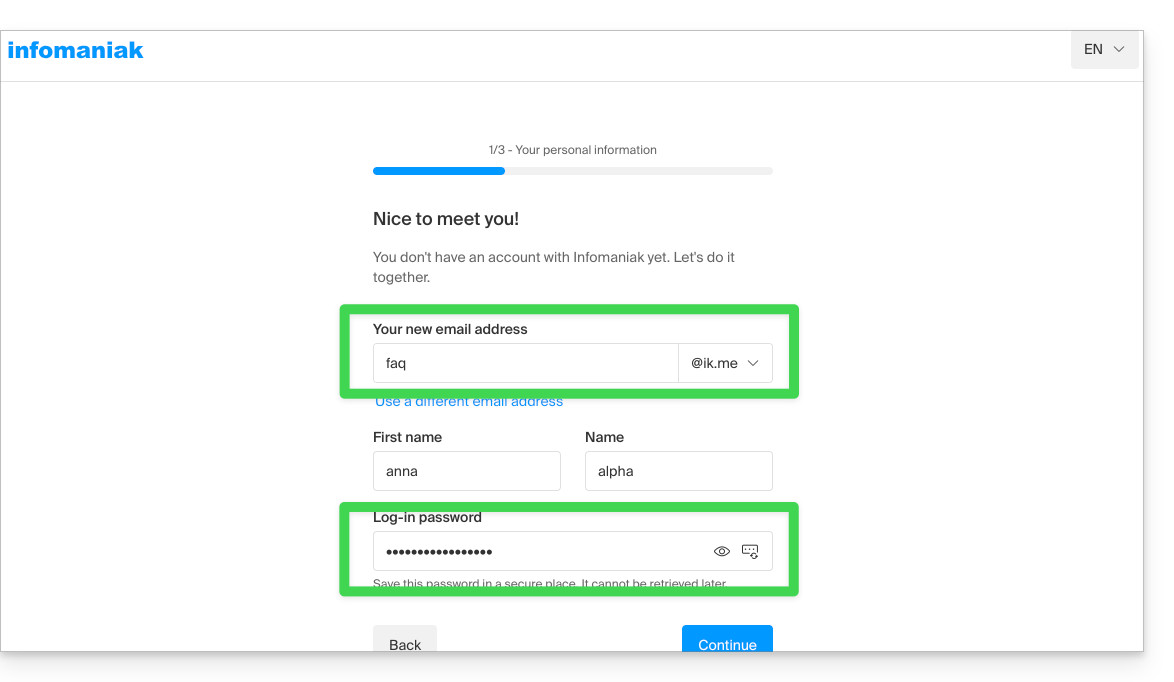
Once registered, you can go to ksuite.infomaniak.com/mail and use the email service: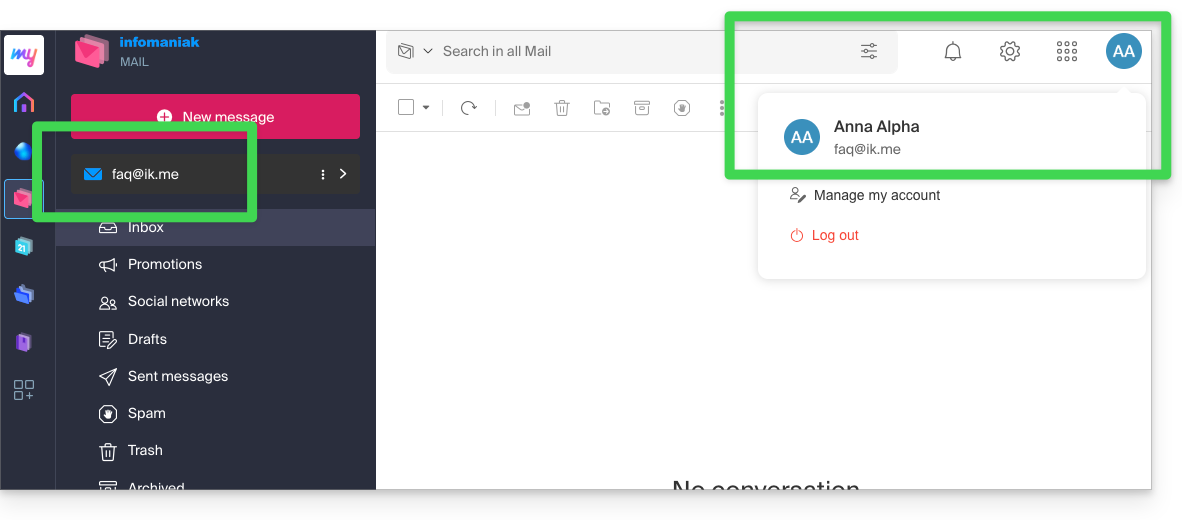
2. Reconnecting: using your username and password
On another computer or after reopening your browser, simply go back to ksuite.infomaniak.com/mail (or ik.me) and reconnect using the credentials you created and obtained (see point 1 above):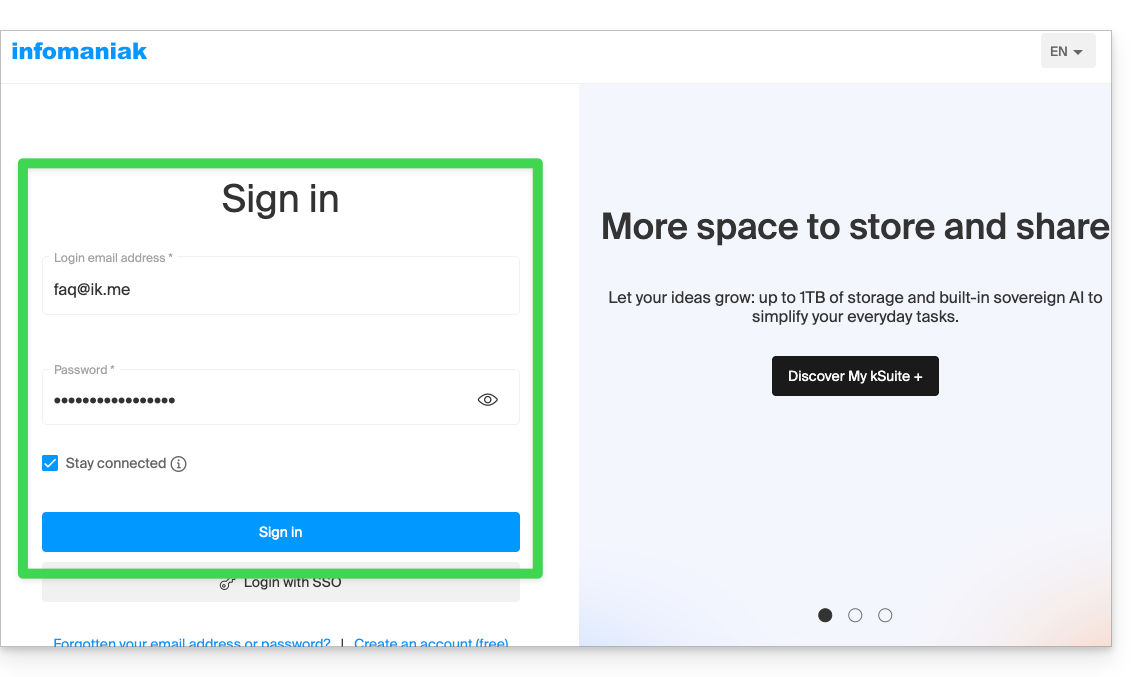
You will then access your email within the my kSuite Infomaniak interface: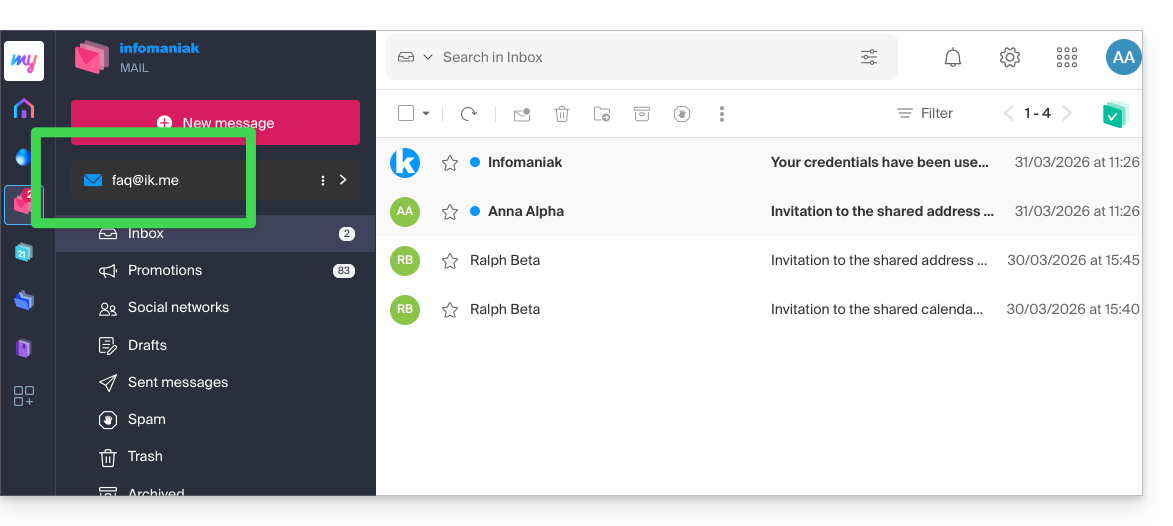
3. Using the email address outside of Infomaniak
To synchronize your email address with a mail client such as Outlook or Thunderbird, or even on an iPhone or Apple Mail on macOS, you need to create an additional password (= “a device”) because the password for your Infomaniak account (points 1 & 2 above) will not allow you to configure the address outside of Infomaniak.
To add a device (= “create an additional password”) and use it in your IMAP/SMTP configurations:
- Log in to your my kSuite account as described in step 2 above.
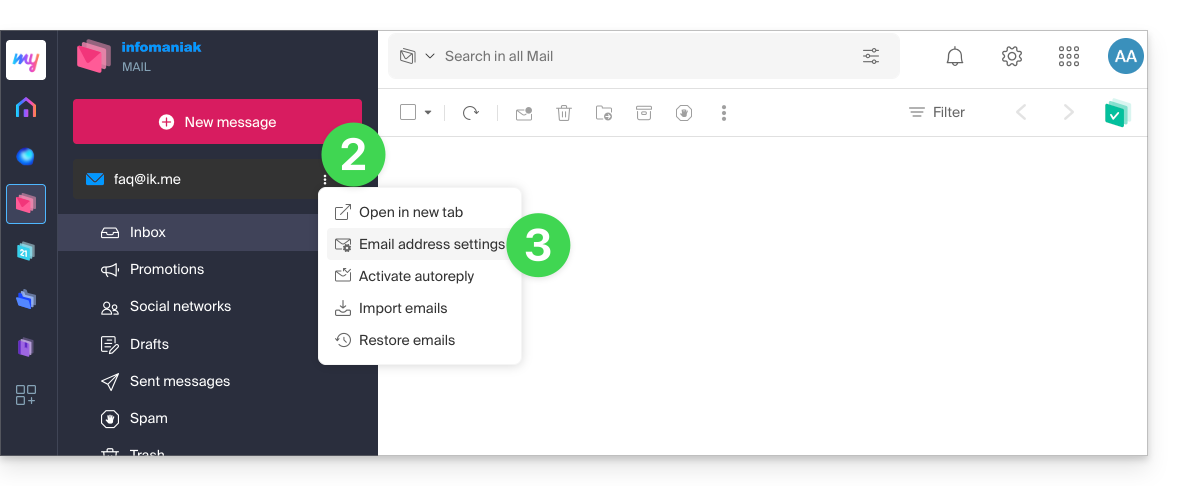
- Click the action button ⋮ to the right of your my kSuite address.
- Click on the settings for the email address:
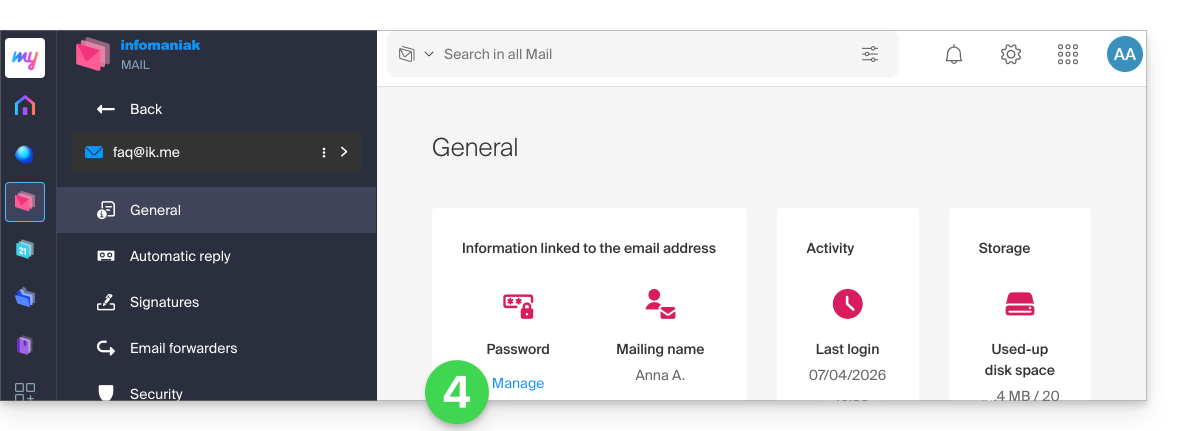
- Click on Manage password:
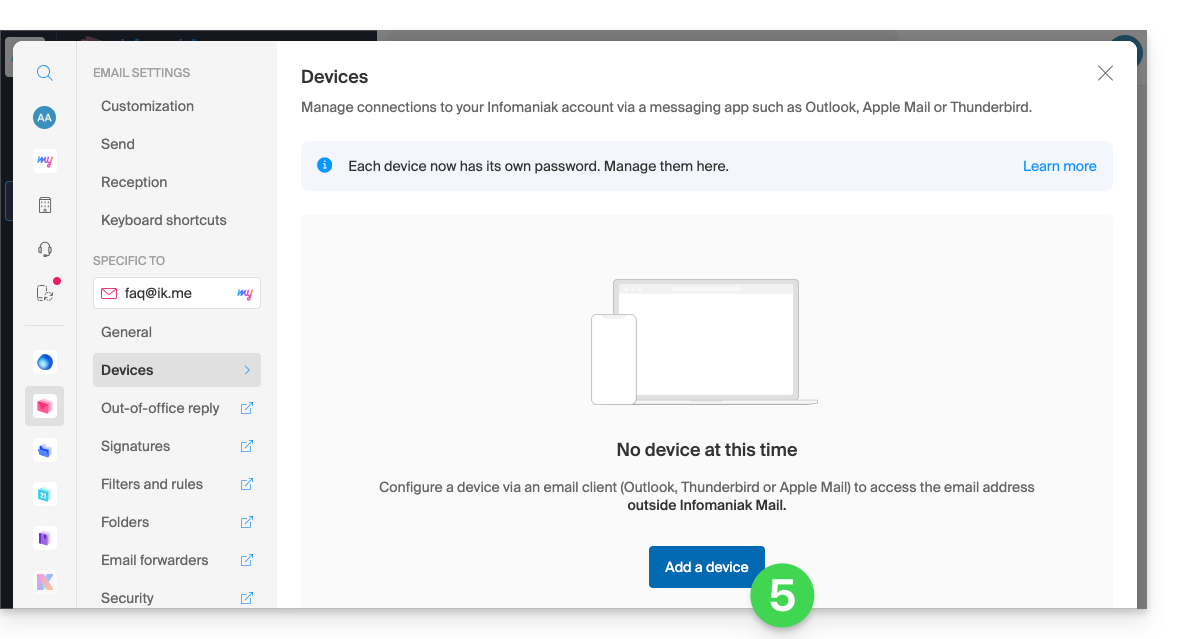
- Click on Add a device:
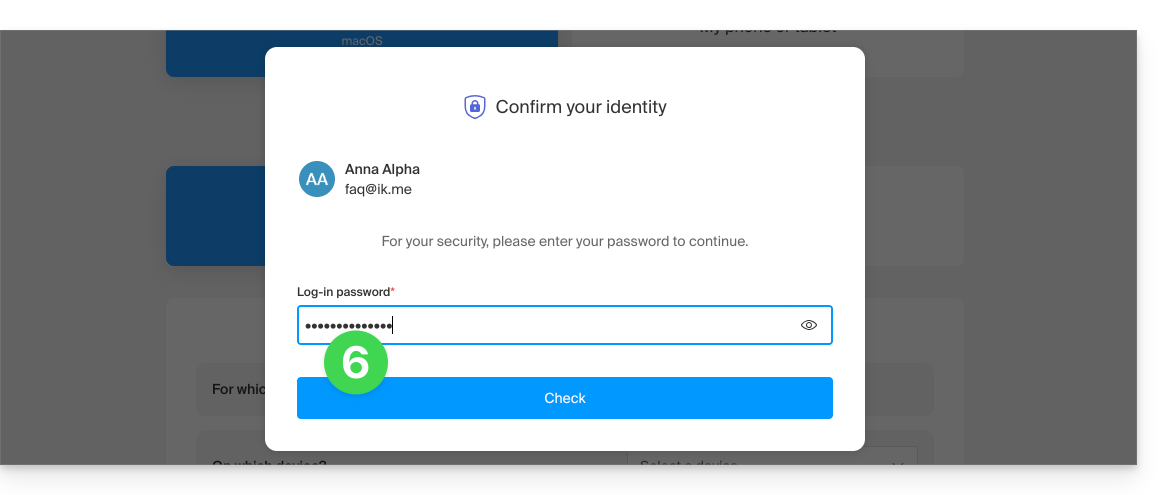
- Enter the login password if required for security purposes:
- Follow the wizard according to your needs, until a new device is created:
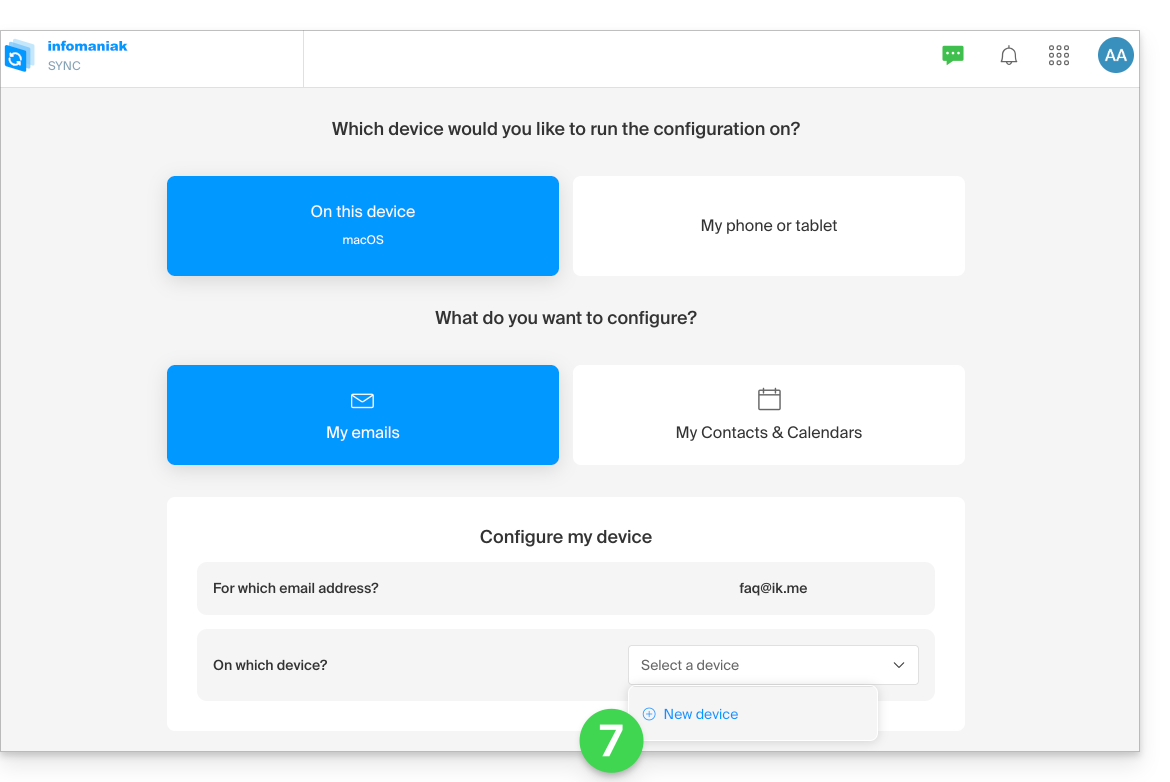
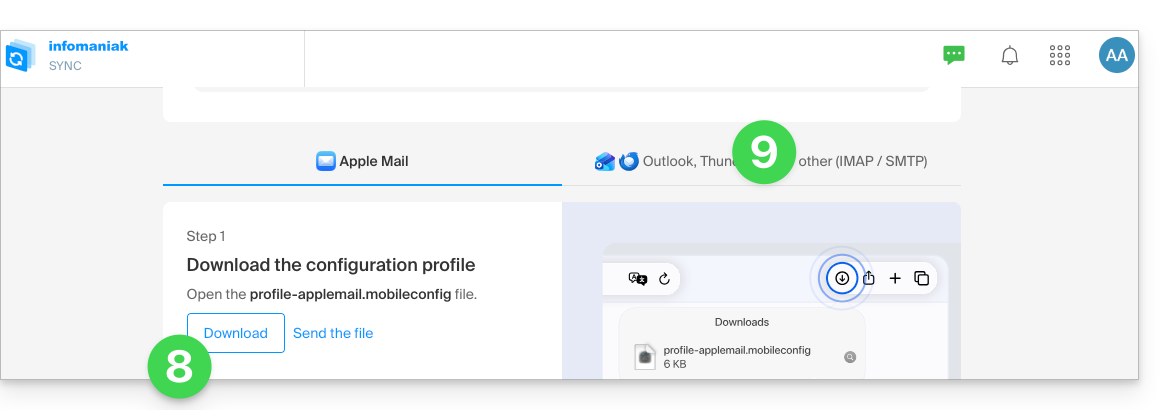
- The wizard will offer you to download an Apple profile, depending on your device (refer to this other guide for macOS or this one for iOS), and then create a new secure password to enable synchronization via the profile.
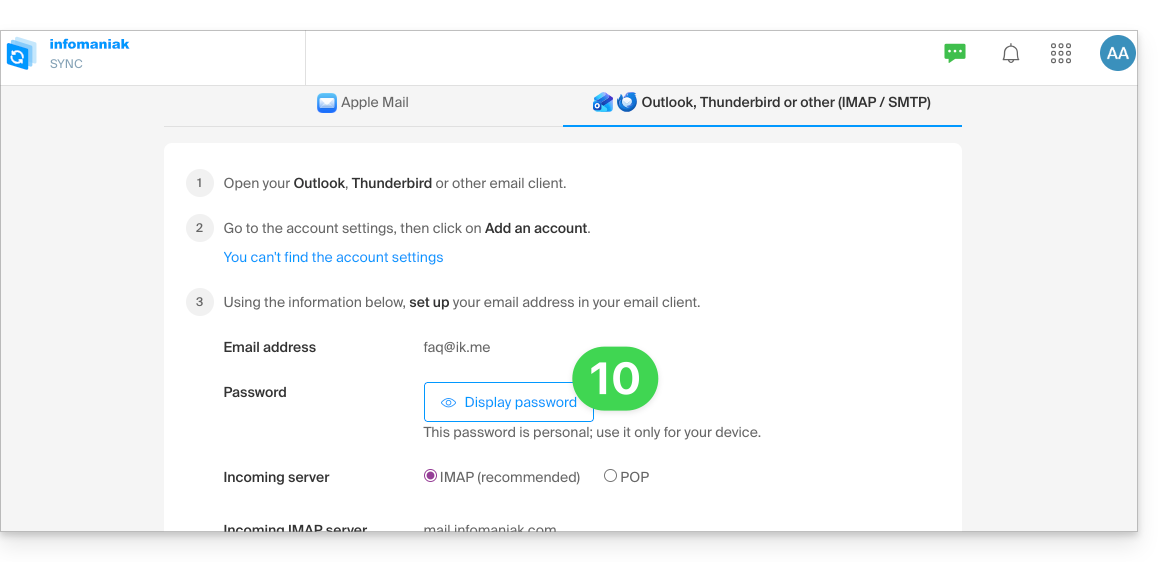
- To simply create a new password and configure the tool of your choice (refer to the configuration guides), click on the IMAP / SMTP tab:
- You can then generate a new secure password to use in your configuration:
Link to this FAQ: https://faq.infomaniak.com/2904
Has this FAQ been helpful?
This guide explains how to save and export your contacts from the address books in the Infomaniak Contacts web app (online service ksuite.infomaniak.com/contacts).
Introduction
- It is not possible to export an Organization directory.
- The export generates a file of type vCard with the .vcf extension.
Export contacts
To select the contacts or address book to export:
- Click here to access the Infomaniak Web app Contacts (online service ksuite.infomaniak.com/contacts).
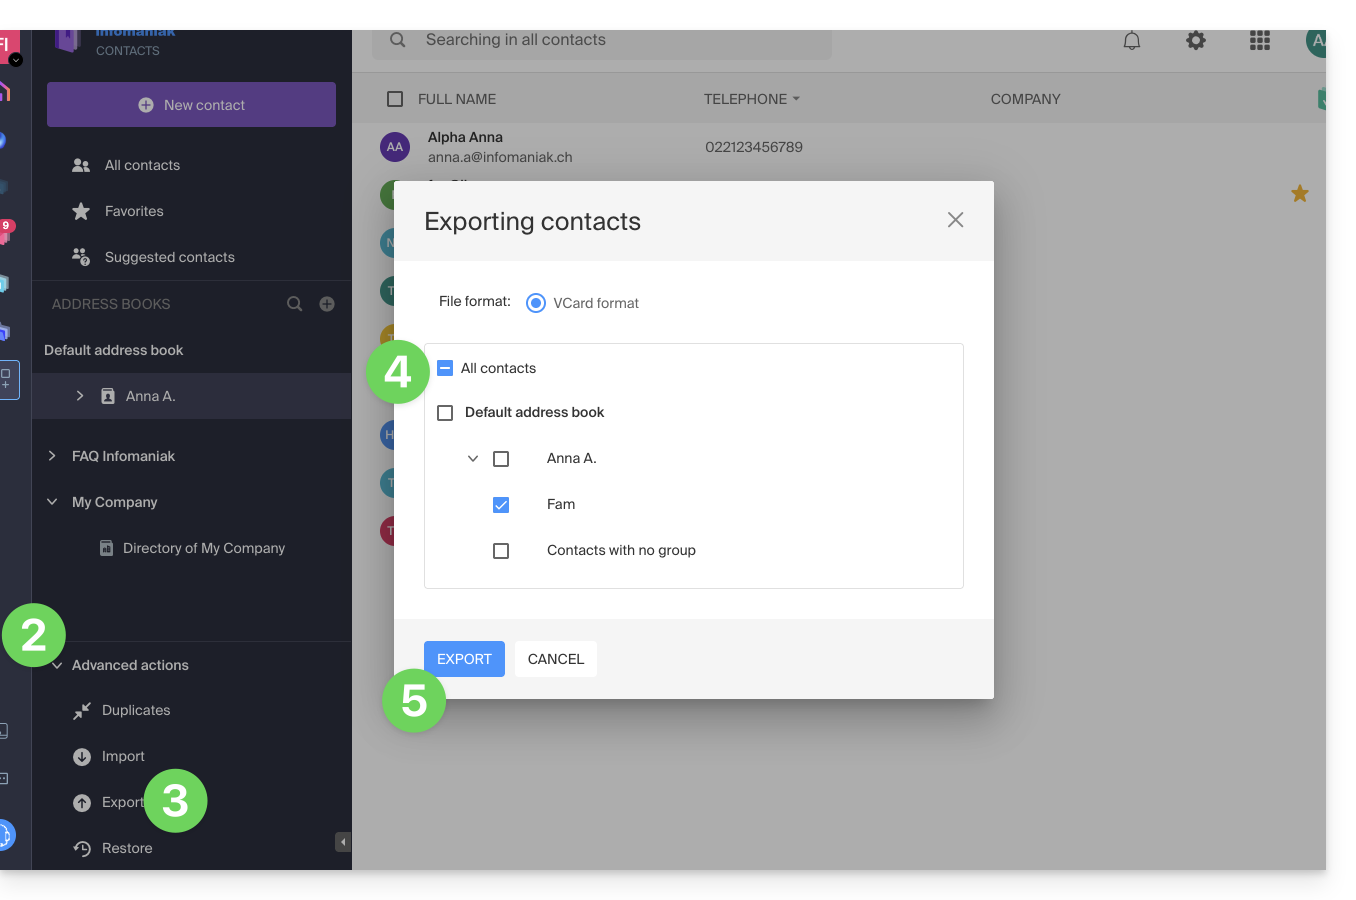
- Click on the chevron to expand the Advanced actions section.
- Click on the Export menu.
- Click on the address book to export.
- Click on the Export button:
- Choose the location on your device where you want to save the vCard file containing your contacts.
You can then open it in macOS Contacts or any compatible application.
Link to this FAQ: https://faq.infomaniak.com/2593
Has this FAQ been helpful?
This guide explains how to create forms that will be linked to the different pricing options for an event (within the Infomaniak ticketing system). This allows you to create specific forms for each pricing option available for an event.
Create a form for each pricing option
To do this:
- Click here to access the management interface for your product in the Infomaniak Manager (need help?).
- Click directly on the name assigned to the ticketing system for the event.
- Click on Settings in the left-hand menu.
- Click on Form in the left-hand menu.
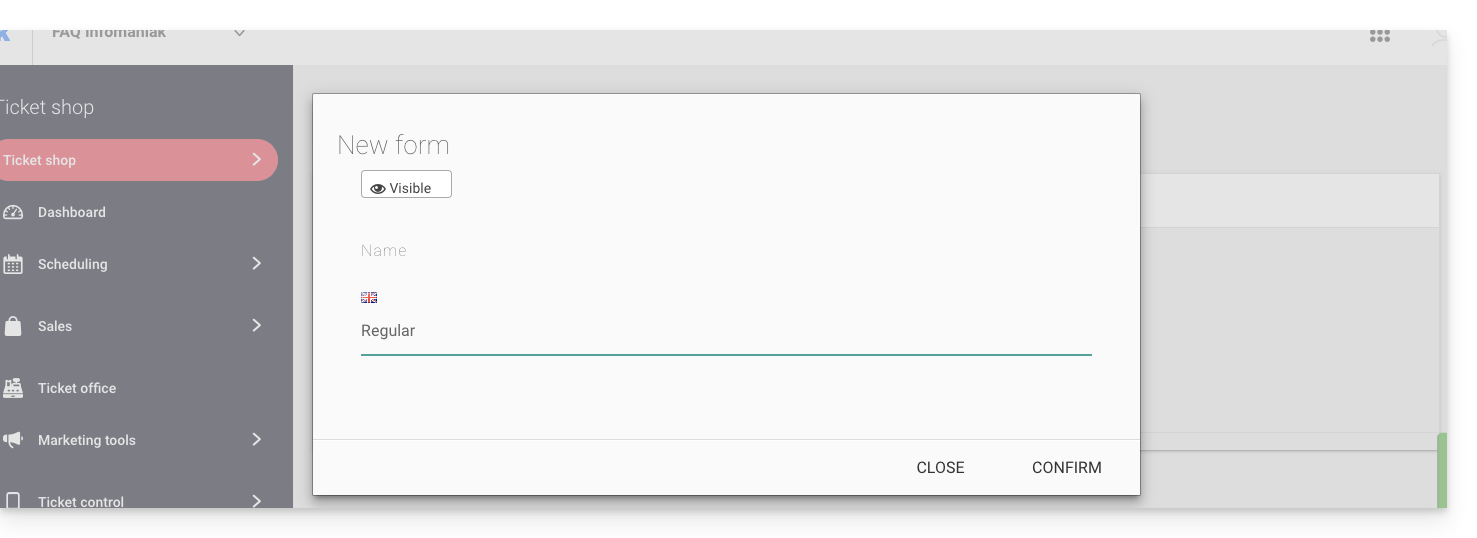
- Click on the Add a form button and give the form a name:
Add fields
Add the items to include in the form, per pricing plan:
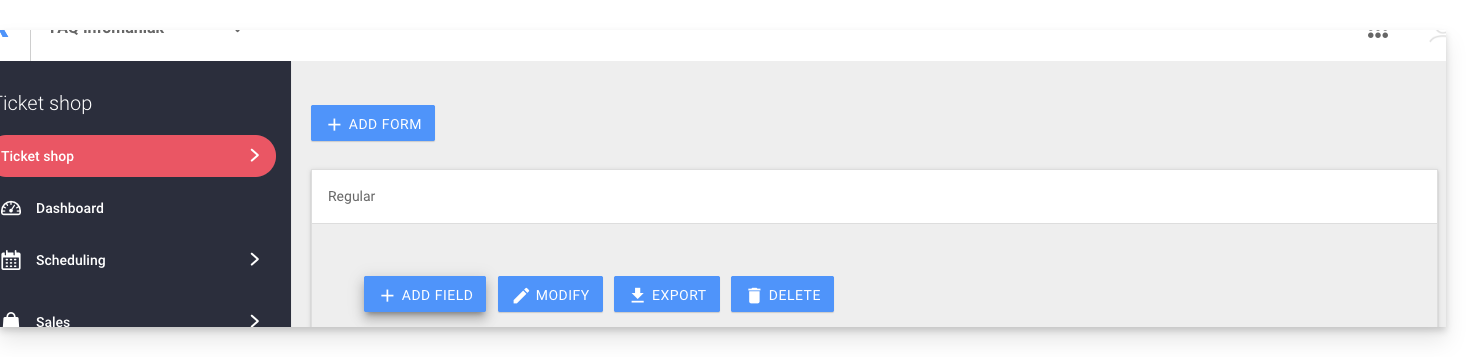
- Click on the Add button:
Choose the field name and type:
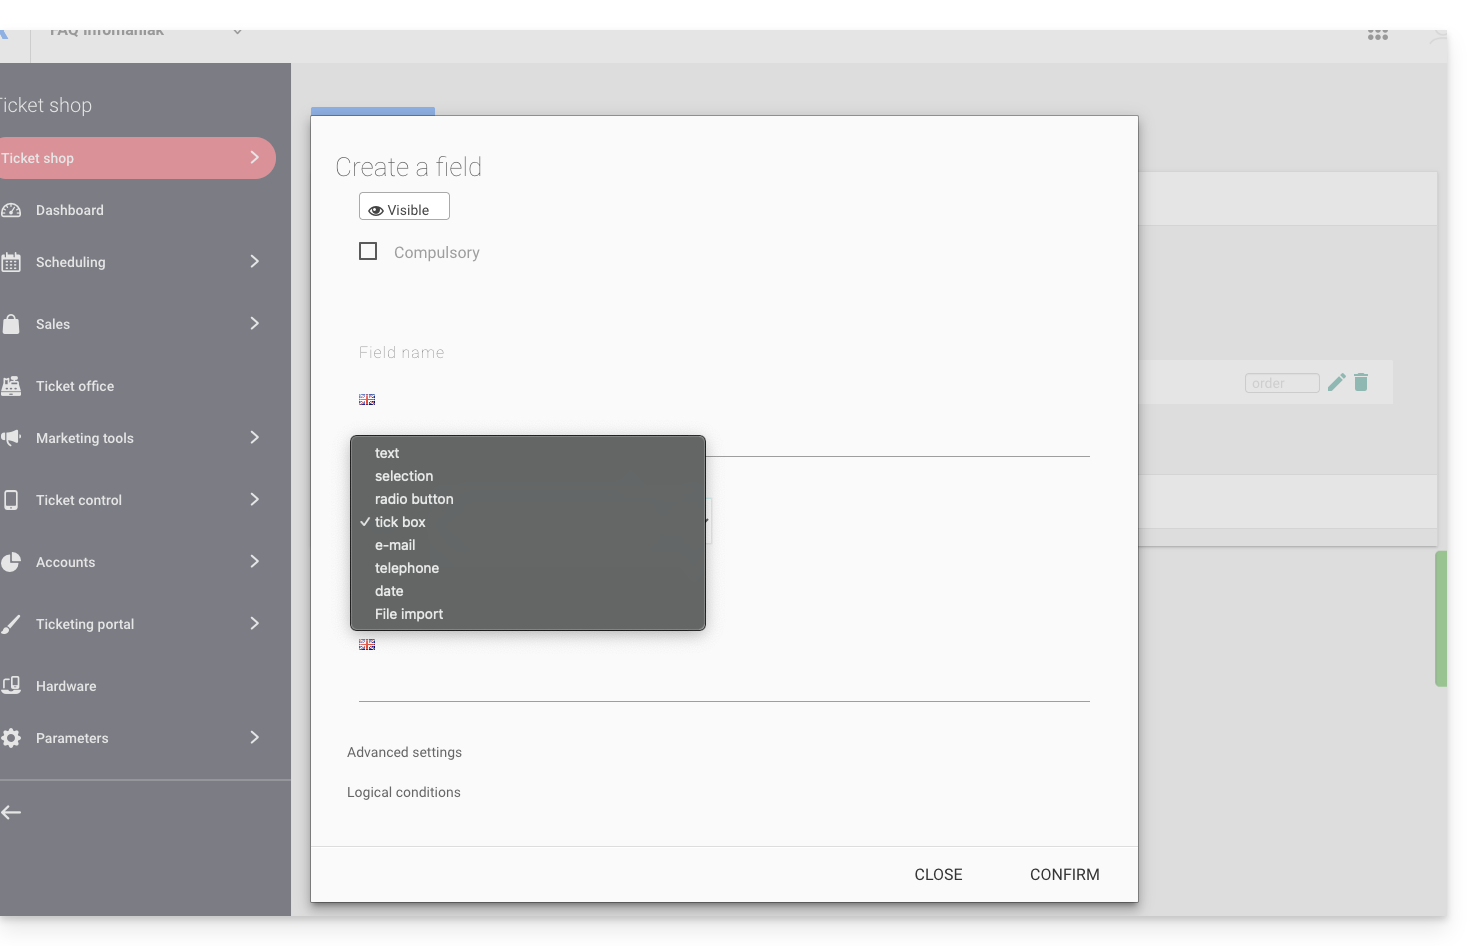
- Text: a free field for inserting text
- Selection: a drop-down menu for selecting an option from the available options
- Radio button: radio buttons for selecting an option from the available options
- Checkboxes: checkboxes that can be checked or left blank
Note: if the required option is selected, all checkboxes must be checked to proceed. Example use: “I have read and accept the terms of use”…
- Email: for entering an email address. This allows you to use a different email address than the one used by the person who placed the order.
- Phone: for a phone number
- Date: for a date
Advanced options and logical conditions
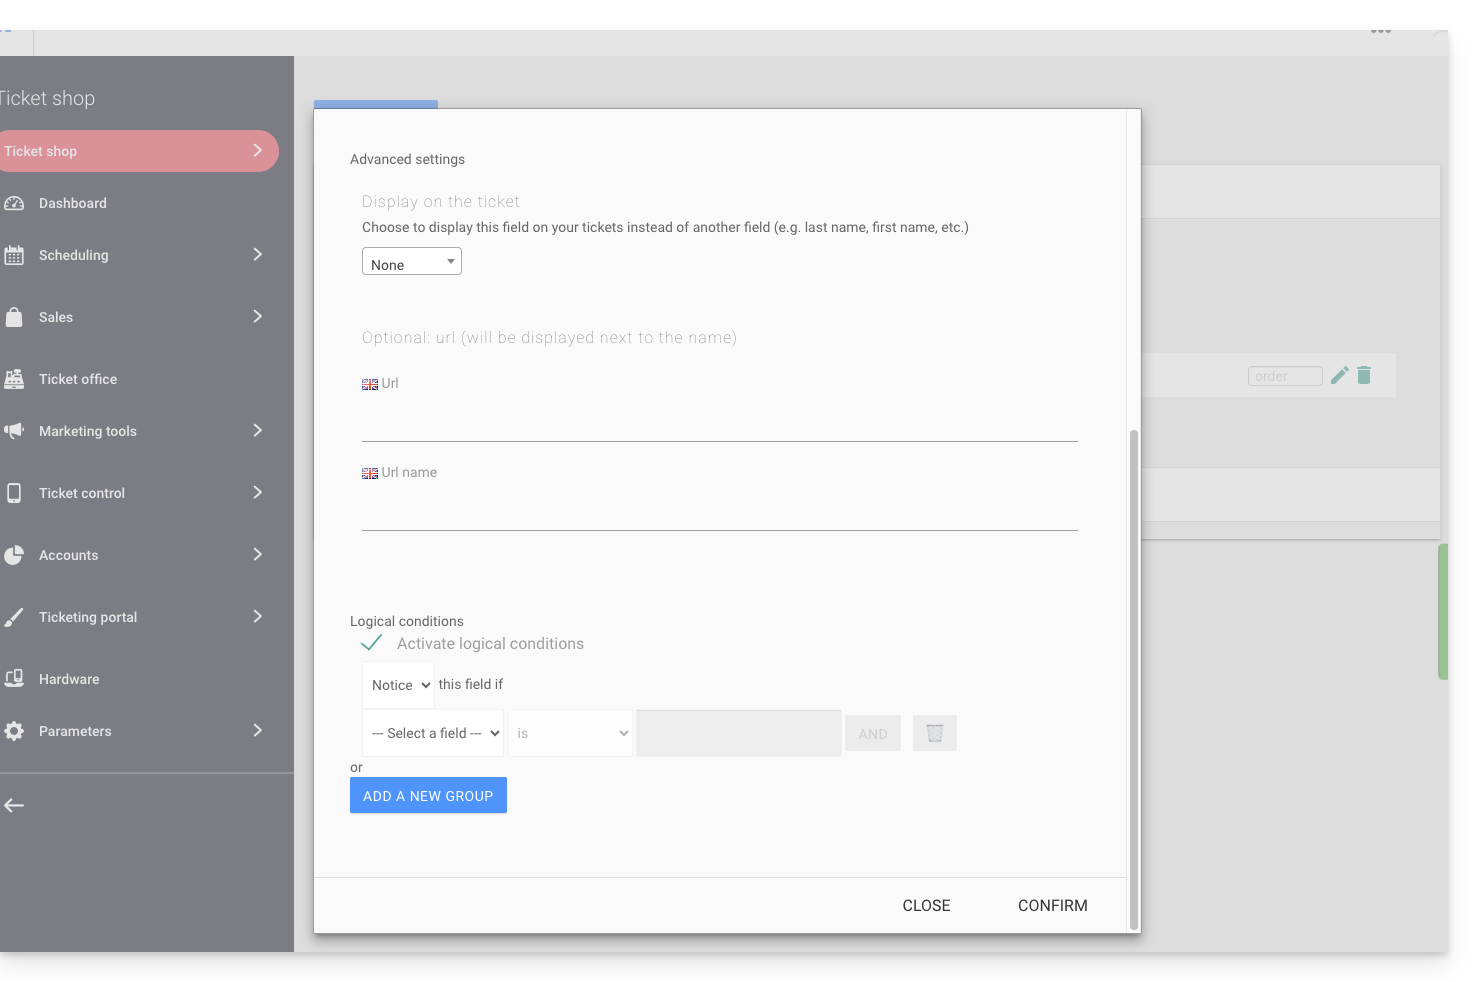
- Display on the ticket: allows you to replace the form information directly. For example, to display the name of the person attending the event on the ticket instead of the name of the person who made the order…
- Add a URL: URL that will be displayed in the field, then above the field to allow the visitor to fill it in.
- Logical conditions should be used when multiple fields have been created and you want to control their display/visibility/presence.
Choose the order of the questions
Choose the order in which the questions will appear on the ticketing form: 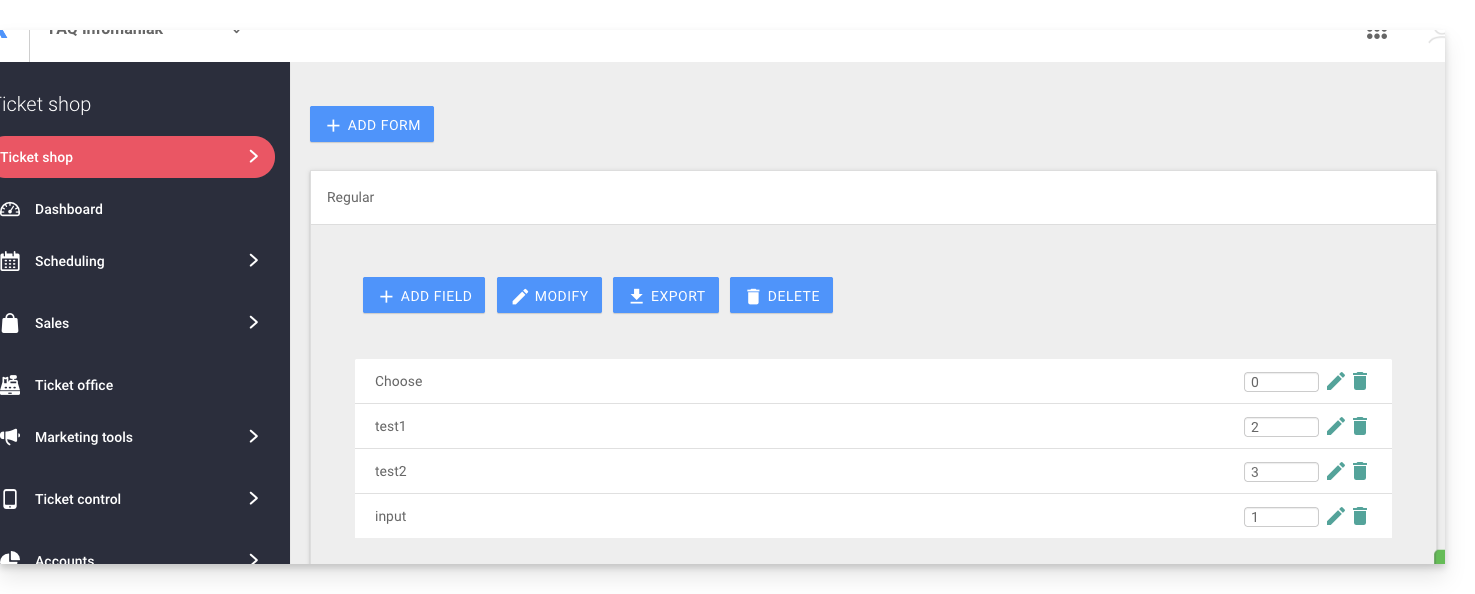
- Numbered positions will be in numerical order: 1, 2, 3, etc.
- Those without a defined order will follow (not recommended).
- Position 0 will appear at the very end.
Link the form to a pricing plan
To do this:
- Click here to access the management interface for your product in the Infomaniak Manager (need help?).
- Click directly on the name assigned to the ticketing system for the event.
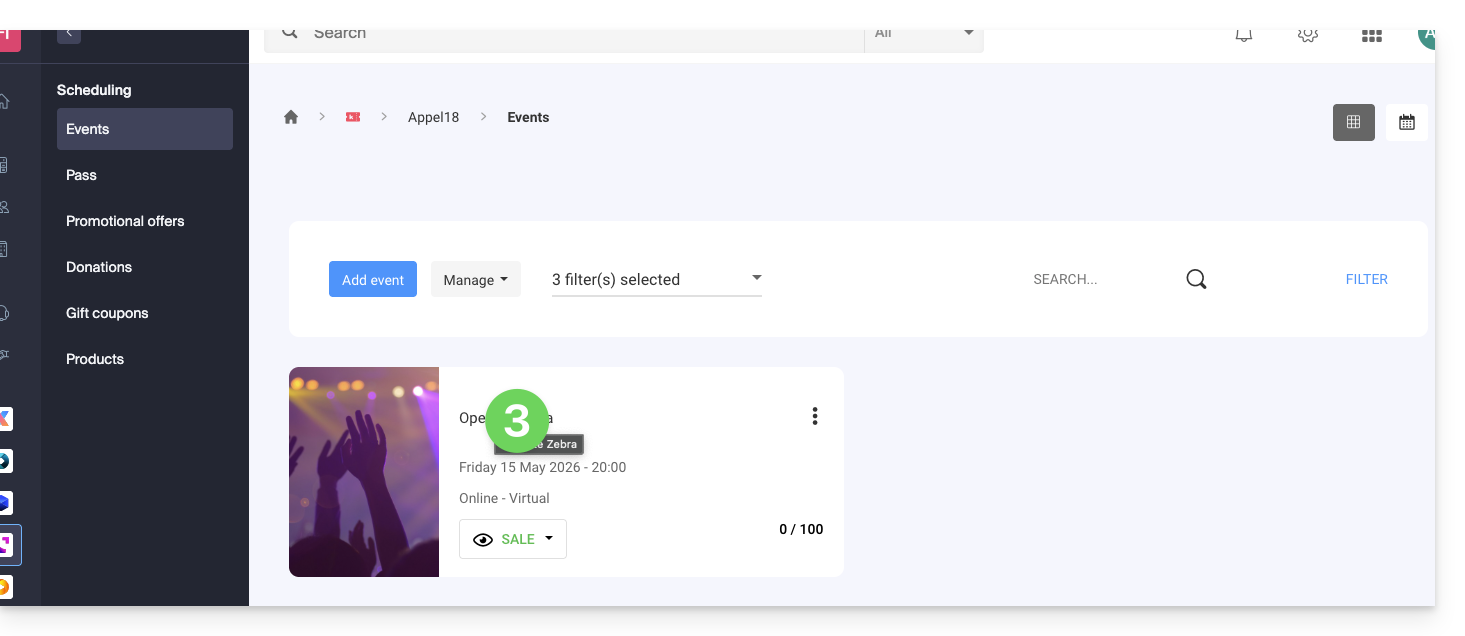
- Click directly on the name assigned to the event (or, if necessary, click on Program in the left-hand menu, then Events):
- Click on the Pricing tab.
- If the event has multiple dates, this section is replaced by “Dates”, which opens a calendar.
- Click on the date in the calendar to access the pricing…
- Click on the action menu ⋮ located to the right of the price to which you want to associate the form (by expanding the Zone using the chevron if necessary).
- Click on Edit:
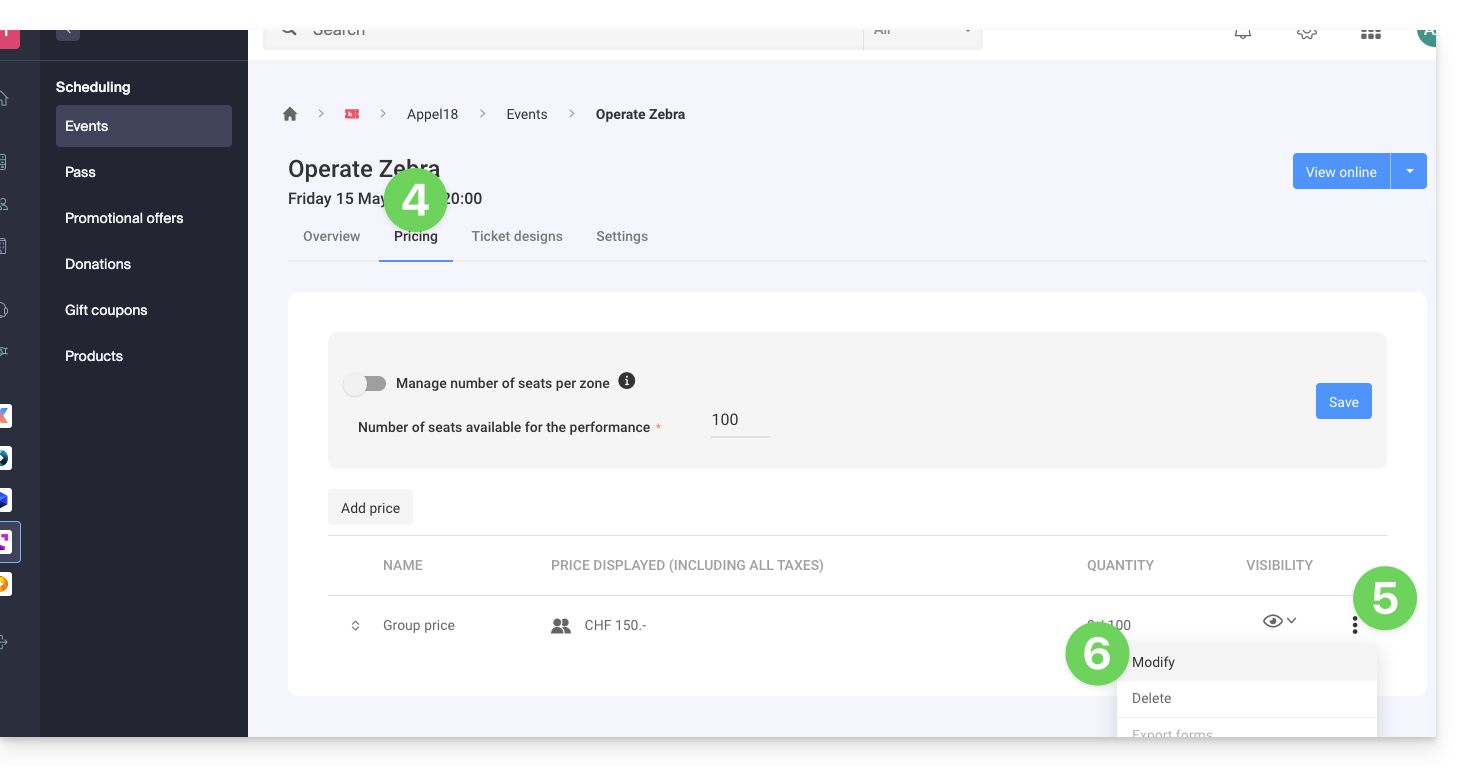
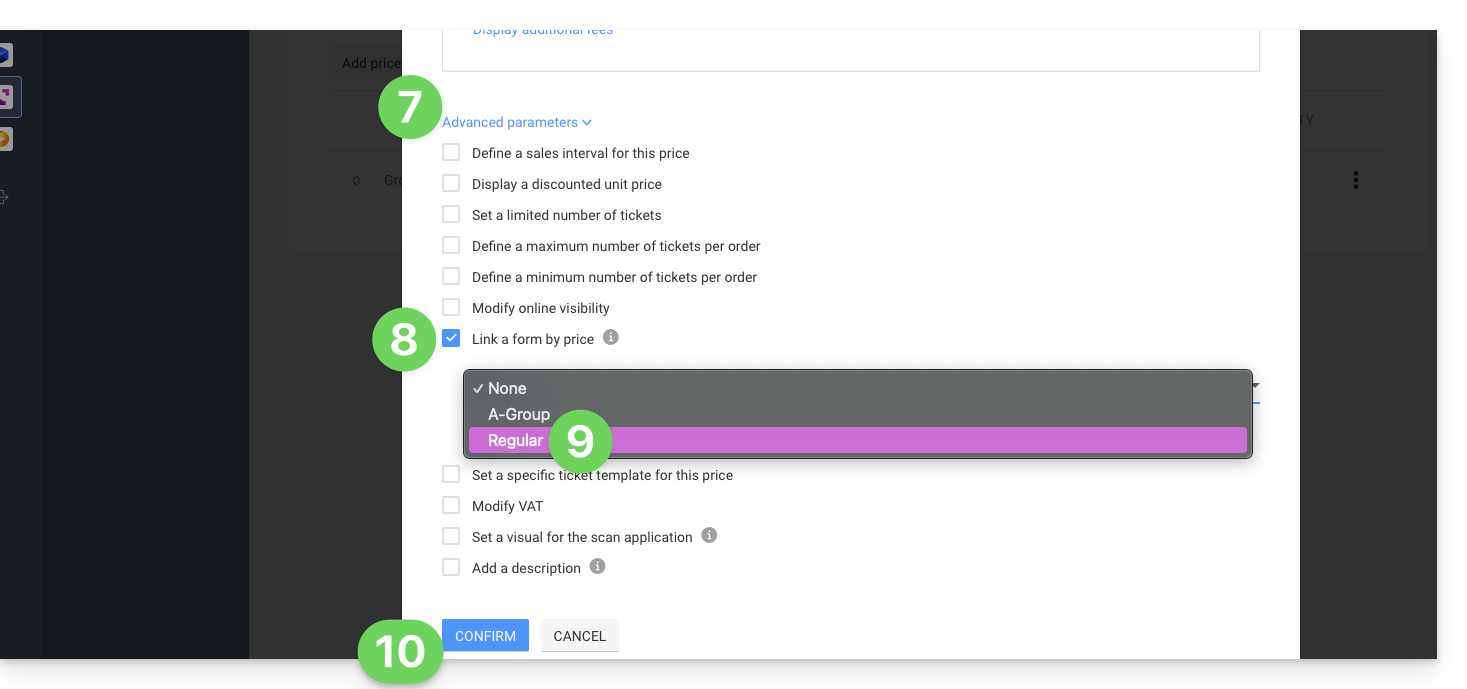
- Then, click on the down arrow to expand the advanced settings.
- Enable the Link a form to a price option.
- Choose the form to link.
- Click the Confirm button:
To retrieve information related to the forms, please refer to this other guide.
Link to this FAQ: https://faq.infomaniak.com/2678
Has this FAQ been helpful?
This guide will help you find the public IP address of your device, which can be useful when submitting certain support requests.
Display the public IP address on the connected device
Click here to obtain the public IP address of your device in IPv4 and IPv6 format.
Alternative methods
Visit ipinfo.io or ifconfig.me.
… on macOS
- From a
Terminalapplication (command-line interface,CLI) on your device, run thecurl ifconfig.mecommand and press Enter. - The address displayed is the public IP address of your computer.
Please note that this address may change periodically, especially if the router restarts or if the internet service provider uses dynamic IP address assignment.
To automate the process of finding the public IP address, use commands or scripts that query services such as api.ipify.org...
Link to this FAQ: https://faq.infomaniak.com/528
Has this FAQ been helpful?
This guide details the important elements to ensure you don't miss any of the kChat discussions that are relevant to you.
Introduction
- If notifications are correctly configured to work on the kChat mobile app, they will also work on smartwatches such as Garmin or Apple Watch.
Manage chat and event notifications
To manage kChat notifications, and thus be notified, for example, when a new message is sent directly to you or when you follow a specific message, including based on certain keywords:
- Click here to access the kChat web app (online service ksuite.infomaniak.com/kchat), or open the kChat mobile app (application for iOS/Android smartphones or tablets), or the kChat desktop app (desktop application on macOS/Windows/Linux).
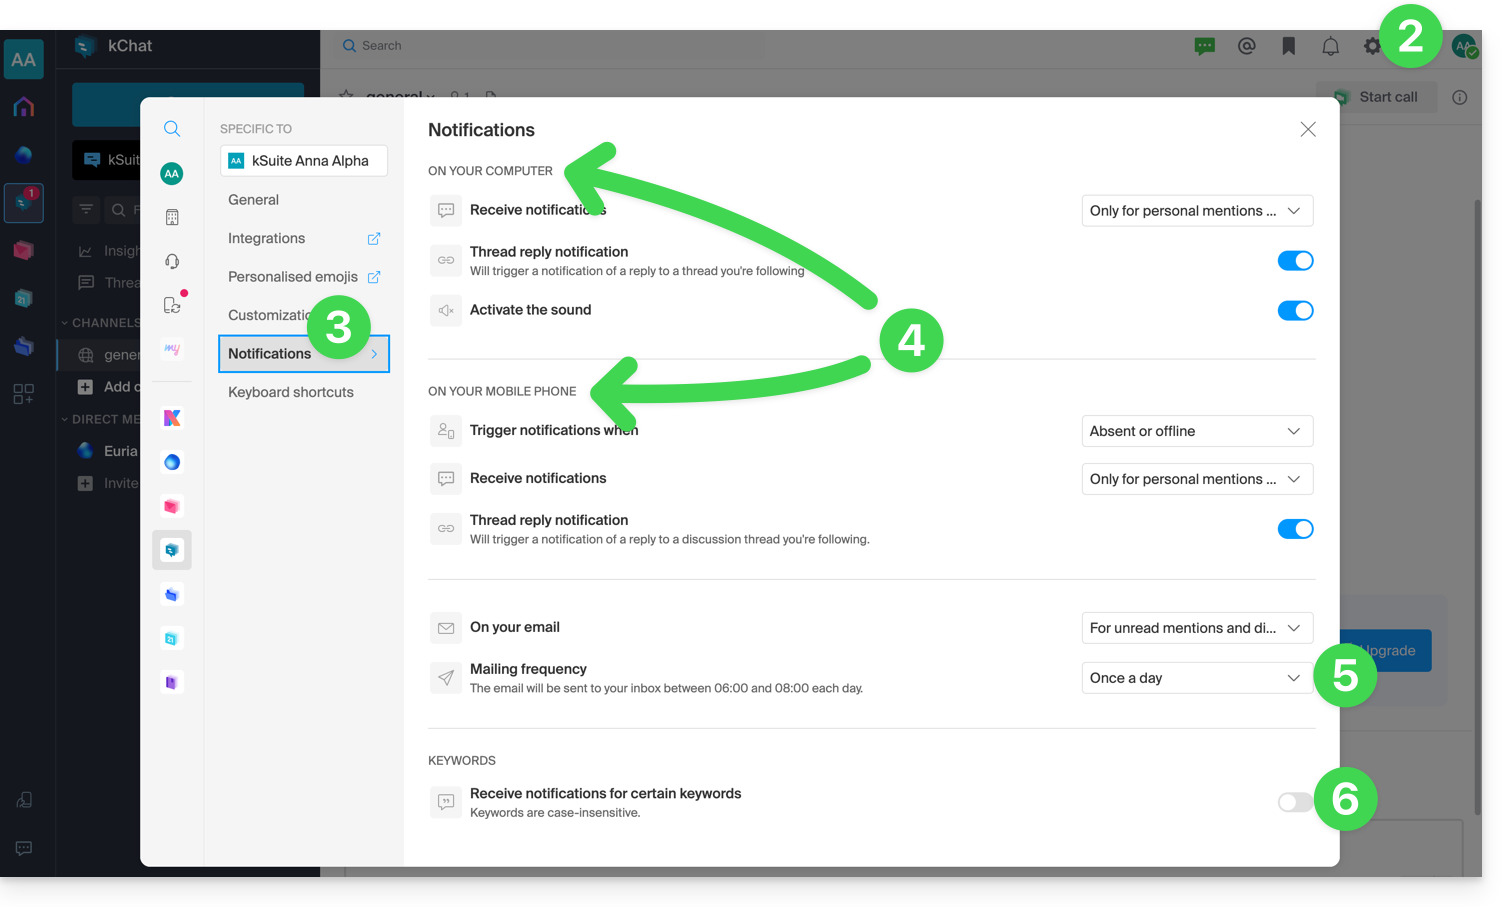
- Click on Settings in the top right corner.
- Click on Notifications.
- Define how you want to be notified (computer/mobile, present/absent, etc.) and under what circumstances (all messages or only messages with mentions, followed messages, etc.).
- Choose to receive regular notifications by email:
- This email is sent either every day or once a week, between 6 and 8 a.m., and informs the user about the messages they have not read.
- The user receives an email per kChat product to which they have access.
- Define a keyword for which you want to be notified when a new message is posted:
If necessary, allow browser notifications:
on Safari (❓: help)
- Open Safari.
- Click on Settings (or Preferences), select Websites, then Notifications.
- Find the infomaniak.kchat.infomaniak.com website and select Allow.
on Firefox (❓: help)
- Open Firefox.
- Go to the main menu and click on Settings (or Preferences).
- Go to Privacy & Security in the left-hand panel.
- Scroll down to the Permissions section and locate the Notifications line.
- Click the Settings… button to the right of Notifications.
- Search for the site https://infomaniak.kchat.infomaniak.com and select Allow.
- Click Save changes.
on Google Chrome (❓: help)
- Open Google Chrome.
- Click on the More ⋮ menu in the top right corner, then click Settings.
- Go to Privacy and security, then click Site settings.
- Click on Notifications and choose to allow the site:
- Next to the Allow option, click on Add. Enter the URL:
https://infomaniak.kchat.infomaniak.com, then click on Add.
- Next to the Allow option, click on Add. Enter the URL:
on Microsoft Edge
- Open Microsoft Edge.
- Click on the … menu in the top right corner, then click on Settings.
- Go to the Cookies and site permissions menu.
- Click on Notifications:
- Next to the Allow option, click on Add. Enter the URL:
https://infomaniak.kchat.infomaniak.com, then click on Add.
- Next to the Allow option, click on Add. Enter the URL:
Manage desktop app icon notifications
For example, you can choose to animate the desktop app icon when a new message arrives:
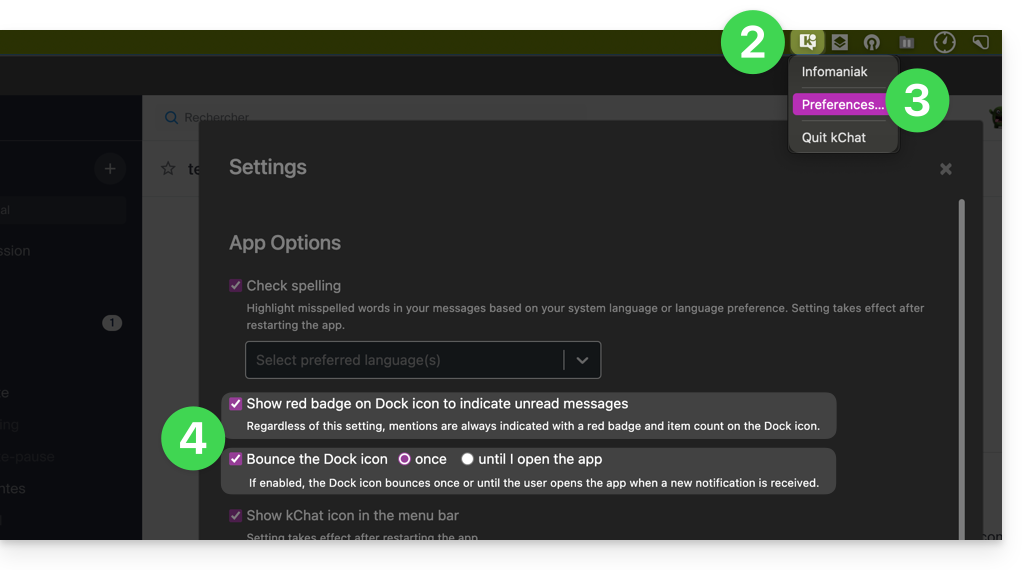
- Open the kChat desktop app (desktop application on macOS / Windows / Linux).
- Left-click on the desktop app icon in your computer's notification area (top right on macOS, bottom right on Windows, and double-left-click in the taskbar on Linux).
- Click on Preferences...
- Under Application Options, adjust the operating system's notification preferences:
Manage notifications for a specific channel
In the relevant chat channel:
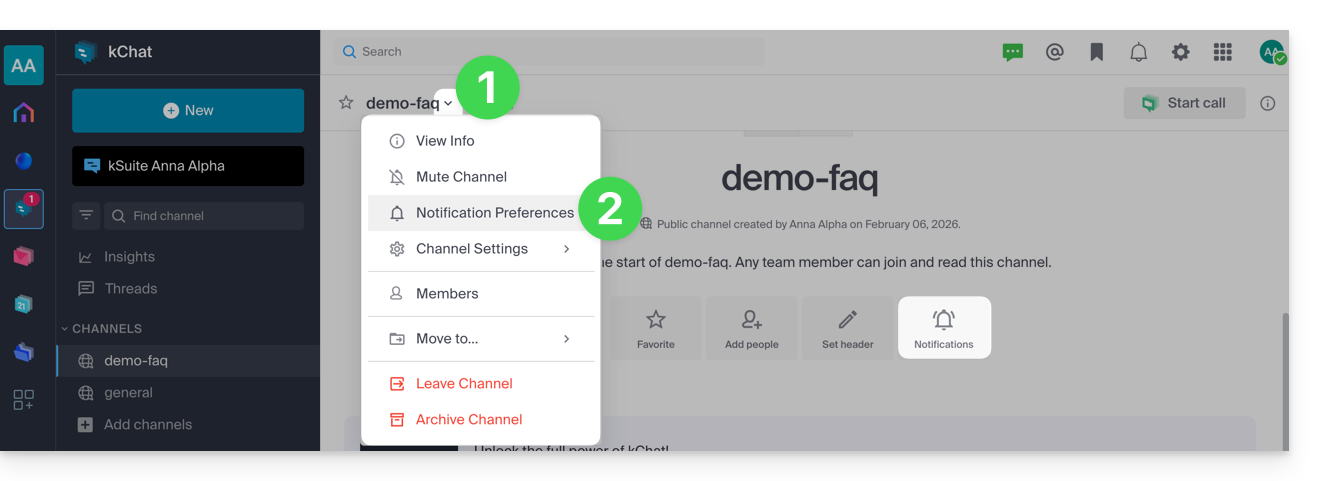
- Click on the chevron to the right of the channel name.
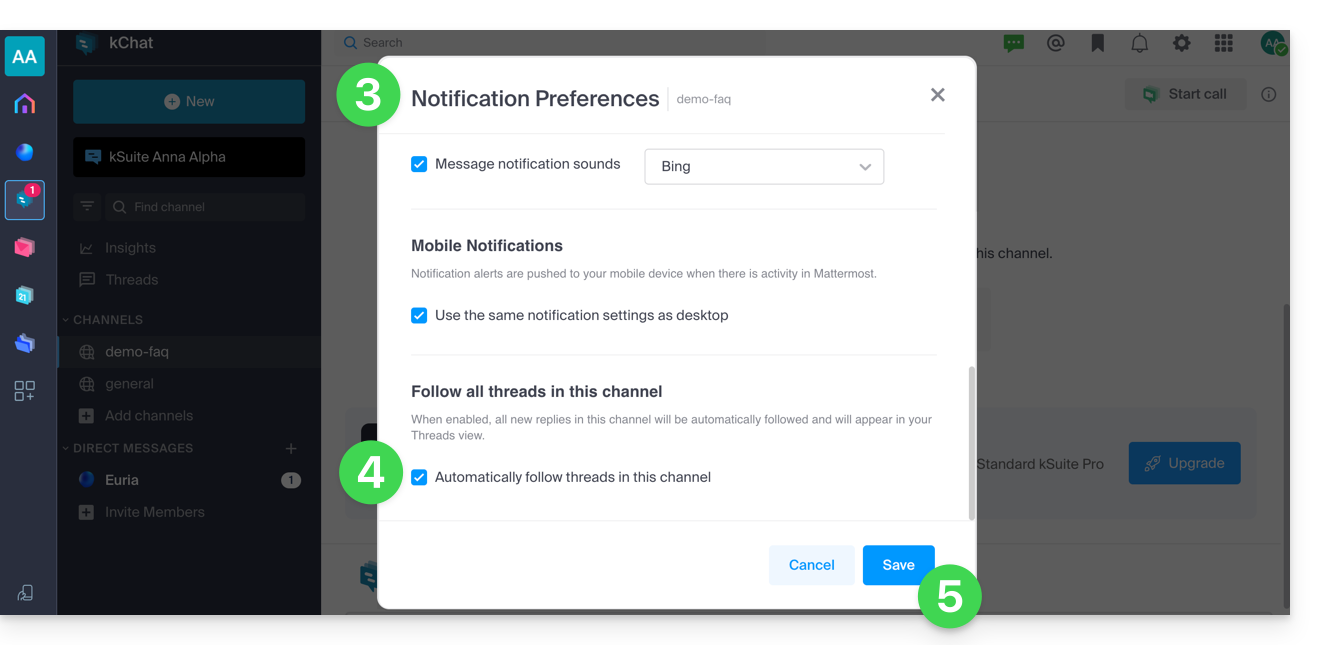
- Click on Notification preferences (or directly on the dedicated icon at the top of the channel):
- Browse and enable the desired notifications.
- One of the options allows you to be automatically notified as soon as a discussion thread (thread) is initiated following a message posted in the relevant channel.
- Save your choices by clicking the button at the bottom:
Manage notifications for a specific discussion
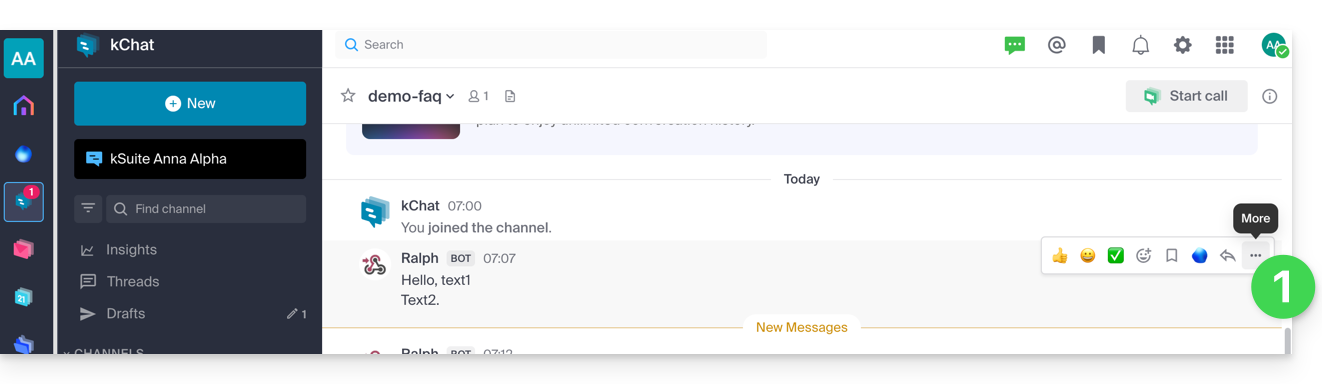
To be notified of a new message in a specific discussion thread, even if you are not a direct participant, you need to enable Follow:
- either by hovering over the action menu ••• to the right of a user in a discussion:
- and clicking on More…:
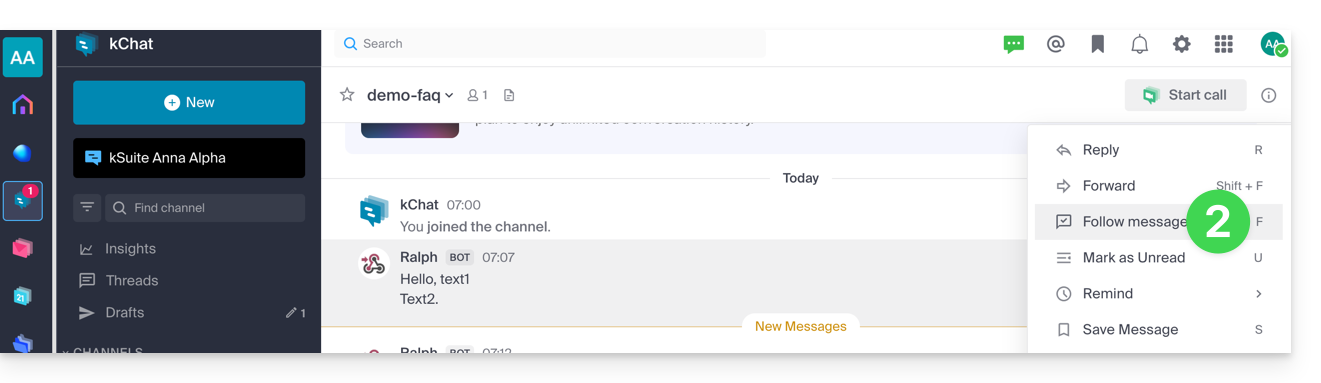
- then Follow the message:
- and clicking on More…:
- within a discussion thread (reply to a message):
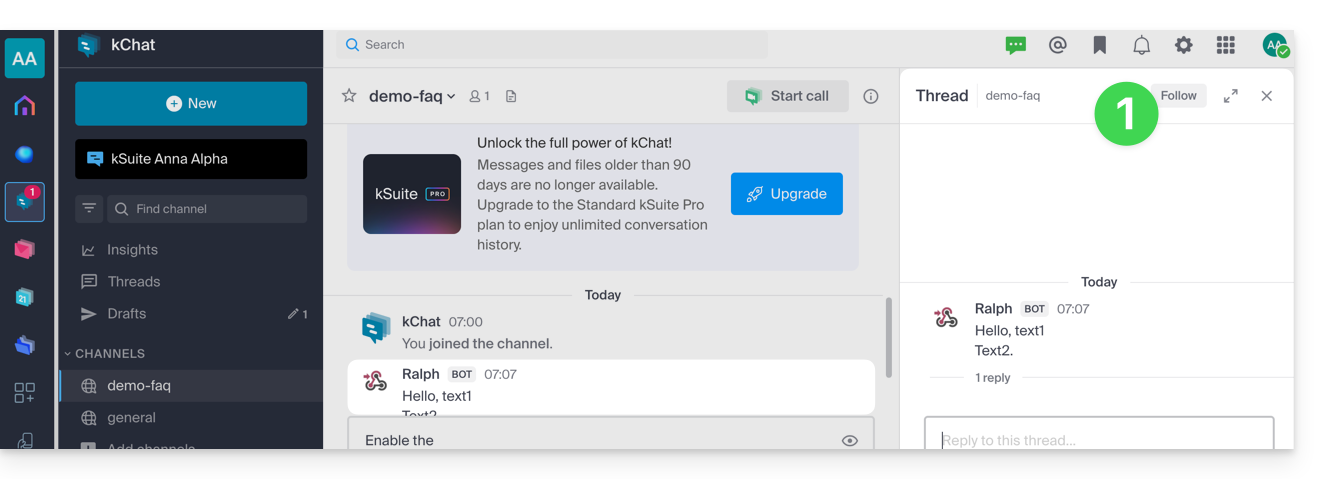
- click on Follow at the top of the discussion (you automatically follow the discussion from the moment you post a message, and you can then Stop following the exchanges in this discussion thread):
- click on Follow at the top of the discussion (you automatically follow the discussion from the moment you post a message, and you can then Stop following the exchanges in this discussion thread):
Link to this FAQ: https://faq.infomaniak.com/1460
Has this FAQ been helpful?
This guide details the automatic translation service integrated into the kChat app by Infomaniak.
Translate text while reading
To automatically translate a received message written in a foreign language into your language:
- Click here to access the Infomaniak kChat web app (online service ksuite.infomaniak.com/kchat) or open the mobile app (application for iOS/Android smartphones or tablets) or the desktop app (desktop application on macOS/Windows/Linux).
- Go to the message you want to translate.
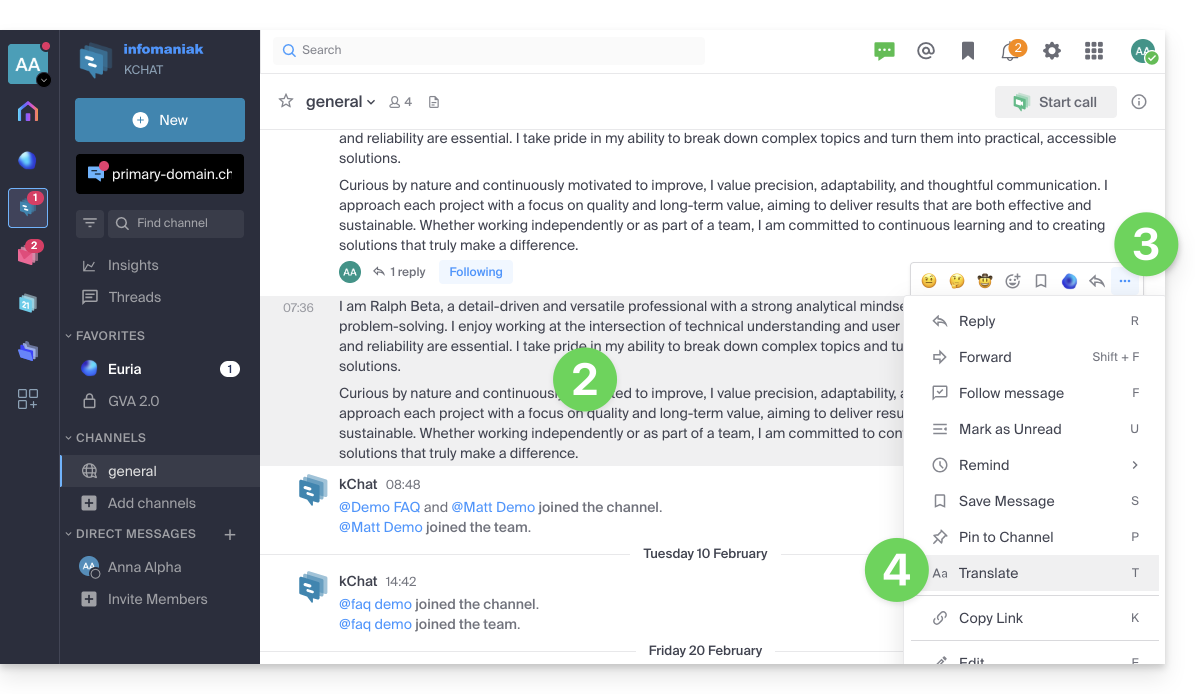
- Click on the action menu ••• located in the upper right corner of the item.
- Click on Translate:
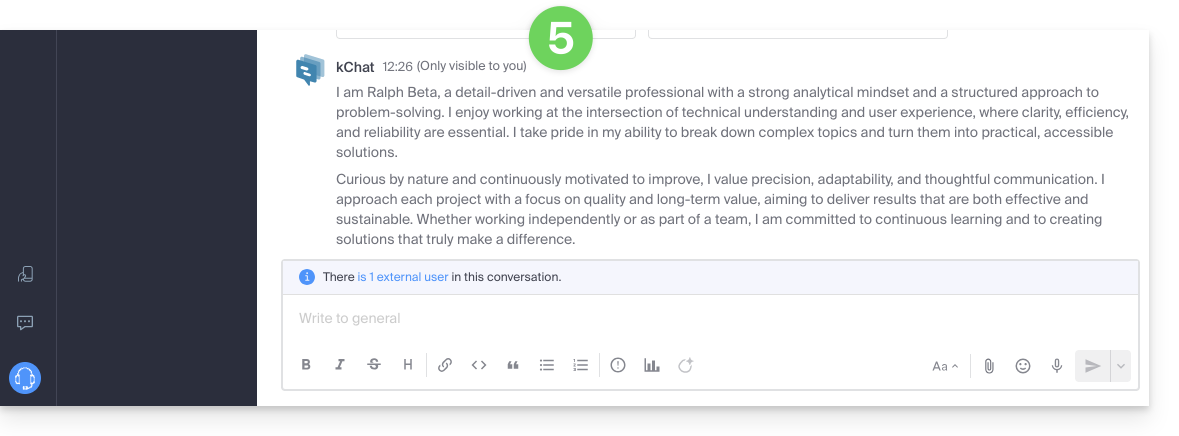
- The translated message is displayed after the last message in your conversation and is only visible to you:
Translate text with Euria while writing
You can ask Euria to translate the text you are currently writing:
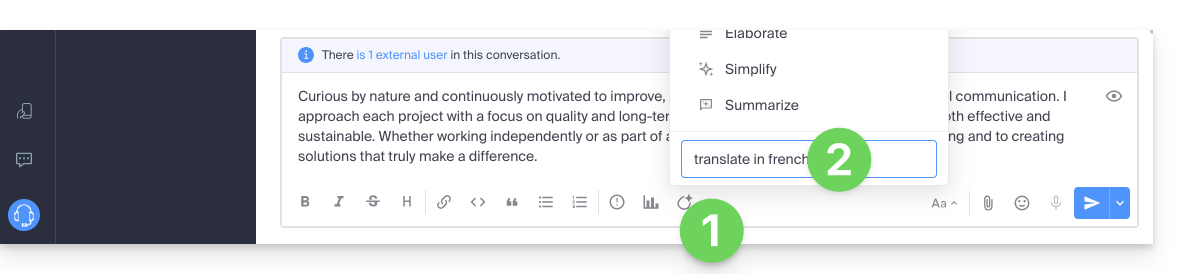
- Click on the Euria icon.
- Enter your instructions:
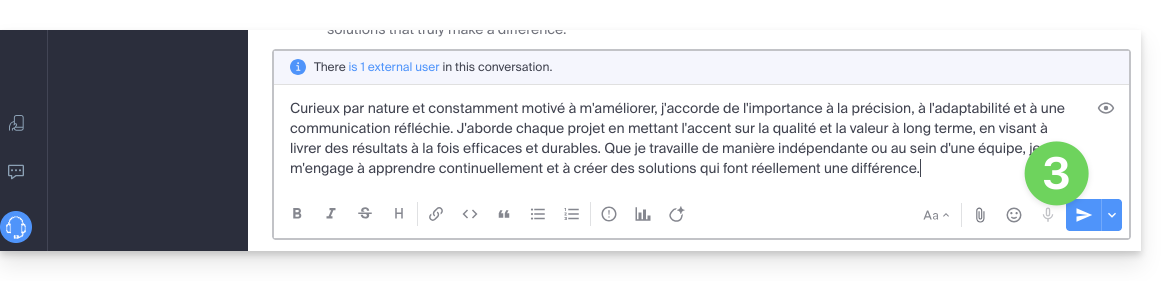
- The text will then be displayed in the desired language, and you can send it as follows:
Link to this FAQ: https://faq.infomaniak.com/1467
Has this FAQ been helpful?
This guide details how to back up a Google Workspace account (Gmail, Google Drive, Google Calendar, …)using Acronis on Swiss Backup, the backup solution in a Swiss independent cloud.
It is also possible to back up other types of data.
Prerequisites
- Have an Swiss Backup Infomaniak account with an available device quota (minimum 1) for a Google Workspace backup (1 license per Workspace user to be backed up):
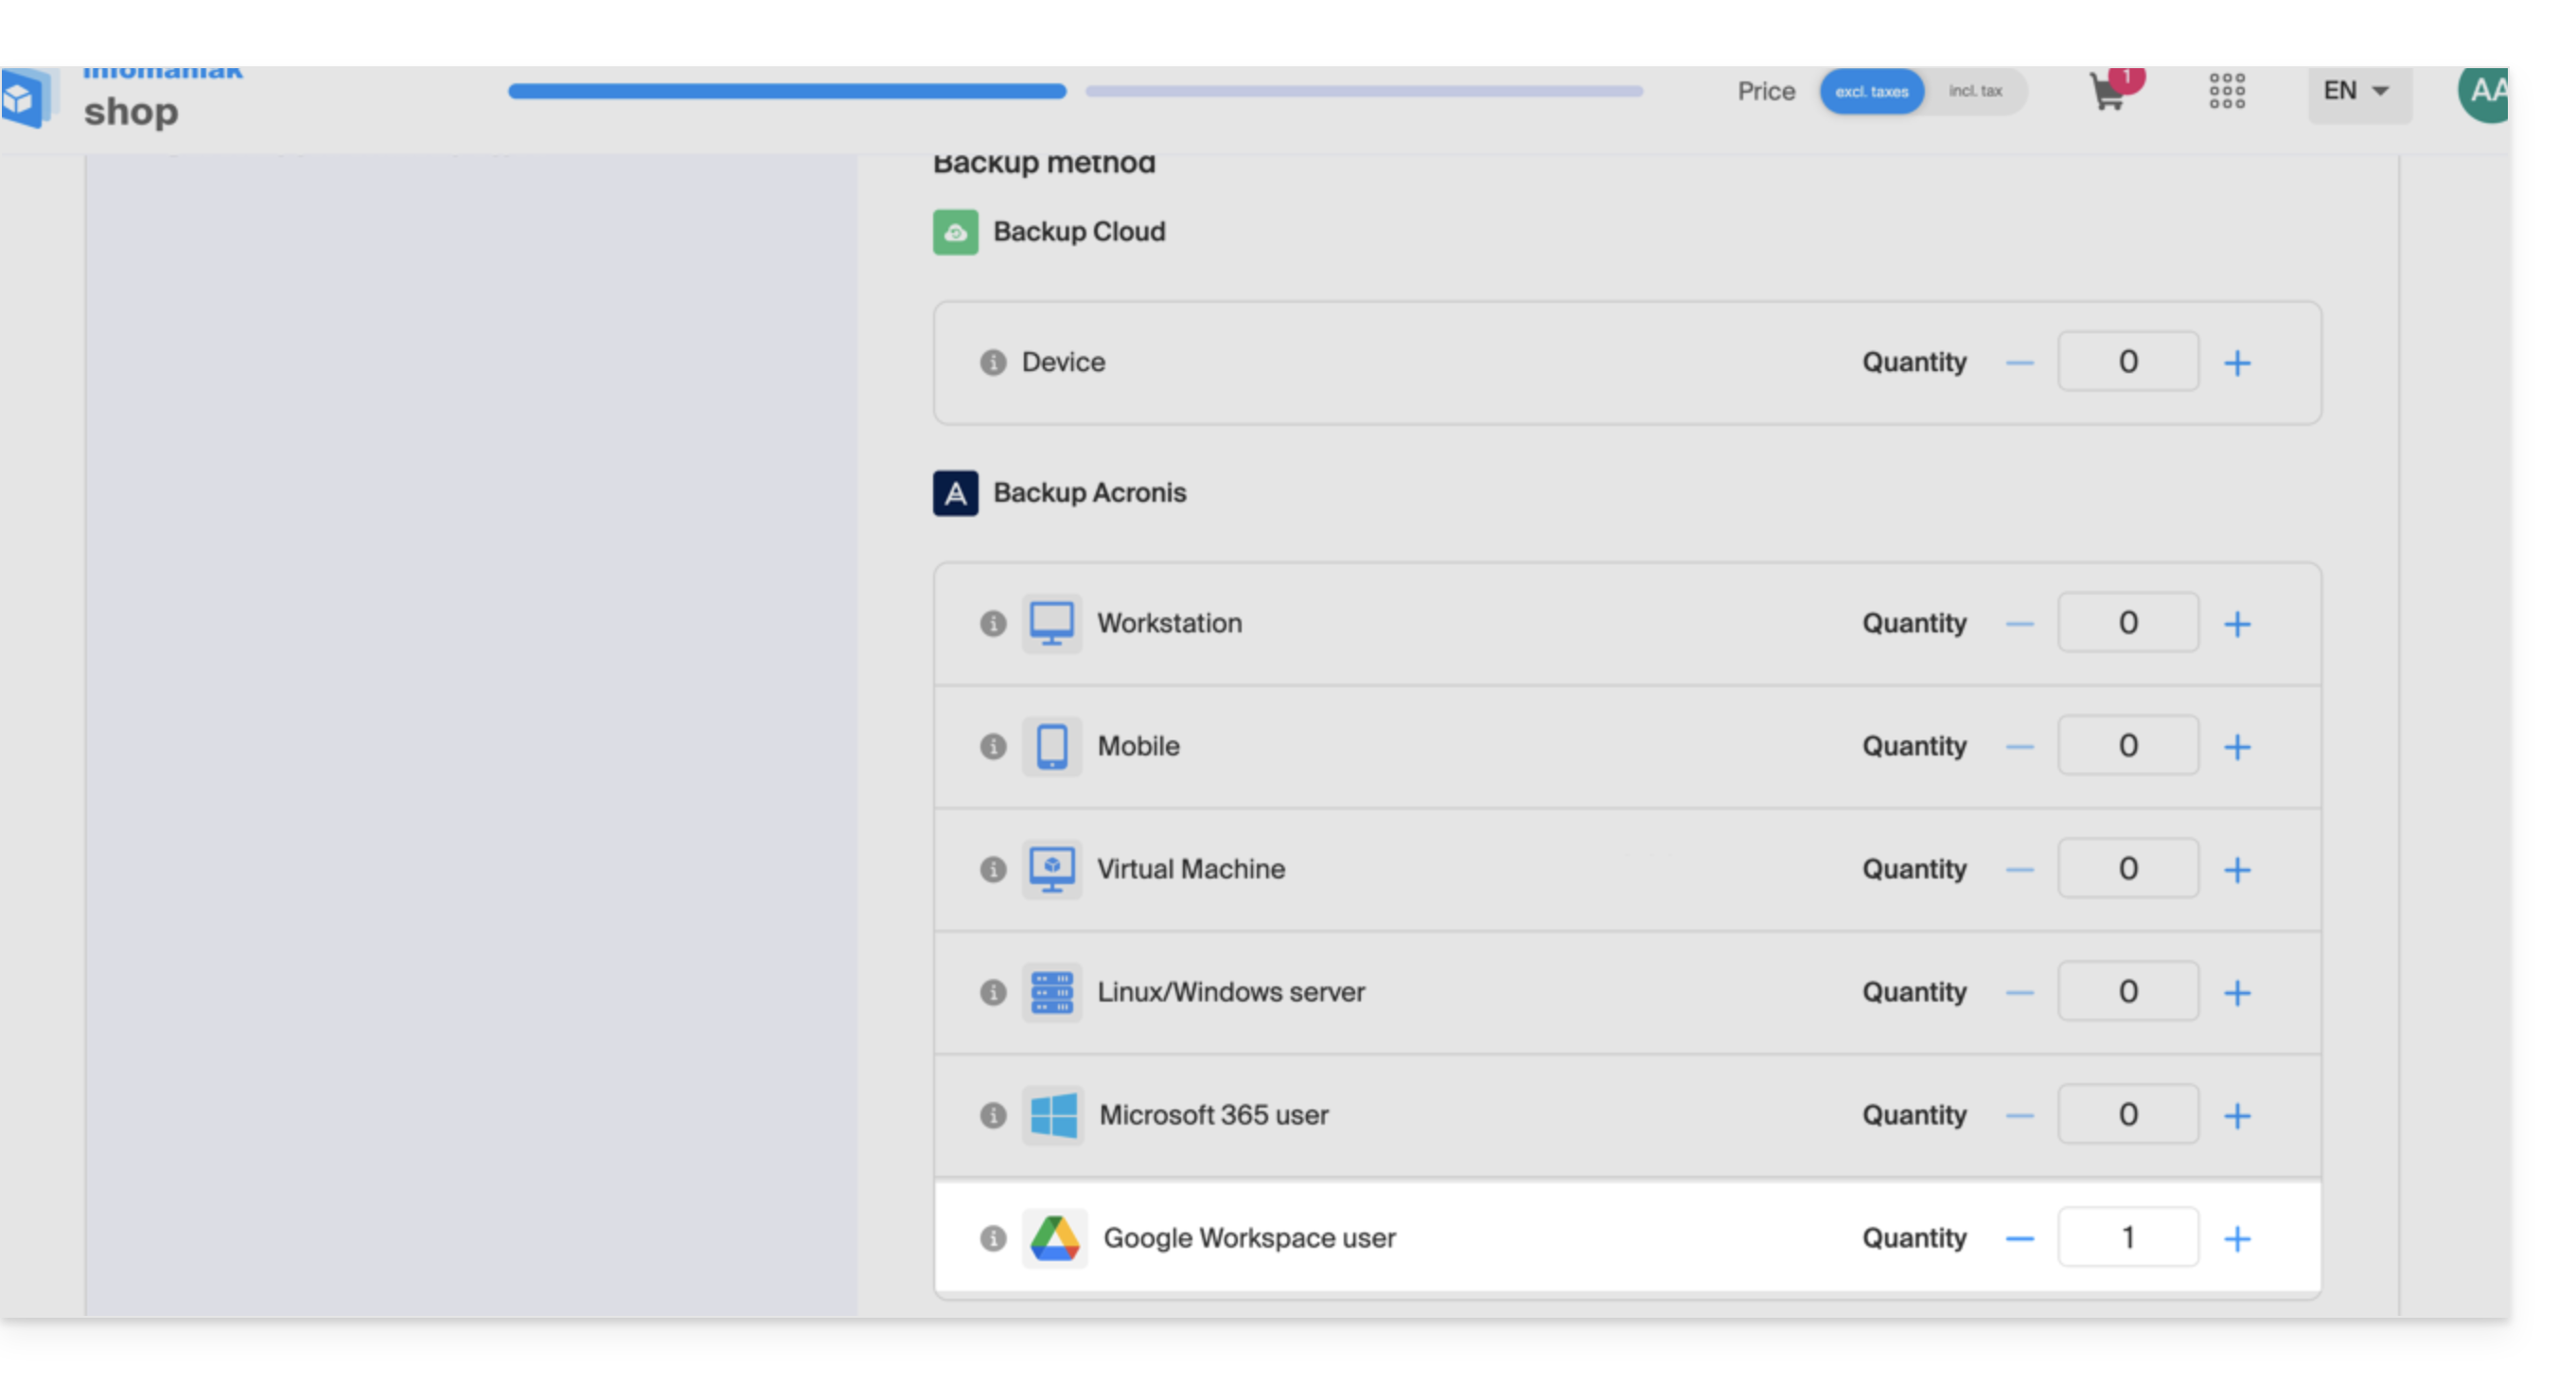
- If necessary, increase the device quota according to your needs.
- Add the device to the Infomaniak Manager to receive the login credentials.
- Create a new project on Google Cloud Platform (console.cloud.google.com) as a super administrator:
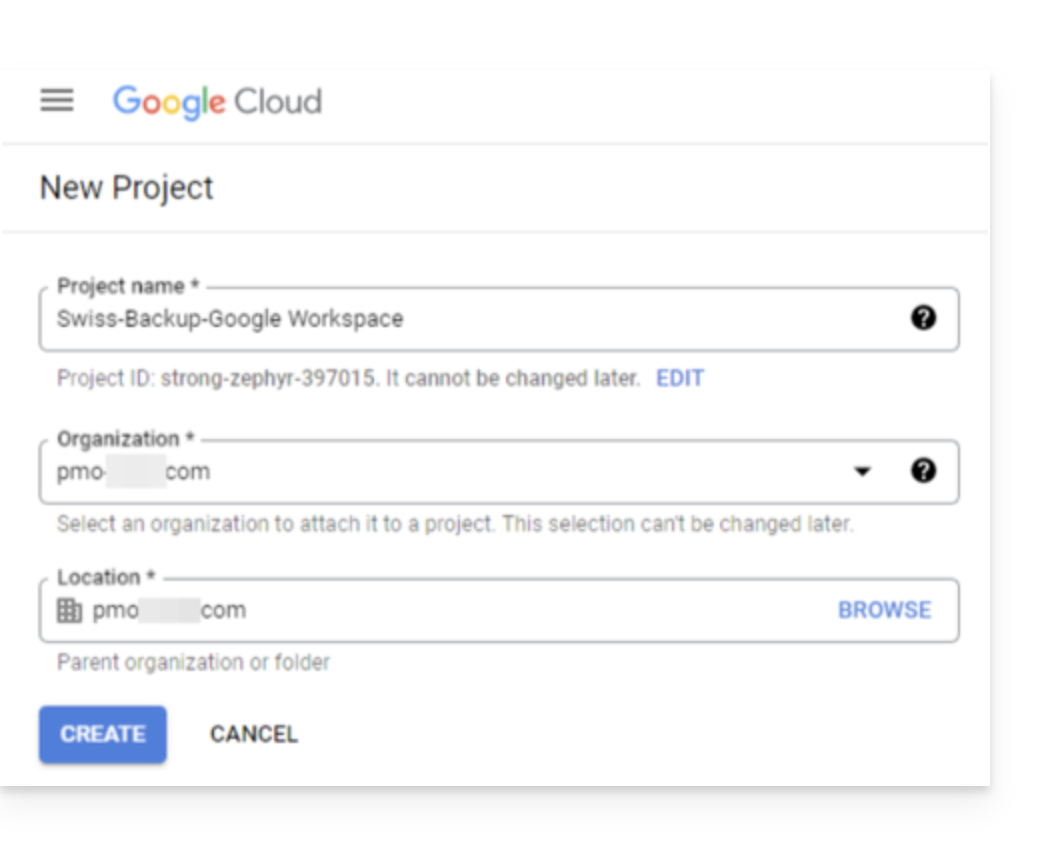
- Consult the Acronis documentation on this topic:
- Allow 20 to 30 minutes to configure everything.
Allow Acronis to access Google Cloud Platform
In the Google Cloud Platform console:
- Select your new project.
- In the navigation menu, select APIs & Services > Enabled APIs & Services:
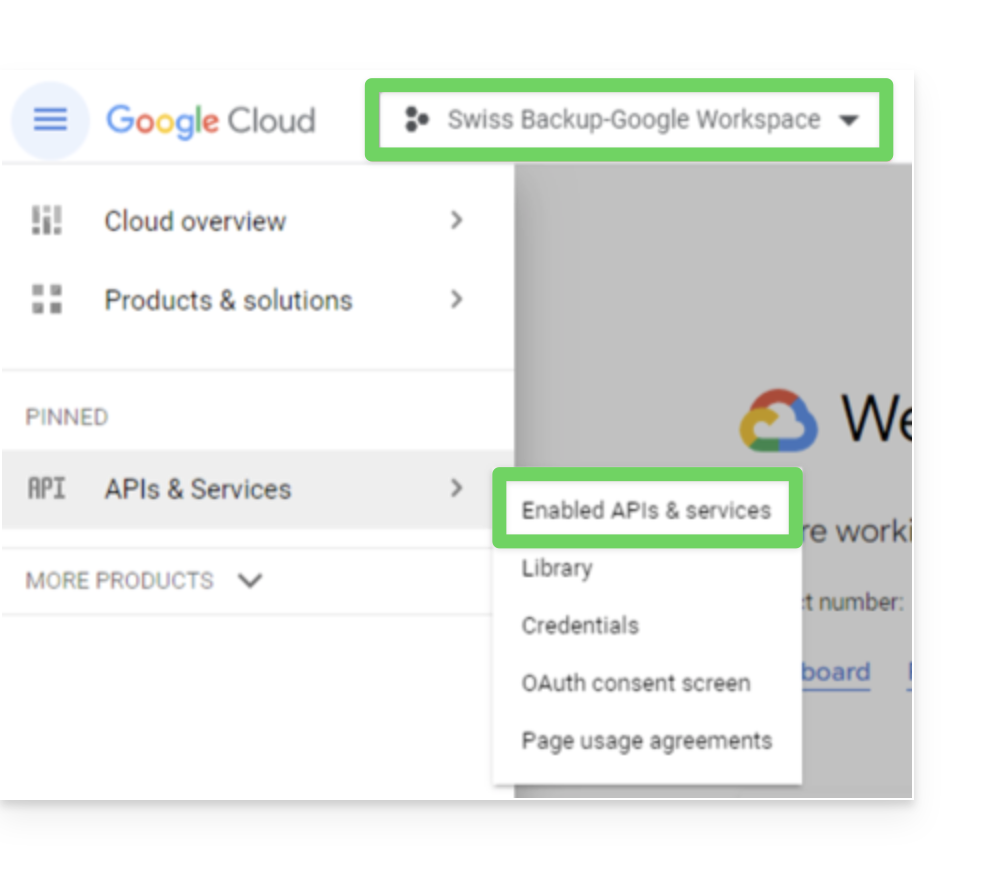
- Disable all APIs that are enabled by default in this project, one by one:
- Scroll down to the Enabled APIs and services page.
- Click on the name of an enabled API.
- On the API/Service details page that opens, click on Disable and confirm:
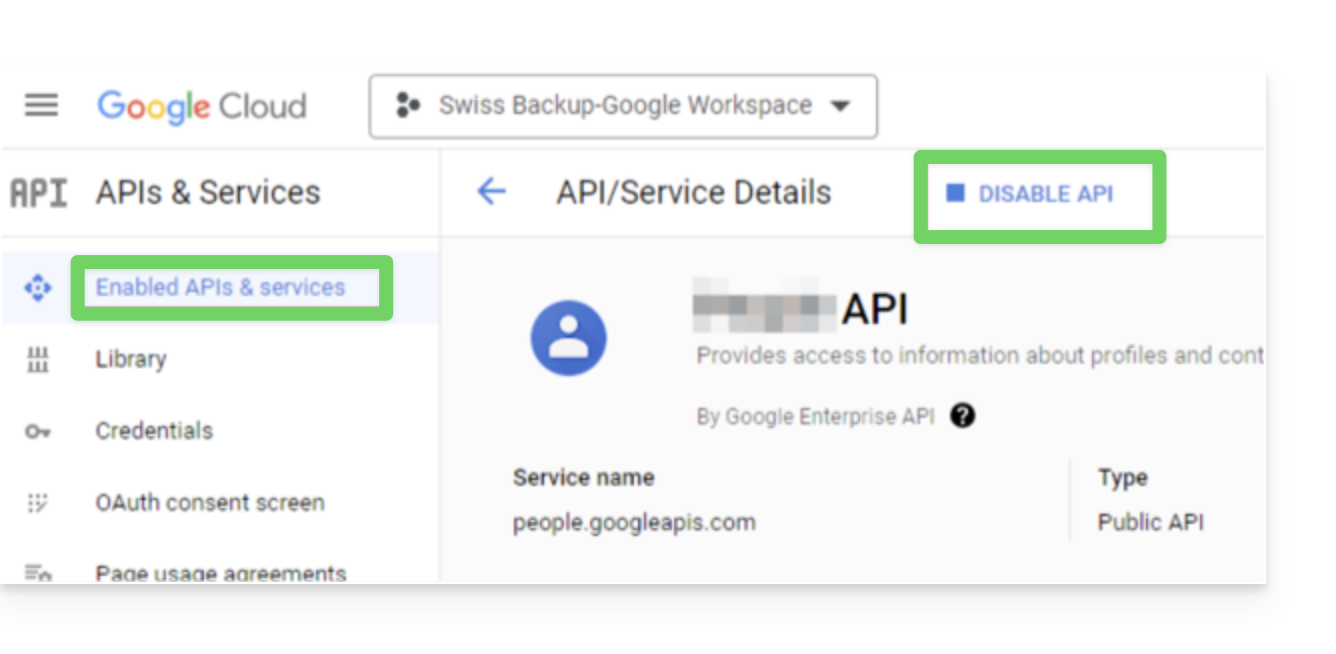
- Go back to the previous page and repeat the process for the next API.
- From the navigation menu, select APIs and services > Library.
- In the API library, enable the following APIs one by one, using the search bar to find the required APIs:
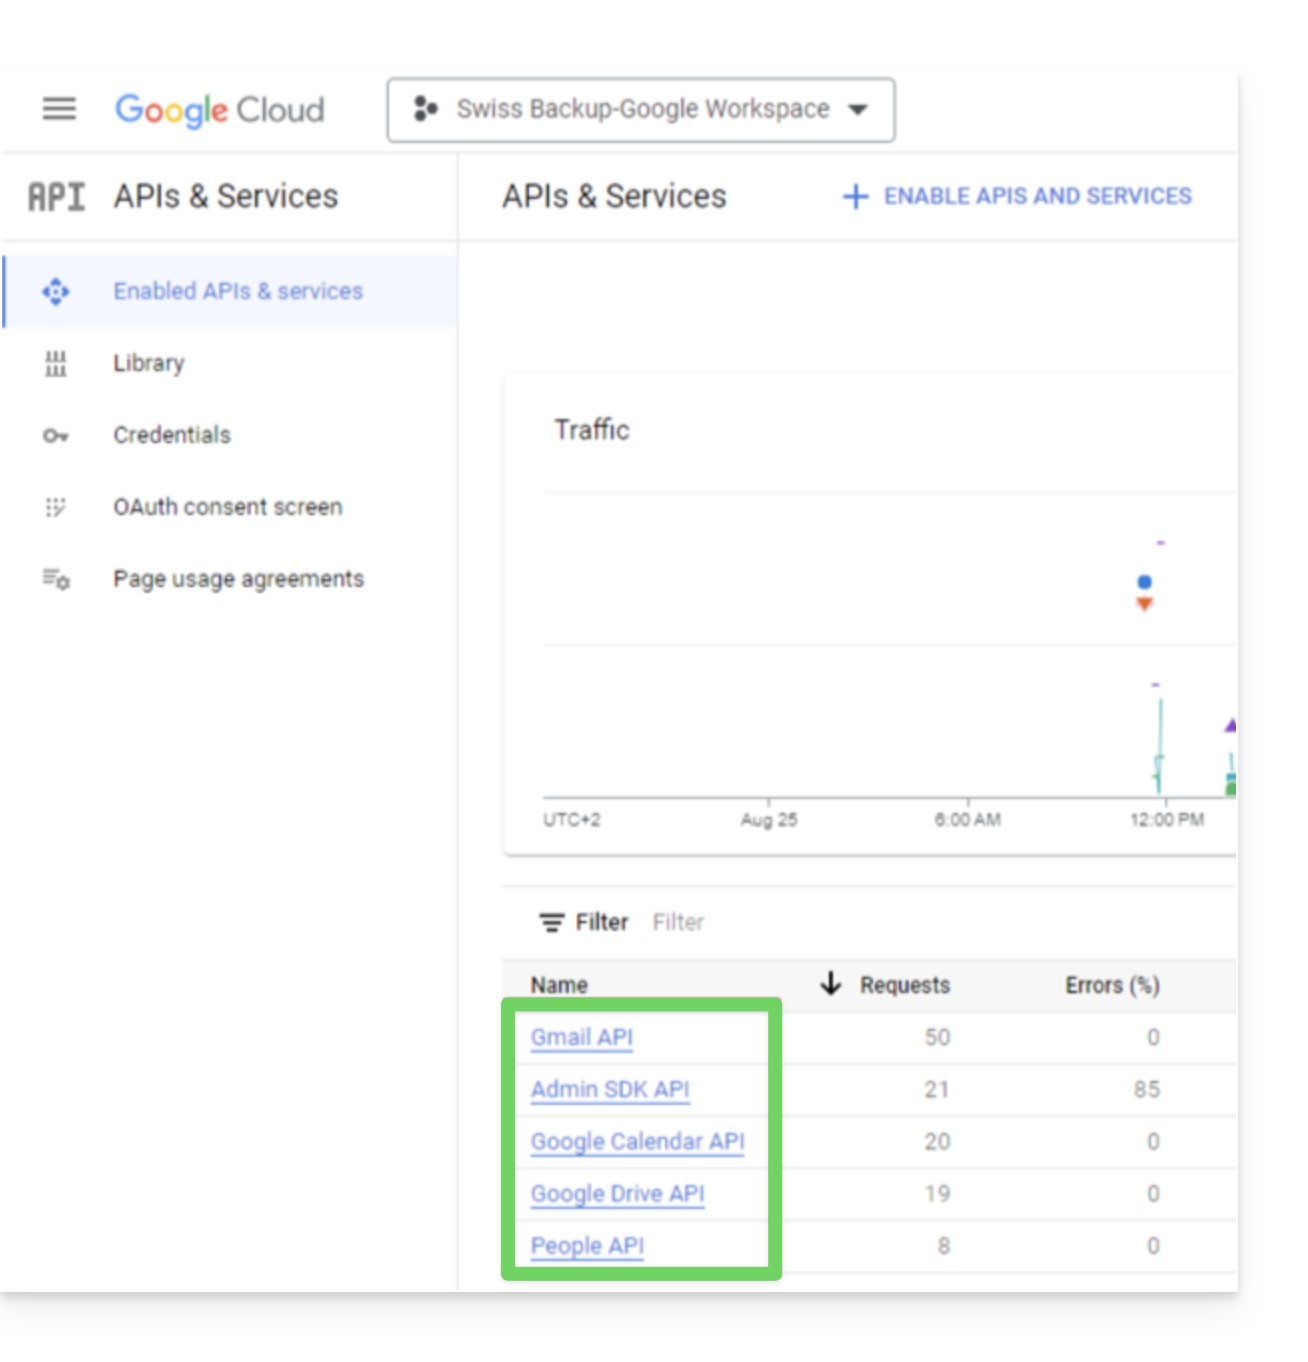
- Gmail API
- Google Drive API
- Admin SDK
- Google Calendar API
- Google People API
- Click on its name then click on Enable.
- To search for the next API, go back to step 5.
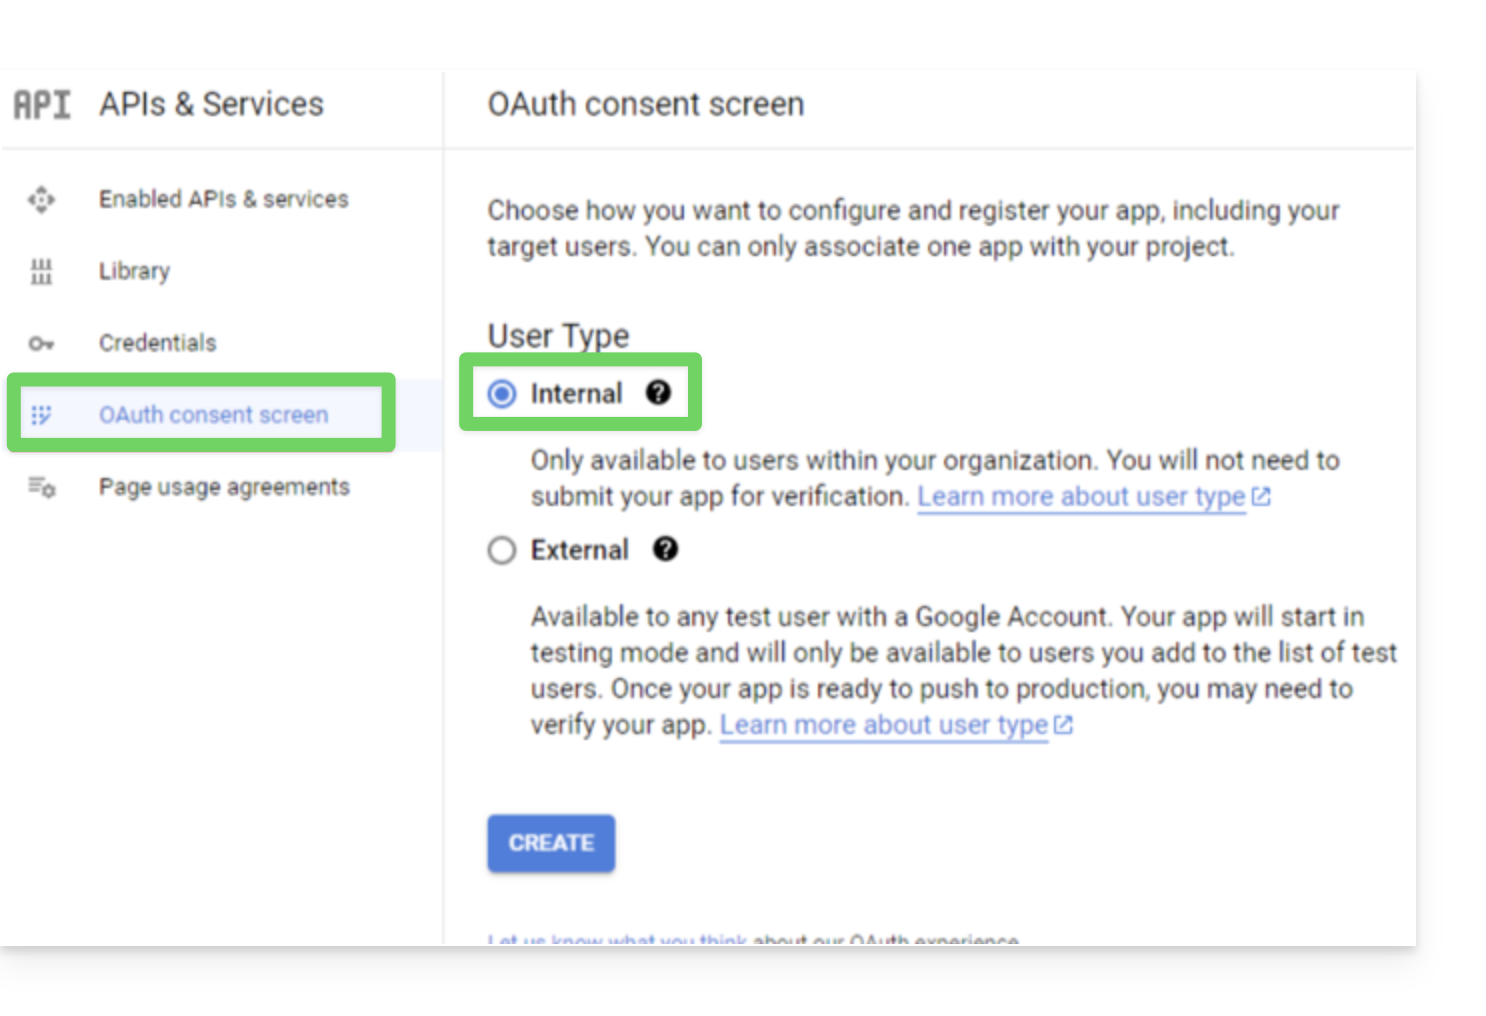
- From the Google Cloud Platform navigation menu, select APIs & Services > OAuth consent screen.
- In the window that opens, select Internal for the user type, then click Create:
- In the Name field for the application, enter a name for your application.
- In the User support email field, enter the super administrator's email address.
- In the Developer contact information field, enter the super administrator's email address.
- Leave all other fields blank, then click Save and continue.
- On the Scopes page, click Save and continue without making any changes.
- On the Summary page, check your settings and then click Back to Dashboard.
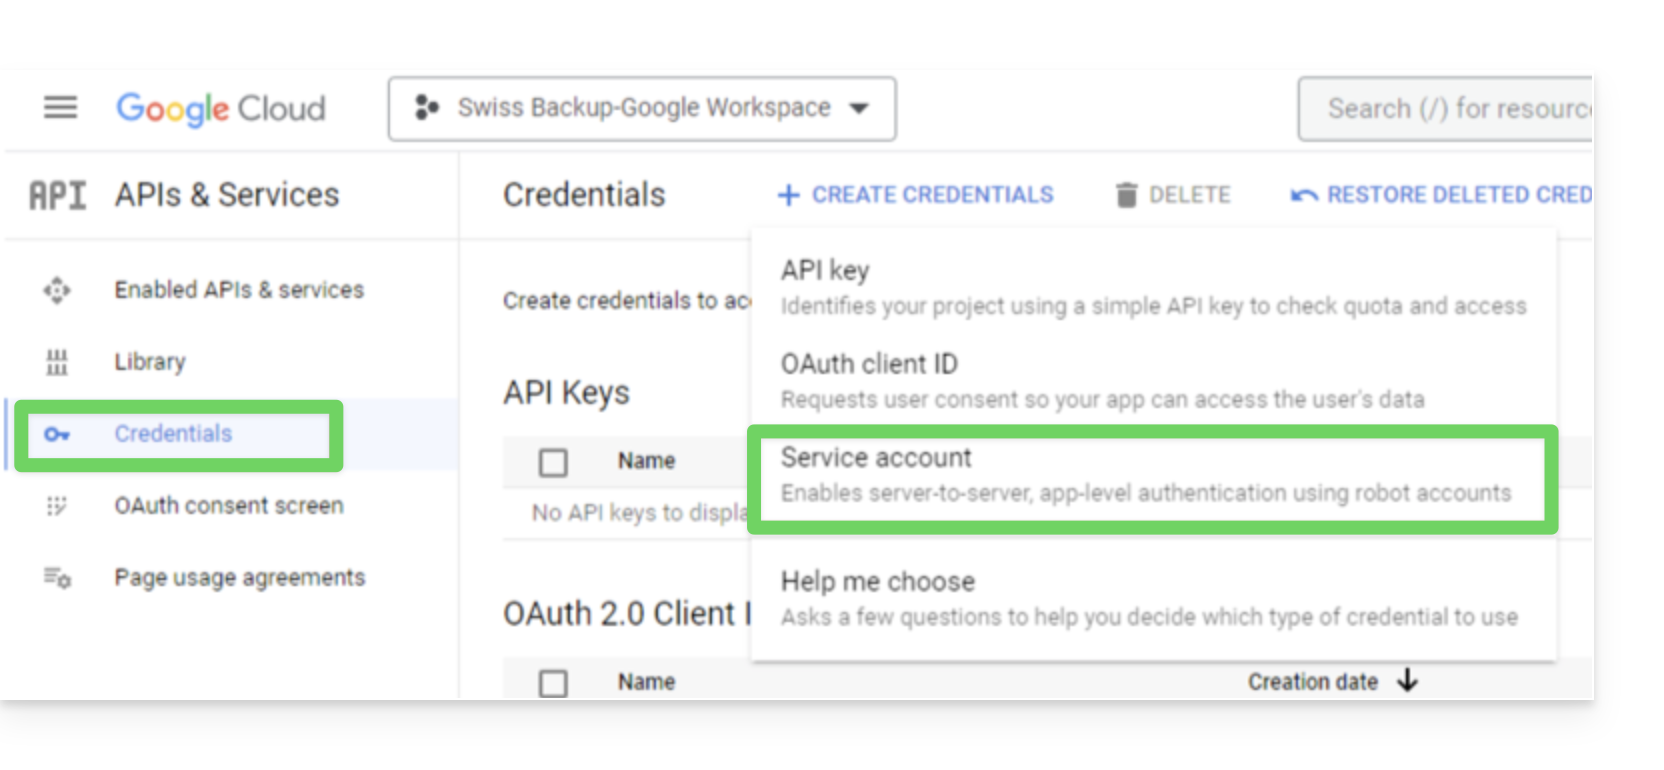
- In the Google Cloud Platform navigation menu, select Credentials > Service account.
- Click on Create a service account:
- Specify a name, a description, and click on Create and continue:
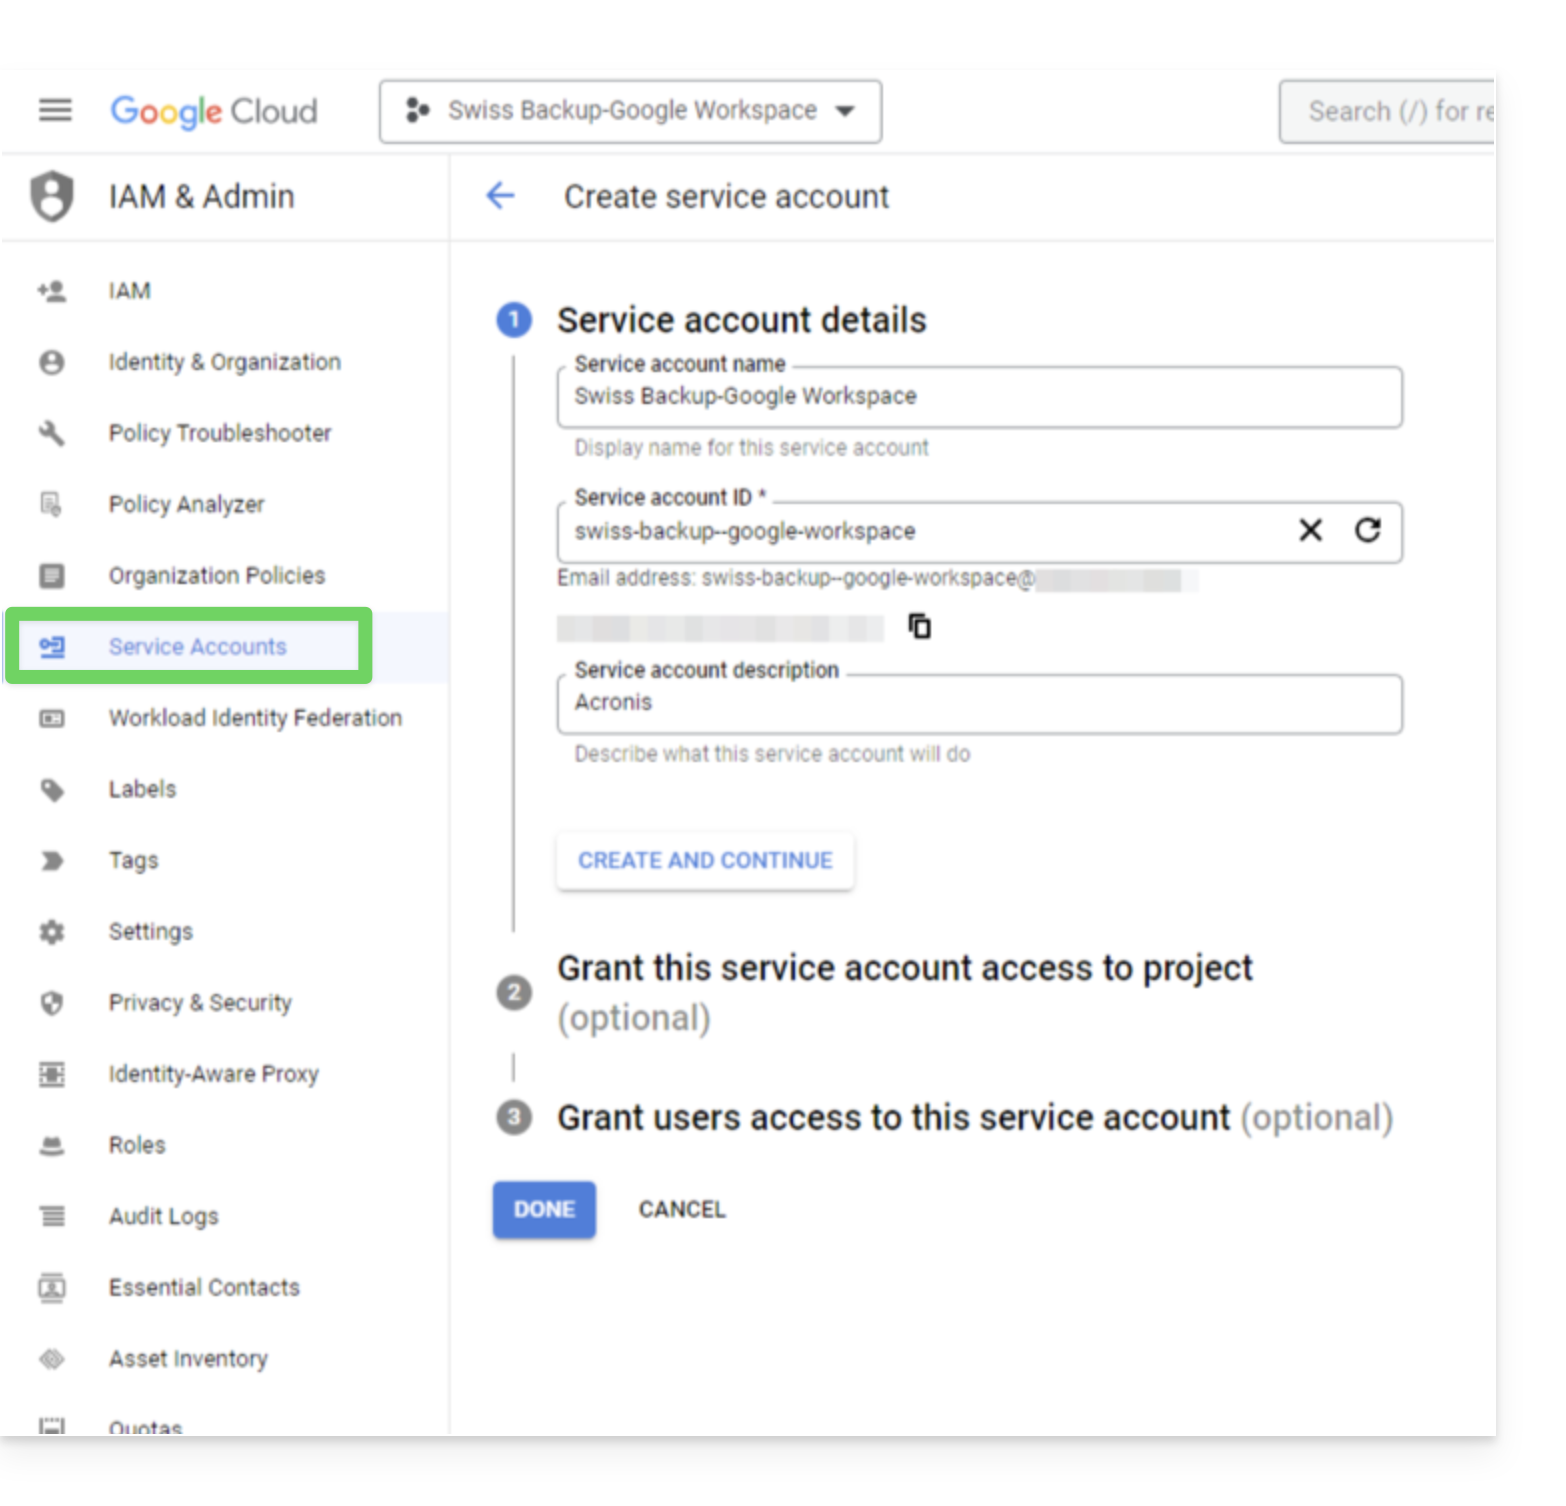
- Do not modify the steps Grant this service account access to the project and Grant users access to this service account.
- Click on Done; the Service accounts page will open.
- Select the new service account, then under Actions, click on Manage keys.
- Under Keys, click Add a key > Create a new key, then select the JSON key type:
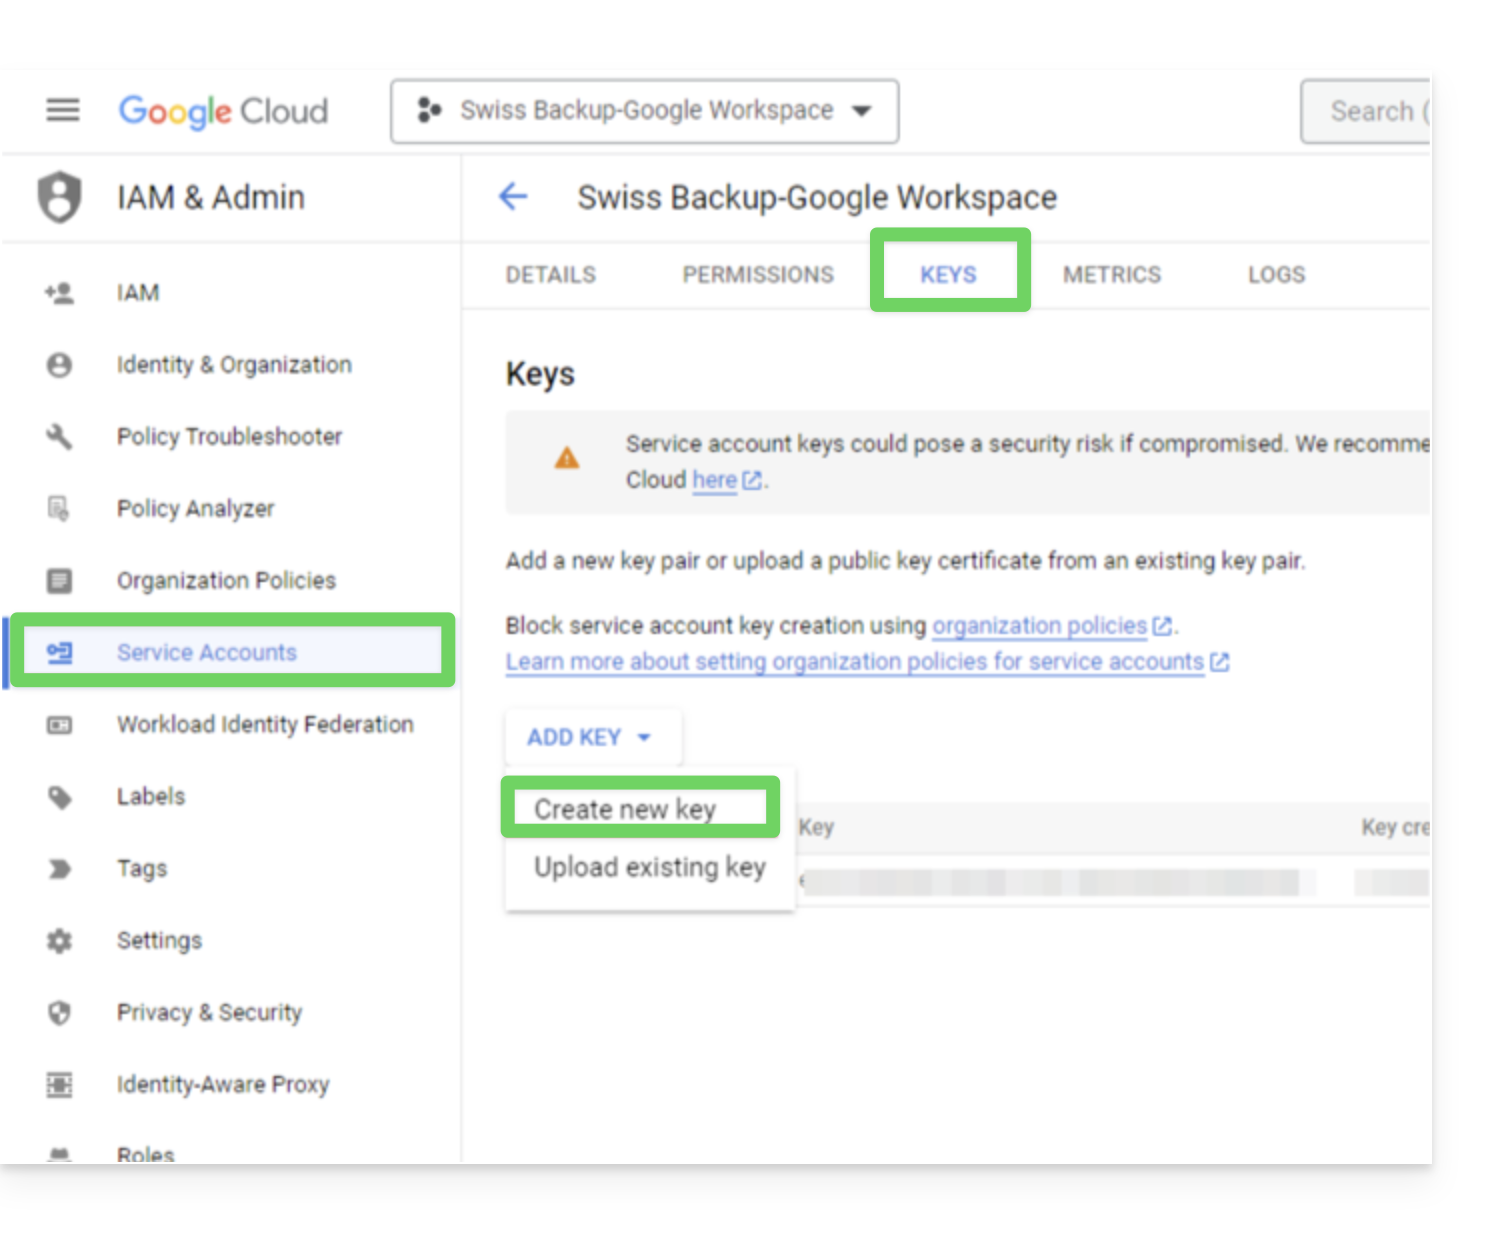
- Click Create; a JSON file containing the service account's private key is automatically downloaded to your computer: keep this file in a safe place as you will need it to add your Google Workspace organization to the Cyber Protection service as described below in this guide.
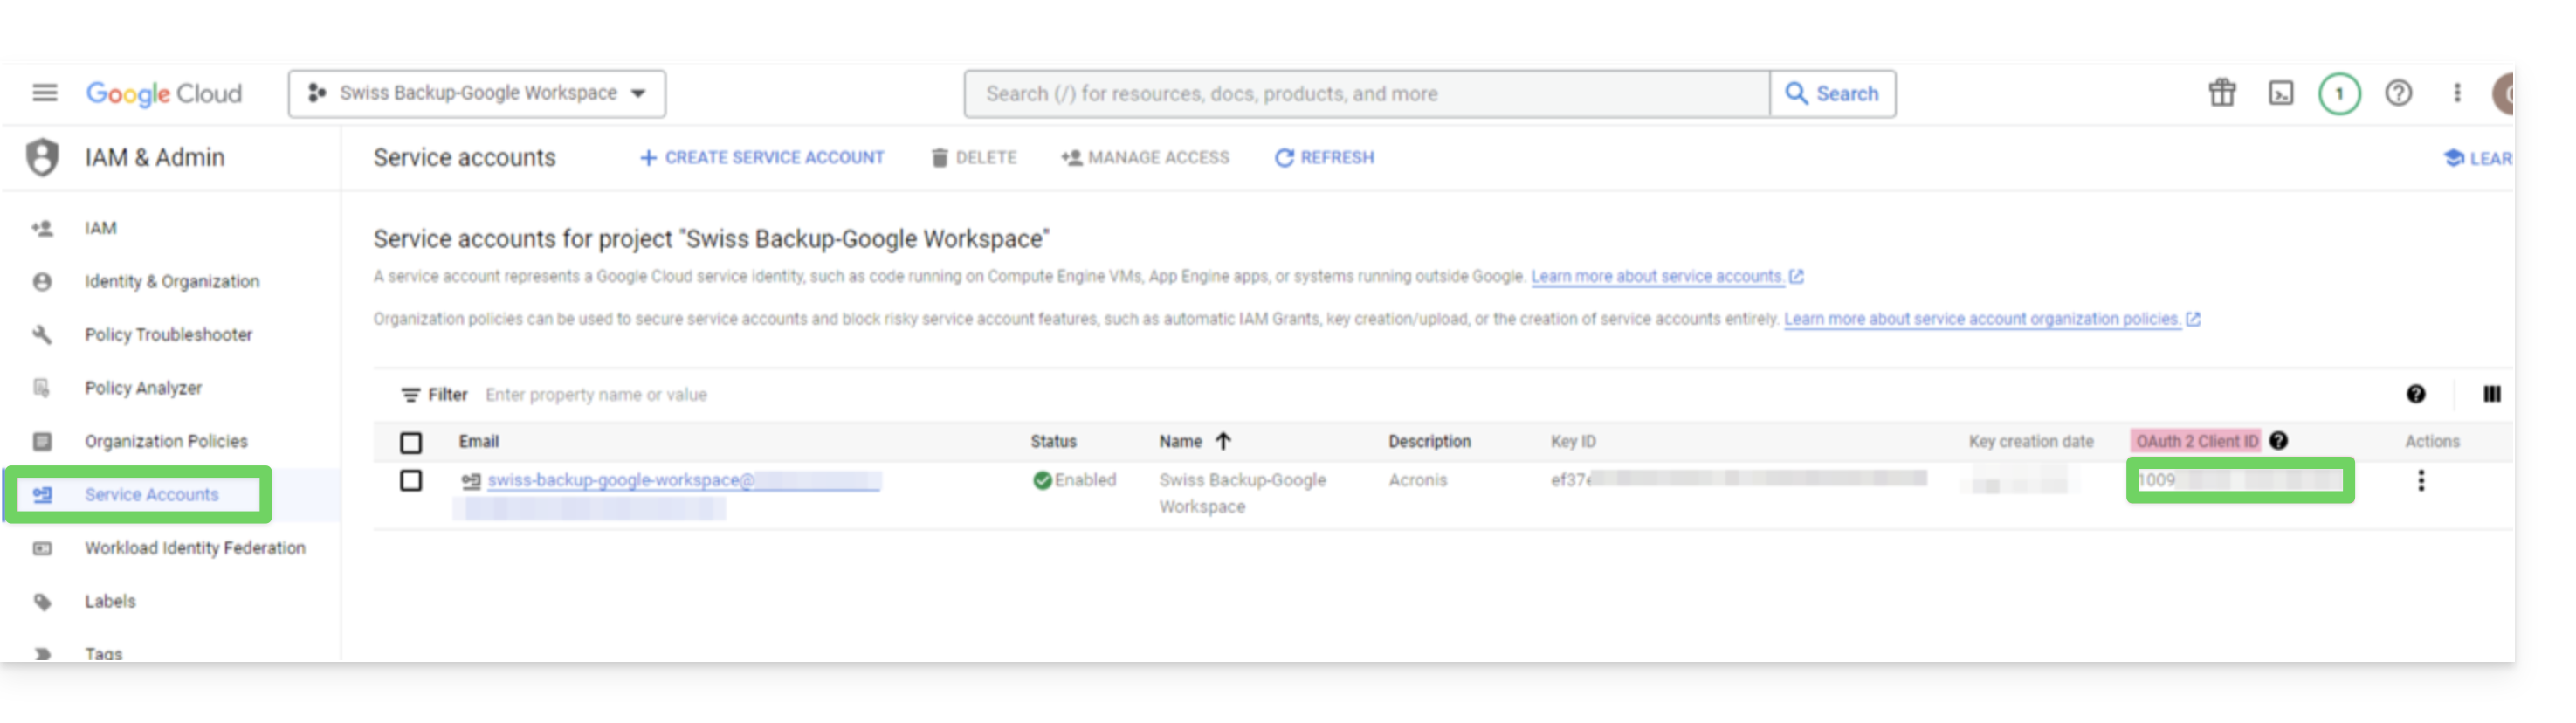
- In the Google Cloud Platform navigation menu, select Credentials > Service account.
- In the list, find the service account you created, then copy its client ID, which is displayed in the OAuth 2.0 Client ID column:
- Click here to access the Google admin interface as a super administrator.
- In the navigation menu, selectSecurity > Access and data control > API controls:
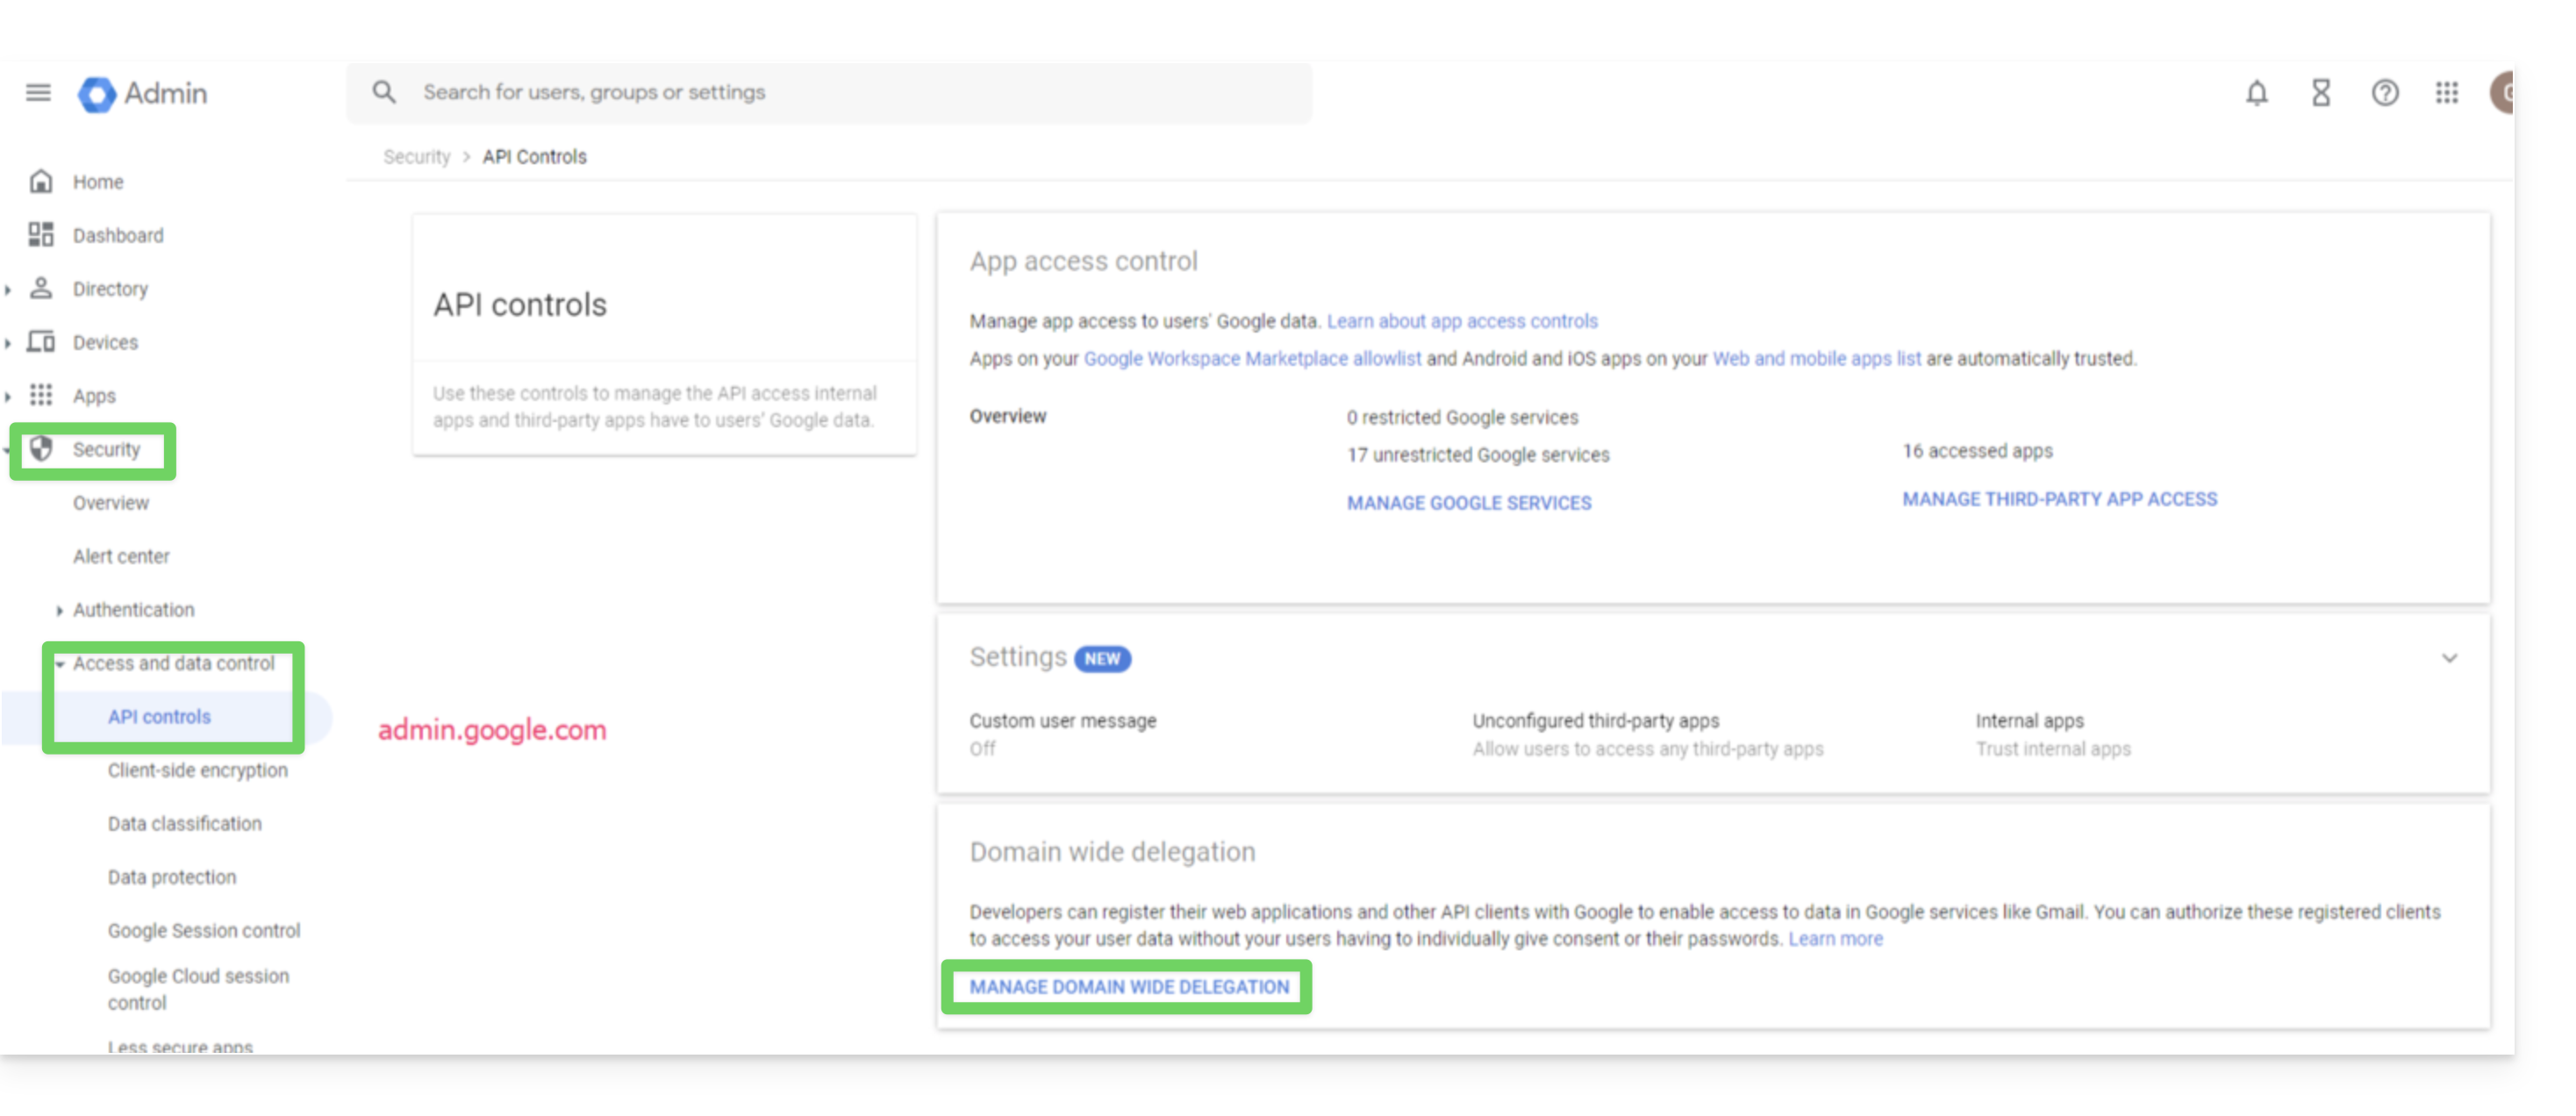
- Scroll down the API controls page, then under Domain-wide delegation, click on Manage domain-wide delegation; the Domain-wide delegation page will open.
- On this page, click on Add:
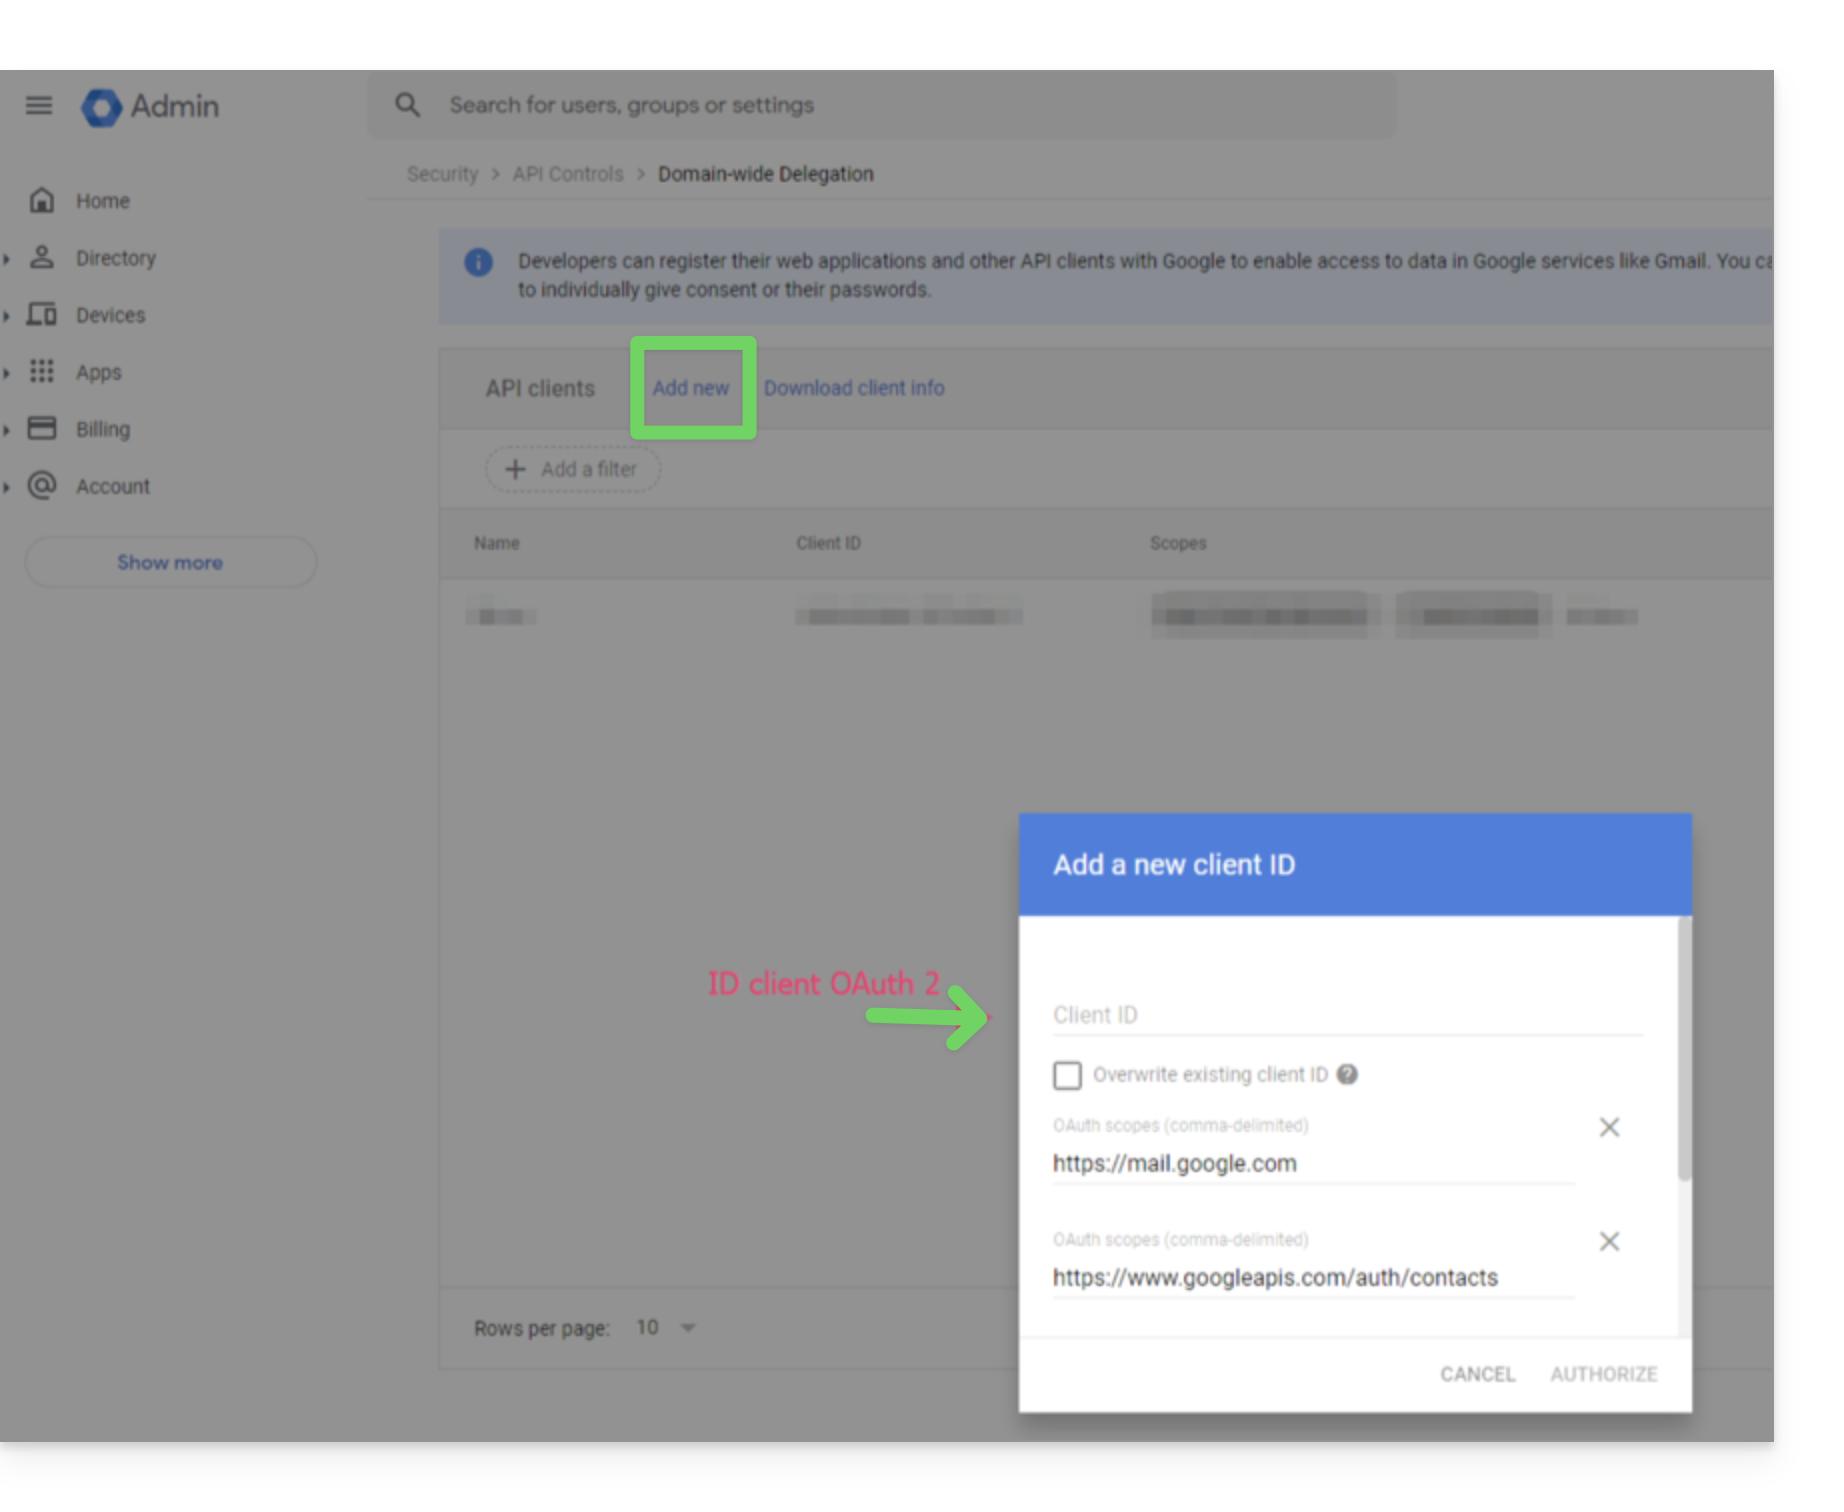
- The Add a new client ID window opens.
- In the Client ID field, enter the client ID for your service account.
- In the OAuth scopes field, add the following scopes:
- https://mail.google.com
- https://www.googleapis.com/auth/contacts
- https://www.googleapis.com/auth/calendar
- https://www.googleapis.com/auth/admin.directory.user.readonly
- https://www.googleapis.com/auth/admin.directory.domain.readonly
- https://www.googleapis.com/auth/drive
- https://www.googleapis.com/auth/gmail.modify
- Click on Allow.
Your new Google Cloud project can now access the data in your Google Workspace account.
Creating the backup space
To configure the backup of your Google Workspace with Acronis:
- Click here to access the Acronis Console using the credentials obtained after adding the device (need help?).
- Click the "Add device" button to add a Google Workspace device:
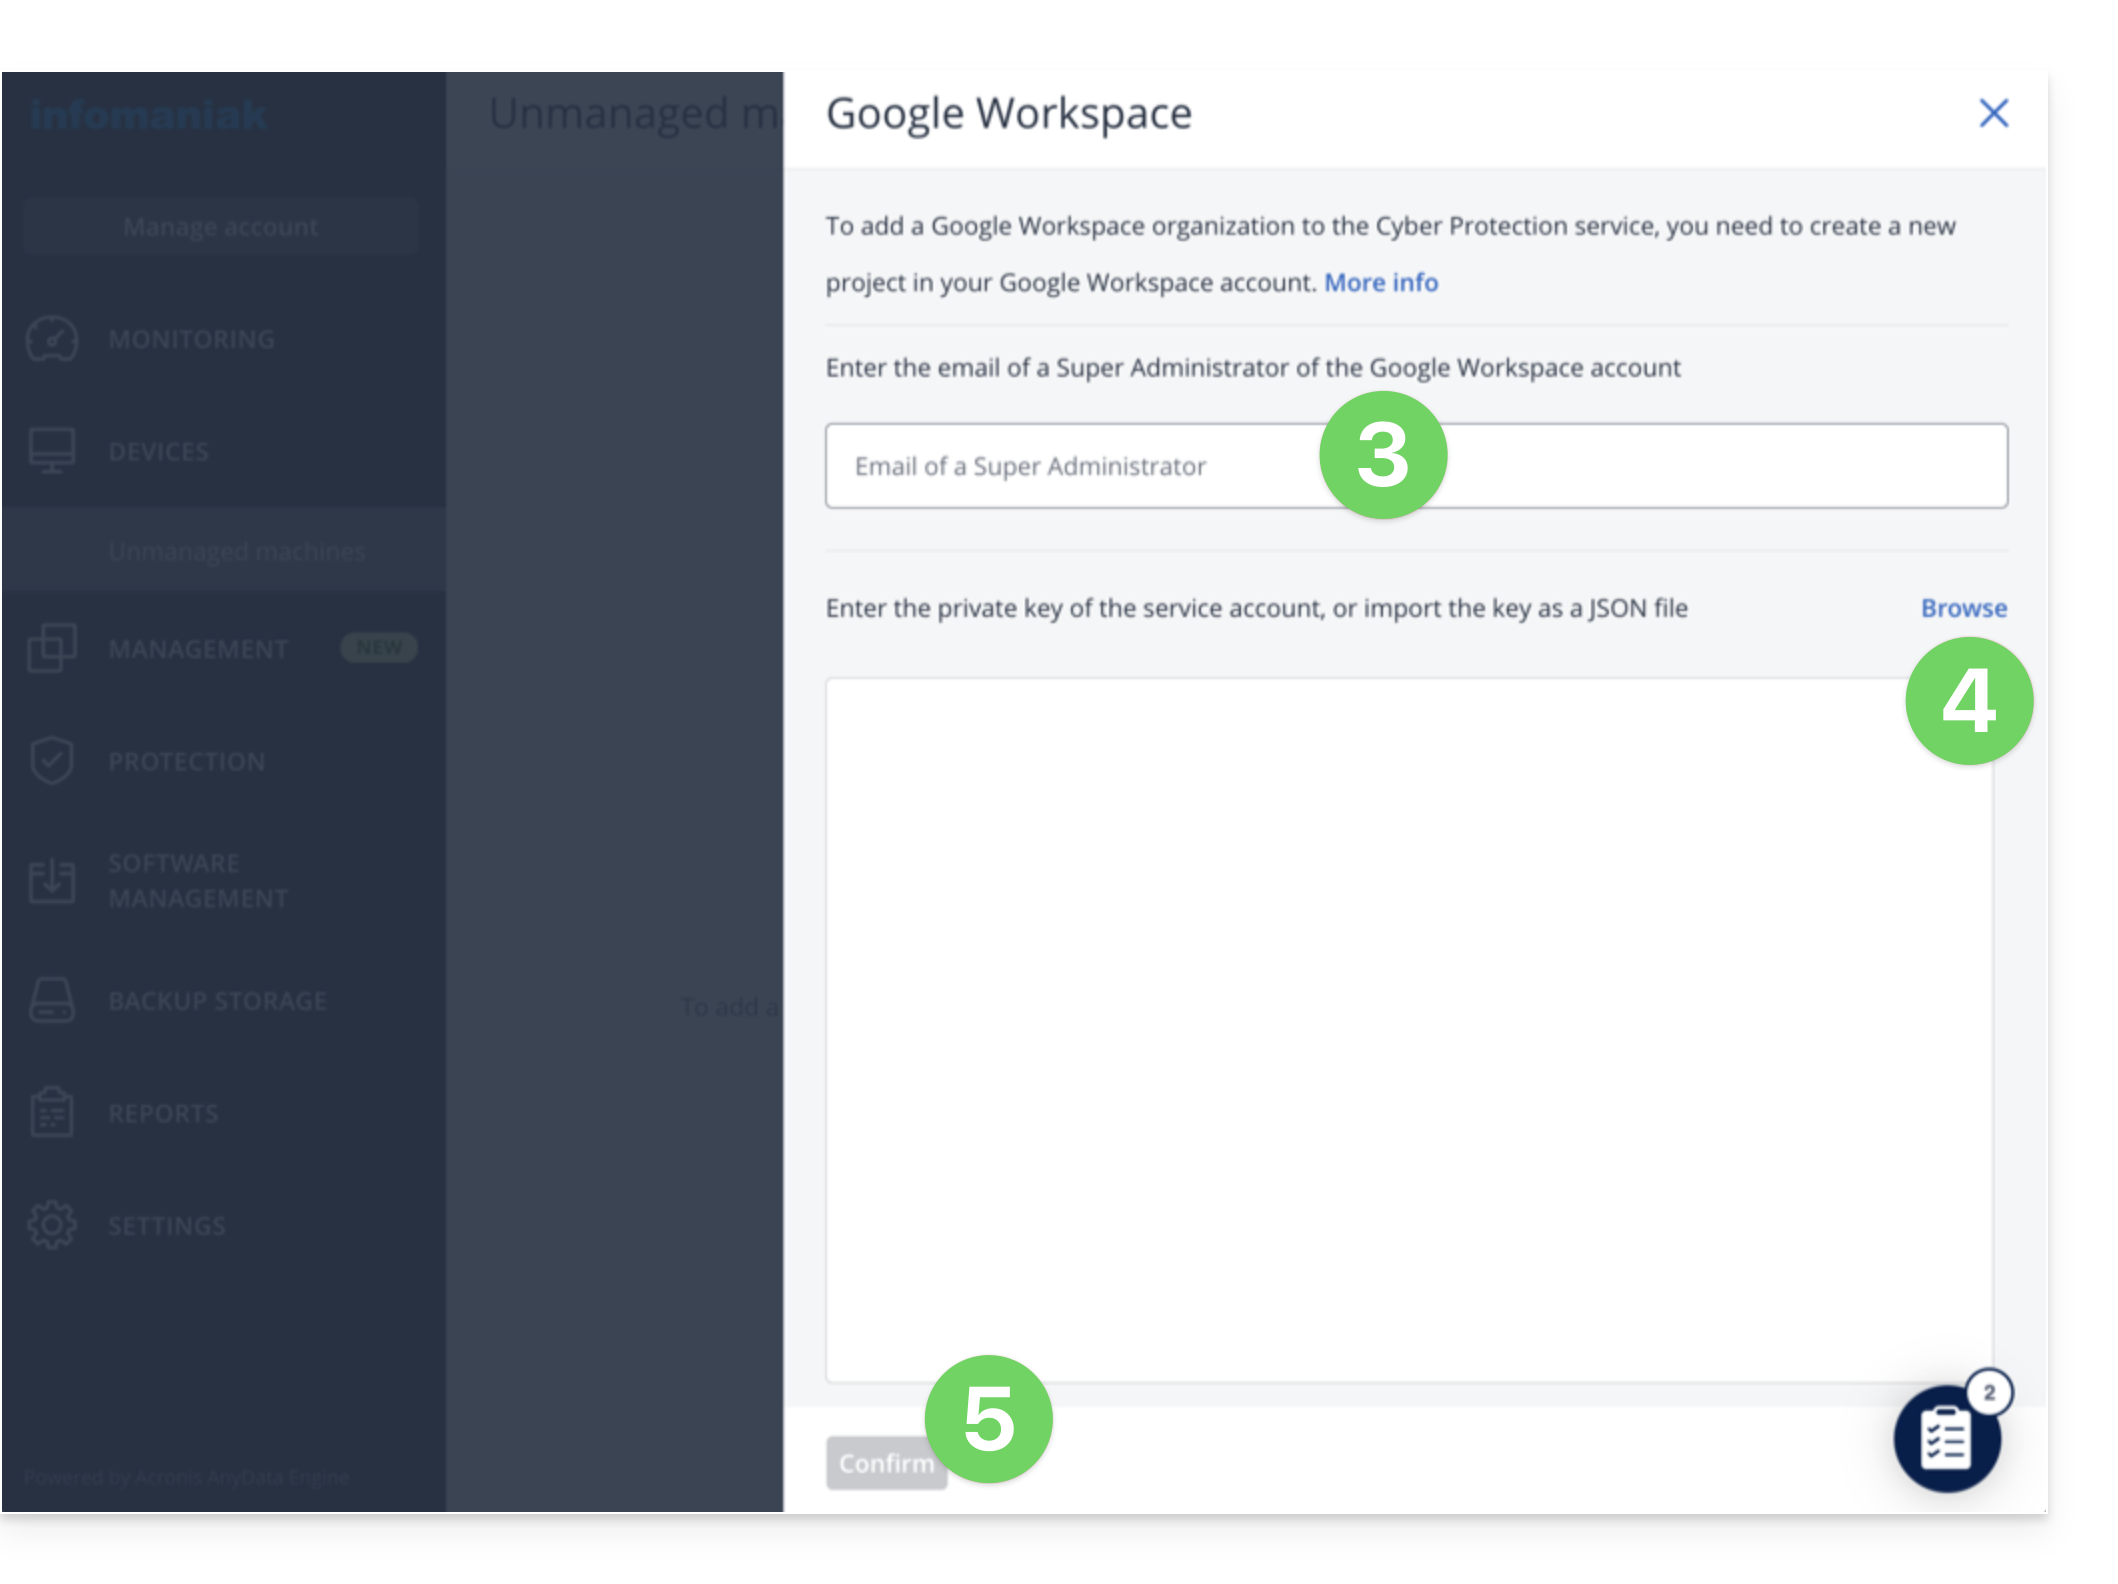
- Enter the address of a super administrator for your Google Workspace account (it doesn't matter if two-step verification is enabled for the super administrator's email account).
- Find the JSON file that contains the private key for the service account you created in your Google Cloud project (or paste the file's content as text).
- Click on Confirm:
Your Google Workspace organization will then appear under the Devices tab in the service console: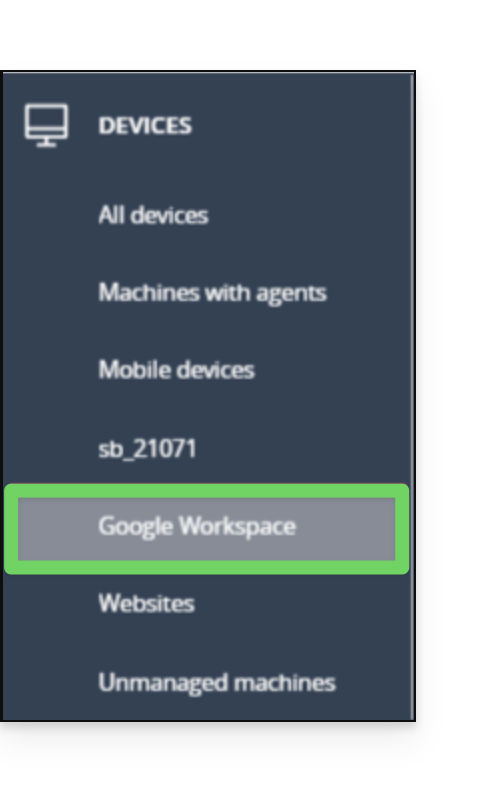
Link to this FAQ: https://faq.infomaniak.com/2805
Has this FAQ been helpful?